

Page 1

World Wide Web
http://www.samsungmobile.com
SCH-A220
User’s Manual
Printed in Korea
No.: GHxx -xxxxxA
English.06/2002.Rev.1.0
Please read this manual before operating your phone, and keep it
for future reference.
* Some contents in this manual may differ from your phone
depending on the software of the phone or your service provider.
Page 2

FCC RF EXPOSURE INFORMATION
In August 1996 the Federal Communications Commission (FCC) of the United States with its action in Report and
Order FCC 96-326 adopted an updated safety standard for human exposure to radio frequency electromagnetic
energy emitted by FCC regulated transmitters. Those guidelines are consistent with the safety standard
previously set by both U.S. and international standards bodies. The design of this phone complies with the FCC
guidelines and these international standards.
Use only the supplied or an approved antenna. Unauthorized antennas, modifications, or attachments could
impair call quality, damage the phone, or result in violation of FCC regulations.
Do not use the phone with a damaged antenna. If a damaged antenna comes into contact with the skin, a minor
burn may result. Please contact your local dealer for replacement antenna.
WARNING! Read this information before using your phone
Body-worn Operation
This device was tested for typical body-worn operations with the back of the phone kept 1.5 cm. from the body. To
maintain compliance with FCC RF exposure requirements, use only belt-clips, holsters or similar accessories that
maintain a 1.5 cm. separation distance between the user’s body and the back of the phone, including the antenna,
whether extended or retracted. The use of belt-clips, holsters and similar accessories should not contain metallic
components in its assembly. The use of accessories that do not satisfy these requirements may not comply with
FCC RF exposure requirements, and should be avoided.
For more information about RF exposure, please visit the FCC website at www.fcc.gov
Page 3

3
Safety Quick Guide ..................................................................... 7
Unpacking ..................................................................................... 9
Your Phone
Phone Layout ................................................................................. 10
Display .......................................................................................... 13
Service Light .................................................................................. 15
Getting Started
Using a Battery ...............................................................................16
Switching the Phone On/Off ............................................................20
Your Phone’s Mode ......................................................................... 21
Call Functions
Making a Call .................................................................................. 23
Redialing the Last Call...................................................................... 24
Emergency Dialing............................................................................ 24
Prepend Dialing................................................................................ 25
Making a Call from the Phonebook ................................................... 25
Speed Dialing ................................................................................... 26
Pause Dialing...................................................................................27
Voice Dialing....................................................................................30
Adjusting the Volume........................................................................ 31
Answering a Call .............................................................................. 32
Options During a Call ....................................................................... 33
Using Caller ID ................................................................................34
Viewing Missed Calls ........................................................................34
Three-Way Calling ...........................................................................35
Call Waiting ..................................................................................... 36
Call Forwarding ...............................................................................36
Table of Contents
Page 4

4 5
Entering Text
Changing the Text Input Mode .........................................................38
T9 Word Mode ................................................................................. 39
ABC Mode .......................................................................................41
Symbol Mode ..................................................................................43
123 Mode .......................................................................................43
Using the Menus
Accessing a Menu Function by Scrolling ............................................44
Accessing a Menu Function by Using Its Shortcut................................ 45
List of Menu Functions ..................................................................... 46
Calls
Missed Calls (MENU 1-1) ........................................................... 48
Incoming Calls
(MENU 1-2) ....................................................... 49
Outgoing Calls
(MENU 1-3)......................................................... 49
Erase History
(MENU 1-4) .......................................................... 49
Air Time
(MENU 1-5) ................................................................. 50
Phone Book
Find (MENU 2-1) ...................................................................... 51
Add New Entry
(MENU 2-2) ...................................................... 53
Group Setting
(MENU 2-3) ........................................................ 55
My Phone Number
(MENU 2-4).................................................. 55
Memory
(MENU 2-5) ................................................................ 55
Message
Voice Mail (MENU 3-1) ............................................................... 56
New Message
(MENU 3-2).......................................................... 57
Inbox
(MENU 3-3) ..................................................................... 59
Info Alerts
(MENU 3-4)............................................................... 60
Outbox
(MENU 3-5)................................................................... 61
Saved Messages
(MENU 3-6)...................................................... 62
Message Setting
(MENU 3-7)...................................................... 63
Mobile Web
Get In Web (MENU 4-1)............................................................. 66
Prompt
(MENU 4-2) .................................................................... 69
Voice
Voice Dial (MENU 5-1) .............................................................. 70
Voice Memo
(MENU 5-2) .......................................................... 73
Voice Answer
(MENU 5-3).......................................................... 75
Planner
Today (MENU 6-1) ................................................................... 78
Scheduler
(MENU 6-2) .............................................................. 79
Task List
(MENU 6-3) ............................................................... 81
Memo Pad
(MENU 6-4) ............................................................ 82
Alarm Clock
(MENU 6-5) .......................................................... 83
Calculator
(MENU 6-6) ............................................................. 84
World Time
(MENU 6-7) ............................................................ 85
Count Down
(MENU 6-8) .......................................................... 85
Set Time
(MENU 6-0) ............................................................... 86
Setup
Display (MENU 7-1) ................................................................. 87
Sounds
(MENU 7-2) ................................................................. 90
Location
(MENU 7-3) ................................................................ 93
Network
(MENU 7-4) ............................................................... 94
Security
(MENU 7-5) .................................................................95
Others
(MENU 7-6) .................................................................. 98
World Time
(MENU 7-7) .......................................................... 101
Page 5

6 7
Safety Quick Guide
Read these guidelines before using your wireless
phone. Failure to comply with them may be dangerous
or illegal. For more detailed safety information, see
“Health and Safety Information” on page xx.
Road Safety at All Times
Do not use a hand-held phone while driving; park the
vehicle first.
Switching Off When Refuelling
Do not use the phone at a refuelling point (service
station) or near fuels or chemicals.
Switching Off in Aircraft
Wireless phones can cause interference. Using them
in aircraft is both illegal and dangerous.
Switching Off in Hospitals
Switch off your phone near medical equipment.
Follow any regulations or rules in force.
Interference
All wireless phones may be subject to interference,
which could affect their performance.
Special Regulations
Meet any special regulations in force in any area and
always switch off your phone whenever it is forbidden
to use it, or when it may cause interference or danger
(in a hospital for example).
Health and Safety Information
Precautions When Using Batteries ..................................................102
Road Safety .................................................................................. 104
Operating Environment................................................................... 106
Electronic Devices ..........................................................................107
Potentially Explosive Atmospheres.................................................. 109
Emergency Calls ............................................................................110
Other Important Safety Information................................................ 111
Care and Maintenance....................................................................112
Glossary ........................................................................114
Index............................................................................. 117
Quick Reference Card..................................................... 121
Page 6
8
SSaaffeettyy QQuuiicckk GGuuiiddee
9
Sensible Use
Use only in the normal position (held to the ear). Avoid
unnecessary contact with the antenna when the phone
is switched on.
Accessories and Batteries
Use only Samsung-approved accessories and batteries.
Qualified Service
Only qualified service personnel may install or repair
your phone.
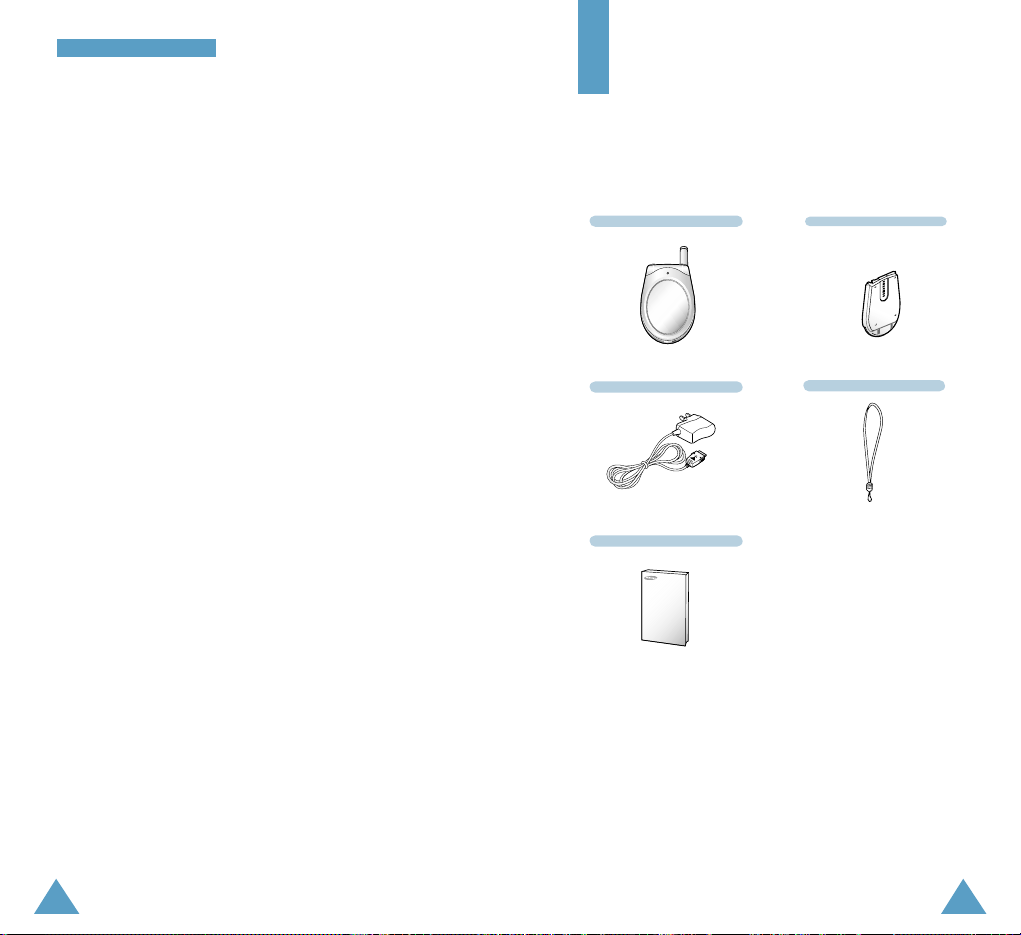
Travel Adapter
Handset
Battery
User’s manual
Hand strap
Unpacking
Your package contains the following items:
In addition, you can obtain the following accessories
for your phone from your local Samsung dealer.
• Ear-microphone
• Cigarette lighter adapter
• Hands-free car kit
• Standard and slim batteries
• Desktop charger
• Data cable
• Leather case
Page 7
1110
YYoouurr PPhhoonnee
Enters Menu mode. Also, scrolls through the
menu options.
In menu mode, scroll through the menu
options and Phonebook memory.
In Standby mode, enters the Find
menu and the other keys allow you to
enter your favorite menus, depending upon
the settings in the Launch Pad menu; see
page xx.
Key Functions
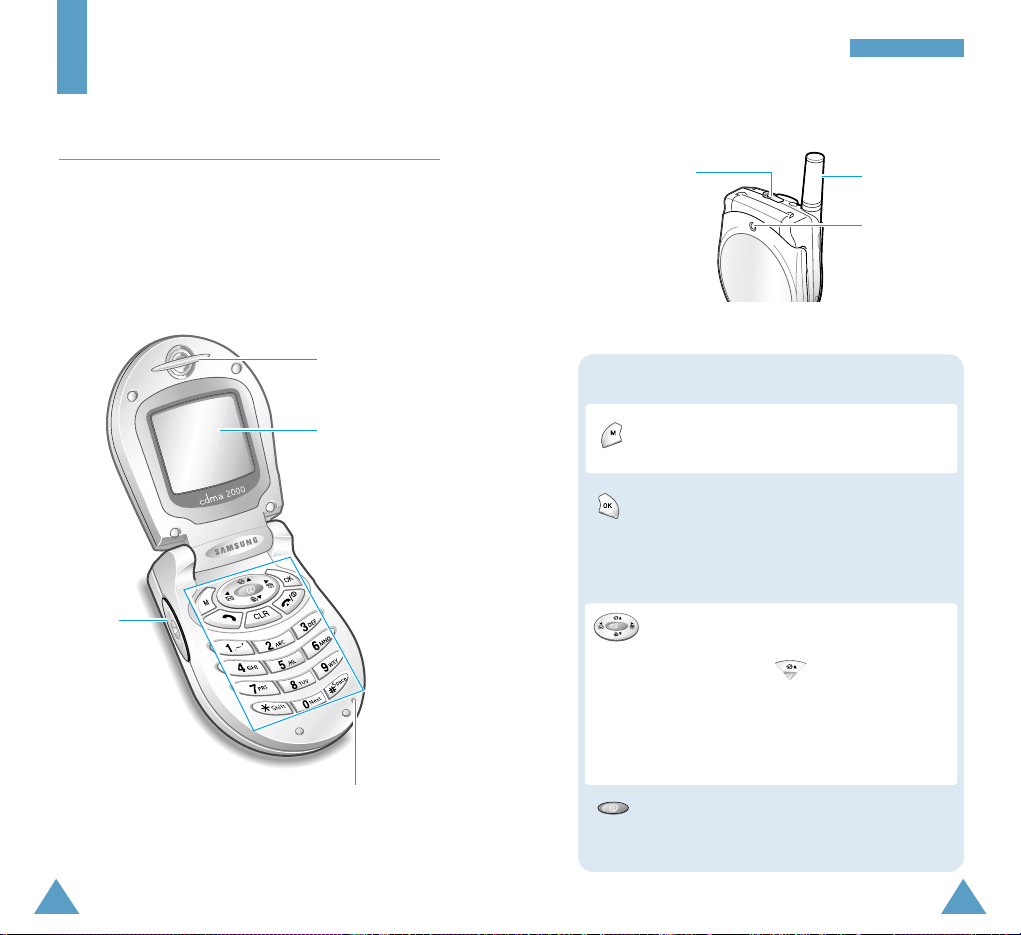
Antenna
In menu mode, selects a menu function or
stores information that you have entered,
such as a name in the phone memory.
In Standby mode, enters the Mail Kit
menu.
Microphone
Earpiece
Display
Your Phone
Phone Layout
The following illustrations shows the main elements of
your phone.
Service light
Ear-microphone
jack
Volume
keys
Open View
Closed View
Enters the Mobile Web menu.
Quickly launches the web browser when
held down.
Page 8
1312
Display
Layout
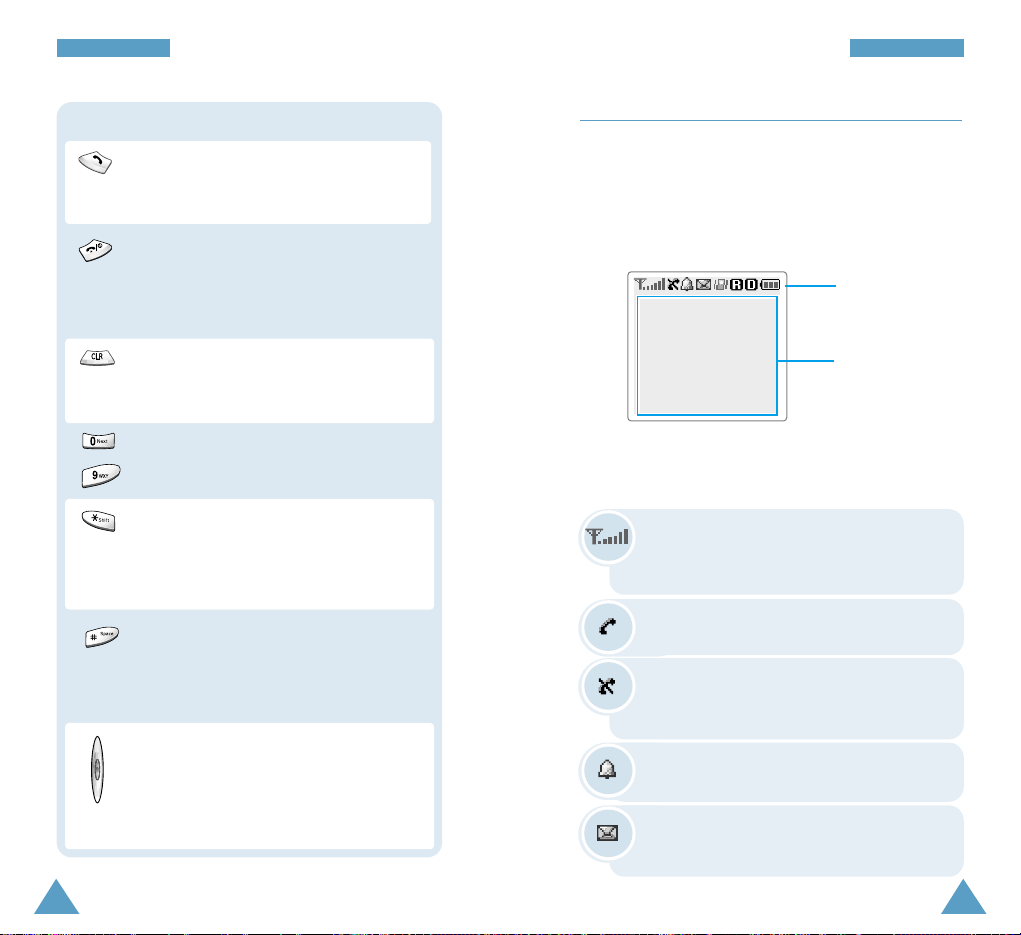
The display comprises two areas; an upper line of
various icons and the lower text and graphic area.
Icons
Text and
graphic area
Signal Strength: shows the received
signal strength. The greater the number of
bars, the stronger the signal strength.
Icons
Service: appears when a call is in
progress.
No Service: appears when you are
outside a service area. When it appears,
you cannot make or receive calls.
YYoouurr PPhhoonnee YYoouurr PPhhoonnee
Key Functions (continued...)
Alarm: appears when you set an alarm.
During a call, adjusts the voice volume.
In Standby mode , adjusts the volume for
the key beep.
In menu mode, scrolls through the menu
options.
Ends a call. Also switches the phone on
and off when held down.
In menu mode, cancels your input and
returns to Standby mode.
Makes or answers a call.
In Standby mode, enters the Outgoing
call log.
New Message: appears when a new
message is received.
Enters numbers, letters and some special
characters.
~
In Standby mode, enters and exit Silent
mode when held down.
Also, it is used at various times for
special features.
Deletes characters from the display.
In menu mode, returns to the previous
menu level.
In Standby mode, initiates a voice dialing
call when held down.
Also, it is used at various times for
special features.
Page 9
1514
Backlight
The display and the keys of your phone are illuminated
by a backlight. When you press any key, the backlight
illuminates. It turns off if no key is pressed within a
given period of time, depending on your setting of the
Backlight menu option. The backlight remains on at
all times when the phone is connected to an optional
car kit.
To specify the length of time for which the backlight is
active, set the Backlight menu option (MENU 7-1-5);
see page xx for further details.
Service Light
The service light is on the cover of your phone. It
flashes to indicate incoming call or message. Also, the
service light flashes for a few seconds when you turn
the phone on or off.
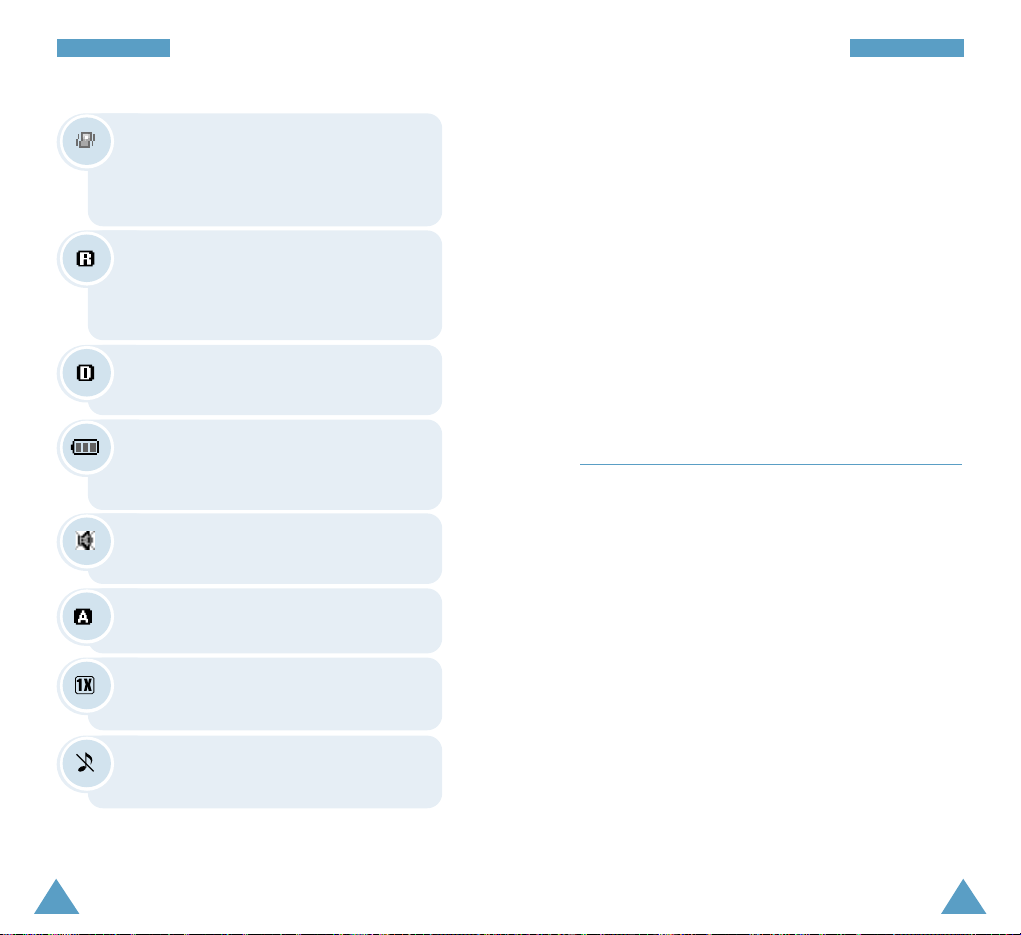
Silent Mode: appears when your phone is
in Silent mode.
Roaming: appears when you are out of
your home area and have registered onto a
different network, when travelling in other
countries, for example.
Vibration: appears when the ringer
volume for voice calls is set to Vibrate. An
incoming call will vibrate the phone rather
than ring it.
Digital Mode: indicates that your phone
is in Digital mode.
1X mode: indicates that your phone is in 1X
mode.
Ringer off: appears when your phone’s
ringer volume is off.
Analog mode: indicates that your phone is
in Analog mode.
Battery Strength: shows the level of your
battery capacity. The more bars you see,
the more power you have left.
YYoouurr PPhhoonnee YYoouurr PPhhoonnee
Page 10
17
GGeettttiinngg SSttaarrtteedd
16
Getting Started
Using a Battery
Your Samsung phone comes packaged with a partially
charged, rechargeable Li-ion battery.
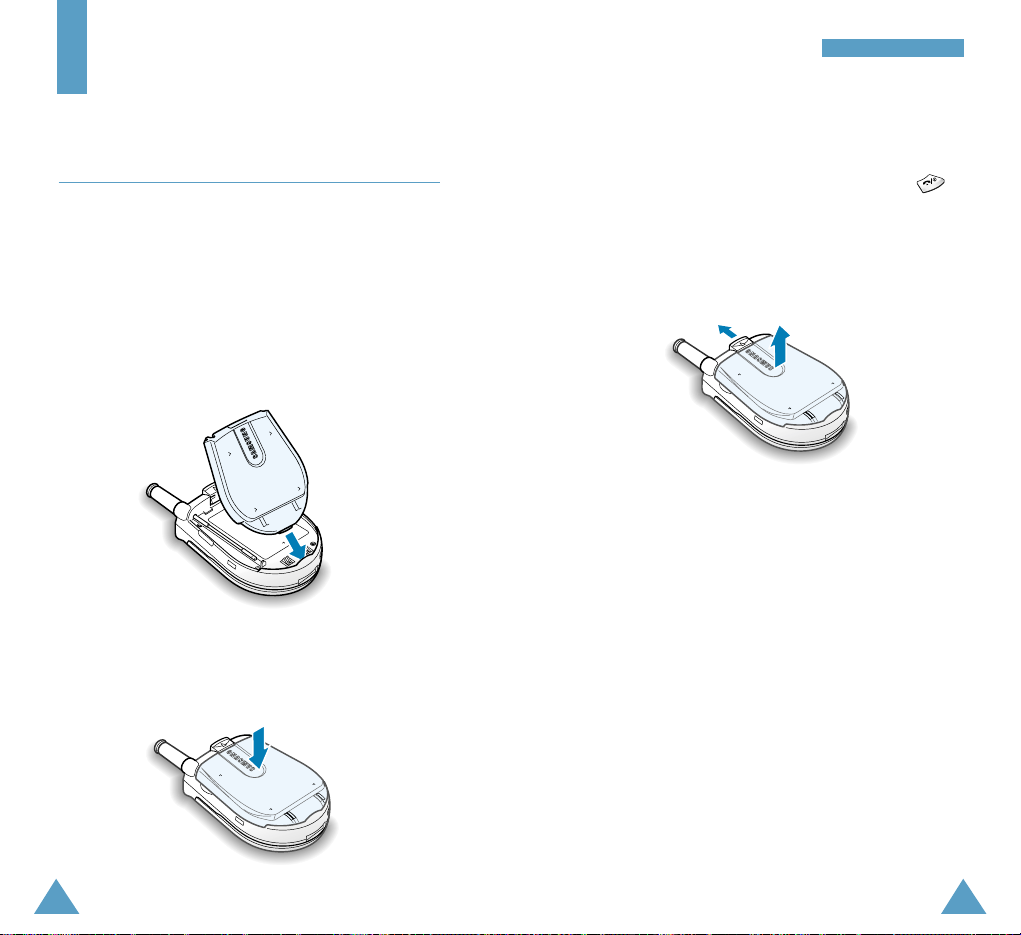
Installing the Battery
1. Place the battery on the phone so that the tab at
the bottom of the battery fits into the
corresponding slot at the bottom of the phone.
Removing the Battery
1. If necessary, switch off the phone by holding
down until the power-off animation appears.
2. Push up and hold the catch above the battery and
lift the battery away.
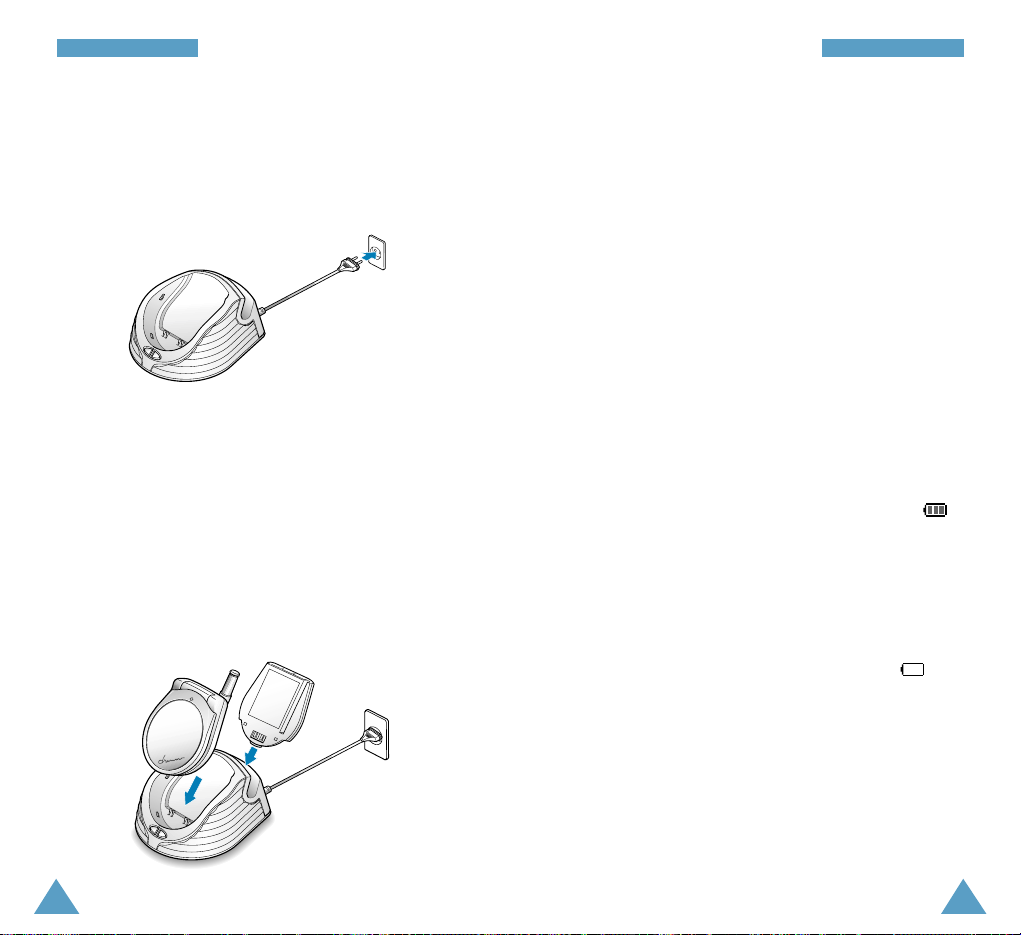
Charging the Battery
A desktop charger is provided with your phone. It
allows you to charge your phone’s battery from any AC
standard wall outlet.
Note: You must fully charge the battery before using
the phone for the first time. The charger will
fully charge an “empty” standard battery in
approximately 4 hours.
The phone can be used while the battery is charging,
but this increases time it will take to charge your
battery. To get the quickest charge for any battery, turn
the phone off.
2. Push the battery down until it snaps into place.
Make sure that the battery is properly installed
before switching the phone on.
Page 11
19
GGeettttiinngg SSttaarrtteedd
18
GGeettttiinngg SSttaarrtteedd
3. The color indication of the LEDs on the charger is
as listed below:
• Red: the battery is being charged.
• Green: the battery is fully charged.
• Yellow: the battery is not plugged in correctly or
operating at a too high or too low temperature.
Please check the charger and/or battery.
4. When charging is completed (the LED turns into
green), remove the battery or phone from the
charger and unplug the power cord of the charger
from the AC outlet.
Low Battery Indicator
You can easily tell if your battery needs to be
recharged by checking the Battery Strength icon ( )
at the top right corner of your phone’s display. The
presence of all three bars indicates a full charge, two
bars indicates a smaller charge, and one bar indicates
an even smaller charge. No bars (the battery icon is
empty) means that your battery need to be charged.
When the battery charge level gets low, the battery
sensor blinks an empty Battery Strength icon ( )
and sounds a beep. If the battery level gets too low,
the phone will turn off automatically. Unfortunately, if
this happens, you’ll lose whatever you are doing and
your phone call will cut off. Watch the Battery
Strength icon and make sure your battery is
adequately charged.
To charge the battery:
1. Plug the power cord of the desktop charger into a
standard AC outlet. When the power is connected
properly, the LEDs on the charger flicker briefly and
then turn off.
2. Place the battery into the compartment of the
charger. Select one of the following two options:
• Place the phone with the battery attached into
the front compartment. The left LED on the
charger glows red.
• Insert a battery alone, not attached to the phone,
into the rear compartment. The right LED on the
charger glows red.
Page 12
21
GGeettttiinngg SSttaarrtteedd
20
GGeettttiinngg SSttaarrtteedd
Switching the Phone On/Off
1. Hold down for more than one seconds to
switch the phone on.
The service light on the phone flashes, and an alert
sounds. When the system locates services, the
greeting message displays along with the current
date and time.You can now place and receive calls.
If the phone is out of service, the No Service icon
( ) appears on the display. In this case, you
cannot make and receive calls. Try again later when
service is available.
Note: You can change the LCD display language. To
change the language, use the Language
menu option (MENU 7-6-4); for further details,
refer to page xx.
2. When you wish to switch the phone off, hold down
for more than two seconds.
WARNING!
Do not switch on the phone when mobile phone use
is prohibited or when it may cause interference or
danger.
Note: As with any other radio-transmitting device,
do not touch the antenna unnecessarily when
the phone is switched on. Contact with the
antenna of your phone affects the call quality
and may cause the phone to operate at a
higher power level than otherwise needed.
Your Phone’s Mode
Standby Mode
Standby is the most basic state of your phone. The
phone goes into Standby mode after you turn it on or
whenever you briefly press . When your phone is
in Standby mode, you will typically see the greeting
message and current date and time. If you enter a
phone number, you can press to dial it or press
to save it in the internal Phonebook.
Press at any time to return to Standby mode. Be
careful; if you are on a call when you press , you
will disconnect the call and return to Standby mode.
Press several times or hold it down to return to
Standby mode without ending the call.
The main menu can be accessed when you are in
Standby mode.
Talk Mode
You can place and answer calls only when your phone
is turned on. During a call, the phone is in Talk mode.
While you are in Talk mode, pressing gives you a
list of options referred to as “In-call Options.” See
page xx for further information about the options.
Page 13

Call Functions
Making a Call
In Standby mode, key in the area code and phone
number and press .
Note: If you have set the Auto Retry menu option
(MENU 0-3) have been enabled (see page xx),
the phone automatically retries to make the call
when the line is busy or the remote person does
not answer you.
While entering a phone number, press to insert a
pause or hyphen between the numbers. For further
information about pause dialing, see page xx.
Correcting the Number
To clear ... Then ....
The last digit displayed Press .
The whole display Hold down for
more than one second.
Ending a Call
When you want to end your call, briefly press or
close the folder.
If you press , the call time, or the length of the
call displays briefly and the phone returns to Standby
mode.
2322
GGeettttiinngg SSttaarrtteedd
Power Save Mode
Your phone comes with a Power Save feature that will
automatically be activated if your phone is unable to
find a signal after 15 minutes of searching. While this
feature is active, the phone’s battery charge is
conserved. The phone will automatically recheck for a
signal periodically. To manually force the phone to
recheck for a signal, press any key. A message on the
display lets you know when your phone is operating in
Power Save Mode.
Lock Mode
When you lock your phone using the Lock Phone
menu (MENU 7-5-1), you cannot use the phone. In
Lock mode, you can receive messages and calls, but
you cannot place outgoing calls until you lock the
phone. To unlock the phone, you need to enter the lock
code.
For further details about locking and unlocking your
phone, see page xx.
Page 14

Prepend Dialing
The Prepend option lets you add digits such as area
codes and network feature activation codes to a phone
number that is in your call log entries.
1. Access the desired phone number in the call log by
pressing and scrolling through the call list.
You can also access the outgoing, incoming or
missed call logs via the Calls menu of the main
menu facility. See page xx.
2. Press to access the Options menu.
3. Press to select Prepend.
4. Enter the area code or feature code.
5. Press to dial the displayed number.
Making a Call from the Phonebook
You can store the frequently-used phone numbers with
a name in memory, which is called the Phonebook. You
then simply recall the number to dial. For further
information about the Phonebook features, refer to
page xx.
24
CCaallll FFuunnccttiioonnss
25
CCaallll FFuunnccttiioonnss
Redialing the Last Call
To redial the last call you made, press twice
quickly.
Your phone stores the last 10 outgoing calls. To recall
any of these numbers:
1. If there are any characters on the display, press
to return to Standby mode.
2. Press . The list of the call logs is displayed.
3. Use and to scroll through the list until
you select the required name or number.
4. Press to dial the displayed number.
Emergency Dialing
You can place emergency call from your emergency
number list even if your phone is locked or all outgoing
calls are restricted. For further information about
emergency numbers, refer to page xx.
Page 15

26
CCaallll FFuunnccttiioonnss
27
CCaallll FFuunnccttiioonnss
Speed Dialing
Once you have stored phone numbers in the
Phonebook memory, you can dial them easily any time
you want.
One-Touch Dial
Memory locations 001 through 009 are special onetouch locations. You can dial the phone numbers
stored in the Phonebook memory from 001 through 009
simply by pressing one button.
Press and hold the third digit of the memory location
number.
For example: Location no. 009
Press and hold .
The number (and name) stored is displayed, then
dialed.
Two-Touch Dial
Memory locations 010 through 099 are special twotouch locations.
Press the second digit briefly and hold down the third
digit of the memory location number.
For example: Location no. 023
Press briefly and hold down .
The number (and name) stored is displayed and then
dialed.
Three-Touch Dial
Memory locations 100 through 500 are special threetouch locations.
Press the first and the second digit briefly, then hold
down the third digit of the memory location number .
For example: Location no. 123
Press and briefly, and hold
down .
The number (and name) stored is displayed and the
dialed.
Note : When several numbers are saved in one
location, only the phone number which is
specified with the Speed Dial tag will be
automatically dialed. For details, see page xx.
Pause Dialing
When you call automated system, like banking
services, you often need to enter a password or
account number. Instead of manually entering the
numbers each time, you can store the numbers in your
Phonebook, separated by special characters which are
called pauses.
Page 16
29
CCaallll FFuunnccttiioonnss
28
CCaallll FFuunnccttiioonnss
Storing Pauses in a Phonebook Entry
To store a number in your Phonebook that contains
pauses:
1. Enter the phone number you want to store, such as
the bank’s teleservice phone number.
2. Press . The menu options display.
3. Press or to highlight one of the two
pause menu options.
• P pause: The letter “P” displays, meaning that a
hard pause will occur at that point in the calling
sequence.
• T pause: The letter “T” displays, meaning that a
timed, or 2-second pause will occur at that point in
the calling sequence.
4. Press to select an option.
5. Enter digits that need to follow the pause.
6. Store the number in your Phonebook as you normally
would by pressing and following the screen
prompts.
For further information about storing a number, see
page 53.
Pause Dialing from a Stored Phonebook Entry
1. Dial the number from the Phonebook.
2. If you stored the number using “T” pause, simply
call the number form the Phonebook.
If you stored the number using “P” pause, wait for
the appropriate prompt for the number, such as
credit card number or bank account number.
3. When prompted, press to send the DTMF
number that follows your pause.
Manual Pause Dialing
You can enter pauses manually during the dialing
process.
1. Enter the phone number of the service you want to
connect to, such as a bank’s teleservice phone
number.
2. Press . The pause menu options display.
3. Use and to highlight the one of the
two pause menu options, P pause or T pause.
4. Press to select an option. Continue entering
the number.
5. When entering the number is completed, press
to dial the number.
Page 17
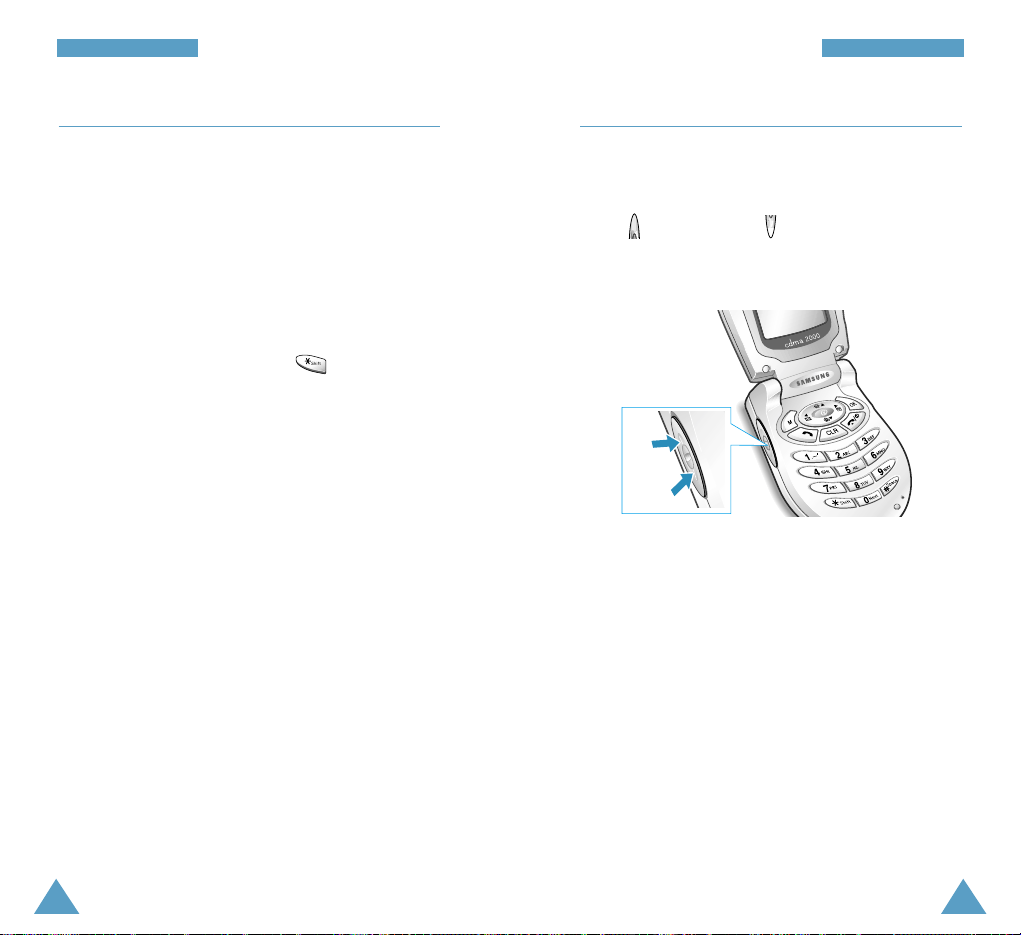
Adjusting the Volume
During a call, if you want to adjust the voice volume,
use the volume keys on the left side of the phone.
Press to increase and to decrease the volume.
The illustration shows the volume level; the more bars
your see, the louder the volume.
31
CCaallll FFuunnccttiioonnss
30
CCaallll FFuunnccttiioonnss
Voice Dialing
You can dial a phone number only by speaking a name.
Before using the Voice Dialing feature, you must
program your phone to recognize the name and
number by using the Voice Dial menu. For further
information, see page xx.
Note: The voice Dialing feature does not work when
your phone is in Analog mode.
1. To place a call, press and hold or open the
phone, depending on the Set Active menu option
(MENU 5-1-4). See page xx .
2. At the voice prompt, say the name into the
microphone.
• If the phone recognizes the name, the phone
attempts a connection.
• If the phone does not recognize the name, the
screen prompts for the name again.
• If the phone is unable to recognize the name after
two attempts, the message “Cannot Recognize
Name. Please check name” is displayed. Try the
call again later, or check the recorded name.
3. The phone dials the corresponding number.
In Standby mode, you can adjust the volume for the
key beep using these keys.
Page 18

Options During a Call
Your phone provides a number of functions that you can
use during a call. As many of these options are network
services, you may not be able to use all of them at all
times.
Press during a call to access the following options:
Phone Book: allows you to use the Phone Book
menu.
Mute/Quit: allows you to switch your phone’s
microphone off, so that the other party cannot hear you.
Example
: You wish to say something to another person
in the room but do not want the other party to hear you.
Silent/Quit: does not transmit the key tones. It allows
you to press keys without hearing annoying key tones
during a call.
Send Tel #: sends your telephone number to the other
party.
My Phone #: shows your phone number.
SEND DTMF: sends DTMF tones of the currently
displayed number. DTMF (Dual Tone Multi Frequency)
tones can be used to control electronic phone services
such as bank-by-phone or voice mail. During a call, key
in the digits you want to send as DTMF tones, for
example, the bank account number and password. Then,
press .
32
CCaallll FFuunnccttiioonnss
33
CCaallll FFuunnccttiioonnss
Answering a Call
When somebody calls you, the phone sounds the
ringer and shows the animated Phone icon in the
middle of the LCD display.
If the caller can be identified, the caller’s phone
number or name (if stored in your Phonebook) also
appears.
1. To answer a call, open the folder and press .
If the Call Answer menu (MENU 7-6-2) is set to
Any Key, you can answer a call only by pressing
any key except for .
If the menu is set to Folder Open, you can simply
opent the folder. For details, see page xx.
2. End the call by pressing or closing the folder.
Note: You can answer a call while using the
Phonebook or menu features. The current
operation will be interrupted.
Page 19

34
CCaallll FFuunnccttiioonnss
35
CCaallll FFuunnccttiioonnss
Using Caller ID
This feature tells you who is calling you by displaying
the caller’s number when the phone rings. If a caller’s
name and number are stored in your Phonebook, the
corresponding name is also displayed. If you call
someone who has this feature, your phone number will
be displayed on the their phone.
Note: Contact your service provider to set up the
Caller ID service.
Viewing Missed Calls
Your phone keeps a list of calls that you do not answer
when the phone is on and the caller is identified. The
phone indicates a missed call by displaying a text
notification on the screen. Additionally, if caller
information is available, the screen displays the phone
number of the most recent missed call.
Press to call the displayed number or to
save the number in Phonebook.
Three-Way Calling
This feature enables you to conduct conference calls
with two separate parties at the same time. The phone
records each party into the Outgoing call log. Also, You
are billed airtime for each outgoing call separately.
Note: Contact your service provider to activate Three-
Way Calling.
To place a Three-Way call:
1. During a conversation, press . The phone
places the other party on hold.
2. Enter the phone number for the third party, and then
press . The phone dials the third party.
3. When you are connected to the third party, press
again to begin your three-way call.
If one of the callers not you hangs up, you and
remaining caller stay connected. If the caller who
initiated the three-way call hangs up first, all three
parties are disconnected.
Page 20

Entering Text
At many times when using your phone, you will need
to enter text; for example, when storing a name in the
Phonebook, creating your personal greeting or
scheduling events in your calendar. You can enter
alphanumeric characters into your phone by using your
phone’s number keypad.
You are provided with the following text input modes.
• T9 Word: This mode allows you to enter words with
only one keypress per letter. Each key on a keypad
has more than one letter - a single press on
could be J, K or L. The T9 mode automatically
compares your keypresses to an internal linguistic
database to determine the correct word. The T9
mode requires far fewer keystrokes than the
traditional multi-tap method, ABC mode.
• ABC: This mode allows you to enter letters by
pressing the key labeled with the desired letter
once, twice, or three times until the letter appears
on the display.
• Symbol: This mode allows you to enter special
characters.
• 123: This mode allows you to enter numbers.
Note: The T9 mode supplies an appropriate language
database as your setting in the Language menu
(MENU7-6-4).
3736
CCaallll FFuunnccttiioonnss
Call Waiting
Call Waiting lets you receive a second call during a
conversation. Your phone notifies you of a waiting call
by beeping and displaying “Call Waiting.”
Your phone provides the option of turning the Call
Waiting feature on and off, if you have subscribed to the
service. Call Waiting is on by default in the phone. If you
want to have a undisturbed conversation, simply turn
the feature for the current call off .
Note: Contact your service provider to activate the Call
Waiting service.
To answer a waiting call:
1. To answer the call, press . The phone connects
the calling party, and places the current party on hold.
2. Press again to switch between tthe wo parties.
Note: If you do not respond to a Call Waiting
notification, the phone will forward the call to
voice mail or another number that you set up.
Contact your service provider for more
information.
Call Forwarding
This feature provides the option of forwarding incoming
calls to another phone, even while your phone is off.
Activating Call Forwarding does not affect outgoing calls
from your phone. Contact your service provider to
activate the Call Forwarding feature.
Page 21
39
EEnntteerriinngg TTeexxtt
38
EEnntteerriinngg TTeexxtt
T9 Word Mode
To type a word, press keys labeled with the letters you
need. Remember the following as you are typing.
1. Press keys on the phone just once per desired letter.
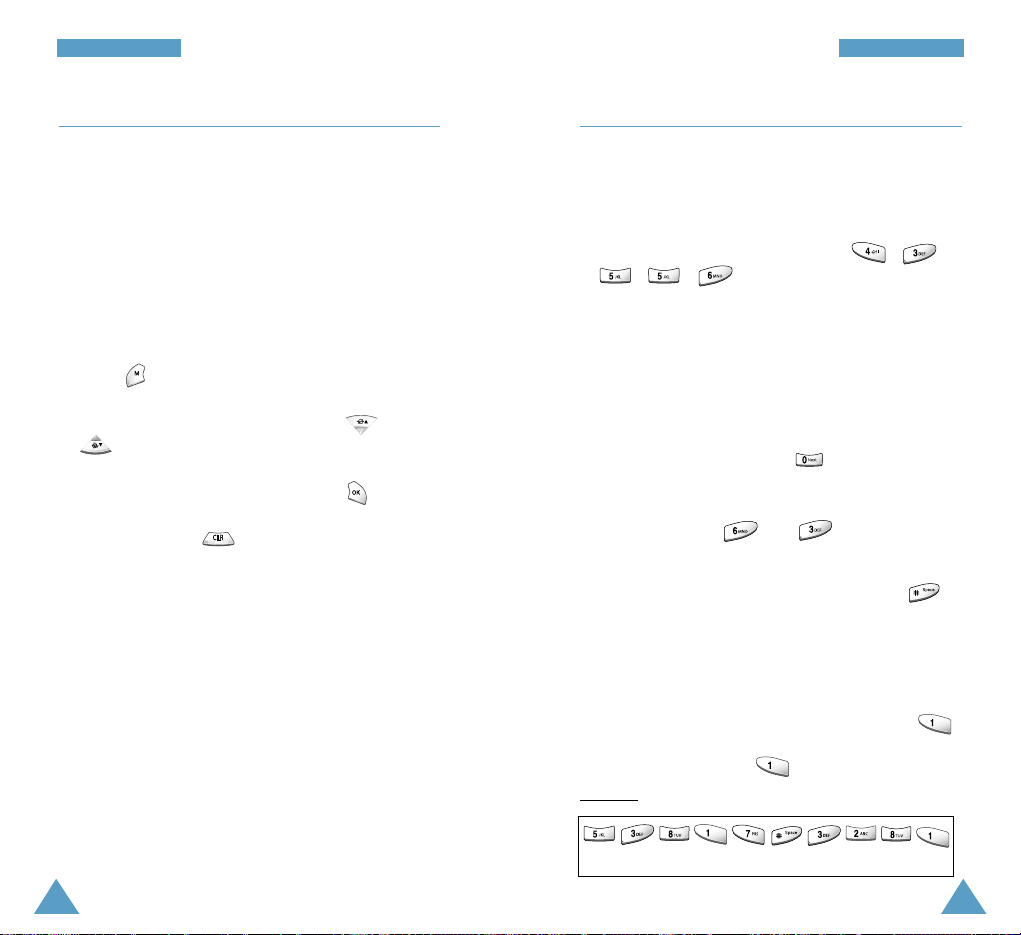
For example, to enter “hello,” press ,
, , .
2. The word you are typing appears on the display. It
may change with each keypress.
3. Type to the end of the word before editing or
deleting any keystrokes.
If the word that appears on the display is not the
word that you desire, press one or more times
to display alternate word choices for the keys you
have typed. For example, both “of” and “me” have
the key sequence and . The phone will
display the most commonly used choice first.
4. Put a space between each word by pressing .
5. Continue entering the next word.
Smart Punctuations
Period, hyphen and apostrophe are available on .
T9 applies rules of grammar to insert the correct
punctuation. Notice that is used twice in this
example
to display two punctuation marks.
l e t ‘ s e a t .
Changing the Text Input Mode
When you are in a field that allows characters entry,
you should notice the text input mode indicator at the
bottom of the display.
You can change between T9 Word and ABC to enter
words. To include a symbol or a number between the
letters, Symbol and 123 modes are also available.
To change to another text input mode:
1. Press . The list of the text input modes appears.
2. Scroll to the desired mode by pressing or
.
3. To select the mode highlighted, press .
If you want to exit the menu without changing to a
new mode, press .
You will find the selected text input mode indicator
on the display.
Page 22
41
EEnntteerriinngg TTeexxtt
40
EEnntteerriinngg TTeexxtt
ABC Mode
When typing by using the ABC mode, you need to
press the key labeled with the required letter:
- Once for the first letter
- Twice for the second letter
- And so on.
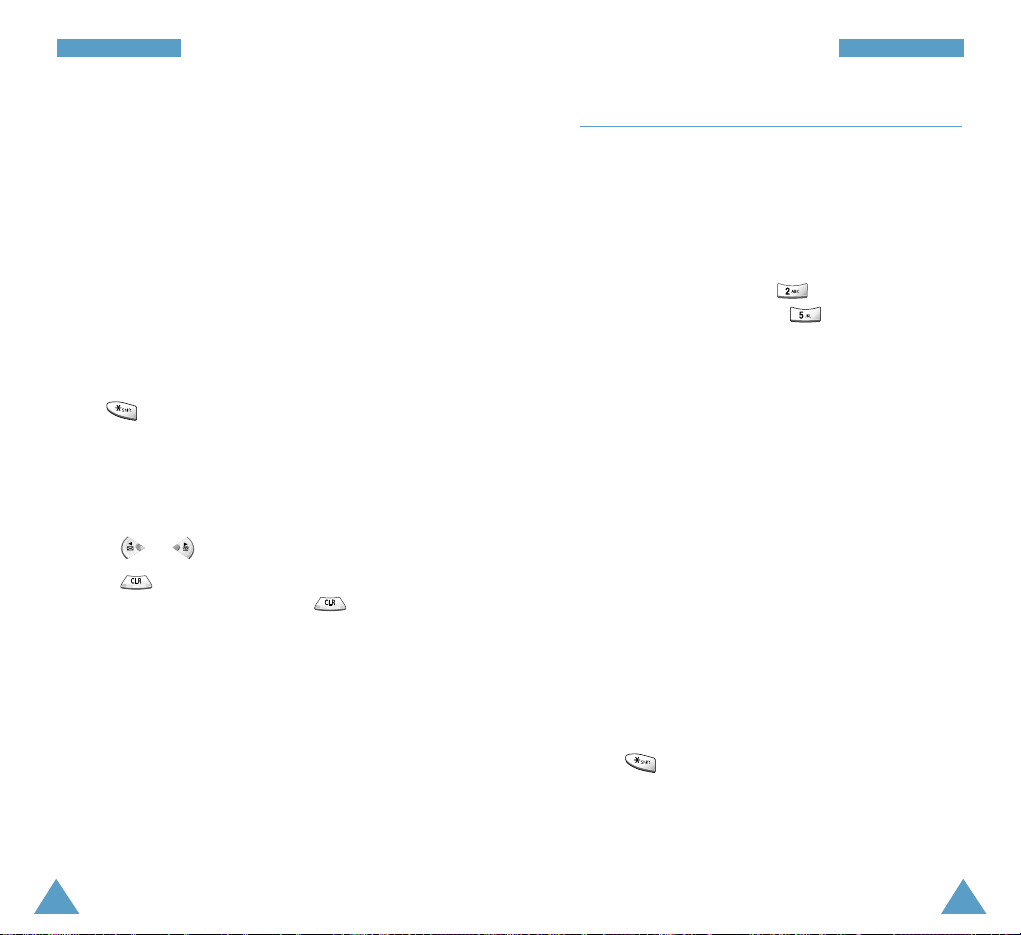
For example, you can press three times quickly
to display the letter “C”, and two times quickly
to display the letter “K”. In this reason, this method is
called multi-tap typing.
The cursor moves to the right when you press a
different key. When entering the same letter twice or a
different letter on the same key, just wait for a few
seconds for the cursor to move right automatically, and
then select the next letter.
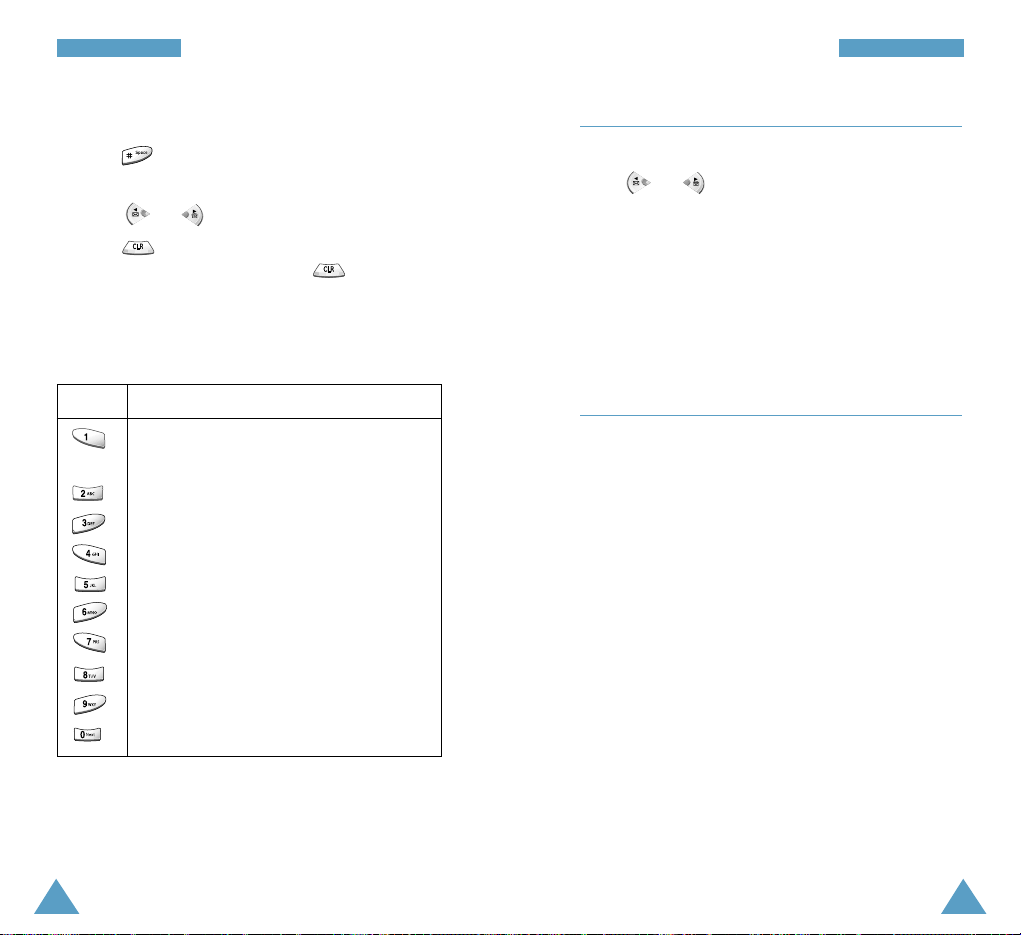
Refer to the table on next page for the list of
characters assigned on each key.
Changing Case
Your phone offers three cases;
• Abc : initial letter is capitalized
• ABC : all letters are capitalized
• abc : all letters are lower case
Press one or more times to display the
appropriate case indicator, and begin typing normally.
Including a Number
You can include a number between letters without
exiting the T9 input mode. Press and hold the
corresponding number key.
Changing Case
Your phone offers three cases:
• T9 Word: initial letter is capitalized
• T9 WORD: all letters are capitalized
• T9 word: all letters are lower case
Press one or more times to display the
appropriate case indicator, and begin typing normally.
Another Usages
• To move the cursor left or right through your text,
press or .
• Press one or more times to clear letters one
by one to the left. Press and hold to erase all
letters.
Page 23
43
EEnntteerriinngg TTeexxtt
42
EEnntteerriinngg TTeexxtt
Symbol Mode
Symbol mode enables you to enter symbols.
Press or to display more symbol sets.
Press the number keys corresponding to the desired
symbols. The phone automatically switches back to
the text input mode used just prior to selecting the
Symbol mode.
123 Mode
123 mode enables you to enter numbers. Press the
number keys corresponding to the desired digits. You
need to manually switch to text input mode of your
choice.
Another Usages
• Press to insert a space.
• To move the cursor left or right through your text,
press or .
• Press one or more times to clear letters one
by one to the left. Press and hold to erase all
letters.
AB C2
DE F 3
GH I 4
JK L5
MN O 6
PQ RS7
TU V8
WX Y Z 9
0
(Caps Lock mode)
List of Characters Available
1.@ , : ? - ; ‘ / ( ) ! # % &
*
< > _ + = “ \ { } $ [ ]
Key Characters in the Order Displayed
Page 24

45
UUssiinngg tthhee MMeennuuss
Accessing a Menu Function by Using Its
Shortcut
The menu items, such as menu, submenus and setting
options, are numbered and can be accessed quickly by
using their shortcut number.
Note: The numbers assigned to each menu function
are indicated on the list on page xx.
1. In Standby mode, press to access the main
menu.
2. Within three seconds, key in the first digit of the
shortcut number. Repeat this for each digit of the
shortcut number.
Example:
Selecting the ringer type for calls
Press , , , and .
7 for Setup, 2 for Sounds, 2 for Ringer Type, and
1 for Calls.
3. Find the setting of your choice by pressing
or , and then press to confirm the
selection.
44
Using the Menus
The phone offers a range of functions that allows you
to tailor the phone to your needs. These functions are
arranged in menus and submenus.
The menus and submenus can be accessed by scrolling
or by using the shortcuts.
Accessing a Menu Function by Scrolling
1. In Standby mode, press to access the menu
facility.
2. Scroll with or and to reach the
desired main menu; for example, Sounds. Press
to enter the menu.
3. If the menu contains any submenus; for example,
Ringer Type, find the one you want by scrolling
with and . Press to enter the
submenu.
If the menu you have selected contains submenus,
repeat this step.
4. Scroll with the navigation keys to find the setting of
your choice. Press to confirm the selection.
Notes:
• You can return the previous menu level by pressing
.
• You can exit the menu without changing the menu
settings by pressing .
Page 25
47
UUssiinngg tthhee MMeennuuss
46
UUssiinngg tthhee MMeennuuss
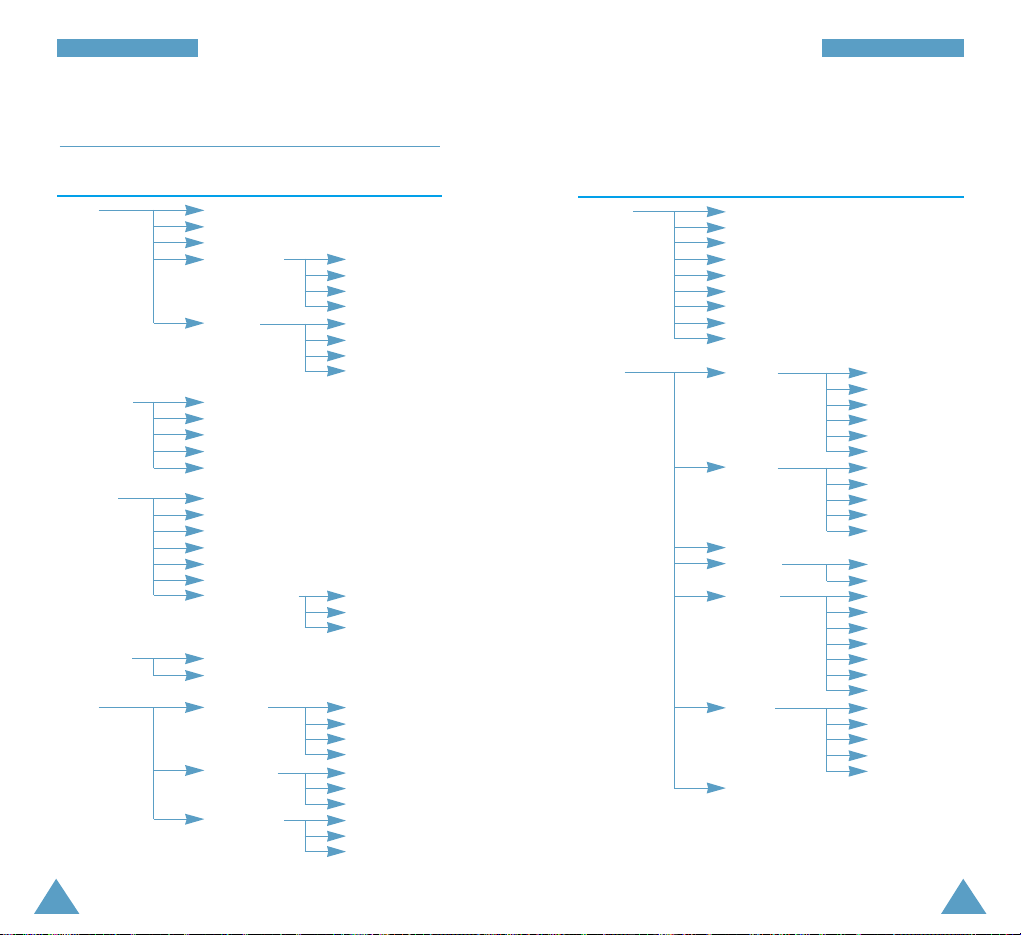
Main menu Main menu 1 Main menu 2
1. Calls 1. Missed Calls
2. Incoming Calls
3. Outgoing Calls
4. Erase History 1. Missed
2. Incoming
3. Outgoing
4. All Calls
5. Air Time 1. Last Call
2. Total
3. Erase Total
4. LifeTime
2. Phone Book 1. Find
2. Add New Entry
3. Group Setting
4. My Phone #
5. Memory
3. Message 1. Voice Mail
2. New Message
3. Inbox
4. Info Alerts
5. Outbox
6. Saved
7. Message Setting 1. General
2. New Message
3. Alert Type
4. Mobile Web 1. Get In Web
2. Prompt
5. Voice 1. Voice Dial 1. Record
2. Review
3. Erase All
4. Set Active
2. Voice Memo 1. Record
2. Review
3. Erase All
3. Voice Answer 1. On/Off
2. Setup
3. Inbox
Main menu Main menu 1 Main menu 2
6. Planner 1. Today
2. Scheduler
3. Task List
4. Memo Pad
5. Alarm
6. Calculator
7. World Time
8. Count Down
9. Set Time
7. Setup 1. Display 1. Menu Style
2. Animation
3. Banner
4. Auto Hyphen
5. Backlight
6. Contrast
2. Sounds 1. Ringer Volume
2. Ringer Type
3. Key Beep
4. Alerts
5. Power on/off
3. Location
4. Network 1. Set Nam
2. Roam Option
5. Security 1. Lock Phone
2. Change Lock
3. Special #
4. Voice Privacy
5. Restriction
6. Erase Pbook
7. Reset Phone
6. Others 1. Launch Pad
2. Call Answer
3. Auto Answer
4. Language
5. Data/Fax
7. Phone Info
List of Menu Functions
Page 26

49
CCaallllss
48
Incoming Calls MENU 1-2
The phone stores up to 10 calls you received, if you
are subscribed to the Caller Line Identification service.
When you access this menu, the list of the incoming
calls is displayed.
For further information about scrolling through the list
and accessing a call log, refer to “Missed Calls” on
page xx.
Missed Calls MENU 1-3
The phone stores up to 10 calls you dialed. When you
access this menu, the list of outgoing calls is
displayed.
For further information about scrolling through the list
and accessing a call log, refer to “Missed Calls” on
page xx.
Erase History MENU 1-4
You can erase the entries stored in each of the three
call logs or all three logs at once.
When a confirming message pops up, press to
erase the log. If you want to cancel the operation,
press .
Calls
You can use the Callsmenu to:
• View and dial the last missed, incoming or
outgoing numbers.
• Erase the numbers in the call log memory.
• View the duration of calls.
Missed Calls MENU 1-1
Note: You can also access this menu by pressing
in Standby mode.
If the Caller Line Identification service is available,
your phone keeps a list of 10 incoming calls that you
failed to answer.
1. Press or to find the desired number or
name if saved in the phonebook.
2. Press to select the highlighted number.
The dialed number, and name if stored in the
phonebook is displayed.
3. If you want to access the options, press . The
following options are available.
• Talk: dials the selected number.
• Save: allows you to save the number in the
Phone book.
• Prepend: allows to add an area code or feature
code to the number before calling the number.
4. If you want to place a call to the displayed phone
number, press . To exit the call log, press .
Page 27

51
Phone Book
The phonebook allows you to store frequently-used
phone numbers and the associated names in your
personal directory to make it easy for you to make a
call without having to remember or enter the phone
number. You can store up to 500 entries including up
to 6 different numbers, such as workplace number,
mobile number, and fax number, individually.
Find MENU 2-1
This option allows you to find an entry stored in your
phonebook.
Note:You can quickly access this menu by pressing
in Standby mode.
1. Press or to scroll to the desired one from
the following searching methods.
• By Name: enter the character(s) you want with
the desired input mode. Then, the phone shows
the entries containing that character(s).
• By Entry: enter the location number by pressing
the numeric keys.
• By Group: Highlight the Group field by pressing
and select the group containing the entry
you want to find by pressing or . The
phone lists all entries in the selected group.
50
CCaallllss
Air Time MENU 1-5
Your phone records the amount of the airtime or talk
time used. Using this option, you can view the number
of the calls to or from your phone and the airtime for
all calls. You can also easily erase the airtime
measurement at any time. This feature is helpful for
estimating your phone usage.
Note: This feature is not intended for billing purposes.
The following options are available.
Last Call: shows the airtime of the last call.
Total: shows the number of all calls made to and total
duration of the calls since the air time counter was
lastly set to zero by using the Erase Total option.
Erase Total: erases the “Total” airtime measurement
and resets the air time counter.
LifeTime:shows the number and total duration of all
calls made to or from your phone since the phone was
shipped from the factory.
Page 28
53
PPhhoonnee BBooookk
52
PPhhoonnee BBooookk
Add New Entry MENU 2-2
This menu allows you to store a number with a name
in your phonebook.
Adding a New Entry to the Phonebook
1. Enter a phone number and press .
2. Press to confirm to add a new entry.
3. Select the label to assign to the phone number by
pressing or and press .
The available labels are; Mobile, Home, Office,
Pager, Fax and No label.
4. Highlight the desired option you want to customize
by using or , and set each option as
needed by using or and the number
keypad. The following options are available.
• No Name: Enter the desired name. You can enter
up to 12 characters. For further information about
entering characters, see page xx.
• Location: The first available location displays. If
necessary, enter the location number by using the
number keypad.
• Mobile/Home/Office/Pager/Fax/No label:
Enter the desired numbers, if necessary.
• E-mail: Enter the person’s e-mail address. You
can enter up to 46 characters.
• Voice Dial: Set the voice dial tag for the entry.
For further information about the Voice Dialing
feature, see page xx.
2. If necessary, press or to find the
desired entry.
3. When the entry is highlighted, press to access
the entry.
The phone shows details of the entry, such as
name, phone number and location number.
4. Press to place a call or press to see the
following options.
• Talk: allows you to place a call to the number.
• Edit: allows you to edit the information of the
selected entry.
• Erase: erases the selected number.
If you press from the phonebook list, you can
access the following options.
Edit: allows you to edit the information of the
currently selected entry.
Erase: erases the selected entry.
Add New: allows you to add a new entry. For further
information about adding a new entry, see page xx.
Page 29

55
PPhhoonnee BBooookk
54
PPhhoonnee BBooookk
Group Setting MENU 2-3
This option allows you to change the name or the LED
setting of the caller group.
1. Scroll to the group you want to edit by pressing
or .
2. Press to select the group.
3. To change the name, select Rename and enter a
new group name. For further information about
entering characters, see page xx.
To change the LED setting, select LED and then the
desired color by pressing or . 7 different
colors are available; Red, Blue, Green, Skyblue,
Violet, Orange and Pink.
4. Press to save the selection or input.
My Phone Number MENU 2-4
This option displays your phone number that is
currently being used.
Memory MENU 2-5
This option shows the memory status for the Phone
book and the Voice Dialing entries.
• Speed Dial: Select the priority number to be
speed-dialed by the location number.
• No Group: Select the desired caller group. You
have 5 choices of the group. Select No Group if
you don’t want to set the group.
• Inactive: Select the unique ringer type for the
entry. By selecting different ringer, incoming voice
calls which have caller ID can be distinguished
from those that do not.
• Secret: To make the number secret, select On.
This prevents a number from being displayed or
dialed when it is accessed by unauthorized user.
When you made the number secret, only a person
with your phone’s lock code can view the number.
5. When you finish setting, press to save the
entry.
After storing, the phone displays the phonebook
entry number you saved and the number of the
remaining entries you can further store phone
numbers.
Storing Phone Numbers at Call End
1. After call conversation, press to end the call.
The call time and the phone number appears on the
display.
2. To store the phone number, press .
3. To complete storing the number, follow from Step 2
in “Adding a New Entry to the Phonebook” on page
xx.
Page 30

57
MMeess ss aaggeess
56
Message
Your phone can receive voice mails, text messages,
numeric pages and browser messages from the
Wireless Web. Also, your phone can send text
messages and pages if you system supplier provides
this service.
When the phone receives a message, the phone
sounds an alert and a text notification displays along
with the name and phone number of the caller, if
available. The New Message ( ) icon remains on
the screen until you read the new text, numeric page
or Web Browser message or until you listen to the
new voice mail messages.
The messages can be received even when your phone
is locked. However, the screen will not display the
information about the message. To access a message,
you need to unlock the phone. If you receive an
incoming message during a call conversation, your
phone will automatically mute the ringer. This is to
avoid ringing in your ear while you are trying to
converse.
You can quickly access the Messagemenu by
pressing in Standby mode.
Voice Mail MENU 3-1
When the voice mail list displays, press or
to scroll to the desired voice message and press
to review the message.
If multiple new voice mails are received but not
reviewed, the information of the last one will be
displayed. The information display includes the
time/date stamp, number of new voice mails and
callback number.
While reviewing the message, press to access
the following options.
Listen: allows you to listen to the voice message. The
phone will automatically dial your voice mail center.
Reset: clears the New Message icon and resets the
counter for new voice mail, if necessary. The system
resets the counter automatically after you listen to all
new messages.
New Message MENU 3-2
You can create short text messages and numeric pages
to send to other mobile phones.
Note: Message transmission is available only in digital
networks.
1. Enter the destination number by using the number
keypad and press .
Pressing allows you to recall a number from
the phonebook.
2. Enter the message contents or a numeric page. For
further information about entering text, see page xx.
You can recall the preset messages by selecting
Canned from the Menu list.
Page 31
59
MMeess ss aaggeess
58
MMeess ss aaggeess
3. When entering is completed, press .
4. If you wish to edit the message options before
sending the message, press or to scroll
through the options and then press to edit the
setting.
• Send To: change the destination phone number
you already entered, if necessary.
• Msg: change the message contents you already
entered, if necessary.
• Call Back: change the callback number, if
necessary. It is preset to your phone number.
• Options: change the settings in each option as
needed. Press or to scroll to the
desired option and press or to select
the desired setting. The following options are
available.
- Priority: set the priority level of the message
between Normal and Urgent.
- Validity: specify the length of time for which
your message will be stored at the message
center while attempts to deliver it are made to
the recipient’s phone.
- Send Later: specify the length of time for which
your phone waits before sending the message.
To send it immediately, select None.
- Delivery ACK: to receive the Delivery
Acknowledgement from the network to know if
your message has been read by the recipient or
not, select On. Otherwise, select Off.
Inbox MENU 3-3
Your phone can store up to 42 messages until the total
length of the messages exceeds 160 kbytes, combined
for all in Inbox or Outbox. If the memory is full, a
warning message will be displayed and the phone will
reject additional messages until you erase the
obsolete ones.
Press or to scroll to the desired one of the
messages in the list and press . The phone
displays the message contents. If necessary, press
or to scan through the contents.
- Message Save: sets if you want the phone to
save the message after sending into Outbox or
not. Select Auto Save to automatically save the
message, Prompt Save to display the
confirming message before sending, and Do Not
Save not to save the message.
• Action: asks you to select an action for the
message. Go to Step 5.
5. To... Press ...
Send the message .
Save the message .
Back to the edit mode .
Discard the message .
and quit
Note: Closing the folder or pressing before
sending message is not completed will
terminate the message transmission.
Page 32
Outbox MENU 3-5
Your phone can store up to 40 messages until the total
length of the messages exceeds 160 kbytes, combined
for all messages in Inbox or Outbox. You can review or
resend the messages stored in Outbox, if needed.
When you access this menu, you can see the message
list. The icons next to the messages represents their
status.
• : indicates that the message was successively
delivered.
• : indicates that the message failed to be sent.
To review a message, press or to scroll to
it and press . The display shows the date and
time when the message is created, the destination
number (or name if saved in the phonebook ) and
message contents. If necessary, press or
to scan through the contents.
While reviewing a message, press to access the
following options.
Re-send: allows you to re-send the message. For
further information about sending a message, see
page xx.
Delete: deletes the message.
60
MMeess ss aaggeess
61
MMeess ss aaggeess
While viewing a message, press to access the
following options.
Reply: allows you to send a reply message to the
sender .
Forward: allows you to send the message to the other
person.
Delete: deletes the message.
Save addr: allows you to save the sender’s phone
number into your phonebook. For further information
about storing a number, see page xx.
Save cb#: allows you to save the callback number of
the message.
Info Alerts MENU 3-4
When you receive a new Web message, your phone
notifies you and displays the following options. To
select an option, scroll to highlight it and press .
View: allows you to access the Web Inbox to display
the web message.
Clear: you can press if you do not wish to read
the message at this time.
When you access this menu, you can see the message
list. Press or to scroll to the desired one
of the messages in the list and press . The phone
starts the Web browser and displays the message
contents. If necessary, press or to scan
through the contents.
Page 33
63
MMeess ss aaggeess
62
MMeess ss aaggeess
Saved Messages MENU 3-6
When you only save a message by pressing ; refer
to Step 5 on page xx, the message is stored in this
menu and can be accessed at a later time.
When you access the Saved menu option (MENU 3-
5), you can see the message list. To review a message,
press or to scroll to it and press .
While reviewing a message, press to access the
following options.
Edit: allows you to edit the selected message for
transmission. For further information about sending a
message, see page xx.
Delete: deletes the selected message.
Message Setting MENU 3-7
Via this menu, you can set up the various options for
reading incoming messages or sending outgoing
messages.
General
Scroll Timer:you can set the screen to scroll
automatically while reading a message
- 1~5 Seconds: if an incoming message is too long for
the display, the phone displays it by scrolling the
screen automatically. You can set the time interval in
which the phone scrolls to the next screen.
- Off: the phone does not automatically scroll the
screen. You need to scroll to next screen manually by
using and .
Msg. Reminder: you can set how often the phone
alert you to an incoming message.
- Off: the phone doesn’t alerts.
- Once: the phone alert just once.
- Every 2 min: the phone alerts every 2 minutes.
Auto Delete: you can determine weather or not the
phone will delete a message after you reading it. (???)
Voice Mail #: you can set the phone number of the
voice mail center. All unanswered calls to your phone
will be automatically transferred to voice mail box,
even if your phone is off or in use.
Page 34

6564
MMeess ss aaggeess
New Message
You can set up the default settings of the following
message options which can be changed when creating
a new message. Refer to Step 4 on page 57 for further
information.
Callback #: you can set the call back number. Your
phone number is preset at factory.
Save Message: allows you to set whether you want
the transmitted message to save in Outbox or not.
Entry Method: you can select the text input mode
between T9 Word and Alphabet (ABC).
Delivery Ack: allows you to activate or deactivate
the delivery acknowledgement feature.
Read Ack:?????
Canned Msg.: allows you to change the canned
messages preset in your phone as needed. There are
10 messages available.
Signature: ?????.
Block/Unblock: ??????.
Alert Type
This option allows you to select a melody for the
message ringer. You can have a distinctive ringer for
SMS messages and web alert messages each.
Mobile Web
Your phone comes equipped with a web browser
makes it possible for you to access the wireless web.
The web browser allows you to access up-to-the
minute information through your phone. Browsing the
wireless web through your phone is unlike using your
computer in that site providers have selected only the
critical aspects of their site to present to wireless
phone users, and have removed most graphics.
Each time you start the web browser, the phone will
connect to the wireless web and the Service icon ( )
will appear on the display. Any time the service
indicator icon is visible on the display, you are
connected to the wireless web and will be billed
accordingly. Rates will vary according to your service
option.
The web browser will end the connection after a
certain period of network inactivity and will
automatically reconnect as necessary. For this reason,
you may find that you are billed for several network
connections within a single session. This is normal
and is designed to minimize your bill.
You can quickly launch the web browser by pressing
and holding down in Standby mode.
Page 35
Using the Web Browser Soft Keys
At the bottom of the web browser display is a solid
bar which contains browser commands. “Soft” keys,
and are used to execute the commands.
These keys are called soft keys because their function
changes depending on where you are in the web
browser software.
Navigating the Web Browser
When you use the web browser, some keys on your
phone operate differently than on a normal phone call.
These keys are explained below. The web browser
presents on-screen items in one of the following ways:
• text or numeric input
• links (embedded in content)
• numbered options (some options may not be
numbered)
• simple text
Here’s how the keys work in the Web Browser.
allows you to go back to the Home page.
scroll to and select browser options. The
currently selected option is indicated by an
arrow. You can also use the navigation keys to
move the cursor when editing text.
execute the commands at the bottom of the
browser display. For further information, see
“Using the Web Browser Soft keys” on page
above.
67
MMoobbiillee WWeebb
66
MMoobbiillee WWeebb
Get In Web MENU 4-1
Note: The first time you use the web browser, you will
go through a security setup process that takes 3 to 5
minutes. Please follow the on-screen prompts to
complete the security setup process. This initial setup
process occurs only the first time you access the
service.
Accessing this menu connects your phone to the
wireless web.
If a reminder appear depending on your setting in the
Prompt menu option (MENU 4-2), simply answer Yes
or No by using the soft keys, and .
Once connected, the home page or the last page you
visited will be displayed.
The opening page when accessing the web browser is
dependent on the wireless web service provider’s
content. To scroll through the screen, use and
.
Exiting the Web Browser
To end the web connection, simply press at any
time.
If the To End or Both option is set in the Prompt
menu option, you will be prompted whether you want
to end the Browser call.
Page 36
69
MMoobbiillee WWeebb
68
MMoobbiillee WWeebb
enters the secondary options or a menu of
secondary options.
performs two important functions:
• backs you up in the browser. Press this key
once to move backward to the previous
screen. Pressing and holding the key down
backs you up to the Home page.
• clears out your input when entering
numbers or text. Press this key to clear the
last characters. Pressing and holding the key
down completely clears the input field.
confirms the highlighted item.
exits the web browser and returns the phone
to Standby mode.
If the items on a page are numbered, you can
use these keys to select them.
allows you to scroll up or down by a page or
change the volume setting.
Entering Text, Numbers or Symbols
When prompted, you can enter text, numbers or
symbols using the same way as in the phone mode.
See page xx for further information about entering
characters.
Prompt MENU 4-2
Your phone can be set to view a prompt each time you
start or end a Browser session. You have the option to
change when the start prompt is displayed.
The following options are available.
None: you will never see the prompt.
To Start: this is default setting. You will see the
prompt when enter the browser, but not when you exit
it.
To End: you will see the prompt only when you exit
the browser.
Both: you will be prompted when you enter or exit the
browser.
~
Page 37

71
VVooiiccee
70
Voice
In this menu, you can use the phone’s voice features
such as:
• voice dialing.
• voice memo.
• voice answer.
Voice Dial MENU 5-1
You can call up to 20 stored entries by speaking the
name into the microphone. Using the Voice dialing
feature requires that you first program the phone to
recognize the name of the person you are calling.
Record
This option allows you to record names and register
numbers for subsequent voice dialing. The phone
provides voice prompts and screen displays to guide
you through the recording process.
1. Say the name you want to program at the prompt.
The phone stores the name as a first sample.
2. Respond to the prompt by repeating the name after
the beep. The phone stores the name as a second
sample, and then prompts you to enter the phone
number.
3. Enter the phone number by using the number
keypad and press .
4. Complete storing the number into the phonebook,
referring to page xx.
Note: You can also program the phone for voice
dialing by selecting Voice Dialfrom the label
category when storing a phone number into
your phonebook. See page xx.
Tips on Recording a Name
• Avoid recording similar names phonetically. If you
record a similar name to the one already in memory,
the phone asks for another name.
• Speak clearly and naturally.
• The person who will use the phone should record
the name. The phone does not recognize the name if
the voice sounds differently.
• Avoid too long or too short name. Names with two
to five syllables are recommended.
• If this feature does not work properly, erase the
name, and record with another name.
• You can record up to 20 names. If you try to record
more than 20, the phone announces “Memory is
full.”
Page 38
73
VVooiiccee
72
VVooiiccee
Review
When the list of your stored voice dial entries displays,
scroll to the desired entry by using and
and press . The recorded name plays audibly.
On the Voice Tag List, press to display the
following options.
Info: shows the phonebook information of the selected
entry.
Erase: erases the selected entry.
Talk: places a call to the number of the selected entry.
Play All: plays all the recorded voice dial tags.
Erase All
This option erases all entries in the Voice Dial list.
When a confirming message appears, select Yes to
confirm the selection. Otherwise, select No.
Set Active
Voice Dialing is always active once you have
programmed the phone to accept voice dialing entries
and the associated phone number.
Before using the Voice Dialing feature, you need to
determine how you initiate the voice dialing via this
menu.
The following options are available.
[*] Only: enables Voice Dialing only by pressing and
holding .
[*] /Folder: enables Voice Dialing by pressing and
holding or by opening the folder.
[*] /EarMic: enables Voice Dialing by pressing and
holding or by pressing and holding the button on
your ear-microphone.
Voice Memo MENU 5-2
Note: You can use this feature only in digital mode.
Using this menu option, you can record 30 voice
memos of 4 minutes in length individually.
You can quickly enter this menu by pressing in
Standby mode.
Record
1. Accessing this menu option immediately begins
recording. A timer displays to show the elapsed
time.
2. Speak into the phone to record the voice memo.
While recording, pressing pauses and to
resume.
If maximum recording time expires before you end,
recording automatically stops, sounding an alert.
You can save only the memo already recorded until
then.
Page 39

75
VVooiiccee
74
VVooiiccee
3. Press when recording is completed.
The Rec. Finished screen is displayed with the
following choices:
• Review: allows you to review the voice memo.
The screen displays the length of the memo with
the date and time.
• Rerecord: allows you to re-records the memo.
• Save: allows you to save the voice memo with a
title.
• Quit: cancels your recording and returns to
Standby mode.
5. Select Save to save the recorded voice memo and
press .
6. Enter the desired title for the memo and press .
You can enter up to 12 characters. For further
information about entering characters, see page xx.
Review
When the list of your voice memos displays, scroll to
the desired memo by using and and press
. The phone plays back the memo.
On the Voice Memo List, press to display the
following options.
Play: plays back the selected memo.
Info: shows details of the selected memo.
Erase: erases the selected memo.
Erase All
This option erases all of your voice memos.
When a confirming message appears, select Yes to
confirm the selection. Otherwise, select No.
Voice Answer MENU 5-3
Note: You can use this feature only in digital mode.
The Voice Answer feature allows you to set the phone
to answer an incoming call with the preset greeting
message and record the caller’s message directly into
the memory. This uses the voice memo memory and
the amount of time for a message is dependent on the
available memory less any voice memos.
On/Off
This option allows you to turn the Voice Answer
feature on or off.
Setup
This option provides you with the several setting
options to configure the Voice Answer feature.
The following options are available.
Greeting: You have a predefined greeting message to
play back when a call comes in. Also, you can create
your own greeting message as your preference.
Page 40
77
VVooiiccee
76
VVooiiccee
To record a greeting message:
1. Select Record and press .
2. Wait until a prompt beep sounds and record the
voice memo by speaking into the microphone.
You can pause recording by pressing . To
resume, press .
3. When recording is completed, press . The phone
automatically saves and activates the message.
Note: Each time you record a new message, your
phone automatically overwrites the old
message.
To play back your greeting message, select Play.
To enable or disable your greeting message, use the
Select option. If you disabled your message, the
phone will use the default greeting.
Screening: enables or disables the screening speaker
which allows you to listen to the caller’s message
while the caller is leaving it.
Wait time: selects the time the phone waits before
answering the call with the greeting message. The
wait time can be set to after 3sec, after 5 sec or
after 10 sec. Selecting No Ring answers a call by the
greeting as soon as the phone receives the signal of
the call.
Inbox
This option allows you to listen to the caller’s
messages. The list of the recorded messages appears.
Note: If the phone has the caller’s messages waiting
to be checked, it displays the total number of
the messages and the date and time when the
last message was recorded in Standby mode.
Pressing quickly takes you to the Inbox.
Press or to scroll to the desired message
and press to play it back.
You can pause playback by pressing . To resume,
press .
From the message list, the following options are
available when you press .
Info: shows the detailed information on the memo,
such as the caller’s number, if identified, elapsed time,
the memory used for the message and the time when
the memo was recorded.
Erase: erases the selected message.
Erase All: erases all of the recorded messages.
Talk: places a call the caller’s number, if identified.
Save: saves the caller’s number, if identified, into your
phonebook.
Page 41

79
PPllaannnneerr
78
4. Enter the End time and date by using the number
keypad and press .
5. Select when an alarm will notify you of your event
by pressing or . Selecting No alarm does
not ring the alarm.
6. Press to save your event.
Editing or Erasing an Event
If you already scheduled the events,
the first event is
displayed
when you select the Today menu option
(MENU 6-1)
. Press or to scroll to the event
you want to view.
While viewing details of the selected event,
the
following options are available when you press .
Add new: allows you to schedule a new event.
Edit : allows you to edit the event.
Erase : allows you to erase the event.
Erase All: allows you to erase all events.
Scheduler MENU 6-2
This option allows you to view the current, past and
future month in calendar format. In this option, the
current date is highlighted on the calendar. Days with
the scheduled events are underlined.
Planner
The Planner feature enables you to:
• Keep track of important dates and events
• Create a list of things to do
• Set an alarm to ring at a specified time
• Check the time in another part of the world
• Use the phone as a calculator
Today MENU 6-1
You can schedule up to 9 events for the current day
indicating each event’s start and end time. You can be
alerted by the Calendar function before an event is
commenced. Events scheduled for future dates
automatically appear on your Today display on that
particular day.
Scheduling a New Event
To schedule a new Event:
1. Enter your event information. You can enter up to 32
characters. For further information about entering
characters, see page 38.
2. Press to accept your input.
3. Enter the Start time and date by using the number
keypad and press .
You can move through the input fields by pressing
or , and toggle between AM and PM by
pressing or .
Page 42
81
PPllaannnneerr
80
PPllaannnneerr
Scrolling through the Calendar
• To move through the Calendar by one week by
pressing or .
• To move to the previous or the next day, press
or .
• To display the next or previous month, press or .
On the Calendar view, the following options are
available when you press .
View: allows you to view the scheduled events of the
selected day.
Add new: allows you to add a new event on the
selected day.
To create a new schedule or edit an existing schedule,
refer to “Today” on page xx.
Task List MENU 6-3
This feature allows you to draw up a list of tasks to be
done and assign a priority and deadline to each task.
Creating a New Task
To create a new task:
1. Enter the task contents and press . You can
enter up to 32 characters. For further information
about entering characters, see page xx.
2. Enter the deadline for the task to be done by using
the number keypad and press .
You can move through the input fields by pressing
or , and toggle between AM and PM by
pressing or .
3. Set the priority of the task between Low and High
by pressing or .
4. Press to store the task.
Editing or Erasing an Event
If the tasks are already defined in the To Do List, the
first task is displayed with the deadline and the
associated priority when you access the Task List
menu option (MENU 6-3).
Scroll to the desired task by pressing
or .
Page 43

83
PPllaannnneerr
82
PPllaannnneerr
While viewing details of the selected task, the
following options are available when you press .
Add new: allows you to add a new task.
Edit: allows you to edit the task.
Erase: allows you to erase the task.
Erase All: allows you to erase all tasks.
Memo Pad MENU 6-4
This feature allows you to write down up to 10 memos
about something you need to remember.
Writing a New Memo
To write a new memo:
1. Enter the memo contents. You can enter up to 60
characters. For further information about entering
characters, see page xx.
2. Press to save the memo.
Editing or Erasing a Memo
If the memos are already defined in the memo pad, the
memo list is displayed when you access the Memo
Pad menu option (MENU 6-4).
Scroll to the desired memo by pressing or
and press to view the memo contents.
While viewing details of the selected memo, the
following options are available when you press .
Add new: allows you to add a new memo.
Edit: allows you to edit the memo.
Erase: allows you to erase the memo.
Erase All: allows you to erase all memos.
Alarm MENU 6-5
This option allows you to set or release the alarm to
ring at a specific time.
To set an alarm:
1. Select the desired alarm frequency option by
pressing the navigation keys.
• Once: the alarm rings only once and is then
deactivated.
• Daily: the alarm rings every day at the same
time.
2. Press to confirm your input.
3. Enter the required time for the alarm to work by
using the number keypad.
You can toggle between AMand PM by pressing
or .
4. Press to save the setting.
Page 44

85
PPllaannnneerr
84
PPllaannnneerr
To stop the alarm when it rings, press any key.
To release the alarm setting, select Off from the alarm
frequency options.
Note: For the alarm to work, your phone needs to be
turned on and in Digital mode.
Calculator MENU 6-6
Using this feature, you can use the phone as a
calculator. The calculator provides the basic arithmetic
functions; addition, subtraction, multiplication and
division.
To perform a calculation:
1. Enter the first number by using the number keypad.
2. Set the operator for your calculation by pressing the
corresponding navigation key according to the
illustration on the display; + ( ), -( ),
x ( ), /( ).
3. Enter the second number.
4. Repeat steps 1 to 3 as many times as needed.
5. To get the result, press .
Note:
• To erase any mistakes or clear out the display, press
.
• Press to enter a decimal point and to
change the sign of a number to a negative (-).
World Time MENU 6-7
This menu allows you to check the current time for
Greenwich Mean Time (GMT) and major cities around
the world.
Scroll through the world map by pressing the
navigation keys until the city corresponding to your
time zone appears. The local date and time are also
displayed.
Count Down MENU 6-8
This menu help you know how much time it takes you
to do something, or how many months, days, hours
and minutes until a specific day arrives. You can create
up to 30 counters.
Creating a New Counter
To create a new counter:
1. Enter a title for your new counter and press . For
further information about entering characters, see
page xx.
2. Enter the date and time that you want to count
down from.
You can move through the input fields by pressing
or , and toggle between AM and PM by
pressing or .
Note: You can enter the years between 1980 and
2099.
Page 45

87
Setup
Many different features of your phone can be
customized to suit your preferences.
Display MENU 7-1
This menu option enables you to set various options
for the display.
Menu Style
You can change the display style of the menus and
submenus. Select from Nature or Camera.
Animation
You can select the animated images to display in
Standby mode or when the phone is turned on or off.
You can download the animated images via the
Internet or the PC link, but this function may not be
available according to your service provider.
The following options are available.
Opening: allows you to select an image to display
when you switch the phone on.
Closing: allows you to select an image to display
when you switch the phone off.
Wall Paper: allows you to select an image to display
in idle mode.
86
PPllaannnneerr
3. Press to save the counter.
Editing or Erasing a Counter
If the counters are already defined, the first counter is
displayed when you access the Count Down menu
(MENU 6-8).
Scroll to the desired counter by pressing or .
While viewing the selected counter, the following
options are available when you press .
Add new: allows you to create a new
counter
.
Edit : allows you to edit the
counter
.
Erase : allows you to delete the
counter
.
Erase All: allows you to delete all
counter
s.
Set Time MENU 6-9
This option allows you to set the current date and
time.
Enter the current time and date by using the number
keypad. You can toggle between AMand PM by
pressing or .
The month, day, hour and minute must be entered with
2 digits and the year requires 4 digits. You need to
enter the hour in 12-hour format.
Page 46

89
SSeettuupp
88
SSeettuupp
Banner
This option allows you to set a banner message to be
displayed under the wall paper image in Standby
mode.
To change the banner:
1. If necessary, press repeatedly to delete each
letter of the old banner. Press are hold to
clear it off.
2. Enter your message of up to 12 characters by using
the alphanumeric keys. For further information about
entering characters, refer to page xx.
3. When you finish entering a message, press to
save the new banner.
Auto Hyphenation
With this menu option set to On, your phone
automatically hyphenates numbers when you dial a
number.
This hyphenates numbers as follows: 000-000-0000.
Digits following a pause are not hyphenated.
Backlight
You have several choices for setting how the LCD
backlight operates. Remember that backlight use
drains your battery faster.
The following options are available:
30 (/15/7) seconds: the backlight comes on when you
press a key or receive a call and switches off 30/15/7
seconds after the last key is pressed.
Folder Open: the backlight comes on each time you
open the folder.
Always Off: the backlight are not used.
Contrast
The LCD has the contrast setting that can help you see
the screen better in different lighting conditions.
Adjust the contrast to make the LCD screen darker or
lighter by pressing the navigation keys or the volume
keys.
Page 47

91
SSeettuupp
90
SSeettuupp
Sounds MENU 7-1
You can use the Sounds menu to customize various
sound settings.
Ringer Volume
This menu option allows you to adjust the volume of the
ringers for the following items.
Calls: allows you to adjust the ringer volume for the
incoming calls.
Alarm: allows you to adjust the ringer volume for an
alarm.
Use the navigation keys to adjust the volume from
Level 1 through Level 5 or select the desired type.
Selecting Vibrate switches the phone to Vibration
mode. An incoming call will vibrate the phone.
Selecting 1 Beep sounds a beep.
To turn the ringer off, select Silent.
Ringer Type
This option allows you to set a unique ringer for the
following items.
Calls: allows you to set a unique ringer for incoming
voice calls.
Alarm: allows you to have a distinctive ringer for an
alarm.
Data/Fax In: allows you to be alerted with a
distinctive ring tone when you receive faxes or data
through the phone. This feature may be unavailable
depending on the network.
Scheduler: allows you to select a ringer for an
schedule alarm.
Select the desired ringer by using the navigation keys.
You can choose from 35 tones or melodies, including
10 downloaded melodies. When a tone or melody is
selected, it sounds for a few seconds.
Alerts
Your phone gives audible alerts (beeps) to inform you
that certain things have happened. The alerts only
occur in your earpiece so the other party does not hear
them.
The available alerts are:
Minute Beep: when this menu option is set to On,
the phone sounds an alert 10 seconds before each
elapsed minute to remind you of the length of the
current call.
Service: when this menu option is set to On, the
phone sounds an alert when you exit a service area or
when you return to a service area.
Connect: when this menu option is set to On, the
phone sounds the connect tone when your call is
connected to the system.
Page 48

93
SSeettuupp
92
SSeettuupp
Disconnect: when this menu option is set to On, the
phone sounds the disconnect tone when your call is
disconnected.
Fade: when this menu option is set to On, the phone
sounds an alert when a dropped call occurs during
conversation in response to a signal fade.
Roam: when this menu option is set to On, the phone
sounds an alert when your phone starts roaming.
Voice Privacy: when this menu option is set to On,
the phone sounds an alert when your phone starts
roaming.
Key Beep
Using this option, you can set up the sound that
keypad generates when a key is pressed.
The following options are available:
Volume: allows you to adjust the volume of the key
beep.
Tone Length: enables you to select normal or long
DTMF (dual-tone multi-frequency) tones. When you
use a teleservice, such as your bank account and press
the keys to enter numbers into the teleservice, you are
sending DTMF tones. The system used by the bank or
other service determines if you need short or long
DTMF tones. If the service is digital, as most are,
short DTMF will almost always work.
Power on/off
This option allows you to turn on or off the sounds that
the phone generates when it is switched on and off.
Press the navigation keys to select On to turn the
sound on or Off to turn it off.
Location MENU 7-3
Using this option, emergency calls allow rescue
personnel to find you when they otherwise might not
know your location, provided that you are in a service
area and the service is available. For a stronger
location signal, make sure the antenna is fully
extended.
The following options are available:
Location On: your network can always find your
location.
911 Only: the Location feature is turned on only for
911 calls.
Page 49

95
SSeettuupp
94
SSeettuupp
Network MENU 7-4
This feature enables you to choose how your phone
will roam and to choose between two network.
Roam Option
Roaming is a feature which is only relevant in areas
where there are usually at least two cellular service
providers which are referred to as “A” and “B” and
have valid roaming agreements. Your service provider
will provide you information about this service or the
best roaming methods for you.
The following options are available.
Home Only : With this setting, you cannot roam. If
your home system is not available then your call will
not be connected and the No Service icon ( ) is
displayed. In some service areas an operator may
come on line asking you how you would like to pay for
the call.
Automatic : With this setting, the phone
automatically searches for the best system.
Set Nam
Your Samsung phone can store two NAMs. NAM
stands for numerical assignment module - essentially
your telephone number and this means that you can
have two phone numbers on your phone. You can
quickly and easily switch your service back and forth
between the two numbers.
Press the navigation keys to select Nam 1 or Nam 2.
If you change the NAM, the phone will reboot (turn
itself off and back on) and acquire the service using
the new NAM setting.
Security MENU 7-5
Your phone provides many security options, including a
user-programmable lock code and call restriction. To
access the Security menu, you need to enter your
four-digit lock code. The lock code is preset to “0000”
at the factory.
Lock Phone
This option allows you to lock your phone. When the
phone is locked, you cannot operate the phone until
you enter the lock code.
The following options are available:
Never: the phone remains unlocked.
On Power up: the phone locks automatically at the
next time your phone is turned on.
Now: the phone locks immediately.
You can place emergency calls when the phone is
locked. Enter the desired emergency number and then
press . The phone recognizes the three
emergency numbers you programmed via the Special
# (Menu 7-6- 3) menu option; for further details, see
page xx.
Page 50

97
SSeettuupp
96
SSeettuupp
To unlock the phone, press and enter the lock
code. The phone returns to Standby mode.
Change Lock
You can change your current lock codeto a new one.
The lock code is preset to “0000” at the factory.
Enter a new four-digit lock code and then re-enter the
code to confirm it.
Special Number
Your phone provides the option of storing special
numbers for emergency calls. All of the numbers can
be dialed at any time, even when your phone is locked.
The default numbers may vary depending on your
service provider.
To store an emergency number:
1. Select the desired location by using the number
keypad or the navigation keys, followed by .
2. Enter a number and press . Each emergency
number can be up to 32 digits long.
To make an emergency call in Lock mode, simply enter
an emergency number and press .
Voice Privacy
This menu option is used only in digital networks,
Voice Privacy encrypts the voice channel so that
people cannot eavesdrop on your conversation.
The following options are available.
off: turns this feature on. The phone will make and
receive calls on an encrypted high security line.
on: turns this feature off. The phone will use a
standard line for calls.
Note: This feature may not be available in all areas.
Contact your service provider for details and
availability.
Restriction
This feature allows you to restrict outgoing calls from
your phone except emergency calls the programmed
special numbers (Menu 7-6-3). Once you have
restricted the phone, storing a number is also
unavailable.
Select Yes to turn this feature on or No turn it off.
Erase Phonebook
This menu allows you to erase all the numbers in your
phonebook and the voice dial list.
When a confirming message appears, select Yes to
confirm. To cancel the selection, select No.
Page 51

98
SSeettuupp
99
SSeettuupp
Reset Phone
Resetting the phone erases all of your saved selection
in the user-selectable setting options and returns them
to the factory’s default settings. All of your important
personal data (internal phonebook or voice recordings)
are unaffected by resetting your phone.
When a confirming message appears, select Yes to
confirm. The phone reboots (turns itself off and back
on) and then returns to Standby mode.
Others MENU 7-6
Launch Pad
The three navigation keys can be used as shortcut
keys. In Standby mode, they allow you to access
specific menu options directly.
To assign a different menu function to a key:
1. Select a key to be used as a shortcut key, Down
Key, Right Key or Left Key.
2. Select one from the menus available and press .
Call Answer
This menu option allows you to select how to answer
an incoming call. The following options are available.
Send Key: the phone answers only when you press
.
Folder Open: you can answer the call simply by
opening the folder.
Any Key: the phone answers when you press any key
except .
Auto Answer
This feature is only used when the phone is connected
to an optional hands-free car kit.
When this menu option is activated, the phone
automatically answers calls after predefined rings.
This option is useful while driving, for instance. To
activate this feature, select how long your phone waits
before answering an incoming call. After 5sec, After
3sec and After 1sec are available.
When this menu option is set to No Ring, the phone
does not answer an incoming call. If you do not
answer the call, it will be stored in the Missed Call log
(see page xx).
Language
Select the language of voice prompts, menus and key
input.
Note: This setting does not affect the Web Browser.
Page 52

101
SSeettuupp
Receiving a Fax or Data File
To receive a fax or data, ensure that your phone is
connected to your PC and is turned on. Select a
desired option from the Data/Fax menu option
(MENU 7-6-6).
When you receive a fax call, setup the Answer mode
in the Fax program on your PC and click on Receive
and select one of the following:
• Automatic Receive (recommended)
• Manual Receive
Sending a Fax or Data File
When connected to a computing device, your phone
allows wireless fax and data transmissions. Your
computing device software initiates the call to the
destination phone number. The phone functions as a
wireless modem to send the fax or data file to the
number designated by your PC software.
Phone Info MENU 7-7
This option allows you to view the software and
hardware versions of your phone. This feature is
helpful when you need to call the Customer Care.
100
SSeettuupp
Data/Fax
Your phone is capable of sending and receiving digital
data or fax calls when connected to a computing
device, such as laptop, desktop, handheld and
palmtop, running Windows 95/98/NT/2000/Me/XP.
The phone functions just like a typical modem on your
PC, enabling you to use wireless data involving a wide
variety of Windows software applications.
To use digital data or fax services with your phone, you
will need to obtain a digital data/fax kit from your
service provider. This kit will contain the necessary
cables, software, and user’s guide needed for you to
connect and use the phone with your computing
device.
Note: The phone must be on a digital network to
receive or send faxes and data.
The following options are available.
Data Fax off: your phone receives voice calls only.
Fax for next call: your phone receives fax calls for
next 10 minutes.
Fax until powered off: your phone receives fax calls
until you power the phone off and back on.
Data for next call: your phone receives data calls for
next 10 minutes.
Data until powered off: your phone receives data
calls until you power the phone off and back on.
Page 53

102 103
HHeeaalltthh aanndd SSaaffeettyy IInnffoorrmmaattiioonn
Health and Safety
Information
Precautions When Using Batteries
Your phone is powered by a rechargeable Li-ion
standard battery.
• Never use any charger or battery that is damaged in
any way.
• Use the battery only for its intended purpose.
• If you use the phone near the network’s base
station, it uses less power; talk and standby time
are greatly affected by the signal strength on the
cellular network and the parameters set by the
network operator.
• Battery charging time depends on the remaining
battery charge and the type of battery and charger
used. The battery can be charged and discharged
hundreds of times, but it will gradually wear out.
When the operation time, including talk time and
standby time, is noticeably shorter than normal, it is
time to buy a new battery.
• If left unused, a fully charged battery will discharge
itself over time.
• Use only Samsung-approved batteries and recharge
your battery only with Samsung-approved chargers.
When a charger is not in use, disconnect it from the
power source. Do not leave the battery connected
to a charger for more than a week, since
overcharging may shorten its life.
• Extreme temperatures will affect the charging
capacity of your battery: it may require cooling or
warming first.
• Do not leave the battery in hot or cold places, such
as in a car in summer or winter conditions, as you
will reduce the capacity and life-time of the battery.
Always try to keep the battery at room temperature.
A phone with a hot or cold battery may temporarily
not work, even when the battery is fully charged. Liion batteries are particularly affected by
temperatures below 0 °C (32 °F).
• Do not short-circuit the battery. Accidental short
circuiting can occur when a metallic object (coin,
clip or pen) causes a direct connection between the
+ and – terminals of the battery (metal strips on the
battery), for example when you carry a spare
battery in a pocket or bag. Short-circuiting the
terminals may damage the battery or the object
causing the short-circuit.
• Dispose of used batteries in accordance with local
regulations. Always recycle. Do not dispose of
batteries in a fire.
Page 54

105
HHeeaalltthh aanndd SSaaffeettyy IInnffoorrmmaattiioonn
104
HHeeaalltthh aanndd SSaaffeettyy IInnffoorrmmaattiioonn
Road Safety
Your wireless phone gives you the powerful ability to
communicate by voice, almost anywhere, anytime. But
an important responsibility accompanies the benefits
of wireless phones, one that every user must uphold.
When driving a car, driving is your first responsibility.
When using your wireless phone behind the wheel of
a car, practice good common sense and remember the
following tips:
1. Get to know your wireless phone and its features,
such as speed dial and redial. If available, these
features help you to place your call without taking
your attention off the road.
2. When available, use a hands-free device. If
possible, add an extra layer of convenience and
safety to your wireless phone with one of the many
hands-free accessories available today.
3. Position your wireless phone within easy reach. Be
able to access your wireless phone without
removing your eyes from the road. If you get an
incoming call at an inconvenient time, let your voice
mail answer it for you.
4. Let the person you are speaking with know you are
driving; if necessary, suspend the call in heavy
traffic or hazardous weather conditions. Rain, sleet,
snow, ice and even heavy traffic can be hazardous.
5. Do not take notes or look up phone numbers while
driving. Jotting down a To Do list or flipping through
your phonebook takes your attention away from your
primary responsibility, driving safely.
6. Dial sensibly and assess the traffic; if possible,
place calls when you are not moving or before
pulling into traffic. Try to plan calls when your car
will be stationary. If you need to make a call while
moving, dial only a few numbers, check the road
and your mirrors, then continue.
7. Do not engage in stressful or emotional
conversations that may be distracting. Make the
people with whom you are talking aware that you
are driving and suspend conversations that have the
potential to divert your attention from the road.
8. Use your wireless phone to call for help. Dial the
emergency number in the case of fire, traffic
accident or medical emergencies. Remember, it is a
free call on your wireless phone!
9. Use your wireless phone to help others in
emergencies. If you see a car accident, crime in
progress or other serious emergency where lives are
in danger, call the emergency number, as you would
want others to do for you.
Page 55

107
HHeeaalltthh aanndd SSaaffeettyy IInnffoorrmmaattiioonn
106
HHeeaalltthh aanndd SSaaffeettyy IInnffoorrmmaattiioonn
10. Call roadside assistance or a special nonemergency wireless assistance number when
necessary. If you see a broken-down vehicle posing
no serious hazard, a broken traffic signal, a minor
traffic accident where no one appears injured, or a
vehicle you know to be stolen, call roadside
assistance or any other special non-emergency
wireless number.
Operating Environment
Remember to follow any special regulations in force in
any area and always switch off your phone whenever
it is forbidden to use it, or when it may cause
interference or danger.
When connecting the phone or any accessory to
another device, read its user’s guide for detailed safety
instructions. Do not connect incompatible products.
As with other mobile radio transmitting equipment,
users are advised that for the satisfactory operation of
the equipment and for the safety of personnel, it is
recommended that the equipment should only be used
in the normal operating position (held to your ear with
the antenna pointing over your shoulder).
Electronic Devices
Most modern electronic equipment is shielded from
radio frequency (RF) signals. However, certain
electronic equipment may not be shielded against the
RF signals from your wireless phone. Consult the
manufacturer to discuss alternatives.
Pacemakers
Pacemaker manufacturers recommend that a minimum
distance of 15 cm (6 inches) be maintained between a
wireless phone and a pacemaker to avoid potential
interference with the pacemaker. These
recommendations are consistent with the independent
research and recommendations of Wireless Technology
Research.
Persons with pacemakers:
• Should always keep the phone more than 15 cm (6
inches) from their pacemaker when the phone is
switched on;
• Should not carry the phone in a breast pocket;
• Should use the ear opposite the pacemaker to
minimize potential interference.
If you have any reason to suspect that interference is
taking place, switch off your phone immediately.
Page 56

109
HHeeaalltthh aanndd SSaaffeettyy IInnffoorrmmaattiioonn
108
HHeeaalltthh aanndd SSaaffeettyy IInnffoorrmmaattiioonn
Hearing Aids
Some digital wireless phones may interfere with some
hearing aids. In the event of such interference, you
may wish to consult your hearing aid manufacturer to
discuss alternatives.
Other Medical Devices
If you use any other personal medical devices, consult
the manufacturer of your device to determine if it is
adequately shielded from external RF energy. Your
physician may be able to assist you in obtaining this
information. Switch off your phone in health care
facilities when any regulations posted in these areas
instruct you to do so. Hospitals or health care facilities
may be using equipment that could be sensitive to
external RF energy.
Vehicles
RF signals may affect improperly installed or
inadequately shielded electronic systems in motor
vehicles. Check with the manufacturer or its
representative regarding your vehicle.
You should also consult the manufacturer of any
equipment that has been added to your vehicle.
Posted Facilities
Switch off your phone in any facility where posted
notices require you to do so.
Potentially Explosive Atmospheres
Switch off your phone when in any area with a
potentially explosive atmosphere and obey all signs
and instructions. Sparks in such areas could cause an
explosion or fire resulting in bodily injury or even
death.
Users are advised to switch off the phone while at a
refuelling point (service station). Users are reminded of
the need to observe restrictions on the use of radio
equipment in fuel depots (fuel storage and distribution
areas), chemical plants or where blasting operations
are in progress.
Areas with a potentially explosive atmosphere are
often but not always clearly marked. They include
below deck on boats, chemical transfer or storage
facilities, vehicles using liquefied petroleum gas (such
as propane or butane), areas where the air contains
chemicals or particles, such as grain, dust or metal
powders, and any other area where you would
normally be advised to turn off your vehicle engine.
Page 57

110 111
HHeeaalltthh aanndd SSaaffeettyy IInnffoorrmmaattiioonnHHeeaalltthh aanndd SSaaffeettyy IInnffoorrmmaattiioonn
Emergency Calls
This phone, like any wireless phone, operates using
radio signals, wireless and landline networks as well
as user-programmed functions, which cannot
guarantee connection in all conditions. Therefore, you
should never rely solely on any wireless phone for
essential communications (medical emergencies, for
example).
Remember, to make or receive any calls the phone
must be switched on and in a service area with
adequate signal strength. Emergency calls may not be
possible on all wireless phone networks or when
certain network services and/or phone features are in
use. Check with local service providers.
To make an emergency call:
1. If the phone is not on, switch it on.
2. Key in the emergency number for your present
location. Emergency numbers vary by location.
3. Press the key.
If certain features are in use (call barring, for example),
you may first need to deactivate those features before
you can make an emergency call. Consult this
document and your local cellular service provider.
When making an emergency call, remember to give all
the necessary information as accurately as possible.
Remember that your phone may be the only means of
communication at the scene of an accident; do not cut
off the call until given permission to do so.
Other Important Safety Information
• Only qualified personnel should service the phone or
install the phone in a vehicle. Faulty installation or
service may be dangerous and may invalidate any
warranty applicable to the device.
• Check regularly that all wireless phone equipment in
your vehicle is mounted and operating properly.
• Do not store or carry flammable liquids, gases or
explosive materials in the same compartment as the
phone, its parts or accessories.
• For vehicles equipped with an air bag, remember
that an air bag inflates with great force. Do not
place objects, including both installed or portable
wireless equipment in the area over the air bag or in
the air bag deployment area. If wireless equipment
is improperly installed and the air bag inflates,
serious injury could result.
• Switch off your phone before boarding an aircraft.
The use of wireless phones in aircraft may be
dangerous to the operation of the aircraft, and is
illegal.
• Failure to observe these instructions may lead to the
suspension or denial of telephone services to the
offender, or legal action, or both.
Page 58

113
HHeeaalltthh aanndd SSaaffeettyy IInnffoorrmmaattiioonn
112
HHeeaalltthh aanndd SSaaffeettyy IInnffoorrmmaattiioonn
Care and Maintenance
Your phone is a product of superior design and
craftsmanship and should be treated with care. The
suggestions below will help you fulfill any warranty
obligations and allow you to enjoy this product for
many years.
• Keep the phone and all its parts and accessories
out of the reach of small children’s.
• Keep the phone dry. Precipitation, humidity and
liquids contain minerals that will corrode electronic
circuits.
• Do not use or store the phone in dusty, dirty areas,
as its moving parts may be damaged.
• Do not store the phone in hot areas. High
temperatures can shorten the life of electronic
devices, damage batteries, and warp or melt certain
plastics.
• Do not store the phone in cold areas. When the
phone warms up to its normal operating
temperature, moisture can form inside the phone,
which may damage the phone’s electronic circuit
boards.
• Do not drop, knock or shake the phone. Rough
handling can break internal circuit boards.
• Do not use harsh chemicals, cleaning solvents or
strong detergents to clean the phone. Wipe it with
a soft cloth slightly dampened in a mild soap-andwater solution.
• Do not paint it. Paint can clog the device’s moving
parts and prevent proper operation.
• Use only the supplied or an approved replacement
antenna. Unauthorized antennas or modified
accessories may damage the phone and violate
regulations governing radio devices.
• If the phone, battery, charger or any accessory is
not working properly, take it to your nearest
qualified service facility. The personnel there will
assist you, and if necessary, arrange for service.
Page 59

114 115
GGlloossssaarryy
Glossary
Airtime - Actual time spent talking on the wireless
phone. Most carriers bill customers based
on how many minutes of airtime they use
each month.
Antenna - A device for transmitting or receiving
signals. The size and shape of antennas is
determined, in part, by the frequency of the
signal they receive. Wireless phones and
the base station must have antennas.
Base Station - The fixed radio transmitter/receiver
that maintains communications with
mobile radio telephones within a
given area. (Typically called a cell or
cell site)
CDMA - (Code Division Multiple Access) A spread-
spectrum approach to digital transmission.
With CDMA, each conversion is digitized and
then tagged with a code. The mobile phone
deciphers only a particular code to pick the
right conversation off the air. The transmitted
signal is just above noise level across the
available bandwidth.
Channel - Communications signals transmit along
paths called channels.
Codec - Compression & Decompression.
Deactivation - The process of rendering a wireless
phone inactive.
DTMF - (Dual-tone Modulated Frequency ) You send
DTMF signals when you enter numbers by
pressing the digit keys.
EVRC - (Enhanced Variable Rate Codec) EVRC is a new
global standard for compressing and
decompressing voice signals. EVRC uses a
lower bit rate (the number of bits sent per
second) than existing CDMA vocoders, while
providing significant improvements in voice
quality. This technology enables your phone to
provide superb voice quality while benefiting
from the ability to process more cellular voice
calls using less bandwidth than the voice
codecs in CDMA networks today.
Frequency - A measure based on time, as one or
more waves per second, in an electrical
or light wave information signal. A
signal’s frequency is stated in cycles-persecond or Hertz (Hz).
Hands-Free - A feature that permits a driver to use a
wireless phone without lifting or
holding the handset - an important
safety feature for automobiles, tractors
and most other motorized vehicles.
LCD - (Liquid Crystal Display) Commonly used to refer
to the screen display on the wireless phone.
Page 60

117116
GGlloossssaarryy
LED - (Light Emitting Diode) Commonly used to refer to
a small light on the wireless phone or on the
Desktop Charger. The LED lights on the phone to
indicate an incoming call. The lights on the
charger indicate that battery charging is taking
place.
Prepend - The addition of a prefix, such as an area
code, to a phone number.
RF - Radio Frequency
Roaming - The ability to use a wireless phone to
make and receive calls in places outside of
the home service area.
Service Charge - The amount paid each month to
receive wireless service.
Standby Time - The amount of time a fully charged
wireless portable or transportable
phone can be on and idle without
being in use. See also Talk Time.
Talk Time - The length of time a person can talk on a
portable or transportable wireless phone
without recharging the battery.
Vocoder - Voice Coder. A device used to convert
speech into digital signals.
Wireless - Radio-based Systems that allow
transmission of telephone or data signals
through the air without a physical
connection, such as a metal wire (copper)
or fiber optic cable.
Index
A
Accessories • 9
Air time (1-5) • 50
Alarm (5-7) • 76
Alerts (7-4) • 89
Animation (8-1) • 91
Answer mode (0-2) • 96
Auto hyphen (8-5) • 93
Auto answer (0-1) • 96
Auto retry (0-3) • 97
B
Backlight (8-3) • 15, 92
Battery
charging • 17
installing • 16
low battery indicator • 19
precautions • 105
C
Calculator (5-9) • 78
Call
answering • 32
dialed • 48
emergency • 24
ending • 23
forwarding • 36
from Phone Book • 25
incoming (1-2) • 49
making • 23
missed • 34
outgoing (1-1) • 48
redialing last • 24
restriction • 103
three way • 35
waiting • 36
Caller ID • 34
Care • 115
Characters, entering • 38
Charging batteries • 17
Clock • 94
Connect tone • 90
Contrast (8-4) • 93
Correcting number • 23
Countdown (5-6) • 75
D
Data/fax
alert • 88
receiving/sending • 100
Data/fax (0-8) • 99
Dialing
pause • 27
prepend • 25
speed • 26
voice • 30,79
Disconnect tone • 90
Display
LCD • 13
external • 15
menu (8) • 91
DTMF tone
length (7-3) • 89
Dual clock (8-6) • 94
E
Erasing History (1-4) • 49
Erasing message
received • 59
transmitted • 61
External LCD • 15
F
Finding
phonebook • 51
G
Games (9) • 95
Greeting (8-2) • 92
Page 61

118
IInnddeexx
119
IInnddeexx
I
Icon description • 13
Inbox ( 3-3) • 59
In-call options • 33
Incoming calls (1-2) • 49
Incoming data/fax (0-8) • 99
Installing battery • 16
Internet • 66
J
Jump to date (5-3) • 72
K
Key volume • 87
Keys
description • 11
location • 10
L
Language (0-4) • 97
Last number redialing • 24
Letters, entering • 38
Listening
voicemail •59
Lock code • 101
Low battery indicator • 19
M
Maintenance • 115
Memo pad (5-5) • 74
Memory (2-5) • 55
Memory, clearing • 81
Menus
list • 46
scrolling • 44
shortcuts • 45
Messages
alerts • 88
browser • 62
erasing • 62
filed • 61
greeting • 92
settings (3-8) • 63
text • 56
voice • 59
writing new • 56
Minute beep • 89
Missed calls • 49
Modes
phone • 21
text input • 38
Mute
key tones • 31
microphone • 31
N
Names
entering • 38
searching/dialing (2-1) • 51
NAM setting (0-6) • 98
Number
adding in an entry • 53
correcting • 23
my (2-4)• 55
searching • 51
O
Outbox (3-4) • 60
Outgoing calls (1-1) • 48
P
Phone
layout • 10
lock • 102
my number (2-4) • 55
Phonebook (2) • 51
PIN
code • 104
Planner (5) • 70
Power save mode • 22
Prepend dialing • 25
R
Received Messages
browser • 62
text • 59
voice • 59
Redialing
auto • 97
last call • 24
Restrict • 103
Ring
type • 88
volume • 87
Roam ringer • 90
S
Safety
batteries • 105
information • 105
precautions • 7
Searching/dialing
phonebook • 51
Security • 101
Service alert • 89
Service light • 15
Setting NAM (0-6) • 98
Setting system (0-7) • 98
Setting time (0-5) • 97
Setup (0) • 96
Sounds (7) • 87
Speed dialing • 26
Standby mode • 21
Switching on/off
phone • 20
microphone • 31
T
Text, entering • 38
Today (5-1) • 70
Talk mode • 22
To do list (5-4) • 73
Tone length (7-3) • 89
Transmitted message (3-4) • 60
T9 text mode • 39
U
Unpacking • 9
V
Version (0-9) • 101
View month (5-2) • 71
Voice answer (6-3) • 84
Voice dial (6-1) • 79
Voice memo (6-2) • 82
Voice mail • 59
Volume, adjusting
earpiece • 31
ring • 31, 87
key • 87
W
Web Browser
accessing (4-1) • 66
prompt (4-2) • 69
World time (5-8) • 77
Writing new message • 56
Page 62
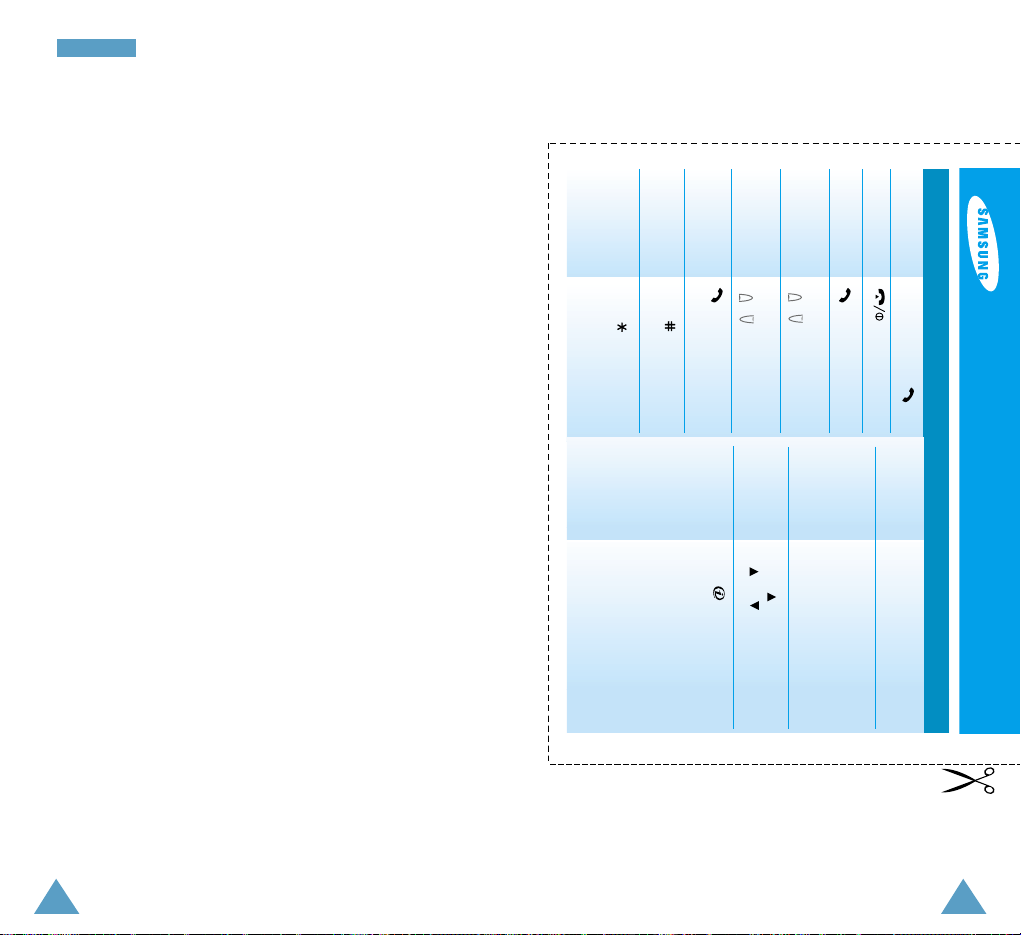
121120
IInnddeexx
Making a call Phone number +
Ending a call
Receiving a call or open the folder
Adjusting key (in Standby mode)
volume / on the left side
Adjusting speaker (during a conversation)
volume / on the left side
Redialing the last twice
call
Switchong to Hold
silent mode
Voice dialing Hold or Open the
folder + Say name
Saving Phone number + OK +
Numbers Follow the screen prompts
Speed dialing Enter memory location of
the desired number, holding
the final digit to
automatically dial.
Phone book Press in standby mode
Search + or
Accessing Hold
Wireless Web
SCH-A220 Quick Reference Card
BASIC OPERATIONS
Page 63

Licensed by QUALCOMM Incorporated under one or more
of the following Patents.
U.S Patent No. 4,901,307 5,056,109 5,099,204
5,101,501 5,103,459 5,107,225
5,109,390
122
MENU TREE
Main Menu (To access, press MENU)
1 : Calls 1 : Missed Calls
2 : Outgoing Calls
3 : Incoming Calls
4 : Erase History
5 : Air Time
2 : Phone Book 1 : Find
2 : Add New Entry
3 : RGroup Setting
4 : My Phone#
5 : Memory
3 : Message 1 : Voice Mail
2 : New Message
3 : Inbox
4 : Info Alerts
5 : Outbox
6 : Saved
7 : Message Setting
4 : Mobile Web 1: Get In Web
2: Prompt
5 : Voice 1 : Voice Dial
2 : Voice Memo
3 : Voice Answer
6 : Planner 1 : Today
2 : Scheduler
3 : Taks List
4 : Memo Pad
5 : Alarm
6 : Calculator
7 : World Time
8 : Count Down
9 : Set Time
7 : Setup 1 : Display
2 : Sounds
3 : Location
4 : Network
5 : Security
6 : Others
7 : Phone Info
 Loading...