

Page 1
ENGLISH
FRANÇAIS
Digital Video Camcorder
SCD5000
AF Auto Focus
CCD Charge Coupled Device
LCD Liquid Crystal Display
Owner’s Instruction Book
Before operating the unit, please
read this instruction manual
thoroughly, and retain it for future
reference.
Caméscope numérique
SCD5000
ELECTRONICS
AF Mise au point
CCD Système à transfert
LCD Écran à cristaux
Avant d’utiliser cet appareil, veuillez lire
attentivement ce mode d’emploi et le conserver pour toute consultation ultérieure.
automatique
de charge
liquides
Mode d’emploi
AD68-00655C(01)
Page 2

ENGLISH
Contents Sommaire
FRANÇAIS
Start............................................................................ 8
Precautions on Camcorder Care ......................................................... 8
Quick Start ............................................................................................ 9
Notes and Safety Instructions .................................. 10
Getting to Know Your Device................................... 14
Features .............................................................................................. 14
Accessories Supplied with the Camcorder ........................................ 15
Basic Accessories ......................................................................... 15
Front & Left View ................................................................................ 16
Left side View ..................................................................................... 17
Right & Top View ................................................................................ 18
Rear & Bottom View ........................................................................... 19
Remote Control .................................................................................. 20
OSD (On Screen Display in CAMERA and PLAYER Modes) ........... 21
OSD (On Screen Display in CAMERA / M.PLAY Modes) ................. 22
Turning the OSD on/off (On Screen Display) ............................... 23
Preparation............................................................... 24
How to use the Remote Control ......................................................... 24
Battery Installation for the Remote Control .................................. 24
Self Record using the Remote Control ........................................ 24
Adjusting the Hand Strap .................................................................. 25
Hand strap ..................................................................................... 25
Shoulder strap.................................................................................25
Connecting a Power Source .............................................................. 26
To use the AC Power adapter and DC Cable ............................. 26
Using the Lithium Ion Battery Pack ................................................... 27
Charging the Lithium Ion Battery Pack ......................................... 27
Table of Continuous Recording Time Based on Model and
Battery Type ................................................................................. 28
Battery Level Display .................................................................... 29
Avant de commencer...................................................8
Précautions d'emploi du caméscope .....................................................8
Démarrage rapide ...................................................................................9
Remarques et consignes de sécurité ..........................10
Familiarisez-vous avec votre appareil ........................11
Fonctionnalités......................................................................................14
Accessoires fournis avec le caméscope..............................................15
Accessoires de base.......................................................................15
Vue avant et latérale (côté gauche......................................................16
Vue du côté gauche..............................................................................17
Vue de droite et du dessus...................................................................18
Vue arrière et du dessous....................................................................19
Télécommande.....................................................................................20
Affichage à l’écran en mode CAMERA <APPAREIL PHOTO> ou
PLAYER <LECTEUR>..........................................................................21
Affichage à l’écran en mode CAMERA <APPAREIL PHOTO> ou
M.PLAY<LECTURE PHOTO>.............................................................22
Activation/désactivation de l’affichage (mode OSD) ......................23
Préparez votre caméscope ........................................24
Utilisation de la télécommande ............................................................24
Installation de la batterie pour la télécommande...........................24
Enregistrement automatique avec la télécommande ....................24
Mise en place de la poignée de soutien ..............................................25
Poignée de soutien.........................................................................25
Bandoulière.....................................................................................25
Connexion d’une source d’alimentation...............................................26
Utilisation de l’adaptateur secteur et du câble CC.........................26
Utilisation du bloc batterie au lithium-ion .............................................27
Chargement du bloc batterie au lithium-ion...................................27
Durée d’enregistrement selon le mode et le type de batterie........28
Affichage du niveau de la batterie..................................................29
22
Page 3

ENGLISH
Contents Sommaire
Setting to CAMCORDER / CAMERA modes .................................... 30
Setting the Power Switch .................................................................. 31
Adjusting the LCD ............................................................................. 32
Using the VIEWFINDER ................................................................... 33
Adjusting the Focus ...................................................................... 33
Adjusting the LCD during PLAY ................................................... 34
Controlling Sound from the Speaker ................................................. 34
Functions.................................................................. 35
Using MENU ...................................................................................... 35
Setting menu items ............................................................................ 37
Setting the Camcorder to REC, TAPE PLAY,
MEMORY PLAYmodes ................................................................ 39
Availability of Functions in CAMCORDER Mode. ........................ 40
CLOCK SET .................................................................................. 41
WL.REMOTE ................................................................................ 42
DEMONSTRATION ....................................................................... 43
DATE/TIME ................................................................................... 44
TV DISPLAY .................................................................................. 45
EASY Mode (for Beginners) .............................................................. 46
MF/AF (Manual Focus/Auto Focus) .................................................. 47
Auto Focusing ............................................................................... 47
Manual Focusing ........................................................................... 47
Zooming In and Out with DIGITALZOOM ................................... 48
Zooming In and Out ...................................................................... 48
Using the CAMCORDER - Basic Recording.............. 49
Inserting and Ejecting a Cassette ..................................................... 49
To select the CAMCORDER mode .................................................. 50
Making Your First Recording ............................................................. 51
Record Search (REC SEARCH) .................................................. 52
Hints for Stable Image Recording ..................................................... 53
Recording with the LCD Monitor .................................................. 53
Recording with the Viewfinder ...................................................... 53
Playing Back a Tape You Have Recorded on the LCD .................... 54
Réglage des modes CAMCORDER <CAMESCOPE> et CAMERA
<APPAREILPHOTO> ..........................................................................30
Réglage du commutateur principal ......................................................31
Réglage de l’écran LCD.......................................................................32
Utilisation du viseur...............................................................................33
Réglage de la mise au point...........................................................33
Réglage de l’écran LCD lors de la lecture.....................................34
Réglage du volume du haut-parleur.....................................................34
Fonctions...................................................................35
Utilisation du menu...............................................................................35
Liste des réglages.................................................................................37
Réglage des modes REC <ENR.>, TAPE PLAY <LECTURE BANDE>,
MEMORY PLAY <LECTURE PHOTO>
Fonctions disponibles pour le mode CAMCORDER <CAMESCOPE>
CLOCK SET <REGLAGE DE L'HORLOGE>................................41
WL.REMOTE <TELECOMMANDE>..............................................42
DEMONSTRATION <DEMONSTRATION>...................................43
DATE/TIME <DATE/HEURE>........................................................44
TV DISPLAY<AFFICHAGE>.........................................................45
Mode EASY <SIMPLIFIE> (pour débutants).......................................46
MF/AF (Manual Focus/Auto Focus <Mise au point manuelle/
automatique>).......................................................................................47
Mise au point automatique...................................................................47
Mise au point manuelle.........................................................................47
Utilisation du zoom numérique.............................................................48
Zoom avant et arrière...........................................................................48
Utilisation du caméscope – enregistrement simple
Insertion et éjection d’une cassette ......................................................49
Sélection du mode CAMCORDER <CAMESCOPE>..........................50
Premier enregistrement........................................................................51
Recherche de séquences (REC SEARCH)...................................52
Astuces pour la stabilité de l’image......................................................53
Utilisation de l’écran LCD...............................................................53
Utilisation du viseur.........................................................................53
Lecture d’une bande à l’écran..............................................................54
FRANÇAIS
.............................................39
..40
............49
33
Page 4

ENGLISH
Contents Sommaire
FRANÇAIS
Using the CAMCORDER - Advanced Recording ...... 55
PROGRAM AE ............................................................................. 55
Setting PROGRAM AE ................................................................ 56
WHT. BALANCE (WHITE BALANCE) - CAMCORDER Mode ... 57
Digital Zoom in CAMCORDER Mode ......................................... 58
EIS (Electronic Image Stabilizer) ................................................. 59
DSE(Digital Special Effects) SELECT in CAMCORDER Mode . 60
Selecting a Digital effect in CAMCORDER Mode ....................... 61
REC MODE .................................................................................. 62
AUDIO MODE .............................................................................. 63
WIND CUT ................................................................................... 64
Using Quick Menu(Navigation Menu) ............................................... 65
Setting the Quick Menu ............................................................... 66
SHUTTER SPEED & EXPOSURE ............................................. 67
SLOW SHUTTER (Low Shutter Speed) ........................................... 68
BLC (Back Light Compensation) ....................................................... 69
Fade In and Out ................................................................................ 70
To Start Recording ....................................................................... 70
To Stop Recording (use FADE IN / FADE OUT) ......................... 70
Audio Dubbing ................................................................................... 71
Dubbing Sound ............................................................................ 71
Dubbed Audio Playback .............................................................. 72
PHOTO Image Recording ................................................................. 73
Searching for a PHOTO Picture .................................................. 73
NITE PIX (0 Lux Recording) ............................................................. 74
POWER NITE PIX ............................................................................. 75
Various Recording Techniques .......................................................... 76
Playback .................................................................. 77
Tape Playback .................................................................................... 77
Playback on the LCD .................................................................... 77
Playback on a TV Monitor ............................................................ 77
Connecting to a TV which has Audio Video Input Jacks ............. 77
44
Utilisation du caméscope – enregistrement perfectionné 55
PROGRAM AE <EXPOSITION AUTOMATIQUE>........................55
Réglage de l’exposition automatique.............................................56
Equilibrage du blanc (WHT. BALANCE) – mode CAMCORDER
<CAMESCOPE>.............................................................................57
Zoom numérique en mode CAMCORDER <CAMESCOPE>.......58
EIS (Stabilisateur électronique d'image)........................................59
DSE (Effets spéciaux numériques) en mode CAMCORDER
<CAMESCOPE>.............................................................................60
Sélection d'un effet numérique en mode CAMCORDER
<CAMESCOPE>.............................................................................61
REC MODE <MODE D'ENREGISTREMENT>.............................62
AUDIO MODE <MODE AUDIO>....................................................63
WIND CUT <COUPE-VENT>.........................................................64
Quick Menu <Menu rapide> (menu de navigation).............................65
Utilisation de Quick Menu <MENU RAPIDE>................................66
SHUTTER SPEED <VITESSE D’OBTURATION> &
EXPOSURE <EXPOSITION>........................................................67
SLOW SHUTTER (Vitesse d'obturation lente).....................................68
BLC (Contre-jour intelligent).................................................................69
Fade In and Out <Fondu en ouverture et en fermeture>....................70
Début de l’enregistrement ..............................................................70
Fin de l’enregistrement (avec fondu)..............................................70
Audio Dubbing <Doublage sonore>.....................................................71
Réalisation du doublage sonore.....................................................71
Écoute du son doublé .....................................................................72
Enregistrement d’une image fixe....................................................73
Recherche d’images fixes ....................................................................73
NITE PIX <PIX DE NUIT> (Enregistrement à 0 lux) ...........................74
POWER NITE PIX <PIX DE NUIT RENFORCÉE>.............................75
Techniques d’enregistrement................................................................76
Lecture ......................................................................77
Lecture d’une bande.............................................................................77
Lecture sur l’écran LCD........................................................................77
Lecture sur l’écran de votre téléviseur.................................................77
Connexion à un téléviseur avec entrée A/V.........................................77
Page 5

ENGLISH
Contents Sommaire
FRANÇAIS
Connecting to a TV which has No Audio and Video Input Jacks 78
Playback ...................................................................................... 78
Various Functions while in PLAYER Mode ....................................... 79
Playback Pause ........................................................................... 79
Picture Search (Forward/Reverse) ............................................. 79
Slow Playback (Forward) ............................................................ 79
ZERO MEMORY ............................................................................... 80
Fonctions du mode PLAYER <LECTEUR> .........................................79
ZERO MEMORY <Mémoire compteur>...............................................80
IEEE 1394 Data Transfer .......................................... 81
Transferring usingIEEE1394 (i.LINK)-DV Standard Data Connections
Connecting to a DV Device ......................................................... 81
Connecting to a PC ..................................................................... 81
System Requirements ................................................................. 82
Recording with a DV Connection Cable...................................... 82
Connexion pour transfert de données numériques par
.81
IEEE 1394 (i.LINK) ...............................................................................81
Using the CAMERA................................................... 83
MEMORY STICK .............................................................................. 83
Memory Stick Functions............................................................... 83
Inserting and Ejecting the Memory Stick ......................................... 84
Inserting the Memory Stick ........................................................ 84
Ejecting the Memory Stick ......................................................... 84
Structure of the Folders and Files on the Memory Stick....................85
MEMORY FILE NUMBER ............................................................... 86
MEMORY STICK..................................................................................83
Insertion/retrait de la carte Memory Stick ............................................84
Structure des dossiers et fichiers sur la carte Memory Stick ..............85
NUMERO DE FICHIER MEMOIRE .....................................................86
Basic Picture-Taking................................................. 87
Taking Your First Picture .................................................................. 87
Viewing Still Images ......................................................................... 88
To View a Single image ................................................................... 88
To View a Slide Show ...................................................................... 89
Quick Review ................................................................................... 90
Adjusting the Focus ......................................................................... 91
Première photo .....................................................................................87
Visualisation d’images fixes..................................................................88
Visualiser une seule image...................................................................88
Visualiser les images sous forme de diaporama.................................89
Visionnage rapide.................................................................................90
Réglage de la mise au point.................................................................91
Connexion à un téléviseur sans entrée A/V...................................78
Lecture ............................................................................................78
Arrêt sur image (mode pause)........................................................79
Recherche d’image avant/arrière...................................................79
Lecture au ralenti (avant)................................................................79
Transfert de données IEEE 1394.................................81
Connexion à un autre appareil vidéo numérique ...........................81
Connexion à un PC ........................................................................81
Configuration système requise.......................................................82
Enregistrement avec un câble de connexion DV...........................82
Utilisation du mode CAMERA <APPAREIL PHOTO>
Fonctions disponibles avec la carte Memory Stick ........................83
Insertion de la carte........................................................................84
Retrait de la carte ...........................................................................84
..........83
Prise de photo simple................................................87
55
Page 6

ENGLISH
Contents Sommaire
FRANÇAIS
Advanced Techniques ............................................... 92
FOCUS LOCK ................................................................................... 92
Digital Zoom in CAMERA Mode ........................................................ 93
MACRO Mode ................................................................................... 94
CONT. SHOT (Continuous Shot) ...................................................... 95
Using the FLASH ............................................................................... 96
FLASH SELECT ................................................................................ 97
WHT. BALANCE (WHITE BALANCE) - CAMERA Mode ................. 98
DSE(Digital Special Effects) SELECT in CAMERA Mode ............... 99
Selecting a Digital effect in CAMERA Mode ................................... 100
SPOT-AE ......................................................................................... 101
NIGHT SCENE ................................................................................ 102
Selecting the Image Quality ............................................................ 103
Select the Image Quality ........................................................... 103
Number of images on the Memory Stick ................................... 103
Selecting the Image Size ................................................................ 104
Select the Image Size ................................................................ 104
Memory Stick and Image Resolutions ...................................... 105
MPEG REC ..................................................................................... 106
MPEG PB ........................................................................................ 107
MPEG SIZE ..................................................................................... 108
Copying Still Images from a Cassette to the Memory Stick ........... 109
Marking Images for Printing ............................................................ 110
Protection from Accidental Erasure ................................................. 111
Deleting Still images ........................................................................ 112
Formatting the Memory Stick .......................................................... 114
Attention ..................................................................................... 114
Recording an Image from a Cassette as a Still Image. .................. 115
Techniques perfectionnées.........................................92
FOCUS LOCK <VERROUILLAGE DE LA MISE AU POINT>............92
Zoom numérique en mode CAMERA <APPAREIL PHOTO> .............93
Mode MACRO <MACRO>...................................................................94
CONT. SHOT (plan continu).................................................................95
Utilisation du flash.................................................................................96
FLASH SELECT <SELECT FLASH>...................................................97
Equilibrage du blanc (WHT. BALANCE) – mode CAMERA
<APPAREILPHOTO> ..........................................................................98
DSE (Effets spéciaux numériques) en mode CAMERA <APPAREIL
PHOTO>...............................................................................................99
Sélection d'un effet numérique en mode CAMERA
<APPAREILPHOTO>..............................................................................100
SPOT-AE <ECLAIRAGE D'EXPOSITION AUTOMATIQUE>
NIGHT SCENE <SCENE DE NUIT> .................................................102
Sélection de la qualité d’image ..........................................................103
Sélectionner la qualité d’image ....................................................103
Nombre d’images pouvant être stockées sur la carte.................103
Sélection de la taille d’image..............................................................104
Sélectionner la taille d’image........................................................104
Memory Stick et résolutions d'image ...........................................105
MPEG REC <ENREGISTREMENT AU FORMAT DE FICHIER
MPEG> ...............................................................................................106
MPEG PB <LECTURE AU FORMAT DE FICHIER MPEG>.............107
Format MPEG .....................................................................................108
Copie d’images fixes d’une cassette sur la carte Memory Stick.......109
Marquage des images pour leur impression......................................110
Protection contre un effacement accidentel.......................................111
Effacement des images fixes mémorisées.........................................112
Formatage d’une carte Memory Stick................................................114
Avertissement................................................................................114
Enregistrement d’une image à partir d’une cassette .........................115
.................101
66
Page 7

ENGLISH
Contents Sommaire
FRANÇAIS
USB Interface ........................................................ 116
Transferring a Digital Image through a USB Connection ................ 116
System Requirements ...................................................................... 116
Installing the DVC Media 5.0 Program...............................................117
Connecting to a PC .......................................................................... 118
Maintenance........................................................... 119
After Finishing a Recording .............................................................. 119
Cleaning and Maintaining the Camcorder ........................................ 120
Cleaning the Video Heads .......................................................... 120
Using Your Camcorder Abroad ........................................................ 121
Power Sources ............................................................................ 121
Color System .............................................................................. 121
Troubleshooting...................................................... 122
Troubleshooting ................................................................................ 122
Self Diagnosis Display ................................................................ 122
Moisture Condensation ............................................................... 122
Self Diagnosis Display in M.REC, M.PLAYMode ..................... 123
Specifications ......................................................... 125
INDEX..................................................................... 126
Warranty (Canada users only)................................ 128
Interface USB...........................................................116
Transfert d’images numériques via l’interface USB...........................116
Configuration système requise...........................................................116
Installation du programme DVC Media 5.0........................................117
Connexion à un PC.............................................................................118
Conseils d’utilisation................................................119
Fin d’un enregistrement......................................................................119
Nettoyage et entretien du caméscope...............................................120
Nettoyage des têtes vidéo ..................................................................120
Utilisation du caméscope à l’étranger................................................121
Sources d’alimentation .......................................................................121
Norme de couleurs.............................................................................121
Dépannage...............................................................122
Dépannage .........................................................................................122
Auto-diagnostic .............................................................................122
Condensation................................................................................122
Auto-diagnostic en modes M.REC <ENREGISTREMENT PHOTO>
et M.PLAY<LECTURE PHOTO>................................................123
Spécifications techniques ........................................125
INDEX......................................................................126
Garantie pour le Canada .........................................128
77
Page 8

ENGLISH
Start Avant de commencer
Precautions on Camcorder Care Précautions d'emploi du caméscope
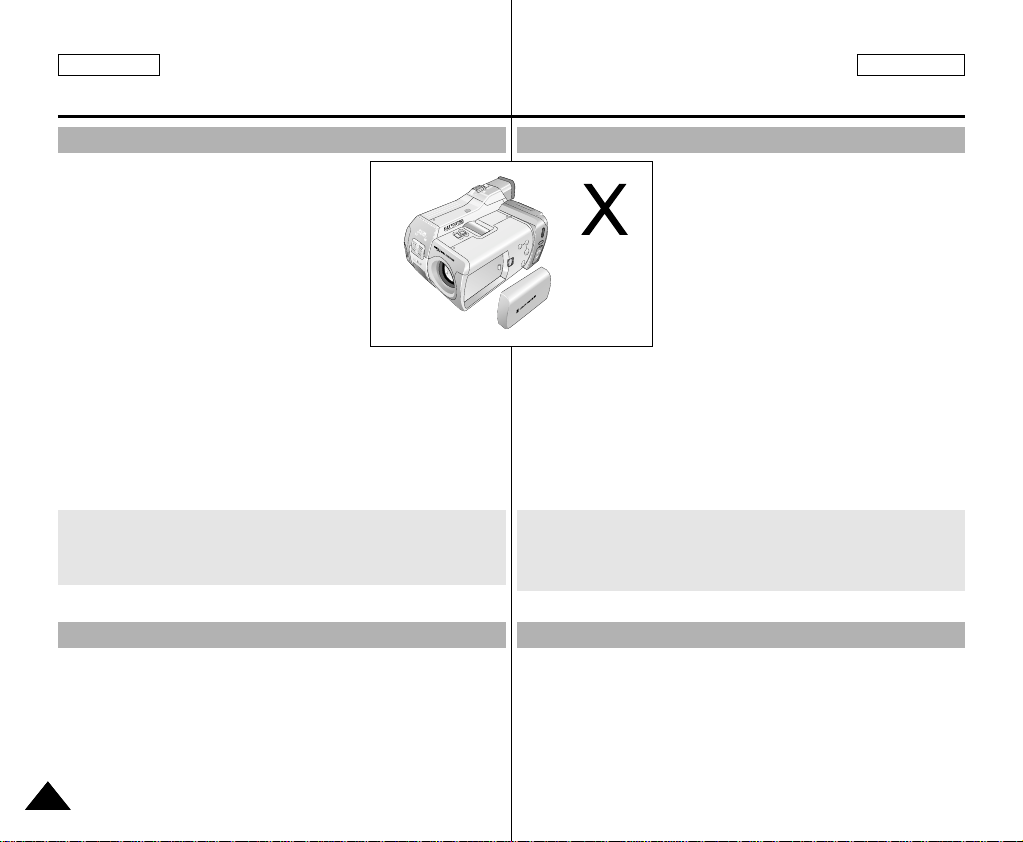
✤ Please note the following precautions for use:
✤ Please keep your device in a safe place. This device contains a
lens that can be damaged by shock. Keep away from the reach of
the children.
✤ Veuillez tenir compte des précautions d'emploi suivantes :
✤ Veuillez entreposer votre appareil dans un endroit sûr.
Cet appareil contient un objectif pouvant être endommagé en cas
de choc.
Tenez le caméscope hors de portée des enfants.
FRANÇAIS
■
Do not place your device in a wet place. Moisture and water may
cause the device to malfunction.
■
Do not aim the device at the sun while looking through the
viewfinder; this may cause permanent damage to your eyes.
■
To avoid electric shock, do not touch your device or power cable
with wet hands.
■
Do not use the flash close to another's eyes. The flash emits a
strong light that may cause damage similar to direct sunlight on
one's eyesight.
■
If the device is not working properly, please consult your nearest
dealer or authorized Samsung service facility. Disassembling the
device yourself may cause irrecoverable damage which will be
difficult to repair.
■
Clean the body with a dry, soft cloth. Use a soft cloth moistened
with a mild detergent solution for removing stains. Do not use any
type of solvent, especially benzenes, as they may seriously
damage the finish.
■
Keep your device away from rain and saltwater. After using, clean
the device. Saltwater may cause the parts to corrode.
■
For better quality, please use CAMERAmode when taking still
images. (CAMERA mode image quality is better than CAMCORDER mode.)
88
■
Ne rangez pas votre appareil dans un endroit humide.
La condensation de même que l'eau peuvent être à l'origine de
dysfonctionnements de l'appareil.
■
N'orientez pas le caméscope en direction du soleil lorsque vous
utilisez le viseur ;
vos yeux pourraient en souffrir irrémédiablement.
■
Pour proscrire tout risque d'électrocution, ne manipulez pas
l'appareil ou le câble d'alimentation avec les mains mouillées.
■
N'utilisez pas le flash à proximité des yeux d'une personne.
Une lumière violente est émise et pourrait avoir des effets néfastes
similaires à ceux du soleil sur la vue.
■
Si l'appareil ne fonctionne pas correctement, veuillez vous adress-
er au service après-vente Samsung ou consulter votre revendeur
le plus proche. Ne procédez pas au désassemblage de l'appareil
car il pourrait en découler des dommages difficilement réparables.
Nettoyez l'appareil à l'aide d'un chiffon doux et sec.
■
Les tâches pourront être ôtées au moyen d'un chiffon doux imbibé
d'une solution légèrement détergente.
N'utilisez aucun solvant, quel qu'il soit, en particulier de type
benzène, sous peine d'endommager la finition.
■
Maintenez votre caméscope à l'écart de la pluie et de l'eau salée.
Nettoyez l'appareil après utilisation. L'eau salée peut être à
l'origine de corrosion.
■
Pour garantir une meilleure qualité, utilisez le mode appareil photo
pour prendre des images fixes.
(La qualité d'image du mode appareil photo est supérieure à celle
du mode caméscope.)
Page 9
ENGLISH
FADE
S.SHOW
BLC
TAPE
MEMORY
P
L
A
Y
R
E
C
O
F
F
FADE
S.SHOW
BLC
REV FWD
TAPE
MEMORY
R
E
C
P
L
A
Y
O
F
F
Start Avant de commencer
Quick Start Démarrage rapide
✤ This device provides a variety of functions because it is a
Camcorder and Digital Still Camera in one system. Please read
this manual thoroughly.
✤ Before using the device, install the accessories in the following
order:
✤ Cet appareil, fusion d'un caméscope et d'un appareil photo
numérique, dispose d'une multitude de fonctions.
Veuillez lire attentivement ce mode d'emploi.
✤ Avant d'utiliser cet appareil, installez les accessoires selon l'ordre
suivant.
FRANÇAIS
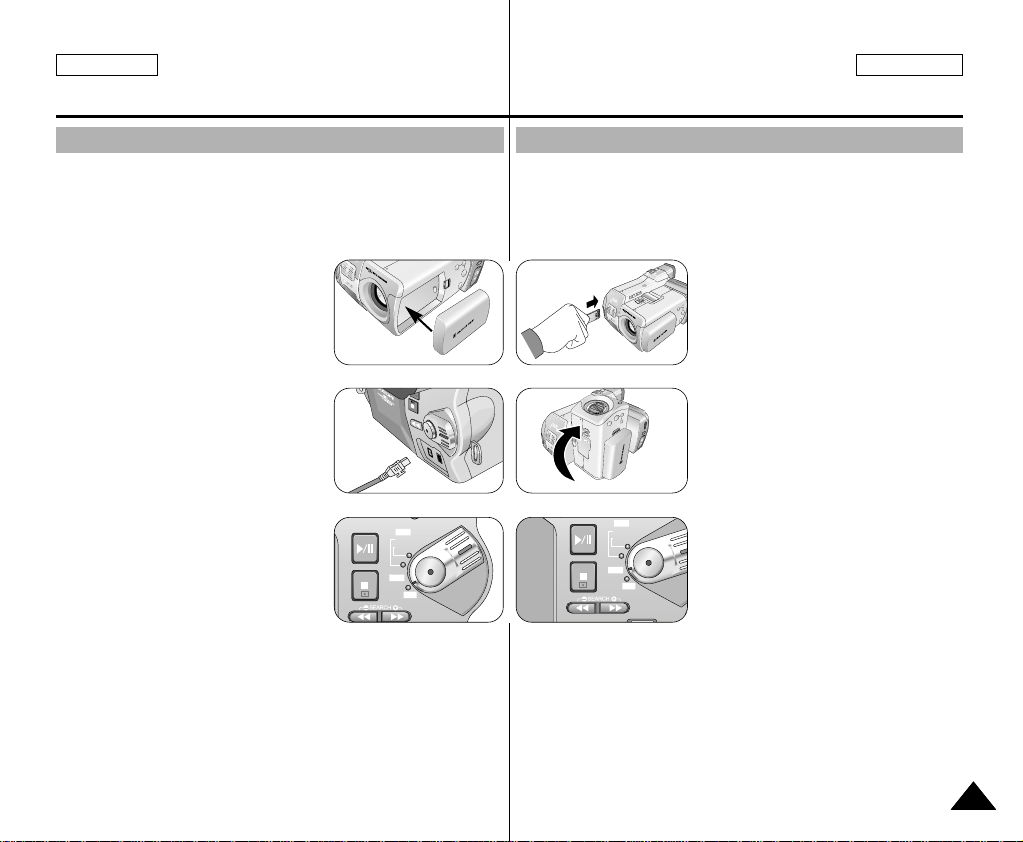
1. Install the battery pack.
2. Insert the Memory Stick into the slot.
3. Charge the battery pack by connecting
the power cable to the camcorder.
4. Set your device to CAMCORDER
mode or CAMERA mode by flipping
the lens body block.
5. Set the Power Switch to proposed
position.
6. When finished, set the Power Switch
to OFF.
2
1. Installez le bloc batterie.
2. Insérez la carte Memory Stick
1
dans son emplacement.
3. Chargez le bloc batterie en
branchant le câble d'alimentation
3
4
au caméscope.
4. Positionnez votre appareil sur le
mode caméscope ou sur le mode
appareil photo en basculant le
bloc d'objectif.
5
6
5. Placez le commutateur sur la
position proposée.
6. Après utilisation, replacez le
commutateur sur OFF.
99
Page 10
ENGLISH
FRANÇAIS
Notes and Safety Instructions Remarques et consignes de sécurité
Notes Regarding the Rotation of the LCD Screen Rotation de l’écran LCD
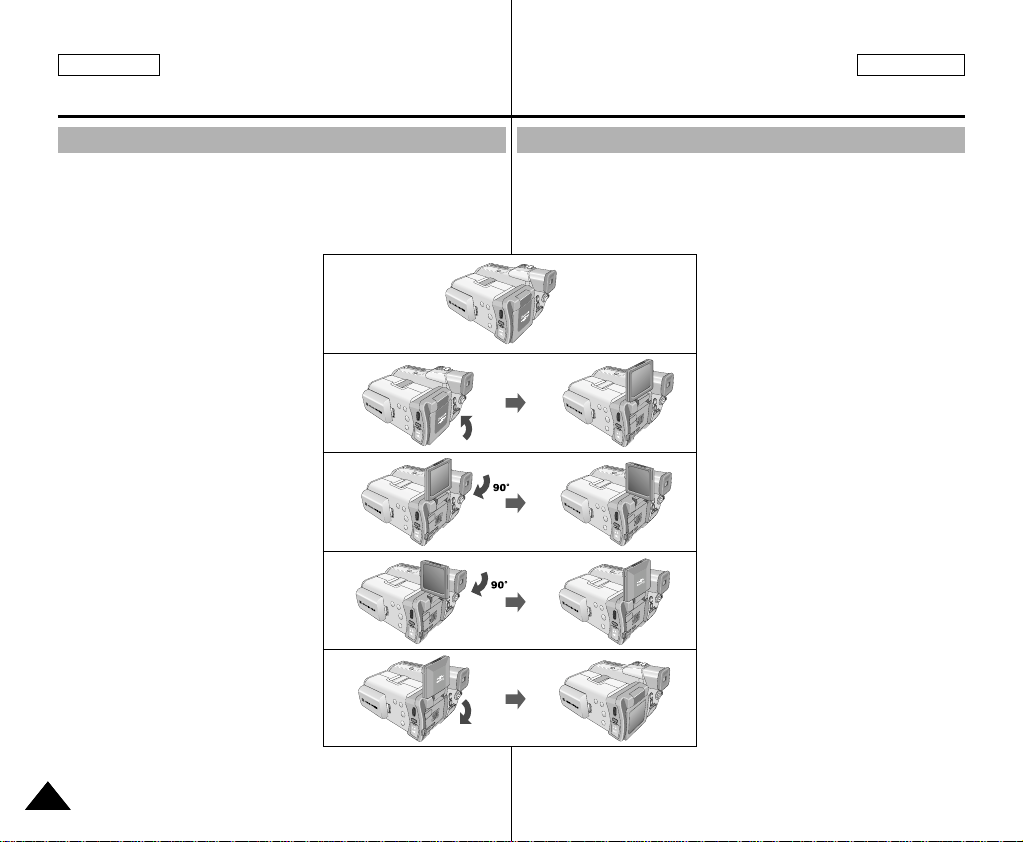
Please rotate the LCD screen carefully as illustrated.
Over rotation may cause damage to the inside of the hinge that
connects the LCD screen to the Camcorder.
Manipulez l’écran doucement lorsque vous le faites tourner.
Une rotation intempestive peut endommager l’intérieur de la charnière
qui relie l’écran LCD au corps de l’appareil.
1. LCD screen closed.
2. Standard recording using the
LCD screen.
3. Recording when looking at the
LCD screen from the left.
4. Recording when looking at the
LCD screen from the front.
5. Recording with the LCD screen
closed.
1010
1
2
180 °
3
4
5
180 °
1. Écran LCD fermé.
2. Enregistrement standard lors de
l’utilisation de l’écran LCD.
3. Enregistrement en regardant l’écran
LCD depuis le côté gauche.
4. Enregistrement en regardant l’écran
LCD de face.
5. Enregistrement avec l’écran
LCD fermé.
Page 11
ENGLISH
FRANÇAIS
Notes and Safety Instructions Remarques et consignes de sécurité
Notices Regarding COPYRIGHT
Television programs, video tapes, DVD titles, films, and other program
materials may be copyrighted.
Unauthorized copying of copyrighted material may be against the law.
Notes Regarding Moisture Condensation
1. A sudden rise in atmospheric temperature may cause moisture
condensation to form inside the camcorder.
For Example:
- When you take the camcorder from a cold place to a warm place
(e.g. from outside to inside during winter.)
- When you take the camcorder from a cool place to a hot place
(e.g. from inside to outside during the summer.)
2. When the (DEW) protection feature is activated, leave the
camcorder in a dry, warm room with the cassette compartment
opened and the battery removed, for at least two hours.
Notes Regarding the CAMCORDER
1. Do not leave the camcorder exposed to high temperatures
(above 60°C or 140°F).
For example, in a parked car in the sun or exposed to direct
sunlight.
2. Do not let the camcorder get wet.
Keep the camcorder away from rain, saltwater, and any other form
of moisture. If the camcorder gets wet, it may be damaged.
A malfunction due to exposure to liquids cannot always be
repaired.
Droits d'auteur
Les programmes de télévision, les bandes vidéo, les DVD, les films et
tout autre support enregistré de ce type peuvent être protégés par des
droits d’auteurs.
Les copier sans autorisation peut aller à l’encontre des lois en vigueur
dans votre pays.
Formation de condensation
1. Un accroissement soudain de température peut entraîner la forma-
Ce peut être le cas lorsque vous passez
- d’un extérieur froid à un intérieur chaud (en hiver, par exemple),
- d’un intérieur frais à un extérieur chaud (en été, par exemple).
2. Si la fonction de protection "DEW" se déclenche, laissez
Caméscope
1. N’exposez pas votre caméscope à des températures trop élevées
2. Ne mouillez pas votre caméscope.
tion de condensation à l’intérieur de l’appareil.
l’appareil pendant deux heures dans un endroit sec et à température ambiante, le compartiment à cassette ouvert et sans le bloc
batterie.
(plus de 60°C), par exemple, en plein soleil ou dans une voiture
garée au soleil.
Tenez-le à l’abri de toute humidité (pluie, eau salée, etc.).
Sinon, il risque d’être endommagé, entraînant parfois un
dysfonctionnement irréparable de l’appareil.
1111
Page 12
ENGLISH
Notes and Safety Instructions
FRANÇAIS
Remarques et consignes de sécurité
Notes Regarding the Battery Pack
- Make sure that the battery pack is fully
charged before starting to record.
- To preserve battery power, keep your
camcorder turned off when you are not
operating it.
- If your device is in CAMCORDER mode with
a tape installed, and it is left in STBY mode
without being operated for more than
5 minutes it will automatically turn itself off to
protect against unnecessary battery
discharge.
- Make sure that the battery pack fits firmly into place.
Dropping the battery pack may damage it.
- A brand new battery pack will not be charged.
Before using the battery pack, you need to charge it completely.
- It is a good idea to use the viewfinder rather than the LCD when
recording for long periods, because the LCD uses up more battery
power.
* When the battery reaches the end of its life, please contact your
local dealer. The batteries need to be dealt with as chemical waste.
* Be careful not to drop the battery when you release it
Notes Regarding Video Head Cleaning
- To ensure normal recording and a clear picture, clean the video
heads regularly. If the picture is distorted, or only a blue screen is
displayed, the video heads may be dirty. If this happens, clean the
video heads with a dry type cleaning cassette.
- Do not use a wet-type cleaning cassette. It may damage the video
heads.
1212
Bloc batterie
- Assurez-vous que le bloc batterie est chargé
avant de filmer sans connexion au secteur.
- Pour prolonger la durée de votre batterie,
gardez votre caméscope éteint lorsque vous
ne l’utilisez pas.
- En mode caméscope, si vous laissez votre
appareil en veille pendant plus de cinq
minutes sans vous en servir et avec une
bande à l’intérieur, il s’éteint automatiquement pour éviter tout déchargement inutile
de la batterie.
- Assurez-vous que le bloc batterie est parfaitement en place.
Ne faites pas tomber le bloc batterie ; vous risqueriez de
l’endommager.
- Un bloc batterie neuf n’est jamais chargé.
Avant de l’utiliser, vous devez le charger complètement.
- Si vous prévoyez de filmer longtemps, il est conseillé d’utiliser le
viseur plutôt que l’écran LCD, car celui-ci consomme plus
d’énergie.
* Lorsque la batterie ne fonctionne plus ou est hors d’usage, con-
tactez votre revendeur le plus proche.
Les batteries doivent être traitées en tant que déchets chimiques.
* Veillez à ne pas laisser tomber la batterie en la relâchant
Nettoyage des têtes vidéo
- Pour garantir un enregistrement normal et obtenir des images
claires, nettoyez régulièrement les têtes vidéo.
L’apparition de déformations de l’image ou l’affichage d’un écran
vide peut signifier que les têtes vidéo sont sales. Dans ce cas,
nettoyez-les avec la cassette de type sec prévue à cet effet.
- N’utilisez pas de cassette de type humide, car vous risqueriez d’endommager les têtes vidéo.
Page 13

ENGLISH
FRANÇAIS
Notes and Safety Instructions Remarques et consignes de sécurité
Note Regarding the LENS
- Do not film with the camera lens pointing directly at the sun.
Direct sunlight can damage the CCD (Charge Coupled Device).
- Over-rotating of the LENS body block may damage it.
- Si vous filmez en plein soleil, veillez à ne pas diriger l’objectif vers
- Évitez les rotations intempestives du bloc de l'objectif qui risquent
Notes Regarding Electronic Viewfinder
1. Do not position the camcorder such that the viewfinder is pointing
towards the sun.
Direct sunlight can damage the inside of the viewfinder. Be careful
when placing the camcorder under sunlight or near a window
exposed to sunlight.
2. Do not pick up the camcorder by the viewfinder.
Notes Regarding ‘Record’ or ‘Playback’ Using the LCD
1. The LCD display has been manufactured using high-precision technology. However, there may be tiny
dots (red, blue or green in color) that
appear on the LCD display.
These dots are normal and do not
affect the recorded picture in any way.
2. When you use the LCD display under direct sunlight or outdoors,
it maybe difficult to see the picture clearly.
If this occurs, we recommend using the viewfinder.
3. Direct sunlight can damage the LCD monitor.
1. N’orientez pas le viseur vers le soleil.
2. Ne saisissez pas votre caméscope par le viseur.
Enregistrement ou lecture avec l’écran LCD
2. Lorsque vous utilisez l’écran LCD à la lumière directe du soleil, la
3. La lumière directe peut endommager l’écran LCD.
Notes Regarding the Hand Strap
- To ensure a steady picture during filming, check that
the hand strap is properly adjusted.
- Do not force your hand into the hand strap as you
could damage it.
Objectif
le soleil. La lumière solaire directe peut endommager le système à
transfert de charge (Charge Coupled Device).
de l’endommager.
Viseur électronique
La lumière solaire directe peut endommager l’intérieur du viseur.
Soyez vigilant lorsque vous placez votre caméscope au soleil ou
près d’une fenêtre.
1. L’écran a été conçu à l’aide d’une
technologie de haute précision.
Cependant, de minuscules points
(rouges, bleus ou verts) peuvent
apparaître de façon constante sur
l’écran LCD.
Ces points sont normaux et n’affectent
aucunement l’image enregistrée.
visualisation à l’écran peut s’avérer difficile.
Dans ce cas, nous vous recommandons d’utiliser le viseur.
Poignée de soutien
- Pour une meilleure qualité de prise de vue, il est
important de bien ajuster la poignée de soutien.
- Ne forcez pas pour insérer votre main dans la
poignée, car vous risqueriez de l’endommager.
1313
Page 14

ENGLISH
FRANÇAIS
Getting to Know Your Device Familiarisez-vous avec votre appareil
Features Fonctionnalités
• Digital data transfer function with IEEE1394
By incorporating the IEEE 1394 (i.LINK™ : i.LINK is a serial data
transfer protocol and interconnectivity system, used to transmit
DV data) high speed data transport port, both moving and still images
can be transferred to a PC, making it possible to produce or edit
various images.
• Unique Style & Free Style Shooting
An integrated digital imaging device that easily converts between a
CAMCORDER and a CAMERA by using a revolving Lens Body Block.
• High Resolution Image Quality (Digital Still Camera)
Employing a 4.13 Mega Pixels CCD, a maximum resolution of
2272 X 1704 is possible.
• Digital Zoom
Allows you to magnify an image up to 800X (CAMCORDER mode) or
6X (CAMERA mode) its original size.
• Color TFT LCD
A high-resolution color TFT LCD gives you clean, sharp images as well
as the ability to review your recordings immediately.
• Electronic Image Stabilizer (EIS)
The EIS compensates for any shaking that occurs when the camera is
handheld, reducing unstable images particularly at high magnification.
• Various Digital Effects
The DSE (Digital Special Effects) function allows you to give your films
a special look by adding various special effects.
• Back Light Compensation (BLC)
The BLC function compensates for a bright background behind the
subject you're recording.
• Program AE
The Program AE enables you to alter the shutter speed and aperture to
suit the type of scene/action to be filmed.
• NITE PIX / NIGHT SCENE
The NITE PIX or NIGHT SCENE function enables you to record a subject in a dark place.
• USB Interface for Digital Image Data Transfer
You can transfer still images to a PC using the USB interface without
an add-on card.
1414
• Transfert de données numériques avec le port IEEE 1394
Le port haute vitesse IEEE 1394 de type i.LINK™ (i.LINK est un
protocole de transfert de données série et système d’interconnexion)
vous permet de transférer des images mobiles et fixes vers un PC,
où vous pourrez les modifier à loisir.
• Prise de vue style unique et style libre
Un appareil d'imagerie numérique intégré permet de jongler aisément
entre le caméscope et l'appareil photo via un bloc d'objectif pouvant
basculer.
• Qualité d'image haute résolution (appareil photo numérique)
L'utilisation d'un système à transfert de charge à 4.13 mégapixels rend
possible une résolution maximale de 2272 x 1704.
• Zoom numérique
La fonction Zoom vous permet de grossir l'image jusqu'à 800 fois
(mode caméscope) ou jusqu'à 6 fois (mode appareil photo) sans avoir
à vous déplacer.
• Écran LCD TFT couleur
L’écran LCD TFT couleur à haute résolution offre une image nette et
vous permet de visionner vos enregistrements immédiatement.
• Stabilisateur électronique d'image (EIS)
La fonction EIS rétablit la stabilité des images lorsque le tremblement
de la main provoque des vibrations désagréables, surtout en mode
zoom avant.
• Effets numériques divers
L’ajout de différents effets spéciaux vous permet de donner un côté
spectaculaire à vos films.
• Contre-jour intelligent (BLC)
Lorsque vous filmez un sujet devant une source lumineuse ou devant
un fond clair, utilisez la fonction BLC pour effectuer un contre-jour
intelligent.
• Exposition automatique (Program AE)
La fonction Program AE vous permet d’adapter la vitesse d’obturation
et le diaphragme selon la scène à filmer.
• Pix de nuit/scène de nuit
La fonction NITE PIX ou NIGHT SCENE vous permet de filmer un sujet
dans un endroit à faible luminosité.
• Transfert d’images numériques avec l’interface USB
Le port USB vous permet de transférer des images vers votre PC sans
utiliser de carte vidéo supplémentaire.
Page 15
ENGLISH
START/STOP
PHOTO
REW/RPS
A.DUB STOP SELF TIMER
SLOW
PLAY FF/FPS
STILL ZERO MEM.
F.ADV
TW
FRANÇAIS
Getting to Know Your Device Familiarisez-vous avec votre appareil
Accessories Supplied with the Camcorder Accessoires fournis avec le caméscope
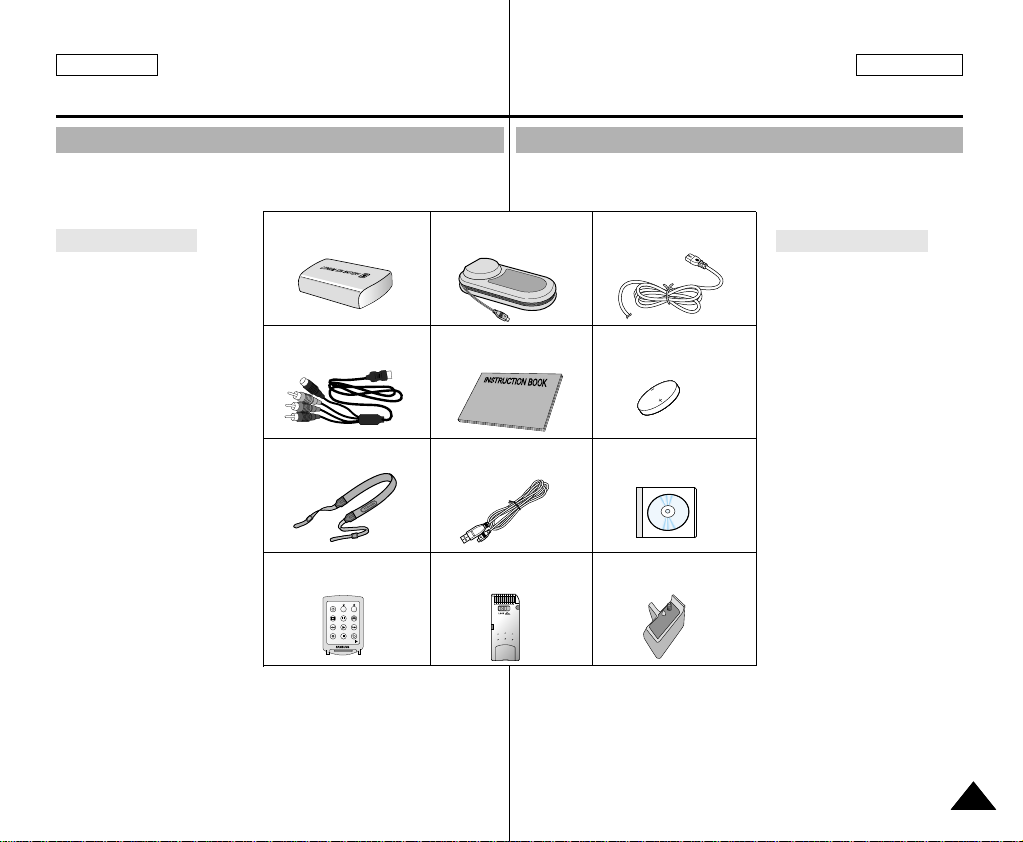
Make sure that the following basic accessories are supplied with your
digital video camera.
Assurez-vous que les accessoires ci-après ont été livrés avec votre
caméscope numérique.
Basic Accessories
1. Lithium Ion Battery Pack
2. AC Power Adapter
3. AC Cord
4. AUDIO/VIDEO Cable
5. Instruction Manual
6. Lithium Battery for
Remote Control.
(TYPE: CR2025)
7. Shoulder Strap
8. USB Cable
9. Software CD
10. Remote Control
11. Memory Stick
12. Tripod Adaptor
1. Lithium Ion Battery pack
4. AUDIO/VIDEO cable
10. Remote Control
2. AC Power Adapter
5. Instruction Book
8. USB cable7. Shoulder strap
11. Memory Stick
3. AC cord
6. Lithium battery
9. Software CD
12. Tripod Adapter
Accessoires de base
1. Bloc batterie au
lithium-ion
2. Adaptateur secteur
3. Cordon secteur
4. Câble AUDIO/VIDEO
5. Mode d'emploi
6. Batterie au lithium pour
la télécommande
(de type : CR2025)
7. Bandoulière
8. Câble USB
9. CD du logiciel
10. Télécommande
11. Memory Stick
12. Adaptateur pour trépied
1515
Page 16
ENGLISH
FRANÇAIS
Getting to Know Your Device Familiarisez-vous avec votre appareil
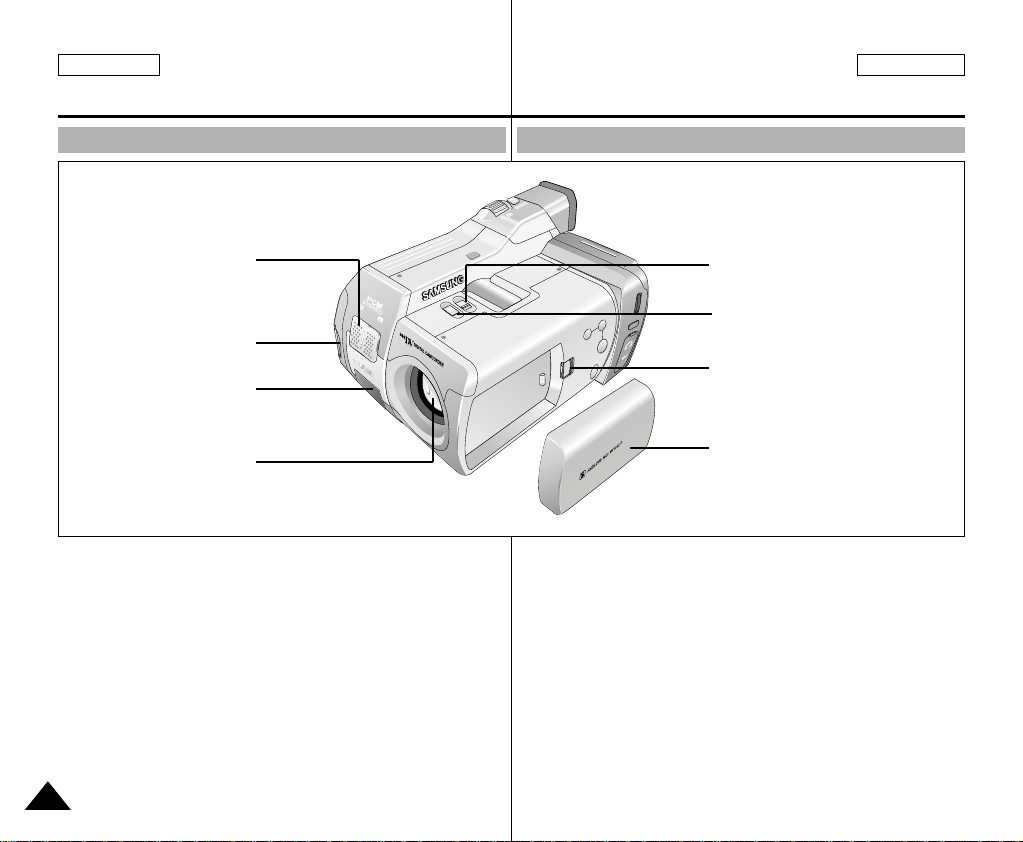
Front & Left View Vue avant et latérale (côté gauche)
1. Internal MIC
2. Memory Stick Slot
3. Remote Sensor
4. Lens
1. Internal MIC
2. Memory Stick Slot
3. Remote Control Sensor
4. Lens
5. Battery
6. Battery release button
7. Slow Shutter
8. NITE PIX
1616
8. NITE PIX
7. Slow Shutter
6. Battery release button
5. Battery
1. Entrée microphone interne
2. Emplacement de la carte Memory Stick
3. Capteur de la t élécommande
4. Objectif
5. Batterie
6. Touche de déverrouillage de la batterie
7. Obturation lente
8. NITE PIX <PIX DE NUIT>
Page 17

ENGLISH
FRANÇAIS
Getting to Know Your Device Familiarisez-vous avec votre appareil
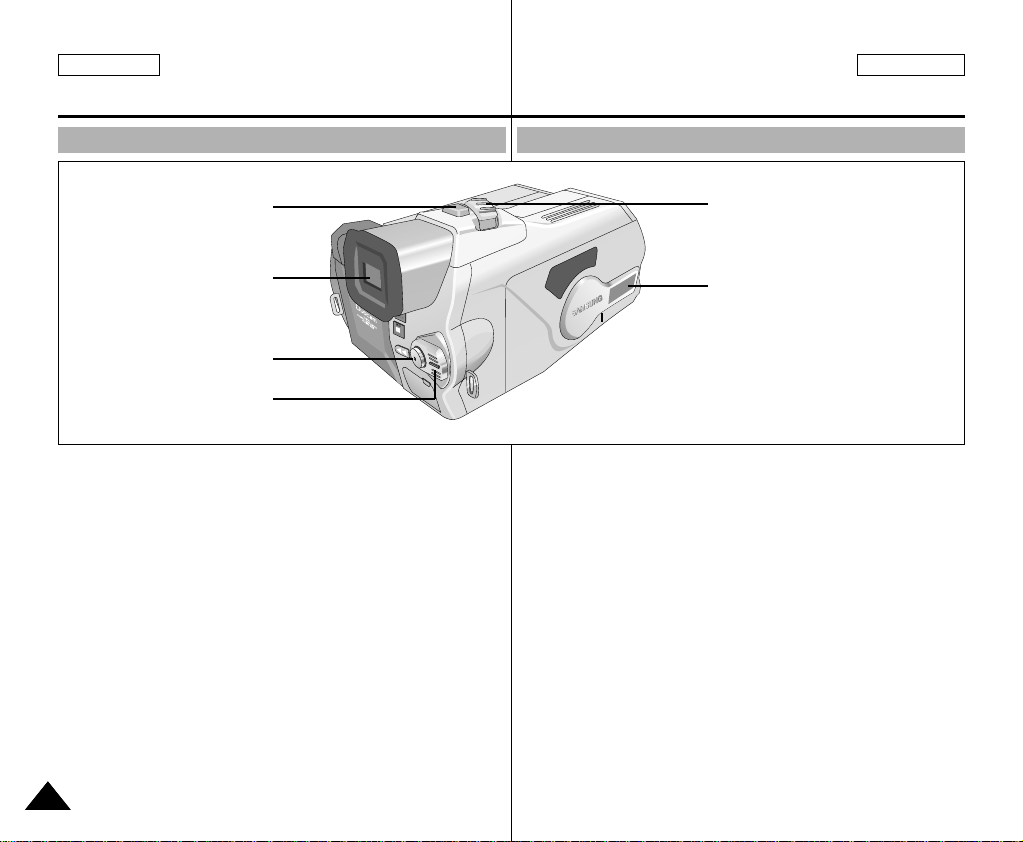
Left Side View Vue du côté gauche
14. Flash
13. NIGHT SCENE Button
12. MACRO Button
4. Easy Button
3. PB zoom
2. MF/AF
1. Display
5. External MIC / Earphone
1. Display
2. MF/AF
3. PB Zoom
4. Easy Button
5. External MIC / Earphone
6. Hook for handstrap
7. MENU Button
8. MENU Dial
9. Focus Adjust knob
10. TFT LCD Screen
11. Rotation Release Button
12. MACRO Button
13. NIGHT SCENE Button
14. Flash
1. Touche Display
2. Mise au point automatique/manuelle (MF/AF)
3. PB Zoom
4. Touche Easy <SIMPLIFIE>
5. Microphone
externe/casque d'écoute
6. Anneau de fixation pour la
poignée de soutien
7. Touche MENU
11. Rotation Release Button
10. TFT LCD Screen
9.Focus Adjust Knob
8. MENU Dial
7. MENU Button
6. Hook for handstrap
8. Molette MENU
9. Molette de réglage du
zoom
10. Écran à cristaux liquides
(LCD)
11. Touche de déverrouillage
de rotation
12. Touche MACRO
13. Touche NIGHT SCENE
<SCENE DE NUIT>
14. Flash
1717
Page 18
ENGLISH
FRANÇAIS
Getting to Know Your Device Familiarisez-vous avec votre appareil
Right & Top View Vue de droite et du dessus
1. PHOTO button
2. Viewfinder
3. START/STOP button
4. Power switch
1. Photo Button
2. Viewfinder
3. Start/Stop Button
4. Power switch
5. Zoom Lever
6. Memory Stick Slot
5. Zoom Lever
6. Memory Stick Slot
1. Touche Photo
2. Viseur
3. Touche Start/Stop <Début/Arrêt de l’enregistrement>
4. Commutateur
5. Touche Zoom
6. Emplacement de la carte Memory Stick
1818
Page 19
ENGLISH
FADE
S.SHOW
BLC
REV FWD
TAPE
MEMORY
R
E
C
P
L
A
Y
O
F
F
FADE
S.SHOW
BLC
TAPE
MEMORY
R
EC
PLAY
OFF
FRANÇAIS
Getting to Know Your Device Familiarisez-vous avec votre appareil
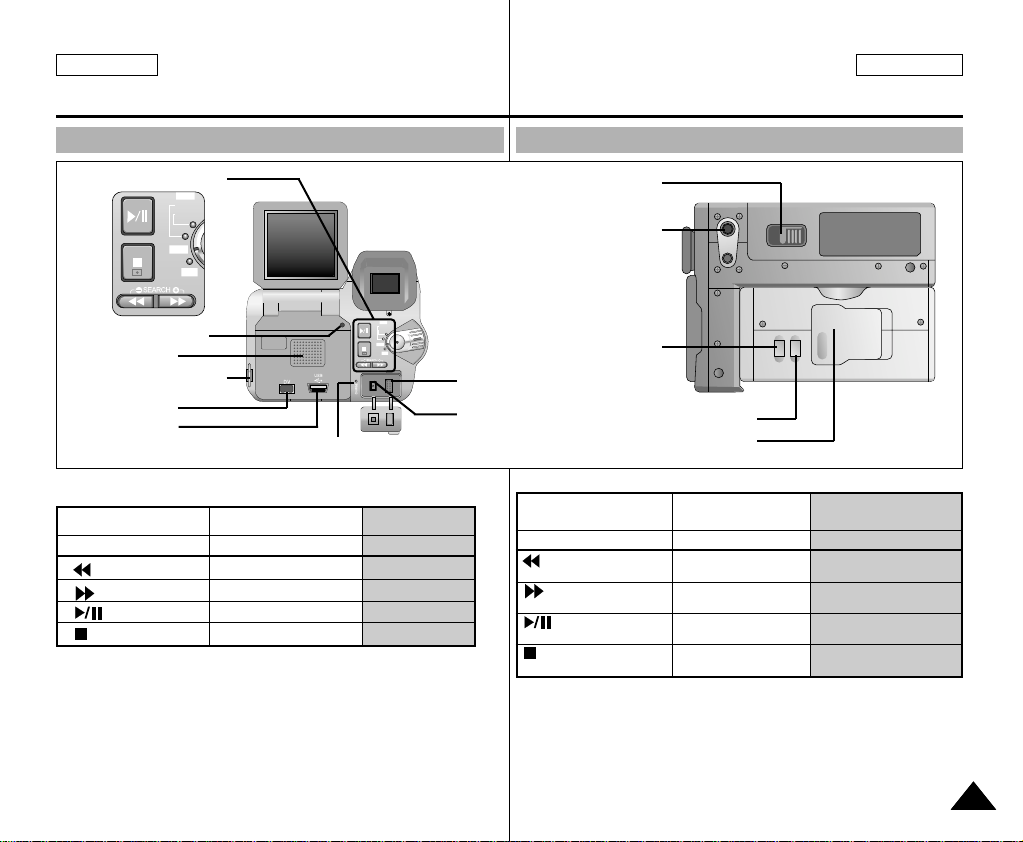
Rear & Bottom View Vue arrière et du dessous
1. Function Button
14. RESET button
2. Speaker
3. Hook for shoulder strap
4. DV Jack
5. USB Jack
1. Function Button
TAPE PLAY REC MEMORYPLAY
- EASY MULTI
: (REW) REC SEARCH – REV
: (FF) REC SEARCH + FWD
: (PLAY/STILL) FADE SLIDE SHOW
: (STOP) BLC SPOT AE
2. Speaker
3. Hook for the shoulder
strap
4. DV Jack
5. USB Jack
6. Charging Indicator
7. DC Jack
13. TAPE EJECT
12. Tripod Receptacle
11. MACRO Button
8. AV/S-V ideo
7. DC Jack
6. Charging Indicator
10. NIGHT SCENE Button
9. FLASH
1. Touches de fonction
LECTURE DE BANDE REC <ENR.>
MEMORYPLAY
<LECTURE PHOTO>
- EASY <SIMPLIFIE> MULTI <MULTI>
: Touche REW REC SEARCH – REV <REV>
<rembobinage>
: Touche FF REC SEARCH + FWD <AVANCE>
<avance rapide>
Touche PLAY/STILL
:
<LECTURE/PAUSE>
: Touche STOP BLC <CONTRE-JOUR SPOT-AE
8. AV/S-Video
9. FLASH
10. NIGHT SCENE Button
11. MACRO Button
12. Tripod Receptacle
13. TAPE EJECT
14. RESET button
<arrêt> INTELLIGENT>
2. Haut-parleur intégré
3. Anneau de fixation pour
la bandoulière
4. Prise DV
5. Prise USB
6. Témoin de charge de la batterie
7. Prise CC
8. AV/S-Vidéo
FADE <FONDU> SLIDE SHOW
9. FLASH
10. Touche NIGHT SCENE
11. Touche MACRO
12. Pas de vis trépied
13. TAPE EJECT
14. Touche RESET
<INDICATEUR DE DIAPORAMA>
<ECLAIRAGE
D'EXPOSITION AUTOMA TIQUE>
<Scène de nuit>
<EJECTION DE LA BANDE>
<REINITIALISATION>
1919
Page 20

ENGLISH
FRANÇAIS
Getting to Know Your Device Familiarisez-vous avec votre appareil
Remote Control Télécommande
12. TELE (F.ADV -)
1. START / STOP
2. (STILL)
3. PHOTO
4. (REW) / RPS
5. A.DUB
START/STOP
F.ADV
TW
PHOTO
STILL ZERO MEM.
REW/RPS
PLAY FF/FPS
A.DUB STOP SELF TIMER
SLOW
11. WIDE (F.ADV +)
10. ZERO MEMORY
9. (PLAY)
8. (FF) / FPS
7. SELF TIMER
6. (STOP)
1. START / STOP
2. (STILL)
3. PHOTO
4. (REW) / RPS
5. A.DUB
6. (STOP)
2020
7. SELF TIMER
8. (FF) / FPS
9. (PLAY)
10. ZERO MEMORY
11. WIDE (F.ADV +)
12. TELE (F.ADV -)
1. Touche START/STOP
<DEBUT/ARRET DE L’ENREGISTREMENT>
2. Touche STILL
<PAUSE>
3. Touche PHOTO <PHOTO>
4. Touche REW/RPS
<REMBOBINAGE>
5. A.DUB <DOUBLAGE
SONORE>
6. Touche STOP
<ARRET>
7. SELF TIMER <MINUTERIE
AUTOMA TIQUE>
8. Touche FF/FPS
<AVANCE RAPIDE>
9. Touche PLAY
<LECTURE>
10. Touche ZERO MEMORY
<Mémoire compteur>
11. WIDE <GRAND ANGLE>
(F.ADV +) <AVANCE
IMAGE PAR IMAGE +>
12. TELE <TELEOBJECTIF>
(F.ADV -) <AVANCE IMAGE
PAR IMAGE ->
Page 21
ENGLISH
TAPE !
NITE PIX
MIRROR
P
SHUTTER
ZOOM
SHUTTER
EXPOSURE
EXPOSURE
EASY
M - 0 : 0 0 : 0 0
5 5 min
1 6 bit
1 2 : 0 0 AM
O C T. 1 0 , 2 0 0 3
REC
S 1 / 30
T
W
BLC
. . . D
FRANÇAIS
Getting to Know Your Device Familiarisez-vous avec votre appareil
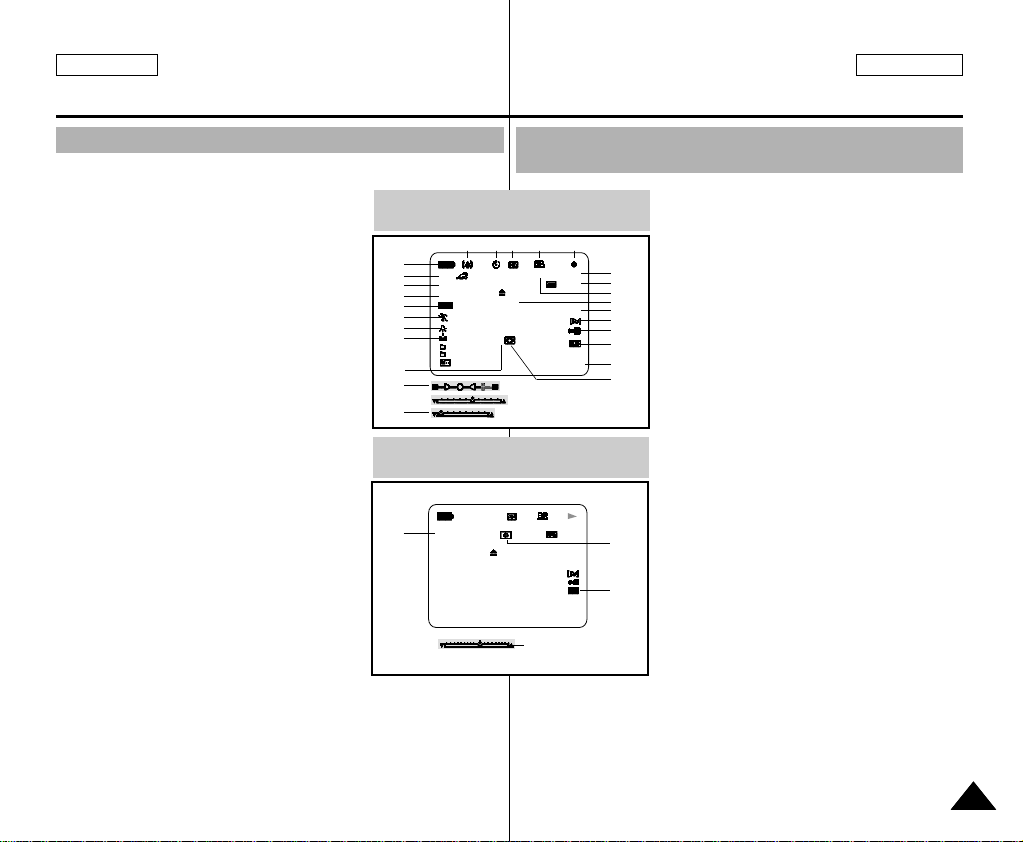
OSD (On Screen Display in CAMERA and PLAYER Modes)
1. Battery Level (See page 29)
2. Easy Mode (See pages 46)
3. Slow Shutter (See pages 68)
4. DSE (Digital Special Effects) Mode
(See page 60)
5. BLC (Back Light Compensation)
(See page 69)
6. Program AE (See page 55)
7. White Balance Mode (See page 57)
8. Manual Focus (See page 47)
9. POWER NITE PIX (See page 75)
10. Zoom Position (See page 48)
11. Shutter Speed and EXPOSURE
(See page 67)
12. NITE PIX (See page 74)
13. DATE / TIME (See page 44)
14. USB (See page 116)
15. WL.REMOTE (See page 42)
16. WIND CUT (See page 64)
17. Audio recording mode (See page 63)
18. Message Line
19. Zero Memory Indicator (See page 80)
20. Remaining Tape (measured in minutes)
21. Tape Counter
22. Operating Mode
23. Record Speed Mode (See page 62)
24. PHOTO Mode (See page 73)
25. Self Recording and Waiting Timer
(See page 24)
26. EIS (See page 59)
27. Audio Playback Channel (See page 72)
28. Volume Control (See page 34)
29. DV IN (DV data transfer mode) (See page 82)
30. DEW (See page 11)
OSD in CAMCORDER mode
1
2
3
4
5
6
7
8
9
10
11
26 25 24 23 22
OSD in TAPE PLAY mode
SOUND [ 2 ]
27
VOL. [ 1 1 ]
Affichage à l’écran en mode CAMERA
<APPAREIL PHOTO> ou PLAYER <LECTEUR>
1. Niveau de la batterie (voir page 29)
2. Mode EASY <SIMPLIFIE> (voir page 46)
3. Obturation lente (voir page 68)
4. Mode DSE (effet spécial numérique
sélectionné) (voir page 60)
5. BLC (contre-jour intelligent) (voir page 69)
21
20
6. Program AE (activation/désactivation du
19
18
17
16
15
14
13
12
0 : 0 0 : 0 0 : 0 0
5 5 min
TAPE !
. . . D
1 2 : 0 0 AM
O C T . 1 0 . 2 0 0 3
28
1 6 bit
30
DV
29
24. Mode PHOTO (voir page 73)
25. Vitesse d’enregistrement sélectionnée et minuterie (voir page 24)
26. EIS (voir page 59)
27. Canal de lecture audio (voir page 72)
28. Contrôle du volume (voir page 34)
29. DV IN (mode de réception des données DV) (voir page 82)
30. Contrôle de la condensation (voir page 11)
mode d’exposition automatique
sélectionné) (voir page 55)
7. Mode d’équilibrage du blanc choisi
(voir page 57)
8. Mise au point manuelle (voir page 47)
9. POWER NITE PIX (capture de nuit
renforcée) (voir page 75)
10. Position du zoom (voir page 48)
11. Vitesse d’obturation et exposition
(voir page 67)
12. NITE PIX (pix de nuit)
(voir page 74)
13. Date et heure (voir page 44)
14. USB (voir page 116)
15. WL.REMOTE (télécommande)
(voir page 42)
16. Fonction coupe-vent (voir page 64)
17. Mode Audio (voir page 63)
18. Ligne de message
19. Mémoire compteur (voir page 80)
20. Temps restant sur la bande (en minutes)
21. Compteur de bande
22. Mode activé
23. Vitesse d’enregistrement sélectionné
(voir page 62)
2121
Page 22
ENGLISH
FRANÇAIS
Getting to Know Your Device Familiarisez-vous avec votre appareil
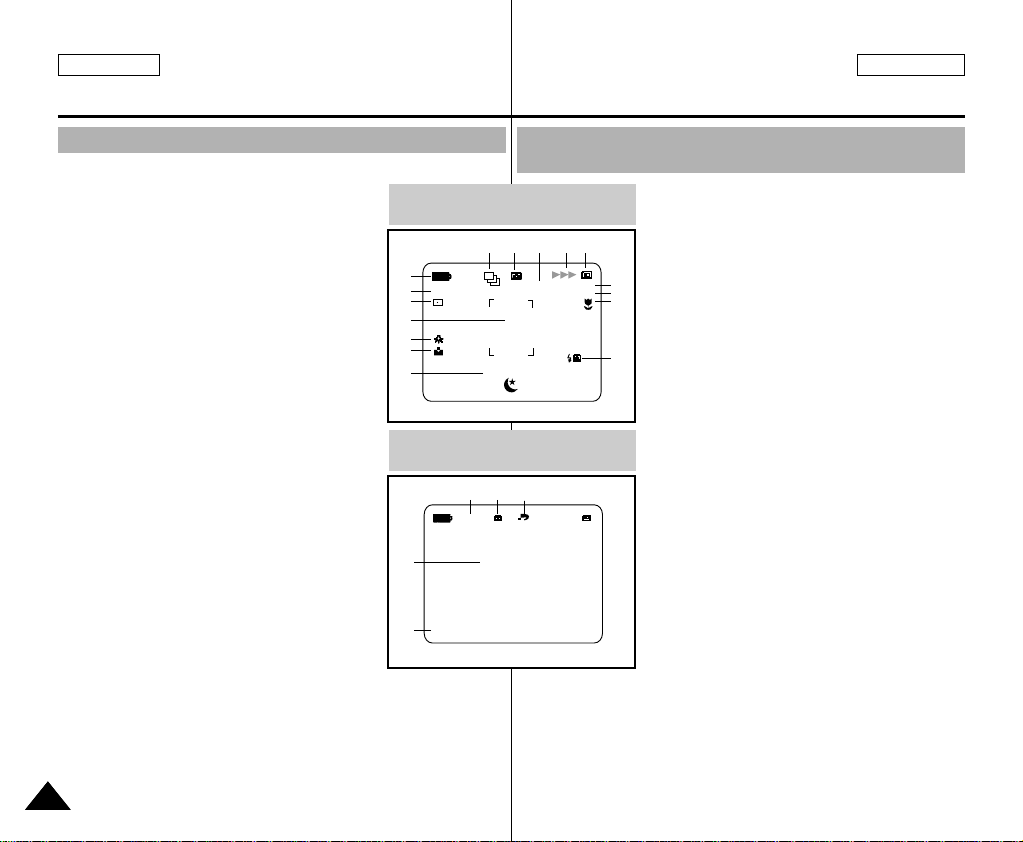
OSD (On Screen Display in CAMERA/M.PLAY Modes) Affichage à l’écran en mode CAMERA
1. Battery Level (See page 27)
2. DSE (Digital Special Effects) Mode
(See page 99)
3. SPOT AE Mode (See page 101)
4. Focus Area
5. White Balance Mode (See page 98)
6. Manual Focus (See page 57)
7. NIGHT SCENE (See page 102)
8. FLASH Mode (See page 97)
9. MACRO Mode (See page 95)
10. Image Size (See page 104)
11. Image Counter
- Current still image/Total number of record-
able still images.
12. CARD (MEMORY STICK) Indicator
13. Image Recording and Loading Indicator
14. Image Quality (See page 103)
15. Focus (See page 91)
16. SLIDE SHOW (See page 89)
17. ERASE PROTECTION indicator
(See page 111)
18. Print Mark (See page 110)
19. Message Line
20. Folder number-file number (See page 85)
21. Continuous Shot (See page 95)
OSD in CAMERA mode
1
SUNSET
2
3
4
5
6
7
OSD in M.PLAY mode
SLIDE
19
1 0 0 - 0 0 0 1
20
<APPAREIL PHOTO> ou M.PLAY <LECTURE PHOTO>
1. Niveau de la batterie (voir page 27)
2. Mode DSE (effet spécial numérique
sélectionné) (voir page 99)
3. Mode SPOT-AE <ECLAIRAGE
D'EXPOSITION AUTOMA TIQUE>
11
10
9
(voir page 101)
4. Zone de mise au point
5. Mode d’équilibrage du blanc choisi
(voir page 98)
6. Mise au point manuelle (voir page 57)
8
7. SCENE DE NUIT (voir page 102)
8. Mode FLASH (voir page 97)
9. Mode MACRO (voir page 95)
10. Taille d'image (voir page 104)
11. Compteur d'images
- Image affichée/nombre total d’images
pouvant être enregistrées.
12. Indicateur de carte mémoire
(MEMORY STICK)
13. Indicateur d’enregistrement et de
chargement d’images
14. Qualité d'image (voir page 103)
15. Mise au point (voir page 91)
16. DIAPORAMA (voir page 89)
17. Indicateur de protection contre
l’effacement (voir page 111)
18. Marque DPOF (voir page 110)
19. Ligne de message
20. Numéro de dossier-numéro de fichier
(voir page 85)
21. Plan continu (voir page 95)
NIGHT SCENE
16
MEMORY STICK !
14
131521
12
1 0 0 0 / 1 0 0 0
SF
L 2 2 7 2
17
18
0 0 1
2 2 / 2 4 0
2222
Page 23

ENGLISH
FRANÇAIS
Getting to Know Your Device Familiarisez-vous avec votre appareil
Turning the OSD ON/OFF (On Screen Display)
●
Turning OSD ON/OFF
Press the DISPLAYbutton.
- Each press of the button toggles the OSD function ON and OFF.
- When you turn the OSD OFF,
In CAMCORDER / CAMERA mode: The STBY, REC, EASY.Q
modes are always displayed on the OSD, even when the OSD is
turned OFF. The key input is displayed for 3 seconds then turned off.
In PLAYER mode: When you press any Function button,
the function is displayed
on the OSD for 3 seconds before it disappears.
●
Turning the DATE/TIME ON/OFF
- The DATE/TIME is not affected when the OSD function is switched
ON or OFF.
- To turn the DATE/TIME ON or OFF, access the menu and change
the DATE/TIME mode. (See page 50)
- You may also use the Quick Menu to turn the DATE/TIME ON or
OFF. (See page 65) (only in CAMCORDER / CAMERA mode)
Activation/désactivation de l’affichage (mode OSD)
●
Activation/désactivation de l’affichage
Appuyez sur la touche DISPLAY<AFFICHAGE>.
- Chaque fois que vous appuyez sur la touche, vous activez et dés-
activez le mode OSD.
- Lorsque vous désactivez l’affichage :
En mode CAMCORDER/CAMERA <CAMESCOPE/APPAREIL
PHOTO> : les modes STBY <VEILLE>, REC <ENREG-
ISTREMENT> et EASY.Q <EASY.Q> s’affichent à l’écran même si
le mode OSD est désactivé.
L’affichage clignote pendant 3 secondes à l’écran, puis disparaît.
En mode PLAYER <LECTEUR> : lorsque vous appuyez sur une
touche de fonction, la fonction activée s’affiche 3 secondes à
l’écran, puis disparaît.
●
Affichage de la date et de l’heure
- La date et l’heure s’affichent indépendamment de l’état du mode
OSD.
- Pour faire apparaître ou disparaître la date et l’heure, sélectionnez
le menu DATE/TIME <DATE/HEURE> du panneau de commandes
(Voir page 50)
- Vous pouvez également utiliser le menu rapide. (Voir page 65)
(uniquement en mode CAMCORDER / CAMERA
<CAMESCOPE/APPAREILPHOTO>)
2323
Page 24
ENGLISH
START/STOP
PHOTO
REW/RPS
A.DUB STOP SELF TIMER
SLOW
PLAY FF/FPS
STILL ZERO MEM.
F.ADV
TW
Preparation Préparez votre caméscope
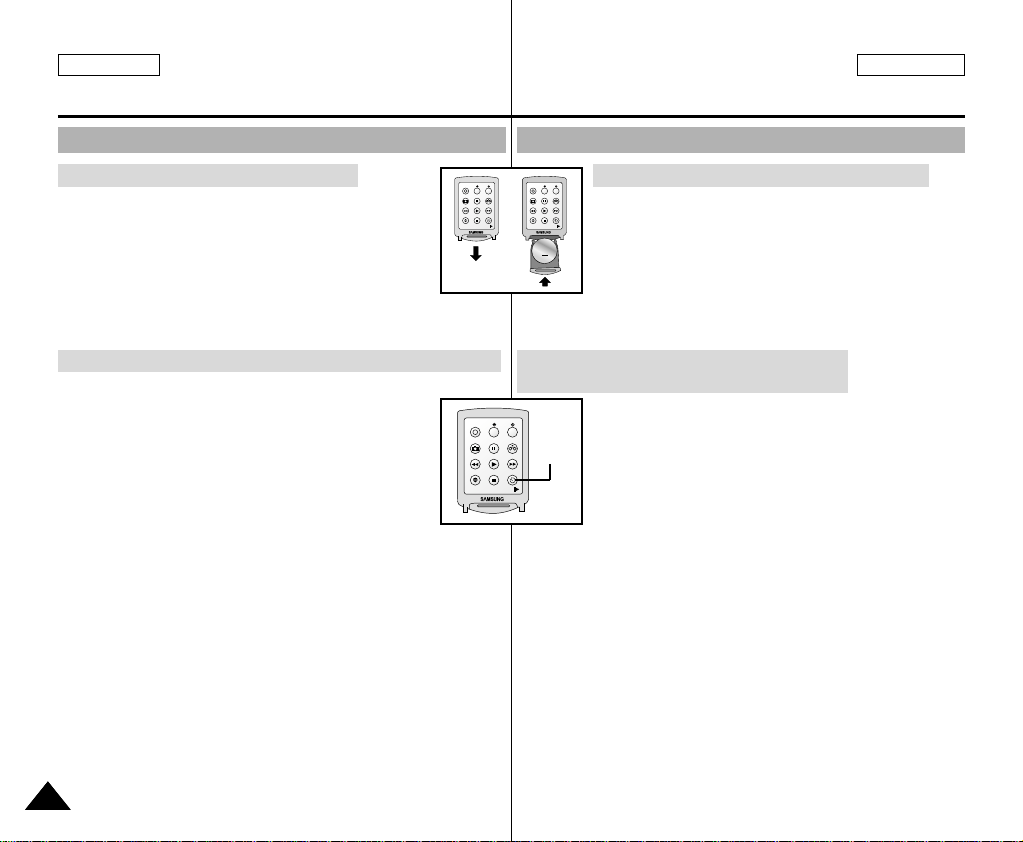
How to use the Remote Control Utilisation de la télécommande
Battery Installation for the Remote Control
✤ You need to insert or replace the lithium battery
when :
- You purchase the camcorder.
- The remote control doesn’t work.
✤ Make sure that you insert the lithium cell correctly,
following the + and - markings.
✤ Be careful not to reverse the polarity of the battery.
START/STOP
PHOTO
REW/RPS
A.DUB STOP SELF TIMER
F.ADV
TW
STILL ZERO MEM.
PLAY FF/FPS
SLOW
START/STOP
PHOTO
REW/RPS
A.DUB STOP SELF TIMER
Installation de la batterie pour la télécommande
F.ADV
TW
STILL ZERO MEM.
PLAY FF/FPS
SLOW
✤ Vous devez insérer ou remplacer la batterie au
lithium :
- lors de l’achat du caméscope,
- lorsque la télécommande ne fonctionne pas.
✤ Insérez la batterie au lithium (CR2025) en
respectant la polarité + et -.
✤ Veillez à ne pas inverser la polarité de la batterie.
FRANÇAIS
Self Timer Recording and Photography Using the Remote Control
When you use the Self Timer function on the remote
control, recording begins automatically in 10 seconds.
1. Set the device to CAMCORDER or CAMERA mode.
2. Press the SELF-TIMER button until the appropriate
indicator is displayed in the LCD or viewfinder.
3. Press the START/STOPbutton or the PHOTO Button
to start the timer.
- After 10 seconds, recording or photography begins.
- Press START/STOP again when you want to stop recording.
2424
Enregistrement avec minuterie automatique et
photographie avec la télécommande
La fonction de minuterie automatique sur la télécom
mande vous permet de démarrer automatiquement
Self
l’enregistrement au bout de 10 secondes.
Timer
1. Réglez le caméscope sur le mode CAMCORDER
<CAMESCOPE> ou CAMERA <APPAREIL PHOTO>.
2. Appuyez sur la touche SELF TIMER <MINUTERIE
AUTOMATIQUE> jusqu’à ce que l’indication souhaitée
s’affiche dans le viseur ou à l'écran.
3. Appuyez sur la touche START/STOP<DEBUT/ARRET DE
L'ENREGISTREMENT> ou sur la touche PHOTO <PHOTO> pour
démarrer la minuterie.
- L'enregistrement ou la photographie débute au bout de
10 secondes.
- Appuyez de nouveau sur START/STOP <DEBUT/ARRET DE
L'ENREGISTREMENT> pour arrêter l’enregistrement.
Page 25
ENGLISH
Preparation Préparez votre caméscope
Adjusting the Hand Strap Mise en place de la poignée de soutien
It is very important to ensure that the Hand Strap has been correctly
adjusted before you begin recording.
The hand strap enables you to :
- Hold the camcorder in a stable, comfortable position.
- Press the Zoom START/STOP, and PHOTO button without having
to change the position of your hand.
Il est très important d’ajuster la poignée de soutien afin de filmer dans
les meilleures conditions possibles.La poignée de soutien vous
permet :
- de maintenir le caméscope dans une position stable et confortable,
-d’appuyer sur le bouton Zoom, sur le bouton START/STOP
<DEBUT/ARRET DE L'ENREGISTREMENT> et sur le bouton
PHOTO <PHOTO> sans avoir à changer la position de votre main.
FRANÇAIS
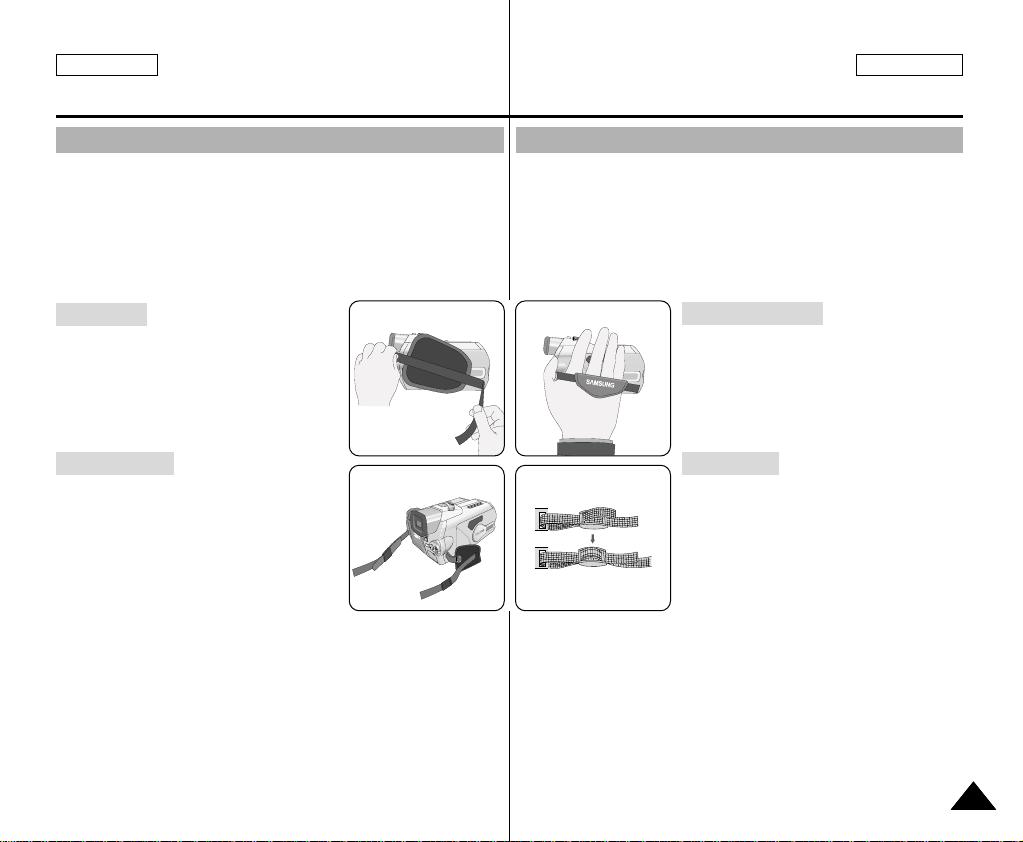
Hand Strap
a. Pull the Hand Strap cover open and
release the Hand Strap.
b. Adjust its length and stick it back into the
Hand Strap cover.
c. Close the Hand Strap cover.
Shoulder Strap
The Shoulder Strap enables you to carry
your camcorder around in complete
safety.
1. Insert the end of strap into the
Shoulder Strap hook on the
camcorder.
Insert the other end of strap into the
ring inside the hand strap.
2. Thread each end into the buckle, adjust the length of the strap
and then pull it tight in the buckle.
12
Poignée de soutien
a. Ouvrez le rabat de la poignée en le
décollant.
b. Ajustez la longueur de la poignée,
puis recollez-le.
c. Fermez le rabat.
Bandoulière
La bandoulière vous permet de porter le
caméscope en toute sécurité.
1. nsérez une extrémité de la
bandoulière dans l’anneau de fixation
du caméscope.
Insérez l’autre extrémité dans
l’anneau situé à l’intérieur de la poignée
de soutien.
2. Enfilez ensuite les extrémités dans la boucle, ajustez la
longueur désirée, puis resserrez la boucle.
2525
Page 26
ENGLISH
Preparation Préparez votre caméscope
Connecting a Power Source Connexion d’une source d’alimentation
There are two types of power sources that can be connected to your
camcorder.
- The AC Power Adapter with the AC cord : used for indoor
recording.
- The Battery Pack : used for outdoor recording.
Deux possibilités d’alimentation s’offrent à vous :
-l’adaptateur avec le cordon secteur : pour l'enregistrement en
intérieur.
- le bloc batterie : pour l'enregistrement en extérieur.
FRANÇAIS
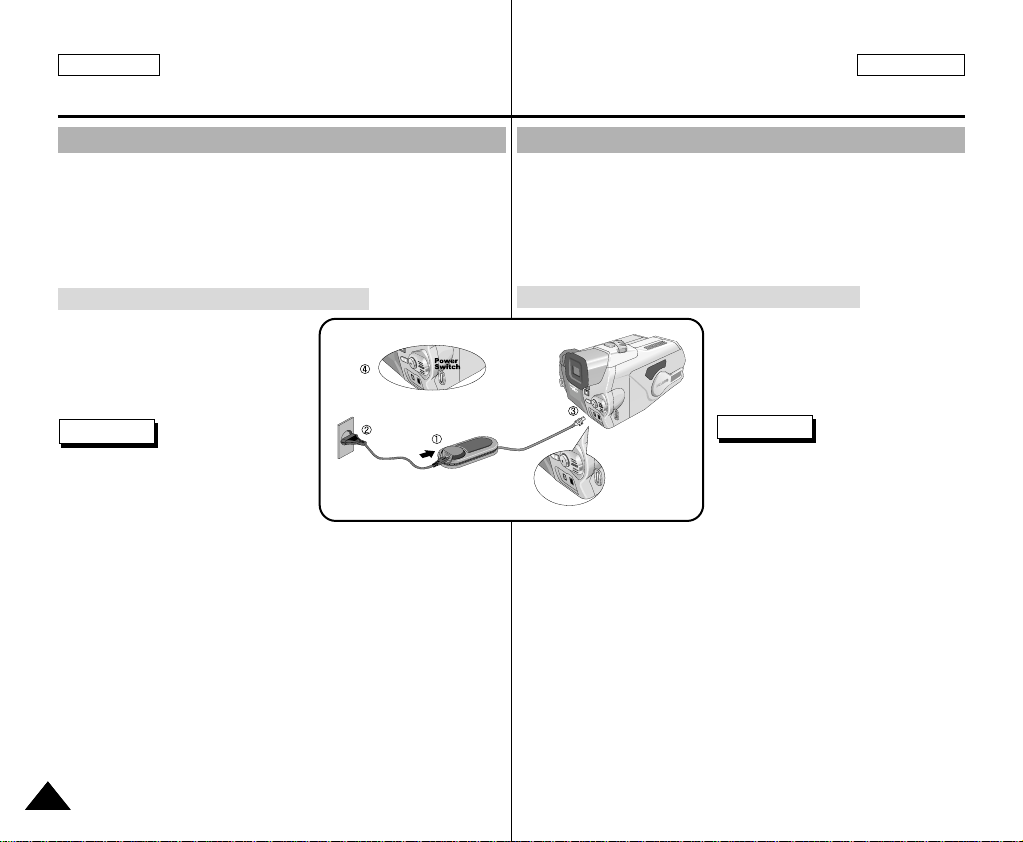
To Use the AC Power Adapter and DC Cable
1. Connect the AC Power adapter to
the AC cord.
2. Connect the AC cord to a wall
socket.
Note
The plug and wall socket type may
differ according to your country of
residence.
3. Connect the DC cable to the
DC jack socket on the camcorder.
4. Set the camcorder to different modes by holding down the tab on
the power switch and turning it to REC, TAPE PLAY,
MEMORY PLAYmodes.
2626
Utilisation de l’adaptateur secteur et du câble CC
1. Connectez l’adaptateur à un
cordon secteur.
2. Branchez le cordon secteur sur
une prise murale.
Remarque
Le type de fiche et de prise murale
peut différer selon les pays.
3. Connectez le câble CC à la prise
CC du caméscope.
4. Réglez le caméscope sur différents modes en maintenant le
commutateur enfoncé et en le tournant sur les modes REC
<ENREGISTREMENT>, TAPE PLAY <LECTURE DE BANDE> et
MEMORY PLAY<LECTURE PHOTO>.
Page 27

ENGLISH
Preparation Préparez votre caméscope
Using the Lithium Ion Battery Pack Utilisation du bloc batterie au lithium-ion
✤ The amount of continuous recording time available depends on :
- The type and capacity of the battery pack you are using.
- How often the Zoom function is used.
It is recommended that you have several batteries available.
Charging the Lithium Ion Battery Pack
1. Attach the battery pack to the
device.
2. Connect the AC Power adapter to
the AC cord and connect the AC
cord to a wall socket.
3. Connect the DC cable to the DC
jack socket on the camcorder.
4. Turn the Camera power switch to
OFF, and the charging indicator will
start to flash, showing that the
battery is charging.
Blinking time Charging rate
Once per second Less than 50%
Twice per second 50% ~ 75%
Three times per second 75% ~ 90%
Blinking stops and stays on 90 ~ 100%
On for a second and Error - Reset the battery pack and the
off for a second DC cable
5. When the battery is fully charged, disconnect the battery pack and
the AC Power adapter from the camcorder.
■ Even with the power switched off, the battery pack will still
discharge if it is left connected to the camcorder.
Notes
■ The battery pack may be charged a little at the time of purchase.
■ To prevent reduction in the life and capacity of the battery pack,
always remove it from the camcorder after it is fully charged.
✤ La durée d’enregistrement dépend :
- du modèle de bloc batterie utilisé,
- de l’utilisation du zoom.
Par conséquent, nous vous recommandons d’avoir à
disposition plusieurs batteries.
Chargement du bloc batterie au lithium-ion
1. Fixez le bloc batterie sur le
caméscope.
2. Connectez l’adaptateur secteur à
un cordon secteur et branchez ce
dernier sur une prise murale.
3. Connectez le câble CC à la prise
CC du caméscope.
4. Éteignez le caméscope (position
OFF) ; le témoin de charge se met
alors à clignoter et le chargement
commence.
Clignotement du témoin Niveau de charge
Une fois par seconde Moins de 50 %
Toutes les demi-secondes 50% ~ 75%
TROIS FOIS PAR SECONDE 75% ~ 90%
Le témoin reste allumé sans clignoter 90 ~ 100%
Le témoin clignote lentement Erreur - Remettez le bloc batterie
et le câble CC bien en place
5. À la fin du chargement, séparez les trois éléments, bloc batterie,
adaptateur et cordon électrique.
■
Même si l’alimentation est coupée, la batterie se décharge.
Remarques
■
Il se peut que le bloc batterie ne soit pas entièrement chargé au
moment de l’achat.
■
Pour éviter d’endommager la batterie et de réduire sa durée d’utilisation, retirez-la toujours de l’appareil lorsqu’elle est complètement
chargée, et ce, si vous n’utilisez pas votre caméscope.
FRANÇAIS
2727
Page 28
ENGLISH
Preparation Préparez votre caméscope
FRANÇAIS
Using the Lithium Ion Battery Pack
Table of Continuous Recording Time Based on Model and
Battery Type.
✤ If you close the LCD screen, it switches off and the viewfinder
switches on automatically.
✤ The continuous recording times given in the table above are
approximations.
Actual recording time depends on usage.
Time
Charging
Battery
SB-L70G
SB-L110G
time
Approx.
1hr 20min
Approx.
1hr 40min
Notes
■
The battery pack should be recharged in an environment between
32°F (0°C) and 104°F (40°C).
■
The battery pack should never be charged in a room temperature
that is below 32°F (0°C).
■
The life and capacity of the battery pack will be reduced if it is used
in temperatures below 32°F (0°C) or left in temperatures above
104°F (40°C) for a long period, even when it is fully recharged.
■
Do not put the battery pack near any heat source (fire or flames,
for example).
■
Do not disassemble, apply pressure to, or heat the Battery Pack.
■
Do not allow the + and - terminals of the battery pack to be
short-circuited.
It may cause leakage, heat generation, induce fire or overheating.
2828
Continuous recording time
LCD ON CVF ON
Approx.
58min
Approx.
1hr 30min
Approx.
1hr 2min
Approx.
1hr 40min
Utilisation du bloc batterie au lithium-ion
Durée d’enregistrement selon le mode et le type de batterie.
✤ Si vous éteignez l’écran LCD, le viseur s’active
automatiquement.
✤ Les durées d’enregistrement données dans le tableau ci-
dessus sont estimatives.
La durée d’enregistrement réelle varie selon l’utilisation.
Durée
Temps de
Batterie
SB-L70G
SB-L110G
charge
Environ
1 h 20
Environ
1 h 40
Remarques
■
Le bloc batterie doit être rechargé à une température comprise
entre 0°C et 40°C.
■
N’effectuez jamais de chargement à des températures inférieures
à 0°C.
■
Si vous utilisez votre caméscope pendant une période prolongée à
des températures inférieures à 0°C ou supérieures à 40°C, la
durée de vie et la capacité du bloc batterie seront définitivement
réduites, même si vous le rechargez.
■
Éloignez votre bloc batterie de toute source de chaleur (un feu, par
exemple).
■
Évitez de démonter, d’écraser ou de chauffer le bloc batterie.
■
Évitez tout contact des bornes + et – du bloc batterie avec des
objets métalliques.
Cela risquerait de provoquer des fuites, une surchauffe, voire un
début d’incendie.
Durée d’enregistrement continu
Écran LCD allumé Viseur allumé
Environ
58
Environ
1 h 30
Environ
1 h 2
Environ
1 h 40
Page 29
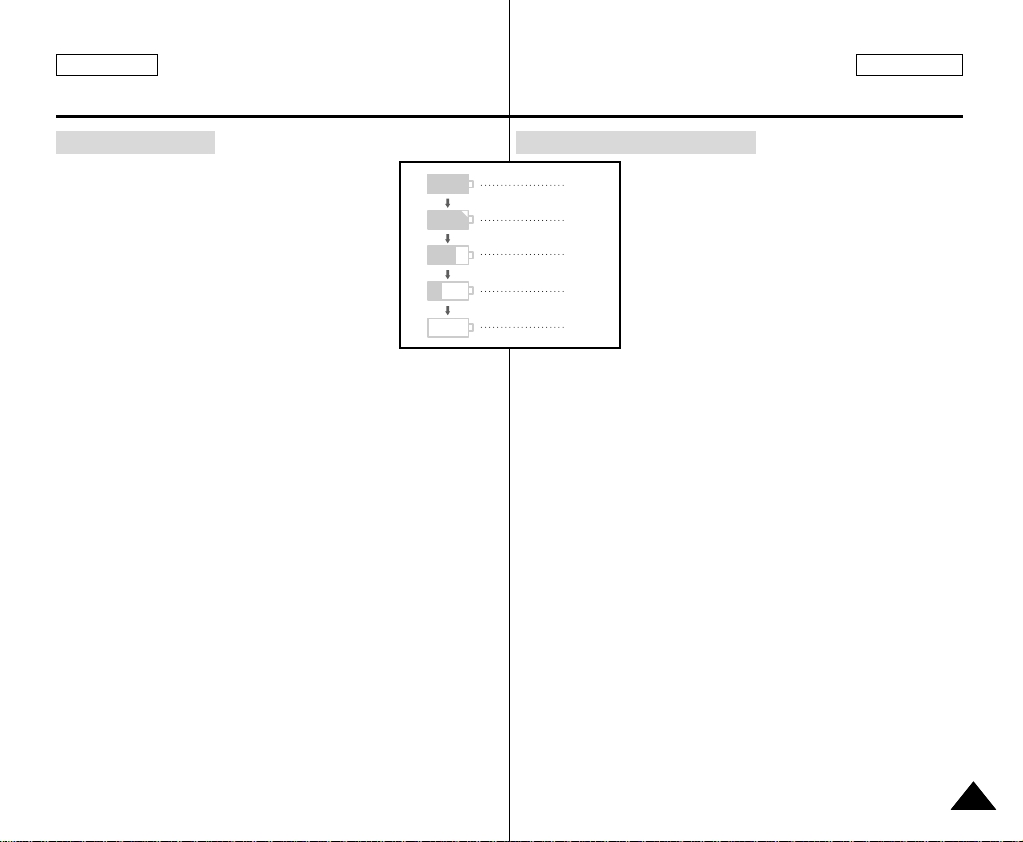
ENGLISH
Preparation Préparez votre caméscope
FRANÇAIS
Battery Level Display
• The battery level display indicates the
amount of power remaining in the battery
pack.
a. Fully Charged
b. 20~40% Used
c. 40~80% Used
d. 80~95% Used
e. Completely Used (flickers)
(The device will turn off soon, change the battery
as soon as possible)
✤ Please refer to the table on page 28 for approximate continuous
recording times.
✤ The recording time is affected by temperature and environmental
conditions.
The recording time becomes very short in a cold environment.
The continuous recording times in the operating instructions are
measured using a fully charged battery pack at 77°F(25°C).
As the temperature and environmental conditions may differ from
this when you actually use the camcorder, the remaining battery
time may not be the same as the approximate continuous recording times given in these instructions.
Affichage du niveau de la batterie
●
a
b
c
d
e
✤ Veuillez vous reporter au tableau de la page 28 pour obtenir les
durées approximatives d’enregistrement.
✤ La durée d’enregistrement peut varier selon la température
ambiante.
En particulier, au froid, elle est extrêmement réduite. Dans ce
mode d’emploi, la durée théorique d’enregistrement est calculée
avec un bloc batterie complètement chargé et à une
température de 25°C.
En fonction des conditions d’utilisation de votre caméscope, la
durée d’enregistrement correspondant à la charge restante de la
batterie peut différer des valeurs données dans le tableau indicatif.
L’affichage du niveau de la batterie indique
la charge restante dans le bloc batterie.
a. Entièrement chargée
b. Utilisée de 20 à 40 %
c. Utilisée de 40 à 80 %
d. Utilisée de 80 à 95 %
e. Entièrement déchargée (le symbole clignote)
(L'appareil va bientôt s’éteindre, changez la
batterie dès que possible.)
2929
Page 30
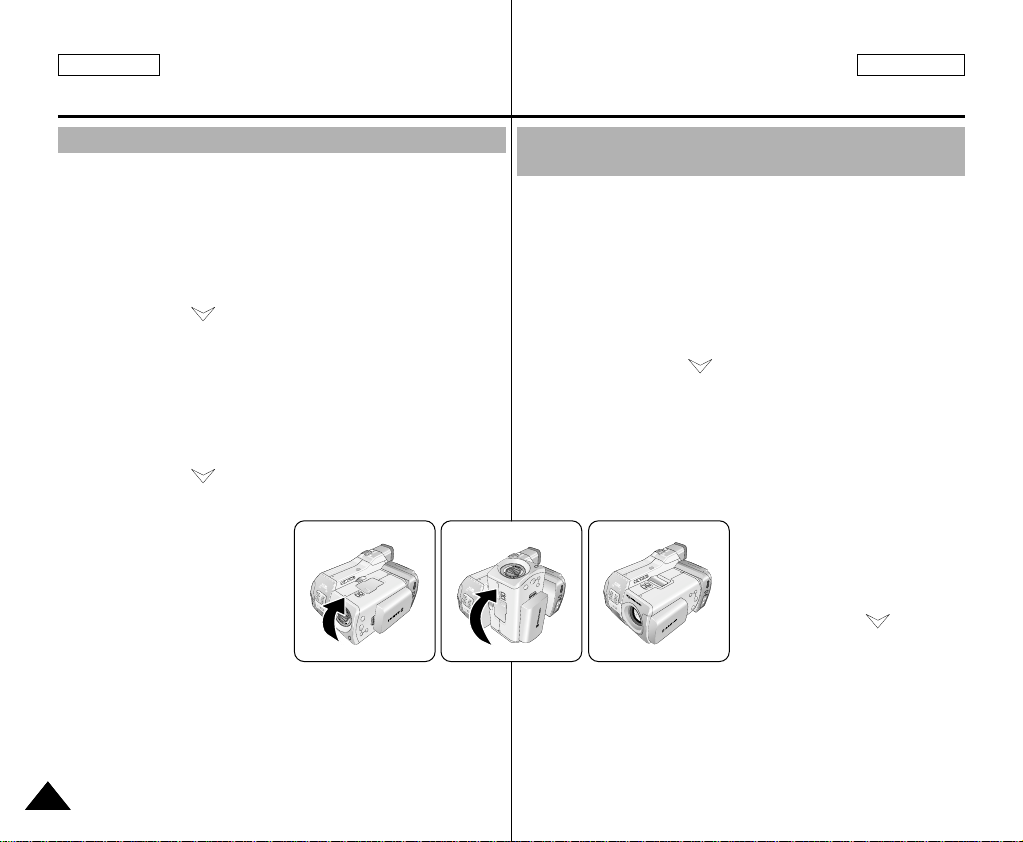
ENGLISH
Preparation Préparez votre caméscope
FRANÇAIS
Setting to CAMCORDER / CAMERA modes
✤ This device switches between the DVC (Digital Video Camcorder)
mode and the DSC (Digital Still Camera) mode by revolving the
Lens Body Block.
✤ Switching between CAMCORDER/CAMERA Modes
■
To set your device to CAMERA Mode from CAMCORDER
Mode: Rotate the Lens Body Block 180° counterclockwise
while pressing the Rotation Release Button (Left View).
* Follow the ( ) mark printed on the LENS body block when
rotating it.
■
To set your device to CAMCORDER Mode from CAMERA
Mode: Rotate the Lens Body Block 180° clockwise while
pressing the Rotation Release Button (Left View).
* To rotate the LENS body block safely, please wait for the lens
to shut after rotating 90°. After lens is shut, rotate the LENS
body block further.
* Follow the ( ) mark printed on the LENS body block when
rotating it.
Warning
■
Do not rotate the lens body block by force, or without pressing
the Release button. It may break the device.
■
Rotating the Lens Body Block while power is being supplied
may stop recording and cause problems with the device.
3030
Réglage des modes CAMCORDER <CAMESCOPE> et
CAMERA <APPAREIL PHOTO>
✤ Cet appareil bascule automatiquement du mode caméscope
numérique (DVC) au mode appareil photo numérique (DSC) en
tournant le bloc d'objectif.
✤ Basculement entre les modes CAMCORDER <CAMESCOPE> et
CAMERA <APP AREILPHOTO>
■
Pour régler votre appareil sur le mode CAMERA <APPAREIL
PHOTO> à partir du mode CAMCORDER <CAMESCOPE> :
tournez le bloc d'objectif de 180° dans le sens inverse des
aiguilles d'une montre tout en appuyant sur la touche de
déverrouillage de rotation (côté gauche).
* Suivez le repère ( ) imprimé sur le bloc d'objectif en le
tournant.
■
Pour régler votre appareil sur le mode CAMCORDER
<CAMESCOPE> à partir du mode CAMERA <APPAREIL
PHOTO> :
tournez le bloc d'objectif de 180° dans le sens des aiguilles
d'une montre tout en appuyant sur la touche de déverrouillage
de rotation (côté gauche).
Avertissement
■
Ne forcez pas pour tourner le bloc d'objectif et n'oubliez pas
d'appuyer sur la touche de déverrouillage.
Cela pourrait endommager l'appareil.
■
Tourner le bloc d'objectif tandis que l'alimentation se poursuit
peut engendrer l'arrêt de l'enregistrement et provoquer des
problèmes sur l'appareil.
* Pour basculer le bloc d'objectif en
toute sûreté, patientez jusqu'à ce
que l'objectif se soit fermé après
une rotation de 90°.
Une fois l'objectif fermé, vous
pouvez continuer à tourner le
bloc d'objectif.
* Suivez le repère ( ) imprimé
sur le bloc d'objectif en le
tournant.
Page 31

ENGLISH
FADE
S.SHOW
BLC
TAPE
MEMORY
P
LAY
REC
O
FF
FADE
S.SHOW
BLC
TAPE
MEMORY
PLA
Y
REC
O
F
F
FADE
S.SHOW
BLC
TAPE
MEMORY
PLAY
REC
O
FF
FADE
S.SHOW
BLC
TAPE
MEMORY
P
LAY
REC
O
FF
Preparation Préparez votre caméscope
Setting the Power Switch Réglage du commutateur principal
✤ Use the Power Switch to select the working modes of the device.
■
REC mode: Record onto a tape or store
images on the Memory Stick.
✤ Utilisez le commutateur pour sélectionner les modes de
fonctionnement de l'appareil.
■
Mode REC <ENREGISTREMENT> :
enregistrement sur une bande ou
mémorisation d'images sur la carte
Memory Stick.
FRANÇAIS
■
OFF: Turn the device off. To recharge the
battery, connect the power cable while the
Power Switch is set to OFF.
■
TAPE PLAY (PLAYER) mode: Play and edit
the recorded tape.
■
MEMORY PLAY(M.PLAY) mode: View and
edit images and motion clips stored on the
Memory Stick.
■
OFF <DESACTIVATION> : désactive l'appareil.
Pour recharger la batterie, connectez le câble
d'alimentation pendant que le commutateur
est positionné sur OFF <DESACTIVATION>.
■
Mode TAPE PLAY <LECTURE DE BANDE>
(PLAYER <LECTEUR>) : lecture et
modification de la bande enregistrée.
■
Mode MEMORY PLAY<LECTURE PHOTO> :
Lecture et modification d'images et de
séquences animées mémorisées sur la carte
Memory Stick.
3131
Page 32

ENGLISH
CAMCORDER REC MODE
LCD ADJUST
VIEWER SET
BRIGHT ADJUST . . . . . . [ 1 8 ]
COLOR ADJUST . . . . . . [ 1 8 ]
CAMCORDER REC MODE
VIEWER SET
LCD ADJUST
DATE / TIME
TV DISPLAY
CAMCORDER REC MODE
INITIAL
LCD ADJUST
DATE/TIME
TV DISPLAY
CAMCORDER
CAMERA
MEMORY
VIEWER
Preparation Préparez votre caméscope
Adjusting the LCD Réglage de l’écran LCD
✤ Your camcorder is equipped with a 2 inch color Liquid Crystal
Display(LCD) screen, which enables you to view what you are
recording and play back directly.
✤ Depending on the conditions under which you are using the
camcorder (indoors or outdoors), you can adjust ;
■
BRIGHT ADJUST
■
COLOR ADJUST
✤ Votre caméscope est équipé d’un écran couleur à cristaux liquides
de 5 cm (2 pouces) qui vous permet de voir directement ce que
vous enregistrez ou visionnez.
✤ Selon les conditions dans lesquelles vous utilisez le caméscope
(à l’intérieur ou à l’extérieur), vous pouvez :
■
ajuster la luminosité (BRIGHTADJUST),
■
ajuster la couleur (COLOR ADJUST).
FRANÇAIS
1. Set the POWER switch to REC mode.
■
In PLAYER mode, you can only setup the
LCD while the tape is playing.
2. Open the LCD screen. The LCD switches on.
3. Press the MENU button.
4. Turn the MENU DIAL so that
VIEWER is highlighted and then
press the MENU DIAL.
5. Turn the MENU DIAL so that LCD
ADJUST is highlighted.
6. Press the MENU DIAL to enter the
sub-menu.
7. Turn the MENU DIAL so that it highlights the menu
item you want to adjust (BRIGHT ADJUST,
COLOR ADJUST).
3232
FADE
S.SHOW
BLC
P
TAPE
MEMORY
O
FF
LA
Y
REC
1. Réglez le commutateur sur
REC <ENREGISTREMENT>.
■
En mode PLAYER <LECTEUR>, le réglage
de l’écran à cristaux liquides ne peut se faire
que durant la lecture d’une bande.
2. Ouvrez l’écran LCD.
L'écran LCD s'allume.
3. Appuyez sur la touche MENU.
4. À l’aide de la molette MENU,
sélectionnez VIEWER
<VISUALISATEUR>, puis appuyez
sur la molette MENU.
5. À l’aide de la molette MENU, sélectionnez
LCD ADJUST <AJUSTER ECRAN LCD>.
6. Appuyez sur la molette MENU pour accéder au
sous-menu.
7. À l’aide de la molette MENU, sélectionnez l’option
souhaitée (BRIGHTADJUST <AJUSTER LA
LUMINOSITE> COLOR ADJUST <AJUSTER
LA COULEUR>).
Page 33

ENGLISH
Preparation Préparez votre caméscope
FRANÇAIS
8. Press the MENU DIAL.
■
Use the MENU DIAL to adjust the value of BRIGHT ADJUST
and COLOR ADJUST.
■
You can set the values for BRIGHT ADJUST between 0 ~ 35
and COLOR ADJUST between 0 ~ 35.
9. Press the MENU button to complete the setting.
Using the VIEWFINDER
✤ The VIEWFINDER will not work when the
LCD is open.
Adjusting the Focus
Use the focus adjustment knob on the
VIEWFINDER to focus the
picture. (refer to diagram)
8. Appuyez sur la molette MENU.
■
À l’aide de la molette MENU, réglez l’intensité de la luminosité
(BRIGHT ADJUST <AJUSTER LA LUMINOSITE>) et de la
couleur (COLOR ADJUST <AJUSTER LACOULEUR>).
■
Vous avez le choix entre des valeurs allant de 0 à 35 pour la
luminosité et de 0 à 35 pour la couleur.
9. Une fois le réglage de l’écran terminé, appuyez sur la touche
MENU.
Utilisation du viseur
✤ Le viseur ne peut pas fonctionner si l’écran
à cristaux liquides est ouvert.
Réglage de la mise au point
Ajustez la mise au point de l’oculaire pour
obtenir une image nette
(voir figure).
3333
Page 34

ENGLISH
0 : 2 3 : 4 7
5 5 min
1 2 : 0 0 AM
O C T . 1 0 . 2 0 0 3
VOL. [ 1 1 ]
FADE
S.SHOW
BLC
REV FWD
TAPE
MEMORY
PLAY
REC
OFF
Preparation Préparez votre caméscope
Adjusting the LCD during PLAY
✤ You can adjust the LCD during playback.
✤ The adjustment method is the same as is used while in
CAMERA mode. (See page 32)
Controlling Sound from the Speaker
The Speaker only works in PLAYER mode.
■
When you use the LCD screen for playback, you
can hear the recorded sound from the built-in
Speaker.
- Follow the instructions below to decrease or
mute speaker volume in PLAYER mode.
- Take the following steps to lower the volume or
mute the sound while playing a tape
on the camcorder.
1. Set the device to CAMCORDER and set the Power
Switch to PLAYER mode.
2. Press (PLAY/STILL) to play the tape.
3. Once the tape is in play and you hear sound, use
the MENU DIAL to adjust the volume.
■
A Volume Level display will appear on the LCD.
Levels may be adjusted from anywhere
between 0 to 19. You will not hear any sound
when the volume is set on 0.
■
If you close the LCD while playing, you will not
hear sound from the speaker.
Notes
■
When the cable is connected to the A/V jack, you
cannot hear sound from the speaker and
■
3434
cannot adjust the volume.
You can hear sound from the speaker by removing the connected
cable from the A/V jack
<3-2>
Réglage de l’écran LCD lors de la lecture
✤ Vous pouvez régler l’écran LCD tout en visionnant des images.
✤ Le réglage se fait de la même manière qu’en mode CAMERA
<APPAREILPHOTO> (Voir page 32)
Réglage du volume du haut-parleur
Le haut-parleur fonctionne uniquement en mode
PLAYER <LECTEUR>.
■
Lorsque vous visionnez des images sur l’écran
LCD, le son est diffusé à partir du haut-parleur
intégré.
- Suivez les instructions ci-dessous pour
diminuer ou supprimer le son du haut-parleur
en mode PLAYER <LECTEUR>.
- Si vous souhaitez diminuer ou supprimer le
son du haut-parleur lorsque vous lisez une
bande sur votre caméscope, procédez
comme suit :
1. Positionnez l'appareil sur le mode CAMCORDER
<CAMESCOPE> et placez le commutateur sur le
mode PLAYER <LECTEUR>.
2. Appuyez sur la touche (PLAY/STILL
<LECTURE/PAUSE>) pour lire la bande.
3. Dès que la lecture commence, réglez le son du
haut-parleur à l’aide de la molette MENU.
■
Le volume s’affiche alors à l’écran.
Vous pouvez sélectionner le volume sur une
échelle allant de 00 à 19.
Le son est coupé lorsqu’il est réglé sur 00.
■
Si vous fermez l’écran LCD durant la lecture,
le haut-parleur est coupé.
Remarques
■
Lorsque le câble est connecté à la sortie A/V, aucun son ne sort du
haut-parleur et vous ne pouvez pas régler le volume.
■
Lorsque vous débranchez le câble de la sortie A/V, le son sort du
haut-parleur.
FRANÇAIS
Page 35

ENGLISH
Functions Fonctions
Using MENU Utilisation du menu
✤ Use the MENU button to change or select recording settings and
Hardware functions.
✤ MENU instructions are displayed both on the LCD and the
viewfinder. It is easier to manipulate your device using the LCD.
✤ Utilisez la touche MENU pour modifier ou sélectionner les
paramètres d'enregistrement et les fonctions matérielles.
✤ Les instructions de MENU s'affichent à la fois sur l'écran LCD et
sur le viseur. La manipulation de l'appareil est toutefois plus aisée
à partir de l'écran LCD.
FRANÇAIS
MENU
I
N
I
T
I
A
L
C
A
M
C
O
R
D
E
R
SUB MENU Functions Page
CLOCK SET
WL.REMOTE
REC.LAMP
BEEP SOUND
SHUT. SOUND
DEMO
REC SELECT
REC MODE
EIS
R
E
D. ZOOM
C
O
PROGRAM AE
R
D
WHT. BALANCE 57
S
DSE SELECT
E
T
AUDIO MODE
WIND CUT
AV IN/OUT
Setting the Time 41
Using the Remote Control 42
Record Indicator Play Various Sound Effects Sound Effect for the Photo button Demonstration 43
Selecting the Storage Media for
Camcorder mode
Selecting the Recording Speed
Selecting the Image Stabilizing Function
Selecting Digital Zoom in CAMCORDER
Mode
Selecting the PROGRAM AE Function
Setting White Balance of CAMCORDER
Mode
Setting special effects in CAMCORDER
Mode
Selecting Sound Quality for Recording
Removing Screen Noise 64
Selecting AV in/out
MENU
I
N
I
T
I
A
L
50
62
59
C
58
A
M
C
55
O
R
D
E
60
R
63
-
SOUS-MENU Fonctions Page
CLOCK SET <REGLAGE
DE L'HORLOGE>
WL.REMOTE
<TELECOMMANDE>
REC.LAMP <VOYANT
D'ENREGISTREMENT>
BEEP SOUND <BIP
SONORE>
SHUT. SOUND <SON DE
FERMETURE>
DEMO <DEMO>
REC SELECT <SELECT
ENR.>
REC MODE <MODE
D'ENREGISTREMENT>
EIS <STABILISATEUR ELECTRONIQUE D'IMAGES>
R
D. ZOOM <ZOOM
E
NUMERIQUE>
C
PROGRAM AE <EXPOSI-
O
TION AUTOMATIQUE>
R
D
WHT. BALANCE <EQUILIBRAGE DU BLANC>
S
DSE SELECT <SELECTION
E
EFFETS SPECIAUX
T
NUMERIQUES>
AUDIO MODE <MODE
AUDIO>
WIND CUT <COUPE-
VENT>
AV IN/OUT<ENTREE/SOR-
TIE AUDIO/VIDEO>
Utilisation de la télécommande
Indicateur de séquences
Lecture de sons variés
Son accompagnant la touche Photo
Démonstration
Réglage de l'heure
Sélection du support de stockage en
mode caméscope
Sélection de la vitesse d'enregistrement
Sélection de la fonction de stabilisation d'image
Sélection du zoom numérique en mode
CAMCORDER <CAMESCOPE>
Sélection de la fonction PROGRAM
AE <EXPOSITION AUTOMATIQUE>
Réglage de l'équilibrage du blanc en
mode CAMCORDER <CAMESCOPE>
Réglage des effets spéciaux en
mode CAMCORDER
<CAMESCOPE>
Sélection de la qualité sonore pour
l'enregistrement
Effacement des parasites à l'écran
Sélection AV in/out <entrée/sortie
audio/vidéo>
41
42
-
-
43
50
62
59
58
55
57
60
63
64
-
3535
Page 36

ENGLISH
Functions Fonctions
FRANÇAIS
MENU SUB MENU Functions Page
CAMCORD
ER
C
A
M
E
R
A
M
E
M
O
R
Y
VIEWER
PHOTO SEARCH
PLAY
PHOTO COPY
SET
AUDIO SELECT
CONT. SHOT
WHT. BALANCE
D. ZOOM
DSE SELECT
M.PLAYSELECT
PHOTO
SET
QUALITY
SIZE
MPEG4 SIZE
PRINT MARK
PROTECT
FILE NO
DELETE
FORMAT
LCD ADJUST
DATE/TIME
TV DISPLAY
Searching Pictures recorded in TAPE
Copying Pictures from TAPE onto the
Memory Stick
Selecting the Audio playback channel
Continuous Shot
Selecting White Balance in CAMERA Mode
Selecting Digital Zoom in CAMERA Mode
Setting special effects in CAMERA mode
Selecting Storage Media to
MPEG playback
Selecting Image Quality
Selecting Image Resolution
Selecting MPEG Resolution
Printing Images
Preventing Accidental Erasure
File Naming Options
Deleting Files
Formatting the Memory Stick
Setting the brightness and Color Tones of
the LCD
Setting the Date and Time
Selecting TV out
73
109
72
95
98
93
99
107
103
104
108
110
111
86
112
114
32
44
45
MENU SOUS-MENU Fonctions Page
PHOTO SEARCH
PLAY
<RECHERCHE D'IMAGE>
SET
CAME
SCOP
E
APPA
REIL
PHOT
O
M
E
M
O
I
R
E
VISUALISA
TEUR
PHOTO COPY
<REGLA
GE DE
<COPIE D'IMAGE>
LA LEC-
AUDIO SELECT
TURE>
<SELECTION AUDIO>
CONT. SHOT
<PLAN CONTINU>
WHT. BALANCE
<EQUILIBRAGE DU BLANC>
D. ZOOM
<ZOOM NUMERIQUE>
DSE SELECT
<SELECTION EFFETS SPECIAUX NUMERIQUES>
M.PLAYSELECT <SELECTION
LECTURE PHOTO>
PHOTO
SET
<REGLAG
E PHOTO>
MPEG4 SIZE
<FORMATMPEG4>
PRINT MARK
<MARQUE DPOF>
PROTECT
<PROTECTION>
FILE NO <N° DE FICHIER> Options d'attribution de nom de fichier
DELETE
<SUPPRESSION>
FORMAT<FORMAT> Formatage d’une carte Memory Stick
LCD ADJUST
<AJUSTER ECRAN LCD>
DATE/TIME <DATE/HEURE> Réglage de la date et de l’heure
TV DISPLAY<AFFICHAGE> Sélection de la prise TV externe
QUALITY
<QUALITE>
SIZE
<TAILLE>
Recherche d'images enregistrées sous
TAPE <BANDE>
Copie d'images depuis TAPE <BANDE>
sur la carte Memory Stick
Sélection du canal de lecture audio
Plan continu
Sélection de l'équilibrage du blanc en
mode CAMERA <appareil photo>
Sélection du zoom numérique en mode
CAMERA <appareil photo>
Réglage des effets spéciaux en mode
CAMERA <appareil photo>
Sélection d'un support de stockage
pour lecture MPEG
Sélection de la qualité d’image
Sélection de la résolution d’image
Sélection de la résolution MPEG
Impression d'images
Protection contre les effacements accidentels
Effacement de fichiers
Réglage de la luminosité et des
tonalités de couleurs de l'écran LCD
73
109
72
95
98
93
99
107
103
104
108
110
111
86
112
114
32
44
45
3636
Page 37

ENGLISH
Functions Fonctions
FRANÇAIS
Setting menu items
MENU
INITIAL
CAMCORD
ER
SUB MENU
CLOCK SET
WL.REMOTE
REC.LAMP
BEEP SOUND
SHUT. SOUND
DEMO
REC SELECT
REC MODE
EIS
R
E
D. ZOOM
C
O
PROGRAM AE
R
D
WHT. BALANCE
S
DSE SELECT
E
T
AUDIO MODE
WIND CUT
AV IN/OUT
Available mode
REC
TAPE
PLAY
MEMORY
RECORD
MEM.
PLAY
✔✔ ✔✔
✔✔ ✔✔
✔✔
✔✔ ✔✔
✔✔ ✔
✔
✔
✔✔
✔
✔
✔
✔
✔
✔✔
✔✔
✔
Liste des réglages
MENU
INITIAL
<INITIAL>
CAMCORDER
<CAMES
COPE>
SOUS-MENU
CLOCK SET <REGLAGE
DE L'HORLOGE>
WL.REMOTE <TELECOMMANDE>
REC.LAMP <VOYANT
D'ENREGISTREMENT>
BEEP SOUND <BIP
SONORE>
SHUT. SOUND <SON DE
FERMETURE>
DEMO <DEMO>
REC SELECT
<SELECT ENR.>
REC MODE
<MODE D'ENREGISTREMENT>
EIS <STABILISATEUR ELECTRONIQUE D'IMAGES>
D. ZOOM <ZOOM
NUMERIQUE>
RECO
PROGRAM AE
RD
<EXPOSITION
SET
AUTOMATIQUE>
<REG
WHT. BALANCE
LAGE
<EQUILIBRAGE
ENRE
DU BLANC>
GIST
REME
DSE SELECT
NT>
<SELECTION
EFFETS SPECIAUX
NUMERIQUES>
AUDIO MODE
<MODE AUDIO>
WIND CUT
<COUPE-VENT>
AV IN/OUT
<ENTREE/SORTIE
AUDIO/VIDEO>
Mode disponible
REC
<ENR.>
TAPE PLAY
<LECTURE DE
BANDE>
MEMORY RECORD
ISTREMENT
<ENREGPHOTO>
MEM PLAY
<LECTURE
PHOTO>
✔✔ ✔✔
✔✔ ✔✔
✔✔
✔✔ ✔✔
✔✔ ✔
✔
✔
✔
✔
✔
✔
✔
✔
✔
✔✔
✔✔
✔
3737
Page 38

ENGLISH
Functions Fonctions
FRANÇAIS
3838
MENU
CAMCOR
DER
C
A
M
E
R
A
M
E
M
O
R
Y
VIEWER
SUB MENU
PHOTO SEARCH
PLAY
PHOTO COPY
SET
AUDIO SELECT
CONT. SHOT
WHT. BALANCE
D. ZOOM
DSE SELECT
M.PLAYSELECT
PHOTO
SET
QUALITY
SIZE
MPEG4 SIZE
PRINT MARK
PROTECT
FILE NO
DELETE
FORMAT
LCD ADJUST
DATE/TIME
TV DISPLAY
Available mode
REC
PLAY
MEMORY
RECORD
MEM.
PLAY
TAPE
✔
✔
✔
✔
✔
✔
✔
✔
✔✔
✔
✔
✔
✔✔✔
✔
✔
✔✔ ✔✔
✔✔ ✔✔
✔✔ ✔✔
MENU
CAMCORDER
<CAMES
COPE>
CAMERA
<APPAR
EIL
PHOTO>
MEMORY
<MEMOIRE>
VIEWER
<VISUALISATEUR>
SOUS-MENU
PHOTO SEARCH
PLAY
<RECHERCHE D'IM-
SET
AGE>
<REGL
PHOTO COPY
AGE
<COPIE D'IMAGE>
DE LA
AUDIO SELECT
LEC-
<SELECTION
TURE>
AUDIO>
CONT. SHOT
<PLAN CONTINU>
WHT. BALANCE <EQUILIBRAGE DU BLANC>
D. ZOOM
<ZOOM NUMERIQUE>
DSE SELECT <SELECTION EFFETS SPECIAUX
NUMERIQUES>
M.PLAYSELECT
<SELECTION LECTURE
PHOTO>
PHOTO SET
<REGLAGE
PHOTO>
MPEG4 SIZE
<FORMATMPEG4>
PRINT MARK
<MARQUE DPOF>
PROTECT
<PROTECTION>
FILE NO
<N° DE FICHIER>
DELETE
<SUPPRESSION>
FORMAT<FORMAT>
LCD ADJUST
<AJUSTER ECRAN LCD>
DATE/TIME
<DATE/HEURE>
TV DISPLAY
<AFFICHAGE>
QUALITY
<QUALITE>
SIZE
<TAILLE>
Mode disponible
REC <ENR.>
TAPE PLAY
<LECTURE DE
BANDE>
ISTREMENT
<ENREG-
PHOTO>
MEM PLAY
<LECTURE
PHOTO>
MEMORYRECORD
✔
✔
✔
✔
✔
✔
✔
✔
✔✔
✔
✔
✔
✔✔✔
✔
✔
✔✔ ✔✔
✔✔ ✔✔
✔✔ ✔✔
Page 39

ENGLISH
CAMCORDER REC MODE
CAMCORDER SET
RECORD SET
PLAY SET
Functions Fonctions
FRANÇAIS
Setting the Camcorder to REC, TAPE PLAY,
●
MEMORY PLAY modes
1. Press the MENU button.
2. The MENU OSD is displayed. The cursor
( HIGHLIGHT ) indicates the feature you are
currently adjusting.
3. Use the MENU DIAL to move between items and
press the MENU DIAL to select and activate an
item.
4. You can exit Menu mode by pressing the MENU
button.
Réglage des modes REC <ENR.>, TAPE PLAY
●
<LECTURE DE BANDE>, MEMORY PLAY <LECTURE PHOTO>
1. Appuyez sur la touche MENU.
2. Le menu s’affiche. Le curseur ( SURBRILLANCE )
indique la fonction que vous réglez.
3. Utilisez la molette MENU pour aller d'un réglage à
l'autre et appuyez sur la molette MENU pour
sélectionner et activer le réglage.
4. Pour quitter le menu, appuyez de nouveau sur la
touche MENU.
3939
Page 40

ENGLISH
Functions Fonctions
FRANÇAIS
●
Availability of Functions in CAMCORDER Mode.
Requested
Operating
Mode
SLOW SHUTTER
Digital Special Effects
Mode
EIS
D.ZOOM
PHOTO
NITE PIX
Digital functions
EIS D.ZOOM
O
O
✕
O
O
O
O
PHOTO
(TAPE)
O
O
O
O
O
SLOW
SHUTTER
*
✕
O
O
Digital
special
effects
O
O
O
O
✕
O : The requested mode will work in this operating mode.
✕ : You can not change the requested mode.
NITE PIX
●
Mode activé
EIS <STABILISA TEUR ELEC-
O
O
✕
O
✕
<Effets spéciaux numériques>
O : Le mode demandé fonctionne avec le mode activé.
✕ : Le mode demandé ne peut pas être changé.
: The operating mode will be released and the requested mode will
work.
* : The operating mode will be released and the requested mode will
* : Le mode de fonctionnement va s’arrêter et le mode demandé va
work.
(The data input while operating will be backed up)
Notes
■
When a menu item on the LCD is marked with an , that item
X
Remarques
■
cannot be activated.
■
When you select an item that cannot be changed, an error mes-
■
sage will be displayed.
Fonctions disponibles pour le mode CAMCORDER <CAMESCOPE>.
Mode
demandé
TRONIQUE D'IMAGES>
D.ZOOM
<ZOOM NUMERIQUE>
PHOTO
SLOW SHUTTER
<OBTURATION LENTE>
DSE
NITE PIX
<PIX DE NUIT>
Fonctions numériques
EIS D.ZOOM
PHOTO
(TAPE)
O
O
✕
O
O
O
O
O
O
O
O
O
SLOW
SHUTTER
*
✕
O
O
Effets spéci-
aux
numériques
O
O
O
O
✕
PIX DE
NUIT
O
O
✕
O
✕
: Le mode de fonctionnement va s’arrêter et le mode demandé va
être utilisé.
être utilisé.
(les données enregistrées pendant le mode activé seront
activées)
Si une marque apparaît en regard d’une option, celle-ci n’est
X
pas modifiable.
Si vous sélectionnez une option qui n’est pas modifiable, un
message d’erreur s’affiche alors à l’écran.
4040
Page 41

ENGLISH
CAMCORDER REC MODE
INITIAL
CLOCK SET
WL. REMOTE
REC LAMP
BEEP SOUND
SHUT. SOUND
DEMO
CAMCORDER
CAMERA
MEMORY
VIEWER
CAMCORDER REC MODE
INITIAL SET
CLOCK SET
WL.REMOTE
RECORD LAMP
BEEP SOUND
SHUTTER SOUND
DEMONSTRATION
SET TIME!
- - - - - -
- - - - - - - - -
CAMCORDER REC MODE
INITIAL SET
CLOCK SET
1 0 : 0 0 AM
O C T. 1 0 , 2 0 0 3
Functions Fonctions
FRANÇAIS
●
CLOCK SET
✤ CLOCK setup works in CAMCORDER or CAMERA modes.
✤ The DATE/TIME is automatically recorded onto the tape and
Memory Stick.
Before recording or taking photos, please set the DATE/TIME.
1. Press the MENU button.
■
The menu list will appear.
2. Turn the MENU DIAL to highlight INITIAL and
press the MENU DIAL.
3. Use the MENU DIAL to select CLOCK SET from
the sub-menu.
4. Press the MENU DIAL to enter SETTING mode.
■
A blinking item indicates the item can be
changed. The year will blink first.
5. Using the MENU DIAL, change the year setting.
6. Press the MENU DIAL.
■
The month will blink.
7. Using the MENU DIAL, change the month setting.
8. Press the MENU DIAL.
■
The day will blink.
9. You can set the day, hour and minute following the
same procedure for setting the year and month.
10. Press the MENU DIAL after setting the minutes.
■
The word COMPLETE! will appear, and a few
seconds later, the menu screen will automatically return to the sub menu.
11. To exit, press the MENU button.
●
CLOCK SET <REGLAGE DE L'HORLOGE>
✤ Le réglage de l’horloge est possible à la fois en mode
CAMCORDER <CAMESCOPE> et CAMERA <APPAREIL
PHOTO>.
✤ La date et l’heure sont automatiquement pré-enregistrées sur
la bande et sur la carte Memory Stick.
Avant d’enregistrer ou de photographier, il convient de régler la
date et l’heure.
1. Appuyez sur la touche MENU.
■
La liste des options apparaît.
2. À l’aide de la molette MENU, sélectionnez INITIAL
<INITIAL> et appuyez sur la molette MENU.
3. À l’aide de la molette MENU, sélectionnez
CLOCK SET <REGLAGE DE L'HOROLOGE>
dans le sous-menu.
4. Appuyez sur la molette MENU pour procéder au
réglage.
■
Lorsqu’une entrée clignote, vous pouvez la
modifier. L’année est la première entrée à
clignoter.
5. À l’aide de la molette MENU, modifiez l’année.
6. Appuyez sur la molette MENU.
■
Ensuite, c’est le mois qui clignote.
7. À l’aide de la molette MENU, modifiez le mois.
8. Appuyez sur la molette MENU.
■
La date clignote.
9. Vous pouvez modifier le jour, les heures et les
minutes comme vous l’avez fait pour l’année et le
mois.
10. Appuyez sur la molette MENU après avoir réglé
les minutes.
■
Le mot COMPLETE! clignote et le menu
disparaît automatiquement.
11. Pour quitter, appuyez sur la touche MENU.
4141
Page 42

ENGLISH
CAMCORDER REC MODE
INITIAL
CLOCK SET
WL. REMOTE
REC LAMP
BEEP SOUND
SHUT. SOUND
DEMO
CAMCORDER
CAMERA
MEMORY
VIEWER
CAMCORDER REC MODE
INITIAL SET
CLOCK SET
WL.REMOTE
RECORD LAMP
BEEP SOUND
SHUTTER SOUND
DEMONSTRATION
SET TIME!
Functions Fonctions
FRANÇAIS
●
WL.REMOTE
✤ The WL.REMOTE function works in CAMCORDER or
CAMERA modes.
✤ The WL.REMOTE option allows you to enable or disable the
remote control for use in CAMCORDER and CAMERA modes.
1. Press the MENU button.
■
The menu list will appear.
2. Turn the MENU DIAL to highlight INITIAL and
press the MENU DIAL.
3. Use the MENU DIAL to select WL.REMOTE from
the sub-menu.
4. Press the MENU DIAL to enable or disable the
remote control.
The setting switches between ON/OFF each time
you press the MENU DIAL.
5. To exit, press the MENU button.
■
If you set the remote to OFF in the menu and
try to use it, the remote control icon will blink
for 3 seconds and disappear on the LCD.
4242
●
WL.REMOTE <TELECOMMANDE>
✤ La fonction WL.REMOTE <TELECOMMANDE> est disponible
à la fois en mode CAMCORDER <CAMESCOPE> et CAMERA
<APPAREILPHOTO>.
✤ Cette option vous permet d’activer ou de désactiver la télécom-
mande en modes CAMCORDER <CAMESCOPE> et
CAMERA <APP AREILPHOTO>.
1. Appuyez sur la touche MENU.
■
La liste des options apparaît.
2. À l’aide de la molette MENU, sélectionnez
INITIAL <INITIAL> et appuyez sur la molette
MENU.
3. À l’aide de la molette MENU, sélectionnez
WL.REMOTE <TELECOMMANDE> dans le
sous-menu.
4. Appuyez sur la molette MENU pour activer ou
désactiver la télécommande.
Le réglage alterne entre ON <ACTIVATION> et
OFF <DESACTIVATION> chaque fois que vous
appuyez sur la molette MENU.
5. Pour quitter, appuyez sur la touche MENU.
■
Si vous désactivez la télécommande (option
réglée sur OFF <DESACTIVATION>), l’icône
de la télécommande clignote à l’écran puis
disparaît au bout de 3 secondes.
Page 43

ENGLISH
CAMCORDER REC MODE
INITIAL
CLOCK SET
WL. REMOTE
REC LAMP
BEEP SOUND
SHUT. SOUND
DEMO
CAMCORDER
CAMERA
MEMORY
VIEWER
CAMCORDER REC MODE
INITIAL SET
CLOCK SET
WL.REMOTE
RECORD LAMP
BEEP SOUND
SHUTTER SOUND
DEMONSTRATION
SET TIME!
Functions Fonctions
FRANÇAIS
●
DEMONSTRATION
✤ Demonstration automatically shows you the major functions
that are included with your camcorder so that you may use
them more easily.
✤ The DEMONSTRATION function may only be used in the
CAMCORDER mode without a tape inserted in the camcorder.
✤ The demonstration operates repeatedly until the
DEMONSTRATION mode is switched OFF.
1. Set the device to CAMCORDER and set the
power switch to REC mode.
2. Press the MENU button.
■
The menu list will appear.
3. Turn the MENU DIAL to highlight INITIAL.
4. Select DEMONSTRATION from the submenu and
press the MENU DIAL.
5. To activate the DEMONSTRATION,
set DEMONSTRATION to ON.
■
Press the menu button to quit the menu.
■
The demonstration will begin.
6. To end the DEMONSTRATION, set the
DEMONSTRATION to OFF.
Notes
■
The DEMONSTRATION function only works when there is no
TAPE installed.
■
The DEMONSTRATION mode is automatically activated when the
camcorder is left idle for more than 10 minutes after switching to
CAMCORDER mode (when no tape is inserted in the camcorder).
■
If you press other buttons (FADE, BLC, PHOTO, EASY) during the
DEMONSTRATION mode,
the DEMONSTRATION stops temporarily and resumes 10 minutes
later if you do not operate any other functions.
●
DEMONSTRATION <DEMONSTRATION>
✤ La démonstration vous permet de vous familiariser avec les
fonctions principales de votre caméscope.
✤ Ce mode est disponible uniquement lorsque le caméscope est
réglé sur CAMCORDER <CAMESCOPE> et qu’il ne contient
pas de bande.
✤ La démonstration se répète automatiquement jusqu’à ce que
vous sélectionniez l’option OFF <DESACTIVATION>.
1. Réglez l'appareil sur CAMCORDER
<CAMESCOPE>, puis le commutateur sur le
mode REC <ENR.>.
2. Appuyez sur la touche MENU.
■
La liste des options apparaît.
3. À l’aide de la molette MENU, sélectionnez
INITIAL <INITIAL>.
4. Sélectionnez DEMONSTRATION dans le
sous-menu qui s’affiche et appuyez sur la
molette MENU.
5. Pour activer la fonction DEMONSTRATION,
réglez-la sur ON <ACTIVATION>.
■
Appuyez sur la touche MENU pour quitter le
menu.
■
La démonstration commence.
6. Pour arrêter la démonstration, réglez l’option
sur OFF <DESACTIVATION>.
Remarques
■
Le mode DEMONSTRATION ne fonctionne que si le caméscope
ne contient aucune bande.
■
Le mode DEMONSTRATION est automatiquement activé si le
caméscope est laissé en mode veille plus de 10 minutes après le
réglage en mode CAMCORDER <CAMESCOPE> (il ne doit pas y
avoir de bande dans le caméscope).
■
Si vous appuyez sur d’autres touches (FADE <FONDU>, BLC
<CONTRE-JOUR INTELLIGENT>, PHOTO <PHOTO>, EASY
<SIMPLIFIE>) lors de la démonstration, celle-ci s’arrête, puis
reprend dix minutes plus tard si vous n’appuyez sur aucune autre
touche.
4343
Page 44

ENGLISH
CAMCORDER REC MODE
VIEWER SET
LCD ADJUST
DATE / TIME
TV DISPLAY
CAMCORDER REC MODE
INITIAL
LCD ADJUST
DATE/TIME
TV DISPLAY
CAMCORDER
CAMERA
MEMORY
VIEWER
CAMCORDER REC MODE
DATE / TIME
VIEWER SET
DATE
TIME
DATE & TIME
Functions Fonctions
●
DATE/TIME
✤ The DATE/TIME function works in CAMCORDER or CAMERA
mode and PLAYmodes.
✤ The date and time are automatically recorded on a special data
area of the tape.
1. Press the MENU button.
■
The menu list will appear.
2. Turn the MENU DIAL to highlight VIEWER and
press the MENU DIAL.
3. Turn the MENU DIAL to highlight DATE/TIME.
4. Press the MENU DIAL to select the sub-menu.
5. Using the MENU DIAL, select DATE/TIME mode.
■
You can choose to display - OFF, DATE, TIME,
DATE/TIME
- OFF
- DATE only
- TIME only
- DATE & TIME
■
To return to the previous menu, highlight the
DATE/TIME in the middle and press the MENU
DIAL.
6. To exit, press the MENU button.
Notes
■
The DATE/TIME is not affected by the OSD
ON/OFF (DISPLAY) button.
■
The DATE/TIME will read “- - -” in the following
conditions.
- During playback of a blank section of a tape.
- If the tape was recorded before setting the
4444
DATE/TIME in the Camera’s memory.
- When the lithium battery becomes weak or dead.
■
Before you can use the DATE/TIME function, you must set the
Clock.
See CLOCK SET on page 41.
●
■
FRANÇAIS
DATE/TIME <DATE/HEURE>
✤ Cette fonction est disponible à la fois en mode CAMCORDER
<CAMESCOPE>, en mode CAMERA <APPAREILPHOTO> et en
mode PLAY<LECTURE>.
✤ La date et l’heure sont automatiquement enregistrées sur une sec-
tion spéciale de la bande.
1. Appuyez sur la touche MENU.
■
La liste des options apparaît.
2. À l’aide de la molette MENU, sélectionnez VIEWER
<VISUALISATEUR> et appuyez sur la molette
MENU.
3. À l’aide de la molette MENU, sélectionnez
DATE/TIME <DATE/HEURE>.
4. Appuyez sur la molette MENU pour accéder au
sous-menu.
5. À l’aide de la molette MENU, sélectionnez le mode
DATE/TIME <DATE/HEURE>.
■
Vous pouvez choisir l’un des modes d’affichage
suivants : OFF <ACTIVATION>, DATE <DATE>,
TIME <HEURE>, DATE/TIME <DATE/HEURE>
- OFF <DESACTIVATION>
- Date uniquement (DATE)
- Heure uniquement (TIME)
- Date et heure (DATE/TIME)
■
Pour retourner au menu précédent, placez le
curseur sur DATE/TIME <DATE/HEURE>,
au centre du menu et appuyez sur la molette
MENU.
6. Pour quitter, appuyez sur la touche MENU.
Remarques
■
Le mode DATE/TIME <DATE/HEURE> est actif quel
que soit l’état du mode d’affichage écran.
■
Le mode DATE/TIME <DATE/HEURE> affiche "- - -"
dans les cas suivants :
- Lors de la lecture d’une partie vierge de la bande.
- Si la cassette a été enregistrée avant le réglage
de la fonction DATE/TIME <DATE/HEURE>.
- Si la batterie au lithium est faible ou
Pour pouvoir utiliser cette fonction, vous devez avoir réglé l’horloge
(CLOCK SET <REGLAGE DE L'HOROLOGE) (voir page 41).
complètement déchargée.
Page 45

ENGLISH
CAMCORDER REC MODE
VIEWER SET
LCD ADJUST
DATE / TIME
TV DISPLAY
CAMCORDER REC MODE
INITIAL
LCD ADJUST
DATE/TIME
TV DISPLAY
CAMCORDER
CAMERA
MEMORY
VIEWER
Functions Fonctions
●
TV DISPLAY
✤ The TV DISPLAY function works in CAMCORDER or CAMERA
modes.
✤ You can select the output path of the OSD (On Screen
Display).
■
OFF: The OSD appears on the LCD screen only.
■
ON: The OSD appears on the LCD screen, CVF and TV.
■
Use the DISPLAYbutton located on the left side of the
camcorder to turn ON/OFF all of the OSD displayed on the
LCD/CVF/TV .
●
TV DISPLAY <AFFICHAGE>
✤ La fonction d’affichage est disponible en mode CAMCORDER
<CAMESCOPE> et CAMERA <APPAREIL PHOTO>.
✤ Vous pouvez prérégler l’affichage des messages comme suit :
■
OFF <DESACTIVATION> : l’affichage apparaît sur l’écran
LCD uniquement.
■
ON <ACTIVATION> : l’affichage apparaît sur l’écran LCD,
dans le viseur et sur la TV.
■
Utilisez la touche DISPLAY<AFFICHAGE>, située sur le
côté gauche du caméscope pour activer ou désactiver
l’option d’affichage sur l’écran LCD, dans le viseur et sur la
TV .
FRANÇAIS
1. Set the Power switch to REC or PLAY modes.
2. Press the MENU button.
■
The menu list will appear.
3. Turn the MENU DIAL to highlight VIEWER and
press the MENU DIAL.
4. Select TV DISPLAY mode from the list, press the
MENU DIAL.
■
The DISPLAYmode switches between
ON/OFF with each push.
5. To exit, press the MENU button.
1. Réglez le commutateur sur le mode REC <ENR.>
ou PLAY<LECTURE>.
2. Appuyez sur la touche MENU.
■
La liste des options apparaît.
3. À l’aide de la molette MENU, sélectionnez
VIEWER <VISUALISATEUR> et appuyez sur la
molette MENU.
4. Pour sélectionner la fonction TV DISPLAY
<AFFICHAGE>, appuyez sur la molette MENU.
■
La fonction DISPLAY<AFFICHAGE> alterne
entre ON <ACTIVATION> et OFF
<DESACTIVATION> chaque fois que vous
appuyez sur la touche ENTER <ENTREE>.
5. Pour quitter, appuyez sur la touche MENU.
4545
Page 46

ENGLISH
0 : 0 0 : 0 0
1 0 : 0 0 AM
O C T . 1 0 , 2 0 0 3
STBY
EASY
5 5 min
Functions Fonctions
EASY Mode (for Beginners) Mode EASY <SIMPLIFIE> (pour débutants)
✤ The EASY mode allows a beginner to easily make good
recordings.
■
The EASY mode only operates in CAMCORDER and
CAMERA modes.
1. Set the Power Switch to REC mode.
2. By pressing the EASY button, all functions on the
camera will be set to OFF and the recording settings will be set to the following basic modes:
■
Battery level, recording mode, counter,
DATE/TIME, and EIS ( ) will be displayed.
■
The word “EASY.Q” will appear on the LCD at
the same time.
However, the DATE/TIME will only be seen if it
has been previously set. (See page 44)
3. Press the START/STOPor PHOTO button to start
recording.
■
Recording will begin using the basic automatic
settings.
4. Press the EASY button again to turn EASY mode
off.
■
The EASY function will not turn off when you are
recording.
■
The camera will return to the settings that were set prior to
activating EASY mode.
Notes
■
In EASY mode, certain functions are not available, such as MENU,
FADE, BLC, MF/AF.
- If you want to use these functions, you must first turn EASY
■
The EASY mode settings are deleted when the battery pack is
mode off.
uninstalled from the camcorder and
therefore, they must be reset when a battery pack has been
replaced.
4646
✤ Le mode EASY <SIMPLIFIE> permet aux débutants de réaliser des
enregistrements de façon très simple.
■
Le mode EASY <SIMPLIFIE> est uniquement disponible en modes
CAMCORDER <CAMESCOPE> et CAMERA <APPAREIL
PHOTO>.
1. Réglez le commutateur sur le mode REC <ENR.>.
2. En mode EASY <SIMPLIFIE>, toutes les fonctions
du caméscope sont désactivées et les options
d’enregistrement retrouvent leurs réglages de base,
à savoir :
■
Le niveau de charge de la batterie, le mode
d’enregistrement, le compteur, la date, l’heure et
l’icône EIS ( ) s’affichent au démarrage de
l’enregistrement.
■
L’indication EASY.Q est également affichée sur
l’écran LCD.
La date et l’heure apparaissent uniquement si
leur affichage a été activé par avance
(Voir page 44)
3. Appuyez sur la touche START/STOP
<DEBUT/ARRET DE L'ENREGISTREMENT> ou
sur la touche PHOTO <PHOTO> pour commencer
l’enregistrement.
■
L’enregistrement s’effectue en fonction des
4. Appuyez une nouvelle fois sur la touche EASY <SIMPLIFIE> pour dés-
activer le mode d’enregistrement simplifié.
■
La fonction EASY <SIMPLIFIE> n'est pas désactivée lors de
l’enregistrement.
■
Le caméscope retrouve ses réglages antérieurs.
réglages automatiques de base.
Remarques
■
En mode EASY <SIMPLIFIE>, certaines fonctions telles que MENU
<MENU>, FADE <FONDU>, BLC <CONTRE-JOUR INTELLIGENT>
ou MF/AF <MISE AU POINTAUTOMATIQUE/MANUELLE> ne sont
pas disponibles.
- Vous devez tout d’abord désactiver le mode EASY <SIMPLIFIE>
pour pouvoir utiliser ces fonctions.
■
Le caméscope ne garde pas en mémoire les réglages du mode EASY
<SIMPLIFIE> si le bloc batterie est remplacé. Vous devrez alors
effectuer de nouveaux réglages.
FRANÇAIS
Page 47

ENGLISH
FADE
S.SHOW
BLC
TAPE
MEMORY
PLA
Y
REC
O
FF
Functions Fonctions
MF/AF (Manual Focus/Auto Focus) MF/AF (Manual Focus/Auto Focus
✤ The MF/AF function works in CAMCORDER and CAMERA modes.
✤ In most situations, it is better to use the automatic focus
feature, as it enables you to concentrate on the creative side of
your recording.
✤ Manual focusing may be necessary under certain conditions that
make automatic focusing difficult and/or unreliable.
Auto Focusing
✤ In CAMCORDER Mode, turning on the
device will set it to automatic focus.
In CAMERA Mode, pressing the Photo
Button halfway down will set the focus.
Manual Focusing
✤ In the following cases you may obtain bet-
ter results by adjusting the focus manually.
a. A picture containing several objects, some
close to the camcorder, others further away.
b. A person enveloped in fog or surrounded by
snow.
c. Very shiny or glossy surfaces like a car.
d. People or objects moving constantly or quickly
like an athlete or a crowd.
1. Set the Power Switch to REC mode.
2. Press the MF Button.
■
MF Icon( ) is displayed on the LCD
screen.
3. Turn the MENU DIAL up or down until the object is in focus.
■
Zoom out a little if focusing is difficult.
4. To return to AF, press the MF Button again.
<Mise au point manuelle/automatique>)
✤ La fonction MF/AF <MF/AF> est disponible en modes CAMCORDER
<CAMESCOPE> et CAMERA <APPAREILPHOTO>.
✤ Dans la plupart des cas, mieux vaut utiliser la mise au point
automatique car elle permet de vous concentrer sur l’aspect créatif de l’enregistrement.
✤ L’utilisation de la mise au point manuelle peut s’avérer nécessaire dans les
cas où la mise au point automatique est inadéquate.
Mise au point automatique
✤ En mode CAMCORDER <CAMESCOPE>,
l’appareil s’allume en mise au point
automatique.
En mode CAMERA <APPAREIL PHOTO>,
enfoncez la touche Photo à mi-course pour
régler la mise au point.
Mise au point manuelle
✤ Vous obtiendrez de meilleurs résultats en
effectuant une mise au point manuelle dans
les cas suivants.
a. Image contenant plusieurs objets, dont certains
sont proches du caméscope, d’autres plus
éloignés.
b. Sujet dans la neige ou la brume.
c. Surfaces très brillantes (une voiture, par exemple).
d. Sujets ou objets en déplacement rapide ou continu
(un sportif ou une foule, par exemple).
1. Réglez le commutateur sur le mode REC <ENR.>.
2. Appuyez sur la touche MF.
■
L'icône MF ( ) s'affiche sur l'écran LCD.
3. Faites tourner la molette MENU vers le haut ou
vers le bas jusqu’à ce que la scène soit nette.
■
Vous pouvez obtenir une image
nette en effectuant un léger zoom arrière.
4. Pour retourner en mode automatique, appuyez de
nouveau sur la touche MF.
FRANÇAIS
4747
Page 48

ENGLISH
Functions Fonctions
FRANÇAIS
Zooming In and Out with DIGITAL ZOOM
✤ The Zoom works in CAMCORDER and CAMERA modes.
Zooming In and Out
✤ Zooming is a recording technique that lets you change the size
of the subject in a scene.
For more professional looking recordings, do not use the zoom
function too often.
✤ You can zoom using variable zoom speeds.
✤ Use these features for different shots. Please note that
over-use of the zoom feature can lead to unprofessional looking results and a reduction of battery usage time.
1. Move the zoom lever slowly for
a gradual zoom, move it faster for
a high-speed zoom.
Your zooming can be monitored on the OSD.
2. T(Telephoto) side:
Subject appears closer.
3. W(Wide angle) side:
Subject appears
farther away.
Note
You can record a subject that is a minimum of 1 m (about 2.65 feet)
away from the lens surface in the TELE position,
or about 10 mm (about 0.5 inch) away in the WIDE position.
1-1 1-2
TELE
WIDE
Utilisation du zoom numérique
✤ Le zoom est disponible en mode CAMCORDER
<CAMESCOPE> et en mode CAMERA <APPAREIL PHOTO>.
Zoom avant et arrière
✤ L’utilisation du zoom est une technique d’enregistrement qui
vous permet de changer la taille d’un sujet.
Le zoom apporte à vos films une touche plus professionnelle,
mais doit être utilisé avec parcimonie.
✤ Vous pouvez sélectionner la vitesse de zoom.
✤ Utilisez ces fonctions pour varier vos plans.
Notez cependant qu’une utilisation trop fréquente risque de
donner un aspect d’amateurisme à vos films et réduit la durée
de vie de la batterie.
1. Déplacez doucement le bouton du zoom
pour un zoom très progressif, et plus vite
pour un zoom rapide.
Vous pouvez contrôler l’ef fet à l’écran.
2. Vers le "T" (téléobjectif) :
le sujet se rapproche.
3. Vers le "W"
(grand angle) :
le sujet s’éloigne.
Remarque
Vous pouvez filmer un sujet qui se trouve à une distance minimale
d’un mètre de l’objectif en position TELEOBJECTIF (T), ou à environ
10 mm en position GRAND ANGLE (W).
4848
Page 49

ENGLISH
Using the CAMCORDER - Basic Recording
Utilisation du caméscope –
enregistrement simple
Inserting and Ejecting a Cassette Insertion et éjection d’une cassette
✤ When inserting a tape or closing the cassette holder, do not apply
excessive force.
This may cause a malfunction.
✤ Do not use any tapes other than Mini DV
cassettes.
1. Connect a power source. Slide the TAPE
OPEN/EJECT switch and open
the cassette door.
- The cassette holding mechanism rises
automatically.
2. Insert a tape into the cassette holder with
the tape window facing outward and
the protection tab toward the top.
3. Press the area labelled PUSH on the
cassette holding mechanism until it clicks
into place.
- The cassette is loaded automatically.
4. Close the cassette door.
- Close the door completely until you can hear a “click”.
Note
When you have recorded something that you wish to
keep, you can protect it so that it will not be accidentally
erased.
a. Protecting a Tape :
Push the safety tab on the cassette so that the hole
is uncovered.
b. Removing the protection from a tape :
If you no longer wish to keep the recording on the
cassette, push the write-protect tab back so that it
covers the hole.
• How to Store a Tape
a. Avoid places with magnets or magnetic interference.
b. Avoid humidity and dust prone places.
c. Keep the tape in an upright position and avoid storing
it in direct sunlight.
d. Avoid dropping or knocking your tapes.
1
3 4
a. SAVE
b. REC
✤ Ne forcez pas pour insérer une bande ou refermer le compartiment à
cassette.
Vous risqueriez de provoquer un dysfonctionnement.
✤ N’utilisez pas d’autres types de bandes que les Mini DV.
2
4. Refermez le couvercle du compartiment.
- Refermez le couvercle du compartiment jusqu’à ce que vous
entendiez un clic.
Remarque
Lorsque vous avez enregistré une cassette que vous souhaitez
garder, vous pouvez la protéger contre un effacement accidentel.
a. Enregistrement impossible (protection) :
b. Enregistrement possible :
• Rangement des bandes
a. Ne placez pas les bandes à proximité d’aimants ou
b. Évitez les endroits humides et poussiéreux.
c. Rangez-les en position verticale, à l’abri du soleil.
d. Ne faites pas tomber les bandes et ne les cognez pas.
1. Branchez une source d’alimentation.
Faites glisser la touche TAPE OPEN/EJECT
et ouvrez le couvercle du compartiment à
cassette.
- Le compartiment s’ouvre
automatiquement.
2. Insérez une cassette dans le compartiment,
face transparente tournée vers l’extérieur et
languette de protection vers le haut.
3. Appliquez une légère pression à l’endroit
marqué PUSH jusqu’à ce qu’un déclic se
produise.
- La cassette est automatiquement chargée
dans le compartiment.
Faites glisser la languette de protection vers la position
Save de façon à découvrir l’ouverture.
Pour réenregistrer sur une cassette, repoussez la languette
de protection de façon à recouvrir l’ouverture (position REC).
d’interférences magnétiques.
FRANÇAIS
4949
Page 50

ENGLISH
CAMCORDER REC MODE
CAMCORDER SET
RECORD SET
PLAY SET
CAMCORDER REC MODE
CAMCORDER SET
RECORD SET
REC SELECT
REC MODE
EIS
D. ZOOM
PROGRAM AE
WHT. BALANCE
TAPE
SP
CAMCORDER REC MODE
INITIAL
RECORD SET
PLAY SET
CAMCORDER
CAMERA
MEMORY
VIEWER
Using the CAMCORDER - Basic Recording
Utilisation du caméscope –
enregistrement simple
FRANÇAIS
To select the CAMCORDER mode
✤ You can select either a tape or the Memory Stick as the storage
media for motion clips.
✤ Use M.Play mode to view the motion clips stored on the Memory
Stick.
1. Set the device to CAMCORDER and set the
power switch to REC mode.
2. Press the MENU button.
■
The menu list will appear.
3. Turn the MENU DIAL highlight to
CAMCORDER and press the MENU DIAL.
■
The sub-menu list will appear.
4. Select RECORD SET from the sub-menu and
press the MENU DIAL.
5. Turn the MENU DIAL to activate REC SELECT,
press the MENU DIAL.
■
CAMCORDER mode toggles between TAPE
and MEMORY with each press.
6. The menu list will disappear.
5050
Sélection du mode CAMCORDER <CAMESCOPE>
✤ Vous pouvez sélectionner soit une bande soit la carte Memory
Stick comme support de stockage des séquences animées.
✤ Utilisez le mode M.Play <LECTURE PHOTO> pour visionner les
séquences animées stockées sur la carte Memory Stick.
1. Réglez l'appareil sur CAMCORDER
<CAMESCOPE>, puis le commutateur sur le
mode REC <ENR.>
.
2. Appuyez sur la touche MENU.
■
La liste des options apparaît.
3. À l’aide de la molette MENU, sélectionnez
CAMCORDER <CAMESCOPE>, puis appuyez
sur la molette MENU.
■
La liste des options du sous-menu s’affiche.
4. Sélectionnez RECORD SET <REGLAGE ENR. >
dans le sous-menu et appuyez sur la molette
MENU.
5. À l’aide de la molette MENU, activez REC
SELECT <SELECT. ENR.>, puis appuyez sur la
molette MENU.
■
Le mode CAMCORDER <CAMESCOPE>
passe de TAPE <BANDE> à MEMORY
<MÉMOIRE> et vice-versa à chaque appui.
6. La liste des options disparaît
Page 51

ENGLISH
Using the CAMCORDER - Basic Recording
Utilisation du caméscope –
enregistrement simple
Making Your First Recording Premier enregistrement
P
L
A
Y
T
A
P
1. Connect a Power source to
1
the camcorder. (See page 26)
(A battery pack or the AC power
adapter)
■
Insert a cassette.
(See page 49)
2. Set the device to CAMCORDER and set the
power switch to REC mode.
■
Open the LCD monitor.
■
If the protection tab of the cassette is
open, the words STOP and
PROTECTION! will be displayed.
■
Make sure the image you want to record
appears on the LCD monitor or viewfinder.
■
Make sure the battery level indicates that
there is enough remaining power for your expected recording
time.
3. To start recording, press the START/STOP button.
■
REC is displayed on the LCD.
To stop recording, press the START/STOP button again.
■
STBY is displayed on the LCD.
■
Assurez-vous que l’image que vous voulez filmer apparaît à
l’écran LCD ou dans le viseur.
■
Assurez-vous que le niveau de la batterie indique une charge
suffisante.
3. Pour démarrer l’enregistrement, appuyez sur la touche
STAR T/STOP.
■
L’indication REC <ENR.> s'affiche.
Pour arrêter de filmer, appuyez de nouveau sur la touche
STAR T/STOP.
■
L’indication STBY<VEILLE> est affichée.
E
2
M
E
M
O
R
Y
O
F
F
C
E
R
LAY
3
PE
EMORY
REC
FRANÇAIS
1. Connectez une source
d’alimentation au caméscope.
(Voir page 26)
(Bloc batterie ou adaptateur
secteur)
■
Insérez une cassette.
(Voir page 49)
2. Réglez l'appareil sur CAMCORDER <CAMESCOPE>,
puis le commutateur sur le
mode REC <ENR.>.
■
Ouvrez l’écran LCD.
■
Si la languette de protection
de la cassette est ouverte,
les indications STOP
<ARRET> et PROTECTION!
<PROTECTION !> s'affichent.
5151
Page 52

ENGLISH
FADE
S.SHOW
BLC
REV FWD
TAPE
MEMORY
REC
P
LA
Y
O
FF
FADE
S.SHOW
BLC
REV FWD
TAPE
MEMORY
REC
P
LA
Y
O
FF
Using the CAMCORDER - Basic Recording
Utilisation du caméscope –
enregistrement simple
FRANÇAIS
When a cassette is loaded and the camcorder is left in the STBY
mode for more than 5 minutes without being used,
it will automatically turn off.
To use it again, push the START/STOP button or set the Power
switch to OFF and then back to CAMERA.
This Auto Power Off feature is designed to save battery power.
Record Search (REC SEARCH)
✤ You can view a recording using the
REC SEARCH +, _function in STBY
mode.
REC SEARCH _enables you to play the
recording backwards and
REC SEARCH + enables you to play it
forwards, for as long as you keep each
button pressed down.
✤ If you press the REC SEARCH _button in
STBY mode, your camcorder will play
in reverse for 3 seconds and return to the
original position automatically.
Note
Mosaic shaped distortion may appear on the screen while in Record
Search mode.
5252
Lorsqu’une cassette est insérée et que le caméscope est laissé en
mode veille pendant plus de cinq minutes sans être utilisé, il s’éteint
automatiquement.
Pour l’utiliser de nouveau, appuyez sur la touche START/STOP ou
placez le commutateur principal sur OFF, puis de nouveau sur
CAMERA.
Cette fonction a été conçue pour prolonger la durée de la batterie.
Recherche de séquences (REC SEARCH)
✤ Vous pouvez visionner une scène
précise à l’aide de la touche REC
SEARCH + ou _en mode STBY
<VEILLE>.
REC SEARCH - vous permet de revenir
en arrière et REC SEARCH + d’avancer,
aussi longtemps que vous appuyez sur
ces touches.
✤ Si vous appuyez rapidement sur REC
SEARCH _en mode STBY <VEILLE>,
votre caméscope revient en arrière
pendant trois secondes, puis retourne
automatiquement en lecture à sa
position d’origine.
Remarque
L’image peut apparaître brouillée lorsque vous recherchez des
séquences.
Page 53

ENGLISH
Using the CAMCORDER - Basic Recording
Utilisation du caméscope –
enregistrement simple
Hints for Stable Image Recording Astuces pour la stabilité de l’image
✤
When recording, it is very important to hold the camcorder correctly.
✤ Fix the LENS cap firmly by clipping it to the hand strap. (refer to
the diagram)
Recording with the LCD Monitor
1. Hold the camcorder firmly using the hand strap.
2. Place your right elbow against your side.
3. Place your left hand under or beside the LCD to support
and adjust it.
Do not touch the built-in microphone.
4. Choose a comfortable, stable position for the shots that
you are taking.
You can lean against a wall or on a table for greater
stability.
Do not forget to breathe gently.
5. Use the LCD frame as a guide to determine the horizontal plane.
6. Whenever possible, use a tripod.
Recording with the Viewfinder
1. Hold the camcorder firmly using the hand strap.
2. Place your right elbow against your side.
3. Place your left hand under the camcorder to support it.
Be sure not to touch the built-in microphone.
4. Choose a comfortable, stable position for the shots that
you are taking.
You can lean against a wall or on a table for greater
stability.
Do not forget to breathe gently.
5. Place your eye firmly against the viewfinder eyecup.
6. Use the viewfinder frame as a guide to determine the
horizontal plane.
7. Whenever possible, use a tripod.
✤ Lors d’un enregistrement, il est très important de tenir le
caméscope correctement.
✤ Fixez le cache de protection de l’objectif à la poignée de soutien.
(voir figure)
Utilisation de l’écran LCD
1. Maintenez le caméscope fermement par la poignée.
2. Gardez le coude droit le long du corps.
3. Placez votre main gauche sous le caméscope pour le
soutenir.
Ne touchez pas le microphone intégré.
4. Adoptez une position confortable et stable, adaptée à la
vue à prendre ; adossez-vous éventuellement à un mur
ou appuyez-vous sur une table pour une plus grande
stabilité.
N’oubliez pas de respirer doucement.
5. Utilisez le cadre de l’écran LCD pour vous aider à
déterminer le plan horizontal.
6. Si possible, utilisez un trépied.
Utilisation du viseur
1. Maintenez le caméscope fermement par la poignée.
2. Gardez le coude droit le long du corps.
3. Placez votre main gauche sous le caméscope pour le
soutenir.
Ne touchez pas le microphone intégré.
4. Adoptez une position confortable et stable, adaptée à la
vue à prendre ; adossez-vous éventuellement à un mur
ou appuyez-vous sur une table pour une plus grande
stabilité.
N’oubliez pas de respirer doucement.
5. Placez votre œil contre l’oculaire du viseur.
6. Utilisez le cadre à l’intérieur du viseur pour vous aider à
déterminer le plan horizontal.
7. Si possible, utilisez un trépied.
FRANÇAIS
5353
Page 54

ENGLISH
FADE
S.SHOW
BLC
REV FWD
TAPE
MEMORY
R
E
C
PLAY
OFF
Using the CAMCORDER - Basic Recording
Utilisation du caméscope –
enregistrement simple
Playing Back a Tape You Have Recorded on the LCD Lecture d’une bande à l’écran
✤ You can monitor the playback picture on the LCD monitor.
✤ Make sure that the battery pack is in place.
1. Set the device to CAMCORDER and the
1
Power Switch to PLAYmode.
2. Insert the tape you wish to view. (See page 49)
2
3. Open the LCD screen.
Adjust the angle of the LCD screen and set the
brightness or color if necessary.
4. Press the (REW) button to rewind the tape to
4
the starting point.
■
To stop rewinding, press the (STOP)
button.
■
The camcorder stops automatically after
rewinding is complete.
5. Press the (PLAY/STILL) button to start the playback.
■
You can view the pictures you recorded on the LCD.
■
To stop the PLAY operation, press the (STOP) button.
Notes
■
You can also view the picture on a TV screen, after connecting the
camcorder to a TV or VCR. (See page 77)
■
Various functions are available in Playback mode. (See page 79)
5454
FADE
S.SHOW
✤ Vous pouvez visionner les images que vous avez enregistrées sur
l’écran LCD.
✤ Assurez-vous que le bloc batterie est en place.
P
LA
Y
TAPE
MEMORY
BLC
O
FF
REC
1. Réglez l'appareil sur CAMCORDER
<CAMESCOPE>, puis le commutateur sur le
mode PLAY<LECTURE>.
2. Insérez la bande que vous souhaitez visualiser
(Voir page 49)
3. Ouvrez l’écran LCD.
Ajustez l’angle de l’écran, sa luminosité et sa
couleur, si nécessaire.
4. Appuyez sur la touche (REW) pour
rembobiner la cassette jusqu’à son point de
départ.
■
Pour arrêter le rembobinage, appuyez sur la
touche (STOP).
■
Le caméscope s’arrête automatiquement
lorsque la bande a atteint le début de la
cassette.
5. Appuyez sur la touche (PLAY/STILL) pour commencer
l’enregistrement.
■
Vous pouvez visionner à l’écran les images que vous venez
d’enregistrer.
■
Pour arrêter la lecture, appuyez sur la touche (STOP).
Remarques
■
Vous pouvez également visionner ces images sur l’écran d’un
téléviseur, après avoir connecté le caméscope au téléviseur ou
à un magnétoscope. (Voir page 77)
■
Plusieurs fonctions sont disponibles en mode Playback
<LECTURE>. (Voir page 79)
FRANÇAIS
Page 55

ENGLISH
Using the CAMCORDER - Advanced Recording
●
PROGRAM AE
✤ The PROGRAM AE function works in CAMCORDER mode
only.
✤ PROGRAM AE mode allows you to adjust shutter speeds and
apertures to suit different recording conditions.
✤ It gives you creative control over the depth of field.
■ AUTO Mode
- Auto balance between the subject and the background.
- To be used in normal conditions.
- The shutter speed automatically varies from 1/60 to 1/250 per
second, depending on the scene.
■ SPORTS Mode ( )
- For recording people or objects which are moving quickly.
■ PORTRAIT Mode ( )
- For focusing on the background of a subject, when the background is out of focus.
- PORTRAIT mode is most effective when used outdoors.
- The shutter speed automatically varies from 1/60 to 1/1000 per
second.
■ SPOTLIGHT Mode ( )
- For proper recording when there is only light on the subject and
not the rest of the picture.
■ SAND/SNOW Mode ( )
- For recording when people or objects are darker than the background because of reflected light from sand or snow.
■ High S. SPEED(High Shutter Speed) Mode ( )
- For recording fast-moving subjects such as players in golf or
tennis games.
Utilisation du caméscope –
FRANÇAIS
enregistrement perfectionné
●
PROGRAM AE <EXPOSITION AUTOMATIQUE>
✤ L’option PROGRAM AE <EXPOSITION AUTOMATIQUE> est
disponible uniquement en mode CAMCORDER
<CAMESCOPE>.
✤ Elle vous permet de régler la vitesse d’obturation et le
diaphragme en fonction des différentes scènes à filmer.
✤ Vous pouvez ainsi contrôler la profondeur de champ.
■ Mode AUTO <AUTO>
- Équilibrage automatique entre le sujet et l’arrière-plan.
- À utiliser dans des conditions normales.
- La vitesse d’obturation varie entre 1/60 et 1/250 de seconde,
selon la scène filmée.
■ Mode SPORTS <SPORTS> ( )
- Enregistrement d’une personne ou d’un objet se déplaçant
rapidement.
■ Mode PORTRAIT <PORTRAIT> ( )
- Mise en valeur d’un sujet en avant-plan, l’arrière-plan étant
flou.
- Le mode PORTRAIT <PORTRAIT> est à utiliser de préférence
à l’extérieur.
- La vitesse d’obturation varie entre 1/60 et 1/1000 de seconde.
■ Mode SPOTLIGHT <PROJECTEUR> ( )
- Enregistrement d’un sujet lorsque la lumière est dirigée
uniquement sur le sujet à filmer.
■ MODE SAND/SNOW <SABLE/NEIGE> ( )
- Enregistrement d’une personne ou d’un objet plus sombre que
l’arrière-plan en raison du reflet provoqué par la neige ou le
sable.
■ Mode High S. SPEED (Vitesse d'obturation rapide) ( )
- Enregistrement de sujets effectuant des mouvements très
rapides, par exemple, des joueurs de tennis ou de golf.
5555
Page 56

ENGLISH
CAMCORDER REC MODE
PROGRAM AE
AUTO
SPORTS
PORTRAIT
SPOTLIGHT
SAND / SNOW
HIGH S. SPEED
RECORD SET
CAMCORDER REC MODE
CAMCORDER SET
RECORD SET
PLAY SET
CAMCORDER REC MODE
CAMCORDER SET
RECORD SET
REC SELECT
REC MODE
EIS
D. ZOOM
PROGRAM AE
WHT. BALANCE
TAPE
SP
CAMCORDER REC MODE
INITIAL
RECORD SET
PLAY SET
CAMCORDER
CAMERA
MEMORY
VIEWER
Using the CAMCORDER - Advanced Recording
Utilisation du caméscope –
enregistrement perfectionné
FRANÇAIS
Setting PROGRAM AE
1. Press the MENU button.
■
The menu list will appear.
2. Turn the MENU DIAL to highlight
CAMCORDER and press the
MENU DIAL.
3. Select PROGRAM AE from the
sub-menu.
4. Press the MENU DIAL to enter the
sub-menu.
5. Using the MENU DIAL, select one
of the PROGRAM AE modes.
■
Press the MENU DIAL to
confirm the Program AE mode
you have selected.
6. To exit, press the MENU button.
5656
Réglage de l’exposition automatique
1. Appuyez sur la touche MENU.
■
La liste des options apparaît.
2. À l’aide de la molette MENU,
sélectionnez CAMCORDER
<CAMESCOPE>, puis appuyez
sur la molette MENU.
3. Sélectionnez PROGRAM AE
<EXPOSITION AUTOMA TIQUE>
dans le sous-menu qui s’affiche.
4. Appuyez sur la molette MENU
pour accéder au sous-menu.
5. À l’aide de la molette MENU,
sélectionnez l'un des modes
PROGRAM AE <EXPOSITION
AUTOMA TIQUE>.
■
Appuyez sur la molette MENU pour valider le mode Program
AE <EXPOSITION AUTOMATIQUE> que vous avez
sélectionné.
6. Pour quitter, appuyez sur la touche MENU.
Page 57

ENGLISH
CAMCORDER REC MODE
CAMCORDER SET
RECORD SET
REC SELECT
REC MODE
EIS
D. ZOOM
PROGRAM AE
WHT. BALANCE
TAPE
SP
CAMCORDER REC MOD
INITIAL
RECOR
PLAY
CAMCORDER
CAMERA
MEMORY
VIEWER
CAMCORDER REC MODE
CAMCORDER SET
RECORD SET
PLAY SET
CAMCORDER REC MODE
INITIAL
RECORD SET
PLAY SET
CAMCORDER
CAMERA
MEMORY
VIEWER
CAMCORDER REC MODE
AUTO
HOLD
WHT. BALANCE
INDOOR
OUTDOOR
RECORD SET
Using the CAMCORDER - Advanced Recording
●
WHT. BALANCE (WHITE BALANCE) - CAMCORDER Mode
✤ The WHITE BALANCE function in CAMCORDER mode is a
recording function that preserves the unique color of the object
under any recording condition.
✤ You may select the appropriate WHITE BALANCE mode to obtain
high quality color in the image.
■
AUTO ( ) : This mode is generally used to
control the WHITE BALANCE automatically.
■
HOLD ( ) : This fixes the current WHITE
BALANCE value.
■
INDOOR ( ) : This controls the WHITE
BALANCE according to indoor ambience.
■
OUTDOOR ( ) : This controls the WHITE
BALANCE according to outdoor ambience.
1. Set the camcorder to CAMCORDER mode.
2. Press the MENU button.
■
The menu list will appear.
3. Turn the MENU DIALto highlight CAMCORDER and
press the MENU DIAL.
4. Select WHT.BALANCE from the submenu.
5. Press the MENU DIAL to enter the sub-menu.
6. Using the MENU DIAL, select the WHITE BALANCE
function you wish to use.
■
Press the MENU DIAL to confirm the
WHITE BALANCE function you have selected.
7. To exit, press the MENU button.
Notes
■
While setting NITE PIX to ON, the WHT.BALANCE
function does not work.
■
The WHT.BALANCE function will not operate in EASY
mode.
■
Turn the Digital Zoom off (if necessary) to set a more
accurate White Balance.
■
If you have set the White Balance and the lighting
conditions change, reset the White Balance.
■
For normal outdoor recording, setting the White
Balance to AUTO may provide the best results.
Utilisation du caméscope –
FRANÇAIS
enregistrement perfectionné
●
WHITE BALANCE (WHT. BALANCE) <EQUILIBRAGE DU BLANC> -
Mode CAMCORDER <CAMESCOPE>
✤ Cette fonction en mode CAMCORDER <CAMESCOPE> permet de
préserver la couleur particulière d’un objet dans toutes les conditions de
prise de vue.
✤ Sélectionnez le mode WHITE BALANCE <EQUILIBRAGE
DU BLANC> approprié pour obtenir une bonne qualité
des couleurs de l’image.
■
AUTO <AUTO> ( ) : Ce mode permet un réglage
automatique de WHITE BALANCE <EQUILIBRAGE
DU BLANC>.
■
HOLD ( ) <CONSERVER> : Ce mode conserve la
valeur active de WHITE BALANCE <EQUILIBRAGE
DU BLANC>.
■
INDOOR <INTERIEUR> ( ) : Ce mode règle
WHITE BALANCE <EQUILIBRAGE DU BLANC> en
fonction de l’éclairage intérieur.
■
OUTDOOR <EXTERIEUR>( ) : Ce mode règle
WHITE BALANCE <EQUILIBRAGE DU BLANC> en
fonction de l’éclairage extérieur.
1. Réglez le caméscope sur CAMCORDER <CAMESCOPE>.
2. Appuyez sur la touche MENU.
■
La liste des options apparaît.
3. À l’aide de la molette MENU, sélectionnez CAMCORDER
<CAMESCOPE>, puis appuyez sur la molette MENU.
4. Sélectionnez WHT.BALANCE <EQUILIBRAGE DU
BLANC> dans le sous-menu.
5.
Appuyez sur
6. A l'aide de la molette MENU, sélectionnez la fonction
WHITE BALANCE <EQUILIBRAGE DU BLANC> à utiliser.
■
7. Pour quitter, appuyez sur la touche MENU.
Remarques
■
La fonction WHT.BALANCE <EQUILIBRAGE DU BLANC>
n’est pas disponible lorsque la fonction NITE PIX <PIX DE
NUIT> est activée.
■
La fonction WHT.BALANCE <EQUILIBRAGE DU BLANC>
n’est pas disponible en mode EASY <SIMPLIFIE>.
■
Si nécessaire, désactivez le zoom numérique pour obtenir
un équilibrage du blanc plus précis.
■
Si vous avez sélectionné WHT.BALANCE <EQUILIBRAGE
DU BLANC> et que les conditions d’éclairage ont changé,
procédez à un nouveau réglage de cette fonction.
■
À l’extérieur et dans des conditions normales, vous
obtiendrez de meilleurs résultats en réglant White Balance
<EQUILIBRAGE DU BLANC> sur le mode AUTO <AUT O>.
la molette MENU
Appuyez sur la molette MENU pour valider la fonction
WHITE BALANCE <EQUILIBRAGE DU BLANC> que
vous avez sélectionnée.
pour accéder au sous-menu.
5757
Page 58

ENGLISH
CAMCORDER REC MODE
CAMCORDER SET
RECORD SET
REC SELECT
REC MODE
EIS
D. ZOOM
PROGRAM AE
WHT. BALANCE
TAPE
SP
CAMCORDER REC MODE
DIGITAL ZOOM
100X
200X
400X
RECORD SET
800X
CAMCORDER REC MODE
CAMCORDER SET
RECORD SET
PLAY SET
CAMCORDER REC MODE
INITIAL
RECORD SET
PLAY SET
CAMCORDER
CAMERA
MEMORY
VIEWER
Using the CAMCORDER - Advanced Recording
Digital Zoom in CAMCORDER Mode
✤ Zooming more than 10x is achieved digitally.
✤ The picture quality may deteriorate depending
on how much you zoom in on the subject.
✤ We recommend that you use the EIS feature
with DIGITALZOOM for picture stability.
(See page 59)
1. Set the power switch to CAMCODER or
CAMERA mode.
2. Press the MENU button.
■
The menu list will appear.
3. Turn the MENU DIAL to CAMCORDER and
press the MENU DIAL.
4. Select RECORD SET from the sub-menu and
press the MENU DIAL.
Utilisation du caméscope –
enregistrement perfectionné
Zoom numérique en mode CAMCORDER
<CAMESCOPE>
✤ Le zoom numérique autorise un grossissement
de 10 fois.
✤ La qualité d’image peut se détériorer à mesure
que l’échelle d’agrandissement augmente.
✤ Pour assurer la stabilité de l’image, nous vous
recommandons d’utiliser la fonction EIS
<STABILISATEUR D'IMAGES ELECTRONIQUE> lorsque vous faites appel au zoom
numérique. (Voir page 59)
1. Réglez le commutateur sur le mode
CAMCORDER <CAMESCOPE> ou CAMERA
<APPAREILPHOTO>.
2. Appuyez sur la touche MENU.
■
La liste des options apparaît.
3. À l’aide de la molette MENU, sélectionnez
CAMCORDER <CAMESCOPE>, puis appuyez sur
la molette MENU.
FRANÇAIS
5. Select D.ZOOM from the sub-menu.
6. Press the MENU DIAL to setup the 100x, 200x,
400x, 800x digital zoom function or
to turn the feature OFF.
7. To exit, press the MENU button.
5858
4. Sélectionnez RECORD SET <REGLAGE ENR. >
dans le sous-menu et appuyez sur la molette
MENU.
5. Sélectionnez D.ZOOM <ZOOM NUMERIQUE>
dans le sous-menu.
6. Appuyez sur la molette MENU pour sélectionner
l’échelle de grandeur voulue (100x, 200x, 400x,
800x) ou pour désactiver le zoom numérique.
7. Pour quitter, appuyez sur la touche MENU.
Page 59

ENGLISH
CAMCORDER REC MODE
INITIAL
RECORD SET
PLAY SET
CAMCORDER
CAMERA
MEMORY
VIEWER
CAMCORDER REC MODE
CAMCORDER SET
RECORD SET
PLAY SET
CAMCORDER REC MODE
CAMCORDER SET
RECORD SET
REC SELECT
REC MODE
EIS
D. ZOOM
PROGRAM AE
WHT. BALANCE
TAPE
SP
Using the CAMCORDER - Advanced Recording
●
EIS (Electronic Image Stabilizer)
✤ The EIS function works in CAMCORDER mode only.
✤ EIS (Electronic Image Stabilizer) is a function that compen-
sates for any shaking or hand movement while holding the
camcorder (within reasonable limits).
✤ It provides more stable pictures when:
■
Recording with the zoom
■
Recording a small object close-up
■
Recording and walking at the same time
■
Recording through the window of a vehicle
Utilisation du caméscope –
FRANÇAIS
enregistrement perfectionné
●
EIS (Stabilisateur électronique d'image)
✤ Cette fonction est disponible uniquement en mode
CAMCORDER <CAMESCOPE>.
✤ Elle compense, jusqu’à un certain point, le léger tremblement
qui peut survenir en filmant.
✤ Cette fonction permet d’obtenir des images plus stables dans
les situations suivantes :
■
lorsque vous filmez avec le zoom,
■
lorsque vous filmez un petit objet en plan serré,
■
lorsque vous filmez et marchez en même temps,
■
lorsque vous filmez à travers la vitre d’un véhicule.
1. Set the device to CAMCORDER and set the power
switch to REC mode.
2. Press the MENU button.
■
The menu list will appear.
3. Turn the MENU DIAL highlight to CAMCORDER
and press the MENU DIAL.
■
The sub-menu list will appear.
4. Select RECORD SET from the sub-menu and
press the MENU DIAL.
5. Turn the MENU DIAL to activate the EIS function,
then press the MENU DIAL.
■
The EIS menu is changed to ON.
■
If you do not want to use the EIS function, set
the EIS menu to OFF.
6. To exit, press the MENU button.
Note
■
It is recommended that you deactivate the shake
compensation function when using a tripod.
1. Réglez l'appareil sur CAMCORDER
<CAMESCOPE>, puis le commutateur sur le
mode REC <ENR.>.
2. Appuyez sur la touche MENU.
■
La liste des options apparaît.
3. À l’aide de la molette MENU, sélectionnez
CAMCORDER <CAMESCOPE>, puis appuyez
sur la molette MENU.
■
La liste des options du sous-menu s’affiche.
4. Sélectionnez RECORD SET <REGLAGE ENR. >
dans le sous-menu et appuyez sur la molette
MENU.
5. À l’aide de la molette MENU, activez la fonction
EIS, puis appuyez sur la molette MENU.
■
L’option EIS est activée lorsqu’elle est réglée
sur la position ON.
■
Si vous ne souhaitez pas utiliser la fonction
EIS, réglez-la sur OFF.
6. Pour quitter, appuyez sur la touche MENU.
Remarque
■
Nous vous recommandons de désactiver le
stabilisateur d’images lorsque vous filmez avec
un trépied.
5959
Page 60

ENGLISH
Using the CAMCORDER - Advanced Recording
●
DSE(Digital Special Effects) SELECT in CAMCORDER Mode
✤ The DSE function works in CAMCORDER mode only.
✤ The digital effects enable you to give a creative look to your
recording by adding various special effects.
✤ Select the appropriate digital effect for the type of picture that
you wish to record and the effect you wish to create.
✤ There are 9 DSE modes.
Utilisation du caméscope –
FRANÇAIS
enregistrement perfectionné
●
DSE (Effets spéciaux numériques) en mode
CAMCORDER <CAMESCOPE>
✤ Cette fonction est disponible uniquement en mode
CAMCORDER <CAMESCOPE>.
✤ Les effets numériques donnent un caractère original à vos
films.
✤ Choisissez l’effet numérique que vous souhaitez donner à vos
images.
✤ Il existe neuf effets spéciaux au choix.
a. ART Mode
This mode gives the images a coarse effect.
b. MOSAIC Mode
This mode gives the images a mosaic effect.
c. SEPIAMode
This mode gives the images a reddishbrown pigment.
d. NEGA Mode
This mode reverses the colors of the
images, creating a negative image.
e. MIRROR Mode
This mode cuts the picture in half, using a mirror effect.
f. BLK & WHT Mode
This mode changes the images to black and
white.
g. EMBOSS Mode
This mode creates a 3D effect (embossing).
h. CINEMA Mode
This mode covers the upper/lower portions of
the screen to create a cinematic effect.
i. MAKE - UP Mode
This mode allows the images to be colored
red, green, blue or yellow.
6060
a
e f
g
i
b
dc
h
a. Mode ART <ART>
Ce mode donne à l’image un effet artistique,
appelé solarisation.
b. Mode MOSAIC <MOSAIQUE>
L’image est traitée comme une mosaïque.
c. Mode SEPIA<SEPIA>
Ce mode donne à l’image un effet
monochrome de couleur sépia.
d. Mode NEGA <NEGATIF>
Ce mode permet de filmer en donnant un
effet négatif à l’image.
e. Mode MIRROR <MIROIR>
L’image apparaît symétriquement par
rapport à un axe médian vertical.
f. Mode BLK & WHT <NOIR & BLANC>
Les images sont reproduites en noir et
blanc.
g. Mode EMBOSS <RELIEF>
Ce mode permet un effet 3D.
h. Mode CINEMA <CINEMA>
Ce mode ajoute des bandes noires en haut
et en bas de l’image pour donner l’effet
d’une image de film.
i. Mode MAKE - UP <MAQUILLAGE>
Ce mode permet de colorer l’image en
rouge, jaune, vert ou bleu.
Page 61

ENGLISH
CAMCORDER REC MODE
CAMCORDER SET
RECORD SET
DSE SELECT
AUDIO MODE
WIND CUT
AV IN/OUT
12bit
OUT
CAMCORDER REC MODE
INITIAL
RECORD SET
PLAY SET
CAMCORDER
CAMERA
MEMORY
VIEWER
CAMCORDER REC MODE
CAMCORDER SET
RECORD SET
PLAY SET
CAMCORDER REC MODE
DSE SELECT
ART
MOSAIC
SEPIA
RECORD SET
NEGA
MIRROR
BLK&WHT
Using the CAMCORDER - Advanced Recording
Utilisation du caméscope –
enregistrement perfectionné
FRANÇAIS
Selecting a Digital Effect in CAMCORDER Mode
1. Set the device to CAMCORDER and set the
power switch to REC mode.
2. Press the MENU button.
■
The menu list will appear.
3. Turn the MENU DIAL to highlight CAMCORDER
and press the MENU DIAL.
4. Select RECORD SET from the sub-menu and
press the MENU DIAL.
5. Select DSE SELECT from the sub-menu.
6. Press the MENU DIAL to enter the sub-menu.
7. Using MENU DIAL, select the DSE mode you wish
to use.
■
Press the MENU DIAL to confirm the DSE
mode you have selected.
8. To exit, press the MENU button.
Notes
■
While setting NITE PIX to ON, the DSE function
does not work.
■
The DSE function will not operate in EASY mode.
Sélection d'un effet numérique en mode
CAMCORDER <CAMESCOPE>
1. Réglez l'appareil sur CAMCORDER
<CAMESCOPE>, puis le commutateur sur le
mode REC <ENR.>.
2. Appuyez sur la touche MENU.
■
La liste des options apparaît.
3. À l’aide de la molette MENU, sélectionnez
CAMCORDER <CAMESCOPE>, puis appuyez
sur la molette MENU.
4. Sélectionnez RECORD SET <REGLAGE ENR. >
dans le sous-menu et appuyez sur la molette
MENU.
5. Sélectionnez DSE SELECT <SELECT DSE>
dans le sous-menu qui s’affiche.
6. Appuyez sur la molette MENU pour accéder au
sous-menu.
7. A l'aide de la molette MENU, sélectionnez le
mode DSE <EFFETS SPECIAUX
NUMERIQUES> à utiliser.
■
Appuyez sur la molette MENU pour valider le
mode DSE <EFFETS SPECIAUX
NUMERIQUES> que vous avez sélectionné.
8. Pour quitter, appuyez sur la touche MENU.
Remarques
■
La fonction DSE <EFFETS SPECIAUX
NUMERIQUES> n’est pas disponible lorsque
NITE PIX <PIX DE NUIT> est réglé sur ON.
■
La fonction DSE <EFFETS SPECIAUX
NUMERIQUES> n’est pas disponible en mode
EASY <SIMPLIFIE>.
6161
Page 62

ENGLISH
CAMCORDER REC MODE
CAMCORDER SET
RECORD SET
PLAY SET
CAMCORDER REC MODE
INITIAL
RECORD SET
PLAY SET
CAMCORDER
CAMERA
MEMORY
VIEWER
CAMCORDER REC MODE
CAMCORDER SET
RECORD SET
REC SELECT
REC MODE
EIS
D. ZOOM
PROGRAM AE
WHT. BALANCE
TAPE
LP
Using the CAMCORDER - Advanced Recording
●
REC MODE
✤ The REC MODE function works in both CAMCORDER and
PLAY(DV IN) modes.
✤ This camcorder records and plays back in SP (standard play)
mode and in LP (long play) mode.
■
SP (standard play): This mode permits 60 minutes of
recording time with a DVM60 tape.
■
LP (long play): This mode permits 90 minutes of recording
time with a DVM60 tape.
1. Set the device to CAMCORDER and set the
power switch to REC mode.
2. Press the MENU button.
■
The menu list will appear.
3. Turn the MENU DIAL to highlight CAMCORDER
and press the MENU DIAL.
4. Select RECORD SET from the sub-menu and
press the MENU DIAL.
5. Turn the MENU DIAL to highlight REC MODE and
press the MENU DIAL.
6. Select REC MODE from the sub-menu and press
the MENU DIAL.
■
The REC MODE toggles between SP and LP
with each press.
7. To exit, press the MENU button.
Notes
■
We recommend that you use this camcorder to
play back any tapes recorded on this camcorder.
Playing back a tape recorded in other equipment
may produce mosaic shaped distortion.
■
When you record a tape in SP and LP modes,
or LP mode only, the playback picture may be
distorted or the time code
may not be written properly between scenes.
■
Record using SP mode for the best picture and sound quality.
6262
Utilisation du caméscope –
FRANÇAIS
enregistrement perfectionné
●
REC MODE <MODE D'ENREGISTREMENT>
✤ La fonction REC MODE <MODE D'ENREGISTREMENT> est
disponible en modes CAMCORDER <CAMESCOPE> et
PLAY(DV IN) <LECTURE (DV IN)>.
✤ Ce caméscope peut enregistrer et lire des cassettes en mode
SP (standard) et LP (longue durée).
■
SP (standard) : offre 60 minutes d’enregistrement sur une
bande DVM60.
■
LP (longue durée) : offre 90 minutes d’enregistrement sur une
bande DVM60.
1. Réglez l'appareil sur CAMCORDER
<CAMESCOPE>, puis le commutateur sur le mode
REC <ENR.>.
2. Appuyez sur la touche MENU.
■
La liste des options apparaît.
3. À l’aide de la molette MENU, sélectionnez
CAMCORDER <CAMESCOPE>, puis appuyez sur
la molette MENU.
4. Sélectionnez RECORD SET <REGLAGE ENR. >
dans le sous-menu et appuyez sur la molette MENU.
5. À l’aide de la molette MENU, sélectionnez REC
MODE <MODE D'ENREGISTREMENT>, puis
appuyez sur la molette MENU.
6. Sélectionnez REC MODE <MODE D'ENREGISTREMENT> dans le sous-menu et appuyez sur la
molette MENU.
■
SP et LP s’affichent alors alternativement à
chaque appui.
7. Pour quitter, appuyez sur la touche MENU.
Remarques
■
Nous vous recommandons d’utiliser ce caméscope
pour lire les bandes que vous avez enregistrées
avec ce dernier.
Si vous lisez des bandes enregistrées avec un autre
appareil, la qualité de l’image risque d’être altérée.
■
Lorsque vous utilisez à la fois les modes SP et LP
sur une même bande, ou le mode LP uniquement,
l’image visionnée risque d’être déformée ou l’horo
datage peut être incorrect.
■
Pour conserver une bonne qualité sonore et visuelle,
il est conseillé d’utiliser le mode d’enregistrement
standard SP.
Page 63

ENGLISH
CAMCORDER REC MODE
CAMCORDER SET
RECORD SET
DSE SELECT
AUDIO MODE
WIND CUT
AV IN/OUT
16bit
OUT
CAMCORDER REC MODE
CAMCORDER SET
RECORD SET
PLAY SET
CAMCORDER REC MODE
INITIAL
RECORD SET
PLAY SET
CAMCORDER
CAMERA
MEMORY
VIEWER
Using the CAMCORDER - Advanced Recording
●
AUDIO MODE
✤ The AUDIO MODE function works in CAMCORDER mode.
✤ This camcorder records sound in two ways. (12bit, 16bit)
■
12bit : You can record two 12bit stereo sound tracks.
The original stereo sound can be recorded onto the
MAIN (SOUND1) track.
Additional stereo sound can be dubbed onto the
■
1. Set the device to CAMCORDER and set the power
switch to REC mode.
2. Press the MENU button.
■
The menu list will appear.
3. Turn the MENU DIAL to highlight CAMCORDER
and press the MENU DIAL.
4. Select RECORD SET from the sub-menu and
press the MENU DIAL.
5. Turn the MENU DIAL to highlight AUDIO MODE
and press the MENU DIAL.
6. Select the AUDIO MODE you wish to use from the
menu then press the MENU DIAL.
■
The AUDIO MODE toggles between 12bit-16bit
with each press of the dial.
7. To exit, press the MENU button.
SUB (SOUND2) track.
16bit : You can record one high quality stereo sound using
the 16bit recording mode.
Audio dubbing is not possible when using this mode.
Utilisation du caméscope –
FRANÇAIS
enregistrement perfectionné
●
AUDIO MODE <MODE AUDIO>
✤ La fonction AUDIO MODE <MODE AUDIO> est disponible en
mode CAMCORDER <CAMESCOPE>.
✤ Ce caméscope peut enregistrer le son de deux manières dif-
férentes (en 12 et 16 bits).
■
12 bits : vous pouvez enregistrer deux pistes sonores
stéréo 12 bits. Le son stéréo original peut être
enregistré sur la piste principale (SOUND1) et
des sons supplémentaires sur la piste secondaire
■
(SOUND2).
16 bits : ce mode offre un enregistrement haute qualité
16 bits. Cependant, dans ce mode, vous ne
pourrez pas réaliser de doublage.
1. Réglez l'appareil sur CAMCORDER
<CAMESCOPE>, puis le commutateur sur le
mode REC <ENR.>.
2. Appuyez sur la touche MENU.
■
La liste des options apparaît.
3. À l’aide de la molette MENU, sélectionnez
CAMCORDER <CAMESCOPE>, puis appuyez
sur la molette MENU.
4. Sélectionnez RECORD SET <REGLAGE ENR. >
dans le sous-menu et appuyez sur la molette
MENU.
5. À l’aide de la molette MENU, sélectionnez AUDIO
MODE <MODE AUDIO>, puis appuyez sur la
molette MENU.
6. Sélectionnez le mode audio que vous souhaitez
dans le menu, puis appuyez sur la molette MENU.
■
AUDIO MODE <MODE AUDIO> bascule entre
12 bits et 16 bits à chaque appui sur la
molette.
7. Pour quitter, appuyez sur la touche MENU.
6363
Page 64

ENGLISH
CAMCORDER REC MODE
CAMCORDER SET
RECORD SET
DSE SELECT
AUDIO MODE
WIND CUT
AV IN/OUT
12bit
OUT
CAMCORDER REC MODE
CAMCORDER SET
RECORD SET
PLAY SET
CAMCORDER REC MODE
INITIAL
RECORD SET
PLAY SET
CAMCORDER
CAMERA
MEMORY
VIEWER
Using the CAMCORDER - Advanced Recording
●
WIND CUT
✤ The WIND CUT function works in CAMCORDER, and PLAY
modes.
✤ The WIND CUT function minimizes wind noise or other noise
while recording.
- When the wind cut is on, some low sounds are eliminated
along with the sound of the wind.
Utilisation du caméscope –
FRANÇAIS
enregistrement perfectionné
●
WIND CUT <COUPE-VENT>
✤ La fonction WIND CUT <COUPE-VENT> est disponible en mode
CAMCORDER <CAMESCOPE> et PLAY<LECTURE>.
✤ Cette fonction réduit le niveau de bruit ambiant pendant le
tournage, et notamment le souffle du vent.
- Lorsque cette fonction est activée, certains bruits faibles sont
supprimés et ne seront plus audibles dans
l’enregistrement.
1. Set the device to CAMCORDER and set the
power switch to REC mode.
2. Press the MENU button.
■
The menu list will appear.
3. Turn the MENU DIAL to highlight CAMCORDER
and press the MENU DIAL.
4. Select RECORD SET from the sub-menu and
press the MENU DIAL.
5. Turn the MENU DIAL to highlight WIND CUT and
press the MENU DIAL.
6. This feature toggles ON/OFF each time you press
the MENU DIAL.
7. To exit, press the MENU button.
Notes
■
Make sure WIND CUT is set to OFF when you
want the microphone to be as sensitive as
possible.
■
Use the WIND CUT when recording in windy
places such as the beach or near buildings.
6464
1. Réglez l'appareil sur CAMCORDER
<CAMESCOPE>, puis le commutateur sur le
mode REC <ENR.>.
2. Appuyez sur la touche MENU.
■
La liste des options apparaît.
3. À l’aide de la molette MENU, sélectionnez
CAMCORDER <CAMESCOPE>, puis appuyez
sur la molette MENU.
4. Sélectionnez RECORD SET <REGLAGE ENR. >
dans le sous-menu et appuyez sur la molette
MENU.
5. À l’aide de la molette MENU, sélectionnez WIND
CUT <COUPE-VENT>, puis appuyez sur la molette
MENU.
6. Alternez entre ON et OFF pour activer ou
désactiver la fonction en appuyant sur la molette
MENU.
7. Pour quitter, appuyez sur la touche MENU.
Remarques
■
Assurez-vous que la fonction WIND CUT
<COUPE-VENT> est réglée sur OFF lorsque vous
voulez maximiser la sensibilité du micro.
■
Utilisez la fonction WIND CUT <COUPE-VENT>
pour des enregistrements dans des lieux venteux
comme la plage ou à proximité de bâtiments.
Page 65

ENGLISH
Using the CAMCORDER - Advanced Recording
Utilisation du caméscope –
enregistrement perfectionné
FRANÇAIS
Using Quick Menu(Navigation Menu)
✤ Quick Menu is available only in CAMCORDER mode.
✤ Quick Menu is used to adjust camera functions by simply using the
MENU SELECTOR dial.
This feature is useful for when you want to make simple
adjustments without having to access the menus and sub-menus.
■ DATE/TIME
- Each time you select DATE/TIME and press the MENU DIAL,
it will be displayed in the order of DATE - TIME - DATE/TIME OFF (See page 50).
■ WL.REMOTE ( )
- Each time you select WL.REMOTE and press the MENU DIAL,
the WL.REMOTE is switched to either enabled ( ) or
disabled ( ) .
■ EIS ( )
- Each time you select EIS and press the MENU DIAL, the EIS
icon is displayed or set to OFF.
■ DSE (Digital Special Effect) (See page 60)
- Each time you select DSE and press the MENU DIAL, the DSE
preset values are applied or set to OFF.
DSE values will not switch between ON and OFF if they have
not been preset in the menu.
■ PROGRAM AE (See page 55)
- Each time you select PROGRAM AE and press the MENU
DIAL, you can choose between the preset PROGRAM AE
value and AUTO. You can’t choose between AUTO and the
PROGRAM AE value if the value has not been preset in the
regular menu.
Quick Menu <Menu rapide> (menu de navigation)
✤ Cette fonction n’est disponible qu’en mode CAMCORDER
✤ Elle permet d’effectuer des réglages simples à l’aide de la molette
■
■
■
■
■
<CAMESCOPE>.
MENU sans devoir accéder à l’ensemble des menus et sous-
menus.
DATE/TIME <DATE/HEURE>
-Sélectionnez la fonction DATE/TIME (DATE/HEURE). Ensuite,
chaque fois que vous appuyez sur la molette MENU, les mentions DATE <DATE> - TIME <HEURE> - DATE/TIME
<DATE/HEURE> - OFF s'affichent (Voir page 50).
WL.REMOTE ( ) <TELECOMMANDE>
-Sélectionnez la fonction WL.REMOTE <TELECOMMANDE> et
appuyez sur la molette MENU, pour l’activer ( ) ou la dés-
activer ( ).
EIS ( ) <STABILISATEUR ELECTRONIQUE D'IMAGES>
-Sélectionnez la fonction EIS <STABILISATEUR ELECTRON-
IQUE D'IMAGES>. Lorsque vous appuyez sur la molette
MENU, l’icône EIS ou la mention OFF apparaît à l’écran.
DSE (EFFETS SPECIAUX NUMERIQUES) (Voir page 60)
-Sélectionnez la fonction DSE <EFFETS SPECIAUX
NUMERIQUES>. Lorsque vous appuyez sur la molette MENU,
la valeur préréglée ou la mention OFF apparaît à l’écran.
Les réglages DSE doivent être effectués au préalable.
PROGRAM AE <EXPOSITION AUTOMATIQUE> (Voir page 55)
-Sélectionnez la fonction PROGRAM AE <EXPOSITION
AUTOMATIQUE>. Lorsque vous appuyez sur la molette
MENU, vous pouvez sélectionner les valeurs préréglées de
PROGRAM AE <EXPOSITION AUTOMATIQUE> ou l’indication
AUTO <AUTO>.
La sélection entre la valeur de AUTO <AUTO> et celle de
PROGRAM AE <EXPOSITION AUTOMATIQUE> est possible
uniquement si la sélection n'a pas été effectuée dans le menu
principal.
6565
Page 66

ENGLISH
SHUTTER
EXPOSURE
0 : 0 0 : 0 0
1 0 : 0 0 AM
O C T . 1 0 , 2 0 0 3
MIRROR
FADE
S.SHOW
BLC
TAPE
MEMORY
P
LA
Y
REC
O
FF
Using the CAMCORDER - Advanced Recording
■ WHT. BALANCE (See page 57)
- Each time you select WHT. BALANCE and press the MENU
DIAL, you can choose between
the preset WHT.BALANCE value and AUTO. As in PROGRAM
AE, you can't choose between
AUTO and- WHT.BALANCE value if it has not been preset.
■ FOCUS (Manual Focus/Auto Focus) (See page 47)
- Each time you select FOCUS and press the MENU DIAL,
the FOCUS is switched to either Manual Focus (MF) or
Auto Focus.
■ SHUTTER SPEED & EXPOSURE
- You can set values for SHUTTER SPEED and EXPOSURE by
selecting the ( ) icon and pressing the MENU DIAL.
For more information, see the next chapter.
Setting the Quick Menu
1. Set the device to CAMCORDER and set the
power switch to REC mode.
2. Turn the MENU DIAL to select a function you
want and then press the MENU DIAL to change
the values.
Notes
■
The Quick Menu function will not
operate in EASY mode.
■
If you are using the Manual
FOCUS ( ) function,
you cannot use the Quick Menu.
If you want to use the Quick Menu
function, exit the Manual FOCUS
( ) mode.
6666
DSE
PROGRAM AE
WHT. BALANCE
MANUAL FOCUS
SHUTTTER
EXPOSURE
EIS
Utilisation du caméscope –
FRANÇAIS
enregistrement perfectionné
■
WHT. BALANCE <EQUILIBRAGE DU BLANC> (Voir page 57)
-Sélectionnez la fonction WHT. BALANCE <EQUILIBRAGE DU
BLANC>. Lorsque vous appuyez sur la molette MENU, la valeur
préréglée de WHT.BALANCE <EQUILIBRAGE DU BLANC> ou
l’indication AUTO <AUTO> apparaît à l’écran. Comme pour
PROGRAM AE <EXPOSITION AUTOMATIQUE>, vous ne pouvez choisir entre la valeur de AUTO et celle de WHT.BALANCE
<EQUILIBRAGE DU BLANC> si la valeur n'a pas été préréglée.
■
FOCUS <MISE AU POINT> (Mise au point manuelle/automatique) (Voir page 47)
-Sélectionnez la fonction FOCUS <MISE AU POINT> et appuyez
sur la molette MENU pour sélectionner la mise au point manuelle
(MF) ou automatique.
■
SHUTTER SPEED <VITESSE D’OBTURATION> & EXPOSURE
<EXPOSITION>
- Pour régler les valeurs de SHUTTER SPEED <VITESSE D'OBTURATION> et de EXPOSURE <EXPOSITION>,
sélectionnez l’icône ( ) et appuyez sur la molette MENU.
Pour plus d’informations sur cette fonction, reportez-vous au
chapitre suivant.
Utilisation de Quick Menu <MENU RAPIDE>
1. Réglez l'appareil sur CAMCORDER
<CAMESCOPE>, puis le commutateur sur
le mode REC <ENR.>.
2. À l’aide de la molette MENU, sélectionnez
la fonction souhaitée et appuyez sur la molette
MENU pour modifier le réglage.
Remarques
■
La fonction Quick Menu <Menu rapide> n’est pas disponible en mode
EASY <SIMPLIFIE>.
■
WL.REMOTE
DATE/TIME
La fonction Quick Menu <MENU
RAPIDE> n’est pas disponible
en mode MANUAL FOCUS <MISE
AU POINT MANUELLE> ( ).
Pour l’utiliser, vous devez d’abord
revenir en automatique.
Page 67

ENGLISH
Using the CAMCORDER - Advanced Recording
Utilisation du caméscope –
enregistrement perfectionné
FRANÇAIS
SHUTTER SPEED & EXPOSURE
✤ You can set SHUTTER SPEED and EXPOSURE only in
CAMCORDER mode.
✤ SHUTTER SPEED and EXPOSURE values can only be set in
the Quick Menu.
✤ SHUTTER SPEED and EXPOSURE are automatically
switched and/or deactivated.
1. Set the device to CAMCORDER and set the power switch to
REC mode.
2. Turn the MENU DIAL until you see icon ( ) on, and then press
the MENU DIAL.
■
You see a screen on which you can select SHUTTER SPEED
and EXPOSURE.
■
Turn the MENU DIAL to select the item you want and then
press the MENU DIAL.
■
SHUTTER SPEED can be set to 1/60, 1/100, 1/250, 1/500,
1/1000, 1/2000, 1/4000 or 1/10000.
■
EXPOSURE can be set between 00 and 29.
3. To exit from the setting screen, select the icon( ) and press the
MENU DIAL.
Notes
■
If you want to use the selected shutter speed and exposure value,
you should begin the recording with
the shutter speed and the exposure adjustment screens displayed
on the LCD.
■
If you manually change the shutter speed and the exposure value
when Auto-exposure option is selected, manual changes are
applied first.
SHUTTER SPEED <VITESSE D’OBTURATION> & EXPOSURE
<EXPOSITION>
✤ Ces fonctions ne sont disponibles qu’en mode CAMCORDER
<CAMESCOPE>.
✤ Elles ne peuvent être modifiées qu’à partir de Quick Menu
<MENU RAPIDE>.
✤ Ces fonctions sont automatiquement activées et/ou désac-
tivées.
1. Réglez l'appareil sur CAMCORDER <CAMESCOPE>, puis le
commutateur sur le mode REC <ENR.>.
2. À l’aide de la molette MENU, sélectionnez l’icône ( ), puis
appuyez sur la molette MENU.
■
Les options SHUTTER SPEED <VITESSE D'OBTURATION>
et EXPOSURE <EXPOSITION> s’affichent à l’écran.
■
À l’aide de la molette MENU, sélectionnez l’option souhaitée,
puis appuyez sur la molette MENU.
■
Les vitesses disponibles sont les suivantes : 1/60, 1/100,
1/250, 1/500, 1/1000, 1/2000, 1/4000 ou 1/10000.
■
Les valeurs d’exposition sont comprises entre 00 et 29.
3. Pour quitter le menu, sélectionnez l’icône ( ) et appuyez sur la
molette MENU.
Remarques
■
Si vous souhaitez utiliser le réglage de vitesse d’obturation et
d’exposition sélectionné, vous devez commencer votre
enregistrement avec les réglages qui s’affichent à l’écran.
■
Si vous changez manuellement les valeurs de vitesse d’obturation
et d’exposition lorsque l’option Auto-exposure <EXPOSITION
AUTOMATIQUE> est sélectionnée, le réglage manuel prévaut.
6767
Page 68

ENGLISH
Using the CAMCORDER - Advanced Recording
Utilisation du caméscope –
enregistrement perfectionné
FRANÇAIS
SLOW SHUTTER (Low Shutter Speed) SLOW SHUTTER (Vitesse d'obturation lente)
✤ The SLOW SHUTTER function works in CAMCORDER mode only.
✤ The shutter speed can be controlled, allowing you to record slow
moving objects.
✤ Cette fonction est disponible en mode CAMCORDER
<CAMESCOPE> uniquement.
✤ La vitesse d’obturation est réglable, ce qui permet de prendre des
objets se déplaçant lentement.
1. Set the device to CAMCORDER and set the
power switch to REC mode.
2. Press the SLOW SHUTTER button.
3. Each time you press the SLOW SHUTTER
button, SHUTTER SPEED is changed
between S1/30, S1/15, S1/8, and OFF.
4. To exit, press the SLOW SHUTTER button.
Note
■
When using "SLOW SHUTTER" the image takes on a slow motion
like effect.
6868
1. Réglez l'appareil sur CAMCORDER
<CAMESCOPE>, puis le commutateur sur le
mode REC <ENR.>.
2. Appuyez sur la touche SLOW SHUTTER.
3. Cette touche permet de sélectionner l’une
des vitesses d’obturation suivantes : 1/30 s,
1/15 s, 1/8 s et désactivé.
4. Pour sortir du menu, appuyez sur la touche
SLOW SHUTTER.
Remarque
■
Lorsque vous sélectionnez SLOW SHUTTER <OBTURATION
LENTE>, l’image s’affiche avec un effet de ralenti.
Page 69

ENGLISH
FADE
S.SHOW
BLC
REV FWD
TAPE
MEMORY
P
L
A
Y
R
E
C
O
F
F
Using the CAMCORDER - Advanced Recording
Utilisation du caméscope –
enregistrement perfectionné
FRANÇAIS
BLC (Back Light Compensation)
✤ BLC works in CAMCORDER mode only.
✤ Back lighting exists when the subject is
darker than the background.
For example:
■
The subject is in front of a window.
■
The person to be recorded is
wearing white or shiny clothes and
is placed against a bright
background; the person’s face is too
dark to distinguish his/her features.
■
The subject is outdoors and the background is overcast.
■
The light sources are too bright.
■
The subject is against a snowy background.
1. Set the device to CAMCORDER.
2. Set the power switch to REC mode.
3. Press the BLC(STOP) button.
■
Normal - BLC - Normal
■
BLC enhances the subject.
Notes
■
While setting NITE PIX to ON, the BLC function does not work.
■
The BLC function will not operate in EASY mode.
BLC (Contre-jour intelligent)
* BLC on* BLC off
■
Le sujet est à l’extérieur et l’arrière-plan est un ciel couvert.
■
Les sources lumineuses sont trop vives.
■
L’arrière-plan est enneigé.
1. Réglez l'appareil sur CAMCORDER
2. Réglez le caméscope sur le mode REC <ENR.>.
3. Appuyez sur la touche BLC(STOP).
Remarques
■
La fonction BLC n’est pas disponible lorsque NITE PIX <PIX DE
NUIT> est réglé sur ON.
■
Cette fonction n’est pas disponible en mode EASY <SIMPLIFIE>.
✤ La fonction BLC n’est disponible qu’en
mode CAMCORDER <CAMESCOPE>.
✤ Un contre-jour apparaît lorsque le
sujet est plus sombre que son
environnement. Par exemple :
■
Le sujet est placé devant une
fenêtre.
■
La personne filmée porte des
vêtements clairs ou brillants alors
que l’arrière-plan est lumineux :
son visage devient trop sombre.
<CAMESCOPE>.
■
Normal - BLC - Normal
■
BLC met en évidence le sujet.
6969
Page 70

ENGLISH
FADE
S.SHOW
BLC
TAPE
MEMORY
P
LA
Y
REC
O
F
F
FADE
S.SHOW
BLC
TAPE
MEMORY
PLA
Y
REC
O
F
F
FADE
S.SHOW
BLC
TAPE
MEMORY
PLA
Y
REC
O
FF
FADE
S.SHOW
BLC
TAPE
MEMORY
P
LA
Y
REC
O
FF
Using the CAMCORDER - Advanced Recording
Utilisation du caméscope –
enregistrement perfectionné
FRANÇAIS
Fade In and Out
✤ The FADE function works in CAMCORDER and CAMERA modes.
✤ You can give your recordings a
professional look by using special effects such as fading in at the
beginning of a sequence or fading out at the end of a sequence.
To Start Recording
1. Before recording, hold down the
FADE button.
The picture and sound gradually
disappear (Fade Out).
2. Press the START/STOPbutton and at
the same time release the FADE button.
Recording starts and the picture and
sound gradually appear (Fade In).
To Stop Recording
(Using FADE IN / FADE OUT)
3. When you wish to stop recording, hold
down the FADE button. The picture and
sound gradually disappear (fade out).
4. When the picture has
disappeared,
press the START/STOP button to stop
recording.
Press the FADE button a. FADE OUT Gradual disappearance
a. FADE OUT
(Approx. 4 seconds)
b. FADE IN
(Approx. 4 seconds)
Fade In and Out <Fondu en ouverture et en fermeture>
✤ La fonction FADE <FONDU> est disponible en modes CAM-
CORDER <CAMESCOPE> et CAMERA <APPAREIL PHOTO>.
✤ Lors de l’enregistrement de vos films, vous pouvez utiliser certains
effets spéciaux, tels que le fondu en ouverture ou en fermeture,
afin de donner un aspect professionnel à vos séquences.
Début de l’enregistrement
STBY
➔
➔
➔
➔
➔
➔
➔
➔
0:00:00
0:00:15
0:00:15
0:00:20
1. Avant de démarrer l’enregistrement,
appuyez sur la touche FADE et
maintenez-la enfoncée.
L’image et le son disparaissent
REC
progressivement (fondu en fermeture).
2. Appuyez sur la touche START/STOP
tout en relâchant la touche FADE.
L’enregistrement commence : l’image et
le son apparaissent progressivement
REC
(fondu en ouverture).
Fin de l’enregistrement (avec fondu)
3. À la fin de l’enregistrement, appuyez
sur la touche FADE et maintenez-la
STBY
enfoncée.
L’image et le son disparaissent
progressivement (fondu en fermeture).
4. Lorsque l’image a disparu, appuyez sur
la touche START/STOP pour arrêter
l’enregistrement.
a. Fondu en fermeture
(Environ 4 secondes)
b. Fondu en ouverture
(Environ 4 secondes)
7070
Gradual appearance b. FADE IN Release the FADE button
Page 71

ENGLISH
PHOTO
REW/RPS
A.DUB STOP SELF TIMER
SLOW
PLAY FF/FPS
STILL ZERO MEM.
FADE
BLC
REV FWD
TAPE
MEMORY
P
L
A
Y
R
E
C
O
F
F
Using the CAMCORDER - Advanced Recording
Audio Dubbing Audio Dubbing <Doublage sonore>
✤ The AUDIO DUBBING function only works in PLAYER Mode.
✤ You can add sound to the original sound on a pre-recorded tape,
recorded in SP mode with 12bit sound.
✤
Use the internal and external microphones or other audio equipment.
✤ The original sound will not be erased.
Dubbing Sound
1. Set the device to CAMCORDER.
■
If you want to use an external microphone,
connect the microphone to the external
MIC input jack on the camcorder.
2. Set the power switch to PLAY mode.
■
If you want to use an external
microphone, connect the microphone
to the external MIC input jack on the
camcorder.
3. Press the (PLAY/STILL) button and
find the time frame of the scene to
be dubbed.
4. Press the (PLAY/STILL) button to
pause the scene.
5. Press the A.DUB button on the Remote Control.
■
A.DUB will be displayed on the LCD.
■
The camcorder is in a ready-to-dub state for dubbing.
6. Press the (PLAY/STILL) button to start dubbing.
■
Press the (STOP) button to stop the dubbing.
Utilisation du caméscope –
FRANÇAIS
enregistrement perfectionné
✤
Cette fonction est disponible uniquement en mode PLAYER
<LECTEUR>.
✤ Vous pouvez enregistrer un fond sonore (12 bits) pour l’ajouter au
son d’origine sur une bande enregistrée en mode SP.
✤ Pour ce faire, vous pouvez utiliser le micro interne ou bien con-
necter un micro externe ou un équipement audio.
✤ Le son d’origine ne sera pas effacé.
Réalisation du doublage sonore
1. Réglez l'appareil sur CAMCORDER
<CAMESCOPE>.
■
Si vous souhaitez utiliser un micro
externe, branchez-le sur la prise
du caméscope prévue à cet effet.
2. Réglez le commutateur sur le mode
PLAY<LECTURE>.
■
Si vous souhaitez utiliser un micro
externe, branchez-le sur la prise du
caméscope prévue à cet effet.
3. Appuyez sur la touche (PLAY/
STILL) et localisez la première position de
la scène à doubler.
4. Appuyez de nouveau sur la touche (PLAY/STILL) pour
interrompre l’enregistrement de la scène.
5. Appuyez sur la touche A.DUB de la télécommande.
■
L’indication A.DUB s’affiche sur l’écran LCD.
■
Le caméscope est prêt pour le doublage.
6. Appuyez sur la touche (PLAY/STILL) et commencez l’enregistrement du son.
■
Appuyez sur la touche (STOP) pour arrêter le doublage.
7171
Page 72

ENGLISH
TAPE PLAY MODE
AUDIO SELECT
PLAY SET
SOUND[1]
SOUND[2]
MIX [1+2]
CAMCORDER SET
RECORD SET
PLAY SET
TAPE PLAY MODE
TAPE PLAY MODE
INITIAL
RECORD SET
PLAY SET
CAMCORDER
CAMERA
MEMORY
VIEWER
TAPE PLAY MODE
CAMCORDER SET
PLAY SET
PHOTO SEARCH
PHOTO COPY
AUDIO SELECT
SOUND1
Using the CAMCORDER - Advanced Recording
Utilisation du caméscope –
enregistrement perfectionné
FRANÇAIS
Dubbed Audio Playback
1. Insert the dubbed tape and press
the MENU button.
2. Turn the MENU DIAL to highlight
CAMCORDER.
3. Press the MENU DIAL to enter the
sub-menu.
4. Select PLAY SET and press the
MENU DIAL.
5. Use the MENU DIAL to select
AUDIO SELECT from the submenu.
6. Press the MENU DIAL to enter the
sub-menu.
7. Using the MENU DIAL, select the AUDIO playback channel.
■
Press the MENU DIAL to confirm the audio playback channel.
- SOUND1 : play the original sound.
- SOUND2 : play the dubbed sound.
- MIX(1+2) : play back with SOUND1 and 2 equally mixed.
8. To exit, press the MENU button.
9. Press the (PLAY/STILL) button to playback the dubbed tape.
Note
■
When you playback added sound (SOUND2 or MIX mode),
you may experience some loss of sound quality.
7272
Écoute du son doublé
1. Insérez la bande doublée et
appuyez sur la touche MENU.
2. À l’aide de la molette MENU,
sélectionnez CAMCORDER
<CAMESCOPE>.
3. Appuyez sur la molette MENU pour
accéder au sous-menu.
4. Sélectionnez PLAY SET
<REGLAGE LECTURE>, puis
appuyez sur la molette MENU.
5. À l’aide de la molette MENU,
sélectionnez AUDIO SELECT
<SELECT AUDIO> dans le
sous-menu.
6. Appuyez sur la molette MENU pour
accéder au sous-menu.
7. À l’aide de la molette MENU,
sélectionnez le canal de lecture
AUDIO.
■
Appuyez sur la molette MENU pour valider votre sélection.
- SOUND1 <PISTE PRINCIPALE> :
lecture d’un enregistrement avec le son original.
- SOUND2 <PISTE SECONDAIRE> :
lecture d’un enregistrement avec le son doublé.
- MIX(1+2) <MIXTE> : lecture d’un enregistrement composé
pour moitié du son original et pour moitié du son doublé.
8. Pour quitter, appuyez sur la touche MENU.
9. Appuyez sur la touche (PLAY/STILL) pour visionner la bande
doublée.
Remarque
■
Lorsque vous visionnez une cassette doublée (mode SOUND2
<PISTE SECONDAIRE> ou MIX <MIXTE>), la qualité sonore peut
ne pas être complètement rendue.
Page 73

ENGLISH
TAPE PLAY MODE
INITIAL
RECORD SET
PLAY SET
CAMCORDER
CAMERA
MEMORY
VIEWER
CAMCORDER SET
RECORD SET
PLAY SET
TAPE PLAY MODE
TAPE PLAY MODE
CAMCORDER SET
PLAY SET
PB DSE SELECT
PHOTO SEARCH
PHOTO COPY
AUDIO SELECT
SOUND1
Using the CAMCORDER - Advanced Recording
Utilisation du caméscope –
enregistrement perfectionné
PHOTO Image Recording Enregistrement d’une image fixe
1. Press the PHOTO button half way down and hold it.
■
The still picture appears on the LCD monitor.
■
If you do not wish to record, release the button.
2. Release the PHOTO button and press the PHOTO
button again.
■
The still picture is recorded for about
6~7 seconds.
3. After the PHOTO has been recorded, the camcorder returns to STBY mode.
Note
■
To take a quick photo, press the PHOTO button all
the way down. The still picture is recorded
for 6-7 seconds.
Searching for a PHOTO Picture
✤ The PHOTO SEARCH works in TAPE PLAY mode.
■
Press the MENU button.
1.
■
The MENU list will appear.
2. Turn the MENU DIAL to highlight CAMCORDER
and press the MENU DIAL.
3. Select PLAY SET and press the MENU DIAL to
enter the sub-menu.
4. Select PHOTO SEARCH from the sub-menu and
press the MENU DIAL.
5. Search for the PHOTO using the (FF) and
(REW) buttons.
■
The PHOTO search process appears on the
LCD while you are searching.
■
After completing the search, the camcorder
displays the still image.
6. To exit, press the (STOP) button.
6. Pour sortir du menu, appuyez sur la touche (STOP).
1. Enfoncez la touche PHOTO à mi-course et
maintenez-la ainsi.
■
L’image fixe apparaît à l’écran.
■
Pour quitter le mode PHOTO <PHOTO> sans
enregistrer, relâchez la touche PHOTO.
2. Relâchez la touche PHOTO et appuyez de nouveau
sur celle-ci.
■
L’image fixe est enregistrée pendant environ
6 à 7 secondes.
3. Après cet enregistrement, le caméscope revient en
mode STBY <VEILLE>.
Remarque
■
Pour effectuer une prise de vue rapide, enfoncez
complètement la touche PHOTO. L’image fixe est
enregistrée pendant 6 à 7 secondes.
Recherche d’images fixes
✤ La fonction PHOTO SEARCH <RECHERCHE
PHOTO> est disponible uniquement en mode TAPE
PLAY<LECTURE DE BANDE>.
■
Appuyez sur la touche MENU.
1.
■
La liste des options apparaît.
2. À l’aide de la molette MENU, sélectionnez
CAMCORDER <CAMESCOPE>, puis appuyez sur la
molette MENU.
3. Sélectionnez PLAY SET <REGLAGE LECTURE> et
appuyez sur la molette MENU pour accéder au
sous-menu.
4. Sélectionnez PHOTO SEARCH <RECHERCHE
PHOTO> dans le sous-menu et appuyez sur la molette
MENU.
5. Recherchez l’image en utilisant les touches (FF) et
(REW).
■
La recherche s’affiche à l’écran.
■
À la fin de la recherche, le caméscope
affiche l’image fixe.
FRANÇAIS
7373
Page 74

ENGLISH
Using the CAMCORDER - Advanced Recording
Utilisation du caméscope –
enregistrement perfectionné
FRANÇAIS
NITE PIX (0 Lux Recording) NITE PIX <PIX DE NUIT> (Enregistrement à 0 lux)
✤ The NITE PIX function works in CAMCORDER
mode only.
✤ The NITE PIX function enables you to record
a subject in darkness.
1. Set the device to CAMCORDER and set the
Power Switch to REC mode.
2. Slide the NITE PIX switch to ON.
■
(NITE PIX indicator) appears on the LCD monitor.
■
The infrared(invisible rays) light is turned on automatically.
3. To cancel the NITE PIX function, slide the NITE PIX switch to OFF.
2. Faites glisser le sélecteur NITE PIX sur ON.
■
La mention NITE PIX apparaît à l’écran.
■
La lumière infrarouge (invisible) s’allume automatiquement.
3. Pour désactiver la fonction NITE PIX <PIX DE NUIT>,
faites glisser le sélecteur sur OFF.
✤ L’option NITE PIX <PIX DE NUIT> est disponible
uniquement en mode CAMCORDER
<CAMESCOPE>.
✤ Cette fonction permet d’enregistrer un sujet dans
l’obscurité (0 lux).
1. Réglez l'appareil sur le mode CAMCORDER
<CAMESCOPE>, puis le commutateur sur le
mode REC <ENR.>.
Notes
■
The maximum recording distance using the infrared light is about
3 m (about 10 feet).
■
If you use the NITE PIX function in normal recording situations
(ex. outdoors by day), the recorded picture may be tinted green.
■
While in NITE PIX mode, certain functions are not
available, such as White Balance, Program AE, DSE, BLC.
7474
Remarques
■
La distance maximale d’enregistrement de la lampe infrarouge est
de 3 mètres environ.
■
Si vous utilisez la fonction NITE PIX <PIX DE NUIT> dans des
conditions normales d’enregistrement
(ex. à l'extérieur et en plein jour), il est possible que les images
enregistrées apparaissent légèrement verdâtres.
■
Les fonctions suivantes ne sont pas disponibles en mode
NITE PIX <PIX DE NUIT> : White Balance <EQUILIBRAGE DU
BLANC>, Program AE <EXPOSITION AUTOMATIQUE>, DSE
<EFFETS SPÉCIAUX NUMERIQUES>, BLC <CONTRE-JOUR
INTELLIGENT>.
Page 75

ENGLISH
POWER NITE PIX
P
0 : 0 0 : 0 0
5 5 min
1 2 : 0 0 AM
O C T. 1 0 , 2 0 0 3
STBY
S1/30
Using the CAMCORDER - Advanced Recording
Utilisation du caméscope –
enregistrement perfectionné
POWER NITE PIX POWER NITE PIX <PIX DE NUIT RENFORCÉE>
✤ The NITE PIX function works in CAMCORDER mode only.
✤ The POWER NITE PIX function can record a subject more brightly
in darkness than the NITE PIX function.
✤ POWER NITE PIX is displayed for three seconds on the LCD if
you press the SLOW SHUTTER button when the NITE PIX switch
is turned on.
✤ When you work in POWER NITE PIX mode, the POWER NITE
PIX icon appears on the LCD continuously.
1. Set the device to CAMCORDER and set the
power switch to REC mode.
2. Turn on the NITE PIX switch, and then
press the SLOW SHUTTER button.
3. Press the SLOW SHUTTER button to set
the shutter speed. The SLOW SHUTTER function
enables you to record a subject more brightly.
4. When using POWER NITE PIX the image takes on
a slow motion like effect.
5. To cancel the POWER NITE PIX function, press
the SLOW SHUTTER button until it is set to
“ OFF ” and then turn off the NITE PIX switch.
Notes
■
The maximum recording distance using the infrared
light is about
3 m (about 10 feet).
■
If you use the POWER NITE PIX function in normal recording situations (ex. outdoors by day), the recorded picture may contain
unnatural colors.
■
In POWER NITE PIX mode, certain functions are not available,
such as White Balance, Program AE, DSE, BLC.
■
When the subject is too bright, it is better to press the SLOW
SHUTTER button (S1/8 ➝ S1/30) so that you can record with
better quality.
✤ L’option NITE PIX <PIX DE NUIT> est disponible uniquement en mode
CAMCORDER <CAMESCOPE>.
✤ La fonction POWER NITE PIX <PIX DE NUIT RENFORCEE> permet d’en-
registrer un sujet de façon plus claire qu’avec la fonction NITE PIX <PIX DE
NUIT>.
✤ La fonction POWER NITE PIX <PIX DE NUIT RENFORCEE> s’affiche pen-
dant trois secondes sur l’écran LCD lorsque vous appuyez sur la touche
SLOW SHUTTER alors que le sélecteur NITE PIX est placé sur ON.
✤ Lorsque vous utilisez le mode POWER NITE PIX <PIX DE NUIT REN-
FORCEE>, l’icône correspondante s’affiche de façon continue sur l’écran
LCD.
■
La distance maximale d’enregistrement de la lampe infrarouge est de
3 mètres environ.
■
Si vous utilisez la fonction POWER NITE PIX <PIX DE NUIT RENFORCEE>
dans des conditions normales d'enregistrement (ex : à l’extérieur et en plein
jour), il est possible que les images enregistrées apparaissent légèrement
verdâtres.
■
Les fonctions suivantes ne sont pas disponibles en mode POWER NITE PIX
<PIX DE NUIT RENFORCEE> : White Balance <EQUILIBRAGE DES
BLANCS>, Program AE <EXPOSITION AUTOMATIQUE>, DSE <EFFETS
SPECIAUX NUMERIQUES>, BLC <CONTRE-JOUR INTELLIGENT>.
■
Lorsque le sujet est trop exposé à la lumière, appuyez sur la touche
SLOW SHUTTER (S1/8 ➝ S1/30) ; vous obtenez alors une meilleure
qualité d’enregistrement.
1. Réglez l'appareil sur CAMCORDER <CAMESCOPE>,
puis le commutateur sur le mode REC <ENR.>.
2. Faites glisser le sélecteur NITE PIX sur ON, puis appuyez
sur la touche SLOW SHUTTER.
3. Appuyez sur cette touche pour régler la vitesse de
l’obturateur. La fonction SLOW SHUTTER <OBTURATION LENTE> permet d’enregistrer les sujets de façon
plus claire.
4. Lorsque vous sélectionnez POWER NITE PIX <PIX DE
NUIT RENFORCEE>, l’image s’affiche avec un effet de
ralenti.
5. Pour désactiver la fonction POWER NITE PIX <PIX DE
NUIT RENFORCEE>, appuyez sur la touche SLOW
SHUTTER jusqu'à ce que "OFF" soit sélectionné, puis
faites glisser le sélecteur NITE PIX sur OFF.
Remarques
FRANÇAIS
7575
Page 76

ENGLISH
Using the CAMCORDER - Advanced Recording
Utilisation du caméscope –
enregistrement perfectionné
Various Recording Techniques Techniques d’enregistrement
✤ In some situations different recording techniques may be required
for more dramatic results.
✤ Selon l’atmosphère que vous souhaitez créer, vous pouvez utiliser
différentes techniques d’enregistrement.
FRANÇAIS
Note
Please rotate the LCD screen carefully as excessive rotation may
cause damage to the inside of the hinge that connects the LCD screen
to the Camcorder.
1. General Recording.
2. Downward recording.
Recording while viewing the LCD screen
from above.
3. Upward Recording.
Recording while viewing the LCD screen
from below.
4. Self recording.
Recording while viewing the LCD screen
from the front.
5. Recording with the Viewfinder.
In circumstances where it is difficult to use
the LCD monitor, the viewfinder can be
used as a convenient alternative.
7676
1 2
3
5
Remarque
Manipulez l’écran LCD avec précaution lorsque vous le faites tourner.
Une rotation intempestive peut endommager la charnière qui relie
l’écran LCD à l’appareil.
1. De niveau (technique la plus courante).
2. Vers le bas.
Enregistrement en visionnant l’écran
LCD d’en haut.
3. Vers le haut.
4
Enregistrement en visionnant l’écran
LCD d’en bas.
4. Autoportrait.
Enregistrement en visionnant l’écran
LCD de face.
5. Utilisation du viseur.
■
Dans les cas où il est difficile d’utiliser
l’écran LCD, le viseur se révèle une
solution de rechange pratique.
Page 77

ENGLISH
Playback Lecture
Tape Playback Lecture d’une bande
✤ The playback function works in PLAYmode only.
Playback on the LCD
✤ It is practical to view a tape using the LCD when in a car or
outdoors.
Playback on a TV Monitor
✤ To play back a tape, the television must have a compatible
color system.
✤ We recommend that you use the AC Power Adapter as the
power source for the camcorder.
Connecting to a TV which has Audio/Video Input Jacks
1. Connect the camcorder to the TV with
the Audio/Video cable.
■
The Yellow plug : Video
■
The White plug : Audio(L)
■
The Red plug : Audio(R) - STEREO
TV
Video input-
Yellow
Audio input
(left)-White
only
- If you connect to a monaural
TV or VCR, connect the Yellow plug
(Video) to the video input of the
TV or VCR and the White plug
(Audio L) to the audio input of the
TV or VCR.
2. Set the device to CAMCORDER.
3. Set the power switch to PLAY mode.
4.
Turn the TV on and set the TV/VIDEO selector on the TV to VIDEO.
■
Refer to the TV or VCR User's Manual.
5. Play the tape.
Notes
■
You may use a S-VIDEO cable to obtain better quality pictures if
you have a S-VIDEO connector on your TV.
■
Even if you use a S-VIDEO cable, you need to connect an audio
cable.
■
If you connect the cable to the A/V Jack, you will not hear sound
from the speakers.
✤ La lecture d’une cassette n’est possible qu’en mode PLAY <LECTURE>.
Lecture sur l’écran LCD
✤ L’écran LCD s’avère très pratique à l’extérieur ou dans une voiture.
Lecture sur l’écran de votre téléviseur
✤ Pour lire une cassette sur le téléviseur, ce dernier doit disposer d'un
système couleur compatible avec celui du caméscope.
✤ Nous recommandons de brancher l’adaptateur secteur du
caméscope.
Connexion à un téléviseur avec entrée A/V
1. Reliez le caméscope au téléviseur à l’aide du câble Audio/Vidéo en
respectant le codage des connecteurs :
Audio input
(right)-Red
S-VIDEO input
Multi A/V
cable
Camcorder
2. Réglez l'appareil sur CAMCORDER <CAMESCOPE>.
3. Réglez le commutateur sur le mode PLAY <LECTURE>.
4. Allumez le téléviseur et sélectionnez le canal vidéo approprié.
■
Reportez-vous au mode d’emploi du téléviseur ou du
magnétoscope.
5. Démarrez la lecture d’une bande.
Remarques
■
Vous pouvez brancher un câble S-VIDEO sur votre téléviseur
(si celui-ci est équipé d’une prise S-VIDEO), afin d’obtenir une meilleure
qualité d’image.
■
Même si vous utilisez le câble S-VIDÉO, vous devez connecter un câble
audio.
■
Lorsque vous connectez le câble à la sortie Audio/Vidéo, aucun son
n’est émis par les haut-parleurs.
FRANÇAIS
■
Jaune : vidéo
■
Blanc : audio (gauche)
■
rouge : audio (droite) – STEREO
uniquement
- Pour connecter le caméscope à un
téléviseur ou un magnétoscope
monophonique, branchez
respectivement la fiche jaune (vidéo)
et la fiche blanche (audio gauche)
aux entrées vidéo et audio de votre
appareil.
7777
Page 78

ENGLISH
FADE
S.SHOW
BLC
REV FWD
T
A
P
E
M
E
M
O
R
Y
P
LA
Y
R
E
C
O
F
F
Playback Lecture
FRANÇAIS
Connecting to a TV which has No Audio and Video Input Jacks
✤ You can connect your camcorder to a TV through a VCR.
1. Connect the camcorder to the VCR with the Audio/Video cable.
■
The Yellow plug : Video
■
The White plug : Audio(L)
■
The Red plug : Audio(R) -
VCR
STEREO only
2. Connect the TV to the VCR.
3. Set the device to CAMCORDER.
4. Set the power switch to PLAY mode.
5. Turn on both the TV and VCR.
■
Set the input selector on the VCR to
ANTENNA
LINE.
■
Select the channel reserved for your VCR on the TV set.
6. Play the tape.
Playback
✤ You can play the recorded tape in PLAY mode.
1. Connect a power source and set the device
to CAMCORDER.
2. Set the power switch to PLAY mode.
3. Using the (FF) and (REW) buttons,
find the first position you wish to play back.
4. Press the (PLAY/STILL) button.
■
The images you recorded will appear on
the TV after a few seconds.
■
If a tape reaches its end while being played back,
the tape will rewind automatically.
Note
The playback mode (SP/LP) is selected automatically.
7878
■
Connexion à un téléviseur sans entrée A/V
✤ Vous pouvez connecter votre caméscope à un téléviseur via
un magnétoscope.
VIDEO
AUDIO(L)
AUDIO(R)
S-VIDEO
Multi A/V
TV
cable
CAMCORDER
1. Reliez le caméscope au magnétoscope à
l’aide du câble Audio/Vidéo en respectant
le codage des connecteurs :
■
Jaune : vidéo
■
Blanc : audio (gauche)
■
rouge : audio (droite) – STEREO
uniquement
2. Reliez le magnétoscope au téléviseur.
3. Réglez l'appareil sur CAMCORDER
<CAMESCOPE>.
4. Réglez le commutateur sur le mode PLAY <LECTURE>.
5. Allumez le téléviseur et le magnétoscope.
■
Réglez le sélecteur d’entrée du magnétoscope sur LINE
<LIGNE>.
■
Sélectionnez le canal réservé au magnétoscope sur le
téléviseur.
6. Démarrez la lecture d’une bande.
Lecture
✤ Vous pouvez lire une cassette enreg-
istrée en mode PLAY <LECTURE>.
1. Branchez le caméscope sur une source
d’alimentation, puis réglez le périphérique
sur le mode CAMCORDER <CAMESCOPE>.
2. Réglez le commutateur sur le mode
PLAY<LECTURE>.
3. À l’aide des touches (FF) et (REW), cherchez la position
à partir de laquelle vous voulez visionner la cassette.
4. Appuyez sur la touche (PLAY/STILL).
■
Les images que vous avez enregistrées apparaissent à l’écran
du téléviseur au bout de quelques secondes.
■
Si la cassette arrive à la fin de la bande, celle-ci se rembobine
automatiquement.
Remarque
■
Le mode de lecture (SP/LP) est sélectionné automatiquement.
Page 79

ENGLISH
FADE
S.SHOW
BLC
REV FWD
T
A
P
E
M
E
M
O
R
Y
P
LA
Y
R
E
C
O
F
F
Playback Lecture
Various Functions while in PLAYER Mode Fonctions du mode PLAYER <LECTEUR>
✤ The PLAY/STILL, STOP, FF, REW buttons are located on the
camcorder and the Remote Control.
✤ The F.ADV(Frame advance), SLOW buttons are located on the
Remote Control only.
✤ To prevent tape and head-drum wear, your camcorder will
automatically stop if it is left in STILL or SLOW modes for more
than 5 minutes.
✤ Les touches PLAY/STILL, STOP, FF, REW sont disponibles sur le
caméscope et sur la télécommande.
✤ Les touches F.ADV (lecture image par image) et SLOW sont
disponibles uniquement sur la télécommande.
✤ Si vous laissez plus de cinq minutes votre caméscope en mode
STILL <PAUSE> ou SLOW <RALENTI> sans vous en servir, il
s’éteint automatiquement pour éviter une détérioration de la bande
et des têtes.
FRANÇAIS
Playback Pause
✤ Press the (PLAY/STILL) button during
Playback.
✤ To resume playback, press the
(PLAY/STILL) button again.
Picture Search - Forward/Reverse
✤ Press the (FF) or (REW) buttons once
during Playback or while in Still mode.
To resume normal playback,
press the (PLAY/STILL) button.
✤ Keep pressing the (FF) or (REW)
buttons during Playback or while in Still mode.
To resume normal playback, release the button.
Slow Playback - Forward
✤ Forward Slow Playback
■
Press the SLOW button on the remote
control during Playback.
■
To resume normal playback,
press the (PLAY/STILL) button.
START/STOP
F.ADV
TW
PHOTO
STILL ZERO MEM.
REW/RPS
PLAY FF/FPS
A.DUB STOP SELF TIMER
SLOW
Arrêt sur image (mode pause)
✤ Appuyez sur la touche (PLAY/STILL)
pendant la lecture.
✤ Pour reprendre la lecture, appuyez de
nouveau sur la touche (PLAY/STILL).
Recherche d’image - avant/arrière
✤ Appuyez sur la touche (FF) ou
(REW) pendant la lecture ou en mode
pause.
Pour reprendre la lecture normale, appuyez
sur la touche (PLAY/STILL).
✤ Maintenez enfoncée la touche (FF) ou
(REW) pendant la lecture
ou en mode Still <PAUSE>.
Pour reprendre la lecture normale, relâchez
la touche.
Lecture au ralenti - avant
✤ Lecture au ralenti avant
■
Appuyez sur la touche SLOW de la
télécommande pendant la lecture.
■
Pour reprendre la lecture normale,
appuyez sur la touche
(PLAY/STILL).
7979
Page 80

ENGLISH
Playback Lecture
ZERO MEMORY ZERO MEMORY <Mémoire compteur>
✤ The MEMORY function works in both REC and TAPE PLAY
modes.
✤ You can mark a point on a tape that you want to return to following
playback.
1. Press the ZERO MEMORY button on the remote control during
playback or while recording at the point you wish to return to.
■
The time code is changed to a tape counter that is set to
Zero Memory with the 0:00:00 (Zero Memory Indicator)
■
If you want to cancel the Zero Memory function, press the
M
ZERO MEMORY button again.
2. Finding the Zero Position.
■
When you have finished playback, fast forward or rewind the
tape.
- The tape stops automatically when it reaches the
Zero Position.
■
When you have finished recording, press the power switch on
the PLAYER and press the (REW) button.
- The tape stops automatically when it reaches the zero
position.
3. The tape counter with the (Zero Memory Indicator) disappears
M
from the display and the tape counter is changed back to time
code.
Notes
■
In the following situations, ZERO MEMORY mode may be
canceled automatically:
- At the end of the section marked with the ZERO MEMORY
function.
- When the tape is ejected.
- When you remove the battery pack or power supply.
■
The Zero Memory may not function correctly when there is a break
between recordings on the tape.
8080
✤ Cette fonction est disponible à la fois en mode REC <ENR.> et
TAPE PLAY <LECTURE DE BANDE>.
✤ Vous pouvez marquer sur la bande l’endroit où vous voulez vous
repositionner après la lecture.
1. Pendant la lecture ou l’enregistrement, appuyez sur la touche
ZERO MEMORY de la télécommande à l’endroit que vous voulez
retrouver plus tard.
■
L’affichage de la date ou de l’heure disparaît et fait place à un
compteur mis à zéro précédé de l’indication 0:00:00
(mémoire compteur à zéro)
■
Pour désactiver le mode mémoire compteur, appuyez de
nouveau sur la touche ZERO MEMORY.
2. Remise à zéro.
■
À la fin de la lecture, faites avancer ou rembobinez la bande.
- La bande s’arrête automatiquement lorsque le compteur
atteint la position zéro.
■
Lorsque l’enregistrement est fini, placez le commutateur sur
PLAYER et appuyez sur la touche (REW).
- La bande s’arrête automatiquement lorsque le compteur atteint la position zéro.
3. Le compteur associé à l’indicateur (mémoire compteur à zéro)
disparaît de l’écran et la
M
date/heure s’affiche à nouveau.
Remarques
■
Le mode ZERO MEMORY <MEMOIRE COMPTEUR> peut être
désactivé automatiquement dans les cas suivants :
- Après le retour à la position zéro.
- Lors de l’éjection de la bande.
- Lors du retrait du bloc batterie ou lorsque vous débranchez
l’adaptateur secteur.
■
Le mode Zero Memory <MEMOIRE COMPTEUR> peut ne pas
fonctionner correctement s’il existe des blancs entre les enregistrements de la bande.
FRANÇAIS
M
Page 81

ENGLISH
FRANÇAIS
IEEE 1394 Data Transfer Transfert de données IEEE 1394
Transferring Using IEEE1394 (i.LINK)-DVStandard Data Connections
Connecting to a DV Device
✤ Connecting with Other DV Standard Products.
■
A standard DV connection is quite simple.
If a product has a DV port(firewire), you can transfer data
by connecting to the DV port using the correct cable.
!!! Please be careful since there are two types of DV ports,
(4pin & 6pin). This camcorder has a 4pin terminal.
✤ With a digital connection, video and audio signals are
transmitted in digital format, allowing high quality images to be
transferred.
Connecting to a PC
✤ If you want to transmit data to a PC, you must install an IEEE
1394 add-on card onto the PC. (not supplied)
✤ The frame rate recorded for video capturing is dependent on
the capacity of the PC.
Notes
■
When you transmit data from the camcorder to another DV device,
some functions may not work.
If this occurs, please reconnect the DV cable or turn the power
OFF and ON again.
■
When you transmit data from the camcorder to the PC, the PC
function button is not available in M.PLAYmode.
Connexion pour transfert de données
numériques par IEEE 1394 (i.LINK)
Connexion à un autre appareil vidéo numérique
✤ Connexion à d’autres appareils vidéo numériques standard.
■
Cette connexion est très simple.
Si l’appareil comporte un port DV (bus Firewire), vous
pouvez transférer des données en vous connectant au port
à l’aide d’un câble adapté.
!!! Attention : il existe deux types de ports DV, à 4 et 6
broches.
Celui de ce caméscope est à 4 broches.
✤ Sur une connexion numérique, les signaux vidéo et audio sont
transmis au format numérique et offrent une excellente qualité
d’image.
Connexion à un PC
✤ Si vous voulez transférer des données à un PC, vous devez
installer une carte IEEE 1394 sur votre PC (non fournie).
✤ Le débit d’images enregistrées lors de la capture vidéo dépend
des capacités du PC.
Remarques
■
Lorsque vous transférez des données du caméscope vers un autre
périphérique DV, certaines fonctions sont désactivées.
Dans ce cas, reconnectez le câble DV ou éteignez le caméscope
et rallumez-le.
■
Lorsque vous transférez des données du caméscope vers un PC,
la touche de fonction PC n’est pas disponible en mode M.PLAY
<LECTURE PHOTO>.
8181
Page 82

ENGLISH
FADE
S.SHOW
BLC
REV FWD
DELETE
T
A
P
E
M
E
M
O
R
Y
REC
P
L
A
Y
IEEE 1394 Data Transfer
●
System Requirements
■
CPU : Intel®(or compatible) Pentium III™ 450Mhz or faster.
■
Operating System : Windows®98SE, ME, XP, Mac OS (9.1~10.2)
■
Main Memory : More than 64 MB RAM
■
IEEE1394 Add-On Card or Built In IEEE1394 Card
Recording with a DV Connection Cable
1. Set the device to CAMCORDER and
the power switch to TAPE PLAY
mode.
2. Connect the DV cable (not supplied)
from the DV IN/OUT port of
the camcorder to the DV IN/OUT
port of the other DV device.
■
Make sure that DV IN appears
on the screen.
3. Press the PLAY button of the
CAMCORDER.
■
Picture is displayed on PC
screen.
4. Click on the REC button on PC screen with the mouse.
5. To stop recording, click the (STOP) button on the PC screen.
FRANÇAIS
Transfert de données IEEE 1394
●
Configuration système requise
■
Unité Centrale : Intel®(ou compatible) Pentium III™ 450Mhz ou
■
Système d’exploitation : Windows®98SE, ME, XP,
■
Mémoire vive : plus de 64 Mo de RAM
■
Carte IEEE 1394 additionnelle ou intégrée
Enregistrement avec un câble de connexion DV
■
L’image s’affiche sur l’écran de votre ordinateur.
4. Appuyez sur la touche REC sur l’écran de votre ordinateur.
5. Pour arrêter l’enregistrement, cliquez sur la touche (STOP) sur
l’écran de votre ordinateur.
plus rapide.
Mac OS (9.1~10.2)
1. Réglez le périphérique sur
CAMCORDER <CAMESCOPE> et le
commutateur sur le mode TAPE PLAY
<LECTURE DE BANDE>.
2. Connectez le câble DV (non fourni) au
port DV IN/OUT du caméscope et au
port DV IN/OUT d’un autre appareil
vidéo numérique.
■
Assurez-vous que DV IN
apparaît bien à l’écran.
3. Appuyez sur la touche PLAY du
caméscope.
Note
When using this camcorder as a recorder, the pictures that appear on
the monitor may seem uneven, however recorded pictures will not be
affected.
8282
Remarque
Lorsque vous utilisez ce caméscope pour enregistrer des images
transférées, leur affichage sur le moniteur peut être affecté.
Cependant, la qualité des images elles-mêmes n’est pas remise en
cause.
Page 83

ENGLISH
TM
TM
Using the CAMERA
Utilisation du mode CAMERA <APPAREIL PHOTO>
MEMORY STICK MEMORY STICK
✤ The Memory Stick stores and manages still images recorded by
the camera.
Memory Stick Functions
✤ Record Still Images
✤ View Still Images
■
Single(View Frame by Frame)
■
Slide Show
✤ Protect Images Against Accidental Erasure
✤ Delete Images Recorded on the Card
✤ Add text to Still Images
✤ Formatting the Card
Notes
■
You can use most of the camera's functions when recording to the
Memory Stick.
■
“” appears on the screen while recording to the Memory
Stick.
■
While recording or loading an image, do not eject or insert the
Memory Stick.
- Inserting or ejecting a Memory Stick while recording or loading
an image can cause data damage.
■
If you want to save all images on the Memory Stick, set the write
protect tab on the Memory Stick to LOCK.
✤ La carte Memory Stick permet de stocker et de gérer les images
fixes enregistrées par le caméscope.
Fonctions disponibles avec la carte Memory Stick
Terminal
Protection
✤ Enregistrement d’images fixes
✤ Visualisation d’images fixes
tab
✤ Protection des images contre les effacements
✤ Suppression des images enregistrées sur la carte
✤ Ajouter du texte aux images fixes
✤ Formatage de la carte
Remarques
■
La plupart des fonctions du caméscope sont disponibles lorsque
vous enregistrez sur une carte Memory Stick.
■
“” s’affiche à l’écran lorsque vous enregistrez des images sur
une carte Memory Stick.
■
Veillez à ne pas éjecter ou insérer la carte Memory Stick pendant
l’enregistrement ou le chargement d’une image.
-L’insertion ou l’éjection de la carte Memory Stick pendant
l’enregistrement ou le chargement d’une image pourrait
endommager les données.
■
Pour éviter que les images enregistrées sur la carte Memory Stick
ne soient effacées, placez l’onglet de protection situé sur la carte
en position LOCK.
■
Une seule image
(Visualisation image par image)
■
Diaporama (toutes les images)
accidentels
FRANÇAIS
■
"Memory Stick" and are trademarks of Sony Corporation.
■
All other product names mentioned herein are the trademarks or
TM
TM
registered trademarks of their respective companies.
Furthermore, "TM" and "®" will not be mentioned in each case in this
manual.
■
Memory Sticks of 8MB ~ 128MB are supported.
■
“Memory Stick” et sont des marques déposées de Sony
Corporation.
■
Tous les autres noms et marques cités dans ce document sont la
propriété de leurs détenteurs respectifs.
Les mentions "TM" et “®” ne sont pas toujours indiquées dans le
présent manuel.
■
Des cartes Memory Sticks de 8 à 128 Mo sont prises en charge.
8383
Page 84

ENGLISH
Using the CAMERA
Utilisation du mode CAMERA <APPAREIL PHOTO>
Inserting and Ejecting the Memory Stick Insertion/retrait de la carte Memory Stick
●
Inserting the Memory Stick
1. Turn the Power switch to OFF.
2. Insert the Memory Stick into the CARD slot in the
direction of the arrow.
●
Ejecting the Memory Stick
1. Turn the Power switch to OFF.
2. Push the Memory Stick, and it will automatically
come out of the camcorder.
3. Pull out the Memory Stick.
Notes
■
If you set the camcorder to MEMORY PLAYmode, the last
recorded still image appears.
- If there are no recorded images on the Memory Stick,
"NO STORED PHOTO!" will appear on the screen.
■
Do not turn the power off while recording, loading, erasing or
formatting.
■
Please turn the power off before you insert or eject the Memory
Stick, otherwise.
You may lose data on the Memory Stick.
■
Do not allow metal substances to come in contact with the
terminals of the Card.
■
Do not bend the Card.
■
After pulling the card out from the camcorder, please keep the
Memory Stick in a soft case to prevent electrostatic shock.
■
The content stored on the Memory Stick may be changed or lost
as a result of misuse, static electricity, electric noise or repair.
Save important images separately.
■
Samsung is not responsible for data loss due to misuse.
8484
- Si la carte Memory Stick ne contient aucune image, l'indication
"NO STORED PHOTO!" apparaît à l’écran.
■
N’éteignez pas le caméscope pendant l’enregistrement, le chargement, l’effacement ou le formatage de données.
■
Éteignez le caméscope avant d'insérer ou de retirer la carte
Memory Stick sinon vous risquez de perdre toutes les données
contenues dans la carte.
■
Les connecteurs de la carte ne doivent en aucun cas entrer en
contact avec un objet métallique.
■
Ne pliez pas la carte.
■
Une fois la carte Memory Stick extraite du caméscope, rangez-la
dans son étui pour éviter toute décharge d’électricité statique.
■
Le contenu mémorisé sur la carte Memory Stick peut être altéré ou
perdu lors d’une utilisation non conforme, d’une décharge d’élec-
tricité statique, de la présence de parasites électriques ou d’une
réparation.
Sauvegardez les images importantes sur un autre support.
■
Nous n’assumons aucune responsabilité pour la perte de données
due à une utilisation non conforme.
●
Insertion de la carte
1. Réglez le commutateur sur OFF.
2. Insérez la carte Memory Stick dans la fente
CARD, selon le sens de la flèche.
●
Retrait de la carte
1. Réglez le commutateur sur OFF.
2. Appuyez sur la carte. Celle-ci est alors
automatiquement éjectée de son compartiment.
3. Retirez la carte.
Remarques
■
Vous pouvez afficher la dernière image
enregistrée en réglant le commutateur sur le
mode MEMORY PLAY<LECTURE PHOTO>.
FRANÇAIS
Page 85

ENGLISH
DCIM
100 SSDVC
DCAM 0001
DCAM 0002
101SSDVC
.
.
.
.
File number
Folder number
000-0000
*MEM/P
Using the CAMERA
Utilisation du mode CAMERA <APPAREIL PHOTO>
FRANÇAIS
Structure of the Folders and Files on the Memory Stick Structure des dossiers et fichiers sur la carte Memory Stick
✤ The still images that you recorded are saved in
JPEG file format on the card.
✤ Each file has a file number and all files are
assigned to a folder.
■
A file number from DCAM0001 to DCAM9999
is sequentially assigned to each recorded
image.
■
Each folder is numbered from 100SSDVC to
999SSDVC and recorded on the CARD.
✤ Les images fixes sont sauvegardées sur la carte
au format de fichier JPEG.
✤ Chaque fichier est identifié par un numéro et
tous les fichiers appartiennent à un dossier.
■
Les numéros de fichiers compris entre
DCAM0001 et DCAM9999 sont attribués
dans l’ordre d’enregistrement des images.
■
Chaque dossier est numéroté entre
100SSDVC et 999SSDVC et enregistré sur
la carte.
8585
Page 86

ENGLISH
M. PLAY SELECT
PHOTO SET
MPEG4 SIZE
PRINT MARK
PROTECT
FILE NO
DELETE
FORMAT
CAMERA REC MODE
INITIAL
CAMCORDER
CAMERA
MEMORY
VIEWER
M. PLAY SELECT PHOTO
PHOTO SET
MPEG4 SIZE 320X240
PRINT MARK
PROTECT
FILE NO SERIES
DELETE
FORMAT
CAMERA REC MODE
MEMORY SET
000
Using the CAMERA
Utilisation du mode CAMERA <APPAREIL PHOTO>
MEMORY FILE NUMBER Numéro de fichier mémoire
✤ File numbers will be given to images in order of recording when
still images are stored in the Memory Stick.
✤ MEMORY FILE NUMBERS may be set as follows:
■
SERIES: When there are existing files, the new image will be
named as the next number in the sequence.
■
RESET
- When there are no files stored in the Memory Stick:
The file numbering starts from 0001
- When there are files stored in the Memory Stick:
File numbering will continue after the last file's number
1. Set the device to CAMERA and set the
Power Switch to REC mode.
2. Press the MENU button.
■
The menu list will appear.
3. Turn the MENU DIAL to highlight MEMORY and
press the MENU DIAL.
4. Turn the MENU DIAL to activate the FILE NO.
and press the MENU DIAL.
5. To exit, press the MENU button.
Notes
■
When using a Memory Stick that contains image
files from another device, the file numbering will
begin after the largest number that is memorized whether in the
camera or the the Memory Stick.
■
File numbering starts from 0001 again when 9999 files have been
8686
saved.
✤ Les numéros de fichiers seront attribués aux images afin
d’effectuer l’enregistrement lorsque les images fixes sont
contenues dans la carte Memory Stick.
✤ Les numéros de fichiers mémoire peuvent être configurés de la
manière suivante :
■
SERIES <SERIE> : Lorsque des fichiers existent déjà, chaque
nouvelle image prendra le numéro suivant dans la séquence.
■
RESET <REINITIALISATION>
- Lorsque la carte Memory Stick ne contient aucun fichier :
la numérotation des fichiers commence à 0001
- Lorsque la carte Memory Stick contient déjà des fichiers :
la numérotation se poursuivra à partir du dernier numéro de
fichier
1. Réglez l'appareil sur CAMERA <APPAREIL
PHOTO> puis le commutateur sur le mode
REC <ENR.>.
2. Appuyez sur la touche MENU.
■
3. À l’aide de la molette MENU, sélectionnez
MEMORY <MEMOIRE>, puis appuyez sur la
molette MENU.
4. À l’aide de la molette MENU, activez le numéro
de fichier et appuyez sur la molette MENU.
5. Pour quitter, appuyez sur la touche MENU.
Remarques
■
Si vous utilisez une carte Memory Stick contenant des fichiers
images provenant d’un autre appareil, la numérotation des fichiers
commencera à partir du numéro le plus grand mémorisé soit dans
le caméscope soit dans la carte Memory Stick.
■
La numérotation des fichiers recommence à 0001 lorsque 9999
fichiers ont été sauvegardés.
FRANÇAIS
La liste des options apparaît.
Page 87

ENGLISH
FADE
S.SHOW
BLC
TAPE
MEMORY
P
L
A
Y
R
E
C
O
F
F
Basic Picture-Taking Prise de photo simple
Taking Your First Picture Première photo
1. Connect a power source to the CAMERA (See page 26)
(A battery pack or an AC power adapter)
1. Connectez une source d’alimentation au caméscope
(Voir page 26) (bloc batterie ou adaptateur secteur).
FRANÇAIS
2. Set the device to CAMERA mode and the
power switch to the REC mode.
■
Open the LCD monitor.
■
Ensure that the Memory Stick has been
properly inserted into the device.
■
Make sure the image you want to record
appears on the LCD monitor or viewfinder.
■
Make sure the battery level indicates that
there is enough remaining power for your
expected recording time.
3. Press the Photo Button halfway down to set the
focus.
■
A Sound Effect will play when the focus is
set.
■
Press the Photo Button halfway down to
automatically set the focus, White Balance,
and exposure for the best results.
4. Press the Photo Button firmly to take a picture.
■
While the camcorder is recording the still
image, " " appears on the screen.
Notes
■
This Auto Power off feature is designed to save battery power.
■
Take a photograph in 2m distance from a photographic subject in
low illumination.
2. Réglez l'appareil sur le mode CAMERA
<APPAREILPHOTO> et le commutateur sur le
mode REC <ENR.>.
■
Ouvrez l’écran LCD.
■
Assurez-vous que la carte Memory Stick est
bien insérée dans l’appareil.
■
Assurez-vous que l’image que vous voulez
filmer apparaît à l’écran LCD ou dans le
viseur.
■
Assurez-vous que le niveau de la batterie
indique une charge suffisante.
3. Appuyez jusqu'à mi-course sur la touche Photo
pour ajuster la mise au point.
■
Un son sera émis lorsque la mise au point
sera ajustée.
■
Appuyez sur la touche Photo jusqu'à
mi-course pour ajuster automatiquement la
mise au point, l’équilibrage du blanc et
l’exposition afin d’obtenir de meilleurs
résultats.
4. Appuyez fermement sur la touche Photo pour
prendre une photo.
■
Lorsque le caméscope enregistre l'image
fixe, " " apparaît à l'écran.
Remarques
■
Cette fonction a été conçue pour prolonger la durée de la batterie.
■
Il est possible de prendre une photo à 2 m de distance d’un sujet
photographique à faible luminosité.
8787
Page 88

ENGLISH
FADE
S.SHOW
BLC
REV FWD
TAPE
MEMORY
P
L
A
Y
R
E
C
O
F
F
FADE
S.SHOW
BLC
TAPE
MEMORY
P
L
A
Y
R
E
C
O
F
F
Basic Picture-Taking Prise de photo simple
FRANÇAIS
Viewing Still Images
✤ You can playback and view still images recorded on the Memory
Stick.
✤ Still Images stored on the Memory Stick are displayed in the same
size despite their resolution on the LCD or viewfinder.
✤ There are 2 ways to view recorded images.
■
Single : To view an image frame by frame.
■
Slide Show : To view all images automatically and in
consecutive order.
To View a Single image
1. Set the device to CAMERA.
2. Set the power switch to MEMORY PLAY mode.
■
The last recorded image appears.
- If there are no recorded images on the
Memory Stick, "NO STORED PHOTO!"
will appear on the screen.
3. Using the (FWD) and (REV) buttons,
search for the desired still image.
■
To View the Next Image :
press the (FWD) button.
■
To View the Previous Image :
press the (REV) button.
■
Pressing (FWD) when you are on the last
image will take you to the first image and
pressing (REV) when you are on the first
image will take you to the last image.
■
Keep pressing (FWD) or (REV) to search for an image
quickly.
8888
Visualisation d’images fixes
✤ Vous pouvez lire et visualiser les images fixes enregistrées sur la
carte Memory Stick.
✤ Les images fixes enregistrées sur la carte Memory Stick s’affichent
dans la même taille quelle que soit la résolution de l’écran LCD ou
du viseur.
✤ Deux possibilités vous sont offertes :
■
Une seule image : permet de visualiser une image à la fois.
■
Diaporama (toutes les images) : permet de visualiser toutes les
images automatiquement dans l’ordre de leur enregistrement.
Visualiser une seule image
1. Réglez l'appareil sur CAMERA <APPAREIL
PHOTO>
2. Réglez le commutateur sur le mode
MEMORY PLAY<LECTURE PHOTO>.
■
La dernière image enregistrée s’affiche.
- Si la carte Memory Stick ne contient
aucune image, l'indication "NO
3. À l’aide des touches (FWD) et (REV),
passez à la première image. Inversement, si vous appuyez sur
la touche (REV) lorsque la première image est affichée,
vous revenez à la dernière image.
■
Appuyez en continu sur (FWD) ou sur (REV) pour une
recherche rapide d’image.
STORED PHOTO!" apparaît à l’écran.
recherchez l’image que vous souhaitez
visualiser.
■
Pour afficher l’image suivante :
appuyez sur la touche (FWD).
■
Pour afficher l’image précédente :
appuyez sur la touche (REV).
■
Si vous appuyez sur la touche (FWD)
lorsque la dernière image est affichée, vous
Page 89

ENGLISH
FADE
S.SHOW
BLC
REV FWD
TAPE
MEMORY
P
L
A
Y
R
E
C
O
F
F
FADE
S.SHOW
BLC
TAPE
MEMORY
P
L
A
Y
R
E
C
O
F
F
Basic Picture-Taking Prise de photo simple
FRANÇAIS
To View a Slide Show
1. Set the device to CAMERA
2. Set the power switch to MEMORY PLAY mode.
■
The last recorded image appears.
- If there are no recorded images on the
Memory Stick, "NO STORED PHOTO!"
will appear on the screen.
3. Press the (S.SHOW) button.
■
All images will be played back consecutively
for 4~5 seconds each.
4. To stop the slide show, press the
(S.SHOW) button again.
Visualiser les images sous forme de diaporama
1. Placez le périphérique sur CAMERA
<APPAREILPHOTO>.
2. Réglez le commutateur sur le mode MEMORY
PLAY<LECTURE PHOTO>.
■
La dernière image enregistrée s’affiche.
- Si la carte Memory Stick ne contient
aucune image, l'indication "NO STORED
PHOTO!" apparaît à l’écran.
3. Appuyez sur la touche (S.SHOW).
■
Toutes les images défilent les unes à la
suite des autres, à raison de 4 à 5 secondes
par image.
4. Pour interrompre le diaporama, appuyez une
nouvelle fois sur la touche (S.SHOW).
8989
Page 90

ENGLISH
FADE
S.SHOW
BLC
REV FWD
TAPE
MEMORY
P
L
A
Y
R
E
C
O
F
F
Basic Picture-Taking
Prise de photo simple
Quick Review Visionnage rapide
✤ Quick Review is used to view the last recorded image.
✤ Le visionnage rapide permet de visualiser la dernière image
enregistrée.
FRANÇAIS
1. Record a picture using Photo Button.
2. Press the REV( ) Button to view the picture
taken.
3. To return to CAMERA mode, press the REV ( )
Button again or press the Photo Button halfway
down.
9090
1. Enregistrez une image à l’aide de la touche
Photo.
2. Appuyez sur la touche REV ( ) pour visualiser
la photo que vous avez prise.
3. Pour revenir au mode CAMERA <APPAREIL
PHOTO>, appuyez de nouveau sur la touche
( ) ou appuyez jusqu'à mi-course sur la
touche Photo.
Page 91

ENGLISH
1 0 0 0 / 1 0 0 0
SF
L 2 2 7 2
Basic Picture-Taking Prise de photo simple
Adjusting the Focus Réglage de la mise au point
✤ In CAMERA Mode, the automatic focus will not engage unless the
Photo Button is pressed.
✤ To get a good image, please verify the focus is set properly before
pressing the Photo Button firmly.
✤ While the camera is focusing (by pressing the Photo Button
halfway down), a flashing icon
( ) will appear on the OSD (On Screen Display). A beep will be
heard once the focus is set.
✤ En mode CAMERA <APPAREIL PHOTO>, la mise au point
automatique démarre lorsque vous appuyez sur la touche Photo.
✤ Pour obtenir une bonne image, vérifiez que la mise au point a été
effectuée correctement avant d’appuyer fermement sur la touche
Photo.
✤ Lorsque le caméscope est en cours de mise au point (en appuyant
sur la touche Photo jusqu'à mi-course), une icône ( ) clignote
sur l'affichage à l’écran.
Un son est émis une fois la mise au point effectuée.
FRANÇAIS
1. Adjust your frame so that the subject is within the
AF frame on the LCD screen.
2. Pressing the Photo Button halfway down will set
the focus.
■
When the focus is set, a sound effect will play.
3. Press the Photo Button firmly to take the picture.
Notes
■
If the focus is not set properly, release the Photo
Button and then press the button halfway down
again.
■
Use MACRO Mode for recording images at close
range (under 30cm), or the proper focus will not
occur.
■
If the image still seems blurry, use the MF(Manual
Focus) feature.
1. Ajustez votre cadre afin que le sujet se trouve
dans le cadre de mise au point automatique sur
l’écran LCD.
2. Appuyez sur la touche Photo jusqu'à mi-course
pour faire la mise au point.
■
A ce moment-là, un son est émis.
3. Appuyez fermement sur la touche Photo pour
prendre la photo.
Remarques
■
Si la mise au point n’a pas été effectuée
correctement, relâchez la touche Photo puis
réappuyez jusqu'à mi-course.
■
Utilisez le mode MACRO <MACRO> pour
enregistrer des images rapprochées (à moins
de 30cm), sinon la mise au point ne sera pas
exécutée correctement.
■
Si l’image semble toujours floue, utilisez la
fonction de mise au point manuelle.
9191
Page 92

ENGLISH
Advanced Techniques Techniques perfectionnées
FRANÇAIS
FOCUS LOCK
✤ Focus will be set to the AF frame of LCD screen. If the subject
leaves the AF frame, the acquired image may blur.
✤ When objects are spread throughout the frame, use FOCUS LOCK
to get even focusing.
1. First, adjust your frame so that
the subject is within the AF
frame on the LCD screen.
2. Press the Photo Button halfway
down to set the focus on the
subject.
3. Adjust your framing with the
Photo Button pressed halfway
down to get the desired frame.
4. Press the Photo Button fully
down to take a picture.
Notes
■
To get even focusing, for example, while taking a group photo,
maintain a distance of 3~6 m when recording.
■
The FOCUS LOCK function will not work under 1m focal
distance.
FOCUS LOCK <VERROUILLAGE DE LA MISE AU POINT>
✤ La mise au point s'effectue à l'aide du cadre de mise au point
✤ Lorsque les objets sont dispersés dans le cadre, utilisez la fonction
Remarques
■
■
automatique de l’écran LCD. Si le sujet se trouve hors du cadre de
mise au point automatique, l’image obtenue sera floue.
FOCUS LOCK <VERROUILLAGE DE LA MISE AU POINT> pour
obtenir une mise au point uniforme.
1. Tout d’abord, ajustez votre cadre
afin que le sujet se trouve dans le
cadre de mise au point
automatique sur l’écran LCD.
2. Appuyez sur la touche Photo
jusqu'à mi-course pour ajuster la
mise au point sur le sujet.
3. Ajustez votre cadrage en
appuyant jusqu'à mi-course sur la
touche Photo pour obtenir le
cadre que vous souhaitez.
4. Appuyez fermement sur la touche
Photo pour prendre une photo.
Pour obtenir une mise au point uniforme, par exemple si vous
prenez une photo de groupe, conservez une distance de 3 à 6
mètres environ lors de l'enregistrement.
La fonction FOCUS LOCK <VERROUILLAGE DE LA MISE AU
POINT> ne fonctionne pas à une distance focale inférieure à 1 m.
9292
Page 93

ENGLISH
CAMERA REC MODE
INITIAL
CONT. SHOT
WHT. BALANCE
D. ZOOM
DSE SELECT
CAMCORDER
CAMERA
MEMORY
VIEWER
CONTINUOUS SHOT
CAMERA REC MODE
CAMERA SET
WHT. BALANCE
D. ZOOM
DSE SELECT
6X
Advanced Techniques Techniques perfectionnées
FRANÇAIS
Digital Zoom in CAMERA Mode
✤ A 6X Digital Zoom is provided.
✤ The Digital Zoom, which differs from the Optical Zoom, may cause
deterioration of image quality. Please use with caution.
1. Set the device to CAMERA and set the power
switch to REC mode.
2. Press the MENU button.
■
The menu list will appear.
3. Turn the MENU DIAL to highlight CAMERA and
press the MENU DIAL.
4. Turn the MENU DIAL to activate the D. ZOOM
and press the MENU DIAL.
■
The D. ZOOM menu is changed to 6X.
■
If you do not want to use the Digital Zoom
function, set the D. ZOOM menu to OFF.
5. To exit, press the MENU button.
Note
■
The Digital Zoom magnifies the image. This may cause deterioration of the image when it is recorded using the maximum rate of
magnification.
Zoom numérique en mode CAMERA <APPAREIL PHOTO>
✤ Le caméscope est doté d'un zoom numérique 6X.
✤ Le zoom numérique, différent du zoom optique, peut entraîner une
détérioration de la qualité d'image.
Manipulez-le donc avec précaution.
1. Réglez l'appareil sur CAMERA <APPAREIL
PHOTO> et le commutateur sur le mode REC
<ENR.>.
2. Appuyez sur la touche MENU.
■
La liste des options apparaît.
3. À l’aide de la molette MENU, sélectionnez
CAMERA <APPAREIL PHOTO>, puis appuyez
sur la molette MENU.
4. À l’aide de la molette MENU, activez la fonction
D. ZOOM <ZOOM NUMERIQUE>, puis appuyez
sur la molette MENU.
■
Le menu D. ZOOM <ZOOM NUMERIQUE>
est remplacé par 6X.
■
Si vous ne souhaitez pas utiliser la fonction
Digital Zoom <ZOOM NUMERIQUE>,
positionnez le menu D. ZOOM <ZOOM
NUMERIQUE> sur OFF.
5. Pour quitter, appuyez sur la touche MENU.
Remarque
■
Le zoom numérique grossit l'image.
Cela peut entraîner une détérioration de l'image lorsqu'elle est
enregistrée avec le taux d'agrandissement maximal.
9393
Page 94

ENGLISH
Advanced Techniques Techniques perfectionnées
MACRO Mode Mode MACRO <MACRO>
✤ The MACRO function works in CAMERA mode only.
✤ Use MACRO Mode for recording images at close range
(under 80cm).
✤ Effective focal distance in MACRO Mode is 30~80cm
✤ Cette fonction est disponible uniquement en mode CAMERA
<APPAREILPHOTO>.
✤ Utilisez le mode MACRO <MACRO> pour enregistrer des images de
près (à moins de 80 cm).
✤ La distance focale d'utilisation en mode MACRO <MACRO> va de
30 cm à 80 cm.
FRANÇAIS
Notes
■
Pressing the MACRO Button again or turning
it off will exit from MACRO Mode.
■
Please be careful not to cause a shadow
when recording in MACRO Mode.
■
As the distance to the subject decreases,
focusing area will be narrowed.
■
When you can not get proper focus, use the
Zoom Lever to achieve focus.
■
The viewfinder may not show the entire
recording range. Refer to the LCD Screen for
more precise framing.
9494
Remarques
■
En appuyant de nouveau sur la touche
MACRO ou en la plaçant en position
désactivée, vous quittez le mode MACRO
<MACRO>.
■
Veillez à ne pas produire d'ombre lors d'un
enregistrement en mode MACRO <MACRO>.
■
Plus la distance vous séparant du sujet
diminue, plus la zone de mise au point rétrécit.
■
Pour obtenir une bonne mise au point, utilisez
la touche du zoom.
■
Le viseur peut ne pas montrer l'ensemble de la
zone d'enregistrement. Utilisez l'écran LCD
pour un cadrage plus précis.
Page 95

ENGLISH
CAMERA REC MODE
INITIAL
CONT. SHOT
WHT. BALANCE
D. ZOOM
DSE SELECT
CAMCORDER
CAMERA
MEMORY
VIEWER
CONTINUOUS SHOT
CAMERA REC MODE
CAMERA SET
WHT. BALANCE
D. ZOOM
DSE SELECT
6X
Advanced Techniques Techniques perfectionnées
CONT. SHOT (Continuous Shot) CONT. SHOT (plan continu)
✤ The CONT. SHOT function works in CAMERA mode only.
✤ Continuous recording will occur while the Photo Button is being
pressed.
■
OFF: Records one picture at a time
■
Records pictures continuously up to storage capacity.
- When the image resolution is set to 1600 x 1200 or higher,
only 3 continuous pictures can be recorded when using
CONTINUOUS SHOT.
1. Set the device to CAMERA and set the power
switch to REC mode.
2. Press the MENU button.
■
The menu list will appear.
3. Turn the MENU DIAL to highlight CAMERA and
press the MENU DIAL.
4. Turn the MENU DIAL to activate CONTINUOUS
SHOT and press the MENU DIAL.
■
The CONTINUOUS SHOT menu is changed
to ON.
5. To exit, press the MENU button.
✤ L’option CONT. SHOT <PLAN CONTINU> est disponible
uniquement en mode CAMERA <APPAREIL PHOTO>.
✤ L'enregistrement continu s'exécute en actionnant la touche Photo.
■
OFF : Enregistre une image à la fois
■
Enregistre des images en continu jusqu'à atteindre la capacité
maximum de stockage.
- Lorsque la résolution d'image est réglée sur 1600 x 1200
ou plus, vous ne pouvez enregistrer que 3 images en
continu avec la fonction CONTINUOUS SHOT (PLAN
CONTINU).
1. Réglez l'appareil sur CAMERA <APPAREIL
PHOTO> et le commutateur sur le mode
REC <ENR.>.
2. Appuyez sur la touche MENU.
■
La liste des options apparaît.
3. À l’aide de la molette MENU, sélectionnez
CAMERA <APPAREIL PHOTO>, puis appuyez
sur la molette MENU.
4. À l’aide de la molette MENU, activez
CONTINUOUS SHOT <PLAN CONTINU> et
appuyez sur la molette MENU.
■
L’option CONTINUOUS SHOT<PLAN
CONTINU> est activée lorsqu’elle est réglée
sur la position ON.
5. Pour quitter, appuyez sur la touche MENU.
FRANÇAIS
Notes
■
When the CONT. SHOT function is set to "ON", an icon is displayed on the LCD screen.
■
It is recommended to limit your usage of Continuous Shot to under
10 seconds to prevent problems that may be caused by excessive
usage of this feature.
■
The flash does not function while using the CONT. SHOT function.
Remarques
■
Lorsque la fonction CONT. SHOT <PLAN CONTINU> est réglée
sur "ON", une icône s'affiche sur l'écran LCD.
■
Il est recommandé de limiter l'utilisation du plan continu à
10 secondes afin d'éviter les problèmes pouvant résulter de
l'utilisation excessive de cette fonction.
■
Le flash ne fonctionne pas lors de l'utilisation de l'option
CONT. SHOT <PLAN CONTINU>.
9595
Page 96

ENGLISH
Advanced Techniques Techniques perfectionnées
Using the FLASH Utilisation du flash
✤ The FLASH works in CAMERA mode only.
✤ When power is supplied, FLASH mode is set to Auto. When you
change FLASH modes, an icon that shows the current FLASH
mode will be displayed on the LCD screen.
✤ Using a flash enables the user to take bright pictures in dark
circumstances, such as nighttime shooting and in shaded areas.
✤ Le flash fonctionne uniquement en mode CAMERA <APPAREIL
PHOTO>.
✤ A la mise sous tension, le mode FLASH <FLASH> est réglé sur
Auto <Auto>. Lors d'un changement de mode FLASH <FLASH>,
une icône indiquant le mode FLASH <FLASH> actuel s'affiche sur
l'écran LCD.
✤ L'utilisation d'un flash vous permet de prendre des photos
lumineuses dans un environnement sombre : de nuit ou dans des
zones ombragées par exemple.
FRANÇAIS
Notes
■
By setting the Power Switch to CAMERA
Mode after placing the CAMERA side of the
Lens Body Block to the forward position, the
FLASH will automatically open according to
the lighting conditions.
■
To close the FLASH, push the FLASH cover
until it clicks.
■
The Flash does not function in CONTINUOUS
SHOT mode or CAMCORDER Mode.
■
The battery power will be consumed faster with repeated use of
the flash.
■
To use the flash again, wait until the flash is recharged
(5 to 7 seconds).
9696
Remarques
■
Si vous réglez le commutateur sur le mode
CAMERA <APPAREIL PHOTO> après avoir
placé le bloc d'objectif en position CAMERA
<APPAREILPHOTO>, le flash s'ouvre
automatiquement en fonction des conditions
d'éclairage.
■
Pour fermer le flash, rabattez-le dans son
logement jusqu'à ce que vous entendiez un
clic.
■
Le flash ne fonctionne pas en mode
CONTINUOUS SHOT <PLAN CONTINU> ou
en mode CAMCORDER <CAMESCOPE>.
■
L'utilisation répétée du flash décharge plus
rapidement la batterie.
■
Pour réutiliser le flash, attendez qu'il se soit
rechargé (de 5 à 7 secondes).
Page 97

ENGLISH
Advanced Techniques Techniques perfectionnées
FLASH SELECT FLASH SELECT <SELECT FLASH>
✤ The FLASH SELECT function works in CAMERA mode only.
✤ L’option FLASH SELECT <SELECT FLASH> est disponible
uniquement en mode CAMERA <APPAREIL PHOTO>.
FRANÇAIS
■ Auto : The Flash automatically strobes when the surroundings are
dark enough.
■ RED-EYE REDUCTION : Using the flash to take pictures in dark
surroundings may cause red-eye to occur. Using the RED-EYE
REDUCTION setting, the flash pre-strobes before recording the
picture to reduce the occurrence of red-eye .
■ SLOW SYNC : When the Shutter Speed is set to SLOW, the flash
strobes at the adjusted shutter speed. It is recommended to use a
tripod when the shutter speed is set to SLOW.
■ FILL-IN FLASH : Forces the flash to strobe despite the light
condition. To get finer results, it is recommended to use the flash to
take pictures, for example taking a picture of a dark object in the
shade of a tree during daylight.
■ OFF : Sets the flash not to strobe. It is recommended to set your
flash not to strobe in public places like art galleries, museums, and
theaters.
1. Set the device to CAMERA and the power switch to REC mode.
2. Press the PB ZOOM/ button to select flash function.
■ Auto <Auto> :
■ RED-EYE REDUCTION <ANTI-YEUX ROUGES> :
■ SLOW SYNC <SYNC LENTE> :
■ FILL-IN FLASH <FLASH D'APPOINT> :
■ OFF :
1. Réglez l'appareil sur CAMERA <APPAREILPHOTO>, puis le
2. Appuyez sur la touche PB ZOOM/ pour sélectionner le flash.
le flash se déclenche automatiquement lorsque l'environnement de
prise de vue est suffisamment sombre.
l'utilisation du flash pour prendre des photos dans un lieu sombre
peut produire un effet yeux rouges. Grâce au réglage REDEYE
REDUCTION <ANTI-YEUX ROUGES>, le flash se déclenche
préalablement à l'enregistrement de l'image afin de réduire cet
effet.
lorsque la vitesse d'obturation est réglée sur SLOW <LENTE>, le
flash se déclenche à la vitesse d'obturation réglée. Il est recommandé d'utiliser un trépied lorsque la vitesse d'obturation est
réglée sur SLOW <LENTE>.
force le flash à se déclencher quel que soit l'éclairage. Afin
d'obtenir de meilleurs résultats, il est recommandé d'utiliser le flash
pour prendre des photos, par exemple lorsque vous photographiez
un objet sombre à l'ombre d'un arbre pendant la journée.
désactive le déclenchement du flash. Utilisez ce réglage pour que
le flash ne se déclenche pas dans des lieux publics tels que des
galeries d'art, des musées et des théâtres.
commutateur sur le mode REC <ENR.>.
9797
Page 98

ENGLISH
CAMERA REC MODE
INITIAL
CONT. SHOT
WHT. BALANCE
D. ZOOM 6X
DSE SELECT
CAMCORDER
CAMERA
MEMORY
VIEWER
CONTINUOUS SHOT
CAMERA REC MODE
CAMERA SET
WHT. BALANCE
D. ZOOM
DSE SELECT
6X
CAMERA REC MODE
AUTO
HOLD
WHT. BALANCE
INDOOR
OUTDOOR
CAMERA SET
Advanced Techniques Techniques perfectionnées
WHT. BALANCE (WHITE BALANCE) - CAMERA Mode EQUILIBRAGE DU BLANC (WHT. BALANCE) -
✤ When the recorded color of a subject appears differently because
of certain weather or lighting conditions, adjusting the White
Balance enables you to get the correct color of the subject.
✤ The Adjusted White Balance is stored when the device is turned
off. If the battery is fully discharged or detached, the White Balance
will return to the AUTO setting, which is the factory default.
■
AUTO : This mode is generally used to control the
WHITE BALANCE automatically.
■
HOLD :This keeps the current
WHITE BALANCE value.
■
INDOOR : This controls the WHITE
BALANCE according to indoor ambience.
■
OUTDOOR : This controls the WHITE
BALANCE according to outdoor ambience.
1. Set the device to CAMERA and set the
power switch to REC mode.
2. Press the MENU button.
■
The menu list will appear.
3. Turn the MENU DIAL to highlight CAMERA and
press the MENU DIAL.
4. Turn the MENU DIAL to activate WHT. BALANCE
and press the MENU DIAL.
5. Using the MENU DIAL, select the WHT. BALANCE
you wish to use.
■
Press the MENU DIAL to confirm the
WHT. BALANCE you have selected.
6. To exit, press the MENU button.
Notes
■
The WHT.BALANCE function will not operate in
EASY mode.
■
Turn the Digital Zoom off (if necessary) to set a more
accurate White Balance.
■
If you have set the White Balance and the lighting
conditions change, reset the White Balance.
■
During normal outdoor recording, setting the White Balance to
AUTO may provide the best results.
9898
Mode CAMERA <APPAREIL PHOTO>
✤ Lorsque les couleurs enregistrées d'un sujet apparaissent différemment en
raison de certaines conditions climatiques ou d'éclairage, le réglage de
l'équilibrage du blanc vous permet de corriger les couleurs du sujet.
✤ Le niveau d'équilibrage du blanc est mémorisé lorsque l'appareil est éteint.
Lorsque la batterie est complètement déchargée ou qu'elle est retirée,
l'équilibrage du blanc revient au réglage automatique, c'est-à-dire au réglage
par défaut.
■
À l’extérieur et dans des conditions normales, vous obtiendrez de meilleurs
résultats en réglant White Balance <Equilibrage du blanc> en mode AUTO
<AUTO>.
■
AUTO <AUTO> : ce mode permet un réglage
automatique de WHITE BALANCE
<EQUILIBRAGE DU BLANC>.
■
HOLD <CONSERVER> : ce mode permet de conserver la
valeur active de WHITE BALANCE <EQUILIBRAGE DU
BLANC>.
■
INDOOR <INTERIEUR> : ce mode ajuste l'équilibrage du
blanc en fonction de l’éclairage intérieur.
■
OUTDOOR <EXTERIEUR> : ce mode ajuste l'équilibrage
du blanc en fonction de l’éclairage extérieur.
1. Réglez l'appareil sur CAMERA <APPAREIL PHOTO> et le
commutateur sur le mode REC <ENR.>.
2. Appuyez sur la touche MENU.
■
La liste des options apparaît.
3. À l’aide de la molette MENU, sélectionnez CAMERA
<APPAREILPHOTO>, puis appuyez sur la molette MENU.
4. À l’aide de la molette MENU, sélectionnez
WHT. BALANCE <EQUILIBRAGE DU BLANC>, puis
appuyez sur la molette MENU.
5. À l’aide de la molette MENU, sélectionnez l'équilibrage du
blanc que vous souhaitez utiliser.
■
Appuyez sur la molette MENU pour valider l'équilibrage du
blanc que vous avez sélectionné.
6. Pour quitter, appuyez sur la touche MENU.
Remarques
■
La fonction WHT.BALANCE <EQUILIBRAGE DU BLANC>
n’est pas disponible en mode EASY <SIMPLIFIE>.
■
Si nécessaire, désactivez le zoom numérique pour obtenir
un équilibrage du blanc plus précis.
■
Si vous avez sélectionné WHT.BALANCE <EQUILIBRAGE
DU BLANC> et que les conditions d’éclairage ont changé,
procédez à un nouveau réglage de cette fonction.
FRANÇAIS
Page 99

ENGLISH
FRANÇAIS
Advanced Techniques Techniques perfectionnées
DSE(Digital Special Effects) SELECT in CAMERA Mode DSE (Effets spéciaux numériques) en mode CAMERA
✤ The DSE function works in CAMERA mode only.
✤ The Digital Effects function will apply special effects to the image
while recording.
✤ There are 3 DSE (Digital Special Effects) in CAMERA Mode.
You can check the DSE applied image on the LCD screen or the
viewfinder.
a. BLK & WHT Mode
This mode changes the images to black and white.
b. SEPIA Mode
This mode gives the images a reddish-brown pigment.
c. SUNSET Mode
Sunset Mode is used to record sunsets.
a
b
c
<APPAREIL PHOTO>
✤ Cette fonction est disponible uniquement en mode CAMERA
<APPAREILPHOTO>.
✤ La fonction d'effets spéciaux numériques applique des effets
spéciaux à l'image pendant l'enregistrement.
✤ Il existe 3 effets spéciaux numériques (DSE) en mode CAMERA
<APPAREILPHOTO>.
Sur l'écran LCD ou dans le viseur, vous pouvez savoir quel effet
spécial numérique (DSE) est appliqué à l'image.
a. Mode BLK & WHT <NOIR & BLANC>
Les images sont reproduites en noir et blanc.
b. Mode SEPIA <SEPIA>
Ce mode donne à l’image un effet monochrome de
couleur sépia.
c. Mode SUNSET <COUCHANT>
Ce mode permet d'enregistrer des couchers de soleil.
9999
Page 100

ENGLISH
CAMERA REC MODE
INITIAL
CONT. SHOT
WHT. BALANCE
D. ZOOM 6X
DSE SELECT
CAMCORDER
CAMERA
MEMORY
VIEWER
CONTINUOUS SHOT
CAMERA REC MODE
CAMERA SET
WHT. BALANCE
D. ZOOM
DSE SELECT
6X
Advanced Techniques Techniques perfectionnées
FRANÇAIS
Selecting a Digital Effect in CAMERA Mode
1. Set the device to CAMERA and set the power switch
to REC mode.
2. Press the MENU button.
■
The menu list will appear.
3. Turn the MENU DIAL to highlight CAMERA and
press the MENU DIAL.
4. Turn the MENU DIAL to activate DSE SELECT and
press the MENU DIAL.
5. Using the MENU DIAL, select the DSE you wish to
use.
■
Press the MENU DIAL to confirm the DSE you
have selected.
6. To exit, press the MENU button.
Note
■
The DSE function will not operate in EASY mode.
100100
Sélection d'un effet numérique en mode
CAMERA <APPAREIL PHOTO>
1. Réglez l'appareil sur CAMERA <APPAREIL
PHOTO> et le commutateur sur le mode
REC <ENR.>.
2. Appuyez sur la touche MENU.
■
La liste des options apparaît.
3. À l’aide de la molette MENU, sélectionnez
CAMERA <APPAREIL PHOTO>, puis appuyez
sur la molette MENU.
4. À l’aide de la molette MENU, activez DSE
SELECT <SELECT DSE>, puis appuyez sur la
molette MENU.
5. A l'aide de la molette MENU, sélectionnez l'effet
spécial numérique (DSE) à utiliser.
■
Appuyez sur la molette MENU pour valider
l'effet spécial numérique (DSE) que vous avez
sélectionné.
6. Pour quitter, appuyez sur la touche MENU.
Remarque
■
La fonction DSE <EFFETS SPECIAUX NUMERIQUES> n’est pas
disponible en mode EASY <SIMPLIFIE>.
 Loading...