

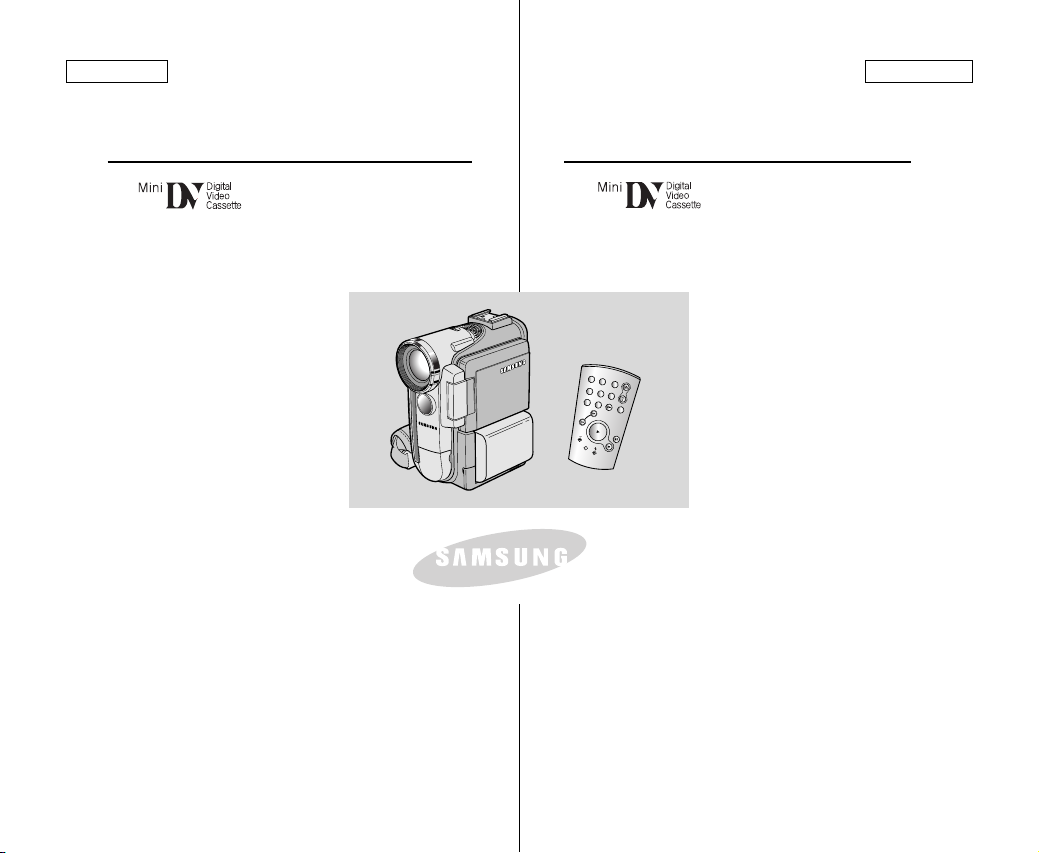
Samsung SCD230 User Manual
ENGLISH
ELECTRONICS
FRANÇAIS
Digital Video Camcorder
SCD200/D230/
D250/D270
AF Auto Focus
CCD Charge Coupled Device
LCD Liquid Crystal Display
Owner’s Instruction Book
Before operating the unit, please read this
instruction book thoroughly, and retain it for
future reference.
Caméscope numérique
SCD200/D230/
D250/D270
S
T
A
R
T
/
S
T
O
P
P
H
O
T
O
D
I
S
P
L
A
Y
S
E
L
F
T
Z
I
E
M
R
E
O
R
M
E
D
M
A
T
O
E
R
/
Y
T
I
M
E
P
H
O
T
O
S
E
A
R
C
H
A
.D
U
B
S
L
O
W
X
2
F
.
A
D
V
AF Mise au point automatique
CCD Système à transfert
de charge
LCD Écran à cristaux liquides
Mode d’emploi
Avant d’utiliser cet appareil, veuillez lire
attentivement ce mode d’emploi et le
conserver pour toute consultation ultérieure.
AD68-00709C

ENGLISH
FRANÇAIS
SommaireContents
Notes and Safety Instructions .................................... 6
Getting to Know Your Camcorder ........................... 11
Features ................................................................................................................. 11
Accessories Supplied with camcorder .................................................................. 12
Front & Left View ................................................................................................... 13
Left side View ........................................................................................................ 14
Right & Top View ................................................................................................... 15
Rear & Bottom View .............................................................................................. 16
Remote control (SCD230/D250/D270 only) ........................................................ 17
OSD (On Screen Display in CAM and PLAYER modes) ..................................... 18
OSD (On Screen Display in M.REC and M.PLAY modes)
(SCD230/D250/D270 only) ................................................................................... 19
Turning the OSD on/off (On Screen Display) ................................................ 19
Preparation .............................................................. 20
How to use the Remote Contro (SCD230/D250/D270 only) ................................ 20
Battery Installation for the Remote Control .................................................... 20
Self Record using the Remote Control .......................................................... 20
Lithium Battery Installation ......................................................................................21
Adjusting the Hand Strap ..................................................................................... 22
Hand strap ....................................................................................................... 22
Attaching the Lens Cover .................................................................................22
Connecting a Power Source ................................................................................. 23
To use the AC Power adapter and DC Cable ............................................... 23
To select the CAMCORDER mode (SCD230/D250/D270 only) .....................23
Using the Lithium Ion Battery Pack ..................................................................... 24
Charging the Lithium Ion Battery Pack .......................................................... 24
Table of continuous recording time based on model and
battery type .................................................................................................... 25
Battery level display ........................................................................................ 26
Inserting and Ejecting a Cassette ........................................................................ 27
BASIC Recording ..................................................... 28
Making your First Recording ................................................................................. 28
Record Search (REC SEARCH) ................................................................... 29
Hints for Stable Image Recording ......................................................................... 30
Recording with the LCD monitor .................................................................... 30
Recording with the Viewfinder ....................................................................... 30
Adjusting the LCD ................................................................................................ 31
Using the VIEWFINDER ...................................................................................... 32
Adjusting the Focus ........................................................................................ 32
Playing back a tape you have recorded on the LCD ........................................... 33
Adjusting the LCD during PLAY ..................................................................... 34
Controlling Sound from the Speaker ................................................................... 34
22
Remarques et consignes de sécurité ........................... 6
Familiarisez-vous avec le caméscope........................ 11
Fonctionnalités ···································································································· 11
Accessoires fournis avec votre caméscope ······················································· 12
Vue avant et latérale (côté gauche) ··································································· 13
Vue du côté gauche ···························································································· 14
Vue de droite et du dessus ················································································· 15
Vue arrière et du dessous ··················································································· 16
Télécommande (SCD230/D250/D270 uniquement) ·········································· 17
Affichage à l’écran en mode caméscope ou magnétoscope ····························· 18
Affichage à l’écran en mode enregistrement ou lecture photo
(SCD230/D250/D270 uniquement) ····································································· 19
Activation/désactivation de l’affichage (mode OSD) ·································· 19
Préparez votre caméscope........................................ 20
(
Utilisation de la télécommande
Installation de la batterie de la télécommande ·········································· 20
Enregistrement automatique avec la télécommande ································ 20
Installation de la batterie au lithium ···································································· 21
Mise en place de la poignée de soutien ····························································· 22
Poignée de soutien ····················································································· 22
Fixation du couvre-objectif············································································22
Connexion d’une source d’alimentation ····························································· 23
Utilisation de l’adaptateur secteur et du câble CC ···································· 23
Sélection du mode caméscope (
Utilisation du bloc batterie au lithium-ion ···························································· 24
Chargement du bloc batterie au lithium-ion ··············································· 24
Durée d’enregistrement selon le mode et le type de batterie ··················· 25
Affichage du niveau de la batterie ······························································ 26
Insertion et éjection d’une cassette ···································································· 27
SCD230/D250/D270
SCD230/D250/D270
uniquement)
uniquement)
··················· 20
·················· 23
Effectuez un enregistrement simple.......................... 28
Effectuez votre premier enregistrement ····························································· 28
Recherche de séquences (REC SEARCH) ··············································· 29
Astuces pour la stabilité de l’image ···································································· 30
Utilisation de l’écran LCD ··········································································· 30
Utilisation du viseur ···················································································· 30
Réglage de l’écran LCD ······················································································ 31
Utilisation du viseur ····························································································· 32
Réglage de la mise au point ······································································ 32
Lecture d’une bande à l’écran ············································································ 33
Réglage de l’écran LCD lors de la lecture ················································· 34
Réglage du volume du haut-parleur ··································································· 34

ENGLISH
FRANÇAIS
SommaireContents
Advanced Recording ............................................... 35
Use of various Functions ....................................................................................... 35
Setting menu items ......................................................................................... 35
Set the camcorder to CAM or PLAYER mode and
M.REC or M.PLAY mode (SCD230/D250/D270 only).................................... 36
Availability of functions in each mode ............................................................ 37
CLOCK SET ................................................................................................... 38
WL. REMOTE (SCD230/D250/D270 only) ................................................... 39
BEEP SOUND (SCD230/D250/D270 only) .................................................... 40
SHUTTER SOUND (SCD230/D250/D270 only)............................................. 41
DEMONSTRATION ....................................................................................... 42
PROGRAM AE ............................................................................................... 43
Setting the PROGRAM AE ............................................................................. 44
WHT. BALANCE (WHITE BALANCE) ........................................................... 45
Zooming In and Out with DIGITAL ZOOM ..................................................... 46
Zooming In and Out ........................................................................................ 46
Digital Zoom ................................................................................................... 47
DIS (Digital Image Stabilizer) ......................................................................... 48
DSE (Digital Special Effects) SELECT .......................................................... 49
Selecting an effect .......................................................................................... 50
REC MODE .................................................................................................... 51
AUDIO MODE ................................................................................................ 52
WIND CUT ..................................................................................................... 53
DATE/TIME .................................................................................................... 54
TV DISPLAY ................................................................................................... 55
Using Quick Menu ................................................................................................ 56
Setting the Quick menu .................................................................................. 57
SHUTTER SPEED & EXPOSURE ............................................................... 58
SLOW SHUTTER(Low Shutter Speed) ............................................................... 59
EASY Mode (for Beginners) .................................................................................. 60
MF/AF (Manual Focus/Auto Focus) ...................................................................... 61
Auto Focusing ................................................................................................. 61
Manual Focusing ............................................................................................. 61
BLC (Back Light Compensation) .......................................................................... 62
Fade In and Out .................................................................................................... 63
To Start Recording .......................................................................................... 63
To Stop Recording (use FADE IN / FADE OUT) ........................................... 63
Audio dubbing (SCD230/D250/D270 only) ......................................................... 64
Dubbing sound................................................................................................. 64
Dubbed Audio Playback ................................................................................. 65
PHOTO Image Recording ..................................................................................... 66
Searching for a PHOTO picture ..................................................................... 66
Perfectionnez vos enregistrements ........................... 35
Fonctions du mode menu ··················································································· 35
Liste des réglages ······················································································ 35
Réglez le caméscope sur CAMERA ou PLAYER, ou bien sur
M.REC ou M.PLAY(SCD230/D250/D270
Fonctions disponibles pour chaque mode ················································· 37
Réglage de l’horloge (CLOCK SET) ·························································· 38
Activation/désactivation de la télécommande (WL. REMOTE)
(SCD230/D250/D270 uniquement) ···························································· 39
Activation/désactivation de la sonorité (BEEP SOUND)
(SCD230/D250/D270 uniquement) ···························································· 40
Bruit de l’obturateur (SHUTTER SOUND)
(SCD230/D250/D270 uniquement) ···························································· 41
Mode DEMONSTRATION ·········································································· 42
Exposition automatique (PROGRAM AE) ·················································· 43
Réglage de l’exposition automatique ························································· 44
Équilibrage du blanc (WHT. BALANCE) ···················································· 45
Utilisation du zoom numérique ··································································· 46
Zoom avant et arrière ················································································· 46
Zoom numérique (DIGITAL ZOOM) ··························································· 47
Stabilisateur électronique d’images (DIS) ·················································· 48
Effets spéciaux numériques (DSE) ···························································· 49
Sélection d’un effet ····················································································· 50
Mode d’enregistrement (REC MODE) ······················································· 51
Mode AUDIO ······························································································· 52
Fonction coupe-vent (WIND CUT) ····························································· 53
Affichage de la date et de l’heure (DATE/TIME) ········································ 54
Affichage (fonction TV DISPLAY) ······························································· 55
Menu rapide ········································································································ 56
Utilisation du menu rapide ·········································································· 57
Vitesse d’obturation et exposition
(SHUTTER SPEED & EXPOSURE) ·························································· 58
Obturation lente (SLOW SHUTTER) ·································································· 59
Mode EASY (débutants) ····················································································· 60
Mise au point manuelle/automatique (MF/AF) ··················································· 61
Mise au point automatique ········································································· 61
Mise au point manuelle ·············································································· 61
Contre-jour intelligent (BLC) ··············································································· 62
Fondu en ouverture et en fermeture (FADE) ····················································· 63
Début de l’enregistrement ·········································································· 63
Fin de l’enregistrement (avec fondu) ························································· 63
Doublage sonore (AUDIO DUBBING)
(SCD230/D250/D270 uniquement) ····································································· 64
Réalisation du doublage sonore ································································· 64
Écoute du son doublé ················································································· 65
Enregistrement d’une image fixe ········································································ 66
Recherche d’images fixes ·········································································· 66
uniquement)
······························ 36
33

ENGLISH
Contents
FRANÇAIS
Sommaire
Playback .................................................................. 70
NITE PIX (0 lux recording) ......................................................................................67
POWER NITE PIX...................................................................................................68
Various Recording Techniques ............................................................................. 69
Tape Playback ....................................................................................................... 70
Playback on the LCD ...................................................................................... 70
Playback on a TV monitor .............................................................................. 70
Connecting to a TV which has Audio/Video input jacks ................................ 70
Connecting to a TV which has no Audio and Video input jacks ................... 71
Playback .......................................................................................................... 71
Various Functions while in PLAYER mode ........................................................... 72
Playback pause ............................................................................................... 72
Picture search (Forward/Reverse) .................................................................. 72
Slow playback (Forward/Reverse) (SCD230/D250/D270 only) .................... 72
Frame advance (To play back frame by frame)
(SCD230/D250/D270 only) ............................................................................ 73
X2 Playback (Forward/Reverse ) (SCD230/D250/D270 only) ...................... 73
Reverse playback (SCD230/D250/D270 only) .............................................. 73
ZERO MEMORY (SCD230/D250/D270 only) ..................................................... 74
PB DSE (Playback Digital Special Effects) ......................................................... 75
PB ZOOM ............................................................................................................. 76
Recording in PLAYER mode (SCD250/D270 only)........... 77
IEEE 1394 Data Transfer .......................................... 78
Transferring IEEE1394 (i.LINK)-DV standard data connections ......................... 78
Connecting to a DV device ............................................................................. 78
Connecting to a PC ......................................................................................... 78
System requirements ...................................................................................... 79
Recording with a DV connection cable .......................................................... 79
USB interface (SCD230/D250/D270 only) ....................... 80
Transferring a Digital Image through a USB Connection .................................... 80
System Requirements ........................................................................................... 80
Installing DVC Media 5.1 Program ........................................................................ 81
Using the “PC camera” function.................................................................... 81
Using the “removable Disk” function ............................................................. 82
Using the “USB streaming” function.............................................................. 82
Connecting to a PC ............................................................................................... 82
Digital Still Camera mode (SCD230/D250/D270 only)
MEMORY STICK (SCD250/D270 only) ................................................................ 83
Memory Stick Functions .................................................................................. 83
Inserting and ejecting the Memory Stick ........................................................ 84
44
........... 83
Visionnez une cassette.............................................. 70
Capture de nuit (NITE PIX) ················································································· 67
Capture de nuit renforcée (POWER NITE PIX) ················································· 68
Différentes techniques d’enregistrement ···························································· 69
Lecture d’une bande ··························································································· 70
Lecture sur l’écran LCD ·············································································· 70
Lecture sur l’écran de votre téléviseur ······················································· 70
Connexion à un téléviseur avec entrée A/V ··············································· 70
Connexion à un téléviseur sans entrée A/V ··············································· 71
Lecture de la cassette ················································································ 71
Fonctions du mode magnétoscope ···································································· 72
Arrêt sur image (mode pause) ··································································· 72
Recherche d’image avant/arrière ······························································· 72
Lecture au ralenti avant/arrière (SCD230/D250/D270 uniquement) ········ 72
Lecture image par image (SCD230/D250/D270 uniquement) ·················· 73
Lecture X2 avant/arrière (SCD230/D250/D270 uniquement) ···················· 73
Lecture arrière (SCD230/D250/D270 uniquement) ··································· 73
Mémoire compteur (ZERO MEMORY) (SCD230/D250/D270 uniquement) ····· 74
Effets spéciaux numériques en lecture (PB DSE) ············································· 75
Zoom en lecture (PB Zoom) ··············································································· 76
Enregistrement en mode magnétoscope
(SCD250/D270 uniquement).............................................. 77
Transfert de données IEEE 1394................................ 78
Connexion pour transfert de données numériques-IEEE 1394 (i.LINK) ··········· 78
Connexion à un autre appareil vidéo numérique ······································· 78
Connexion à un PC ···················································································· 78
Configuration système requise ··································································· 79
Enregistrement avec un câble de connexion DV ······································· 79
Interface USB
Transfert d’images numériques avec l’interface USB ········································ 80
Configuration système requise ··········································································· 80
Installation du programme DVC Media 5.1 ························································ 81
Utilisation de la fonction «Caméra d’ordinateur» ······································· 81
Utilisation de la fonction «Disque amovible» ············································· 82
Utilisation de la fonction de diffusion en temps réel via le port
USB (USB STREAMING) ··········································································· 82
Connexion à un PC ····························································································· 82
(
SCD230/D250/D270
uniquement) ........................
80
Appareil photo numérique (SCD230/D250/D270 uniquement) 83
Mémorisation sur carte MEMORY STICK (SCD250/D270 uniquement) ·········· 83
Fonctions disponibles avec la carte Memory Stick ···································· 83
Insertion/retrait de la carte Memory Stick ·················································· 84

ENGLISH
Contents
Structure of folders and files on the Memory Stick ........................................ 85
Image Format .................................................................................................. 85
Selecting the CAMCORDER mode ...................................................................... 85
MEMORY FILE NUMBER ..................................................................................... 86
Selecting the image quality ................................................................................... 87
Select the image quality ................................................................................ 87
Number of images on the Memory Stick ....................................................... 87
Recording Still images to a Memory Stick in M.REC Mode ................................ 88
Recording images to a Memory Stick .............................................................88
Recording an image from a cassette as a still image .................................. 89
Viewing Still images ............................................................................................... 90
To view a Single image .................................................................................... 90
To view a slide show ........................................................................................ 90
To view the Multi Display ................................................................................. 91
Copying still images from a cassette to Memory Stick ......................................... 92
Marking images for printing ................................................................................... 93
Protection from accidental erasure ........................................................................ 94
Deleting Still images .............................................................................................. 95
Formatting the Memory Stick ................................................................................ 96
Attention .......................................................................................................... 96
MPEG RECORDING ............................................................................................. 97
Selecting the moving picture sizes ....................................................................... 98
MPEG Playback .................................................................................................... 99
Maintenance........................................................... 100
After finishing a recording ................................................................................... 100
Cleaning and Maintaining the Camcorder ........................................................... 101
Cleaning the Video Heads ............................................................................ 101
Using Your Camcorder Abroad ........................................................................... 102
Power sources .............................................................................................. 102
Color system ................................................................................................. 102
Troubleshooting...................................................... 103
Troubleshooting ................................................................................................... 103
Self Diagnosis Display .................................................................................. 103
Moisture Condensation ................................................................................. 103
Self Diagnosis Display in M.REC, M.PLAY mode
(SCD230/D250/D270 only) ........................................................................... 104
Specifications...........................................................106
INDEX .................................................................... 107
Warranty (Canada users only) ................................ 108
FRANÇAIS
Sommaire
Structure des dossiers et fichiers sur la carte Memory Stick ···················· 85
Format des images ····················································································· 85
Sélection du mode du caméscope ····································································· 85
Numéro de fichier mémoire ················································································ 86
Sélection de la qualité d’image ··········································································· 87
Sélection de la qualité d’image ·································································· 87
Nombre d’images pouvant être stockées sur la carte
Memory Stick ······························································································ 87
Enregistrement d’images sur une carte Memory Stick ······································ 88
Enregistrement d’images sur une carte Memory Stick ······························ 88
Enregistrement d’une image à partir d’une cassette ································· 89
Visualisation d’images fixes ················································································ 90
Visualiser une seule image ········································································ 90
Visualiser les images sous forme de diaporama ······································· 90
Visualiser plusieurs images à la fois ·························································· 91
Copie d’images fixes d’une cassette sur la carte Memory Stick ······················· 92
Marquage des images pour leur impression ······················································ 93
Protection contre un effacement accidentel ······················································· 94
Effacement des images fixes mémorisées ························································· 95
Formatage d’une carte Memory Stick ································································ 96
Avertissement ····························································································· 96
ENREGISTREMENT MPEG ·············································································· 97
Sélection de tailles d'image mobile ···································································· 98
Lecture MPEG ····································································································· 99
Conseils d’utilisation............................................... 100
Fin d’un enregistrement ···················································································· 100
Nettoyage et entretien du caméscope ····························································· 101
Nettoyage des têtes vidéo ········································································ 101
Utilisation du caméscope à l’étranger ······························································ 102
Sources d’alimentation ············································································· 102
Normes de couleurs ················································································· 102
Dépannage ............................................................. 103
Dépannage ········································································································ 103
Auto-diagnostic ························································································· 103
Condensation ···························································································· 103
Indicateurs de l’auto-diagnostic en mode M.REC/M.PLAY
(SCD230/D250/D270 uniquement) ························································· 104
Spécifications techniques ....................................... 106
INDEX .................................................................... 107
Garantie pour le Canada ........................................ 108
55
ENGLISH
FRANÇAIS
Remarques et consignes de sécuritéNotes and Safety Instructions
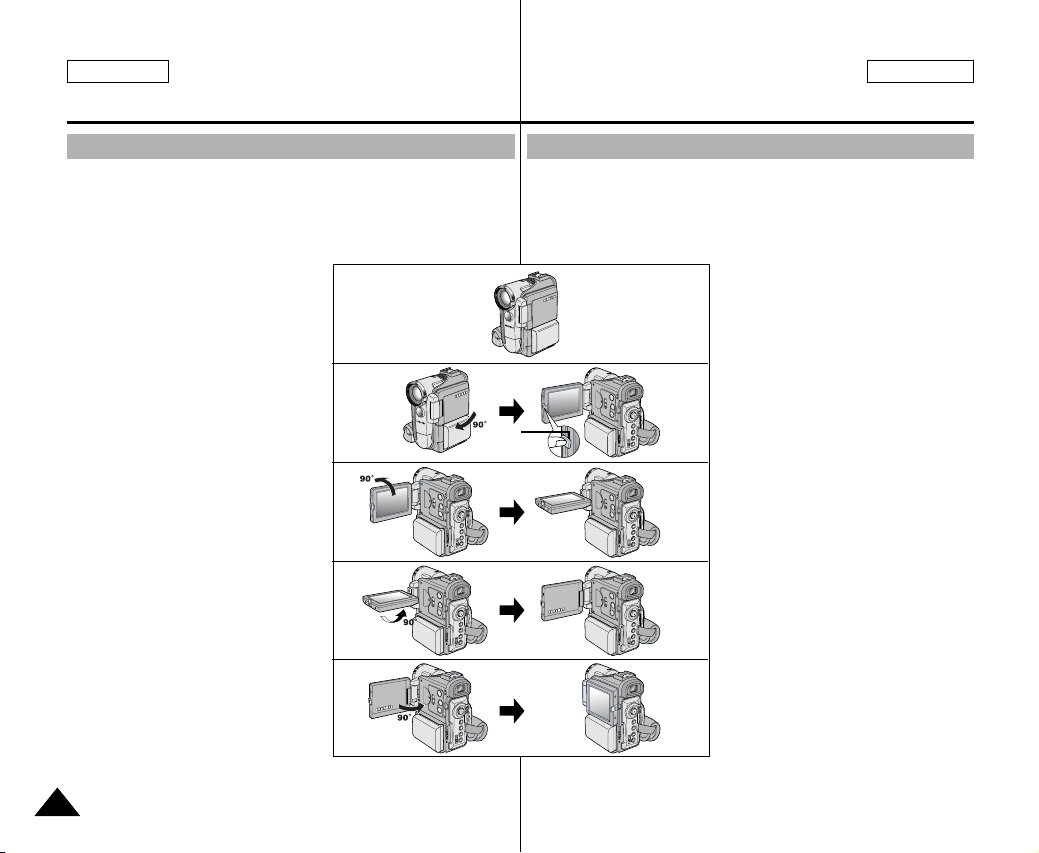
Notes regarding the rotation of the LCD screen
Please rotate the LCD screen carefully as illustrated.
Over rotation may cause damage to the inside of the hinge that
connects the LCD screen to the Camcorder.
1. LCD screen closed.
2. Standard recording using the LCD
screen.
■
A LCD Monitor is opened
applying a finger to LCD open
knob.
3. Recording when looking at the
LCD screen from the top.
4. Recording when looking at the
LCD screen from the front.
5. Recording with the LCD screen
closed.
1
2
3
4
5
Rotation de l’écran LCD
Manipulez l’écran doucement lorsque vous le faites tourner.
Une rotation intempestive peut endommager l’intérieur de la charnière
qui relie l’écran LCD au corps de l’appareil.
1. Écran LCD fermé.
2. Enregistrement standard lors de
l’utilisation de l’écran LCD.
■
LCD
open knob
Pour ouvrir l'écran LCD,
posez votre doigt sur le
bouton d'ouverture
correspondant.
3. Enregistrement en regardant
l’écran LCD d’en haut.
4. Enregistrement en regardant
l’écran LCD de face.
5. Enregistrement avec l’écran
LCD fermé.
66

ENGLISH
Notes and Safety Instructions
FRANÇAIS
Remarques et consignes de sécurité
Notices regarding COPYRIGHT
Television programs, video tapes, DVD titles, films, and other program
materials may be copyrighted.
Unauthorized copying of copyrighted material may be against the law.
Notes regarding moisture condensation
1. A sudden rise in atmospheric temperature may cause
condensation to form inside the camcorder.
for example:
- When you move the camcorder from a cold location to a warm
location (e.g. from outside to inside during winter.)
- When you move the camcorder from a cool location to a hot
location (e.g. from inside to outside during the summer.)
2. If the (DEW) protection feature is activated, leave the
camcorder for at least two hours in a dry, warm room with the
cassette compartment opened and the battery pack removed.
Notes regarding CAMCORDER
1. Do not leave the camcorder exposed to high temperature
(above 60°C or 140°F).
For example, in a parked car in the sun or exposed to direct
sunlight.
2. Do not let the camcorder get wet.
Keep the camcorder away from rain, sea water, and any other form
of moisture. If the camcorder gets wet, it may get damaged.
Sometimes a malfunction due to exposure to liquids cannot be
repaired.
Droits d’auteur
Les programmes de télévision, les bandes vidéo, les DVD, les films et
tout autre support enregistré de ce type peuvent être protégés par des
droits d’auteur.
Les copier sans autorisation peut aller à l’encontre des lois en vigueur
dans votre pays.
Formation de condensation
1. Un accroissement soudain de température peut entraîner la
Ce peut être le cas lorsque vous passez:
-d’un extérieur froid à un intérieur chaud (en hiver, par exemple),
-d’un intérieur frais à un extérieur chaud (en été, par exemple).
2. Si la fonction de protection "DEW" se déclenche, laissez
Caméscope
1. N’exposez pas votre caméscope à des températures trop élevées
2. Ne mouillez pas votre caméscope.
formation de condensation à l’intérieur de l’appareil.
l’appareil pendant deux heures dans un endroit sec et à
température ambiante, le compartiment à cassette ouvert et sans
le bloc batterie.
(plus de 60°C), par exemple, en plein soleil ou dans une voiture
garée au soleil.
Tenez-le à l’abri de toute humidité (pluie, eau de mer, etc.).
Sinon, il risque d’être endommagé, entraînant parfois un
dysfonctionnement irréparable de l’appareil.
77
ENGLISH
FRANÇAIS
Remarques et consignes de sécuritéNotes and Safety Instructions
Notes regarding the battery pack
- Make sure that the battery pack is fully
charged before starting to record.
- To preserve battery power, keep your
camcorder turned off when you are not
operating it.
- If your camcorder is in CAM mode, and it is
left in STBY mode without being operated for
more than 5 minutes with a tape installed, it
will automatically turn itself off to protect
against unnecessary battery discharge.
- Make sure that the battery pack is fitted firmly into place.
Dropping the battery pack may damage it.
- A brand new battery pack is not charged.
Before using the battery pack, you need to charge it completely.
- It is a good idea to use the viewfinder rather than the LCD when
making a long recordings, because the LCD uses up more battery
power.
* When the battery reaches the end of its life, please contact your
local dealer. The batteries have to be dealt with as chemical waste.
Notes regarding the Video Head Cleaning
- To ensure normal recording and a clear picture, clean the video
heads regularly. If a square block-shape distorts playback,
or only a blue screen is displayed, the video heads may be dirty.
If this happens, clean the video heads with a dry type cleaning
cassette.
- Do not use a wet-type cleaning cassette. It may damage the video
heads.
Bloc batterie
- Assurez-vous que le bloc batterie est parfaitement en place.
- Un bloc batterie neuf n’est jamais chargé.
- Si vous prévoyez de filmer longtemps, il est conseillé d’utiliser le
* Lorsque la batterie ne fonctionne plus ou est hors d’usage,
Nettoyage des têtes vidéo
- Pour garantir un enregistrement normal et obtenir des images
-N’utilisez pas de cassette de type humide, car vous risqueriez
- Assurez-vous que le bloc batterie est
chargé avant de filmer sans connexion
au secteur.
- Pour prolonger la durée de votre batterie,
gardez votre caméscope éteint lorsque
vous ne l’utilisez pas.
- En mode CAMERA, si vous laissez votre
appareil en veille pendant plus de cinq
minutes sans vous en servir et avec une
bande à l’intérieur, il s’éteint
automatiquement pour éviter tout
déchargement inutile de la batterie.
Ne faites pas tomber le bloc batterie; vous risqueriez de
l’endommager.
Avant de l’utiliser, vous devez le charger complètement.
viseur plutôt que l’écran LCD, car celui-ci consomme plus d’énergie.
contactez votre revendeur le plus proche.
Les batteries doivent être traitées en tant que déchets chimiques.
claires, nettoyez régulièrement les têtes vidéo.
L’apparition de parasites sur l’image ou l’affichage d’un écran vide
peut signifier que les têtes vidéo sont sales.
Dans ce cas, nettoyez-les avec la cassette de type sec prévue à
cet effet.
d’endommager les têtes vidéo.
88
ENGLISH
SLOW
SHUTTER
PHOTO
T
W
FRANÇAIS
Remarques et consignes de sécuritéNotes and Safety Instructions
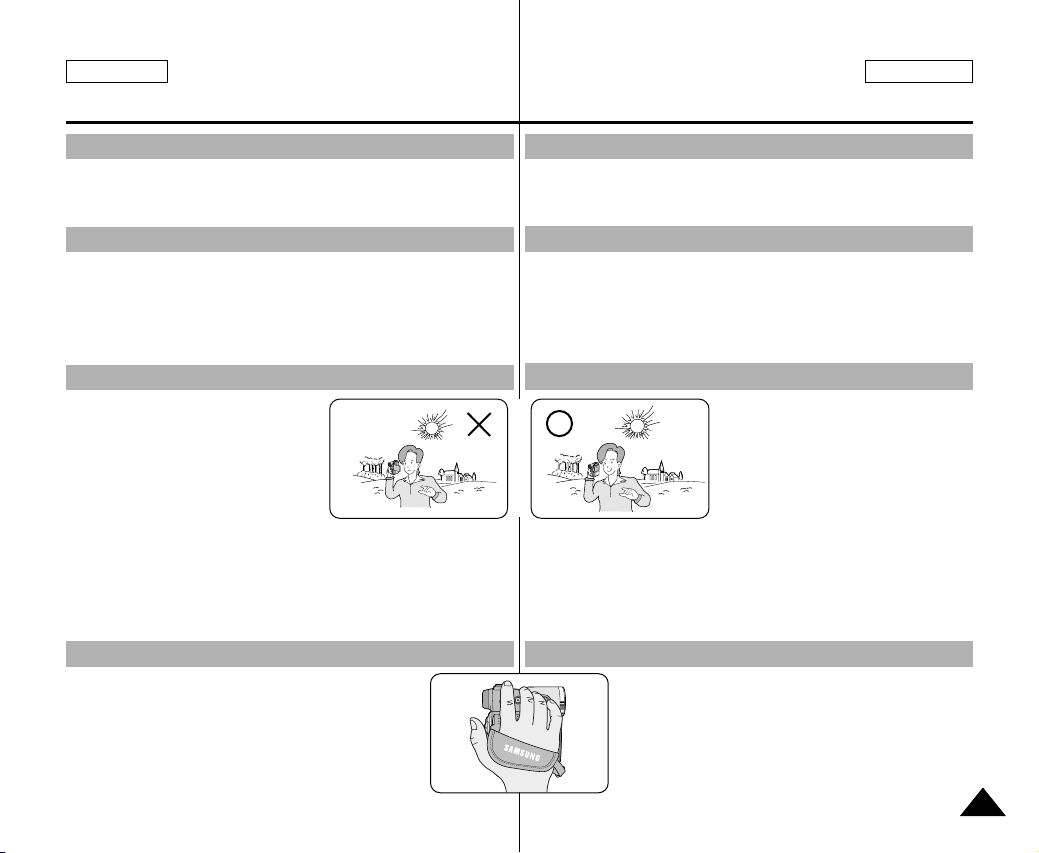
Note regarding the LENS
- Do not film with the camera lens pointing directly at the sun.
Direct sunlight can damage the CCD(Charge Coupled Device).
- Si vous filmez en plein soleil, veillez à ne pas diriger l’objectif vers
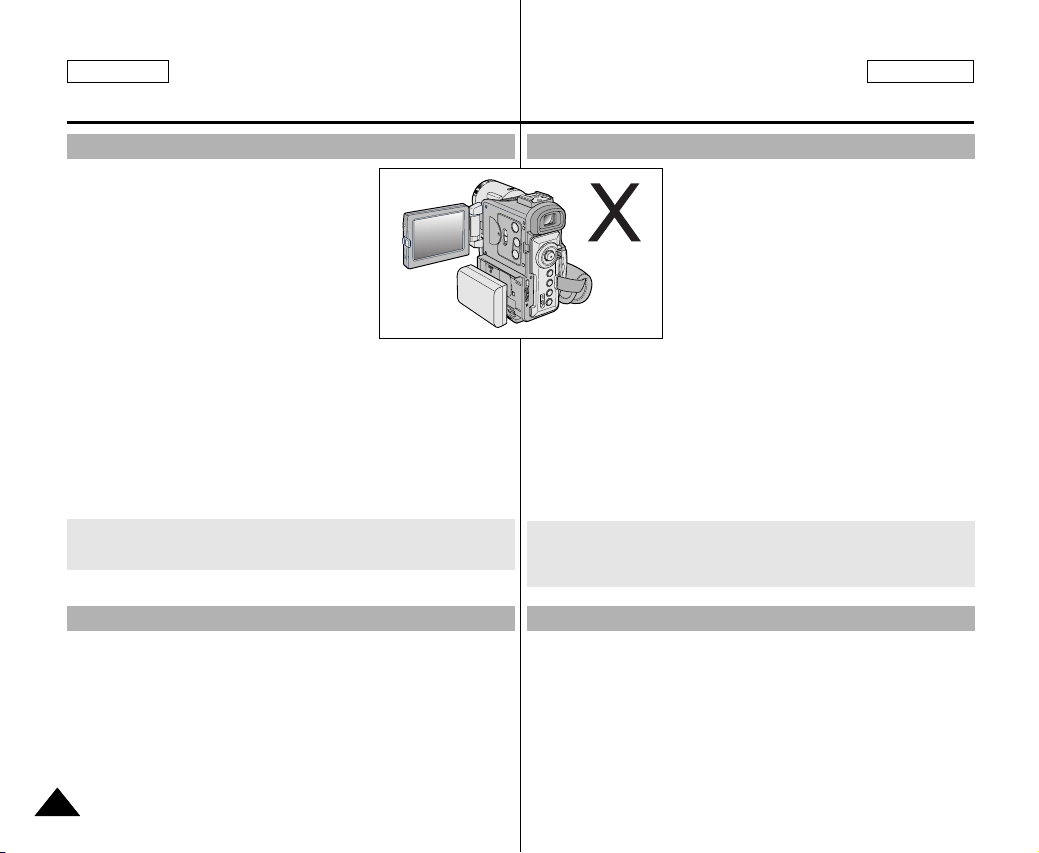
Notes regarding electronic viewfinder
1. Do not position the camcorder such that the viewfinder is pointing
towards the sun.
Direct sunlight can damage the inside of the viewfinder. Be careful
when placing the camcorder under sunlight or near a window
exposed to sunlight.
1. N’orientez pas le viseur vers le soleil.
Notes regarding ‘Record’ or ‘Playback’ using the LCD
1. The LCD display has been
manufactured using high precision
technology. However, there may be
tiny dots (red, blue or green in color)
that appear on the LCD display.
These dots are normal and do not
affect the recorded picture in any
way.
2. When you use the LCD display under direct sunlight or outdoors,
it maybe difficult to see the picture clearly.
2. Lorsque vous utilisez l’écran LCD à la lumière directe du soleil,
If this occurs, we recommend using the viewfinder.
3. Direct sunlight can damage the LCD monitor.
3. La lumière directe peut endommager l’écran LCD.
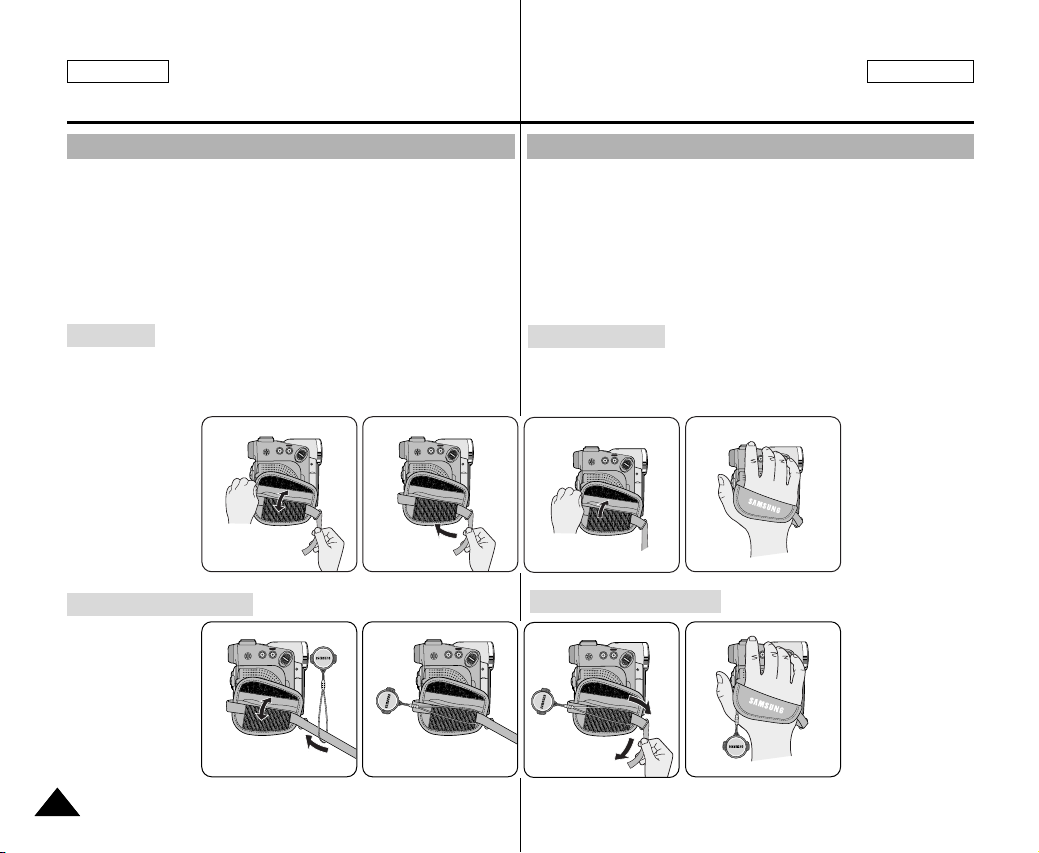
Notes regarding the hand strap
- To ensure a steady picture during filming, check that
the hand strap is properly adjusted.
- Do not force your hand into the hand strap as you
could damage it.
Objectif
le soleil. La lumière solaire directe peut endommager le système à
transfert de charge (Charge Coupled Device).
Viseur électronique
La lumière solaire directe peut endommager l’intérieur du viseur.
Soyez vigilant lorsque vous placez votre caméscope au soleil ou
près d’une fenêtre.
Enregistrement ou lecture avec l’écran LCD
1. L’écran a été conçu à l’aide d’une
technologie de haute précision.
Cependant, de minuscules points
(rouges, bleus ou verts) peuvent
apparaître de façon constante sur
l’écran LCD.
Ces points sont normaux et
n’affectent aucunement l’image
enregistrée.
la visualisation à l’écran peut s’avérer difficile.
Dans ce cas, nous vous recommandons d’utiliser le viseur.
Poignée de soutien
- Pour une meilleure qualité de prise de vue, il est
important de bien ajuster la poignée de soutien.
- Ne forcez pas pour insérer votre main dans la
poignée, car vous risqueriez de l’endommager.
99

ENGLISH
FRANÇAIS
Remarques et consignes de sécuritéNotes and Safety Instructions
Precautions regarding the Lithium battery
1. The lithium battery maintains the clock function and user settings;
even if the battery pack or AC adapter is removed.
2. The lithium battery for the camcorder lasts about 6 months under
normal operation from time of installation.
3. When the lithium battery becomes weak or dead, the date/time
indicator will display “---” when you set the DATE/TIME to ON.
In this case, replace the lithium battery with a new one(type
CR2025).
4. Danger of explosion if battery is incorrectly replaced.
Replace only with the same or equivalent type.
Warning: Keep the LITHIUM BATTERY out of reach of children.
Should a battery be swallowed, consult a doctor
immediately.
1. La batterie au lithium sert à sauvegarder la date et l’heure, les
2. La longévité de la batterie au lithium est d’environ six mois à
3. Lorsque la batterie au lithium s’affaiblit ou est déchargée,
4. Il existe un risque d’explosion si la batterie n’est pas remplacée par
Attention: maintenez la BATTERIE AU LITHIUM hors de portée
Précautions d’emploi de la batterie au lithium
titres et les réglages prédéfinis, en l’absence du bloc batterie ou de
l’adaptateur secteur.
compter de sa mise en fonctionnement et dans des conditions
normales d’utilisation.
l'affichage de la date et de l'heure indique "---" lorsque vous activez
l'option DATE/TIME.
Dans ce cas, remplacez-la par une nouvelle de type CR2025.
un modèle approprié.
Utilisez exclusivement une batterie équivalente ou de même type.
des enfants. Si la batterie venait à être avalée,
consultez un médecin immédiatement.
1010

ENGLISH
FRANÇAIS
Familiarisez-vous avec le caméscopeGetting to Know Your Camcorder
Features
• Digital data transfer function with IEEE1394
By incorporating the IEEE 1394 (i.LINK™ : i.LINK is a serial data
transfer protocol and interconnectivity system, used to transmit DV
data) high speed data transport port, both moving and still images can
be transferred to a PC, making it possible to produce or edit various
images.
• USB interface for digital image data transfer
(SCD230/D250/D270 only)
You can transfer images to a PC using the USB interface without an
add-on card.
• PHOTO
The PHOTO function lets you capture an object as a still along with
sound, while in Camera mode.
• 800x Digital zoom
Allows you to magnify an image up to 800 times its original size.
• Color TFT LCD
A high-resolution color TFT LCD gives you clean, sharp images as well
as the ability to review your recordings immediately.
• Digital Image Stabilizer (DIS)
The DIS compensates for any handshake, reducing unstable images
particularly at high magnification.
• Various digital effects
The DSE (Digital Special Effects) allows you to give your films a special
look by adding various special effects.
• Back Light Compensation (BLC)
The BLC function compensates for the bright background behind a
subject you're recording.
• Program AE
The Program AE enables you to alter the shutter speed and aperture to
suit the type of scene/action to be filmed.
• NITE PIX
The NITE PIX function enables you to record a subject in a dark place.
• Digital Still Camera function (SCD230/D250/D270 only)
■
Using Memory Stick, you can easily record and playback standard
still images.
■
You can transfer standard still images on the Memory Stick to your
PC using the USB interface.
• MPEG Recording (SCD230/D250/D270 only)
MPEG recording makes it possible to record video onto a Memory
Stick.
Fonctionnalités
• Transfert de données numériques avec le port IEEE 1394
Le port haute vitesse IEEE 1394 de type i.LINK™ (i.LINK est un protocole
de transfert de données série et système d’interconnexion) vous permet
de transférer des images mobiles et fixes vers un PC, où vous pourrez les
modifier à loisir.
• Transfert d’images numériques avec l’interface USB
(SCD230/D250/D270 uniquement)
Vous pouvez transférer des images vers un PC à l’aide de l’interface USB
sans carte supplémentaire.
• PHOTO
La fonction PHOTO vous permet de capturer une image fixe pendant
environ 6 secondes sur la bande vidéo, et ce, en mode caméscope
(CAMERA).
• Zoom numérique 800x
La fonction Zoom vous permet de vous rapprocher du sujet filmé sans
avoir à vous déplacer.
•Écran LCD TFT couleur (LCD = écran à cristaux liquides)
L’écran LCD TFT couleur à haute résolution offre une image nette et
permet de filmer dans une position stable et confortable.
• Stabilisateur électronique d’images (DIS)
La fonction DIS rétablit la stabilité des images lorsque le tremblement de
la main provoque des vibrations désagréables, surtout en mode zoom
avant.
• Effets numériques divers
L’ajout de différents effets spéciaux vous permet de donner un côté
spectaculaire à vos films.
• Contre-jour (BLC)
Lorsque vous filmez un sujet devant une source lumineuse ou devant un
fond clair, utilisez la fonction BLC pour effectuer un contre-jour intelligent.
• Exposition automatique (Program AE)
La fonction Program AE vous permet d’adapter la vitesse d’obturation et le
diaphragme selon la scène à filmer.
• Capture de nuit
La fonction NITE PIX vous permet de filmer un sujet dans un endroit à
faible luminosité.
• Appareil photo numérique (SCD230/D250/D270 uniquement)
■
La carte Memory Stick vous permet d'enregistrer et de lire des images
fixes standard.
■
Vous pouvez transférer des images fixes standard sur la carte
Memory Stick de votre PC à l'aide de l'interface USB.
• MPEG REC (SCD230/D250/D270 uniquement)
La fonction MPEG REC permet d’enregistrer les données du caméscope
sur une carte Memory Stick.
1111
ENGLISH
Getting to Know Your Camcorder
FRANÇAIS
Familiarisez-vous avec le caméscope
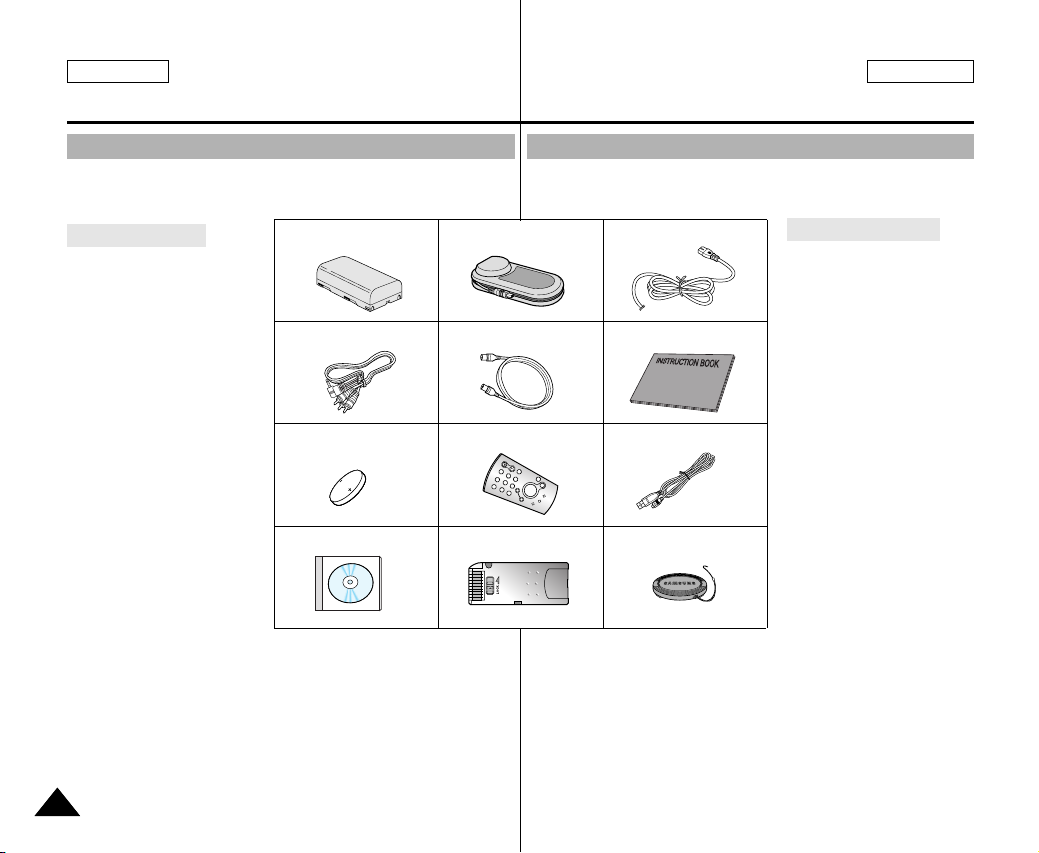
Accessories Supplied with camcorder
Make sure that the following basic accessories are supplied with your
digital video camera.
Basic Accessories
1. Lithium Ion Battery pack
2. AC Power Adapter
3. AC Cord
4. AUDIO/VIDEO Cable
5. S-VIDEO Cable
(SCD230/D250/D270 only)
6. Instruction Book
7. Lithium battery for
Remote Control or Clock.
(TYPE: CR2025)
8. Remote Control
(SCD230/D250/D270 only)
9. USB cable
(SCD230/D250/D270 only)
10. Software CD
(SCD230/D250/D270 only)
11. Memory Stick
(SCD250/D270 only)
12. Lens Cover
1. Lithium Ion Battery pack
AUDIO/VIDEO Cable
4.
7. Lithium battery
(CR2025)
10. Software CD
2. AC Power Adapter
5. S-VIDEO Cable
8. Remote Control
11. Memory Stick
Accessoires fournis avec votre caméscope
Assurez-vous que les accessoires ci-après ont été livrés avec votre
caméscope numérique.
3. AC cord
6. Instruction Book
9. USB cable
12. Lens Cover
Accessoires de base
1. Bloc batterie au lithium-ion
2. Adaptateur secteur
3. Cordon secteur
4. Câble AUDIO/VIDEO
5. Câble S-VIDEO
(SCD230/D250/D270
uniquement)
6. Mode d’emploi
7. Batteries au lithium pour la
télécommande ou le
soutien mémoire
(type: CR2025)
8. Télécommande
(SCD230/D250/D270
uniquement)
9. Câble USB
(SCD230/D250/D270
uniquement)
10. Logiciel (CD)
(SCD230/D250/D270
uniquement)
11. Carte Memory Stick
(SCD250/D270
uniquement)
12. Couvre-objectif
1212
ENGLISH
FRANÇAIS
Familiarisez-vous avec le caméscopeGetting to Know Your Camcorder
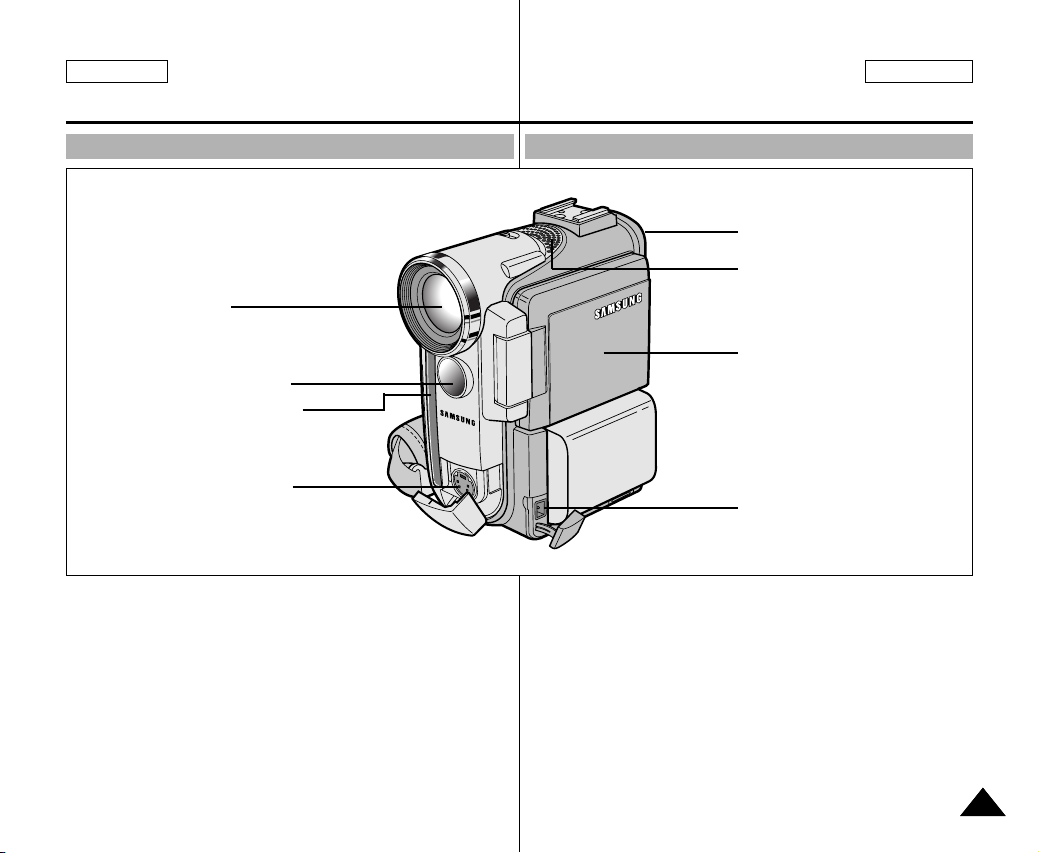
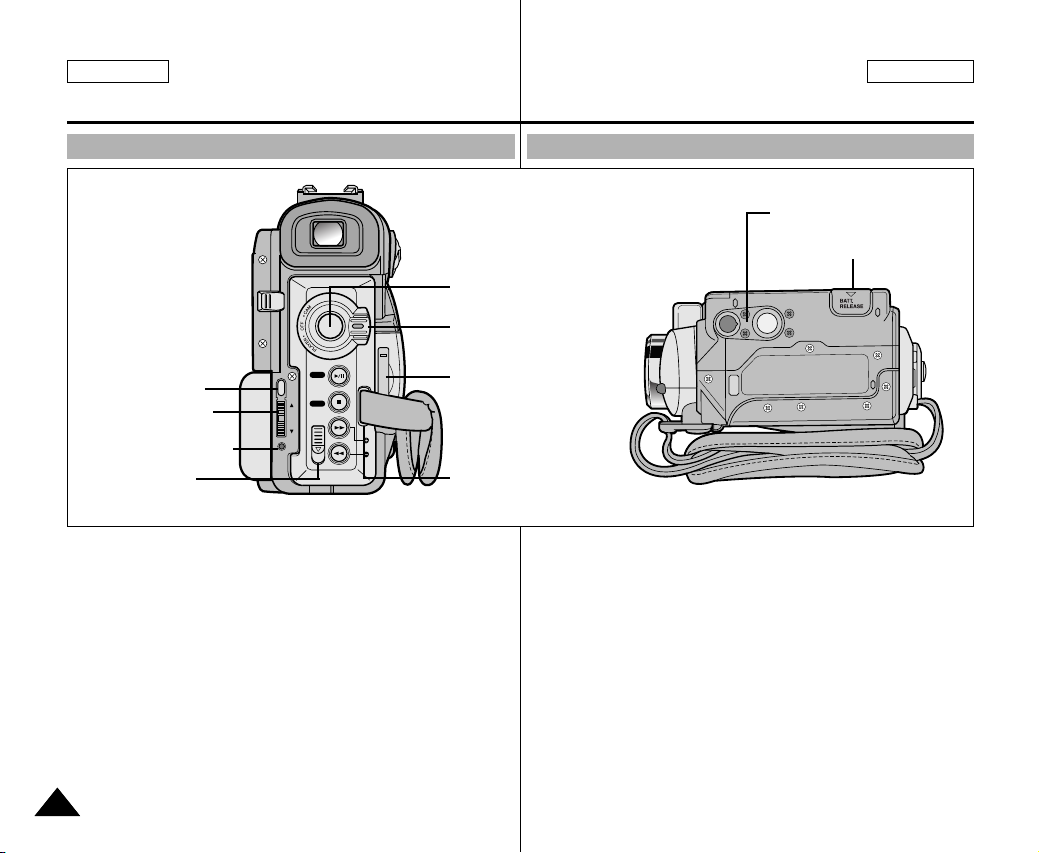
Front & Left View
1. Lens
2. Infrared Light
3. Remote Sensor
4. S-VIDEO Jack
1. Lens
2. Infrared Light
(see page 67)
3. Remote Sensor
4. S-VIDEO Jack
5. View Finder (see page 32)
6. Internal MIC
7. TFT LCD Monitor
(see page 31)
8. DC Jack (see page 23)
Vue avant et latérale (côté gauche)
5. View Finder
6. Internal MIC
7. TFT LCD Monitor
8. DC Jack
1. Objectif
2. Témoin infrarouge
(Voir page 67)
3. Capteur de la
télécommande
4. Sortie S-VIDEO
5. Viseur (voir page 32)
6. Entrée microphone
interne
7. Écran à cristaux
liquides (LCD)
(voir page 31)
8. Prise CC (voir page 23)
1313
ENGLISH
FADE
BLC
TAPE
EJECT
VOL/MF
CHARGE
MENU
S.SHOW
FWD
SEARCH
REV
EASY
MULTI
PB
ZOOM
DISPLAY
MEMORY
STICK
TAP E
FRANÇAIS
Familiarisez-vous avec le caméscopeGetting to Know Your Camcorder
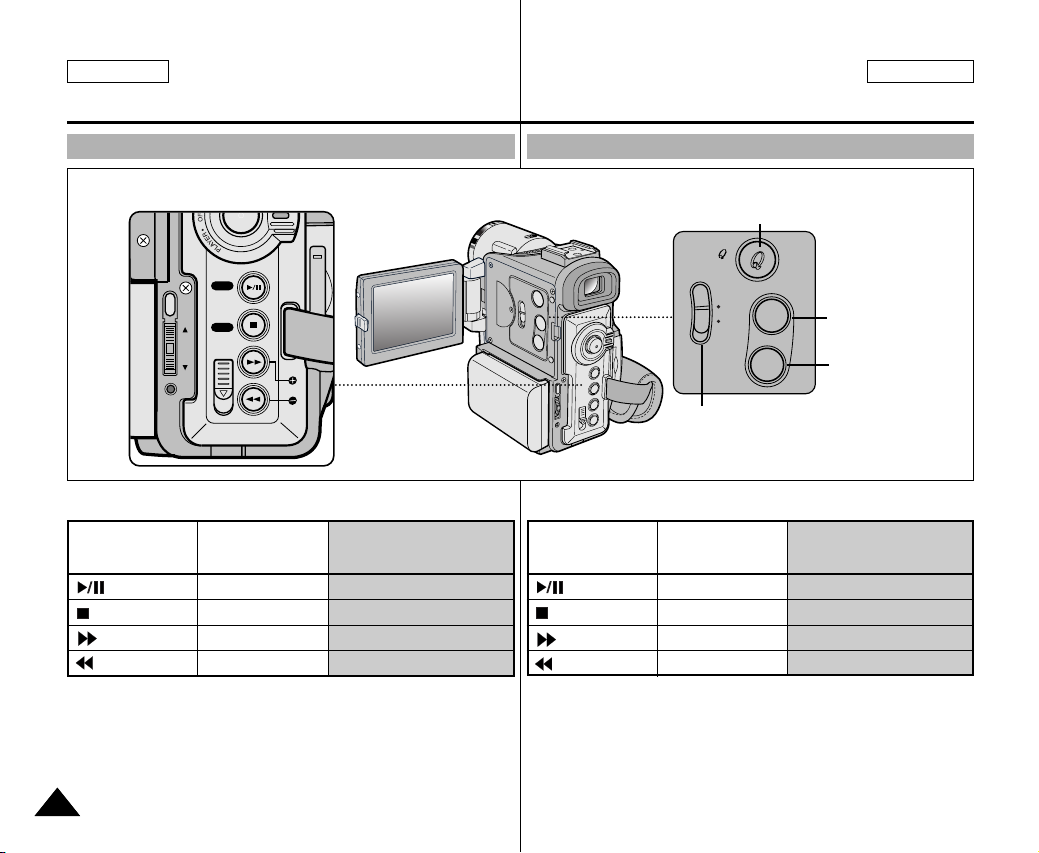
Left Side View
1. Function buttons
1. Function buttons
PLAYER CAMERA
: (PLAY/STILL) FADE (see page 63) SLIDE SHOW (see page 90)
: (STOP) BLC (see page 62) : (FF) REC SEARCH + FWD (see page 90)
: (REW) REC SEARCH – REV (see page 90)
2. EASY.Q Button (CAM) /
MULTI (M.PLAY)
(SCD230/D250/D270 only)
3. PB ZOOM
1414
M.PLAY
(SCD230/D250/D270 only)
4. DISPLAY
5. Mode Switch
(TAPE/MEMORY STICK)
(SCD230/D250/D270 only)
Vue du côté gauche
2. EASY.Q (see page 60)/
MULTI (see page 91)
3. PB ZOOM
(see page 76)
4. DISPLAY
(see page 19)
5. Mode Switch (TAPE/MEMORY STICK)
1. Touches de fonction
PLAYER CAMERA
(
: (PLAY/STILL) FADE (voir page 63) SLIDE SHOW (voir page 90)
: (STOP) BLC (voir page 62) : (FF) REC SEARCH + FWD (voir page 90)
: (REW) REC SEARCH – REV (voir page 90)
2. EASY.Q(CAM)/
MULTI(M.PLAY)
(SCD230/D250/D270
uniquement)
3. PB ZOOM
4. DISPLAY
5. Sélecteur de mode
(TAPE/MEMORY STICK)
(SCD230/D250/D270
uniquement)
M.PLAY
SCD230/D250/D270
uniquement)
ENGLISH
FRANÇAIS
Familiarisez-vous avec le caméscopeGetting to Know Your Camcorder
Right & Top View
1. Accessory Shoe
2. Speaker
3. FOCUS Adjustment knob
4. Slow Shutter Button
5. PHOTO Button
1. Accessory Shoe
2. Speaker
3. FOCUS Adjustment knob
(see page 32)
4. Slow Shutter Button
(see page 59)
5. PHOTO Button
(see page 66)
6. NITE PIX Switch
(see page 67)
7. Zoom lever (see page 46)
8. External MIC
9. AV Jack
10. DV Jack (see page 78)
11. USB Jack (see page 80)
(SCD230/D250/D270 only)
Vue de droite et du dessus
6. NITE PIX Switch
7. Zoom lever
8. External MIC
9. AV Jack
10. DV Jack
11. USB Jack
1. Sabot d’accessoire
2. Haut-parleur intégré
3. Molette de réglage du
zoom (voir page 32)
4. Touche Slow Shutter
(voir page 59)
5. Touche PHOTO
(voir page 66)
6. Sélecteur NITE PIX
(voir page 67)
7. Touche Zoom
(voir page 46)
8. Entrée micro externe
9. Prise AV
10. Prise DV (voir page 78)
11. Prise USB (voir page 80)
(SCD230/D250/D270
uniquement)
1515
ENGLISH
FRANÇAIS
Familiarisez-vous avec le caméscopeGetting to Know Your Camcorder
Rear & Bottom View
1. MENU Button
2. MENU Selector
(VOL/MF)
3. Charging indicator
4. TAPE EJECT
1. MENU Button
2. MENU Selector (VOL/MF)
3. Charging indicator
4. TAPE EJECT
5. START/STOP button
6. Power Switch
(see page 28)
1616
FADE
S.SHOW
MENU
BLC
TAPE
EJECT
VOL/MF
CHARGE
FWD
SEARCH
REV
7. Memory Stick Slot
(SCD230/D250/D270 only)
8. Hook for hand strap
9. Tripod receptacle
10. Battery Release
Vue arrière et du dessous
5. START/STOP button
6. Power Switch
7. Memory Stick Slot
8. Hook for hand strap
1. Touche MENU
2. MENU SELECTOR
(sélection du menu et du
volume)
3. Témoin de charge de la
batterie
4. Touche TAPE EJECT
(éjection de la bande)
5. Touche START/STOP
(marche/arrêt)
6. Commutateur
(voir page 28)
9. Tripod receptacle
10. Battery Release
7. Emplacement de la carte
Memory Stick
(SCD230/D250/D270
uniquement)
8. Anneau de fixation pour la
poignée de soutien
9. Pas de vis trépied
10. Éjection de la batterie

ENGLISH
FRANÇAIS
Familiarisez-vous avec le caméscopeGetting to Know Your Camcorder
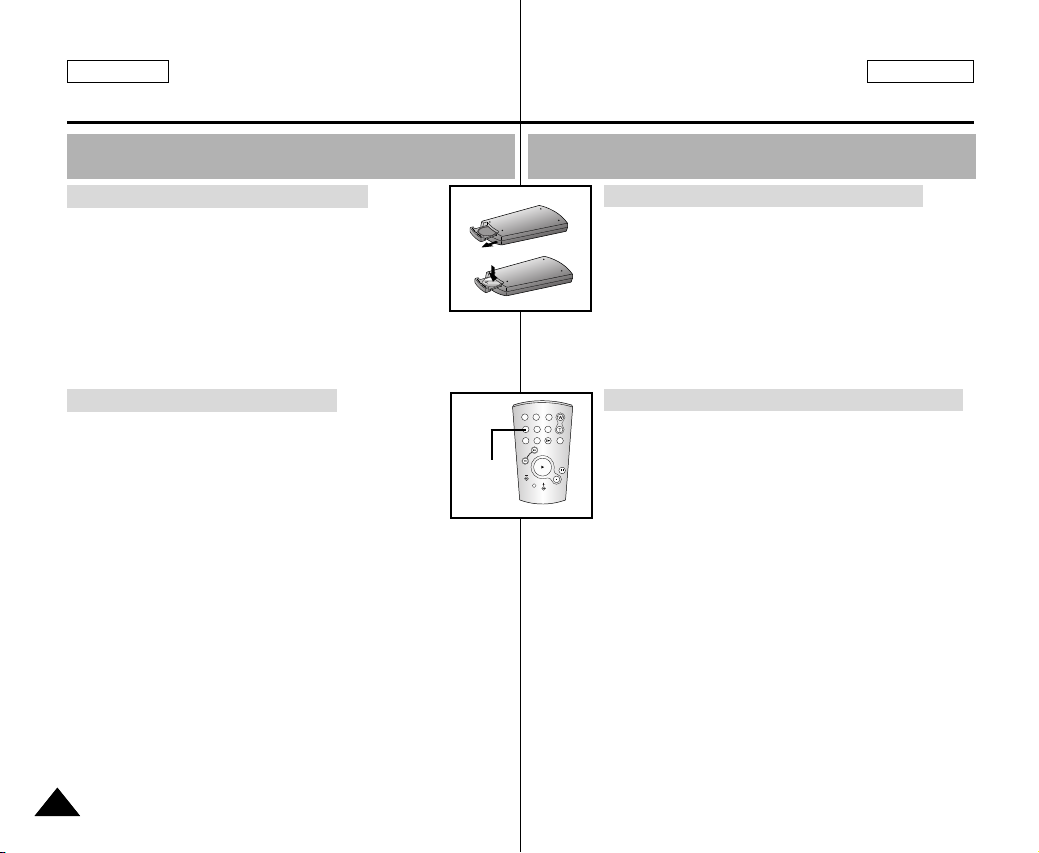
Remote control (SCD230/D250/D270 only) Télécommande (SCD230/D250/D270 uniquement)
1. PHOTO
2. START/STOP
3. SELF TIMER
4. ZERO MEMORY
5. PHOTO SEARCH
1. PHOTO
2. START/STOP
3. SELF TIMER (see page 20)
4. ZERO MEMORY
(see page 74)
5. PHOTO Search
6. A.DUB (see page 64)
7. (FF)
8. (REW)
9. (PLAY)
6. A.DUB
7. (FF)
8. (REW)
9. (PLAY)
10. Direction
10. Direction ( , )
(see page 72)
11. F. ADV (see page 73)
12. (STOP)
13. (STILL)
14. (SLOW)
15. DATE/TIME
16. X2 (see page 73)
17. Zoom
18. Display
18. DISPLAY
17. Zoom
16. X2
15. DATE/TIME
14. (SLOW)
13. (STILL)
12. (STOP)
11. F. ADV
1. Touche PHOTO
2. Touche START/STOP
(marche/arrêt)
3. Touche SELF TIMER
(minuterie automatique)
(voir page 20)
4. Touche ZERO MEMORY
(voir page 74)
5. Touche PHOTO Search
6. Touche A.DUB (doublage
sonore) (voir page 64)
7. Touche FF
(avance rapide)
8. Touche REW
(rembobinage)
9. Touche PLAY (lecture)
10. Touches directionnelles
( , ) (avant/arrière)
(voir page 72)
11. Touche F. ADV
(avance image par image)
(voir page 73)
12. Touche STOP (arrêt)
13. Touche STILL (pause)
14. Touche SLOW (ralenti)
15. Touche DATE/TIME
(date et heure)
16. Touche X2 (voir page 73)
17. Touche Zoom
18. Touche Display
(activation/désactivation
de l’affichage)
1717

ENGLISH
. . . C
SOUND [ 2 ]
MIRROR
ENTER :
PB ZOOM
1.2x
M - 0 : 0 0 : 0 0
5 5 min
1 6 bit
VOL. [ 1 1 ]
DV
1 0 : 0 0 A M
J A N . 1 0 , 2 0 0 3
FRANÇAIS
Familiarisez-vous avec le caméscopeGetting to Know Your Camcorder
OSD (On Screen Display in CAM and PLAYER modes)
1. Battery level (see page 26)
2. Easy mode (see pages 60)
3. DSE (Digital Special Effects) mode
(see page 49)
4. Program AE (see page 43)
5. White Balance mode (see page 45)
6. BLC (Back Light Compensation)
(see page 62)
7. Manual focus (see page 61)
8. Shutter speed and EXPOSURE
(see page 58)
9. Zoom position (see page 46)
10. NITE PIX (see page 67)
11. DATE/TIME (see page 54)
12. USB (SCD230/D250/D270 only)
13. WL. REMOTE
(SCD230/D250/D270 only)
14. WIND CUT (see page 53)
15. Audio recording mode (see page 52)
16. Zero memory indicator
(SCD230/D250/D270 only) (see page 74)
17. Remaining Tape (measured in minutes)
18. Tape Counter
19. Operating mode
20. Record speed mode
21. PHOTO mode
22. Self recording and waiting timer
(SCD230/D250/D270 only)
(see page 20)
23. DIS (see page 48)
24. Volume control (see page 34)
25. Audio playback channel
26. DV IN(DV data transfer mode)
(see page 79)
27. DEW (see page 7)
28. Message Line
29. PB DSE (see page 75)
30. PB ZOOM/ENTER (see page 76)
31. POWER NITE PIX (see page 68)
1818
OSD in CAM mode
1
2
3
6
4
5
7
31
9
8
OSD in PLAYER mode
25
30
29
30
23 22 21 20 19
EASY
MIRROR
BLC
TAPE !
NIGHT CAPTUREMF
SHUTTER
P
EXPOSURE
ZOOM
SHUTTER
EXPOSURE
21 20 19
Affichage à l’écran en mode caméscope ou magnétoscope
1. Niveau de la batterie (voir page 26)
2. Mode EASY (voir page 60)
3. Mode DSE (effet spécial numérique
sélectionné) (voir page 49)
REC
M - 0 : 0 0 : 0 0
1 0 : 0 0 A M
JAN . 10 , 2 0 0 3
24
23. DIS (stabilisateur électronique d’images) (voir page 48)
24. Contrôle du volume (voir page 34)
25. Canal de lecture audio
26. DV IN (mode de réception des données DV) (voir page 79)
27. Contrôle de la condensation (voir page 7)
28. Ligne de message
29. PB DSE (effets spéciaux numériques en lecture) (voir page 75)
30. PB Zoom (voir page 76)
31. POWER NITE PIX (capture de nuit renforcée) (voir page 68)
5 5 min
1 6 bit
11
18
17
16
28
15
14
13
12
11
10
27
28
26
4. Program AE (activation/désactivation du
mode d’exposition automatique
sélectionné) (voir page 43)
5. Mode d’équilibrage du blanc choisi
(voir page 45)
6. BLC (contre-jour intelligent)
(voir page 62)
7. Mise au point manuelle (voir page 61)
8. Vitesse d’obturation et exposition
(voir page 58)
9. Position du zoom (voir page 46)
10. Mode capture de nuit (voir page 67)
11. Date et heure (voir page 54)
12. USB
(SCD230/D250/D270 uniquement)
13. Mode Télécommande
(SCD230/D250/D270 uniquement)
14. Fonction coupe-vent (voir page 53)
15. Mode Audio (voir page 52)
16. Mémoire compteur
(SCD230/D250/D270 uniquement)
(voir page 74)
17. Temps restant sur la bande (en minutes)
18 . Compteur de bande
19. Mode de fonctionnement
20. Vitesse d’enregistrement sélectionnée
21. Mode PHOTO
22. Vitesse d’enregistrement sélectionnée
et minuterie (SCD230/D250/D270
uniquement) (voir page 20)
ENGLISH
2 2 / 2 4 0
3 5 2 2 min
SF
1 0 : 0 0 A M
J A N . 1 0 , 2 0 0 3
FRANÇAIS
Familiarisez-vous avec le caméscopeGetting to Know Your Camcorder
OSD (On Screen Display in M.REC/M.PLAY modes)
(SCD230/D250/D270 only)
A. Folder number-file number (see page 85)
B. Image counter
- Current still image/Total number of
recordable still images.
C. CARD (MEMORY STICK) indicator
D. Image recording and loading indicator
E. Quality
F. ERASE PROTECTION indicator
(see page 94)
G. Print Mark (see page 93)
H. SLIDE SHOW
I. MPEG4 SCREEN SIZE
Turning the OSD on/off (On Screen Display)
●
Turning OSD on/off
Press the DISPLAY button on the left side panel.
- Each press of the button toggles the OSD
function on and off.
- When you turn the OSD off,
In CAM mode: The STBY, REC, EASY.Q
modes are always displayed on the OSD,
even when the OSD is turned OFF and
the key input is displayed for 3 seconds
then turned off.
In PLAYER mode: When you press any
Function button, the function is displayed
on the OSD for 3 seconds before it turns off.
●
Turning the DATE/TIME on/off
- The DATE/TIME is not affected when the OSD function is switched
ON or OFF.
- To turn the DATE/TIME on or off, access the menu and change the
DATE/TIME mode. (see page 54)
- You may also use the Quick Menu to turn the DATE/TIME ON or
OFF. (see page 56) (only in CAM/M.REC mode)
OSD in M.REC mode
OSD in M.PLAY mode
H
SLIDE
MEMORY STICK !
1 0 0 - 0 0 0 1
A
Affichage à l’écran en mode enregistrement ou
lecture photo (
EBD C
F
G
0 0 1
2 2 / 2 4 0
1 0 : 0 0 A M
J A N . 1 0 , 2 0 0 3
• Affichage de la date et de l’heure
- La date et l’heure s’affichent indépendamment de l’état du mode OSD.
- Pour faire apparaître ou disparaître la date et l’heure, sélectionnez le
menu DATE/TIME du panneau de commandes (voir page 54).
- Vous pouvez également utiliser le menu rapide (voir page 56).
(uniquement en mode caméscope et enregistrement photo)
SCD230/D250/D270
uniquement)
A. Numéro de dossier-numéro de fichier
(voir page 85)
B. Compteur d’images
- Image affichée/nombre total d’images pouvant
être enregistrées.
C. Indicateur de carte mémoire (MEMORY STICK)
D. Indicateur d’enregistrement et de chargement
I
d’images
E. Qualité Touche
F. Indicateur de protection contre l’effacement
(voir page 94)
G. Marque DPOF (voir page 93)
H. Indicateur de diaporama
I. TAILLE D'ÉCRAN MPEG4
Activation/désactivation de l’affichage (mode OSD)
• Activation/désactivation de l’affichage
Appuyez sur la touche DISPLAY à gauche du panneau
de commandes.
- Chaque fois que vous appuyez sur la touche,
vous activez et désactivez le mode OSD.
- Lorsque vous désactivez l’affichage :
En mode caméscope: les modes STBY (veille),
REC (enregistrement) et EASY.Q s’affichent à
l’écran même si le mode OSD est désactivé.
L’affichage clignote pendant 3 secondes à l’écran,
puis disparaît.
En mode magnétoscope: lorsque vous appuyez
sur une touche de fonction, la fonction activée
s’affiche 3 secondes à l’écran, puis disparaît.
1919
ENGLISH
Preparation
FRANÇAIS
Préparez votre caméscope
How to use the Remote Control
(SCD230/D250/D270 only)
Battery Installation for the Remote Control
✤ You need to insert or replace the lithium battery
when :
- You purchase the camcorder.
- The remote control doesn’t work.
✤ Ensure that you insert the lithium cell correctly,
following the + and - markings.
✤ Be careful not to reverse the polarity of the battery.
Self Record using the Remote Control
When you use the Self Timer function on the remote
control, the recording begins automatically in 10 seconds.
1. Set the camcorder to CAM mode.
2. Press the SELF TIMER button until the appropriate
indicator is displayed in the LCD.
3. Press the START/STOP button to start the timer.
- Self Timer starts counting down from 10 with a beep sound.
- In the last one second of the countdown, the beep sound gets
faster, then recording starts automatically.
- If you want to cancel the Self Timer function before recording,
press the SELF TIMER button.
4. Press START/STOP again when you wish to stop recording.
Self
Timer
Utilisation de la télécommande
(SCD230/D250/D270 uniquement)
Installation de la batterie de la télécommande
✤ Vous devez insérer ou remplacer la batterie au
lithium :
- lors de l’achat du caméscope,
- quand la télécommande ne fonctionne pas.
✤ Insérez la batterie au lithium (CR2025) en respectant
la polarité + et –.
✤ Veillez à ne pas inverser la polarité de la batterie.
START/
PHOTO DISPLAY
STOP
SELF
ZERO
DATE/
TIMER
MEMORY
TIME
PHOTO
SLOW
A.DUB
SEARCH
F.ADV
2. Appuyez sur la touche SELF TIMER jusqu’à ce que l’indication
3. Appuyez sur la touche START/STOP pour démarrer la minuterie.
Enregistrement automatique avec la télécommande
La fonction de minuterie automatique sur la télécommande
X2
vous permet de démarrer automatiquement l’enregistrement
au bout de 10 secondes.
1. Réglez le caméscope sur CAM (mode caméscope).
souhaitée s’affiche dans le viseur.
- La minuterie automatique entame un décompte de
10 secondes en émettant un bip.
- À la dernière seconde du décompte, le bip s'accélère, puis
l'enregistrement démarre automatiquement.
- Pour désactiver la fonction de minuterie automatique avant
l'enregistrement, appuyez sur la touche SELF TIMER.
2020
4. Appuyez de nouveau sur START/STOP pour arrêter
l’enregistrement.
ENGLISH
FRANÇAIS
Préparez votre caméscopePreparation
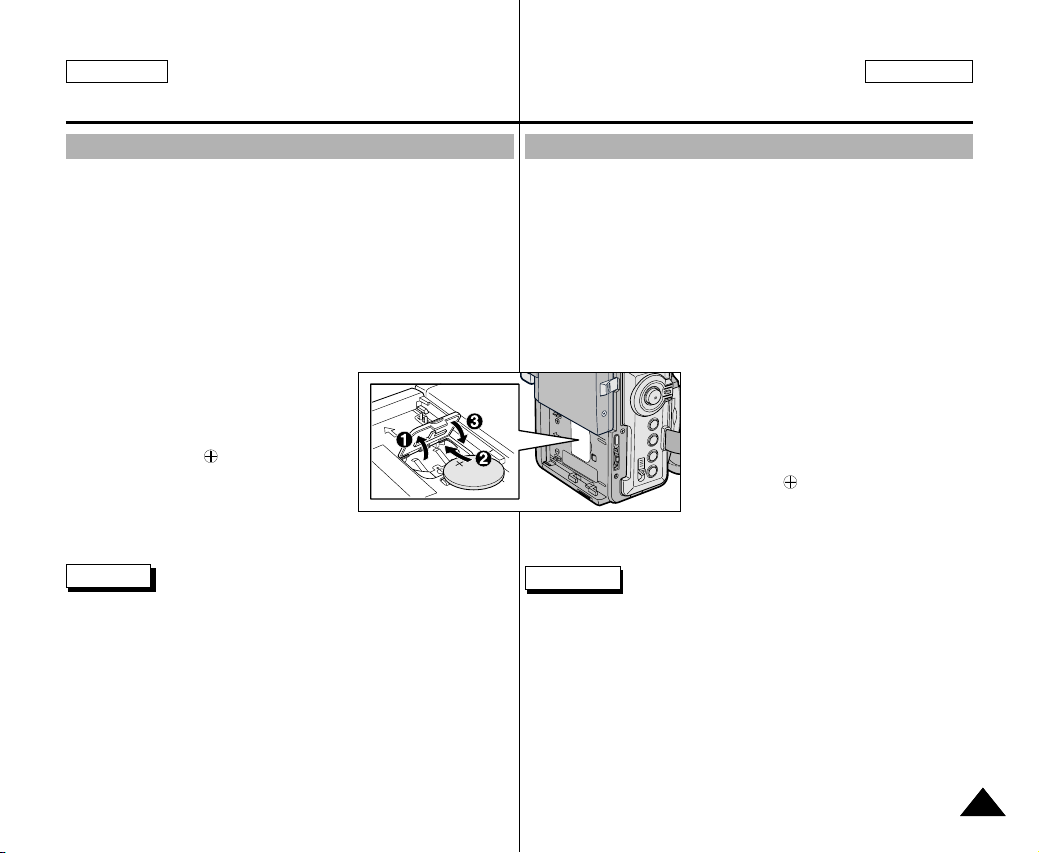
Lithium Battery Installation
✤ The lithium battery maintains the clock function and preset
contents of the memory; even if the battery pack or AC power
adapter is removed.
✤ The lithium battery for the camcorder lasts about 6 months under
normal operation from the time of installation.
✤ When the lithium battery becomes weak or dead, the date/time
indicator will display “---” when you set the DATE/TIME to ON.
When this occurs, replace the lithium battery with CR2025 type.
1. Open the lithium battery cover from
the camcorder.
2. Position the Lithium cell in the holder,
with the positive ( ) terminal face
outward.
3. Close the lithium battery cover.
Note The lithium battery must be inserted in the correct
direction.
Warning: Keep the LITHIUM BATTERY out of the reach of
the children.
Should any battery be swallowed, consult a doctor
immediately.
Installation de la batterie au lithium
✤ La batterie au lithium sert à mémoriser la date et l’heure, ainsi que
les titres et les réglages prédéfinis, en l’absence du bloc batterie
ou de l’adaptateur secteur.
✤ La longévité de la batterie au lithium est d’environ six mois à
compter de sa mise en place et dans des conditions normales
d’utilisation.
✤ Lorsque la batterie au lithium s’affaiblit ou est déchargée,
l'affichage de la date et de l’heure indique "---" lorsque vous
activez le mode DATE/TIME.
Dans ce cas, remplacez-la par une batterie de type CR2025.
1. Ouvrir le couvercle de protection de la
batterie lithium-ion
2. Positionner la batterie lithium-ion dans
le réceptacle, en mettant la face
positive ( ) vers l’extérieur.
3. Refermez le couvercle.
Important La batterie doit être correctement positionnée.
Attention: maintenez la BATTERIE AU LITHIUM hors de portée
des enfants.
Si la batterie venait à être avalée, consultez un
médecin immédiatement.
2121
ENGLISH
SLOW
SHUTTER
PHOTO
T
W
SLOW
SHUTTER
PHOTO
T
W
SLOW
SHUTTER
PHOTO
T
W
SLOW
SHUTTER
PHOTO
T
W
SLOW
SHUTTER
PHOTO
T
W
SLOW
SHUTTER
PHOTO
T
W
SLOW
SHUTTER
PHOTO
T
W
SLOW
SHUTTER
PHOTO
T
W
FRANÇAIS
Préparez votre caméscopePreparation
Adjusting the Hand Strap
It is very important to ensure that the Hand strap has been correctly
adjusted before you begin your recording.
The hand strap enables you to :
- Hold the camcorder in a stable, comfortable position.
- Press the Zoom and START/STOP button without having to
change the position of your hand.
Hand strap
a. Pull open the Hand Strap cover and release the Hand Strap.
b. Adjust its length and stick it back onto the Hand Strap cover.
c. Close the Hand Strap cover again.
Attaching the Lens Cover
1 2 3 4
Mise en place de la poignée de soutien
Il est très important d’ajuster la poignée de soutien afin de filmer dans
les meilleures conditions possibles.
La poignée de soutien vous permet :
- de maintenir le caméscope dans une position stable et confortable,
-d’appuyer sur le bouton Zoom et sur le bouton START/STOP sans
avoir à changer la position de votre main.
Poignée de soutien
a. Ouvrez le rabat de la poignée en le décollant.
b. Ajustez la longueur de la poignée, puis recollez-le.
c. Refermez le rabat.
Fixation du couvre-objectif
2222
ENGLISH
MEMORY
STICK
TAP E
FRANÇAIS
Préparez votre caméscopePreparation
Connecting a Power Source
There are two types of power source that can be connected to your
camcorder.
- The AC Power Adapter and AC cord : used for indoor recording.
- The Battery Pack : used for outdoor recording.
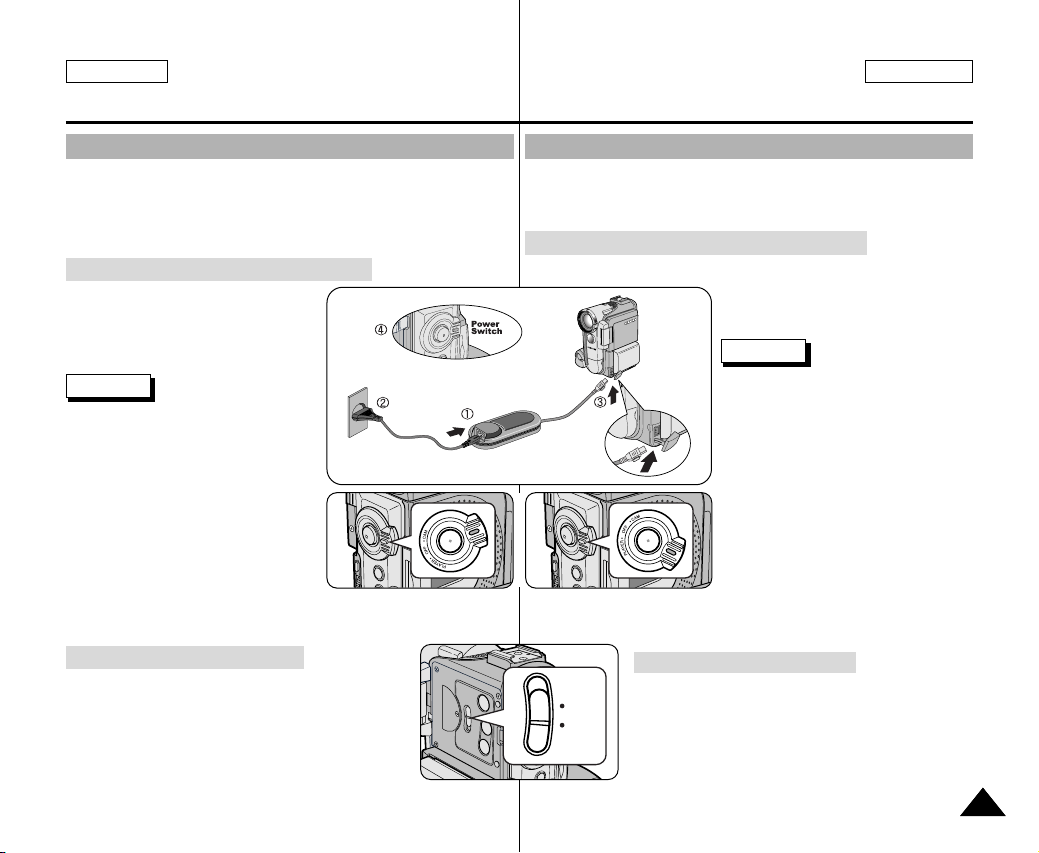
To use the AC Power adapter and DC Cable
1. Connect the AC Power adapter to
the AC cord.
2. Connect the AC cord to a wall
socket.
Note
■
The plug and wall socket type may
differ according to your resident
country.
3. Connect the DC cable to the
DC jack socket of the camcorder.
(When the battery is attached on
the set, you should keep outside
the projection of the DC cable.)
4. Set the camcorder to each mode by
holding down the tab on the power
switch and turning it to the CAM or PLAYER mode.
To select the CAMCORDER mode
✤ If you want to use this unit as a camcorder,
set the mode switch to TAPE position.
✤ If you want to use this unit as a DSC
(Digital Still Camera), set the mode switch to
MEMORY STICK position.
(SCD230/D250/D270 only)
Connexion d’une source d’alimentation
Deux possibilités d’alimentation s’offrent à vous :
-l’adaptateur secteur et le cordon secteur : utilisation intérieure,
- le bloc batterie : utilisation extérieure.
Utilisation de l’adaptateur secteur et du câble CC
1. Connectez l’adaptateur à un
cordon secteur.
2. Branchez le cordon secteur sur
une prise murale.
Important
Le type de fiche et de prise murale
peut différer selon les pays.
3. Connectez le câble CC de
l’adaptateur à la prise CC du
caméscope.
(Lorsque la batterie est fixée à
l'ensemble, tenez-vous éloigné du
câble CC.)
4. Sélectionnez le mode caméscope
(CAM) ou le mode magnétoscope
(PLAYER) en procédant comme
suit: appuyez sur le commutateur
et mettez ce dernier sur la position
CAM ou PLAYER.
Sélection du mode caméscope
✤ Pour utiliser votre appareil en mode
caméscope, placez le sélecteur de mode
sur la position TAPE.
✤ Pour utiliser votre appareil en mode appareil
photo numérique (DSC), placez le sélecteur de
mode sur la position MEMORY STICK.
(SCD230/D250/D270 uniquement)
2323
ENGLISH
TAPE
EJECT
VOL/
CHARGE
Preparation
FRANÇAIS
Préparez votre caméscope
Using the Lithium Ion Battery Pack
✤
The amount of continuous recording time available depends on.
- The type and capacity of the battery pack you are using.
- How often the Zoom function is used.
It is recommended that you have several batteries available.
Charging the Lithium Ion Battery Pack
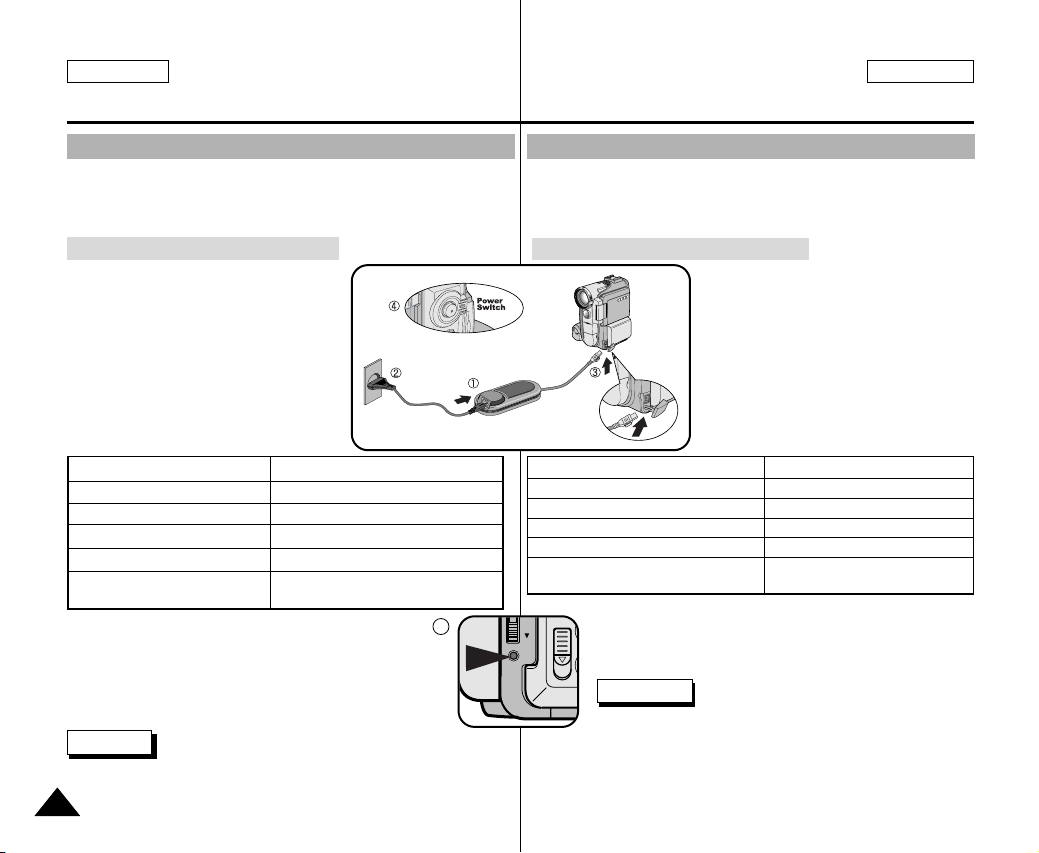
1.
Attach the battery pack to the camcorder.
2. Connect the AC Power adapter to an
AC cord and connect the AC cord to
a wall socket.
3. Connect the DC cable to the DC jack
socket on the camcorder.
4. Turn the Camera power switch to off,
and the charging indicator will start to
flash, showing that the battery is
charging.
Blinking time Charging rate
Once per second Less than 50%
Twice per second 50% ~ 75%
Three times per second 75% ~ 90%
Blinking stops and stays on 90 ~ 100%
On for a second and Error - Reset the battery pack and
off for a second the DC cable
5. When the battery is fully charged, disconnect the
battery pack and the AC Power adapter from the
camcorder.
■
Even with the power switched off, the battery pack
will still discharge if it is left connected to the
camcorder.
Notes
■
The battery pack may be charged a little at the time of purchase.
■
To prevent reduction in the life and capacity of the battery pack,
2424
always remove it from the camcorder after it is fully charged.
5
Utilisation du bloc batterie au lithium-ion
✤
La durée d’enregistrement dépend : - du modèle de bloc batterie utilisé.
- de l’utilisation du zoom.
- Par conséquent, nous vous recommandons d’avoir à disposition
plusieurs batteries.
Chargement du bloc batterie au lithium-ion
1. Fixez le bloc batterie sur le caméscope.
2. Connectez l’adaptateur secteur à un
cordon secteur et branchez ce dernier sur
une prise murale.
3. Connectez le câble CC à la prise CC du
caméscope.
4. Éteignez le caméscope (position OFF); le
témoin de charge se met alors à clignoter
et le chargement commence.
Clignotement du témoin Niveau de charge
Une fois par seconde Moins de 50 %
Toutes les demi-secondes entre 50 % et 75 %
Trois fois par seconde entre 75 % et 90 %
Le témoin reste allumé sans clignoter entre 90 % et 100 %
Le témoin clignote lentement Erreur - Remettez le bloc batterie
5. À la fin du chargement, séparez les trois éléments,
bloc batterie, adaptateur et cordon électrique.
■
Même si l’alimentation est coupée, la batterie se
décharge.
Important
■
Il se peut que le bloc batterie ne soit pas entièrement
chargé au moment de l’achat.
■
Pour éviter d’endommager la batterie et de réduire sa
durée d’utilisation, retirez-la toujours de l’appareil
lorsqu’elle est complètement chargée, et ce, si vous
n’utilisez pas votre caméscope.
et le câble CC bien en place
ENGLISH
Preparation
FRANÇAIS
Préparez votre caméscope
Using the Lithium Ion Battery Pack
Table of continuous recording time based on model and
battery type.
✤ If you close the LCD screen, it switches off and the viewfinder
switches on automatically.
✤ The continuous recording times given in the table above are
approximations.
Actual recording time depends on usage.
Time
Charging
Battery
SB-LS70
SB-LS110
time
Approx.
1hr 30min
Approx.
1hr 40min
Notes
■
You must use the lithium ion battery pack of SB-LSXXX type.
■
The battery pack should be recharged in an environment of
between 32°F (0°C) and 104°F (40°C).
■
The battery pack should never be charged in a room temperature
that is below 32°F (0°C).
■
The life and capacity of the battery pack will be reduced if it is used
in temperatures below 32°F (0°C) or left in temperatures above
104°F (40°C) for a long period, even when it is fully recharged.
■
Do not put the battery pack near any heat source (fire or flames,
for example).
■
Do not disassemble, process, pressure, or heat the Battery Pack.
■
Do not allow the + and - terminals of the battery pack to be shortcircuited. It may cause leakage, heat generation, induce fire and
overheating.
Continuous recording time
LCD ON
Approx.
1hr
Approx.
1hr 30min
VIEWFINDER ON
Approx.
1hr 30min
Approx.
2hr
Utilisation du bloc batterie au lithium-ion
Durée d’enregistrement selon le mode et le type de batterie
✤ Si vous éteignez l’écran LCD, le viseur s’active
automatiquement.
✤ Les durées d’enregistrement données dans le tableau
ci-dessus sont estimatives.
La durée d’enregistrement réelle varie selon l’utilisation.
Durée
Temps de
Batterie
SB-LS70
SB-LS110
charge
Environ
1h 30
Environ
1h 40
Important
■
Vous devez utiliser le pack pile lithium-ion de type SB-LSXXX.
■
Le bloc batterie doit être rechargé à une température comprise
entre 0°C et 40°C.
■
N’effectuez jamais de chargement à des températures inférieures
à 0°C.
■
Si vous utilisez votre caméscope pendant une période prolongée à
des températures inférieures à 0°C ou supérieures à 40°C, la
durée de vie et la capacité du bloc batterie seront définitivement
réduites, même si vous le rechargez.
■
Éloignez votre bloc batterie de toute source de chaleur
(un feu, par exemple).
■
Évitez de démonter, de manipuler, d’écraser ou de chauffer le bloc
batterie.
■
Évitez tout contact des bornes + et – du bloc batterie avec des
objets métalliques. Cela risquerait de provoquer des fuites,
une surchauffe, voire un début d’incendie.
Durée d’enregistrement continu
Écran LCD
allumé
Environ
1h
Environ
1h 30
Viseur
allumé
Environ
1h 30
Environ
2h
2525
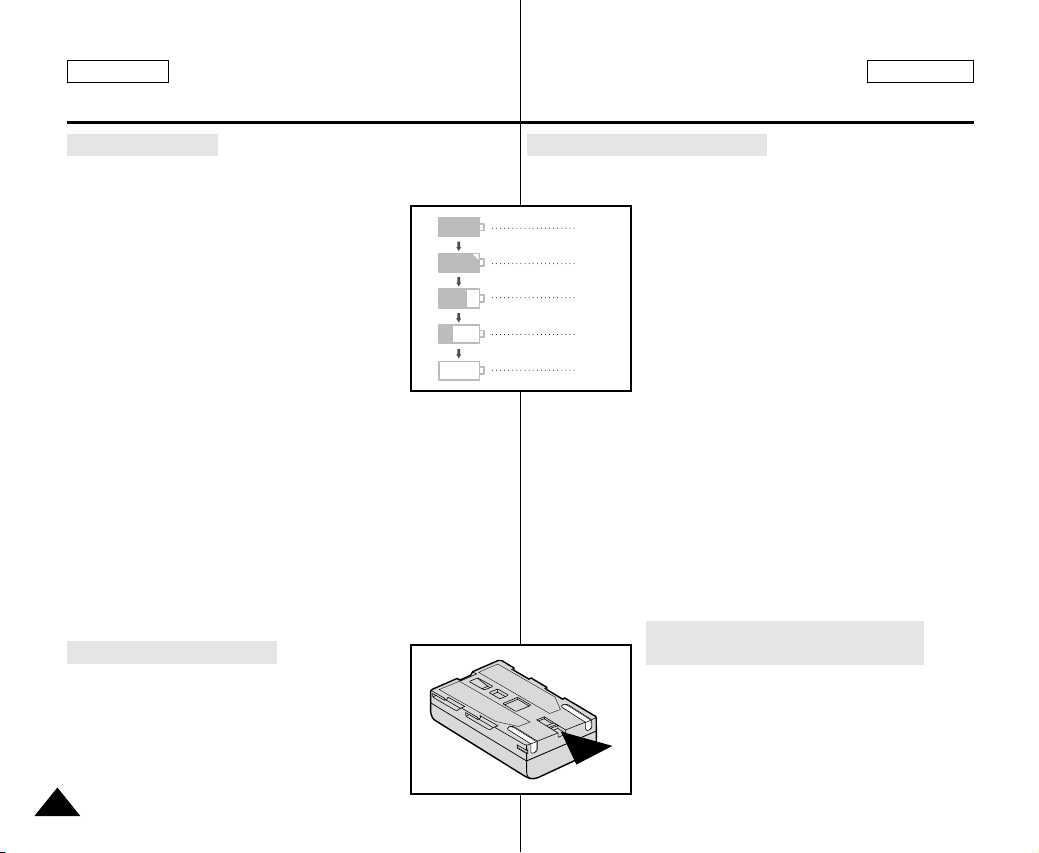
ENGLISH
Preparation
FRANÇAIS
Préparez votre caméscope
Battery level display
•
The battery level display indicates the amount of power
remaining in the battery pack.
a. Fully charged
b. 20~40% used
c. 40~80% used
d. 80~95% used
e. Completely used (flickers)
(The camcorder will turn off soon,
change the battery as soon as possible)
✤ Please refer to the table on page 25 for approximate continuous
recording times.
✤ The recording time is affected by environmental temperature and
conditions.
The recording time becomes very short in a cold environment.
The continuous recording times in the operating instructions are
measured using a fully charged battery pack at 77°F(25°C).
As the environmental temperature and conditions may differ when
you actually use the camcorder, the remaining battery time may
not be the same as the approximate continuous recording times
given in these instructions.
Tips for Battery Identification
A charge mark is provided on the battery pack to help
you remember whether it has been charged or not.
Two colors are provided (red and grey)-you may
choose which one indicates charged and which
indicates discharged. (SB-LS110 only)
2626
Affichage du niveau de la batterie
•
L’affichage du niveau de la batterie indique la charge restante
dans le bloc batterie.
a
b
c
d
e
✤ Veuillez vous reporter au tableau de la page 25 pour obtenir les
durées approximatives d’enregistrement.
✤ La durée d’enregistrement peut varier selon la température
ambiante. En particulier, au froid, elle est extrêmement réduite.
Dans ce mode d’emploi, la durée théorique d’enregistrement est
calculée avec un bloc batterie complètement chargé et à une
température de 25°C. En fonction des conditions d’utilisation de
votre caméscope, la durée d’enregistrement correspondant à la
charge restante de la batterie peut différer des valeurs données
dans le tableau indicatif.
a. Entièrement chargée
b. Utilisée de 20 à 40 %
c. Utilisée de 40 à 80 %
d. Utilisée de 80 à 95 %
e. Entièrement déchargée (le symbole clignote)
(Le caméscope va bientôt s’éteindre, changez
la batterie dès que possible.)
Comment savoir si vous avez chargé la
batterie?
Un indicateur de charge bicolore (rouge et noir)
présent sur la batterie vous aide à vous rappeler
si vous avez chargé la batterie ou non.
Utilisez la couleur de votre choix pour indiquer
que la batterie est chargée ou non. (SB-LS110
uniquement)
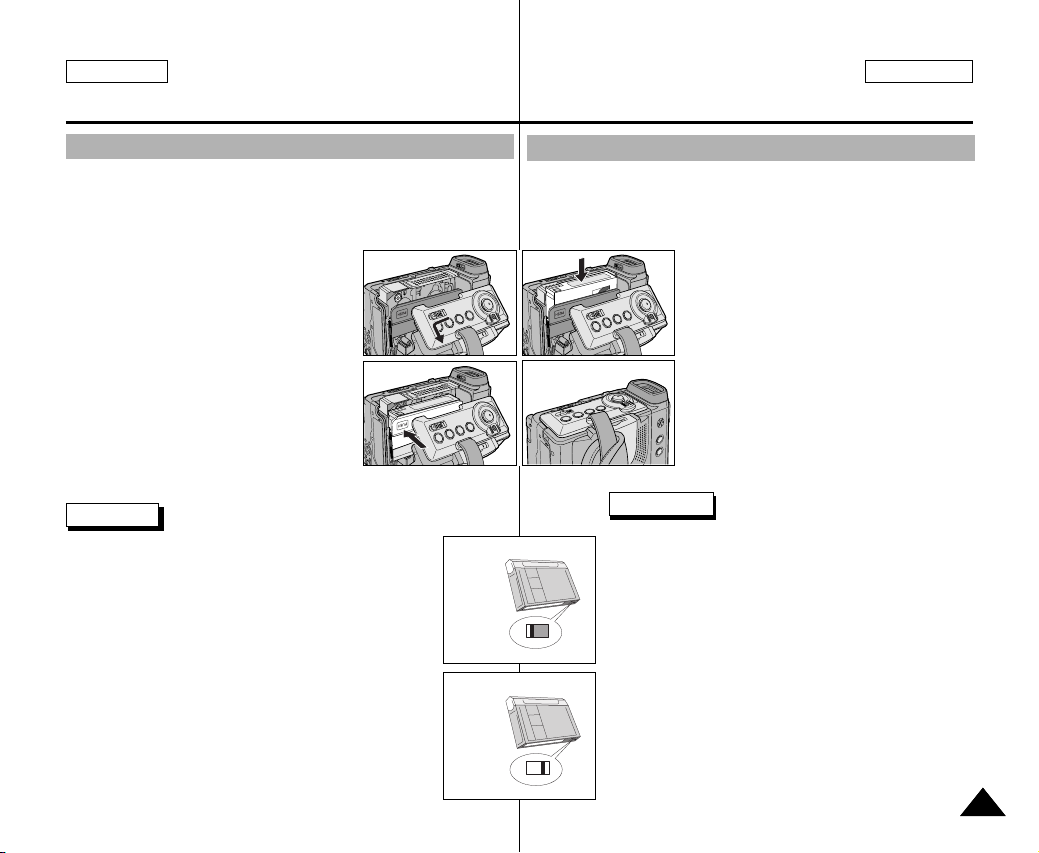
ENGLISH
Preparation
FRANÇAIS
Préparez votre caméscope
Inserting and Ejecting a Cassette
✤ When inserting a tape or closing a cassette holder, do not apply
excessive force.
This may cause a malfunction.
✤ Do not use any tapes other than Mini DV cassettes.
1. Connect a power source and slide the
TAPE EJECT switch and open the
cassette door.
- The cassette holding mechanism rises
automatically.
2. Insert a tape into the cassette holder with
the tape window facing outward and
the protection tab bottom.
3. Press the area marked PUSH on the
cassette holding mechanism until
it clicks into place.
- The cassette is loaded automatically.
4. Close the cassette door.
- Close the door completely until you can hear a “click”.
Note
When you have recorded something that you wish to keep,
you can protect it so that it will not be accidentally erased.
a. Protecting a tape :
Push the safety tab on the cassette so that the hole is
uncovered.
b. Removing the tape protection :
If you no longer wish to keep the recording on the
cassette, push the write-protect tab back so that it
covers the hole.
•
How to store a tape
a. Avoid places with magnets or magnetic interference.
b. Avoid humidity and dust prone places.
c. Keep the tape in an upright position and avoid storing it
in direct sunlight.
d. Avoid dropping or knocking your tapes.
1
3
push
a. SAVE
b. REC
Insertion et éjection d’une cassette
✤ Ne forcez pas pour insérer une bande ou refermer le
compartiment à cassette.
Vous risqueriez de provoquer un dysfonctionnement.
✤ N’utilisez pas d’autres types de bandes que les Mini DV.
2
4
1. Faites glisser la touche TAPE EJECT
vers l'avant et soulevez légèrement le
couvercle du compartiment à cassette.
- Le compartiment s’ouvre
automatiquement.
2. Insérez une cassette dans le
compartiment, face transparente tournée
vers l’extérieur et languette de protection
vers le bas.
3. Appliquez une légère pression à l’endroit
marqué PUSH jusqu’à ce qu’un déclic se
produise.
4. Refermez le couvercle du compartiment
jusqu’à ce que vous entendiez un "clic".
Important
Lorsque vous avez enregistré une cassette que vous
souhaitez garder, vous pouvez la protéger contre un
effacement accidentel.
a. Enregistrement impossible (protection):
Faites glisser la languette de protection vers la
position SAVE de façon à découvrir l’ouverture.
b. Enregistrement possible:
Pour réenregistrer sur une cassette, repoussez la
languette de protection de façon à recouvrir
l’ouverture (position REC).
• Rangement des bandes
a. Ne placez pas les bandes à proximité d’aimants
ou d’interférences magnétiques.
b. Évitez les endroits humides et poussiéreux.
c. Rangez-les en position verticale, à l’abri du soleil.
d. Ne faites pas tomber les bandes et ne les cognez
pas.
2727
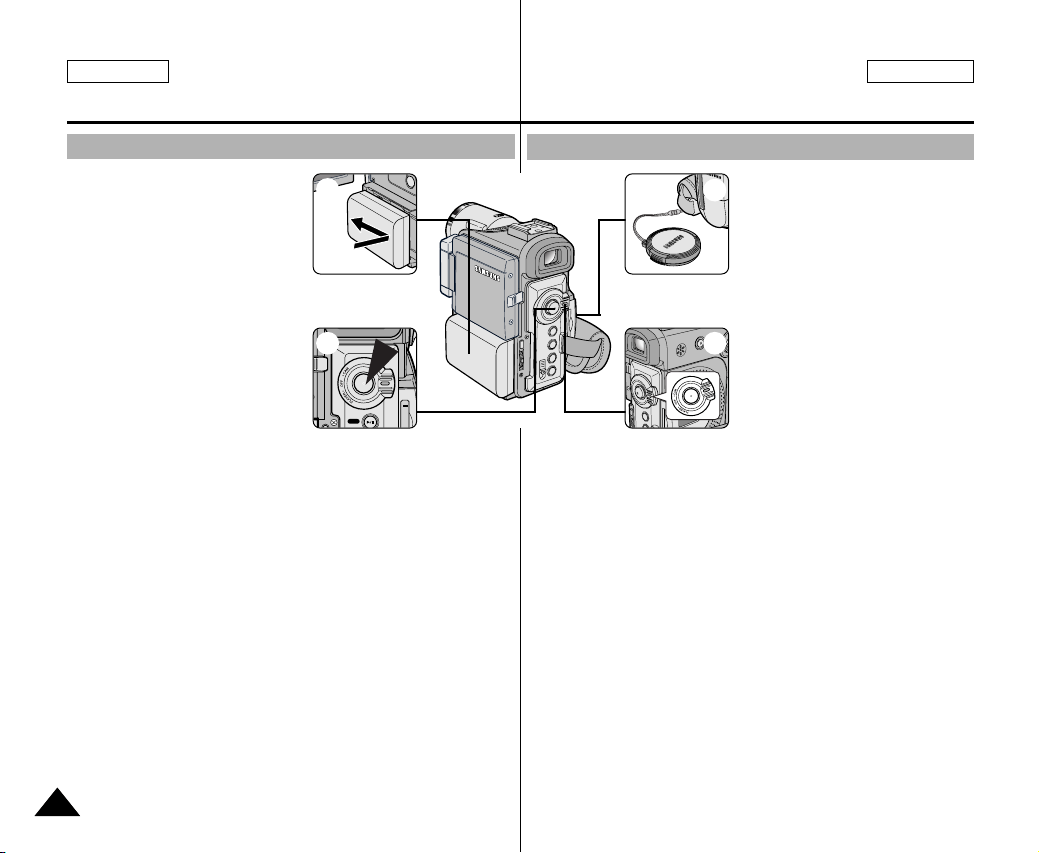
ENGLISH
FADE
S.SHOW
Basic Recording
FRANÇAIS
Effectuez un enregistrement simple
Making your First Recording
1. Connect a Power source to the
camcorder. (see page 23)
(A battery pack or a AC power
adapter)
■
Insert a cassette.
(see page 27)
2. Remove the LENS CAP.
3. Set the power switch to the
CAM position.
■
Open the LCD monitor.
■
Set the mode switch to the
TAPE position.
(SCD230/D250/D270 only)
Make sure that STBY is displayed.
■
If the protection tab of the cassette is open, STOP and
PROTECTION! will be displayed.
■
Make sure the image you want to record appears in the LCD
monitor or viewfinder.
■
Make sure the battery level indicates that there is enough
remaining power for your expected recording time.
4. To start recording, press the START/STOP button.
■
REC is displayed in the LCD.
To stop recording, press the START/STOP button again.
■
STBY is displayed in the LCD.
1
4
Effectuez votre premier enregistrement
1. Connectez une source
2
3
■
Placez le sélecteur de mode sur la position TAPE.
(SCD230/D250/D270 uniquement)
Assurez-vous que l’indication STBY est affichée.
■
Si la languette de protection de la cassette est ouverte, les
indications STOP et PROTECTION! apparaissent.
■
Assurez-vous que l’image que vous voulez filmer apparaît à
l’écran LCD ou dans le viseur.
■
Assurez-vous que le niveau de la batterie indique une charge
suffisante.
4. Pour démarrer l’enregistrement, appuyez sur le bouton
START/STOP.
■
L’enregistrement démarre et l’indication "REC" s’affiche à
l’écran.
Pour arrêter de filmer, appuyez de nouveau sur le bouton
START/STOP.
■
L’enregistrement s’arrête et l’indication "STBY" s’affiche à l’écran.
d’alimentation au caméscope
(voir page 23).
(bloc batterie ou adaptateur
secteur).
■
Insérez une cassette
(voir page 27).
2. Ôtez le cache de protection de
l’objectif.
3. Placez le commutateur sur la
position CAM (mode
caméscope).
■
Ouvrez l’écran LCD.
2828
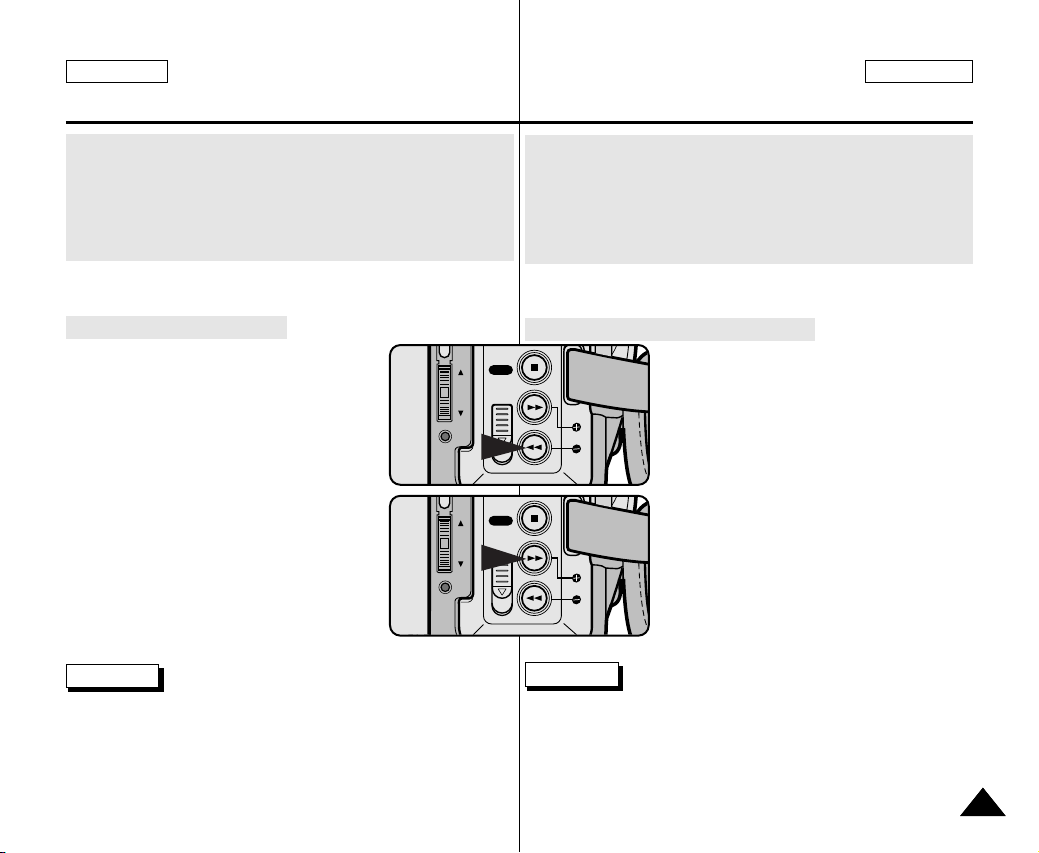
ENGLISH
BLC
TAPE
EJECT
VOL/MF
CHARGE
MEN
FWD
SEARCH
REV
BLC
TAPE
EJECT
VOL/MF
CHARGE
MEN
FWD
SEARCH
REV
Basic Recording
FRANÇAIS
Effectuez un enregistrement simple
When a cassette is loaded and the camcorder is left in the STBY
mode for more than 5 minutes without being used, it will switch off
automatically.
To use it again, push the START/STOP button or set the Power
switch to OFF and then back to CAM.
This Auto Power off feature is designed to save battery power.
Record Search (REC SEARCH)
✤ You can view a recording using the REC
SEARCH +, -- function in STBY mode.
REC SEARCH -- enables you to play the
recording backwards and
REC SEARCH + enables you to play it
forwards, for as long as you keep each
button pressed down.
✤ If you press the REC SEARCH -- button in
STBY mode, your camcorder will play
in reverse for 3 seconds and return to the
original position automatically.
Note
Mosaic shaped distortion may appear on the screen while in
Record Search mode.
Lorsqu’une cassette est insérée et que le caméscope est laissé en
mode veille pendant plus de cinq minutes sans être utilisé, il s’éteint
automatiquement. Pour l’utiliser de nouveau, appuyez sur le bouton
START/STOP ou placez le commutateur principal sur OFF, puis de
nouveau sur CAM.
Cette fonction a été conçue pour prolonger la durée de la batterie.
Recherche de séquences (REC SEARCH)
✤ Vous pouvez visionner une scène précise
à l’aide de la touche REC SEARCH + ou –
(en mode veille).
REC SEARCH - vous permet de revenir
en arrière et REC SEARCH + d’avancer,
aussi longtemps que vous appuyez sur
ces touches.
✤ Si vous appuyez rapidement sur
REC SEARCH - en mode veille, votre
caméscope revient en arrière pendant
trois secondes, puis retourne
automatiquement en lecture à sa position
d’origine.
Important
L’image peut apparaître brouillée lorsque vous recherchez des
séquences.
2929
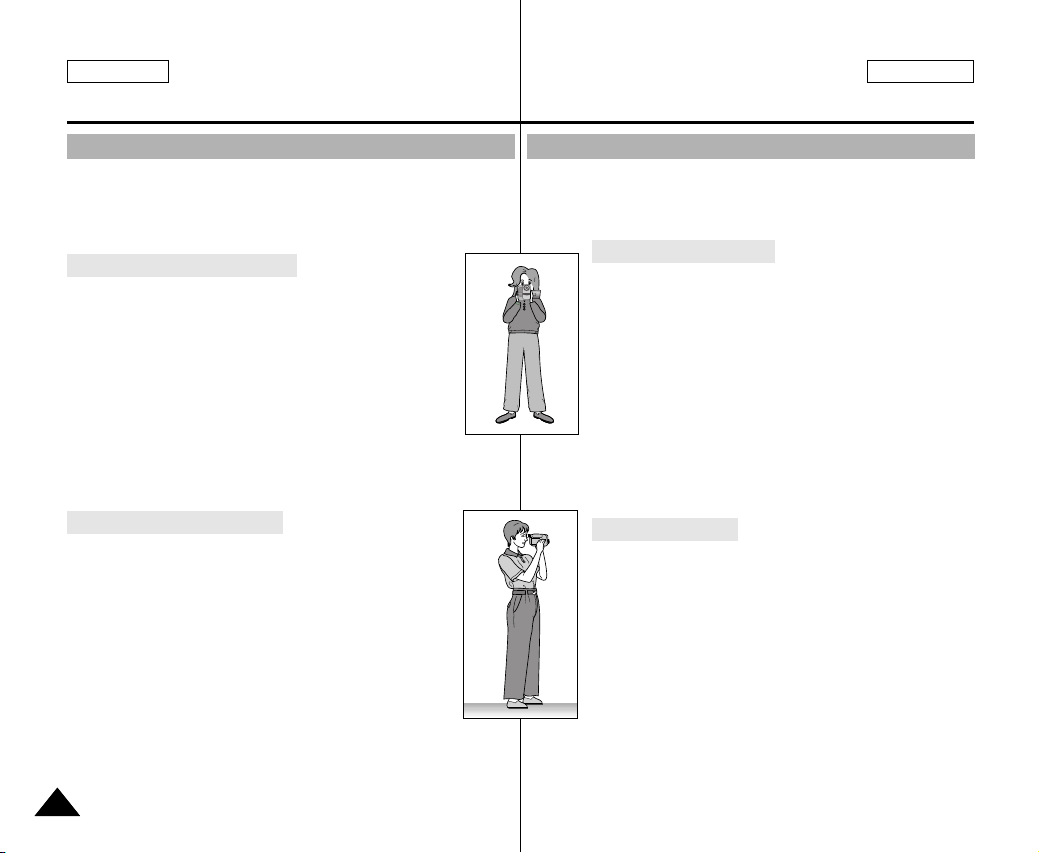
ENGLISH
Basic Recording
FRANÇAIS
Effectuez un enregistrement simple
Hints for Stable Image Recording
■
While recording, it is very important to hold the camcorder
correctly.
■
Fix the LENS cap firmly by clipping it to the hand strap. (refer to
the figure)
Recording with the LCD monitor
1. Hold the camcorder firmly using the hand strap.
2. Place your right elbow against your side.
3. Place your left hand under or beside the LCD to support
and adjust it.
Do not touch the built-in Remote Sensor or Infrared Light.
4. Choose a comfortable, stable position for the shots that
you are taking. You can lean against a wall or on a table
for greater stability.
Do not forget to breathe gently.
5. Use the LCD frame as a guide to determine the horizontal plane.
6. Whenever possible, use a tripod.
Recording with the Viewfinder
1. Hold the camcorder firmly using the hand strap.
2. Place your right elbow against your side.
3. Place your left hand under the camcorder to support it.
Be sure not to touch the built-in Remote Sensor or
Infrared Light.
4. Choose a comfortable, stable position for the shots that
you are taking. You can lean against a wall or on a table
for greater stability.
Do not forget to breathe gently.
5. Place your eye firmly against the viewfinder eyecup.
6. Use the viewfinder frame as a guide to determine the
horizontal plane.
7. Whenever possible, use a tripod.
3030
Astuces pour la stabilité de l’image
■
Lors d’un enregistrement, il est très important de tenir le caméscope
correctement.
■
Fixez le cache de protection de l’objectif à la poignée de soutien
(reportez-vous à l’illustration ci-contre)
Utilisation de l’écran LCD
1. Maintenez le caméscope fermement par la poignée.
2. Gardez le coude droit le long du corps.
3. Placez votre main gauche sur le côté de l'écran LCD
ou sous ce dernier pour le soutenir et le régler.
Ne touchez pas le capteur de la télécommande ou la
lampe infrarouge intégrés.
4. Adoptez une position confortable et stable, adaptée à
la vue à prendre; adossez-vous éventuellement à un
mur ou appuyez-vous sur une table pour une plus
grande stabilité.
N’oubliez pas de respirer doucement.
5. Utilisez le cadre de l’écran LCD pour vous aider à
déterminer le plan horizontal.
6. Si possible, utilisez un trépied.
Utilisation du viseur
1. Maintenez le caméscope fermement par la poignée.
2. Gardez le coude droit le long du corps.
3. Placez votre main gauche sous le caméscope pour
le soutenir.
Ne touchez pas le capteur de la télécommande ou la
lampe infrarouge intégrés.
4. Adoptez une position confortable et stable, adaptée à
la vue à prendre; adossez-vous éventuellement à un
mur ou appuyez-vous sur une table pour une plus
grande stabilité.
N’oubliez pas de respirer doucement.
5. Placez votre œil contre l’oculaire du viseur.
6. Utilisez le cadre à l’intérieur du viseur pour vous aider
à déterminer le plan horizontal.
7. Si possible, utilisez un trépied.
 Loading...