

Samsung SCD20, SCD21 User Guide

ENGLISH ESPAÑOL
ELECTRONICS
S
A
M
S
U
N
G
C
A
M
C
O
R
D
E
R
L
E
N
S
1
0
X
Z
O
O
M
S
A
M
S
U
N
G
C
A
M
C
O
R
D
E
R
L
E
N
S
1
0
X
Z
O
O
M
R
E
C
S
E
A
R
C
H
F
A
D
E
B
L
C
S
A
M
S
U
N
G
C
A
M
C
O
R
D
E
R
L
E
N
S
1
0
X
Z
O
O
M
S
A
M
S
U
N
G
C
A
M
C
O
R
D
E
R
L
E
N
S
1
0
X
Z
O
O
M
E
A
S
Y
R
E
C
S
E
A
R
C
H
F
A
D
E
B
L
C
Digital Video Camcorder
SCD20/D21/D22
AF Auto Focus
CCD Charge Coupled Device
LCD Liquid Crystal Display
Owner’s Instruction Book
Before operating the unit, please read this
instruction book thoroughly, and retain it for
future reference.
Videocámara digital
SCD20/D21/D22
AF Autofoco
CCD Dispositivo acoplado por carga
LCD Visualización en cristal líquido
Manual de instrucciones
Antes de emplear la cámara lea
detenidamente este manual de instrucciones
y consérvelo para consultas posteriores.
AD68-00658C

ENGLISH ESPAÑOL
Contents Índice
Notes and Safety Instructions .................................... 6
Getting to Know Your Camcorder ........................... 11
Features .............................................................................................. 11
Accessories Supplied with camcorder ............................................... 12
Front & Left View ................................................................................ 13
Left side View ..................................................................................... 14
Right & Top View ................................................................................ 15
Rear & Bottom View ........................................................................... 16
OSD (On Screen Display in CAMERA and PLAYER modes) ........... 17
Turning the OSD on/off (On Screen Display) ............................... 18
Preparation .............................................................. 19
Lithium Battery Installation .................................................................. 19
Adjusting the Hand Strap .................................................................. 20
Hand strap ..................................................................................... 20
Shoulder strap ................................................................................ 20
Connecting a Power Source .............................................................. 21
To use the AC Power adapter and DC Cable ............................. 21
Using the Lithium Ion Battery Pack ................................................... 22
Charging the Lithium Ion Battery Pack ......................................... 22
Table of continuous recording time based on model and battery
type ............................................................................................... 23
Battery level display ...................................................................... 24
Inserting and Ejecting a Cassette ..................................................... 25
BASIC Recording ..................................................... 26
Making your First Recording .............................................................. 26
Record Search (REC SEARCH) ................................................. 27
Hints for Stable Image Recording ...................................................... 28
Recording with the LCD monitor ................................................. 28
Recording with the Viewfinder ..................................................... 28
Adjusting the LCD ............................................................................. 29
22
Notas e instrucciones de seguridad.............................6
Introducción a la videocámara..................................11
Características ······················································································11
Accesorios incluidos con la videocámara············································12
Accesorios básicos···············································································12
Vistas frontal y lateral izquierda ···························································13
Vista lateral izquierda ···········································································14
Vistas superior y lateral derecha··························································15
Vistas posterior e inferior ······································································16
OSD (presentación en pantalla en las modalidades CAMERA y
PLAYER)·······························································································17
Encendido y apagado de la OSD (presentación en pantalla)······18
Preparación ...............................................................19
Instalación de la pila de litio ·································································19
Ajuste de la empuñadura ·····································································20
Empuñadura··················································································20
Correa para el hombro··································································20
Conexión a una fuente de energía·······················································21
Utilización del adaptador de AC y del cable de CC·····················21
Utilización de la batería de ion de litio·················································22
Carga de la batería de ion de litio·················································22
Tabla de tiempos de grabación continuada según el modelo
y el tipo de batería·········································································23
Indicador de carga de la batería···················································24
Introducción y expulsión del casete·····················································25
Grabación BÁSICA ....................................................26
Primera grabación ················································································26
Búsqueda de grabación (REC SEARCH)····································27
Consejos para la grabación estable de imágenes·······························28
Grabación utilizando la pantalla LCD···········································28
Grabación utilizando el visor ·························································28
Ajuste de la pantalla LCD·····································································29

ENGLISH ESPAÑOL
Contents
Índice
Using the VIEWFINDER ................................................................... 30
Adjusting the Focus ...................................................................... 30
Playing back a tape you have recorded on the LCD ......................... 31
Adjusting the LCD during PLAY ................................................... 32
Controlling Sound from the Speaker ................................................. 32
Advanced Recording ............................................... 33
Use of various Functions .................................................................... 33
Setting menu items ....................................................................... 33
Set the camcorder to CAMERA or PLAYER mode....................... 33
Availability of functions in each mode .......................................... 34
CLOCK SET ................................................................................. 35
DEMONSTRATION ..................................................................... 36
PROGRAM AE ............................................................................. 37
Setting the PROGRAM AE ........................................................... 38
WHT. BALANCE (WHITE BALANCE) .......................................... 39
Zooming In and Out with DIGITALZOOM ................................... 40
Zooming In and Out ...................................................................... 40
Digital Zoom ................................................................................. 41
DIS (Digital Image Stabilizer) ....................................................... 42
DSE (Digital Special Effects) SELECT ......................................... 43
Selecting an effect ........................................................................ 44
REC MODE .................................................................................. 45
AUDIO MODE .............................................................................. 46
WIND CUT ................................................................................... 47
DATE/TIME .................................................................................. 48
TV DISPLAY ................................................................................. 49
Using Quick Menu ............................................................................. 50
Setting the Quick menu ................................................................ 51
SHUTTER SPEED & EXPOSURE ............................................. 52
SLOW SHUTTER(Low Shutter Speed) ............................................ 53
EASY Mode (for Beginners) ............................................................... 54
MF/AF (Manual Focus/Auto Focus) ................................................... 55
Utilización del visor···············································································30
Ajuste del foco···············································································30
Reproducción en la pantalla LCD de una cinta grabada·····················31
Ajuste de la pantalla LCD durante la reproducción······················32
Control de sonido desde el altavoz ······················································32
Grabación avanzada ..................................................33
Utilización de las distintas funciones····················································33
Ajustes del menú···········································································33
Ajuste de la videocámara en la modalidad de cámara (CAMERA)
o de reproducción (PLAYER)························································33
Disponibilidad de funciones en cada modalidad··························34
Ajuste del reloj (CLOCK SET) ······················································35
Demostración (DEMONSTRATION) ·············································36
Programa AE (PROGRAM AE)·····················································37
Ajustes del programa AE (PROGRAM AE)··································38
WHT. BALANCE (WHITE BALANCE)········································· 39
Cómo acercar o alejar la imagen mediante el zoom digital·········40
Acercamiento y alejamiento de las imágenes······························40
Zoom Digital ··················································································41
DIS (Estabilizador digital de la imagen)········································42
Selección de DSE (Efectos especiales digitales)·························43
Selección de un efecto··································································44
Modalidad de grabación (REC MODE)········································45
Modalidad de audio (AUDIO MODE)············································46
Eliminación del ruido del viento (WIND CUT)······························47
Fecha y hora (DATE/TIME)···························································48
Monitor de TV (TV DISPLAY) ·······················································49
Utilización del menú rápido··································································50
Ajustes del menú rápido································································51
Velocidad del obturador y exposición (SHUTTER SPEED &
EXPOSURE) ·················································································52
Velocidad de obturación baja (SLOW SHUTTER)····························· 53
Modalidad sencilla para principiantes (EASY)·····································54
Enfoque manual / enfoque automático (MF/AF)··································55
33

ENGLISH ESPAÑOL
Contents
Índice
Auto Focusing ............................................................................... 55
Manual Focusing ........................................................................... 55
BLC (Back Light Compensation) ........................................................ 56
Fade In and Out ................................................................................. 57
To Start Recording ........................................................................ 57
To Stop Recording (use FADE IN / FADE OUT) .......................... 57
Dubbed Audio Playback ..................................................................... 58
PHOTO Image Recording .................................................................. 59
Searching for a PHOTO picture ................................................... 59
Using the VIDEO LIGHT (SCD21/D22 only) ...................................... 60
Various Recording Techniques ........................................................... 61
Playback .................................................................. 62
Tape Playback .................................................................................... 62
Playback on the LCD .................................................................... 62
Playback on a TV monitor ............................................................ 62
Connecting to a TV which has Audio Video input jacks .............. 62
Connecting to a TV which has no Audio and Video input jacks .. 63
Playback ........................................................................................ 63
Various Functions while in PLAYER mode ........................................ 64
Playback pause ............................................................................. 64
Picture search (Forward/Reverse) ................................................ 64
PB DSE (Playback Digital Special Effects) ....................................... 65
PB ZOOM .......................................................................................... 66
IEEE 1394 Data Transfer .......................................... 67
Transferring IEEE1394 (i.LINK)-DV standard data connections ....... 67
Connecting to a DV device ........................................................... 67
Connecting to a PC ....................................................................... 67
System requirements .................................................................... 68
Recording with a DV connection cable ......................................... 68
Enfoque automático ······································································55
Enfoque manual ···········································································55
Compensación de la luz de fondo (BLC)·············································56
Aparición y desaparición gradual de la imagen (fundido)···················57
Comienzo de la grabación····························································57
Detención de la grabación (utilizando FADE IN / FADE OUT)····57
Reproducción de una cinta con audio mezclado·································58
Grabación de imágenes fotográficas···················································59
Búsqueda de una fotografía··························································59
Utilización del foco de la cámara·························································60
Técnicas diversas de grabación···························································61
Reproducción de cintas.............................................62
Reproducción de una cinta···································································62
Reproducción en la pantalla LCD·················································62
Reproducción en un monitor de televisión···································62
Conexión a un televisor que dispone de conectores de
Audio/Vídeo···················································································62
Conexión a un televisor que no dispone de conectores de
Audio/Vídeo···················································································63
Reproducción ················································································63
Diferentes funciones en la modalidad PLAYER···································64
Pausa de la reproducción·····························································64
Búsqueda de imágenes (hacia delante/hacia atrás)····················64
Aplicación de efectos especiales digitales a la reproducción (PB DSE) 65
Ampliación de imágenes (PB ZOOM)··················································66
Transferencia de datos IEEE 1394........................................67
Conexiones para la transferencia de datos estándar IEEE1394
(i.LINK)-DV····························································································67
Conexión a un aparato DV ···························································67
Conexión a un ordenador ·····························································67
Requisitos del sistema··································································68
Grabación con un cable de conexión DV·····································68
44

ENGLISH ESPAÑOL
Contents
Índice
USB interface (SCD22 only) ......................................... 69
Transferring a Digital Image through a USB Connection .................. 69
System Requirements ........................................................................ 69
Installing DVC Media 5.0 Program ..................................................... 70
Connecting to a PC ............................................................................ 71
Maintenance............................................................. 72
After finishing a recording ................................................................... 72
Cleaning and Maintaining the Camcorder .......................................... 73
Cleaning the Video Heads ............................................................ 73
Using Your Camcorder Abroad .......................................................... 74
Power sources .............................................................................. 74
Color system ................................................................................. 74
Troubleshooting........................................................ 75
Troubleshooting .................................................................................. 75
Self Diagnosis Display .................................................................. 75
Moisture Condensation ................................................................. 75
Specifications ........................................................... 77
INDEX ...................................................................... 78
Interfaz USB (sólo modelos SCD22) ..................................69
Transferencia de imágenes digitales mediante una conexión USB····69
Requisitos del sistema··········································································69
Instalación del programa DVC Media 5.0············································70
Conexión a un ordenador·····································································71
Mantenimiento ..........................................................72
Después de haber finalizado una grabación·······································72
Limpieza y mantenimiento de la videocámara·····························73
Limpieza de los cabezales de vídeo·············································73
Utilización de la videocámara en el extranjero····································74
Fuentes de potencia······································································74
Sistemas de color··········································································74
Problemas y soluciones .............................................75
Problemas y soluciones········································································75
Pantalla de autodiagnósticos························································75
Condensación de humedad··························································75
Especificaciones técnicas ...........................................77
ÍNDICE ALFABÉTICO................................................78
55

ENGLISH ESPAÑOL
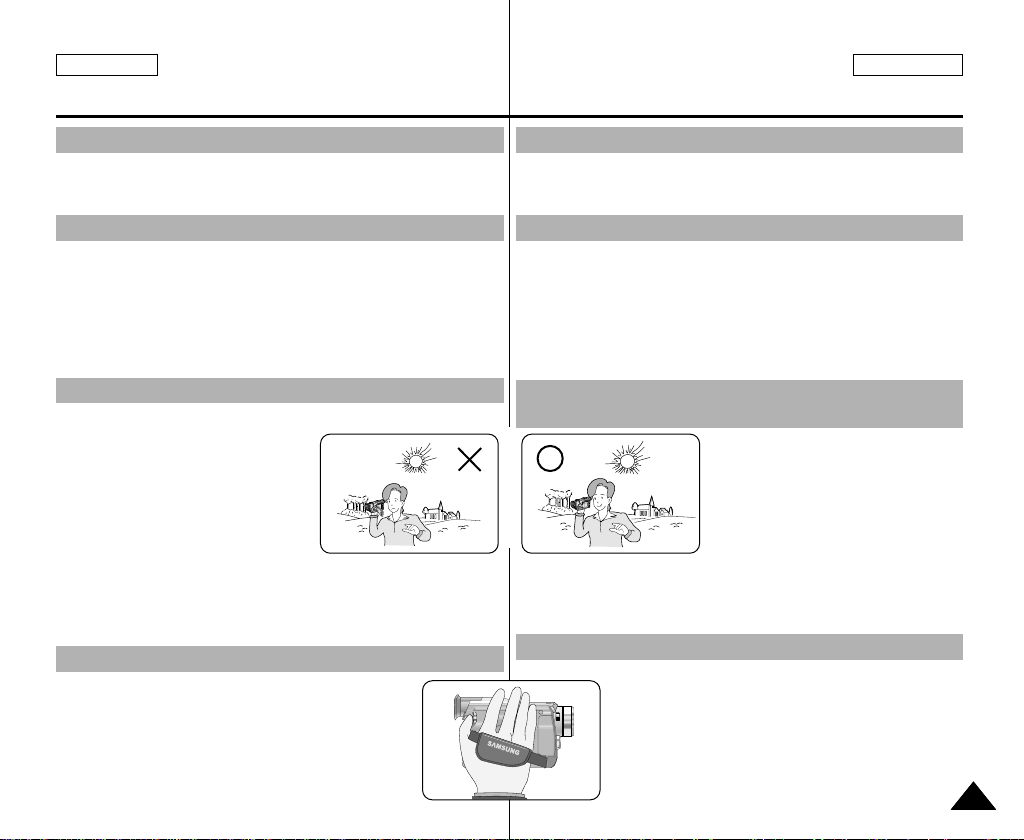
Notes and Safety Instructions Notas e instrucciones de seguridad
Notes regarding the rotation of the LCD screen
Please rotate the LCD screen carefully as illustrated.
Over rotation may cause damage to the inside of the hinge that
connects the LCD screen to the Camcorder.
1. LCD screen closed.
2. Standard recording using the
LCD screen.
3. Recording when looking at the
LCD screen from the top.
4. Recording when looking at the
LCD screen from the front.
5. Recording with the LCD screen
closed.
1
2
3
4
5
Notas referentes a la rotación de la pantalla LCD
Gire cuidadosamente la pantalla como se indica en la figura.Si se gira
demasiado se puede estropear la bisagra interior que la une a la
videocámara.
1. Pantalla LCD cerrada.
2. Grabación estándar
empleando la pantalla LCD.
3. Grabación mirando la pantalla
LCD desde arriba.
4. Grabación mirando la pantalla
LCD desde el frente.
5. Grabación con la pantalla
LCD cerrada.
66

ENGLISH ESPAÑOL
Notes and Safety Instructions Notas e instrucciones de seguridad
Notices regarding COPYRIGHT
Television programs, video tapes, DVD titles, films, and other program
materials may be copyrighted.
Unauthorized copying of copyrighted material may be against the law.
Notes regarding moisture condensation
1. A sudden rise in atmospheric temperature may cause
condensation to form inside the camcorder.
for example:
- When you move the camcorder from a cold location to a warm
location (e.g. from outside to inside during winter.)
- When you move the camcorder from a cool location to a hot
location (e.g. from inside to outside during the summer.)
2. If the (DEW) protection feature is activated, leave the
camcorder for at least two hours in a dry, warm room with the
cassette compartment opened and the battery removed.
Notas referentes a los DERECHOS DE REPRODUCCIÓN
Es probable que los programas de televisión, las cintas de vídeo, los
DVD, las películas y otros materiales audiovisuales tengan registrados
los derechos de reproducción. La copia no autorizada de material
protegido por dichos derechos puede quebrantar la ley.
Notas referentes a la condensación de humedad
1. Una subida repentina de la temperatura puede producir
Por ejemplo:
- Cuando se traslada la videocámara de un sitio frío a uno más
- Cuando se traslada la videocámara de un sitio templado a uno
2. Si el dispositivo de protección contra la humedad (DEW) está
Notes regarding CAMCORDER
1. Do not leave the camcorder exposed to high temperature
(above 60°C or 140°F).
For example, in a parked car in the sun or exposed to direct
sunlight.
2. Do not let the camcorder get wet.
Keep the camcorder away from rain, sea water, and any other form
of moisture. If the camcorder gets wet, it may get damaged.
Sometimes a malfunction due to exposure to liquids cannot be
repaired.
1. No deje la videocámara expuesta a temperaturas altas
2. No permita que la videocámara se moje.
condensación en el interior de la videocámara.
cálido (por ejemplo, de un espacio exterior a uno interior en
invierno).
caliente (por ejemplo, de un espacio interior a uno exterior en
verano).
activado, abra el compartimento para el casete, retire la batería y
deje la videocámara durante al menos dos horas en un lugar seco
y templado.
Notas referentes a la VIDEOCÁMARA
(más de 60¡ÆC o 140¡ÆF).
Por ejemplo, en un coche aparcado al sol o expuesta directamente
a la luz del sol.
Mantenga la videocámara alejada de la lluvia, del agua de mar y
de cualquier otro tipo de humedad.
Si la videocámara se moja puede estropearse.
En algunas ocasiones, los daños causados por líquidos no
pueden repararse.
77
ENGLISH ESPAÑOL
X
V
.
L
I
G
H
T
D
I
S
P
L
A
Y
P
B
Z
O
O
M
Notes and Safety Instructions
Notas e instrucciones de seguridad
Notes regarding the battery pack
- Make sure that the battery pack is fully
charged before starting to record.
- To preserve battery power, keep your
camcorder turned off when you are not
operating it.
- If your camcorder is in CAMERAmode,
and it is left in STBY mode without being
operated for more than 5 minutes with a
tape installed, it will automatically turn itself
off to protect against unnecessary battery
discharge.
- Make sure that the battery pack is fitted firmly into place.
Dropping the battery pack may damage it.
- A brand new battery pack is not charged.
Before using the battery pack, you need to charge it completely.
- It is a good idea to use the viewfinder rather than the LCD when
making long recordings, because the LCD uses up more battery
power.
* When the battery reaches the end of its life, please contact your
local dealer. The batteries have to be dealt with as chemical waste.
Notes regarding the Video Head Cleaning
- To ensure normal recording and a clear picture, clean the video
heads regularly. If a square block-shape distorts playback,
or only a blue screen is displayed, the video heads may be dirty.
If this happens, clean the video heads with a dry type cleaning
cassette.
- Do not use a wet-type cleaning cassette. It may damage the video
heads.
88
Notas referentes a la batería
- Asegúrese de que la batería esté
completamente cargada antes de empezar
a grabar.
- Para ahorrar energía de la batería,
mantenga la videocámara apagada cuando
no la esté usando.
- Si la videocámara está en la modalidad
CAMERA con una cinta puesta y se deja
en la modalidad de STBY (espera) sin
hacerla funcionar durante más de cinco
minutos, se apagará automáticamente
para ahorrar energía de la batería.
- Asegúrese de que la batería esté colocada correctamente en su
sitio.Si se llegara a caer se podría estropear.
- Las baterías nuevas no vienen cargadas.Antes de utilizar la
batería es necesario cargarla por completo.
- Cuando se graba durante mucho tiempo, es mejor mirar por el
visor que a través de la pantalla LCD, ya que ésta consume más
energía.
* Cuando se termine la vida útil de la batería, póngase en contacto
con su proveedor habitual. Para desechar las baterías gastadas,
éstas deben tratarse como residuos químicos.
Notas referentes a la limpieza de los cabezales de vídeo
- Para asegurarse de que obtendrá una grabación normal y una
imagen clara es necesario limpiar regularmente los cabezales de
vídeo. Si durante la reproducción hay un cuadrado que deforma la
imagen o si sólo se ve una pantalla azul, es posible que los
cabezales de vídeo estén sucios. En caso de ser así, límpielos
con un casete de limpieza de tipo seco.
- No utilice casetes de limpieza de tipo húmedo, pues los cabezales
se podrían estropear.
ENGLISH ESPAÑOL
Notes and Safety Instructions
Notas e instrucciones de seguridad
Note regarding the LENS
- Do not film with the camera lens pointing directly at the sun.
Direct sunlight can damage the CCD(Charge Coupled Device).
- No grabe con el objetivo de la cámara dirigido directamente hacia
Notes regarding electronic viewfinder
1. Do not position the camcorder such that the viewfinder is pointing
towards the sun.
Direct sunlight can damage the inside of the viewfinder.
Be careful when placing the camcorder under sunlight or near a
window exposed to sunlight.
2. Do not pick up the camcorder from the viewfinder.
3. Over-rotating of the viewfinder may damage it.
1. No ponga la videocámara de manera que el sol incida
2. No sujete la videocámara por el visor.
3. No fuerce el giro del visor; podría estropearse.
Notes regarding ‘Record’ or ‘Playback’ using the LCD
1. The LCD display has been manufactured using high precision
technology. However, there may be
tiny dots (red, blue or green in color)
that appear on the LCD display.
These dots are normal and do not
affect the recorded picture in any
way.
2. When you use the LCD display
under direct sunlight or outdoors,
it maybe difficult to see the picture clearly.
If this occurs, we recommend using the viewfinder.
3. Direct sunlight can damage the LCD monitor.
2. Si se emplea el visor LCD bajo la acción directa del sol o en
3. La acción directa del sol puede estropear la pantalla LCD.
Notes regarding the hand strap
- To ensure a steady picture during filming,
check that the hand strap is properly adjusted.
- Do not force your hand into the hand strap as you
could damage it.
Nota referente al OBJETIVO
el sol.La acción de la luz directa del sol podría estropear el CCD
(Dispositivo acoplado por carga)
Notas referentes al visor electrónico
directamente en el visor.
La acción directa del sol sobre el visor podría estropear su interior.
Tenga cuidado cuando ponga la videocámara bajo el sol o cerca
de una ventana expuesta a la acción del sol.
Notas referentes a la grabación o a la reproducción
utilizando la pantalla LCD
1. Para la fabricación de la pantalla
LCD se ha empleado tecnología de
alta precisión.
Sin embargo, pueden aparecer en
ella puntitos rojos, azules o verdes.
Esta situación es normal y no afecta
en modo alguno la grabación.
exteriores, es probable que resulte difícil ver la imagen con claridad.
Si esto sucede, es recomendable utilizar el visor normal.
Notas referentes a la empuñadura
- Para obtener una imagen estable durante la
grabación, asegúrese de que la empuñadura
está debidamente ajustada.
- Al introducir la mano tenga cuidado de no forzar
la empuñadura, pues podría estropearse.
99

ENGLISH ESPAÑOL
Notes and Safety Instructions
Notas e instrucciones de seguridad
Precautions regarding the Lithium battery
1. The lithium battery maintains the clock function and user settings;
even if the battery pack or AC adapter is removed.
2. The lithium battery for the camcorder lasts about 6 months under
normal operation from time of installation.
3. When the lithium battery becomes weak or dead, the date/time
indicator will flash for about five seconds when you set the power
switch to CAMERA.
In this case, replace the lithium battery with a new one
(type CR2025 ).
4. Danger of explosion if battery is incorrectly replaced.
Replace only with the same or equivalent type.
Warning: Keep the LITHIUM BATTERY out of reach of children.
Danger:
DANGER: DO NOT DIRECT LIGHT AT PERSONS OR MATERIALS
DANGER: TO PREVENT POSSIBLE BURN HAZARD,
1010
Should a battery be swallowed, consult a doctor
immediately.
Notice regarding VIDEO LIGHT
- The Video Light can become extremely hot. Do not touch it
during operation or after turning it off, otherwise serious injury
may result. Wait 5 minutes (approx.) for the light to cool down.
- Do not place the camcorder into the carrying case immediately
after using the video light. The video light will be hot.
Please allow time for it to cool down.
- Do not use it near flammable or explosive materials.
- It is recommended that you consult your nearest SAMSUNG
dealer for replacement bulbs.
- Not to be handled by children. Emits intense heat and light.
Use with caution to reduce the risk of fire or injury to persons.
LOCATING LESS THAN FOUR FEET DURING USE.
DISCONNECT WHEN NOT IN USE.
DISCONNECT THE SUPPLY CORD AND ALLOW THE
LAMP TO COOL DOWN BEFORE REPLACING.
(SCD21/D22 only)
Precauciones referentes a la pila de litio
1. La pila de litio de la videocámara mantiene en funcionamiento el
reloj y los ajustes programados aun cuando se haya quitado la
batería o el adaptador de CA.
2. La pila de litio de la videocámara dura aproximadamente seis
meses bajo condiciones normales de funcionamiento.
3. Cuando se descargue o agote la pila de litio, el indicador de la
fecha y la hora parpadeará durante cinco segundos al poner el
interruptor en la posición CAMERA.
En ese caso, reemplácela por una nueva del tipo CR2025.
4. Si la pila no se reemplaza correctamente se corre el riesgo de
una explosión. Reemplace la pila sólo por una igual o de
especificaciones equivalentes.
Precaución: Mantenga la PILA DE LITIO fuera del alcance de los
niños. En caso de que, por accidente, alguien se tragara una,
avise inmediatamente a un médico.
Aviso referente al FOCO DE LACÁMARA (sólo modelos SCD21/D22)
Peligro:
- El foco de la cámara puede alcanzar temperaturas muy
elevadas. No lo toque mientras se encuentre en
funcionamiento o después de apagarlo.
En caso contrario podrían producirse quemaduras.
Espere aproximadamente cinco minutos a que se enfríe.
- No introduzca la videocámara en su bolsa de transporte
inmediatamente después de utilizar el foco de la cámara, ya
que éste se encontrará a una temperatura elevada.
Deje pasar unos minutos hasta que se enfríe.
- No lo utilice cerca de materiales inflamables o explosivos.
- Cuando llegue el momento de sustituir la bombilla, póngase en
contacto con su distribuidor SAMSUNG más cercano.
- No apto para uso infantil. Fuente de luz y calor de gran
intensidad.
Utilícelo con precaución para reducir el riesgo de incendio o
daños personales.
PELIGRO: NO DIRIJA EL FOCO DIRECTAMENTE A PERSONAS O
PELIGRO: PARAEVITAR EL RIESGO DE QUEMADURAS,
MATERIALES SITUADOS A MENOS DE CUATRO
METROS. DESCONÉCTELO CUANDO NO LO UTILICE.
DESCONECTE EL CABLE DE ALIMENTACIÓN Y DEJE
QUE SE ENFRÍE EL FOCO ANTES DE SUSTITUIRLO.

ENGLISH ESPAÑOL
Getting to Know Your Camcorder Introducción a la videocámara
Features
• Digital data transfer function with IEEE1394
By incorporating the IEEE 1394 (i.LINK™ : i.LINK is a serial data
transfer protocol and interconnectivity system, used to transmit DV
data) high speed data transport port, both moving and still images
can be transferred to a PC, making it possible to produce or edit
various images.
• USB interface for digital image data transfer
(SCD22 only)
You can transfer still images to a PC using the USB interface
without an add-on card.
• PHOTO
The PHOTO function lets you capture an object as a still along with
sound, while in Camera mode.
• 800x Digital zoom
Allows you to magnify an image up to 800 times its original size.
• Color TFT LCD
A high-resolution color TFT LCD gives you clean, sharp images as
well as the ability to review your recordings immediately.
• Digital Image Stabilizer (DIS)
The DIS compensates for any handshake, reducing unstable
images particularly at high magnification.
• Various digital effects
The DSE (Digital Special Effects) allows you to give your films a
special look by adding various special effects.
• Back Light Compensation (BLC)
The BLC function compensates for the bright background behind a
subject you're recording.
• Program AE
The Program AE enables you to alter the shutter speed and
aperture to suit the type of scene/action to be filmed.
Características
• Función de transferencia digital de datos mediante IEEE1394
Con la incorporación del puerto de transferencia de datos a alta
velocidad IEEE1394 (i.LINK™: el i.LINK es un sistema de
protocolo de transferencia de datos en serie e intercomunicación
empleado para transmitir datos DV), se pueden transferir
imágenes de vídeo o fijas al ordenador. De este modo, es posible
producir o editar imágenes.
• Interfaz USB para la transferencia de datos de imagen digital
(sólo modelos SCD22)
Es posible transferir imágenes fijas al ordenador por medio de la
interfaz USB sin necesidad de una tarjeta adicional.
• FOTOGRAFÍA
La función de fotografía (PHOTO) permite tomar fotografías de
objetos con sonido cuando la videocámara está en la modalidad
CAMERA.
• Zoom digital 800x
Permite ampliar la imagen hasta 800 veces su tamaño original.
• LCD TFT en color
El sistema de color de alta resolución TFT de la pantalla LCD
proporciona imágenes limpias y nítidas a la vez que permite ver
las grabaciones inmediatamente.
• Estabilizador digital de la imagen (DIS)
El DIS compensa los movimientos de la mano reduciendo la
inestabilidad de las imágenes, especialmente cuando éstas
últimas se graban con una gran ampliación.
• Efectos digitales diversos
Gracias al sistema DSE (efectos especiales digitales) se puede
dar a la grabación un aire especial al permitir añadir diversos
efectos especiales.
• Compensación de la luz de fondo (BLC)
La función BLC compensa el brillo que puede aparecer detrás del
objeto que se graba.
• Programa AE
El programa AE permite modificar la velocidad y la apertura del
obturador para que se ajuste a la escena que se vaya a filmar.
1111
ENGLISH ESPAÑOL
Getting to Know Your Camcorder
Introducción a la videocámara
Accessories Supplied with camcorder
Make sure that the following basic accessories are supplied with your
digital video camera.
Basic Accessories
1. Lithium Ion Battery pack
2. AC Power Adapter
3. AC Cord
4. AUDIO/VIDEO cable
5. Instruction Book
6. Lithium battery for Clock.
(TYPE: CR2025)
7. Shoulder strap
8. USB cable (SCD22 only)
9. Software CD (SCD22 only)
1. Lithium Ion Battery pack
4. AUDIO/VIDEO cable
2. AC Power Adapter
5. Instruction Book
8. USB cable7. Shoulder strap
Accesorios incluidos con la videocámara
Asegúrese de que los siguientes accesorios básicos le hayan sido
entregados junto con la videocámara digital.
3. AC cord
6. Lithium battery
9. Software CD
Accesorios básicos
1. Batería de ion de litio
2. Adaptador de CA
3. Cable de CA
4. Cable AUDIO/VÍDEO
5. Manual de instrucciones
6. Pilas de litio para el reloj
(TYPE: CR2025)
7. Correa para el hombro
8. Cable USB
(sólo modelos SCD22)
9. CD de software
(sólo modelos SCD22)
1212

ENGLISH ESPAÑOL
Getting to Know Your Camcorder
Introducción a la videocámara
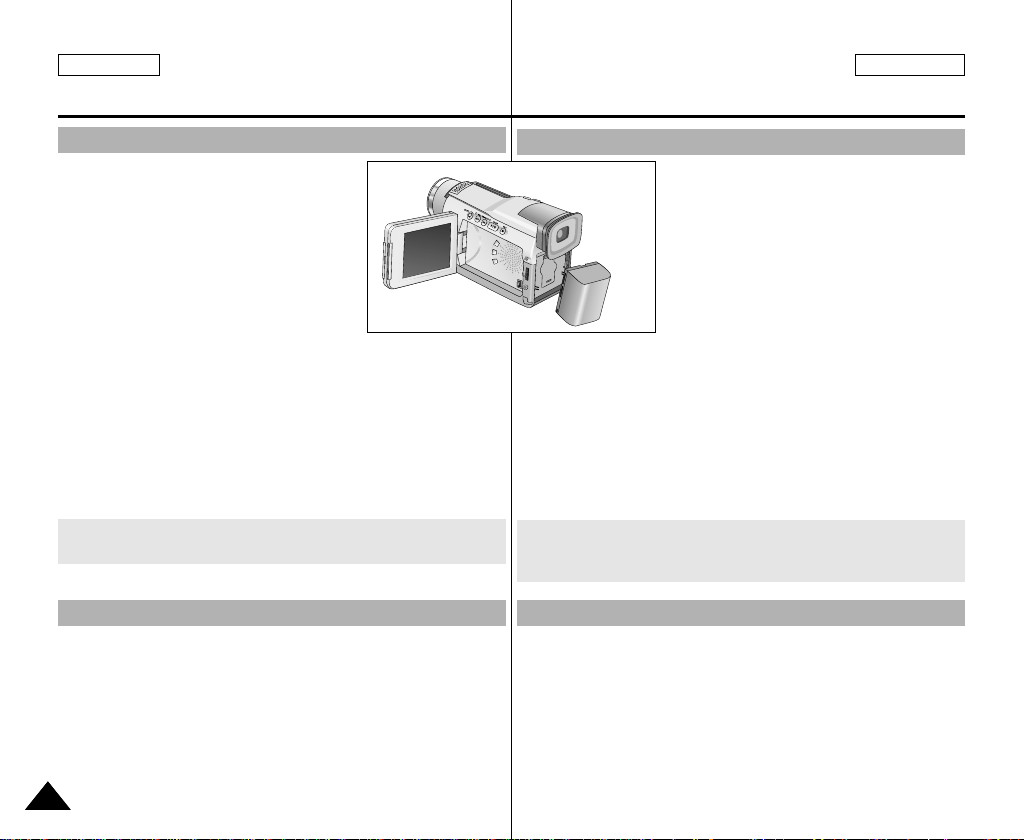
Front & Left View Vistas frontal y lateral izquierda
3. Video Light (SCD21/D22 only)
1. Internal MIC
2. Lens
3. Video Light
(SCD21/D22 only)
1. Internal MIC
M
M
O
O
O
O
Z
Z
X
X
0
0
1
1
S
2. Lens
S
4. Viewfinder
(see page 30)
5. EASY button
(see page 54)
6. TFT LCD monitor
4. Viewfinder
C
L
B
E
D
A
F
H
C
R
A
E
S
C
E
R
Y
S
A
E
N
N
E
E
L
L
R
R
E
E
D
D
R
R
O
O
C
C
M
M
A
A
C
C
G
G
N
N
U
U
S
S
M
M
A
A
S
S
1. Micrófono incorporado
2. Objetivo
5. EASY button
6. TFT LCD monitor
4. Visor (ver página 30)
5. Botón de
funcionamiento sencillo
3. Foco de la cámara
(ver página 54)
(sólo modelos
SCD21/D22)
6. Pantalla LCD TFT
1313

ENGLISH ESPAÑOL
Getting to Know Your Camcorder
Introducción a la videocámara
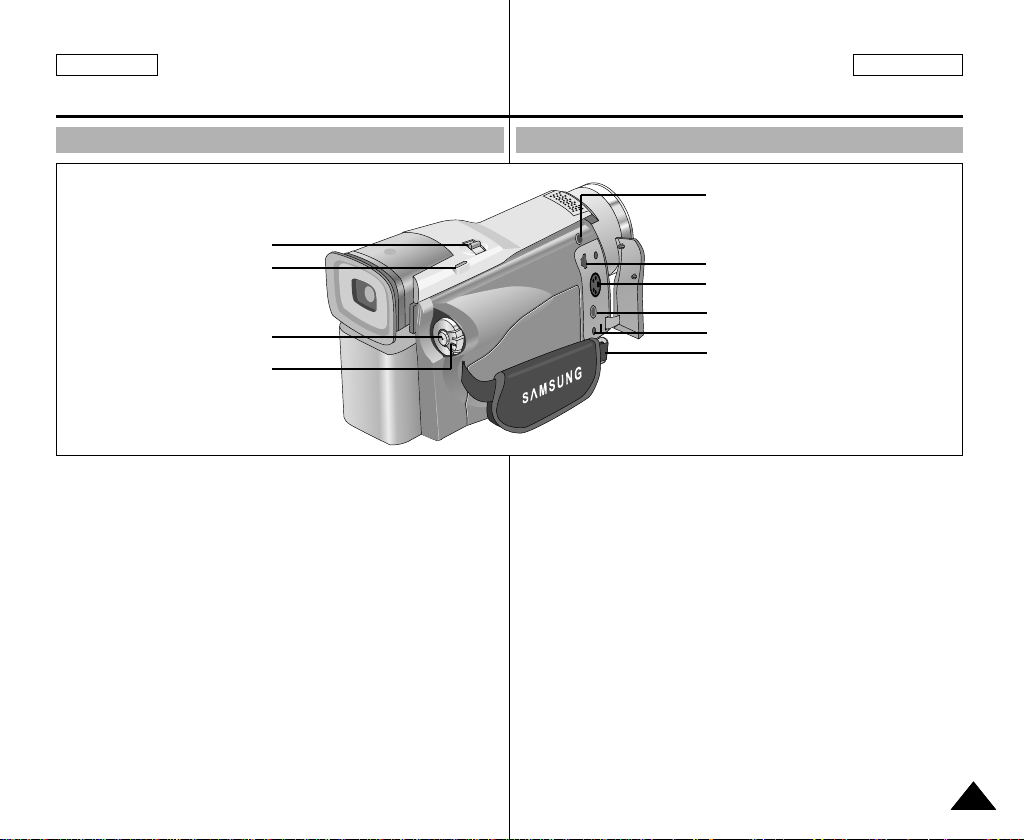
Left Side View Vista lateral izquierda
1. Function buttons
M
O
O
Z
2. PB zoom
3. Display
4. V. light
(SCD21/D22 only)
5. DV jack
B
P
Y
A
L
P
S
I
D
T
H
G
I
L
.
V
10. MENU button
9. Speaker
8. MENU dial
7. ENTER button
6. DC jack
1. Function buttons
PLA YER CAMERA
- EASY
: (REW) REC SEARCH –
: (FF) REC SEARCH +
: (PLAY/STILL) FADE
: (STOP) BLC
2. PB zoom
3. Display
4. V. light
(SCD21/D22 only)
5. DV jack
1414
6. DC jack
7. ENTER button
8. MENU dial
9. Speaker
10. MENU button
1. Botones de funciones
PLA YER CAMERA
- EASY (funcionamiento sencillo)
: (REW; rebobinado) REC SEARCH – (búsqueda de grabación -)
: (FF; avance rápido) REC SEARCH + (búsqueda de grabación +)
: (PLAY/STILL; FADE (fundido)
reproducción/imagen fija)
: (STOP; parada) BLC (compensación de la luz de fondo)
2. Ampliación de
imágenes (PB zoom)
3. Pantalla
4. Foco de la cámara
(sólo modelos
SCD21/D22)
5. Conector DV
6. Conector de CC
7. Botón ENTER
(introducir)
8. Dial MENÚ
9. Altavoz
10. Botón MENU (menú)
ENGLISH ESPAÑOL
Getting to Know Your Camcorder
Introducción a la videocámara
Right & Top View Vistas superior y lateral derecha
10. SLOW SHUTTER
1. Zoom lever
2. PHOTO button
3. START/STOP button
4. Power switch
1. Zoom lever
2. PHOTO button
(see page 59)
3. START/STOP button
4. Power switch
(CAMERA or PLAYER)
5. Hook for handstrap
6. External MIC in
7. Audio/Video jack
8. S-VIDEO jack
9. USB jack
(SCD22 only)
10. SLOW SHUTTER
1. Botón del zoom
2. Botón PHOTO
(fotografía;
ver página 65)
3. Botón START/STOP
(inicio/parada)
4. Interruptor (CAMERA
o PLAYER)
5. Enganche para la
empuñadura
9. USB jack (SCD22 only)
8. S-VIDEO jack
7. Audio/Video jack
6. External MIC in
5. Hook for handstrap
6. Conector para
micrófono externo
7. Conector Audio/Vídeo
8. Conector S-VIDEO
9. Conector USB (sólo
modelos SCD22)
10. Obturador lento
1515

ENGLISH ESPAÑOL
P
L
A
Y
E
R
•
O
F
F
•
C
A
M
E
R
A
+
-
CHARGE
Getting to Know Your Camcorder
Introducción a la videocámara
Rear & Bottom View
1. Charging indicator
7. Tripod receptacle
2. Battery Release
3. Lithium battery cover
6. Focus adjust knob
4. Hook for shoulder strap
1. Charging indicator
2. Battery Release
3. Lithium battery cover
4. Hook for shoulder strap
1616
5. TAPE OPEN/EJECT
6. Focus adjust knob
7. Tripod receptacle
1. Indicador de carga
2. Botón para liberar la
pila
3. Cubierta de la pila de
litio
4. Enganche de la correa
para el hombro
5. TAPE OPEN/EJECT
5. Expulsión de la cinta
6. Botón de enfoque
7. Agujero para el trípode
ENGLISH ESPAÑOL
. . . C
SOUND [ 2 ]
MIRROR
ENTER :
PB ZOOM
1.2x
M - 0 : 0 0 : 0 0
5 5 min
1 6 bit
1 0 : 0 0 AM
J A N . 1 0 , 2 0 0 3
VOL. [ 1 1 ]
DV
Getting to Know Your Camcorder Introducción a la videocámara
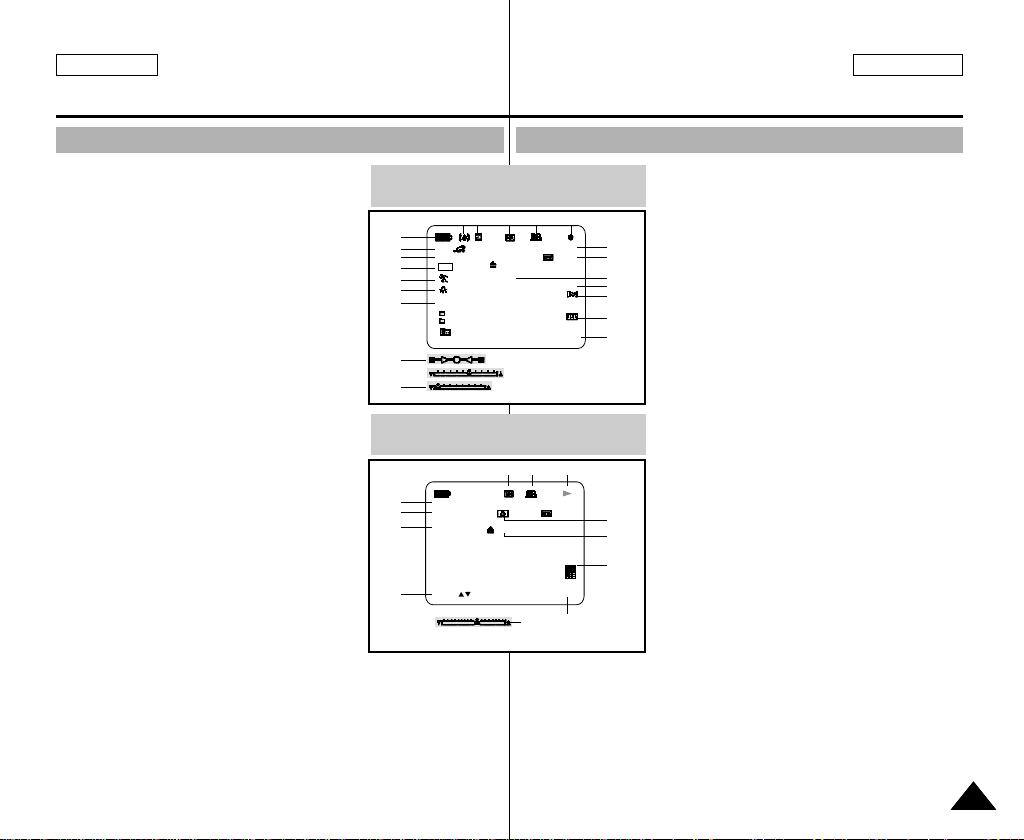
OSD (On Screen Display in CAMERA and PLAYER modes)
1. Battery level (see page 24)
2. Easy mode (see pages 54)
3. DSE (Digital Special Effects) mode
(see page 43)
4. Program AE (see page 37)
5. White Balance mode (see page 39)
6. BLC (Back Light Compensation)
(see page 56)
7. Manual focus (see page 55)
8. Shutter speed and EXPOSURE
(see page 52)
9. Zoom position (see page 40)
10. DATE/TIME (see page 48)
11. USB (SCD22 only)
12. WIND CUT (see page 47)
13. Audio recording mode (see page 46)
14. Remaining Tape (measured in minutes)
15. Tape Counter
16. Operating mode
17. Record speed mode
18. PHOTO mode
19. DIS (see page 42)
20. Volume control (see page 32)
21. Audio playback channel
22. DV IN(DV data transfer mode)
(see page 68)
23. DEW (see page 7)
24. Message Line
25. PB DSE (see page 65)
26. PB zoom/enter (see page 66)
27. Video light (see page 60) (SCD21/D22 only)
OSD in CAMERA mode
1
2
3
6
4
5
7
9
8
19 27 18 17 16
EASY
MIRROR
BLC
MF
SHUTTER
EXPOSURE
OSD in PLAYER mode
21
26
25
26
OSD (presentación en pantalla en las modalidades CAMERA y PLAYER)
1. Nivel de carga de la batería
(ver página 24)
2. Modalidad sencilla (ver página 54)
REC
5 5 min
1 6 bit
15
14
24
13
12
11
10
23
24
22
10
0 : 0 0 : 0 0
TAPE !
J A N. 1 0 , 2 0 0 3
ZOOM
EXPOSURE
SHUTTER
18 17 16
20
1 0 : 0 0 AM
23. Humedad (DEW; ver página 7)
24. Línea de mensajes
25. PB DSE (Aplicación de efectos digitales a la reproducción;
ver página 65)
26. Ampliación de imágenes/introducir (ver página 66)
27. Foco de la cámara (SCD21/D22; ver página 60)
3. DSE (efectos especiales digitales;
ver página 43)
4. Programa AE (ver página 37)
5. Modalidad de equilibrio del blanco
(ver página 39)
6. BLC (compensación de la luz de fondo;
ver página 56)
7. Enfoque manual (ver página 55)
8. Velocidad del obturador y EXPOSICIÓN
(ver página 52)
9. Posición del zoom (ver página 40)
10. FECHA/HORA (ver página 48)
11. USB (sólo modelos SCD22)
12. Eliminación del ruido del viento
(ver página 47)
13. Modalidad de grabación de audio
(ver página 46)
14. Cantidad de cinta que queda sin grabar
(en minutos)
15. Contador de la cinta
16. Modalidad de funcionamiento
17. Modalidad de velocidad de grabación
18. Modalidad de FOTOGRAFÍA
19. DIS (estabilizador digital de la imagen;
ver página 42)
20. Control de volumen (ver página 32)
21. Canal de reproducción de audio
22. ENTRADA DE DV (modalidad de
transferencia de datos DV;
ver página 68)
1717

ENGLISH ESPAÑOL
Getting to Know Your Camcorder Introducción a la videocámara
Turning the OSD on/off (On Screen Display)
●
Turning OSD on/off
Press the DISPLAYbutton on the left side panel.
- Each press of the button toggles the OSD function on and off.
- When you turn the OSD off,
In CAMERA mode: The STBY, REC, EASY.Q modes are
always displayed on the OSD,
even when the OSD is turned OFF and the key input is
displayed for 3 seconds then turned off.
In PLAYER mode: When you press any Function button, the
function is displayed
on the OSD for 3 seconds before it turns off.
●
Turning the DATE/TIME on/off
- The DATE/TIME is not affected when the OSD function is
switched ON or OFF.
- To turn the DATE/TIME on or off, access the menu and change
the DATE/TIME mode. (see page 48)
- You may also use the Quick Menu to turn the DATE/TIME ON
or OFF. (see page 50)
(only in CAMERA mode)
Encendido y apagado de la OSD (presentación en pantalla)
●
Encendido y apagado de la OSD
Pulse el botón DISPLAY en el panel izquierdo.
- Al pulsar repetidas veces el botón, la función OSD cambiará
alternativamente entre activada y desactivada (ON/OFF).
- Al desactivar la OSD,
En la modalidad CAMERA: las modalidades STBY, REC e
EASY.Q siempre aparecen en la OSD,
incluso si ésta se encuentra apagada y el nombre de la
modalidad aparece durante tres segundos. Luego se apaga.
En la modalidad PLAYER: si se pulsa algún botón de función,
ésta aparece en la OSD durante tres segundos y después se
apaga.
●
Encendido y apagado de la fecha y la hora
- La presentación de fecha y hora no se ve afectada cuando se
enciende o apaga la función OSD.
- Para encender o apagar la presentación de fecha y hora, acceda
al menú y cambie la modalidad DATE/TIME (fecha y hora)
(ver página 48).
- También se puede emplear el menú rápido para encender o
apagar la presentación de fecha y hora (ver página 50).
Esto sólo es posible en la modalidad CAMERA.
1818
ENGLISH ESPAÑOL
Preparation
Preparación
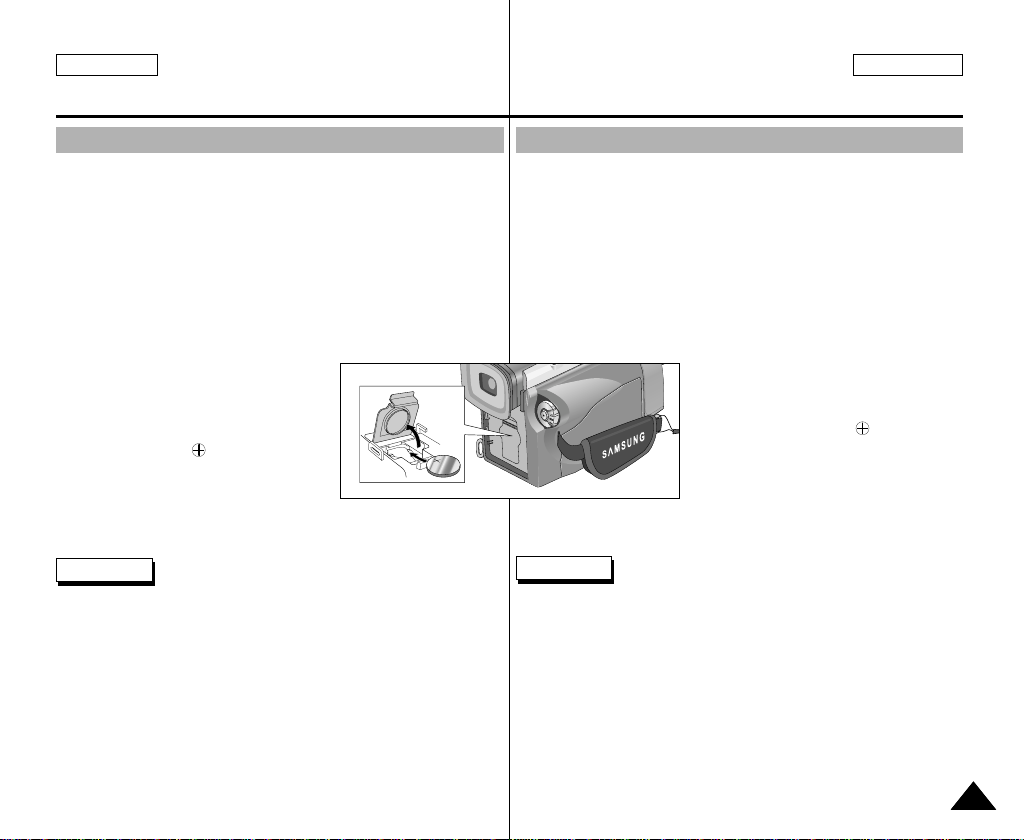
Lithium Battery Installation
✤ The lithium battery maintains the clock function and preset
contents of the memory; even if the battery pack or AC power
adapter is removed.
✤ The lithium battery for the camcorder lasts about 6 months under
normal operation from the time of installation.
✤ When the lithium battery becomes weak or dead, the date/time
indicator flashes for about 5 seconds when you set the power
switch to CAMERA.
When this occurs, replace the lithium battery with CR2025 type.
1. Open the Lithium battery cover from the
camera.
2. Position the Lithium cell in the holder,
with the positive ( ) terminal face
outward.
3. Close the lithium battery cover.
Note The lithium battery must be inserted in the correct
direction.
Warning: Keep the LITHIUM BATTERY out of the reach of the
children.
Should any battery be swallowed, consult a doctor
immediately.
Instalación de la pila de litio
✤ La pila de litio mantiene el funcionamiento del reloj y los ajustes
programados en la memoria incluso cuando se quita la batería o el
adaptador de CC.
✤ La pila de litio de la videocámara dura aproximadamente seis
meses bajo condiciones normales de funcionamiento.
✤ Cuando la pila de litio se descargue o agote, el indicador de fecha
y hora parpadeará durante cinco segundos al poner el interruptor
en la posición CAMERA.En ese caso, reemplace la pila por una
nueva del tipo CR2025.
1. Abra la cubierta de la pila de litio.
2. Coloque la pila en el compartimento
con el polo positivo ( ) hacia fuera.
3. Cierre la cubierta de la pila.
Nota La pila de litio debe colocarse en el sentido
correcto.
Precaución: mantenga la PILA DE LITIO fuera del alcance
de los niños.
En caso de que, por accidente, alguien se tragara
una, avise inmediatamente a un médico.
1919
ENGLISH ESPAÑOL
Preparation
Preparación
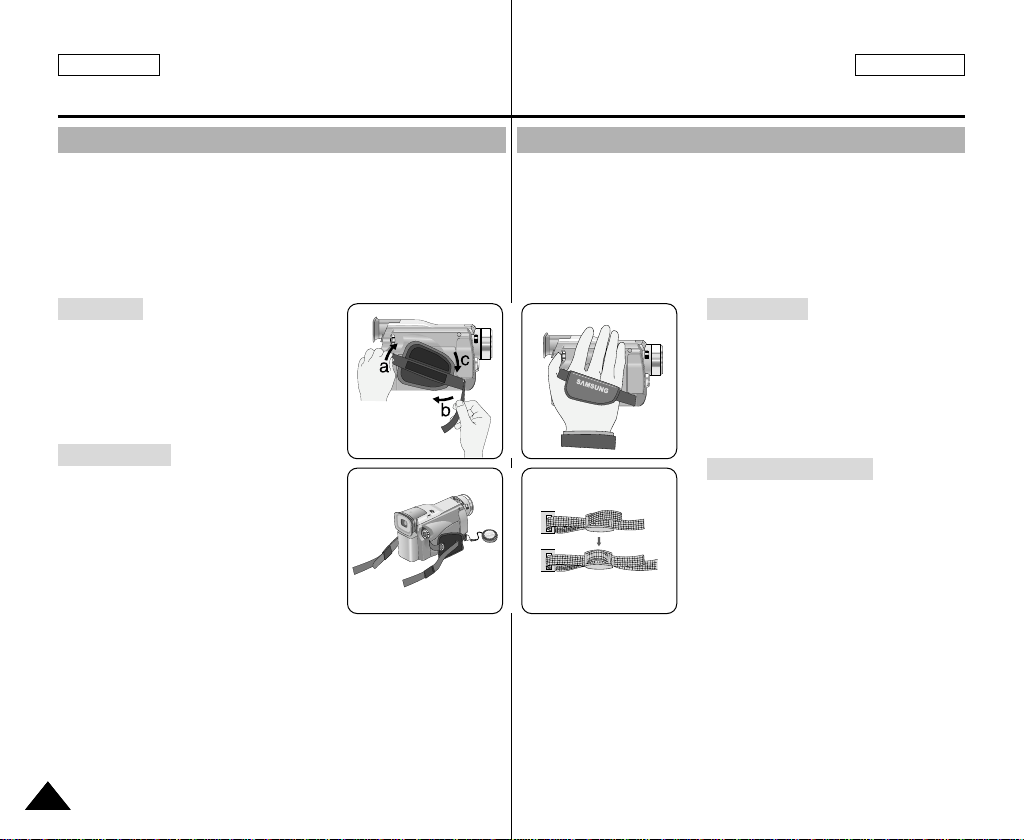
Adjusting the Hand Strap
It is very important to ensure that the Hand strap has been correctly
adjusted before you begin your recording.
The hand strap enables you to :
- Hold the camcorder in a stable, comfortable position.
- Press the Zoom and START/STOP button without having to
change the position of your hand.
Hand strap
a. Pull open the Hand Strap cover and
release the Hand Strap.
b. Adjust its length and stick it back
onto the Hand Strap cover.
c. Close the Hand Strap cover again.
Shoulder Strap
The Shoulder Strap enables you to
carry your camcorder around in
complete safety.
1. Insert the end of strap into the
Shoulder Strap hook on the
camcorder.
Insert the other end of strap into ring
inside hand strap.
2. Thread each end into the buckle,
adjust the length of the strap and
then pull it tight in the buckle.
12
Ajuste de la empuñadura
Es muy importante asegurarse de que la empuñadura esté
correctamente ajustada antes de empezar la grabación.
La empuñadura permite:
- Mantener la videocámara en una posición estable y cómoda.
- Pulsar los botones de zoom y START/STOP sin tener que
modificar la posición de la mano.
Empuñadura
a. Abra la cubierta de la empuñadura
y saque la correa.
b. Ajuste la longitud de la correa y
ponga lo que sobra nuevamente
dentro de la cubierta.
c. Cierre de nuevo la cubierta.
Correa para el hombro
La correa para el hombro permite llevar
la videocámara de manera segura.
1. Introduzca un extremo de la correa
en el enganche apropiado de la
videocámara y el otro extremo en el
aro que hay dentro de la cubierta
de la empuñadura.
2. Pase cada uno de los extremos de
la correa por la hebilla y ajuste la
longitud que desee. Finalmente tire
de los extremos para que queden
bien sujetos a las hebillas.
2020

ENGLISH ESPAÑOL
Preparation
Preparación
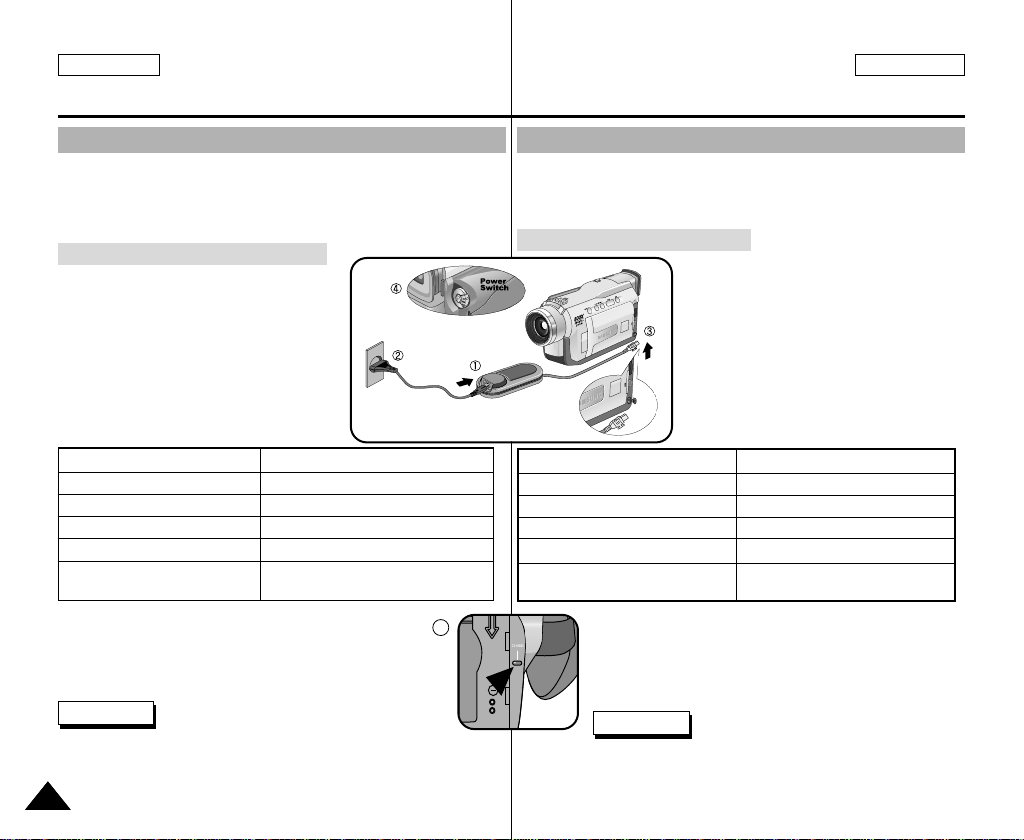
Connecting a Power Source
There are two types of power source that can be connected to your
camcorder.
- The AC Power Adapter and AC cord : used for indoor recording.
- The Battery Pack : used for outdoor recording.
To use the AC Power adapter and DC Cable
1. Connect the AC Power adapter
to the AC cord.
2. Connect the AC cord to a wall
socket.
Note
The plug and wall socket type may
differ according to your resident
country.
3. Connect the DC cable to the
DC jack socket of the
camcorder.
4. Set the camcorder to each
mode by holding down the tab
on the power switch and turning
it to the CAMERA or PLAYER mode.
Conexión a una fuente de energía
Hay dos tipos de fuentes de energía a las que se puede conectar la
videocámara.
- El adaptador de CAy el cable de CA: se emplean para
grabaciones en interiores.
- La batería: se emplea para grabaciones en exteriores.
Utilización del adaptador de CA y del cable de CC
1. Conecte el adaptador de CA
al cable de CA.
2. Conecte el cable de CA a una
toma de corriente.
Nota
Es posible que la clavija y la toma
de corriente sean de distinto tipo,
dependiendo de su lugar de
residencia.
3. Conecte el cable de CC al
conector de CC de la
videocámara.
4. Ajuste la videocámara
pulsando la lengüeta y
colocándola en la modalidad
deseada: CAMERA o
PLAYER.
2121
ENGLISH ESPAÑOL
Preparation Preparación
Using the Lithium Ion Battery Pack
✤
The amount of continuous recording time available depends on :
- The type and capacity of the battery pack you are using.
- How often the Zoom function is used.
It is recommended that you have several batteries available.
Charging the Lithium Ion Battery Pack
1. Attach the battery pack to the camcorder.
2. Connect the AC Power adapter to an AC
cord and connect the AC cord to a wall
socket.
3. Connect the DC cable to the DC jack
socket on the camcorder.
4. Turn the Camera power switch to off, and
the charging indicator will start to flash,
showing that the battery is charging.
Blinking time Charging rate
Once per second Less than 50%
Twice per second 50% ~ 75%
Three times per second 75% ~ 90%
Blinking stops and stays on 90 ~ 100%
On for a second and Error - Reset the battery pack and
off for a second the DC cable
5. When the battery is fully charged, disconnect
the battery pack and the AC Power adapter
from the camcorder.
■
Even with the power switched off, the battery pack will
still discharge if it is left connected to the camcorder.
Notes
■
The battery pack may be charged a little at the time of
purchase.
■
To prevent reduction in the life and capacity of the battery pack,
always remove it from the camcorder after it is fully charged.
2222
5
Utilización de la batería de ion de litio
✤
El tiempo disponible de grabación continuada depende de:
- El tipo y la capacidad de la batería que use.
- La frecuencia con que se emplee el zoom.
Es aconsejable disponer de varias baterías.
Carga de la batería de ion de litio
1. Conecte la batería a la videocámara.
2. Conecte el adaptador de CA al cable
de CA y conecte este último a una
toma de corriente.
3. Conecte el cable de CC al conector de
CC de la videocámara.
4. Ajuste el interruptor de la videocámara
en la posición de apagado. El indicador
de carga empezará a parpadear, lo que
indica que la batería se está cargando.
Frecuencia de parpadeo Cantidad de carga
Una vez por segundo Menos del 50%
Dos veces por segundo 50% ~ 75%
Tres veces por segundo 75% ~ 90%
Deja de parpadear y queda encendido 90 ~ 100%
Encendido durante un segundo Error: repita la operación de conexión
y apagado durante un segundo de la batería y el cable de CC
5. Cuando la batería esté completamente cargada,
desconéctela de la videocámara y desconecte
también el adaptador de CA.
■
Incluso en el caso de que se deje apagado el
interruptor de encendido, la batería se seguirá
descargando si se deja conectada a la videocámara.
Notas
■
Es posible que la batería esté un poco cargada en el momento
de la compra.
■
Para evitar que la vida útil de la batería y su capacidad se reduzcan,
quítela siempre de la videocámara después de que esté
completamente cargada.
ENGLISH ESPAÑOL
Preparation Preparación
Using the Lithium Ion Battery Pack
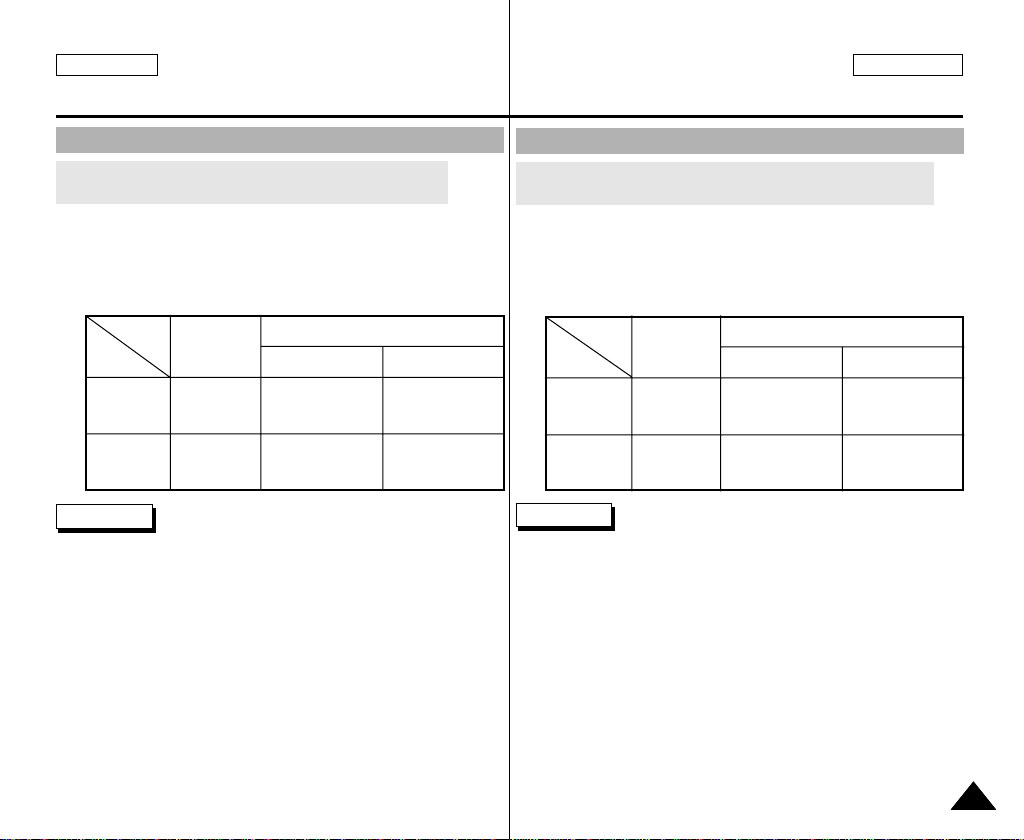
Table of continuous recording time based on model and
battery type.
✤ If you close the LCD screen, it switches off and the viewfinder
switches on automatically.
✤ The continuous recording times given in the table above are
approximations.
Actual recording time depends on usage.
Time
Charging
Battery
SB-L110
SB-L220
time
Approx.
2hr
Approx.
3hr 30min
Notes
■
The battery pack should be recharged in an environment of
between 32°F (0°C) and 104°F (40°C).
■
The battery pack should never be charged in a room temperature
that is below 32°F (0°C).
■
The life and capacity of the battery pack will be reduced if it is used
in temperatures below 32°F (0°C) or left in temperatures above
104°F (40°C) for a long period, even when it is fully recharged.
■
Do not put the battery pack near any heat source (fire or flames,
for example).
■
Do not disassemble, process, pressure, or heat the Battery Pack.
■
Do not allow the + and - terminals of the battery pack to be
short-circuited.
It may cause leakage, heat generation, induce fire and overheating.
Continuous recording time
LCD ON EVF ON
Approx.
1hr 30min
Approx.
3hr 10min
Approx.
2hr
Approx.
4hr 10min
Utilización de la batería de ion de litio
Tabla de tiempos de grabación continuada según el modelo
y el tipo de batería
✤ Si cierra la pantalla LCD, ésta se apaga y el visor se enciende
automáticamente.
✤ Los tiempos de grabación continuada que se dan en la tabla
que aparece más abajo son aproximados.El tiempo real de
grabación depende del uso de la videocámara.
Tiempo
Batería
SB-L110
SB-L220
Tiempo de
carga
Aprox.
2h
Aprox.
3h 30min
Notas
■
La batería debe recargarse a una temperatura ambiente de entre
0°C (32°F) y 40°C (104°F).
■
La batería nunca debe cargarse cuando la temperatura ambiente
es de menos de 0°C (32°F).
■
La vida útil y la capacidad de la batería se verán reducidas si se
utiliza en ambientes con temperaturas inferiores a 0°C (32°F) o si se
deja durante largos periodos expuesta a temperaturas superiores a
los 40°C (104°F), incluso si está cargada por completo.
■
No ponga la batería cerca de una fuente de calor (chimeneas,
radiadores, etc).
■
No desmonte la batería ni la someta a manipulaciones, presiones
ni al calor.
■
No permita que se produzca un cortocircuito entre los polos + y –
de la batería.
Podrían producirse pérdidas o recalentamiento, lo cual podría
ocasionar un incendio.
Tiempo de grabación continuada
LCD ACTIVADA EVF ACTIVADO
Aprox.
1h 30min
Aprox.
3h 10min
Aprox.
2h
Aprox.
4h 10min
2323
ENGLISH ESPAÑOL
Preparation Preparación
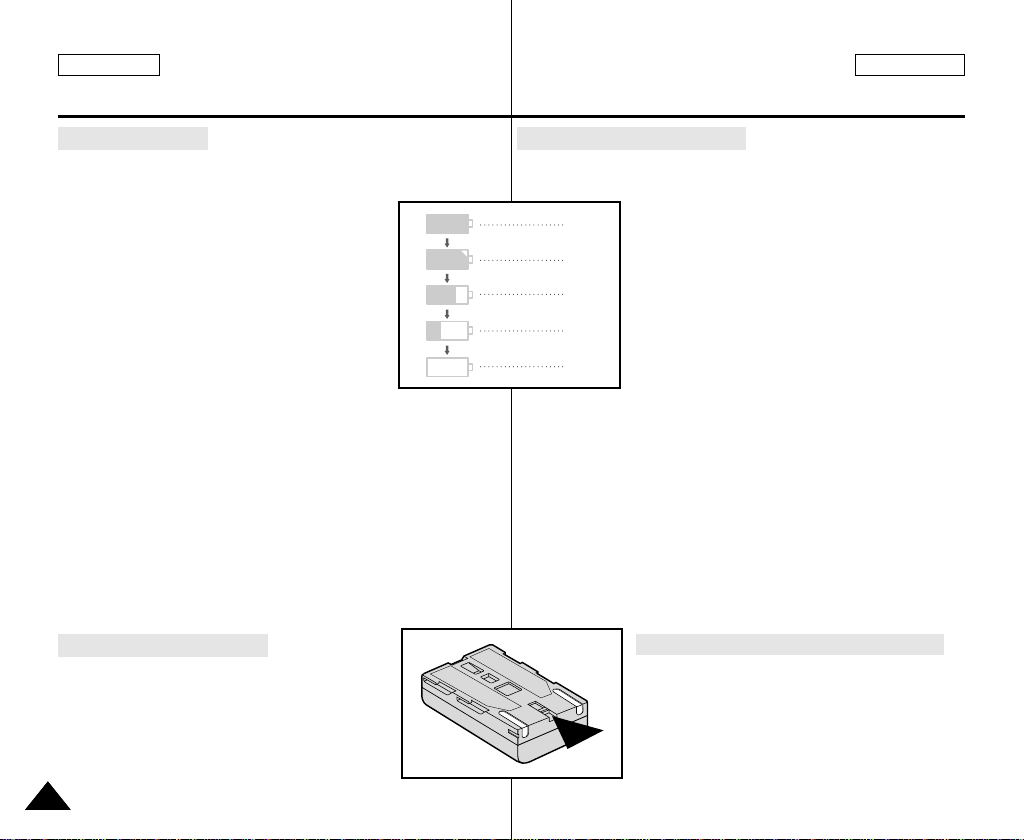
Battery level display
•
The battery level display indicates the amount of power
remaining in the battery pack.
a. Fully charged
b. 20~40% used
c. 40~80% used
d. 80~95% used
e. Completely used (flickers)
(The camcorder will turn off soon, change the
battery as soon as possible)
✤ Please refer to the table on page 25 for approximate continuous
recording times.
✤ The recording time is affected by environmental temperature and
conditions.
The recording time becomes very short in a cold environment.
The continuous recording times in the operating instructions are
measured using a fully charged battery pack at 77°F(25°C).
As the environmental temperature and conditions may differ when
you actually use the camcorder, the remaining battery time may
not be the same as the approximate continuous recording times
given in these instructions.
Tips for Battery Identification
A charge mark is provided on the battery pack to help
you remember whether it has been charged or not.
Two colors are provided (red and grey)-you may
choose which one indicates charged and which
indicates discharged.
2424
Indicador de carga de la batería
•
El indicador de carga de la batería muestra la cantidad de
energía que queda en ésta.
a
b
c
d
e
✤ Consulte la tabla de la página 25 para obtener información sobre
los tiempos aproximados de grabación continuada.
✤ El tiempo de grabación se ve afectado por las condiciones
ambientales y la temperaturay puede reducirse en un ambiente
frío. Los tiempos de grabación continuada que se dan en este
manual de instrucciones están medidos empleando una batería
completamente cargada a 25°C (77°F). Debido a que las
condiciones ambientales pueden ser distintas cuando utilice la
videocámara, el tiempo restante de carga de la batería puede
diferir de los tiempos aproximados que se dan en este manual.
a. Completamente cargada
b. 20% - 40% de uso
c. 40% - 80% de uso
d. 80% - 95% de uso
e. Completamente descargada (parpadea).
La videocámara se apagará muy pronto.
Reemplace la batería lo antes posible.
Consejos para la identificación de la batería
La batería dispone de una marca que permite
saber si ha sidorecargada o no.
Hay dos colores, rojo y negro.
Usted deberá decidir cuál indica que la batería
está completamente cargada y cuál que la
bateríaestá descargada.
 Loading...