

Samsung SCC-B5368, SCC-B5368S, SCC-B5366S, SCC-B5366 User Manual

SCC-B5366
SCC-B5368
SCC-B5366S
SCC-B5368S
DIGITAL COLOR DOME
CAMERA
user manual
ENG FRC
ENG
SPA-M
JAP
imagine the possibilities
Thank you for purchasing this Samsung product.
To receive more complete service,
please register your product at
www.samsungsecurity.com
POR-B

Safety information
A
.
.
.
.
0
.
.
.
.
.
.
.
.
.
CAUTION
RISK OF ELECTRIC SHOCK.
DO NOT OPEN
CAUTION: TO REDUCE THE RISK OF ELECTRIC SHOCK, DO NOT REMOVE COVER (OR BACK) NO USER SERVICEABLE PARTS
INSIDE. REFER SERVICING TO QUALIFIED SERVICE PERSONNEL.
This symbol indicates that dangerous voltage consisting a risk of electric shock is
present within this unit.
This exclamation point symbol is intended to alert the user to the presence of important
operating and maintenance (servicing) instructions in the literature accompanying the
appliance.
WARNING
To reduce the risk of fi re or electric shock, do not expose this appliance to rain or moisture.
•
To prevent injury, this apparatus must be securely attached to the fl oor/wall in accordance with the
•
installation instructions.
If this power supply is used at 240V ac, a suitable plug adapter should be used.
•
WARNING
Be sure to use only the standard adapter that is specifi ed in the specifi cation sheet.
1.
Using any other adapter could cause fi re, electrical shock, or damage to the product.
Incorrectly connecting the power supply or replacing battery may cause explosion, fi re, electric shock, or
2.
damage to the product.
Do not connect multiple cameras to a single adapter. Exceeding the capacity may cause abnormal heat
3.
generation or fi re.
Securely plug the power cord into the power receptacle. Insecure connection may cause fi re.
4.
When installing the camera, fasten it securely and fi rmly. The fall of camera may cause personal injury.
5.
2 – DIGITAL COLOR DOME CAMERA
6
7
8
9
1
C
1
2
3
4
5
6
7
8
9

Safety information
6.
Do not place conductive objects (e.g. screwdrivers, coins, metal parts, etc.) or containers fi lled with water on
top of the camera. Doing so may cause personal injury due to fi re, electric shock, or falling objects.
7.
Do not install the unit in humid, dusty, or sooty locations. Doing so may cause fi re or electric shock.
8.
If any unusual smells or smoke come from the unit, stop using the product. In such case, immediately
disconnect the power source and contact the service center. Continued use in such a condition may cause
t
fi re or electric shock.
9.
If this product fails to operate normally, contact the nearest service center. Never disassemble or modify
this product in any way. (SAMSUNG is not liable for problems caused by unauthorized modifi cations or
attempted repair.)
10.
When cleaning, do not spray water directly onto parts of the product. Doing so may cause fi re or electric shock.
CAUTION
1.
Do not drop objects on the product or apply strong blows to it. Keep away from a location subject to
excessive vibration or magnetic interference.
2.
Do not install in a location subject to high temperature (over 140°F), low temperature (below -14°F), or high
humidity. Doing so may cause fi re or electric shock.
If you want to relocate the already installed product, be sure to turn off the power and then move or reinstall
3.
it.
Remove the power plug from the outlet when there is a lighting storm. Neglecting to do so may cause fi re or
4.
damage to the product.
Keep out of direct sunlight and heat radiation sources. It may cause fi re.
5.
Install it in a place with good ventilation.
6.
Avoid aiming the camera directly towards extremely bright objects such as sun, as this may damage the
7.
CCD image sensor.
Apparatus shall not be exposed to dripping or splashing and no objects fi lled with liquids, such as vases,
8.
shall be placed on the apparatus.
The Mains plug is used as a disconnect device and shall stay readily operable at any time.
9.
English – 3
ENG

W
.
.
.
.
.
.
.
.
.
0
1
2
3
4
Safety information
FCC Statement
This device complies with part 15 of the FCC Rules. Operation is subject to the following two conditions :
1) This device may not cause harmful interference, and
2) This device must accept any interference received including interference that may cause undesired operation.
Caution
This equipment has been tested and found to comply with the limits for a Class A digital device, pursuant to part 15 of FCC Rules. These limits are designed to provide reasonable protection against harmful
interference when the equipment is operated in a commercial environment.
This equipment generates, uses, and can radiate radio frequency energy and, if not installed and used
in accordance with the instruction manual, may cause harmful interference to radio communications.
Operation of this equipment in a residential area is likely to cause harmful interference in which case the
user will be required to correct the interference at his own expense.
IC Compliance Notice
This Class A digital apparatus meets all requirements of the Canadian Interference.Causing Equipment Regulations of ICES-003.
4 – DIGITAL COLOR DOME CAMERA
1
2
3
4
5
6
7
8
9
1
1
1
1
1
Important Safety Instructions
n
e
WARNING
Read these instructions.
1.
Keep these instructions.
2.
Heed all warnings.
.
l
3.
Follow all instructions.
4.
Do not use this apparatus near water.
5.
Clean only with dry cloth.
6.
Do not block any ventilation openings. Install in accordance with the manufacturer’s instructions.
7.
Do not install near any heat sources such as radiators, heat registers, or other apparatus (including
8.
amplifi ers) that produce heat.
Do not defeat the safety purpose of the polarized or grounding-type plug. A polarized plug has two blades
9.
with one wider than the other. A grounding type plug has two blades and a third grounding prong. The wide
blade or the third prong is provided for your safety. If the provided plug does not fi t into your outlet, consult
an electrician for replacement of the obsolete outlet.
Protect the power cord from being walked on or pinched particularly at plugs, convenience receptacles, and
10.
the point where they exit from the apparatus.
Only use attachments/accessories specifi ed by the manufacturer.
11.
Use only with cart, stand, tripod, bracket, or table specifi ed by the manufacturer, or
12.
sold with the apparatus.
Unplug this apparatus when a card is used. Use caution when moving the cart/
13.
apparatus combination to avoid injury from tip-over.
Refer all servicing to qualifi ed service personnel. Servicing is required when the apparatus has been
14.
damaged in any way, such as powersupply cord or plug is damaged, liquid has been spilled or objects have
fallen into the apparatus, the apparatus has been exposed to rain or moisture, does not operate normally, or
has been dropped.
Apparatus shall not be exposed to dripping or splashing and no objects fi lled with
liquids, such as vases, shall be placed on the apparatus
English – 5
ENG

Contents
❖
❖
❖
❖
❖
❖
❖
❖
❖
Introduction
Features 7
Product & Accessories 8
Part Names and Functions 9
Installation
Before installation 12
Installation procedure 12
Adjusting the camera direction 14
F
How to use OSD Menu
Using Icons in the Menu 15
Main Menu 15
Profi le 16
Camera Setup 18
Intelligence 25
Privacy zone Setup
Other Set 29
System Information 30
Language 30
28
Specifi cations
Specifi cations 31
6 – DIGITAL COLOR DOME CAMERA

Introduction
FEATURES
High Resolution
❖
•
This camera has realized high resolution of 600 lines using the top-notch full digital image processing and
special algorithm technologies.
Intelligent Motion Detection & Tracking
❖
•
This is an intelligent function that automatically detects a motion of an object. You can set a virtual fence so it
displays an alert if an object passes / enters /exits the virtual fence or virtual area.
XDR (eXtended Dynamic Range)
❖
Actively controls the gamma compensation in the way it operates the ambient luminance contrast in a
•
certain pixel unit to determine the optimal visibility.
High Sensitivity
❖
It implements images of high sensitivity using the up-to-date SONY Super-HAD IT CCD..
•
Low Illumination
❖
It uses the digital signal technologies such as low illumination and Day/Night functions that make your camera
•
identify objects even in the worst environment.
Superior Backlight Adjustment
❖
When an object has a bright illumination or sunlight behind it, this camera automatically improves the
•
shaded object picture quality.
Digital Power Synchronization
❖
The full digital Line Lock function directly adjusts the vertical camera synchronization to enhance the
•
operationability and reliability of this camera.
Output Signal Setting
❖
You can set the following Video output signals: Image reversion (Horizontal, Vertical, or both), Privacy,
•
Horizontal/Vertical profi ling, and digital zooming.
OSD(On Screen Display) Menu
❖
OSD menu is provided to display the status of camera and to confi gure the functions interactively.
•
ENG
English – 7
Introduction
P
❖
Coaxial Cable Communication
❖
This is a remote control function that overlaps the coaxial cable (for a transfer of the video signal) with the
•
control signal. In installation or repair, this helps you control the communication controller (optional) without
additional cabling.
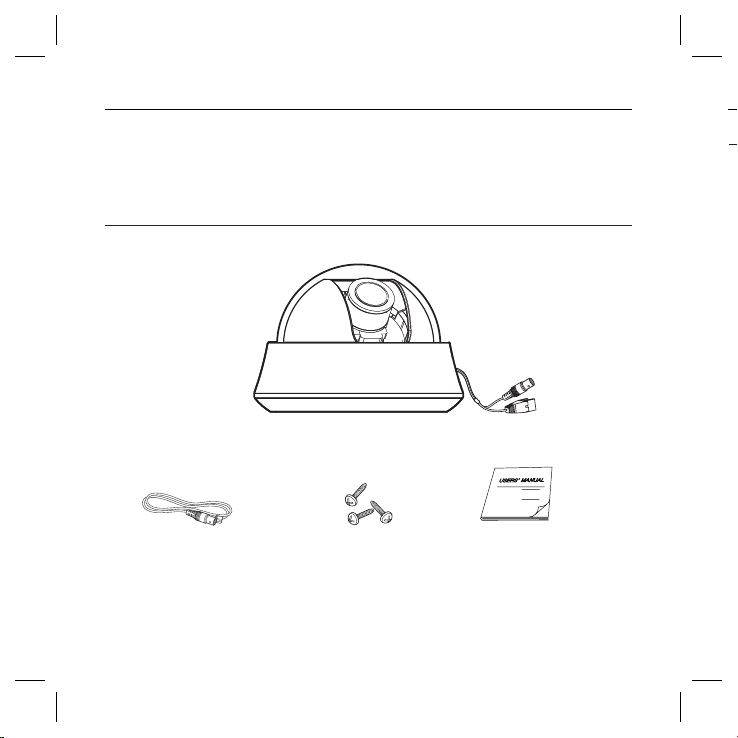
PRODUCT & ACCESSORIES
Product & Accessories❖
Main Product
•
Camera
Accessories
•
Test Monitor Cable
Note :
The test monitor cable is used to test the camera by connecting to a portable display. If you really want to connect the camera
–
to a monitoring display, use the BNC cable.
8 – DIGITAL COLOR DOME CAMERA
Tab screw
User’s Manual

Introduction
a
PART NAMES AND FUNCTIONS
Components of your camera❖
테스트 모니터 출력
Test monitor output
ENG
Lens
렌즈
Video connector
비디오 커넥터
Power connector
전원 커넥터
English – 9

Introduction
❖
No Name Brief description
1 Cover dome Covers the inner cover, lens, and main body to protect them.
2 Inner cover Covers the main body to protect it.
3 Wing locker
4 Main body Includes a lens, a switch board, a PCB board, screws, and such.
5 Mount bracket
6 Wiring Passage
7 Zoom lever Using this lever, the lens zoom can be adjusted and fi xed.
8 Focus lever The lens focus can be adjusted by rotating it left or right. Rotate it clockwise for fi xing.
9 Tilt fi xing screw Using this screw, the slope of the lens can be adjusted and fi xed.
10 4-way Switch This switch is used to set and adjust the settings of the camera’s functions.
11 Groove mark
12 Locker Used to open or close the Cover dome. To open the cover dome, press the locker.
13 Lock releaser
14 Cable Connect the Video connector to BNC cable and Power connector to power adapter.
10 – DIGITAL COLOR DOME CAMERA
Push a long thin screwdriver into its narrow spot and press it outward when you want to
remove the inner cover.
Used as a ceiling or wall fi xture. It is fi xed using three long tab screws provided in the
package.
This passage is designed to make arrangement of the cables if you drill a hole to extend the wiring.
To attach the Main body to the Mount bracket, align this groove mark on the Main body with
the wide groove in the CAMERA FRONT side on the Mount bracket.
Push it outward and rotate the main body in UNLOCK direction when you want to remove
the Mount bracket from the Main body or to remove the installed camera from the Mount
bracket.
•

Introduction
t
Setting switches❖
.
ENG
h
SETUP Switch
•
This switch is used to set the function or property. When this switch is pressed for at least 2 seconds, the
MAIN MENU appears.
ef
(Left/Right)
: By pressing this switch left or right, you can move left or right on the menu or change the
cd
(Up/Down) :
: When you press this switch in the menu, the selected function is confi rmed. To enter a submenu, press
this button..
displayed value.
By pressing this switch up or down, you can move up or down on the menu.
English – 11
 Loading...