

Page 1
imagine the possibilities
Thank you for purchasing a Samsung product.
To receive more complete service,
please register your product at
www.samsung.com/register
Vacuum Cleaner
user manual
✻ Before operating this unit, please read the instructions carefully.
✻ For indoor use only.
English
SC88P* series
This manual is made with 100% recycled paper.
Page 2
2_ safety information
safety information
SAFETY INFORMATION
• Before operating the appliance, please read this manual thoroughly and retain
it for your reference.
• Because the following operating instructions cover various models, the
characteristics of your vacuum cleaner may differ slightly from those
described in this manual.
CAUTION/WARNING SYMBOLS USED
WARNING
Indicates that a risk of death or serious injury exists.
CAUTION
Indicates that a risk of personal injury or material damage exists.
OTHER SYMBOLS USED
Represents something you must NOT do.
Represents something you must follow.
Indicates that you must disconnect the power plug from the socket.
This vacuum cleaner is designed for domestic household use only. Do not use this
vacuum cleaner to clear building waste or debris. Do not use this vacuum cleaner with
any of the filters removed as this could cause damage to the internal components and
void your warranty.
SAVE THESE INSTRUCTIONS
POLARIZED PLUG INSTRUCTIONS
- To reduce the risk of electric shock, this appliance has a polarized plug (one blade is wider than
the other). This plug will fit in a polarized outlet only one way. If the plug does not fit fully in the
outlet, reverse the plug. If it still does not fit, contact a qualified electrician to install the proper
outlet. Do not change the plug in any way.
WARNING
WARNING
WARNING
Page 3

safety information _3
IMPORTANT SAFETY INSTRUCTIONS
When using an electrical appliance, you should always follow these basic precautions:
READ ALL INSTRUCTIONS BEFORE USING YOUR CANISTER VACCUM
WARNING – To reduce the risk of fire, electric shock, or injury:
1. Do not leave the appliance unattended when it is plugged in. Unplug from the outlet
when not in use and before servicing.
2. Do not use outdoors or on wet surfaces.
3. Do not allow the vacuum to be used as a toy. Pay close attention when the vacuum is
used by or near children.
4. Use only as described in this manual. Use only manufacturer’s recommended
attachments.
5. Do not use with a damaged cord or plug. If the appliance is not working as it should,
has been dropped, damaged, left outdoors, or dropped into water, bring it to a service
center.
6. Do not pull or carry by the cord, use the cord as a handle, close a door on the cord, or
pull the cord around sharp edges or corners. Do not run appliance over the cord.
Keep the cord away from heated surfaces.
7. Do not unplug by pulling on the cord. To unplug, grasp the plug, not the cord.
8. Do not handle the plug or appliance with wet hands.
9. Do not put any object into openings. Do not use with any opening blocked.
Keep free of dust, lint, hair, and anything that may reduce air flow.
10. Keep hair, loose clothing, fingers, and all parts of your body away from openings and
moving parts.
11. Turn off all controls before unplugging.
12. Use extra care when cleaning on stairs.
13. Do not use to pick up flammable or combustible liquids, such as gasoline, or use in
areas where they may be present.
14. Do not pick up anything that is burning or smoking, such as cigarettes, matches, or
hot ashes.
15. Do not use without the dirt cup and/or filters in place.
16. Do not use the vacuum cleaner in an enclosed space filled with vapors given off by oil
base paint, paint thinner, some moth proofing substances, flammable dust, or other
explosive or toxic materials.
17. Do not pick up hard or sharp objects such as glass, nails, screws, coins, etc.
18. The hose contains electrical wires. Do not use when damaged, cut, or punctured.
19. Always turn off this appliance before connecting or disconnecting either the hose or
motorized nozzle.
20. Unplug before connecting the motorized nozzle.
21. Hold the plug when rewinding onto the cord reel. Do not allow the plug to whip when
rewinding.
safety information
Page 4

4_ contents
contents
ASSEMBLING THE VACUUM
05
05 Assembling the vacuum
OPERATING THE VACUUM
06
06 Power cord
06 On/Off switch
07 Power control
08 Power Brush
MAINTAINING THE TOOLS AND
FILTERS
09
09 Using accessories
10 Maintaining floor tools
11 Emptying the dust bin
12 Cleaning the dust pack
14 Cleaning the outlet filter
14 Changing the battery
TROUBLESHOOTING
15
Page 5

assembling the vacuum _5
01 ASSEMBLING THE VACUUM
assembling the vacuum
• Please do not push the button of
the dust bin handle when carrying
the machine. (See page 11.)
• When storing, park the oor nozzle.
OPTIONS
Page 6
6_ operating the vacuum
operating the vacuum
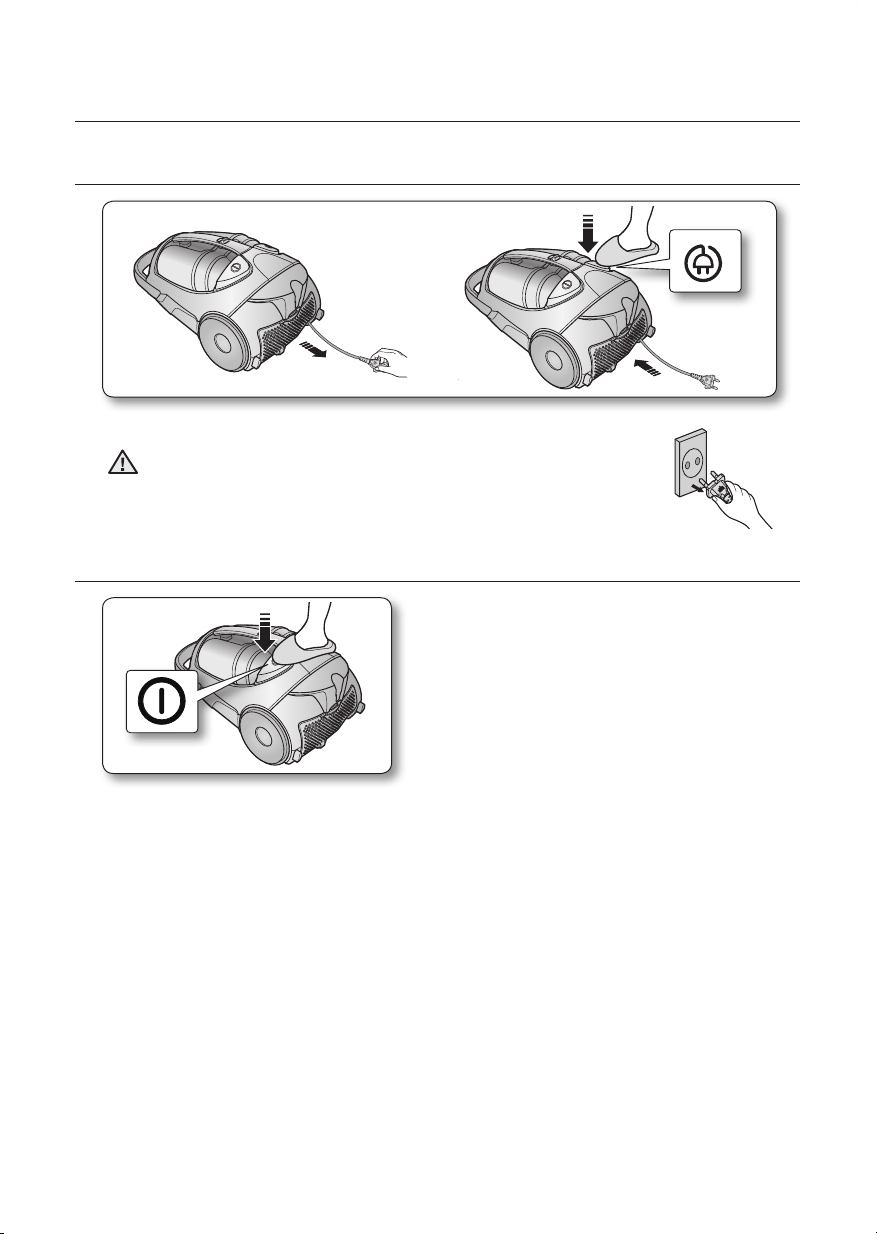
POWER CORD
ON/OFF SWITCH
• When removing the plug from the electrical outlet, grasp the
plug, not the cord.
CAUTION
Page 7
operating the vacuum _7
02 OPERATING THE VACUUM
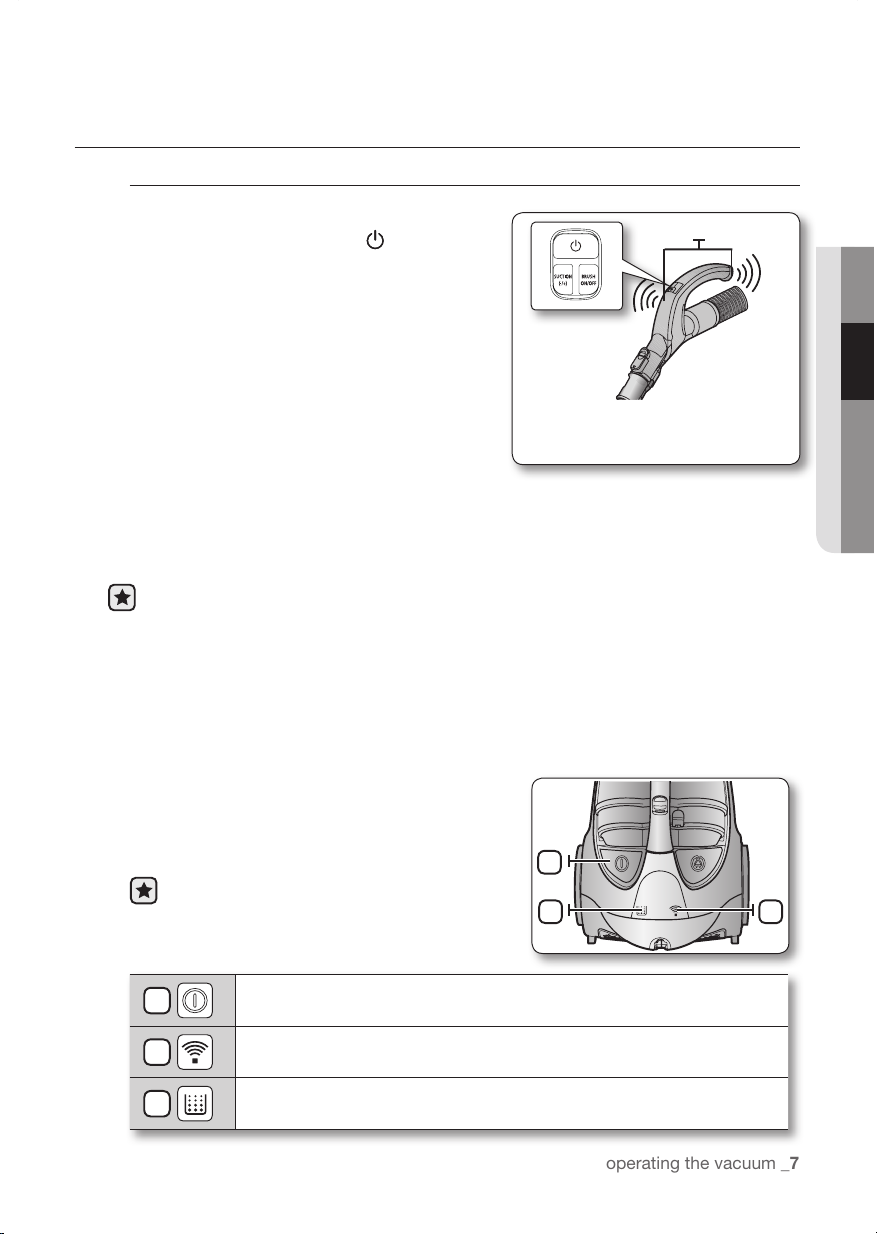
- BODY
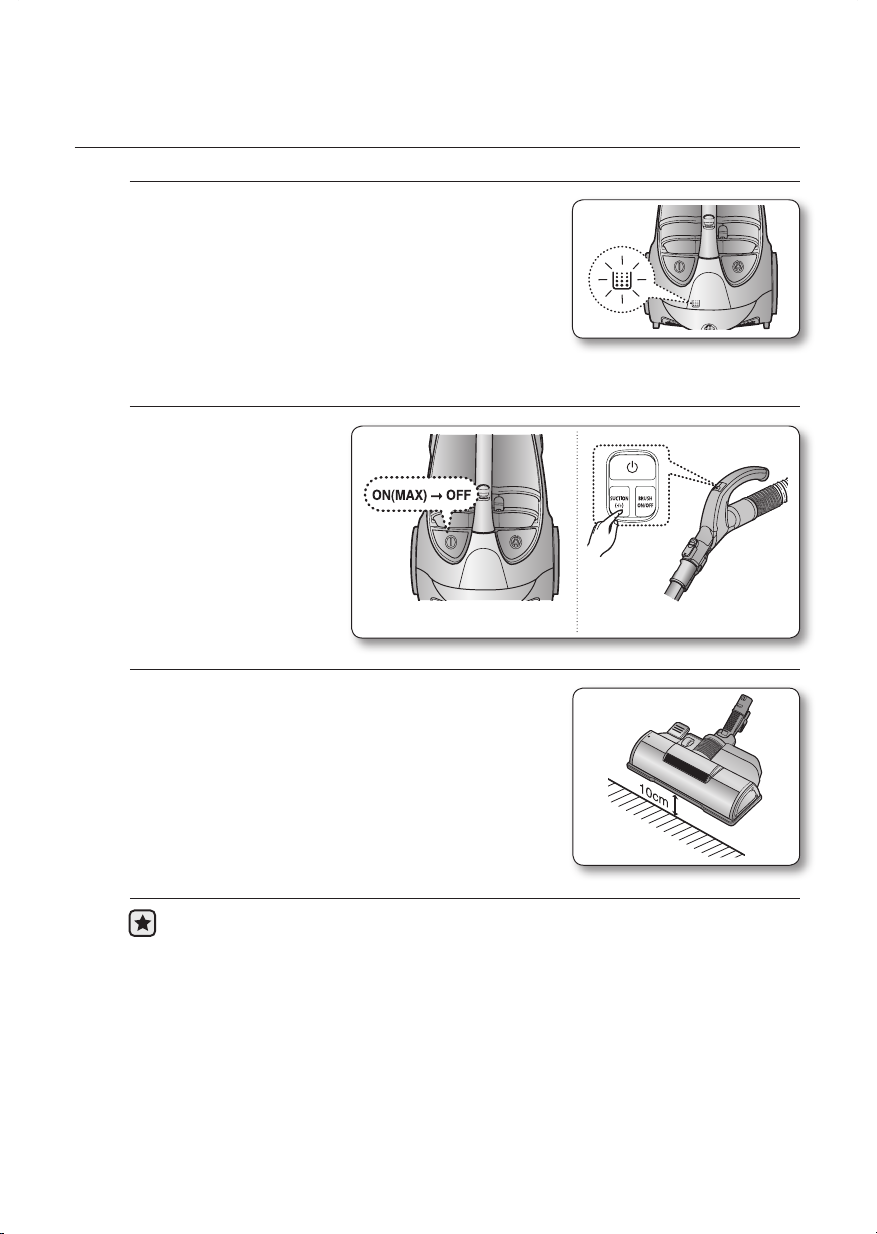
Press the power ON/OFF button repeatedly to start
and to stop the vacuum cleaner.
(OFF → ON → OFF)
If the remote handle control is not working, the
cleaner can be operated using the ON/OFF
button on the body of the machine.
1
The ON/OFF button operates the vacuum cleanner or stops it.
2
The RADIO FREQUENCY light indicates the part that receives the
RADIO FREQUENCY signal from the handle control.
3
The filter light is illuminated when the dust pack requires checking or
emptying. An audio signal will also sound.
1
3 2
POWER CONTROL
1. Vacuum cleaner ON/OFF( )
Press the ON/OFF button to operate the
vacuum cleaner. Press again to stop the
vacuum cleaner.
2. Vaccum cleaner suction(-/+)
Press the SUCTION (+/) button to increase
or decrease the suction power. Each time
you press the button, you gradually increase
the suction power. After the suction power
reaches its maximum, the next time you press
the button, you return the suction power to its
minimum.
3. BRUSH ON/OFF
Press the BRUSH ON/OFF button to operate the Power Brush. Press again to stop the
Power Brush.
Don’t cover the handle transmitter when you use a handle control button.
FCC NOTICE
This device complies with part 15 of the FCC Rules. Operation is subject to the
following two conditions:
1. This device may not cause harmful interference, and
2. This device must accept any interference received, including interference that may
cause undesired operation.
RADIO FREQUENCY REMOTE-CONTROL
- HOSE
Handle Control
The cleaner is controlled by radio
frequency signals.
transmitter
Page 8
8_ operating the vacuum
VACUUMING WITH THE POWER BRUSH
OVERLOAD PROTECTOR
1. Attaching the Power Brush
The hose must be plugged into the canister and the
power brush must be plugged into the hose and
extension wand.
2. Vacuuming
• For best results, move the power brush slowly using
short, overlapping strokes.
• For heavily soiled areas, repeat strokes in several
directions.
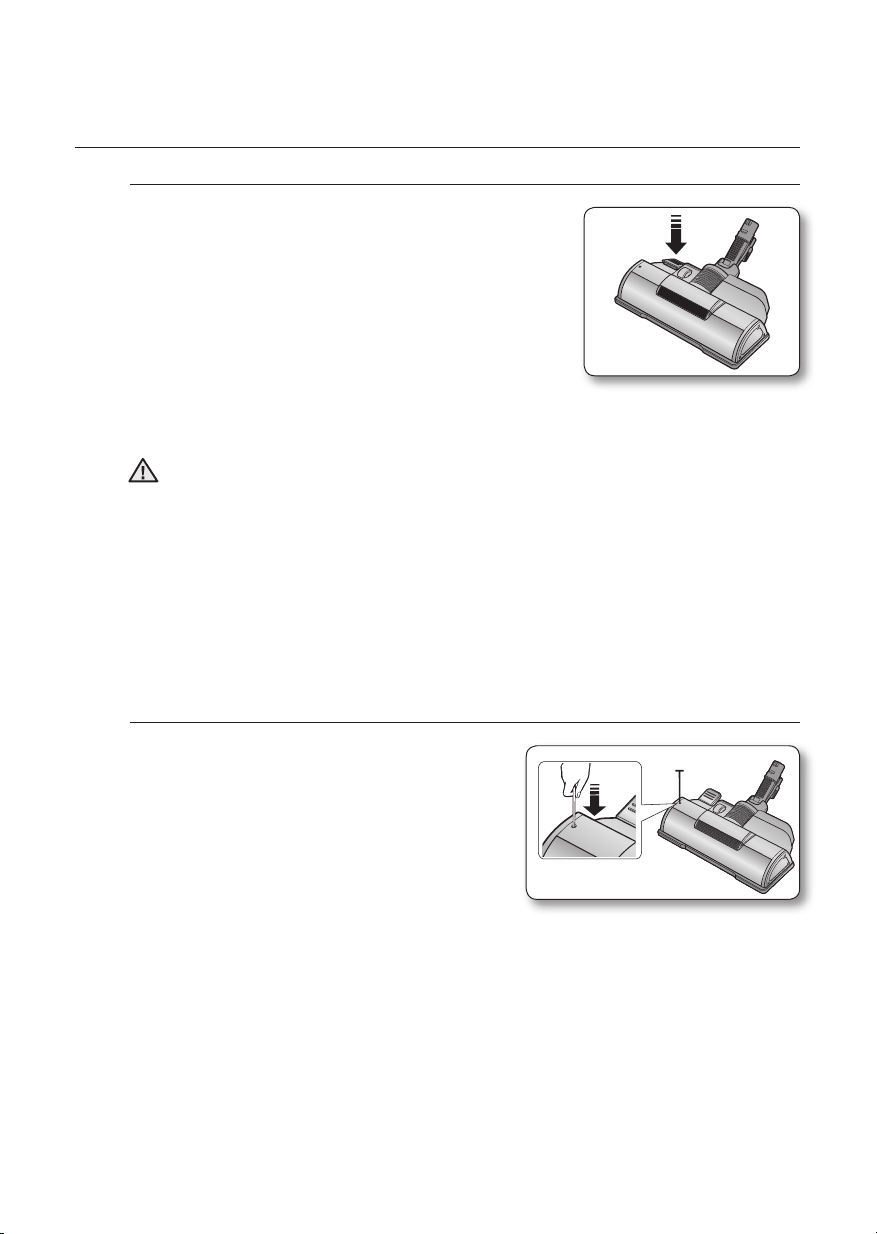
• Push the height adjustment button to match the surface being cleaned.
• Press the height adjustment button at the bottom of the wand until it clicks.
Do not invert the power brush while it is running.
3. Checking the Performance of the Power Brush
You can check whether the power brush is operating correctly by lifting up the
extension tube slightly to view the back of the brush.
The Power Brush will not operate when it is jammed or the unit is turned off.
If the Power Brush is jammed, unplug the power cord from the electrical outlet.
Turn the power brush over and remove the jammed object.
Turn the power brush back to the vacuuming position and resume vacuuming.
The overload protector shuts off the brush motor if
the floor brush becomes obstructed, the floor brush
will stop, but the suction motor will continue to run.
To reset the overload protector, turn the vacuum off
and unplug it. Clear the obstruction from the floor
brush area. Use a pen tip to press down the reset
switch. Turn the vacuum on and continue cleaning.
CAUTION
Reset S/W
POWER BRUSH
Page 9

maintaining the tools and filters _9
03
MAINTAINING THE TOOLS AND FILTERS
maintaining the tools and filters
USING ACCESSORIES
PIPE
• Adjust the length of the telescopic pipe by sliding
the length control button located in the center of the
telescopic pipe back and forth.
• To check for blockages, separate the telescopic pipe
and adjust to shorten. This allows for easier removal of
waste clogging the tube.
ACCESSORIES (OPTIONAL)
• Push the accessory onto the end of
the hose handle.
• Pull out the dusting brush to use the
crevice tool.
Page 10

10_ maintaining the tools and filters
•
Vacuums dust in a
wide area at once.
•
Remove waste matter completely from
the inlet if the inlet is blocked.
PARQUET BRUSH (OPTIONAL)
REPLACING the Drive Belt
1. Make sure that the vacuum is unplugged.
2. With the rotating floor brush removed from the vacuum
cleaner, grasp the old drive belt and remove it from the
motor pulley. Discard the old drive belt.
3. Place the new drive belt over the motor pulley and stretch
the other end over the rotating floor brush in the space
between the bristles.
4. Place the ends of the rotating floor brush down into the
slots on the sides as shown.
5. Turn the rotating floor brush by hand several times in the
direction of the motor pulley. If properly installed, the drive
belt will center itself on the rotating brush crown.
6. Reposition the brush cover and screws. Tighten the screws securely.
CHECKING the Rotating Floor Brush and Drive Belt
You should check your vacuum cleaner’s rotating floor brush and drive belt regularly for
wear or damage. You should also clean strings, hair, and carpet fibers off the brush and
brush ends. These can wrap around the brush and hamper its ability to effectively clean
your carpet. Also remove any debris that has accumulated under the brush cover.
1. Unplug the vacuum the electrical outlet.
2. Place the handle in low position and turn the vacuum
cleaner over so the bottom side is up.
3. Remove the six screws (at arrows, right) with a screwdriver.
4. Remove the brush cover from the floor brush.
5. Grasp the rotating floor brush at both ends and lift.
6. Clean string, hair and other debris off the rotating floor
brush, paying particular attention to brush ends.
7. Clean string, hair and other debris off the motor pulley and
drive belt areas.
8. Check the drive belt carefully for wear, cuts or stressed
areas.
9. Check the air passageway for obstructions. Remove
debris from this area.
The rotating floor brush could cause the fringe of a rug
to become tangled within the vacuum.
Use caution and turn off the floor brush when
vacuuming throw rugs with fringe.
Brush
Cover
CAUTION
MAINTAINING FLOOR TOOLS
Page 11
maintaining the tools and filters _11
03
MAINTAINING THE TOOLS AND FILTERS
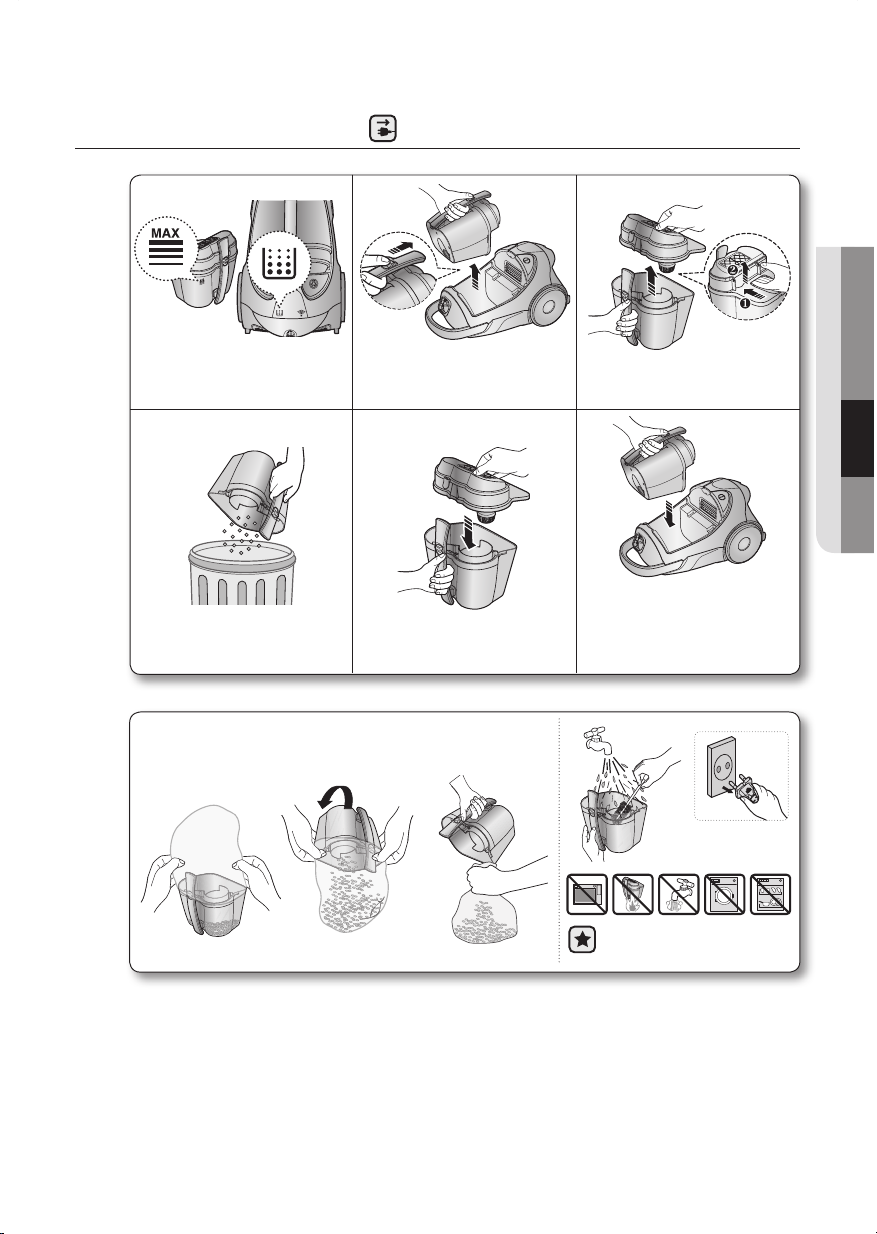
EMPTYING THE DUST BIN
Once dust reaches the dust
full mark, empty the dust bin.
Take the dust bin out by
pushing the dust bin button,
and then lifting the dust bin out.
Separate the dust bin cover.
Throw the dust in the bin
away.
Close the dust bin cover.
Before use, push the dust
bin into the main body of
the vacuum cleaner until
you hear a “click” sound.
4 5 6
1 2 3
Rinse the dust bin with
cold water only.
- To empty into a plastic bag:
(recommended for asthma/allergy sufferers)
Page 12
12_ maintaining the tools and filters
If suction is noticeably and continuously reduced or the vacuum cleaner overheats
abnormally, please clean the dust pack.
CLEANING THE DUST PACK
WHEN TO CLEAN THE DUST PACK
TO CONFIRM THE DUST PACK NEEDS CLEANING
• The lamp will turn red when suction is reduced.
If the light comes on, please clean the dust pack.
• If the filter check indicator turns red with the inlet held
10cm (4 inches) above a flat floor, clean the dust pack.
• Turn the vacuum power
to ‘MAX’.
Handle Control
Body Control
Page 13
maintaining the tools and filters _13
03
MAINTAINING THE TOOLS AND FILTERS
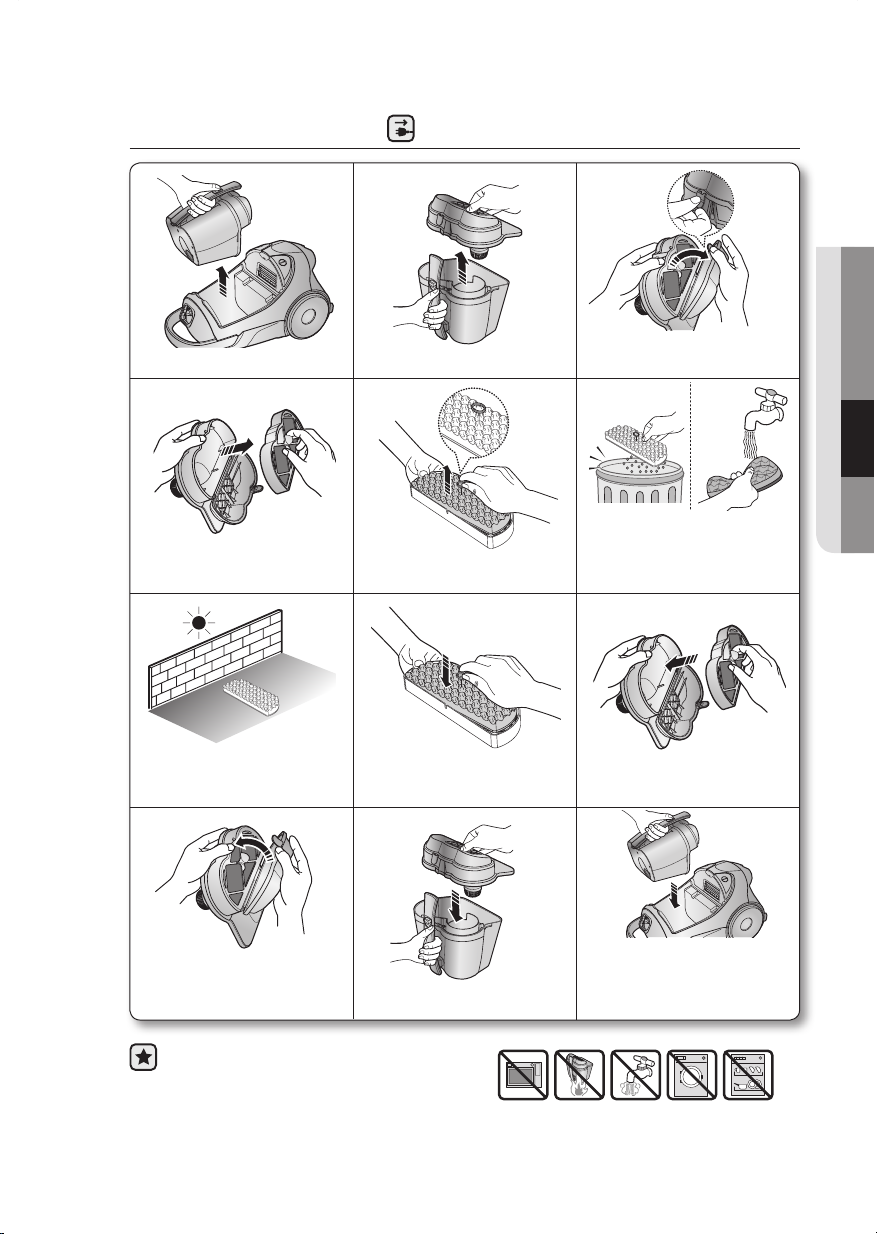
Make sure the filter is completely dry
before putting it back into the vacuum
cleaner. Allow 12 hours for it to dry.
CLEANING THE DUST PACK
1
4
7
10
2
5
8
11 12
3
Remove the dust bin. Separate the dust bin cover.
Before reassembly, align the
dust pack cover and dust
pack correctly.
Close the dust bin cover.
Before use, push the dust
bin into the main body of
the vacuum cleaner until
you hear a “click” sound.
Remove the fixed frame of
the dust pack cover.
Separate the dust pack
from the dust bin cover.
Let the sponge and filter dry
in the shade for more than 12
hours.
Put the sponge and filter into
the dust pack.
Remove the sponge and filter
from the dust pack.
Shake the sponge and filter over
a garbage can to remove loose
dust, then wash the sponge and
filter of the dust pack with water.
Put the assembled dust pack
into the cover.
6
9
Page 14
14_ maintaining the tools and filters
CHANGING THE BATTERY
1. If the vacuum cleaner does not work, replace the batteries in the handle.
If the problem persists, please contact an authorized dealer.
2. Use 2 AAA batteries.
1. Never disassemble or recharge the batteries.
2. Never heat up the batteries or throw them into a fire.
3. Do not reverse the (+), (-) poles.
4. Dispose of the batteries property.
WARNING
BATTERY TYPE : AAA Size
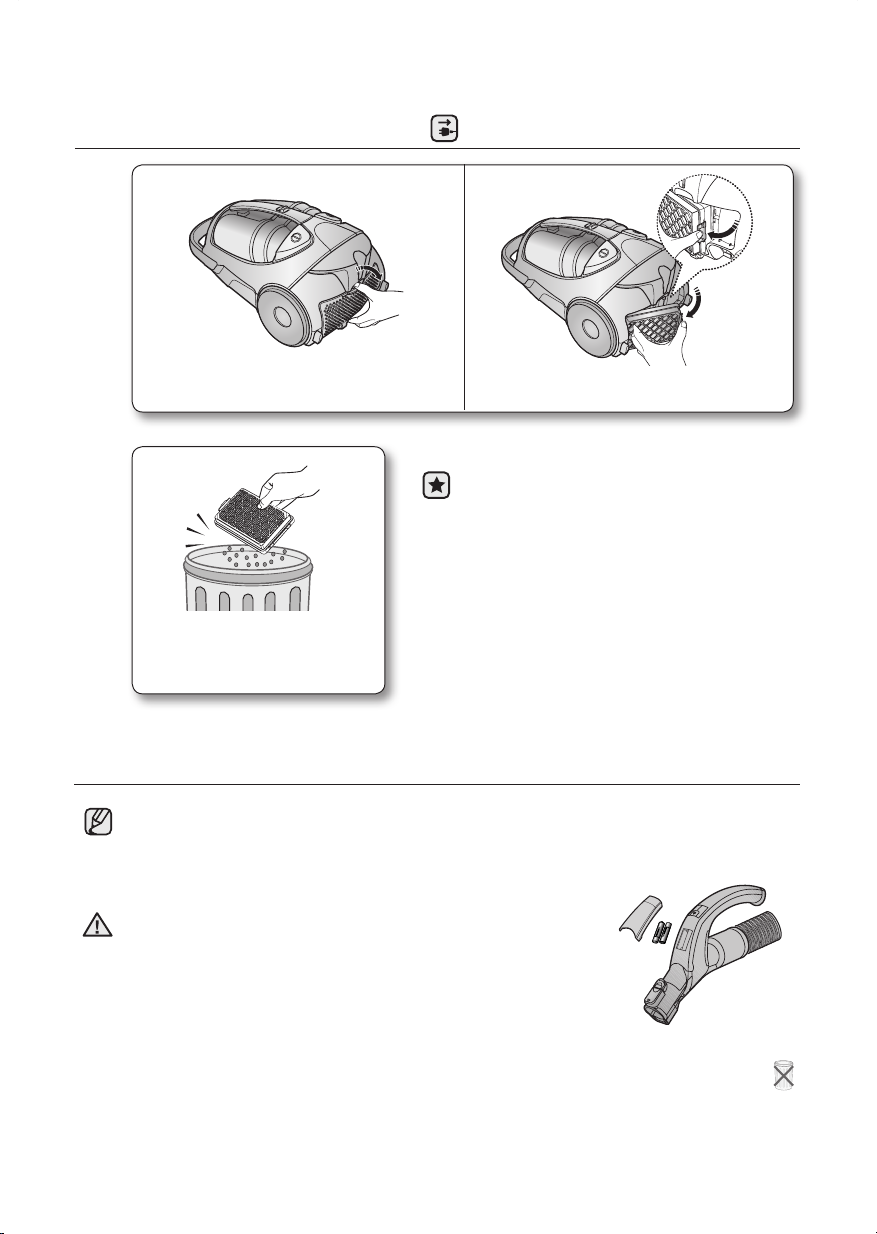
CLEANING THE OUTLET FILTER
1 2
Press the fixed frame part at the back of
the main body to remove.
Remove the dust bin and HEPA Filter as
shown.
Clean the HEPA filter. If cleaning
the filter does not resolve the
problem, replace the filter.
• When suction is noticeably and
continuously reduced or the vacuum
cleaner overheats abnormally, please clean
the outlet filter.
Note : Do not wash the HEPA filter. If
cleaning does not resolve the problem,
please replace the blocked filter.
• Replacement lters are available at your
local Samsung distributor.
Page 15

troubleshooting _15
04 TROUBLESHOOTING
troubleshooting
PROBLEM SOLUTION
Motor does not start
• Check the cable, plug, and socket.
• Let cool.
Suction force is gradually
decreasing
• Check for a blockage and remove.
Cord does not rewind
fully
• Pull the cord out 2-3m (6.5 - 9.75 ft.) and push the cord
rewind button.
Vacuum cleaner does not
pick up dirt
• Check the hose and replace if necessary.
Low or decreasing
suction
• Please check the lters and, if needed, clean as illustrated
in the instructions. If the lters are clogged and cannot be
cleaned, replace with new ones.
Body overheating
• Please check the lters. If needed, clean as illustrated in the
instructions.
Static electricity
discharge
• Please decrease power suction.
• This can also occur when the air in the room is very dry.
Please ventilate the room to increase the humidity.
Page 16

Page 17

imaginez les possibilités
Merci d’avoir choisi un produit Samsung.
Afin de bénéficier d’un service plus complet,
veuillez enregistrer votre produit à l’adresse
www.samsung.com/register
Aspirateur
Guide d'utilisation
✻ Avant d'utiliser cet appareil, veuillez lire attentivement les instructions.
✻ Utilisation intérieure uniquement.
Français
Série SC88P*
Ce manuel est en papier recyclé à 100 %.
Page 18

2_ Renseignements relatifs à la sécurité
Renseignements relatifs à la sécurité
RENSEIGNEMENTS RELATIFS À LA SÉCURITÉ
• Avant d’utiliser cet appareil, veuillez lire attentivement ce guide et le conserver
pour toute référence ultérieure.
• Les instructions d’utilisation suivantes concernent plusieurs modèles; il est
donc possible que les caractéristiques de votre aspirateur soient légèrement
différentes de celles spécifiées dans ce guide.
SYMBOLES AVERTISSEMENT/ATTENTION UTILISÉS
AVERTISSEMENT
Indique un danger de mort ou de blessure grave.
ATTENTION
Indique un risque de blessure ou de dommage matériel.
AUTRES SYMBOLES UTILISÉS
Indique une action INTERDITE.
Indique une action que vous devez effectuer.
Indique que vous devez débrancher la fiche d'alimentation de la prise.
Cet aspirateur est destiné à une utilisation domestique uniquement. Ne l’utilisez pas
pour le nettoyage de saletés ou de débris de construction. N’utilisez pas cet aspirateur
avec un de ses filtres retiré car cela risque d’endommager les composants internes et
d’annuler la garantie.
CONSERVEZ CE GUIDE D’UTILISATION
Cet aspirateur est conçu pour une utilisation domestique uniquement.
INSTRUCTIONS RELATIVE À LA FICHE POLARISÉE
- Pour limiter les risques d’électrocution, cet appareil est doté d’une fiche polarisée (une broche est
plus large que l’autre). Cette fiche ne peut s’insérer dans la prise murale polarisée que dans un
seul sens. Si la che ne s’enfonce pas entièrement dans la prise murale, retournez-la. Si elle ne
s’enfonce toujours pas correctement, contactez un électricien qualifié pour faire installer une prise
murale adéquate. Ne remplacez et ne modifiez jamais la fiche.
AVERTISSEMENT
AVERTISSEMENT
AVERTISSEMENT
Page 19

Renseignements relatifs à la sécurité _3
CONSIGNES DE SÉCURITÉ IMPORTANTES
Lors de l’utilisation d’un appareil électrique, suivez toujours ces précautions de base :
LISEZ TOUTES LES INSTRUCTIONS AVANT D’UTILISER VOTRE ASPIRATEUR-TRAÎNEAU
AVERTISSEMENT – Pour limiter tout risque d’incendie,
d’électrocution ou de blessure :
1. Ne laissez pas l’appareil sans surveillance lorsqu’il est branché. Débranchez l’appareil
de la prise lorsqu’il n’est pas utilisé ou avant toute opération d’entretien.
2. N’utilisez pas l’appareil à l’extérieur ni sur des surfaces mouillées.
3. Cet appareil ne doit pas être utilisé comme un jouet. En cas d’utilisation par un enfant
ou à proximité d’un enfant, soyez extrêmement vigilant.
4. Utilisez cet appareil uniquement de la façon indiquée dans le présent guide.
N’utilisez que des accessoires recommandés par le fabricant.
5. N’utilisez jamais de cordon ou de fiche endommagé(e). Si l’appareil fonctionne
anormalement, a reçu un choc, a été endommagé, laissé à l’extérieur ou plongé dans
l’eau, retournez-le au centre de service.
6. Ne tirez pas sur le cordon; ne soulevez pas l’appareil par le cordon; n’utilisez pas le
cordon comme poignée; ne fermez pas de porte sur le cordon; ne tirez pas le cordon
sur des rebords ou des angles coupants. Ne passez pas l’appareil sur le cordon.
Maintenez le cordon éloigné des surfaces chauffées.
7. Ne débranchez pas l’appareil en tirant sur le cordon. Pour débrancher l’appareil,
saisissez la fiche, et non le cordon.
8. Ne manipulez pas la fiche ou l’appareil si vous avez les mains mouillées.
9.
N’insérez aucun objet dans les ouvertures. N’utilisez pas l’appareil si l’une des ouvertures
est obstruée. Nettoyez régulièrement les ouvertures pour éliminer toute trace de poussière,
peluches, cheveux, ou toute autre chose risquant d’empêcher le passage de l’air.
10. Maintenez les cheveux, les vêtements amples, les doigts et toute autre partie du
corps loin des ouvertures et des pièces en mouvement.
11. Éteignez toutes les commandes avant de débrancher l’appareil.
12. Soyez très prudent lorsque vous nettoyez des escaliers.
13. N’aspirez jamais de liquides inflammables ou combustibles, tels que de l’essence, et
n’utilisez jamais l’appareil si de tels liquides risquent d’être présents.
14. N’aspirez jamais d’objets en train de brûler ou de fumer, tels que des cigarettes, des
allumettes ou des cendres chaudes.
15.
N’utilisez pas l’aspirateur si le bac à poussière et/ou les ltres ne sont pas à leur place.
16. N’utilisez pas l’aspirateur dans un espace clos rempli de vapeurs de peinture à l’huile,
de diluant, de substances antimites, de poussières inammables ou d’autres vapeurs
explosives ou toxiques.
17. N’aspirez jamais d’objets durs ou tranchants tels que des morceaux de verre, des
clous, des vis, des pièces de monnaie, etc.
18. Le tuyau contient des câbles électriques. Ne l’utilisez pas s’il est endommagé, coupé
ou percé. Évitez d’aspirer des objets coupants.
19. Mettez toujours l’appareil hors tension avant de connecter ou de déconnecter le
tuyau ou le suceur motorisé.
20. Débranchez l’appareil avant de connecter le suceur motorisé.
21. Tenez la fiche pendant l’enroulement du cordon. Ne laissez pas la fiche s’agiter
pendant l’enroulement du cordon.
Renseignements relatifs à la sécurité
Page 20

4_ Table des matières
Table des matières
DÉPANNAGE
15
ENTRETIEN DES ACCESSOIRES ET
DES FILTRES
09
09 Utilisation d’accessoires
10 Entretien des accessoires pour planchers
11 Vidage du réservoir à poussière
12 Nettoyage du groupe filtrant
14 Nettoyage du filtre de sortie
14 Remplacement des piles
UTILISATION DE L’ASPIRATEUR
06
06 Cordon d’alimentation
06 Bouton de mise sous/hors tension
07 Réglage de la puissance
08 Brosse électrique
ASSEMBLAGE DE L’ASPIRATEUR
05
05 Assemblage de l’aspirateur
Page 21

Assemblage de l’aspirateur _5
01 ASSEMBLAGE DE L’ASPIRATEUR
Assemblage de l’aspirateur
• N’appuyez pas sur le bouton de la
poignée du réservoir à poussière
lorsque vous transportez l’appareil.
• Avant d’entreposer l’aspirateur, xez le
suceur en position de rangement.
OPTION
Page 22

6_ Utilisation de l’aspirateur
Utilisation de l’aspirateur
CORDON D'ALIMENTATION
BOUTON DE MISE SOUS/HORS TENSION
• Lorsque vous débranchez la che d’une prise électrique,
saisissez la fiche, et non le cordon.
ATTENTION
Page 23

Utilisation de l’aspirateur _7
02 UTILISATION DE L'ASPIRATEUR
- CORPS DE L'ASPIRATEUR
Appuyez sur le bouton MARCHE/ARRÊT pour
démarrer et arrêter l’aspirateur.
(ARRÊT → MARCHE → ARRÊT)
Si la télécommande sur la poignée ne fonctionne
pas, vous pouvez utiliser le bouton MARCHE/
ARRÊT situé sur le corps de l'appareil.
1
Le bouton MARCHE/ARRÊT permet la mise en marche et la mise en
arrêt de l’aspirateur.
2
Le témoin RADIOÉLECTRIQUE indique le composant qui reçoit le
signal RADIOÉLECTRIQUE de la commande sur la poignée.
3
Le témoin du filtre s'allume lorsque le groupe filtrant doit être vérifié ou
vidé. Un signal sonore est également émis.
1
3 2
RÉGLAGE DE LA PUISSANCE
1. MARCHE/ARRÊT de l’aspirateur ( )
Appuyez une fois sur le bouton MARCHE/ARRÊT
pour mettre en marche l’aspirateur. Appuyez
dessus une deuxième fois pour l’arrêter.
2.
Puissance d’aspiration de l’aspirateur (-/+)
Appuyez sur le bouton SUCTION (-/+)
(ASPIRATION (-/+) pour utiliser l’aspirateur avec
une puissance d’aspiration haute/basse. Chaque
fois que le bouton est actionné, la puissance
d’aspiration augmente progressivement. Une fois
que l’aspirateur atteint sa puissance d’aspiration
maximale, il revient à sa puissance d’aspiration minimale lorsque vous appuyez sur le
bouton.
3. MARCHE/ARRÊT DE LA BROSSE
Appuyez une fois sur le bouton BRUSH ON/OFF (MARCHE/ARRÊT DE LA BROSSE) pour
mettre en marche la brosse électrique. Appuyez dessus une deuxième fois pour l’arrêter.
Ne placez pas d’obstacle devant l’émetteur lorsque vous utilisez un bouton de commande
sur la poignée.
AVIS RELATIF À LA FCC
Cet appareil est conforme aux exigences de la partie 15 du règlement de la FCC. Son
utilisation est assujettie aux deux conditions suivantes :
1. Cet appareil ne doit pas causer d’interférences nuisibles, et
2. il doit absorber tout type d’interférence, y compris les interférences pouvant causer
un fonctionnement non désiré.
TÉLÉCOMMANDE PAR SIGNAUX RADIOÉLECTRIQUES
- TUYAU
Commande sur la poignée
L'aspirateur est commandé par signaux
radioélectriques.
émetteur
Page 24

8_ Utilisation de l’aspirateur
ASPIRATION AVEC LA BROSSE ÉLECTRIQUE
PROTECTEUR CONTRE LES SURCHARGES
1. Fixation de la brosse électrique
Le tuyau doit être raccordé au traîneau, et la
brosse électrique doit être fixée au tuyau et au tube
télescopique.
2. Aspiration
• Pour de meilleurs résultats, déplacez la brosse
électrique lentement sur des distances courtes et se
chevauchant.
• Dans des zones très sales, passez l’aspirateur dans plusieurs sens.
• Placez le bouton de réglage de la hauteur de manière à sélectionner le réglage
correspondant à la surface nettoyée.
• Appuyez sur le bouton en bas jusqu’à ce qu’un déclic se fasse entendre.
Ne retournez pas la brosse électrique pendant son fonctionnement.
3. Vérification du rendement de la brosse électrique
Vous pouvez vérifier si la brosse électrique fonctionne correctement en soulevant
légèrement le tube d’extension pour voir la partie arrière de la brosse.
La brosse électrique ne fonctionne pas lorsqu’elle est bouchée ou lorsque l’appareil
est hors tension.
Si la brosse électrique est bouchée, débranchez le cordon d’alimentation de la prise
électrique.
Retournez la brosse électrique et retirez l’objet coincé.
Remettez la brosse électrique en place et reprenez l’aspiration.
Le protecteur contre les surcharges coupe le
moteur de la brosse pour planchers lorsque cette
dernière est bouchée. La brosse pour planchers
s’arrête, mais le moteur d’aspiration continue de
fonctionner. Pour réinitialiser le protecteur contre
les surcharges, mettez l’aspirateur hors tension
et débranchez-le. Retirez l’objet provoquant
l’obstruction de la brosse pour planchers. Utilisez la
pointe d’un stylo pour appuyer sur le commutateur
de réinitialisation. Mettez l’aspirateur en marche et continuez le nettoyage.
ATTENTION
Commutateur de
réinitialisation
BROSSE ÉLECTRIQUE
Page 25

Entretien des accessoires et des filtres _9
03
ENTRETIEN DES ACCESSOIRES ET DES FILTRES
Entretien des accessoires et des filtres
UTILISATION D'ACCESSOIRES
TUBE
• Réglez la longueur du tube télescopique en faisant
glisser vers l’avant ou vers l’arrière le bouton de réglage
de la longueur situé au centre du tube.
• En cas d'obstruction, retirez le tube télescopique et
réglez-le à la longueur minimum. Cela permet d'éliminer
plus facilement tout objet obstruant le tube.
ACCESSOIRES (EN OPTION)
• Enfoncez l’accessoire dans
l’extrémité de la poignée du tube.
• Retirez la brosse à épousseter pour
utiliser le suceur plat.
Page 26

10_ Entretien des accessoires et des filtres
•
Éliminez la poussière d’une
large zone
d’une seule fois.
•
Retirez tous les débris de l’orifice
d’aspiration s’il est bouché.
BROSSE POUR PARQUET (EN OPTION)
VÉRIFICATION de la courroie d’entraînement
1. Assurez-vous que l’aspirateur est débranché.
2.
Retirez la brosse rotative pour planchers de l’aspirateur,
saisissez la courroie d’entraînement usée, puis retirez-la de
la poulie du moteur et jetez-la.
3. Placez la nouvelle courroie d’entraînement sur la poulie du
moteur et étirez l’autre extrémité sur l’espace situé entre
les poils de la brosse rotative pour planchers.
4. Insérez les extrémités de la brosse rotative pour planchers
dans les fentes situées sur les côtés, tel qu’il est illustré.
5. Tournez la brosse rotative pour planchers manuellement
plusieurs fois dans le sens de la poulie du moteur.
Lorsqu’elle est correctement installée, la courroie d’entraînement se centre d’ellemême sur la crête de la brosse rotative pour planchers.
6. Remettez en place le couvercle de la brosse et les vis. Serrez bien les vis.
VÉRIFICATION de la brosse rotative pour planchers et de la courroie d’entraînement
Vous devez vérier régulièrement si la brosse rotative pour planchers et la courroie
d’entraînement de votre aspirateur sont endommagées ou usées. En outre, vous devez retirer
les ficelles, les cheveux et les fibres de moquette de la brosse et de ses extrémités. Ces
éléments pourraient s’enrouler autour de la brosse et réduire sa capacité à nettoyer efficacement
votre tapis. Retirez également tous les débris accumulés sous le couvercle de la brosse.
1. Débranchez l’aspirateur de la prise électrique.
2.
Placez la poignée en position inférieure et retournez l’aspirateur
pour que la partie inférieure soit orientée vers le haut.
3. À l’aide d’un tournevis, retirez les six vis, tel qu’il est illustré.
4. Retirez le couvercle de la brosse pour planchers.
5.
Saisissez la brosse rotative pour planchers aux deux extrémités
et soulevez-la.
6. Retirez les ficelles, les cheveux et les autres débris de
la brosse rotative et soyez particulièrement attentif aux
extrémités de la brosse.
7.
Retirez les ficelles, les cheveux et les autres débris des zones
de la poulie du moteur et de la courroie d’entraînement.
8. Vérifiez si la courroie d’entraînement est usée, coupée ou
endommagée.
9. Vérifiez si le passage d’air est obstrué. Retirez les débris
de cette zone.
La brosse rotative pour planchers pourrait happer une
frange de carpette à l’intérieur de l’aspirateur.
Soyez prudent et désactivez la brosse pour planchers
lorsque vous nettoyer des carpettes avec des franges.
Couvercle
de la brosse
ATTENTION
ENTRETIEN DES ACCESSOIRES POUR PLANCHERS
Page 27

Entretien des accessoires et des filtres _11
03
ENTRETIEN DES ACCESSOIRES ET DES FILTRES
VIDAGE DU RÉSERVOIR À POUSSIÈRE
Lorsque le réservoir à
poussière est plein (limite
atteinte), videz-le.
Sortez le réservoir à poussière
en appuyant sur le bouton.
Retirez le couvercle du
réservoir.
Videz la poussière dans la
poubelle.
Refermez le couvercle du
réservoir.
Avant de recommencer à utiliser
l’appareil, poussez le réservoir à
poussière à l’intérieur du corps
de l’aspirateur jusqu’à ce qu’un
déclic se fasse entendre.
4 5 6
1 2 3
Vous ne pouvez rincer le réservoir
à poussière qu’à l’eau froide.
- Vidage dans un sac en plastique :
( recommandé pour les personnes souffrant d’asthme
ou d’allergies)
Page 28

12_ Entretien des accessoires et des filtres
Si la puissance d’aspiration est nettement et continuellement réduite ou si l’aspirateur
surchauffe anormalement, nettoyez le groupe filtrant.
NETTOYAGE DU GROUPE FILTRANT
QUAND NETTOYER LE GROUPE FILTRANT
POUR VÉRIFIER SI LE GROUPE FILTRANT DOIT ÊTRE NETTOYÉ
• Le témoin devient rouge lorsque l’aspiration est
réduite.
Si le témoin s’allume, nettoyez le groupe filtrant.
• Si l’indicateur de vérification du filtre devient rouge
lorsque la brosse est maintenue à 10 cm (4 po) du sol,
nettoyez le groupe filtrant.
• Réglez la puissance de
l'aspirateur à « MAX ».
Commande sur la poignée
Commande sur l'appareil
Page 29

Entretien des accessoires et des filtres _13
03
ENTRETIEN DES ACCESSOIRES ET DES FILTRES
Veillez à ce que le filtre soit totalement
sec avant de le remettre dans
l'aspirateur. Laissez-le sécher pendant
12 heures.
NETTOYAGE DU GROUPE FILTRANT
1
4
7
10
2
5
8
11 12
3
Retirez le réservoir à poussière.
Retirez le couvercle du réservoir.
Avant de le monter à nouveau,
alignez le couvercle du groupe filtrant
et le groupe filtrant correctement.
Refermez le couvercle du
réservoir à poussière.
Avant de recommencer à utiliser l’appareil,
poussez le réservoir à poussière à
l’intérieur du corps de l’aspirateur jusqu’à
ce qu’un déclic se fasse entendre.
Retirez le cadre fixé du
couvercle du groupe filtrant.
Retirez le groupe filtrant.
Laissez sécher l’éponge et
le filtre à l’ombre pendant
12 heures au minimum.
Replacez l'éponge et le filtre
dans le groupe filtrant.
Retirez l'éponge et le filtre du
groupe filtrant.
Secouez l'éponge et le filtre au-dessus
de la poubelle pour retirer la poussière,
puis nettoyez l'éponge et le filtre du
groupe filtrant avec de l'eau.
Remettez le groupe filtrant
réassemblé dans le couvercle.
6
9
Page 30

14_ Entretien des accessoires et des filtres
REMPLACEMENT DES PILES
1. Si l’aspirateur ne fonctionne pas, remplacez les piles de la télécommande.
Si le problème persiste, veuillez communiquer avec un détaillant autorisé.
2. Utilisez 2 piles AAA.
1. Ne démontez et ne rechargez jamais les piles.
2. N’exposez jamais les piles à la chaleur, et ne les jettez jamais
au feu.
3. N’inversez pas les pôles (+) et (-).
4. Mettez les piles au rebut en respectant les règles en vigueur.
AVERTISSEMENT
TYPE DE PILE : AAA
NETTOYAGE DU FILTRE DE SORTIE
1 2
Appuyez sur la cadre xé à l'arrière de
l'appareil pour le retirer.
Retirez le réservoir à poussière et le ltre
HEPA comme indiqué.
Nettoyez le filtre HEPA. Si le
nettoyage du filtre ne résout pas
le problème, remplacez le ltre.
• Si la puissance d’aspiration est nettement
et continuellement réduite ou si l’aspirateur
surchauffe anormalement, nettoyez le filtre
de sortie.
Remarque : Ne lavez pas le filtre HEPA.
Si le nettoyage ne résout pas le problème,
remplacez le filtre bouché.
• Vous pouvez vous procurer des ltres de
rechange auprès de votre distributeur
Samsung local.
Page 31

Dépannage _15
04 DÉPANNAGE
Dépannage
PROBLÈME SOLUTION
Le moteur ne démarre
pas
• Vériez le câble, la che et la prise.
• Laissez refroidir.
La puissance d'aspiration
diminue progressivement
• Vériez que rien n'obstrue l'appareil et éliminez toute
obstruction.
Le cordon ne s’enroule
pas entièrement
• Tirez environ 2 à 3 m (6,5 à 9,75 pi) de cordon et appuyez sur
le bouton d’enroulement du cordon.
L'aspirateur n'aspire plus • Vériez le tuyau et remplacez-le si nécessaire.
Aspiration faible ou
de moins en moins
puissante
• Vériez les ltres et si nécessaire, nettoyez-les tel qu’il est
indiqué dans les instructions. Si les ltres sont obstrués et ne
peuvent pas être nettoyés, remplacez-les par de nouveaux
ltres.
Surchauffe de l'appareil
• Vériez l'état des ltres. Si nécessaire, nettoyez-les tel qu’il
est indiqué dans les instructions.
Décharge électrostatique
• Diminuez la puissance d'aspiration.
• Cela peut également arriver lorsque l'air de la pièce est très
sec.
Aérez la pièce pour augmenter le niveau d'humidité.
Page 32

Page 33

Imagine las posibilidades
Gracias por adquirir un producto Samsung.
Para recibir un servicio más completo,
registre su producto en
www.samsung.com/register
Aspiradora
manual del usuario
✻ Antes de poner en funcionamiento esta unidad, lea atentamente las
instrucciones.
✻ Para uso en interiores solamente.
Inglés
Serie SC88P*
Este manual está impreso en papel 100% reciclado.
Page 34

2_ safety information
información sobre seguridad
INFORMACIÓN SOBRE SEGURIDAD
• Antes de poner en funcionamiento el aspiradora, lea detenidamente este
manual y consérvelo para su referencia.
• Debido a que las siguientes instrucciones de funcionamiento corresponden a
diversos modelos, es posible que las características de su aspiradora difieran
ligeramente de las que se describen en este manual.
SÍMBOLOS DE CUIDADO Y ADVERTENCIA UTILIZADOS
ADVERTENCIA
Indica que existe riesgo de muerte o lesiones graves.
PRECAUCIÓN
Indica que existe riesgo de lesión personal o daños materiales.
OTROS SÍMBOLOS UTILIZADOS
Representa algo que NO se debe hacer.
Representa algo que se debe respetar.
Indica que se debe desconectar el enchufe de la pared.
Esta aspiradora está diseñada para uso doméstico solamente. No utilice esta
aspiradora para limpiar escombros o residuos. No utilice esta aspiradora sin sus filtros
ya que podría causar daños a los componentes internos e invalidar su garantía.
GUARDE ESTAS INSTRUCCIONES
Esta aspiradora es sólo de uso doméstico.
INSTRUCCIONES SOBRE EL ENCHUFE POLARIZADO
- Para reducir el riesgo de descarga eléctrica, este electrodoméstico cuenta con un enchufe
polarizado (una punta es más ancha que la otra). Sólo hay una manera en que el enchufe se
conectará con un tomacorriente polarizado. Dé vuelta el enchufe si no cabe totalmente en el
tomacorriente. Si el enchufe aún no cabe, comuníquese con un electricista calificado para que
instale el tomacorriente correcto. No modifique el enchufe de ninguna forma.
ADVERTENCIA
ADVERTENCIA
ADVERTENCIA
Page 35

safety information _3
INSTRUCCIONES DE SEGURIDAD
IMPORTANTES
Cuando se utilizan aparatos eléctricos, siempre se deben seguir estas instrucciones básicas
de seguridad:
LEA TODAS LAS INSTRUCCIONES ANTES DE USAR SU ASPIRADORA
ADVERTENCIA – Para reducir el riesgo de incendio, descargas
eléctricas o lesiones:
1. No deje el electrodoméstico conectado. Desconectado cuando no lo utilice y antes de
realizar el mantenimiento.
2. No utilice la aspiradora en el exterior o sobre superficies húmedas.
3. No permita que se utilice la aspiradora como un juguete. Es necesario prestar atención
cuando se utilice la aspiradora cerca de los niños.
4. Utilice la aspiradora sólo como se describe en el manual. Utilice sólo los accesorios
recomendados por el fabricante.
5. No utilice la aspiradora si el cable o el enchufe están dañados. Si el electrodoméstico
no funciona como corresponde, se ha caído, se ha dañado, ha permanecido a la
intemperie o se ha caído en el agua, llévelo a un centro de servicio.
6. No tire del cable ni lo utilice para trasladar la aspiradora, no lo utilice como asa, no
lo aplaste con la puerta ni tire de él contra bordes o esquinas filosas. No pase el
electrodoméstico sobre el cable. Mantenga el cable alejado de superficies calientes.
7.
No desconecte la aspiradora tirando del cable. Para desconectar, tome el enchufe, no el cable.
8. No toque el enchufe o el electrodoméstico con las manos húmedas.
9.
No inserte ningún objeto en las aberturas. No utilice la aspiradora si hay aberturas obstruidas.
Manténgala libre de polvo, pelusa, cabello o cualquier cosa que reduzca el flujo de aire.
10. Mantenga el cabello, ropa suelta, sus dedos y todas las partes de su cuerpo lejos de
las aberturas o partes móviles.
11. Apague todos los controles antes de desenchufar.
12. Tenga especial cuidado cuando limpie las escaleras.
13. No utilice la aspiradora para aspirar líquidos combustibles o inflamables, tales como
gasolina, ni en áreas donde estas sustancias puedan estar presentes.
14. No aspire nada que esté encendido o humeando, como cigarrillos, fósforos o cenizas
calientes.
15. No utilice la aspiradora sin el depôsito para polvo y/o filtros en su lugar.
16. No utilice la aspiradora en espacios cerrados donde se concentren vapores
despedidos por pinturas al óleo, disolventes de pinturas, sustancias antipolillas,
polvos inflamables y demás vapores tóxicos o explosivos.
17. No aspire objetos duros o cortantes, tales como vidrio, uñas, tornillos, monedas, etc.
18. La manguera contiene cables eléctricos. No la utilice si se encuentra dañada, cortada
o pinchada. Evite aspirar objetos cortantes.
19. Siempre apague este electrodoméstico antes de conectar o desconectar la
manguera o la boquilla motorizada.
20. Desenchufe la aspiradora antes de conectar la boquilla motorizada.
21. Sujete el enchufe cuando enrolle el cable. No deje que el enchufe dé latigazos al
enrollarlo.
información sobre seguridad
Page 36

4_ contents
contenido
ARMADO DE LA ASPIRADORA
05
05 Armado de la aspiradora
FUNCIONAMIENTO DE LA
ASPIRADORA
06
06 Cable de alimentación
06 Interruptor de encendido/apagado
07 Control de potencia
08 Cepillo mecánico
MANTENIMIENTO DE LOS
ACCESORIOS Y DE LOS FILTROS
09
09 Uso de accesorios
10 Mantenimiento de accesorios para piso
11 Vaciado del depósito de polvo
12 Limpieza de la caja para polvo
14 Limpieza del ltro de salida
14 Cambio de pilas
SOLUCIÓN DE PROBLEMAS
15
Page 37

assembling the vacuum _5
01 ARMADO DE LA ASPIRADORA
armado de la aspiradora
• No presione el botón de la manija
del depósito de polvo al trasladar
la máquina.
• Al guardar la aspiradora, deje la boquilla
para pisos como se muestra.
OPCIONAL
Page 38

6_ operating the vacuum
funcionamiento de la aspiradora
CABLE DE ALIMENTACIÓN
INTERRUPTOR DE ENCENDIDO/APAGADO
• Cuando saque el enchufe del tomacorriente, sujete por el
enchufe, no por el cable.
PRECAUCIÓN
Page 39

operating the vacuum _7
02
FUNCIONAMIENTO DE LA ASPIRADORA
- CUERPO
Presione el botón de encendido/apagado
repetidamente para arrancar y detener la aspiradora.
(Apagado → Encendido → Apagado)
Si el control remoto de la manija no está activado,
la aspiradora puede ponerse en funcionamiento
utilizando el botón de encendido/apagado ubicado
en el cuerpo de la máquina.
1
El botón de encendido/apagado pone la aspiradora en
funcionamiento o la detiene.
2
La luz de la FRECUENCIA DE RADIO indica la parte que recibe la señal
de FRECUENCIA DE RADIO proveniente del control de la manija.
3
La luz del filtro se ilumina cuando el depósito para polvo requiere una
verificación o vaciado. También se producirá una señal sonora.
1
3 2
CONTROL DE POTENCIA
1.
Encendido/apagado de la aspiradora ( )
Presione el botón de encendido/apagado
para poner la aspiradora en funcionamiento.
Presiónelo nuevamente para detener la
aspiradora.
2. Botón Suction (-/+) (Succión (-/+)) de la
aspiradora
Presione el botón SUCTION (-/+) para
aumentar o disminuir la potencia de succión de
la aspiradora. La potencia de succión aumenta
gradualmente cada vez que se presiona
el botón. Cuando la aspiradora alcanza la
potencia de succión máxima, al presionar el botón se restablece la potencia de succión
mínima.
3. Botón BRUSH ON/OFF (ENCENDIDO/APAGADO DEL CEPILLO)
Presione el botón BRUSH ON/OFF para poner el cepillo mecánico en funcionamiento.
Presiónelo nuevamente para detener el cepillo mecánico.
No cubra el transmisor de la manija cuando utilice un botón del control de la manija.
AVISO PARA FCC
Este aparato cumple con la sección 15 de las Normas de la FCC. El funcionamiento se
encuentra sujeto a las siguientes dos condiciones:
1. Este aparato no puede causar interferencia dañina, y
2. Este aparato debe aceptar la recepción de cualquier interferencia, incluidas aquellas
que puedan causar un funcionamiento indeseado.
CONTROL REMOTO DE FRECUENCIA DE RADIO
- MANGUERA
Control de la manija
La aspiradora es controlada por señales
de frecuencia de radio.
transmisor
Page 40

8_ operating the vacuum
CÓMO ASPIRAR CON EL CEPILLO MECÁNICO
PROTECTOR CONTRA SOBRECARGA
1. Colocación del cepillo mecánico
La manguera debe conectarse al trineo y el cepillo
mecánico debe conectarse a la manguera y al tubo de
extensión.
2. Cómo aspirar
• Para obtener mejores resultados, desplace el cepillo
mecánico lentamente haciendo recorridos cortos y
superpuestos.
• En áreas muy sucias, repita los recorridos en distintas direcciones.
• Presione el botón de ajuste de altura para que coincida con la supercie que está
limpiando.
• Pulse el boton hasta que haga clic.
No invierta el cepillo mecánico mientras está en funcionamiento.
3. Verificación del rendimiento del cepillo mecánico
Puede verificar si el cepillo mecánico funciona con normalidad levantando levemente el
tubo de extensión para ver la parte posterior del cepillo.
El cepillo mecánico no funcionará si se encuentra atascado o si la unidad está
apagada.
Si el cepillo mecánico se encuentra atascado, desenchufe el cable de alimentación del
tomacorriente.
Dé vuelta el cepillo mecánico y quite el objeto atascado.
Vuelva a colocar el cepillo mecánico en la posición adecuada y siga aspirando.
El protector contra sobrecarga apaga el motor del
cepillo si el cepillo para piso se obstruye. El cepillo
para piso se detendrá, pero el motor de succión
seguirá en funcionamiento. Para restablecer el
protector contra sobrecarga, apague la aspiradora y
desenchúfela. Elimine la obstrucción del cepillo para
piso. Utilice la punta de un bolígrafo para presionar
el interruptor para restablecer el protector. Encienda
la aspiradora y siga limpiando.
PRECAUCIÓN
Interruptor de
restablecimiento
CEPILLO MECÁNICO
Page 41

maintaining the tools and filters _9
03
MANTENIMIENTO DE LOS ACCESORIOS Y DE LOS FILTROS
mantenimiento de los accesorios y de los filtros
USO DE ACCESORIOS
TUBO
• Ajuste la longitud del tubo telescópico deslizando el
botón del control de longitud ubicado en el centro del
tubo telescópico hacia atrás y hacia adelante.
• Para verificar que no haya obstrucciones, separe el tubo
telescópico y ajústelo de manera tal de acortarlo. Esto
facilita la extracción de los desperdicios que obstruyen
el tubo.
ACCESORIOS (OPCIONALES)
• Coloque el accesorio en el extremo
de la manija de la manguera.
• Extraiga el cepillo para polvo a fin de
utilizar la boquilla para rincones.
Page 42

10_ maintaining the tools and filters
•
Aspira el polvo de una vez
en áreas
amplias .
•
Extraiga completamente los materiales
de desperdicio de la entrada, si esta se
encuentra bloqueada.
CEPILLO PARA PARQUÉ (OPCIONAL)
Verificación de la correa de accionamiento
1. Asegúrese de que la aspiradora esté desenchufada.
2. Una vez que se haya extraído el cepillo giratorio para piso
de la aspiradora, tome la vieja correa de accionamiento y
quítela de la polea del motor. Deseche la vieja correa de
accionamiento.
3. Coloque la correa de accionamiento sobre la polea del
motor y extienda el otro extremo sobre el cepillo giratorio
para piso en el espacio entre las cerdas.
4. Calce los extremos del cepillo giratorio para piso en las
ranuras ubicadas a los lados, como se muestra.
5. Gire a mano el cepillo giratorio para piso varias veces en la dirección de la polea
del motor. Si está bien instalada, la correa de accionamiento se centrará sola en el
cabezal del cepillo giratorio.
6. Vuelva a colocar la tapa del cepillo y los tornillos. Ajuste bien los tornillos.
Verificación del cepillo giratorio para piso y de la correa de accionamiento
Verifique regularmente que el cepillo giratorio para piso y la correa de accionamiento
de la aspiradora no estén desgastados o dañados. También debe quitar los hilos,
los cabellos y las fibras de la alfombra del cepillo y de los extremos del cepillo. Estos
pueden enrollarse en el cepillo y dificultar la eficacia para limpiar su alfombra. Extraiga
también cualquier residuo que pueda haberse acumulado debajo de la tapa del cepillo.
1. Desenchufe la aspiradora del tomacorriente.
2.
Coloque la manija en una posición baja y dé vuelta la aspiradora
de manera tal que la parte inferior quede hacia arriba.
3.
Retire los seis tornillos con un destornillador, como se muestra.
4. Extraiga la tapa del cepillo del cepillo para piso.
5. Tome el cepillo giratorio para piso de los dos extremos y
levántelo.
6.
Quite los hilos, los cabellos y otros residuos del cepillo giratorio
para piso prestando especial atención a los extremos del cepillo.
7. Quite los hilos, los cabellos y otros residuos de las áreas
donde se encuentran la polea del motor y la correa de
accionamiento.
8. Verifique cuidadosamente que la correa de accionamiento
no esté desgastada, ni presente cortes o torceduras.
9. Verifique que no haya obstrucciones en la salida de aire.
Retire los residuos de esta área.
El cepillo giratorio para piso puede hacer que los flecos
de alfombras se enreden dentro de la aspiradora.
Sea cauteloso y apague el cepillo para piso al aspirar
alfombras con flecos.
Tapa del
cepillo
PRECAUCIÓN
MANTENIMIENTO DE ACCESORIOS PARA PISO
Page 43

maintaining the tools and filters _11
03
MANTENIMIENTO DE LOS ACCESORIOS Y DE LOS FILTROS
VACIADO DEL DEPÓSITO DE POLVO
Cuando el polvo llegue hasta
la marca que indica que la
aspiradora está llena, vacíe el
depósito de polvo.
Extraiga el depósito de polvo
presionando el botón.
Separe la tapa del depósito
de polvo.
Deseche el polvo del
depósito.
Cierre la tapa del depósito de
polvo.
Antes de utilizar la aspiradora
nuevamente, introduzca el
depósito de polvo en el cuerpo
principal de la aspiradora hasta
escuchar un clic.
4 5 6
1 2 3
Puede enjuagar el depósito
de polvo sólo con agua fría.
- Para vaciarlo en una bolsa de plástico:
(recomendado para asmáticos/alérgicos)
Page 44

12_ maintaining the tools and filters
Si la potencia de succión disminuye considerablemente de forma continua o la
aspiradora se sobrecalienta de manera anormal, limpie el depósito para polvo.
LIMPIEZA DEL DEPÓSITO PARA POLVO
CUÁNDO LIMPIAR EL DEPÓSITO PARA POLVO
PARA CONFIRMAR SI EL DEPÓSITO PARA POLVO REQUIERE UNA LIMPIEZA
• Cuando la potencia de succión se reduzca, la
lámpara se pondrá roja.
Si la luz se enciende, limpie el depósito para
polvo.
• Si en un piso plano el indicador de verificación del
filtro se pone rojo cuando la entrada se encuentra a
10 cm (4 pulgadas), limpie el depósito para polvo.
• Suba la potencia de la
aspiradora a ‘MÁX’.
Control de la manija
Control del cuerpo
Page 45

maintaining the tools and filters _13
03
MANTENIMIENTO DE LOS ACCESORIOS Y DE LOS FILTROS
Asegúrese de que el filtro esté
completamente seco antes de volver a
colocarlo en la aspiradora. Espere 12
horas para que se seque.
LIMPIEZA DEL DEPÓSITO PARA POLVO
1
4
7
10
2
5
8
11 12
3
Extraiga el depósito de polvo.
Separe la tapa del depósito
de polvo.
Antes de rearmarlo, alinee la
tapa del depósito para polvo y el
depósito para polvo correctamente.
Cierre la tapa del depósito de
polvo.
Antes de utilizar la aspiradora
nuevamente, introduzca el depósito
de polvo en el cuerpo principal de la
aspiradora hasta escuchar un clic.
Extraiga el armazón fijo de la
tapa del depósito para polvo.
Separe el depósito para polvo.
Deje secar la esponja y el
filtro a la sombra durante más
de 12 horas.
Coloque la esponja y el filtro
en el depósito para polvo.
Extraiga la esponja y el filtro
del depósito para polvo.
Sacuda la esponja y el filtro sobre
el basurero para eliminar el polvo
suelto; luego, lave la esponja y el ltro
del depósito para polvo con agua.
Vuelva a colocar el depósito
para polvo armada en la tapa.
6
9
Page 46

14_ maintaining the tools and filters
CAMBIO DE PILAS
1. Cuando la aspiradora no funcione, reemplace las pilas del control remoto.
Si el problema continúa, comuníquese con un distribuidor autorizado.
2. Utilice 2 pilas AAA.
1. Nunca desarme las pilas ni las recargue.
2. Nunca caliente las pilas ni las tire en el fuego.
3. No invierta los polos (+) y (-).
4. Deseche las pilas de la manera correspondiente.
ADVERTENCIA
TIPO DE PILA: Tamaño AAA
LIMPIEZA DEL FILTRO DE SALIDA
1 2
Presione la parte del armazón fijo en la
parte posterior del cuerpo principal de la
aspiradora para extraer el filtro.
Extraiga el depósito de polvo y el filtro
HEPA como se muestra.
Limpie el filtro HEPA. Si la
limpieza del filtro no resuelve el
problema, reemplace el filtro.
• Si la potencia de succión disminuye
considerablemente de forma continua o
la aspiradora se sobrecalienta de manera
anormal, limpie el filtro de salida.
Nota : No lave el filtro HEPA. Si la limpieza
no resuelve el problema, reemplace el filtro
bloqueado.
• Los ltros de repuesto están disponibles
con su distribuidor local de Samsung.
Page 47

troubleshooting _15
04 SOLUCIÓN DE PROBLEMAS
solución de problemas
PROBLEMA SOLUCIÓN
El motor no arranca
• Verique el cable, el enchufe y el tomacorriente.
• Deje enfriar.
La potencia de succión
disminuye gradualmente
• Verique si hay obstrucciones y elimínelas.
El cable no se enrolla
completamente
• Tire del cable unos 2 a 3 m (6,5 a 9,75 pies) y luego presione
el botón para enrollar el cable.
La aspiradora no aspira
polvo
• Verique el estado de la manguera y remplácela de ser
necesario.
Potencia de succión baja
o decreciente
• Verique el estado de los ltros y, de ser necesario, límpielos
como se indica en las instrucciones. Si los ltros están
obstruidos y no pueden limpiarse, reemplácelos por unos
nuevos.
Sobrecalentamiento del
cuerpo de la aspiradora
• Verique el estado de los ltros. De ser necesario, límpielos
como se indica en las instrucciones.
Descarga de electricidad
estática
• Baje la potencia de succión.
• Esto también puede suceder si el aire de la habitación es
muy seco.
Ventile la habitación para aumentar la humedad.
Page 48

Code No. DJ68-00597P REV(0.0)
If you have any questions or comments relating to Samsung products,
please contact the SAMSUNG customer care center.
Country
Customer Care Center
Web Site
U.S 1-800-SAMSUNG www.samsung.com
CANADA 1-800-SAMSUNG (726-7864) www.samsung.com
 Loading...