

Samsung SC-8790 User Manual [no]

Vacuum Cleaner
user manual
✻ Before operating this unit, please read the instructions carefully.
✻ For indoor use only.
imagine the possibilities
Thank you for purchasing a Samsung product.
To receive a more complete service,
please register your product at
www.samsung.com/register
English
safety information
SAFETY INFORMATION
•
WARNING
WARNING
Before operating the appliance, please read this manual thoroughly and retain
it for your reference.
•
Because these following operating instructions cover various models,
the characteristics of your vacuum cleaner may differ slightly from those
described in this manual.
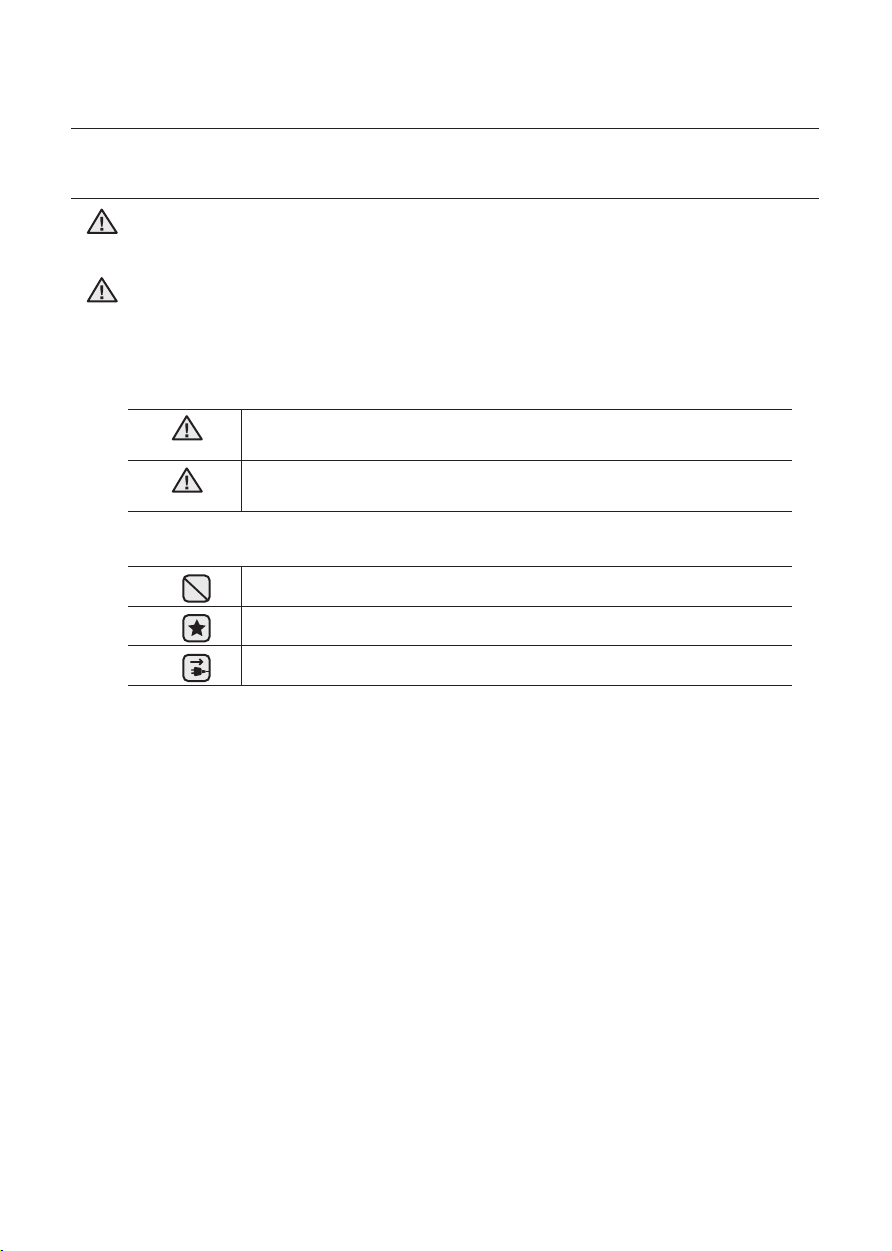
CAUTION/WARNING SYMBOLS USED
WARNING
CAUTION
Indicates that a danger of death or serious injury exists.
Indicates that a risk of personal injury or material damage exists.
OTHER SYMBOLS USED
Represents something you must NOT do.
Represents something you must follow.
Indicates that you must disconnect the power plug from the socket.
2_ safety information

safety information
IMPORTANT SAFEGUARDS
1. Read all instructions carefully. Before switching on, make sure that the voltage of your
electricity supply is the same as that indicated on the rating plate on the bottom of the
cleaner.
2. WARNING : Do not use the vacuum cleaner when rug or floor is wet.
Do not use to suck up water.
3. Close supervision is necessary when any appliance is used by or near children. Do
not allow the vacuum cleaner to be used as a toy. Do not allow the vacuum cleaner
to run unattended at any time. Use the vacuum cleaner only for its intended use as
described in these instructions.
4. Do not use the vacuum cleaner without a dust bin. Empty the dust bin before it is full
in order to maintain the best efficiency.
5. Do not use the vacuum cleaner to pick up matches, live ashes or cigarette butts.
Keep the vacuum cleaner away from stoves and other heat sources. Heat can deform
and discolour the plastic parts of the unit.
6. Avoid picking up hard, sharp objects with the vacuum cleaner as they may damage
the cleaner parts. Do not stand on the hose assembly. Do not put weight on the hose.
Do not block the suction or the exhaust port.
7. Switch the vacuum cleaner off on the body of the machine before unplugging from
the electrical outlet. Disconnect the plug from the electrical outlet before emptying the
dust bin. To avoid damage, please remove the plug by grasping the plug itself, not by
pulling on the cord.
8. This appliance is not intended for use by persons (including children) with reduced
physical, sensory or mental capabilities, or lack of experience and knowledge, unless
they have been given supervision or instruction concerning use of the appliance by a
person responsible for their safety.
9. Children should be supervised to ensure that they do not play with the appliance.
10. The plug must be removed from the socket outlet before cleaning or maintaining the
appliance.
11. The use of an extension cord is not recommended.
12. If your vacuum cleaner is not operating correctly, switch off the power supply and
consult an authorized service agent.
13. If the supply cord is damaged, it must be replaced by the manufacturer or its service
agent or a similarly qualified person in order to avoid a hazard.
14. Don’t carry the vacuum cleaner by holding the hose.
Use the handle on the vacuum cleaner set.
15. Unplug the cleaner when not in use. Turn off the power switch before unplugging.
safety information _3

contents
AssemblING The CleANeR
05
OpeRATING The CleANeR
06
mAINTAIN TOOls ANd fIlTeR
08
TROUbleshOOTING
16
05 Assembling the Cleaner
06 Power cord
06 Power control
08 Using accessory
09 Maintain floor tools
11 Emptying the dust bin
12 Cleaning the dust pack
14 Cleaning the motor protection filter
14 Cleaning the outlet filter
15 Change the battery
4_ contents

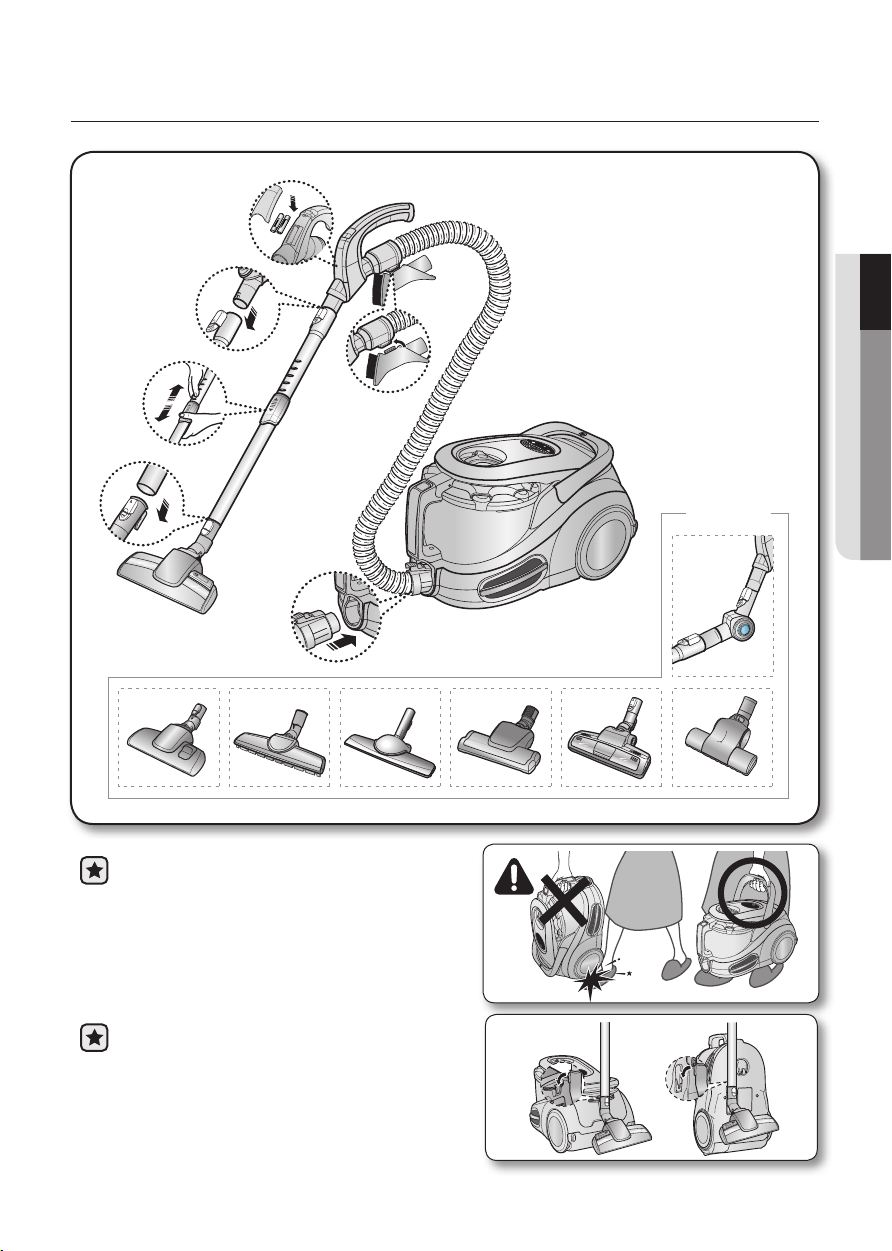
assembling the cleaner
01 ASSEMBLING THE CLEANER
OPTION
• Please do not press the button
of dust bin handle when
carrying machine.
• For storage, park the oor nozzle.
assembling the cleaner _5
operating the cleaner
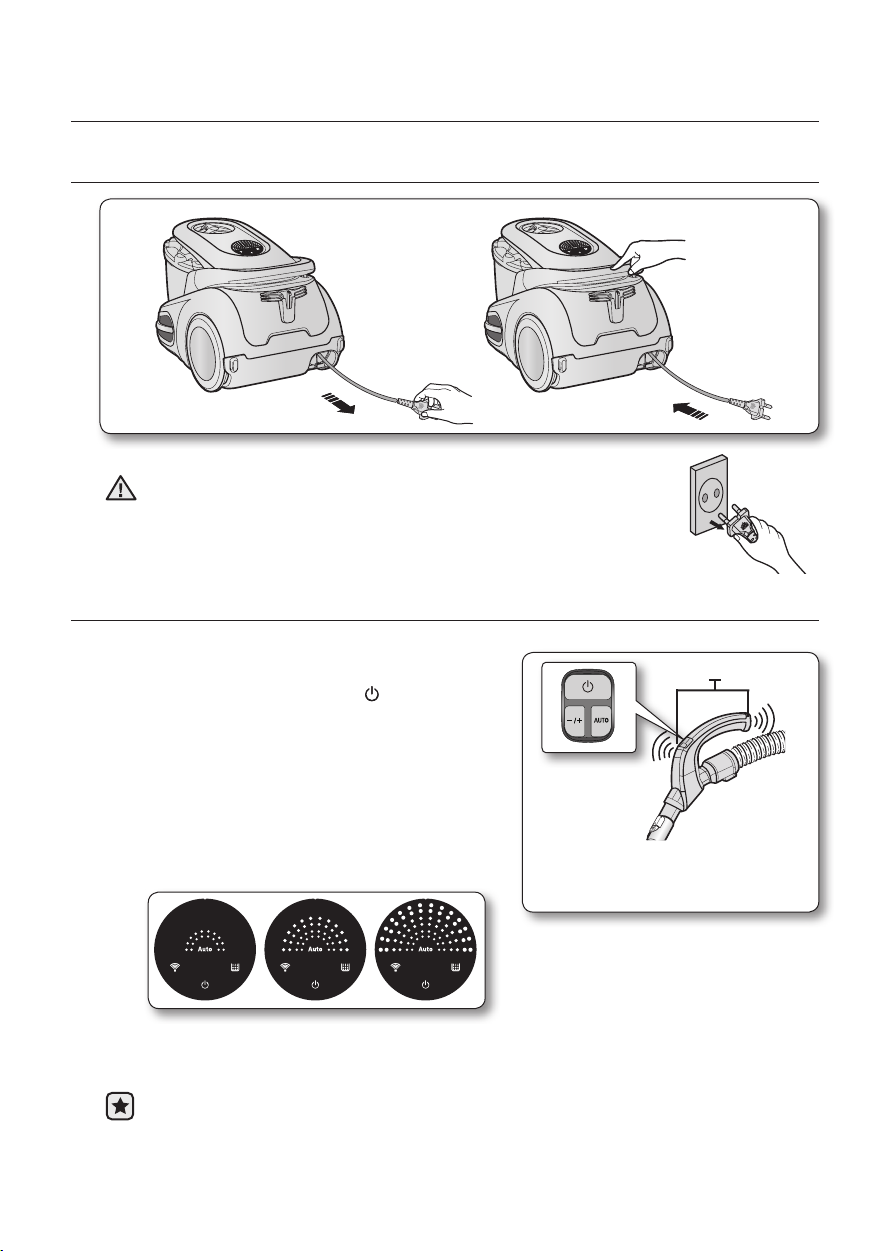
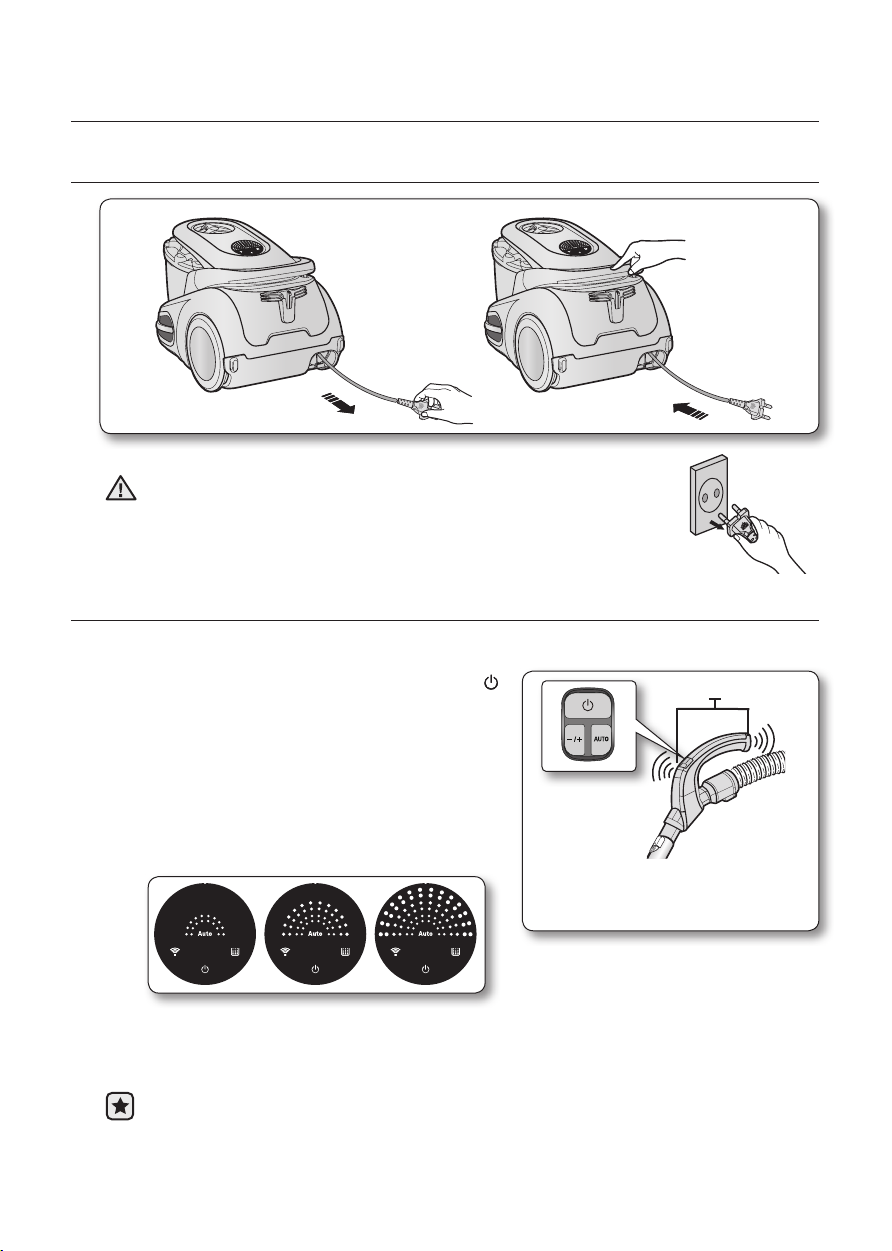
POWER CORD
• When removing the plug from the electrical outlet, grasp the
CAUTION
POWER CONTROL (INFRARED CONTROL)
plug, not the cord.
- hOse
1. Vacuum cleaner ON/OFF(
Press the ON/OFF button to operate the
vacuum cleaner. Press again to stop the
vacuum cleaner.
2. Vacuum cleaner (-,+)
Press the MODE button repeatedly to select
the correct mode.
(ON) MIN → MID → MAX
3. Using Auto mode
Press the Auto button to operate the vacuum cleaner automatically.
Don’t cover the handle sender when you use a handle control button.
6_ operating the cleaner
)
sender
Handle Control
The cleaner is controlled by using
infrared signals.
- bOdY
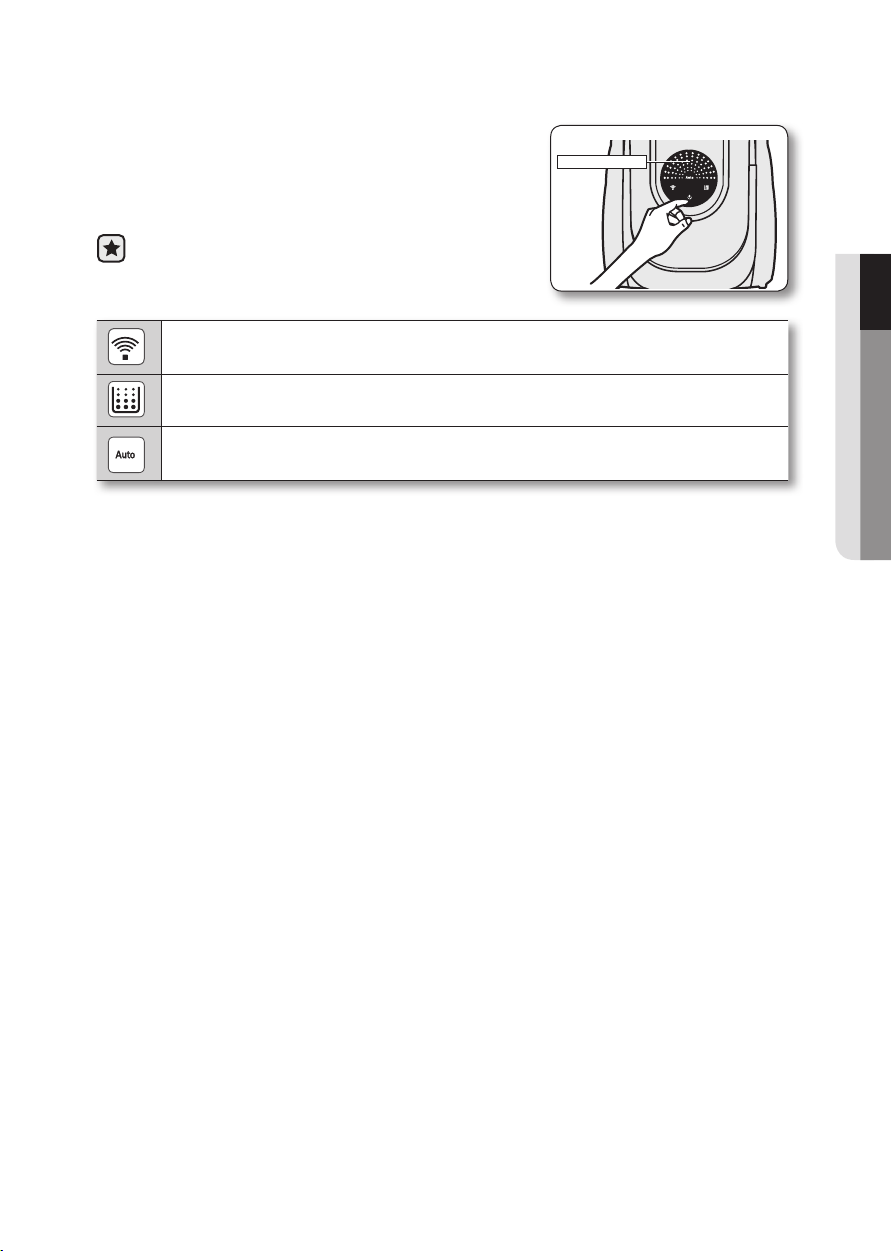
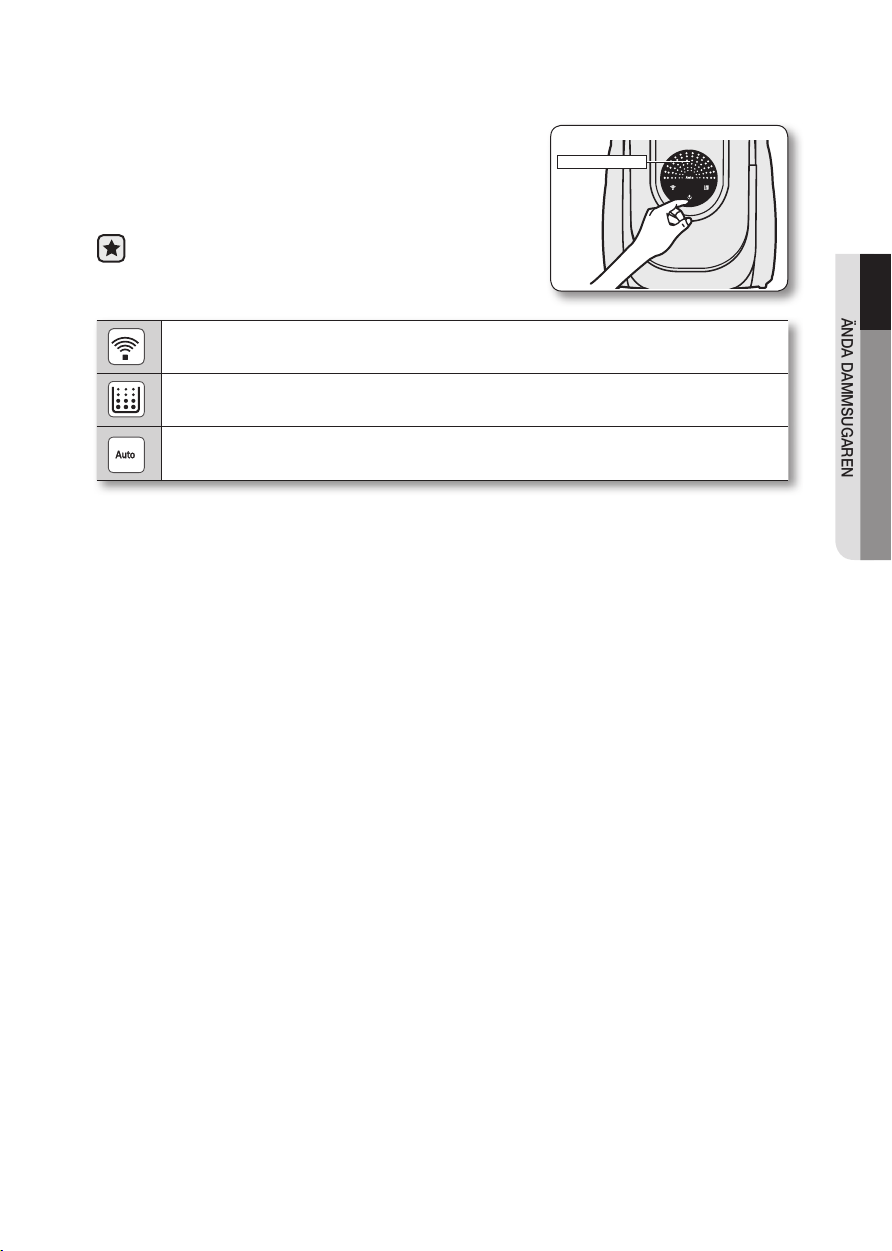
POWER CONTROL
Press the power control button repeatedly to select
the correct mode.
(ON(MAX) → OFF)
If the remote control is not working, the
cleaner can be operated using the control
button on the body of the machine.
The IR light indicates the part that receives the infra-red signal from the handle
control.
The filter light is illuminated when the dust pack requires checking or emptying.
An audio signal will also sound.
This indicates that the automatic suction mode is selected. The level of suction
is indicated by the LED display.
02 OPERATING THE CLEANER
operating the cleaner _7

maintain tools and filter
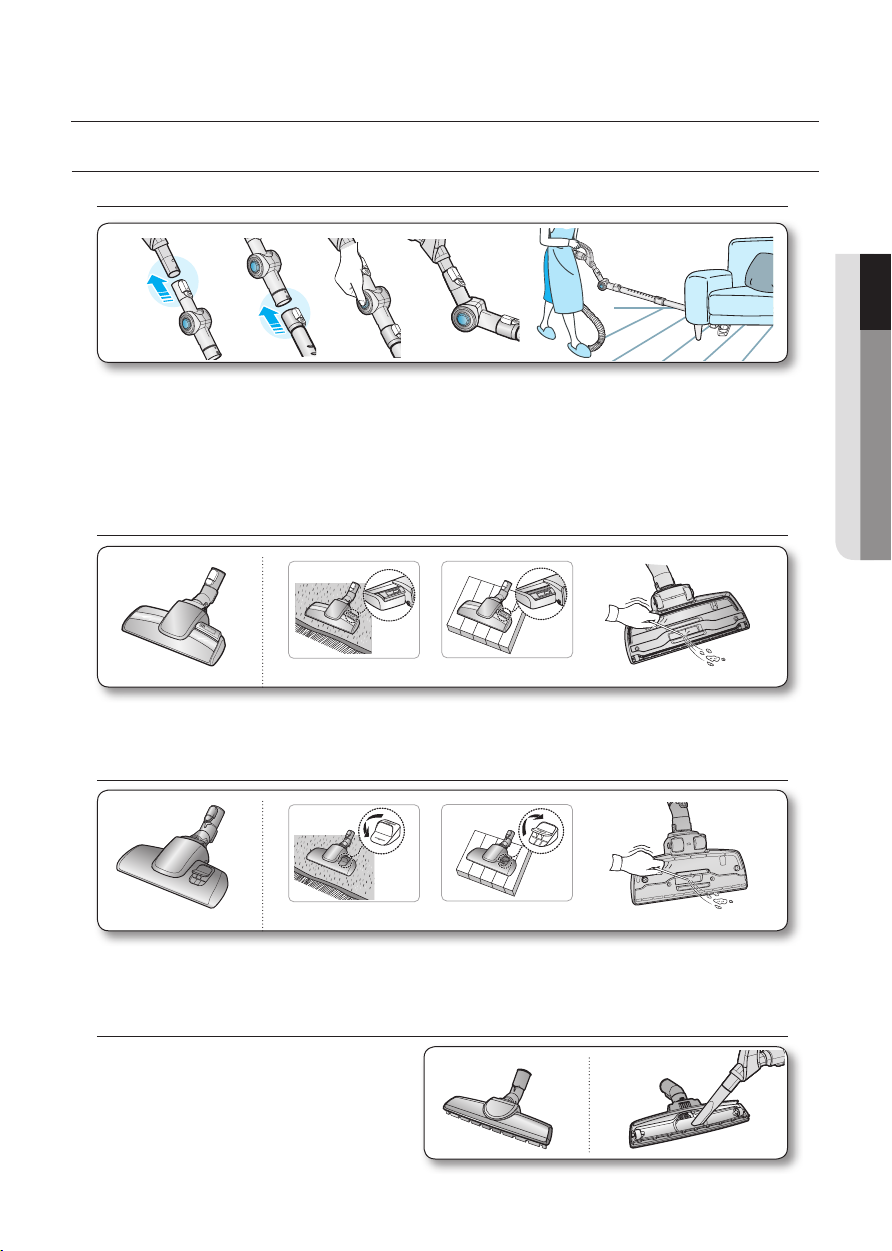
USING ACCESSORY
Accessory
•
Push the accessory on to the end of
the hose handle.
• To use the dusting tool, push the
accessory on to the end of the hose
handle.
• To use the upholstery tool, push the
accessory on to the end of the hose
handle.
Pipe
• Adjust the length of the telescopic pipe by sliding
the length control button located in the center of the
telescopic pipe back and forth.
• To check for blockages, separate the telescopic pipe
and adjust to shorten. This allows for easier removal
of waste clogging the tube.
8_ maintain tools and filter
maintain tools and filter
MAINTAIN FLOOR TOOLS
Elbow Extending Tube (Option)
1 2 3 4
1.
Connect the elbow extending tube to connecting part for hose knob and telescopic pipe.
2. Fit the telescopic pipe to the lower part of the elbow extending tube.
3. Press the PUSH button.
4. With the PUSH button pressed, the elbow extending tube is folded.
5. Using the elbow extending tube allows hard to reach areas (e.g. under furniture)to be
cleaned without having to kneel down.
5
3 Way Brush (Option)
Carpet Cleaning Floor Cleaning
•
Adjust the inlet lever according to the floor surface.
•
Remove waste matter completely if the inlet is blocked.
2-Step Brush (Option)
03 MAINTAIN TOOLS AND FILTER
Carpet Cleaning Floor Cleaning
•
Adjust the inlet lever according to the floor surface.
•
Remove waste matter completely if the inlet is blocked.
Parquet Master Brush (Option)
•
Vacuum dust in wide area at once.
•
Remove waste matter completely if
the inlet is blocked.
maintain tools and filter _9
maintain tools and filter
Parquet Brush (Option)
•
Vacuum dust in wide area at once.
•
Remove waste matter completely if
the inlet is blocked.
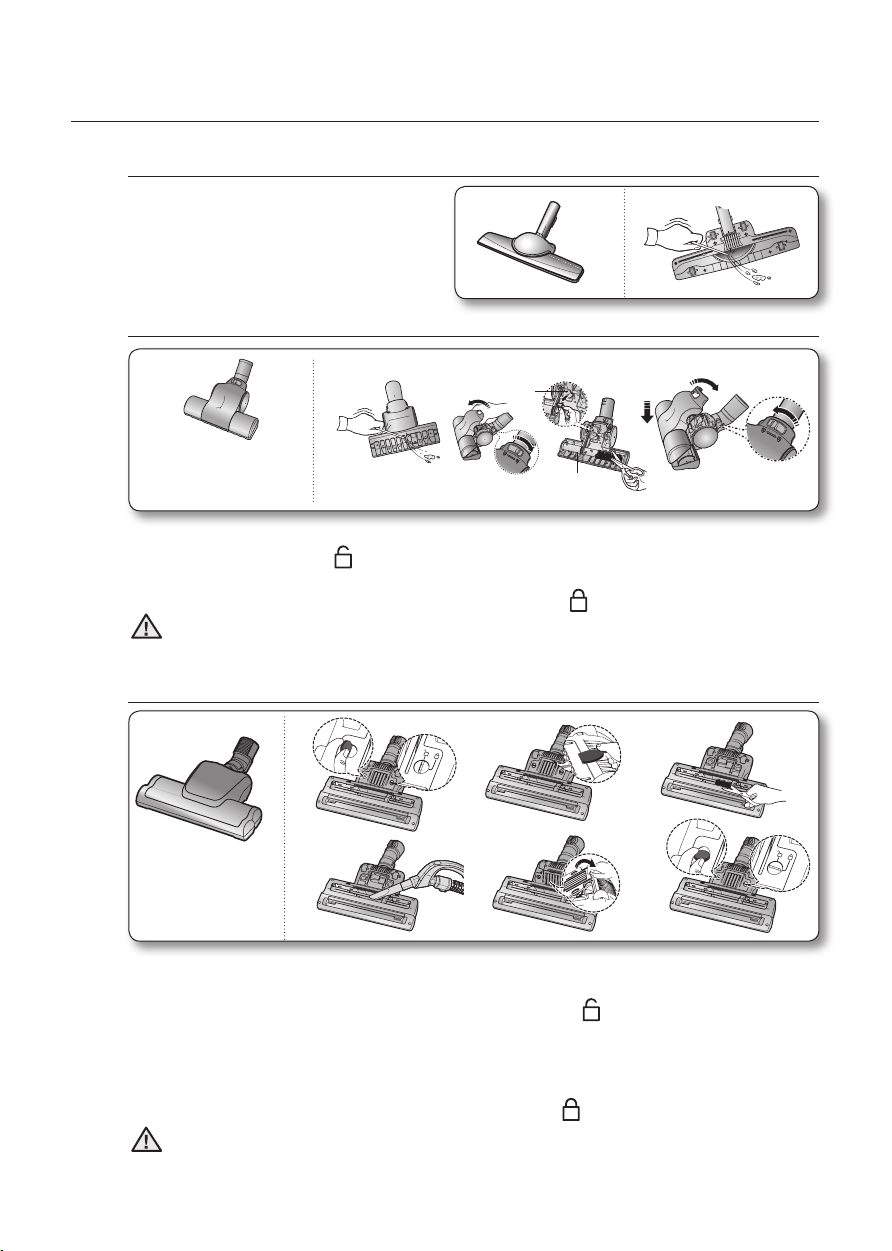
Blanket Brush(Option)
1
For picking up pet hair
and fibre on upholstery
and bed linen.
1. Remove waste matter completely when inlet is blocked.
2. Turn the lock button to ( ), and remove.
3. To reassemble, align the cover to the front of the main body and close. After closing
the cover, ensure that the lock button is turned to the ( ) position.
CAUTION
Use for bedclothes only. Be cautious not to damage brush during unclogging.
2 3
Turbine
Brush
Super turbine brush (Option)
1 2
4 5
For improved
pickup of pet
hair and fibre on
carpets.
Frequent vacuuming of hair or pet fur may cause a falling-off of the rotation due to
matters tangled around the drum. In this case, clean the drum with care.
1. Turn the lock button to unlock position use the like coin ( ).
2. Remove the guide air use the like coin.
3. Remove waste matter such as dust and hair tangled around the brushbar using scissors.
4. Remove dust inside the brush housing using a dry duster or crevice tool.
5. Assemble the guide air.
6. Turn the lock button to lock position use the like coin ( ).
3
6
CAUTION
10_ maintain tools and filter
Please be careful not to damage the brush.
maintain tools and filter
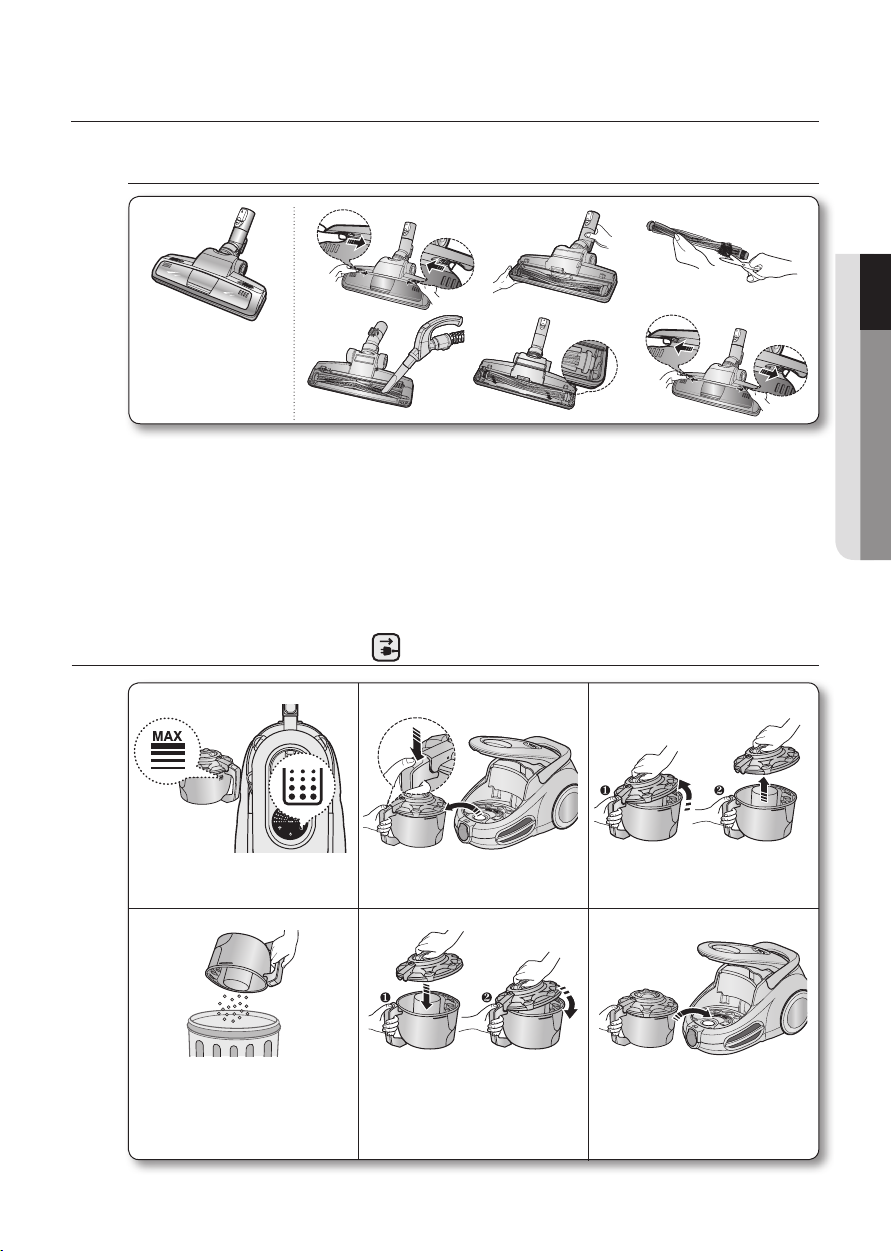
Power Pet Plus Brush (Option)
1 2 3
4 5 6
For improved
pickup of pet
hair and fibre on
carpets.
Frequent vacuuming of hair or pet fur may cause a falling-off of the rotation due to
matters tangled around the drum. In this case, clean the drum with care.
1. Push the Open button of the transparent screen cover to separate the cover.
2. Remove the brushbar from the transparent screen.
3.
Remove waste matter such as dust and hair tangled around the brushbar using scissors.
4. Remove dust inside the brush housing using a dry duster or crevice tool.
5. Insert brushbar into rotating belt and assemble.
6. Click the transparent screen cover back into place to reassemble.
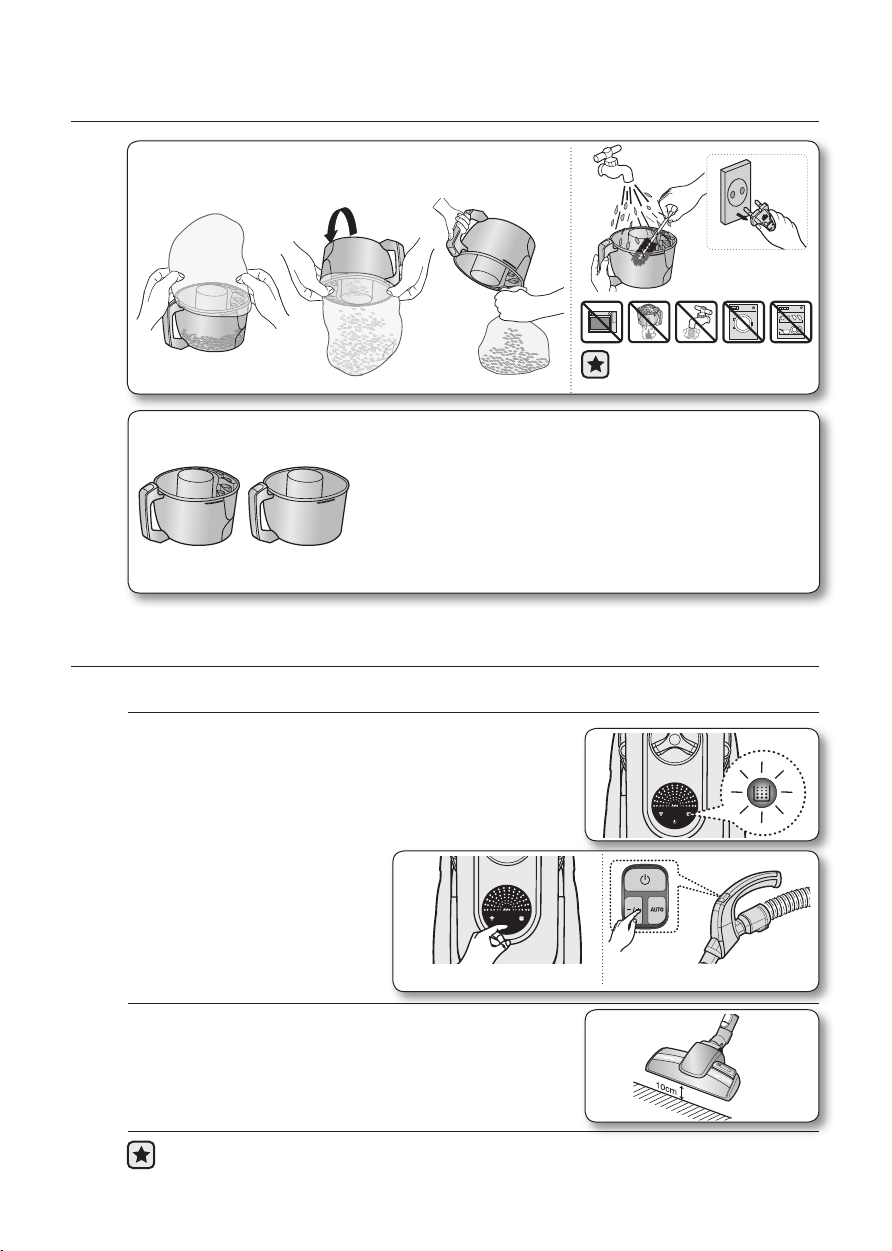
EMPTYING THE DUST BIN
03 MAINTAIN TOOLS AND FILTER
1 3
Once dust reaches the dust
full mark, empty the dust bin.
4 6
Throw the dust away in the
bin.
2
Take the dust bin out by
pressing the button.
5
After emptying the dust bin,
remove the obstacles like
hair, fur on the cap of the
dust bin.
Separate the dust bin cover.
Before use, push the dust bin
into the main body and press the
cover dust of the vacuum cleaner
until you hear the “click” sound.
maintain tools and filter _11
maintain tools and filter
- Empty into a plastic bag.
(recommended for asthma/allergy sufferers)
You may rinse the dust
bin with cold water.
Option
When emptying any vacuum cleaner it is difcult to avoid
exposure to dust. To minimize this risk, Please ensure that you
encase the dust pot in a large bag to empty it and close the bag
as tightly as possible round the pot. Remove the pot and close
the bag as tightly and quickly as possible and dispose of this
immediately. it is advisable to wear disposable gloves and a face
mask while emptying the cleaner. If at all possible, ask a non
allergy sufferer to empty the dust pot when required.
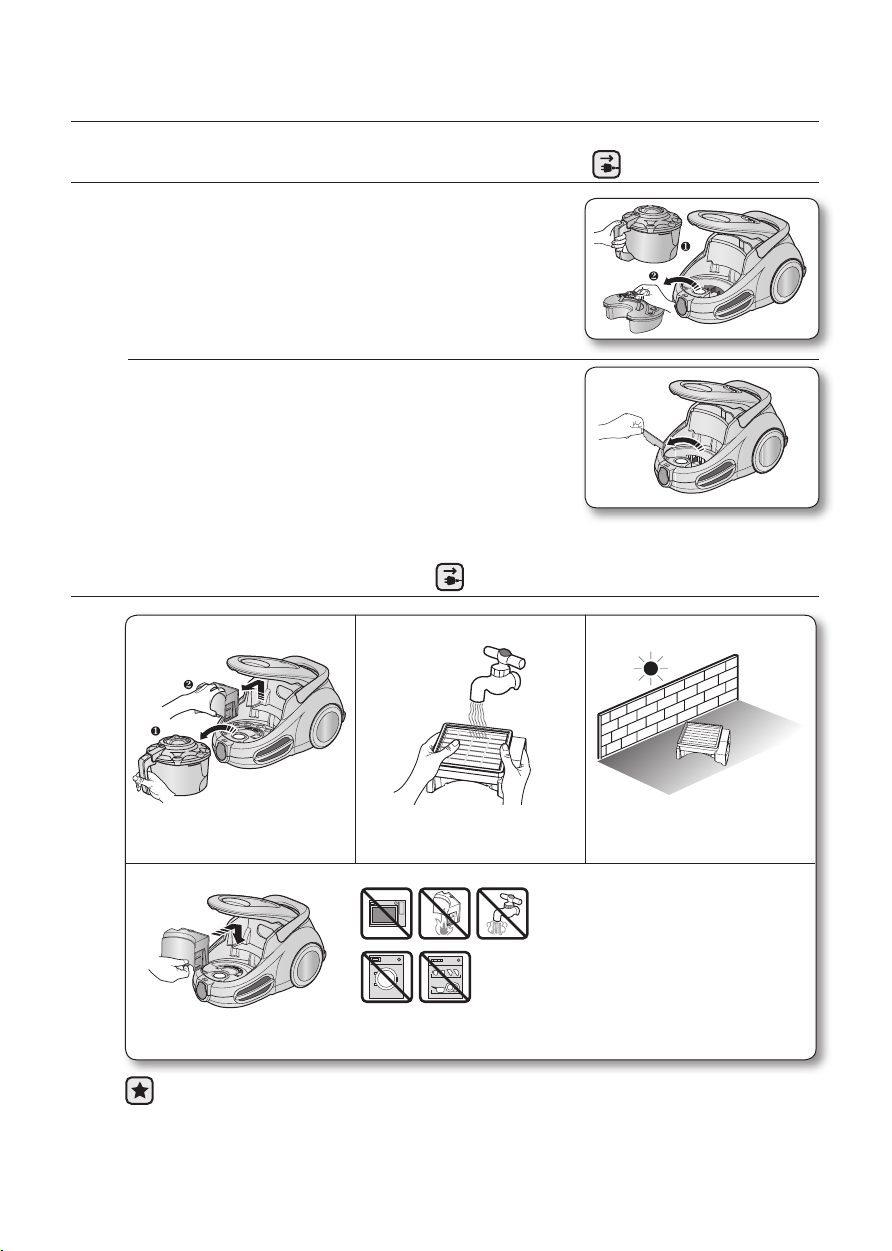
CLEANING THE DUST PACK
WHEN TO CLEAN THE DUST PACK
• The lamp will turn red when suction is reduced. If the
light comes on, please clean the dust pack.
• Turn the vacuum power to
‘MAX’.
Handle ControlBody Control
• If the filter check indicator turns red with
the inlet floating 10cm above flat floor,
clean the dust pack.
When suction is noticeably reduced continuously, please cleaning the dust pack.
12_ maintain tools and filter
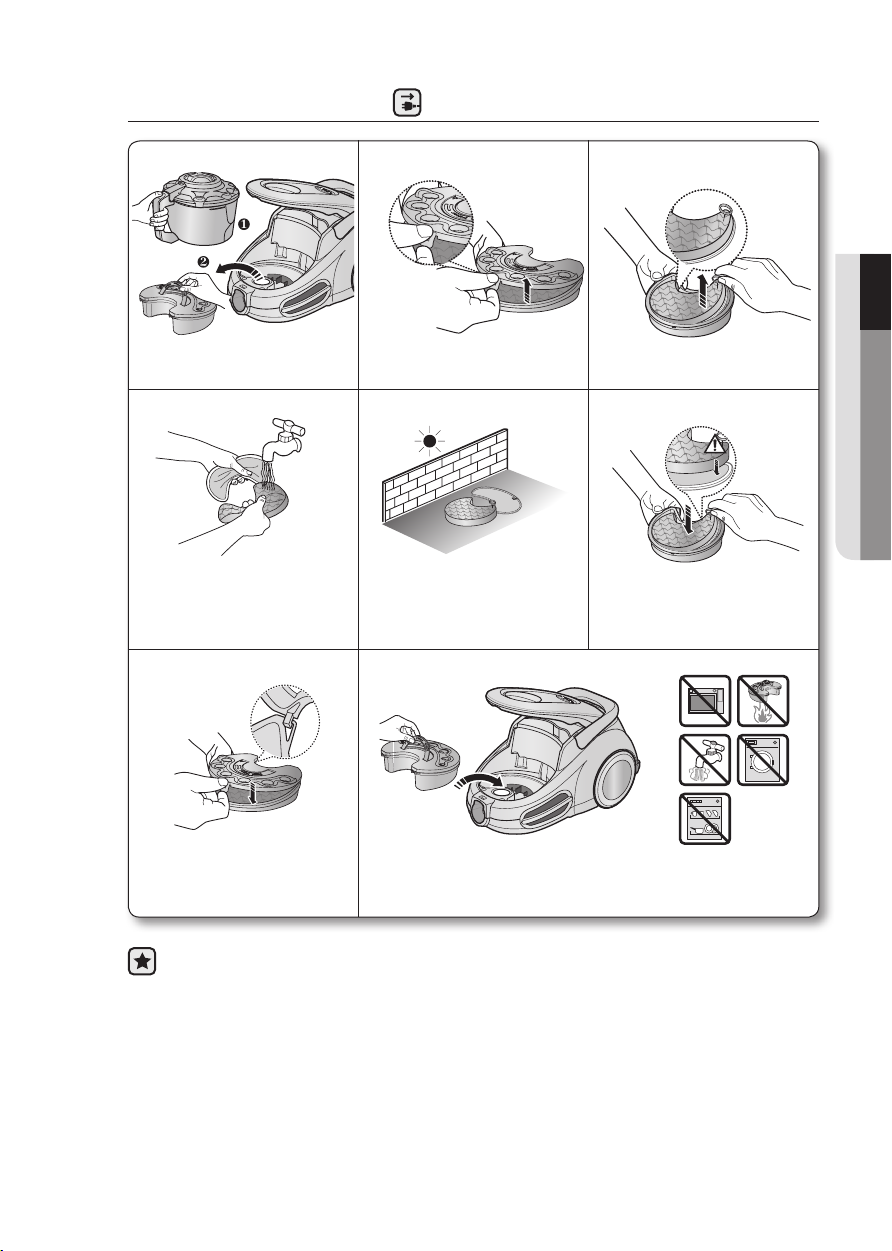
CLEANING THE DUST PACK
1
Remove the dust bin and
dust pack as shown.
4
Wash the sponge and the
filter of the dust pack with
water.
7
2
Remove the fixed frame
of the dust pack cover.
5
Let the sponge and filter dry
in the shade for more than
12 hours.
8
3
03 MAINTAIN TOOLS AND FILTER
Remove the sponge and
filter from the dust pack.
6
Put the sponge and lter into
the dust pack.
Before reassembly, align the
dust pack cover and dust
pack correctly.
Make sure the lter is completely dry before putting it back into the vacuum
cleaner. Allow 12 hours for it to dry.
Put the assembled dust pack into the
main body.
maintain tools and filter _13
maintain tools and filter
CLEANING THE MOTOR PROTECTION FILTER
• Take out both the dust bin and the dust pack.
• Remove the motor protection filter from the mian
body. Shake and tap the dust from it and put back in
machine.
CLEANING THE OUTLET FILTER
1 2 3
Remove the dust bin and
HEPA Filter as shown.
4
Put assemble HEPA Filter into the main body.
Make sure the lter is completely dry before putting it back into the vacuum
cleaner. Allow 12 hours for it to dry.
14_ maintain tools and filter
Clean the HEPA Filter.
Let the HEPA Filter dry in the
shade for more than 12 hours.
maintain tools and filter
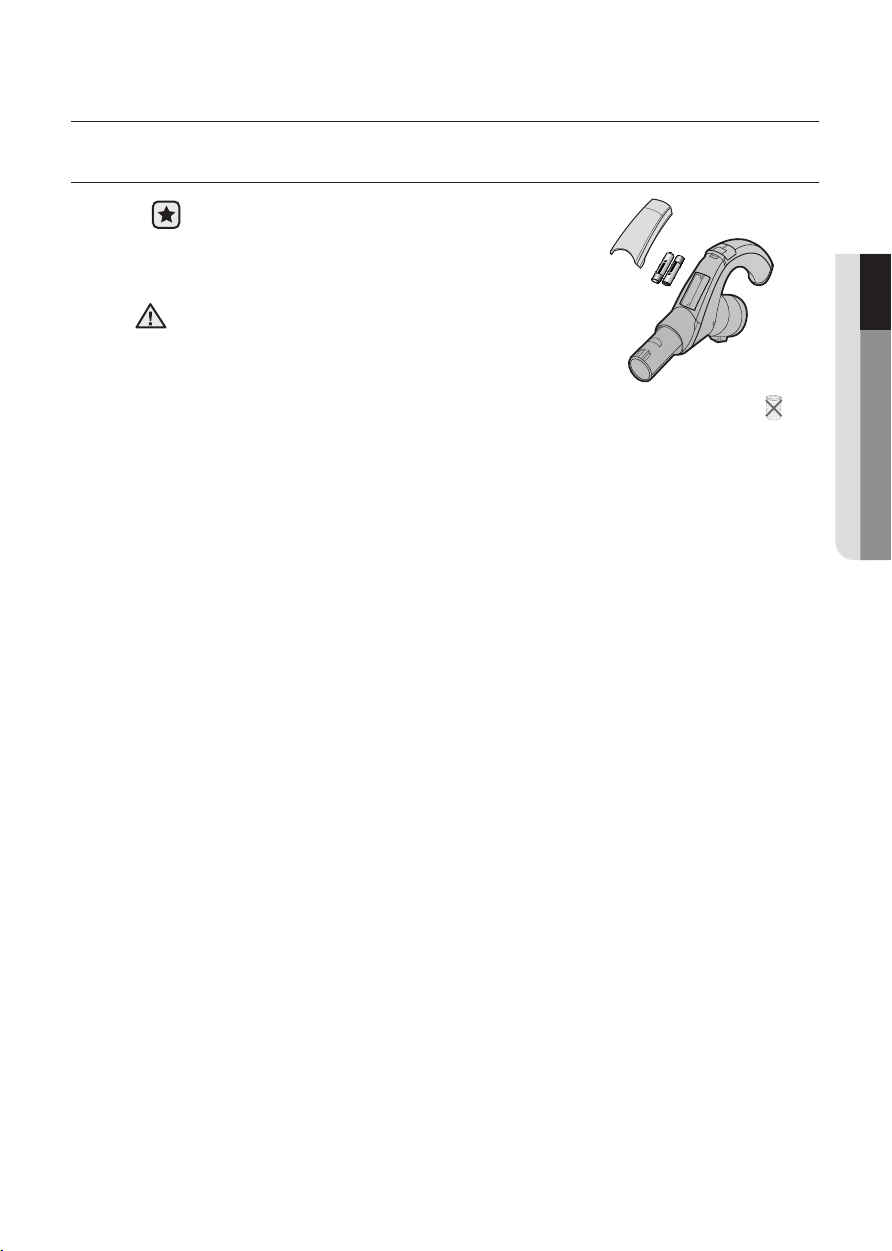
CHANGE THE BATTERY
1. When the vacuum cleaner does not work, replace
the batteries. If the problem persists, please
contact our authorized dealer.
2. Use 2 batteries of size AAA.
1. Never disassemble or recharge the batteries.
CAUTION
2. Never heat up the batteries or throw them into fire.
3. Do not reverse (+), (-) poles.
4. Dispose of the batteries property.
03 MAINTAIN TOOLS AND FILTER
BATTERY TYPE : AAA Size
maintain tools and filter _15

troubleshooting
pROblem sOlUTION
Motor does not start
Suction force is gradually
decreasing
Cord does not rewind fully • Pull the cord out 2-3m and push down the cord rewind button.
Vacuum cleaner does
not pick up dirt
Low or decreasing suction
Body overheating • Please check lters, If required clean as illustrated in the instruction.
Static electicity discharge • Please decrease power suction.
This Vacuum cleaner is approved the following.
EMC Directive : 2004/108/EEC
Low Voltage Directive : 2006/95/EC
• Check cable, pulg and socket.
• Leave to cool.
• Check for blockage and remove.
• Check hose and replace if required.
• Please check lter and, if required, clean as illustrated in the
instructions. if lters are out of condition change them to new ones.
16_ troubleshooting

Dammsugare
bruksanvisning
✻ Läs igenom anvisningarna noggrant innan du använder den här enheten.
✻ Endast för inomhusbruk.
imagine the possibilities
Tack för att du väljer att köpa en produkt från Samsung.
För att få en mer komplett tjänst, registrera
produkten på adressen
www.samsung.com/register
Svenska
säkerhetsinformation
SÄKERHETSINFORMATION
•
VARNING
VARNING
Innan du använder enheten ska du läsa igenom bruksanvisningen noggrant
och spara den för framtida referens.
•
Eftersom de här anvisningarna täcker flera olika modeller kan egenskaperna
hos din dammsugare variera något från de som beskrivs i den här
bruksanvisningen.
SYMBOLER SOM ANVÄNDS FÖR VAR FÖRSIKTIG/VARNING
VARNING
VAR fÖRsIKTIG
Indikerar att det finns risk för dödsfall eller allvarlig skada.
Indikerar att det finns risk för personskada eller materialskada.
ANDRA SYMBOLER SOM ANVÄNDS
Representerar något du INTE får göra.
Representerar något du måste följa.
Indikerar att du måste koppla ur strömkontakten ur uttaget.
2_ säkerhetsinformation

säkerhetsinformation
VIKTIGA SÄKERHETSFÖRESKRIFTER
1. Läs instruktionerna noggrant. Innan du slår på dammsugaren ska du se till
att spänningen i el-källan är samma som den som anges på märkplattan på
dammsugarens undersida.
2. VARNING : Använd inte dammsugaren när mattan eller golvet är vått.
Använd den inte för att suga upp vatten.
3. Noggrann övervakning krävs när en enhet används av eller i närheten av barn. Låt inte
dammsugaren användas som en leksak. Låt inte dammsugaren gå utan att någon
övervakar den. Använd bara dammsugaren för avsett syfte, enligt vad som beskrivs i
de här anvisningarna.
4. Använd inte dammsugaren utan en dammbehållare. Töm dammbehållaren innan den
är full för att bibehålla bästa effekt.
5. Använd inte dammsugaren för att plocka upp tändstickor, brinnande aska eller
cigarettfimpar. Håll dammsugaren på avstånd från spisar och andra värmekällor. Hetta
kan deformera och missfärga enhetens plastdelar.
6. Undvik att plocka upp hårda, vassa föremål med dammsugaren, eftersom de kan
skada dammsugarens delar. Stå inte på slangen. Anlägg ingen vikt mot slangen.
Blockera inte in- eller utsug.
7. Slå av dammsugaren på huvudenheten innan du kopplar ur den ur el-uttaget. Koppla
ur kontakten från el-uttaget innan du tömmer dammbehållaren. För att undvika skador
ska du ta ur kontakten genom att dra i själva kontakten och inte i sladden.
8. Den här enheten är inte avsedd att användas av några personer (inklusive barn)
med nedsatt fysisk, psykisk eller mental förmåga, eller avsaknad av erfarenhet och
kunskap, om personen eller personerna inte har någon som övervakar och instruerar
angående enhetsanvändningen av en person som ansvarar för deras säkerhet.
9. Barn ska övervakas för att säkerställa att de inte leker med enheten.
10. Kontakten måste tas ur el-uttaget före rengöring eller underhåll av enheten.
11. Användning av förlängningssladd rekommenderas ej.
12. Om dammsugaren inte fungerar som den ska slår du av strömmen och kontaktar ett
behörigt serviceombud.
13. Om strömsladden skadas måste den bytas av tillverkaren eller dess serviceombud
eller en liknande behörig person för att undvika skada.
14. Bär inte dammsugaren i slangen.
Använd handtaget på enheten.
15. Dra ur kontakten när dammsugaren inte används. Slå av strömbrytaren innan du drar
ur kontakten.
säkerhetsinformation _3

innehåll
mONTeRA dAmmsUGAReNsflb
05
ANVäNdA dAmmsUGAReNsflb
06
fÖRVARA VeRKTYG
OCh fIlTeRsflb
08
felsÖKNINGsflb
16
05 Montera dammsugaren
06 Strömsladd
06 Strömkontroll
08 Använda tillbehör
09 Förvara golvverktyg
11 Tömma dammbehållaren
12 Rengöra dammsatsen
14 Rengöra motorskyddsfiltret
14 Rengöra utloppsfiltret
15 Ladda batteriet
4_ innehåll
montera dammsugaren
01 MONTERA DAMMSUGAREN
TILLVAL
• Tryck inte på knappen på
dammbehållarens handtag när
du bär maskinen.
• För förvaring, parkera golvmunstycket.
montera dammsugaren _5
använda dammsugaren
STRÖMSLADD
• När du drar ur kontakten ur el-uttaget ska du dra i kontakten,
VAR fÖRsIKTIG
POWER CONTROL (STRÖMKONTROLL) (INFRARÖD KONTROLL)
inte i sladden.
- slANG
1. Dammsugarens ON/OFF(PÅ/AV)-knapp (
Tryck på ON/OFF(PÅ/AV)-knappen för att
använda dammsugaren. Tryck igen för att
stänga av dammsugaren.
2. Dammsugarens effekt (-,+)
Tryck på knappen MODE (LÄGE) era gånger
för att välja önskat läge.
(ON (PÅ)) MIN → MID → MAX
)
Handtagskontroll
Dammsugaren styrs med hjälp av infra-
röda signaler.
sändare
3. Använda autoläget
Tryck på knappen Auto för att använda dammsugarens automatiska funktion.
Täck inte över handtagssändaren när du använder en hantagskontrollknapp.
6_ använda dammsugaren
- eNheT
POWER CONTROL
Tryck på strömkontroll flera gånger för att välja
önskat läge.
(ON (PÅ)(MAX) → OFF (AV))
Om fjärrkontrollen inte fungerar kan
dammsugaren styras med hjälp av
kontrollknappen på dammsugarenheten.
IR-ljuset visar vilken del som tar emot den infraröda signalen från
handtagskontrollen.
Filterljuset tänds när dammsatsen kräver kontroll eller tömning. En ljudsignal
hörs också.
Detta indikerar att det automatiska sugläget är valt. Sugnivån anges på LEDskärmen.
(STRÖMKONTROLL)
02 ANVÄNDA DAMMSUGAREN
använda dammsugaren _7

förvara verktyg och filter
ANVÄNDA TILLBEHÖR
Tillbehör
• Dra ut tillbehörsdelen på
slanghandtaget.
• Om du vill använda dammverktyget
trycker du in tillbehöret i ena änden
av slanghandtaget.
• Om du vill använda textiltyget trycker
du in tillbehöret i ena änden av
slanghandtaget.
Rör
• Justera längden på det teleskopiska röret genom att
vrida längdkontrollknappen som sitter i mitten av det
teleskopiska röret fram och tillbaka.
• För att kontrollera blockeringar, separera det
teleskopiska röret och justera för att förkorta. Detta
medger enklare borttagning av avfall som sätter igen
röret.
8_ förvara verktyg och lter
 Loading...