

Page 1
Operating Instructions
VACUUM CLEANER
❈
Before operating this unit, please read the instructions carefully.
❈ Indoor use only.
Register your product at www.samsung.com/global/register
Page 2

IMPORTANT SAFEGUARDS
1. Read all instructions carefully. Before switching on, make sure that the voltage of your
electricity supply is the same as that indicated on the rating plate on the bottom of the
cleaner.
2. WARNING : Do not use the vacuum cleaner when rug or floor is wet.
3. Close supervision is necessary when any appliance is used by or near children. Do
not allow the vacuum cleaner to be used as a toy. Do not allow the vacuum cleaner to
run unattended at any time. Use the vacuum cleaner only for its intended use as
described in these instructions.
4. Do not use the vacuum cleaner without a dust bin. Empty the dust bin before it is full in
order to maintain the best efficiency.
5. Slide to the Stop (or Min)position before inserting a plug into the electrical outlet.
6. Do not use the vacuum cleaner to pick up matches, live ashes or cigarette butts. Keep
the vacuum cleaner away from stoves and other heat sources. Heat can deform and
discolour the plastic parts of the unit.
7. Avoid picking up hard, sharp objects with the vacuum cleaner as they may damage
the cleaner parts. Do not stand on the hose assembly. Do not put weight on the hose.
Do not block the suction or the exhaust port.
8. Switch the vacuum cleaner off on the body of the machine before unplugging from the
electrical outlet. Disconnect the plug from the electrical outlet before changing the dust
bag or dust container. To avoid damage, please remove the plug by grasping the plug
itself, not by pulling on the cord.
9. This appliance is not intended for use by young children or infirm persons without
supervision unless they are adequately supervised by a responsible person to ensure
that they can use the appliance safely. Young children should be supervised to ensure
that they do not play with the appliance.
10. The plug must be removed from the socket outlet before cleaning or maintaining the
appliance.
11. The use of an extension cord is not recommended.
12. If your vacuum cleaner is not operating correctly, switch off the power supply and
consult an authorized service agent.
13. If the supply cord is damaged, it must be replaced by the manufacturer or its service
agent or a similarly qualified person in order to avoid a hazard.
14. Don’t carry the vacuum cleaner by holding the hose.
Use the handle on the vacuum cleaner set.
Do not use to suck up water.
1
Page 3
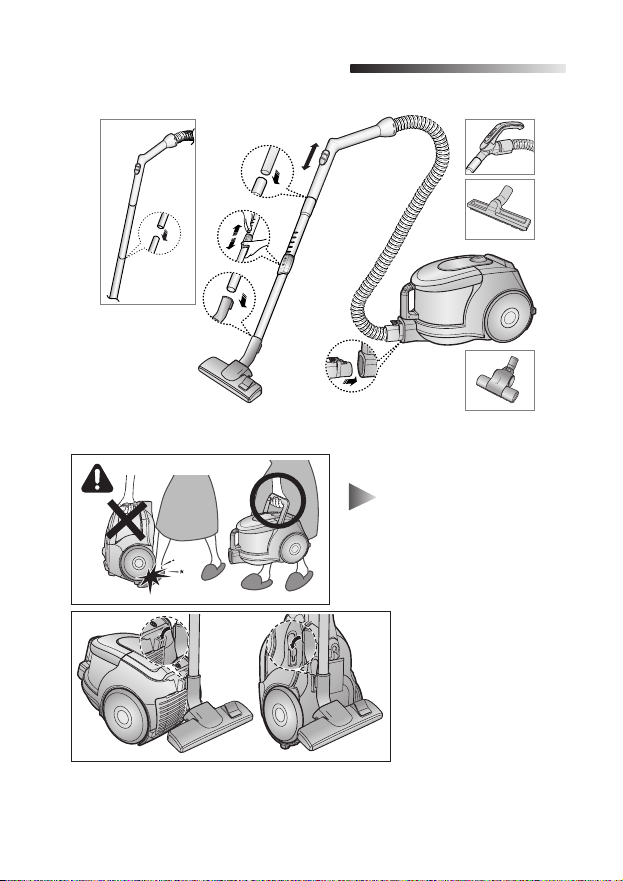
ASSEMBLING THE CLEANER
1
Features may vary according to model.
▼
OPTIONOPTION
CAUTION
Please do not press the button of
dust bin handle when carrying
machine.
For storage, park the floor
nozzle.
2
Page 4
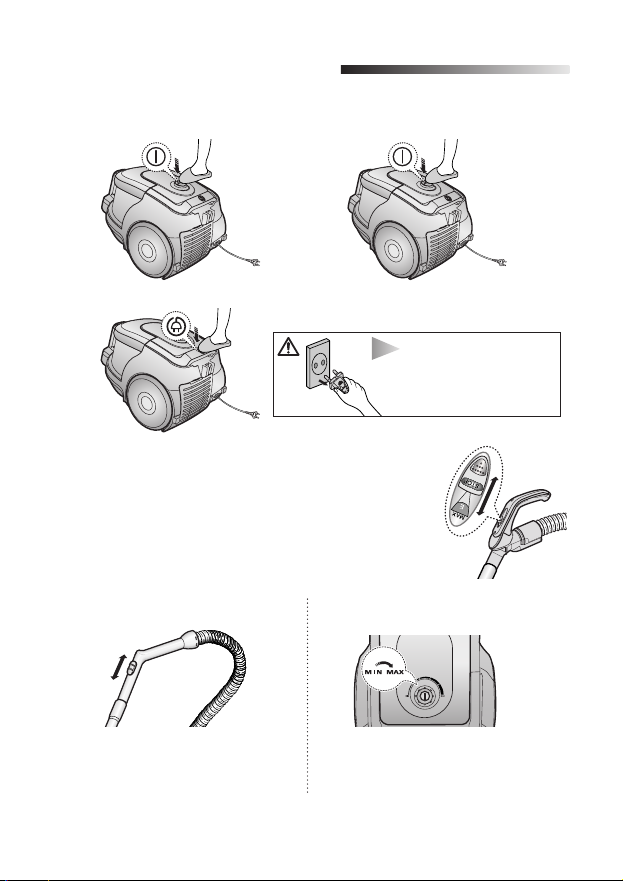
OPERATING THE CLEANER
2
2-1 ON/OFF SWITCH
1) BODY CONTROL TYPE
2) ON/OFF TYPE
2-2 POWER CORD
NOTE
When removing the plug from
the electrical outlet, grasp the
plug, not the cord.
2-3 POWER-CONTROL
1) SILDE CONTROL TYPE ONLY (Optional)
• SLIDE TO THE STOP POSITION
Vacuum-cleaner switches off (stand by mode)
• SLIDE FORWARD TO MAX
Suction capacity increases smoothly up to maximum.
2) BODY-CONTROL TYPE / ON/OFF TYPE
- HOSE - BODY (BODY-CONTROL TYPE ONLY)
To reduce suction for cleaning draperies,
small rugs, and other light fabrics, pull the
tap air until the hole is open.
3
MIN = For delicate surface e.g. net curtains.
MAX = For hard floors and heavily soiled
carpets.
Page 5
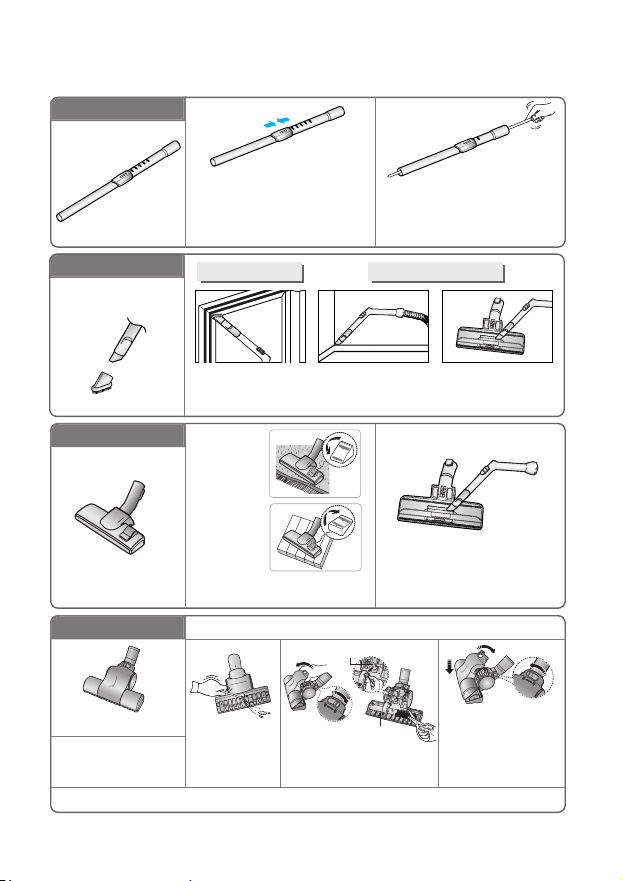
2-4 HOW TO USE AND MAINTAIN THE ACCESSORIES
Features may vary according to model.
▼
PIPE
Adjust the length of the telescopic
pipe by sliding the length control
button located in the center of the
telescopic pipe back and forth.
ACCESSORY
OPTION
OPTION
Brush for blanket
For picking up pet hair
and fibre on upholstery
and bed linen.
Warning : Use for bedclothes only. Be cautious not to damage brush during unclogging.
DUSTING BRUSH CREVICE TOOL
Dusting brush for
furniture. shelves,
books, etc.
Carpet
Cleaning
Floor
Cleaning
Adjust the inlet lever according to
the floor surface.
Clogs on turbine keep brush from turning, thus need to be unclogged as follows.
Remove waste
matter
completely when
inlet is blocked.
Turn the lock button to
‘UNLOCK’, and remove
waste matter.
To check for blockages, separate
the telescopic pipe and adjust to
shorten. This allows for easier
removal of waste clogging the tube.
Crevice tool for radiators,
crevices, corners, between
cushions.
Remove waste matter
completely if the inlet is blocked.
Turbine
Brush
For efficiency. clean
Floor Nozzle with
Crevice Tool.
To reassemble, align the
cover to the front of the
main body and close. After
closing the cover, ensure
that the lock button is turned
to the ‘LOCK’ position.
4
Page 6
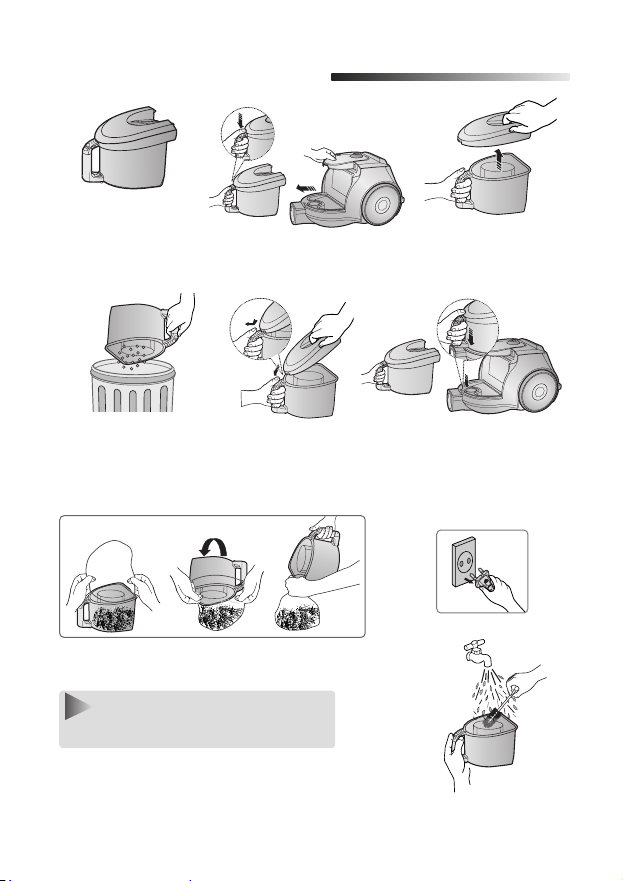
EMPTYING THE DUST BIN
3
1
Once dust reaches the
dust full mark, or sution
is noticeably reduced
during cleaning, empty
the dust bin.
45 6
23
Take the dust bin out by
pressing the button.
Separate the dust bin
cover.
Throw away dust into
the bin.
- Empty into a plastic bag
(recommended for asthma/allergy sufferers)
NOTE
You may rinse the dust bin with cold water.
Close the dust bin
cover.
Before use, push the dust bin
into the main body of the
vacuum cleaner until you hear
the "click" sound.
5
Page 7
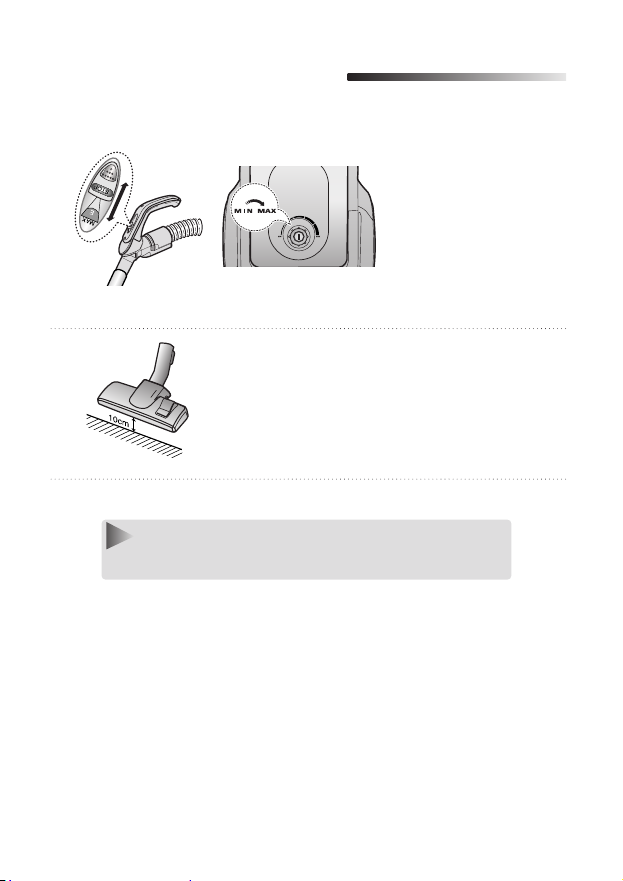
CLEANING THE DUST PACK
4
4-1. WHEN TO CLEAN THE DUST PACK
- If suction is noticeably reduced during cleaning, please check the dust pack as indicated
below.
Turn the vacuum power to
'MAX'
HANDLE CONTROL
If suction is noticeably reduced with the inlet floating
10cm above flat floor, clean it.
NOTE
When suction is noticeably reduced continuously,
please empty the Dust Pack(4-2) as shown in the following illustration.
6
Page 8
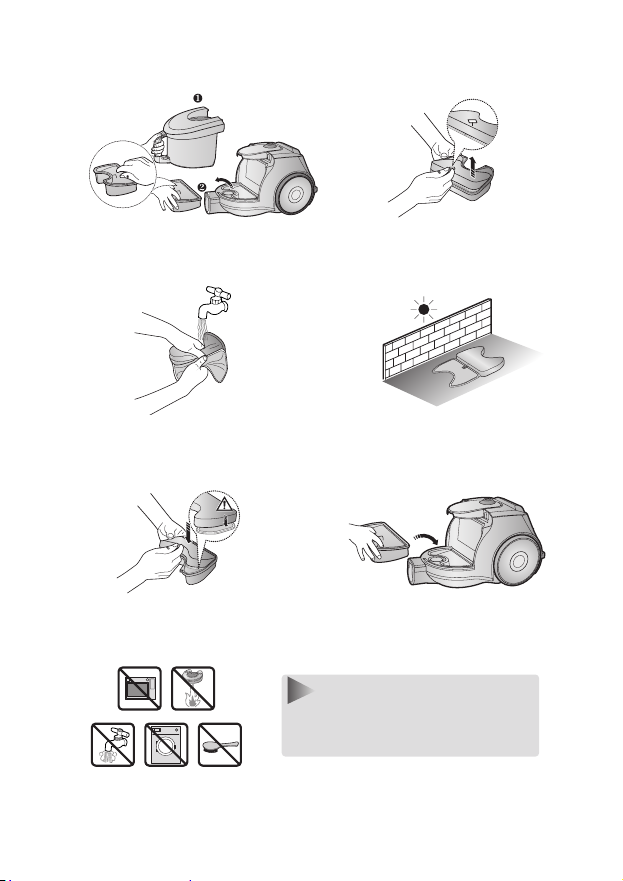
4-2 CLEANING THE DUST PACK
12
Remove the dust bin and dust pack as
shown.
34
Wash the sponge and the filter of the dust
pack with water.
56
Put the sponge and filter into the dust
pack.
Remove the sponge and filter from
the dust pack
Let the sponge and filter dry in the
shade for more than 12 hours.
Put the assembled dust pack
into the main body.
NOTE :
Make sure the filter is completely
dry before putting it back into the
vacuum cleaner. Allow 12 hours for
it to dry.
7
Page 9
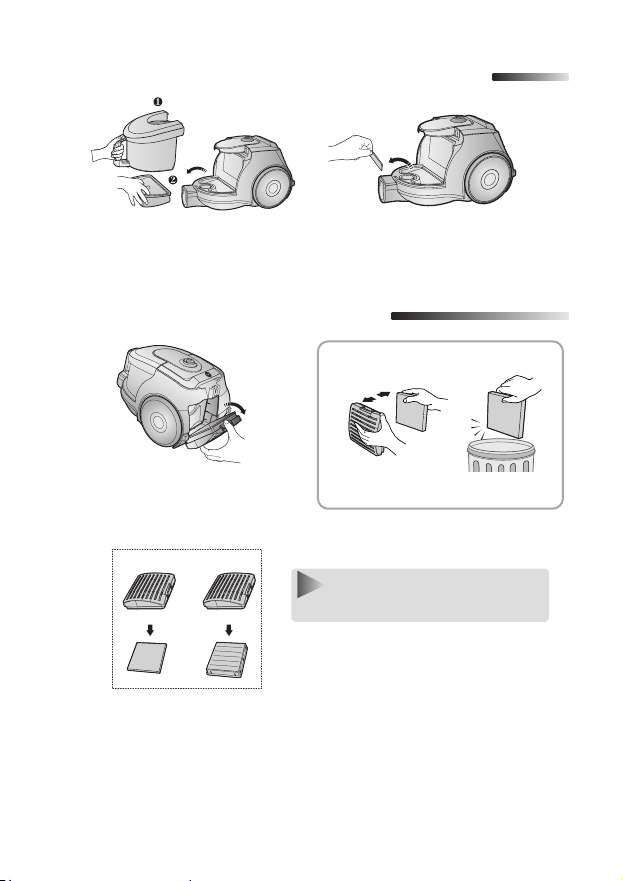
CLEANING THE MOTOR PROTECTION FILTER
5
Take out both the dust bin and the dust
pack.
CLEANING THE OUTLET FILTER
6
Press the fixed frame part at the
back of the main body to
remove.
OPTION
NOTE :
Remove the motor protection filter from the
vacuum cleaner.
Shake and tap the dust from it and put
back in machine.
OPTION - MICRO FILTER
Remove and replace the blocked outlet
filter.
Replacement filters are available at
your local Samsung distributor.
8
Page 10
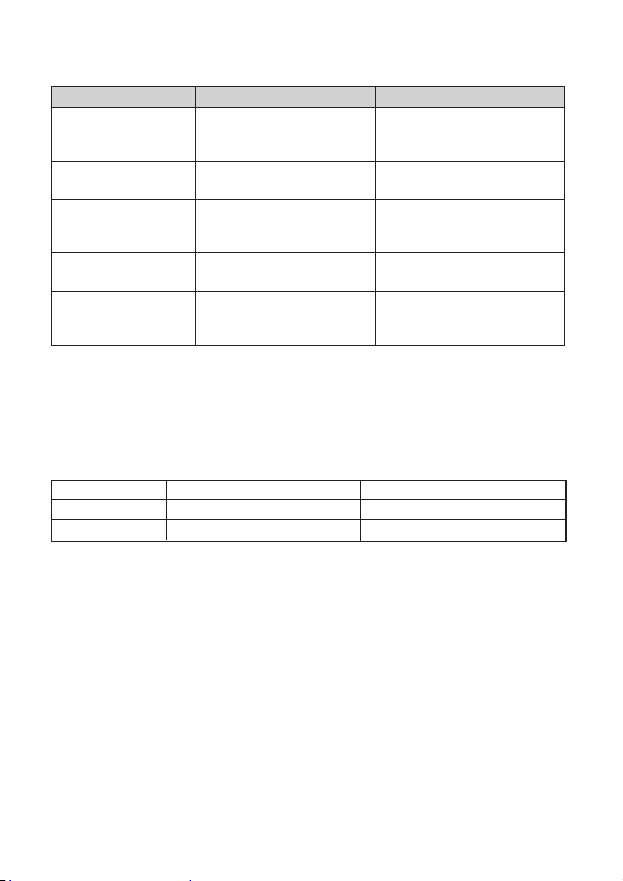
- IF YOU HAVE A PROBLEM
PROBLEM CAUSE REMEDY 0
Motor does not start.
No power supply.
Thermal cut-out.
Check cable, plug and socket.
Leave to cool.
Suction force is gradually
decreasing.
Cord does not rewind
fully.
Vacuum cleaner does
not pick up dirt.
Low or decreasing
suction
Nozzle, suction hose or tube
is blocked.
Check that the cord is not
twisted or wound unevenly.
Crack or hole in hose.
Filter is full of dust.
Check for blockage and
remove it.
Pull the cord out 2-3m and
push the cord rewind button.
Check hose and replace if
required.
Please check filter and, if
necessary, clean as illustrated
in the instructions.
This Vacuum cleaner is approved the following.
EMC Directive : 2004/108/EEC
Low Voltage Directive : 2006/95/EC
If you have any comments or questions regarding a Samsung products,
contact the SAMSUNG customer care center.
Country
U.K
SOUTH AFRICA
Customer Care Center ☎
0845-SAMSUNG(726-7864)
0860 7267864 (SAMSUNG)
Web Site
www.samsung.com
www.samsung.com
9
Page 11
MM EE MM OO
Page 12
MM EE MM OO
Page 13
MM EE MM OO
Page 14
MM EE MM OO
Page 15
MM EE MM OO
Page 16

DJ68-00387A REV(0.3)
 Loading...