

Samsung SAMTRON 56E, SAMTRON 56V User Manual

USER’S MANUAL
38cm (15”) Color Monitor
56E/56V
56E56V.Cover.auto.fm Page 1 Wednesday, November 8, 2000 4:38 PM
Information in this document is subject to change without notice.
© 2001 Samsung Electronics Co., Ltd. All rights reserved.
Reproduction in any manner whatsoever without the written permission of Samsung Electronics Co.,
Ltd. is strictly forbidden.
Samsung Electronics Co., Ltd. shall not be liable for errors contained herein or for incidental or
consequential damages in connection with the furnishing, performance, or use of this material.
The SAMTRON logo is registered trademark of Samsung Electronics Co., Ltd.; Microsoft, Windows
®
and Windows
®
NT are registered trademarks of Microsoft Corporation; VESA, DPMS and DDC are
registered trademarks of Video Electronics Standard Association; the E
NERGY
S
TAR
name and logo are
registered trademarks of the U.S. Environmental Protection Agency (EPA). As an E
NERGY
S
TAR
Partner,
Samsung Electronics Co., Ltd. has determined that this product meets the E
NERGY
S
TAR
guidelines for
energy efficiency. All other product names mentioned herein may be the trademarks or registered
trademarks of their respective owners.
56E56V.Cover.fm Page 2 Friday, March 23, 2001 10:39 AM
English - 1
FrançaisEspañolDeutschItaliano EnglishPortuguese
Safety Instructions . . . . . . . . . . . . . . . . . . . . . . . . . . . . . . . . . . . . . . . . . . . . . . . . . . . . . . . . . . 2
Your New Monitor . . . . . . . . . . . . . . . . . . . . . . . . . . . . . . . . . . . . . . . . . . . . . . . . . . . . . . . . . . . 3
Connecting Your Monitor . . . . . . . . . . . . . . . . . . . . . . . . . . . . . . . . . . . . . . . . . . . . . . . . . . 3
Front Panel . . . . . . . . . . . . . . . . . . . . . . . . . . . . . . . . . . . . . . . . . . . . . . . . . . . . . . . . . . . . . 4
Direct Access Buttons . . . . . . . . . . . . . . . . . . . . . . . . . . . . . . . . . . . . . . . . . . . . . . . . . . . .4
Operation . . . . . . . . . . . . . . . . . . . . . . . . . . . . . . . . . . . . . . . . . . . . . . . . . . . . . . . . . . . . . . . . . . 5
On Screen Display(OSD) . . . . . . . . . . . . . . . . . . . . . . . . . . . . . . . . . . . . . . . . . . . . . . . . . . . 5
Monitor function control . . . . . . . . . . . . . . . . . . . . . . . . . . . . . . . . . . . . . . . . . . . . . . . . . . . 6
Brightness . . . . . . . . . . . . . . . . . . . . . . . . . . . . . . . . . . . . . . . . . . . . . . . . . . . . . . . . . . .6
Contrast . . . . . . . . . . . . . . . . . . . . . . . . . . . . . . . . . . . . . . . . . . . . . . . . . . . . . . . . . . . .6
Horizontal Position . . . . . . . . . . . . . . . . . . . . . . . . . . . . . . . . . . . . . . . . . . . . . . . . . . . .6
Vertical Position . . . . . . . . . . . . . . . . . . . . . . . . . . . . . . . . . . . . . . . . . . . . . . . . . . . . . . 6
Horizontal Size . . . . . . . . . . . . . . . . . . . . . . . . . . . . . . . . . . . . . . . . . . . . . . . . . . . . . . . 6
Vertical Size . . . . . . . . . . . . . . . . . . . . . . . . . . . . . . . . . . . . . . . . . . . . . . . . . . . . . . . . . .6
Pincushion . . . . . . . . . . . . . . . . . . . . . . . . . . . . . . . . . . . . . . . . . . . . . . . . . . . . . . . . . . .7
Geometry . . . . . . . . . . . . . . . . . . . . . . . . . . . . . . . . . . . . . . . . . . . . . . . . . . . . . . . . . . . 7
Trapezoid . . . . . . . . . . . . . . . . . . . . . . . . . . . . . . . . . . . . . . . . . . . . . . . . . . . . . . . . 7
Parallelogram . . . . . . . . . . . . . . . . . . . . . . . . . . . . . . . . . . . . . . . . . . . . . . . . . . . . . 7
Pinbalance . . . . . . . . . . . . . . . . . . . . . . . . . . . . . . . . . . . . . . . . . . . . . . . . . . . . . . . 7
V-Linearity . . . . . . . . . . . . . . . . . . . . . . . . . . . . . . . . . . . . . . . . . . . . . . . . . . . . . . . 7
Language . . . . . . . . . . . . . . . . . . . . . . . . . . . . . . . . . . . . . . . . . . . . . . . . . . . . . . . . . . . 8
Advanced . . . . . . . . . . . . . . . . . . . . . . . . . . . . . . . . . . . . . . . . . . . . . . . . . . . . . . . . . . . . 8
V- Moiré . . . . . . . . . . . . . . . . . . . . . . . . . . . . . . . . . . . . . . . . . . . . . . . . . . . . . . . . . 8
Video Input Level . . . . . . . . . . . . . . . . . . . . . . . . . . . . . . . . . . . . . . . . . . . . . . . . . . 8
Color Temperature . . . . . . . . . . . . . . . . . . . . . . . . . . . . . . . . . . . . . . . . . . . . . . . . .8
Zoom . . . . . . . . . . . . . . . . . . . . . . . . . . . . . . . . . . . . . . . . . . . . . . . . . . . . . . . . . . . . . . .9
Degauss . . . . . . . . . . . . . . . . . . . . . . . . . . . . . . . . . . . . . . . . . . . . . . . . . . . . . . . . . . . .9
Recall . . . . . . . . . . . . . . . . . . . . . . . . . . . . . . . . . . . . . . . . . . . . . . . . . . . . . . . . . . . . . . 9
Display Timing . . . . . . . . . . . . . . . . . . . . . . . . . . . . . . . . . . . . . . . . . . . . . . . . . . . . . . . . 9
OSD Lock/Unlock. . . . . . . . . . . . . . . . . . . . . . . . . . . . . . . . . . . . . . . . . . . . . . . . . . . . . . 9
Troubleshooting . . . . . . . . . . . . . . . . . . . . . . . . . . . . . . . . . . . . . . . . . . . . . . . . . . . . . . . . . . . . 10
Power Saver . . . . . . . . . . . . . . . . . . . . . . . . . . . . . . . . . . . . . . . . . . . . . . . . . . . . . . . . . . . . . . 11
Display Modes . . . . . . . . . . . . . . . . . . . . . . . . . . . . . . . . . . . . . . . . . . . . . . . . . . . . . . . . . . . . . 11
Specifications . . . . . . . . . . . . . . . . . . . . . . . . . . . . . . . . . . . . . . . . . . . . . . . . . . . . . . . . . . . . . 12
Index . . . . . . . . . . . . . . . . . . . . . . . . . . . . . . . . . . . . . . . . . . . . . . . . . . . . . . . . . . . . . . . . . . . . 13
Regulatory lnformation . . . . . . . . . . . . . . . . . . . . . . . . . . . . . . . . . . . . . . . . . . inside back cover
Table of Contents
TOC.fm Page 1 Saturday, September 22, 2001 8:53 AM
English - 2
Safety Instructions
1
Before connecting the AC power cord
to an outlet, make sure the voltage
designation on your monitor
corresponds to the local electrical
supply.
2
Never insert anything metallic into
the monitor openings. Doing so may
create the danger of electric shock.
3
To avoid electric shock, never touch
the inside of the monitor. Only a
qualified technician should open the
monitor’s case.
4
Never use your monitor if the power
cord has been damaged. Do not
allow anything to rest on the power
cord, and keep the cord away from
areas where people can trip over it.
5
Be sure to hold the plug, not the cord,
when disconnecting the monitor from
an electric socket.
6
Openings in the monitor cabinet are
provided for ventilation. To prevent
overheating, these openings should
not be blocked or covered. Also,
avoid using the monitor on a bed,
sofa, rug, or other soft surface. Doing
so may block the ventilation
openings in the bottom of the
cabinet. If you put the monitor in a
bookcase or some other enclosed
space, be sure to provide adequate
ventilation.
7
Put your monitor in a location with
low humidity and a minimum of dust.
8
Do not expose the monitor to rain or
use it near water (in kitchens, near
swimming pools, etc.). If the monitor
accidentally gets wet, unplug it and
contact an authorized dealer
immediately. You can clean the
monitor with a damp cloth when
necessary, but be sure to unplug the
monitor first.
9
Place the monitor on a solid surface
and treat it carefully. The screen is
made of glass and can be damaged if
dropped, hit or scratched.
10
Locate your monitor near an easily
accessible AC outlet.
11
If your monitor does not operate
normally – in particular, if there are
any unusual sounds or smells coming
from it – unplug it immediately and
contact an authorized dealer or
service center.
12
High temperatures can cause
problems. Don’t use your monitor in
direct sunlight, and keep it away
from heaters, stoves, fireplaces, and
other sources of heat.
13
Unplug the monitor when it is going
to be left unused for an extended
period of time.
14
Unplug your monitor from the AC
outlet before any service.
CAUTION
RISK OF ELECTRIC SHOCK
DO NOT OPEN
CAUTION: TO REDUCE THE RISK OF ELECTRIC SHOCK,
DO NOT REMOVE COVER (OR BACK).
NO USER-SERVICEABLE PARTS INSIDE.
REFER SERVICING TO QUALIFIED SERVICE PERSONNEL.
Saf.fm Page 2 Wednesday, November 8, 2000 4:40 PM
English - 3
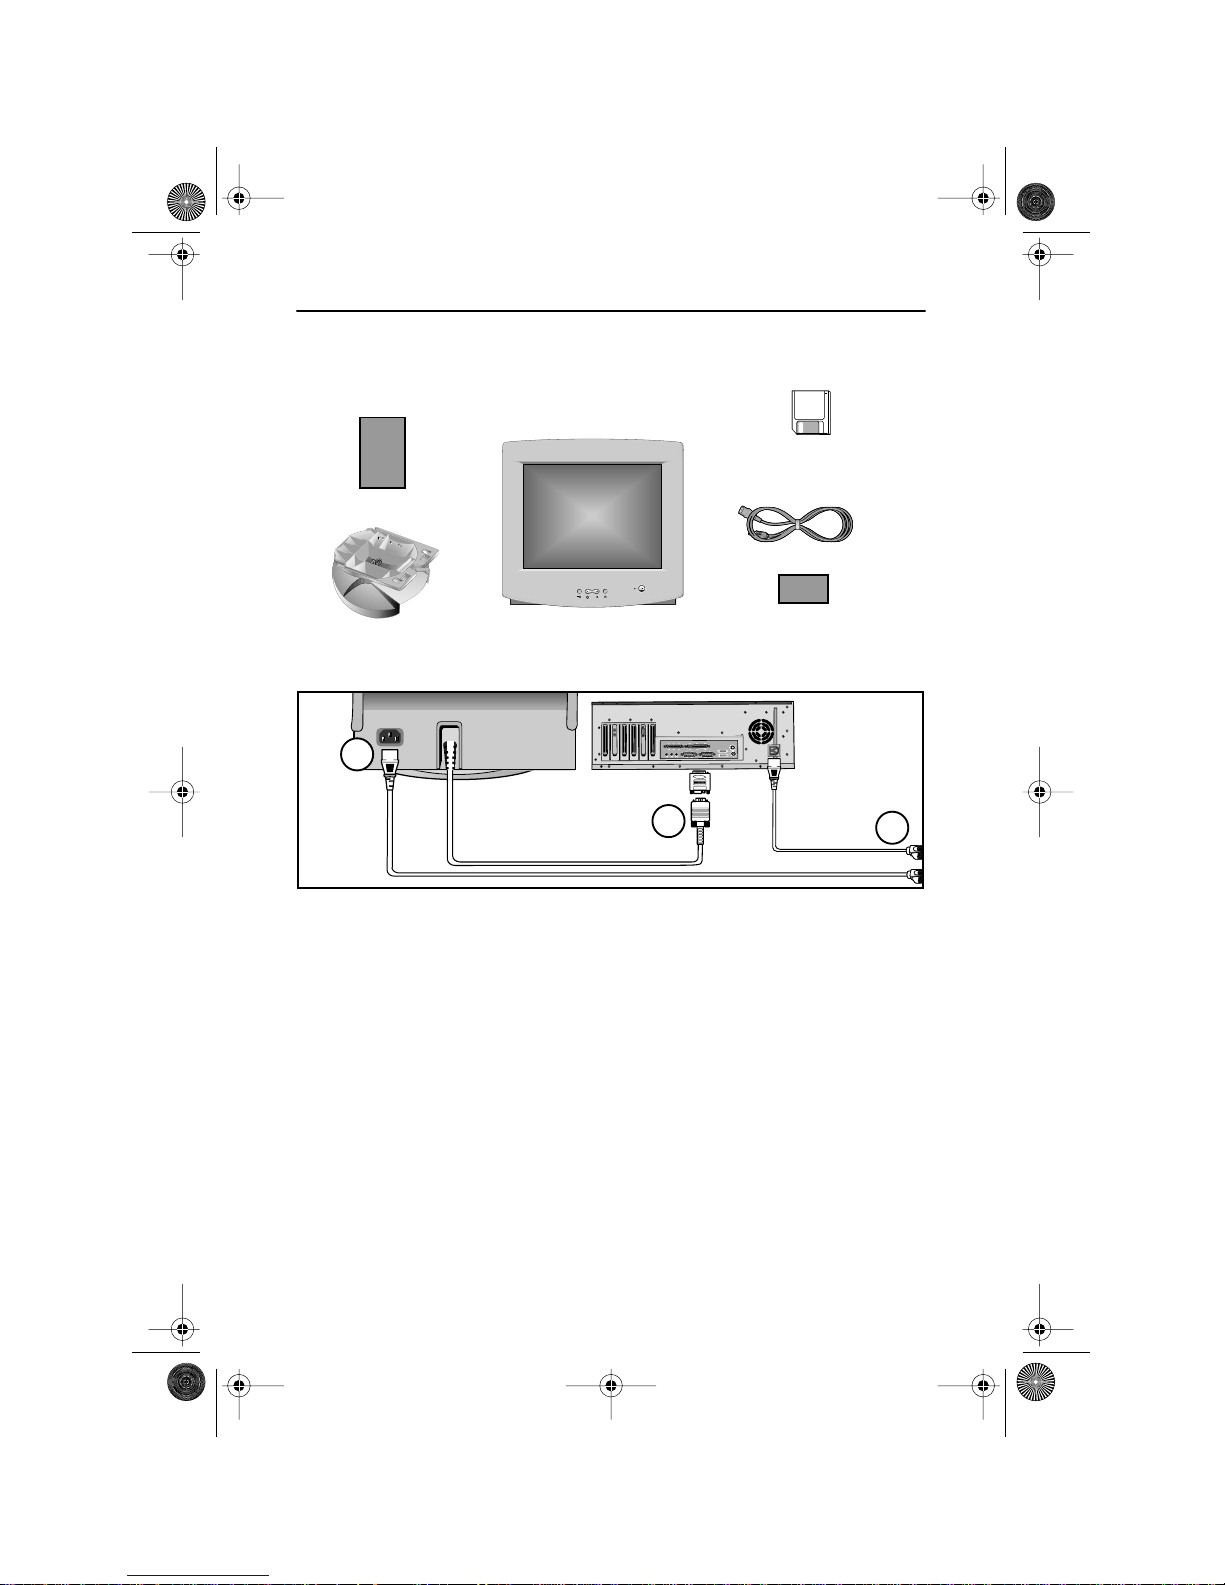
Please make sure the following items are included with your monitor. If any items are
missing, contact your dealer.
Connecting Your Monitor
1
Turn off your computer and unplug
the power cord.
2
Signal cable
Connect the end of the signal cable to
your computer’s video port (Video
board, video card, or graphics card).
If you are using a Macintosh
computer, connect the cable to a
Macintosh adapter, and set the pins
on your adapter (Adapter not
included). A PC-compatible computer
does not need an adapter.
3
Power port
Connect the power cord for your
monitor to the power port on the back
of the monitor.
4
Power cords
Plug the power cord for the monitor
and the power cord for your computer
into a nearby outlet.
5
Turn on your computer and monitor.
If your monitor displays an image,
installation is complete.
6
Install monitor driver
•
Insert the provided diskette into the
A drive.
•
Double click the “install.exe” file.
Manual
Stand
Monitor
Power Cord
Warranty card
(Not available in all locations)
Driver Installation Diskette
(Not available in all locations)
EXIT
EXIT
MENUMENU
MENU
3
2
4
(Adapter not included)
Your New Monitor
3p-4p.fm Page 3 Friday, December 1, 2000 11:05 AM
English - 4
FrançaisEspañolDeutschItaliano EnglishPortuguese
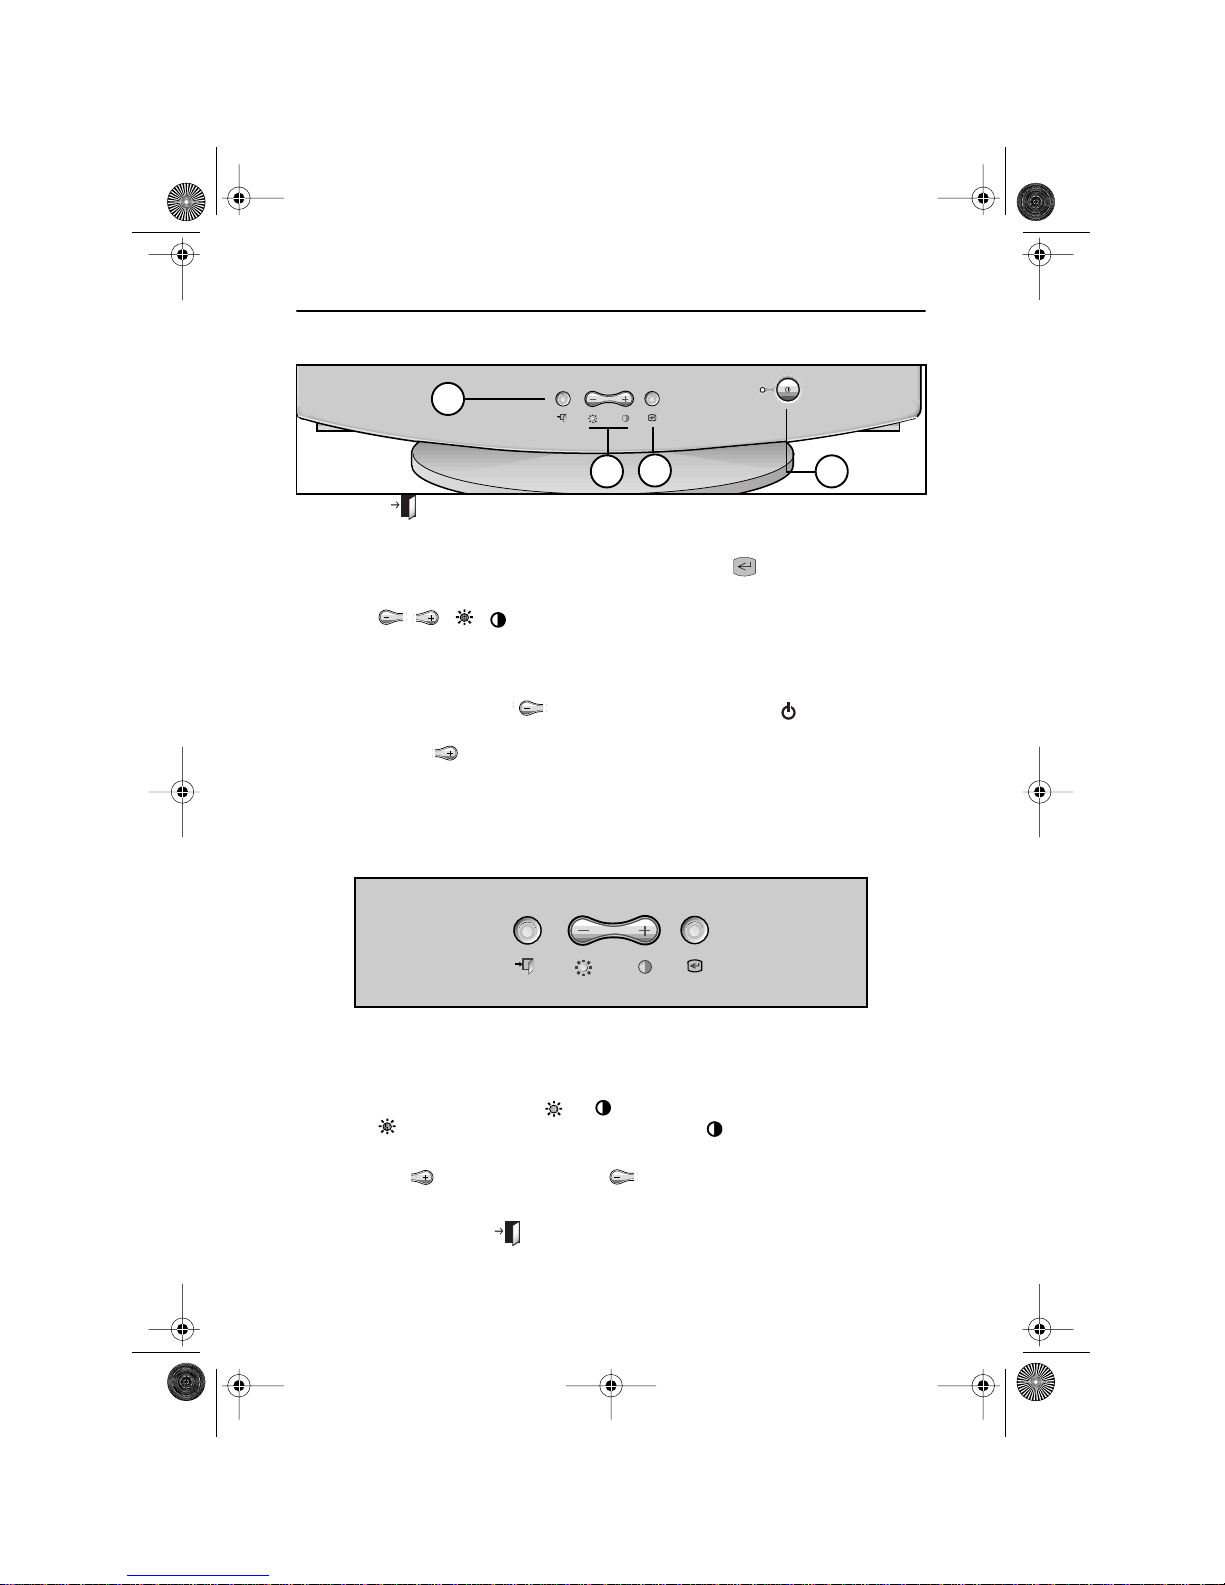
Front Panel
1
EXIT ( ) button
Closes the On Screen Display. It is
also used to return to the previous
menu when using the on-screen
menu system.
2
The / ( / ) buttons
These buttons allow you to select and
adjust items using the on-screen
menu. When adjusting an item using
the on-screen menu, the button
lowers the value of the selected
function. The button raises the
value of the selected function. These
buttons are also direct access buttons
for the Contrast and Brightness
feature controls. (See the section
below on Direct Access Buttons.)
3
MENU ( ) button
Opens the on-screen menu. It is also
used to select a highlighted function,
open a sub-menu, or move between
menus when using the on-screen
menu system.
4
Power button
The power button turns the monitor
on and off. The power indicator light
glows green during normal operation,
see page 11.
Direct Access Buttons
Most of the adjustments you make to your monitor will be accessed through the on-screen
menu described in the next section. The Contrast and Brightness features can also be
accessed directly from the front of your monitor.
1
With the menu off, press the or button on the front of your monitor.
The button accesses the Brightness feature. The button accesses the
Contrast feature.
2
Push the button to increase or the button to decrease the value of the
selection.
3
Press the EXIT button twice to exit the on-screen menu.
EXIT
EXIT
MENU
MENU
1
2
3
4
EXIT
EXIT
MENU
MENU
Your New Monitor
3p-4p.fm Page 4 Friday, December 1, 2000 11:05 AM
 Loading...