

Samsung S860, SAMSUNG D760, EC-S760ZR01K, EC-S860ZPBA, EC-S760ZP01K User Manual
...
$860 $760
fhankyouor buyingaSamsun90a__ea
Thismanual_t guideyoutx_e@ usingthecamea nc_dnf_
cap_.n9sages downoadingmagesandusn9theapp caton sofws e
Pease_eadtis mansaca efulybe!oe usingyou_newcamerx_
]his _Yan._al is based on nodal $860,, ENGLISH

instructions
Use this camera in the following order.
Before connecting the camera to a
PC, via the USB cable, you will need
to set up the camera driver. Insta!l
driver that is contained in
CD-ROM. (p.79)
into
tfthe
t the
ton.
Open Windows's EXPLORER and
search for [Removable Disk]. (p.82)
Getting to Know your camera
Thank you for buying a Samsung Digital Camera.
oPrior to using this camera, please read the user manual thoroughly.
oil you require After Sales service, please bring the camera and the
cause of the camera malfunction (such as battery, Memory card etc.)
to the A/S centre.
oPtease check that the camera is operating properly prior to when you
intend to use it (e.g. for a trip or an important event) to avoid disap-
pointment. Samsung takes no responsibility for any toss or damage
that may result from camera malfunction.
oKeep this manual in a safe place.
oil you use a card reader to copy the images on the memory card to
your PC, the images could be damaged. When transferring the im-
ages taken with the camera to your PC, be sure to use the supplied
USB cable to connect the camera to your PC. Please note that the
manufacturer holds no responsibility for loss or damage of images on
the memory card due to the use of a card reader.
oThe contents and illustrations of this manual are subject to change
without prior notice for upgrading the camera functions.
_Microsoft, Windows and Windows logo are registered trademarks of
Microsoft Corporation incorporated in the United States and/or other
countries.
_Att brand and product names appearing in this manual are registered
trademarks of their respective companies.
Danger Warning
DANGER indicates an imminently hazardous situation which, if not
avoided, will result in death or serious injury.
• Do not attempt to modify this camera in any way. To do so may
result in fire, injury, electric shock or severe damage to you or your
camera, internal inspection, maintenance and repairs should only
be carried out by your dealer or Samsung Camera Service centre.
• Please do not use this prodyct::_ _lose proximity to flammable or
explosive gases, as this c_id increase the risk of explosion.
• Shou d an form of qu d_r afore _n object enter the camera do
Y .....
not use it. Switch off th,e '_am:e_ and':t!-ien disconnect the power
source. You must contact yo r dealer _:_amsung Camera Service
centre. Do not conti _e to use camer:a as this may cause a fire
or ale ctric shock.
• Do not insert or,,dop metalli6 _flammabt_ _oreign ob acts into the
camera throug_ access points e.g. the memo?y card slot and battery
chamber. This
• Do not operate_th,i_ camera with _:t ha_S: This could pose a risk
ofetectricshoc i,' :
WARNING indicates a potentially hazardous situation which, if not
avoided, could result in death or serious injury.
• Do not use the flash in close proximity to people or animals. Position-
ing the flash too close to your subject's eyes may cause eyesight
damage.
• For safety reasons keep this product and accessories out of reach of
children or animals to prevent accidents e.g.:
- Swallowing battery or small camera _pessories. If an accident
should occur, please consult_:a d£$!pr i_nmediately.
- There is the possibility of in_ry fre :the\_#mera's moving parts.
• Batter and camera may b_ome _Otdur n_ pro onged use and t
Y
may result in camera maI_nction. _buld thisbe the case, allow the
camera to sit idle for a _ minute_to allow it t_me to cool.
• Do not leave this cam_a in place #ject to extitemely high tem-
peratures, such as a:_ealed vehici'_ direct sunligl4_ or other places
of extremes in temperature Exposure t,oext-rem_t_mperatures may
heat to build up and distort the camera body or cause a fire. Always
use the camera and its accessories in a welt-ventilated area.
{2}
Caution Contents
CAUTION indicates a potentially hazardous situation which, if not
avoided, may result in a minor or moderate injury.
• Leaking, overheating, or damaged battery could result in fire or injury.
- Use battery with the correct specification for the camera.
- Do not short circuit, heat or dispose of battery in fire.
- Do not insert the battery with the polarities reversed.
• Remove the battery when not pla_[h_ to use the camera for a long
period of time. Otherwise the b#_{ery may leak corrosive electrolyte
and permanently damage the 'araera,';s€0mponents.
• Do not fire the flash while it i_ in d_ct with hands or objects. Do not
touch the flash after using it'conti _sly. tt_ay cause burns.
• Do not move the camere:_hile it i Switched tin, if you are using the
AC Charger. After use 'iwaysswi offthe ca #re before unplug-
ging the cable from t_e wall socket::Then make _re that any connec-
tor cords or cables t0 other devices are disconnec_d before moving
the camera. Failure or cables and
cause a fire or etect_ic _h0¢_., ,,
• Take care not to tou_h i:h en_Qr e_s _ vedtb _ d tak ng an un-
clear image and possibly causing camera malfunction.
• Avoid obstructing the lens or the flash when you capture an image.
• Credit cards may be demagnetized if left near case. Avoid leaving
magnetic strip cards near the case.
• Using an AC adapter that doesn't match with the camera specification
may cause camera malfunction. We recommend supplied battery or
exclusive rechargeable battery.
Available AC adapter :
(_,o_)_) Voltage: 3.3V, Ampere: 2.0A, Diameter: _ 2.35
• After turning on the camera, Check whether the battery type and the
camera setting set on the [Settings] > [Battery Type] menu (p. 49) are
same.
READY
U/
RECORDING
007 System chart
008 identification of features
008 Front & Top
009 Back
010 Bottom / 5 Function button
010 Self-timer tamp
010 Camera Status Lamp
011 Mode icon
011 Connecting to a Power Source
012 Inserting the memory card
013 Instructions on how to use the memory card
015 LCD monitor indicator
016 Starting the recording mode
016 How to use the Auto mode
016 How to use the Program mode
017 How to use the Manual mode
017 How to use the DIS mode
018 Using the Photo Help Guide mode
019 How to use the Portrait mode
019 How to use the Scene modes
020 How to use the Movie clip mode
020 Recording the movie clip without sound
020 Pausing while recording a movie clip
(Successive Recording)
(3}

Contents
(4:)
021 Things to Watch Out for When Taking Pictures
022 Using the camera buttons to set the camera
022 POWER button
022 SHUTTER button
022 ZOOM W / T button
024 Face Detection(FD) button
025 Function Description / Info / Up button
026 Macro / Down button
027 Focus lock
028 Flash / Left button
030 Self-timer/Right button
031 MENU / OK button
032 E (Effect) button
032 E (Effect) button : Cotour
033 Fn button
033 How to use the Fn menu
034 Size
034 Quality / Frame rate
035 Metering
035 Sharpness
036 ISO
036 White balance
037 Exposure compensation
SETUP
Q
038 Using the LCD monitor to adjust the
camera settings
038 Recording
038 Auto Focus type
039 Voice Memo
039 Voice Recording
040 Recording the movie clip without voice
040 SCENE mode
041 Sound menu
041 Sound
041 Volume
041 Start up sound
041 Shutter sound
042 Beep Sound
042 AF sound
042 Self Portrait
042 Setup menu
043 Display
043 Language
044 Setting up the Date / Time / Date type
044 Start up image
044 LCD brightness
045 Quick view
045 LCD save
046 Settings
Contents
PLAY
046 Formatting a memory
046 Initialisation
047 File name
047 imprinting the recording date
048 Auto power off
048 Selecting Video out type
049 Auto Focus lamp
049 Selecting a battery type
050 Starting play mode
050 Playing back a still image
050 Playing back a movie clip
051 Movie clip capture function
051 Playing back a recorded voice
051 Playing back a voice memo
052 LCD monitor indicator
052 Using the camera buttons to set the camera
052 Thumbnail / Enlargement button
054 Info / Up button
054 Play & Pause / Down button
055 Left / Right / Menu / OK button
055 Printer button
055 Delete button
056 E (Effect) button : Resize
057 E (Effect) button : Rotating an image
057 E (Effect) button : Cotour
059 Setting up the play back function using the
LCD monitor
060 Starting the Multi Slide Show
060 Start the Multi Slide Show
061 Selecting Images
061 Configure Multi Slide Show effects
062 Setting ptay interval
062 Setting Background Music
062 Playback
062 Voice memo
063 Deleting images
063 Protecting images
064 DPOF
066 Copy To Card
067 PictBridge
068 PictBridge : Picture Selection
068 PictBridge : Print Setting
069 PictBridge : Reset
069 important notes
071 Warning indicator
072 Before contacting a service centre
074 Specifications
Contents
SOFTWARE
77
077 Software Notes
077 System Requirements
078 About the software
079 Setting up the application software
081 Starting PC mode
084 Removing the removable disk
085 Setting up the USB Driver for MAC
085 Using the USB Driver for MAC
085 Removing the USB Driver for Windows 98SE
086 Samsung Master
089 FAQ
(6)
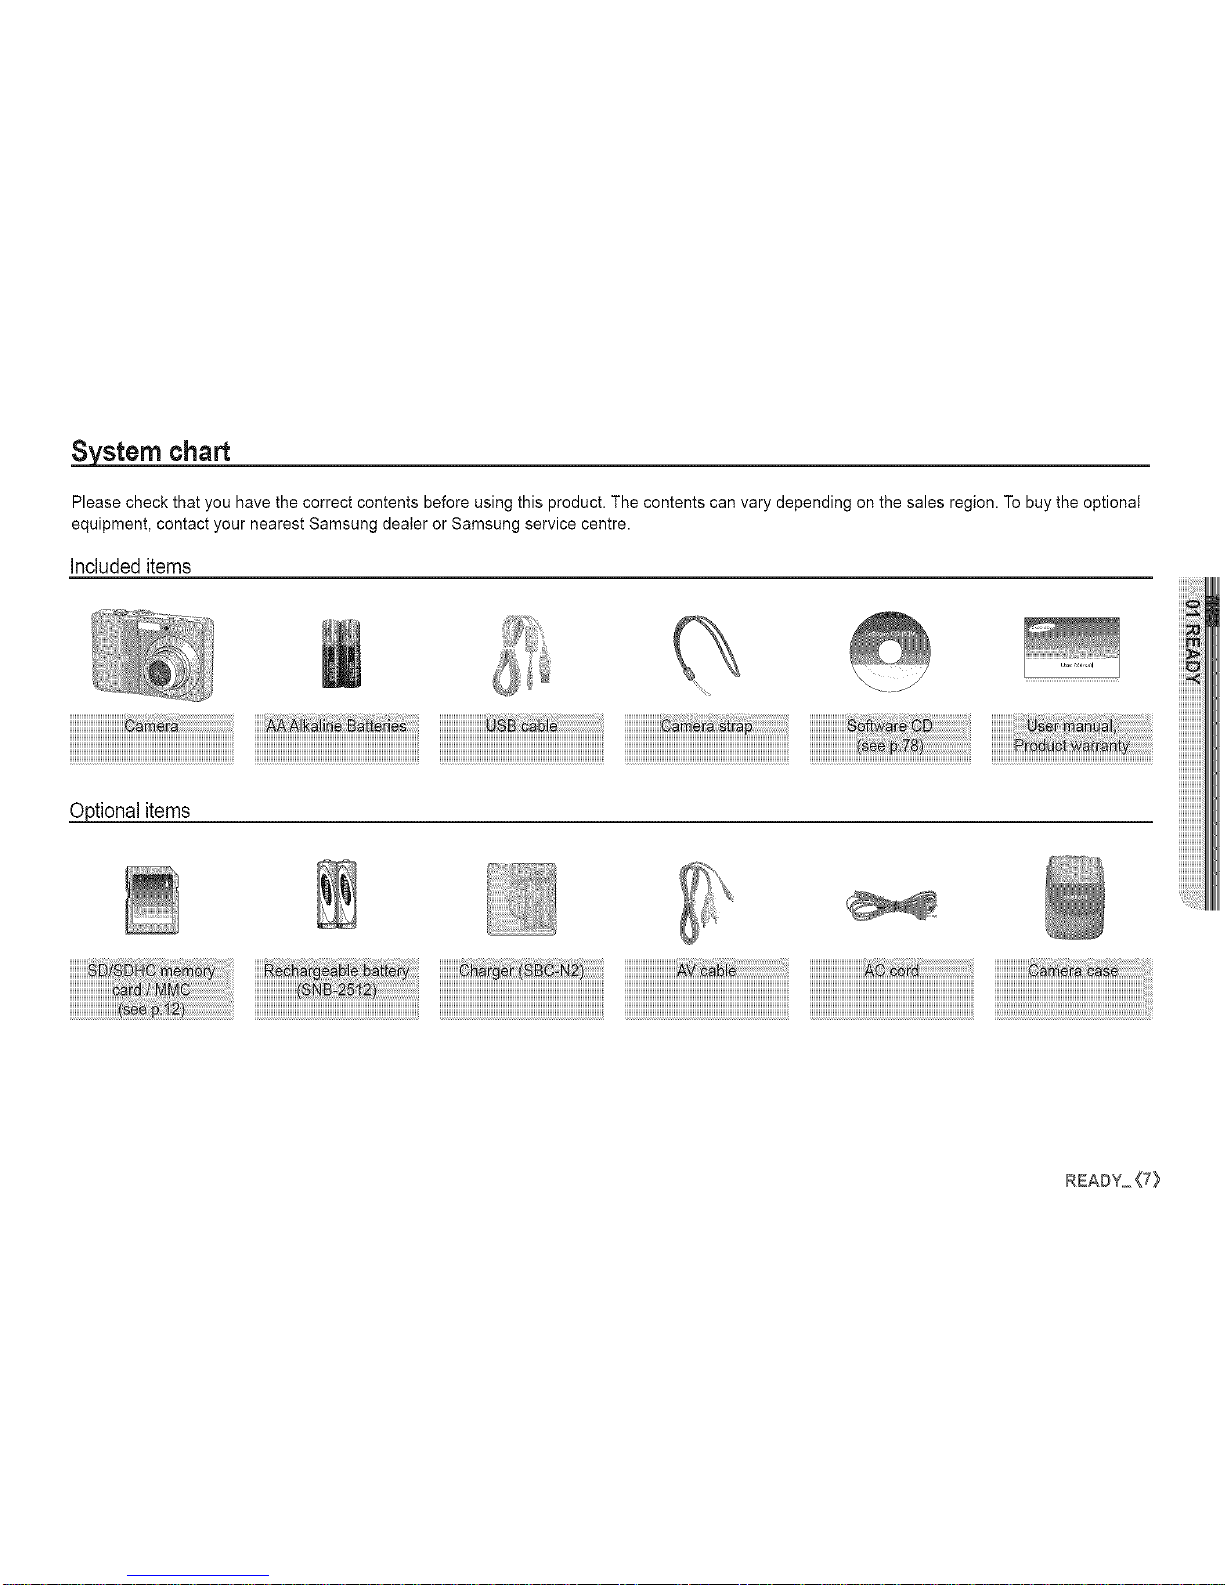
System chart
Please check that you have the correct contents before using this product. The contents can vary depending on the sales region. To buy the optional
equipment, contact your nearest Samsung dealer or Samsung service centre.
Includeditems
Optional items
iiiiiiiiiiiiiiiiiiiiiiiiiiiiii_!_z!_!_!i!_!_i!_i!_i!_i!_i!_i!_i!_i!_i!_i!_i!_i!_i!_i!_i!_i!_i!_i@i!i_i
READY_{7}
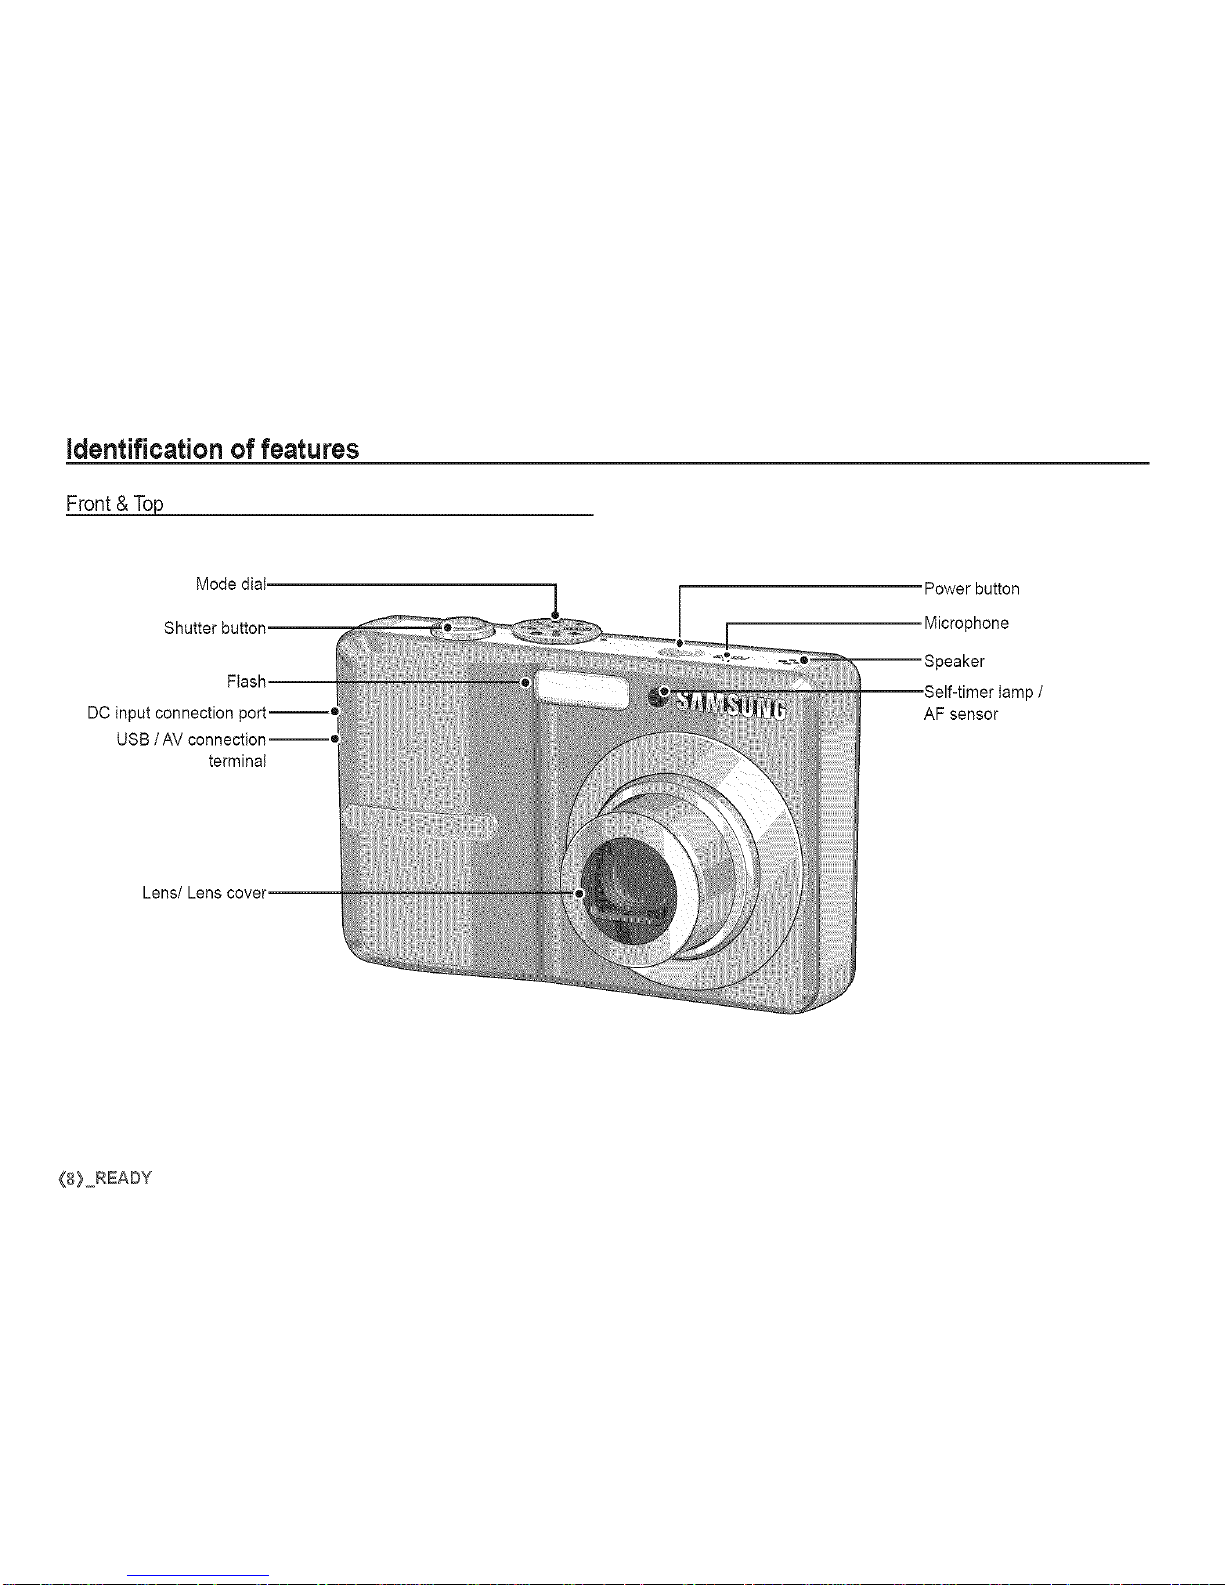
identification of features
Front & Top
Mode dial.
Power button
Microphone
DC input connection port--_
USB /AV connection--_
terminal
tamp /
AF sensor
_8} READY
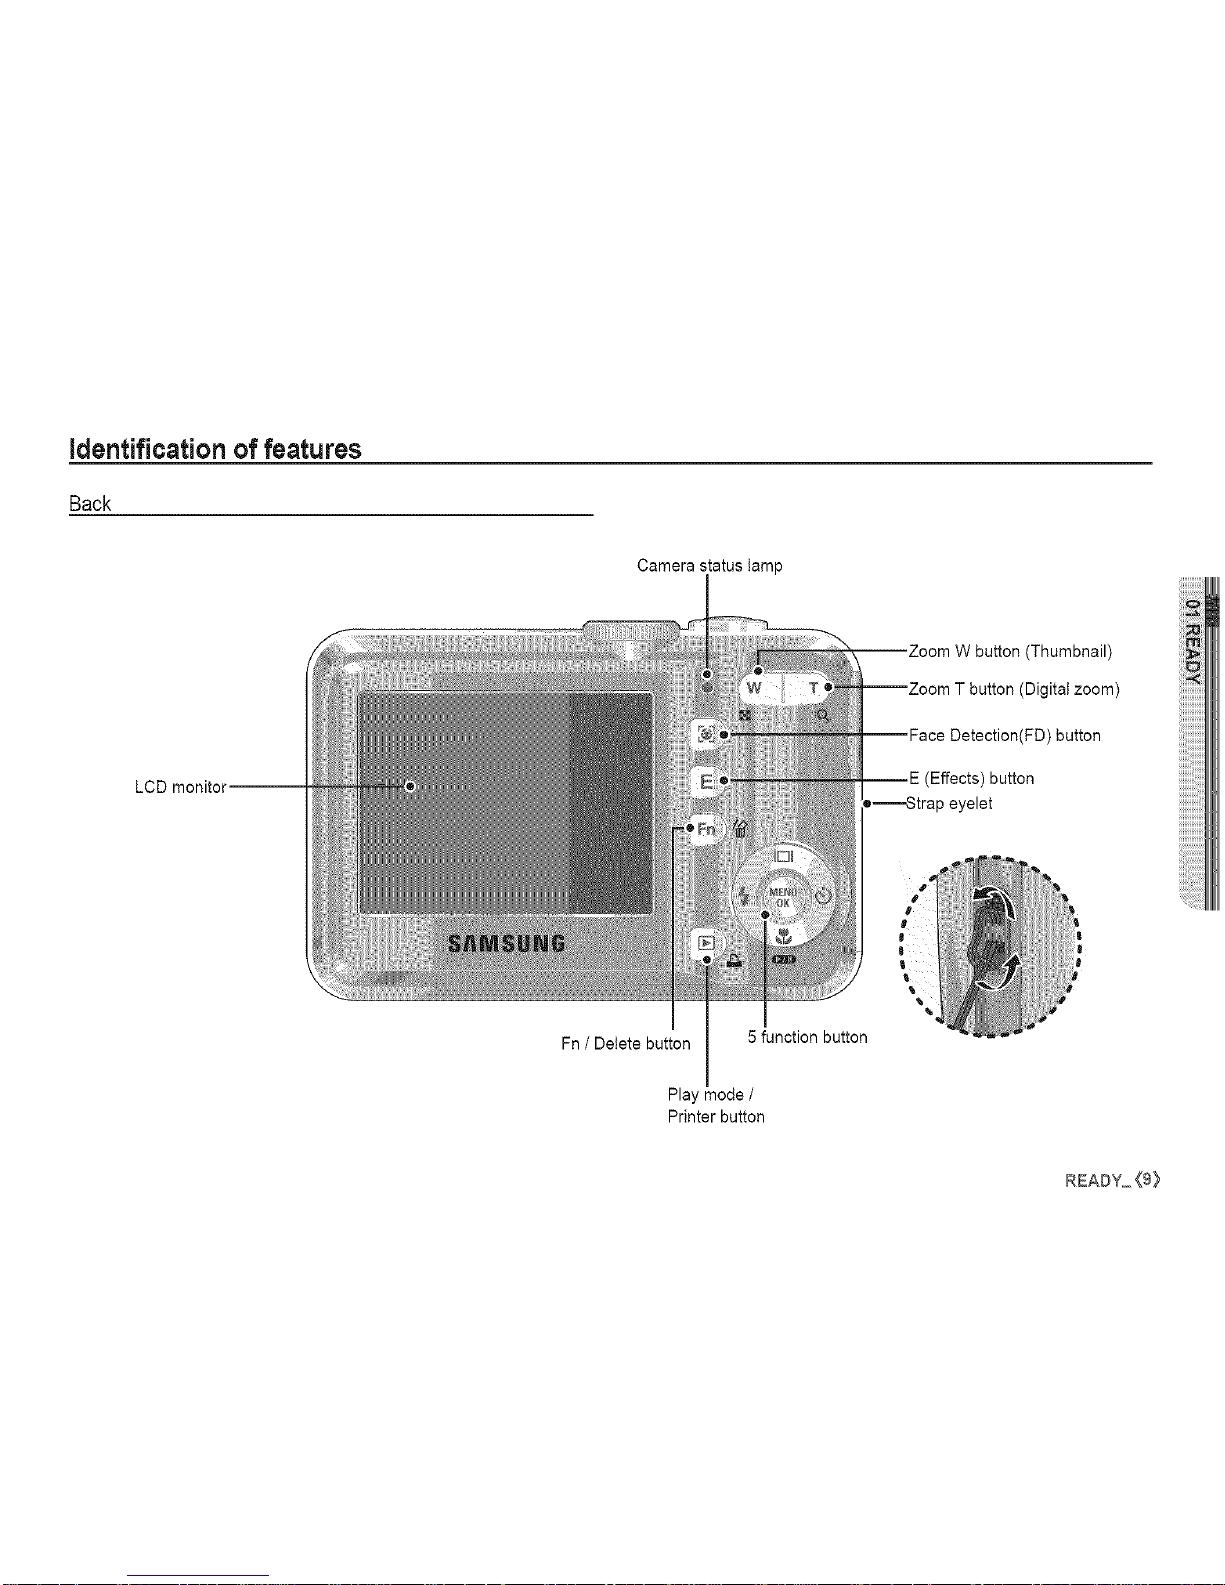
identification of features
Back
Camera status tamp
LCD monitor--
button (Thumbnail)
(Digital zoom)
(FD) button
(Effects) button
•-........-_trap eyelet
Fn / Delete button 5 function button
Play mode /
Printer button
£EA#Y_<9_
identification of features
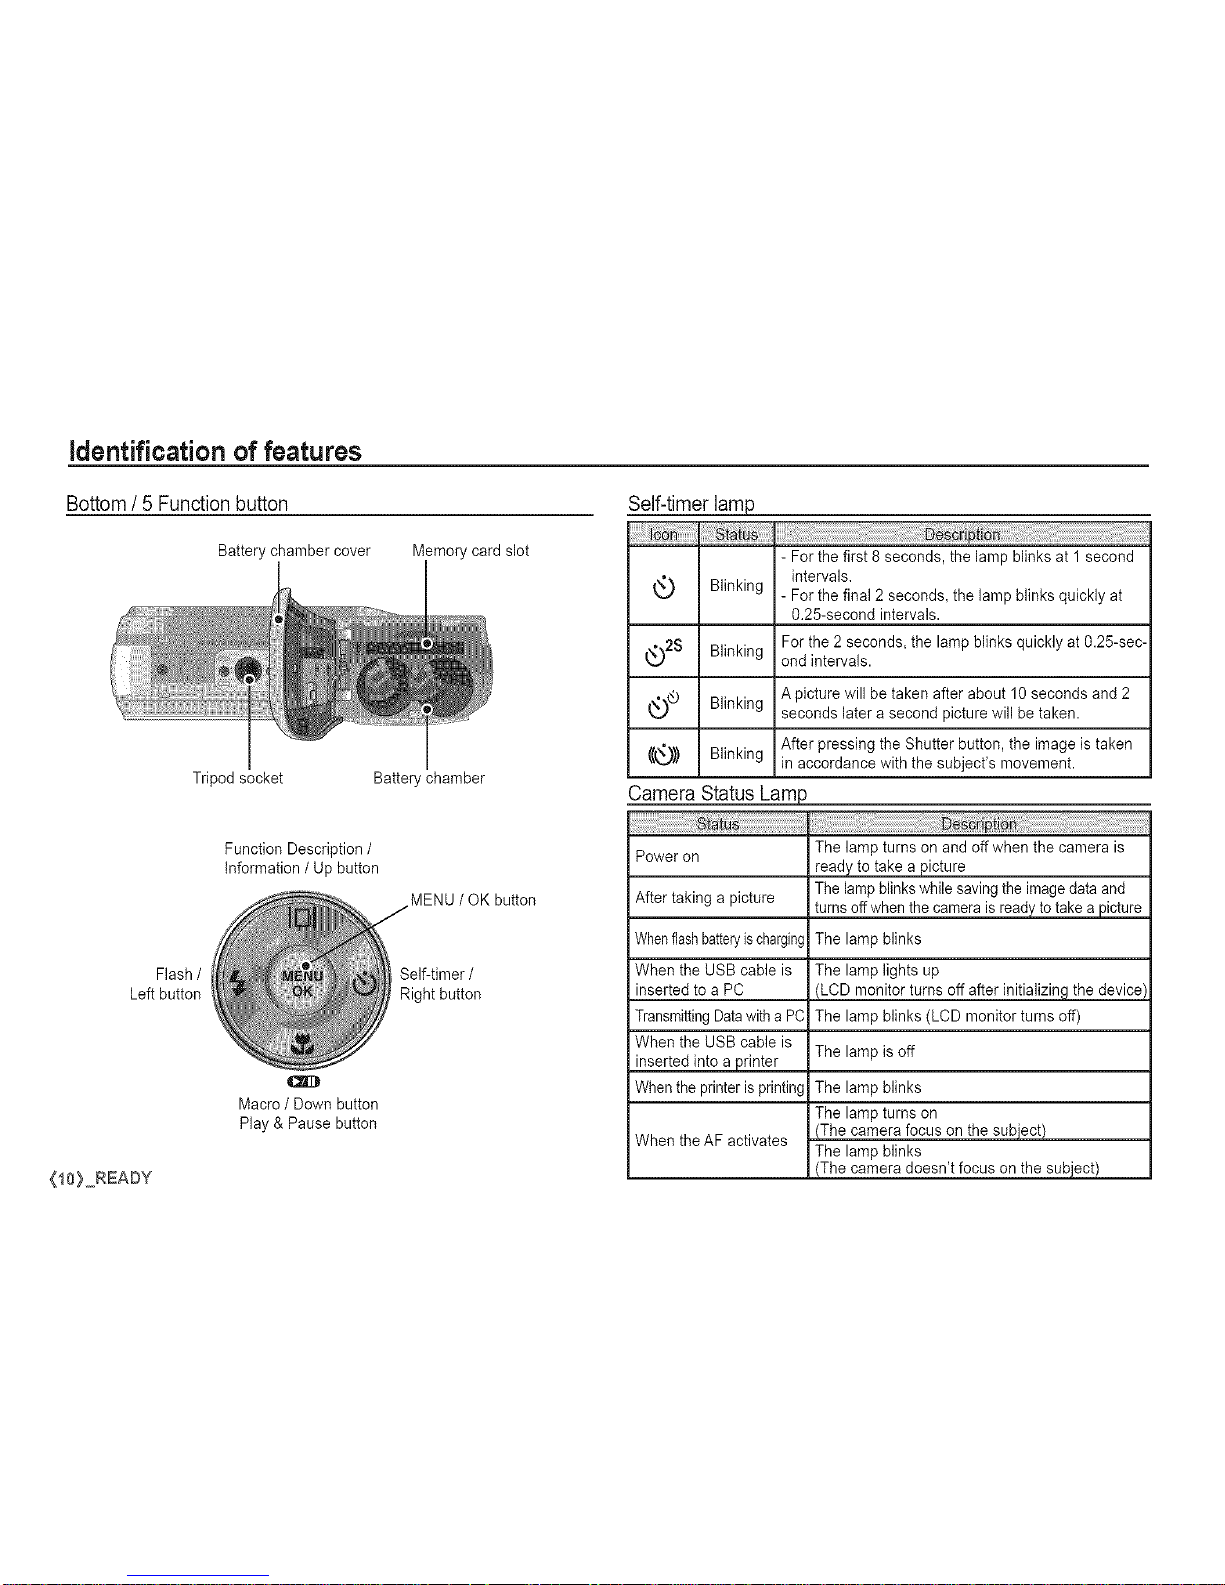
Bottom/ 5 Functionbutton
Battery chamber cover
{10) READY
Tripod socket
Memory card slot
Flash /
Left button
Function Description /
information / Up button
Battery chamber
Macro / Down button
Play & Pause button
MENU / OK button
Self-timer /
Right button
Self-timer lamp
Blinking
_t_)2S Blinking
- For the first 8 seconds, the lamp blinks at 1 second
intervals.
- For the final 2 seconds, the lamp blinks quickly at
0.25-second intervals.
For the 2 seconds, the lamp blinks quickly at 0.25-sec-
ond intervals.
_..)_ Apicture will be taken after about 10 seconds and 2
Blinking
seconds later a second picture will be taken.
After pressing the Shutter button, the image is taken
((_1,_)) Blinking in accordance with the subject's movement.
Camera Status Lamp
The lamp turns on and off when the camera is
Power on
ready to take a picture
After taking a picture The lampblinks while saving the image data and
turns off whenthe camera is readyto take a picture
The lamp blinks
The lamp lights up
(LCD monitor turns off after initializing the device)
The lamp blinks (LCD monitor turns off)
Whenflashbatteryischarging
When the USB cable is
inserted to a PC
TransmittingDatawith a PC
When the USB cable is
inserted into a printer
When the printeris printing
When the AF activates
The lamp is off
The lamp blinks
The lamp turns on
(The camera focus on the subiect)
The lamp blinks
(The camera doesn't focus on the subject)
identification of features
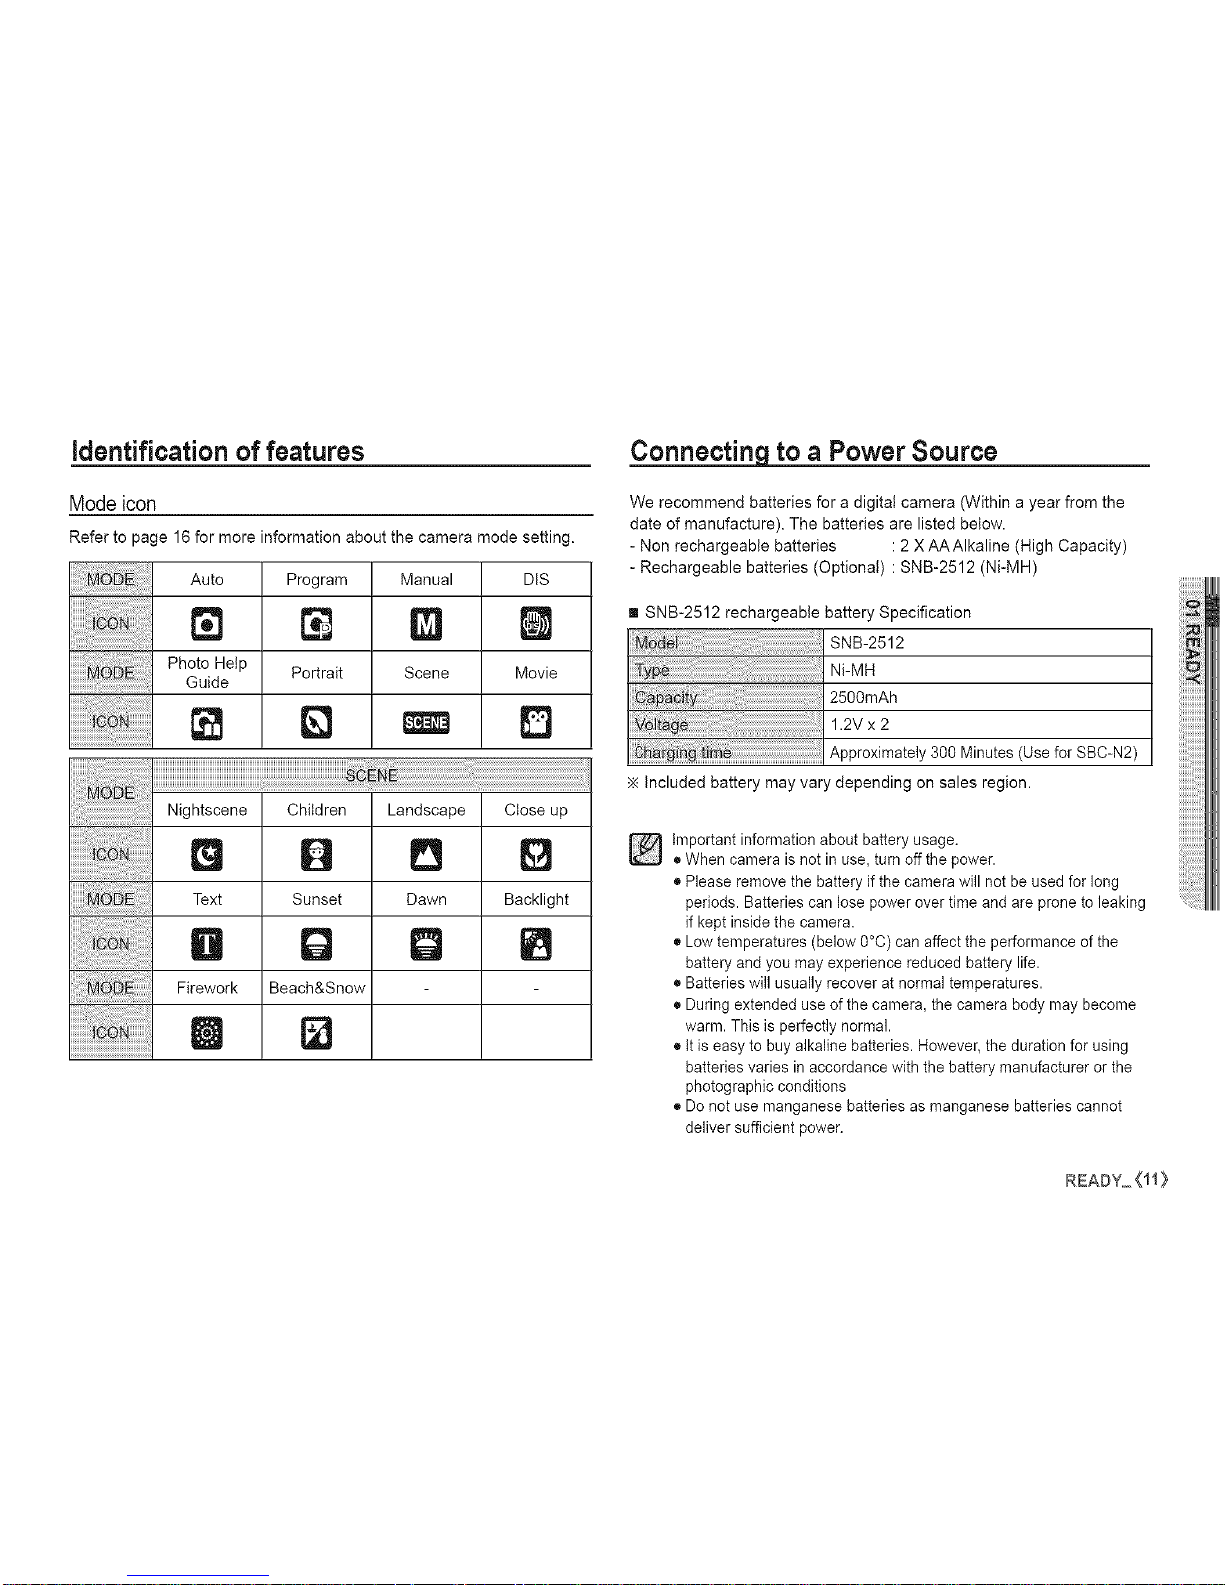
Modeicon
Refer to page 16 for more information about the camera mode setting.
Auto
N
Photo Help
Guide
Program
Portrait
Manual
gl
Scene
DIS
Movie
D
Q B
Text Sunset Dawn Backlight
lib Q Q
Firework Beach&Snow
D
Connecting to a Power Source
We recommend batteries for a digital camera (Within a year from the
date of manufacture). The batteries are listed below.
- Non rechargeable batteries :2 X AAAIkaline (High Capacity)
- Rechargeable batteries (Optional) : SNB-2512 (Ni-MH)
[] SNB-2512 rechargeabte battery Specification
SNB-2512
Ni-MH
2500mAh
1.2V x 2
Approximately 300 Minutes (Use for SBC-N2)
Included battery may vary depending on sales region.
]important information about battery usage.
• When camera is not in use, turn off the power.
• Please remove the battery if the camera will not be used for long
periods. Batteries can lose power over time and are prone to leaking
if kept inside the camera.
• Low temperatures (below 0°C) can affect the performance of the
battery and you may experience reduced battery life.
• Batteries will usually recover at normal temperatures.
• During extended use of the camera, the camera body may become
warm. This is perfectly normal.
• It is easy to buy alkaline batteries. However, the duration for using
batteries varies in accordance with the battery manufacturer or the
photographic conditions
• Do not use manganese batteries as manganese batteries cannot
deliver sufficient power.
mmAmY_Oi}
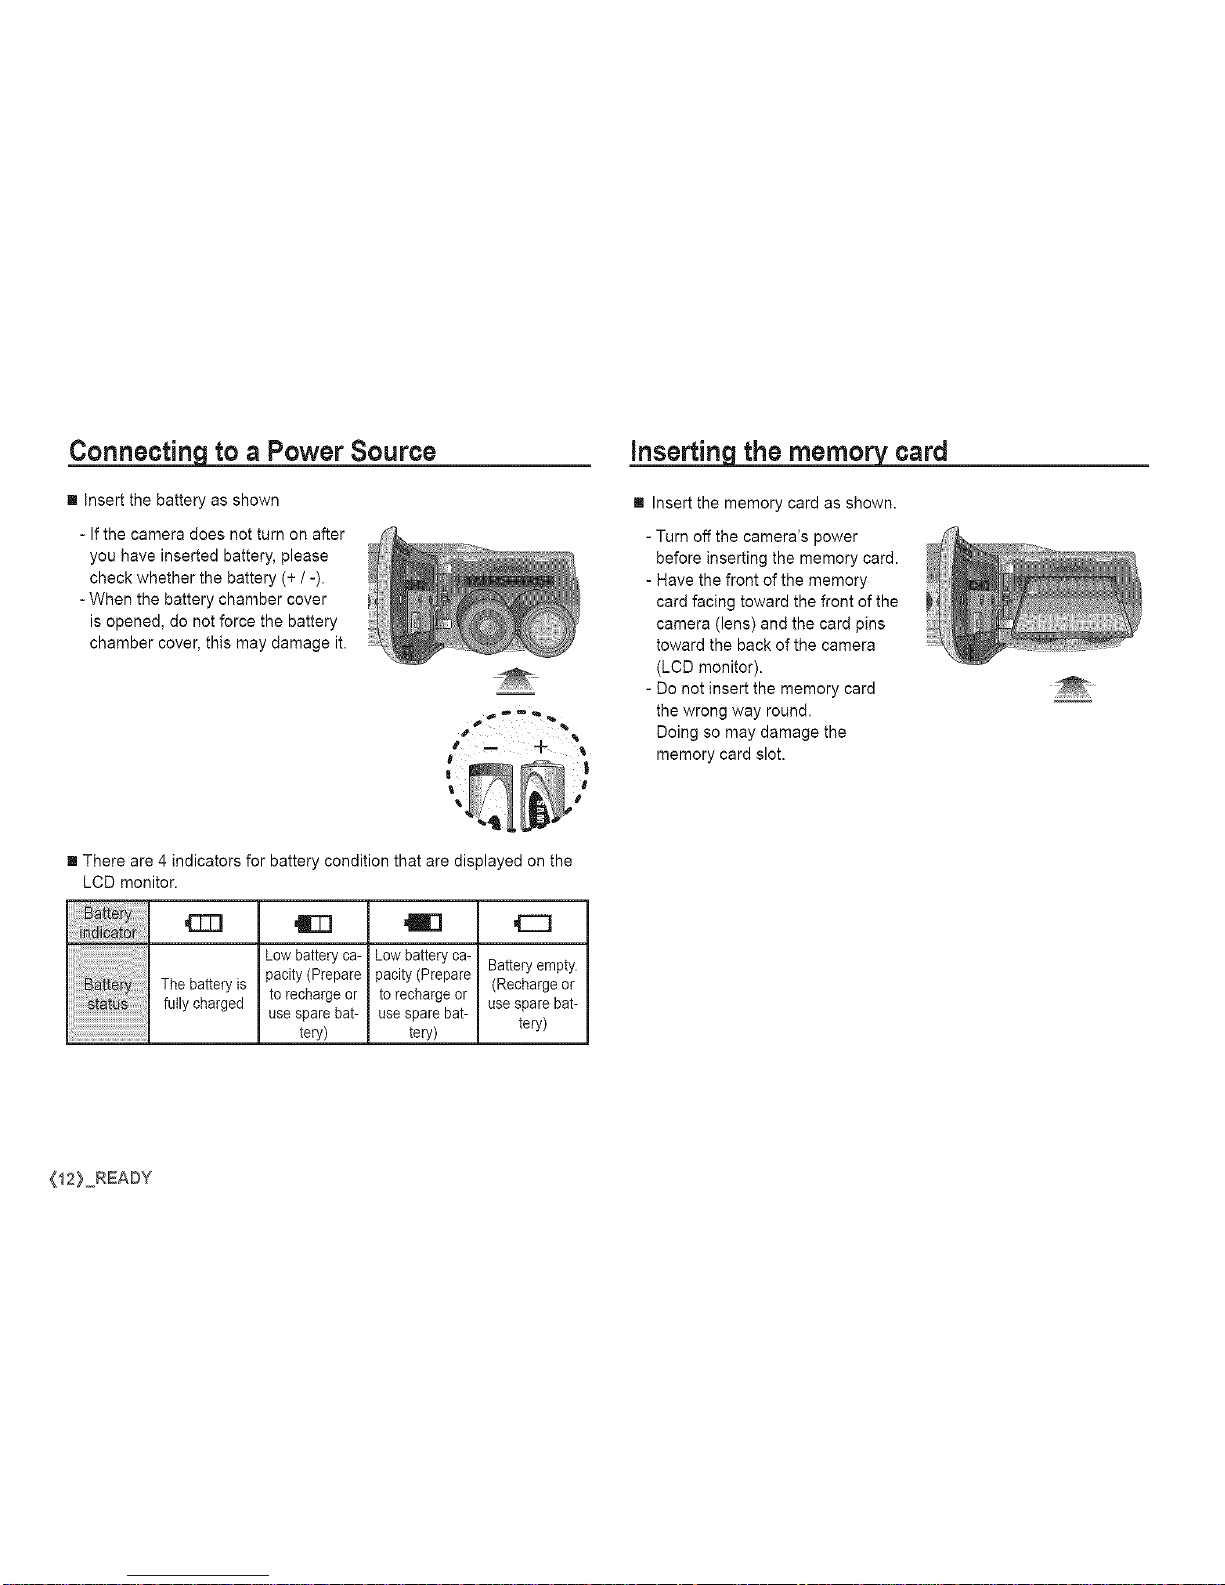
Connecting to a Power Source
[] insert the battery as shown
- If the camera does not turn on after
you have inserted battery, please
check whether the battery (+ / -).
-When the battery chamber cover
is opened, do not force the battery
chamber cover, this may damage it.
inserting the memory card
[] Insert the memory card as shown.
- Turn off the camera's power
before inserting the memory card.
- Have the front of the memory
card facing toward the front of the
camera (lens) and the card pins
toward the back of the camera
(LCD monitor).
- Do not insert the memory card
the wrong way round.
Doing so may damage the
memory card slot.
[] There are 4 indicators for battery condition that are displayed on the
LCD monitor.
iiiii! ittlii !!iiiiiiiiiiI The battery is
)i)i)i)i)i)i)ii_i!i!i!i!iii!;i!:!ii!ifully charged
Low batteryca-
pacity (Prepare
to rechargeor
use sparebat-
tery)
gel
Lowbatteryca-
pacity (Prepare
to rechargeor
use sparebat-
tery)
,E]
Batteryempty.
(Rechargeor
use spare bat-
teN)
(12}_READY
instructions on how to use the memory card
• Be sure to format the memory card (see p.46) if you are using a newly
purchased memory card for the first time, if it contains data that the
camera cannot recognise, or if it contains images captured with a dif-
ferent camera.
• Turn off the camera power whenever the memory card is being inserted
or removed.
• Repeated use of the memory card will eventually reduce the memory
card's performance. Should this be the case, you wilt need to purchase
a new memory card. Wear and tear on the memory card is not covered
by the Samsung warranty.
• The memory card is an electronic precision device.
Do not bend, drop or subject the memory card to any heavy impact.
• Do not store the memory card in an environment with strong electronic
or magnetic fietds, e.g. near loud speakers or TV receivers.
• Please do not use or store in an environment where there are extremes
in temperature.
• Do not altow the memory card to become dirty or to come into contact
with any liquid. Should this happen, clean the memory card with a soft
cloth.
• Please keep the memory card in its case when not in use.
• During and after periods of extended use, you may notice that the
memory card is warm. This is perfectly normal.
• Do not use a memory card that is used in another digital camera. To
use the memory card in this camera, format the memory card using this
camera.
• Do not use a memory card formatted by another digital camera or
memory card reader.
• If the memory card is subjected to any of the following, the recorded
data may become corrupted :
- When the memory card is used incorrectly.
- If the power is switched off or the memory card is removed while
recording, deleting (formatting) or reading.
• Samsung cannot be held responsible for lost data.
• It is advisable to copy important data onto other media as back-up e.g.
floppy disks, hard disks, CD etc.
• If there is insufficient memory available :
A [Memory Full!] message will appear and the camera wilt not operate.
To optimise the amount of memory in the camera, replace the memory
card or detete unnecessary images stored on the memory card.
[] • Don't remove the memory card when the camera status lamp is blink-
ing as this may cause damage to data in the memory card.
READY_<i3}
instructions on how to use the rnerno_ card
The camera can use SD/SDHC Memory Cards and MMC (Multi Media
Cards).
Card
When using a 256MB MMC memory, the specified shooting capacity will
be as follows. These figures are approximate as image capacities can
be affected by variables such as subject matter and memory card type.
- $860
Write
[SD (Secure Digital) memory card]
• The SD/SDHC memory card has a write protect switch that prevents
image files from being deleted or formatted. By sliding the switch to the
bottom of the SD/SDHC memory card, the data will be protected. By
sliding the switch to the top of the SD/SDHC memory card, the data
protection will be cancelled.
• Slide the switch to the top of the SD/SDHC memory card before taking
a picture.
(14} READY
[] About58 About83 About118
[] About64 About132 About186
[] About76 About151 About195
About91 About179 About252
[] About140 About269 About372
[] About459 About600 About744
e _ About2'3" About4'7"
About7'44"About13'24"
- S760
_'_ About65 About130 About190
[] About74 About147 About205
[] About88 About173 About248
[] About88 About173 About248
[] About140 About274 About372
[] About538 About710 About744
About2'3" About4'7"
About7'44" About13'24"
o The zoom button doesn't function during the movie recording.
• The recording times can be changed by the zoom operation.
LCD monitor indicator
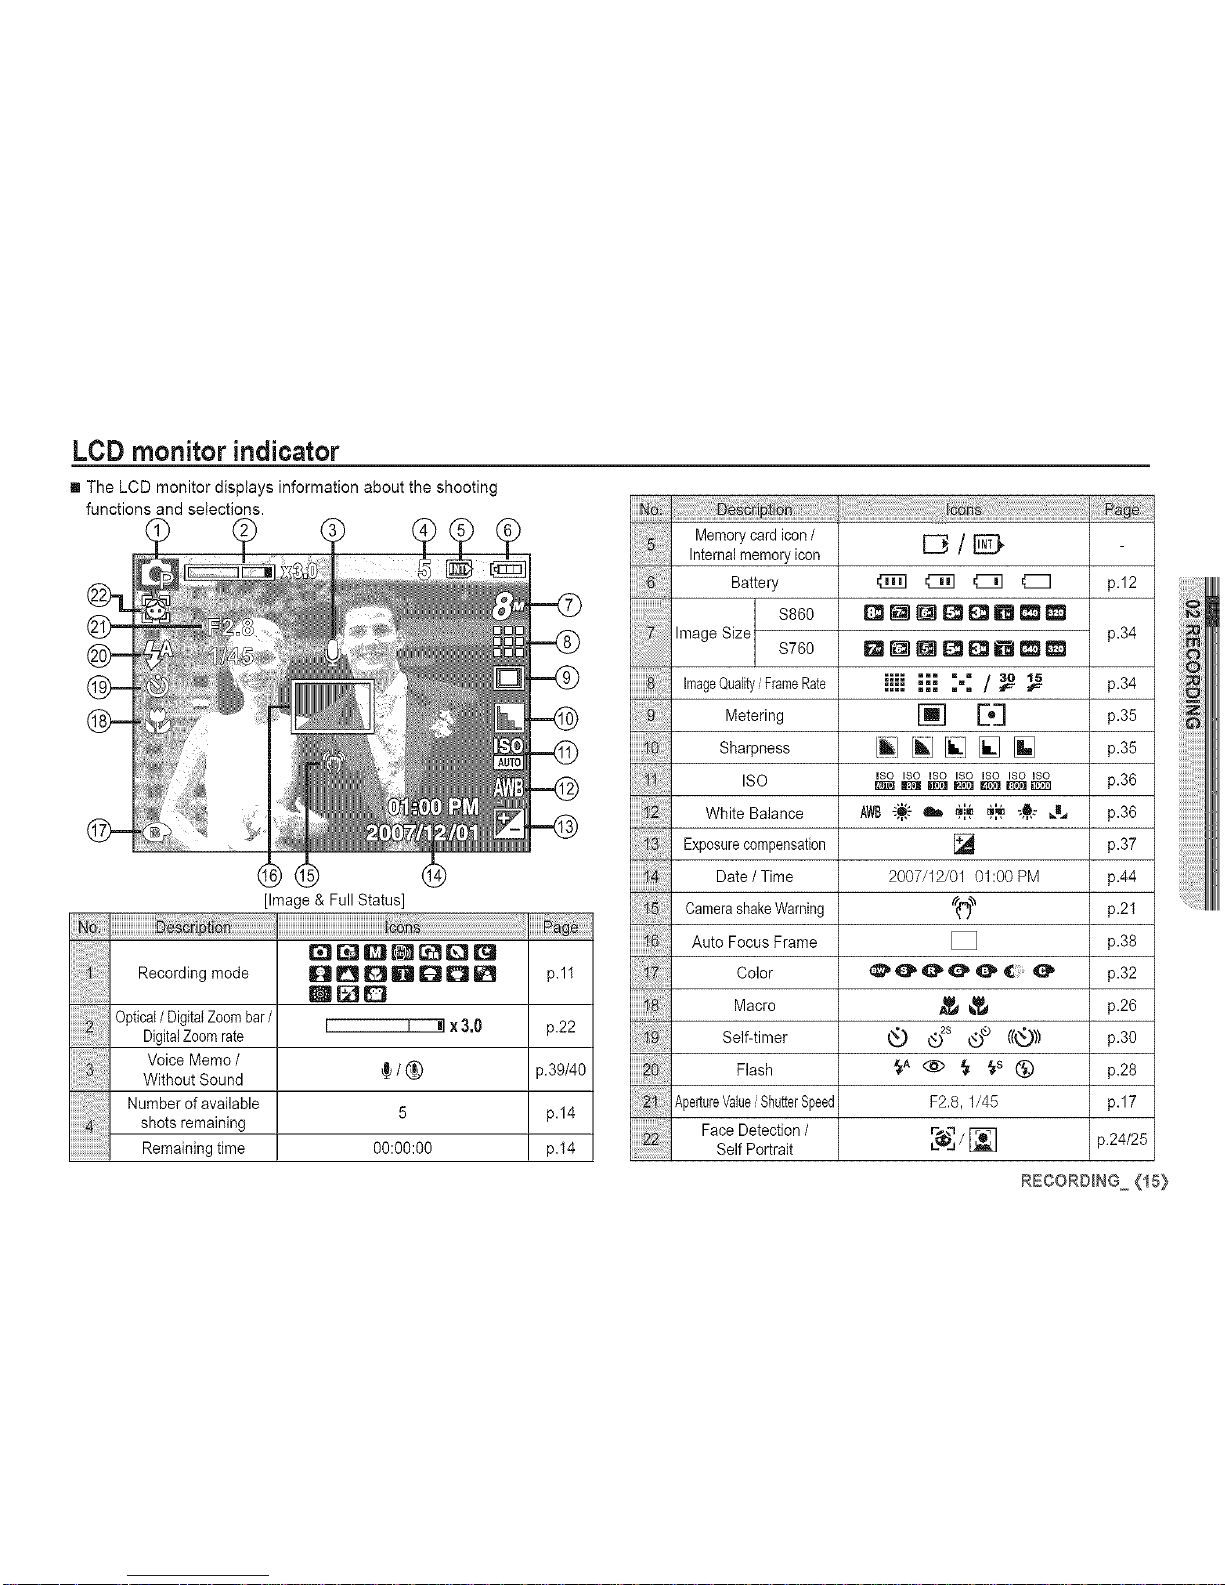
[] The LCD monitor displays information about the shooting
functions and selections.
[Image & Full Status]
I ioo
Recording mode
Optical/ DigitalZoombar/
DigitalZoomrate
Voice Memo /
Without Sound
Number of available
shots remaining
Remaining time
_[]QDDD_ p.ll
RICO
r--[---_ x3,0 p.22
/ @ p.39/40
5 p.14
00:00:00 p.14
Memory cardicon /
Internalmemoryicon
Battery
$860
Image Size
$760
ImageQuality/ FrameRate p.34
Metering p.35
Sharpness p.35
ISO p.36
White Balance p.36
Exposurecompensation p.37
Date / Time p.44
CamerashakeWarning p.21
Auto Focus Frame p.38
Color p.32
Macro p.26
Self-timer p.30
Flash p.28
ApertureValue/ShutterSpeed p.17
Face Detection /
p.24/25
Self Portrait
_{!!i!@i;_ii_i_i!i!!!!_i!_i!_i!_i!!i!!i!!i!_i!_i!i!i!iiiiiiiiiiiii!i!!_!_i_!_!_i!i!!!!_i!_i!_i@_i_i!i_ii_ii_ii_i_iiii_i_i!!_!i_!!!!_!_!!_!!!!!!!_!_i_!_!i_i_;_i_i_!i;i!;_i;iiiiiii!i!!i!!i!_;_;_i_i!_!i;iiiii;ii;!i!i!_!_;_i_;i_!i_i!_ii_iiiiiii!i!_!i_i_;ii_i!iii!iiiii_;_!_i_ii_i;_;i_;!;
D/[_D
_[]DI_E_DO_
iiii iii :-: /_
[] E,3
ILl ILl [] [] []
ISO ISO ISO ISO ISO ISO_
[]
2007/12/01 01:00 PM
[]
F2.8, 1/45
p.12
p.34
RECORO_NG (15}
Starting the recording mode
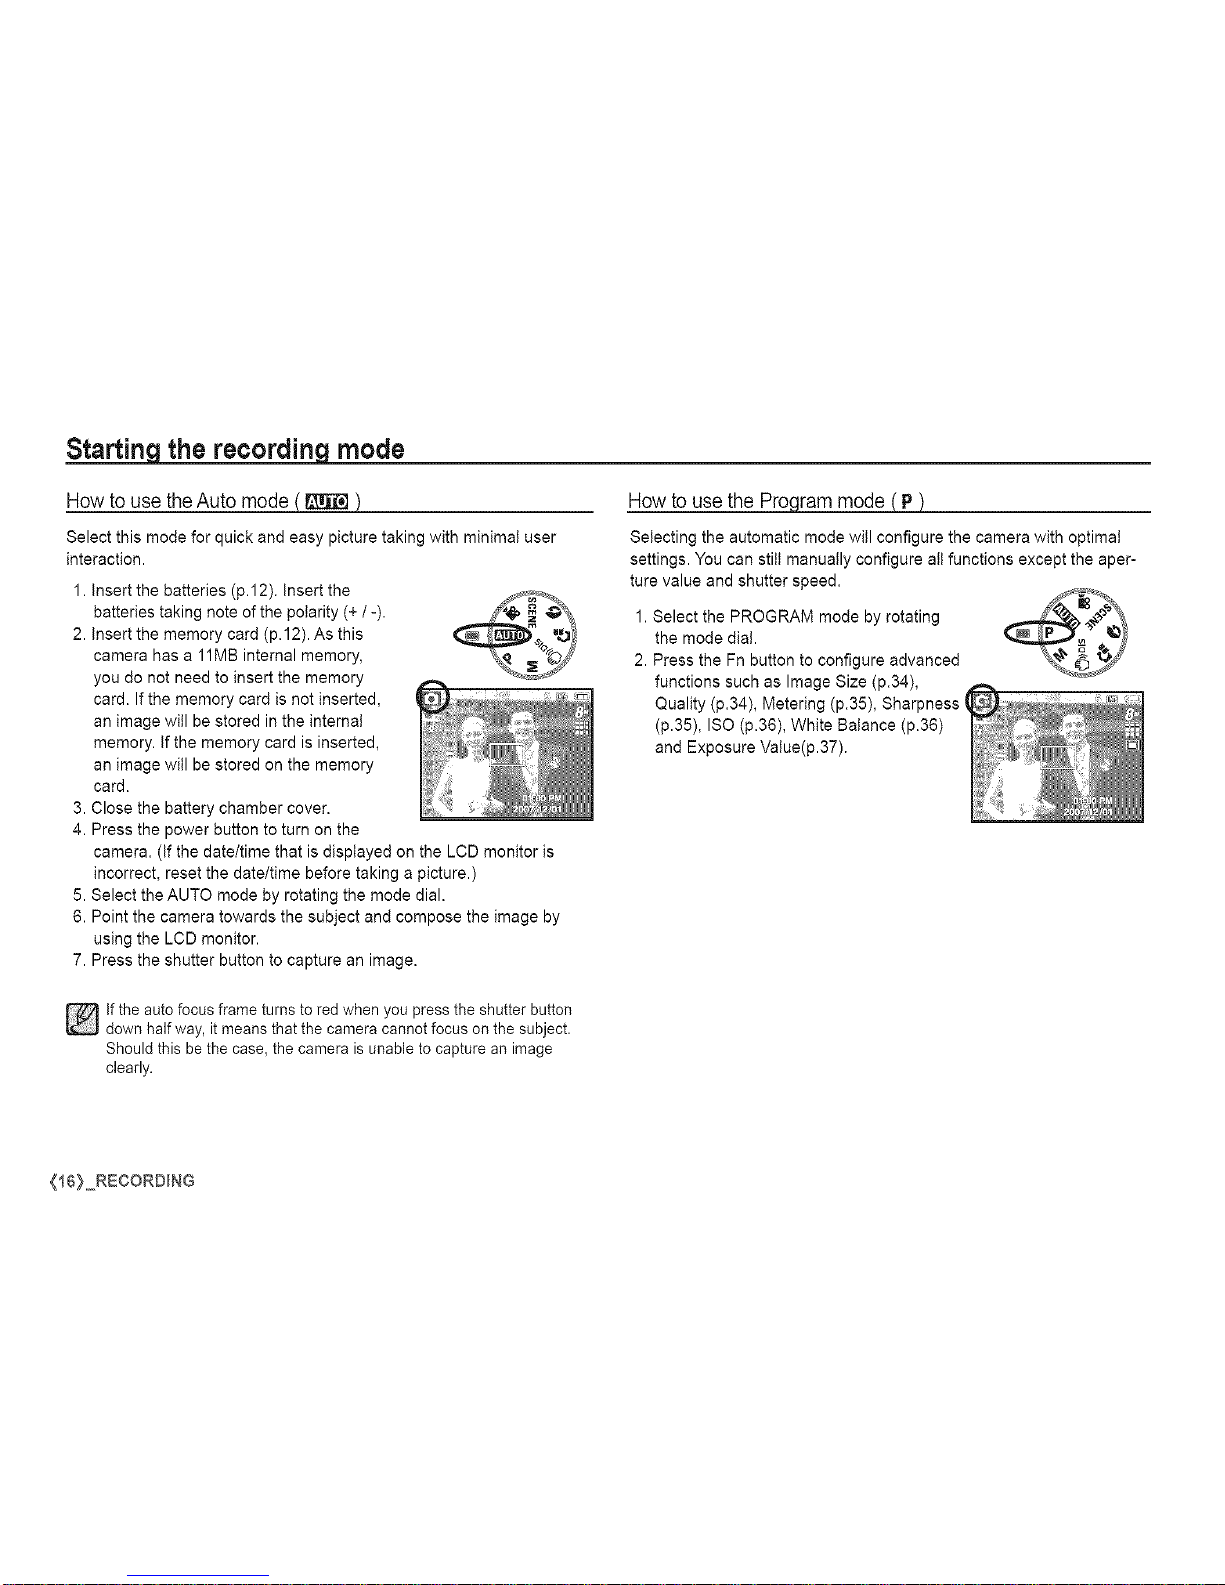
How to usethe Auto mode
Select this mode for quick and easy picture taking with minimal user
interaction.
1. Insert the batteries (p.12). Insert the
batteries taking note of the polarity (+ /-).
2. Insert the memory card (p.12). As this
camera has a 11MB internal memory,
you do not need to insert the memory
card. If the memory card is not inserted,
an image will be stored in the internal
memory. If the memory card is inserted,
an image will be stored on the memory
card.
3. Close the battery chamber cover.
4. Press the power button to turn on the
Howto usethe Pro_
Selecting the automatic mode will configure the camera with optimal
settings. You can still manually configure all functions except the aper-
ture value and shutter speed.
1. Select the PROGRAM mode by rotating
the mode dia!.
2. Press the Fn button to configure advanced
functions such as Image Size (p.34),
Quality (p.34), Metering (p.35), Sharpness (
(p.35), ISO (p.36), White Balance (p.36)
and Exposure Value(p.37).
camera. (if the date/time that is displayed on the LCD monitor is
incorrect, reset the date/time before taking a picture.)
5. Select the AUTO mode by rotating the mode dial.
6. Point the camera towards the subject and compose the image by
using the LCD monitor.
7. Press the shutter button to capture an image.
]if the auto focus frame turns to red when you press the shutter button
down half way, itmeans that the camera cannot focus on the subject.
Should this bethe case, the camera is unable to capture an image
clearly.
{16} RECORDING
Starting the recording mode
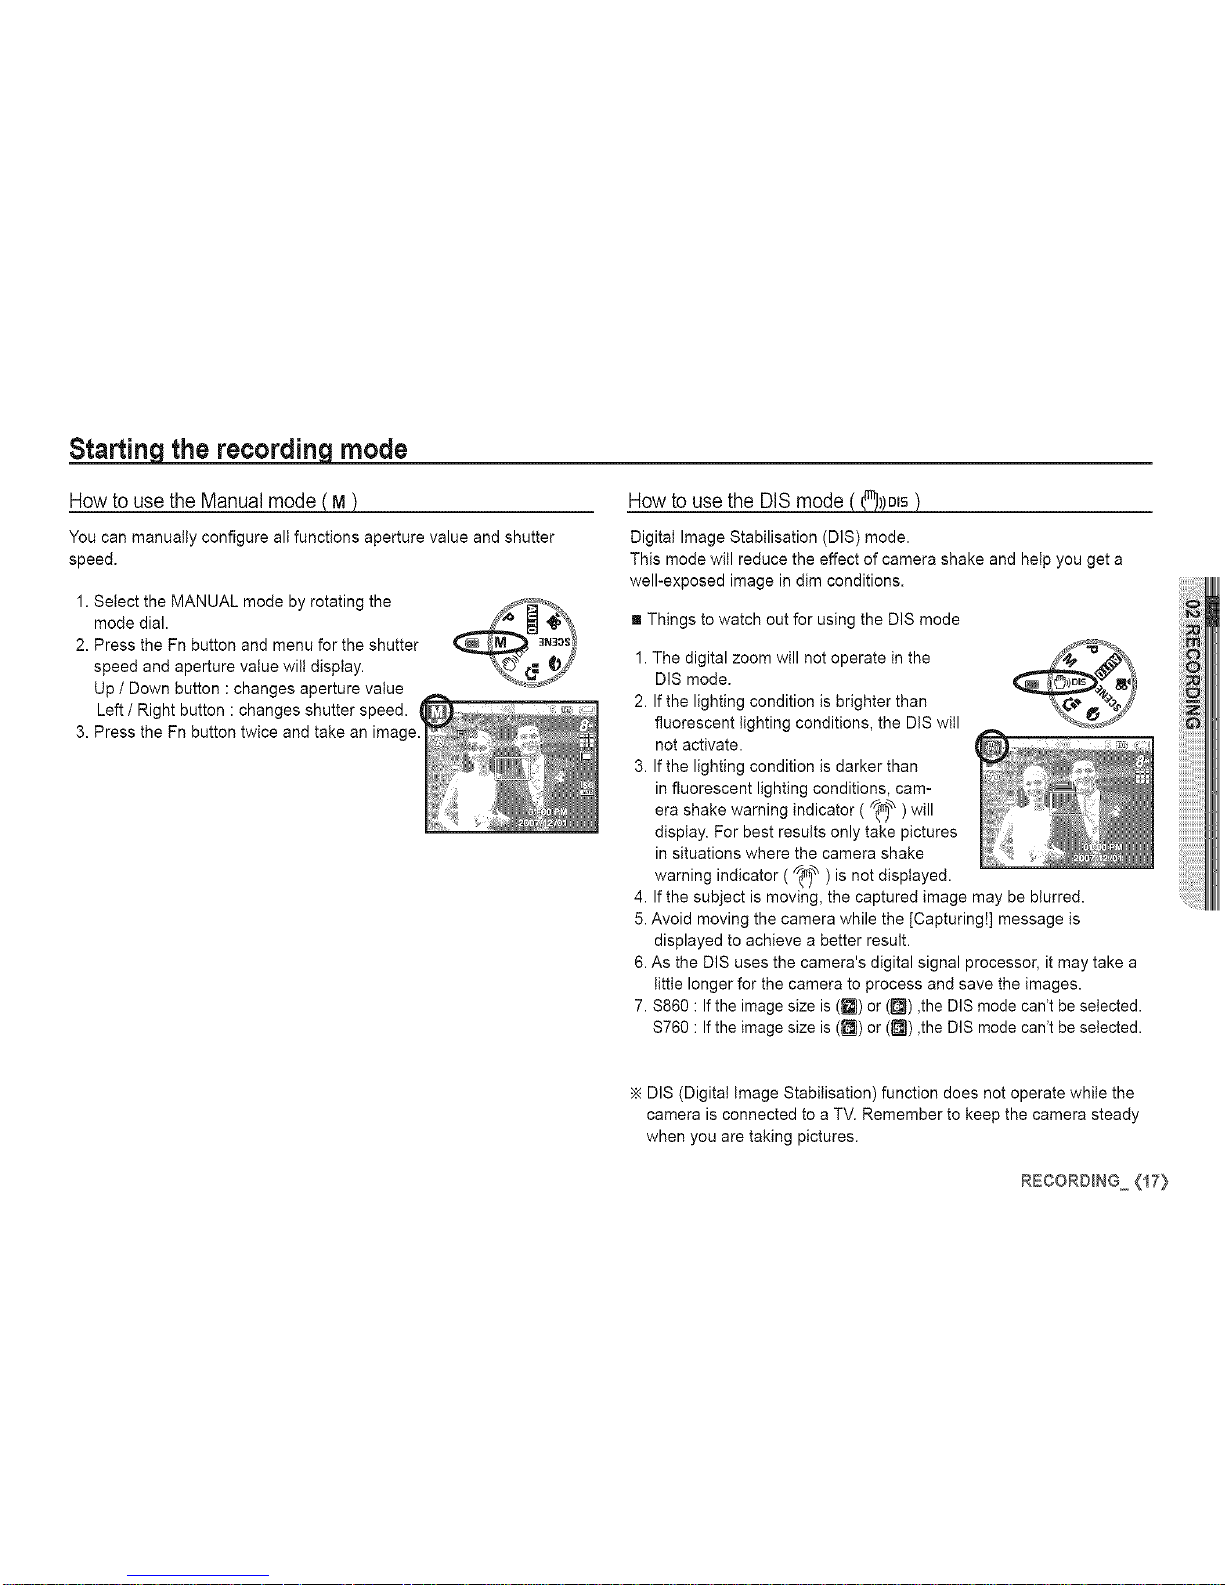
Howto use the Manual mode
You can manually configure all functions aperture value and shutter
speed.
1. Select the MANUAL mode by rotating the
mode dial.
2. Press the Fn button and menu for the shutter
speed and aperture value will display.
Up / Down button : changes aperture value
Left / Right button : changes shutter speed.
3. Press the Fn button twice and take an image.
Howto usethe DIS mode
Digital Image Stabilisation (DIS) mode.
This mode will reduce the effect of camera shake and hetp you get a
well-exposed image in dim conditions.
[] Things to watch out for using the DIS mode
1.The digital zoom will not operate in the
DIS mode.
2. If the lighting condition is brighter than
fluorescent lighting conditions, the DIS will
not activate.
3. If the lighting condition is darker than
in fluorescent lighting conditions, cam-
era shake warning indicator ( '_p ) will
display. For best results only take pictures
in situations where the camera shake
warning indicator ( '_p ) is not displayed.
4. If the subject is moving, the captured image may be blurred.
5. Avoid moving the camera while the [Capturing!] message is
displayed to achieve a better result.
6. As the DIS uses the camera's digital signal processor, it may take a
little longer for the camera to process and save the images.
7. $860 : If the image size is ([]) or (_) ,the DIS mode can't be selected.
$760 : If the image size is (_) or (_) ,the DIS mode can't be selected.
DIS (Digital Image Stabitisation) function does not operate while the
camera is connected to a TV. Remember to keep the camera steady
when you are taking pictures.
RECORO_NG <i7}
Starting the recording mode
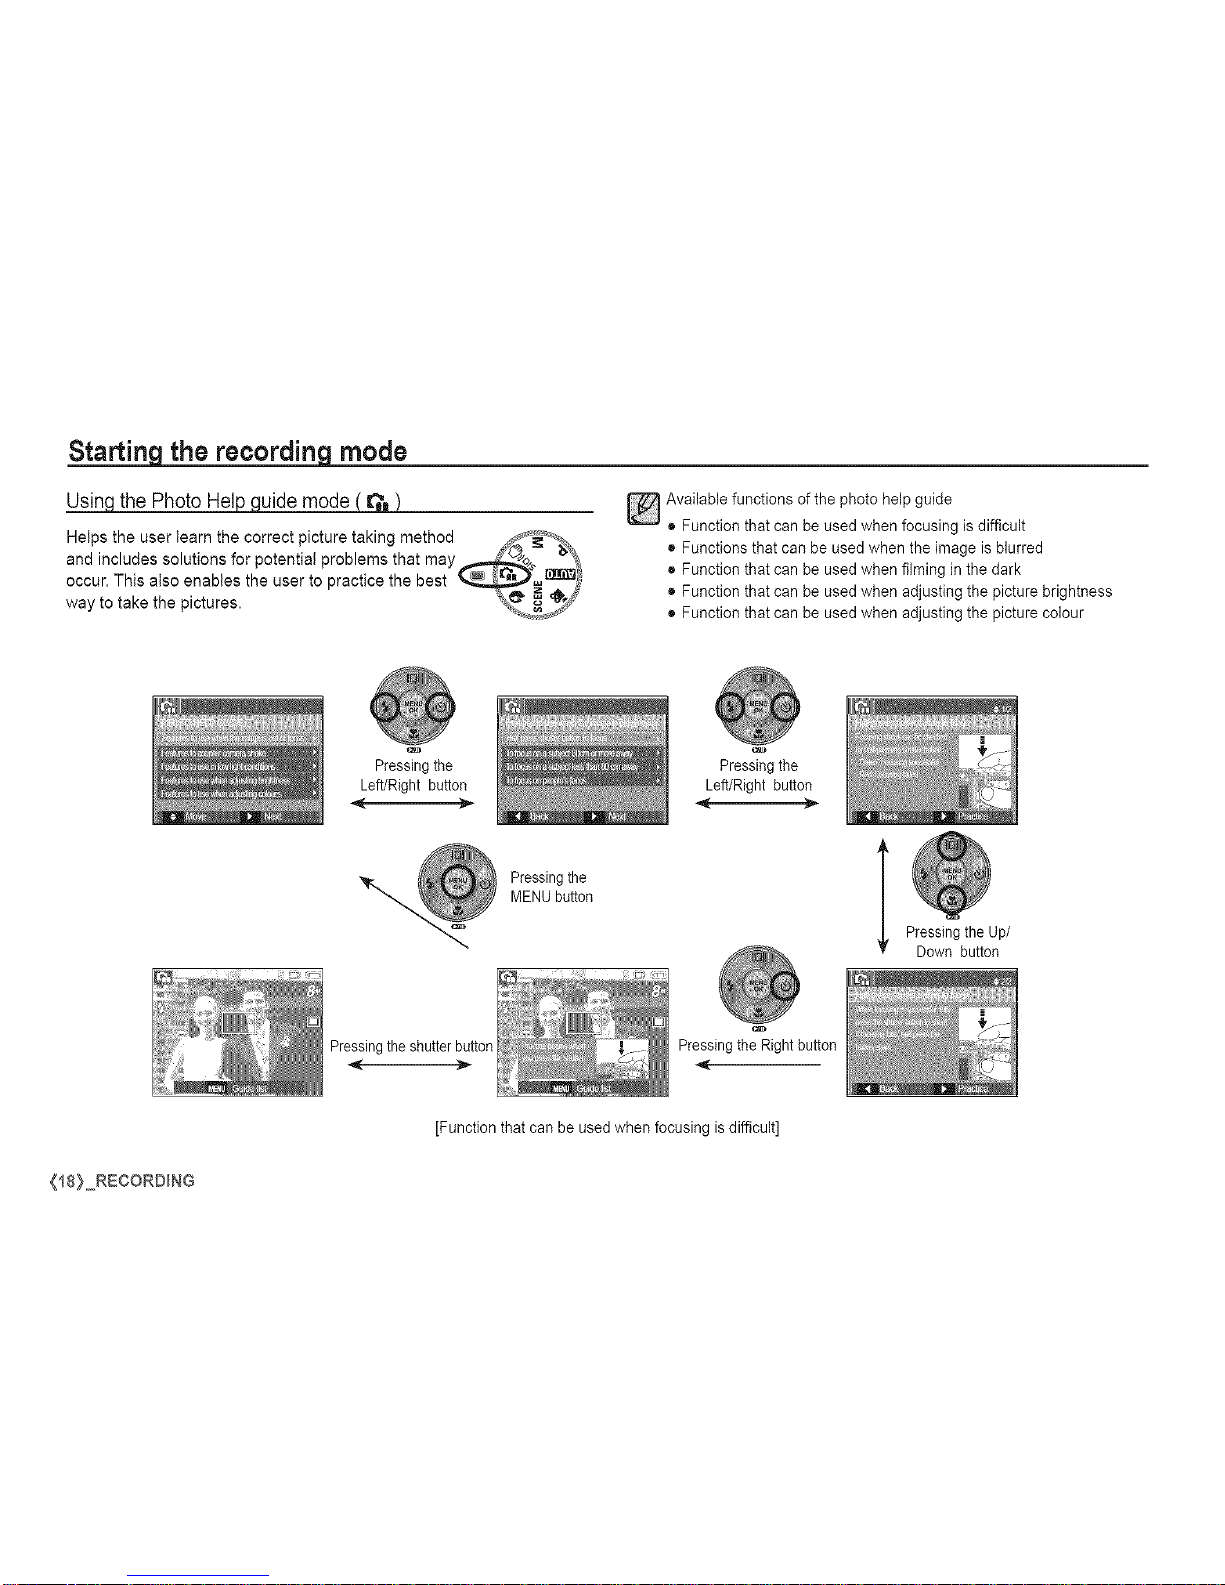
_the PhotoHelpguide mode (
Helps the user learn the correct picture taking method _,. _%_
and includes solutions for potential problems that may_:" _'%1
occur. This also enables the user to practice the best __
way to take the pictures. _ j._;_
Pressing the
Available functions of the photo help guide
• Function that can be used when focusing is difficult
• Functions that can be used when the image is blurred
• Function that can be used when filming in the dark
• Function that can be used when adjusting the picture brightness
• Function that can be used when adjusting the picture colour
Left/Right button
-..,,
Pressing the
MENU button
Pressing the
Left/Right button
[
Pressing the Up/
Down button
Pressingthe shutterbutton
Pressing the Right button
[Function that can be used when focusing is difficult]
{t8) RECORDING
Starting the recording mode
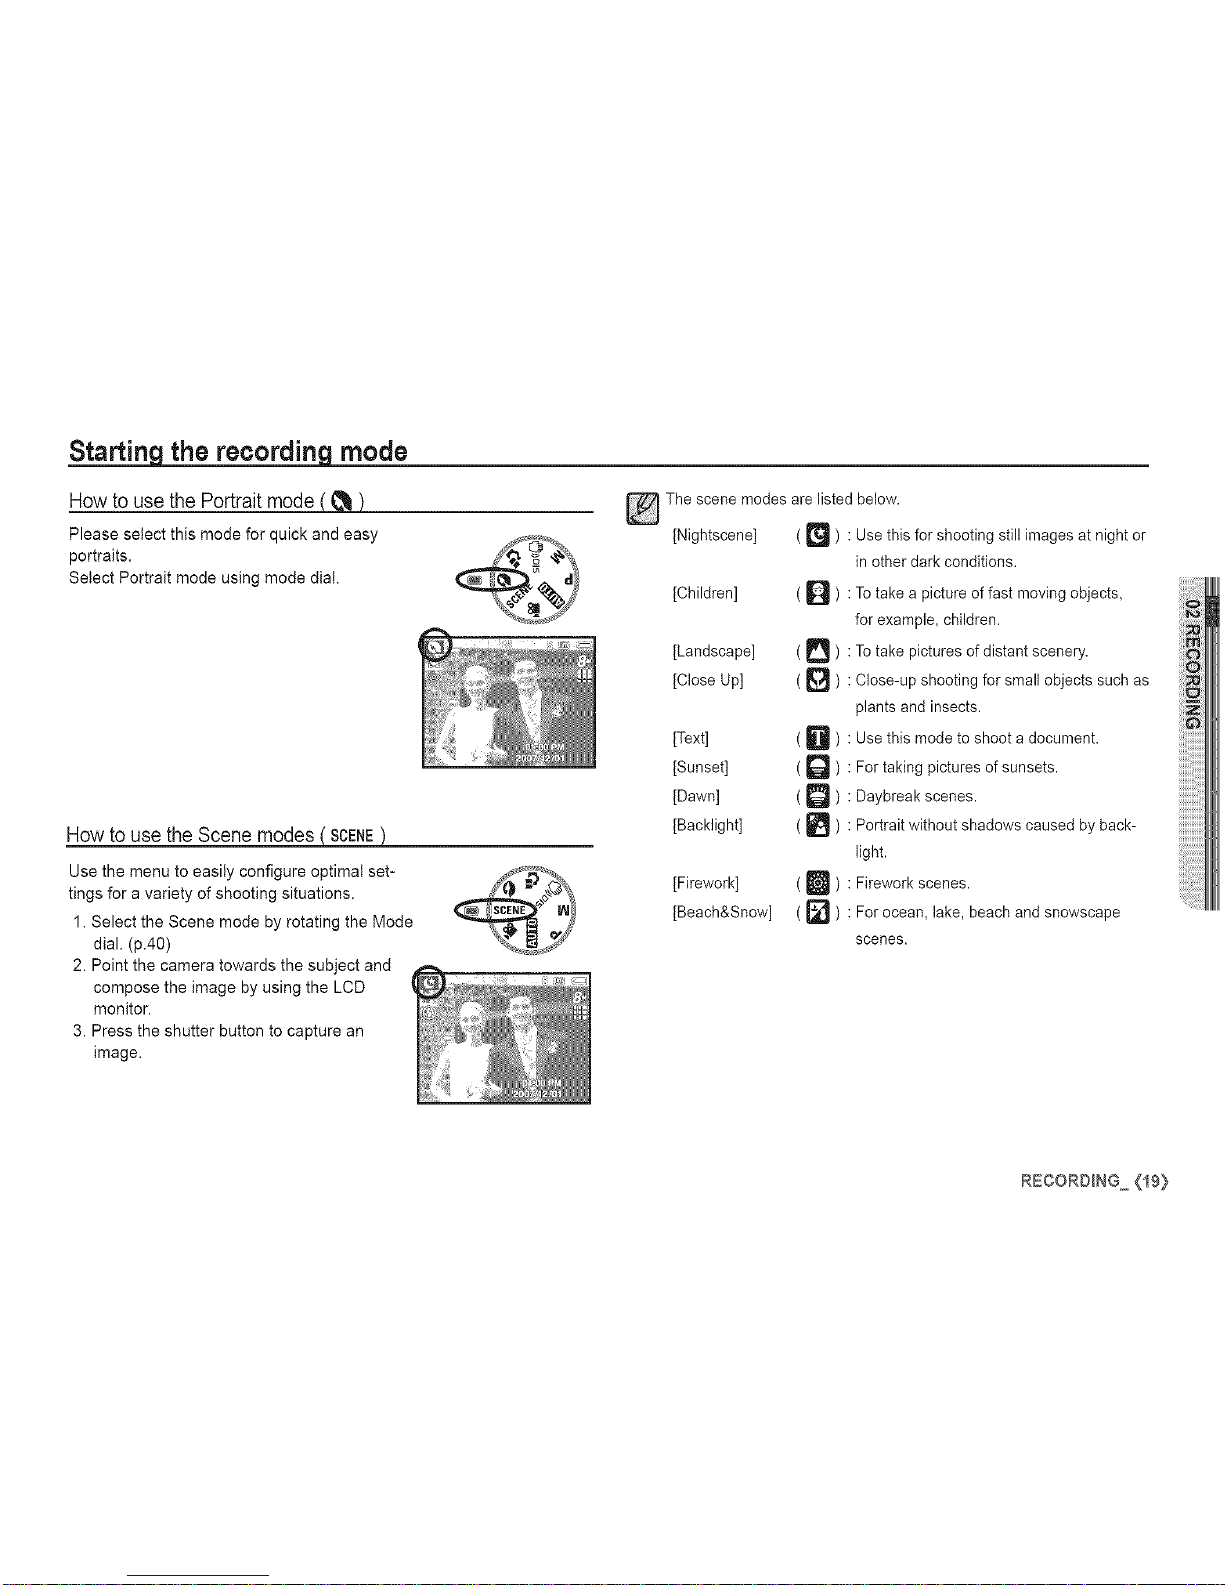
Howto use the Portraitmode
Please select this mode for quick and easy
portraits.
Select Portrait mode using mode dial.
How to usethe Scenemodes
Use the menu to easily configure optimal set-
tings for a variety of shooting situations.
1. Select the Scene mode by rotating the Mode
dial. (p.40)
2. Point the camera towards the subject and
compose the image by using the LCD
monitor.
3. Press the shutter button to capture an
image.
The scene modes are listed below.
[Nightscene] ( _ ) : Use this for shooting still images at night or
[Children] ( _ ) :
[Landscape] ( _ ) :
[Close Up] ( _]_ ) :
[Text] ( D
[Sunset] ( Q
[Dawn] ( D
[Backlight] (
[Firework] ( U ) :
[Beach&Snow] ( _] ) :
in other dark conditions.
To take a picture of fast moving objects,
for example, children.
To take pictures of distant scenery.
Close-up shooting for small objects such as
plants and insects.
Use this mode to shoot a document.
For taking pictures of sunsets.
Daybreak scenes.
Portrait without shadows caused by back-
light.
Firework scenes.
For ocean, lake, beach and snowscape
scenes.
RECORDING ,_19}
Starting the recording mode
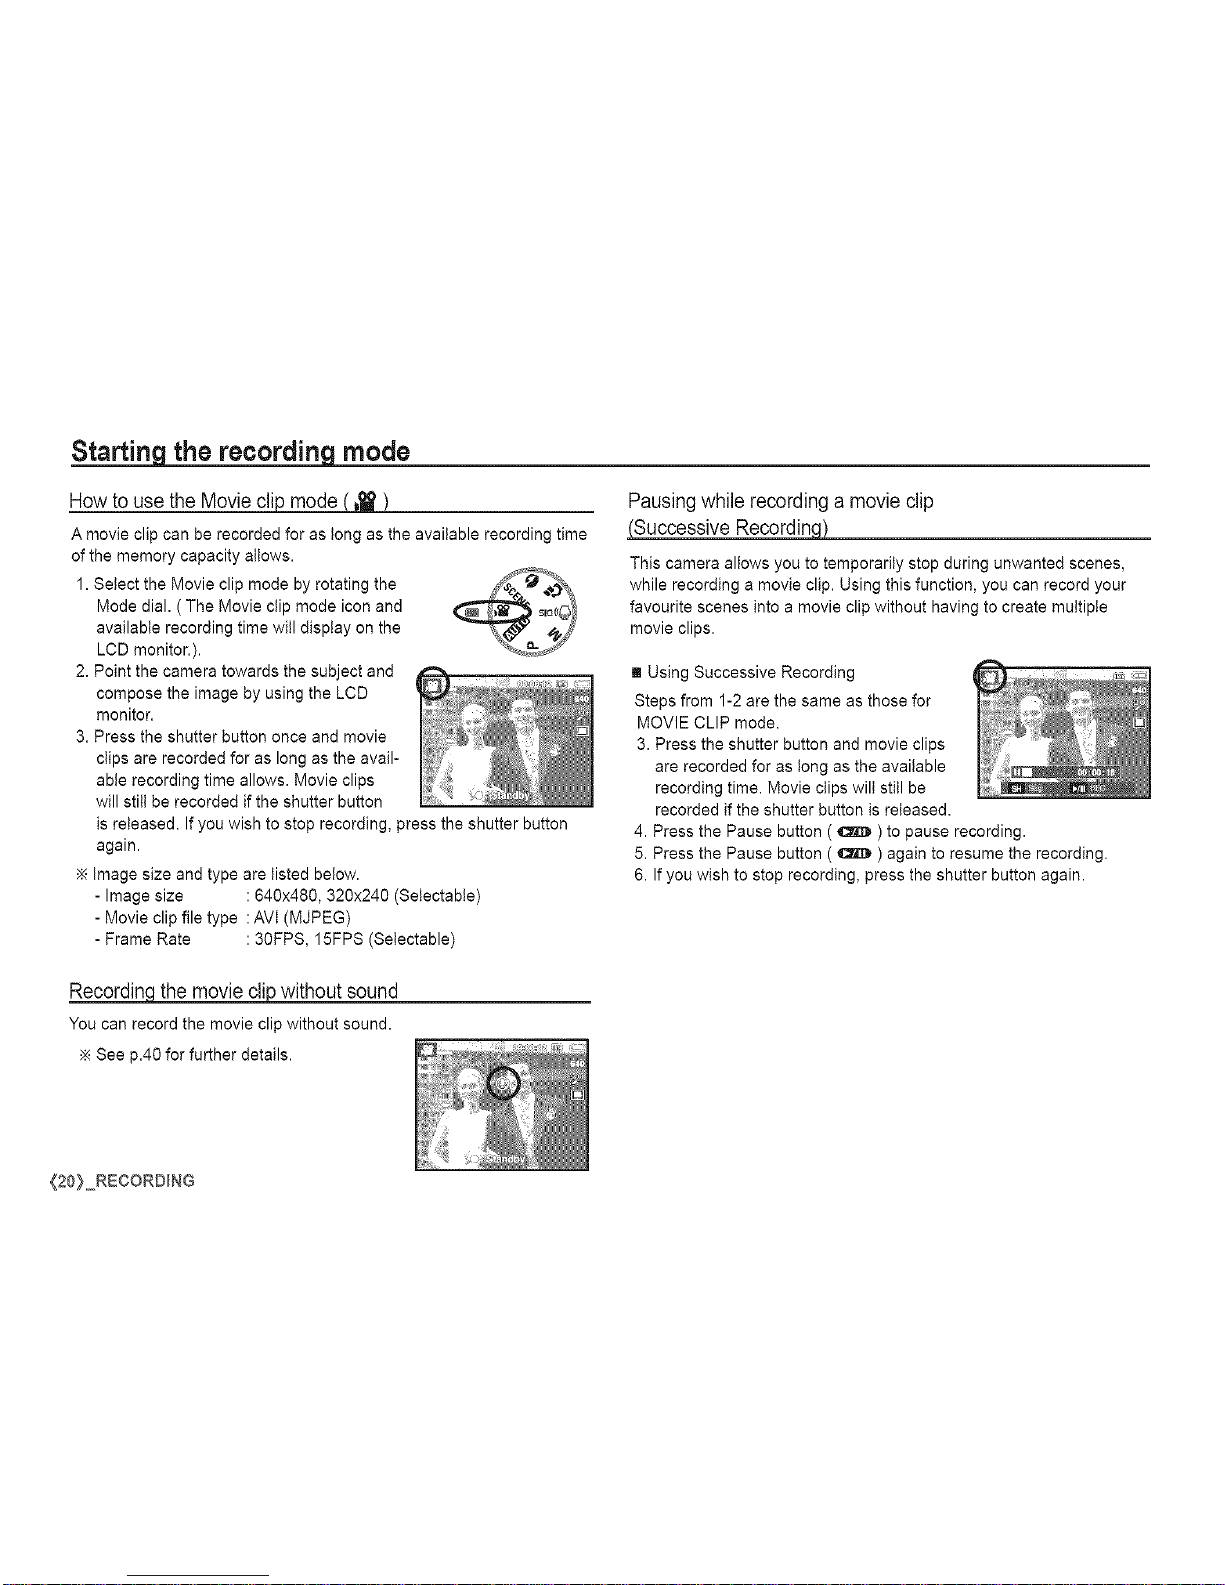
Howto use the Movie
A movie clip can be recorded for as tong as the available recording time
of the memory capacity allows.
1. Select the Movie clip mode by rotating the _--__.,_
Mode dial. (The Movie clip mode icon and (_:_ _OL__ -_
available recording time will display on the
LeD monitor.). \_Y
2. Point the camera towards the subject and
compose the image by using the LCD
monitor.
3. Press the shutter button once and movie
clips are recorded for as long as the avail-
able recording time allows. Movie clips
will still be recorded if the shutter button
is released. If you wish to stop recording, press the shutter button
again.
image size and type are listed below.
- Image size :640x480, 320x240 (Setectabte)
- Movie clip file type :AVI (MJPEG)
- Frame Rate : 30FPS, 15FPS (Setectable)
Pausingwhile recordinga movie clip
(Successive RecordinM
This camera allows you to temporarily stop during unwanted scenes,
while recording a movie clip. Using this function, you can record your
favourite scenes into a movie clip without having to create multiple
movie clips.
[] Using Successive Recording
Steps from 1-2 are the same as those for
MOVIE CLIP mode.
3. Press the shutter button and movie clips
are recorded for as tong as the available
recording time. Movie clips will still be
recorded if the shutter button is released.
4. Press the Pause button ( _ ) to pause recording.
5. Press the Pause button ( _ ) again to resume the recording.
6. If you wish to stop recording, press the shutter button again.
Recordincithemovie clip without sound
You can record the movie clip without sound.
See p.40 for further details.
{20} RECORDING
Things to Watch Out for When Taking Pictures
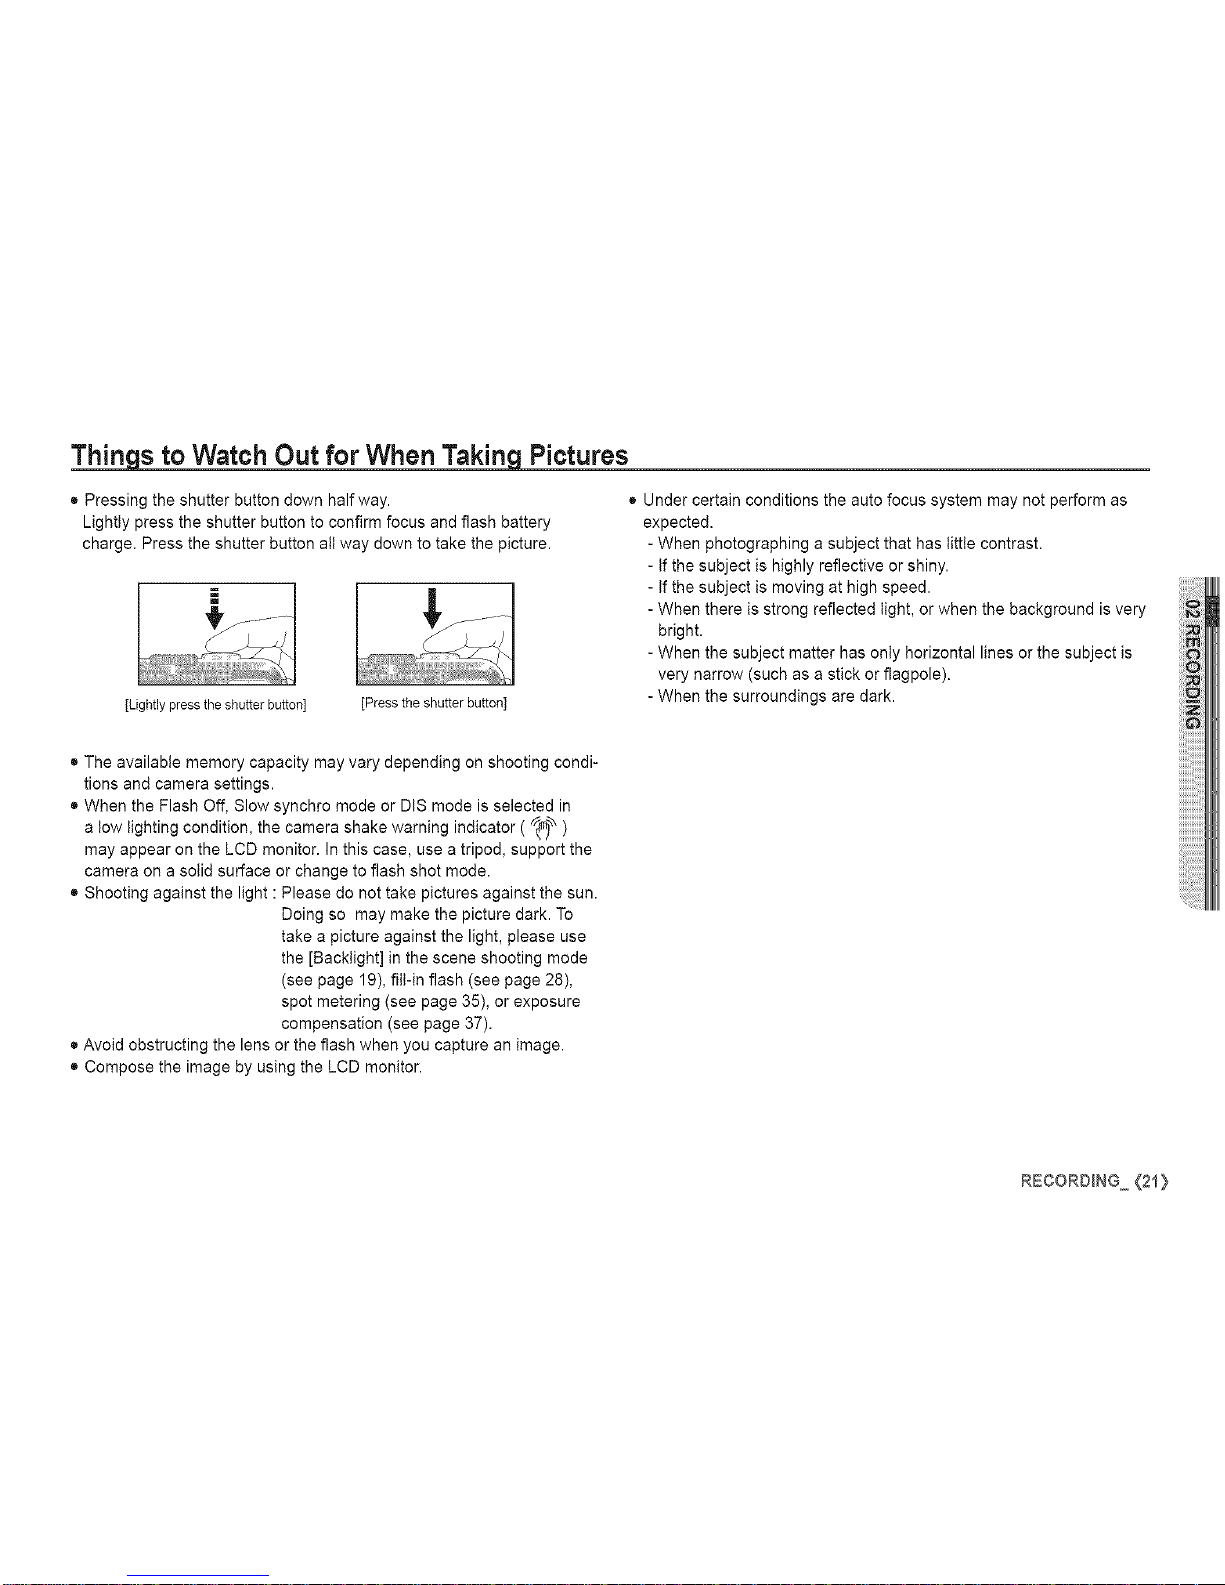
• Pressing the shutter button down halfway.
Lightly press the shutter button to confirm focus and flash battery
charge. Press the shutter button all way down to take the picture.
[Lightly press the shutter button] Dress the shutter button]
• Under certain conditions the auto focus system may not perform as
expected.
- When photographing a subject that has little contrast.
- If the subject is highly reflective or shiny.
- If the subject is moving at high speed.
- When there is strong reflected light, or when the background is very
bright.
- When the subject matter has only horizontal lines or the subject is
very narrow (such as a stick or flagpole).
- When the surroundings are dark.
• The available memory capacity may vary depending on shooting condi-
tions and camera settings.
• When the Flash Off, Slow synchro mode or DIS mode is selected in
a tow lighting condition, the camera shake warning indicator ( _ )
may appear on the LCD monitor. In this case, use a tripod, support the
camera on a solid surface or change to flash shot mode.
• Shooting against the light : Please do not take pictures against the sun.
Doing so may make the picture dark. To
take a picture against the light, please use
the [Backtight] in the scene shooting mode
(see page 19), fill-in flash (see page 28),
spot metering (see page 35), or exposure
compensation (see page 37).
• Avoid obstructing the lens or the flash when you capture an image.
• Compose the image by using the LCD monitor.
R:CORO_NG {21}
Using the camera buttons to set the camera
The recording mode function can be set up by using the camera buttons.
POWER button
Used for turning the camera's power on / off.
If there is no operation during the specified
time, the camera's power will be turned off
automatically to save battery life.
Refer to page 48 for more information about
the auto power off function.
SHUTTERbutton
Used for taking an image or recording voice in the RECORDING
mode.
• In MOVIE CLIP mode
Pressing the shutter button down fully starts
the process for recording a movie clip.
Press the shutter button once and the movie
clip is recorded for as long as the available
recording time in the memory allows. If you
wish to stop recording, press the shutter button again.
• In STILL IMAGE mode
Pressing the shutter button down halfway activates the autofocus and
checks the condition of the flash. Pressing the shutter button down
fully takes and stores the image. If you select voice memo recording,
the recording wilt start after the camera has finished storing the image
data.
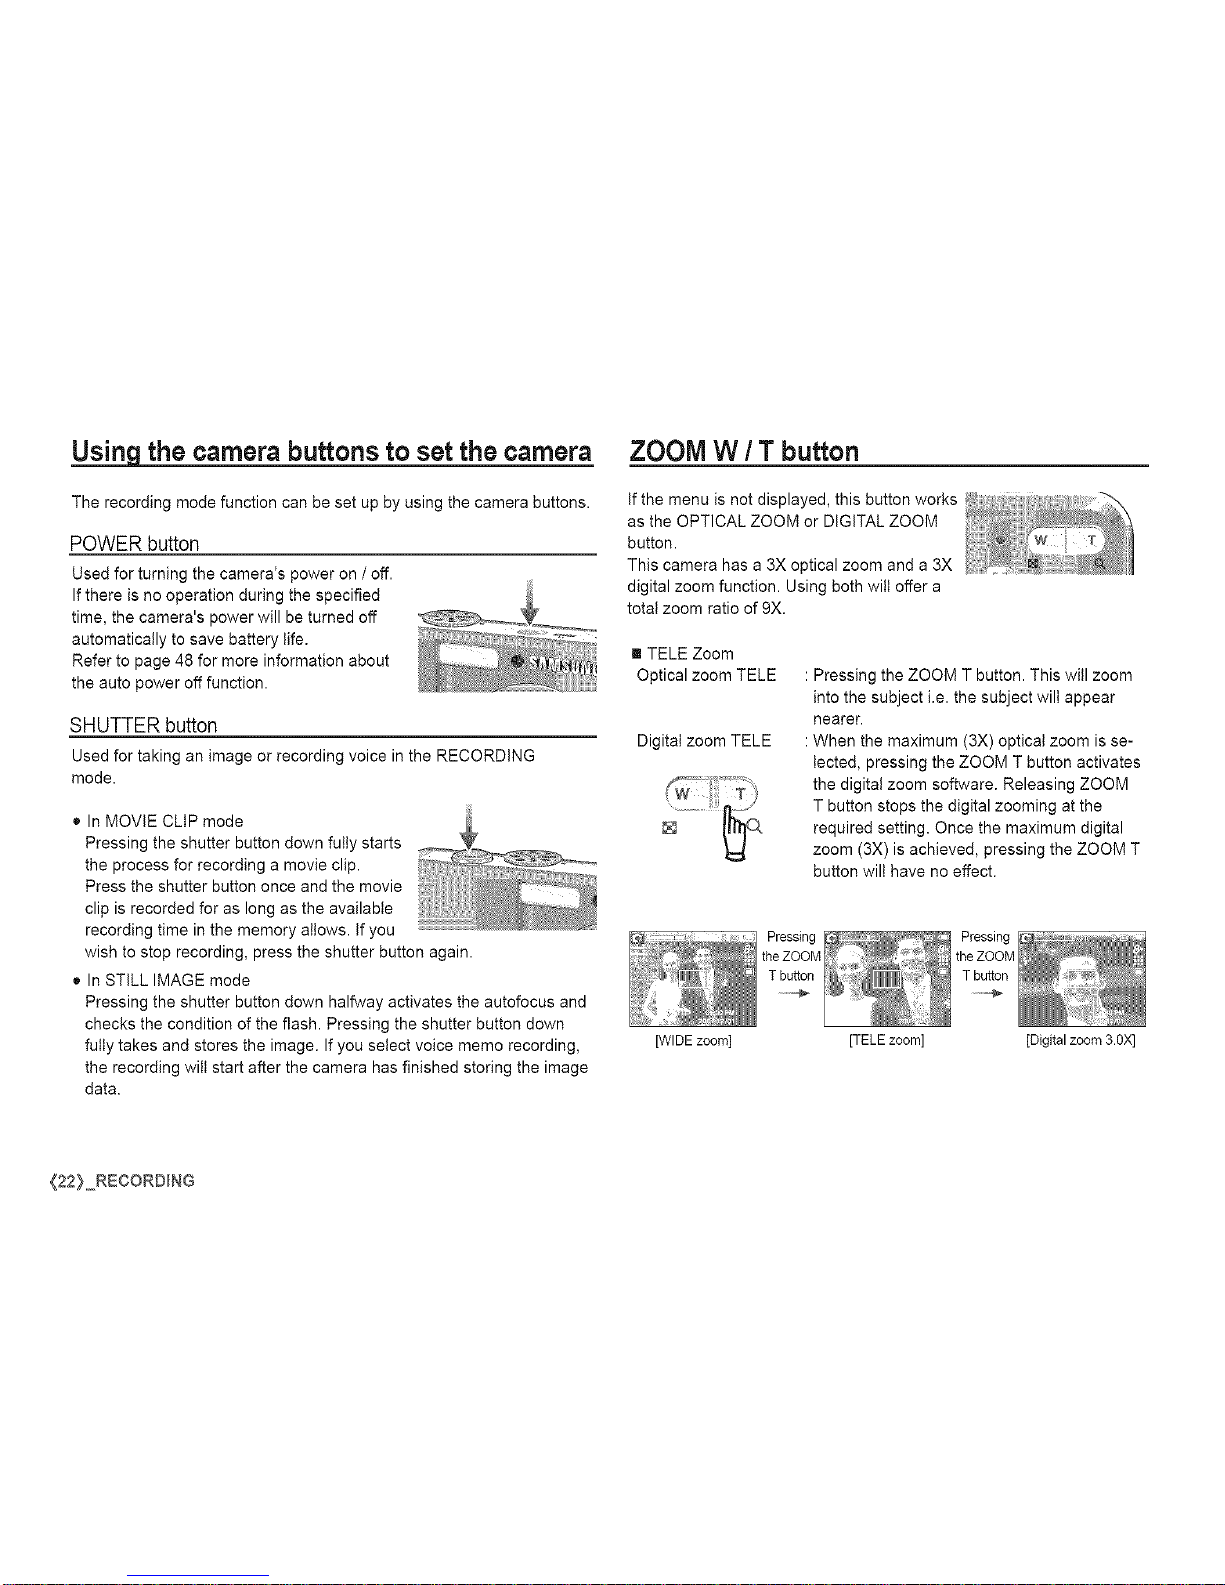
ZOOM W / T button
If the menu is not displayed, this button works
as the OPTICAL ZOOM or DiGiTAL ZOOM
button.
This camera has a 3X optical zoom and a 3X
digital zoom function. Using both wilt offer a
total zoom ratio of 9X.
[] TELE Zoom
Optical zoom TELE
Digital zoom TELE
: Pressing the ZOOM T button. This will zoom
into the subject i.e. the subject wilt appear
nearer.
: When the maximum (3X) optical zoom is se-
lected, pressing the ZOOM T button activates
the digital zoom software. Releasing ZOOM
T button stops the digital zooming at the
required setting. Once the maximum digital
zoom (3X) is achieved, pressing the ZOOM T
button wilt have no effect.
[WIDE zoom] [TELE zoom] [Digital zoom 3.0X]
{22} RECORDING
ZOOM W / T button
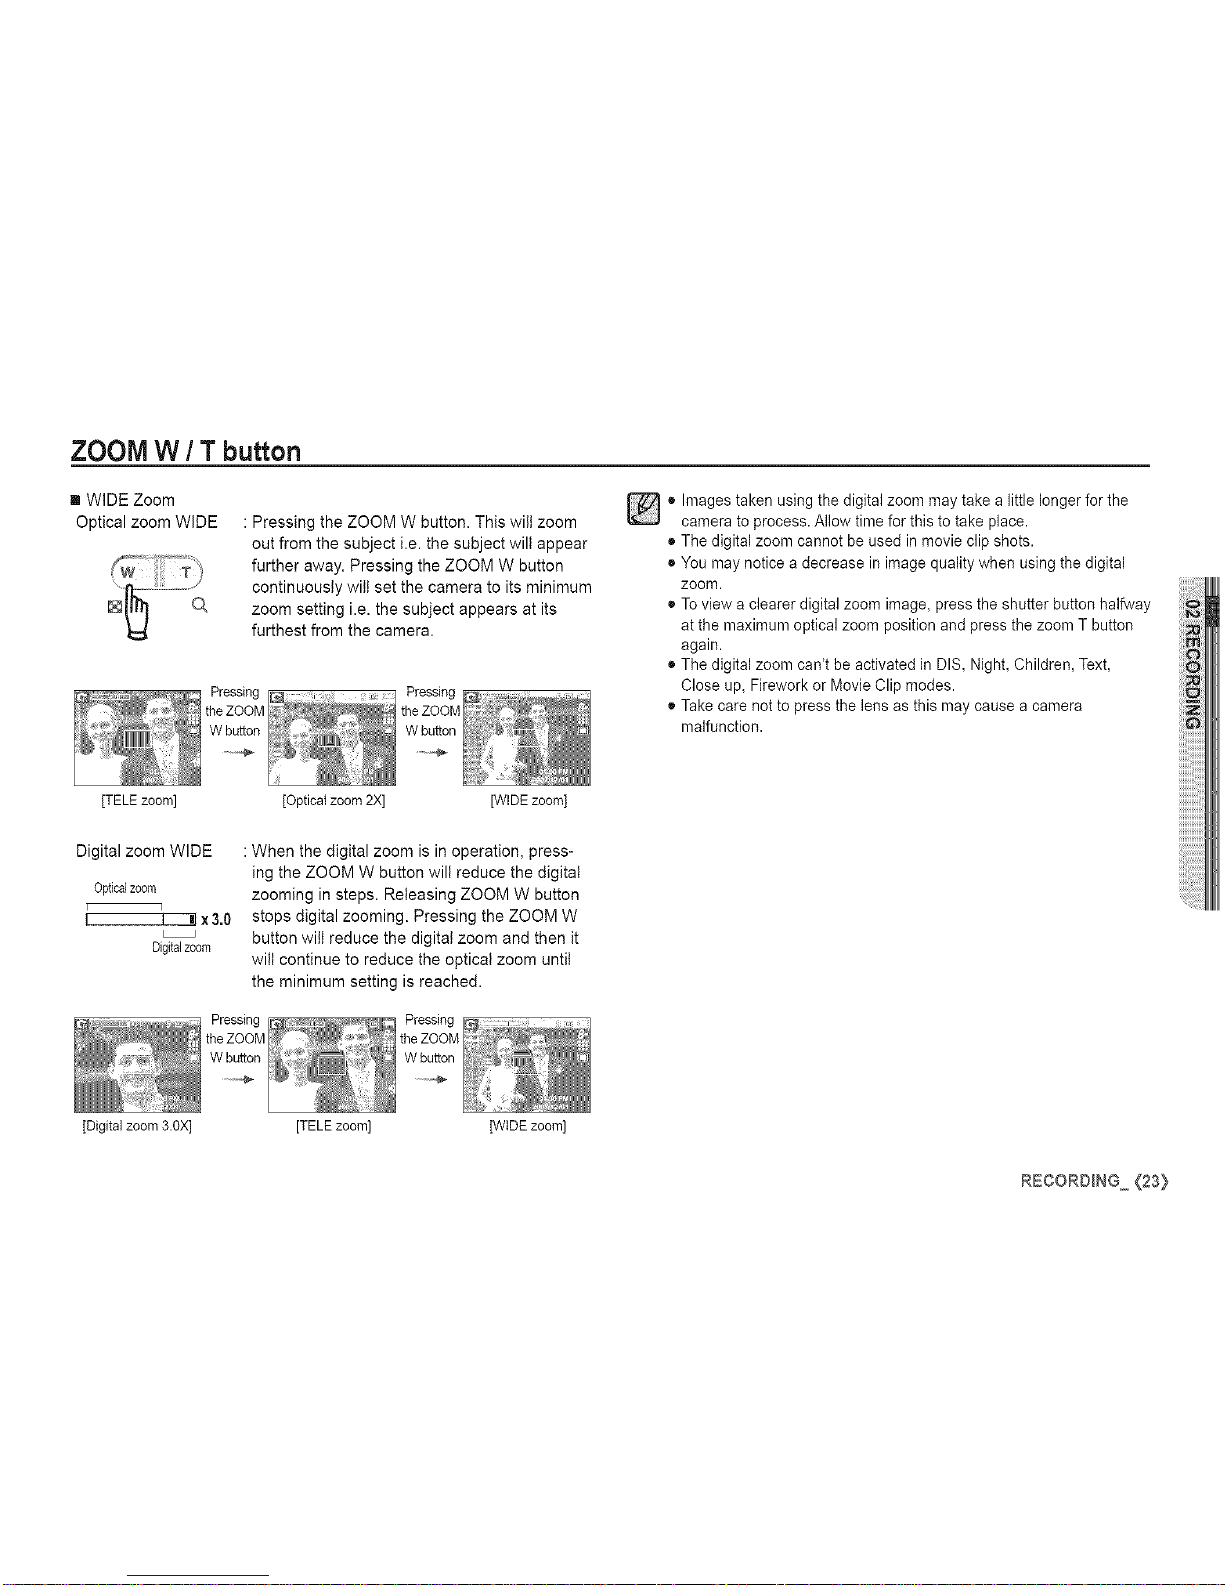
[] WIDE Zoom
Optical zoom WIDE : Pressing the ZOOM W button. This will zoom
out from the subject i.e. the subject will appear
further away. Pressing the ZOOM W button
continuously will set the camera to its minimum
zoom setting i.e. the subject appears at its
furthest from the camera.
o Images taken using the digital zoom may take a little longer for the
camera to process. Allow time for this to take place.
• The digital zoom cannot be used in movie clip shots.
• You may notice a decrease in image quality when using the digital
zoom.
• To view a clearer digital zoom image, press the shutter button halfway
at the maximum optbal zoom position and press the zoom T button
again.
• The digital zoom can't be activated in DIS, Night, Children, Text,
Close up, Firework or Movb Clip modes.
• Take care not to press the lens as this may cause a camera
malfunction.
[TELE zoom] [Optical zoom 2X] [WIDE zoom]
Digital zoom WIDE
Opticalzoom
[ q
I I m!x3,0
Digitalzoom
: When the digital zoom is in operation, press-
ing the ZOOM W button will reduce the digital
zooming in steps. Releasing ZOOM W button
stops digital zooming. Pressing the ZOOM W
button wilt reduce the digital zoom and then it
wilt continue to reduce the optical zoom untit
the minimum setting is reached.
[Digital zoom 3.OX] [TELE zoom] [WIDE zoom]
RECORDING (23}
Face DetectionFJFD_button
[] Face Detection(FD): This mode detects the face position of the sub-
ject automatically and then sets the focus and
exposure. Select this mode for quick and easy
face picture.
Setectabte modes: Auto, Program, Manual, DIS, Portrait, Children,
Beach & Snow
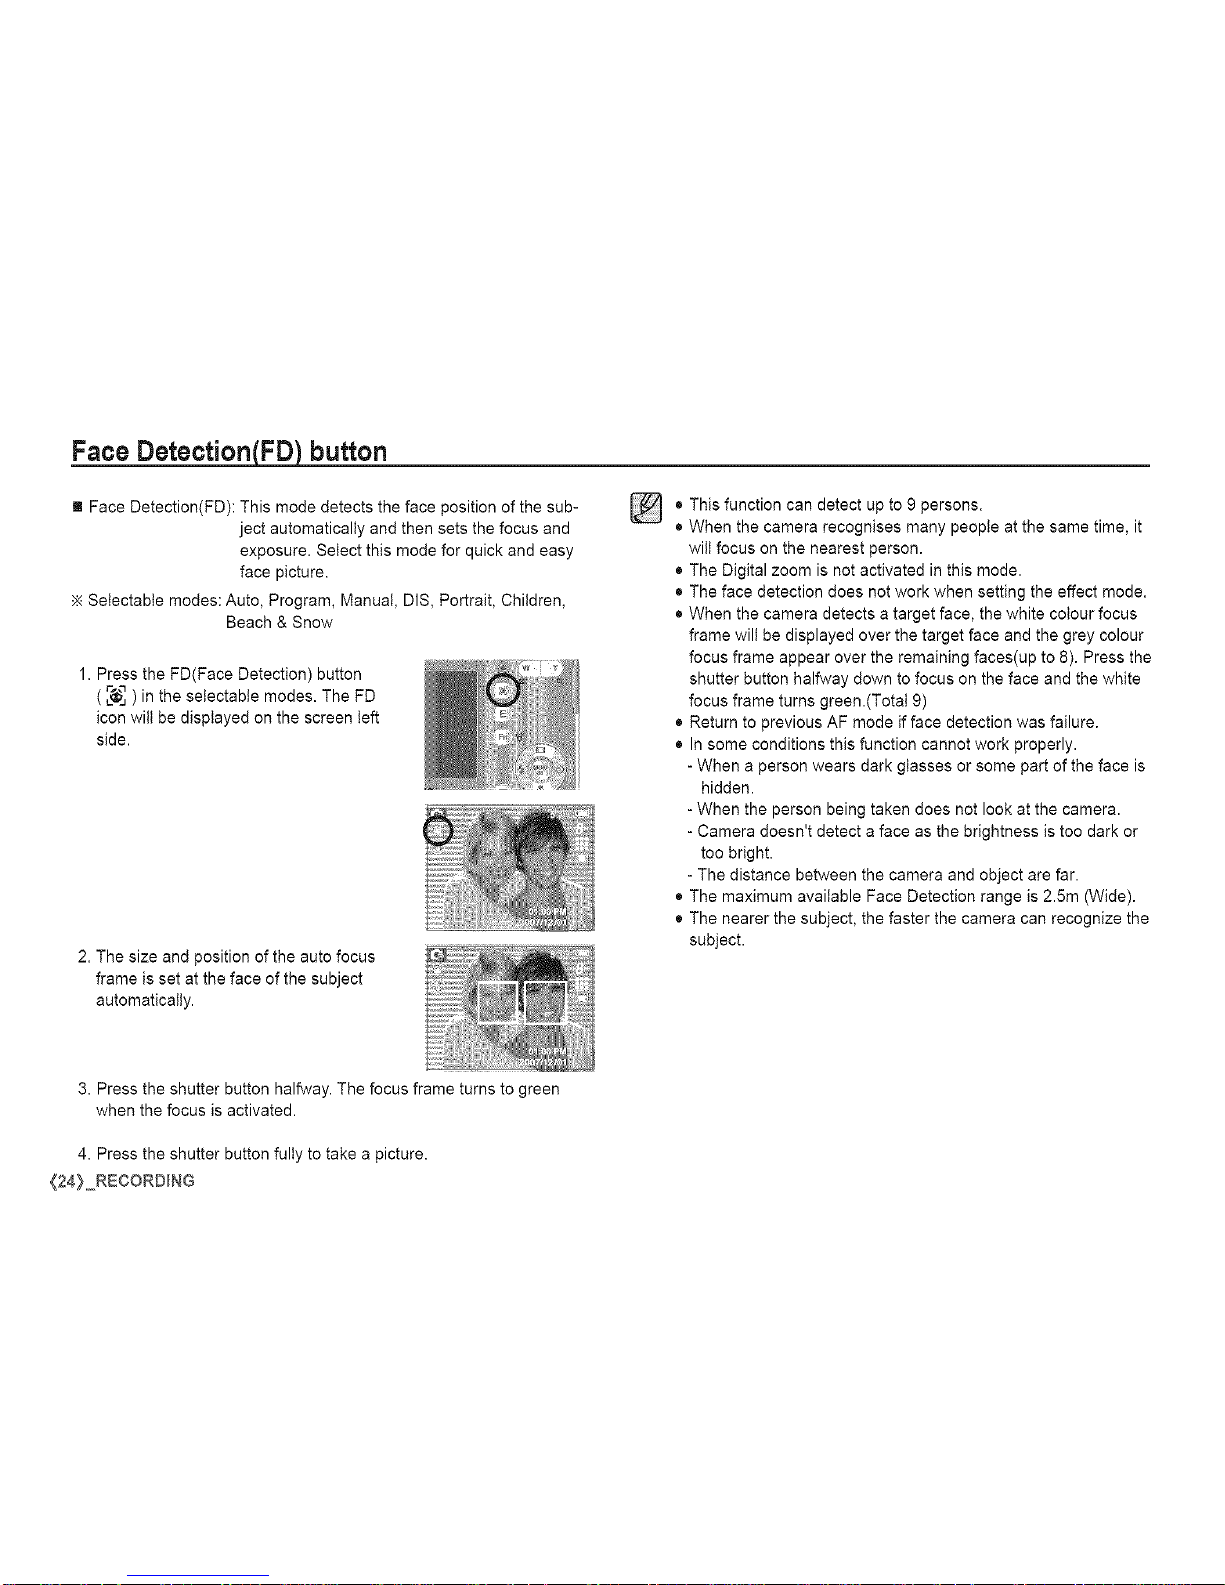
1. Press the FD(Face Detection) button
(_ ) in the selectable modes. The FD
icon wilt be displayed on the screen left
side.
2. The size and position of the auto focus
frame is set at the face of the subject
automatically.
o
o
This function can detect up to 9 persons.
When the camera recognises many people at the same time, it
will focus on the nearest person.
• The Digital zoom is not activated in this mode.
• The face detection does not work when setting the effect mode.
• When the camera detects a target face, the white colour focus
frame will be displayed over the target face and the grey colour
focus frame appear over the remaining faces(up to 8). Press the
shutter button halfway down to focus on the face and the white
focus frame turns green.(Total 9)
• Return to previous AF mode if face detection was failure.
• In some conditions this function cannot work properly.
- When a person wears dark glasses or some part of the face is
hidden.
- When the person being taken does not look at the camera.
- Camera doesn't detect a face as the brightness is too dark or
too bright.
- The distance between the camera and object are far.
• The maximum available Face Detection range is 2.5m (Wide).
• The nearer the subject, the faster the camera can recognize the
subject.
3. Press the shutter button halfway. The focus frame turns to green
when the focus is activated.
4. Press the shutter button fully to take a picture.
{24} RECORDING
Face DetectionFJFDJbutton
[] Self Portrait
When taking pictures of yourself, the area of your face is automatically
detected so that you can take self pictures more easily and quickly.
Selectable modes: Auto, Program, Manual, DIS, Portrait,
Beach & Snow
1. When pressing the Face Detection button again on the face
location screen, the Self Portrait icon appears ( _ ).
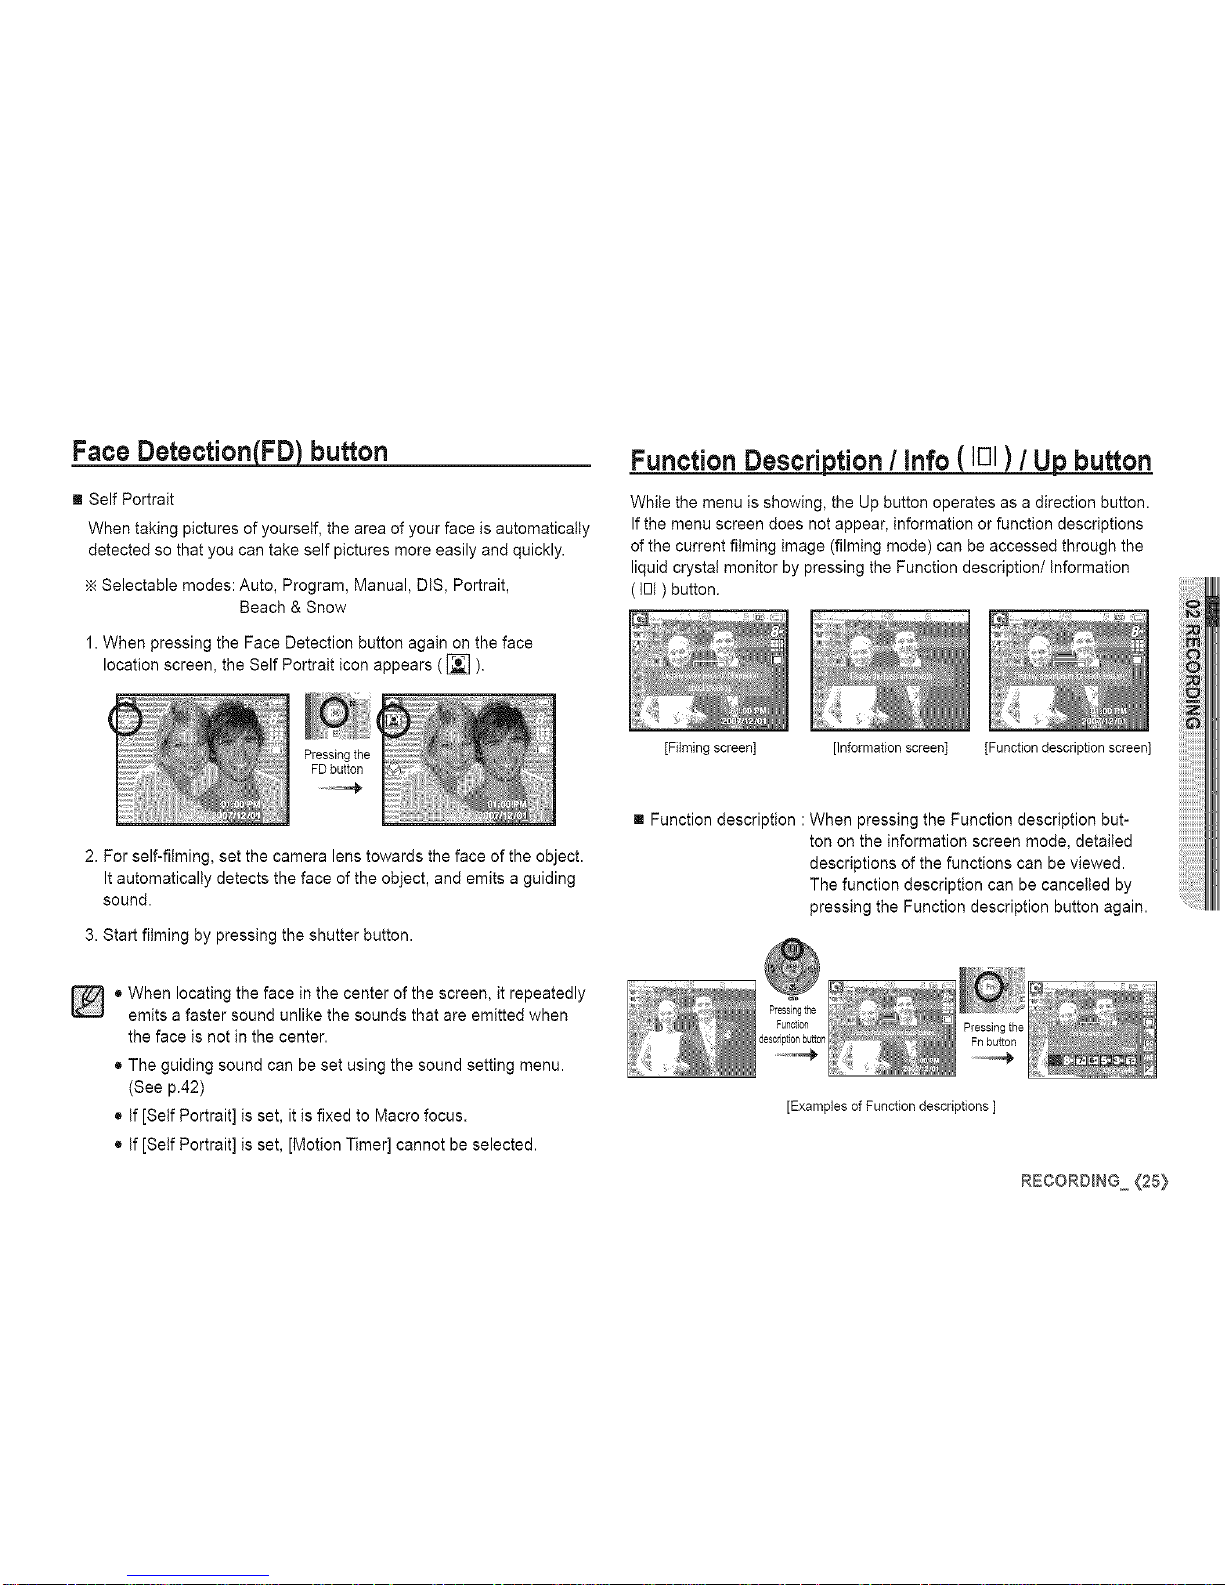
Function Description / Info ( IE]I) / Up button
While the menu is showing, the Up button operates as a direction button.
If the menu screen does not appear, information or function descriptions
of the current filming image (filming mode) can be accessed through the
liquid crystal monitor by pressing the Function description/information
(IOl) button.
2. For self-filming, set the camera lens towards the face of the object.
It automatically detects the face of the object, and emits a guiding
sound.
3. Start filming by pressing the shutter button.
o When locating the face in the center of the screen, it repeatedly
emits a faster sound unlike the sounds that are emitted when
the face is not in the center.
• The guiding sound can be set using the sound setting menu.
(See p.42)
• If [Self Portrait] is set, it is fixed to Macro focus.
• If [Self Portrait] is set, [Motion Timer] cannot be selected.
[Filming screen] [Information screen] [Function description screen]
[] Function description : When pressing the Function description but-
ton on the information screen mode, detailed
descriptions of the functions can be viewed.
The function description can be cancelled by
pressing the Function description button again.
[Examples of Function descriptions ]
RECORDING (25}
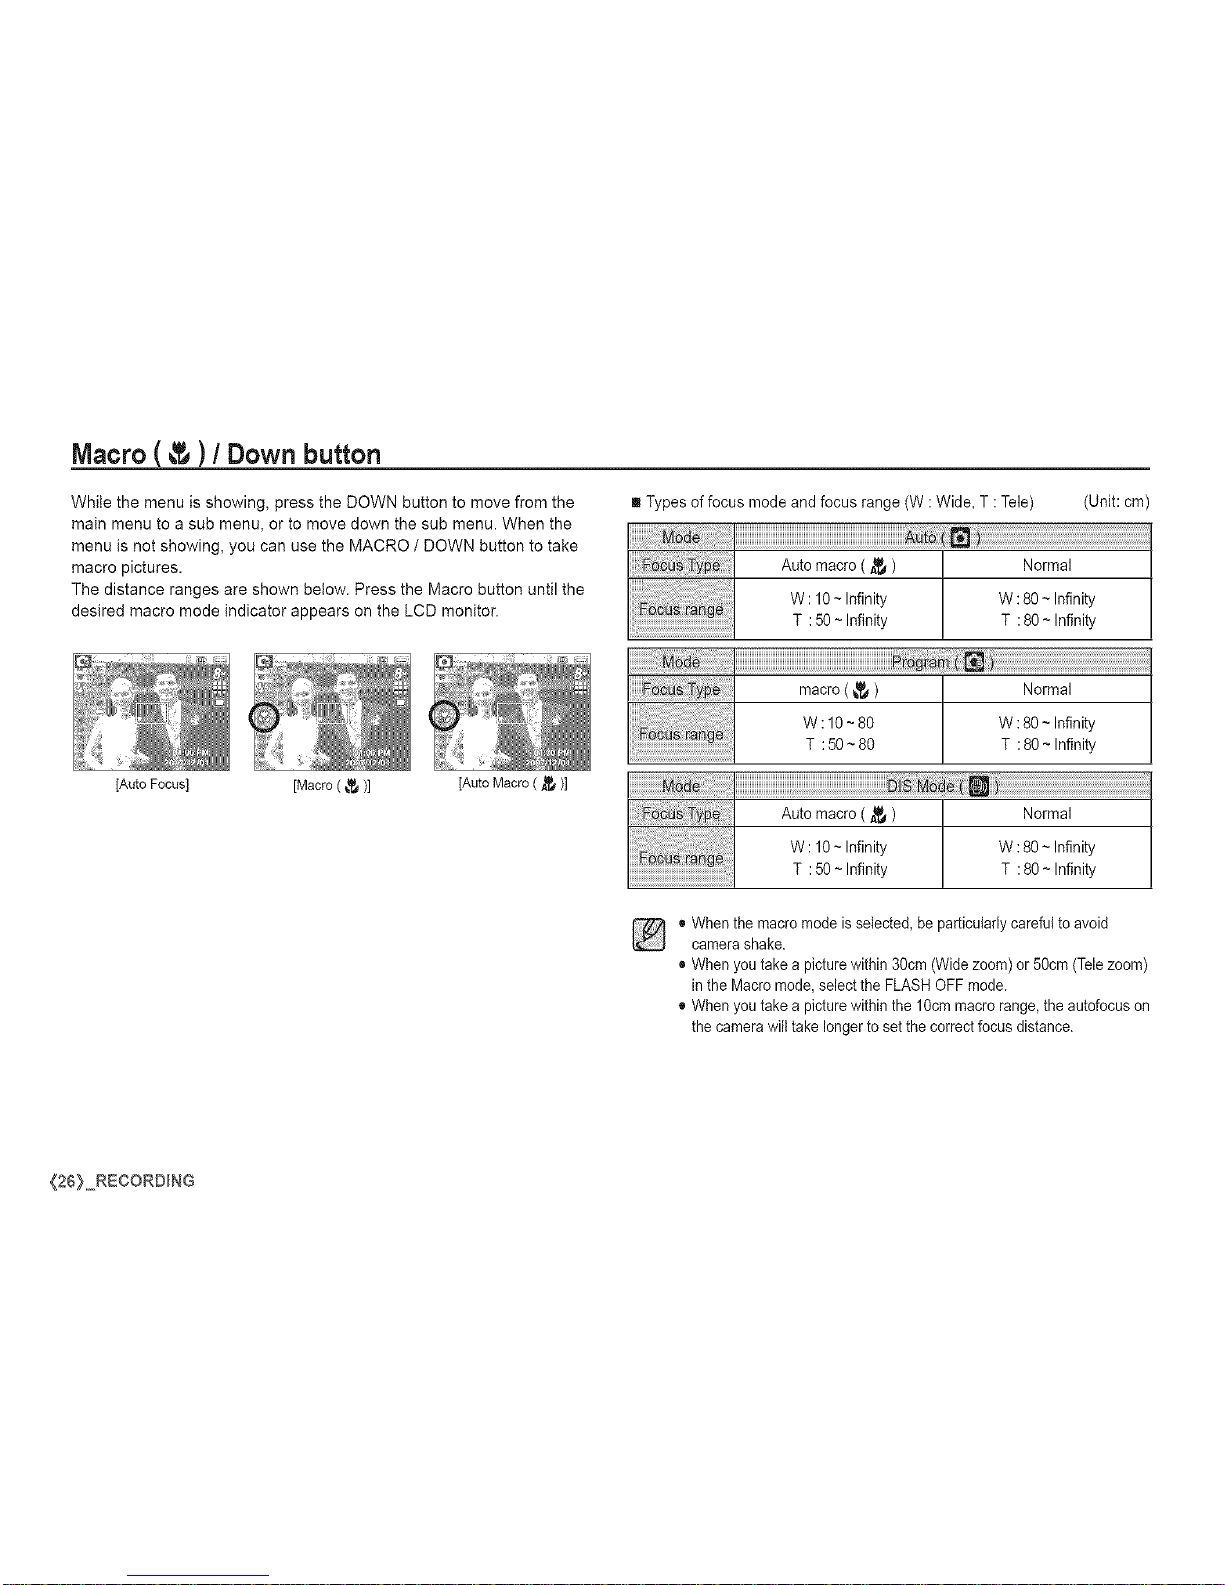
Macro( )/ Downbutton
While the menu is showing, press the DOWN button to move from the
main menu to a sub menu, or to move down the sub menu. When the
menu is not showing, you can use the MACRO / DOWN button to take
macro pictures.
The distance ranges are shown below. Press the Macro button until the
desired macro mode indicator appears on the LCD monitor.
[Auto Focus] [Macro ( _ )] [Auto Macro ( _ )]
Types of focus mode and focus range (W : Wide, T : Tele)
!!!!_i_i_i_i_i_!i_i!_i_iiiiiiiiiii_!_iiiiiiiiiiiii_iiiiiii_iiii_iiiiiiiiiiiiiiiiiiiiiiiiiii_iii_i!_!!!i_i_i_i_i_i!_!_!i_iii_i_ii_!
iiiiii_;!_!_!!;!!!!!!!!!!!ii!_ii!i_!_!i!iiiii_i_iiiiiiiiiiiiiiiiii_iiiiiiiiiiiiiiiiiii_iiiiiiiiii_iiiiiiii!i_!i!!i!iiii_!_i!_!!i!i_!!i!i_i_!;_
(Unit: cm)
Auto macro ( _ ) Normal
W: 10~ Infinity W :80 ~ Infinity
T : 50~ Infinity T : 80 ~ Infinity
iiiiiiiiiiiiiiiiiiiiiiiiiiiiiiiiiiiiiiiiiiiiiiiiiiiiiiiiiiiiiiiiiiiiiiiiiiiiiiiiiiiiiiii_ii_!!_;!_i!_!_!_!_i¸!_!iiiiiiiiiiiiiiiiiiiiiiiiiiiiiii__
macro (_._) Normal
W :10 ~80 W :80 ~ Infinity
T : 50 ~ 80 T : 80 ~ Infinity
Auto macro ( _ ) Normal
W: 10~ Infinity W :80 ~ Infinity
T : 50~ Infinity T : 80 ~ Infinity
® When the macro mode is selected, be particularly careful to avoid
camerashake.
® When you take a picture within 30cm (Wide zoom) or 50cm (Telezoom)
in the Macro mode, selectthe FLASHOFF mode,
® When you take a picture within the 10cm macro range, the autofocus on
the camerawill take longer to setthe correct focus distance,
{26} RECORDING
Macro(_ )/ Downbutton Focuslock
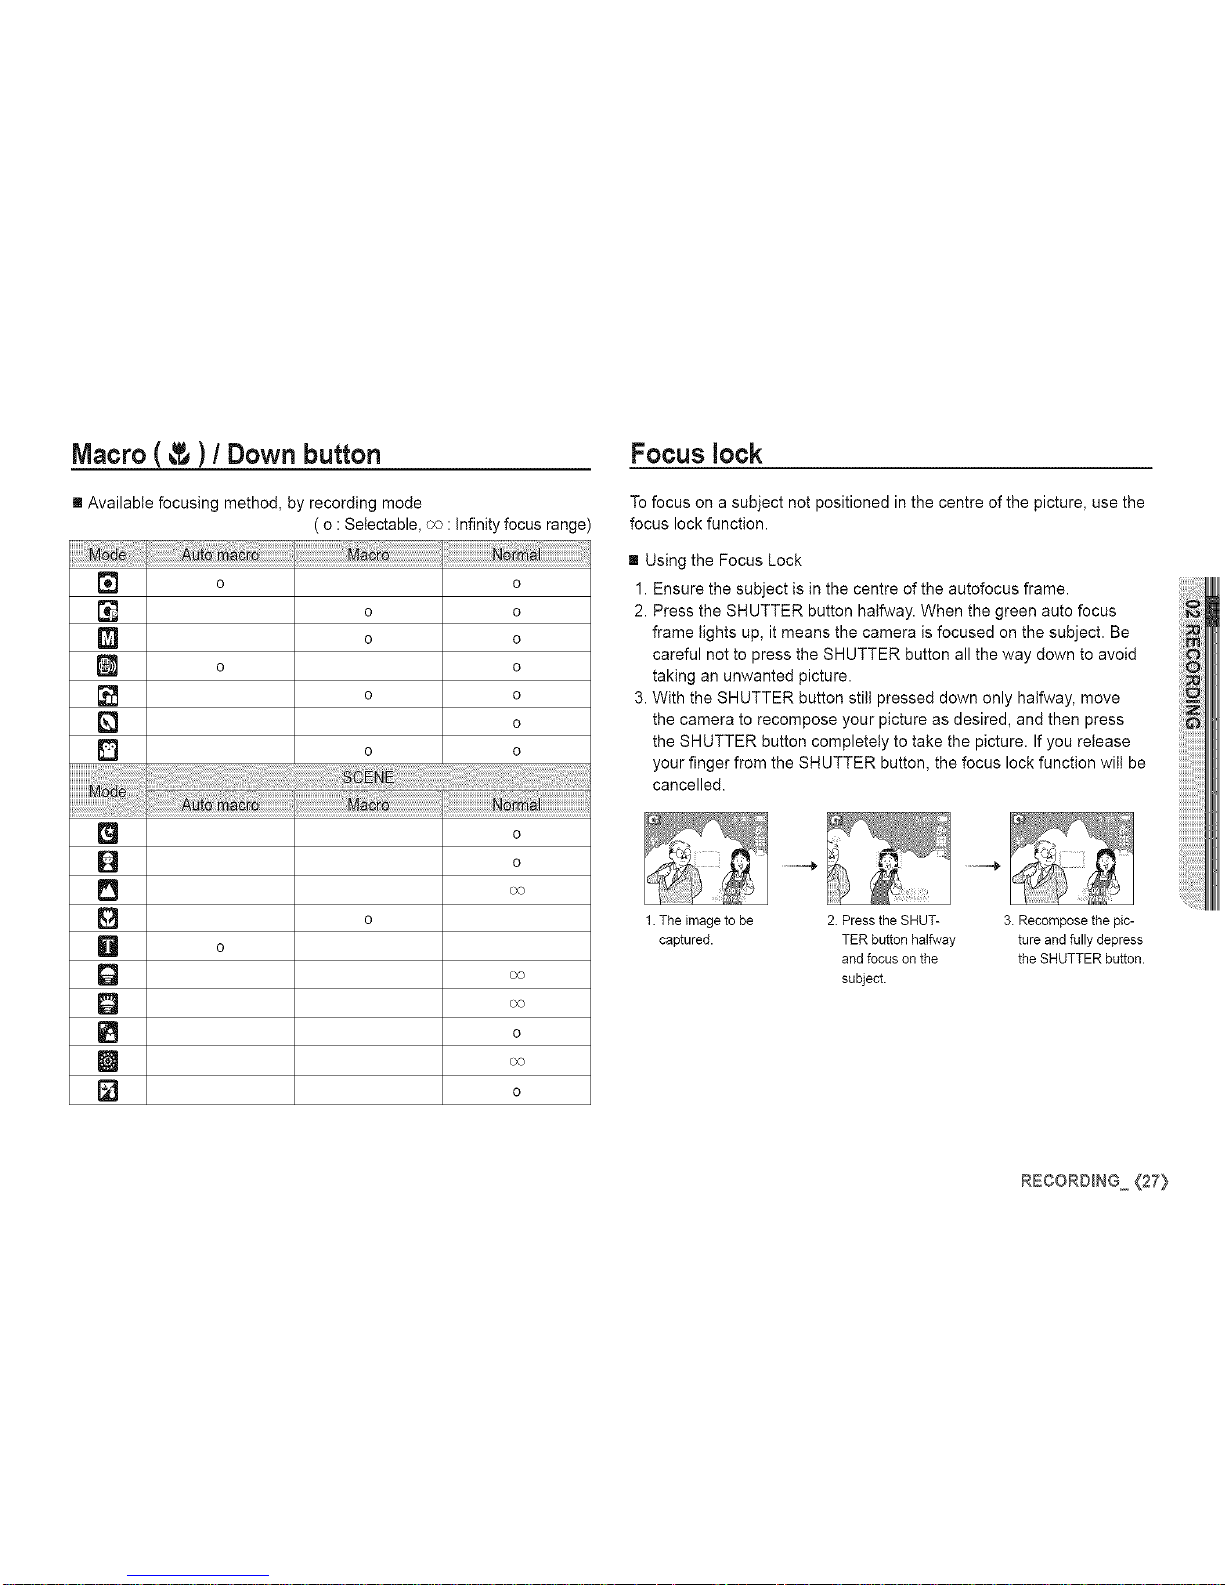
[] Available focusing method, by recording mode
[]
0
[]
[]
[]
[]
0
0
Q
0
0
Q
[]
D
iliiiiiiiiiiiiiiiiiiiiiiiiiiiiiiiiii!ii!i!ili_i_ili_!:!IJ_¸i_i_ii!i!i!i!i!i!i!i!i!i!i!i!i!i!i!i!i!i!i_i
o
(o : Setectable, oo : infinity focus range)
o
o o
o o
o
o o
o
o o
o
o
o
o
o
To focus on a subject not positioned in the centre of the picture, use the
focus lock function.
[] Using the Focus Lock
1. Ensure the subject is in the centre of the autofocus frame.
2. Press the SHUTTER button halfway. When the green auto focus
frame lights up, it means the camera is focused on the subject. Be
careful not to press the SHUTTER button all the way down to avoid
taking an unwanted picture.
3. With the SHUTTER button still pressed down only halfway, move
the camera to recompose your picture as desired, and then press
the SHUTTER button completely to take the picture. If you release
your finger from the SHUTTER button, the focus lock function wilt be
cancelled.
1.The image to be 2. Press the SHUT- 3. Recompose the pic-
captured. TER button halfway ture and fully depress
and focus on the the SHUTTER button.
subject.
RECORDING {27}
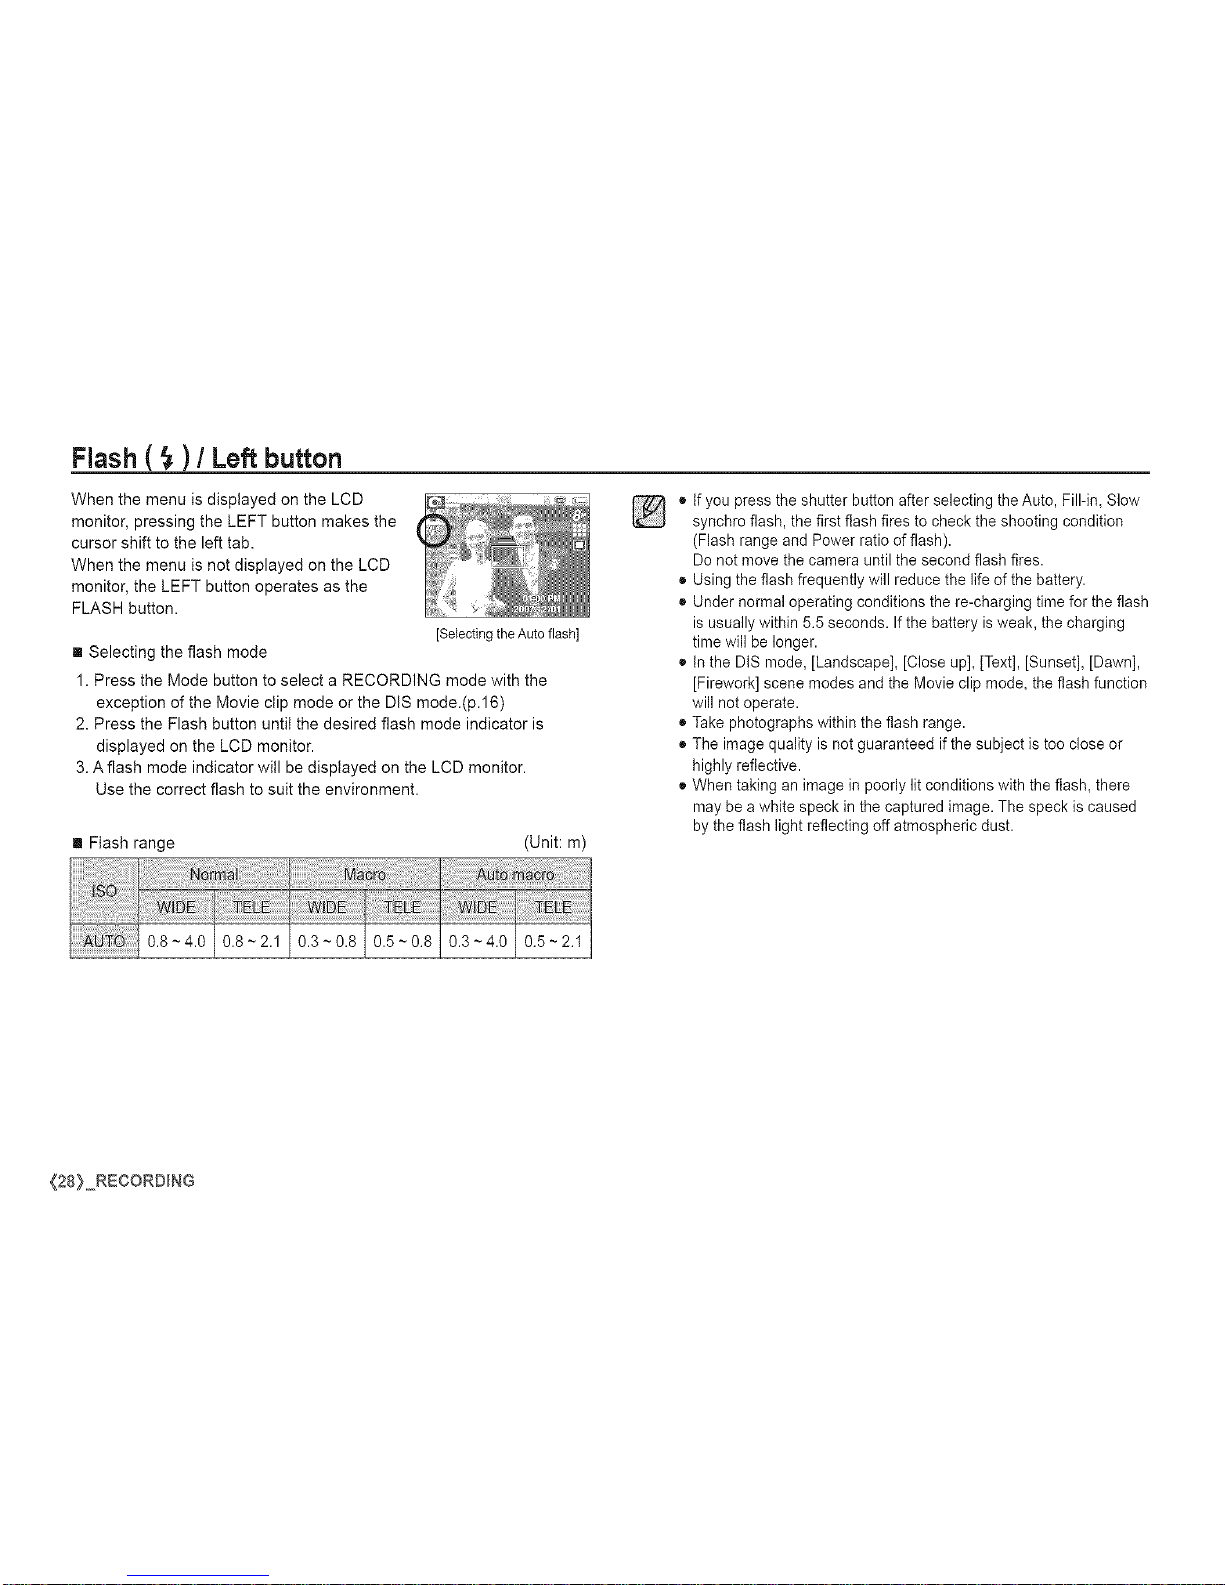
Flash ( _ ) / Left button
When the menu is displayed on the LCD
monitor, pressing the LEFT button makes the
cursor shift to the left tab.
When the menu is not displayed on the LCD
monitor, the LEFT button operates as the
FLASH button.
[Selecting the Auto flash]
[] Selecting the flash mode
1. Press the Mode button to select a RECORDING mode with the
exception of the Movie clip mode or the DIS mode.(p.16)
2. Press the Flash button until the desired flash mode indicator is
displayed on the LCD monitor.
3. Aflash mode indicator will be displayed on the LCD monitor.
Use the correct flash to suit the environment.
[] Flash range (Unit: m)
03 08105 080.3-4.010.5-2.1
] •
o
o
If you press the shutter button after selecting the Auto, Fill-in, Slow
synchro flash, the first flash fires to check the shooting condition
(Flash range and Power ratio of flash).
Do not move the camera until the second flash fires.
Using the flash frequently will reduce the life of the battery.
Under normal operating conditions the re-charging time for the flash
is usuallywithin 5.5 seconds. If the battery is weak, the charging
time will be longer.
In the DtS mode, [Landscape], [Close up], [Text], [Sunset], [Dawn],
[Firework] scene modes and the Movie clip mode, the flash function
will not operate.
Take photographs within the flash range.
The image quality is not guaranteed if the subject is too close or
highly reflective.
When taking an image inpoorly lit conditions with the flash, there
may bea white speck in the captured image. The speck is caused
by the flash light reflecting off atmospheric dust.
{28} RECORDING
 Loading...