

Page 1
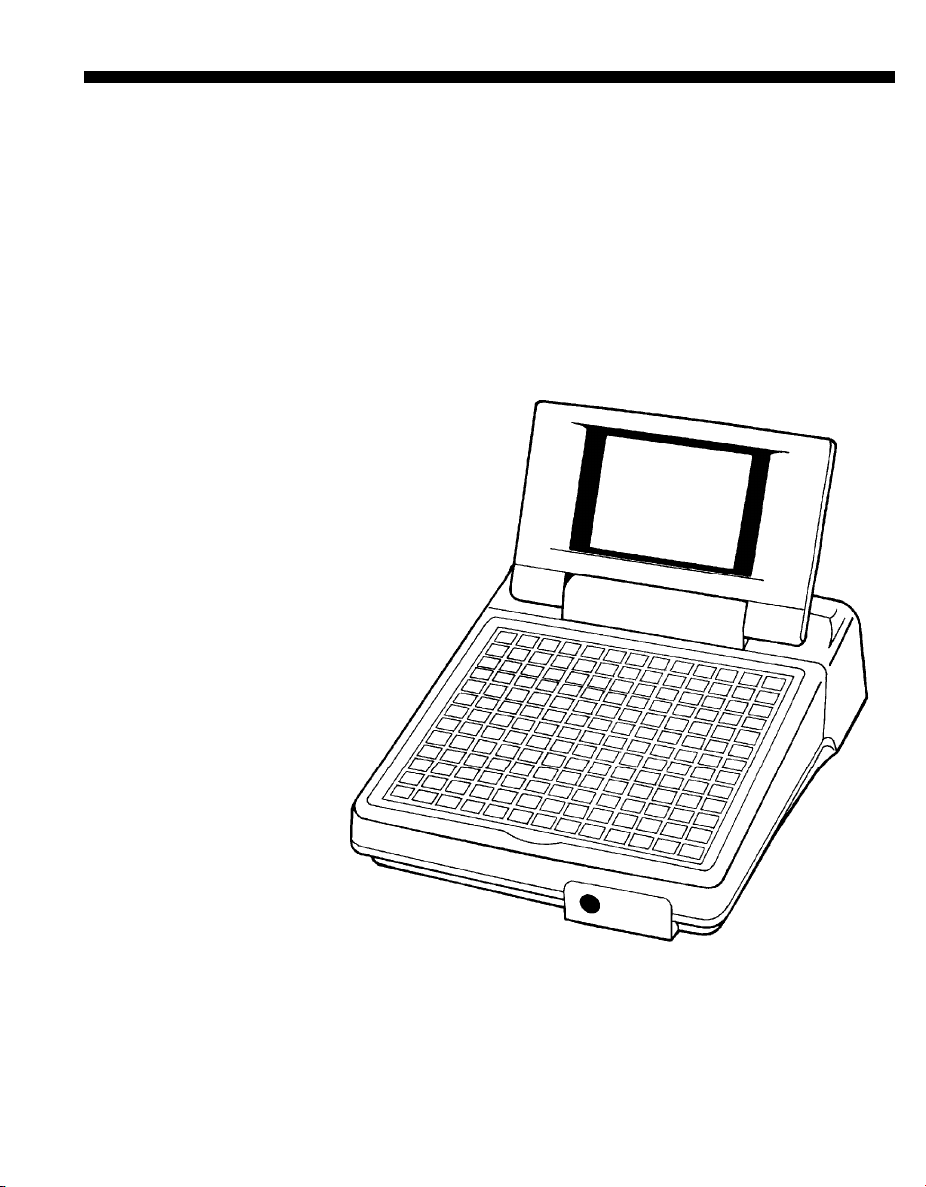
Samsung SPS-1000
SAM1000 For Windows
User's Manual
Version 2.3
All specifications are subject to change without notice. 2013, CRS, Inc.
Page 2

CRS, Inc.
Limited Warranty and Disclaimers of Warranty
This manual has been developed by CRS, Inc. It is intended for the use of its customers and service personnel and should be read in its
entirety before attempting to install, use or program the product(s).
Nothing contained in this manual shall be deemed to be, and this manual does not constitute, a warranty of, or representation with respect
to, the product or any of the products to which this manual applies. This manual is subject to change without notice and CRS, Inc. has no
obligation to provide any updates or corrections to this manual. Further, CRS, Inc. also reserves the right, without prior notice, to make
changes in equipment design or components as it deems appropriate. No representation is made that this manual is complete or accurate in
all respects and CRS, Inc. shall not be liable for any errors or omissions contained in this manual. In no event shall CRS, Inc. be liable for
any incidental or consequential damages relating to or arising out of the use of this manual. This document contains proprietary
information that is protected by copyright. All rights are reserved. No part of this document may be photocopied or reproduced without
prior written consent of CRS, Inc.
NOTICE
IF ANY WARRANTY IS EXTENDED TO YOU WITH REGARD TO THE PRODUCT(S) TO WHICH THIS MANUAL APPLIES, IT
IS A WARRANTY FROM THE ENTITY OR INDIVIDUAL FROM WHOM YOU DIRECTLY PURCHASED THE PRODUCT(S).
SUBJECT TO THE FOREGOING, UNLESS YOU ARE A DIRECT END USER CUSTOMER OF CRS, INC., CRS, INC. DOES NOT
EXTEND TO YOU ANY EXPRESS WARRANTY OR ANY IMPLIED WARRANTY AND EXPRESSLY DISCLAIMS ANY IMPLIED
WARRANTY OF MERCHANTABILITY, FITNESS FOR USE, OR FITNESS FOR ANY PARTICULAR PURPOSE, OR ANY
WARRANTY OF NON-INFRINGEMENT OF INTELLECTUAL PROPERTY RIGHTS IN CONNECTION WITH THE PRODUCT(S)
OR ANY SOFTWARE, DRIVERS, OR PROGRAMMING PRODUCT, WHETHER EMBEDDED IN PRODUCT(S) OR PROVIDED AS
A SEPARATE PROGRAM, OR USED IN CONJUNCTION WITH THIS/THESE PRODUCT(S). CRS, INC. SPECIFICALLY DOES
NOT WARRANT THAT THE OPERATION OF ANY DRIVERS, SOFTWARE, OR PROGRAMMING PRODUCTS LICENSED
HEREUNDER, WHETHER EMBEDDED IN PRODUCTS OR PROVIDED AS SEPARATE PROGRAMS, SHALL BE
UNINTERRUPTED OR ERROR FREE OR THAT FUNCTIONS CONTAINED IN SUCH DRIVERS, SOFTWARE OR
PROGRAMMING PRODUCTS SHALL OPERATE IN COMBINATION(S) WHICH MAY BE SELECTED FOR USE BY YOU OR
OTHERWISE MEET YOUR REQUIREMENTS.
CRS, Inc. is not responsible for any damages or loss, either direct, indirect, special, incidental or consequential, which you may experience
as a result of your purchase or use of the product(s). Your sole remedy in the event that you encounter any difficulties with the product(s)
is against the entity or individual from whom you purchased the product(s).
Revision 2.0 - April 1, 2005
Page 3

Contents
Introduction 1
Overview ................................................................................................................................... 1
Installing .................................................................................................................................... 2
Starting ...................................................................................................................................... 4
Navigating ................................................................................................................................. 5
Interface Specifications ............................................................................................................. 9
Menu Functions 11
Stores ....................................................................................................................................... 11
Edit ECR Data ......................................................................................................................... 16
Features ....................................................................................................................... 1
Requirements ............................................................................................................... 1
Cash Register Settings ................................................................................................. 3
Mouse and Keyboard .................................................................................................. 5
Viewing Menus and Selecting Menu Items ................................................................. 5
Working with Edit Screens.......................................................................................... 7
Creating a New Store ................................................................................................ 12
Selecting the Default Store ........................................................................................ 13
Editing Store Information .......................................................................................... 14
Deleting a Store ......................................................................................................... 15
PLU File .................................................................................................................... 18
PLU Status Group ..................................................................................................... 27
Group ......................................................................................................................... 28
Function Keys ........................................................................................................... 29
Options ...................................................................................................................... 30
Tax Tables ................................................................................................................. 32
Messages ................................................................................................................... 33
Time Periods.............................................................................................................. 41
Employee ................................................................................................................... 42
Authority Levels ........................................................................................................ 46
Printer Tables and KV Routing ................................................................................. 47
Ingredient Inventory .................................................................................................. 52
Time Activated Functions ......................................................................................... 54
Product Mix Groups .................................................................................................. 55
Custom Report ........................................................................................................... 57
String Report ............................................................................................................. 58
Non-PLU Code .......................................................................................................... 59
Macros ....................................................................................................................... 60
WLU .......................................................................................................................... 61
Age Verification ........................................................................................................ 62
Mix and Match .......................................................................................................... 63
S-Mode System Options ............................................................................................ 64
Printer Drivers ........................................................................................................... 65
SAM1000 For Windows User's Manual v2.3 Contents i
Page 4

Serial Port Parameters ............................................................................................... 66
Keyboard Layout ....................................................................................................... 67
Tare Weights ............................................................................................................. 69
Communications ...................................................................................................................... 70
Polling ....................................................................................................................... 70
Send Programs to ECR (Download) .......................................................................... 72
Receive Programs from ECR (Upload) ..................................................................... 73
Polling Setup File ...................................................................................................... 74
Print ......................................................................................................................................... 75
Daily Poll File ............................................................................................................ 76
Log Files .................................................................................................................... 77
PLU File .................................................................................................................... 80
PLU Range ................................................................................................................ 81
Consolidated Store Report ......................................................................................... 82
Not Found PLU File .................................................................................................. 83
Remove .................................................................................................................................... 84
Old Poll Files ............................................................................................................. 84
Log Files (Upload, Download, Poll) ......................................................................... 84
Utilities .................................................................................................................................... 85
Display Memory Allocation ...................................................................................... 85
Re-Index PLU Misc Files .......................................................................................... 86
Copy a Store .............................................................................................................. 86
Copy PLU and Status Group Files ............................................................................ 87
Pause Between Stores in Polling ............................................................................... 88
Calculate Number of PLUs ........................................................................................ 88
Set Auto-Polling ........................................................................................................ 89
Physical Inventory Comparison Partial Inventory Comparison ................................ 90
Inventory Comparison Procedure .............................................................................. 90
Inventory Stock Totals .............................................................................................. 92
Program EPROM ....................................................................................................... 93
Disable Upload of ECR Data..................................................................................... 94
After Polling .............................................................................................................. 95
Convert Polled File to Comma Delimited ................................................................. 96
Copy PLU Price Levels ............................................................................................. 97
Set the Number of Attempts in Polling ...................................................................... 97
Backup Poll Data Files .............................................................................................. 97
Quit .......................................................................................................................................... 99
Appendices 100
Structure of Stores ................................................................................................................. 100
File Definitions ...................................................................................................................... 101
Structure of Polling Files ....................................................................................................... 104
Sam1000 File Structures for PLU Information ...................................................................... 107
Logo Creation Instructions .................................................................................................... 109
Bit Map File Specification ....................................................................................... 109
Create Bitmap Image ............................................................................................... 110
Converting the Bit Map Image for the SPS-1000 .................................................... 111
Prepare Downloading the Bit Map Image on the SPS-1000 ................................... 111
Downloading the Bit Map Image to the SPS-1000 with SAM1000 ........................ 111
Downloading the Bit Map Image to the SPS-1000 with the Samsung Utility ......... 111
Downloading the Bit Map Image to the Printer ....................................................... 112
Printing the Bit Map Image ..................................................................................... 112
Troubleshooting Common Problems ..................................................................................... 113
Hardware ................................................................................................................. 113
ii Contents SAM1000 For Windows User's Manual v2.3
Page 5

Software .................................................................................................................. 113
Samsung SPS 1000 .................................................................................................. 113
SAM 1000 ............................................................................................................... 113
Starting Operations .................................................................................................. 114
Cabling Diagrams .................................................................................................................. 115
Cable Pinouts ........................................................................................................... 116
Manual Revision Record 118
SAM1000 For Windows User's Manual v2.3 Contents iii
Page 6

Page 7

Introduction
Overview
Features
SAM1000 For Windows controls the connection between a Samsung SPS 1000 electronic
cash register and an IBM compatible PC running in a Windows XP (or later) environment.
Using SAM1000 For Windows at your PC, you can:
Connect directly or via telephone modems.
Upload program files from the register to the PC.
Edit cash register programs.
Download program files to the register from the PC.
Poll reports from the register, save, display or print them at the PC.
Poll all stores, or individual stores.
Poll unattended at a predetermined time.
Convert polled reports to ASCII files, ready to be used by other PC applications.
Requirements
To use this utility, you must have:
Pentium 100 or faster CPU.
32 MB RAM.
150 MB minimum hard disk space available.
Dedicated serial port (RS-232C).
CD ROM drive.
3.5” floppy disk drive
VGA or SVGA display.
US Robotics Sportster Modems are recommended for remote connections (for both PC
and ECR sites.)
SAM1000 For Windows User's Manual v2.3 Introduction 1
Page 8

Installing
Notes:
SAM Polling software requires a LPT or USB software key to be installed on the PC running
the software to access all of the polling and programming features. Software can be installed
on a PC without the key, but it can be used only for program saving/loading.
The connection from the ECR to your PC requires a serial port on the PC. See “Cabling
Diagrams” on page 115 for more information on cables and connections.
1. Load the SAM1000 program CD into your CD drive.
2. From the Windows Desktop, double click the My Computer icon.
3. Select your CD ROM drive (usually drive "D".)
4. Choose Setup. The Welcome dialog displays.
5. Click Next. The Ready to Install dialog displays.
6. Click Next. The Install Directory dialog displays.
7. Click Next. The Select Shortcut Folder dialog displays.
8. Click Next. When all files are copied, the Finished dialog displays.
9. Click Finish.
10. Next, the HSAP SRM loads the driver for the software key.
11. When the driver installation is complete, the Aladdin HASP SRM dialog displays.
12. Click OK.
13. Remove the CD ROM. Your installation is complete.
2 Introduction SAM1000 For Windows User's Manual v2.3
Page 9

Cash Register Settings
To communicate with a Samsung SPS 1000 you must configure one of the available ports for
polling and you must set the appropriate parameters for that port.
See "Serial Port Device Selections" in the Samsung SPS 1000 Program Manual to select
the Polling option for the port to which you are connected.
See "Define Serial Port Parameters" in the Samsung SPS 1000 Program Manual to select
the BAUD rate and other options for the port to which you are connected.
SAM1000 For Windows User's Manual v2.3 Introduction 3
Page 10
Starting
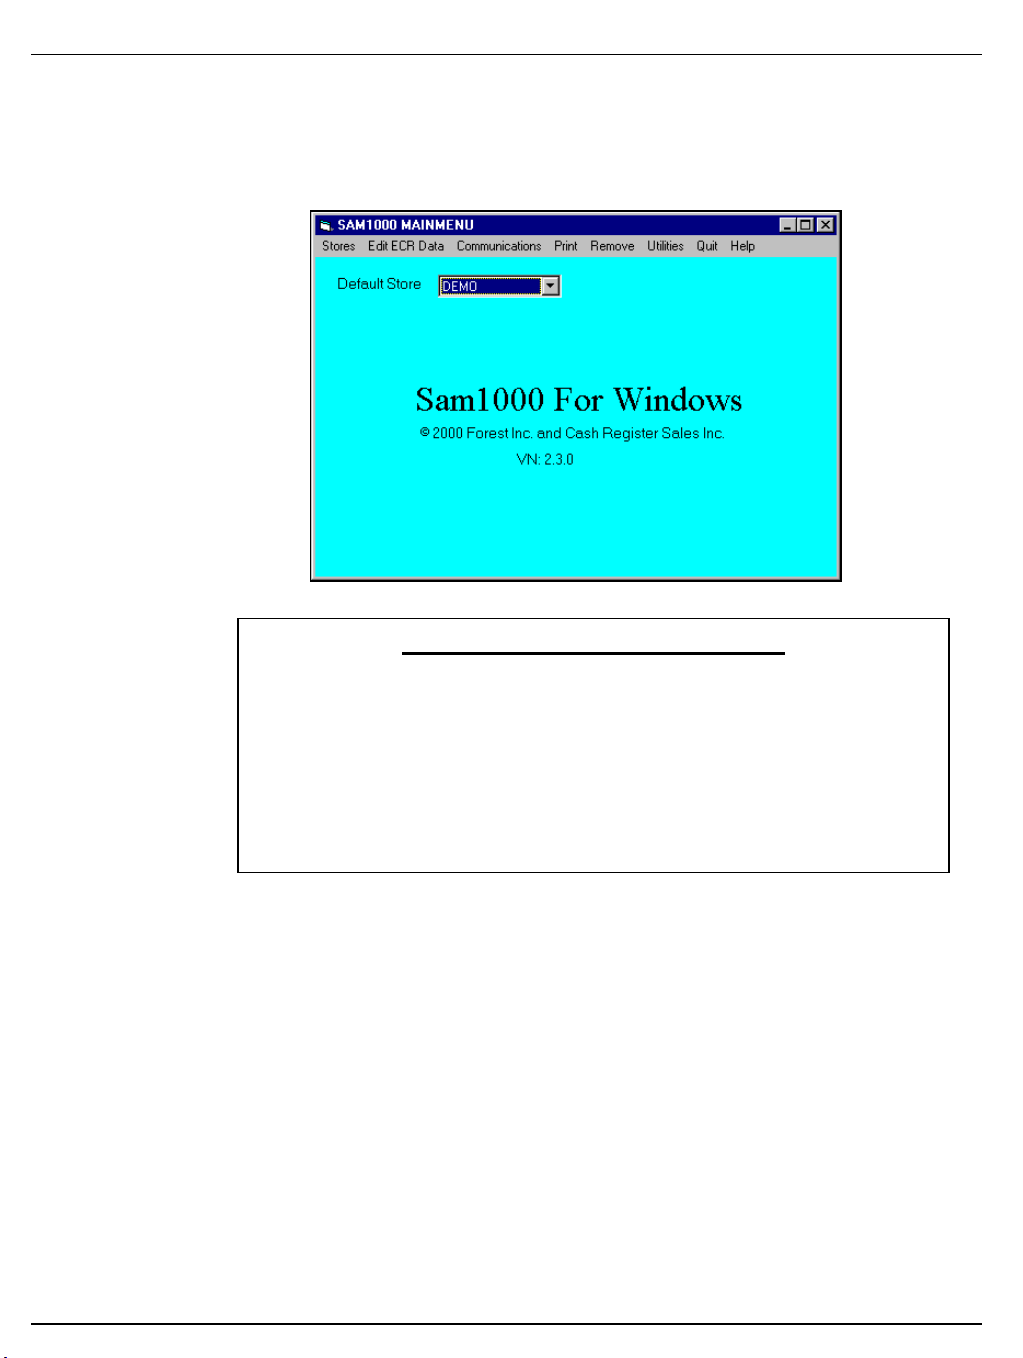
1. From Windows, click the Start button, click Programs, click SAM1000, then click
SAM1000.exe.
2. The SAM1000 For Windows main screen displays.
YOU MUST DO THIS FIRST!
1. Before you can attempt communications or editing, you must
create at least one store. Refer to "Creating a New Store" on
page 12.
2. After creating a store, you must Receive (Upload) information
from the ECR. Refer to "Receive Programs from ECR (Upload)"
on page 73.
4 Introduction SAM1000 For Windows User's Manual v2.3
Page 11
Navigating
Mouse and Keyboard
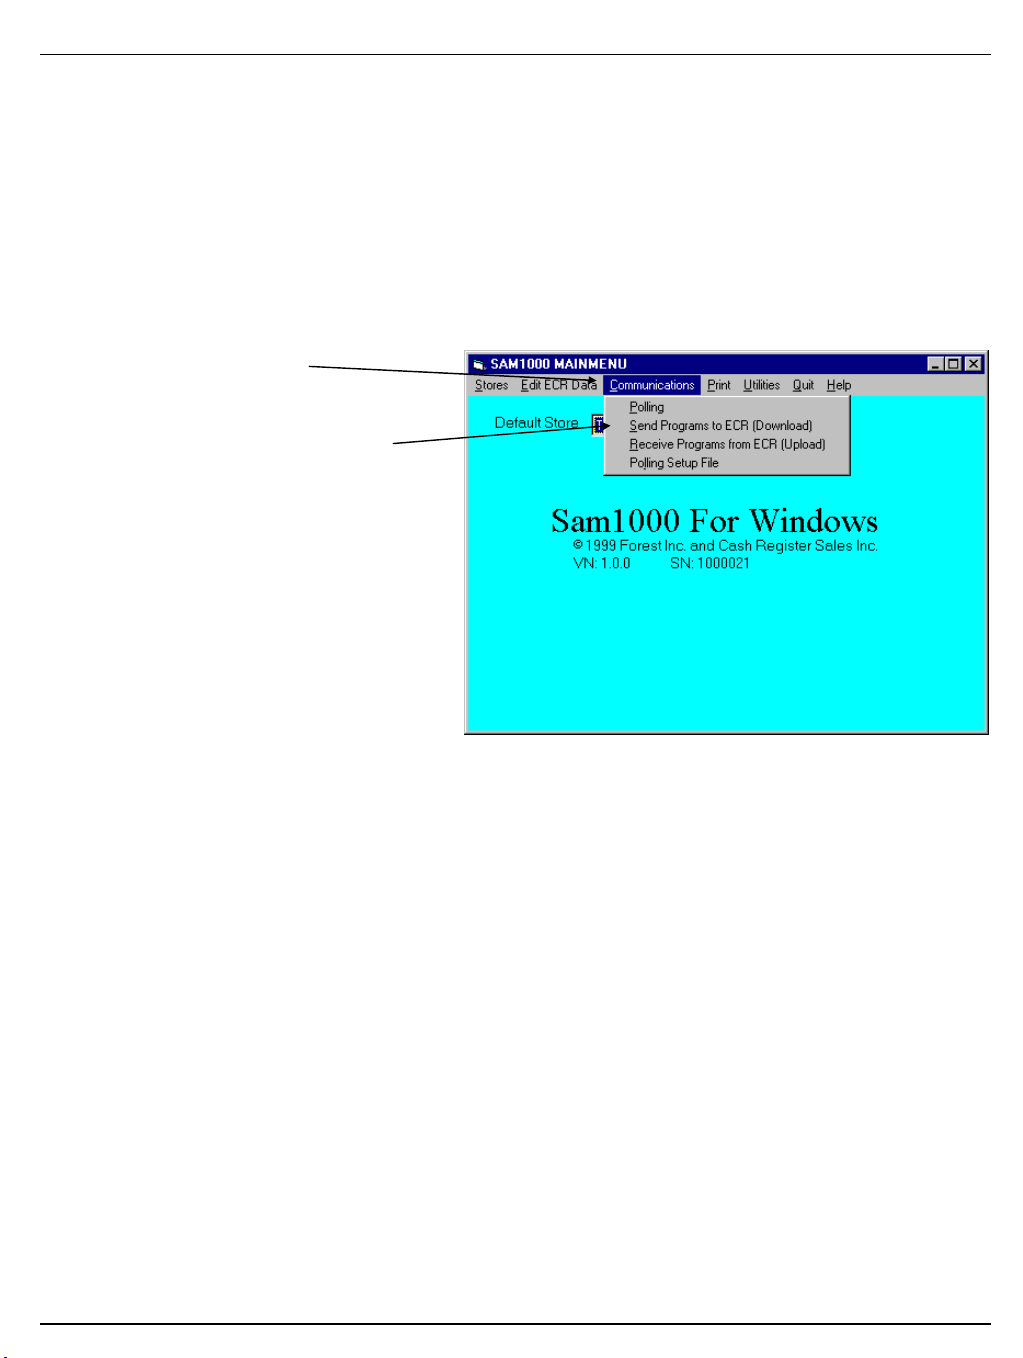
You can choose a menu, menu item, or a command by clicking on it with your mouse.
Viewing Menus and Selecting Menu Items
1. Point at a menu item with your mouse.
2. Point at your choice on the menu and click the left mouse button.
Menu Item
Menu Choices
SAM1000 For Windows User's Manual v2.3 Introduction 5
Page 12
Cascading Menus
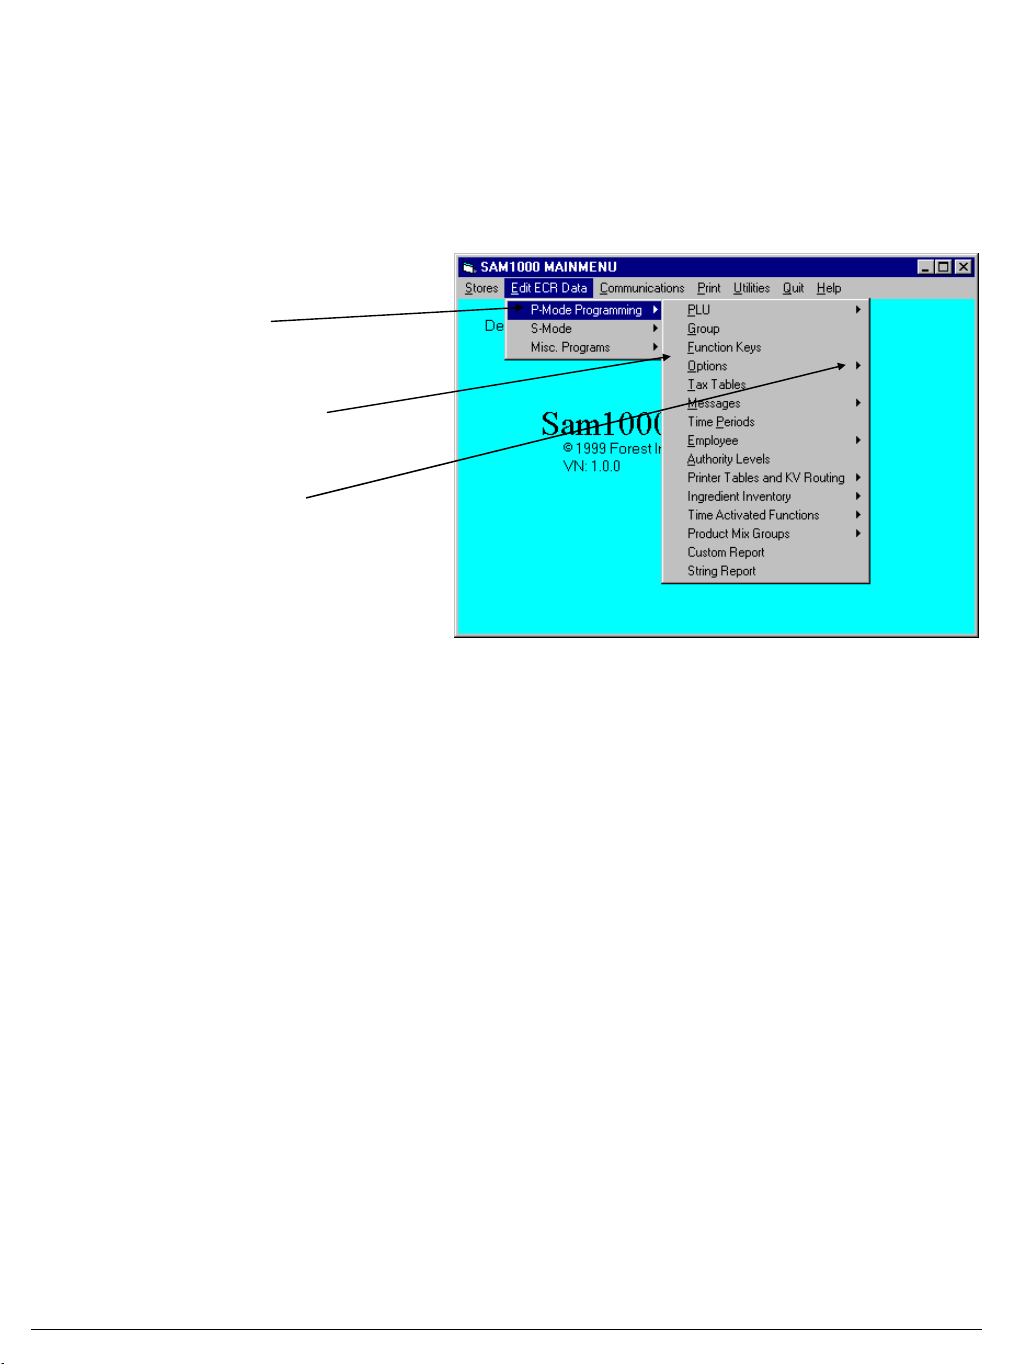
1. An arrow indicates that additional choices cascade from the first menu.
2. Move the mouse pointer in the direction of the arrow to display additional choices.
3. In some cases, additional choices are available from a cascading menu. Move the mouse
pointer in the direction of the arrow to display additional choices.
Arrow
Cascading Menu
More Choices
6 Introduction SAM1000 For Windows User's Manual v2.3
Page 13
Working with Edit Screens
Selecting Items to Edit
Drop Down List Boxes
In some situations, you select the object you are editing by using a drop down list box.
Type your selection when the box is selected, or click on the arrow to open the box and view
your options. Click on an item to select it. (If all the choices are not in view, scroll bars are
provided.)
Scroll Boxes
In some situations, you select the object you are editing by using a scroll list box.
Move the scroll box to select the item you wish to work with. Drag the scroll box or click the
scroll arrows to find your selection.
SAM1000 For Windows User's Manual v2.3 Introduction 7
Page 14
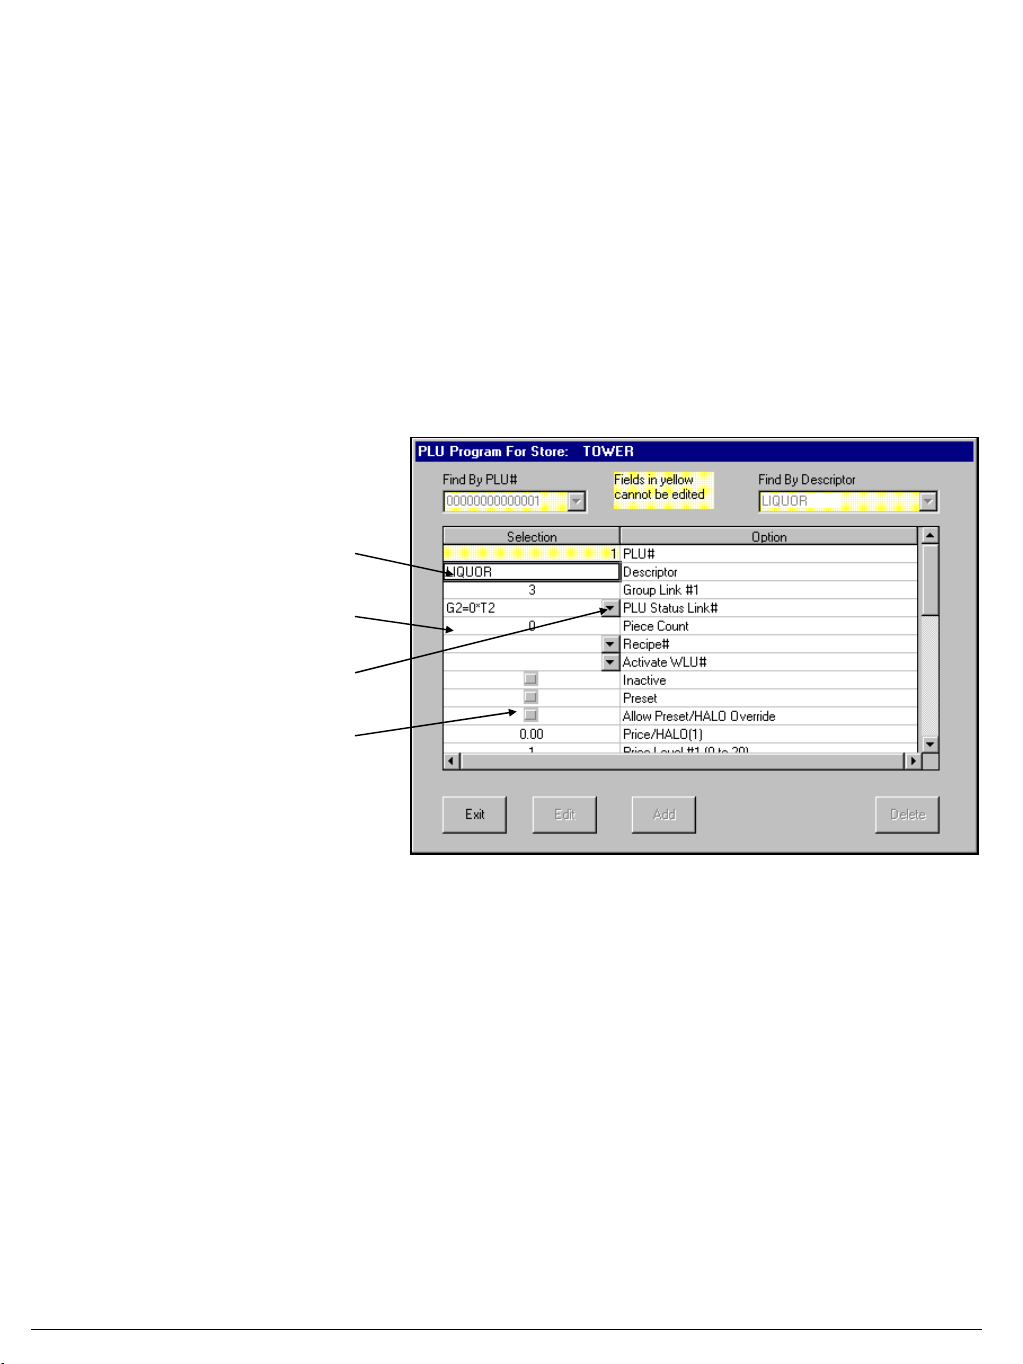
Making Changes on Edit Screens
Numeric or Alpha Numeric Fields
The cursor changes to a cross shape when you drag it over a numeric or alpha numeric field.
Double click on the field, then enter new data. If you are entering price data, you must use
the decimal key. Fields in yellow cannot be edited.
Check Boxes
The cursor changes to an arrow when it passes over a check box field. Click on a check box
to make a selection. Click the check box again to deselect the item
Drop Down List Boxes
The cursor changes to an arrow when it passes over a drop down list box arrow. Click on the
arrow in the box to open the drop-down list box and display a list of choices. Click on an
item to select it. (If all the choices are not in view, scroll bars are provided.)
Alpha Numeric field
Numeric field
Drop Down List Box
Check box
8 Introduction SAM1000 For Windows User's Manual v2.3
Page 15

Interface Specifications
Communications Specifications
Asynchronous Operation
Communication Mode Half Duplex
Baud Rate Select: 9600, 19,200, 38,400, or 57,600
Signal Level RS-232C
Character Bits 8
Parity Bits None
Stop Bits 1
Error Detection Data sum check
SAM1000 For Windows User's Manual v2.3 Introduction 9
Page 16

10 Introduction SAM1000 For Windows User's Manual v2.3
Page 17
Menu Functions
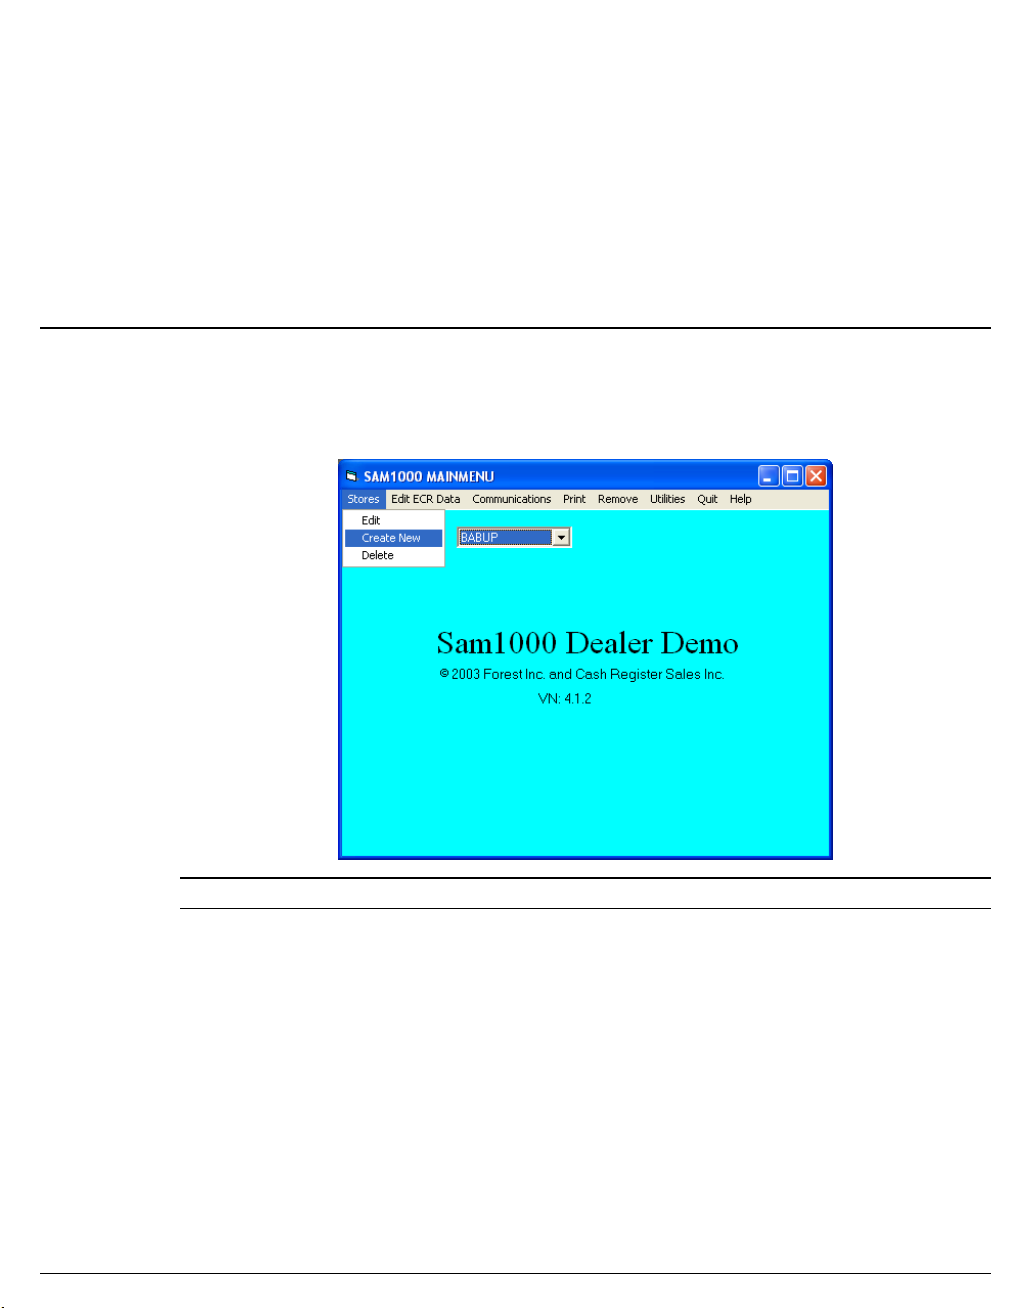
Stores
Choose Stores from the Main menu to edit, create a new or delete as store.
A store must be created before any communications or editing can take place.
SAM1000 For Windows User's Manual v2.3 Menu Functions 11
Page 18
Creating a New Store
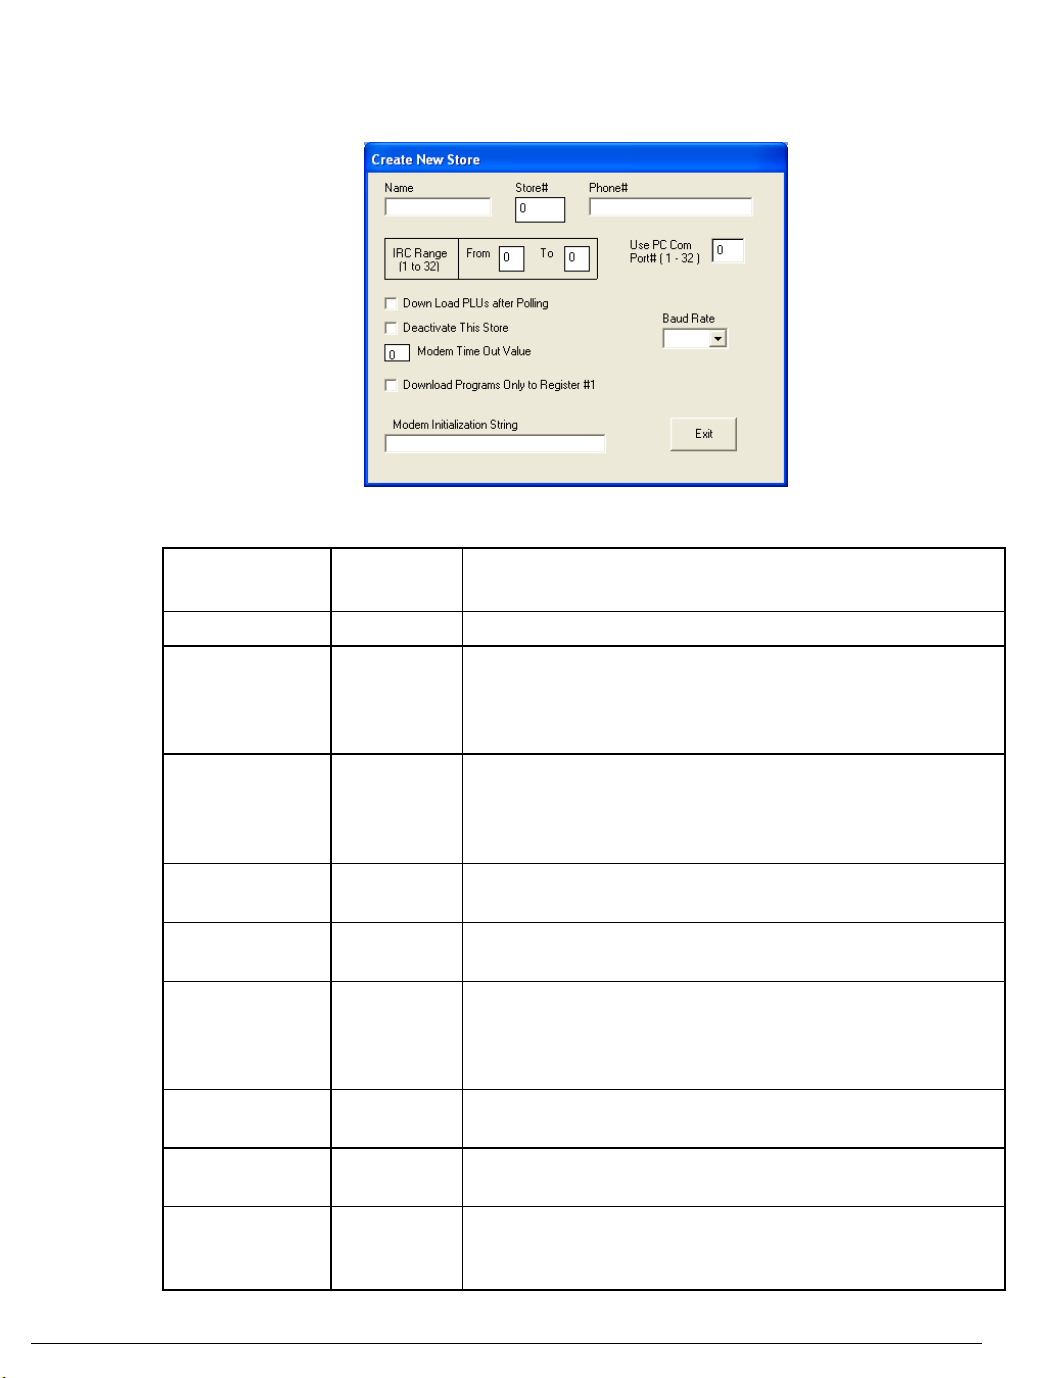
1. Choose Create New from the Store menu to create a store. You can create an unlimited
number of stores. The Create New Store dialog displays.
2. Complete the Create New Store dialog according to the table below:
Field Name
Required
/Optional
Description/Instructions
Name
Store#
Phone#
From/To
IRC Range
Use PC Com
Port# (1-32)
Download
PLUs
Deactivate
This Store
Modem Time
Out Value
Download
Programs Only
to Register #1
R
O
O
R
R
O
O
R
O
Enter an eight character store name.
Enter the four digit number that is the same number that
you used when you programmed the store# at the register.
If store numbers do not match, you will not be able to
communicate with the register.
Enter the Phone number preceded by the letter T or P if
you intend to communicate with the register by modem.
The T is for TONE and the P is for PULSE. If you
communicate direct, leave this field blank.
Enter the IRC range of registers from 1-32. If the register
is standalone, use from 1 to 1.
Enter the PC Com port (1-32) that you are using for
communications.
Select the Download PLUs check box if you wish to
download changed PLUs in a polling session. When the
session is finished polling, the program will download any
changed PLUs.
Select the Deactivate This Store check box if you wish the
store to be inactive.
Unless otherwise indicated, the default value of 99 will be
entered automatically when the store is created
If selected, download only to register #1. IRC can be used
at the store level to update all register programs.
12 Menu Functions SAM1000 For Windows User's Manual v2.3
Page 19
Field Name
Required
/Optional
Description/Instructions
Modem Initial
String
Baud Rate
3. Click Exit to save store information.
O
R
This field is to allow you to enter any initialization
required for your modem for polling or communications.
Do not add the command prefix “AT” in this string. If you
are using the U.S. Robotics Sportster modem, it would be
good to initialize with the string S7=60. This value makes
the modem wait for up to 60 seconds to detect a carrier. If
no carrier is detected within 60 seconds after you dial, the
modem will answer back with No Carrier Detect. Do not
put into this string any E, Q or V values. The software
automatically handles these values.
Select the communications speed for this store.
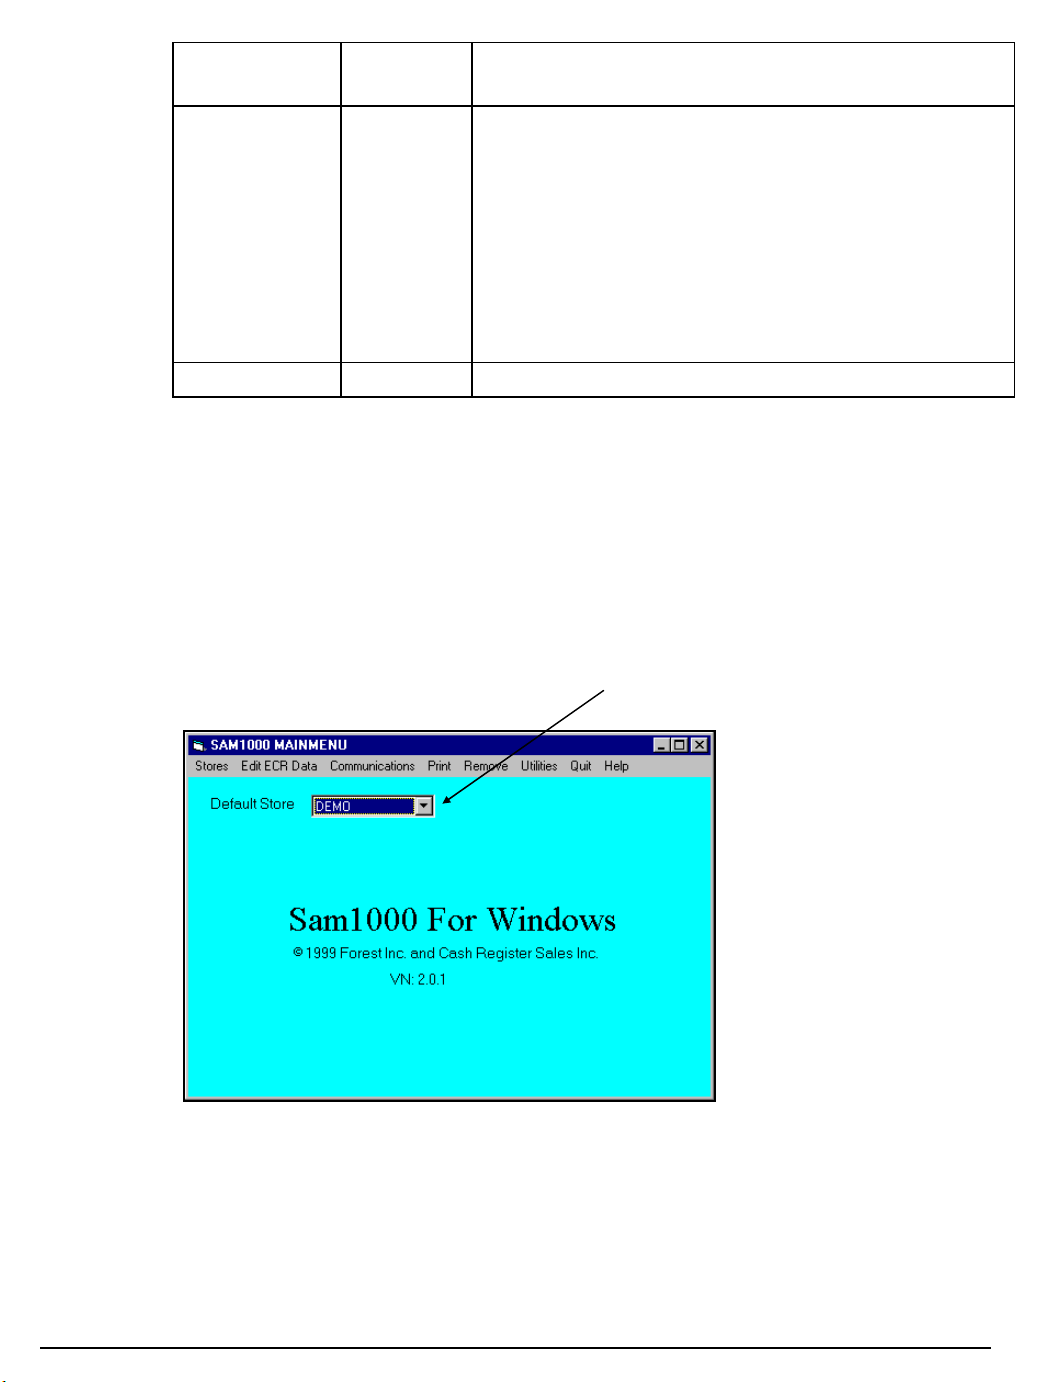
Selecting the Default Store
Click the Default Store drop-down list box to select the working store. When you have
created at least one store, the list box will display all stores created. The working store
will display in the Default Store field. All editing and programming will pertain to the
selected working store.
.
Default Store Drop-down list box
SAM1000 For Windows User's Manual v2.3 Menu Functions 13
Page 20
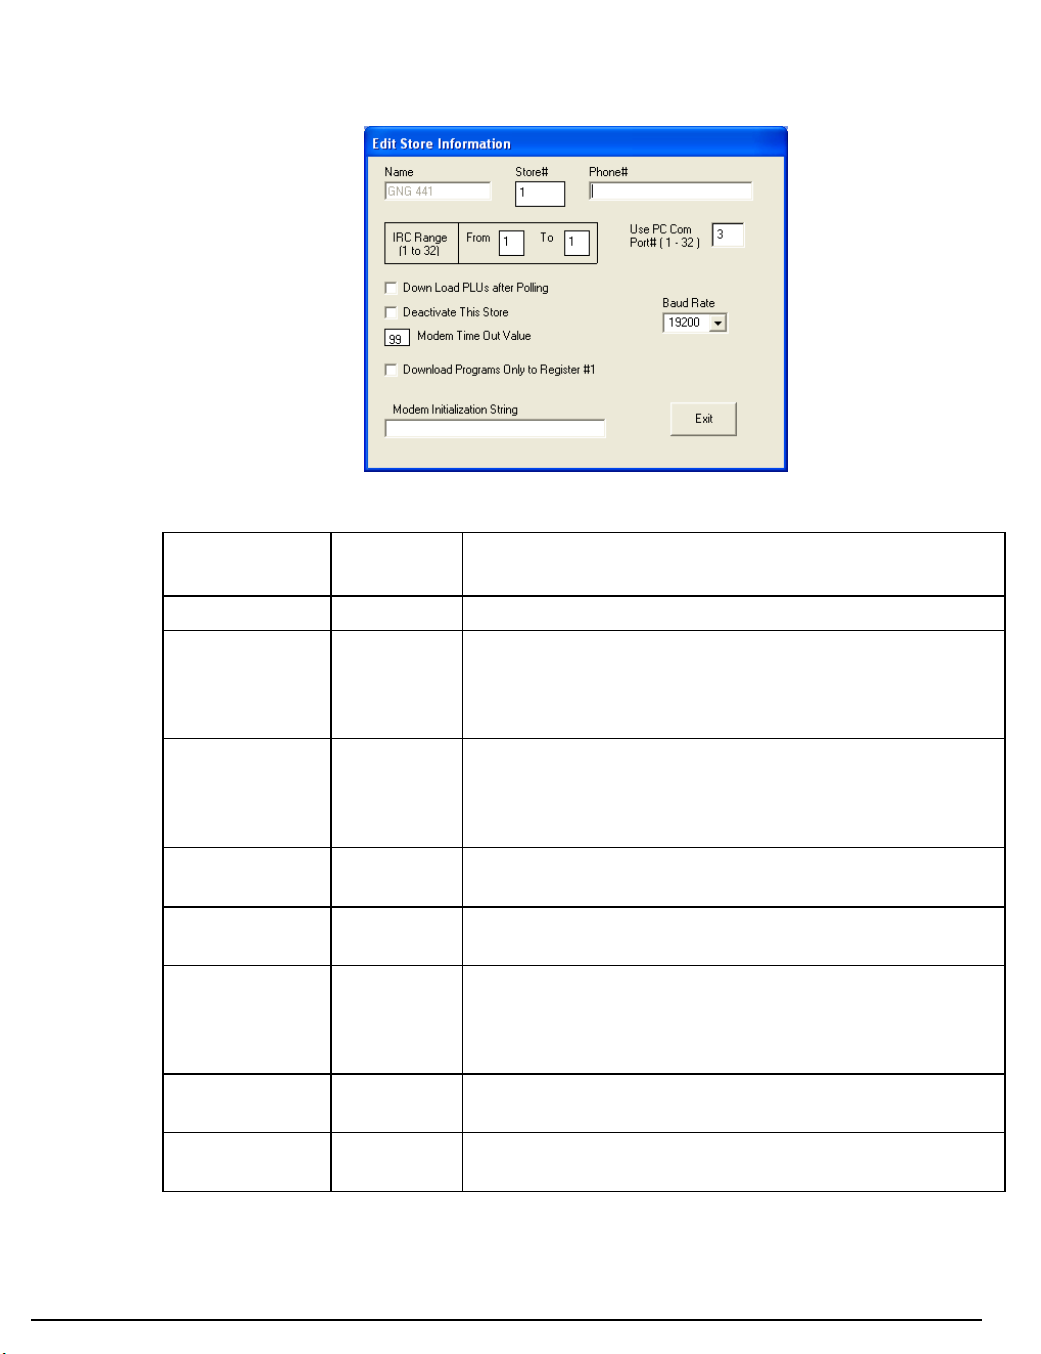
Editing Store Information
1. Choose Edit from the Stores menu to edit a store.
2. Complete the Edit Store Information dialog according to the table below:
Field Name
Required
/Optional
Description/Instructions
Name
Store#
Phone#
From/To
IRC Range
Use PC Com
Port# (1-32)
Download
PLUs
Deactivate
This Store
Modem Time
Out Value
R
O
O
R
R
O
O
R
Enter an eight character store name.
Enter the four digit number that is the same number that
you used when you programmed the store# at the register.
If store numbers do not match, you will not be able to
communicate with the register.
Enter the Phone number preceded by the letter T or P if
you intend to communicate with the register by modem.
The T is for TONE and the P is for PULSE. If you
communicate direct, leave this field blank.
Enter the IRC range of registers from 1-32. If the register
is standalone, use from 1 to 1.
Enter the PC Com port (1-32) that you are using for
communications.
Select the Download PLUs check box if you wish to
download changed PLUs in a polling session. When the
session is finished polling, the program will download any
changed PLUs.
Select the Deactivate This Store check box if you wish the
store to be inactive.
Unless otherwise indicated, the default value of 99 will be
entered automatically when the store is created
14 Menu Functions SAM1000 For Windows User's Manual v2.3
Page 21
Field Name
Required
/Optional
Description/Instructions
Download
Programs Only
to Register #1
Modem Initial
String
3. Click Exit to save store information.
O
O
If selected, download only to register #1. IRC can be used
at the store level to update all register programs.
This field is to allow you to enter any initialization
required for your modem for polling or communications.
Do not add the command prefix “AT” in this string. If you
are using the U.S. Robotics Sportster modem, it would be
good to initialize with the string S7=60. This value makes
the modem wait for up to 60 seconds to detect a carrier. If
no carrier is detected within 60 seconds after you dial, the
modem will answer back with No Carrier Detect. Do not
put into this string any E, Q or V values. The software
automatically handles these values.
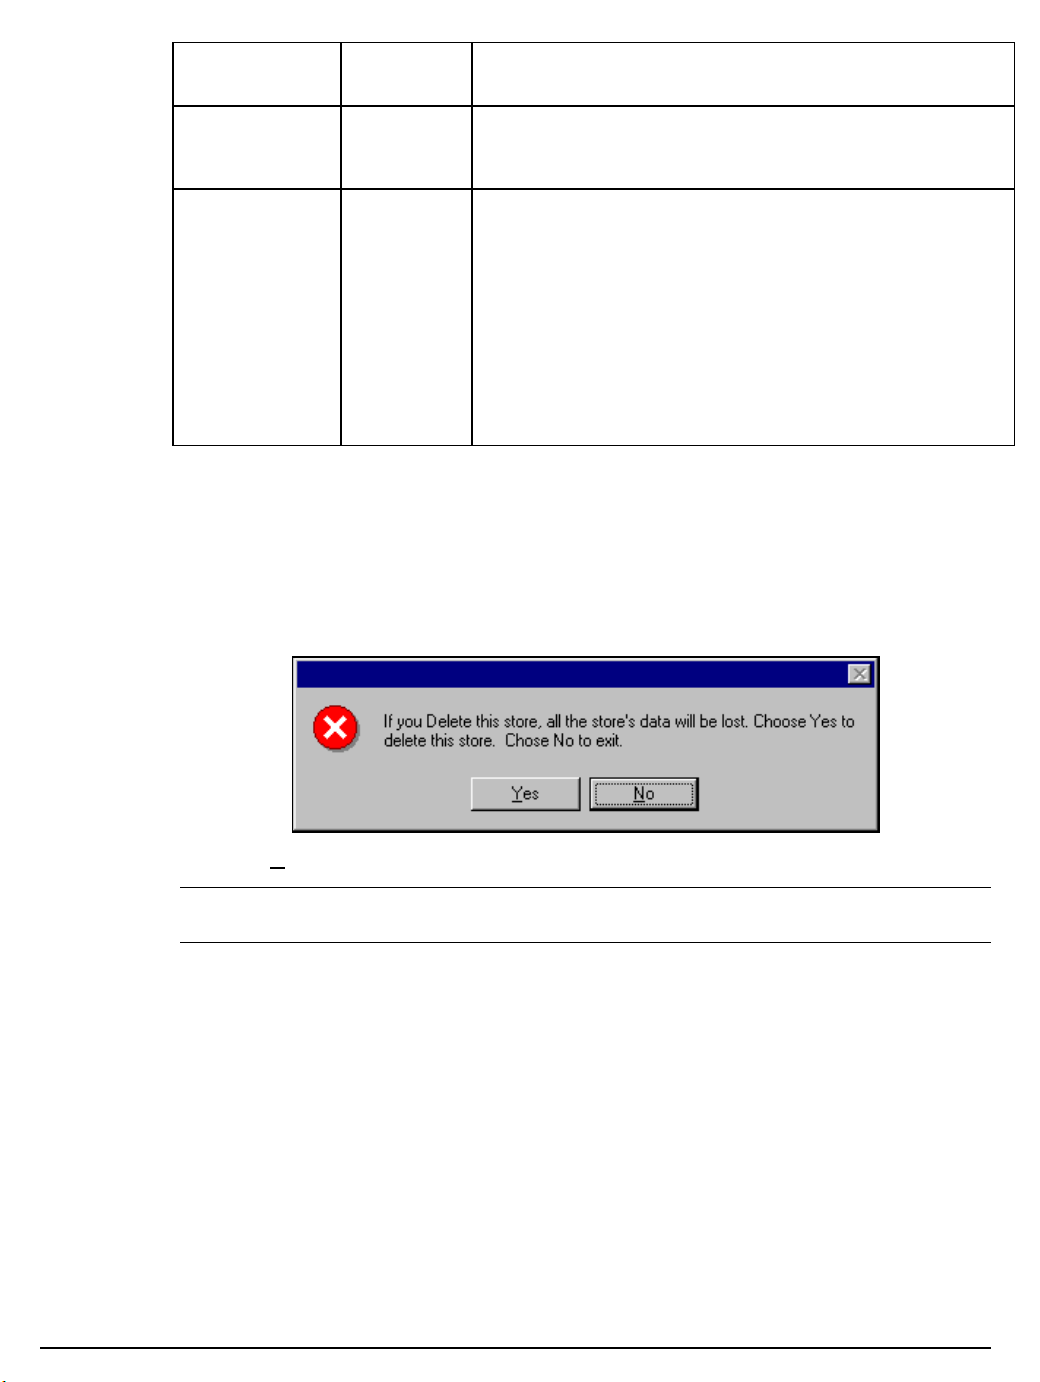
Deleting a Store
1. Choose Delete from the Stores menu to delete the working store from you hard drive. A
warning dialog displays.
2. Click Yes to delete the store.
Caution: This function will erase everything that pertains to this store. Use extreme caution
with this function. Information that is deleted cannot be recovered.
SAM1000 For Windows User's Manual v2.3 Menu Functions 15
Page 22
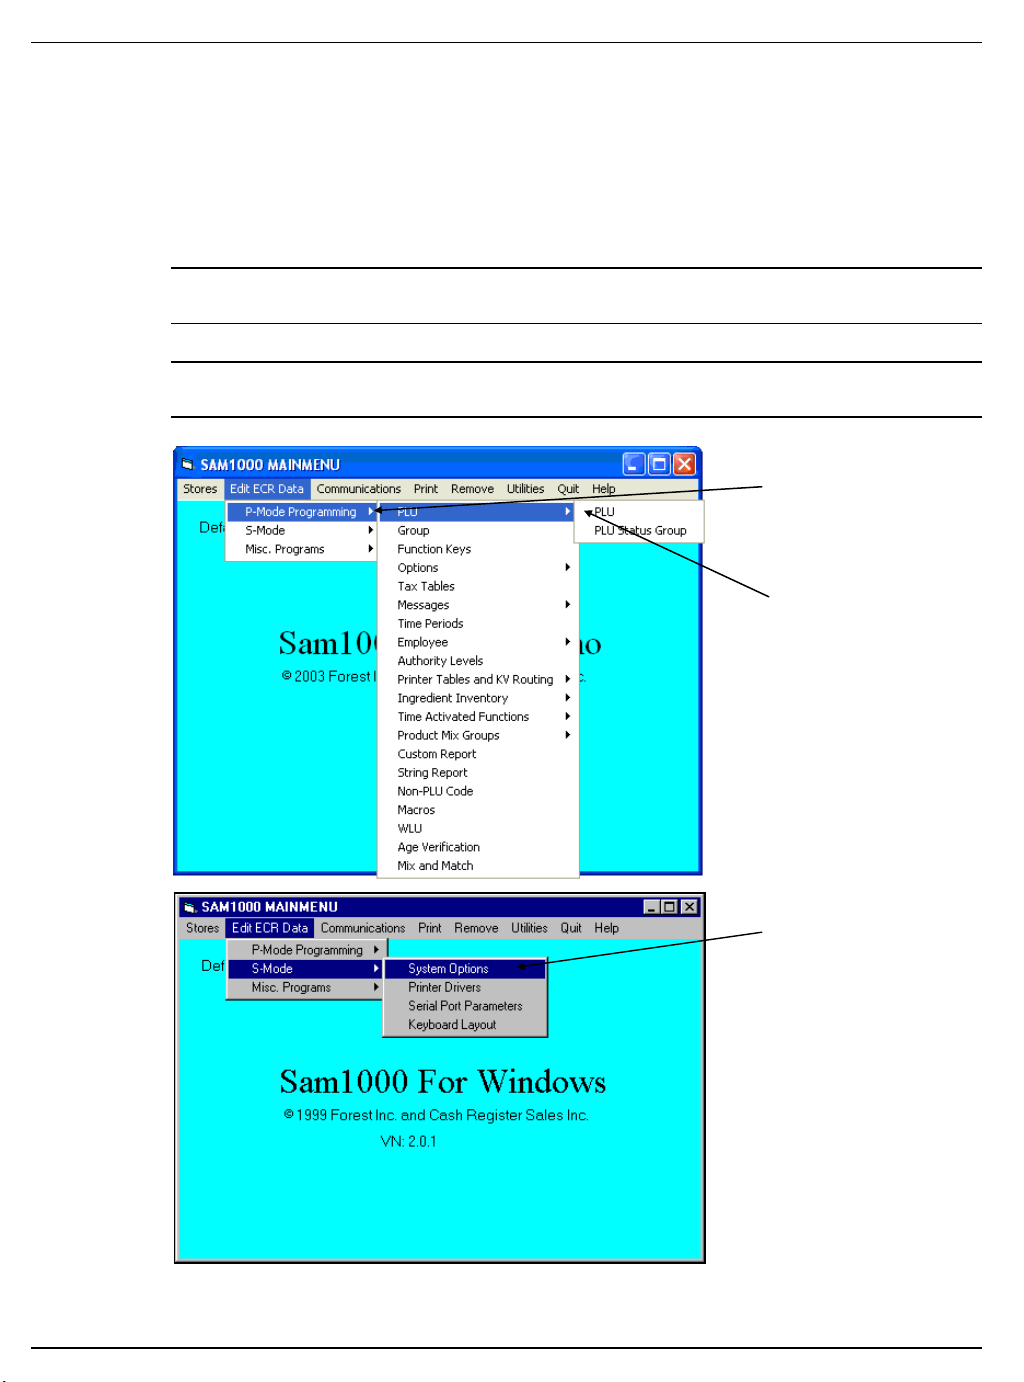
Edit ECR Data
Choose P-Mode Programming, S-Mode, or Misc. Programs from the Edit ECR Data
menu, then select a specific item to modify that part of an existing Samsung SPS 1000
program. The options in this program allow you to edit the same program options that you
set on a standalone SPS 1000 through the register's keyboard. Detailed questions about the
meaning of the register options are best answered by referring to the Samsung SPS1000
Program Manual.
Note: If you did not Upload programs from the ECR, you will get a message "The file
does not exist" if you attempt to select any of these options.
Note: If you wish to create a program for a new store, you can use the "Copy a Store"
on page 86 and then edit the copied program to suit your needs.
P-Mode
Programming items
Move your mouse
pointer in the
direction of the arrow
to display additional
choices.
S-Mode items
16 Menu Functions SAM1000 For Windows User's Manual v2.3
Page 23
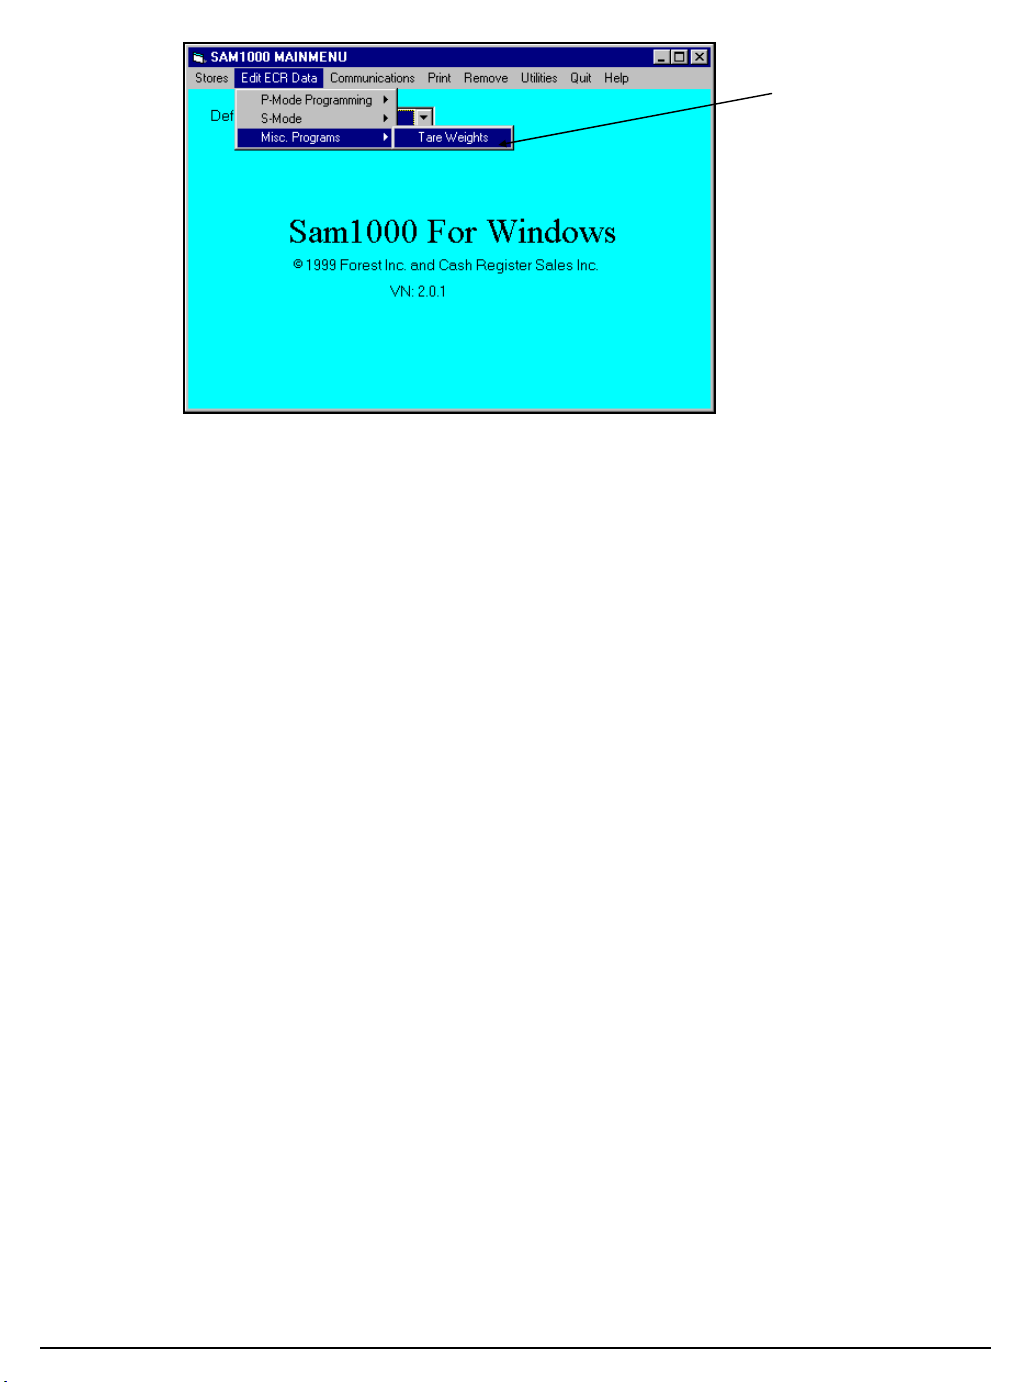
Misc. Program items
SAM1000 For Windows User's Manual v2.3 Menu Functions 17
Page 24
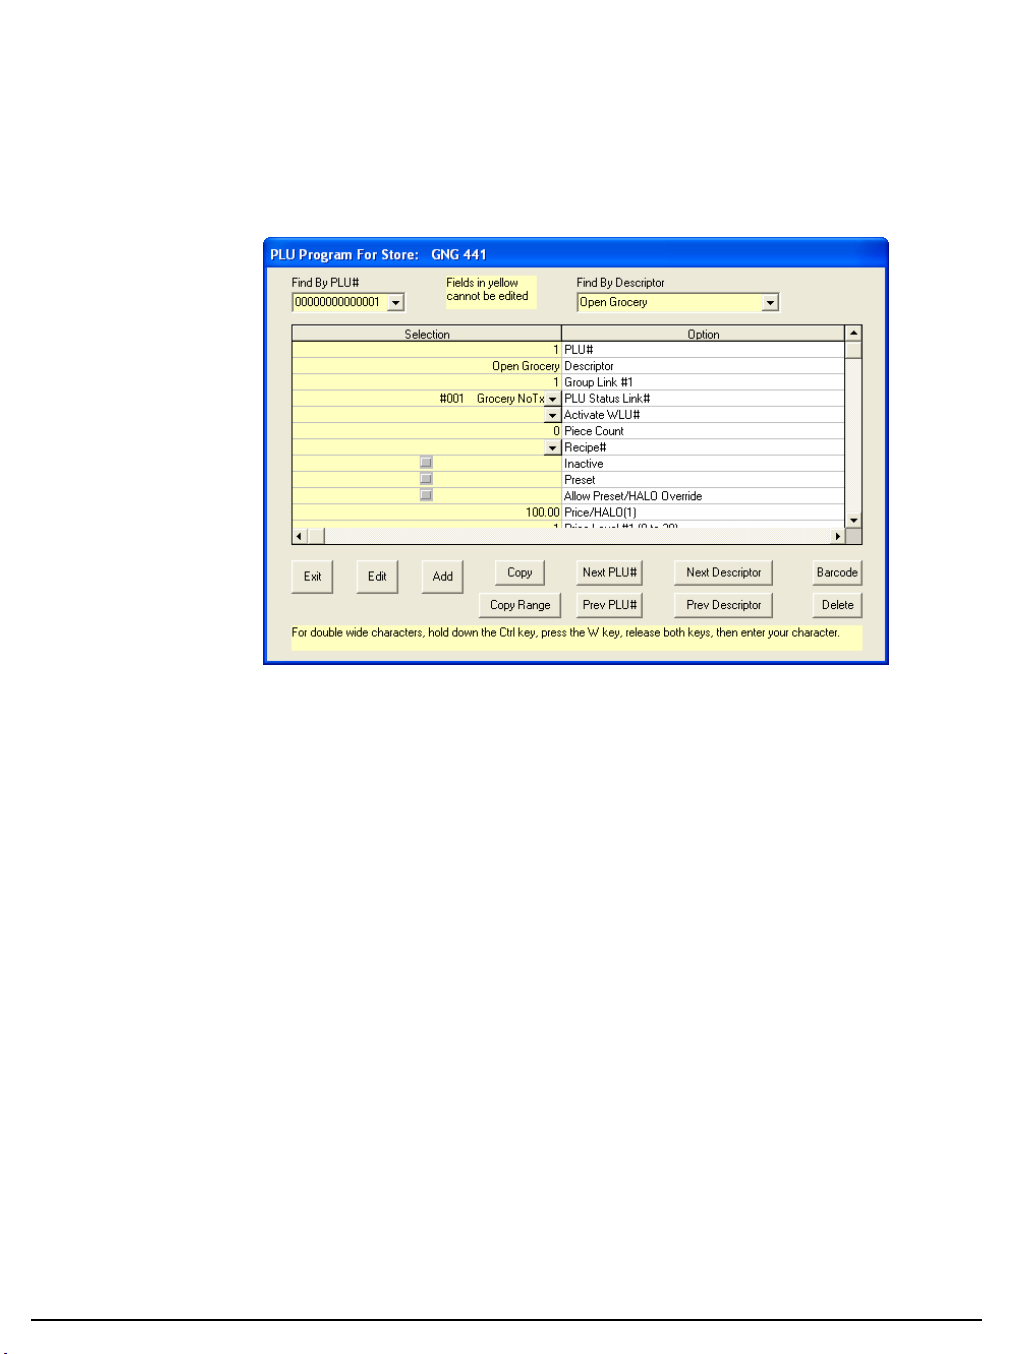
PLU File
The PLU file is maintained here. Follow the instructions on the screen, or refer to the
Samsung SPS 1000 Program Manual for a complete description of your program options.
1. Choose the Edit ECR Data menu, then select P-Mode Programming menu to open the
P-Mode Programming menu. Select PLU to open the PLU menu. Choose PLU. The
PLU Program screen displays with the first PLU in the store file displayed.
18 Menu Functions SAM1000 For Windows User's Manual v2.3
Page 25
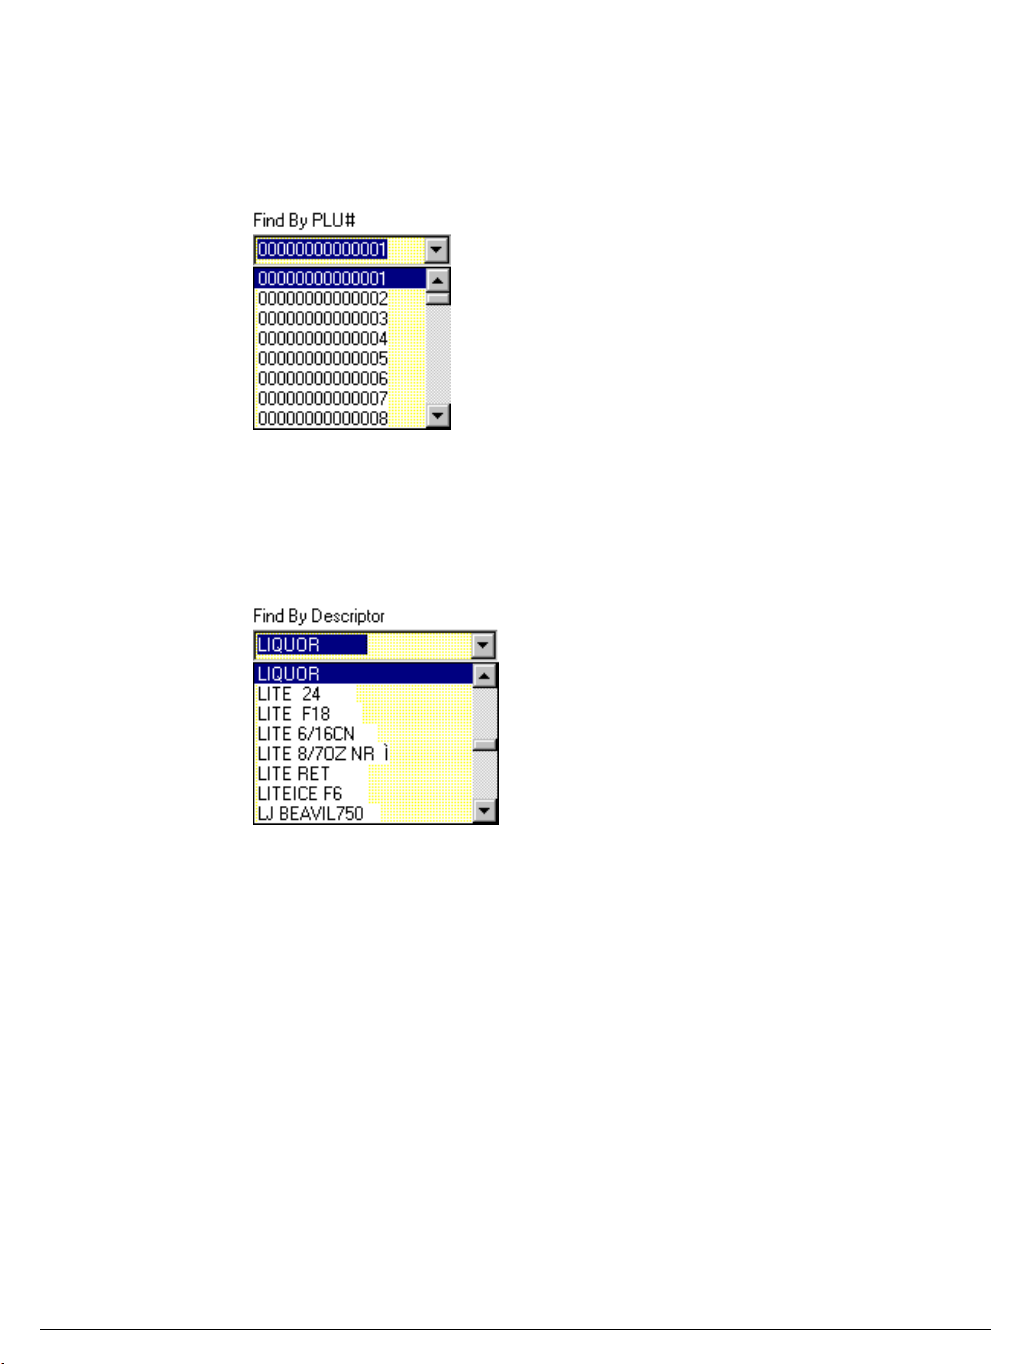
Editing a PLU
1. Select the PLU you wish to edit:
Type a PLU number in the box and press ENTER, or open the Find by PLU# drop
down list box and click on the PLU you wish to edit. If necessary, use the scroll box
to view the list of PLUs in the file.
Type a PLU descriptor in the box and press ENTER, or open the Find by Descriptor
drop down list box and click on the PLU you wish to edit. If necessary, use the scroll
box to view the list of PLUs in the file. Open the Find by Descriptor drop down list
box. Select the PLU you wish to edit. With the list box open, you can type the
beginning letter or letters of a PLU descriptor and PLUs beginning with your entry
will display in the box.
Click Next PLU #, Prev PLU #, Next Descriptor, or Prev Descriptor to find the
next PLU you wish to edit.
SAM1000 For Windows User's Manual v2.3 Menu Functions 19
Page 26
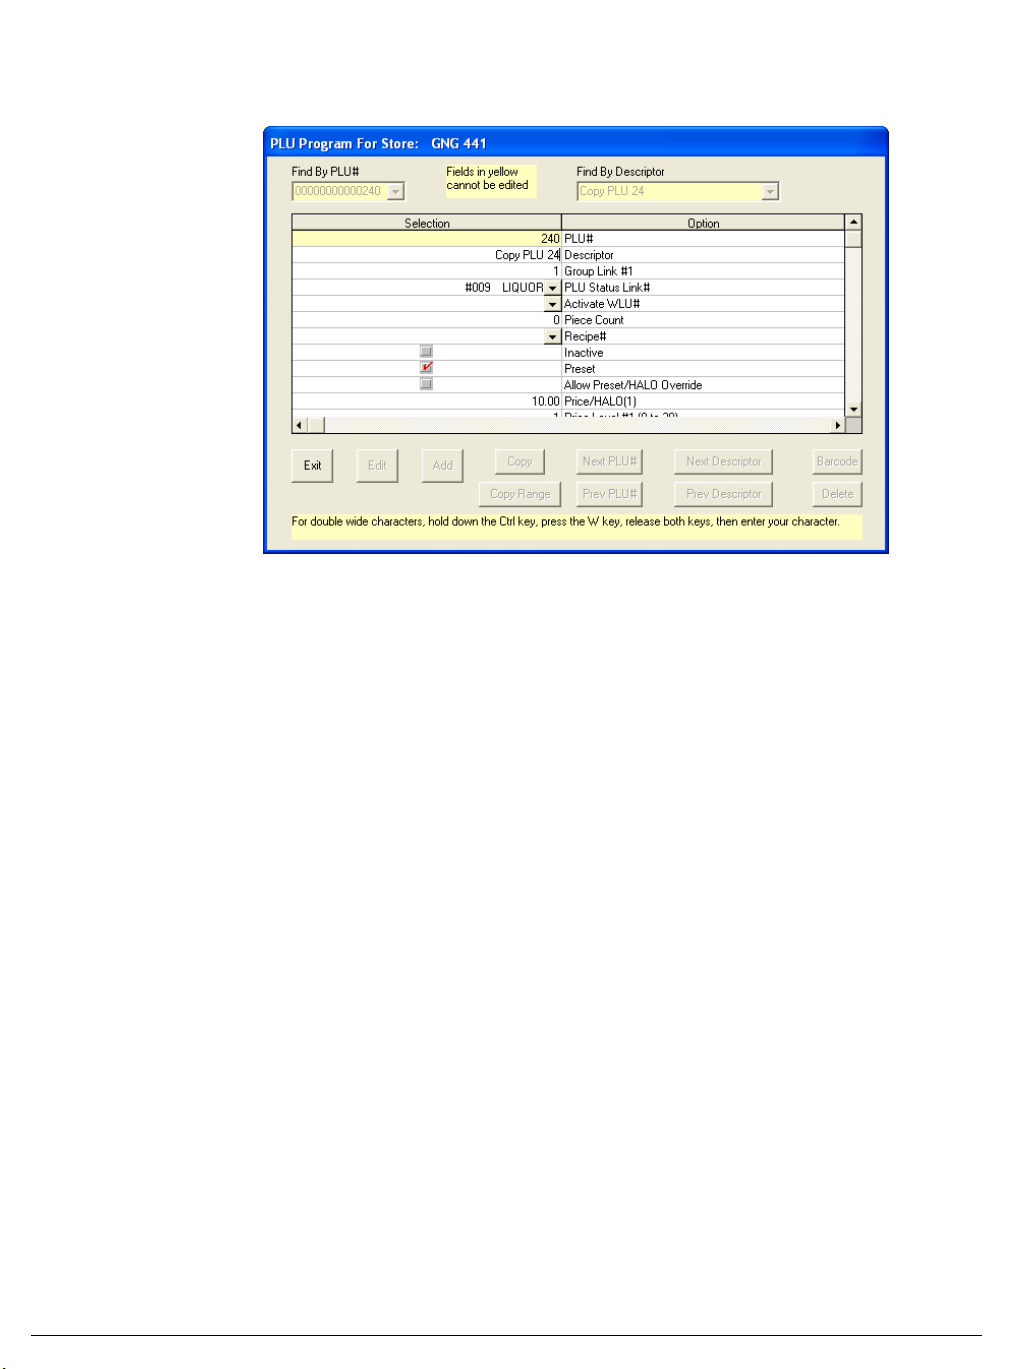
2. Click the Edit button to open the selection fields for editing. Note fields in yellow
cannot be edited. Note that you must use the scroll bar to access the fields that are not
currently in view.
3. Edit fields as necessary by moving your mouse pointer to the field you wish to edit:
You can edit fields with numeric information by double clicking on the field, then
entering new data. If you are entering price data, you must use the decimal key.
You can edit fields with drop-down list boxes (such as the PLU STATUS LINK#
field) by opening the list box and selecting from the available options.
You can edit fields with check boxes (such as the PRESET field) by clicking on the
field to add or remove a check.
4. Click Exit to save changes.
20 Menu Functions SAM1000 For Windows User's Manual v2.3
Page 27
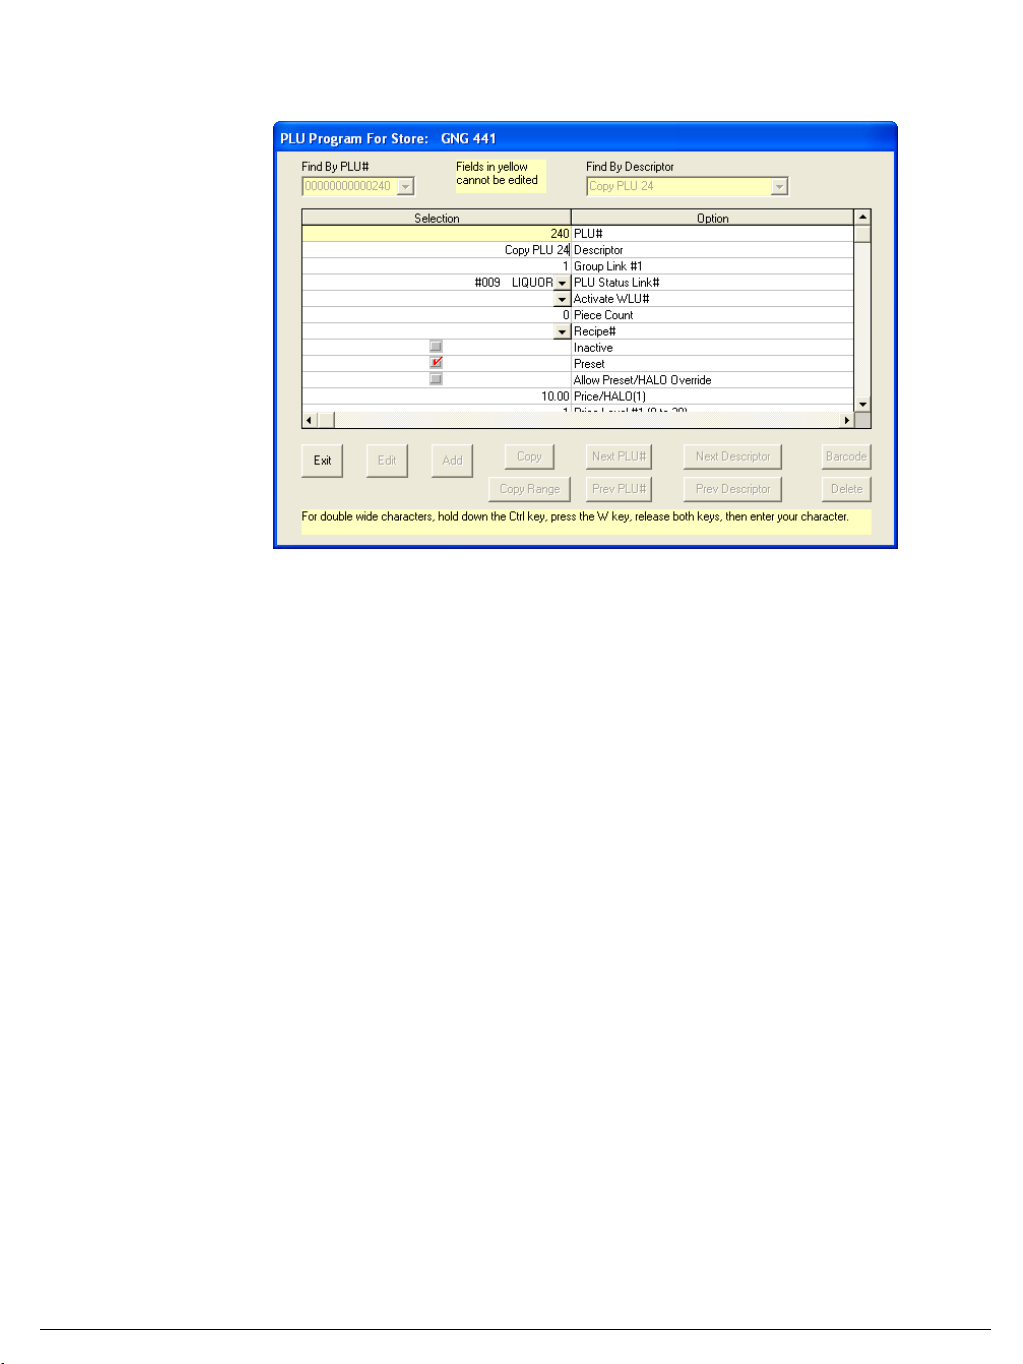
Adding a PLU
1. Click the Add button. A new PLU screen opens for entries.
2. Enter the PLU number you wish to assign in the PLU # field, and then complete entries
for the new PLU.
3. Click Exit to save changes.
SAM1000 For Windows User's Manual v2.3 Menu Functions 21
Page 28
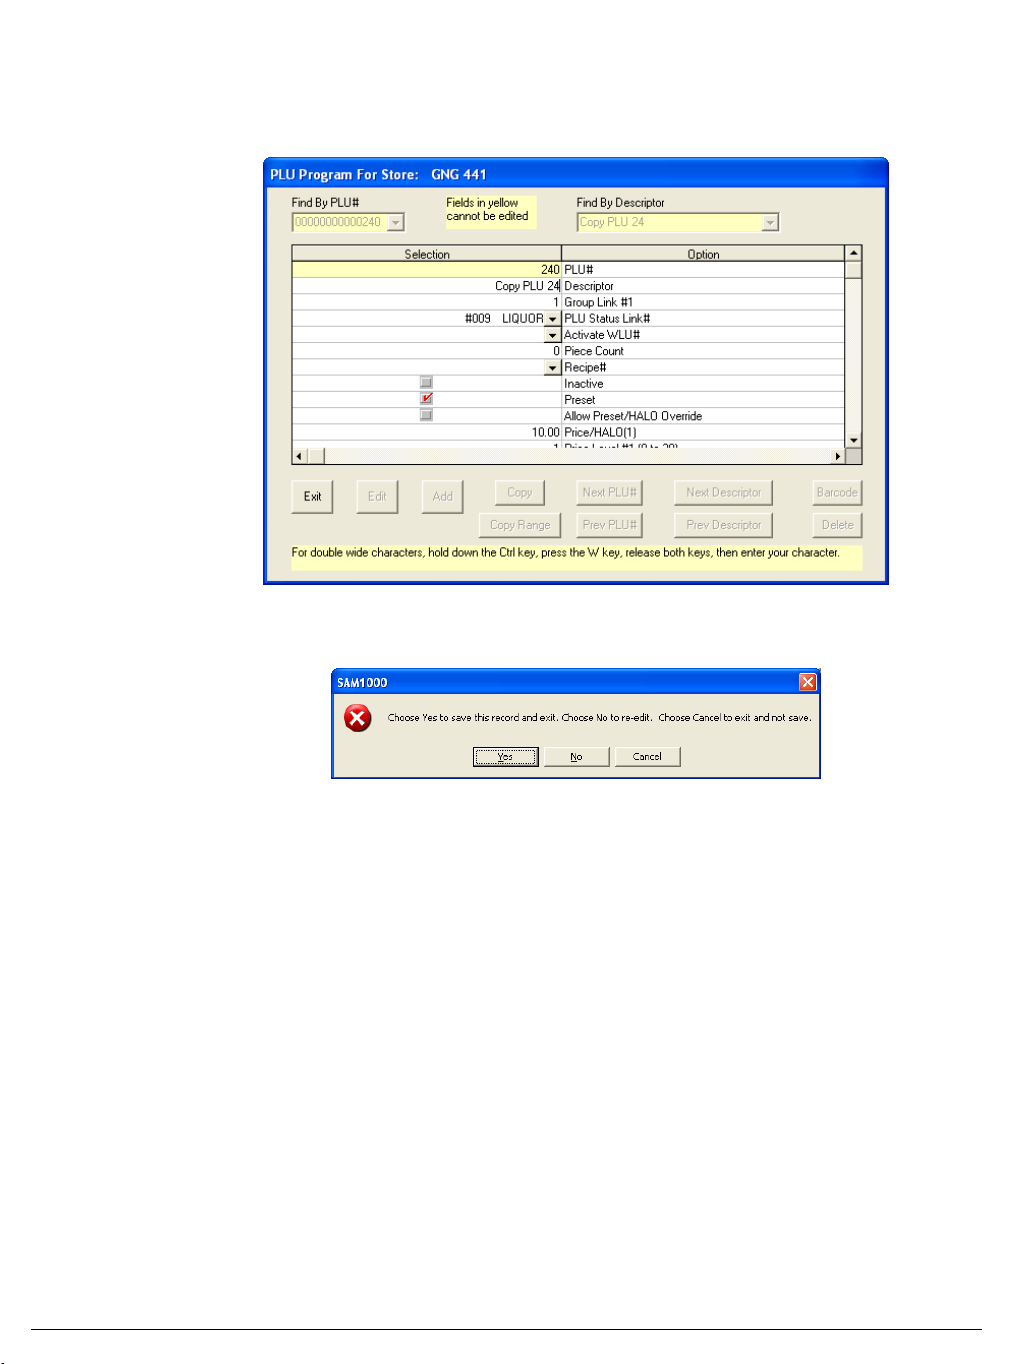
Copying a PLU
1. Select the PLU you wish to copy.
2. Click the Copy button. A new PLU screen opens for edits.
3. Enter the new PLU #, Descriptor, and change any other fields as necessary.
4. Click Exit to save changes. A confirmation dialog displays.
5. Choose Yes to save the new PLU, choose No to re-edit, or choose Cancel to exit without
saving.
22 Menu Functions SAM1000 For Windows User's Manual v2.3
Page 29
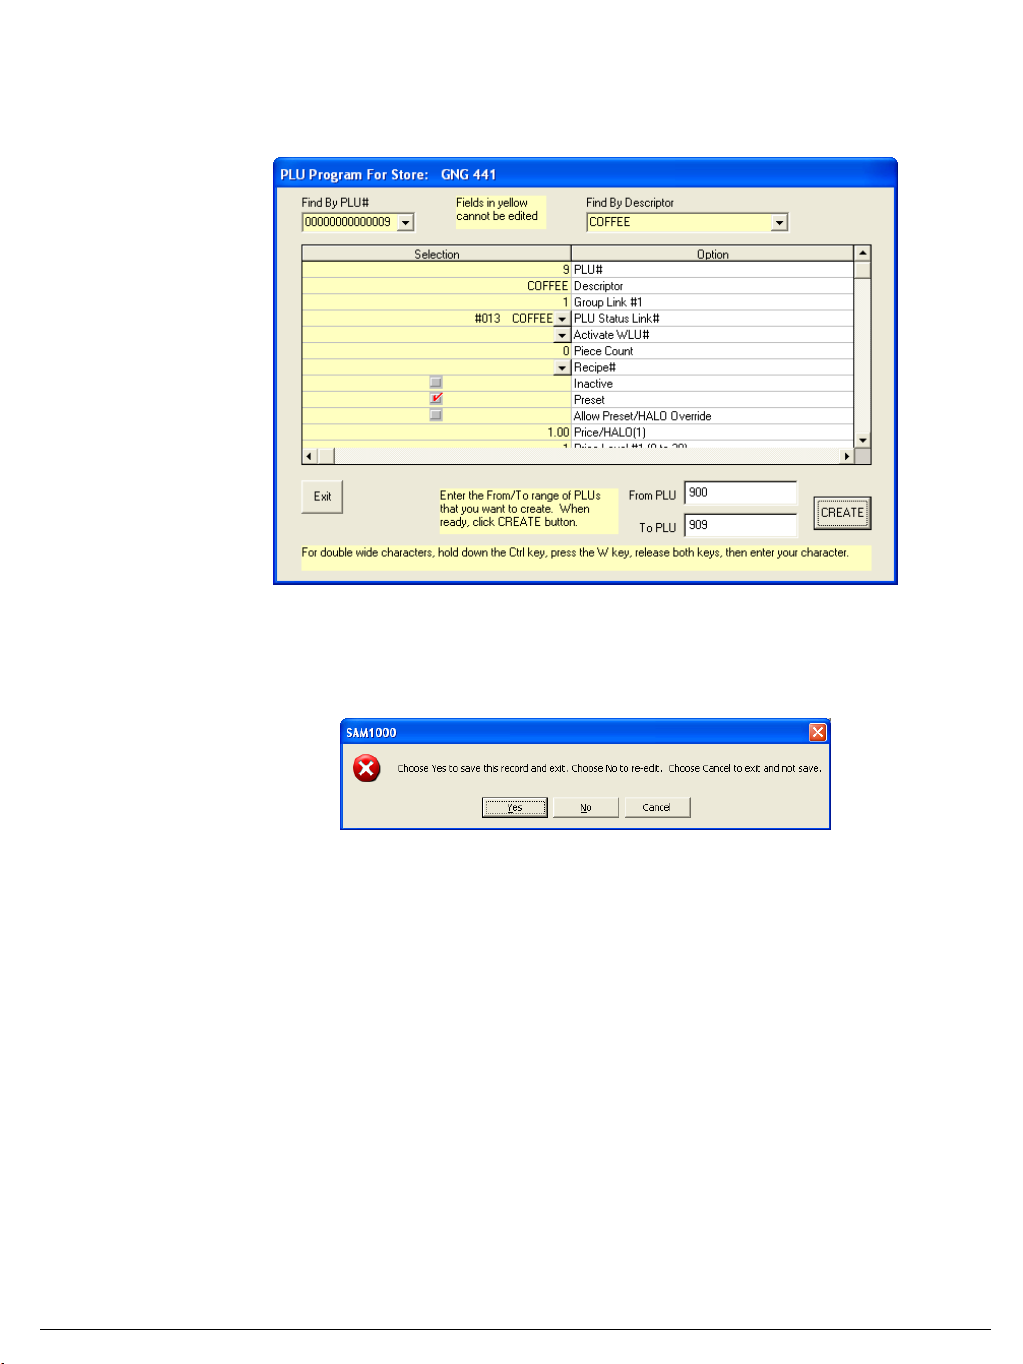
Copying a Range of PLUs
1. Select the PLU you wish to copy.
2. Click the Copy Range button. A new PLU screen opens for edits.
3. Enter the range of PLUs you wish to create in the From PLU and To PLU fields.
4. Click Create to complete the copy. You will need to go to each PLU individually and
edit the descriptor and other PLU attributes that are unique to the new PLUs. You can
condinue to create new PLU ranges as necessary—click Exit when complete.
5. Choose Yes to save the new PLU, choose No to re-edit, or choose Cancel to exit without
saving.
6. Go to each individual PLU in the PLU range you created to edit the PLU Descriptor,
Price, etc.
SAM1000 For Windows User's Manual v2.3 Menu Functions 23
Page 30
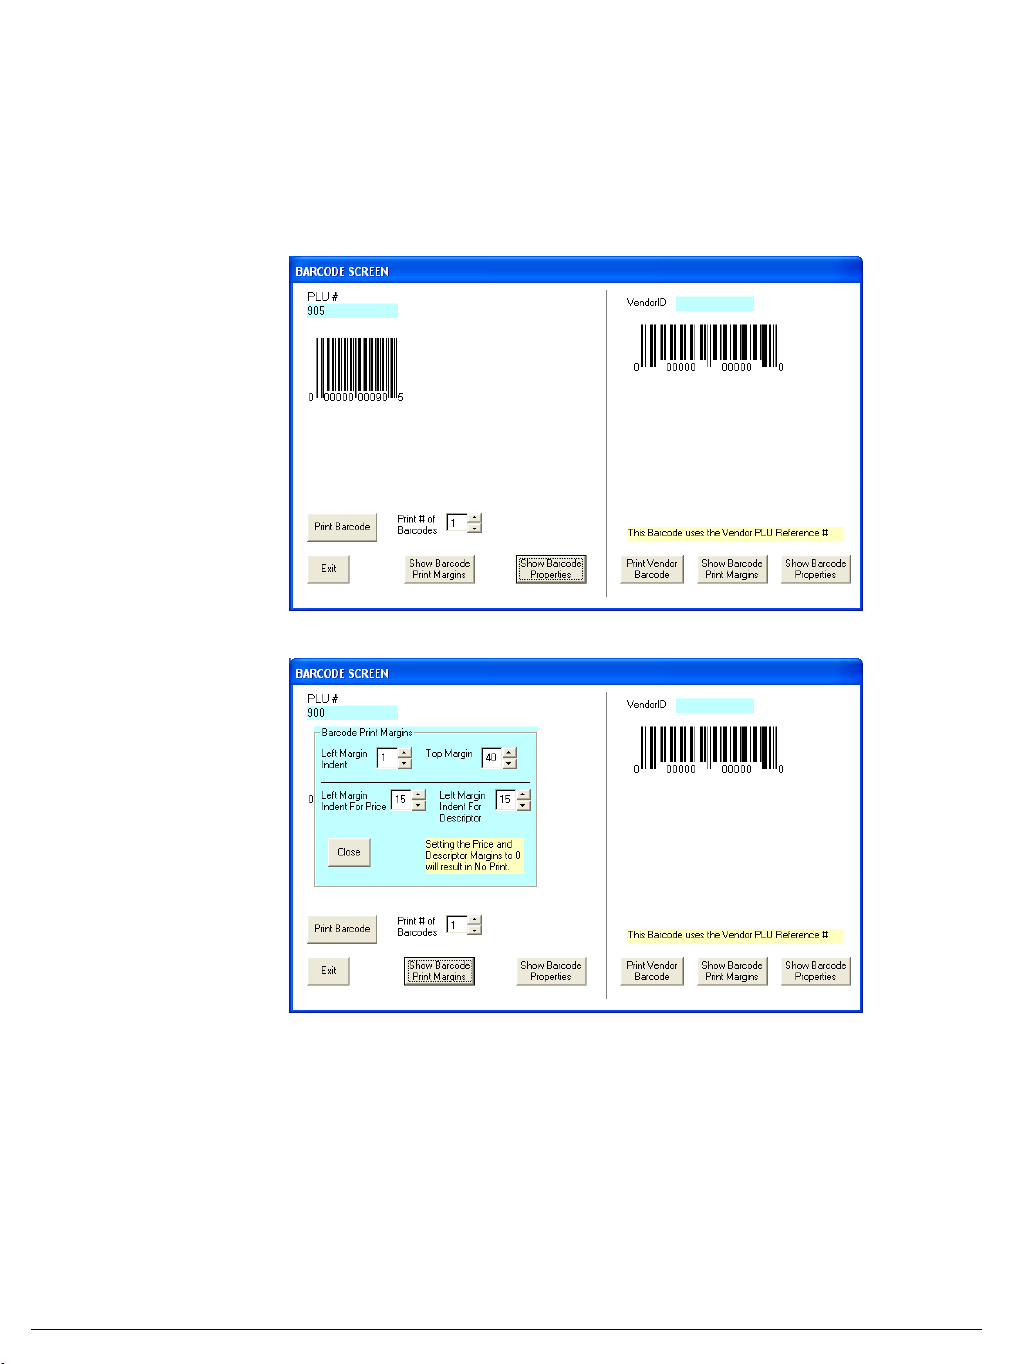
Barcode
You can print barcodes to your default printer. The label will print to the label size selected
in printer settings. For best results use a label printer such as the Samsung SRP-770 label
printer (contact your CRS representative or the CRS Parts & Peripherals Division for more
information.)
1. Select the Barcode tab from the PLU programming screen. The screen displays a view
of the barcode with the current barcode property settings.
2. Click the Show Barcode Print Margins button.
3. Set the margins as indicated for the SPR-770 printer loaded with 1 ¼” x 2 ¼” labels.
Adjust settings as necessary for other label/printer combinations.
4. Click the Show Barcode Properties button. The Active Barcode Control Properties
dialog box displays with the General tab selected.
24 Menu Functions SAM1000 For Windows User's Manual v2.3
Page 31
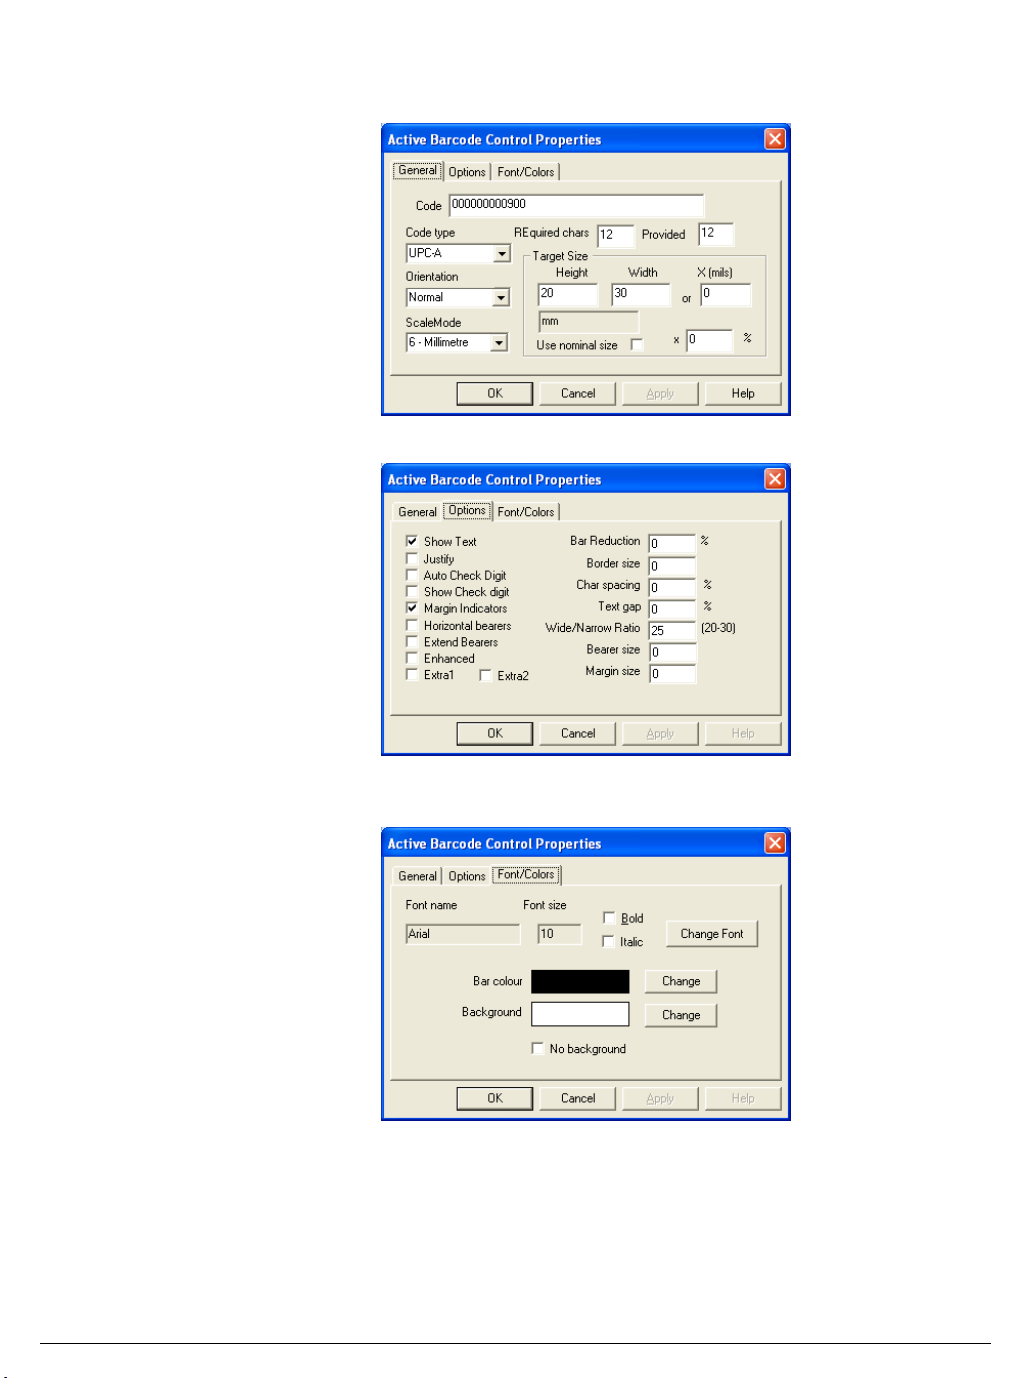
5. Select the Code type and set the properties as indicated for the SPR-770 printer loaded
with 1 ¼” x 2 ¼” labels. Adjust settings as necessary for other label/printer
combinations.
6. Click the Options tab and set the properties as indicated.
7. Click the Font/Colors tab. Click the Change Font button and select the font size and
style for the print of the bar code number.
8. Click OK to accept the settings and view the bar code as specified.
SAM1000 For Windows User's Manual v2.3 Menu Functions 25
Page 32
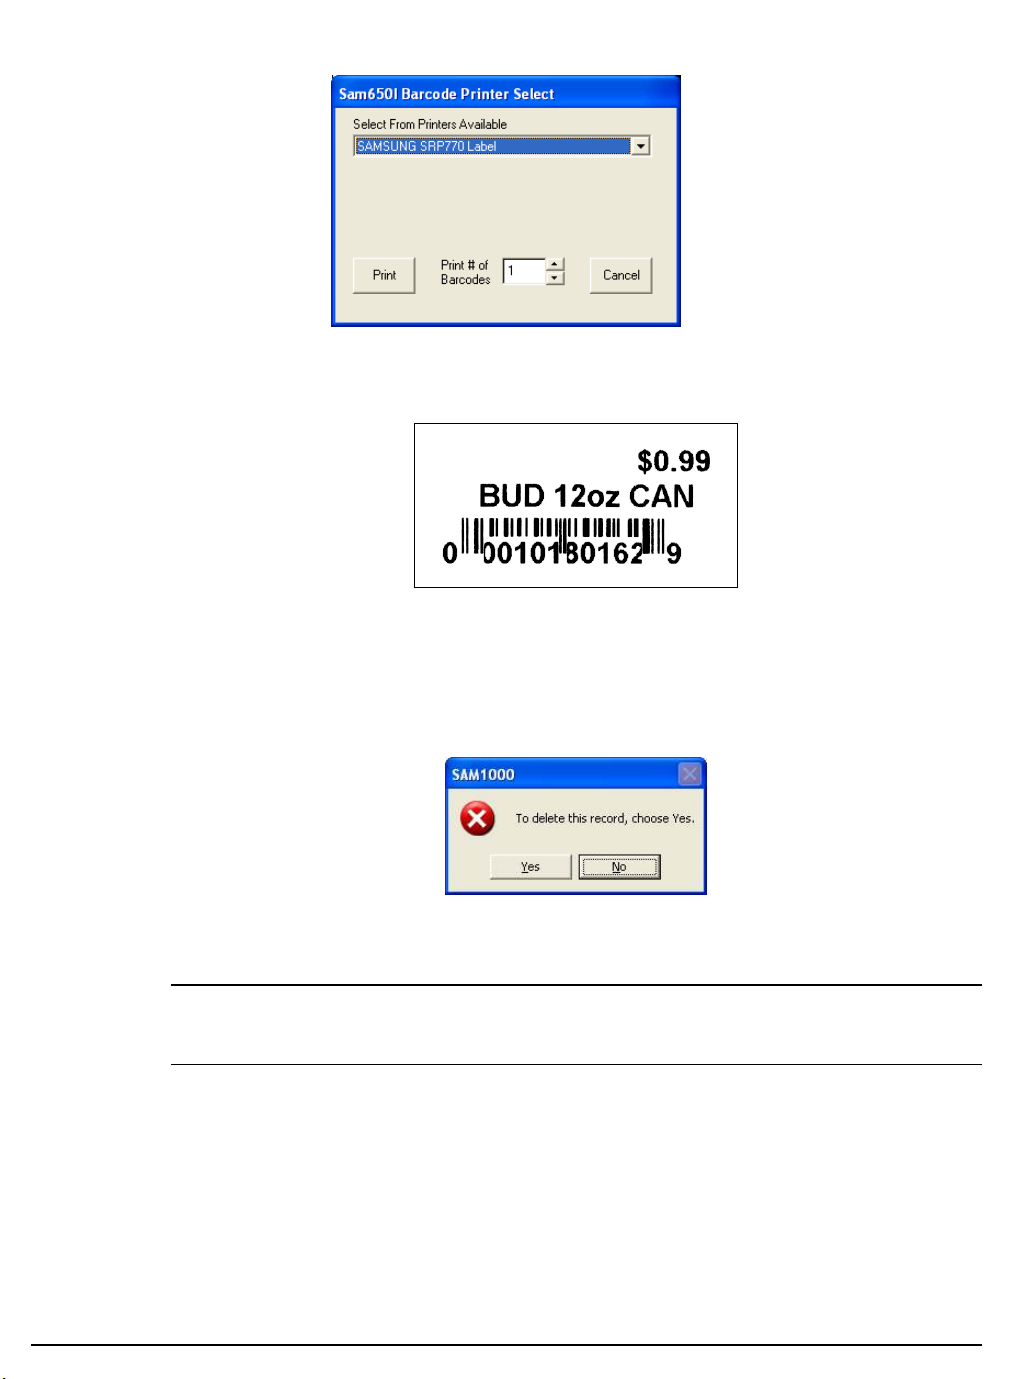
9. Click the Print this Barcode button. Select printer from list then click Print.
10. The print sample below was generated by a Samsung SRP-770 label printer on a 1 ¼” x 2
¼” label.
Deleting a PLU
1. Select the PLU you wish to delete.
2. Click the Delete button.
3. A warning dialog displays asking if you are sure you wish to delete the PLU.
4. Click Yes to delete the PLU; click No to abort the delete process.
Note: To delete a PLU, all totals (Z1 through Z5) for that PLU must first be cleared. PLUs
will not be deleted at the register unless there is no register activity and deleted PLUs are
downloaded. (See "Send Programs to ECR (Download)" on page 72.)
26 Menu Functions SAM1000 For Windows User's Manual v2.3
Page 33
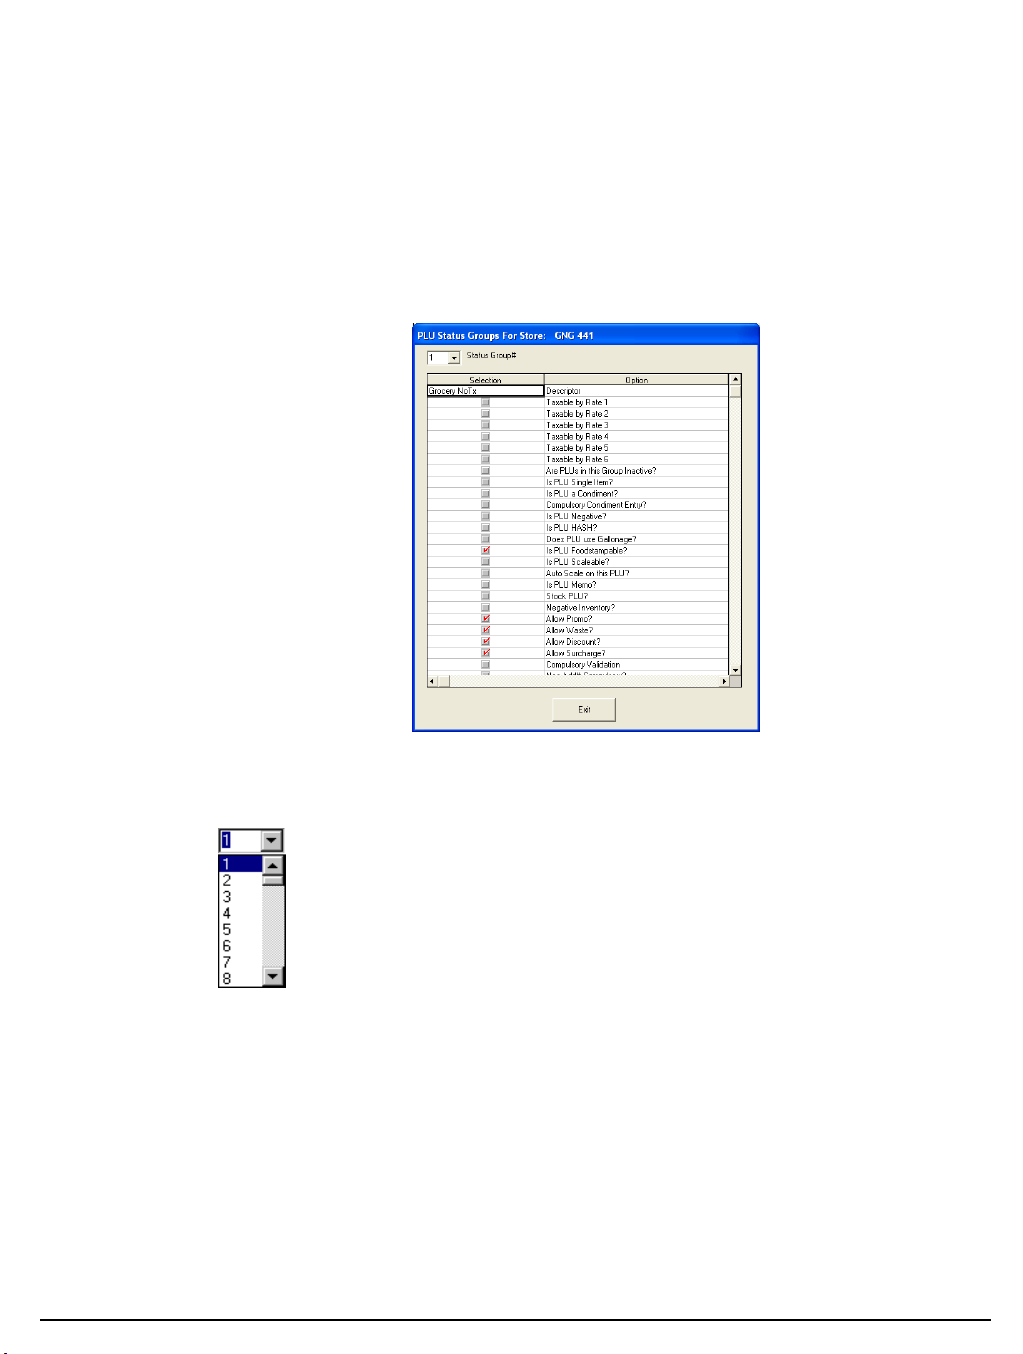
PLU Status Group
Options associated with each PLU Status Group are maintained here. Follow the instructions
on the screen, or refer to the Samsung SPS 1000 Program Manual for a complete description
of your program options.
The total number of PLU status groups is defined by memory allocation.
1. Choose the Edit ECR Data menu, then select P-Mode Programming menu to open the
P-Mode Programming menu. Select PLU to open the PLU menu. Choose PLU Status
Group. The PLU Status Groups screen displays with the first status group in the store
file displayed.
2. Select the Status Group you wish to edit by typing a number in the box and pressing
ENTER, or open the Status Group# drop down list box and click on the group you wish
to edit. If necessary, use the scroll bar to view all of the groups.
3. Edit fields as necessary by moving your mouse pointer to the field you wish to edit:
You can edit fields with numeric information by double clicking on the field, then
entering new data.
You can edit fields with drop-down list boxes by opening the list box and selecting
from the available options.
You can edit fields with check boxes by clicking on the field to add or remove a
check.
4. Click Print Grid to print or Exit to save changes.
SAM1000 For Windows User's Manual v2.3 Menu Functions 27
Page 34
Group
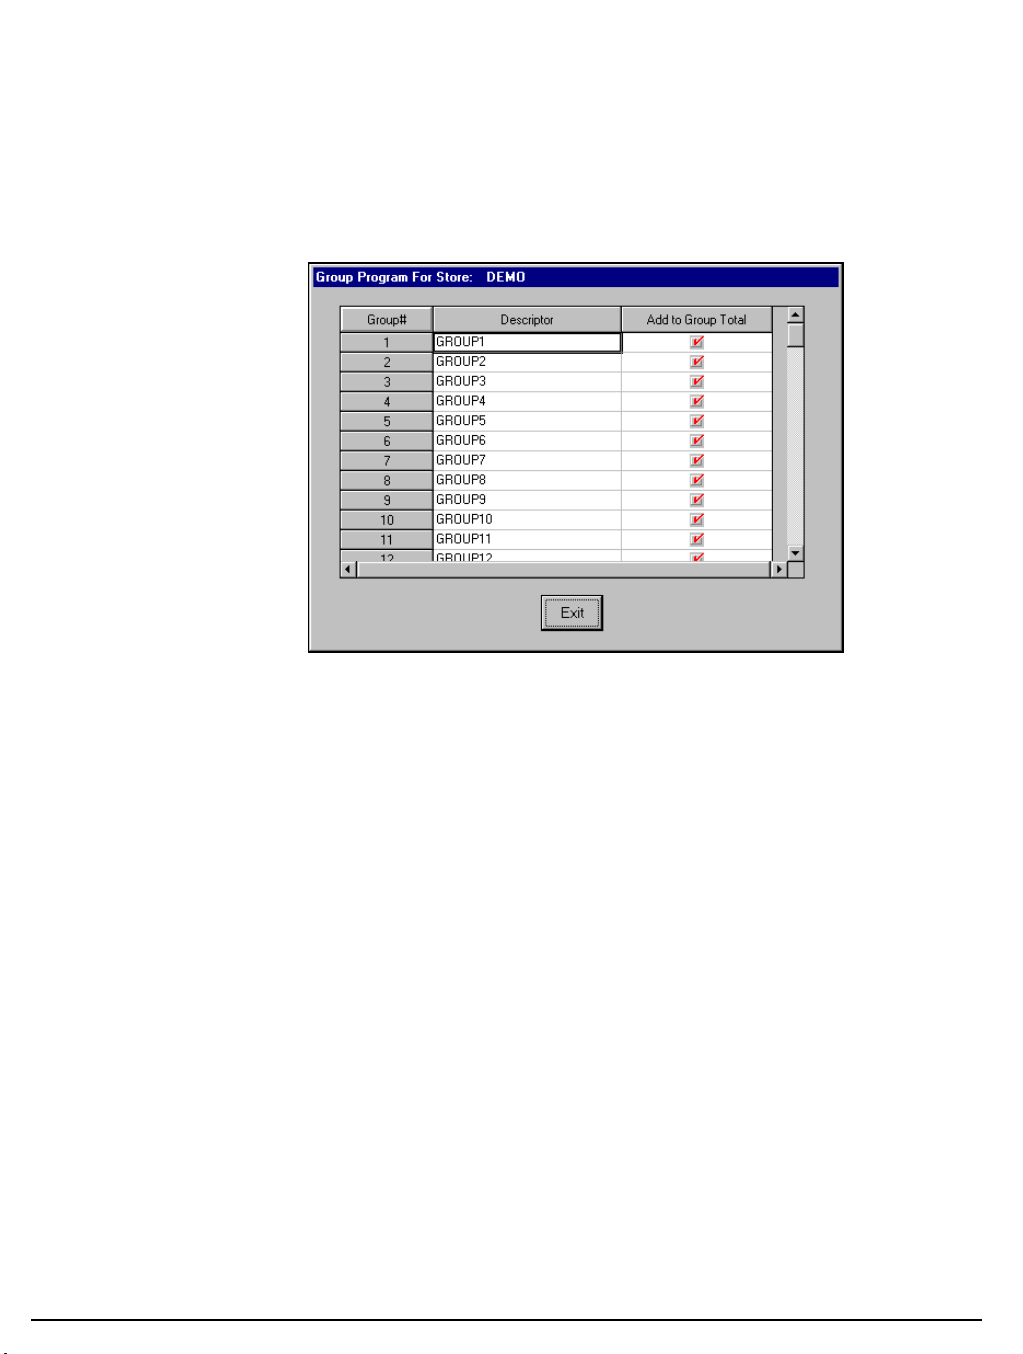
You can program the descriptor and options for each of the 99 groups. Follow the
instructions on the screen, or refer to the Samsung SPS 1000 Program Manual for a complete
description of your program options.
1. Choose the Edit ECR Data menu, then select P-Mode Programming menu to open the
P-Mode Programming menu. Select Group to display the Group Program screen for the
selected store file.
2. Use the scroll box at the right of the screen to select the group you wish to program.
3. The options for the specific group are displayed. Make selections or changes as
necessary.
4. Click Exit to save changes and return to the main menu.
28 Menu Functions SAM1000 For Windows User's Manual v2.3
Page 35
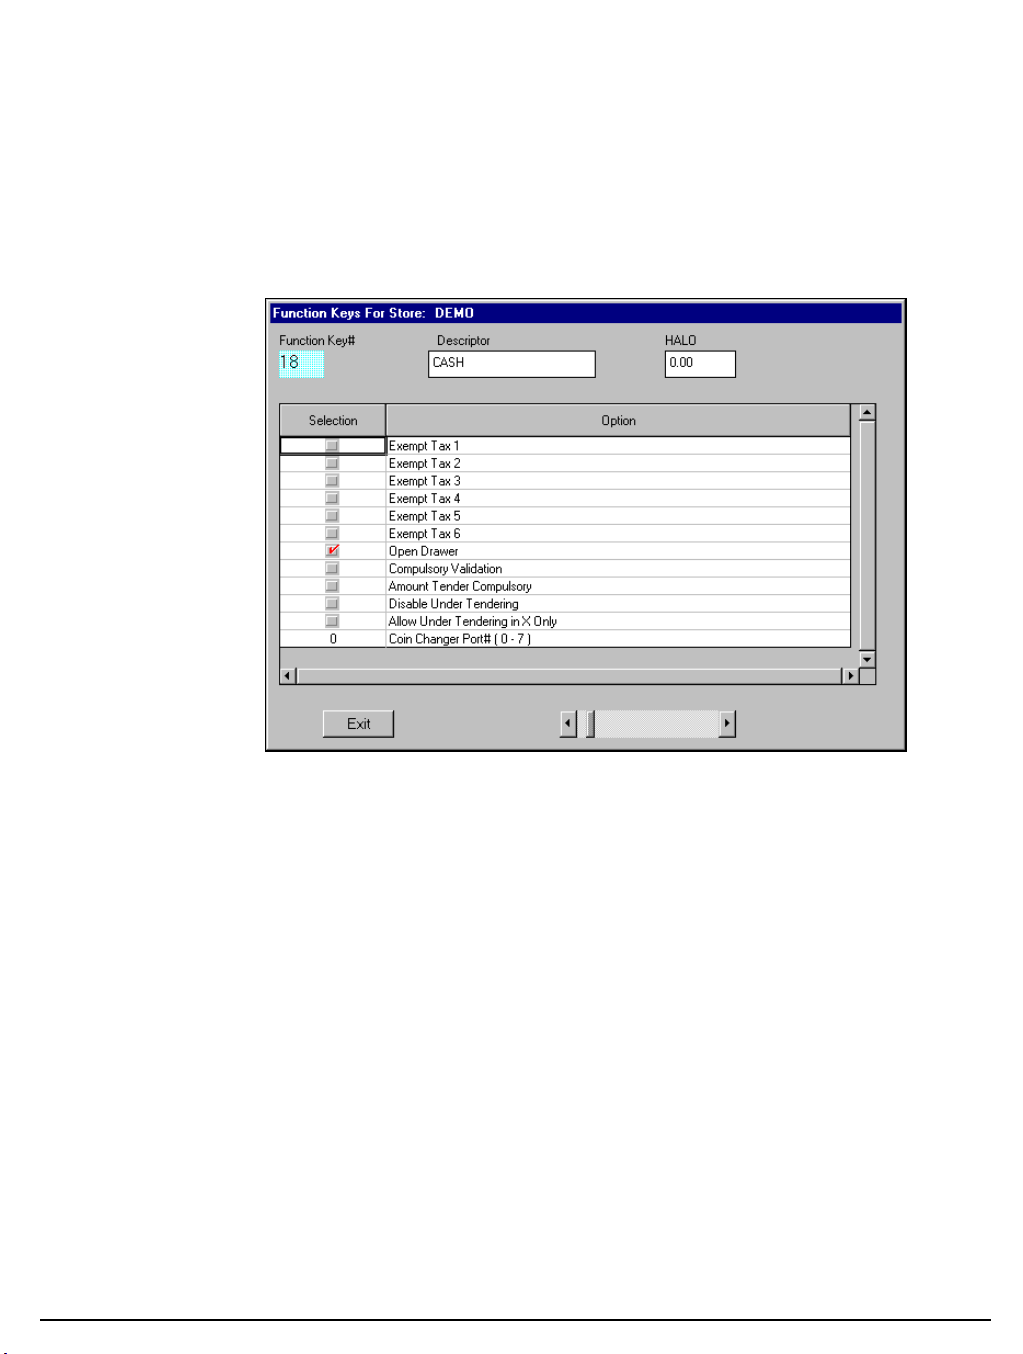
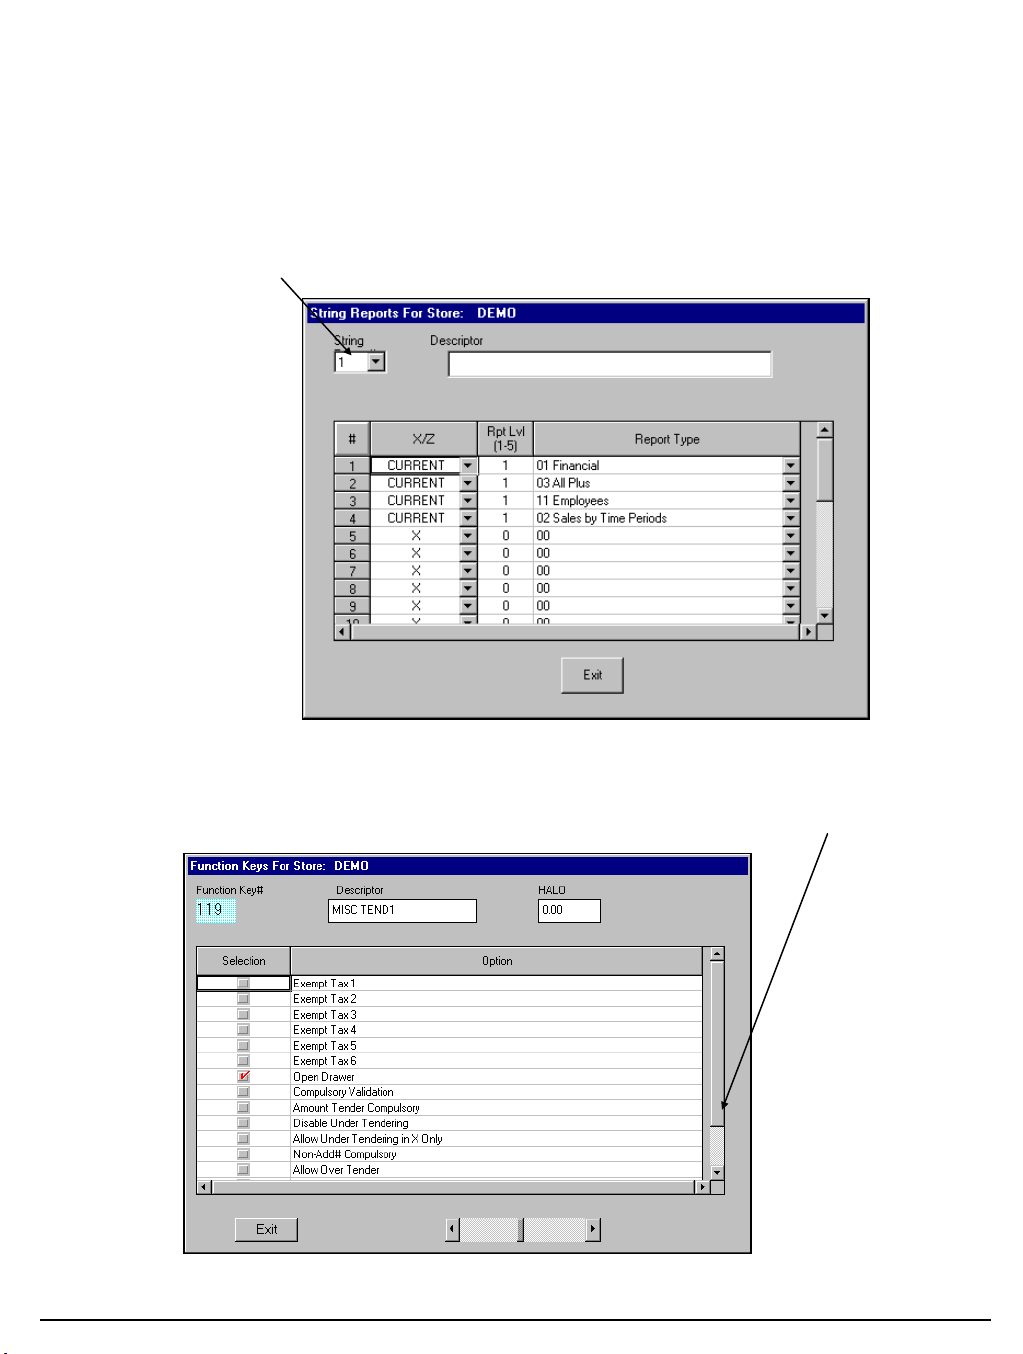
Function Keys
You can program the different options for each function key. Follow the instructions on the
screen, or refer to the Samsung SPS 1000 Program Manual for a complete description of your
program options.
1. Choose the Edit ECR Data menu, then select P-Mode Programming menu to open the
P-Mode Programming menu. Select Function Keys to display the Function Keys screen.
2. Use the scroll box at the bottom of the screen to select the function key you wish to
program. Note that the options vary from one function key to another.
3. Make selections or changes as necessary.
4. If needed, use the scroll box to select additional function keys you wish to program.
5. Click Exit to save changes and return to the main menu.
SAM1000 For Windows User's Manual v2.3 Menu Functions 29
Page 36
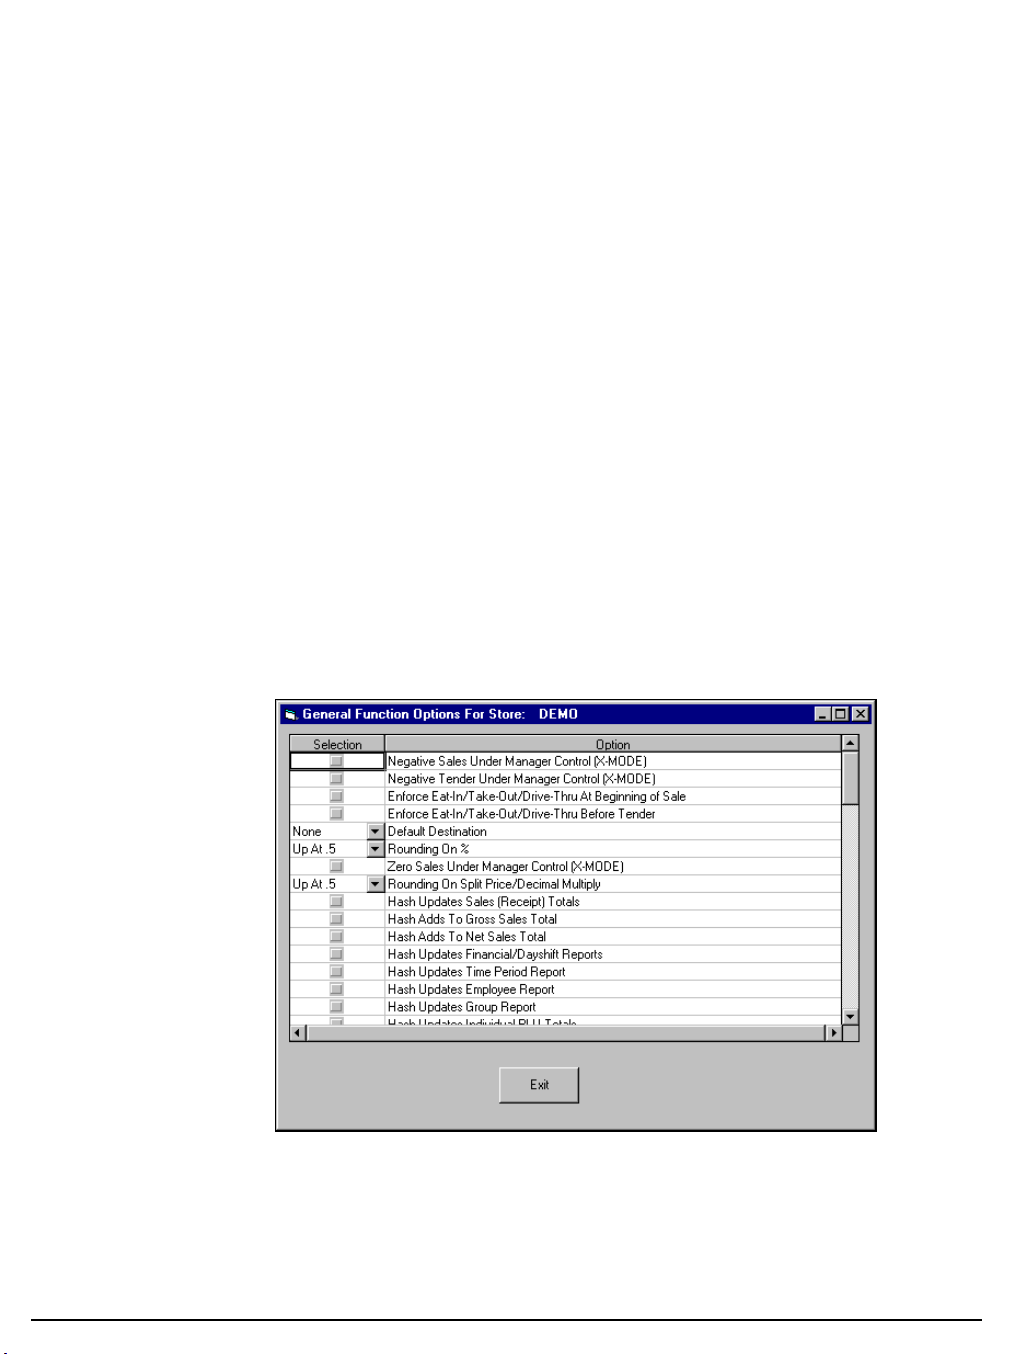
Options
Options are sorted by category to assist the programmer in finding a specific option. Follow
the instructions on the screen, or refer to the Samsung SPS 1000 Program Manual for a
complete description of your program options.
1. Choose the Edit ECR Data menu, then select P-Mode Programming menu to open the
P-Mode Programming menu. Select Options.
2. Choose one of the following option categories:
General Function Options
Tax Options
Cash Drawer Options
Training Mode Options
Level/Modifier Options
Tracking File Options
Kitchen Printing/Video Options
Validation/Subtotal Print Options
General Printing Options
Report Printing Options
Report Options
Time Keeping Options
E.J. and Detail Printing Options
3. The General Function Options screen is shown below:
4. Use the scroll box at the right of the screen to find the option you wish to program.
30 Menu Functions SAM1000 For Windows User's Manual v2.3
Page 37

5. Edit fields as necessary by moving your mouse pointer to the field you wish to edit:
You can edit fields with numeric information by double clicking on the field, then
enter new data. If you are entering data with a decimal, you must use the decimal
key.
You can edit fields with drop-down list boxes by opening the list box and selecting
from the available options.
You can edit fields with check boxes by clicking on the field to add or remove a
check.
6. Click Exit to save changes.
SAM1000 For Windows User's Manual v2.3 Menu Functions 31
Page 38
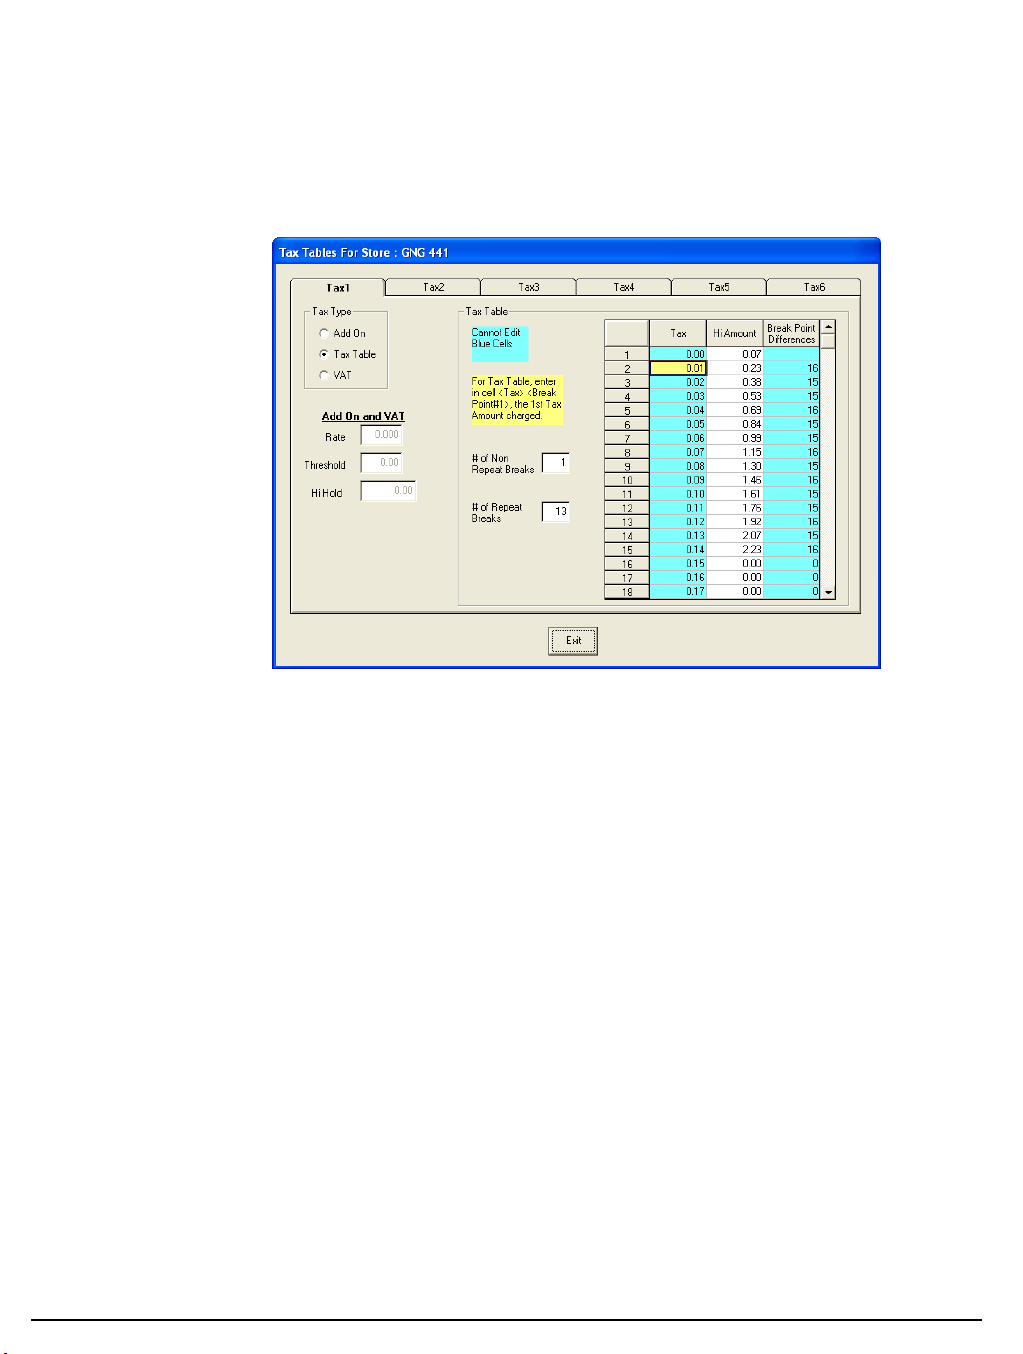
Tax Tables
Tax 6 should be used for the Canadian Goods and Services tax (GST). Here you have the
option of taxing the GST by other applicable rates (tax on tax).
1. Choose the Edit ECR Data menu, then select P-Mode Programming menu to open the
P-Mode Programming menu. Select Tax Tables, and then select either Tax Rates 1-5 or
Tax Rate 6 to display the appropriate Tax Rate Program screen for the selected store file.
2. If you are programming tax 1-5, select the tax from the Tax# drop down box.
3. Select the tax type option button.
4. If the tax type you select is Add On or VAT, the Rate, Threshold and High Hold fields
are activated; if you select Table, the Table fields are activated.
5. Complete the appropriate fields. Refer to the Samsung SPS 1000 Program Manual for a
complete description of your program options.
6. Click Exit to save changes.
32 Menu Functions SAM1000 For Windows User's Manual v2.3
Page 39
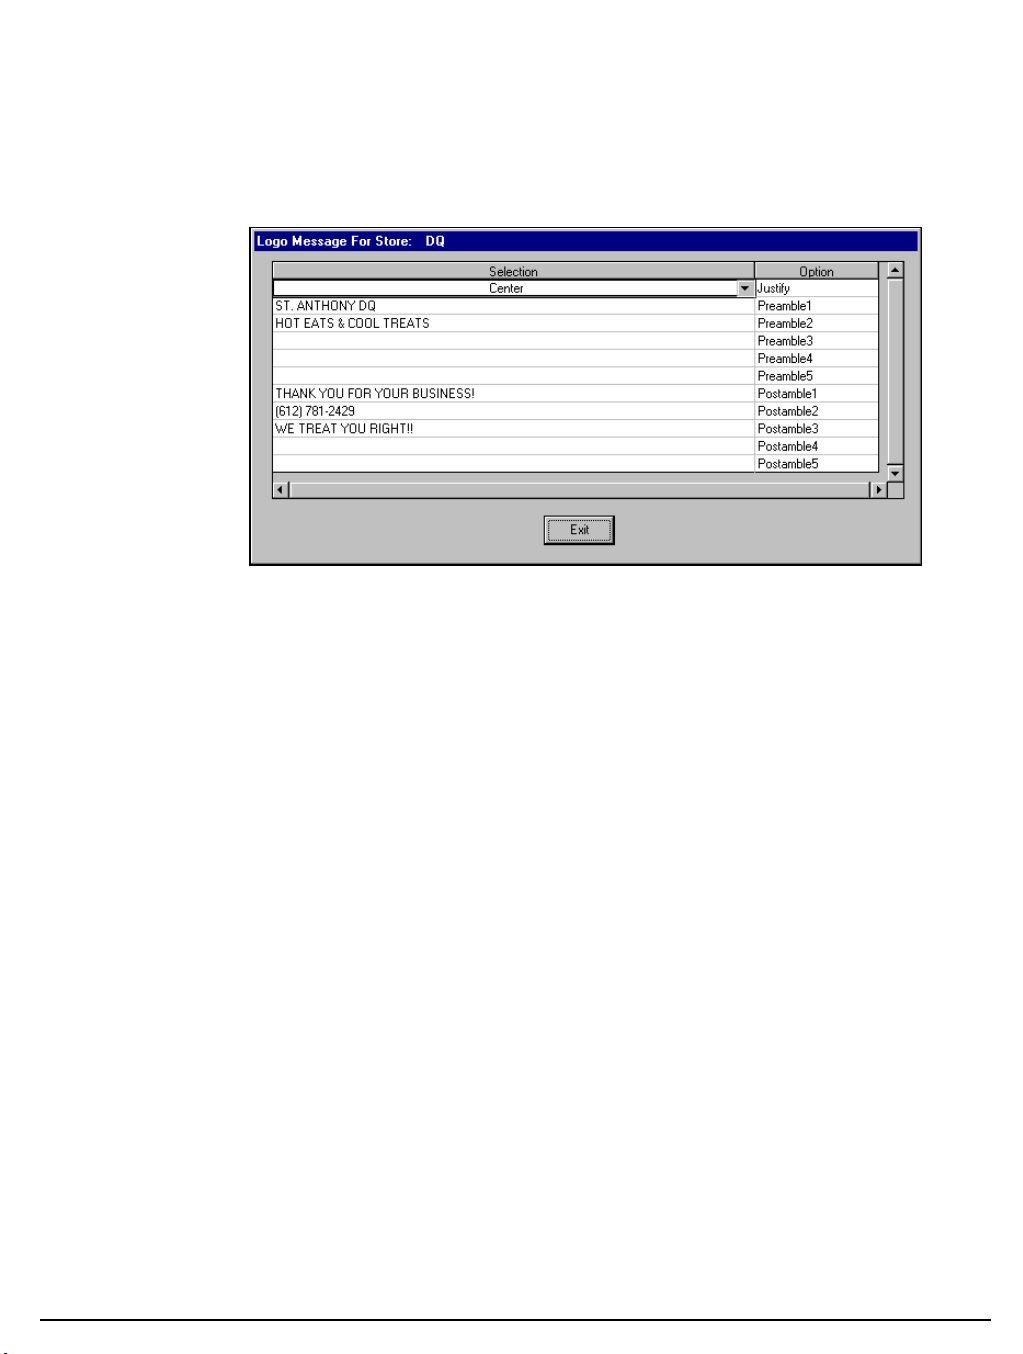
Messages
Logo
1. Choose the Edit ECR Data menu, then select P-Mode Programming menu to open the
P-Mode Programming menu. Select Messages, then select Logo to display the Logo
Messages screen for the selected store file.
2. Use the scroll box at the right of the screen to find the message you wish to program.
3. Select Left, Right, or Center justification from the Justify drop down box.
4. Enter a new message or edit an existing message by double clicking on a field, then
typing a new message.
5. Click Exit to save changes.
SAM1000 For Windows User's Manual v2.3 Menu Functions 33
Page 40
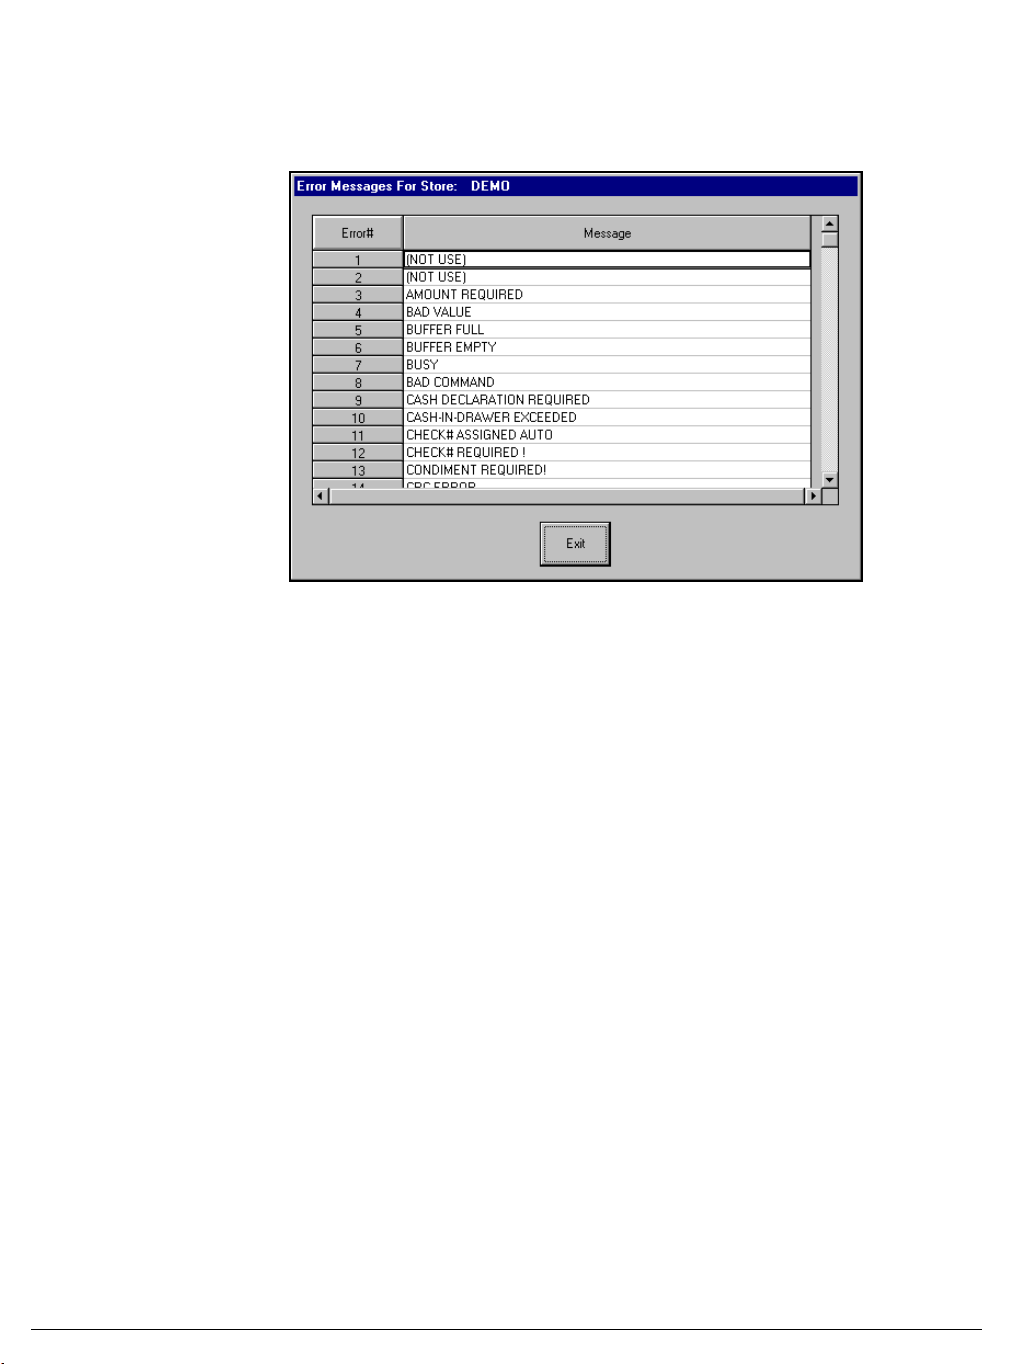
Error Messages
1. Choose the Edit ECR Data menu, then select P-Mode Programming menu to open the
P-Mode Programming menu. Select Messages, then select Error Messages to display
the Error Messages screen for the selected store file.
2. Use the scroll box at the right of the screen to find the message you wish to program.
3. Edit messages as necessary by double clicking on a field, then typing a new message.
4. Click Exit to save changes.
34 Menu Functions SAM1000 For Windows User's Manual v2.3
Page 41
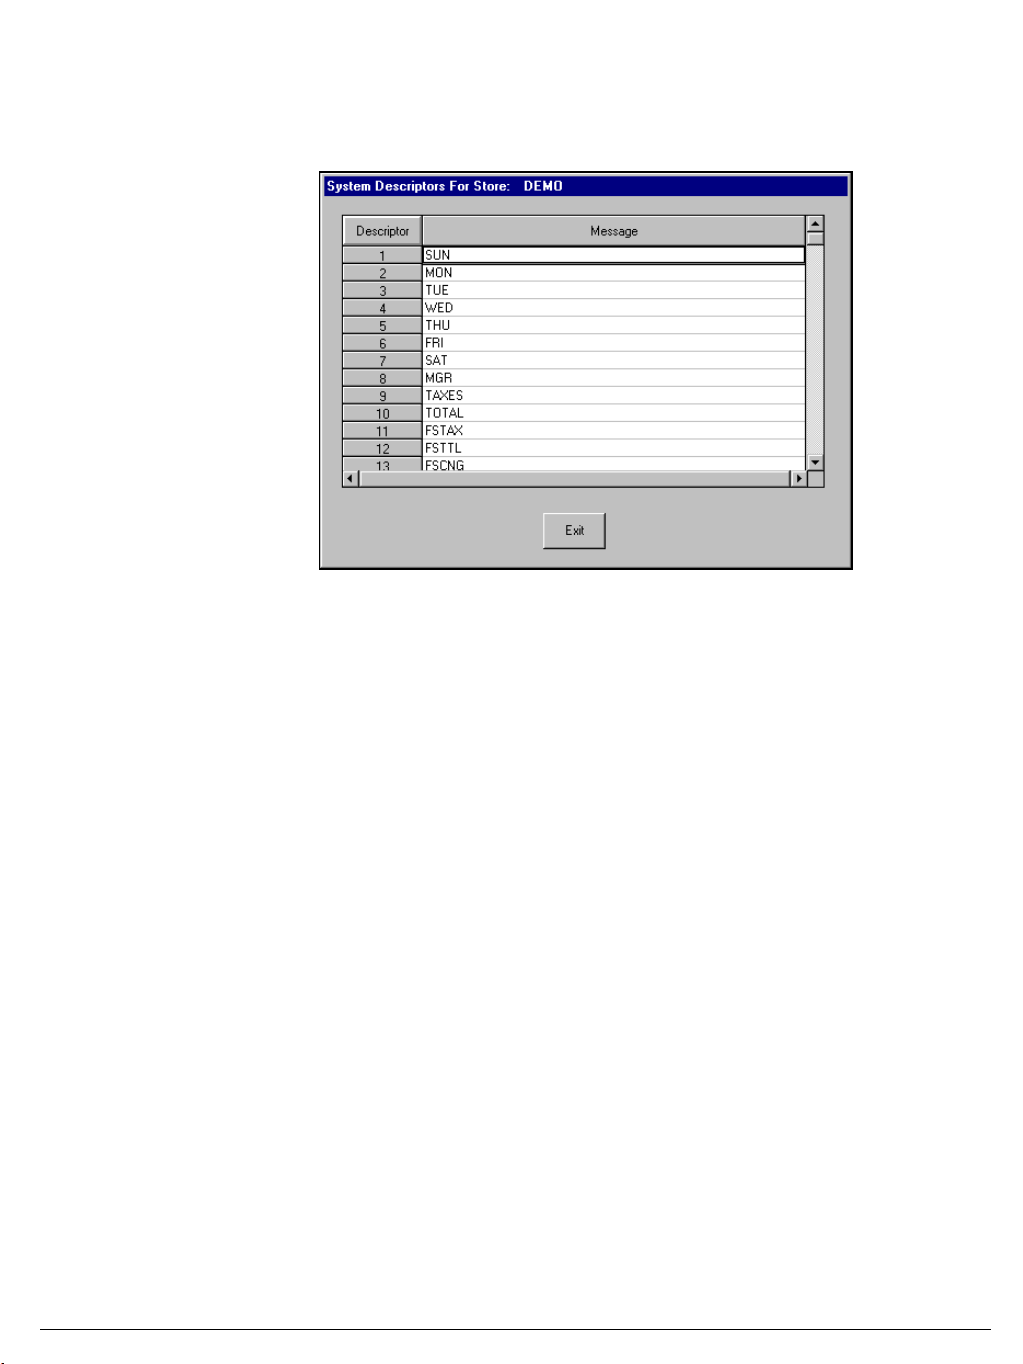
System Descriptors
1. Choose the Edit ECR Data menu, then select P-Mode Programming menu to open the
P-Mode Programming menu. Select Messages, then select System Descriptors to
display the System Descriptors screen for the selected store file.
2. Use the scroll box at the right of the screen to find the message you wish to program.
3. Edit descriptors as necessary by double clicking on a field, then typing a new descriptor.
4. Click Exit to save changes.
SAM1000 For Windows User's Manual v2.3 Menu Functions 35
Page 42
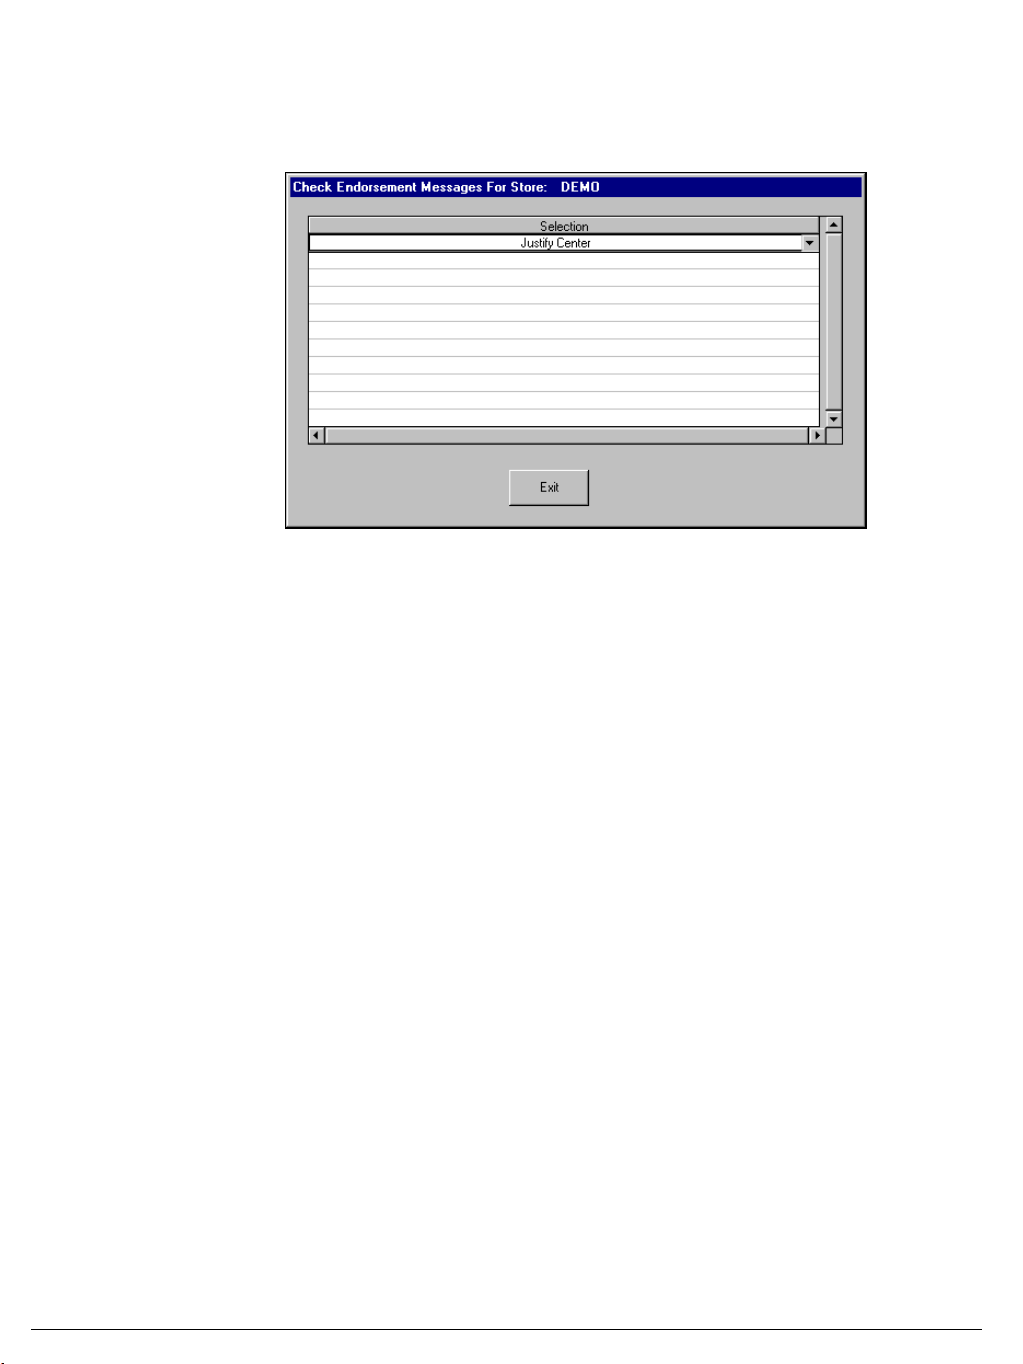
Check Endorsement Messages
1. Choose the Edit ECR Data menu, then select P-Mode Programming menu to open the
P-Mode Programming menu. Select Messages, then select Check Endorsement
Messages to display the Check Endorsement Messages screen for the selected store file.
2. Select Left, Right, or Center justification from the Justify drop down box.
3. Enter a new message or edit an existing message by double clicking on a field, then
typing a new message.
4. Click Exit to save changes.
36 Menu Functions SAM1000 For Windows User's Manual v2.3
Page 43
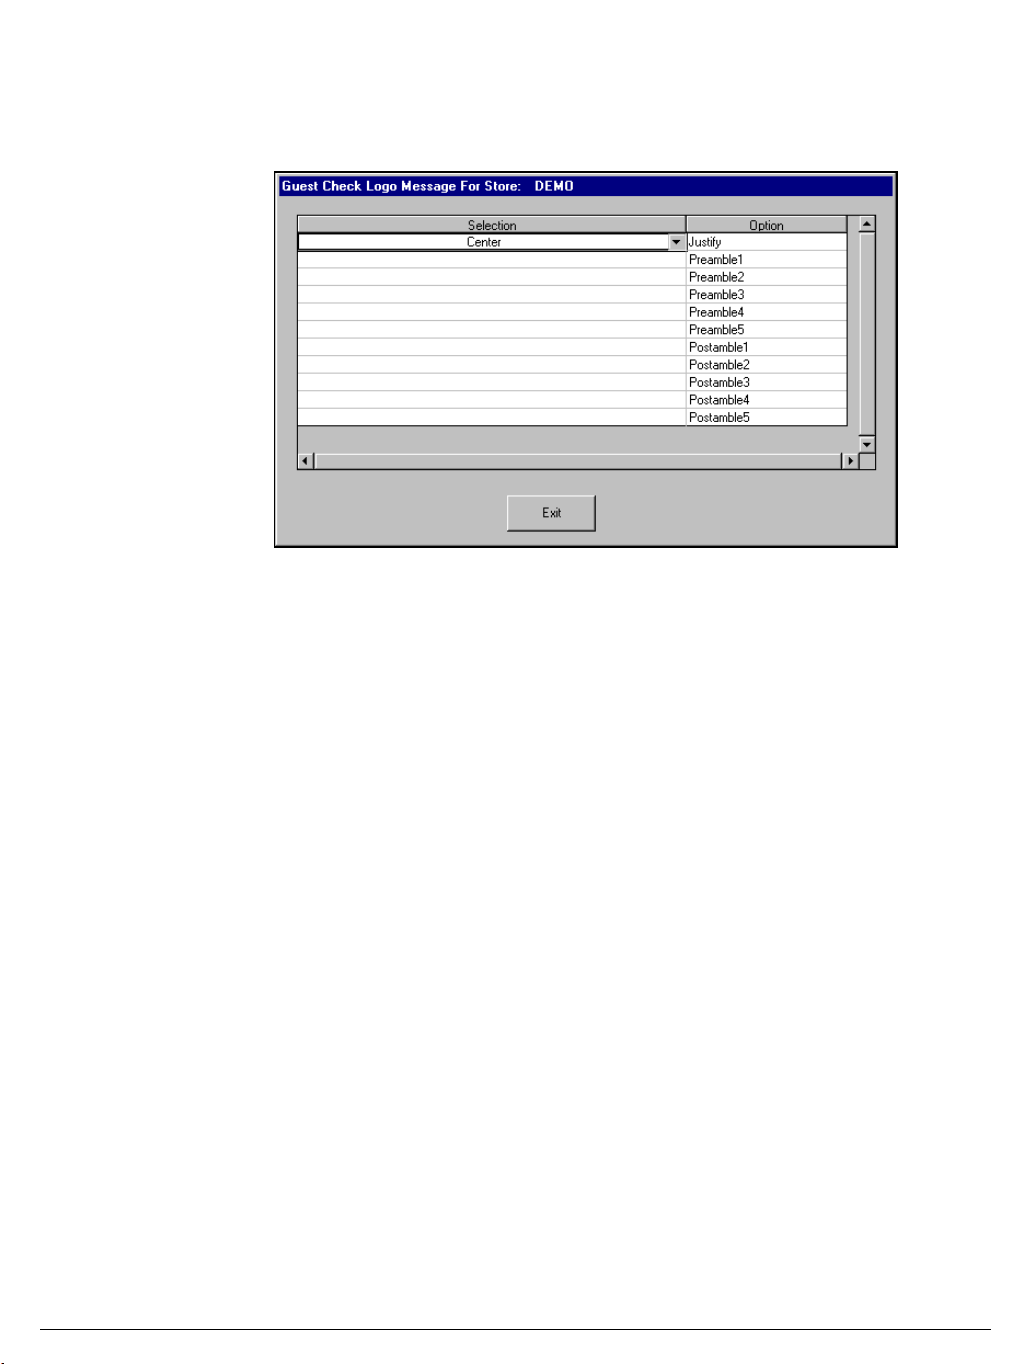
Guest Check Logo Message
1. Choose the Edit ECR Data menu, then select P-Mode Programming menu to open the
P-Mode Programming menu. Select Messages, then select Guest Check Logo Message
to display the Guest Check Logo Message screen for the selected store file.
2. Select Left, Right, or Center justification from the Justify drop down box.
3. Enter a new message or edit an existing message by double clicking on a field, then
typing a new message.
4. Click Exit to save changes.
SAM1000 For Windows User's Manual v2.3 Menu Functions 37
Page 44
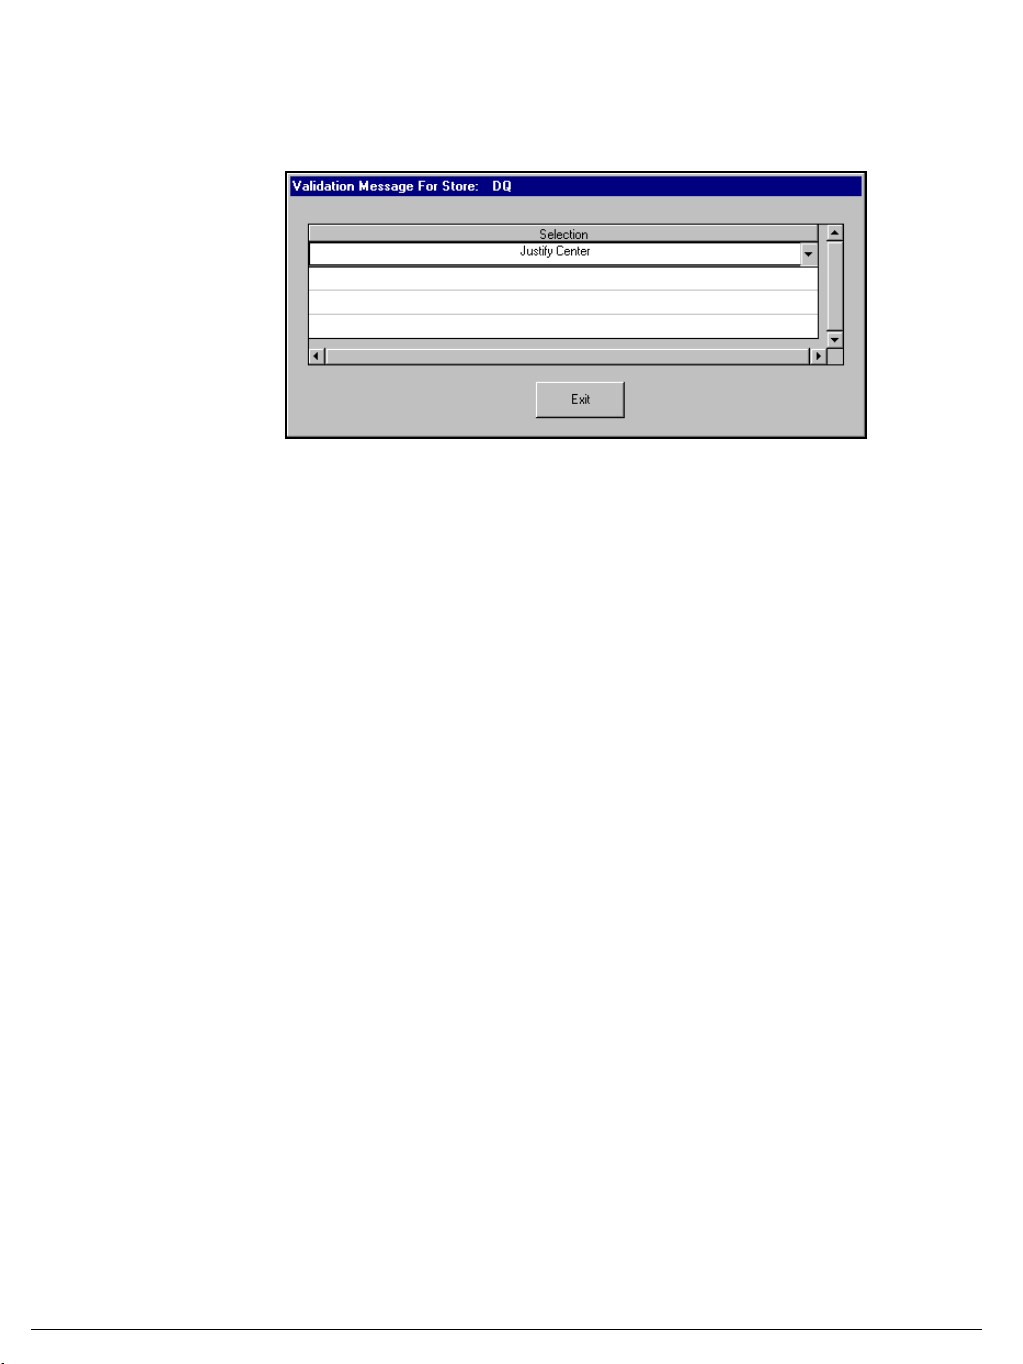
Validation Message
1. Choose the Edit ECR Data menu, then select P-Mode Programming menu to open the
P-Mode Programming menu. Select Messages, then select Validation Message to
display the Validation Message screen for the selected store file.
2. Select Left, Right, or Center justification from the Justify drop down box.
3. Enter a new message or edit an existing message by double clicking on a field, then
typing a new message.
4. Click Exit to save changes.
38 Menu Functions SAM1000 For Windows User's Manual v2.3
Page 45
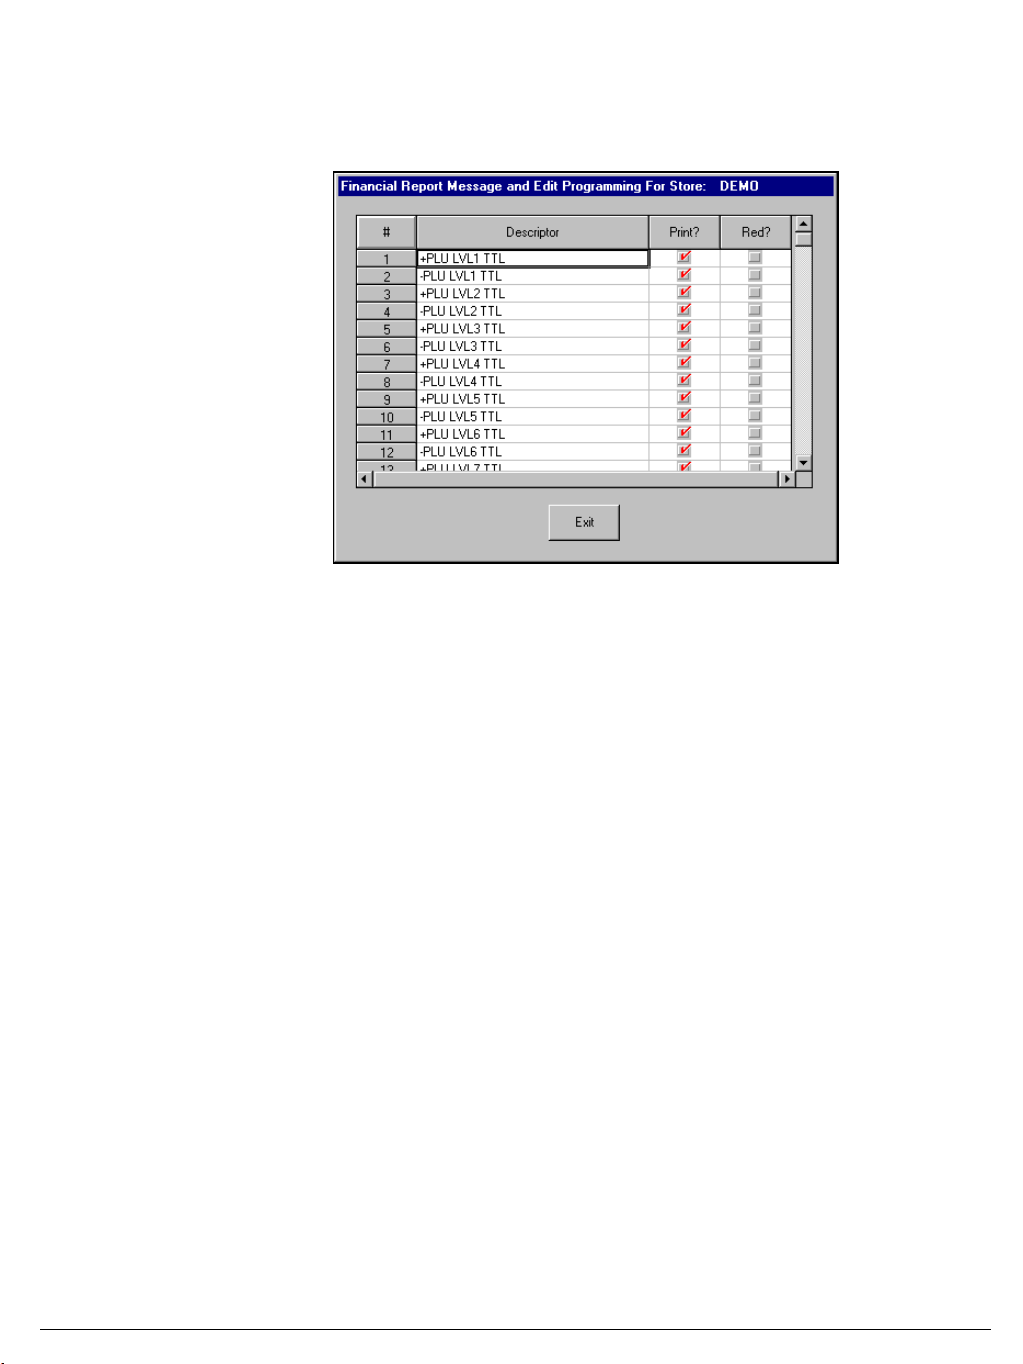
Financial Report Messages
1. Choose the Edit ECR Data menu, then select P-Mode Programming menu to open the
P-Mode Programming menu. Select Messages, then select Financial Report Message to
display the Financial Report Messages screen for the selected store file.
2. Use the scroll box at the right of the screen to find the message you wish to program.
3. Edit messages as necessary by double clicking on a field, then typing a new message.
4. Click the Print? or Red? check boxes to set the appropriate status for appearance on
reports.
5. Click Exit to save changes.
SAM1000 For Windows User's Manual v2.3 Menu Functions 39
Page 46
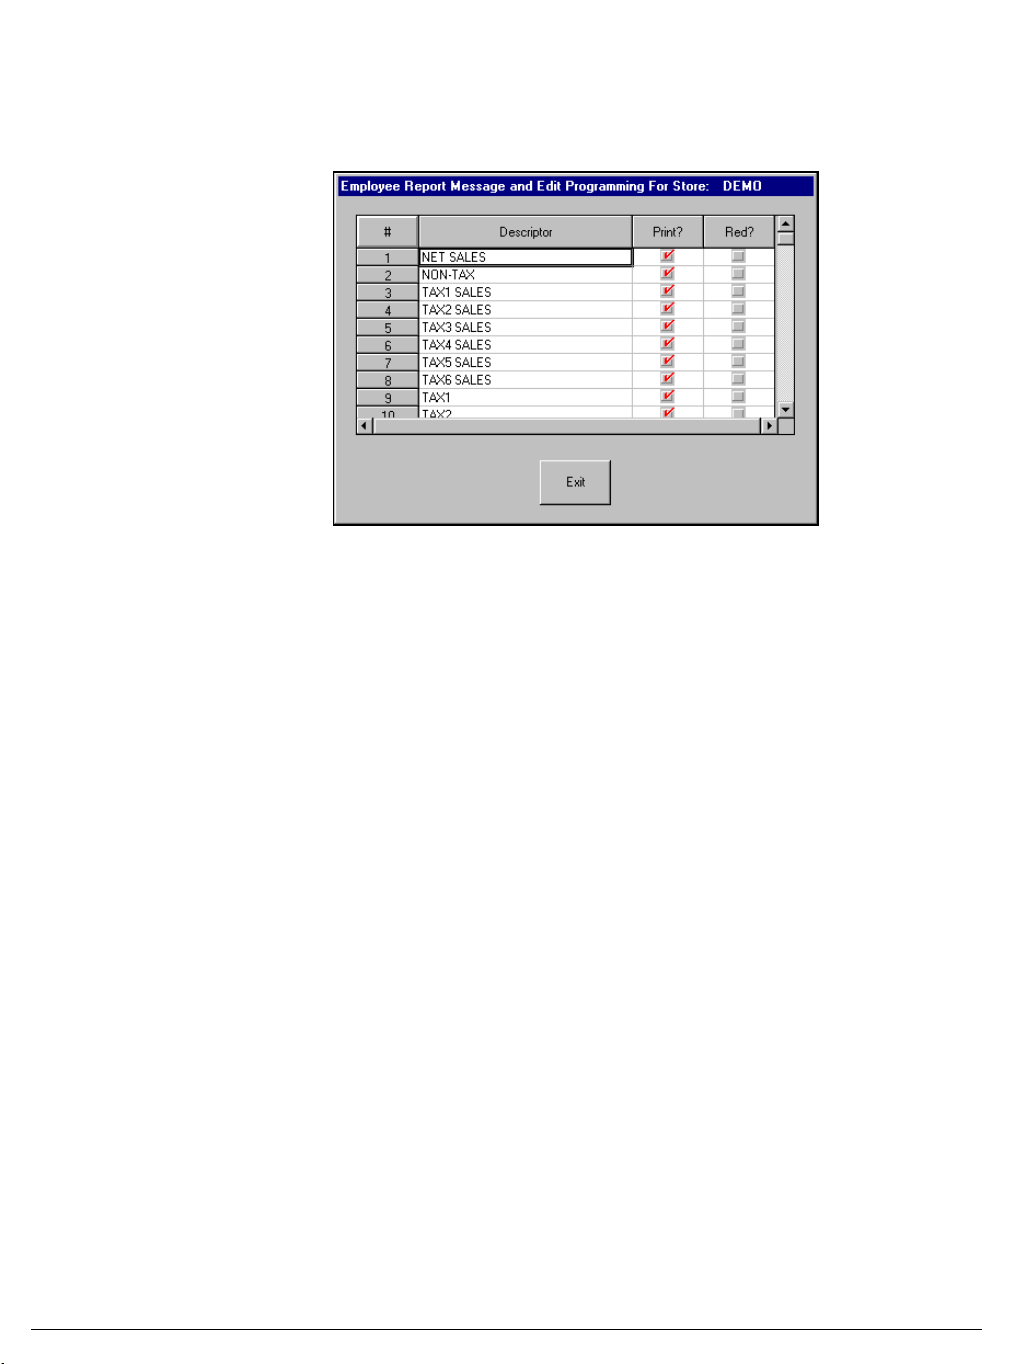
Employee Report Messages
1. Choose the Edit ECR Data menu, then select P-Mode Programming menu to open the
P-Mode Programming menu. Select Messages, then select Employee Report Message
to display the Employee Report Messages screen for the selected store file.
2. Use the scroll box at the right of the screen to find the message you wish to program.
3. Edit messages as necessary by double clicking on a field, then typing a new message.
4. Click the Print? or Red? check boxes to set the appropriate status for appearance on
reports.
5. Click Exit to save changes.
40 Menu Functions SAM1000 For Windows User's Manual v2.3
Page 47
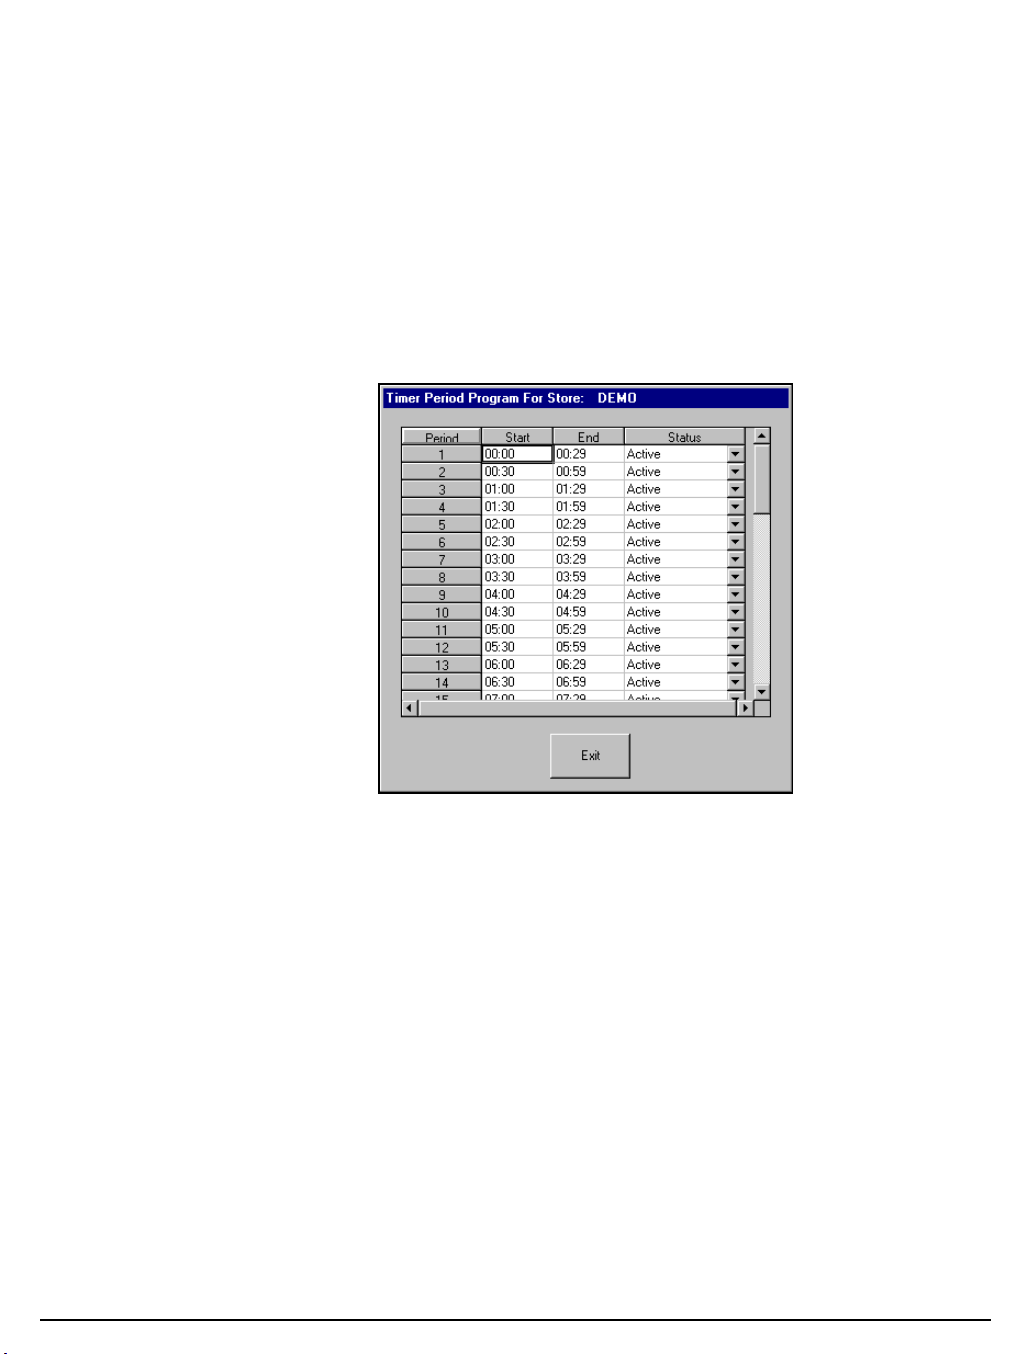
Time Periods
Memory allocation determines whether there are 24, 48, or 96 time periods. Time periods
will default to hourly periods if 24 periods are selected in memory allocation; 30 minute
periods if 48 periods are selected; 15 minute periods if 96 periods are selected.
Periods can be set to custom lengths using this program. If fewer periods are needed than are
available, unneeded periods can be inactivated so that they will not appear on reports. To
inactivate a period, replace "active" for the period with an "inactive".
All time units are based upon a 24 hour clock (military time).
1. Choose the Edit ECR Data menu, then select P-Mode Programming menu to open the
P-Mode Programming menu. Select Time Periods to display the Time Period Program
screen for the selected store file.
2. Use the scroll box at the right of the screen to find the time period you wish to program.
3. Edit times as necessary by double clicking on a field, then typing a new time.
4. Select Active or Inactive from the drop down box to determine if the period is used.
5. Click Exit to save changes.
SAM1000 For Windows User's Manual v2.3 Menu Functions 41
Page 48
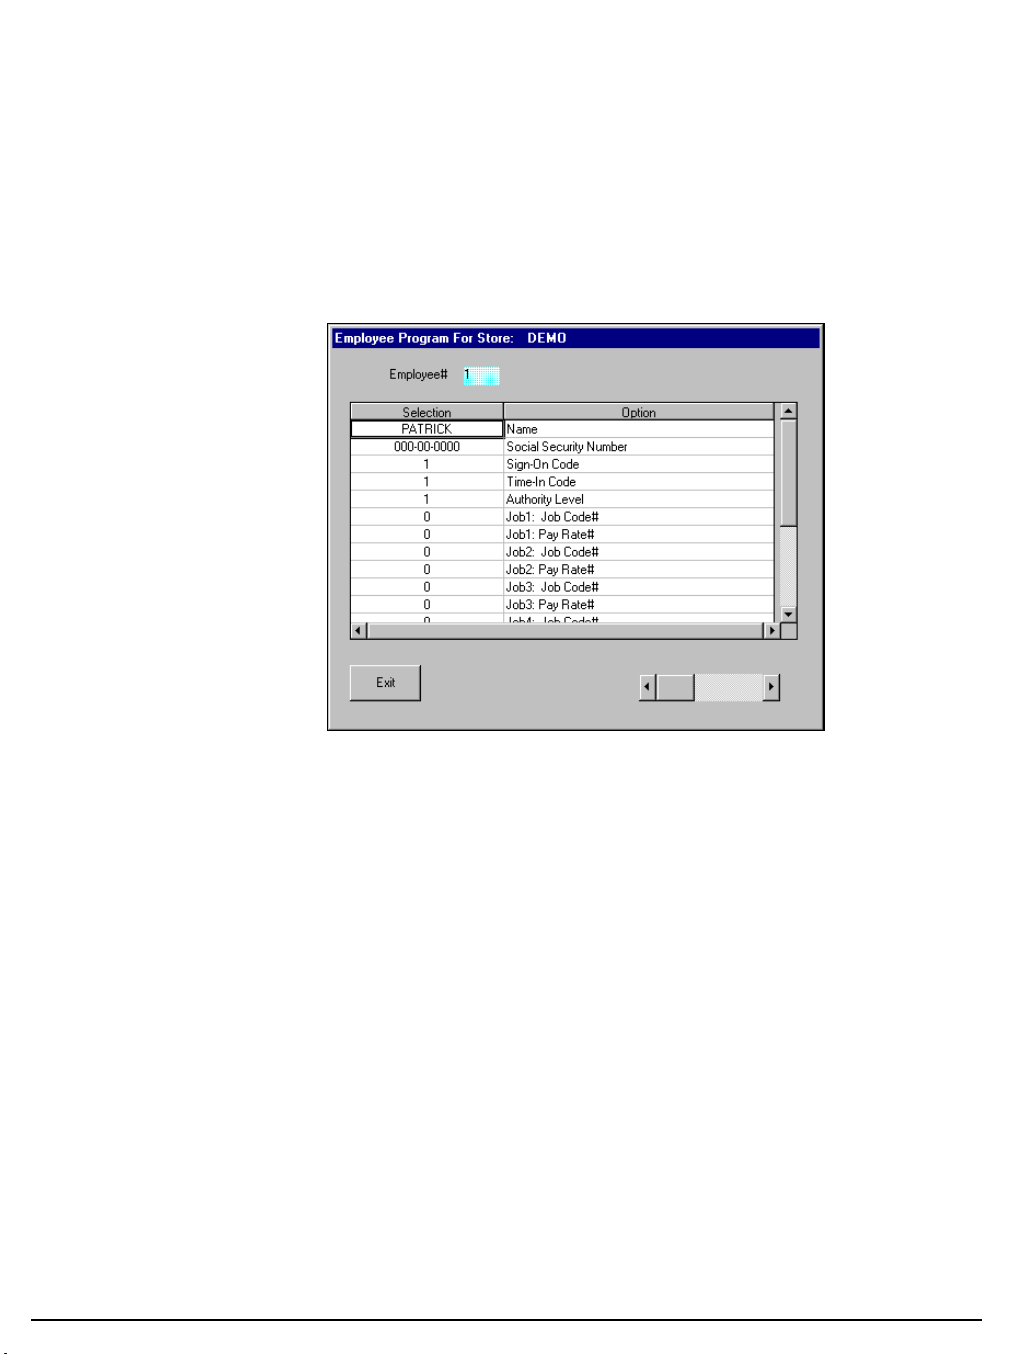
Employee
Two 10 digit code numbers may be assigned for each employee. A time keeping code is used
to clock in or out and a separate sign on code used to operate the register. The social security
number is for reference only and appears only on reports.
The total number of employees (up to 999) is set in memory allocation. See "Memory
Allocation" in "S-Mode Programming".
1. Choose the Edit ECR Data menu, then select P-Mode Programming menu to open the
P-Mode Programming menu. Select Employee, then select Employee to display the
Employee Program screen for the selected store file.
2. Move the scroll box to select the employee you wish to work with. Drag the scroll box or
click the scroll arrows to find your selection.
3. Use the scroll box at the right of the screen to find the field you wish to program.
4. Edit fields as necessary by moving your mouse pointer to the field you wish to edit:
You can edit fields with alpha numeric or numeric information by double clicking on
the field, then entering new data.
You can edit fields with drop-down list boxes by opening the list box and selecting
from the available options.
You can edit fields with check boxes by clicking on the field to add or remove a
check.
5. Click Exit to save changes.
42 Menu Functions SAM1000 For Windows User's Manual v2.3
Page 49
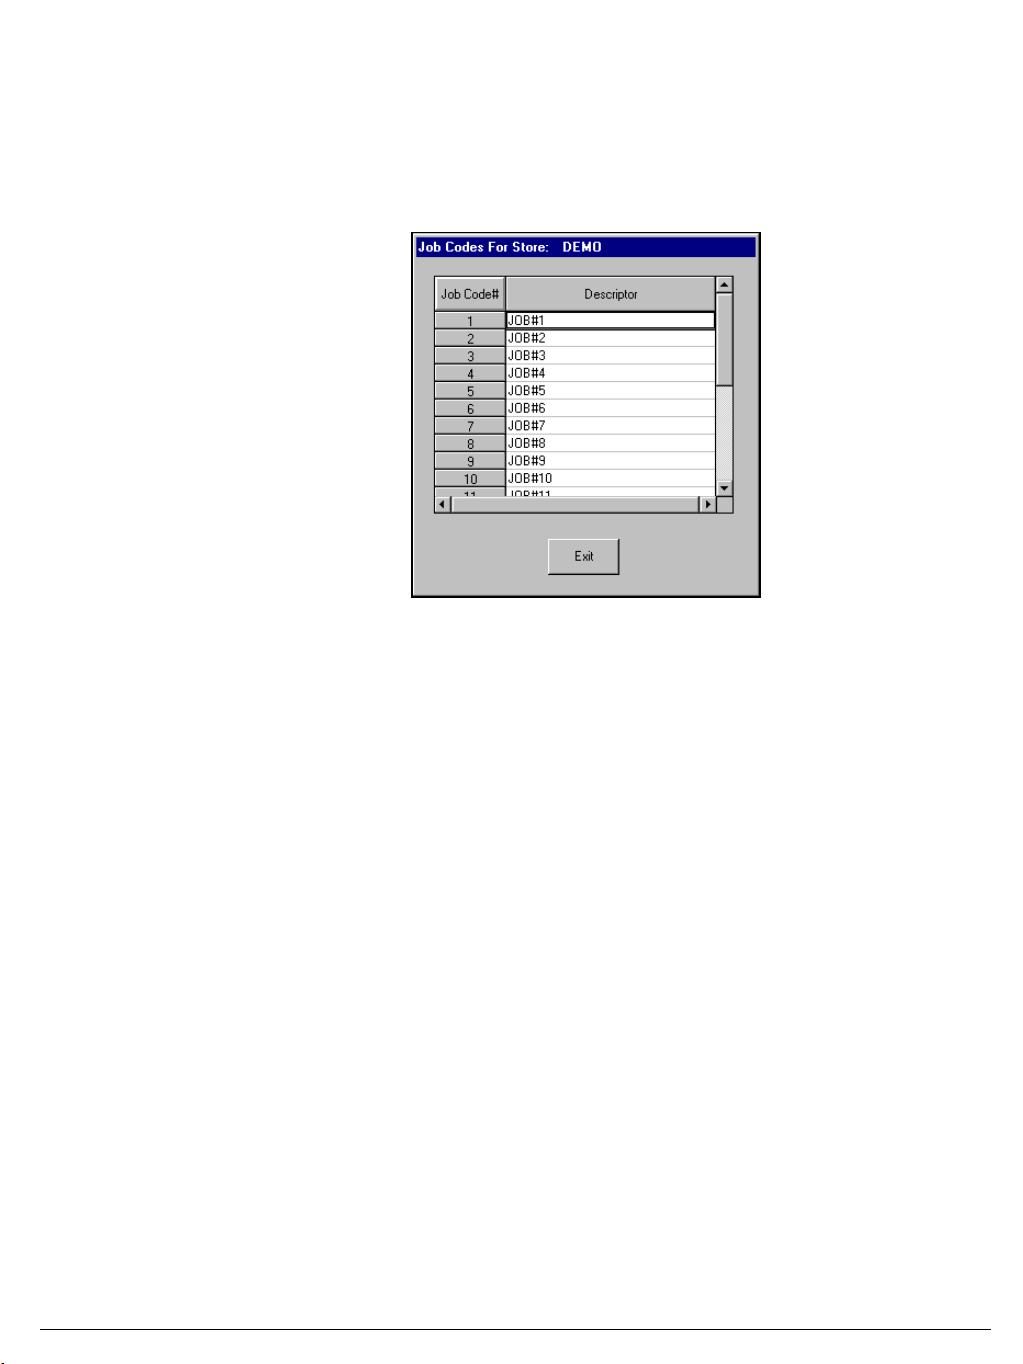
Job Codes
The job codes to be used by all employees are set up here. There are 20 possible job codes.
Each job code you wish to activate must be given a descriptor here.
1. Choose the Edit ECR Data menu, then select P-Mode Programming menu to open the
P-Mode Programming menu. Select Employee, then select Job Codes to display the Job
Codes Program screen for the selected store file.
2. Use the scroll box at the right of the screen to find the field you wish to program.
3. Edit job codes as necessary by double clicking on a field, then entering a new descriptor.
4. Click Exit to save changes.
SAM1000 For Windows User's Manual v2.3 Menu Functions 43
Page 50
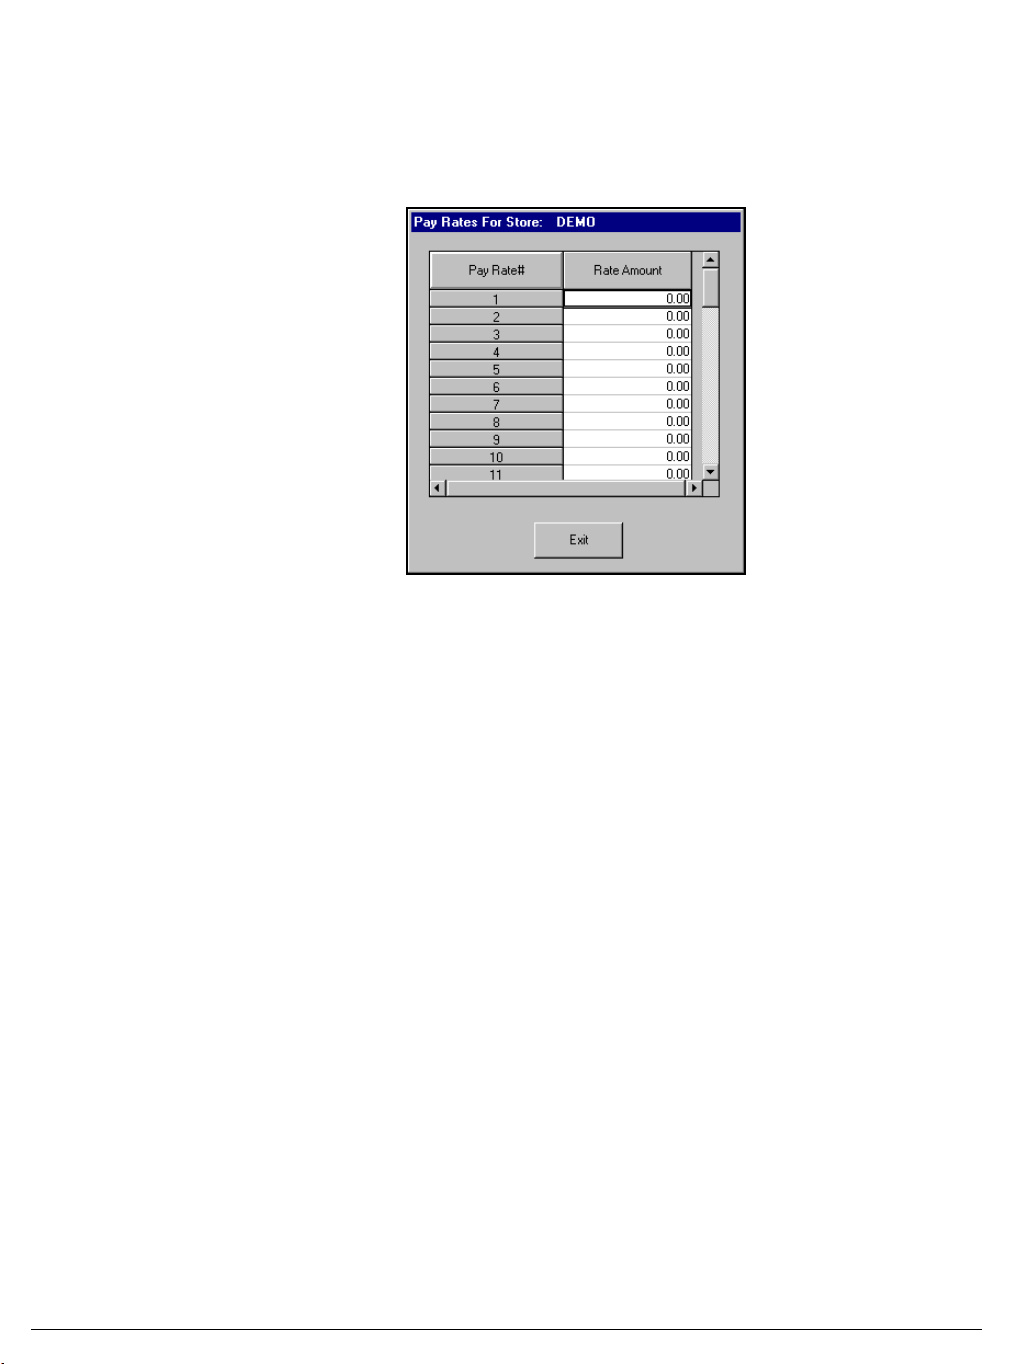
Pay Rates
The pay rates to be used by all employees are set up here. There are 50 pay rates.
1. Choose the Edit ECR Data menu, then select P-Mode Programming menu to open the
P-Mode Programming menu. Select Employee, then select Pay Rates to display the Pay
Rates Program screen for the selected store file.
2. Use the scroll box at the right of the screen to find the field you wish to program.
3. Edit pay rates as necessary by double clicking on a field, then entering a new rate. Use
the decimal key as necessary.
4. Click Exit to save changes.
44 Menu Functions SAM1000 For Windows User's Manual v2.3
Page 51
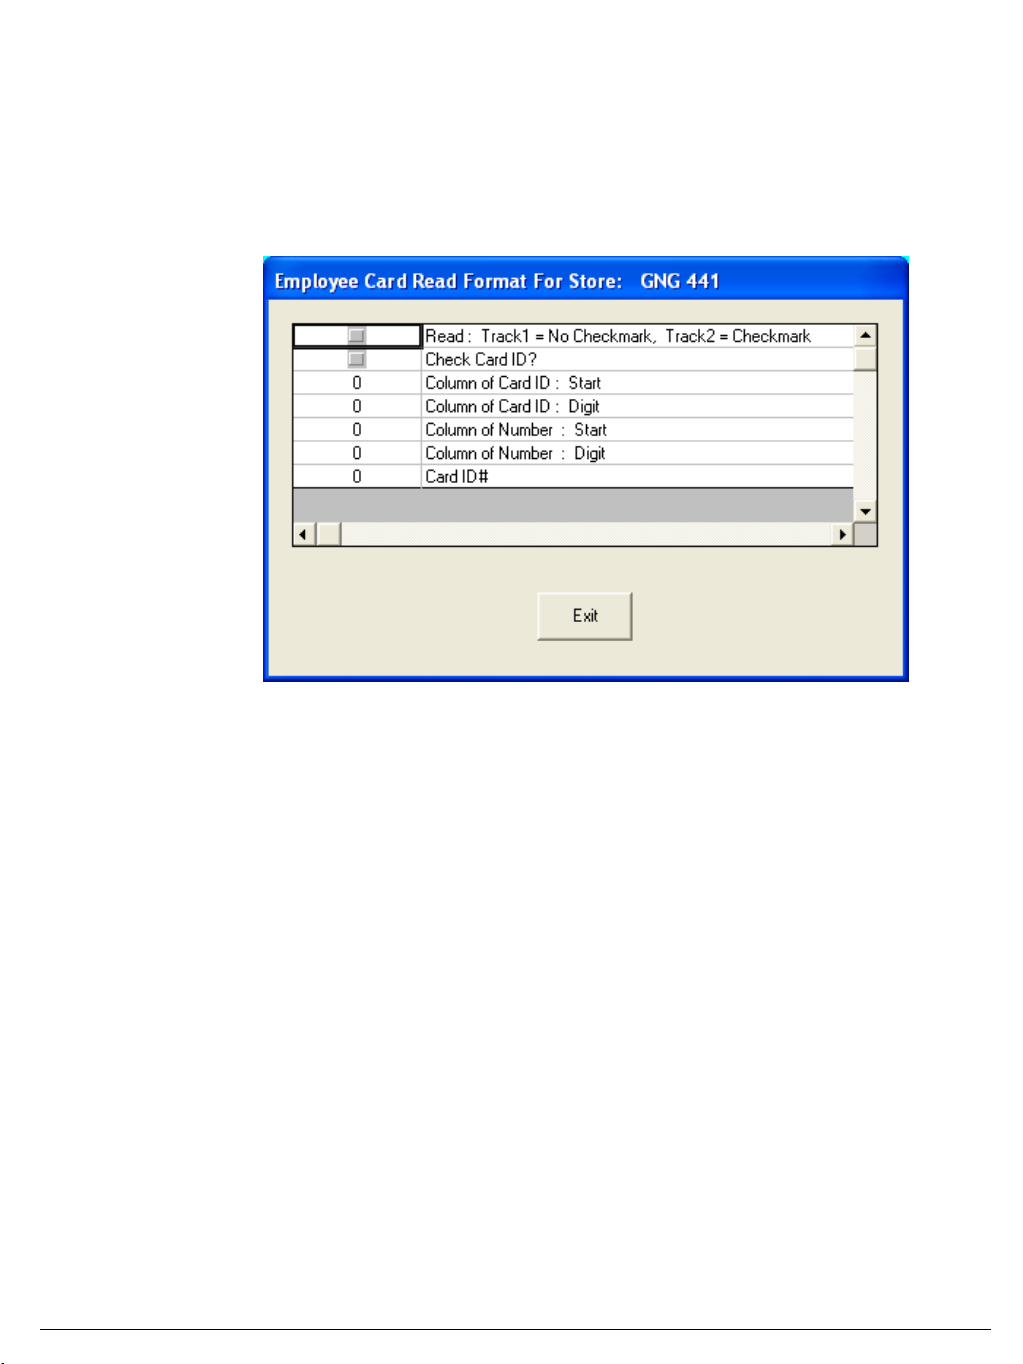
Employee Card Read Format
The Employee Card Read Format is programmed here to have the optional magnetic card
reader operate for employee sign on. Information set here determines the number that is read
when the card is swiped.
1. Choose the Edit ECR Data menu, then select P-Mode Programming menu to open the
P-Mode Programming menu. Select Employee, nad then select Card Read Format to
display the Card Read Format Program screen for the selected store file.
2. Click on the check boxes and fill in the numeric fields to program your magnetic card
reader to work for employee sign in.
SAM1000 For Windows User's Manual v2.3 Menu Functions 45
Page 52
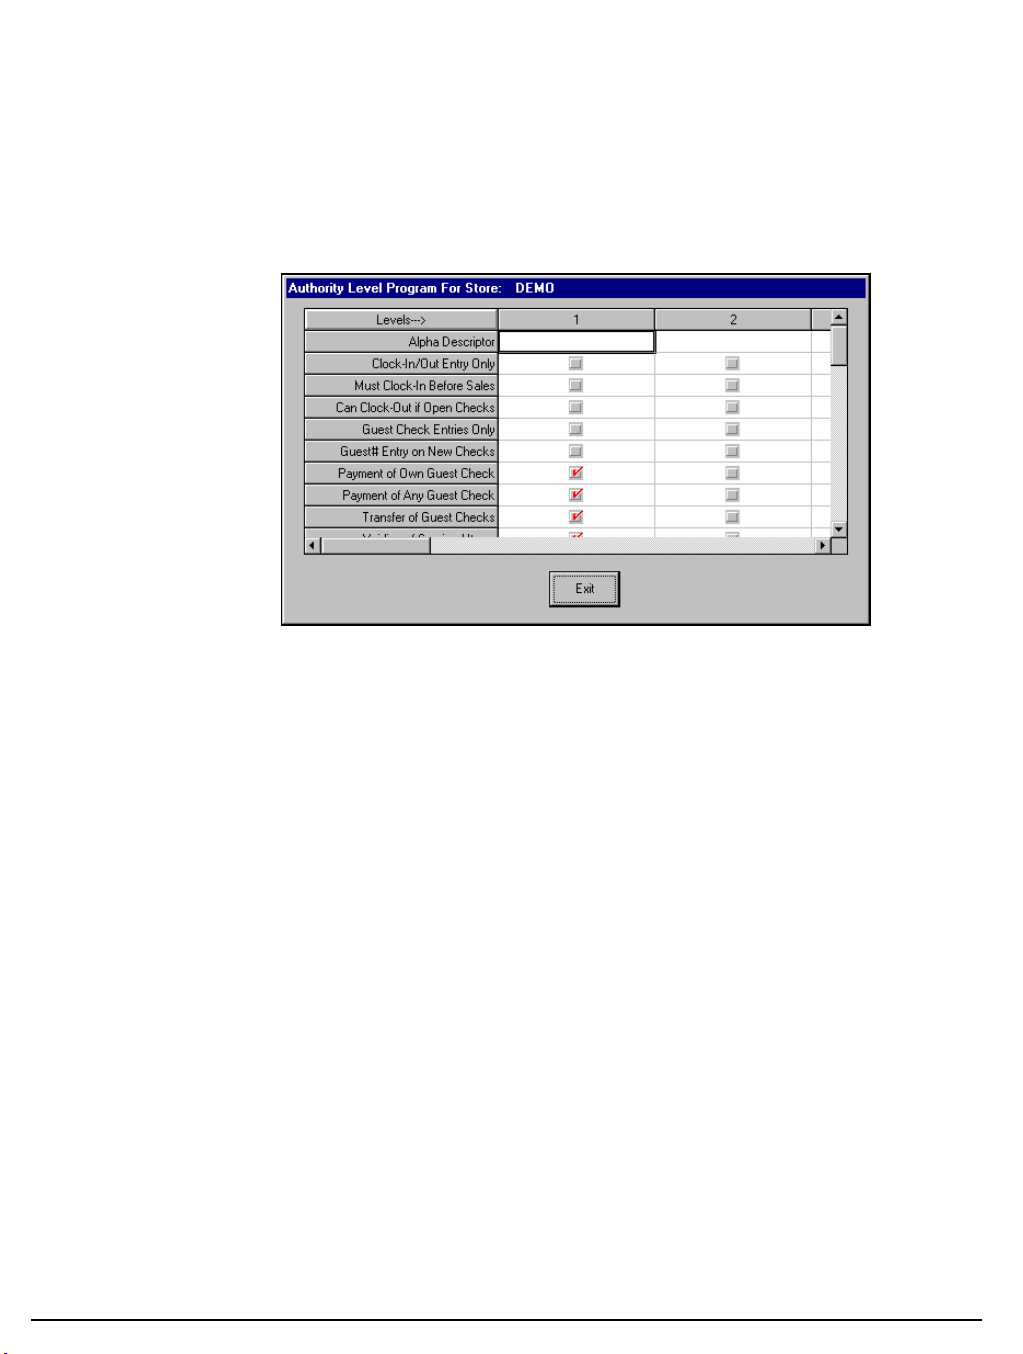
Authority Levels
Each employee must be assigned to one of nine authority levels. The selections made here
for each authority level determine the operations that are allowed for each employee.
The total number of authority levels is determined in memory allocation.
1. Choose the Edit ECR Data menu, then select P-Mode Programming menu to open the
P-Mode Programming menu. Select Authority Levels to display the Authority Level
Program screen for the selected store file.
2. Use the scroll boxes at the right of the screen and the bottom of the screen to find the
field you wish to program.
3. Edit fields as necessary by clicking on the field to add or remove a check.
4. Click Exit to save changes.
46 Menu Functions SAM1000 For Windows User's Manual v2.3
Page 53
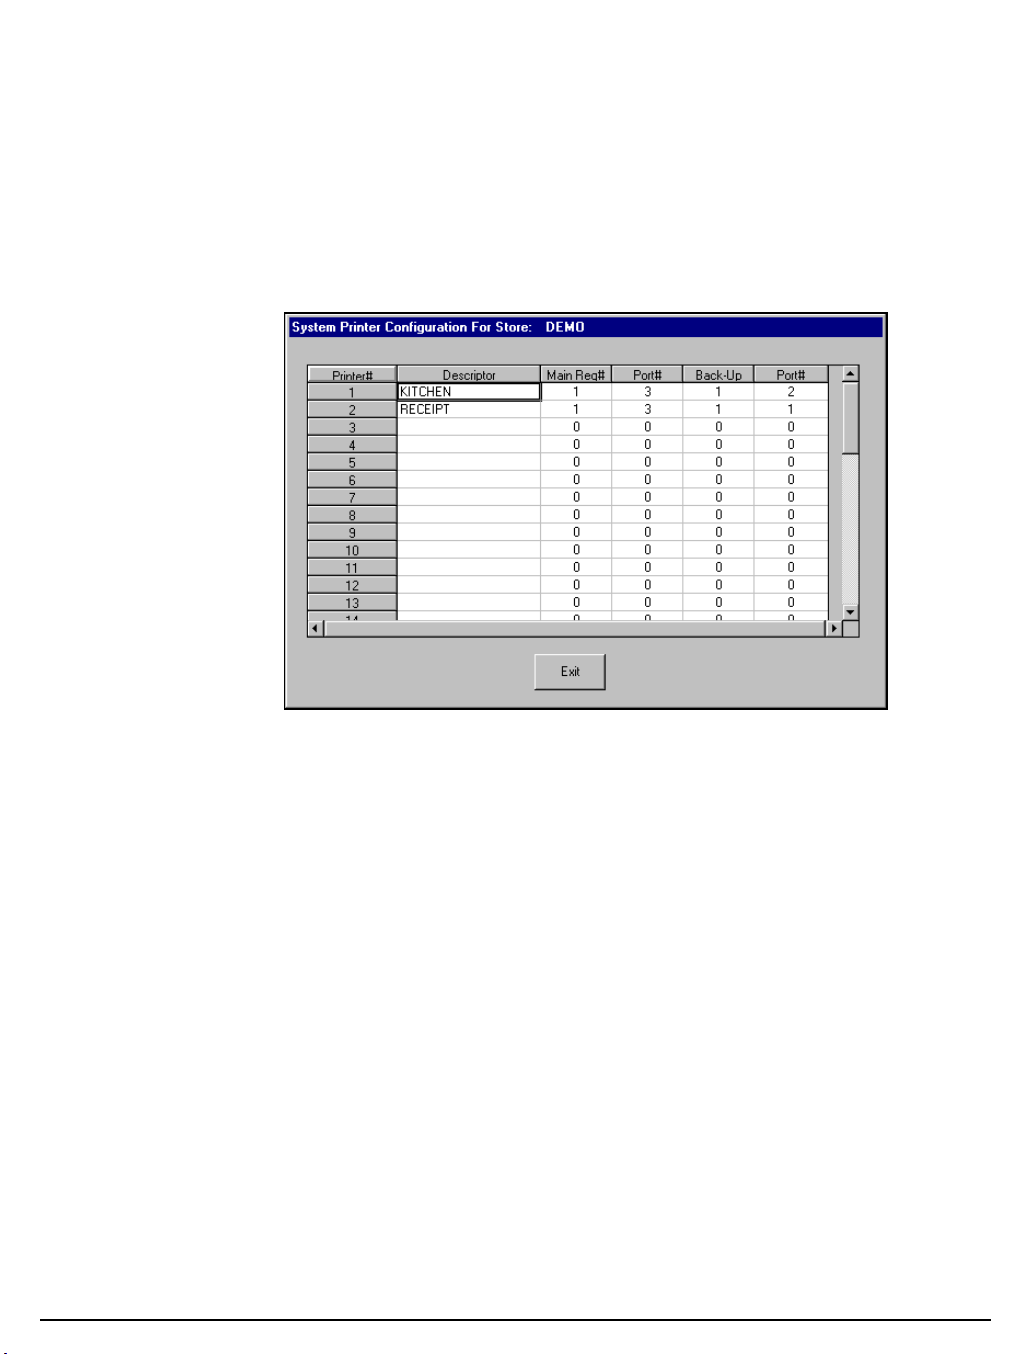
Printer Tables and KV Routing
System Printer Configuration
Use System Printer Routing to define the locations within the system for up to 40 possible
system printers.
1. Choose the Edit ECR Data menu, then select P-Mode Programming menu to open the
P-Mode Programming menu. Select Printer Tables and KV Routing, then select
System Printer Configuration to display the System Printer Configuration screen for
the selected store file.
2. Use the scroll box at the right of the screen to find the field you wish to program.
3. Edit fields as necessary by moving your mouse pointer to the field you wish to edit. You
can edit fields with alpha numeric or numeric information by double clicking on the field,
then entering new data.
4. Click Exit to save changes.
SAM1000 For Windows User's Manual v2.3 Menu Functions 47
Page 54
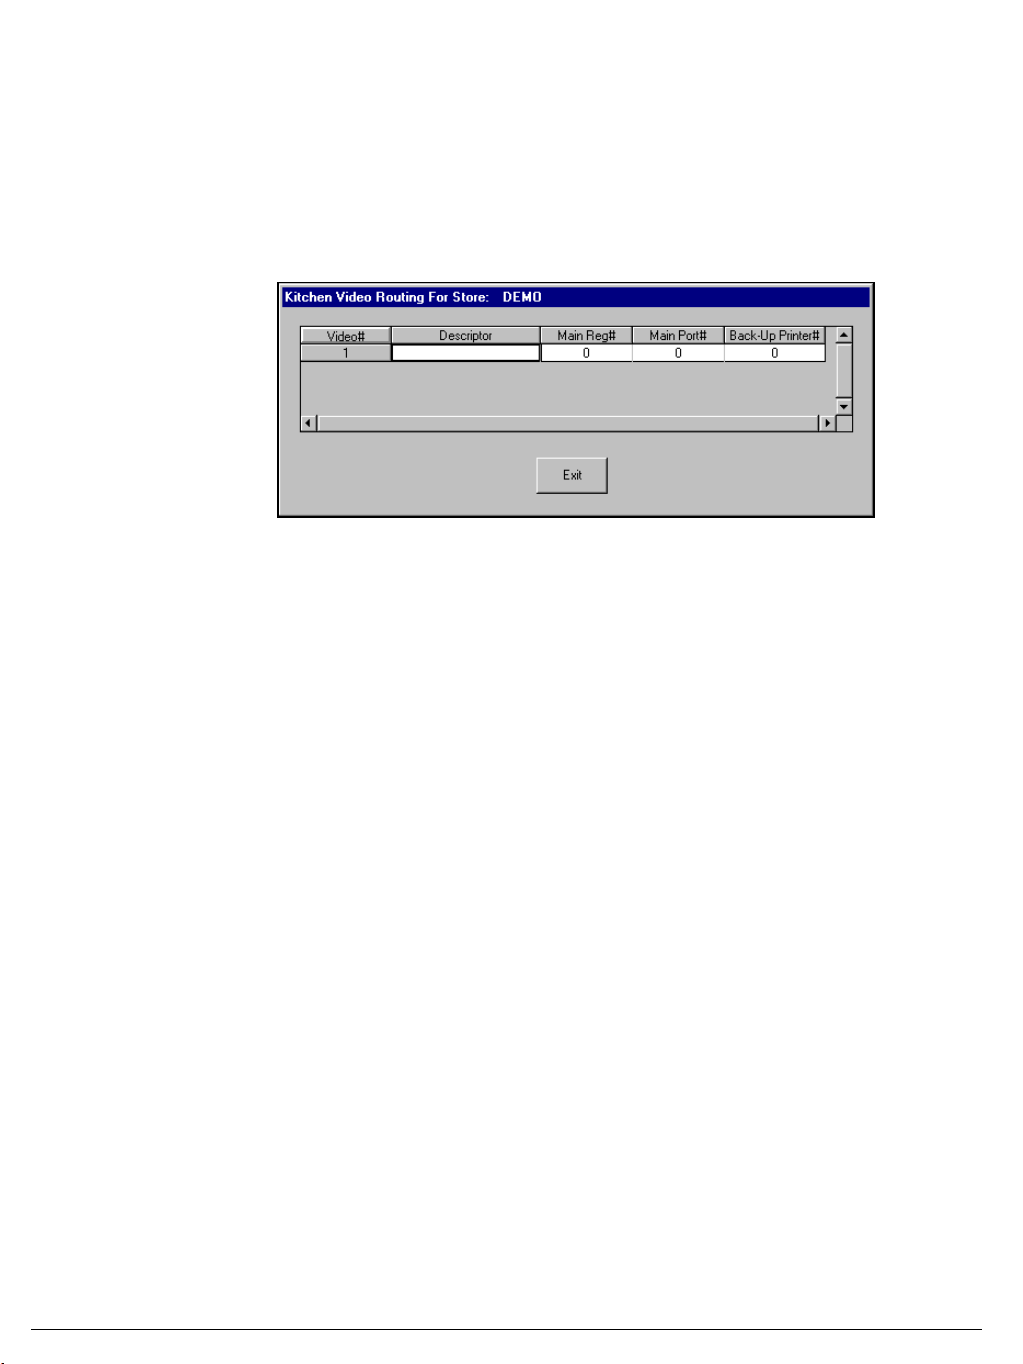
Kitchen Video Routing
Use Kitchen Video Routing to define the location of the video controller. If you wish to
designate a backup printer in the event that the video system is not operational, enter the
location of the back-up printer here.
1. Choose the Edit ECR Data menu, then select P-Mode Programming menu to open the
P-Mode Programming menu. Select Printer Tables and KV Routing, then select
Kitchen Video Routing to display the Kitchen Video Routing screen for the selected
store file.
2. Use the scroll box at the right of the screen to find the field you wish to program.
3. Edit fields as necessary by moving your mouse pointer to the field you wish to edit. You
can edit fields with alpha numeric or numeric information by double clicking on the field,
then entering new data.
4. Click Exit to save changes.
48 Menu Functions SAM1000 For Windows User's Manual v2.3
Page 55
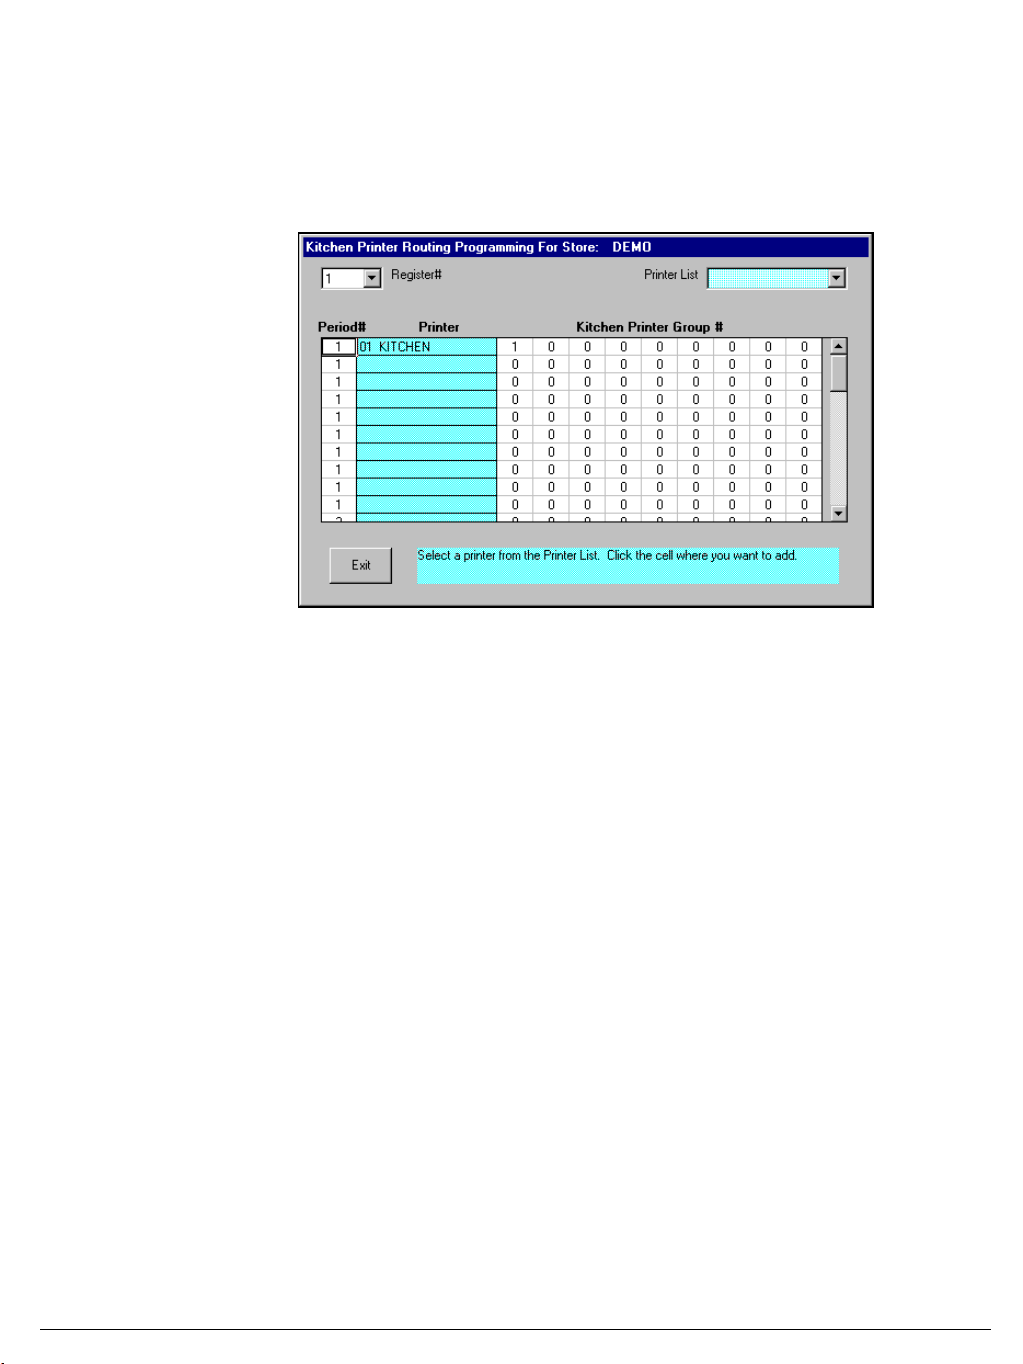
Kitchen Printer Routing
Use Kitchen Printer Routing to link kitchen printer assignment to actual printers.
1. Choose the Edit ECR Data menu, then select P-Mode Programming menu to open the
P-Mode Programming menu. Select Printer Tables and KV Routing, then select
Kitchen Printer Routing to display the Kitchen Printer Routing Programming screen for
the selected store file.
2. Use the scroll box at the right of the screen to find the field you wish to program.
3. Edit the Printer field by selecting a printer from the Printer List drop down box, then
clicking on the appropriate cell.
4. Edit fields as necessary by moving your mouse pointer to the field you wish to edit.
Double click on the field, then enter new data.
5. Click Exit to save changes.
SAM1000 For Windows User's Manual v2.3 Menu Functions 49
Page 56
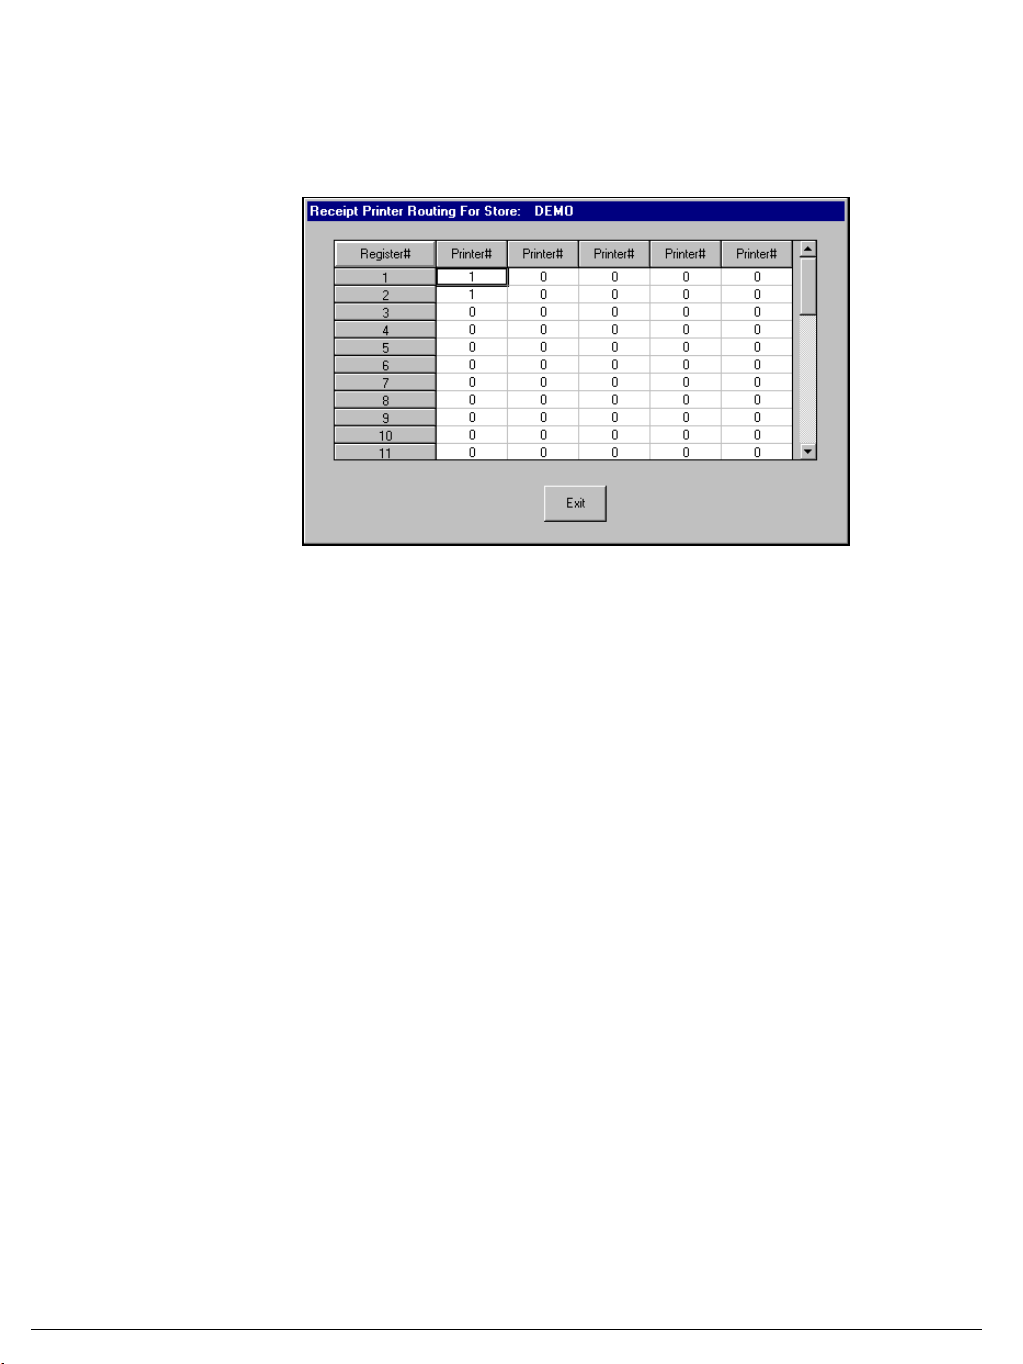
Receipt Printer Routing
1. Choose the Edit ECR Data menu, then select P-Mode Programming menu to open the
P-Mode Programming menu. Select Printer Tables and KV Routing, then select
Receipt Printer Routing to display the Receipt Printer Routing screen for the selected
store file.
2. Use the scroll box at the right of the screen to find the field you wish to program.
3. Edit fields as necessary by moving your mouse pointer to the field you wish to edit.
Double click on the field, then enter new data.
4. Click Exit to save changes.
50 Menu Functions SAM1000 For Windows User's Manual v2.3
Page 57
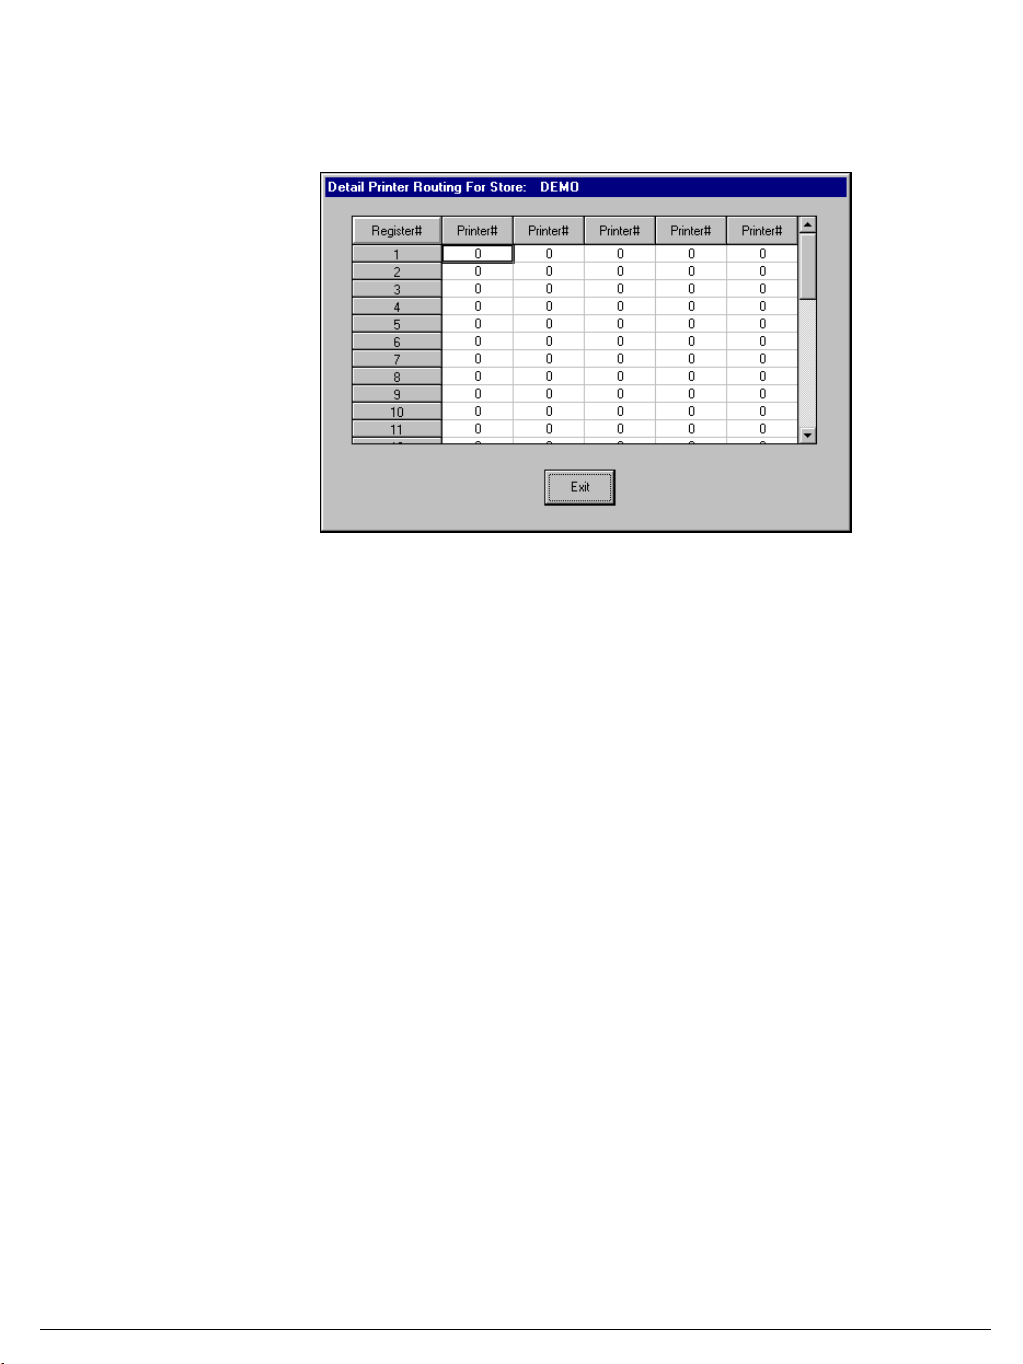
Detail Printer Routing
1. Choose the Edit ECR Data menu, then select P-Mode Programming menu to open the
P-Mode Programming menu. Select Printer Tables and KV Routing, then select Detail
Printer Routing to display the Detail Printer Routing screen for the selected store file.
2. Use the scroll box at the right of the screen to find the field you wish to program.
3. Edit fields as necessary by moving your mouse pointer to the field you wish to edit.
Double click on the field, then enter new data.
4. Click Exit to save changes.
SAM1000 For Windows User's Manual v2.3 Menu Functions 51
Page 58
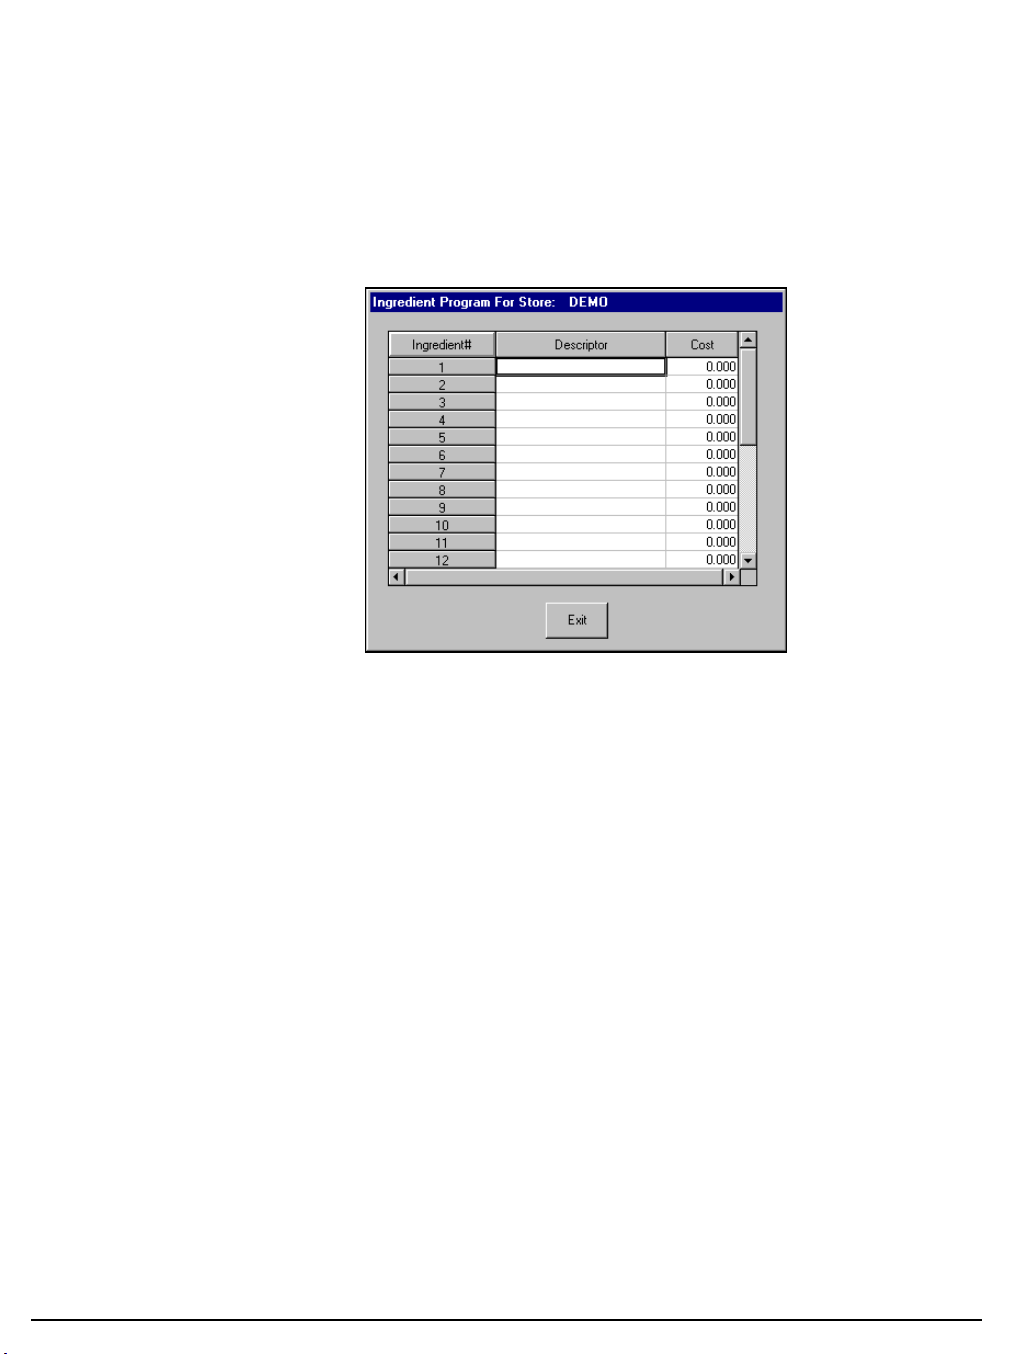
Ingredient Inventory
A menu-explosion type inventory system is set up when PLUs are linked to a recipe#. Select
Ingredient Inventory to maintain recipe files and ingredient lists.
Edit Ingredient
1. Choose the Edit ECR Data menu, then select P-Mode Programming menu to open the
P-Mode Programming menu. Select Ingredient Inventory, then select Edit Ingredient
to display the Ingredient Program screen for the selected store file.
2. Use the scroll box at the right of the screen to find the field you wish to program.
3. Edit fields as necessary by moving your mouse pointer to the field you wish to edit.
Double click on the field, then enter new data.
4. Click Exit to save changes.
52 Menu Functions SAM1000 For Windows User's Manual v2.3
Page 59
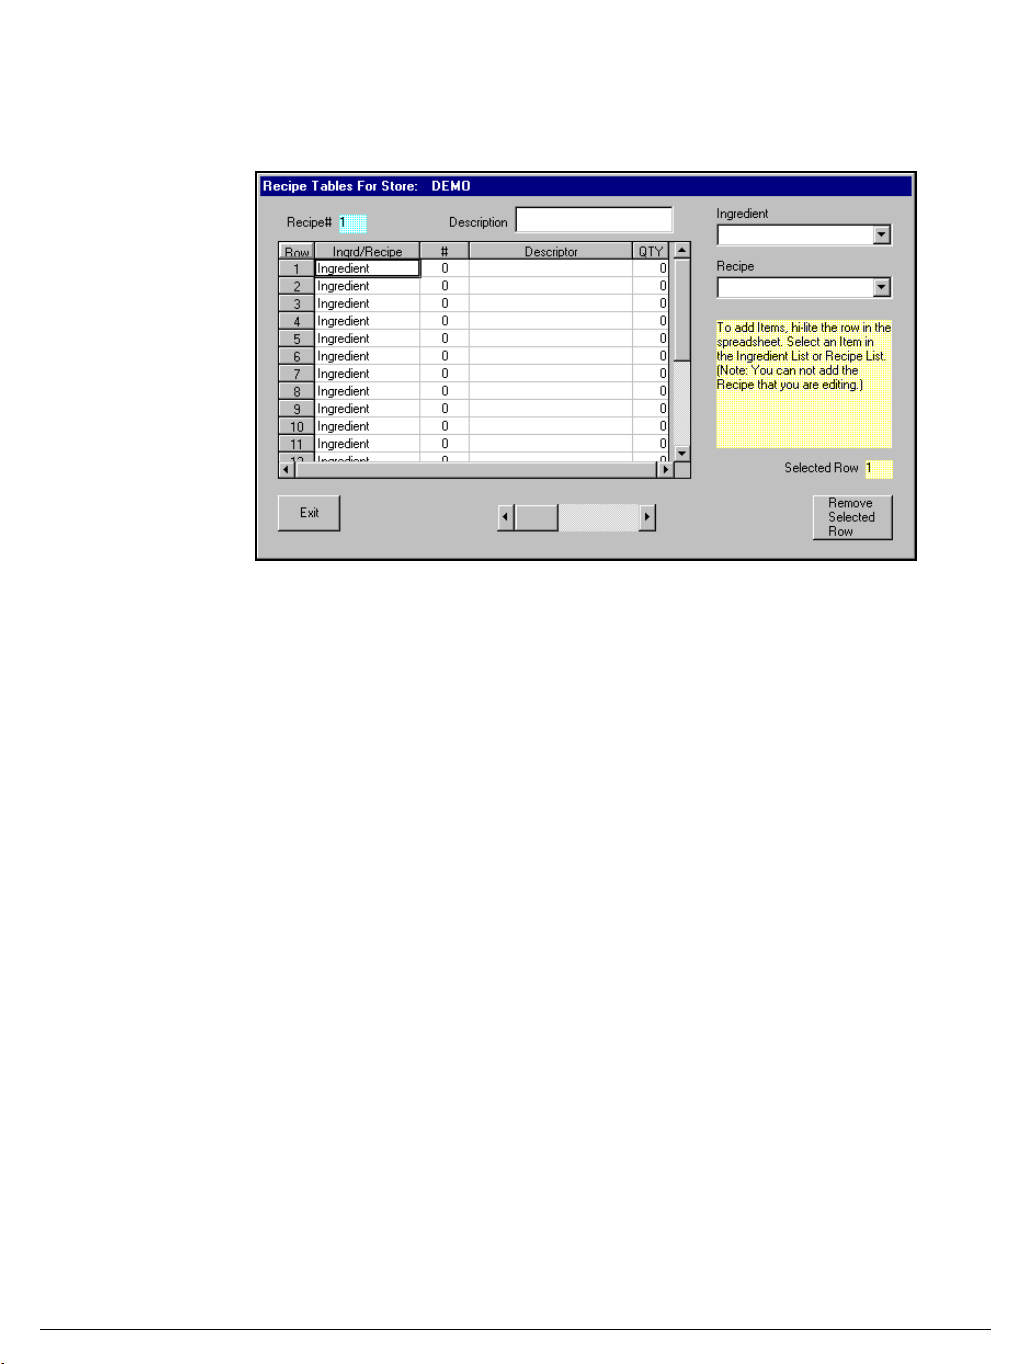
Recipe Table
1. Choose the Edit ECR Data menu, then select P-Mode Programming menu to open the
P-Mode Programming menu. Select Ingredient Inventory, then select Recipe Table to
display the Recipe Table screen for the selected store file.
2. Use the scroll box at the right of the screen to find the field you wish to program.
3. Edit fields as necessary by moving your mouse pointer to the field you wish to edit.
Double click on the field, then enter new data.
4. Click Exit to save changes.
SAM1000 For Windows User's Manual v2.3 Menu Functions 53
Page 60
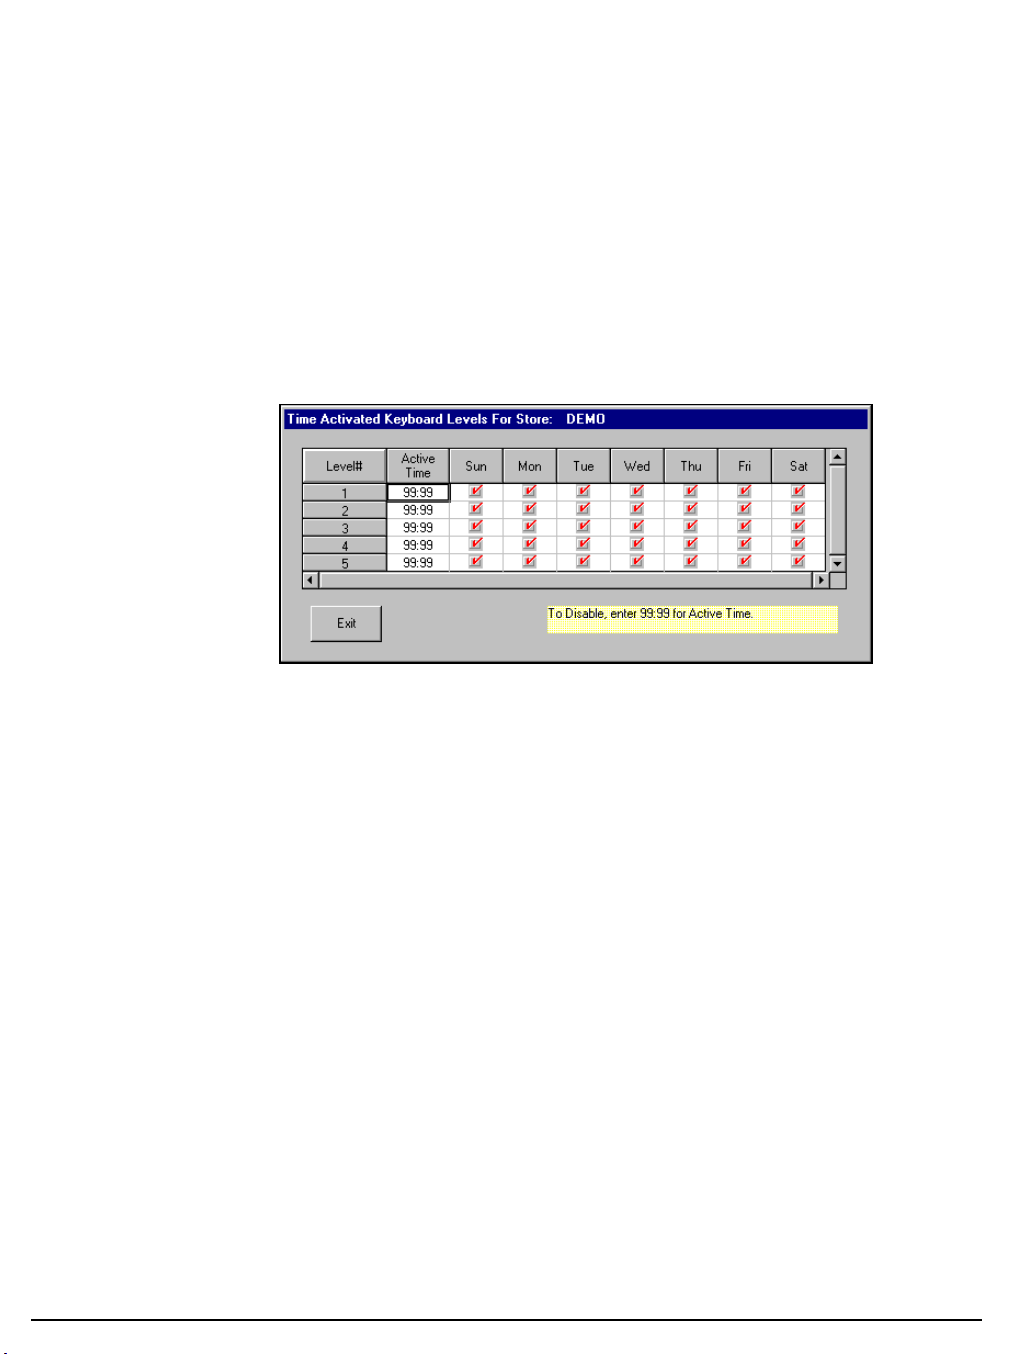
Time Activated Functions
1. Choose the Edit ECR Data menu, then select P-Mode Programming menu to open the
P-Mode Programming menu. Select Time Activated Function.
2. Choose one of the following option categories:
Keyboard Levels
Price Levels
Macros
String Reports
Shifts
KP Time Period
3. The Time Activated Keyboard Levels screen is shown below:
2. If necessary, use the scroll box at the right of the screen to find the field you wish to
program.
3. Edit the Active Time fields as necessary by moving your mouse pointer to the field you
wish to edit. Double click on the field, then enter new data.
4. Edit the day of week fields by clicking on the field to add or remove a check mark.
5. Click Exit to save changes.
54 Menu Functions SAM1000 For Windows User's Manual v2.3
Page 61
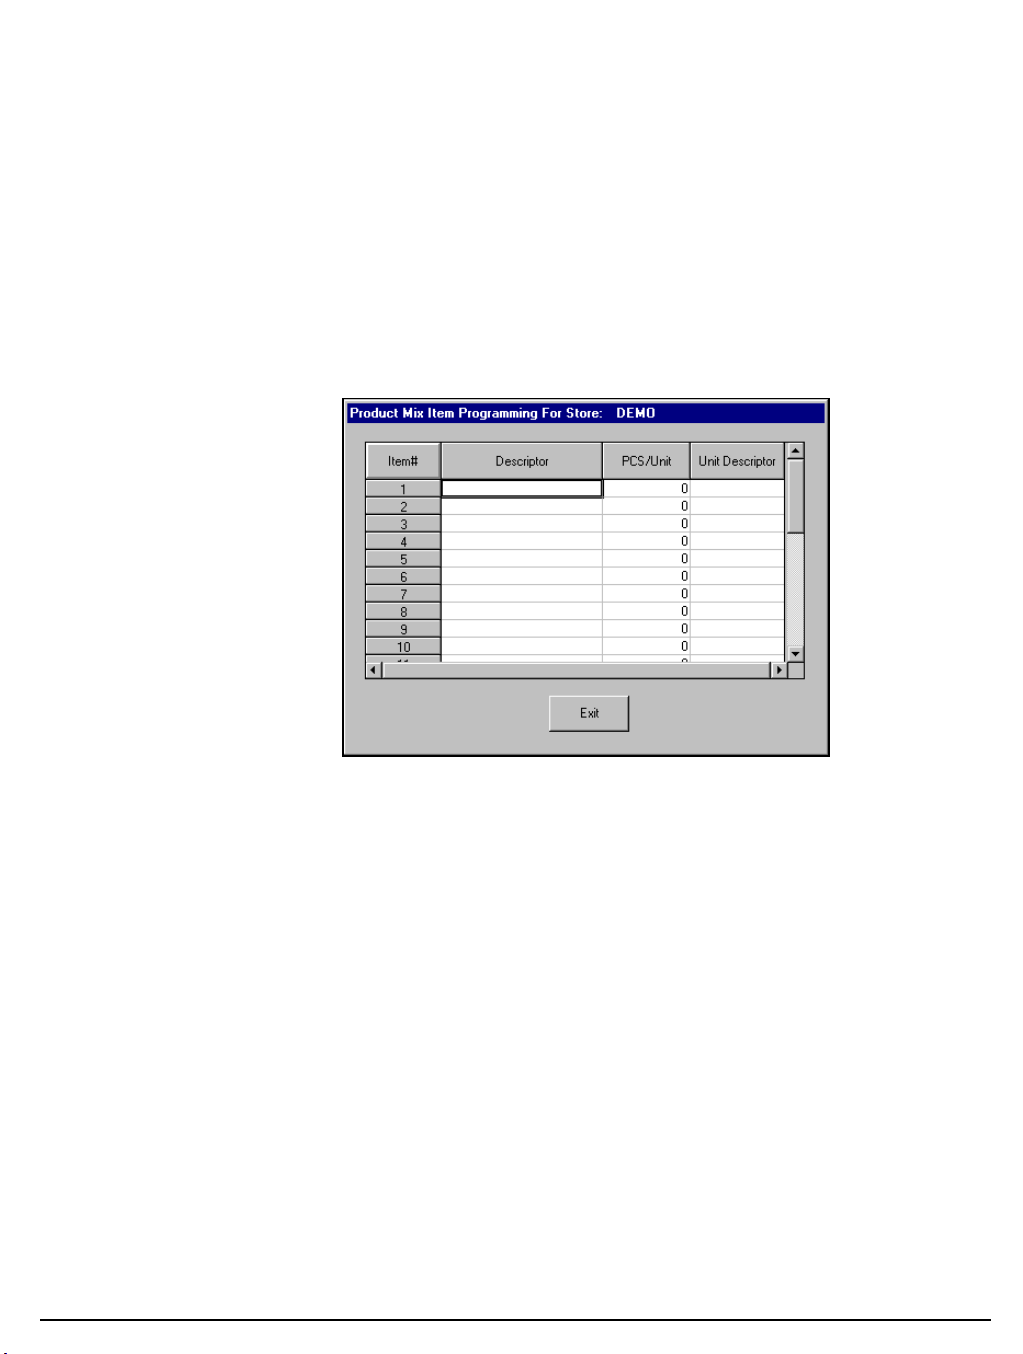
Product Mix Groups
Product Mix Groups can be used to implement a simplified ingredient system for tracking
only essential ingredients associated with items (i.e. cups for beverages or number of pieces
for chicken menus.)
Product mix groups also report usage by time period and optional Product Projections
reporting is also available. The Product Projection report provides a history of each item's
sales by day of week.
Product Mix Items
1. Choose the Edit ECR Data menu, then select P-Mode Programming menu to open the
P-Mode Programming menu. Select Product Mix Groups, then select Product Mix
Items to display the Product Mix Item Programming screen for the selected store file.
2. Use the scroll box at the right of the screen to find the field you wish to program.
3. Edit fields as necessary by moving your mouse pointer to the field you wish to edit.
Double click on the field, then enter new data.
4. Click Exit to save changes.
SAM1000 For Windows User's Manual v2.3 Menu Functions 55
Page 62
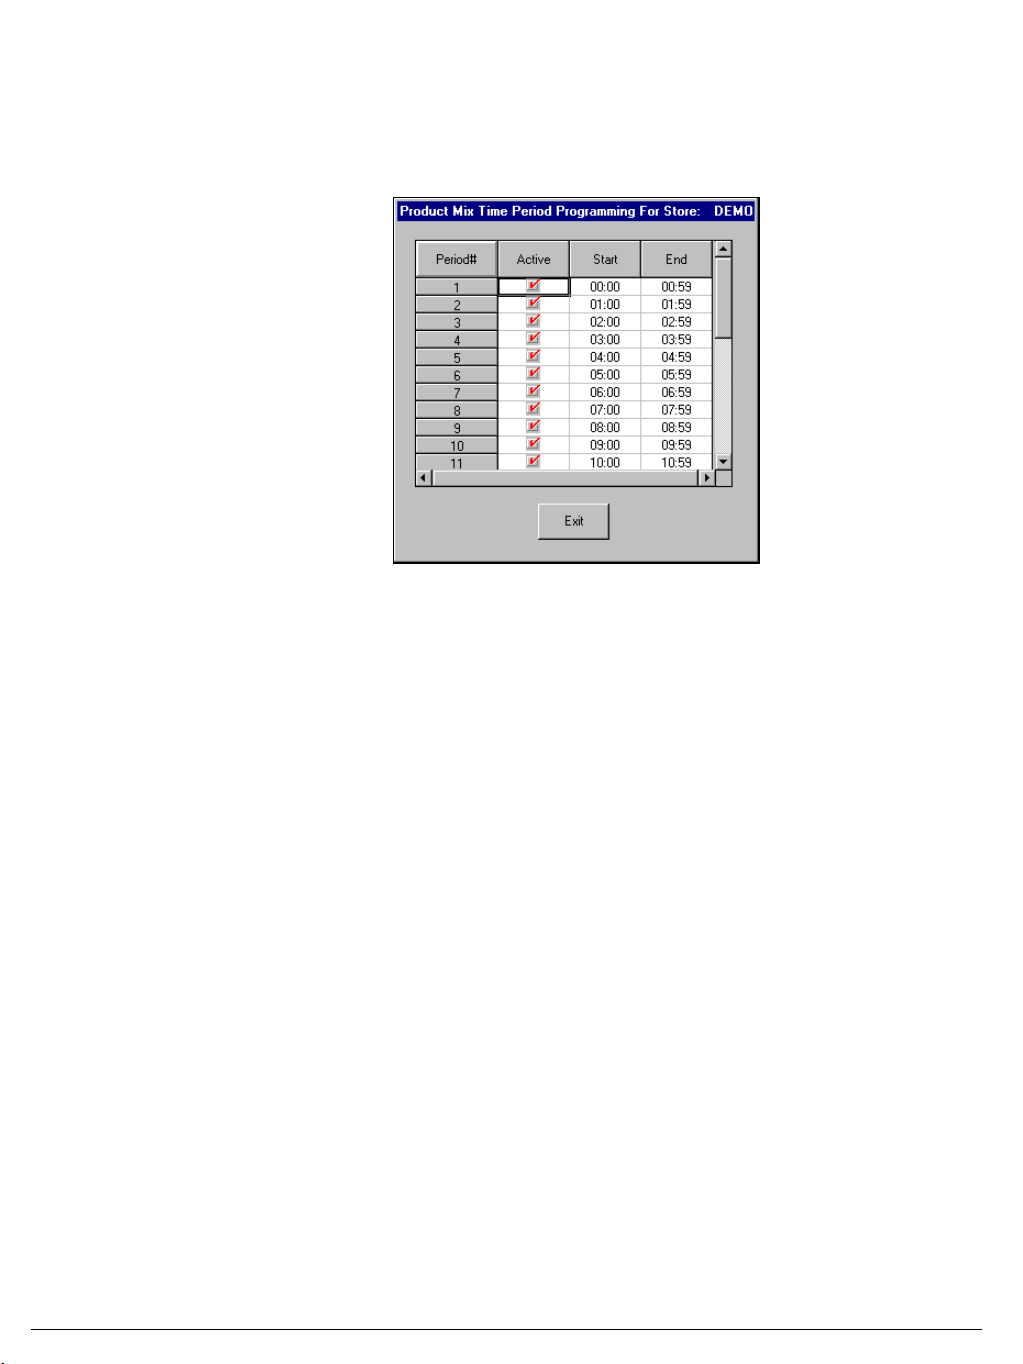
Product Mix Group Time Periods
1. Choose the Edit ECR Data menu, then select P-Mode Programming menu to open the
P-Mode Programming menu. Select Product Mix Groups, then select Product Mix
Group Time Periods to display the Product Time Period Programming screen for the
selected store file.
2. Use the scroll box at the right of the screen to find the time period you wish to program.
3. Edit times as necessary by double clicking on a field, then typing a new time.
4. Select Active or Inactive from the drop down box to determine if the period is used.
5. Click Exit to save changes.
56 Menu Functions SAM1000 For Windows User's Manual v2.3
Page 63
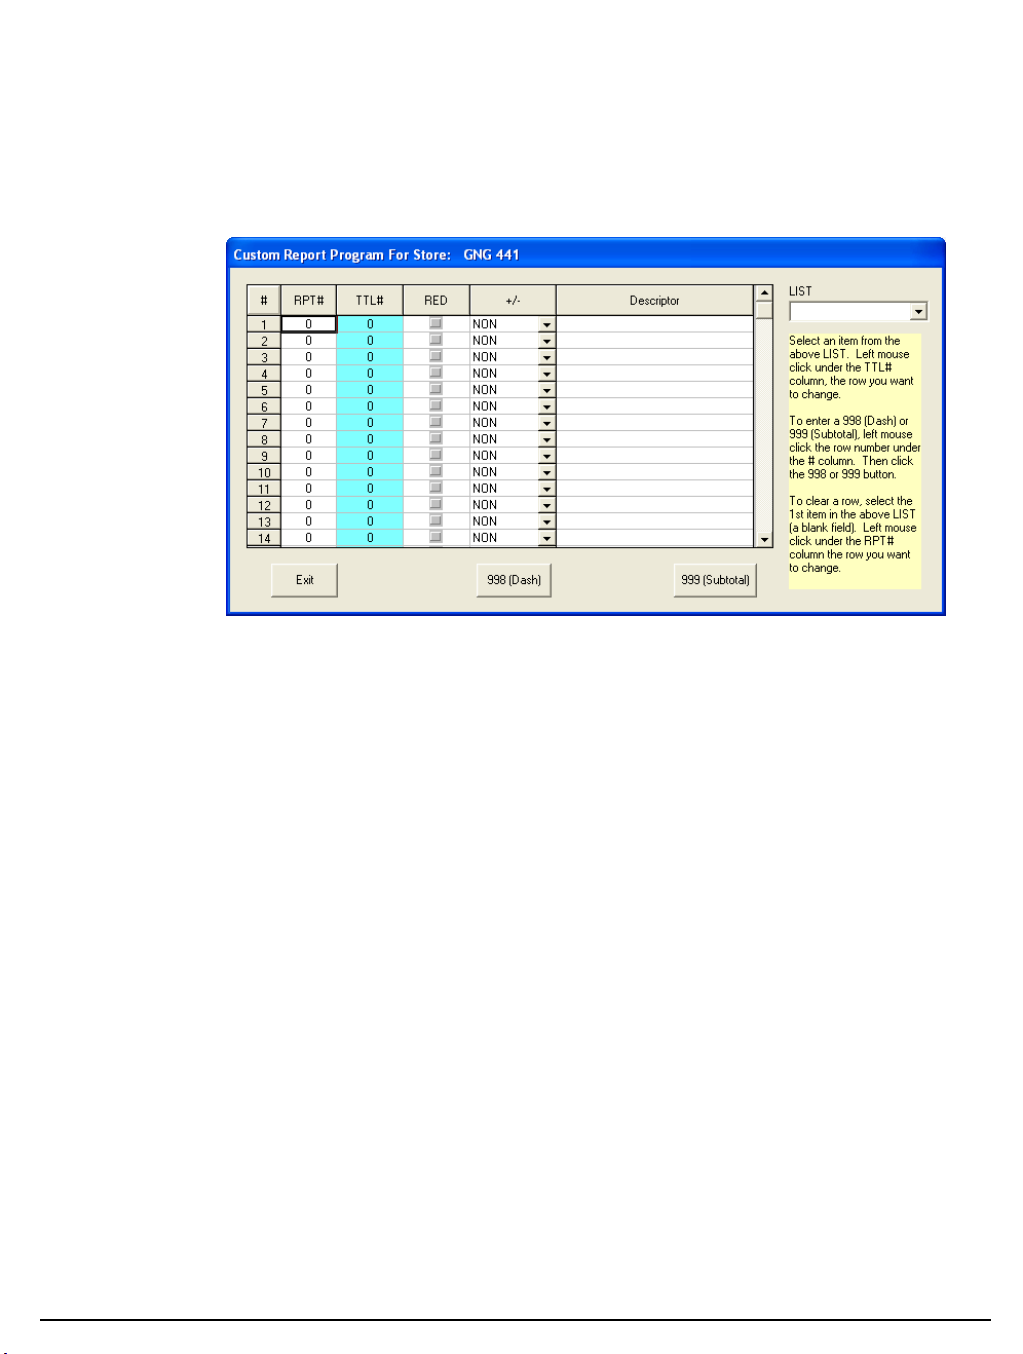
Custom Report
One custom report can be created. Also, on the financial or employee report, any total may
be deleted, or printed in red (provided the printer has red/black printing capability.)
1. Choose the Edit ECR Data menu, then select P-Mode Programming menu to open the
P-Mode Programming menu. Select Custom Report to display the Custom Report
Program screen for the selected store file.
2. Use the scroll box at the right of the screen to find the total on the report you wish to
program.
3. Edit fields as necessary by moving your mouse pointer to the field you wish to edit:
You can edit fields with numeric information by double clicking on the field, then
entering new data.
You can edit fields with drop-down list boxes (such as the +/- field) by opening the
list box and selecting from the available options.
You can edit fields with check boxes by clicking on the field to add or remove a
check.
4. Click Exit to save changes.
SAM1000 For Windows User's Manual v2.3 Menu Functions 57
Page 64
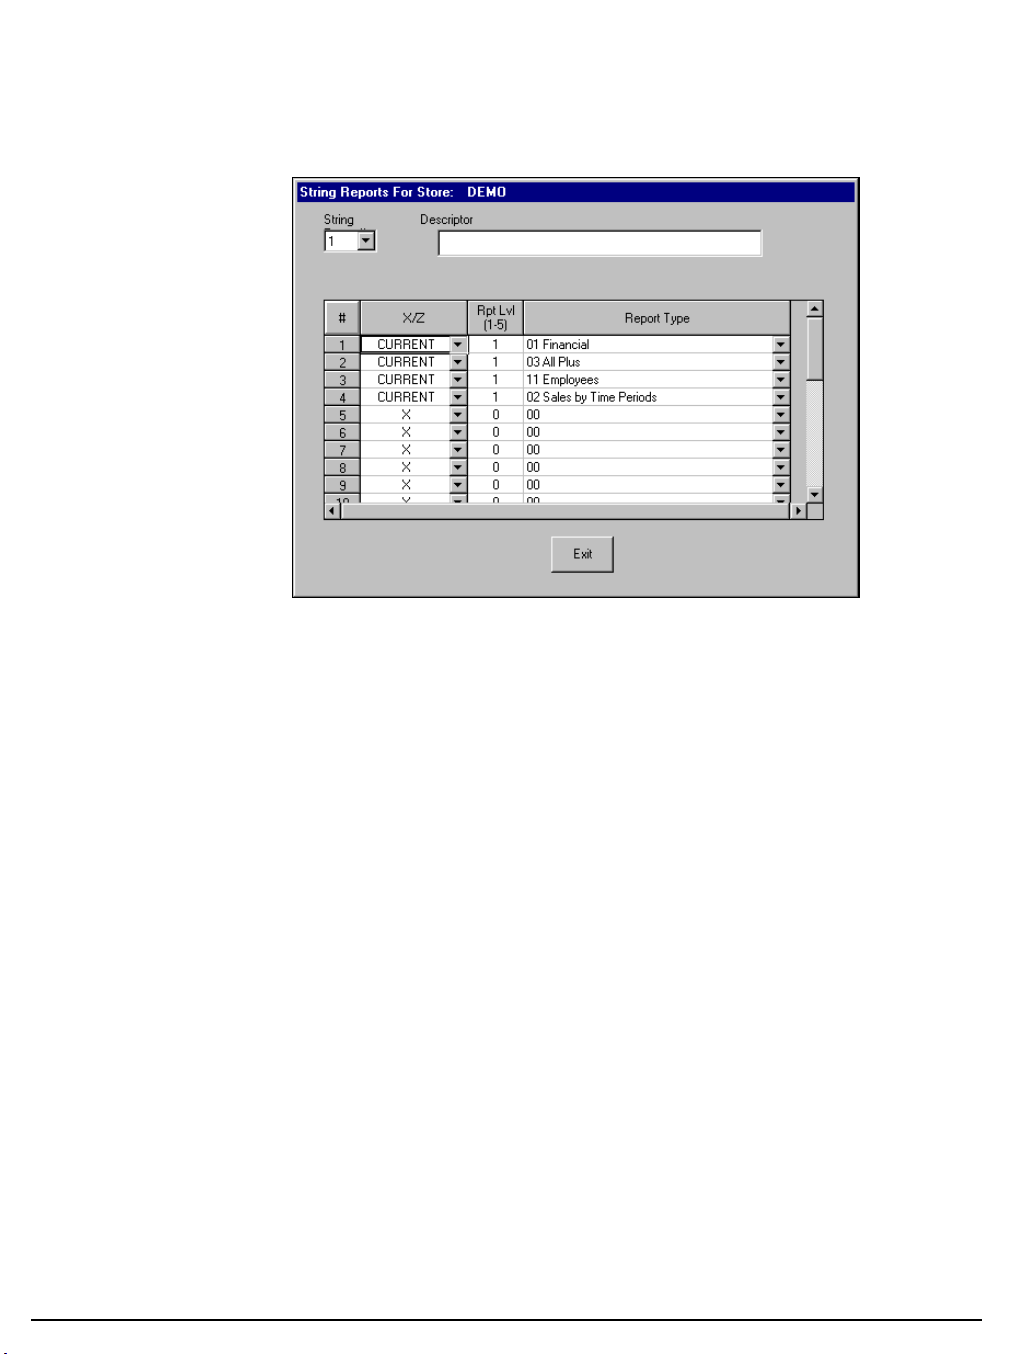
String Report
1. Choose the Edit ECR Data menu, then select P-Mode Programming menu to open the
P-Mode Programming menu. Select String Report to display the String Reports screen
for the selected store file.
2. Enter the string report # you wish to edit, or select the string report at the
String Report# list box.
3. Use the scroll box at the right of the screen to find the total on the report you wish to
program.
4. Edit fields as necessary by moving your mouse pointer to the field you wish to edit:
You can edit fields with numeric information by double clicking on the field, then
enter new data.
You can edit fields with drop-down list boxes by opening the list box and selecting
from the available options.
5. Click Exit to save changes.
58 Menu Functions SAM1000 For Windows User's Manual v2.3
Page 65
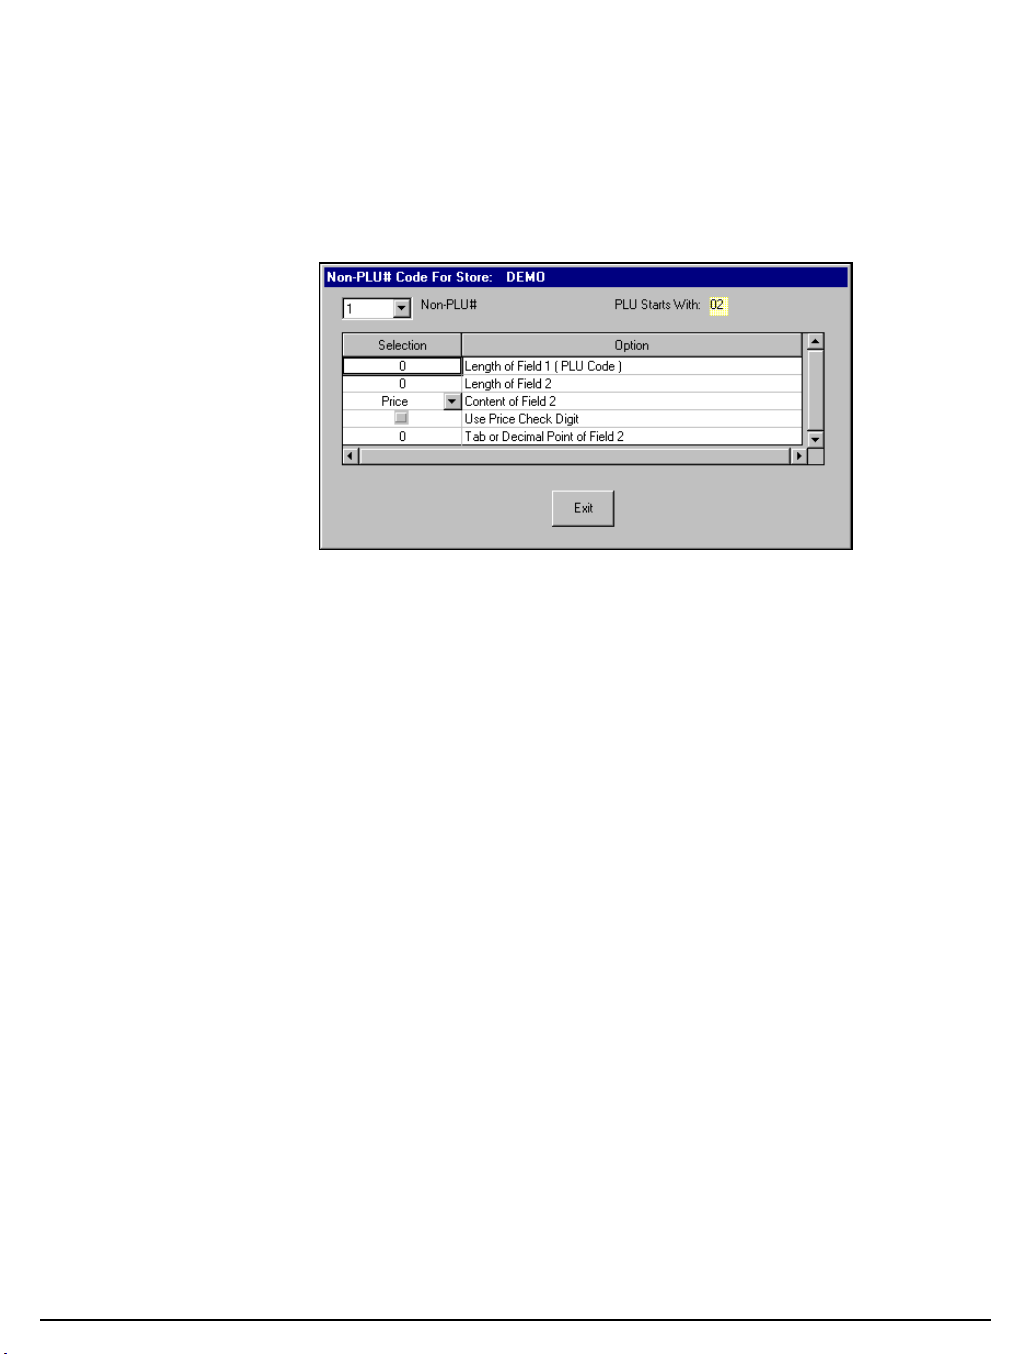
Non-PLU Code
The NON-PLU Code program must be set if you wish to scan UPCs (using the EAN 13 code)
with embedded prices, weights or quantities. Refer to the Samsung SPS 1000 Program
Manual for a complete description of your options in this program.
1. Choose the Edit ECR Data menu, then select P-Mode Programming menu to open the
P-Mode Programming menu. Select Non-PLU Code to display the Non PLU# Code
screen for the selected store file.
2. Enter the Non PLU Code # you wish to edit, or select the number at the
Non PLU# list box.
3. Edit fields as necessary by moving your mouse pointer to the field you wish to edit:
You can edit fields with numeric information by double clicking on the field, then
entering new data.
You can edit fields with drop-down list boxes by opening the list box and selecting
from the available options.
You can edit fields with check boxes by clicking on the field to add or remove a
check.
4. Click Exit to save changes.
SAM1000 For Windows User's Manual v2.3 Menu Functions 59
Page 66
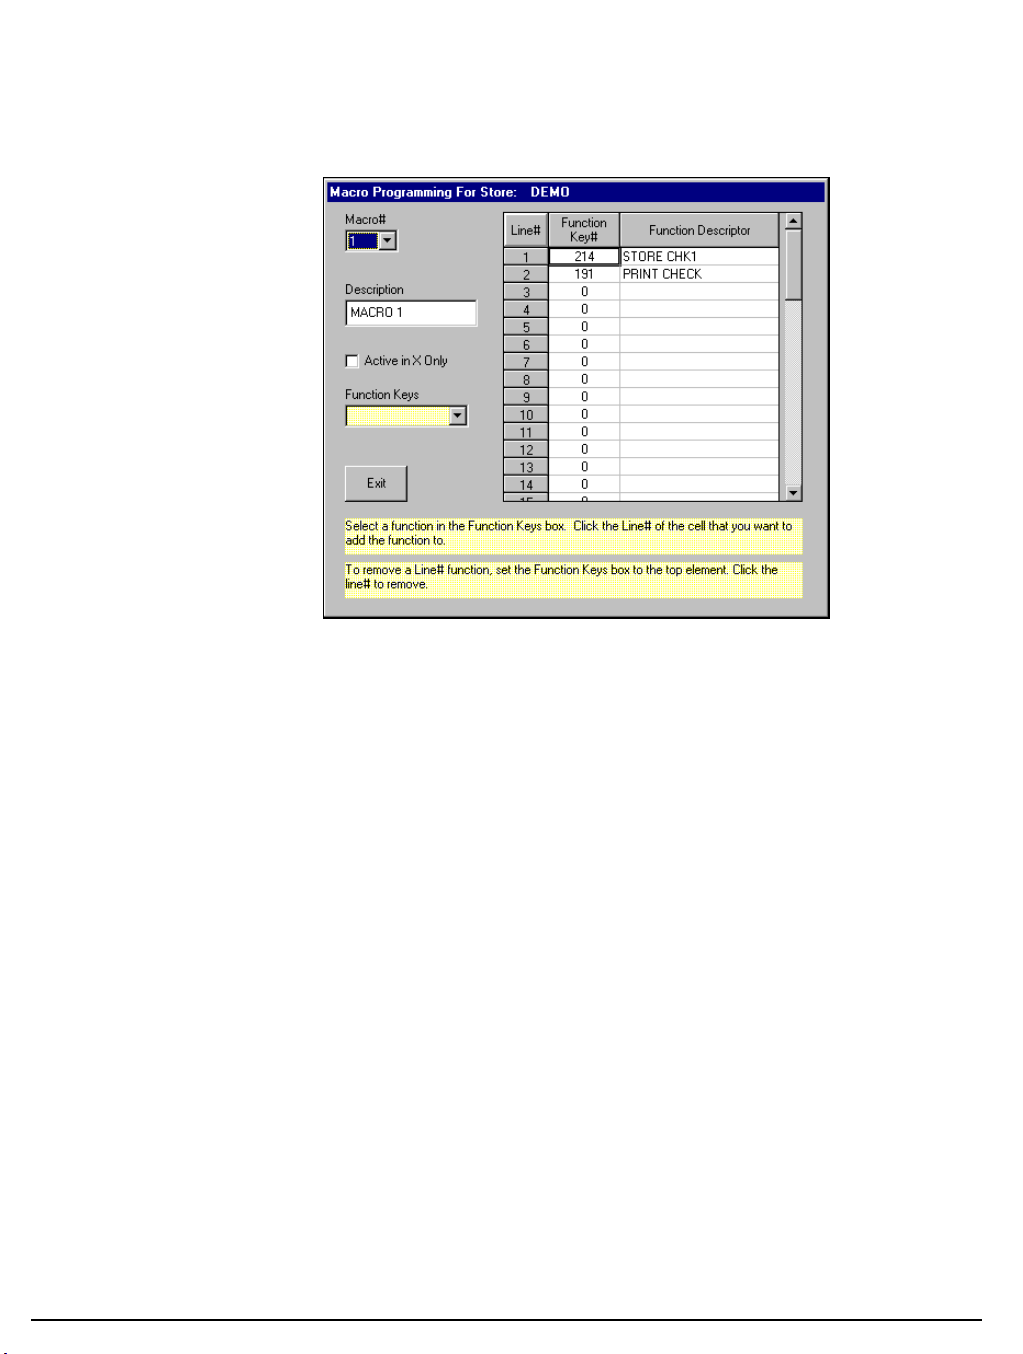
Macros
1. Choose the Edit ECR Data menu, then select P-Mode Programming menu to open the
P-Mode Programming menu. Select Macros to display the Macro Programming screen
for the selected store file.
2. Enter the Macro # you wish to edit, or select the macro at the
Macro# list box.
3. Add a function to a macro line# by first selecting the function you wish to add from the
Function Key list box, then click a cell adjacent to the line # you wish to set.
4. To remove a function from a macro sequence, replace the existing function with Function
Key #0.
5. Click Exit to save changes.
60 Menu Functions SAM1000 For Windows User's Manual v2.3
Page 67
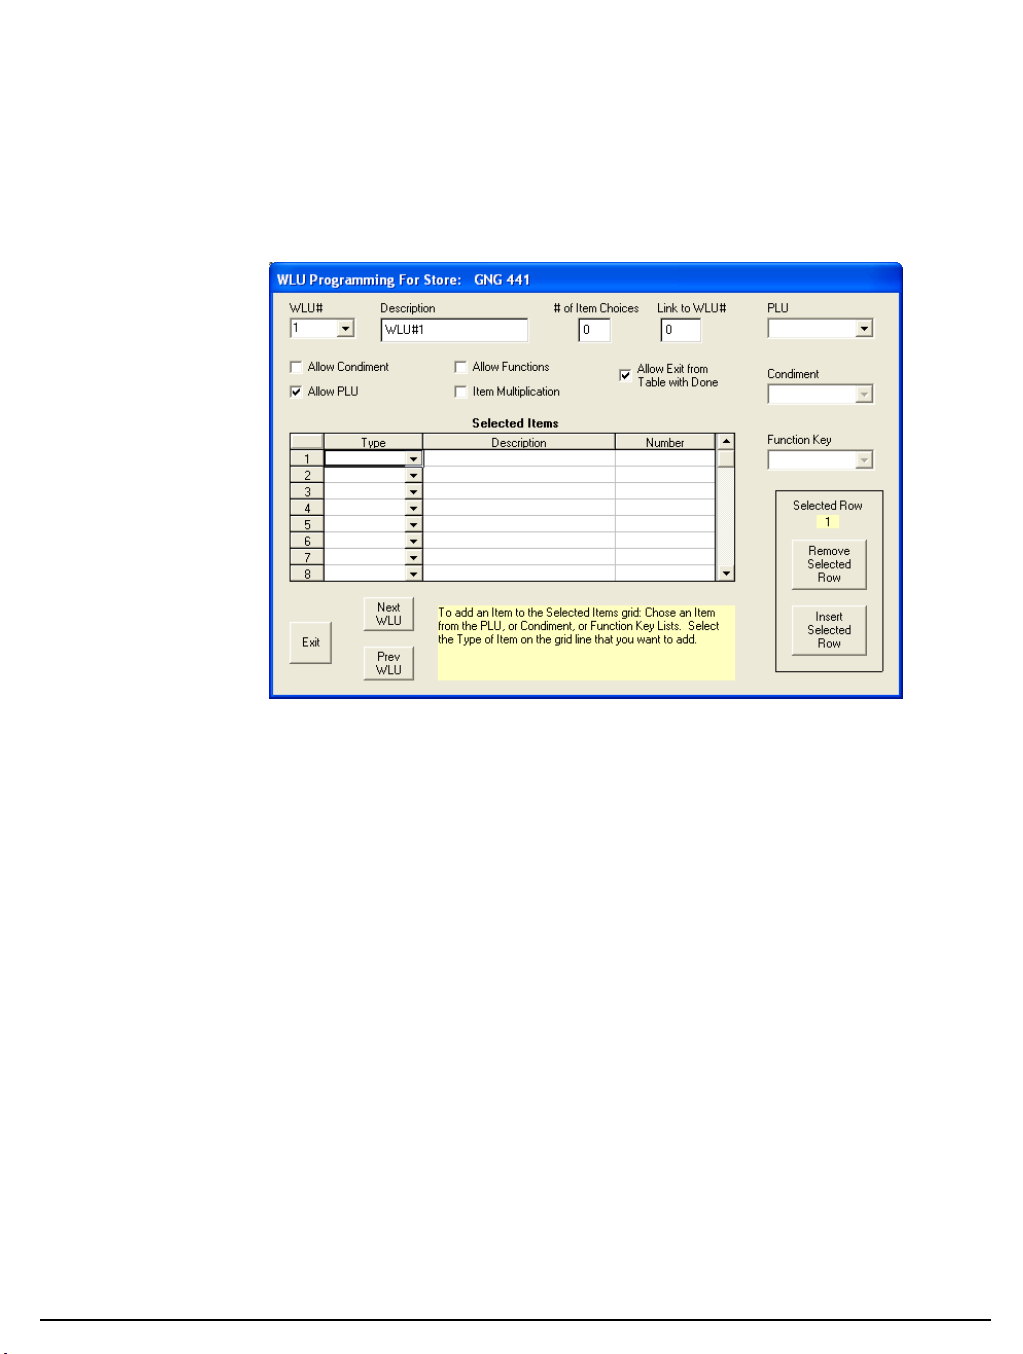
WLU
There are three types of items that can be found on a Window Look-Up (WLU): condiments,
functions, and PLUs. Refer to the Samsung SPS 1000 Program Manual for a complete
discussion of WLU options.
1. Choose the Edit ECR Data menu, then select P-Mode Programming menu to open the
P-Mode Programming menu. Select WLU to display the WLU screen for the selected
store file.
2. Use the WLU # drop down list box to select the WLU you wish to edit.
3. If necessary, edit the Description, # of Item Choices and Link to WLU# fields, then edit
the option check boxes for the WLU.
4. To add items to the WLU, first select the item you wish to add from the PLU, Condiment,
or Function Key drop down list box. Then select the Type on the grid line where you
want to add.
5. To remove an item from the WLU, select the grid line you wish to remove, and then click
the Remove Selected Row button. You can add a new row before the selected row by
clicking Insert Selected Row.
6. If necessary select another WLU by choosing Next WLU or Prev WLU. When editing
is complete, click Exit to save changes.
SAM1000 For Windows User's Manual v2.3 Menu Functions 61
Page 68
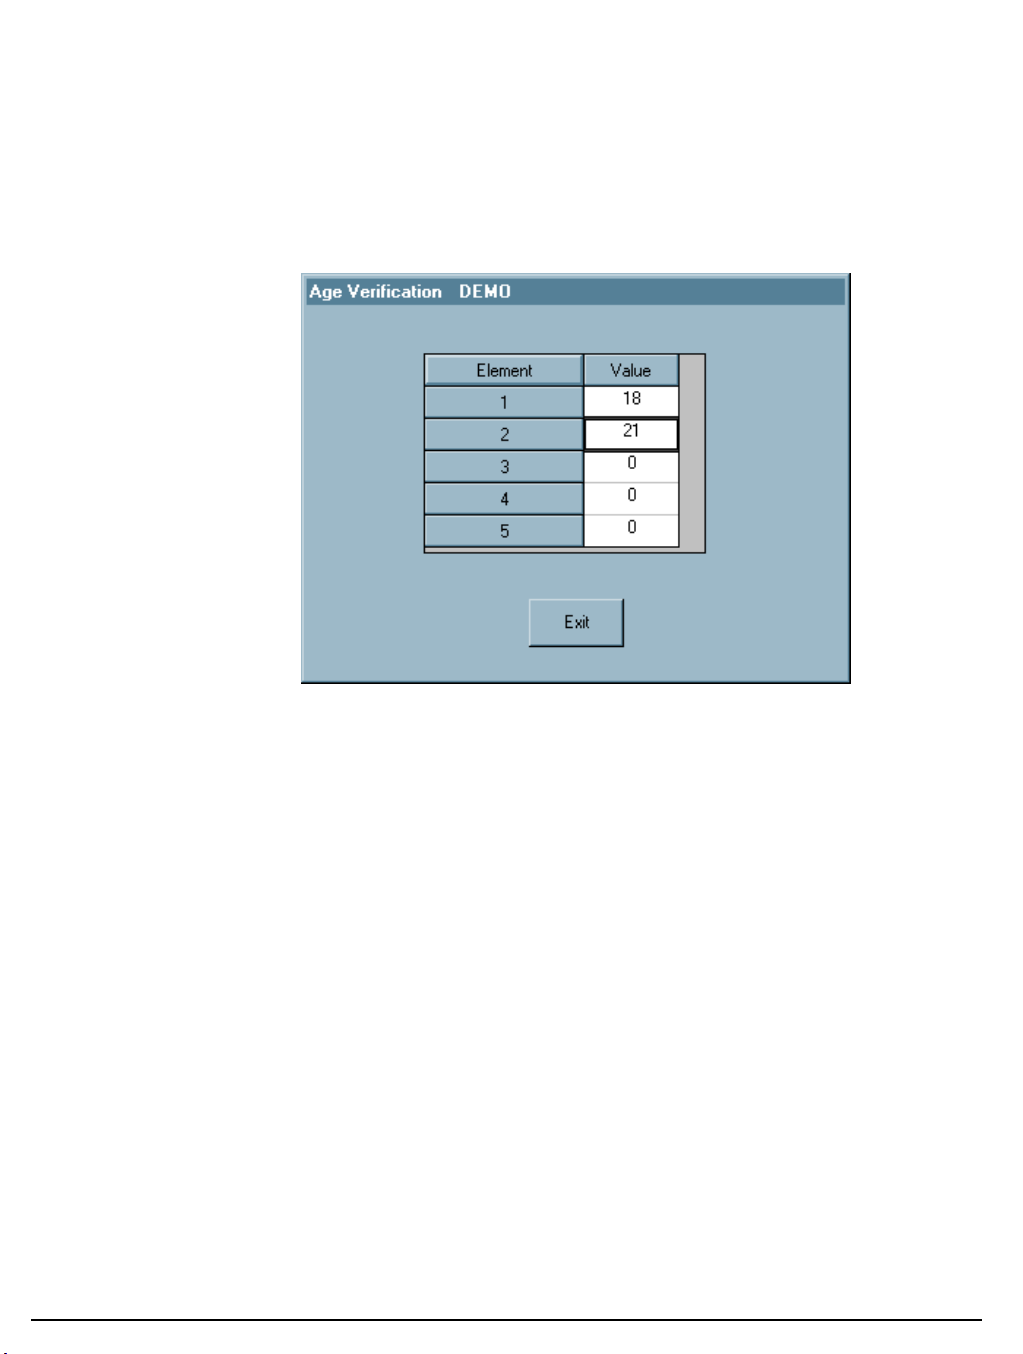
Age Verification
Age Verification parameters may be programmed in Sam 1000. Five different ages may be
set in the SPS-1000 to control the sale of age sensitive materials.
1. Choose the Edit ECR Data menu, then select P-Mode Programming menu to open the
P-Mode Programming menu. Select Age Verification to display the Age Verification
screen for the selected store file.
2. Select the Value text box for the appropriate Age Verification Element number and type
in the age at which sales will be allowed.
3. Click on the Exit icon to return to the main menu and save your changes.
62 Menu Functions SAM1000 For Windows User's Manual v2.3
Page 69
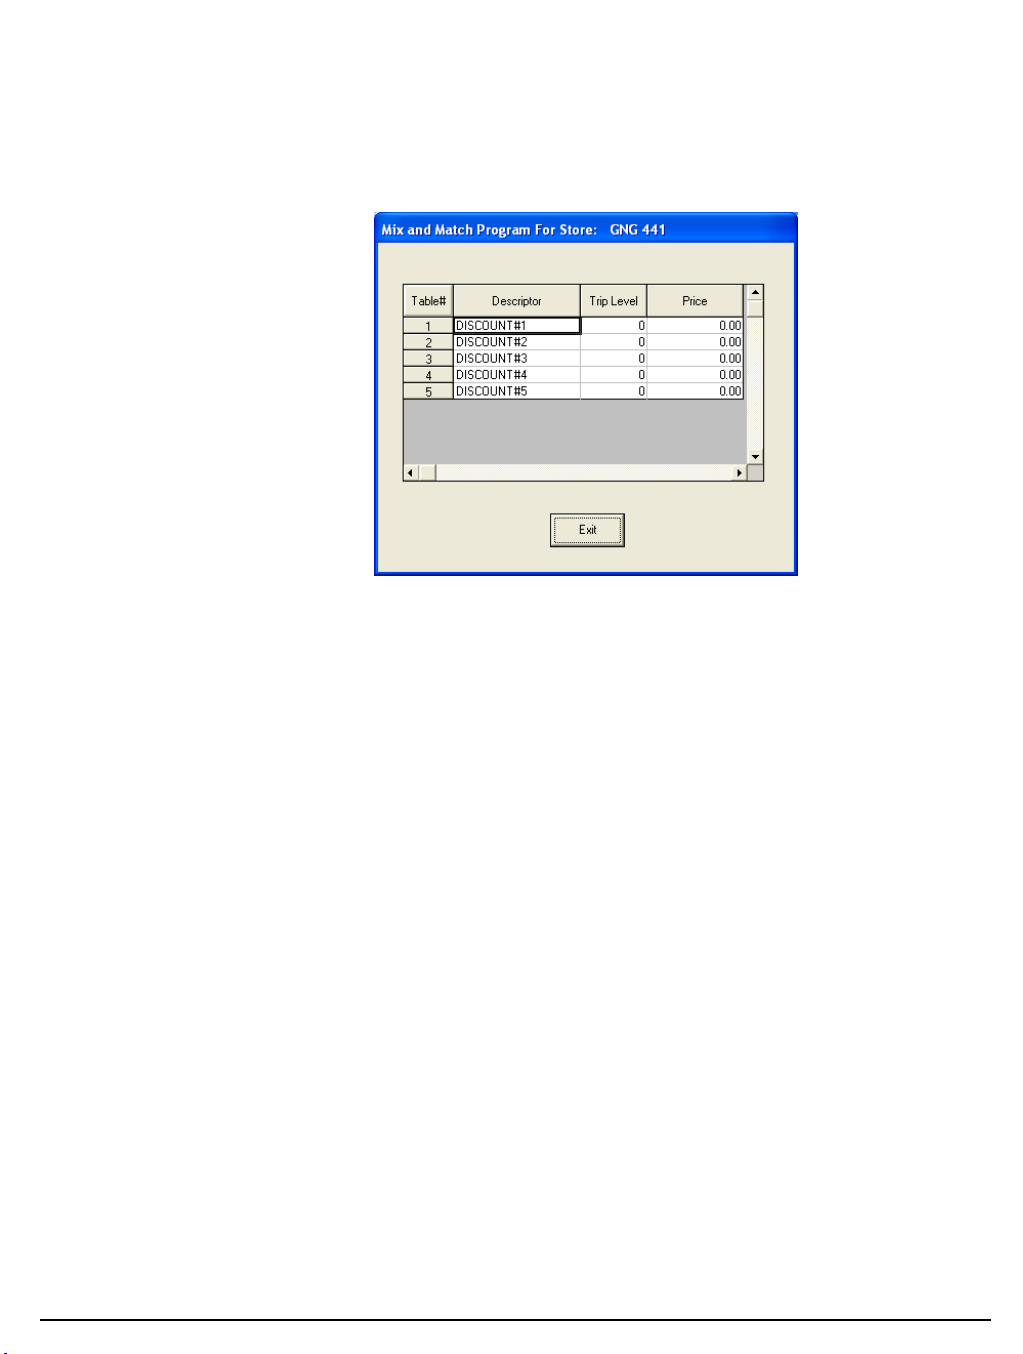
Mix and Match
Set Mix and Match discounts here.
1. Choose the Edit ECR Data menu, then select P-Mode Programming menu to open the
P-Mode Programming menu. Select Mix and Match to display the Mix and Match
screen for the selected store file.
2. Enter descriptors, trip level and prices as appropriate.
3. Click on the Exit icon to return to the main menu and save your changes.
SAM1000 For Windows User's Manual v2.3 Menu Functions 63
Page 70
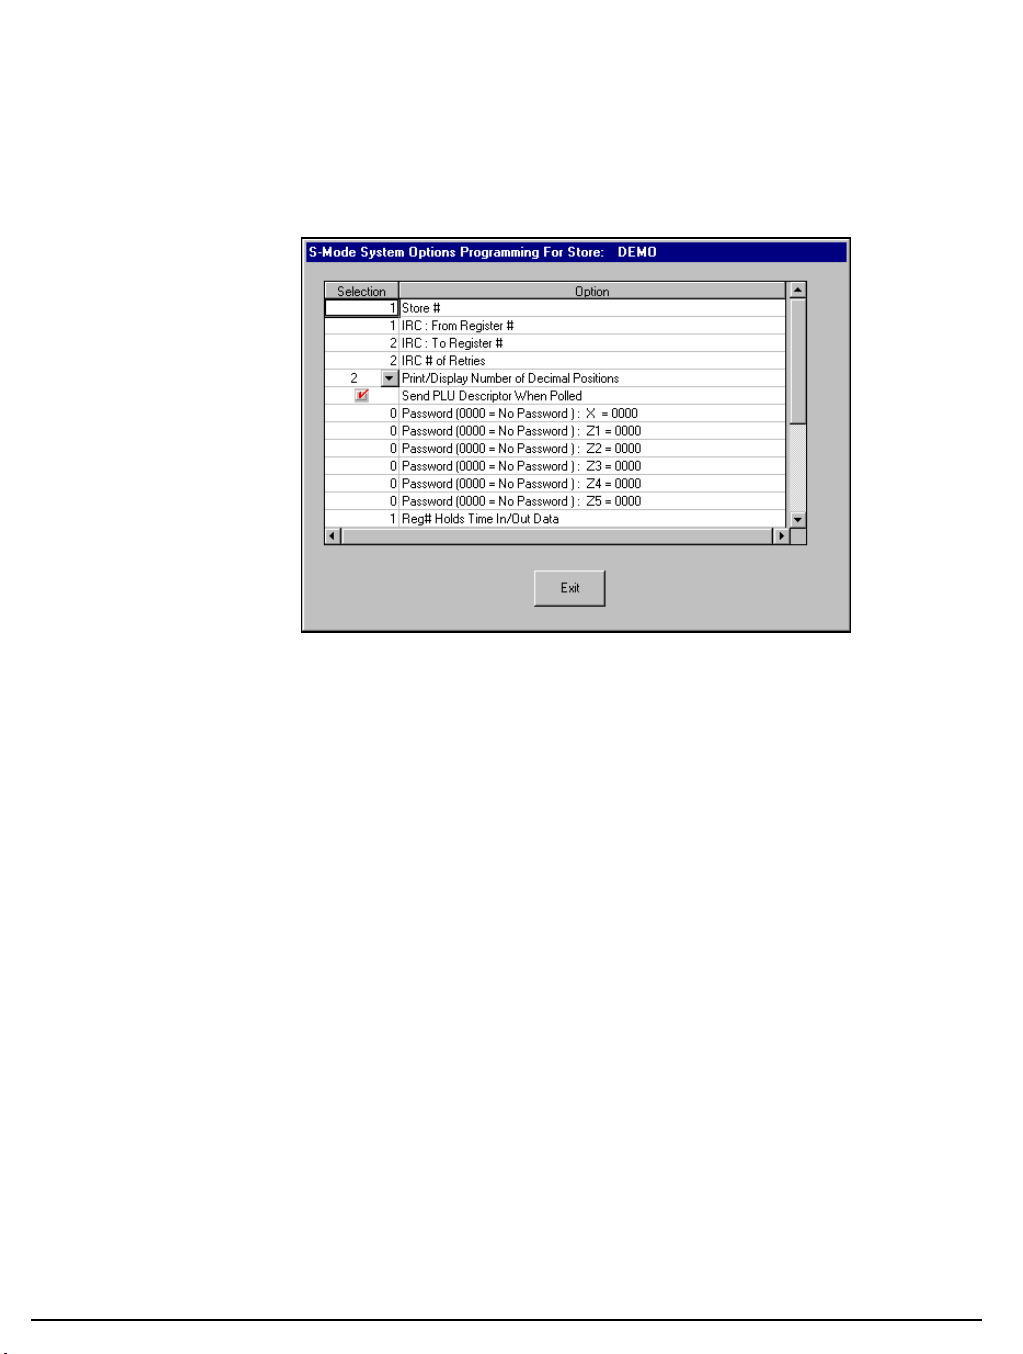
S-Mode System Options
Refer to the Samsung SPS 1000 Program Manual for a complete description of the S-Mode
system options.
1. Choose the Edit ECR Data menu, then select S-Mode menu to open the S-Mode
Programming menu. Select System Options to display the S-Mode System Option
programming screen for the selected store.
2. Use the scroll box at the right of the screen to find the option you wish to program.
3. Edit fields as necessary by moving your mouse pointer to the field you wish to edit:
You can edit fields with numeric information by double clicking on the field, then
entering new data.
You can edit fields with drop-down list boxes by opening the list box and selecting
from the available options.
You can edit fields with check boxes by clicking on the field to add or remove a
check.
4. Click Exit to save changes.
64 Menu Functions SAM1000 For Windows User's Manual v2.3
Page 71
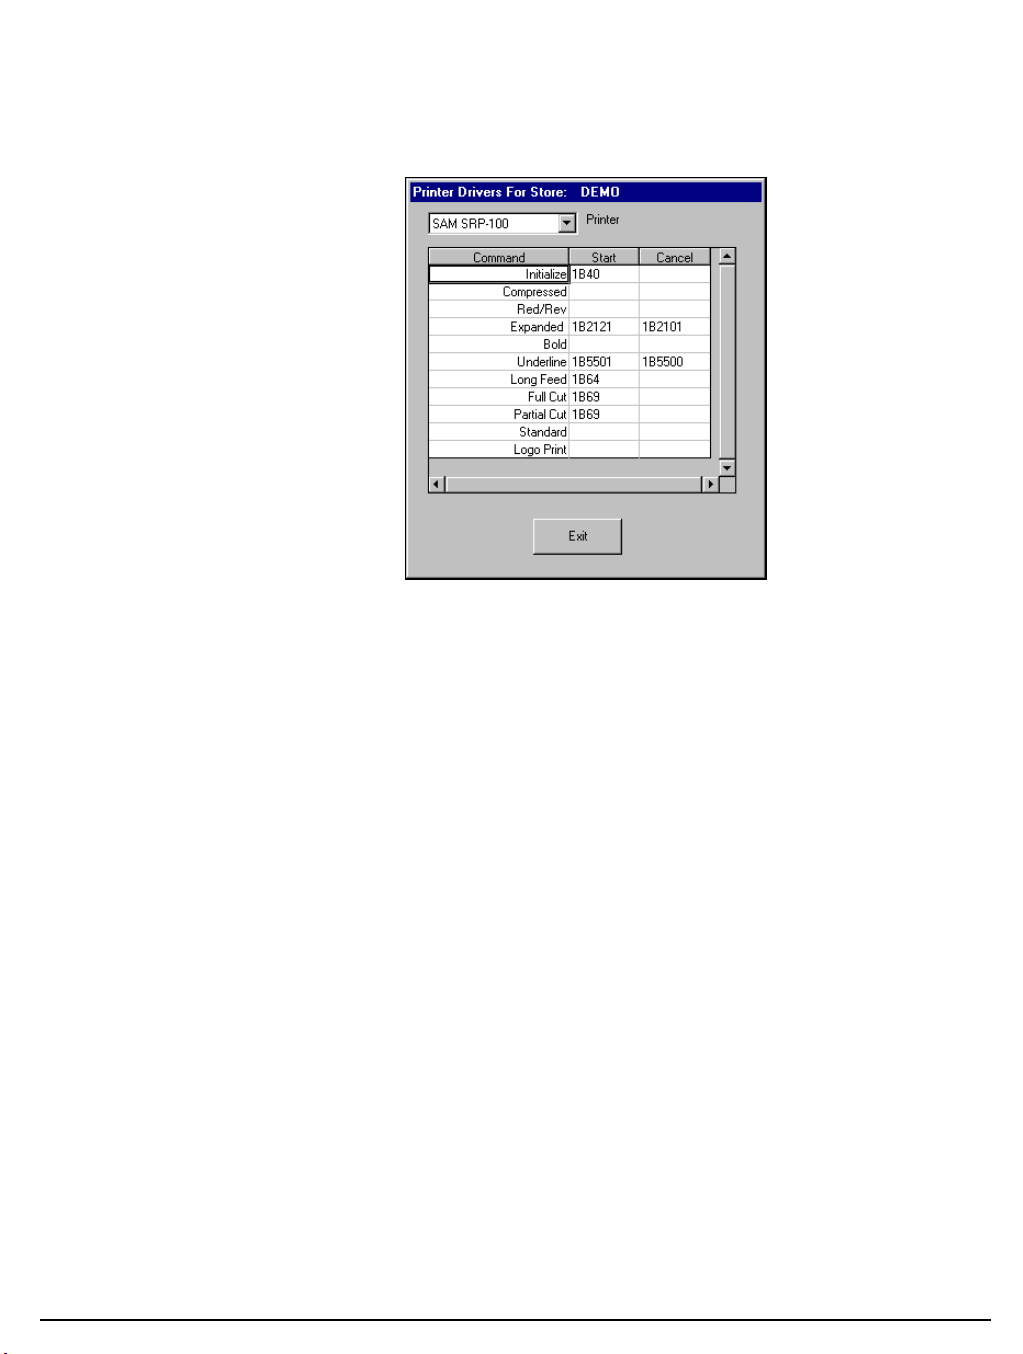
Printer Drivers
1. Choose the Edit ECR Data menu, and then select S-Mode to open the S-Mode
Programming menu. Select Printer Drivers to display the Printer Drivers programming
screen for the selected store.
2. Select the printer you wish to edit from the Printer list box.
3. Select the Start or Cancel field you wish to edit, then type new command information.
4. Click Exit to save changes.
SAM1000 For Windows User's Manual v2.3 Menu Functions 65
Page 72
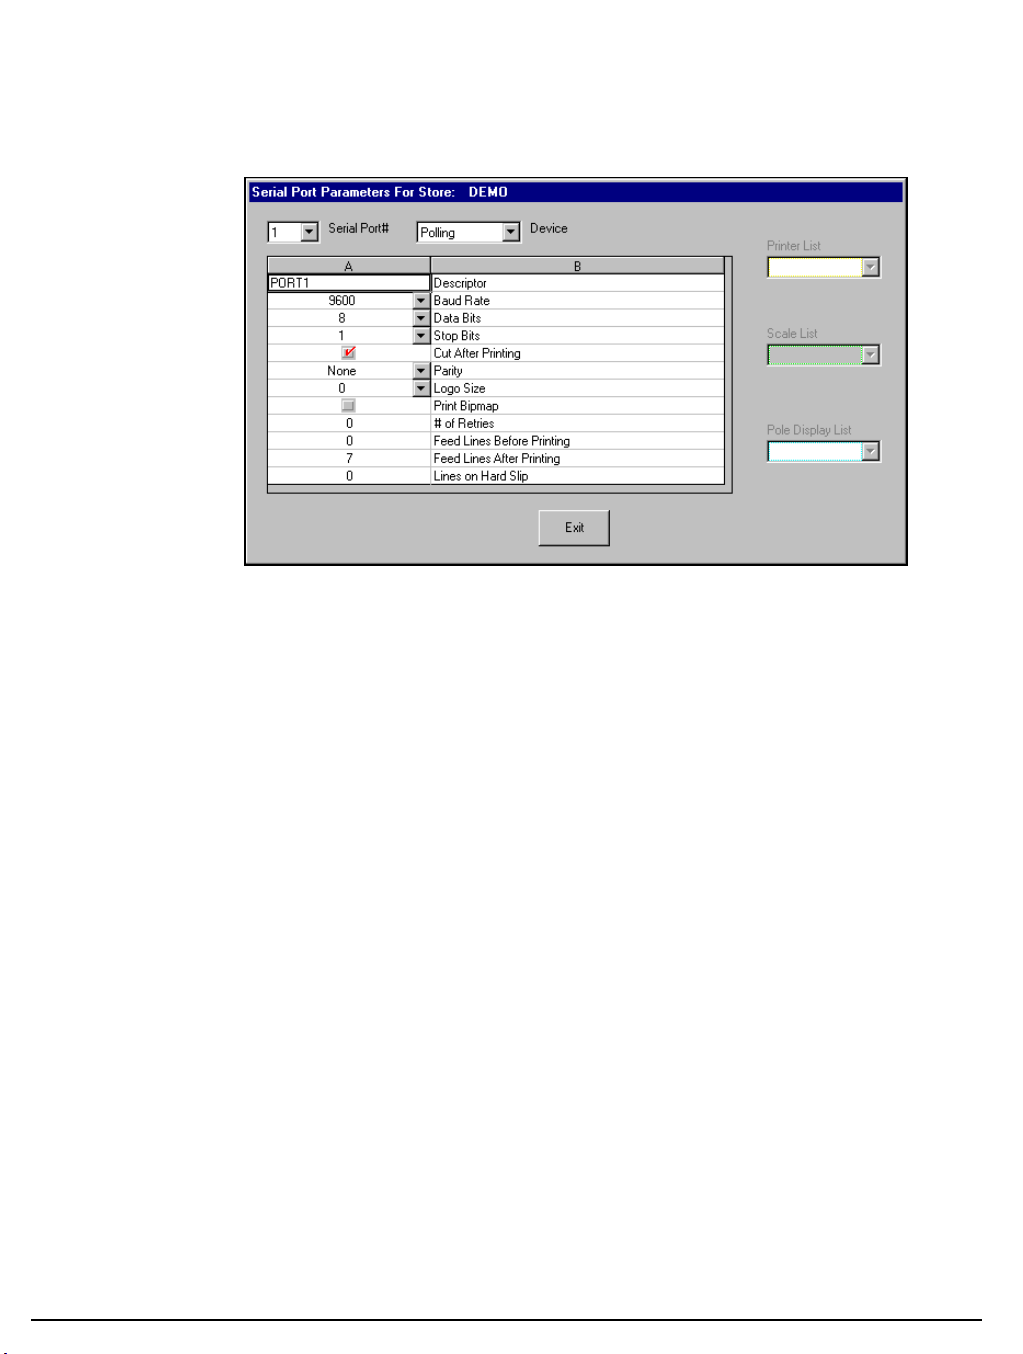
Serial Port Parameters
1. Choose the Edit ECR Data menu, then select S-Mode menu to open the S-Mode
Programming menu. Select Serial Port Parameters to display the Serial Port
Parameters programming screen for the selected store.
2. Select the port you wish to edit from the Serial Port # list box. Then select the device
you are connecting to the port from the Device list box.
3. Edit fields as necessary by moving your mouse pointer to the field you wish to edit:
You can edit fields with numeric information by double clicking on the field, then
entering new data.
You can edit fields with drop-down list boxes by opening the list box and selecting
from the available options.
You can edit fields with check boxes by clicking on the field to add or remove a
check.
4. Click Exit to save changes.
66 Menu Functions SAM1000 For Windows User's Manual v2.3
Page 73
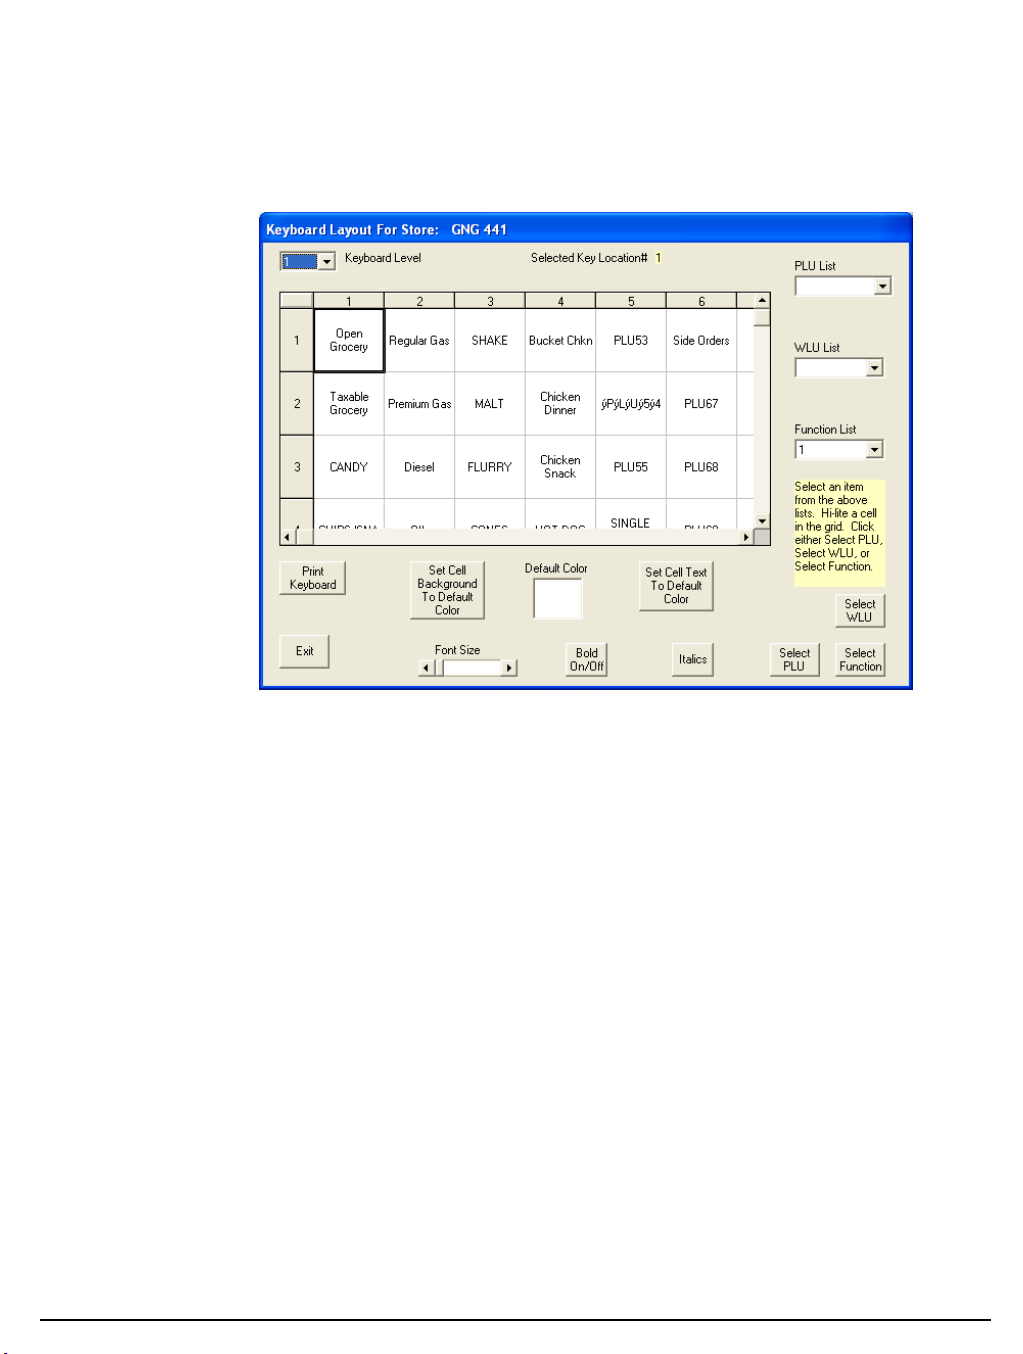
Keyboard Layout
1. Choose the Edit ECR Data menu, and then select S-Mode to open the S-Mode
Programming menu. Select Keyboard Layout to display the Keyboard programming
screen for the selected store.
2. Select the keyboard level you wish to edit from the Keyboard Level list box.
3. Select the keyboard location you wish to edit by clicking on a cell to highlight it. Use the
scroll bar on the bottom to view all of the columns (there are thirteen columns of keys on
the keyboard.) Note that the keyboard location you select is displayed in the Selected
Key Location # field at the top of the screen.
4. Assign a new PLU, WLU or function key to the location you have selected:
If you wish to assign a PLU to the selected location, open the PLU List drop down
box and select the PLU you wish to assign, then click the Select PLU button at the
bottom of the screen.
If you wish to assign a WLU to the selected location, open the WLU List drop down
box and select the WLU you wish to assign, then click the Select WLU button at the
bottom of the screen.
If you wish to assign a function to the selected location, open the Function List drop
down box and select the function you wish to assign, then click the Select Function
button at the bottom of the screen.
5. Click on the Default Color selection box to select the default color. Chose a new color
from the colors displayed and click on OK to change the default color to the selected
color.
SAM1000 For Windows User's Manual v2.3 Menu Functions 67
Page 74

6. Select a key location or group of locations and click on the Set Cell Background to
Default Color icon to change the color of the cell to the default color. Click on the icon
again to set the color back to the original color.
7. Select a key location or group of locations and click on the Set Cell Text to Default Color
icon to set the text in the cell to the default color. Click on the icon again to set the color
of the text back to the original color.
8. Select a key location or group of locations and click on the Bold On/Off or Italics On/Off
to change the text to bold or italics. Click on the icon again to reverse the selection.
9. Select a key location or group of locations and use the Font Size scroll bar to select the
text font size.
10. Click on the Print Keyboard icon to print a copy of the keyboard overlay. The
keyboard will be printed on two pages that have to be cut and taped together, due to the
size of the keyboard on the SPS-1000.
11. Click on Exit to return to the main menu and save your changes.
68 Menu Functions SAM1000 For Windows User's Manual v2.3
Page 75
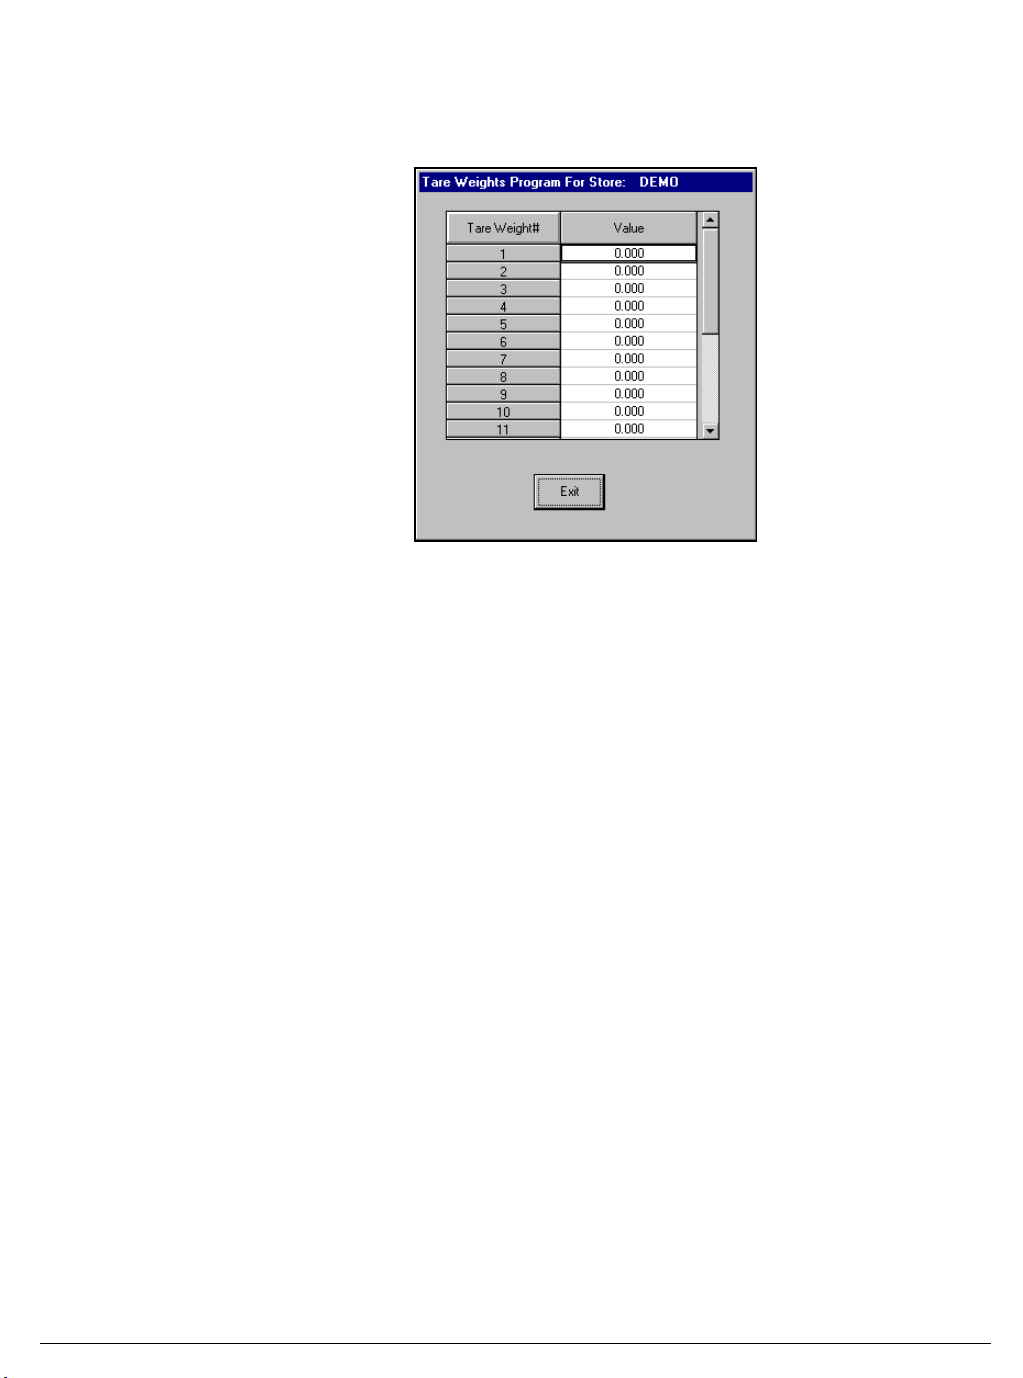
Tare Weights
1. Choose the Edit ECR Data menu, then select Misc. Programs menu to open the S-
Mode Programming menu. Select Tare Weights to display the Tare Weights
programming screen for the selected store.
2. Use the scroll bar on the right to view the tare you wish to program
3. Edit fields as necessary by moving your mouse pointer to the field you wish to edit,
double click on the field, then enter new data (using the decimal key when necessary).
4. Click Exit to save changes.
SAM1000 For Windows User's Manual v2.3 Menu Functions 69
Page 76
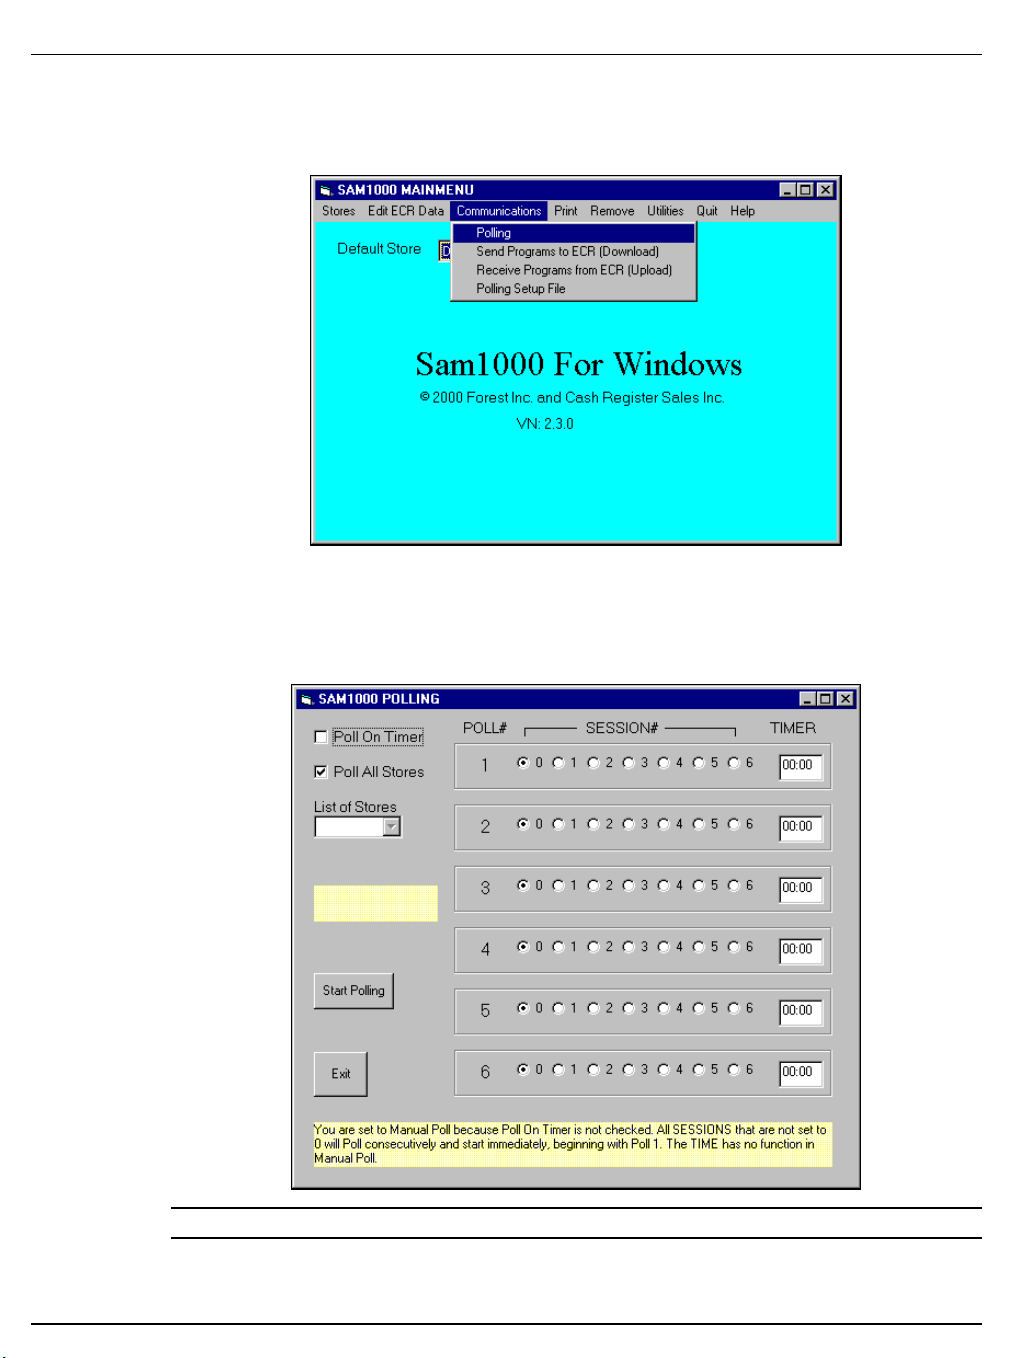
Communications
Choose Communications from the Main menu to initiate communications with the
Samsung SPS 1000.
Polling
1. Choose Polling from the Communications menu to connect to the store to poll reports.
The SAM1000 Polling dialog box will display.
Note: Polling setup file must be completed first.
70 Menu Functions SAM1000 For Windows User's Manual v2.3
Page 77
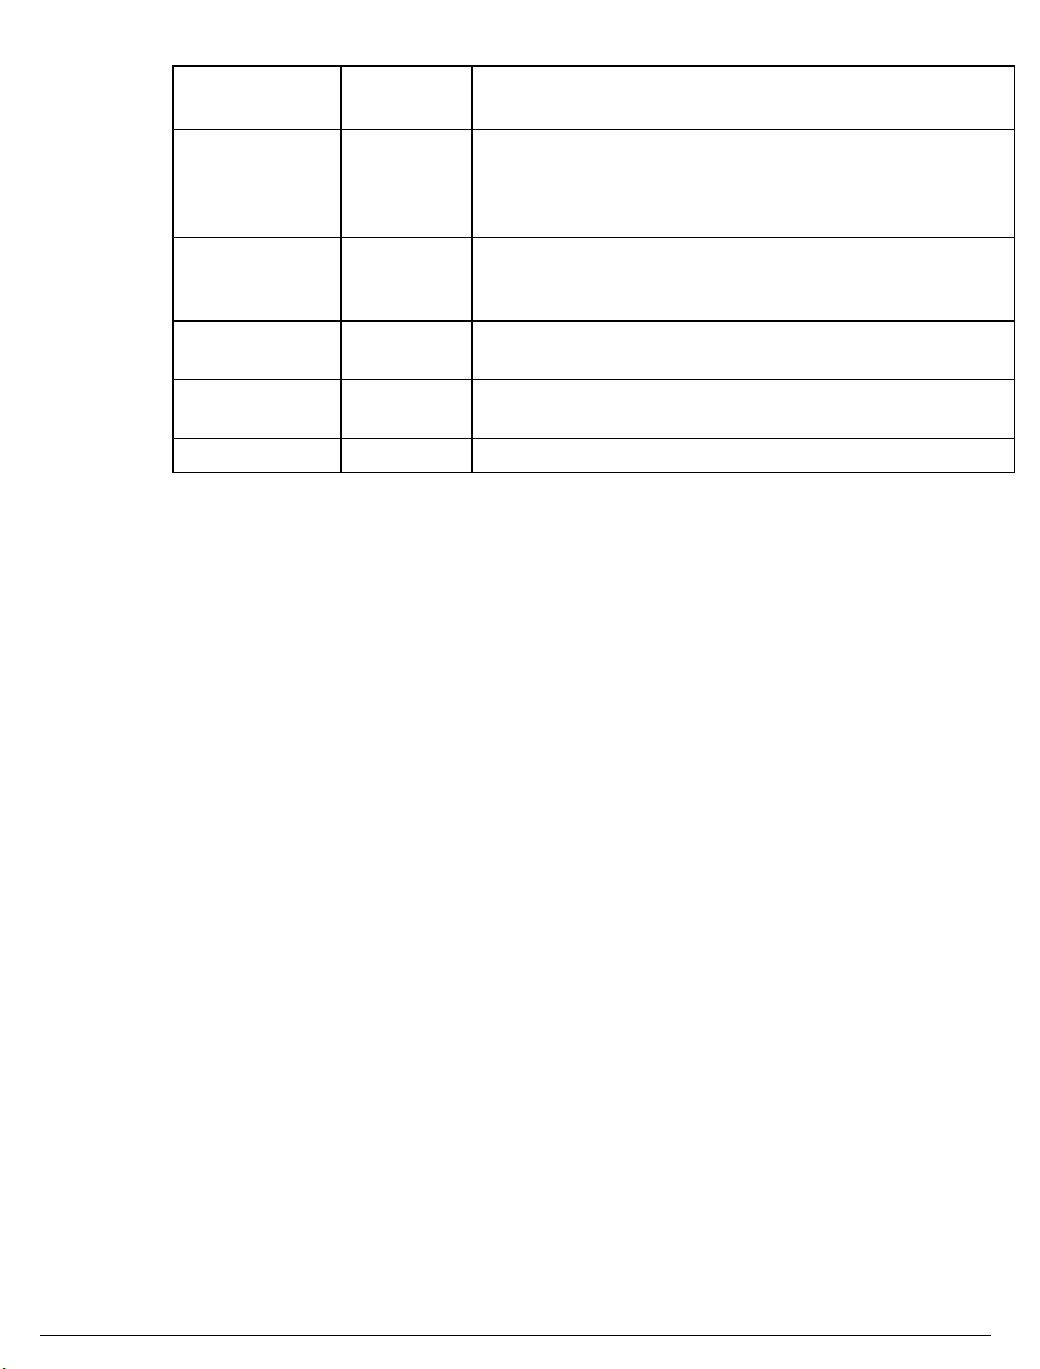
1. Complete the fields on the Polling Routine window according to the table below:
Field Name
Required
/Optional
Description/Instructions
Poll On Timer
O
Select the Poll On Timer checkbox to start polling in
consecutive order beginning with Poll 1 at the defined
time. If not selected, polling is manual and will begin
immediately.
Poll All Stores
O
Select the Poll All Stores checkbox to poll all stores. If not
selected, enter an individual store to poll in the List of
Stores field.
List of Stores
O
Select an individual store to poll if the Poll All Stores
check box is not selected.
Session
R
Select the polling session, 1 - 6. Polling will proceed in
consecutive order by session number.
Timer
O
Enter the military time the polling session is to begin.
3. Click the Start Polling button to begin polling; click Exit to exit the dialog.
SAM1000 For Windows User's Manual v2.3 Menu Functions 71
Page 78
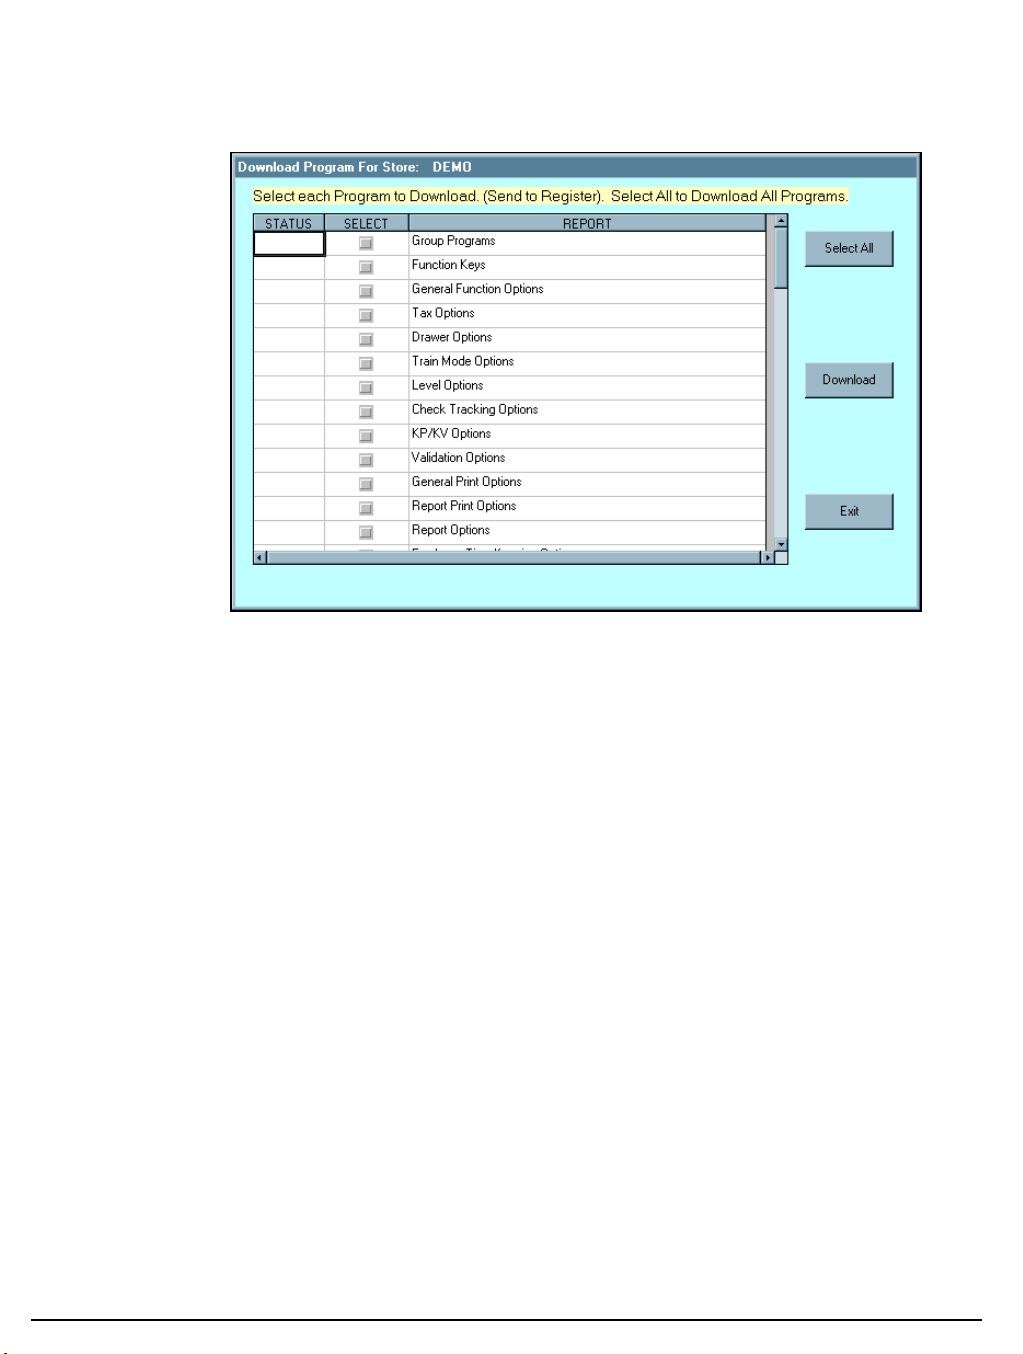
Send Programs to ECR (Download)
1. Choose Send Programs to ECR (Download) from the Communications menu to
send program information from the database of the working store, to the ECR at the store.
2. From the Download Program dialog box, first select Memory Allocation and click the
Download button. Memory allocation must be sent before any other programs can be
downloaded.
3. After memory allocation is successfully downloaded, select the program components you
wish to send to the ECR. (Check Check All for all components except memory
allocation.) A check mark means the item is selected. Use the scroll bar at the right to
view all of the possible program components.
4. Click the Download button to initiate the download to the ECR; click Exit to exit the
window. The Status field will monitor the progress of the download for each program
component. Pass will display in green when the program is successfully downloaded;
Fail will display in red if the download is unsuccessful.
72 Menu Functions SAM1000 For Windows User's Manual v2.3
Page 79
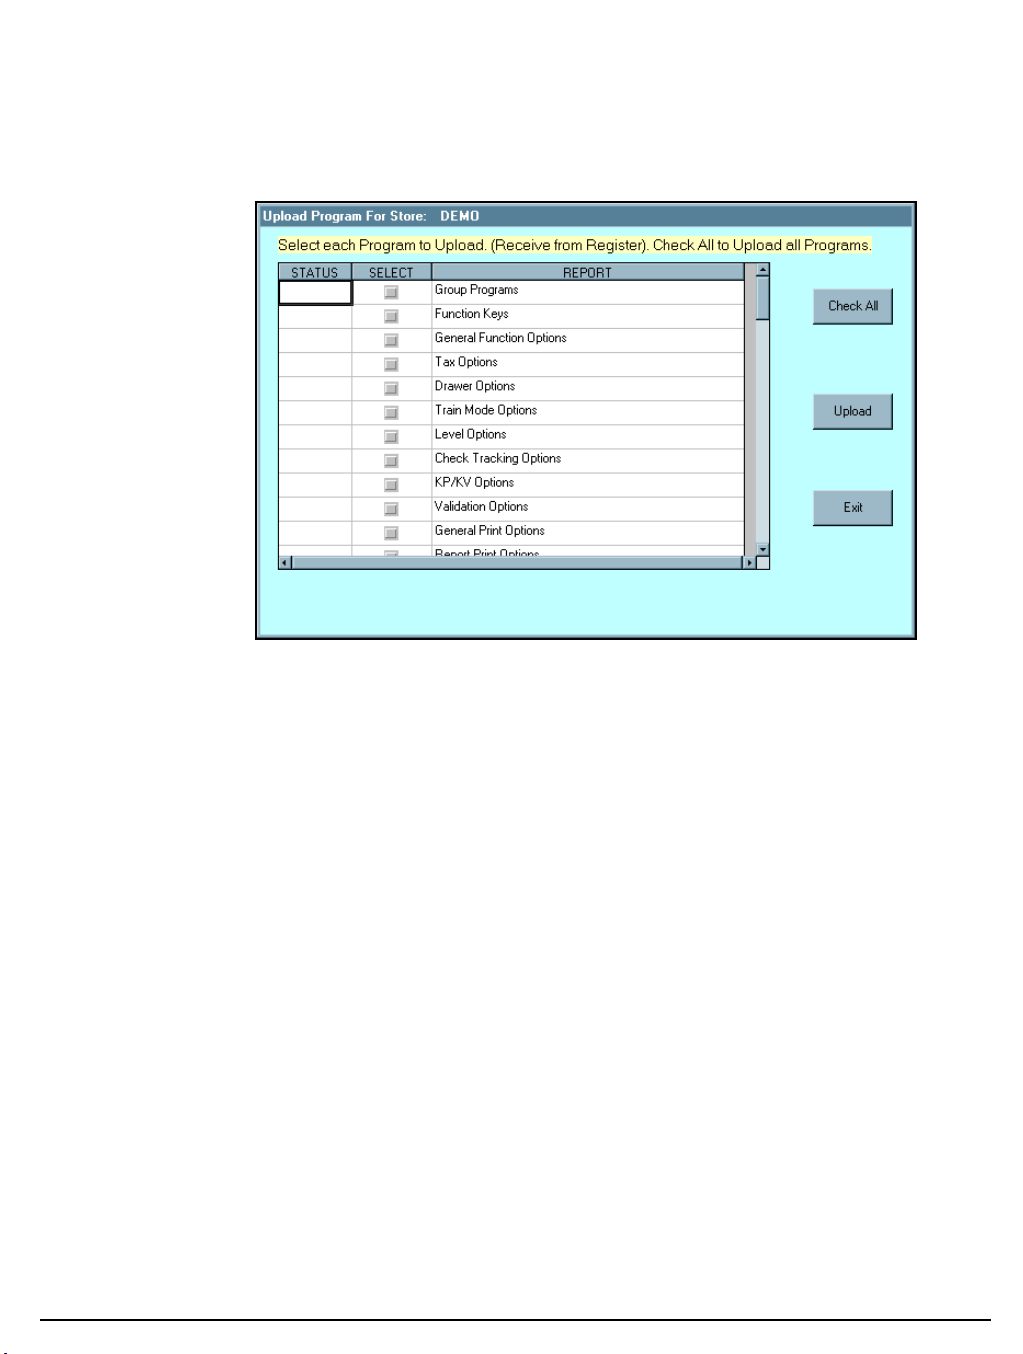
Receive Programs from ECR (Upload)
1. Choose Receive Programs from ECR (Upload) from the Communications menu to
receive program information from the ECR for the working store. When you execute this
function, any program data that was on the hard disk previously will be overwritten by
the new data.
2. From the Upload Program dialog box, select the program components you wish to get
from the ECR. (Check Check All for all components.) A check mark means the item is
selected. Use the scroll bar at the right to view all of the possible program components.
3. Click the Upload button to initiate the download to the ECR; click Exit to exit the
window. The Status field will monitor the progress of the upload for each program
component. Pass will display in green when the program is successfully uploaded; Fail
will display in red if the upload is unsuccessful.
SAM1000 For Windows User's Manual v2.3 Menu Functions 73
Page 80
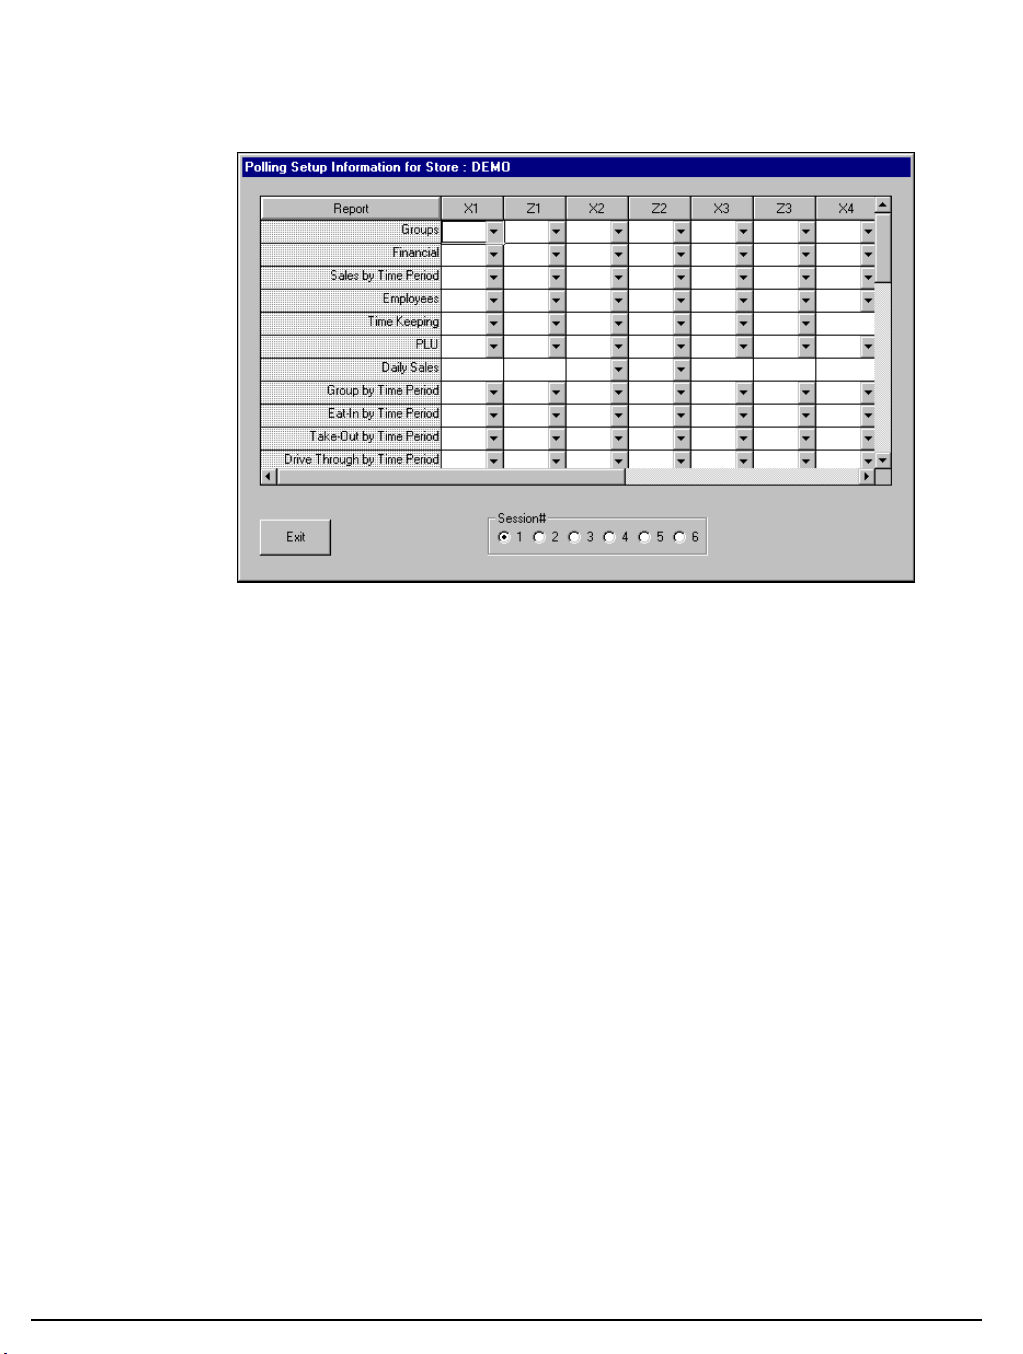
Polling Setup File
1. Choose Polling Setup File from the Communications menu to define the reports to be
taken when polling is initiated. You can set up reports for 6 polling sessions.
2. Click one of the Session# options buttons to display the reports for the session.
3. Find the report you wish to edit, if necessary use the scroll bar on the right. Then find the
type of report (X1, Z2, etc.), if necessary use the scroll bar on the bottom. When you
have located the field for the specific report you wish to edit, open the list box by
clicking on the appropriate arrow.
Select Print from the list box if you wish to print the report at the ECR when polling;
select the check box under No Print if you do not wish to print the report at the ECR
when polling. Select the blank position if you wish to remove a report from the session.
4. If necessary, click another one of the Session# options buttons to display the reports for
the session.
5. Repeat step 3 for each session you are setting up.
6. Click Exit to save changes and return to the main menu.
74 Menu Functions SAM1000 For Windows User's Manual v2.3
Page 81
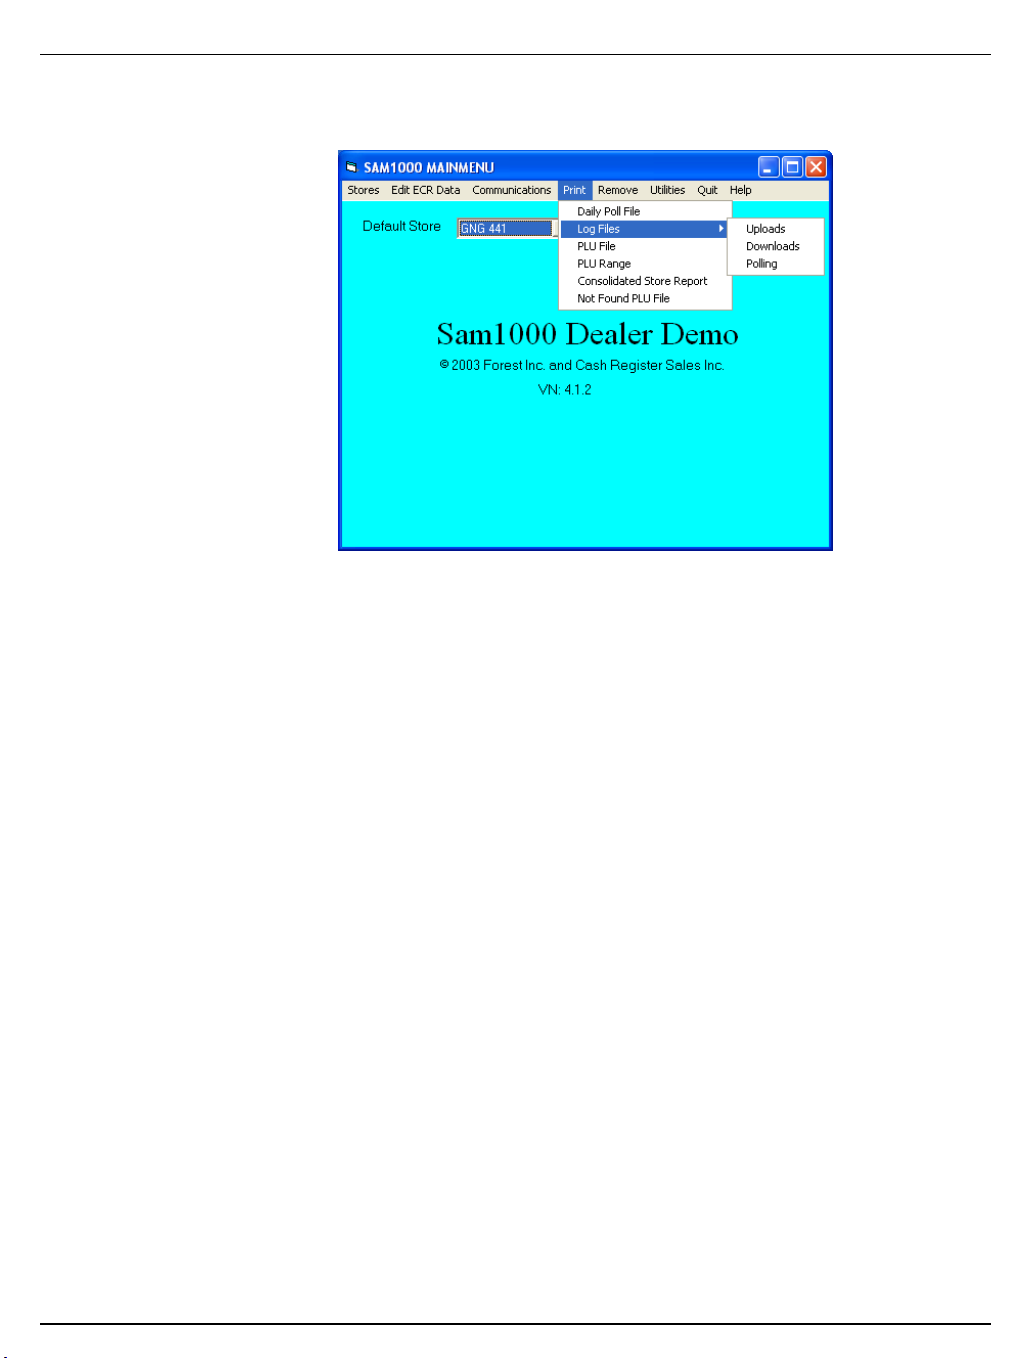
Print
Choose Print from the Main menu to access the printing utilities described below.
SAM1000 For Windows User's Manual v2.3 Menu Functions 75
Page 82
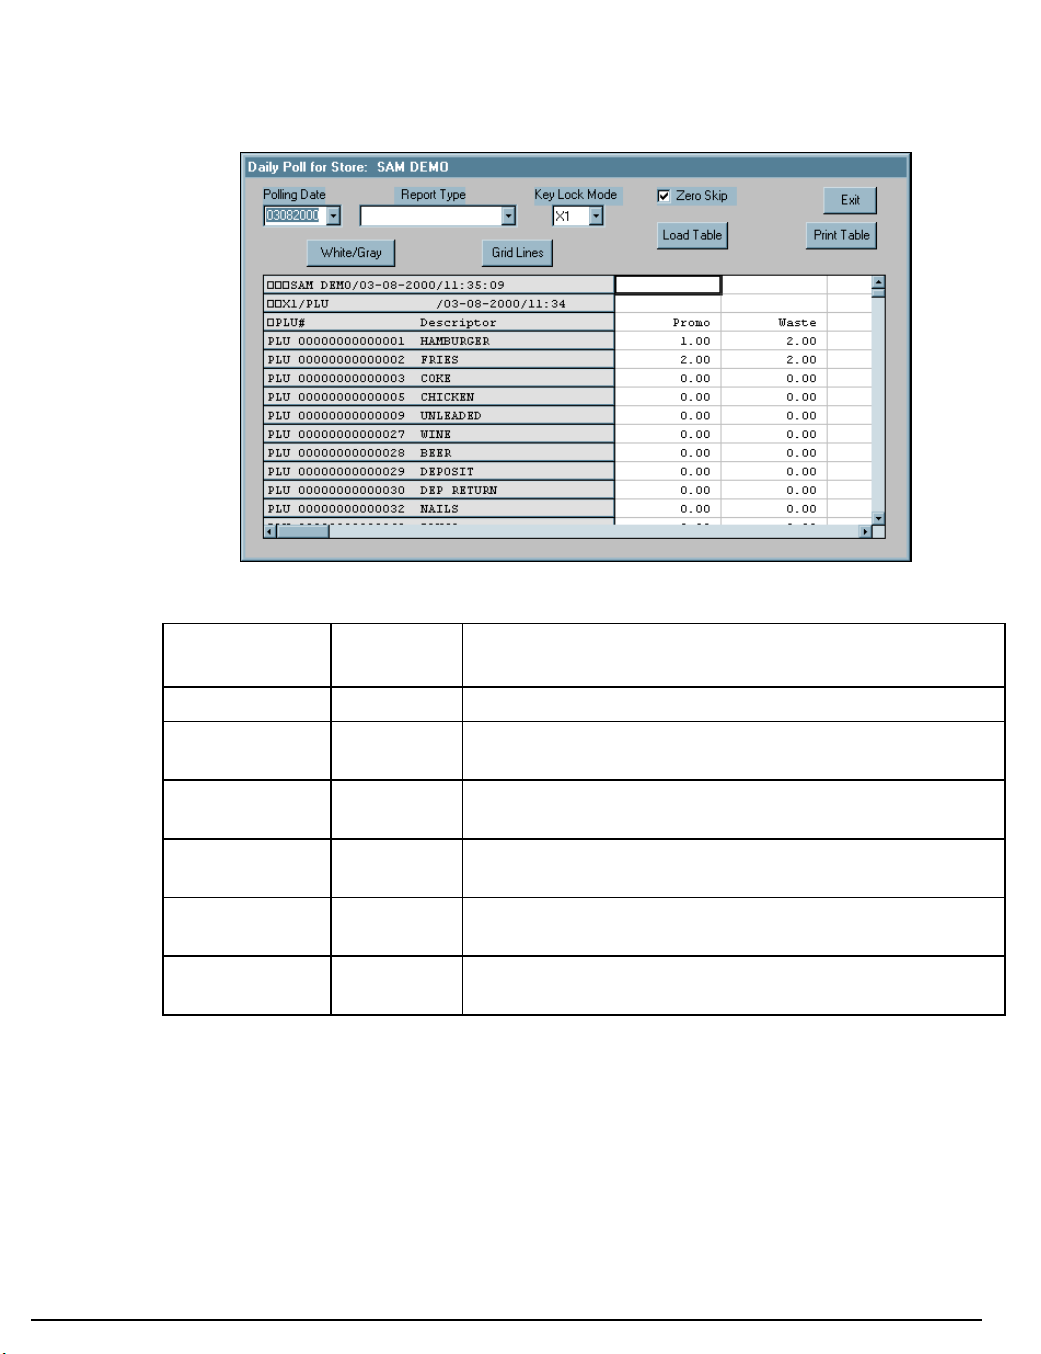
Daily Poll File
1. Choose Daily Poll File from the Print menu to print out the poll file of a given day.
The Daily Poll dialog box displays.
2. Complete the Daily Poll dialog box according to the table below:
Field Name
Required
/Optional
Description/Instructions
Polling Date
Zero Skip
Report Type
Keylock Mode
Grid Lines
White/Gray
3. Click the Load Table button to view the selected report.
4. With the report in view, click the Print Table button to print the report.
5. Click Exit to return to the main menu.
R
O
O
O
O
O
Select the polling date from the drop-down list box.
Select the Zero Skip check box if you wish totals with zero
values skipped.
Select the report type from the drop-down list box. If no
report is chosen, all reports will be loaded.
Select the mode of the report. If nothing is selected, all
key lock modes will be displayed.
Click the Grid Lines button to print/display the selected
report with or without grid lines
Click the White/Gray button to print/display the selected
report with or without shaded fields.
76 Menu Functions SAM1000 For Windows User's Manual v2.3
Page 83
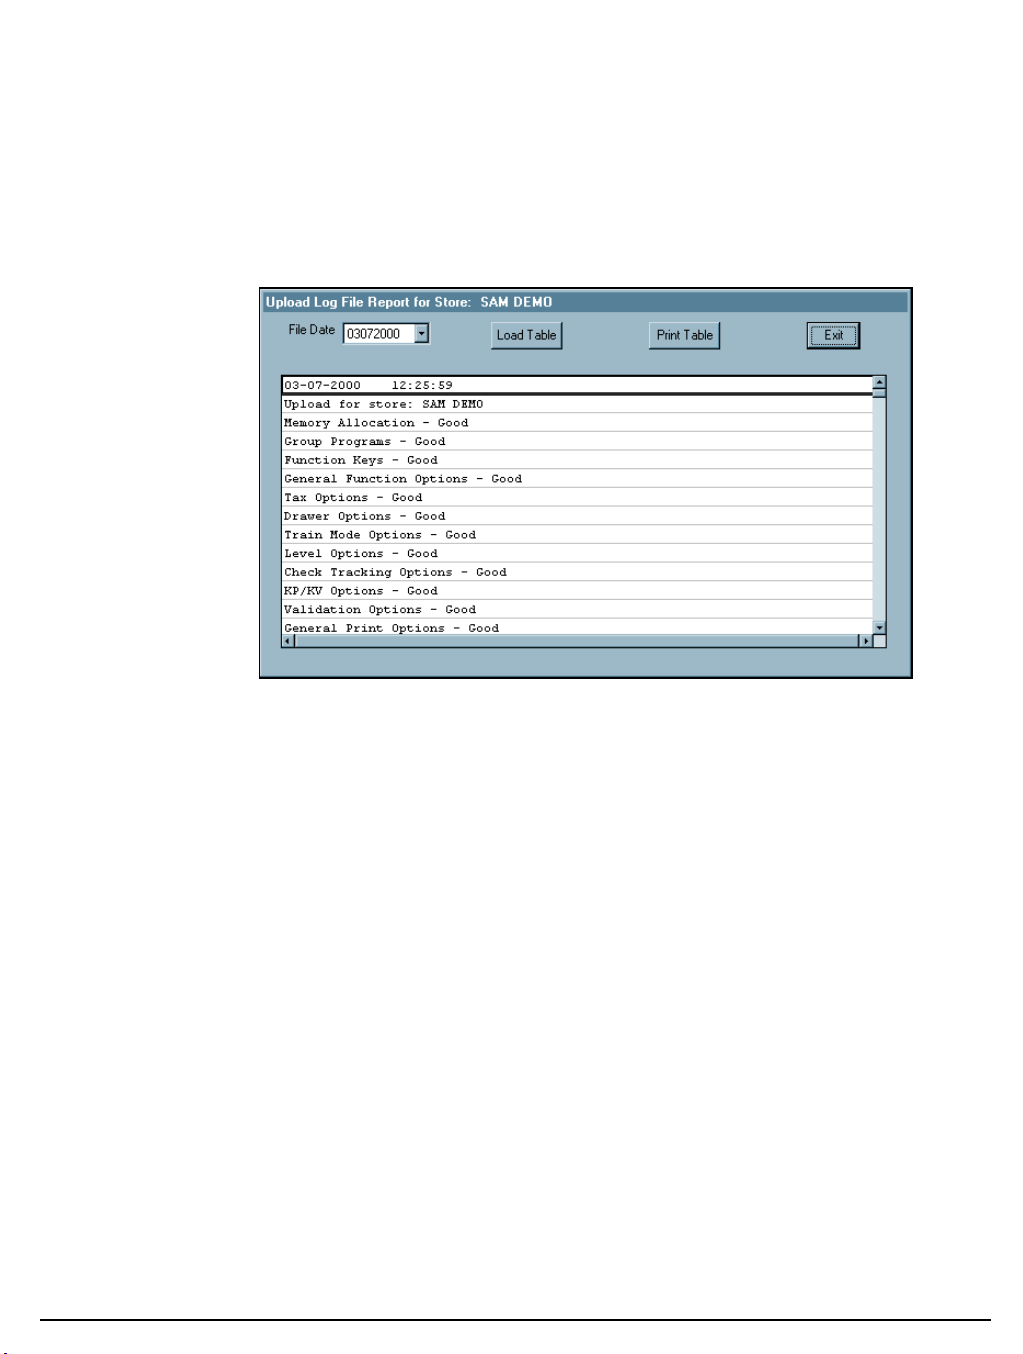
Log Files
For error checking you can choose Log File from the Print menu to print out the upload,
download or poll log file of a given day.
Uploads
1. Choose Log Files from the Print menu, then choose Uploads to view and/or print the
uploads of a given day. The Upload Log File Report dialog box for the selected store
displays.
2. Type or select a date from the File Date list box.
3. Click the Load Table button to load the table for the selected file date.
4. Click the Print Table button to print the table.
SAM1000 For Windows User's Manual v2.3 Menu Functions 77
Page 84
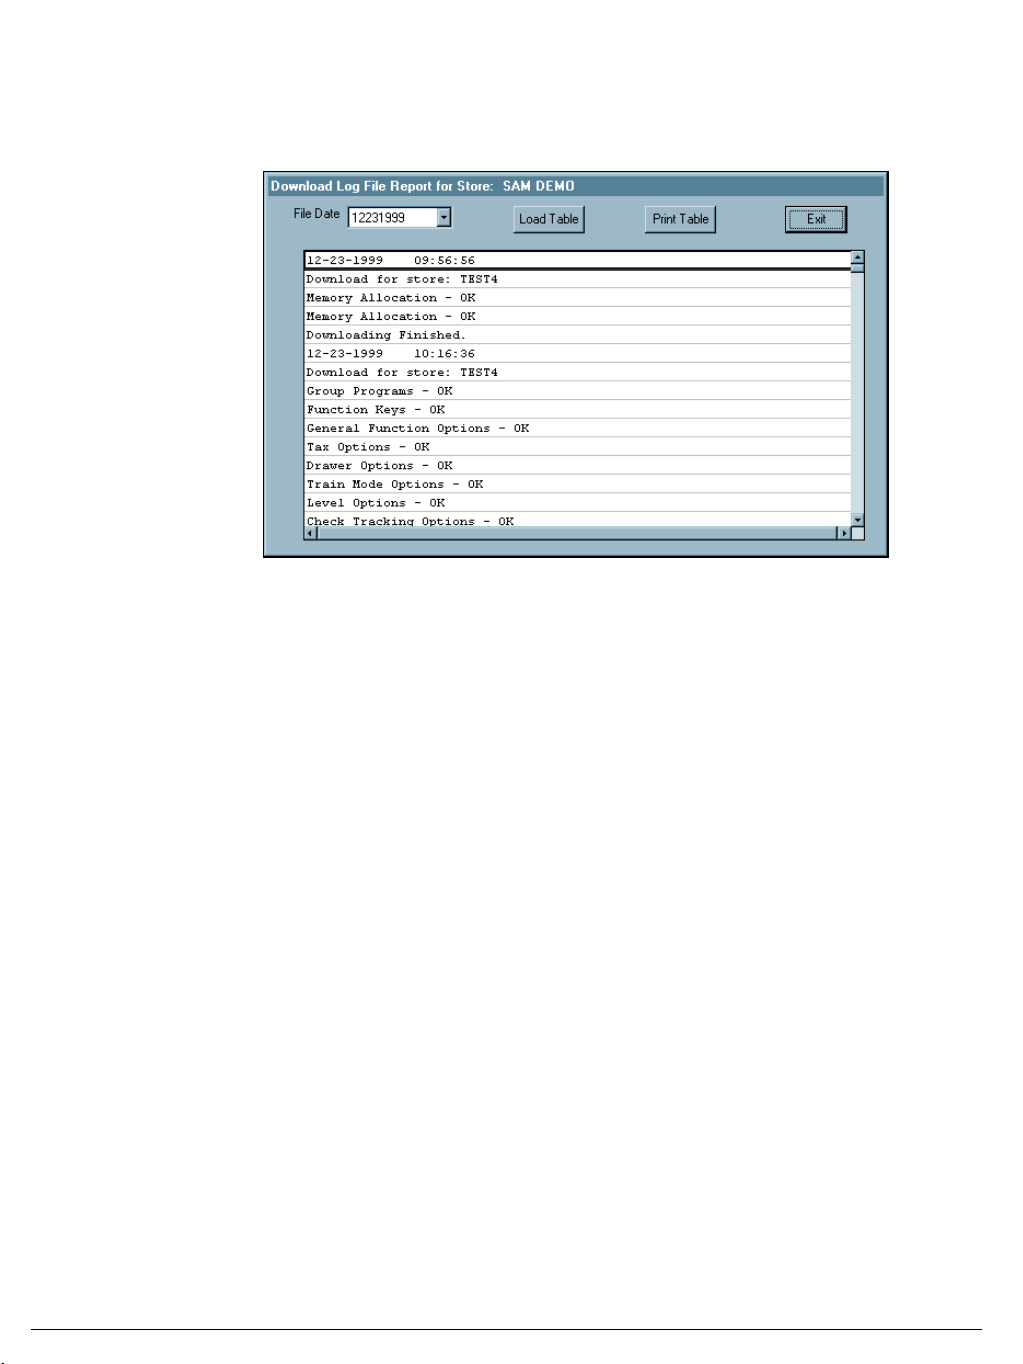
Downloads
1. Choose Log Files from the Print menu, then choose Downloads to view and/or print the
uploads of a given day. The Download Log File Report dialog box for the selected store
displays.
2. Type or select a date from the File Date list box.
3. Click the Load Table button to load the table for the selected file date.
4. Click the Print Table button to print the table.
78 Menu Functions SAM1000 For Windows User's Manual v2.3
Page 85
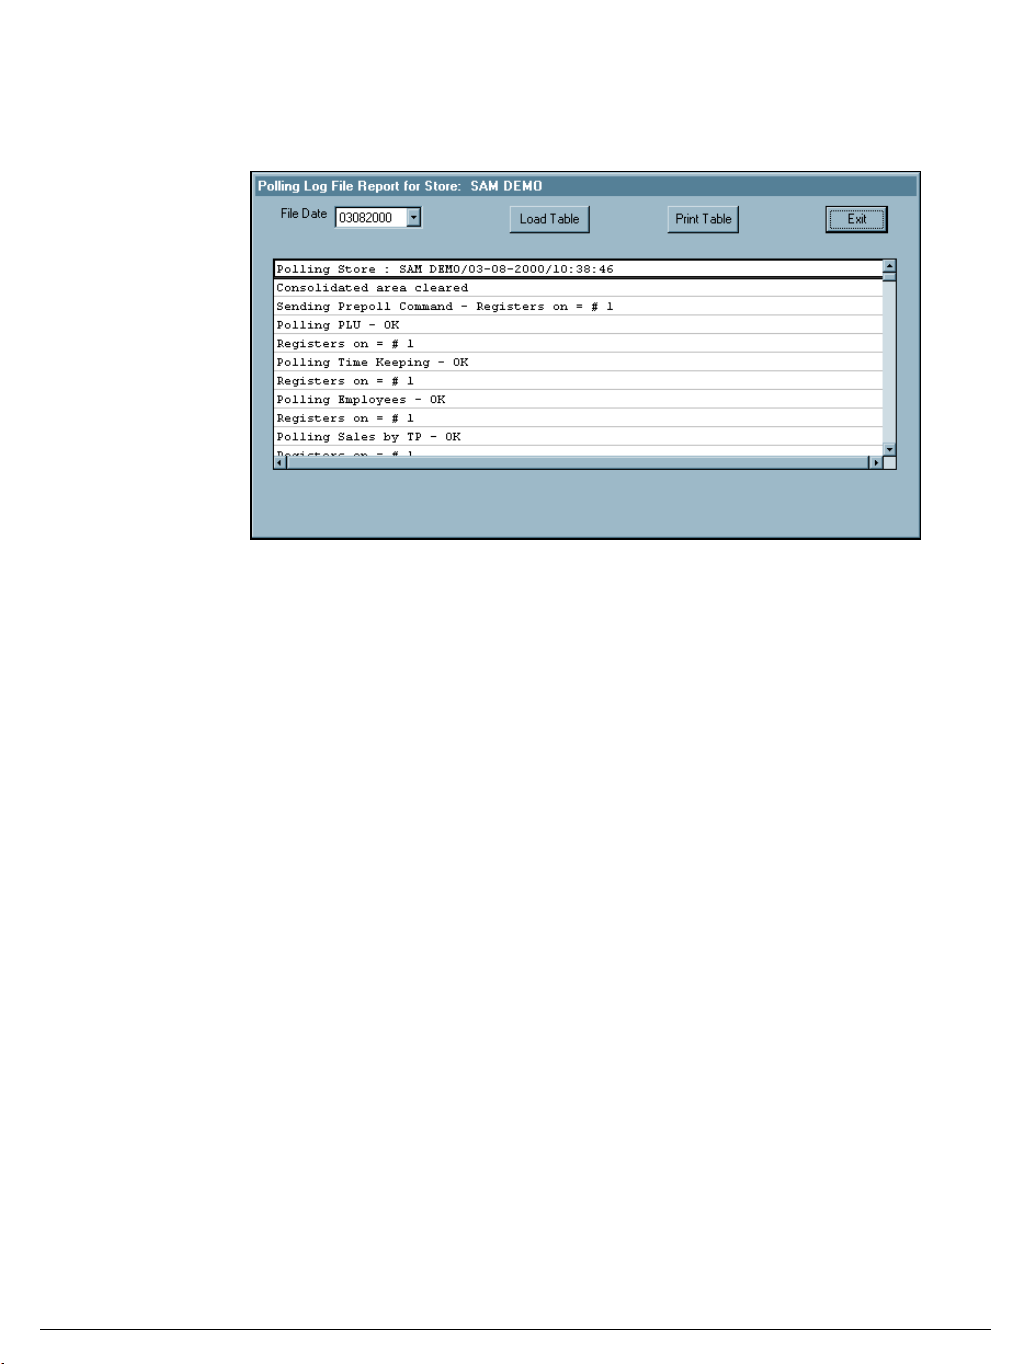
Polling
1. Choose Log Files from the Print menu, then choose Polling to view and/or print the
polling activity of a given day. The Polling Log File Report dialog box for the selected
store displays.
2. Select the polling date from the drop-down list box.
3. Click the Load Table button to view the selected file date log.
4. With the report in view, click the Print Table button to print the report.
5. Click Exit to return to the main menu.
SAM1000 For Windows User's Manual v2.3 Menu Functions 79
Page 86
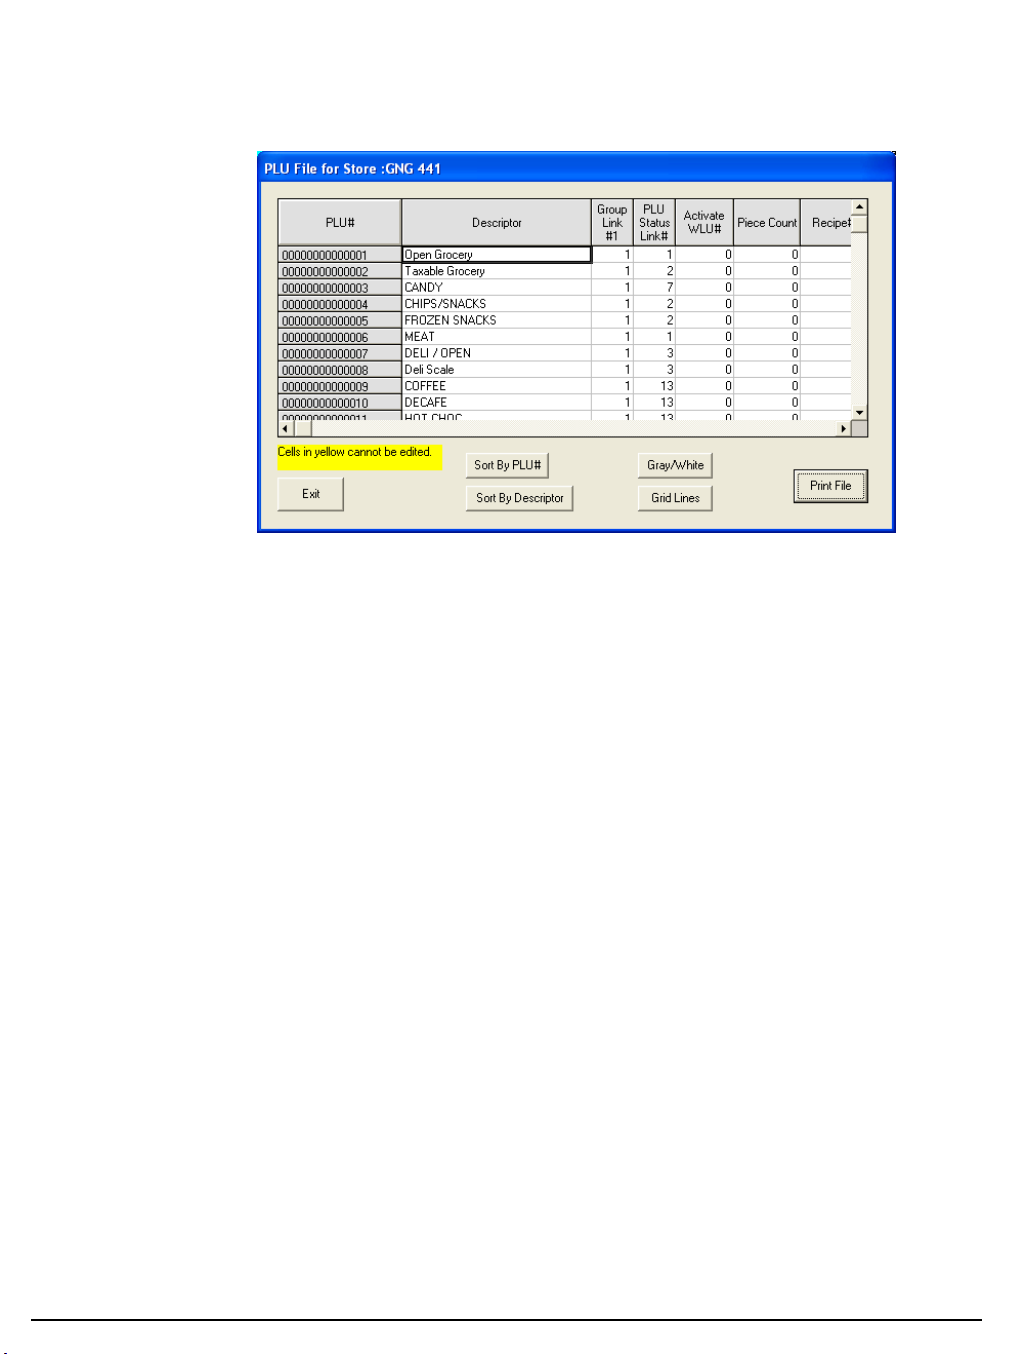
PLU File
1. Choose PLU File from the Print menu to display and print out the PLU file of the
working store. The PLU File dialog box displays.
2. Click the Sort by PLU # button to view the file sorted by PLU #; click the Sort by
Descriptor button to view the file sorted alphabetically by descriptor.
3. Click the Print File button to print the file.
4. Click Exit to return to the main menu.
80 Menu Functions SAM1000 For Windows User's Manual v2.3
Page 87
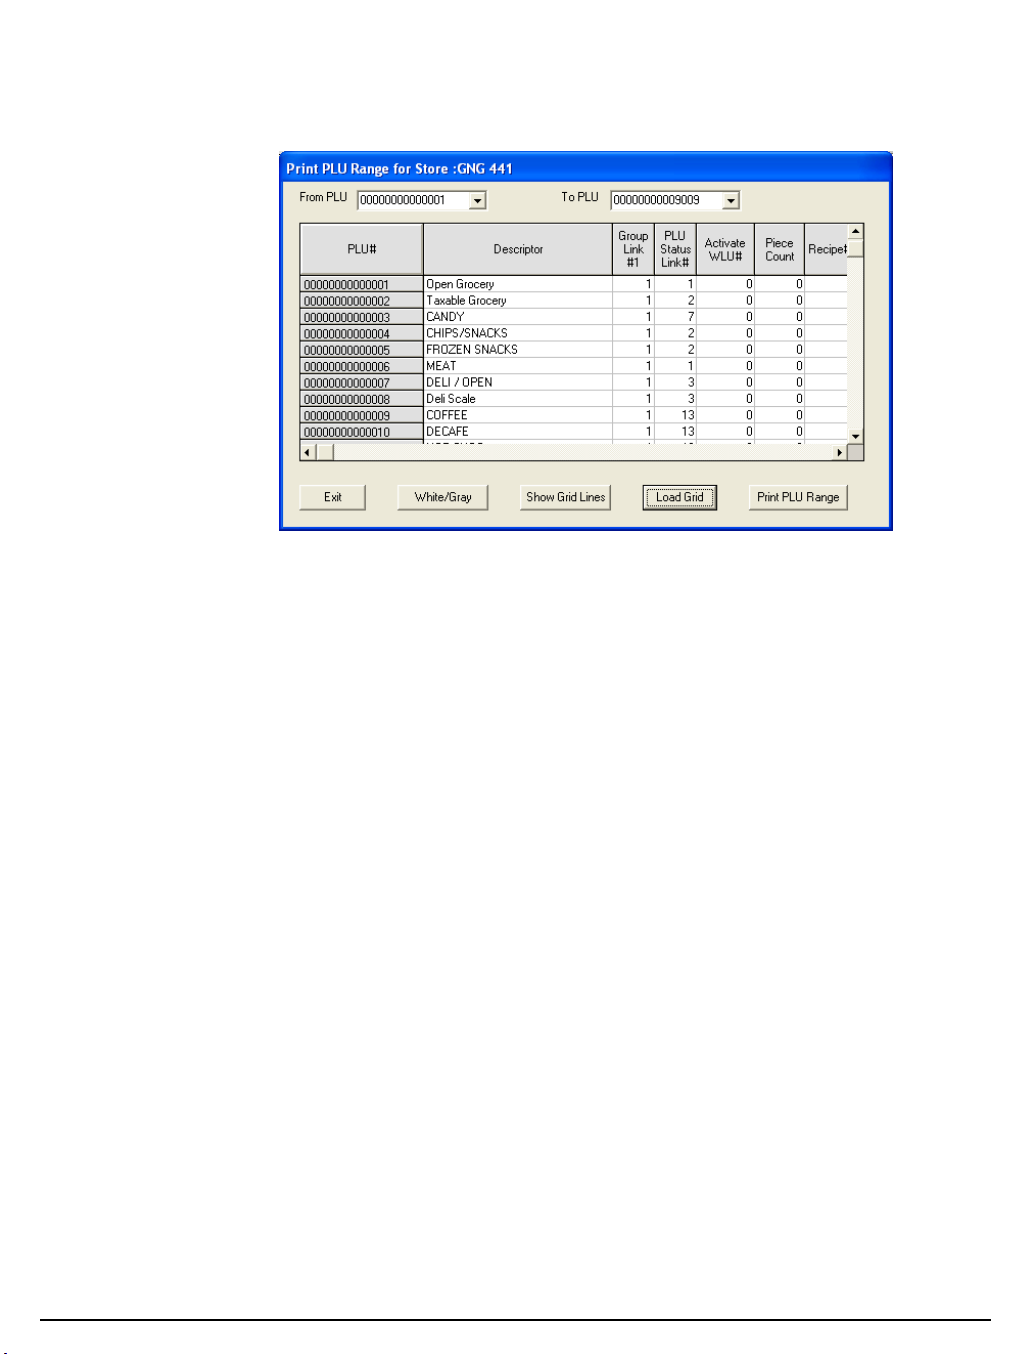
PLU Range
1. Choose PLU Range from the Print menu to display and print out a range of the PLU
file of the working store. The PLU Range dialog box displays.
2. Select the first and last PLU in the range from the drop down list boxes.
3. Click on Load Grid to load the table with the selected range of PLUs.
4. Click on the White/Gray icon to toggle between white and gray background for the
descriptors.
5. Click on the Show Grid Lines to toggle between displaying the grid lines on the table and
showing no lines.
6. Click the Print PLU Range button to print the file.
7. Click Exit to return to the main menu.
SAM1000 For Windows User's Manual v2.3 Menu Functions 81
Page 88
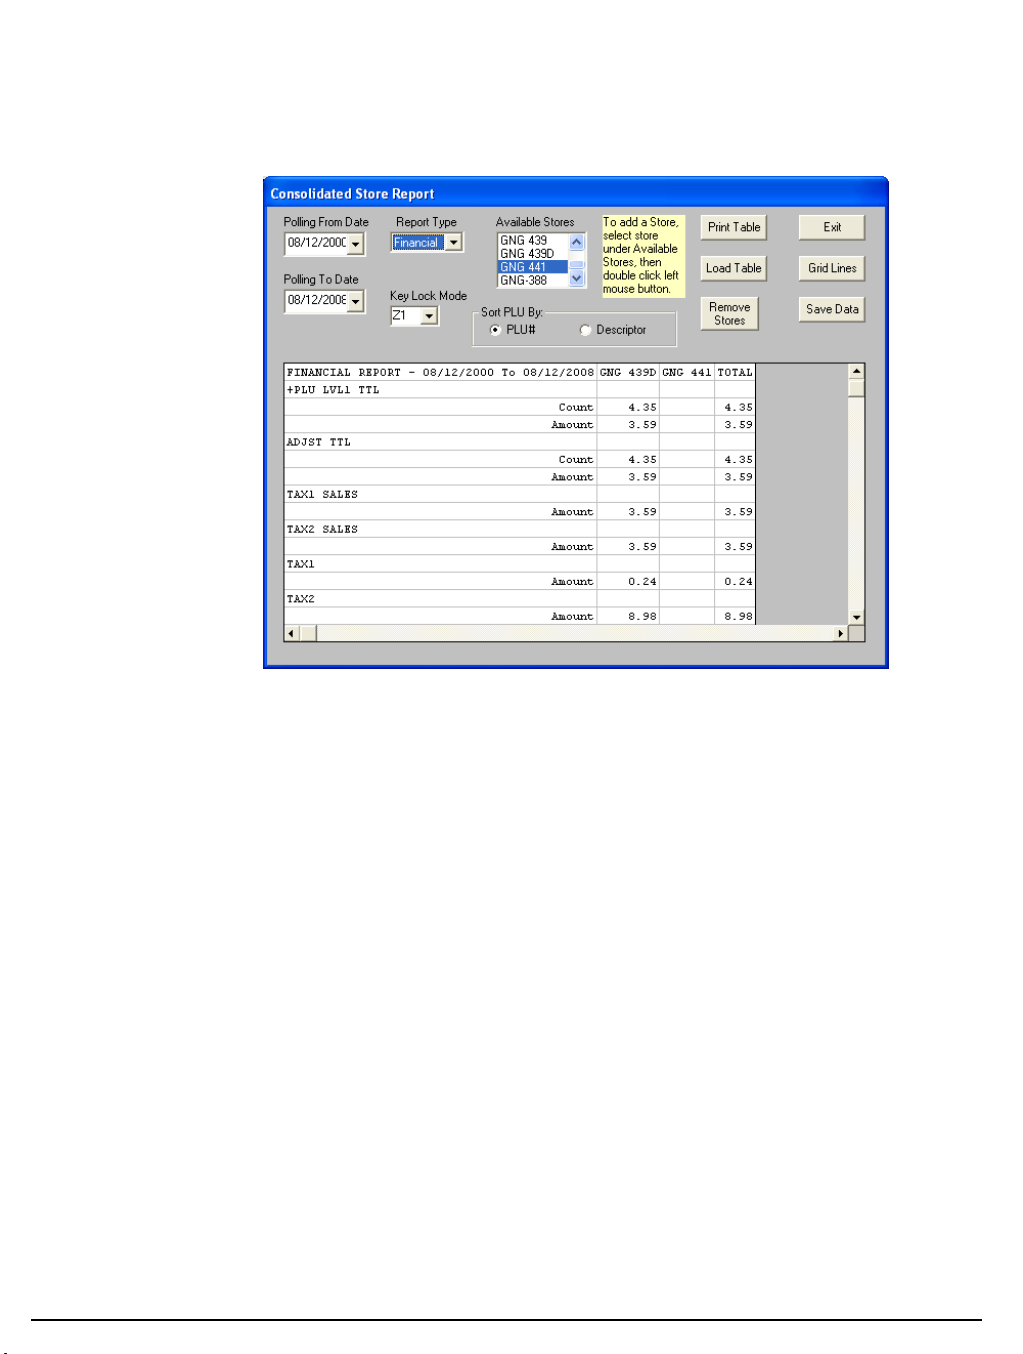
Consolidated Store Report
1. Choose Consolidated Store Report from the Print menu to display and print out the
Consolidated financial, PLU and group reports for all stores. The Consolidated Store
Report dialog box displays.
2. Chose the Polling Date from the drop down list for the reports you wish to consolidate.
3. Chose the Report Type (Financial, PLU, or Groups) from the drop down list for your
consolidated report.
4. Click on Load Table to load the consolidated store report.
5. Click on the Grid Lines icon to toggle between displaying grid lines on the table and not.
6. Click on the White/Gray icon to toggle between showing the descriptors in white or gray.
7. Click on the Print Table icon to print the consolidated store report.
8. Click on Exit to return to the main menu.
82 Menu Functions SAM1000 For Windows User's Manual v2.3
Page 89
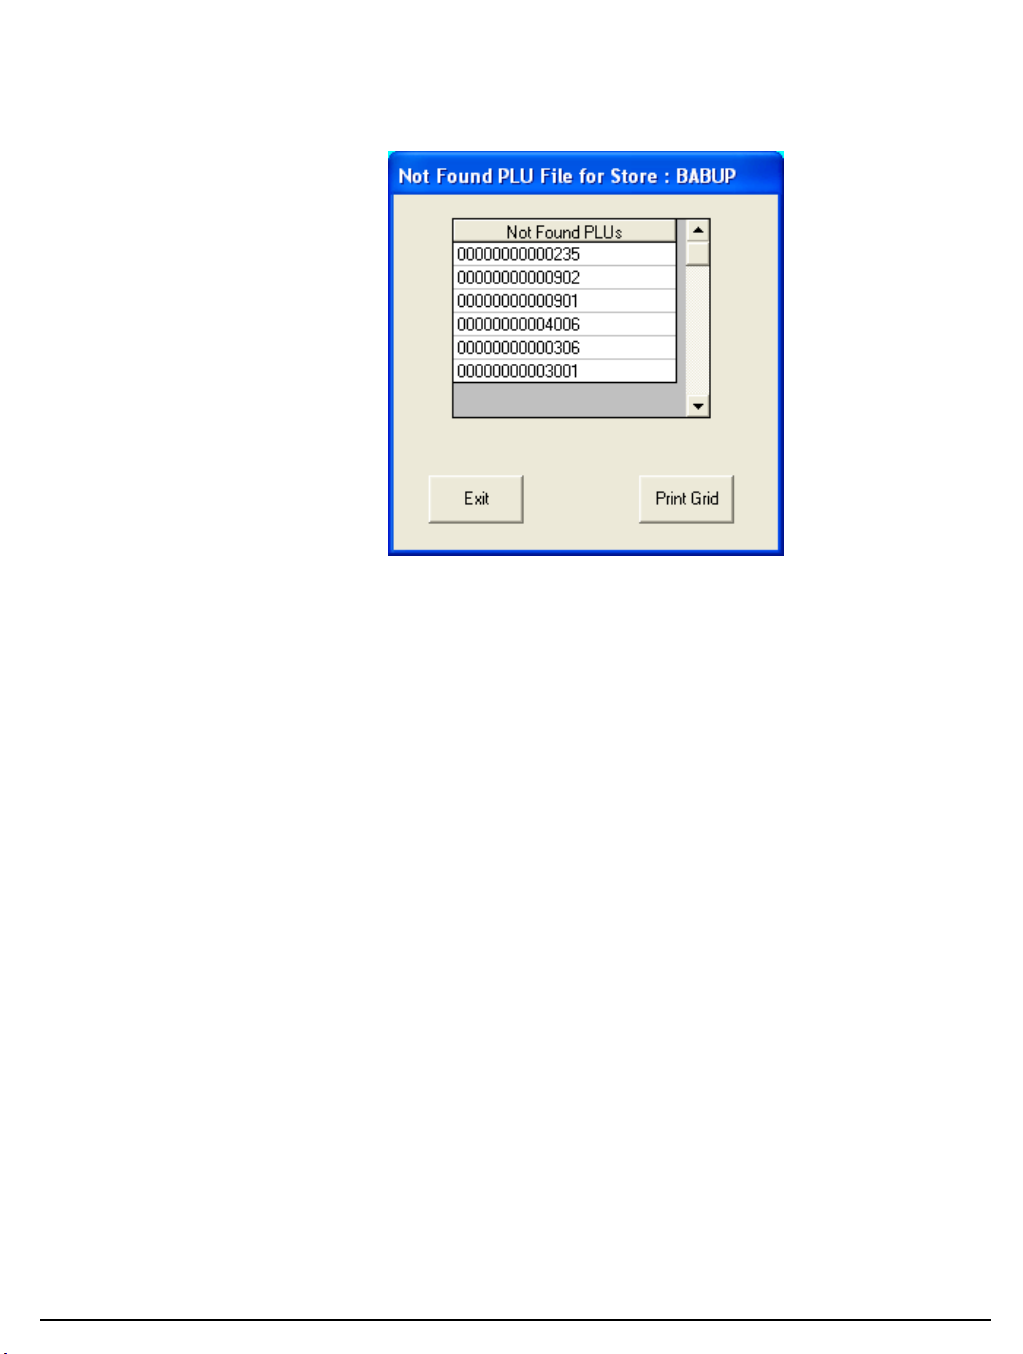
Not Found PLU File
1. Choose Not Found PLU File from the Print menu to display and print out the Not
Found PLUs for the selected store. The Not Found PLU File dialog box displays.
2. Click Print Grid to Print the Not Found PLUs.
3. Chose Exit to return to the main menu.
SAM1000 For Windows User's Manual v2.3 Menu Functions 83
Page 90
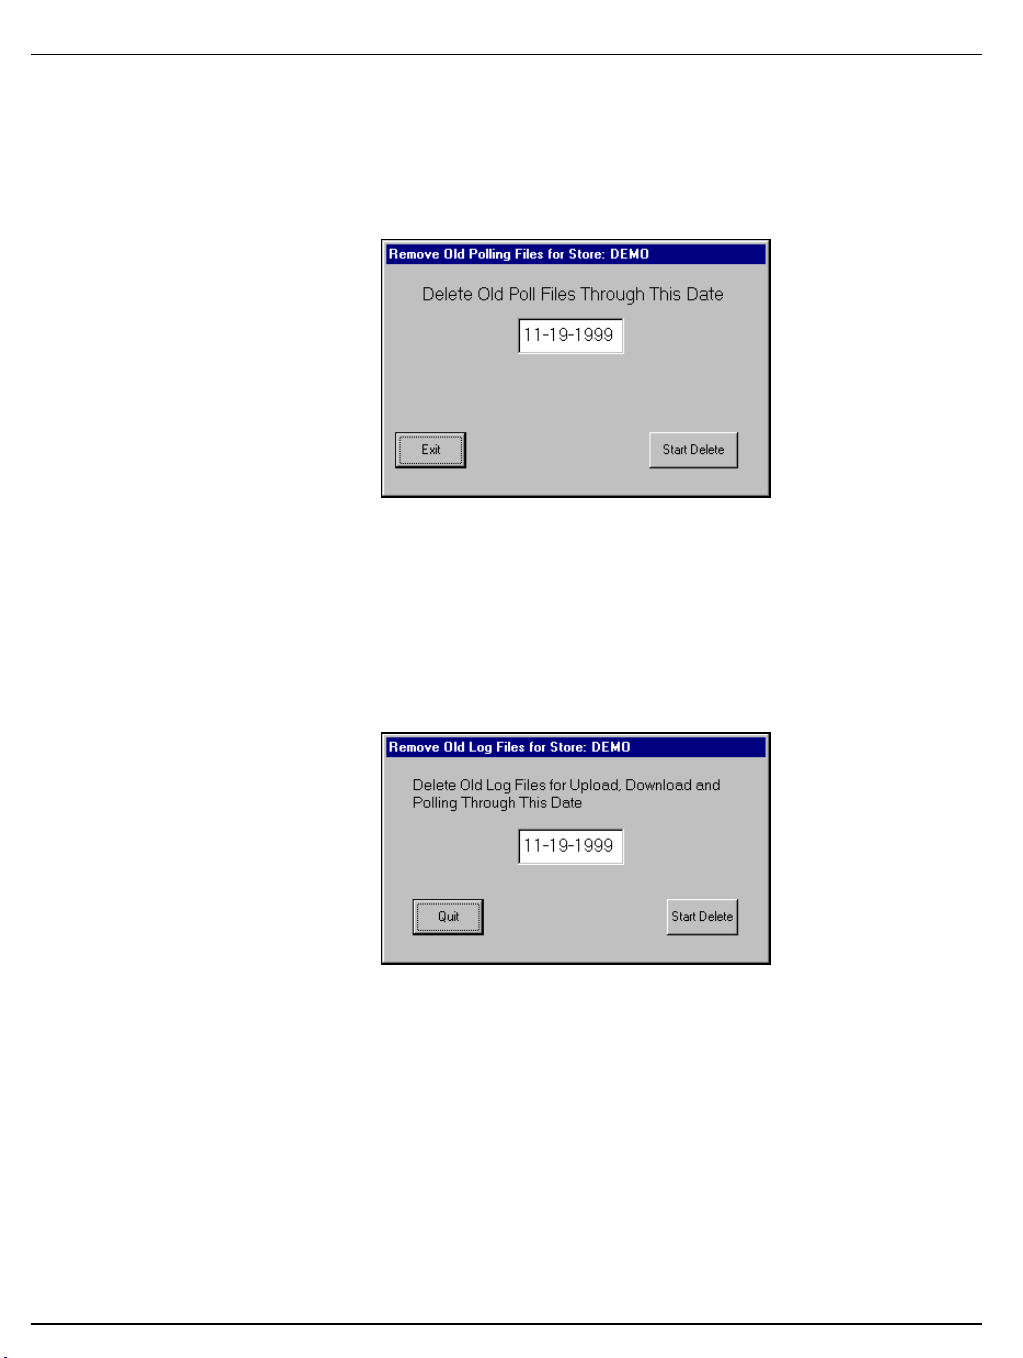
Remove
Old Poll Files
1. Choose Remove Old Poll Files from the Utilities menu to delete unwanted poll files.
The Remove Old Polling Files dialog box displays.
2. Enter the date through which you want old poll files deleted. The message "FINISHED"
will display when completed.
3. Click Exit to return to the main menu.
Log Files (Upload, Download, Poll)
1. Choose Remove Old Poll Log Files from the Utilities menu to delete unwanted poll
log files. The Remove Old Polling Log Files dialog box will display.
2. Enter the date through which you want old poll log files deleted. The message
"FINISHED" will display when completed.
3. Click Exit to return to the main menu.
84 Menu Functions SAM1000 For Windows User's Manual v2.3
Page 91
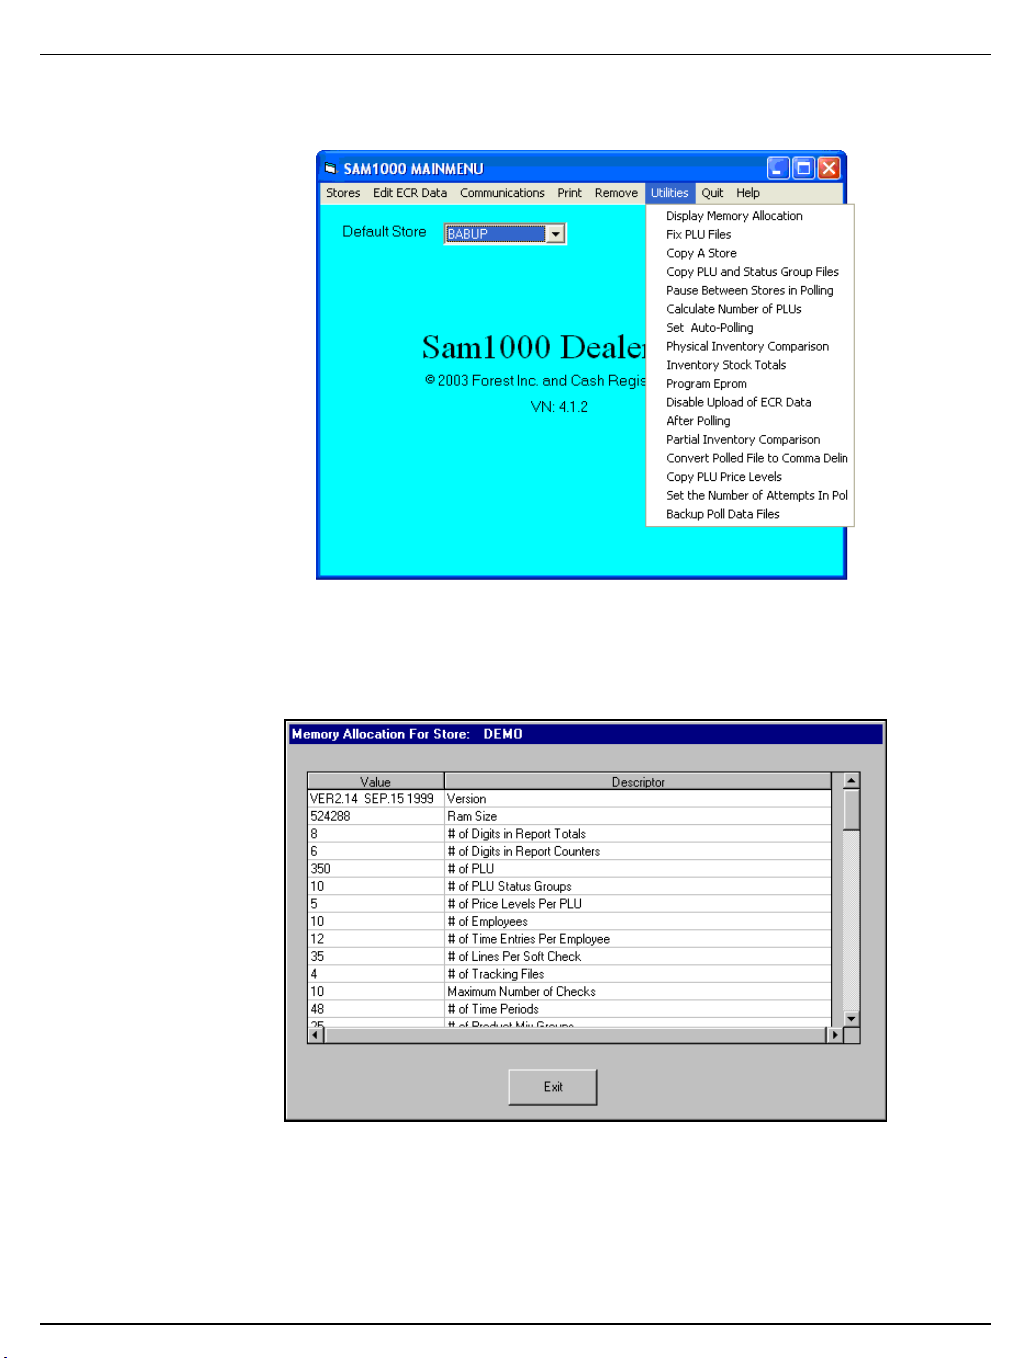
Utilities
Choose Utilities from the Main menu to access the utilities described below.
Display Memory Allocation
1. Choose Display Memory Allocation from the Utilities menu to display the memory
allocation of the store’s ECR.
2. Click Exit to return to the main menu.
SAM1000 For Windows User's Manual v2.3 Menu Functions 85
Page 92
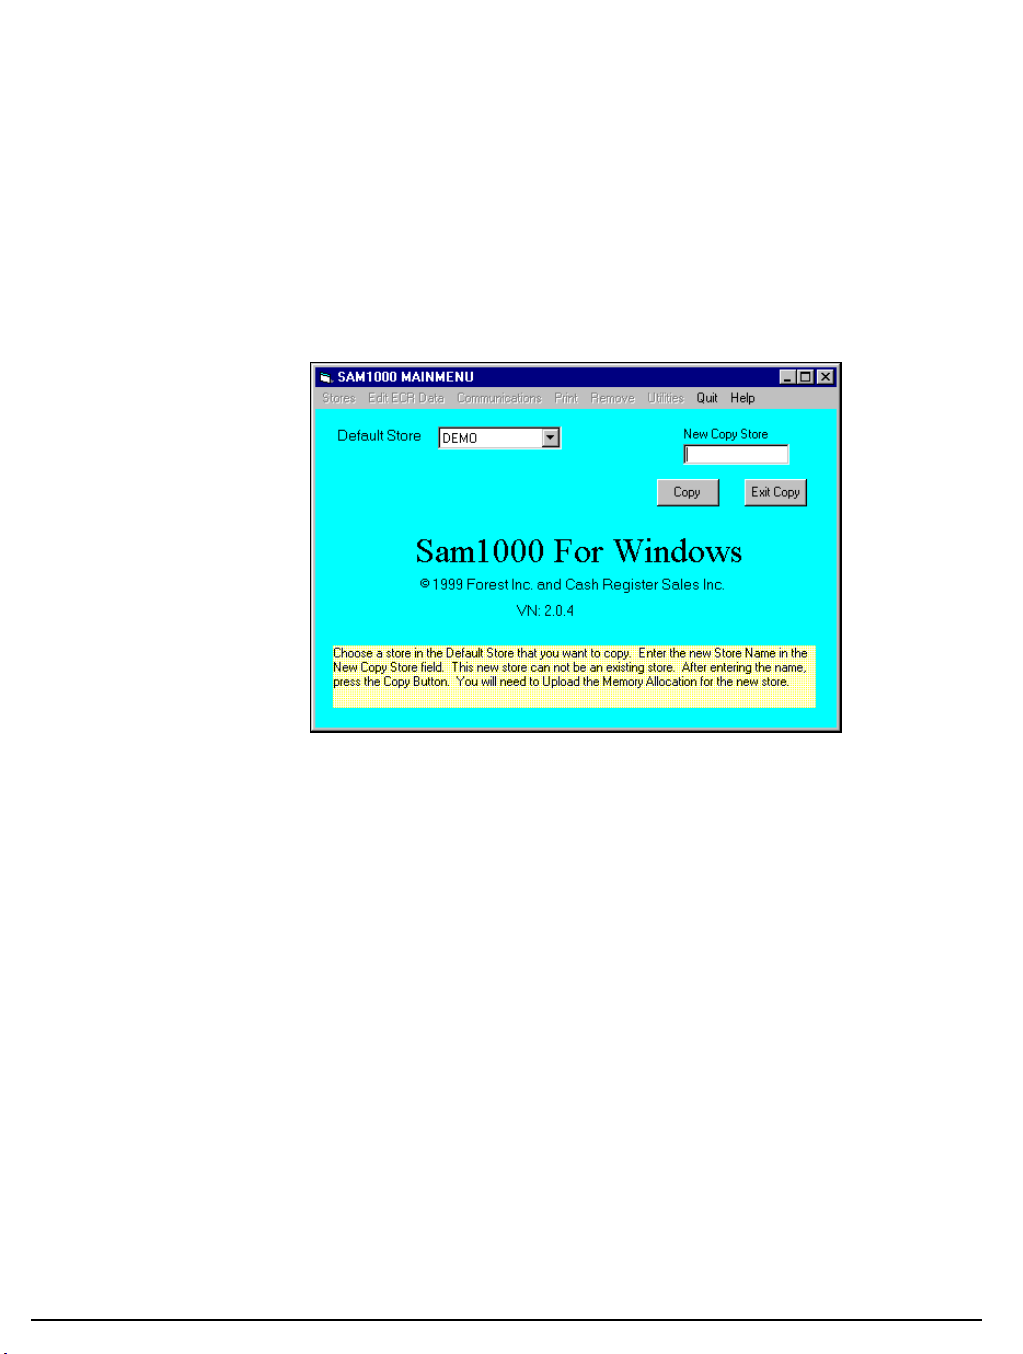
Re-Index PLU Misc Files
This function reindexes the PLU file when there are deletions or changes.
Choose Re-Index PLU Misc Files from the Utilities menu.
Copy a Store
Use the Copy a Store function to create a new store with the identical attributes of an existing
store.
1. Choose Copy a Store from the Utilities menu.
2. Select the store that you wish to copy from by clicking the Default Store field drop-down
list box.
3. Enter the name of the store you wish to create in the New Copy Store field.
4. Click the Copy button to create new store will identical attributes as the default store.
5. Click the Exit Copy button to return to the main menu.
86 Menu Functions SAM1000 For Windows User's Manual v2.3
Page 93
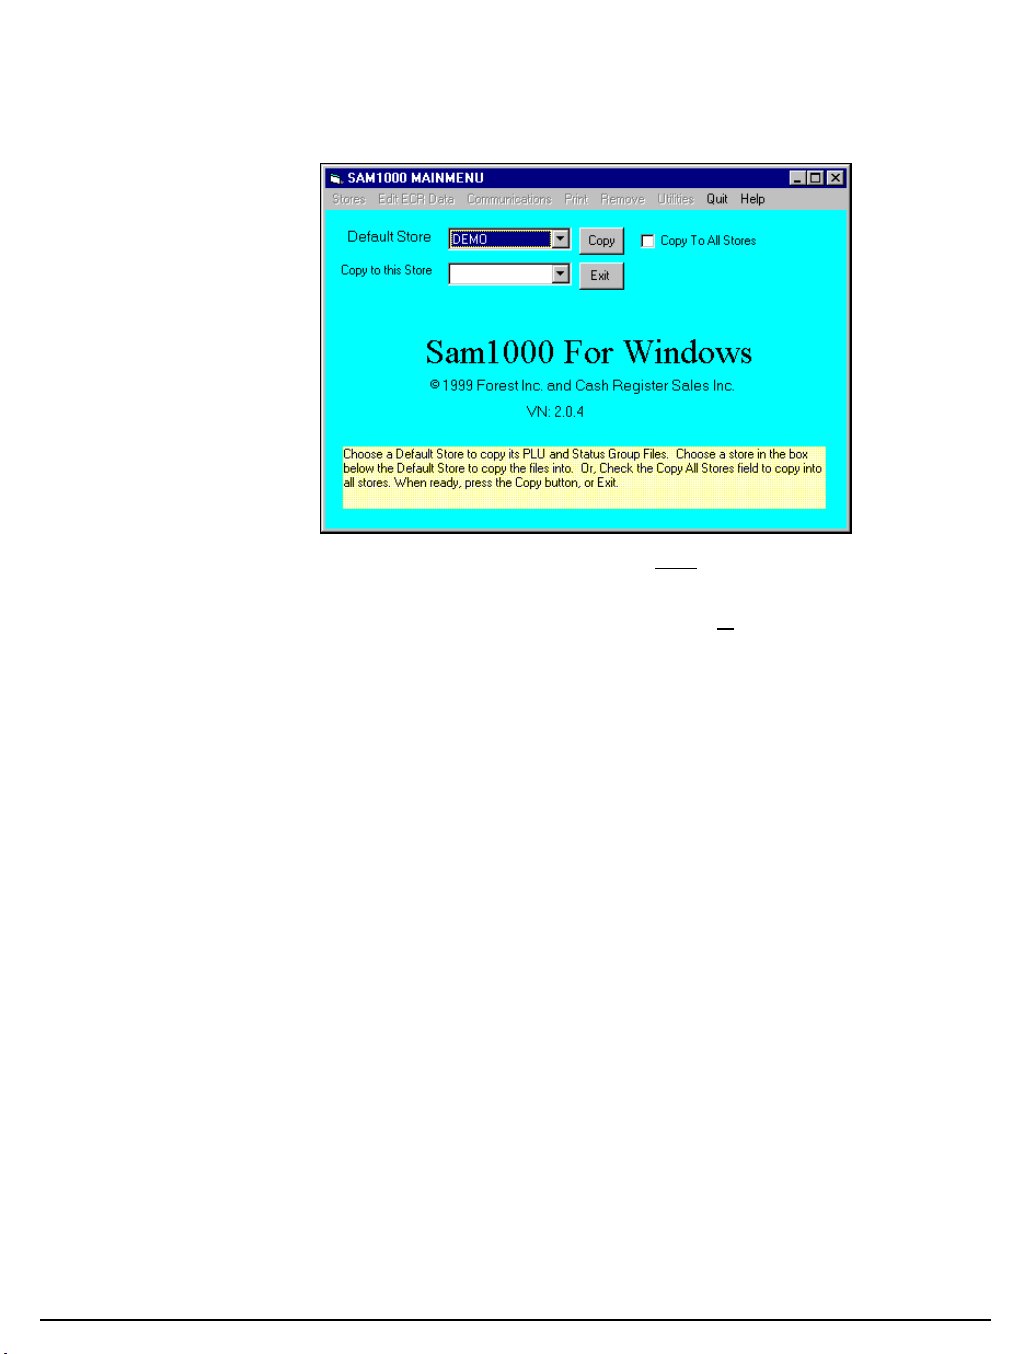
Copy PLU and Status Group Files
Use the Copy a PLU File function to copy a PLU file to an individual store or all stores.
1. Choose Copy a PLU File from the Utilities menu.
2. Select the store that you wish to copy the PLU file from by clicking the Default Store
field drop-down list box.
3. Select the name of the store you wish the PLU file copied to in the Copy PLU File to this
Store field, or click the Copy To All Stores check box.
4. Click the Copy button to copy the PLU file to the selected store or all stores.
5. Click the Exit button to return to the main menu.
SAM1000 For Windows User's Manual v2.3 Menu Functions 87
Page 94
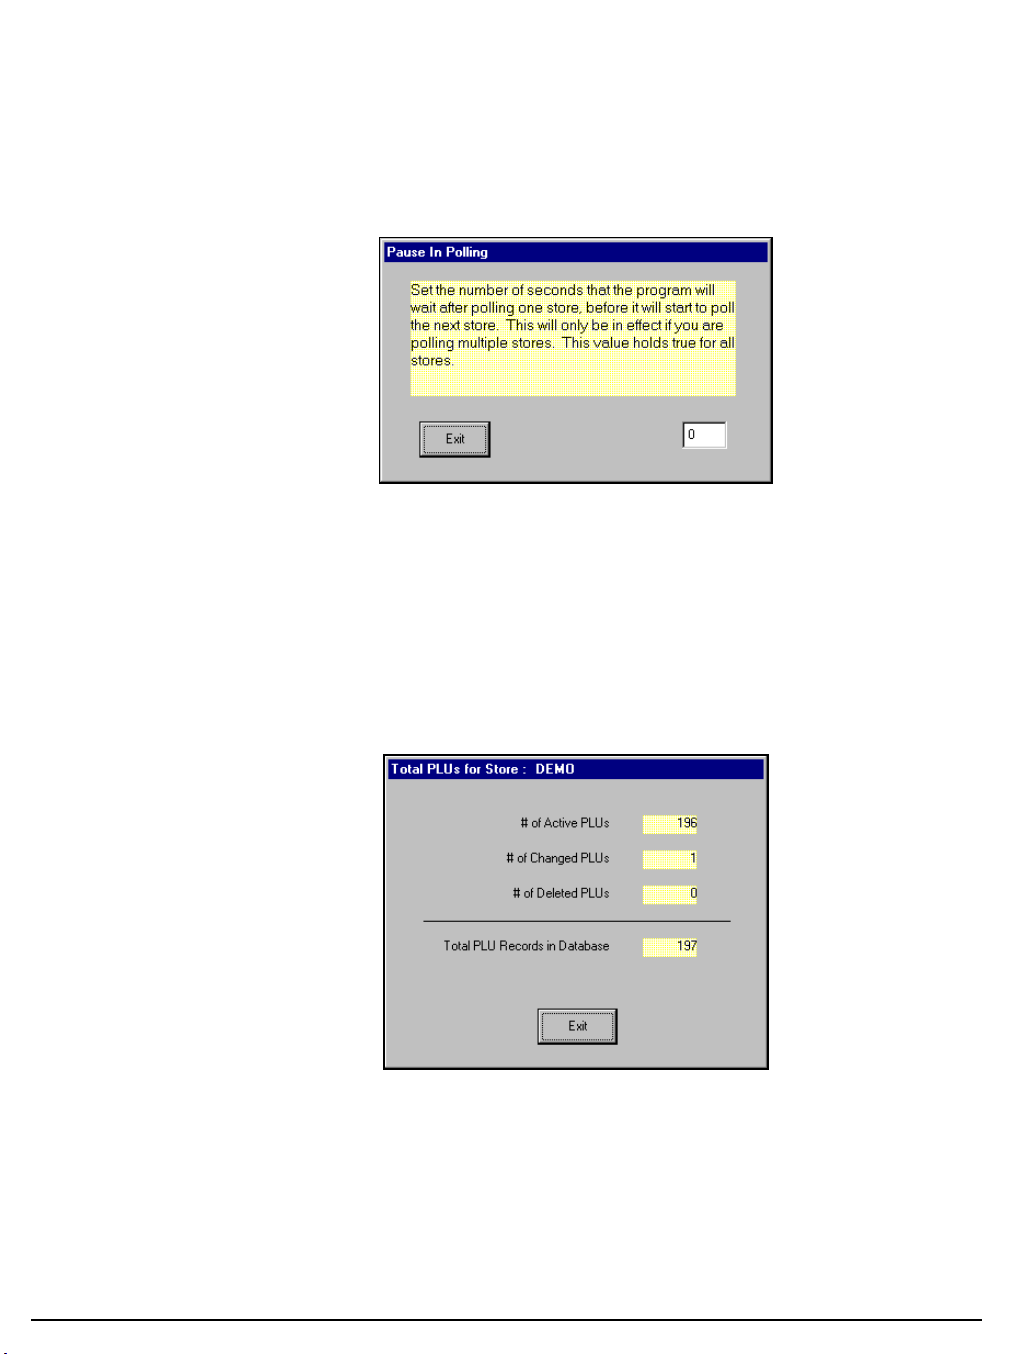
Pause Between Stores in Polling
Here you can set the number of seconds that the program will wait after polling one store
before it will start to poll the next store. This will only be in effect if you are polling multiple
stores. This value holds true for all stores.
1. Choose Pause Between Stores In Poll from the Utilities menu. The Pause In
Polling dialog box displays.
2. Enter the number of seconds you wish to pause in the field provided.
3. Click the Exit button to save changes and return to the main menu.
Calculate Number of PLUs
You can view the total number of PLUs in the database. The number of changed and deleted
PLUs are tracked.
1. Choose Calculate Number of PLUs from the Utilities menu. The Total PLUs dialog
box for the selected store displays.
2. Click the Exit button to return to the main menu.
88 Menu Functions SAM1000 For Windows User's Manual v2.3
Page 95
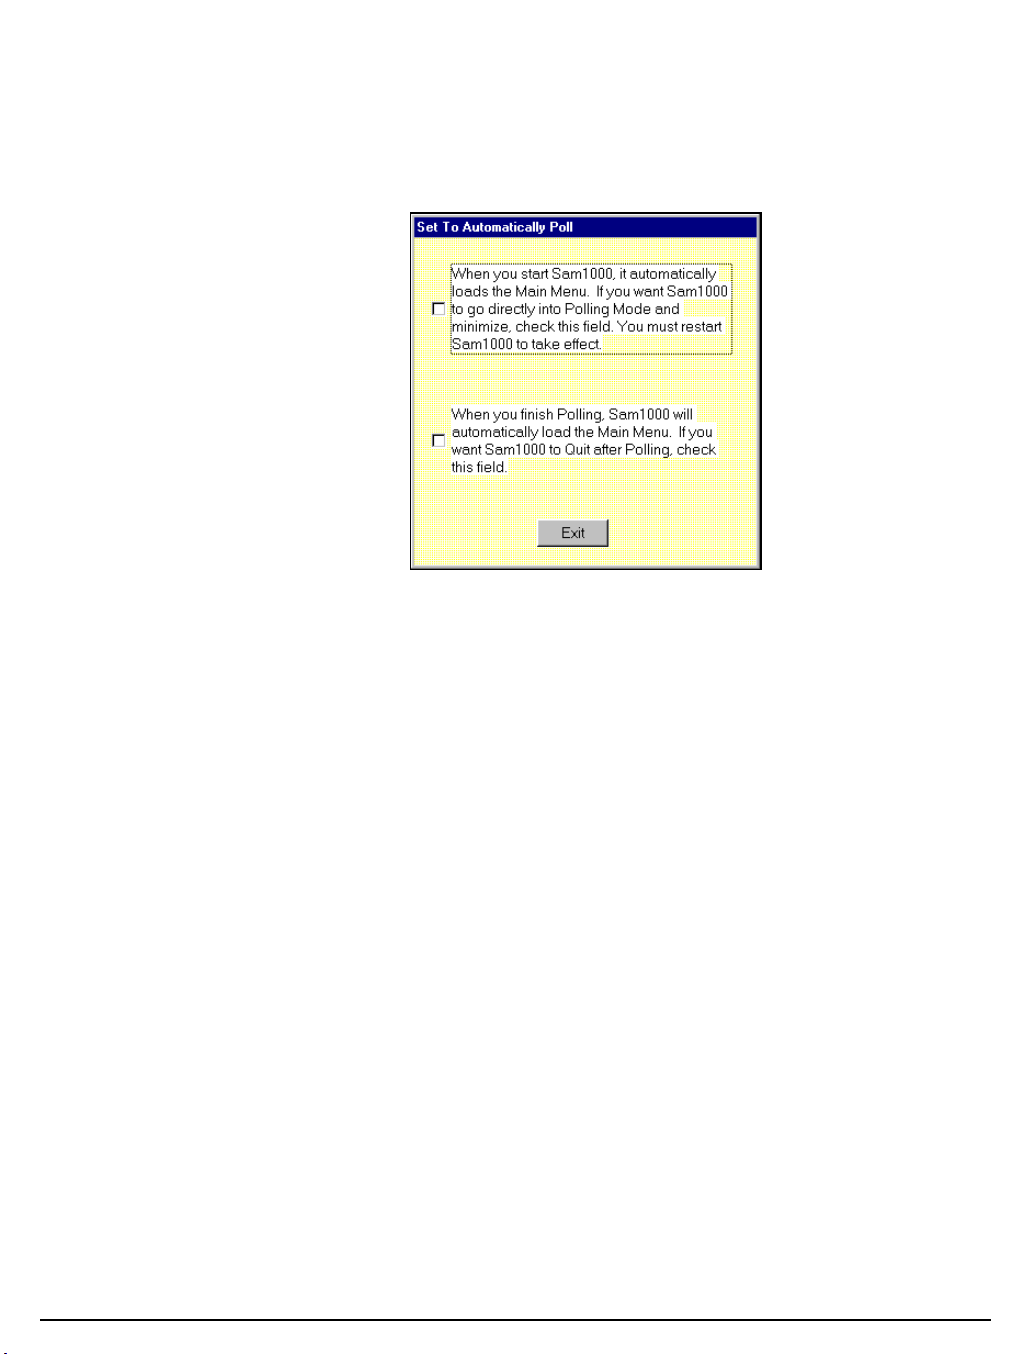
Set Auto-Polling
You can set Sam1000 to automatically go into polling mode when the program is started.
You can also set Sam1000 to automatically close when polling is completed.
1. Choose Set to Automatically Poll from the Utilities menu. The Set to Automatically
Poll dialog box displays.
2. Select the first check box if you wish to automatically poll when Sam1000 is executed.
Select the second check box if you wish to close Sam1000 automatically when polling is
completed.
3. Click Exit.
4. Close Sam1000 and then restart it for changes to take effect.
SAM1000 For Windows User's Manual v2.3 Menu Functions 89
Page 96
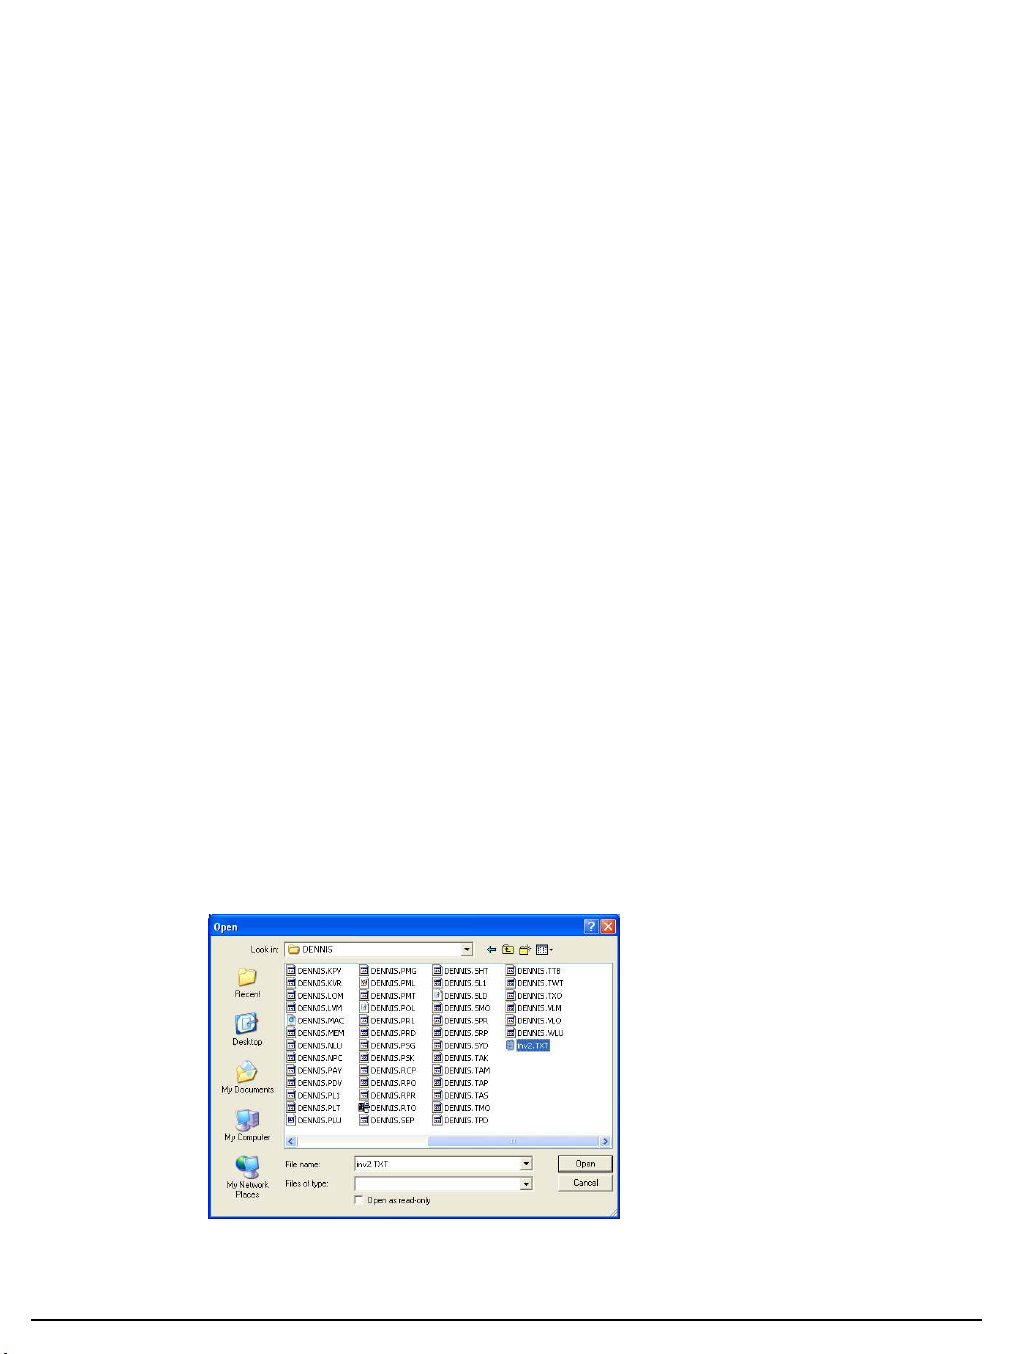
Physical Inventory Comparison
Partial Inventory Comparison
These utilities will compare the inventory quantity of the PLU file with that of an external
file. The external file can be one that was created by a hand scanner that was used to take a
physical inventory count. This file could also be created by an accounting program that has
the capabilities to export an ASCII text file.
The Partial Inventory Comparison compares only PLUs where the external file contains data.
The Physical Inventory Comparison compares all PLUs.
Requirements
In order to compare files, the external file must have the following characteristics:
The name of the file must be COLLECT.DAT
The file COLLECT.DAT must be in the same directory of the Store name. If you collect
data for the store KFC , then the file COLLECT.DAT must be in the path
\SAM1000\STORES\KFC\COLLECT.DAT .
The file must be a comma delimited ASCII text file.
A PLU must be on its own line.
Every Line must end with a carriage return and line feed.
The first field of the line must be the PLU number, followed by a comma.
The second field of the line must be the quantity.
You can have additional fields on the line, however, the comparison program only uses
the first 2 fields.
Inventory Comparison Procedure
1. Choose Partial Physical Inventory Comparison or Physical Inventory Comparison from
the Utilities menu.
2. Click the Load Scanned Data File command button.
90 Menu Functions SAM1000 For Windows User's Manual v2.3
Page 97
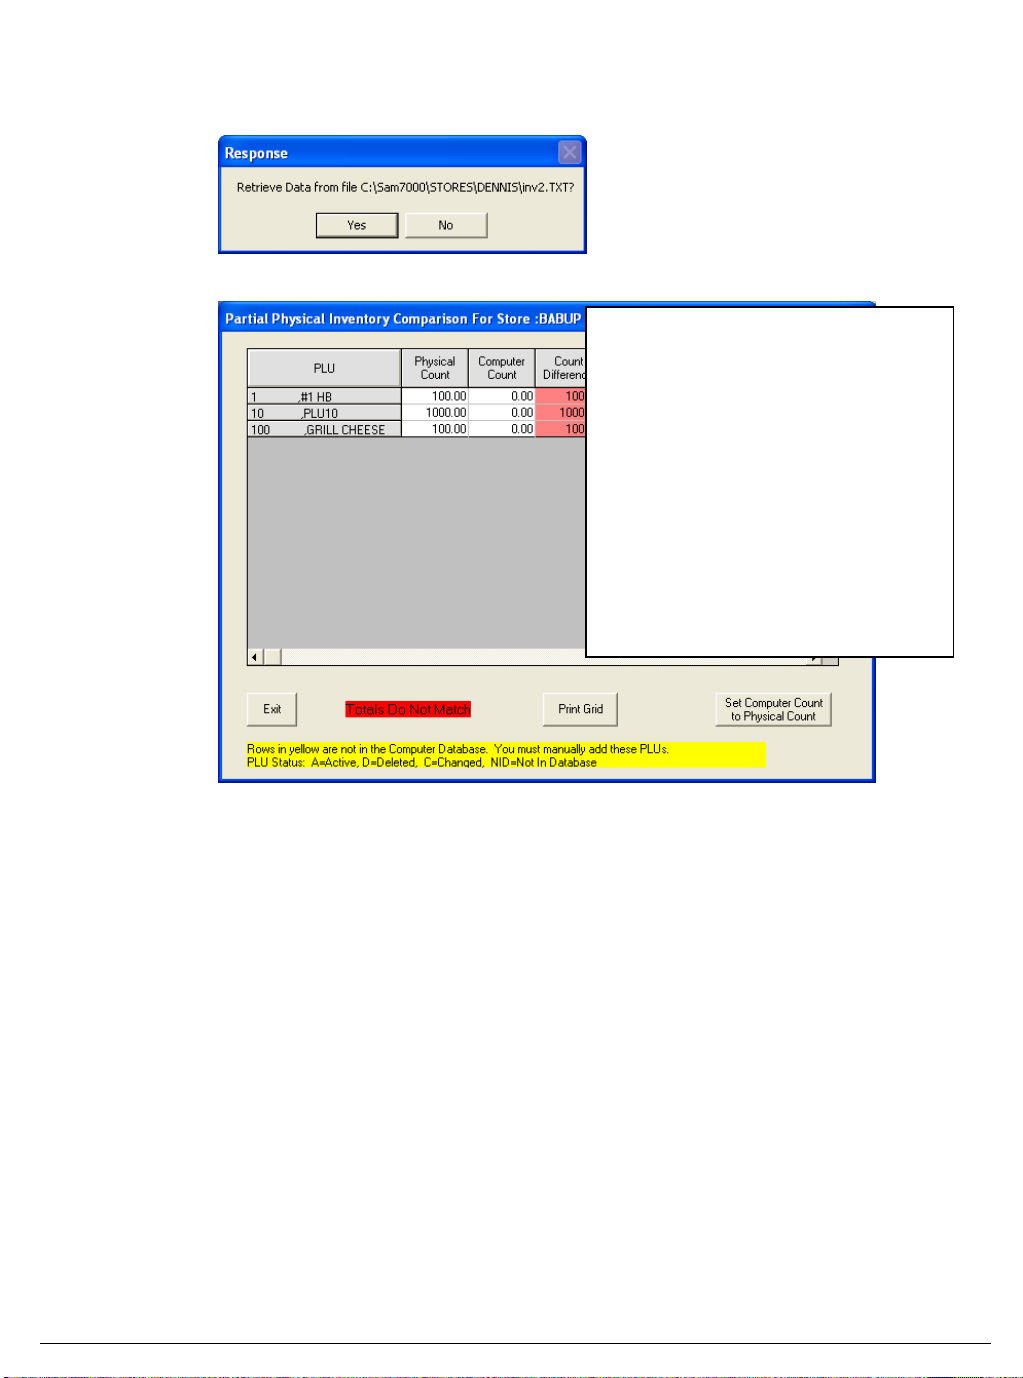
3. From the Open dialog, locate the folder and file where you located the inventory record
text file. Click Open.
4. The Response Dialog displays. Click Yes.
5. Click Yes. The scanned information will now display.
Notes: When you choose “Set Computer
Count to Physical Count”, you will have
an “Adjust” row in the Inventory History,
Purchase History updating your inventory
to the new physical inventory counts you
entered into the portable data terminal.
Price corrections must be made manually
in the PLU file or on the product in the
store, which ever is correct.
6. Click the Print Grid Button to print the spreadsheet to your default printer.
SAM1000 For Windows User's Manual v2.3 Menu Functions 91
Page 98
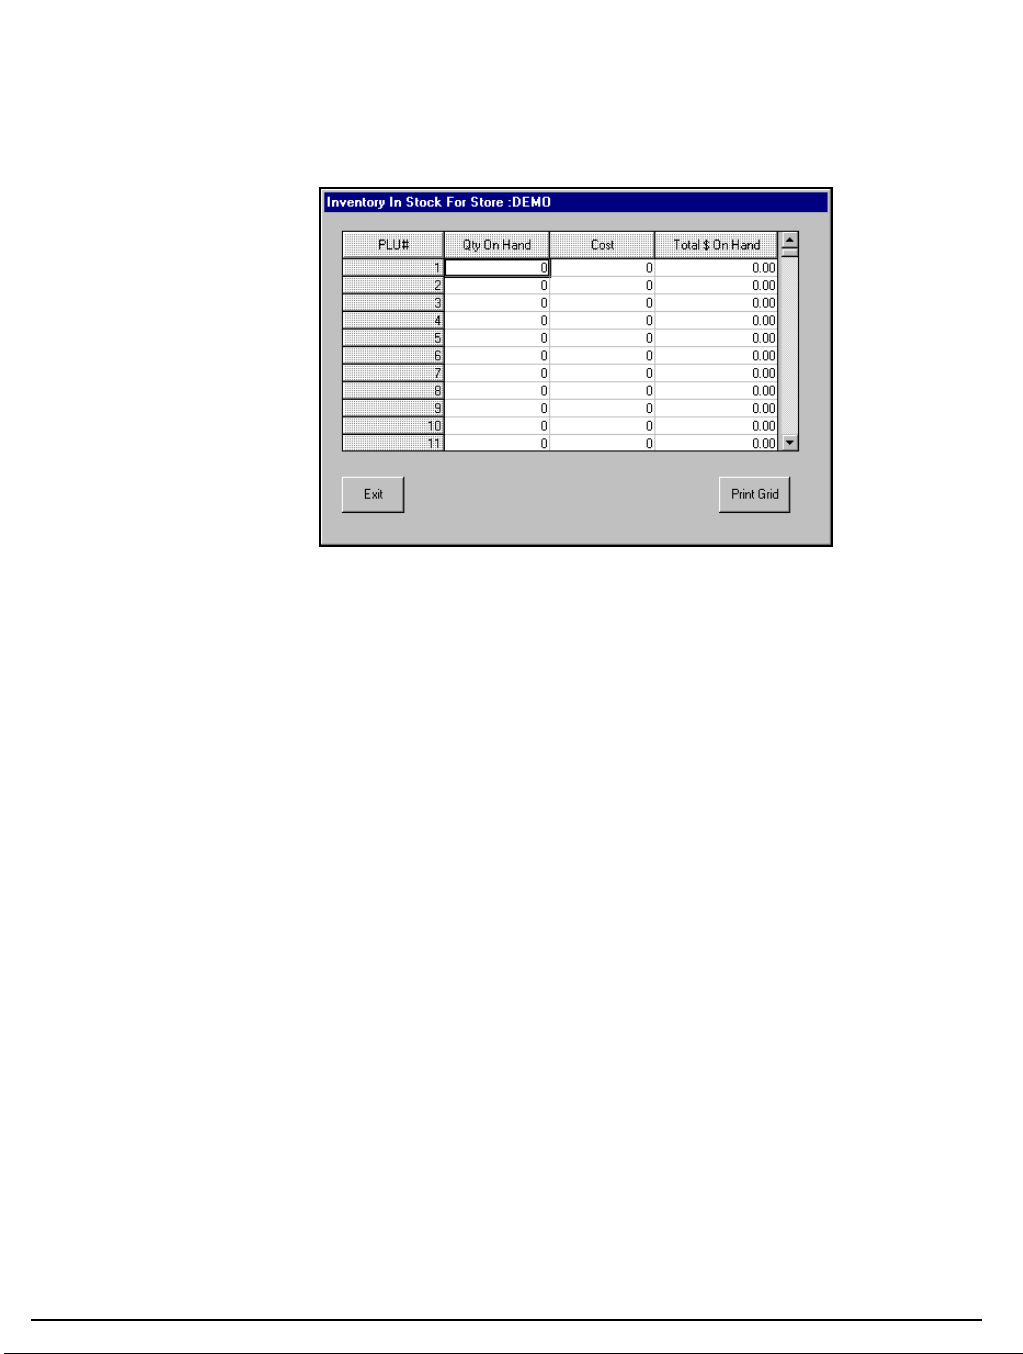
Inventory Stock Totals
This utility will calculate the total inventory of the Store PLU file.
1. Choose Inventory Stock Totals from the Utilities menu. The Inventory In Stock dialog
box displays.
2. Click the Print Grid Button to print the spreadsheet to your default printer.
92 Menu Functions SAM1000 For Windows User's Manual v2.3
Page 99
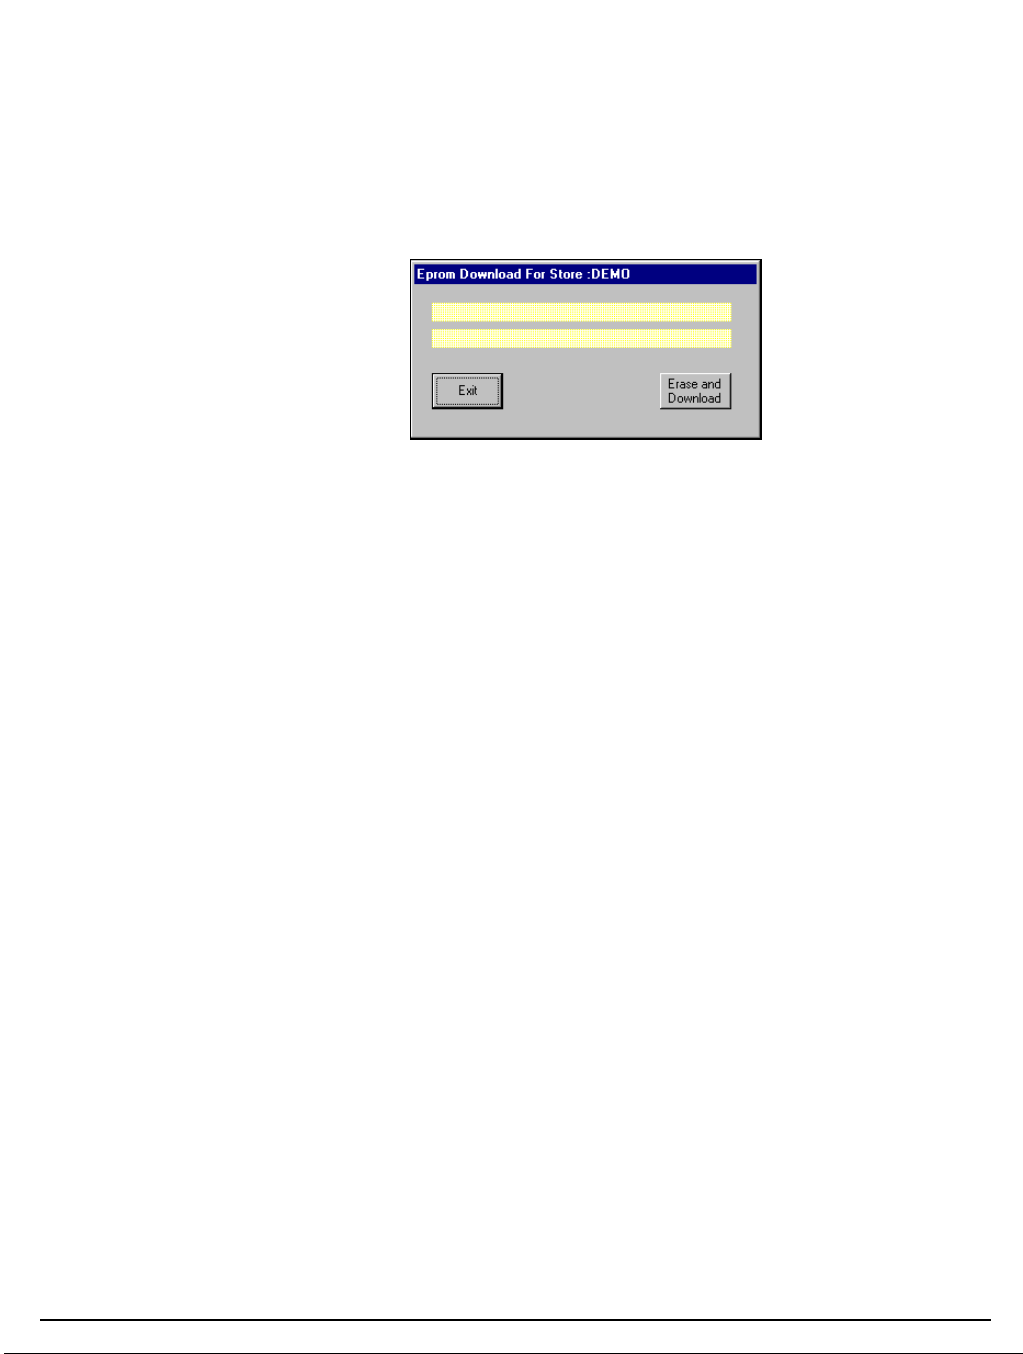
Program EPROM
This utility allows you to download a new EPROM to a SPS 1000.
1. Rename the EPROM file to L&G.bin.
2. Copy L&G.bin to the SAM1000 directory.
3. Choose PROGRAM EPROM from the Utilites menu. The EPROM DOWNLOAD
dialog box displays.
4. Click Erase and Download.
SAM1000 For Windows User's Manual v2.3 Menu Functions 93
Page 100
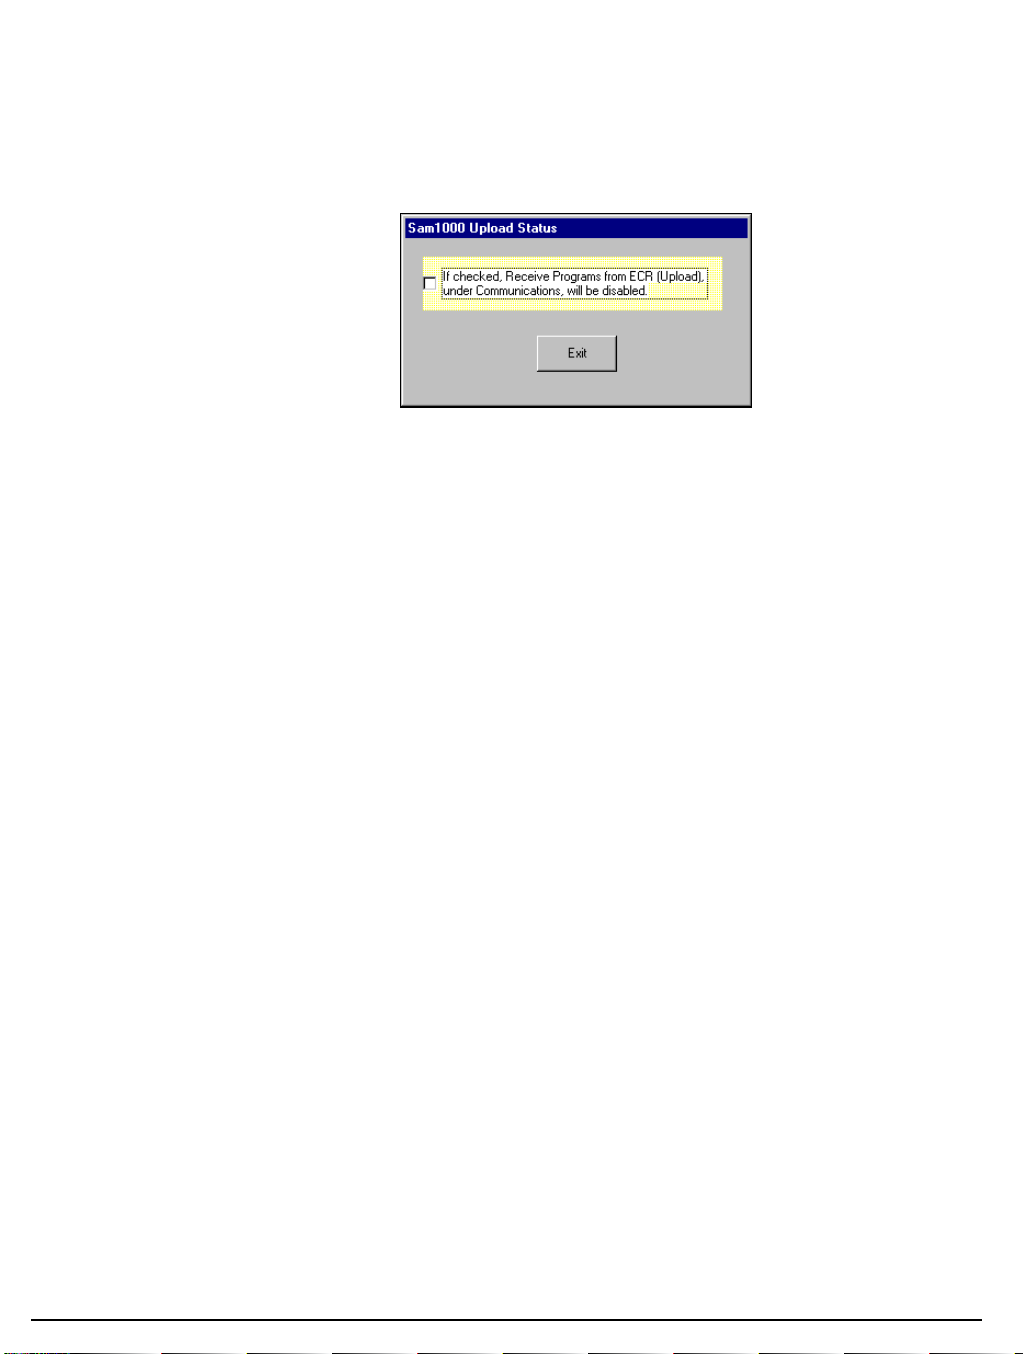
Disable Upload of ECR Data
You can protect the integrity of you the register program stored by SAM 1000 by disabling
the Receive Programs from ECR (upload) function on the Communications menu.
1. Choose Disable Upload of ECR Data from the Utilities menu. The Sam 1000 Upload
Status dialog box displays.
2. Click the check box to disable uploads.
3. Click Exit.
94 Menu Functions SAM1000 For Windows User's Manual v2.3
 Loading...