

Page 1

Samsung Saga™
Global Quad-band
Smartphone
Windows Mobile 6.1 Professional
User Manual
Please read this manual before operating your
phone, and keep it for future reference.
Page 2

Intellectual Property
All Intellectual Property, as defined below, owned by or which is otherwise the
property of Samsung or its respective suppliers relating to the SAMSUNG Phone,
including but not limited to, accessories, parts, or software relating there to (the
“Phone System”), is proprietary to Samsung and protected under federal laws, state
laws, and international treaty provisions. Intellectual Property includes, but is not
limited to, inventions (patentable or unpatentable), patents, trade secrets,
copyrights, software, computer programs, and related documentation and other
works of authorship. You may not infringe or otherwise violate the rights secured by
the Intellectual Property. Moreover, you agree that you will not (and will not attempt
to) modify, prepare derivative works of, reverse engineer, decompile, disassemble,
or otherwise attempt to create source code from the software. No title to or
ownership in the Intellectual Property is transferred to you. All applicable rights of
the Intellectual Property shall remain with SAMSUNG and its suppliers.
Samsung Telecommunications America (STA), LLC
Headquarters: Customer Care Center:
1301 E. Lookout Drive 1000 Klein Rd.
Richardson, TX 75082 Plano, TX 75074
Toll Free Tel: 1.888.987.HELP (4357)
Internet Address: http://www.samsungusa.com
©
2008 Samsung Telecommunications America, LLC is a registered trademark of
Samsung Electronics America, Inc. and its related entities.
Do you have questions about your Samsung Mobile Phone?
For 24 hour information and assistance, we offer a new FAQ/ARS System
(Automated Response System) at:
www.samsungtelecom.com/support
Page 3

Licensed by Qualcomm Incorporated under one or more of the following patents:
U.S.
Patent No. 4, 901, 307; 5, 056, 109; 5, 099, 204; 5, 101, 501; 5, 103, 459; 5, 107,
225; 5, 109, 390.
Printed in Korea
ACCESS and NetFront are trademarks or registered trademarks of ACCESS CO., LTD.
in Japan and other countries.
RSA® is a registered Trademark RSA Security, Inc.
Saga™ is a trademark of Verizon Wireless
Disclaimer of Warranties; Exclusion of Liability
EXCEPT AS SET FORTH IN THE EXPRESS WARRANTY CONTAINED ON THE
WARRANTY PAGE ENCLOSED WITH THE PRODUCT, THE PURCHASER TAKES THE
PRODUCT "AS IS", AND SAMSUNG MAKES NO EXPRESS OR IMPLIED WARRANTY OF
ANY KIND WHATSOEVER WITH RESPECT TO THE PRODUCT, INCLUDING BUT NOT
LIMITED TO THE MERCHANTABILITY OF THE PRODUCT OR ITS FITNESS FOR ANY
PARTICULAR PURPOSE OR USE; THE DESIGN, CONDITION OR QUALITY OF THE
PRODUCT; THE PERFORMANCE OF THE PRODUCT; THE WORKMANSHIP OF THE
PRODUCT OR THE COMPONENTS CONTAINED THEREIN; OR COMPLIANCE OF THE
PRODUCT WITH THE REQUIREMENTS OF ANY LAW, RULE, SPECIFICATION OR
CONTRACT PERTAINING THERETO. NOTHING CONTAINED IN THE INSTRUCTION
MANUAL SHALL BE CONSTRUED TO CREATE AN EXPRESS OR IMPLIED WARRANTY
OF ANY KIND WHATSOEVER WITH RESPECT TO THE PRODUCT. IN ADDITION,
SAMSUNG SHALL NOT BE LIABLE FOR ANY DAMAGES OF ANY KIND RESULTING
FROM THE PURCHASE OR USE OF THE PRODUCT OR ARISING FROM THE BREACH OF
THE EXPRESS WARRANTY, INCLUDING INCIDENTAL, SPECIAL OR CONSEQUENTIAL
DAMAGES, OR LOSS OF ANTICIPATED PROFITS OR BENEFITS.
Saga™_BJ18_PM_102208_F6
Page 4

Table of Contents
Section 1: Getting Started ..........................................................................5
Understanding this User Manual ...............................................................................5
Activating Your Phone ............................................................................................... 5
Powering On the Phone ............................................................................................6
Turning the Phone Features On and Off .....................................................................6
The Today Screen ..................................................................................................... 7
Setting Up Your Voicemail ......................................................................................... 8
Section 2: Understanding Your Phone .......................................................9
Features of Your Phone .............................................................................................9
Front View of Your Phone ........................................................................................ 11
Side View ...............................................................................................................13
Top View ................................................................................................................14
Rear View ...............................................................................................................14
Today Screen .........................................................................................................15
Command Keys ......................................................................................................16
Locking Your Phone ................................................................................................ 17
Display Icons ..........................................................................................................20
Battery ....................................................................................................................23
Using a microSD Memory Card ...............................................................................29
Programs - Installation and Removal .......................................................................34
Managing Certificates ............................................................................................. 35
Rebooting your Phone after Lockup ........................................................................36
Resetting your Phone to Factory Defaults ................................................................ 36
Clearing all Phone Data ...........................................................................................38
Section 3: Customization and Navigation ................................................39
Navigating Your PDA ............................................................................................... 39
Menu Types ............................................................................................................40
Using the Optical Mouse .........................................................................................40
Customizing your Start Menu List ...........................................................................41
Today Screen .........................................................................................................41
Customizing your Today Screen Theme ..................................................................41
Customizing your Today Screen Item Listing ........................................................... 42
Customizing Buttons ............................................................................................... 43
Customizing your touch sensitive keypad ................................................................44
Section 4: Call Functions ..........................................................................46
Making a Call ..........................................................................................................46
Answering a Call .....................................................................................................47
Using the Speakerphone ......................................................................................... 48
Displaying Your Phone Number ............................................................................... 48
Call History .............................................................................................................48
Roaming-Networks .................................................................................................51
1
Page 5

TTY .........................................................................................................................52
Voice Command ......................................................................................................53
Section 5: Entering Text .......................................................................... 55
Virtual QWERTY Keyboard .......................................................................................55
Text Entry - Input Mode ..........................................................................................55
Text Entry - Word Completion .................................................................................57
Text Entry - Options ................................................................................................58
Section 6: Contacts .................................................................................. 59
Understanding Your Contacts ..................................................................................59
Working with your Contacts ....................................................................................60
Adding Notes to Contacts ........................................................................................62
Speed Dial Contacts ................................................................................................63
Section 7: Messaging .............................................................................. 65
Types of Messages .................................................................................................65
Retrieving a Message ..............................................................................................66
Accessing Message Folders ....................................................................................66
Configuration of Messaging Parameters .................................................................. 67
Sending Messages ..................................................................................................69
Text Message Menu Options ...................................................................................71
Multimedia Message Menu Options ........................................................................72
Spell Checking a Text Message ...............................................................................75
Checking Names with an SMS Message .................................................................75
Using My Text Messages ........................................................................................75
E-mail Account Setup .............................................................................................76
Section 8: Changing Your Settings ......................................................... 79
Settings ..................................................................................................................79
Personal Settings ....................................................................................................79
System Settings ......................................................................................................82
Bluetooth ................................................................................................................90
Connections ............................................................................................................92
Sound Settings .......................................................................................................95
Setting a Phone Password ......................................................................................98
Phone Settings ........................................................................................................99
Section 9: Personal Digital Assistant .................................................... 112
Your Personal Digital Assistant ..............................................................................112
Microsoft Mobile Applications ...............................................................................114
Office Mobile ........................................................................................................115
Dormant Mode ......................................................................................................118
Windows Media Player ..........................................................................................119
Camera and Video .................................................................................................121
Application Management ......................................................................................125
Section 10: Personal Organizer ............................................................. 128
Today Screen ........................................................................................................128
Calendar ...............................................................................................................130
Table of Contents 2
Page 6

Tasks List .............................................................................................................133
Notes ....................................................................................................................136
Note Options .........................................................................................................137
Calculator .............................................................................................................138
Section 11: Synchronization ...................................................................139
Active Sync ...........................................................................................................139
Changing the Synchronization Schedule ...............................................................145
Windows Mobile Device Center 6 for Windows Vista .............................................146
Wireless Sync .......................................................................................................147
Section 12: Network Services ................................................................149
Call Forwarding ....................................................................................................149
Three-way Calling .................................................................................................149
Call Waiting ..........................................................................................................150
Caller ID ................................................................................................................150
Section 13: Bluetooth and Wi-Fi Services ..............................................152
About Bluetooth Wireless Technology ...................................................................152
Bluetooth Modes ...................................................................................................156
Bluetooth Bonds ...................................................................................................158
Bluetooth Hands-Free Device ................................................................................159
Bluetooth OBEX FTP .............................................................................................. 160
Bluetooth Virtual Serial Port ..................................................................................160
ActiveSync via Bluetooth Wireless Technology ......................................................161
About Wi-Fi ...........................................................................................................161
Enabling Wi-Fi ......................................................................................................162
Automatically Connecting to a Network ................................................................. 162
Manually Entering Network Settings .....................................................................163
Changing Connection Information .........................................................................164
Section 14: Multimedia ...........................................................................165
Accessories ..........................................................................................................165
SD I/O Expansion Slot (microSD) ...........................................................................165
Games ..................................................................................................................166
Section 15: Health and Safety Information ............................................169
Health and Safety Information ............................................................................... 170
Samsung Mobile Products and Recycling ..............................................................171
UL Certified Travel Adapter ...................................................................................171
Consumer Information on Wireless Phones ...........................................................172
Road Safety ..........................................................................................................178
Responsible Listening ........................................................................................... 179
Operating Environment .........................................................................................181
Using Your Phone Near Other Electronic Devices ...................................................181
Potentially Explosive Environments .......................................................................184
Emergency Calls ................................................................................................... 185
FCC Notice and Cautions .......................................................................................186
Other Important Safety Information .......................................................................186
3
Page 7

Product Performance ............................................................................................187
Availability of Various Features/Ring Tones ...........................................................188
Battery Standby and Talk Time .............................................................................188
Battery Precautions ...............................................................................................188
Care and Maintenance ..........................................................................................190
Section 16: Warranty Information ......................................................... 191
Standard Limited Warranty ...................................................................................191
Index ........................................................................................................ 196
Table of Contents 4
Page 8

Section 1: Getting Started
Topics Covered
• Understanding this User Manual
• Activating Your Phone
• Powering On the Phone
• Turning the Phone Features On and Off
• The Today Screen
• Setting Up Your Voicemail
This section allows you to start using your phone by activating your service, setting
up your voicemail, inserting your battery, and navigating from the Tod ay screen.
Understanding this User Manual
The chapters of this guide generally follow the same order as both the menus and
sub menus in your phone. A robust index for quick reference to most features begins
on page 196.
Also included in this manual is important safety information that you should know
before using your phone.
Activating Your Phone
If you purchased your phone at a Verizon Wireless Store, it is probably activated and
ready to use. If you have upgraded your phone or received a new phone by mail, it
probably needs to be activated before you can use it.
To activate your phone, follow these steps:
1. Visit a Verizon Wireless Store and to have phone activated, or visit
www.verizonwireless.com and enter your login and password in the
Manage Your Account boxes available on the home page.
2. When you have accessed the My Account Overview page, select Activate
a new phone to display instructions needed to activate your phone online.
3. After gathering the required materials, follow the instructions to complete
the activation process.
5
Page 9

Powering On the Phone
Powering On the Phone
1. Press and hold the Power On/
Off key located at the top
of the phone (above the front
speaker grill)
– or –
Press and hold the End key
.
2. The phone receives a signal
from your home network and
then logs in. At this point, the
phone displays the Tod ay screen (page 7) and only functions as a PDA
(allowing you to run applications) until you activate the phone features.
Powering Off the Phone
1. Press and hold the Power On/Off key located at the top of the phone
(above the front speaker grill).
2. Once a Shutdown menu is displayed, tap OK to shutdown the handset.
Turning the Phone Features On and Off
Before you can use your Saga™ phone features, the onboard phone must first be
activated. This phone’s features can be activated by either tapping the
corresponding onscreen function or by using the optical mouse to navigate to the
desired function. For more information, refer to "Command Keys" on page 16.
1. From the To da y screen, tap Start located in the upper left corner of
the screen.
2. Ta p Settings . By default, the Personal tab is highlighted.
Getting Started 6
Page 10
3.
Tap t he Connections tab.
4. Tap Wireless Manager .
5. Tap Phone. The Phone feature is then activated and you are now able to
make and receive phone calls.
6. Tap to return to the Tod ay screen.
The Today Screen
The Tod ay screen displays, important
information, such as upcoming appointments
status indicators, the current date, time, and Get
Applications link.
䊳 To access the Toda y screen from
anywhere, press .
TouchWiz Widget Interface
You can change the Today user interface to the
more user-friendly TouchWiz Widget Interface.
1. From the Tod ay screen, tap Start
located in the upper left corner of the
screen.
2. Tap Settings . By default, the
Personal tab is highlighted.
3. Tap To da y .
1. Tap t he Items tab.
2. Scroll down the list, check the
Samsung Today box, and then
uncheck all other boxes from the list.
3. Tap to apply the changes and return to the Personal tab.
ok
To customize the TouchWiz Widget Interface, follow these steps:
1. Tap and hold on the icon that you would like to change.
2. Tap Edit.
3. Scroll through the list of widgets and select one that you would like to add.
4. Tap Select. The new widget will appear on your screen.
7
Page 11
Setting Up Your Voicemail
Setting Up Your Voicemail
Set up Voicemail
All unanswered calls to your Saga™ are sent to voicemail, even if your device is
turned off. Therefore, you’ll want to set up your voicemail and personal greeting as
soon as you activate your Saga™.
1. Press and hold to dial the voicemail system.
Note: Use of the key is reserved for speed dialing voic email. To dial voicemail without using
speed dial, simply dial your own phone numb er and when the system answers, enter y our
password and press .
2. When the system answers, enter your password and then press .
3. Follow the prompts to setup your voicemail.
Check Voicemail
1. Press and hold to speed dial voicemail.
2. When the voicemail system connects, enter your password and press .
3. Press to listen to your messages.
Getting Started 8
Page 12

Section 2: Understanding Your Phone
Topics Covered
• Features of Your Phone
• Front View of Your Phone
• Today Screen
• Command Keys
• Locking Your Phone
• Display Icons
• Battery
• Using a microSD Memory Card
• Programs - Installation and Removal
• Managing Certificates
• Rebooting your Phone after Lockup
• Resetting your Phone to Factory Defaults
• Clearing all Phone Data
This section outlines many key features of your phone. It also describes the display
icons, frequently used command keys, your display, and how to install your battery.
Features of Your Phone
Congratulations on your purchase of the Samsung Saga™. The Saga™, supports
thousands of applications. Using ActiveSync® 4.5 or later, you can keep your PC and
Saga™ synchronized at all times. The features listed below are just a sample of
what your Saga™ has to offer. You should read this guide to understand the many
features that this phone supports and keep it handy for reference.
9
Page 13

Features of Your Phone
Key Features of your Saga™
• Global Capability - can be used in most continents.
• Touch Screen
• Large 320x320 pixel, 65k color TFT screen
• Wireless Internet Capability
• Windows Mobile
TM
6.1 Professional
• 2-Way Text Messaging (SMS)
• Multimedia Messaging (MMS)
• E-mail Message Service
• microSD and microSDHC (up to 8GB) Expansion Memory
• Utilizes Microsoft's Voice Command technology for voice recognition
• Voice Memo
• Built-in Bluetooth Technology
• Built-in Wi-Fi Support
• LED (Green: Wi-Fi, Red: Phone, Blue: Bluetooth, Purple: Camera)
• 2 Megapixel Camera
Understanding Your Phone 10
Page 14

Front View of Your Phone
2
3
4
6
7
8
9
5
1
Key Functions
1. Earpiece: Allows you to hear the other caller.
2. Main LCD: The main LCD screen displays all the information needed to
operate your phone.
3. Num/Fn Key: Activates functions when pressed in conjunction with certain
keys.
4. Speakerphone/Voice Command Key: Press this key to enable/disable the
speakerphone option. Press and hold to activate Voice Commands.
5. LED: Indicates when certain features are active on your phone such as
Bluetooth or Wi-Fi.
11
Page 15
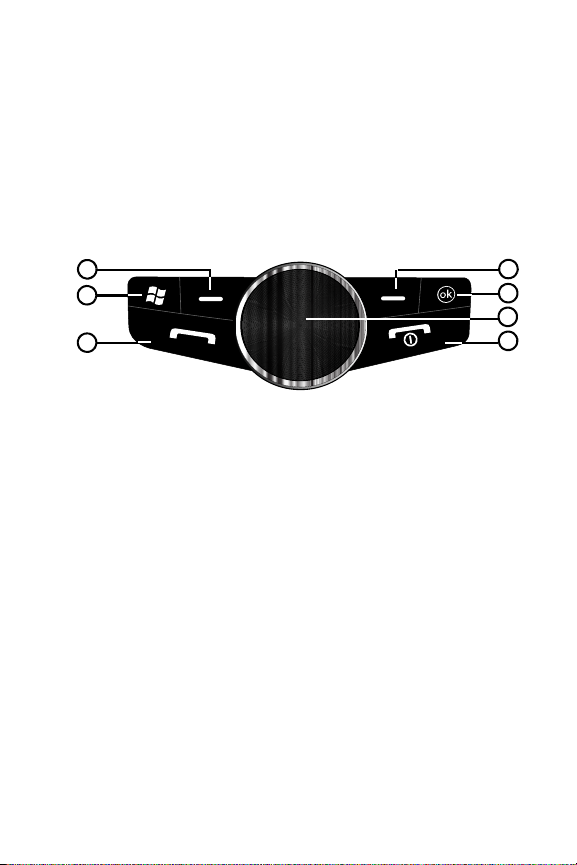
Optical Mouse
1
2
3
4
5
6
7
Front View of Your Phone
6. Delete/Backspace Key: Deletes characters from the display when you are
in text entry mode. Press to return to the previous menu or screen when
navigating features on your phone.
7. Enter Key: Press to perform the function highlighted in the menu or
submenu. Press to enter spaces between lines of text.
8. Messaging Key: Launches Messaging window.
9. Spacebar: Allows you to add spaces between words and characters. Press
and hold to activate vibrate mode.
1. Left Soft Key: This key is used to navigate through menus and
applications by selecting the choice indicated on the lower left area of the
display screen.
2. Windows Start Key: Opens the Start menu.
3. Send Key: This key is used to initiate your calls or to activate your phone
feature.
4. Right Soft Key: This key is used to navigate through menus and
applications by selecting the choice indicated on the lower right area of the
display screen.
5. OK Key: Press to confirm a menu selection.
6. Optical Mouse: The Optical Mouse allows you to scroll through the phone
menu options.
7. End Key: Ends a call. Press and hold this key for a few seconds to turn
your device On or Off. When you receive an incoming call, press the END
key to ignore the incoming call and to send the call to voicemail.
Understanding Your Phone 12
Page 16

Side View
1
2
4
3
5
Key Functions
1. Volume Key: Allows you to adjust the master volume in idle mode or adjust
the voice volume during a call. To mute the ringer during an incoming call,
press the volume key up or down.
2. Lock Key: Locks your phone to prevent accidental entries as well as
unauthorized access. Press to change from Navi mode to cursor mode.
3. Power/Accessory Port: Used to plug in the charging accessories and also
connect any available accessory cables to your phone.
4. Camera/Camcorder Key: This key allows you to activate the camera.
Press and hold to activate the camera. This is also referred to as
Button #2 and its default actions can be altered by the end user (page 82).
5. Reset Button: Resets your phone and ends all applications currently
running.
13
Page 17

Top View
2
3
1
2
3
1
4
Key Functions
1. Stylus: Use as an input device on pressure-sensitive screen. Use for
writing, drawings, selecting a menu option or press and hold down to view
additional options.
2. Headset Jack: Allows you to plug in an optional headset for safe,
convenient conversations.
3. Power On/Off Key: Press to toggle LCD sleep mode on and off.
Rear View
Top View
Key Functions
1. Mirror: Allows you to center an object (such as yourself) in the mirror for
self-portraits or other types of photography.
2. Camera/Camcorder lens: The lens of the built-in camera/camcorder.
3. Speaker: Music, ringtones and sounds are played through the speaker.
4. Battery Cover: The battery cover encases the battery and other internal
components.
Understanding Your Phone 14
Page 18
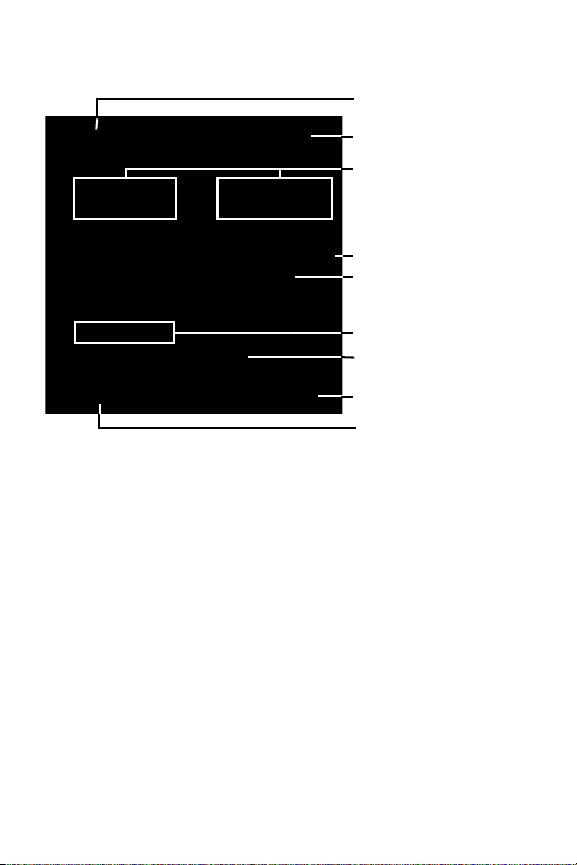
Today Screen
1. Start
2. Title Bar
3. Date/Day/Time
5. Wi-Fi, Bluetooth, Phone,
Message and Network
6. Get Applications Bar
7. Calendar Bar
8. Right Soft Key Command
9. Left Soft Key Command
4. Scroll Bar
Indicators Mode
Today Screen Functions
1. Start Menu: This drop down menu serves as the central launching point
for applications. This menu provides access to a list of programs for the
user to launch, access to settings, and a way to find files and get help.
2. Title Bar: The Title bar at the top of the screen displays the active program,
wireless status, battery level status and allows you to close screens. Use
the Start menu to select a program.
3. Date/Day/Time: Displays the Day/Date/Time.
4. Scroll Bar: Tap the up or down arrows to scroll the Today screen.
5. Indicators: Indicators that display the status (On or Off) for Wi-Fi and
Bluetooth. Also displays phone, message, and network mode.
6. Get Applications Bar: Select to download applications from the Internet.
7. Calendar Bar: Displays daily calendar events.
8. Right Soft Key Command: Right soft key function.
15
Page 19

Command Keys
9. Left Soft Key Command: Left soft key function.
Command Keys
Power On/Off Key
1. Press and hold the Power On/Off key located at the top of the phone
(above the front receiver grill). Follow the steps on the display screen to
calibrate the device.
2. To turn your LCD off, press the Power On/Off key once until the
backlight turns off.
You r Saga™ Ke y p ad
The keys of the Saga™ are divided into three functional groups: Navigation keys,
Alpha-numeric keypad, and Hot keys.
1. Navigation: Access and scroll through menus and lists, confirm changes
that you’ve entered, and interact with menus that appear in the display.
2. Alpha-numeric keypad: Enter text, numbers, and symbols.
3. Hot keys: Located on both sides of the Saga™. Used to lock the phone,
increase or decrease volume, activate the camera/camcorder, and more.
Send Key
䊳 Press at the Tod ay screen to display the phone screen, or to dial a
call after you have entered a telephone number.
Optical Mouse
Use the Optical Mouse to scroll through and highlight items, menus, and programs in
a list or on the Internet. Once an item, link, or menu is highlighted, press the center
of the Optical Mouse to perform the function related to the selection. In standby
mode (using the lock key), a cursor appears and it can be controlled using the
Optical Mouse.
Virtual QWERTY Keyboard
The virtual QWERTY keyboard provides an alphanumeric character keypad layout
display on the main screen. Press the QWERTY keyboard icon at the bottom
bar on the main LCD screen to open the virtual QWERTY keyboard.
Understanding Your Phone 16
Page 20

Volume Up/Down Keys
䊳 Press and release the up or down volume keys to adjust audio volume
for any screen.
Locking Your Phone
When you lock your phone, it requires a password to return to normal operation.
When a password is set up, the phone can be locked immediately or configured to
lock when the screen blanks out.
Setting Up a Lock
1. From the Tod ay screen, tap Start located in the upper left corner of
the screen.
2. Tap Settings .
3. Tap t he Personal tab.
4. Tap Lock .
5. Tap the check box next to Prompt if device unused for.
6. Tap t he Minutes drop down menu and select the amount of unused time
required before you are prompted for a password if the phone becomes
idle.
7. Tap t he Password type box and select one of the following options:
• Simple PIN: This password must be at least four characters in length and can
not contain a simple sequence such as: 000, 1111, or 1234.
• Strong alphanumeric: This password must be at least seven characters in
length and contain at least three of the following: uppercase/lowercase letters,
numerals, and punctuation.
8. Tap t he Password box and use either the alphanumeric keypad or the
virtual QWERTY keyboard to enter your password. Re-enter the password
in the Confirm box.
9. Tap , then tap Yes to confirm.
ok
Setting Up a Password Hint
Another way to make sure you don’t accidentally forget your password is to use the
Hint feature.
17
Page 21

Locking Your Phone
ok
1. At the Password screen, tap the Hint tab.
2. Use either the virtual QWERTY keyboard or the alphanumeric keypad to
enter a hint for your password into the dialogue box. This hint may be
visible by others.
Note: The password hint you set will only appear after five con secutive incorrect password entries .
3. Tap to save your settings, hint and then return to the previous screen.
Unlocking the Phone After a Timeout
To unlock your phone after the timer has expired:
1. Tap your LCD screen to activate the password screen.
2. Enter your password on either the keypad or by using either the virtual
QWERTY keyboard or alphanumeric keypad.
3. Ta p Unlock or press the left soft key to unlock the handset.
Understanding Your Phone 18
Page 22

Manually Locking the Phone
This process acts to temporarily lock the phone without the need to enter a
password. To manually lock the phone:
1. Press and hold the Lock Key to manually lock the phone.
• Unlock is then displayed as a left soft key function at the lower left of the screen.
19
Page 23
Display Icons
To manually unlock the phone:
1. From the Tod ay screen, tap Unlock or press the left soft key . The
Unlock screen displays.
2. Tap t he Unlock button or press to unlock the device.
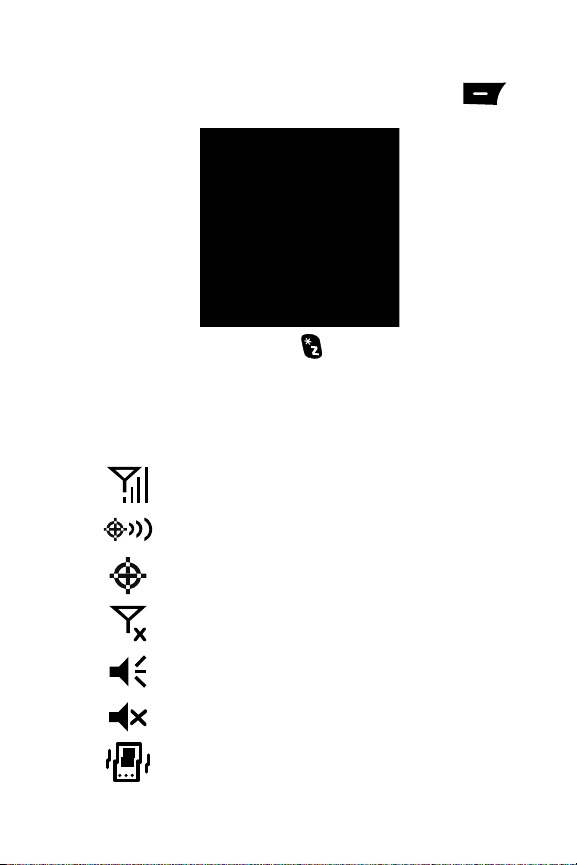
Display Icons
Various icons appear in your Saga™’s display or Title Bar during operation. The
following table lists these icons as well as their descriptions.
IconDefinition
Indicates signal strength. More bars mean better signal.
Indicates GPS is on for location.
Indicates GPS for 911 is active.
Indicates your device is in Flight mode and your cellular radio
is turned off (i.e. the phone is turned Off but the PDA is On).
Indicates the ringer for the selected profile is set to On.
Indicates the ringer for the selected profile is set to Off.
Indicates the ringer for the selected profile is set to Vibrate.
Understanding Your Phone 20
Page 24
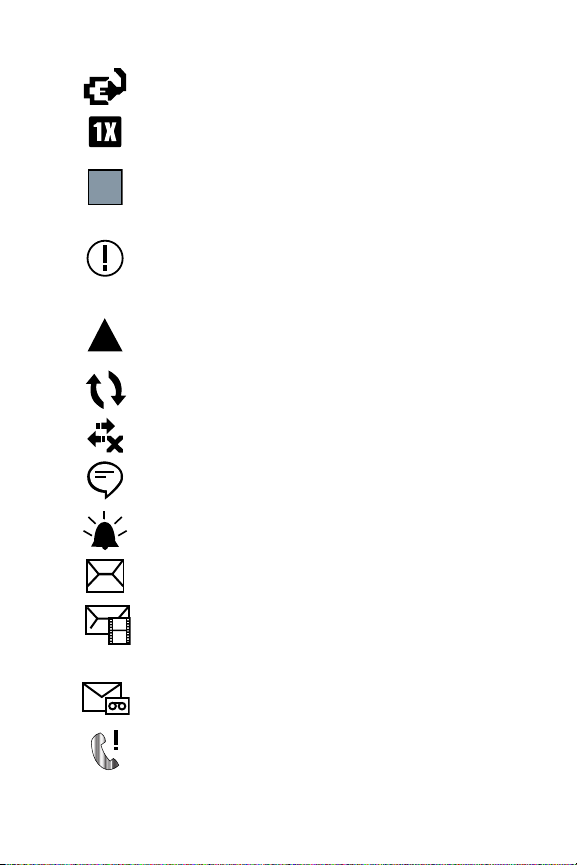
Indicates your Saga™ is charging.
EvEv
Indicates the 1xRTT high speed data transfer protocol is
supported.
Indicates your phone has high speed data services (Ev-Do
protocol), which is required for video streaming and
downloads.
Indicates important information. Indicates a programming
error. The phone can not connect until it is properly
programmed.
Indicates your Saga™ is in Roaming mode. Indicates your
phone is outside of the home service area.
Indicates ActiveSync or a Data Session is currently in use.
Indicates there are no data sessions active.
Indicates two or more message icons are being displayed,
your battery charge is low, or you have missed a call.
Indicates a reminder of an upcoming calendar event.
Indicates you have a new text message. If you tap this icon, a
window is displayed that allows you to access the Inbox.
Indicates you have a new multimedia message. If you tap
this icon, a window is displayed that allows you to access the
Inbox.
Indicates you have a new voicemail message.
Indicates you have a missed call. If you tap the icon a
window is displayed indicating the number of calls missed. It
also gives you the ability to view the missed call information.
21
Page 25
Display Icons
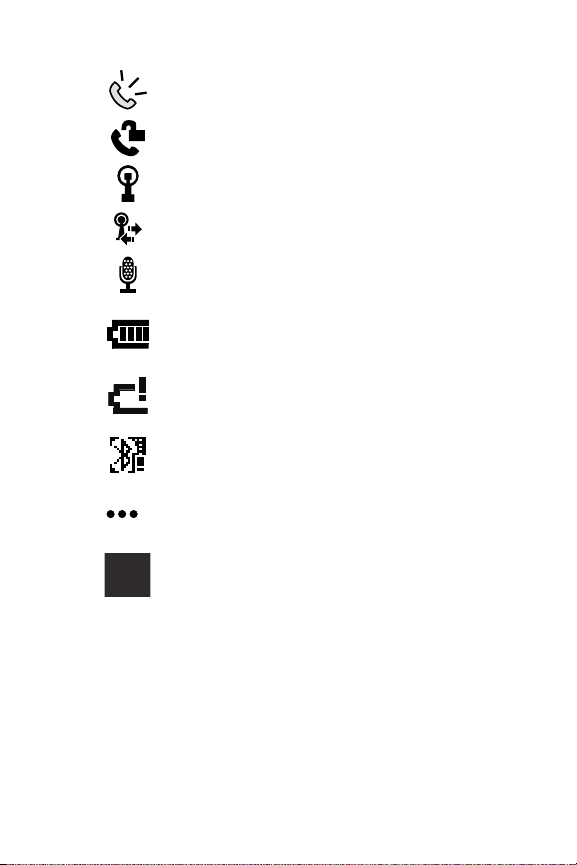
cc
c
Indicates your Saga™ is in Speakerphone mode.
Indicates Voice Privacy is available.
Indicates a Wi-Fi connection is inactive.
Indicates a Wi-Fi connection is available and active.
Indicates the Voice Command feature is active and awaiting
a verbal command.
Indicates the current battery charge strength.
(Icon shown fully charged.)
Indicates the current battery charge strength.
(Icon shown fully discharged and will power down.)
Indicates that Bluetooth DUN is active on your device.
Indicates that Bluetooth is sending data.
Indicates that GPRS service is active.
Understanding Your Phone 22
Page 26
Battery
Your Saga™ comes with a standard rechargeable battery, power accessory, and
headset.
Note: This phone comes packaged with a partially charged rechargeable standard Li-Ion battery and tra vel
charger.
You must fully charge the battery before using your phone for the first time. A fully discharged battery
requires up to 4 hours of charge time.
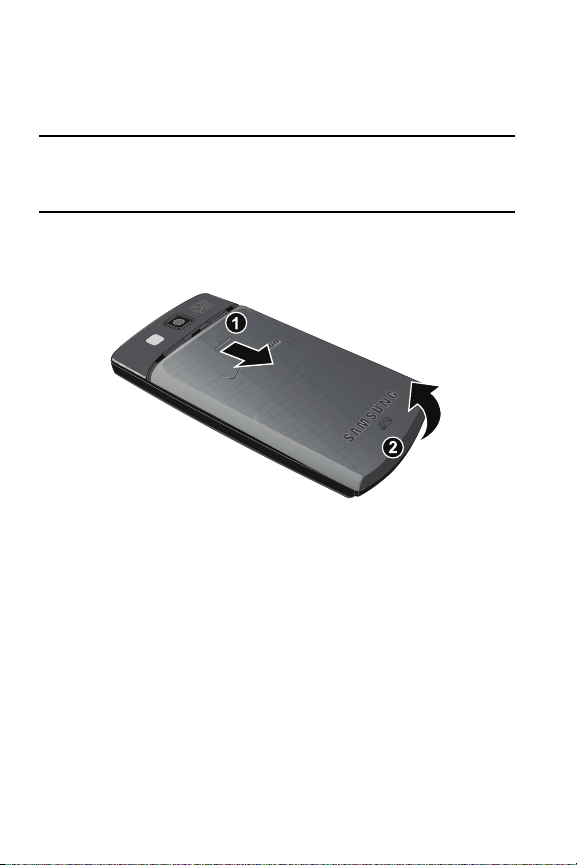
Installing the Battery
1. Press down at the top of the battery cover and push in the direction of the
arrow to remove.
23
Page 27
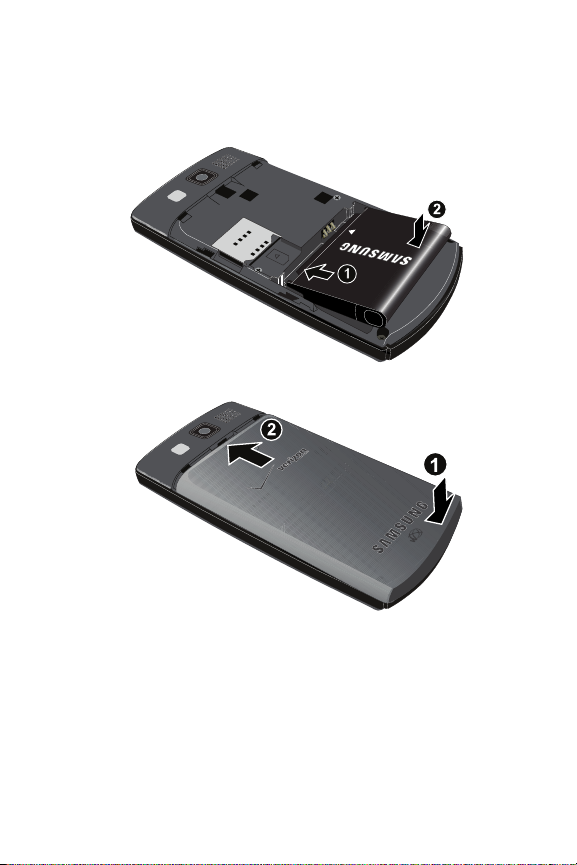
2. Insert the top end of the battery into the phone housing using the
directional arrow printed on the battery. The gold contacts at the battery
end must align with contacts on the phone. Push bottom end of the battery
down until it snaps into place.
3. Slide the battery cover up until it snaps into place.
Battery
Understanding Your Phone 24
Page 28
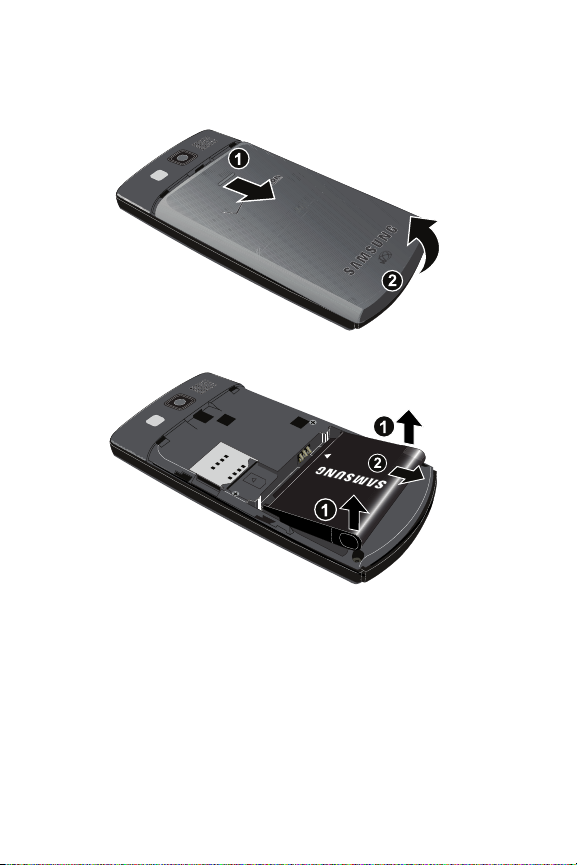
Removing the Battery
1. Power off the phone. Press down at the top of the battery cover and push
in the direction of the arrow to remove.
2. Lift the battery up at each end and remove from the phone.
25
Page 29
Battery
3. Slide the battery cover up until it snaps into place.
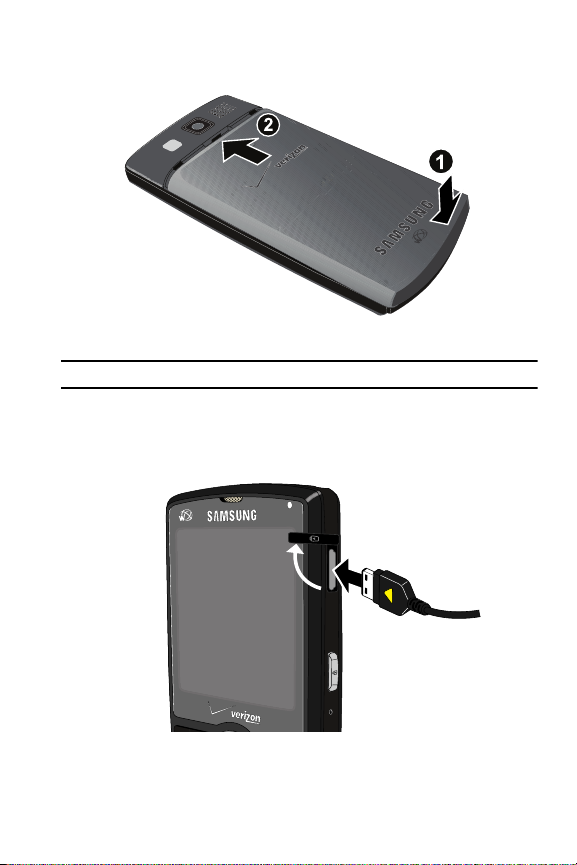
Charging the Battery
Note: Your Saga™ comes with a rechargeable battery. Fully charge this battery before using your phone.
Your phone is powered by a rechargeable standard Li-ion battery. Only use
Samsung-approved charging devices and batteries. Samsung accessories are
designed to maximize battery life. Using other accessories may invalidate your
warranty and may cause damage.
1. Plug the terminal end of the wall charger into the phone’s power/accessory
interface connector and the other end into an electrical outlet.
Understanding Your Phone 26
Page 30
Note: Use the dual desktop charger/cradle or the travel adapter to charge the batter y provided with your
handset.
Checking Battery Charge
Keeping track of the battery’s charge is important. If the battery level becomes too
low, your phone automatically shuts down and you could lose important data.
䊳 For a quick check of your phone’s battery level, tap the battery icon
to display the main battery’s remaining battery power.
Battery Capacity
When the battery is low, a warning window displays and the backlight turns off.
Note: Long backlight settings, simultaneous use of Wi-Fi and Bluetooth, sea rching for service, vibrate mode
and browser use affect the battery’s talk and standby times.
There is also an internal backup battery that saves all phone settings if the regular
battery is discharged. The internal battery maintains data for approximately four
hours. This internal backup battery needs an initial charge of 24 hours.
Perform ActiveSync operations or a backup utility frequently to avoid loosing any
information in case the battery is fully discharged. For more information see
"Synchronization" on page 139.
Battery tab - Charge state
The Battery Tab allows you to view the current power state of the Li-Ion battery. To
perform a battery check using the Start menu:
1. From the Tod ay screen, tap Start .
2. Tap Settings . Tap the System tab at the bottom of the screen.
3. Tap Power. The Power screen is displayed with the Battery tab active.
27
Page 31

Battery
ok
Advanced tab - Power parameters
The Advanced Tab allows you to set the following battery power and external power
parameters for your device:
1. Within the On battery power section, tap the Turn off device if not used
for box. A check mark appears in the box.
2. Select a time interval (from 1 - 5 minutes) for the phone to turn off. If you
are not finished, continue to step 3.
3. Within the On external power section, tap the Turn off device if not used
for box. A check mark appears in the box.
4. Select a time interval (from 1 - 30 minutes) for the phone to turn off.
5. Tap to save your settings and return to the previous System screen.
6. Tap to return to the Tod ay screen.
Understanding Your Phone 28
Page 32

Power Save tab - Save Mode
ok
The Power Save tab allows you to set the power save mode parameters after a call
has been connected for your device:
1. In Phone section, tap the Device goes to power save mode after voice
call is connected for box. A check mark appears in the box.
2. Select a time delay for the phone to wait before entering a power save
mode and tap to save your changes and return to the previous
Settings screen.
3. Tap to return to the Tod ay screen.
Using a microSD Memory Card
Your phone has an expansion slot compatible with microSDTM memory cards which
are primarily used to back up or transfer files and data. This type of card is
specifically designed for use with ultra-small mobile phones and other devices. Its
ideal for storing media-rich files such as music, programs, videos, and photographs
onto your phone.
Note: Use only compatible memory cards w ith your phone. Using incompatible memory cards, such as
Secure Digital (SD) cards, may damage the car d, as well as the phone, and data stored on th e card.
29
Page 33

Using a microSD Memory Card
Installing the microSD Memor y Card
1. Press down at the top of the battery cover and push in the direction of the
arrow to remove.
2. Locate the memory slot on the side of the phone located directly below the
SIM card socket. Orient the microSD card so the contact pins are facing up
(see illustration below).
3. Carefully insert the compatible microSD card into the opening and firmly
push it in until you hear a click that indicates the card is securely installed.
The card is secure when it is not protruding from the slot within the phone.
Understanding Your Phone 30
Page 34

4.
Slide the battery cover up until it snaps into place.
Note: Memory cards with a storage ca pacity of over 8GB will not work with this phone.
Removing the microSD Memory Card
1. Remove the battery cover (see "Installing the microSD Memory Card" on
page 30, step 1.) Firmly push in the microSD card and release so that it
becomes disengaged from the slot. The card should pop out from the slot.
2. Carefully grab the card and pull it out of the slot.
31
Page 35

Using a microSD Memory Card
Installing the SIM Card
You r SIM (Subscriber Identity Module) card is a small rectangular plastic card that
stores your phone number and other important information. It enables you to make
calls and access email in GSM Networks while traveling overseas.
1. Power off the phone. Press down at the top of the battery cover and push
in the direction of the arrow to remove.
2. Lift the battery up at each end and remove from the phone.
Understanding Your Phone 32
Page 36

3.
Insert the SIM card fully into the SIM socket as shown in the illustration
below.
4. Insert the top end of the battery into the phone housing using the
directional arrow printed on the battery. The gold contacts at the battery
end must align with contacts on the phone. Push bottom end of the battery
down until it snaps into place.
5. Slide the battery cover up until it snaps into place.
33
Page 37

Programs - Installation and Removal
Removing the SIM Card
1. Power off the phone. Remove the battery cover, (see "Installing the SIM
Card" on page 32, step 1.)
2. Remove the battery (see "Installing the SIM Card" on page 32, step 2.)
3. Carefully remove the SIM card from the SIM socket.
Important!: Handle the SIM card at it’s sides. Avoid touching the circuits, located at the back of the SIM
card, to avoid possible damage.
Important!: Verizon Wireless has provided a unique SIM card to be used with your Sa ga™.
Programs - Installation and Removal
You can install any program created for your phone, as long as the phone has
enough memory. The most popular place to find software for your phone is on the
Microsoft web site (http://www.microsoft.com/mobile/smartphone).
Adding Programs by using Microsoft® ActiveSync
®
You can install programs downloaded from the Internet or included on the Getting
Started CD found with your Saga™ by performing a synchronization between your
phone and your computer.
First you’ll need to determine what your phone and processor type are so that you
can know which version of a particular software is required for installation.
Understanding Your Phone 34
Page 38

Adding a Program Directly from the Internet
First, you’ll need to determine what your phone and processor type is so that you
know which version of the software to install.
1. From the Tod ay screen, tap Get Applications .
2. From the subsequent Applications page, tap an application entry and
follow the on screen procedures to upload the software to your Saga™.
Removing Programs
To remove a program perform the following:
1. From the Tod ay screen, tapStart located in the upper left corner of
the screen.
2. Tap Settings . By default, the Personal tab is highlighted.
3. Tap t he System tab.
4. Tap Remove Programs .
5. Highlight the programs you want to remove and then tap the Remove
button.
6. Tap Ye s to confirm.
7. Tap to save your changes and return to the previous screen.
ok
Managing Certificates
On your phone you can add and delete public key certificates. You can store the
following two types of certificates on your phone.
1. From the Tod ay screen, tap Start located in the upper left corner of
the screen.
2. Tap Settings . By default, the Personal tab is highlighted.
3. Tap t he System tab.
4. Tap Certificates .
5. To access information about different certificate type, tap one of the
following tabs:
•Personal: Used to identify yourself to others.
•Intermediate: Used to identify intermediate certification authorities.
• Root: Used to identify root certification authorities.
Deleting a Certificate
1. From the Tod ay screen, tap Start located in the upper left corner of
the screen.
35
Page 39

Rebooting your Phone after Lockup
Reset button
2. Ta p Settings . By default, the Personal tab is highlighted.
3. Tap t he System tab.
4. Ta p Certificates . Scroll to and tap the certificate you want to delete.
5. Use your stylus to press against the certificate until the options prompt
appears.
6. Ta p Delete and then tap the Yes soft key to confirm the deletion.
Rebooting your Phone after Lockup
The Reset button allows you to quickly turn off the phone in the event of a program
or application error. In this case your Saga™ would appear to “freeze” and become
unresponsive.
1. Locate the Reset button positioned just below the Camera/Camcorder
key on the right side of the phone.
2. Carefully inserting a thin blunt object (such as your stylus) into this slot will
exit the current screen and cycle power to the phone.
Note: This reset action retains all of your phone’s default parameters and settings. This action i s similar to
that of a Reset action on your computer which only restarts the machine while maintaining all da ta
intact.
Resetting your Phone to Factory Defaults
Note: To completely remove any personal information stored on your device, see "Precautions for Transfer
and Disposal" on page 194.
Understanding Your Phone 36
Page 40

You can reset your phone’s settings and clear all data/applications from phone’s
Reset button
Optical
Mouse
internal memory by using the Reset button in conjunction with the Optical Mouse
. This action resets your phone to its factory default settings, ends all
applications currently running, and wipes all data (pics/video/contacts) from your
phone.
Note: Although this action wipes all information and settings from your Saga™, you can circumvent the
deletion of important data by storing it on your removable microSD memory card.
1. Locate both the Reset button and the Optical Mouse (shown below).This
process requires the reset button and the Optical Mouse be pressed
simultaneously to initiate the reset process.
2. Press and hold the Optical Mouse and Reset simultaneously (by
using a blunt object such as your stylus) for a few seconds.
3. First release Reset then the Optical Mouse . This action restarts the
phone, clears any data stored on the phone, and then cycle power to the
phone.
4. The prompt: “Are you sure you want to format?” appears, press the
SEND key to format, or END key to cancel.
5. Once the phone starts, you must tap the LCD screen using your Stylus to
begin the calibration process.
37
Page 41

Clearing all Phone Data
Note: You should not use your fingertips during the calibration process as this can improperly calibrate yo ur
device. Please use the stylus for calibration of your Saga™.
6. Using your Stylus, tap within the crosshairs that appear in the align screen.
7. Follow the on screen tutorials and complete the setup process.
Clearing all Phone Data
Another method of deleting data and applications stored on the phone is to access
the Phone Settings screen and use the Clear All Data function. Unlike resetting
your phone back to its factory default (which wipes out both data and phone
preferences), this feature only clears the data and applications stored within the
phone’s internal memory while retaining all previous phone settings and
preferences.
Important!: To be certain that your important data (Contacts, videos, pics) and applications are protected
from such a deletion process, i t is recommended you utilize a remova ble microSD card as the
preferred storage medium.
1. From the To da y screen, tap Start located in the upper left corner of
the screen.
2. Ta p Settings . By default, the Personal tab is highlighted.
3. Ta p Phone .
4. Tap t he Security tab.
5. Tap t he Clear All Data button.
6. If you previously created a password, tap the Password field and enter your
Lock Code into the Password field.
7. Tap t he OK button to initiate the process.
8. Ta p Yes to confirm.
Understanding Your Phone 38
Page 42

Section 3: Customization and Navigation
Topics Covered
• Navigating Your PDA
• Menu Types
• Using the Optical Mouse
• Customizing your Start Menu List
• Today Screen
• Customizing your Today Screen Theme
• Customizing your Today Screen Item Listing
• Customizing the left soft key function
• Customizing your touch sensitive keypad
This section explains the menu navigation for your phone.
Navigating Your PDA
Your Saga™ provides the power of a personal computer with exceptional portability
and integration of a mobile device. Unlocking its power begins with using your
Saga™ so that it becomes an extension of your desktop or laptop computer.
Your Saga™ is powered by Windows Mobile 6.1 Professional, providing the power
and familiarity of Microsoft Windows. Mobile versions of popular Microsoft
applications such as Word, Excel®, Windows Media Player® and Outlook® eliminate
the need to learn new software.
39
Page 43

Menu Types
Scrolling Up/Down
Scrolling Left/Right
Note:
You may need to scroll several times to move through the menus.
Menu Types
There is one main menu used by your
Saga™ called the Start Menu.
The Start menu contains links to all the
applications and settings information, similar
to that of a Windows based PC system. To
access the Start menu, simply use the stylus
to tap in the upper left corner of the screen
on the word Start. A drop down menu list is
then displayed, and from the here, all other
applications and settings can be accessed.
Using the Optical Mouse
The Optical Mouse can be used to scroll through menu items. A highlighted
menu item can be selected by pressing the center of the Optical Mouse.
The default function of the Optical Mouse uses a cursor for navigation. The 4-way
Navigation Mode can be selected. In 4-way Navigation Mode, sliding your finger up,
down, left or right on the Optical Mouse allows you to scroll or move through menus,
sub-menus and options. To set up 4-way Navigation Mode, see see "Customizing
Buttons" on page 43.
All instructions in the User Manual refers to this action as “Use the Optical Mouse.”
1. Use the Optical Mouse to move the cursor up or down or to scroll up
or down through a list in 4-way Navigation Mode.
2. You can use the Optical Mouse to move the cursor left or right or to
scroll left or right through menus, sub-menus and options in 4-way
Navigation Mode when using the phone feature.
Customization and Navigation 40
Page 44

Customizing your Start Menu List
ok
Method 1 - Using a Stylus
1. From the Tod ay screen, tap Start located in the upper left corner of
the screen.
2. Tap Settings to reveal the Settings screen.
3. From the Personal tab, tap Menus .
4. Enable/Disable an application by tapping the adjacent box. Select up to
seven items you want displayed within the Start menu.
5. Tap to save your new settings and return to the previous screen.
ok
Method 2 - Using the Keypad
1. Press the Start key to activate the Start menu.
2. Use the Optical Mouse to scroll down, highlight Settings , and press
the Optical Mouse to open.
3. From the Personal tab, use the Optical Mouse to highlight Menus
and press to open.
4. Enable/Disable an application by highlighting the entry and pressing .
Select up to seven items you want displayed within the Start menu.
5. Press to save your new settings and return to the previous screen.
Today Screen
The items listed on the Tod ay screen provide quick access to several user selectable
applications. The To da y screen displays important information, such as upcoming
appointments, status indicators, the current date, time, and recently used program
icons. You can open a program directly tapping its associated icon.
Customizing your Today Screen Theme
Method 1 - Using a Stylus
1. From the Tod ay screen, tap Start located in the upper left corner of
the screen.
2. Tap Settings to reveal the Settings screen.
3. From the Personal tab, tap To da y .
4. Select your new theme by tapping an entry from the list.
• The default theme is Guava Bubbles.
5. Tap to save your new settings and return to the previous screen.
ok
6. Tap to return to the Tod ay screen.
41
Page 45

Customizing your Today Screen Item Listing
ok
Method 2 - Using the Keypad
1. From the To da y screen, press the Start key.
2. Use the Optical Mouse to scroll down, highlight Settings and press
to open.
3. From the Personal tab, use the Optical Mouse to highlight To da y and
press the Optical Mouse to open.
4. Use the Optical Mouse to highlight your theme selection from the list and
then press .
5. Press to save your new settings and return to the previous screen.
ok
Customizing your Today Screen Item Listing
Method 1 - Using a Stylus
1. From the To da y screen, tap Start located in the upper left corner of
the screen.
2. Ta p Settings to reveal the Settings screen.
3. From the Personal tab, tap To day .
4. Tap t he Items tab.
5. Select those items which will appear on the Today screen by tapping each
item and placing a check mark adjacent to the entry.
• Remove these items by removing the check mark from each item.
6. Position each item (from top to bottom) on the list by tapping an entry and
using the Move Up/Move Down buttons to position them in the list.
7. Tap to save your new settings and return to the previous screen.
8. Tap to return to the Tod ay screen.
Method 2 - Using the Keypad
1. From the To da y screen, press the Start key.
2. Use the Optical Mouse to scroll down, highlight Settings and press
to open.
3. From the Personal tab, use the Optical Mouse to highlight To da y and
press the Optical Mouse to open.
4. Use the Optical Mouse to scroll right until the Items tab is activated.
5. Use your Optical Mouse to highlight an item from the list and then press
to place a checkmark on the item. These selected items then appear
on the Tod ay screen.
Customization and Navigation 42
Page 46

• Remove these items by removing the check mark from each item.
ok
6. Press to save your new settings and return to the previous screen.
Customizing Buttons
1. From the To da y screen, tap Start ( ) located in the upper left corner of
the screen.
2. Tap Settings to reveal the Settings screen.
3. From the Personal tab, tap Buttons .
4. Tap any of the assigned buttons from the Button menu.
5. Tap the down arrow at the Assign a program: drop down menu and tap a
program you would like as your new assigned button. Tap to save
your new settings.
6. Tap to return to the Tod ay screen.
ok
43
Page 47

Customizing your touch sensitive keypad
ok
Customizing your touch sensitive keypad
1. From the To da y screen, tap Start located in the upper left corner of
the screen. Tap Settings to reveal the Settings screen.
2. From the Personal tab, tap Dialer Display . The Dialer Skin tab
displays.
3. Tap t he Skin Type drop down menu and select a skin type. Choose from
the following colors:
• Red
• Green
• Blue
• Mits (Default)
4. Tap to save your new settings
5. Ta p Yes to confirm the change and to return to the Phone screen.
6. Tap to return to the Tod ay screen.
Customization and Navigation 44
Page 48

Changing the Handler
Right Handler
Left Handler
The Handler tab allows you to adjust the onscreen keypad to a right or left hand
preference.
1. Tap t he Handler tab.
2. Tap t he Handler Type drop down menu. Select one of the following:
3. Tap to save your new settings.
ok
4. Tap Ye s to confirm the change and to return to the Phone screen.
5. Tap to return to the Tod ay screen.
45
Page 49

Making a Call
Section 4: Call Functions
Topics Covered
• Making a Call
• Answering a Call
• Using the Speakerphone
• Displaying Your Phone Number
• Call History
• Roaming-Networks
• TTY
• Voice Command
This section describes how to make or answer calls. It also includes the features and
functionality associated with using your phone, as well as explaining the voice
command feature built into your Saga™.
Note: Before initiating a call, verify your phone features are active, see "Turning the Phone Features On and
Off" on page 6.
Making a Call
There are several ways to make calls on your new Saga™. You can use speed dial,
voice dial, call history, or simply enter the desired number and press .
Method 1 - Using the Optical Mouse
1. Press the Windows Start Key to open the Start menu.
2. Use the Optical Mouse to scroll down the Start menu listing and highlight
Phone, then press .
3. Use the Optical Mouse to highlight a previously dialed phone number and
press .
Method 2 - Using the Keypad
1. From the To da y screen, enter the number using the keypad.
2. Press to dial the number.
Call Functions 46
Page 50

Method 3 - Using the Soft Key
This calling method requires you to have previously entered some contact
information. For more information, refer to "Contacts" on page 59. Using the soft
keys allows you to make a call while using just one hand. To make a call:
1. From the Tod ay screen, press the right soft key Contacts .
2. Use the Optical Mouse to select the contact entry you want to dial, then
press .
3. If the contact contains multiple phone numbers, use the Optical Mouse to
select the desired number.
4. Press to display the number in the phone screen and dial the
number.
Method 4 - Using the Stylus
1. From the Tod ay screen, tap Start located in the upper left corner of
the screen.
2. Tap Phone . The phone keypad is displayed.
3. Tap t he Hide Keypad soft key to hide the keypad and view both the
recently call numbers and your Address Book.
4. Tap t he Menu soft key to display the following options:
• Contacts
• Open Contact
• Send Text Message
•Paste
• Options
• View
5. Tap the phone number of the person you are calling to initiate the call.
Note: Always use the stylus when touching the screen to avoid scratching or damage caused by other
instruments.
Answering a Call
Make sure the phone is turned on. When you receive an incoming call, the Phone
Incoming screen appears in the display.
䊳 Tap the Answer soft key, press the left soft key , or press to
answer the call
䊳 Tap the Ignore soft key, press the right soft key ,or press to
send the call to voicemail.
47
Page 51

Using the Speakerphone
ok
Call History
Call History
Note: When you receive a call, you can silence the ringer by pressin g the volume key on the side of your
phone.
Using the Speakerphone
During an active call, the speakerphone allows you to speak to others without the
need to hold the phone to your ear.
Method 1
1.
While in a call, press and hold to activate the speakerphone. The
speakerphone icon then appears at the top of the screen.
2. To deactivate the speakerphone, press and hold again.
Method 2
While in a call, press to activate the speakerphone. The speakerphone
1.
icon appears in the top of the screen.
2. To deactivate the speakerphone, press .
Displaying Your Phone Number
1. From the To da y screen, tap Start located in the upper left corner of
the screen.
2. Ta p Phone .
3. Tap t he Menu soft key and then tap Options to open the Settings screen
and display your phone number at the top of the screen.
4. Tap from the upper right of the screen to exit.
Call History
When a call is received, made, or missed a record is saved with all the available
information in the Call History. The Call History logs are:
• All Calls: Displays all call received, sent, or missed.
• Missed: Displays any missed calls.
• Outgoing: Displays all outgoing calls made from your phone.
• Incoming: Displays all incoming calls that were answered.
Tapping an entry displays the time, date, and duration of the call.
1. From the To da y screen, tap Start located in the upper left corner of
the screen.
2. Ta p Phone .
3. Tap .
Call Functions 48
Page 52

Filtering Call History
Call History
Call History
End
End
Call History
Call History
Filtering allows you to sort and view calls by selecting from one of the preset call
filters.
1. From the Tod ay screen, tap Start located in the upper left corner of
the screen.
2. Tap Phone .
3. Tap .
Note: Call history can also be accessed directly from the Today screen by pressing the Menu soft key
(lower-right) and then tapping Call History.
4. Tap t he Menu soft key and then tap Filter. The following filter options are
then available for selection:
• All Calls: Displays all call received, sent, or missed.
• Missed: Displays any missed calls .
• Outgoing: Displays all outgoing calls made from your phone .
• Incoming: Displays all incoming calls that were answered by your Saga™
.
5. Tap the desired filter type to then refresh the screen entries with those
calls matching the selection.
Placing a Call Using Call Histor y
1. From the Tod ay screen, tap Phone .
2. Tap t he Menu soft key and then tap Filter -> All Calls.
3. Select a history entry by either:
• Tapping the filtered history entry.
• Use the Optical Mouse to highlight the entry
4. Tap t he Call soft key (from the lower left of the screen) to initiate a call to
the selected number.
5. When finished, tap .
Creating a Contact Using Call History
1. From the Tod ay screen, tap Start located in the upper left corner of
the screen.
2. Tap Phone .
3. Tap .
4. Tap t he Menu soft key and select Filter.
49
Page 53

Call History
ok
Call History
Call History
5. Tap one of the available filter options (All Calls, Missed, Outgoing, or
Incoming).
6. Use the Optical Mouse to highlight a call log entry.
7. Tap t he Menu soft key and select Save to Contacts.
8. From the Contacts screen, tap the <New Contact> entry.
9. Use either your keypad or virtual QWERTY keyboard to enter the contact
information such as name, and number type. The phone number is already
pre-entered.
10. Tap to save your new contact and return to the previous screen.
Deleting the Call History
The call logs found within the Call History listing can be deleted individually or as a
whole. Deleting all call entries will remove all currently displayed call entries. These
entries are dependant on the Filter used for call log display (All Calls, Missed,
Outgoing, or Incoming).
Deleting Individual Call History Entries
From the To da y screen, tap Start located in the upper left corner of
1.
the screen.
2. Ta p Phone .
3. Tap .
4. Tap t he Menu soft key and select Filter.
5. Tap one of the available filter options (All Calls, Missed, Outgoing, or
Incoming).
6. Use the Optical Mouse to highlight a call log entry for deletion.
7. Tap t he Menu soft key and select Delete.
8. Tap t he Ye s button to confirm the deletion.
Deleting All Call Entries
This option is dependant on the list of currently displayed call logs. Only those
entries displayed in your current list will be displayed.
Note: If your currently selected filter is only displaying your Missed Calls, for
example, deleting all calls in this instance would only delete these listed calls while
leaving all remaining Incoming and Outgoing Call entries untouched.
To truly delete all call log entries, you will need to activate the All Calls Filter and
then select the Delete All Calls option.
Call Functions 50
Page 54

1.
Call History
Call History
Call History
Call History
From the Tod ay screen, tap Start located in the upper left corner of
the screen.
2. Tap Phone .
3. Tap .
4. Tap t he Menu soft key and select Delete All Calls.
5. Tap t he Yes button to confirm the deletion.
Sending a Text Message using Call History
Text messages can be sent to other users that support SMS capabilities.
Note: Contact your service provider for more in formation on SMS messaging servi ces.
1. From the Tod ay screen, tap Start located in the upper left corner of
the screen.
2. Tap Phone .
3. Tap .
4. Highlight the number to whom you are sending a message, then tap Menu.
5. Highlight Send Text Message to open the Text Message screen with the
recipient already filled in.
6. Use your virtual QWERTY keyboard to enter the message text.
Note: Each text message can contain a maximum of 160 characters. Any characters (text) over that limit
will be moved onto consecutive text messages to the same recipient.
7. Tap t he Send soft key when your finished and send the message.
Roaming-Networks
What is Roaming
Your phone can roam on other digital networks. Roaming occurs when you travel
outside a pre-designated coverage area. The roaming icon appears on when in
roaming is active, and extra charges may apply when making or receiving a call.
Note: Some features may be unavailable whil e roaming. Roaming also consumes additional power from the
battery requiring more freq uent charges.
51
Page 55

Changing your Roaming Network Options
ok
Note: Contact your service provider for informati on regarding preferred systems.
To change your Roaming option:
1. From the To da y screen, tap Start located in the upper left corner of
the screen.
2. Ta p Settings . By default, the Personal tab is highlighted.
3. Ta p Phone to display the Phone screen.
4. Tap t he Services tab.
5. Scroll down the list of phone services and tap/select Networks.
6. Tap t he Change Setting button and from the Phone - Networks screen
make your System Selection and Time Setting changes.
• Automatic: The preferred roaming list is used to acquire service. If no
preferred systems are found, any digital “Automatic A” or “Automatic B” system
is acquired.
• Home only: Your phone is available for normal operation only in the designated
coverage area.
Note: If the phone feature is off, this menu cannot be acessed.
7. Tap to save your changes and return to the previous screen.
TTY
Your Saga™ is fully TTY compatible, and it allows you to connect TTY equipment to
the phone’s headset jack. However, before you can use a TTY device, you need to
enable TTY functions using these steps:
1. From the To da y screen, tap Start located in the upper left corner of
the screen.
2. Ta p Settings . By default, the Personal tab is highlighted.
3. Ta p Phone to display the Phone screen.
4. Tap t he Services tab.
5. Scroll down the list of phone services and tap/select TTY.
6. Tap t he Change Setting button.
7. Tap t he Ye s button from the TTY Warning popup. Enabling TTY will disable
the audio of any connected headset.
TTY
Call Functions 52
Page 56

Voice Command
Voice CommandTM transforms your device into your own virtual personal assistant,
letting you use your voice to look up contacts, make phone calls, get calendar
information, play and control your music, as well as start programs.
See http://www.microsoft.com/windowsmobile/voicecommand/default.mspx for a
Voice Command demo.
Voice Command Settings
1.
From the Tod ay screen, tap Start located in the upper left corner of
the screen.
2. Tap Settings . By default, the Personal tab is highlighted.
3. Tap Voice Command .
4. Tap t he Enable box to enable/disable the Voice Command feature.
• A checkmark in the boxes adjacent to an application indicates the Voice
Command is enabled for that particular feature.
• An unmarked box indicates the Voice Command feature is disabled.
• If a selected application has available options, the Options button becomes
active. Tap the Options softy key to access that application’s available options.
• If a selected application has available notification parameters, the
Notifications button becomes active. Tap the Notifications softy key to
access that application’s available notification parameters and make
modifications if desired.
5. Tap t he Password Protected box to turn password protection On/Off.
• A checkmark in the box indicates Password Protected is on.
• An unmarked box means indicates Password Protected is off.
53
Page 57

6. Tap the menu applications you want to be accessible when using the Voice
Command. Choose from the following:
• Calendar
• Contacts
• Media
• Messaging
• Phone
• Start Menu
• Status
Using the Voice Command
1. Press and hold the Voice Command-Start key to activate the Start
menu. A microphone icon displays in the Title bar.
2. After the phone beeps, say the name of the command you want to perform.
The Voice Commands are:
• Call: Lets you dial a phone number by saying a name saved in your contact list
or by saying the digits in the telephone number.
• Lookup: Lets you retrieve contact information for any entry in your contacts list.
• Open: This provides you with one-step access to many of your phone’s
applications such as Calendar.
•Help: This provides you with voice commands for using phone, contacts, media,
calendar, start menu, status, or general.
Voice Command
Call Functions 54
Page 58

Section 5: Entering Text
Topics Covered
• Virtual QWERTY Keyboard
• Text Entry - Input Mode
• Text Entry - Word Completion
• Text Entry - Options
This section outlines how to select the desired text input mode when entering
characters into your Saga™. This section also describes the predictive text entry
system that reduces the amount of key strokes associated with entering text.
Virtual QWERTY Keyboard
Your Saga™ has a virtual QWERTY keyboard. You can access this keyboard by
tapping the QWERTY keyboard icon located at the bottom of the display, when
certain menus are accessed. Using this keypad, you can type letters, punctuation,
numbers, and other special characters into text entry fields or other applications
available on your Saga™.
Text Entry - Input Mode
There are four different character input methods available:
• Virtual QWERTY keyboard
• Block Recognizer
• Keyboard
• Letter Recognizer
• Symbol
• Tra ns cr ib er
Each of these methods allow you to input alphanumeric characters and symbols into
your Saga™. In addition to these input methods, there are other options such as
Word Completion associated with the input selected.
To access the Input settings:
1. Tap Start located in the upper left corner of the screen.
2. Tap Settings . By default, the Personal tab is highlighted.
3. Tap Input .
55
Page 59

Text Entry - Input Mode
Block Recognizer
This input method uses the traditional writing area box split in the middle. This
method allows you to enter characters using single strokes.
The left side is used to write letters and the right side is for number entry. Symbols
and common functions are located in other smaller boxes located to the right of the
writing box area. There are no options associated with this type of input method.
Keyboard
This input method displays an on-screen keyboard that can be used to input
characters by tapping the screen using the stylus. The keyboard entry method has
the following options:
• Large keys
• Small keys
• Use gestures for the following keys: allows you to use touch point shortcuts to
indicate the following keyboard actions:
• Space
• Shift+key
• Backspace
• Enter
To select larger or smaller keys, simply tap the button next to the desired option.
The gestures feature allows you to replace keys used on the keyboard for space,
backspace, shift+key, and enter by drawing a gesture or motion. The large key
option must be selected for this option to be available.
Letter Recognizer
This option allows you to enter text using your own handwriting (natural character
strokes). The screen is divided into three different areas. A capital letter area, small
letter area, and a number area. Characters are entered by printing letters in each
area. The character is then analyzed and typed on the screen automatically.
䊳 Tap th e Options button to access the following options associated with this
method:
• Quick stroke
• Right to left crossbar
• Allow accented characters
Transcriber
The transcriber option is similar to the letter recognizer, except instead of entering
characters into a designated area, you can enter entire words and sentences using
Entering Text 56
Page 60

your own handwriting (cursive), print, or mixed formats. Transcriber supports both
printing and cursive writing styles and then automatically types the information on
the screen.
Text Entry - Word Completion
Word completion settings determine if words are automatically displayed after
entering a defined number of characters on the screen. The following options are
available:
• Suggest words when entering text
• Suggest after entering (space or 1-7 letters)
• Suggest (1-4) word(s)
• Add a space after suggested word
• Clear Stored Entries
• Enable Auto Correct
To access the Word Completion settings:
1. From the Tod ay screen, tap Start located in the upper left corner of
the screen.
2. Tap Settings . By default, the Personal tab is highlighted.
3. Tap Input .
4. Tap t he Word Completion tab.
5. To enable this feature, tap Suggest words when entering text.
Note: Tapping the box adjacent to each item can either enable (check) or disa ble (uncheck) the features.
6. Tap t he Suggest after entering drop down list and choose the minimum
number of letters a word must contain before a word is suggested.
7. Tap the Suggest # words drop down list and choose the numbers of words
your Saga™ will suggest once the word completion parameters are met.
8. To enter an empty space after each recognized word, tap Add a space
after word.
9. To enable the auto correction feature which dynamically corrects for
spelling errors and other mistakes, tap Enable Auto Correct.
10. Tap to save your changes and return to the previous screen.
ok
57
Page 61

Text Entry - Options
ok
Text Entry - Options
Note: These option settings only apply when writing or recording is suppo rted.
The Options tab provides the following input options:
• Voice recording format
• Default zoom level for writing
• Default zoom level for typing
• Capitalize first letter of sentence
• Scroll upon reaching the last line
To access these options:
1. From the To da y screen, tap Start located in the upper left corner of
the screen.
2. Ta p Settings . By default, the Personal tab is highlighted.
3. Ta p Input .
4. Tap t he Options tab.
Note: Tapping the box adjacent to each item can either enable (check) or disable (uncheck) the features.
5. Tap each option's associated box or field and make your desired changes.
6. Tap to save your changes and return to the previous screen.
Entering Text 58
Page 62

Section 6: Contacts
Topics Covered
• Understanding Your Contacts
• Working with your Contacts
• Adding Notes to Contacts
• Speed Dial Contacts
This section describes how to manage your daily contacts by storing someone’s
name and number in your phonebook.
Understanding Your Contacts
This feature is used to save important data regarding your friends, colleagues, or
business acquaintances. The contacts screen allows you to save the person’s:
• Name • Mobile Telephone • Home Fax • Govt. ID
• Picture • Ring tone • Company Telephone • Account
• Company • Web page • Work2 & Home2
Telephone
• Department • Office Location • Radio Telephone • Birthday
• Job Title • Home Telephone
• IM2 & IM3 • Anniversary
& Address
• File as • Categories • E-mail2 & E-mail3 • Spouse
• Work Telephone,
• Other Addresses • Assistant • Children
Fax & Address
• IM • Pager • Assistant Telephone
• E-mail • Car Telephone • Manager
• Customer ID
59
Page 63

Working with your Contacts
ok
Working with your Contacts
In addition to the information available in contacts, you can also record or write a
note associated with the contact. All of this information can be synchronized with a
PC or Laptop using the Microsoft ActiveSync application. For more information, refer
to "Synchronization" on page 139.
Add a New Contact
1. From the To da y screen, tap Start located in the upper left corner of
the screen.
2. Ta p Contacts to reveal the Contacts screen.
3. Tap t he New soft key.
4. Use the keypad or the QWERTY keyboard to enter your contact information
into the fields provided.
5. Tap to save your new contact information and return to the previous
screen.
Find a Contact
To locate a specific contact, you can use the find feature. Find allows you to enter
the first few letters of the contact entry and then have the results displayed on the
screen. The Find box is located in the upper corner of the contact screen. To find a
contact:
1. From the To da y screen, tap Start located in the upper left corner of
the screen.
2. Ta p Contacts to reveal the Contacts screen.
3. Tap t he Enter a name... field and use the virtual QWERTY keyboard to
enter the first few characters of the contact entry. With each consecutive
character, the list of matching contacts becomes more refined.
4. Tap an entry from the list to display its information.
Edit a Contact
1. From the To da y screen, tap Start located in the upper left corner of
the screen.
2. Ta p Contacts to reveal the Contacts screen.
3. Locate the desired contact by using either the Enter a name... field or
scrolling through the contact list.
4. Tap t he Menu soft key and select Edit.
Contacts 60
Page 64

5.
From the available list of contact information, tap a field to begin updating
the desired information.
6. Tap to save your changes and return to the previous screen.
ok
Delete a Contact
1. From the Tod ay screen, tap Start located in the upper left corner of
the screen.
2. Tap Contacts to reveal the Contacts screen.
3. Locate the desired contact by using either the Enter a name... field or
scrolling through the contact list.
4. Tap t he Menu soft key and select Delete Contact.
5. Tap t he Ye s button from the Delete Contact popup to confirm the deletion.
Make a Call from Contacts
1. From the Tod ay screen, tap Start located in the upper left corner of
the screen.
2. Tap Contacts to reveal the Contacts screen.
3. Locate the desired contact by using either the Enter a name... field or
scrolling through the contact list.
4. Tap an entry from the list to display its information.
5. Tap t he Call soft key to place a call to the selected contact.
Beam a Contact Entry via Bluetooth
Your Saga™ allows you to send and receive information wirelessly between either
two Saga™ Bluetooth enabled devices.
1. From the Tod ay screen, tap Start located in the upper left corner of
the screen.
2. Tap Contacts to reveal the Contacts screen.
3. Locate the desired contact by using either the Enter a name... field or
scrolling through the contact list.
4. Highlight the entry and tap the Menu soft key.
5. Tap Send Contact and select Beam. The Saga™ begins to search for
compatible device is its communication range.
6. Tap the devices you wish to transmit to. When the contact has been
successfully transferred, the selected device displays Done.
7. Tap to exit and return to the previous screen.
ok
61
Page 65

Adding Notes to Contacts
ok
Accepting Incoming Beams
To set your Saga™ to accept all incoming beams, follow these steps:
1. From the To da y screen, tap Start located in the upper left corner of
the screen.
2. Ta p Settings . By default, the Personal tab is highlighted.
3. Tap t he Connections tab.
4. Ta p Bluetooth .
5. Tap t he Mode tab.
6. Tap the box Turn on Bluetooth and the box Make this device visible to
other devices. A check mark will display in the boxes.
7. Tap to start receiving incoming beams.
Adding Notes to Contacts
Notes allow you to attach either a recorded audio file or attach a written note to a
saved contact entry. When you view the summary screen on the contact, you can
view or listen to any notes that are associated with the contact.
Adding a Note
1. From the To da y screen, tap Start located in the upper left corner of
the screen.
2. Ta p Contacts to reveal the Contacts screen.
3. Locate the desired contact by using either the Enter a name... field or
scrolling through the contact list.
4. Tap the contact entry.
5. Tap t he Notes tab.
Contacts 62
Page 66

6.
ok
ok
Tap t he Edit soft key to open the notepad.
7. Enter the note using the desired entry method.
8. After the note has been successfully entered, tap to return to the
previous screen.
Deleting a Note
1. From the Tod ay screen, tap Start located in the upper left corner of
the screen.
2. Tap Contacts to reveal the Contacts screen.
3. Locate the desired contact by using either the Enter a name... field or
scrolling through the contact list.
4. Tap the contact entry and then tap the Notes tab.
5. Tap t he Edit soft key to open the notepad.
6. Tap t he Menu soft key, select Edit, and tap Select All.
7. Tap t he Menu soft key, select Edit, and tap Clear.To exit and save, tap
.
Speed Dial Contacts
Speed dial can be used to dial contacts that you talk to the most. Speed dial allows
you to press up to two numeric keys to dial to the contact. Memory locations 2-94
are available for speed dialing.
Note: Location 1, 95, 96, 97, 98 and 99 is pre-configured to dial your voicemail and can not be altered.
To speed dial:
1. From the Tod ay screen, tap Start located in the upper left corner of
the screen.
2. Tap Phone . The phone keypad is displayed.
3. Tap t he Menu soft key located at the bottom right of the screen.
4. Tap Speed Dial.
5. Tap t he Menu soft key and select New.
6. From the list of available contacts, tap an entry for speed dial assignment.
7. From the Speed Dial screen, tap the Location field's up or down arrows to
assign this contact to an available speed dial location (2 - 94).
63
Page 67

Speed Dial Contacts
ok
8. After the contact has been successfully assigned a location, tap to
return to the previous screen.
9. To exit the Phone screen, press .
Contacts 64
Page 68

Section 7: Messaging
Topics Covered
• Types of Messages
• Retrieving a Message
• Accessing Message Folders
• Configuration of Messaging Parameters
• Sending Messages
• Text Message Menu Options
• Multimedia Message Menu Options
• Spell Checking a Text Message
• Checking Names with an SMS Message
• Using My Text Messages
• E-mail Account Setup
• Message Folders
This section discusses the types of messages you can send and receive, how to set
up your phone to work with email and how to send email messages using different
types of connections.
Types of Messages
Your Saga™ is capable of sending Email, text (SMS), picture (MMS), and video
(MMS) messages. Send Email, text, picture and video messages by simply entering
the Email address or the phone number of the recipient in the To: field when creating
a new message.
Note: Text, Picture and Video Messaging are charged in accordance with your Messaging Plan. Higher rates
apply for International Text and Picture Messaging (where ava ilable). Video Messaging not available
while abroad. Please check www.verizonwireless .com/vzglobal for rates and c overage. Compatible
device required. Not ava ilable everywhere.
65
Page 69

Retrieving a Message
Retrieving a Message
When you receive a new email, text, picture, or video message, the message ringer
sounds, (unless turned off), and the message appears in a preview pane.
Note: The Message Notification icon appears in the top of the display.
1. Press Notification (left soft key) to re-open and to display the message in
the preview pane.
2. Once the preview of the message appears in the display press Reply (left
soft key) to reply to the message.
Accessing Message Folders
1. From the To da y screen, tap Start located in the upper left corner of
the screen.
2. Ta p Messaging to reveal the Messaging screen.
3. Tap one of the available account types.
4. At the top left of your screen is an Inbox drop-down menu. Tap this arrow
to display a menu tree that lists folders for the following message types:
• MMS, Outlook E-mail, Text Messages, and any other accounts you have
created.
5. Expand the folders by tapping the + sign next to folder. Select Inbox to
display its contents.
6. Tap any of the folders within any of the account trees to view that particular
folder’s contents.
Message Folders
There are five message folders in the MMS,
Outlook E-mail and Text Messages directory
(see adjacent image).
The folders and their functions are similar to
the folders in the ActiveSync directory, except
for Outbox. In ActiveSync, E-mail is stored in
the Outbox until you perform an ActiveSync
with your PC.
In Text Messages, new messages are stored
in the Outbox folder until message sending is
complete.
Messaging 66
Page 70

The following is a list of Text folders and their function.
• Deleted Items: Deleted messages are sent to the Deleted Items folder. Once
messages are removed from the Deleted Items folder, they are permanently
erased.
• Drafts: Drafts contain all messages that were not completed and saved to be sent
at a later date.
• Inbox: All incoming messages arrive and are stored in the Inbox until deleted. If
memory is full, new messages are rejected. Delete older messages to free up
space for incoming messages.
• Outbox: When you send a message, it is stored in the Outbox until the message
sent is complete.
• Sent Items: Sent Items keeps a record of all sent messages from your device.
Configuration of Messaging Parameters
Configuring Text Message Parameters
1. From the Tod ay screen, tap Start located in the upper left corner of
the screen.
2. Tap Messaging to reveal the Messaging screen.
3. Use the Optical Mouse to highlight the Text Messages entry. Tap the Menu
soft key and then tap Options. The following tabs appear in the display:
67
Page 71

Configuration of Messaging Parameters
• Accounts: Allows you to change message settings for Text Messages, Outlook
E-mail, and New Accounts.
•Message: Allows you to change message options. Tap the box of the options
you would like to turn on or off.
• Address: Allows you to check e-mail address information using set address
books. Tap the Add button to add address books to your Saga™. These
additional address books provide more available e-mail addresses.
Messaging 68
Page 72

• Storage: Allows you to view the amount of memory available for the Main
Memory, Storage Card (when inserted), and Current size of attachments.
4. Tap to save your changes and return to the previous screen.
ok
Configuring Picture and Video Message Parameters
䊳 For more information, refer to "Configuring Text Message Parameters" on
page 67.
Sending Messages
Threaded Messaging
When you text with a friend or colleague, the messages are threaded together into a
single conversation, so you can view the entire conversation as you type.
Creating and Sending Text Messages
1. From the Tod ay screen, tap Start located in the upper left corner of
the screen.
2. Tap Messaging to reveal the Messaging screen.
69
Page 73

Sending Messages
ok
3. Ta p Text Messages.
4. Tap t he Menu soft key and tap New.
5. Enter the phone number or email addresses of up to ten recipient(s) in the
To field. Press the Function key twice to enter alphanumeric values.
• Use the QWERTY keyboard to place a semicolon between numbers, if there is
more than one recipient.
6. Tap t he Te xt field and use your QWERTY keyboard to enter the content of
your message.
7. Tap t he Menu soft key and tap Message Options.
8. To ensure that your message was delivered to the intended recipients, tap
the check box next to Request message delivery notification.
9. Select the Priority for the message.
10. To attach a call back number to the message, tap the check box next to
Send a callback number.
11. Tap to save your changes and return to the previous screen.
12. Tap t he Send soft key to transmit your message to the selected recipients.
Note: There is a 160-character limit for text messages. The character limit applies to messages sent using
the Text Messaging account only. If you send a text message with more than 160 characters, the
message is truncated after the first 160 characters and the remaining characters are then sent in
consecutive messages until the entire messa ge text has been sent. Charges apply in accordance
with the sender's and the recipient's calling pla ns.
Creating and Sending Picture/Video Messages
1. From the To da y screen, tap Start located in the upper left corner of
the screen.
2. Ta p Messaging to reveal the Messaging screen.
3. Ta p MMS.
4. Tap t he Menu soft key and tap New. The MMS screen is then displayed.
5. Enter the phone number or email address of up to ten recipient(s) in the To
field. Press the Function key twice to enter numbers from the
keypad.
• Use the virtual QWERTY keyboard to place a semicolon between numbers, if
there is more than one recipient.
6. At any point during the creation of the message, tap the Menu soft key and
tap MMS Options to see additional options.
7. Tap t he Subject field and enter the subject of your message.
Messaging 70
Page 74

8.
Tap t he Tex t field and use your virtual QWERTY keyboard to enter the
content of your message.
9. Tap +Image/Video to attach a picture or video file.
10. Search for a file to attach by either:
• Insert Picture from My Pictures folder.
• Insert Video from My Videos folder.
• Insert New Image allows you to take a new picture.
• Insert New Video allows you to capture a new video.
• Or, press and hold the Camera key, on the right side of the phone, to launch the
camera/camcorder. Take a photo or record a new video and save it. The picture
or video will be saved and displayed in My Pictures or My Videos.
11. Tap +Audio to attach an audio file.
• Insert Sound from My Music folder. Folder (and sub-folder) selections can be
sorted by tapping My Music pull down menu and tapping either My Device or
My Documents. Sound files include: MP3, MID, MIDI, XMFO, and WAV.
12. Browse for a folder and file type, then tap the desired sound file.
• Insert New Sound allows you to record and attach the new sound.
13. Tap +Slide to attach addition images/videos and audio files.
14. Once all fields are completed and the message has been fully entered, tap
the Send soft key to transmit your message to the selected recipients.
Text Message Menu Options
New Text Messages Options
Several message features are available under Menu when creating a new text
message.
1. From the Tod ay screen, tap Start located in the upper left corner of
the screen.
2. Tap Messaging to reveal the Messaging screen.
3. Tap Text Me s sage s .
4. Tap t he Menu soft key and tap New. The To: field is active.
5. Tap Menu to reveal the following options:
• Add Recipient: Browse for and attach a recipient from your contacts.
•Check Names: Check contacts for the name of the recipient.
• My Text: (Available when in the text field.) Choose from up to 9 pre-loaded
messages.
• Save to Drafts: Saves the message to the draft folder.
• Spell Check: Spell check your message.
71
Page 75

Multimedia Message Menu Options
• Cancel Message: Cancels the new message.
• Message Options: Request Message Delivery Notification, Priority, and
Callback Number for the message.
Received Text Messages Options
Several message features are available for received text messages.
1. From the To da y screen, tap Start located in the upper left corner of
the screen.
2. Ta p Messaging to reveal the Messaging screen.
3. Ta p Text Messages and then tap the Inbox drop down menu. The Text
Message screen then displays your unread and read SMS text messages
on screen. The Text Message screen (as a whole) has the following options
available:
•New: Allows you to create a new message.
•Reply: Sends a reply to the sender and/or all other recipients, or forwards the
message to other people.
•Delete: Deletes the message.
•Go To: Allows you to switch to another message account or message folder.
Select one of the following:
- Folders
- Text Messages
- Outlook E-mail
- MMS
• Tools
- Sort By: Allows you to sort messages by one of the following: Message Type,
From, Received, or Subject.
- Empty Deleted Items: Allows you to permanently delete all items in the Deleted
Items folder.
- Clear “Text Messages”: Deletes all items in the Inbox and Sent Items folder.
- New Account...: Allows you set-up a new e-mail account.
- Options...: Allows you to change the options for the Messaging.
Multimedia Message Menu Options
New Multimedia Messages Options
Several message features are available under Menu when creating a new
Multimedia (MMS) message.
1. From the To da y screen, tap Start located in the upper left corner of
the screen.
2. Ta p Messaging to reveal the Messaging screen.
Messaging 72
Page 76

3.
Tap MMS.
4. Tap t he Menu soft key and tap New.
5. Tap Menu to reveal the following options:
•Preview: Allows you to preview the new MMS message prior to delivery.
• Add Recipients: Browse for and attach a recipient from your Contacts or
Online Album.
•Insert: Allows you to attach both pre-existing or new files to the new MMS
message: Picture, Sound, Video, New Picture, New Sound, New Video, Text, and
MMS Templates.
• Attach: Allows you to attach a vCard, vCalendar or File.
• Edit Slide: Allows you to: Add Slide, Delete Slide, Slide Style, Slide Duration,
Move Slide UP or Move Slide Down in the MMS message.
•Save to: Allows you to save the current MMS message as a Draft or an MMS
Tem pl a te .
• Cancel Message: Allows you to cancel the current MMS message.
• MMS Options: Allows you to assign options for sending and receiving your
MMS message. Allows you to edit the MMS profiles as well as set an active
profile.
Received MMS Messages Options
Several message features are available for received MMS messages.
1. From the Tod ay screen, tap Start located in the upper left corner of
the screen.
2. Tap Messaging to reveal the Messaging screen.
3. Tap MMS and then tap the Inbox drop down menu. The MMS screen then
displays your unread MMS messages on screen. The following options are
available when previewing a Multimedia (MMS) message in the Inbox.
•New: Allows you to create a MMS message.
•Reply: Sends a reply to the sender and/or all other recipients, or forwards the
message to other people.
• Mark as Read: Allows you to mark the message as unread or read. Unread
messages are boldfaced on the message list.
•Move: Allows you to move the message to other folders.
•Go To: Allows you to switch to another message account or message folder.
Select one of the following:
- Folders
- Text Messages
- Outlook E-mail
- MMS
73
Page 77

Multimedia Message Menu Options
• Tools
- Sort By: Allows you to sort messages by one of the following: Message Type,
From, Received, or Subject.
- Manage Folders: Allows you create or modify a message folder.
- Empty Deleted Items: Allows you to permanently delete all items in the Deleted
Items folder.
- Clear “MMS”: Deletes all items in the Inbox and Sent Items folder.
- New Account...: Allows you set-up a new e-mail account.
- Options...: Allows you to change the options for the Messaging.
• Select Messages: Allows you to select multiple messages.
• Send/Receive: Select to send or receive new messages.
• MMS Options: Allows you to Auto Receive your messages, Reply on
Delivery Report after receiving the MMS, or create a Delivery Report.
Read MMS Message Options
Several message features are available under Menu when reading an MMS
message.
1. From the To da y screen, tap Start located in the upper left corner of
the screen.
2. Ta p Messaging to reveal the Messaging screen.
3. Ta p MMS. The MMS screen then displays your read and unread MMS
messages on screen. The following options available within an actively
open message:
• Mute: Mutes the speaker.
• Stop: Allows you to stop a video message that is being played.
•Delete: Deletes the message.
•Reply: Sends a reply to the sender and/or all other recipients, or forwards the
message to other people.
• Reply All: Allows you to send a reply to all recipients of the message. From the
Reply All option, you can select Multimedia Message or Text Message.
• Forward: Allows you to forward the message to another number or email
address.
• Mark as Unread: Allows you to change the status of the message from Read to
Unread.
• Resend: If the message fails to be sent after its initial delivery, this options allows
you to resend the last outgoing message.
• Message Info: Allows you to view message information such as Subject, Date,
From, Size, Priority, Expiry, and Type.
• From Address: Allows you to either Save the From Address, or Call it.
• Save as Template: Allows you to save a message as a template.
Messaging 74
Page 78

• Attached Files...: Allows you to view image and sound sent in the message.
Spell Checking a Text Message
1. Create a new text message. For more information, refer to "Creating and
Sending Text Messages" on page 69.
2. Tap the Menu soft key and select Spell Check. Words that are not present
in the Spell Check library of files are then highlighted and available word
choices are presented in a list.
3. From this list of alternate words, tap either:
• An alternate word
•Ignore: to ignore the currently selected word.
•Ignore All: to ignore all remaining “misspelled words in the text message.
• Add: To add the currently highlighted word into the Spell Check’s word library.
4. When the spell check is complete, tap to return to the message.
5. Tap t he Send soft key to transmit your message to the selected recipients.
Note: The Spell Check feature is not availab le for MMS messages.
ok
Checking Names with an SMS Message
1. Create a new text message. For more information, refer to "Creating and
Sending Text Messages" on page 69.
2. Tap t he Menu soft key and select Check Names. Recipient names
currently used within the To field will be verified against the current
Contacts list and e-mail addresses are reviewed to verify they conform
with the standard e-mail formats.
Note: The Checking Names feature is not available for MMS messages.
Using My Text Messages
My Text Messages consist of 9 pre-composed text message phrases you can quickly
insert into the body of a new message or as a response to a received message
without having to type a message. These default messages are:
• What are you up to?
• Just checking in...
• Where are you?
• Check this out!
• I’ll be right there.
75
Page 79

E-mail Account Setup
ok
• I’m running late.
• I’ll get right back to you.
• Urgent! Please reply ASAP.
• Let’s catch up soon.
Inserting a My Text Message
1. Create a new text message. For more information, refer to "Creating and
Sending Text Messages" on page 69.
2. Tap t he Menu soft key and select My Text.
3. Tap a desired message from the list. The selected message is then
inserted into the body of the message.
4. Tap t he Send soft key to transmit your message to the selected recipients.
Editing a My Text Message
1. Create a new text message. For more information, refer to "Creating and
Sending Text Messages" on page 69.
2. Tap t he Menu soft key and select My Text.
3. Tap t he Edit My Text Messages entry to display the list of editable Text
Messages.
4. Tap a pre-existing message entry.
5. Use either the virtual QWERTY keyboard or virtual keypad to edit the text.
6. Tap to save your changes and return to the message.
E-mail Account Setup
E-mail can be sent and received using ActiveSync, or you can also configure your
Saga™ to send E-mail using an ISP account.
Note: For more information on how to wirelessly sync e-mail, refer to the Wireless Sync documentation
included within the Companion CD.
Creating an Email Account
1. From the Today Screen, tap Start located in the upper left corner of
the screen.
2. Ta p Messaging to reveal the Messaging screen.
3. Ta p Setup E-mail to launch the E-mail Setup screen and begin the setup
process.
4. Follow the setup procedure.
Messaging 76
Page 80

Using Outlook for E-mail
Install ActiveSync on your PC and set up a Standard Partnership, so you can
send/receive E-mail. For more information, refer to "Setting Up a Partnership" on
page 140. E-mail is composed off-line and is sent to the intended recipient(s) the
next time you perform ActiveSync.
1. From the Today Screen, tap Start located in the upper left corner of
the screen.
2. Tap Messaging to reveal the Messaging screen.
3. Highlight Outlook E-mail and press .
4. Press the Menu right soft key.
5. New is highlighted, press .
6. Enter the E-mail address in the To field.
7. Press down on the Optical Mouse to move to the Subject field and enter a
subject.
8. Use the Optical Mouse to move to the Message field and enter the content
of your E-mail.
9. When you’re finished, press the Send left soft key.
Using an ISP for E-mail
If you’ve configured your Saga™ to send E-mail using an Internet Service Provider
(ISP), you can send E-mail directly from your Saga™ without connecting to your PC
through ActiveSync.
Tip: Before you can send and receive E-mail using your ISP, see "Setup of an ISP" on page 77.
Setup of an ISP
Before you can send E-mail directly, you’ll need to configure your Saga™ to work
through an existing account with an Internet Service Provider (ISP) or your network
at work. To configure your Saga™ to work with an ISP:
1. From the Today Screen, tap Start located in the upper left corner of
the screen.
2. Tap Settings . By default, the Personal tab is highlighted.
3. Tap t he Connections tab.
4. Tap Connections and select Add a new modem connection.
77
Page 81

E-mail Account Setup
5. Enter a name into the Enter a name for the connection field (default is
My Connection).
6. From within the Select a modem field, select Cellular Line.
7. Tap t he Next soft key.
8. Enter a modem number (exactly as it should be dialed) into the empty field
on the My Connection screen.
9. Tap t he Next soft key.
10. Enter the User name, Password, and Domain information for your
account.
11. Tap t he Finish soft key to save your information.
Messaging 78
Page 82

Section 8: Changing Your Settings
Topics Covered
• Settings
• Personal Settings
• System Settings
• Bluetooth
• Connections
• Sound Settings
• Setting a Phone Password
• Phone Settings
This section explains how to either set or change many of the settings available on
your Saga™.
Settings
The Settings menus for your Saga™ allow you to configure or change how many of
your phone’s features or functions appear or work. Some of the settings on these
menus are associated with shortcuts or hotkeys on your phone and can be quickly
accessed for your convenience.
For example, the To da y Screen has shortcuts for Owner Information and Bluetooth
connections.
Settings that are not easily associated with other applications or features of your
phone are discussed here. They are not listed in a specific order; however, some
settings are grouped with topics that include them.
If you don’t see a setting that you are looking for discussed here, check the Index
that begins on page 196, for a complete listing of all settings for your phone.
Personal Settings
Button Assignments
There are 2 default functions assigned to the 2 external buttons which include:
79
Page 83

Button 1 (long press) - Camera
(long press - Button #1)
Camera/Camcorder Key
(long press)
Lock Key (Button #2)
Button 2 (long press) - Lock Key
Personal Settings
Changing Your Settings 80
Page 84

The following functions can be assigned to the buttons above:
• <Context Menu> • Alarms • Messaging • Opera Browser
• <Input Panel> • Bubble Breaker • Modem Link • TipCalculator
• <Left Softkey> • Calculator • Notes • USB setting for
• <None> • Calendar • OpticalMouse • Voice Command
• <OK/Close> • Camera • Phone • VZAppZone
• <Right Softkey> • Contacts • Pictures & Videos • Windows Media
• <Scroll Down> • Excel Mobile • PowerPoint Mobile • Wireless Sync
• <Scroll Left> • Favorites • Remote Desktop
• <Scroll Right> • File Explorer • Search • World Clock
• <Scroll Up> • Getting Started • Smart Converter
• <Start Menu> • Help • Solitaire
• <Today> • Internet Explorer • Task Manager
• ActiveSync • Main Menu • Tasks
Mobile
VzAccess Manager
• Word Mobile
81
Page 85

System Settings
ok
ok
Assigning the External Buttons
The Buttons setting allows you to assign your favorite programs to your phone’s
hardware buttons:
1. From the To da y screen, tap Start located in the upper left corner of
the screen.
2. Ta p Settings . By default, the Personal tab is highlighted.
3. Tap t he Buttons .
4. Tap t he Assign a program drop down box for each of the buttons listed
below.
5. Tap to save and exit Buttons settings.
System Settings
About
1. From the To da y screen, tap Start located in the upper left corner of
the screen.
2. Ta p Settings . By default, the Personal tab is highlighted.
3. Tap t he System tab.
4. Ta p About .
•Version tab: Displays important device information, including the type of
processor and the amount of memory.
•Device ID tab: Displays the name used to identify the device to other computer.
• Copyrights tab: Displays information about copyrights.
5. Tap to return to the previous screen.
Backlight
1. From the To da y screen, tap Start located in the upper left corner of
the screen.
2. Ta p Settings . By default, the Personal tab is highlighted.
3. Tap t he System tab.
4. Ta p Backlight to access the various backlight usage parameters.
• Battery Power tab: Allows you to set the backlight on/off parameters.
• External Power tab: Allows you to set the backlight power save parameters.
•Brightness tab: Allows you to adjust the backlight brightness settings.
Note: For longer battery usage time, Level 5 is recommended for i ndoor usage.
Changing Your Settings 82
Page 86

•Keyboard tab: Allows you to set the keyboard backlight parameters.
5. Tap to save your changes and return to the previous screen.
ok
Certificates
1. From the Tod ay screen, tap Start located in the upper left corner of
the screen.
2. Tap Settings . By default, the Personal tab is highlighted.
3. Tap t he System tab.
4. Tap Certificates to access information about different certificate
type, tap one of the following tabs:
•Personal: Used to identify yourself to others.
•Intermediate: Used to identify intermediate certification authorities.
• Root: Used to identify root certification authorities.
5. Tap to save your changes and return to the previous screen. For more
ok
information, refer to "Managing Certificates" on page 35.
Clock & Alarms
1. From the Tod ay screen, tap Start located in the upper left corner of
the screen.
2. Tap Settings . By default, the Personal tab is highlighted.
3. Tap t he System tab.
4. Tap Clocks & Alarms to access the following time settings such as:
•Time: Allows you to configure and assign the time and date for both your local
and visiting regions.
•Alarms: Displays the list of currently configured alarms and allows you to
activate/deactivate a specific alarm entry from the list.
•More: Provide you with the options to:
- Display the clock on the title bar in all programs.
- Sound alarms even when the device is set to silent or vibrate.
5. Tap to save your changes and return to the previous screen.
ok
Customer Feedback
Customer Feedback allows you to provide feedback concerning your user
experience with Windows Mobile software.
1. From the Tod ay screen, tap Start located in the upper left corner of
the screen.
2. Tap Settings . By default, the Personal tab is highlighted.
83
Page 87

3. Tap t he System tab.
ok
ok
4. Ta p Customer Feedback .
5. To send feedback, tap the Send Feedback button.
Encryption
1. From the To da y screen, tap Start located in the upper left corner of
the screen.
2. Ta p Settings . By default, the Personal tab is highlighted.
3. Tap t he System tab.
4. Ta p Encryption to open the Encryption page.
5. To enable encryption of information on storage cards, tap/enable the
Encrypt files when placed on a storage card.
6. Tap to save your changes and return to the previous screen.
Error Reporting
1. From the To da y screen, tap Start located in the upper left corner of
the screen.
2. Ta p Settings . By default, the Personal tab is highlighted.
3. Tap t he System tab.
4. Ta p Error Reporting to open the Error Reporting page.
5. Tap either the Enable error reporting or Disable error reporting option to
allow your device to collect operation information and then pass that along
to Microsoft in the event of an error.
6. Tap to save your changes and return to the previous screen.
Note: Enabling this option might incur data usage charges.
External GPS
1. From the To da y screen, tap Start located in the upper left corner of
the screen.
2. Ta p Settings . By default, the Personal tab is highlighted.
3. Tap t he System tab.
4. Ta p External GPS to open the GPS Settings page.
5. From the Programs tab, tap the GPS program port drop down menu and
select the port which installed programs will use to obtain GPS data.
System Settings
Changing Your Settings 84
Page 88

6.
From the Hardware tab, tap the GPS hardware port drop down menu and
select the port to which your GPS device is connected and then select the
Baud rate.
7. From the Access tab, tap the Manage GPS automatically
(recommended) field to allow Windows Mobile to manage access to the
GPS data for all resident programs.
8. Tap to save your changes and return to the previous screen.
ok
Fn Shortcuts
Fn Shortcuts allows you to change the settings for the Fn (function) key. From the
Today screen, pressing and holding the Fn key and a specific key, launches
predefined applications or specific functions.
1. From the Tod ay screen, tap Start located in the upper left corner of
the screen.
2. Tap Settings . By default, the Personal tab is highlighted.
3. Tap t he System tab.
4. Tap Fn Shortcuts . Tap Edit, if desired, to add or edit a shortcut key.
5. In the 1. Select shortcut: field, tap an empty space (B, C,.etc.) then select
2. Select programs: and tap the desired program. Tap to save your
ok
selection.
Managed Programs
Managed Programs displays the installation history of any programs downloaded to
your Saga™.
1. From the Tod ay screen, tap Start located in the upper left corner of
the screen.
85
Page 89

2. Ta p Settings . By default, the Personal tab is highlighted.
ok
3. Tap t he System tab.
4. Ta p Managed Programs .
Memory
1. From the To da y screen, tap Start located in the upper left corner of
the screen.
2. Ta p Settings . By default, the Personal tab is highlighted.
3. Tap t he System tab.
4. Ta p Memory to open the Memory screen and select from one of the
following information tabs:
•Main: Displays the To tal , In use, and Free memory available on the phone for
Storage and Programs.
• Storage Card: Displays the To ta l, In use, and Free memory available on the
internal microSD card for Storage and Programs.
5. Tap to return to the previous screen.
Network Mode
Network Mode allows you to change network mode between CDMA and
International GSM mode.
1. From the To da y screen, tap Start located in the upper left corner of
the screen.
2. Ta p Settings . By default, the Personal tab is highlighted.
3. Tap t he System tab.
4. Ta p Network Mode .
5. Tap a setting to select the network mode.
6. Ta p Apply, type Yes in the text box, and then tap OK to change the mode.
Optical Mouse
Optical Mouse allows you to configure the settings for the optical mouse.
1. From the To da y screen, tap Start located in the upper left corner of
the screen.
2. Ta p Settings . By default, the Personal tab is highlighted.
3. Tap t he System tab.
4. Ta p Optical Mouse .
5. Tap a setting to customize the optical mouse.
Changing Your Settings 86
System Settings
Page 90

Power
1. From the Tod ay screen, tap Start located in the upper left corner of
the screen.
2. Tap Settings . By default, the Personal tab is highlighted.
3. Tap t he System tab.
4. Tap Power . For more information, refer to "Checking Battery Charge"
on page 27.
5. Tap to return to the previous screen.
ok
R2VS
1. From the Tod ay screen, tap Start located in the upper left corner of
the screen.
2. Tap Settings . By default, the Personal tab is highlighted.
3. Tap t he System tab.
4. Tap R2VS . For more information, refer to "R2VS Audio Processing"
on page 97.
5. Tap to save your changes and return to the previous screen.
ok
Regional Settings
1. From the Tod ay screen, tap Start located in the upper left corner of
the screen.
2. Tap Settings . By default, the Personal tab is highlighted.
3. Tap t he System tab.
4. Tap Regional Settings to open the Regional Settings screen where
you can alter the following settings:
• Region tab: Displays the appearance of regional information based on the
currently selected region.
•Number tab: Allows you to adjust regional numeric display settings.
• Currency tab: Allows you to adjust regional currency settings.
•Time tab: Allows you to adjust the time format.
•Date tab: Allows you to adjust the date format.
5. Tap to save your changes and return to the previous screen.
ok
Remove Programs
1. From the Tod ay screen, tap Start located in the upper left corner of
the screen.
2. Tap Settings . By default, the Personal tab is highlighted.
87
Page 91

System Settings
ok
3. Tap t he System tab.
4. Ta p Remove Programs to open the Remove Programs screen.
5. Highlight the programs you want to remove and then tap the Remove
button. For more information, refer to "Adding a Program Directly from the
Internet" on page 35.
6. Ta p Yes to confirm.
7. Tap to save your changes and return to the previous screen.
Screen
1. From the To da y screen, tap Start located in the upper left corner of
the screen.
2. Ta p Settings . By default, the Personal tab is highlighted.
3. Tap t he System tab.
4. Ta p Screen to open the Regional Settings screen where you can alter
the following settings:
• Alignment tab: Allows you to assign the display orientation of the screen
information and use the Align Screen feature to calibrate the touch screen.
• Clear Type tab: Allows you to choose whether the text on screen will have
smooth edges.
• Text Size tab: Allows you to change the size of the text displayed on screen to
make it easier to read. Increasing the size of the text will reduce the amount of
information displayed on the screen at any one time.
Tas k Mana g e r
Task Manager displays current applications that are running on the operating
system.
1. From the To da y screen, tap Start located in the upper left corner of
the screen.
2. Ta p Settings . By default, the Personal tab is highlighted.
3. Tap t he System tab.
4. Ta p Task Manager .
5. If needed, select an application that you would like to end and then tap End
Tas k.
6. Tap to return to the System screen.
Changing Your Settings 88
Page 92

Versi on
Version displays important device information such as S/W Version (PDA, Phone,
Eboot), H/W, PRL/ERI, Bluetooth, Wi-Fi, and WDC versions.
1. From the Tod ay screen, tap Start located in the upper left corner of
the screen.
2. Tap Settings . By default, the Personal tab is highlighted.
3. Tap t he System tab.
4. Tap Version .
Wake Up Button
Wake Up Button allows you to select a specific button wake up the device when it is
turned off.
1. From the Tod ay screen, tap Start located in the upper left corner of
the screen.
2. Tap Settings . By default, the Personal tab is highlighted.
3. Tap t he System tab.
4. Tap Wake Up Button .
5. Tap e ithe r : Power Button Only or Any Button to wake up your device.
6. Tap to save your selection.
ok
Windows Update
Windows Update allows you to install the latest updates to your Windows operating
system.
1. From the Tod ay screen, tap Start located in the upper left corner of
the screen.
2. Tap Settings . By default, the Personal tab is highlighted.
3. Tap t he System tab.
4. Tap Windows Update .
5. Tap Next. Select how you want your Saga™ to check for updates. Tap in
the field for either Manual or Automatic.
6. Tap Next. Tap Finish to complete the installation wizard.
7. If you selected Manual for your updates, tap Check Now at the next
screen after the installation wizard. If any updates are available, they will
install.
8. Tap Done after update installation, if any available, is finished.
89
Page 93

Bluetooth
Bluetooth
About Bluetooth
Bluetooth is a short-range wireless communications technology capable of
exchanging information over a distance of about 30 feet without requiring a physical
connection.
Unlike infrared, you don't need to line up the devices to beam information with
Bluetooth. If the devices are within a range of one another, you can exchange
information between them, even if they are located in different rooms.
Bluetooth Service Profiles
Actually, the Bluetooth specification is a protocol that describes how the short-range
wireless technology works, whereas individual profiles describe the services
supported by individual devices. Profiles reduce the chance that different devices
will not work together.
• For more information, refer to "Bluetooth Service Profiles" on page 152.
Toggling Bluetooth On/Off
When the Bluetooth radio is turned on, you can use the Bluetooth features available.
When the Bluetooth radio is turned off, you cannot send or receive information via
Bluetooth. To save battery life or in situations where radio use is prohibited, such as
airline traveling, you can turn off the Bluetooth wireless technology.
1. From the To da y screen, tap the Bluetooth icon (see illustration below).
Changing Your Settings 90
Page 94

2.
Bluetooth Off Bluetooth On
Tap Bluetooth to toggle the active state.
Note: Tap the All button to toggle the active state of all three components simultaneously (Wi-Fi, Bluetooth,
and Phone).
3. Press the Menu soft key to display the following options:
• Disconnect Cellular Data
• Wi-Fi Settings
• Bluetooth Settings
• Phone Settings
4. Tap t he Done button to return to the To day screen. You can now connect
Bluetooth devices your Saga™.
Bluetooth Settings
The Bluetooth wireless technology settings menu provides the ability to view the
device name and to show the visibility for the device.
䊳 For more information, refer to "Bluetooth Settings" on page 153.
Adding a Bluetooth Device
The Bluetooth pairing process allows you to establish trusted connections between
your phone and other Bluetooth devices.
Note: Devices must be paired before you can send i nformation between devices. Also all devi ces donot
support the same Bluetooth profiles as the Saga.
1. From the Tod ay screen, tap Start located in the upper left corner of
the screen.
2. Tap Settings . By default, the Personal tab is highlighted.
91
Page 95

Connections
ok
ok
3. Tap t he Connections tab.
4. Ta p Bluetooth .
5. Prepare your external Bluetooth device for communication and detection.
6. Tap t he Devices tab and select Add new device from the on screen list.
Your phone will then display a list of discovered Bluetooth devices which
have been detected within its communication range.
7. Tap/select the device you wish to pair with and tap the Next button.
8. Enter the numeric passcode and press the Next button. You are then
notified the pairing is in progress.
9. Use either your virtual QWERTY keyboard or keypad to enter a new Device
Name for the external Bluetooth device and tap the desired services
available to that same device.
10. Tap t he Done button to complete the process.
11. Tap to save your changes and return to the previous screen.
Note: Smart pairing mode allows you to easily make a connection wi th your hands-free or stereo headset.
Beam
A Beam connection can be established by:
1. From the To da y screen, tap Start located in the upper left corner of
the screen.
2. Ta p Settings . By default, the Personal tab is highlighted.
3. Tap t he Connections tab.
4. Ta p Beam to open the Beam screen.
5. Tap the box to place a check mark to receive all incoming beams, if
desired.
6. Tap to save your changes and return to the previous screen.
Connections
1. From the To da y screen, tap Start located in the upper left corner of
the screen.
2. Ta p Settings . By default, the Personal tab is highlighted.
3. Tap t he Connections tab.
4. Ta p Connections .
5. Make any changes, if necessary, in the Task s or Advanced tabs.
Changing Your Settings 92
Page 96

6.
Tap to save your changes and return to the previous screen.
ok
Domain Enroll
You can enroll into a domain to connect your device with company resources. You
will need the enrollment password provided by your system administrator. To enroll
your device, click Enroll.
1. From the Tod ay screen, tap Start located in the upper left corner of
the screen.
2. Tap Settings . By default, the Personal tab is highlighted.
3. Tap t he Connections tab.
4. Tap Domain Enroll to open the Domain Enrollment screen.
5. Tap Enroll. Read the on-screen instructions to enroll.
USB to PC
USB to PC allows you to change the type of USB connection your devices uses when
having problems connecting to ActiveSync.
1. From the Tod ay screen, tap Start located in the upper left corner of
the screen.
2. Tap Settings . By default, the Personal tab is highlighted.
3. Tap t he Connections tab.
4. Tap USB to PC .
5. Tap Enable advanced network functionally to enable or disable.
6. Tap to save your changes and return to the previous screen.
ok
Wi-Fi
A Wi-Fi connection can be established by:
1. From the Tod ay screen, tap Start located in the upper left corner of
the screen.
2. Tap Settings . By default, the Personal tab is highlighted.
3. Tap t he Connections tab.
4. Tap Wi-Fi to open the Configure Wireless Networks screen.
5. From the Wireless tab, filter the list of available networks by tapping
within the Networks to access field and selecting a search parameter:
• All Available
• Only access points
• Only computer-to-computer
93
Page 97

Connections
6. Ta p Menu and then Add New to add a new connection or tap and an
available connection to edit the parameters.
7. Enter a Network name for the new network connection and select a
security connection preset (The Internet or Work) from the Connects to
drop down.
• Tap The Internet if the network connects to the Internet (does not use proxy
settings) or Work (uses proxy settings).
• If the connection is for an ad-hoc network, tap the This device is a device-to
device (ad-hoc) connection box.
8. Tap t he Next button to continue onto the Authentication and Data
Encryption information. Use the information provided by your Network
administrator to complete this section and tap the Next button to continue.
9. Complete the process by selecting the appropriate security protocol
parameters from the EAP type drop-down menu.
10. Tap t he Finish button to complete the process.
11. Tap t he Network Adapter tab to select a security connection preset (The
Internet or Work) and modify an adapter from the list provided.
Wireless Manager
Verizon Wireless allows you to turn on/off the following services, Wi-Fi, Bluetooth
and Phone. You can access Verizon Wireless from the Tod ay screen.
1. From the To da y screen, tap Verizon Wireless located in the mid-
portion of the display.
2. Tap any of the three fields to turn their respective options On or Off.
3. For more information, refer to "Toggling Bluetooth On/Off" on page 90.
Changing Your Settings 94
Page 98

Sound Settings
PDA/Phone Ringer Volume
You can set the volume for both PDA
notifications and phone volume. To adjust
these volumes, follow these steps:
1. Tap the icon located at the
top of your screen. A menu
displays with sliders to adjust both
the PDA and phone ringer volumes.
2. Using the stylus, tap the desired
level on the slider located under
Volume. The left slider controls the
PDA volume and the right slider
controls the ringer volume.
3. Tap the icon again to exit.
Note: You can also press and hold the slider tab and move it back and forth along the sli der using the
stylus.
Sounds and Notifications
The Sounds and Notifications settings allows you to select the actions for which you
hear sounds and how you are notified when different events occur.
To view the sounds and notifications screen, follow these steps:
1. From the Tod ay screen, tap Start located in the upper left corner of
the screen.
2. Tap Settings .
3. Tap t he Personal tab.
4. Tap Sounds & Notifications . By default, the Sounds tab is selected.
5. Activate sound notifications for any of the following events by tapping on:
• Events (warnings, system events)
•Programs and Notifications (alarms, reminders)
• Screen taps (Soft or Loud)
• Hardware buttons (Soft or Loud)
Note: When you enable a sound, your Saga™ plays tones to notify you that an event ha s occurred. Refer to
the following section below for a com plete list of events for which you can select sounds.
95
Page 99

6. Tap t he Notifications tab to assign specific audio files (or vibrate) to be
ok
ok
played for specific applications or actions. Sounds can be set for each of
the following events:
• Phone: Incoming call
• ActiveSync: Begin sync
• ActiveSync: End sync
• Connection disconnected
• Connection established
• Messaging: New e-mail message
• Messaging: New text message
• Phone: Missed call
• Phone: Voice mail
• Reminders
• Wireless network detected
7. Tap to save your changes and exit.
Setting an Event Notification
From the To da y screen, tap Start located in the upper left corner of
1.
the screen.
2. Ta p Settings .
3. Tap t he Personal tab.
4. Ta p Sounds & Notifications .
5. Tap t he Notifications tab.
6. Select the event from the Event drop down menu.
7. Tap either Ring type: or Ring tone: to choose a option.
8. Tap the Play button to sample the sound file and tap the Stop button
to stop playback.
9. Tap to save your changes and exit.
Setting Your Phone’s Incoming Ringtone
1.
From the To da y screen, tap Start located in the upper left corner of
the screen.
2. Ta p Settings .
3. Tap t he Personal tab.
4. Ta p Sounds & Notifications .
5. Tap t he Notifications tab.
6. Select Phone: Incoming call from the Event drop down menu.
Changing Your Settings 96
Sound Settings
Page 100

7.
Tap t he Ring type field and select the type of desired ringer/vibration
combination from the drop down menu.
• The available notification options for this type of event are: Ring, Increasing
ring, Ring once, Vibrate, Vibrate and ring, Vibrate then ring, or None.
8. Tap t he Ring tone field and select an available ringtone.
9. Tap t he Play button to play a sample of the currently selected ring
tone. Press the Stop button to stop the sample playback.
10. Tap to save the new phone ringtone and type then return to the
ok
previous screen.
Turn Phone Volume Off
You can turn the ringer off, or you can select one of the other Ring tone options, such
as Vibrate, Vibrate and ring, or Vibrate then ring.
1. From the Tod ay screen, tap Start located in the upper left corner of
the screen.
2. Tap Settings , then tap the Personal tab.
3. Tap Phone .
4. Tap the drop down arrow next to Ring type and select one of the Vibrate
options or select None.
5. Tap to exit.
ok
R2VS Audio Processing
R2VSTM significantly enhances the quality of mono and stereo audio, creating
improved dynamics and bass performance in your Saga™ internal speakers or
optional headphones when attached. R2VS provides a panoramic three-dimensional
audio image that extends the sound in both the horizontal and vertical planes well
beyond the speakers or headphones themselves. These enriching effects are
especially noticeable on digitally compressed audio formats such as MP3 and WMA.
R2VS is comprised of 3D® and 5.1ch® technologies, and adds the following features
to your audio listening experience.
• 3D -The leading 3D sound technology in the world, which restores the spatial
information that is masked by traditional recording and playback techniques.
• 5.1 ch - R2VS technology that enhances bass performance by utilizing
psychoacoustic techniques to restore the perception of low frequency tones,
delivering deep rich bass to your Saga™ internal speakers or optional
headphones.
97
 Loading...