

Page 1

E-MANUAL
Thank you for purchasing this Samsung product.
To receive more complete service, please register
your product at
www.samsung.com/register
Model______________ Serial No.______________
Page 2

Contents
e-Manual Guide
Viewing the e-Manual
1 Scrolling a Page
1 Using the Top Icons
1 Returning to the Home Page
1 Searching the Index
2 Searching Pages
2 Closing the e-Manual
2 Jumping to a Menu Item
2 Updating the e-Manual
Connections
Aerial Connection
Video Device Connections
HDMI Connection
Component Connection
Channel Settings
17 Country (Area)
17 Manual Tuning
18 When Aerial Source is set to Air or Cable
18 Transfer Channel List
18 Delete CAM Operator Profile
19 Satellite System
21 Scanning for Satellite Channels
Channel Management
24 Remove Channels
24 Number Change
24 Channel Lock
24 Channel Unlock
24 Rename Analogue Channels
Common Interface
Audio Options
Favourites Channels
27 Add Channels
AV Connection
SCART Connection
Audio Device Connections
9 Digital Audio (Optical) Connection
ARC (Audio Return Channel)
Computer Connection
12 HDMI Connection
13 HDMI-to-DVI Connection
Smartphone Connection
Getting Started
Switching Between Video Sources
Programming
16 Auto Tuning
16 Antenna Connection Type
28 Remove Channels
28 Rearrange the Favourites Channels List
28 Rename a Favourites Channel List
28 Copy a Favourites Channels List
Network Settings
Network Configuration
29 Wired Network
30 Wireless Network
30 Wireless Network Precautions
30 Network Security Protocols
Wired Network Setup
31 Automatic Wired Network Setup
32 Manual Wired Network Setup
34 Failed Wired Connection
Wireless Network Setup
35 Automatic Wireless Network Setup
36 Manual Wireless Network Setup
37 WPS Button
38 Failed Wireless Connection
39 Dynamic versus Static IP Addresses
Page 3

Checking the Network Status
Mobile Device Connection
40 Wi-Fi Direct
41 AllShare Settings
41 Set Remote Access
Universal Remote Setup
54 Connecting the IR Extender
54 Add the External Device
55 Using the Universal Remote Control
55 Registered External Device Management
41 Rename the TV
Controlling TV
Smart Touch Control
42 Inserting the Batteries (AAA X 2)
42 Connecting to the TV
43 Reconnecting the Smart Touch Control
43 Battery Low Alarm
44 Buttons and Descriptions
46 Special Functions
Touchpad
47 Dragging
47 Press
48 Flicking
48 Pressing and Holding
49 Pressing and Dragging
49 Scrolling Up/Down
50 Scrolling Left/Right
50 Changing Channels by Entering Numbers
50 Numerical Input Guide
51 Adjusting the Touchpad
51 Show Status and Notification Banner
51 Recommendations
51 History
Entering Text using the Onscreen Keypad
56 Entering Text using the QWERTY Keypad
56 Additional Features
SMART Interaction
SMART Interaction
57 Precautions
57 Face Recognition
57 TV Camera Use
58 Motion Control
58 Voice Recognition
Voice Recognition
60 Operating Environment
60 Voice Recognition Environment Test
60 Voice Recognition Tutorial
60 Enabling Voice Recognition
61 Basic Voice Recognition Use
62 Voice Recognition Settings
62 Interactive Voice Recognition Commands
62 Deactivating Voice Recognition
Motion Control
63 Operating Environment
64 Motion Control Environment Test
64 Motion Control Tutorial
65 Motion Control Activation
51 Deleting History Data
51 Searching
Using the Virtual Remote Control
52 Changing the Virtual Remote Control Panel
52 Change a position of the Virtual Remote Panel
53 Using the Number Panel
53 Using the Playback Control Panel
53 Using the Quick Access Panel
53 Adjusting the virtual remote control
65 Using the Basic Motion Controls
65 Motion Control Options
66 Motion Control Screen
66 The Screen Composition while Viewing TV
67 The Smart Hub Screen Composition
Face Recognition
69 Operating Environment
70 Face Registration
70 Face Registration from the Smart Hub account information
screen
71 Face Registration for the Smart Hub account using face
recognition
71 Face Recognition Login
Page 4

Using Peripheral Devices
72 Keyboard Connection
72 Keyboard Use
73 Mouse Connection
73 Mouse Use
Recorded Programme Playback
83 Changing the Viewing Mode
83 Filtered View
83 Playlist Creation
83 Recording Lock / Unlock
84 Deleting Saved Programmes
TV Viewing
TV Viewing
74 Programme Info
74 Change the Broadcast Signal
74 Guide
75 Change Channels
75 Recording the Current Programme
75 Change Category
75 Quick Navigation
75 Schedule Viewing
75 Schedule Recording
75 Checking the Programme Info
76 Channel List
76 Change Channels
76 Sorting
76 Genre
76 Change the Broadcast Signal
76 Change the Channel List
Schedule Viewing
77 Digital Channel Schedule Viewing
77 Guide
77 Programme Info
78 Analogue Channel Schedule Viewing
78 Cancel a Schedule Viewing
78 Edit Schedule List
84 Rename
84 Manage Devices
84 Playing a Different Programme
84 Programme Scan
85 Additional Recorded Programme Playback Settings
Timeshift
86 Precautions
87 Activating the Timeshift function
3D TV
88 Precautions
88 Tips
89 Activating 3D Mode
90 Setting 3D Effects
Samsung Multi View
91 Using Samsung Multi View
91 Multi Screen Viewing Mode
92 2 Player Gaming Mode
92 Limitations
93 Screen Control
93 Supported Screen Control Buttons
93 Speaker Selection
93 Supported Input Signals
Schedule Recording
79 Precautions
80 Dedicated Recording Device Setup
80 Plug & Play
81 Dedicated Recording Device Management
81 Programme Recording
81 Instant Recording
82 Guide
82 Programme Info
82 Specified Time and Date
82 Cancel the Schedule Recording function
82 Edit Timer List
PIP
Analogue Screen Calibration
95 Fine Tune
Subtitles
96 Show Subtitles
96 Subtitle Options
96 Changing the Teletext Language
Page 5

TV Settings
Screen Protection and Maintenance
115 Eco Solution
Basic Picture Settings
97 Changing the Picture Mode
98 Picture Quality
98 Applying the Current Picture Quality Setting to Another
Input
99 Picture Size
100 Screen Position
100 4:3 Screen Size
100 Picture Off
100 Picture Reset
Advanced Settings
Picture Options
Basic Sound Settings
105 Changing the Sound Mode
106 Adjusting the Sound Settings
106 Auto Volume
116 Screen Burn Protection
116 Pixel Shift
116 Auto Protection Time
Password
117 Password Change
117 Programme Rating Lock
Additional Features
118 Changing the Menu Language
118 Game Mode
118 Precautions and Restrictions
119 BD Wise
119 Menu Transparency
119 Sound Feedback
119 Panel Locking
120 Booting Logo
120 Anti Flicker
120 DivX® Video On Demand
106 3D Audio
106 Sound Reset
Sound Customiser
107 Creating Custom sound
107 Editing Custom Sound
107 Managing Custom Sounds
Speaker Settings
108 Speaker Select
108 Additional Settings
109 TV Audio through the Samsung Multi View 3D Glasses
109 Restrictions
110 DTV Audio Level
110 Digital Audio Out
111 Dolby Digital Comp
111 Samsung Audio Device Connection
Clock and Timer
112 Setting the Time
112 Auto
112 Time Offset
113 Manual
113 Sleep Timer
SMART TV Features
Smart Hub
121 Agreements Required to Use Smart Hub
122 Samsung Account
122 Creating a Samsung Account
122 Terms & Conditions, Privacy policy
123 Logging In
123 Linking a Samsung Account to Other Accounts
124 Managing Accounts
124 Resetting Smart Hub
125 Searching
125 Keyword Search
125 Setting Search Scope
125 Sports Mode
126 Status and Notification
126 Voice Recognition & Motion Control Configuration
126 Samsung Account Configuration
126 Network Configuration
126 Notification
113 On Timer
114 Off Timer
Page 6

Social
127 Social Settings
127 Checking the Application
127 Connecting a Service to a Samsung Account
128 Watching Videos
128 Friend Profile
128 Select a friend to call
128 Filters
139 Watching Recorded Programmes
Films and TV Shows
140 Sub Menus on the Bottom of the Main Screen
141 Custom Recommendations List
141 Watching Content
141 VOD Rating Lock
141 Miscellaneous
Apps
130 Precautions
131 Installing Standard Applications
131 Launching an Application
131 Samsung Apps
131 Searching for Apps
131 Installing Applications
132 Apps Management
132 Edit My Apps
133 Deleting Applications
133 Managing Application Folders
133 Application Lock/Unlock
133 Application Update
134 Fitness
134 Creating a Profile
134 Kids
135 Web Browser
135 Social Networks
135 Linking Service Accounts
136 Apps Settings
136 Auto Ticker
136 Push Notification Settings
136 Channel-Bound Apps
136 Properties
On TV
138 On TV Settings
138 On TV Setup
138 Recommendation Notice
138 Recommendation Method
138 Adult Content Block
139 Auto Start
139 Watching an On-Aerial Recommended Programme
139 Scheduled Recommended Programme Info
139 Activating the Guide
139 Programme Recommendations by Time
Photos, Videos & Music
143 Restrictions
144 Supported File Formats
144 USB Device Connection
144 USB Device Removal
145 Watching Recorded Programmes
145 Playing all the Content on a Storage Device
145 Clearing the Photos, Videos & Music Screen
145 Using Networked External Storage Devices
146 Allowing DLNA Device Connections
146 Samsung Link
146 Exporting Contents
Video Playback
147 Changing the view mode
147 Playlist Creation
147 Opening a Different File
147 Video Scanning
148 Show Subtitles
148 Additional Video Playback Settings
Music Playback
149 Changing the view mode
149 Playlist Creation
149 Music Scanning
149 Opening a Different File
150 Additional Music Playback Settings
Photo Playback
151 Changing the view mode
151 Slideshow
151 Slideshow Settings
151 Playlist Creation
151 Opening a Different File
152 Background Music
152 Mini Player
152 Additional Photo Playback Settings
Page 7

Anynet+ (HDMI-CEC)
153 Precautions
154 Anynet+ (HDMI-CEC) Setup
154 Anynet+ (HDMI-CEC) Use
154 Switching between Anynet+ Devices
155 Anynet+ (HDMI-CEC) Device Menu
155 ARC
Teletext Feature
Display Resolution
170 IBM
170 MAC
171 VESA DMT
172 Picture Size and Input Signal
Sharing Mobile Device Screens on the TV
156 MHL
156 MHL USE
156 Restrictions
157 Screen Mirroring
157 Mobile Device Connection
Other Information
Support
158 Remote Management
158 What is Remote Support?
159 How Does it Work?
160 e-Manual
160 Self Diagnosis
160 Picture Test
160 Samsung Multi View Test
161 Sound Test
161 Voice & Motion Control Environment Check
161 Signal Information
161 Reset
162 Updating the Software
162 Update now
162 Manual Update
163 Auto update
163 Manage Satellite Channels
163 Usage Mode
163 Support Info
Data Service
164 Auto Run Data Service
173 Supported 3D Resolutions
173 HDMI
174 Component
174 Digital Channel
174 Videos / Photos
174 Computer via HDMI
Subtitle and Media Contents file formats, and Codec
175 Subtitle
175 External
175 Internal
176 Supported image resolutions
176 Supported music file formats
177 Video Codec
178 Other Restrictions
178 Video Decoders
178 Audio Decoders
Restrictions
179 Requirements for Aerial Connection
180 Restrictions to PIP (Picture-in-Picture)
180 Flexible CI
3D Precautions
181 Viewing guidelines
182 CAUTION
183 SAFETY PRECAUTIONS
S-Recommendation Disclaimer
184 S Recommendation with Voice Interaction
184 S Recommendation
Licence
164 Using Data Service
165 Main Data Service buttons and their functions
HbbTV
Connecting to a TV Viewing Card slot
167 To connect the CI CARD, follow these steps:
167 Using the “CI or CI+ CARD”
Page 8

Troubleshooting
Screen
Sound
3D TV
Connection
190 Aerial (Air / Cable / Satellite) Connection
190 Computer Connection
Networking
Miscellaneous
Data Service
Schedule Recording / Timeshift
Anynet+ (HDMI-CEC)
Photos, Videos & Music
Apps
Reset the Personal Info and TV settings
Web Browser
Page 9

Viewing the e-Manual
The embedded e-Manual contains information about your TV's key features.
This TV has a built-in user guide. To read it, use one of the following methods:
Open the Support menu and choose e-Manual (Troubleshooting).
●
Press the E-MANUAL button on the regular remote control.
●
Press the MORE button on the Smart Touch Control to display control buttons on the screen.
●
Flick the Touchpad until e-Manual appears and select it.
"
Words in blue refer to screen menu options and words in light blue refer to remote control buttons.
"
A printable version of this guide is also available at www.samsung.com/support.
Scrolling a Page
To scroll a page, use of one of the following methods:
Press the or button on the scroll bar at the right edge of the screen.
●
Drag or flick up or down the line on either the left or right edge of the touchpad.
●
Place the focus on the or button at the right edge of the screen, drag or flick up or down
●
on the touchpad.
Using the Top Icons
Use the Back, Forward, and Opened page icons on the top left of the screen to navigate through
pages. These icons are available when two or more pages are passed.
Returning to the Home Page
To return to the home page, press the a button or select on the top right of the screen.
Searching the Index
Press the b button or select on the top right of the screen to display the index. Select a term to
display the page containing the term.
Page 10

Searching Pages
Press the { button or select on the top of the screen to access the search screen. Enter a search
phrase and select Done. Select an item from the search results list to navigate to the relevant page.
Closing the e-Manual
To close the e-Manual, press and hold the RETURN button or select at the upper-right corner of
the screen or press EXIT button.
Jumping to a Menu Item
To directly jump to the menu item that is described in the current section, select
to jump from a menu item directly to the related section in the e-Manual. If you want to read an
e-Manual entry on a specific screen menu feature, press the virtual remote panel's or the regular
remote's E-MANUAL button to load the corresponding e-Manual page.
"
This feature may not be available, depending on the menu.
Try Now
. It is possible
Updating the e-Manual
Press the button to launch Smart Hub and select Apps, and then select More Apps. The e-Manual
can be updated in the same way with an application update.
On the More Apps screen, select Apps to update. Select e-Manual from the list. The e-Manual starts
updating to the latest version. However, Apps to update appears on the screen only when the update
is required.
Page 11
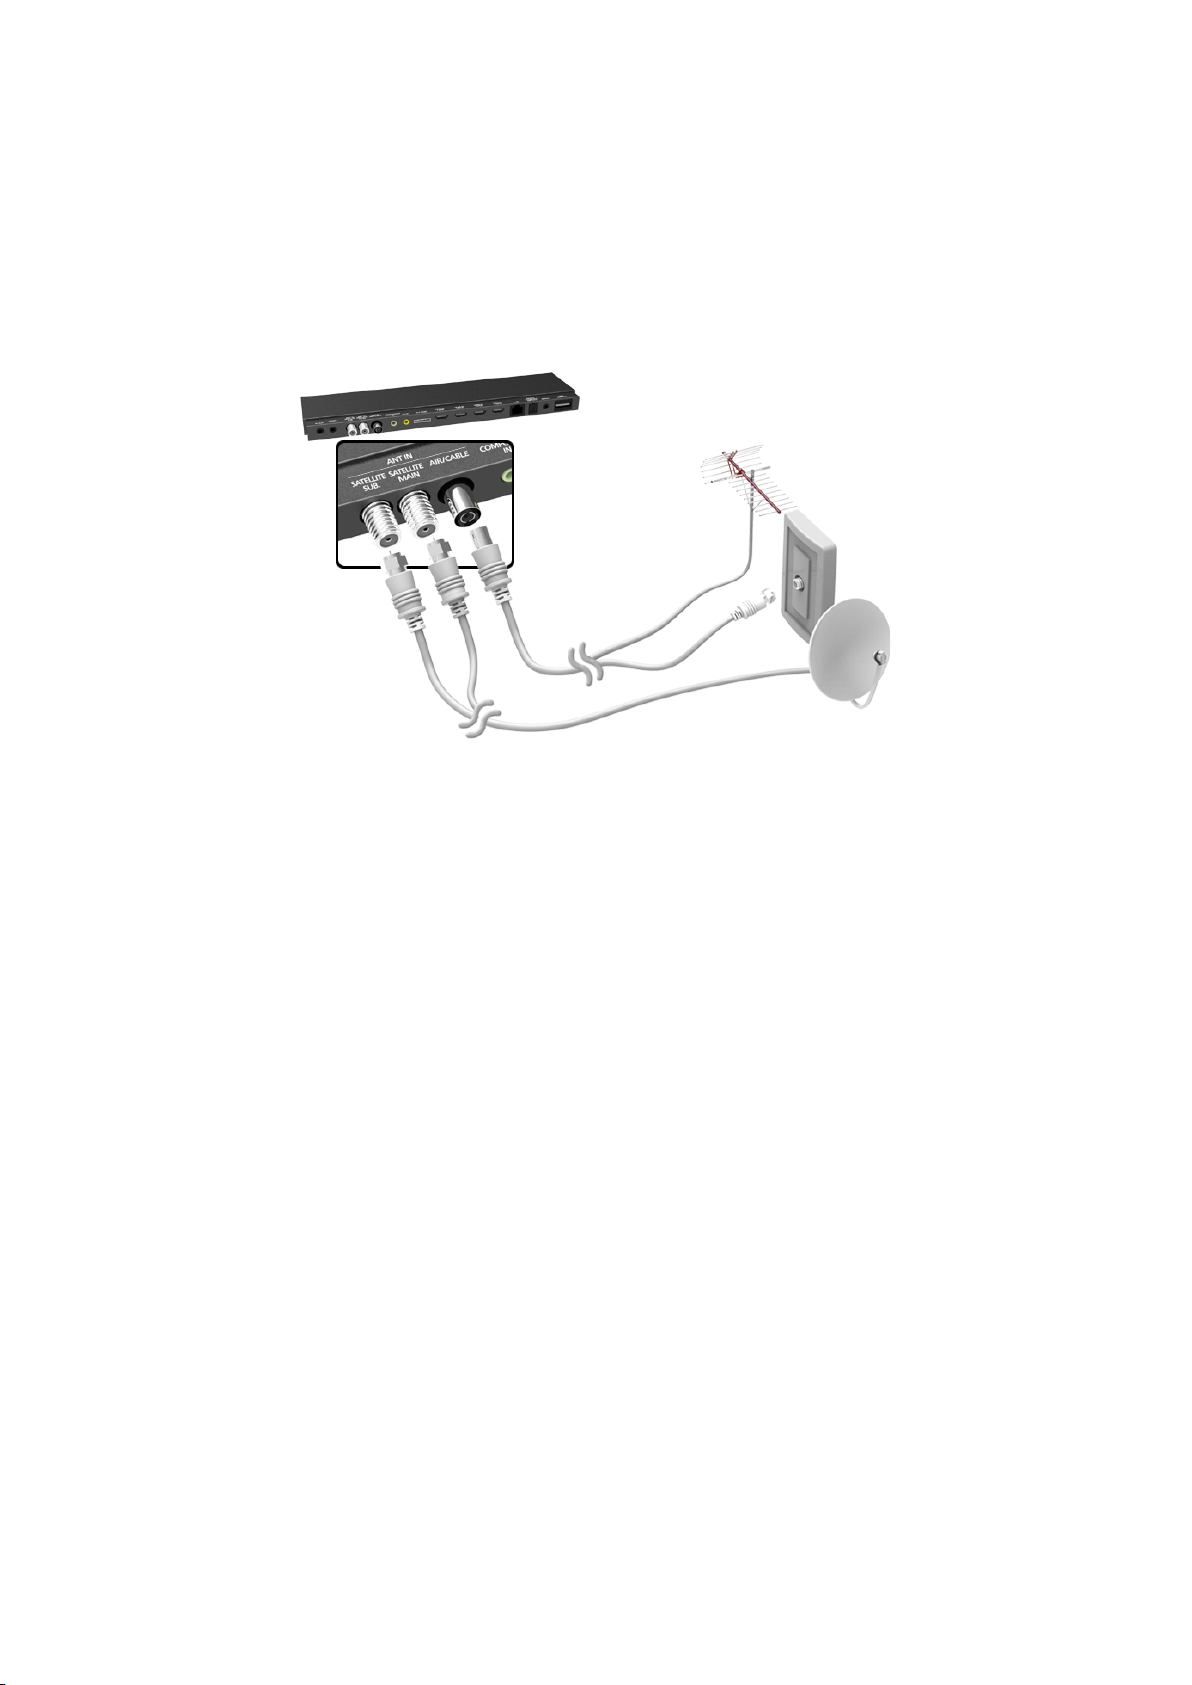
Aerial Connection
Refer to the diagram and connect the aerial cable to the aerial input connector. Make sure that you do
not bend the cable. The number of connectors and their names and locations may vary depending on
the model.
Connect the correct aerial cable for your viewing environment (over-the-air or cable broadcasting).
However, an aerial connection is not necessary if you are using a cable box or satellite receiver.
Refer to the "Requirements for Aerial Connection" for more information.
Page 12

Video Device Connections
This TV has a wide range of connectors for video input from video devices such as Blu-ray players,
DVD players, camcorders and gaming consoles. Below is a list of featured connectors shown in
descending order of picture quality.
HDMI
●
Component
●
AV
●
Connect the video device to the TV via an HDMI connector for the best picture quality. If the device
does not have an HDMI connector, try a component connector to get the next best possible picture
quality.
The number of connectors and their names and locations may vary depending on the model.
When connecting an external device, refer to the device's operating manual. The number of external
device connectors and their names and locations may vary depending on the manufacturer.
Page 13
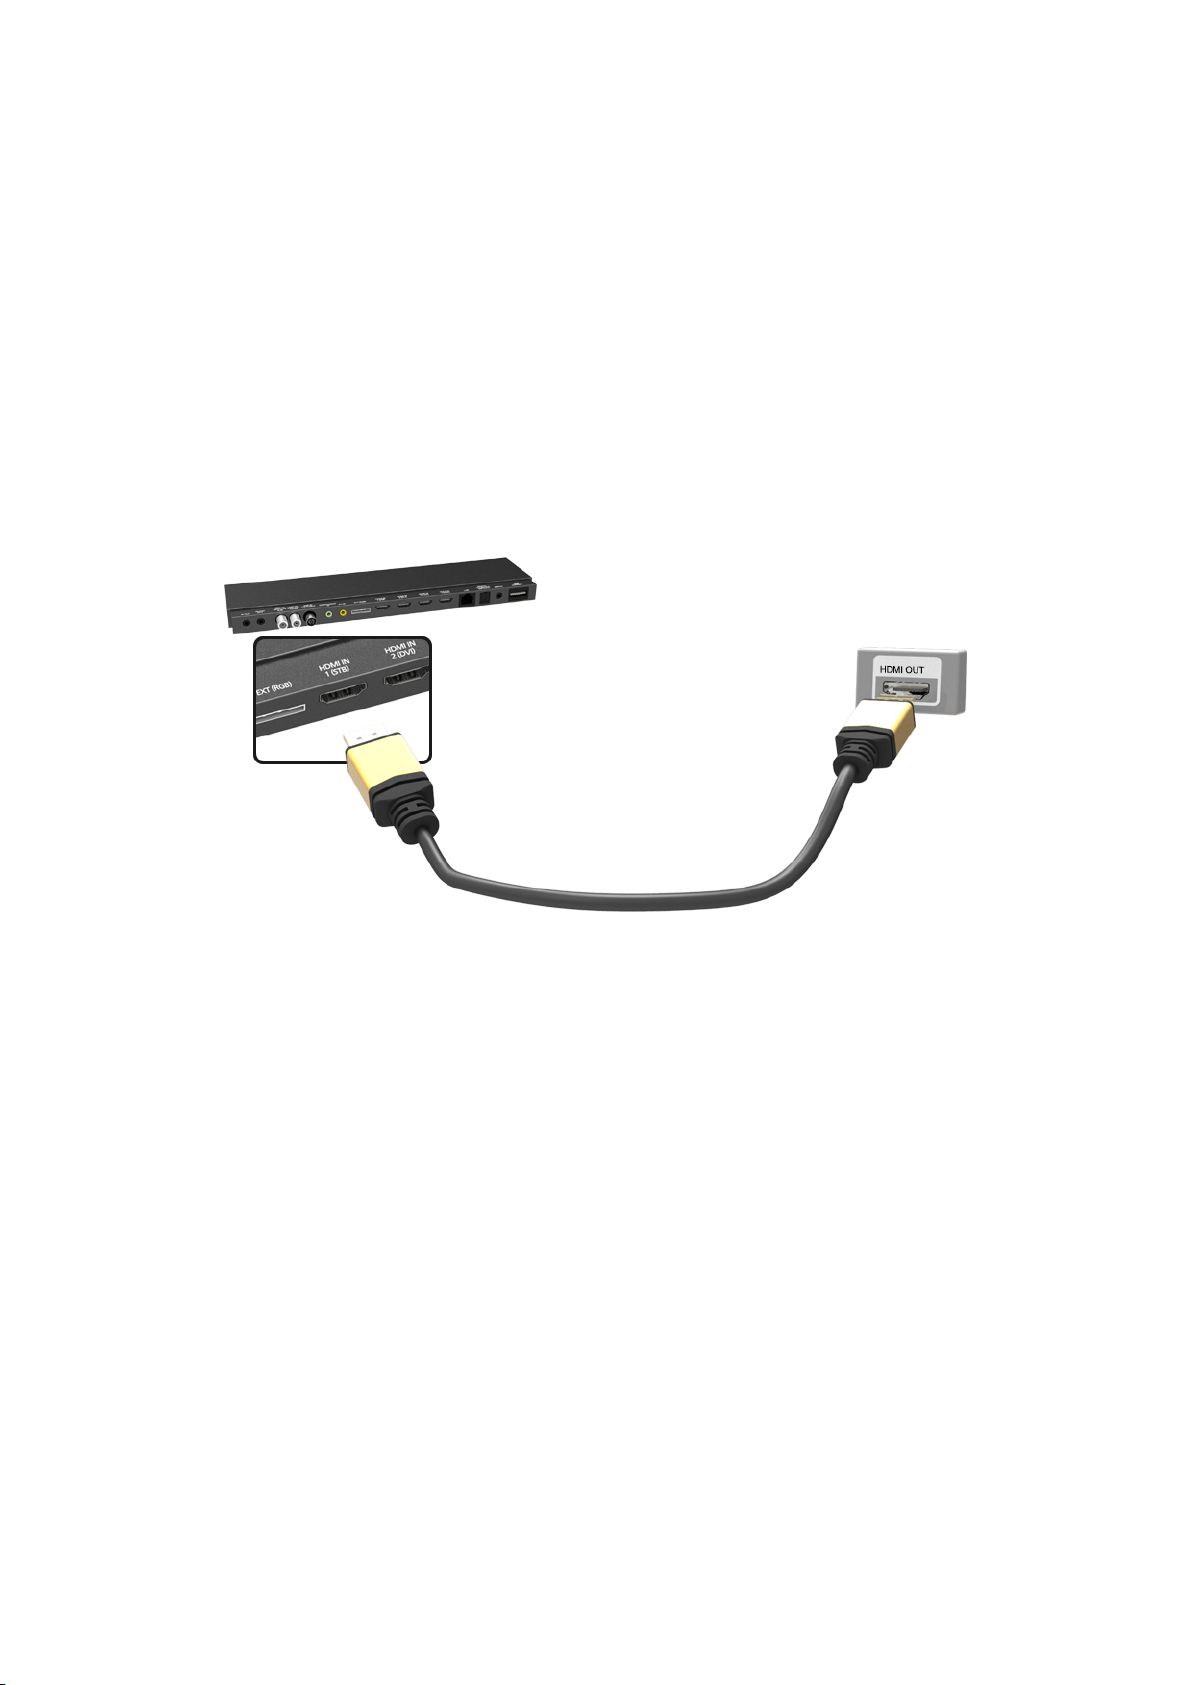
HDMI Connection
Refer to the diagram and connect the HDMI cable to the video device's HDMI output connector and the
One Connect HDMI input connector. One of the following HDMI cable types is recommended:
High-Speed HDMI Cable
●
High-Speed HDMI Cable with Ethernet
●
Use an HDMI cable with a thickness of 14 mm or less. Using a non-certified HDMI cable may result in
a blank screen or a connection error.
"
Some HDMI cables and devices may not be compatible with the TV due to different HDMI specifications.
"
This TV does not support the HDMI Ethernet Channel. Ethernet is a LAN (Local Area Network) built on
coaxial cables standardized by the IEEE.
"
The number of connectors and their names and locations may vary depending on the model.
Page 14
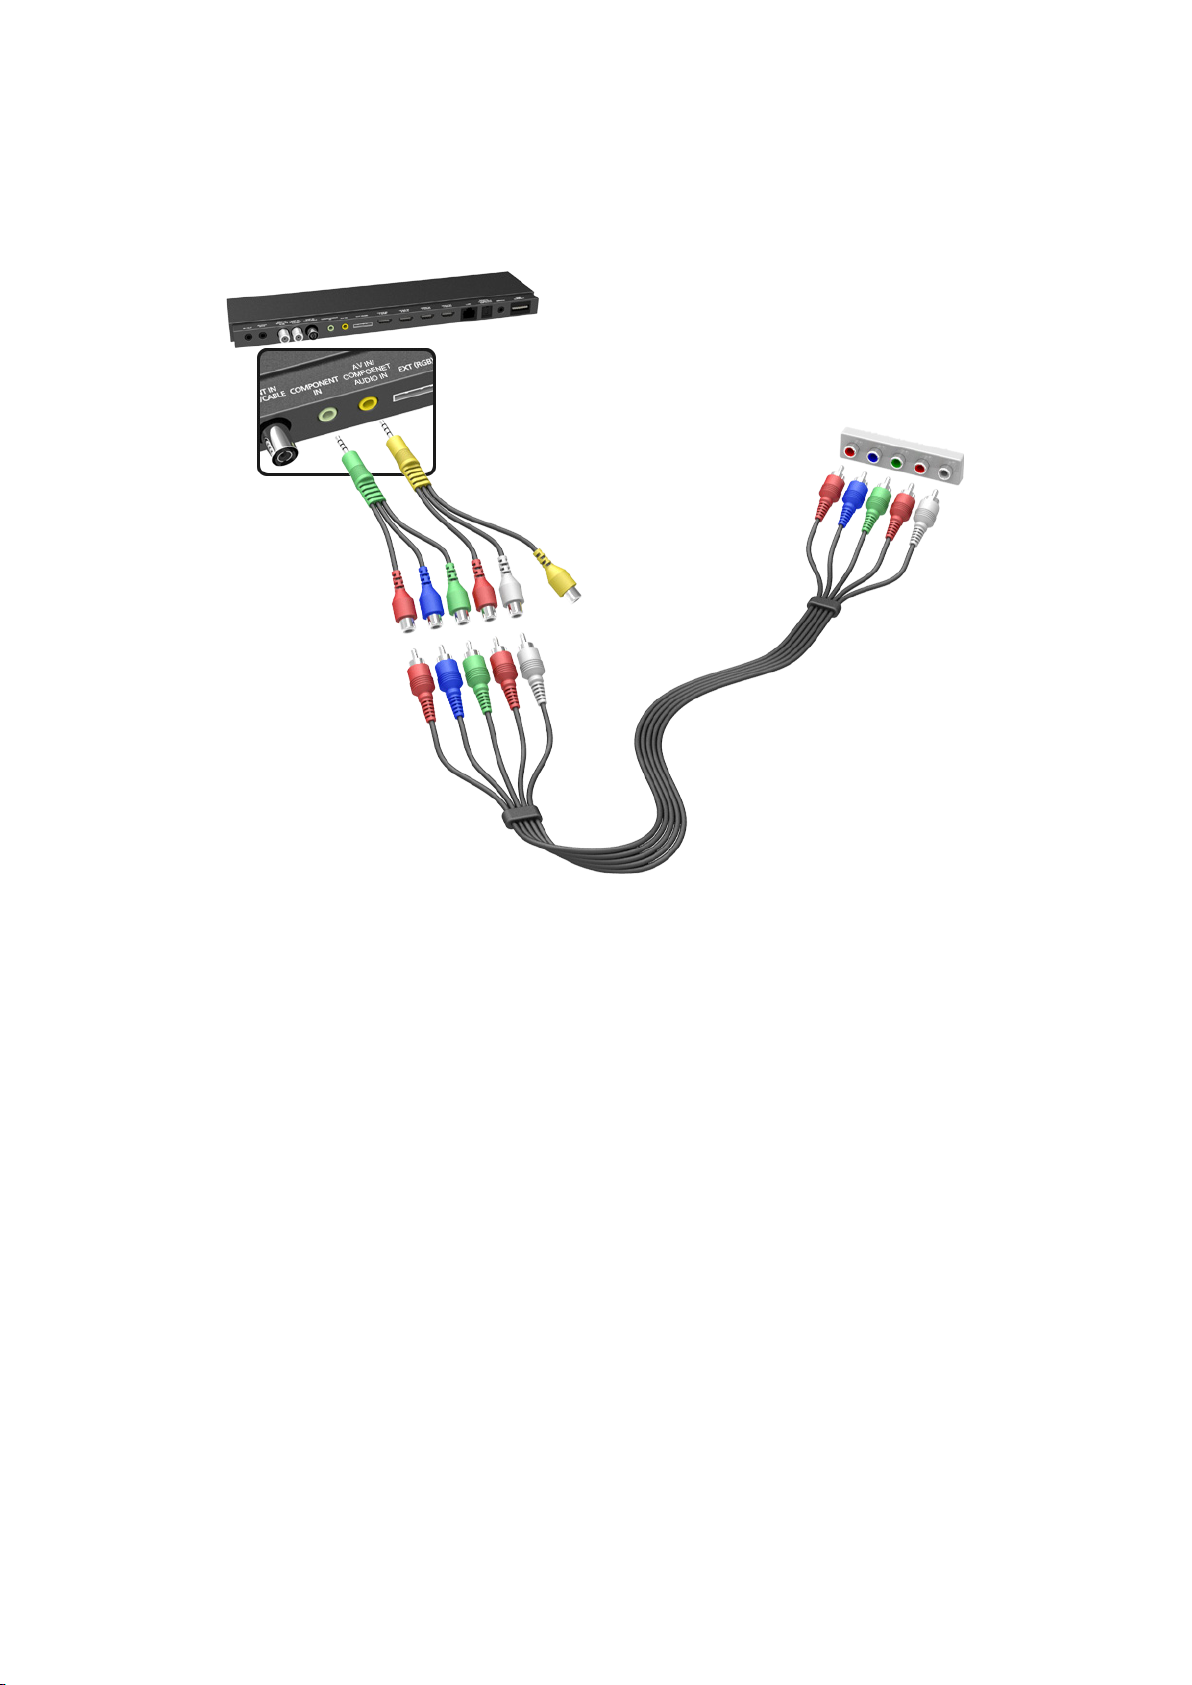
Component Connection
Refer to the diagram and connect the component video and audio cables to the component adapter
(accessory) and to the One Connect component input connectors. Make sure the cable colours match
the connector colours.
Page 15
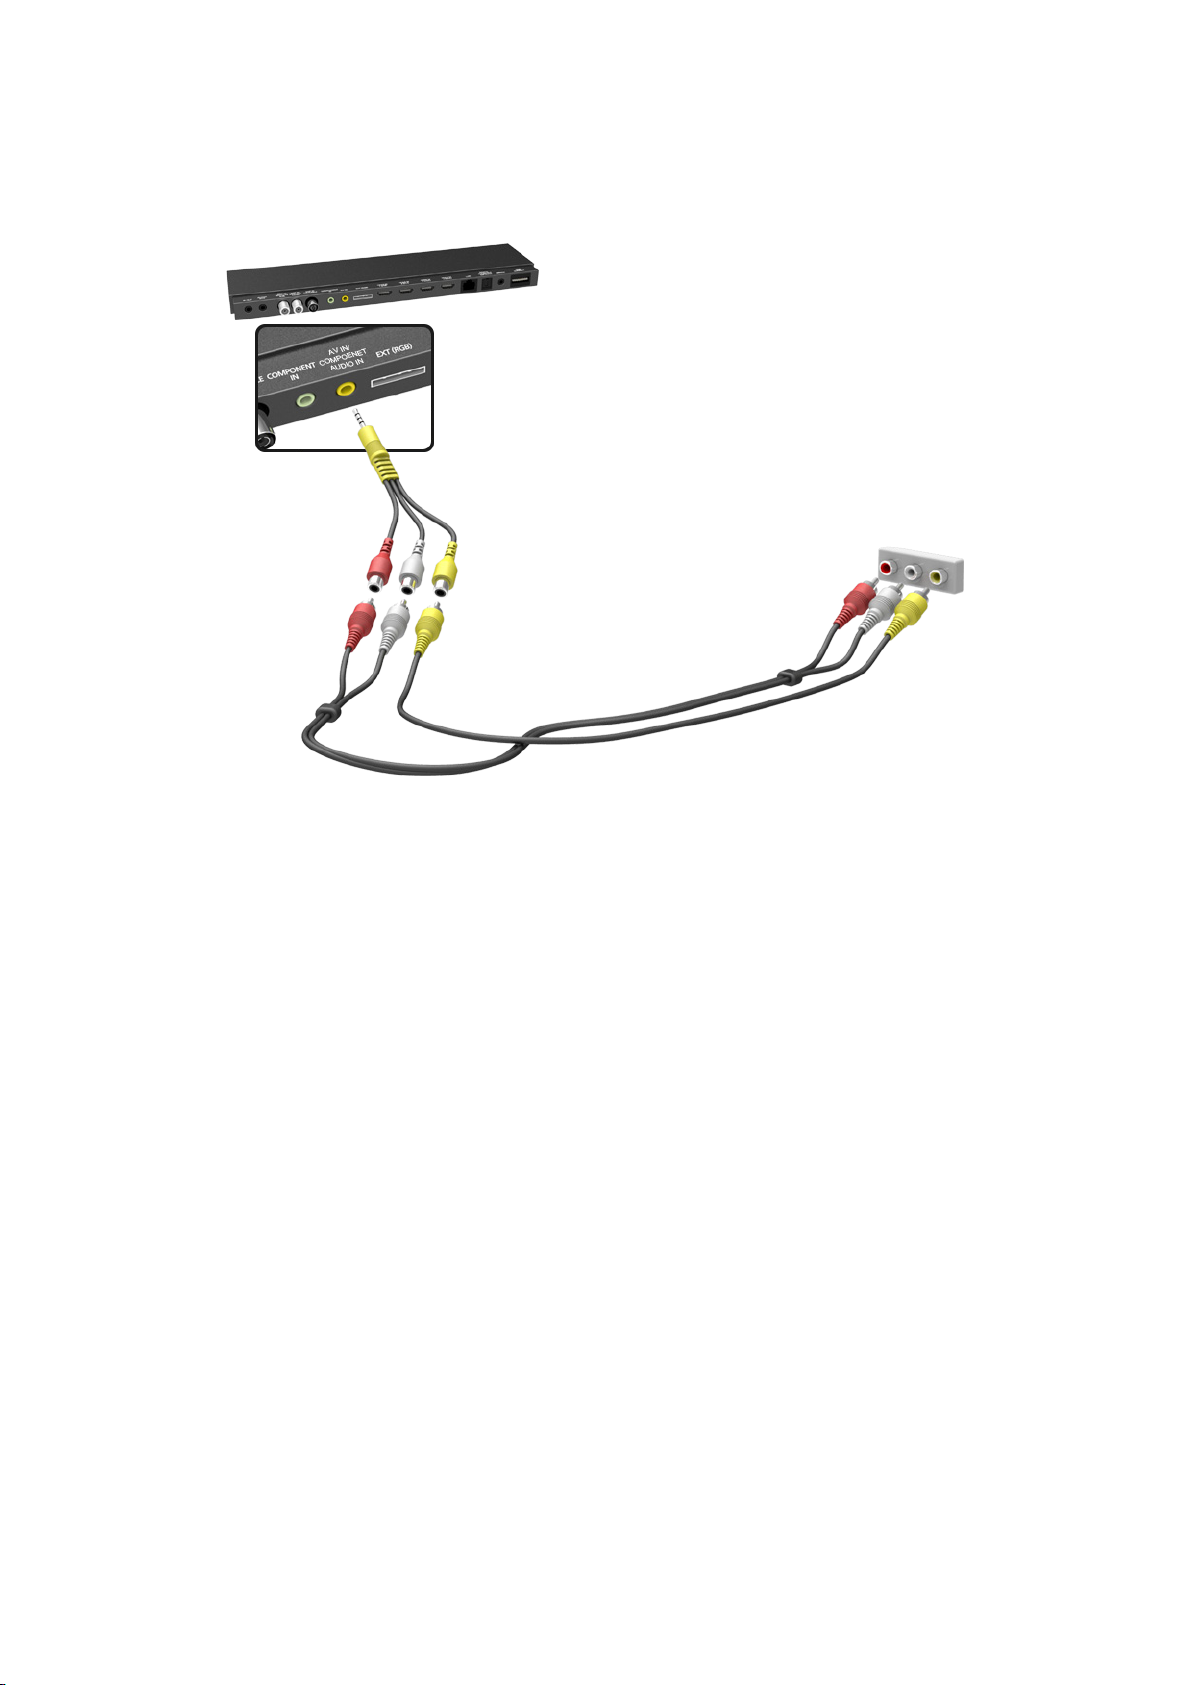
AV Connection
Refer to the diagram and connect the video and audio cables to the A/V adapter (included) and the
adapter to One Connect's external input connector.
Page 16
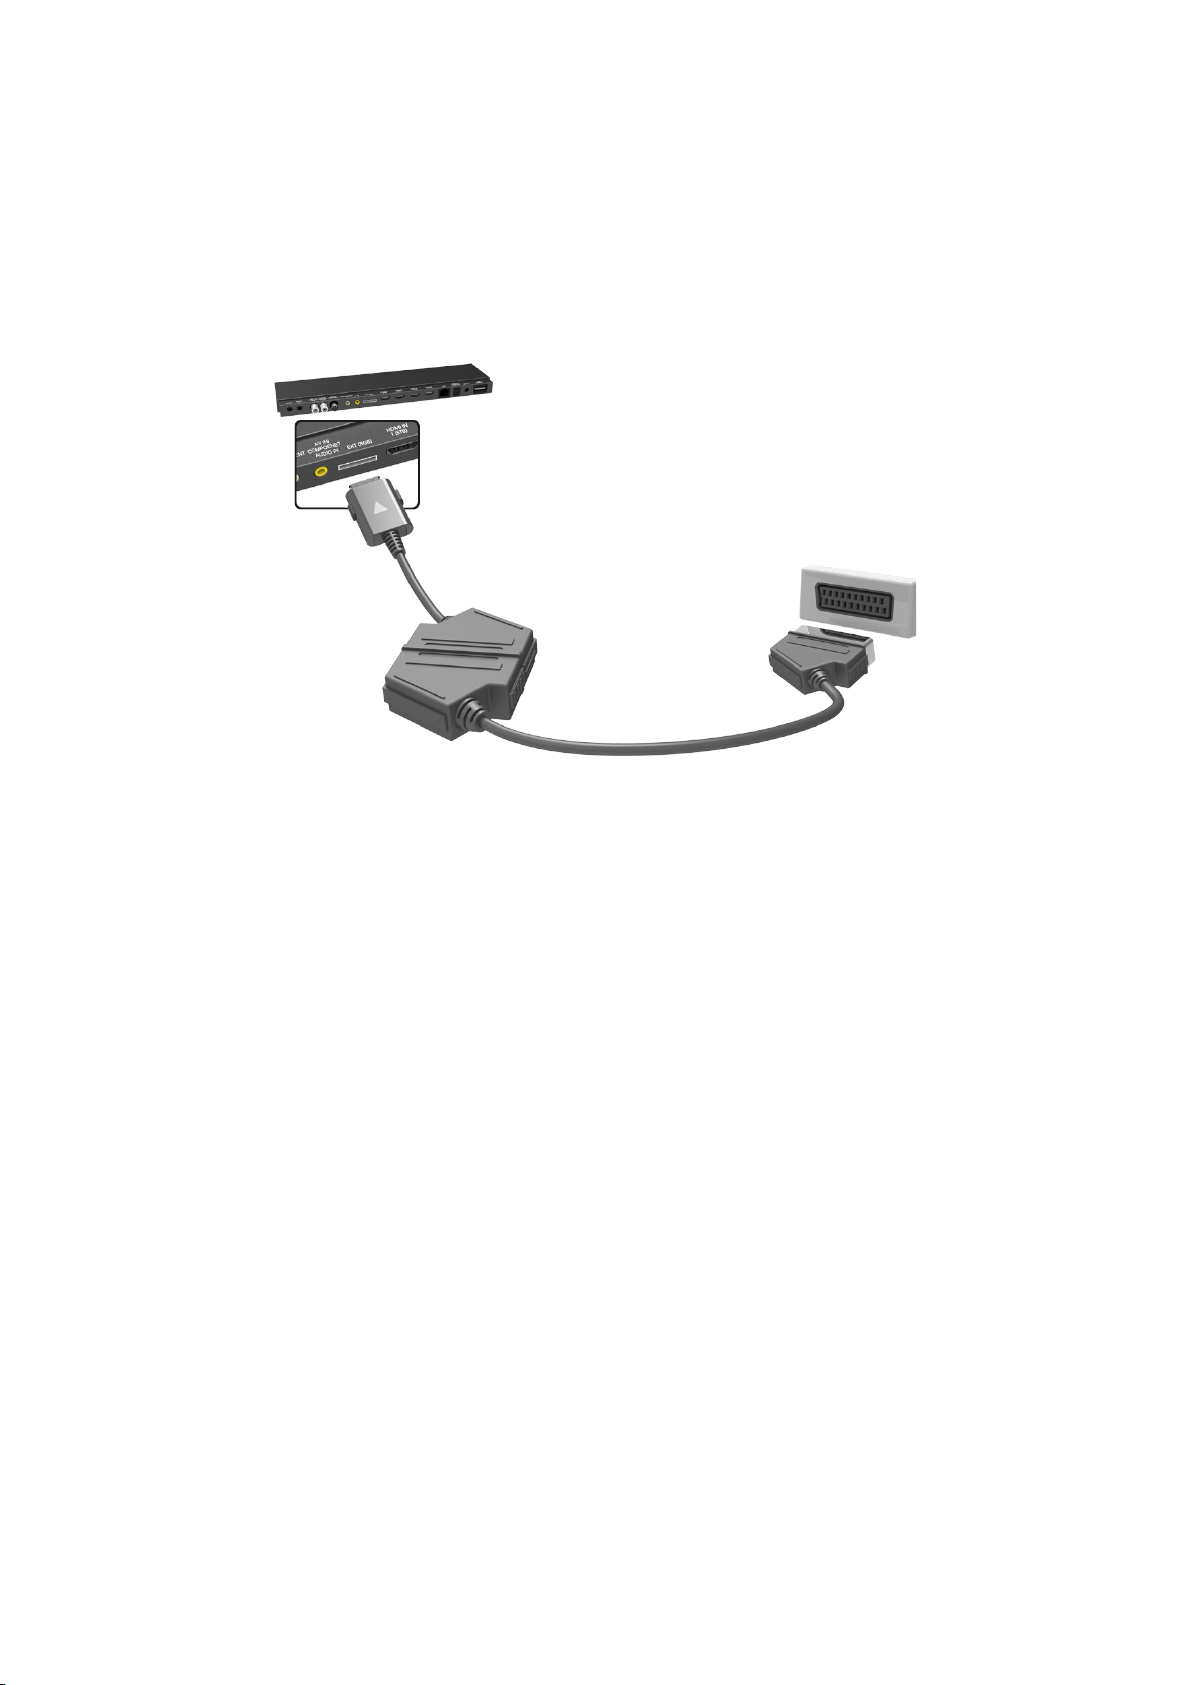
SCART Connection
Refer to the diagram and connect the TV’s SCART input connector to the device’s SCART output
connector and to the One Connect SCART input connectors using a SCART cable. An extra audio
connection is not needed because SCART also carries audio.
"
SCART can only carry standard-definition video.
"
The location of connectors may vary depending on the model.
Page 17

Audio Device Connections
This TV has a wide range of connectors for audio input from devices such as amplifiers, Blu-ray
players and DVD players. For better audio quality, it is a good idea to use an AV receiver.
Digital Audio (Optical)
●
ARC (Audio Return Channel)
●
The number of connectors and their names and locations may vary depending on the model.
When connecting an external device, refer to the device's operating manual. The number of external
device connectors and their names and locations may vary depending on the manufacturer.
Digital Audio (Optical) Connection
Connect the optical cable to the TV's digital audio output connector and the device's digital audio
input connector.
Connecting the device using an optical cable does not automatically turn off the TV speakers. To turn
off the TV speakers, open the Speaker Select (Sound > Speaker Settings > Speaker Select) menu,
then set External Speaker.
Adjust the audio device's volume using its remote control.
An unusual noise coming from the audio device while it is being used may indicate a problem with the
audio device itself. If this is the case, ask for assistance from the audio device manufacturer.
5.1-channel audio for digital channels is only available with broadcasts that support 5.1-channel audio.
Page 18
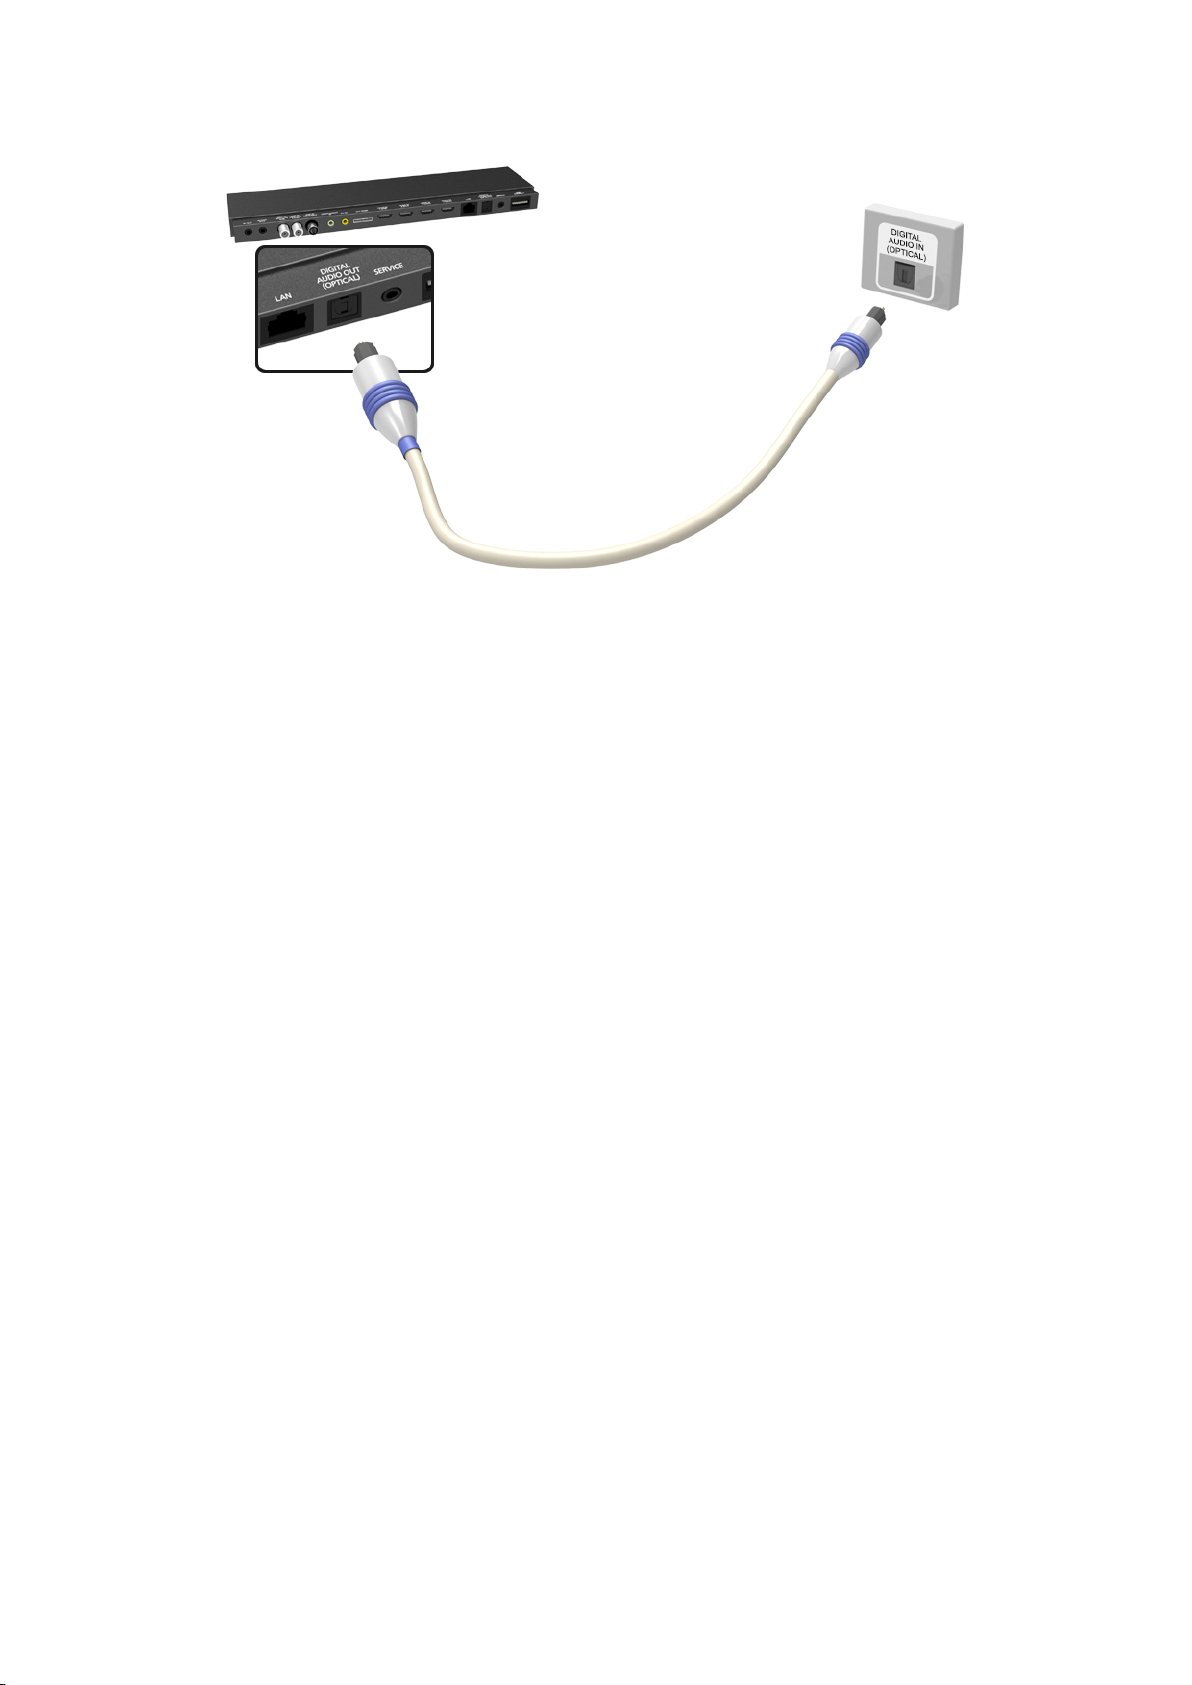
Refer to the diagram and connect the optical cable to the One Connect digital audio output connector
and the device's digital audio input connector.
Page 19
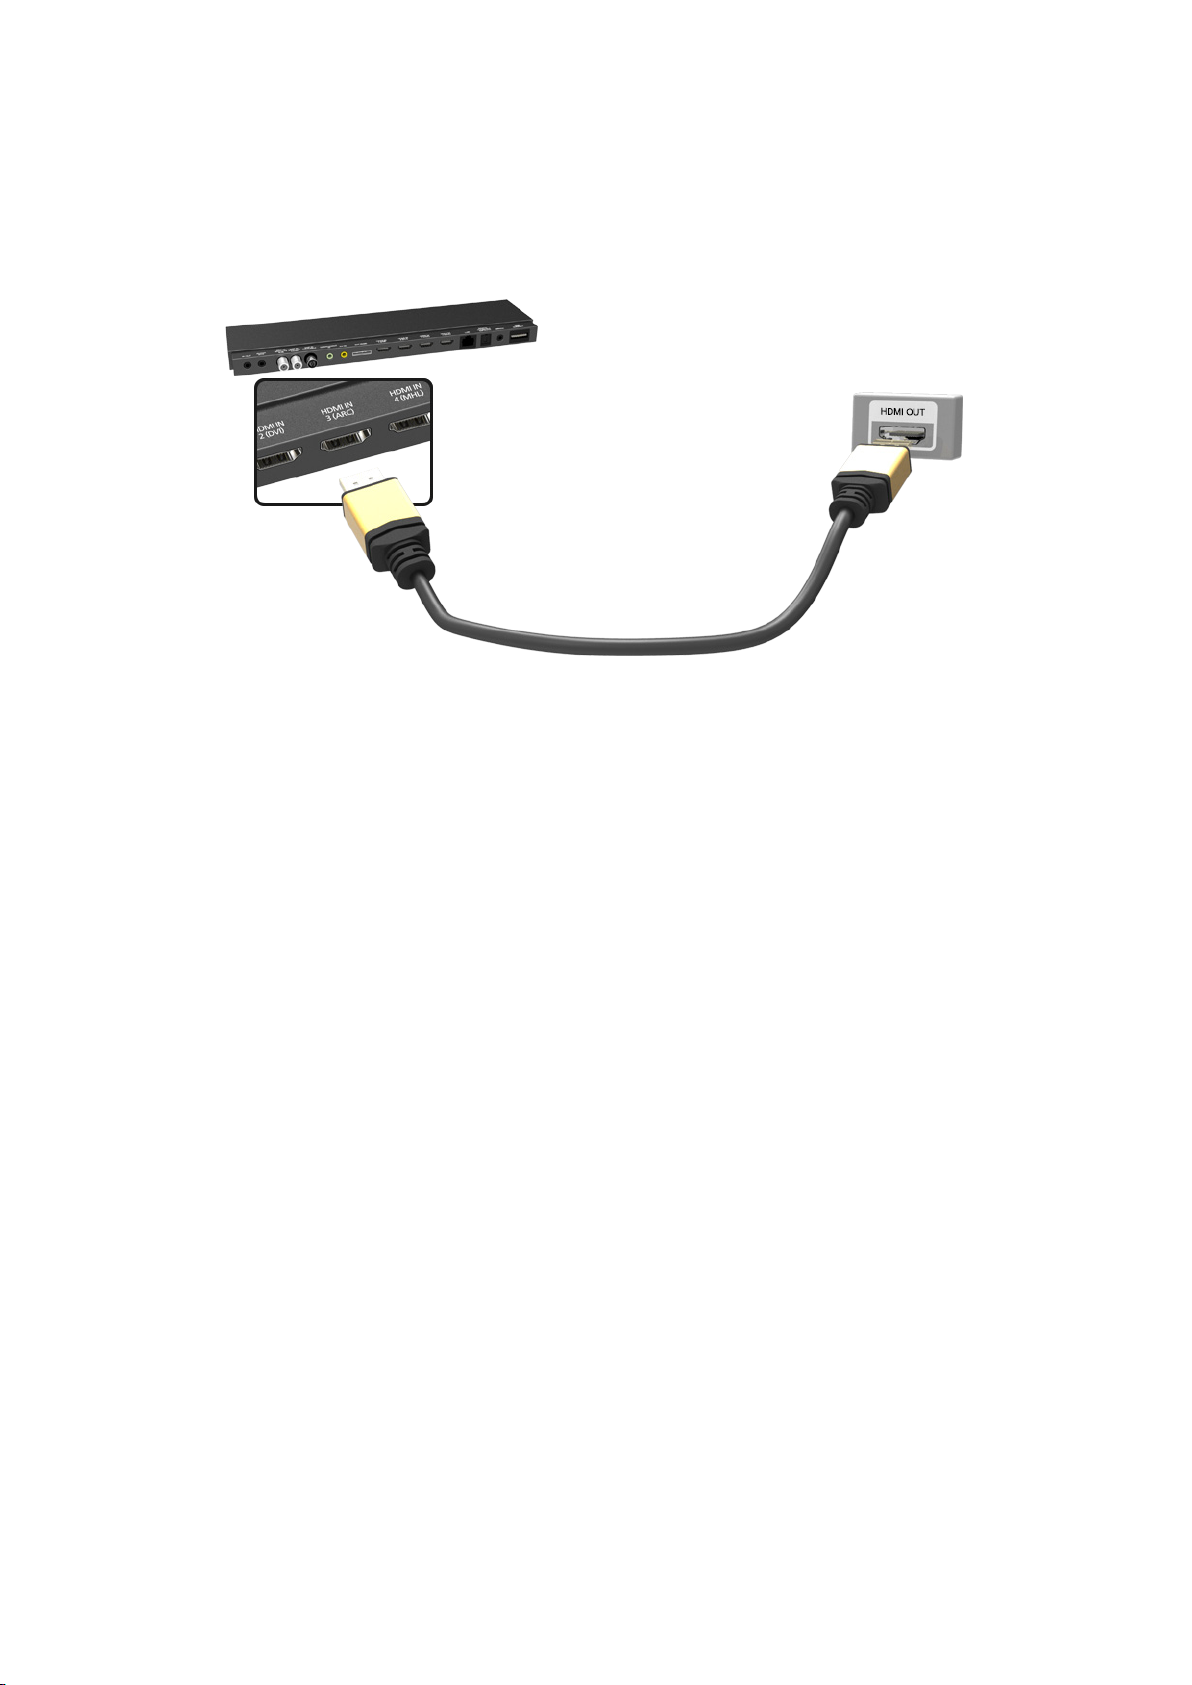
ARC (Audio Return Channel)
This TV supports 3D and ARC (Audio Return Channel) functions via an HDMI cable. ARC enables
digital sound to be output using just an HDMI cable. However, ARC is only available through the HDMI
(ARC) port and only when the One Connect is connected to an ARC-enabled AV receiver. Connect the
HDMI cable to the One Connect HDMI (ARC) connector and the device's HDMI output connector.
Page 20
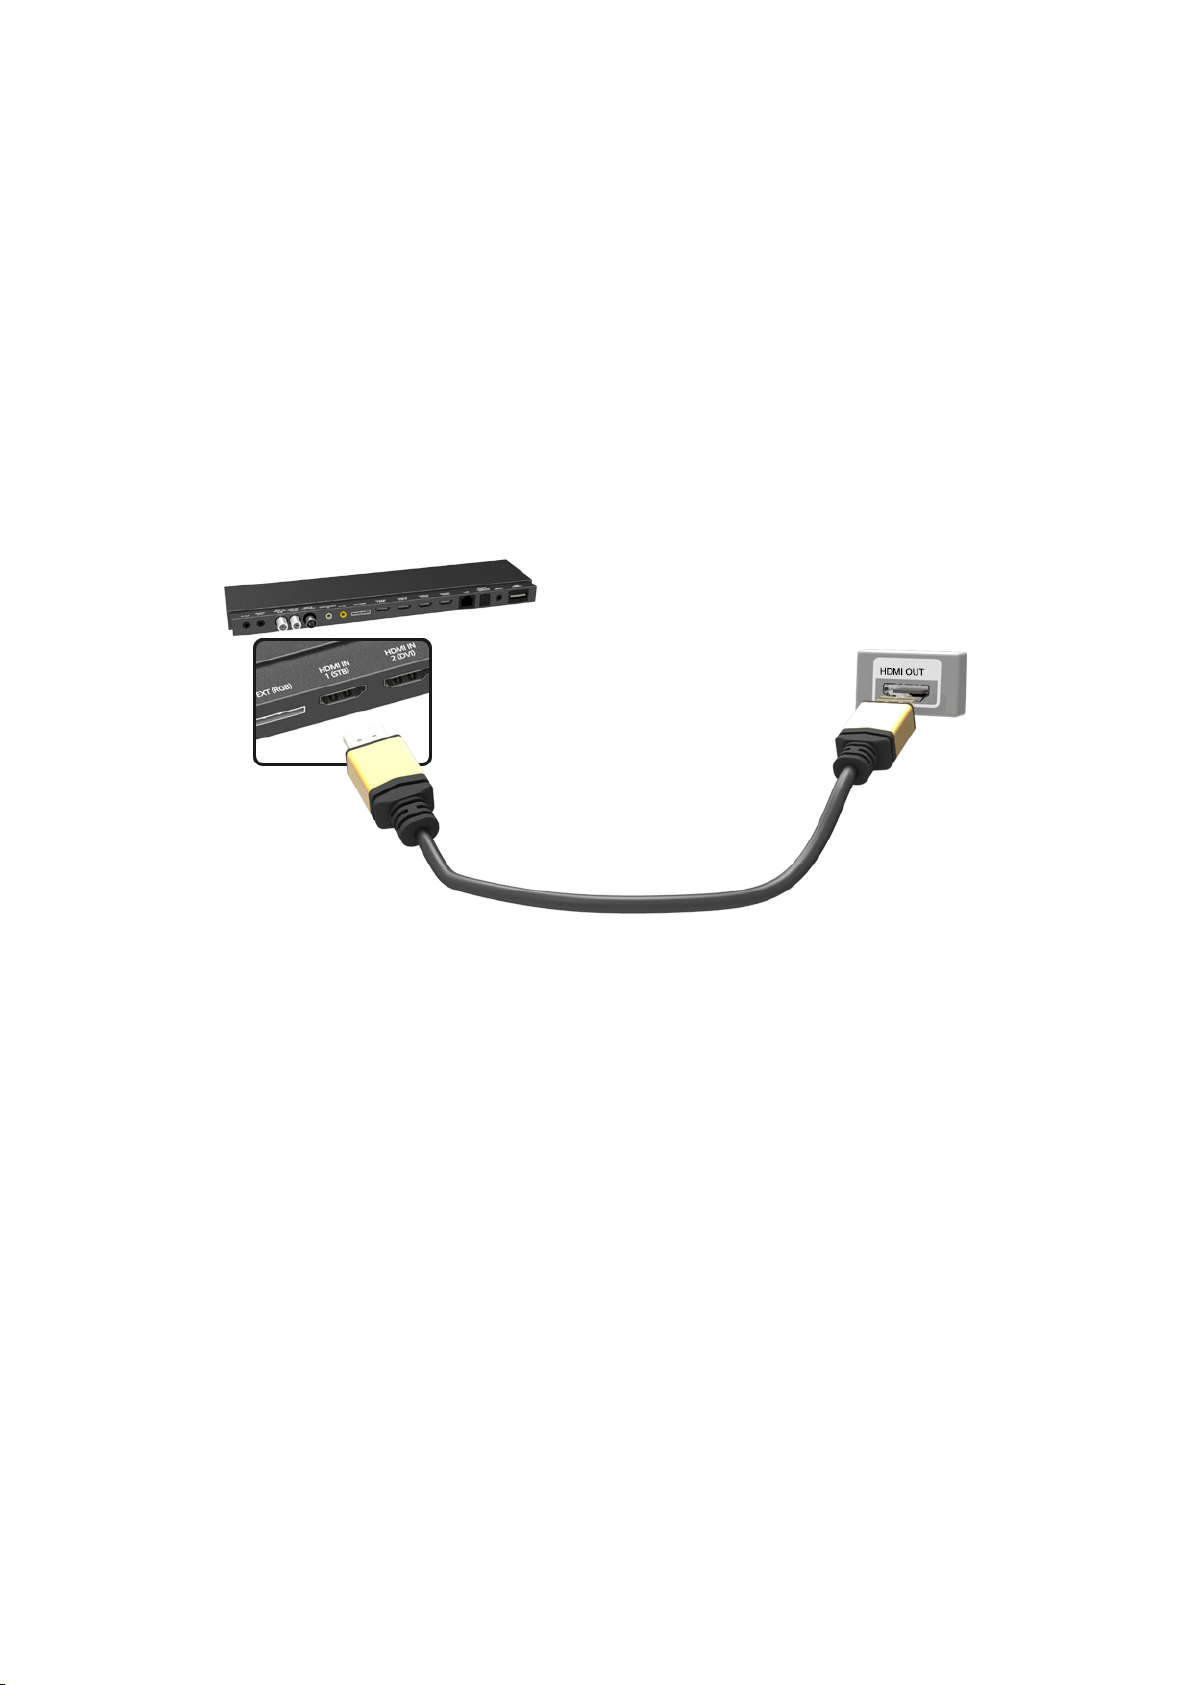
Computer Connection
This SMART TV has the following computer connection ports:
HDMI
●
HDMI-to-DVI
●
For the highest picture quality, connect the computer to the HDMI/DVI port. Not all computers are
HDMI-enabled. In this case, use an HDMI-to-DVI cable to connect the computer to the TV. Refer to the
"Display Resolution" for information on the resolution settings supported by the TV.
HDMI Connection
Refer to the diagram and connect the HDMI cable to the One Connect HDMI input port and the
computer's HDMI output port.
Page 21
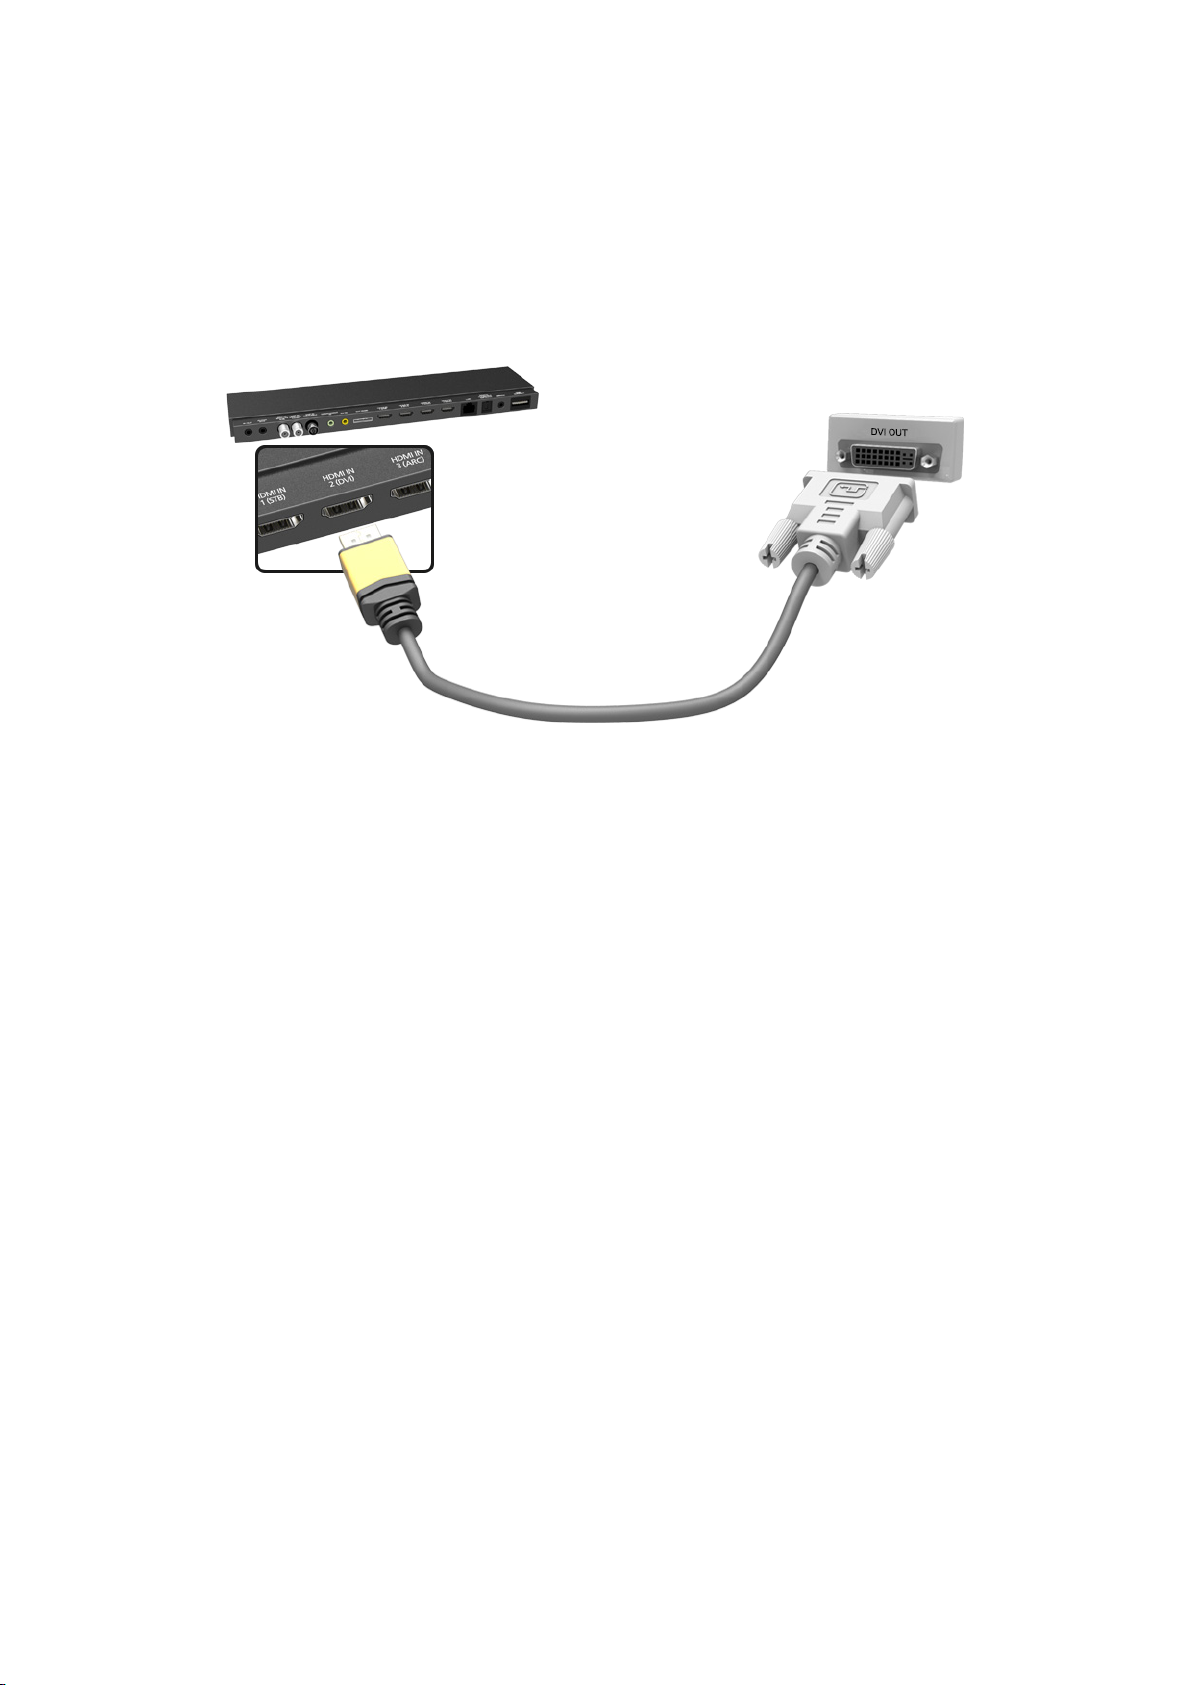
HDMI-to-DVI Connection
Refer to the diagram and connect the HDMI-to-DVI cable to the One Connect HDMI (DVI) port and
the computer's DVI output port. The HDMI-to-DVI connection is available through the HDMI (DVI) port
only.
DVI cannot carry audio. To listen to the computer sound, connect the external speaker to the
computer’s audio output connector.
"
The connectors names and locations may vary depending on the model.
Page 22
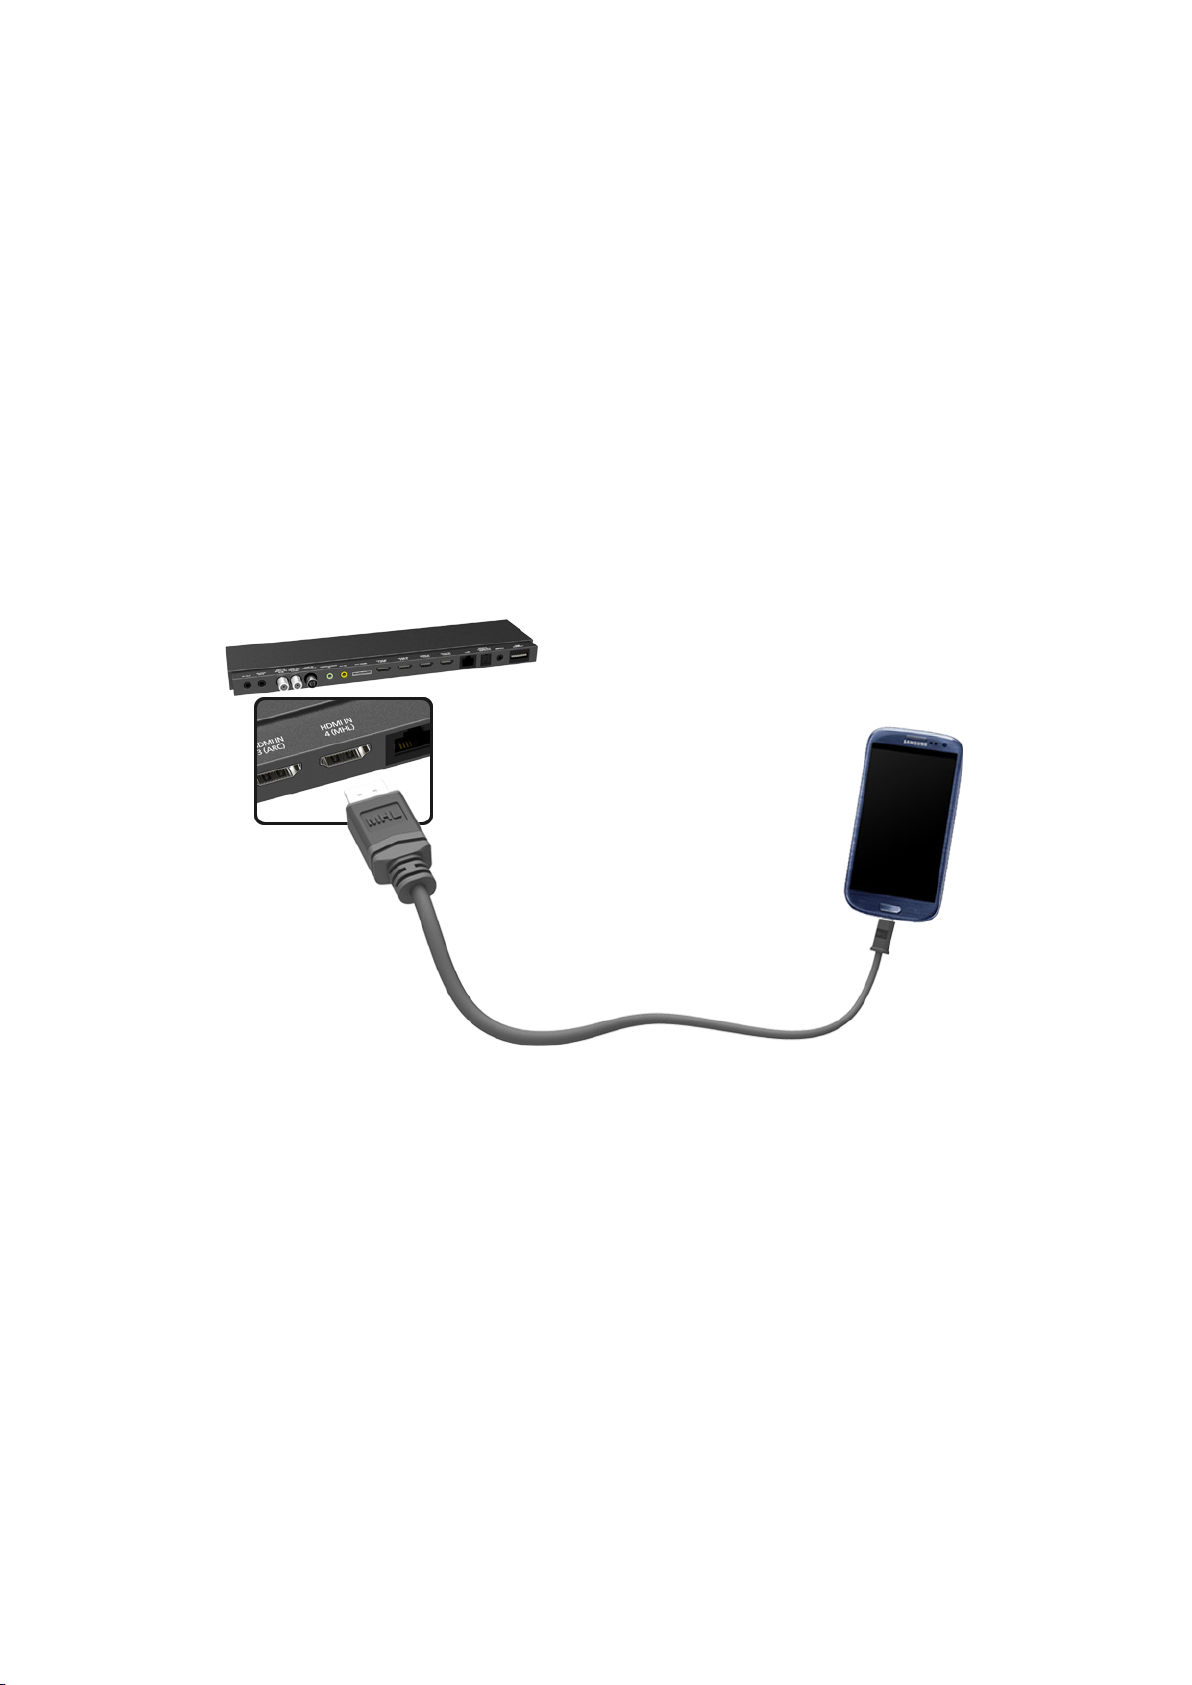
Smartphone Connection
This SMART TV supports MHL (Mobile High-definition Link) via an MHL cable. MHL makes it possible
to enjoy video, image, and audio files from mobile devices on your TV. However, MHL is only available
through the TV's HDMI (MHL) port and only when used in conjunction with an MHL-enabled mobile
device. Connect the MHL-to-HDMI cable to the TV's HDMI (MHL) port and the mobile device's USB
port.
"
Connecting the MHL-to-HDMI cable automatically switches Picture Size to Screen Fit. This setting will not
change automatically if you are using an HDMI adapter. In this case, change the setting manually in the
menu.
"
If you are using an HDMI adapter, the TV recognises the signal as an HDMI signal and may respond
differently than it would to an MHL-to-HDMI cable connection.
"
To use MHL function, make sure that your mobile device supports MHL and obtain a MHL cable to connect
it to the TV.
Refer to the diagram and connect the MHL cable to One Connect's HDMI (MHL) connector and the
mobile device's USB port.
Page 23

Switching Between Video Sources
Press SOURCE button to switch between devices connected to the TV.
For example, to switch to a game console connected to the second HDMI connector, press SOURCE
button. From the Source list, select HDMI2. The connector names may vary depending on the product.
Select Tools at the upper-right corner of the Source screen to access the following functions.
"
For some compatible devices connected via SCART or HDMI sockets, the TV may automatically select the
correct source when this device is accessed. For this to work the HDMI Anynet+ system must be switched
on (see Screen Menu > System > Anynet+ (HDMI-CEC)). Anynet+ will also automatically power off
compatible HDMI devices when the TV is switched off.
Anynet+ (HDMI-CEC)
●
A list appears showing Anynet+ compatible ones of external devices connected to the TV.
"
This function is only available Anynet+ (HDMI-CEC) function set to On.
Edit Name
●
You can edit name of devices connected to the TV to more easily identify external sources.
With a computer connected to the TV's HDMI (DVI) port via an HDMI cable, for example, you can
change Edit Name to PC.
With a computer connected to the TV's HDMI (DVI) port via an HDMI-to-DVI cable, for example,
you can change Edit Name to DVI PC.
With an AV device connected to the TV's HDMI (DVI) port via an HDMI-to-DVI cable, for
example, you can change Edit Name to DVI Devices.
Information
●
View detailed information about the connected devices.
Disconnect USB Device
●
Remove the USB device from the list safely. This function is only available when the USB device
selected.
To add a new external device to control it with the Smart Touch Control, press the SOURCE button
and select Universal remote setup on the top right of the screen. Using the universal remote control,
users can control external devices connected to the TV, such as a settop box, Blu-ray player, and AV
receiver.
Page 24

Programming
Scan and index available channels.
You can also remove channels from the index and designate favourites channels for a more convenient
TV viewing experience. Programming is not necessary if you are connected to a cable or satellite
receiver.
Auto Tuning
Screen Menu > Broadcasting > Auto Tuning
Try Now
Broadcasting
Auto Tuning
Aerial Air
Channel List
Guide
Schedule Manager
Edit Channel
Edit Favourites
"
The displayed image may differ depending on the model.
"
Some channel may not be transmitted to this television. It depends on broadcasting signal gain or
specification.
Automatically scans and indexes all channels received through the TV's aerial input connector.
To start, navigate to Broadcasting and select Auto Tuning.
1.
Select Start when prompted with a message. This initiates the Auto Tuning function. The process
2.
can take up to 30 minutes to complete. If starting the Auto Tuning function when there is an
existing index of channels overwrites the previous index.
Auto Tuning
●
Scans for channels automatically and stores them in the TV’s memory.
Cable Search Option (when the aerial was set to Cable)
●
Try Now
(Depending on the country)
Sets additional search options such as the frequency and symbol rate for a cable network search.
Try Now
Antenna Connection Type
Screen Menu > Broadcasting > Antenna Connection Type
Choose your antenna connection type Dual or Single.
"
This function is available when Aerial is set to Satellite.
Try Now
Page 25

Channel Settings
Screen Menu > Broadcasting > Channel Settings
Try Now
Broadcasting
Channel Settings
Subtitle Off
Audio Options
Programme Rating Lock Allow All
Teletext Language ----
Common Interface
Channel Lock On
"
The displayed image may differ depending on the model.
Country (Area)
Screen Menu > Broadcasting > Channel Settings > Country (Area)
Try Now
Select your country so that the TV can correctly auto-tune the broadcasting channels.
"
The PIN input screen appears. Enter your 4 digit PIN number.
Digital Channel
●
Change the country for digital channels.
Analogue Channel
●
Change the country for analogue channels.
Manual Tuning
Screen Menu > Broadcasting > Channel Settings > Manual Tuning
Scans for a channel manually and stores in the TV.
"
If a channel is locked using the Channel Lock function, the PIN input window appears.
"
This function may not be supported depending on the country.
Try Now
Page 26

When Aerial Source is set to Air or Cable
Digital Channel Tuning
●
Scans for a digital channel.
Select the New.
1.
"
When selecting Aerial → Air: Channel, Frequency, Bandwidth
"
When selecting Aerial → Cable: Frequency, Modulation, Symbol Rate
Select the Search. When scanning has finished, a channel is updated in the channel list.
2.
Analogue Channel Tuning
●
Scans for an analogue channel.
Select the New.
1.
Set the Programme, Colour System, Sound System, Channel and Search.
2.
Select the Store. When scanning has finished, a channel is updated in the channel list.
3.
Channel mode
P (programme mode)
●
When tuning is complete, the broadcasting stations in your area have been assigned to position
numbers from P0 to P99. You can select a channel by entering the position number in this mode.
C (aerial channel mode) / S (cable channel mode)
●
These two modes allow you to select a channel by entering the assigned number for each aerial
broadcasting station or cable channel.
Transfer Channel List
Screen Menu > Broadcasting > Channel Settings > Transfer Channel List
Imports or exports the channel map.
"
You should connect USB storage to use this function.
"
The PIN input screen appears. Enter the PIN using your remote.
Import from USB: Import channel list from USB.
●
Export to USB: Export channel list to USB. This function is available when USB is connected.
●
Now
Try Now
Try Now
Try
Delete CAM Operator Profile
Screen Menu > Broadcasting > Channel Settings > Delete CAM Operator Profile
Select the CAM operator to delete.
"
This function may not be supported depending on the country.
Try Now
Page 27

Satellite System
Screen Menu > Broadcasting > Channel Settings > Satellite System
Try Now
A set of satellite dish settings must be configured for each wanted satellite before performing a
channel scan.
Satellite System is available when Aerial is set to Satellite.
"
The PIN input screen appears. Enter your 4 digit PIN number.
Satellite Selection: You can choose the satellites for this TV.
●
LNB Power: Enables or disables the power supply for the LNB.
●
LNB Settings: Configures the outdoor equipment.
●
Try Now
Try Now
Satellite: Selects the satellite for receiving digital broadcasts.
Transponder: Selects a transponder from the list or adds a new transponder.
DiSEqC Mode: Selects DiSEqC mode for the selected LNB.
Lower LNB Oscillators: Sets the LNB oscillators to a lower frequency.
Upper LNB Oscillators: Sets the LNB oscillators to a higher frequency.
Tone 22 kHz: Selects the Tone 22 kHz depending on the LNB type. For a universal LNB it should
be Auto.
SatCR/Unicable Settings: Configure single cable installation.
●
"
SatCR is short for satellite channel router.
"
This function may not support depending on the country.
SatCR/Unicable: Enables or disable single cable installation support.
Slot Number (Tuner 1), Slot Number (Tuner 2): Select the SatCR user slot number for this
receiver.
Slot Frequency (Tuner 1), Slot Frequency (Tuner 2): Enter the appropriate frequency to receive
the signal from SatCR.
Detect Slot Frequency: Auto-detect the signal frequency for the selected slot number.
Verify Slot Frequency: Verify that the frequency entered corresponds to the selected slot.
Page 28

Positioner Settings: Configures the aerial positioner.
●
Try Now
Positioner: Enables or disables the positioned control.
Positioner Type: Sets the positioned type between DiSEqC 1.2 and USALS (Universal Satellite
Automatic Location System).
My Longitude: Sets the longitude for my location.
–
My Latitude: Sets the latitude for my location.
–
Satellite Longitude Settings: Sets the longitude of user defined satellites.
–
User Mode: Sets the position of satellite aerial according to each satellite.
If you store the current position of satellite aerial according to a certain satellite, when the signal
of that satellite is needed, the satellite aerial can be moved to pre-populated position.
Satellite: Selects the satellite to set the position for.
–
Transponder: Selects a transponder from the list for signal reception.
–
Moving Mode: Selects the movement mode between discrete and continuous movement.
–
Step Size: Adjusts the step size degrees for the aerial rotation. Step Size is available when
–
Moving Mode is set to Step.
Go To Stored Position: Rotates the aerial to the stored satellite position.
–
Aerial Position: Adjusts and stores the aerial position for the selected satellite.
–
Store Current Position: Stores current position as the selected positioner limit.
–
Installer Mode: Sets limits to the scope of movement of satellite aerial or reset the position.
Generally, installation guide uses this function.
Limit Position: Selects the direction of the positioner Limit.
–
Aerial Position: Adjusts and stores the aerial position for the selected satellite.
–
Store Current Position: Stores the current position as the selected positioner Limit.
–
Go to zero: Moves the aerial to the reference position.
–
Reset positioner limit: Allows the aerial to rotate over the full arc.
–
Reset all settings: All satellite settings will be reset to the initial values.
●
Page 29

Scanning for Satellite Channels
Screen Menu > Broadcasting > Channel Settings > Manual Tuning
Press Scan after setting the items below.
Transponder
●
Selects the transponder.
Scan Mode
●
Selects either free or all channels to store.
Network Search
●
Enable / Disable network search.
Signal Quality
●
Display the current status of broadcasting signal.
Network Name
●
This displays the name of the network that is found.
"
Information on a satellite and its transponder is subject to change depending on the broadcasting
conditions.
"
When setting is completed, move to Search. Channel scan is started.
Page 30
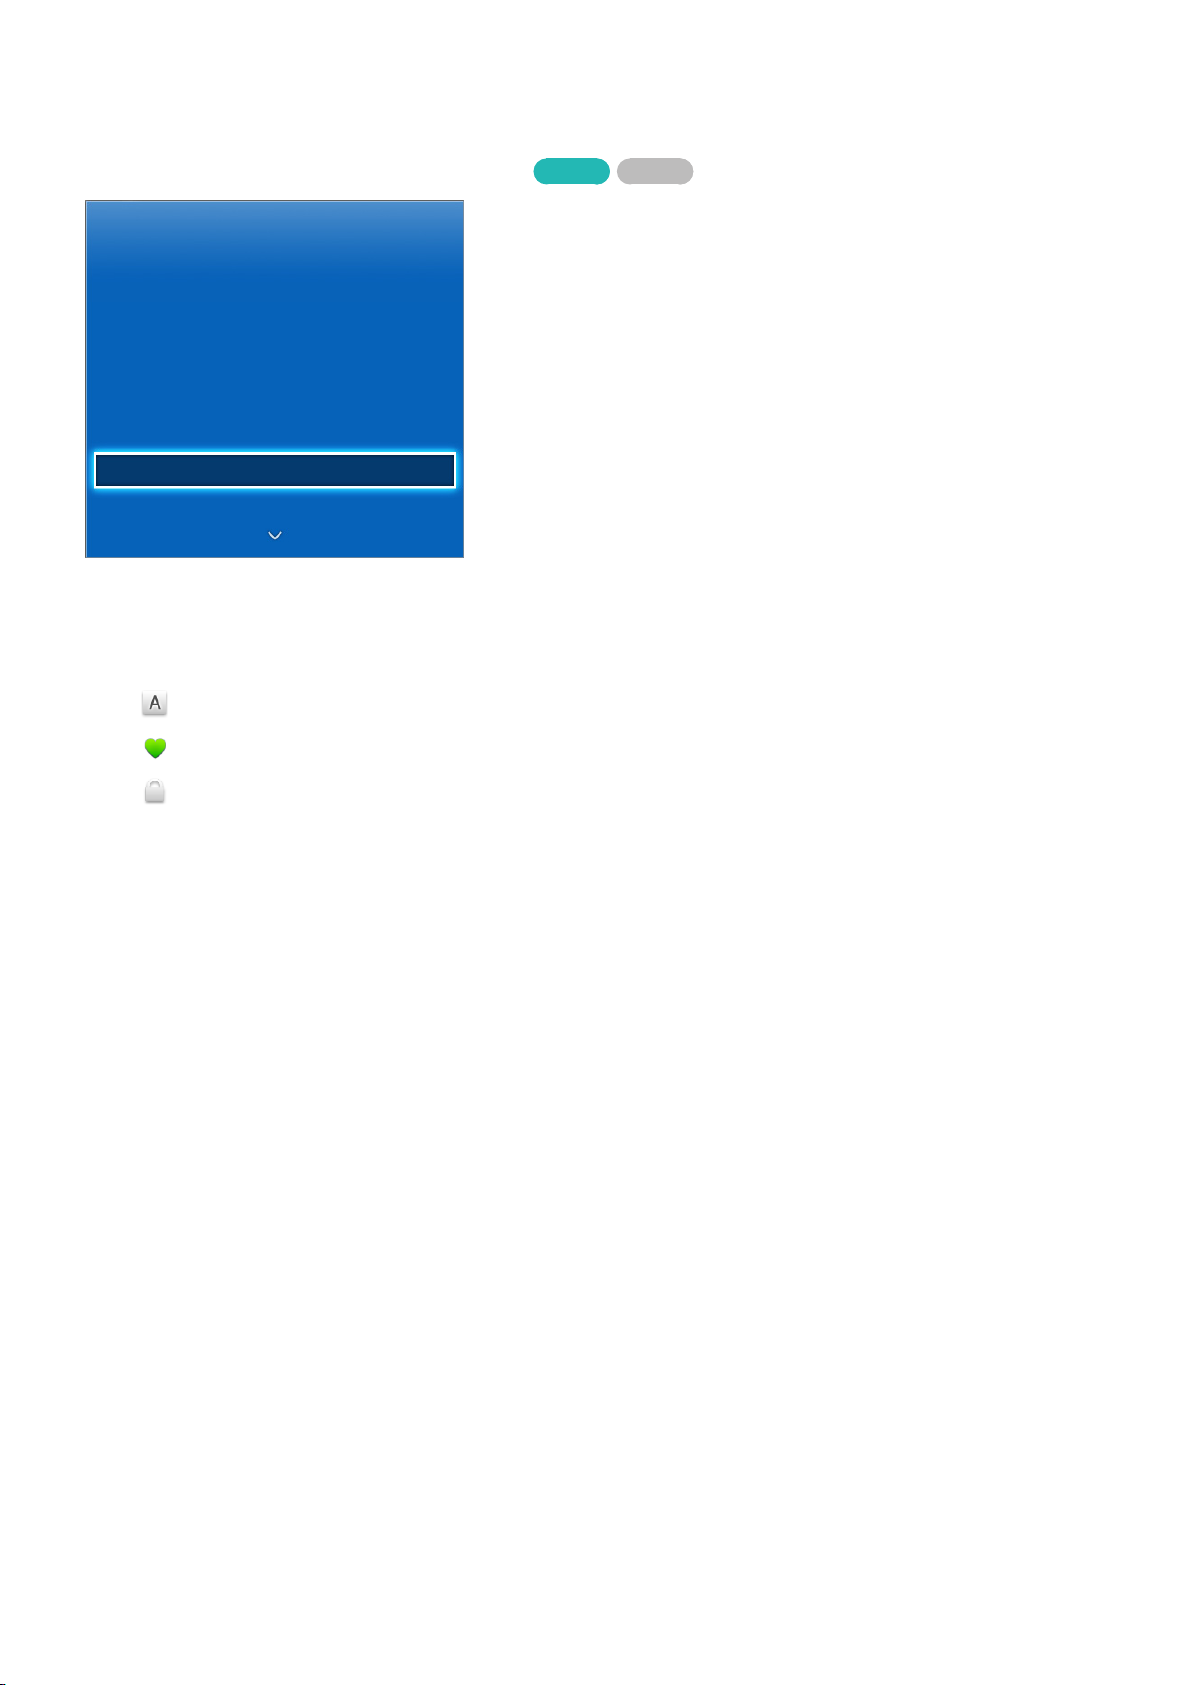
Channel Management
Screen Menu > Broadcasting > Edit Channel
Try Now Try Now
Broadcasting
Auto Tuning
Aerial Air
Channel List
Guide
Schedule Manager
Edit Channel
Edit Favourites
"
The displayed image may differ depending on the model.
Remove channels from the index and rename analogue channels. The Edit Channel screen icons
indicate the following:
●
●
: An analogue channel
: A favourites channel
●
: A locked channel
Page 31

In the Edit Channel screen, select the Virtual Remote panel's or the regular remote's TOOLS button to
access the following options:
Sorting
●
(Digital channels only)
Change the list ordered by Name or Number.
Aerial
●
Choose between Air, Cable or Satellite.
Category
●
The TV's channel index is divided into different categories such as All, TV, Radio, Data/Other,
Analogue, Recently Viewed and Most Viewed. Choose a category.
Edit Favourites
●
Organize favourites lists to find favourite channels and switch between channels more easily.
Channel Info
●
Check the information of the channel.
Information
●
Check the information of the broadcast.
Page 32

Remove Channels
Screen Menu > Broadcasting > Edit Channel
Remove registered channels from the index. Removing channels appearing in the Recently Viewed or
Most Viewed list clears the channels from the list only and does not remove them from the index.
From the screen, select the channels you wish to remove. Unselect channels by choosing them
1.
again.
Press { button. The selected channel(s) will be deleted.
2.
Number Change
Change the number of the channels in edit channels List.
Press a button to bring up the edit channels list and select the channel you wish to change the
1.
number of the channels.
Select the number you wish change. Select Done E or press touchpad to finish.
2.
Channel Lock
Screen Menu > Broadcasting > Channel Lock
You can lock channels you don't want your children to view.
Lock is only available with Channel Lock set to On.
Navigate to the Edit Channel screen, select the channels you wish to lock, press
enter the password. This locks the selected channels.
Try Now
button, and then
b
Channel Unlock
Unlock locked channels. Navigate to the Edit Channel screen, select the locked channels you wish to
unlock, press b button and then enter the password. This unlocks the selected channels.
Rename Analogue Channels
From the screen, select an analogue channel, and then select the virtual remote panel's or the regular
remote's TOOLS button. The list screen appears. Select Rename channel from the list.
You can now rename the selected channel. The new name can be up to 5 characters long.
Page 33

Common Interface
Screen Menu > Broadcasting > Common Interface
Refer to the "Flexible CI" for more information.
CI Menu
●
This enables the user to select from the CAM-provided menu. Select the CI Menu based on the
menu PC Card.
CAM video transcoding
●
You can configure the setting to transcode the video codec from the CAM automatically. Turn it
Off if you do not want to use it.
"
You must use a CAM that supports transcoding the video codec.
Application Info
●
View information on the CAM inserted into the CI slot and on the “CI or CI+ CARD” which is
inserted into the CAM. You can install the CAM anytime whether the TV is on or off.
Purchase a CI CAM module at your nearest dealer or by phone.
1.
Firmly insert the “CI or CI+ CARD” into the CAM in the direction of the arrow.
2.
Insert the CAM with the “CI or CI+ CARD” into the common interface slot, in the direction of the
3.
arrow so that it aligns parallel with the slot.
Try Now
Check if you can see a picture on a scrambled signal channel.
4.
CICAM PIN Manager
●
Manage of CICAM (Common Interface Common Access Module) PIN. You can save PIN or change
stored PIN, and set other options about PIN.
Page 34

Audio Options
Screen Menu > Broadcasting > Audio Options
Audio Language
●
Try Now
Try Now
(Digital channels only)
Change the default value for audio languages.
Primary audio
–
Set the primary audio language.
Secondary audio
–
Set the secondary audio language.
"
The available language may differ depending on the broadcast.
Audio Format
●
Try Now
(Digital channels only)
Change a desired audio format. The supported audio format may vary depending on the
broadcast programme.
Audio Description
●
Try Now
(Not available in all locations) (Digital channels only)
This function handles the Audio Stream for the AD (Audio Description) which is sent along with
the Main audio from the broadcaster.
"
Audio Description: Turn the audio description function on or off.
"
Volume: Adjust the audio description volume.
Page 35

Favourites Channels
Screen Menu > Broadcasting > Edit Favourites
Try Now
Broadcasting
Auto Tuning
Aerial Air
Channel List
Guide
Schedule Manager
Edit Channel
Edit Favourites
"
The displayed image may differ depending on the model.
You can designate frequently watched channels as favourites. The channels assigned as a favourite
are displayed with the
symbol on the Edit Channel and channel list screens. You can create up to 5
favourites channel lists. You can also rename and edit favourites channel lists.
From the Edit Favourites screen, select the Virtual Remote panel's or the regular remote's TOOLS
button to access the following options:
Sorting: Change the list ordered by Name or Number. This function is not available on analogue
●
channel.
Aerial: Choose between Air, Cable, and Satellite.
●
Edit Channel: You can manage the channels saved on the TV.
●
Information: View detailed information about the current programme.
●
Add Channels
Add a channel to a favourites channels list.
Press a button to bring up the channel list containing the channels you wish to add and then
1.
select the channels. However, the a button is available only when the Recently Viewed or Most
Viewed channel list has one or more channel entries.
Press b button to bring up a favourites channels list and then { button to add the selected
2.
channels.
Page 36

Remove Channels
Remove channels from a favourites channels list.
Press b button to bring up a favourites channels list and then select the channels you wish to
1.
remove.
Press { button to remove the channels from the list.
2.
Rearrange the Favourites Channels List
Rearrange the order of the channels in a Favourites Channels List.
Press b button to bring up the favourites channels list and select the channel you wish to move.
1.
Press a button to rearrange the order of the selected channel. Select Done E or press the
2.
touchpad to finish.
Rename a Favourites Channel List
Rename an existing favourites channels list.
Select the Virtual Remote panel's or the regular remote's TOOLS button to display the list. Select
1.
Rename Favourites from the list.
Rename the list in the popup window. The new name can be up to 20 characters long.
2.
Copy a Favourites Channels List
Copy channels from one favourites channels list to another.
Press b button to bring up a favourites channels list and select the channels you wish to copy.
1.
Select the Virtual Remote panel's or the regular remote's TOOLS button to display the list. Select
2.
Copy to Favourites from the list, and then select the favourites channels list(s) you wish to copy
to. This copies over the channels to the selected favourites channels list(s).
Page 37
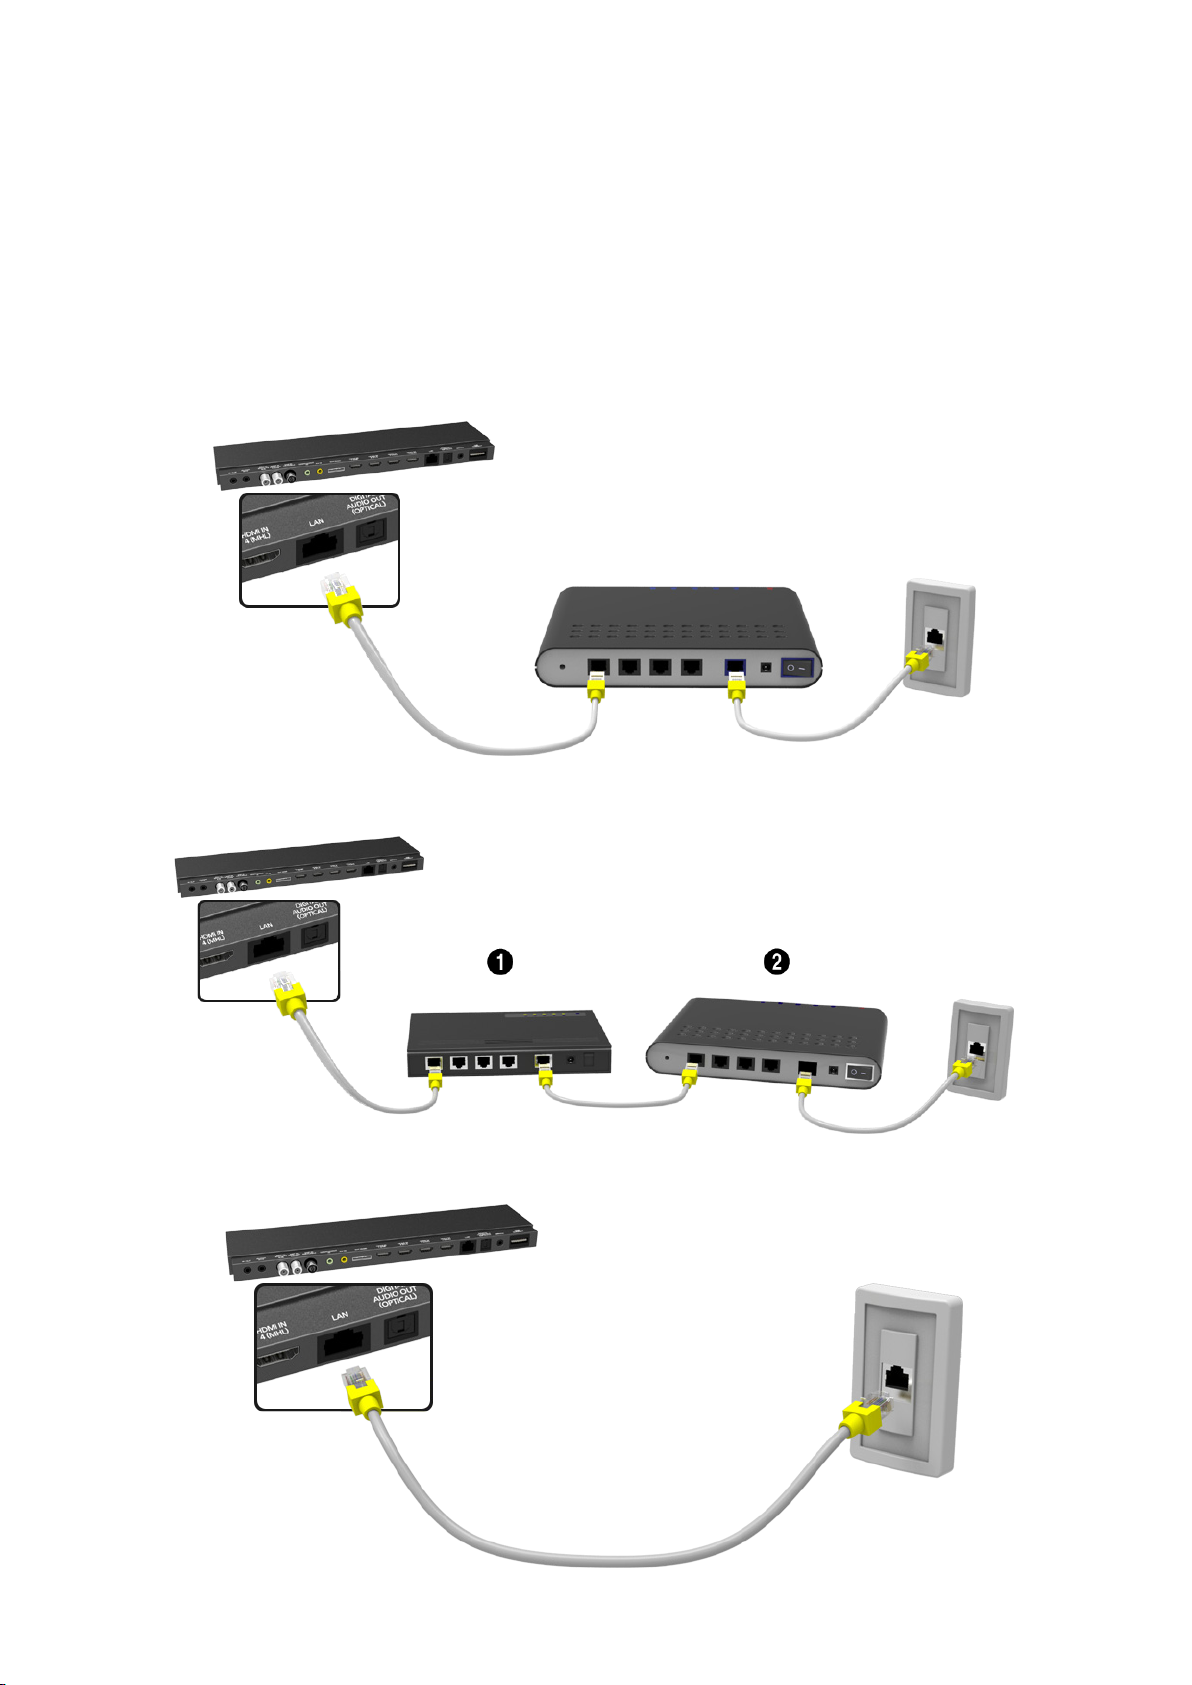
Network Configuration
Connecting the TV to a network gives you access to online services such as the Smart Hub and
Samsung Link, as well as software updates.
Wired Network
There are three ways to connect the TV to a Local Area Network (LAN).
External Modem
●
① IP Router + ② External Modem
●
Wall-mounted LAN Outlet
●
Page 38
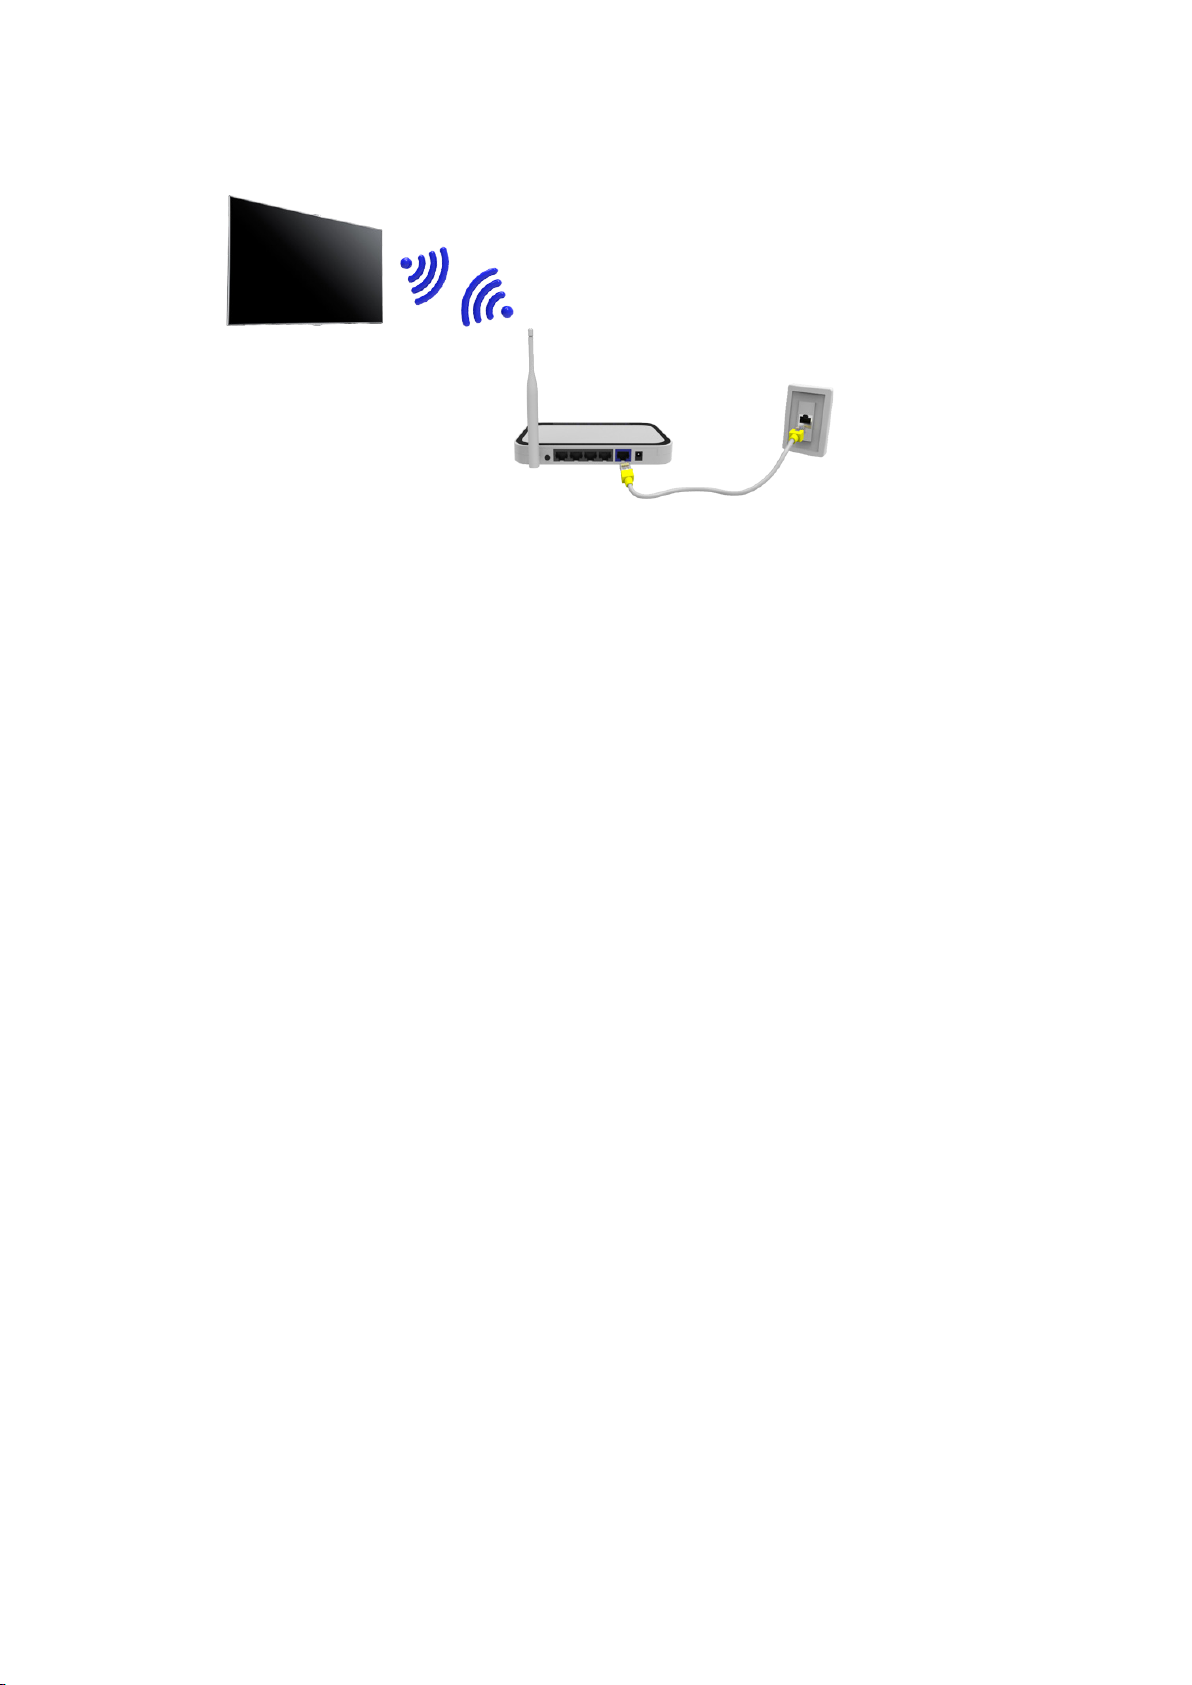
Wireless Network
Connect the TV to the Internet using a standard router or modem.
Wireless Network Precautions
This TV supports the IEEE 802.11a/b/g/n communication protocols. Samsung recommends using
●
IEEE 802.11n. Otherwise when you play video over a network connection, the video may not play
smoothly.
To use a wireless network, the TV must be connected to a wireless router or modem. If the
●
wireless router supports DHCP, the TV can use a DHCP or static IP address to connect to the
wireless network.
Select a channel that is not currently in use for the wireless router. If the channel set for the
●
wireless router is currently being used by another device, the result is usually interference and/or
a communications failure.
Most wireless networks have an optional security system. To enable a wireless network's security
●
system, you need to create a security key using characters and numbers. This security key is then
needed to connect to the wireless network.
Network Security Protocols
The TV only supports the following wireless network security protocols and is unable to connect to
non-certified wireless routers:
Authentication Modes: WEP, WPAPSK, WPA2PSK
●
Encryption Types: WEP, TKIP, AES
●
If the wireless router has been set to Pure High-throughput (Greenfield) 802.11n mode and the
Encryption Type to WEP or TKIP, Samsung SMART TVs will not support the connection in compliance
with the new Wi-Fi certification specifications.
If the wireless router supports WPS (Wi-Fi Protected Setup), it is possible to connect to the network
using PBC (Push Button Configuration) or a PIN (Personal Identification Number). WPS automatically
configures the SSID and WPA key settings.
Page 39

Wired Network Setup
Screen Menu > Network > Network Settings
Network
Network Status
Network Settings
Wi-Fi Direct
AllShare Settings
Set Remote Access
Device Name [TV]Samsung LE...
"
The displayed image may differ depending on the model.
Try Now
Automatic Wired Network Setup
The TV's wired network connection is automatically configured when it is connected to a network that
supports DHCP.
Set Network Type to Wired and then select Connect.
1.
The TV attempts to connect to the network. A confirmation message is then shown once a
2.
connection is established. Select OK to proceed. If the attempt fails, try again or connect
manually.
Page 40
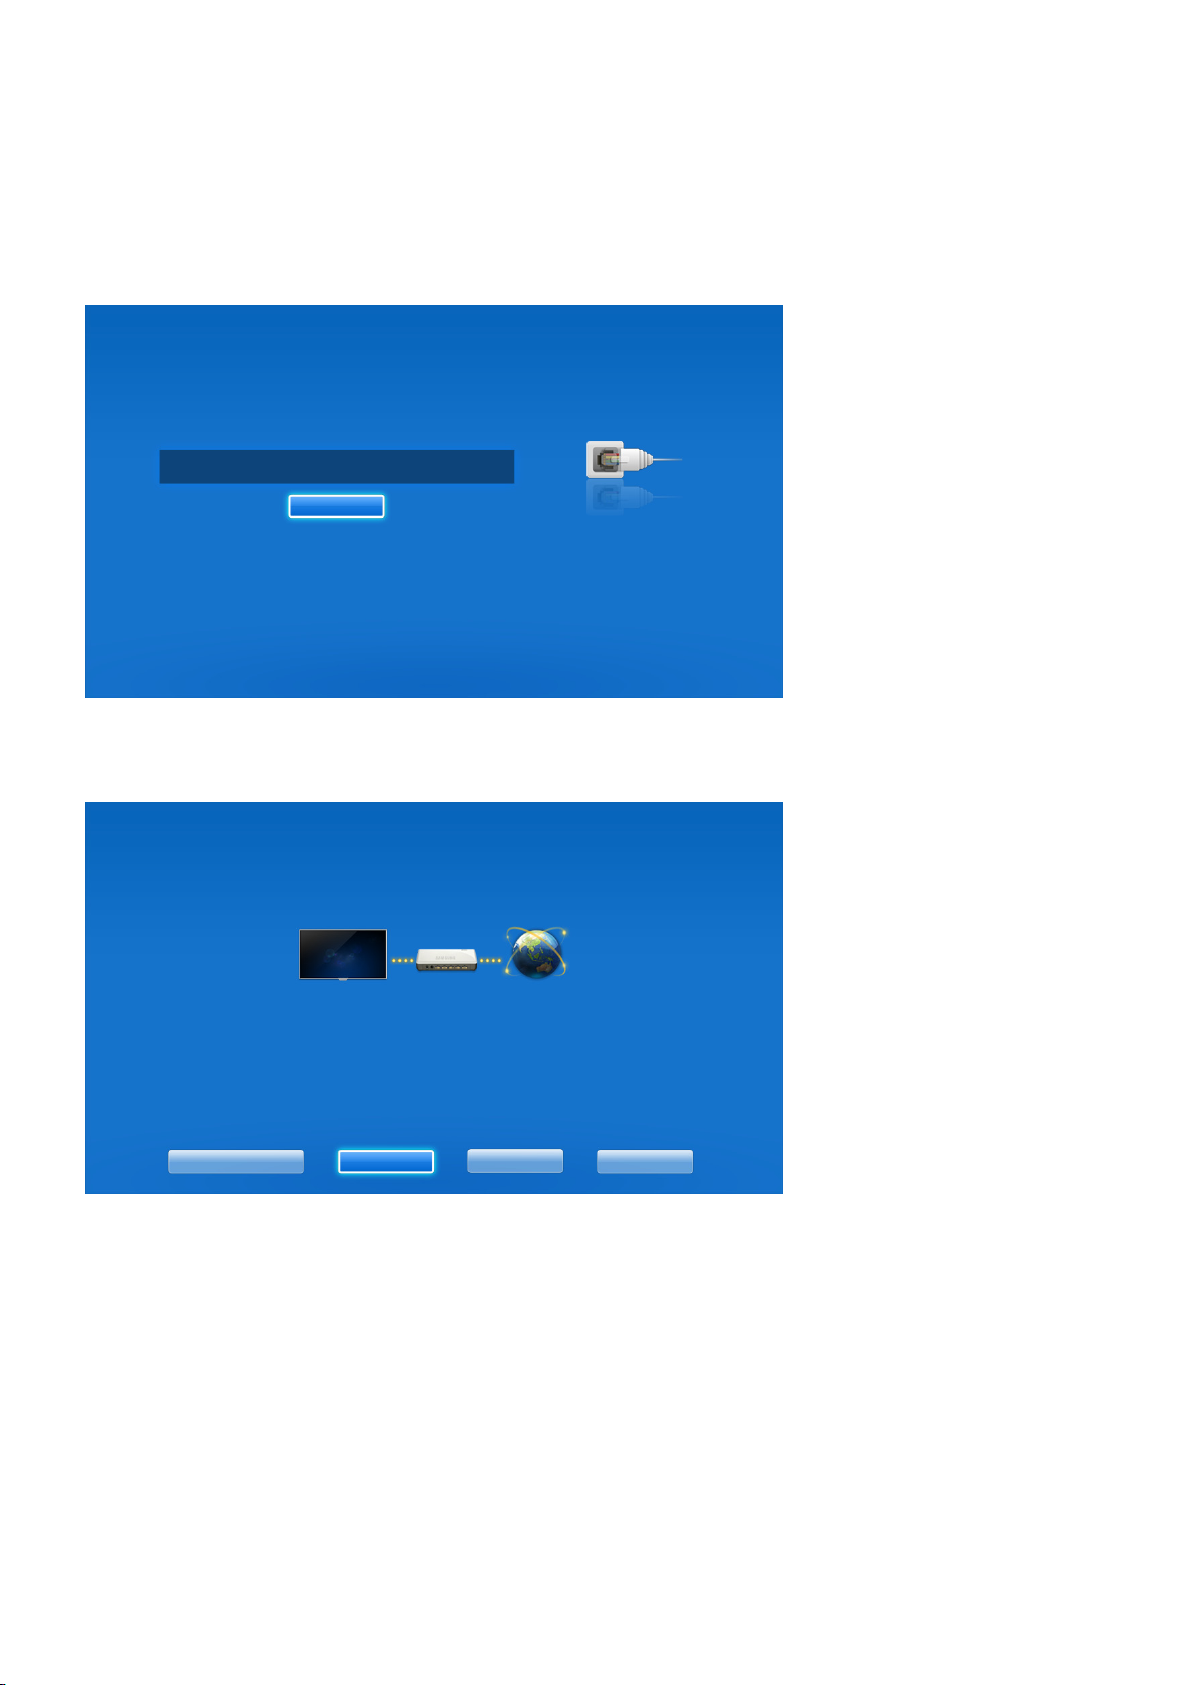
Manual Wired Network Setup
If the network requires a static IP address, enter the IP address, subnet mask, gateway and DNS values
to connect to the network manually. To get the IP address, subnet mask, gateway and DNS values,
contact your Internet Service Provider (ISP). Refer to the "Dynamic versus Static IP Addresses" for
more information.
Set Network Type to Wired and then select Connect.
1.
Network Settings
Select your network type.
Network Type Wired
Connect
Plug a network cable into
the back of your TV.
Select Stop when the TV attempts to connect to the network. Once the network connection has
2.
been interrupted, select IP Settings.
Network Settings
Connection verification cancelled.
Wired network connection test stopped.
Change Network IP Settings Retry Close
Page 41

From the IP Settings screen, set IP setting to Enter manually, enter IP Address, Subnet Mask,
3.
Gateway, and the DNS Server values, and then select OK.
IP Settings
IP setting Enter manually
IP Address 0.0.0.0
Subnet Mask 0.0.0.0
Gateway 0.0.0.0
DNS setting Enter manually
DNS Server 0.0.0.0
OK Cancel
The TV attempts to connect to the network again using the specified settings. A confirmation
4.
message is then shown once a connection is established. Select OK to proceed.
"
The network connection speed may differ depending on the DNS server settings. For details on the DNS
server settings, contact the Internet service provider (ISP).
Page 42

Failed Wired Connection
No network cable found
Make sure the network cable is plugged in. If it is connected, make sure the router is turned on. If it is
on, try turning it off and on again.
IP auto setting failed
Perform the following or set the IP address manually from IP Settings.
Ensure that the DHCP server is enabled on the router and reset the router.
1.
If this does not work, contact your Internet Service Provider for more information.
2.
Unable to connect to the network
Check the following:
Check the IP Settings.
1.
Ensure that the DHCP server is enabled on the router and unplug and then plug the router back in.
2.
If this does not work, contact your Internet Service Provider for more information.
3.
Try Now Try Now
Try Now
Try Now
Connected to a local network, but not to the Internet
Make sure that the Internet LAN cable is connected to the router's external LAN port.
1.
Check the DNS settings under IP Settings.
2.
If the problem persists, contact your Internet Service Provider.
3.
Network setup complete, but unable to connect to the Internet
If the problem persists, contact your Internet Service Provider.
Try Now
Try Now
Page 43

Wireless Network Setup
Screen Menu > Network > Network Settings
Network
Network Status
Network Settings
Wi-Fi Direct
AllShare Settings
Set Remote Access
Device Name [TV]Samsung LE...
"
The displayed image may differ depending on the model.
Try Now
Automatic Wireless Network Setup
Connect the TV to the Internet via a wireless router. Check the wireless router's SSID and security
key settings before attempting to connect. The security key can be found on the wireless router's
configuration screen.
Setting Network Type to Wireless automatically displays a list of available wireless networks.
1.
Select the network (SSID) you wish to connect to. If the desired wireless router doesn't appear in
2.
the list, select Add Network and enter the network's SSID manually.
Enter the security key and select Done. If the selected network is not security-enabled, the TV will
3.
attempt a connection right away.
The TV attempts to connect to the network. A confirmation message is then shown once a
4.
connection is established. Select OK to proceed. If the attempt fails, try again or connect
manually.
Page 44
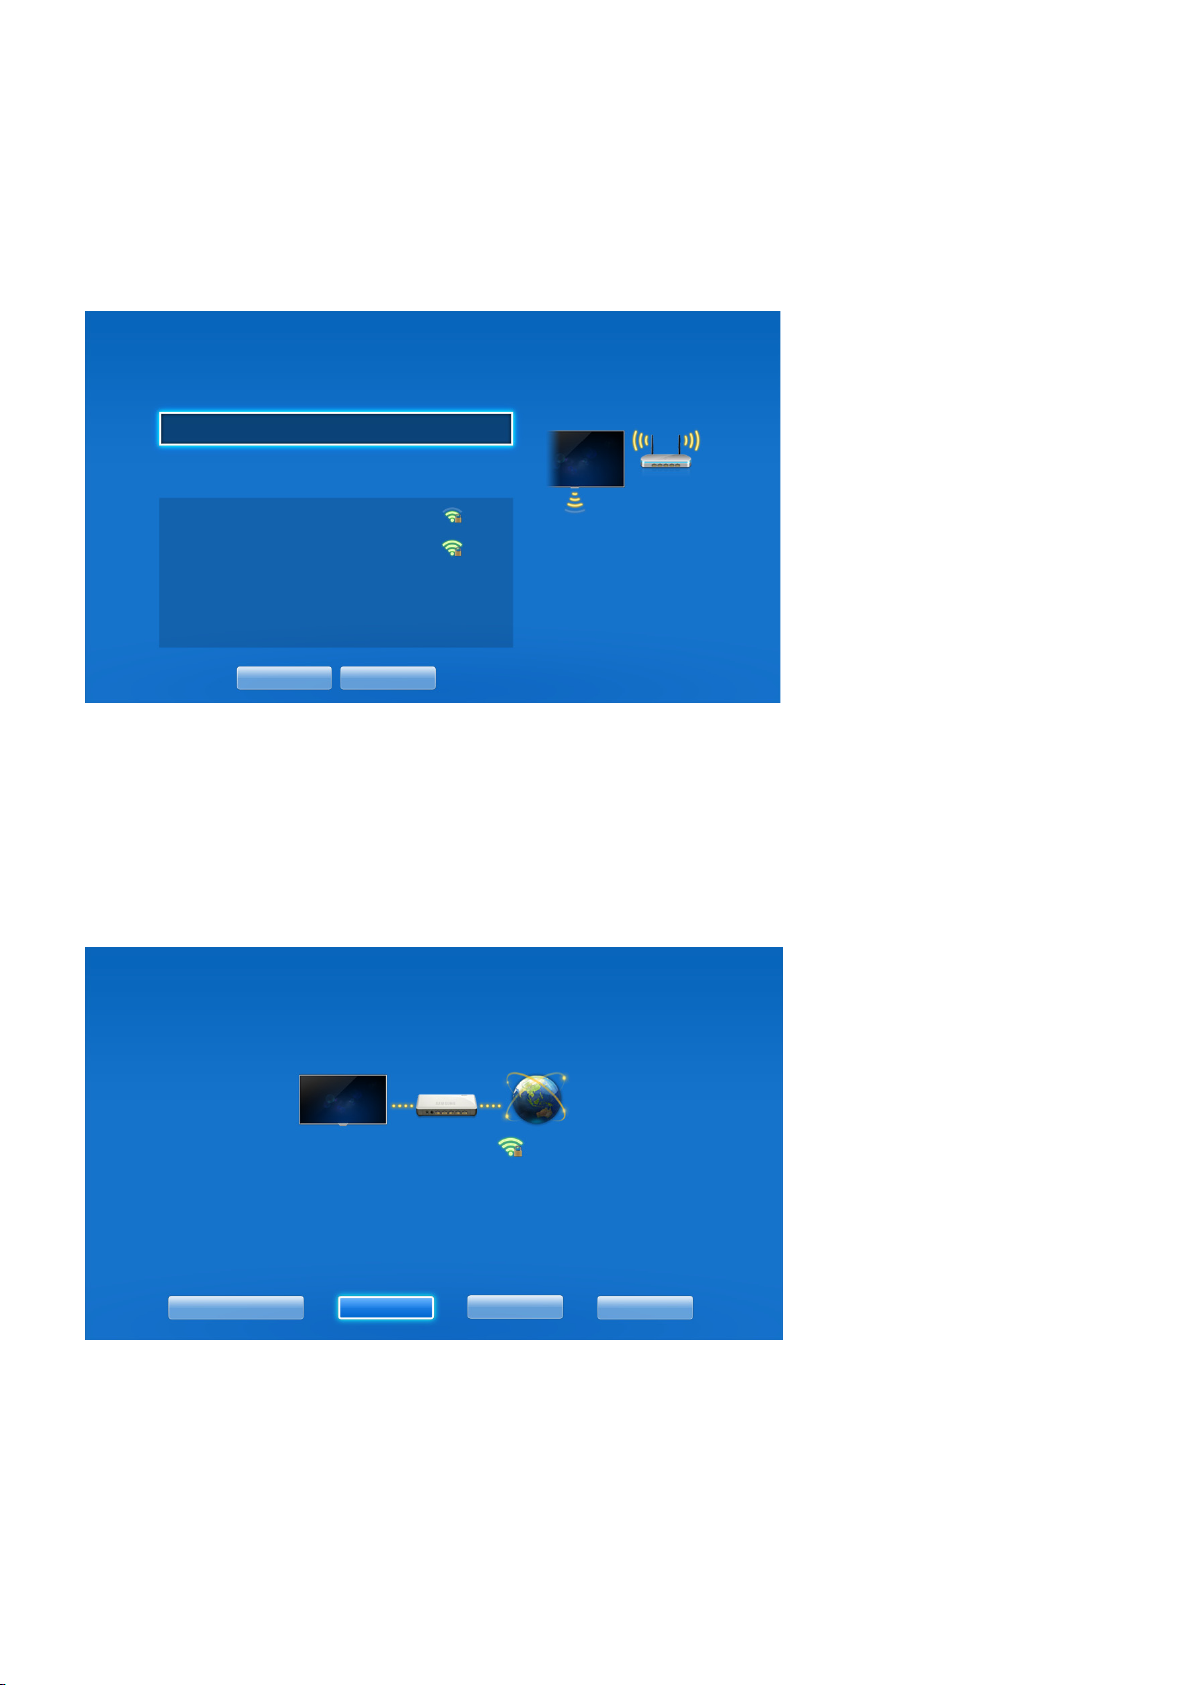
Manual Wireless Network Setup
If the network requires a static IP address, enter the IP address, subnet mask, gateway and DNS values
to connect to the network manually. To get the IP address, subnet mask, gateway and DNS values,
contact your Internet Service Provider (ISP). Refer to the "Dynamic versus Static IP Addresses" for
more information.
Setting Network Type to Wireless automatically displays a list of available wireless networks.
1.
Network Settings
Select your network type.
Network Type Wireless
Wireless network
AP0000
AP0001
Add Network
Refresh WPS(PBC)
You can connect your TV to the
internet. Please select which
wireless network to use.
Select the network (SSID) you wish to connect to. If the desired wireless router doesn't appear in
2.
the list, select Add Network and enter the network's SSID manually.
Enter the security key and select Done. If the selected network is not security-enabled, the TV will
3.
attempt a connection right away.
Select Stop when the TV attempts to connect to the network. Once the network connection has
4.
been interrupted, select IP Settings.
Network Settings
Connection verification cancelled.
AP00000
Wireless network connection test stopped.
Change Network IP Settings Retry Close
Page 45

From the IP Settings screen, set IP setting to Enter manually, enter IP Address, Subnet Mask,
5.
Gateway, and the DNS Server values, and then select OK.
IP Settings
IP setting Enter manually
IP Address 0.0.0.0
Subnet Mask 0.0.0.0
Gateway 0.0.0.0
DNS setting Enter manually
DNS Server 0.0.0.0
OK Cancel
The TV attempts to connect to the network again using the specified settings. A confirmation
6.
message is then shown once a connection is established. Select OK to proceed.
"
The network connection speed may differ depending on the DNS server settings. For details on the DNS
server settings, contact the Internet service provider (ISP).
WPS Button
If the router has a WPS push button, you can use it to connect the TV to the router automatically. WPS
automatically configures the SSID and WPA key settings.
Setting Network Type to Wireless automatically displays a list of available wireless networks.
1.
Select WPS(PBC) and then press the router's WPS button within two minutes.
2.
The TV automatically acquires the SSID and security key settings and connects to the network. A
3.
confirmation message is then shown once a connection is established. Select OK to proceed.
Page 46

Failed Wireless Connection
Wireless network connection failed, or no wireless router selected.
Go to Network Settings and select the correct router.
Unable to connect to a wireless router
Check the following:
Check that the router is turned on, and if it is, turn it off and on again.
1.
Enter the correct security key if required.
2.
IP auto setting failed
Perform the following or set the IP address manually from IP Settings.
Make sure that the DHCP server is enabled on the router and unplug and plug the router back in.
1.
Enter the correct security key if required.
2.
If this does not work, contact your Internet Service Provider for more information.
3.
Try Now
Try Now Try Now
Try Now Try Now
Unable to connect to the network
Check the following:
Check the IP Settings.
1.
Enter the correct security key if required.
2.
If this does not work, contact your Internet Service Provider for more information.
3.
Connected to a local network, but not to the Internet
Make sure that the Internet LAN cable is connected to the router's external LAN port.
1.
Check the DNS settings under IP Settings.
2.
If the problem persists, contact your Internet Service Provider.
3.
Try Now
Try Now
Page 47

Network setup complete, but unable to connect to the Internet
Try Now
If the problem persists, contact your Internet Service Provider.
Dynamic versus Static IP Addresses
If the network requires a dynamic IP address, use an ADSL modem or router that supports the
Dynamic Host Configuration Protocol (DHCP). Modems and routers that support DHCP automatically
provide the IP address, subnet mask, gateway and DNS values the TV needs to access the Internet, so
they do not have to be entered manually. Most home networks use a dynamic IP address.
If the network requires a static IP address, enter the IP address, subnet mask, gateway, and DNS values
manually when setting up the network connection. To get the IP address, subnet mask, gateway and
DNS values, contact your Internet Service Provider (ISP).
If the network requires a static IP address, use an ADSL modem that supports DHCP. ADSL modems
that support DHCP also allow static IP addresses.
Checking the Network Status
Screen Menu > Network > Network Status
Try Now
Network
Network Status
Network Settings
Wi-Fi Direct
AllShare Settings
Set Remote Access
Device Name [TV]Samsung LE...
"
The displayed image may differ depending on the model.
View the current network and Internet status.
Page 48

Mobile Device Connection
Network
Network Status
Network Settings
Wi-Fi Direct
AllShare Settings
Set Remote Access
Device Name [TV]Samsung LE...
"
The displayed image may differ depending on the model.
You can either directly connect a mobile device to the TV with no need for a wireless router or connect
them on the same network to play media files from the mobile device on the TV.
Wi-Fi Direct
Screen Menu > Network > Wi-Fi Direct
Connect a mobile device that supports Wi-Fi Direct to the TV without using a wireless router.
Enable Wi-Fi Direct on the mobile device and then launch Wi-Fi Direct. The TV automatically
1.
scans for and displays a list of available devices. The TV's name also appears on the mobile
device.
Select the device from the list to initiate a connection. If a connection request is made by the
2.
TV, a permission message appears on the mobile device and vice versa. Accept the request to
connect the mobile device to the TV.
Try Now
Page 49

AllShare Settings
Screen Menu > Network > AllShare Settings
This TV can play media files from computers or other DLNA-enabled devices connected to the TV via
a network. Refer to the "Using Networked External Storage Devices", for more information.
In addition, this TV can be used as a display for mobile devices, including smartphones and tablets.
Refer to the "Screen Mirroring", for more information.
Set Remote Access
Screen Menu > Network > Set Remote Access
Remote access allows you to access and control your TV from other devices. You need to log in to set
this service. When it is enabled on your TV, the TV will automatically go into stand-by when you turn
it off. Energy consumption may increase as a result.
Rename the TV
Screen Menu > Network > Device Name
Assign a unique name for your TV. The assigned name appears on the external devices connected to
the TV via the network.
Try Now
Page 50
Smart Touch Control
The Smart Touch Control makes it easier and more convenient to use the TV. For example, you can
use the remote control's built-in touchpad to move the focus and make selections as you would on a
computer using a mouse. In addition, you can use the virtual remote panel displayed on the screen to
change channels, play media files, and access favourites.
"
The RECOMM. / SEARCH button may be used for the History function, depending on the country or region.
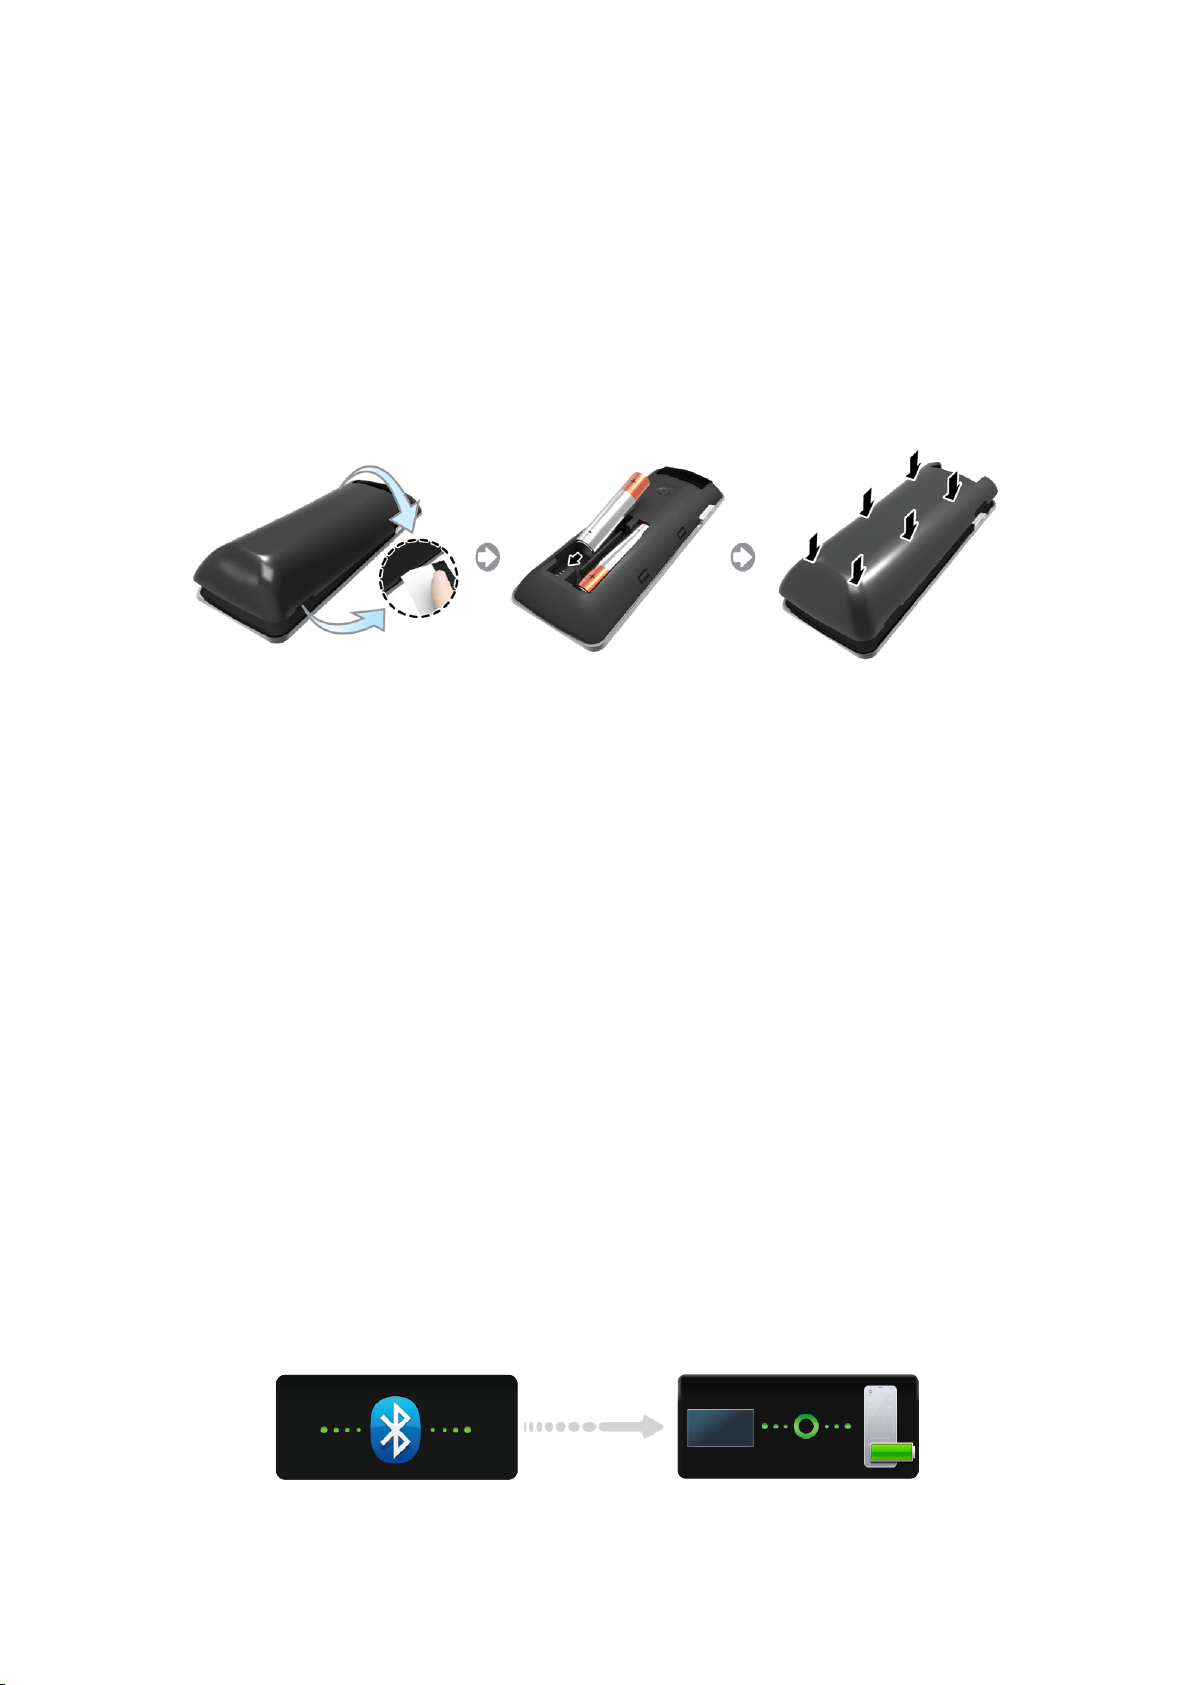
Inserting the Batteries (AAA X 2)
Slightly lift the battery cover using a plastic card. Next, pull on the cover’s notch with a fingernail
1.
to remove the cover completely.
"
Check the location of the battery cover groove. The groove's location may vary depending on the type
of Smart Touch Control is provided with the product.
Insert 2 AAA batteries, making sure to align the positive and negative ends correctly.
2.
Align the battery cover with the back of the remote control and press down along the edges until
3.
it is cleanly attached to the remote control.
Connecting to the TV
In order to operate the TV using a Smart Touch Control, you must first pair it to the TV via Bluetooth.
However, the Smart Touch Control is only available for the paired Samsung TV.
"
We recommend to use the Smart Touch Control in less than 6m. A usable distance may differ depending on
the wireless environmental conditions.
When the TV is off, point the Smart Touch Control at the remote control receiver of the TV and
1.
press the TV button for the first pairing. Only this buttons sends an IR signal. The remote control
receiver's location may vary depending on the model.
A Bluetooth icon will appear at the bottom left of the screen as shown below. The TV will then
2.
attempt to connect to the Smart Touch Control automatically.
<Attempting to connect and completion icons>
Page 51
Reconnecting the Smart Touch Control
If the Smart Touch Control stops operating or works abnormally, replace the battery as this may
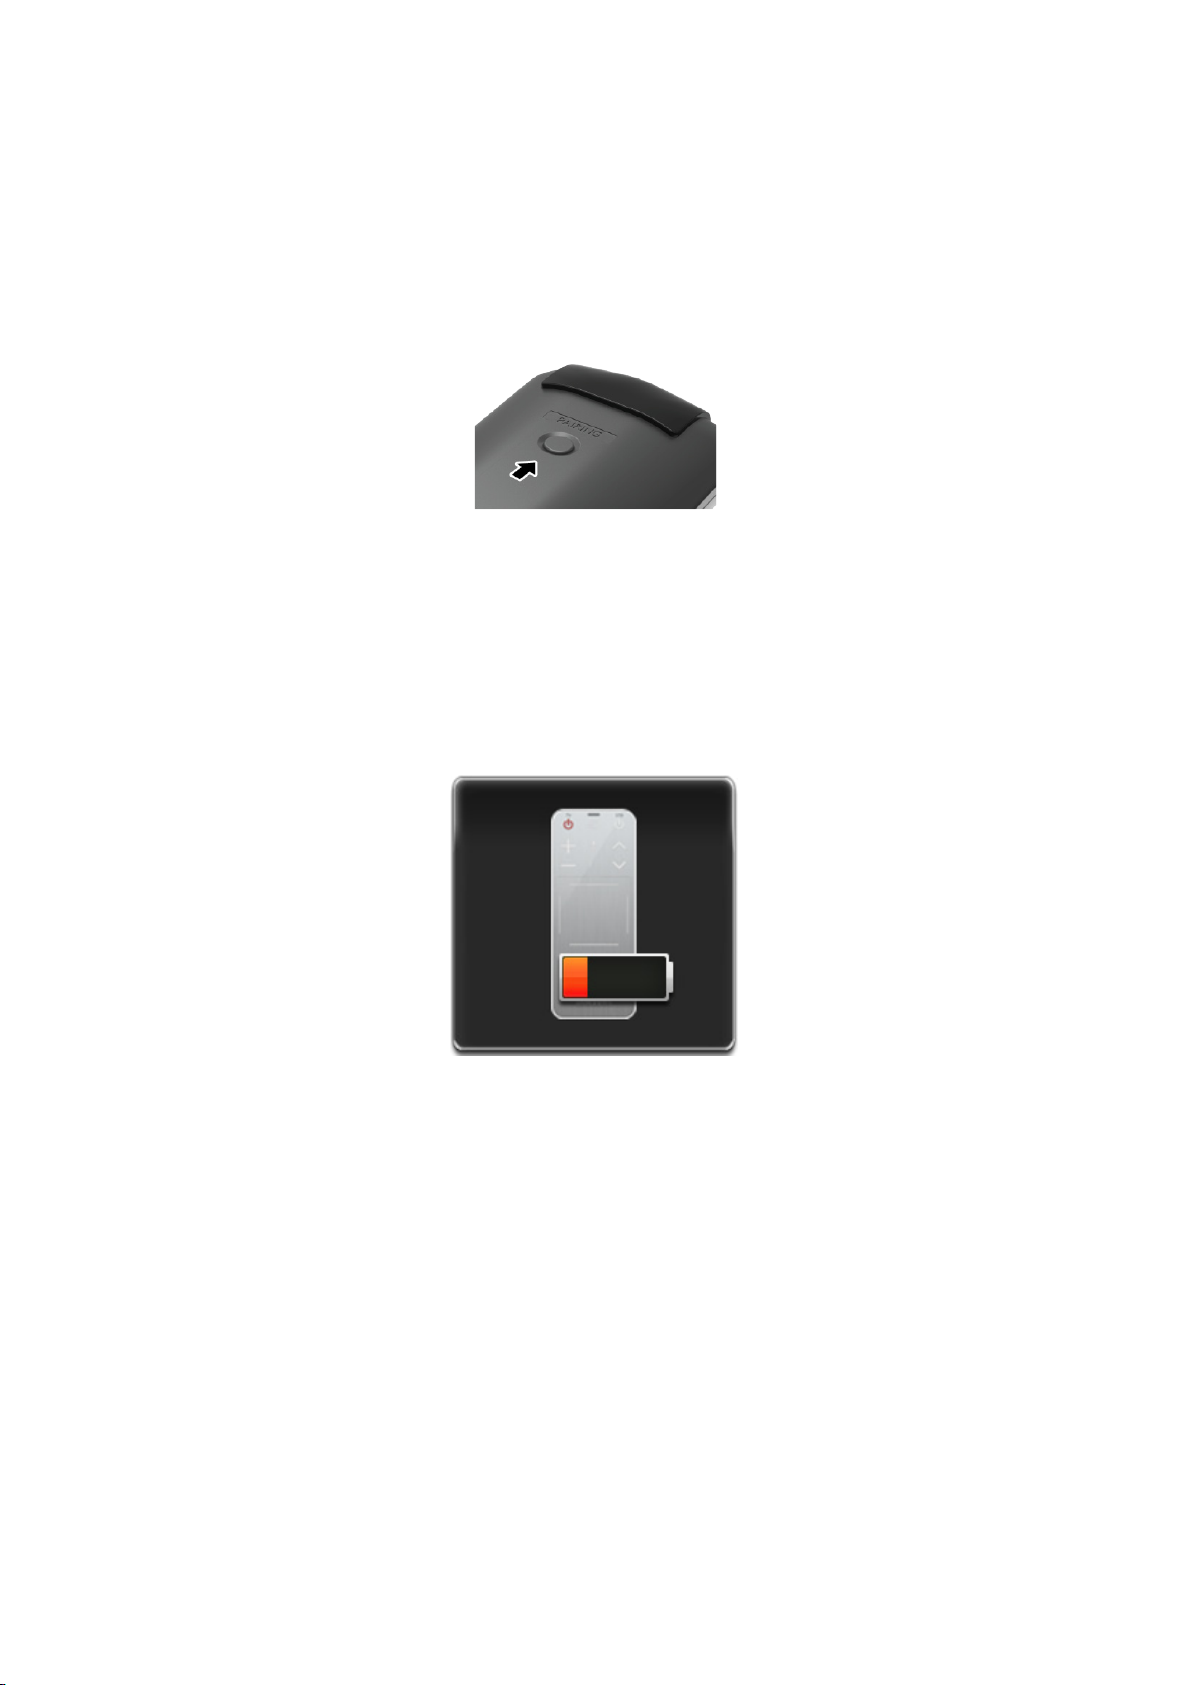
be caused by insufficient battery power. If the problem persists, press the PAIRING button on the
Smart Touch Control to restore pairing with the TV. The PAIRING button cannot be accessed without
removing the Smart Touch Control's battery cover. Within a distance between 30cm to 4m, point the
Smart Touch Control to the TV receiver and press the PAIRING button. When pairing is complete, the
pairing image displays at the bottom left of the TV screen.
<The Smart Touch Control pairing button>
Battery Low Alarm
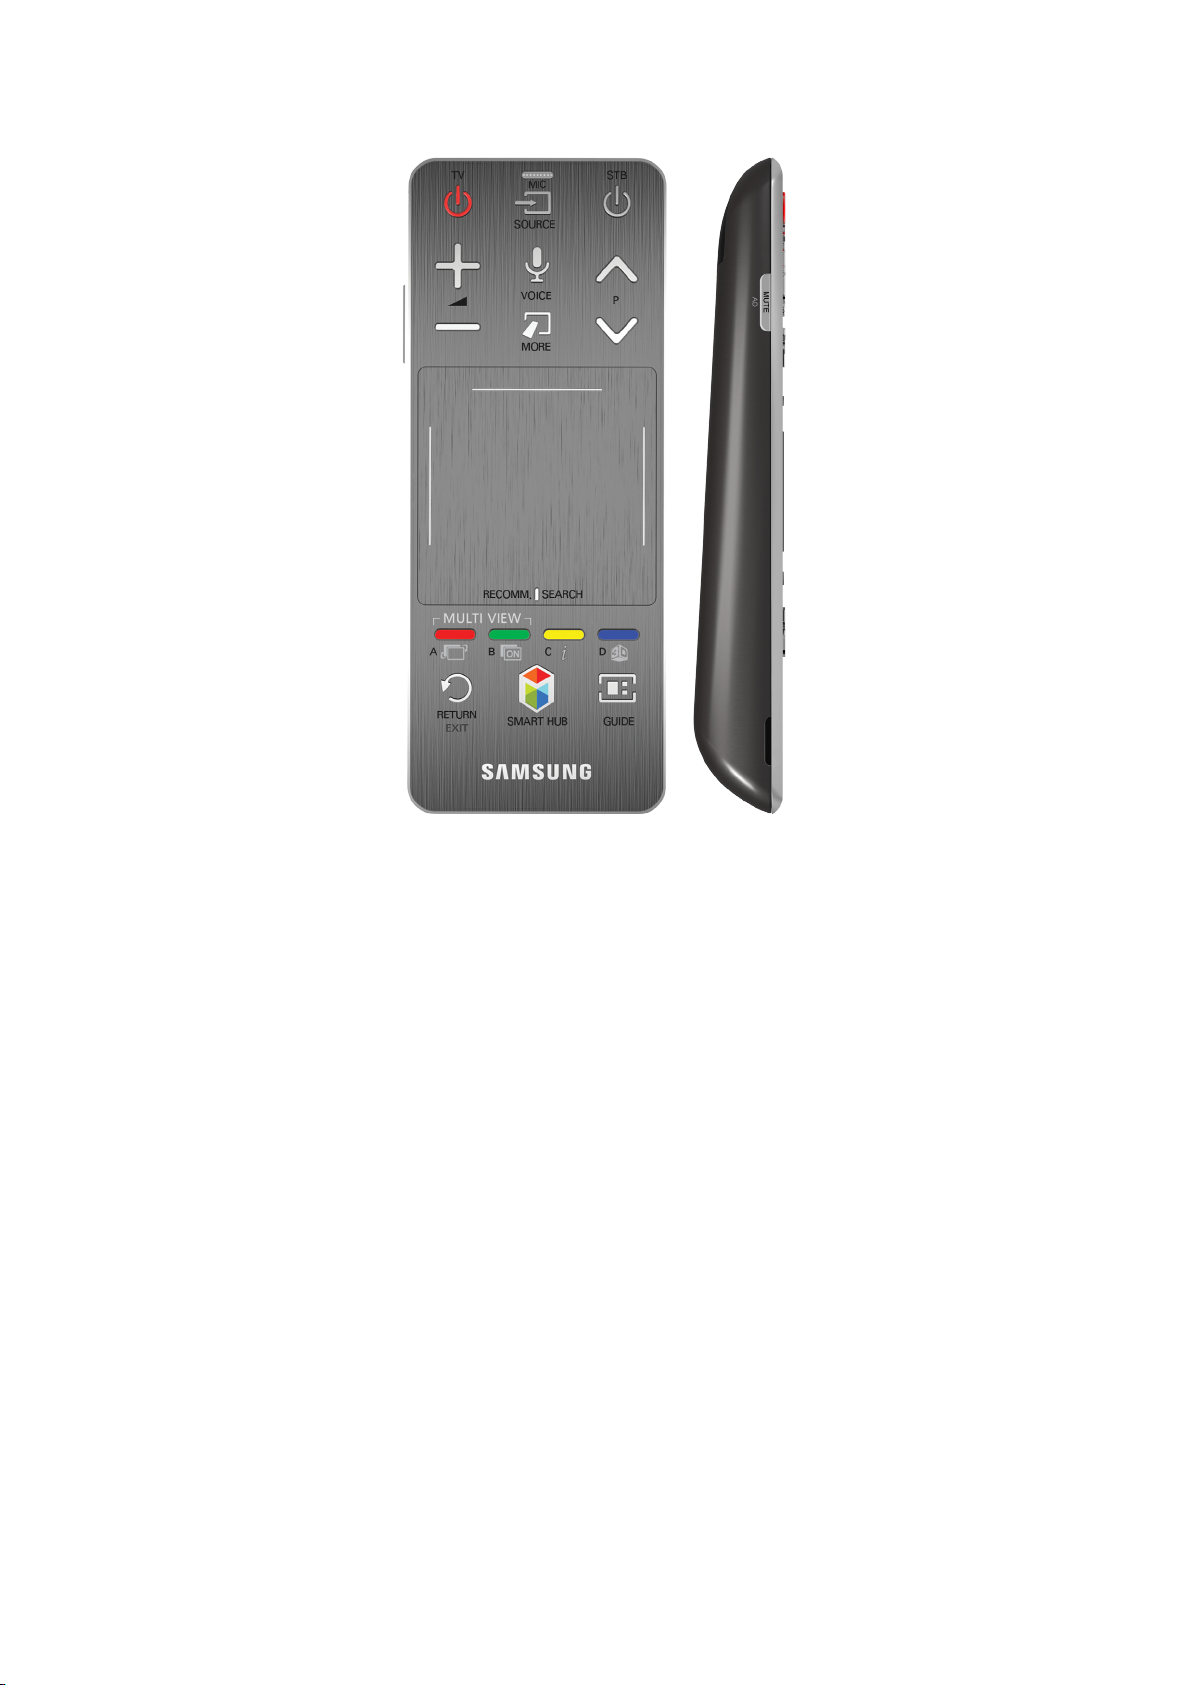
If the battery becomes and blanks low while using the Smart Touch Control, the following alarm
window blinks and appears at the bottom left of the screen. If the alarm window pops up, replace the
batteries of the Smart Touch Control. Use alkaline batteries for longer usage.
<Low battery alarm window>
Page 52
Buttons and Descriptions
"
The product colour and shape may vary depending on the country or region.
Page 53
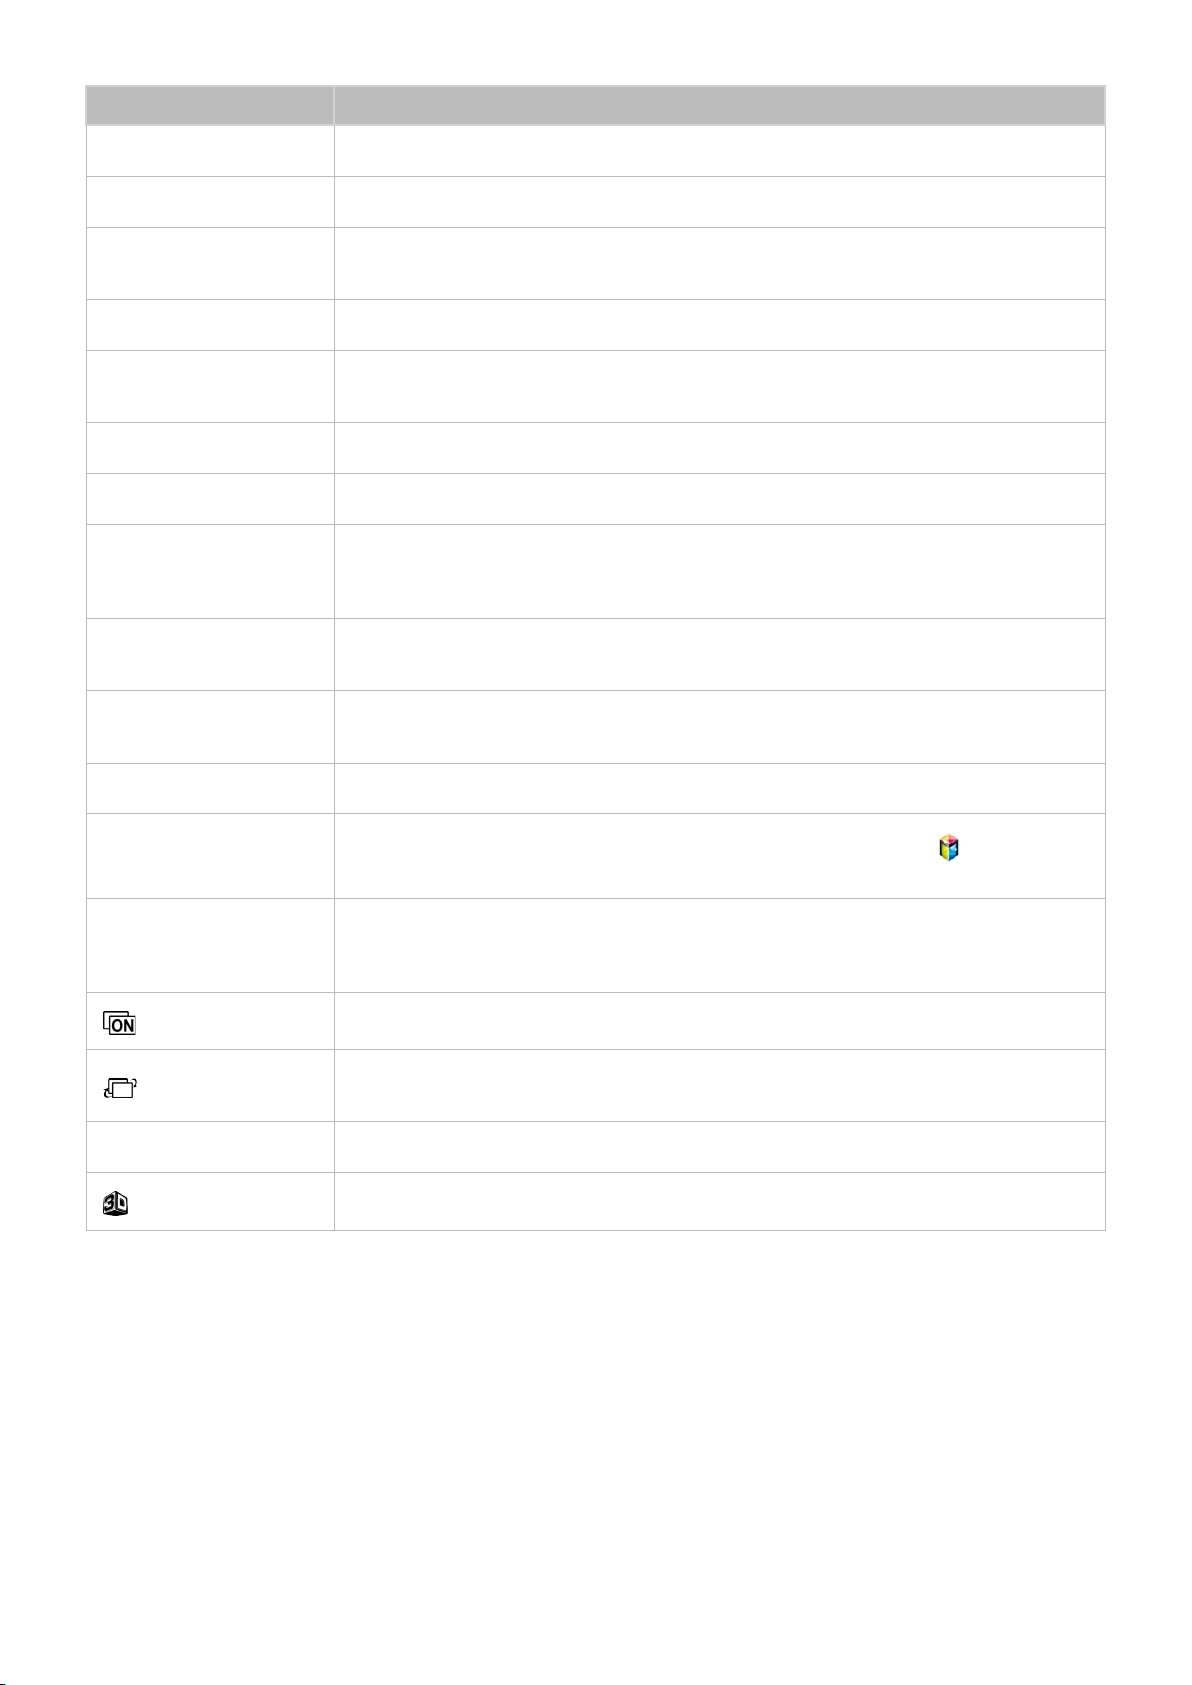
Buttons Descriptions
TV
SOURCE
STB
w = v
VOICE
MUTE / AD Turns the TV sound on/off.
P
<
>
MORE
Touchpad
a, b, {, }
Turns the TV on/off.
Changes the source.
Turns on and off the satellite or cable set-top box connected to the TV. For this,
the Smart Touch Control must be configured as a universal remote control.
Adjusts the volume.
Run Voice Recognition. To speak a voice command, press and hold the VOICE
button and say a voice command.
Changes the channel.
Displays the virtual remote panel on the screen. The virtual remote panel consists
of a number panel, a colour and playback control panel, and a quick access panel.
Use the touchpad to select numbers and buttons.
Drag your finger on the touchpad as you would on the touchpad of a laptop to
move the focus displayed on the screen. To select item, press the touchpad.
The colour buttons work differently, depending on the function that the TV is
currently performing.
RETURN / EXIT Returns to the previous menu.
SMART HUB
GUIDE
`
Launch Smart Hub. While an application is running, pressing the
terminates the application.
View each digital channel's programming schedule, including showtimes. In
addition, sets a Schedule Viewing or Schedule Recording to press the touchpad
on the programme entry scheduled to air later.
Turns the Samsung Multi View on and off.
When using the Samsung Multi View function, users can select a screen to control
among the Screen 1 and Screen 2.
Displays information on the TV screen.
Turns the 3D function on or off.
button
Page 54

Special Functions
Press and hold the following Smart Touch Control buttons to access various special functions.
Buttons Descriptions
MUTE / AD
Touchpad
RETURN / EXIT Press and hold this button to quit the current process or app.
MORE
Press and hold this button to select Audio Description and Subtitle. (Depending
on the country or region.)
Press and hold the touchpad while watching TV to display CH List on the screen.
In addition, you can press and hold the touchpad for 2 seconds or more while an
application is running to access the application's hidden features. (Not available
with all applications.)
Press and hold the MORE button to select a desired function (e.g. MENU (m),
TOOLS (T), INFO (`), etc.) easily.
Page 55
Touchpad
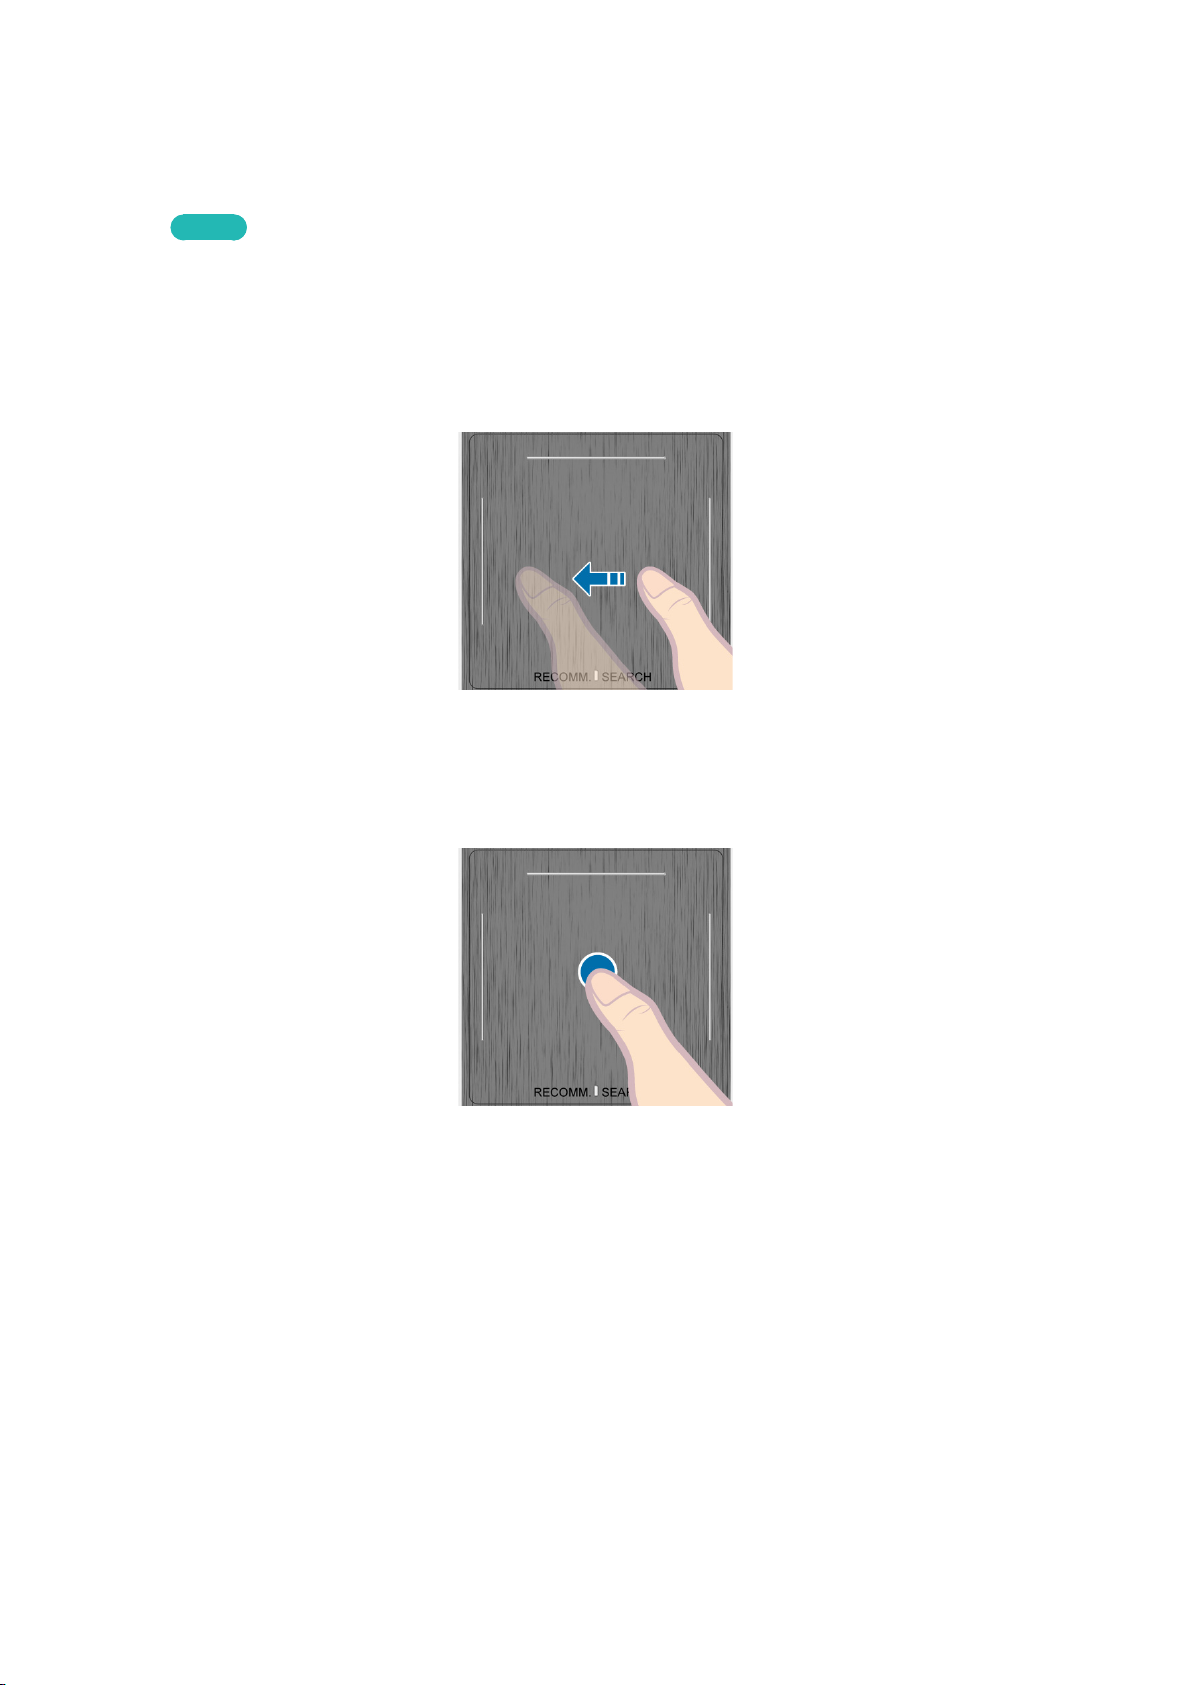
Use the touchpad to perform various commands. Navigate to Tutorial (System > Device Manager
Smart Touch Control Settings > Tutorial) to view an on-screen guide to using the Smart Touch
>
Control.
Dragging
Drag on the touchpad in the desired direction. Move the focus or the pointer in the direction the finger
is dragging.
Try Now
Press
Press on the touchpad. This selects the focused item.
Page 56
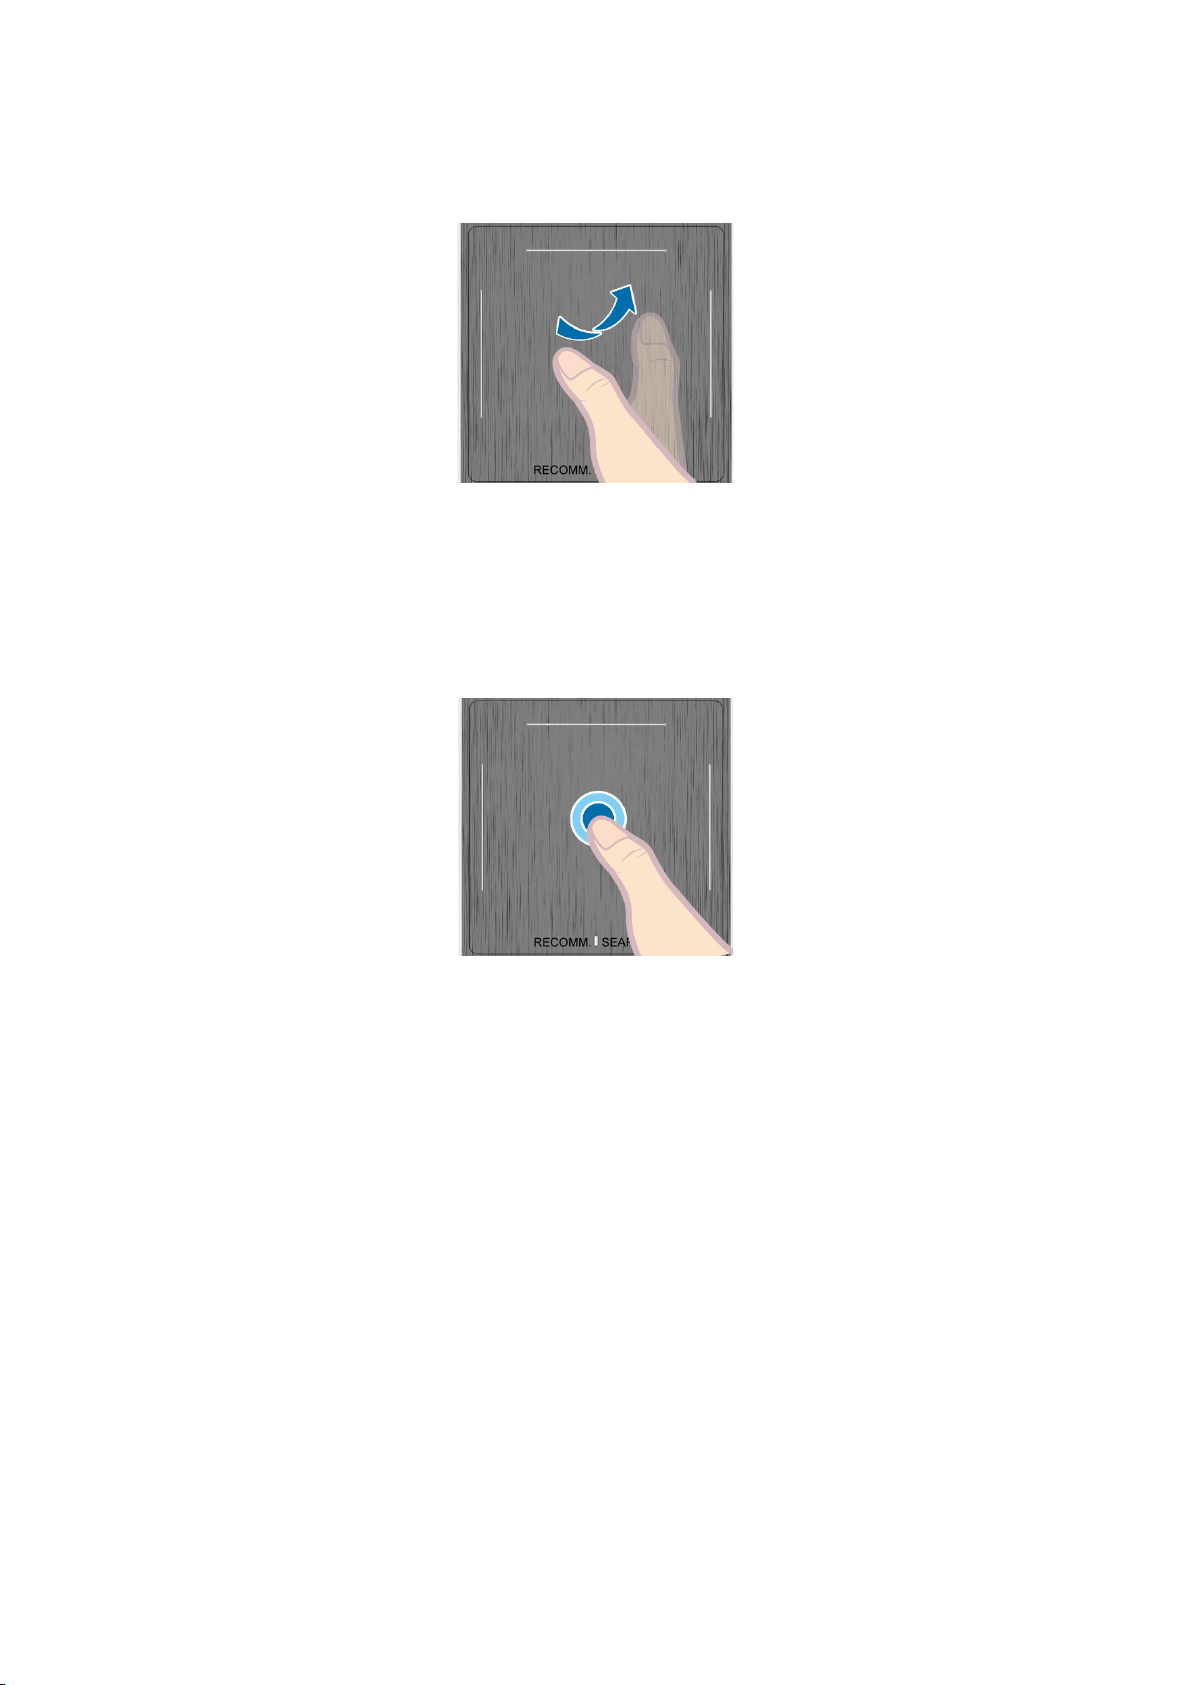
Flicking
Flick on the touchpad in the desired direction. This moves the focus or scrolls the screen based on the
direction and speed of the flick.
Pressing and Holding
Press and hold the touchpad while watching TV to display CH List on the screen. In addition, you
can tap and hold the touchpad for 2 seconds or more while an application is running to access the
application's hidden features. (Not available with all applications.)
Page 57
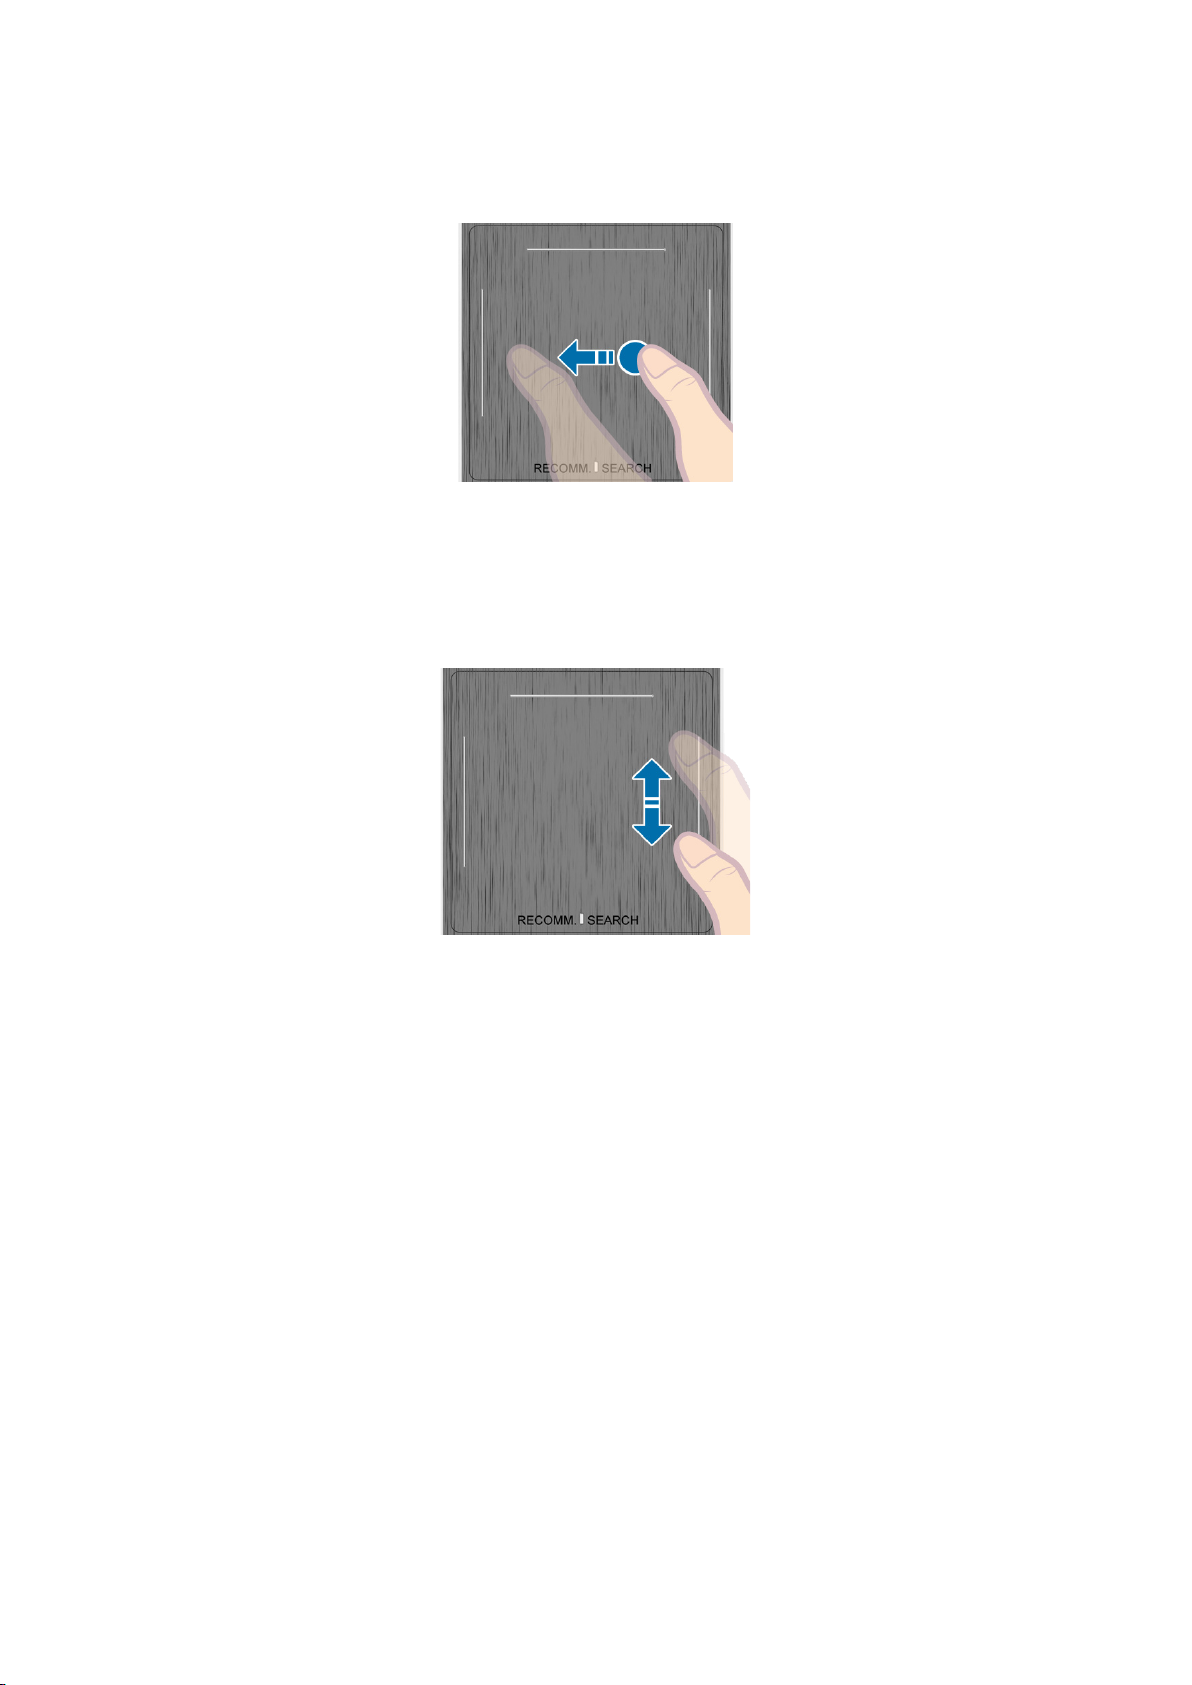
Pressing and Dragging
Press the touchpad, drag and release. This moves the selected web item in a webpage or your current
location on a map.
Scrolling Up/Down
Scroll up/down the line on either the left or right edge of the touchpad. This scrolls a webpage or a
list up/down. This scrolling feature easily accommodates both right-handed and left-handed users.
Page 58
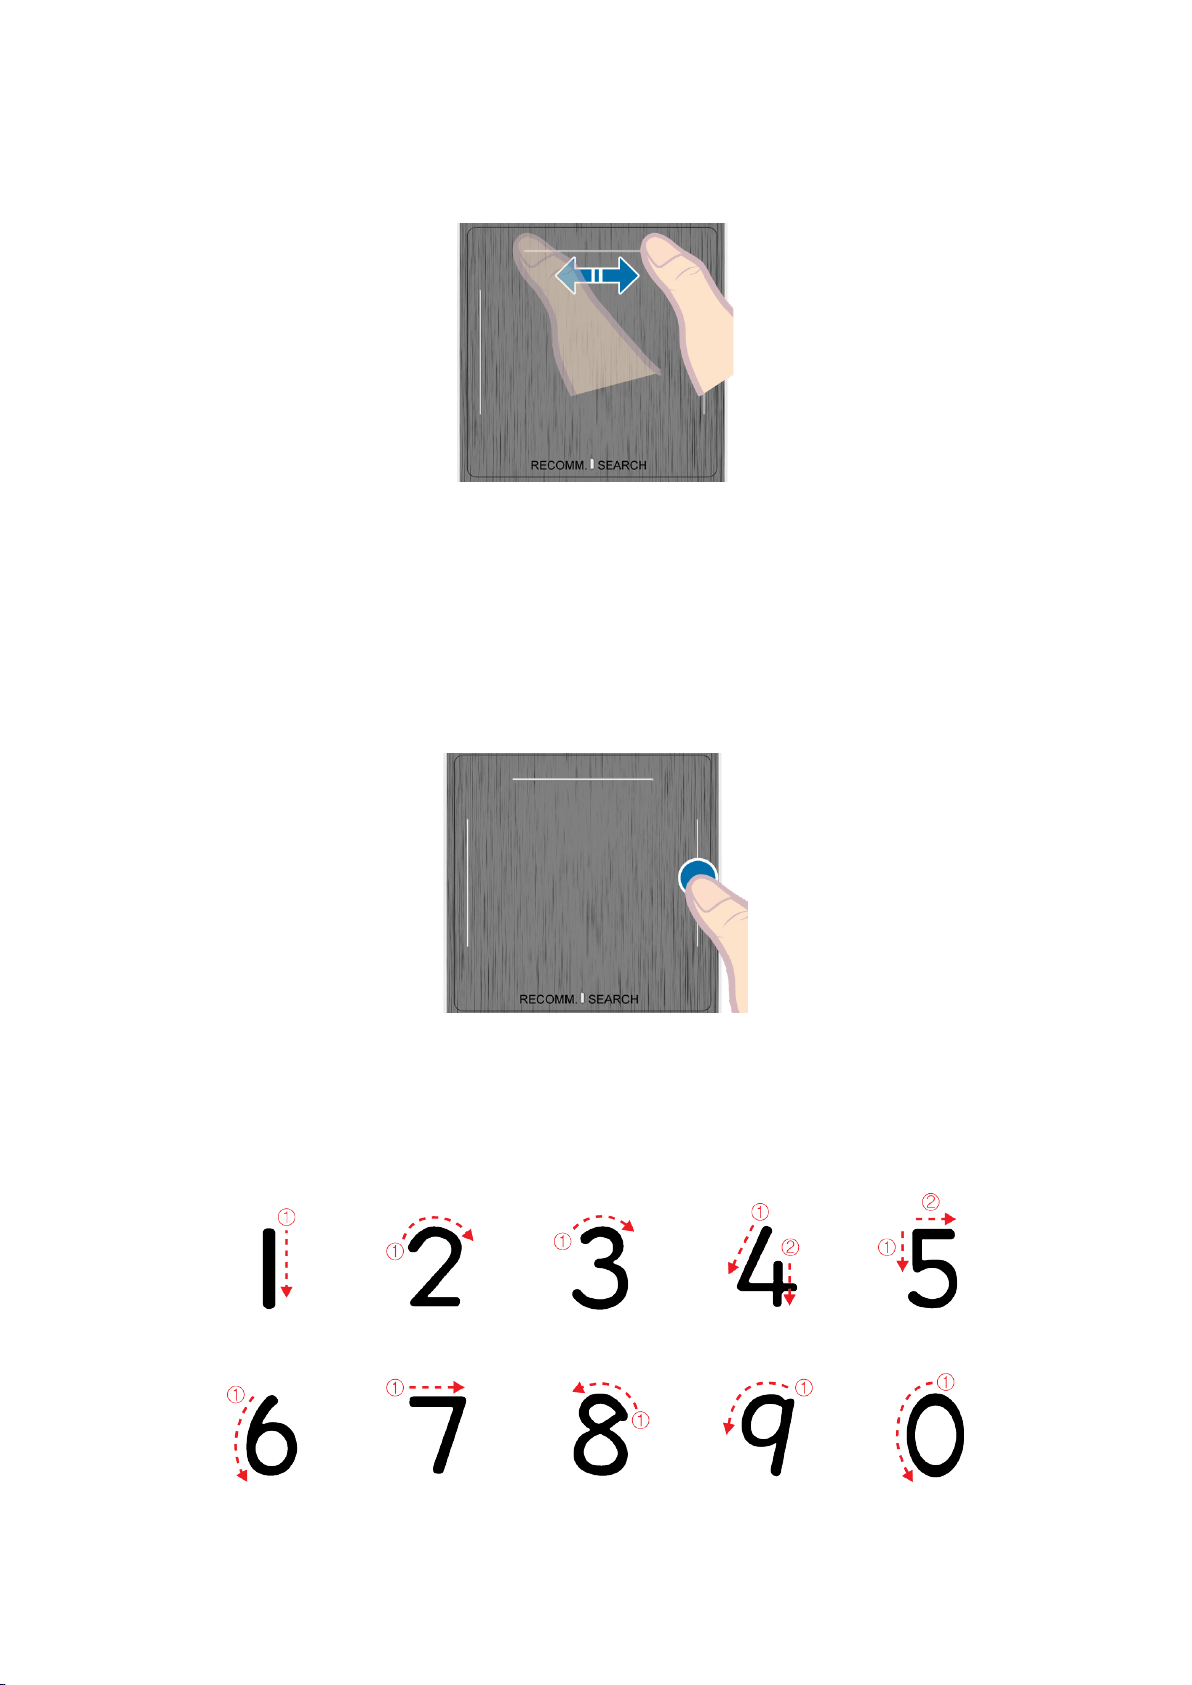
Scrolling Left/Right
Move your finger horizontally on the projected line at the top of the touchpad. You can horizontally
scroll a horizontal list or the Smart Hub panel.
Changing Channels by Entering Numbers
While watching TV, tap on the protruding line on the left or right edge of the touchpad to bring up the
numerical input window on the screen. Use your finger to enter the number for the channel you want
to watch. The recognised number is displayed on the screen and the TV switches to the corresponding
channel. However, the number you have entered may not be recognised properly by the TV. Refer to
the guide below to ensure that your numerical entries are recognised accurately.
Numerical Input Guide
Refer to the diagrams below when entering numerical values. The TV may not recognise your entries if
you do not follow the sequences shown below.
Page 59

Adjusting the Touchpad
Screen Menu > System > Device Manager > Smart Touch Control Settings > Touch Sensitivity
Now
Users can adjust the sensitivity of the Smart Touch Control’s touchpad. Set Touch Sensitivity to adjust
sensitivity and make it more convenient to use.
Try
Show Status and Notification Banner
Press the MORE button on the Smart Touch Control and then select STATUS on the virtual control
panel to display the status and notification banner at the top of the screen. Refer to the "Status and
Notification" banner for more information.
Recommendations
Press the RECOMM. / SEARCH button and then select Recommended from the list displayed at the
bottom of the screen.
This shows the current / scheduled programme and application recommendations.
Select a programme that is currently airing to jump to the corresponding channel or a programme
that is scheduled to air to set up a Schedule Viewing or Schedule Recording setting. Refer to the
"Scheduled Recommended Programme Info" for more information.
Select an application to launch. Samsung Apps will launch if the selected application is not installed
on the TV. For more information, see "Samsung Apps".
History
Press the RECOMM. / SEARCH button and then select History from the list displayed at the bottom
of the screen. This displays an interactive list of recently accessed channels, media content and
applications.
"
The RECOMM. / SEARCH button may function as a History recall feature, depending on your country or
region.
Deleting History Data
Screen Menu > Smart Features > Clear viewing history > History
You can delete the history information about recently viewed channels, content and applications.
Searching
Press the RECOMM. / SEARCH button on the Smart Touch Control. The list appears at the bottom of
the screen. Press the RECOMM. / SEARCH button again. The keypad will appear on the screen. Enter
search criteria to search not only many apps and their contents on the TV but also the Web. This
button toggles between Recommended and Search.
Page 60

Using the Virtual Remote Control
Press MORE button to display the virtual remote panel on the screen. The virtual remote panel consists
of a number panel, a playback control panel, and a quick access panel. Use the touchpad to select
numbers and buttons. Press and hold the MORE button. A quick access panel of virtual remote panel
appears. You can select screen buttons easily.
Changing the Virtual Remote Control Panel
Choose the number panel, playback control panel, or quick access panel as the panel to be shown on
the screen.
Use the touchpad to keep moving the focus left or right. The panel changes when the focus is moved
beyond the leftmost or rightmost edge.
Use left/right scroll function on the touchpad to change the panel easily.
Change a position of the Virtual Remote Panel
Press the MORE button on the Smart Touch Control. The virtual remote panel appears on the screen.
Press and hold the touchpad for one second. Users can change a position of the virtual remote panel
of the screen.
Page 61

Using the Number Panel
Use the number panel to enter numbers on a keypad screen or webpage or to change the channel
while watching TV. Changing the channel using the number pad leaves a record, allowing you to easily
return to previous channels.
Using the Playback Control Panel
Use the playback control panel to pause, rewind, fast forward, skip to the next file, and much more
while enjoying media content.
Using the Quick Access Panel
Quickly access the INFO, MENU and e-Manual buttons. However, the availability of buttons vary
depending on the operating mode of the Smart Touch Control (with the TV only, as a universal remote,
etc.).
Adjusting the virtual remote control
Screen Menu > System > Device Manager > Smart Touch Control Settings > Onscreen Remote Size
Try Now
You can resize the virtual remote control. If the virtual remote control buttons are too small, enlarge
the remote control window before using the virtual remote control.
Page 62
Universal Remote Setup
Screen Menu > System > Device Manager > Universal Remote Setup
This TV has a universal remote control feature that lets you control cable boxes, Blu-ray players, home
theatres, and other third-party external devices connected to the TV using the TV's remote control.
You can also use the Anynet+ (HDMI-CEC) function to operate Samsung external devices with your
TV's remote control without any additional setup. Refer to the "Anynet+ (HDMI-CEC)" for more
information.
Some or new models of the external device connected to the TV, may not be supported from the
Universal Remote Setup.
Try Now
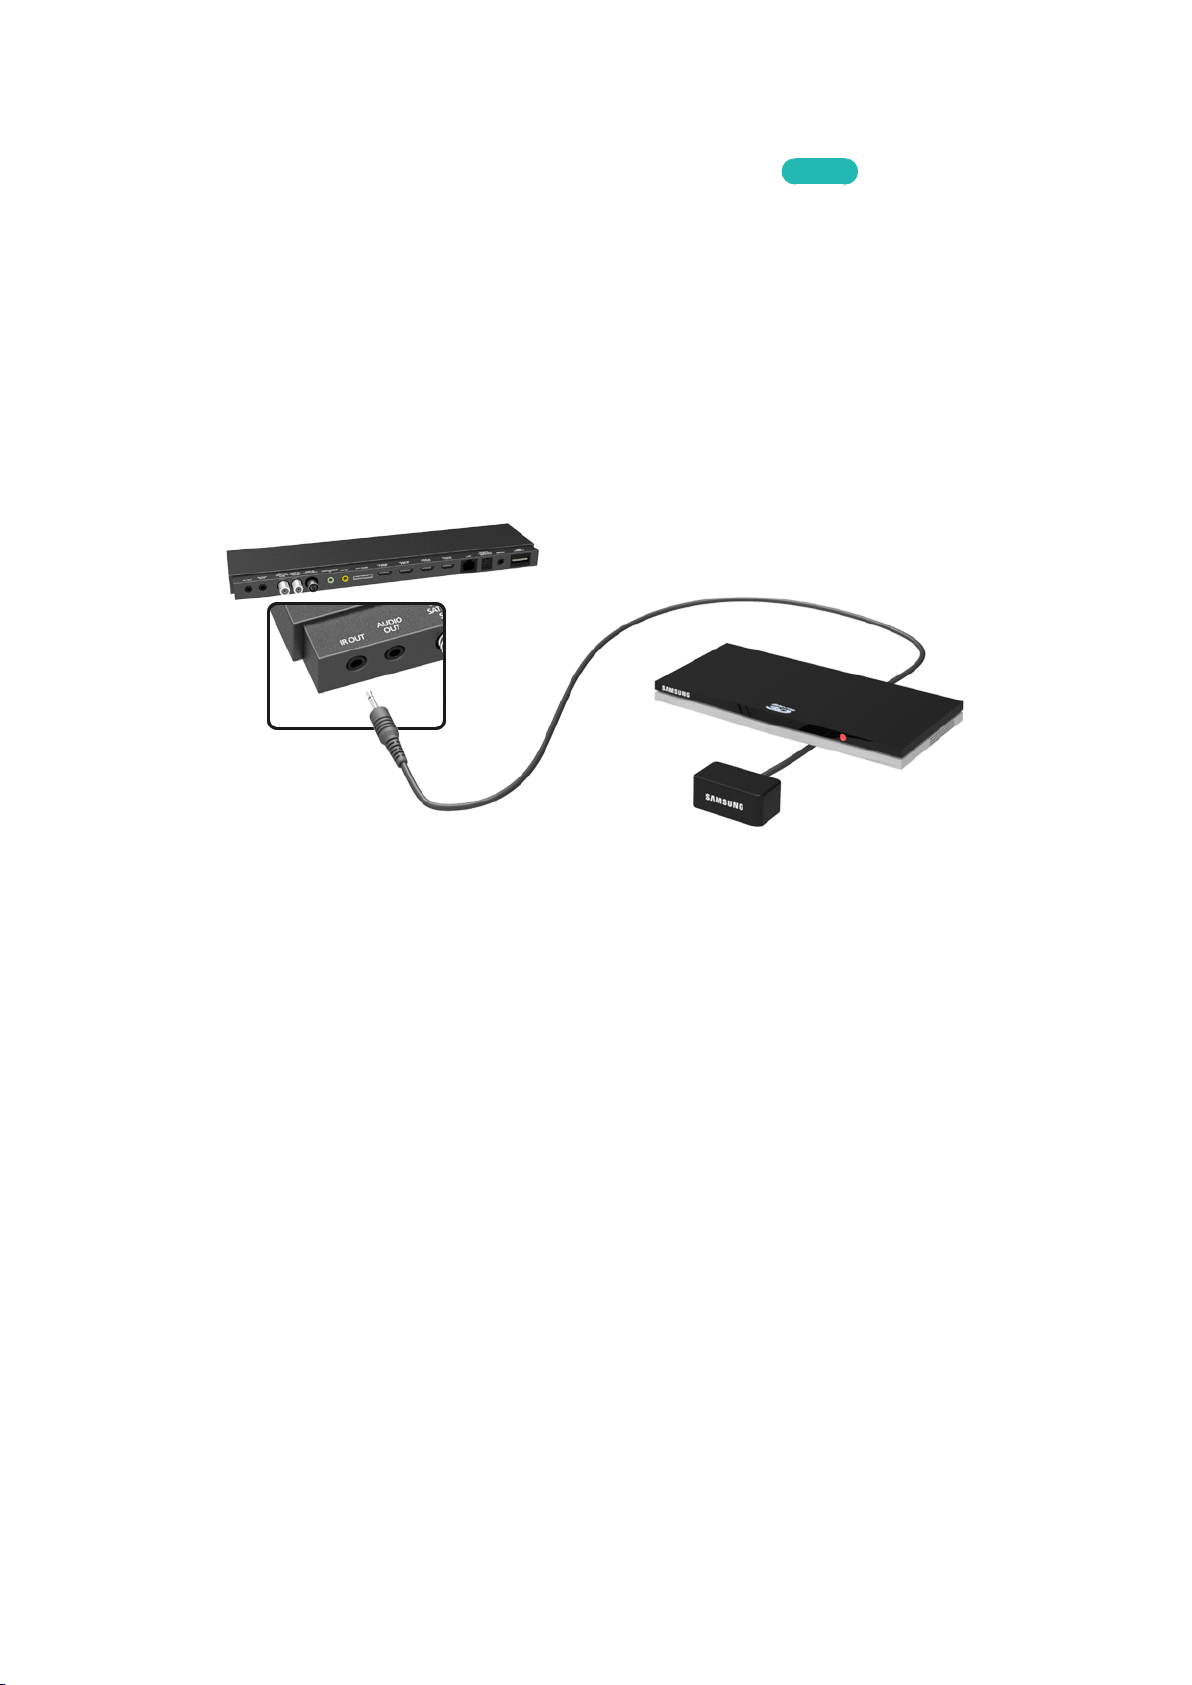
Connecting the IR Extender
Plug the cable into the One Connect IR connector and then point the transmitter at the other end of
the cable towards the external device's remote panel receiver. However, there can't be any obstacles
between the IR extension cable and the external device. The presence of an obstacle will interfere with
the transmission of the remote panel signal.
"
The colour and design of the IR Extender may vary depending on the model.
Add the External Device
Turn on the external device you wish to set up universal remote function for and then press
1.
SOURCE to bring up the Source screen.
Select Universal remote setup from the top of the screen. This initiates the universal remote
2.
setup process.
Follow the on-screen instructions for the Universal remote setup. If it does not respond properly,
3.
set up the remote control by entering the model number manually.
Page 63

Using the Universal Remote Control
By configuring the universal remote control feature for a connector to which an external device is
already connected, you can use the Smart Touch Control as a universal remote control simply by
sending the input signals to the corresponding connector.
Registered External Device Management
From the Universal remote setup screen, select a registered external device. The following options are
available:
Source Setup
●
Change the TV's input connector that the external device is connected to.
Synced Power Off
●
Configure the external device to turn off when the TV is turned off.
Rename
●
Rename the registered external device (up to 15 characters long).
Delete
●
Delete the registered external device.
Page 64

Entering Text using the Onscreen Keypad
An onscreen keypad appears when you need to enter text (entering the network password, logging
into your Samsung account, etc.), allowing you to enter text using your remote control.
Entering Text using the QWERTY Keypad
Use the QWERTY keypad as you would a normal keyboard. Simply select the letters you want to enter
them.
Additional Features
Select the icon from the keypad to access the following features:
Language
●
Select a language from the list.
Recommend text
●
Enable/disable the Recommend Text feature. Enabling the Recommend Text feature displays word
recommendations based on the entered characters. To enter the word "Internet", for example, all
you have to do is enter "In" and select the word "Internet" from the list of recommend words.
Predict Next Letter
●
Enable/disable the Text Prediction feature. Enabling the Text Prediction feature eliminates the
need to find and select individual character keys. However, this feature is limited to words that
have previously been added to the dictionary. To enter the word "Internet", for example, select
"I". A predicted word will then appear next to the I key. Simply select the predicted word to enter
"Internet".
Page 65

SMART Interaction
Using this function, you can access and control menu options and functions using motions.
When using the Motion Control feature for the first time, the TV must be connected to the Internet so
that it can download the software module related to Motion Control. Users can control the TV more
easily and quickly using this feature. It takes about 15 seconds after the TV turns on to get ready for
Motion Control.
Motion Control and Face Recognition may not be available in all regions and territories.
–
Certain Samsung Smart Hub features may not be available without express consent to the
–
collection and use of personal information.
Precautions
Face Recognition
This product saves thumbnail images of users' faces for use during the Face Login. Logging into the
Smart Hub via face recognition may be less secure than logging in using an ID and password.
TV Camera Use
Under some circumstances and under certain legal conditions, the use/misuse of the TV camera may
result in legal liability. There may be obligations under local privacy laws regarding the protection of
individuals concerning personal data and on the free movement of such data, and possibly other laws
including criminal laws, regulating camera surveillance both in the workplace and elsewhere.
By using the TV camera, users agree that it will not be used (i) in locations where cameras are
generally prohibited (such as bathrooms, locker rooms or changing rooms), (ii) in any manner that will
result in an invasion of a person’s privacy or (iii) in violation of any applicable laws, regulations or
statutes.
Page 66

Motion Control
Motion Control works by using the camera, so the user must be within the camera's recognition range.
The camera's recognition range varies depending on the ambient light level and other factors. User
may experience physical fatigue when using Motion Control for extended periods.
Voice Recognition
For the best Voice Recognition experience, we recommend that you use a Smart Touch Control.
Voice Recognition is not available in all languages, dialects or regions. The performance varies
depending on the language chosen, voice volume and ambient noise levels in the surrounding area.
Perform a Voice Recognition Environment Test prior to using Voice Recognition to test the level and
clarity and the ambient sound of the surrounding area.
Voice Text Input requires the user's agreement with any third-party app’s voice privacy policy and to
provide Samsung with the user's MAC address and other private information.
Voice Text Input lets users enter text using voice commands instead of a mouse, keyboard or remote
control. This feature is particularly useful for searching, browsing the web, and using applications that
require text input.
Page 67

Voice Recognition
Screen Menu > Smart Features > Voice Recognition
Try Now
Voice Recognition
Voice Recognition On
Language UK English
Trigger Word Hi TV
Use TV Voice
Voice Recognition Environment Test
Voice Recognition Tutorial
"
The displayed image may differ depending on the model.
Voice Recognition lets you access and control specific functions of the TV using voice commands.
For the accurate recognition of voice commands, pronounce words and phrases clearly in the language
selected in Language. The TV's clock has to be set before you use Voice Recognition. Set the Clock
(System > Time > Clock).
Voice Recognition can be used in the following ways:
Using the TV's built-in microphone (from a distance)
●
Using the VOICE button (up close)
●
Ambient noise can interfere with voice recognition. If this is the case, press VOICE and then say
the command word/phrase 10cm to 15cm away from the microphone on the Smart Touch Control.
Commands may not be recognised if you speak too softly or loudly. The optimal volume is
approximately 75 ~ 80db.
Page 68

Operating Environment
Voice Recognition and the Turn TV On voice command should be used within 4m of the TV.
Perform a Voice Recognition Environment Test prior to using Voice Recognition to test the level and
clarity and the ambient sound of the surrounding area. Ambient noise can cause Voice Recognition
to malfunction. (Suitable Ambient Noise Level: Less than 40 dB, *40 dB - the sound at library or
residential area in the daytime.) Visit the Samsung website for a list of standard voice commands.
The voice recognition rate varies depending on the volume/tone, pronunciation, and ambient
environment (TV sound and ambient noise).
Voice Recognition Environment Test
Screen Menu > Smart Features > Voice Recognition > Voice Recognition Environment Test
This test determines how well Voice Recognition will work in the TV’s current environment. This test
must be performed before using Voice Recognition to make sure it functions properly.
Run the Voice Recognition Environment Test and stand within 4m of the TV.
1.
Select Start to measure the ambient noise. If the ambient noise level is suitable, the test will
2.
proceed to the next step. If this part of the test fails, remain quiet and try again.
This part of the test measures the volume and clarity of the user's voice. A command will appear
3.
on the TV's screen. Say the command loud and clear within 30 seconds. If the TV successfully
recognises the user's voice, the test proceeds to the next step. If this part of the test fails, try
again.
To measure the level of echo in the surrounding area. If the echo level is suitable, the Voice
4.
Recognition Environment Test will end.
Try Now
Voice Recognition Tutorial
Screen Menu > Smart Features > Voice Recognition > Voice Recognition Tutorial
This lets you familiarize yourself with the basics of using Voice Recognition. Run Voice Recognition
Tutorial or activate Voice Recognition.
Try Now
Enabling Voice Recognition
Say the trigger word or press VOICE button to run Voice Recognition. Say a command. You can use
Voice Recognition to operate the TV.
If Voice Recognition is not working, check see if Voice Recognition (Smart Features > Voice
Recognition > Voice Recognition) has been enabled. To use Voice Recognition, Voice Recognition
must be set to On.
"
While Voice Recognition is activated, the TV can turn on automatically due to an environmental input.
Try Now
Page 69

Basic Voice Recognition Use
You can use the following commands anytime while Voice Recognition is active:
All Voice Commands: Say "Show all commands" to display a complete list of voice commands
●
by category. Say the name of a category.
Available Voice Commands: A list of basic voice commands available in the current state is
●
shown.
TV Basics
●
Adjust Volume: Say "Volume up" / "Volume down".
–
Change Channels: Say "Channel up" / "Channel down".
–
Power off: Say "TV Power Off".
–
Moving the Focus: Say "Focus left", "Focus right", "Focus up", or "Focus down" to move
–
the focus. However, these commands can only be used in situations when the focus can be
moved.
Select Item: Say "Select".
–
Apps and Services
●
A list of the words associated with the Apps and Services available in the current state is shown
as "Explore 3D", "Web Browser", "Samsung Apps".
Only preset voice commands are recognised. Available voice commands may vary, depending on the
software version.
Page 70

Voice Recognition Settings
Screen Menu > Smart Features > Voice Recognition
Language: Select a language for Voice Recognition.
●
Trigger Word: Designate certain commands as trigger words. Saying a trigger word activates
●
Try Now
Voice Recognition. To turn on the TV using a voice command, say "(a trigger word) + Power On".
(Example: “Hi TV Power On")
"
Spanish commands are not available on models for sale in Turkey.
Use TV Voice: Enable / disable the TV's voice responses to your Voice Recognition commands
●
Try Now
and choose between a male and female voice.
"
This function is not supported depending on the region.
Interactive Voice Recognition Commands
Interactive Voice Recognition allows you to set up a Schedule Recording / Schedule Viewing, access
VODs, search and launch applications, and execute various other commands without having to
remember specific commands or keywords. Saying "Turn off the TV in 30 minutes," for example,
instructs the TV to turn off after 30 minutes (Sleep Timer).
Activate Interactive Voice Recognition and say a command. See the examples below:
When you don't know which channel a specific programme is on:
●
"Play <programme title>."
When you need information about a specific genre:
●
"Which *** (genre name) shows are on today?"
When you want to watch a programme featuring a specific actor or directed by a specific director:
●
"Please look up programmes featuring *** (cast member)." / "Find me works directed by ***
(director name)."
When you want to find out more information about the programme you are watching:
●
"Who are the cast members in this programme?" / “What's the title of this programme?"
When you want programme recommendations:
●
"Please recommend something to watch this evening." / "Are there any shows worth watching
today?"
When you want to operate the TV:
●
"Adjust the volume to ten." / "Change to channel **."
Deactivating Voice Recognition
To deactivate Voice Recognition, say "Close Voice Recognition" or press the RETURN button.
Page 71

Motion Control
Screen Menu > Smart Features > Motion Control
Motion Control
Motion Control On
Animated Motion Guide Off
Pointer Speed Medium
Motion Control Environment Test
Motion Control Tutorial
"
The displayed image may differ depending on the model.
Use Motion Control to change the channel, adjust the volume, move the pointer, and control other TV
functions.
Some applications may not support Motion Control.
Try Now
Operating Environment
Make sure that the TV camera is extended before using motion controls.
Users should be located between 1.5m and 4m from the camera. The actual recognition range may
vary depending on the camera angle and other factors.
Motion Control relies on the TV camera and therefore will not function if the camera is pointed up or
down. You can also use the camera's angle adjustment knob to change the camera's viewing angle. Do
not point the camera directly at the sun or any other light source or obstruct its view.
In order for the camera to recognise movement, the user has to stand out from the background.
The appropriate ambient brightness is between 50 to 500 lux. (ex: 100 Lux: bathroom, 400 Lux: living
room)
Avoid direct sunlight when using Motion Control.
Run Motion Control Environment Test to assess the camera's recognition range before using Motion
Control.
Page 72

Motion Control Environment Test
Screen Menu > Smart Features > Motion Control > Motion Control Environment Test
Run this test before using Motion Control to ensure proper functionality.
Run Motion Control Environment Test and select Start within 1.5m and 4m of the TV. If light
1.
reflects on the TV screen, user can be difficult to use Motion Control.
Adjust the camera angle so that you appear inside the square displayed on the screen. Once
2.
you have finished adjusting the camera angle, wave one hand slowly from left to right. Spread
your hand out with the palm facing the TV. An arrow cursor appears on the screen when the TV
recognises the action. If recognition fails, try again.
Motion Control Tutorial
Screen Menu > Smart Features > Motion Control > Motion Control Tutorial
A fun and easy way to learn about Motion Control. Launch Motion Control and follow the guide's
instructions.
Page 73

Motion Control Activation
Screen Menu > Smart Features > Motion Control > Motion Control
Try Now
Raise your hand with the palm facing the TV. Hold it for a moment and slowly wave your hand from
side to side three or four times. When your hand is successfully recognised, the Motion Control is
activated and a pointer is displayed on the screen.
"
Dropping your hand out of the range of the TV camera deactivates Motion Control. Raise your hand within 3
seconds to reactivate it.
Using the Basic Motion Controls
Available motion commands may vary, depending on what the TV is currently doing.
The following basic Motion Control commands are available:
Pointing Navigation: This action moves the cursor to the desired position.
●
Run / Select: Make a fist to select an option or execute a command. Keeping your fist clenched is
●
like holding down a remote control button.
Return: Make a circle with your hand in the counterclockwise direction to return to the previous
●
menu.
Turning over screens: Hold one palm vertical, and swing to the left or right to change the Smart
●
Hub screens.
Zoom in / Zoom out: Clench two fists, and make the gap between them wider or narrower. Use
●
these actions with webpages, maps, or photos.
Rotate: Clench two fists, and rotate them clockwise or anticlockwise as if turning a steering
●
wheel. Use these actions with photos.
Like: Without activating the Motion Control, raise and hold your thumb for 2 seconds. This
●
automatically adds Facebook's "Like" option. However, This motion is available only on the
Facebook.
Pan: While zoomed into the photo, make a fist and then move it left / right / up / down to pan.
●
Scrolling a web page: While viewing a web page, make a fist on the scroll bar, and then move it
●
up / down to scroll the page up / down.
Motion Control Options
Screen Menu > Smart Features > Motion Control
Animated Motion Guide
●
Displays an Animated Motion Guide guide when user motion is detected.
Pointer Speed
●
Set the speed of the pointer used in Motion Control.
Page 74
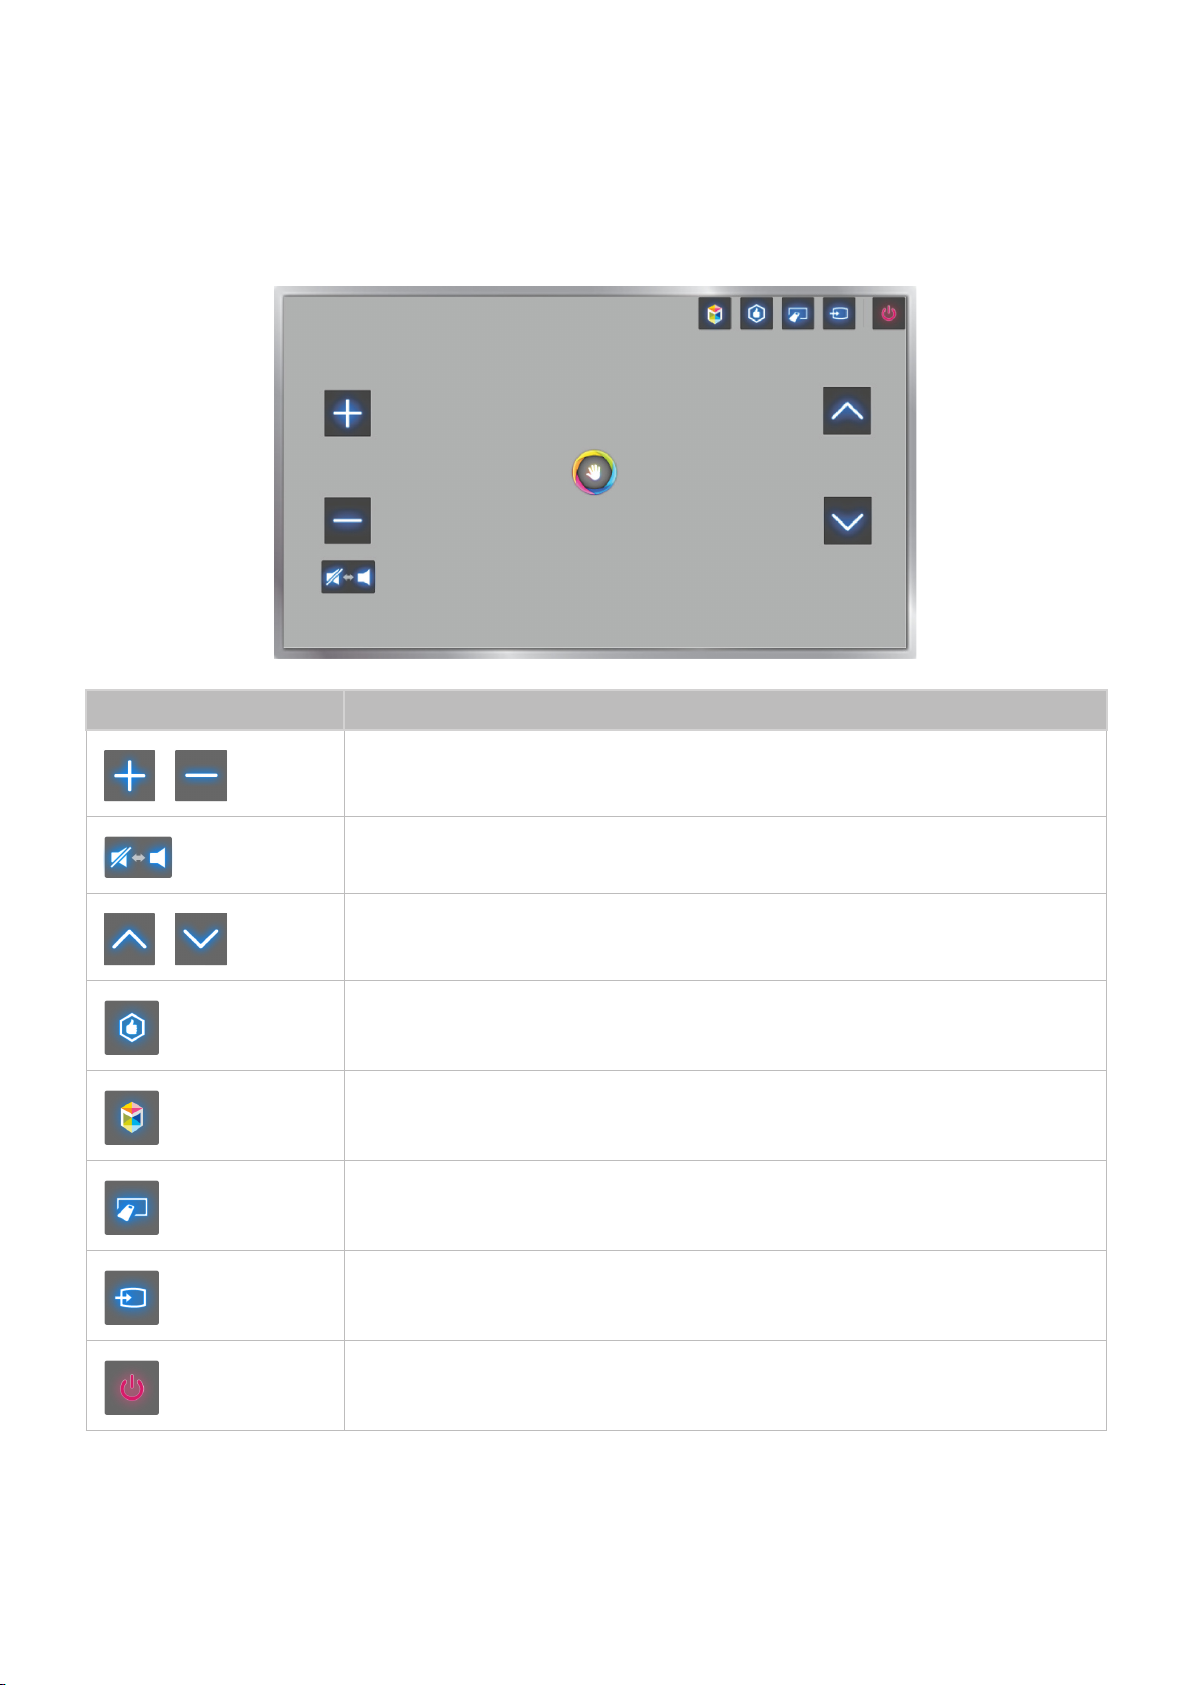
Motion Control Screen
The Screen Composition while Viewing TV
Launching Motion Control while watching TV displays the following icons on the screen.
Icon Description
/
/
Adjust the volume.
Turns the TV sound on / off.
Changes the channel.
Check the recommended programme information and aerial times. Select a
programme from the list to view detailed information about that programme.
Launch Smart Hub.
Displays the virtual remote panel on screen.
Change the source.
Turn off the TV.
Page 75
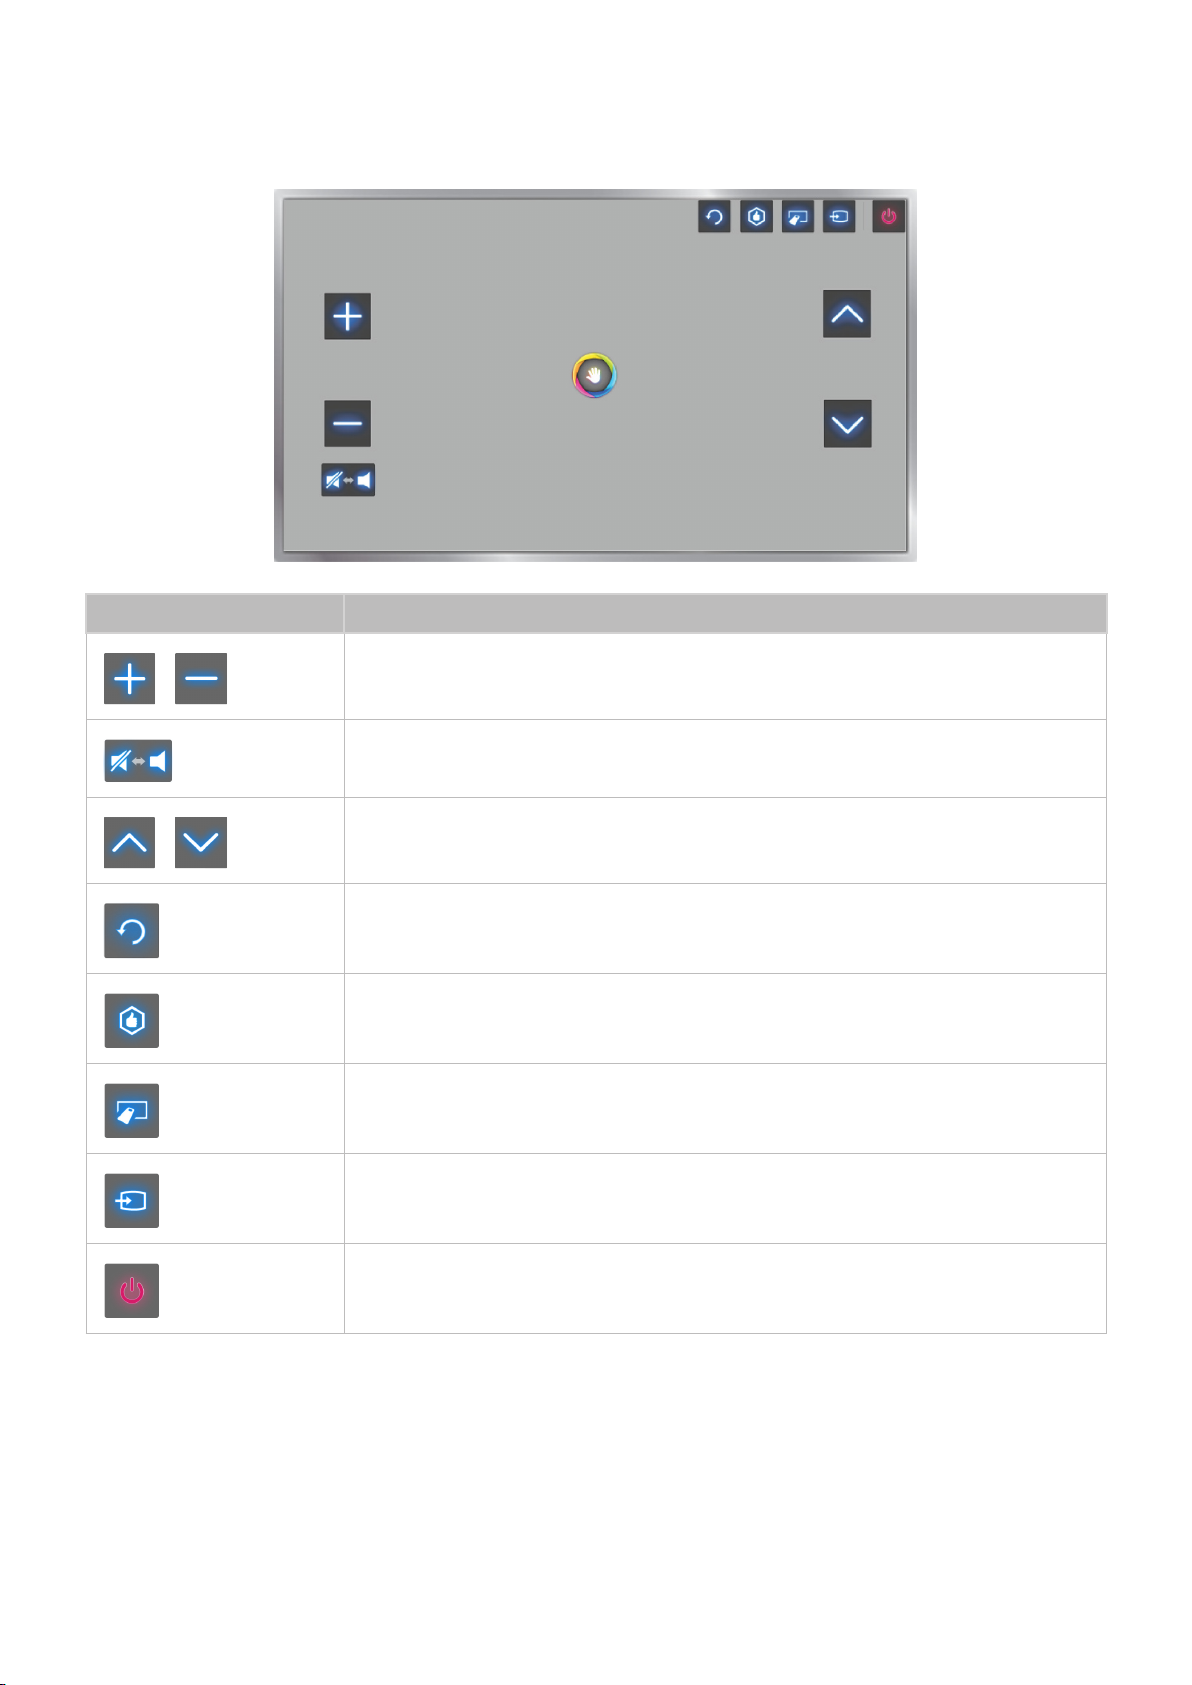
The Smart Hub Screen Composition
Launching Motion Control while using Smart Hub displays the following icons on the screen.
Icon Description
/
/
Adjust the volume. However, this can only be used from On TV.
(Depending on the region.)
Turns the TV sound on / off. However, this can only be used from On TV.
(Depending on the region.)
Changes the channel. However, this can only be used from On TV.
(Depending on the region.)
Return to the previous menu.
Check the recommended programme information and aerial times. Select a
programme from the list to view detailed information about that programme.
Displays the virtual remote panel on screen.
Change the source.
Turn off the TV.
Page 76
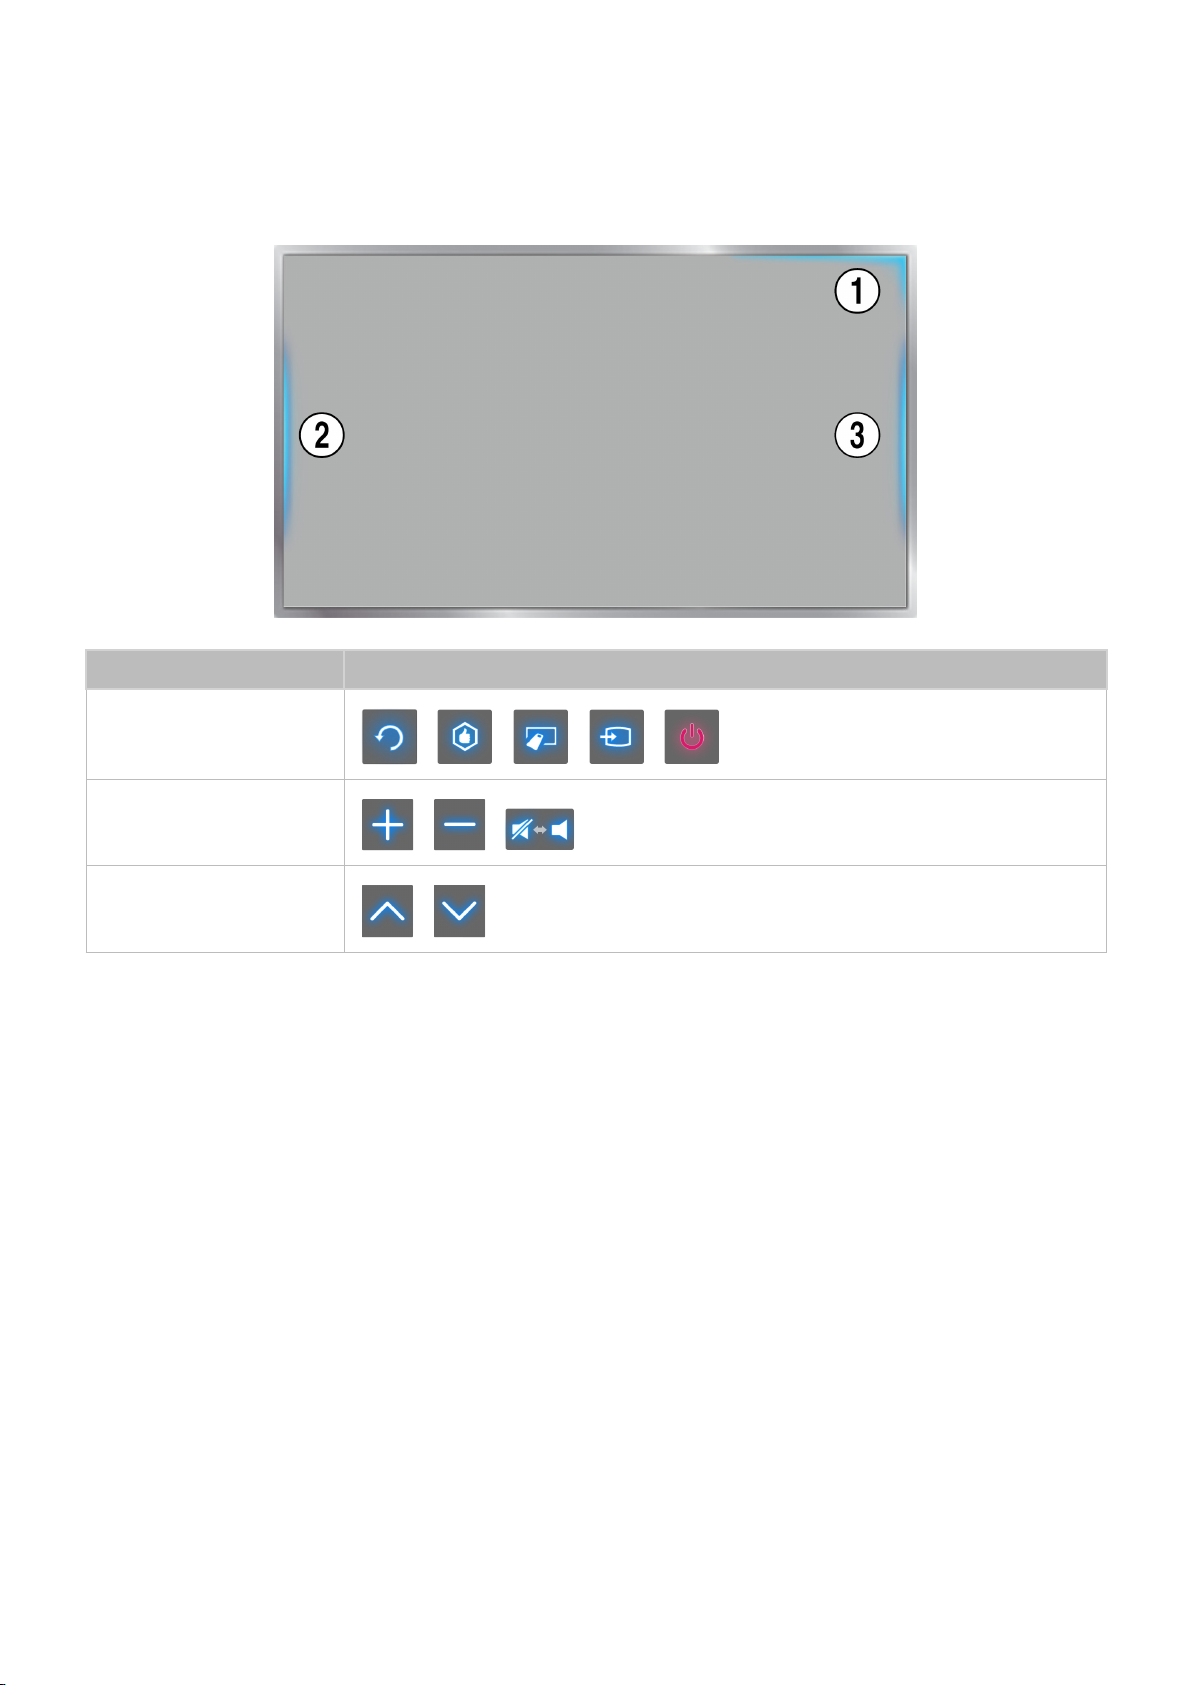
Retrieving Icons on the Screen
When using Motion Control with Smart Hub, the icons will disappear automatically after two seconds
of inactivity. To retrieve the icons, move the pointer to one of the three edges shown below (marked in
blue) and then hold it there for 1 second. The icons will reappear on the screen.
Icon Description
①
②
③
/ / / /
/ /
/
Page 77

Face Recognition
Users can register their faces and log into their Smart Hub accounts through Face Recognition. One
face may be registered per account. Depending on the ambient brightness level and the user's skin
tone, the TV may have difficulty recognizing the user's face. Refer to the "Samsung Account" for more
information.
Operating Environment
The user should be located between 1.5m and 4m from the camera. The actual recognition range may
vary depending on the camera angle and other factors. The appropriate ambient brightness is 50 to
500 lux. (100 Lux: Bathroom, 400 Lux: Living Room)
Face Recognition can recognise up to 5 different users at a time.
The TV may have difficulty recognising twins and people with similar faces as two different
individuals.
Note the following when using Face Recognition.
Do not cover your face with a hat, a pair of sunglasses, or your hair.
●
The user's entire face must be visible to the camera. Avoid shadows over your face. Shadows
●
prevent the camera from recognising your face accurately.
Keep your expression as neutral as possible. In addition, keep your mouth closed but at the same
●
time as neutral as possible.
Your facial expression when logging into your Samsung account must be the same as the facial
●
expression during the registration process.
Page 78

Face Registration
Users can register their faces to the Smart Hub accounts. Create a new account if you do not already
have one.
Face Registration from the Smart Hub account information screen
"
Log into Smart Hub first.
Open the Smart Features > Samsung Account > Edit profile menu, and select Register face.
1.
Read the instruction, select OK, and then enter the password for the Samsung account.
2.
Select Take picture, and the user’s face appears on the screen. Keep the face to be completely
3.
in the red dotted frame. The face is successfully registered when the frame turns green. If it fails,
select Retry.
"
The user's entire face must be visible to the camera. Avoid shadows over your face. Shadows prevent
the camera from recognising your face accurately.
"
Keep your expression as neutral as possible. In addition, keep your mouth closed but at the same time
as neutral as possible.
"
It is better to select the checkbox beside I want to enter a password as well for increased security for
higher security. With the checkbox selected, the user must enter the password when logging in using
face recognition.
Select Save to finish.
4.
Page 79

Face Registration for the Smart Hub account using face recognition
From the Smart Hub login window, select Face Recognition, and then select Start. The TV
1.
automatically recognises the user's face.
Select a face to register from the list, and then select Register face in the popup window.
2.
Read the instruction from the popup window, select OK, and then select the account from the list.
3.
However, a user account appears in the list if the TV has a record of the user's account and the
user is logged in.
Enter the password for the Samsung account. To make face recognition more accurate, scan the
4.
user's face again.
Select Take picture. The user’s face appears on the screen. Keep the face completely within the
5.
red round. The face is successfully registered when the round turns green. Select OK to proceed.
"
The user's entire face must be visible to the camera. Avoid shadows over your face. Shadows prevent the
camera from recognizing your face accurately.
"
Keep your expression as neutral as possible. In addition, keep your mouth closed but at the same time as
neutral as possible.
"
It is better to select the checkbox beside I want to enter a password as well for increased security for
higher security. With the checkbox selected, the user must enter the password when logging in using face
recognition.
Face Recognition Login
Select Face Registration, and then select Start from the login window. The TV automatically recognises
a user's face. If recognition fails, try again. If the password entry option has been enabled under Edit
profile, you need to enter your password as well in order to log into the Smart Hub.
"
The user's entire face must be visible to the camera. Avoid shadows over your face. Shadows prevent the
camera from recognising your face accurately.
"
Keep your expression as neutral as possible. In addition, keep your mouth closed but at the same time as
neutral as possible.
"
Once recognition succeeds, the TV logs into the Smart Hub automatically. If the TV recognises two or more
registered faces, a list of corresponding accounts appears. Select the appropriate account. Recognition of an
unregistered face prompts a warning.
Page 80

Using Peripheral Devices
Device Manager
Keyboard Settings
Mouse Settings
Smart Touch Control Settings
Universal Remote Setup
"
The displayed image may differ depending on the model.
This TV can be controlled with a keyboard and a mouse instead of a remote control. These peripheral
devices make it easier and more convenient to use the TV.
Certain models do not support USB HID class keyboards and mice.
"
Some Keyboard may not support this function.
Keyboard Connection
Screen Menu > System > Device Manager > Keyboard Settings
Connect a keyboard to the TV for easier text entry. To use a USB keyboard, plug the keyboard cable
into the TV's USB port. With a Bluetooth keyboard, pair it using the TV's Bluetooth function.
Select Keyboard
●
Designate which keyboard to use. Only one keyboard can be used at a time.
Add Bluetooth Keyboard
●
View a list of Bluetooth keyboards within range. Select the keyboard you wish to use.
Keyboard Options
●
Configure the language, type and other basic keyboard settings.
Keyboard Use
Use the following keyboard keys to control the TV.
Arrows key (Moves the focus), Windows (m), Menu (TOOLS), Enter (Selects and activates), ESC
●
(RETURN), Numbers (Numbers)
Try Now
Try Now
Try Now
F1 (a), F2 (b), F3 ({), F4 (}), F5 ( ), F6 (SOURCE button), F7 (CH LIST button), F8 (MUTE button),
●
F9/F10 (w / v), F11/F12 (< / >)
Page Up / Page Down: Scroll a webpage up or down.
●
Page 81

Mouse Connection
Screen Menu > System > Device Manager > Mouse Settings
Try Now
Connect a mouse to the TV and right-click on the mouse to bring up the go to screen. You can
then use the screen menu, Smart Hub, and other TV functions using the mouse as you would on a
computer.
To use a USB mouse, plug the mouse cord into the TV's USB port. To use a Bluetooth mouse, pair it
using the TV's Bluetooth function.
Select Mouse
●
Designate which mouse to use. Only one mouse may be used at a time.
Add Bluetooth Mouse
●
Try Now
View a list of Bluetooth Mouse within range. Select the mouse you wish to use.
Mouse Options
●
Configure button assignments, pointer speed and other basic mouse settings.
Try Now
Mouse Use
Left Button: Selects and activates.
●
Right Button: Brings up the go to screen, which includes options such as Power Off, Screen
●
Menu, Smart Hub, and Tools.
Mouse wheel: Scroll a webpage up or down.
●
Page 82

TV Viewing
Broadcasting
Auto Tuning
Aerial Air
Channel List
Guide
Schedule Manager
Edit Channel
Edit Favourites
"
The displayed image may differ depending on the model.
Use this feature to view the programme guide and programme information more easily. However, these
features are not available when viewing TV using a cable box or satellite receiver.
Programme Info
Select the Virtual Remote panel's or press the regular remote's INFO button while watching TV to view
information about the current programme.
However, Programme Info is only available with digital channels. In order to use the Programme Info,
you must first set the TV's clock. To set the clock, navigate to Time (System > Time > Clock). The
Programme Info may vary depending on the type of incoming signal and may not be available at all
for certain programmes.
Tap on the touchpad while the programme information screen is shown to start recording the current
programme. In addition, drag left/right on the touchpad to check out other programmes or tap on the
touchpad to set up a Schedule Viewing or Schedule Recording setting for the selected programme.
"
Press and hold the { button while watching TV to view information about the current programme.
Change the Broadcast Signal
Screen Menu > Broadcasting > Aerial
Choose an aerial to receive digital broadcast signals from.
Try Now
Guide
Screen Menu > Broadcasting > Guide
View each digital channel's programming schedule, including showtimes. Check the programming
schedules and even setup a Schedule Viewing or Schedule Recording. Press GUIDE to launch the
guide. This function is only available for digital channels.
Try Now
Page 83

Change Channels
Select a channel from Guide to jump to that channel right away.
Recording the Current Programme
Highlight a programme currently being aired, and select the virtual remote panel's or the regular
remote's INFO button. The information screen appears. Select Record. Record is only available for the
programme currently being aired.
Change Category
Press b button to change the desired category.
Quick Navigation
Press a button. A popup window will open. Dragging left or right on the touchpad moves the focus
24 hours back or forward, enabling faster browsing of the programming schedule. However, the focus
cannot be on a time prior to the current time.
Schedule Viewing
Select a programme that you wish to view, and then select the Virtual Remote panel's or press the
regular remote's INFO button to display the detailed information screen. Select Schedule Viewing
from the detailed information screen to set up a Schedule Viewing. Schedule Viewing is only available
for programmes that haven't aired yet. Press { button and navigate to the Schedule Manager screen
to view a list of reserved programmes.
Schedule Recording
Select a programme that you wish to record, and then select the Virtual Remote panel's or press the
regular remote's INFO button to display the detailed information screen. Schedule Recording is only
available for programmes that haven't aired yet. Press { button and navigate to the Schedule Manager
screen to view a list of reserved programmes.
Checking the Programme Info
Highlight a programme and press INFO button. This displays detailed information about the highlighted
programme. The Programme Info may vary depending on the type of incoming signal and may not be
available at all for certain programmes.
Page 84

Channel List
Screen Menu > Broadcasting > Channel List
Launch Channel List while watching TV to change channels or to check what's on other digital
channels. Press and hold the touchpad for 2 seconds. The Channel List screen appears.
The Channel List screen icons indicate the following:
●
●
●
●
●
: An analogue channel
: A favourites channel
: A Schedule Viewing reserved channel
: A Schedule Recording reserved channel
: A locked channel
Try Now
Change Channels
Select a channel to jump to it right away. To quickly scroll through the list, use the channel up/down
buttons. The focus moves up and down the list in one page.
Sorting
(Digital channels only)
Drag left on the touchpad or press the left arrow button on the remote control. Change the list ordered
by Name or Number.
Genre
Drag left on the touchpad or press the left arrow button on the remote control and then select Genre.
Select a desired TV channel genre.
Genre can only be used when the Channel List's Channel Mode is set to Added Channels. However, the
Added Channels must contain genre information.
Change the Broadcast Signal
Drag right on the touchpad or press the right arrow button on the remote control and then select a
broadcasting signal. This will change the signal source immediately.
Change the Channel List
Drag right on the touchpad or press the right arrow button on the remote control. The Favourites
list can only be selected if it contains at least one favourites channel. If no favourites channel was
previously added, select Edit Favourites and add channels from the Edit Favourites screen.
Page 85

Schedule Viewing
Method 1: Screen Menu > Broadcasting > Schedule Manager
Try Now
Method 2: Select the Virtual Remote panel's or the regular remote's GUIDE button to activate Guide
screen, and then press the { button.
Broadcasting
Auto Tuning
Aerial Air
Channel List
Guide
Schedule Manager
Edit Channel
Edit Favourites
"
The displayed image may differ depending on the model.
Configure the TV to show a specific channel or programme at a specific time and date. Before
scheduling TV watching, make sure that the date and time is set properly under the System > Time >
Clock menu.
The
icon appears next to programmes that have been configured for a Schedule Viewing.
Digital Channel Schedule Viewing
Schedule Viewing for programmes on digital channels can be set up through the following two
options:
Guide
●
Programme Info
●
Guide
From Guide, select a programme you wish to view.
Programme Info
Select the Virtual Remote panel's or the regular remote's INFO button to display information about
the current programme. From the programme information screen, drag left / right on the touchpad or
press left / right button on the remote control to select a programme that has not yet aired and set up
a Schedule Viewing for it.
Page 86

Analogue Channel Schedule Viewing
The Schedule Viewing function for programmes on analogue channels can be set up by specifying the
time and date.
Run Schedule Manager and then select Schedule. A popup menu will appear. Select Schedule
1.
Viewing to process.
Specify that programme's Aerial, Channel, Repeat, and Start Time and then select, OK to finish.
2.
Cancel a Schedule Viewing
To cancel a Schedule Viewing for a specific programme, select the programme from the Schedule
Manager screen. A popup menu will appear. Select Delete to cancel.
Edit Schedule List
Select an entry from the Schedule Manager screen and then select Edit from the popup menu. Edit the
settings of the selected entry.
Page 87
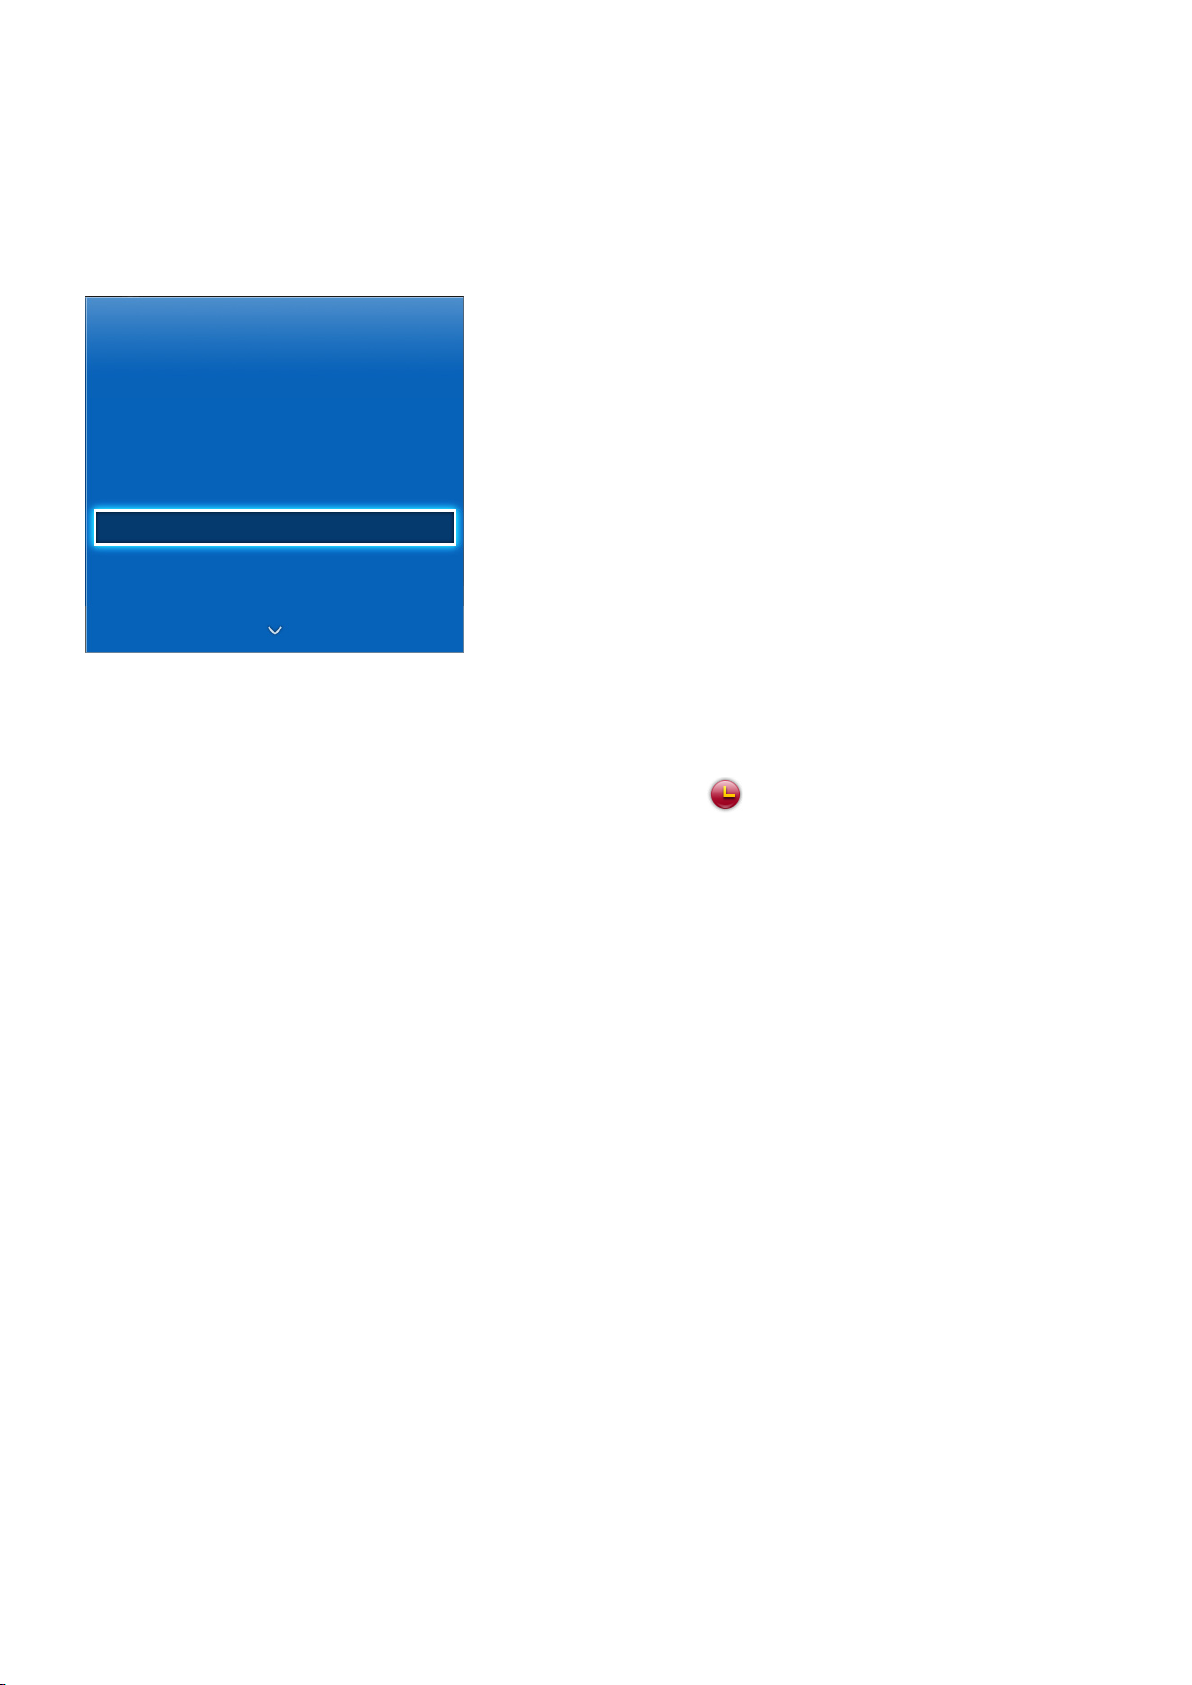
Schedule Recording
Method 1: Screen Menu > Broadcasting > Schedule Manager
Method 2: Select the Virtual Remote panel's or the regular remote's GUIDE button to activate Guide
screen, and then press the
menu will appear. Select Schedule Recording to proceed.
Broadcasting
Auto Tuning
Aerial Air
Channel List
Guide
Schedule Manager
Edit Channel
Edit Favourites
"
The displayed image may differ depending on the model.
button to activate Schedule Manager screen. Select Schedule. A popup
{
This SMART TV is capable of recording current and future programmes onto a USB storage device for
later viewing without the use of an external recording device.
Schedule Recording is available for digital channels only. The
icon appears next to channels and
programmes that have been configured for a Schedule Recording.
You can view recordings by selecting Recorded TV of the On TV or Photos, Videos & Music.
Precautions
To set up a Schedule Recording, you must first set the TV's clock. Set the Clock from System >
●
Time > Clock.
Recordings are DRM-protected and therefore cannot be played back on a computer or on a
●
different TV. In addition, these files cannot be played back on your TV if its video circuit is
replaced.
A USB hard drive with a speed of 5,400rpm or above is recommended.
●
A USB memory Stick is not supported.
●
The total recording capacity may vary depending on the amount of available hard drive space
●
and the recording quality level.
Schedule Recording requires at least 100MB of free space on the USB storage device. Recording
●
will stop if the available storage space falls below 50MB while recording is in progress.
If the available storage space falls below 500MB while the Schedule Recording and Timeshift
●
functions are in progress, only the recording will stop.
Page 88

The maximum recording time is 360 minutes.
●
The TV's settings apply when playing back recordings and using the Timeshift function.
●
If the input signal is changed while recording is in progress, the screen will go blank until the
●
switch is made. Recording will resume, but or REC will not be available.
"
The recording button may differ depending on the model.
Device Performance Test must be performed on the USB storage device connected to the TV
●
before a recording can be made. A Device Performance Test can be performed from the On TV
or Photos, Videos & Music > Recorded TV. If recording is selected from Guide or the Programme
Info and the USB storage device has failed the Device Performance Test, the TV will initiate
Format Device and conduct Device Performance Test again.
When using the recording function, the actual recording may start a second or two later than the
●
specified time.
If the Schedule Recording function is running at the same time as a recording is being made on
●
an HDMI-CEC-compliant external device, the priority is given to the Schedule Recording function.
Connecting a TV-recording USB device automatically deletes abnormally saved Timeshift and
●
recording files.
If Off Timer or Auto Power Off has been configured, the TV will override the setting if recording
●
is in progress at the specified time and turn off after the recording has ended.
Dedicated Recording Device Setup
After connecting an external storage device, it must be configured as a dedicated Recorded TV device
before the Schedule Recording and Timeshift features can be used.
Plug & Play
Press and launch Smart Hub. Select Recorded TV from the bottom of the On TV or Photos,
1.
Videos & Music screen to display a list of connected devices. Select the device you wish to use.
A popup window appears.
Select Yes . From the Format Device screen, you can format the device to a system compatible for
2.
video recording. Note that formatting the device erases all existing data.
Once formatting is complete, test the device to see if it supports the recording and Timeshift
3.
functions. Once testing is complete, the device is ready for use with the Schedule Recording
and Timeshift functions. A test failure indicates that the selected device cannot be used as a
dedicated recording device. Select a different device.
Page 89

Dedicated Recording Device Management
Manage the external storage device that has been configured as the dedicated recording device.
Press and launch Smart Hub. Select Recorded TV from the bottom of the On TV or Photos,
1.
Videos & Music screen to display a list of connected devices. Select the dedicated recording
device to display the list of files stored on the device.
Select Options from the top of the screen and then Manage Devices.
2.
The following options are available from the Manage Devices screen:
Format Device: Format the external storage device to a system compatible for video recording.
●
Check Device: Check if the external storage device uses a system compatible for video recording.
●
Device Performance Test: Test the external storage device to see if it supports the recording and
●
Timeshift functions.
Default Recording Device: If there are multiple external storage devices connected to the TV, you
●
can designate a default device to use with the recording and Timeshift functions.
Programme Recording
The following options are available for programme recording:
Instant Recording
●
Guide
●
Programme Info
●
Specified Time and Date
●
Instant Recording
To record the programme currently being aired, select the virtual remote panel's or the regular remote's
or REC button, and then set a desired recording duration.
"
The recording button may differ depending on the model.
Page 90

Guide
From Guide, select a programme currently being aired, select the virtual remote panel's or the regular
remote's INFO button. You can record the selected programme. Alternatively, when you select a
programme scheduled to air later, you can reserve the recording. This function is only available with
digital channels.
Programme Info
Select the virtual remote panel's or the regular remote's INFO button. The information screen for the
programme currently watching appears.
From the information screen, press the touchpad, and then you can record the programme.
Alternatively, drag left or right on the touchpad and select a programme scheduled to air later, you can
reserve the recording. This function is only available with digital channels.
Specified Time and Date
Run Schedule Manager and then select Schedule. A popup menu will appear. Select Schedule
1.
Recording to proceed.
Specify the programme's Aerial, Channel, Repeat, Start Time, and End Time and then select OK
2.
to finish.
Cancel the Schedule Recording function
To cancel a Schedule Recording for a specific programme, select the programme from the Schedule
Manager screen. A popup menu will appear. Select Delete to cancel.
Edit Timer List
Select an entry from the Schedule Manager screen and then select Edit from the popup menu. Edit the
settings of the selected entry.
Page 91

Recorded Programme Playback
Press and launch Smart Hub. Select Recorded TV from the bottom of the On TV or Photos, Videos
& Music screen. Select the external storage device containing the recorded programmes to display a
list of available recordings.
Select a programme from the list or press ∂ to play the selected programme. Use the remote control or
onscreen control buttons while playing the files. Press the touchpad or TOOLS to show the on-screen
control buttons. Press RETURN to hide them.
To exit, select the virtual remote panel's or the regular remote's ∫ button or press the RETURN button.
Changing the Viewing Mode
Select View at the top of the list and then select a viewing mode. The list will be sorted in the order
corresponding to the selected viewing mode.
Filtered View
Select Filter at the top of the list and then select a filter. Only the recorded programmes corresponding
to the selected filter will be listed.
Playlist Creation
From the Options list at the top of the screen, select Play Selected. Select the programmes you wish
to play and then select Play. You can create a playlist. However, if the list is in Folder view mode, you
can only select recordings from within the same folder. To add programmes from other folders to the
playlist, change the viewing mode.
Recording Lock / Unlock
From the Options list at the top of the screen, select Lock. Select the programmes you wish to lock
and then select Lock. This locks all the selected programmes.
To unlock a programme, go to the Options list at the top of the screen and select Unlock. Select the
programmes you wish to unlock and select Unlock. This unlocks all selected programmes.
Page 92

Deleting Saved Programmes
From the Options list at the top of the screen, select Delete. Select all the programmes you wish to
delete and select Delete. This deletes all selected programmes.
Rename
From the Options list at the top of the screen, select Rename. Select the programme you wish to
rename. Enter the new name using the keypad and then select Done to finish renaming the programme.
The new name can be up to 29 characters long.
Manage Devices
Designate a device connected to the TV as a dedicated recording device.
Playing a Different Programme
Select the € / ‚ on-screen button.
●
Select the Search on-screen button and then Search Titles.
●
Programme Scan
Drag left/right on the touchpad. Scan 10 seconds backward or forward.
●
Press † / …. You can change the playback speed by a factor of up to 5. To restore normal
●
playback speed, press ∂. Alternatively, press … while paused to reduce the playback speed (1/4).
Slow playback doesn't support audio.
Press ∑ to pause the screen and then ∑ to scan through the paused video in 1-frame increments.
●
Audio is not supported while the video is paused.
Select the Search on-screen button and then Search Scene. You can play the file from a
●
particular scene. However, this function is not available with the following.
Scene thumbnails are not created.
–
Only sound is recorded.
–
The recording time is under 60 seconds.
–
Select the Search on-screen button and then select Search Time Bar. This lets you skip to the
●
specified time frame.
Select the € on-screen button. This plays the video from the beginning.
●
Page 93

Additional Recorded Programme Playback Settings
Repeat
●
Select the Repeat on-screen button. This changes the repeat mode. Repeat One repeats the
current programme only. Repeat All repeats all programmes contained in the folder.
Audio Language
●
Select a language from the list.
Picture Size
●
Select the Picture Size on-screen button and then select the picture size.
Receiver
●
Select the Receiver on-screen button and then power on the receiver.
Picture Mode
●
Select the Settings on-screen button and then select Picture Mode. Select the Picture Mode
setting.
Sound Mode
●
Select the Settings on-screen button and then select Sound Mode. Select the Sound Mode
setting.
Information
●
In the Screen Control button, select Settings and Information. You can view more detailed
information about the current programme.
Page 94

Timeshift
Timeshift temporarily records the current programme. Using this feature, users can pause and resume
a live programme and even scan through it backward or forward. However, Timeshift is only available
for digital channels. In addition, activating the Timeshift function, only certain function disable in
Broadcasting Menu.
Precautions
Recordings are DRM-protected and therefore cannot be played back on a computer or on a
●
different TV. In addition, these files cannot be played back on your TV if its video circuit is
replaced.
The maximum amount of time available for the Timeshift function is 90 minutes.
●
The Timeshift function is not available for locked channels.
●
A USB memory Stick is not supported.
●
A USB hard drive with a speed of 5,400rpm or above is recommended.
●
Device Performance Test must be performed on the USB storage device connected to the TV
●
before the Timeshift function can be used. Device Performance Test can be initiated from Smart
Hub > On TV or Photos, Videos & Music > Recorded TV.
The total recording capacity may vary depending on the amount of available hard drive space
●
and the recording quality level.
The TV's settings apply when playing back recordings and using the Timeshift function.
●
Connecting a TV-recording USB device automatically deletes abnormally saved Timeshift and
●
recording files.
The Timeshift function may terminate automatically once it reaches its maximum capacity.
●
The Timeshift function requires at least 1.5GB of free space available on the USB storage device.
●
Launching an application, switching to an analogue channel, and otherwise changing the TV
●
to a state that does not support the Timeshift function automatically terminates the Timeshift
function. The Timeshift operation will resume if the TV is changed back to a digital channel
again.
Page 95

Activating the Timeshift function
Press ∂ while watching TV to activate the Timeshift function. The Timeshift Progress Bar appears on
the screen.
The Timeshift control buttons and functions are as follows:
/ …: You can change the playback speed by a factor of up to 5. To restore normal playback
●
†
speed, press ∂ button.
Drag left / right on the touchpad. Scan 10 seconds backward or forward.
●
: Press while viewing a Timeshift segment to return to real time. Press while in real-time viewing
●
∫
mode to deactivate the Timeshift function.
: Pause the screen. Press ∑ button while in the paused state to scan one paused frame at a time.
●
∑
Audio is not available when the TV is paused in Timeshift mode, and frame-by-frame scanning
is only available in the forward direction. Press † / … button while in the paused state to resume
playback at 1/4th the normal speed.
Page 96

3D TV
Screen Menu > Picture > 3D
Try Now
3D
3D Mode
3D Perspective 0
Depth 5
L/R Change L/R Image
3D → 2D Off
3D Auto View On
"
The displayed image may differ depending on the model.
This TV is 3D-enabled. For the best 3D viewing experience, users must wear Samsung's 3D Active
Glasses.
The ideal viewing distance is three times or more the height of the screen. We also recommend sitting
with your eyes level with the screen.
Precautions
Carefully read the health and safety information concerning 3D viewing before viewing the TV in 3D.
Refer to the "3D Precautions", for more information.
Tips
The left and right 3D images may initially overlap when the TV is turned on. It takes a moment
●
for the display to optimize and the overlapping to go away.
The 3D Active Glasses may not work properly if there is another 3D product or electronic device
●
turned on near the glasses or TV. If there is a problem, keep other electronic devices as far away
as possible from the 3D Active Glasses.
Whether or not 3D video is displayed in true HD is usually determined by the quality of the
●
content.
Page 97

Activating 3D Mode
Screen Menu > Picture > 3D > 3D Mode
Try Now
Choose a 3D mode according to the input signal. Available 3D modes may vary depending on the
input signal. Some 3D contents may differ preferred 3D mode. In this case, change the desired 3D
mode for watching. Select a 3D mode from the available 3D modes depending on the input signal.
"
Available 3D modes may vary depending on the input signal.
●
●
●
●
●
●
●
●
Off: Deactivates 3D viewing.
Normal: Converts normal images to 3D images. Some formats do not support this mode.
L/R: Splits a single image into left and right overlapping images to create the 3D effect.
T/B: Splits a single image into top and bottom overlapping images to create the 3D effect.
Horizontal Line: Switches between left and right images one horizontal line at a time.
Vertical Line: Switches between left and right images one vertical line at a time.
Pixel: Switches between left and right images one pixel at a time.
Frame: Switches between left and right images one frame at a time.
"
(Horizontal Line), (Vertical Line), and (Pixel) can only be selected when the computer's resolution
is set to 1920x1080 or the computer is connected to the TV via an HDMI-DVI cable.
"
(Frame) can only be selected when the computer's resolution is set to 1920x1080 and the frequency to
60Hz.
"
When viewing a 3D content in (horizontal Line), (Vertical Line), (Pixel), and (Frame) modes
using the Samsung Multi View function, the 3D mode will be set to
(T/B) mode automatically.
Resolutions supported by the TV may vary, depending on the 3D mode. Refer to the "Supported 3D
Resolutions" for more information.
Page 98

Setting 3D Effects
There are several adjustments that can be made to make 3D content more enjoyable.
3D Perspective
●
Adjusts the 3D perspective.
Depth
●
Adjusts the 3D depth. This option cannot be used if 3D mode is set to
Now
L/R Change
●
Swaps the left and right pictures.
3D → 2D
●
Try Now
(L/R) or (T/B).
Try Now
Converts 3D images to normal images. This function is not available if 3D mode is set to
(Normal) or (Off).
3D Auto View
●
Try Now
Setting 3D Auto View to On switches the TV to 3D automatically. Setting 3D Auto View
to Message Alert brings up a message screen when the TV receives a 3D signal. If some
applications are running, The TV can not switch 3D. In this case, close the application and then
watch the 3D.
Try Now
Try
Page 99

Samsung Multi View
Screen Menu > Picture > Samsung Multi View
Samsung Multi View is a convenient feature that allows two users that are both wearing Samsung
Multi View 3D Glasses to individually view different screens on the same TV simultaneously. For
example, two viewers can use the Samsung Multi View feature to each watch a channel of his or
her choosing at the same time. In addition, two users can enjoy the same game simultaneously on a
single screen.
To use Samsung Multi View, connect the Samsung Multi View 3D Glasses (included) to the TV with
each user wearing their own pair of glasses.
Try Now
Using Samsung Multi View
To use Samsung Multi View, press and hold the b button or select Samsung Multi View on the virtual
remote panel. From the window that pops up, select either Multi Screen View or 2 Player Gaming.
With the Do not show again checkbox selected, Samsung Multi View starts immediately. To start
–
Samsung Multi View, press and hold the
remote panel.
To display Samsung Multi View window, choose Samsung Multi View from the menu (Screen
–
Menu > Picture > Samsung Multi View). Accessing this menu always brings up the window.
button or select Samsung Multi View on the virtual
Multi Screen Viewing Mode
If two or more users each want to watch a different channel or source, use Multi Screen View mode.
To use Samsung Multi View, press the button or, alternatively, select Samsung Multi View on
1.
the virtual remote panel.
Select Multi Screen View from the pop-up window.
2.
Choose the input sources for screens 1 and 2 from the input signal selection window. Refer to
3.
"Supported Input Signals" for more information on selectable input sources.
Once selections have been made, select Start. The Samsung Multi View guide screen will appear.
4.
Read the guide and then select OK.
"
If you do not wish to see the guide again, check the Do not show again option.
"
To finish watching Samsung Multi View, press the button.
Page 100

2 Player Gaming Mode
Two users can play the same game at the same time by splitting the screen into vertical or horizontal
halves.
"
2 Player Gaming mode can only be used when the external device is connected to the TV via the HDMI or
Component port.
"
If any other external devices in addition to the game console are connected to the TV, or a title that does
not support split-screen gameplay is being run, exit from 2 Player Gaming mode and then continue with 2
Player Gaming mode.
"
Changing the input source in 2 Player Gaming mode deactivates Samsung Multi View.
To use Samsung Multi View, press the button or, alternatively, select Samsung Multi View on
1.
the virtual remote panel.
Select 2 Player Gaming mode from the pop-up window.
2.
In the screen split selection window, choose up/down or left/right.
3.
Once selections have been made, select Start. The Samsung Multi View guide screen will appear.
4.
Read the guide and then select OK.
"
If you do not wish to see the guide again, check the Do not show again option.
"
To finish watching Samsung Multi View, press the button.
Limitations
Samsung Multi View is not available while certain features are running.
Certain TV features and menu options will not be available while Samsung Multi View is running.
 Loading...