

Page 1
Level
7.
Disassembly and Assembly Instructions
7-1.
Repair
2
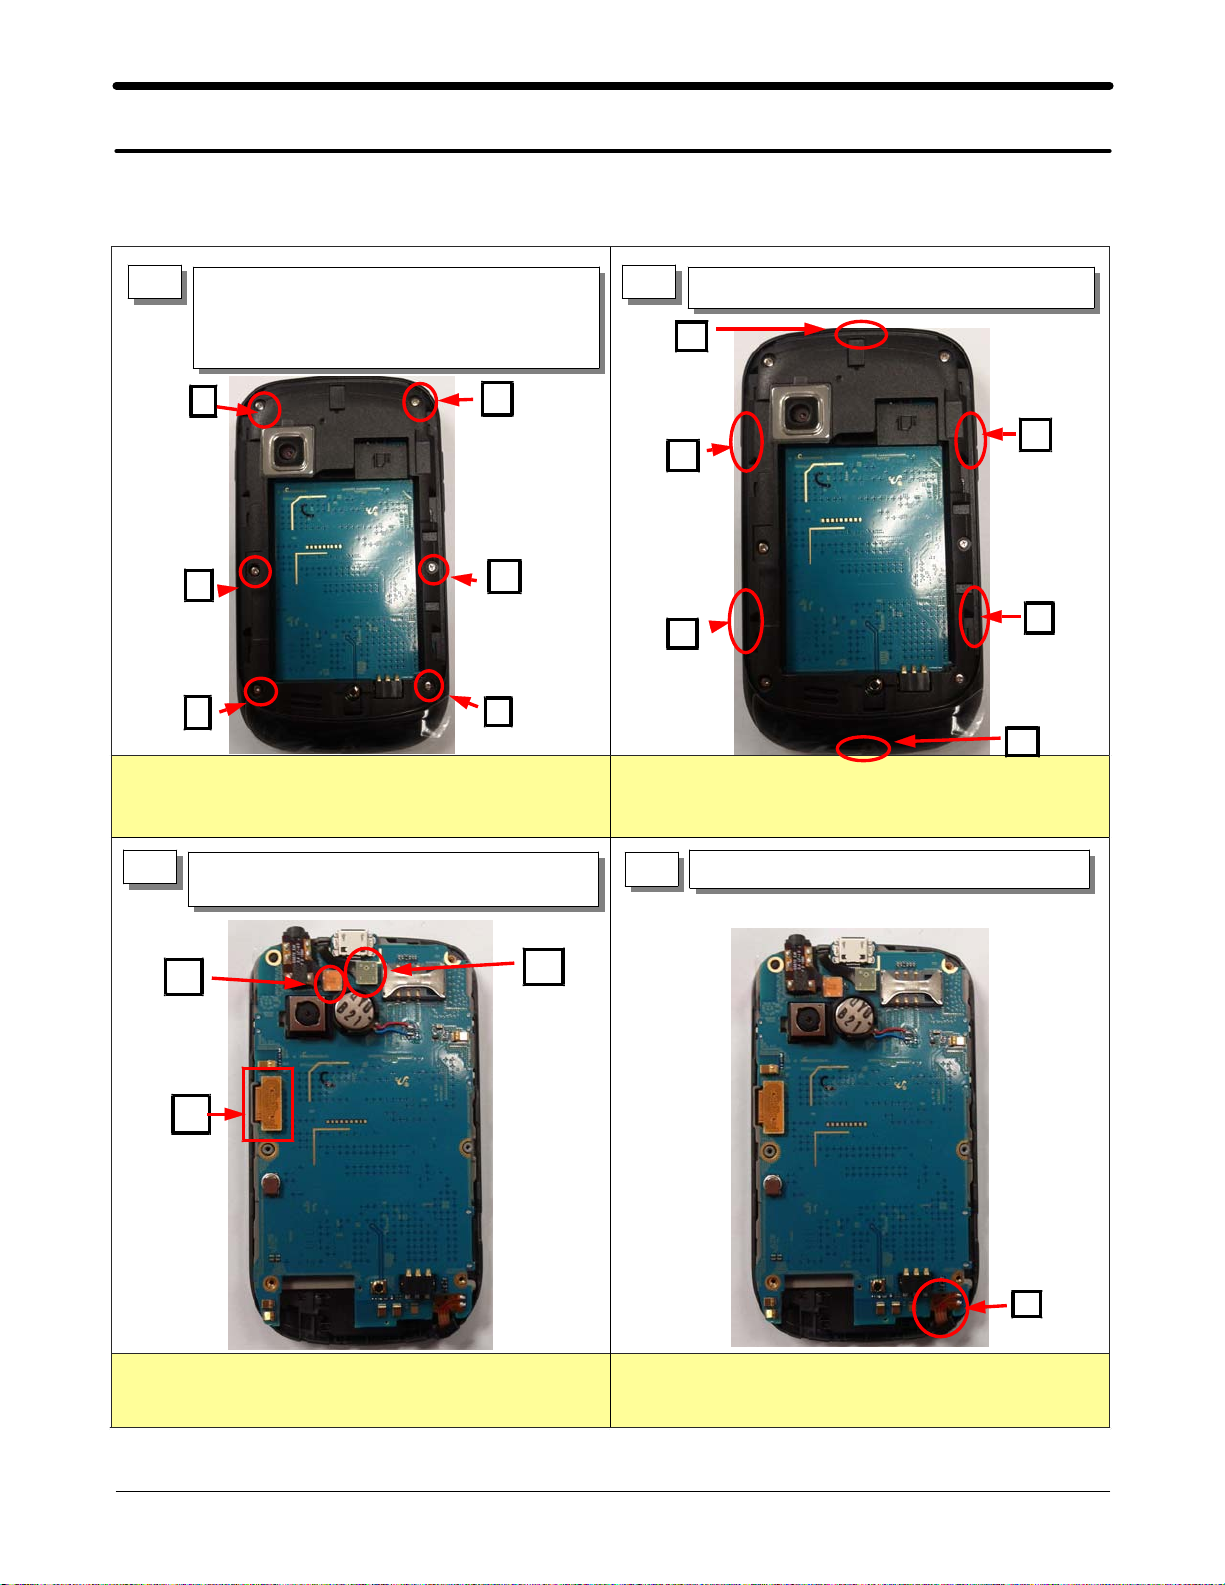
7-1-1.
Disassembly
1
Unscrew the6points.
1)
Torque
size: M1.4*L4.0
: 1.1 ~1.2
Kgf,cm
①
①
②
③
Caution
※
Be care of scratch and molding damage.
1)
④
⑥
⑤
2
Seperate the REAR CASE.
1)
①
②
③
Caution
※
Be care of scratch and molding damage.
1)
Must use the disassembly apparatus.
2)
④
⑤
⑥
3
Separate the LCD and Receiver and
1)
EarJack CONNECTORS.
①
②
Caution
※
Be care of scratch and molding damage.
1)
③
4
Caution
※
Be care of scratch and molding damage.
1)
Pull out MIC
1)
①
7-1
SAMSUNG Proprietary-Contents may change without notice
This Document can not be used without Samsung's authorization
Page 2

Level2Repair
7.
5 6
Caution
※
Be care of scratch and molding damage.
1)
Be care of the LCD FPCB damage.
2)
Separate the PBA ASS'Y from the
1)
FRONT ASS'Y.
Separate TSP CONNECTOR and
1)
EARJACK and LCD BRAKET from
FRONT CASE.
①
Caution
※
Be care of scratch and molding damage.
1)
Be care of damage to the LCD.
2)
②
7 8
Caution
※
Be care of LCD BROKEN
1)
Separate LCD and KEYPAD
1)
①
②
③
④
Push the Main Key and Separate Keypad
1)
from Front
Caution
※
Be care of scratch
1)
7-2
SAMSUNG Proprietary-Contents may change without notice
This Document can not be used without Samsung's authorization
Page 3

Level2Repair
7.
9 10
Detach the DomeSheet from PBA ASS'Y
1)
Separate the CAMERA from the PBA
2)
ASS'Y
TOP
①
DD
②
BOT
Separate the MOTOR and MIC from the
1)
PBA.ASS'Y
①
②
Caution
※
Be care of the KEY FPCBs damage.
1)
11
Separate the MOTOR BRAKET from
1)
PBA ASS'Y
①
Caution
※
Be care of MOTOR wire.
1)
Caution
※
Be care of scratch
1)
.
7-3
SAMSUNG Proprietary-Contents may change without notice
This Document can not be used without Samsung's authorization
Page 4

Level2Repair
7.
7-1-2.
Assembly
1 2
Solder the MOTOR wire and MIC FPCB
1)
Assemble the MOTOR BRAKET to PBA.
2)
①
②
③
Caution
※
Be care of the FPCBs and MOTOR wire damage.
1)
Attach the DomeSheet
1)
Assemble the CAMERA
2)
Insert CAMERA to CAMERA CONNECTOR
(
①
②
Assemble the FRONT and KEY and
1)
3
KEY BRAKET
Caution
※
Be care of damage to CAMERA CONNECTOR and
1)
FPCB.
Assemble the KEY
1)
4
Assemble the KEY BRAKET
2)
①
Caution
※
When Assemble MOTOR BRAKET
1)
First Assemble Left Side
②
7-4
SAMSUNG Proprietary-Contents may change without notice
This Document can not be used without Samsung's authorization
Page 5

Level2Repair
7.
5 6
Caution
※
Be care of TSP FPCB Damage
1)
Assemble the TSP to FRONT
1)
Assemble the LCD
1)
①
②
Caution
※
Be care of to LCD.
1)
③
④
7 8
Assemble the Reicever(+sensor) to
1)
LCD BRAKET
※
1)
Assemble the Reicever(+sensor) to
1)
LCD BRAKET
Fit the hole
2)
Caution
Do not the sensor When Assemble
Reicever(+sensor) to LCD BRAKET
①
7-5
SAMSUNG Proprietary-Contents may change without notice
This Document can not be used without Samsung's authorization
Page 6

Level2Repair
7.
9 10
Assemble the LCD BRAKET
1)
Assemble the TSP CONNECTOR
2)
①
Caution
※
Be care of damage the LCD and TSP FPCB.
1)
Assemble the LCD and Receiver and
1)
EarJack CONNECTORS
insert MIC to MIC Hole
2)
①
②
③
④
11
①
Assemble the Rear Case
1)
②
③
④
⑤
⑥
12
①
②
③
Screw6points
1)
④
⑤
⑥
7-6
SAMSUNG Proprietary-Contents may change without notice
This Document can not be used without Samsung's authorization
 Loading...