

Page 1
Freezer
user manual
imagine the possibilities
Thank you for purchasing this Samsung product.
To receive more complete service, please
register your product at
www.samsung.com/register
English
Free Standing Appliance
Page 2

2_ features
features of your new freezer
KEY FEATURES OF YOUR NEW FREEZER
Your Samsung Freezer comes equipped with various innovative storage and energy-efficient
features.
• Alone or together, whichever way you want
You can put the freezer together with Samsung Twin refrigerator to use it just
like a Side by Side refrigerator or use the freezer alone.
• Power Freeze
Speed up the freezing process with the Power Freeze function. It is fastest
way to freeze ice, foods or beverages that need to be chilled quickly.
• Eco Function
Save energy and electricity bills with Eco function that adjusts the
temperature range.
• Door Alarm
A helpful beeper alerts you if the door is not closed.
CE Notice
This product has been determined to be in compliance with the Low Voltage
Directive (2006/95/EC), the Electromagnetic Compatibility Directive (2004/108/EC)
and Energy efficiency Directive (96/57/EC) of the European Union.
For easy future reference, write the model and serial
number down. You will find your model number and
serial number on the left side of the freezer.
Model #
Serial #
Page 3

safety information _3
safety information
SAFETY INFORMATION
• Before operating the appliance, please read this manual thoroughly and retain it
for your reference.
• Use this appliance only for its intended purpose as described in this instruction
manual. This appliance is not intended for use by persons (including children)
with reduced physical, sensory or mental capabilities, or lack of experience and
knowledge, unless they have been given supervision or instruction concerning
use of the appliance by a person responsible for their safety.
• Because these following operating instructions cover various models, the
characteristics of your freezer may differ slightly from those described in this
manual.
Important safety symbols and precautions:
Hazards or unsafe practices that may result in severepersonal
injuryordeath.
Hazards or unsafe practices that may result in minorpersonal
injuryorpropertydamage.
Do NOT attempt.
Do NOT disassemble.
Do NOT touch.
Follow directions carefully.
Unplug the power plug from the wall socket.
Make sure the machine is grounded to prevent electric shock.
Call the contact center for help.
Note.
These warning signs are here to prevent injury to you and others.
Please follow them carefully.
After reading this section, keep it in a safe place for future reference.
WARNING
CAUTION
Page 4
4_ safety information
safety information
SEVERE WARNING SIGNS FOR INSTALLATION
• Do not install the freezer in a damp place or place where it may come in
contact with water.
- Deteriorated insulation of electrical parts may cause an electric shock or fire.
• Do not place this freezer in direct sunlight or expose to the heat from stoves,
room heaters or other appliance.
•
Never use gas pipes, telephone lines or other potential lightening rods as ground.
- Improper use of the ground plug can result in electric shock.
• Do not plug several appliances into the same multiple power board. The freezer
should always be plugged into its own individual electrical which has a voltage
rating that matched the rating plate.
- This provides the best performance and also prevents overloading house
wiring circuits, which could cause a fire hazard from overheated wires.
• Do not use a cord that shows cracks or abrasion damage along its length or at
either end.
• Do not bend the power cord excessively or place heavy articles on it.
• Never unplug your freezer by pulling on the power cord. Always grip plug rmly
and pull straight out from the outlet.
- Damage to the cord may cause a short-circuit, fire and/or electric shock.
• This freezer must be properly installed and located in accordance with the
manual before it is used.
• If the wall socket is loose, do not insert the power plug.
- There is a risk of electric shock of fire.
• Connect the power plug in proper position with the cord hanging down.
-
If you connect the power plug upside down, wire can get cut off and cause fire
or electric shock.
•
When moving the freezer, be careful not to roll over or damage the power cord.
- This constitutes a fire hazard.
• Make sure that the power plug is not squashed or damaged by the back of the
freezer.
• Keep the packing materials out of reach of children.
- There is a risk of death from suffocation if children put them on their head.
•
The appliance must be positioned so that the plug is accessible after installation.
• The freezer must be grounded.
- You must ground the freezer to prevent any power leakages or electric
shocks caused by current leakage from the freezer.
WARNING
Page 5

•
If the power cord is damaged, have it replaced immediately by the manufacturer
or its service agent.
•
The fuse on refrigerator must be changed by a qualified technician or service
company.
- Failing to do so may result in electric shock or personal injury.
CAUTION SIGNS FOR INSTALLATION
• Allow sufcient space to install the freezer on a at surface.
- If your freezer is not level, the internal cooling system may not work correctly.
• Keep ventilation opening in the appliance enclosure or mounting structure clear
of obstruction.
• Allow the appliance to stand for 2 hours after installation.
SEVERE WARNING SIGNS FOR USING
• Do not insert the power plug with wet hands.
• Do not store articles on the top of the appliance.
- When you open or close the door, the articles may fall and cause personal
injury and/or material damage.
• Do not put a container lled with water on the freezer.
- If spilled, there is a risk of fire or electric shock.
• Do not let children hang on the door. If not, a serious injury may occur.
• Do not let children enter inside of the freezer. There is a risk of children
entrapment.
• Do not insert your hands into the bottom area under the appliance.
- Any sharp edges may cause personal injury.
• Do not let children step on drawer’s cover.
- It may break and cause slip hazard.
• Do not overll the freezer with food.
- When you open the door, an item may fall out and cause personal injury or
material damage.
• Do not touch the inside walls of the freezer or products stored in the freezer
with wet hands.
- This may cause frostbite.
• Do not store volatile or ammable substances in the freezer.
- The storage of benzene, thinner, alcohol, ether, LP gas and other such
products may cause explosions.
• Do not store pharmaceuticals products, scientic materials or temperature
sensitive products in the freezer.
- Products that require strict temperature controls must not be stored in the
freezer.
• Do not place or use electrical appliance inside the freezer, unless they are of a
type recommended by the manufacturer.
safety information _5
CAUTION
WARNING
Page 6
6_ safety information
safety information
• Do not use mechanical devices or any other means to accelerate the defrosting
process, other than those recommended by the manufacturer.
• Do not damage the refrigerant circuit.
• Do not disassemble or repair the freezer by yourself.
- You run risk of causing a fire, malfunction and/or personal injury.
•
Children should be supervised to ensure that they do not play with the appliance.
• This product is intended only for the storage of food in a domestic environment.
• If a gas leak is detected, avoid any naked ames or potential sources of ignition
and air the room in which the appliance is standing for several minutes.
• Use only the LED Lamps provided by manufacturer or service agents.
• Pull the power plug out of the socket before changing the interior lamps of the
freezer.
- Otherwise, there is a risk of electric shock.
• If you smell pharmaceutical or smoke, pull out power plug immediately and
contact your Samsung Electronics service center.
• If you experience difculty when changing the light, contact service agents.
• If the products equipped with LED Lamp, do not disassemble Lamp Cover and
LED Lamp by yourself.
- Please contact your service agents.
CAUTION SIGNS FOR USING
• Do not re-freeze frozen foods that have thawed completely.
• Do not place carbonated or zzy drinks in the freezer compartment. Do not put
bottles or glass containers in the freezer.
- When the contents freeze, the glass may break and cause personal injury.
• If the freezer is disconnected from the power supply, you should wait for at
least five minutes before plugging it back.
•
If you have a long vacation planned or the freezer is not to be used for a long
period of time, you must empty the freezer and pull out the power plug.
- Deterioration in the insulation may cause fire.
• Wipe excess moisture from the inside and leave the doors open.
- Otherwise, odor and mold may develop.
• To get Best performance of product,
- Do not place foods too closely in front of the vents at the rear of the appliance
as it can obstruct free air circulation in the freezer compartment.
CAUTION
Page 7
safety information _7
- Wrap the food up properly or place it in airtight containers before put it into
the freezer.
- Do not put any newly introduced food for freezing near to already food.
• Please observe maximum storage times and expiry dates of frozen goods.
• There is no need to disconnect the freezer from the power supply if you will be
away for less than three weeks. But, Remove all the food if you are going away
for the three weeks or more. Unplug the freezer and clean it, rinse and dry.
• Fill water tank, ice tray, water cubes only with potable water.
• If the freezer is damaged by water, pull out the power plug and contact your
Samsung Electronics service center.
CAUTION SIGNS FOR CLEANING
•
Do not directly spray water inside or outside the freezer.
- There is a risk of fire or electric shock.
•
Do not spray inammable gas near the freezer.
- There is a risk of explosion or fire.
• Remove any foreign matter or dust from the power plug pins. But do not use a
wet or damp cloth when cleaning the plug, remove any foreign material or dust
from the power plug pins.
- Otherwise there is a risk of fire or electric shock.
•
Do not spray cleaning products directly on the display.
- Printed letters on the display may come off.
•
Unplug the freezer before cleaning and making repairs.
SEVERE WARNING SIGNS FOR DISPOSAL
• When disposing of this or other freezers, remove the door/door seals, door
latch so that small children or animals cannot become trapped inside. Children
should be supervised to ensure that they do not play with the appliance.
• Please dispose of the packaging material for this product in an environmentally
friendly manner.
•
Leave the shelves in place so that children may not easily climb inside. Ensure
that none of the pipes on the back of the appliance are damaged prior to
disposal.
• R600a or R134a is used as a refrigerant. Check the compressor label on
the rear of the appliance or the rating label inside the freezer to see which
refrigerant is used for your freezer. When this product contains ammable gas
(Refrigerant R600a), contact your local authority in regard to safe disposal of
this product. Cyclopentane is used as a insulation blowing gas. The gases in
insulation material require special disposal procedure. Please contact your local
authorities in regard to the environmentally safe disposal of this product. Ensure
that none of the pipes on the back of the appliances are damaged prior to
disposal. The pipes shall be broke in the open space.
CAUTION
WARNING
Page 8
8_ safety information
• If the appliance contains iso-butane refrigerant (R600a), a natural gas with
high environmental compatibility that is, however, also combustible. When
transporting and installing the appliance, care should be taken to ensure that
no parts of the refrigerating circuit are damaged.
• Refrigerant squirting out of the pipes could ignite or cause an eye injury. If a
leak is detected, avoid any naked ames or potential sources of ignition and air
the room in which the appliance is standing for several minutes.
• In order to avoid the creation of a ammable gas-air mixture if a leak in the
refrigerating circuit occurs, the size of the room in which the appliance may be
sited depends on the amount of refrigerant used.
Never start up an appliance showing any signs of damage. If in doubt, consult
your dealer.
The room must be 1m³ in size for every 8g of R600a refrigerant inside the
appliance. The amount of refrigerant in your particular appliance is shown on
the identification plate inside the appliance.
ADDITIONAL TIPS FOR PROPER USAGE
• In the event of a power failure, call the local ofce of your Electricity Company
and ask how long it is going to last.
- Most power failures that are corrected in an hour or two will not affect your
freezer temperatures. However, you should minimize the number of door
openings while the power is off.
- But Should the power failure last more than 24 hours, remove all frozen food.
• If the key is provided with freezer, the keys should be kept out of the reach of
children and not in vicinity of the appliance.
• The appliance might not operate consistently (possibility of defrosting of
contents or temperature becoming too warm in the freezer) when sited for an
extended period of time below the cold end of the range of temperatures for
which the refrigerating appliance is designed.
• Your appliance is frost free, which means there is no need to manually defrost
your appliance, as this will be carried out automatically.
• Temperature rising during the defrost can comply with ISO requirement. But
If you want to prevent an undue rise in the temperature of the frozen food
while defrosting the appliance, please wrap the frozen food in several layers of
newspaper.
• Any increase in temperature of frozen food during defrosting can shorten its
storage life.
safety information
Page 9

contents _9
contents
SETTING UP YOUR
FREEZER
10
10 Getting ready to install the freezer
11 Reversing the freezer door
16 Leveling the freezer
17 Setting up the freezer
OPERATING YOUR
FREEZER
18
18 Checking the control panel
18 Using the control panel
20 Storing food
21 Using the fresher box
22 Making ice
MAINTAINING YOUR
FREEZER
23
23 Removing the interior parts
24 Cleaning the freezer
25 Maintaining the interior parts
APPENDIX
26
26 Troubleshooting
Page 10

10_ setting up
CAUTION
setting up your freezer
GETTING READY TO INSTALL THE FREEZER
Congratulations on your purchase of this Samsung Freezer. We hope you enjoy the state-ofart features and efficiencies that this new appliance offers.
• This freezer must be properly installed and located in accordance with the
manual before it is used.
• Use this appliance only for its intended purpose as described in this instruction
manual.
•
We strongly recommend that any servicing be performed by a qualified individual.
• Please dispose of the packaging material for this product in an environmentally
friendly manner.
Pull the power plug out of the socket before changing the interior light of the
freezer.
- Otherwise, there is a risk of electric shock.
Selecting the best location for the Freezer
• A location without direct exposure to sunlight.
• A location with at oor surface.
• A location with enough space for the freezer door to open easily.
• Allow sufcient space for air circulation of the internal cooling system.
If the freezer does not have enough space, the internal cooling system may
perform more.
• Height of the product may be different depending on the models.
• Allow clearance to the right, left, back and top when installing. This will help
reduce power consumption and keep your energy bills lower.
• Do not install the freezer in a place with the temperature lower than 10°C.
Pull the unit straight out when installing, servicing or cleaning behind the freezer
and push it straight back after work is complete.
Make sure your oor can support fully loaded freezer.
WARNING
100mm
50mm
1800mm
or
1650mm
Page 11

setting up _11
01 SETTING UP
REVERSING THE FREEZER DOOR
Before you reverse the freezer door, make sure to unplug the freezer.
If this operation is performed by After sales service, it is not covered as the
warranty service.
Required Tools (Not provided)
Phillips Head
Driver (+)
Flat Head
Driver (-)
10mm
Socket
Wrench
(for bolts)
8mm
Socket
Wrench
(for bolts)
Spanner
(for hinge shaft)
4mm Hex
Wrench
(for bottom
hinge shaft)
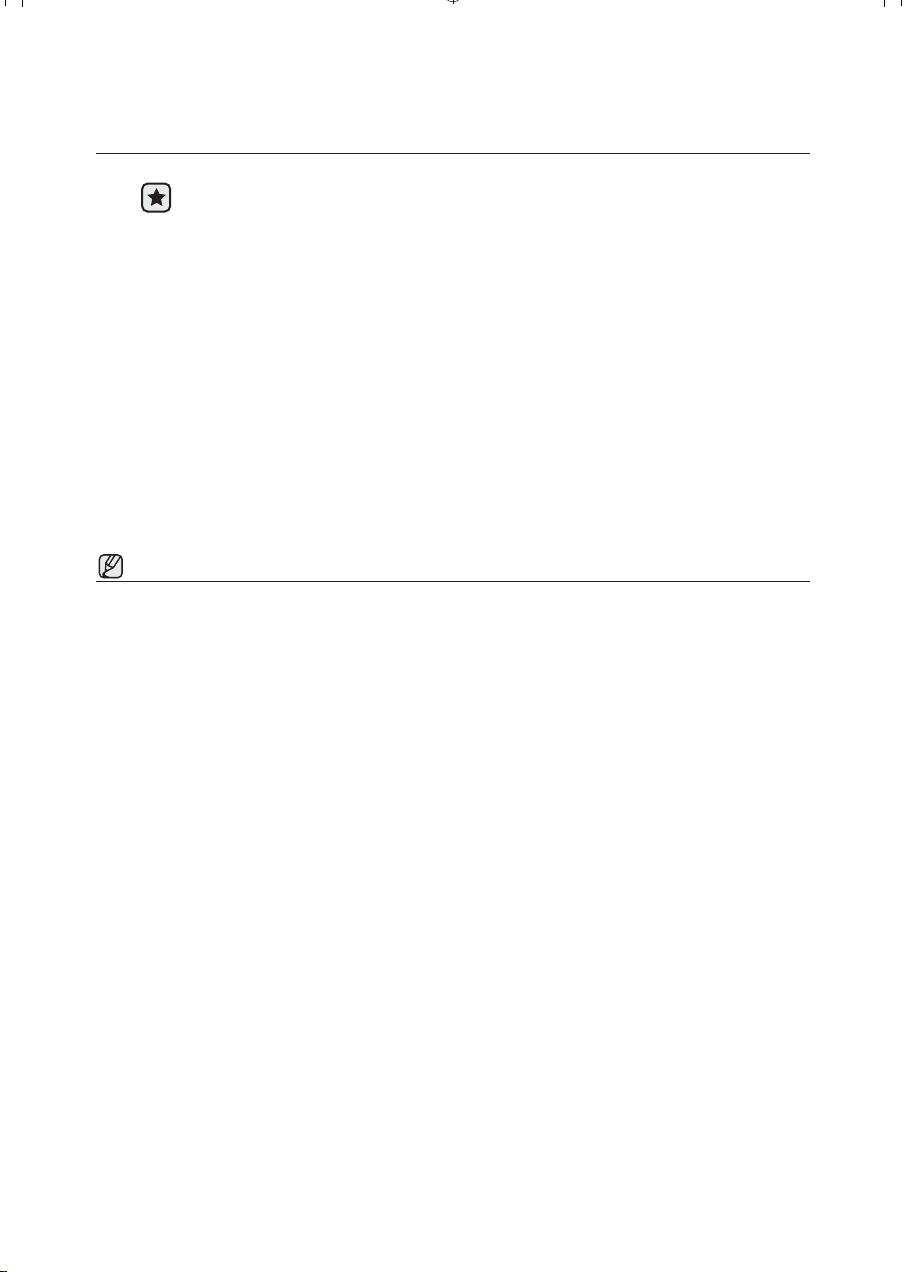
1. Remove 2 screws on the top of the freezer.
2.
Remove the plastic cover and make sure to disconnect the wire connected to it.
After removing the plastic cover, check the parts for reversing the door.
Be careful not to damage the electrical wires when removing the plastic cover.
3. Disconnect the wires and then remove 3 bolts.
Make sure your freezer is unplugged before handling electrical wires.
WARNING
WARNING
CAUTION
Page 12

12_ setting up
setting up your freezer
REVERSING THE FREEZER DOOR
4. Remove the door from the lower hinge by carefully lifting the door straight up.
Freezer door is heavy, be careful not to injure yourself when removing the
freezer door.
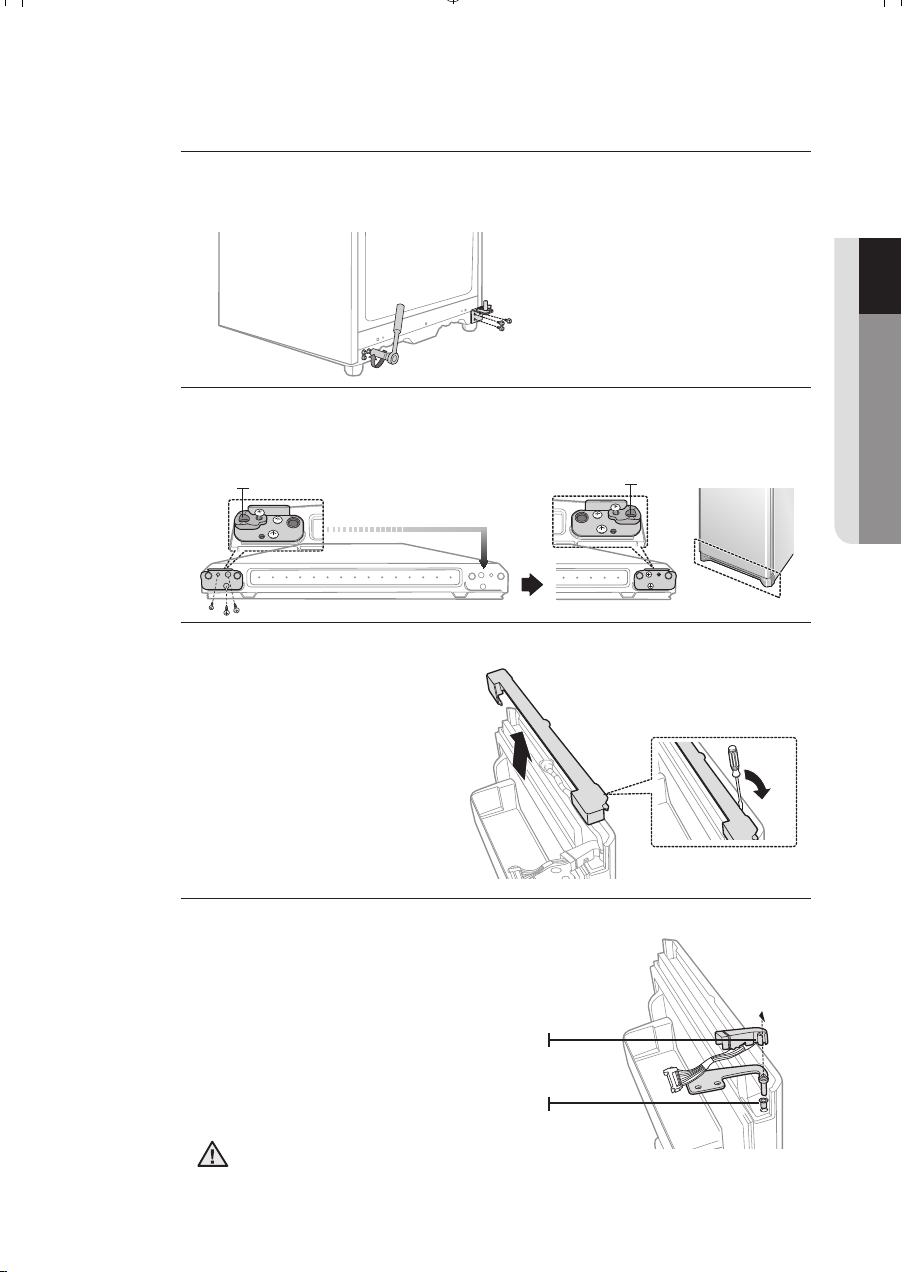
5.
Separate the front leg cover after removing 2 screws.
6. Unscrew 3 bolts tightening the hinge and also unscrew 3 bolts on the bottom
right side by the front leg where removed hinge will be attached.
7. Separate the hinge shaft by using hex wrench first. Unscrew the bolt to
remove the hinge riser and switch the side of the hinge shaft and the hinge
riser.
CAUTION
10mm
10mm
Hingeshaft
8mmBolt
Hingeriser
Page 13
setting up _13
01 SETTING UP
8.
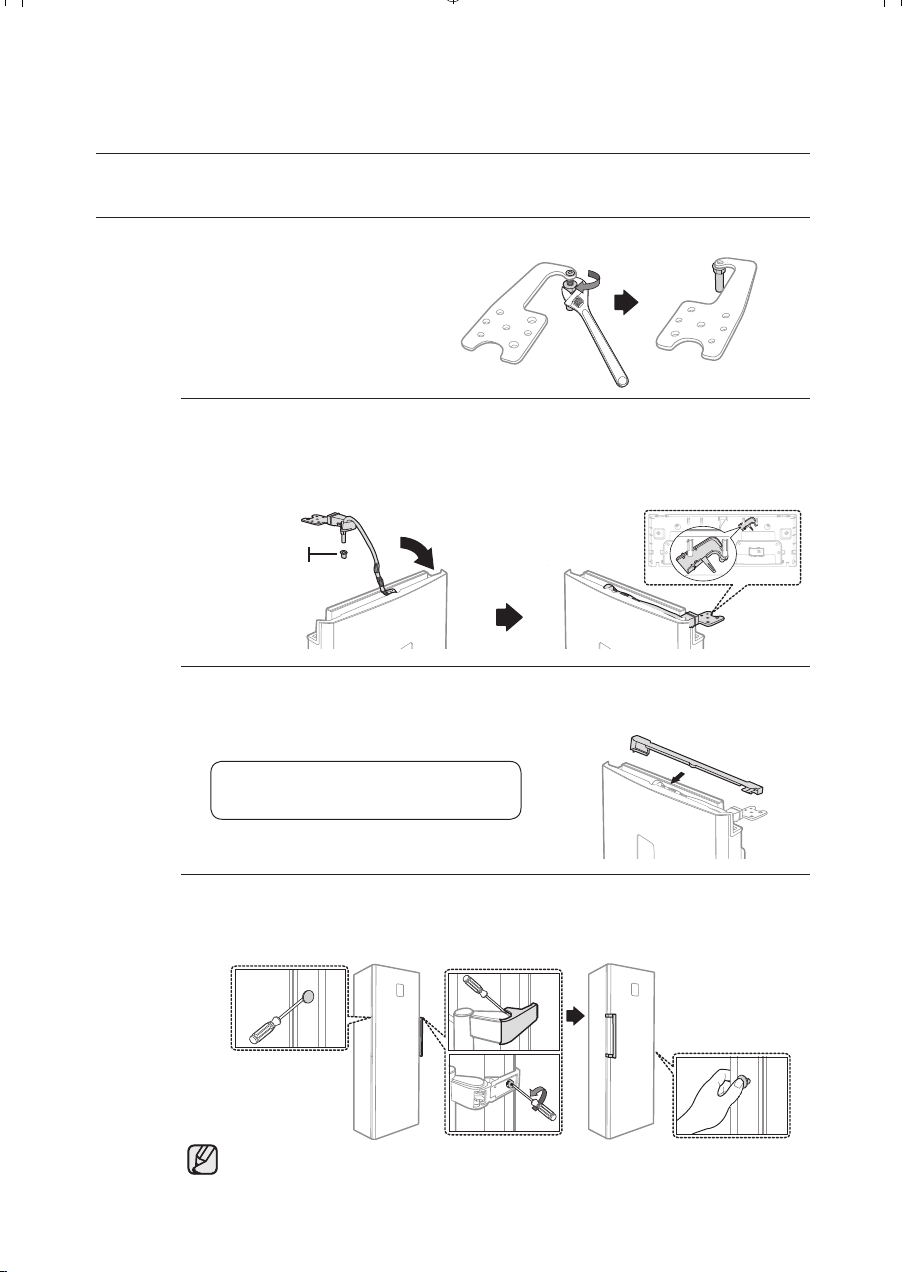
Attach the hinge on the bottom right side of the freezer where bolts were
previously removed in step 6. Screw the bolts that were removed on the bottom
left side of the freezer for the future usage.
9.
Remove the screws on the bottom right and left side of the freezer door. Switch
the side of the door stopper from left to the right. Hinge riser should be switched
as well.
10
.Remove the wire cover on top of the freezer door to switch the side of the
wires.
11
.Remove the hinge and the grommet from the freezer door. Detach the left
side hinge cover and pull the wires out of the hinge cover.
Be careful not to damage the electrical wires when removing the hinge cover.
Hingecover
10mm
10mm
Hingeriser Hingeriser
CAUTION
Grommet
Page 14
14_ setting up
setting up your freezer
REVERSING THE FREEZER DOOR
12
.Use wrench to separate the hinge shaft and then ip the hinge and reattach
the hinge shaft.
13.Reassemble the hinge on the freezer door by reversing the step 11.
Make sure to use right side hinge cover (which can be found underneath the
removed plastic cover from step 2) and remove the grommet. After reassembling
the hinge, wire and the hinge cover, switch the side from left to the right.
14
.After switching the hinge, make sure to take out the right side wire cover, and
close it with the wire cover on the top of freezer door.
15
.Take off the handle cover and remove the screws, make sure to detach the
caps and the handle from the right to left side of the door.
(Make sure to cover the right side with detached caps.)
Handles may not have cover depending on the models.
“Cover Wire Door R” can be found
in the packaging
Grommet
Page 15

setting up _15
01 SETTING UP
16.Switch the hinge cap and attach the front leg cover. Carefully put the freezer
door back on.
17.Tighten the 3 bolts and then connect the wires back together.
Make sure your freezer is unplugged before handling electrical wires.
18
.Connect the wire on the plastic cover and put the cover back to its original
position.
19
. Tighten 2 screws back to its place.
• After reversing the door, make sure rubber door seal is properly arranged.
• If the product makes noise after reversing the door, apply some oil on the
door seal.
WARNING
Hingecap
CAUTION
Page 16

16_ setting up
setting up your freezer
LEVELING THE FREEZER
If the front of the appliance is slightly higher than the rear, the door can be opened and
closed more easily.
Turn the adjusting legs clockwise to raise and counter-clockwise to lower the height.
Case 1) The appliance tilts down to the left.
• Turn the left adjusting leg in the direction of the arrow until the appliance is level.
Case 2) The appliance tilts down to the right.
• Turn the right adjusting leg in the direction of the arrow until the appliance is level.
Page 17

setting up _17
01 SETTING UP
SETTING UP THE FREEZER
Now that you have your new freezer installed and in place, you are ready to set up and enjoy
the full features and functions of the appliance.
By completing the following steps, your freezer should be fully operational.
If not, first check the power supply and electricity source or try the troubleshooting section
at the back of this user manual. If you have any further questions, contact your Samsung
Electronics service center.
1. Place the freezer in an appropriate location with reasonable clearance
between the wall and the freezer. Refer to installation instructions in this
manual. (Refer to page 10)
2. Once the freezer is plugged in, make sure the interior light comes on when
you open the doors.
3. Set the temperature control to the coldest temperature and wait for an hour.
The freezer should get slightly chilled and the motor should run smoothly.
4. After powering the freezer, it will take a few hours to reach the appropriate
temperature. Once the freezer temperature is sufficiently cool, you can store
food and drink in the freezer.
Saving Energy Tips
- Install the appliance in a cool, dry room with adequate ventilation.
Ensure that it is not exposed to direct sunlight and never put it near a direct source of heat
(radiator, for example).
- Never block any vents or grilles on the appliance.
- Allow warm food to cool down before placing it in the appliance.
- Put frozen food in the refrigerator to thaw.
You can then use the low temperatures of the frozen products to cool food in the
refrigerator.
- Do not keep the door of the appliance open for too long when putting food in or taking
food out.
The shorter time for which the door is open, the less ice will form in the freezer.
- Clean the rear of the refrigerator regularly. Dust increases energy consumption.
- Do not set temperature colder than necessary.
- Ensure sufficient air exhaust at the refrigerator base and at the back wall of the refrigerator.
Do not cover air vent openings.
- Allow clearance to the right, left, back and top when installing.
This will help reduce power consumption and keep your energy bills lower.
Page 18

18_operating
operating your freezer
CHECKING THE CONTROL PANEL
CHILD LOCK
You can activate/deactivate the Child Lock function to prevent
the children from pressing the buttons on the control panel.
FREEZER
Temperature of the freezer can be adjusted by setting the
desired temperature from the range between -14°C and -24°C.
POWER FREEZE
Speeds up the time needed to freeze products in the freezer.
This can be helpful if you need to quickly freeze items that
spoil easily or if the temperature in the freezer has been
increased dramatically (by leaving the freezer door open, etc.)
or making ice.
ALARM
The alarm will alert you if the freezer door is kept open for
longer than 2 minutes. To cancel the alarm, press the Alarm
button again.
ECO
Eco Function will help save energy and lower your electricity
bills by setting the maximum desired temperature to -18°C
when the desired temperature is set between -19°C to -24°C.
Each time you press the button, a short beep will sound.
USING THE CONTROL PANEL
Child Lock
Press the Child Lock button for 3 seconds to activate the
Child Lock function.
Child lock indicator will light up and all the buttons on the
control panel will be locked.
To deactivate the Child Lock function, press the Child Lock
button again for 3 seconds.
1
2
3
4
5
1
2
3
4
5
Page 19

02 OPERATING
operating _19
Freezer
Press the Freezer button to set the desired temperature from
the range between -14°C and -24°C.
Default set temperature is set on -19°C and each time you
press the Freezer button temperature will change in following
order and temperature indicator will display the desired
temperature.
When the temperature setting is done, temperature indicator
will display the current temperature of the freezer.
Power Freeze
Press the Power Freeze button to activate the Power Freeze
function. Power Freeze indicator will light up and the freezer will
speed up the time to needed to freeze products in the freezer.
When you use this function, the energy consumption will
increase. This function must be activated before putting large
amount of food stuff in the freezer compartment at least
24 hours before.
To deactivate the Power Freeze function, press the Power
Freeze button again.
Power Freeze function cannot be used together with
Eco function. Selecting Eco function will automatically
deactivate the Power Freeze function.
Alarm
Press the Alarm button to activate the Alarm function.
Alarm indicator will light up and the freezer will alert you with
alarm sound if the freezer door is kept open for longer than
2 minutes.
To deactivate the Alarm function, press the Alarm button again.
Eco
Press the Eco button to activate the Eco function.
Eco indicator will light up and the freezer will set the limit for
desired temperature range between -14°C and -18°C.
If you have set the desired temperature to -19°C or lower,
freezer will automatically set the temperature to -18°C.
Eco function cannot be used together with Power Freeze
function. Selecting Power Freeze button or Freezer button
will automatically deactivate the Eco function.
Page 20

20_ operating
3
1
7
6
operating your freezer
STORING FOOD
The Samsung Freezer has been designed to provide you with maximum space saving
features and functions. Here are some of the customized compartments we have created to
keep your food fresher, longer. Remember, in order to prevent odor penetration to the ice,
stored food should be wrapped securely and as airtight as possible.
• Some of the features can be different and may not be available depending on
the model.
• Position of the Twist ice maker and the Small box can be switched with
each other.
• To get more space, you can remove cover of Top shelf , Twist ice maker ,
Fresher box , top three of the Big boxes and the Small box . It does not
affect thermal and mechanical characteristics. A declared storage volume of
freezer compartment is calculated with these parts removed.
1 2
3 4 6
2 6
5
2
4
Page 21

02 OPERATING
operating _21
CAUTION
TOP SHELF
Top shelf was equipped with ip type plastic cover to
easily get or store foods.
TWIST ICE MAKER
You can make ice and store them in the ice bin
underneath the twist ice maker.
FRESHER BOX
Best to store meat and shes to prevent dripping. Can
also be used to more long time stored freshly in this Box.
BIG BOX
Best used to store meats or dry foods.
Stored food should be wrapped securely with foil or other
suitable wrapping material or containers.
TEMPERED GLASS
SHELF
Holds the big boxes but it can be used as ordinary shelves
to put the foods on it.
SMALL BOX
Store small packaged or wrapped foods.
SOFT FROST
DOOR GUARD
Can be used for small packages of frozen food.
Do not store glass bottles in the freezer.
USING THE FRESHER BOX
You can use the Fresher box to store foods or beverages that needs to be frozen or stored
freshly.
• Use the lever on the top of the box to set the fresher box in Fresh or Fresher
.
Fresh
Set the lever in Normal to use the
Fresher box the same way as other big
boxes.
Fresher
Set the lever in Fresher if you want to
more long time stored freshly in the
Fresher Box.
1
2
3
4
5
6
7
Page 22

operating your freezer
MAKING ICE
Ice tray may look different depending on models.
Making ice cubes
1. Remove the ice cube tray by pulling it
towards you.
2. Fill the tray with water up to the maximum
water level marked on the tray.
3. Slide the tray back into the holder, taking
care not to spill the water.
4. Wait until the ice cubes are formed.
Freezing time
It is recommended that you wait for about
one hour with the temperature set to
Power Freeze for the ice cubes to form.
Removing the ice cubes
1. Make sure that the ice bin is in place
under the ice tray. If not, slide it into place.
2. Twist one of the levers firmly in the
clockwise direction until the tray twists
slightly. The ice cubes fall into the storage
bin.
3. Repeat Step 2 for the other half of the tray,
if necessary.
4. To get ice, slightly lift up the ice tray and
pull it towards you.
22_
operating
water
level
Page 23

maintaining your freezer
REMOVING THE INTERIOR PARTS
Some of the features can be different and may not be available depending on the model.
Top shelf cover
1.
Push the right side of cover inward until you
can get the projection on the left side out.
2.
When both sides of the projections are out of
the grooves, pull it towards you to remove the
cover.
Make sure that you remove the top shelf cover when you assemble or
disassemble the glass shelf.
Twist ice maker
Slightly lift up the twist ice maker and pull it
towards you.
Boxes
Pull the boxes out fully then slightly lift it up to
remove the boxes.
(Small box/Fresher box/Big box)
Tempered glass shelf
Gently lift up the shelves with both hands and
pull it toward you.
Soft frost door guard
Firmly grab the door guard with both hands
and lift it up gently to remove the door guard.
To get the best energy efficiency of this
product, please leave all selves, drawers
and baskets on their original position like
as illustration in page (20)
03 MAINTAINING
maintaining _23
Page 24

maintaining your freezer
CLEANING THE FREEZER
Caring for your Samsung Freezer prolongs the life of the product and helps keep it from
odor and germs.
Cleaning the Interior
Clean the inside walls and interior parts with a
mild detergent and then wipe it with dry soft
cloth. You may remove the drawers and
shelves for a more thorough cleaning.
Make sure to dry them before putting them
back into place.
Cleaning the Exterior
Wipe the control panel and display panel with
a clean, soft cloth.
Spray water onto the cleaning cloth instead of
spraying directly on the surface of the freezer
to ensure even distribution of moisture on the
surface. Doors, handles and cabinet surfaces
should be cleaned with a mild detergent and
then wiped with a dry soft cloth.
To keep your appliance looking its best, the
exterior should be polished once or twice a year.
Do not use Benzene, Thinner or Clorox™ for cleaning.
They may damage the surface of the appliance and can create a risk of fire.
Cleaning behind the freezer
To keep cords and exposed parts free of dust
and dirt accumulation, vacuum behind the
freezer once or twice a year.
Do not remove the back cover. There can be a risk of electric shock.
24_
maintaining
WARNING
WARNING
Page 25

Cleaning the Rubber door seals
If the rubber door seals are dirty, doors may
not close properly and the freezer will not
operate efficiently.
Keep the door seals free of grit or grime by
cleaning the doors with a mild detergent and
damp cloth. Wipe dry with a clean, soft cloth.
• Do not spray the freezer with water while it is plugged in, as it may cause an
electric shock. Do not clean the freezer with benzene, thinner or car detergent
for risk of fire.
• You may remove the rubber door seal from the door to clean it. Make sure
that you put the rubber door seal back correctly or the freezer will not operate
efficiently.
MAINTAINING THE INTERIOR PARTS
Maintaining the Interior Light
The interior light is equipped with LED lamp.
Do not disassemble the lamp cover and LED
lamp by yourself.
-Please contact your service agents.
03 MAINTAINING
maintaining _25
CAUTION
LEDlamp
Page 26

appendix
TROUBLESHOOTING
PROBLEM SOLUTION
The appliance is not
operating at all or the
temperature is too high.
• Check if the power plug is correctly connected.
•
Is the temperature control on the front panel correctly set?
• Does sun shine on the appliance or are there any heat
sources nearby?
• Is the back of the appliance too close to the wall?
There are unusual noises.
• Check if the appliance is installed on a stable and even
oor.
• Is the back of the appliance too close to the wall?
• Have any foreign objects fallen behind or under the
appliance?
• Is the noise coming from the compressor in the appliance?
• A ticking sound may be heard inside the appliance; this is
normal. This sound occurs when the various accessories
contract or expand.
The front corners and
sides of the appliance are
warm and condensation
starts to form.
• Heat-proof pipes are installed in the front corners of the
appliance to prevent condensation from forming.
When the surrounding temperature rises, this may not
always be effective. However, this is not abnormal.
• In very humid weather, condensation may form on the
outer surface of the appliance when the moisture in the air
comes into contact with the cool surface of the appliance.
You can hear a liquid
bubbling in the appliance.
• This is the refrigerant, which cools the inside of the
appliance.
There is a bad smell
inside the appliance.
• Is there any spoiled food inside of the freezer?
• Make sure that strong smelling food (for example, sh) is
wrapped so that it is airtight.
• Clean out your freezer periodically and throw away any
spoiled or suspect food.
There is a layer of frost
on the appliances walls.
• Are the air outlet vents blocked by food stored inside the
freezer?
• Space the food out as much as possible to improve
ventilation.
• Is the door fully closed?
Condensation forms on
the inside wall of the
appliance and around
vegetables.
• Food with a high water content is stored uncovered with a
high humidity level or the door has been left open for a
long time.
• Store the food with a cover or in sealed containers.
26_
appendix
Page 27

memo
Page 28

Code No. DA99-01951A REV(0.5)
Contact SAMSUNG WORLD WIDE
If you have any questions or comments relating to Samsung products, please contact
the SAMSUNG customer care center.
COUNTRY CALL Web site
AUSTRALIA
1300 362 603 www.samsung.com/au
COLOMBIA
01-8000112112 www.samsung.com.co
EIRE
0818 717 100 www.samsung.com/ie
HONG KONG
(852) 3698-4698 www.samsung.com/hk
INDIA
3030 8282, 1800 110011,
1-800-3000-8282,1800 266 8282
www.samsung.com/in
MALAYSIA
1800-88-9999 www.samsung.com/my
NEW ZEALAND
0800 SAMSUNG (726-7864) www.samsung.com/nz
PANAMA
800-7267 www.samsung.com/latin
PHILIPPINES
1800-10-SAMSUNG (726-7864) www.samsung.com/ph
SINGAPORE
1800-SAMSUNG (726-7864) www.samsung.com
SOUTH AFRICA
0860-SAMSUNG (726-7864 ) www.samsung.com
U.K
0845 SAMSUNG (7267864) www.samsung.com
VIETNAM
1 800 588 889 www.samsung.com
In an effort to promote recycling this user manual is printed on recycled paper.
Ambient Room Temperature Limits
This refrigerator is designed to operate in ambient temperatures specified by its
temperature class marked on the rating plate.
Class Symbol Ambient Temperature range (°C)
Extended Temperate SN +10 to +32
Temperate N +16 to +32
Subtropical ST +16 to +38
Tropical T +16 to +43
Internal temperatures may be affected by such factors as the location of the refrigerator,
ambient temperature and the frequency with which you open the door. Adjust the
temperature as required to compensate for these factors.
Correct Disposal of This Product
(Waste Electrical & Electronic Equipment)
(Applicable in the European Union and other European countries with separate collection systems)
This marking on the product, accessories or literature indicates that the product and
its electronic accessories (e.g. charger, headset, USB cable) should not be disposed
of with other household waste at the end of their working life. To prevent possible
harm to the environment or human health from uncontrolled waste disposal, please
separate these items from other types of waste and recycle them responsibly to
promote the sustainable reuse of material resources.
Household users should contact either the retailer where they purchased this
product, or their local government office, for details of where and how they can take
these items for environmentally safe recycling.
Business users should contact their supplier and check the terms and conditions
of the purchase contract. This product and its electronic accessories should not be
mixed with other commercial wastes for disposal.
English
 Loading...