

Page 1
INSTRUCTION MANUAL
Samsung Wine Refrigerator
Model RW13EBBB
RW13EBSS
ENGLISH
ADD: Jinmen Road 221,Suzhou
Jiangsu Province, China
TEL: 86-512-65321234-3550
CABLE:7449
FAX: 86-512-65321234-3555
P.C: 215004
Please read this manual carefully
before switching on the power and
nicely keep it for future reference.
The product is subject to change
without notice.
DA68-01096C
Page 2
Contents
Safety.......................................2
Name of parts...........................2
Notes concerning operation ....3
Control panel...........................5
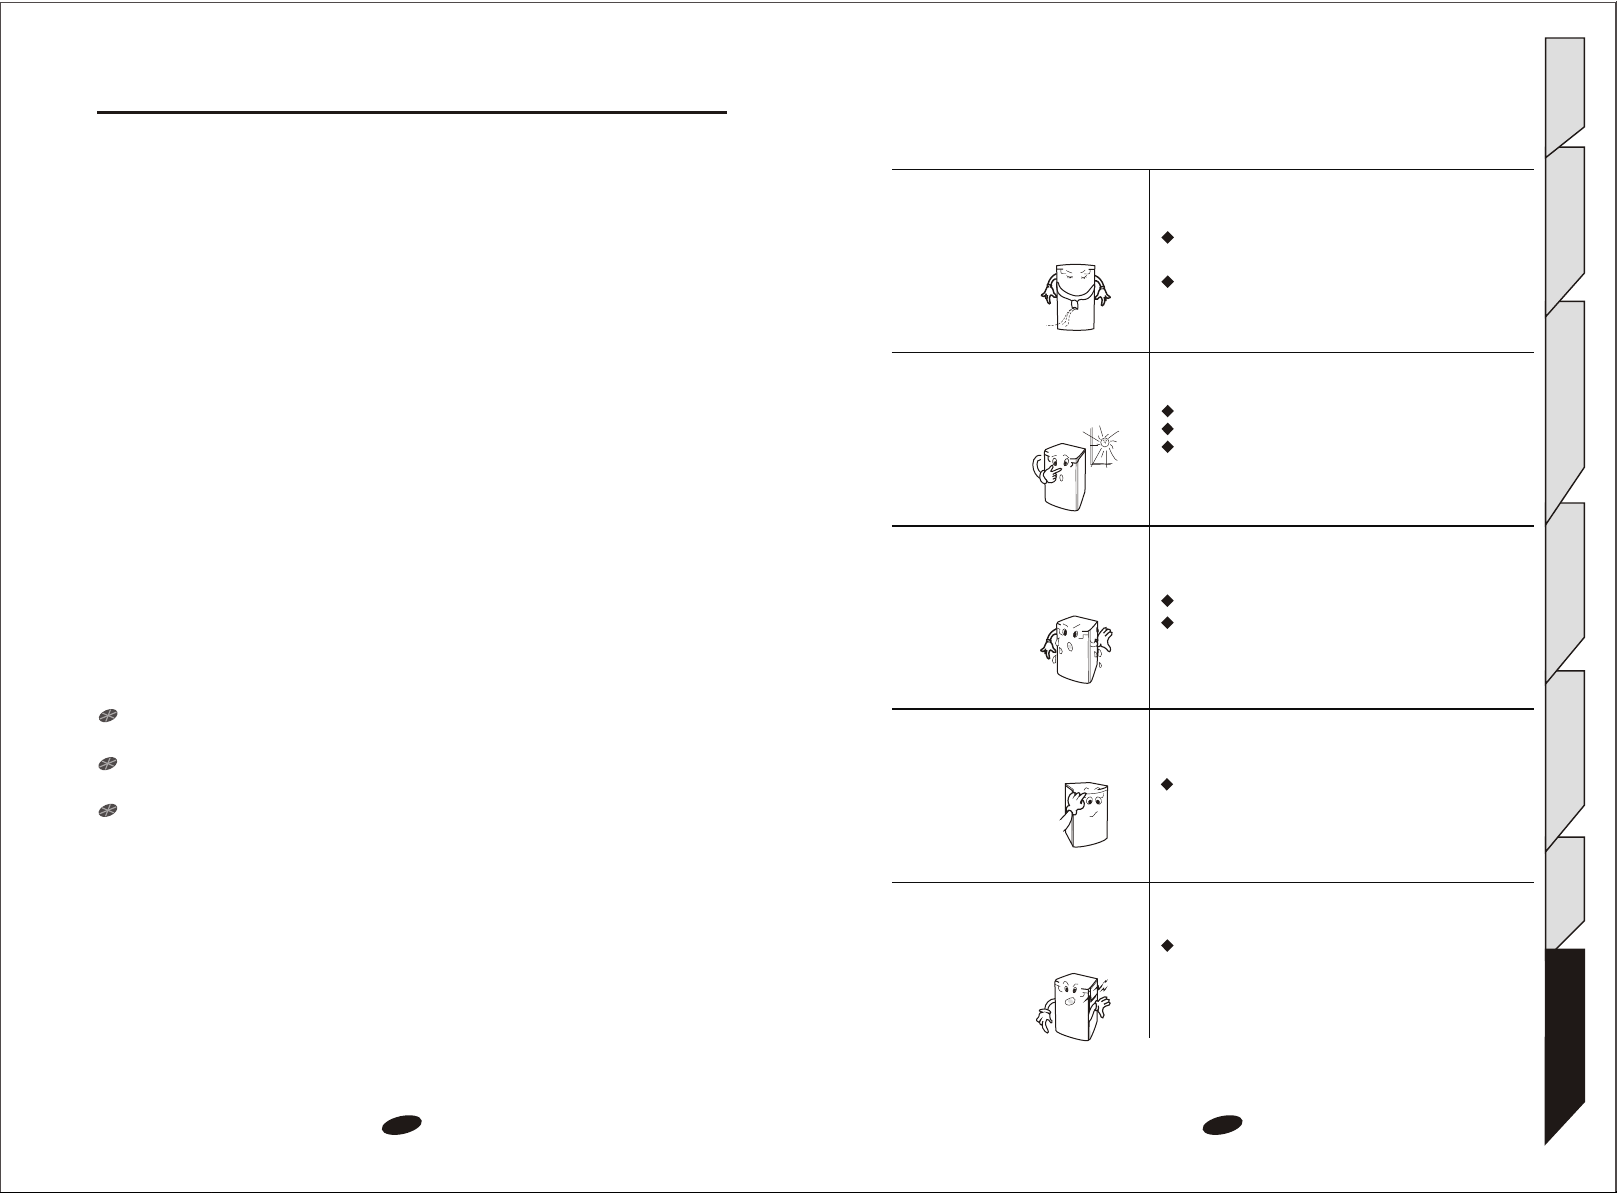
Water-flowing
sound is heard.
It is the sound arising from the flowing of refrig
-erant.
It is not a fault.
Safety
Name of parts
operation
Notes concerning
Maintenance &cleaning.............7
Set up.......................................8
Troubleshooting......................9
Technical data..........Back cover
Please read this manual carefully before
using the refrigerator.
Please read carefully the contents concer
-ning safety before using the refrigerator.
Please keep this manual in a readily acces
-sible place for future reference.
The refrigerator is
running
continuously
without stop.
Condensation is
found on the
door and frame.
The door is
difficult to open.
Creaks are coming
from the
refrigerator.
The ambient temperature is too high in summer.
The door is opened frequently.
The ventilation around the refrigerator is not
enough.
The ambient humidity is quite high.
It can be removed with a soft cloth.
Open the door 5~10 seconds after it was closed.
The difficulty comes from pressure.
The creaks arise from the contraction or expan
-sion of internal parts. It is not a fault.
Control panel
&cleaning
Maintenance
Set up
Troubleshooting1Troubleshooting
10
Page 3

Safety
TROUBLESHOOTING
Safety
The refrigerator
Name of parts
doesn't work.
Notes concerning
operation
There are noises
in the refrigerator.
outlet.
placed.
flat surface.
Control panel
The plug has not been nicely inserted into the
The things in the refrigerator have not been evenly
The refrigerator has not been placed on a rigid and
The refrigerator is too close to the wall.
Something is behind or under the refrigerator.
The sound is from the compressor.
SAFETY
Please read this manual.
Please read carefully the contents in this manual concerning safety and operation
before switching on the power.
Please keep this manual.
Please keep this manual nicely for your future reference.
Please pay attention to warnings.
Please pay attention to the warnings on the wine refrigerator concerning operation
and follow their instructions.
Please follow the instructions in this manual concerning
operation.
NAME OF PARTS
Top frame
Large steel wire rack
Name of parts
operation
Notes concerning
Control panel
&cleaning
Maintenance
The front and sides
of refrigerator
are hot.
Maintenance
&cleaning
Set up
There is frost on
the back wall
inside the
refrigerator.
Troubleshooting
The frame is equipped with anti-condensation
pipe, so the refrigerator will become hot when
it is running.
It is not a fault.
There are radiating devices (condensers)
inside both sides of refrigerator.
It's normal when the refrigerator is running.
It will disappear when the refrigerator stops
working.
9
Small steel wire rack
Accessories
Name
Model
RW13EBBB
RW13EBSS
Large steel wire Rack
Small steel wire rack
5 1 1 1
2
Lamp Cover
Internal lamp
Set up
Page 4

Safety
NOTES CONCERNING OPERATION
Safety
POWER SOURCE
Do not use a damaged plug.
Do not pull the plug. Do not touch the plug when your hands are
wet.
Name of parts
The plug should not be over-bent or pressed under a heavy thing.
Please remove the plug from the outlet when there are thunders
and lightning or the refrigerator is not to be used for a long time.
The refrigerator should not share the outlet with other
appliances, otherwise electric shock and fire may happen.
Check the voltage of refrigerator if it is in conformity with
that of outlet before plugging.
Notes concerning
operation
The permissible voltage range is 98-143V. If the voltage of your
power source is not in this range, you have to use a 500W automatic
regulator, which can easily be found on the market.
The extension of power line is not recommended. If you want to use
a connection plate, it should be in line with the capacity of refrigerator
and nicely grounded. The connection plate should be hung up or put
at a place more than 200mm far from the refrigerator.
If the supply cord is damaged,it must be replaced by manufacturer,
Control panel
retailer it s service agent or similar qualified person in order to avoid
a hazard.
ATTENTION
SET UP
Please read the following section carefully to avoid
any injury of personnel and damage of property.
Place the refrigerator on a rigid and horizontal surface and flat it
with the adjusting foot.
The refrigerator should be put in a place with good ventilation. There
should be a distance of over 5cm to both sides and the rear and over
10cm to the top.
Do not place the refrigerator in a place with direct sunshine or near
the heat source (such as gas stove and oven) or in a damp place.
The refrigerator should be put in a place near the outlet.
Please use a separate 220~240V outlet for the refrigerator.
The refrigerator should be nicely grounded. Do not ground it through
phone line or gas pipe.
The replacement of power line needs special tools, so please contact
the service center if your power line is damaged.
Name of parts
operation
Notes concerning
Control panel
&cleaning
Maintenance
Maintenance
&cleaning
Set up
CLEANING
Troubleshooting
Please do not put your hands under the refrigerator.
Do not put cigarette butts or candles on the refrigerator.
The refrigerator should be far away from any heat source.
Please do not put heavy things on the refrigerator.
Do not clean the refrigerator with water or chemicals.
If there is dirt on the plug, please use it after cleaning.
Please wait 5 minutes when you want to insert the plug into
the outlet again after it was removed.
3
Noises will arise when something is beside, behind or on
the refrigerator.
The ambient temperature should be over 5 , otherwise the refrigerator
may freeze up.
ATTENTION
The refrigerator must be correctly grounded, otherwise incident may happen.
Do not put the refrigerator upside down or transversely. The slope between the
refrigerator and the floor should never be more than 45 .
8
Set up
Troubleshooting
Page 5

6. RESET MODE
Safety
6-1 If you press the white wine key and the red wine key simultaneously,
all indicators will go out.
6-2 After 3 seconds, all settings will become ex-factory ones.
CAUTION
Do not disassemble, repair and rebuild the refrigerator by yourself.
Do not let children play around the refrigerator. If the refrigerator
is to be discarded, please remove the door in order to prevent
the child from being sealed in it.
Safety
Name of parts
7. KEYBOARD LOCK MODE
Name of parts
7-1 Please press the white wine key and the internal lamp key together for
3 seconds.
7-2 The refrigerator will run in the keyboard lock mode if it was not running in that
mode before the keys are pressed. Otherwise, the refrigerator will exit from
the keyboard lock mode.
Notes concerning
operation
7-3.In the keyboard lock mode, no action will happen and DIAPLAY will show "LO"
if any key is pressed (internal lamp key excluded). When the key is released,
DISPLAY will show the actual temperature.
MAINTENANCE & CLEANING
Control panel
Please remove the plug from the outlet first before
cleaning.
Inside
Maintenance
&cleaning
Please take out the racks, wash them with sterilization spray and dry
them with a clean cloth. The door should be cleaned carefully by using
neutral detergent and a soft cloth.
Do not put inflammable near the refrigerator.
When gas leaking happens, do not remove the plug from the
outlet or adjust the temperature. Please turn off the gas first.
Please remove the plug from the outlet immediately when there are
noises, fumes or abnormal odor in the refrigerator and contact the service
center promptly.
Do not put thermal bottle, medicine or metal chains on the refrigerator.
WARNING
Keep ventilation openings,in the appliance enclosure or in the built-in
structure, clear of obstruction.
Do not use mechanical devices or other means to accelerate the de
-frosting process,other than those recommended by the manufacturer.
Do not damage the refrigerant circuit.
Do not use electrical appliances inside the food storage compartments
of the appliance ,unless they are of the type recommended by the man
-ufacturer
ADDITION
operation
Notes concerning
Control panel
&cleaning
Maintenance
Set up
Water collector
Set up
Pour out the water in the collector and replace it after cleaning.
Attention
The plug should be removed from the outlet and the door should be opened
when you are doing the cleaning or the refrigerator is not to be used for a
long time.
Do not clean the refrigerator with water or chemicals.
Troubleshooting
7
Instructions for replacing the illuminating lamps
When the lamp need to be replaced,please power off the wine chiller at first,
then remove the two screws that were used to fix the lamp cover,removing
the lamp cover and then pull the old lamp,replacing a new one,fixing the lamp
cover with screws .
Finally,power on the wine chiller.
Max.rated input of lamp:7W
4
Troubleshooting
Page 6

CONTROL PANEL
Safety
Red wine key
Red wine
White wine key
White wine
Custom
Custom
Interior light key
Interior light
Name of parts
Red wine indicator
After the power is switched on, all indicators will light up for self-inspection and
Notes concerning
operation
then the refrigerator will be automatically set on the red wine mode. At that time,
the red wine indicator will light up and DISPLAY will show the actual temperature.
White wine indicator
Red wine
White wine
Custom indicator
Custom
Interior light
2.WHITE WINE MODE
2-1 If you press the white wine key when the refrigerator is in the white wine
mode, DISPLAY will show the temperature setting 7 45 F .
2-2 If you press the white wine key when the refrigerator is not in the white wine
mode, the white wine indicator will light up, DISPLAY will show the tempera
-ture
setting of white wine 7 45 F and the refrigerator will start running
in the white wine mode.
2-3 When the white wine key is released, DISPLAY will show the actual temper
-ature.
3.CUSTOM MODE
3-1 If you press the custom key when the refrigerator is in the custom mode,
DISPLAY will show the temperature setting.
3-2 If you press the custom key when the refrigerator is not in the custom
mode, the custom indicator will light up, DISPLAY will show the tempera
-ture preset by the user and the refrigerator will start running in the custom
mode.
Safety
Name of parts
operation
Notes concerning
Control panel
Note:
In the red wine mode, the temperature setting is 13 55 F |15 ~12
59 F 54 F ),
Which is suitable mainly for the storage of red wine.
Control panel
In the white wine mode, the temperature setting is 7 45 F |9 ~5
48 F 41 F ), which is
In the custom mode, the temperature can be set in the range of 4 ~1
65 F
Maintenance
&cleaning
40 F
according to user`s requirement.
suitable mainly for the storage of white wine.
1.RED WINE MODE
1-1 If you press the red wine key when the refrigerator is in the red wine mode,
DISPLAY will show the temperature setting 13 55 F .
Set up
1-2 If you press the red wine key when the refrigerator is not in the red wine
mode, the red wine indicator will light up, DISPLAY will show the temper
-ature setting of red wine 13 55 F and the refrigerator will start
running in
1-3 When the red wine key is released, DISPLAY will show the actual temper
-ature.
Troubleshooting
the red wine mode.
5
3-3 When the custom key is released, DISPLAY will show the actual tempera
-ture.
4. ADJUSTMENT OF TEMPERATURE
4-1 Please let the refrigerator run in the user setting mode.
&cleaning
4-2 Press the user setting key for 3 seconds and the refrigerator will enter into
8
the sate for adjustment of temperature. at that time, led will flash and show
the current temperature setting.
4-3 If you press the red wine key, the temperature setting will be increased by
1 (34 F) until it becomes 18 65 F . After that, the temperature setting
will no longer change if you press the red wine key again. alternately, if
you press the white wine key, the temperature setting will be decreased by
1 34 F until it becomes 4 40 F . After that, the temperature
setting will no longer change if you press the white wine key again.
4-4 DISPLAY will show the actual temperature after 5 seconds with the comp
-letion of adjustment.
Maintenance
Set up
Troubleshooting
5. INTERNAL LAMP
5-1 If you press the internal lamp key, the internal lamp will go out when it is lit,
and vice versa.
5-2 When the internal lamp is continuously lit for1 hour, it will go out
automatically.
6
 Loading...