

Page 1

Room
Cinema System
user manual
HE20
imagine the possibilities
Thank you for purchasing this Samsung product.
To receive more complete service,
please register your product at
www.samsung.com/global/register
Page 2

Features
Multi-Disc Playback & FM Tuner
The RTS-HE20 combines the convenience of multi-disc playback capability, including, DVD-VIDEO, CD, MP3-CD, WMA-CD,
DivX, CD-R/RW, with a sophisticated FM tuner, all in a single player.
USB Host support
You can connect and play fi les from external USB storage devices such as MP3 players, USB fl ash memory, etc.
using the Room Cinema's USB HOST function.
TV Screen Saver Function
If the main unit remains in Stop mode for 3 minutes, Samsung logo appears on TV screen.
The
RTS-HE20
automatically switches itself into the power saving mode after 20 minutes in the Screen Saver mode.
Power Saving Function
The
RTS-HE20
automatically shuts itself off after 20 minutes in Stop mode.
HDMI
HDMI transmits DVD video and audio signals simultaneously, and provides a clearer picture.
Anynet+(HDMI-CEC) Function
Anynet+ is a convenient function that offers linked operation of this unit through Samsung TVs with the Anynet+
feature.
WHAT’S INCLUDED
Check for the supplied accessories below.
Audio Video Cable FM Antenna User's Manual
2
Remote Control
/ Batteries (AAA size)
Page 3

Safety information
SAFETY WARNINGS
TO REDUCE THE RISK OF ELECTRIC SHOCK, DO NOT REMOVE THE COVER(OR BACK).
NO USER-SERVICEABLE PARTS ARE INSIDE. REFER SERVICING TO QUALIFIED SERVICE PERSONNEL.
This symbol indicates “dangerous voltage”
CAUTION
RISK OF ELECTRIC SHOCK
DO NOT OPEN
CLASS 1 LASER PRODUCT
KLASSE 1 LASER PRODUKT
LUOKAN 1 LASER LAITE
KLASS 1 LASER APPARAT
PRODUCTO LASER CLASE 1
CAUTION : INVISIBLE LASER RADIATION WHEN OPEN AND INTERLOCKS DEFEATED, AVOID EXPOSURE TO
WARNING : To reduce the risk of fi re or electric shock, do not expose this appliance to rain or moisture.
CAUTION :
This apparatus shall always be connected to a AC outlet with a protective grounding connection.
•
•
To disconnect the apparatus from the mains, the plug must be pulled out from the mains socket, therefore the
mains plug shall be readily operable.
CAUTION
Apparatus shall not be exposed to dripping or splashing and no objects fi lled with liquids, such as vases, shall be
•
placed on the apparatus.
The Mains plug is used as a disconnect device and shall stay readily operable at any time.
•
BEAM.
TO PREVENT ELECTRIC SHOCK, MATCH WIDE BLADE OF PLUG TO WIDE SLOT, FULLY INSERT.
CLASS 1 LASER PRODUCT
This Compact Disc player is classifi ed as a CLASS 1
LASER product.
Use of controls, adjustments or performance of
procedures other than those specifi ed herein may result in
hazardous radiation exposure.
inside the product that presents a risk of
electric shock or personal injury.
This symbol indicates important instructions
accompanying the product.
GB
3
Page 4
PRECAUTIONS
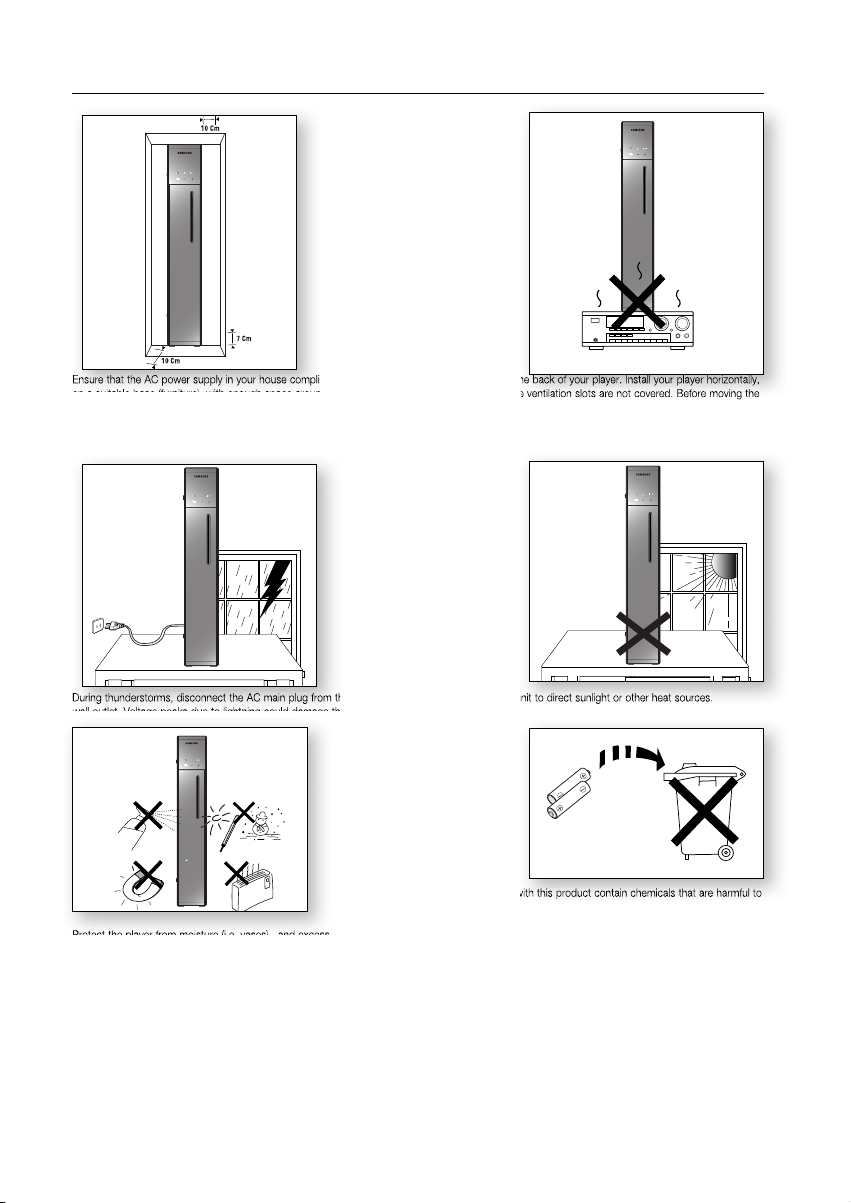
Ensure that the AC power supply in your house complies with the identification sticker located on the back of your player. Install your player horizontally,
on a suitable base (furniture), with enough space around it for ventilation (7.5~10cm). Make sure the ventilation slots are not covered. Before moving the
player, ensure the disc tray is empty. This player is designed for continuous use. Switching off the Room Cinema System to the stand-by mode does
not disconnect the electrical supply. In order to disconnect the player completely from the power supply, remove the main plug from the wall outlet,
especially when left unused for a long period of time.
During thunderstorms, disconnect the AC main plug from the
wall outlet. Voltage peaks due to lightning could damage the unit.
Protect the player from moisture (i.e. vases) , and excess heat
(e.g.fireplace) or equipment creating strong magnetic or electric fields
(i.e.speakers...). Disconnect the power cable from the AC supply if the
player malfunctions. Your player is not intended for industrial use. Use of
this product is for personal use only.
Condensation may occur if your player or disc has been stored in
cold temperatures. If transporting the player during the winter,
mately 2 hours until the unit has reached room temperature
wait approxi
before using.
4
Do not expose the unit to direct sunlight or other heat sources.
This could lead to overheating and malfunction of the unit.
The batteries used with this product contain chemicals that are harmful to
the environment.
Do not dispose of batteries in the general household trash.
Page 5

contents
FEATURES
2
SAFETY INFORMATION
3
GETTING STARTED
7
DESCRIPTION
10
REMOTE CONTROL
12
2 What’s included
3 Safety Warnings
4 Precautions
7 Before Reading the User’s Manual
8 Playable Discs
8 Do not use the following types of disc!
8 Copy Protection
9 Disc Type and Characteristics
10 Front Panel
11 Rear Panel
13 Tour of the Remote Control
CONNECTIONS
15
BEFORE USING YOUR ROOM
THEATRE
21
PLAYBACK
22
15 Connecting the Speakers
17 Connecting the Video Out to your TV
18 HDMI Function
19 Connecting Audio from External Components
20 Connecting the FM Antenna
22 Disc Playback
23 MP3/WMA-CD Playback
24 JPEG File Playback
25 DivX Playback
27 Using the Playback Function
31 Playing Media Files using the USB Host
Feature
5
Page 6

SYSTEM SETUP
34
34 Setting the Language
34 Setting The Display
37 Rating Level
37 Change Password
38 DIVX(R) Registration
38 Setting the DRC
38 Setting the AV-SYNC
38 Setting the EQUALIZER Function
39 Setting the DSP Function
39 SLEEP TIMER Function
39 Adjusting Display Brightness
RADIO
40
TROUBLESHOOTING
41
USB HOST FEATURE SUPPORTED
PRODUCTS
42
APPENDIX
43
40 Listening to Radio
40 Presetting Stations
42 Digital Camera
42 USB Flash Disc
42 MP3 Player
43 Cautions on Handling and Storing Discs
44 Specifi cations
6
Page 7

BEFORE READING THE USER’S MANUAL
Make sure to check the following terms before reading the user manual.
GB
Icons that will be used in manual
Icon Term Defi nition
DVD
CD This involves a function available with a data CD (CD-R or CD-RW).
B
MP3 This involves a function available with CD-R/-RW discs.
A
JPEG This involves a function available with CD-R/-RW discs.
G
DivX
D
Caution
Note
M
M
In this manual, the instructions marked with "DVD ( )" are applicable to DVD-VIDEO, DVD-AUDIO and
DVD-R/-RW discs that have been recorded in Video Mode and then fi nalized. Where a particular DVD type is
mentioned, it is indicated separately.
If a DVD-R/-RW disc has not been recorded properly in DVD Video format, it will not be playable.
This involves a function available with DVD or DVD-R/DVD-RW discs that
have been recorded and fi nalized in Video Mode.
This involves a function available with MPEG4 discs.
(DVD±R/RW, CD-R or CD-RW)
This involves a case where a function does not operate or settings may be
cancelled.
This involves tips or instructions on the page that help each function
operate.
About the use of this user’s manual
Be sure to be familiar with Safety Instructions before using this product. (See pages 3~4)
1.
If a problem occurs, check the Troubleshooting. (See pages 41)
2.
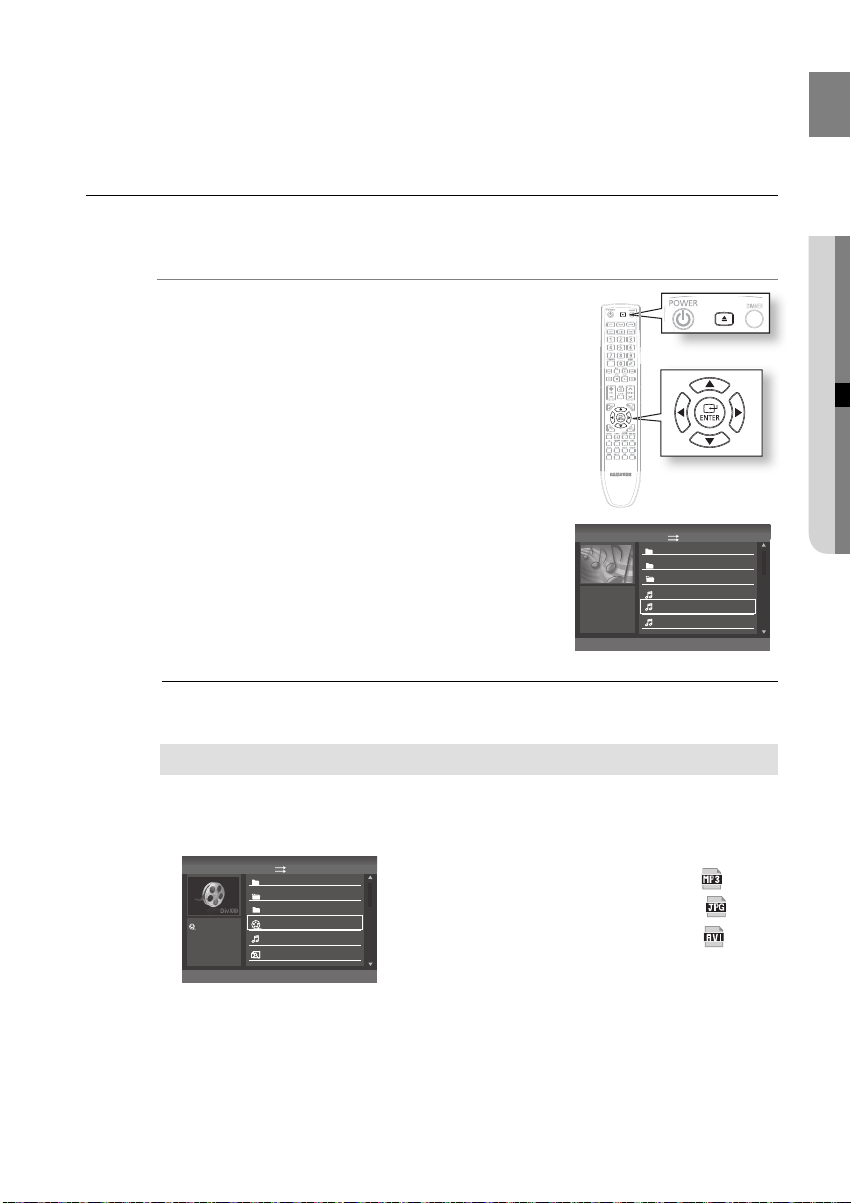
● GETTING STARTED
Copyright
©2009 Samsung Electronics Co.,Ltd.
All rights reserved; No part or whole of this user’s manual may be reproduced or copied without the
prior written permission of Samsung Electronics Co.,Ltd.
7
Page 8
Getting started
DVD (Digital Versatile Disc) offers fantastic audio and video, thanks to Dolby Digital
surround sound and MPEG-2 video compression technology. Now you can enjoy these
realistic effects in the home, as if you were in a movie Cinema or concert hall.
~
1 6
Room Cinema Systems and the discs are coded by region. These regional codes must match in
order for the disc to play. If the codes do not match, the disc will not play.
The Region Number for this player is given on the rear panel of the player.
(Your Room Cinema System will only play DVDs that are labelled with identical region codes.)
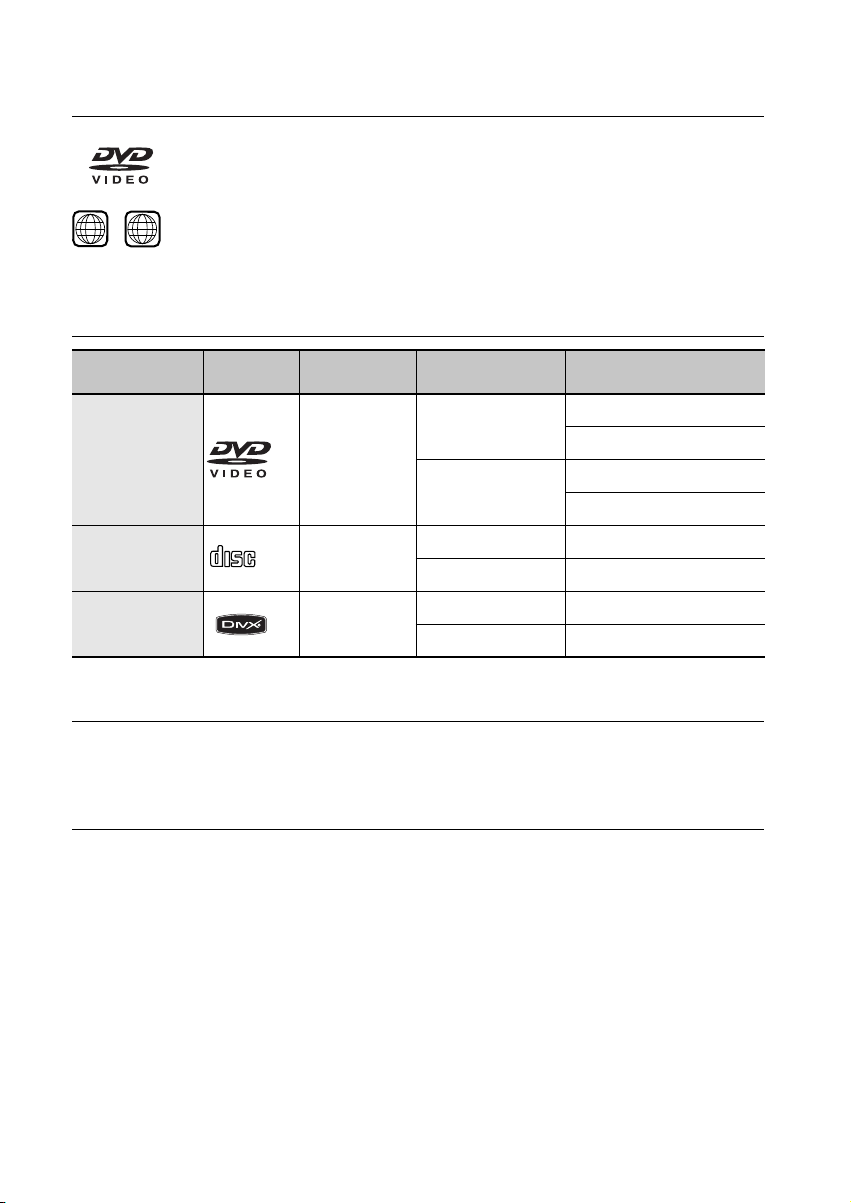
PLAYABLE DISCS
Disc Type Mark (Logo)
DVD-VIDEO
AUDIO-CD
DivX
COMPACT
DIGITAL AUDIO
Recorded
Signals
VIDEO
AUDIO
AUDIO + VIDEO
Disc Size Max. Playing Time
Approx. 240 min. (single-sided)
12 cm
Approx. 480 min. (double-sided)
Approx. 80 min. (single-sided)
8 cm
Approx. 160 min. (double-sided)
12 cm 74 min.
8 cm 20 min.
12 cm 74 min.
8 cm 20 min.
DO NOT USE THE FOLLOWING TYPES OF DISC!
LD, CD-G, CD-I, CD-ROM, DVD-RAM and DVD-ROM discs cannot be played on this player.
•
DVD discs purchased abroad may not play on this player.
•
COPY PROTECTION
Many DVD discs are encoded with copy protection. Because of this, you should only connect your Room Cinema
•
System directly to your TV, not to a VCR. Connecting to a VCR results in a distorted picture from copy-protected
DVD discs.
This product incorporates copyright protection technology that is protected by methods claims of certain U.S.
•
patents and other intellectual property rights owned by Macrovision Corporation and other rights owners. Use of
this copyright protection technology must be authorisedd by Macrovision Corporation, and is intended for home
and other limited viewing uses only unless otherwise authorisedd by Macrovision Corporation. Reverse
engineering or disassembly is prohibited.
8
Page 9

Getting started
DISC TYPE AND CHARACTERISTICS
This product does not support Secure (DRM) Media fi les.
CD-R Discs
❖
Some CD-R discs may not be playable depending on the disc recording device (CD-Recorder or PC) and the
•
condition of the disc.
Use a 650MB/74 minute CD-R disc.
•
Do not use CD-R discs over 700MB/80 minute as they may not be played back.
Some CD-RW (Rewritable) media, may not be playable.
•
Only CD-Rs that are properly "closed" can be fully played. If the session is closed but the disc is left open, you
•
may not be able to fully play the disc.
CD-R MP3 Discs
❖
MP3 fi le names should be 8 characters or less in length and contain no blank spaces or special characters
•
(. / = +).
Use discs recorded with a compression/decompression data rate greater than 128Kbps.
•
Only fi les with the "mp3" and extensions can be played.
•
Only a consecutively written multisession disc can be played. If there is a blank segment in the Multisession
•
disc, the disc can be played only up to the blank segment.
If the disc is not closed, it will take longer to begin playback and not all of the recorded fi les may be played.
•
For fi les encoded in Variable Bit Rate (VBR) format, i.e. fi les encoded in both low bit rate and high bit rate
•
(e.g., 32Kbps ~ 320Kbps), the sound may skip during playback.
A maximum of 500 tracks can be played per CD.
•
A maximum of 300 folders can be played per CD.
•
CD-R JPEG Discs
❖
Only fi les with the "jpg" extensions can be played.
•
If the disc is not closed, it will take longer to start playing and not all of the recorded fi les may be played.
•
Only CD-R discs with JPEG fi les in ISO 9660 or Joliet format can be played.
•
JPEG fi le names should be 8 characters or less in length and contain no blank spaces or special characters
•
(. / = +).
Only a consecutively written multisession disc can be played. If there is a blank segment in the multisession
•
disc, the disc can be played only up to the blank segment.
A maximum of 9,999 images can be stored on a single CD.
•
When playing a Kodak/Fuji Picture CD, only the JPEG fi les in the picture folder can be played.
•
Picture discs other than Kodak/Fuji Picture CDs may take longer to start playing or may not play at all.
•
DVD±R/RW, CD-R/RW DivX Discs
❖
Since this product only provides encoding formats authorisedd by DivX Networks, Inc., a DivX fi le created by
•
the user might not play.
Software updates for incompatible formats are not supported.
•
(Example : QPEL, GMC, resolution higher than 800 x 600 pixels, etc.)
Sections with a high frame rate might not be played while playing a DivX fi le.
•
For more information about the formats authorisedd by DivX Networks, Inc., please visit "www.divxnetworks.
•
net".
9
Page 10
Description
Description
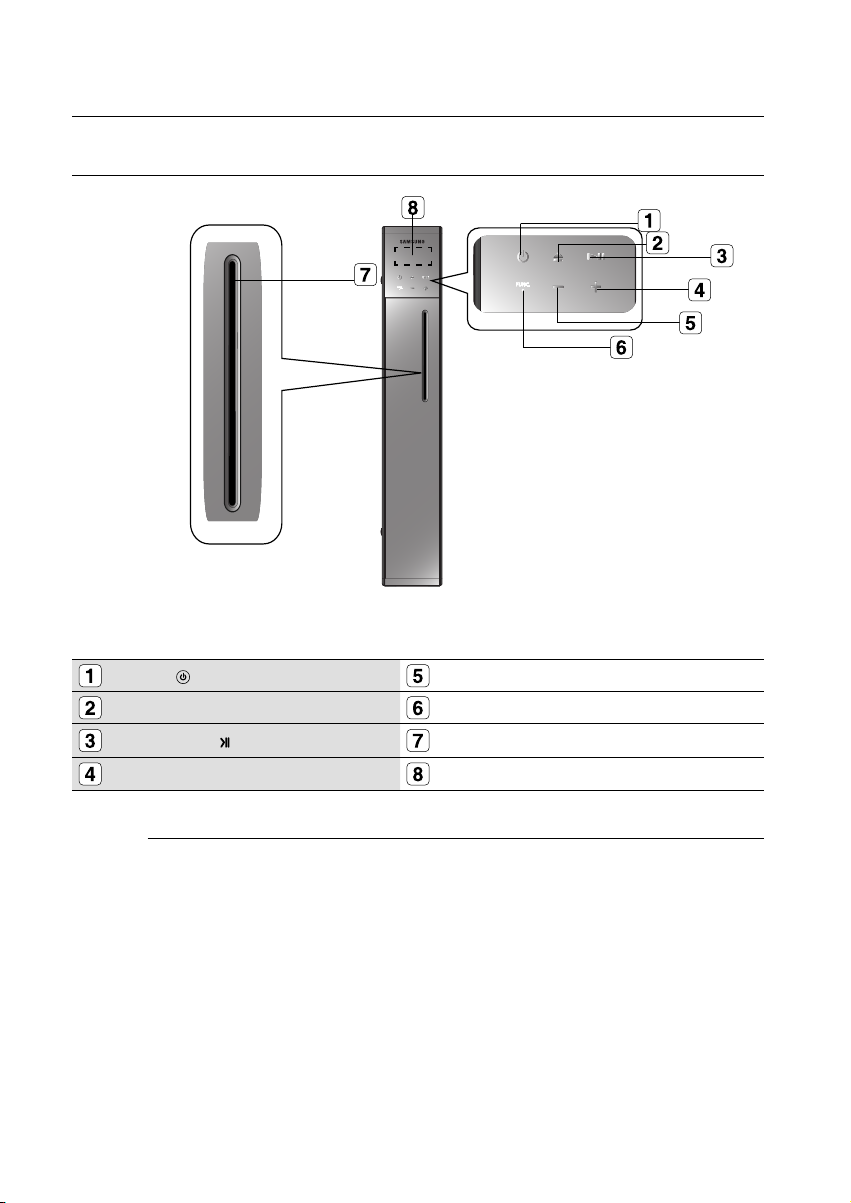
FRONT PANEL
POWER( ) BUTTON
EJECT BUTTON Function Button
PLAY/PAUSE ( ) BUTTON
Volume Control (+) Display
Service for Speaker system is not available. For speaker system replacement please contact your authorised
M
Samsung Service Centre.
If you press the button. there will be a Bip Sound.
There will be a delay between 3 seconds, when you touch the Power ON/OFF.
10
Volume Control (-)
DISC TRAY
Page 11
REAR PANEL
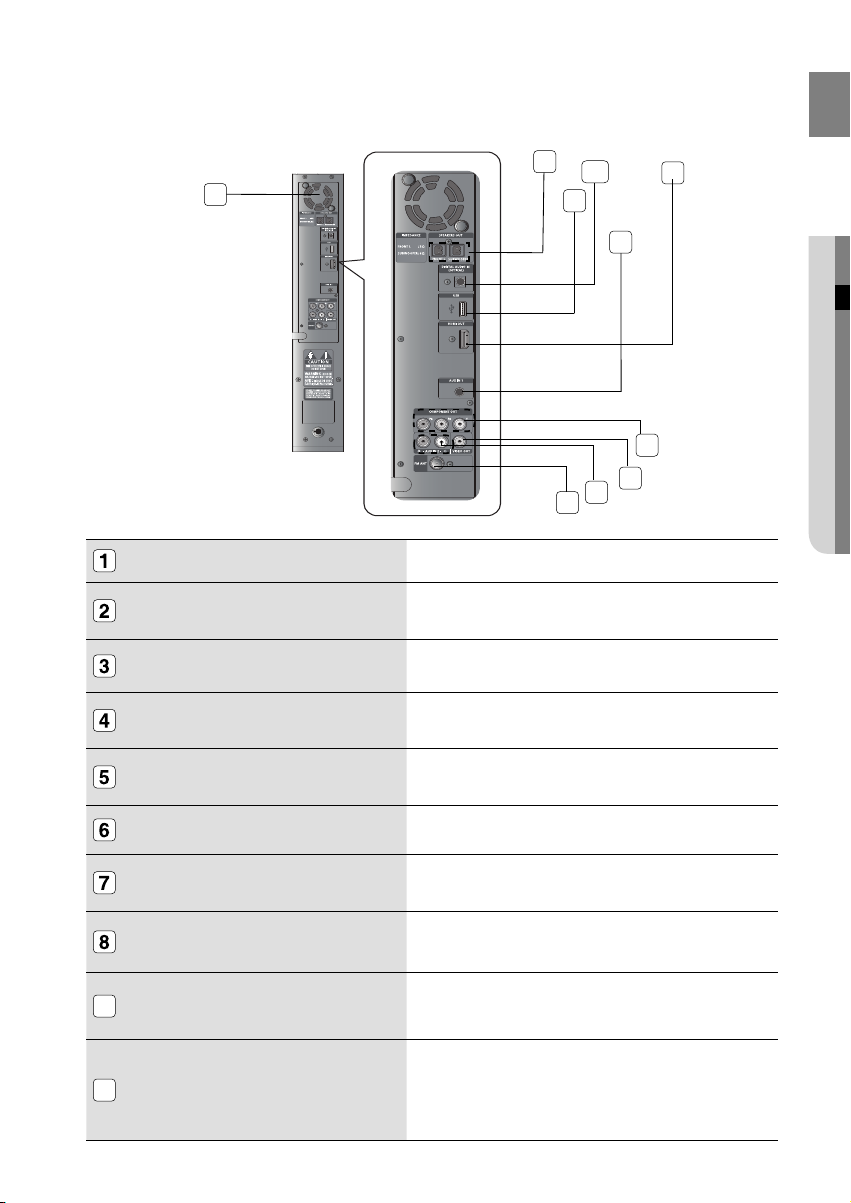
GB
1
10
9
2
4
SPEAKER OUTPUT CONNECTORS
USB Host
AUX IN JACK
HDMI OUT JACK
FM 75Ω
3
8
7
6
5
Connect Left, subwoofer speakers.
Connect digital still camera, MP3 Player, memory stick, card reader, or
other removable storage devisces.
Connect to the Analogue output of an external device (such as a MP3
Player)
Use the HDMI cable, connect this HDMI output terminal to the HDMI
input terminal on your TV for the best quality picture.
Connect the FM antenna.
● DESCRIPTION
AUX IN 2 JACK
VIDEO OUTPUT JACK
COMPONENT VIDEO OUTPUT JACKS
9
COOLING FAN
10
DIGITAL AUDIO IN (OPTICAL)
Connect to the 2 channel analogue output of an external device (such
as VCR).
Connect the TV's Video Input Jack (Video IN) to the Video Out Jack.
Connect a TV with Component video inputs to these jacks.
The fan always revolves when the power is on. Ensure a minimum of
10 Cm of clear space on all sides of the fan when installing the
product.
Use coaxial digital cable to connect to a compatible Dolby Digital
•
receiver.
Use coaxial digital cable to connect to an A/V Amplifi er that contains a
•
Dolby Digital, MPEG2 or DTS decoder.
11
Page 12
Remote control
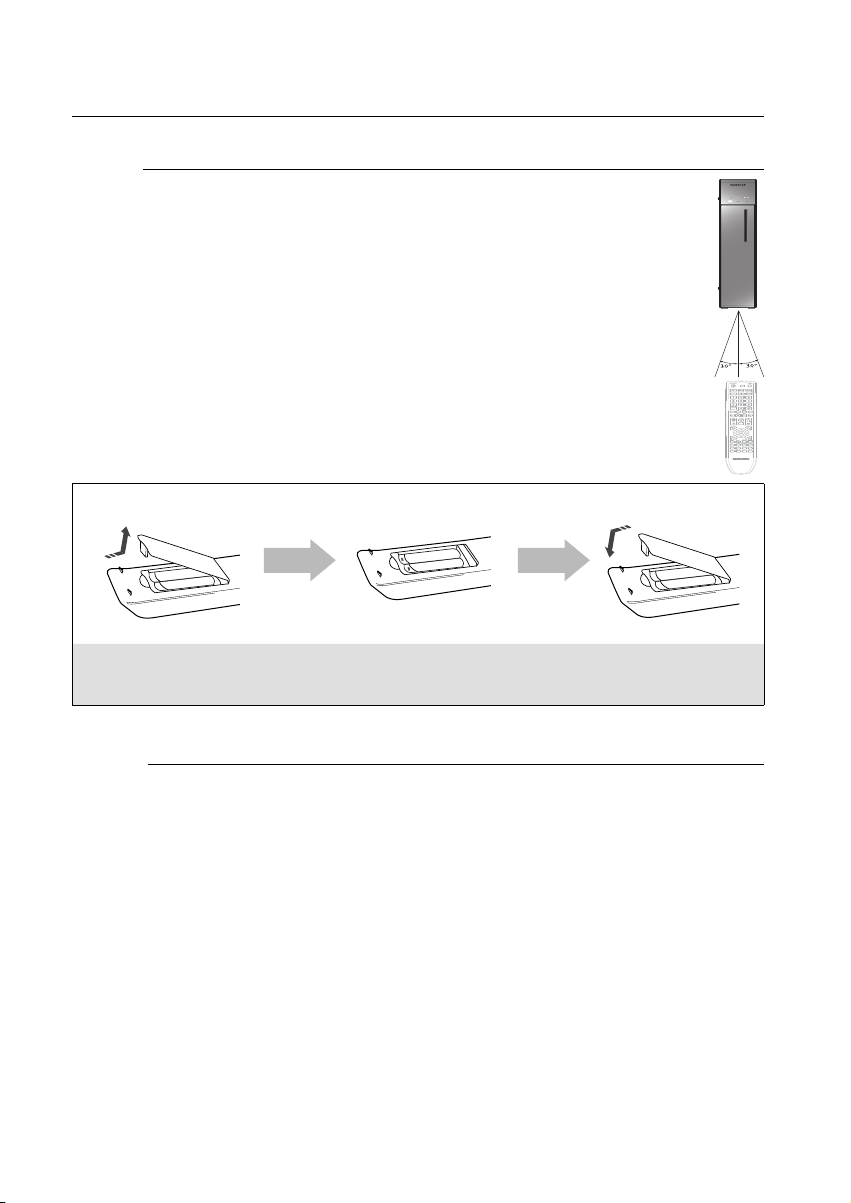
Operation Range of the Remote Control
The remote control can be used up to approximately
23 feet (7 meters) in a straight line. It can also be operated at a horizontal angle of up to 30°
from the remote control sensor.
Insert Remote Batteries
1. Remove the battery
cover in the direction of
the arrow.
Follow these precautions to avoid leaking or cracking cells:
2. Insert two 1.5V AAA batteries, paying
attention to the correct polarities
(+ and –).
M
Place batteries in the remote control so they match the polarity : (+) to (+) and (–) to (–).
Use the correct type of batteries. Batteries that look similar may differ in voltage.
Always replace both batteries at the same time.
Do not expose the batteries to heat or a fl ame.
12
3. Replace the battery
cover.
Page 13

TOUR OF THE REMOTE CONTROL
1
2
3
4
41
40
39
38
37
36
GB
● REMOTE CONTROL
10
12
13
14
15
16
17
18
19
5
6
7
8
9
11
35
34
33
32
31
30
29
28
27
26
25
24
23
22
21
20
13
Page 14

Remote control
POWER button
1
DVD button
2
USB button
3
Number buttons (0 ~ 9)
4
CD Ripping button
5
STEP Button
6
REVERSE/FORWARD Skip buttons
7
VOLUME button
8
MENU button
9
Preset ▲, ▼, ◄, ► Cursor/ Enter button
10
INFO button
11
REPEAT button
12
EQUALIZER button
13
SLEEP button
14
DNSE button
15
SLOW button
16
WIDE ST button
17
Power Sound button
18
REPEAT A-B button
19
ANGLE button
20
DSP button
21
TREBLE/BASS button
22
TUNER MEMORY button
23
ZOOM button
24
REMAIN button
25
MO/ST button
26
SUBTITLE button
27
EXIT button
28
RETURN button
29
AUDIO button
30
TUNNING button
31
MUTE button
32
PLAY/ INSERT ►, STOP , SEARCH
33
, buttons
PAUSE button
34
CANCEL button
35
D.IN button
36
AUX2 button
37
AUX1 button
38
TUNER button
39
DIMMER button
40
EJECT button
41
14
Page 15

Connections
This section involves various methods of connecting the Digital Room Cinema to other external components.
Before moving or installing the product, be sure to turn off the power and disconnect the power cord.
CONNECTING THE SPEAKERS
L R
Position of Digital Room Cinema
Place it on a stand or cabinet shelf, or under the TV stand.
Selecting the Listening Position
The listening position should be located about 2.5 to 3 times the distance of the TV's screen size away from
the TV.
Example : For 32" TVs 2~2.4m (6~8feet)
For 55" TVs 3.5~4m (11~13feet)
Front Speakers
Place these speakers in front of your listening position, facing inwards (about 45°) toward you.
Place the speakers so that their tweeters will be at the same height as your ear.
Align the front face of the front speakers with the front face of the centre speaker or place them slightly
in front of the centre speakers.
ei
GB
● CONNECTIONS
15
Page 16

Connections
Connecting The Speakers
Press down the terminal tab on the back of the speaker.
1.
Insert the black wire into the black terminal (–) and the red wire into
2.
the red (+) terminal, and then release the tab.
Connect the connecting plugs to the back of the Room Cinema.
3.
Make sure the colours of the speaker terminals match the colours
•
of the connecting plugs.
Subwoofer
Black
Red
16
Do not let children play with or near the speakers. They could get hurt if a speaker falls.
When connecting the speaker wires to the speakers, make sure that the polarity (+/ –) is correct.
If you place a speaker near your TV set, screen Colour may be distorted because of the magnetic fi eld
M
generated by the speaker. If this occurs, place the speaker away from your TV set.
Page 17
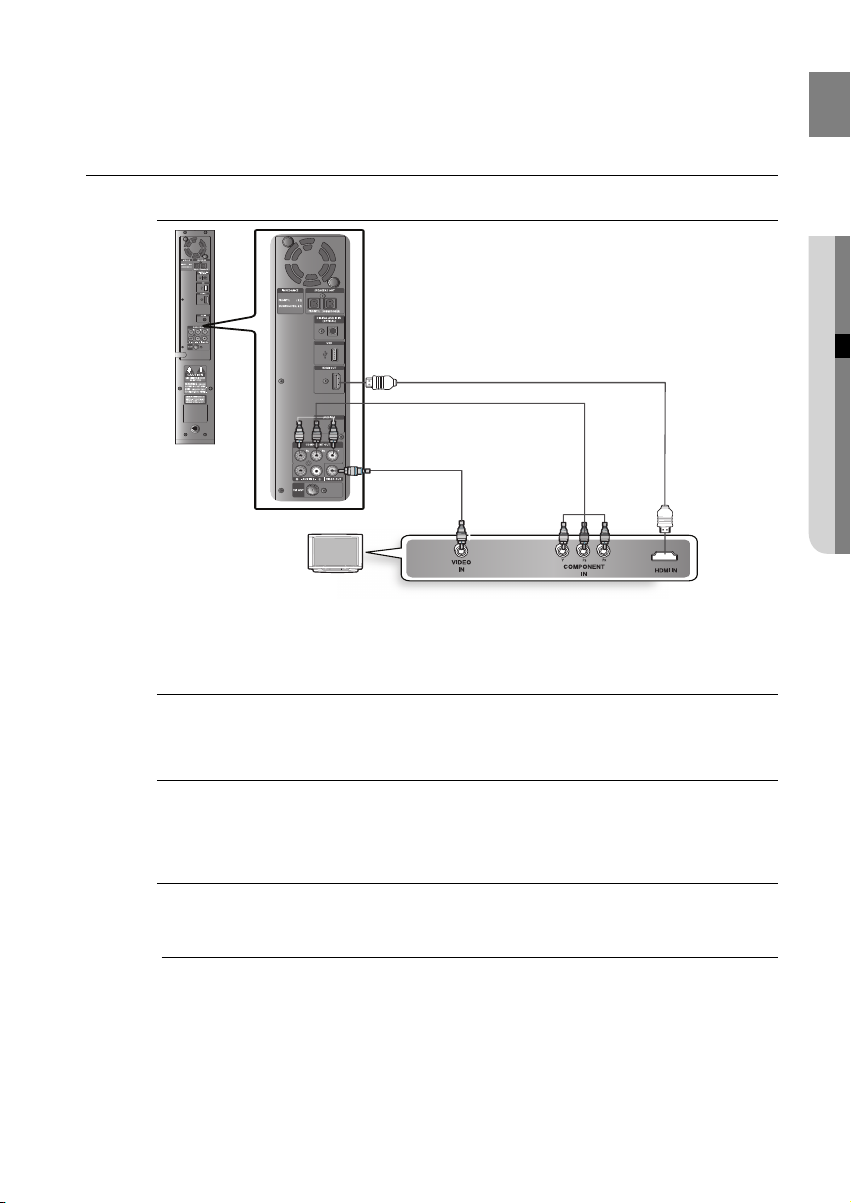
CONNECTING THE VIDEO OUT TO YOUR TV
Choose one of the three methods for connecting to a TV.
GB
● CONNECTIONS
METHOD3
(supplied)
METHOD2 METHOD1
(supplied)
METHOD 1 : HDMI
Connect the HDMI cable from the HDMI OUT jack on the back of the Room Cinema System to the
HDMI IN jack on your TV.
METHOD 2 : Component Video
If your television is equipped with Component Video inputs, connect a Component video cable(not
supplied) from the Component Video Output (P
System to the Component Video Input jacks on your TV.
R
, PB and Y) jacks on the back of the Room Cinema
METHOD 3 : Composite Video
Connect the supplied Video cable from the VIDEO OUT jack on the back of the Room Cinema System
to the VIDEO IN jack on your TV.
This product operates in Interlace scan mode 576i(480i) for component output.
M
Please check the n logo (If your TV has an n logo, then it supports the Anynet+ function.)
17
Page 18

Connections
HDMI Auto Detection Function
The player's video output will automatically change to HDMI mode when connecting an HDMI cable
while power is on.
HDMI (High Defi nition Multimedia Interface)
•
HDMI is an interface that enables the digital transmission of video and audio data with just a single connector.
Using HDMI, the DVD Room Cinema transmits a digital video and audio signal and displays a vivid
picture on a TV having an HDMI input jack.
HDMI connection description
•
HDMI connector - Supports video and digital audio data.
- HDMI outputs only a pure digital signal to the TV.
- If your TV does not support HDCP (High-bandwidth Digital Content Protection), random noise
appears on the screen.
Why does Samsung use HDMI?
•
Analogue TVs require an Analogue video/audio signal. However, when playing a DVD, the data
transmitted to a TV is digital. Therefore either a digital-to-Analogue converter (in the DVD Room
Cinema) or an Analogue-to-digital converter (in the TV) is required. During this conversion, the picture
quality is degraded due to noise and signal loss. HDMI technology is superior because it requires no
D/A conversion and is a pure digital signal from the player to your TV.
What is the HDCP?
•
HDCP (High-band width Digital Content Protection) is a system for protecting DVD content outputted via HDMI
from being copied. It provides a secure digital link between a video source (PC, DVD. etc) and a display device
(TV, projector. etc). Content is encrypted at the source device to prevent unauthorisedd copies from being made.
What is Anynet+?
•
Anynet+ is a convenient function that offers linked operation of this unit through Samsung TVs with the
Anynet+ feature.
If your Samsung TV has an n logo, then it supports the Anynet+ function.
•
If you turn on the player and insert a disc, the player will start playing the disc, and the TV will turn
•
on automatically and switch to HDMI mode.
If you turn on the player and press the Play button with a disc already inserted, the TV will
•
immediately turn on and switch to HDMI mode.
HDMI FUNCTION
Resolution Selection
This function allows the user to select the screen resolution for HDMI output.
In Stop mode, press the Menu button button on the remote
control, to setup the HDMI output.
Resolutions available for the HDMI output are 576p(480p),
•
720p, 1080i/1080p.
SD(Standard Defi nition) resolution is 576p(480p) and HD
•
(High Defi nition) resolution is 720p, 1080i/1080p.
The default value of HDMI output is 576P(480P).
If the TV does not support the confi gured resolution, you will not be able to see the picture properly.
M
See your TV owner's manual for more information on how to select the TV's Video Input source.
18
Why use HDMI (High Definition
Multimedia Interface)?
This device transmits a DVD video
signal digitally without the process of
converting to Analogue. You will get
sharper digital pictures when using an
HDMI connection.
Page 19

CONNECTING AUDIO FROM EXTERNAL COMPONENTS
AUX1 : Connecting an External Component/MP3 player
Components such as an MP3 Player
1.
Connect AUX IN (Audio) on the Room Cinema to the Audio Out of the external component/MP3
player.
2.
Press the AUX1 button on the remote control to select AUX in 1 input.
Audio OUT
When the unit is powered on and you connect an iPod MP3 player, the unit will charge your iPod's battery.
M
AUX2 : Connecting an External Analog Component
Analog signal components such as a VCR.
1.
Connect AUX IN 2 (Audio) on the Home Theater to the Audio Out of the external analog component.
2.
Press the AUX2 button on the remote control to select AUX in 2 input.
•
You can also use the FUNCTION button on the main unit. The mode switches as follows :
DVD ➞ USB ➞ TUNER ➞ AUX 1 ➞ AUX 2 ➞ D.IN.
Audio Cable
(not supplied)
GB
● CONNECTIONS
Audio Cable
(not supplied)
External
Analog
Component
You can connect the Video Output jack of your VCR to the TV, and connect the Audio Output jacks of the VCR
M
to this product.
19
Page 20

Connections
CONNECTING THE FM ANTENNA
1.
Connect the FM antenna supplied to the FM 7Ω COAXIAL Jack.
2.
Slowly move the antenna wire around until you fi nd a location where reception is good, then fasten it
to a wall or other rigid surface.
This unit does not receive AM broadcasts.
M
Cooling Fan
The cooling fan supplies cool air to the unit to
prevent overheating.
Please observe the following cautions for your safety.
Make sure the unit is well-ventilated. If the unit has
•
poor ventilation, the temperature inside the unit may
rise and may damage it.
Do not obstruct the cooling fan or ventilation holes.
•
(If the cooling fan or ventilation holes are covered
with a newspaper or cloth, heat may build up inside
the unit and fi re may result.)
FM Antenna
(supplied)
20
Page 21
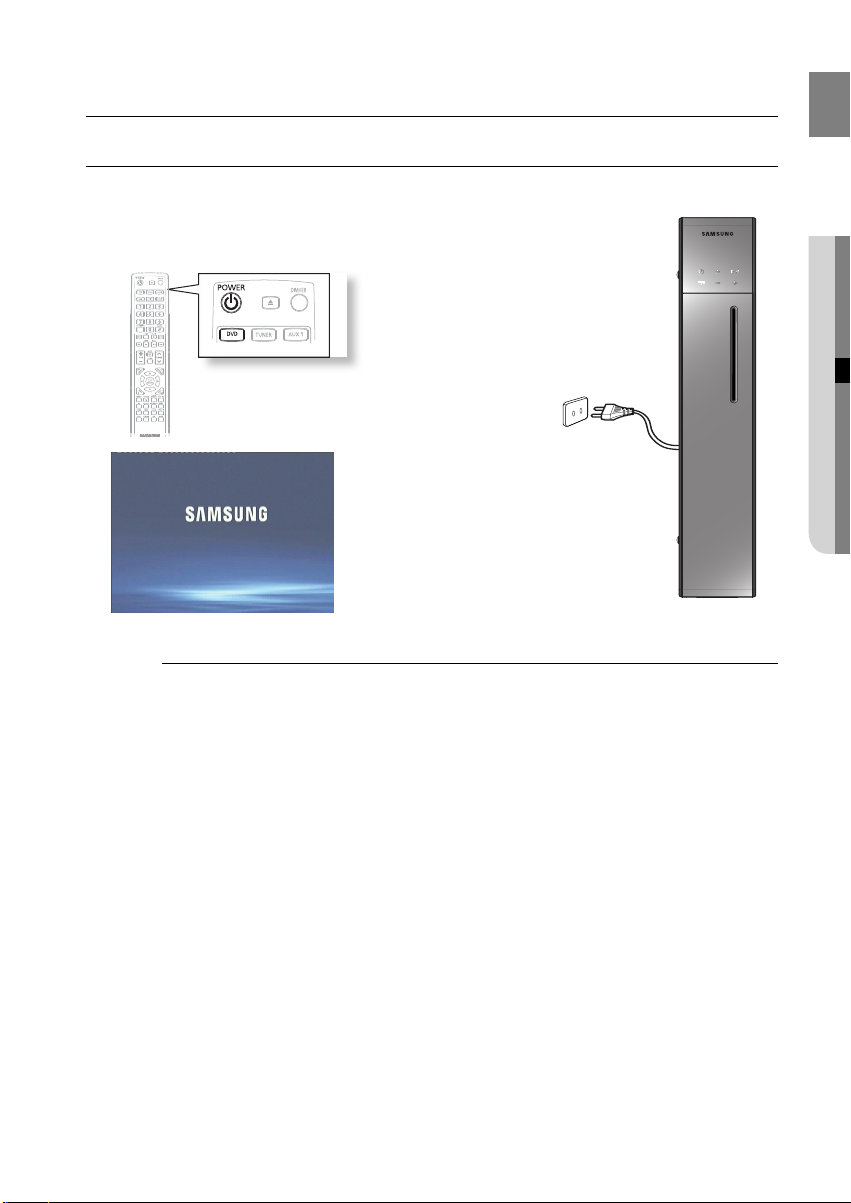
Before using your room theatre
THE ROOM CINEMA SYSTEM
Plug the main unit's power cord into the AC power supply.
1)
Press the DVD button to switch to DVD mode to operate the DVD Room
2)
Cinema.
No Disc
GB
●
BEFORE USING YOUR ROOM CINEMA
When you turn the power on or off by using the key touch on the main set, there will be a delay time about 3
M
seconds.
There will be a delay time 2 seconds, while you were ejecting the disc.
21
Page 22
Playback
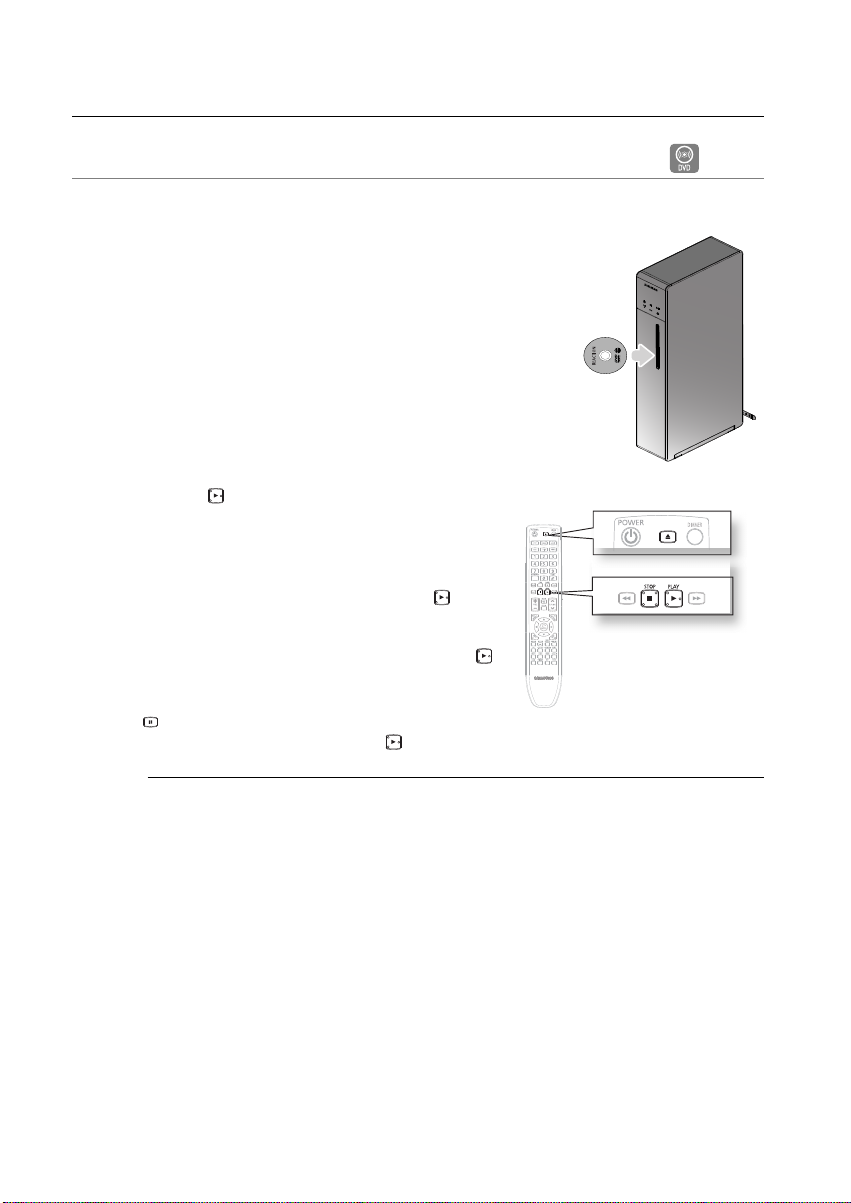
DISC PLAYBACK
1.
Load a disc vertically into the Disc Insert Hole.
•
Place a disc vertically into a disc slot with the disc facing right.
B
2.
To stop playback, press the STOP (
during playback.
If pressed once, PRESS PLAY is displayed and the stop
•
position will be stored in memory. If the PLAY (
or ENTER button is pressed, playback resumes from the
stop position. (This function works only with DVDs.)
•
If pressed twice, STOP is displayed, and if the PLAY (
button is pressed, playback starts from the beginning.
To temporarily pause playback, press the PAUSE (
) button during playback.
•
To resume playback, press the PLAY ( ) button again.
M
) button.
PLAY (
Playback starts automatically.
•
) button
) button
)
Depending on the content of the disc, the initial screen may appear different.
Pirated discs will not run in this player because it violates the CSS (Content Scrambling System :
a copy protection system) recommendations.
22
Page 23
MP3/WMA-CD PLAYBACK
Data CDs (CD-R, CD-RW) encoded in MP3/WMA format can be played.
Load the MP3/WMA disc.
1.
The MP3/WMA menu screen will appear and
•
playback will start.
The appearance of the menu depends on the
•
MP3/WMA disc.
WMA-DRM fi les cannot be played.
•
In Stop mode, use the Cursor
2.
†, π, √, ®
to select the album, and then press the ENTER button.
Use the Cursor †, π button to select the track.
•
To change the album, use the Return and Cursor †,
3.
button to select another album, and then press the ENTER.
Press the STOP
4.
(■) button to stop playback.
button
π
A
CD Library
► No One 00:00:16
s
Songs
Films
Pictures
Spider man
9
MP3
No One
Alicia Keys
SELECT rRETURN e MENU
GB
● PLAYBACK
Depending on the recording mode, some MP3/WMA-CDs may not play.
M
Table of contents of a MP3-CD varies depending on the MP3/WMA track format recorded on the disc.
To play a fi le icon in the screen,
Press the Cursor †, π, √, ® button when it is in Stop mode and select a desired icon from
•
the top part of the menu.
CD Library
No One 00:00:19
Songs
Films
Pictures
Spider man
DIVX
No One
Alicia Keys
s
SELECT rRETURN e MENU
Music File Icon : To play music fi les only, select the
Image File Icon : To view image fi les only, select the
Movie File Icon : To view movie fi les only, select the
Icon.
Icon.
Icon.
23
Page 24

Playback
JPEG FILE PLAYBACK
Images captured with a digital camera or camcorder, or JPEG fi les on a PC can be stored on a CD and then played back
with this Room Cinema.
Picture Library
Alicia Keys 00:00:00
s
Songs
Films
Pictures
Spider man
JPEG
No One
Alicia Keys
SELECT rRETURN e MENU
Rotation/ Flip
Press the ▼, ▲, ◄, ► button. Each time the ▲ button is pressed, the picture rotates clockwise. Each time
the ▼ button is pressed, the picture rotates counterclockwise. Press the ◄
previous or next picture.
,
► button to display the
Slideshow
Press the INFO button. Press the ▼, ▲ to select time interval.
•
Slideshow speed Normal: 12 second
•
Slideshow speed Slow: 18 second
•
Slideshow speed Fast: 7 second
G
G
M
Depending on the file size, each interval between images may take longer or shorter 0than the manual suggests.
The maximum resolutions supported by this product are 5120 x 3480 (or 19.0 MPixel) for standard JPEG fi les
and 2048 x 1536 (or 3.0 MPixel) for progressive image fi les.
If a JPEG fi le is played when the HDMI output resolution is 720p/1080i/1080p, the mode is automatically
converted to 576p(480p) mode.
24
Page 25

DIVX PLAYBACK
The functions on this page apply to DivX disc playback.
Skip Forward/Back
During playback, press the [
Goes to the next fi le whenever you press the $ button, if there
•
are over 2 fi les in the disc.
Goes to the previous fi le whenever you press the
•
# button, if there are over 2 fi les in the disc.
l√√
or
®®l
]
button.
D
GB
● PLAYBACK
Fast Playback
During playback, press the , button.
To play back the disc at a faster speed, press the or button during playback.
Each time you press either button, the playback speed will change as follows:
•
2x 4x 8x.
Audio Display
Press the AUDIO button.
If there are multiple audio tracks on a disc, you can toggle between them.
•
Each time you press the button, your selection will toggle between AUDIO (1/N, 2/N ...) and
•
is displayed when there is one supported language in the disc.
M
Subtitle Display
Press the SUBTITLE button.
Each time you press the button, your selection will toggle between
•
SUBTITLE (1/N, 2/N ...) and SUBTITLE OFF.
If the disc has only one subtitle fi le, it will be played automatically.
•
D
D
.
D
25
Page 26

Playback
DivX(Digital internet video eXpress)
DivX is a video fi le format developed by Microsoft and is based on MPEG4 compression technology to
provide audio and video data over the Internet in real-time.
MPEG4 is used for video encoding and MP3 for audio encoding so that the users can watch a movie at
near DVD-quality video and audio.
1.
Supported Formats
This product only supports the following media formats.If both video and audio formats are not
supported, the user may experience problems such as broken images or no sound.
Supported Video Formats
Format AVI WMV
Supported Versions DivX3.11~DivX5.1, XviD V1/V2/V3/V7
Supported Audio Formats
Format MP3 WMA AC3
Bit Rate 80~384kbps 56~128kbps 128~384kbps
Sampling Frequency 44.1khz 44.1/48khz
•
Aspect Ratio : Although the default DivX resolution is 640x480 pixels (4:3), this product supports
up to 800x600 pixels (16:9). TV screen resolutions higher than 800 will not be supported.
•
When you play a disc whose sampling frequency is higher than 48khz or 320kbps, you may
experience shaking on the screen during playback.
2.
Caption Function
•
You must have some experience with video extraction and editing in order to use this feature
properly.
•
To use the caption function, save the caption fi le (*.smi) in the same fi le name as that of the DivX
media fi le (*.avi) within the same folder.
Example. Root Samsung_007CD1.avi
•
Up to 60 alphanumeric characters or 30 East Asian characters (2 byte characters such as Korean
and Chinese) for the fi le name.
Samsung_007CD1.smi
26
Page 27
USING THE PLAYBACK FUNCTION
GB
Displaying Disc Information
D
To view the current Title, Chapter, and counter position, press the INFO button
during DVD playback. The display screen can also be used to quickly choose a
title, chapter, or playing time.
1.
View the Display
During DVD playback, press the INFO button.
2.
Press the π or † button to select the desired item.
√
or
®
button
3.
Press the
ENTER button.
You may use the number buttons of the remote control to directly
•
access a title, chapter or to start the playback from the desired
time.
To make the screen disappear, press the INFO button again.
4.
to make the desired setup, then press the
DVD Info
Title : 001
Chapter : 001
Playing Time : 00:30:15
Audio : ENG 5.1 CH3
Subtitle : Off
<
CHANGE sSELECT
Title: To access the desired title when there is more than one in the disc.
For example, if there is more than one movie on a DVD, each movie will
be identifi ed. A DVD may contain several different titles. For example, if a
disc contains four different movies, each might be considered a title.
Chapter: Most of DVD discs are recorded in chapters so that you can quickly fi nd a specifi c passage.
Each Title on a DVD is usually divided into chapters.
Playing Time: Allows playback of the fi lm from a desired time.
Audio: Refers to the language of the fi lm
soundtrack. In the example, the soundtrack is played in
English 5.1CH.A DVD disc can have up to eight different soundtracks.
Subtitle: Refers to the subtitle languages available in the disc. You will be able to choose the subtitles
language or, if you prefer, turn them off from the screen. A DVD disc can have up to 32 different
subtitles.
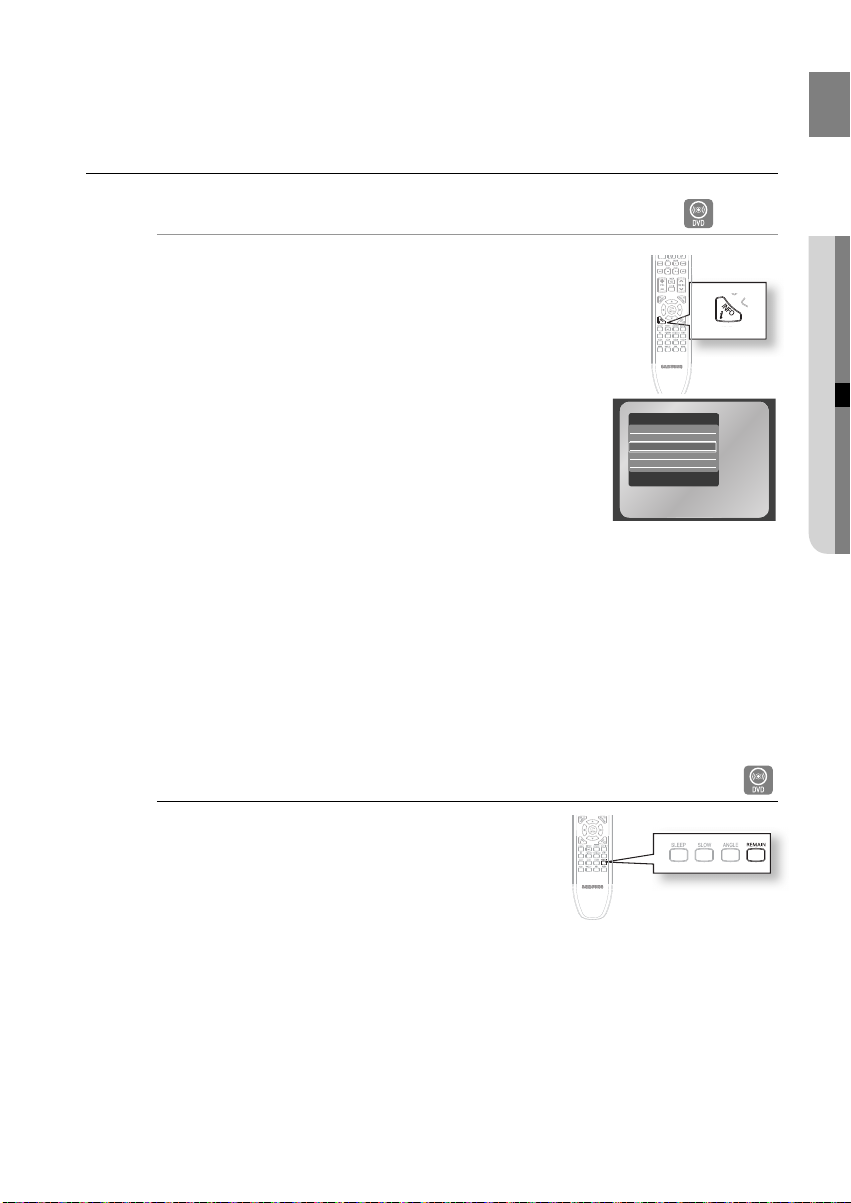
Checking the Remaining Time
Press the REMAIN button.
For checking the total remaining time of being played.
•
● PLAYBACK
27
Page 28

Playback
Fast Playback
D
Press the (
•
D
√√
or
®®
) button.
Each time the button is pressed during playback, the playback
speed changes as follows:
X2 ➞ X4 ➞ X8 ➞ X16 ➞ X32 ➞ X128
X2 ➞ X4 ➞ X8 ➞ X16 ➞ X32 ➞ X128
X2 ➞ X4 ➞ X8
X2 ➞ X4 ➞ X8
Slow Playback
In Pause mode, Press the (√√ or ®®) button.
Each time the button is pressed during playback, the playback speed
•
changes as follows:
1/2
➞1/4➞1/8➞1/2➞1/4➞1/8
D
M
Skipping Scenes/Songs
Press the [
Each time the button is pressed during playback, the previous or next chapter, track or directory (fi le)
•
will be played.
➞1/4➞1/8
1/2
No sound is heard during slow playback.
Reverse slow playback does not work with DivX.
l√√
or
®®l
] button.
DA
D
28
Page 29

Repeat Playback
Repeat playback allows you to repeatedly play a chapter, title, track
(song), or directory (MP3 fi le).
Press the REPEAT button.
•
Each time the button is pressed during playback, the repeat playback
mode changes as follows:
REPEAT : CHAPTER REPEAT : TITLE REPEAT : OFF
D
REPEAT : TITLE REPEAT : FOLDER REPEAT : OFF
BAD
GB
● PLAYBACK
AB
CHAPTER : Repeatedly plays the selected chapter.
TITLE : Repeatedly plays the selected title.
TRACK/
FOLDER/
OFF: Cancels Repeat Playback.
RANDOM/
: Repeat All, : Play Normal
A-B Repeat Playback
Press the REPEAT A-B button at the point where you want repeat
1.
play to start (A).
Press the REPEAT A-B button at the point where you want the
2.
repeat play to stop (B).
To return to normal play, press the REPEAT A-B button to select Off.
•
M
Step Function
Press the STEP button.
: Repeatedly plays the selected track.
: Repeatedly plays the selected folder
: You can listen to songs randomly or in the desired sequence.
The A-B Repeat function does not operate with MP3 or JPEG discs.
D
D
•
The picture moves forward one frame each time the button is pressed during playback.
No sound is heard during step motion playback.
M
29
Page 30

Playback
Zoom (Screen Enlarge) Function
This function allows you to enlarge a particular area of the displayed
image.
1.
Press the ZOOM button.
2.
Press the Cursor ▲, ▼, ◄, ► button to move to ANGLE display.
3.
Press the ENTER button.
•
Each time the button is pressed, the zoom level changes as
follows:
ZOOM X 2 ZOOM X 4 ZOOM OFF
Audio Language Selection Function
1.
Press the INFO button.
2.
Press the Cursor
3.
Press the Cursor
language.
•
Depending on the number of languages on a DVD disc, a different
audio language is selected each time the button is pressed.
To operate this function, you can also press the AUDIO buttons on the remote control.
M
Depending on the disc, the Audio Language functions may not be available.
π
or † button to move to Audio display.
√
or ® button to select the desired audio
Subtitle Language Selection Function
Press the INFO button.
1.
π
Press the Cursor
2.
Press the Cursor
3.
desired subtitle.
or † button to move to SUBTITLE display.
√
or
®
button or ENTER button to select the
D
30
To operate this function, you can also press the SUBTITLE buttons on the remote control.
M
Depending on the disc, the Subtitle Language functions may not be available.
Using the Disc Menu
You can use the menus for the audio
language, subtitle language, profi le, etc.
DVD menu contents differ from disc to disc.
1.
In stop mode, press the MENU button
on the remote control.
2.
▲
or
▼
Press the
Menu, then press the ► or ENTER
button.
buttons to select Disc
No Disc
m
MOVE
Disc Menu
Title Menu
Audio
Setup
s
Press ENTER key
for Disc Menu
SELECT
r
RETURN
e
Disc Menu
EXIT
Page 31

Depending on a disc, the Disc Menu may not work.
M
GB
Using the Title Menu
For DVDs containing multiple titles, you can view the title of each movie. Depending on the disc, the
availability of this feature may vary.
1.
In stop mode, press the MENU button on the remote control.
2.
Press the
M
▲
or
▼
buttons to select Title Menu, then press the ► or ENTER button.
RETURN
Title Menu
e
No Disc
Disc Menu
Press ENTER key
for Title Menu
Title Menu
Audio
Setup
m
MOVE
s
SELECT
r
Depending on a disc, the Title Menu may not work.
Title Menu will only be displayed if there are at least two titles in the disc.
EXIT
P-SOUND (POWER SOUND)
The function of Power Sound mode amplifi er bass and improves high key or bass twice as much. For
you to appreciate powerful real sound.
•
To make this function works press the P.SOUND button, the display will show :
P. SND ON
P. SND OFF
● PLAYBACK
PLAYING MEDIA FILES USING THE USB HOST FEATURE
You can enjoy the media fi les such as pictures, movies and tunes saved in an MP3 player, USB memory or digital
camera in high audio by connecting the storage device to the USB port of the Room Cinema System.
Using the USB HOST feature
Connect the USB device to the USB port.
31
Page 32

Playback
Safe USB Removal
To prevent damage to the memory stored in the USB device, perform safe removal before disconnecting
the USB cable.
•
Press the STOP ( ) button
Remove the USB cable.
•
Skip Forward/Back
During playback, press the
When there is more than one fi le, when you press the
•
(
l√√
or
®®l
)
button.
l√√
or
®®l
button, the next and previous fi le is selected.
Fast playback
During playback, press the , button.
Each time you press either button, the playback speed will change as follows:
•
➞
4x ➞ 8x.
2x
CD Ripping
This feature lets you to copy audio fi les from disc to USB device into MP3 format.
Connect the USB device
1.
Place the Audio CD(CD DA) disc
2.
Press the CD ripping button.
3.
To STOP, press the STOP button.
4.
Only the Audio CD(CD DA) dics can be ripping.
M
Compatible Devices
USB devices that support USB Mass Storage v1.0. (USB devices that operate as a removable disc
1.
in Windows (2000 or later) without additional driver installation.)
MP3 Player: HDD and fl ash type MP3 players.
2.
Digital camera: Cameras that support USB Mass Storage v1.0.
3.
Cameras that operate as a removable disc in Windows (2000 or later) without additional driver installation.
•
USB HDD and USB Flash Drive: Devices that support USB2.0 or USB1.1.
4.
You may experience a difference in playback quality when you connect a USB1.1 device.
•
5. USB card Reader: One slot USB card reader and Multi slot USB card reader.
•
Depending on the manufacturer. the USB card reader may not be supported.
•
If you install multiple memory devices into a multi card reader, you may experience problems.
6. If you use a USB extension cable, the USB device might not be recognised.
32
Page 33

Supported Formats
GB
Format File name
Still Picture JPG JPG .JPEG – – 640x480 –
Music
Movie DivX .AVI,.ASF 4Mbps
•
•
•
•
•
•
•
MP3 .MP3 80~384kbps – – 44.1kHz
WMA .WMA 56~128kbps V8 – 44.1kHz
CBI (Control/Bulk/Interrupt) is not supported.
Digital Cameras that use PTP protocol or require additional program installation when connected
to a PC are not supported.
A device using NTFS fi le system is not supported. (Only FAT 16/32 (File Allocation Table 16/32) fi le
system is supported.)
Some MP3 players, when connected to this product, may not operate depending on the sector
size of their fi le system.
The USB host function is not supported if a product that transfers media fi les by its manufacturer-
specifi c program is connected.
Does not operate with Janus enabled MTP (Media Transfer Protocol) devices.
The USB host function of this product does not support all USB devices. For information
on the supported devices, see page 42.
File
extension
Bit rate Version Pixel
DivX3.11~
DivX5.1, XviD
720x480
Sampling
Frequency
44.1KHz~48KHz
● PLAYBACK
33
Page 34

System setup
System setup
For your convenience, you can set this Room Cinema's features for the best use in your home environment.
SETTING THE LANGUAGE
OSD(On-Screen Display) language is set to English by default.
In Stop mode, press the MENU button.
1.
▼
Press the Cursor
2.
button to move to Setup and then press the
ENTER or ► button.
Select Language Setup and then press the ENTER or ► button.
3.
Press the Cursor
4.
▲,▼
button to select Player Menu and then
press the ENTER or ► button.
▲,▼
Press the Cursor
5.
button to select the desired language and
then press the ENTER button.
The language is selected and the screen returns to Language
•
Setup Menu.
d Press the RETURN button to return to the previous level.
d Press the EXIT button to exit the setup screen.
Player Menu : Selecting the Player Menu Language.
•
•
DISC MENU : Selecting the Disc Menu Language (recorded on the disc)
•
AUDIO : Selecting the Audio Language (recorded on the disc)
•
SUBTITLE : Selecting the Subtitle Language (recorded on the disc)
•
DivX Subtitle : Selecting the DivX Subtitle Language.
No Disc
Language Setup
Disc Menu
Display Setup
Title Menu
Parental Setup
DivX(R) Registration
Audio
Setup
m
MOVE
s
SELECT
No Disc
Player Menu : English
Disc Menu
Disc Menu : English
Title Menu
Audio : English
Subtitle : Automatic
Audio
DivX Subtitle : Unicode
Setup
m
MOVE
s
SELECT
No Disc
Player Menu : English
Disc Menu
Disc Menu : English
Title Menu
Audio : English
Subtitle : Automatic
Audio
DivX Subtitle : Unicode
Setup
m
MOVE
s
SELECT
®
®
®
r
RETURN
e
LANGUAGE SETUP
r
RETURN
e
LANGUAGE SETUP
r
RETURN
e
▲
English
Français
Deutsch
Italiano
Nederlands
Polski
▼
®
EXIT
®
®
®
®
®
EXIT
®
®
®
®
EXIT
SETTING THE DISPLAY
Depending on your TV type (Wide Screen or conventional 4:3), you can select the TV's aspect ratio.
1.
In Stop mode, press the MENU button.
2.
Press the Cursor
▼
button to move to Setup and then press the
ENTER or ► button.
3.
Press the Cursor
▼
button to move to Display Setup and then
press the ENTER or ► button.
4.
Press the Cursor
▲,▼
button to select the desired item and then
press the ENTER button.
•
Once the setup is complete, you will be taken to the previous
screen.
d Press the RETURN button to return to the previous level.
d Press the EXIT button to exit the setup screen.
Adjusting the TV Aspect Ratio (Screen Size)
The horizontal to vertical screen size ratio of conventional TVs is 4:3, while that of widescreen and high
defi nition TVs is 16:9. This ratio is called the aspect ratio. When playing DVDs recorded in different
screen sizes, you should adjust the aspect ratio to fi t your TV or monitor.
No Disc
Language Setup
Disc Menu
Display Setup
Title Menu
Parental Setup
DivX(R) Registration
Audio
Setup
m
MOVE
s
SELECT
No Disc
TV Aspect : Wide ®
Disc Menu
Screen Messages : On ®
TV System : PAL ®
Title Menu
Video Output : I-SCAN ®
BD-Wise : Off ®
Audio
Resolution : 576P ®
Setup
Picture Quality ®
m
MOVE
s
SELECT
®
®
®
r
RETURN
e
r
RETURN
e
®
EXIT
DISPLAY SETUP
EXIT
®
34
For a standard TV, select either 4:3PS or 4:3LB option according to personal preference.
Select WIDE if you have a widescreen TV.
Page 35

4:3 Letter box
Select this to play a 16:9 picture in the letter box mode on a conventional TV.
Black bars will appear at the top and bottom of the screen.
GB
4:3 Pan&Scan
Select this to play a 16:9 picture in the pan & scan mode on a conventional
TV.
•
You can see the central portion of the screen only (with the sides of the 16:9
picture cut off).
16:9 WIDE
Select this to view a 16:9 picture in the full-screen mode on your widescreen
TV.
•
You can enjoy the widescreen aspect.
If a DVD is in the 4:3 ratio, you cannot view it in widescreen.
M
Since DVD discs are recorded in various image formats, they will look different depending on the software, the
type of TV, and the TV aspect ratio setting.
When using HDMI, the screen is automatically converted to Wide mode.
Screen Messages
Use to turn on-screen messages On or Off.
TV System
NTSC : In case of using NTSC disc.
•
If your TV system only has PAL-Video input, you must choose
"PAL".
When you chose "PAL" Interlace output format is PAL 60Hz
•
output.
If your TV system only has NTSC, input you must choose :
•
"NTSC"
PAL : In case of using PAL Disc.
If you set up the NTSC TV, HDMI output frame rate is 60Hz.
•
If your TV system only has NTSC-Video input, you must choose "NTSC"
•
•
If your TV system only has PAL input, you must choose "PAL"
If you set up the PAL TV, HDMI output frame rate is 50Hz.
•
AUTO
No Disc
TV Aspect : Wide ®
Disc Menu
Screen Messages : On ®
TV System : PAL ®
Title Menu
Video Output : I-SCAN ®
BD-Wise : Off ®
Audio
Resolution : 576P ®
Setup
Picture Quality ®
m
MOVE
s
SELECT
r
RETURN
DISPLAY SETUP
NTSC
PAL
Auto
e
● SYSTEM SETUP
EXIT
Video Output
Select Video Output.
•
I-SCAN : Select when you want to use Component Interlace (525i)
Out.
•
P-SCAN : Select when you want to use Component Progressive
(525p) Out.
If you press the VIDEO SEL. button,Video output mode is changed in
•
regular sequence in no disc model. (I-SCAN P-SCAN).
No Disc
TV Aspect : Wide ®
Disc Menu
Screen Messages : On ®
TV System : PAL ®
Title Menu
Video Output : I-SCAN ®
BD-Wise : Off ®
Audio
Resolution : 576P ®
Setup
Picture Quality ®
m
MOVE
s
SELECT
r
RETURN
DISPLAY SETUP
I-SCAN
P-SCAN
e
EXIT
35
Page 36

System setup
•
If the Yes/No selection in the Display Setup sub Menu is not made within 10 seconds, the screen
returns to the previous menu.
BD-Wise
Setting Up the BD Wise
When the player is connected to a SAMSUNG TV which supports “BD
Wise”,you can enjoy optimized Picture Quality by setting the “BD Wise”
function as “On”.
1.
With the unit in Stop mode, press the MENU button.
2.
3.
4.
M
▲,▼
Press the
buttons to select Setup, then press the ► or ENTER
button.
Press the
▲,▼
buttons to select Display Setup, then press the ► or ENTER button.
▲,▼
Press the
buttons to select BD-Wise, then press the ► or ENTER button. Press the ▲,▼
buttons to select On, then press the ► or ENTER button.
The HDMI resolution will be changed to maximum resolution supported by your TV.
It is recommended to set the "BD Wise" to "Off" In case of playback JPEG image fi le bigger than 720 X 480
pixel size.
No Disc
TV Aspect : Wide ®
Disc Menu
Screen Messages : On ®
TV System : PAL ®
Title Menu
Video Output : I-SCAN ®
BD-Wise : Off ®
Audio
Resolution : 576P ®
Setup
Picture Quality ®
m
MOVE
s
SELECT
r
RETURN
DISPLAY SETUP
e
EXIT
Resolution
Resolution
480p/576p : 720 X 480, 720 X 576
•
720p : 1280 X 720
•
1080i : 1920 X 1080
•
1080p : 1920 X 1080
•
No Disc
TV Aspect : Wide ®
Disc Menu
Screen Messages : On ®
TV System : PAL ®
Title Menu
Video Output : I-SCAN ®
BD-Wise : Off ®
Audio
Resolution : 576P ®
Setup
Picture Quality ®
m
MOVE
s
SELECT
Picture quality
•
Black Level : Adjusts the brightness of the screen, (On or Off) it does
not function in progressive mode.
•
Brightness : Level 1 ~ level 5
•
Contrast : Level 1 ~ level 5
•
Colour Saturation : Level 1 ~ level 5
Consult your TV User's manual to fi nd out if your TV support Progressive Scan. If Progressive Scan is
M
supported, follow the TV User's Manual regarding Progressive Scan setting in the TV's menu system.
If video OUtput is set incorrectly, the screen maybe blocked.
The resolutions available for HDMI output depend on the connected TV or projector. For details, see the user's
manual of your TV or projector.
When the resolution is changed during playback, it may take a few seconds for a normal image to appear.
If you set the HDMI output resolution 720p, 1080p or 1080i, HDMI output provides better picture quality.
No Disc
Black Level : Off
Disc Menu
Brightness : Level 3
Contrast : Level 3
Title Menu
Colour Saturation : Level 3
Audio
Setup
m
MOVE
s
SELECT
r
r
RETURN
RETURN
DISPLAY SETUP
e
EXIT
PICTURE QUALITY
e
EXIT
36
Page 37

SETTING (RATING LEVEL)
Use this to restrict playback of adult or violent DVDs you do not want
children to view.
1.
In Stop mode, press the MENU button.
2.
Press the π or † button to select SETUP, then press the Enter or
►
button.
3.
Press the π or † button to select Parental Setup, then press the
Enter or
►
button.
4.
Press the π or † button to select Rating Level, then press the
►
Enter or
•
button.
For example, if you select up to level 6, Discs that contain
Level 7, adult will now not play.
5.
To make the Setup menu disappear press the
d Press the RETURN button to return to the previous level.
d Press the EXIT button to exit the setup screen.
This function works only if a DVD disc contains the rating level information.
M
The password is set to "7890" by default.
If you have forgotten the rating level password, do the following
While the player is in No DIsc mode, hold the Play/Pause (&) button on the front panel for longer than
•
5 seconds.
CHANGE PASSWORD
Use this to restrict playback of adult or violent DVDs you do not want
children to view.
1.
In Stop mode, press the MENU button.
2.
Press the π or † button to select SETUP, then press the Enter or ►
button.
3.
Press the π or † button to select Parental Setup, then press the
Enter or
►
button.
Press the
4.
The Enter Password is displayed. Enter your password by pressing
5.
the number buttons. Then the Enter New Password is displayed to
confi rm the password.
6.
To make the Setup menu disappear press the
π or †
button to select Change Password.
MENU
MENU
button.
button.
No Disc
Language Setup
Disc Menu
Display Setup
Title Menu
Parental Setup
DivX(R) Registration
Audio
Setup
m
MOVE
s
SELECT
No Disc
Rating Level : Kids Safe
Disc Menu
Change Password
Title Menu
Audio
Setup
m
MOVE
s
SELECT
No Disc
Language Setup
Disc Menu
Display Setup
Title Menu
Parental Setup
DivX(R) Registration
Audio
Setup
m
MOVE
s
SELECT
No Disc
Disc Menu
Title Menu
Audio
Setup
m
MOVE
s
SELECT
No Disc
Disc Menu
Title Menu
Audio
Setup
m
MOVE
s
SELECT
®
®
®
r
RETURN
e
Level 7
Adult
r
RETURN
e
®
®
®
r
RETURN
e
PARENTAL SETUP
Enter Password
r
RETURN
e
PARENTAL SETUP
Enter New Password
r
RETURN
e
Setup
®
EXIT
PARENTAL SETUP
▲
▼
EXIT
Setup
®
EXIT
EXIT
EXIT
GB
● SYSTEM SETUP
37
Page 38

System setup
d Press the RETURN button to return to the previous level.
d Press the EXIT button to exit the setup screen.
M
This function works only if a DVD disc contains the rating level information.
DVIX (R) REGISTRATION
Please use the Registration code to register this player with the DivX (R) video on demand format.
To learn more, go to www.divx.com/vod.
SETTING THE DRC
You can use this function to enjoy Dolby Digital sound when watching movies at
low volume at night.
In Stop mode, press the MENU button.
1.
2.
Press the π or † button to select AUDIO, then press the Enter or
►
button.
3.
Press the π or † button to select DRC, then press the Enter or
button.
Press the
4.
π or †
button to adjust the DRC.
Code is
HAMG648S
OK
RETURN
RETURN
Setup
e
e
EXIT
Audio
EXIT
®
®
®
No Disc
DivX(R) Video on Demand Your Registration
Disc Menu
Title Menu
m
MOVE
No Disc
Disc Menu
Title Menu
►
m
MOVE
Audio
Setup
s
SELECT
DRC : 0
AV-SYNC : 0ms
HDMI Audio : Off
Audio
Setup
s
SELECT
http://www.divx.com/vod
r
r
SETTING THE AV SYNC
1.
In Stop mode, press the MENU button.
2.
Press the π or † button to select AUDIO, then press the Enter or
►
button.
3.
Press the π or † button to select AV Sync, then press the Enter
►
button.
or
Press the
4.
π or †
button to adjust the Delay Time.
No Disc
m
MOVE
Disc Menu
Title Menu
Audio
Setup
s
DRC : 0
AV-SYNC : 0ms
HDMI Audio : Off
SELECT
r
SETTING THE EQUALIZER FUNCTION
EQ :
You can select ROCK, POP, or CLASSIC to optimize the sound for the genre of music you are playing
Press the EQ button.
•
Each time the button is pressed, the selection changes as follows:
ROCK ➞ JAZZ ➞ POP ➞ CLASSIC ➞ PASS
This feature works with CDs, MP3-CDs, DivX, tuner and Dolby Digital discs.
M
38
RETURN
e
Audio
EXIT
®
®
®
Page 39

SETTING THE DSP FUNCTION
DSP(Digital Signal Processor) : DSP modes have been designed to simulate different acoustic environments.
Press the DSP button.
Each time the button is pressed, the selection changes as follows:
•
STUDIO ➞ STADIUM ➞ HALL ➞ Theatre ➞ CHURCH ➞ PASS
This feature works with DVD discs.
M
SLEEP TIMER FUNCTION
You can set the time that the Home Theatre will shut itself off.
Press the SLEEP button.
SLEEP will be displayed. Each time the button is pressed, the preset time changes as follows :
90 60 45 30 15 OFF
ADJUSTING DISPLAY BRIGHTNESS
You can adjust the brightness of the display on the main unit so it won't interfere with your movie viewing.
Press the DIMMER button.
Each time the button is pressed, the brightness of front display will be adjusted.
•
ECO MODE
In STAND BY mode, press the POWER button for 5 second. The ECO mode will appear in the front display.
GB
● SYSTEM SETUP
In this condition the power consumption will be under 1 W.
M
39
Page 40

Radio
LISTENING TO RADIO
This feature lets you to listen FM radio from this Room Cinema System.
just press TUNER button on the remote control.
Press the TUNER button.
1.
Tune in to the desired station.
2.
Press the STOP () to select PRESET and press the ,,. button to select the preset station.
•
Press the STOP () to select AUTO and press the ,,. button to search band automatically.
•
Press the STOP () to select MANUAL and press the ,,. button to increase or decrease the
•
frequency incrementally.
Presetting Stations
1.
Press the TUNER button to select the FM band.
2.
Press the ,,. button to select frequency.
3.
Press the TUNER MEMORY button.
4.
Press the ,,. button to select preset number.
•
You can select between 1 and 15 presets.
5.
Press the TUNER MEMORY button again.
•
Press the TUNER MEMORY button before Number disappears from the display.
•
Number disappears from the display and the station is stored in memory.
6.
To preset another station, repeat steps 2 to 5.
Anytime we want to display FM radio menu,
40
Page 41

Troubleshooting
Refer to the chart below when this unit does not function properly. If the problem you are experiencing is not listed
below or if the instruction below does not help, turn off the unit, disconnect the power cord, and contact the nearest
authorisedd dealer or Samsung Electronics Service Centre.
GB
SYMPTOM Check/Remedy
I cannot eject the disc. • Is the power cord plugged securely into the outlet?
• Turn off the power and then turn it back on.
Playback does not start. • Check the region number of the DVD.
Playback does not start
immediately when the
Play/Pause button is pressed.
Sound is not produced. • No sound is heard during fast playback, slow playback, and step motion playback.
The remote control does not work. • Is the remote control being operated within its operation range of angle and
• Disc is rotating but no
picture is produced.
• Picture quality is poor and
picture is shaking.
Audio language and subtitles do not work. • Audio language and subtitles will not work if the disc does not contain them.
Menu screen does not appear even when the
menu function is selected.
Aspect ratio cannot be changed. • You can play 16:9 DVDs in 16:9 WIDE mode, 4:3 LETTER BOX mode, or 4:3 PAN
• The main unit is not working.
(Example: The power goes out or strange
DVD discs purchased from abroad may not be playable.
• CD-ROMs and DVD-ROMs cannot be played on this Room Cinema System.
• Make sure that the rating level is correct.
• Are you using a deformed disc or a disc with scratches on the surface?
• Wipe the disc clean.
• Are the speakers connected properly? Is the speaker setup correctly customized?
• Is the disc severely damaged?
distance?
• Are the batteries exhausted?
• Is the TV power on?
• Are the video cables connected properly?
• Is the disc dirty or damaged?
• A poorly manufactured disc may not be playable.
• Are you using a disc that does not contain menus?
SCAN mode, but 4:3 DVDs can be seen in 4:3 ratio only. Refer to the DVD disc
jacket and then select the appropriate function.
• While the player is in No DIsc mode, hold the Play/Pause (&) button
on the front panel for longer than 5 seconds.
noise is heard.)
• The Room Cinema System is not working
normally.
The password for rating level has been
forgotten.
• Press the Play/Pause (
&
) button (in front panel) for more than 5
seconds under no disc inside. All settings including the password will
revert to the factory settings. Don't use this unless absolutely necessary.
Can't receive radio broadcast. • Is the antenna connected properly?
• If the antenna's input signal is weak, install an external FM antenna in an
area with good reception.
● TROUBLESHOOTING
41
Page 42

USB host feature supported products
DIGITAL CAMERA
Product
Finepix-A340 Fuji Digital Camera
Finepix-F810 Fuji Digital Camera
Finepix-F610 Fuji Digital Camera
Finepix-f450 Fuji Digital Camera
Finepix S7000 Fuji Digital Camera
Finepix A310 Fuji Digital Camera
KD-310Z Konica Digital Camera
Finecam SL300R Kyocera Digital Camera
Finecam SL400R Kyocera Digital Camera
Finecam S5R Kyocera Digital Camera
Finecam Xt Kyocera Digital Camera
Dimage-Z1 Minolta Digital Camera
Dimage Z1 Minolta Digital Camera
Dimage X21 Minolta Digital Camera
Coolpix4200 Nikon Digital Camera
Coolpix4300 Nikon Digital Camera
Coolpix 2200 Nikon Digital Camera
Coolpix 3500 Nikon Digital Camera
Coolpix 3700 Nikon Digital Camera
Coolpix 4100 Nikon Digital Camera
Coolpix 5200 Nikon Digital Camera
Stylus 410 digital Olympus Digital Camera
300-digital Olympus Digital Camera
300-digital Olympus Digital Camera
Company
Type
U300 Olympus Digital Camera
X-350 Olympus Digital Camera
C-760 Olympus Digital Camera
C-5060 Olympus Digital Camera
X1 Olympus Digital Camera
U-mini Olympus Digital Camera
Lumix-FZ20 Panasonic Digital Camera
DMC-FX7GD Panasonic Digital Camera
Lumix LC33 Panasonic Digital Camera
LUMIX DMC-F1 Panasonic Digital Camera
Optio-S40 Pentax Digital Camera
Optio-S50 Pentax Digital Camera
Optio 33LF Pentax Digital Camera
Optio MX Pentax Digital Camera
Digimax-420 Samsung Digital Camera
Digimax-400 Samsung Digital Camera
Sora PDR-T30 Toshiba Digital Camera
Coolpix 5900 Nikon Digital Camera
Coolpix S1 Nikon Digital Camera
Coolpix 7600 Nikon Digital Camera
DMC-FX7 Panasonic Digital Camera
Dimage Xt Minolta Digital Camera
AZ-1 Olympus Digital Camera
USB FLASH DISC
Product
Cruzer Micro Sandisk
Cruzer Mini Sandisk USB 2.0 128M
Cruzer Mini Sandisk USB 2.0 256M
SONY Micro Vault Sony USB 2.0 64MB
FLEX DRIVE Serotech USB 2.0 32MB
AnyDrive A.L tech USB 2.0 128MB
Company
Type
USB 2.0 USB Flash Drive 128M
XTICK LG USB 2.0 128M
Micro Mini Iomega USB 2.0 128M
iFlash Imation USB 2.0 64M
LG XTICK(M) USB 2.0 64M
RiDATA EZDrive USB 2.0 64M
Product
Product
Company
Company
Type
Type
MP3 PLAYER
Product
Creative MuVo NX128M
Iriver H320 Iriver 20G HDD MP3 Player
YH-920 Samsung 20G HDD MP3 Player
YP-T7 Samsung MP3 Player
YP-MT6 Samsung MP3 Player
YP-T6 Samsung MP3 Player
YP-53 Samsung MP3 Player
YP-ST5 Samsung MP3 Player
YP-T5 Samsung MP3 Player
YP-60 Samsung MP3 Player
Company
Creative 128 MB MP3 Player
Type
42
Product
YP-780 Samsung MP3 Player
YP-35 Samsung MP3 Player
YP-55 Samsung MP3 Player
iAUDIO U2 Cowon MP3 Player
iAUDIO G3 Cowon MP3 Player
iAudio M3 Cowon HDD MP3 Player
SI-M500L Sharp 256MB MP3 Player
H10 Iriver MP3 Player
YP-T5 VB Samsung MP3 Player
YP-53 Samsung 256MB MP3 Player
Company
Type
Page 43

Appendix
CAUTIONS ON HANDLING AND STORING DISCS
Small scratches on the disc may reduce sound and picture quality or cause skipping.
Be especially careful not to scratch discs when handling them.
Handling discs
Do not touch the playback side of the disc.
Hold the disc by the edges so that fi ngerprints will not get on the surface.
Do not stick paper or tape on the disc.
Disc Storage
GB
● APPENDIX
Keep in a clean Protection
jacket.
Store vertically.
Do not keep in direct sunlight
Do not allow the discs to become contaminated with dirt.
M
Do not load cracked or scratched discs.
Keep in a cool
ventilated area
Handling and Storing Discs
When you get fi ngerprints or dirt on the disc, clean it with a mild detergent diluted in water and wipe with
a soft cloth.
•
When cleaning, wipe gently from the inside to the outside of the disc
Condensation may form if warm air comes into contact with cold parts inside the player. When condensation
M
forms inside the player, the player may not operate correctly. If this occurs, remove the disc and let the player
stand for 1 or 2 hours with the power on.
43
Page 44

Appendix
SPECIFICATIONS
Power Consumption
General
Disc
Video Output
Weight 4.0 kg
Dimensions 86 (W) x 215 (H) x 500 (D) mm
Operating Temperature Range
Operating Humidity Range 10 % to 75 %
DVD (Digital Versatile Disc)
CD : 12 cm (COMPACT DISC)
CD : 8 cm (COMPACT DISC)
Composite Video 1.0 Vp-p (75 Ω load)
Component Video
HDMI Impedance: 85~115 Ω
Front speaker output
Subwoofer speaker output
Amplifi er
Speaker
- Samsung Electronics Co., Ltd reserves the right to change the specifi cations without notice.
- Weight and dimensions are approximate.
Frequency range
S/N Ratio
Channel separation
Input sensitivity
Speaker system
Impedance
Frequency range
Output sound pressure level
Rated input
Maximum input
Dimensions (W x H x D)
Weights
30 W, AC 110-240V, 50/60 Hz
+5°C ~ +35°C
Reading Speed : 3.49 ~ 4.06 m/sec.
Approx. Play Time (Single Sided, Single Layer Disc) : 135 min.
Reading Speed : 4.8 ~ 5.6 m/sec.
Maximum Play Time : 74 min.
Reading Speed : 4.8 ~ 5.6 m/sec.
Maximum Play Time : 20 min.
Y : 1.0 Vp-p (75 load)
Pr : 0.70 Vp-p (75 Ω load)
Pb : 0.70 Vp-p (75 Ω load)
30W x 2(3Ω)
60W(6Ω)
20Hz~30KHz
70dB
65dB
(AUX)400mV
2.1ch speaker system
Front Subwoofer
3
Ω
175 Hz ± 20 % 70 Hz ± 20 %
79dB 84dB
30W 60W
30W 60W
Front :
86 (W) x 215 (H) x 500 (D) mm
Front : 4.0 Kg
Subwoofer : 3.8 Kg
6
Ω
*: Nominal specifi cation
44
Page 45

Contact SAMSUNG WORLD WIDE
If you have any questions or comments relating to Samsung products, please contact the SAMSUNG customer care center.
Region Country Contact Center Web Site
North America
Latin America
Europe
CIS
Asia Pacifi c
Middle East &
Africa
CANADA 1-800-SAMSUNG(726-7864) www.samsung.com/ca
MEXICO 01-800-SAMSUNG(726-7864) www.samsung.com/mx
U.S.A 1-800-SAMSUNG(726-7864) www.samsung.com/us
ARGENTINE 0800-333-3733 www.samsung.com/ar
BRAZIL 0800-124-421, 4004-0000 www.samsung.com/br
CHILE 800-SAMSUNG(726-7864) www.samsung.com/cl
NICARAGUA 00-1800-5077267 www.samsung.com/latin
HONDURAS 800-7919267 www.samsung.com/latin
COSTA RICA 0-800-507-7267 www.samsung.com/latin
ECUADOR 1-800-10-7267 www.samsung.com/latin
EL SALVADOR 800-6225 www.samsung.com/latin
GUATEMALA 1-800-299-0013 www.samsung.com/latin
JAMAICA 1-800-234-7267 www.samsung.com/latin
PANAMA 800-7267 www.samsung.com/latin
PUERTO RICO 1-800-682-3180 www.samsung.com/latin
REP. DOMINICA 1-800-751-2676 www.samsung.com/latin
TRINIDAD & TOBAGO 1-800-SAMSUNG(726-7864) www.samsung.com/latin
VENEZUELA 0-800-100-5303 www.samsung.com/latin
COLOMBIA 01-8000112112 www.samsung.com.co
BELGIUM 02 201 2418 www.samsung.com/be
CZECH REPUBLIC 800-726-786 (800 - SAMSUNG) www.samsung.com/cz
DENMARK 70 70 19 70 www.samsung.com/dk
FINLAND 030-6227 515 www.samsung.com/fi
FRANCE
GERMANY 01805 - SAMSUNG(726-7864 € 0,14/Min) www.samsung.de
HUNGARY 06-80-SAMSUNG(726-7864) www.samsung.com/hu
ITALIA 800-SAMSUNG(726-7864) www.samsung.com/it
LUXEMBURG 02 261 03 710 www.samsung.com/lu
NETHERLANDS 0900-SAMSUNG (726-7864 € 0,10/Min) www.samsung.com/nl
NORWAY 815-56 480 www.samsung.com/no
POLAND 0 801 801 881, 022-607-93-33 www.samsung.com/pl
PORTUGAL 80820-SAMSUNG(726-7864) www.samsung.com/pt
SLOVAKIA 0800-SAMSUNG(726-7864) www.samsung.com/sk
SPAIN 902-1-SAMSU(72678) www.samsung.com/es
SWEDEN 0771-400 200 www.samsung.com/se
U.K 0845 SAMSUNG (7267864) www.samsung.com/uk
EIRE 0818 717 100 www.samsung.com/ie
AUSTRIA 0800-SAMSUNG(726-7864) www.samsung.com/at
SWITZERLAND 0800-SAMSUNG(726-7864) www.samsung.com/ch
RUSSIA 8-800-555-55-55 www.samsung.ru
KAZAKHSTAN 8-10-800-500-55-500 www.samsung.com/kz_ru
UZBEKISTAN 8-10-800-500-55-500 www.samsung.com/kz_ru
KYRGYZSTAN 00-800-500-55-500
TADJIKISTAN 8-10-800-500-55-500
UKRAINE 8-800-502-0000 www.samsung.ua
LITHUANIA 8-800-77777 www.samsung.lt
LATVIA 8000-7267 www.samsung.com/lv
ESTONIA 800-7267 www.samsung.ee
AUSTRALIA 1300 362 603 www.samsung.com/au
NEW ZEALAND 0800 SAMSUNG (0800 726 786) www.samsung.com/nz
CHINA 800-810-5858, 400-810-5858, 010-6475 1880 www.samsung.com/cn
HONG KONG 3698-4698 www.samsung.com/hk
INDIA 3030 8282, 1800 110011, 1-800-3000-8282 www.samsung.com/in
INDONESIA 0800-112-8888 www.samsung.com/id
JAPAN 0120-327-527 www.samsung.com/jp
MALAYSIA 1800-88-9999 www.samsung.com/my
PHILIPPINES 1800-10-SAMSUNG(726-7864) www.samsung.com/ph
SINGAPORE 1800-SAMSUNG(726-7864) www.samsung.com/sg
THAILAND 1800-29-3232, 02-689-3232 www.samsung.com/th
TAIWAN 0800-329-999 www.samsung.com/tw
VIETNAM 1 800 588 889 www.samsung.com/vn
TURKEY 444 77 11 www.samsung.com/tr
SOUTH AFRICA 0860-SAMSUNG(726-7864 ) www.samsung.com/za
U.A.E 800-SAMSUNG (726-7864), 8000-4726 www.samsung.com/ae
3260 SAMSUNG (€ 0,15/Min)
08 25 08 65 65 (€ 0,15/Min)
www.samsung.com/fr
Page 46

Correct Disposal of This Product (Waste Electrical & Electronic Equipment)
(Applicable in the European Union and other European countries with separate collection
systems)
This marking on the product, accessories or literature indicates that the product and its electronic
accessories (e.g. charger, headset, USB cable) should not be disposed of with other household waste
at the end of their working life. To prevent possible harm to the environment or human health from
responsibly to promote the sustainable reuse of material resources.
Household users should contact either the retailer where they purchased this product, or their local government offi ce,
for details of where and how they can take these items for environmentally safe
uncontrolled waste disposal, please separate these items from other types of waste and recycle them
recycling.
Business users should contact their supplier and check the terms and conditions of the purchase contract. This
product and its electronic accessories should not be mixed with other commercial wastes for disposal.
Correct disposal of batteries in this product
(Applicable in the European Union and other European countries with separate battery
return systems.)
This marking on the battery, manual or packaging indicates that the batteries in this product should
not be disposed of with other household waste at the end of their working life. Where marked, the
the reference levels in EC Directive 2006/66. If batteries are not properly disposed of, these substances can cause
harm to human health or the environment.
To protect natural resources and to promote material reuse, please separate batteries from other types of waste and
recycle them through your local, free battery return system.
chemical symbols Hg, Cd or Pb indicate that the battery contains mercury, cadmium or lead above
AH68-02201G-01
Page 47

Système
Home cinéma
Manuel d’utilisation
HE20
Un monde de possibilités
Merci d'avoir choisi Samsung.
Pour bénéfi cier d’un service plus complet,
enregistrez votre produit sur le site
www.samsung.com/global/register
Page 48

fonctions
Lecture multiformat et tuner FM
Le RTS-HE20 allie une fonction de lecture multiformat (DVD-VIDEO, CD, CD MP3, CD WAV, DivX, CD R/RW) à un tuner FM
sophistiqué, le tout dans un seul lecteur.
Prise en charge des hôtes USB
Vous pouvez connecter et lire des fi chiers depuis un périphérique de stockage USB externe (lecteur MP3, mémoire
fl ash USB, etc.) grâce à la fonction USB HOST (HÔTE USB) de votre système de Home cinéma.
Fonction d’économiseur d’écran du téléviseur
Si l’unité principale reste en mode Arrêt plus de trois minutes, le logo Samsung s’affi che sur l'écran du téléviseur.
Le RTS-HE20 passe automatiquement en mode d’économie d'énergie après 20 minutes en mode économiseur
d’écran.
Fonction économie d’énergie
Le RTS-HE20 se met automatiquement hors tension après 20 minutes en mode Arrêt.
HDMI
Le HDMI transmet simultanément les signaux audio et vidéo d’un DVD et offre une image de meilleure qualité.
Fonction Anynet+ (HDMI-CEC)
Anynet+ est une fonction pratique qui permet de commander le lecteur via la télécommande d'un téléviseur
Samsung compatible Anynet+.
CONTENU
Vérifi ez que les accessoires ci-dessous sont fournis.
Câble vidéo Antenne FM
2
Manuel d’utilisation
Télécommande/Piles
(taille AAA)
Page 49

FR
FR
consignes de sécurité
AVERTISSEMENTS
AFIN DE LIMITER LES RISQUES D'ÉLECTROCUTION, NE RETIREZ JAMAIS LE COUVERCLE (OU LE CACHE ARRIÈRE).
AUCUN DES ÉLÉMENTS INTERNES N'EST RÉPARABLE PAR L'UTILISATEUR. CONFIEZ L'ENTRETIEN DE CET
APPAREIL À UNE PERSONNE QUALIFIÉE.
Ce symbole signale la présence à l'intérieur
CAUTION
RISK OF ELECTRIC SHOCK
DO NOT OPEN
CLASS 1 LASER PRODUCT
KLASSE 1 LASER PRODUKT
LUOKAN 1 LASER LAITE
KLASS 1 LASER APPARAT
PRODUCTO LASER CLASE 1
ATTENTION : RADIATIONS LASER INVISIBLES LORS DE L’OUVERTURE ET EN CAS DE DÉFAILLANCE DU
AVERTISSEMENT : Pour diminuer les risques d’incendie ou d’électrocution, n’exposez pas cet appareil à la pluie
ou à l’humidité.
ATTENTION :
MÂLE (LARGE) DANS LE LOGEMENT FEMELLE DE LA PRISE.
Cet appareil doit toujours être connecté à une prise d’alimentation CA mise à la terre.
•
Pour débrancher l'appareil, il convient de retirer la fi che de la prise murale ; par conséquent celle-ci doit être
•
facilement accessible.
ATTENTION
Veillez à éviter toute projection sur l’appareil et ne placez jamais de récipients contenant un liquide (ex. : vase)
•
dessus.
La prise d’alimentation fait offi ce de système de déconnexion ; elle doit donc rester disponible en permanence.
•
VERROUILLAGE, ÉVITEZ DE VOUS EXPOSER AU FAISCEAU.
POUR PRÉVENIR TOUT RISQUE D’ÉLECTROCUTION, INSÉREZ COMPLÈTEMENT LA BROCHE
du produit d'une tension dangereuse
susceptible de provoquer une électrocution
ou des blessures corporelles.
Ce symbole précède les consignes
importantes qui accompagnent le produit.
CLASS 1 LASER PRODUCT
Ce lecteur de compact disque est catégorisé produit
LASER DE CLASSE 1.
L’utilisation des commandes, un réglage ou l’observation de
procédures autres que ceux spécifi és dans ce manuel peut
engendrer une exposition à des radiations dangereuses.
● CONSIGNES DE SÉCURITÉ
3
Page 50

consignes de sécurité
PRÉCAUTIONS
Assurez-vous que l’alimentation secteur de votre maison est conforme aux indications inscrites sur l'autocollant d'identifi cation situé à
l'arrière de votre lecteur. Installez votre lecteur à l’horizontale, sur une surface appropriée (meuble), et ménagez un espace autour suffi sant
pour la ventilation (7,5 à 10 cm). Veillez à ce que les orifi ces de ventilation ne soient pas obstrués. Avant de déplacer le lecteur, assurezvous que le tiroir disque est bien vide. Cet appareil est conçu pour une utilisation continue. La mise en veille du système de Home cinéma
ne met pas l’appareil hors tension. Pour mettre le lecteur complètement hors tension, débranchez la fi che d’alimentation de la prise
murale, surtout si l’appareil doit rester inutilisé pendant une période prolongée.
Pendant un orage, débranchez le cordon d’alimentation secteur
de la prise murale. Les pics de tension dus à la foudre risqueraient
d’endommager l’appareil.
Évitez d’exposer le lecteur à l’humidité (ex : vases) et à des
températures excessives (ex : foyer de cheminée) ou à tout
équipement générant des champs magnétiques ou électriques
importants (ex : haut-parleurs…). Débranchez le cordon
d’alimentation de la prise d’alimentation secteur en cas de
dysfonctionnement du lecteur. Votre lecteur n’est pas conçu pour
un usage industriel.
Ce produit est uniquement destiné à un usage privé.
Si le lecteur est stocké dans un environnement froid, il se peut que
de la condensation se forme. Lors du transport du lecteur en hiver,
attendez environ 2 heures que l’appareil atteigne la température
ambiante de la pièce avant de l’utiliser.
4
N’exposez pas l’appareil à la lumière directe du soleil ni à d’autres
sources de chaleur.
Ceci pourrait entraîner une surchauffe et un dysfonctionnement de
l’appareil.
Les piles utilisées avec ce produit contiennent des produits chimiques dangereux pour l’environnement.
Ne jetez pas les piles avec les déchets ménagers.
Page 51

contenu
FR
FONCTIONS
2
CONSIGNES DE SÉCURITÉ
3
INFORMATIONS PRÉALABLES
7
DESCRIPTION
10
TÉLÉCOMMANDE
12
BRANCHEMENTS
15
AVANT D’UTILISER VOTRE HOME
CINÉMA
2 Contenu
3 Avertissements
4 Précautions
7 Avant de lire le manuel d'utilisation
8 Disques compatibles
8 Types de disques non compatibles
8 Protection contre la copie
9 Types de disque et caractéristiques
10 Façade
11 Panneau arrière
13 Fonctions de la télécommande
15 Branchement des enceintes
17 Branchement de la sortie vidéo sur le téléviseur
18 Fonction HDMI
19 Branchement audio de périphériques externes
20 Branchement de l’antenne FM
21
LECTURE
22
22 Lecture de disques
23 Lecture des CD MP3/WMA
24 Lecture des fi chiers JPEG
25 Lecture des DIVX
27 Utilisation de la fonction de lecture
32 Lecture de fi chiers multimédia avec la
fonctionnalité USB HOST (HÔTE USB)
5
Page 52

contenu
CONFIGURATION DU SYSTÈME
35
RADIO
41
DÉPANNAGE
42
PRODUITS PRIS EN CHARGE PAR LA
FONCTION USB HOST (HÔTE USB)
44
ANNEXES
45
35 Réglage de la langue
35 Confi guration du type d’écran du téléviseur
38 Confi guration (niveau de classfi cation)
38 Changement de mot de passe
39 Enregistrement DIVX (R)
39 Confi guration de la compression DRC
39 Confi guration de la compression AV Sync
40 Confi guration de la fonction EQUALIZER
(ÉGALISEUR)
40 Confi guration de la fonction DSP
40 Fonction SLEEP TIMER
40 Régler la brillance de l’écran
41 Écoute de la radio
41 Pré-réglage des stations
44 Appareil photo numérique
44 Disque USB à mémoire fl ash
44 Lecteur MP3
45 Précautions à prendre lors de la manipulation
et du rangement des disques
46 Caractéristiques
6
Page 53

informations préalables
AVANT DE LIRE LE MANUEL D'UTILISATION
Assurez-vous d'avoir assimilé les termes suivants avant de passer à la lecture du manuel d'utilisation.
FR
Icônes utilisées dans ce manuel d'utilisation
Icône Terme Défi nition
DVD
CD
B
MP3 Indique une fonction disponible avec un CD-R/-RW.
A
JPEG Indique une fonction disponible avec un CD-R/-RW.
G
DivX
D
Avertissement
Remarque
M
M
Dans ce manuel, les instructions comportant le signe "DVD ( )" s’appliquent aux DVD-VIDEO, DVD-AUDIO
et DVD-R/-RW enregistrés en mode Vidéo puis fi nalisés. Lorsqu’un type de DVD particulier est mentionné, il
est indiqué séparément.
Si un disque DVD-R/-RW n'a pas été enregistré correctement au format vidéo DVD, il ne pourra pas être lu.
Indique une fonction disponible avec les DVD ou DVD-R/DVD-RW
enregistrés et fi nalisés en mode Vidéo.
Indique une fonction disponible avec un CD de données (CD-R ou CD-RW).
Indique une fonction disponible avec un disque MPEG4
(DVD±R/RW, CD-R ou CD-RW).
Indique qu'une fonction ne fonctionne pas ou que des paramètres ont
peut-être été annulés.
Indique des astuces ou des consignes pouvant vous aider à utiliser les
différentes fonctions.
Comment utiliser ce manuel d'utilisation
Veillez à bien connaître les consignes de sécurité avant d'utiliser l'appareil.
1.
(reportez-vous aux pages 3 à 4)
En cas de problème, consultez la section Dépannage. (reportez-vous aux pages 42 à 43)
2.
● INFORMATIONS PRÉALABLES
Copyright
©2009 Samsung Electronics Co.,Ltd.
Tous droits réservés ; il est interdit de reproduire ou de copier tout ou partie de ce manuel d'utilisation
sans l'accord préalable écrit de Samsung Electronics Co., Ltd.
7
Page 54

informations préalables
Le DVD (Digital Versatile Disc) offre une qualité audio et vidéo exceptionnelle grâce au son
ambiophonique Dolby Digital et à la technologie de compression vidéo MPEG-2. Désormais, vous
pouvez bénéficier de ces effets très réalistes chez vous, comme si vous étiez dans une salle de
cinéma ou de concert.
~
1 6
DISQUES COMPATIBLES
Type de disque Marque (logo) Signaux enregistrés Diamètre Durée de lecture maxi.
Les systèmes Home cinéma et les disques possèdent des codes régionaux. Ces codes régionaux
doivent correspondre pour que le disque puisse être lu. Si les codes ne correspondent pas, le disque ne
sera pas lu.
Le code régional du lecteur figure sur le panneau arrière de l’appareil.
(Votre système Home cinéma lit uniquement les DVD ayant le même code régional.)
Environ 240 min (une face)
Environ 480 min (double face)
Environ 80 min (une face)
Environ 160 min (double face)
DVD-VIDEO VIDEO
CD audio
DivX
COMPACT
DIGITAL AUDIO
AUDIO
AUDIO + VIDEO
12 cm
8 cm
12 cm 74 min
8 cm 20 min
12 cm 74 min
8 cm 20 min
TYPES DE DISQUE NON COMPATIBLES
Les disques laser, CD-G, CD-I, CD-ROM, DVD-RAM et DVD-ROM ne peuvent pas être lus par ce lecteur.
•
Il est possible que le lecteur ne puisse pas lire les DVD achetés à l’étranger.
•
PROTECTION CONTRE LA COPIE
•
Un grand nombre de disques DVD sont encodés avec la protection contre la copie. Pour cette raison, vous devez
brancher directement votre système Home cinéma sur un téléviseur uniquement et non sur un magnétoscope.
Les DVD protégés contre la copie affi chent des images déformées lors du branchement sur un magnétoscope.
•
Ce produit intègre la technologie de protection des droits d'auteur dont certains brevets américains et autres
droits de propriété intellectuelle possédés par Macrovision Corporation et autres propriétaires sont protégés par
des dépôts de brevet. L'utilisation de cette technologie de protection des droits d'auteur doit être autorisée par
Macrovision Corporation et doit se limiter à une utilisation domestique et à d'autres emplois limités, à moins qu'il
n'en soit autrement décidé par Macrovision Corporation. Tenter de démonter l'appareil et d'en étudier le
fonctionnement en vue de le reproduire est strictement interdit.
8
Page 55

TYPES DE DISQUE ET CARACTÉRISTIQUES
Cet appareil ne prend pas en charge les fi chiers sécurisés (DRM) (Gestion des droits numériques).
Disques CD-R
❖
Certains disques CD-R ne peuvent pas être lus en fonction du périphérique d’enregistrement utilisé (graveur de
•
CD ou ordinateur) et de l’état du disque.
Utilisez un CD-R de 650 Mo/74 minutes.
•
N’utilisez pas de CD-R de plus de 700 Mo/80 minutes car ils risquent de ne pas pouvoir être lus.
Certains CD-RW (réinscriptibles) ne peuvent pas être lus.
•
Seuls les CD-R correctement "fermés" peuvent être lus intégralement. Si la session est fermée alors que le
•
disque reste ouvert, le disque ne pourra pas être entièrement lu.
Disques CD-R MP3
❖
Le nom des fi chiers MP3 ne doit pas comporter plus de 8 caractères et ne doit pas contenir d’espaces ni de
•
caractères spéciaux (. / = +).
Utilisez des disques enregistrés avec une vitesse de compression/décompression supérieure à 128 kbit/s.
•
Seuls les fi chiers comportant l’extension "mp3" peuvent être lus.
•
Seul les disques multisession écrits de manière consécutive peuvent être lus. Si le disque multisession
•
comporte un segment vierge, il sera lu jusqu’au segment vierge uniquement.
Si le disque n’est pas fermé, le lancement de la lecture sera plus long et il est possible que tous les fi chiers
•
enregistrés ne puissent pas être lus.
Pour les fi chiers encodés au format VBR (débit binaire variable), c’est-à-dire les fi chiers encodés avec des
•
débits binaires faible et élevé (ex. : 32 à 320 kbit/s), il est possible que le son soit décalé pendant la lecture.
Vous pouvez lire un maximum de 500 plages par CD.
•
Vous pouvez lire un maximum de 300 dossiers par CD.
•
Disques CD-R JPEG
❖
Seuls les fi chiers comportant l’extension "jpg" peuvent être lus.
•
Si le disque n’est pas fermé, le lancement de la lecture sera plus long et il est possible que tous les fi chiers
•
enregistrés ne puissent pas être lus.
Seuls les disques CD-R comportant des fi chiers JPEG au format ISO 9660 ou Joliet peuvent être lus.
•
Le nom des fi chiers JPEG ne doit pas comporter plus de 8 caractères et ne doit pas contenir d’espaces ou de
•
caractères spéciaux (. / = +).
Seul les disques multisession écrits de manière consécutive peuvent être lus. Si le disque multisession
•
comporte un segment vierge, il sera lu jusqu’au segment vierge uniquement.
Vous pouvez stocker un maximum de 9 999 images sur un même CD.
•
Lors de la lecture d’un CD d’images Kodak ou Fuji, seuls les fi chiers JPEG du dossier images peuvent être lus.
•
Il est possible que le lancement de la lecture des CD d’images Kodak ou Fuji soit plus long voire impossible.
•
Disques DVD±R/RW, CD-R/RW DivX
❖
Cet appareil proposant uniquement des formats d’encodage autorisés par DivX Networks, Inc., il est possible
•
qu’un fi chier DivX créé par l’utilisateur ne puisse pas être lu.
Les mises à jour logicielles des formats non compatibles ne sont pas prises en charge.
•
(Exemple : QPEL, GMC, résolution supérieure à 800 x 600 pixels, etc.)
La lecture des sections avec une vitesse d’enregistrement élevée peut s’avérer impossible pendant la lecture
•
d’un fi chier DivX.
Pour de plus amples informations sur les formats autorisés par DivX Networks, Inc., rendez-vous sur le site
•
"www.divxnetworks.net".
FR
● INFORMATIONS PRÉALABLES
9
Page 56

description
FAÇADE
10
BOUTON DE MISE SOUS TENSION ( )
BOUTON D’ÉJECTION Fonction Bouton
BOUTON LECTURE/PAUSE ( ) TIROIR DISQUE
Réglage du volume (+) Affi chage
La réparation des enceintes n’est pas possible. Pour le remplacement des enceintes, veuillez contacter votre
M
centre de dépannage Samsung agréé.
Si vous appuyez sur le bouton. il y aura un bip sonore.
Il y aura un délai entre 3 secondes, lorsque vous touchez le Power ON / OFF.
Réglage du volume (-)
Page 57

PANNEAU ARRIÈRE
9
FR
1
10
4
2
3
● DESCRIPTION
8
7
6
5
CONNECTEURS DE SORTIE DES
ENCEINTES
Hôte USB
PRISE D’ENTRÉE AUX
PRISE SORTIE HDMI OUT
FM 75 Ω
PRISE D’ENTRÉE AUX 2
PRISE VIDEO OUT (SORTIE VIDÉO)
PRISES DE SORTIE COMPONENT VIDEO
VENTILATEUR
9
SORTIE DIGITAL AUDIO OUT
10
Permettent de brancher l'enceinte gauche et le caisson de basse.
Permet de brancher un appareil photo numérique, un lecteur MP3, une
carte mémoire Memory Stick, un lecteur de carte ou tout autre support
de stockage amovible.
Permet de connecter l’appareil à la sortie analogique d’un périphérique
externe (ex : lecteur MP3).
À l’aide d’un câble HDMI, permet de brancher la prise de sortie HDMI à
la prise d’entrée HDMI de votre téléviseur pour obtenir une image de
meilleure qualité.
Permet de connecter l’antenne FM.
Connectez l’appareil à la sortie analogique 2 canaux d’un périphérique
externe (ex : magnétoscope).
Reliez la prise d’entrée vidéo du téléviseur (VIDEO IN) à la prise VIDEO
OUT (SORTIE VIDÉO).
Permettent de connecter les entrées Vidéo composant de votre téléviseur
à ces prises.
Le ventilateur se met en marche dès que l'appareil s'allume. Prévoyez un
espace d’environ 10 cm minimum autour du ventilateur lorsque vous
installez l'appareil.
•
Utilisez un coaxial numérique pour le raccordement à un amplifi cateur
Dolby Digital compatible.
Munissez-vous d’un câble numérique coaxial pour effectuer le
•
raccordement à un amplifi cateur A/V équipé d’un décodeur Dolby
Digital, MPEG2 ou DTS.
11
Page 58

télécommande
Portée de fonctionnement de la télécommande
La télécommande peut être utilisée jusqu’à environ
7 mètres en ligne droite. Elle peut également être utilisée à un angle horizontal de 30°
maximum par rapport au capteur de la télécommande.
Insertion des piles de la télécommande
1. Retirez le cache du
compartiment à piles
selon le sens de la
fl èche.
Respectez les précautions suivantes afi n d’éviter toute fuite ou fi ssure des piles :
M
12
•
Placez les piles dans la télécommande en respectant la polarité : (+) sur (+) et (–) sur (–).
Utilisez un type de piles adapté. Les piles peuvent sembler identiques d’apparence mais avoir une tension différente.
Remplacez toujours les deux piles en même temps.
Ne mettez pas les piles en contact avec une source de chaleur ou des fl ammes.
2. Insérez deux piles AAA de 1,5 V en
veillant à respecter la polarité (+ et -).
3. Remettez le cache
en place.
Page 59

FONCTIONS DE LA TÉLÉCOMMANDE
1
2
3
4
41
40
39
38
37
36
FR
● TÉLÉCOMMANDE
5
6
7
8
9
10
11
12
13
14
15
16
17
18
19
35
34
33
32
31
30
29
28
27
26
25
24
23
22
21
20
13
Page 60

télécommande
Bouton POWER (MARCHE/ARRÊT)
1
Bouton DVD
2
Bouton USB (USB)
3
Touches numériques (0 à 9)
4
Bouton CD Ripping
5
Bouton STEP (PAS À PAS)
6
Boutons de saut AVANT/ARRIÈRE
7
Bouton VOLUME (VOLUME)
8
Bouton MENU (MENU)
9
Boutons ▲/▼, ◄/► curseur, Enter (Entrée)
10
Bouton INFO (INFO)
11
Bouton REPEAT (RÉPÉTITION)
12
Bouton EQ (EG)
13
Bouton SLEEP (VEILLE)
14
Bouton DNSE
15
Bouton SLOW
16
Bouton WIDE ST
17
Bouton Power Sound
18
Bouton REPEAT A-B
19
Bouton ANGLE
20
Bouton DSP
21
Bouton TREBLE/BASS
22
Bouton TUNER MEMORY
23
Bouton ZOOM
24
Bouton REMAIN
25
Bouton MO/ST
26
Bouton SUBTITLE
27
Bouton EXIT
28
Bouton RETURN
29
Bouton AUDIO
30
Bouton TUNNING
31
Bouton MUTE
32
Bouton PLAY/ INSERT ►, STOP , SEARCH
33
Bouton PAUSE
34
Bouton CANCEL
35
Bouton D.IN
36
Bouton AUX2
37
Bouton AUX1
38
Bouton TUNER
39
Bouton DIMMER
40
Bouton EJECT
41
14
Page 61

branchements
Cette section indique différents modes de branchement du Home cinéma numérique à d'autres périphériques
externes.
Avant de déplacer ou d'installer l’appareil, mettez-le hors tension et débranchez le cordon d’alimentation.
BRANCHEMENT DES ENCEINTES
L R
Position du Home cinéma numérique
Placez-le sur un support, une étagère ou dans le meuble TV.
Sélection de la position d’écoute
La distance entre la position d’écoute et le téléviseur doit être égale à environ 2,5 à 3 fois la taille de l’écran du
téléviseur.
Exemple : 2 à 2,4 m pour un téléviseur de 32"
3,5 à 4 m pour un téléviseur de 55"
Enceintes avant
Placez ces enceintes devant votre position d’écoute, tournées vers vous (à environ 45°).
Placez les enceintes de sorte que les haut-parleurs d’aigus se trouvent à hauteur de vos oreilles.
Alignez la façade des enceintes avant sur la façade de l'enceinte centrale ou placez-les légèrement en
avant de l'enceinte centrale.
ei
FR
● BRANCHEMENTS
15
Page 62

branchements
Branchement des enceintes
Appuyez sur la languette de la borne située à l’arrière de l'enceinte.
1.
Insérez le fi l noir dans la borne noire (-) et le fi l rouge dans la borne
2.
rouge (+) puis relâchez la languette.
Branchez les fi ches à l’arrière du Home cinéma.
3.
Assurez-vous que les couleurs des bornes de l’enceinte
•
correspondent aux couleurs de la fi che.
Caisson de basse
Noir
Rouge
16
Ne laissez pas les enfants jouer avec ou à proximité des enceintes. Ils risqueraient d’être blessés en cas de
chute des enceintes.
Lors du branchement des fi ls sur les enceintes, assurez-vous que la polarité (+/-) est respectée.
Si vous placez une enceinte à proximité du téléviseur, la couleur de l’écran peut s’en trouver altérée en raison
M
du champ magnétique généré par l’enceinte.
Si cela se produit, éloignez l’enceinte du téléviseur.
Page 63

BRANCHEMENT DE LA SORTIE VIDÉO SUR LE TÉLÉVISEUR
Choisissez l’une des méthodes suivantes pour le branchement sur le téléviseur.
FR
● BRANCHEMENTS
MÉTHODE 3
(fournie)
MÉTHODE 2
MÉTHODE 1
(fournie)
MÉTHODE 1 : HDMI
À l’aide du câble HDMI, reliez la prise HDMI OUT (SORTIE HDMI) située à l'arrière du système Home
cinéma à la prise HDMI IN (ENTRÉE HDMI) de votre téléviseur.
MÉTHODE 2 : Vidéo composant
Si votre téléviseur est équipé d’entrées Vidéo composant, reliez les prises de sortie Vidéo composant
(P
R
, PB et Y) situées à l’arrière du système Home cinéma aux prises d’entrée Vidéo composant de votre
téléviseur à l’aide du câble Vidéo composant (non fourni).
MÉTHODE 3 : Vidéo composite
Branchez le câble vidéo fourni sur la prise VIDEO OUT (SORTIE VIDÉO) qui se trouve à l'arrière du
système Home cinéma et sur la prise VIDEO IN (ENTRÉE VIDÉO) de votre téléviseur.
Cet appareil fonctionne en mode Balayage entrelacé 576i (480i) avec la sortie composant.
M
Vérifi ez si votre téléviseur porte le logo n. Si c’est le cas, cela signifi e qu’il peut accueillir la fonction
n.
17
Page 64

branchements
Fonction HDMI Auto Detection (Détection auto HDMI)
La sortie vidéo du lecteur passe automatiquement en mode HDMI lorsqu'un câble HDMI est raccordé et
que l’appareil est sous tension.
HDMI (High Defi nition Multimedia Interface- Interface multimédia haute défi nition)
•
HDMI est une interface permettant la transmission numérique de données vidéo et audio via un seul
connecteur.
Lorsque vous utilisez le HDMI, le Home cinéma DVD transmet un signal audio et vidéo numérique et
affi che une image claire sur un téléviseur disposant d'une prise d'entrée HDMI.
Description de la connexion HDMI
•
Connecteur HDMI : prend en charge les données vidéo et audio numériques.
Le HDMI ne transmet qu'un signal numérique pur au téléviseur.
•
Si votre téléviseur ne prend pas en charge la protection HDCP (High-bandwidth Digital Content
•
Protection - Protection du contenu numérique sur large bande passante), un bruit aléatoire est
transmis à l'écran.
Pourquoi Samsung utilise-t-il le HDMI?
•
Les téléviseurs analogiques requièrent un signal vidéo/audio analogique. Toutefois, lorsque vous lisez
un DVD, les données transmises au téléviseur sont numériques. Vous avez donc besoin d'un
convertisseur numérique-analogique (sur le Home cinéma DVD) ou d'un convertisseur analogiquenumérique (sur le téléviseur). Lors de la conversion, la qualité de l'image se détériore en raison du bruit
et de la perte de signal. La technologie HDMI est de meilleure qualité car elle ne nécessite aucune
conversion numérique-analogique et elle est constituée d'un signal numérique pur entre le lecteur et
votre téléviseur.
Qu'est-ce que le HDCP?
•
Le système HDCP (High-bandwidth Digital Content Protection - Protection du contenu numérique sur
large bande passante) vise à empêcher les données DVD émises par le biais de la technologie HDMI
d'être copiées. Il offre une liaison numérique sûre entre une source vidéo (ordinateur, DVD, etc.) et un
écran (téléviseur, projecteur, etc.). Les données sont codées au niveau de la source afi n d'empêcher
les copies non autorisées.
Qu’est-ce que Anynet+?
•
Anynet+ est une fonction pratique qui permet de commander le lecteur via la télécommande d'un
téléviseur Samsung compatible Anynet+.
Si votre téléviseur Samsung comporte le logo n, il peut accueillir la fonction Anynet+.
•
Lorsque vous allumez le lecteur et insérez un disque, le lecteur démarre la lecture du disque et le
•
téléviseur s’allume et passe automatiquement en mode HDMI.
Lorsque vous allumez le lecteur et appuyez sur le bouton Play (Lecture) alors qu'un disque est
•
déjà inséré, le téléviseur s'allume immédiatement et passe en mode HDMI.
FONCTION HDMI
Sélection de la résolution
Cette fonction permet de sélectionner la résolution d’écran pour la sortie HDMI.
En mode Arrêt, appuyez sur le bouton Menu (Menu) de la télécommande pour confi gurer la sortie HDMI.
•
Les résolutions suivantes sont disponibles pour la sortie
HDMI : 576p (480p), 720p, 1080i/1080p.
•
La résolution SD (défi nition standard) est de 576p (480p) et la
résolution HD
(haute défi nition) est de 720p, 1080i/1080p.
Le réglage par défaut de la sortie HDMI est 576p (480p).
18
Pourquoi utiliser le HDMI?
Cette fonction permet de transmettre
des signaux vidéo DVD numériques
sans les convertir en signaux
analogiques. Les images numériques
sont donc plus nettes avec une
connexion HDMI.
Page 65

Si le téléviseur ne prend pas en charge la résolution confi gurée, l’image affi chée sera déformée.
M
Reportez-vous au manuel d’utilisation de votre téléviseur pour de plus amples informations sur la méthode de
sélection de la source d’entrée vidéo du téléviseur.
BRANCHEMENT AUDIO DE PÉRIPHÉRIQUES EXTERNES
FR
AUX1 : branchement d’un périphérique externe/lecteur MP3
Périphériques tels qu’un lecteur MP3
Branchez la prise AUX IN (entrée auxiliaire) du Home cinéma à la prise de sortie audio du
1.
périphérique externe/lecteur MP3.
Appuyez sur le bouton AUX1 de la télécommande pour sélectionner l’entrée AUX1.
2.
Câble audio
(non fourni)
Audio OUT
M
Si vous connectez un lecteur MP3 iPod lorsque le lecteur DVD est allumé, celui-ci permet de recharger la
batterie de votre iPod.
AUX2 : branchement d'un périphérique externe analogique
Périphériques émettant des signaux analogiques (magnétoscope, par
exemple)
1.
Reliez la prise AUX IN 2 (Audio) de votre Home Cinema à la prise
Audio Out (Sortie audio) du périphérique externe analogique.
2.
Appuyez sur la touche AUX2 de la télécommande pour sélectionner
l'entrée AUX 2.
•
Vous pouvez également utiliser le bouton FUNCTION de l'unité
principale. Les différents modes disponibles défi lent comme suit:
DVD ➞ USB ➞ TUNER ➞ AUX 1 ➞ AUX 2 ➞ D.IN.
Composant
externe
analogique
Câble audio
(non fourni)
● BRANCHEMENTS
Vous avez la possibilité de relier la prise <Video output> (Sortie vidéo) de votre magnétoscope à la télévision et
M
de relier la prise <Audio output> (Sortie audio) du magnétoscope à ce produit.
19
Page 66

branchements
BRANCHEMENT DE L’ANTENNE FM
Branchez l’antenne FM fournie à la prise FM 7Ω COAXIALE.
1.
Déplacez progressivement le fi l de l’antenne jusqu’à trouver une position dans laquelle la réception
2.
est de qualité, fi xez-le ensuite solidement à un mur ou une autre surface solide.
Cet appareil ne reçoit pas les émissions AM.
M
Antenne FM
(fournie)
20
Ventilateur
Le ventilateur fournit de l’air frais à l’appareil afi n
d’éviter toute surchauffe.
Pour votre sécurité, veuillez respecter les
consignes suivantes.
Vérifi ez que l’appareil est suffi samment bien ventilé.
•
Si l’appareil est mal ventilé, sa température interne
risque de s’élever et il pourrait être endommagé.
Veuillez à ne pas obstruer le ventilateur ou les
•
orifi ces d’aération. (Si le ventilateur ou les orifi ces
d’aération sont obstrués avec du papier journal ou
du tissu, la température interne de l’appareil risque
d’augmenter et cela pourrait provoquer un incendie.)
Page 67

avant d’utiliser votre Home cinéma
Le système Home cinéma
Branchez le cordon d’alimentation de l’unité principale à la source d’alimentation secteur.
1.
Appuyez sur le bouton DVD pour passer en mode DVD et utiliser le lecteur DVD du Home cinéma.
2.
FR
●
AVANT D’UTILISER VOTRE HOME CINÉMA
Pas de Disque
Un temps de retard de 3 secondes environ est constaté lorsque vous appuyez sur la touche de l’appareil permettant d’allumer ou
M
d’éteindre ce dernier.
Il y aura un délai de 2 secondes, pendant que vous éjecter le disque.
21
Page 68

lecture
LECTURE DE DISQUES
Insérez un disque verticalement dans la fente d’insertion de disques.
1.
Placez délicatement un disque dans le tiroir, face imprimée dirigée vers le haut.
•
Fermez le tiroir en appuyant sur le bouton PLAY (LECTURE) (
2.
La lecture commence automatiquement.
•
B
)).
22
Pour arrêter la lecture en cours, appuyez sur le bouton STOP (ARRÊT) (
Si le bouton STOP (ARRÊT) n’est actionné qu'une seule fois, PRESS PLAY (APPUYEZ SUR
•
LECTURE) s’affi che et la position où la lecture a été interrompue est gardée en mémoire. Si vous
appuyez sur le bouton PLAY (LECTURE) (
été interrompue. (Cette fonction n’est disponible qu’avec les DVD.)
•
Si le bouton STOP (ARRÊT) est actionné deux fois, STOP (ARRÊT) s’affi che. Si vous appuyez
ensuite sur le bouton PLAY (LECTURE) (
Pour suspendre momentanément la lecture en cours, appuyez sur le bouton PAUSE
(PAUSE)
•
M
( ).
Pour reprendre la lecture, appuyez de nouveau sur le bouton PLAY (LECTURE) ( ).
Selon le contenu du disque, il est possible que l’écran initial soit différent.
Les disques piratés ne sont pas lus par ce lecteur car cela irait à l’encontre des recommandations CSS (Content Scrambling
System : système de brouillage du contenu pour la protection contre la copie).
)) ou ENTER (ENTRÉE), la lecture reprend là où elle a
)), la lecture reprend depuis le début.
).
Page 69

LECTURE DES CD MP3/WMA
Les CD de données (CD-R, CD-RW) encodés au format MP3 ou WMA peuvent être lus.
Insérez le disque MP3/WMA.
1.
L’écran du menu MP3/WMA s’affi che et la
•
lecture commence.
L’apparence du menu dépend du disque
•
MP3/WMA.
Les fi chiers WMA-DRM ne peuvent pas être lus.
•
En mode Arrêt, utilisez les boutons du curseur
2.
†, π, √, ®
sur le bouton ENTER (ENTRÉE).
•
Pour changer d’album, utilisez les boutons Return
3.
(Retour) et
autre album, puis appuyez sur ENTER (ENTRÉE).
Appuyez sur le bouton STOP (ARRÊT) () pour arrêter la lecture.
4.
M
pour sélectionner l’album, puis appuyez
Utilisez les boutons du curseur †, π pour sélectionner
la piste.
†, π
du curseur, sélectionnez une
Selon le mode d’enregistrement, certains CD MP3/WMA peuvent ne pas être lus.
La table des matières d’un CD MP3 varie en fonction du format de piste MP3/WMA enregistré sur le disque.
CD Bibliothéque
► No One 00:00:16
9
MP3
s
SÉLECT rRETOUR e MENU
Songs
Films
Pictures
Spider man
No One
Alicia Keys
FR
A
● LECTURE
Pour sélectionner une icône de fi chier sur l’écran
Appuyez sur les boutons †, π, √, ® du curseur lorsque l’appareil est en mode Arrêt et
•
sélectionnez l’icône de votre choix dans la partie supérieure du menu.
CD Bibliothéque
No One 00:00:19
Songs
Films
Pictures
Spider man
DIVX
No One
Alicia Keys
s
SÉLECT rRETOUR e MENU
Icône de fi chiers musicaux : pour lire uniquement des
fi chiers musicaux, sélectionnez l’icône
.
Icône de fi chiers images : pour affi cher uniquement des
fi chiers images, sélectionnez l’icône
.
Icône de fi chiers vidéo : pour lire uniquement des fi chiers
vidéo, sélectionnez l’icône
.
23
Page 70

lecture
Lecture des fichiers JPEG
Les images provenant d’un appareil photo ou d’un caméscope numérique ou les fi chiers JPEG d’un PC peuvent être
stockés sur un CD puis lus à l’aide de votre Home cinéma.
CD Bibliothéque
Alicia Keys 00:00:00
s
Songs
Films
Pictures
Spider man
JPEG
No One
Alicia Keys
SÉLECT rRETOUR e MENU
Rotation
Appuyez sur le bouton ▼,
•
À chaque fois
aiguilles d'une montre. À chaque fois
de dans le sens antihoraire.
•
Appuyez sur le bouton ◄, ► pour afficher l’image précédente ou suivante.
▲, ◄, ►
.
▲
que vous appuyez sur le bouton, l'image effectue une rotation de dans le sens des
▼
que vous appuyez sur le bouton, l'image effectue une rotation
Diaporama
Appuyez sur le bouton
l'affi chage des images.
•
Vitesse Diaporama Normal: 12 second
•
Vitesse Diaporama Slow: 18 second
•
Vitesse Diaporama Fast: 7 second
Les résolutions maximales prises en charge par cet appareil sont de 5120 x 3480 (soit 19,0 Mpixel) pour les
M
fi chiers JPEG standard et de 2048 x 1536 (soit 3,0 Mpixel) pour les fi chiers images progressifs.
Si un fi chier JPEG est lu alors que la résolution de sortie HDMI est de 720p/1080i/1080p, le mode est
automatiquement converti en mode 576p (480p).
Selon la taille des fi chiers, les intervalles entre les images peuvent être plus ou moins longs que ne l’indique le
manuel.
INFO
. Appuyez sur le bouton ▼,
▲ pour sélectionner choisir l'intervalle séparant
G
G
24
Page 71

LECTURE DES DIVX
Les fonctions énumérées sur cette page s’appliquent à la lecture des disques DivX.
Saut avant/arrière
Pendant la lecture, appuyez sur le bouton [# ou $].
•
Passe au fi chier suivant à chaque fois que vous appuyez sur le
bouton $ (à condition que le disque contienne au moins 2
fi chiers).
•
Revient au fi chier précédent à chaque fois que vous appuyez sur
le bouton # (à condition que le disque contienne au moins 2
fi chiers).
FR
D
● LECTURE
Lecture rapide
Pendant la lecture, appuyez sur les boutons ,.
Pour lire le disque à une vitesse plus élevée, appuyez sur le bouton ou pendant la lecture.
•
Chaque fois que vous appuyez sur l’un des deux boutons, la vitesse de lecture change de la façon
suivante : 2x 4x 8x.
Sélection de l’audio
Appuyez sur le bouton AUDIO (AUDIO).
•
S’il existe plusieurs pistes audio sur un disque, vous pouvez passer de l’une à l’autre.
•
Chaque fois que vous appuyez sur le bouton, votre sélection passe de AUDIO (1/N, 2/N …) à
M
Le symbole
s’affi che lorsqu’il n’y a qu’une seule langue prise en charge sur le disque.
Affi chage des sous-titres
Appuyez sur le bouton SUBTITLE (SOUS-TITRES).
Chaque fois que vous appuyez sur le bouton, votre sélection passe
•
de SUBTITLE (1/N, 2/N …) à SUBTITLE OFF (SOUS-TITRES
DÉSACTIVÉS).
Si le disque ne comporte qu’un seul fi chier de
•
sous-titres, il sera lu automatiquement.
D
D
D
.
25
Page 72

lecture
DivX (Digital internet video eXpress)
DivX est un format de fi chiers vidéo développé par Microsoft et basé sur la technologie de compression
MPEG4 pour fournir des données audio et vidéo en temps réel sur Internet.
Le format MPEG4 est utilisé pour l’encodage vidéo et le format MP3 pour l’encodage audio de façon à
ce que les utilisateurs puissent regarder un fi lm avec une qualité vidéo et audio proche de celle d’un
DVD.
Formats pris en charge
1.
Cet appareil ne prend en charge que les formats suivants. Si le format audio et le format vidéo ne
sont pas pris en charge, vous risquez d’obtenir des images saccadées ou une absence de son.
Formats vidéo pris en charge
Versions prises en charge DivX3.11 à DivX5.1, XviD V1/V2/V3/V7
Formats audio pris en charge
Fréquence d’échantillonnage 44,1 kHz 44,1/48 kHz
•
Format d’image : bien que la résolution DivX par défaut soit de 640 x 480 pixels (4:3), ce produit
prend en charge des résolutions jusqu’à 800 x 600 pixels (16:9). Les résolutions de téléviseur
supérieures à 800 ne sont pas prises en charge.
•
Lorsque vous lisez un disque dont la fréquence d’échantillonnage est supérieure à 48 kHz ou 320
kbit/s, l’image peut trembler.
2.
Fonction sous-titres
•
Cette fonction nécessite de posséder de bonnes connaissances dans le domaine de l’extraction
et du montage vidéo.
•
Pour utiliser la fonction sous-titres, enregistrez le fi chier de sous-titres (*.smi) sous le même nom
que le fi chier DivX (*.avi) et dans le même dossier.
Exemple: Racine Samsung_007CD1.avi
•
Jusqu’à 60 caractères alphanumériques ou 30 caractères asiatiques (langues avec caractères à 2
octets telles que le Coréen et le Chinois) pour le nom de fi chier.
Format AVI WMV
Format MP3 WMA AC3
Débit binaire 80 à 384 kbit/s 56 à 128 kbit/s 128 à 384 kbit/s
Samsung_007CD1.smi
26
Page 73

UTILISATION DE LA FONCTION DE LECTURE
FR
Affi chage des informations du disque
D
Pour affi cher le titre, le chapitre actuellement lu ainsi que le compteur, appuyez
sur le bouton INFO (INFO) pendant la lecture du DVD.
Cet écran vous permet également de choisir rapidement un titre, un chapitre ou
encore un moment précis affi ché au compteur.
Visualisation de l’affi chage
1.
Pendant la lecture du DVD, appuyez sur le bouton INFO (INFO).
•
Pour que l’écran disparaisse, appuyez de nouveau sur le bouton
INFO (INFO)
2.
Appuyez sur le bouton π ou † pour sélectionner l'élément de votre choix.
3.
Appuyez sur le bouton
.
√
ou ® pour effectuer les réglages souhaités, puis appuyez sur le bouton
ENTER (ENTRÉE).
•
Vous pouvez utiliser les boutons numériques de la télécommande
pour accéder directement à un titre ou un chapitre ou pour
démarrer la lecture à un moment de votre choix.
4.
Pour que l’écran disparaisse, appuyez de nouveau sur le bouton
INFO (INFO)
.
DVD Info
Titre : 001
Chapitre : 002
Durée de lecture : 00:30:15
Audio : ENG 5.1 CH
Sous-Titre : Non
<
MODIF sSÉLECT
Titre: Pour accéder au titre désiré lorsque plusieurs choix s’offrent à vous.
Exemple : si le DVD contient plus d’un fi lm, chaque fi chier est identifi é. Un
DVD peut contenir plusieurs titres différents. Par exemple, si un disque
contient quatre fi lms différents, chacun d’entre eux pourrait être considéré
comme un titre.
Chapitre: La plupart des DVD sont divisés en chapitres de manière à ce que vous puissiez rechercher
rapidement un passage spécifi que. Chaque titre d’un DVD est généralement divisé en chapitres.
Durée de lecture: Permet de démarrer la lecture d’un fi lm à l’heure de votre choix.
Audio: Fait référence à la langue de la bande son du fi lm. Dans cet exemple, la bande son est lue
en anglais 5.1. Un DVD peut posséder jusqu’à huit bandes son différentes.
Sous-Titre: Fait référence aux langues de sous-titrage disponibles sur le disque. Vous pouvez choisir la
langue de sous-titrage ou, si vous le préférez, les supprimer de l’écran. Un DVD peut comporter jusqu’à
32 sous-titres.
● LECTURE
Vérifi cation de la durée restante
Appuyez sur le bouton REMAIN (DURÉE RESTANTE).
•
Permet de vérifi er le temps de lecture restant.
27
Page 74

lecture
Lecture rapide
Appuyez sur le bouton √√ ou ®®
Chaque fois que vous appuyez sur ce bouton pendant la lecture, les vitesses de lecture défi lent dans
•
l’ordre suivant :
X2 ➞ X4 ➞ X8 ➞ X16 ➞ X32 ➞ X128
X2 ➞ X4 ➞ X8 ➞ X16 ➞ X32 ➞ X128
D
X2 ➞ X4 ➞ X8
X2 ➞ X4 ➞ X8
Lecture lente
En mode Pause (Pause), appuyez sur le bouton (√√ ou ®®).
•
Chaque fois que vous appuyez sur ce bouton pendant la lecture, les
vitesses de lecture défi lent dans l’ordre suivant :
1/2
1/2
D
➞1/4➞1/8➞1/2➞1/4➞1/8
➞1/4➞1/8
D
D
28
Aucun son n’est émis pendant la lecture en vitesse lente.
M
La lecture lente arrière ne fonctionne pas avec les DivX.
Saut de scènes/chansons
Appuyez sur le bouton [
À chaque fois que ce bouton est activé, la lecture du chapitre, de la plage ou du répertoire (fi chier)
•
démarre.
l√√
ou
®®l
].
DA
Page 75

Répétition de la lecture
La répétition de la lecture vous permet de lire de façon répétée un
chapitre, un titre, une plage (chanson) ou un répertoire (fi chier MP3).
Appuyez sur le bouton REPEAT.
•
Chaque fois que vous appuyez sur ce bouton pendant la lecture, les
modes de lecture répétée défi lent dans l’ordre suivant :
REPEAT : TITRE REPEAT : CHAPITRE REPEAT : NON
DVD-VIDEO
REPEAT : TITRE
D
AB
CHAPTER (CHAPITRE) : permet de lire de façon répétée le chapitre sélectionné.
TITLE (TITRE) : permet de lire de façon répétée le titre sélectionné.
TRACK (PLAGE)/
FOLDER (DOSSIER)/
OFF (DÉSACTIVÉ) : permet d’annuler la répétition de la lecture.
RANDOM (ALÉATOIRE)/
: répéter toutes les, : jeu normal
REPEAT : FOLDER
: permet de lire de façon répétée la plage sélectionnée.
: permet de lire de façon répétée le dossier sélectionné.
: permet d’écouter des plages en lecture aléatoire ou en suivant une
séquence prédéfi nie.
REPEAT : NON
Répétition de la lecture d’un segment A-B
BAD
D
FR
● LECTURE
Permet de répéter la lecture d’une section défi nie d’un DVD.
Appuyez sur le bouton REPEAT A-B du curseur pour sélectionner A.
1.
Appuyez sur le bouton REPEAT A-B du curseur pour sélectionner A.
2.
Pour revenir en mode de lecture normale, appuyez sur le bouton REPEAT A-B.
•
La fonction A-B Repeat (Répétition A-B) ne peut pas être utilisée avec les disques MP3 ou JPEG.
M
Fonction Pas à pas
Appuyez sur le bouton STEP.
•
La lecture du fi lm se fait image par image.
Aucun son n’est émis pendant la lecture en mode pas à pas.
M
D
29
Page 76

lecture
Fonction Zoom (Agrandissement de l’écran)
Cette fonction vous permet d’agrandir une partie de l’image affi chée.
Appuyez sur la touche ZOOM.
1.
Appuyez sur ▲, ▼, ◄, ► pour aller à l’affi chage ANGLE.
2.
Appuyez sur la touche ENTER.
3.
Chaque fois que vous appuyez sur cette touche, vous passez d’un
•
niveau à l’autre dans l’ordre suivant:
ZOOM X 2 ZOOM X 4 ZOOM OFF
Fonction de sélection de la langue de la bande son
1.
Appuyez sur le bouton INFO (INFO).
2.
Appuyez sur le bouton
pour sélectionner l’affi chage AUDIO.
3.
Appuyez sur le bouton
bande son de votre choix.
•
En fonction du nombre de langues disponibles sur le disque DVD,
une langue différente est sélectionnée à chaque nouvelle pression
sur le bouton.
Vous pouvez également activer cette fonction en appuyant sur le bouton AUDIO (AUDIO) de la télécommande.
M
Selon les disques, il est possible que la fonction Audio Language (Langue de la bande-son) ne soit pas
disponible.
π
ou † du curseur
√
ou ® pour sélectionner la langue de la
Fonction de sélection de la langue de sous-titrage
Appuyez sur le bouton INFO (INFO).
1.
Appuyez sur le bouton
2.
pour sélectionner l’affi chage SUBTITLE
(SOUS-TITRES).
3.
Appuyez sur le bouton
(ENTRÉE) pour sélectionner la langue de sous-titrage de votre choix.
π
ou † du curseur
√
ou ® du curseur ou le bouton ENTER
D
30
Vous pouvez également activer cette fonction en appuyant sur le bouton SUBTITLE (SOUS-TITRES) de la
M
télécommande.
Selon les disques, il est possible que la fonction Subtitle Language (Langue de sous-titrage) ne soit pas
disponible.
Utilisation du menu Disc (Disque)
RETURN
e
Menu Disque
EXIT
Vous pouvez utiliser les menus de la langue
de la bande son, de la langue de soustitrage, du profi l, etc.
Le contenu des menus DVD varie d’un
disque à l’autre.
No Disc
m
MOVE
Disc Menu
Title Menu
Audio
Setup
s
Appuyez sur la touche
ENTREE pour accéder
au Menu Disque
SELECT
r
Page 77

En mode Stop (Arrêt), Appuyez sur le bouton MENU (MENU).
1.
▲
Appuyez sur le bouton
2.
ou ▼ du curseur pour sélectionner Disc Menu (Menu disque), puis
appuyez sur le bouton ENTER (ENTRÉE).
Le menu Disque peut ne pas être compatible avec certains disques.
M
FR
Utilisation du menu Title (Titre)
Pour les DVD contenant plusieurs titres, vous pouvez affi cher le titre de chaque fi lm. La disponibilité de
cette fonction peut varier d’un disque à l’autre.
En mode Stop (Arrêt), Appuyez sur le
1.
bouton MENU (MENU).
Appuyez sur le bouton
2.
▲
ou ▼ du
curseur pour sélectionner Title Menu
(Menu titre). Appuyez sur le bouton
ENTER (ENTRÉE).
Le menu Titres peut ne pas être compatible avec certains disques.
M
Le menu Titres ne s’affi che que si le disque contient au moins deux titres.
No Disc
m
MOVE
Disc Menu
Title Menu
Audio
Setup
s
Appuyez sur la touche
ENTREE pour accéder
au Menu Titres
SELECT
r
RETURN
e
Menu Titres
EXIT
P-SOUND (POWER SOUND)
La fonction de Power Sound er amplifi cation mode basse et haute améliore clé ou une basse deux
fois plus. Pour vous faire apprécier son réel puissant.
Puis avec la presse P.SOUND bouton, l'écran affiche:
P. SND ON
P. SND OFF
● LECTURE
31
Page 78

lecture
LECTURE DE FICHIERS MULTIMÉDIA AVEC LA FONCTIONNALITÉ USB
HOST (HÔTE USB)
Lisez vos fi chiers photo, vidéo ou musicaux enregistrés sur un lecteur MP3, une mémoire USB ou un caméscope
numérique en audio haute qualité en connectant le périphérique de stockage sur le port USB du système Home
cinéma.
Utilisation de la fonctionnalité USB HOST (HÔTE USB)
Connectez le périphérique USB sur le port USB.
Retrait du périphérique USB en toute sécurité
Afi n d’éviter d’endommager les données enregistrées sur le périphérique USB, suivez la procédure cidessous avant de déconnecter le câble USB.
Appuyez sur le bouton STOP (ARRÊT) (
•
Déconnectez le câble USB.
•
).
32
Saut avant/arrière
Pendant la lecture, appuyez sur le bouton (
•
S’il y a plus d’un fi chier, le fi chier suivant et le fi chier précédent sont sélectionnés lorsque vous appuyez sur
le bouton [
l√√
ou
®®l
].
l√√
ou
®®l
).
Lecture rapide
Pendant la lecture, appuyez sur les boutons ,.
•
Chaque fois que vous appuyez sur l’un des deux boutons, les vitesses de lecture défi lent dans l’ordre
suivant :
➞
4x ➞ 8x.
2x
Page 79

Extraction audio
Cette fonction permet de copier les fi chiers audio d’un CD sur un périphérique USB au format MP3.
Ouvrez le tiroir disque.
Connectez le périphérique USB.
1.
Placez-y un CD audio (CD DA), puis refermez le tiroir disque.
2.
Sur le fi chier souhaité CD-Ripping.
3.
Appuyez sur le bouton STOP (ARRÊT) ( ), pour arrêter le progrès.
4.
La fonction d’extraction audio ne fonctionne qu’avec les CD audio (CD DA).
M
FR
● LECTURE
33
Page 80

lecture
Périphériques compatibles
Les périphériques USB qui prennent en charge le stockage de grande capacité USB v.1.0. (appareils
1.
USB fonctionnant comme disque dur externe sur Windows (2000 et version ultérieure) sans installation
de pilote supplémentaire).
2.
Lecteur MP3 : les lecteurs MP3 de type HDD (disque dur) ou fl ash.
3.
Appareil photo numérique : appareils prenant en charge le stockage de grande capacité USB v. 1.0.
•
Appareils fonctionnant comme disques durs externes sur Windows (2000 et ultérieur) sans installation
de pilote supplémentaire.
DD USB et clé USB à mémoire fl ash : périphériques prenant en charge la version USB 2.0 ou USB 1.1.
4.
La qualité de lecture peut varier lorsque vous connectez un périphérique USB 1.1.
•
Lecteur de cartes USB : lecteur de cartes USB à une fente et lecteur de carte USB à plusieurs fentes.
5.
Selon le fabricant, le lecteur de cartes USB pourra ne pas être pris en charge.
•
Si vous installez plusieurs dispositifs de mémoire sur un lecteur multicartes, des problèmes peuvent
•
survenir.
Si vous utilisez un câble d’extension USB, le périphérique USB pourrait ne pas être reconnu.
6.
Formats pris en charge
Format
Image
fi xe
Musique
Cinéma
La fonction CBI (Control/Bulk/Interrupt) n’est pas prise en charge.
•
Les appareils photo numériques qui utilisent le protocole PTP ou qui nécessitent l’installation de
•
programmes supplémentaires pour la connexion à l’ordinateur ne sont pas pris en charge.
Les périphériques utilisant le système de fi chiers NTFS ne sont pas pris en charge. (Seul le système de
•
fi chiers FAT 16/32 (File Allocation Table) est pris en charge.)
Une fois connectés à ce lecteur, certains lecteurs MP3 peuvent ne pas fonctionner selon la taille de
•
secteur de leur système de fi chiers.
La fonction USB Host (Hôte USB) n’est pas prise en charge si le périphérique connecté utilise un
•
programme spécifi que au fabriquant pour transférer ses fi chiers.
Ne fonctionne pas avec les périphériques MTP (Media Transfer Protocol) dotés de la technologie Janus.
•
La fonction USB Host (Hôte USB) de ce lecteur ne prend pas en charge tous les périphériques
•
USB. Pour obtenir de plus amples informations sur les périphériques pris en charge, reportezvous en page 44.
Nom de
fi chier
Extension
de fi chier
JPG JPG .JPEG – – 640x480 –
MP3 .MP3 80 à 384 kbit/s – – 44,1 kHz
WMA .WMA 56 à 128 kbit/s V8 – 44,1 kHz
DivX
.AVI,.ASF 4 Mbit/s
Débit binaire Version Pixel
DivX3.11 à
DivX5.1, XviD
720x480 44,1 kHz à 48 kHz
Fréquence
d’échantillonnage
34
Page 81

confi guration du système
Pour plus de facilité, vous pouvez régler les fonctions de ce Home cinéma de la façon la mieux adaptée à votre
environnement.
RÉGLAGE DE LA LANGUE
La langue OSD (On Screen Display) (Affi chage à l’écran) est réglée sur Anglais par
défaut.
En mode Stop (Arrêt), appuyez sur le bouton MENU.
1.
Appuyez sur le bouton
2.
▼
du curseur pour le déplacer sur Réglage,
puis appuyez sur le bouton ENTER ou ►.
3.
Sélectionnez Réglage de la langue et appuyez ensuite sur le
bouton ENTER ou le bouton ►.
4.
Appuyez sur les boutons
▲,▼
du curseur pour le déplacer sur
Menu du Lecteur, puis appuyez sur le bouton
ENTER ou sur le bouton ►.
5.
Appuyez sur les boutons
▲,▼
du curseur pour sélectionner la
langue de votre choix, puis appuyez sur le bouton
ENTER
•
La langue est sélectionnée et l’écran revient sur le menu
Language Setup (Confi guration de la langue).
d Appuyez sur le bouton RETURN pour revenir au niveau récédent.
d Appuyez sur le bouton EXIT pour quitter le menu de configuration.
•
Menus du Lecteur : sélection de la langue du menu lecteur.
•
Menus du Disque : sélection de la langue du menu Disc (Disque)
(enregistrée sur le disque)
•
AUDIO : sélection de la langue de la bande son (enregistrée sur le
disque)
•
SOUS-TITRES : sélection de la langue de sous-titrage (enregistrée sur le disque)
•
DivX Sous-titres : sélection de la langue de sous-titrage du DivX.
Pas de Disque
Réglage de la langue
Menu Disque
Options D'affichage
Menu Titres
Cont. Parental
DivX(R) immatriculation
Audio
Réglage
m
DÉPLQC
s
Pas de Disque
Menus du Lecteur : Français
Menu Disque
Menus du Disque : English
Menu Titres
Audio : English
Sous-Titre : Auto.
Audio
DivX Sous-Titre : Unicode
Réglage
m
DÉPLQC
s
Pas de Disque
Menus du Lecteur : Français
Menu Disque
Menus du Disque : English
Menu Titres
Audio : English
Sous-Titre : Automatique
Audio
DivX Sous-Titre : Unicode
Réglage
m
DÉPLQC
s
SÉLECT
SÉLECT
SÉLECT
r
r
r
®
®
RETOUR
RÉGLAGE DE LA LANGUE
RETOUR
RÉGLAGE DE LA LANGUE
RETOUR
®
e
e
English
Français
Deutsch
Italiano
Nederlands
e
Polski
QUITTE
QUITTE
▲
▼
QUITTE
FR
Réglage
● CONFIGURATION DU SYSTÈME
®
®
®
®
®
®
®
®
®
®
®
CONFIGURATION DU TYPE D’ÉCRAN DU TÉLÉVISEUR
En fonction du modèle de votre téléviseur (16:9 ou 4:3 conventionnel), vous pouvez sélectionner le format d’image
du téléviseur.
1.
En mode Stop (Arrêt), appuyez sur le bouton MENU.
2.
Appuyez sur le bouton
▼
du curseur pour le déplacer sur Réglage,
puis appuyez sur le bouton ENTER ou ►.
3.
Appuyez sur le bouton
▼
du curseur pour le déplacer sur
Options D’affi chage, puis appuyez sur le bouton ENTER ou sur le
bouton ►.
4.
Appuyez sur les boutons
▲,▼
du curseur pour sélectionner
l’élément de votre choix, puis appuyez sur le bouton
ENTER.
•
Une fois la confi guration terminée, vous revenez
automatiquement à l’écran précédent.
d
Appuyez sur le bouton RETURN pour revenir au niveau précédent.
d Appuyez sur le bouton EXIT pour quitter le menu de configuration.
Pas de Disque
Réglage de la langue
Menu Disque
Options D'affichage
Menu Titres
Cont. Parental
DivX(R) immatriculation
Audio
Réglage
m
DÉPLQC
s
SÉLECT
Pas de Disque
Format êcran : Large ®
Menu Disque
Messages écran : Oui ®
Systéme TV : PAL ®
Menu Titres
Sortie Vidéo : I-SCAN ®
BD-Wise : Non ®
Audio
Résolution : 576P ®
Réglage
Qualité image ®
m
DÉPLQC
s
SÉLECT
®
®
r
RETOUR
OPTIONS D'AFFICHAGE
r
RETOUR
®
e
QUITTE
e
QUITTE
Réglage
®
35
Page 82

confi guration du système
Réglage du format d’affi chage du téléviseur (Taille de l’écran)
Le rapport horizontal/vertical du format d’image d’un téléviseur
conventionnel est de 4:3 tandis que celui d’un téléviseur écran large de
haute défi nition est de 16:9. Ce rapport est appelé le format d’image. Lors
de la lecture de DVD enregistrés dans différentes tailles d’écran, vous
devez ajuster le format d’image de votre téléviseur ou de votre moniteur.
Pour un téléviseur standard, sélectionnez l’option 4:3PS ou l’option 4:3LB
en vous basant sur vos préférences personnelles. Sélectionnez WIDE
(PLEIN ÉCRAN) si vous possédez un téléviseur à écran large.
4:3 Letter Box (Boîte aux lettres)
Sélectionnez cette option pour lire un fi lm en 16:9 en mode boîte
aux lettres sur un téléviseur conventionnel. Des barres noires
apparaîtront en haut et en bas de votre écran.
4:3 Pan&Scan (Recadrage automatique)
Sélectionnez cette option pour lire un fi lm en 16:9 en mode
Recadrage automatique sur un téléviseur conventionnel.
•
Vous ne pouvez voir que la portion centrale de l’écran
(avec les côtés de l’image 16:9 coupés).
16:9 WIDE (PLEIN ÉCRAN)
Sélectionnez cette option pour lire une image 16:9 en mode plein
écran sur votre téléviseur écran large.
•
Vous pouvez profi ter du format écran large.
Si un DVD est au format 4:3, vous ne pouvez pas le lire en mode écran large.
M
Les disques DVD étant enregistrés dans divers formats d’image, ils s’affi chent différemment en fonction du
logiciel, du type de téléviseur et du format d’image utilisé.
Lorsque vous utilisez le mode HDMI, l’écran est automatiquement converti en mode Plein écran.
36
Messages écran (Screen Messages)
Utilisez ces options pour placer les messages à l’écran sur Oui ou Non.
Systéme TV (TV System)
NTSC : Si vous utilisez des disques NTSC.
Si votre téléviseur ne comporte qu’une entrée vidéo PAL, vous devez sélectionner “PAL”. Lorsque
•
vous sélectionnez “PAL”, le format de sortie entrelacé est PAL 60 Hz.
Si votre téléviseur ne comporte qu’une entrée NTSC, vous devez sélectionner “NTSC”.
•
Si vous avez paramétré le systéme TV NTSC, La vitesse de défi lament de la sortie HDMI est de 60 Hz.
•
PAL : Si vous utilisez des disques PAL.
•
Si votre téléviseur ne comporte qu’une entrée vidéo NTSC, vous
devez sélectionner “NTSC”.
•
Si votre téléviseur ne comporte qu’une entrée PAL, vous devez
sélectionner “PAL”.
•
Si vous avez paramétré le systéme TV PAL, La vitesse de défi lament
de la sortie HDMI est de 50 Hz.
AUTO
Pas de Disque
Menu Disque
Menu Titres
Audio
Réglage
m
DÉPLQC
s
OPTIONS D'AFFICHAGE
Format êcran : Large ®
Messages écran : Oui ®
Systéme TV : PAL ®
Sortie Vidéo : I-SCAN ®
BD-Wise : Non ®
Résolution : 576P ®
Qualité image ®
SÉLECT
r
RETOUR
NTSC
PAL
Auto
e
QUITTE
Page 83

Sortie Vidéo (Video Output)
Sélectionnez la sortie vidéo.
I-SCAN : Sélectionnez cette option lorsque vous voulez utiliser la
•
sortie composant entrelacé (525i).
P-SCAN : Sélectionnez cette option lorsque vous voulez utiliser la
•
sortie composant progressif (525p).
Si Yes/No (Oui/Non) n’est pas sélectionné dans le sousmenu Display Setup (Confi guration de l’affi chage) dans
M
Pas de Disque
Menu Disque
Menu Titres
Audio
Réglage
m
DÉPLQC
s
les 10 secondes, l’écran revient au menu précédent.
OPTIONS D'AFFICHAGE
Format êcran : Large ®
Messages écran : Oui ®
Systéme TV : PAL ®
Sortie Vidéo : I-SCAN ®
BD-Wise : Non ®
Résolution : 576P ®
Qualité image ®
SÉLECT
r
RETOUR
I-SCAN
P-SCAN
BD-Wise
Confi guration de la fonction BD Wise
Lorsque le lecteur est connecté à un téléviseur SAMSUNG prenant en
charge "BD Wise" (BD Wise), vous bénéfi ciez d'une qualité d'image
optimisée en réglant la fonction "BD Wise" (BD Wise) sur "On" (Marche).
1.
Appuyez sur le bouton MENU, appareil en mode Arrêt.
2.
Appuyez sur les boutons ▲/▼ pour sélectionne Setup, puis
appuyez sur ► ou ENTER.
3.
Appuyez sur les boutons ▲/▼ pour sélectionne Options D'affi chage, puis appuyez sur ► ou
Pas de Disque
Menu Disque
Menu Titres
Audio
Réglage
m
DÉPLQC
s
ENTER.
4.
Appuyez sur les boutons ▲/▼ pour sélectionne BD-Wise, puis appuyez sur ► ou ENTER. Appuyez
sur les boutons ▲/▼ pour sélectionne Oui, puis appuyez sur ► ou ENTER.
OPTIONS D'AFFICHAGE
Format êcran : Large ®
Messages écran : Oui ®
Systéme TV : PAL ®
Sortie Vidéo : I-SCAN ®
BD-Wise : Non ®
Résolution : 576P ®
Qualité image ®
SÉLECT
r
RETOUR
e
e
FR
● CONFIGURATION DU SYSTÈME
QUITTE
QUITTE
Cette option peut être modifi ée à condition que la fonction BD Wise soit prise en charge par le téléviseur.
M
Il est recommandé de défi nir "BD Wise" (BD Wise) sur "Off" (Arrêt) lors de la lecture d’un fi chier d’image JPEG
de taille supérieure à 720x480 pixels.
Resolution
480p/576p : 720 X 480, 720 X 576
•
720p : 1280 X 720
•
1080i : 1920 X 1080
•
1080p : 1920 X 1080
•
Qualité Image
•
Niveau des noirs : ajuste la luminosité de l’écran Oui (Activé) ou NON
(Désactivé). Ne fonctionne pas en mode Balayage progressif.
•
Luminosité : Niveau ~ Niveau 5
•
Contrast : Niveau ~ Niveau 5
•
Saturation des couleurs : Niveau 1 ~ Niveau 5
Affi chage en mode Balayage progressif Reportez-vous au manuel d’utilisation de votre téléviseur pour vérifi er
M
si celui-ci prend en charge le balayage progressif. Si tel est le cas,
Pas de Disque
Format êcran : Large ®
Menu Disque
Messages écran : Oui ®
Systéme TV : PAL ®
Menu Titres
Sortie Vidéo : I-SCAN ®
BD-Wise : Non ®
Audio
Résolution : 576P ®
Réglage
Qualité image ®
m
DÉPLQC
s
SÉLECT
Pas de Disque
Niveau des Noirs : Non
Menu Disque
Luminosité : Niveau 3
Contraste : Niveau 3
Menu Titres
Satur. couleurs : Niveau 3
Audio
Réglage
m
DÉPLQC
s
SÉLECT
OPTIONS D'AFFICHAGE
r
RETOUR
r
RETOUR
e
QUITTE
QUALITÉ IMAGE
e
QUITTE
37
Page 84

confi guration du système
suivez les instructions du manuel d’utilisation du téléviseur relatives aux réglages du balayage progressif dans
les menus du téléviseur.
Si la sortie Vidéo n’est pas correctement réglée, l’écran peut être bloqué.
Les résolutions disponibles pour les sorties HDMI varient selon la TV ou le projecteur connecté( e). Pour plus
de détails, référez-vous au manuel de votre TV ou projecteur.
Lorsque la résolution change pendant la lecture, quelques secondes peuvent s’écouler avant que l’image
n’apparaisse.
Vous obtiendrez une meilleure qualité d’image si vous réglez la résolution de sortie HDMI à 720p, 1080p ou
1080i.
CONFIGURATION (NIVEAU DE CLASSFICATION)
Cette option permet d’interdire l’accès au contenu de certains DVD
violents ou à caractère pornographique aux enfants.
En mode Stop (Arrêt), appuyez sur le bouton MENU (MENU).
1.
2.
Appuyez sur le bouton π ou † pour sélectionner Réglage, puis sur
le bouton ENTER ou
3.
Appuyez sur le bouton π ou † pour sélectionner Cont. parental
Puis appuyez sur le bouton Enter (Entrée) ou
Appuyez sur le bouton π ou † pour sélectionner Rating Level
4.
►
.
►
.
(Niveau de contrôle), puis appuyez sur le bouton
ENTER ou
►
. - Exemple : si vous allez jusqu’au niveau 6,
les disques de niveau 7 ou Adult ne pourront plus être lus.
Pour que le menu de confi guration disparaisse, appuyez sur le bouton
5.
MENU.
Appuyez sur le bouton RETURN (RETOUR) pour revenir au
d
niveau précédent.
d Appuyez sur le bouton EXIT (QUITTER) pour quitter le menu de configuration.
Pas de Disque
Menu Disque
Menu Titres
Audio
Réglage
m
DÉPLQC
Pas de Disque
Menu Disque
Menu Titres
Audio
Réglage
m
DÉPLQC
s
s
Réglage de la langue
Options D'affichage
Cont. Parental
DivX(R) immatriculation
SÉLECT
r
RNiveau de Contrôle : Adulte
Modif. CodeSecret
SÉLECT
r
®
®
®
RETOUR
e
QUITTE
CONTRÔLE PARENTAL
▲
Level 7
Adult
▼
RETOUR
e
QUITTE
Réglage
®
Cette option fonctionne uniquement si un DVD contient des informations entrant dans le cadre de l’interdiction.
M
CHANGEMENT DE MOT DE PASSE
Cette option permet d’interdire l’accès au contenu de certains DVD
violents ou à caractère pornographique aux enfants.
En mode Stop (Arrêt), appuyez sur le bouton MENU (MENU).
1.
2.
Appuyez sur le bouton π ou † pour sélectionner Réglage, puis sur
38
le bouton ENTER ou
3.
Appuyez sur le bouton π ou † pour sélectionner Cont. parental.
Puis appuyez sur le bouton Enter ou
4.
Appuyez sur le bouton π ou † pour sélectionner Modif. Code
Secret.
5.
Le menu Entrer Code Secret s’affi che.
Saisissez votre mot de passe à l’aide des boutons numériques.
Le message "Entrer le nouveau Code Secret" s’affi che.
6.
Pour que le menu de configuration disparaisse, appuyez sur le
bouton MENU.
d
Appuyez sur le bouton RETURN (RETOUR) pour revenir au niveau précédent.
d Appuyez sur le bouton EXIT (QUITTER) pour quitter le menu de configuration.
►
.
►
.
Pas de Disque
Réglage de la langue
Menu Disque
Options D'affichage
Menu Titres
Cont. Parental
DivX(R) immatriculation
Audio
Réglage
m
DÉPLQC
s
SÉLECT
Pas de Disque
Menu Disque
Menu Titres
Audio
Réglage
m
DÉPLQC
s
SÉLECT
®
®
®
r
RETOUR
CONTRÔLE PARENTAL
Entrer Code Secret
r
RETOUR
e
e
Réglage
®
QUITTE
QUITTE
Page 85

FR
Pas de Disque
Menu Disque
Menu Titres
Audio
Réglage
m
DÉPLQC
s
Cette option fonctionne uniquement si un DVD contient des informations entrant dans le cadre de l’interdiction.
M
Par défaut, le mot de passe est réglé sur "7890".
CONTRÔLE PARENTAL
Entrer le nouveau Code Secret
SÉLECT
r
RETOUR
e
Si vous avez oublié le mot de passe du niveau de classifi cation,
procédez comme suit
Lorsque le lecteur est en mode No Disc (Pas de disque), appuyez pendant plus de 5 secondes sur le
•
bouton de saut (&) situé sur la façade.
ENREGISTREMENT DIVX (R)
Veuillez enregistrer votre lecteur DVD avec le format Vidéo à la demande DivX(R) ; utilisez pour cela votre code
d’enregistrement.
Pour obtenir davantage d’informations, rendez-vous sur www.divx.com/vod.
Pas de Disque
Menu Disque
Menu Titres
m
DÉPLQC
Audio
Réglage
s
DivX(R) Vidéo sur Demande
Votre code d'inscription est
HAMG648S
http://www.divx.com/vod
OK
SÉLECT
r
RETOUR
e
CONFIGURATION DE LA COMPRESSION DRC
Cette fonction permet d’établir un équilibre entre les sons les plus forts et les
sons les moins forts dans la gamme de fréquence. Vous pouvez utiliser cette
fonction pour profi ter du son Dolby Digital lorsque vous regardez des fi lms
nécessitant un faible volume sonore (ex. : la nuit).
En mode Stop (Arrêt), appuyez sur le bouton MENU (MENU).
1.
Appuyez sur le bouton
2.
▲,▼
du curseur pour le déplacer sur
Audio, puis appuyez sur le bouton ENTER ou ►.
3.
Appuyez sur le bouton
▲,▼
du curseur pour le déplacer sur
DRC, puis appuyez sur le bouton ENTER ou sur le bouton ►.
4.
Appuyez sur les boutons
▲,▼
du curseur pour sélectionner DRC.
Pas de Disque
Menu Disque
Menu Titres
Audio
Réglage
m
DÉPLQC
DRC : 0
AV-SYNC : 0ms
HDMI Audio : Off
s
SÉLECT
r
RETOUR
e
QUITTE
QUITTE
Réglage
QUITTE
Audio
®
®
®
● CONFIGURATION DU SYSTÈME
CONFIGURATION DE LA COMPRESSION AV SYNC
1.
En mode Stop (Arrêt), appuyez sur le bouton MENU (MENU).
2.
Appuyez sur le bouton
puis appuyez sur le bouton ENTER ou ►.
3.
Appuyez sur le bouton
Sync, puis appuyez sur le bouton ENTER ou sur le bouton ►.
4.
Appuyez sur les boutons
▲,▼
du curseur pour le déplacer sur Audio,
▲,▼
du curseur pour le déplacer sur AV
▲,▼
du curseur pour sélectionner.
Pas de Disque
Menu Disque
Menu Titres
Audio
Réglage
m
DÉPLQC
DRC : 0
AV-SYNC : 0ms
HDMI Audio : Off
s
SÉLECT
r
RETOUR
e
Audio
QUITTE
®
®
®
39
Page 86

confi guration du système
CONFIGURATION DE LA FONCTION EQUALIZER (ÉGALISEUR)
EQ (ÉG) : vous pouvez sélectionner CLASSIQUE, ROCK, JAZZ ou POP pour améliorer le rendu sonore
du genre musical que vous êtes en train de lire
Chaque fois que vous appuyez sur ce bouton, les fonctions défi lent dans l’ordre suivant
•
ROCK ➞ JAZZ ➞ POP ➞ CLASSIC ➞ PASS
Cette option fonctionne avec les CD, les CD-MP3, les DivX, le syntoniseur et les disques Dolby Digital.
M
CONFIGURATION DE LA FONCTION DSP
Chaque fois que vous appuyez sur ce bouton, les fonctions défi lent dans l’ordre suivant
•
STUDIO ➞ STADIUM ➞ HALL ➞ THEATER ➞ CHURCH ➞ PASS
Cette option fonctionne avec les DVD.
M
FONCTION SLEEP TIMER
Si vous réglez l’heure à l’avance, l’unité s’éteint automatiquement à l’heure désignée.
Appuyez sur la touche SLEEP.
SLEEP s'affi
suivante :
90 60 45 30 15 OFF
che. Chaque fois que vous appuyez sur ce bouton, la durée prédéfi nie change de la façon
RÉGLER LA BRILLANCE DE L’ÉCRAN
Vous pouvez régler la luminosité de l’affi chage à partir de l’unité principale.
Appuyez sur la touche DIMMER.
Chaque pression sur cette touche permet de régler la luminosité de l'écran situé sur la façade de
•
l’appareil.
40
Page 87

FR
radio
ÉCOUTE DE LA RADIO
Cette fonction vous permet d’écouter la radio FM sur votre système Home cinéma. Pour afficher le menu de radio FM,
appuyez simplement sur le bouton TUNER (SYNTONISEUR) de la télécommande.
Appuyez sur la touche TUNER.
1.
Sélectionnez une station.
2.
Appuyez sur STOP () pour sélectionner PRESET. Appuyez sur ,,.pour sélectionner le numéro
•
pré-réglé.
Appuyez sur STOP () pour sélectionner AUTO, appuyez sur ,,. à la recherche automatique
•
de bande.
Appuyez sur STOP () pour sélectionner MANUAL. Appuyez rapidement sur ,,. pour
•
augmenter ou diminuer la fréquence.
● RADIO
PRÉ-RÉGLAGE DES STATIONS
1.
Appuyez sur la touche TUnER et sélectionnez la bande FM.
2.
Appuyez sur ,,. pour sélectionner la fréquence
3.
Appuyez sur TUnER MEMORY.
4.
Appuyez sur ,,.pour sélectionner le numéro pré-réglé.
•
Vous avez la possibilité de sélectionner entre 1 et 15 stations mémorisées.
5.
Appuyez à nouveau sur la touche TUNER MEMORY.
•
Appuyez sur la touche TUNER MEMORY avant que Number ne disparaisse de l'écran.
•
Number disparaît de l'écran et la fréquence de la station est conservée en mémoire.
6.
Pour prérégler une autre station, renouvelez les étapes 2 à 5.
41
Page 88

dépannage
Reportez-vous au tableau ci-dessous lorsque cet appareil ne fonctionne pas correctement. Si le problème que vous
rencontrez n’est pas répertorié ci-dessous ou si les consignes ne vous sont d’aucune aide, éteignez l’appareil,
débranchez le cordon d’alimentation et contactez le revendeur agréé le plus proche ou un centre de dépannage
Samsung Electronics.
SYMPTÔME Vérifi cation/Solution
Le cordon d’alimentation est-il branché correctement sur la
Le disque ne peut pas être éjecté.
La lecture ne démarre pas.
La lecture ne démarre pas immédiatement
lorsque le bouton Play/Pause (Lecture/
Pause) est actionné.
Aucun son n’est produit.
La télécommande ne
fonctionne pas.
• Le disque tourne mais aucune image ne
s’affi che.
• La qualité est mauvaise et l’image
tremble.
La langue de la bande-son et les sous-titres
ne fonctionnent pas.
L’écran de menu n’apparaît pas même si la
fonction de menu est sélectionnée.
Le format d’image ne peut pas être modifi é.
•
prise secteur ?
Coupez l’alimentation électrique, puis rallumez-la.
•
Vérifi ez la zone du DVD.
•
Les DVD achetés à l’étranger peuvent ne pas être
compatibles.
Les CD-ROM et DVD-ROM ne peuvent pas être lus sur ce
•
système Home cinéma.
Vérifi ez que le niveau de classifi cation est approprié.
•
Le disque est-il déformé ou rayé ?
•
Nettoyez le disque.
•
Aucun son n’est émis pendant la lecture en mode rapide,
•
ralenti ou pas à pas.
Les enceintes sont-elles correctement branchées ? La
•
confi guration des enceintes est-elle réglée correctement ?
Le disque est-il sale ou endommagé ?
•
•
La télécommande est-elle utilisée en accord avec son rayon
et son angle de fonctionnement ?
•
Les piles sont-elles déchargées ?
Le téléviseur est-il sous tension ?
•
Les câbles vidéo sont-ils correctement branchés ?
•
Le disque est-il sale ou endommagé ?
•
La lecture d’un disque de mauvaise fabrication peut s’avérer
•
impossible.
La langue de la bande son et les sous-titres ne fonctionnent
•
pas si le disque n’en comporte pas.
•
Le disque que vous utilisez contient-il des menus ?
Vous pouvez lire les DVD 16:9 en mode 16:9 WIDE (PLEIN ÉCRAN),
•
en mode 4:3 LETTER BOX (BOÎTE AUX LETTRES) ou en mode 4:3
PAN SCAN (RECADRAGE AUTOMATIQUE) ; en revanche, les DVD
4:3 peuvent être lus au format 4:3 uniquement. Reportez-vous à la
pochette du disque et sélectionnez alors la fonction appropriée.
42
Page 89

SYMPTÔME Vérifi cation/Solution
Lorsque le lecteur est en mode No Disc (Pas de disque),
• L’unité principale ne fonctionne pas.
(exemple : l’appareil s’éteint ou émet un
bruit anormal).
•
appuyez pendant plus de 5 secondes sur le bouton de saut
(&) situé sur la façade.
• Le Home cinéma ne fonctionne pas
normalement.
Appuyez sur le bouton & pendant plus de 5 secondes (tiroir-
Le mot de passe du niveau de classifi cation
a été oublié.
Réception de l’émission de radio
impossible.
•
disque vide). Tous les réglages seront réinitialisés, y compris le mot
de passe. N’utilisez ce bouton que si cela est vraiment nécessaire.
L’antenne est-elle correctement branchée ?
•
Si le signal d’entrée de l’antenne est faible, installez une
•
antenne FM extérieure dans une zone bénéfi ciant d’une
bonne réception.
FR
● DÉPANNAGE
43
Page 90

USB host feature supported products
APPAREIL PHOTO NUMÉRIQUE
Produit
Finepix-A340 Fuji
Finepix-F810 Fuji
Finepix-F610 Fuji
Finepix-f450 Fuji
Finepix S7000 Fuji
Finepix A310 Fuji
KD-310Z Konica
Finecam SL300R Kyocera
Finecam SL400R Kyocera
Finecam S5R Kyocera
Finecam Xt Kyocera
Dimage-Z1 Minolta
Dimage Z1 Minolta
Dimage X21 Minolta
Coolpix4200 Nikon
Coolpix4300 Nikon
Coolpix 2200 Nikon
Coolpix 3500 Nikon
Coolpix 3700 Nikon
Coolpix 4100 Nikon
Coolpix 5200 Nikon
Stylus 410 digital Olympus
300-digital Olympus
300-digital Olympus
Entreprise
Type
Appareil photo numérique
Appareil photo numérique
Appareil photo numérique
Appareil photo numérique
Appareil photo numérique
Appareil photo numérique
Appareil photo numérique
Appareil photo numérique
Appareil photo numérique
Appareil photo numérique
Appareil photo numérique
Appareil photo numérique
Appareil photo numérique
Appareil photo numérique
Appareil photo numérique
Appareil photo numérique
Appareil photo numérique
Appareil photo numérique
Appareil photo numérique
Appareil photo numérique
Appareil photo numérique
Appareil photo numérique
Appareil photo numérique
Appareil photo numérique
DISQUE USB À MÉMOIRE FLASH
Produit
Cruzer Micro Sandisk
Cruzer Mini Sandisk USB 2.0 128 Mo
Cruzer Mini Sandisk USB 2.0 256 Mo
SONY Micro Vault Sony USB 2.0 64 Mo
FLEX DRIVE Serotech USB 2.0 32 Mo
AnyDrive A.L tech USB 2.0 128 Mo
Entreprise
Type
Clé USB à mémoire flash USB 2.0 128 Mo
Produit
U300 Olympus
X-350 Olympus
C-760 Olympus
C-5060 Olympus
X1 Olympus
U-mini Olympus
Lumix-FZ20 Panasonic
DMC-FX7GD Panasonic
Lumix LC33 Panasonic
LUMIX DMC-F1 Panasonic
Optio-S40 Pentax
Optio-S50 Pentax
Optio 33LF Pentax
Optio MX Pentax
Digimax-420 Samsung
Digimax-400 Samsung
Sora PDR-T30 Toshiba
Coolpix 5900 Nikon
Coolpix S1 Nikon
Coolpix 7600 Nikon
DMC-FX7 Panasonic
Dimage Xt Minolta
AZ-1 Olympus
Produit
XTICK LG USB 2.0 128 Mo
Micro Mini Iomega USB 2.0 128 Mo
iFlash Imation USB 2.0 64 Mo
LG XTICK(M) USB 2.0 64 Mo
RiDATA EZDrive USB 2.0 64 Mo
Entreprise
Entreprise
Type
Appareil photo numérique
Appareil photo numérique
Appareil photo numérique
Appareil photo numérique
Appareil photo numérique
Appareil photo numérique
Appareil photo numérique
Appareil photo numérique
Appareil photo numérique
Appareil photo numérique
Appareil photo numérique
Appareil photo numérique
Appareil photo numérique
Appareil photo numérique
Appareil photo numérique
Appareil photo numérique
Appareil photo numérique
Appareil photo numérique
Appareil photo numérique
Appareil photo numérique
Appareil photo numérique
Appareil photo numérique
Appareil photo numérique
Type
LECTEUR MP3
Produit
Creative MuVo NX128M
Iriver H320 Iriver
YH-920 Samsung
YP-T7 Samsung Lecteur MP3
YP-MT6 Samsung Lecteur MP3
YP-T6 Samsung Lecteur MP3
YP-53 Samsung Lecteur MP3
YP-ST5 Samsung Lecteur MP3
YP-T5 Samsung Lecteur MP3
YP-60 Samsung Lecteur MP3
Entreprise
Creative Lecteur MP3 128 Mo
Type
Lecteur MP3 disque dur 20 Go
Lecteur MP3 disque dur 20 Go
44
Produit
YP-780 Samsung Lecteur MP3
YP-35 Samsung Lecteur MP3
YP-55 Samsung Lecteur MP3
iAUDIO U2 Cowon Lecteur MP3
iAUDIO G3 Cowon Lecteur MP3
iAudio M3 Cowon Lecteur MP3 disque dur
SI-M500L Sharp Lecteur MP3 256 Mo
H10 Iriver Lecteur MP3
YP-T5 VB Samsung Lecteur MP3
YP-53 Samsung Lecteur MP3 256 Mo
Entreprise
Type
Page 91

annexes
PRÉCAUTIONS À PRENDRE LORS DE LA MANIPULATION ET DU
RANGEMENT DES DISQUES
De petites rayures sur la surface du disque peuvent altérer la qualité du son et de l’image ou provoquer des sauts.
Veillez à ne pas rayer les disques lorsque vous les manipulez.
Manipulation des disques
Ne touchez pas la surface de lecture du disque.
Tenez le disque par les bords afi n de ne pas laisser d’empreintes sur sa surface.
Ne collez pas de papier ou d’adhésif sur le disque.
Rangement du disque
FR
● ANNEXES
N’exposez pas le disque à la lumière
directe du soleil.
Évitez que de la saleté ne se dépose sur les disques.
M
N'insérez pas de disques fi ssurés ou rayés.
Rangez-le dans un endroit frais et
aéré.
Rangez-le dans une pochette propre.
Rangez-le verticalement.
Manipulation et rangement des disques
En cas d’empreintes ou de saleté sur le disque, nettoyez-le à l'aide d'eau additionnée de détergent
doux et d’un chiffon doux.
•
Lors de son nettoyage, essuyez le disque du centre vers le bord.
De la condensation est susceptible de se former si de l’air chaud entre en contact avec les parties froides à
M
l’intérieur du lecteur. Si de la condensation se forme à l’intérieur du lecteur, il ne fonctionnera pas
correctement. Dans ce cas, retirez le disque et n'utilisez pas le lecteur sous tension pendant 1 ou 2 heures.
45
Page 92

annexes
CARACTÉRISTIQUES
Consommation
Généralités
Disque
Sortie vidéo
Amplifi cateur
Enceinte
- Samsung Electronics Co., Ltd se réserve le droit de modifi er les caractéristiques techniques sans avis préalable.
- Le poids et les dimensions sont approximatifs.
Poids 4.0 kg
Dimensions 86 (W) x 215 (H) x 500 (D) mm
Température de fonctionnement
Taux d'humidité 10 % à 75 %
DVD (Digital Versatile Disc)
CD : 12 cm (COMPACT DISC)
CD : 8 cm (COMPACT DISC)
Vidéo composite 1,0 V crête à crête (charge 75 Ω)
Vidéo composant
HDMI Impédance : 85 à 115 Ω
Sortie de l’enceinte avant
Sortie du caisson de basse
Bande de fréquences
Rapport signal/bruit
Séparation des canaux
Sensibilité d’entrée
Enceintes
Impédance
Bande de fréquences
Niveau de pression sonore de la sortie
Entrée nominale
Entrée maximale
Dimensions (l x H x P)
Poids
30 W, AC 110-240V, 50/60 Hz
+5°C à +35°C
Vitesse de lecture : 3,49 à 4,06 m/s
Temps de lecture approx. (disque à une face, une couche) : 135 min
Vitesse de lecture : 4,8 à 5,6 m/s
Temps de lecture maximal : 74 min
Vitesse de lecture : 4,8 à 5,6 m/s
Temps de lecture maximal : 20 min
Y : 1,0 V crête à crête (charge 75 Ω)
Pr : 0,70 V crête à crête (charge 75 Ω)
Pb : 0,70 V crête à crête (charge 75 Ω)
30 W x 2 (3Ω)
60 W (6Ω)
20 Hz à 30 KHz
70 dB
65 dB
(AUX) 400 mV
Enceintes 2.1
Avant Caisson de basse
3
Ω
175 Hz ± 20 % 70 Hz ± 20 %
79 dB 84 dB
30 W 60 W
30 W 60 W
86 (W) x 215 (H) x 500 (D) mm
Avant :
Avant : 4.0 Kg
Caisson de basse : 3.8 Kg
*: Caractéristiques nominales
6
Ω
46
Page 93

Page 94

Contact SAMSUNG WORLD WIDE
If you have any questions or comments relating to Samsung products, please contact the SAMSUNG customer
care center.
Pour toutes questions ou observations concernant les produits Samsung, veuillez contacter le service clientèle de
SAMSUNG.
Page 95

Les bons gestes de mise au rebut de ce produit (Déchets d’équipements électriques et
électroniques)
(Applicable dans les pays de l’Union Européenne et dans d’autres pays européens
pratiquant le tri sélectif)
Ce symbole sur le produit, ses accessoires ou sa documentation indique que ni le produit, ni ses
accessoires électroniques usagés (chargeur, casque audio, câble USB, etc.) ne peuvent être jetés
avec les autres déchets ménagers. La mise au rebut incontrôlée des déchets présentant des risques
autres déchets. Vous favoriserez ainsi le recyclage de la matière qui les compose dans le cadre d’un développement
durable.
Les particuliers sont invités à contacter le magasin leur ayant vendu le produit ou à se renseigner auprès des autorités
locales pour connaître les procédures et les points de collecte de ces produits en vue de leur recyclage.
Les entreprises et professionnels sont invités à contacter leurs fournisseurs et à consulter les conditions de leur contrat
de vente. Ce produit et ses accessoires ne peuvent être jetés avec les autres déchets professionnels et commerciaux.
symboles chimiques Hg, Cd ou Pb signifi e que la batterie contient des quantités de mercure, de cadmium ou de
plomb supérieures aux niveaux de référence stipulés dans la directive CE 2006/66. Si les batteries ne sont pas
correctement éliminées, ces substances peuvent porter préjudice à la santé humaine ou à l’environnement.
Afi n de protéger les ressources naturelles et d’encourager la réutilisation du matériel, veillez à séparer les batteries des
autres types de déchets et à les recycler via votre système local de collecte gratuite des batteries.
environnementaux et de santé publique, veuillez séparer vos produits et accessoires usagés des
Elimination des batteries de ce produit (Déchets d’équipements électriques et
électroniques)
(Applicable dans les pays de l’Union Européenne et dans d’autres pays européens
pratiquant le tri sélectif)
Le symbole sur la batterie, le manuel ou l’emballage indique que les batteries de ce produit ne doivent
pas être éliminées en fi n de vie avec les autres déchets ménagers. L’indication éventuelle des
AH68-02201G-01
 Loading...