

Page 1
REFRIGERATOR
OWNER`S INSTRUCTIONS
Before operating the unit, please read this
manual thoroughly, and retain for future
reference.
ENGLISH
Page 2
FEATURES
Model
Dimension(WxDxH) mm.
Gross Capacity
Net Capacity
Rated Voltage
Rated Frequency
Rated Input
Rated Current
Defrosting Input(W/A)
Climatic Class of The Appliance
Rated Maximum Input of Lamp
Refrigerant
Mass
Power Consumption
Freezing Capacity
Large freezer storage area
-stores large quantities of food in the
freezer
Jumbo storage guard
-holds large bottles securely
Adjustable storage guards
-position them for your convenience and
according to the height of your food
containers
Specification
RT30 RT34 RT37
RT30MA RT30MB RT34MB RT37MBRT34MA RT37MA
600X640X1560 600X610X1560 600X610X1630 600X660X1630600X640X1630 600X690X16 30
264 liter
259 liter
58.5 Kg
1.16kwh/24hr
281 liter
275 liter
230-240 V~
50 Hz
135W
0.6A
150W/0.63A
N
15W
HFC-134a(160g)
60 Kg
1.25kwh/24hr
4.8kwh/24hr
314 liter
306 liter
63 Kg
1.33kwh/24hr
1
Page 3
Safety precautions
Read Instructions
Please read all safety and operating
instructions before operating this
appliance.
Retain Instructions
Please keep this Owner's Manual for
future reference.
Heed Warnings
All warnings, Cautions and Notes on this
refrigerator are important ; please pay
attention to them.
Follow Instructions
For best results, follow all instructions
given in this manual.
Model and Serial Numbers
Include both the model number and the
serial number when corresponding with
Electrostar or your Dealer concerning this
product.
Contents
Features.............................................1
Installation..........................................3
Cautions while using..........................4
Parts
- TYPE A MODEL..............................5
- How to use the water dispenser......5
REPLACING THE LAMP...................6
BASIC PREPARATION
- Storing food
HOW T O USE
- Temperature control.........................8
- Making ice cubes ............................9
- Chiller Compartment .....................10
- V egetab le Bin ...............................10
LEVELING THE APPLIANCE..........10
REMOVING ACCESSORIES.....11-12
CLEANING THE REFRIGERA T OR.13
BEFORE CALLING SERVICE.........14
.....................................7
......................6
This manual is made on the basis of TYPE A
model among TYPE A, TYPE B,(P9)
Date of Purchase:
Model No:
Serial No:
2
Page 4

INSTALLATION
Install this refrigerator on a
11
11
firm, flat surface.
For optimum operation,
22
22
normal room temperature
is recommended. Avoid
locations affected by
draughts or dampness.
For optimum operation,
33
33
normal room temperature is recommended.
Avoid locations in
direct sunlight, near
heaters, rediators, stoves
or ovens.
Allow a 50mm space between
44
44
the refrigerator and the wall. If
your refrigerator is going into
a recessed area, allow at
least 300mm clearance above
the refrigerator.
For personal safety, properly
55
55
ground this appliance.
Do not ground this refrigerator
with a telephone line, gas pipe,
etc.
3
above 300mm
above 50mm
above 50mm
Page 5
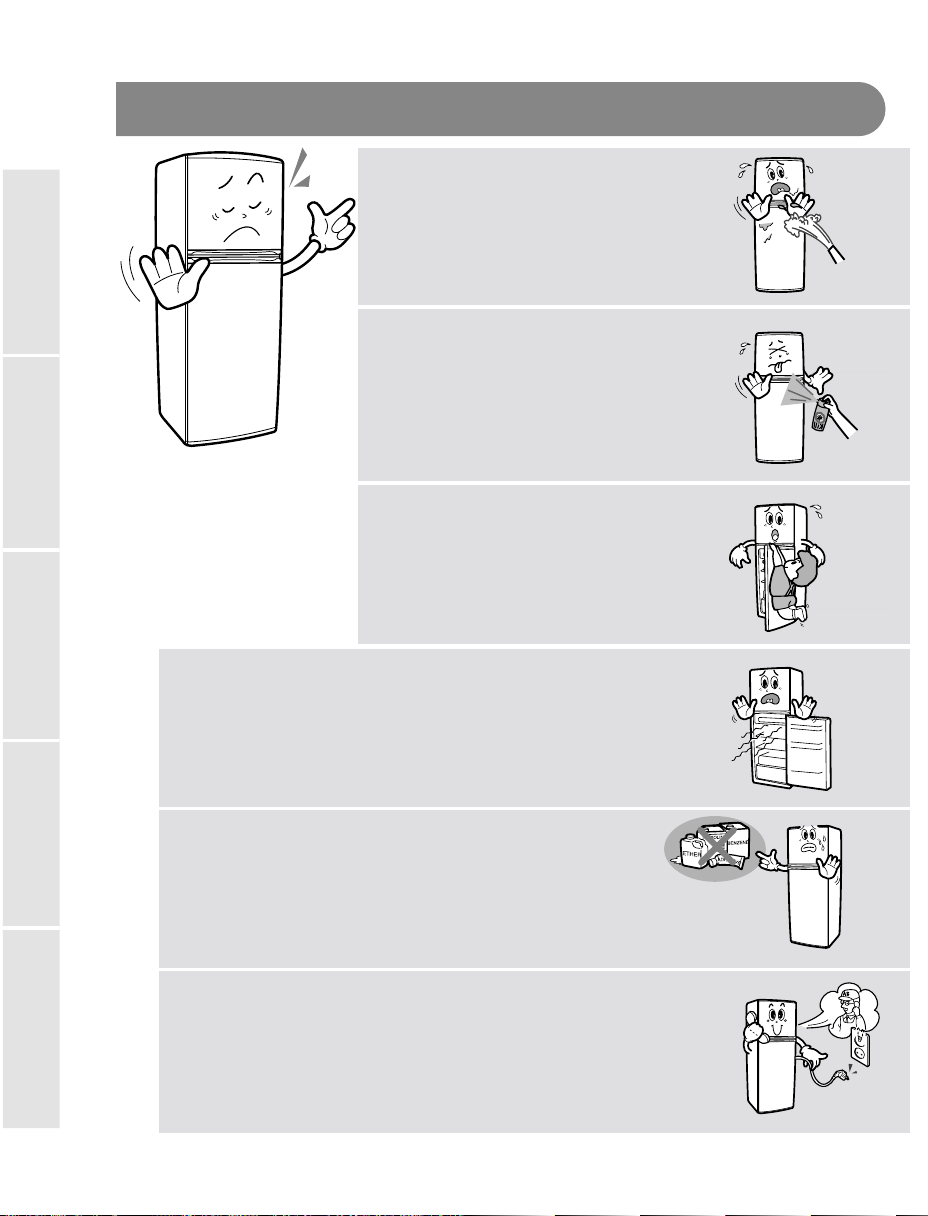
CA UTIONS WHILE USING
- Do not allow water to splash
11
onto the back of the refrigerator.
11
- Water impairs the insulation of
electric parts and may cause an
electrical short or a shock
hazard.
- Do not use flammable sprays
such as lacquer and paint near
22
22
the refrigerator.
- Heat from the refrigeration unit
may ignite flammable aerosols.
- Do not allow unattended children to
play in or around refrigerators and
33
33
other large appliances.The child
may get hurt or they could damage
the appliance.
- To avoid damage to the refrigerator
or injury to the child, do not allow
children to hang on the refrigerator
door.
- For optimum operation, do not leave the door open for
44
any longer than necessary.
44
- Leaving the door open allows warmer air to enter the
refrigerator and causes the refrigeration unit to use more
energy to maintain the cool temperature.
- Do not store volatile chemicals such as ether
55
and benzene in the refrigerator.
55
- The fumes, besides damaging food, can build
up and cause an explosion.
- Do not use the refrigerator if it is not operating correctly
66
or has been damaged. Disconnect it from the power sup-
66
ply and call your local service center.
- If the power cord is damaged, avoid a hazard by replacing it through the manufacturer or its service agent or a
similarly qualified person.
4
Page 6

PARTS
TYPE A MODEL
Ice Cube Tray
Ice Storage Bin
Freezer Compartment Temperature
Control
Freezer Shelf
Chiller Compartment
Lamp
Refrigerator Shelf
Refrigerator Compartment
Temperature Control
Adjustable Storage Guards
Bottle Storage Guards
Vegetable Bin
How to use the water dispenser
Push the lever with glass to dispenser water.
When tank cleaning is needed, lift tank and
then tilt outwards(after removing the connecting hose).
When refilling is needed, slide cover to
the left and pour in water(only drinking
water should be used).
Remove the connecting-hose
when cleaning needed.
Before using the water dispenser
1. Clean the water before use, to remove dust and oder.
2. Fill water tank with drinking water.
3. Push dispenser lever with glass to discard 3-4 glasses of
water, thereby cleaning the water hose before use.
4. Dispensing water for the first time might take 1-5 seconds
due to air within the hose.
5
Page 7

REPLACING THE LAMP
Press upper tab of the lamp cover
11
11
with some tool such as screwdriver and
pull it out.
- Turn the existing lamp bulb and replace it with a new one.
22
22
- Replace the lamp cover by aligning the cover at the top and carefully
pressing it into place.
BASIC PREPARATION
Before using
Wipe the appliance inside and outside
11
using a cloth dampened with warm
11
water and a small amount of
detergent.
Before plugging in for the first time,
allow the refrigerator to stabilize for at
22
22
least one hour.
Allow the freezer compartment to cool
for 2 to 3 hours before storing food.
6
Page 8

Storing food
Store food in small portions.
Seal food in containers with lids, in plastic
wrap or in plastic bags to prevent drying and
the mingling of odors.
Allow hot food and drinks to cool to room
temperature before placing them in the
refrigerator or freezer.
Allow sufficient room between food to help
the circultion of cool air.
Place liquid at the front of the refrigerator
to avoid freezing.
Dry fruits and vegetables after washing
before placing them in the refrigerator.
7
Page 9

HO W TO USE
Temperature control
COLDER
Turn the Temperature Control to “COLDER” if you:
- Have a lot of food to store (refrigerator or freezer)
- Want to make ice(freezer)
- Require fast freezer(freezer)
COLDER
Turn the Temperature Control to the midway point between
“COLDER” and “COLD” for normal refrigerating or freezing
mode.
COLD
Turn the Temperature Control to “COLD” if you want to store
only a small amount of food in the refrigerator or freezer.
NOTE
When the room air surrounding the refrigerator is below 5°C
turn the Temperature Control to “COLD” to avoid freezing.
When on vacation for a long period consider emptying the
refrigerator of food a & disconnecting from the power to conserv
power.
8
er
Page 10

Making ice cubes
(TYPE A MODEL)
Fill the ice cube tray with taking care
11
11
not to overfill.
Water level
Slide the tray onto the cube shelf.
22
22
Removing Ice cubes
Remove the ice cubes from the ice
cube tray by twisting the ice tray
levers.Make sure the ice storage
bin is beneath the ice cube tray
(see diagram below)
Knobs of ice
tray
Making ice cubes
(TYPE B MODEL)
Fill the tray ice with water taking
11
11
care not to overfill.
Water level
Hold both ends of the ice tray, remove
22
22
the ice cubes from the tray by twisting
it gently.
9
Page 11

Chiller Compartment
This is compartment helps preserve the taste of
food and prolongs its freshness by freezing the surface of the food only.Use the chiller for storing
cheese, meat, snacks, fish or any food to be used
soon.
Vegetable Bin
This compartment maintains the moisture and freshness of vegetables.The vegetable bin is enclosed to
protect the vegetables from direct draughts of cold
air and to help maintain the humidity which
prevents drying.
ve
ng
CAUTION
The vegetable bin is not suitable for storing tropical fruits such as bananas,
pineapples, etc.
LEVELING THE APPLIANCE
To compensate for any floor unevenness, adjust the
height of the appliance by turning the adjustable feet
clockwise or counterclockwise.The adjustable feet are
at the front along the lower edge of the refrigerator
chassis,
When the refrigerator leans to the left, turn the
left front foot counterclockwise.
When the refrigerator leans to the right, turn
the right front foot counterclockwise.
10
Page 12

REMOVING ACCESSORIES
Freezer Shelf
- Pull the ice cube tray unit forward and of
the freezer compartment.
- Lift the front of the freezer shelf upward
to release the hooks and pull the shelf
out of the freezer.
Refrigerator Shelves
- Pull the shelves towards you until it
meets the stopper.
- Tilt the front of the shelves up and continue pulling the shelves out.
Vegetable Bin and Cover
- Pull the vegetable bin towards you and
out of the refrigerator.
- Lift the cover up and pull it out of the
refrigerator.
11
Page 13

Chiller Compartment
- Pull the chiller compartment towards you
until it meets the stopper.
- Tilt the front upward and continue pulling
the compartment out.
Adjustable Storage Guard
Lift straight upwards to release the tabs,
then pull it out of the refrigerator.(These
storage guards are adjustable and may be
positioned to best fit your needs.)
Bottle Storage Guards
Lift straight upwards to release the tabs,
then pull it out of the refrigerator.(This
bottle storage guard is not adjustable; it
fits in only one position.)
12
Page 14

CLEANING THE REFRIGERA TOR
Evaporation Slot in Freezer
Wipe the slot area with a clean, dry, soft
cloth.
Caution: Do not allow any foreign sub-
stance or particles to clog
these openings.
Interior Parts
After removing all the shelves, wipe the
appliance clean using a clean, soft cloth
dampened with warm water and a mild
detergent.
Door Seals
Clean the door seals often using a clean, soft cloth
dampened with warm water and a mild detergent.
Be careful not to damage the seals.
Caution: Dirt encrusted door seals prevent the
doors from closing properly. Poorly
closed doors waste energy and add
unnecessary cost to your electricity bills.
13
Page 15

BEFORE CALLING SERVICE
when the Refrigerator / Freezer
is not operating or the food
does not freeze suffciently:
- Is the plug properly connected?
- Is the power fuse blown?
- Are the temperature controls
set properly (not set to
“COLD”)?
- Is the appliance exposed to
direct sunlight or installed near
a heater?
- Does the appliance have
enough clearance from the wall
in all directions?
When food freezes in the
refrigerator:
- Are the temperature controls
set properly (not set to
“COLDER”)?
- If the food is juicy or very
moist, is the tem perature
control set to “COLDER”)?
- Is the ambient temperature
too low?
When there is noise from the
unit:
- Is the refrigerator installed on
a flat, stable surface?
- Is the appliance positioned too
close to a wall?
- Are there any objects behind or
under the refrigerator?
- Is the sound coming from the
compressor?
when you hear a sound like
water flowing:
- This sound is generated by
movement of the refrigerant
and is not a malfunction.
When you notice a foul odor
inside the appliance:
- Do you have spoiled food in
the refrigerator?
- Is all food stored in sealed
containers?
- Has fluid collected in the bot
tom of the vegetable bin?
- Are the freezer evaporation
slots clogged?
- Has the evaporation tray at the
back of the appliance become
foul?
When frost develops inside
the freezer:
- Does the door seal tightly?
- Are the evaporation slots
clogged?
- Is there enough room for effi
cient air circu lation?
When the rear or side panel of
the refrigerator is hot:
- Is a radiation (air
ventilator/cooler) pipe
installed?
- Is the ambient temperature
high?
- How dew formed on the out
side of the appliance
because of high humidity?
14
When dow develops on the
vegetable compartment:
- Does the door seal tightly?
- Have you left the door open for
a long time?
- Is liquid stored without a
cover?
Page 16

DA68-01184A REV(1.0)
 Loading...