

Page 1

Refrigerator
user manual
This manual is made with 100% recycled paper.
imagine the possibilities
Thank you for purchasing a Samsung product.
To receive a more complete service,
please register your product at
www.samsung.com/register
Free Standing Appliance
English
Page 2

safety information
SAFETY INFORMATION
• Before operating the appliance, please read
this manual thoroughly and retain it at a
safe place near the appliance for your future
reference.
• Use this appliance only for its intended
purpose as described in this instruction
manual. This appliance is not intended for use
by persons (including children) with reduced
physical, sensory or mental capabilities, or
lack of experience and knowledge, unless they
have been given supervision or instruction
concerning use of the appliance by a person
responsible for their safety.
• Warnings and Important Safety Instructions
in this manual do not cover all possible
conditions and situations that may occur. It
is your responsibility to use common sense,
caution, and care when installing, maintaining,
and operating your appliance.
• Because these following operating instructions
cover various models, the characteristics of
your refrigerator may differ slightly from those
described in this manual and not all warning
signs may be applicable. If you have any
questions or concerns, contact your nearest
service center or fi nd help and information
online at www.samsung.com.
Important safety symbols and
precautions :
Hazards or unsafe practices that
WARNING
CAUTION
may result in severe personal
injury or death.
Hazards or unsafe practices that
may result in minor personal
injury or property damage.
Do NOT attempt.
Do NOT disassemble.
Do NOT touch.
Follow directions carefully.
Unplug the power plug from the
wall socket.
Make sure the machine is grounded
to prevent electric shock.
Call the contact center for help.
Note.
These warning signs are here to prevent
injury to you and others.
Please follow them carefully.
After reading this section, keep it in a safe
place for future reference.
CE Notice
This product has been determined to be in
compliance with the Low Voltage Directive
(2006/95/EC), the Electromagnetic Compatibility
Directive (2004/108/EC) and the Eco-Design
Directive(2009/125/EC) implemented by Regulation
(EC) No 643/2009 of the European Union.
SEVERE WARNING SIGNS
FOR TRANSPORTATION
WARNING
- Refrigerant leaking from the pipe work could
• In order to avoid the creation of a fl ammable
• Never start up an appliance showing any signs
AND SITE
• When transporting and installing the
appliance, care should be taken to ensure
that no parts of the refrigerating circuit are
damaged.
ignite or cause an eye injury. If a leak is detected,
avoid any naked fl ames or potential sources of
ignition and air the room in which the appliance
is standing for several minutes.
gas-air mixture if a leak in the refrigerating
circuit occurs, the size of the room in which the
appliance may be sited depends on the amount
of refrigerant used.
of damage. If in doubt, consult your dealer. The
room where the refrigerator will be sited must
be 1m³ in size for every 8g of R600a refrigerant
inside the appliance.
The amount of refrigerant in your particular
appliance is shown on the identifi cation plate
inside the appliance.
2_ safety information
Page 3
SEVERE WARNING SIGNS
WARNING
- Deteriorated insulation of electrical parts may
• Do not place this refrigerator in direct sunlight or
• Do not plug several appliances into the same
- This provides the best performance and also
• If the wall socket is loose, do not insert the
- There is a risk of electric shock of fi re.
• Do not use a cord that shows cracks or abrasion
• Do not bend the power cord excessively or
• Do not use aerosols near the refrigerator.
- Aerosols used near the refrigerator may cause
• Connect the power plug in proper position with
- If you connect the power plug upside down, wire
• Make sure that the power plug is not squashed
• When moving the refrigerator, be careful not to
- This constitutes a fi re hazard.
• The appliance must be positioned so that the
any power leakages or electric shocks caused by
current leakage from the refrigerator.
• Never use gas pipes, telephone lines or other
- Improper use of the ground plug can result in
FOR INSTALLATION
•
Do not install the refrigerator in a damp place
or place where it may come in contact with
water.
cause an electric shock or fi re.
expose to the heat from stoves, room heaters or
other appliance.
multiple power board.
The refrigerator should always be plugged into
its own individual electrical which has a voltage
rating that matched the rating plate.
prevents overloading house wiring circuits, which
could cause a fi re hazard from overheated wires.
power plug.
damage along its length or at either end.
place heavy articles on it.
an explosion or fi re.
• This refrigerator must be properly installed
and located in accordance with the manual
before it is used.
the cord hanging down.
can get cut off and cause fi re or electric shock.
or damaged by the back of the refrigerator.
roll over or damage the power cord.
plug is accessible after installation.
• The refrigerator must be grounded.
- You must ground the refrigerator to prevent
potential lightening rods as ground.
electric shock.
• If the power cord is damaged, have it
replaced immediately by the manufacturer
or its service agent.
• The fuse on the refrigerator must be changed by
a qualifi ed technician or service company.
- Failing to do so may result in electric shock or
personal injury.
CAUTION SIGNS FOR
CAUTION
• Allow the appliance to stand for 2 hours after
INSTALLATION
• Keep ventilation opening in the appliance
enclosure or mounting structure clear of
obstruction.
installation.
SEVERE WARNING SIGNS
WARNING
• Do not store articles on the top of the appliance.
- When you open or close the door, the articles
• Do not put items fi lled with water on the
- If spilled, there is a risk of fi re or electric shock.
• Do not let children hang on the door.
- Failure to do so may cause serious personal
• Do not leave the doors of the refrigerator open
- There is a risk of children entrapment and serious
• Never put fi ngers or other objects into the
- Failure to do so may cause personal injury or
• Do not store volatile or fl ammable substances
- The storage of any of such products may cause
FOR USING
• Do not insert the power plug with wet
hands.
may fall and cause personal injury and/or
material damage.
refrigerator.
injury.
while the refrigerator is unattended and do not
let children enter inside of the refrigerator.
personal injury because of low temperature.
dispenser hole.
material damage.
such as benzene, thinner, alcohol, ether or LP
gas in the refrigerator.
explosions.
safety information _3
Page 4
• Do not store low temperature-sensitive
pharmaceuticals products, scientifi c
materials or other low temperaturesensitive products in the refrigerator.
- Products that require strict temperature controls
must not be stored in the refrigerator.
• Do not place or use electrical appliance inside
the refrigerator, unless they are of a type
recommended by the manufacturer.
• Do not use a hair dryer to dry the inside of the
refrigerator. Do not place a lighted candle in the
refrigerator for removing bad odors.
- This may result in electric shock or fi re.
Do not touch the inside walls of the freezer or
•
products stored in the freezer with wet hands.
- This may cause frostbite.
• Do not use mechanical devices or any other
means to accelerate the defrosting process,
other than those recommended by the
manufacturer.
• Do not damage the refrigerant circuit.
• This product is intended only for the
storage of food in a domestic environment.
• Bottles should be stored tightly together so that
they do not fall out.
• If a gas leak is detected, avoid any naked fl ames
or potential sources of ignition and air the room
in which the appliance is standing for several
minutes.
• Use only the LED Lamps provided by
manufacturer or service agents.
• Children should be supervised to ensure that
they do not play with and/or climb into the
appliance.
• Do not disassemble or repair the
refrigerator by yourself.
- You run risk of causing a fi re, malfunction and/
or personal injury. In case of malfunction, please
contact your service agents.
• If the appliance generates a strange noise,
a burning or smell or smoke, unplug the
power plug immediately and contact your
nearest service center.
- Failing to do so may result in electric or fi re
hazards. Keep ventilation opening in the
appliance enclosure or mounting structure clear
of obstruction.
• If you experience diffi culty when changing the
light, contact service agents.
• If the products equipped with LED Lamp, do
not disassemble Lamp Cover and LED Lamp by
yourself.
- Please contact your service agents.
• If any dust or water is in refrigerator, pull
out power plug and contact your Samsung
Electronics service center.
- There is a risk of fi re.
CAUTION SIGNS FOR
CAUTION
USING
• To get best performance of product,
- Do not place foods too closely in front of
the vents at the rear of the appliance as
it can obstruct free air circulation in the
refrigerator compartment.
Wrap the food up properly or place it in airtight
-
containers before put it into the refrigerator.
• Do not place carbonated or fi zzy drinks in the
freezer compartment. Do not put bottles or glass
containers in the freezer.
- When the contents freeze, the glass may break
and cause personal injury and property damage.
• Do not change the functionality of or modify the
refrigerator.
- Changes or modifi cations may result in personal
injury and/or property damage. Any changes or
modifi cations performed by a 3rd party on this
completed appliance is neither covered under
Samsung warranty service, nor is Samsung
responsible for safety issues and damages that
result from 3rd party modifi cations.
• Do not block air holes.
If the air holes are blocked, especially with a plastic
-
bag, the refrigerator can be over cooled. If this
cooling period lasts too long, the water fi lter may
break and cause water leakage.
- Do not put any newly introduced food for
freezing near to already food.
• Please observe maximum storage times and
expiry dates of frozen goods.
• Fill water tank, ice tray, water cubes only with
potable water.
• Use only the ice maker provided with the
refrigerator.
• The water supply to this refrigerator must only
be installed/connected by a suitably qualifi ed
person and connect to a potable water supply
only.
In order to operate the ice maker properly, water
•
pressure of 138 ~ 862kpa(1.4~8.8kgf/cm3) is
required.
4_ safety information
Page 5
CAUTION SIGNS
FOR CLEANING AND
CAUTION
- There is a risk of fi re or electric shock.
• Do not spray infl ammable gas near the
- There is a risk of explosion or fi re.
• Do not spray cleaning products directly on the
- Printed letters on the display may come off.
•
- Otherwise there is a risk of fi re or electric shock.
• Never put fi ngers or other objects into the
- It may cause personal injury or material damage.
MAINTENANCE
• Do not directly spray water inside or
outside the refrigerator.
refrigerator.
display.
Remove any foreign matter or dust from the
power plug pins. But do not use a wet or damp
cloth when cleaning the plug, remove any foreign
material or dust from the power plug pins.
dispenser hole and ice chute.
• Unplug the refrigerator before cleaning and
performing maintenance.
SEVERE WARNING SIGNS
WARNING
• R600a or R134a is used as a refrigerant.
• If the appliance contains iso-butane refrigerant
FOR DISPOSAL
• Ensure that none of the pipes on the back
of the appliance are damaged prior to
disposal.
Check the compressor label on the rear of
the appliance or the rating label inside the
refrigerator to see which refrigerant is used for
your refrigerator. When this product contains
fl ammable gas (Refrigerant R600a), contact your
local authority in regard to safe disposal of this
product. Cyclopentane is used as a insulation
blowing gas. The gases in insulation material
require special disposal procedure. Please
contact your local authorities in regard to the
environmentally safe disposal of this product.
Ensure that none of the pipes on the back of the
appliances are damaged prior to disposal. The
pipes shall be broke in the open space.
(R600a), a natural gas with high environmental
compatibility that is, however, also combustible.
When transporting and installing the appliance,
care should be taken to ensure that no parts of
the refrigerating circuit are damaged.
• When disposing of this product or other
refrigerators, remove the door/door seals, door
latch so that small children or animals cannot
become trapped inside. Leave the shelves in
place so that children may not easily climb
inside. Children should be supervised to ensure
that they do not play with the old appliance.
Please dispose of the packaging material for this
•
product in an environmentally friendly manner.
ADDITIONAL TIPS FOR
PROPER USAGE
• In the event of a power failure, call the local offi ce
of your Electricity Company and ask how long it is
going to last.
- Most power failures that are corrected within
an hour or two will not affect your refrigerator
temperatures. However, you should minimize the
number of door openings while the power is off.
- Should the power failure last more than 2 hours,
remove all ice in the Ice Bucket.
- Should the power failure last more than 24 hours,
remove all frozen food.
• If keys are provided with the refrigerator, the
keys should be kept out of the reach of children
and not in vicinity of the appliance.
• The appliance might not operate consistently
(possibility of temperature becoming too warm
in refrigerator) when sited for an extended period
of time below the cold end of the range of
temperature for which the refrigerating appliance
is designed.
• Do not store food which spoils easily at low
temperature, such as bananas, melons.
• Your appliance is frost free, which means there
is no need to manually defrost your appliance,
as this will be carried out automatically.
• Temperature rising during the defrost can
comply with ISO requirement. But if you want
to prevent an undue rise in the temperature of
the frozen food while defrosting the appliance,
please wrap the frozen food in several layers of
newspaper.
• Any increase in temperature of frozen food
during defrosting can shorten its storage life.
safety information _5
Page 6
Saving Energy Tips
- Install the appliance in a cool, dry room with
adequate ventilation.
Ensure that it is not exposed to direct sunlight and
never put it near a direct source of heat (radiator, for
example).
- Never block any vents or grilles on the appliance.
- Allow warm food to cool down before placing it in
the appliance.
- Put frozen food in the refrigerator to thaw.
You can then use the low temperatures of the
frozen products to cool food in the refrigerator.
- Do not keep the door of the appliance open for too
long when putting food in or taking food out.
The shorter time for which the door is open, the less
ice will form in the freezer.
- Clean the rear of the refrigerator regularly. Dust
increases energy consumption.
- Do not set temperature colder than necessary.
- Ensure suffi cient air exhaust at the refrigerator base
and at the back wall of the refrigerator.
Do not cover air vent openings.
- Allow clearance to the right, left, back and top when
installing.
This will help reduce power consumption and keep
your energy bills lower.
contents
SETTING UP YOUR SIDE-BY-SIDE REFRIGERATOR ···································7
OPERATING THE SAMSUNG SIDE-BY-SIDE REFRIGERATOR ····················16
TROUBLESHOOTING ·····················································································22
6_ safety information
Page 7

setting up your side-by-side
refrigerator
GETTING READY TO INSTALL
THE REFRIGERATOR
Congratulations on the purchase of your Samsung
Side-By-Side Refrigerator. We hope you will enjoy the
many state-of-the-art features and effi ciencies that
this new appliance has to offer.
Selecting the best location for the
refrigerator
• Select a location with easy access to the water
supply.
• Select a location without direct exposure to
sunlight.
• Select a location with level (or nearly level) fl ooring.
• Select a location with enough space for the
refrigerator doors to open easily.
• Overall space required in use. Refer to drawing and
dimension as below.
• Please ensure that appliance can be moved freely
in the event of maintenance & service.
25mm
When moving your refrigerator
To prevent fl oor damage be sure the front levelling
legs are in the up position (above the fl oor). Refer to
‘Levelling the refrigerator’ in the manual (at page 11).
To protect the fi nish of the fl ooring, place the
protection sheet such as packing carton under the
refrigerator.
CAUTION
Leg
When installing, servicing or cleaning
behind the refrigerator, be sure to pull the
unit straight out and push back in straight
after fi nishing.
Screw Driver
01 SETTING UP
50mm
at least 50mm at least 50mm
732mm
1027mm
160º
160º
1724mm
777mm
1155mm
setting up _7
Page 8
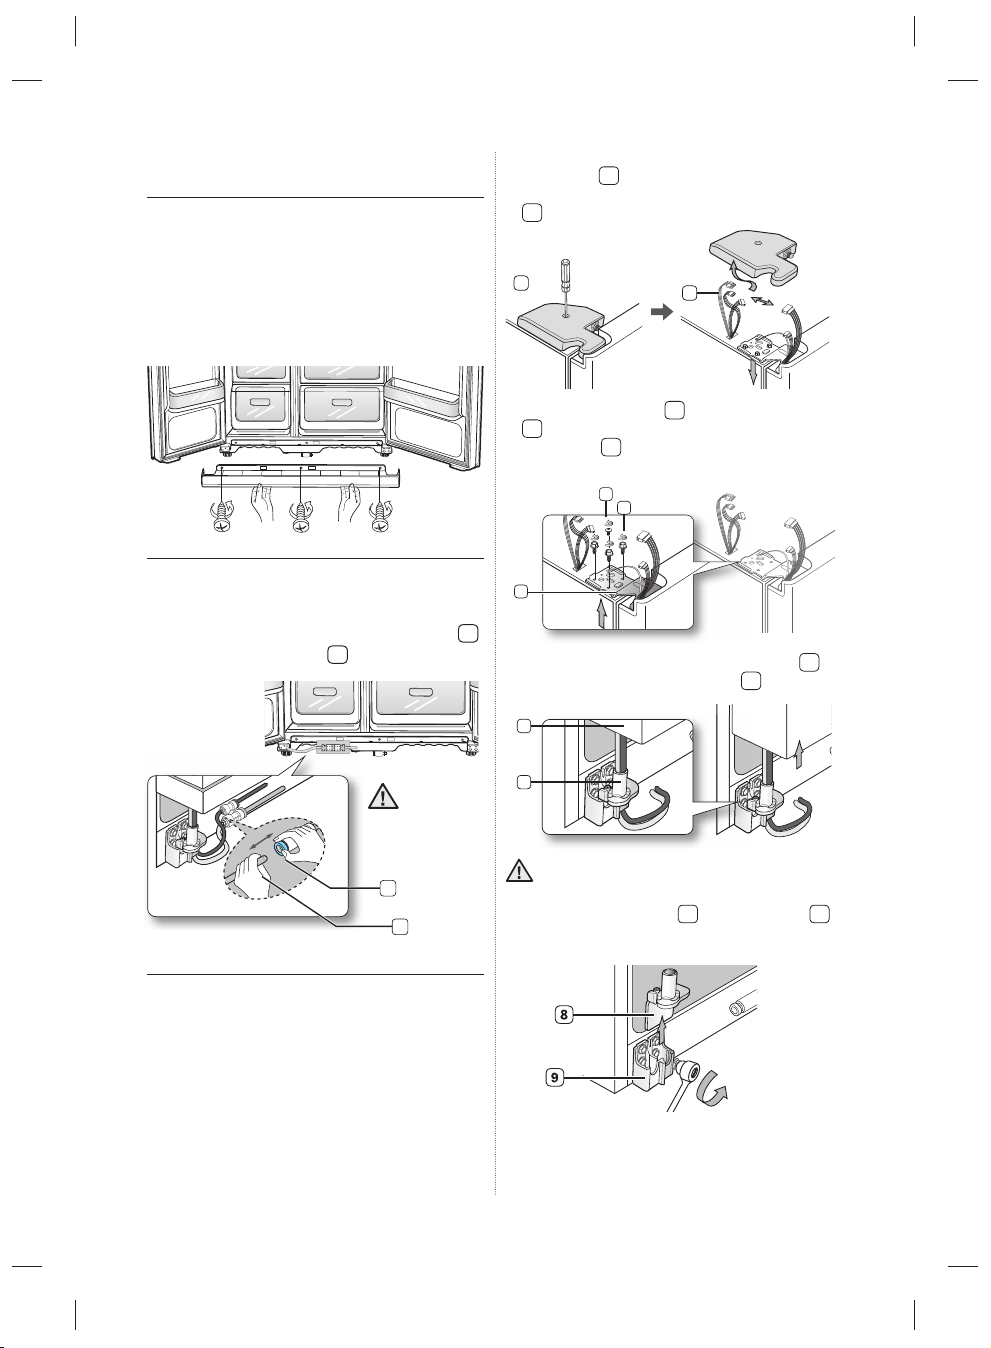
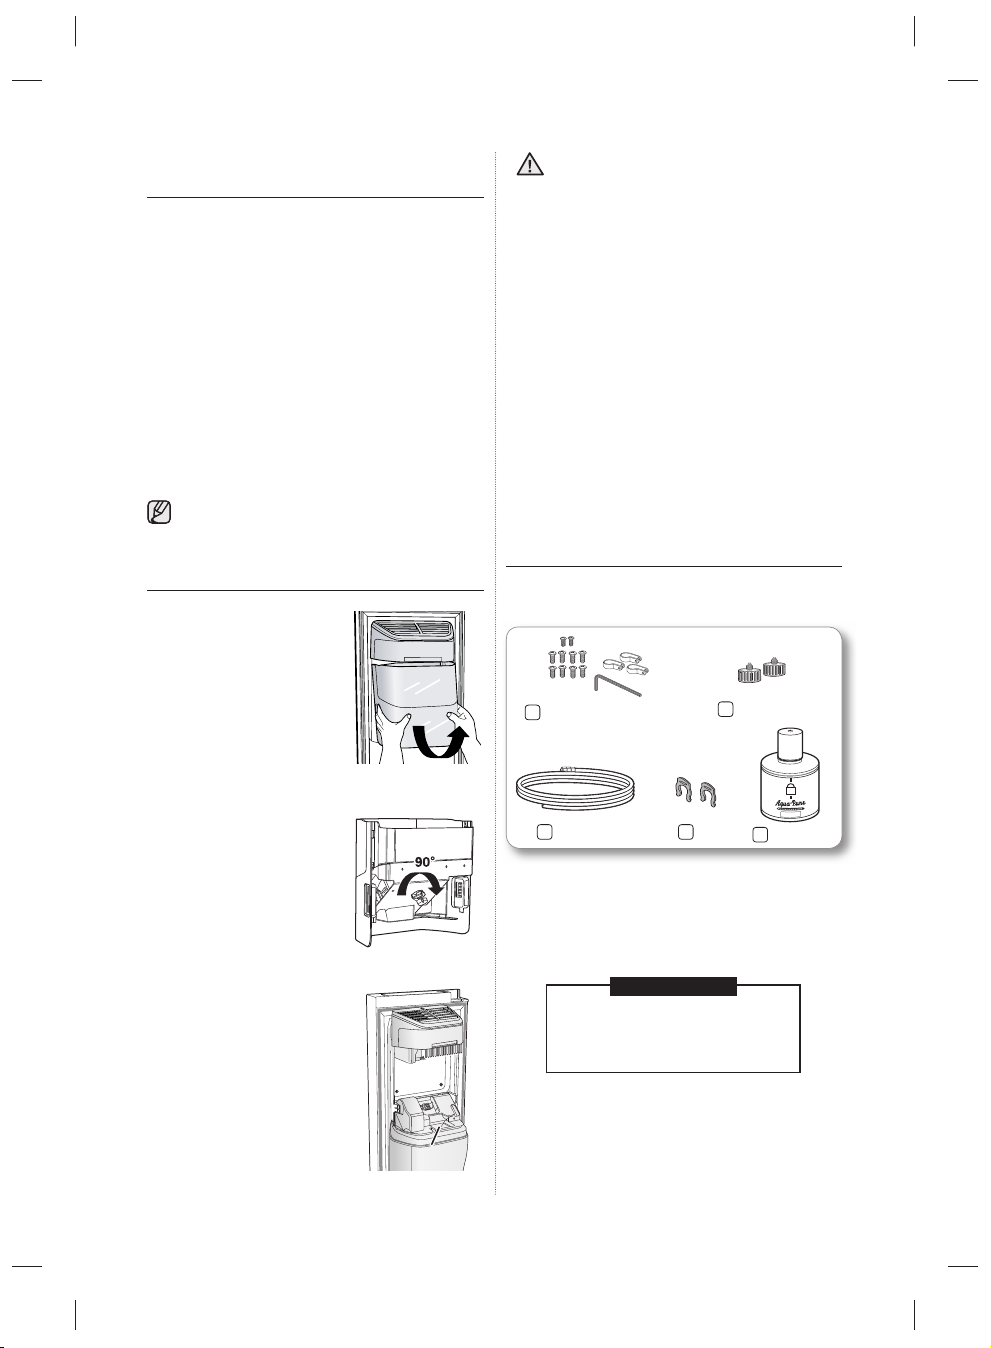
REMOVING THE REFRIGERATOR
DOORS
If your entrance won’t allow the refrigerator to pass
easily through it, you can remove the doors.
1. With the Freezer door closed, remove the upper
1
hinge cover
using a screwdriver, and then
disconnect the wires by gently pulling them apart
2
.
1. Removing the Front Leg Cover
First, open both the freezer and refrigerator doors,
and then take off the front leg cover by removing the
three screws counter-clockwise.
Separating the Water Supply Line from
the Refrigerator
1. Remove the water line by pressing the coupler 1
and pulling the water line
2
away.
water tube match
same colour.
1
2
Be careful
that the
1
2. Remove hinge screws
4
by turning counter-clockwise, and take off the
upper hinge
5
. Be careful that the door does not
2
3
and the ground screw
fall on you as you are removing it
4
3
5
3. Next, remove the door from the lower hinge
7
carefully lifting the door straight up
7
6
.
Be careful not to pinch the water tubing and
wire harness on the door.
4. Remove the lower hinge
8
from the bracket 9
by gently lifting the lower hinge upwards.
6
by
2. Removing the freezer door
A few things to mention fi rst.
• Make sure that you lift the door straight up so the
hinges are not bent or broken.
• Be careful not to pinch the water tubing and wire
harness on the door.
• Place doors on a protected surface to prevent
scratching or damage.
8_ setting up
Page 9
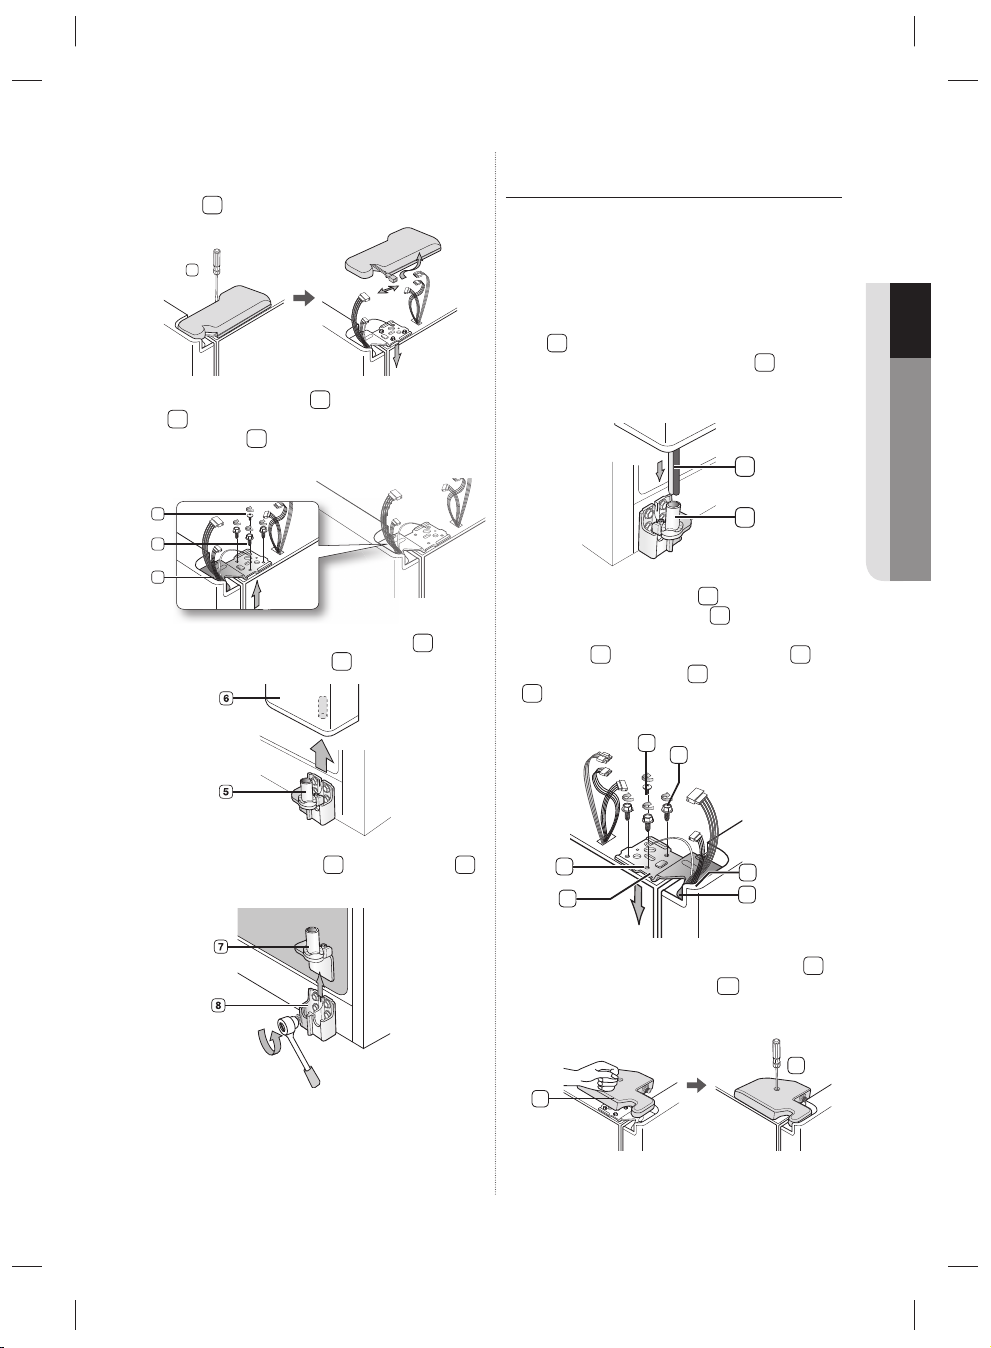
Removing the Fridge Door
1. With the door closed, remove the upper hinge
2. Remove hinge screws
1
cover
using a screwdriver.
1
2
3
by turning counter-clockwise, and take off the
upper hinge
4
. Be careful that the door does not
and the ground screw
fall on you as you are removing it
REATTACHING THE
REFRIGERATOR DOORS
Once you have safely placed your refrigerator where
you plan for it to stay, it is time to put the doors back
on.
Reattaching the Freezer Door
1. Replace the freezer door by inserting the water
1
line
back into the lower corner of the door and
then into the hole on the lower hinge
Gently pull the water line back down so that it runs
straight, with no kinks or bends.
2
.
1
01 SETTING UP
2
3
4
3. Remove the door from the lower hinge
6
lifting the door straight up
4. Remove the lower hinge
.
7
from the bracket 8
by gently lifting the lower hinge upwards.
2
2. Insert the upper hinge shaft
the corner of the freezer door
5
by
Make sure the hinge is level between the upper
hinge hole
5
and the hole of the cabinet 6 and
reattach the hinge screws
8
by turning in a clockwise direction.
3
into the hole on
4
.
7
and ground screw
Reconnect the wires.
8
7
5
6
3. Place the front part of the upper hinge cover
on the front of the upper hinge
3
4
and reattach
10
9
with the screw.
10
9
setting up _9
Page 10
Reattaching the Fridge Door
Center of transparent
coupler
clip A (1/4”)
(6.35mm)
1. Insert the lower hinge 1 back into the lower
hinge bracket
2
.
Reattaching the Water Supply Line
1. Insert the water line 2 into the coupler
1
2
1
.
2. Fit the hole in the corner of the fridge door
over the lower hinge
3
4
3. Insert the upper hinge shaft
on the hinge
between the upper hinge hole
the top of the cabinet
9
screws
and the ground screw 10 by turning it
4
.
5
6
. Make sure the hinge is level
into the hole
7
8
and the hole on
. Then, reattach hinge
in a clock wise direction.
4. Place the front part of the upper hinge cover
on the front of the upper hinge
and reattach it
12
with the screw.
3
1
2
2. The Water Line must be fully Inserted to the center
of transparent coupler to prevent water leakage
from the dispenser.
3. Insert the 2 clips in the install pack and check that
each clip holds the line fi rmly.
Center of transparent
coupler
clip A (1/4”)
(6.35mm)
Do not cut the water line. Gently separate it
from the coupler.
Reattaching the Front Leg Cover
Before attaching the cover, check water
connector for leakage.
Replace the front leg cover by turning the three
11
screws clockwise, as shown in the fi gure.
11
10_ setting up
12
Page 11
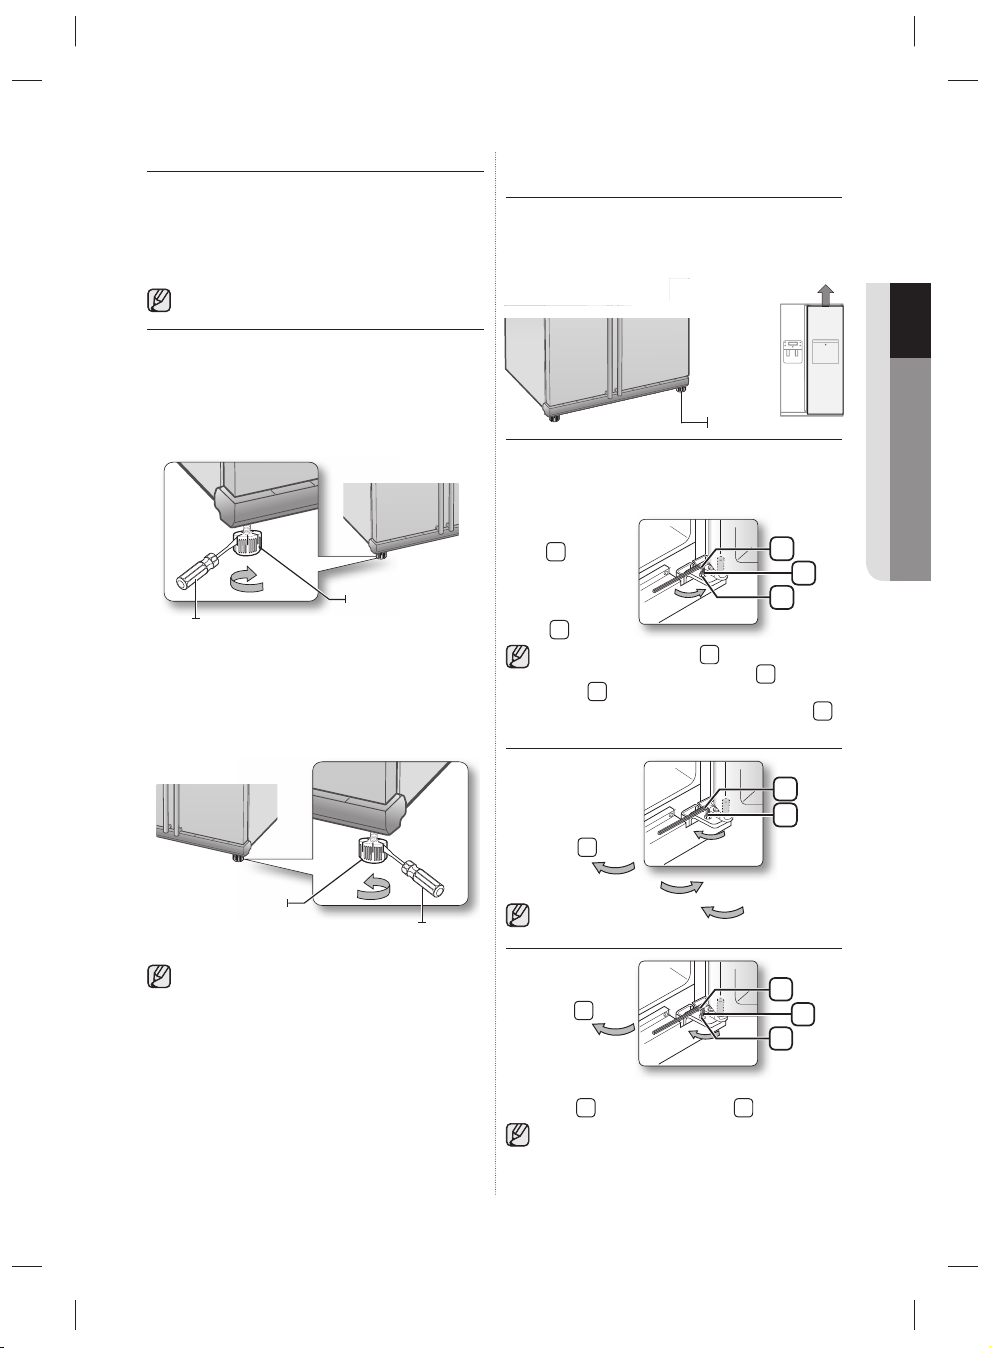
LEVELLING THE REFRIGERATOR
Now that the doors are back on the refrigerator, you
will want to make sure the refrigerator is level so you
can then make fi nal adjustments. If the refrigerator
is not level, it will not be possible to get the doors
perfectly even.
The front of the refrigerator is also adjustable.
When the Freezer door is lower than
the fridge
Insert a fl at-blade screwdriver into a notch on the
Leg, turn it clockwise or counter clockwise to level
the freezer.
Leg
Screw Driver
When the Freezer door is higher than
the fridge
Insert a fl at-blade screwdriver into a notch on the
Leg, turn it clockwise or counter clockwise to level
the fridge.
Leg
Screw Driver
MAKING MINOR ADJUSTMENTS
TO THE DOORS
Remember, a level refrigerator is necessary for getting
the doors perfectly even. If you need help, review the
previous section on levelling the refrigerator.
When the door of the freezer
is higher than the fridge
Adjustment
part
In the process for adjusting both the doors is the
same. Open the doors and adjust them, one at a
time, as follows:
1. Unscrew the
1
nut
from the
lower hinge until
it reaches the
upper end of the
2
bolt
.
1
When you release the nut
, make sure that
you use the Allen wrench provided
2
the bolt
in a counter-clockwise direction.
You should then be able to unscrew the nut
with your fi ngers.
2. Adjust the
height difference
between the
doors by turning
2
the bolt
clockwise
or counter clockwise
.
When you turn clockwise
move up.
Wrench
3
2
1
Nut
3
to loosen
Wrench
3
Bolt
2
, the door will
Bolt
1
01 SETTING UP
Refer to the next section for the best way to
make very minor adjustments to the doors.
3. After adjusting
the doors, turn
1
the nut
clockwise
until it reaches
the lower end
of the bolt, then tighten the bolt again with the
3
wrench
to fi x the nut in place 1.
If you do not secure the nut fi rmly, the bolt may
release.
setting up _11
3
1
Wrench
Bolt
2
Nut
Page 12
CHECKING THE WATER
Ice Chute
DISPENSER LINE (OPTIONAL)
A water dispenser is just one of the helpful features
on your new Samsung refrigerator. To help promote
better health, the Samsung water fi lter removes
unwanted particles from your water. However, it
does not sterilize or destroy microorganisms. You
will need to purchase a water purifying system to do
that. In order for the icemaker to operate properly,
water pressure of 138 ~862 Kpa is required. Under
normal conditions, a 170 cc paper cup can be fi lled
in 10 seconds. If the refrigerator is installed in an area
with low water pressure (below 138 Kpa), you can
install a booster pump to compensate for the low
pressure. Make sure the water storage tank inside
the refrigerator is properly fi lled. To do this, press the
water dispenser lever until the water runs from the
water outlet.
Water Line installation Kits are included. You can
fi nd it in one of the freezer drawers.
USING THE ICE MAKER (OPTIONAL)
To Remove the Ice Bucket
-
Hold the handle as shown in fi gure1.
-
Slightly pull up the bottom part.
-
Take out the ice bucket slowly.
- When ICE OFF blinks on the display panel,
reinsert the bucket and/or make sure it’s
CAUTION
installed properly.
- When the door is open, the Ice and water
dispenser do not work.
- If you close the door hard, it may cause
water spilling over the ice maker.
- To prevent dropping the ice bucket, use
both hands when removing it.
- To prevent injury, be sure to clean up any
ice or water that may have dropped on
the fl oor.
Do not let children hang on the ice dispenser
-
or on the bucket.
They may get hurt.
- Be sure not to put your hand or any object
into the ice chute.
It may cause personal injury or damage
mechanical parts.
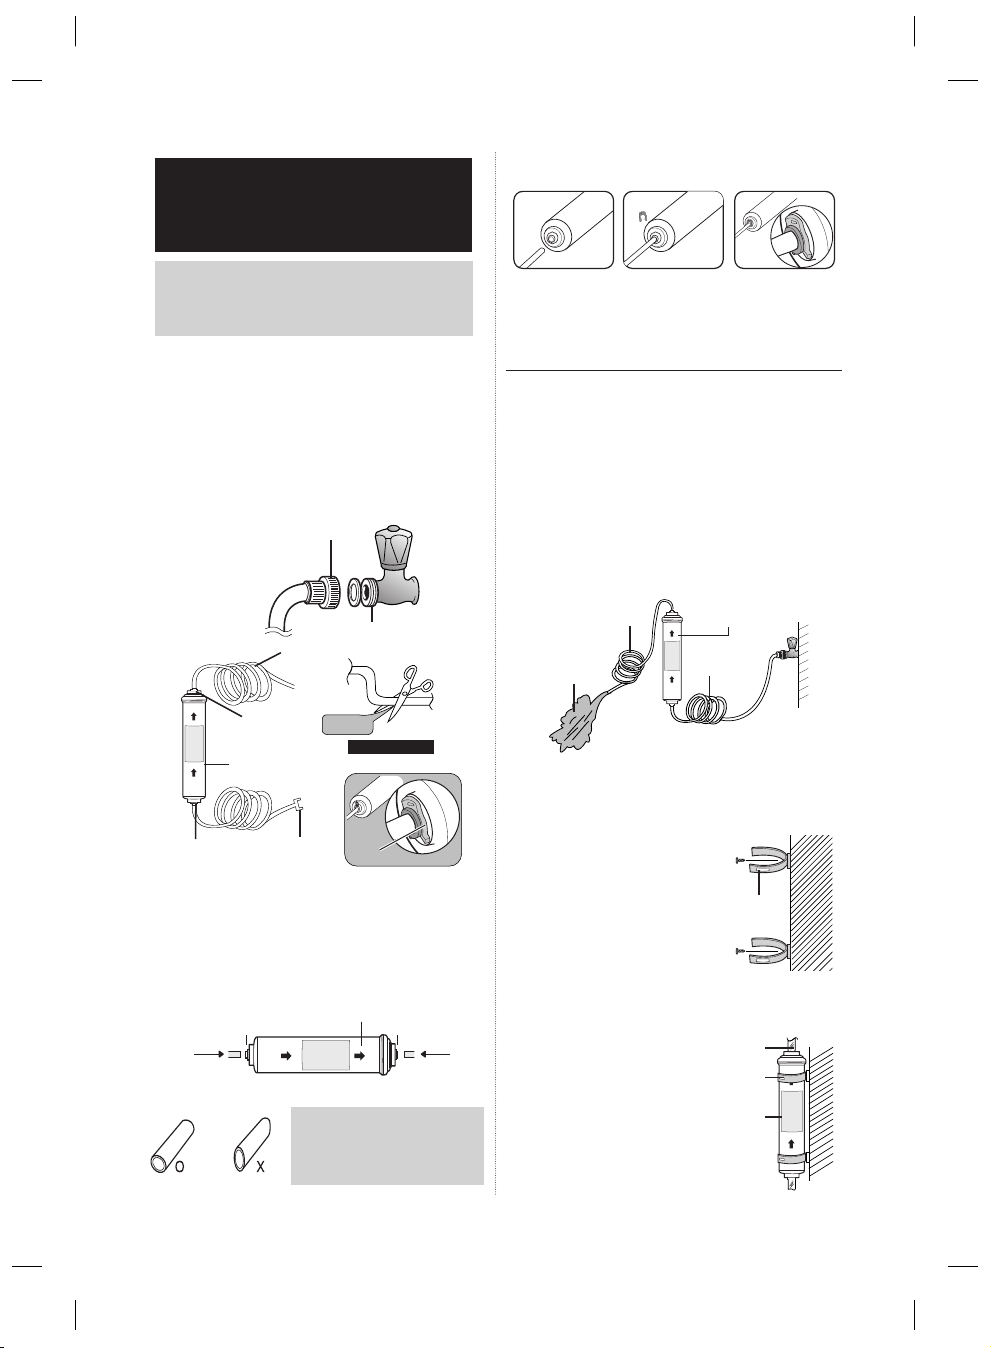
INSTALLING THE WATER
DISPENSER LINE
For Interior model
Parts for water line Installation
To Refi t The Ice Bucket
- Assemble it in the reverse
order of disassembly.
- Push the bucket in fi rmly until
you hear a clicking sound.
- When the bucket does not fi t
into its place, turn the gear
handle on its back by 90
degrees and reinstall it again
as shown in fi gure 2.
Normal Operation
- Any sounds you hear when
the ice maker dumps ice into
the bucket are part of normal
operation.
- Not dispensing ice for long
periods may cause ice
clumps in the ice bucket.
Remove the remaining ice
and empty the bucket.
- When ice does not come
out, Check for any ice stuck
in the chute and remove it.
-
The fi rst batch of ice cubes may
be small due to air in the pipe
after connection, any air will be
purged during normal use.
12_ setting up
Figure1
Figure2
Ice Chute
2
4
Clip
Pipe connector
5
Water Filter
1
Water line fi xer and screws
3
Water line
Connecting to the water supply line
1. fi rst, shut off the main water supply line.
2. locate the nearest cold, drinking water line.
3. follow the Water line Installation Instructions in the
installation kit.
CAUTION
The water line must be connected
to the cold water pipe. If it is connected
to the hot water pipe, it may cause the
purifi er to malfunction.
Page 13
Close Main
Close Main
Water pipe
Close Main
Water pipe
NO GAP
Remove
cap
Water Line
from unit
Water Line
from Kit
No gap
Loosen a
Water pipe
Close Main
Water pipe
NO GAP
4. After connecting the water supply to the water
fi lter, turn your main water supply back on and
dispense about 1l to clear and prime the water
fi lter.
Connecting the water line to the
refrigerator
1. Remove the dust cap from the water line on the
rear of the unit and fi t a compression nut from the
install kit.
2. Remove the water pipe from the install kit and fi t a
compression nut to one end.
3. Join the two pipes together using the compression
joint from the install kit ensuring that the joint is
water tight.
4. Join the other end of the install pipe to the main
water supply and turn on the water to check for
leaks.
• Samsung Warranty does not cover WATER LINE
INSTALLATION.
• The cost of connection to a water supply is at the
customer expense, unless included in the delivery
charge (refer to the delivery agreement with the
seller)
• Please contact Plumber or Authorised Installer for
the installation if needed.
• If Water leakage occurs due to improper
installation, Please contact installer.
INSTALLING THE WATER
DISPENSER LINE
For Exterior model
Parts for water line Installation
01 SETTING UP
Water Line
Remove
Water Line
from unit
from Kit
cap
No gap
Loosen a
Only connect the water line to a drinkable water
source.
If you have to repair or disassemble the water
line, cut off 6.5mm of the plastic tubing to
make sure you get a snug, leak-free connection.
Before being used, the leakage in
CAUTION
these places should be examined
Water line fi xer and screws
Water line
Purifi er lock-clip
Pipe connector
Purifi er
Connecting to the water supply line
Connect the water pipe with coupler and tap.
1. Close the main water tap.
2. Connect coupler “A” to the tap.
CAUTION
The water line must be connected to the cold
water pipe. If it is connected to the hot water
pipe, it may cause the purifi er to malfunction.
setting up _13
Page 14
WARRANTY INFORMATION
Locking Clip
Insert Locking Clip After
tube seated
This water line installation is not covered by the
refrigerator or ice maker manufacturer’s warranty.
Follow these instructions carefully to minimise the risk of
expensive water damage.
4. After inserting tube, put together the clip strongly.
The Clip fi x the tube.
Note:
If the coupler does not fi t on the current tap, go
the nearest authorised service dealer and purchase the
right couplers fi ttings.
select the location where the purifi er is to
install. (Model with the purifi er)
- If you wish to reassemble the water inlet and outlet
sides of the purifi er during purifi er installation, see
the reference illustration.
- Cut the water line attached to the purifi er to the
appropriate place after measuring the distance
between the purifi er and the cold water tap.
COUPLER “A”
TAP
90 degree
CAUTION
Insert Locking Clip After
tube seated
Locking Clip
SIDE OF
PURIFIER
PURIFIER WATER
WATER INLET
SIDE OF PURIFIER
LINE OUTLET
COUPLER
5. Turn on the water and check for leaks. If leaks
occur, repeat step 1,2,3,4. If leaks persist,
discontinue use and call your supporting dealer.
6. Flush fi lter for 5 minutes before use.
Remove any residual matter inside the
purifi er. (Model with the purifi er)
- Open the main water tap to check whether water
is running through the water tube on the water inlet
side of the purifi er.
- If water does not come out through the line, check
whether the tap is open.
- Leave the tap open until clean water is running
out and any residual matter that built up during
manufacturing has been removed.
OUTLET SIDE
OF PURIFIER
WATER
PURIFIER
WATER LINE
Attach the purifi er lock-clip.
- Hold the purifi er lock-clip in the appropriate position
(under the sink for example) and fi x it tightly into
place where to screw.
Replacement Instructions
1. Shut off water supply.
2. Note the Flow direction on the fi lter.
3. Insert water supply tube into the inlet side of the
fi lter until the tube stop.
FLOW DIRECTION
WATER SUPPLY
INLET SIDE
Note : You must also ensure
that the cut is square
and not at any sort
of angle as this could
cause a leak
PERMEAT
14_ setting up
PURIFIER LOCK-CLIP
Secure the purifi er in position.
- Fix the purifi er in position, as shown in the fi gure on
the right.
WATER TUBE
PURIFIER LOCK-CLIP
PURIFIER
Page 15
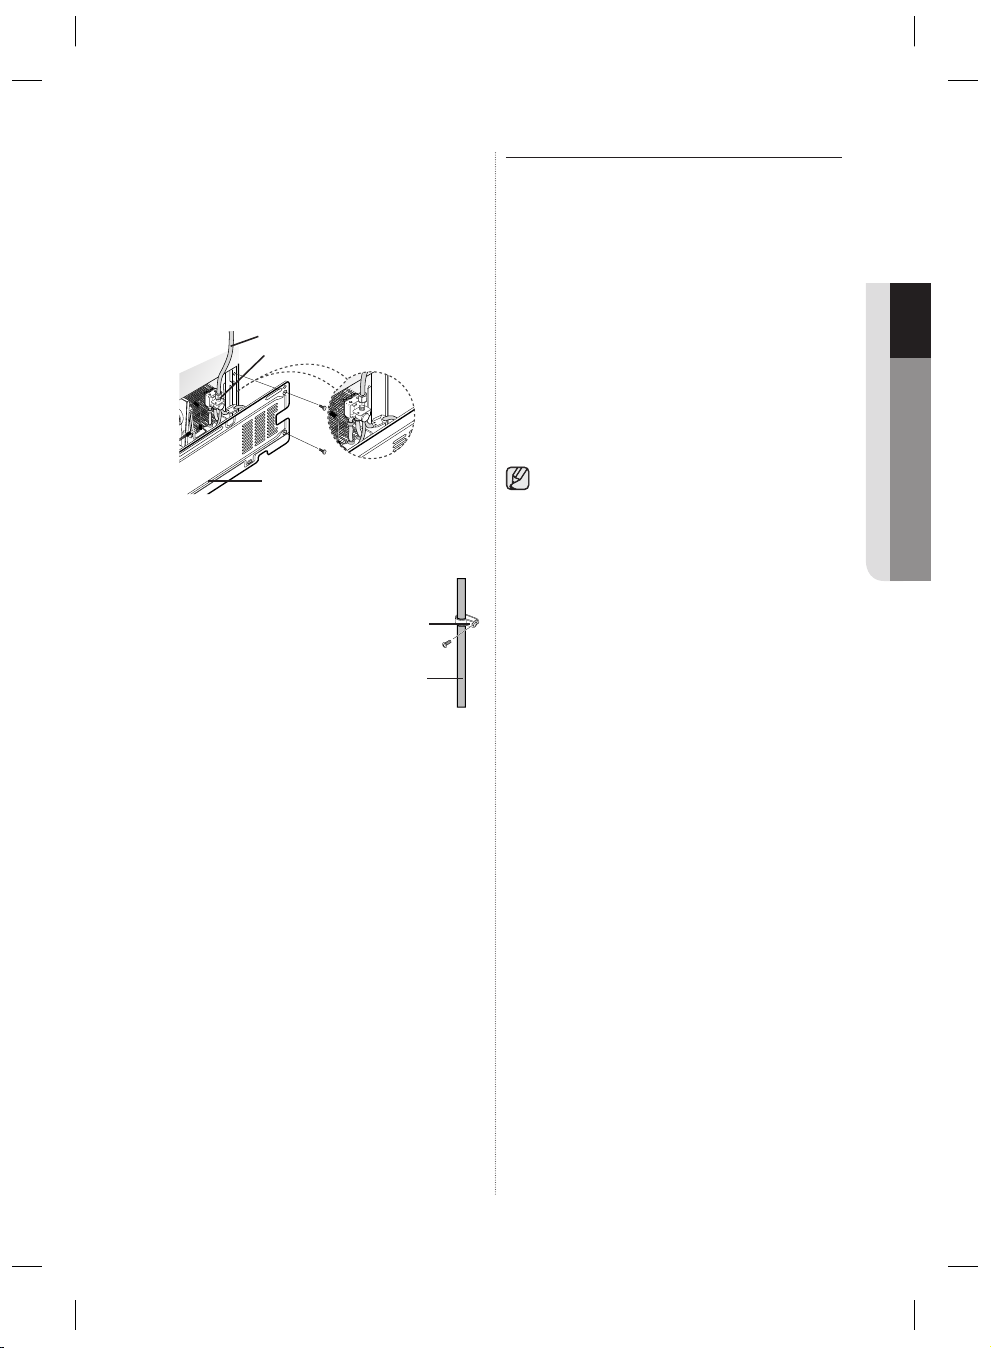
Connect the water line to the
refrigerator.
- Remove the compressor cover of the refrigerator.
- Connect the water line to the valve, as shown in
the fi gure.
- When connected, check if there is any leakage.
If any, repeat the connection.
- Reattach the compressor cover of the refrigerator.
WATER LINE
CONNECTION NUT
INSTRUCTIONS
COMPRESSOR COVER OF
REFRIGERATOR
Secure the water line.
- Using clip ”A”, fi x the water
line to the wall (the back of
refrigerator).
- When the water line is
secure, make sure whether
the water line is not
excessively bent, pinched or
squashed.
CLIP A
WATER LINE
Removing any residual matter inside
the water supply line after installing
fi lter.
1. Turn ON the main water supply & turn OFF the
valve to the water supply line.
2. Run water through the dispenser until the water
runs clear (approx. 1L). This will clean the water
supply system and remove air from the lines.
3. Additional fl ushing may be required in some
households.
4. Open the refrigerator door and make sure there
are no water leaks coming from the water fi lter.
A newly installed water fi lter cartridge may cause
water to briefl y spurt from the water dispenser.
This is due to air getting into the line. It should
pose no problem to operation.
01 SETTING UP
setting up _15
Page 16
operating the SAMSUNG
side-by-side refrigerator
OPERATING THE REFRIGERATOR
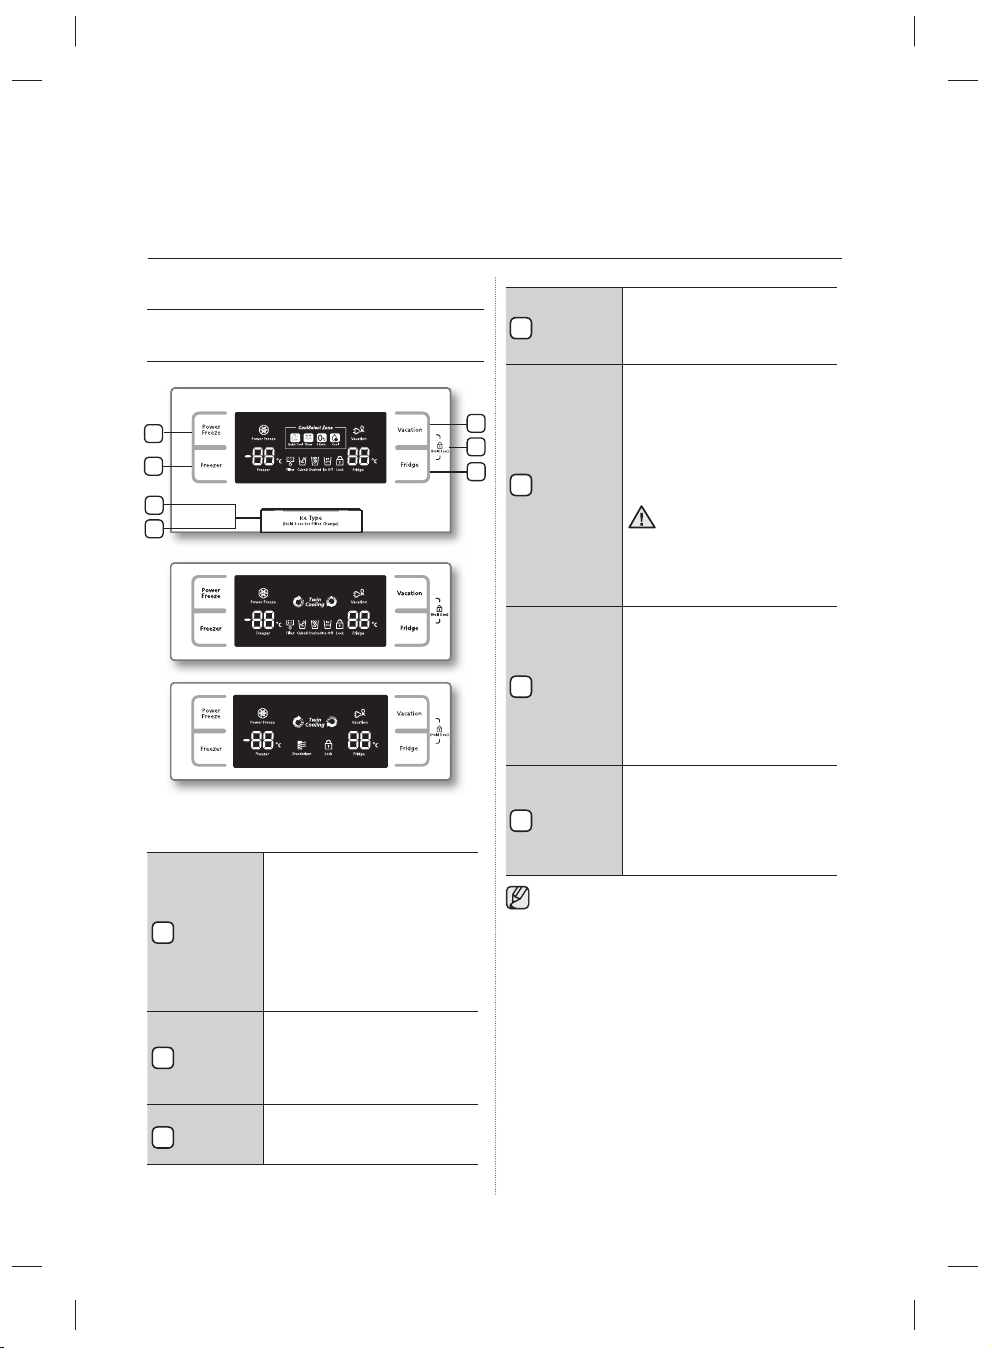
USING THE CONTROL PANEL /
DIGITAL DISPLAY
COOLSELECT MODEL
1
2
3
4
DISPENSER MODEL
NORMAL MODEL
When not in use the temperature display will turn off,
this is normal.
Speeds up the time needed
to freeze products in the
POWER
1
FREEZE
BUTTON
FREEZER
2
BUTTON
ICE TYPE
3
BUTTON
freezer. This can be helpful
if you need to quickly freeze
items that spoil easily or if the
temperature in the freezer
has warmed dramatically (For
example, if the door was left
open).
Press the Freezer button to
set the freezer to your desired
temperature, You can set the
temperature between -14°C
(8°F) and -25ºC (-14°F).
Use this button to choose
Cubed, Crushed or to turn the
Ice feature off.
FILTER
CHANGE
4
BUTTON
5
6
7
VACATION
5
BUTTON
CHILD
LOCK
6
FUNCTION
FRIDGE
7
BUTTON
When you use Power Freeze the energy
consumption of the refrigerator will increase.
Remember to turn it off when you don’t
need it and return the freezer to your original
temperature setting.
If you need to freeze large amount of food stuff,
activate Power Freeze function at least 24 hours
before.
When you change the fi lter,
press this button for 3
seconds to reset the fi lter
schedule.
If you are going on vacation
or business trip or you do not
need to use the refrigerator,
press the Vacation button.
When you select vacation
button for fridge compartment
off, display LED of Vacation will
be on.
It is strongly requested to
remove foods in the freshfood compartment and do
not leave the door open
when you select Vacation
function.
By pressing the Vacation
button and the Fridge button
simultaneously for 3 seconds,
all buttons will be locked. The
Water dispenser lever and
the Ice lever will not work
either. To cancel this function,
Press these two buttons for 3
seconds again.
Press the Fridge button to
set the fridge to your desired
temperature.
You can set temperature
between 1°C and 7°C (34°F
and 45°F).
16_ operating
Page 17
CONTROLLING THE
TEMPERATURE
CONTROLLING THE FREEZER
TEMPERATURE
The freezer temperature can be set between -14°C
(8°F) and -25ºC (-14°F) to suit your particular needs.
Press the Freezer button repeatedly until the desired
temperature is shown in the temperature display.
Keep in mind that foods like ice cream may melt at
-16ºC (4°F).
The temperature display will move sequentially from
-14°C (8°F) and -25ºC (-14°F). When the display
reaches -14ºC (8°F), it will begin again at -25ºC
(-14°F).
Five seconds after the new temperature is set the
display will again show the actual current freezer
temperature. However, this number will change as
the Freezer adjusts to the new temperature.
The door guards in the freezer of this model are
the two star sections, so the temperature in
two star sections are slightly higher than other
freezer compartment.
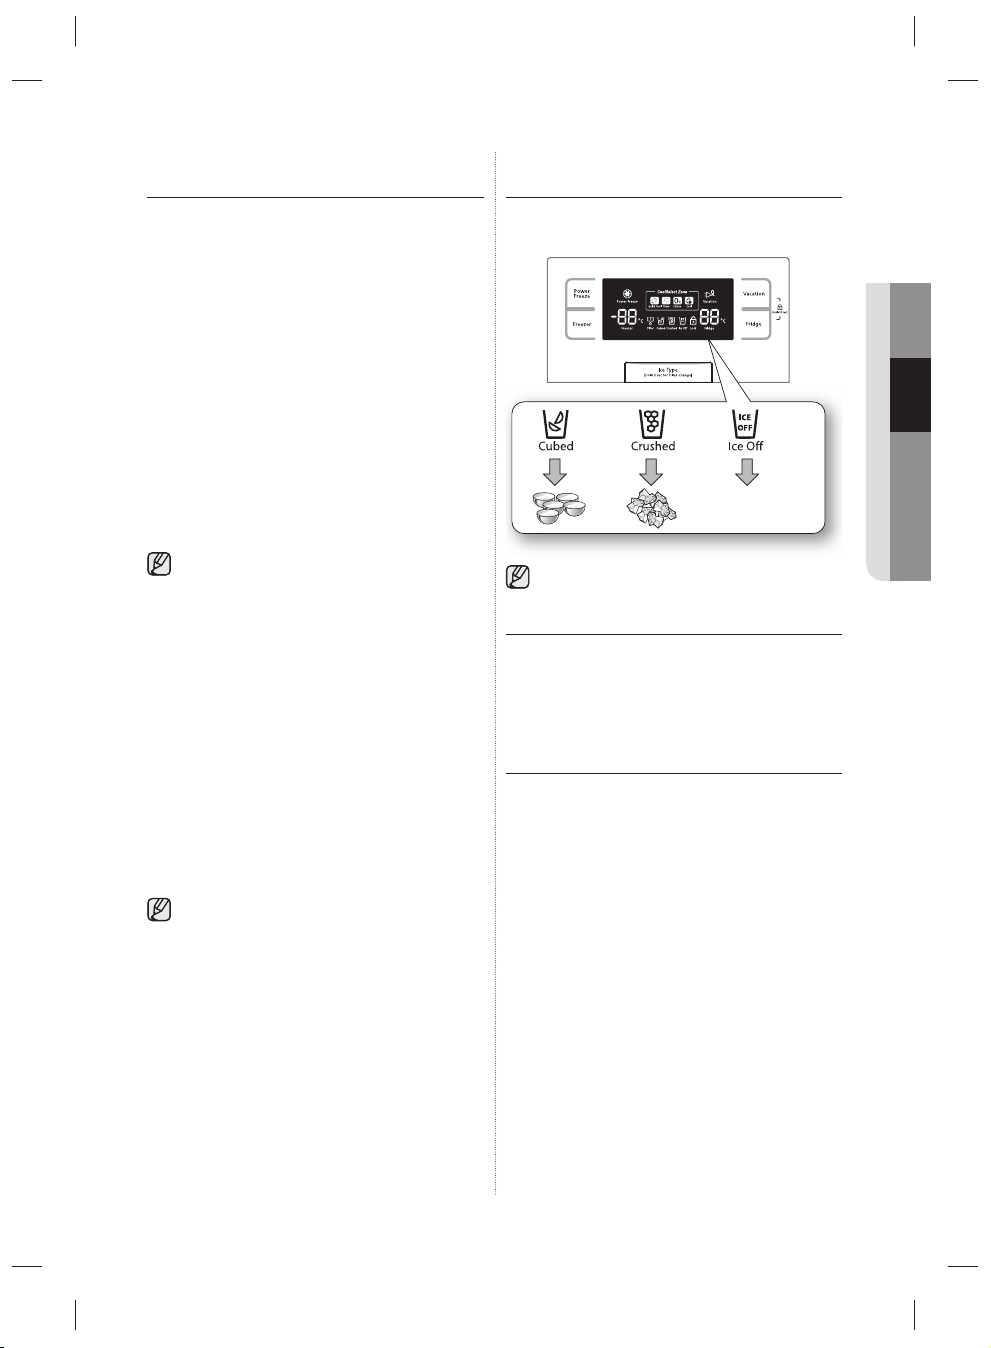
USING THE ICE AND COLD
WATER DISPENSER
Press the Ice Type button to select the type of ice
you want
No Ice
Select this if you want to
turn off the icemaker
Ice is made in cubes. When you select
“Crushed”, the icemaker grinds the ice cubes
into crushed ice.
02 OPERATING
CONTROLLING THE FRIDGE
TEMPERATURE
The refrigerator temperature can be set between 7ºC
(46°F) and 1ºC (34°F) to suit your particular needs.
Press the Fridge button repeatedly until the desired
temperature is shown in the temperature display.
The temperature control process for the Fridge works
just like the Freezer process.
Press the Fridge button to set your desired
temperature. After a few seconds, the Fridge will
begin tracking towards the newly set temperature.
This will be refl ected in the digital display.
The temperature of the freezer or the refrigerator
may rise from opening the doors too frequently,
or if a large amount of warm or hot food is
placed in either side.
This may cause the digital display to blink.
Once the freezer and refrigerator return to their
normal set temperatures the blinking will stop.
If the blinking continues, you may need to “reset”
the refrigerator.
Try unplugging the appliance, wait about 10
minutes and then plug back in.
Dispensing ice
Place your glass underneath the ice outlet and push
gently against the ice dispenser lever with your glass.
Make sure the glass is in line with the dispenser to
prevent the ice from bouncing out.
Using the Water Dispenser
Place a glass underneath the water outlet and push
gently against the water dispenser lever with your
glass.
Make sure the glass is in line with the dispenser to
prevent the water from splashing out.
operating _17
Page 18

• Do not put your fi ngers, hands or any
WARNING
other unsuitable objects in the chute or
ice-maker bucket.
- It may result in personal injury or material
damage.
• Never put fi nger or any other objects in
the dispenser opening.
- It may cause injury.
• Use only the ice maker provided with the
refrigerator.
• The water supply to this refrigerator must
only be installed/connected by a suitably
qualifi ed person and connect to a potable
water supply only.
• In order to operate the ice maker properly,
water pressure of 138 ~ 862 Kpa is
required.
• If you have a long vacation or business
CAUTION
trip and won’t use water or ice
dispensers, close the water valve.
- Otherwise, water leakage may occur.
• Wipe excess moisture from the inside and
leave the doors open.
- Otherwise, odor and mold may develop.
USING THE COOLSELECT
ZONE™ DRAWER (OPTIONAL)
Quick Cool
• You can use the Quick Cool feature with the
CoolSelect Zone
• “Quick Cool” allows 1~3 canned beverages to cool
within 60 min.
• To cancel this function, press the “Quick Cool”
button again. CoolSelect Zone
previous temperature.
• When “Quick Cool” ends, it returns to the “Cool”
temperature setting.
Thaw
• Drips loss and quality deterioration of meats
reduces the freshness of foods.
•
After “Thaw” is selected, warm and cold air is
alternately supplied into the CoolSelect Zone
Drawer.
• Depending on the weight of meat, thawing time
can be selected for 4 hrs, 6 hrs, 10 hrs, and 12 hrs
sequentially.
• When “Thaw” ends, CoolSelect Zone
returns to “Zero Zone” condition.
• When “Thaw “ ends, there are no juice in the meats
and they are half-freezed condition so it is easy to
cut them for cooking.
• To cancel this option, press any button except
“Thaw”.
• The approximate thawing time of meat and fi sh are
shown below. (Based on 1inch thickness)
TM
.
TM
returns to the
TM
TM
display
To get more space,you can remove top freezer
drawer since it does not affect thermal and
mechanical characteristics. A declared storage
volume of frozen food storage compartment is
calculated with these drawers removed.
For more space, you can
store food with Guard
FRE-UPP instead of the ice
bucket.
If you remove the ice bucket,
ICE OFF will blink on the
display panel.
GUARD FRE-UPP
18_ operating
(Optional)
THAW TIME WEIGHT
4hours 363g (0.8Ib)
6hours 590g (1.3Ib)
10hours 771g (1.7Ib)
12hours 1000g (2.2Ib)
Depending on the size and thickness of meat
and fi sh, the thawing time may vary.
The above weight represents the total weight of
food in the CoolSelect Zone
Ex) The total thawing time for 400g frozen beef
and 600g frozen chicken will be 10 hours.
With the “Thaw” option, food which is not
WARNING
needed to thaw in the CoolSelect Zone
Drawer should be removed.
TM
Drawer.
TM
Page 19

Zero Zone (0ºC)
• When “Zero Zone” is chosen, the temperature
of the CoolSelect Zone
regardless of the set refrigerator temperature.
• “Zero Zone” temperature helps keep meat or fi sh
fresh longer.
TM
Drawer is kept at 0 ºC
Cool
• When “Cool” is chosen, the temperature will be the
same as the set temperature of the refrigerator. The
digital panel shows the same temperature as that of
the display panel.
• The CoolSelect Zone
refrigerator space.
Depending on the beverages, the cool-down
time may vary.
For “Quick Cool” option, food stored in
WARNING
the CoolSelect Zone
removed.
TM
Drawer allows extra
TM
Drawer should be
REMOVING THE FREEZER
ACCESSORIES
Cleaning and rearranging the interior of the freezer is
simple.
1. Remove the Glass shelf by pulling the shelf out as
far as it will go. Then, gently lift it up and remove it.
3. Remove the Plastic drawer by pulling it out and
slightly lifting it up.
02 OPERATING
4. ice bucket (freezer)
Remove the Icemaker Bucket by lifting up and
pulling it out slowly.
• Grip the handle as
shown in the fi gure
• Lift the low part slightly
• Take the ice bucket out
slowly.
Do not use excessive force when removing the
cover.
Otherwise, the cover may break and cause
injury.
2. Remove the door bin by holding the door bin with
both hands and then gently lift it up.
operating _19
Page 20

REMOVING THE FRIDGE
ACCESSORIES
1. Remove the spill Proof Glass Shelf by pulling the
shelf out as far as it will go. Then, gently lift it up
and gently remove it.
2. Remove the Vegetable & Fruit Drawer by
pressing on the indentations found on the inside
left and right sides of the Veggie Box/Dry Box
cover and remove by
pulling forward.
Holding the drawer with
one hand, lift it up a
little bit while pulling it
forward and take it out
of the refrigerator.
3. Remove the Gallon Door Bin by holding the bin
with both hands and gently lifting it up.
Before removing any
no food is in the way.
When possible, remove the food altogether to
reduce the risk of accidents.
To get the best energy effi ciency of this product,
please leave all selves, drawers and baskets on
their original position like as illustration in page
(18).
accessories, make sure that
CLEANING THE REFRIGERATOR
Do not use Benzene, Thinner or Clorox™
WARNING
CAUTION
for cleaning.
They may damage the surface of the
appliance and can create a risk of fi re.
Do not spray the refrigerator with water
while it is plugged in, as it may cause an
electric shock.
Do not clean the refrigerator with benzene,
thinner or car detergent for risk of fi re.
REPLACING THE INTERIOR
LIGHT
For LED lamp, please contact service engineer
to replace it.
4. The Z Shelf is attached to the cabinet wall.
Remove the wine shelf by sliding it up and gently
lifting the shelf out of the tabs.
Ensure that the Z Shelf is fi tted as shown in
the diagram and not upside down.
CAUTION
20_ operating
Page 21
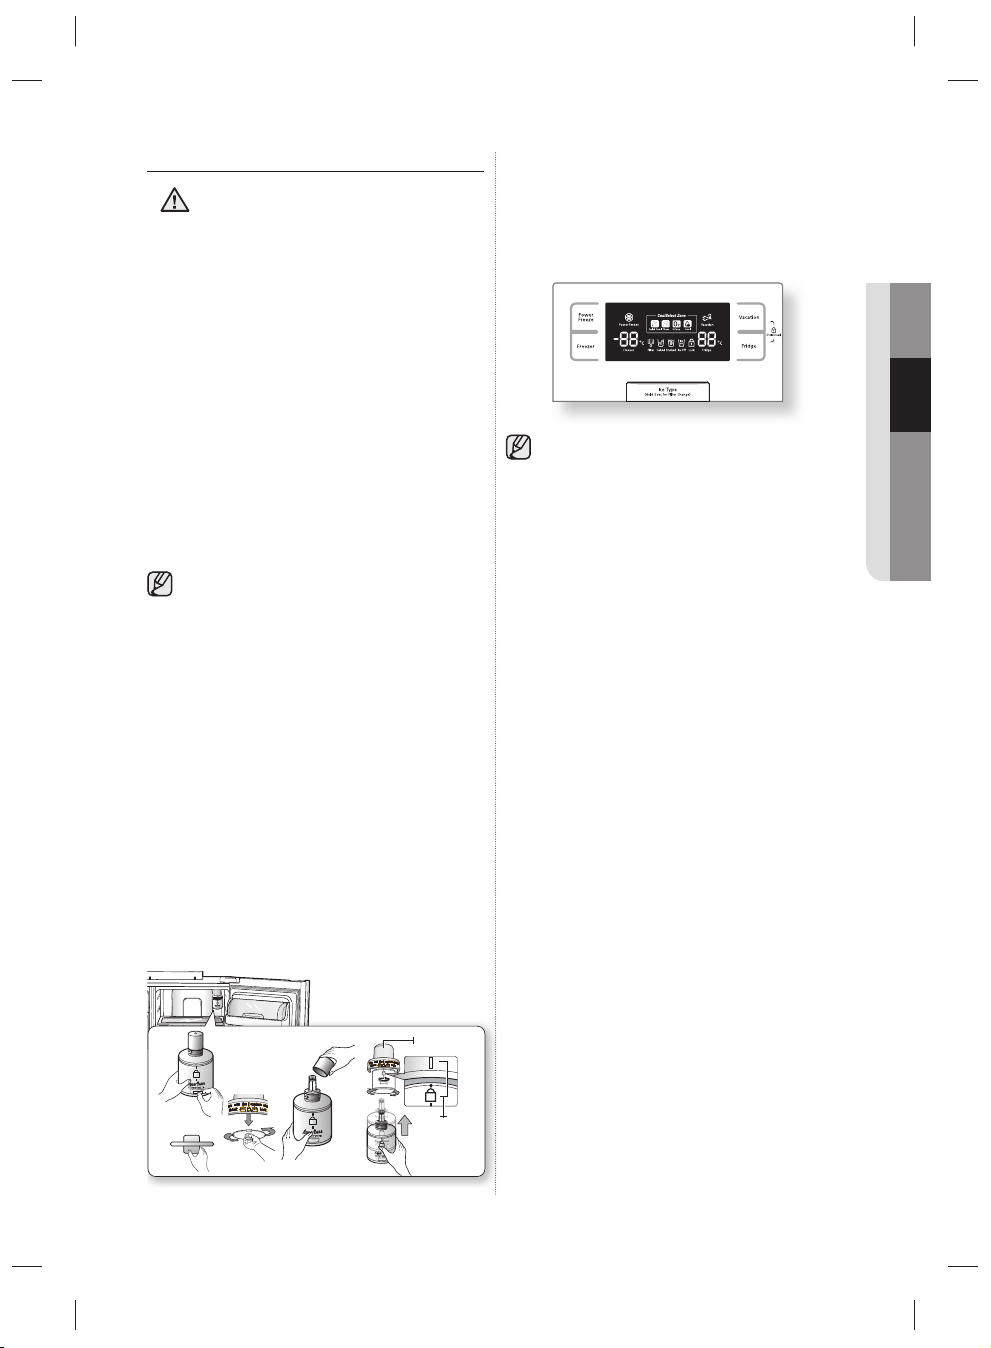
CHANGING THE WATER FILTER
To reduce risk of water damage to your
WARNING
The “Filter Indicator” light lets you know when it is
time to change your water fi lter cartridge.
When the fi lter indicator light changes to red, it is time
to change the fi lter.
To give you some time to get a new fi lter, the light will
come on up just before the capacity of the current
fi lter runs out.
Changing the fi lter on time provides you with the
freshest, cleanest water from your fridge.
property DO NOT use generic brands of
water fi lers in your SAMSUNG Refrigerator.
USE ONLY SAMSUNG BRAND WATER
FILTERS. SAMSUNG will not be legally
responsible for any damage, including, but
not limited to property damage caused by
water leakage from use of a generic water
fi lter.
SAMSUNG Refrigerators are designed to
work ONLY WITH SAMSUNG Water Filter.
1. Remove the water fi lter from the box and
put a month indicator sticker on the fi lter as
shown.
2. Place a sticker on the fi lter that dates six
months in the future. For example, if you
are replacing the water fi lter in March, put
the “SEP” (September) sticker on the fi lter
to remind you to replace in September.
Normally fi lter life is about every 6 months.
3. Next, remove the fi xed cap by turning it
counter clockwise.
4. Remove the new fi lter’s protective cap and
remove the old fi lter.
5. Position and insert the new fi lter into the fi lter
housing.
Slowly turn the water fi lter clockwise 90º to
align with the indication mark on the cover,
locking the fi lter in position. Make sure
that the indicator is lined up with the “lock”
position. Do not over tighten.
6. Once you have completed this process, hold the
Ice Type button for 3 seconds to reset the fi lter
schedule.
7. Lastly, Dispense 1L of water through water
dispenser and throw away. Make sure that water
fl ows clearly again before drinking.
02 OPERATING
A newly installed water fi lter cartridge may
cause water to briefl y spurt from the water
dispenser. This is due to air getting into the line.
It should pose no problem to operation.
Ordering replacement fi lters
To order more water fi lter cartridges, contact your
authorised Samsung dealer.
1
Sticker
(month
indicator)
Cover fi lter
2
4
3
Align the
indication
mark with
5
lock position
operating _21
Page 22
troubleshooting
PROBLEM SOLUTION
The refrigerator
does not work at all
or it does not chill
suffi ciently.
The food in the fridge is
frozen.
You hear unusual
noises or sounds.
The front corners of
the appliance are hot
and condensation is
occurring.
Ice is not dispensing.
You can hear water
bubbling in the
refrigerator.
There is a bad smell in
the refrigerator.
Frost forms on the
walls of the freezer.
Water dispenser is not
functioning.
• Check that the power plug is properly connected.
• Is the temperature control on the display panel set to the correct
temperature? Try setting it to a lower temperature.
• Is the refrigerator in direct sunlight or located too near a heat source?
• Is the back of the refrigerator too close to the wall and therefore keeping air
from circulating?
• Is the temperature control on the display panel set to the correct
temperature? Try setting it to a warmer temperature.
• Is the temperature in the room very low?
• Did you store the food with a high water content in the coldest part of the
fridge? Try moving those items into the body of the fridge instead of keeping
them in the CoolSelect Zone™ drawer.
• Check that the refrigerator is level and stable.
• Is the back of the refrigerator too close to the wall and therefore keeping air
from circulating?
• Was anything dropped behind or under the refrigerator?
• A “ticking” sound is heard from inside the refrigerator. This is normal and
occurs because various accessories are contracting or expanding in relation
to the temperature of the refrigerator interior.
• Some heat is normal as anti-condensators are installed in the front corners
of the refrigerator to prevent condensation.
• Is the refrigerator door ajar? Condensation can occur when you leave the
door open for a long time.
• Did you wait for 12 hours after installation of the water supply line before
making ice?
• Is the water line connected and the shut-off valve open?
• Did you manually stop the ice making function? Make sure Ice Type is set to
Cubed or Crushed.
• Is there any ice blocked within the ice maker bucket?
• Is the freezer temperature too warm? Try setting the freezer temperature
lower.
• This is normal. The bubbling comes from the refrigerant coolant liquid
circulating through the refrigerator.
• Has a food item spoiled?
• Make sure that strong smelling food (for example, fi sh) is wrapped so that it
is airtight.
• Clean out your freezer periodically and throw away any spoiled or suspect
food.
• Is the air vent blocked? Remove any obstructions so air can circulate freely.
• Allow suffi cient space between the foods stored for effi cient air circulation.
• Is the freezer door closed properly?
• Is the water line connected and the shut-off valve open?
• Has the water supply line tubing been crushed or kinked?
Make sure the tubing is free and clear of any obstruction.
• Is the water tank frozen because the refrigerator temperature is too low?
Try selecting a warmer setting on the main display panel.
22_ troubleshooting
Page 23
memo
Page 24
Ambient Room Temperature Limits
This refrigerator is designed to operate in ambient temperatures specifi ed by its
temperature class marked on the rating plate.
Class Symbol Ambient Temperature range (°C)
Extended Temperate SN +10 to +32
Temperate N +16 to +32
Subtropical ST +16 to +38
Tropical T +16 to +43
Internal temperatures may be affected by such factors as the location of the refrigerator,
ambient temperature and the frequency with which you open the door. Adjust the
temperature as required to compensate for these factors.
English
Correct Disposal of This Product
(Waste Electrical & Electronic Equipment)
(Applicable in the European Union and other European countries with separate collection
systems)
This marking on the product, accessories or literature indicates that the product and its
electronic accessories (e.g. charger, headset, USB cable) should not be disposed of with
other household waste at the end of their working life. To prevent possible harm to the environment or human health from uncontrolled waste disposal, please separate these items
from other types of waste and recycle them responsibly to promote the sustainable reuse
of material resources.
Household users should contact either the retailer where they purchased this product, or
their local government offi ce, for details of where and how they can take these items for
environmentally safe recycling.
Business users should contact their supplier and check the terms and conditions of the
purchase contract. This product and its electronic accessories should not be mixed with
other commercial wastes for disposal.
Page 25
Lodówka
Instrukcja obsługi
Niniejsza instrukcja została wydrukowana w całości na papierze makulaturowym.
wyobraź sobie nieograniczone
możliwości
Dziękujemy za zakupienie produktu fi rmy Samsung.
Aby móc korzystać z pełniejszej obsługi,
prosimy zarejestrować swoje urządzenie na
www.samsung.com/register
Urządzenie wolno stojące
Polski
Page 26

Zalecenia bezpieczeństwa
ZALECENIA BEZPIECZEŃSTWA
•
Przed przystąpieniem do eksploatacji tego urządzenia
należy dokładnie zapoznać się z niniejszą instrukcją
obsługi i zachować ją w pobliżu urządzenia na
wypadek korzystania z niej w przyszłości.
• Niniejsze urządzenie, należy wykorzystywać
wyłącznie do celów, dla których zostało ono
zaprojektowane i które zostały opisane w
niniejszej instrukcji obsługi. To urządzenie nie
jest przeznaczone do użycia przez osoby (również
dzieci) ze zmniejszonymi możliwościami
fi zycznymi, sensorycznymi lub psychicznymi,
osoby bez doświadczenia lub wiedzy, chyba,
że znajdują się pod nadzorem lub zostały
poinstruowane odnośnie obsługi urządzenia przez
osobę odpowiedzialną za ich bezpieczeństwo
•
Ostrzeżenia i ważne zalecenia bezpieczeństwa
przedstawione w tej instrukcji obsługi nie obejmują
wszystkich sytuacji i warunków, jakie mogą wystąpić
podczas korzystania z lodówki. Użytkownik
jest odpowiedzialny za kierowanie się zdrowym
rozsądkiem i stosowaniem środków ostrożności w
czasie instalacji, konserwacji i obsługi produktu.
•
Ponieważ niniejsza instrukcja obsługi dotyczy
różnych modeli lodówek, niektóre dane dotyczące
Twojego urządzenia mogą się nieznacznie różnić od
tych opisanych w instrukcji i nie wszystkie znaki
ostrzegawcze mogą mieć zastosowanie do Twojej
lodówki. W przypadku pytań lub uwag odnoszących
się do produktu fi rmy Samsung, należy skontaktować
się z najbliższym Centrum serwisowym lub skorzystać
ze strony internetowej www.samsung.com.
Ważne symbole bezpieczeństwa i środki
ostrożności :
Niebezpieczne i ryzykowne działania,
które
OSTRZEŻENIE
PRZESTROGA
2_ zalecenia bezpieczeństwa
mogą doprowadzić do obrażeń
lub śmierci.
Niebezpieczne i ryzykowne działania, które
mogą doprowadzić do
obrażeń i uszkodzenia mienia.
NIE próbuj.
NIE demontuj.
NIE dotykaj.
niezbyt
.
poważnych
Postępuj zgodnie z zaleceniami.
Wyjmij wtyczkę z gniazdka.
Aby zapobiec porażeniu prądem, należy
upewnić się, że urządzenie zostało uziemione.
W celu uzyskania pomocy, należy
zadzwonić do Centrum serwisowego.
Uwaga.
Te symbole ostrzegawcze mają na celu ochronę
użytkownika i osoby postronne przed ryzykiem
obrażeń. Należy ich kategorycznie przestrzegać.
Po zapoznaniu się z tymi informacjami, należy je
zachować w bezpiecznym miejscu do
późniejszego wglądu.
OZNACZENIE CE
Produkt niniejszy został zatwierdzony jako zgodny z
postanowieniami dyrektyw: Low Voltage (2006/95/EC), EMC
(2004/108/EC) oraz Eco-Design (2009/125/EC) określonymi
przez regulację Unii Europejskiej (EC) Nr 643/2009.
SZCZEGÓLNIE WAŻNE ZNAKI
OSTRZEGAWCZE DOTYCZĄCE
OSTRZEŻENIE
aby nie uszkodzić żadnego elementu obiegu chłodzącego.
-
•
• Nigdy nie należy uruchamiać urządzenia noszącego znaki
TRANSPORTU I LOKALIZACJI
•
Podczas transportu lub w trakcie instalowania
urządzenia należy zachować szczególną ostrożność,
Czynnik chłodniczy wyciekający z układu chłodniczego
może wybuchnąć, zapalić się lub doprowadzić do urazu
oczu. W przypadku wykrycia wycieku, należy unikać
kontaktu z ogniem przedmiotami mogącymi spowodować
wybuch. Należy przewietrzyć przez kilka minut
pomieszczenie, w którym znajduje się urządzenie.
Aby uniknąć utworzenia się mieszanki zapalnej gazu
z powietrzem w przypadku wycieku gazu z układu
chłodniczego, należy ustawić urządzenie w pomieszczeniu
wystarczająco dużym, aby jego powierzchnia była
dostosowana do ilości stosowanego czynnika chłodzącego.
uszkodzenia. W przypadku wątpliwości, należy skontaktować
się ze sprzedawcą. Pomieszczenie, w którym będzie stała
lodówka musi mieć powierzchnię 1m3 dla każdych 8 g gazu
chłodzącego R600a zastosowanego w urządzeniu. Ilość
czynnika chłodzącego użytego w lodówce jest podana na
tabliczce znamionowej znajdującej się w jej wnętrzu.
Page 27
WA ŻNE OSTRZEŻENIA
OSTRZEŻENIE
ryzyko kontaktu z wodą.
- Uszkodzona izolacja części elektrycznych może
• Nie należy ustawiać lodówki w bezpośrednim zasięgu
• Nie należy podłączać kilku urządzeń do gniazda z
- Zapewnia to najlepsze warunki pracy urządzenia oraz
• Jeśli gniazdo zasilające jest luźno zamocowane, nie
- Istnieje ryzyko porażenia prądem lub pożaru.
• Nie należy używać popękanego lub przetartego wzdłuż
• Nie należy nadmiernie zaginać przewodu zasilającego
•
- Nieprzestrzeganie zalecenia może doprowadzić do
zainstalowana zgodnie z dostarczoną instrukcją.
• Podłączyć wtyczkę w prawidłowej pozycji z
- Podłączenie wtyczki do góry nogami może
•
• Przesuwając lodówkę, należy uważać, aby nie
- Stwarza to ryzyko pożaru.
• Należy tak ustawić urządzenie, aby po jego instalacji
prądu z urządzenia i uniknąć porażenia prądem.
• Nigdy nie należy używać rur gazowych, linii
DOTYCZĄCE INSTALACJI
•
Nie należy ustawiać lodówki w wilgotnym
miejscu lub w miejscach, w których istnieje
doprowadzić do pożaru lub porażenia prądem.
promieni słonecznych lub w pobliżu kuchenek,
grzejników lub innych urządzeń emitujących ciepło.
zastosowanym rozgałęziaczem.Lodówka jako jedyna
powinna być podłączona do gniazda elektrycznego o
napięciu znamionowym odpowiadającemu wartości
wskazanej na tabliczce znamionowej.
zapobiega przeciążeniu obwodu elektrycznego, które
mogłoby spowodować przegrzanie przewodów i pożar.
należy podłączać do niego wtyczki zasilają
lub na końcówkach przewodu.
lub ustawiać na nim ciężkich przedmiotów.
Nie należy używać w pobliżu lodówki środków w aerozolu.
wybuchu i pożaru.
• Przed rozpoczęciem eksploatacji,
lodówka musi być odpowiednio ustawiona i
przewodem opuszczonym w dół.
doprowadzić do przecięcia przewodu i spowodować
porażenie prądem lub pożar.shock.
Należy sprawdzić, czy wtyczka nie jest zbyt dociśnięta,
zmiażdżona lub uszkodzona przez tył lodówki.
przemieszczać jej po przewodzie zasilającym i aby
go nie uszkodzić.
był swobodny dostęp do wtyczki zasilającej w
gnieździe zasilania.
• Lodówka musi być uziemiona.
Należy uziemić lodówkę, aby zapobiec upływowi
-
telefonicznych lub instalacji piorunochronów jako
uziemienia dla lodówki.
cej.
- Niewłaściwe użycie wtyczki uziemienia może
doprowadzić do porażenia prądem.
• Jeśli przewód zasilający został uszkodzony,
należy go natychmiast wymienić kontaktując
się z producentem lub przedstawicielem.
• Bezpiecznik lodówki może być wymieniany tylko
przez wykwalifi kowanego technika lub fi rmę.
- Nieprzestrzeganie zalecenia może doprowadzić do
porażenia prądem i obrażeń.
OSTRZEŻENIA
PRZESTROGA
• Po dokonaniu instalacji należy pozostawić
urządzenie bez włączania na dwie godziny.
DOTYCZĄCE INSTALACJI
• Nie należy zasłaniać otworów wentylacyjnych
i elementów montażowych urządzenia.
WA ŻNE OSTRZEŻENIA
DOTYCZĄCE UŻYWANIA
OSTRZEŻENIE
•
- Podczas otwierania i zamykania drzwi urządzenia,
• Nie należy umieszczać na lodówce zbiornika
- Może to doprowadzić do powstania pożaru lub
• Nie wolno pozwalać, aby dzieci „wieszały się” na
- Nieprzestrzeganie zalecenia może doprowadzić do
•
- Istnieje ryzyko uwięzienia dziecka i poważnych
• Nigdy nie należy wkładać palców lub innych
- Nieprzestrzeganie zalecenia może doprowadzić do
• Nie należy przechowywać w lodówce ulatniających
- Nieprzestrzeganie zalecenia może doprowadzić do
URZĄDZENIA
• Nie należy podłączać wtyczki zasilającej do
gniazda mokrymi rękami.
Nie należy stawiać żadnych przedmiotów na urządzeniu.
przedmioty mogą spaść i zranić kogoś i/lub
doprowadzić do uszkodzenia urządzenia.
wypełnionego wodą.
porażenia prądem.
drzwiach.
obrażeń.
Nie należy pozostawiać otwartych drzwi lodówki, kiedy
lodówka jest pozostawiana bez nadzoru i nie należy
pozwolić dzieciom wchodzić do wnętrza lodówki.
obrażeń z powodu niskiej temperatury.
przedmiotów do otworu dystrybutora wody.
obrażeń i uszkodzenia lodówki.
się i łatwopalnych substancji takich jak benzen,
rozpuszczalnik, alkohol, eter i gaz płynny.
wybuchu.
zalecenia bezpieczeństwa _3
Page 28
• Nie należy przechowywać w lodówce
wrażliwych na niskie temperatury produktów
farmaceutycznych, materiałów do zastosowań
naukowych lub innych produktów wrażliwych na
niskie temperatury.
- Nie należy przechowywać w lodówce produktów,
które wymagają ścisłej kontroli temperatury.
• Nie należy wkładać lub używać wewnątrz lodówki
żadnych urządzeń elektrycznych chyba, że są to
urządzenia zalecane przez producenta.
Nie należy używać suszarki do wysuszenia wnętrza
•
lodówki. Nie należy umieszczać w lodówce zapalonej
świecy w celu usunięcia nieprzyjemnych zapachów.
-
Może to doprowadzić do porażenia prądem lub pożaru.
•
Nie należy dotykać wewnętrznych ścianek zamrażarki lub
produktów w niej przechowywanych mokrymi rękami
- Może to spowodować odmrożenie rąk.
•
Nie należy używać żadnych urządzeń, ani żadnych
innych środków przyspieszających proces rozmrażania,
niż te, które są zalecane przez producenta.
• Nie należy uszkodzić obwodu układu chłodniczego.
• Ten produkt jest przeznaczony tylko do
przechowywania produktów spożywczych w
gospodarstwie domowym.
• Butelki należy przechowywać ustawione ściśle koło
siebie, tak aby nie wypadały.
W razie wykrycia wycieku gazu, należy unikać kontaktu
•
z ogniem i przedmiotami mogącymi spowodować
wybuch. Należy przewietrzyć przez kilka minut
pomieszczenie, w którym znajduje się urządzenie.
• Używać tylko lamp LED dostarczonych przez
producenta lub jego przedstawiciela.
• Należy pilnować, aby dzieci nie używały urządzenia
do zabawy i/lub nie wchodziły na urządzenie.
• Nie należy podejmować próby samodzielnej
naprawy lub demontażu lodówki.
- Grozi to ryzykiem pożaru, nieprawidłową pracą
urządzenia i/lub ryzykiem odniesienia obrażeń.
W razie awarii, należy skontaktować się z
przedstawicielem serwisowym.
• Jeżeli z urządzenia wydobywa się dziwny
hałas, pali się lub wydobywa się z niego dym,
należy odłączyć natychmiast urządzenie od zasilania i
skontaktować się z najbliższym Centrum
serwisowym.
- Nieprzestrzeganie zalecenia może doprowadzić do
porażenia prądem lub pożaru. Nie należy zasłaniać
otworów wentylacyjnych i elementów montażowych
urządzenia.
• W przypadku trudności z wymianą żarówki, należy
.
4_ zalecenia bezpieczeństwa
skontaktować się z przedstawicielem serwisowym.
• Jeżeli produkt jest wyposażony w lampę LED, nie
należy samodzielnie demontować pokrywy lampy i
lampy LED.
- Należy skontaktować się z przedstawicielem
serwisowym.
• Jeżeli w lodówce znajduje się pył lub woda, należy
wyciągnąć wtyczkę i skontaktować się z Centrum
serwisowym fi rmy Samsung Electronics.
- Istnieje ryzyko pożaru.
OSTRZEŻENIA
PRZESTROGA
DOTYCZĄCE UŻYCIA
• Aby zapewnić najlepsze warunki dla
przechowywanych produktów spożywczych,
- Nie należy zastawiać produktami spożywczymi
otworów wentylacyjnych, znajdujących się w
tylnej części urządzenia. Mogą one utrudniać obieg
powietrza w przedziale lodówki.
- Produkty spożywcze przed włożeniem do lodówki
należy dobrze zapakować lub zamknąć w szczelnych
pojemnikach.
Nie należy wkładać do przedziału zamrażarki napojów
•
gazowanych lub musujących. Nie należy wkładać do
przedziału zamrażarki butelek lub szklanych pojemników.
-
Podczas procesu zamrażania zawartości, szkło może
pęknąć i doprowadzić do obrażeń i uszkodzenia mienia.
• Nie należy zmieniać i modyfi kować lodówki.
Nieprzestrzeganie zalecenia może doprowadzić do
obrażeń i/lub uszkodzenia mienia. Wszystkie zmiany
i modyfi kacje wykonane przez osoby trzecie nie są
objęte serwisem gwarancyjnym Samsung. Firma
Samsung nie ponosi odpowiedzialności za powstałe
w wyniku modyfi kacji osób trzecich problemy z
bezpieczeństwem oraz uszkodzenia urządzenia.
• Nie należy blokować otworów wentylacyjnych.
Zablokowanie otworów wentylacyjnych np. workiem
-
plastikowym może doprowadzić do nadmiernego
schłodzenia lodówki. Jeżeli taki okres nadmiernego
schłodzenia będzie trwał zbyt długo, może
doprowadzić do uszkodzenia fi ltra i wycieku wody.
- Nie należy umieszczać produktów przeznaczonych
do zamrożenia blisko produktów już zamrożonych.
• Należy przestrzegać maksymalnego okresu
przechowywania i terminu ważności dla
zamrożonych produktów spożywczych.
Napełniać zbiornik wody, tacę na lód tylko wodą pitną.
•
• Należy używać wyłącznie kostkarki dostarczonej z
lodówką.
• Doprowadzenie wody do tej lodówki (instalacja
i podłączenie) powinno być wykonane przez
odpowiednio wykwalifi kowaną osobę, a instalacja
podłączona do źródła wody pitnej.
Page 29
•
Aby kostkarka mogła pracować w prawidłowy
sposób, wymagane ciśnienie wody wynosi 138 ~
862 kPa (1,4~8,8 kgf/cm
3
).
OSTRZEŻENIA DOTYCZĄCE
PRZESTROGA
- Nieprzestrzeganie zalecenia może doprowadzić do
• Nie należy rozpylać łatwopalnych gazów w pobliżu
- Istnieje ryzyko spowodowania wybuchu lub pożaru.
• Nie należy pryskać środkiem czyszczącym
- Może to doprowadzić do zgaśnięcia liter
•
- Nieprzestrzeganie zalecenia może doprowadzić do
• Nigdy nie należy wkładać palców lub innych
- Może to doprowadzić do obrażeń lub uszkodzenia
CZYSZCZENIA I KONSERWACJI
•
Nie należy bezpośrednio rozpylać wody we
wnętrzu urządzenia lub na lodówkę z zewnątrz.
pożaru lub porażenia prądem.
lodówki.
bezpośrednio na wyświetlacz.
wyświetlanych na wyświetlaczu.
Należy usuwać kurz lub zanieczyszczenia znajdujące
się na bolcach wtyczki zasilającej. Nie należy
używać mokrej lub wilgotnej ścierki do czyszczenia
wtyczki zasilającej. Należy usunąć wszystkie
zanieczyszczenia i kurz z bolców suchą ścierką.
pożaru lub porażenia prądem.
przedmiotów do otworu dystrybutora wody.
urządzenia.
Przed rozpoczęciem czyszczenia i konserwacją
•
należy odłączyć lodówkę od zasilania.
OSTRZEŻENIA DOTYCZĄCE
OSTRZEŻENIE
przeznaczonego do usunięcia, nie zostały uszkodzone.
• W zależności od typu lodówki, jako czynnik
PRAWIDŁOWEGO USUWANIA
• Należy się upewnić, czy rury układu
chłodniczego znajdujące się z tyłu urządzenia
chłodniczy może być użyty gaz R600a lub R134a.
Aby dowiedzieć się, który czynnik zastosowano w
urządzeniu, należy sprawdzić etykietę sprężarki,
znajdującą się na tylnej ściance urządzenia lub
tabliczkę znamionową znajdującą się wewnątrz
lodówki. Jeśli produkt zawiera łatwopalny gaz
(czynnik chłodzący R600a), należy skontaktować
się z lokalnym urzędem miasta lub gminy, aby
uzyskać informacje dotyczące sposobu właściwego
usunięcia urządzenia. Cyklopentan, używany do
izolacji jest gazem wybuchowym. Gazy w materiale
izolacyjnym wymagają specjalnej procedury
usunięcia. Należy skontaktować się z lokalnym
urzędem w celu uzyskania informacji dotyczących
bezpiecznego pozbycia się tego produktu. Należy
się także upewnić, czy kanały układu chłodniczego
znajdujące się z tyłu urządzenia przeznaczonego do
usunięcia nie zostały uszkodzone. Kanały powinno
się niszczyć w otwartej przestrzeni.
• Jeżeli urządzenie zawiera izobutan (R600a), jest
to naturalny gaz o dużym stopniu biodegradacji,
palny. Podczas transportu lub w trakcie instalowania
urządzenia należy zachować szczególną ostrożność,
aby nie uszkodzić żadnego elementu obiegu
chłodzącego.
• Przed usuni
drzwi/uszczelki drzwi i rączki, uchwyty do drzwi,
aby uniknąć ryzyka zamknięcia się dzieci lub
zwierząt wewnątrz urządzenia. Należy pozostawić
półki na miejscu, aby uniemożliwić wchodzenie
dzieci do wnętrza urządzenia. Należy pilnować, aby
dzieci nie używały urządzenia do zabawy.
• Materiały opakowania urządzenia należy usunąć w
sposób zgodny z przepisami dotyczącymi ochrony
środowiska naturalnego.
ęciem każdej lodówki, należy zdjąć
DODATKOWE WSKAZÓWKI
DOTYCZĄCE WŁAŚCIWEGO
UŻYWANIA URZĄDZENIA
• W przypadku wystąpienia awarii zasilania należy
skontaktować się z lokalnym biurem dostawcy energii
i dowiedzieć się, jak długo potrwa awaria.
– Większość awarii zasilania jest usuwana w ciągu
maks. dwóch godzin, co nie ma negatywnego wpływu
na temperatury w lodówce. – W czasie przerwy w
dostawie energii należy jednak jak najrzadziej otwierać
lodówkę.
– Jeśli awaria będzie trwać dłużej niż 2 godziny, należy
opróżnić pojemnik na lód.
– Jeśli awaria będzie trwać dłużej niż 24 godziny, należy
wyjąć z lodówki wszystkie zamrożone produkty.
• Jeśli lodówka posiada opcję zamykania na kluczyk, to
kluczyk należy przechowywać poza zasięgiem dzieci,
nie w pobliżu urządzenia.
• Urządzenie może pracować nieregularnie (ewentualny
wzrost temperatury w lodówce), jeś
umieszczone przez dłuższy czas w środowisku, gdzie
temperatura otoczenia przekracza dopuszczalny limit,
dla którego urządzenie zostało zaprojektowane.
• Nie należy przechowywać w lodówce produktów
nieodpornych na niskie temperatury, takich jak banany
czy melony.
• Twoja lodówka jest urządzeniem bezszronowym, co
oznacza, że nie ma potrzeby manualnego rozmrażania
urządzenia. Lodówka usuwa szron automatycznie.
• Wzrost temperatury w lodówce podczas rozmrażania
jest procesem zgodnym z zaleceniami ISO.
Jednak, jeśli chce się zapobiec niepożądanemu
zalecenia bezpieczeństwa _5
li zostanie
Page 30

wzrostowi temperatury zamrożonych produktów
spożywczych, należy je owinąć w kilka warstw gazety.
• Każdy wzrost temperatury zamrożonych produktów
spożywczych podczas procesu rozmrażania może
skrócić czas przechowywania tych produktów
PORADY DOT. OSZCZĘDZANIA
ENERGII
-
Należy ustawić urządzenie w chłodnym, suchym,
dobrze przewietrzanym pomieszczeniu.
Należy upewnić się, czy nie znajduje się ono w
bezpośrednim zasięgu promieni słonecznych i nigdy,
nie należy ustawiać go w pobliżu źródła ciepła (na
przykład, grzejników).
- Nigdy, nie należy zastawiać otworów wlotu i wylotu
powietrza urządzenia.
- Należy gorące potrawy i napoje ochłodzić przed
włożeniem do urządzenia.
- Mrożonki przeznaczone do rozmrożenia, należy włożyć
do chłodziarki. Niska temperatura mrożonek przyczyni
się jeszcze do oziębienia produktów spożywczych w
nim przechowywanych.
- Nie należy otwierać drzwi na zbyt długi okres czasu. Im
krócej otwarte są
drzwi urządzenia, tym mniej szronu i
lodu zbierze się na ściankach zamrażarki.
- Regularnie usuwaj zanieczyszczenia z tylnej części
lodówki. Kurz zwiększa zużycie energii.
- Nie ustawiaj temperatury niższej niż to konieczne.
- Upewnij się, że odpływ powietrza u podstawy i z tyłu
lodówki jest wystarczający. Nie należy przykrywać
otworów wentylacyjnych.
- Upewnij się, że podczas montażu dostępna jest
odpowiednia ilość miejsca od góry, z tyłu, z prawej i
lewej strony.
Pomoże to zredukować zużycie energii i obniży
rachunki za prąd.
Spis treści
URUCHOMIENIE TWOJEJ LODÓWKI SIDE BY-SIDE ·································· 7
OBSŁUGIWANIE LODÓWKI SIDE-BY-SIDE ····················································· 16
ROZWIĄZYWANIE PROBLEMÓW ····································································· 22
6_ zalecenia bezpieczeństwa
Page 31

Uruchomienie Twojej
lodówki side by- side
PRZYGOTOWANIE LODÓWKI
DO INSTALACJI
Gratulujemy Państwu zakupu lodówki side-byside fi rmy
Samsung! Mamy nadzieję, że wiele wyjątkowych funkcji,
jakie oferuje to nowe urządzenie, jak również jego znakomita
efektywność pracy, dadzą Państwu pełną satysfakcję.
Wybór najlepszego miejsca dla lodówki
• Należy wybrać miejsce z łatwym dostępem do
instalacji wodnej.
• Należy wybrać miejsce poza bezpośrednim zasięgiem
promieni słonecznych.
• Należy wybrać miejsce o płaskiej, wypoziomowanej
(lub prawie wypoziomowanej) powierzchni.
Należy wybrać miejsce o wystarczająco dużej
•
przestrzeni, aby drzwi lodówki mogły się łatwo otwierać.
•
Całkowitą przestrzeń niezbędna dla funkcjonowania lodówki
raz jej wymiary są przedstawione na poniższym rysunku.
o
• Należy zapewnić, aby urządzenie można było łatwy
wyjąć na wypadek potrzeby konserwacji lub serwisu.
25mm
Przestawianie lodówki
Aby uniknąć uszkodzenia podłogi, należy sprawdzić,
czy przednie nogi poziomujące znajdują się w pozycji
podniesionej (powyżej podłogi). Patrz “Poziomowanie
lodówki” w instrukcji obsługi (na stronie 11).
Aby chronić podłogę, umieść pod chłodziarką np.
karton opakunkowy.
Noga
W czasie instalacji, serwisowania lub
czyszczenia miejsca za lodówką, należy
UWAGA
wyciągnąć lodówkę w linii prostej i w linii
prostej umieścić z powrotem na miejscu.
Wkrętak
01 URUCHOMIENIE
50mm
Co najmniej 50mm Co najmniej 50mm
732mm
1027mm
160º
160º
1724mm
777mm
1155mm
uruchomienie _7
Page 32

DEMONTAŚ DRZWI LODÓWKI
Jeśli lodówka nie mieści się w drzwiach wejściowych
Twojego domu, to można zdjąć drzwi urządzenia.
1. Demontaż przykrywy przednich nóg
lodówki.
Najpierw należy otworzyć drzwi zamrażarki i chłodziarki
i zdjąć pokrywę przednich nóg odkręcając trzy śruby w
kierunku przeciwnym do ruchu wskazówek zegara.
Odłączanie przewodu dopływu wody od
lodówki
1. Odłącz przewód wodny naciskając łącznik 1 i
odciągając przewód
2
wodny.
1. Przy zamkniętych drzwiach zamrażarki, zdejmij
1
osłonę górnego zawiasu
używając śrubokrętu i
następnie rozłącz przewody, odciągając je delikatnie
2
od siebie
1
2. Usuń śruby z zawiasu i śrubę uziemienia
wykręcając je w kierunku przeciwnym do
wskazówek zegara i zdejmij górny zawias
.
2
3
4
ruchu
5
.
Zachowaj ostrożność, aby drzwi podczas zdejmowania
nie upadły na Ciebie.
4
3
5
6
3. Następnie zdejmij drzwi z dolnego zawiasu
7
ostrożnie unosząc je pionowo
7
.
,
Zwróć
uwagę, czy
podłączana rura
wodnama ten sam
kolor.
1
2
2. Demontaż drzwi zamrażarki
Na co należy zwrócić uwagę w pierwszej kolejności.
• Upewnij się, czy drzwi unoszone są w pionie a zawiasy
nie ulegają wygięciu lub pęknięciu.
• Uważaj, aby nie przycisnąć rury do przepływu wody i
wiązki przewodów znajdujących się na drzwiach.
• Postaw drzwi na zabezpieczonej powierzchni, aby
uniknąć ich zarysowania lub uszkodzenia.
8_ uruchomienie
6
Uważaj, aby nie przycisnąć rury do przepływu
wody i wiązki przewodów znajdujących się na
drzwiach.
4. Wyjmij dolny zawias
8
ze wspornika 9 unosząc go
ostrożnie do góry.
Page 33

Demontaż drzwi chłodziarki
1. Przy zamkniętych drzwiach chłodziarki, zdejmij za
pomocą śrubokrętu przykrywę zawiasu górnego
MONTAŚ DRZWI LODÓWKI
Po ustawieniu lodówki na zaplanowanym miejscu należy
1
.
zamontować w niej ponownie drzwi.
1
2.
Usun śruby zawiasu 2 i śrubę uziemienia 3
wykręcając je w kierunku przeciwnym do ruchu
wskazówek zegara i zdejmij górny zawias
4
.
Zachowaj ostrożność, aby drzwi podczas zdejmowania
nie upadły na Ciebie.
2
3
4
3. Następnie, zdejmij drzwi z dolnego zawiasu 5
6
unosząc je pionowo
.
Montaż drzwi zamrażarki
1. Wsun z powrotem wąż 1 w dolny róg drzwi i do
otworu na dolnym zawiasie
otwór, aby wszedł prosto bez załamania i wygięcia.
Następnie załóż drzwi.
2. Wsuń dyszel górnego zawiasu
znajdującego
4
.
się na rogu drzwi zamrażarki
jest w poziomie między otworem górnego zawiasu i
otworem znajdującym się na obudowie zamrażarki
6
, Następnie zamocuj śruby zawiasu 7 i śrubę
uziemienia
8
wkręcając je w kierunku zgodnym z
ruchem wskazówek zegara.
Połącz ponownie przewody.
2
Delikatnie włóż go w
1
2
3
do otworu
5
Sprawdź, czy zawias
8
7
01 URUCHOMIENIE
4. Wyjmij dolny zawias
go ostrożnie do góry.
7
ze wspornika 8 unosząc
5
6
3
4
3. Zestaw przedni brzeg osłony górnego zawiasu
przednią częścią górnego zawiasu
i przymocuj
10
go śrubą.
9
uruchomienie _9
9
z
10
Page 34

Montaż drzwi chłodziarki
Środek przezroczystego
łącznika
Klips A
(6,35 mm)
1. Wsun z powrotem dolny zawias 1 do dolnego
wspornika zawiasu
2
.
Zamocowywanie linii wodnej
1. Włóż wąż doprowadzający wodę 2 do łącznika
1
2
1
.
2. Ustaw otwór znajdujący się w rogu drzwi chłodziarki
3
nad dolnym zawiasem 4.
3
4
5
3. Wsuń dyszel górnego zawiasu
znajdującego się na zawiasie
do otworu
6
. Sprawdź, czylevel
zawias jest w poziomie między otworem górnego
7
zawiasu
części obudowy chłodziarki
ponownie śruby zawiasu
10
i otworem znajdującym się w górnej
8
. Następnie, zamocuj
i śrubę uziemienia
9
wkręcając je w kierunku zgodnym z ruchem
wskazówek zegara.
4. Zestaw przedni brzeg osłony górnego zawiasu
z przednią częścią górnego zawiasu
12
11
i przymocuj
go śrubą.
2. Rura doprowadzająca wodę musi być wsunięta do
połowy długości przezroczystego łącznika, aby
zapobiec wyciekaniu wody z dozownika.
3. Zamocuj 2 klipsy z zestawu instalacyjnego i upewnij
się, że mocno przytrzymują rurę.
Środek przezroczystego
Klips A
(6,35 mm)
Należy uważać, aby nie przeciąć przewodu
wodnego. Należy ostrożnie odłączyć przewód od
łącznika.
Zakładanie przykrywy przednich nóg
loówki.
Przed założeniem przykrywy, sprawdź
szczelność połączenia wodnego. Załóż według
zamieszczonego schematu przykrywę przednich
nóg i przykręć śrubę w kierunku zgodnym z
ruchem wskazówek zegara.
1
2
łącznika
11
10_ uruchomienie
12
Page 35

POZIOMOWANIE LODÓWKI
.
Po założeniu drzwi, należy się upewnić, czy lodówka jest
wypoziomowana i dokonać końcowych regulacji. Jeśli
lodówka nie będzie wypoziomowana, drzwi nie będą
ustawione perfekcyjnie na tym samym poziomie.
Przednia część lodówki jest również regulowana.
Jeśli drzwi zamrażarki są niżej niż drzwi
chłodziarki
Do wcięcia w nóżce włóż płaski śrubokręt i obracaj go w
lewo lub prawo, aby wypoziomować zamrażarkę.
NÓŻKA
Śrubokręt
Jeśli drzwi zamrażarki są wyżej niż drzwi
chłodziarki
Do wcięcia w nóżce włóż płaski śrubokręt i obracaj go w
lewo lub prawo, aby wypoziomować lodówkę.
WYKONYWANIE MNIEJSZYCH
USTAWIEŃ DRZWI
Należy pamiętać, że wypoziomowanie lodówki jest
niezbędne, aby drzwi mogły być ustawione na tym samym
poziomie. W tym celu, jeśli trzeba, należy przejrzeć
poprzedni paragraf na temat poziomowania lodówki.
Jeśli drzwi zamrażarki są wyżej
niż drzwi chłodziarki
Dźwignia
regulacji
W obu przypadkach sposób korygowania różnicy jest ten
sam. Otwórz drzwi lodówki i wyreguluj je
wykonując po kolei następującą procedurę :
1. Odkręć nakrętkę
zaciskową
dolnego zawiasu aż
dojdzie do górnego
końca sworznia
Podczas
odkręcania nakrętki
sześciokątnego
kierunku przeciwnym do ruchu wskazówek zegara.
Nakrętkę
z
1
.
2
, użyj dostarczonego klucza
1
3, aby poluzować śrubę 2 w
powinno się łatwo odkręcić, palcami.
1
Klucz nasadkowy
3
Sworzeń
2
1
Nakrętka
01 URUCHOMIENIE
2. Wyreguluj różnicę
NÓŻKA
Śrubokręt
W tym celu należy zapoznać się z następnym
paragrafem dotyczącym sposobu precyzyjnej
regulacji drzwi.
wysokości między
drzwiami obracając
2
sworzeń
kierunku zgodnym z
ruchem wskazówek
zegara
3. Po wyregulowaniu drzwi, przykręć nakrętkę 1
z ruchem
wskazówek
zegara, aż dojdzie
do dolnego
końca sworznia;
następnie dokręć
sworzeń za pomocą klucza nasadkowego
nakrętka została zamocowana na swoim miejscu
w
lub w kierunku przeciwnym .
Przykręcając sworzeń zgodnie z ruchem wskazówek
zegara
Jeśli nakrętka nie zostanie mocno zaciśnięta,
sworzeń może się zluzować.
, rrazy podnosi się drzwi.
zgodnie
Klucz nasadkowy
3
Sworzeń
2
Klucz nasadkowy
3
Sworzeń
2
1
Nakrętka
3
, aby
1
.
uruchomienie _11
Page 36

SPRAWDZANIE LINII WODNEJ
Dozownik
lodu
DYSTRYBUTORA WODY (OPCJA)
Dystrybutor wody jest jedną z użytecznych funkcji
zainstalowanych w Twojej nowej lodówce fi rmy Samsung.
Filtr wodny, usuwając zanieczyszczenia, dba o Twoje
zdrowie. Jednakże - nie sterylizuje on wody i nie niszczy
mikroorganizmów. W takim celu, należy zapewnić sobie
specjalny system oczyszczający wodę. Do prawidłowego
działania kostkarki lodu, ciśnienie linii wodnej powinno wynosić
138~862 Kpa. Przy tym ciśnieniu, czas napełniania papierowego
kubka o pojemności170 cc wyniesie około 10 sekund. Jeśli
lodówka jest zainstalowana w miejscu, gdzie jest niskie ciśnienie
(poniżej 138 Kpa), można zainstalować dodatkową pompę dla
wzmocnienia niskiego ciśnienia. Upewnij się, czy pojemnik
na wodę wewnątrz lodówki wypełnia się prawidłowo. W tym
celu wciśnij dźwignię dystrybutora wody, aż woda zacznie
wydobywać się z otworu wylotowego dystrybutora.
Zestawy podłączenia do instalacji wodnej dołączone są do
urządzenia. Można je znaleźć w szufl adzie zamrażalnika.
KORZYSTANIE Z MASZYNKI
DO LODU
Aby wyjąć pojemnik na lód
- Chwyć uchwyt tak jak to
pokazano na rysunku.
-
Lekko podnieś do góry dolną część.
-
Powoli wyjmij pojemnik na lód.
Aby włożyć pojemnik
na lód
- Zamontować w kolejności
odwrotnej niż demontaż.
Wciśnij pojemnik dokładnie, do
-
momentu aż usłyszysz kliknięcie.
- Jeżeli pojemnik nie pasuje
na miejsce, obróć znajdujący
się z tyłu uchwyt o 90 stopni
i spróbuj go ponownie
zainstalować tak jak to
pokazano na rysunku 2.
Praca zwykła
- Wszelkie odgłosy, które
można usłyszeć, podczas gdy
maszynka do lodu wyrzuca lód
do pojemnika są zjawiskiem
normalnym.
- Jeżeli lód nie jest pobierany
przez dłuższy okres czasu,
może zdarzyć się, że w
pojemniku powstaną bryły.
Usuń pozostały lud i opróżnij
pojemnik.
12_ uruchomienie
Rysunek1
Rysunek2
Dozownik
lodu
- Jeżeli lód nie wypada, należy sprawdzić czy nie
zablokował się on w dozowniku.
- Pierwsze kostki lodu mogą być mniejsze z powodu
powietrza znajdującego się w rurce zaraz po
podłączeniu.
- Gdy drzwi są otwarte, dozownik lodu oraz
wody nie działają.
UWAGA
- Jeżeli drzwi zostaną silnie zamknięte, może
zdarzyć się, że woda rozleje się na maszynkę
do lodu.
- Aby uniknąć upuszczenia pojemnika na lód,
należy podczas jego wyjmowania użyć obu rąk.
- Aby uniknąć wypadków, należy zawsze
wycierać pozostałości lodu lub wody, które
mogą pozostać na podłodze.
- Nie wolno pozwalać dzieciom wieszać się na
dozowniku lub na pojemniku do lodu. Mogą
one ulec wypadkom.
- Nie wolno wkładać r
innych przedmiotów do dozownika. Może
to spowodować wypadku lub uszkodzenia
mechanicznych części urządzenia.
ąk lub jakichkolwiek
INSTALACJA LINII WODNEJ
DYSTRYBUTORA WODY
Model wewnętrzny
Części do instalacji wodnej
2
1
Mocowanie do linii wodnej
oraz śruby
3
Linia wodna
Podłączanie do instalacji wodneje
1. Na początku zakręć główny zawór wody.
2. Znajdź najbliższe źródło zimnej wody pitnej.
3. Postępuj zgodnie z instrukcjami instalacji zestawu linii
wodnej, znajdującej się w zestawie montażowym.
znajdującej się w zestawie montażowym.
OSTRZEŻENIE
Linia wodna musi być podłàczona
do rury z zimnà wodà. Je×eli b∏dzie
podłàczona do rury z wodà goràcà, mo×e
to spowodować zniszczenie fi ltra wodnego.
Złącze do rury
4
Zacisk
5
Filtr wody
Page 37

Należy zamknąć
Należy zamknąć
główny dopływ
wody.
Główny
dopływ wody
NIE MOŻE
BYĆ SZPARY
Zdejmij
zaślepkę.
Linia wodna w
lodówce
Linia wodna
zestawu
Szczelnie
Poluzuj a
główny dopływ
wody.
Główny
dopływ wody
NIE MOŻE
BYĆ SZPARY
4. Po podłączeniu instalacji wodnej do fi ltra, odkręć z
powrotem główny zawór wody i odlej około 1 litra
wody, aby wyczyścić fi ltr.
Podłączenie linii wodnej do lodówki
1. Zdejmij zaślepkę z linii dopływu wody chłodziarki
i wsuń na nią nakrętkę zaciskową odłączywszy ją
uprzednio od dołączonego zestawu linii wodnej.
2. Połącz dostarczony zestaw linii wodnej z linią
dopływu wody lodówki.
3. Dokręć nakrętkę zaciskową na złączu zaciskowym.
Upewnij się, czy nie ma szpary między dwoma
elementami.
4. Odkręć dopływ wody i sprawdź, czy nie ma żadnego
wycieku.
• Gwarancja Samsung nie obejmuje PODŁĄCZENIA
DO INSTALACJI WODNEJ.
• Zostanie to wykonane na koszt klienta, za wyjątkiem
ceny detalicznej zawierającej koszt instalacji.
• Jeżeli konieczna jest instalacja prosimy skontaktować
się z hydraulikiem lub autoryzowanym instalatorem.
• Jeżeli wystąpi wyciek wody spowodowany
nieprawidłową instalacją, prosimy skontaktować się z
instalatorem.
INSTALACJA LINII WODNEJ
DYSTRYBUTORA
Model zewnętrzny
Części do instalacji wodnej
01 URUCHOMIENIE
Linia wodna w
lodówce
Linia wodna
zestawu
Zdejmij
zaślepkę.
Szczelnie
Poluzuj a
Linia wodna musi być podłączona do źródła wody
pitnej.
W przypadku konieczności zreperowania lub
rozmontowania linii wodnej, utnij 6.5 mm
plastikowej rurki i upewnij się, czy łączenie jest
szczelne.
Przed użyciem należy sprawdzić, czy
w tych miejscach nie ma przecieków
UWAGA
Mocowanie do linii
wodnej oraz śruby
Wąż wodny
Zatrzask fi ltra
Złącze do rury
Filtr wodny
Podłączenie do linii wodnej
Podłącz rurę układu wodnego za pomocą łącznika i
kranu.
1. Zakręć główny kran z wodą.
2. Podłącz łącznik „A” do kranu.
OSTRZEŻENIE
Linia wodna musi być podłàczona do rury z
zimnà wodà. Je×eli b∏dzie podłàczona do rury z
wodà goràcà, mo×e to spowodować zniszczenie
fi ltra wodnego.
uruchomienie _13
Page 38

INFORMACJA GWARANCYJNA
Zatrzask
Włożyć zatrzask po
osadzeniu rury.
Niniejsza instalacja linii wodnej nie jest objęta gwarancją
producenta lodówki lub kostkarki do lodu.
Postępuj ściśle według instrukcji, aby zminimalizować
ryzyko kosztownych awarii systemu wodnego.
4. Po włożeniu rury mocno zacisnąć zatrzask. Zatrzask
mocuje rurę.
Uwaga :
Jeżeli łącznik nie pasuje do zainstalowanego kranu, udaj
się do najbliższego autoryzowanego punktu serwisowego i
zakup pasujące mocowanie.
Wybierz miejsce instalacji urządzenia czyszczącego.
(Model z urządzeniem czyszczącym)
- Przytnij na potrzebnej długości wąż do wody
podłączony do fi ltra wodnego po zmierzeniu odległości
pomiędzy kranem a fi ltrem.
- Jeżeli chcesz zmontować wlot i wylot wody
fi ltra wodnego podczas instalacji fi ltra, obejrzyj
zamieszczoną ilustrację.
ŁĄCZNIK TYPU „A”
KRAN
90 stopni
UWAGA
Włożyć zatrzask po
osadzeniu rury.
Zatrzask
Wylotowa strona
wody w filtrze
WODA
OCZYSZCZONA
WLOT WODY DO
FILTRA
UJŚCIE
ŁĄCZNIK
5. Odkręcić wodę i sprawdzić szczelność. Jeżeli pojawią
się przecieki, powtórzyć kroki 1, 2, 3, 4. Jeżeli
nadal występuje przeciek, zaprzestać używania i
skontaktować się ze sprzedawcą.
6. Przed użyciem przepłukać fi ltr przez około 5 minut.
Usuń wszelką zawartość z wnętrza
urządzenia czyszczącego.
(Model z urządzeniem czyszczącym)
-
Otwórz główny kran z wodą, aby sprawdzić przepływ wody
w wężu wodnym po stronie wlotowej fi ltra wodnego.
- Jeżeli woda nie przepływa w linii wodnej, sprawdź czy
kran jest otwarty.
- Pozostaw otwarty kran, aż będzie leciała czysta
woda i wypłuczą się wszelkie zanieczyszczenia fi ltra
powstające podczas procesu produkcji.
WYLOTOWA FILTRA
STRONA
WODA
FILTR WODNY
WĄŻ WODNY
Zamocować zatrzask fi ltra.
- Trzymać zatrzask fi ltra w odpowiedniej pozycji (np.
pod zlewozmywakiem) i zamocować go szczelnie w
miejscu, gdzie ma być zakręcony.
Instrukcje wymiany
1. Odciąć dopływ wody.
2. Zaznaczyć kierunek przepływu wody w fi ltrze.
3. Włożyć rurę doprowadzającą wodę od strony wlotowej
fi ltra aż do oporu.
KIERUNEK PRZEPŁYWU WODY
DOPŁYW WODY –
STRONA WLOTOWA
Uwaga
PRZESIĄKANIE
:
Należy mieć pewność,
że cięcie jest proste i nie
przyjmuje kształtu żadnego
innego kąta, gdyż mogłoby to
powodować przeciek.
leak
14_ uruchomienie
ZATRZASK FILTRA
Zabezpiecz fi ltr na miejscu.
- Umocuj fi ltr na miejscu w sposób pokazany na
rysunku.
RURA WODNA
ZATRZASK FILTRA
FILTR
Page 39

Podłącz linię wodną do lodówki.
- Zdejmij pokrywę kompresora lodówki.
- Podłącz linię wodną do zaworu w sposób pokazany na
rysunku.
- Po podłączeniu sprawdź, czy nie ma wycieku. Jeżeli
się pojawi, powtórz operację podłączenia.
- Zamknij pokrywę kompresora.
LINIA WODNA
NAKRęTKA ŁĄCZĄCA
Usuwanie wszelkich zanieczyszczeń z linii
dopływu wody po instalacji fi ltra.
1. Otwórz główny dopływ wody i wciśnij kran
dystrybutora wody w lodówce.
2. Pozostaw płynącą wodę z dystrybutora do czasu, aż
popłynie czysta woda (approx. 1L). Pozwoli to na
oczyszczenie systemu linii wodnej i opróżni linię z
pozostałego w niej powietrza.
3. W niektórych domach może być potrzebne dodatkowe
przepłukanie linii wodnej.
4. Otwórz drzwi chłodziarki i sprawdź, czy nie ma
wycieku wody z fi ltra wodnego.
01 URUCHOMIENIE
POKRYWA KOMPRESORA
LODÓWKI
Zabezpiecz linię wodną.
- Za pomocą klamry typu “A”
umocuj linię wodną do osłony
(z tyłu lodówki).
- Kiedy linia wodna jest
zabezpieczona upewnij się,
że nie jest nigdzie nadmiernie
napięta, przyciśnięta lub
zagięta.
Nowo zainstalowany wkład fi ltra wodnego
może przez krótki okres czasu powodować
rozpryskiwanie się wodę z dystrybutora.
Jest to wynik pojawiającego sie powietrza w
linii wodnej. Nie powinno to być przeszkodą w
funkcjonowaniu dystrybutora.
KLAMRA A
LINIA WODNA
uruchomienie _15
Page 40

Obsługiwanie Twojej
lodówki side-by-side
OBSŁUGIWANIE LODÓWKI
PANEL STEROWANIA/
WYŚWIETLACZ CYFROWY
MODEL CHŁODZĄCY COOL SELECT
1
2
3
4
MODEL Z DOZOWNIKIEM
MODEL ZWYCZAJNY
Komora zamrażalnika powinna zostać opróżniona.
Umożliwia przyspieszenie
procesu zamrażania produktów
w zamrażarce. Funkcja ta jest
Przycisk
1
POWER
FREEZE
Przycisk
2
FREEZER
Przycisk
3
ICE TYPE
16_ obsługiwanie
szczególnie użyteczna, kiedy
trzeba szybko zamrozić łatwo
psujące się produkty, lub kiedy
temperatura w zamrażarce
drastycznie wzrośnie (na
przykład, jeśli drzwi zamrażarki
zostały pozostawione otwarte).
Naciśnięcie tego przycisku
umożliwia ustawienie żądanej
temperatury w zamrażarce.
Zakres ustawień temperatury
wynosi od -14°C do -25°C.
Przycisk ten umożliwia wybór
rodzaju wytwarzanego lodu - w
kostkach lub kruszonego lub
wyłączenie funkcji wytwarzania
lodu.
Przycisk
4
FILTER
CHANGE
5
6
7
Przycisk
5
VACATION
Funkcja
CHILD
6
LOCK
Przycisk
7
FRIDGE
Podczas użycia funkcji Power Freeze, wzrasta
zużycie energii urządzenia.
Należy pamiętać, aby wyłączyć tę funkcję, gdy
nie jest już potrzebna i powrócić do optymalnych
ustawień temperatury.
Jeżeli potrzebujesz zamrozić większą ilość
żywności pamiętaj, aby aktywować funkcję Power
Freeze co najmniej 24 godziny wcześniej.
Po wymianie fi ltra należy
nacisnąć ten przycisk przez
3 sekundy, aby wyzerować
wskaźnik zużycia fi ltra.
Wyjeżdżając na dłuższy czas
z domu (wakacje, podróż
służbowa...) lub kiedy, nie
ma potrzeby korzystania z
chłodziarki, należy nacisnąć
przycisk Vacation. Jeśli
wybierzesz wyłączenie lodówki
przyciskiem nieobecności,
kontrolka automatycznie
przełączy się z ch odziarki na
Vacation.
Zalecamy usunięcie
produktów z ch odziarki i
pozostawienie zamkniętych
drzwi, gdy funkcja Vacation
jest włączona.
Przez jednoczesne naciśnięcie
przycisku Wakacje (Vacation)
oraz Lodówka Fridge) na 3
sekundy, Wszystkie przyciski
zostaną zablokowane. Dźwignia
dozownika wody oraz dozownika
lodu nie będą działać. Aby
anulować funkcję, naciśnij te
dwa przyciski ponownie na 3
sekundy.
Naciśnięcie przycisku Fridge
umożliwia ustawienie żądanej
temperatury chłodziarki. Zakres
temperatur wynosi od 1°C do
7°C.
Page 41

REGULACJA TEMPERATURY
REGULACJA TEMPERATURY
ZAMRAŻARKI
Temperatura zamrażarki może być ustawiona, między
-4°Ci -25°C. Wci śnij kilkakrotnie przycisk FREEZER,
aż zostanie wyświetlona żądana temperatura. Pamiętaj,
że produkty takie jak lody mogą się topić w temperaturze
- 16°C.
Temperatura na wyświetlaczu będzie zmieniać się
kolejno między -14°C i -25°C. Po wyświetleniu wartości
-25°C wy świetlacz powróci do temperatury -14°C.
Pięć sekund po ustawieniu nowej temperatury,
yświetlacz ponownie wskaże bieżącą temperaturę
zamrażarki. Jednakże, wartość ta będzie się zmieniać
zgodnie ze zmianą temperatury do wybranego
ustawienia.
Osłony drzwiczek tego modelu zamrażarki są
oznaczone dwoma gwiazdkami. Temperatura
w części oznaczonej dwiema gwiazdkami jest
nieznacznie wyższa niż w innych obszarach.
REGULACJA TEMPERATURY
CHŁODZIARKI
Temperatura chłodziarki może być ustawiona między
7°C i -1°C. Wci śnij kilkakrotnie przycisk Fridge,
aż na wyświetlaczu ukaże się żądana temperatura.
Proces regulacji temperatury chłodziarki i zamrażarki
jest taki sam.
Naciśnięcie przycisku Fridge umożliwia ustawienie
żądanej temperatury chłodziarki.
Po kilku sekundach chłodziarka zacznie przestawiać się
na nowo wybraną temperaturę i będzie to pokazane na
cyfrowym wyświetlaczu.
Zbyt częste otwieranie drzwi lub wkładanie dużej
ilości ciepłych produktów spożywczych może
spowodować wzrost temperatury w chłodziarce lub
zamrażarce.
Może to spowodować miganie wyświetlacza.
Wyświetlacz przestanie migać, jak tylko
chłodziarka lub zamrażarka powróci do uprzednio
ustawionej temperatury. Jeśli miganie bę
dalej, należy dokonać „zresetowania” lodówki,
czyli dokonania ustawień od początku.
Należy odłączyć wtedy urządzenie od źródła
zasilania, odczekać 10 minut i podłączyć je
ponownie.
dzie trwać
DYSTRYBUTOR LODU I ZIMNEJ
WODY
Wciśnij przycisk Ice Type, aby wybrać żądany rodzaj
lodu.
Brak lodu
Wybierz tę opcję aby
wyłączyć kostkarkę.
Lód produkowany jest w kostkach.
Po wybraniu opcji “Crushed”, kostkarka mieli lód
w kostkach na kruszony.
Branie lodu
Umieść szklankę pod otworem wylotowym lodu i
naciśnij nią lekko dźwignię kostkarki.
Sprawdź czy szklanka znajduje się dokładnie pod
dźwignią aby zapobiec wypadaniu kostek.t.
Używanie dystrybutora wody
Umieść szklankę pod otworem wylotowym wody i
naciśnij nią lekko dźwignię dystrybutora wody.
Sprawdź, czy szklanka znajduje się dokładnie pod
dźwignią aby zapobiec rozlaniu się wody.
02 OBSŁUGIWANIE
obsługiwanie_17
Page 42

• Nie wkładaj palców, rąk i żadnych innych
OSTRZEŻENIE
UWAGA
nieodpowiednich przedmiotów do otworu
wylotowego ani do pojemnika kostkarki.
- Może to spowodować zranienie lub
spowodować uszkodzenia urządzenia.
• Nigdy nie wolno wkładać palców czy innych
przedmiotów do otworu dystrybutora.
- Może to być spowodować zranienie.
• Należy używać wyłącznie kostkarki
dostarczonej z lodówką.
Doprowadzenie wody do tej lodówki (instalacja
•
i podłączenie) powinno być wykonane przez
odpowiednio wykwalifi kowaną osobę, a
instalacja podłączona do źródła wody pitnej.
•
Aby maszynka do lodu działała prawidłowo,
cieśninie wody powinno wynosić 138~862 Kpa.
• Jeśli dystrybutor wody i lodu nie będzie
używany przez dłuższy czas (np. z powodu
wakacji, podróży służbowej…), należy
zamknąć zawór doprowadzający wodę.
- Zapobiegnie się w ten sposób
ewentualnemu wyciekaniu wody.
Należy wytrzeć nadmiar wilgoci wewnątrz lodówki
•
(jeśli powstanie) i zostawić otwarte drzwi lodówki.
- W przeciwnym razie w lodówce mogą się
pojawić nieprzyjemne zapachy i pleśń.
UŻYWANIE SZUFLADY
COOLSELECT ZONE™ (OPCJA)
Quick Cool (Szybkie chłodzenie)
• Możesz używać funkcji Quick Cool z CoolSelect
Zone™
• “Quick Cool” umożliwia ochłodzenie 1~3 puszek
napoju w przeciàgu 60 min.
• Aby anulować tȩ funkcjȩ, naciśnij ponownie przycisk
“Quick Cool”. CoolSelect Zone™ powraca do
poprzedniej temperatury.
• Gdy szybkie chłodzenie dobiega końca, temperatura
powraca do ustawienia “Cool (ch odzenie)”.
Thaw (Rozmrażanie)
• Utrata wilgoci i świeśości zmniejsza jakość żywności.
• Po wybraniu “Thaw (Rozmrażanie)” do szufl ady strefy
CoolSelect Zone™ podawane jest na przemian ciepłe i
zimne powietrze.
• W zależności od wagi mięsa czas rozmrażania może
być ustawiony kolejno na 4, 6, 10 i 12 godzin.
• Gdy odmrażanie dobiega koǹca, wyświetlacz
CoolSelect Zone™ powraca do stanu “Zero Zone”.
• Gdy rozmrażanie się kończy, mięso znajduje się jeszcze
w stanie na pół zamrarzniętym, co ułatwia krojenie
przed gotowaniem.
• Aby anulować tę funkcję, naciśnij dowolny przycisk, za
wyjàtkiem “Thaw”.
• Szacowany czas rozmrażania mięsa i ryb przedstawiono
poniżej.(W oparciu o grubość kawałka mięsa 2.5 cm)
Aby uzyskać większą przestrzeń, możesz wyjąć górne szufl ady
zamrażarki, ponieważ nie mają one wpływu na charakterystykę
termiczną i mechaniczną. Nie ma to wpływu na parametry
termiczne i mechaniczne. Pojemność
zamrażarki jest podawana bez szufl ad.
Dla uzyskania większej ilości
miejsca, można zainstalować osłonę
FRE-UPP zamiast pojemnika na lód.
Po wyjęciu pojemnika na lód, na
wyświetlaczu miga komunikat ICE OFF.
GUARD FRE-UPP
18_ obsługiwanie
(opcja)
Czas rozmrażania Waga
4 godziny 363g (0.8Ib)
6 godziny 590g (1.3Ib)
10 godziny 771g (1.7Ib)
12 godziny 1000g (2.2Ib)
Czas rozmrażania może różnić się w zależności od
wielkości i grubości mięsa i ryb.
Powyższa waga reprezentuje całkowità wagę
pokarmów w szufl adzie CoolSelect Zone™ Np.
Całkowity czas rozmrażania dla 400 g zamarzniętej
wołowiny i 600 g kurczaków wyniesie 10 godzin.
Przy opcji "Thaw" produkt, który nie musi
OSTRZEŻENIE
być rozmrażany w strefi e szufl ady CoolSelect
Zone™ powinien zostać usunięty.
Page 43

Strefa Zero (0°C)
•
W przypadku wybrania "Zero Zone" temperatura strefy
szufl ady CoolSelect Zone™ utrzymywana jest na poziomie
0°C, niezależnie od ustawionej temperatury lodówki.
• Temperatura "Strefy zero" pomaga zachować
świeżośćmięs i ryb przez dłuższy czas.
Cool (ch odzenie)
• Wybraie "Cool" ustawia temperaturę na tym samym
poziomie, co temperatura lodówki. Panel cyfrowy
wskazuje tę samà temperaturę, co panel wyświetlacza.
• Szufl ada CoolSelect Zone™ oferuje dodatkowà
przestrzeń lodówki.
Czas ch odzenia może być różny w zależności od
napojów.
Dla opcji "Quick Cool" pokarmy
OSTRZEŻENIE
przechowywane w szufl adzie strefy CoolSelect
Zone™ powinny zostać usunięte.
WYJMOWANIE AKCESORIÓW Z
ZAMRAŚARKI
Czyszczenie i ponowne wkładanie elementów
zamrażarki jest bardzo szybkie i łatwe.
1. Półka szklana, należy pociągnąć ją do siebie, tak
daleko jak jest to możliwe, unieść i ostrożnie wyjąć.
3. Szufl ada plastikowa, należy pociągnąć ją w kierunku
siebie, ostrożnie unieść i wyjąć.
4. Pojemnik na lód (zamrażarka)
Wyjmij pojemnik kostkarki na lód podnosząc go do
góry i wyciągając powoli.
• Złap uchwyt w sposób
przedstawiony na rysunku
• Podnieś nieznacznie dolną
część
• Powoli wyjmij pojemnik
Nie wolno stosować zbyt dużej siły przy
zdejmowaniu pokrywy. Pokrywa może pękn
spowodować obrażenia.
ąć i
02 OBSŁUGIWANIE
2. Kieszeń drzwiowa, należy przytrzymać ją dwiema
rękami, ostrożnie unieść i następnie wyjąć.
obsługiwanie_19
Page 44

WYJMOWANIE AKCESORIÓW Z
CHŁODZIARKI
1. Odporna na zabrudzenia półka szklana, należy
pociągnąć ją do siebie, tak daleko, jak jest to możliwe,
unieść i ostrożnie wyjąć.
2. Szufl ada na warzywa i owoce, należy nacisnąć na
wciski znajdujące się od wewnątrz, po prawej i lewej
stronie przykrywy pojemnika na warzywa/pojemnika
na suche produkty,
wysunąć ją do siebie i
wyjąć. Przytrzymując
szufl adę dwiema
rękami, należy unieść ją
nieznacznie, wysunąć i
wyjąć z chłodziarki.
3. Kieszeń drzwiowa na duże opakowania, należy
przytrzymać ją dwiema rękami, ostrożnie unieść i
następnie wyjąć.
Przed wyjęciem akcesoriów, należy sprawdzić, czy
nie ma na/w nich produktów spożywczych. Jeśli
jest to możliwe, należy wyjąć wszystkie produkty
w tym samym czasie, aby uniknąć ryzyka
jakiegokolwiek wypadku.
Aby uzyskać najlepszą wydajność energetyczną,
umieść wszystkie półki, szufl ady i kosze w
miejscach pokazanych na rysunku na stronie (18).
CZYSZCZENIE LODÓWKI
Nie wolno używać do czyszczenia benzenu,
OSTRZEŻENIE
rozcieńczalnika czy Clorox™-u.
Mogą one uszkodzić powierzchnię urządzenia
oraz stworzyć ryzyko pożaru.
Nie należy rozpryskiwać wody na lodówkę,
kiedy jest ona podłączona do prądu.
UWAGA
Może to spowodować porażenie elektryczne.
Nie wolno także czyścić lodówki benzenem,
rozcieńczalnikiem lub detergentem do
samochodów ze względu na ryzyko pożaru.
WYMIANA WEWNĘTRZNEGO
OŚWIETLENIA
W przypadku wymiany diody LED, należy zwrócić
się do punktu serwisu.
4. Z-PÓŁKA jest zamocowana do ścian chłodziarki.
Należy ją
wysunąć, ostrożnie unieść i wyjąć z klapek.
Uważaj, aby nie zmontować półki Z ze
zmienianą stroną górną, dolną, lewą oraz prawą,
UWAGA
20_ obsługiwanie
Page 45

WYMIANA FILTRA WODNEGO
Aby zmniejszyć ryzyko strat spowodowanych
OSTRZEŻENIE
Lampka wskaźnikowa informuje o konieczności
wymiany wkładu fi ltra wodnego.
Gdy kontrolka fi ltra zaświeci się na czerwono, nadszedł
czas na jego wymianę.
Lampka wskaźnikowa zapala się, zanim fi ltr zuŻyje
się całkowicie, dając czas na nabycie nowego fi ltra.
Terminowa wymiana fi ltra zapewnia świeższą, czystszą
wodę z chłodziarki.
przez rozlanie wody NIE UŻYWAĆ w
lodówce SAMSUNG fi ltrów do wody innych
marek. UŻYWAĆ TYLKO FILTRY MARKI
SAMSUNG Firma SAMSUNG nie może
być odpowiedzialna za wszelkie szkody oraz
straty spowodowane przez wyciek wody
spowodowany przez użycie fi ltra innej marki.
Lodówki fi rmy SAMSUNG przystosowane są do
pracy TYLKO Z fi ltrami do wody SAMSUNG.
1. Wyjmij fi ltr wodny z pudełka i przyklej na nim
naklejkę w sposób pokazany na rysunku.
2. Naklejka powinna wskazywać termin ważności
fi ltra odpowiadający 6 miesiącom od daty
jego zainstalowania. Na przykład, jeśli fi ltr
zostanie zainstalowany w marcu, należy
przykleić naklejkę z informacją ”wrzesień”, aby
przypomnieć o konieczności wymiany
fi ltra we
wrześniu. śywotność fi ltra to około 6 miesięcy.
3. Następnie usuń zamocowaną nakrętkę,
odkręcając ją w kierunku przeciwnym ruchu
wskazówek zegara.
4. Zdejmij ochronną nakrętkę z nowego fi ltra i
wyjmij zużyty fi ltr.
5. Ustawić go na wprost otworu i wsuń do
obudowy fi ltra. Powoli obróć fi ltr wodny o
90o, zgodnie z ruchem wskazówek zegara,
aby zrównać go z oznaczeniem na pokrywie,
blokując fi ltr na miejscu.
Sprawdź, czy wskaźnik znajduje się w linii z
oznaczeniem pozycji zablokowania ”lock”.
Uważaj, żeby nie przekręcić fi ltra.
6. Po zakończeniu procesu wymiany fi ltra, naciśnij i
przytrzymaj przycisk Ice Type, przez trzy sekundy,
aby wyzerować wskaźnik zużycia fi
ltra.
7. Na koniec, odlej 1 litr wody poprzez dozownik i wylej
ją do zlewu. Przed wypiciem należy sprawdź czy
płynąca z dystrybutora woda jest przezroczysta.
Po zainstalowaniu wkładu fi ltra wodnego, woda
może przez krótki czas rozpryskiwać z dystrybutora
wody. Jest to wynik obecności powietrza w
linii wodnej. Nie powinno to przeszkadzać w
funkcjonowaniu dystrybutora.
Zamawianie fi ltrów do wymiany
Aby zamówić fi ltry na wymianę, skontaktuj się ze
sprzedawcą produktu, infolinią Samsung lub punktem
serwisowym fi rmy Samsung.
02 OBSŁUGIWANIE
1
Naklejka
(oznaczenie
miesiąca)
Pokrywa fi ltra
2
4
3
Wyrównaj
oznaczenia
w pozycji
5
zablokowania.
obsługiwanie_21
Page 46

Rozwiązywanie problemów
PROBLEM ROZWIĄZANIE
Lodówka nie działa w
ogóle lub słabo chłodzi.
Produkty w chłodziarce są
zmrożone
Chłodziarka wydaje
niezwykłe hałasy i dźwięki.
Przednie kąty i boki
urządzenia są ciepłe;
występuje zjawisko
kondensacji.
Kostkarka nie wydaje
lodu
Słychać bulgotanie wody w
lodówce.
Urządzenie wydziela z
wnętrza przykre zapachy
Na ściankach zamrażarki
formuje się szron
Dystrybutor wody nie działa.
• Sprawdź, czy wtyczka urządzenia jest prawidłowo podłączona do gniazda sieciowego.
• Czy temperatura na panelu sterowania jest ustawiona prawidłowo?
Spróbuj ustawić niższą temperaturę.
• Czy lodówka jest ustawiona w bezpośrednim zasięgu promieni słonecznych lub w pobliżu
źródła ciepła?
• Czy tył lodówki znajduje się zbyt blisko ściany uniemożliwiając w ten sposób cyrkulację
powietrza?
• Czy temperatura na panelu sterowania jest ustawiona prawidłowo?
Spróbuj ustawić wyższą temperaturę.
• Czy temperatura w pomieszczeniu jest zbyt niska?
• Czy produkty o dużej zawartości wody przechowywane są w najzimniejszym przedziale
chłodziarki? Spróbuj przełożyć produkty do chłodziarki zamiast trzymać je w szufl adzie
CoolSelect Zone™.
• Sprawdź czy lodówka jest stabilnie ustawiona i wypoziomowana.
• Czy tył lodówki znajduje się zbyt blisko ściany, uniemożliwiając w ten sposób cyrkulację
powietrza?
• Coś upadło z tyłu lub pod lodówkę?
• Trzeszczący dźwięk może być słyszalny z wnętrza chłodziarki. Jest to dźwięk normalny,
wydawany przez liczne kurczące i rozszerzające się pod wpływem temperatury panującej w
lodówce akcesoria.
• Trochę ciepła jest zjawiskiem normalnym, ponieważ w przednich katach chłodziarki jest
zainstalowany system zapobiegający kondensacji.
• Czy drzwi lodówki były pozostawione uchylone? Zjawisko kondensacji może się pojawić, jeśli
pozostawi się je otwarte przez dłuższy czas.
• Czy przed rozpoczęciem wytwarzania lodu urządzenie stało przez 12 godzin po zainstalowaniu
linii wodnej?
• Czy rurka linii wodnej jest podłączona i klapka dystrybutora lodu zwolniona?
• Czy nie została wyłączona funkcja wytwarzania lodu? Sprawdź, czy przycisk Ice Type jest
ustawiony na Cubed (lód w kostkach) lub Crushed (lód kruszony).
• Czy lód nie blokuje zbiornika lodu?
• Czy temperatura w zamrażarce jest zbyt wysoka? Spróbuj ustawić niższą temperaturę w
zamrażarce.
• Jest to zjawisko normalne. Bulgotanie powoduje czynnik chłodzący, krążący w układzie
chłodniczym lodówki.
• Czy przechowywane produkty nie są zepsute?
• Sprawdź, czy produkty spożywcze o mocnym zapachu (na przykład ryba) są szczelnie
opakowane.
• Sprawdzaj od czasu do czasu zamrażarkę wyrzuć popsute lub niebezpiecznie długo
przechowywane produkty spożywcze.
• Czy otwór wentylacyjny jest zatkany? Usuń wszelkie przeszkody uniemożliwiające wolną
cyrkulację powietrza.
• Zachowaj wystarczająco dużą przestrzeń między przechowywanymi produktami spożywczymi
dla zapewnienia lepszej cyrkulacji powierza.
• Czy drzwi zamrażarki są szczelnie zamknięte?
• Czy linia wodna jest podłączona i zawór odcinający wodę jest otwarty?
• Czy linia dopływu wody nie została zmiażdżona lub skręcona? Sprawdź czy nic nie naciska i
nie blokuje przewodów linii wodnej.
• Czy zbiornik na wodę jest zamarznięty ze względu na zbyt niską temperaturę w chłodziarce?
Spróbuj ustawić na panelu sterowania wyższą temperaturę w zamrażarce.
22_ rozwiązywanie problemów
Page 47

memo
Page 48

Wartości graniczne temperatury pokojowej i otoczenia
Ta lodówka jest przeznaczona do pracy w temperaturach otoczenia odpowiadających wartościom
wskazanym na tabliczce znamionowej.
Klasa Symbol Zakres temperatury otoczenia (°C)
Rozległy umiarkowany SN +10 do +32
Umiarkowany N +16 do +32
Podzwrotnikowy ST +16 do +38
Tropikalny T +16 do +43
Na temperaturę wewnętrzną mają wpływ takie czynniki jak położenie lodówki, temperatura otoc-
zenia i częstotliwość z jaką otwierane są drzwi. Ustawić temperaturę w sposób wymagany tak, aby
wyrównać te czynniki.
Prawidłowe usuwanie produktu
(zu żyty sprzęt elektryczny i elektroniczny)
To oznaczenie umieszczone na produkcie, a kcesor iach lub dokumentacji oznacza , że po
Poland
zakończeniu eksploatacji nie należy tego produktu ani jego akcesoriów (np. ładowarki,
zestawu słuchawkowego, przewodu USB) wyrzucać wraz ze zwykłymi odpadami gospodarstwa domowego. Aby uniknąć szkodliwego wpływu na środowisko naturalne i
zdrowie ludzi wskutek niekontrolowanego usuwania odpadów, prosimy o oddzielenie
tych przedmiotów od odpadów innego typu oraz o odpowiedzialny recykling i praktykowanie ponownego wykorzystania materiałów.
W celu uzyskania informacji na temat miejsca i sposobu bezpiecznego dla środowiska
recyklingu tych przedmiotów, użytkownicy w gospodarstwach domowych pow-
inni skontaktować się z punktem sprzedaży detalicznej, w którym dokonali zakupu
produktu, lub z organem władz lokalnych.
Użytkownicy w fi rmach powinni skontaktować się ze swoim dostawcą i sprawdzić
warunki umowy zakupu. Produktu ani jego akcesoriów nie należy usuwać razem z
innymi odpadami komercyjnymi.
Kontakt do SAMSUNG WORLD WIDE
Jeżeli masz jakieś uwagi lub pytania w sprawie produktów marki Samsung,
skontaktuj się z naszą infolinią.
Samsung Electronics Polska sp. Z o.o
Dział Obsługi Klienta 02-678 Warszawa; ul. Szturmowa 2a
0-801-1SAMSUNG(172678)
022-607-93-33
www.samsung.com/pl
Page 49

Hűtőszekrény
Használati útmutató
Az útmutató 100%-ban újrahasznosított papírból készult.
Képzelje el a lehetőségeket
Köszönjük, hogy a Samsung termékét választotta.
A még teljesebb kiszolgálás érdekében kérjük,
regisztrálja a terméket a következő címen:
www.samsung.com/register
Szabadon álló készülék
Magyar
Page 50

Biztonsági tudnivalók
BIZTONSÁGI INFORMÁCIÓ
• A készülék használata előtt fi gyelmesen
olvassa el ezt az útmutatót, és őrizze meg,
mert a későbbiekben is szüksége lehet rá.
A készüléket csak rendeltetésszerűen, a
•
Használati útmutatóban foglaltak szerint
használja. A készüléket nem használhatják
korlátozott fi zikai, érzékelési vagy mentális
képességekkel, tapasztalattal vagy ismeretekkel
rendelkező személyek (a gyermekeket is
ideértve) kivéve a biztonságukért felelős
személyek felügyelete alatt, vagy ha tőlük
utasítást kaptak a készülék használatára.
• A jelen kézikönyv fi gyelmeztetései és
biztonsági utasításai nem terjednek ki az
összes esetlegesen előforduló állapotra és
helyzetre. Az Ön felelőssége, hogy józan
ésszel, elővigyázatossággal és óvatossággal
járjon el a lészülék telepítése, karbantartása és
használata során.
• Ez az útmutató több modellváltozatra
érvényes, ezért az ön készülékének jellemzői
kisebb mértékben eltérhetnek az itt leírtaktól,
és nem biztos, hogy az összes fi gyelmeztető
jelzés alkalmazható. Ha bármilyen kérdése
vagy aggodalma van, forduljon a legközelebbi
szervizközponthoz vagy keressen az interneten
keresztül segítséget és tájékoztatást a www.
samsung.com oldalon.
Fontos biztonsági ábrák és
óvintézkedések :
Esetlegesen súlyos személyi
FIGYELMEZTETÉS
VIGYÁZAT
2_ biztonsági információ
sérülést vagy halált okozó veszélyek
és nem biztonságos gyakorlatok.
Esetlegesen könnyebb személyi sérülést
vagy anyagi kárt okozó veszélyek és nem
biztonságos gyakorlatok.
NE kísérelje meg.
NE szerelje szét
NE érintse meg.
Gondosan kövesse az
óvintézkedéseket.
húzza ki az elektromos dugót a fali
aljzatból.
Az áramütés megelőzése érdekében
ügyeljen rá, hogy a gép földelve legyen.
hívja az ügyfélszolgálatot segítségért.
Megjegyzés.
E fi gyelmeztető jelzések célja, hogy
megelőzze az Ön és mások sérülését.
Kérjük, gondosan tartsa be őket.
Ezt a részt elolvasás után is őrizze meg, mert
később még szükség lehet rá.
CE tanúsítvány
A termék teljesíti az EU által kiadott kisfeszültségű
irányvonal (2006/95/EC), elektromágneses
kompatibilitási irányvonal (2004/108/EC) és az Európai
Unió EC 643/2009 szabályozásában megvalósított
eco-kialakítási irányvonal (2009/125/EC) előírásait.
SÚLYOS VESZÉLYRE
FIGYELMEZTETŐ JELEK
A SZÁLLÍTÁS ÉS A
FIGYELMEZTETÉS
sérüljön meg.
-
•
•
TELEPHELY ESETÉBEN
• A készülék szállítása és telepítése során
gondoskodni kell arról, hogy a hűtőkör ne
A csövekből szivárgó hűtőközeg lángra lobbanhat
vagy szemsérülést okozhat. ha szivárgást észlel,
kerülje nyílt láng vagy más potenciális gyújtóforrás
használatát, és több percen át szellőztesse azt a
helyiséget, ahol a készülék található.
Annak érdekében, hogy a hűtőkör esetleges
szivárgása esetén is elkerülje tűzveszélyes gázlevegő
keverék létrejöttét, a készülék elhelyezésére
szolgáló helyiség méretét az alkalmazott hűtőközeg
mennyiségétől függően kell megválasztania.
Soha ne indítson be olyan háztartási gépet,
amelyen sérülés nyomai látszanak. Kétség esetén
kérje kereskedője tanácsát. A készülékben lévő
R600a hűtőközeg minden 8 grammjára számítva
1 m3 légtérre van szükség abban a helyiségben,
ahol a hűtőszekrényt el fogják helyezni. Az ön
készülékében lévő hűtőközeg mennyiségét a
készülék
belsejében lévő
azonosító tábla mutatja.
Page 51

SÚLYOS VESZÉLYRE
FIGYELMEZTETŐ JELEK A
FIGYELMEZTETÉS
- Az elektromos alkatrészek szigetelésének
• Ne helyezze a hűtőszekrényt közvetlen
• Ne csatlakoztasson több készüléket ugyanabba
- Ez biztosítja a legjobb teljesítményt, és
• Ha a fali csatlakozó aljzat meglazult, ne dugja be
- Fennáll az áramütés vagy tűz kockázata.
• Ne használjon olyan csatlakozó kábelt, amely
• Ne törje meg a csatlakozó kábelt, illetve ne
•
- A hűtőszekrtény közelében használt aeroszolok
kell elhelyezni és üzembe helyezni.
• Csatlakoztassa az elektromos dugót a megfelelő
- Ha fejjel lefelé dugja be az elektromos dugót,
• Győződjön meg róla, hogy a hűtőszekrény
• A hűtőszekrény mozgatása közben ügyeljen
- Ez tűzveszélyes.
• A készüléket úgy kell elhelyezni, hogy a dugó a
áramütés veszélye a feszültség alatt levő
alkatrészek szigetelésének esetleges hibája esetén
is megakadályozható.
TELEPÍTÉS ESETÉBEN
•
Ne tegye a hűtőszekrényt nedves helyre,
vagy ahol víz érheti.
meghibásodása áramütést vagy tüzet okozhat.
napfényre, és ne tegye ki a tűzhelyek, szobai
fűtőkészülékek és más készülékek hőhatásának.
a csatlakozó aljzatba. A hűtőszekrényt mindig
saját külön csatlakozó aljzatához csatlakoztassa,
és annak névleges feszültsége egyezzen meg a
minősítő táblán szereplő értékkel.
megakadályozza a ház áramköreinek
túlterhelését, ami tűzveszélyes lehet.
az elektromos dugót.
bárhol megrepedt vagy kikopott.
helyezzen rá nehéz tárgyakat.
Ne használjon aeroszolokat a hűtőszekrény közelében.
robbanást vagy tüzet okozhatnak.
• Ezt a hűtőszekrényt a használatba vétel
előtt a Használati útmutatónak megfelelően
pozícióban úgy, hogy a zsinór lefelé lóg.
elszakadhat a vezeték, ami tüzet vagy
áramütést okozhat.
hátoldala ne rongálja meg a hálózati csatlakozó
dugóját.
arra, hogy a csatlakozó kábel ne kerülhessen a
készülék alá.
elhelyezés után is hozzáférhető legyen.
• A hűtőszekrényt földelni kell.
- A hűtőszekrényt földelni kell, ezzel az
• A földeléshez soha ne használjon gázcsövet,
telefonvezetéket vagy más potenciális
villámhárítót.
- A földelő csatlakozó helytelen használata
áramütést okozhat.
• Ha a csatlakozó kábel sérült, azonnal
cseréltesse ki a gyártóval vagy a szervizzel.
• A hűtőszekrény biztosítékát szakképzett
szerelőnek vagy szakszerviznek kell kicserélnie.
- Ennek elmulasztása áramütést vagy személyi
sérülést okozhat.
FIGYELMEZTETŐ JELEK
VIGYÁZAT
vagy beépítő szerkezetek alkalmazásával.
• Üzembe helyezés után hagyja a készüléket 2
AZ ELHELYEZÉSHEZ
• A szellőzőnyílásokat soha ne takarja el a
készülék zárt helyre történő elhelyezésével
órán át állni.
SÚLYOS VESZÉLYRE
FIGYELMEZTETŐ JELEK A
FIGYELMEZTETÉS
• Ne tároljon semmilyen tárgyat a készülék tetején.
- Amikor az ajtót kinyitja vagy becsukja, azok
• Ne tegyen vízzel töltött tárgyat a hűtőszekrényre.
- Ha a víz kifolyik, tűz vagy áramütés veszélye
• Ne hagyja, hogy kisgyermekek az ajtajára
- Ennek elmulasztása súlyos személyi sérülést
• Ne hagyja nyitva a hűtőszekrény ajtaját, ha a
- Fennáll annak a veszélye, hogy a gyerekek
• Ne dugja be az ujját vagy más tárgyakat az
- Ennek elmulasztása személyi sérülést vagy
• Ne tároljon a hűtőszekrényben illékony
- Az ilyen termékek tárolása robbanást okozhat.
HASZNÁLAT ESETÉBEN
• Nedves kézzel soha ne dugja be az
elektromos dugót.
leeshetnek, és személyi sérülést és/vagy
anyagi kárt okozhatnak.
állhat fenn.
kapaszkodjanak.
okozhat.
hűtőszekrény nincs felügyelet alatt, és ne hagyja,
hogy gyermekek másszanak a hűtőszekrénybe.
beszorulnak és súlyos sérülést szenvednek az
alacsony hőmérséklet miatt.
adagolónyílásba.
anyagi kárt okozhat.
vagy gyúlékony anyagokat, például benzint,
hígítót,alkoholt, étert vagy LP gázt.
biztonsági információ _3
Page 52

•
Ne tároljon a hűtőszekrényben
alacsony hőmérsékletre érzékeny
gyógyszerkészítményeket, tudományos kutatási célú
anyagokat vagy hőmérsékletre érzékeny termékeket.
- Precíz hőmérséklet-szabályozást igénylő
termékeket ne tároljon a hűtőszekrényben.
• Ne helyezzen elektromos készülékeket a
hűtőszekrénybe, illetve abban ne használjon
ilyeneket, csak ha a gyártó kifejezetten ajánlja.
• Ne használjon hajszárítót a hűtőszekrény
belsejének szárítására. Ne tegyen égő gyertyát
a hűtőszekrénybe a kellemetlen szag eltávolítása
érdekében.
- Ez áramütést vagy tüzet okozhat.
• Nedves kézzel ne érintse meg a fagyasztó falát
vagy az abban tárolt termékeket.
- Ez fagyási sérülést okozhat.
• A leolvasztási folyamat gyorsításához – a gyártó
által ajánlott lehetőségeken kívül – ne használjon
mechanikus vagy más eszközöket.
• Óvja a hűtőkört a sérülésektől.
• A termék háztartási használatra, kizárólag
élelmiszerek tárolására szolgál.
• A palackokat szorosan egymás mellé helyezve
tárolja, hogy ne essenek ki.
• Ha gázszivárgást észlel, kerülje nyílt láng vagy
más potenciális gyújtóforrás használatát, és
több percen át szellőztesse azt a helyiséget,
ahol a készülék található.
• Csak a gyártó vagy a szakszerviz által adott LED
lámpákat használja.
A gyermekeket szemmel kell tartani, hogy ne
•
játsszanak a készülékkel, illetve ne másszanak bele.
• A hűtőszekrényt ne szerelje szét, és ne
próbálja megjavítani.
- Ezzel tűz, hibás működés és/vagy személyi
sérülés bekövetkezését kockáztatja.
Meghibásodás esetén forduljon a helyi
szakszervizhez.
• Ha a készülékből furcsa zaj hallatszik,
ég, kellemtlen szagú vagy füstöl, azonnal
húzza ki az elektromos vezetéket és forduljon a
legközelebbi szakszervzhez.
- Ennek elmulasztása áramütést vagy tüzet
okozhat. A szellőzőnyílásokat soha ne takarja
el a készülék zárt helyre történő elhelyezésével
vagy beépítő szerkezetek alkalmazásával.
• Ha a világítás cseréjekor nehézséget tapasztal,
forduljon szakszervizhez.
4_ biztonsági információ
• Ha a termékek LED lámpákkal vannak
felszerelve, ne szerelje szét saját maga a
lámpaburát és a LED lámpát.
- Forduljon szakszervizhez.
Ha por vagy víz halmozódik fel a hűtőszekrényben,
•
húzza ki az elektromos dugót és forduljon a
Samsung Electronics ügyfélszolgálatához.
- Fennáll a tűzveszély kockázata.
FIGYELMEZTETŐ JELEK
VIGYÁZAT
HASZNÁLATHOZ
• A hűtőszekrény legjobb teljesítményének
eléréséhez
- ne helyezzen élelmiszert túl közel a készülék
hátulján lévő szellőzőnyílások elé, mert ezzel
akadályozhatja a levegő szabad keringését a
hűtőszekrényben.
- Csomagolja be vagy helyezze légmentesen
záró tartóedénybe az élelmiszert, mielőtt a
hűtőszekrénybe tenné.
• Szénsavas vagy habzó italokat ne rakjon a
mélyhűtőbe. Üvegpalackot vagy üvegedényt ne
tegyen a fagyasztóba.
- Amikor ezek tartalma megfagy, az üveg eltörhet,
és személyi sérülést vagy anyagi kárt okozhat.
• Ne változtassa meg a hűtőszekrény működését
és semmilyen módon se módosítsa azt.
- A módosítások személyi sérülést vagy anyagi
kárt okozhatnak. A külső személyek által a teljes
készüléken végzett egyetlen módosításra sem
vonatkozik a Samsung jótállási szolgáltatás
és a Samsung nem felelős a külső személyek
által végzett módosításokból eredő biztonsági
problémákért vagy károkért.
• Ne zárja el a szellőzőnyílásokat.
A szellőzőnyílások eltakarása esetén, különösen
-
ha az műanyag zacskóval történik, a hűtőszekrény
túlzottan lehűlhet. ha a hűtési idő túl hosszú ideig
tart, eltörhet a vízszűrő, ami vízszivárgást okoz.
- Fagyasztásra behelyezett friss élelmiszert ne
rakjon a már lefagyasztott mellé.
Tartsa be a maximális eltarthatósági időket, és
•
vegye fi gyelembe a fagyasztott áruk lejárati idejét.
• Csak iható vizet töltsön a víztartályba, és a
víztartó rekeszbe.
• Csak a hűtőszekrénnyel együtt szállított
jégkészítőt használja.
• A hűtőszekrény vízellátását csak megfelelően
képzett személy telepítheti / csatlakoztathatja, és
csak ivóvízhálózathoz csatlakoztatható.
• Ahhoz, hogy a jégkészítő megfelelően
működhessen, 138 ~ 862 kPa (1,4~8,8 kgf/cm3)
víznyomásra van szükség.
Page 53

FIGYELMEZTETŐ JELEK
TISZTÍTÁSHOZ ÉS
VIGYÁZAT
- Tűz vagy áramütés veszélye állhat fenn.
• Ne fújjon szét gyúlékony gázt a hűtőszekrény
- Robbanás vagy tűz kockázata állhat fenn.
•
- Lekophatnak a kijelzőre nyomtatott betűk.
• Távolítson el minden idegen anyagot vagy
- Ellenkező esetben fennáll a tűz vagy áramütés
• Ne dugja be az ujját vagy más tárgyakat az
- Ezzel személyi sérülést vagy anyagi kárt okozhat.
KARBANTARTÁSHOZ
•
Ne permetezzen vizet a hűtőszekrény
belsejébe vagy a készülék közvetlen közelében.
közelében.
Ne permetezzen tisztítószert közvetlenül a kijelzőre.
szennyeződést az elektromos dugó villáiról.
A csatlakozó dugó tisztításához azonban ne
használjon nedves vagy vizes ruhát; távolítson el
minden idegen anyagot vagy szennyeződést a
csatlakozó dugó villáiról.
kockázata.
adagolónyílásba és a jégadagolóba.
• Tisztítás vagy karbantartás előtt húzza ki a
mélyhűtő kábelét a csatlakozó aljzatból.
SÚLYOS VESZÉLYRE
FIGYELMEZTETŐ JELEK
FIGYELMEZTETÉS
egyike sem sérült.
• Alkalmazott hűtőközeg: R600a vagy R134a.
• Ha a készülék izobután (R600a) hűtőközeget
HULLADÉKKEZELÉSHEZ
• Ártalmatlanítás előtt győződjön meg róla,
hogy a készülék hátoldalán lévő csövek
Ellenőrizze a kompresszor címkéjét a készülék
hátulján és a minősítő címkét a hűtőszekrény
belsejében; innen megtudhatja, hogy az ön
hűtőszekrénye milyen hűtőközeggel működik.
Amikor a termék tűzveszélyes gázt (R600a
hűtőközeget) tartalmaz, forduljon a helyi
hatósághoz a termék biztonságos hulladékkezelése
érdekében. A ciklopentánt a szigetelés felfúvató
gázaként használják. A szigetelőanyagban lévő
gázok esetében különleges ártalmatlanítási eljárásra
van szükség. Kérje a helyi hatóságok tanácsát
e termék környezetre biztonságos elhelyezésére
vonatkozóan. hulladékkezelés előtt győződjön meg
róla, hogy a készülék hátoldalán lévő csövek egyike
sem sérült. A csövek szabad térben eltörnek.
tartalmaz, akkor ez a gáz egy természetes gáz,
amely nagy mértékben kompatibilis a környezettel,
de egyben tűzveszélyes is. A készülék szállítása
és telepítése során gondoskodni kell arról, hogy a
hűtőkör ne sérüljön meg.
• E hűtőszekrény és más hűtőszekrények
hulladékként való kezelésekor távolítsa el az ajtót,
az ajtó tömítéseit és az ajtóreteszeket, nehogy
kisgyermekek vagy állatok maradjanak benne. A
polcokat hagyja a készülékben, hogy a gyermekek
ne tudjanak könnyen belemászni. A gyermekeket
szemmel kell tartani, hogy ne játsszanak a régi
készülékkel.
• Kérjük, környezetbarát módon kezelje hulladékként
a termék csomagolóanyagait is.
TOVÁBBI TIPPEK A
RENDELTETÉSSZERŰ
HASZNÁLATHOZ
• Áramkimaradás esetén hívja fel a helyi Elektromos
Mûveket, és érdeklõdje meg, milyen hosszú lesz az
áramszünet.
Egy rövid, egy-két órás áramszünet nem befolyásolja
-
a hûtõszekrényben mérhetõ hõmérsékletet.
Ennek ellenére áramkimaradás idején csak a
legszükségesebb esetben nyissa ki az ajtót.
- Ha az áramszünet 2 óránál tovább tart, távolítsa el
az összes jeget a jégtartóból.
- Ha az áramszünet 24 óránál tovább tart, távolítsa el
az összes fagyasztott ételt.
• Ha a hűtőszekrény kulccsal zárható, tartsa azt
távol a gyermekektől, és ne a készülék közelében
helyezze el.
• A készülék nem működik megbízhatóan
(túl magasra emelkedhet a hőmérséklet a
hűtőszekrényben), ha a külső hőmérséklet hosszú
ideig a hűtőszekrény tervezési hőmérsékleti
tartománya fölé emelkedik.
• Ne tároljon a fagyasztóban olyan élelmiszereket,
amelyek alacsony hőmérsékleten könnyen
romlanak, például banánt, dinnyét.
• A készülék jegesedésmentes kialakítású, ami azt
jelenti, hogy nincs szükség a hűtőtér leolvasztására,
miután ez automatikusan történik.
• A leolvasztás alatti hőmérséklet-emelkedés
megfelel az ISO szerinti követelményeknek.
Ha azonban meg kívánja akadályozni,
hogy a készülék leolvasztása alatt túlzottan
megemelkedjen a fagyasztott élelmiszerek
hőmérséklete, csomagolja azokat több réteg
újságpapírba.
• A fagyasztott élelmiszerek hőmérsékletének
leolvasztás alatt történő megemelkedése
lerövidítheti azok eltarthatóságának időtartamát.
biztonsági információ _5
Page 54

Energiatakarékos tippek
- A készüléket hűvös, száraz helyiségbe telepítse,
ahol megfelelő a szellőzés.
Gondoskodjon róla, hogy a készüléket ne érje
közvetlen napsugárzás, és zat soha ne helyezze
közvetlenül hőforrás (például radiátor) mellé.
- Soha ne zárja el a készülék szellőzőnyílásait vagy -rácsait.
- Mielőtt meleg ételt rakna a hűtőszekrénybe, hagyja
azt kihűlni.
- A fagyasztott élelmiszert hagyja a hűtőszekrényben
kiolvadni.
Így a fagyasztott termékek hőenergiáját a
hűtőszekrényben lévő élelmiszerek hűtésére
használhatja fel.
- Ne hagyja nyitva túl hosszú ideig a készülék ajtaját,
amikor élelmiszert helyez be, vagy vesz ki. Minél
rövidebb ideig van nyitva az ajtó, a hűtőszekrényben
annál kevesebb jég képződik.
- Rendszeresen tisztítsa meg a hűtőszekrény hátulját.
A por növeli az energiafogyasztást.
- Ne állítsa a hőmérsékletet a szükségesnél
alacsonyabbra.
- Tegye lehetővé a levegő megfelelő kiáramlását a
hűtőszekrény aljánál és a hátuljánál.
Ne fedje el a szellőzőnyílásokat.
- Üzembe helyezéskor hagyjon szabad helyet a
hűtőszekrény előtt, mögött, valamint a két oldalán.
Ezzel csökkenthető az energiafogyasztás, így
alacsonyabb lesz az áramszámla.
Tartalom
A SIDE-BY-SIDE ELRENDEZÉSŰ HŰTŐSZEKRÉNY TELEPÍTÉSE ··············7
A SAMSUNG „SIDE-BY-SIDE” HŰTŐSZSEKRÉNY HASZNÁLATA ···············16
HIBAELHÁRÍTÁS ·····························································································22
6_ biztonsági információ
Page 55

A Side-by-Side elrendezésű
hűtőszekrény telepítése
FELKÉSZÜLÉS A
HŰTŐSZEKRÉNY TELEPÍTÉSÉRE
Gratulálunk, hogy a Samsung Side-by-Side
hűtőszekrényét választotta. Reméljük élvezni fogja az
új készülék által kínált csúcstechnológiájú funkciók
hatékonyagát.
A legjobb hely kiválasztása a
hűtőszekrény számára
• Válasszon olyan helyet, ahol a vízellátás könnyen
biztosítható.
• Válasszon olyan helyet, amit nem ér közvetlen
napsugárzás.
• OIyan helyet válasszon, ahol sík (vagy majdnem
sík) a padló.
• Válasszon olyan helyet, ahol a hűtőszekrény
számára elegendő tér van az ajtók kinyitásához.
• A használat közben igényelt teljes terület. Lásd
alább a rajzokat és a méreteket.
• Ügyeljen arra, hogy a készüléket karbantartás és
szerviz esetén szabadon lehessen mozgatni.
25mm
A hűtőszekrény szállítása
A padló sérülésének megakadályozása érdekében
ügyeljen rá, hogy az elülső szintezőlábak felső
pozícióban legyenek (a padló fölött). Lásd a
kézikönyvben „A hűtőszekrény szintezése” című részt
(11. oldal).
A padlóburkolat felületének védelme érdekében
tegyen alátétet, pl. kartonlapot a hűtőgép alá.
VIGYÁZAT
Láb
Elhelyezéskor, szervizeléskor vagy
a hűtőszekrény mögötti terület
tisztításakor mindig egyenesen húzza ki a
hűtőszekrényt, és egyenesen tolja vissza,
ha végzett.
Csavarhúzó
01 TELEPÍTÉSE
50mm
legalább 50mm legalább 50mm
732mm
1027mm
160º
160º
1724mm
777mm
1155mm
telepítése _7
Page 56

A HŰTŐSZEKRÉNY AJTÓINAK
ELTÁVOLÍTÁSA
Ha nem lehet egyben bevinni a hűtőszekrényt a
bejárati ajtón, akkor leveheti az ajtókat.
1.
Az első lábak burkolatának eltávolítása
Először nyissa ki a mélyhűtő és a hűtőszekrény ajtóit, majd
távolítsa el az elülső láb burkolatát úgy, hogy az óramutató
járásával ellentétes irányba forgatja a három csavart.
1. A mélyhűtő becsukott ajtaja mellett távolítsa el
a felső pánt burkolatát
csavarhúzóval, majd
1
válassza le a vezetékeket úgy, hogy óvatosan
2
széthúzza őket
1
2. Távolítsa el a pánt csavarjait
4
csavart
.
2
3
és a földelő
úgy, hogy elforgatja az óramutató
járásával ellentétes irányba, és leemeli a felső
5
pántról
. Legyen óvatos,fall on you as you
nehogy eltávolítás közben magára ejtse az ajtót.
4
3
A vízellátás vezetékének leválasztása
a hűtőszekrényről.
1. Távolítsa el a vízcsövet 1 a csatlakozás 2
összenyomásával és a vízcső kihúzásával.
Vigyázzon,
hogy az
azonos színű
vízcsöveket
kösse össze.
1
2
2. A mélyhűtő ajtajának leszerelése
Először meg kell említeni néhány dolgot.
• Ellenőrizze, hogy egyenesen emelje fel az ajtót úgy,
hogy a zsanérok ne hajoljanak el, és ne törjenek
meg.
• Vigyázzon, hogy a vízcsöveket és az ajtón lévő
kábelköteget ne sértse meg.
• Helyezze az ajtókat védett felületre, hogy
megelőzze a megkarcolódást vagy a sérülést.
5
Ezt követően vegye le az ajtót az alsó pántról 6
3.
úgy, hogy óvatosan felemeli egyenesen az ajtót
7
6
Vigyázzon, hogy a vízcsöveket és az ajtón lévő
kábelköteget ne sértse meg.
8
4. Távolítsa el az ajtó pántját
a 9 ban lévő
tartóelemből úgy, hogy óvatosan felemeli az alsó
pántról.
7
.
8_ telepítése
Page 57

A hűtőszekrény ajtajának eltávolítása
1. Csukja be az ajtót, és a csavarhúzóval távolítsa el a
felső zsanér fedelét
1
2. Távolítsa el a pánt csavarjait
3
csavart
járásával ellentétes irányba, és leemeli a felső
4
pántról
. Legyen óvatos, nehogy eltávolítás
közben magára ejtse az ajtót.
2
3
4
3. Vegye le az ajtót az alsó pántról
felemeli egyenesen az ajtót
1
.
2
és a földelő
úgy, hogy elforgatja az óramutató
5
úgy, hogy
6
.
A HŰTŐSZEKRÉNY AJTÓINAK
VISSZASZERELÉSE
Amint biztonságosan elhelyezte a hűtőszekrényt oda,
ahová tervezte, visszaszerelheti rá az ajtókat.
A fagyasztó ajtajának visszaszerelése
1. A mélyhűtő ajtajának visszaszerelésekor helyezze
vissza a tömlőt
alsó pántban
Óvatosan húzza hátra a tömlőt úgy, hogy
egyenesen haladjon, megtörés és elhajlás nélkül.
2. Helyezze be a felső pánt tengelyét
ajtajának sarkában lévő lyukba
Ellenőrizze, hogy a pánt egy szintben van-e a
felső pánt lyukával
6
lyukával 7 , és csatlakoztassa vissza a pánt
csavarjait
Csatlakoztassa vissza a vezetékeket.
1
az ajtó alsó sarkába, majd az
2
lévő lyukba.
5
és a hűtőszekrény házának
8
és a földelő csavarokat.
8
7
1
2
3
4
.
a mélyhűtő
01 TELEPÍTÉSE
7
4. Távolítsa el az ajtó pántját
a 8 ban lévő
tartóelemből úgy, hogy óvatosan felemeli az alsó
pántról.
5
6
3. Helyezze a felső pánt fedelének
felső pánt
elülső részére, és rögzítse vissza
10
egy csavarral.
9
3
4
9
első szélét a
telepítése _9
10
Page 58

A hűtőszekrény ajtóinak visszaszerelése
Az átlátszó csőcsatlakozó
közepe
Csőbilincs (1/4”)
(6,35 mm)
1. Helyezze vissza az alsó pántot 1 az alsó pánt
tartójába
2
.
1
2
A vízadagoló vezeték visszaszerelése
1. Helyezze be a vízvezetéket 2 a csatlakozóba
1
.
2. Illessze a hűtőszekrény ajtajának sarkában lévő
3
lyukat
az alsó pánt 4 fölé.
3
4
5
3. Helyezze be a felső pánt tengelyét
lévő lyukba
pánt lyuka
lévő lyuk
vissza a pánt csavarjait
úgy, hogy az óramutató járásával egyező
10
6
. Ellenőrizze, hogy a pánt a felső
7
és a hűtőszekrény házának tetején
8
között legyen. Ezek után hajtsa
9
és a földelő csavarokat
a pántban
irányba hajtja őket.
4. Helyezze a felső pánt fedelének
a felső pánt
elülső részére, és rögzítse vissza
12
elülső részét
11
egy csavarral.
1
2
2. A vízcsövet tökéletesen bele kell illeszteni az
átlátszó csőcsatlakozó közepébe, hogy a
vízadagolóból ne szivároghasson a víz.
3. Illessze a helyére a szerelési csomagban található
két csőbilincset, és ellenőrizze, hogy stabilan
tartják-e a vízcsövet.
Az átlátszó csőcsatlakozó
közepe
Csőbilincs (1/4”)
(6,35 mm)
Ne vágja el a vízcsövet. Óvatosan válassza szét
a csatlakozótól.
Az elülső láb burkolatának
visszaszerelése
A burkolat visszaszerelése után ellenőrizze a
vízcsatlakozó szivárgását.
Az első láb burkolatának visszaszereléséhez
húzza meg a három csavart az óramutató
járásával egyező irányba az ábrán jelzett módon.
11
10_ telepítése
12
Page 59

A HŰTŐSZEKRÉNY SZINTEZÉSE
Most, hogy az ajtók újból a hűtőszekrényen vannak,
lehet, hogy ellenőrizni szeretné, hogy a hűtőszekrény
szintben van-e, hogy megtehesse a végső beállításokat.
Ha a hűtőszekrény nincs szintben, nem biztos, hogy
tökéletesen szintbe lehet hozni az ajtókat.
A hűtőszekrény első része is állítható.
Amikor a mélyhűtő alja alacsonyabban
van, mint a hűtőszekrény
A talp hornyába illesszen egy lapos csavarhúzót és a
készülék szintezéséhez forgassa a talpat jobbra vagy
balra.
Láb
Csavarhúzó
Amikor a mélyhűtő alja magasabban
van,mint a hűtőszekrény
A talp hornyába illesszen egy lapos csavarhúzót és a
készülék szintezéséhez forgassa a talpat jobbra vagy
balra.
Láb
Csavarhúzó
Ehelyett olvassa el a következő részt arról, hogy
mi a legjobb módja az ajtók kisebb mértékű
beállításának.
AZ AJTÓK KISEBB UTÁNÁLLÍTÁSA
Ne feledje, hogy a hűtőszekrénynek szintben kell állnia
ahhoz, hogy az ajtók tökéletesen síkban legyenek.
Ha segítségre van szüksége, olvassa el az előző részt
a hűtőszekrény szintezéséről.
Amikor a mélyhűtő alja
magasabban
van, mint a hűtőszekrény
Állítható rész
Mindkét esetben ugyanolyan módon lehet kijavítani
a kiegyensúlyozatlanságot. Nyissa ki az ajtókat, és
állítsa be őket egyenként az alábbiak szerint :
1. Hajtsa le az
1
anyát
az alsó
pántról, amíg el
nem éri a csavar
2
felső végét.
1
Az
, anya lecsavarásakor a 3 csavart a
mellékelt imbuszkulccsal
Ezek után képesnek kell lennie kézzel lehajtani
az anyát
2.
Az ajtók közötti
1
.
2
forgassa balra.
magasságkülönbség
beállításához hajtsa
2
a csavart
az
óramutató járásával
egyező
ellentétes
vagy
irányba.
Az óramutató járásával egyező , irányba
hajtva az ajtó felfelé mozdul.
3. Az ajtók beállítása
után hajtsa
az anyát
1
az óramutató
járásával
egyező
irányba,amíg el nem éri a csavar alsó végét, majd
húzza meg ismét a csavart a csavarkulccsal
az anya rögzítéséhez
1
.
Ha nem húzza meg erősen az anyát, a csavar
elengedhet.
3
Csavarkulcs
2
1
Anya
3
Csavarkulcs
2
Csavar
3
Csavarkulcs
2
1
Anya
Csavar
Csavar
3
01 TELEPÍTÉSE
telepítése _11
Page 60

A VÍZADAGOLÓ VEZETÉKÉNEK
Jégcsatorna
ELLENŐRZÉSE (OPCIONÁLIS)
A vízadagoló csak egy az új Samsung hűtőszekrény
hasznos funkciói közül. A jobb egészség érdekében
a Samsung vízszűrője eltávolítja a nem kívánatos
részecskéket a vízből. Viszont nem sterilizál, és nem
pusztítja el a mikroorganizmusokat. Ehhez víztisztító
berendezést kell vásárolnia. A jégkészítő megfelelő
működéséhez 138~862 Kpa nyomásra van szükség.
Normál körülmények között az 1,7 deciliteres
papírpohár 10 másodperc alatt tölthető tele. Ha
a hűtőszekrény alacsony (138 Kpa) víznyomással
rendelkező helyen van telepítve, beszerelhet egy
nyomásfokozó szivattyút az alacsony nyomás
kiegyenlítésére. Ellenőrizze, hogy a hűtőszekrényben
lévő víztartály megfelelően feltöltődött-e. Ehhez
nyomja le a vízadagoló karját, amíg víz nem folyik ki a
vízadagoló nyílásából.
A vízcsatlakoztató készlet a készülék tartozéka.
A fagyasztófi ókban találhatja meg.
A JÉGKÉSZÍTŐ HASZNÁLATA
A jégtartó eltávolítása
- Az ábra szerint fogja meg a
fogantyút.
-
Enyhén húzza fel az alsó részt.
- Lassan vegye ki a jégtartályt.
- Ha a kijelzőn az ICE OFF kijelzés villog,
VIGYÁZAT
tegye vissza a tartályt és/ vagy ellenőrizze a
megfelelő behelyezést.
- Ha az ajtó nyitva van, akkor víz- és
jégadagoló nem működik.
- Ha az ajtót túl erősen csapja be, akkor víz
fröccsenhet a jégkészítőre.
- A jégtartályt két kézzel fogja meg, mert
egyébként leeshet.
- A balesetek elkerülése érdekében törölje fel
a padlóra került vizet vagy jeget.
- Gyerekek ne kapaszkodjanak a
jégadagolóba vagy a jégtartályba. Ez
sérülést okozhat.
- Ne helyezze a kezét vagy más tárgyat a
jégcsatornába.
Ez személyi vagy mechanikai sérülést
okozhat.
A VÍZADAGOLÓ VEZETÉK
FELSZERELÉSE
Beltéri modell esetén
A víz csatlakozatásához szükséges
alkatrészek
A jégtartó
visszahelyezése
- A visszahelyezést fordított
sorrendben kell elvégezni.
- A tartályt határozottan,
kattanásig nyomja a helyélre.
- H
a a tartály nem kattan a
helyére, a hátulján található
fogantyút fordítsa el 90 fokkal
és a 2. ábra szerint próbálja
ismét a helyére tenni a tartályt.
Normál működés
- A jégkészítőből a jégtartályba
hulló jég hangja a normál
működéshez tartozik.
-
Ha sokáig nem vesz ki jeget a
tartóból, akkor a jég feltorlódhat.
Távolítsa el a feltorlódott jeget és
ürítse ki a tartályt.
-
Ha a jég nem jön ki, ellenőrizze,
hogy nincs-e feltorlódott jég,
ha van, távolítsa el.
- Az első adag jégkocka a
csatlakoztatás után a csőben
maradt levegő miatt kicsi
lehet, a használat során ez a
levegő eltávozik.
12_ telepítése
1. ábra
2. ábra
Jégcsatorna
2
1
Vízcső-rögzítő és csavarok
3
Vízbezeték
Csőcsatlakozó
4
“A” szorítókapocs
5
Vízszűrő
Csatlakoztatás a vízadagoló
vezetékhez
1. Első lépésként zárja el a vezetékes vizet.
2. Keresse meg a legközelebbi hidegvíz-vezetéket.
3. Kövesse a vízvezeték telepítési utasításait, amely a
szerelőkészletben található.
FIGYELMEZTETÉS
A bekötést a hidegvizes csőrendszerhez
kell csatlakoztatni. Amennyiben
a melegvizes csőrendszerhez
csatlakoztatja, az a tisztító
meghibásodását okozhatja.
Page 61

Zárja el a fő
Zárja el a fő
vízvezetéket
Zárja el a fő
vízvezetéket
NINCS
RÉS
Táv olítsa
el a sapkát
A készülék
vízvezetéket
A készlet
vízvezetéke
nincs
rés
Lazítsa meg
az „a”-t
vízvezetéket
Zárja el a fő
vízvezetéket
NINCS
RÉS
4. A vízellátás vízszűrőre csatlakoztatása után nyissa
ki a vezetékes vízellátást, majd a vízszűrő tisztítása
és üzembe helyezés céljából adagoljon ki kb. 1 l
vizet.
A vízvezeték csatlakoztatása a
hűtőszekrényhez.
1. Távolítsa el a készüléken lévő vízvezetéken
lévő sapkát, és helyezze be a hollandi anyát a
készüléken lévő vízvezetékre, miután leszerelte azt
a mellékelt vízvezetékről.
2. Csatlakoztassa mind a készülék vízvezetékét, mind
a készletben lévő vízvezetéket.
3. Húzza rá a hollandi anyát a menetes szerelvényre.
Vigyázzon, hogy ne legyen rés a két elem között.
4. Nyissa ki a vízcsapot, és ellenőrizze, hogy nincs-e
szivárgás.
• A Samsung garanciája a VÍZSZERELÉSRE nem
vonatkozik!
• Ezt a felhasználó költségére kell elvégezni, kivéve,
ha a viszonteladói ár tartalmazza a beszerelés
költségét.
• Szükség esetén a szerelést szakemberrel
végeztesse el.
• Ha a helytelen szerelés miatt vízszivárgást
tapasztal, értesítse a beszerelést végző
szakembert.
A VÍZADAGOLÓ CSÖVEZETÉKÉNEK
ÜZEMBEHELYEZÉSE
Kültéri üzemeltetési modell
A víz csatlakozatásához szükséges
alkatrészek
01 TELEPÍTÉSE
vízvezetéket
vízvezetéke
Táv olítsa
el a sapkát
A készülék
A készlet
nincs
rés
Lazítsa meg
az „a”-t
Csak ivóvízvezetékhez csatlakoztassa a
vízvezetéket. Ha meg kell javítania, vagy
szét kell szerelnie a vízvezetéket, vágjon le egy
6.5mm hosszú műanyag csövet, hogy
biztosan pontosan illeszkedő és
szivárgásmentes csatlakozást kapjon.
A használat megkezdése előtt
VIGYÁZAT
vizsgálja meg, hogy ezeken a
helyeken nincs-e vízszivárgás.
Vízcső-rögzítő
és csavarok
Vízvezeték cső
Víztisztító tartója
Csőcsatlakozó
Tisztító
Vízvezeték csatlakoztatása
Csatalkoztassa a vízvezetéket a csap csatlakozója
segítségével.
1. Zárja el a fő vízcsapot.
2. Csatlakoztassa a vízcsaphoz az “A” csatlakozót.
FIGYELMEZTETÉS
A bekötést a hidegvizes csőrendszerhez kell
csatlakoztatni. Amennyiben a melegvizes
csőrendszerhez csatlakoztatja, az a tisztító
meghibásodását okozhatja.
telepítése _13
Page 62

JÓTÁLLÁSRA VONATKOZÓ INFORMÁCIÓK
Rögzítőkapocs
A cső behelyezése után
illessze be a rögzítőkapcsot.
Ezen vízvezeték bekötésre nem vonatkoznak a
hıtőszekrény és jégkészítő gyártójának jótállási
körülményei. Gondosan tartsa be ezen utasításokat,
amivel is a víz által okozott károk kockázatát csökkenti.
4. A cső behelyezése után erősen nyomja össze a
kapcsot. Ezzel rögzíti a csövet.
Megj : A mennyiben a csatlakozó nem felel meg
a meglévő vízcsapnak, vegye fel a kapcsolatot a
legközelebbi márkaszerviz képviselőjével és vásároljon
egy megfelelő méretű csatlakozót.
Válassza ki a tisztító felszerelésének helyét.
(Tisztítóval ellátott modell)
Vágja méretre a víztisztítóhoz csatlakoztatott
-
vízvezeték csatlakozási csövét a tisztító és a hidegvíz
csapja között mért távolságnak megfelelően.
- Amennyiben a víztisztító felszerelése közben össze
kívánja szerelni a víztisztító kilépő és belépő oldalát,
nézze meg a megfelelő (AJÁNLOTT) ábrát.
“A” JELÙ
CSATLAKOZÓ RÉSZ
SZELEP
90 fok
VIGYÁZAT!
A cső behelyezése után
illessze be a rögzítőkapcsot.
Rögzítőkapocs
A víztisztító vízkimeneti
oldala.
VÍZTISZTÍTÓ
A VÍZTISZTÍTÓ
VÍZBEMENETI OLDALA
VÍZKIMENET
CSATLAKOZÓ
RÉSZ
5. Nyissa meg a vizet és ellenőrizze, hogy van-e
szivárgás. Szivárgás esetén ismételje meg az 1.,
2., 3. és 4. lépést. Ha a szivárgás fennmarad,
értesítse a szakszervizt.
6. Használatba vétel előtt 5 percig folyassa át a vizet
a szűrőn.
Távolítsa el az összes maradékot a
tisztítóból. (Tisztítóval ellátott modell)
- Nyissa ki a vízvezeték főcsapját és ellenőrizze, hogy
a víz befolyik-e a tisztító belépő oldalán.
- Amennyiben a csőben nem folyik víz, ellenőrizze,
hogy a csap nyitva van-e.
- Hagyja nyitva a csapot, míg tiszta víz nem folyik, és
a gyártáskor visszamaradt hulladékanyag ki nem
öblítődik.
KIFOLYÁSI
OLDAL TISZTÍTÓK
VÍZ
TISZTÍÓ
VÍZ BEÖMLÉS
A szűrőtartó felszerelése
- A szűrőtartót tartsa a kívánt helyzetben (pl. a
mosogató alatt) és csavarral szilárdan rögzítse.
A víztisztító cseréje
1. Zárja le a vízellátást.
2. Ügyeljen a szűrőn feltüntetett folyásirányra.
3. A vízbemeneti csövet ütközésig tolja a szűrő
vízbemeneti végébe.
VÍZBEMENETI
OLDAL
14_ telepítése
FOLYÁSIRÁNY
Megjegyzés
: Ügyeljen arra, hogy
SZŰRT
VÍZ
a vágás merőleges
legyen és ne ferde,
mert ez szivárgást
okozhat.
A VÍZTISZTÍTÓ
SZŰRŐ TARTÓJA
Rögzítse a tisztítót.
- A tisztítót a jobb oldali ábra szerinti helyzetben
rögzítse.
A VÍZTISZTÍTÓ SZŰRŐ
VÍZTISZTÍTÓ SZŰRŐ
VÍCSŐ
TARTÓJA
Page 63

Csatlakoztassa a hűtőszekrényt a
vízvezeték csatlakozóhoz.
- Vegye le a hıtőszekrény kompresszorának
burkolatátt.
- Csatlakoztassa a vízvezeték bekötését a szelephez
az ábra szerint.
- Ellenőrizze a csatlakoztatás után, nincs-e valahol
vízszivárgás. Ha szivárgást észlel, ismételje meg a
csatlakoztatást.
- Helyezze vissza a hűtőszekrény kompresszorának
borítását.
VÍZVEZETÉK CSŐ
CSATLAKOZTATÓ ANYA
A HÙTŐSZEKRÉNY
KOMPRESSZOR
BURKOLATA
biztosítsa a vízvezeték csatlakozókat
- Az “A” csőbilincs
felhasználásával rögzítse
a csövet a falhoz (a
hıtőszekrény hátoldala).
- A rögzítés biztosítása után
győződjék meg róla, hogy
a vízcsövet nem hajlította-e
meg túlságosan, nem csípte
vagy nyomta-e oda erősen.
RÖZÍTŐ A
VÍZVEZETÉK
CSŐ
A vízvezetékben lerakódott
anyagmaradványok eltávolítása a
szűrő beszerelése után.
1. Nyissa ki a fő vízvezeték csapját, és zárja el a
vízcső szelepét.
2. Hagyja, hogy a víz átöblítse az adagolót, amíg
tiszta víz nem folyik belőle (approx. 1L). Ezzel
megtisztítja a vízellátó rendszert, és eltávolítja a
levegőt a csövekből.
3. Néhány háztartásban további átöblítésre is
szükség lehet.
4. Nyissa ki a hűtőszekrény ajtaját, és ellenőrizze,
hogy nem szivárog-e a víz a vízszűrőből.
Az újonnan felszerelt vízszűrő betét miatt rövid
ideig a víz kilövellhet a vízadagolóból. Ennek
oka a vezetékben összegyűlt levegő. Ez nem
okozhat problémát a használat során.
01 TELEPÍTÉSE
telepítése _15
Page 64

A SAMSUNG Side-by-Side
hűtőszekrény használata
A HŰTŐSZEKRÉNY HASZNÁLATA
A KEZELŐPANEL HASZNÁLATA / A
DIGITÁLIS KIJELZŐ HASZNÁLATA
COOL SELECT TÍPUS
1
2
3
4
ADAGOLÓS TÍPUS
NORMÁL TÍPUS
A készülék kikapcsolása után a kijelző kikapcsolódik,
ez normális jelenség.
Felgyorsítja a mélyhűtőben
történő fagyasztáshoz
“POWER
FREEZE”
1
(GYORSFAGYASZTÁS)
GOMB
“FREEZER”
2
(MÉLYHŰTŐ)
HOMB
“ICE TYPE”
3
(JÉG TÍPUSA)
GOMB
szükséges időt. Ez akkor
hasznos, ha gyorsan romló
élelmiszert szeretne gyorsan
lefagyasztani, vagy ha a
mélyhűtő hőmérséklete hirtelen
megemelkedett (például nyitva
hagyták az ajtót).
A Freezer gomb lenyomásával
a kívánt hőmérsékletre állítható
a mélyhűtő. A hőmérséklet -14
és -25 °C között állítható.
Ezzel a gombbal lehet választani
a jégkocka (Cubed), jégkása
(Crushed) és a jégkészítés
kikapcsolása között.
“FILTER
CHANGE”
4
(SZŰRŐCSERE)
GOMB
5
6
7
“VACATION”
5
(VAKÁCIÓ)
GOMB
GYERMEKZÁR
6
FUNKCIÓ
FRIDGE
(HŰTŐSZEKRÉNY)
7
GOMB
A Power Freeze (gyors fagyasztás) funkció
használata során a hűtőgép energiafogyasztása
megnő. Ha nincs szüksége rá, ne felejtse
el kikapcsolni, és az eredeti beállított
hőmérséklettel használja a hűtőgépet.
Ha nagy mennyiségű élelmiszert kell
lefagyasztani, a Power Freeze (gyors fagyasztás)
funkciót legalább 24 órával előtte kapcsolja be.
Amikor szűrőt cserél,
nyomja le ezt a gombot 3
másodpercig a szűrő
ütemezésének
visszaállításához.
Ha szabadságra vagy üzleti
útra indul, vagy ha nem kívánja
használni a hűtőszekrényt,
nyomja meg a “Vacation”
(Vakáció) gombot. Ha a
Vakáció gombbal kikapcsolja
a hűtőkamrát, a kijelzőn a
hűtőszekrény jelzőlámpáj helyett
automatikusan a Vakációüzemmód jelzőlámpája gyullad ki.
A Vakáció mód kiválasztásakor
nyomatékosan ajánlott kivenni
az élelmiszert a friss élelmiszer
tároló rekeszből és becsukni
az ajtót.
A szabadság (Vacation) és a
hűtőszekrény (Fridge) gombot
együttesen 3 mp-ig nyomva
tartva, egyik nyomógomb sem
használható. Sem a vízadagoló
kar, sem a jégadagoló kar
nem működik. A funkciót a
két gomb ismételt együttes
megnyomásával lehet
kikapcsolni.
A Fridge (Hűtőszekrény)
gomb lenyomásával állítható
be a kívánt hőmérséklet.
A hőmérséklet 1 és 7°C között
állítható.
16_ használata
Page 65

A HŐMÉRSÉKLET SZABÁLYOZÁSA
A MÉLYHŰTŐ HŐMÉRSÉKLETÉNEK
SZABÁLYOZÁSA
A mélyhűtő hőmérséklete -14 és -25°C között
állítható az egyéni igényeknek megfelelően.
Ismételten nyomja meg a Freezer gombot, amíg a
hőmérséklet-kijelzőn a beállítani kívánt hőmérséklet
jelenik meg. Ne feledje, hogy az olyan élelmiszerek,
mint a jégkrém, -16°C-on olvadnak.A hőmérséklet
kijelzője folyamatosan mozog -14 és -25°C között.
Amikor a kijelző eléri a -14°C-t, újrakezdődik -25°Con. Öt másodperccel az új hőmérséklet beállítását
követően a kijelzőn ismét a mélyhűtő aktuális
hőmérséklete jelenik meg. Ez a szám azonban
változni fog, miközben a mélyhűtő átáll az új
hőmérsékletre.
Ennél a modellnél a fagyasztóban az
ajtórekeszek a kétcsillagos tárhelyek. A
kétcsillagos rekeszekben kissé magasabb a
hőmérséklet, mint a fagyasztó többi részében.
A JÉG- ÉS HIDEGVÍZ-ADAGOLÓ
HASZNÁLATA
Nyomja le az Ice Type (Jégtípus) gombot a kívánt
jégtípus kiválasztásához
A HŰTŐSZEKRÉNY HŐMÉRSÉKLETÉNEK
SZABÁLYOZÁSA
A hűtőszekrény hőmérséklete 7 és 1°C között
állítható az egyéni igényeknek megfelelően.
Ismételten nyomja meg a Fridge (Hűtő) gombot, amíg
a hőmérséklet-kijelzőn a beállítani kívánt hőmérséklet
jelenik meg.
A hűtőszekrény hőmérsékletének beállítása ugyanúgy
történik, mint a mélyhűtőé.
A Fridge (Hűtőszekrény) gomb lenyomásával állítható
be a kívánt hőmérséklet.
Néhány másodperc elteltével a hűtőszekrény elkezd
átállni az újonnan beállított hőmérsékletre.
Ez a digitális kijelzőn is követhető.
Az ajtók túl gyakori kinyitása megemelheti a
mélyhűtő vagy a hűtőszekrény hőmérsékletét,
vagy ha nagy mennyiségű meleg ételt helyeznek
el bennük.
Emiatt a digitális kijelző villoghat.
Amint a mélyhűtő és a hűtőszekrény visszatér
a normál beállított hőmérsékletre, a villogás
megszűnik. Ha a villogás folytatódik, lehet, hogy
„vissza kell állítani” a hűtőszekrényt.
Húzza ki a készüléket a hálózatból, várjon 10
percig, majd dugja vissza.
A jég adagolása
Helyezze a poharat a jégadagoló nyílás alá, és
nyomja óvatosan a jégadagoló karjának.
Ügyeljen rá, hogy a pohár egy vonalban legyen az
adagoló nyílással, nehogy kifröccsenjen a víz.
A vízadagoló használata
Helyezze az üveget a vízadagoló nyílás alá, és nyomja
óvatosan a vízadagoló karjának.
Ügyeljen rá, hogy a pohár üveg egy vonalban legyen
az adagoló nyílással, nehogy kifröccsenjen a víz.
nincs jég
Válassza ezt, ha ki szeretné
kapcsolni a jégkészítőt
A jég jégkockaként jön létre. Ha a „Crushed”
(Jégkása) lehetőséget választja, a jégkészítő
kásává zúzza össze a jégkockákat.
02 HASZNÁLATA
használata _17
Page 66

• Ne tegye az ujját, a kezét vagy bármilyen
FIGYELMEZTETÉS
ELŐVIGYÁZATOSSÁG
más oda nem illő tárgyat az adagoló
tölcsérbe vagy a jégkészítő edényébe.
Személyi sérülést vagy anyagi kárt okozhat.
-
• Soha ne dugja be az ujját vagy más
tárgyat az adagolónyílásba.
- Ez sérülést okozhat.
• Csak a hűtőszekrénnyel együtt szállított
jégkészítőt használja.
A hűtőszekrény vízellátását csak megfelelően
•
képzett személy telepítheti / csatlakoztathatja,
és csak ivóvízhálózathoz csatlakoztatható.
• A jégkészítő helyes működése érdekében
a víznyomásnak 138 ~ 862 Kpa között
kell lennie.
Amennyiben hosszabb nyaralást vagy üzleti
•
utat tervez, és nem fogja használni a jég-,
illetve a vízadagolót, zárja el a vízszelepet.
- Ellenkező esetben a víz szivárgása
fordulhat elő.
• A készülék belsejében törölje le a
nedvességet, és hagyja nyitva az ajtót.
- Ha nem így tesz, kellemetlen szag és
penész alakulhat ki.
A COOLSELECT ZONE™ FIÓK
HASZNÁLATA (OPCIONÁLIS)
Gyorshűtés
• A gyorshűtés mód a CoolSelect Zone™ beállítással
használható.
• A “Gyorshűtés” funkcióval 1-3 dobozos ital 60
percen belül lehűthető.
• A mód érvénytelenítéséhez ismételten nyomja le
a “Gyorshűtés” gombot. A CoolSelect Zone™
visszaáll a korábbi hőmérsékletre.
• A “Gyorshűtés” befejeztével visszaállnak a “Hűtés”
egyes beállított hőmérsékleti értékei.
Kiolvasztás
• Az élelmiszerből kiolvasztáskor cseppenként elfolyó
nedvesség és a hùs minőségromlása csökkenti az
élelmiszerek frissességét.
• A „Kiolvasztás” mód kiválasztásakor a készülék
váltakozva meleg és hideg levegőt továbbít a
CoolSelect Zone™ fi ókjába.
• A hùs sùlyától függően 4, 6, 10, illetve 12 órás
kiolvasztási idő választható.
• A “Kiolvasztás” befejeztével a CoolSelect Zone™
kijelzője visszaáll a “hűtés” üzemmódba.
• A “kiolvasztás” befejeztével a hùs nem tartalmaz
levet, félig megfagyott állapotban van, ùgyhogy
könnyen szeletelhető a főzéshez.
• Az egyes típusoknál érvénytelenítéséhez nyomjon le
bármely, a “kiolvasztástól” eltérő gombot.
• Az alábbiakban a hùs és a hal hozzávetőleges
kiolvasztásai idejeit tüntettük fel.
(2.5 cm vastag szeleteket feltételezve)
ha több helyre van szüksége, ki lehet venni a
fagyasztó felső fi ókjait, mivel ez a hőmérsékleti
és mechanikai jellemzőket nem befolyásolja. A
fagyasztott élelmiszerek tárolására szolgáló rekesz
űrtartalma eltávolított fi ókok mellett van megadva.
Ha több helyet szeretne, a
jégtartó kosár helyére tett
FRE-UPP használatával is
tárolhatja az élelmiszert.
A jégtartó kosár eltávolítása
után a kijelzőn az
ICE OFF kijelzés villog.
GUARD FRE-UPP
(opcionális)
18_ használata
Kiolvasztási idő sùly
4óra 363g (0.8Ib)
6óra 590g (1.3Ib)
10óra 771g (1.7Ib)
12óra 1000g (2.2Ib)
A hùs és a hal méretétől, illetve vastagságától
függően a kiolvasztási idő eltérő lehet.
A fenti sùlyadatok a CoolSelect Zone™ fi ókban
tárolt élelmiszer teljes sùlyát jelentik.
Példa: 40 dkg fagyasztott marhahùs és 60 dkg
fagyasztott csirke teljes kiolvasztási ideje 10 óra.
A „kiolvasztási” mód használatakor a
FIGYELMEZTETÉS
kiolvasztani nem kívánt élelmiszert ki kell
venni a CoolSelect Zone™ fi ókból.
Page 67

Nullás zóna (0°C)
• A “Nullás zóna” kiválasztásakor a CoolSelect
Zone™ hőmérséklete a hűtőszekrény beállított
hőmérsékletétől függetlenül 0°C marad.
• A “Nullás zóna” hőmérséklet hosszabb ideig
biztosítja a hùs és a hal frissen tartását.
Hűtés
• A „Hűtés” egyes típusok kiválasztásakor a
hőmérséklet azonos lesz a hűtőszekrény beállított
hőmérsékletével. A digitális kezelőtáblán ugyanaz a
hőmérséklet jelenik meg, mint a kijelzőtáblán.
• A CoolSelect Zone™ fi ók plusz helyet teremt a
hűtőszekrényben.
A konkrét italtól függően a lehűtési idő eltérő
lehet.
Ha a “Gyorshűtés” egyes típusoknál van
FIGYELMEZTETÉS
kiválasztva, akkor ki kell venni az ételt a
CoolSelect Zone™ fi ókjából.
A MÉLYHŰTŐ TARTOZÉKAINAK
ELTÁVOLÍTÁSA
A mélyhűtő belseje gyorsan tisztítható és
átrendezhető.
1. Ha el szeretné távolítani az üvegpolcot, húzza ki,
ameddig csak lehet. Ezek után emelje meg, és
távolítsa el.
3. Ha el szeretné távolítani a műanyag fi ókot, húzza
felfelé, és kissé emelje meg.
02 HASZNÁLATA
4. Jégtartó edény (mélyhűtő)
Ha el szeretné távolítani a jégkészítő edényt, emelje
meg és húzza ki.
• Fogja meg a fogantyút
az ábrán látható módon
• Emelje fel kissé az alsó
részét
• Lassan vegye ki a
jégtartó edényt
A burkolat eltávolításakor ne fejtsen ki nagy erőt,
Eltörhet a burkolat, és sérülést okozhat.
2. Ha el szeretné távolítani az ajtórekeszt, fogja meg
két kézzel, és óvatosan emelje meg.
használata _19
Page 68

A HŰTŐSZEKRÉNY
TARTOZÉKAINAK ELTÁVOLÍTÁSA
1. Ha el szeretné távolítani az fröccsenésvédő
üvegpolcot, húzza ki, ameddig csak lehet. Ezek
után emelje meg, és óvatosan távolítsa el.
2. Ha el szeretné távolítani a zöldség- és
gyümölcstartó fi ókot, nyomja meg a
zöldségdoboz/száraz
doboz jobb és bal
oldalán belül lévő
mélyedéseket, és
távolítsa el úgy, hogy
előrehúzza. A fi ókot egy
kézzel tartva emelje föl
egy kissé, miközben
előrehúzza, és kiveszi a
hűtőszekrényből.
3. Ha el szeretné távolítani a gallonos ajtórekeszt,
fogja meg két kézzel a rekeszt, és óvatosan
emelje fel.
A tartozékok eltávolítása előtt ellenőrizze hogy
nincs-e az útban élelmiszer. Amikor csak
lehetséges, távolítsa el az összes élelmiszert a
balesetveszély csökkentése érdekében.
A készülék energiahatékony működése
érdekében hagyja az eredeti helyükön a
polcokat, rekeszeket és tárolókat, ahogy az a
(18.) oldalon található ábrán látható.
A HŰTŐSZEKRÉNY TISZTÍTÁSA
A tisztításhoz NE használjon benzolt, hígítót
FIGYELMEZTETÉS
ELŐVIGYÁZATOSSÁG
vagy Clorox™-ot.
Ezek kárt tehetnek a készülék felületében,
és tűzveszélyesek lehetnek.
Ha a hűtőszekrény feszültség alatt van, ne
permetezzen rá vizet, mert az áramütést
okozhat.
Ne használjon benzolt, hígítót vagy
autómosó szert a hűtőszekrény tisztítására
a tűzveszély miatt.
A BELSŐ MEGVILÁGÍTÓ LÁMPA
CSERÉJE
LED-es megvilágítás esetén annak cseréjéhez
hívja a szerviztechnikust.
4. AZ-POLC a készülékház falához van rögzítve. Ha
el szeretné távolítani a bortartó polcot, csúsztassa
felfelé, és óvatosan emelje le a polcot a tartóiról.
Ügyeljen arra, hogy a a Z polc felszerelésekor
ne cserélje fel a fel-le és jobb-bal irányt.
ELŐVIGYÁZATOSSÁG
20_ használata
Page 69

A VÍZSZŰRŐ CSERÉJE
Annak megelőzése érdekében, hogy a víz
FIGYELMEZTETÉS
A vízszűrő állapotjelzője fi gyelmeztet, hogy mikor
kell cserélni a vízszűrőbetétet. Ha a szűrő jelzőfénye
pirosra vált, ki kell cserélni a szűrőt.
Annak érdekében, hogy legyen ideje új szűrőt
beszerezni, a lámpa akkor gyullad fel, mielőtt véget
érne az aktuális szűrő kapacitása. A szűrő időben
történő cseréje biztosítja, hogy a hűtőszekrény vize a
legfrissebb és a legtisztább legyen.
megrongálja a tulajdonát, a SAMSUNG
hűtőgépben NE használjon más típusú
vízszűrőt. CSAK SAMSUNG-GYÁRTMÁNYÚ
VÍZSZŰRŐT HASZNÁLJON. A SAMSUNG
jogilag semmilyen módon nem tehető
felelőssé a más vízszűrő használata miatti
vízszivárgás által okozott kárért, beleértve
(de nem csak erre korlátozódóan) a vagyoni
kárt is. A SAMSUNG hűtőgépei CSAK a
SAMSUNG vízszűrővel működnek.
1.
Távolítsa el a vízszűrőt a dobozából, és helyezzen
el a vízszűrőn egy matricát a hónap jelzéséve.
2. Helyezzen egy fél évvel későbbi dátummal
ellátott matricát a szűrőre. Például ha
márciusban cseréli ki a vízszűrőt, helyezze
a „SEP” (szeptember) feliratú matricát
a szűrőre, amely emlékeztet arra, hogy
szeptemberben kell kicserélni. A szűrő
normál élettartama 6 hónap.
3. Ezt követően távolítsa el a rögzített sapkát
úgy, hogy az óramutató járásával ellentétes
irányba forgatja.
4. Távolítsa el z új szűrő védősapkáját, és vegye
ki a régi szűrőt.
5. Helyezze el, és nyomja be az új szűrőt
a szűrő házába. Lassan forgassa el a
vízszűrőt 90°-kal az óramutató járásával
ellentétes irányba, hogy egy vonalba kerüljön
a burkolaton lévő jelzéssel, és a szűrő a
helyére rögzüljön. Ügyeljen rá, hogy a jelzés a
„rögzítés” állásban legyen. Ne húzza túl.
6. Amint befejezte az eljárást, tartsa lenyomva 3
másodpercig az Ice Type(Jég be/ki) gombot a
szűrő ütemezésének visszaállításához.
7. Végül adagoljon ki 1 l vizet és öntse ki. Ivás előtt
ellenőrizze, hogy tiszta víz folyik-e.
02 HASZNÁLATA
Az újonnan felszerelt vízszűrő betét miatt rövid
ideig a víz kilövellhet a vízadagolóból.
Ennek oka a vezetékben összegyűlt levegő. Ez
nem okozhat problémát a használat során.
Cserélhető szűrőbetétek megrendelése
Ha több vízszűrő betétet szeretne rendelni, forduljon
hivatalos Samsung forgalmazóhoz.
1
Matrica
(hónapjelzéssel)
Fedje le a
szűrőt
2
4
3
5
Állítsa egy
vonalba a
jelzést
a rögzítési
pozícióval
használata _21
Page 70

Hibaelhárítás
PROBLÉMA MEGOLDÁS
Nem működik, vagy nem
hűt rendesen a
hűtőszekrény.
A hűtőszekrényben lévő
élelmiszer megfagyott.
Szokatlan hangok vagy
zajok hallhatók.
A készülék elülső sarkai
és oldalai melegek, és
pára csapódik le.
Nincs jégadagolás.
Bugyborékoló
hang hallatszik a
hűtőszekrényből.
Kellemetlen szag
van a hűtőszekrény
belsejében.
Jég képződik a mélyhűtő
falán.
Nem működik a
vízadagoló.
• Ellenőrizze, hogy a hálózati csatlakozó megfelelően van-e bedugva.
• A helyes hőmérsékletre van beállítva a kezelőegységen lévő hőmérsékletszabályozó?
Próbálja alacsonyabb hőmérsékletre beállítani a készüléket.
• A hűtőszekrény közvetlen napsugárzás hatásának van kitéve, vagy túl közel van
valamilyen hőforráshoz?
• Túl közel van a falhoz a hűtőszekrény hátsó része, és így megakadályozza alevegő
keringését?
• A helyes hőmérsékletre van beállítva a kijelző panelen lévő hőmérsékletszabályozó?
Próbálja a készüléket magasabb hőmérsékletre állítani.
• Nem túl alacsony a helyiség hőmérséklete?
• Elhelyezett nagy víztartalmú élelmiszert a hűtőszekrény leghidegebb részében?
Próbálja az ilyen élelmiszereket a hűtőszekrény fő rekeszében, nem pedig a
CoolSelect Zone™ fi ókban tárolni.
• Ellenőrizze, hogy a hűtőszekrény vízszintes és stabil-e.
• Túl közel van a falhoz a hűtőszekrény hátsó része, és így megakadályozza a levegő
keringését?
• Nem esett le valamilyen tárgy a hűtőszekrény mögé vagy alá?
• Kattogó hang hallatszik a hűtőszekrény belsejéből. Ez normális, és azért van, mert
a különböző alkatrészek összehúzódnak vagy kitágulnak a hűtőszekrény belső
hőmérsékletétől függően.
• Valamennyi hő normális, mivel a hűtőszekrény elülső sarkaira melegítő csöveket
építettek be a páralecsapódás megelőzése érdekében.
• Nincs nyitva a hűtőszekrény ajtaja? A páralecsapódás fordulhat elő, ha sokáig nyitva
hagyja az ajtót.
• Várt 12 órát a vízadagoló vezeték bekötése után, mielőtt jeget készített volna?
• Csatlakoztatva van a vízvezeték, és a zárószelep nyitva van?
• Nem állította le manuálisan a jégkészítési funkciót? Ellenőrizze, hogy az Ice Type
(Jégtípus) beállítása Cubed (Jégkocka) vagy Crushed (Jégkása).
• Nem akadt el a jég a jégtárolóban?
• Nem túl magas a mélyhűtő hőmérséklete? Próbálja lejjebb venni a mélyhűtő
hőmérsékletét.
• Ez normális. A bugyborékolás oka, hogy hűtőfolyadék kering a hűtőszekrényben.
• Nem romlott meg az élelmiszer?
• Ügyeljen rá, hogy az erős szagú élelmiszer (például hal) légmentesen legyen
becsomagolva.
• Rendszeres időközönként tisztítsa meg a mélyhűtőt, és dobja ki a megromlott vagy
gyanús élelmiszert.
• Nem záródott el a szellőzőnyílás? Távolítsa el az akadályokat, hogy a levegő
szabadon keringhessen.
• Biztosítson elegendő helyet a tárolt élelmiszerek között, hogy a levegő szabadon
keringhessen.
• Megfelelően be van csukva van a mélyhűtő ajtaja?
• Csatlakoztatva van a vízvezeték, és a zárószelep nyitva van?
• Nem nyomódott össze, és nem tört meg a vízadagoló cső?
Ellenőrizze, hogy nincs-e akadály a csővezetékben.
• Nem azért fagyott be a víztartály, mert túl alacsonyra állította a hűtőszekrény
hőmérsékletét?
Próbáljon magasabb hőmérsékletet beállítani a fő kezelőegységen.
22_ hibaelhárítás
Page 71

Hűtőgép
Gyártó SAMSUNG Electronics
Márka SAMSUNG
Kategória Háztartási hűtő/fagyasztó
Modell név RSH7Z*** RSH7P*** RSH7U***
Energiaosztály (A++/leghatékonyabb/G/legkevésbé hatékony/)
A+ A+ A+
Környezetbarát védjegy - - -
Villamosenergia-fogyasztás (kWh/
év 24 órá s szabványos vizsgálati
458 465 467
eredmények alapján)
Hűtőtér nettó térfogata (liter) 335 354 357
Fagyasztótér nettó térfogata (liter) 180 180 180
Fagyasztó besorolás
No Frost Frost Free Frost Free Frost Free
Áramkimaradási biztonság (óra) 12 12 12
Fagyasztási teljesítmény (kg/24 h) 12 12 12
Klímaosztály SN, N, ST, T SN, N, ST, T SN, N, ST, T
Zajszint (dBA) 43 43 43
Beépíthetőség Szabadonálló Szabadonálló Szabadonálló
Page 72

Környezeti hőmérsékleti határok
Ezt a hűtőszekrényt az adattáblán megadott hőmérséklet-osztályra megadott környezeti
hőmérséklet-tartományban való üzemelésre tervezték.
Besorolás Ábra Környezeti hőmérsékleti tartomány (°C)
Kiterjesztett mérsékelt övi
Mérsékelt övi N +16 – +32
Szubtrópusi ST +16 – +38
Trópusi T +16 – +43
A belső hőmérsékletre hatással lehetnek olyan tényezők, mint pl. a hűtőszekrény elhelyezése,
a környezeti hőmérséklet és az, hogy milyen gyakran nyitják az ajtót. A hőmérséklet beállításával ezek a tényezők kompenzálhatók.
Hungary
Ez a jelzés a terméken, tartozékain vagy dokumentációján arra utal, hogy hasznos élettartama végén a terméket és elektronikus tartozékait (pl. töltőegység, fejhallgató, USB kábel)
nem szabad a háztartási hulladékkal együtt kidobni. A szabálytalan hulladékba helyezés
által okozott környezet- és egészségkárosodás megelőzése érdekében ezeket a tárgyakat
különítse el a többi hulladéktól, és felelősségteljesen gondoskodjon az újrahasznosításukról
az anyagi erőforrások fenntartható újrafelhasználásának elősegítése érdekében.
A háztartási felhasználók a termék forgalmazójától vagy a helyi önkormányzati szervektől
kérjenek tanácsot arra vonatkozóan, hová és hogyan vihetik el az elhasznált termékeket a
környezetvédelmi szempontból biztonságos újrahasznosítás céljából.
Az üzleti felhasználók lépjenek kapcso latba beszállítójukkal, é s vizsgáljá k meg az adásvételi
szerződés feltételeit. Ezt a terméket és tartozékait nem szabad az egyéb közületi hulladékkal együtt kezelni.
SN +10 – +32
A termék hulladékba helyezésének módszere
(WEEE – Elektromos és elektronikus berendezések hulladékai)
Kapcsolatfelvétel : SAMSUNG WORLD WIDE
Bármilyen észrevétele, vagy kérdése van Samsung termékekkel kapcsolatban,
forduljon a SAMSUNG ügyfélszolgálathoz
Samsung Electronics Magyar Rt.Szépvölgyi Business Park, 1138 Budapest,
Dunavirág utca 2.
06-80-SAMSUNG(7267864)
www.samsung.com
Page 73

Chladnička
návod k obsluze a instalaci
Tato příručka je vyrobena ze 100% recyklovaného papíru.
představujte si možnosti
Děkujeme vám, že jste si zakoupili výrobek
společnosti Samsung. Pokud se zaregistrujete
na následující adrese, získáte lepší servis:
www.samsung.com/register
Volně stojící přístroj
Čeština
Page 74

Bezpečnostní informace
BEZPEČNOSTNÍ INFORMACE
• Před použitím tohoto spotřebiče si pečlivě
přečtěte návod a uchovejte jej na bezpečném
místě poblíž spotřebiče pro budoucí potřebu.
• Používejte tento přístroj pouze pro účely, k
nimž je určen, a to způsobem popsaným v
této příručce. Tento spotřebič není určen pro
používání osobami (včetně dětí) se sníženými
psychickými, smyslovými nebo duševními
schopnostmi, nebo nezkušenými osobami,
pokud nejsou pod dozorem nebo nebyly
poučeny o způsobu používání spotřebiče
osobou odpovědnou za jejich bezpečnost.
• Varování a důležité bezpečnostní pokyny
uvedené v této příručce nezahrnují všechny
možné podmínky a situace, které můžou
nastat. Je na vaší zodpovědnosti, abyste
při instalaci, údržbě a používání spotřebiče
postupovali rozumně, obezřetně a pečlivě.
• Následující návod k obsluze slouží pro více
modelů, a proto se vlastnosti vaší chladničky
mohou v některých detailech odlišovat od
vlastností, které jsou v návodu popsány, a ne
všechny varovné značky musí platit. V případě
jakýchkoli dotazů nebo problémů se obraťte
na nejbližší servisní centrum nebo vyhledejte
pomoc a informace online na adrese www.
samsung.com.
Důležité bezpečnostní symboly a
opatření:
Riskantní a nebezpečné jednání,
VÝSTRAHA
UPOZORNĚNÍ
které může vést k vážnému
poranění nebo smrti.
Riskantní a nebezpečné jednání, které
může vést k lehčímu poranění nebo
k poškození majetku.
NEPOKOUŠEJTE SE.
NEROZEBÍREJTE.
NEDOTÝKEJTE SE.
Pečlivě dodržujte pokyny.
Odpojte napájení ze zásuvky.
Ujistěte se, že je spotřebič
uzemněn, aby nedošlo k úrazu
elektrickým proudem.
Zavolejte kontaktní středisko, kde
vám pomohou.
Poznámka.
Smyslem výstražných symbolů je předejít úrazu,
který by se mohl stát vám nebo někomu jinému.
Dodržujte je prosím pečlivě.
Po přečtení této části ji uložte na bezpečné
místo pro možné použití v budoucnosti.
Označení CE
Tento výrobek je ve shodě se základními požadavky a dalšími
příslušnými ustanoveními směrnice 2006/95/ES o harmonizaci
právních předpisů členských států týkajících se elektrických
zařízení určených pro používání v určitých mezích napětí,
směrnice o elektromagnetické kompatibilitě (EMC) 2004/108/
ES a směrnice 2009/125/ES o stanovení rámce pro určení
požadavků na ekodesign výrobků spojených se spotřebou
energie dle Nařízení Komise (ES) č. 643/2009.
DŮLEŽITÉ VÝSTRAŽNÉ
SYMBOLY PRO PŘEPRAVU
VÝSTRAHA
A UMÍSTĚNÍ
• Při dopravě a instalaci spotřebiče je třeba
dbát, aby nedošlo k poškození některé
části chladicího okruhu.
-
Pokud chladicí médium unikne z okruhu, může
vzplanout nebo způsobit poranění očí. Zjistíteli únik
chladiva, nepřibližujte se k chladničce s otevřeným
plamenem nebo předměty, které by mohly způsobit
požár a místnost důkladně vyvětrejte.
•
Aby se při výskytu netěsnosti chladicího okruhu
nevytvořila výbušná směs vzduch – plyn, je třeba umístit
chladničku do místnosti dostatečné velikosti; velikost
místnosti závisí na množství použitého chladicího média.
• Nikdy nezapínejte chladničku, která vykazuje jakékoli
známky poškození. Jste-li na pochybách, konzultujte
problém s vaším prodejcem. Velikost místnosti, ve které je
chladnička umístěna, musí být taková, aby na každých 8 g
chladiva R600a ve spotřebiči připadl 1m3 prostoru. Objem
chladícího média obsažený ve vašem modelu chladničky
je uveden na technickém
štítku uvnitř
chladničky.
2_ bezpečnostní
Page 75

DŮLEŽITÉ VÝSTRAŽNÉ
VÝSTRAHA
- Při poškození izolace by mohlo dojít k úrazu
• Chladničku neumísťujte na místo, kde by byla
• Nezapojujte více spotřebičů do společné
- Správným zapojením zajistíte optimální výkon
• Nepoužívejte k zapojení chladničky uvolněné
- Vzniká nebezpečí požáru nebo úrazu elektrickým
• Nepoužívejte kabel, jehož izolace je popraskaná
• Přívodní kabel nadměrně neohýbejte a nestavte
• Nepoužívejte v blízkosti chladničky spreje.
- Používání sprejů v blízkosti chladničky může vést
• Zástrčku zapojte ve správné poloze s kabel
- Pokud zástrčku zapojíte dolní stranou vzhůru,
•
• Při posunování chladničky dbejte, aby se kabel
- Vzniká tím nebezpečí požáru.
• Spotřebič musí být umístěn tak, aby po instalaci
k probíjení a následně k úrazům elektrickým proudem.
• Pro uzemnění nikdy nepoužívejte plynové
- Nesprávné připojení uzemnění může způsobit
SYMBOLY PRO INSTALACI
•
Chladničku neinstalujte ve vlhkém prostředí, nebo
tam, kde by mohlo dojít ke kontaktu s vodou.
elektrickým proudem nebo k požáru.
vystavena přímému slunečnímu záření nebo
teplu ze sporáku, kamen nebo jiných zařízení.
zásuvky. Chladnička by měla být vždy zapojena
do samostatné zásuvky s napětím, které
odpovídá údajům na technickém štítku.
chladničky a předejdete případnému přetížení
elektrických okruhů ve vaší domácnosti, které by
mohlo vést ke vzniku požáru.
zásuvky.
proudem.
nebo jakkoli poškozená.
na něj těžké předměty.
k explozi nebo požáru.
• Před uvedením do provozu je chladničku
třeba vhodně umístit a správně instalovat
podle pokynů uvedených v této příručce.
zavěšeným směrem dolů.
může dojít k vytržení kabelu a k úrazu elektrickým
proudem.
Ujistěte se, že přívodní napájecí kabel není v zadní
části chladničky přiskřípnut nebo poškozen.
nedostal pod těleso chladničky a nedošlo tak k
jeho skřípnutí a poškození.
zařízení byla napájecí zásuvka přístupná.
• Chladnička musí být uzemněna.
Chladničku je třeba uzemnit, aby nedocházelo
-
potrubí, telefonní vedení nebo hromosvody.
úraz elektrickým proudem.
• Poškozený kabel ihned vyměňte u výrobce,
nebo za pomoci servisního technika.
• Pojistka na chladničce musí být měněna
kvalifi kovaným technikem nebo v servisu.
- Nedodržení tohoto pokynu může vést k úrazu
elektrickým proudem nebo k jinému zranění.
UPOZORNĚNÍ TÝKAJÍCÍ SE
UPOZORNĚNÍ
• Po instalaci spotřebič nechejte stát v klidu po
INSTALACE
• Ventilační otvory v konstrukci spotřebiče
nebo jeho krytech udržujte volné.
dobu 2 hodin.
DŮLEŽITÉ VÝSTRAŽNÉ
VÝSTRAHA
SYMBOLY PRO POUŽITÍ
• Přívodní kabel nepřipojujte do zásuvky
mokrýma rukama.
Neskladujte předměty na vrchní ploše chladničky.
•
- Při otevření dveří mohou předměty spadnout a
někoho zranit nebo způsobit hmotnou škodu.
• Na chladničku nepokládejte nádoby s vodou.
- Při rozlití vzniká nebezpečí požáru a úrazu
elektrickým proudem.
• Nedovolte, aby se děti věšely na dveře
chladničky.
- Nedodržení tohoto pokynu může vést k vážnému
poranění.
• Nenechávejte dveře chladničky otevřené, pokud
je chladnička bez dozoru, a zabraňte dětem ve
vstupování do chladničky.
-
Hrozí nebezpečí uvíznutí dítěte v chladničce a vážného
poškození v důsledku působení nízkých teplot.
• Nikdy nedávejte prsty ani předměty do otvoru
zásobníku ledu.
- Nedodržení tohoto pokynu může vést k
vážnému poranění nebo hmotné škodě.
• Neskladujte v chladničce těkavé nebo hořlavé
látky, například benzen, ředidla, alkohol, éter
nebo zemní plyn.
- Skladování uvedených produktů by mohlo vést k
explozi.
• V prostorách chladničky neskladujte
farmaceutické produkty, vědecké materiály ani
jiné materiály citlivé na nízkou teplotu.
- Produkty, které vyžadují přesnou regulaci teploty
nesmí být skladovány v chladničce.
• Ve vnitřním prostoru chladničky nepoužívejte
elektrické spotřebiče, pokud nejsou přímo
výrobcem doporučeny.
bezpečnostní _3
Page 76

• K vysoušení vnitřku chladničky
nepoužívejte vysoušeč vlasů.
Neumisťujte do chladničky zapálenou
svíčku pro odstranění zápachu.
- Mohlo by dojít k úrazu elektrickým proudem
nebo požáru.
• Nedotýkejte se vnitřních stěn mrazničky, nebo
uskladněných zmrazených produktů vlhkýma
rukama.
- Mohli byste si způsobit omrzliny.
• K odstranění ledu při odmrazování nepoužívejte
žádné mechanické nářadí, ani jiné prostředky,
které nejsou doporučeny výrobcem.
• Dbejte, aby nedošlo k poškození chladicího
okruhu.
• Tento výrobek je určen pouze k domácímu
použití pro skladování potravin.
• Láhve je třeba skladovat uložené těsně vedle
sebe tak, aby nevypadly.
• Pokud je zjištěn únik plynu, nepřibližujte se k
chladničce s otevřeným ohněm nebo jiným
prostředkem, který může způsobit vznícení, a
vyvětrejte místnost, ve které chladnička stojí po
dobu několika minut.
• Používejte pouze LED diody dodávané
výrobcem nebo servisními zástupci.
• Je třeba zajistit, aby si děti nehrály s tímto
spotřebičem ani na něj nešplhaly.
• Chladničku nikdy sami neopravujte ani
nerozebírejte.
- Mohli byste způsobit požár, poškodit přístroj
nebo si přivodit zranění. V případě závady
kontaktujte servisního zástupce.
Pokud spotřebič vydává silný zvuk, hoří
•
nebo uvolňuje kouř, odpojte zástrčku okamžitě
ze sítě a kontaktujte nejbližší servisní centrum.
-
Pokud tak neučiníte, vystavujete se nebezpečí
zranění nebo požáru. Ventilační otvory v konstrukci
spotřebiče nebo jeho krytech udržujte volné.
• Jestliže je pro vás výměna vnitřního osvětlení
příliš složitá, obraťte se na servisní zástupce.
• Pokud jsou produkty vybaveny LED diodami,
neprovádějte sami demontáž krytu osvětlení a
LED diody.
- Obraťte se na servisní zástupce.
• Pokud do chladničky vnikne prach nebo voda,
okamžitě vytáhněte napájecí kabel ze zásuvky
a kontaktujte servisní centrum fi rmy Samsung
Electronics.
- V opačném případě vzniká nebezpečí požáru.
UPOZORNĚNÍ TÝKAJÍCÍ
UPOZORNĚNÍ
- Před uložením do chladničky potraviny
• Perlivé nápoje do mrazničky nepatří. Láhve ani
- Po zmrznutí obsahu může sklo prasknout a
• Neměňte funkce chladničky a neupravujte ji.
- Změny nebo úpravy mohou vést ke zranění
• Nezakrývejte větrací otvory.
- V případě zakrytí větracích otvorů, zvláště pokud
- Čerstvé potraviny ke zmražení nepokládejte
• Dodržujte doporučenou dobu skladování a
• Zásobník na vodu a přihrádku na výrobu ledu
• Používejte pouze výrobník ledu dodaný s
• Přívod vody do chladničky musí být nainstalován/
• Pro správnou funkci výrobníku ledu je třeba tlaku
SE ČIŠTĚNÍ
•
Jak dosáhnout optimálního výkonu spotřebiče
- Neukládejte potraviny příliš blízko
ventilačních otvorů v zadní části chladničky,
aby nebránily volné cirkulaci vzduchu.
vhodným způsobem zabalte nebo je vložte do
hermetických nádob.
skleněné nádoby nedávejte do mrazničky.
způsobit zranění nebo materiální škody.
nebo k poškození majetku. Na změny nebo
úpravy prováděné na spotřebiči třetí stranou se
nevztahuje servisní záruka společnosti Samsung
a společnost Samsung nezodpovídá za
bezpečnostní problémy a poškození zapříčiněná
úpravami, které provedly třetí osoby.
jsou zakryty igelitem, může dojít k nadměrnému
ochlazení chladničky. Pokud by byly otvory
zakryty příliš dlouho, mohlo by dojít k prasknutí
vodního fi ltru a to by vedlo k úniku vody.
těsně vedle zmražených potravin.
datum spotřeby mražených potravin.
plňte pouze pitnou vodou.
chladničkou.
připojen pouze osobou s odpovídající kvalifi kací
a připojen pouze ke zdroji pitné vody.
vody 138 až 862 kPa (1.4~8.8kgf/cm3).
4_ bezpečnostní
Page 77

UPOZORNĚNÍ TÝKAJÍCÍ SE
UPOZORNĚNÍ
- Vzniká tím nebezpečí požáru nebo úrazu
• V blízkosti chladničky nepoužívejte hořlavé
- Hrozí nebezpečí výbuchu, nebo požáru.
• Čistícími prostředky nepostřikujte přímo displej.
- Mohlo by dojít k setření potisku displeje.
• Z kontaktů vidlice odstraňte nečistoty a prach.
- Jinak vzniká nebezpečí požáru nebo úrazu
• Nikdy nedávejte prsty, nebo jiné předměty do
- Můžete si způsobit zranění nebo poškodit
ČIŠTĚNÍ A ÚDRŽBY
• Nepoužívejte přímý proud vody na čištění
vnitřních ani vnějších stěn chladničky.
elektrickým proudem.
spreje.
Při čištění vidlice přívodního kabelu nepoužívejte
mokré ani vlhké textilie, z kolíků vidlice
odstraňujte nečistoty a prach.
elektrickým proudem.
otvoru zásobníku ledu.
přístroj.
• Před čištěním nebo opravou odpojte
chladničku ze sítě.
VÝSTRAHY TÝKAJÍCÍ SE
VÝSTRAHA
• Jako chladicí medium je použit isobutan R600a
Obsahuje-li tento výrobek vznětlivý plyn (chladivo
Před likvidací přístroje zkontrolujte, zda trubky na
• Pokud chladnička obsahuje chladicí médium
• Při likvidaci této nebo jiné chladničky odstraňte
LIKVIDACE
• Před likvidací chladničky zkontrolujte, zda
trubky na zadní stěně přístroje nejsou
poškozeny.
nebo R134a. Typ chladicího média je uveden na
štítku kompresoru na zadní straně spotřebiče a
na technickém štítku uvnitř chladničky.
R600a), obraťte se na obecní úřad, který vám
poradí, jak bezpečně tento výrobek zlikvidovat.
Jako plnící plyn pří výrobě izolace je použit
cyklopentan. Plyny obsažené v izolačních
materiálech musí být likvidovány speciálními
způsobem. Obraťte se na obecní úřad, kde vám
poradí, jak bezpečně zlikvidovat tento výrobek.
zadní stěně přístroje nejsou poškozeny. Trubky
mají být odpojeny na volném prostranství.
isobutan (R600a), jedná se o přírodní plyn bez
podstatného vlivu na životní prostředí, který je však
také hořlavý. Při dopravě a instalaci spotřebiče je
třeba dbát, aby nedošlo k poškození některé části
chladicího okruhu.
dveře/těsnění dveří, kliku dveří, aby nemohlo dojít k
tomu, že malé dítě nebo zvíře zůstane v chladničce
uzavřeno. Ponechte zásuvky v chladničce, aby do
skříně nemohly snadno vlézt děti. Je třeba zajistit,
aby si děti nehrály s vyhozeným spotřebičem.
• Zlikvidujte prosím obalový materiál tohoto výrobku
způsobem, který šetří životní prostředí.
DALŠÍ DOPORUČENÍ PRO
SPRÁVNÉ POUŽÍVÁNÍ
• V případě výpadku elektrické energie zavolejte do
kanceláře místní energetické společnosti a zeptejte
se, jak dlouho bude výpadek trvat.
- Většina výpadků elektrické energie je vyřešena
během jedné nebo dvou hodin, což teplotu ve vaší
chladničce neovlivní. V době, kdy je vypnutý proud,
ale omezte otevírání chladničky na minimum.
- Pokud by výpadek elektrické energie trval déle než
2 hodiny, vyndejte všechen led z tvořiče ledu.
- Pokud by výpadek elektrické energie trval déle než
24 hodin, vyndejte veškeré mražené potraviny.
• Je-li vaše chladnička vybavena zámkem, klíče od
přístroje by neměly být ukládány v dosahu dětí ani
v blízkosti spotřebiče.
• Je-li okolní teplota chladničky po delší dobu nižší
než je rozpětí teplot, pro které je určena, může
dojít ke krátkodobému přerušení chodu přístroje
(možnost rozmrazení obsahu nebo zvýšení teploty
v oddělení pro zmrazené potraviny).
• Neskladujte potraviny, které snadno podléhají
zkáze při nízkých teplotách, jako jsou banány nebo
melouny.
• Zařízení je vybaveno systémem automatického
odmrazování, to znamená, že ji není třeba
odmrazovat manuálně.
• Křivka zvýšení teploty během automatického
odmrazování zcela odpovídá normám ISO.
Chceteli však předejít nežádoucímu zvýšení teploty
zmrazených potravin při odmrazování, zabalte
mražené potraviny do několika vrstev novinového
papíru.
• Každé zvýšení teploty zmrazených potravin
během rozmrazování může zkrátit maximální dobu
skladování.
bezpečnostní _5
Page 78

Rady, jak šetřit energii
- Umístěte přístroj v chladné, suché a dostatečně
větrané místnosti.
Dbejte, aby nebyl vystaven přímému dopadu
slunečních paprsků a nebyl umístěn v těsné blízkosti
zdroje tepla (např. radiátoru).
- Nikdy nezakrývejte ventilační otvory a mřížky
přístroje.
- Horké pokrmy nechejte vychladnout než je uložíte
do chladničky.
- Zmrazené potraviny rozmrazujte v chladničce.
Využijete tak jejich nízké teploty k ochlazení
ostatních potravin uložených v chladničce.
- Při manipulaci s uloženými potravinami
nenechávejte dveře chladničky příliš dlouho
otevřené.
Dlouhé a časté otevírání dveří způsobuje nadměrnou
tvorbu ledu v mrazničce.
- Pravidelně čistěte zadní stranu chladničky. Prach
zvyšuje spotřebu energie.
- Nenastavujte chladnější teplotu, než jakou
potřebujete.
- Zajistěte dostatečné místo pro ventilaci u základny
chladničky a na její zadní straně.
Nezakrývejte ventilační otvory.
- Při instalaci ponechte vpravo, vlevo, vzadu a
nad chladničkou volný prostor. Tím pomůžete
snížit spotřebu energie a také částky na vašich
složenkách.
Obsah
NASTAVENÍ VAŠÍ CHLADNIČKY TYPU SIDE-BY-SIDE ·································7
POUŽÍVÁNÍ CHLADNIČKY SAMSUNG TYPU SIDE-BY-SIDE ·······················16
ODSTRAŇOVÁNÍ ZÁVAD ················································································22
6_ bezpečnostní
Page 79

Nastavení vaší chladničky
typu side-by-side
PŘÍPRAVA NA INSTALACI
CHLADNIČKY
Blahopřejeme vám ke koupi chladničky Samsung
typu Side-By-Side. Věříme, že využijete mnoho
nejnovějších vlastností a schopností, kterými tento
nový přístroj disponuje.
Výběr nejlepšího místa pro chladničku
• Vyberte místo se snadným přístupem k přívodu
vody.
• Vyberte místo bez přímého působení slunečních
paprsků.
• Vyberte místo s vodorovnou (nebo skoro
vodorovnou) podlahou.
• Vyberte místo, na kterém je dostatek prostoru pro
snadné otevírání dveří chladničky.
• Prostor nutný k zajištění správného fungování
přístroje. Viz údaje na zobrazení uvedeném níže.
• Zajistěte, aby se spotřebič dal jednoduše posunout
v případě nutnosti údržby a servisu.
25mm
Posunování vaší chladničky
Ujistěte se, že přední stavěcí nohy jsou v horní poloze
(nad podlahou), aby nedošlo k poškození podlahy.
Viz “Ustavení chladničky do vodorovné polohy” v
tomto návodu (stránka 11).
Kvůli ochraně podlahové krytiny vložte pod
chladničku ochrannou vrstvu, např. kartón.
UPOZORNĚNÍ
Noha
Pokud instalujete, provádíte servis nebo
uklízíte za chladničkou, vytáhněte přístroj
rovně dopředu a po dokončení prací ho
zatlačte opět rovně zpět na místo.
Šroubovák
01 NASTAVENÍ
50mm
nejméně 50mm nejméně 50mm
732mm
1027mm
160º
160º
1724mm
777mm
1155mm
nastavení _7
Page 80

DEMONTÁŽ DVEŘÍ CHLADNIČKY
Pokud není možné projít s chladničkou některými
dveřmi, je možné demontovat dveře chladničky.
1. Při zavřených dveřích mrazničky sundejte pomocí
1
šroubováku kryt horního závěsu
opatrným táhnutím od sebe rozpojte vodiče
a pak
2
.
1. Demontáž krytu předních nohou
Otevřete dveře mrazničky a chladničky, vyšroubujte tři
šrouby a vyjměte kryt předních nohou.
Odpojení přívodu vody do chladničky
1. Stlačením uvolněte spojku 1 a vytáhněte přívodní
hadicii
2
.
Postupujte
opatrně,
propojené přívodní
hadice musí mít
stejnou barvu.
1
2
2. Demontáž dveří mrazničky
Nejdříve několik důležitých připomínek.
• Dveře zvedejte přímo nahoru, aby nedošlo ke
zkřivení nebo prasknutí závěsů.
• Postupujte opatrně, abyste nepoškodili vodní
potrubí nebo kabelový svazek na dveřích.
• Dveře dejte na chráněnou plochu, aby se
nepoškrábaly nebo nepoškodily.
1
2. Odšroubujte šrouby závěsů
4
a sundejte horní závěs 5. Při demontáži dveří
2
3
a zemnící šroub
postupujte opatrně, aby na vás nespadly.
4
3
5
6
3. Dále sundejte dveře ze spodního závěsu
že je opatrně zvednete přímo nahoru
7
6
tak,
7
.
Postupujte opatrně, abyste nepoškodili vodní
potrubí nebo kabelový svazek na dveřích.
4. Opatrně vytáhněte směrem nahoru spodní závěs
8
z držáku 9.
8_ nastavení
Page 81

Demontáž dveří chladničky
1. Při zavřených dveřích sundejte pomocí šroubováku
kryt horního závěsu
1
.
MONTÁŽ DVEŘÍ CHLADNIČKY
Jakmile jste bezpečně dopravili chladničku na místo,
kde má být nainstalována, je čas vrátit zpět dveře.
1
2. Odšroubujte šrouby závěsů
3
a sundejte horní závěs 4. Při demontáži dveří
2
a zemnící šroub
postupujte opatrně, aby na vás nespadly.
2
3
4
5
3. Sundejte dveře ze spodního závěsu
opatrně zvednete přímo nahoru
6
tak, že je
.
4. Opatrně vytáhněte směrem nahoru spodní závěs
7
z držáku 8.
Montáž dveří mrazničky
1. Nejprve nasaďte hadici 1 ve spodní části dveří
do otvoru ve spodním závěsu
Lehce zasunujte hadici zpět dolů, tak aby byla
rovně, bez smyček nebo ohybů.
2. Čep horního závěsu
dveří mrazničky
4
.
Zarovnejte otvory v závěsu
skříni chladničky
upevňující závěs
6
a zašroubujte zpět šrouby
7
a zemnící šroub 8.
Propojte vodiče.
8
5
6
3. Nasaďte přední část krytu horního závěsu
přední část horního závěsu
šroubem.
2
.
1
2
3
zasuňte do otvoru v rohu
5
s otvory ve
7
3
4
a kryt zajistěte
10
9
na
01 NASTAVENÍ
10
9
nastavení _9
Page 82

Montáž dveří chladničky
Střed průhledné spojky
svorka A (1/4 palce)
(6,35 mm)
1. Zasuňte spodní závěs 1 zpět do držáku
spodního závěsu
2
.
Připojení přívodu vody do chladničky
1. Přívod vody 2 zasuňte do spojky
1
2
1
.
2. Dveře chladničky nasaďte otvorem
rohu dveří, na čep spodního závěsu
3
4
5
3. Čep horního závěsu
dveří chladničky
7
s otvory ve skříni chladničky 8. Potom
zasuňte do otvoru v rohu
6
. Zarovnejte otvory v závěsu
zašroubujte zpět šrouby upevňující závěs
zemnící šroub
.
10
3
, který je v
4
.
9
a
4. Nasaďte p st krytu horního závěsu 11 na přední
část horního závěsu
a kryt zajistěte šroubem.
12
1
2
2. Vodovodní přípojku je třeba zcela zasunout do
středu průhledné spojky, aby nedocházelo k
unikání vody z rozvodu.
3. Nasaďte 2 svorky z instalačního balení a
zkontrolujte, zda každá ze svorek pevně drží
přípojku.
Střed průhledné spojky
svorka A (1/4 palce)
(6,35 mm)
Přívodní hadice nepřeřezávejte. Opatrně je
vyjměte ze spojky.
Montáž krytu předních nohou
Před připevněním krytu zkontrolujte těsnost
připojení vody.
Kryt předních nohou nasaďte na své místo, jak
je ukázáno na obrázku, a přitáhněte ho třemi
šrouby.
11
10_ nastavení
12
Page 83

USTAVENÍ CHLADNIČKY DO
VODOROVNÉ POLOHY
Poté, co jsou dveře nasazeny, je nutné se ujistit, že
je chladnička vodorovně, aby bylo možné dokončit
nastavení. Pokud není chladnička vodorovně, nebude
možné provést dokonalé vyrovnání dveří.
Přední část chladničky je také nastavitelná.
Dveře mrazničky jsou níže než dveře
chladničky
Vložte šroubovák s plochou čepelí do drážky na
noze, otočte jej ve směru hodinových ručiček nebo
proti směru hodinových ručiček pro nastavení
mrazničky.
Noha
Šroubovák
Dveře mrazničky jsou výše než dveře
chladničky
Vložte šroubovák s plochou čepelí do drážky na
noze, otočte jej ve směru hodinových ručiček nebo
proti směru hodinových ručiček pro nastavení
chladničky.
Noha
ŠroubovákDriver
Nejlepší způsob, jak udělat velmi malé změny
nastavení dveří, je uveden v následující
části.
PROVÁDĚNÍ JEMNÉHO
NASTAVENÍ DVEŘÍ
Pamatujte na to, že nastavení chladničky do
vodorovné polohy je nutné pro dokonalé zarovnání
dveří. Pokud potřebujete nápovědu jak ustavit
chladničku do vodorovné polohy, přečtěte si
předešlou část.
Dveře mrazničky jsou níže
než dveře chladničky
Nastavovací
mechanizmus
V obou případech je postup pro seřízení nevyrovnanosti
stejný. Otevřete dveře a postupně je nastavte
následujícím způsobem :
1.
Vyšroubujte matici
1
, která je na
spodním závěsu,
až na horní konec
2
šroubu
2. Výškový rozdíl
mezi dveřmi
seřiďte otáčením
šroubu
doprava
nebo doleva
3. Po nastavení polohy dveří otáčejte maticí
doprava
až dosáhnete
dolního konce
šroubu, potom
opět utáhněte
šroub pomocí
klíče
zajistěte tak matici
.
Po uvolnění
1
matice
klíč
směru hodinových ručiček. Potom budete
schopni odšroubovat
Otáčením doprava
Pokud matici řádně neutáhnete, může se šroub
uvolnit.
, se ujistěte, že používáte šestistěnný
3
používaný na uvolnění šroubu 2 proti
1
matici rukou.
2
.
, se dveře zvedají.
3
a
1
.
3
Klíč
Šroub
2
1
Matice
3
Klíč
2
Šroub
1
3
Klíč
2
Šroub
1
Matice
nastavení _11
01 NASTAVENÍ
Page 84

KONTROLA PŘÍVODU VODY DO
Dávkovač ledu
ZÁSOBNÍKU (V ZÁVISLOSTI NA
MODELU)
Chladič pitné vody s výdejem je jedna z užitečných
vlastností vaší nové chladničky Samsung. Vodní fi ltr
Samsung odstraňuje z vody nežádoucí částice a
napomáhá tak zlepšit vaše zdraví. Neslouží však ke
sterilizaci ani neničí mikroorganismy. Pro tento účel
byste si museli zakoupit čistící systém na vodu. Pro
potřeby správné funkce výrobníku ledu je zapotřebí
tlak vody v rozmezí 138~862 Kpa. Při tomto tlaku se
papírový kelímek o objemu 1,7 dl naplní během 10
sekund. Pokud je chladnička nainstalována v místě s
nízkým tlakem vody (méně než 138 Kpa), je možné
nainstalovat přídavné čerpadlo, které bude nízký tlak
kompenzovat. Ověřte, zda je zásobník vody, který je
umístěn uvnitř chladničky, řádně naplněn. Zásobník
naplníte tak, že držíte páku chladiče pitné vody
stlačenou tak dlouho, dokud nezačne z vypouštěcího
otvoru.
Jednotka obsahuje i instalační soupravu pro
vodovod. Najdete ji v zásuvce v mrazničce.
POUŽÍVÁNÍ VÝROBNÍKU LEDU
Vyjmutí nádoby na led
- Uchopte rukojeť jako na
obrázku 1.
- Lehce zatáhněte za spodní
část.
- Pomalu vyjměte nádobu na
led.
- Pokud led nevystupuje, ujistěte se, zda není žlab
blokován zaseknutým ledem a případě nutnosti jej
odstraňte.
- První dávka ledových kostek může být malá
vzhledem k přítomnosti vzduchu v potrubí po
připojení; v průběhu normálního používání bude
veškerý vzduch vytlačen.
- Když na displeji zabliká zpráva ICE OFF,
VÝSTRAHA
vložte nádobu nebo zkontrolujte, zda je
správně vložena.
- Dávkovače ledu a vody nefungují při
otevřených dveřích.
- Prudké zavření dveří může způsobit rozlití
vody ve výrobníku ledu.
- Nádobu na led držte při vyjímání oběma
rukama, aby vám nevypadla.
- Ukliďte všechen led a vodu, které případně
spadnou na podlahu, abyste předešli úrazu.
- Nedovolte dětem, aby se věšely na
dávkovač ledu nebo na nádobu na led.
Mohlo by dojít k úrazu.
- Do dávkovače ledu nevkládejte ruce ani
jiné předměty. Může dojít k úrazu nebo
poškození mechanických součástí.
INSTALACE PŘÍVODU VODY DO
ZÁSOBNÍKU
Pro model instalovaný v interiéru
Díly na instalaci vodovodu
Nasazení nádoby na
led do původní polohy
- Montáž se provádí opačným
postupem než demontáž.
-
Zatlačte nádobu na led dovnitř,
dokud neuslyšíte cvaknutí.
- Pokud nádoba nezapadne
na místo, otočte rukojetí
šroubu na její zadní straně o
90°a znovu nádobu vložte,
jako na obrázku 2.
Normální provoz
-
Zvuky, které se ozývají při
tom, když kostky ledu padají z
výrobníku ledu do nádoby, jsou
normálním jevem při provozu.
- Pokud nebude led delší dobu
odebírán z nádoby, může
dojít ke slepení kostek ledu v
nádobě. Vyjměte zbývající led
a nádobu vyprázdněte.
12_ nastavení
Obrázek 1
Obrázek 2
Dávkovač ledu
2
1
Šroubovák a šrouby na
vodovod
3
Vodovod
4
Příchytka a
spojnice pro potrubí
5
Vodní fi ltr
Připojení k vodovodnímu potrubí
1. Nejprve odpojte hlavní vedení přívodu vody.
2. Vyhledejte nejbližší potrubí studené pitné vody.
3. Postupujte v souladu s pokyny, které naleznete v
instalační sadě.
UPOZORNĚNÍ
Přívod musí být připojen k potrubí se
studenou vodou. Pokud je připojen k
teplovodnímu potrubí, může způsobit
selhání čističe.
Page 85

uzavřete hlavní
uzavřete hlavní
přívod vody
uzavřete hlavní
přívod vody
BEZ MEZERY
Sundejte
Víčko
Trubka vedoucí
ze spotřebiče
Trubka vedoucí
Ze spotřebiče
BEZ
MEZERY
Povolte a
přívod vody
uzavřete hlavní
přívod vody
BEZ MEZERY
4. Po zapojení přívodu vody do vodního fi ltru znovu
zapněte hlavní přívod vody a nalijte asi 1l na
vyčistění a naplnění vodního fi ltru.
Připojení přívodu vody do chladničky
1. Sundejte víčko z přívodu vody na spotřebiči a
na trubku nasuňte přítužnou matici, kterou jste
předem odšroubovali z trubky v instalační sadě.
2. Spojte obě trubky, trubku ze spotřebiče s trubkou
z instalační sady.
3. Přitáhněte přítužnou matici na tlakovou spojku.
Postupujte opatrně, mezi částmi nesmí zůstat
mezera.
4. Otevřete přívod vody a zkontrolujte těsnost spojů.
Povolte a
Sundejte
Víčko
• Záruka společnosti Samsung nepokrývá
INSTALACI VODOVODU.
• Instalace se vykoná na náklady zákazníka s
výjimkou případu, kdy maloobchodní cena
zahrnovala i náklady na instalaci.
• Při instalaci kontaktujte v případě potřeby
autorizovaného instalatéra.
• Pokud dojde k průsaku vody v důsledku nesprávné
instalace, kontaktujte prosím instalatéra.
INSTALACE POTRUBÍ
DÁVKOVAČE VODY
Model pro instalaci v exteriéru
Díly na instalaci vodovodu
01 NASTAVENÍ
Trubka vedoucí
ze spotřebiče
Trubka vedoucí
Ze spotřebiče
Přívod vody připojte pouze ke zdroji pitné vody.
Pokud musíte opravit nebo rozebrat tlakovou
spojku, odřízněte z konce plastové trubky
BEZ
MEZERY
6.5mm, aby vzniknul těsný spoj.
Před použitím by se měli na těchto
UPOZORNĚNÍ
místech prověřit možné úniky.
Šroubovák a šrouby
na vodovod
Vodovodní potrubí
Pojistka čističe
Spojnice pro potrubí
Připojení vodovodního přívodu
Připojte přívod vody pomocí spojky a kohoutku.
1. Uzavřete hlavní vodovodní kohout.
2. K vodovodnímu kohoutu připojte spojku “A”.
UPOZORNĚNÍ
Přívod musí být připojen k potrubí se
studenou vodou. Pokud je připojen k
teplovodnímu potrubí, může způsobit selhání
čističe.
nastavení _13
Čistič
Page 86

INFORMACE TÝKAJÍCÍ SE ZÁRUKY
Pojistka
Po usazení trubky vložte
pojistku
Tato instalace vodovodní přípojky nespadá do záručních
podmínek výrobce chladničky a výrobníku
ledu. Pečlivě dodržte tyto pokyny, abyste snížili riziko
drahých oprav po škodách způsobených vodou.
4. Po vložení trubice pevně nasaďte pojistku, která
bude držet trubici na místě.
Pozn.: Pokud nebude spojka odpovídat stávajícímu
vodovodnímu kohoutku, kontaktujte nejbližšího
autorizovaného servisního zástupce a zakupte správný
rozměr spojovacího dílce.
Zvolte si místo, kde bude čistič namontován.
(Model s čističem.)
- Odstřihněte vodovodní přívodní hadici připojenou
k čističi v naměřené vzdálenosti mezi čističem a
vodovodním kohoutkem studené vody.
- Pokud chcete znovu namontovat přívodní
a výtokovou stranu čističe během jeho
instalace,podívejte se na příslušný obrázek.
SPOJOVACÍ DÍLEC “A”
KOHOUTEK
90 stupňů
VÝSTRAHA
Po usazení trubky vložte
pojistku
Pojistka
DÍL
Výstupní strana
čističe vody
PROČIŠTĚNÁ VODA
VSTUPNÍ STRANA
ČISTIČE VODY
VÝSTUPNÍ VEDENÍ
SPOJOVACÍ
5. Otevřete přívod vody a zkontrolujte, zda neuniká.
Pokud dochází k únikům, opakujte kroky 1-4.
Pokud se vám nepodaří únikům zamezit, přestaňte
zařízení používat a kontaktujte našeho obchodního
zástupce.
6. Před použitím fi ltr 5 minut proplachujte.
Z čističe odstraňte veškeré zbytky.
(Model s čističem.)
- Otevřete hlavní vodovodní kohout a zkontrolujte,
zda voda vtéká do přítokové části čističe.
- Pokud voda potrubím neteče, zkontrolujte, zda je
kohoutek otevřený.
- Nechejte kohoutek otevřený, dokud nepoteče
čistá voda a zbytkový materiál z výroby nebude
vypláchnut.
VÝTOKOVÁ
VODA
STRANA
ČISTIČE
ČISTIČ
PRÍVOD
VODY
Připevnění pojistky čističe
- Přidržte pojistku čističe ve vhodné poloze (např.
pod dřezem) a pevně ji přišroubujte.
Pokyny pro výměnu
1. Odpojte přívod vody.
2. Všimněte si směru průtoku fi ltrem.
3. Zasuňte trubku přívodu vody do vstupní strany
fi ltru až nadoraz.
VSTUPNÍ STRANA –
PŘÍVOD VODY
14_ nastavení
SMĚR PRŮTOKU
Poznámka :
Řez musí být v
pravém úhlu k
podélné ose trubice,
aby nedocházelo k
úniku vody.
VÝSTUP
POJISTKA ČISTIČE
Čistič připevněte.
- Připevněte čistič v poloze podle obrázku vpravo.
VODNÍ TRUBICE
POJISTKA ČISTIČE
ČISTIČ
Page 87

Připojte chladničku k vodovodnímu
přívodu
- Odstraňte kryt kompresoru chladničky.
- Připojte vodovodní přípojku k ventilu podle
obrázku.
- Po připojení zkontrolujte, zda voda někde
neprosakuje. Pokud ano, připojení proveďte znovu.
- Nasaďte nazpět kryt kompresoru chladničky.
VODOVODNÍ POTRUBÍ
SPOJOVACÍ MATICE
Odstranění jakýchkoliv nečistot z
přívodního potrubí po instalaci fi ltru.
1. Otevřete hlavní přívod vody a ventil k přívodnímu
potrubí.
2. Nechejte protékat vodu přes zásobník, dokud z
výstupu nevytéká čistá voda (approx. 1L). Vyčistíte
tak systém přívodu vody a odstraníte vzduch z
potrubí.
3. V některých domácnostech bude nutné delší
proplachování.
4. Otevřete dveře chladničky a zkontrolujte, zda není
okolo fi ltru nějaká netěsnost.
01 NASTAVENÍ
KRYT KOMPRESORU
CHLADNIČKY
Vodovodní přípojku zajistěte.
- Použijte příchytku “A” k
připevnění potrubí ke stěně
(zadní strana chladničky).
- Po zajištění vodovodního
potrubí se ujistěte, zda
není nadměrně ohnuté,
přiskřípnuté nebo
přimáčknuté.
PˇÍCHYTKA A
VODOVODNÍ
POTRUBÍ
Nově instalovaná vložka vodního fi ltru může
způsobovat, že na začátku provozu voda z
chladiče pitné vody prudce vystříkne.
To je způsobenou vzduchem, který se dostal do
potrubí. Tento jev není žádnou překážkou pro
provoz.
nastavení _15
Page 88

Používání chladničky
SAMSUNG typu side-by-side
POUŽÍVÁNÍ CHLADNIČKY
POUŽÍVÁNÍ OVLÁDACÍHO PANELU /
POUŽITÍ DIGITÁLNÍHO DISPLEJE
MODEL COOL SELECT
1
2
3
4
MODEL DISPENSER
MODEL NORMAL
Displej se vypne, když není používán.
Nejedná se o poruchu.
TLAČÍTKO
1
POWER
FREEZE
TLAČÍTKO
2
FREEZER
TLAČÍTKO
3
PRO VÝBĚR
TYPU LEDU
Slouží pro zkrácení času
potřebného pro zmrazení
výrobků v mrazničce. Může být
užitečné, pokud potřebujete
rychle zmrazit snadno se kazící
potraviny nebo pokud se teplota
v mrazničce dramaticky zvýšila
(například pokud jste nechali
otevřené dveře).
Požadovanou teplotu v
mrazničce nastavíte stlačením
tlačítka Freezer.
Teplotu můžete nastavit v
rozmezí od -14°C do -25°C.
Pomocí tohoto tlačítka můžete
zvolit led typu Cubed (kostky),
Crushed (drcený) nebo můžete
výrobník ledu vypnout.
TLAČÍTKO
4
VÝMĚNA
FILTRU
5
6
7
TLAČÍTKO
5
VACATION
DĚTSKÝ
6
ZÁMEK
TLAČÍTKO
7
FRIDGE
Při využívání režimu Power Freeze se zvýší
spotřeba elektrické energie chladničky.
Pokud již tento režim není třeba, nezapomeňte
jej vypnout a znovu nastavit původní teplotu vaší
chladničky.
Pokud budete potřebovat zmrazit velký objem
potravin, aktivujte funkci Power Freeze nejméně
24 hodin předem.
Po provedené výměně vodního
fi ltru stiskněte toto tlačítko na
3 sekundy, dojde k vynulování
termínu pro výměnu fi ltru.
Hodláte-li odjet na dovolenou
či služební cestu nebo
nebudete nepoužívat
chladničku, stiskněte tlačítko
“Vacation”. Pokud vypnete
chladící část stiskem
tlačítka Vačation, automaticky
se na LED displeji změní
hodnota fridge na vacation.
Je vrele doporučeno
při použití funkce
Vacation vyjmout
potraviny z chladící části
a neponechat dvere
otevřené.
Současným stisknutím tlačítek
Dovolená a Chladnička po
dobu 3 vteřin, všechna
tlačítka budou zablokována.
Páka Výdej vody ani páka pro
Led. Pro přerušení této
funkce stiskněte tato dvě
tlačítka znovu po dobu 3 vteřin.
Požadovanou teplotu v
chladničce nastavíte stlačením
tlačítka Fridge.
Teplotu můžete nastavit v
rozmezí od 1°C do 7°C.
16_ používání
Page 89

REGULACE TEPLOTY
REGULACE TEPLOTY V MRAZNIČCE
Teplota v mrazničce může být nastavena na
hodnotu mezi -14°C a -25°C, aby odpovídala vaší
konkrétní představě. Opakovaně stiskněte tlačítko
pro nastavení teploty v Freezer, dokud se na displeji
nezobrazí požadovaná teplota.
Pamatujte si, že potraviny, jako je například zmrzlina,
se mohou při teplotě nad -16°C rozpustit. Indikace
teploty se mění postupně od -14°C do -25°C.
Jakmile zobrazená hodnota dosáhne - 14°C, začne
opět na -25°C. Pět sekund po nastavení nové
teploty se na displeji opět zobrazí aktuální teplota
v mrazničce. Tato hodnota se bude postupně se
změnou teploty v mrazničce měnit.
Přední strany přihrádek tohoto modelu mrazáku
jsou označeny dvěma hvězdičkami, proto je
teplota v těchto přihrádkách mírně vyšší než ve
zbylém prostoru mrazáku.
REGULACE TEPLOTY V
CHLADNIČCE
Teplota v chladničce může být nastavena na hodnotu
mezi 7°C a 1°C, aby odpovídala vaší konkrétní
představě.
Opakovaně stiskněte tlačítko pro nastavení teploty
v chladničce (Fridge), dokud se na displeji nezobrazí
požadovaná teplota.
Postup pro nastavení teploty v chladničce
je stejný jako postup pro nastavení mrazničky.
Požadovanou teplotu nastavíte stlačením tlačítka
Fridge. Po několika sekundách se teplota v
chladničce začne měnit směrem k nově nastavené
teplotě. Tato změna bude zobrazována na displeji.
Teplota uvnitř mrazničky nebo chladničky se
může zvýšit při příliš častém otevírání dveří, nebo
pokud dovnitř uložíte velké množství teplého
nebo horkého jídla.
Může dojít k blikání displeje.
Blikání se zastaví, jakmile se teplota v prostoru
chladničky nebo mrazničky opět ustálí na
nastavené hodnotě.
Pokud se tak nestane, může být zapotřebí
„resetovat“ chladničku. Odpojte spotřebič ze
sítě, vyčkejte asi 10 minut a opět ho zapojte.
POUŽITÍ ZÁSOBNÍKU NA LED A
LEDOVOU VODU
Požadovaný druh ledu zvolíte stisknutím tlačítka pro
výběr druhu ledu
Žádný led
Zvolte, pokud chcete
vypnout výrobník ledu.
Led je vyráběn v kostkách. Pokud zvolíte
„Crushed“, pak výrobník ledu rozemele kostky
ledu a vytvoří drcený led.
Dávkování ledu
Sklenici vložte pod výstup ledu a zlehka sklenicí
zatlačte na páku zásobníku na led.
Ujistěte se, že je sklenice souose s dávkovačem, aby
led nevyskakoval ven ze sklenice.
Použití zásobníku na vodu
Sklenici vložte pod výstup vody a zlehka sklenicí
zatlačte na páku zásobníku na vodu.
Ujistěte se, že je sklenice souose s dávkovačem, aby
voda nevystříkla ven ze sklenice.
02 POUŽÍVÁNÍ
používání _17
Page 90

• Nestrkejte prsty, ruce nebo jakékoliv jiné
VÝSTRAHA
UPOZORNĚNÍ
nevhodné předměty do prostoru skluzu
nebo do koše na led.
- Můžete si přivodit zranění nebo způsobit
materiální škodu.
• Nikdy nedávejte prsty ani jiné předměty do
otvoru zásobníku ledu.
- Mohlo by dojít ke zranění.
• Používejte pouze výrobník ledu dodaný s
chladničkou.
• Přívod vody do chladničky musí být
nainstalován/připojen pouze osobou s
odpovídající kvalifi kací a připojen pouze ke
zdroji pitné vody.
Chcete-li, aby stroj na tvorbu ledu fungoval
•
správně, požaduje se tlak vody 138~862Kpa.
•
Pokud budete na dlouhé dovolené nebo na
služební cestě a nebudete používat zásobník
na led nebo na vodu, uzavřete přívod vody.
- V opačném případě by mohlo dojít k
netěsnostem.
• Vysušte vlhkost uvnitř chladničky a nechte
dveře otevřené.
- Jinak by mohl uvnitř vzniknout zápach
nebo plíseň.
POUŽITÍ ZÁSUVKY COOLSELECT
ZONE™ (V ZÁVISLOSTI NA MODELU)
Quick Cool (Rychlé zchlazení)
• Funkci Quick Cool lze použít v zásuvce CoolSelect
TM
.
Zone
• Funkce “Quick Cool” umožní zchladit 1~3
plechovky nápoje do 60 minut.
• Opětovným stiskem tlaãítka “Quick Cool” tuto
funkci zrušíte. Teplota v zásuvce CoolSelect Zone
se navrátí na předchozí úroveň.
• Po dokončení funkce “Quick Cool” se nastavení
teploty vrátí do polohy “Cool”.
Thaw (Rozmrazení)
• Ztráta vlhkosti a zhoršení kvality masa snižuje
svěžest pokrmu.
• Pokud zvolíte funkci “Thaw”, do zásuvky CoolSelect
TM
Zone
je střídavě vháněn tepý a studený vzduch.
•
Podle hmotnosti vloženého masa lze nastavit krokově
doba rozmražení na 4 hod, 6 hod, 10 hod, a 12 hod.
• Po dokončení funkce rozmražení “Thaw” se
zobrazení na displeji zásuvky CoolSelect Zone
navrátí do polohy chlazení “chill”.
• Po dokončení funkce rozmražení “Thaw” maso
neobsahuje šťávu a je v polomraženém stavu tak,
aby se dalo lehce krájet a pfi ipravovat k pečení.
• Tuto funkci lze zrušit stiskem jakéhokoliv tlačítka
vyjma tlačítka “Thaw”.
• Přibližná doba rozmražení masa a ryb je zobrazena
níže. (Spoičítána na sílu plátků 1 palce (asi 2.5 cm))
TM
TM
Prostor v mrazničce můžete zvětšit, vyjmete-li horní
zásuvku, přičemž vyjmutí zásuvka nemá žádný vliv
na mechanické a teplotní parametry mrazničky.
Uvedený užitný objem mrazničky je vypočítán po
vyjmutí těchto zásuvek.
Pro zajištění více místa lze
potraviny umístit do koše FREUPP místo do kbelíku s ledem.
Pokud vyjmete kbelík s
ledem, začne na panelu
displeji blikat ICE OFF.
GUARD FRE-UPP
(v závislosti na modelu)
18_ používání
DOBA
ROZMRAZOVÁNÍ
HMOTNOST
4 hodiny 363g
6 hodiny 590g
10 hodiny 771g
12 hodiny 1000g
Doba rozmražení se může lišit v závislosti na
velikosti a síle plátků masa a ryb. Výše uvedená
hmotnost značí celkovou hmotnost uložených
potravin v zásuvce CoolSelect Zon
Příklad: Celková doba rozmražení pro 400 g
mraženého hovězího masa a 600 g mraženého
kuřete bude 10 hodin.
Při zapnutí funkce “Thaw” by měly být
vyjmuty ze zásuvky CoolSelect Zone™ty
UPOZORNĚNÍ
potraviny, které není třeba rozmražovat.
TM
.
Page 91

Zero Zone (Oblast nuly) (0°C)
• Pokud je zvoleno “Zero Zone”, teplota v zásuvce
CoolSelect Zone™ je udržována na 0°C bez ohledu
na nastavenou teplotu v chladničce.
• Nastavení teploty “Zero Zone” pomáhá uchovat
maso a ryby déle čerstvé.
Cool (Chlazené)
• Pokud je zvoleno “Cool”, teplota bude stejná jako
nastavená teplota v chladničce.
Na digitálním panelu bude zobrazena stejná teplota
jako na displeji.
• Zásuvka CoolSelect Zone
chlazený prostor.
Doba zchlazení se mÛže lišit podle typu nápojů.
Pri použití funkce “Quick Cool” by mûly být
UPOZORNĚNÍ
potraviny ze zásuvky CoolSelect Zone
vyjmuty.
TM
vám pfi idá další
TM
VYJMUTÍ PŘÍSLUŠENSTVÍ
MRAZNIČKY
Čištění a změna interiéru mrazničky je snadný úkol.
1. Vysuňte skleněnou poličku, jak nejvíce to jde.
Potom ji pomalu nadzvedněte a vyndejte ji.
3. Plastovou zásuvku vytáhněte ven a mírně ji
nadzvedněte.
02 POUŽÍVÁNÍ
4. Nádoba na led (mraznička)
Nádobu výrobníku ledu nadzvedněte a pomalu ji
vytáhněte ven.
• Uchopte rukojeť, jak je
uvedeno na obrázku
• Nadzvedněte trochu
spodní část
• Pomalu vyjměte nádobu
na led ven
Při demontáži krytu nepoužívejte nadměrnou
sílu.
Kryt by se mohl rozlomit a poranit vás.
2. Polici ve dveřích uchopte oběma rukama a
pomalu ji zvedněte.
používání _19
Page 92

VYJMUTÍ PŘÍSLUŠENSTVÍ
CHLADNIČKY
1. Nejprve vysuňte skleněnou poličku s ochranou
proti rozlití jak nejvíce to jde. Potom ji pomalu
nadzvedněte a vyndejte ji.
2. Při vyndávání zásuvky na zeleninu a ovoce
stiskněte zarážky, které jsou na vnitřní levé a pravé
straně krytu boxu na zeleninu a zásuvku vysuňte
směrem dopředu.
Držte zásuvku
jednou rukou, trochu
ji nadzvedněte a
současně ji vysouvejte
dopředu a vyndejte ji z
chladničky.
Před tím, než začnete vyndávat jakékoliv
příslušenství, ujistěte se, že vám nepřekáží
žádné potraviny.
Pokud je to možné, vyndejte všechny potraviny,
aby se snížilo riziko vzniku nehody.
Nejlepší energetické účinnosti dosáhnete
tím, že ponecháte veškeré vnitřní uspořádání
chladničky v původním stavu, viz ilustrace na
straně (18.)
ČIŠTĚNÍ CHLADNIČKY
NEPOUžÍVEJTE na čištění benzen, ředidlo
VÝSTRAHA
UPOZORNĚNÍ
nebo čističes obsahem chlóru.
Mohly by poškodit povrchovou úpravu
chladničky a vytvořit riziko vzniku požáru.
Pokud je chladnička zapojena do elektřiny,
nestříkejte na ni vodu, protože by hrozilo
nebezpečí úrazu elektrickým proudem.
Nepoužívejte na čištění chladničky benzen,
ředidlo ani čistící prostředky na automobil,
hrozí riziko vzniku požáru.
VÝMĚNA ŽÁROVKY VNITŘNÍHO
OSVĚTLENÍ
3. Polici na krabice ve dveřích uchopte oběma
rukama a pomalu ji zvedněte.
4. Z POLICE je připevněna ke stěnám skříně
chladničky. Polici na víno posuňte nahoru a
pomalu ji nadzvedněte z příchytek.
Dávejte pozor, aby police Z nebyla během
montáže zatlačena nahoru nebo dolu,
UPOZORNĚNÍ
vpravo nebo vlevo.
20_ používání
V případě, že je vnitřní osvětlení vybaveno
žárovkou LED, svěřte její výměnu odborníkovi.
Page 93

VÝMĚNA VODNÍHO FILTRU
Pro snížení rizika poškození výrobku
VÝST RAHA
Kontrolka vodního fi ltru vás upozorní na nutnost
výměny fi ltrační vložky.
Pokud se barva indikátoru fi ltru změní na červenou, je
nutné vyměnit fi ltr.
Abyste měli čas na zakoupení nového fi ltru, rozsvítí se
kontrolka těsně před tím, než se kapacita stávajícího
fi ltru vyčerpá.
Při včasné výměně fi ltru si zachováte stálý přísun
čisté čerstvé vody.
vodou NEPOUžÍVEJTE běžně užívané
značky vodních fi ltrů v chladičce
SAMSUNG. POUžÍVEJTE POUZE VODNÍ
FILTRY SAMSUNG SAMSUNG nenese
odpovědnost za jakékoli poškození, včetně,
ale není to omezeno jen na poškození
majetku způsobené protékáním vody z
důvodu používání vodního fi ltru. Chladničky
SAMSUNG jsou vytvořeny pro práci s
vodními fi ltry POUZE ZNAČKY SAMSUNG.
1. Vyjměte vodní fi ltr z obalu a přilepte na fi ltr
štítek pro zapsání data instalace.
2. Nalepte štítek, který udává datum, které
bude za šest měsíců. Například, pokud
vyměňujete vodní fi ltr v březnu, nalepte na
fi ltr štítek “SEP“ (September = září), aby vám
v září připomněl nutnost výměny. Běžná
životnost fi ltru je asi 6 měsíců.
3. Otočte vestavěným víkem směrem doleva a
vyndejte ho.
4. Z nového fi ltru sundejte ochrannou krytku a
vyndejte starý fi ltr.
5. Nastavte nový fi ltr do správné polohy a
zasuňte ho do pouzdra fi ltru.
Pomalu otáčejte vodním fi ltrem o 90°
směrem doprava, až se srovná značka na
obalu fi ltru se značkou na krytu; takto je fi ltr
uzamčen ve správné poloze. Ujistěte se, že
značka je zarovnaná s označením „zamčené“
polohy. Nepřetáhněte.
6. Po provedené výměně vodního fi ltru stiskněte
tlačítko Ice ice type na 3 sekundy, dojde k
vynulování termínu pro výměnu fi ltru.
7. Poté nalijte do výdejníku 1l vody. Před pitím se
ujistěte, že voda teče bez problémů.
02 POUŽÍVÁNÍ
Nově instalovaná vložka vodního fi ltru může
způsobovat, že na začátku provozu voda z
chladiče pitné vody prudce vystříkne. To je
způsobenou vzduchem, který se dostal do
potrubí.
Tento jev není žádnou překážkou pro provoz.
Objednání náhradních fi ltrů
Potřebujete-li objednat více vložek vodního fi ltru,
obraťte se na autorizovaného prodejce Samsung.
1
Štítek
(indikace
měsíce)
Kryt fi ltru
2
4
3
Zarovnejte
značku
se zamčenou
5
polohou
používání _21
Page 94

Odstraňování závad
ZÁVADA ŘEŠENÍ
Chladnička vůbec
nepracuje nebo
nedostatečně chladí.
Potraviny v chladničce
jsou zmrzlé.
Jsou slyšet nezvyklé
zvuky nebo hluk.
Čelní hrany a boční
stěny skříně jsou teplé;
objevuje se kondenzát.
V zásobníku se netvoří
led.
• Zkontrolujte, zda je přívodní kabel řádně připojen na síť.
• Je na ovládacím panelu nastavena správná teplota? Vyzkoušejte nastavení na nižší
teplotu.
• Není chladnička vystavena vlivu přímých slunečních paprsků nebo není umístěna
příliš blízko zdroje tepla?
• Není zadní strana chladničky umístěna příliš blízko stěny a vzduch tedy nemůže
cirkulovat?
• Je na ovládacím panelu nastavena správná teplota? Vyzkoušejte nastavení na vyšší
teplotu.
• Není teplota v místnosti příliš nízká?
• Neuložili jste potraviny s vysokým obsahem vody do nejchladnějšího prostoru
chladničky? Zkuste zmrzlé potraviny přendat ze zásuvky CoolSelect Zone™ do
vnitřní části chladničky.
• Zkontrolujte, zda je chladnička vodorovně a stabilní.
• Není zadní strana chladničky umístěna příliš blízko stěny a vzduch tedy nemůže
cirkulovat?
• Nespadl pod nebo za chladničku nějaký předmět?
• Zevnitř chladničky se ozývá “tikání”. Jedná se o normální zvuk, který vzniká v
důsledku smršťování nebo rozpínání různého příslušenství při změnách teploty
uvnitř chladničky.
• Jisté množství tepla je normální, protože v čelních hranách chladničky je instalováno
antikondenzační zařízení, které zabraňuje tvorbě kondenzátu.
• Nejsou dveře chladničky pootevřeny? Kondenzát se může vytvářet v případě, že
ponecháte dveře chladničky delší dobu otevřené.
• Vyčkali jste po instalaci přívodu vody 12 hodin, než jste začali vyrábět led?
• Je připojen přívod vody a otevřen uzavírací ventil?
• Není výrobník ledu vypnutý? Ujistěte se, že typ ledu je nastaven na Cubed nebo
Crushed.
• Je v zásobníku ledu nějaký led?
• Není v mrazničce příliš vysoká teplota? Zkuste nastavit mrazničku na nižší teplotu.
V chladničce je slyšet
bublání vody.
V chladničce je cítit
nepříjemný zápach.
Na stěnách mrazničky
se vytvořil led.
Zásobník na vodu
nefunguje.
22_ odstraňování
• Jedná se o normální stav. Bublání způsobuje cirkulující kapalné chladivo.
• Nezkazila se nějaká potravina?
• Ujistěte se, že potraviny, které jsou značně cítit (například ryby), jsou hermeticky
zabaleny.
• Čistěte pravidelně mrazničku a vyhazujte jakékoliv zkažené nebo podezřelé
potraviny.
• Nejsou zablokovány ventilační otvory? Odstraňte jakékoliv překážky bránící volnému
proudění vzduchu.
• Mezi uloženými potravinami je třeba ponechat dostatečné mezery umožňující
proudění vzduchu.
• Dovírají správně dveře mrazničky?
• Je připojen přívod vody a otevřen uzavírací ventil?
• Není přívod vody deformovaný nebo zlomený?
Ujistěte se, že je přívod vody volný a nic mu nepřekáží.
• Nedošlo k zamrznutí vody v zásobníku, protože byla nastavena příliš nízká teplota?
Na ovládacím panelu nastavte vyšší teplotu.
Page 95

memo
Page 96

Maxima pokojové teploty
Tato chladnička je určena k provozu při pokojové teplotě odpovídající jeho teplotní třídě
vyznačené na technickém štítku.
Třída Symbol Rozsah pokojových teplot (°C)
Chladné pásmo SN +10 až +32
Mírné pásmo N +16 až +32
Subtropické pásmo ST +16 až +38
Tropické pásmo T +16 až +43
Teploty uvnitř výrobku mohou být ovlivňovány různými faktory, například umístěním
chladničky, okolní teplotou a četností otvírání dveří. Nastavte potřebnou teplotu pro kompenzaci těchto faktorů.
Správná likvidace výrobku
(Elektrický a elektronický odpad)
Czech
Republic
Toto označení na výrobku, jeho příslušenství nebo dokumentaci znamená, že
výrobek a jeho elektronické příslušenství (například nabíječku, náhlavní sadu,
USB kabel) je po skončení životnosti zakázáno likvidovat jako běžný komunální
odpad. Možným negativním dopadům na životní prostředí nebo lidské zdraví
způsobeným nekontrolovanou likvidací zabráníte oddělením zmíněných produktů
od os tatních typů od padu a jejich zodpovědn ou recyklací za úče lem ud ržitelného
využívání druhotných surovin.
Uživatelé z řad domácností by si měli od prodejce, u něhož produkt zakoupili,
nebo u příslušného městského úřadu vyžádat informace, kde a jak mohou tyto
výrobky odevzdat k bezpečné ekologické recyklaci.
Podnikoví uživatelé by měli kontaktovat dodavatele a zkontrolovat všechny podmínky kupní smlouvy. Tento výrobek a jeho elektronické příslušenství nesmí být
likvidován spolu s ostatním průmyslovým odpadem.
Kontaktujte SAMSUNG WORLD WIDE
Pokud máte otázky týkající se výrobků Samsung,
kontaktujte středisko Samsung pro péči o zá kazníky.
Samsung Zrt., česká organizační složka, Oasis Florenc,
Sokolovská394/17, 180 00, Praha 8
800 - SAMSUNG (800-726786)
www.samsung.com/cz
Page 97

Chladnička
Návod na použitie
Táto príručka sa vyrobila zo 100% recyklovaného papiera.
Predstavte si tie možnosti
Ďakujeme, že ste si kúpili výrobok značky Samsung.
Aby ste mohli lepšie využívať naše služby,zaregistrujte
svoj výrobok na adrese
www.samsung.com/register
Voľne stojace zariadenie
SLOVENČINA
Page 98

Bezpečnostné informácie
BEZPEČNOSTNÉ INFORMÁCIE
• Pred spustením zariadenia do prevádzky si
dôkladne prečítajte túto príručku a uschovajte
ju na bezpečnom mieste v blízkosti zariadenia
pre budúcu potrebu.
• Používajte toto zariadenie len pre účely jemu
určené ako je to popísané v tejto užívateľskej
príručke. Tento spotrebič nie je určený na
používanie osobami (vrátane detí) so zníženými
psychickými, zmyslovými alebo duševnými
schopnosťami alebo neskúsenými osobami,
ak nie sú pod dozorom alebo neboli poučené
o spôsobe používania spotrebiča osobou
zodpovednou za ich bezpečnosť.
Varovania a dôležité bezpečnostné pokyny
•
uvedené v tejto príručke nepokrývajú všetky možné
podmienky a situácie, ktoré sa môžu vyskytnúť.
Pri inštalácii, údržbe a obsluhe tohto spotrebiča
používajte zdravý rozum a buďte opatrní.
• Nasledujúci návod na obsluhu slúži pre viac
modelov, vlastnosti vašej chladničky sa
môžu preto v niektorých detailoch odlišovať
od vlastností popísaných v tomto návode
a nemusia platiť všetky varovné označenia.
Ak máte akékoľvek otázky alebo obavy,
kontaktujte najbližšie servisné stredisko alebo
pomoc a informácie nájdete na webovej
stránke www.samsung.com.
Dôležité bezpečnostné symboly a
upozornenia :
Riziká alebo nebezpečné postupy,
VÝSTRAHA
UPOZORNENIE
ktoré môžu spôsobiť vážne
zranenia alebo smrť.
Riziká alebo nebezpečné postupy,
ktoré môžu spôsobiť ľahšie zranenia
alebo škody na majetku.
ToTo neskúšajte.
ToTo nerozoberajte.
TohoTo sa nedotýkajte.
Podrobne dodržiavajte pokyny.
Odpojte sieťovú zástrčku zo
zásuvky.
Uistite sa, že je zariadenie uzemnené, aby
ste tak predišli úrazu elektrickým prúdom.
Ak potrebujete pomoc, zavolajte na
kontaktné centrum.
Poznámka.
Tieto symboly vás varujú pred možnosťou
zranenia vás a iných osôb.
Bezvýhradne ich dodržiavajte.
Po prečítaní tejto časti si návod uschovajte na
bezpečnom mieste pre prípadné budúce použitie.
CE Upozornenie
T
ento výrobok bol vyrobený v zhode so Smernicou
2006/95/ES o elektrických zariadeniach navrhovaných
na použitie v určitom napäťovom rozmedzí (2006/95/ES),
Smernicou 2004/108/ ES o elektromagnetickej kompatibilite
a Nariadením Komisie (ES), ktorým sa vykonáva Smernica
2009/125/ES o vytvorení rámca na stanovenie požiadaviek
na ekodizajn energeticky významných výrobkov.
DÔLEŽITÉ VÝSTRAŽNÉ
OZNAČENIA PRE PREPRAVU
VÝSTRAHA
- Chladiaca zmes unikajúca z okruhu sa môže
Ak zistíte únik chladiacej zmesi, nepribližujte
• Aby sa pri výskyte netesnosti chladiaceho
•
A MIESTO INŠTALÁCIE
•
Pri preprave a inštalácii chladničky je potrebné
dbať na to, aby nedošlo k poškodeniu
niektorej z častí chladiaceho okruhu.
vznietiť alebo spôsobiť poranenie očí.
sa k chladničke s otvoreným plameňom alebo
s predmetmi, od ktorých by mohlo nastať
vznietenie. Miestnosť ihneď dôkladne vyvetrajte.
okruhu nevytvorila výbušná zmes vzduch plyn,
je potrebné umiestniť chladničku do miestnosti
dostatočnej veľkosti; veľkosť miestnosti závisí od
množstva použitého chladiaceho média.
Nikdy nezapínajte chladničku, ak sú na nej viditeľné
akékoľvek stopy poškodenia. V prípade pochybností
konzultujte problém s vaším predajcom. Veľkosť
miestnosti, v ktorej sa nachádza chladnička, musí
byť 1m3 na každých 8 g chladiacej zmesi R600a
vo vnútri chladiaceho okruhu chladničky. Objem
chladiacej zmesi vo vašom modeli chladničky je
uvedený na štítku vo vnútri chladničky.
2_ bezpečnostné
Page 99

DÔLEŽITÉ VÝSTRAŽNÉ
VÝSTRAHA
-
•
• Nepripájajte niekoľko spotrebičov do spoločnej
- Zabezpečíte tak najlepší výkon a tiež zabránite
• Pre zapojenie chladničky nepoužívajte zásuvku,
- Vzniká nebezpečenstvo požiaru alebo úrazu
• Nepoužívajte šnúru, ktorej izolácia je popraskaná
• Sieťovú šnúru nadmerne neohýnajte a neklaďte
•
- Aerosóly používané v blízkosti chladničky môžu
• Zapojte napájacie vedenie do správnej polohy
- Ak zapojíte sieťovú zástrčku naopak, môže
• Uistite sa, že sieťová šnúra nie je žiadnou časťou
• Pri presúvaní chladničky dávajte pozor, aby ste
- Predídete možnosti vzniku požiaru skratom.
• Chladnička musí byť umiestnená tak, aby bola
• Na uzemnenie nikdy nepoužívajte plynové
OZNAČENIA PRE INŠTALÁCIU
• Chladničku neinštalujte vo vlhkom prostredí
alebo tam, kde by mohlo dôjsť ku kontaktu
s vodou.
Pri poškodení izolácie elektrických častí by mohlo
dôjsť k úrazu elektrickým prúdom alebo k požiaru.
Chladničku neumiestňujte na miesto, kde by bola
vystavená priamemu slnečnému žiareniu alebo
teplu zo sporáka, pece alebo iných zariadení.
zásuvky. Chladnička by mala byť vždy zapojená
do samostatnej elektrickej zásuvky, v ktorej je
také napätie, ako sa uvádza na štítku chladničky.
preťaženiu elektrickej inštalácie v domácnosti.
Predídete tak možnosti vzniku požiaru, ktorý by
mohol vzniknúť prehriatím vodičov.
ktorá je uvoľnená.
elektrickým prúdom.
alebo akokoľvek poškodená.
na ňu ťažké predmety.
V blízkosti chladničky nepoužívajte horľavé spreje.
spôsobiť výbuch alebo požiar.
Pred uvedením chladničky do prevádzky je
•
nutné ju vhodne umiestniť a správne nainštalovať
podľa pokynov uvedených v tomto návode.
so šnúrou visiacou smerom nadol.
vzniknúť skrat na vedení a spôsobiť požiar alebo
úraz elektrickým prúdom.
chladničky pritlačená alebo poškodená.
ju nepresúvali cez sieťovu šnúru alebo aby ste ju
nijak nepoškodili.
zástrčka po inštalácii voľne prístupná.
• Chladnička musí byť uzemnená.
- Chladničku je potrebné uzemniť, aby
nedošlo k úrazom elektrickým prúdom.
potrubie, telefónne vedenie alebo bleskozvody.
- Nesprávne uzemnenie môže byť príčinou úrazu
elektrickým prúdom.
• Poškodenú sieťovú šnúru dajte ihneď
vymeniť u výrobcu alebo u autorizovaného
servisného technika.
•
Poistku na chladničke môže vymeniť iba kvalifi kovaný
servisný technik alebo servisná spoločnosť.
- Ak tak neurobíte, môže to spôsobiť úraz
elektrickým prúdom alebo zranenie osôb.
UPOZORNENIA TÝKAJÚCE
UPOZORNENIE
• Po inštalácii nechajte spotrebič stáť 2 hodiny v
SA INŠTALÁCIE
• Dbajte o to, aby vetracie otvory na
zariadení alebo na montážnej konštrukcii
neboli nijak blokované.
pokoji.
DÔLEŽITÉ VÝSTRAŽNÉ
VÝSTRAHA
• Na vrchu chladničky neskladujte žiadne
- Pri otvorení dvierok môžu uskladnené predmety
• Na chladničku neklaďte nádoby s vodou.
- Pri rozliatí hrozí nebezpečenstvo požiaru alebo
• Nedovoľte, aby sa deti vešali na dvere
- Nedodržanie tohto pokynu môže spôsobiť vážne
• Dvere nenechávajte otvorené, keď je chladnička
- Existuje nebezpečenstvo uviaznutia detí v
• Nikdy nedávajte prsty alebo iné predmety do
- Môžete si spôsobiť zranenie alebo poškodiť
• V chladničke neskladujte prchavé alebo horľavé
- Skladovanie ktorejkoľvek z uvedených látok
OZNAČENIA PRE POUŽITIE
• Sieťovú šnúru nepripájajte do zásuvky
mokrými rukami.
predmety.
vypadnúť a spôsobiť zranenie osôb alebo
hmotné škody.
úrazu elektrickým prúdom.
chladničky.
zranenie osôb.
bez dozoru a nedovoľte deťom, aby vstupovali
do vnútorného priestoru chladničky.
chladničke s následným vážnym ohrozením
zdravia v dôsledku podchladenia.
otvoru dávkovača.
prístroj.
látky, napr. benzén, riedidlo, alkohol, éter alebo
LPG.
môže spôsobiť výbuch.
bezpečnostné _3
Page 100

• V priestoroch chladničky neskladujte
farmaceutické produkty, vedecké alebo iné
materiály citlivé na nízku teplotu.
- Chladnička nie je určená na skladovanie
predmetov a látok, ktoré vyžadujú prostredie s
presne regulovanou teplotou.
• Vo vnútornom priestore zariadenia nepoužívajte
elektrické spotrebiče, ak nie sú priamo výrobcom
odporúčané.
Na sušenie vnútorného priestoru chladničky
•
nepoužívajte sušič vlasov. Na odstránenie zápachu
nedávajte do vnútra chladničky zapálenú sviečku.
- Môže to spôsobiť úraz elektrickým prúdom alebo
požiar.
•
Nedotýkajte sa vnútorných stien mrazničky alebo
uskladnených zmrazených potravín vlhkými rukami.
- Môžu sa vytvoriť omrzliny.
• Na odstránenie ľadu pri odmrazovaní
nepoužívajte žiadne mechanické náradie ani iné
prostriedky, ktoré neodporúča výrobca.
• Dbajte na to, aby nedošlo k poškodeniu
chladiaceho okruhu.
• Tento výrobok je určený len na skladovanie
potravín v domácnostiach.
• Fľaše skladujte tesne vedľa seba tak, aby
nevypadli.
• Ak zistíte netesnosť plynu, nepribližujte sa k
zariadeniu s otvoreným ohňom alebo iným
zdrojom zapálenia a na niekoľko minút vyvetrajte
miestnosť, v ktorej sa zariadenie nachádza.
• Používajte vždy len LED lampy dodávané
výrobcom alebo servisnými zástupcami.
• Je potrebné dohliadať na deti, aby sa so
spotrebičom nehrali a/alebo naň neliezli.
• Chladničku nikdy sami neopravujte ani
nerozoberajte.
- Mohli by ste spôsobiť požiar, poškodiť prístroj a/
alebo si spôsobiť zranenie. V prípade poruchy
kontaktujte vašich servisných zástupcov.
• Ak zariadenie vydáva zvláštne zvuky, cítite
zápach horenia alebo dym, okamžite
odpojte chladničku z elektrickej siete a
kontaktujte najbližšie servisné centrum.
- Ak tak neurobíte, môže to spôsobiť úraz
elektrickým prúdom alebo požiar. Dbajte o
to, aby vetracie otvory na zariadení alebo na
montážnej konštrukcii neboli nijak blokované.
• Ak je pre vás výmena vnútorného osvetlenia
príliš zložitá, obráťte sa na autorizovaný servis.
• Ak je výrobok vybavený LED lampou,
nerozoberajte svojpomocne kryt lampy ani LED
lampu samotnú.
- Prosím skontaktujte vášich servisných
zástupcov.
• Ak sa v chladničke nachádza prach alebo voda,
vytiahnite sieťový kábel zo zásuvky a kontaktujte
vaše servisné stredisko spoločnosti Samsung
Electronics.
- Predídete možnosti vzniku požiaru.
UPOZORNENIA TÝKAJÚCE
UPOZORNENIE
SA POUŽITIA
• Ako zaistiť optimálny výkon spotrebiča:
- Neukladajte potraviny príliš blízko
ventilačných otvorov v zadnej časti chladničky,
aby nebránili voľnej cirkulácii vzduchu.
- Pred uložením do chladničky potraviny
vhodným spôsobom zabaľte alebo ich vložte do
hermetických nádob.
• Nevkladajte do mrazničky perlivé nápoje. Do
mrazničky nedávajte fľaše ani sklenené nádoby.
- Po zamrznutí obsahu môže sklo prasknúť a
spôsobiť zranenie alebo materiálne škody.
• Nemeňte funkcie chladničky ani ju inak
neupravujte.
Zmeny alebo úpravy môžu spôsobiť zranenie a/
-
alebo materiálne škody. A tretia strana zmenila
alebo upravila tento spotrebič, nevzťahuje
sa naň záručný servis spoločnosti Samsung
a spoločnosť Samsung nepreberá žiadnu
zodpovednosť za bezpečnosť a škody spôsobené
úpravou tohto zariadenie treťou stranou.
• Neblokujte vetracie otvory.
- Ak sa vetracie otvory zablokujú, hlavne
plastovými taškami, chladnička sa môže
podchladiť. Ak podchladenie trvá príliš dlho,
vodný fi lter môže prasknúť a spôsobiť únik vody.
- Čerstvé potraviny v prípade zmrazenia
neukladajte tesne vedľa už zmrazených potravín.
• Dodržiavajte odporúčanú dobu skladovania a
dátum spotreby mrazených potravín.
• Naplňte nádrž na vodu, zásobník na ľad, na
ľadové kocky len pitnou vodou.
• Používajte zásadne výrobník ľadu dodaný s
chladničkou.
• Prívod vody k tejto chladničke musí nainštalovať
a pripojiť iba kvalifi kovaná osoba a voda musí byť
pitná.
• Pre správnu funkciu výrobníka ľadu je potrebný
tlak vody 138 až 862 kPa (1,4 až 8,8 kgf/cm
3
).
4_ bezpečnostné
 Loading...