

Page 1

Refrigerator
user manual
imagine the possibilities
Thank you for purchasing a Samsung product.
To receive more complete service or accessory parts,
please register your product at or contact
www.samsung.com/register
1-800-SAMSUNG (726-7864)
Free Standing Appliance
This manual is made with 100% recycled paper.
RSG309**
DA68-02500B-13.indb 1 13. 12. 4. �� 7:12
Page 2
Safety information
SAFETY INFORMATION
Before using your new Samsung Side-by-side door
Refrigerator, please read this manual thoroughly to
ensure that you know how to operate the features
and functions that your new appliance offers safely
and efficiently.
This appliance is not intended for use by persons
(including children) with reduced physical,
sensory, or mental capabilities, or those who lack
experience and knowledge, unless they have been
given supervision or instruction concerning the use
of the appliance by a person responsible for their
safety.
Because the following instructions cover various
models, the characteristics of your refrigerator may
differ slightly from the refrigerator described in this
manual.
If you have any question, contact us at
1-800-SAMSUNG or find help and information
online at www.samsung.com.
Important safety symbols and
precautions:
Hazards or unsafe practices that may result in
severe personal injury or death.
WARNING
Hazards or unsafe practices that may result in
minor personal injury or property damage.
CAUTION
Do NOT attempt.
Do NOT disassemble.
Do NOT touch.
Follow directions carefully.
Unplug the power plug from the wall socket.
Make sure the refrigerator is grounded to
prevent electric shock.
Call the contact center for help.
English - 02
Note.
These warning signs are here to prevent
injury to you and others.
Please follow them carefully.
After reading this section, keep it in a safe
place for future reference.
CRITICAL INSTALLATION
WARNING
WARNINGS
• Do not install the refrigerator in a damp
place or place where it may come in
- Deteriorated insulation of electrical parts may
• Do not place this refrigerator in direct sunlight
• Do not plug several appliances into the same
- This provides the best performance and
• If the wall socket is loose, do not insert the
- There is a risk of electric shock of fire.
• Do not use a cord that shows cracks or
• Do not bend the power cord excessively or
• Never unplug your refrigerator by pulling on the
- Damage to the cord may cause a short-circuit,
• Do not use aerosols near the refrigerator.
contact with water.
cause an electric shock or fire.
or expose to the heat from stoves, room
heaters or other appliance.
multiple power strip.
The refrigerator should always be plugged into
its own individual electrical outlet which has a
voltage rating that matches the voltage listed
on the refrigerator’s rating plate.
also prevents overloading house wiring
circuits, which could cause a fire hazard from
overheated wires.
power plug.
abrasion damage along its length or at either
end.
place heavy articles on it.
power cord.
Always grip plug firmly and pull straight out
from the outlet.
fire and/or electric shock.
DA68-02500B-13.indb 2 13. 12. 4. �� 7:12
Page 3
- Aerosols used near the refrigerator may cause
an explosion or fire.
• This refrigerator must be properly
installed and located in accordance with
the manual before you use it.
• Connect the power plug in the proper position
with the cord hanging down.
- If you connect the power plug upside down, the
wire can get cut off and cause a fire or electric
shock.
• When moving the refrigerator, be careful not to
roll over or damage the power cord.
- This constitutes a fire hazard.
• Make sure that the power plug is not squashed
or damaged by the back of the refrigerator.
• Keep the packing materials out of reach of
children.
- There is a risk of death from suffocation if a
child puts the packing materials on his or her
head.
• The appliance must be positioned so that the
plug is accessible after installation.
• You need to remove all the protective plastic
film before you initially plug the product in.
• The refrigerator must be grounded.
- Always make sure that you have
grounded the refrigerator before
attempting to investigate or repair any
part of the appliance.
Power leakages can cause severe
electric shock.
• Never use gas pipes, telephone lines or other
potential lightning attractors as an electrical
ground.
- Improper use of the grounding plug can result
in a risk of electric shock.
If it is necessary to use an extension cord, use
only a 3-wire extension cord that has a 3-blade
grounding plug and a 3-slot receptacle that will
accept the plug on the appliance.
The marked rating of the extension cord should
be AC 115-120V, 10A, or more.
If a grounding adapter is used, make sure the
receptacle box is fully grounded.
• If the power cord is damaged,
have it replaced immediately by the
manufacturer or its service agent.
English - 03
INSTALLATION CAUTIONS
CAUTION
• Allow sufficient space to install the
refrigerator on a flat surface.
- If your refrigerator is not level, the internal
cooling system may not work correctly.
• Keep the ventilation space in the appliance
enclosure or mounting structure clear of
obstruction.
• Allow the appliance to stand for 2 hours after
installation.
• We recommend you have this refrigerator
installed by a qualified technician or service
company.
- Failing to do so may result in an electric shock,
fire, explosion, problems with the product, or
injury.
SEVERE WARNING SIGNS FOR
WARNING
USING
• Do not insert the power plug with wet
hands.
• Do not store articles on the top of the
appliance.
- When you open or close the door, the articles
may fall and cause personal injury and/or
material damage.
• Do not put a container filled with water on the
refrigerator.
- If spilled, there is a risk of fire or electric shock.
• Children should be supervised to ensure that
they do not play with the appliance.
• Do not let children hang on the door.
A serious injury may occur.
• Do not let children go inside the refrigerator.
Children could become trapped.
• Do not insert your hands into the bottom area
under the appliance.
- Any sharp edges may cause personal injury.
• Do not let children step on a drawer’s cover.
- The drawer may break and cause them to slip.
• Do not overfill the refrigerator with food.
- When you open the door, an item may fall out
and cause personal injury or material damage.
• Do not touch the inside walls of the freezer or
products stored in the freezer with wet hands.
- This may cause frostbite.
• Never put fingers or other objects into the water
dispenser hole, ice chute, or ice maker bucket.
DA68-02500B-13.indb 3 13. 12. 4. �� 7:12
Page 4
- It may cause personal injury or material
damage.
• Do not spray flammable gas near the
refrigerator.
- There is a risk of explosion or fire.
• Do not store volatile or flammable substances
in the refrigerator.
- The storage of benzene, thinner, alcohol, ether,
LP gas and other such products may cause
explosions.
• Do not store pharmaceuticals products,
scientific materials, or temperature sensitive
products in the refrigerator.
- Products that require strict temperature
controls must not be stored in the refrigerator.
• Do not place or use an electrical appliance
inside the refrigerator, unless it is of a type
recommended by the manufacturer.
• Do not use mechanical devices or any other
means to accelerate the defrosting process,
other than those recommended by the
manufacturer.
• Do not damage the refrigerant circuit.
• Do not disassemble or repair the
refrigerator by yourself.
- You run risk of causing a fire, malfunction and/
or personal injury.
- When the interior or exterior LED lamp has
gone out, please contact your service agents.
• Children should be supervised to ensure
that they do not play with the appliance.
• Bottles should be stored tightly together so that
they do not fall out.
• This product is intended only for the storage of
food in a domestic environment.
• If a gas leak is detected, avoid any naked
flames or potential sources of ignition and air
the room in which the appliance is standing for
several minutes.
• Use only the LED Lamps provided by
manufacturer or service agents.
• If there are burning smells or smoke, pull
out power plug immediately and contact
your Samsung Electronics service center.
• If you experience difficulty when changing the
light, contact a service agent.
• If the product is equipped with LED Lamps,
do not disassemble the Lamp Cover and LED
Lamp by yourself.
- Please contact your service agents.
• If any dust or water is in refrigerator, pull out
the power plug and contact your Samsung
Electronics service center.
- Otherwise there is a risk of fire.
USAGE CAUTIONS
CAUTION
• Do not re-freeze frozen foods that have
thawed completely.
Do not place carbonated or fizzy drinks
in the freezer compartment.
Do not put bottles or glass containers in
the freezer.
- When the contents freeze, the glass may break
and cause personal injury.
• Service warranty and Modification.
- Any changes or modifications performed
by a 3rd party on this finished appliance
are not covered under Samsung
warranty service, nor can Samsung be
responsible for safety issues that result
from 3rd party modifications.
• Do not block air holes.
- If the air holes are blocked, especially with a
plastic bag, the refrigerator can be over cooled.
If this cooling period lasts too long, the water
filter may break and cause water leakage.
• If the refrigerator is disconnected from the
power supply, you should wait for at least five
minutes before plugging it back in.
• If you have a long vacation planned or the
refrigerator is not to be used for a long period of
time, you must empty the refrigerator and pull
out the power plug.
- Letting the refrigerator run for a long time
without using it can cause the insulation to
deriorate and may cause a fire.
- Wipe excess moisture from the inside and leave
the doors open.
- Otherwise, odor and mold may develop.
• To get the best performance from the product:
- Do not place foods too close to the vents at the
rear of the appliance as it can obstruct free air
circulation in the refrigerator compartment.
- Wrap food up properly or place it in airtight
containers before putting it into the refrigerator.
• Fill the water tank, ice tray, and water cubes
only with potable water.
English - 04
DA68-02500B-13.indb 4 13. 12. 4. �� 7:12
Page 5
• If the product is flooded, make sure to
contact your nearest service center.
- There is a risk of electric shock or fire.
CLEANING CAUTIONS
CAUTION
• Do not directly spray water on the inside
or outside the refrigerator.
- There is a risk of fire or electric shock.
• Remove any foreign matter or dust from
the power plug pins.
Do not use a wet or damp cloth when
cleaning the plug.
- Otherwise, there is a risk of fire or electric
shock.
• Unplug the refrigerator before cleaning or
making repairs.
• This product contains chemicals known
WARNING
to the State of California to cause cancer
and reproductive toxicity.
CRITICAL DISPOSAL
WARNING
WARNINGS
• Risk of child entrapment. Before you
throw away your old refrigerator or
freezer:
- Take off the doors.
- Leave the shelves in place so that children can
not easily climb inside.
• Please dispose of the packaging material from
this product in an environmentally friendly
manner.
• Leave the shelves in place so that children can
not easily climb inside.
Ensure that none of the pipes on the back of
the appliance are damaged prior to disposal.
• When disposing of this refrigerator, remove the
door/door seals and door latch so that small
children or animals cannot become trapped
inside.
Children should be supervised to ensure that
they do not play with the appliance.
• Cyclopentane is used in the insulation.
The gases in the insulation material require a
special disposal procedure.
Please contact your local authorities in regard
to the environmentally safe disposal of this
product.
Ensure that none of the pipes on the back of
the refrigerator are damaged prior to disposal.
ADDITIONAL TIPS FOR PROPER
USAGE
• In the event of a power failure, call the local
office of your Electricity Company and ask how
long it is going to last.
• Most power failures that are corrected within
an hour or two will not affect your refrigerator
temperatures.
However, you should minimize the number of
door openings while the power is off.
- Should the power failure last more than 2
hours, remove all ice in the Ice Bucket.
- Should the power failure last more than 24
hours, remove all frozen food.
English - 05
DA68-02500B-13.indb 5 13. 12. 4. �� 7:12
Page 6

Saving Energy Tips
- Install the appliance in a cool, dry room with
adequate ventilation.
Ensure that it is not exposed to direct sunlight
and never put it near a direct source of heat
(radiator, for example).
- Never block any vents or grilles on the
appliance.
- Allow warm food to cool down before placing it
in the appliance.
- Put frozen food in the refrigerator to thaw.
You can then use the low temperatures of the
frozen products to cool food in the refrigerator.
- Do not keep the door of the appliance open for
too long when putting food in or taking food
out. The shorter time for which the door is
open, the less ice will form in the freezer.
- Clean the rear of the refrigerator regularly.
Dust increases energy consumption.
- Do not set temperature colder than necessary.
- Ensure sufficient air exhaust at the refrigerator
base and at the back wall of the refrigerator.
Do not cover air vent openings.
- Allow clearance to the right, left, back and top
when installing.
This will help reduce power consumption and
keep your energy bills lower.
- To get the best energy efficiency of this
product, please leave all selves, drawers and
baskets on their original position like as above
illustration.
English - 06
DA68-02500B-13.indb 6 13. 12. 4. �� 7:12
Page 7

1. Regulatory Notice
1.1 FCC Notice
FCC CAUTION:
CAUTION
Any changes or modifications not expressly approved by the party responsible for compliance could void
the user’s authority to operate the equipment.
Contains Transmitter Module FCC ID: A3LDNURS11
This device complies with Part 15 of FCC Rules. Operation is Subject to following two conditions:
(1) This device may not cause harmful interference, and
(2) This device must accept any interference received including interference that cause undesired
operation.
For product available in the USA/Canada market, only channel 1~11 can be operated.
Selection of other channels is not possible.
FCC STATEMENT:
This equipment has been tested and found to comply within the limits for a Class B digital device,
pursuant to part 15 of the FCC Rules. These limits are designed to provide reasonable protection against
harmful interference in a residential installation.
This equipment generates, uses, and can radiate radio frequency energy and, if not installed and used
in accordance with the instructions, may cause harmful interference to radio communications. However,
there is no guarantee that interference will not occur in a particular installation. If this equipment does
cause harmful interference to radio or television reception, which can be determined by turning the
equipment off and on, the user is encouraged to try to correct the interference by one or more of the
following measures:
• Reorient or relocate the receiving antenna
• Increase the separation between the equipment and receiver
• Connect the equipment into an outlet on a different circuit from that to which the receiver is connected
• Consult the dealer or an experienced radio/TV technician for help.
FCC RADIATION EXPOSURE STATEMENT:
This equipment complies with FCC radiation exposure limits set forth for an uncontrolled environment.
This equipment should be installed and operated with a minimum distance of 20cm between the radiator
and your body. This device and its antenna(s) must not be co-located or operation in conjunction with any
other antenna or transmitter.
SAVE THESE INSTRUCTIONS
English - 07
DA68-02500B-13.indb 7 13. 12. 4. �� 7:12
Page 8
Contents
SETTING UP YOUR SIDE-BY-SIDE REFRIGERATOR …………………………… 08
OPERATING YOUR SIDE-BY-SIDE REFRIGERATOR …………………………… 16
TROUBLESHOOTING ………………………………………………………………… 88
Setting up your side-by-side
refrigerator
GETTING READY TO INSTALL
THE REFRIGERATOR
Congratulations on the purchase of your Samsung
Side-By-Side Refrigerator.
We hope you will enjoy the many state-of-the-art
features and efficiencies that this new appliance
has to offer.
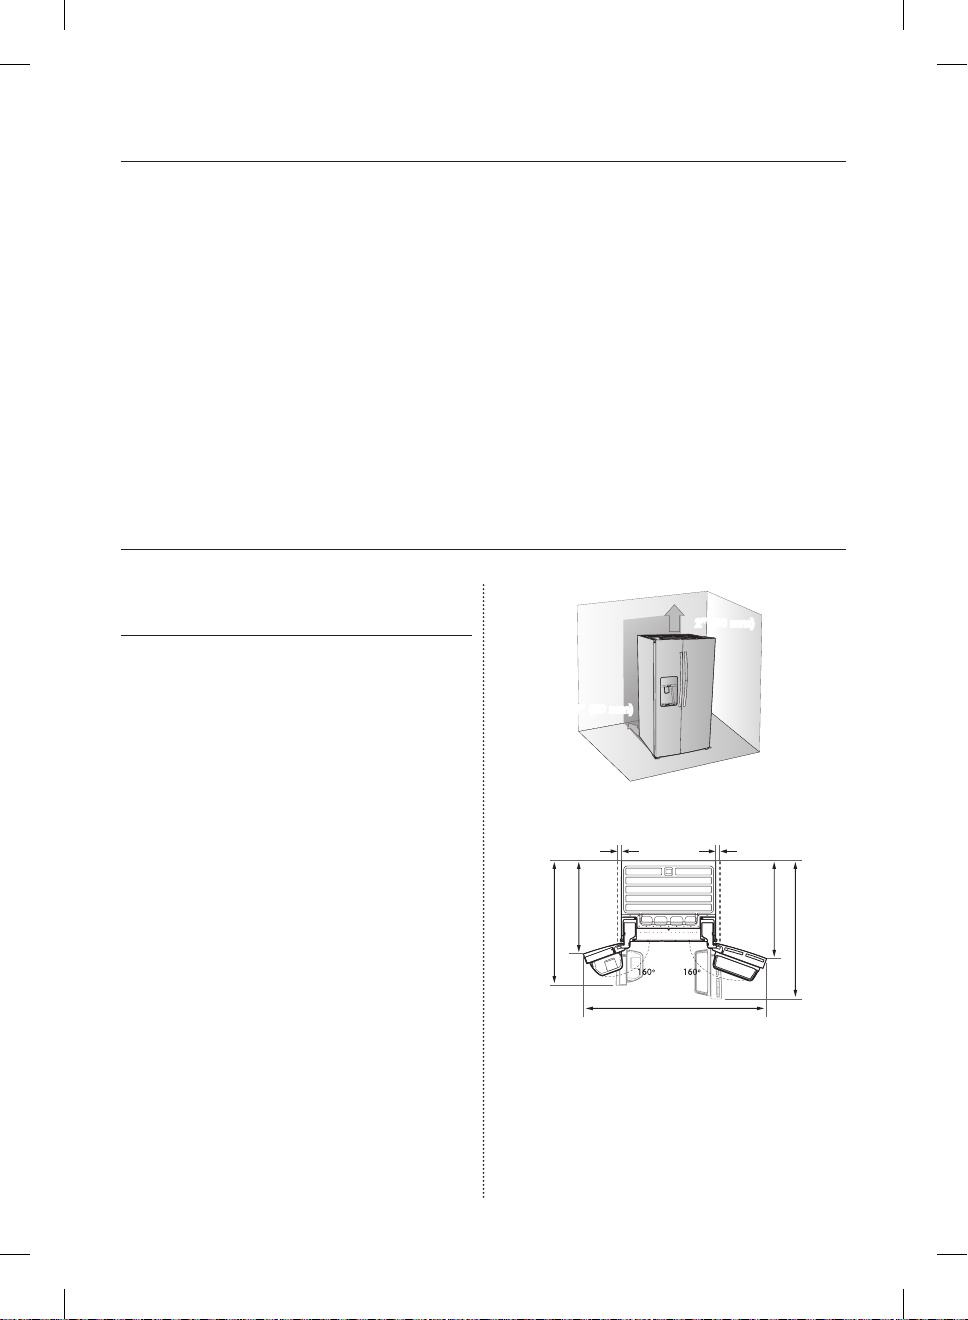
2” (50mm)
2” (50mm)
Selecting the best location for the
refrigerator
• Select a location with easy access to a water
supply.
• Select a location without direct exposure to
sunlight.
• Select a location with level (or nearly level)
flooring.
• Select a location with enough space for the
refrigerator doors to open easily.
See the diagram below.
• Select a location that allows sufficient space to
the right,left, back, and top for air circulation.
See the diagram below.
• Select a location that allows you to move the
refrigerator easily if it needs maintenance or
service.
English - 08
DA68-02500B-13.indb 8 13. 12. 4. �� 7:12
at least ¼”
(6mm)
38 3/8” (974mm)
46 1/2” (1181mm)
68” (1727mm)
at least ¼”
(6mm)
40” (1016mm)
51 1/2” (1308mm)
Page 9
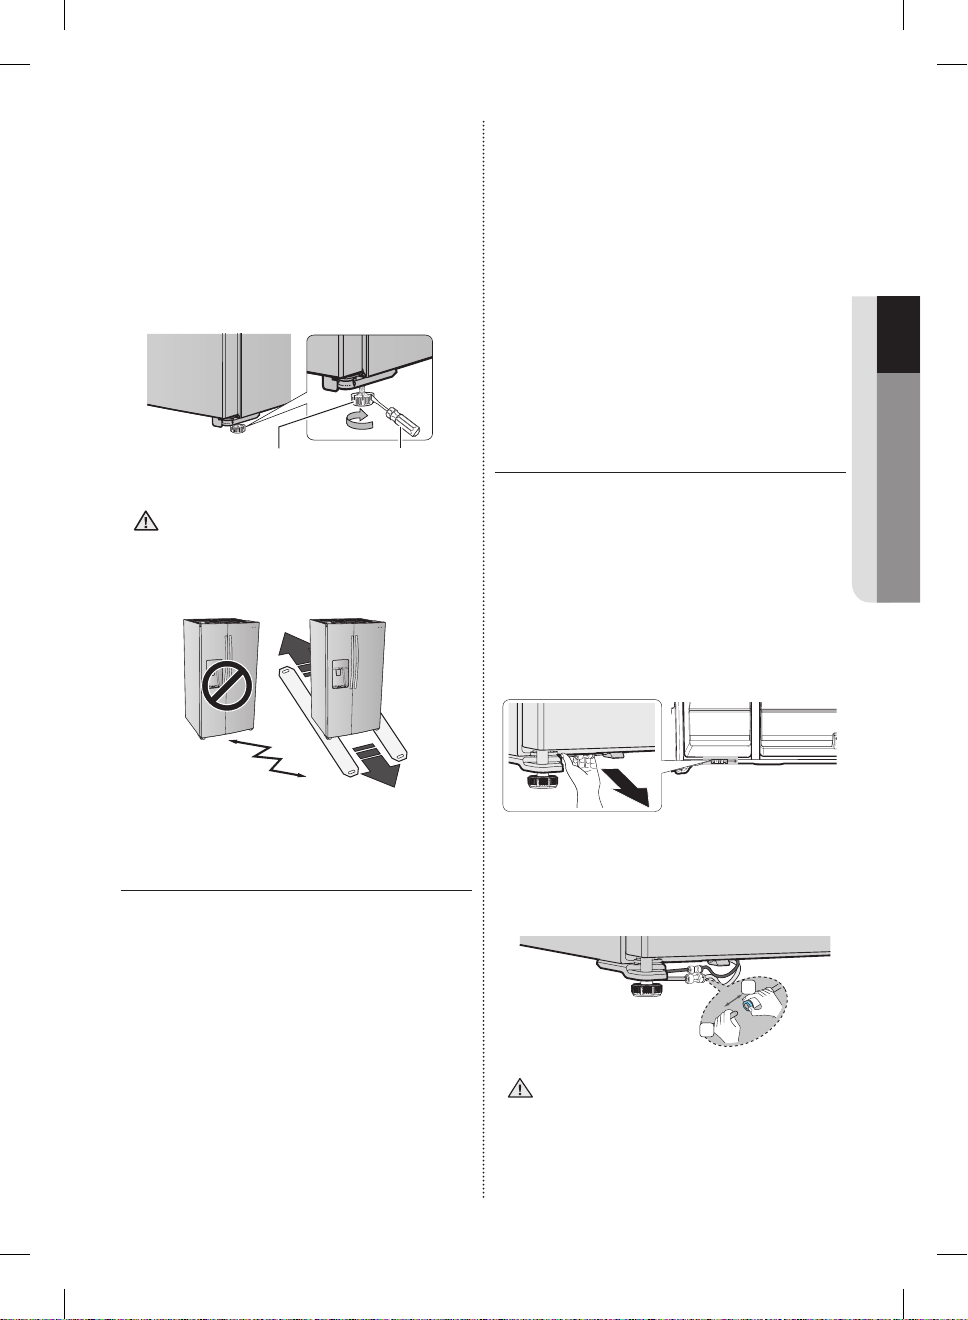
When moving your refrigerator
To prevent floor damage, be sure the front levelling
legs are in the up position (above the floor).
Refer to ‘Levelling the refrigerator’ in this manual
(page 11).
To protect the finish of your flooring while you are
installing the refrigerator, place a large section of
the cardboard carton under the refrigerator where
you are working.
Leg Screw Driver
When installing, servicing or cleaning
CAUTION
behind the refrigerator, be sure to pull the
unit straight out and push back straight in
after finishing.
2. Once the Refrigerator is plugged in, make sure
the interior light comes on when you open the
doors.
3. Set the Temperature control to the coldest
temperature and wait for an hour.
The Freezer will get slightly chilled and the
motor will run smoothly.
4. After powering the Refrigerator, it will take a few
hours to reach the appropriate temperature.
You can store food and drinks in the
Refrigerator after the temperature is sufficiently
cool.
SETTING UP THE REFRIGERATOR
DOORS
If your entrance won’t allow the refrigerator to pass
easily through it, you can remove the doors.
Separating the Water Supply Line from
the Refrigerator
1. Pull the two water lines (which are in the Fixer)
out to the front.
01 SETTING UP
2. Remove two water lines (White one is for water
SETTING UP THE REFRIGERATOR
Now that you have your new Refrigerator installed
in place, you are ready to set up and enjoy the
features and functions of the appliance.
By completing the following steps, your
Refrigerator should be fully operational.
If not, first check the power supply and electricity
source or try the troubleshooting section at the
back of this user’s guide.
If you have any further questions, contact your
Samsung Electronics service center.
1. Place the Refrigerator in an appropriate location
with reasonable clearance between the wall
and the Refrigerator.
Refer to installation instructions in this manual.
English - 09
DA68-02500B-13.indb 9 13. 12. 4. �� 7:12
and the other one is for ice) by pressing the
coupler (1) and pulling the water line (2)
away.
1
2
Make sure the color of the water lines
match.
Page 10
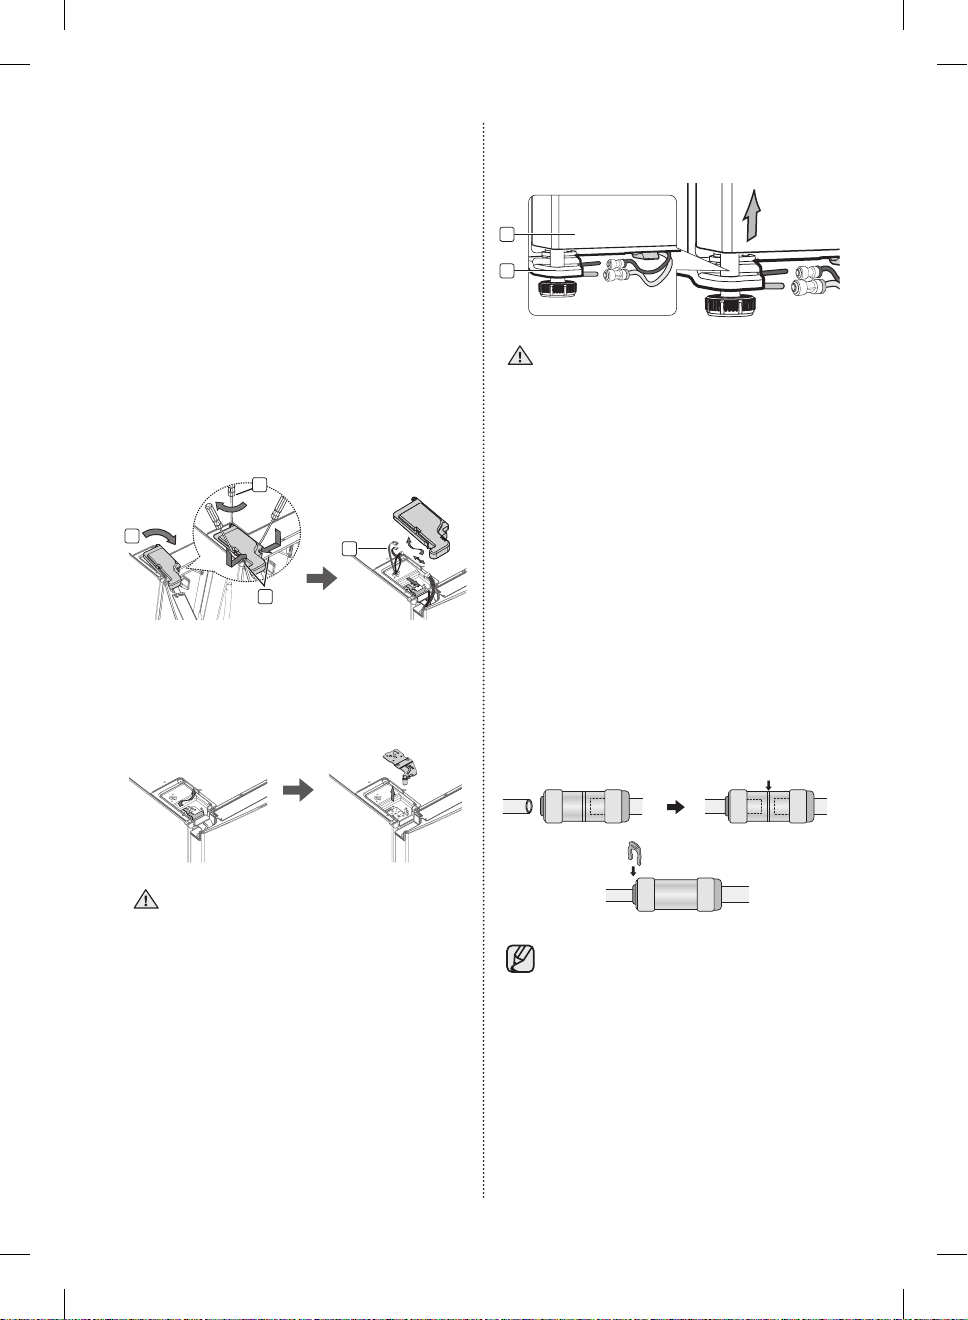
Removing the freezer door
A few things to mention first.
• Make sure that you lift the door straight up so
the hinges are not bent or broken.
• Be careful not to pinch the water tubing and
wire harness on the door.
• Place doors on a protected surface to prevent
scratching or damage.
3. Next, remove the door from the lower hinge
(5) by carefully lifting the door straight up (6).
6
5
1. Remove a screw on the upper hinge cover
(1). With the door open, disengage the two
locking tabs with a flat-head screw driver (2)
and remove it while the lifting up the rear of the
cover (3), and then disconnect the wires by
gently pulling them apart (4).
1
3
2
4
2. Removing the FIXER HINGE ,and next take off
the upper hinge.
Be careful that the door does not fall on you as
you are removing it.
Be sure to keep track of all parts you are
removing.
Be careful not to pinch the water tubing
and wire harness on the door.
Reattaching the freezer doors
To reattach the freezer doors, replace parts in
reverse order.
Reattaching the Water Supply Line
1. The Water Line must be fully Inserted to the
center of transparent coupler to prevent water
leakage from the dispenser.
2. Insert the 2 clips in the install pack and check
that each clip holds the line firmly.
Center of transparent coupler
Clip A (¼”) (6.35mm)
Do not cut the water line.
Gently separate it from the coupler.
English - 10
DA68-02500B-13.indb 10 13. 12. 4. �� 7:12
Page 11
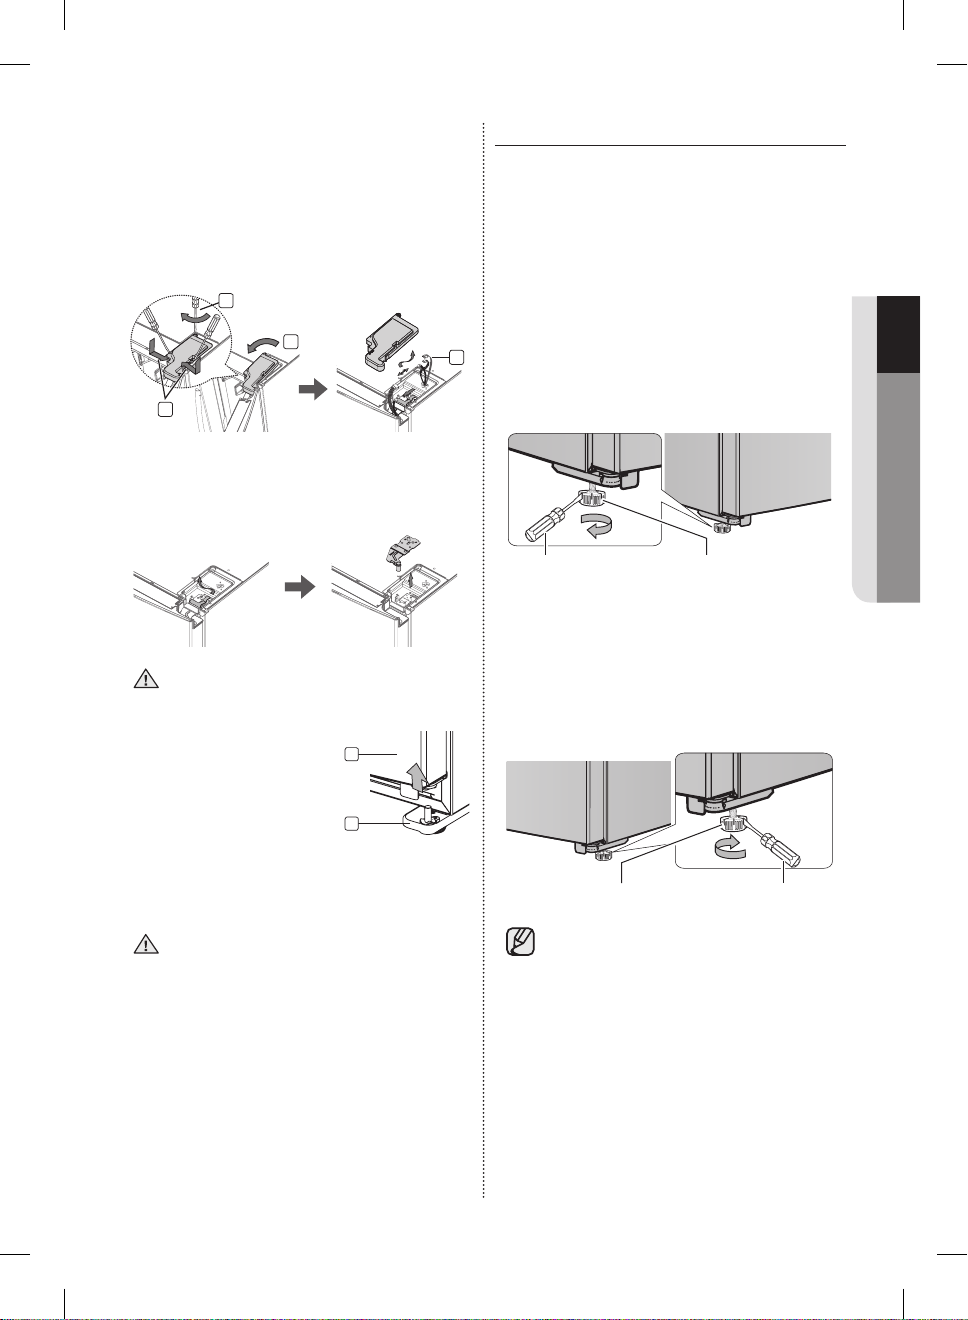
Removing the Fridge Door
1. Remove a screw on the upper hinge cover
(1). With the door open, disengage the two
locking tabs with a flat-head screw driver (2)
and remove it while the lifting up the rear of the
cover (3), and then disconnect the wires by
gently pulling them apart (4).
LEVELLING THE REFRIGERATOR
Now that the doors are back on the refrigerator,
you want to make sure the refrigerator is level
so that you can make final adjustments. If the
refrigerator is not level, it will not be possible to get
the doors perfectly even.
1
3
2
2. Removing the FIXER HINGE ,and next take off
the upper hinge. Be careful that the door does
not fall on you as you are removing it.
Be sure to keep track of all parts you are
removing.
3. Remove the door from the
lower hinge (5) by lifting
6
the door straight up (6).
5
When the Freezer part is lower than the
Fridge part.
4
Insert a flat-blade screwdriver into a slot on the
Freezer Leg, then turn it clockwise.
Freezer LegScrew Driver
When the Fridge part is lower than the
Freezer part.
Insert a flat-blade screwdriver into a slot on the
Fridge Leg, then turn it clockwise.
01 SETTING UP
Reattaching the Fridge door
Fridge Leg Screw Driver
To reattach the fridge doors, replace parts
in reverse order.
English - 11
DA68-02500B-13.indb 11 13. 12. 4. �� 7:12
Refer to the next section for the best way
to make very minor adjustments to the
doors.
Page 12

MAKING MINOR ADJUSTMENTS
TO THE DOORS
Remember, a level refrigerator is necessary for
getting the doors perfectly even.
If you need help, review the previous section on
levelling the refrigerator.
When the door of the fridge is higher
than the freezer
Insert a flat-blade screwdriver into a slot on the
freezer leg, then turn it clockwise.
When the door of the freezer is higher
than the fridge
Insert a flat-blade screwdriver into a slot on the
fridge leg, then turn it clockwise.
CHECKING THE WATER
DISPENSER LINE
A water dispenser is one of the helpful features on
your new Samsung Refrigerator.
To help promote better health, the Samsung water
filter removes unwanted particles from your water.
However, it does not sterilize or destroy
microorganisms.
You may need to purchase a water purifying
system to do that.
In order for the ice maker to operate properly, a
water pressure of 20~125psi (pound per square
inch) is required. Under normal conditions, a
170cc (5.75oz.) paper cup can be filled in 10
seconds.
If the Refrigerator is installed in an area with low
water pressure (below 20psi), you can install a
booster pump to compensate for the low pressure.
Make sure the water storage tank inside the
Refrigerator is properly filled.
To do this, press the water dispenser lever until the
water runs from the water outlet.
Water line installation kits are available at
extra cost from your dealer.
We recommend using a water supply kit
that contains copper tubing.
Check the accessory list below.
Hex wrench Clip
English - 12
DA68-02500B-13.indb 12 13. 12. 4. �� 7:12
Page 13

Connecting to the water supply line
1. First, shut off the main water supply line and
turn the ice-maker off.
2. Locate the nearest cold, drinking water line.
3. After connecting the water supply with water
filter, turn on water supply and Flush 3 gallons
through filter before use (flush approximately 6
minutes).
Cold water line
Pipe clamp
Shut off valve
Water line installation kit
INSTALLING THE WATER LINE
Connecting the water line to the
Refrigerator.
There are several items that you need to purchase
to complete this connection.
You may find these items sold as a kit at your local
hardware store.
• ¼” compression nut
• copper tubing
• plastic tubing
• ferrule
Refrigerator
Plastic Tubing
Compression Nut
(1/4”) (Assembled)
Ferrule
(Not supplied)
Copper tubing
(Not supplied)
Household water supply line
(Assembled)
Compression
Fitting (Assembled)
Plastic tubing (B)
or
(Not supplied)
Bulb
Compression
nut (B) (1/4”)
(Not supplied)
1. Connect the household water line to the
assembled compression fitting.
- If you are using copper tubing, slip the
compression nut (B) (not included) and ferrule
(not included) on copper tubing (not included)
as shown.
- If you are using plastic tubing (B), insert the
molded end (Bulb) of the plastic tubing (B) into
the compression fitting.
Do not use without the molded end (Bulb)
CAUTION
of the plastic tubing (B).
2. Tighten the compression nut (B) onto the
compression fitting.
Do not over-tighten the compression nut (B).
01 SETTING UP
3. Turn water on and check for any leakage.
Only connect the water line to a drinkable
water source.
If you have to repair or disassemble the
water line, cut off 1/4“ of the plastic tubing
to make sure you get a snug, leak-free
connection.
English - 13
DA68-02500B-13.indb 13 13. 12. 4. �� 7:12
Page 14
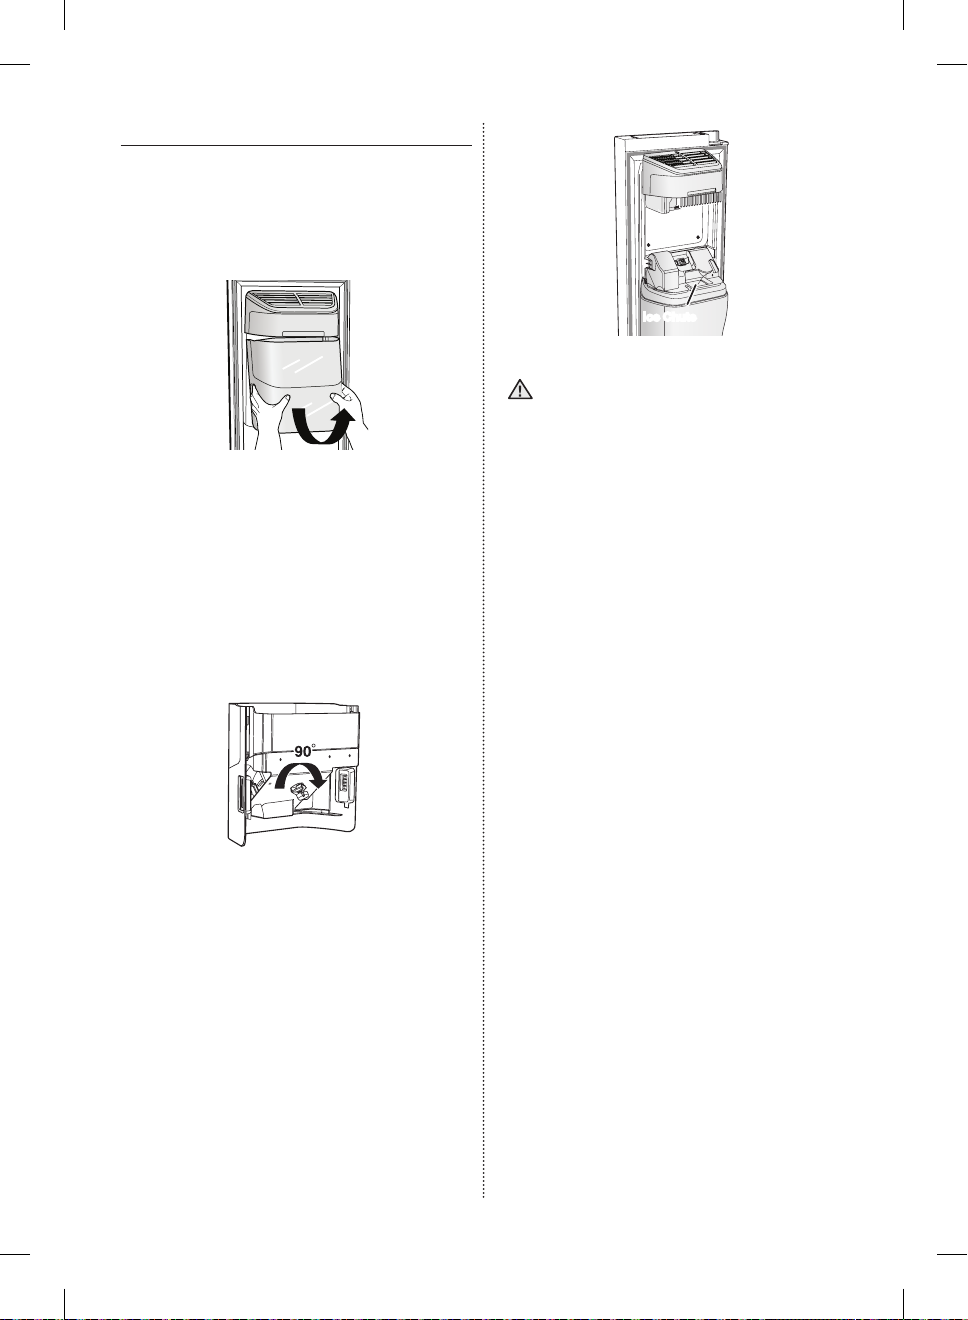
BEFORE USING ICEMAKER
• Remove
- Hold the handle as shown in Figure1.
- Slightly pull up the bottom part.
- Take out the ice bucket slowly.
Figure 1
• Install
- Assemble the icemaker in the reverse order of
disassembly.
- Push the bucket in firmly until you hear a
clicking sound.
- If the bucket does not fit into its place, turn the
gear handle on its back by 90 degrees and
reinstall it again as shown in Figure 2.
Ice Chute
• When Ice Off blinks on the display
CAUTION
panel, reinsert the bucket and/or make
sure it’s installed properly.
• When the door is open, the Ice and water
dispenser do not work.
• If you close the door hard, it may cause water
spilling over the ice maker.
• To prevent dropping the ice bucket, use both
hands when removing it.
• To prevent injury, be sure to clean up any ice or
water that may have dropped on the floor.
• Do not let the children hang on the ice
dispenser or on the bucket.
They may get hurt.
• Be sure not to put your hand or any object into
the ice chute.
It may cause personal injury or damage
mechanical parts.
Figure 2
• Before calling service
- Any sounds you hear when the ice maker
dumps ice into the bucket are part of normal
operation.
- If you don’t dispense ice for a long period
of time, the ice may form clumps in the
ice bucket. If ice clumps form, remove the
remaining ice and empty the bucket.
- When ice does not come out, check for ice
stuck in the chute and remove it.
English - 14
DA68-02500B-13.indb 14 13. 12. 4. �� 7:12
Page 15
Removing residual matter inside the
water supply line after installing filter.
1. Turn ON the main water supply.
2. Press the Water button and push the Dispenser
Lever.
3. Flush 1 gallons of water through the filter before
use. (Flush approximately 6 minutes.) This will
clean the water supply system and remove air
from the lines.
4. Additional flushing may be required in some
households.
5. Open the refrigerator door and make sure there
are no water leaks coming from the water filter.
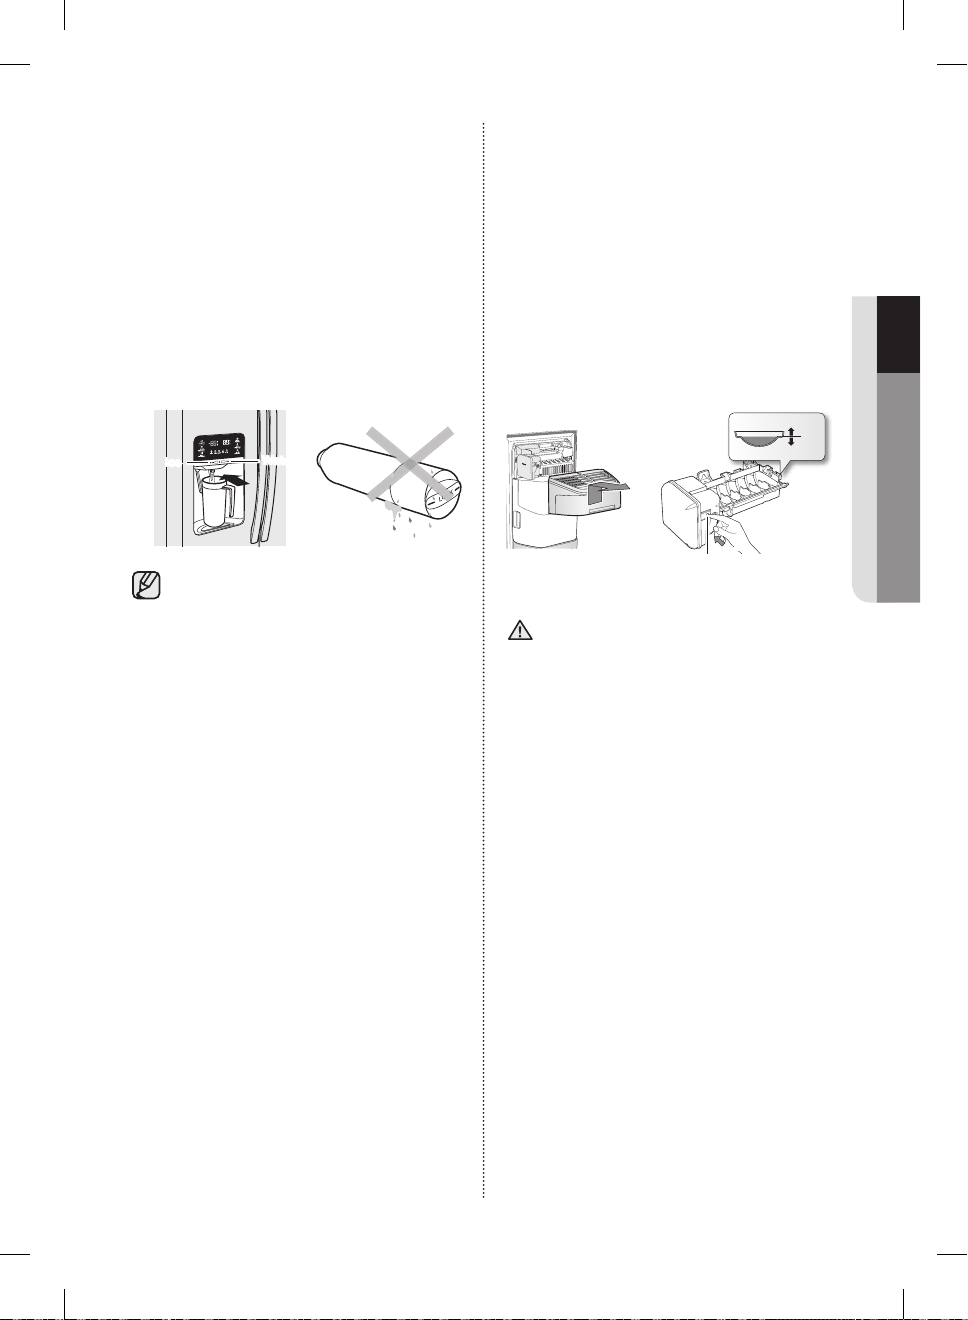
Check the amount of water supplied to
the ice tray.
1. Lift up the icemaker cover and gently pull it out.
2. When you press the Test button for 3 seconds,
the ice cube container is filled with water from
the water supply tap.
Check to make sure the amount of water is
correct (see the illustration below).
If the water level is too low, the ice cubes will
be small.
This is a water pressure problem from within
the main water pipes, not the refrigerator.
01 SETTING UP
Ice
Water
A newly installed water filter cartridge may
cause water to briefly spurt from the water
dispenser.
This is due to air getting into the line. It
should pose no problem to operation.
Check the water
1
Ice maker
level
2
Test button
• It will take a few minutes to reach the
CAUTION
amount of water you want.
• Do not press the test button continuously when
the tray is filled with ice or water.
Water may overflow or ice jamming may occur.
• When the bucket is not installed, the ice maker
does not work.
• When “Ice maker will not work when the ice
bucket is not installed” message appears on
the display panel, reinsert the bucket and/or
make sure it’s installed properly.
English - 15
DA68-02500B-13.indb 15 13. 12. 4. �� 7:12
Page 16

Operating your side-by-side
refrigerator
DISPLAY PANEL RESTRICTIONS AND ALERTS
1. English is a default language for the Display.
Languages not supported are not displayed on the screen.
2. Periodic updates of Weather or News will cause network traffic even when you are not using the
Display.
3. When software updates become available, Samsung automatically updates the refrigerator software
and then issues an alert which appears on your Display.
4. Please note that the relevant licensor(contents provider) retains sole discretion as to what content is
made available through the various refrigerator applications.
Furthermore, each licensor retains the sole right to remove any such content that the licensor may
cease to offer through the refrigerator application.
In such case, the licensor may send a written notice to the user with regards to the removal of
content.
DIGITAL PANEL
CPU NEXELL CPU OS Linux 2.6.28
RAM 256 MB LCD 8" TFT-LCD (800*480)
ROM 512 MB NETWORKS IEEE802.11b/g/n
English - 16
DA68-02500B-13.indb 16 13. 12. 4. �� 7:12
Page 17
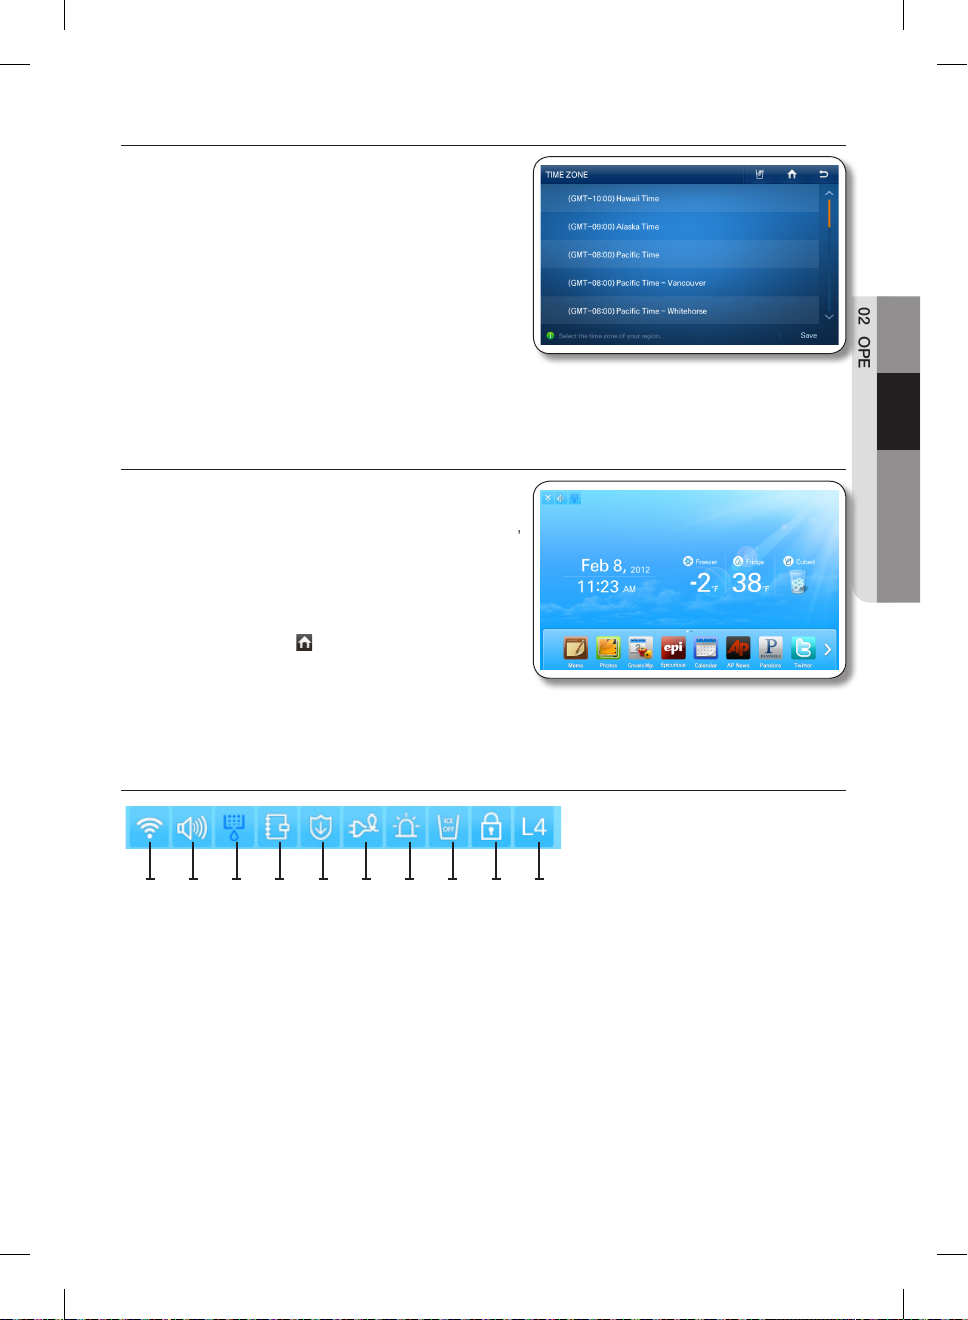
USING FOR THE FIRST TIME
• When you use the product for the first time after
installation, the Time Zone Setting screen appears on
the Display Panel.
You need to select your time zone to use Google
Calendar and the Twitter service correctly.
• After you select the time zone and press the [Save]
button, the Home Screen appears on the Display
Panel.
The Time Zone Setting screen may appear again after
a software update.
HOME SCREEN
• The Home screen is the starting point for all functions.
In the center of the Home screen, basic refrigerator
information such as Time, Date, Weather, Temperature,
and Dispenser Selection appears.
The indicator icons at the top left of the screen display
information about the refrigerator’s status.
The Menu icons on the bottom of the screen start
various applications or functions.
When you select the ( ) on any menu, the screen
returns to the Home screen immediately.
02 OPERATING
Indicator Icons (At the left-top of the Screen)
1 2 3 4 5 6 7 8 9 10
1. Network Signal Strength
: 5 Level (off - 1 - 2 - 3 - 4)
2. Volume Level : 5 Level (off - 1 - 2 - 3 - 4)
3. Filter Status : 3 Level (blue - pink - red)
4. Schedule Alarm
5. S/W Update Notice
DA68-02500B-13.indb 17 13. 12. 4. �� 7:12
6. Energy Saver
7. Door Alarm
8. Ice Off
9. Dispenser Lock
10. Smart Grid Level (Off - 1 - 2 - 3 - 4)
English - 17
Page 18

Date/Time, Freezer/Fridge temperature, Dispenser selection, Current weather
(At the center of the Screen), News (At the bottom of the Screen)
④
②
①
③
②
③
①
⑤
<Wireless network connected>
<Wireless network disconnected>
1. Date/Time : Indicates the current date and time.
2. Freezer/Fridge temperature : Displays the current freezer/fridge temperature.
When you select the freezer/fridge temperature, the temperature setting screen appears.
3. Dispenser : Displays the current status of the dispenser. When you select the current status of the
dispenser, the ice type selection screen appears.
4. Weather: Displays the current local weather, if the refrigerator is connected to a WIFI.
The Home Screen displays the current weather (and time of day), using one of eight images (Clear,
Cloudy, Snow, Rain) X (Day or Night).
5. News: Displays via the Internet, as long as the unit is connected to WIFI.
News titles change at certain intervals. When you select a title, the article will appear on the screen.
At the bottom of the Screen : Menu Icons
1. Memo : Lets you create, save, or check memos.
2. Photos : Lets you manage stored photos and import photos from external devices such as memory
cards or mobile phones and from the Internet.
3. Grocery Manager : Lets you manage food items by location, storage date, and expiration date.
4. Epicurious : Lets you view recipes and create shopping lists for the recipes you select.
5. Calendar : Lets you view the schedule you stored in Google Calendar.
6. AP News : Displays the news from one of 11 categories you select.
7. Pandora : Plays music provided by the Pandora Internet radio service.
8. Twitter : Displays Twitter messages.
9. WeatherBug : Displays the current weather and weather forecast.
10. Settings : Lets you set the refrigerator’s basic functions such as Energy Saver, Door Alarm, Time, etc.
English - 18
DA68-02500B-13.indb 18 13. 12. 4. �� 7:12
Page 19
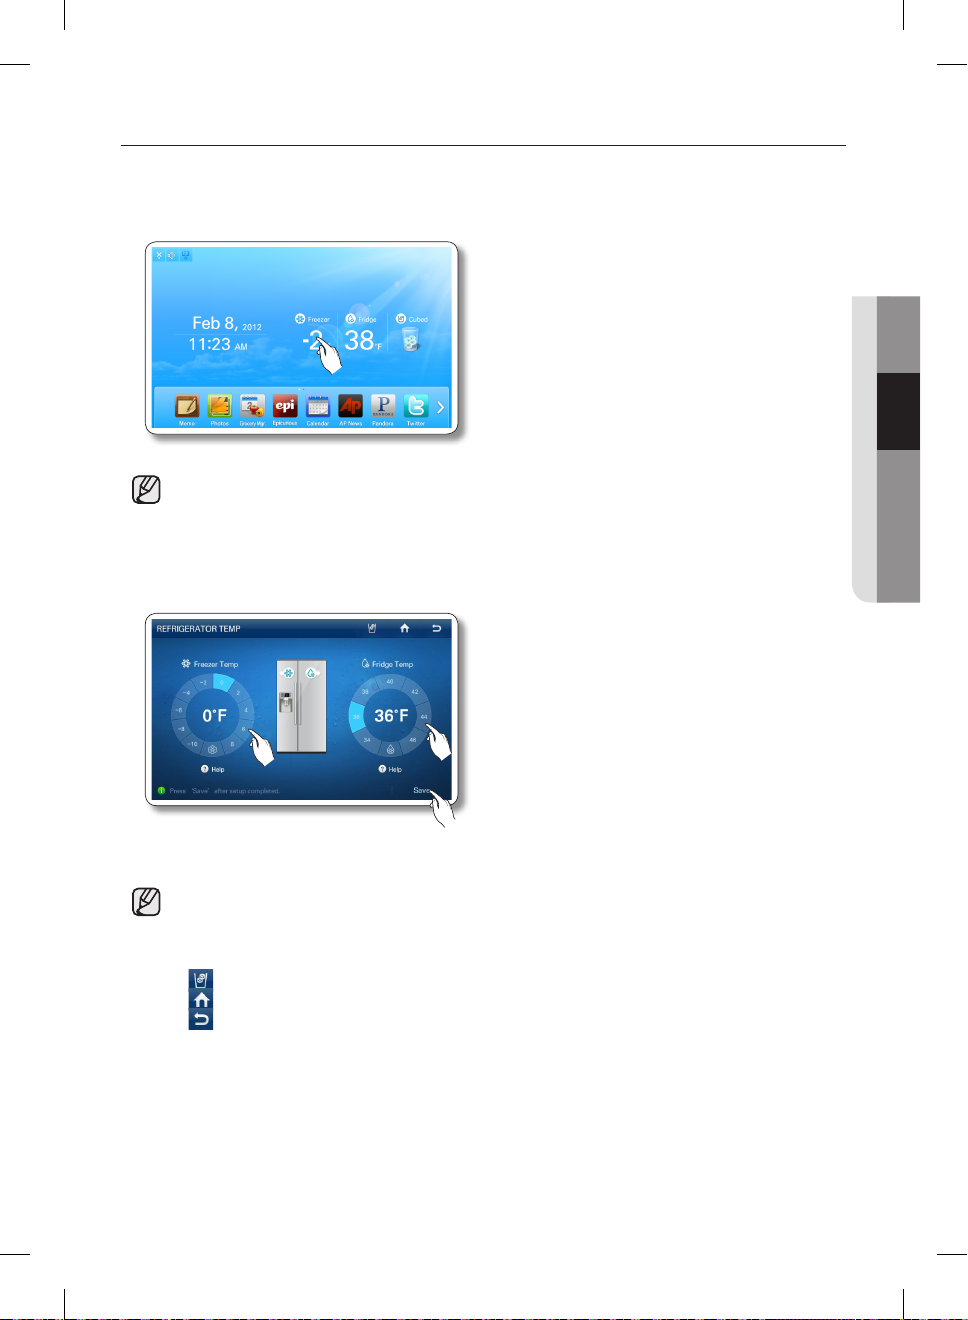
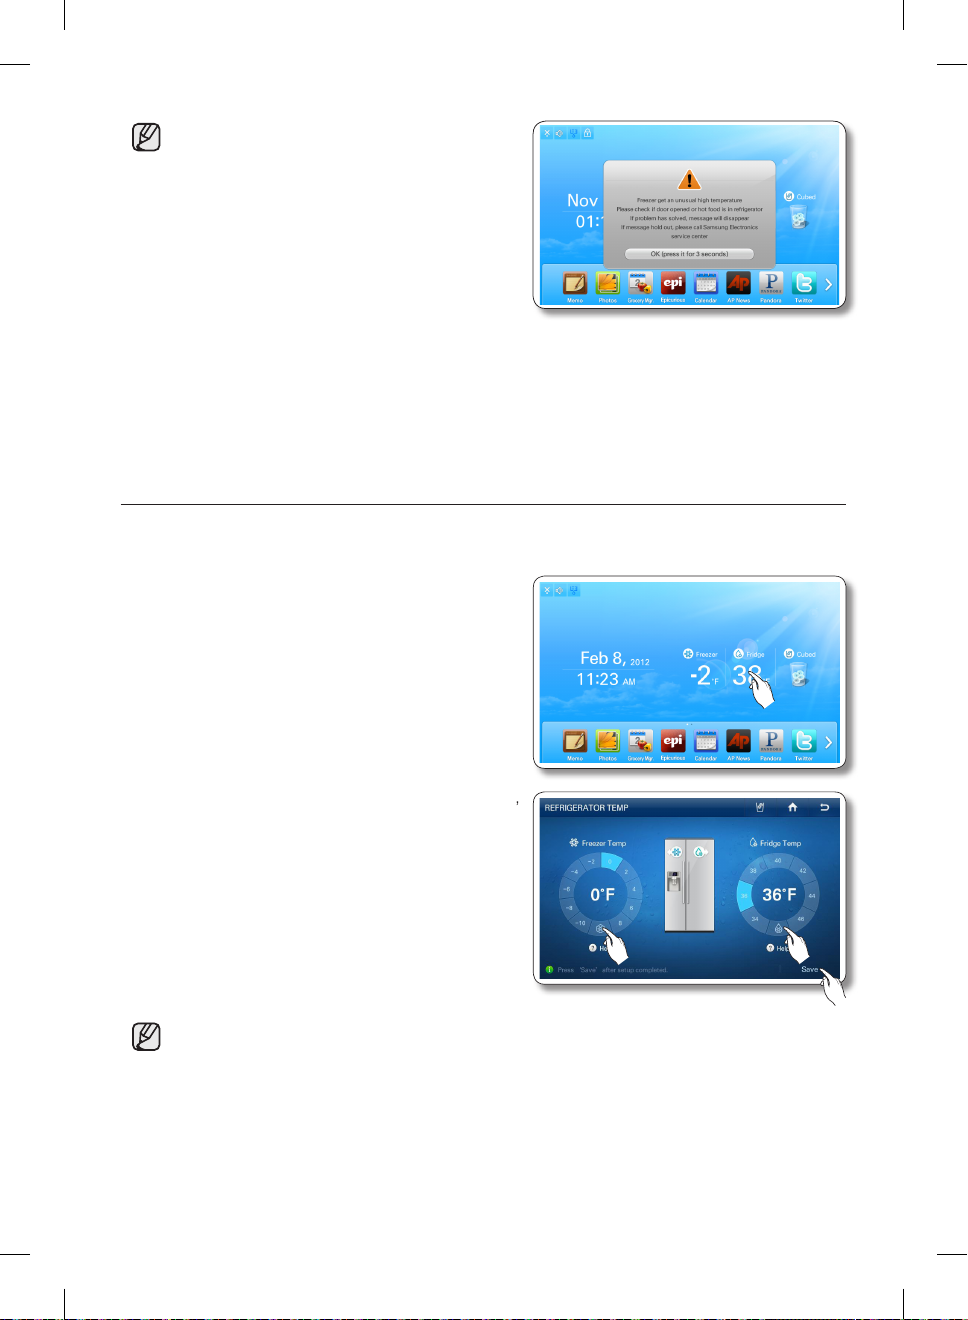
SETTING THE FREEZER / FRIDGE TEMPERATURE
The temperature control allows you to set the freezer and the fridge temperatures.
Use the following instructions to change and set these temperatures.
1. Select the Freezer/Fridge temperature on the Home screen.
• When you store ice cream at a temperature above 4°F (-16°C) in the freezer, it may melt.
2. Choose a freezer and/or fridge temperature using the temperature buttons, and then select the [Save]
button.
02 OPERATING
• The freezer/fridge temperature can be set as follows based on models.
Freezer : Fahrenheit : -10°F ~ 8°F(Default: -4°F), Celsius : -23°C ~ -14°C(Default: -20°C)
Fridge : Fahrenheit : 34°F ~ 46°F(Default: 38°F), Celsius : 1°C ~ 7°C(Default: 3°C)
• Function Icons on the upper right of the Display function screen:
• : Press to set the dispenser type. (Cubed/Crushed/Water)
• : Press to go to the Home screen.
• : Press to display the preview screen.
English - 19
DA68-02500B-13.indb 19 13. 12. 4. �� 7:12
Page 20
• The freezer or fridge temperature may change
depending on how often you open and close
the door, the food quantity, the ambient
temperature, etc.
• Temperatures vary in each food storage section
in the freezer and fridge compartments.
• If the room temperature becomes unusually
warm, it can cause temperatures in the Fridge
and Freezer to rise abnormally.
If this occurs, the screen will display the
“Abnormally High Temperature” pop-up.
When the temperatures return to normal, the pop-up will close automatically.
If the room temperature returns to normal and the pop-up does not close automatically within a
few hours, please contact your nearest repair center.
SETTING THE POWER FREEZE / POWER COOL
You can use the Power Freeze and Power Cool functions to lower the temperature of the freezer and
fridge compartments quickly. To use the Power Freeze or Power Cool function, follow these steps:
1. Touch the Freezer/Fridge temperature on the Home
screen.
2. Select the Power Freezer and/or Power Cool button(s),
and then Press the [Save] button.
• To cancel the Power Freeze and the Power Cool, select a Temperature Setting button.
• Energy consumption increases during Power Freeze and/or Power Cool usage.
• If you select the question icon (?), the function description screen pops up. Press the [OK]
button on the popup screen to re-display the Temperature Display Screen.
• When you turn on Power Freeze/Power Cool, the refrigerator’s compressor speeds up and is
louder than during normal operation.
English - 20
DA68-02500B-13.indb 20 13. 12. 4. �� 7:12
Page 21
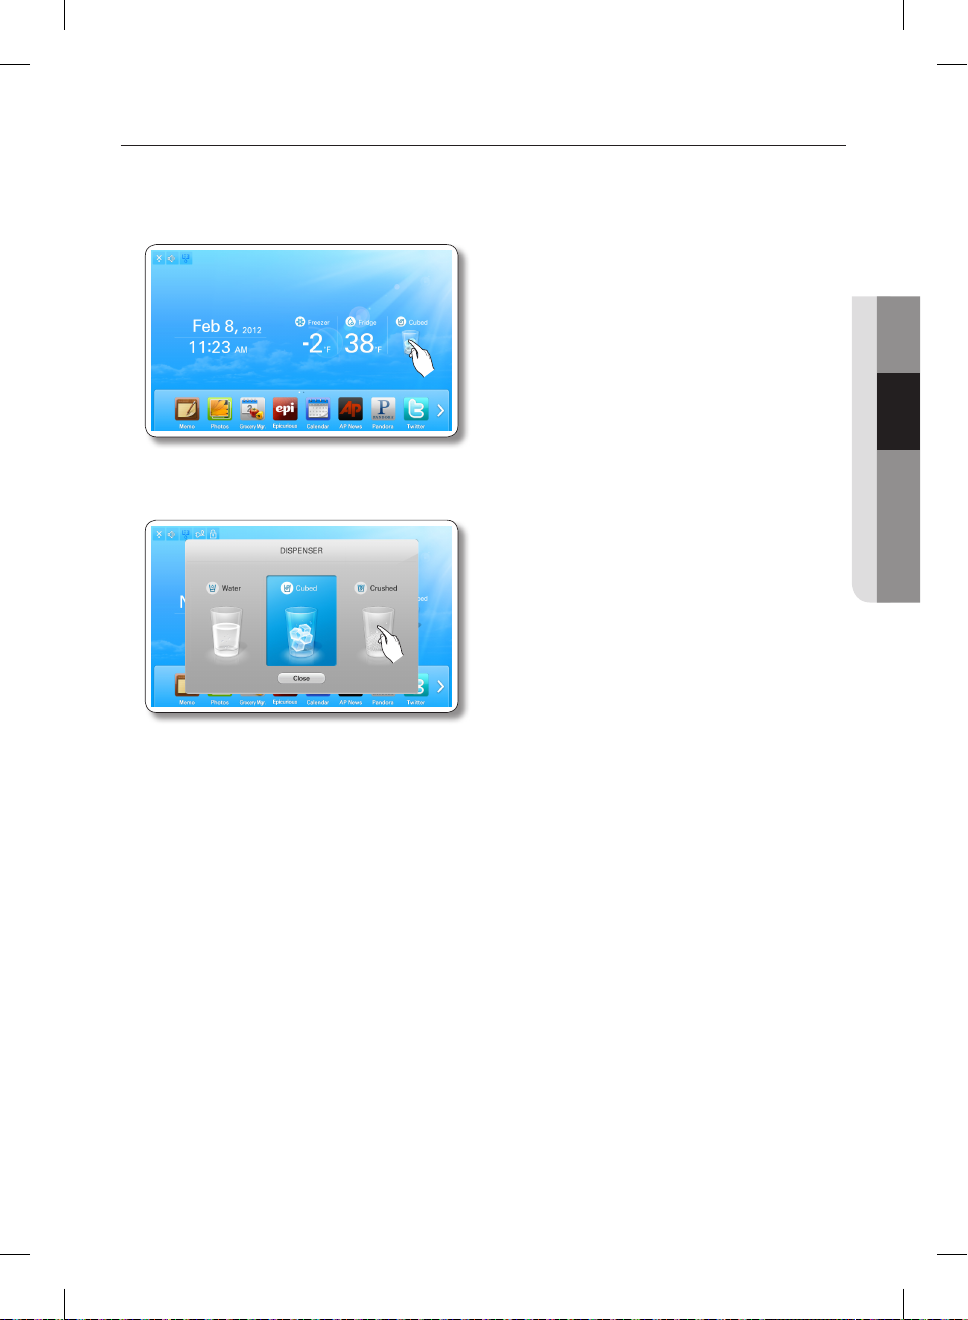
SETTING THE DISPENSER
You can select the ice type and water.
1. Touch Dispenser Status on the Home screen. The Dispenser pop-up appears.
2. Touch the desired dispenser type, and then press the [Close] button.
02 OPERATING
English - 21
DA68-02500B-13.indb 21 13. 12. 4. �� 7:12
Page 22
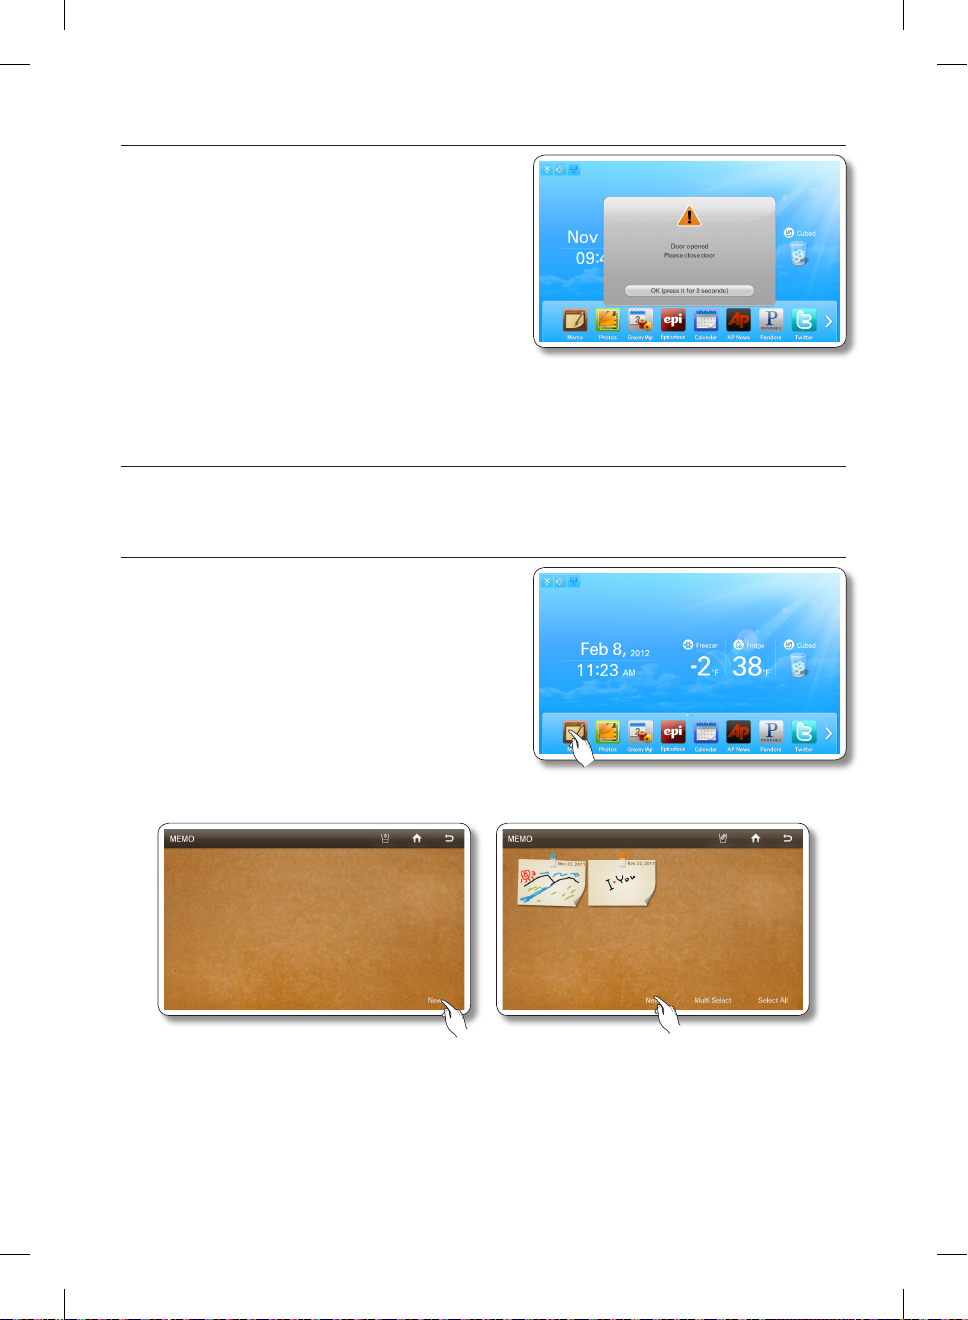
DOOR OPEN ALARM
If the fridge / freezer door remains open more than 2
minutes, a warning window pops up accompanied by
alarm sounds.
The alarm repeats every minute and only stops when you
close both doors.
If you set Door Alarm to OFF in the Settings menu, the
alarm does not operate.
MEMO
You can use the Memo function to leave a memo for yourself or someone else.
How to leave a new memo.
1. Select the [Memo] button on the Home screen.
2. Select the [New] button.
English - 22
DA68-02500B-13.indb 22 13. 12. 4. �� 7:12
Page 23
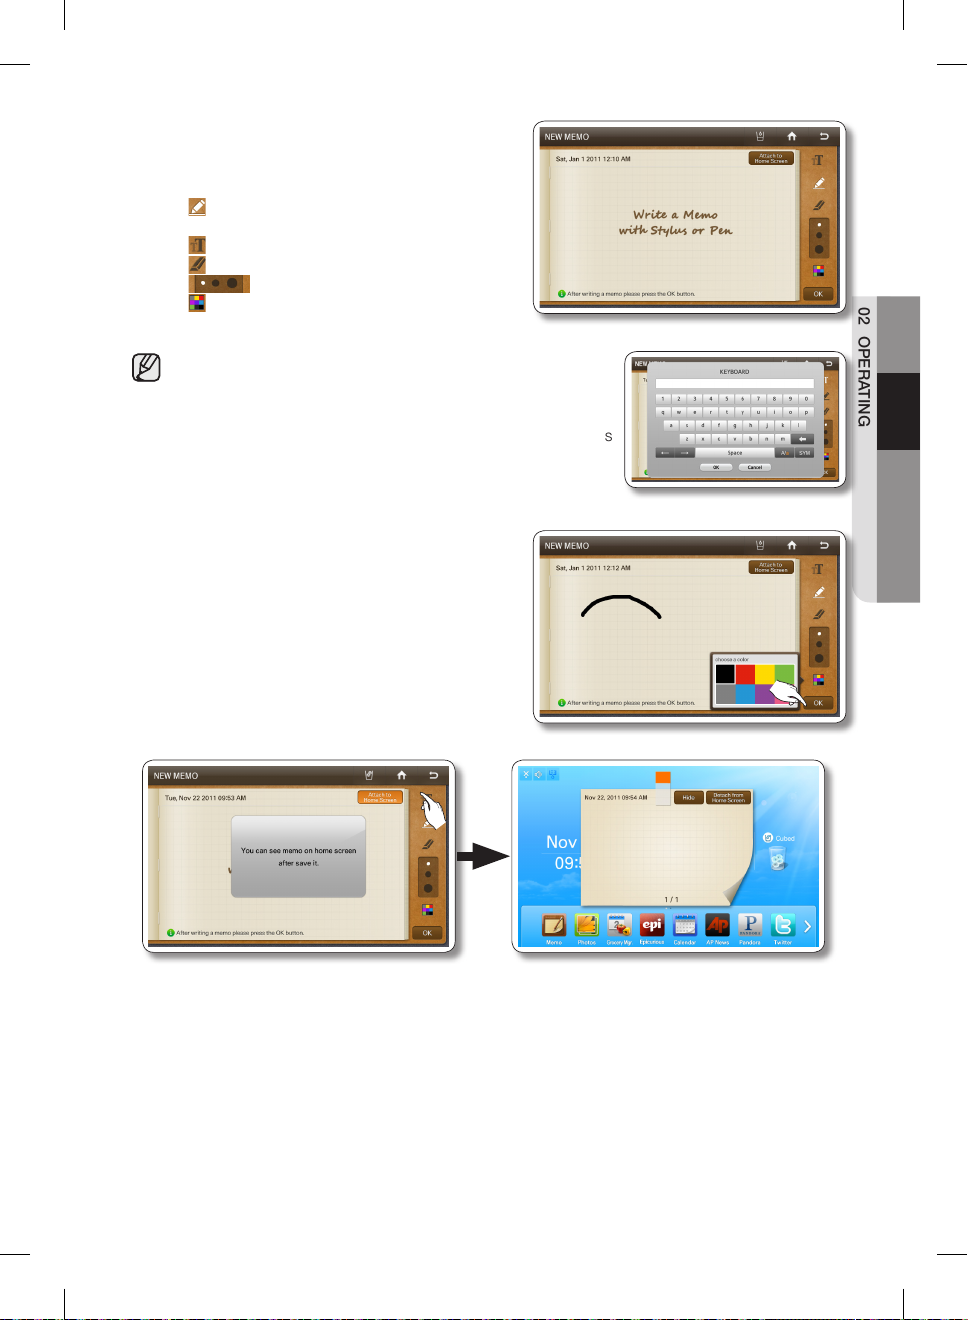
3. Select the memo tools you want by touching the tool
buttons above the memo entry area.
The tools are described below.
• : Select to input a memo in pen mode.
Use your finger or a smooth-tipped stylus.
• : Select to input a memo in keyboard mode.
• : Select to erase a memo.
• : Select pen or erase thickness.
• : Select pen color.
• You can save up to 80 memos.
• To use the Keyboard, press the Keyboard icon, and then
touch where you want the memo to begin. The keyboard
pops up on the Display. The number of characters you can
input with the Keyboard is limited to the number of characters
that will fit in the memo entry area.
4. Press the [Save] button after you have completed your
memo.
• If you want to display the memo on the Home
screen, select the [Attach to Home Screen]
button, and then select the [Save] button. See
below.
02 OPERATING
English - 23
DA68-02500B-13.indb 23 13. 12. 4. �� 7:12
Page 24
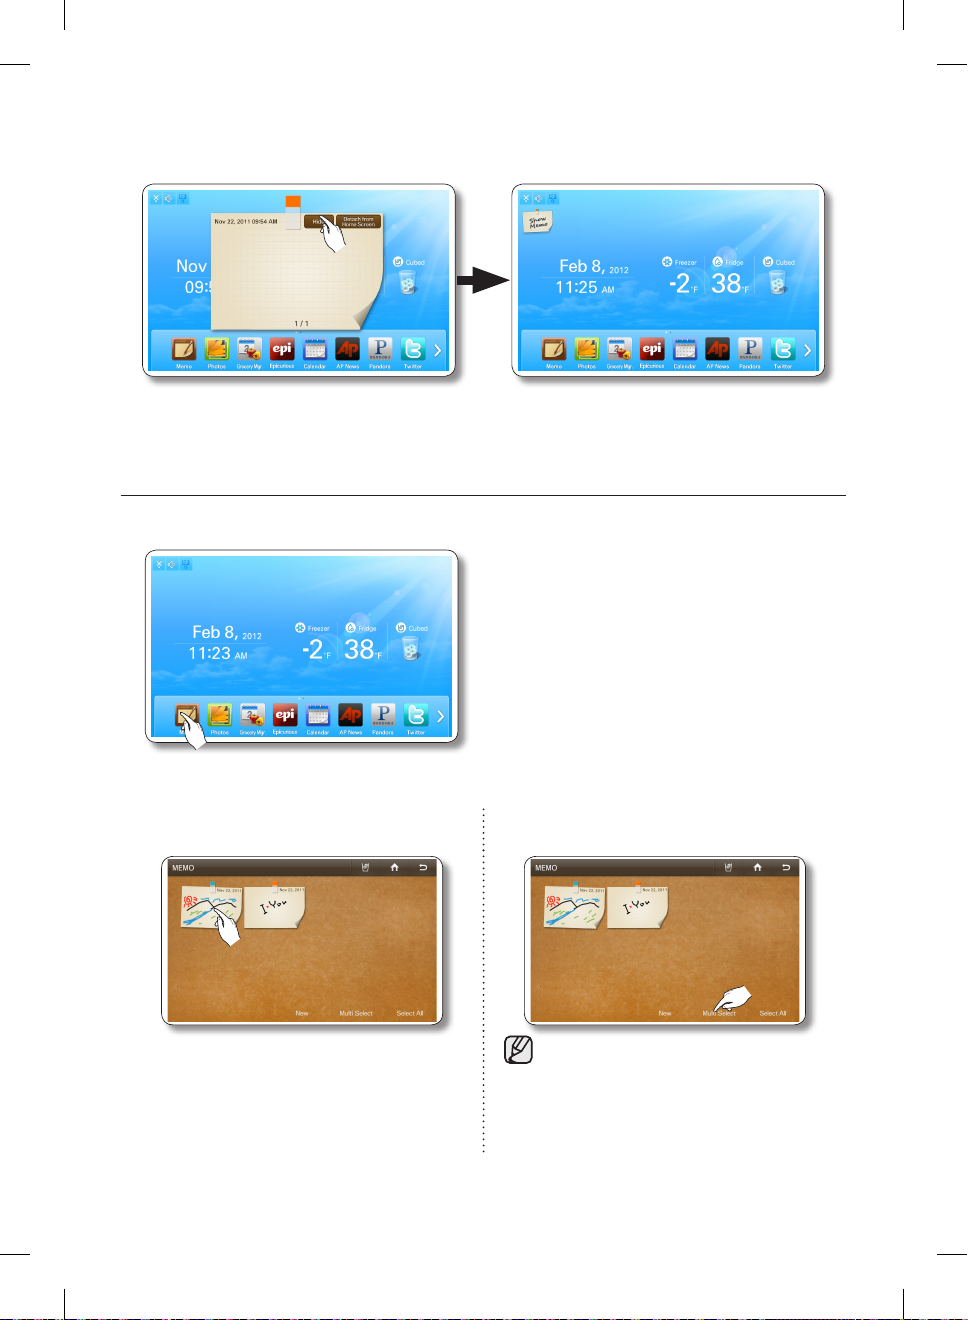
• You can “put away” the memo being displayed on the Home screen by pressing the [Detach
from Home Screen] button or hide it temporarily by pressting the [Hide] button.
How to display memos.
1. Select the Memo button on the Home screen.
To view multiple memos, continue here.
2. Select the memo you want to display. 2. To view multiple memos, press the [Multi
• When you select the [Select All] button, the
Multi Selection screen shows.
• When there are multiple pages with many
memos, there will be page number on the
bottom of the screen. If you select a page
number, the screen shifts to that page.
English - 24
DA68-02500B-13.indb 24 13. 12. 4. �� 7:12
Select] button.
Multi-Select mode lets you select a
number of memos and then view them
one after another by pressing the [<] or [>]
buttons.
Page 25
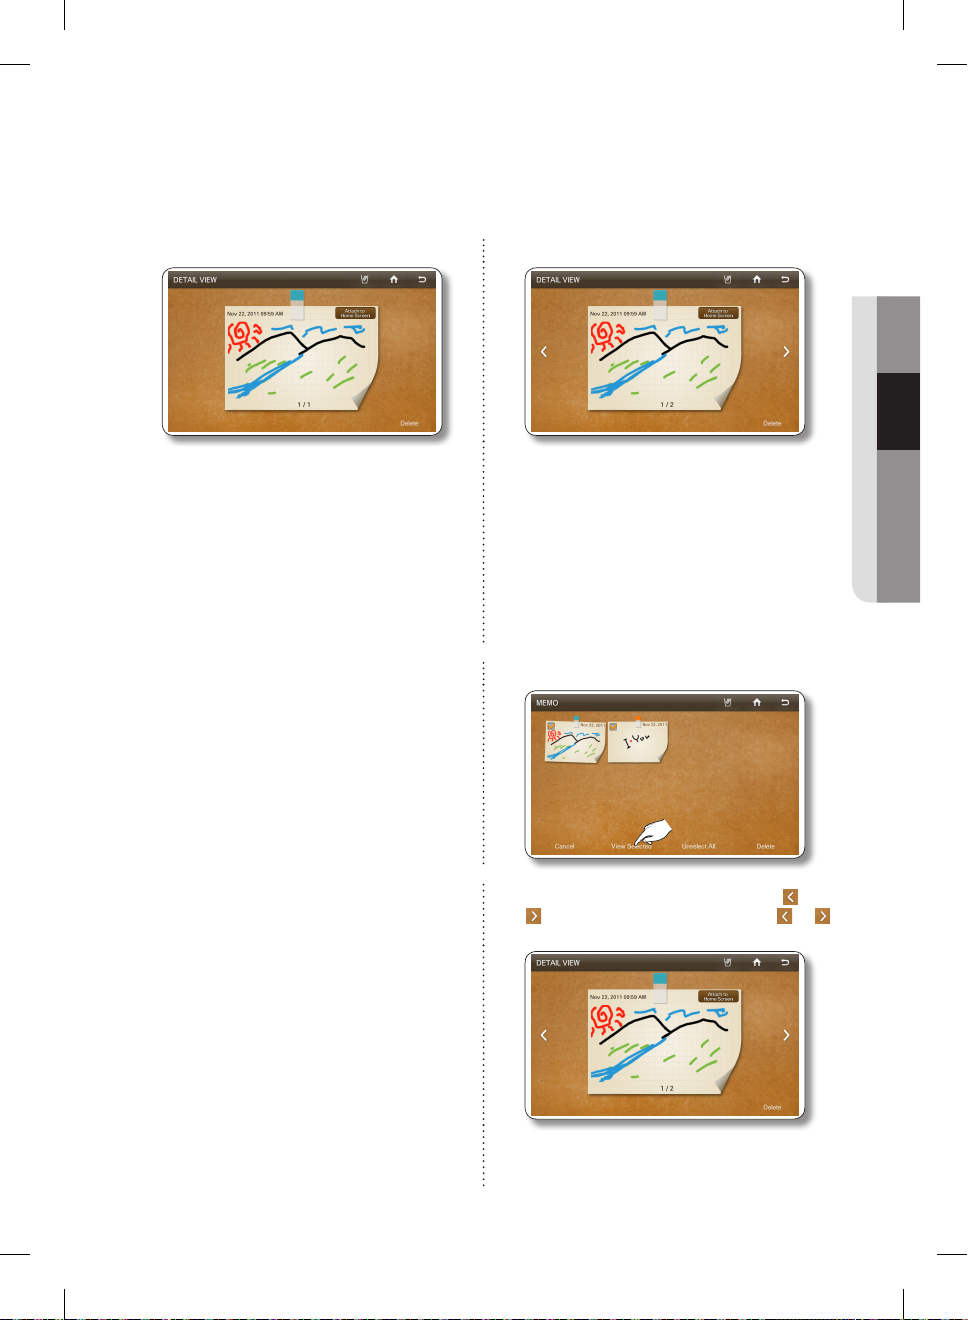
• The memo(s) being displayed on the Home screen is indicated with the red tack.
• The written memos appear as thumbnails.
You can change the order of the written memos by dragging and dropping.
3. View the saved memo. 3. Select the memos you want to view.
02 OPERATING
• In the Detail View screen, you can delete the
memo or attach it to or detach it from the
Home screen.
• When you select the [Select All] button, all the
memos on the current page will be selected
and the [Select All] button will shift to the
[Unselect All] button.
• To exit the Multi Select screen, press the
[Cancel] button.
• When there are multiple pages with many
memos, there will be page numbers on the
bottom of the screen. If you press a page
number, the screen shifts to that page.
4. Select the [View Selected] button.
5. Check the saved memo by using the and
buttons. Each time you press the or
button, the next menu in sequence appears.
• In the Detail View screen, you can delete a
memo or attach it to or detach it from the
Home screen.
English - 25
DA68-02500B-13.indb 25 13. 12. 4. �� 7:12
Page 26
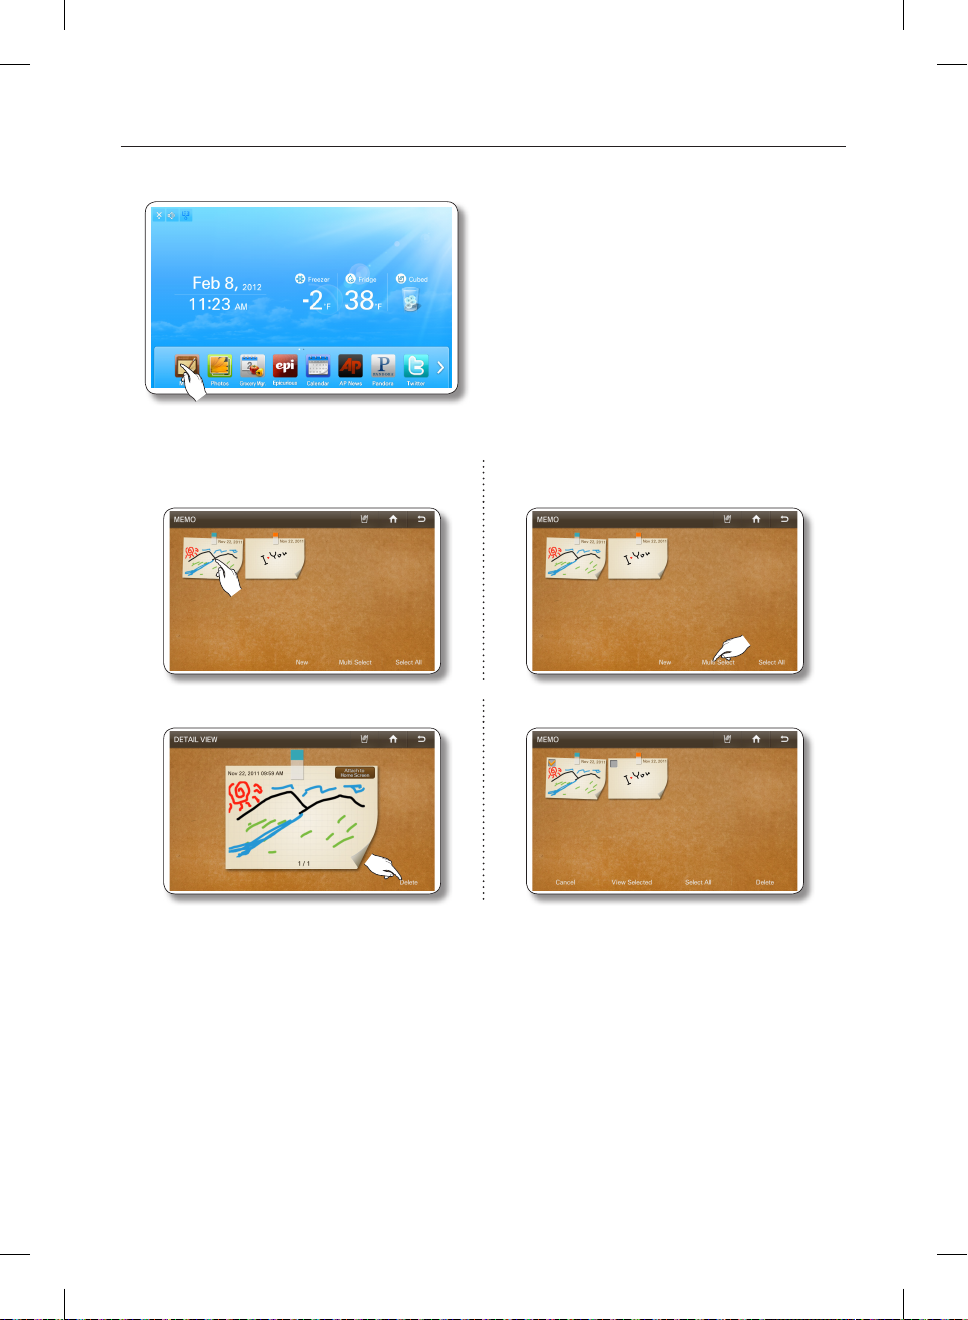
How to delete memos.
1. Select the [Memo] button on the Home screen.
To delete multiple memos, continue here.
2. Select the memo you want to delete. 2. To delete multiple memos, select the [Multi
3. Press the [Delete] button. 3. Select the memos you want to delete.
Select] button.
English - 26
DA68-02500B-13.indb 26 13. 12. 4. �� 7:12
Page 27
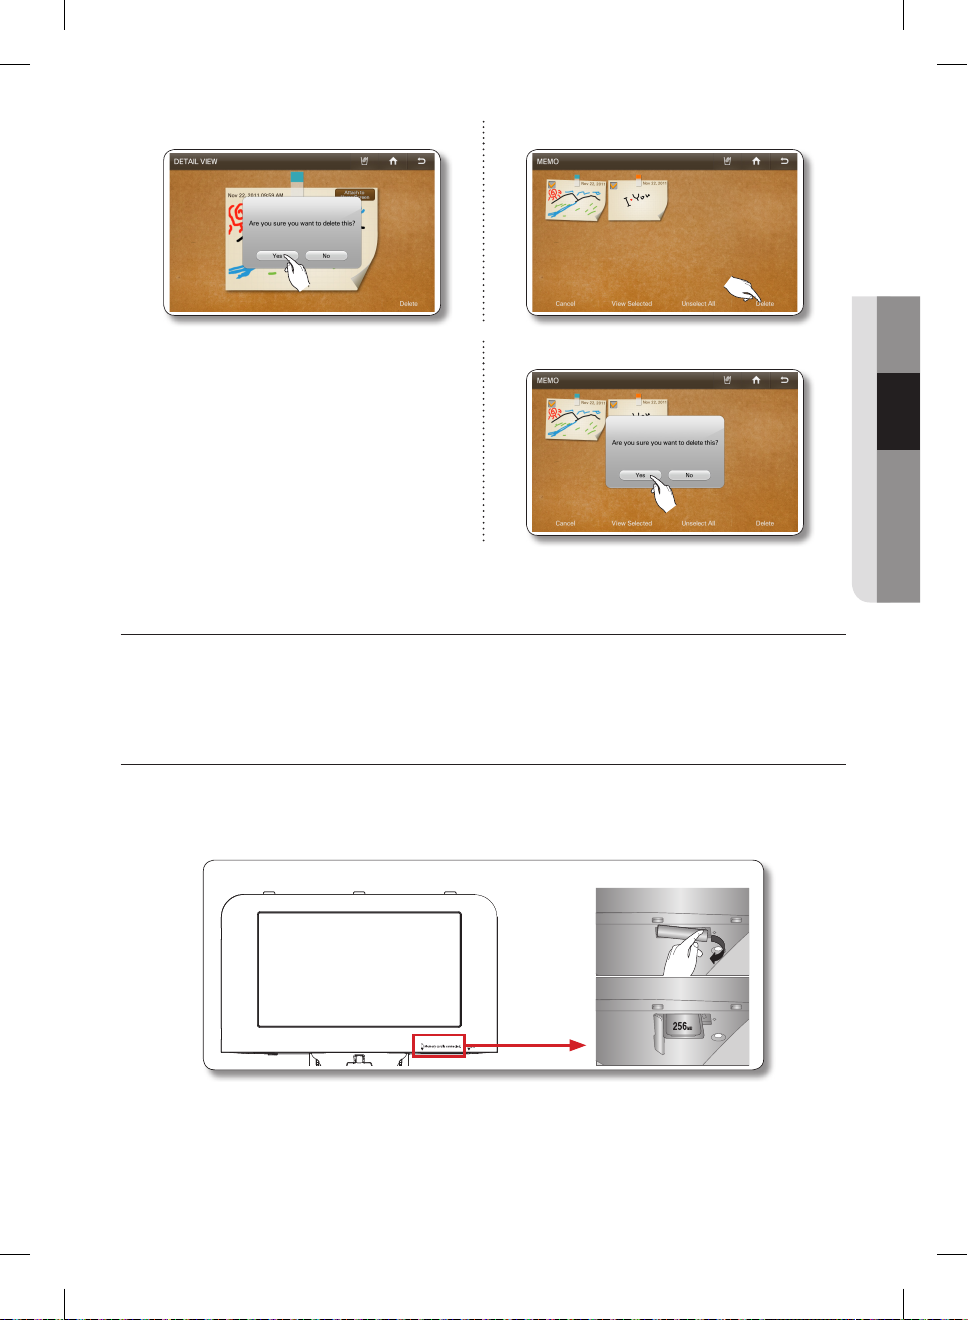
4. Press the [Yes] button. 4. Press the [Delete] button.
5. Press the [Yes] button.
PHOTOS
You can upload photos from a Memory card/DLNA device/Picasa Web Album into My Album on your
refrigerator.
02 OPERATING
How to Copy Photos from a Memory Card to My Album
1. Pull out the cover over the card slot and move it to the side.
2. Insert the memory card (SD/SDHC/MMC/HS MMC) with saved images into the card slot.
The “A SD/MMC card is connected” message appears on the screen.
English - 27
DA68-02500B-13.indb 27 13. 12. 4. �� 7:12
Page 28
• The Memory slot is only for SD/SDHC/MMC/HS MMC type memory cards.
• The slot can read only JPEG(JPG) images.
• The Panel has a capacity of about 300 photos.
• When saving photos from a memory card to the panel, the refrigerator automatically changes
the photo size to 800 x 480 pixels, regardless of the original size.
• If there are many photos saved on the Memory card, it will take awhile for the preview function
to load.
• If the Memory Card is removed while transferring images, My Album only shows the images that
have transferred completely. If no images have completely transferred, the Display returns to
the Photos screen.
• The saved images are fit to the screen size. Depending on the size of an image, there may be
black bars on the top or sides.
• A Memory Card is not supplied with the refrigerator.
• The refrigerator may not be able to read your SD/SDHC/MMC/HS MMC memory card,
depending on the type of card it is.
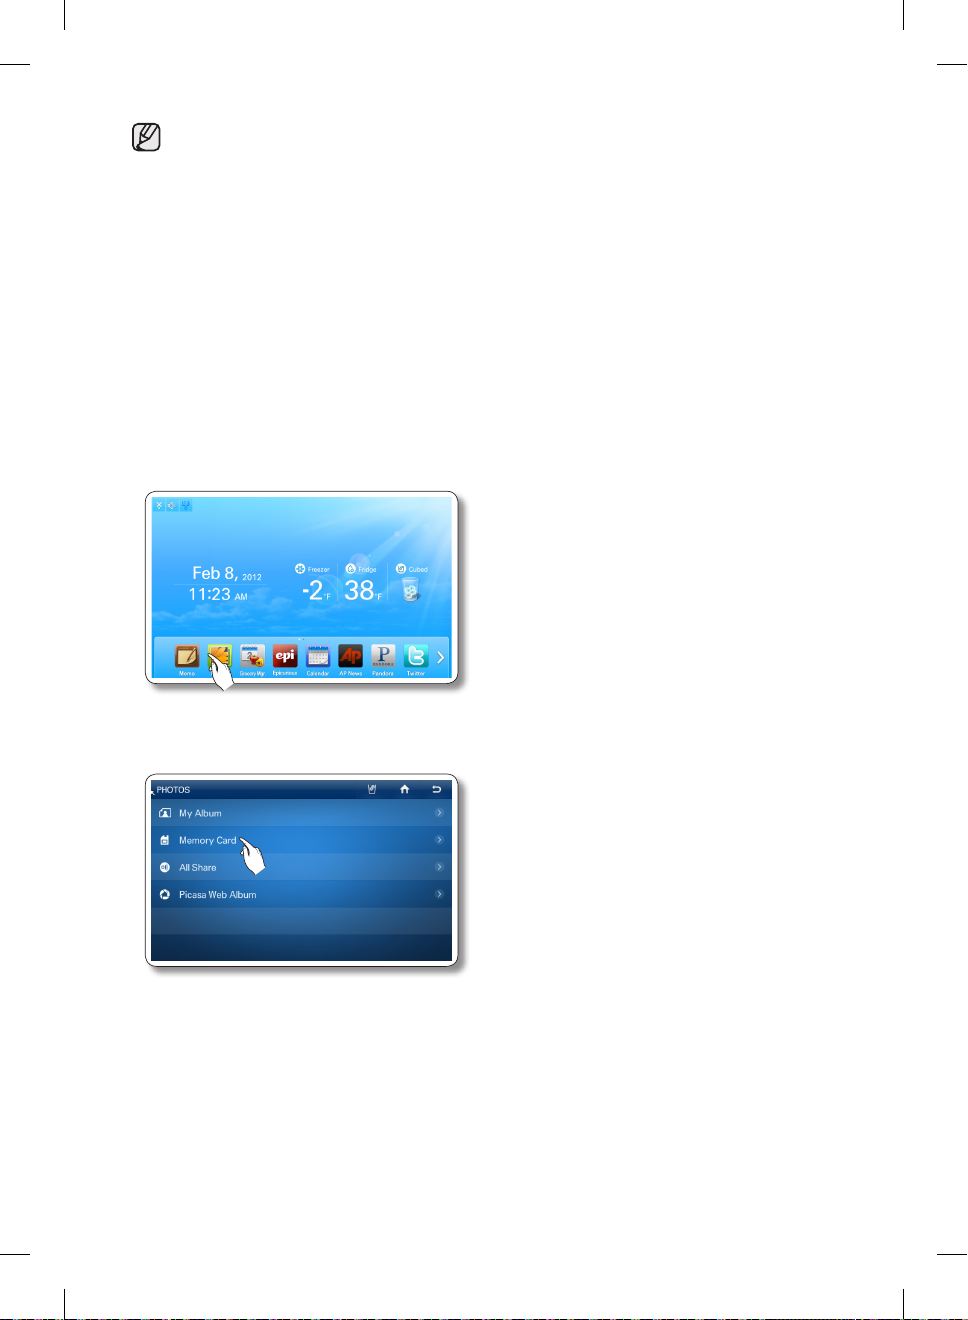
3. Select the [Photos] button on the Home screen.
4. Select [Memory Card] on the Photos list.
English - 28
DA68-02500B-13.indb 28 13. 12. 4. �� 7:12
Page 29

5. Select the photo you want to save to My
Album.
5. To store multiple photos, press the [Multi
Select] button.
• When you select the [Select All] button, the
Multi Selection screen appears.
• When there are multiple pages with many
photos, there will be page numbers on the
bottom of the screen. If you select the page
number, the screen shifts to that page.
• This function also applies to the <All Share>
and <Picasa Web Album> functions.
• When there are folders in the Memory Card, the folder icons will appear on the screen.
• When you select a folder, you will see the photos stored in it.
• When you are in a sub-folder, you can move up to the folder that contains sub-folder by selecting
the “..” icon on the sub-folder.
02 OPERATING
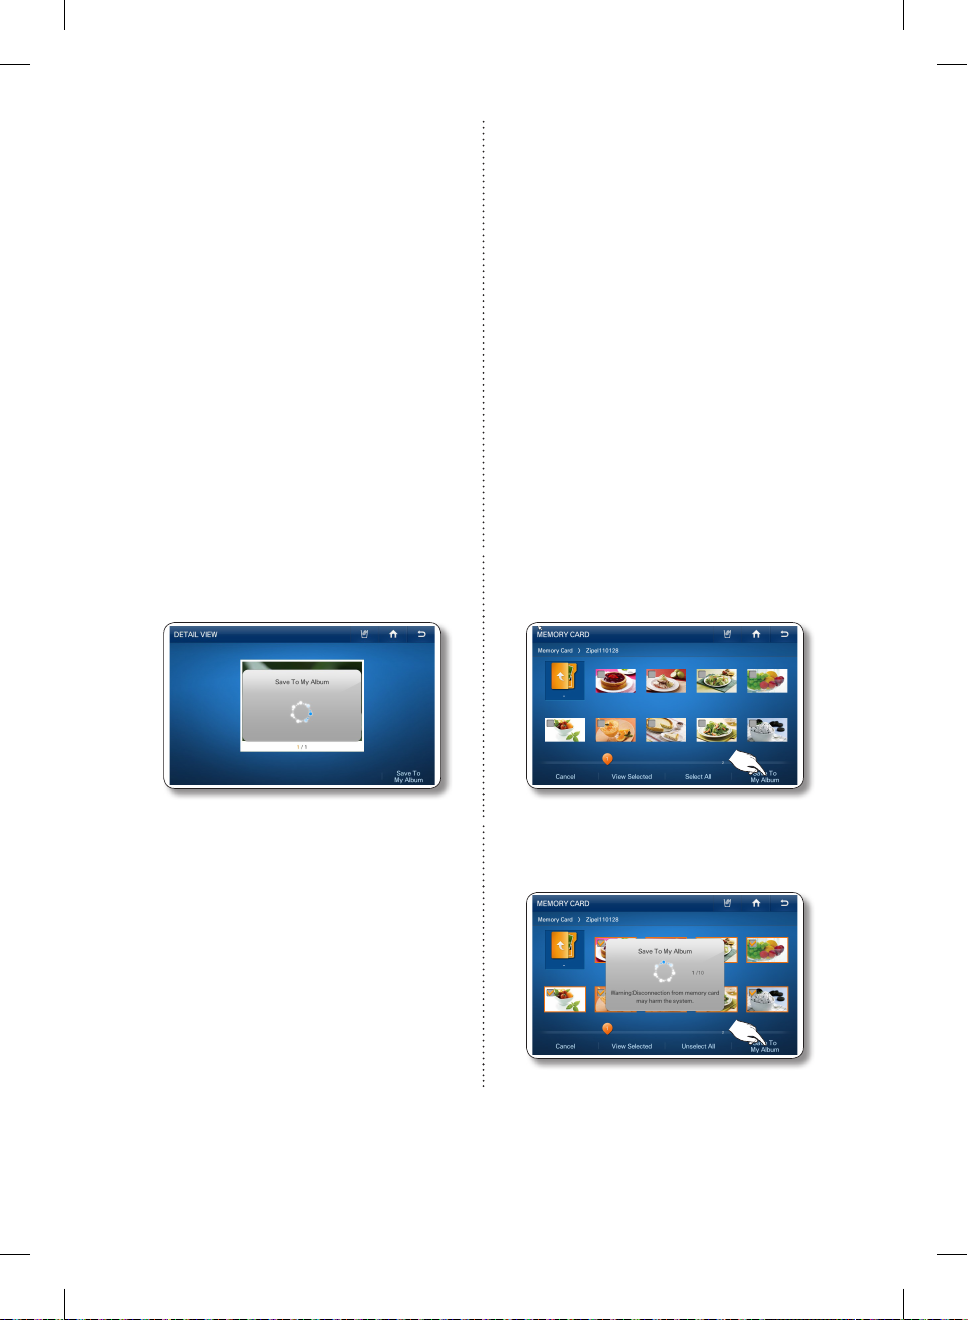
6. Press the [Save To My Album] button. 6. Select all the photos you want to save to My
Album.
English - 29
DA68-02500B-13.indb 29 13. 12. 4. �� 7:12
Page 30
• When you select a photo, its detail information
will appear.
7. While the photo uploads from the Memory
Card, the “Save To My Album” popup
appears on the screen.
• When you select the [Select All] button, all the
photos on the current page are selected and
the [Select All] button shifts to the [Unselect All]
button.
• When you press the [View Selected] button,
you will see its larger version.
• To exit the Multi Select screen, press the
[Cancel] button.
• To delete the check mark on a selected photo,
touch the photo again.
• When there are multiple pages with many
photos, there will be page numbers on the
bottom of the screen.
• If you have photos selected and move to
another folder, the selected photos will be
automatically unselected.
• When you touch the folder name above the
thumb-nails (Preview Photos), the screen
displays that folder.
• This function also applies to the <All Share>
and <Picasa Web Album> functions.
7. Press the [Save To My Album] button.
• Larger photo sizes will take longer to upload.
8. While the photos upload from the Memory
Card, the “Save To My Album” popup
appears on the screen.
• Larger photo sizes will take longer to upload.
9. When the upload is complete, take the Memory Card out of the slot.
English - 30
DA68-02500B-13.indb 30 13. 12. 4. �� 7:12
Page 31

How to upload photos from DLNA device to My Album (All Share)
• This function is only available when the refrigerator is connected to your wireless network
(Wi-Fi).
1. Select the [Photos] button on the Home screen.
2. Select [All Share] on the Photos list, and then connect the
DLNA device to the same wireless AP as the refrigerator.
3. In the All Share list, select the DLNA device you want to
connect.
• If the DLNA device you want to connect does not
appear, press the [Refresh] button several times to
detect it.
02 OPERATING
• The device you want to connect must have the related function installed with the DLNA (Digital
Living Network Alliance) certificate.
• The display supports up to 4096 x 4096 (16 mega) resolutions.
When the number of pixels at either vertical or horizontal axis of a photo is more than 4,096 or
its resolution is changed, the display may not support it.
4. Select the desired folder.
English - 31
DA68-02500B-13.indb 31 13. 12. 4. �� 7:12
Page 32

• When you are in a sub-folder, you can move up to the folder that contains sub-folder by selecting
the “..” icon on the sub-folder.
5. Select the photo you want to save to My
Album.
5. To store multiple photos, press the [Multi
Select] button.
6. Press the [Save To My Album] button. 6. Select the photos you want to save to My
Album.
7. While the photo uploads from the DLNA
7. Press the [Save To My Album] button.
device, the “Save To My Album” popup
appears on the screen.
8. While the photos upload from the DLNA
device, the “Save To My Album” popup
appears on the screen.
English - 32
DA68-02500B-13.indb 32 13. 12. 4. �� 7:12
Page 33

• Larger photo sizes will take longer to upload.
• The wireless network is used to transmit photos from the DLNA device. The transmission may
not always work properly depending on the network conditions.
• When you select a photo, its detail information will appear.
How to save photos in the Picasa Web Album to My Album.
[Public Photos]
You can download and store public photos from Google Picasa Web Album.
• This function is only available when the refrigerator is connected to your wireless network
(Wi-Fi).
1. Select the [Photos] button on the Home screen.
2. Select [Picasa Web Album] in the Photos list.
v
02 OPERATING
3. Select the photo you want to save to My
Album.
DA68-02500B-13.indb 33 13. 12. 4. �� 7:12
3. To store multiple photos, select the [Multi
Select] button.
English - 33
Page 34

4. Press the [Save To My Album] button. 4. Select the photos you want to save to My
Album.
5. While the photo downloads from Picasa
5. Press the [Save To My Album] button.
Web Album, the “Save To My Album” popup
appears on the screen.
6. While the photos download from Picasa
Web Album, the “Save To My Album” popup
appears on the screen.
• When you select a photo, its detail information will appear.
• Larger photo sizes will take longer to upload.
• Depending on the status of the wireless network, the download may not always work.
[Personal Photos]
You can download and store personal photos from Google Picasa Web Album.
• This function is available only when the refrigerator is connected to your wireless network
(Wi-Fi).
• To use this function, you must have a Google account.
1. Select the [Photos] button on the Home screen.
English - 34
DA68-02500B-13.indb 34 13. 12. 4. �� 7:12
Page 35

2. Select [Picasa Web Album] in the Photos list.
3. Press the [Sign In] button.
• When you have an account with Google Picasa
(http://picasaweb.google.com), you can see the
photos you uploaded to Picasa by logging into your
account.
4. Select the Email input box, and then enter your Google account ID using the on-screen keyboard.
Select Password input box, and then enter your Google password using the on screen keyboard.
5. Press the [Sign In] button.
02 OPERATING
• If you check the ‘Stay signed in’ box, the refrigerator will store the account for faster future log-ins.
6. Select a web album which has photos you want to store
in My Album.
• If you press the [Sign Out] button, the Display returns
to the Picasa public photos screen.
• If you choose the Explore tab in the right upper
corner, the screen displays the public photos screen.
English - 35
DA68-02500B-13.indb 35 13. 12. 4. �� 7:12
Page 36

7. Select the photo you want to save to My
Album.
7. To store multiple photos, select the [Multi
Select] button.
8. Press the [Save To My Album] button. 8. Select the photos you want to save to My
Album.
9. While the photo downloads from Picasa
9. Press the [Save To My Album] button.
Web Album, the “Save To My Album” popup
appears on the screen.
10. While the photo downloads from Picasa
Web Album, the “Save To My Album” popup
appears on the screen.
• When you select a photo, its detail information will appear.
• Larger photo sizes will take longer to upload.
English - 36
DA68-02500B-13.indb 36 13. 12. 4. �� 7:12
Page 37

How to run a slide show.
1. Select the [Photos] button on the Home screen.
2. Select [My Album] in the Photos list.
3. Select the [Multi Select] button.
02 OPERATING
4. Select the photos you want for the slide show, and then
press the [View Selected] button. (Select more than two
photos.
• When you select a photo, its detail information will
appear.
5. Select the [Slide Show] button.
• Depending on a photo’s size (Width x Height), the
screen may display blank bars on the top or sides of
the image.
English - 37
DA68-02500B-13.indb 37 13. 12. 4. �� 7:12
Page 38

6. The slide show starts. Select the screen to change the view option.
• The slide show runs once. When it finishes, the view options appear on the screen.
• By selecting the or button, you can move to the previous or next photo.
• Select the button to run the slide show again.
7. To change the screen transition effect of the slide show,
select the button.
8. Select the desired slide show transition effects, and then
press the [OK] button.
• You can preview the selected effect on the left side
of the screen.
• The Random effect runs the photos in a random
order.
9. To change the screen transition time, select the
button.
English - 38
DA68-02500B-13.indb 38 13. 12. 4. �� 7:12
Page 39

10. Use the and buttons to change the slide show
transition time, and then press the [OK] button.
11. To change the order of the photos in the slide show,
select the button.
12. Select [Normal] or [Shuffle], and then press the [OK]
button.
02 OPERATING
English - 39
DA68-02500B-13.indb 39 13. 12. 4. �� 7:12
Page 40

How to rotate photos.
1. Select [My Album] in the Photos list.
2. Select the photo you want to rotate. 2. Select the [Multi Select] button to rotate
3. Select the [-90° Rotate] or [90° Rotate]
button.
multiple photos.
3. Select the photos you want to rotate, and
then press the [View Selected] button.
4. After selecting the photos you want to rotate,
select the [-90° Rotate] or [90° Rotate]
button.
• The system automatically stores the rotated photos, replacing the original photos.
English - 40
DA68-02500B-13.indb 40 13. 12. 4. �� 7:12
Page 41

Saving photos to a memory card.
1. Insert a memory card into the refrigerator’s memory card slot.
2. Select [My Album] in the Photos list.
02 OPERATING
3. Select the photo you want to save. 3. To save multiple photos, select the [Multi
4. Press the [Save To Memory Card] button. 4. Select the photos you want to save, and then
5. While the photos are being save, “Save To Memory Card” appears on the screen.
• You must insert a memory card into the memory card slot to use this function.
Select] button.
press the [Save To Memory Card] button.
English - 41
DA68-02500B-13.indb 41 13. 12. 4. �� 7:12
Page 42

How to delete photos.
1. Select [My Album] in the Photos list.
2. Select the photo you want to delete. 2. To delete multiple photos, press the [Multi
3. Press the [Delete] button. 3. Select the photos you want to delete, and
4. Press the [Yes] button. 4. Press the [Yes] button.
Select] button.
then press the [Delete] button.
• There are 10 photos that have been pre-loaded by Samsung.
These photos explain product features and cannot be deleted.
English - 42
DA68-02500B-13.indb 42 13. 12. 4. �� 7:12
Page 43

GROCERY MANAGER
You can save the purchase date and expiration date of your food before storing it in the fridge and then
easily check how long food has been stored at a later time.
Additionally, you can easily see what food items are stored and where they are located in the refrigerator.
How to add food
1. Select the [Grocery Manager] button on the Home screen.
2. Select the [Add Food] button at the bottom right.
[No food is stored] [Food is stored]
3. Select and hold one of the food images displayed on
the right. Then, drag & drop it into the location on the
refrigerator image where it will be stored. Be sure to keep
your finger on the food image until it is in place.
02 OPERATING
• The storage area for the refrigerator is divided into 4
sections. The added food is displayed as an icon in
the refrigerator image.
• To change the location of a stored item, press and
hold the food image, and then drag & drop it to
another location within the refrigerator image.
• If you select a food icon added to the refrigerator and
drag & drop it outside of the refrigerator, the food
item is deleted.
• The refrigerator section and the quantity of added
food items are displayed at the bottom of the
refrigerator image.
• You can store up to 15 kinds of food and ‘freshness’
durations. See examples below: All food : 3 days.
English - 43
DA68-02500B-13.indb 43 13. 12. 4. �� 7:12
Page 44

4. The ‘Purchase Date’ and ‘Expiration Date’ are displayed
at the bottom of the screen.
The Purchase Date is automatically set to today, the
Expiration Date is automatically set to the last day of the
freshness duration.
To change the Purchase Date, touch the appropriate
section on the screen, and then enter the new date.
• You can also select a date by using the [+] and [-] buttons.
However, the Purchase Date must always be earlier than the Expiration Date.
5. Select the date, and then press [Save] button.
• To select additional food items, repeat steps 2 to 5.
6. Press the [OK] button after you have completed the date settings.
Press the [Save] button to save your settings.
• You can save up to 50 grocery items.
English - 44
DA68-02500B-13.indb 44 13. 12. 4. �� 7:12
Page 45

How to use the Grocery Manager
1. Select the [Grocery Manager] button on the Home screen.
All food items are displayed as icons in their stored locations within the refrigerator image on the left.
They are also listed on the right side of the screen.
2. Select a storage section in the refrigerator image to display the food stored in that section on the
right side of screen. Select the storage section again (deselect it) to list all the food items stored in
the refrigerator on the right side of the screen.
3. Select one of the stored food icons on the right side of
the screen to identify where it is located in the refrigerator.
The purchase and expiration dates of the item will also be
displayed.
02 OPERATING
• An expiration date can be set up to 999 days.
• You cannot modify the purchase date and expiration
date of the food in the Grocery Manager screen.
English - 45
DA68-02500B-13.indb 45 13. 12. 4. �� 7:12
Page 46

How to delete food
1. Select the [Grocery Manager] button on the Home screen.
2. Select the food, and then select the [Delete] button.
• To select all the stored food items, select the [Delete
all] button.
3. Select the [Yes] button to complete.
How to set a Reminder
1. Select the [Grocery Manager] button on the Home screen, and then select the [Set Reminder]
button.
2. Select the Reminder options you want, and then select
the [OK] button.
• A reminder is set based on the Expiration Date of the
stored food. A reminder window appears when the
scheduled duration has passed.
• If more than one item is set to the same Reminder
value (except [None]), the reminder window appears
at 6:00 AM, 11:00 AM, and 5:00 PM.
English - 46
DA68-02500B-13.indb 46 13. 12. 4. �� 7:12
Page 47

EPICURIOUS
With the Epicurious service, you can easily to find various recipes by ingredient, season, occasion, or
category.
• This function is only available when the refrigerator is connected to your wireless network
(Wi-Fi).
How to use the Featured Recipes function
1. Select the [Epicurious] button on the Home screen.
• There will be a 4-second commercial ad when you
start Epicurious.
2. Select [Featured Recipes] on the Epicurious list.
3. Select a Featured Recipes category.
The screen displays a list of recipes.
4. Select a recipe. The screen displays the recipe ingredients
and other details.
• The popularity of a recipe is indicated by the number
of forks. Four forks is the highest.
• : Select to show recipes in the last used order.
• : Select to show in order of photo information.
• : Select to show recipes in order of popularity.
• : Select to show recipes in alphabetical order.
02 OPERATING
English - 47
DA68-02500B-13.indb 47 13. 12. 4. �� 7:12
Page 48

5. Press the [Favorite] button to add a recipe to your favorite list.
Press the [Shopping List] button to make a shopping list for a recipe.
6. Select the [Preparation] tab on the top of the page to view the recipe’s step by step preparation
instructions.
7. Select the [Review] tab on the top of the page to see reviews of the recipe by other users.
8. Select the [About] tab on the top of the page to view information about the author of the recipe.
English - 48
DA68-02500B-13.indb 48 13. 12. 4. �� 7:12
Page 49

How to use Recipe Search by Ingredient.
1. Select [Recipe Search by Ingredient] on the Epicurious list.
2. Select the [Food] or [Drink] button, and then select the
[Food]/[Drink] type on the left of screen.
Next, select an ingredient icon on the right.
• When you select an ingredient icon, the number of
recipes using that ingredient appears on the bottom
of the page.
• You can select multiple ingredient icons.
3. Select the [View Recipe Results] button.
02 OPERATING
4. Select the recipe you want. The screen displays the ingredients and other detail information.
5. Select the [Favorite] button to add the recipe to your Favorites list.
Select the [Shopping] List button to view a shopping list for the recipe.
English - 49
DA68-02500B-13.indb 49 13. 12. 4. �� 7:12
Page 50

How to use My Favorites.
1. Select [My Favorites] on the Epicurious list.
• You can store up to 100 favorite recipes.
2. Select the recipe you want.
• Select the A-Z button on the right to arrange the favorites in the alphabetical order.
• Select a recipe, and then select the [Delete] button to delete the recipe from your Favorites List.
How to use My Shopping List.
1. Select [My Shopping List] on the Epicurious list.
• Displays the ingredients for recipes you select so you
can create shopping lists.
• You can store up to 100 shopping lists.
2. Select the recipe or recipes you want.
English - 50
DA68-02500B-13.indb 50 13. 12. 4. �� 7:12
Page 51

3. Select the [View Combined Shopping List]
button.
3. Select the [View Shopping List] button.
02 OPERATING
4. The screen displays the combined ingredient
list for all the recipes you selected.
4. Select a recipe on the left of screen. The
screen displays the ingredient list for the
recipe you selected.
CALENDAR
Displays the calendar from Google Calendar.
• This function is only available when the refrigerator is connected to your wireless network
(Wi-Fi).
• To use the Calendar function, you need a Google account.
• The Calendar schedule supports dates from Jan 1970 to Dec 2037.
How to view the Google Calendar.
1. Select the [Calendar] button on the Home screen.
English - 51
DA68-02500B-13.indb 51 13. 12. 4. �� 7:12
Page 52

2. Select the Email input box, and then enter your Google account ID using the on-screen keyboard.
Select the Password input box, and then enter your password using the on-screen keyboard.
3. Press the [Sign in] button.
• If you check the ‘Stay signed in’ box, the refrigerator
will store the account for faster future log-ins.
• If you do not have a Google account, you can get
one at http://calendar.google.com.
• In the Email section, enter your Google account ID in
this format: UserID@gmail.com.
4. To view your schedule, select a date. The screen displays
the daily schedule for the date you selected.
• You cannot modify or erase the Google Calender
schedule through the refrigerator Display screen.
• The display color of each scheduled event is the
same as that in the Google Calender application.
• Press the left / right direction arrows to check the
Monthly Schedule.
• When there are more than 4 events within a day, the calendar indicates the excess with “+1
more”.
• The schedule updates every 30 minutes.
5. Press the event you want to view. The event you selected appears on the screen.
English - 52
DA68-02500B-13.indb 52 13. 12. 4. �� 7:12
Page 53

How to manage Shared Calendar
1. Select [Other Calendar].
2. Select a [Show] or [Hide] button.
• You can show or hide schedules from your Google
Web Calendar subscription list using the Other
Calendar List screen.
• If you change the Show / Hide setting here, it does
not change in the subscription list and the Show /
Hide setting on the Google Web Calendar.
3. Select the [Apply] button.
The Google Calendar re-appears with the displayed
schedule changed according to your selections.
02 OPERATING
English - 53
DA68-02500B-13.indb 53 13. 12. 4. �� 7:12
Page 54

How to create an event
1. Select the [Create event] button on the Calendar screen.
• You must be logged in onyour primary Gmail email
address (***@gmail.com) to use the Create an event
feature.
To view the primary email address:
1. Log in to www.google.com.
2. Access Gmail.
3. Click the e-mail address on the upper right side of the screen ( ***@gmail.com).
A drop down window appears.
4. Click Account.
5. Look under [Email addresses and usernames] for the email address identified as the Primary
email.
2. Enter the Event Title, Date and Time, Location (Where), and Description in the corresponding entry
fields using the screen keyboard.
3. To set a reminder for a scheduled event, select the Reminders input box, and then select one of the
Reminder options.
4. When all settings are complete, select [Save].
English - 54
DA68-02500B-13.indb 54 13. 12. 4. �� 7:12
Page 55

WEATHERBUG
The internet weather service provides current and weekly weather information by region.
• This function is only available when the refrigerator is connected to your wireless network
(Wi-Fi).
How to add your Region to Weatherbug
1. Select the [WeatherBug] button on the Home screen.
• There will be a 4-second commercial ad when you
start the WeatherBug.
2. Select the region search bar on the top left of the screen.
02 OPERATING
3. Select the [+] button in the upper right corner of screen.
4. Enter your location or zipcode (US Only) using the
onscreen keyboard, and then press the [OK] button.
English - 55
DA68-02500B-13.indb 55 13. 12. 4. �� 7:12
Page 56

5. Select your location.
6. Select a local weather station.
7. Select the “ ” button on the top right of the screen.
8. The display screen shows your local weather.
English - 56
DA68-02500B-13.indb 56 13. 12. 4. �� 7:12
Page 57

How to view today’s weather.
1. Select the [WeatherBug] button on the Home screen.
• There will be a 4-second commercial ad when you start the WeatherBug.
2. The Weatherbug screen at right appears displaying your local weather.
• If you select Active Alerts, the screen displays weather alerts.
3. Select [So Far Today]. The screen displays the current weather detail information.
02 OPERATING
English - 57
DA68-02500B-13.indb 57 13. 12. 4. �� 7:12
Page 58

How to add other Regions to Weatherbug
1. Select the region search bar on the top left of the screen.
2. The current region information appears on the screen.
3. Select the [+] button in the upper right corner of the
screen.
4. Enter the location name or zipcode (US Only) using the
on-screen keyboard, and then press the [OK] button.
5. Select the desired location.
English - 58
DA68-02500B-13.indb 58 13. 12. 4. �� 7:12
Page 59

6. Select the desired local weather station.
7. Press the button on the top right of the screen.
8. The screen displays the weather for the location you selected.
How to view Weather Information for a Region
1. Select the desired location on the location list.
02 OPERATING
2. Press the back( ) button in the upper right corner.
The screen displays the weather for the location you selected.
English - 59
DA68-02500B-13.indb 59 13. 12. 4. �� 7:12
Page 60

How to delete Regions from Weatherbug
1. Select the [edit] button in the upper right corner of screen.
2. Select the check box on the left of the location you want
to delete, and then then select the Delete button.
How to view weather forecasts.
1. Select the [Forecast] button or Tonight’s Forecast.
2. Select the desired forecast on the forecast list. The screen displays detailed forecast information.
• The forecast screen lists weather forecasts for 7 days.
• It shows the day, the Day / Night (US weather only), the weather condition icon, the
temperature and the weather description.
• If you select the [Conditions] button on the lower right, the screen displays the current weather
information.
English - 60
DA68-02500B-13.indb 60 13. 12. 4. �� 7:12
Page 61

AP NEWS
The internet news service provides current news in up to 11 categories.
• This function is only available when the refrigerator is connected to your wireless network
(Wi-Fi).
How to view news from AP News.
1. Select the [Ap News] button on the Home screen.
2. Select a news category.
• When you select a category on the left, the screen displays the major news for that category.
3. Select the desired article.
02 OPERATING
English - 61
DA68-02500B-13.indb 61 13. 12. 4. �� 7:12
Page 62

• To see all the photos related to the article, select the main photo in the detail news article.
To view the article in detail, visit http://www.ap.org on your mobile phone or PC.
4. To see all the photos related to the article, select the main photo in the detail news article.
• Select the and buttons on the top right of the article to view other articles.
5. Select a photo to enlarge it.
• Press the and buttons to see other photos in enlarged view.
English - 62
DA68-02500B-13.indb 62 13. 12. 4. �� 7:12
Page 63

PANDORA
• This function is only available when the refrigerator is connected to your wireless network
(Wi-Fi).
• Through the Pandora service, you can enjoy your favorite songs free of charge.
• The song selections are based on the analysis data collected by Pandora’s Music Genome
Project. Your individual song selections - used as feedback - can affect Pandora’s next song
selection.
How to Activate and Use Pandora Internet radio.
1. Select the [Pandora] button on the Home screen.
2. Select the ‘ I’m new to Pandora’ text. An Activation Code screen pops up. On your PC, go to the
web site on the pop-up and use the Code to set up and activate your Pandora account.
When done, Select the [Continue] button.
3. Select the Email input box. Enter your Pandora account ID using the on-screen keyboard.
Select the Password input box. Enter your Pandora password using the on-screen keyboard.
02 OPERATING
• If you do not have a Pandora account, you can create one at http://www.pandora.com.
• In the Email input box, enter your Pandora account ID, for example, UserID@gmail.com.
English - 63
DA68-02500B-13.indb 63 13. 12. 4. �� 7:12
Page 64

4. Press the [Sign in] button.
• If you forget your password, press the “I forgot my
password” button to get an email with your password
sent to the email address you registered with
Pandora.
5. Select a station from the list on the left.
• Pandora supports up to 100 stations
• You can create stations at www.pandora.com or
through mobile devices that support Pandora.
• If you select other stations, you can to play the
selected songs in those stations.
6. When you select the Bookmark button( ) while playing
a song, the song is to be added to the Song Bookmark
List. You can view this list at the Pandora site.
• By bookmarking favorite songs, you can view the
song list and purchase albums with those songs on
the [Your Profile] page at www.pandora.com.
7. If you like a song that’s playing, select the Thumb Up ( )
button. Otherwise, select the Thumb Down ( )button.
• When you select the Thumb Up button, Pandora
creates a station with songs similar to the song you
approved.
English - 64
DA68-02500B-13.indb 64 13. 12. 4. �� 7:12
Page 65

8. To put the currently playing song on hold, press the hold
( ) button.
9. To play the next song, press the Next ( ) button.
• Unfortunately, our music licenses force us to limit the
number of songs you can skip in an hour.
10. Press the speaker ( ) button to adjust the volume.
02 OPERATING
English - 65
DA68-02500B-13.indb 65 13. 12. 4. �� 7:12
Page 66

How to Create a Station in Pandora
1. Select the [Create Station] button at the bottom of the
Pandora screen.
2. Select the blank space next to “Artist of Song” to bring up the Keyboard window. Enter the artist’s
name to add a station.
3. After selecting the station you want among the searched
stations, press the [OK] button.
4. Confirm the newly added station on the left of the Screen.
English - 66
DA68-02500B-13.indb 66 13. 12. 4. �� 7:12
Page 67

TWITTER
• This function is only available when the refrigerator is connected to your wireless network
(Wi-Fi).
• You can’t write a tweet while using this function.
How to view Twitter.
1. Select the [Twitter] button on the Home screen.
2. Select the Email input box. Enter your twitter account ID using the on-screen keyboard. Select the
Password input box. Enter your twitter password using the on-screen keyboard.
02 OPERATING
3. Press the [Sign in] button.
• If you do not have a twitter account, you can create
one at http://twitter.com.
• In the Email section, enter your Twitter account ID, for
example, UserID@gmail.com.
• If you select the ‘Stay signed in’ check box, you
do not need to log in each time to enter the Twitter
menu.
• If the system time is not set exactly, login may fail. If
login fails, set the current time correctly at Settings →
Time/Date, and then retry.
4. The Tweet list screen appears. This page displays your
following tweetters up-to-date information including their
photos, comment previews and listed dates.
English - 67
DA68-02500B-13.indb 67 13. 12. 4. �� 7:12
Page 68

5. Press a tweet on the tweet list and you can see the detail
information.
• When selecting the List View on the Detail View
screen, the screen changes to the Twit List.
6. Select the i button on the right of the screen to see detail
information about the follower/followee.
SCREENSAVER THEME
Select the themes for the Display screen screensaver.
1. Select the [Settings] button.
2. Select the [Screensaver Theme] on the Settings list.
3. Select the theme(s) you want to use in the screensaver,
and then press the [Save] button.
• The Clock and Photo themes are the default themes.
You cannot deselect them.
• The themes you select may not display if the data
underlying them is not ready or unavailable.
English - 68
DA68-02500B-13.indb 68 13. 12. 4. �� 7:12
Page 69

ENERGY SAVER
Turns the Energy Saver function on and off. When the Energy
Saver is on, the power consumption decreases.
1. Select the Energy Saver ON or OFF buttons on the
Settings list.
• The Energy Saver function is pre-set to ON in the
factory.
• If condensation or water drops appear on the doors,
turn the Energy Saver mode off.
DOOR ALARM
Turns the Door Alarm on and off.
1.
Select the Door Alarm ON or OFF buttons on the Settings list.
• If the door alarm is set to ON, an alarm beeps if any
door is left open for more than two minutes.
• The beeping stops when you close the door. The
door alarm function is pre-set to ON in the factory.
DISPENSER LOCK
When you activate the Dispenser Lock function, the dispenser
will not work.
1. Select the Dispenser Lock ON or OFF buttons on the
Settings list.
• If you select the Dispenser Lock ON button, the Lock
icon ( ) appears in the upper left corner of the
Home screen.
• When the Dispenser Lock is ON, only the dispenser
does not work.
02 OPERATING
• If you suddenly can not use the dispenser, check whether the Dispenser Lock function is on.
ICE MAKING OFF
1. Select the [Ice Making Off] ON or OFF button on the
Settings list.
• When the Ice Off is set, the Ice Off indicator icon
( ) appears on the top left of the Home screen.
• Pressing the [ON] button turns Ice Making Off.
• We recommend you stop ice making if the following occur:
- There is enough ice in the ice bucket.
- You want to save water and energy.
- Water is not being supplied to the refrigerator.
• If the ice maker function is ON, and the water line is not connected, there will be a water valve
noise from back of the unit. Touch the Ice making Off ON button in the settings list to turn the
ice maker off.
English - 69
DA68-02500B-13.indb 69 13. 12. 4. �� 7:12
Page 70

WATER FILTER
The Water Filter status icon on the Home screen enables you to check the current status of the water
filter. Follow the instructions below to check and/or replace the water filter.
1. Check the water filter status in the Settings list or indicator icons on the upper left of Home screen.
• Good (Blue) : The filter does not need replacement. It is normal.
• Order (Pink) : The filter needs replacement. Order a new filter.
• Replace (Red) : The filter needs replacement immediately.
2. If the status reads “Order” or “Replace,” select the Water Filter on the Settings list to access the
replacement instructions.
3. Follow instructions in the Water Filter replacement guide to replace the Water Filter.
• Press the [Next] button to move to the next page of the instructions.
English - 70
DA68-02500B-13.indb 70 13. 12. 4. �� 7:12
Page 71

4. When the replacement is done, press and hold ‘Reset the water filter’ at the center of the screen for
3 or more seconds to reset the water filter indicator.
DO NOT use the water or ice dispenser without a water filter cartridge. You can block the water
CAUTION
line or damage the dispenser.
• Be sure to flush the dispenser thoroughly to prevent the dispenser from dripping.
If water drips from the dispenser, it means that there is still air in the line.
• For a replacement water filter, visit your local home improvement center or Samsung’s official
on-line parts distributor at http://www.samsungparts.com.
Be sure the replacement water filter has the SAMSUNG logo on the box and on the water filter.
DISPLAY
Lets you set the brightness of the LCD and the running time of the Screensaver.
1. Press the button in the right bottom corner of the Settings list.
2. Select [Display] in the Setting list.
02 OPERATING
3. Select the Brightness level and/or Screensaver Running Time you
want, and then press the [Save] button.
• After 60 seconds, the Screen Saver runs for the time you set,
then the LCD panel turns off.
English - 71
DA68-02500B-13.indb 71 13. 12. 4. �� 7:12
Page 72

VOLUME
Lets you control the volume of the alert sounds.
1. Press the button in the bottom right corner of the Settings list.
2. Select [Volume] in the Settings list.
3. Select a volume level button to change the alert sound level.
4. Press the [Save] button to set the new volume level.
• An alert sounds whenever a button is touched or a message window or menu list appears.
TIMEZONE
You must select your time zone to use Google Calendar and the Twitter service correctly.
To select your time zone, follow these steps:
1. Press the button in the bottom right corner of the Settings list.
The Time Zone Setting screen appears.
2. Select [Timezone] in the Setting list.
3. To save the new time zone, press the [Save] button.
• The Time Zone Setting screen may appear again
automatically after a software update.
English - 72
DA68-02500B-13.indb 72 13. 12. 4. �� 7:12
Page 73

TIME SETTING
Lets you set the current time.
1. Press the button in the bottom right corner of the Settings list.
2. Select [Time] in the Settings list.
3. Press the and buttons to revise the time settings, and then
press the [Save] button.
• If the current time is incorrect, you may not be able to use
twitter.
DATE SETTING
Lets you can set the current date.
1. Press the button in the bottom right corner of the Settings list.
2. Select [Date] in the Settings list.
02 OPERATING
3. Use the and buttons to revise the month.
4. Select the desired day, and then press the [Save] button.
• If the current date is incorrect, you may not be able to use
twitter.
English - 73
DA68-02500B-13.indb 73 13. 12. 4. �� 7:12
Page 74

WI-FI
Lets you turn the refrigerator’s connection to your wireless network on and off.
1. Press the button in the right bottom corner of the Settings list.
2. Select [Wi-Fi] in the Settings list.
3. Select ON or OFF.
WI-FI NETWORKS
When you set Wi-Fi ON, (see above) the refrigerator’s wireless network function searches for a wireless
AP to connect to.
• In addion to the router installed in your home, your refrigerator can detect other wireless routers
CAUTION
installed in nearby houses or offices while connecting to your wireless network. It is illegal to use
another’s router without permission and can be subject to severe penalties. Consequently, you
should connect the refrigerator only to your own wireless router or to routers for which you have
permission.
1. Press the button in the bottom right corner of the Settings list.
2. Select [Wi-Fi Networks] in the Settings list.
3. Select the wireless AP you want to connect to.
• : Locked with Security Code
• : Signal Strength
• You can check the MAC address of the Fridge on the bottom
of the Screen.
English - 74
DA68-02500B-13.indb 74 13. 12. 4. �� 7:12
Page 75

• If there are no APs showing on the screen, press the [Search] menu at the bottom.
• Depending on the wireless AP type, the refrigerator may not make a connection. We
recommended you use a wireless AP that supports IEEE802.11b/g/n.
• If you don’t have a wireless router, please contact your internet provider or purchase and install
one yourself.
• If you can’t remember the name of your wireless network system (SSID) or its security code,
please see the user manual of your router.
• Radio frequency signals can interfere with any the wireless network system and they may affect
the network performance of your refrigerator.
• Obstacles such as concrete walls and metallic doors and radio and microwave interference
from devices such as microwave ovens can affect the operation of your wireless network
system.
• Depending on the type and location of your wireless network system and the surrounding
environment, the range and quality of your wireless network may vary.
4. If your wireless network has a security code enter the security
code, and then press the [OK] button. In most cases, after
you have entered the security code, the refrigerator acquires
the Network addresses it needs (IP Address, Subnet Mask,
Gateway, and DNS) to connect to the network. If it does not or
you need to enter these values manually, go to Step 6.
5. After the refrigerator has connected to your network, you can select the [IP Address] button on the
Wi-Fi Networks screen to view the current IP address and Gateway values.
02 OPERATING
6. If you need to enter the IP Address, Subnet Mask, Gateway, and DNS manually, press the [User
Config] button on the IP Address screen. Then, select the [IP Address], [Subnet Mask], [Gateway],
and [DNS] buttons in turn and, using the keypad, enter the appropriate values. When you are done
with each entry, press the [OK] button on the keypad.
English - 75
DA68-02500B-13.indb 75 13. 12. 4. �� 7:12
Page 76

7. After entering the values for all four parameters, press the
[Apply] button.
TEMPERATURE UNIT CONVERTER
Lets you set the temperature display to Fahrenheit or Centigrade. The unit you select applies to the
Freezer / Fridge set temperature and the temperature displayed by the Weather function.
1. Press the button in the bottom right corner of the Settings list.
2. Select the Temperature Unit Converter °C or °F button in the Settings list.
DISPENSER LIGHT
Lets you set the operation of the dispenser lamp light.
1. Press the button in the bottom right corner of the Settings list.
2. Select [Dispenser Light] in the Settings list.
3. Select the desired dispenser light status, and then press
the [Save] button.
• On : The Dispenser lamp is always on.
• Auto : The Dispenser lamp lights up when you use
the Dispenser. When you release the Dispenser lever,
the light goes off in 5 seconds.
• Off : The Dispenser lamp does not light up when you
use the Dispenser.
English - 76
DA68-02500B-13.indb 76 13. 12. 4. �� 7:12
Page 77

COOLING OFF
The cooling off function shuts off the cooling mechanism in freezer and fridge compartments, but does
not shut off the electrical power to the refrigerator.
This function is only used to demo refrigerator models on showroom floors.
1. Press the button in the bottom right corner of the Settings list.
2. Select the Cooling Off ON or OFF button in the settings list.
• If you select the Cooling Off ON button, the Home screen will displays “OFF” on the freezer/
fridge temperatures and the refrigerator comselector functions will be deactivated.
(The refrigerator and freezer do not get cold.)
3. If you select the [ON] button, the message window below appears.
4. Press the [Yes] button for more than 3 seconds to confirm.
02 OPERATING
English - 77
DA68-02500B-13.indb 77 13. 12. 4. �� 7:12
Page 78

TOUCH SCREEN CORRECTION
You can calibrate the stylus touch point to best meet your needs.
To adjust the stylus touch point on the touch screen:
1. Press the button in the right bottom corner of the Settings list.
2. Select [Touch Screen Correction] in the Settings list.
3. Select the [Yes] button. A screen appears with pointer instructions on the top.
4. Press down lightly on the center of the “+” mark. Repeat as the “+” mark moves across the screen.
• If you do not press the center of the [+] properly, the cross mark appears repeatedly.
If you cannot run the Touch Screen Correction function in Settings because the touch screen input point
is incorrect:
1. Press and hold the Epicurious icon on the home screen for 5 seconds.
This will launch the select screen calibration function.
2. The screen will display a series of cross icons.
Press the exact center of each cross icon as it appears on the screen.
English - 78
DA68-02500B-13.indb 78 13. 12. 4. �� 7:12
Page 79

S/W UPDATE
Lets you check the current software version and update it to new software when available.
1. Press the button in the bottom right corner of the Settings list.
2. Select [S/W Update] in the Settings list.
• The software update is provided through the wireless network.
When updated software is available, the [Upgarde] button on the bottom right corner of the
screen is activated.
When you press the [Upgrade] button, the upgraded starts almost immediately (in about 10
seconds). When the update is complete, “Upgrade completed.” message appear on the screen
and then press the [Reboot] button in the “Upgrade completed.” message.
02 OPERATING
• Open Source License Notice - This product uses open source software.
The Open Source Licenses are available on the product menu.
Press [Legal Information] button to see the detail information.
English - 79
DA68-02500B-13.indb 79 13. 12. 4. �� 7:12
Page 80

SMART GRID
Although Smart Grid is not currently available in the U.S., we have built the Smart Grid function into your
refrigerator in the expectation that it will be available in the near future.
The Smart Grid function gives you access to Smart Grid settings and to information about Smart Grid
features.
If your electric company provides the Smart Grid service some time after you install your refrigerator, you
can implement the Smart Grid function by following the steps below:
• Ask your electric company if they have installed the Gateway, Smart Meter, and the other equipment
needed for Smart Grid.
• Obtain and install a Smart Grid modem to access the service. (Sold or provided separately.)
• If your electric company has installed the necessary equipment and you have installed the Smart Grid
modem, see if the Smart Grid Service screen appears when you select Smart Grid on the Settings
screen.
• If the Smart Grid Service screen does not appear, contact the Samsung Electronics Service Center for
help.
How to see the Smart Grid Level
1. Press the button in the bottom right corner of the Settings list.
2. Select [Smart Grid] in the Settings list.
3. When a Smart Grid Modem is connected, you can check the DR-Level received from your electric
utility company. DR (Demand Response)-Level means the degree to which the company is
managing your consumption of electricity.
English - 80
DA68-02500B-13.indb 80 13. 12. 4. �� 7:12
Page 81

4. If you select the button for each level or the [Help] button,
you can see information about the Smart Grid Function.
Higher Level means higher peak time than lower levels.
• If the Modem is not connected, the following messages appear:
How to override the Smart Grid Control
1. Press the button in the bottom right corner of the Settings list.
2. Select [Smart Grid] in the Settings list.
3. If you want your Fridge to operate according to the DR-Level (or Smart Grid), select the Override
“Off” button. If you want your Fridge to operate irrespective of the DR-Level (or Smart Grid), select
the Override “On” button.
02 OPERATING
[Turn Off Overide, Turn On Smart Grid] [Turn On Overide, Turn Off Smart Grid]
English - 81
DA68-02500B-13.indb 81 13. 12. 4. �� 7:12
Page 82

4. You can set the Override time from 1 hour to 24 hours.
After the set time, the Override function turns off and
Smart Grid control starts. If you select “Permanently”, the
Override function operates continuously until you turn the
Override function off or set a time.
5. Press the [Save] button.
• If “Permanently” does not turn off, the Override
function will operate continuously.
• If you think refrigerator temperature is too high, you
need to use “Override” function.
• If you think there is not enough ice, you need to use
“Override” function.
How to select the Limit Delay Time on Smart Grid
1. Press the button in the bottom right corner of the Settings list.
2. Select [Smart Grid] in the Settings list.
3. Select “Limit Delay Time” from 1 hour to 4 hours. “Limit
Delay Time” lets you set the maximum time during which
Smart Grid control operates.
4. Press the [Save] button.
• If you don’t choose the a “Limit Delay Time” Option,
Smart Grid works with the “4-hour” option by default.
English - 82
DA68-02500B-13.indb 82 13. 12. 4. �� 7:12
Page 83

HOW TO USE THE DISPENSER
Touch the dispenser status on the Home screen to
select the type of dispenser you want.
Place your cup under the ice outlet and push
gently against the dispenser lever.
Make sure the glass is in line with the dispenser to
prevent the ice from bouncing out.
When Cubed Ice is selected after using the
Crushed Ice feature, a small amount of residual
crushed ice might be produced.
CAUTION
may melt then freeze together when
the power comes back on, causing the
dispenser to be out of order.
To prevent this problem, after a power failure, pull
out the ice bucket and discard the residual ice or
water.
After you dump the ice from the ice
If a power failure occurs, ice cubes
CAUTION
bucket, you should press the dispenser
lever once with the ‘CUBED’ or
‘CRUSHED’ function ON.
02 OPERATING
CAUTION
the glass under the dispenser to prevent
spills.
If the Freezer door opens, the Dispenser
does not work.
• Do not pull the lever out.
You could damage or break the lever’s spring.
• To clean the ice bin/bucket, wash with a mild
detergent, rinse well, and dry thoroughly it.
Do not use harsh or abrasive cleaners or
solvents.
• In case ice doesn’t come out, pull out the ice
bucket and press the test button located on the
right side of ice maker.
• Do not press the test button continuously when
the tray is filled with ice or water.
Water may overflow or ice may jam the bucket.
• When you select the Test button, you will
hear the refrigerator chime (ding-dong).
When the chime sounds, release the
[Test] button.
• The chime sounds automatically again to let
you know the ice maker is working well.
Please wait 2 seconds before removing
The ice maker will make new ice faster after you
return the ice bucket in the refrigerator.
• Do not put your fingers, hands or any
CAUTION
other unsuitable objects in the chute or
ice-maker bucket.
- It may result in personal injury or material
damage.
• Use only the ice maker provided with the
refrigerator.
• The water supply to this refrigerator must only
be installed/connected by a suitably qualified
person and connect to a potable water supply
only.
• In order to operate the ice maker properly,
water pressure of 20~125 psi is required.
English - 83
DA68-02500B-13.indb 83 13. 12. 4. �� 7:12
Page 84

• If you have a long vacation or business
CAUTION
trip and won’t use the water or ice
dispensers, close the water valve.
- Otherwise, water leakage may occur.
• When you have not used the Ice maker for a
while, or you have opened the Freezer door
frequently, the Ice may stick together.
If this has occurred, empty the ice bucket or
break up the ice with a wood kitchen tool.
Do not use sharp items such as knives or forks.
• When the bucket is removed, there may still be
some residual ice in the ice maker that will be
produced.
Ice-Maker Cover
Ice BucketIce Chute
• In case ice doesn’t come out, pull out
CAUTION
the icemaker cover and press test button
located on the ic e maker.
• Do not press the test button continuously when
the tray is filled with ice or water as illustration
below. Water may overflow or ice jamming may
occur.
CLEANING THE REFRIGERATOR
Do not use Benzene, Thinner or Clorox™
WARNING
for cleaning.
They may damage the surface of the
appliance and can create a risk of fire.
Do not spray the refrigerator with water
CAUTION
while it is plugged in, as it may cause an
electric shock.
Do not clean the refrigerator with benzene,
thinner or car detergent as there is a risk
of fire.
REMOVING THE FREEZER/
FRIDGE ACCESSORIES
Cleaning and rearranging the interior of the freezer
is a snap.
1. Shelves (Freezer/Fridge)
• Pull the shelf out as far as it goes.
Then lift up and remove it.
2. DOOR BIN
• Remove the Door Bin by holding it with both
hands and then gently lift it up.
Test button
English - 84
DA68-02500B-13.indb 84 13. 12. 4. �� 7:12
Page 85

3. DRAWER
• Remove the Drawer by pulling it out and slightly
lifting it up.
CLEANING THE REFRIGERATOR
Do not disassemble or replace the led type
CAUTION
lighting.
To change the led type lighting, contact a
samsung service center.
4. Drawer Cover
• Pull the cover out as far as it goes.
Then lift up and remove it.
5. Ice Bucket (Freezer)
• Remove the Icemaker Bucket by lifting up and
pulling it out slowly.
- Grip the handle as shown in the figure.
- Lift the low part slightly.
- Take the ice bucket out slowly.
CHANGING THE WATER FILTER
To reduce risk of water damage to your
WARNING
property DO NOT use generic brands of
water filers in your SAMSUNG Refrigerator.
USE ONLY SAMSUNG BRAND WATER
FILTERS.
SAMSUNG will not be legally responsible for any
damage, including, but not limited to property
damage caused by water leakage from use of a
generic water filter.
SAMSUNG Refrigerators are designed to work
ONLY WITH SAMSUNG Water Filter.
The “Filter Indicator” icon lets you know when it is
time to change your water filter cartridge.
To give you preparation time to get a new filter, the
red light will come on just before the capacity of
the current filter runs out.
Changing the filter on time provides you with the
freshest, cleanest water from your fridge.
1. Turn the water filter 90˚
counter-clockwise.
02 OPERATING
2. Turn the water filter 90˚
counter-clockwise.
Do not use excessive force when removing
the drawer cover.
Otherwise, the cover may break and cause
injury.
3. Insert new water filter inside
the filter housing.
Before removing any accessories, make
sure that no food is in the way.
When possible, remove the food
altogether to reduce the risk of accidents.
English - 85
DA68-02500B-13.indb 85 13. 12. 4. �� 7:12
Page 86

4. Insert new water filter inside
the filter housing.
5. When the replacement is done, press and hold
the ‘Reset the water filter’ simultaneously for 3
or more seconds at the center of the screen.
(Refer to the “WATER FILTER” part on this
manual.)
A newly installed water filter cartridge may
cause water to briefly spurt from the water
dispenser.
This is due to air getting into the line.
It should pose no problem to operation.
Removing residual matter inside the
water supply line after installing a new
filter
1. Press the Water button, and then push the
Dispenser Lever with a cup or glass.
2. Flush 1 gallon of water through the filter, one
cup or glass at a time.
(Flush approximately 6 minutes.)
This will clean the water supply system and
remove air from the lines.
3. Additional flushing may be required in some
households.
4. Open the refrigerator door and make sure there
are no water leaks coming from the water filter.
Reverse Osmosis Water Supply
IMPORTANT : The pressure of the water supply
coming out of a reverse osmosis system going to
the water inlet valve of the refrigerator needs to be
between 35 and 120 psi (241 and 827 kPa).
If a reverse osmosis water filtration system is
connected to your cold water supply, the water
pressure to the reverse osmosis system needs to
be a minimum of 40 to 60 psi (276 to 414 kPa.)
If the water pressure to the reverse osmosis
system is less than 40 to 60 psi (276 to 414 kPa):
• Check to see whether the sediment filter in the
reverse osmosis system is blocked.
Replace the filter if necessary.
• Allow the storage tank on the reverse osmosis
system to refill after heavy usage.
• If your refrigerator has a water filter, it may
further reduce the water pressure when used
in conjunction with a reverse osmosis system.
Remove the water filter.
If you have questions about your water pressure,
call a licensed, qualified plumber.
Ordering replacement filters
To order more water filter cartridges, contact your
authorized Samsung dealer.
English - 86
DA68-02500B-13.indb 86 13. 12. 4. �� 7:12
Page 87

TO IMPROVE THE COOLING
PERFORMANCE
• If the cold air outlet is blocked by food
items, the cold air cannot penetrate the
entire compartment and will be unable to
freeze the food efficiently which results in
a degraded cooling performance.
Cold air outlet
• In particular, there is load limit at the top
of the freezing compartment.
Please do not put food items above this
limit.
Load limit in the freezing
compartment
02 OPERATING
English - 87
DA68-02500B-13.indb 87 13. 12. 4. �� 7:12
Page 88

troubleshooting
PROBLEM SOLUTION
The refrigerator
does not work at
all or it does not
chill sufficiently.
Food in the fridge
is frozen.
You hear unusual
noises or sounds.
The front corners
of the appliance
are hot and
condensation is
occurring.
Ice is not
dispensing.
You can hear water
bubbling in the
refrigerator.
There is a bad
smell in the
refrigerator.
Frost forms on
the walls of the
freezer.
Water dispenser is
not functioning.
Display does not
work!
• Check that the power plug is properly connected.
• Is the temperature control on the display panel set to the correct temperature?
Try setting it to a lower temperature.
• Is the refrigerator in direct sunlight or located too near a heat source?
• Is the back of the refrigerator too close to the wall and therefore keeping air from
circulating?
• Is the temperature control on the display panel set to the correct temperature?
Try setting it to a warmer temperature.
• Is the temperature in the room very low?
• Did you store food with a high water content in the coldest part of the fridge?
• Check that the refrigerator is level and stable.
• Is the back of the refrigerator too close to the wall and therefore keeping air from
circulating?
• Was anything dropped behind or under the refrigerator?
• If you hear a “ticking” sound from inside the refrigerator, this is normal. It occurs
because various parts contract or expand in response to temperature changes in the
refrigerator interior.
• Some heat is normal as anti-condensators are installed in the front corners of the
refrigerator to prevent condensation.
• Is the refrigerator door ajar?
Condensation can occur when you leave the door open for a long time.
• Did you wait at least 12 hours after installation of the water supply line before making
ice?
• Is the water line connected and the shut-off valve open?
• Did you manually stop the ice making function?
Make sure Ice Type is set to Cubed or Crushed.
• Are there ice cubes frozen together in the ice maker bucket?
• Is the freezer temperature too warm? Try setting the freezer temperature lower.
• This is normal. The bubbling comes from the refrigerant liquid circulating through the
refrigerator.
• Has a food item spoiled?
• Make sure that strong smelling food (for example, fish) is wrapped so that it is airtight.
• Clean out your freezer periodically and throw away any spoiled or suspect food.
• Is the air vent blocked? Remove any obstructions so air can circulate freely.
• Allow sufficient space between the foods stored for efficient air circulation.
• Is the freezer door closed properly?
• Is the water line connected and the shut-off valve open?
• Has the water supply line tubing been crushed or kinked?
Make sure the tubing is free and clear of any obstruction.
• Is the water tank frozen because the refrigerator temperature is too low?
Try selecting a warmer setting on the main display panel.
• Press the Reset button over one second to reset the memory.
With this, the user information is not to be reset.
English - 88
DA68-02500B-13.indb 88 13. 12. 4. �� 7:12
Page 89

PROBLEM SOLUTION
Photos not
showing with a
memory card
connected.
The LCD
screen turns off
frequently.
There is an after
image or an edge
line left on the
screen.
The input point of
the touch screen is
not correct.
There is no
wireless AP
detected.
It is not able to
connect to the
wireless AP.
Can’t remember
the password for
the wireless AP
connection.
Functions using
the wireless
network (Wi-FI) do
not work.
• If the “A SD/MMC card is connected” messages do not appear on the screen, check
if the memory type is SD / SDHC / MMC / HS MMC.
• Check if there are photos or images stored in the memory card.
• Check if the images in the memory card are JPEG (JPG) types.
• This is a power-saving function and it is normal.
• At the Settings-Display, the Screensaver Running Time can be set.
• Still images can cause permanent damage to the LCD screen. When you select
Screensavers, select a number of themes so the image changes frequently.
NOTE : Defects caused by this are not be covered by the factory warranty.
• Run the Touch Screen Calibration function at the Settings.
• Check if the power for the wireless AP is on.
• Check if the wireless AP supports IEEE802.11b/g/n.
• If the wireless AP is located away from the Fridge, move the wireless AP closer to the
Fridge and check if it is detected.
• Turn the power of both the Wireless AP and the Fridge off and on.
• Check if the wireless AP supports IEEE802.11b/g/n.
• Check the status of the internet connection of the wireless AP.
• Check if the current cost rate plan for the internet covers the wireless network
connection. If it does, check how many connections are allowed.
• Your Refrigerator may not be able to connect to the Internet because your ISP has
permanently registered the MAC address (a unique identifying number) of your PC or
modem, which it then authenticates each time you connect to the Internet as a way
of preventing unauthorized access.
As your Refrigerator has a different MAC address, your ISP can not authenticate its
MAC address, and your Refrigerator can not connect.
To resolve this problem, ask your ISP about the procedures required to connect
devices other than a PC (such as your Refrigerator) to the Internet.
(To find the MAC address of your Fridge, touch Settings ---> WiFi Networks, and then
look on the bottom of the screen that lists the available network connections.)
• Turn the power of both the Wireless AP and the Fridge off and on.
• Refer to the wireless AP manual and reset the password.
• Functions using the wireless network (Wi-Fi) such as Epicurious, Calendar,
WeatherBug, AP News, Pandora and Twitter can be used only if the refrigerator is
connected to your wireless network (Wi-Fi).
• If there are any other devices connected to the wireless network, please check the
connection status of the devices.
• Because these services depend on data downloaded from the internet, the
information updates can be delayed or cut depending on the status of the internet
connection.
• Turn the power of both the Wireless AP and the Fridge off and on.
03 TROUBLESHOOTING
English - 89
DA68-02500B-13.indb 89 13. 12. 4. �� 7:12
Page 90

PROBLEM SOLUTION
Can’t connect
to the external
devices being
detected.
After turn on the
power, is possible
to operate only
the dispenser
selection button.
• If the network connection of an external device the Fridge detects was shut down
abnormally (by a power failure or by moving out of range, etc), the device’s network
information will remain on the network list (as stipulated by DLNA specifications), but
its connection will not be available.
• Select the Photos function - All Share, and then search for the external devices again.
• Click the “Dispenser OK” button which is at the bottom of display. If the “”Dispenser
OK” button is changed to “Complete”, turn the power off and on again.
It is correct to show the “Time Zone Setting screen”.
English - 90
DA68-02500B-13.indb 90 13. 12. 4. �� 7:12
Page 91

Warranty
WARRANTY ON SAMSUNG REFRIGERATOR
LIMITED WARRANTY TO ORIGINAL PURCHASER
This Samsung brand product, as supplied and distributed by Samsung Electronics America, Inc. (Samsung) and
delivered new, in the original carton to the original consumer purchaser, is warranted by Samsung against manufacturing
defects in materials and workmanship for a limited warranty period of:
One (1) year Parts and Labor on Refrigerator
Five (5) years Parts and Labor on sealed Refrigeration System, which includes ONLY those components that
contain refrigerant
(Compressor, evaporator, condenser, drier, connecting tubing)
This limited warranty begins on the original date of purchase, and is valid only on products purchased and used in the
United States. To receive warranty service, the purchaser must contact Samsung for problem determination and service
procedures. Warranty service can only be performed by a Samsung authorized service center. The original dated bill of
sale must be presented upon request as proof of purchase to Samsung or Samsung authorized service center.
Samsung will repair or replace any part found to be defective, at our option and at no charge as stipulated herein, with
new or reconditioned parts during the limited warranty period specified above. All replaced parts and products become
the property of Samsung and must be returned to Samsung. Replacement parts and products assume the remaining
original warranty, or ninety (90) days, whichever is longer.
In-home service will be provided during the warranty labor period subject to availability within the contiguous United
States. In-home service is not available in all areas. To receive in-home service, the product must be unobstructed
and accessible from floor level to service personnel. If during in-home service repair cannot be completed, it may be
necessary to remove, repair and return the product. If in-home service is unavailable, Samsung may elect, at our option,
to provide for transportation of our choice to and from a Samsung authorized service center. Otherwise, transportation to
and from the Samsung authorized service center is the responsibility of the purchaser.
This limited warranty covers manufacturing defects in materials and workmanship encountered in normal,
noncommercial use of this product, and shall not apply to the following, including, but not limited to: damage which
occurs in shipment; delivery and installation; applications and uses for which this product was not intended; altered
product or serial numbers; cosmetic damage or exterior finish; accidents, abuse, neglect, fire, water, lightning or other
acts of nature; use of products, equipment, systems, utilities, services, parts, supplies, accessories, applications,
installations, repairs, external plumbing and leaks, external wiring, circuit breakers, fuses or connectors not supplied and
authorized by Samsung, or which damage this product or result in service problems; incorrect electrical line voltage,
fluctuations and surges; customer adjustments and failure to follow operating instructions, cleaning, maintenance
and environmental instructions that are covered and prescribed in the instruction book; loss of food due to spoilage;
consumable items including filters and light.
THERE ARE NO EXPRESS WARRANTIES OTHER THAN THOSE LISTED AND DESCRIBED ABOVE, AND NO
WARRANTIES WHETHER EXPRESS OR IMPLIED, INCLUDING, BUT NOT LIMITED TO, ANY IMPLIED WARRANTIES
OF MERCHANTABILITY OR FITNESS FOR A PARTICULAR PURPOSE, SHALL APPLY AFTER THE EXPRESS
WARRANTY PERIODS STATED ABOVE, AND NO OTHER EXPRESS WARRANTY OR GUARANTY GIVEN BY ANY
PERSON, FIRM OR CORPORATION WITH RESPECT TO THIS PRODUCT SHALL BE BINDING ON SAMSUNG.
SAMSUNG SHALL NOT BE LIABLE FOR LOSS OF REVENUE OR PROFITS, FAILURE TO REALIZE SAVINGS OR
OTHER BENEFITS, OR ANY OTHER SPECIAL, INCIDENTAL OR CONSEQUENTIAL DAMAGES CAUSED BY THE
USE, MISUSE OR INABILITY TO USE THIS PRODUCT, REGARDLESS OF THE LEGAL THEORY ON WHICH THE
CLAIM IS BASED, AND EVEN IF SAMSUNG HAS BEEN ADVISED OF THE POSSIBILITY OF SUCH DAMAGES.
NOR SHALL RECOVERY OF ANY KIND AGAINST SAMSUNG BE GREATER IN AMOUNT THAN THE PURCHASE
PRICE OF THE PRODUCT SOLD BY SAMSUNG AND CAUSING THE ALLEGED DAMAGE. WITHOUT LIMITING THE
FOREGOING, PURCHASER ASSUMES ALL RISK AND LIABILITY FOR LOSS, DAMAGE OR INJURY TO PURCHASER
AND PURCHASER’S PROPERTY AND TO OTHERS AND THEIR PROPERTY ARISING OUT OF THE USE, MISUSE
OR INABILITY TO USE THIS PRODUCT SOLD BY SAMSUNG NOT CAUSED DIRECTLY BY THE NEGLIGENCE
OF SAMSUNG. THIS LIMITED WARRANTY SHALL NOT EXTEND TO ANYONE OTHER THAN THE ORIGINAL
PURCHASER OF THIS PRODUCT, IS NONTRANSFERABLE AND STATES YOUR EXCLUSIVE REMEDY.
Some states do not allow limitations on how long an implied warranty lasts, or the exclusion or limitation of incidental or
consequential damages, so the above limitations or exclusions may not apply to you. This warranty gives you specific
legal rights, and you may also have other rights, which vary from state to state.
To obtain warranty service, please contact Samsung at:
SAMSUNG CUSTOMER CARE CENTER
Samsung Electronics America, Inc. 85 Challenger Road Ridgefield Park, NJ 07660
1-800-SAMSUNG (1-800-726-7864) and www.samsung.com
DA68-02500B-13.indb 91 13. 12. 4. �� 7:12
Page 92

Scan the QR code* or visit
www.samsung.com/spsn
to view our helpful
How-to Videos and Live Shows
* Requires reader to be installed on your
smartphone
QUESTIONS OR COMMENTS?
COUNTRY CALL OR VISIT US ONLINE AT WRITE
U.S.A
CANADA
DA68-02500B-13.indb 92 13. 12. 4. �� 7:12
1-800-SAMSUNG
(726-7864)
1-800-SAMSUNG
(726-7864)
www.samsung.com
www.samsung.com/ca (English)
www.samsung.com/ca_fr (French)
Samsung Electronics America, Inc.
85 Challenger Road Ridgefield Park, NJ 07660
Samsung Electronics Canada Inc.
Customer Service, 55 Standish Court
Mississauga, Ontario L5R 4B2 Canada
Page 93

Refrigerador
manual del usuario
Imagine las posibilidades
Gracias por adquirir este producto Samsung.
Para recibir un servicio más completo o accesorios,
registre su producto o comuníquese con
www.samsung.com/register
1-800-SAMSUNG (726-7864)
Electrodoméstico independiente
Este manual está impreso en papel 100 % reciclado.
RSG309**
DA68-02500B-13.indb 1 13. 12. 4. �� 7:12
Page 94

Información sobre seguridad
INFORMACIÓN SOBRE SEGURIDAD
Antes de utilizar su nuevo refrigerador de puerta
francesa Samsung, lea detenidamente este
manual a fin de aprender a usar las funciones que
ofrece de manera segura y eficiente.
Este refrigerador no debe ser utilizado por
personas (incluidos niños) con capacidades
mentales, sensoriales o físicas reducidas o
por personas que carezcan de experiencia y
conocimientos, a menos que se encuentren bajo
la supervisión o hayan recibido instrucciones por
parte un responsable de su seguridad sobre el uso
del refrigerador.
Debido a que las siguientes instrucciones
corresponden a diversos modelos, es posible
que las características de su refrigerador difieran
ligeramente de las que se describen en este
manual. Si tiene alguna duda, comuníquese
al 1-800-SAMSUNG o encuentre ayuda e
información en línea en www.samsung.com.
Símbolos y advertencias de seguridad
importantes:
Riesgos o prácticas inseguras que pueden causar
graves lesiones personales o incluso la muerte.
ADVERTENCIA
Riesgos o prácticas inseguras que pueden causar
leves lesiones personales o daños materiales.
PRECAUCIÓN
NO lo intente.
NO lo desarme.
NO lo toque.
Siga atentamente las instrucciones.
Desconecte el enchufe de la pared.
Asegúrese de que el refrigerador esté conectado
a tierra para evitar una descarga eléctrica.
Comuníquese con el centro de contacto para
obtener ayuda.
Español - 02
Nota.
Estas señales de advertencia se incluyen aquí
para evitar que se produzcan lesiones.
Sígalas atentamente.
Después de leer esta sección, consérvela en
un lugar seguro para referencia futura.
ADVERTENCIAS DE INSTALACIÓN
ADVERTENCIA
MUY IMPORTANTES
• No instale el refrigerador en un lugar
húmedo o que se encuentre en contacto
- Un aislamiento deteriorado de piezas eléctricas
• No exponga este refrigerador a la luz solar
• No enchufe varios artefactos en el mismo
- Este procedimiento brinda el mejor rendimiento
• Si el enchufe de pared está flojo, no conecte
- Existe el riesgo de que se produzca una
• No utilice un cable que esté dañando o
• No doble excesivamente el cable de
• Nunca desenchufe el refrigerador tirando del
- Los daños al cable pueden provocar un corto
con agua.
puede provocar una descarga eléctrica o un
incendio.
directa ni al calor de cocinas, calefactores u
otros artefactos.
toma múltiple. El refrigerador debe conectarse
siempre a una toma de corriente individual
cuyo voltaje nominal coincida con el que se
especifica en la placa de voltaje del refrigerador.
y también impide que se sobrecarguen los
circuitos de cables del hogar, lo que podría
provocar un riesgo de incendio a causa de
cables recalentados.
el cable.
descarga eléctrica y causar un incendio.
gastado a lo largo o en sus extremos.
alimentación ni coloque elementos pesados
sobre él.
cable de alimentación. Siempre sostenga el
enchufe con firmeza y tire para extraerlo del
toma de corriente.
DA68-02500B-13.indb 2 13. 12. 4. �� 7:12
Page 95

circuito, incendio o una descarga eléctrica.
• No utilice aerosoles cerca del refrigerador.
- Si se utilizan aerosoles cerca del refrigerador
puede provocarse una explosión o un incendio.
• Este refrigerador debe instalarse de
manera apropiada y ubicarse de acuerdo
con las instrucciones del manual antes
de usarse.
• Conecte el enchufe en la posición correcta con
el cable colgando hacia abajo.
- Si conecta el enchufe al revés, el cable puede
cortarse y provocar un incendio o una descarga
eléctrica.
• Al mover el refrigerador, tenga cuidado de no
rodar sobre el cable de alimentación o dañarlo.
- Esto representa un riesgo de incendio.
• Asegúrese de que el enchufe no esté aplastado
o dañado en la parte posterior del refrigerador.
• Mantenga los materiales de embalaje fuera del
alcance de los niños.
- Existe el riesgo de muerte por asfixia si un niño
se coloca los materiales de embalaje en la
cabeza.
• El refrigerador debe colocarse de manera tal
que se pueda acceder al enchufe después de
la instalación.
• Es necesario quitar toda la película plástica
protectora antes de enchufar el producto por
primera vez.
• Si el cable de alimentación está dañado,
solicite su reemplazo inmediato al
fabricante o al agente de servicios.
PRECAUCIONES DE
PRECAUCIÓN
INSTALACIÓN
• Deje espacio suficiente para instalar el
- Si su refrigerador no está nivelado, es posible
• Mantenga el espacio de ventilación en
• El refrigerador debe permanecer en posición
• Le recomendamos que encargue la instalación
- No seguir esta recomendación puede causar
refrigerador sobre una superficie plana.
que el sistema de enfriamiento interno no
funcione correctamente.
el gabinete o estructura de montaje del
refrigerador libre de obstáculos.
vertical durante dos horas después de la
instalación.
de este frigorífico a un técnico cualificado o una
empresa de servicios.
descargas eléctricas, incendio, explosión,
problemas con el producto o lesiones.
• El refrigerador debe estar conectado a
tierra de manera segura.
- Siempre asegúrese de haber conectado el
refrigerador a tierra antes de intentar examinar
o reparar alguna pieza. Las fugas de energía
pueden provocar una descarga eléctrica grave.
• Nunca utilice tubos de gas, líneas telefónicas
o potenciales fuentes de atracción de rayos
como conexión a tierra.
- El uso inapropiado de la conexión a tierra
puede traer como consecuencia un riesgo de
descarga eléctrica. Si necesita usar un cable
de extensión, use sólo uno de tres hilos con
un enchufe que tenga una tercera punta para
el polo a tierra; el toma de corriente deberá
tener 3 ranuras para adaptarse al enchufe
del refrigerador. La potencia indicada en el
cable de extensión debe ser CA115-120 V,
10 A o superior. Si se utiliza un adaptador de
tierra, asegúrese de que el receptáculo esté
conectado correctamente a tierra.
Español - 03
DA68-02500B-13.indb 3 13. 12. 4. �� 7:12
SEÑALES DE ADVERTENCIA
ADVERTENCIA
IMPORTANTES PARA EL USO
• No conecte el enchufe con las manos
• No coloque elementos en la parte superior del
- Cada vez que abra o cierre la puerta, éstos
• No coloque un recipiente con agua sobre el
- Si se derrama, existe el riesgo de que se
• Se deberá vigilar a los niños para asegurarse
• No permita que se cuelguen de la puerta.
• No permita que los niños ingresen al
• No coloque las manos debajo del refrigerador.
- Es posible que algunas puntas filosas le
mojadas.
refrigerador.
pueden caerse y provocar lesiones personales
o daños materiales.
refrigerador.
produzca un incendio o una descarga eléctrica.
de que nojueguen con el refrigerador.
Es posible que se produzca una lesión grave.
refrigerador. Un niño podría quedar atrapado.
Page 96

provoquen lesiones.
• No permita que los niños se paren sobre la
cubierta de un cajón.
- El cajón se puede romper y los niños pueden
caerse.
• No sobrecargue el refrigerador con comida.
- Cuando abra la puerta, algún elemento puede
caerse y provocar lesiones personales o daños
materiales.
• No toque las paredes internas del congelador
ni los productos almacenados en éste con las
manos mojadas.
- Puede provocar congelación.
• Nunca coloque los dedos u otros objetos
en el hueco del dispensador de agua, en el
recipiente de hielo o en la cubeta de la fábrica
de hielo.
- Es posible que provoque lesiones personales o
daños materiales.
• No pulverice con gas inflamable cerca del
refrigerador.
- Existe el riesgo de que se produzca una
explosión o un incendio.
• No almacene sustancias volátiles o inflamables
dentro del refrigerador.
- Si se almacena benzina, solvente, alcohol, éter,
gas licuado y otros productos similares, se
pueden provocar explosiones.
• No almacene en el refrigerador productos
farmacéuticos, materiales científicos ni
productos sensibles a la temperatura.
- No se deben almacenar productos que
requieran controles de temperatura rigurosos.
• No coloque ni utilice aparatos eléctricos dentro
del refrigerador, a menos que sean del tipo
recomendado por el fabricante.
• No utilice dispositivos mecánicos ni cualquier
otro medio para acelerar el proceso de
descongelamiento, que no sean aquellos
recomendados por el fabricante.
• No dañe el circuito refrigerante.
• No desarme ni repare el refrigerador
usted mismo.
- Corre el riesgo de provocar un incendio,
el funcionamiento incorrecto o lesiones
personales.
- Si el LED interior o exterior se ha apagado,
comuníquese con los agentes de servicio
técnico.
• Se deberá vigilar a los niños para
asegurarse de que no jueguen con el
refrigerador.
• Las botellas se debe almacenar una junto a
otra de manera tal que no se caigan.
• Este producto se debe utilizar sólo para
almacenar alimentos en un entorno doméstico.
• Si se detecta una fuga de gas, evite llamas
o posibles fuentes de inflamación y ventile el
ambiente en el que se encuentra el refrigerador
durante varios minutos.
• Utilice solamente lámparas de LED
proporcionadas por el fabricante o agentes de
servicios.
• En caso de sentir olor a quemado o a
humo, desenchufe el refrigerador de
inmediato y comuníquese con el Centro
de Servicio de Samsung Electronics.
• Si le resulta difícil cambiar la luz, comuníquese
con un agente de servicio.
• Si el producto cuenta con lámparas de LED, no
desarme la cubierta de la lámpara y la lámpara
de LED usted mismo.
- Comuníquese con su agente de servicio.
• Si el refrigerador tiene polvo o agua,
desenchúfelo y comuníquese con el Centro de
Servicio de Samsung Electronics.
- Si no lo hace, existe el riesgo de que se
produzca un incendio.
PRECAUCIONES DE USO
PRECAUCIÓN
• No vuelva a congelar alimentos que se
hayan descongelado completamente.
No coloque bebidas carbonatadas o con
gas en el compartimento del congelador.
No coloque botellas ni recipientes de
vidrio en el congelador.
- Cuando el contenido se congela, el vidrio
puede romperse y provocar lesiones
personales.
• Garantía de servicio y modificación.
- El servicio de garantía de Samsung no
cubre los cambios o modificaciones
realizados por un tercero a este
refrigerador; Samsung tampoco
es responsable de los problemas
relacionados con la seguridad que
puedan surgir a causa de modificaciones
Español - 04
DA68-02500B-13.indb 4 13. 12. 4. �� 7:12
Page 97

• No obstruya las tomas de aire.
hechas por terceros.
- Si las tomas de aire están bloqueadas,
en particular con una bolsa de plástico, el
refrigerador se puede sobrecongelar. Si el
período de enfriamiento es muy prolongado, el
filtro del agua puede romperse y provocar fugas
de agua.
• Si se desconecta el refrigerador del suministro
de energía, espere al menos cinco minutos
antes de volver a enchufarlo.
• Si tiene planificado tomarse unas largas
vacaciones o siel refrigerador no se utilizará
durante mucho tiempo, debe vaciarlo y
desenchufarlo.
- Si se deja el refrigerador encendido por mucho
tiempo sin utilizarlo, se puede deteriorar el
aislamiento y provocar un incendio.
- Retire el exceso de humedad del interior del
refrigerador y deje las puertas abiertas. Si no lo
hace, pueden aparecer olores y moho.
• Para obtener el mejor rendimiento del producto:
- No coloque alimentos muy cerca de las
rejillas de ventilación de la parte posterior del
refrigerador ya que pueden obstruir la libre
circulación del aire en el refrigerador.
- Envuelva los alimentos adecuadamente o
colóquelos en recipientes herméticos antes de
almacenarlos en el refrigerador.
• Llene el tanque de agua, la charola para el
hielo y los cubos de agua solamente con agua
potable.
• Si el producto está lleno de agua,
comuníquese con el Centro de Servicio
más cercano.
- Existe el riesgo de que se produzca una
descarga eléctrica o un incendio.
PRECAUCIONES DE LIMPIEZA
PRECAUCIÓN
• No pulverice con agua directamente
dentro o fuera del refrigerador.
- Existe el riesgo de que se produzca un incendio
o una descarga eléctrica.
• Retire cualquier sustancia extraña o
polvo de las clavijas del enchufe. No
utilice un paño mojado ni húmedo para
limpiar el enchufe.
- De lo contrario, existe el riesgo de que se
produzca un incendio o una descarga eléctrica.
• Desenchufe el refrigerador antes de
limpiarlo o repararlo.
• Este producto contiene sustancias
ADVERTENCIA
químicas que, según el Estado de
California, provocan cáncer y toxicidad
reproductiva.
ADVERTENCIAS DE
ADVERTENCIA
ELIMINACIÓN MUY
IMPORTANTES
• Riesgo de que los niños se queden
encerrados. Antes de eliminar su antiguo
- Retire las puertas.
- Deje los estantes en su lugar de manera tal
• Deseche el material de embalaje de este
• Deje los estantes en su lugar de manera tal
• Cuando deseche este refrigerador, retire
• Se utiliza ciclopentano como aislante. Los
refrigerador o congelador:
que los niños no puedan trepar dentro del
refrigerador fácilmente.
producto de forma que no resulte nociva para
el medio ambiente.
que los niños no puedan trepar dentro del
refrigerador fácilmente. Asegúrese de que
ninguno de los tubos que se encuentran
detrás del refrigerador estén dañados antes de
desecharlo.
los burletes y los pestillos de las puertas de
manera tal que los niños pequeños o los
animales no puedan quedarse atrapados
en el interior. Se deberá vigilar a los niños
para asegurarse de que no jueguen con el
refrigerador.
gases del material de aislamiento requieren
un procedimiento especial de eliminación.
Comuníquese con las autoridades locales
para desechar este producto de manera que
no resulte nocivo para el medio ambiente.
Asegúrese de que ninguno de los tubos que se
encuentran en la parte trasera del refrigerador
estén dañados antes de desecharlos.
Español - 05
DA68-02500B-13.indb 5 13. 12. 4. �� 7:12
Page 98

CONSEJOS ADICIONALES PARA
UN USO CORRECTO
• En el caso de un fallo de corriente, llame a la
oficina local de su compañía eléctrica y solicite
información sobre la duración de la interrupción
del suministro.
• La mayoría de los cortes de electricidad que
se solucionan en una o dos horas no afectan
a la temperatura del refrigerador. Sin embargo,
mientras el aparato esté sin corriente abra la
puerta lo menos posible.
- Si el fallo de corriente supera las 2 horas, quite
todo el hielo del depósito del hielo.
- Si el fallo de corriente supera las 24 horas,
saque todos los alimentos congelados.
Recomendaciones para el ahorro de
energía
- Instale el refrigerador en un ambiente fresco y
seco con la ventilación adecuada.
Asegúrese de que no esté expuesto a la luz
solar directa y nunca lo coloque cerca de una
fuente de calor directa (como por ejemplo un
radiador).
- Nunca obstruya las ventilaciones ni las rejillas
del refrigerador.
- Deje enfriar los alimentos calientes antes de
colocarlos en el electrodoméstico.
- Coloque los alimentos congelados en el
refrigerador para descongelarlos.
Puede utilizar las temperaturas bajas de
los productos congelados para enfriar los
alimentos en el refrigerador.
- No mantenga la puerta del refrigerador abierta
durante mucho tiempo cuando coloque o retire
alimentos. Cuanto menor sea el tiempo en que
esté abierta la puerta, menos hielo se formará
en el congelador.
- Cuando realice la instalación, deje un espacio
libre a la derecha, izquierda, atrás y arriba del
refrigerador.
Esto ayudará a reducir tanto el consumo como
el gasto de energía.
Español - 06
DA68-02500B-13.indb 6 13. 12. 4. �� 7:12
Page 99

1. Aviso regulatorio
1.1 Aviso para FCC
PRECAUCIÓN FCC:
PRECAUCIÓN
Todos los cambios y modificaciones que no cuenten con la aprobación expresa de la parte responsable
del cumplimiento pueden invalidar la autoridad del usuario para operar el equipo.
Contiene módulo transmisor FCC ID: A3LDNURS11
Este aparato cumple con la sección 15 de las Normas de la FCC. El funcionamiento se encuentra sujeto
a las siguientes dos condiciones:
(1) Este aparato no puede causar interferencia dañina, y
(2) Este aparato debe aceptar la recepción de cualquier interferencia, incluidas aquellas que causen un
funcionamiento indeseado.
Producto disponible en el mercado de Estados Unidos/Canadá, sólo puede operarse el canal 1~11. No
es posible seleccionar otros canales.
DECLARACIÓN DE LA FCC:
Este equipo ha sido sometido a pruebas y se ha determinado que se encuentra dentro de los límites para
los dispositivos digitales clase B, de acuerdo con la parte 15 de las Normas de la FCC. Dichos límites
han sido diseñados para proporcionar una protección razonable contra la interferencia dañina en una
instalación residencial.
Este equipo genera, utiliza y puede irradiar energía de frecuencias de radio y, si no se lo instala y utiliza
de acuerdo con las instrucciones, puede provocar interferencia dañina a las comunicaciones de radio.
Sin embargo, no existe garantía alguna de que no habrá interferencia en una instalación determinada.
Si el equipo provoca interferencia dañina a la recepción de radio o televisión, que puede determinarse al
encender y apagar el equipo, se sugiere que el usuario trate de corregir la interferencia mediante una o
más de las siguientes medidas:
• Reoriente o reubique la antena receptora
• Aumente la distancia entre el equipo y el receptor
• Conecte el equipo en una toma de un circuito diferente de aquel donde está conectado el receptor
• Consulte a su distribuidor o a un técnico experimentado en radio/TV para obtener ayuda.
DECLARACIÓN DE LA FCC SOBRE LA EXPOSICIÓN A LA RADIACIÓN:
Este equipo cumple con los límites de exposición a la radiación establecidos por la FCC para un entorno
no controlado. Este equipo debe instalarse y utilizarse con una distancia mínima de 20 cm entre el
radiador y su cuerpo. Este aparato y su/s antena/s no deben ubicarse ni utilizarse junto con cualquier
otra antena o transmisor.
GUARDE ESTAS INSTRUCCIONES
Español - 07
DA68-02500B-13.indb 7 13. 12. 4. �� 7:12
Page 100

contenido
PUESTA A PUNTO DEL REFRIGERADOR DE DOBLE PUERTA ……………… 08
FUNCIONAMIENTO DEL REFRIGERADOR DE DOBLE PUERTA ……………… 16
SOLUCIÓN DE PROBLEMAS ……………………………………………………… 88
puesta a punto del refrigerador
de doble puerta
PREPARACIÓN PARA
LA INSTALACIÓN DEL
REFRIGERADOR
Felicitaciones por haber adquirido el refrigerador
de doble puerta Samsung. Esperamos que disfrute
todas las funciones y ventajas de vanguardia que
tiene para ofrecer este nuevo refrigerador.
2” (50mm)
2” (50mm)
Selección de la mejor ubicación para el
refrigerador
• Seleccione una ubicación con fácil acceso a un
suministro de agua.
• Seleccione una ubicación sin exposición directa
a la luz solar.
• Seleccione una ubicación en la que el piso esté
nivelado.
• Seleccione una ubicación con suficiente
espacio para que las puertas del refrigerador se
abran fácilmente. Vea el diagrama que aparece
a continuación.
• Seleccione una ubicación que deje el espacio
libre suficiente a la derecha, izquierda, atrás
y arriba del refrigerador para la circulación
del aire. Vea el diagrama que aparece a
continuación.
• Seleccione una ubicación que permita
mover fácilmente el refrigerador si necesita
mantenimiento o reparación.
Español - 08
DA68-02500B-13.indb 8 13. 12. 4. �� 7:12
al menos ¼”
(6 mm)
38 3/8” (974mm)
46 1/2” (1181mm)
68” (1727mm)
al menos ¼”
(6 mm)
40” (1016mm)
51 1/2” (1308mm)
 Loading...