

Refrigerator
user manual
This manual is made with 100 % recycled paper.
imagine the possibilities
Thank you for purchasing this Samsung product.
Free Standing Appliance
DA68-03015D-04.indb 1DA68-03015D-04.indb 1 2015. 1. 7. 4:572015. 1. 7. 4:57
Contents
SAFETY INFORMATION ……………………………………………………… 2
SETTING UP YOUR REFRIGERATOR …………………………………… 15
OPERATING YOUR SAMSUNG REFRIGERATOR ……………………… 29
TROUBLESHOOTING ……………………………………………………… 45
Safety information
SAFETY INFORMATION
• Before operating the
appliance, please read this
manual thoroughly and retain
it in a safe place near the
appliance for your future
reference.
• Use this appliance only for
its intended purpose as
described in this instruction
manual.
This appliance is not
intended for use by persons
(including children) with
reduced physical, sensory
or mental capabilities, or
lack of experience and
knowledge, unless they have
been given supervision or
instruction concerning use
of the appliance by a person
responsible for their safety.
• This appliance can be used
by children aged from 8 years
and above and persons with
reduced physical, sensory
or mental capabilities or
lack of experience and
knowledge if they have
been given supervision or
instruction concerning use of
the appliance in a safe way
and understand the hazards
involved.
Children shall not play with
the appliance.
Cleaning and user
maintenance shall not be
made by children without
supervision.
English - 2
DA68-03015D-04.indb 2DA68-03015D-04.indb 2 2015. 1. 7. 4:572015. 1. 7. 4:57
• Warnings and Important
Safety Instructions in this
manual do not cover all
possible conditions and
situations that may occur.
It is your responsibility to use
common sense, caution,
and care when installing,
maintaining, and operating
your appliance.
• Because these following
operating instructions
cover various models,
the characteristics of your
refrigerator may di er slightly
from those described in this
manual and not all warning
signs may be applicable.
If you have any questions
or concerns, contact your
nearest service center or fi nd
help and information online at
www.samsung.com.
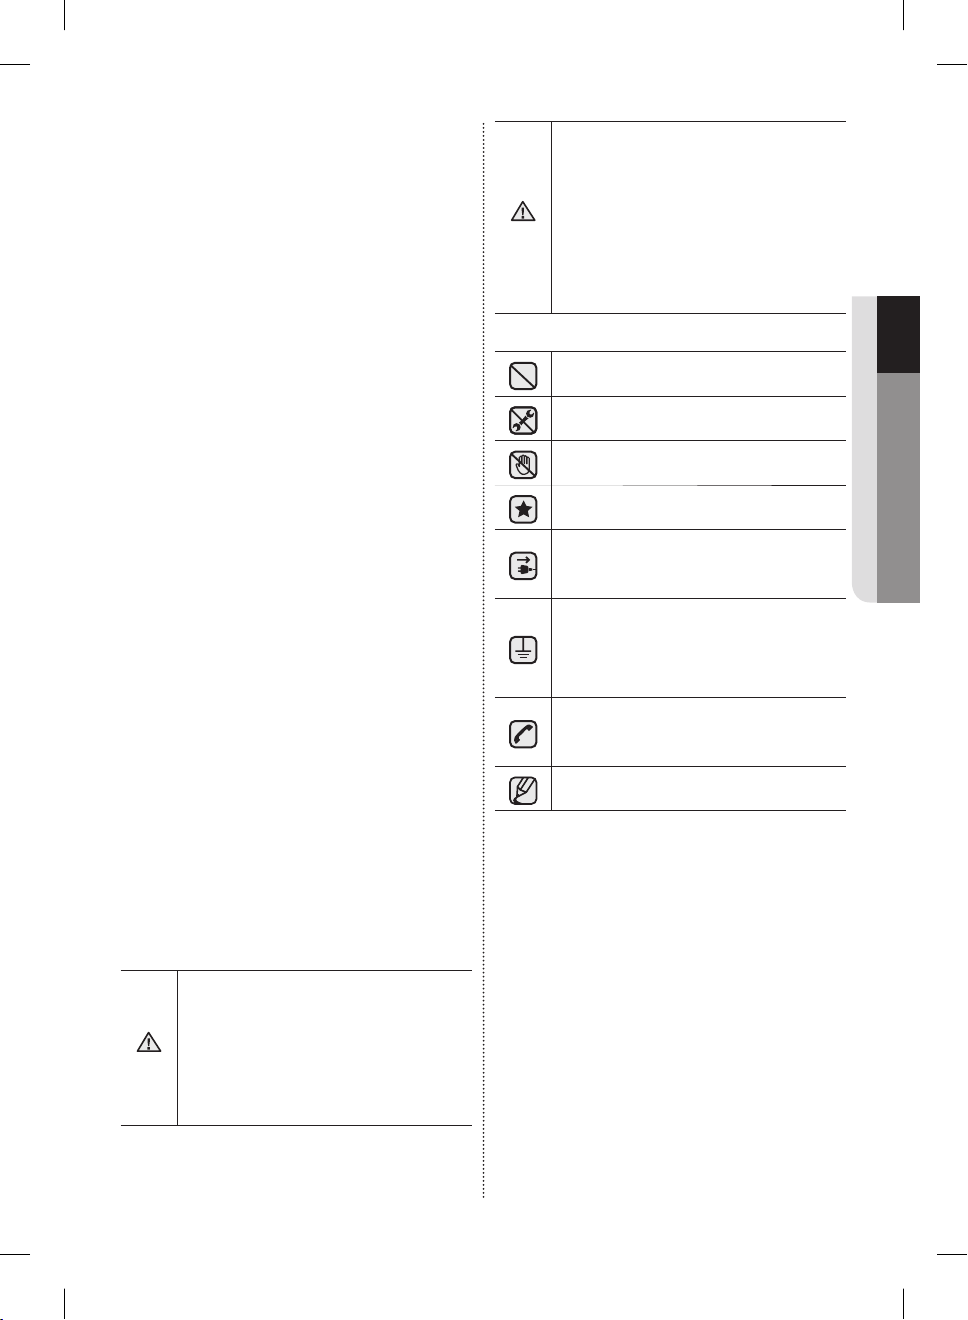
Hazards or unsafe
practices that may result
CAUTION
in minor personal
injury or property
damage.
Do NOT attempt.
Do NOT disassemble.
Do NOT touch.
Follow directions carefully.
Unplug the power plug
from the wall socket.
Make sure the machine
is grounded to prevent
electric shock.
Call the contact center for
help.
Note.
SAFETY INFORMATION
These warning signs are
Important safety symbols
and precautions:
here to prevent injury to you
and others.
Please follow them carefully.
After reading this section,
keep it in a safe place for
future reference.
WARNING
Hazards or unsafe
practices that may result
in severe personal
injury or death.
English - 3
DA68-03015D-04.indb 3DA68-03015D-04.indb 3 2015. 1. 7. 4:572015. 1. 7. 4:57
CE Notice
This product has been
determined to be in
compliance with the Low
Voltage Directive (2006/95/
EC), the Electromagnetic
Compatibility Directive
(2004/108/EC), RoHS Directive
(2011/65/EU), Commission
Delegated Regulation (EU)
No 1060/2010 and the EcoDesign Directive(2009/125/
EC) implemented by Regulation
(EC) No 643/2009 of the
European Union. (For products
sold in European Countries
only)
SEVERE WARNING
WARNING
SIGNS FOR
TRANSPORTATION
AND SITE
• When transporting
and installing the
appliance,care should be
taken to ensure that no
parts of the refrigerating
circuit are damaged.
• R-600a or R-134a is used as
a refrigerant.
Check the compressor label
on the rear of the appliance
or the rating label inside the
refrigerator to see which
refrigerant is used for your
refrigerator.
• When this product contains
fl ammable gas (Refrigerant
R-600a),
- Refrigerant leaking from the
pipe work could ignite or
cause an eye injury.
If a leak is detected, avoid
any naked fl ames or potential
sources of ignition and air the
room in which the appliance
is standing for several
minutes.
- In order to avoid the
creation of a fl ammable gasair mixture if a leak in the
refrigerating circuit occurs,
the size of the room in which
the appliance may be sited
depends on the amount of
refrigerant used.
- Never start up an appliance
showing any signs of
damage. If in doubt, consult
your dealer.
The room where the
refrigerator will be sited must
be 1m³ in size for every 8g
of R-600a refrigerant inside
the appliance.
The amount of refrigerant in
English - 4
DA68-03015D-04.indb 4DA68-03015D-04.indb 4 2015. 1. 7. 4:572015. 1. 7. 4:57
your particular appliance is
shown on the identifi cation
plate inside the appliance.
• Refrigerant squirting out of
the pipes could ignite or
cause an eye injury.
When refrigerant leaks from
the pipe, avoid any naked
fl ames and move anything
fl ammable away from the
product and ventilate the
room immediately.
- Failing to do so may result in
fi re or explosion.
- If the appliance contains
isobutane refrigerant
(R-600a), a natural gas
with high environmental
compatibility that is, however,
also combustible.
When transporting and
installing the appliance,
care should be taken to
ensure that no parts of
the refrigerating circuit are
damaged.
SEVERE WARNING
WARNING
SIGNS FOR
INSTALLATION
• Do not install this
appliance in a humid,
oily or dusty location, in
a location exposed to
direct sunlight and water
(rain drops).
- Deteriorated insulation of
electrical parts may cause an
electric shock or fi re.
• Do not place this refrigerator
in direct sunlight or expose to
the heat from stoves, room
heaters or other appliances.
• Do not plug several
appliances into the same
multiple power board.
The refrigerator should
always be plugged into its
own individual electrical outlet
which has a voltage rating
that matched the rating plate.
- This provides the best
performance and also
prevents overloading house
wiring circuits, which could
cause a fi re hazard from
overheated wires.
If the wall socket is loose, do
not insert the power plug.
SAFETY INFORMATION
- There is a risk of electric
shock or fi re.
English - 5
DA68-03015D-04.indb 5DA68-03015D-04.indb 5 2015. 1. 7. 4:572015. 1. 7. 4:57
• Do not use a cord that shows
cracks or abrasion damage
along its length or at either
end.
- If you connect the power
plug upside down, the wire
can get cut o and cause fi re
or an electric shock.
• Do not bend the power cord
excessively or place heavy
articles on it.
• Do not use aerosols near the
refrigerator.
- Aerosols used near the
refrigerator may cause an
explosion or fi re.
• Do not install this appliance
in a location where gas may
leak.
- This may result in an electric
shock or fi re.
• The installation or any
service of this appliance
is recommended by a
qualifi ed technician or
service company.
- Failing to do so may result
in an electric shock, fi re,
explosion, problems with the
product, or injury.
• Make sure that the power
plug is not squashed or
damaged by the back of the
refrigerator.
• When moving the refrigerator,
be careful not to roll over or
damage the power cord.
- This constitutes a fi re hazard.
• The appliance must be
positioned so that the plug is
accessible after installation.
• The refrigerator must be
grounded.
- You must ground the
refrigerator to prevent any
power leakages or electric
shocks caused by current
leakage from the refrigerator.
• Never use gas pipes,
telephone lines or other
potential lightening rods as
ground.
• This refrigerator must be
properly installed and located
in accordance with the
- Improper use of the ground
plug can result in an electric
shock.
manual before it is used.
• Connect the power plug in
the proper position with the
cord hanging down.
English - 6
DA68-03015D-04.indb 6DA68-03015D-04.indb 6 2015. 1. 7. 4:572015. 1. 7. 4:57
• If the power cord is
damaged, have it
replaced immediately by
the manufacturer or its
service agent.
• The fuse on the refrigerator
must be changed by a
qualifi ed technician or service
company.
- Failing to do so may result in
an electric shock or personal
injury.
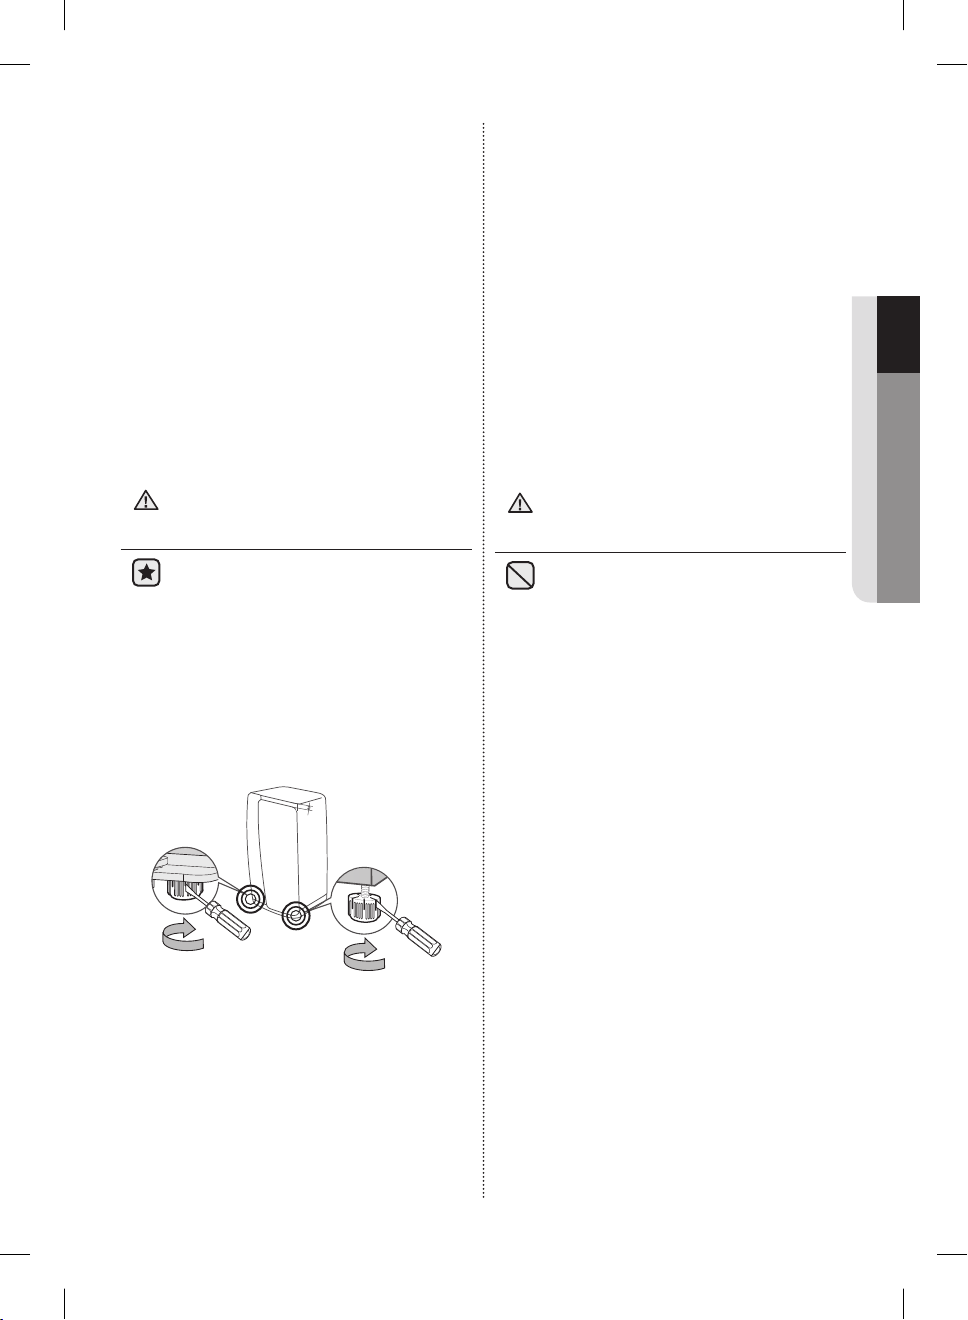
bottom back of each door.
Insert a fl athead screwdriver
and turn it in the direction of
the arrow until it is level.
- Always balance the load on
each door.
- Overload on any one door
may fell the refrigerator,
causing physical injury.
SAFETY INFORMATION
CAUTION SIGNS FOR
CAUTION
INSTALLATION
• Keep ventilation
opening in the appliance
enclosure or mounting
structure clear of
obstruction.
• Allow the appliance to stand
for 2 hours after installation.
- When installing the
refrigerator, make sure both
legs contact the fl oor for
secure installation.
Legs are located at the
English - 7
SEVERE WARNING
WARNING
SIGNS FOR USING
• Do not insert the power
plug with wet hands.
• Do not store items on top of
the appliance.
- When you open or close
the door, items may fall and
cause a personal injury and/
or material damage.
• Do not put items fi lled with
water on the refrigerator.
- If spilled, there is a risk of fi re
or electric shock.
• Do not let children hang on
the door.
- Failure to do so may cause
serious personal injury.
• Do not leave the doors of
the refrigerator open while
the refrigerator is unattended
and do not let children enter
DA68-03015D-04.indb 7DA68-03015D-04.indb 7 2015. 1. 7. 4:572015. 1. 7. 4:57

inside the refrigerator.
• Do not allow babies or
children to go inside the
drawers.
- It can cause death from
su ocation by entrapment or
personal injury.
• Do not sit on the Freezer
door.
- The door can be broken and
cause personal injury.
• When remove the divider
from the drawer to clean
or other reason, should
reassemble the divider with
provided screws to prevent
children trapped.
• Never put fi ngers or other
objects into the dispenser
hole.
- Failure to do so may cause
personal injury or material
damage.
• Do not store volatile or
fl ammable substances such
as benzene, thinner, alcohol,
ether or LP gas in the
refrigerator.
- The storage of any of such
products may cause an
explosion.
• Do not store low
temperature-sensitive
pharmaceutical products,
scientifi c materials or other
low temperature-sensitive
products in the refrigerator.
- Products that require
strict temperature controls
must not be stored in the
refrigerator.
• Do not place or use electrical
appliances inside the
refrigerator, unless they are of
a type recommended by the
manufacturer.
• Do not use a hair dryer to dry
the inside of the refrigerator.
Do not place a lighted
candle in the refrigerator for
removing bad odours.
- This may result in an electric
shock or fi re.
• Do not touch the inside walls
of the freezer or products
stored in the freezer with wet
hands.
- This may cause frostbite.
• Do not use mechanical
devices or any other means
to accelerate the defrosting
process, other than those
recommended by the
manufacturer.
• Do not damage the
refrigerant circuit.
English - 8
DA68-03015D-04.indb 8DA68-03015D-04.indb 8 2015. 1. 7. 4:572015. 1. 7. 4:57
• This product is intended
only for the storage
of food in a domestic
environment.
• Bottles should be stored
tightly together so that they
do not fall out.
• In the event of a gas leak
(such as propane gas,
LP gas, etc.), ventilate
immediately without touching
the power plug.
Do not touch the appliance
or power cord.
- Do not use a ventilating fan.
- A spark may result in an
explosion or fi re.
• Use only the LED Lamps
provided by manufacturer or
service agent.
• Children should be
supervised to ensure that
they do not play with and/or
climb into the appliance.
• Do not disassemble or
repair the refrigerator by
yourself.
- You run a risk of causing
a fi re, malfunction and/ or
personal injury.
In case of malfunction, please
contact your service agent.
• If the appliance
generates a strange
noise, a burning or smell
or smoke, unplug the
power plug immediately
and contact your nearest
service centre.
- Failing to do so may result
in an electric shock or fi re
hazards.
• If you experience di culty
when changing the light,
contact service agent.
• If the products is equipped
with LED Lamps, do not
disassemble the Lamp Cover
and LED Lamps by yourself.
- Please contact your service
agent.
• If any dust or water is in the
refrigerator, pull out power
plug and contact your
Samsung Electronics service
centre.
- There is a risk of fi re.
SAFETY INFORMATION
English - 9
DA68-03015D-04.indb 9DA68-03015D-04.indb 9 2015. 1. 7. 4:572015. 1. 7. 4:57
CAUTION SIGNS FOR
CAUTION
USING
• To get best performance
from the product,
- Do not place foods too
closely in front of the vents
at the rear of the appliance
as it can obstruct free air
circulation in the refrigerator
compartment.
- Wrap the food up properly or
place it in airtight containers
before putting it into the
refrigerator.
- Do not put any newly
introduced food for freezing
near to already existing food.
• Do not place carbonated
or fi zzy drinks in the freezer
compartment.
Do not put bottles or glass
containers in the freezer.
- When the contents freeze,
the glass may break and
cause personal injury and
property damage.
• Do not change or modify
the functionality of the
refrigerator.
- Changes or modifi cations
may result in a personal injury
and/or property damage.
Any changes or modifi cations
performed by a 3rd party on
this completed appliance
are neither covered under
Samsung warranty service,
nor is Samsung responsible
for safety issues and
damages that result from 3rd
party modifi cations.
• Do not block air holes.
- If the air holes are blocked,
especially with a plastic bag,
the refrigerator can be over
cooled.
If this cooling period lasts
too long, the water fi lter
may break and cause water
leakage.
- Do not put any newly
introduced food for freezing
near to already existing food.
• Please observe maximum
storage times and expiry
dates of frozen goods.
• Do not spray volatile material
such as insecticide onto the
surface of the appliance.
- As well as being harmful to
humans, it may also result
in an electric shock, fi re or
problems with the product.
• Do not apply strong shock
or excessive force onto the
surface of glass.
English - 10
DA68-03015D-04.indb 10DA68-03015D-04.indb 10 2015. 1. 7. 4:572015. 1. 7. 4:57

- Broken glass may result
in a personal injury and/or
property damage.
CAUTION SIGNS
CAUTION
FOR CLEANING AND
MAINTENANCE
• Do not directly spray
water inside or outside
the refrigerator.
- There is a risk of fi re or
electric shock.
• Do not use or place any
substances sensitive
to temperature such
as infl ammable sprays,
infl ammable objects, dry ice,
medicine, or chemicals near
the refrigerator.
Do not keep volatile or
infl ammable objects or
substances (benzene,
thinner, propane gas, etc.) in
the refrigerator.
- This refrigerator is for storing
food only.
- This may result in a fi re or an
explosion.
• Remove any foreign matter
or dust from the power plug
pins.
But do not use a wet or
damp cloth when cleaning
the plug, remove any foreign
material or dust from the
power plug pins.
- Otherwise there is a risk of
fi re or electric shock.
• Never put fi ngers or other
objects into the dispenser
hole and ice chute.
- It may cause a personal injury
or material damage.
• Clean the unreachable parts
such as hinges by using a
brush or toothbrush.
• Unplug the refrigerator
before cleaning and
performing maintenance.
• If any foreign substance
such as water has entered
the appliance, unplug the
power plug and contact your
nearest service centre.
- Failing to do so may result in
an electric shock or fi re.
SAFETY INFORMATION
• Do not spray cleaning
products directly on the
display.
- Printed letters on the display
may come o .
English - 11
DA68-03015D-04.indb 11DA68-03015D-04.indb 11 2015. 1. 7. 4:572015. 1. 7. 4:57

SEVERE WARNING
WARNING
SIGNS FOR
DISPOSAL
• Ensure that none of the
pipes on the back of the
appliance are damaged
prior to disposal.
• R-600a or R-134a is used as
a refrigerant.
Check the compressor label
on the rear of the appliance
or the rating label inside the
refrigerator to see which
refrigerant is used for your
refrigerator.
When this product contains
fl ammable gas (Refrigerant
R-600a), contact your local
authority in regard to safe
disposal of this product.
Cyclopentane is used as an
insulation blowing gas.
The gases in insulation
material require special
disposal procedure.
Please contact your local
authorities in regard to the
environmentally safe disposal
of this product.
Ensure that none of the pipes
on the back of the appliances
are damaged prior to
disposal.
The pipes shall be broken in
the open space.
• When disposing of this
product or other refrigerators,
remove the door/door seals,
door latch so that small
children or animals cannot
become trapped inside.
Leave the shelves in place so
that children may not easily
climb inside.
Children should be
supervised to ensure that
they do not play with the old
appliance.
• Please dispose of the
packaging material for this
product in an environmentally
friendly manner.
ADDITIONAL TIPS
FOR PROPER USAGE
• In the event of a power
failure, call the local o ce of
your Electricity Company and
ask how long it is going to
last.
- Most power failures that are
corrected within an hour
or two will not a ect your
refrigerator temperatures.
However, you should
minimise the number of door
English - 12
DA68-03015D-04.indb 12DA68-03015D-04.indb 12 2015. 1. 7. 4:572015. 1. 7. 4:57
openings while the power is
o .
- Should the power failure last
more than 24 hours, remove
all frozen food.
• If keys are provided with the
refrigerator, the keys should
be kept out of the reach of
children and not be in the
vicinity of the appliance.
• The appliance might
not operate consistently
(possibility of temperature
becoming too warm in the
refrigerator) when sited
for an extended period of
time below the cold end of
the range of temperature
for which the refrigerating
appliance is designed.
of the frozen food while
defrosting the appliance,
please wrap the frozen
food up in several layers of
newspaper.
• Any increase in temperature
of frozen food during
defrosting can shorten its
storage life.
• When you use this function
the energy consumption of
the refrigerator will increase.
Remember to turn it o when
you don’t need it and return
the freezer to your original
temperature setting.
If you need to freeze large
amount of food stu , activate
Power Freeze function at
least 24hours before.
SAFETY INFORMATION
• Do not store food which
spoils easily at low
temperature, such as
bananas, melons.
• Your appliance is frost free,
which means there is no
need to manually defrost
your appliance, as this will be
carried out automatically.
• Temperature rise during
defrosting can comply with
ISO requirements.
Except for RH57H9060*
model
• Contains fl uorinated
greenhouse gases covered
by the Kyoto Protocol.
• Foam blown with fl uorinated
greenhouse gases.
• Foam blown additive:
Perfl uorohexane Global
Warming Potential (GWP)
= 9000
But if you want to prevent an
undue rise in the temperature
English - 13
DA68-03015D-04.indb 13DA68-03015D-04.indb 13 2015. 1. 7. 4:572015. 1. 7. 4:57

Saving Energy Tips
- Install the appliance in a
cool, dry room with adequate
ventilation.
Ensure that it is not exposed
to direct sunlight and never
put it near a direct source of
heat (radiator, for example).
- Never block any vents or
grilles on the appliance.
- Allow warm food to cool
down before placing it in the
appliance.
- Put frozen food in the
refrigerator to thaw.
You can then use the low
temperatures of the frozen
products to cool food in the
refrigerator.
- Do not keep the door of
the appliance open for too
long when putting food in or
taking food out.
The shorter time for which
the door is open, the less ice
will form in the freezer.
- Clean the rear of the
refrigerator regularly.
Dust increases energy
consumption.
- Do not set temperature
colder than necessary.
and at the back wall of the
refrigerator.
Do not cover air vent
openings.
- Allow clearance to the right,
left, back and top when
installing.
This will help reduce power
consumption and keep your
energy bills lower.
- For the most e cient use
of energy, please keep the
all inner fi ttings such as
baskets, drawers, shelves
on the position supplied by
manufacturer.
This appliance is intended
to be used in household and
similar applications such as
- sta kitchen areas in shops,
o ces and other working
environments;
- farm houses and by clients
in hotels, motels and other
residential type environments;
- bed and breakfast type
environments;
- catering and similar non-retail
applications.
- Ensure su cient air fl ow
at the refrigerator base
English - 14
DA68-03015D-04.indb 14DA68-03015D-04.indb 14 2015. 1. 7. 4:572015. 1. 7. 4:57

A
B
C
D
E
1725mm
468mm
165
°
165
°
50mm
912mm
610mm
1170mm
34mm
31mm
Setting up your refrigerator
GETTING READY TO INSTALL THE
REFRIGERATOR
Congratulations on your purchase of the Samsung
refrigerator.
We hope you enjoy the state-of-art features and
e ciencies that this new appliance o ers.
Selecting the best location for the
Refrigerator
• Select a location with easy access to a water
supply.
• Select a location without direct exposure to
sunlight.
• Select a location with level (or nearly level)
fl ooring.
• Select a location with enough space for the
refrigerator doors to open easily.
• Select a location that allows su cient space to
the right,left, back, and top for air circulation.
• Select a location that allows you to move the
refrigerator easily if it needs maintenance or
service.
• Do not install the refrigerator in locations where
the temperature is over 43°C or below 5°C.
B
A
E
165
D
°
468mm
1170mm
C
Depth “A” 718mm
Width “B” 912mm
Height “C” 1742mm
Overall Height “D” 1774mm
Depth “E” 721mm
50mm
°
165
1725mm
610mm
912mm
34mm
31mm
SETTING UP
Each measurement based on the design
dimension, so it may di er depending on
DA68-03015D-04.indb 15DA68-03015D-04.indb 15 2015. 1. 7. 4:572015. 1. 7. 4:57
English - 15
the measuring method.

When moving your refrigerator
Leg
To prevent fl oor damage, be sure the front leveling
legs are in the up position (above the fl oor).
Refer to “How to level the refrigerator” in the
manual on page 21.
Leg
Screw Driver
Flooring
For proper installation, you must place this
refrigerator on a level, hard surface that is the same
height as the rest of the fl oor.
This surface should be strong enough to support a
fully loaded refrigerator.
To protect the fi nish of the fl ooring, cut a large
section of the cardboard carton and place it under
the refrigerator where you are working.
When moving the refrigerator, you need to pull and
push it straight forwards or back.
Do not wiggle it from side to side.
Required Tools (Not provided)
Philips screwdriver
(+)
Allen wrench
5mm
Flat-blade screw
driver (-)
Socket wrench
10mm
SETTING UP THE REFRIGERATOR
Now that you have your new Refrigerator installed
in place, you are ready to set up and enjoy the
features and functions of the appliance.
By completing the following steps, your Refrigerator
should be fully operational.
If not, fi rst check the power supply and electricity
source or try the troubleshooting section at the
back of this user’s guide.
If you have any further questions, contact your
Samsung Electronics service centre.
1. Place the Refrigerator in an appropriate location
with reasonable clearance between the wall and
the Refrigerator.
Refer to installation instructions in this manual.
2. Once the Refrigerator is plugged in, make sure
the interior light comes on when you open the
doors.
3. Set the Temperature control to the coldest
temperature and wait for an hour.
The Freezer will get slightly chilled and the
motor will run smoothly.
4. After powering the Refrigerator, it will take a few
hours to reach the appropriate temperature.
You can store food and drinks in the Refrigerator
after the temperature is su ciently cool.
5. Once installation is complete, press the
dispenser lever to check if the water or the ice
is properly dispensed.
6. Make sure the front side of the refrigerator is 0.6
degree higher than its rear side.
English - 16
DA68-03015D-04.indb 16DA68-03015D-04.indb 16 2015. 1. 7. 4:572015. 1. 7. 4:57
SETTING UP THE REFRIGERATOR
Make sure the
color of the water
lines match.
(1)
(2)
Center of Transparent coupler
Clip A (1/4”)
(6.35mm)
(1)
(2)
(3)
DOORS
If your entrance won’t allow the refrigerator to pass
easily through it, you can remove the doors.
Separating the water supply line from the
refrigerator
Center of Transparent coupler
Clip A (1/4”)
(6.35mm)
SETTING UP
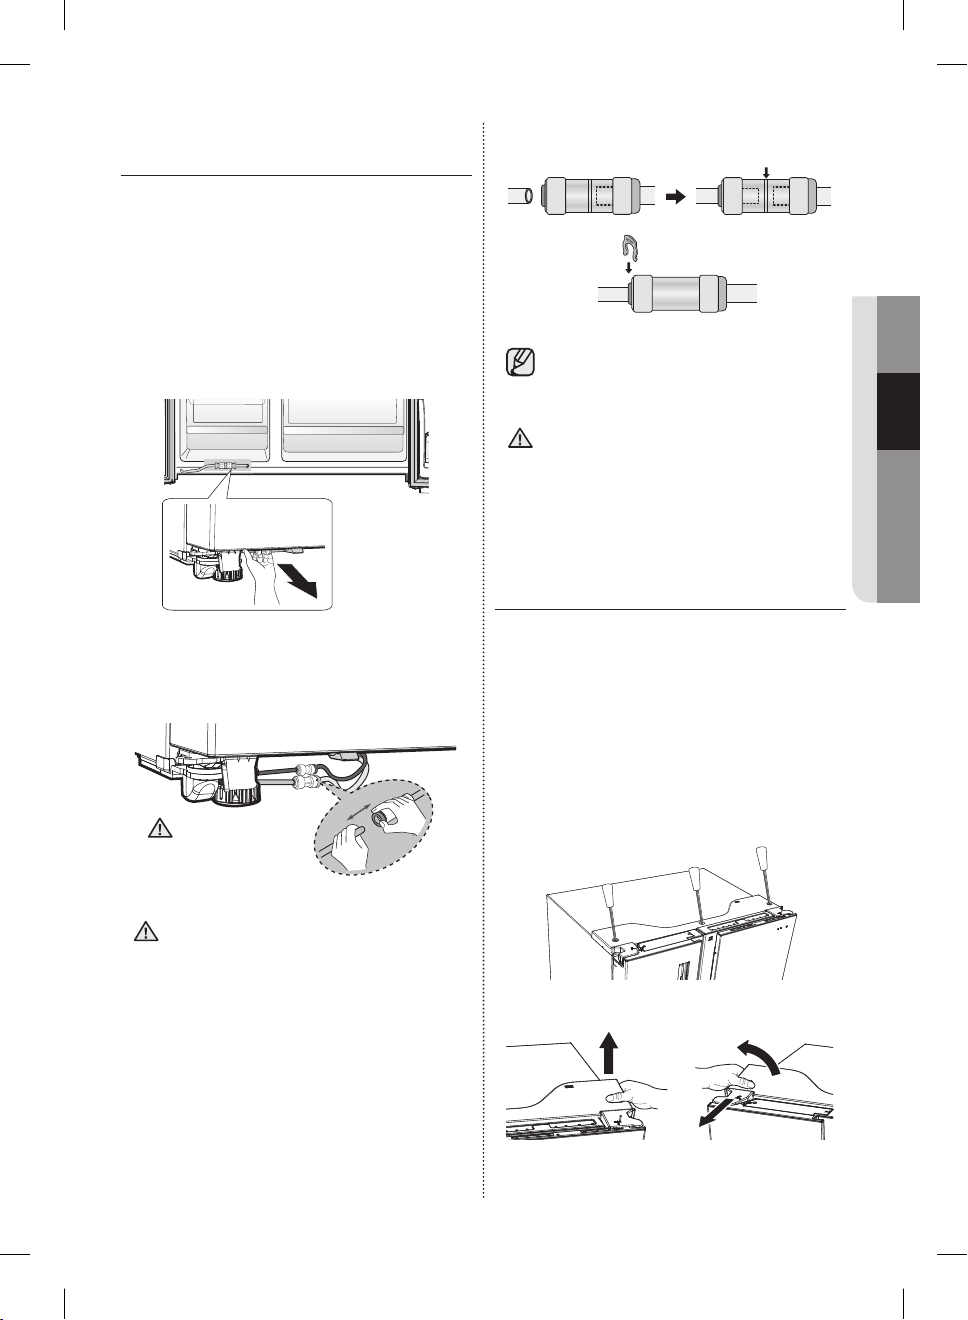
1. Pull the two water lines (which are in the Fixer)
out to the front.
2. Remove two water lines (White one is for water
and the other one is for ice) by pressing the
coupler (1) and pulling the water line (2) away.
(1)
Make sure the
color of the water
CAUTION
lines match.
(2)
When reconnecting the supply hoses,
CAUTION
make sure the same colored hoses are
inserted with each other.
Do not cut the water line.
Gently separate it from the coupler.
Keep the clips out of the reach of children
CAUTION
and make sure that children do not play
with them or put them into their mouths.
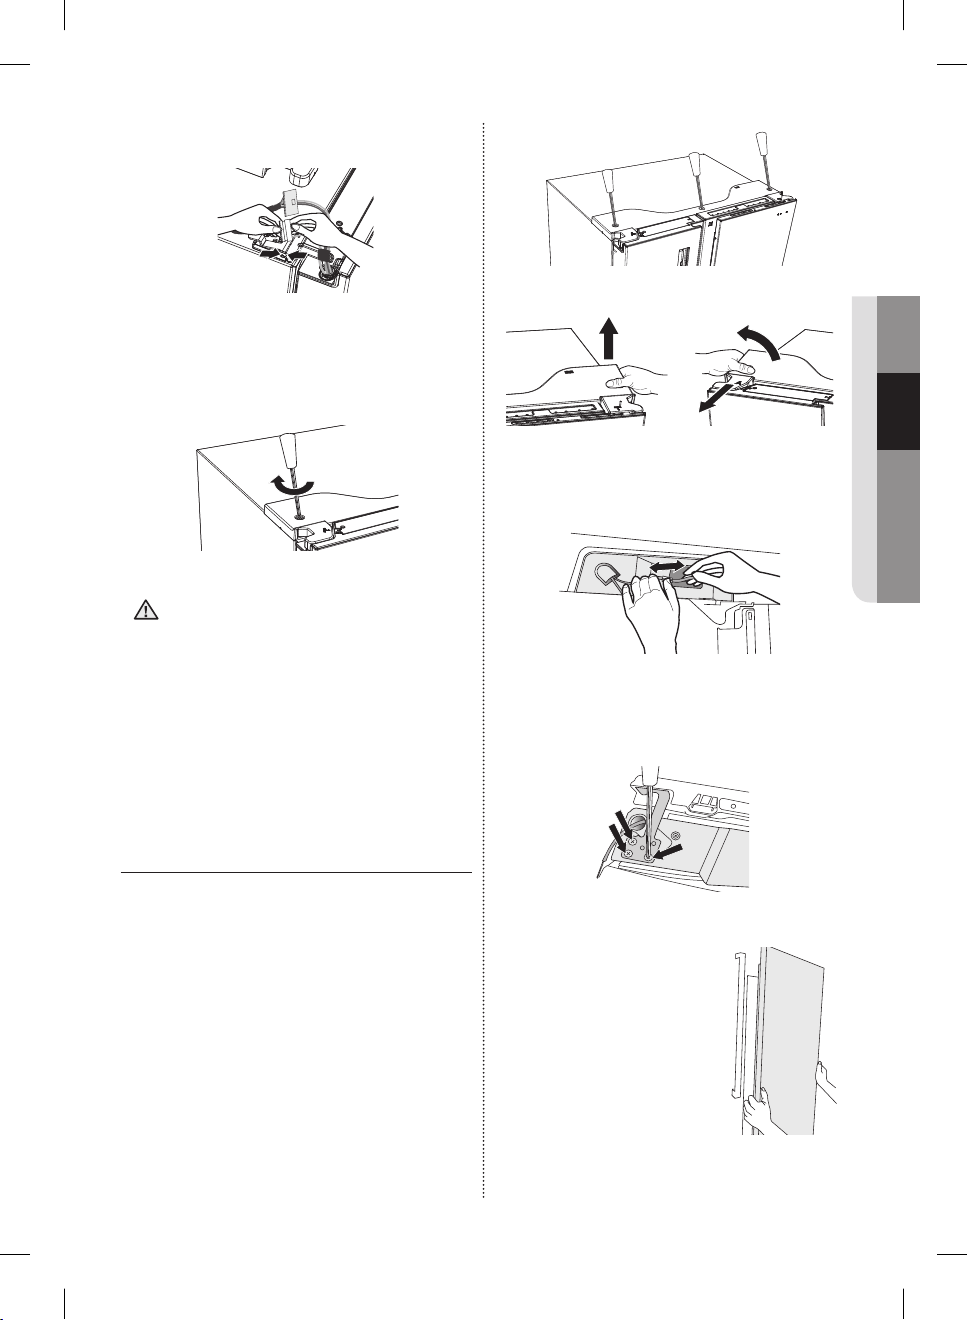
DISASSEMBLE THE FREEZER
DOORS
1. Disconnect the power cord, and Remove 3
cover screws using a Phillips screwdriver (1).
Then open the refrigerator door and pull
the hooks on the sides to loosen the cover
(2).
Lift up the cover and towards you to
detach it (3).
- Detach the hinge cover with the door open and
then close the door once the hinge cover has
been detached.
(1)
Reattaching the Water Supply Line
(2)
(3)
1. The Water Line must be fully Inserted to the
centre of transparent coupler to prevent water
leakage from the dispenser.
2. Insert the 2 clips in the install pack and check
that each clip holds the line fi rmly.
English - 17
DA68-03015D-04.indb 17DA68-03015D-04.indb 17 2015. 1. 7. 4:572015. 1. 7. 4:57
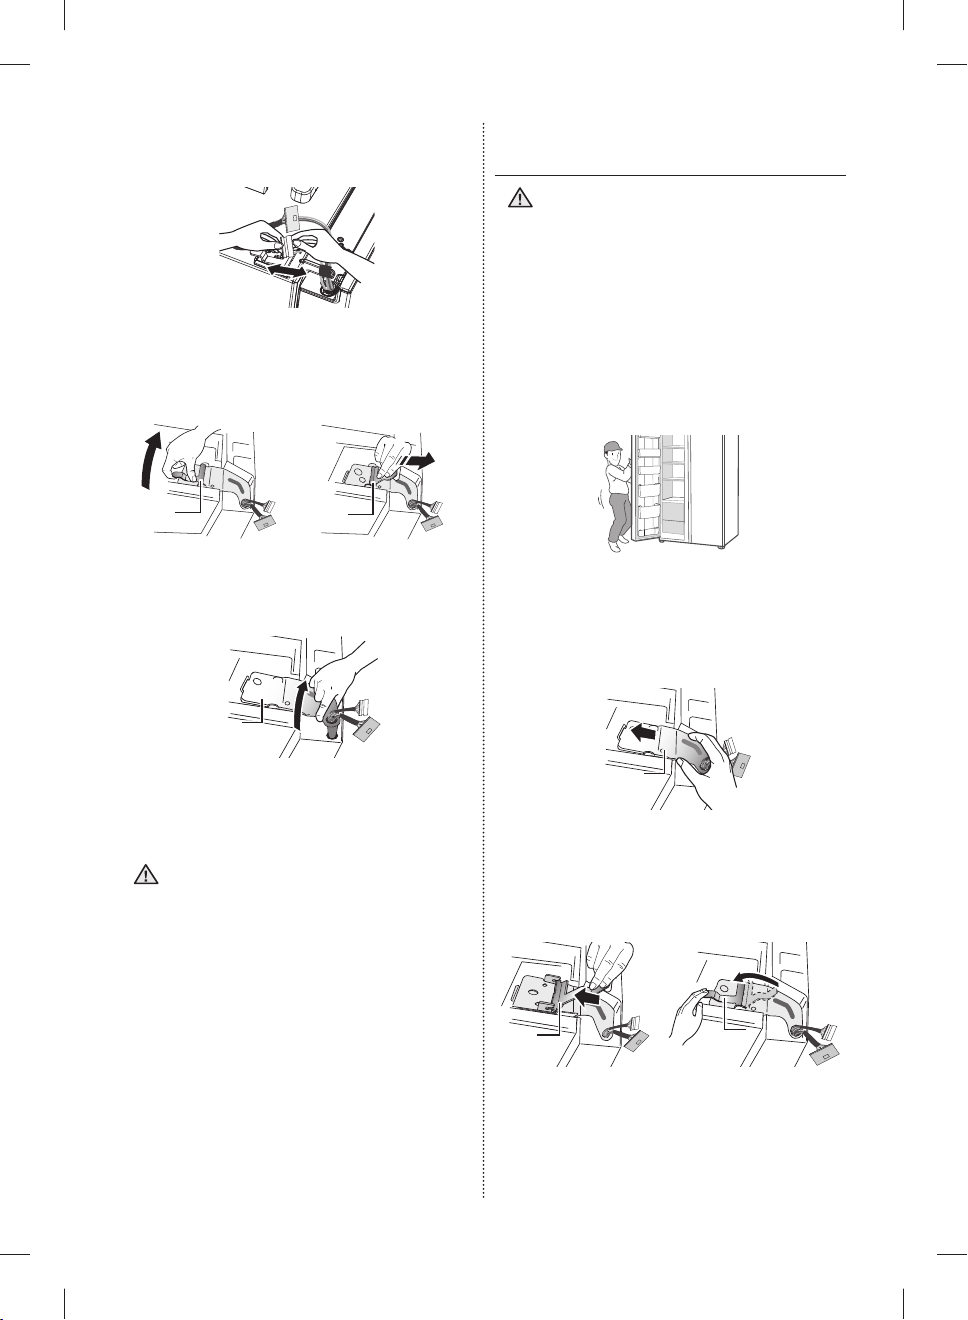
2. Remove the hinge cover and then disconnect
(A)
(1)
(A)
(2)
(B)
(B)
(A)
(1)
(A)
(2)
the electrical wire connector.
3. Flip the clamp (A) up in direction (1) and then
pull it o in direction (2).
RE-ATTACHING THE FREEZER
DOORS
• Be sure to re-attach the Freezer Door
CAUTION
• Before re-attaching, make sure that all the wire
How to Assemble Door
1. Attach the doors to the hinges at the bottom of
before re-attaching the Fridge Door.
connectors at the bottom of the Freezer Door
are connected.
the refrigerator.
(1)
(A)
(A)
4. Remove the hinge (B).
(B)
5. Lift up the door and detach it from the
refrigerator.
• Be careful not to damage the electrical
CAUTION
wires when assembling or disassembling
the doors.
• Make sure the doors do not fall over and
become damaged while they are detached from
the refrigerator.
(2)
2. Insert the hinge (B) into the hinge slot on the
refrigerator and then press down over the hinge
hole on the door.
(B)
3. Insert the clamp (A) in the direction of arrow
(1) and then lower it in the direction of arrow
(2) to lock it in place.
(2)
(A)
(1)
(A)
English - 18
DA68-03015D-04.indb 18DA68-03015D-04.indb 18 2015. 1. 7. 4:572015. 1. 7. 4:57
4. Hook up the electrical wire connector.
(1)
(2)
(3)
(1)
5. Insert 2 front parts of the cover fi rst, push down
on both side parts of the cover, and then secure
the cover in place using a Phillips screwdriver.
• The doors can be assembled in the
CAUTION
reverse order of their disassembly.
• The display may not function properly if you
neglect to connect the electrical wires while
assembling the door.
DISASSEMBLE THE
REFRIGERATOR DOORS
(SHOW CASE OF COLD
COMPARTMENT)
1. Disconnect the power cord, and Remove 3
cover screws using a Phillips screwdriver (1).
Then open the refrigerator door and pull
the hooks on the sides to loosen the cover
(2).
Lift up the cover and towards you to
detach it (3).
- Detach the hinge cover with the door open and
then close the door once the hinge cover has
been detached.
(2)
(3)
2. Disassemble the housing connector.
3. Disassemble the three fastening screws on the
top hinge of the show case.
4. Disassemble the show
case.
SETTING UP
English - 19
DA68-03015D-04.indb 19DA68-03015D-04.indb 19 2015. 1. 7. 4:572015. 1. 7. 4:57

DISASSEMBLE THE
(1)
(2)
(3)
REFRIGERATOR DOORS
1. Disconnect the power cord, and Remove 3
cover screws using a Phillips screwdriver (1).
Then open the refrigerator door and pull
the hooks on the sides to loosen the cover
(2).
Lift up the cover and towards you to
detach it (3).
- Detach the hinge cover with the door open and
then close the door once the hinge cover has
been detached.
(1)
(2)
(3)
3. Push the fi xer hinge up, and pull it forward to
remove it.
4. Disassemble the top hinge from the front of the
door.
5. Disassemble the show
case.
2. Disassemble the housing connector.
Fix the wire on the Hinge Hook to
CAUTION
prevent the damage on the wire when
reassembling.
RE-ATTACHING REFRIGERATOR
DOORS
To reattach the REFRIGERATOR doors, assemble
parts in reverse order.
English - 20
DA68-03015D-04.indb 20DA68-03015D-04.indb 20 2015. 1. 7. 4:572015. 1. 7. 4:57

LEVELING THE REFRIGERATOR
AND ADJUSTING HEIGHT AND
GAP OF THE DOORS
How to level the refrigerator
To avoid a hazard due to
instability of the refrigerator,
please place the refrigerator
on a horizontal support and
levelled in accordance with
the following instruction for
installation.
Failing to do so may result in
the refrigerator tipping and a
personal injury.
If the front of the appliance is
slightly higher than the rear,
the door can be opened and
closed more easily.
Setting up the refrigerator on
an uneven surface will cause
the refrigerator to be uneven.
- When install the refrigerator,
the legs should touch the
fl oor surely.
The legs should be located
on the back of under the
each door.
Insert it with fl athead
screwdriver and tighten up to
arrow direction.
- Do not put the food on only
one side when store the
food.
If put it on only one side, it is
able to occur the conduction
and injury.
SETTING UP
English - 21
DA68-03015D-04.indb 21DA68-03015D-04.indb 21 2015. 1. 7. 4:572015. 1. 7. 4:57

If the freezer side is lower:
(A)
(B)
(A)
• Insert a fl athead screwdriver into the height
leveler located at the bottom back of the freezer
door and turn it in the direction of the arrow
until it is level.
HOW TO ADJUST THE DOOR
HEIGHT
If refrigerator door is lower than the other:
• The door height levels can be adjusted using
the adjustment nut located at the bottom of
refrigerator door.
• Raising the door too high can cause the door to
interfere with the hinge cover when it is opened
or closed.
If the refrigerator side is lower:
• Insert a fl athead screwdriver into the height
leveler located at the bottom back of the
refrigerator door and turn in the direction of the
arrow until it is level.
• Raise the front of the refrigerator so that
the doors close by themselves.
Adjusting the levelers so that the back
of the refrigerator is much higher than
the front of the refrigerator can make it
di cult to open the doors.
• If the back of the refrigerator is not level,
support the bottom with an appropriately sized
object and secure the object in place using
tape.
Slide the refrigerator into its spot and then
adjust the level.
• When pushing the refrigerator in, be careful not
to damage the fl oor.
(B)
(A)
1. Open the door that needs to be adjusted and
loosen the clamping nut (A) at the bottom of
the door by turning it in the clockwise direction
) using the spanner included in the
(
product package.
(A)
English - 22
DA68-03015D-04.indb 22DA68-03015D-04.indb 22 2015. 1. 7. 4:572015. 1. 7. 4:57
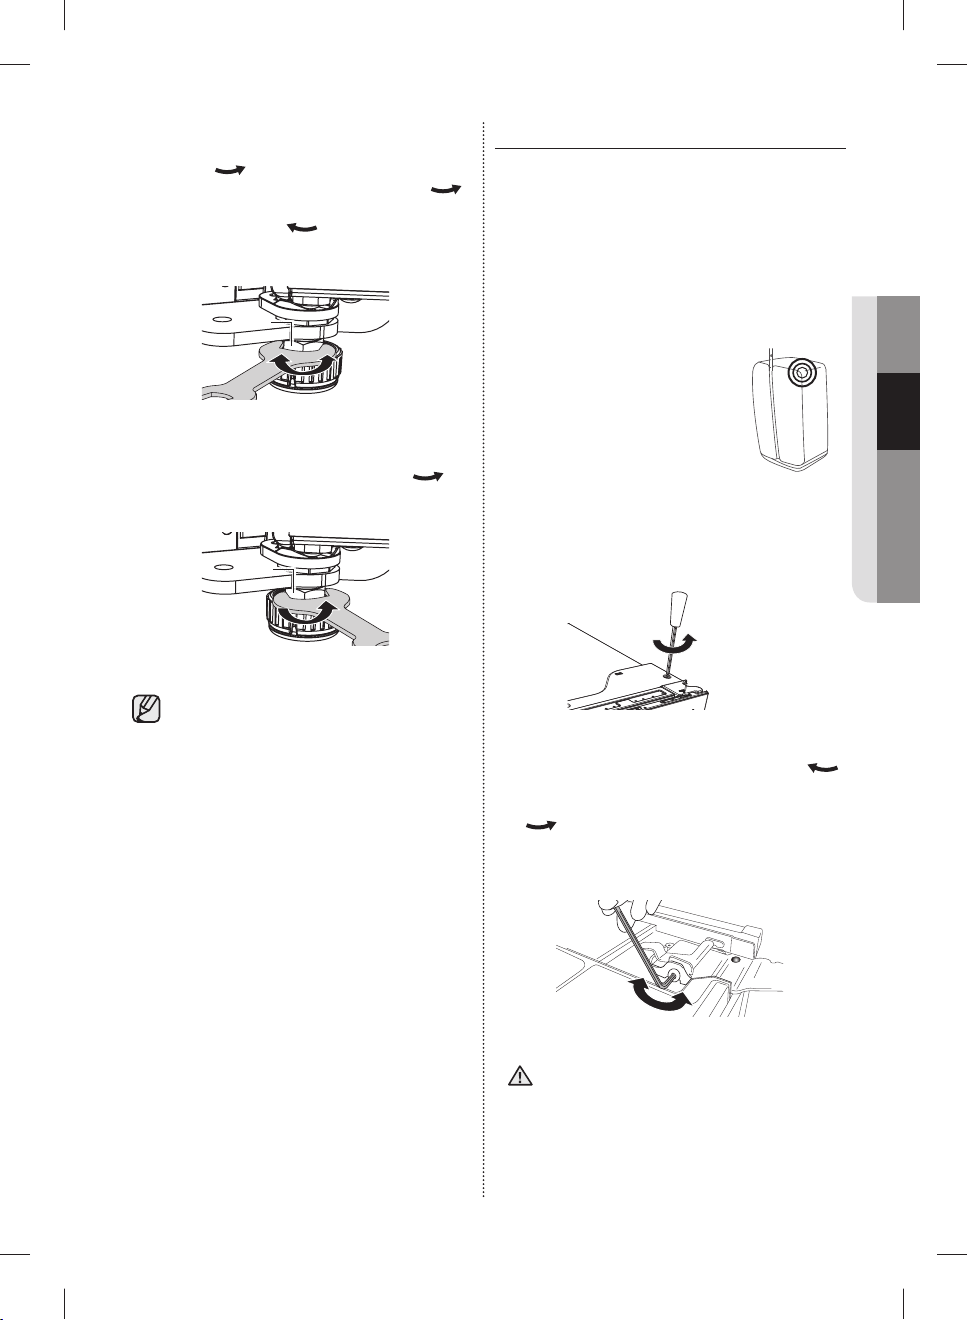
1. Adjust the height of the door by turning the
(A)
(A)
adjustment nut (B) in the counterclockwise
direction (
) with a spanner.
(Turn it in the counterclockwise direction (
to increase the height of the door and in the
clockwise direction ( ) to decrease it.)
- Open the door and adjust it from the inside.
(A)
2. Once the doors are level, turn the clamping nut
(A) in the counterclockwise direction ( ) to
tighten it.
(A)
Adjusting the level when the refrigerator
is empty can result in the refrigerator
becoming uneven again once items have
been placed inside.
If this occurs, adjust the level again.
HOW TO ADJUST THE DOOR GAP
If the gap between the refrigerator door and the
freezer door is uneven:
)
• Use the gap adjustor located at the top of the
refrigerator door (right side).
• Excessive force can cause the adjustor bolt to
break.
1. Remove the refrigerator
door’s hinge cover.
- Detach the hinge cover with
the door open and then close
the door once the hinge cover
has been detached.
2. Adjust the gap using a 4mm Allen wrench (not
included).
3. Rotate the bolt in the clockwise direction ( )
to widen the gap.
Rotate it in the counterclockwise direction
( ) to narrow the gap.
Adjust until the gap between the refrigerator
door and the freezer door appears even.
SETTING UP
When arranging the cables, take caution
CAUTION
not to tear or peel o the cable coating.
English - 23
DA68-03015D-04.indb 23DA68-03015D-04.indb 23 2015. 1. 7. 4:572015. 1. 7. 4:57

HOW TO ADJUST THE
REFRIGERATOR DOOR GAP
(BACK)
If the gap between the refrigerator door and the
refrigerator is uneven:
• Use the adjustors located at the top edge inside
each door.
1. Open the door where the gap with the
refrigerator is narrower and then turn the
adjustor in the counterclockwise direction
( ) until the gap is even.
CHECKING THE WATER
DISPENSER LINE
A water dispenser is one of the helpful features on
your new Samsung Refrigerator.
To help promote better health, the Samsung water
fi lter removes unwanted particles from your water.
However, it does not sterilize or destroy
microorganisms.
You may need to purchase a water purifying
system to do that.
In order for the ice maker to operate properly,
a water pressure of 20~125psi (138~862kPa)
(pound per square inch) is required.
Under normal conditions, a 170cc (5.75oz.) paper
cup can be fi lled in 10 seconds.
If the Refrigerator is installed in an area with low
water pressure (below 20psi), you can install a
booster pump to compensate for the low pressure.
Make sure the water storage tank inside the
Refrigerator is properly fi lled.
To do this, press the water dispenser lever until the
water runs from the water outlet.
Water line installation kits are available at
extra cost from your dealer.
We recommend using a water supply kit
that contains copper tubing.
Adjustor
2. Once the gap between the door and the
refrigerator has been adjusted, turn the adjustor
nut in the clockwise direction ( ) to lock the
adjustor in place.
Locking Nut
The new hose-sets supplied with the
appliance are to be used and that old
hose-sets should not be reused.
Check the accessory list.
English - 24
DA68-03015D-04.indb 24DA68-03015D-04.indb 24 2015. 1. 7. 4:572015. 1. 7. 4:57
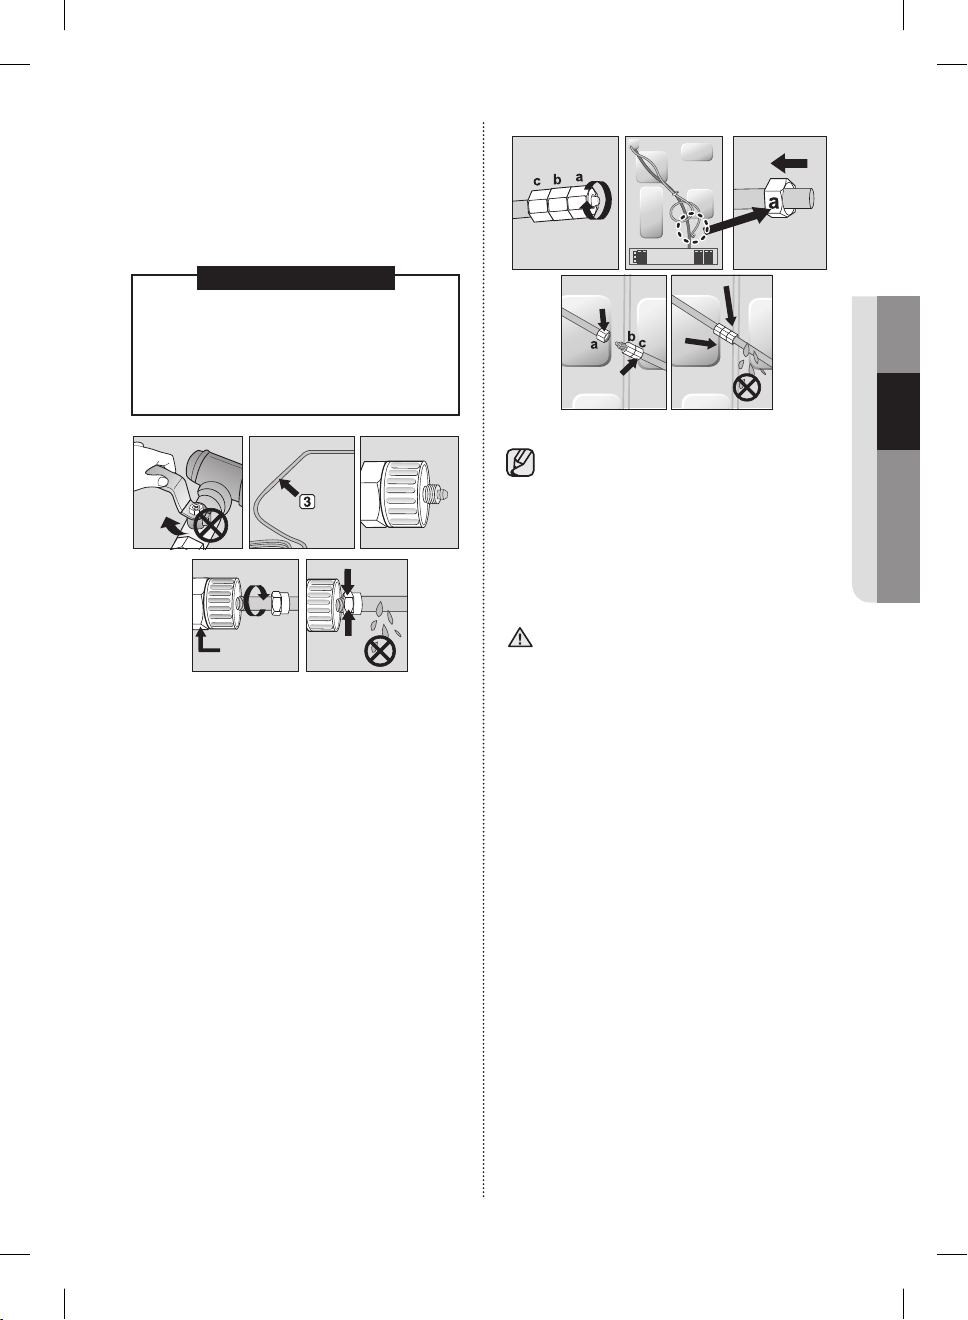
Connecting to the water supply line
Close Main
Water pipe
Close Main
Water pipe
No gap
No gap
Loosen a
Remove cap
Water Line from Kit
Water Line from unit
1. First, shut o the main water supply line.
2. Locate the nearest cold, drinking water line.
3. Follow the Water Line Installation Instructions in
the installation kit.
Loosen a
Remove cap
CAUTION
The water line must be connected to the
cold water pipe.
If it is connected to the hot water pipe, it
may cause the purifi er to malfunction.
Close Main
Water pipe
Close Main
Water pipe
4. After connecting the water supply to the water
No gap
fi lter, turn your main water supply back on and
Dispense about 3L to clear and prime the
water fi lter.
Connecting the water line to the
refrigerator
Water Line from unit
Water Line from Kit
No gap
Only connect the water line to a drinkable
water source.
If you have to repair or disassemble the water line,
cut o 6.5mm of the plastic tubing to make sure
you get a snug, leak-free connection.
Before being used, the leakage in these
CAUTION
places should be examined.
• Samsung Warranty does not cover WATER
LINE INSTALLATION.
• It’ll be done at customer’s charge unless the
retail price includes installation cost.
• Please contact Plumber or Authorized Installer
for the installation if needed.
• If Water leakage occurs due to improper
installation, Please contact installer.
SETTING UP
1. Remove the cap from water line on the unit and
insert compression nut to the water line on the
unit after disassembling from provided water
line.
2. Connect both water line from the unit and water
line in the kit.
3. Tighten the compression nut onto the
compression fi tting.
Be careful no gap between two items.
4. Turn water on and check for any leakage.
English - 25
DA68-03015D-04.indb 25DA68-03015D-04.indb 25 2015. 1. 7. 4:572015. 1. 7. 4:57

No Leak
No Leak
Figure 1
1. Slip the compression nut (A) through the
supplied plastic tubing (A).
2. Tighten the compression nut (A) onto the 1/4”
compression fi tting.
- If you are using copper tubing, slip the
compression nut (B) (not included) and ferrule
(not included) on copper tubing (not included)
as shown.
- If you are using plastic tubing (B), insert the
molded end (Bulb) of the plastic tubing (B) into
the compression fi tting.
BEFORE USING ICEMAKER
Remove
- Remove the Icemaker Bucket by lifting it up and
pulling it out slowly.
- Grip the handle as shown in the fi gure.
- Remove the Ice Bucket slowly to prevent
damage.
Figure 1
Do not use excessive force when removing
the drawer cover.
Otherwise, the cover may break and cause
injury.
Before removing any accessories, make
sure that no food is in the way.
When possible, remove the food altogether
to reduce the risk of accidents.
Do not use without the molded end(Bulb)
CAUTION
of the plastic tubing (B).
3. Tighten the compression nut (B) onto the
compression fi tting.
Do not over-tighten the compression nut (B).
4. Turn water on and check for any leakage.
Install
- Assemble the icemaker in the reverse order of
disassembly.
- Push the bucket in fi rmly until you hear a
clicking sound.
Only connect the water line to a drinkable
water source.
If you have to repair or disassemble the
water line, cut o 1/4“ of the plastic tubing
to make sure you get a snug, leak-free
connection.
English - 26
DA68-03015D-04.indb 26DA68-03015D-04.indb 26 2015. 1. 7. 4:572015. 1. 7. 4:57
Before calling service
Figure 3
Ice Chute
Cubed Ice
Crushed Ice
- Any sounds you hear when the ice maker
dumps ice into the bucket are part of normal
operation.
- If you don’t dispense ice for a long period of
time, the ice may form clumps in the ice bucket.
If ice clumps form, remove the remaining ice
and empty the bucket.
- When ice does not come out, check for ice
stuck in the chute and remove it.
Removing residual matter inside the water
supply line after installing fi lter.
1. Turn ON the main water supply.
2. Push the Dispenser Lever.
3. Flush 1 gallons of water through the fi lter before
use. (Flush approximately 6 minutes.)
This will clean the water supply system and
remove air from the lines.
4. Additional fl ushing may be required in some
households.
5. Open the refrigerator door and make sure there
are no water leaks coming from the water fi lter.
SETTING UP
Ice Chute
Figure 3
• When Ice O blinks on the display panel,
CAUTION
reinsert the bucket and/or make sure it’s
installed properly.
• When the door is open, the Ice and water
dispenser do not work.
• If you close the door hard, it may cause water
spilling over the ice maker.
• To prevent dropping the ice bucket, use both
hands when removing it.
• To prevent injury, be sure to clean up any ice or
water that may have dropped on the fl oor.
• Do not let the children hang on the ice
dispenser or on the bucket.
They may get hurt.
• Be sure not to put your hand or any object into
the ice chute.
It may cause personal injury or damage
mechanical parts.
Cubed Ice
Crushed Ice
A newly installed water fi lter cartridge may
cause water to briefl y spurt from the water
dispenser.
This is due to air getting into the line.
It should pose no problem to operation.
English - 27
DA68-03015D-04.indb 27DA68-03015D-04.indb 27 2015. 1. 7. 4:572015. 1. 7. 4:57
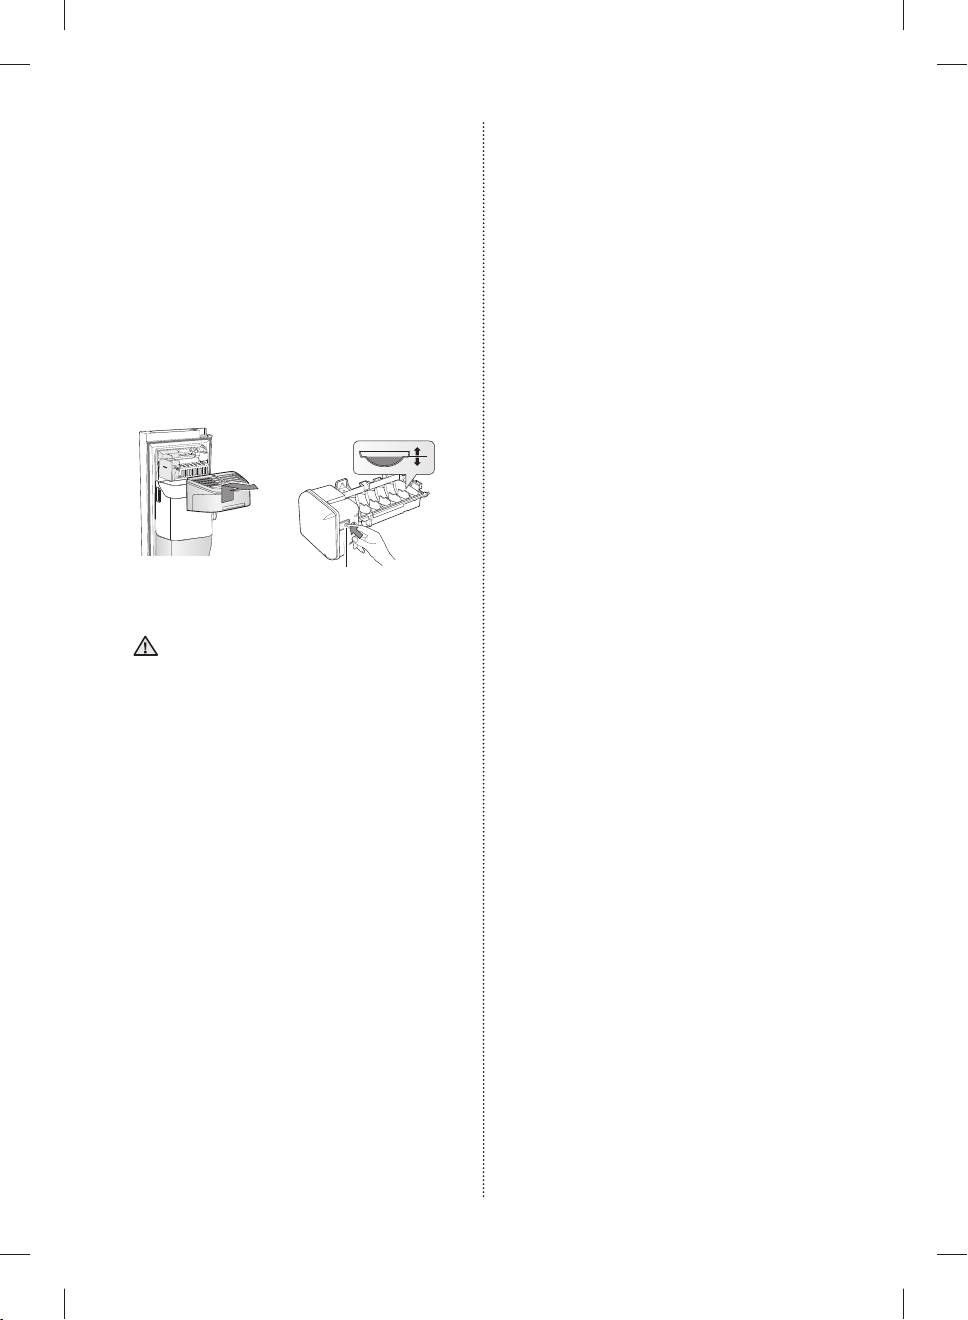
Check the amount of water supplied to
Ice maker
1
Test button
2
Check the water level
the ice tray.
1. Lift up the icemaker cover and gently pull it out.
2. When you press the Test button for 3 seconds,
the ice cube container is fi lled with water from
the water supply tap.
Check to make sure the amount of water is
correct (see the illustration below).
If the water level is too low, the ice cubes will be
small.
This is a water pressure problem from within the
main water pipes, not the refrigerator.
Check the water level
1
2
Ice maker
• It will take a few minutes for the water to
CAUTION
reach the correct level after you push the
Test button.
• Do not press the test button continuously when
the tray is fi lled with ice or water.
Water may overfl ow or ice jamming may occur.
• When the bucket is not installed, the ice maker
does not work.
• When Ice O blinks on the display panel,
reinsert the bucket and/or make sure it’s
installed properly.
Test button
English - 28
DA68-03015D-04.indb 28DA68-03015D-04.indb 28 2015. 1. 7. 4:572015. 1. 7. 4:57

Operating your Samsung
refrigerator
USING THE CONTROL PANEL
DISPENSER MODEL
(1)
(2)
(3)
(9) (10)
(7)
NORMAL MODEL
(1)
(4)
(8)
(1) Freezer / Power Freeze (3sec)
The Freezer button serves two purposes:
- To set the Freezer to your desired
temperature.
(4)
(5)
(6)
(1)
(3)
(4)
- To turn the Power Freeze function on
and o .
1. To set the Freezer temperature, touch
the Freezer button.
You can set the temperature between
5°F (-15°C) and -8°F (-23°C).
2. Power Freeze function
Touch and hold this button for 3 seconds
to decrease the time needed to freeze
products in the Freezer.
It can be helpful if you need to quickly
freeze easily spoiled items or if the
temperature in the freezer has warmed
dramatically.
(For example, if the door was left open.)
When you use this function, the energy
consumption of the refrigerator will
increase.
Remember to turn it o when you don’t
need it and return the freezer to your
original temperature setting.
If you need to freeze a large amount of
food, activate the Power Freeze function at
least 20 hours before you put the food into
the freezer.
OPERATING
(10)
DA68-03015D-04.indb 29DA68-03015D-04.indb 29 2015. 1. 7. 4:572015. 1. 7. 4:57
(10)
English - 29
(2) Lighting / °C↔°F (3sec)
The Lighting button serves two purposes:
- To turn the dispenser light on and o
- To switch the temperature units
between ºC and ºF.
1. Light Function
Touching the Lighting button turns on the
Dispenser LED lamp in continuous mode
so that it stays on continuously.
The button also lights up.
If you want the Dispenser lamp to come on
only when some one uses the dispenser,
press the Lighting button to turn the
continuous mode o .
2. To switch the temperature units
between ºC and ºF.
Touch and hold this button for 3 seconds
to select the temperature display you want.
Each time you press and hold the button,
the ºC and ºF temperature modes alternate
and the ºC or ºF icon lights up, indicating
your selection.
(3) Vacation / Filter Reset (3sec)
The Vacation button serves two purposes:
- To turn Vacation mode on and o
- To reset the water fi lter life indicator.
1. Vacation Function
If you are going on vacation or business
trip or you do not need to use the
refrigerator, press the Vacation button.
When you select vacation button for fridge
compartment o , display LED of Vacation
will be on.
It is strongly requested to remove foods
in the fresh-food compartment and do
not leave the door open when you select
Vacation function.
2. Water Filter Life Indicator Function
After you replace the water fi lter, touch and
hold this button for 3 seconds to reset the
water fi lter life indicator. When you reset
the water fi lter life indicator, the Filter icon
on the panel turns O .
The Filter icon will turn red to let you know
it is time to change the water fi lter after six
months (about 300 gallons).
Some areas have large amounts of lime in
their water, which causes the water fi lter to
clog more quickly.
If this is the case in your area, you will have
to change the fi lter more frequently than
every six months.
English - 30
DA68-03015D-04.indb 30DA68-03015D-04.indb 30 2015. 1. 7. 4:572015. 1. 7. 4:57

(4) Fridge / Power Cool (3 sec)
The Fridge button serves two purposes:
- To set the Fridge to your desired
temperature.
- To turn the Power Cool function on and
o .
(6) Ice Maker O
The Ice Maker O button serves two
purposes:
- To turn the Ice maker on and o
- To turn the Control Lock Function on
and o .
1. To set the Fridge temperature, press
the Fridge button.
You can set the temperature between
44°F (7°C) and 34°F (1°C).
2. Power Cool function
Touch and hold this button for 3 seconds
to decrease the time needed to cool
products in the Refrigerator.
It can be helpful if you need to quickly cool
easily spoiled items or if the temperature in
the fridge has warmed dramatically.
(For example, if the door was left open)
(5) Alarm
Touching this button turns the door open
alarm on and o .
If the door alarm is set to On, an alarm
beeps if any refrigerator door is left open
for more than two minutes.
The beeping stops when you close the
door.
The door alarm function is pre-set to On in
the factory.
You can turn it o by pressing and then
releasing the Alarm button.
You can turn it back on in the same
fashion.
The icon lights up when the function is on.
When the Door Alarm function is on and
the alarm sound is triggered, the Door
Alarm Icon will blink while the alarm
sounds.
1. Ice Maker O Function
If you don’t want to make more ice, press
the Ice Maker O button.
2. Control Lock Function
Touch and hold this button for 3 seconds
to lock the display and the dispenser
buttons so the buttons cannot be used.
When Control Lock is on, the refrigerator
does not dispense ice or water, even if the
Dispenser Lever is pressed.
The Control Lock icon lights up to indicate
you’ve activated the Control Lock function.
Press for 3 seconds to unlock.
If the ice maker function is ON, and the
water line is not connected, there will be a
water valve noise from the back of the unit.
Press the Ice Maker O (Control Lock
(3sec)) button for less than 3 seconds until
the Ice O Indicator (
) lights up.
To save electricity, the Panel Display turns o
automatically under the following conditions: When
no button has been pressed, when no doors
are open, or when no Dispenser Lever has been
pushed.
However, the icon indicating your cubed or
crushed ice selection, will stay on.
When you press a button, open a door, or push
a Dispenser Lever, the Panel Display will turn on
again.
Except for the Water, and Cubed / Crushed
Ice buttons, all function buttons will become
operational after you remove your fi nger from the
button you are currently pressing.
OPERATING
Water
The indicator is supposed to turn on at all
times as it indicates that the water can be
dispensed properly.
English - 31
DA68-03015D-04.indb 31DA68-03015D-04.indb 31 2015. 1. 7. 4:582015. 1. 7. 4:58

(7)
Cubed Ice
(8)
Crushed Ice
Press the Cubed Ice or Crushed Ice
button to select the type of ice you want
dispensed.
Each time you press the button, the cubed
and crushed ice modes alternate and
the Cubed or Crushed ice icon lights up,
indicating your selection.
If you don’t need ice, turn the function o
to save on water and energy consumption
(See Ice Maker O below).
(9) Filter
Water fi lter usage
This icon lights up when you need
to change the fi lter, usually after the
refrigerator has dispensed about 300
gallons of water (after about 6 months).
The icon will blink red for several seconds
when you open or close the door.
After you install the new water fi lter, reset
the fi lter indicator by touching and holding
the Hold 3sec for Filter Reset button for 3
seconds.
- If water is not dispensing or dispensing
slowly, you need to replace the water
fi lter because the water fi lter is clogged.
- Some areas have large amounts of lime
in their water, which causes the water
fi lter to clog more quickly.
(10) Control Lock
This icon lights up when you activate the
Lock function.
When the Control Lock icon is lit, all the
panel buttons, including the Ice button
and the dispensers, are locked and deactivated.
Press and hold the Ice Maker O /Control
Lock button for 3 seconds to turn Control
Lock o and re-activate the panel buttons.
English - 32
DA68-03015D-04.indb 32DA68-03015D-04.indb 32 2015. 1. 7. 4:582015. 1. 7. 4:58

PARTS AND FEATURES
(2)
Two star
section
(4)
(13)
Deodorizer
Foldable Shelf
(Optional)
Water fi lter
(1)
(15)
(14)
(5)
(6)
(7)
(8)
(9)
(10)
(11)
(12)
Two star
section
Use this page to become more familiar with the parts and features of the Refrigerator.
(This image may di erent depends on the model.)
DISPENSER MODEL
(15)
(14)
(1)
(2)
(3)
Two star
section
NORMAL MODEL
(4)
(6)
(13)
Deodorizer
(5)
Foldable Shelf
(Optional)
(7)
(8)
(9)
(10)
(11)
Water fi lter
OPERATING
Two star
section
(12)
The temperature of two star sections is slightly higher than other freezer compartment.
English - 33
DA68-03015D-04.indb 33DA68-03015D-04.indb 33 2015. 1. 7. 4:582015. 1. 7. 4:58

(1) Freezer Shelves
This is used for storing meat, fi sh, ice cream and
other types of frozen food.
(10) Kids’ Case (Optional)
Located at a height within easy reach of children.
Use for storing yogurt, snacks, and other items
for kids.
(2) Multipurpose Freezer Compartments
Features tall freezer compartments for more
e cient food storage.
However, do not use these compartments for
items you intend to store for a long time.
(3) Dried Food and Meat Storage Bin
This is used for long-term storage of dried food
and meat.
Wrap the items in aluminum foil or kitchen wrap
before storing them.
(4) Cheese Case
This is used for storing eggs, cheese, butter, and
other types of dairy products.
(5) Sauce Case
Used for storing di erent types of sauces.
(6) Refrigerator Shelves
This is used for storing general types of food that
require refrigeration.
(7) Drink Case
This is used for storing water, milk, juice, and
other types of beverage.
(8) Snack Case (Optional)
This is used for storing salads and side dishes.
(9) Well-Being Vegetable Bin
This is used for keeping fruit and vegetables
fresh. The top bin is optional.
(11) Multi Case
It is used for storing the dehydrated food such as
dried noodle (spaghetti), beef jerky etc.
(12) Egg Container
Best place to keep eggs.
Place the egg tray on a shelf for easy access.
(13) Wine Rack (Optional)
Helps wine maintain its taste by providing an
optimized place for storing your wine bottles.
Ice Maker Bucket
(14)
(Only dispenser model)
Designed to store lots of ice easily.
• Do not put your fi ngers, hands or any
WARNING
other objects in the ice chute or the
ice maker bucket. Doing so can cause
personal injury or material damage.
(15) Snack Bin (Optional)
This is used for storing small frozen food such as
the ice cream.
• If you plan to go away for a signifi cant
WARNING
time, empty the refrigerator and turn it
o . Wipe the excess moisture from the
inside of the appliance and leave the
doors open. This helps keep odor and
mold from developing.
• If the refrigerator is not to be used for a long
period of time, pull out the power plug.
- Deterioration in the power cord insulation may
cause fi re.
• Do not change the arrangement of shelves.
- If you try to change the arrangement of shelves,
you can damage to door.
English - 34
DA68-03015D-04.indb 34DA68-03015D-04.indb 34 2015. 1. 7. 4:582015. 1. 7. 4:58

CONTROLLING THE
RH57*
Recommend Temp (Freezer) : -2 °F (or -19 °C )
RH57*
Recommend Temp (Fridge) : 37 °F (or 3 °C )
TEMPERATURE
Controlling the Fridge temperature
RH57*
Basic temperature of Freezer and
Refrigerator Compartments
The basic and recommended temperatures of the
Freezer and Fridge compartments are -2°F and
37°F (or -19°C and 3°C) respectively.
If the temperature of the Freezer or Refrigerator
Compartments are too high or low, adjust the
temperature manually.
Controlling the Freezer temperature
RH57*
Recommend Temp (Freezer) : -2 °F (or -19 °C )
The Freezer temperature can be set between -8°F
and 5°F (or between -23°C and -15°C) to suit
your particular needs.Press the Freezer button
repeatedly until the desired temperature is shown
in the temperature display.
The temperature will change by 1°F (or 1°C) with
each press. See below.
Fahrenheit : 0°F → -1°F → -2°F → -3°F → -4°F
-5°F → -6°F → -7°F → -8°F → 5°F → 4°F →
→
3°F → 2°F → 1°F → 0°F.
Centigrade : -18°C → -19°C → -20°C → -21°C
-22°C → -23°C → -15°C → -16°C → -17°C
→
-18°C.
→
Keep in mind that foods such as ice cream maymelt at 4°F (or -15.5°C).
The temperature display will move sequentially
from -8°F to 5°F (or from -23°C to -15°C).
Recommend Temp (Fridge) : 37 °F (or 3 °C )
The fridge temperature can be set between 34°F
and 44°F (or between 1°C and 7°C) to suit your
particular needs.
Press the Fridge button repeatedly until the desired
temperature is shown in the temperature display.
The temperature will change by 1°F (or 1°C) with
each press. See below.
Fahrenheit : 37°F → 36°F → 35°F → 34°F →
44°F → 43°F → 42°F → 41°F → 40°F → 39°F
38°F → 37°F.
→
Centigrade : 3°C → 2°C → 1°C → 7°C → 6°C
5°C → 4°C → 3°C.
→
The temperature control process for the Fridge
works just like the Freezer process.
Press the Fridge button to set your desired
temperature.
After a few seconds, the Fridge will begin adjusting
towards the newly set temperature.
This will be refl ected in the digital display.
• The temperature of the Freezer or Fridge
may rise when you open the doors too
frequently, or if a large amount of warm
• This may cause the digital display to blink.
• If the blinking continues, you may need to “reset”
or hot food is placed inside.
Once the Freezer and Fridge temperatures
return to their normal set temperatures, the
blinking will stop.
the Refrigerator.
Try unplugging the appliance, wait for around
10 minutes, and then plug the power cord back
in.
OPERATING
English - 35
DA68-03015D-04.indb 35DA68-03015D-04.indb 35 2015. 1. 7. 4:582015. 1. 7. 4:58

USING THE COLD WATER
DISPENSER
Push the appropriate ice type button
to select what you want dispensed.
NO ICE
Select this if you want to
turn ice maker o
Using the ice lever (1)
Push the Ice lever dispenser (1) gently with your
glass.
Ice will be released from the dispenser.
You can choose the type of ice by pushing the
cubed or crushed button fi rst.
Using the Water lever (2)
Push the Water lever dispenser (2) gently with
your glass.
Water will be released from the dispenser.
( 1 )
( 2 )
Even if you push the water and Ice lever
at about the same time, the dispenser
operates only the option you actually
selected or pushed fi rst.
Using the Ice & Water Dispenser together
To get Ice and water, push the Ice lever (1) fi rst
for ice, then move your glass down and press the
water dispenser lever (2) for water.
Please wait 2 seconds before removing
CAUTION
the glass under the dispenser to prevent
spills.
If the Refrigerator door opens, the
Dispenser does not work.
• Do not pull the lever out.
You could damage or break the lever’s spring.
• To clean the ice bin/bucket, wash with a mild
detergent, rinse well, and dry thoroughly it.
Do not use harsh or abrasive cleaners or
solvents.
• In case ice doesn’t come out, pull out the ice
bucket and press the test button located on the
right side of ice maker.
• Do not press the test button continuously when
the tray is fi lled with ice or water.
Water may overfl ow or ice may jam the bucket.
• When you press the Test button, you will
hear the refrigerator chime (ding-dong).
When the chime sounds, release the Test
• The chime sounds automatically again to let you
CAUTION
button.
know the ice maker is working well.
If a power failure occurs, ice cubes may
melt then freeze together when the power
comes back on, causing the dispenser to
be out of order.
To prevent this problem, after a power
failure, pull out the ice bucket and discard
the residual ice or water.
Please wait 1 second before removing
the cup after dispensing water to prevent
spills.
Do not pull out the lever dispenser after
dispensing ice or water.
It comes back automatically.
English - 36
DA68-03015D-04.indb 36DA68-03015D-04.indb 36 2015. 1. 7. 4:582015. 1. 7. 4:58

After you dump the ice from the ice bucket,
Test button
CAUTION
you should press the dispenser lever once
with the ‘ICE CUBED’ or ‘CRUSHED’
function ON.
The ice maker will make new ice faster after you
return the ice bucket to the refrigerator.
• Do not put your fi ngers, hands, or any
WARNING
unsuitable objects in the chute or icemaker bucket.
- This can cause personal injury or material
damage.
• Use only the ice maker provided with the
refrigerator.
• The water line to this refrigerator must be
installed / connected by a suitably qualifi ed
person and must be connected to a potable
water supply.
• The ice maker requires water pressure of
20-125psi (138~862kPa) to operate properly.
• If you are going on a long vacation or
CAUTION
business trip and won’t be using the
water or ice dispensers for that period
of time, close the water valve to prevent
leaks.
• If you have not used the Ice maker for a while,
or you have opened the Freezer door frequently,
the Ice may stick together.
If this occurs, empty the ice bucket or break up
the ice with a wood kitchen tool.
Do not use sharp items such as knives or forks.
• When you remove the ice bucket, there may still
be some residual ice in the ice maker.
The ice maker may eject this ice into the freezer.
Using the ice Dispenser
Press the Ice button to select the type of ice you
want.
Place your cup under the ice outlet, and then push
gently against the dispenser pad.
Make sure the glass is in line with the dispenser to
prevent the ice from bouncing out.
If you select Cubed Ice after using the Crushed Ice
feature, a small amount of residual crushed ice
might be produced.
Ice-Maker Cover
Ice BucketIce Chute
• If ice does not dispense, pull out the
CAUTION
• Do not press the test button continuously when
icemaker cover and press test button
located on the ice maker.
the tray is fi lled with ice or water.
Water may overfl ow or the ice may jam the
icemaker or dispenser.
Test button
OPERATING
English - 37
DA68-03015D-04.indb 37DA68-03015D-04.indb 37 2015. 1. 7. 4:582015. 1. 7. 4:58

For more space, you can store food with
GUARD FRE (Freezer)-UPP (Optional)
Ice-Maker Cover
Ice Chute
Shelf
Upper drawer
Outside Humidity
Sensor
Outside Temperature
Sensor
Internal Tempera
ture Sensors
Guard FRE-UPP instead of the ice bucket,
and remove the COVER-ICE MAKER and
Snack Bin.
If you remove the ice bucket, ICE OFF will
blink on the display panel.
Furthermore, you can remove the freezer
Upper drawer.
Since it does not a ect thermal and
mechanical characteristics.
A declared storage volume of frozen
food storage compartment is calculated
with “Guard FRE-UPP” positioned and
“COVER-ICE MAKER”, “Snack Bin”, “Upper
Drawer” removed.
SMART ECO FEATURES
Smart Eco System
Keep freshness of food using 4 sensors according
to the operating environment, usage pattern and
the refrigerator operating status while saving
electricity costs.
Outside Temperature
Sensor
Outside Humidity
Sensor
GUARD FRE (Freezer)-UPP (Optional)
Ice-Maker Cover
Ice Chute
Shelf
Upper drawer
Ice Bucket
Internal Tempera
ture Sensors
English - 38
DA68-03015D-04.indb 38DA68-03015D-04.indb 38 2015. 1. 7. 4:582015. 1. 7. 4:58

FRIDGE MULTI-PURPOSE DOOR
1
2
BIN
A detachable divider makes it convenient to store
food.
Food products can be stored by items.
• Put the divider in place when storing slim-size
condiment bottles and canned drinks together.
• Take out the divider when storing carton-size
milks or drinks.
How to use the divider
How to use the multi supporter
1. When not in use, leave the Multi Supporter
fl ipped over as shown in the diagram.
2. Flip the Multi Supporter to position 1 to prevent
items from falling out and over.
OPERATING
1. Insert the divider as shown in the diagram to
compartmentalize the case.
2. When not in use, simply fl ip it around and move
it out of the way as shown in the diagram.
English - 39
1
3. Flip the Multi Supporter to position 2 to use it as
a divider.
2
DA68-03015D-04.indb 39DA68-03015D-04.indb 39 2015. 1. 7. 4:582015. 1. 7. 4:58

REMOVING THE REFRIGERATOR
(1)
(2)
(3)
(Optional)
ACCESSORIES
1. Shelves (Freezer/Fridge)
• Open the door completely and then lift up the
shelf as you pull it out to remove it.
(1)
3. Drawer
• Remove the Drawer by pulling it out and lifting it
up slightly.
• If you are unable to open the door completely,
pull out the shelf, lift it up, and turn it to remove
it.
(2)
(3)
Be careful not to insert the shelf upside
CAUTION
down.
Glass containers can scratch the surface
of the glass shelves.
2. Door Bin
• Remove the Door Bin by holding the door bin
with both hands and then gently lift it up.
4. Vegetable Bin/Dry Bin Cover
• Take out the bin above the Vegetable Bin
(refrigerator)/Dry Bin (freezer).
• Press down on the clips on either side of the
Vegetable Bin (refrigerator)/Dry Bin (freezer) and
pull them out towards you to remove the bin.
(Optional)
5. Vegetable Bin/Dry Bin
• Before taking out the Vegetable Bin/Dry
Bin, you need to remove the multipurpose
compartments from the door.
• Lift the bin up slightly as you pull it out.
English - 40
DA68-03015D-04.indb 40DA68-03015D-04.indb 40 2015. 1. 7. 4:582015. 1. 7. 4:58

6. Ice Bucket (Freezer)
• Remove the Icemaker Bucket by lifting it up and
pulling it out slowly.
• Grip the handle as shown in the fi gure.
• Remove the Ice Bucket slowly to prevent
damage.
CLEANING THE REFRIGERATOR
• Do not use benzene, thinner, Clorox, or
WARNING
• Do not spray the refrigerator with water while it
1. Unplug the power code of the refrigerator.
2. Slightly dampen a soft lint-free cloth or paper
car detergent to clean the refrigerator.
They can damage the surface of the
appliance and may cause a fi re.
is plugged in.
This can cause an electric shock.
To clean the refrigerator, follow these steps:
towel with water.
OPERATING
Do not use excessive force when removing
the drawer cover.
You can break the cover and cause injury.
Before removing any accessories, make
sure that no food is in the way.
When possible, remove the food altogether
to reduce the risk of accidents.
7. Removing the Deodorizer
• Pull out the shelf slightly and then pull out the
unit while pushing the deodorizer cover clip up
using a fl athead screwdriver.
8. Cleaning the Deodorizer
• Clean the deodorizer once every two years
or whenever you feel its performance has
diminished.
• Dry the deodorizer under the sun for 24 hours
and then replace it in the reverse order of its
removal.
Do not use any kind of detergent to clean
the refrigerator because that can discolour
or damage the refrigerator.
3. Wipe the inside and outside of refrigerator until
it is clean and dry.
4. Plug the power cord of the refrigerator back in.
CHANGING THE INTERIOR
LIGHTS
Freezer / Fridge LED Lamp
• If the LED Lamp Cover is stained with foreign
substances, the LED lamp may not look bright.
Wipe the surface cover with clean dry cloth to
return the light to full brightness.
Do not disassemble or replace the LED
CAUTION
lighting yourself.
To replace the LED lights, contact a
Samsung service centre or your authorized
Samsung dealer.
If you attempt to replace the LED lamps
yourself, you risk subjecting yourself to an
electric shock or serious personal injury.
English - 41
DA68-03015D-04.indb 41DA68-03015D-04.indb 41 2015. 1. 7. 4:582015. 1. 7. 4:58

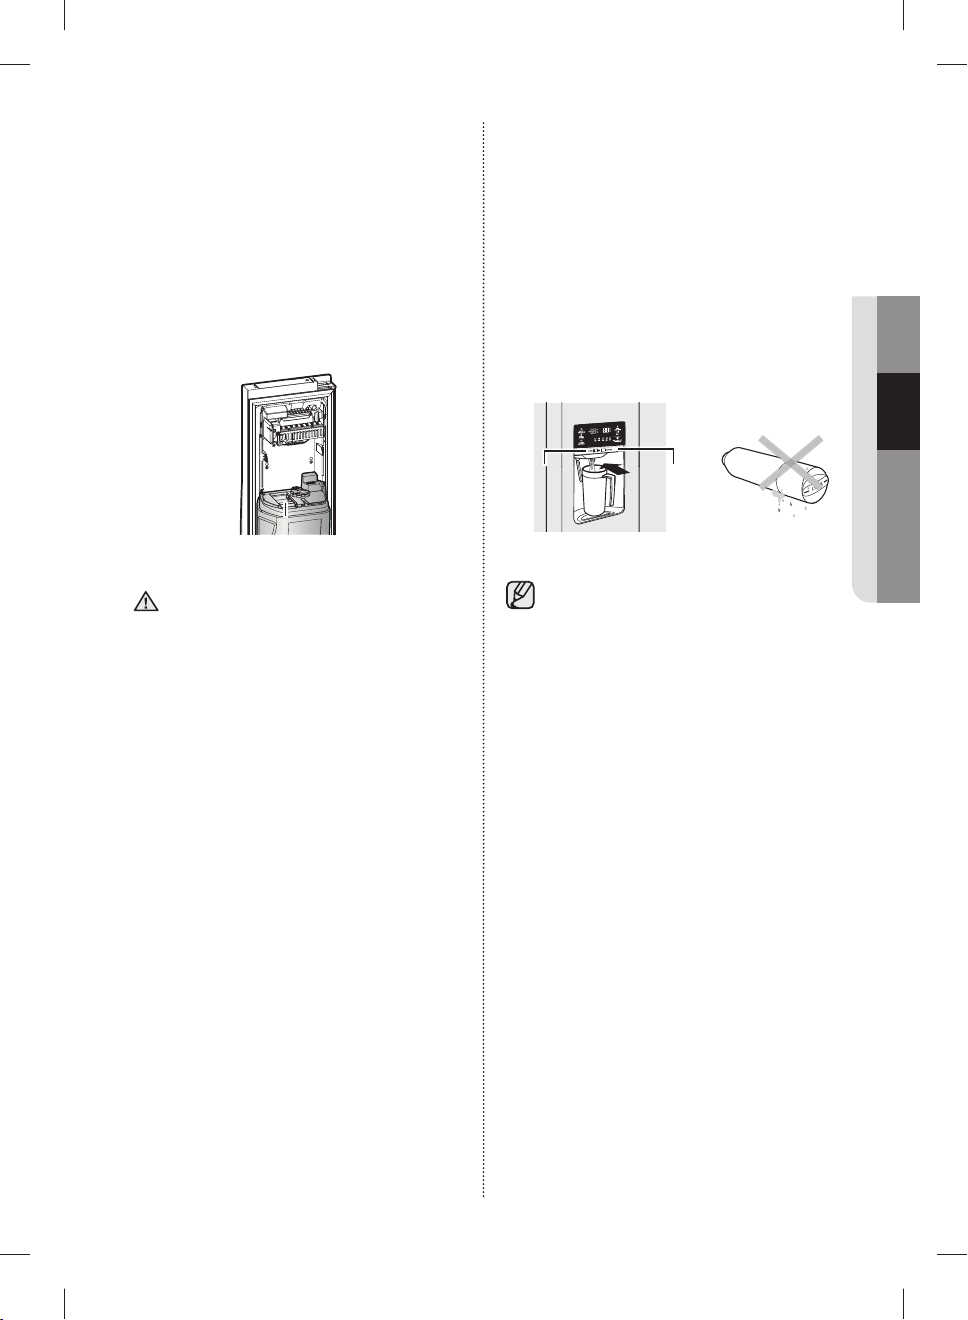
TO IMPROVE THE COOLING
Cold air outlet
PERFORMANCE
If the cold air outlet is blocked by food
items, the cold air cannot penetrate the
entire compartment and will be unable to
freeze the food e ciently which results in a
degraded cooling performance.
Cold air outlet
CHANGING THE WATER FILTER
To reduce risk of water damage to your
WARNING
property DO NOT use generic brands of
water fi lers in your SAMSUNG Refrigerator.
USE ONLY SAMSUNG BRAND WATER FILTERS.
SAMSUNG is not legally responsible for any
damage, including, but not limited to property
damage caused by water leakage from the use of
a generic water fi lter.
SAMSUNG Refrigerators are designed to work
ONLY WITH SAMSUNG Water Filters.
The “Filter Indicator” light lets you know when it is
time to change your water fi lter cartridge.
To give you preparation time to get a new fi lter, the
red light will come on just before the capacity of
the current fi lter runs out.
Changing the fi lter on time provides you with the
freshest, cleanest water from your fridge.
To change the water fi lter, follow these steps:
1. Turn the water fi lter 90˚
counter-clockwise.
2. Pull the water fi lter
from the fi lter housing.
3. Insert new water
fi lter inside the fi lter
housing.
English - 42
DA68-03015D-04.indb 42DA68-03015D-04.indb 42 2015. 1. 7. 4:582015. 1. 7. 4:58

4. Turn the new water
fi lter 90˚ clockwise.
5. Press the “Lighting / °C↔°F (3 sec)” button ( )
for about 3 seconds to reset the water fi lter.
The color of indicator changes from red to light
o .
Reverse Osmosis Water Supply
IMPORTANT :
The pressure of the water supply coming out of a
reverse osmosis system going to the water inlet
valve of the refrigerator needs to be between 35
and 120psi (241 and 827 kPa).
If a reverse osmosis water fi ltration system is
connected to your cold water supply, the water
pressure to the reverse osmosis system needs to
be a minimum of 40 to 60psi (276 to 414kPa.)
If the water pressure to the reverse osmosis system
is less than 40 to 60psi (276 to 414kPa):
OPERATING
A newly installed water fi lter cartridge may
cause water to briefl y spurt from the water
dispenser.
This is due to air getting into the line.
It should pose no problem to operation.
When you replace the water fi lter, water
CAUTION
can drip from the bottom front of the
refrigerator.
Make sure to clean up any drips or spills
after you have changed the fi lter.
Removing residual matter inside the water
supply line after installing a new fi lter
1. Press the Water button, and then push the
Dispenser Lever with a cup or glass.
2. Flush 1 gallon of water through the fi lter, one
cup or glass at a time.
(Flush approximately 6 minutes.)
This will clean the water supply system and
remove air from the lines.
- Additional fl ushing may be required in some
households.
3. Open the refrigerator door and make sure there
are no water leaks coming from the water fi lter.
• Check to see whether the sediment fi lter in the
reverse osmosis system is blocked.
Replace the fi lter if necessary.
• Allow the storage tank on the reverse osmosis
system to refi ll after heavy usage.
• If your refrigerator has a water fi lter, it may
further reduce the water pressure when used
in conjunction with a reverse osmosis system.
Remove the water fi lter.
If you have questions about your water pressure,
call a licensed, qualifi ed plumber.
Ordering replacement fi lters
To order more water fi lter cartridges, contact your
authorized Samsung dealer.
English - 43
DA68-03015D-04.indb 43DA68-03015D-04.indb 43 2015. 1. 7. 4:582015. 1. 7. 4:58

USING THE ICE MAKER
(OPTIONAL)
• To Remove the Ice Bucket.
- Hold the handle as shown in fi gure1.
- Lift up and pull the Bucket out slowly.
- Take out Ice Bucket out slowly to prevent
damage.
- When you reinstall the ice bucket, press and
hold the ICE button for 6 seconds.
• Normal Operation
- Any sounds you hear when the ice maker
dumps ice into the bucket are part of normal
operation.
- Ice may clump in the bucket if you do not
dispense ice for long periods of time.
If this occurs, remove all the ice and empty the
bucket.
- If ice does not come out, check for any ice
stuck in the chute and remove it.
- The fi rst batch of ice cubes after installation
may be small because air has entered the water
line. Any air will be purged during normal use.
• When ICE OFF blinks on the display
CAUTION
panel, reinsert the ice bucket and/or
make sure it’s installed properly.
• When the door is open, the Ice and water
dispenser do not work.
• If you close the door hard, it may cause water
to spill over the ice maker.
• To prevent the ice bucket from dropping, use
both hands when removing it.
• To prevent injury, be sure to clean up any ice or
water that may have dropped on the fl oor.
• Do not let the children hang on the ice
dispenser or on the bucket.
They may get hurt.
• Be sure not to put your hand or any object into
the ice chute.
It may cause personal injury or damage
mechanical parts.
• Use care when storing food in plastic bags in
the freezer.
Incorrectly stored bags can get caught in the
ice bucket’s Auger Motor and prevent the
refrigerator from dispensing ice or cause the
freezer door to open unexpectedly.
ice
English - 44
DA68-03015D-04.indb 44DA68-03015D-04.indb 44 2015. 1. 7. 4:582015. 1. 7. 4:58

Troubleshooting
PROBLEM SOLUTION
The refrigerator
does not work at
all or it does not
chill su ciently.
The food in the
fridge is frozen.
You hear unusual
noise or sounds.
The front corners
of the appliance
are hot and
condensation is
occurring.
• Check that the power plug is properly connected.
• Is the temperature control on the display panel set to the correct
temperature?
Try setting it to a lower temperature.
• Is the refrigerator in direct sunlight or located too near a heat source?
• Is the back of the refrigerator too close to the wall and therefore keeping air
from circulating?
• Is the temperature control on the display panel set to the correct
temperature?
Try setting it to a warmer temperature.
• Is the temperature in the room very low?
• Did you store the food with a high water content in the coldest part of the
fridge?
• Check that the refrigerator is level and stable.
• Is the back of the refrigerator too close to the wall and therefore keeping air
from circulating?
• Was anything dropped behind or under the refrigerator?
• If you hear a “ticking” sound from inside the refrigerator, this is normal.
It occurs because various parts contract or expand in response to
temperature changes in the refrigerator interior.
• Some heat is normal as anti-condensators are installed in the front corners
of the refrigerator to prevent condensation.
• Is the refrigerator door ajar?
Condensation can occur when you leave the door open for a long time.
• Water condensation in a drawer may occur if the drawer contains
vegetables.
The condensation will dissipate naturally as time passes.
TROUBLESHOOTING
Ice is not
dispensing.
You can hear water
bubbling in the
refrigerator.
There is a bad
smell in the
refrigerator.
DA68-03015D-04.indb 45DA68-03015D-04.indb 45 2015. 1. 7. 4:582015. 1. 7. 4:58
• Did you wait for 12 hours after installation of the water supply line before
making ice?
• Is the water line connected and the shut-o valve open?
• Did you manually stop the ice making function?
Make sure Ice is set to Cubed or Crushed.
• Are there any ice clumps in the ice maker bucket? Remove them.
• Is the freezer temperature too warm? Try setting the freezer temperature
lower.
• This is normal.
The bubbling comes from the refrigerant coolant liquid circulating through
the refrigerator.
• Has a food item spoiled?
• Make sure that strong smelling food (for example, fi sh) is wrapped so that it
is airtight.
• Clean out your freezer periodically and throw away any spoiled or suspect
food.
English - 45

PROBLEM SOLUTION
Frost forms on the
walls of the freezer.
The water
dispenser is not
functioning.
What can be done
when freezer door
is not closed well.
• Is the air vent blocked?
Remove any obstructions so air can circulate freely.
• Allow su cient space between the foods stored for e cient air circulation.
• Is the freezer door closed properly?
• Is the water line connected and the shut-o valve open?
• Has the water supply line tubing been crushed or kinked?
Make sure the tubing is free and clear of any obstruction.
• Is the water tank frozen because the refrigerator temperature is too low?
Try selecting a warmer setting on the main display panel.
• Push lever dispenser and check water supply.
• Push lever dispenser (Ice mode) and check operation of auger motor.
• Remove objects on shelves that might obstruct drive auger.
Precautions : If you have not dispensed the water or ice for an extended
time, the ice bucket may accumulate ice chunk that interferes with the drive
auger, causing the inability to dispense.
Remove the remaining ice of bucket and object that might obstruct drive
Auger.
Please operate dispenser (water & ice) and it will improve auto-closing of
freezer door.
English - 46
DA68-03015D-04.indb 46DA68-03015D-04.indb 46 2015. 1. 7. 4:582015. 1. 7. 4:58

Memo
DA68-03015D-04.indb 47DA68-03015D-04.indb 47 2015. 1. 7. 4:582015. 1. 7. 4:58

Ambient Room Temperature Limits
This refrigerator is designed to operate in ambient temperatures specifi ed by its temperature class marked
on the rating plate.
Class Symbol
Extended Temperate SN +10 to +32 +10 to +32
Temperate N +16 to +32 +16 to +32
Subtropical ST +16 to +38 +18 to +38
Tropical T +16 to +43 +18 to +43
IEC 62552 (ISO 15502) ISO 8561
Ambient Temperature range (°C)
Internal temperatures may be a ected by such factors as the location of the refrigerator, ambient
temperature and the frequency with which you open the door.
Adjust the temperature as required to compensate for these factors.
Correct Disposal of This Product
(Waste Electrical & Electronic Equipment)
English
(Applicable in countries with separate collection systems)
This marking on the product, accessories or literature indicates that the product and its
electronic accessories (e.g. charger, headset, USB cable) should not be disposed of with
other household waste at the end of their working life. To prevent possible harm to the
environment or human health from uncontrolled waste disposal, please separate these items
from other types of waste and recycle them responsibly to promote the sustainable reuse of
material resources.
Household users should contact either the retailer where they purchased this product, or
their local government offi ce, for details of where and how they can take these items for
environmentally safe recycling.
Business users should contact their supplier and check the terms and conditions of the
purchase contract. This product and its electronic accessories should not be mixed with other
commercial wastes for disposal.
For more information on safe disposal and recycling, visit our web site www.samsung.com or contact our
Helpline numbers on below contact SAMSUNG WORLD WIDE.
Contact SAMSUNG WORLD WIDE
If you have any questions or comments relating to Samsung products, please contact the SAMSUNG
customer care center.
COUNTRY Custom Care Center WEBSITE
ITALIA 800-SAMSUNG (800.7267864) www.samsung.com/it/support
SPAIN 0034902172678 www.samsung.com/es/support
PORTUGAL 808 20 7267 www.samsung.com/pt/support
GREECE
CYPRUS 8009 4000 only from landline, toll free www.samsung.com/gr/support
DA68-03015D-04.indb 48DA68-03015D-04.indb 48 2015. 1. 7. 4:582015. 1. 7. 4:58
80111-SAMSUNG (80111 726 7864) only from land line
(+30) 210 6897691 from mobile and land line
www.samsung.com/gr/support

Frigorifero
manuale dell'utente
Questo manuale è prodotto interamente con carta riciclata.
immagina le possibilità
Grazie per avere acquistato questo prodotto Samsung.
Apparecchio a installazione indipendente
DA68-03015D-04.indb 1DA68-03015D-04.indb 1 2015. 1. 7. 4:582015. 1. 7. 4:58

Indice
INFORMAZIONI SULLA SICUREZZA ……………………………………… 2
IMPOSTAZIONE DEL FRIGORIFERO …………………………………… 15
FUNZIONAMENTO DEL FRIGORIFERO SAMSUNG …………………… 29
RISOLUZIONE DEI PROBLEMI …………………………………………… 45
Informazioni sulla sicurezza
INFORMAZIONI SULLA
SICUREZZA
• Prima di mettere in funzione
l'apparecchio, leggere per
intero questo manuale e
conservarlo in un luogo sicuro
vicino all'apparecchio per futuro
riferimento.
• Utilizzare l'apparecchio solo
per lo scopo per il quale è stato
prodotto, come descritto in
questo manuale.
L’apparecchio non è inteso
per l'uso da parte di persone
(bambini inclusi) con ridotte
capacità fi siche, sensoriali o
mentali, inesperte o prive di una
adeguata conoscenza, a meno
che una persona responsabile
per la loro sicurezza fornisca
loro una corretta supervisione e
istruzione all'uso.
• Questo apparecchio può
essere utilizzato da bambini di
età superiore agli 8 anni e da
persone con handicap fi sici,
sensoriali o mentali o senza
esperienza o conoscenza
del prodotto solo sotto la
supervisione di una persona
responsabile o nel caso in cui
abbiano ricevuto informazioni
specifi che sull’uso sicuro
dell’apparecchio e ne abbiano
compreso i rischi ad esso
associati.
I bambini non devono giocare
con l’apparecchio. La pulizia e la
manutenzione dell’apparecchio
non devono essere eseguite da
Italiano - 2
DA68-03015D-04.indb 2DA68-03015D-04.indb 2 2015. 1. 7. 4:582015. 1. 7. 4:58

bambini senza la supervisione di
un adulto responsabile.
• Le Avvertenze e le Informazioni
importanti sulla sicurezza
contenute in questo manuale
non coprono tutte le possibili
condizioni e situazioni che si
possono verifi care.
E' responsabilità dell'utente
utilizzare l'apparecchio con
buonsenso, prestando la
massima attenzione e cura
in fase di installazione,
manutenzione e funzionamento.
• Poiché le seguenti istruzioni
operative coprono i vari modelli
disponibili, le caratteristiche
del frigorifero possono di erire
da quelle descritte in questo
manuale e non tutti i simboli
di avvertenza possono essere
applicabili. In caso di domande
o dubbi, rivolgersi al più vicino
centro di assistenza o reperire
le informazioni necessarie online
visitando il sito
www.samsung.com.
Simboli di sicurezza e
precauzioni importanti:
Pericoli o pratiche non
sicure che possono
AVVERTENZA
causare lesioni personali
gravi o mortali.
Pericoli o pratiche non
sicure che possono
ATTENZIONE
causare lesioni personali
lievi o danni alla
proprietà.
NON tentare di.
NON disassemblare.
NON toccare.
Seguire attentamente le
istruzioni.
Estrarre la spina dalla presa
di corrente.
Verifi care il collegamento a
massa dell'apparecchio per
evitare scariche elettriche.
In caso di necessità
rivolgersi al centro
assistenza.
INFORMAZIONI SULLA SICUREZZA
Nota.
Italiano - 3
DA68-03015D-04.indb 3DA68-03015D-04.indb 3 2015. 1. 7. 4:582015. 1. 7. 4:58

Questi simboli di avvertenza
hanno lo scopo di prevenire
lesioni personali.
Seguire attentamente le
istruzioni ad essi associate.
Una volta letto, si raccomanda
di conservare il manuale in
un luogo sicuro per future
consultazioni.
Avviso CE
Questo prodotto è conforme alle
direttive Bassa tensione (2006/95/
CE), Compatibilità elettromagnetica
(2004/108/CE), RoHS (2011/65/
UE), Regolamento Delegato UE N.
1060/2010 della Commissione,
e Progettazione ecocompatibile
(2009/125/CE) implementata dal
Regolamento (CE) N. 643/2009
della Commissione.
(Solo per i prodotti venduti nei
paesi dell'Unione europea)
IMPORTANTI SIMBOLI
AVVERTENZA
DI AVVERTENZA
PER IL TRASPORTO
E IL LUOGO DI
INSTALLAZIONE
• Durante il trasporto
e l'installazione
dell'apparecchio, prestare
attenzione a che nessuna
parte del circuito di
ra reddamento riporti danni.
• Questo frigorifero utilizza come
refrigerante gas R-600a o
R-134a. Controllare l’etichetta
del compressore apposta
sul retro dell’apparecchio
e l’etichetta della potenza
nominale all’interno del frigorifero
per vedere il tipo di refrigerante
utilizzato.
• Nel caso il prodotto contenga
gas infi ammabile (refrigerante
R-600a),
- Una perdita di refrigerante
dalle tubazioni può provocare
incendio o lesioni oculari.
Se si rileva una perdita, evitare
l'uso di fi amme libere o potenziali
fonti di accensione nei pressi e
aerare il locale per alcuni minuti.
- Per evitare che possa crearsi
una miscela di aria e gas
infi ammabile qualora si
verifi casse una perdita nel
circuito di ra reddamento, la
dimensione del locale in cui
viene installato il prodotto deve
essere adeguata alla quantità di
refrigerante utilizzato.
- Non attivare mai un apparecchio
che mostri chiari segni di danni.
In caso di dubbi, consultare il
Italiano - 4
DA68-03015D-04.indb 4DA68-03015D-04.indb 4 2015. 1. 7. 4:582015. 1. 7. 4:58

rivenditore.
L'ambiente di installazione deve
essere su cientemente grande
da garantire un rapporto pari a
1m³ per ogni 8 g di refrigerante
R-600a utilizzato all'interno
dell'apparecchio.
La quantità di refrigerante
utilizzata nell'apparecchio è
indicata nella piastra identifi cativa
all'interno dell'unità.
• Una perdita di refrigerante
dalle tubazioni può provocare
incendio o lesioni oculari.
In caso di perdita di refrigerante
dalle tubazioni, evitare il contatto
del prodotto con fi amme libere o
qualsiasi altra fonte infi ammabile
e ventilare immediatamente il
locale.
- La mancata osservanza di
questa precauzione può causare
incendio o esplosione.
- Se come refrigerante
l'apparecchio utilizza isobutano
(R-600a), nonostante si tratti di
un gas naturale a basso impatto
ambientale esso è comunque
combustibile. Durante il trasporto
e l’installazione dell’apparecchio,
prestare attenzione a non
danneggiare alcuna parte del
circuito refrigerante.
IMPORTANTI SIMBOLI
AVVERTENZA
DI AVVERTENZA PER
L'INSTALLAZIONE
• Non installare l'apparecchio
in un locale soggetto a
umidità, fumi d'olio o
polvere, luce solare diretta o
pioggia.
- L'usura del rivestimento isolante
delle parti elettriche può causare
scariche elettriche o incendio.
• Non collocare il frigorifero in
una posizione esposta alla luce
solare diretta o al calore di stufe,
radiatori o altri apparecchi di
riscaldamento.
• Non collegare più apparecchi
alla stessa presa di corrente.
Il frigorifero deve essere sempre
alimentato attraverso una
presa dedicata di voltaggio
corrispondente a quello
specifi cato sulla piastrina.
- Ciò garantisce le migliori
prestazioni e previene il
sovraccarico dell'impianto
domestico che potrebbe
causare un incendio a causa del
surriscaldamento dei cavi.
Se la presa elettrica è allentata,
non inserire la spina.
- Rischio di incendio o scarica
elettrica.
INFORMAZIONI SULLA SICUREZZA
Italiano - 5
DA68-03015D-04.indb 5DA68-03015D-04.indb 5 2015. 1. 7. 4:582015. 1. 7. 4:58

• Non utilizzare un cavo con
evidenti segni di usura o
abrasione lungo il rivestimento o
alle estremità.
• Non piegare eccessivamente
il cavo di alimentazione né
posizionarvi sopra oggetti pesanti.
• Collegare la spina inserendola
nella posizione corretta con il
cavo rivolto verso il basso.
- Collegando la spina elettrica
al contrario, il cavo potrebbe
danneggiarsi e causare scariche
elettriche o un incendio.
• Non utilizzare spray nei pressi
del frigorifero.
- L'uso di spray vicino al frigorifero
può causare esplosione o
incendio.
• Non installare l'apparecchio in
un luogo esposto a perdite di
gas.
- La mancata osservanza di
questa precauzione può causare
incendio o scarica elettrica.
• L'installazione o eventuali
interventi di manutenzione
su questo apparecchio
devono essere eseguiti da
un tecnico qualifi cato o da
un centro di assistenza.
- Il mancato rispetto di questa
precauzione può causare
scariche elettriche, incendio,
esplosione, malfunzionamenti o
lesioni.
• Prima dell'uso, installare e
posizionare il frigorifero secondo
quanto indicato nel presente
manuale.
• Accertarsi che la spina non sia
schiacciata o danneggiata dal
retro del frigorifero.
• Durante lo spostamento del
frigorifero, prestare attenzione a
non schiacciare o danneggiare il
cavo di alimentazione.
- Pericolo di incendio.
• L’apparecchio deve essere
posizionato in modo che la spina
sia facilmente accessibile dopo
l’installazione.
• Il frigorifero deve essere
collegato a terra.
- Per evitare dispersioni di corrente
o scariche elettriche causate
dalle dispersioni del frigorifero,
collegare l'apparecchio a terra.
• Per il collegamento a terra non
utilizzare condotte del gas, linee
telefoniche o altri tubi e barre
che potenzialmente potrebbero
fungere da parafulmini.
- Un uso improprio della spina di terra
può causare una scarica elettrica.
Italiano - 6
DA68-03015D-04.indb 6DA68-03015D-04.indb 6 2015. 1. 7. 4:582015. 1. 7. 4:58

• Se il cavo di alimentazione
è danneggiato, richiederne
l'immediata sostituzione
al costruttore o al centro
assistenza.
• Il fusibile del frigorifero deve
essere sostituito da un tecnico
qualifi cato o da un centro
assistenza autorizzato.
- Il mancato rispetto di questa
precauzione può causare
scariche elettriche o lesioni
personali.
SIMBOLI DI
ATTENZIONE
ATTENZIONE PER
L'INSTALLAZIONE
• Mantenere le aperture
di ventilazione
dell'apparecchio o della
struttura a incasso libere da
ostruzioni.
• Dopo l'installazione, lasciare
l'apparecchio collegato
all'alimentazione per 2 ore prima
dell'uso.
- Durante l’installazione del
frigorifero, verifi care che
entrambi i piedini poggino sul
pavimento al fi ne di garantire
una installazione sicura.
I piedini sono situati ai lati, in
fondo sulla parte posteriore di
ogni porta. Inserire un cacciavite
a lama piatta e ruotarlo in
direzione della freccia fi no a
quando il frigorifero risulta
livellato.
- Bilanciare sempre il carico sui
balconcini di ogni porta.
- Un carico eccessivo su una delle
porte potrebbe provocare la
caduta del frigorifero e causare
lesioni.
IMPORTANTI SIMBOLI
AVVERTENZA
DI AVVERTENZA PER
L'USO
• Non toccare la spina
elettrica con le mani
bagnate.
• Non collocare alcun oggetto
sopra il frigorifero.
INFORMAZIONI SULLA SICUREZZA
- Durante l'apertura e la chiusura
della porta, tali oggetti
potrebbero cadere e causare
lesioni personali e/o danni
materiali.
Italiano - 7
DA68-03015D-04.indb 7DA68-03015D-04.indb 7 2015. 1. 7. 4:582015. 1. 7. 4:58

• Non collocare recipienti
contenenti acqua sopra il
frigorifero.
- In caso di fuoriuscita, l'acqua
potrebbe causare scariche
elettriche o incendio.
verifi carsi lesioni personali o
danni materiali.
• Non conservare nel frigorifero
sostanze volatili o infi ammabili
quali benzene, diluenti, alcool,
etere o GPL.
• Non lasciare che i bambini si
appendano alla porta.
- In caso contrario, possono
verifi carsi lesioni anche gravi.
• Non lasciare le porte del
frigorifero aperte senza
sorveglianza e non permettere
ai bambini di entrare all'interno
dell'apparecchio.
• Non lasciare che neonati o
bambini entrino nei cassetti.
- In caso contrario, potrebbero
riportare lesioni o morire per
so ocamento.
• Non sedersi sulla porta del
freezer.
- Lo sportello potrebbe rompersi e
causare lesioni personali.
• Per evitare che i bambini
rimangano intrappolati all'interno,
dopo la pulizia reinstallare il
divisore precedentemente
rimosso dal cassetto per
consentirne la manutenzione.
• Non inserire mai le dita o altri
oggetti nel foro del dispenser.
- In caso contrario, possono
- La conservazione di tali prodotti
può causare una esplosione.
• Non conservare nel frigorifero
prodotti farmaceutici sensibili
alle basse temperature, materiali
scientifi ci o qualsiasi altro
prodotto che possa deteriorarsi
in condizioni di bassa
temperatura.
- I prodotti che necessitano di
severi controlli della temperatura
non devono essere conservati in
frigorifero.
• Non collocare né attivare
apparecchi elettrici all'interno
del frigorifero, salvo quelli
raccomandati dal costruttore.
• Non utilizzare un asciugacapelli
all'interno del frigorifero.
Non collocarvi candele accese
per eliminare i cattivi odori.
- La mancata osservanza di
questa precauzione può causare
incendio o scarica elettrica.
• Non toccare le pareti interne del
freezer o i prodotti surgelati con
le mani bagnate.
Italiano - 8
DA68-03015D-04.indb 8DA68-03015D-04.indb 8 2015. 1. 7. 4:582015. 1. 7. 4:58

- Ciò potrebbe causare il
congelamento delle dita.
• Per accelerare il processo di
sbrinamento, non utilizzare
dispositivi meccanici o altri mezzi
diversi da quelli consigliati dal
costruttore.
• Non danneggiare il circuito
refrigerante.
• Questo prodotto è inteso
solo per la conservazione
di alimenti in ambiente
domestico.
• Riporre le bottiglie una vicina
all'altra nel medesimo scomparto
in modo che non possano
cadere all'apertura della porta.
• In caso di perdita di gas (per es.
propano, GPL, ecc), ventilare
immediatamente il locale senza
toccare la spina elettrica.
Non toccare l'apparecchio o il
cavo di alimentazione.
- Non utilizzare ventole elettriche.
- Una scintilla potrebbe causare
esplosione o incendio.
• Utilizzare solo lampadine LED
fornite dal costruttore o dal
centro assistenza.
• Controllare che i bambini
non giochino con questo
apparecchio.
• Non disassemblare
o riparare il frigorifero
autonomamente.
- Ciò potrebbe causare incendio,
malfunzionamento e/o lesioni
personali.
In caso di malfunzionamento,
contattare il centro assistenza.
• Se l'apparecchio genera un
rumore anomalo, odore di
bruciato o fumo, scollegare
immediatamente la spina di
alimentazione e rivolgersi al
più vicino centro assistenza.
- Il mancato rispetto di questa
precauzione può causare
scariche elettriche o incendio.
• In caso di problemi nella
sostituzione delle lampadine,
rivolgersi al centro assistenza.
• Se il prodotto è dotato
di lampadine LED, non
disassemblare l'assieme
coprilampada/lampada LED
autonomamente.
- Rivolgersi al centro assistenza.
• Se all'interno del frigorifero è
penetrata polvere o acqua,
scollegare la spina dalla presa
di corrente e rivolgersi al centro
assistenza Samsung Electronics.
- Rischio di incendio.
INFORMAZIONI SULLA SICUREZZA
Italiano - 9
DA68-03015D-04.indb 9DA68-03015D-04.indb 9 2015. 1. 7. 4:582015. 1. 7. 4:58

SIMBOLI DI
ATTENZIONE
ATTENZIONE PER L'USO
• Per ottenere le prestazioni
migliori dal prodotto,
- Non collocare alimenti davanti
alle aperture di ventilazione sul
retro del frigorifero per evitare di
ostruire la circolazione dell'aria
all'interno del comparto.
- Avvolgere gli alimenti
adeguatamente o riporli in
contenitori sottovuoto prima di
conservarli nel frigorifero.
- Non aggiungere vicino ad
alimenti già surgelati un nuovo
alimento fresco da surgelare.
• Non riporre nel freezer bevande
gassate o frizzanti.
Non riporre nel freezer bottiglie o
contenitori di vetro.
- Durante il surgelamento del
contenuto, il vetro potrebbe
rompersi e causare lesioni
personali e danni alla proprietà.
• Non cambiare o modifi care le
funzioni del frigorifero.
- Eventuali modifi che possono
provocare lesioni personali e/
o danni alla proprietà. Eventuali
modifi che eseguite da terzi su
questo apparecchio non saranno
coperte dalla garanzia Samsung,
inoltre Samsung non potrà
essere ritenuta responsabile per
problemi di sicurezza e danni
risultanti da tali modifi che.
• Non ostruire i fori di ventilazione.
- Se i fori di ventilazione vengono
ostruiti, in particolare da
un sacchetto di plastica, il
frigorifero potrebbe ra reddarsi
eccessivamente.
Un periodo di ra reddamento
troppo lungo potrebbe causare
la rottura del fi ltro dell'acqua ed
eventuali perdite.
- Non aggiungere vicino ad
alimenti già surgelati un nuovo
alimento fresco da surgelare.
• Rispettare i tempi di
conservazione e le date
di scadenza degli alimenti
congelati.
• Non spruzzare sostanze volatili
come per esempio insetticidi
sulla superfi cie dell'apparecchio.
- Oltre ad essere dannosi per
l'uomo, possono causare
scariche elettriche, incendio o
malfunzionamenti.
• Non applicare una forza
eccessiva né urtare con violenza
la superfi cie in vetro.
- La rottura del vetro può
provocare lesioni personali e/o
danni alla proprietà.
Italiano - 10
DA68-03015D-04.indb 10DA68-03015D-04.indb 10 2015. 1. 7. 4:582015. 1. 7. 4:58

SIMBOLI DI
ATTENZIONE
ATTENZIONE PER
LA PULIZIA E LA
MANUTENZIONE
• Non spruzzare acqua
direttamente sulle superfi ci
interne o esterne del
frigorifero.
- Pericolo di scariche elettriche o
incendio.
• Non utilizzare né collocare
sostanze sensibili alla
temperatura, come ad esempio
spray e oggetti infi ammabili,
ghiaccio secco, farmaci o
sostanze chimiche vicino al
frigorifero.
Non conservare oggetti o
sostanze volatili o infi ammabili
(quali benzene, diluenti, propano
e prodotti similari) all'interno del
frigorifero.
- Il frigorifero è idoneo solo alla
conservazione di alimenti.
- Il mancato rispetto di questa
precauzione può causare
incendio o esplosione.
• Non spruzzare prodotti per la
pulizia direttamente sul display.
- Le lettere stampate sul display
potrebbero non essere più
visibili.
estranee o polvere dalla spina di
alimentazione.
Non utilizzare un panno bagnato
o umido per pulire da polvere
o sostanze estranee la spina di
alimentazione.
- In caso contrario, pericolo di
scariche elettriche o incendio.
• Non inserire mai le dita o altri
oggetti nel foro del dispenser e
sullo scarico del ghiaccio.
- Ciò potrebbe causare lesioni
personali o danni materiali.
• Pulire eventuali parti non
raggiungibili, ad esempio le
cerniere, con una spazzola o
uno spazzolino da denti.
• Scollegare il frigorifero dalla
presa di corrente prima
di eseguirne la pulizia o la
manutenzione.
• Se all'interno dell'apparecchio
penetrano sostanze estranee,
ad esempio acqua, scollegare
il cavo di alimentazione dalla
presa di corrente e contattare il
più vicino centro assistenza.
- Il mancato rispetto di questa
precauzione può causare
scariche elettriche o incendio.
INFORMAZIONI SULLA SICUREZZA
• Rimuovere eventuali sostanze
Italiano - 11
DA68-03015D-04.indb 11DA68-03015D-04.indb 11 2015. 1. 7. 4:582015. 1. 7. 4:58

IMPORTANTI SIMBOLI
AVVERTENZA
DI AVVERTENZA PER LO
SMALTIMENTO
• Verifi care l'integrità
delle tubazioni sul retro
dell’apparecchio prima di
smaltirlo.
• Come refrigerante questo
frigorifero utilizza il gas R-600a o
R-134a.
Controllare l’etichetta del
compressore apposta sul retro
dell’apparecchio e l’etichetta
della potenza nominale all’interno
del frigorifero per vedere il tipo di
refrigerante utilizzato.
Nel caso il prodotto contenga
gas infi ammabile (refrigerante
R-600a), contattare l'ente locale
preposto per lo smaltimento
sicuro di questo prodotto.
Come gas isolante questo
prodotto utilizza ciclopentano.
I gas usati nel materiale isolante
richiedono speciali procedure di
smaltimento.
Contattare gli enti locali preposti
per informazioni sul corretto
smaltimento di questo prodotto.
Prima di smaltire il frigorifero,
verifi care che nessuna
delle tubazioni sul retro
dell'apparecchio sia
danneggiata.
Le tubazioni devono essere
scollegate in uno spazio aperto.
• Per lo smaltimento di questo
prodotto o di altri frigoriferi,
rimuovere le porte, le guarnizioni
e le chiusure delle porte in modo
che bambini o animali non
possano rimanere intrappolati
all'interno. Lasciare i ripiani al
loro posto in modo che i bambini
non possano giocare all'interno
dell'apparecchio.
I bambini devono essere
sorvegliati per evitare che
giochino con apparecchiature da
smaltire.
• Si prega di smaltire e riciclare
il materiale utilizzato per
l'imballaggio di questo prodotto
secondo quanto previsto dalle
norme vigenti.
ULTERIORI CONSIGLI
PER UN USO
CORRETTO DEL
PRODOTTO
• Se si verifi ca un blackout
elettrico, chiamare la compagnia
elettrica locale e chiedere il
tempo previsto per il ripristino
dell’elettricità.
- Generalmente, interruzioni di
corrente di una o due ore non
Italiano - 12
DA68-03015D-04.indb 12DA68-03015D-04.indb 12 2015. 1. 7. 4:582015. 1. 7. 4:58

infl uiscono sulle temperature del
frigorifero.
Tuttavia, durante l'interruzione
di corrente limitare al minimo
l'apertura del frigorifero.
- Se il blackout dovesse protrarsi
per più di 24 ore, rimuovere tutti
gli alimenti surgelati dal freezer.
• Se dovessero essere fornite
delle chiavi insieme al frigorifero,
tenerle fuori della portata
dei bambini e non nei pressi
dell'apparecchio.
• L'apparecchio potrebbe non
funzionare in modo corretto
(la temperatura interna
potrebbe aumentare) qualora
la temperatura ambiente
permanesse per lungo tempo
al di sotto della temperatura
minima indicata per questo
frigorifero.
• Non conservare alimenti
facilmente deperibili alle basse
temperature, come banane e
meloni.
• L'apparecchio è di tipo
"frost free"; ciò signifi ca che
non è necessario sbrinarlo
manualmente poiché tale
operazione è automatica.
• L'aumento di temperatura per
lo sbrinamento è conforme ai
requisiti ISO.
Tuttavia, per evitare che durante
lo sbrinamento automatico la
temperatura dei surgelati si alzi
eccessivamente, avvolgere gli
alimenti surgelati in diversi fogli
di giornale.
• L'aumento della temperatura dei
surgelati durante l’operazione di
sbrinamento può ridurre i tempi
di conservazione.
• L'uso di questa funzione
comporta un aumento del
consumo energetico del
frigorifero. Disattivarla qualora
non sia necessaria, riportando
il freezer alla temperatura
originaria.
Attivare la funzione Surgelazione
intensa (Power Freeze) almeno
24 ore prima di surgelare una
grande quantità di alimenti.
Ad eccezione del modello
RH57H9060*
• Contiene gas fl uorurati ad
e etto serra contemplati dal
Protocollo di Kyoto.
• Schiuma generata con gas
fl uorurati ad e etto serra.
• Additivo schiuma:
Potenziale di riscaldamento
globale (GWP)
Perfl uoroesano = 9000
Italiano - 13
INFORMAZIONI SULLA SICUREZZA
DA68-03015D-04.indb 13DA68-03015D-04.indb 13 2015. 1. 7. 4:582015. 1. 7. 4:58

Consigli per risparmiare energia
- Installare l'apparecchio in
un luogo fresco, asciutto e
adeguatamente ventilato.
Verifi care che non sia esposto
a luce solare diretta e non sia
installato vicino a una fonte
diretta di calore (ad esempio un
calorifero).
- Non ostruire le griglie e le
aperture di ventilazione.
- Lasciare che il cibo caldo
si ra reddi prima di riporlo
nell'apparecchio.
- Per scongelare i cibi, collocarli in
frigorifero.
Le basse temperature dei
surgelati consentono inoltre
di rinfrescare ulteriormente gli
alimenti conservati in frigo.
- Nel riporre o estrarre gli alimenti,
non tenere per molto tempo la
porta aperta.
Minore è il tempo di apertura,
minore è il ghiaccio che si forma
nel freezer.
- Pulire il retro del frigorifero
regolarmente. La polvere che si
accumula aumenta il consumo
di corrente.
del frigorifero. Non coprire le
aperture di ventilazione.
- Durante l’installazione, lasciare
su ciente spazio sui lati, sul
retro e in alto per consentire la
circolazione dell’aria.
Ciò consentirà di ridurre sia il
consumo energetico sia il costo
della bolletta elettrica.
- Per i migliori risultati in termini di
e cienza energetica, tenere tutti
gli accessori interni quali cestelli,
cassetti e ripiani nella posizione
indicata dal costruttore.
Questa apparecchiatura è
progettata per un uso domestico
o applicazioni simili quali
- angoli cottura per il personale
in punti vendita, u ci e altri
ambienti lavorativi;
- fattorie/aziende agricole e per
l’uso dei clienti in hotel, motel e
altri ambiti residenziali;
- bed and breakfast;
- catering e applicazioni simili nonretail.
- Non impostare una temperatura
più bassa del necessario.
- Garantire una ventilazione
su ciente alla base e sul retro
Italiano - 14
DA68-03015D-04.indb 14DA68-03015D-04.indb 14 2015. 1. 7. 4:582015. 1. 7. 4:58

A
B
C
D
E
1725mm
468mm
165
°
165
°
50mm
912mm
610mm
1170mm
34mm
31mm
Impostazione del frigorifero
PRIMA DI INSTALLARE IL
FRIGORIFERO
Congratulazioni per l'acquisto del vostro nuovo
frigorifero Samsung.
Speriamo apprezzerete le novità tecniche e le
e cienze o erte da questo nuovo prodotto.
Scelta della posizione migliore per
l'installazione del frigorifero
• Un luogo con facile accesso all'acqua potabile.
• L'apparecchio non deve essere esposto alla
luce solare diretta.
• Il pavimento deve essere in piano (o
leggermente inclinato).
• Lo spazio deve permettere l'apertura agevole
delle porte del frigorifero.
• Lo spazio sui lati, sul retro e in alto deve essere
su ciente a garantire una corretta circolazione
dell'aria.
• La collocazione deve consentire di spostare
facilmente il frigorifero per manutenzione o
assistenza.
• Non installare il frigorifero in un luogo in cui la
temperatura è superiore a 43°C o inferiore a
5°C.
B
A
E
C
Profondità “A”
Larghezza “B”
Altezza “C”
Altezza complessiva “D”
Profondità “E”
50mm
°
165
1725mm
610mm
912mm
34mm
31mm
165
°
468mm
D
718mm
912mm
1742mm
1774mm
721mm
1170mm
IMPOSTAZIONE
Ogni misura è basata sulla dimensione del
design, pertanto può variare a seconda del
DA68-03015D-04.indb 15DA68-03015D-04.indb 15 2015. 1. 7. 4:582015. 1. 7. 4:58
Italiano - 15
metodo di misurazione.

Durante lo spostamento del frigorifero
Piedino
Al fi ne di prevenire danni al pavimento, accertarsi
che i piedini di regolazione anteriori siano sollevati
(sopra il pavimento).
Vedere il manuale alla sezione “Come livellare il
frigorifero” a pag 21.
Strumenti necessari (non forniti)
Cacciavite a croce
(+)
Chiave a brugola
5mm
Cacciavite a lama
piatta (-)
Chiave a bussola
10mm
Piedino
Cacciavite
Pavimento
Per una corretta installazione, questo frigorifero
deve essere posizionato su una superfi cie stabile e
solida livellata con il resto del pavimento.
La superfi cie deve essere su cientemente solida
da supportare il peso del frigorifero a pieno carico.
Durante l'installazione, al fi ne di proteggere il
pavimento, ritagliare un'ampia sezione del cartone
da imballo e posizionarla sotto il frigorifero nella
posizione di lavoro.
Spostando il frigorifero, è necessario muoverlo
avanti e indietro seguendo una linea retta.
Non spostarlo prima da un lato e poi dall'altro.
IMPOSTAZIONE DEL
FRIGORIFERO
Ora che il frigorifero è installato e in posizione,
è pronto per essere impostato in modo da
o rire all'utente tutti i vantaggi o erti dalle sue
caratteristiche e funzioni.
Completando i seguenti passaggi, il frigorifero sarà
pienamente operativo.
In caso contrario, controllare per prima cosa
l'erogazione di energia elettrica e consultare la
sezione dedicata alla risoluzione dei problemi sul
retro di questa guida dell'utente.
Per ulteriori domande, contattare il centro
assistenza Samsung Electronics.
1. Posizionare il frigorifero in un luogo adeguato,
mantenendo uno spazio su ciente tra la parete
e il frigorifero.
Vedere le istruzioni di installazione riportate in
questo manuale.
2. Una volta collegato il frigorifero, verifi care che la
luce interna si accenda all'apertura delle porte.
3. Impostare la temperatura sul valore più freddo e
attendere un'ora.
Il freezer si ra redderà moderatamente e il
motore girerà regolarmente.
4. Una volta acceso il frigorifero, ci vorranno
alcune ore prima che raggiunga la temperatura
impostata. Una volta raggiunta una temperatura
su cientemente bassa sarà possibile
conservare nel frigorifero alimenti e bevande.
5. Al termine dell’installazione, premere la leva del
dispenser per verifi care la corretta erogazione di
acqua e ghiaccio.
6. Assicurarsi che il lato anteriore del frigorifero sia
posizionato con una inclinazione maggiore di 0,6
gradi rispetto al lato posteriore.
Italiano - 16
DA68-03015D-04.indb 16DA68-03015D-04.indb 16 2015. 1. 7. 4:582015. 1. 7. 4:58

IMPOSTAZIONE DELLE PORTE
Verifi care la
corrispondenza
colori dei tubi
dell'acqua.
(1)
(2)
Centro del giunto trasparente
Clip A (1/4”)
(6,35mm)
(1)
(2)
(3)
DEL FRIGORIFERO
Se la porta di ingresso non permette un facile
passaggio, è possibile smontare le porte
dell'apparecchio.
Scollegamento del tubo di alimentazione
dell'acqua dal frigorifero.
Centro del giunto trasparente
Clip A (1/4”)
(6,35mm)
IMPOSTAZIONE
1. Estrarre i due tubi dell'acqua (posizionati nel
gruppo di fi ssaggio) tirandoli verso di se.
2. Rimuovere i due tubi dell'acqua (quello bianco
è per l'acqua, l'altro per il ghiaccio) premendo il
giunto (1) ed estraendo i tubi (2).
(1)
Verifi care la
corrispondenza
ATTENZIONE
colori dei tubi
dell'acqua.
Ricollegando i tubi dell’alimentazione,
ATTENZIONE
collegare assieme solo i tubi aventi lo
(2)
stesso colore.
Non tagliare il tubo dell'acqua.
Staccarlo delicatamente dal giunto.
Tenere i fermi fuori della portata dei
ATTENZIONE
bambini e verifi care che non li usino come
giocattoli o se li mettano in bocca.
SMONTAGGIO DELLE PORTE DEL
FREEZER
1. Scollegare il cavo di alimentazione e rimuovere
le 3 viti del coperchio usando un cacciavite a
croce (1).
Quindi aprire la porta del frigorifero e tirare
i ganci sui lati per allentare il coperchio (2).
Sollevare il coperchio e tirarlo in avanti per
separarlo (3).
- Separare il copricerniera tenendo la porta
aperta, quindi chiuderla.
(1)
(2)
(3)
Ricollegamento del tubo di alimentazione
dell'acqua
1. Il tubo dell'acqua deve essere completamente
inserito al centro del giunto trasparente per
evitare perdite d'acqua dall'erogatore.
2. Inserire le 2 clip contenute nel kit di installazione
e verifi care che ognuna sia in grado di sostenere
saldamente il tubo.
Italiano - 17
DA68-03015D-04.indb 17DA68-03015D-04.indb 17 2015. 1. 7. 4:582015. 1. 7. 4:58

2. Rimuovere il copricerniera e scollegare il
(A)
(1)
(A)
(2)
(B)
(B)
(A)
(1)
(A)
(2)
connettore elettrico.
RIMONTAGGIO DELLE PORTE
DEL FREEZER.
• Prima di rimontare la porta del frigorifero
ATTENZIONE
• Prima del rimontaggio, verifi care che tutti i
è necessario rimontare la porta del
freezer.
connettori posti sul fondo della porta freezer
siano collegati.
3. Ruotare il gancio (A) in direzione (1) quindi
estrarlo in direzione (2).
(1)
(A)
(A)
4. Rimuovere la cerniera (B).
(B)
5. Sollevare la porta e separarla dal frigorifero.
• Prestare attenzione a non danneggiare
ATTENZIONE
i fi li elettrici nel montare o rimuovere le
porte.
• Una volta separate dal frigorifero, prestare
attenzione a non far cadere le porte poiché
potrebbero danneggiarsi.
Istruzioni per il rimontaggio della porta
1. Fissare le porte alle cerniere sul fondo del
frigorifero.
(2)
2. Inserire la cerniera (B) nell'apposito
alloggiamento sul frigorifero, quindi premere
verso il basso sul foro della cerniera sulla porta.
(B)
3. Inserire il gancio (A) nella direzione della freccia
(1) quindi abbassarlo nella direzione della freccia
(2) per bloccarlo in posizione.
(2)
(A)
(1)
(A)
Italiano - 18
DA68-03015D-04.indb 18DA68-03015D-04.indb 18 2015. 1. 7. 4:582015. 1. 7. 4:58

4. Collegare il connettore elettrico.
(1)
(2)
(3)
(1)
5. Inserire per prima cosa le 2 parti frontali del
coperchio, premere verso il basso entrambi i lati
del coperchio, quindi fi ssare il coperchio con un
cacciavite a croce.
• Montare le porte seguendo la procedura
ATTENZIONE
di smontaggio in ordine inverso.
• Il display potrebbe non funzionare se non sono
stati collegati i cavi elettrici durante il montaggio
della porta.
SMONTAGGIO DELLE PORTE DEL
FRIGORIFERO
(PANNELLO ESTERNO DEL
COMPARTO DEL FREDDO)
1. Scollegare il cavo di alimentazione e rimuovere
le 3 viti del coperchio usando un cacciavite a
croce (1).
Quindi aprire la porta del frigorifero e tirare
i ganci sui lati per allentare il coperchio (2).
Sollevare il coperchio e tirarlo in avanti per
separarlo (3).
- Separare il copricerniera tenendo la porta
aperta, quindi chiuderla.
(2)
(3)
2. Scollegare il connettore di alloggiamento.
3. Estrarre le tre viti di fi ssaggio sulla cerniera
superiore del pannello esterno.
4. Smontare il pannello
esterno.
IMPOSTAZIONE
Italiano - 19
DA68-03015D-04.indb 19DA68-03015D-04.indb 19 2015. 1. 7. 4:582015. 1. 7. 4:58

SMONTAGGIO DELLE PORTE DEL
(1)
(2)
(3)
FRIGORIFERO
1. Scollegare il cavo di alimentazione e rimuovere
le 3 viti del coperchio usando un cacciavite a
croce (1).
Quindi aprire la porta del frigorifero e tirare
i ganci sui lati per allentare il coperchio (2).
Sollevare il coperchio e tirarlo in avanti per
separarlo (3).
- Separare il copricerniera tenendo la porta
aperta, quindi chiuderla.
(1)
4. Smontare la cerniera superiore dalla parte
frontale della porta.
5. Smontare il pannello
esterno.
(2)
(3)
2. Scollegare il connettore di alloggiamento.
3. Spingere il fi ssa cerniera verso l'alto, quindi
tirarlo in avanti per rimuoverla.
Fissare il cavo sul gancio della cerniera
ATTENZIONE
per evitare di danneggiarlo in fase di
rimontaggio.
RIMONTAGGIO DELLE PORTE
DEL FRIGORIFERO
Per rimontare le porte del frigorifero, montare le
parti seguendo l'ordine inverso.
Italiano - 20
DA68-03015D-04.indb 20DA68-03015D-04.indb 20 2015. 1. 7. 4:582015. 1. 7. 4:58

LIVELLARE IL FRIGORIFERO
E REGOLARE L'ALTEZZA E LA
DISTANZA DELLE PORTE
Come livellare il frigorifero
Per evitare eventuali pericoli
causati dall'instabilità del
frigorifero, collocare il frigorifero
su una base orizzontale e
livellata seguendo le istruzioni
di installazione qui fornite.
Il mancato rispetto di questa
precauzione può causare il
ribaltamento del frigorifero e
lesioni personali.
Se la parte anteriore
dell'apparecchio si trova
leggermente più in alto di quella
posteriore, risulta più agevole
aprire e chiudere la porta
dell'unità.
Il frigorifero risultare instabile
se viene installato su una
superfi cie non livellata.
- Per installare il frigorifero
estrarre i piedini e verifi care
che poggino sul pavimento.
I piedini sono situati sul fondo
della parte posteriore di ogni
porta. Inserire un cacciavite
a lama piatta e ruotarlo in
direzione della freccia fi no a
quando il frigorifero risulta
livellato.
- Non collocare gli alimenti
solo su un lato dei balconcini
porta.
In caso contrario, il frigorifero
potrebbe inclinarsi e cadere.
IMPOSTAZIONE
Italiano - 21
DA68-03015D-04.indb 21DA68-03015D-04.indb 21 2015. 1. 7. 4:582015. 1. 7. 4:58

Se il lato freezer risulta più basso:
(A)
(B)
(A)
• Inserire un cacciavite a lama piatta nella leva di
regolazione dell'altezza situata in fondo sul retro
della porta freezer e ruotarla nella direzione della
freccia fi no a quando risulterà a livello.
Se il lato frigorifero risulta più basso:
COME REGOLARE L'ALTEZZA
DELLE PORTE
Se una porta del frigorifero è più bassa
dell'altra:
• Agire sulle leve di regolazione dell'altezza della
porta mediante il dado posizionato sul fondo
della porta del frigorifero.
• Un eccessivo sollevamento della porta può
causarne l'interferenza con il copricerniera
durante l'apertura o la chiusura della porta.
• Inserire un cacciavite a lama piatta nella leva
di regolazione dell'altezza situata in fondo sul
retro della porta del frigorifero e ruotarla nella
direzione della freccia fi no a quando risulterà a
livello.
• Sollevare la parte anteriore del frigorifero
in modo che le porte si chiudano da sole.
Ruotare le leve di regolazione nel caso
in cui la parte posteriore del frigorifero
sia più alta della parte anteriore e renda
di cile l'apertura delle porte.
• Se la parte posteriore del frigorifero non è
livellata, inserire sul fondo uno spessore di
dimensioni adeguate e fi ssarlo con nastro
adesivo.
Spingere il frigorifero nella posizione di
installazione e livellarlo.
• Fare attenzione a non danneggiare il pavimento
durante lo spostamento del frigorifero.
(B)
(A)
1. Aprire la porta da regolare e allentare il dado
di fi ssaggio (A) posto sul fondo della porta
ruotandolo in senso orario (
) utilizzando la
chiave fi ssa in dotazione.
(A)
Italiano - 22
DA68-03015D-04.indb 22DA68-03015D-04.indb 22 2015. 1. 7. 4:582015. 1. 7. 4:58

1. Regolare l'altezza della porta ruotando il dado
(A)
(A)
di regolazione (B) in senso antiorario ( ) con
una chiave fi ssa.
(Ruotarlo in senso antiorario ( ) per
aumentare l'altezza della porta e in senso orario
( ) per ridurla.)
- Aprire la porta e regolarla dall'interno.
(A)
COME REGOLARE LO SPAZIO
TRA LE PORTE
Se lo spazio tra la porta del frigorifero e del freezer
non è regolare:
• Ruotare il dado di regolazione in cima alla porta
del frigorifero (lato destro).
• Applicando una forza eccessiva il dado di
regolazione potrebbe rompersi.
IMPOSTAZIONE
2. Una volta livellate le porte, ruotare il dado di
fi ssaggio (A) in senso antiorario ( ) per
serrarlo.
(A)
Se il frigorifero viene livellato senza alimenti
al suo interno, una volta riempito non sarà
più a livello.
In tal caso, procedere nuovamente alla
regolazione dei piedini.
1. Rimuovere il copricerniera
della porta del frigorifero.
- Separare il copricerniera
tenendo la porta aperta,
quindi chiuderla.
2. Regolare lo spazio usando una chiave a brugola
da 4mm (non fornita).
3. Ruotare il dado in senso orario ( ) per
aumentare lo spazio.
Ruotarlo in senso antiorario ( ) per ridurre
lo spazio.
Regolare lo spazio tra la porta del frigorifero e
quella del freezer fi no a quando risulta uniforme.
Durante la disposizione dei cavi, prestare
ATTENZIONE
attenzione a non lacerare o rimuovere il
rivestimento dei cavi.
Italiano - 23
DA68-03015D-04.indb 23DA68-03015D-04.indb 23 2015. 1. 7. 4:582015. 1. 7. 4:58

COME REGOLARE LO SPAZIO
regolazione
TRA LA PORTA E IL FRIGORIFERO
(RETRO)
Se lo spazio tra la porta del frigorifero e il frigorifero
non è uniforme:
• Usare i dadi di regolazione posti sul bordo
superiore all'interno di ogni porta.
1. Aprire la porta laddove lo spazio con il
frigorifero risulti minore, quindi ruotare il dado
di regolazione in senso antiorario ( ) fi no a
quando lo spazio risulti uniforme.
Dado di
2. Una volta regolato lo spazio tra la porta e il
frigorifero, ruotare il dado di regolazione in
senso orario ( ) per bloccarlo in posizione.
regolazione
CONTROLLO DEL TUBO
DELL'ACQUA DEL DISPENSER
Il dispenser dell'acqua è una delle utili funzioni
o erte dal vostro nuovo frigorifero Samsung.
Per favorire migliori condizioni di salute, il fi ltro
dell'acqua Samsung rimuove eventuali particelle
indesiderate.
Tuttavia il fi ltro non sterilizza l'acqua né neutralizza i
microorganismi.
Per ottenere ciò, è necessario acquistare un
sistema per la depurazione dell'acqua.
Perché l'Ice Maker funzioni in modo adeguato, la
pressione dell'acqua deve essere compresa tra 20
e 125 psi (138~862kPa).
In normali condizioni d'uso, una tazza da 170cc
viene riempita in circa 10 secondi.
Se il frigorifero è installato in un'area caratterizzata
da bassa pressione dell'acqua (inferiore a 20psi),
per compensare la pressione insu ciente è
possibile installare un'autoclave.
Verifi care che il serbatoio dell'acqua all'interno del
frigorifero sia correttamente riempito.
Per fare questo, premere la leva del dispenser
dell'acqua fi no a far fl uire l'acqua dall'erogatore.
I kit di installazione del tubo dell'acqua
possono essere acquistati a parte presso il
rivenditore.
Si raccomanda l'uso di un kit di
alimentazione dell'acqua con tubi in rame.
Utilizzare il nuovo set di tubi fornito in
dotazione eliminando il precedente set
senza riutilizzarlo.
Controllare l'elenco degli accessori
riportato sotto.
Dado di fi ssaggio
Italiano - 24
DA68-03015D-04.indb 24DA68-03015D-04.indb 24 2015. 1. 7. 4:582015. 1. 7. 4:58

Connessione al tubo di alimentazione
Chiudere
la mandata
dell'acqua
principale
Chiudere
la mandata
dell'acqua
principale
Nessuno
spazio
Nessuno
spazio
Allentare a
Rimuovere il
tappo
Tubo dell'acqua dal
kit
Tubo dell'acqua
dall'unità
dell'acqua
1. Per prima cosa, chiudere la mandata principale
dell'acqua.
2. Localizzare il tubo dell'acqua fredda potabile più
vicino.
3. Seguire le istruzioni di installazione del tubo
dell'acqua accluse al kit.
ATTENZIONE
Il tubo dell'acqua deve essere collegato al
tubo dell'acqua fredda.
Se è collegato a un tubo dell'acqua calda,
può causare il malfunzionamento del sistema
di depurazione.
Chiudere
la mandata
dell'acqua
principale
Chiudere
la mandata
dell'acqua
principale
4. Dopo il collegamento dell'alimentazione idrica al
Nessuno
spazio
fi ltro, riaprire la mandata dell'acqua ed erogare
circa 3 l d'acqua per pulire il fi ltro.
Collegamento del tubo di alimentazione
dell'acqua al frigorifero
1. Rimuovere il tappo dal tubo dell'acqua sull'unità
e inserirvi il dado di compressione del tubo
dell'acqua fornito nel kit.
2. Collegare i tubi dell'acqua dell'unità e del kit.
3. Serrare il dado di compressione sul raccordo.
Accertarsi che non vi sia spazio tra i due
elementi.
4. Aprire l'acqua e controllare se vi sono perdite.
Rimuovere il
tappo
Allentare a
Tubo dell'acqua
Tubo dell'acqua dal
dall'unità
Nessuno
spazio
kit
Collegare il tubo dell'acqua solo a una
sorgente di acqua potabile.
Se è necessario riparare o smontare il tubo
dell'acqua, tagliare 6,5 mm della tubazione in
plastica per essere certi di ottenere un collegamento
sicuro, privo di perdite.
Prima dell'uso, esaminare queste parti per
ATTENZIONE
rilevare eventuali perdite.
• La garanzia Samsung non copre
l'INSTALLAZIONE DEL TUBO DELL'ACQUA.
• Questa viene eseguita a carico del cliente,
salvo che il prezzo di vendita includa i costi di
installazione.
• Se necessario, rivolgersi a un idraulico o
un installatore autorizzato per far eseguire
l'installazione.
• In caso di perdite d'acqua causate da una
installazione scorretta, rivolgersi all'installatore
che ha eseguito il lavoro.
IMPOSTAZIONE
Italiano - 25
DA68-03015D-04.indb 25DA68-03015D-04.indb 25 2015. 1. 7. 4:582015. 1. 7. 4:58

Nessuna perdita
Nessuna perdita
Figura 1
PRIMA DI USARE LA MACCHINA
DEL GHIACCIO
Rimuovere
- Rimuovere il portaghiaccio sollevandolo verso
l'alto ed estraendolo lentamente.
-A errare la maniglia come mostrato in fi gura.
- Estrarre lentamente il portaghiaccio per evitare
di danneggiarlo.
1. Far scorrere il dado di compressione (A)
attraverso il tubo in plastica in dotazione (A).
2. Serrare il dado di compressione (A) sul raccordo
di compressione da 1/4”.
- Se si usano tubi in rame, far scorrere il dado di
compressione (B), (non fornito) e la ferrula (non
fornita) sul tubo in rame (non fornito), come
illustrato.
- Se si usa un tubo in plastica (B) , inserire il
terminale stampato (a bulbo) del tubo in plastica
(B) nel raccordo di compressione.
Non usare senza il terminale stampato (a
ATTENZIONE
bulbo) del tubo in plastica (B).
3. Serrare il dado di compressione (B) sul raccordo
di compressione.
Non serrare eccessivamente il dado di
compressione (B).
4. Aprire l'acqua e controllare se vi sono perdite.
Collegare il tubo dell'acqua solo a una
sorgente di acqua potabile.
Se è necessario riparare o smontare il tubo
dell'acqua, tagliare 6,5 mm della tubazione
in plastica per essere certi di ottenere un
collegamento sicuro, privo di perdite.
Figura 1
Non applicare una forza eccessiva durante
la rimozione del coperchio del cassetto.
In caso contrario, il coperchio potrebbe
rompersi e causare lesioni.
Prima di rimuovere qualunque accessorio,
verifi care che questo non contenga
alimenti.
Laddove possibile, rimuovere
contemporaneamente tutti gli alimenti
contenuti nel frigorifero per non incorrere in
spiacevoli incidenti.
Installare
- Montare la macchina del ghiaccio seguendo la
procedura di smontaggio in ordine inverso.
- Spingere il portaghiaccio con fermezza fi no ad
avvertire un 'clic'.
Italiano - 26
DA68-03015D-04.indb 26DA68-03015D-04.indb 26 2015. 1. 7. 4:582015. 1. 7. 4:58

Prima di chiamare l'assistenza tecnica
Figura 3
Scarico del ghiaccio
Ghiaccio a
cubetti
Ghiaccio
tritato
- I rumori che si avvertono durante la caduta
dei cubetti nel portaghiaccio sono parte del
normale funzionamento.
- Se per un lungo periodo di tempo non viene
utilizzato l'erogatore del ghiaccio, i cubetti
contenuti nel portaghiaccio potrebbero fondersi
insieme.
In tal caso, rimuovere il ghiaccio rimanente e
svuotare il portaghiaccio.
- Se dall'erogatore non esce ghiaccio, il
condotto di scarico potrebbe essere ostruito
da un accumulo di ghiaccio, in questo caso
rimuoverlo.
Rimozione di residui all'interno del
tubo di alimentazione dell'acqua dopo
l'installazione del fi ltro.
1. Aprire la mandata principale dell'acqua.
2. Premere la leva del dispenser.
3. Far scorrere circa 4 litri d'acqua attraverso il
fi ltro prima di utilizzarlo.
(Flussare per circa 6 minuti.)
Questo accorgimento consente di pulire il
sistema di mandata dell'acqua ed eliminare
l'aria dai tubi.
4. Un ulteriore fl ussaggio può essere necessario in
determinate situazioni.
5. Aprire le porte del frigorifero e accertarsi che
non vi siano perdite d'acqua provenienti dal
fi ltro.
IMPOSTAZIONE
Scarico del ghiaccio
Figura 3
• Quando la spia Ice O (Disattivazione
ATTENZIONE
ghiaccio) lampeggia sul display, reinserire
il portaghiaccio e/o verifi carne il corretto
inserimento.
• A porta aperta, il dispenser del ghiaccio e
dell'acqua non funzionano.
• Se si chiude la porta con una forza eccessiva,
l'acqua contenuta nell'Ice Maker potrebbe
fuoriuscire.
• Quando si estrae il portaghiaccio, tenerlo con
entrambe le mani per evitare di farlo cadere.
• Pulire subito eventuale ghiaccio o acqua caduti
accidentalmente sul pavimento per evitare
lesioni.
• Non lasciare che i bambini si appendano al
dispenser del ghiaccio o al portaghiaccio.
Potrebbero ferirsi.
• Non inserire mani o eventuali oggetti nello
scarico del ghiaccio.
La mancata osservanza di questa precauzione
può causare lesioni personali o danni alle parti
meccaniche.
Ghiaccio a
Ghiaccio
tritato
cubetti
Una cartuccia fi ltro appena installata
potrebbe provocare un breve schizzo
d'acqua dal dispenser.
Ciò è dovuto alla presenza di aria all'interno
del tubo.
Non è indice di malfunzionamento.
Italiano - 27
DA68-03015D-04.indb 27DA68-03015D-04.indb 27 2015. 1. 7. 4:582015. 1. 7. 4:58

Controllare la quantità d'acqua fornita al
Ice Maker
1
Tasto di prova
2
Controllare il livello dell'acqua
cassettino del ghiaccio.
1. Sollevare il coperchio della macchina del
ghiaccio ed estrarlo delicatamente.
2. Premendo il tasto di prova per 3 secondi, il
contenitore del ghiaccio viene riempito con
acqua di rubinetto.
Verifi care che la quantità d'acqua fornita sia
corretta (vedere illustrazione sottostante).
Se il livello dell'acqua è troppo basso, i cubetti
saranno di piccole dimensioni.
Ciò è dovuto a un problema di pressione
nell'erogazione dell'acqua potabile, non del
frigorifero.
Controllare il livello dell'acqua
1
2
Ice Maker
• Dopo aver premuto il tasto di prova sono
ATTENZIONE
necessari alcuni minuti prima che il livello
dell'acqua sia corretto.
• Non premere continuamente il tasto di prova
quando il cassetto è pieno di ghiaccio o acqua.
L'acqua potrebbe fuoriuscire o il ghiaccio
potrebbe incastrarsi.
• Se il portaghiaccio non è montato, l'Ice Maker
non funziona.
• Quando la spia Ice O (Disattivazione ghiaccio)
lampeggia sul display, reinserire il portaghiaccio
e/o verifi carne il corretto inserimento.
Tasto di prova
Italiano - 28
DA68-03015D-04.indb 28DA68-03015D-04.indb 28 2015. 1. 7. 4:582015. 1. 7. 4:58

Funzionamento del frigorifero
Samsung
USO DEL PANNELLO DI
CONTROLLO
MODELLO CON DISPENSER
(1)
(2)
(3)
(9)
(10)
(7)
MODELLO NORMALE
(1)
(4)
Freezer / Power Freeze
(1)
(Surgelazione intensa) (3sec)
Il tasto Freezer serve a due scopi:
- Per impostare il freezer sulla
temperatura desiderata.
(4)
(5)
(6)
(8)
(1)
(3)
(4)
- Per attivare/disattivare la funzione
Surgelazione intensa (Power Freezer).
Per impostare la temperatura del
freezer, toccare il tasto Freezer.
E' possibile impostare la temperatura
tra -15ºC e -23ºC (o tra 5°F e -8°F).
2. Funzione Surgelazione intensa (Power
Freeze)
Tenere premuto questo tasto per 3 secondi
per ridurre il tempo necessario a congelare
gli alimenti nel freezer.
Può essere utile se si ha bisogno di
congelare rapidamente alimenti che si
deteriorano facilmente o se la temperatura
nel freezer si è alzata drasticamente.
(Per esempio, se è stata lasciata aperta la
porta.)
L'uso di questa funzione comporta un
aumento del consumo energetico del
frigorifero.
Disattivarla qualora non sia necessaria,
riportando il freezer alla temperatura
originaria.
Attivare la funzione Surgelazione intensa
(Power Freeze) almeno 20 ore prima di
surgelare una grande quantità di alimenti.
FUNZIONAMENTO
(10)
DA68-03015D-04.indb 29DA68-03015D-04.indb 29 2015. 1. 7. 4:582015. 1. 7. 4:58
(10)
Italiano - 29

(2)
Lighting (Illuminazione) / °C↔°F (3sec)
Il tasto Lighting (Illuminazione) serve a due
scopi:
- Per accendere e spegnere la luce del
dispenser
- Per impostare la temperatura da ºC a ºF
e viceversa.
1. Funzione Luce
Toccando il tasto Lighting (Illuminazione),
si accende in modalità continua il LED
del dispenser, che resta quindi sempre
acceso.
Anche il tasto si illumina.
Se si desidera che il LED del dispenser si
accenda solo quando si usa il dispenser,
premere il tasto Lighting (Illuminazione) per
disattivare la modalità continua.
2. Per impostare la temperatura da ºC a ºF
e viceversa.
Tenere premuto questo tasto per 3 secondi
per selezionare quale unità di temperatura
visualizzare.
Ogni volta che si tiene premuto il tasto,
le modalità di temperatura in ºC e ºF si
alternano e il simbolo ºC o ºF si illumina,
indicando la selezione e ettuata.
Vacation (Vacanza) /
(3)
Filter Reset (Reset fi ltro) (3sec)
Il tasto Vacation (Vacanza) serve a due
scopi:
- Per attivare e disattivare la modalità
vacanza
- Per azzerare l'indicatore di durata del
fi ltro dell'acqua.
1. Funzione Vacanza
Se ci si assenta per molto tempo per una
vacanza o un viaggio di lavoro oppure non
si necessita di usare il frigorifero, premere
il tasto Vacation (Vacanza). Selezionando
il tasto Vacation (Vacanza) per lo
spegnimento del comparto frigorifero, si
accenderà il LED della funzione Vacanza.
Si consiglia fortemente di rimuovere gli
alimenti dal comparto del fresco e di
non lasciare la porta aperta dopo aver
selezionato la funzione Vacanza.
2. Indicatore di durata del fi ltro dell'acqua
Dopo avere sostituito il fi ltro dell'acqua,
tenere premuto questo tasto per 3 secondi
per resettare l'indicatore di durata del fi ltro
dell'acqua. Quando si azzera l'indicatore di
durata del fi ltro dell'acqua, l'icona Filtro sul
panello si spegne.
L'icona Filtro si accende in rosso per
segnalare la necessità di sostituire il fi ltro
dell'acqua; il periodo di sostituzione è di
circa sei mesi (equivalente a una erogazione
di circa 1135 litri d'acqua).
In alcune zone, l'acqua contiene
un'elevata quantità di calcare che provoca
un'ostruzione più rapida del fi ltro.
In tali aree è necessario sostituire il fi ltro più
spesso rispetto alla normale sostituzione
prevista dopo sei mesi.
Italiano - 30
DA68-03015D-04.indb 30DA68-03015D-04.indb 30 2015. 1. 7. 4:582015. 1. 7. 4:58

Fridge (Frigo) / Power Cool
(4)
(Ra reddamento rapido) (3sec)
Il tasto Fridge (Frigo) serve a due scopi:
- Per impostare il frigorifero sulla
temperatura desiderata.
- Per attivare/disattivare la funzione
Power Cool (Ra reddamento rapido).
1. Per impostare la temperatura del
frigorifero, premere il tasto Fridge (Frigo).
E' possibile impostare la temperatura
tra 7ºC e 1ºC (o tra 44°F e 34°F).
2. Funzione Ra reddamento rapido (Power
Cool)
Tenere premuto questo tasto per 3
secondi per ridurre il tempo necessario a
ra reddare gli alimenti nel frigorifero.
Può essere utile se si ha bisogno di
congelare rapidamente alimenti che si
deteriorano facilmente o se la temperatura
nel freezer si è alzata drasticamente.
(Per esempio, se è stata lasciata aperta la
porta)
(5) Alarm (Allarme)
Toccare questo tasto per attivare/
disattivare la segnalazione acustica di
apertura porte.
Se l'allarme porta è attivo, l'allarme suona
appena una delle porte del frigorifero viene
lasciata aperta per più di due minuti.
La chiusura della porta interrompe il
segnale acustico.
La funzione di allarme porta è preimpostata su On in fabbrica.
E' possibile disattivarla premendo e poi
lasciando il tasto Alarm (Allarme).
Può essere riattivata nello stesso modo.
L'icona si illumina quando la funzione è
attiva.
Quando la funzione Door Alarm (Allarme
porta) è attiva e scatta il segnale acustico,
l'icona Allarme porta lampeggerà mentre
l'allarme suona.
(6)
Ice Maker O (Disattivazione Ice Maker)
Il tasto Ice Maker O (Disattivazione Ice
Maker) ha un duplice scopo:
- Accende/spegne l’Ice Maker.
- Attiva/disattiva la funzione Blocco controlli.
1. Funzione Disattivazione Ice Maker
Se non si desidera produrre altro
ghiaccio, premere il tasto Ice Maker O
(Disattivazione Ice Maker).
2. Funzione Blocco controlli
Premere questo tasto per 3 secondi per
bloccare il display e i tasti del dispenser
in modo che questi ultimi non possano
essere attivati inavvertitamente. Quando
la funzione Blocco controlli è attiva, il
frigorifero non eroga ghiaccio o acqua
nemmeno premendo la leva del dispenser.
L’icona Blocco controlli si illumina a
indicare che è stata attivata la relativa
funzione. Premere per 3 secondi per
sbloccare. Se la funzione Ice Maker è
attiva e la tubazione di mandata dell’acqua
non è collegata, si udirà dal retro dell’unità
un rumore proveniente dalla valvola
dell’acqua. Premere il tasto Ice Maker O
(Disattivazione Ice Maker) (Blocco controlli
[3 sec]) (
) per meno di 3 secondi fi no a
quando la spia O si illumina a indicare la
disattivazione dell’Ice Maker.
Per risparmiare energia elettrica, il display si disattiva
automaticamente nelle seguenti circostanze: Se
non è stato premuto alcun tasto, non vi sono porte
aperte, o non è stata premuta la leva del dispenser.
Tuttavia, resterà accesa l'icona indicante la
selezione e ettuata tra ghiaccio in cubetti o tritato.
Il display si accenderà di nuovo premendo un
tasto, aprendo una porta o premendo la leva del
dispenser.
Fatta eccezione per i tasti Water, Cubed / Crushed
(Acqua, Ghiaccio a cubetti / Ghiaccio tritato),
tutti i tasti funzione diventano operativi una volta
rilasciato il tasto.
Water (Acqua)
FUNZIONAMENTO
Ogni volta che la spia è accesa è possibile
erogare acqua.
Italiano - 31
DA68-03015D-04.indb 31DA68-03015D-04.indb 31 2015. 1. 7. 4:582015. 1. 7. 4:58

(7)
Cubed Ice (Ghiaccio a cubetti)
(8)
Crushed Ice (Ghiaccio tritato)
Premere il tasto Cubed Ice (Ghiaccio a
cubetti) o Crushed Ice (Ghiaccio tritato)
per selezionare il tipo di ghiaccio che si
desidera produrre.
Ogni volta che si preme il tasto, le modalità
ghiaccio a cubetti e ghiaccio tritato si
alternano e le icone si illuminano indicando
la selezione e ettuata.
Se non si necessita di ghiaccio, disattivare
la funzione per risparmiare acqua ed
energia elettrica (Vedere Disattivazione Ice
Maker sotto).
(9) Filtro
Uso del fi ltro dell'acqua
Questa icona si illumina quando è
necessario sostituire il fi ltro, solitamente
dopo che il frigorifero ha erogato circa
1135 litri di acqua (dopo circa 6 mesi).
Quando si apre o si chiude la porta, l’icona
lampeggia in rosso per diversi secondi.
Dopo avere installato il nuovo fi ltro
dell'acqua, azzerare l'indicatore del fi ltro
tenendo premuto per 3 secondi il tasto
Filter Reset (Reset fi ltro).
- Se l'acqua non viene erogata o
l'erogazione è lenta, è necessario
sostituire il fi ltro dell'acqua perché è
ostruito.
- In alcune zone, l'acqua contiene
un'elevata quantità di calcare che
provoca un'ostruzione più rapida del
fi ltro.
(10) Blocco controlli
Questa icona si illumina quando si attiva la
funzione Blocco controlli.
Quando l’icona Blocco controlli è accesa,
tutti i tasti presenti sul pannello, inclusi i
tasti di selezione del ghiaccio e i dispenser
sono bloccati e disattivi.
Tenere premuto il tasto Ice Maker O
(Disattivazione Ice Maker)/Blocco controlli
per 3 secondi per disattivare la funzione
Blocco controlli e riattivare i tasti sul
pannello.
Italiano - 32
DA68-03015D-04.indb 32DA68-03015D-04.indb 32 2015. 1. 7. 4:582015. 1. 7. 4:58

PARTI E FUNZIONI
(2)
Sezione a due
stelle
(4)
(13)
Deodorante
Ripiano
pieghevole
(opzionale)
Filtro
dell’acqua
(1)
(15)
(14)
(5)
(6)
(7)
(8)
(9)
(10)
(11)
(12)
Sezione a due
stelle
Usare questa pagina per conoscere meglio le parti e le funzioni del frigorifero.
(Questa immagine può di erire in base al modello.)
MODELLO CON DISPENSER
Sezione a due
(15)
(14)
(1)
stelle
(4)
(6)
(13)
Deodorante
(5)
Ripiano
pieghevole
(opzionale)
(7)
(8)
(2)
(3)
(9)
(10)
(11)
Filtro
dell’acqua
FUNZIONAMENTO
MODELLO NORMALE
Sezione a due
stelle
(12)
La temperatura delle sezioni a due stelle è lievemente superiore rispetto a quella di altri comparti
freezer.
Italiano - 33
DA68-03015D-04.indb 33DA68-03015D-04.indb 33 2015. 1. 7. 4:582015. 1. 7. 4:58

(1) Ripiani freezer
Per conservare carne, pesce, pasta fresca, gelato
e altri tipi di cibo surgelato.
(10) Scomparto bimbi (opzionale)
Posizionato a un'altezza facile da raggiungere per
i bambini. Per conservare yogurt, snack e altri
alimenti per bambini.
(2) Comparti freezer multifunzione
Comparti freezer più alti per conservare i cibi in
modo più e ciente.
Non usare questi comparti per conservare gelato
o cibi da conservare a lungo.
(3) Cassetto carne e cibi essiccati
Per conservare a lungo termine carne e cibi
essiccati.
Prima di conservarli, avvolgere i cibi in un foglio di
alluminio o in carta da cucina.
(4) Scomparto formaggio
Per conservare uova, formaggio, burro e altri
latticini.
(5) Scomparto salse
Per conservare diversi tipi di salse.
(6) Ripiani frigo
Per conservare alimenti vari che richiedono la
conservazione in frigorifero.
(7) Scomparto bevande
Per conservare acqua, latte, succhi di frutta e altri
tipi di bevande.
(11) Scomparto multifunzione
Per la conservazione di cibo disidratato come
noodle (spaghetti) essiccati, carne secca, ecc.
(12) Portauova
Il posto migliore dove mettere le uova.
Posizionare il portauova su un ripiano per
facilitarne l'accesso.
(13) Ripiano per il vino (opzionale)
Aiuta a mantenere il gusto del vino e ottimizza lo
spazio per conservare le bottiglie.
Portaghiaccio
(14)
(Solo modello con dispenser)
Per conservare e avere accesso a una grande
quantità di cubetti di ghiaccio.
• Non inserire dita, mani o altri oggetti nel
AVVERTENZA
condotto di scarico del ghiaccio o nel
portaghiaccio La mancata osservanza di
questa precauzione può causare lesioni
personali o danni materiali.
(15) Cassetto snack (opzionale)
Per conservare piccole quantità di cibo surgelato
come ad esempio il gelato.
(8) Scomparto snack (opzionale)
Per conservare insalate e contorni.
• Se si prevede un'assenza da casa
AVVERTENZA
prolungata, svuotare il frigorifero e
scollegarlo elettricamente. Asciugare
(9) Cassetto verdure
Per conservare frutta e verdura fresca. Il cassetto
superiore è opzionale.
• Se il frigorifero non viene utilizzato per un lungo
l'umidità interna in eccesso e lasciare le
porte aperte. Ciò eviterà la formazione di
cattivi odori e mu a all'interno.
periodo di tempo, scollegarlo dalla presa di
corrente.
- Il deterioramento del cavo di alimentazione può
provocare un incendio.
• Non modifi care l’ordine dei ripiani.
- Cambiando l’ordine dei ripiani la porta potrebbe
subire danni.
Italiano - 34
DA68-03015D-04.indb 34DA68-03015D-04.indb 34 2015. 1. 7. 4:582015. 1. 7. 4:58

CONTROLLO DELLA
RH57*
Temp. raccomandata (Freezer): -19°C (o -2°F)
RH57*
Temp. raccomandata (Frigo): 3°C (o 37°F)
TEMPERATURA
Controllo della temperatura del frigo
RH57*
Temperatura base all'interno dei
comparti freezer e frigo
Le temperature base e consigliate per i comparti
freezer e frigo sono rispettivamente -19°C e 3°C (o
-2°F e 37°F).
Se la temperatura dei comparti freezer e frigo è
troppo alta o troppo bassa, regolarla manualmente.
Controllo della temperatura del
freezer
RH57*
Temp. raccomandata (Freezer): -19°C (o -2°F)
La temperatura del freezer può essere impostata
tra -23°C e -15°C (o tra -8°F e 5°F) per
adeguarla alle proprie esigenze. Premere più volte
il tasto Freezer fi nché il display della temperatura
indicherà la temperatura desiderata.
La temperatura cambierà di 1°C (o 1°F) a ogni
pressione del tasto. Vedere sotto.
Temp. raccomandata (Frigo): 3°C (o 37°F)
La temperatura del frigo può essere impostata tra
1°C e 7°C (o tra 34°F e 44°F) per adeguarla alle
proprie esigenze.
Premere più volte il tasto Fridge (Frigo) fi nché il
display della temperatura indicherà la temperatura
desiderata.
La temperatura cambierà di 1°C (o 1°F) a ogni
pressione del tasto. Vedere sotto.
Fahrenheit: 37°F → 36°F → 35°F → 34°F →
44°F → 43°F → 42°F → 41°F → 40°F → 39°F
38°F → 37°F.
→
Centigradi: 3°C → 2°C → 1°C → 7°C → 6°C →
5°C → 4°C → 3°C.
Il processo di controllo della temperatura del
frigorifero funziona come quello del freezer.
Premere il tasto Fridge (Frigo) per impostare la
temperatura desiderata.
Dopo qualche secondo, il frigorifero inizierà a
regolarsi per raggiungere la temperatura appena
impostata.
Il display digitale rifl etterà tale modifi ca.
FUNZIONAMENTO
Fahrenheit: 0°F → -1°F → -2°F → -3°F → -4°F
-5°F → -6°F → -7°F → -8°F → 5°F → 4°F →
→
3°F → 2°F → 1°F → 0°F.
Centigradi: -18°C → -19°C → -20°C → -21°C
-22°C → -23°C → -15°C → -16°C → -17°C
→
-18°C.
→
Tenere a mente che alimenti come il gelato
possono sciogliersi a -15,5°C (4°F).
Il display della temperatura passerà in sequenza da
-23°C a -15°C (o da -8°F a 5°F).
Italiano - 35
DA68-03015D-04.indb 35DA68-03015D-04.indb 35 2015. 1. 7. 4:582015. 1. 7. 4:58
• La temperatura del freezer o del
frigorifero può aumentare quando si
aprono le porte troppo spesso, o se si
colloca all'interno una grande quantità di
cibo tiepido o caldo.
• In questo caso il display digitale potrebbe
iniziare a lampeggiare.
Non appena freezer e frigo tornano alle normali
temperature impostate, il lampeggio cesserà.
• Se il lampeggio continua, può essere necessario
“resettare” il frigorifero.
Provare a scollegare l'apparecchio, attendere
circa 10 minuti quindi reinserire il cavo di
alimentazione.

USO DEL DISPENSER
DELL'ACQUA FREDDA
Premere il tasto del ghiaccio che si
desidera erogare.
NO ICE (NIENTE
GHIACCIO)
Selezionare questo tasto
se si desidera disattivare
l'Ice Maker
Uso del dispenser del ghiaccio (1)
Premere delicatamente la leva del dispenser del
ghiaccio (1) con il bicchiere.
Il ghiaccio verrà erogato dal dispenser.
Si può scegliere il tipo di ghiaccio premendo prima
il tasto "Cubed" (Cubetti) o "Crushed" (Tritato).
Uso del dispenser dell'acqua (2)
Premere delicatamente la leva del dispenser
dell'acqua (2) con il bicchiere.
L'acqua verrà erogata dal dispenser.
Erogazione di ghiaccio e acqua
Per erogare ghiaccio e acqua, premere prima la
leva del dispenser del ghiaccio (1), poi abbassare il
bicchiere e premere la leva del dispenser dell'acqua
(2).
Dopo l'erogazione, attendere 2 secondi
ATTENZIONE
prima di rimuovere il bicchiere per evitare
fuoriuscite.
Se la porta del frigorifero è aperta, il
dispenser non si attiva.
• Non tirare la leva.
In caso contrario la molla della leva si potrebbe
danneggiare o rompere.
• Per pulire il contenitore del ghiaccio/
portaghiaccio, lavare con un detergente
delicato, sciacquare bene e asciugare con cura.
Non utilizzare detersivi o solventi corrosivi o
abrasivi.
• Se non si riesce a erogare ghiaccio, rimuovere
il portaghiaccio e premere il tasto di prova a
destra dell'Ice Maker.
• Non premere continuamente il tasto di prova
quando il cassetto è pieno di ghiaccio o acqua.
L'acqua potrebbe traboccare oppure il ghiaccio
potrebbe bloccare il portaghiaccio.
• Premendo il tasto di prova, il frigorifero
emetterà un segnale acustico tipo
( 1 )
( 2 )
• Il campanello suonerà di nuovo
campanello (ding-dong). Al suono del
campanello, rilasciare il tasto di prova.
automaticamente per segnalare che l'Ice Maker
funziona correttamente.
Premendo contemporaneamente la leva
di erogazione dell'acqua e del ghiaccio,
il dispenser attiva solo la funzione
selezionata o premuta per prima.
In caso di interruzione di corrente, i
ATTENZIONE
cubetti di ghiaccio possono sciogliersi
e congelarsi in un unico blocco al
riattivarsi dell'alimentazione, provocando il
Dopo avere erogato l'acqua, attendere 1
secondo prima di rimuovere il bicchiere per
evitare fuoriuscite.
Non tirare verso di sé la leva del dispenser
dopo l'erogazione di ghiaccio o acqua.
malfunzionamento del dispenser.
Per evitare questo problema, dopo
un'interruzione di corrente estrarre il
portaghiaccio ed eliminare il ghiaccio o
l'acqua residui.
Essa tornerà indietro automaticamente.
Italiano - 36
DA68-03015D-04.indb 36DA68-03015D-04.indb 36 2015. 1. 7. 4:582015. 1. 7. 4:58

Una volta estratto il ghiaccio dal
Tasto di prova
ATTENZIONE
portaghiaccio, premere la leva del
dispenser una volta con la funzione ‘ICE
CUBED’ (Ghiaccio a cubetti) o ‘CRUSHED’
(Ghiaccio tritato) attivata.
Uso del dispenser del ghiaccio
Premere il tasto Ice (Ghiaccio) per selezionare il tipo
di ghiaccio che si desidera erogare.
Posizionare il bicchiere sotto l'erogatore e premerlo
delicatamente contro la leva per riempirlo di
ghiaccio.
Il bicchiere deve essere allineato al dispenser per
evitare la fuoriuscita del ghiaccio.
Selezionando Cubed Ice (Ghiaccio a cubetti) dopo
avere usato la modalità Crushed Ice (Ghiaccio
tritato), è possibile che si produca una piccola
quantità di ghiaccio tritato residuo.
FUNZIONAMENTO
L'Ice Maker produrrà ghiaccio più rapidamente
una volta reinserita la vaschetta portaghiaccio nel
frigorifero.
• Non inserire dita, mani o altri oggetti
AVVERTENZA
non idonei nel condotto di scarico del
ghiaccio o nel portaghiaccio.
- Il mancato rispetto di questa precauzione può
causare lesioni personali e danni materiali.
• Usare solo il dispositivo Ice Maker fornito
insieme al frigorifero.
• L'allacciamento idrico di questo frigorifero deve
essere eseguito solo da un tecnico qualifi cato e
solo alla linea dell'acqua potabile.
• L'Ice Maker richiede una pressione dell'acqua
compresa tra 20e125psi (138~862kPa) per
funzionare correttamente.
• In caso di prolungata assenza per
ATTENZIONE
vacanze o lavoro, durante la quale non
verranno utilizzati i dispenser dell'acqua
e del ghiaccio, chiudere la valvola di
mandata dell'acqua per evitare perdite.
• Se l'Ice Maker non è stato utilizzato per lungo
tempo, o le porte del freezer sono state aperte
frequentemente, i cubetti di ghiaccio potrebbero
attaccarsi tra loro.
.In tal caso, vuotare il portaghiaccio o rompere il
ghiaccio con attrezzo da cucina in legno.
Non utilizzare oggetti appuntiti come coltelli o
forchette.
• Quando si rimuove il portaghiaccio, prestare
attenzione poiché l'Ice Maker potrebbe
contenere del ghiaccio residuo.
L'Ice Maker potrebbe espellere il ghiaccio
all'interno del freezer.
Coperchio Ice Maker
PortaghiaccioScarico del ghiaccio
• Se non si riesce a erogare ghiaccio,
ATTENZIONE
rimuovere il coperchio dell'Ice Maker
e premere il tasto di prova situato sul
dispositivo.
• Non premere continuamente il tasto di prova
quando il cassetto è pieno di ghiaccio o acqua.
L'acqua potrebbe traboccare oppure il ghiaccio
potrebbe bloccare l'Ice Maker o il dispenser.
Tasto di prova
Italiano - 37
DA68-03015D-04.indb 37DA68-03015D-04.indb 37 2015. 1. 7. 4:582015. 1. 7. 4:58

Per avere più spazio per conservare i
BALCONCINO FRE-UPP (opzionale)
Ripiano
Cassetto superiore
Sensore umidità
esterna
Sensore temperatura
esterna
Sensori temperatura interna
surgelati, rimuovere il coperchio dell’Ice
Maker e il cassetto snack e sostituire il
portaghiaccio con il balconcino freezer.
Rimuovendo il portaghiaccio, sul display
lampeggerà la spia ICE OFF (Disattivazione
ghiaccio).
E’ inoltre possibile rimuovere il cassetto
superiore del freezer.
Ciò non infl uenza le caratteristiche termiche
e meccaniche del prodotto. Il volume di
conservazione dichiarato per lo scomparto
surgelati è calcolato con il balconcino
freezer installato e il coperchio dell’Ice
Maker, il cassetto snack e il cassetto
superiore rimossi.
BALCONCINO FRE-UPP (opzionale)
FUNZIONI SMART ECO
Sistema Smart Eco
Mantiene la freschezza dei cibi mediante 4 sensori
che funzionano in base alle condizioni ambientali, le
abitudini di utilizzo, lo stato operativo del frigorifero
consentendo al contempo di risparmiare energia.
Sensore temperatura
esterna
Sensore umidità
esterna
Coperchio Ice Maker
PortaghiaccioScarico del ghiaccio
Ripiano
Cassetto superiore
Sensori temperatura interna
Italiano - 38
DA68-03015D-04.indb 38DA68-03015D-04.indb 38 2015. 1. 7. 4:582015. 1. 7. 4:58

BALCONCINO FRIGO
1
2
MULTIFUNZIONE
Si tratta di un divisore rimovibile utile per la
conservazione dei cibi.
I cibi possono essere conservati per
tipologia.
Come usare il supporto multifunzione
FUNZIONAMENTO
• Montare il divisore quando si conservano
insieme bottiglie sottili di sughi e condimenti e
bevande in lattina.
• Rimuovere il divisore quando si conservano
latte e bevande in cartone.
Come usare il divisore
1. Per suddividere lo scomparto, inserire il divisore
come mostrato nel disegno.
2. Quando non serve, basta ruotarlo nella
posizione di chiusura come mostrato nel
disegno.
1. Quando non serve, lasciare il supporto ripiegato
come mostrato nel disegno.
2. Ripiegare il supporto multifunzione in posizione
1 per impedire la caduta degli oggetti.
1
3. Ripiegare il supporto multifunzione in posizione
2 per utilizzarlo come divisorio.
2
Italiano - 39
DA68-03015D-04.indb 39DA68-03015D-04.indb 39 2015. 1. 7. 4:592015. 1. 7. 4:59

RIMOZIONE DEGLI ACCESSORI
(1)
(2)
(3)
(Opzionale)
FRIGO
1. Ripiani (Freezer/Frigorifero)
• Aprire completamente la porta, quindi sollevare
i ripiani ed estrarli.
(1)
3. Cassetto
• Estrarre il cassetto tirandolo verso di sé e
sollevandolo leggermente verso l'alto.
• Se la porta non dovesse aprirsi completamente,
tirare verso di sé il ripiano, sollevarlo e ruotarlo
per estrarlo.
(2)
(3)
Prestare attenzione a non inserire il ripiano
ATTENZIONE
sottosopra o al contrario.
I contenitori in vetro possono gra are la
superfi cie dei ripiani in vetro.
2. Balconcini
• Rimuovere i balconcini a errandoli con
entrambe le mani e sollevandoli con delicatezza.
4. Coperchio Cassetto verdure/Alimenti secchi
• Estrarre lo scomparto sopra il Cassetto verdure
(frigorifero)/Alimenti secchi (freezer).
• Premere i fermi posti su entrambi i lati del
Cassetto verdure (frigorifero)/Alimenti secchi
(freezer) e tirarli verso di sé per estrarre il
cassetto.
(Opzionale)
5. Cassetto verdure/Alimenti secchi
• Prima di estrarre il Cassetto verdura/Alimenti
secchi è necessario estrarre i balconcini dalla
porta.
• Sollevare leggermente il cassetto nel tirarlo
verso di sé.
Italiano - 40
DA68-03015D-04.indb 40DA68-03015D-04.indb 40 2015. 1. 7. 4:592015. 1. 7. 4:59

6. Portaghiaccio (Freezer)
• Rimuovere il portaghiaccio sollevandolo verso
l’alto ed estraendolo lentamente.
• A errare la maniglia come mostrato in fi gura.
• Estrarre lentamente il portaghiaccio per evitare
di danneggiarlo.
PULIZIA DEL FRIGORIFERO
• Per pulire il frigorifero non usare
AVVERTENZA
• Non spruzzare acqua sul frigorifero se
1. Scollegare la spina del cavo di alimentazione
benzene, diluenti, Clorox o detergenti
per auto. L'uso di questi prodotti
potrebbe danneggiare la superfi cie
dell'apparecchio e causare un incendio.
l'apparecchio è collegato elettricamente
.La mancata osservanza di questa precauzione
può causare una scarica elettrica.
Per pulire il frigorifero seguire le fasi indicate
sotto:
dalla presa a parete.
FUNZIONAMENTO
Non applicare una forza eccessiva durante
la rimozione del coperchio del cassetto.
In caso contrario, il coperchio potrebbe
rompersi e causare lesioni.
Prima di rimuovere qualunque accessorio,
verifi care che questo non contenga
alimenti.
Laddove possibile, rimuovere
contemporaneamente tutti gli alimenti
contenuti nel frigorifero per non incorrere in
spiacevoli incidenti.
7. Rimozione deodorante
• Tirare leggermente a sé il ripiano, quindi estrarlo
premendo contemporaneamente il fermo del
coprideodorante con un cacciavite a lama
piatta.
8. Pulizia dell’unità Deodorante
• Pulire il deodorante una volta ogni due anni
o quando si ritiene che la sua funzionalità sia
diminuita.
• Lasciare asciugare il deodorante al sole per 24
ore, quindi rimontarlo seguendo la procedura di
rimozione in senso inverso.
2. Inumidire leggermente un panno morbido privo
di pelucchi o della carta.
Per la pulizia del frigorifero non usare
detersivi di alcun tipo perché potrebbero
scolorire o danneggiare l'apparecchio.
3. Strofi nare l'interno e l'esterno del frigorifero
fi nché sarà pulito e asciutto.
4. Ricollegare la spina del cavo di alimentazione
alla presa a parete.
SOSTITUZIONE DELLE
LAMPADINE INTERNE
Lampadina LED Freezer / Frigorifero
• Se il coperchio della lampadina LED è
macchiato, la luce emessa dal LED potrebbe
non essere brillante.
Pulire la superfi cie del coperchio con un panno
asciutto e pulito per ripristinare l’intensità della
luce.
Non smontare o sostituire le lampadine a
ATTENZIONE
LED autonomamente.
Per sostituire una lampadina a LED
contattare il centro assistenza Samsung o
un rivenditore Samsung autorizzato.
Il tentativo di sostituire autonomamente
una lampadina a LED può comportare
il rischio di scariche elettriche o lesioni
personali.
Italiano - 41
DA68-03015D-04.indb 41DA68-03015D-04.indb 41 2015. 1. 7. 4:592015. 1. 7. 4:59

PER MIGLIORARE
Presa di ventilazione
dell'aria fredda
LE PRESTAZIONI DI
RAFFREDDAMENTO
Se la presa di ventilazione dell'aria fredda
è ostruita dagli alimenti, l'aria fredda non
potrà penetrare all'intero del comparto, la
surgelazione del cibo sarà ine ciente e le
prestazioni di ra reddamento non saranno
ottimali.
Presa di ventilazione
dell'aria fredda
SOSTITUZIONE DEL FILTRO
ACQUA
Per ridurre il rischio di danni alla proprietà
AVVERTENZA
provocati dall'acqua, NON usare nel
frigorifero SAMSUNG fi ltri acqua di altre
marche.
USARE SOLO FILTRI ACQUA SAMSUNG.
SAMSUNG non potrà essere ritenuta legalmente
responsabile di eventuali danni inclusi, a titolo
esemplifi cativo ma non esaustivo, danni alla
proprietà causati da perdite d'acqua dovute all'uso
di un fi ltro dell'acqua generico.
I frigoriferi SAMSUNG sono progettati per
funzionare SOLO CON fi ltri dell'acqua SAMSUNG.
La "spia fi ltro" si accende per segnalare la necessità
di sostituire la cartuccia del fi ltro dell'acqua.
Per consentire all'utente di procurarsi un nuovo
fi ltro, la spia rossa si accende appena prima che
la cartuccia installata esaurisca la sua capacità di
fi ltrazione.
La pronta sostituzione del fi ltro consente al
frigorifero di erogare acqua più fresca e pulita.
Per sostituire il fi ltro dell'acqua, seguire questi
passaggi:
1. Ruotare il fi ltro acqua di
90° in senso antiorario.
2. Estrarre il fi ltro dal suo
alloggiamento.
3. Inserire il nuovo fi ltro
all'interno del suo
alloggiamento.
Italiano - 42
DA68-03015D-04.indb 42DA68-03015D-04.indb 42 2015. 1. 7. 4:592015. 1. 7. 4:59

4. Ruotare il nuovo fi ltro
acqua di 90° in senso
orario.
5. Tenere premuto il tasto “Lighting / °C↔°F
(3sec)” (Illuminazione) ( ) per 3 secondi per
azzerare il timer del fi ltro dell’acqua.
Il colore della spia passa da rosso a spento.
Una cartuccia fi ltro appena installata
potrebbe provocare un breve schizzo
d'acqua dal dispenser.
Ciò è dovuto alla presenza di aria all'interno
del tubo.
Non è indice di malfunzionamento.
Durante la sostituzione del fi ltro dell'acqua,
ATTENZIONE
l'acqua fl uisce sul fondo del frigorifero.
Tale condizione è temporanea, perciò è
su ciente rimuovere l'acqua per utilizzare
l'apparecchio normalmente.
Alimentazione dell'acqua a osmosi
inversa IMPORTANTE:
La pressione dell'alimentazione dell'acqua che
esce da un sistema a osmosi inversa e arriva alla
valvola di immissione dell'acqua del frigorifero deve
essere compresa tra 35 e 120psi (241 e 827kPa).
Se un sistema di fi ltrazione dell'acqua a osmosi
inversa è collegato all'alimentazione dell'acqua
fredda, la pressione dell'acqua che arriva al
sistema a osmosi inversa deve essere minimo di
40 - 60 psi (276 - 414kPa.)
Se la pressione idrica che arriva al sistema a
osmosi inversa è inferiore a 40 - 60psi (276 414kPa):
• Controllare se il fi ltro sedimenti nel sistema a
osmosi inversa è bloccato.
Sostituire il fi ltro se necessario.
• Dopo un utilizzo intensivo lasciare che il
serbatoio sul sistema a osmosi inversa si
riempia.
• Se il frigorifero ha un fi ltro dell'acqua, questo
può ridurre la pressione dell'acqua se usato
insieme a un sistema a osmosi inversa.
Rimuovere il fi ltro dell'acqua.
In caso di domande sulla pressione idrica,
chiamare un idraulico autorizzato e qualifi cato.
FUNZIONAMENTO
Rimozione di residui all'interno del
tubo di alimentazione dell'acqua dopo
l'installazione di un nuovo fi ltro.
1. Premere il tasto Water (Acqua), quindi premere
la leva del dispenser con un bicchiere o una
tazza.
2. Flussare circa 4 litri d'acqua attraverso il fi ltro,
un bicchiere o tazza alla volta.
(Flussare per circa 6 minuti.)
Questo accorgimento consente di pulire il
sistema di mandata dell'acqua ed eliminare
l'aria dai tubi.
- Un ulteriore fl ussaggio può essere necessario in
determinate situazioni.
3. Aprire le porte del frigorifero e accertarsi che
non vi siano perdite d'acqua provenienti dal
fi ltro.
DA68-03015D-04.indb 43DA68-03015D-04.indb 43 2015. 1. 7. 4:592015. 1. 7. 4:59
Ordinazione di fi ltri sostitutivi
Per ordinare altre cartucce per il fi ltro dell'acqua,
contattare un rivenditore Samsung autorizzato.
Italiano - 43

USO DELL'ICE MAKER
(OPZIONALE)
• Per estrarre il portaghiaccio.
- Tenere premuta la maniglia come mostrato nella
fi gura 1.
- Sollevare ed estrarre il portaghiaccio
delicatamente.
- Estrarre lentamente il portaghiaccio per evitare
di danneggiarlo.
- Rimontando il portaghiaccio, tenere premuto il
tasto ICE (Ghiaccio) per 6 secondi.
• Funzionamento normale
- I rumori che si avvertono durante la caduta
dei cubetti nel portaghiaccio sono parte del
normale funzionamento.
- In caso di prolungato inutilizzo del dispenser del
ghiaccio, all'interno del portaghiaccio i cubetti
potrebbero fondersi insieme formando un
blocco unico.
Se ciò dovesse verifi carsi, svuotare
completamente il portaghiaccio.
- Se dall'erogatore non esce ghiaccio, il
condotto di scarico potrebbe essere ostruito
da un accumulo di ghiaccio, in questo caso
rimuoverlo.
- I primi cubetti di ghiaccio formati dopo
l'installazione dell'apparecchio potrebbero
risultare di piccole dimensioni a causa dell'aria
contenuta nel tubo dell'acqua. In condizioni
d'uso normali l'aria residua verrà espulsa.
• Quando la spia Ice O (Disattivazione
ATTENZIONE
ghiaccio) lampeggia sul display, reinserire
il portaghiaccio e/o verifi carne il corretto
inserimento.
• A porta aperta, il dispenser del ghiaccio e
dell'acqua non funzionano.
• Se si chiude la porta con una forza eccessiva,
l'acqua contenuta nell'Ice Maker potrebbe
fuoriuscire.
• Quando si estrae il portaghiaccio, tenerlo con
entrambe le mani per evitare di farlo cadere.
• Pulire subito eventuale ghiaccio o acqua caduti
accidentalmente sul pavimento per evitare
lesioni.
• Non lasciare che i bambini si appendano al
dispenser del ghiaccio o al portaghiaccio.
Potrebbero ferirsi.
• Non inserire mani o eventuali oggetti nello
scarico del ghiaccio.
La mancata osservanza di questa precauzione
può causare lesioni personali o danni alle parti
meccaniche.
• Prestare attenzione quando si conservano in
freezer alimenti contenuti in sacchetti di plastica.
Sacchetti conservati in modo inappropriato
possono restare impigliati nel motore dell'Ice
Maker impedendo al frigorifero di erogare
ghiaccio o provocando l'imprevista apertura
della porta del freezer.
ghiaccio
Italiano - 44
DA68-03015D-04.indb 44DA68-03015D-04.indb 44 2015. 1. 7. 4:592015. 1. 7. 4:59

Risoluzione dei problemi
PROBLEMA SOLUZIONE
Il frigorifero
non funziona o
non ra redda a
su cienza.
Il cibo all'interno
del frigorifero è
ghiacciato.
Si avvertono rumori
o suoni insoliti.
Gli angoli anteriori
dell'apparecchio
sono caldi e si
verifi ca condensa.
• Verifi care che la spina sia correttamente inserita nella presa.
• Il controllo della temperatura sul display è impostato sulla temperatura
corretta?
Provare a impostare una temperatura inferiore.
• Il frigorifero è esposto a luce solare diretta o posizionato troppo vicino a
una fonte di calore?
• Il retro del frigorifero è troppo vicino alla parete pertanto l'aria non circola
liberamente?
• Il controllo della temperatura sul display è impostato sulla temperatura
corretta?
Provare a impostare una temperatura superiore.
• La temperatura nella stanza è troppo bassa?
• Sono stati conservati alimenti ad alto contenuto d'acqua nella parte più
fredda del frigorifero?
• Controllare che il frigorifero sia stabile e livellato.
• Il retro del frigorifero è troppo vicino alla parete pertanto l'aria non circola
liberamente?
• Qualcosa è caduto dietro o sotto il frigorifero?
• Se si avverte un ticchettio provenire dall'interno del frigorifero non si tratta
di un malfunzionamento ma di una condizione normale.
Ciò è dovuto alle variazioni di temperatura all'interno del frigorifero che
provocano la contrazione e l'espansione di alcuni elementi.
• La presenza di una certa quantità di calore è normale ed è causata dai
dispositivi anticondensa installati negli angoli anteriori del frigorifero.
• La porta del frigorifero è rimasta socchiusa?
Se una porta rimane aperta per lungo tempo può formarsi condensa.
• Se un cassetto del frigorifero contiene verdura è normale che si formi
condensa.
La condensa si dissiperà naturalmente col tempo.
RISOLUZIONE DEI PROBLEMI
Non viene erogato
ghiaccio.
Si avverte un
gorgoglio d'acqua
nel frigorifero.
DA68-03015D-04.indb 45DA68-03015D-04.indb 45 2015. 1. 7. 4:592015. 1. 7. 4:59
• Si sono attese 12 ore dopo l'installazione del tubo di alimentazione
dell'acqua prima di produrre il ghiaccio?
• Il tubo dell'acqua è collegato e la valvola di chiusura aperta?
• E' stata arrestata manualmente la funzione di produzione del ghiaccio?
Verifi care che la funzione Ice (Ghiaccio) sia impostata su Cubed (Ghiaccio a
cubetti) o Crushed (Ghiaccio tritato).
• Nel portaghiaccio i cubetti si sono fusi formando un blocco di ghiaccio?
Rimuovere il ghiaccio.
• La temperatura del freezer è troppo alta? Provare a impostare una
temperatura più bassa per il freezer.
• Ciò è normale.
Il gorgoglio proviene dalla circolazione del liquido refrigerante nel frigorifero.
Italiano - 45

PROBLEMA SOLUZIONE
All'interno del
frigorifero si
avverte cattivo
odore.
Presenza di
ghiaccio sulle
pareti del freezer.
Il dispenser
dell'acqua non
funziona.
Cosa fare quando
la porta del freezer
non si chiude bene.
• Sono presenti residui di cibo?
• Verifi care che gli alimenti caratterizzati da un odore intenso (il pesce, per
esempio) siano avvolti o collocati in contenitori sottovuoto.
• Pulire il freezer periodicamente e rimuovere eventuali residui di cibo o
alimenti scaduti.
• Le aperture di ventilazione sono ostruite?
Rimuovere eventuali ostruzioni per consentire la libera circolazione dell'aria.
• Lasciare spazio su ciente tra i cibi per una corretta circolazione dell'aria.
• La porta del freezer è chiusa correttamente?
• Il tubo dell'acqua è collegato e la valvola di chiusura aperta?
• Il tubo di alimentazione dell'acqua è stato schiacciato o piegato?
Assicurarsi che il tubo sia libero e non ostruito.
• Il serbatoio dell'acqua è gelato perché la temperatura del frigorifero è
troppo bassa?
Provare a selezionare una temperatura superiore sul display.
• Premere la leva del dispenser e verifi care il fl usso dell’acqua.
• Premere la leva del dispenser (in modalità Ghiaccio) e verifi care il
funzionamento del motore della coclea.
• Rimuovere eventuali alimenti conservati sui ripiani che potrebbero ostruire
l’azionamento della coclea.
Precauzioni : Se non è stato erogato ghiaccio per un lungo periodo
di tempo, il ghiaccio rimasto nel portaghiaccio potrebbe ostacolare il
funzionamento della coclea e bloccare l’erogazione.
Rimuovere tutto il ghiaccio presente nel portaghiaccio e gli alimenti conservati
che potrebbero ostruire l’azionamento della coclea.
Utilizzare il dispenser (acqua e ghiaccio) per migliorare la chiusura automatica
della porta del freezer.
Italiano - 46
DA68-03015D-04.indb 46DA68-03015D-04.indb 46 2015. 1. 7. 4:592015. 1. 7. 4:59

Memo
DA68-03015D-04.indb 47DA68-03015D-04.indb 47 2015. 1. 7. 4:592015. 1. 7. 4:59

Limiti di temperatura ambiente
Il frigorifero è progettato per operare entro la gamma di temperature ambiente specifi cata per la sua
classe e indicata sull’etichetta.
Classe Simbolo
Temperata estesa SN da +10 a +32 da +10 a +32
Temperata N da +16 a +32 da +16 a +32
Subtropicale ST da +16 a +38 da +18 a +38
Tropicale T da +16 a +43 da +18 a +43
Intervallo temperatura ambiente (°C)
IEC 62552 (ISO 15502) ISO 8561
La temperatura interna può essere infl uenzata da molti fattori, come la posizione del frigorifero, la
temperatura ambiente e la frequenza di apertura delle porte.
Regolare la temperatura secondo necessità per compensare tali fattori.
Corretto smaltimento del prodotto
(rifi uti elettrici ed elettronici)
Italiano
(Applicabile nei Paesi con sistemi di raccolta differenziata)
Il simbolo riportato sul prodotto, sugli accessori o sulla documentazione indica che il prodotto
e i relativi accessori elettronici (quali caricabatterie, cuffi a e cavo USB) non devono essere
smaltiti con altri rifi uti al termine del ciclo di vita. Per evitare eventuali danni all'ambiente o
alla salute causati dallo smaltimento dei rifi uti non corretto, si invita l'utente a separare il
prodotto e i suddetti accessori da altri tipi di rifi uti, conferendoli ai soggetti autorizzati secondo
le normative locali.
Gli utenti domestici sono invitati a contattare il rivenditore presso il quale è stato acquistato
il prodotto o l’autorità competente per tutte le informazioni relative alla raccolta differenziata
di questo tipo di materiali.
Gli utenti professionali (imprese e professionisti) sono invitati a contattare il proprio fornitore e
verifi care i termini e le condizioni del contratto di acquisto. Questo prodotto e i relativi acces-
sori elettronici non devono essere smaltiti unitamente ad altri rifi uti commerciali.
Per ulteriori informazioni sulle procedure di smaltimento e riciclaggio in sicurezza visitare il nostro sito web
all’indirizzo www.samsung.com, oppure chiamare il servizio di assistenza telefonica ai numeri riportati
nell’elenco SAMSUNG WORLD WIDE.
Contatta SAMSUNG WORLD WIDE
Se hai commenti o domande sui prodotti Samsung,
contatta il Servizio Clienti Samsung
Samsung Electronics Italia S.p.A Via C. Donat Cattin, 5 20063,
Cernusco Sul Naviglio (MI)
800-SAMSUNG (800.7267864)
www.samsung.com/it/support
DA68-03015D-04.indb 48DA68-03015D-04.indb 48 2015. 1. 7. 4:592015. 1. 7. 4:59

Frigorífi co
manual del usuario
Este manual se ha elaborado con papel 100 % reciclado.
imagine las posibilidades
Gracias por adquirir este producto Samsung.
Electrodoméstico independiente
DA68-03015D-04.indb 1DA68-03015D-04.indb 1 2015. 1. 7. 4:592015. 1. 7. 4:59

Índice
INFORMACIÓN DE SEGURIDAD …………………………………………… 2
PUESTA EN MARCHA DEL FRIGORÍFICO ……………………………… 15
FUNCIONAMIENTO DEL FRIGORÍFICO SAMSUNG …………………… 29
SOLUCIÓN DE PROBLEMAS …………………………………………… 45
Información de seguridad
INFORMACIÓN DE
SEGURIDAD
• Antes de poner en marcha el
aparato, lea atentamente este
manual y consérvelo en un lugar
seguro cerca del aparato para
futuras consultas.
• Utilice este aparato solo para
las funciones propias que se
describen en este manual de
instrucciones.
Este electrodoméstico no
está diseñado para que lo
usen personas (incluidos los
niños) con discapacidad física,
mental y sensorial, o faltas de
conocimiento y experiencia, sin
la supervisión o las indicaciones
de una persona responsable
que garanticen un uso seguro
del aparato.
• Este electrodoméstico lo
pueden utilizar niños a partir
de los 8 años y personas con
discapacidad física, mental y
sensorial, siempre y cuando
tengan una supervisión o
instrucciones sobre el uso de
estos electrodomésticos de
una forma segura y siendo
consecuentes de los posibles
peligros que este pueda
ocasionar.
Los niños no deben jugar con
el electrodoméstico. La limpieza
y el mantenimiento del aparato
deben estar supervisados por
adultos.
• Las advertencias y las
instrucciones de seguridad
importantes de este manual no
Español - 2
DA68-03015D-04.indb 2DA68-03015D-04.indb 2 2015. 1. 7. 4:592015. 1. 7. 4:59

cubren todas las situaciones
posibles que puedan surgir.
Es su responsabilidad usar el
sentido común y actuar con
precaución y cuidado durante la
instalación, el mantenimiento y
el uso del electrodoméstico.
• Ya que las siguientes
instrucciones de funcionamiento
se aplican a varios modelos, las
características de su frigorífi co
pueden variar ligeramente de
las descritas en este manual
y es posible que no sean
relevantes todos los símbolos de
advertencia. Si tiene consultas
o dudas, puede ponerse en
contacto con el centro de
servicio más cercano o solicitar
ayuda e información en línea en
www.samsung.com.
Prácticas peligrosas o
inseguras que pueden
PRECAUCIÓN
provocar lesiones
físicas leves o daños
a la propiedad.
NO intentarlo.
NO desmontar.
NO tocar.
Seguir las instrucciones
cuidadosamente.
Desconectar el enchufe
de la toma mural.
Comprobar que la
máquina está conectada
a tierra para prevenir una
descarga eléctrica.
Llamar al centro de
servicio técnico.
INFORMACIÓN DE SEGURIDAD
Nota.
Símbolos y precauciones de
seguridad importantes:
Estos símbolos de
advertencia tienen la
función de prevenir lesiones
personales a usted y a otras
personas.
Debe seguirlos
ADVERTENCIA
Prácticas peligrosas o
inseguras que pueden
provocar lesiones
físicas graves o la
muerte.
cuidadosamente.
Después de leer esta
sección, guárdela para
consultas futuras.
Español - 3
DA68-03015D-04.indb 3DA68-03015D-04.indb 3 2015. 1. 7. 4:592015. 1. 7. 4:59

Aviso CE
Se ha establecido que
este producto cumple la
Directiva sobre baja tensión
(2006/95/CE), la Directiva
sobre compatibilidad
electromagnética (2004/108/
CE), la Directiva RoHS
(2011/65/UE), el Reglamento
delegado de la comisión (UE)
N.º 1060/2010 y la Directiva
sobre diseño ecológico
(2009/125/CE) establecidas
por el Reglamento (CE) N.º
643/2009 de la Unión Europea.
(Solo para productos que se
venden en países europeos)
SEÑALES DE
ADVERTENCIA
ADVERTENCIA
IMPORTANTES
SOBRE EL
TRANSPORTE Y LA
INSTALACIÓN
• Cuando transporte
e instale el
electrodoméstico, tenga
cuidado de no dañar
ninguna pieza del circuito
de refrigeración.
• Se utilizan los refrigerantes
R-600a o R-134a.
Compruebe la etiqueta del
compresor situada en la parte
posterior del electrodoméstico o
la etiqueta de especifi caciones
del interior del frigorífi co para ver
cuál es el refrigerante utilizado.
• Cuando este producto contenga
gases infl amables (refrigerante
R-600a)
- Una fuga de refrigerante de
los tubos se puede infl amar o
causar lesiones oculares.
Si detecta una fuga de gas,
evite la presencia de llamas o
posibles fuentes de ignición y
ventile durante varios minutos la
habitación donde está instalado
el electrodoméstico.
- Para evitar que se mezclen el
gas infl amable y el aire en caso
de una fuga en el circuito de
refrigeración, el tamaño de la
habitación donde se pueda
instalar el electrodoméstico
dependerá de la cantidad de
refrigerante utilizado.
- Nunca ponga en marcha un
electrodoméstico que presente
indicios de daños. En caso de
duda, póngase en contacto con
el distribuidor.
El tamaño de la habitación
donde se instale el frigorífi co
debe ser de 1 m³ por cada 8 g
de refrigerante R-600a.
Español - 4
DA68-03015D-04.indb 4DA68-03015D-04.indb 4 2015. 1. 7. 4:592015. 1. 7. 4:59
 Loading...