

Page 1
Refrigerator
user manual
imagine the possibilities
Thank you for purchasing this Samsung product.
Free Standing Appliance
This manual is made with 100% recycled paper.
DA68-03055A-06.indb 1DA68-03055A-06.indb 1 2015. 4. 23. 8:162015. 4. 23. 8:16
Page 2
English - 2
Safety information
SAFETY INFORMATION
Before using your new Samsung French Door
Refrigerator, please read this manual thoroughly to
ensure that you know how to operate the features
and functions that your new appliance offers safely
and effi ciently.
This appliance is not intended for use by persons
(including children) with reduced physical,
sensory, or mental capabilities, or those who lack
experience and knowledge, unless they have been
given supervision or instruction concerning the use
of the appliance by a person responsible for their
safety.
Because the following instructions cover various
models, the characteristics of your refrigerator may
differ slightly from the refrigerator described in this
manual.
If you have any question, contact us at
1-800-SAMSUNG or fi nd help and information
online at www.samsung.com.
Important safety symbols and
precautions:
WARNING
Hazards or unsafe practices that may result in
severe personal injury or death.
CAUTION
Hazards or unsafe practices that may result in
minor personal injury or property damage.
Do NOT attempt.
Do NOT disassemble.
Do NOT touch.
Follow directions carefully.
Unplug the power plug from the wall
socket.
Make sure the refrigerator is grounded to
prevent electric shock.
Call the contact center for help.
Note.
These warning symbols are here to prevent
injury to you and others.
Please follow them carefully.
After reading this section, keep it in a safe
place for future reference.
Contents
SAFETY INFORMATION ……………………………………………………………… 2
SETTING UP YOUR FRENCH DOOR REFRIGERATOR ………………………… 11
OPERATING YOUR FRENCH DOOR REFRIGERATOR ………………………… 21
TROUBLESHOOTING ……………………………………………………………… 109
SAMSUNG SMART HOME SETTING GUIDE …………………………………… 112
This smart refrigerator supports from Samsung Smart Home.
More detailed information, please visit www.samsung.com
DA68-03055A-06.indb 2DA68-03055A-06.indb 2 2015. 4. 23. 8:162015. 4. 23. 8:16
Page 3
English - 3
SAFETY INFORMATION
WARNING
CRITICAL INSTALLATION
WARNINGS
• Do not install the refrigerator in a damp
location or place where it may come in
contact with water.
- Deteriorated insulation on electrical parts may
cause an electric shock or fire.
• Do not place this refrigerator in direct sunlight
or expose it to the heat from stoves, room
heaters, or other appliances.
• Do not plug several appliances into the same
multiple power strip.
The refrigerator should always be plugged into
its own individual electrical outlet which has a
voltage rating that matches the voltage listed
on the refrigerator’s rating plate.
- This provides the best performance and
also prevents overloading of house wiring
circuits, which could cause a fire hazard from
overheated wires.
• If the wall socket is loose, do not insert the
power plug.
- There is a risk of electric shock of fire.
• Do not use a power cord that has cracks or
abrasion damage along its length or at either
end.
• Do not bend the power cord excessively or
place heavy objects on it.
• Do not twist or tie the power cord.
• Do not hook the power cord over a metal
object, place a heavy object on the power
cord, insert the power cord between objects, or
push the power cord into the space behind the
appliance.
• When moving the refrigerator, be careful not to
roll over or damage the power cord.
- This may result in an electric shock or fire.
• Never unplug your refrigerator by pulling on the
power cord.
Always grip the plug fi rmly and pull straight out
from the outlet.
- Damage to the cord may cause a short-circuit,
fire, and/or electric shock.
• Do not use aerosols near the refrigerator.
- Using aerosols near the refrigerator may cause
an explosion or fire.
• Do not install this appliance near a heater or
infl ammable material.
• Do not install this appliance in a humid, oily,
or dusty location , or in a location exposed to
direct sunlight or water (rain, etc.).
• Do not install this appliance in a location where
gas may leak.
- This may result in an electric shock or fire.
• This refrigerator must be properly
located and installed in accordance
with the instructions in this manual
before you use it.
• Connect the power plug in the proper position
with the cord hanging down.
- If you connect the power plug upside down, the
wire can get cut off and cause a fire or electric
shock.
• When moving the refrigerator, be careful not to
roll over or damage the power cord.
- This constitutes a fire hazard.
• Make sure that the power plug is not crushed
or damaged by the back of the refrigerator.
• Keep the packing materials out of reach of
children.
- There is a risk of death from suffocation if a
child puts the packing materials on his or her
head.
• The appliance must be positioned so that the
plug is accessible after installation.
- Failing to do so may result in an electric shock
or fire due to electric leakage.
• You need to remove all the protective plastic
fi lm before you initially plug the product in.
• If your refrigerator comes with fasteners used
to level the doors, keep them out of reach of
children. Do not let children play with them.
- There is a risk of death from suffocation if a
child swallows a fastener.
• The refrigerator must be safely
grounded.
- Always make sure that you have grounded the
refrigerator before attempting to investigate or
repair any part of the appliance.
Power leakages can cause severe electric
shock.
• Never use gas pipes, telephone lines, or other
potential lightning attractors as an electrical
ground.
- Improper use of the grounding plug can result
in a risk of electric shock.
If it is necessary to use an extension cord, use
only a 3-wire extension cord that has a 3-blade
DA68-03055A-06.indb 3DA68-03055A-06.indb 3 2015. 4. 23. 8:162015. 4. 23. 8:16
Page 4
English - 4
grounding plug and a 3-slot receptacle that will
accept the plug on the appliance.
The marked rating of the extension cord should
be AC 115-120 V, 10 A, or more.
If a grounding adapter is used, make sure the
receptacle box is fully grounded.
• Plug the power plug into the wall socket fi rmly.
Do not use a damaged power plug, damaged
power cord, or loose wall socket.
- This may result in an electric shock or fire.
• If the power cord is damaged,
have it replaced immediately by the
manufacturer or one of its service
agents.
CAUTION
INSTALLATION CAUTIONS
• Allow suffi cient space around the
refrigerator and install it on a fl at
surface.
- If your refrigerator is not level, the internal
cooling system may not work correctly.
- Keep the ventilation space in the appliance
enclosure or mounting structure clear of
obstructions.
• Allow the appliance to stand for 2 hours after
installation.
• We strongly recommend you have a qualifi ed
technician or service company install the
refrigerator.
- Failing to do so may result in an electric shock,
fire, explosion, problems with the product, or
injury.
WARNING
CRITICAL USAGE WARNINGS
• Do not insert the power plug into a wall
socket with wet hands.
• Do not store articles on the top of the
appliance.
- When you open or close the door, the articles
may fall and cause personal injury and/or
material damage.
• Do not insert hands, feet or metal objects (such
as knives, etc.) into the bottom or the back of
the refrigerator.
- This may result in an electric shock or injury.
- Any sharp edges may cause a personal injury
• Do not put a container fi lled with water on the
refrigerator.
- If spilled, there is a risk of fire or electric shock.
• Children should be supervised to ensure that
they do not play with the appliance.
- Keep fingers out of “pinch point” areas.
Clearances between the doors and cabinet are
necessarily small. Be careful when you open
the doors if children are in the area.
• Do not let children hang on the door.
A serious injury may occur.
• Do not let children go inside the refrigerator.
They could become trapped.
• Do not insert your hands into the bottom area
under the appliance.
- Any sharp edges may cause personal injury.
• Do not let children step on a drawer cover.
- The drawer may break and cause them to slip.
• Do not overfi ll the refrigerator with food.
- When you open the door, an item may fall out
and cause personal injury or material damage.
• Do not touch the inside walls of the freezer or
products stored in the freezer with wet hands.
- This may cause frostbite.
• Never put fi ngers or other objects into the water
dispenser hole, ice chute, or ice maker bucket.
- It may cause personal injury or material
damage.
• Do not use or place any substances sensitive
to temperature such as infl ammable sprays,
infl ammable objects, dry ice, medicine, or
chemicals near or inside the refrigerator.
• Do not keep volatile or infl ammable objects
or substances (benzene, thinner, propane
gas, alcohol, ether, LP gas, and other such
DA68-03055A-06.indb 4DA68-03055A-06.indb 4 2015. 4. 23. 8:162015. 4. 23. 8:16
Page 5
English - 5
SAFETY INFORMATION
products) in the refrigerator.
- This refrigerator is for storing food only.
- This may result in fire or explosion.
• Do not store pharmaceutical products, scientifi c
materials, or temperature sensitive products in
the refrigerator.
- Products that require strict temperature
controls must not be stored in the refrigerator.
• Do not place or use an electrical appliance
inside the refrigerator, unless it is of a type
recommended by the manufacturer.
• Do not stand on top of the appliance or place
objects (such as laundry, lighted candles,
lighted cigarettes, dishes, chemicals, metal
objects, etc.) on the appliance.
This may result in an electric shock, fi re,
problems with the product, or injury.
Do not put a container fi lled with water on the
appliance.
- If spilled, there is a risk of fire or electric shock.
• Do not use mechanical devices or any other
means to accelerate the defrosting process,
other than those recommended by the
manufacturer.
• Do not damage the refrigerant circuit.
• Do not spray volatile material such as
insecticide onto the surface of the appliance.
- As well as being harmful to humans, it may also
result in an electric shock, fire, or problems with
the product.
• Never stare directly at the UV LED lamp for long
periods of time.
- This may result in eye strain due to the
ultraviolet rays.
• Do not attempt to repair, disassemble,
or modify the appliance yourself.
• Do not use any fuse (such as cooper, steel wire,
etc.) other than a standard fuse.
• If your appliance needs to be repaired or
reinstalled, contact your nearest service center.
- Failing to do so may result in an electric shock,
fire, problems with the product, or injury.
• If the interior or exterior LED lamp has gone
out, please contact your nearest service center.
• Children should be supervised to
ensure that they do not play with the
appliance.
- Keep fingers out of “pinch point” areas. :
Clearances between the doors and cabinet are
necessarily small.
Be careful when you open the doors if children
are in the area.
• Do not let children hang on the door.
A serious injury may occur.
• Do not let children go inside the refrigerator.
They could become trapped.
• Bottles should be stored tightly together so that
they do not fall out.
• This product is intended only for the storage of
food in a domestic environment.
• If a gas leak is detected, avoid any naked
fl ames or potential sources of ignition, and air
the room in which the appliance is standing for
several minutes.
- Do not touch the appliance or power cord.
- Do not use a ventilating fan.
- A spark may result in an explosion or fire.
• Use only the LED Lamps provided by the
manufacturer or its service agents.
• If the refrigerator emits a burning smell
or smoke, unplug the refrigerator
immediately and contact your
Samsung Electronics service center.
• If you experience diffi culty changing a non-LED
light, contact a Samsung service center.
• If the product is equipped with LED Lamps, do
not disassemble the Lamp Covers and LED
Lamps yourself.
- Please contact your service agents.
• If dust or water enters the refrigerator, unplug
the refrigerator and contact your Samsung
Electronics service center.
- There is a risk of fire.
DA68-03055A-06.indb 5DA68-03055A-06.indb 5 2015. 4. 23. 8:162015. 4. 23. 8:16
Page 6
English - 6
CAUTION
USAGE CAUTIONS
• Do not re-freeze frozen foods that have
thawed completely.
Do not place carbonated or fi zzy drinks
in the freezer compartment.
Do not put bottles or glass containers
in the freezer.
- When the contents freeze, the glass may break
and cause personal injury.
• Use only the ice maker provided with the
refrigerator.
• Have the refrigerator’s water supply installed by
a suitably qualifi ed person and connected only
to a potable water supply.
To operate the ice maker properly, water
pressure of 20 ~ 125psi (138 ~ 862kPa) is
required.
If you will be away from home for a long period
of time (on vacation, for example) and won’t
be using the water or ice dispensers, close the
water valve.
- Otherwise, water leakage may occur.
• If you won’t be using the refrigerator for a very
long period of time, (3 weeks or more) empty
the refrigerator, unplug it, close the water valve,
wipe excess moisture from the inside walls,
and leave the doors open to prevent odors and
mold.
• Service Warranty and Modifi cation.
• Any changes or modifi cations
performed by a 3rd party on this
fi nished appliance are not covered
under Samsung warranty service, nor is
Samsung responsible for safety issues
that result from 3rd party modifi cations.
• Do not block the air vents inside the refrigerator.
- If the air vents are blocked, especially with a
plastic bag, the refrigerator can be over cooled.
If this cooling period lasts too long, the water
filter may break and cause water leakage.
• If the refrigerator is disconnected from the
power supply, you should wait for at least fi ve
minutes before plugging it back in.
• If you have a long vacation planned or do not
intend to use the refrigerator for a long period of
time, (3 weeks or more) empty the refrigerator,
pull out the power plug, close the water valve,
wipe excess moisture from the inside walls,
and leave the doors open to prevent odors and
mold.
- Letting the refrigerator run long periods of time
without using it can cause the insulation to
deteriorate and may cause a fire.
• To get the best performance from the product:
- Do not place food too close to the vents at the
rear of the appliance as it can obstruct free air
circulation in the refrigerator compartment.
- Wrap food up properly or place it in airtight
containers before putting it into the refrigerator.
- Do not place glasses, bottles, or carbonated
beverages in the freezer.
These items may freeze and break.
Broken glasses, bottles, and beverage
containers can cause injury.
- Please observe maximum storage times and
expiration dates of frozen goods.
- There is no need to disconnect the refrigerator
from the power supply if you will be away for
less than three weeks.
However, if you will be away for more than
three weeks, remove all the food, unplug the
refrigerator, close the water valve, wipe excess
moisture from the inside walls, and leave the
doors open to prevent odors and mold.
• Fill the water tank and ice cube trays with
potable water only (tap water, mineral water, or
purifi ed water).
- Do not fill the tank with tea or a Sports drink.
This may damage the refrigerator.
• Do not strike or apply excessive force to any
glass surface.
- Broken glass may result in a personal injury
and/or property damage.
• If the product is fl ooded, make sure to
contact your nearest service center.
- There is a risk of electric shock or fire.
DA68-03055A-06.indb 6DA68-03055A-06.indb 6 2015. 4. 23. 8:162015. 4. 23. 8:16
Page 7
English - 7
SAFETY INFORMATION
CAUTION
CLEANING CAUTIONS
• Do not spray water directly on the
inside or outside the refrigerator.
- There is a risk of fire or electric shock.
• Do not use a hair dryer to dry the inside of the
refrigerator.
• Do not place a lighted candle in the refrigerator
to remove bad odors.
- This may result in an electric shock or fire.
• Use a clean, dry cloth to remove any
foreign matter or dust from the power
plug blades.
Do not use a wet or damp cloth when
cleaning the plug.
- Otherwise, there is a risk of fire or electric
shock.
• Before cleaning or performing
maintenance, unplug the appliance
from the wall socket.
- Failing to do so may result in an electric shock
or fire.
WARNING
• This product contains chemicals known to
the State of California to cause cancer and
reproductive toxicity.
WARNING
CRITICAL DISPOSAL WARNINGS
• DANGER : Risk of child entrapment.
Before you throw away your old
refrigerator or freezer:
- Take off the doors and door latch.
- Leave the shelves in place so that children
cannot easily climb inside.
- Children trapped inside a refrigerator can hurt
themselves or suffocate to death.
• Please dispose of the packaging material from
this product in an environmentally friendly
manner.
• Ensure that none of the pipes on the back of
the appliance are damaged prior to disposal.
• R-600a or R-134a is used as a refrigerant.
Check the compressor label on the rear of
the appliance or the rating label inside the
fridge to see which refrigerant is used for your
refrigerator.
If this product contains fl ammable gas
(Refrigerant R-600a), contact your local
authority in regard to safe disposal of this
product.
• When disposing of this refrigerator, remove the
door/door seals and door latch so that small
children or animals cannot become trapped
inside.
Children should be supervised to ensure that
they do not play with the appliance.
If trapped inside, the child may get hurt or
suffocate to death.
• Cyclopentane is used in the insulation.
The gases in the insulation material require a
special disposal procedure.
Please contact your local authorities in regard
to the environmentally safe disposal of this
product.
• Keep all packaging materials well out of the
reach of children, as packaging materials can
be dangerous to children.
- If a child places a bag over his or her head, the
child could suffocate.
DA68-03055A-06.indb 7DA68-03055A-06.indb 7 2015. 4. 23. 8:162015. 4. 23. 8:16
Page 8
English - 8
ADDITIONAL TIPS FOR
PROPER USAGE
• In the event of a power failure, call the local
offi ce of your Electricity Company and ask how
long it is going to last.
- Most power failures that are corrected in an
hour or two will not affect your refrigerator
temperatures.
However, you should minimize the number of
door openings while the power is off.
- Should the power failure last more than
24 hours, remove and discard all frozen food.
• If a key is provided with refrigerator, the keys
should be kept out of the reach of children and
not be kept in the vicinity of the appliance.
• The appliance might not operate consistently
(frozen contents can thaw or temperatures
can become too warm in the frozen food
compartment) when sited for an extended
period of time in a location where ambient
air temperatures are constantly below the
temperatures for which the appliance is
designed.
• Do not store food which goes bad easily at low
temperature, such as bananas and melons.
• Your appliance is frost free, which means there
is no need to manually defrost your appliance.
This will be carried out automatically.
• Temperature rise during defrosting complies
with ISO requirements.
But If you want to prevent an undue rise in the
temperature of frozen food while the appliance
defrosts, wrap the frozen food in several layers
of newspaper.
• Any increase in the temperature of frozen food
during defrosting can shorten its storage life.
• Do not re-freeze frozen foods that have thawed
completely.
Saving Energy Tips
- Install the appliance in a cool, dry room with
adequate ventilation.
Ensure that it is not exposed to direct sunlight
and never put it near a direct source of heat (a
radiator, for example).
- Never block any vents or grilles on the
appliance.
- Allow warm food to cool down before placing it
in the appliance.
- Put frozen food in the refrigerator to thaw.
You can then use the low temperatures of the
frozen products to cool food in the refrigerator.
- Do not keep the door of the appliance open for
too long when putting food in or taking food
out.
The shorter the time the door is open, the less
frost build-up you’ll have in the freezer.
- Provide sufficient clearance to the right, left,
back, and top for air circulation when installing
the refrigerator.
This will help reduce power consumption and
keep your energy bills lower.
DA68-03055A-06.indb 8DA68-03055A-06.indb 8 2015. 4. 23. 8:162015. 4. 23. 8:16
Page 9
English - 9
1. Regulatory Notice
1.1 FCC Notice
FCC CAUTION:
Any changes or modifi cations not expressly approved by the party responsible for compliance could void
the user’s authority to operate the equipment.
Contains Transmitter Module FCC ID: A3LWIDT30Q
This device complies with Part 15 of FCC Rules. Operation is Subject to following two conditions:
(1) This device may not cause harmful interference, and
(2) This device must accept any interference received including interference that cause undesired
operation.
For product available in the USA/Canada market, only channel 1~11 can be operated.
Selection of other channels is not possible.
FCC STATEMENT:
This equipment has been tested and found to comply within the limits for a Class B digital device,
pursuant to part 15 of the FCC Rules. These limits are designed to provide reasonable protection against
harmful interference in a residential installation.
This equipment generates, uses, and can radiate radio frequency energy and, if not installed and used
in accordance with the instructions, may cause harmful interference to radio communications. However,
there is no guarantee that interference will not occur in a particular installation. If this equipment does
cause harmful interference to radio or television reception, which can be determined by turning the
equipment off and on, the user is encouraged to try to correct the interference by one or more of the
following measures:
• Reorient or relocate the receiving antenna
• Increase the separation between the equipment and receiver
• Connect the equipment into an outlet on a different circuit from that to which the receiver is connected
• Consult the dealer or an experienced radio/TV technician for help.
FCC RADIATION EXPOSURE STATEMENT:
This equipment complies with FCC radiation exposure limits set forth for an uncontrolled environment.
This equipment should be installed and operated with a minimum distance of 20cm(7.87 inch) between
the radiator and your body. This device and its antenna(s) must not be co-located or operation in
conjunction with any other antenna or transmitter.
Any changes or modifi cations not expressly approved by the manufacturer could void the user’s authority
to operate this equipment.
CAUTION
SAVE THESE INSTRUCTIONS
DA68-03055A-06.indb 9DA68-03055A-06.indb 9 2015. 4. 23. 8:162015. 4. 23. 8:16
Page 10
English - 10
1. Regulatory Notice
1.2 IC Notice
Contains Transmitter Module IC: 649E-WIDT30Q
This device complies with Industry Canada lincence-exempt RSS standard(s).
Operation is subject to the following two conditions :
(1) this device may not cause interference, and
(2) this device must accept any interference, including interference that may cause undesired operation of
the device.
This Class B digital apparatus complies with Canadian ICES-003.
Cet appareil numérique de la classe B est conforme á la norme NMB-003 du Canada.
For product available in the USA/Canada market, only channel 1~11 can be operated.
Selection of other channels is not possible.
IC RADIATION EXPOSURE STATEMENT:
This equipment complies with IC RSS-102 radiation exposure limits set forth for an uncontrolled
environment. This equipment should be installed and operated with minimum distance 20 cm(7.87 inch)
between the radiator & your body. This device and its antenna(s) must not be co-located or operation in
conjunction with any other antenna or transmitter.
SAVE THESE INSTRUCTIONS
DA68-03055A-06.indb 10DA68-03055A-06.indb 10 2015. 4. 23. 8:162015. 4. 23. 8:16
Page 11
English - 11
SETTING UP
GETTING READY TO INSTALL
THE REFRIGERATOR
Congratulations on your purchase of this Samsung
French Door Refrigerator.
We hope you enjoy the state-of-art features and
effi ciencies that this new appliance offers.
Selecting the best location for the
refrigerator
Choose:
• A location with easy access to a water supply.
• A location without direct exposure to sunlight.
• A location with a level fl oor.
• A location with enough space for the
refrigerator doors to open easily.
• A location that provides suffi cient space to the
right, left, back, and top for air circulation.
• A location that allows you to move the
refrigerator easily if it needs maintenance or
service.
• Do not install the refrigerator where the
temperature will go below 50ºF (10ºC).
• Do not locate the refrigerator where it may
become wet.
If the refrigerator does not have enough space, the
internal cooling system may not work properly.
If your refrigerator has an ice maker, allow extra
space at the back for the water line connections.
Important: Make sure that you can easily move
your refrigerator to its fi nal location by measuring
doorways (both width and height), thresholds,
ceilings, stairways, etc.
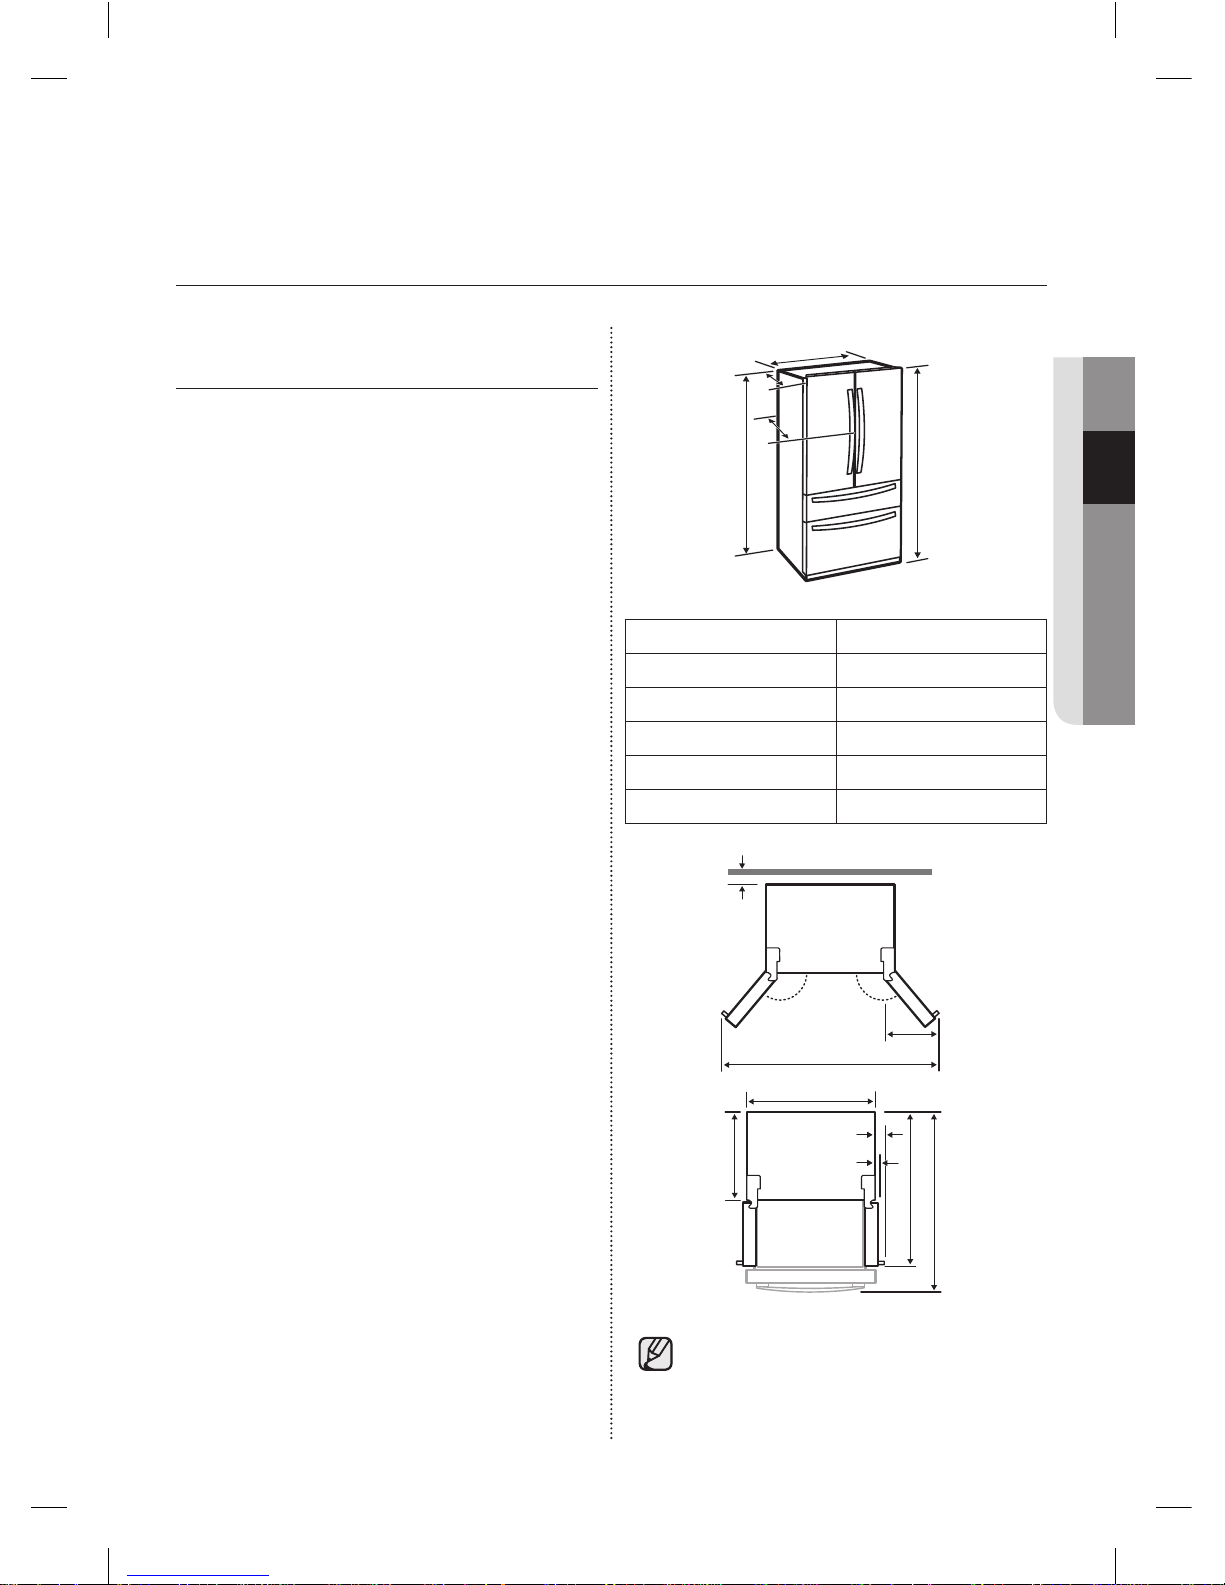
The following chart details the exact height and
depth of this Samsung French Door Refrigerator.
A
A
B
B
C
C
D
D
E
E
Model RF28HM**
Depth “A” 34” (864mm)
Width “B” 35 6/8” (908mm)
Height “C” 68 7/8” (1749mm)
Overall Height “D” 70” (1777mm)
Depth “E” 36 1/2” (926mm)
62 1/8"
62 1/8"
(1578mm)
(1578mm)
13 2/8"
13 2/8"
(335mm)
(335mm)
125°
125°
125°
125°
2" (50mm)
2" (50mm)
35 3/4" (908mm)
35 3/4" (908mm)
29 3/8"
29 3/8"
(748mm)
(748mm)
48 1/4" (1226mm)
48 1/4" (1226mm)
4 6/8" (122mm)
4 6/8" (122mm)
2 3/8" (61mm)
2 3/8" (61mm)
53" (1346mm)
53" (1346mm)
Each measurement based on the design
dimension, so it may differ depending on
the measuring method.
Setting up your French Door
Refrigerator
DA68-03055A-06.indb 11DA68-03055A-06.indb 11 2015. 4. 23. 8:162015. 4. 23. 8:16
Page 12
English - 12
CAUTION
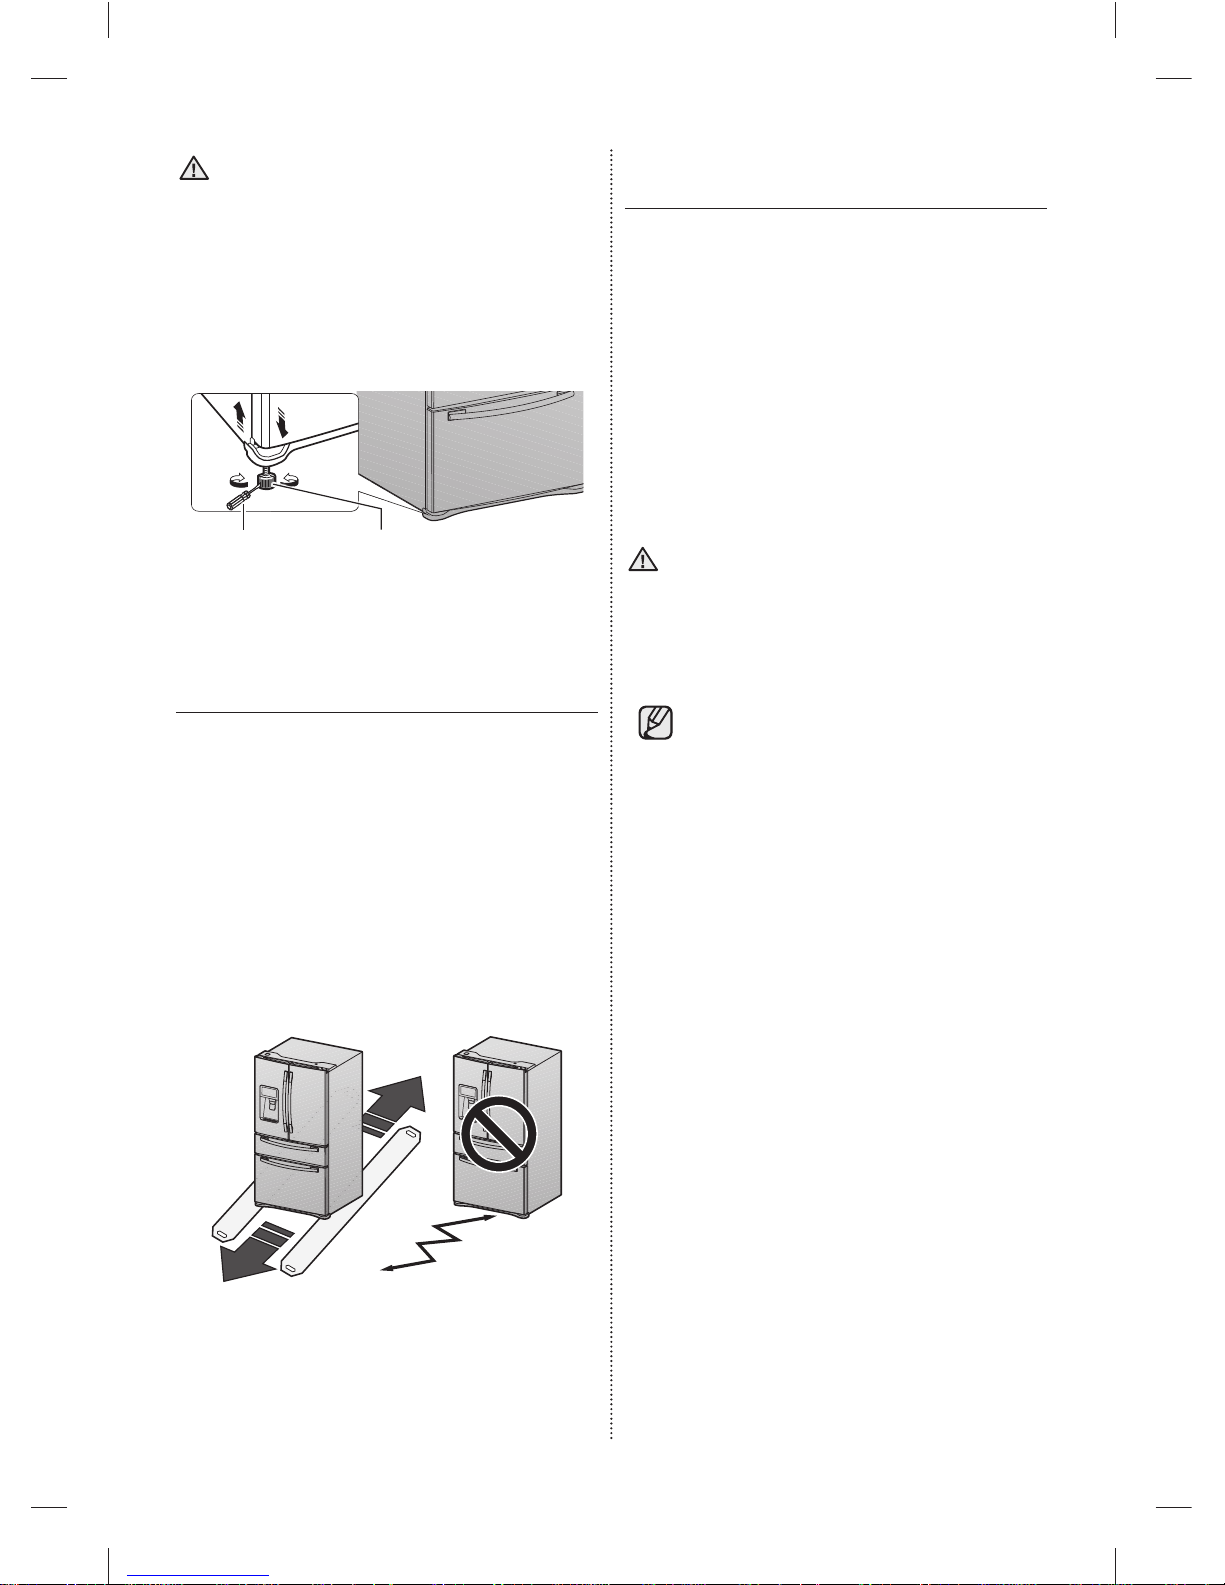
When moving your refrigerator
To prevent fl oor damage, be sure the front
adjusting legs are in the up position (above the
fl oor).
Refer to ‘ Adjusting the Level’ on page 17.
Flat-blade screw
driver (-)
driver (-)
Control Lever
Flooring
For proper installation, you must place this
refrigerator on a level, hard surface that is the
same height as the rest of the fl oor.
This surface should be strong enough to support a
fully loaded refrigerator.
To protect the fi nish of the fl ooring, cut a large
section of the cardboard carton and place it under
the refrigerator where you are working.
When moving the refrigerator, you need to pull and
push it straight forwards or back.
Do not wiggle it from side to side.
REMOVING THE REFRIGERATOR
DOORS
For some installations, you need to remove the
fridge and freezer drawers so you can move the
refrigerator to its fi nal location.
Do not remove the doors/drawer if you don’t
need to.
If you do not need to remove the refrigerator doors
or drawers, go to ‘Leveling the Refrigerator’ on
page 17. If you need to remove the doors and
drawers. continue below.
Before removing the doors or drawers, make sure
you read the following warnings:
WARNING
Disconnect power to the refrigerator before
removing the door or drawer.
• Be careful not to drop, damage
or scratch the door / drawer while
removing them.
• Be careful not to injure yourself while removing
the doors/drawer.
• Reattach the door/drawer properly to avoid:
- Moisture from air leakage.
- Uneven door alignment.
- Wasting energy due to improper door seal.
DA68-03055A-06.indb 12DA68-03055A-06.indb 12 2015. 4. 23. 8:162015. 4. 23. 8:16
Page 13

English - 13
SETTING UP
WARNING
Disassembling the refrigerator doors
Be careful not to drop and scratch the doors while
removing them.
Required Tools (Not provided)
You need the following tools to complete the
installation of your refrigerator:
Philips
screwdriver (+)
Flat-blade screw
driver (-)
Socket wrench
(13/32”) (10mm)
Pliers
Allen wrench
(3/16”) (5mm)
With the door opened
1. Remove 3 screws holding down the TOP
TABLE (1) and separate the connected wires.
(1)
(1)
2. Disconnect two connectors (2) on the left side
door. To remove the water coupler from the
hinge, twist and pull it from the hinge.
Remove the water line (3) while pressing the
marked part (4) of the water line coupler.
(2)
(3)
(3)
(4)
3. Pull and remove the hinge lever (5). Remove
the ground screw (6) attached to the upper
left door hinges with a philips screwdriver (+).
Remove the upper left and right door hinges
(7).
(5)
(7)
(6)
DA68-03055A-06.indb 13DA68-03055A-06.indb 13 2015. 4. 23. 8:162015. 4. 23. 8:16
Page 14
English - 14
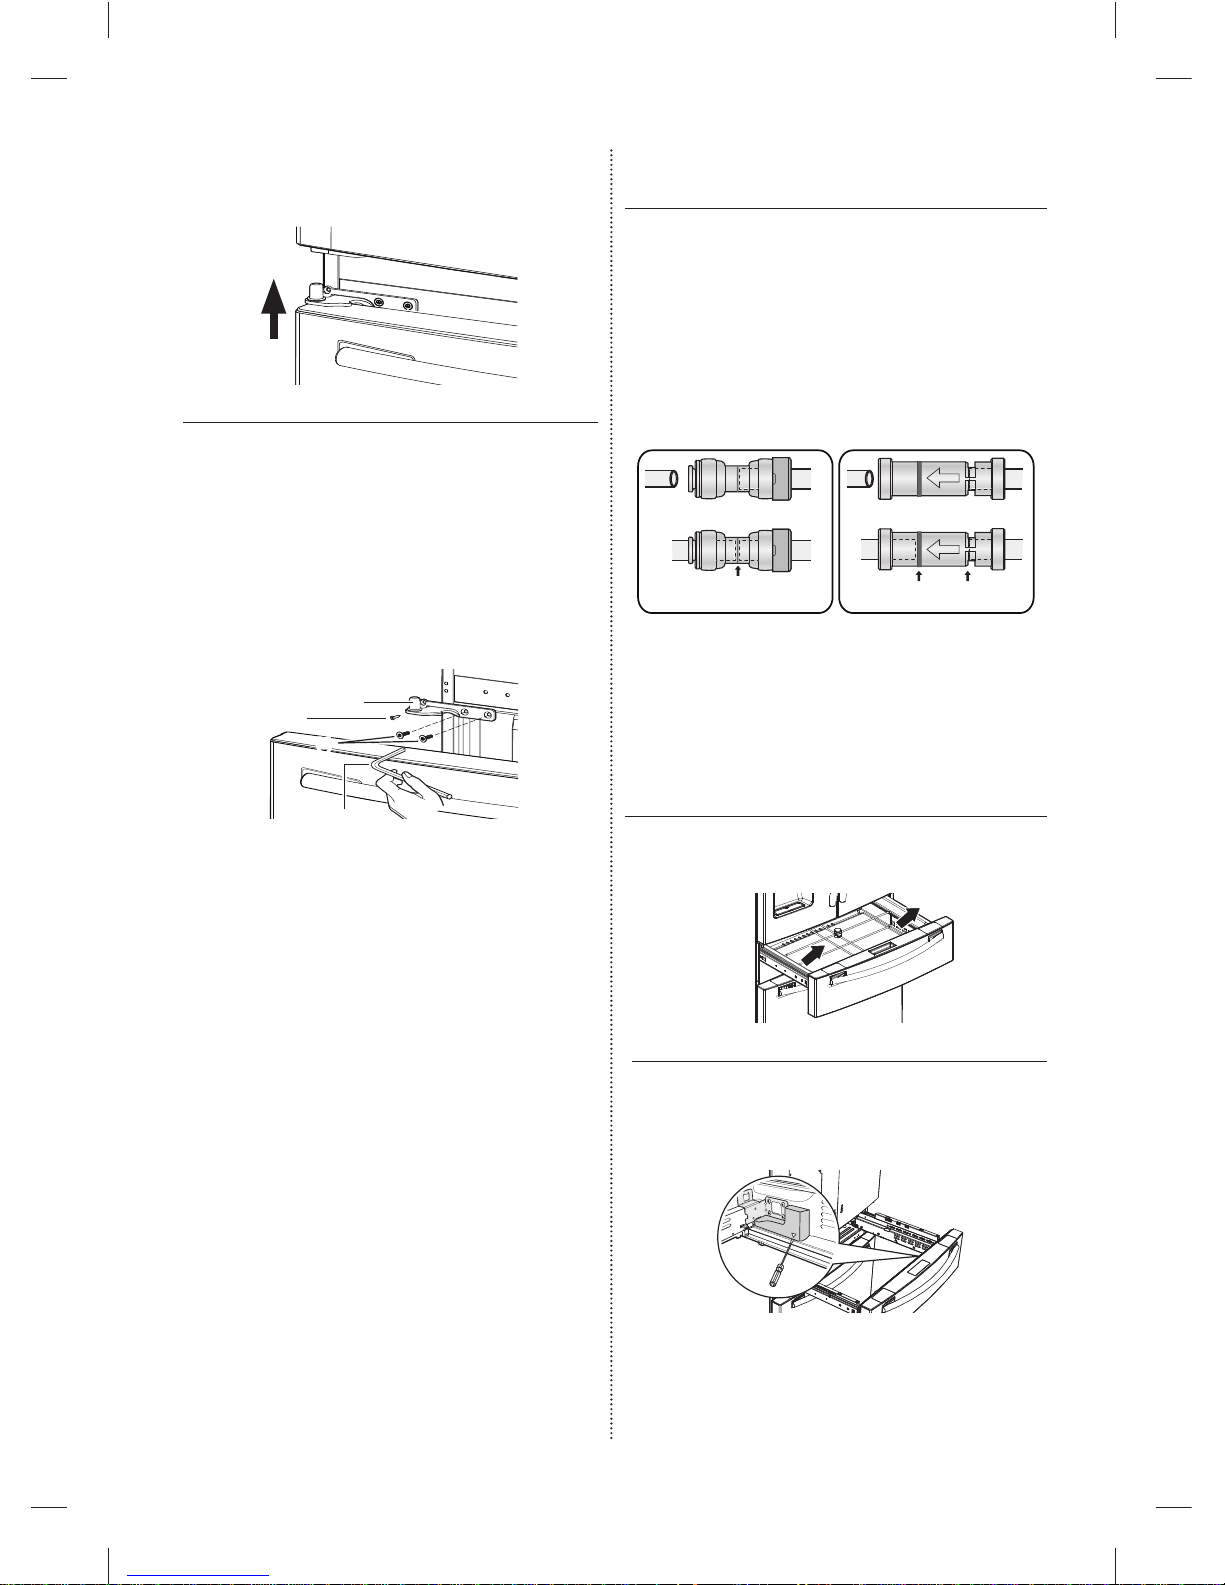
4. Lift the door straight up to remove.
5. Remove the screw (8) attached to the
lower left and right door hinges with a philips
screwdriver (+).
Remove the 2 hex head bolts (9) attached to
the lower left and right door hinges with an allen
wrench (3/16”).
Remove the lower left and right door hinges
(10).
Allen wrench
Allen wrench
(10)
(8)
(9)
REATTACHING THE
REFRIGERATOR DOORS
To reattach the fridge doors after you have moved
the fridge to its fi nal location, assemble the parts in
reverse order.
1. The Water Line must be fully inserted into the
center of the transparent coupler (Type A) or the
Guide Lines (Type B) to prevent water leakage
from the dispenser.
Center of Transparent
Center of Transparent
coupler
coupler
The Guide Lines
The Guide Lines
Dispenser
Dispenser
Type A
Type A
Type B
Type B
DISASSEMBLING THE FLEX
DOOR
1. Take out the Flex Zone (1) by lifting it up.
(1)
(1)
2. Take off the cover (2) with the harness using a
fl at-blade screwdriver (-).
(2)
(2)
DA68-03055A-06.indb 14DA68-03055A-06.indb 14 2015. 4. 23. 8:162015. 4. 23. 8:16
Page 15
English - 15
SETTING UP
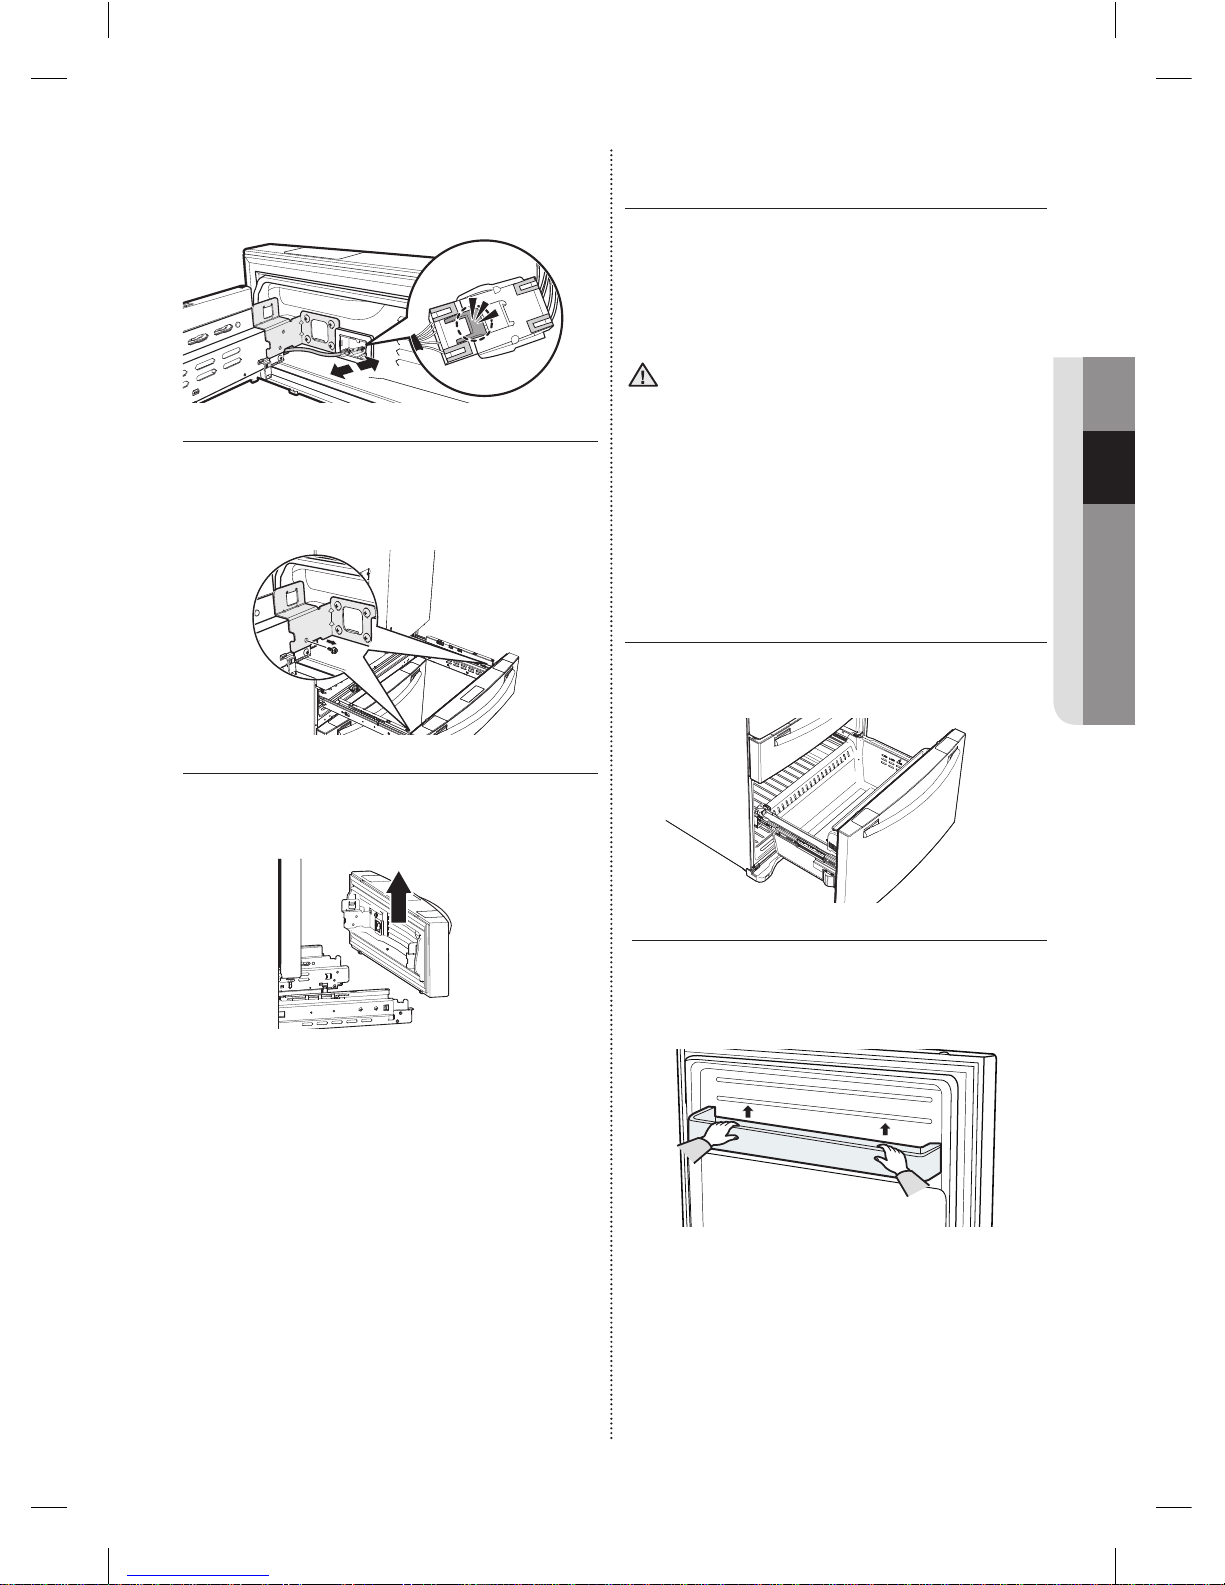
3. Press the locking tab and separate the Wire
Connector.
4. Remove 1 hex head bolt from each side with a
socket wrench (10mm).
5. Lift up the Flex door from the rails.
RE-ASSEMBLING THE FLEX
DOOR
To reattach the Flex door after you have moved the
fridge to its fi nal location, assemble parts in reverse
order.
CAUTION
Be sure to connect the Flex Door Wire Connector.
If it is not connected, the Flex Room does not
work.
DISASSEMBLING THE FREEZER
DOOR
1. Take out the upper drawer by lifting it up.
2. Remove the freeze room guard (1) by lifting
the guard up.
(1)
(1)
DA68-03055A-06.indb 15DA68-03055A-06.indb 15 2015. 4. 23. 8:162015. 4. 23. 8:16
Page 16
English - 16
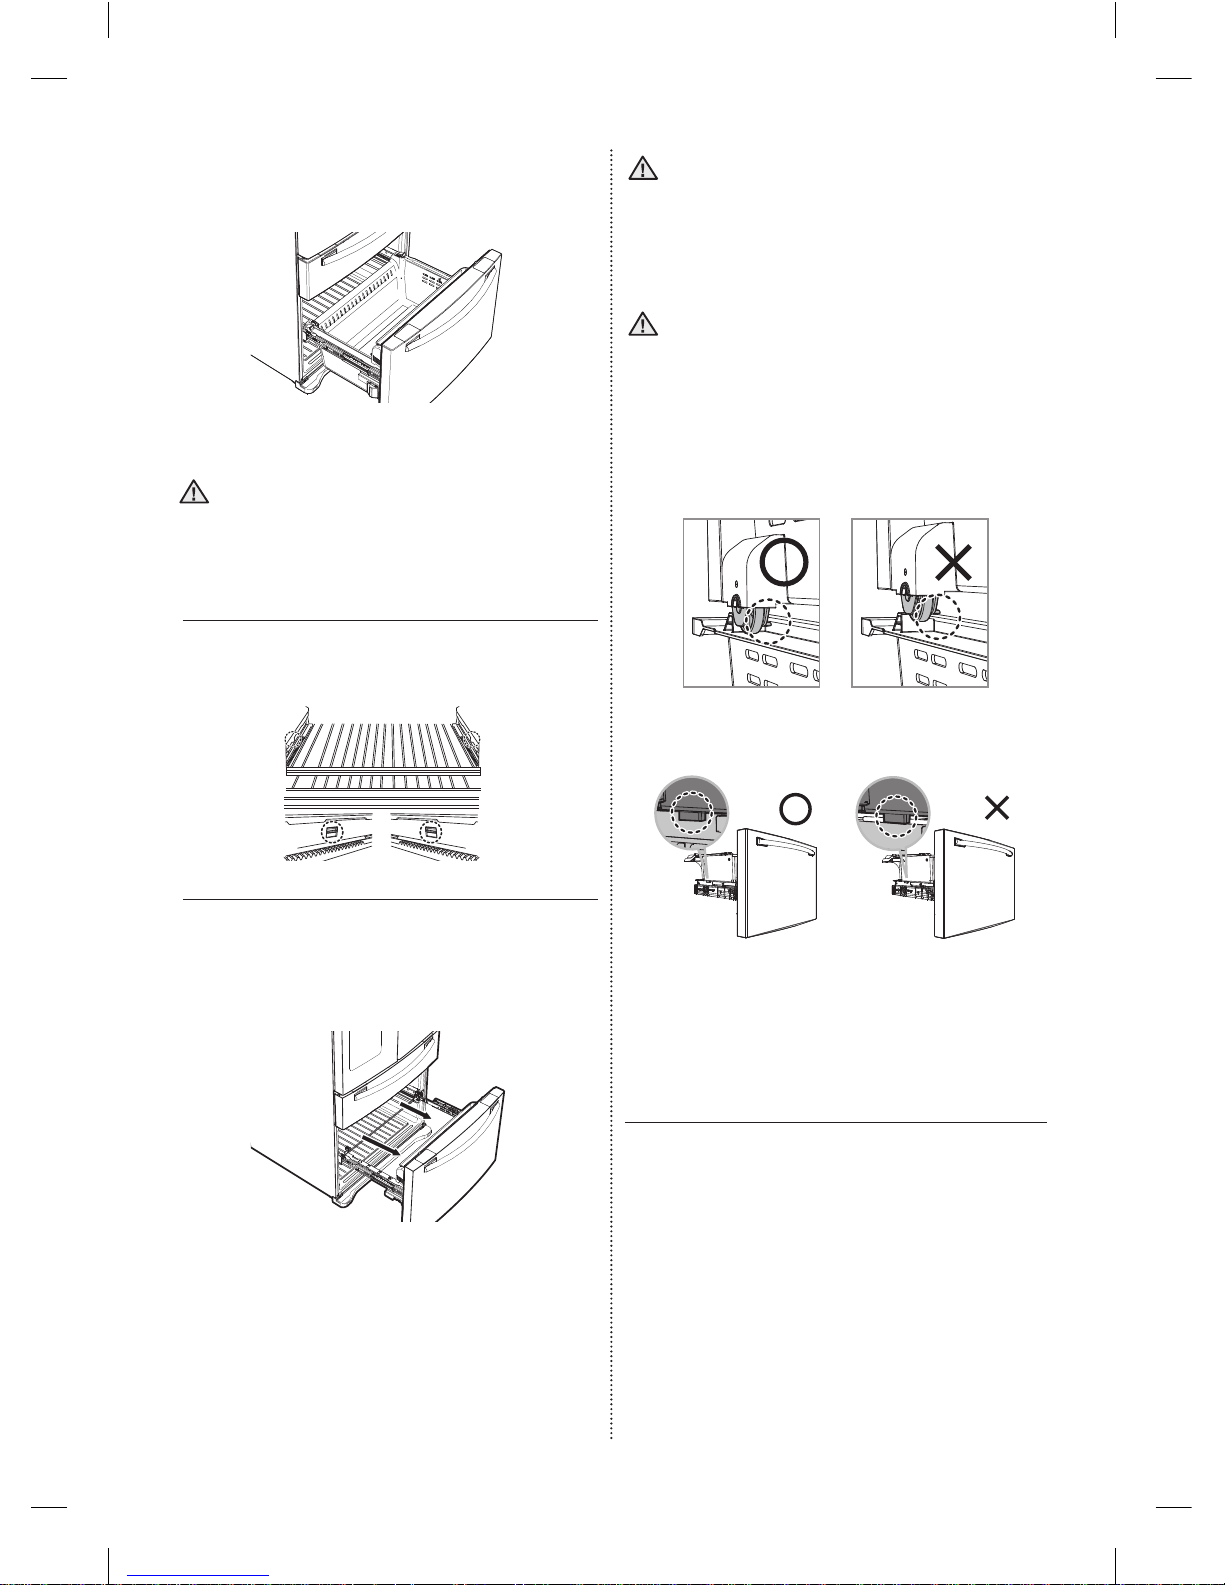
3. Take out the lower basket (2) by lifting the
basket up from the rail system.
(2)
(2)
CAUTION
You can scratch the side of the bin if you twist it
left or right when disassembling or re-assembling
it.
4. Press the fi xing hook of the rail system.
5. Holding the top of the Freezer Drawer, pull it
out all the way, and then remove it from the rail
system.
CAUTION
Be careful not to scratch or dent the sliding rail by
letting it strike the fl oor.
CAUTION
Make sure that you mount the freezer basket in the
right position when removing / installing the freezer
door. Failing to do so may result in the door not
opening or closing properly.
RE-ASSEMBLING THE FREEZER
DOOR
To reattach the drawer after you have moved the
fridge to its fi nal location, assemble the parts in
reverse order.
DA68-03055A-06.indb 16DA68-03055A-06.indb 16 2015. 4. 23. 8:162015. 4. 23. 8:16
Page 17
English - 17
SETTING UP
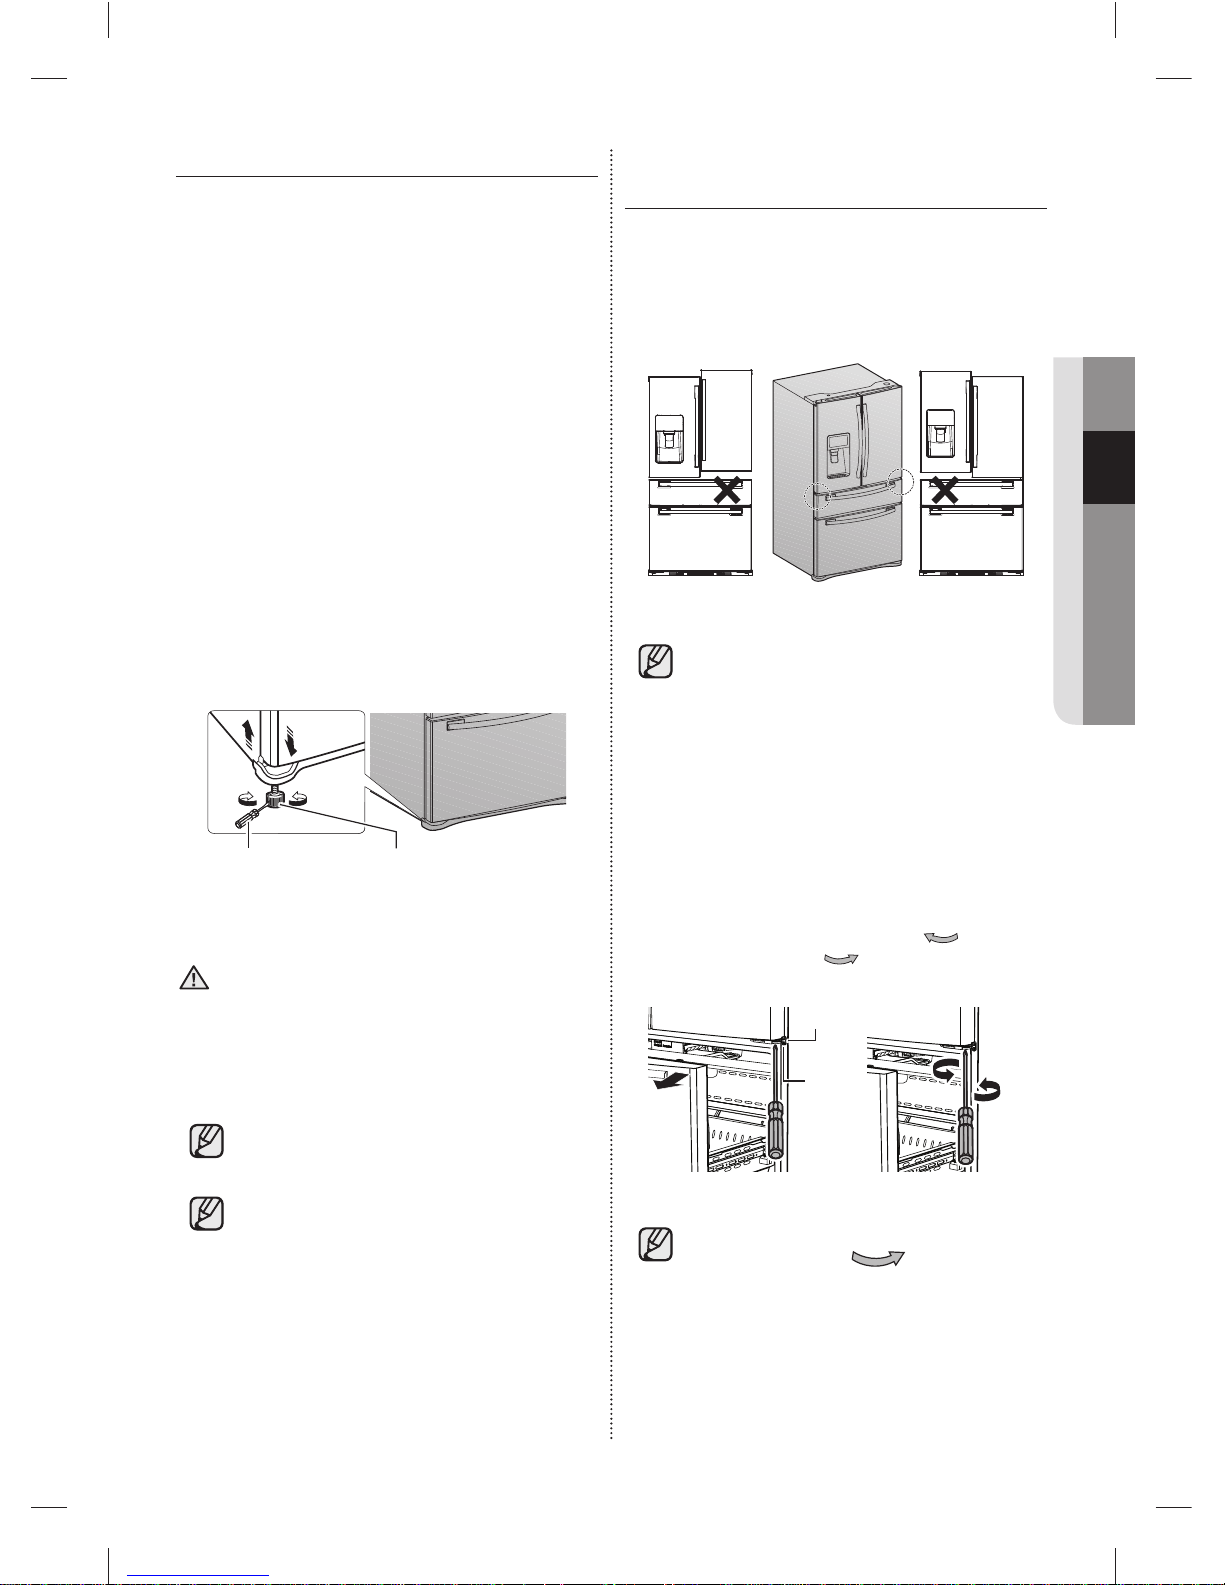
LEVELING THE REFRIGERATOR
Make sure the refrigerator is level so that you can
make fi nal adjustments.
Use a level to test if the refrigerator is level both
side to side and back to front.
If the refrigerator is not level, you will not be able
to get the doors perfectly even, which may cause
moisture condensation and increased energy bills.
Below is an example of how to level the refrigerator
if the left side of the refrigerator is lower than the
right side.
How to adjust the level
1. Open the freezer drawer and remove the lower
basket.
2. Insert a fl at-blade screwdriver (-) into the
notch on the left control lever, and then turn it
counter-clockwise to level the refrigerator. (You
turn the lever clockwise to lower the refrigerator
and counterclockwise to raise it.)
fl at-blade
screwdriver (-)
screwdriver (-)
Control Lever
CAUTION
Both control levers must be touching the fl oor to
avoid possible personal injury or property damage
because of tipping.
If the right side is lower, perform the same
procedure, but with the right control lever.
It is diffi cult to remove the cover leg
front from the refrigerator, so we do not
recommend making small adjustments
with the control lever.
Instead, refer to the next page for the best
way to make minor adjustments to the
doors.
MAKING MINOR ADJUSTMENTS
TO THE DOORS
A leveled refrigerator is necessary for getting the
doors perfectly even. For leveling instructions,
review the previous section on leveling the
refrigerator.
Adjustment part
Adjustment part
Fixed part
Fixed part
The left door is fi xed.
To make minor adjustments to the doors,
adjust only the right door.
1. Pull out the Convertible door (1) to expose the
lower hinge (2).
2. Insert a philips screwdriver (+) (3) into the shaft
(4) of the lower hinge.
3. Adjust the height by turning a philips
screwdriver (+) (3) clockwise (
DOWN
DOWN
) or
counterclockwise (
UP
UP
).
(3)
(3)
(1)
(1)
(3)
(3)
(2)
(2)
(4)
(4)
When you turn a philips screwdriver (+)
counterclockwise ( ), the door will
move up.
DA68-03055A-06.indb 17DA68-03055A-06.indb 17 2015. 4. 23. 8:162015. 4. 23. 8:16
Page 18
English - 18
INSTALLING THE WATER
DISPENSER LINE
A water dispenser with a fi lter is one of the helpful
features on your new refrigerator.
To help promote better health, the water fi lter
removes unwanted particles from your water.
However, it does not sterilize the water or destroy
microorganisms. You may need to purchase a
water purifying system to do that.
The water line also connects to the ice maker.
For the ice maker to operate properly, water
pressure of 20 ~ 125psi (138 ~ 862kPa) is
required.
If the refrigerator is installed in an area with low
water pressure (below 20psi), you can install a
booster pump to compensate for the low pressure.
After you have connected the water line, make
sure the water storage tank inside the refrigerator
is properly fi lled.
To do this, press the water dispenser lever until the
water runs from the water outlet.
Water line installation kits are available at
extra cost from your dealer.
We recommend using a water line
installation kit that contains copper tubing
and a ¼” compression nut.
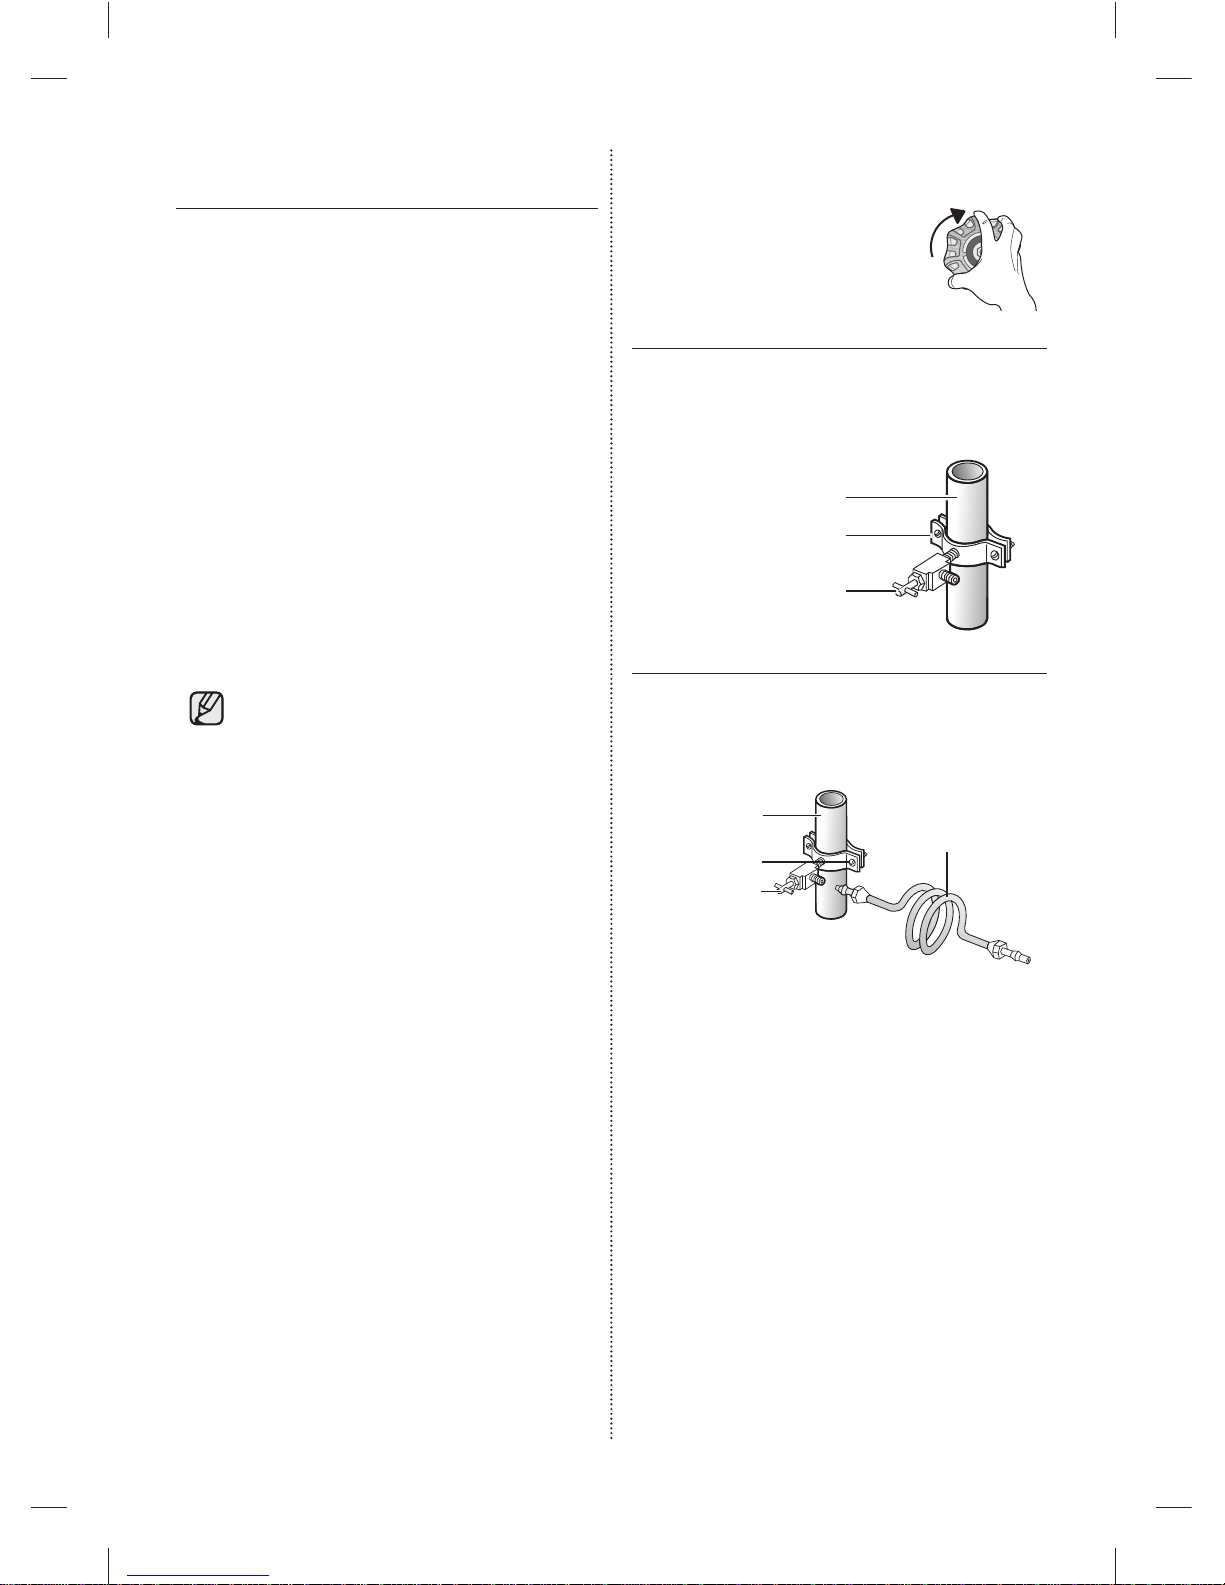
Connecting to the water supply line
1. First, shut off the main water
supply.
2. Locate the nearest cold water drinking line and
install the pipe clamp and shut off valve.
Pipe clamp
Pipe clamp
Cold water line
Cold water line
Shut off valve
Shut off valve
3. Connect the water line installation kit to the
shut off valve.
Shut off valve
Shut off valve
Pipe clamp
Pipe clamp
Cold water line
Cold water line
Water line installation kit
Water line installation kit
DA68-03055A-06.indb 18DA68-03055A-06.indb 18 2015. 4. 23. 8:162015. 4. 23. 8:16
Page 19
English - 19
SETTING UP
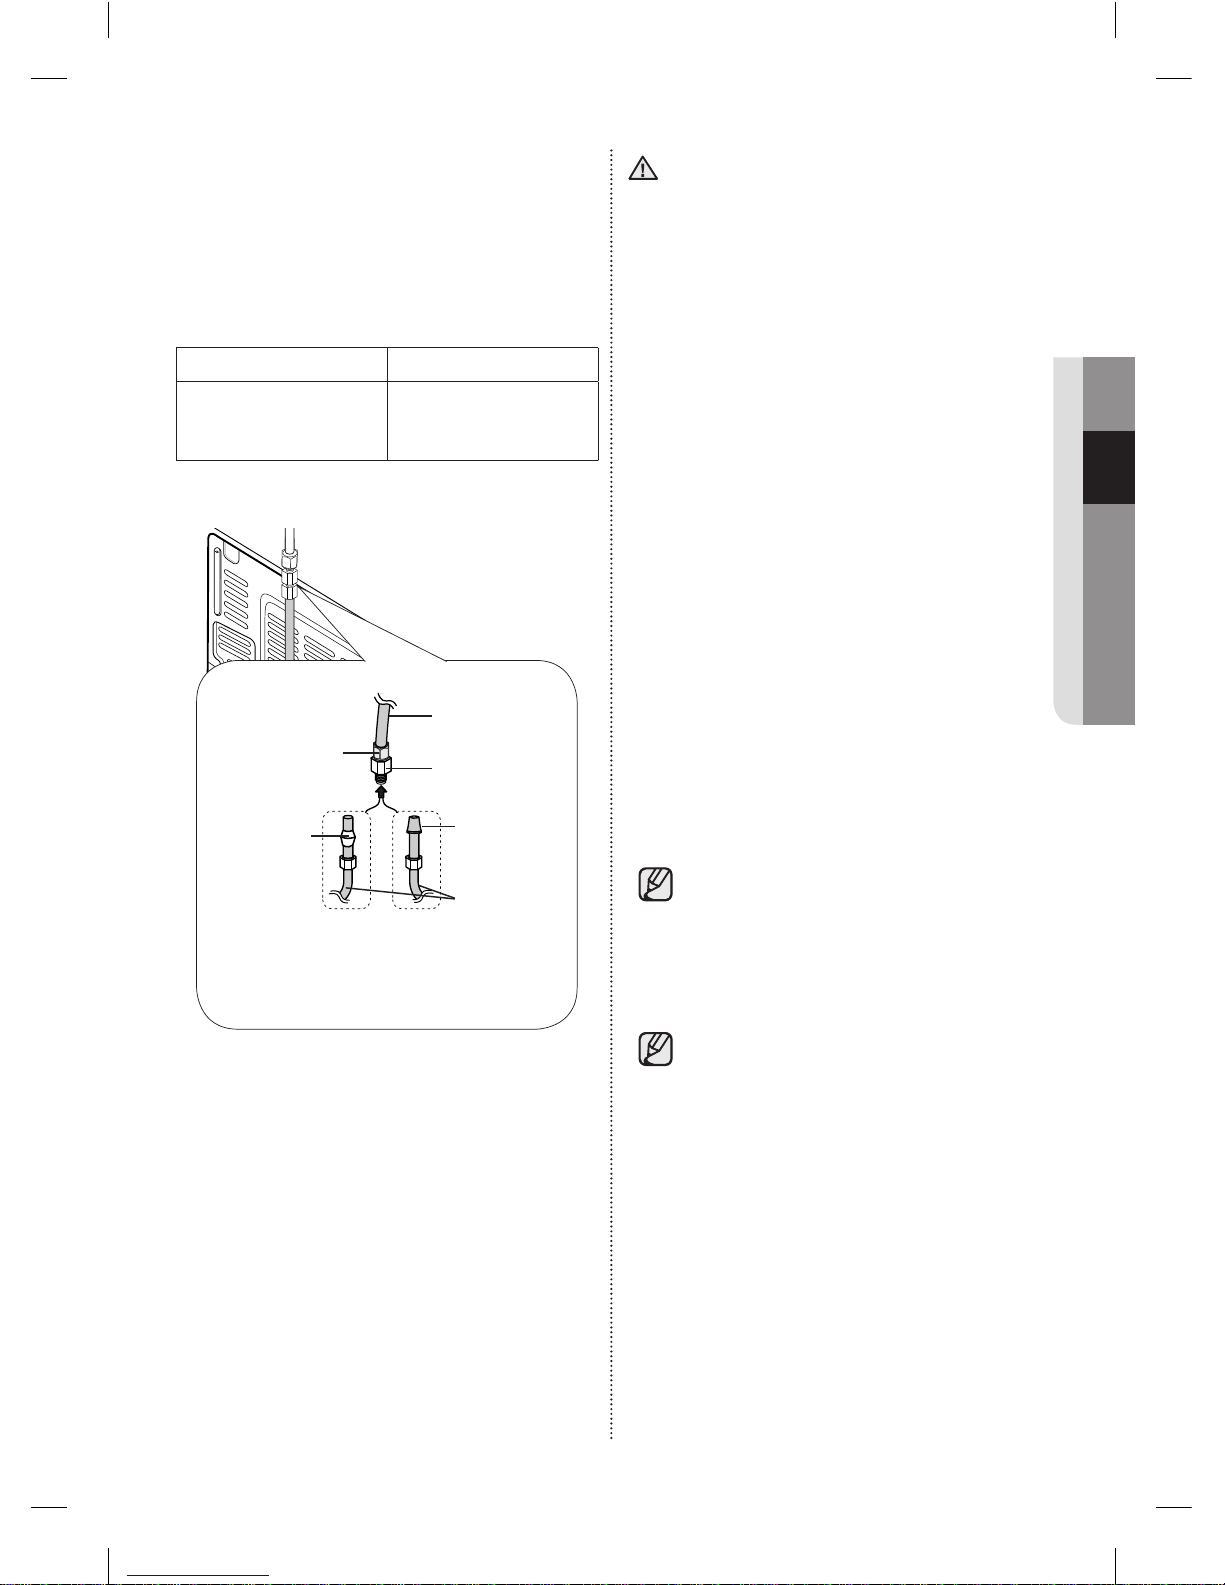
Connecting the water supply line to the
refrigerator
There are several items that you need to purchase
to complete this connection.
You may fi nd these items sold as a kit at your local
hardware store.
Use Copper Tubing Use Plastic Tubing
• ¼” copper tubing
• ¼” compression nut
(1pc)
• Ferrule (2pc)
• ¼” plastic tubing
→ Molded end (Bulb)
• ¼” compression nut
(1pc)
Compression Nut
Compression Nut
(1/4”) (Assembled)
(1/4”) (Assembled)
Ferrule
Ferrule
(Not supplied)
(Not supplied)
Plastic Tubing
Plastic Tubing
(Assembled)
(Assembled)
Compression
Compression
Fitting (Assembled)
Fitting (Assembled)
Molded end
Molded end
(Bulb)
(Bulb)
Compression
Compression
nut (B) (1/4”)
nut (B) (1/4”)
(Not supplied)
(Not supplied)
or
or
Copper tubing
Copper tubing
(Not supplied)
(Not supplied)
Plastic tubing (B)
Plastic tubing (B)
(Not supplied)
(Not supplied)
Household water supply line
Household water supply line
Refrigerator
Refrigerator
1. Connect the household water line to the
assembled compression fi tting.
- If you are using copper tubing, slip the
compression nut (B) (not supplied) and
ferrule (not supplied) on the copper tubing (not
supplied) as shown.
- If you are using plastic tubing (B), insert the
molded end (Bulb) of the plastic tubing (B) into
the compression fi tting.
CAUTION
Do not use without the molded end (Bulb) of the
plastic tubing (B).
2. Tighten the compression nut (B) onto the
compression fi tting.
Do not over-tighten the compression nut (B) .
3. Turn the water on and check for any leakage.
If you fi nd water drops or leakage in the
connection areas, turn off the main water
supply. Check the connections and, if
necessary, tighten.
4. Flush 1 gallon of water through the fi lter before
drinking or using the water from the refrigerator.
(Flush approximately 6 minutes.)
To fl ush, press a large glass or cup against the
water dispenser lever.
Fill the glass, empty it into the kitchen sink after
it is fi lled, and then repeat.
5. After you turn on the refrigerator, let the ice
maker make ice for 1 to 2 days.
Over that period of time, throw out the fi rst 1 or
2 buckets of ice the freezer makes to ensure all
impurities have been removed from the water
line.
Only connect the water line to a drinkable
water source.
If you have to repair or disassemble the
water line, cut off 1/4“ of the plastic tubing
to make sure you get a snug, leak-free
connection.
You can test the water line quickly using a
paper cup. Under normal conditions, the
water dispenser can fi ll a 5.75oz. (170cc)
cup in about 10 seconds.
DA68-03055A-06.indb 19DA68-03055A-06.indb 19 2015. 4. 23. 8:162015. 4. 23. 8:16
Page 20
English - 20
COMPLETING THE SET UP
Now that you have your new refrigerator installed
in place, you are ready to set up and enjoy the
features and functions of the appliance.
By completing the following steps, your refrigerator
should be fully operational.
1. Make sure your refrigerator is in an appropriate
location with reasonable clearance between it
and the wall. Refer to installation instructions in
this manual.
2. Once the refrigerator is plugged in, make sure
the interior light comes on when you open the
doors.
3. Set the Temperature control to the coldest
temperature and wait for an hour.
The freezer will get slightly chilled and the motor
will run smoothly.
Reset the refrigerator and freezer to the
temperatures you want.
4. After you plug the refrigerator in, it will
take a few hours to reach the appropriate
temperature.
You can store food and drinks in the refrigerator
after the temperature is suffi ciently cool.
If condensation or water drops appear
on both sides of the fridge door’s central
part, turn the Energy Saver mode off after
removing the condensation.
(See the explanation of the Energy Saver
button in “Using the Control Panel” on
page 84.)
DA68-03055A-06.indb 20DA68-03055A-06.indb 20 2015. 4. 23. 8:162015. 4. 23. 8:16
Page 21
English - 21
OPERATING
Operating your French Door
Refrigerator
DISPLAY PANEL RESTRICTIONS AND ALERTS
1. English is a default language for the Display. Languages not supported are not displayed on the
screen.
2. Periodic updates of Weather or News will cause network traffi c even when you are not using the
Display.
3. When software updates become available, Samsung automatically updates the refrigerator software
and then issues an alert which appears on your Display.
4. Please note that the relevant licensor(contents provider) retains sole discretion as to what content is
made available through the various refrigerator applications.
Furthermore, each licensor retains the sole right to remove any such content that the licensor may
cease to offer through the refrigerator application. In such case, the licensor may send a written notice
to the user with regards to the removal of content.
DIGITAL PANEL
CPU freescale i.MX6 Solo OS Linux 3.0.35
RAM DDR3 512MB LCD 8” TFT-LCD (800x480)
ROM eMMC 4GB NETWORKS IEEE802.11 a/b/g/n
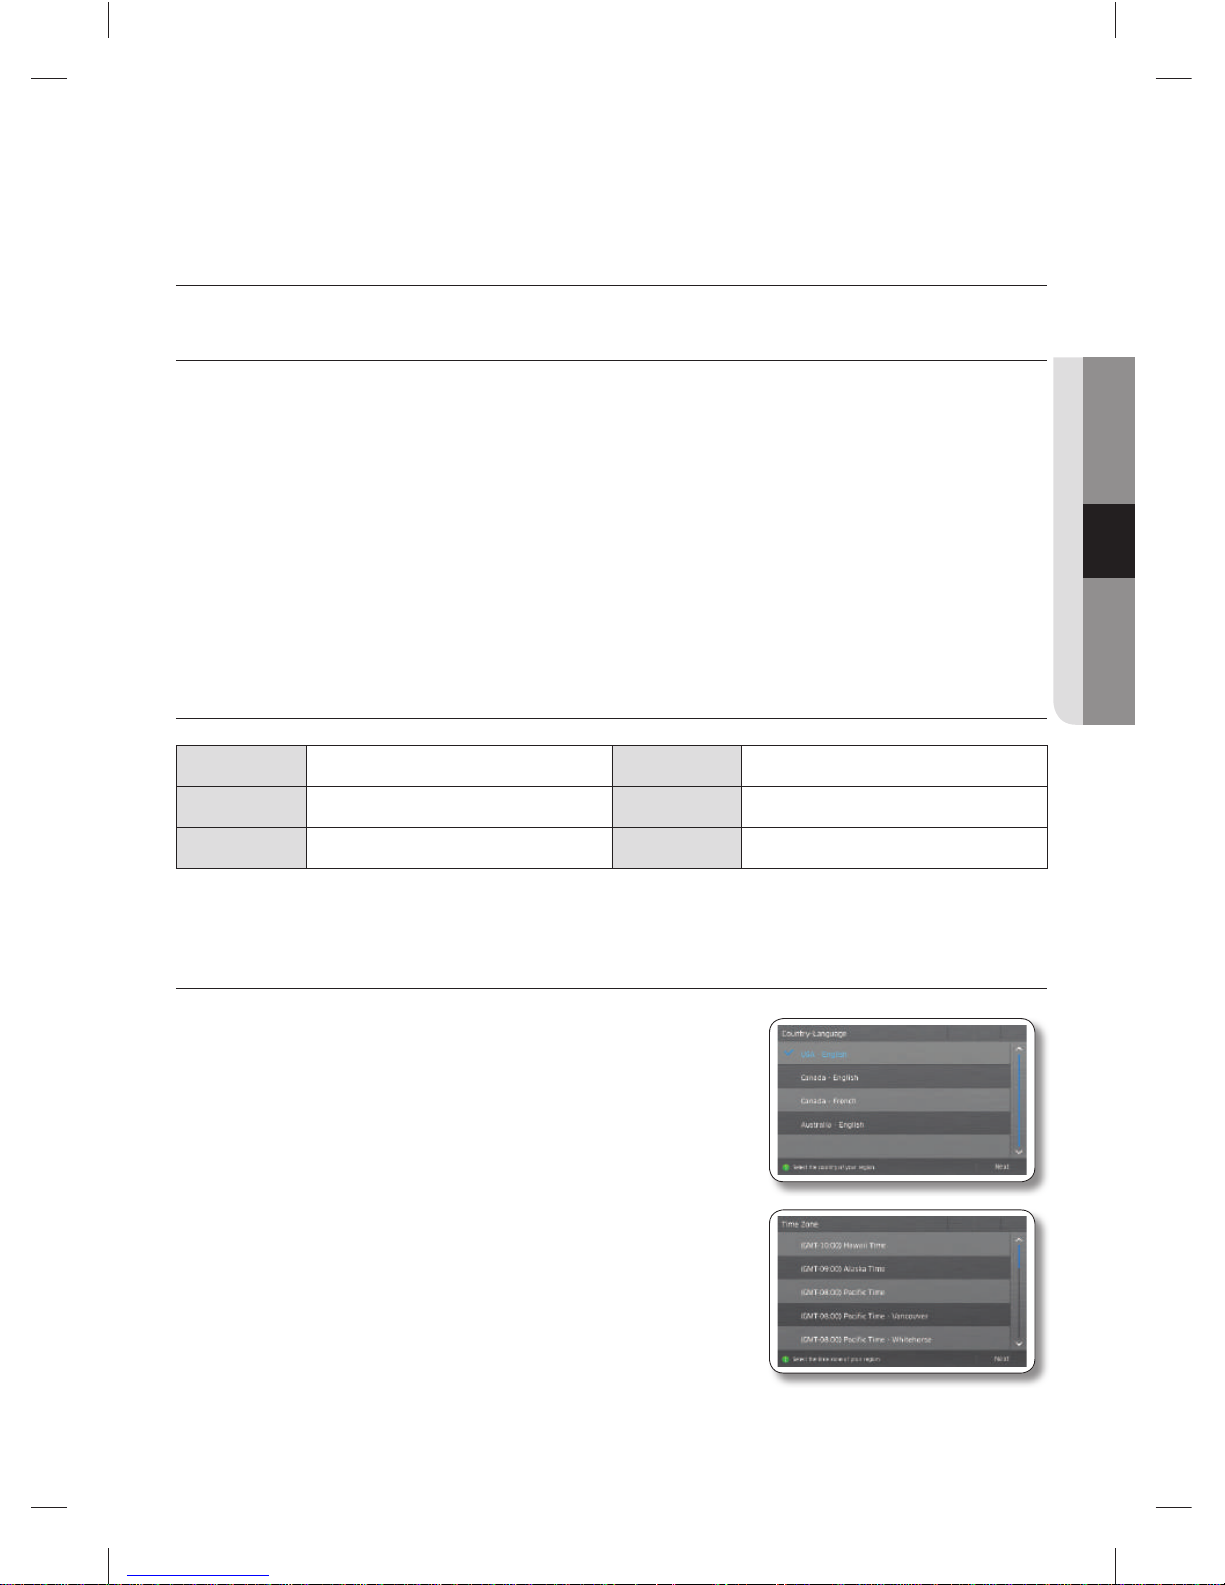
USING FOR THE FIRST TIME
• When you use the product for the fi rst time after installation, the
Country-Language/Time Zone Setting screen appears on the
Display Panel.
The Pandora service is available in the U.S. The TuneIn service is
available in Canada and Australia.
You need to select your Time zone to use Google Calendar
correctly.
• After you select the Time zone and press the [Next] button, the
Home Screen appears on the Display Panel.
The Time Zone Setting screen may appear again after a software
update.
DA68-03055A-06.indb 21DA68-03055A-06.indb 21 2015. 4. 23. 8:162015. 4. 23. 8:16
Page 22
English - 22
HOME SCREEN
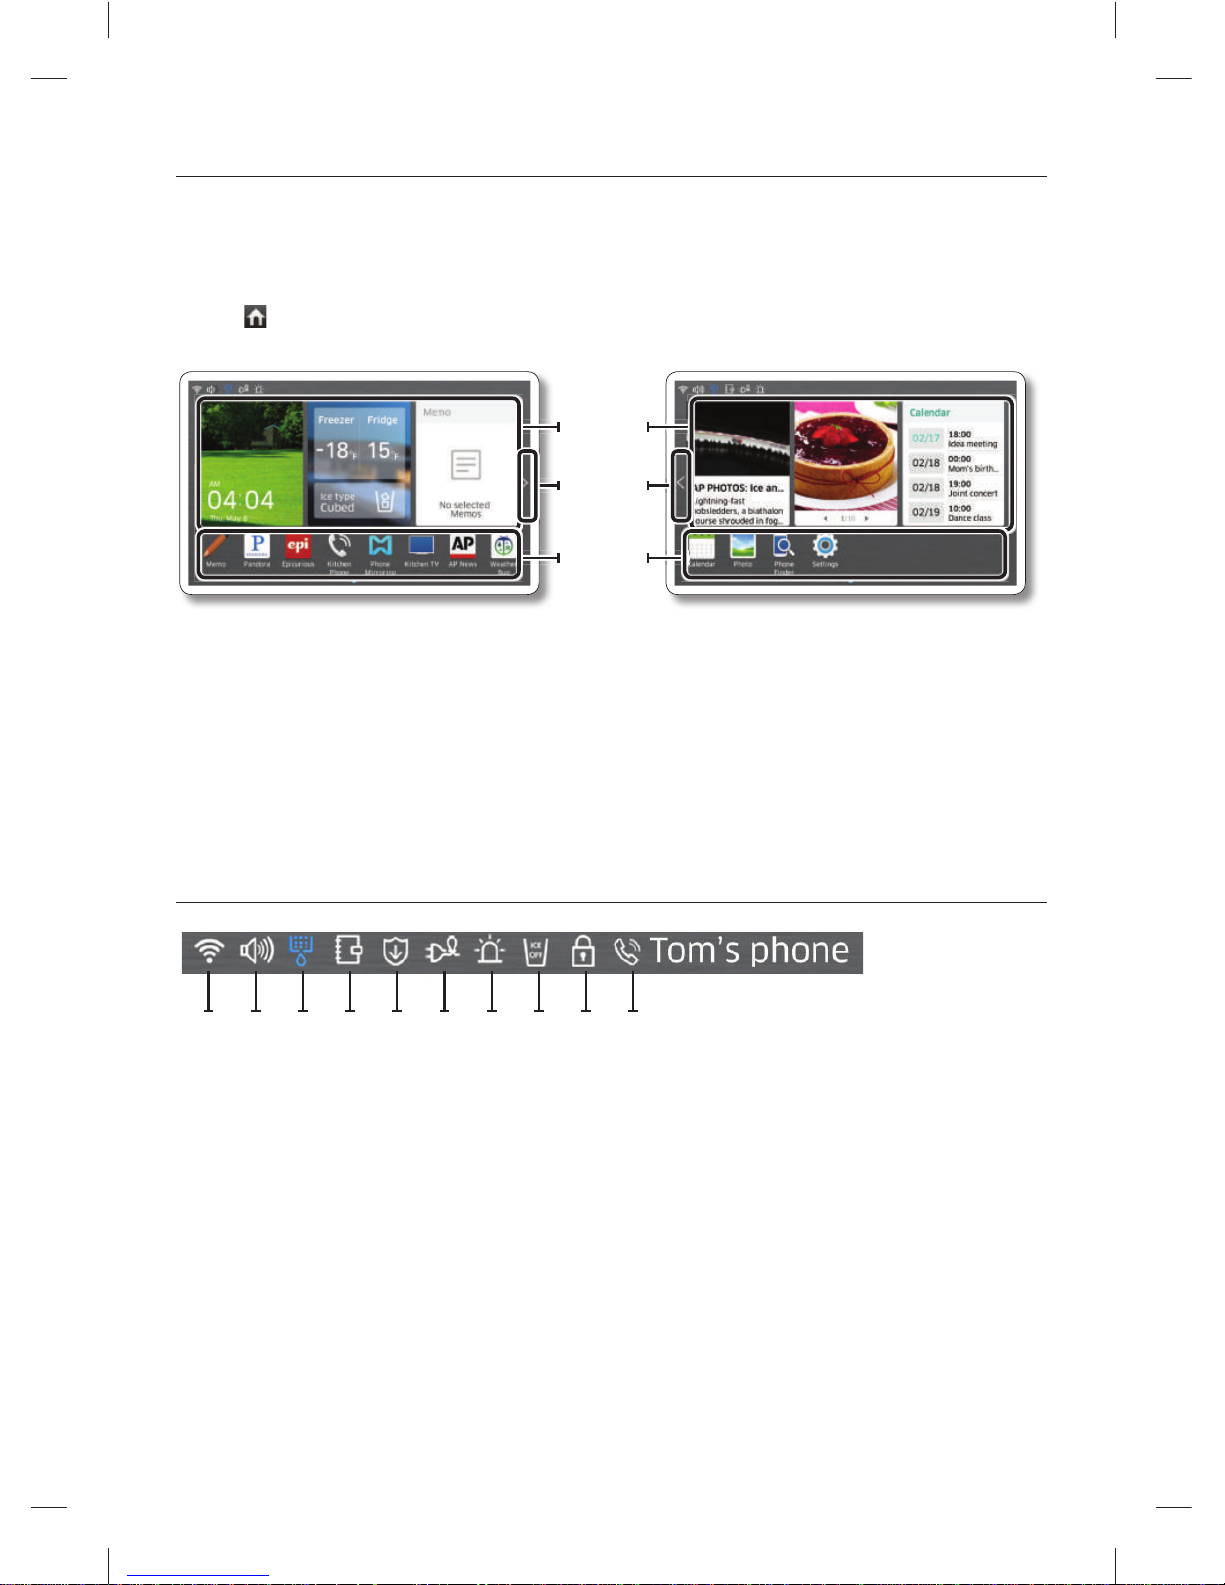
• The Home screen is the starting point for all functions. In the center of the Home screen, basic
refrigerator information such as Time, Date, Weather, Temperature, and Dispenser Selection appears.
(The Home screen may differ depending on the layout of widgets)
The indicator icons at the top left of the screen display information about the refrigerator’s status.
The Menu icons on the bottom of the screen start various applications or functions. When you select
the ( ) on any menu, the screen returns to the Home screen immediately.
2
2
3
3
1
1
2
2
3
3
1
1
• The Home screen is the starting point for all functions.
• Tapping a newly added widget displays an overview of the associated application.
In the Widgets menu under Settings, you can add, delete, or relocate widgets.
• Tap the arrow to move to the Home screen.
Indicator Icons (At the left-top of the Screen)
1122334
455667788991010
1. Network Signal Strength: 5 levels (Off – 1- 2 – 3 -4)
2. Volume Level: 5 levels (Off – 1- 2- 3- 4)
3. Filter Status: 3 levels (blue – pink – red)
4. Schedule Alarm
5. S/W Update Notice
6. Energy Saver
7. Door Alarm
8. Ice Making
9. Dispenser Lock
10. Kitchen Phone (if Kitchen Phone is activated, the connected smartphone’s name appears as well)
DA68-03055A-06.indb 22DA68-03055A-06.indb 22 2015. 4. 23. 8:162015. 4. 23. 8:16
Page 23
English - 23
OPERATING
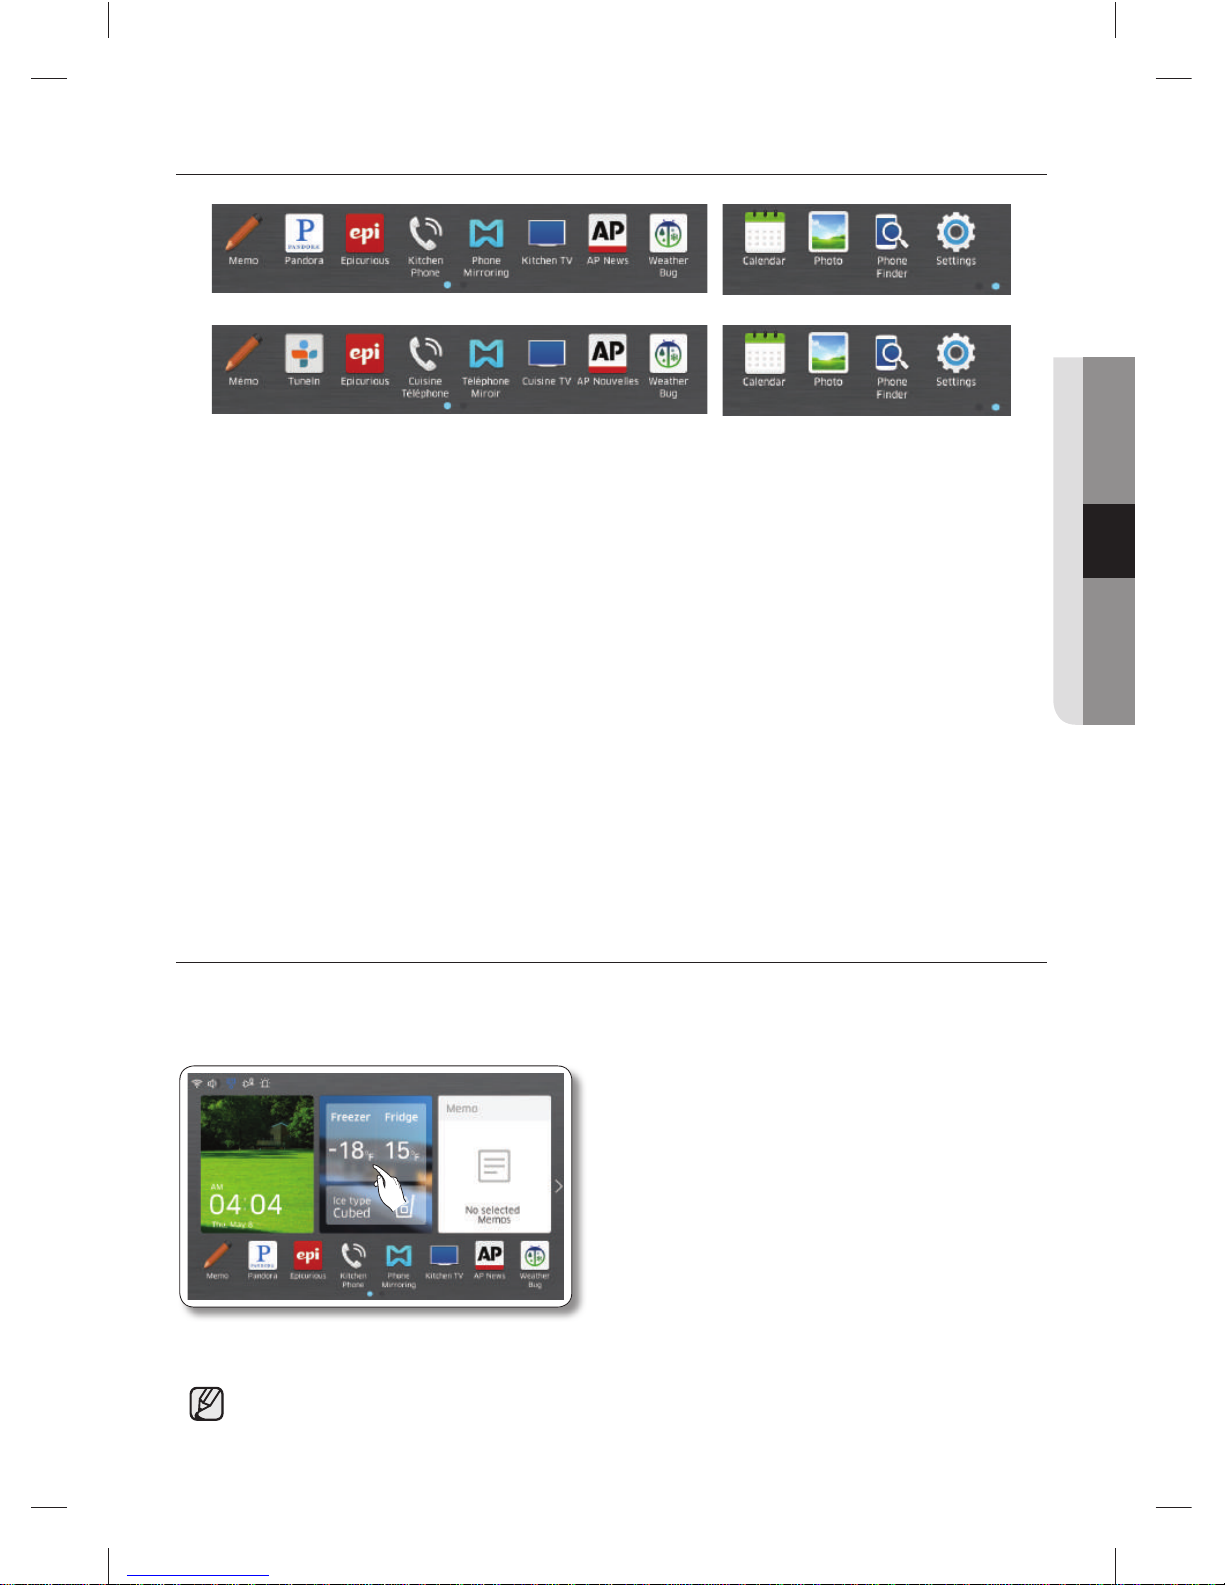
At the bottom of the Screen : Menu Icons
1. Memo : Lets you create, save, or check memos.
2-1. Pandora (USA only): Plays music provided by the Pandora Internet radio service.
2-2. Tunein (Canada and Australia only): You can enjoy your favorite songs free of charge.
3. Epicurious : Lets you view recipes and create shopping lists for the recipes you select.
4. Kitchen Phone : Connect to your smartphone using the Samsung Smart Home app and make or
receive phone calls.
5. Phone Mirroring : Access the smartphone screen on the refrigerator, and control or change the
settings on the phone.
6. Kitchen TV : Connect your Samsung TV to the same network as the refrigerator and watch TV on the
refrigerator’s screen.
7. AP News : Displays the news from one of 11 categories you select.
8. WeatherBug : Displays the current weather and weather forecast.
9. Calendar : Lets you view the schedule you stored in Google Calendar.
10. Photo : Lets you manage stored photos and import photos from external devices such as memory
cards.
11. Phone Finder : Use Phone Finder to fi nd a misplaced smartphone that has the Samsung Smart Home
app installed and is connected to the same network as the refrigerator.
12. Settings : Lets you set the refrigerator’s basic functions such as Energy Saver, Door Alarm, Time, etc.
SETTING THE FREEZER / FRIDGE TEMPERATURE
The temperature control allows you to set the freezer and the fridge temperatures.
To change and set the freezer and fridge temperatures, follow these steps:
1. Select the Freezer/Fridge temperature control on the Home screen.
When you store ice cream at a temperature above 4°F (-16°C) in the freezer, it may melt.
DA68-03055A-06.indb 23DA68-03055A-06.indb 23 2015. 4. 23. 8:162015. 4. 23. 8:16
Page 24
English - 24
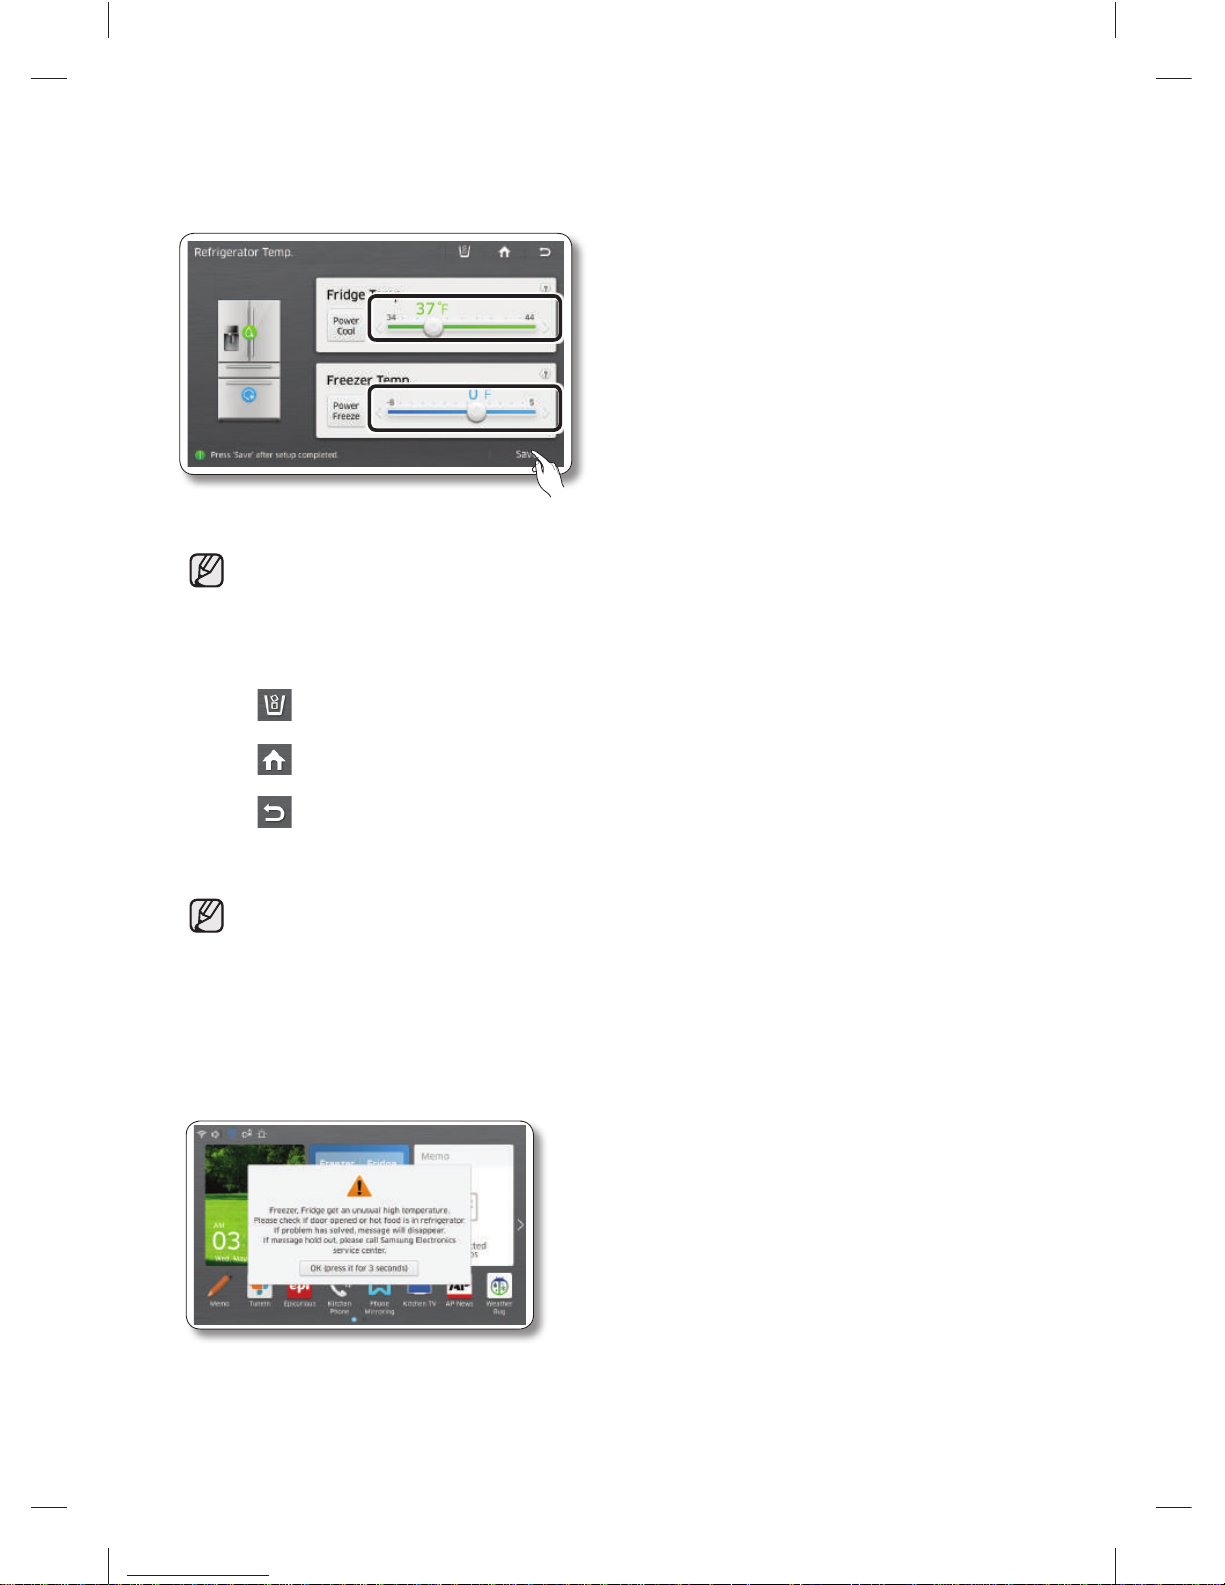
2. Choose a freezer and/or fridge temperature using the temperature buttons, and then select the [Save]
button.
• Freezer : Fahrenheit : -8°F ~ 5°F (Default: 0°F)
Celsius : -23°C ~ -15°C (Default: -18°C)
• Fridge : Fahrenheit : 34°F ~ 44°F (Default: 37°F)
Celsius : 1°C ~ 7°C (Default: 3°C)
• Function Icons on the upper right of the Display function screen:
: Press to set the ice dispenser type. (Cubed/Crushed)
: Press to go to the Home screen.
: Press to display the preview screen.
The freezer or fridge temperature may change depending on how often you open and close the
door, the food quantity, the ambient temperature, etc.
Temperatures vary in each food storage section in the freezer and fridge compartments.
If the room temperature becomes unusually warm, it can cause temperatures in the Fridge
and Freezer to rise abnormally. If this occurs, the screen will display the “Abnormally High
Temperature” pop-up. When the temperatures return to normal, the pop-up will close
automatically. If the room temperature returns to normal and the pop-up does not close
automatically within a few hours, please contact your nearest repair center.
DA68-03055A-06.indb 24DA68-03055A-06.indb 24 2015. 4. 23. 8:162015. 4. 23. 8:16
Page 25
English - 25
OPERATING
SETTING THE POWER FREEZE / POWER COOL FUNCTIONS
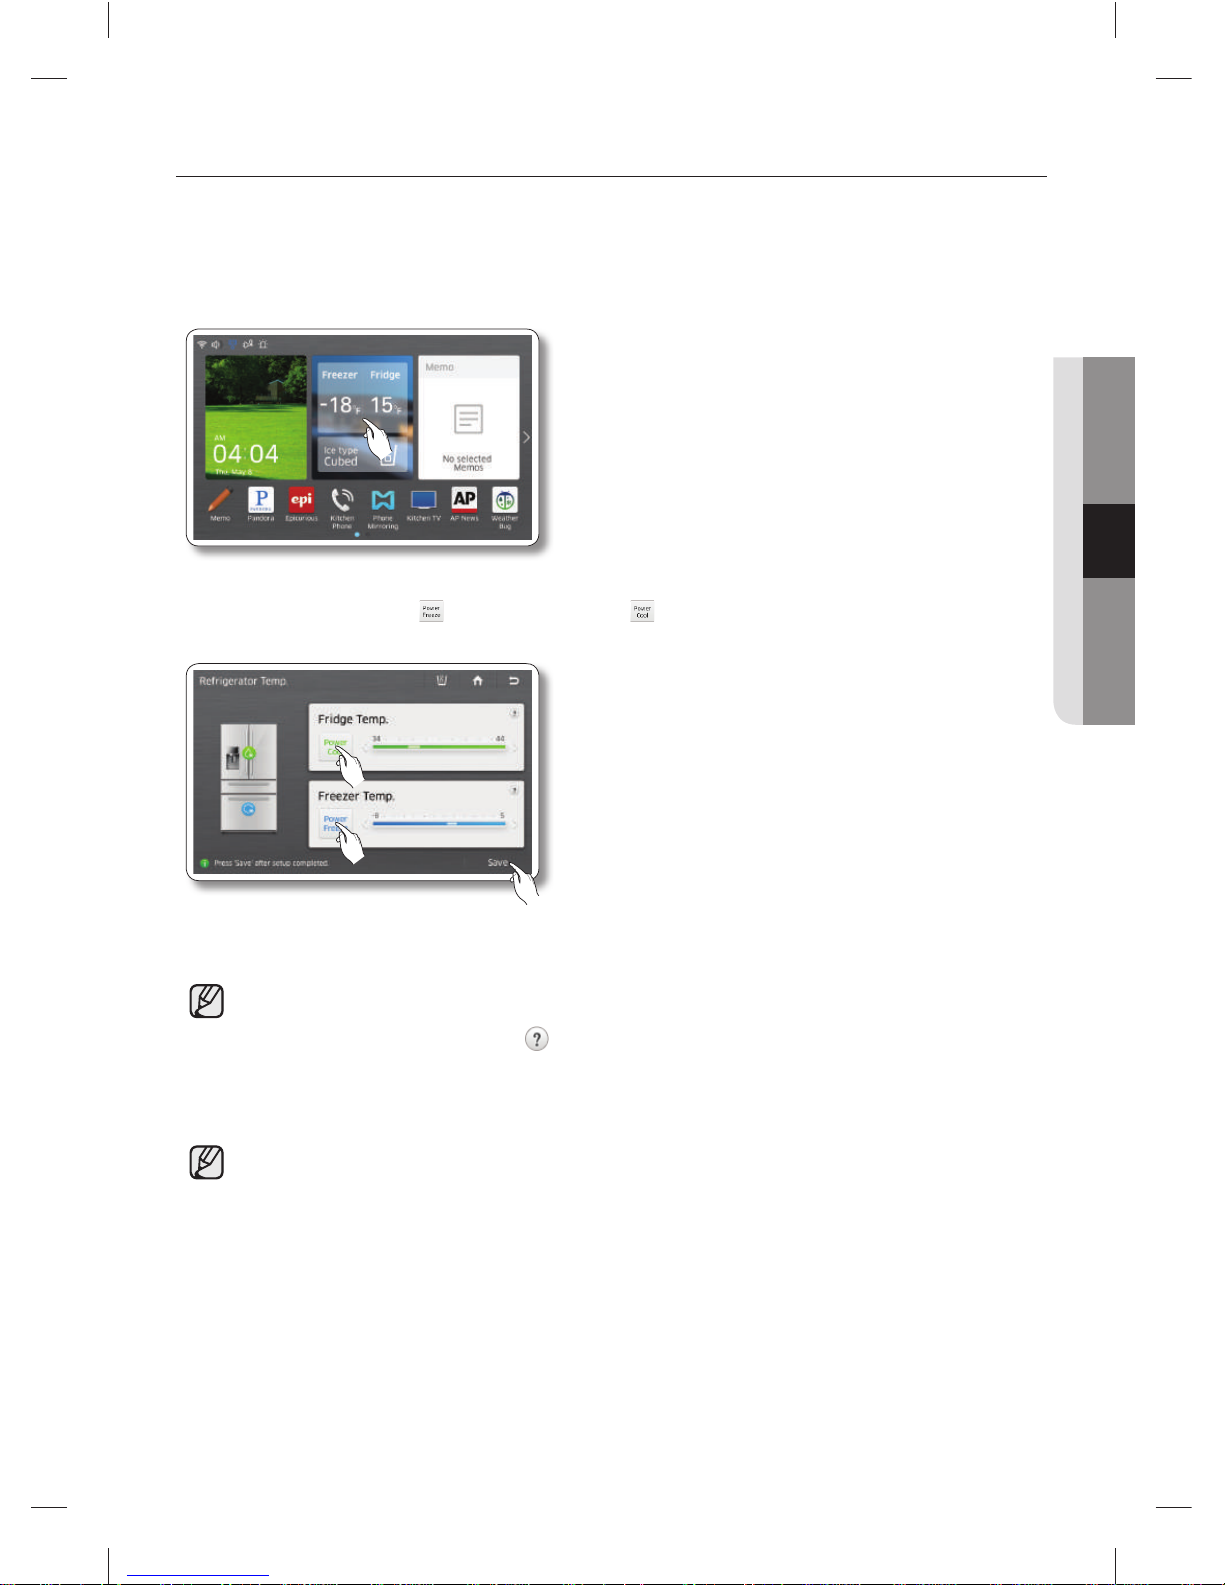
You can use the Power Freeze and Power Cool functions to lower the temperature of the freezer and
fridge compartments quickly. To use the Power Freeze or Power Cool function, follow these steps:
1. Touch the Freezer/Fridge temperature on the Home screen.
2. Select the Power Freeze ( ) and/or Power Cool ( ) button(s), and then Press the [Save] button.
• To cancel Power Freeze or Cool, tap the corresponding button once again.
• Energy consumption increases during Power Freeze and/or Power Cool usage.
• If you select the question icon ( ), the function description screen pops up.
Press the [OK] button on the popup screen to re-display the Temperature Display Screen.
• When you turn on Power Freeze/Power Cool, the refrigerator’s compressor speeds up and is
louder than during normal operation.
• Power Freeze will turn off automatically after a certain period of time, and the freezer
temperature will return to its previous setting.
• Power Cool will turn off automatically after a certain period of time, and the fridge temperature
will return to its previous setting.
DA68-03055A-06.indb 25DA68-03055A-06.indb 25 2015. 4. 23. 8:162015. 4. 23. 8:16
Page 26
English - 26
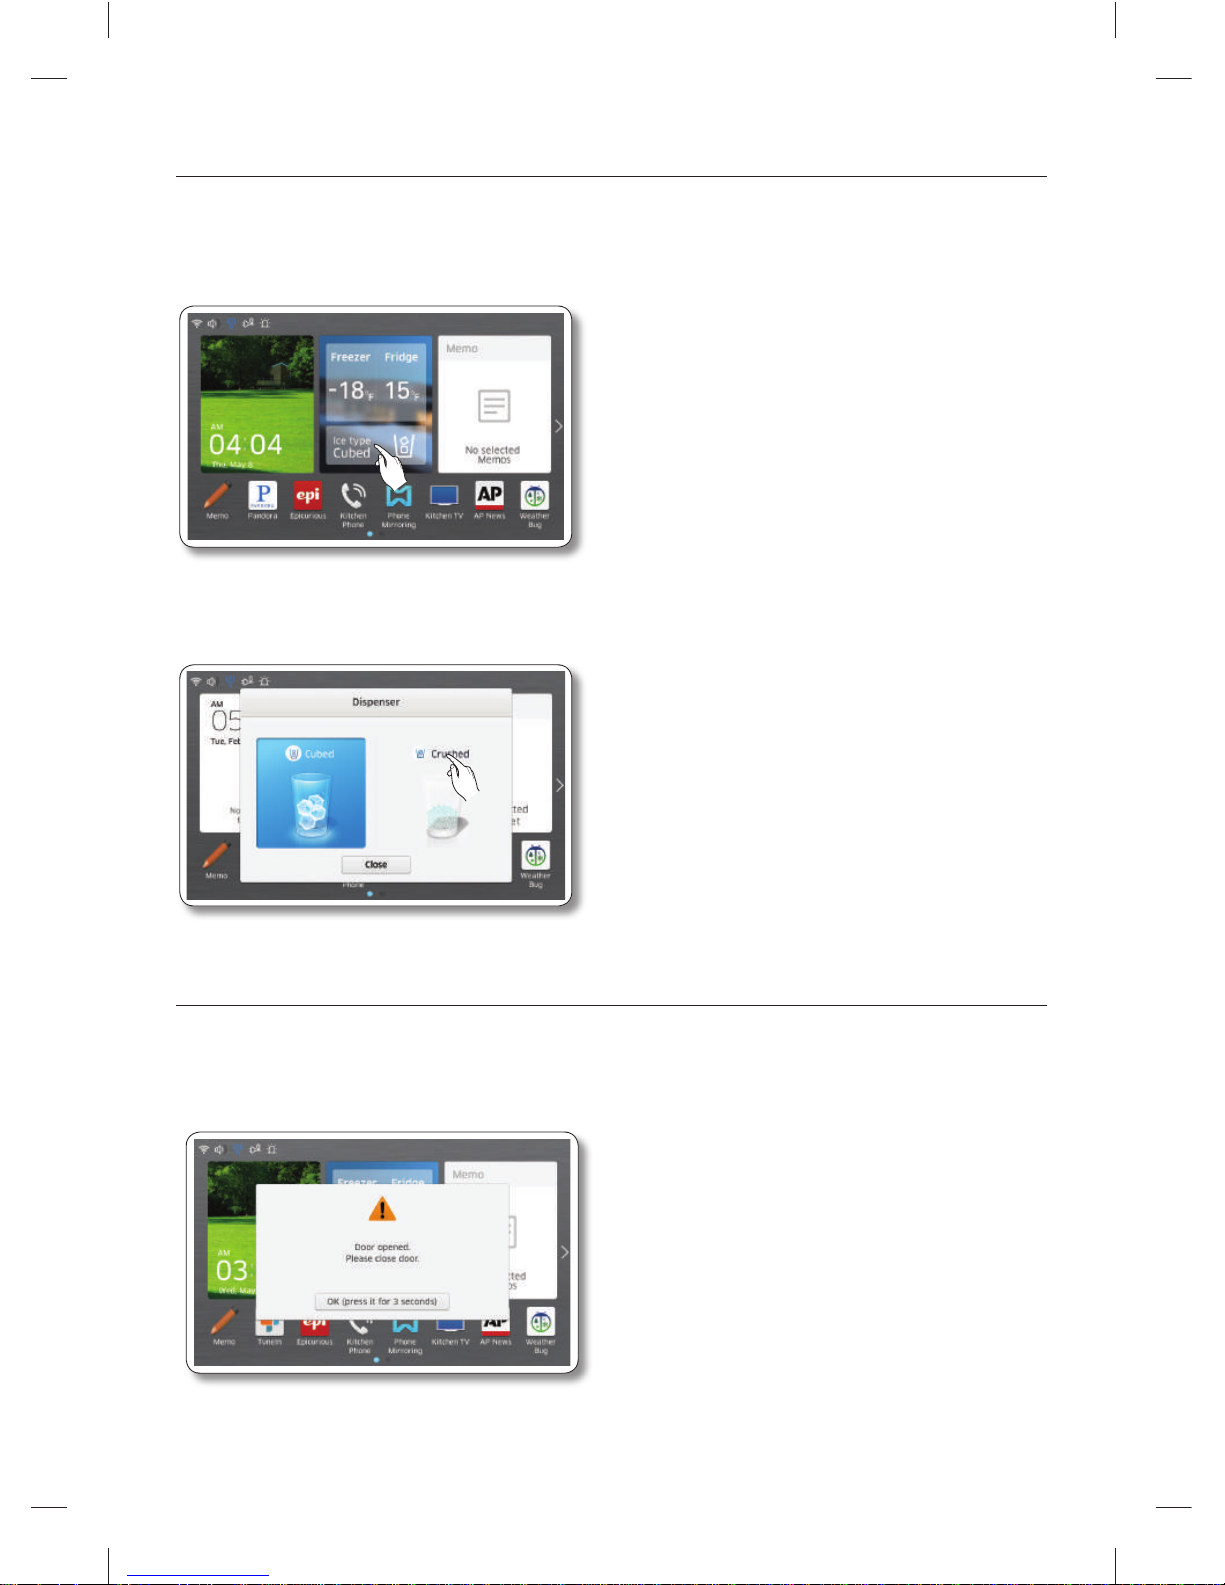
SETTING THE DISPENSER
To select the ice type, follow these steps:
1. Touch Dispenser Status on the Home screen. The Dispenser pop-up appears.
2. Touch the desired dispenser type, and then press the [Close] button.
DOOR OPEN ALARM
If the fridge / freezer door remains open more than 3 minutes, a warning window pops up accompanied
by alarm sounds. The alarm repeats every minute and only stops when you close both doors. If you set
Door Alarm to OFF in the Settings menu, the alarm does not operate.
DA68-03055A-06.indb 26DA68-03055A-06.indb 26 2015. 4. 23. 8:162015. 4. 23. 8:16
Page 27
English - 27
OPERATING
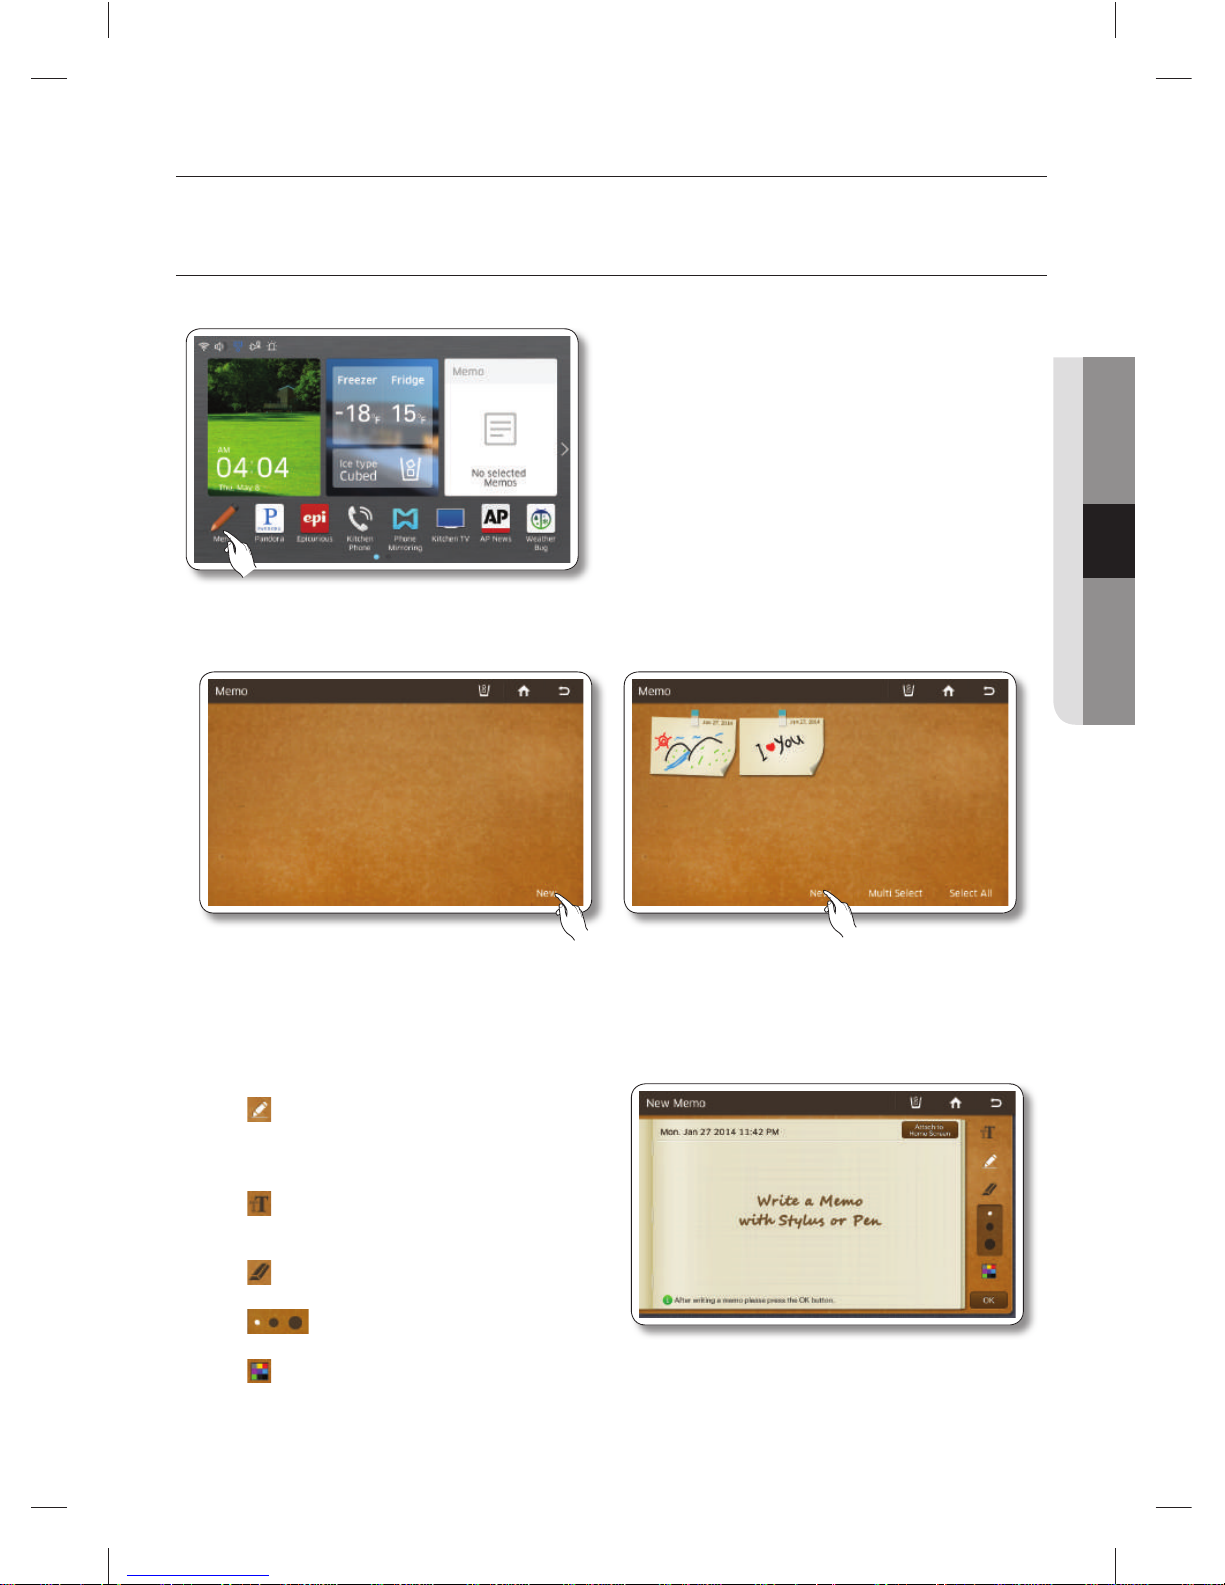
MEMO
You can use the Memo function to leave a memo for yourself or someone else.
How to leave a new memo.
1. Select the [Memo] button on the Home screen.
2. Select the [New] button.
3. Select the memo tools you want by touching the
tool buttons above the memo entry area.
The tools are described below.
: Select to input a memo in pen mode.
Use your fi nger or a smooth-tipped
stylus.
: Select to input a memo in keyboard
mode.
: Select to erase a memo.
: Select pen or erase thickness.
: Select pen color.
DA68-03055A-06.indb 27DA68-03055A-06.indb 27 2015. 4. 23. 8:162015. 4. 23. 8:16
Page 28
English - 28
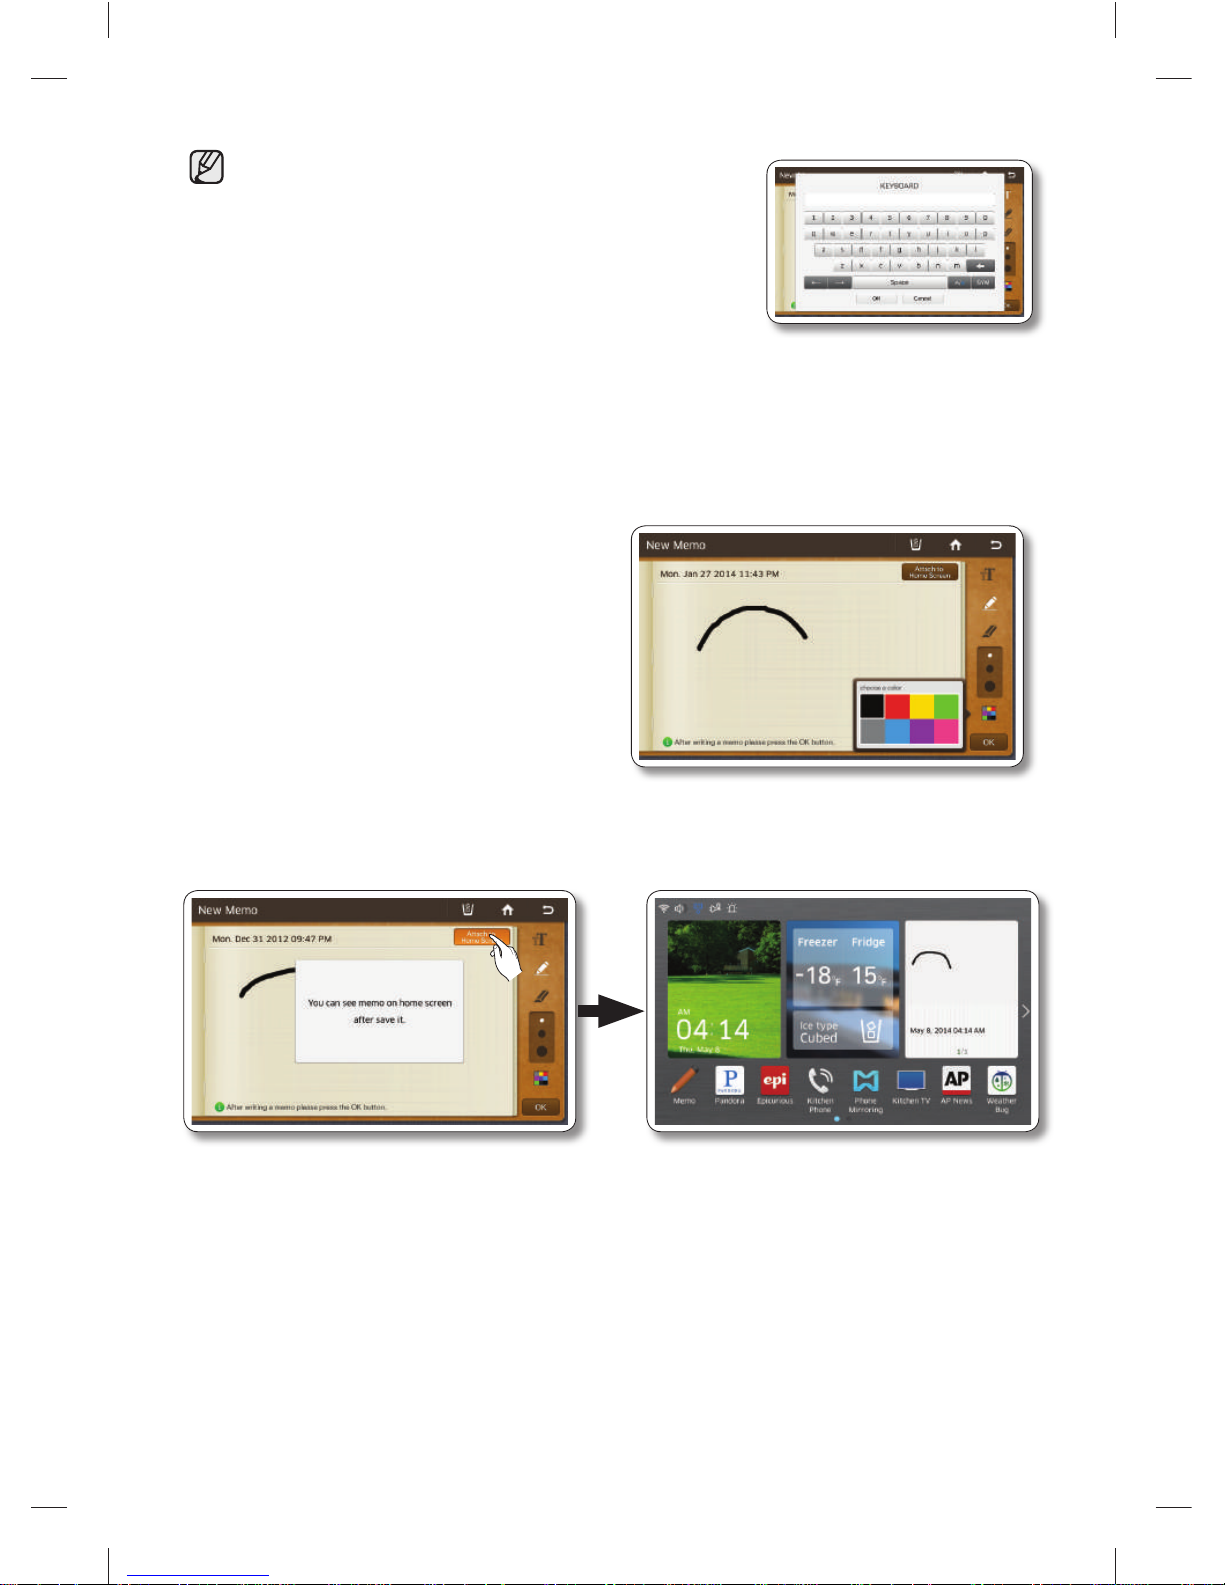
You can save up to 80 memos.
To use the Keyboard, press the Keyboard icon, and then
touch where you want the memo to begin. The keyboard
pops up on the Display. The number of characters you
can input with the Keyboard is limited to the number of
characters that will fi t in the memo entry area.
4. Press the [Save] button after you have
completed your memo.
• If you want to display the memo on
the Home screen, select the [Attach to
Home Screen] button, and then select
the [Save] button. See below.
• Tap [Attach to Home Screen] to display the selected memo on the Memo widget of the Home
screen.
DA68-03055A-06.indb 28DA68-03055A-06.indb 28 2015. 4. 23. 8:162015. 4. 23. 8:16
Page 29
English - 29
OPERATING
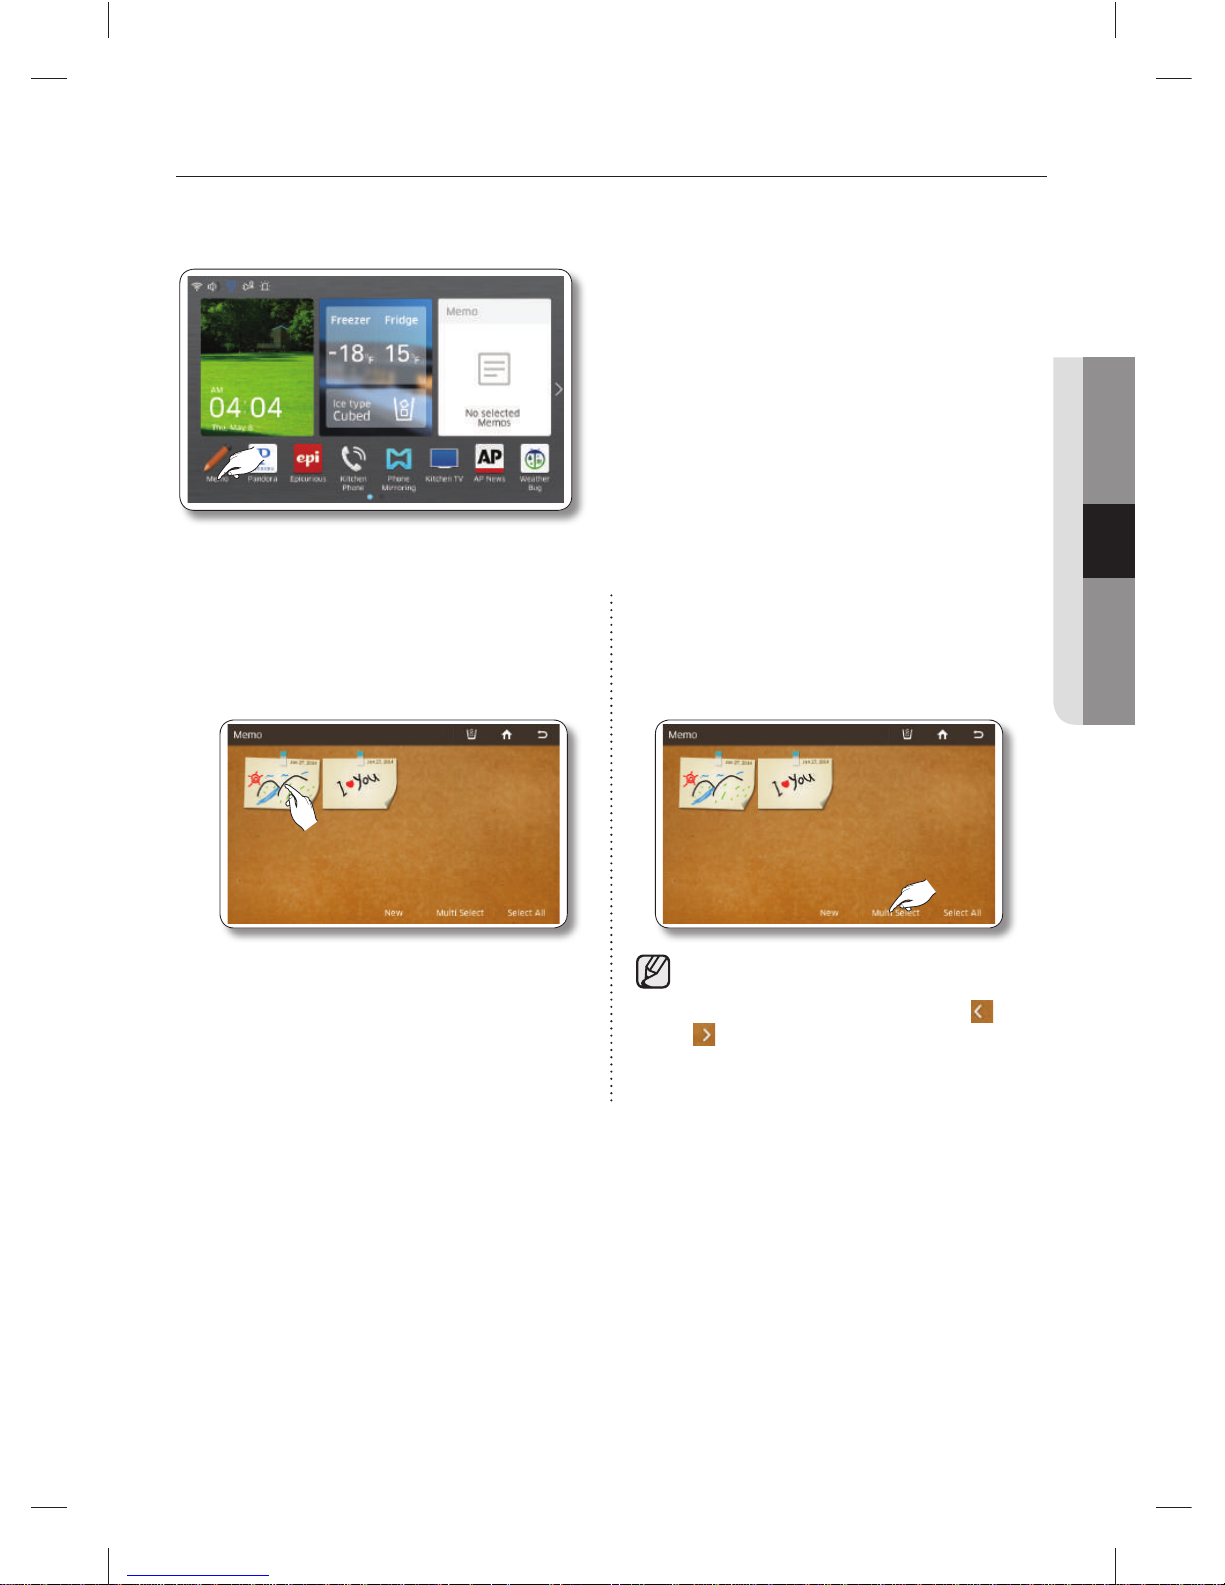
How to display memos.
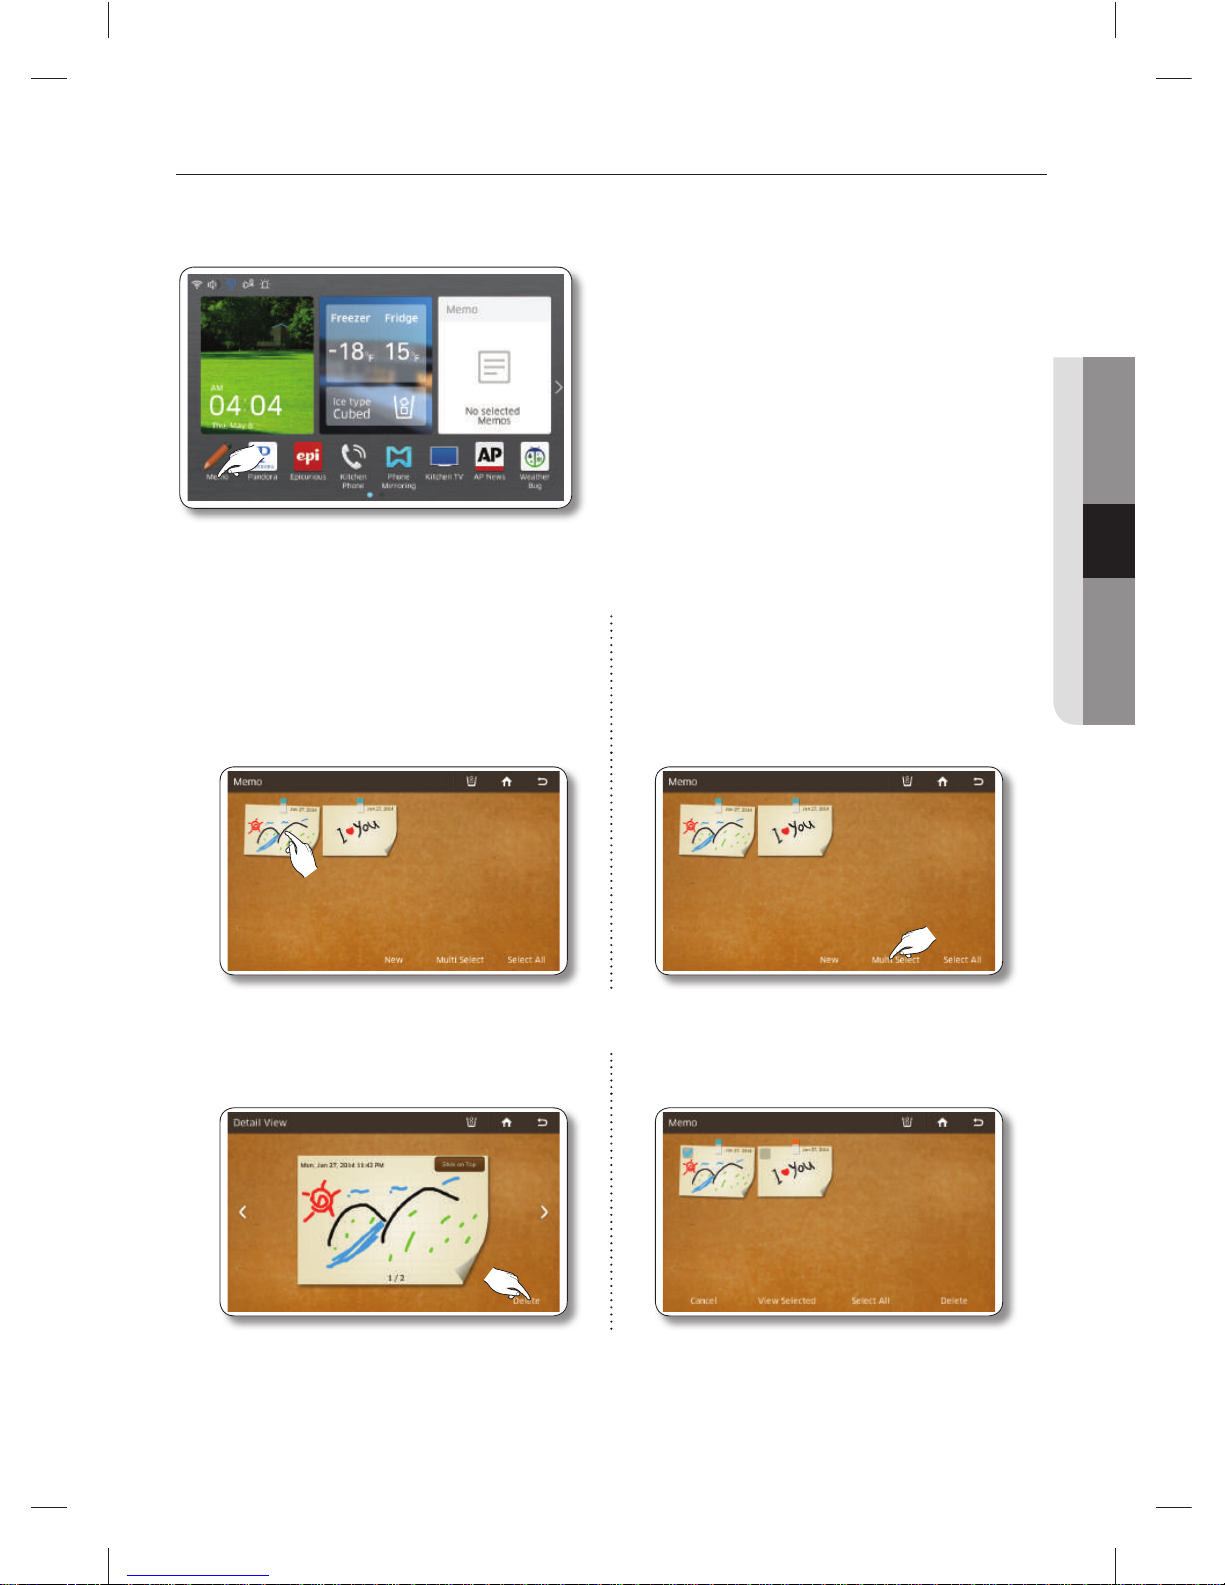
1. Select the Memo button on the Home screen.
2. Select the memo you want to display.
To view multiple memos, continue here.
2. To view multiple memos, press the [Multi
Select] button.
• When you select the [Select All] button, the
Multi Selection screen appears.
• When there are multiple pages with many
memos, there will be page number on the
bottom of the screen. If you select a page
number, the screen shifts to that page.
Multi-Select mode lets you select a
number of memos and then view them
one after another by pressing the or
buttons.
• The memo(s) being displayed on the Home screen is indicated by a red tack.
• The written memos appear as thumbnails.
You can change the order of the written memos by dragging and dropping.
DA68-03055A-06.indb 29DA68-03055A-06.indb 29 2015. 4. 23. 8:162015. 4. 23. 8:16
Page 30
English - 30
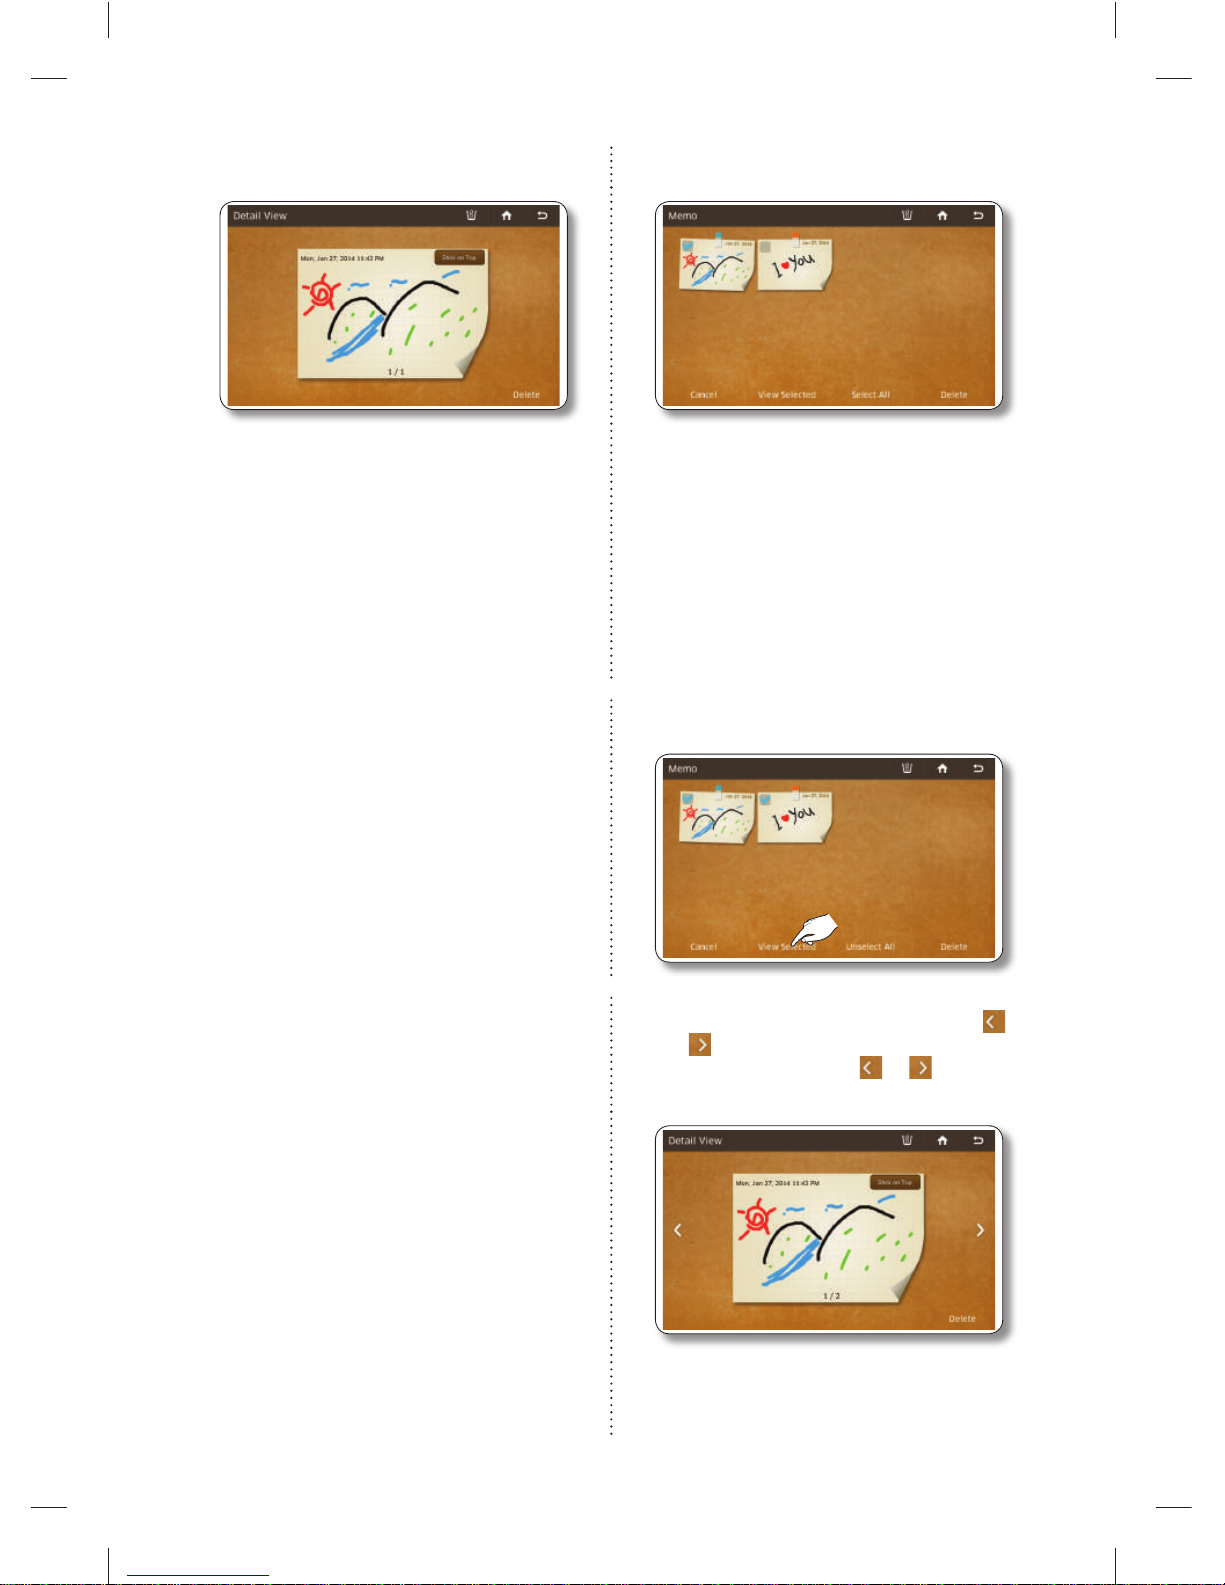
3. View the saved memo. 3. Select the memos you want to view.
• In the Detail View screen, you can delete the
memo or attach it to or detach it from the
Home screen.
• When you select the [Select All] button, all
the memos on the current page are selected
and the [Select All] button converts to the
[Unselect All] button.
• To exit the Multi Select screen, press the
[Cancel] button.
• When there are multiple pages with many
memos, there will be page numbers on the
bottom of the screen. If you press a page
number, the screen shifts to that page.
4. Select the [View Selected] button.
5. View the saved memos by touching the
and buttons.
Each time you select the or button, the
next menu in sequence appears.
• In the Detail View screen, you can delete a
memo or attach it to or detach it from the
Home screen.
DA68-03055A-06.indb 30DA68-03055A-06.indb 30 2015. 4. 23. 8:162015. 4. 23. 8:16
Page 31
English - 31
OPERATING
How to delete memos.
1. Select the [Memo] button on the Home screen.
2. Select the memo you want to delete.
To delete multiple memos, continue
here.
2. To delete multiple memos, select the [Multi
Select] button.
3. Press the [Delete] button. 3. Select the memos you want to delete.
DA68-03055A-06.indb 31DA68-03055A-06.indb 31 2015. 4. 23. 8:162015. 4. 23. 8:16
Page 32
English - 32
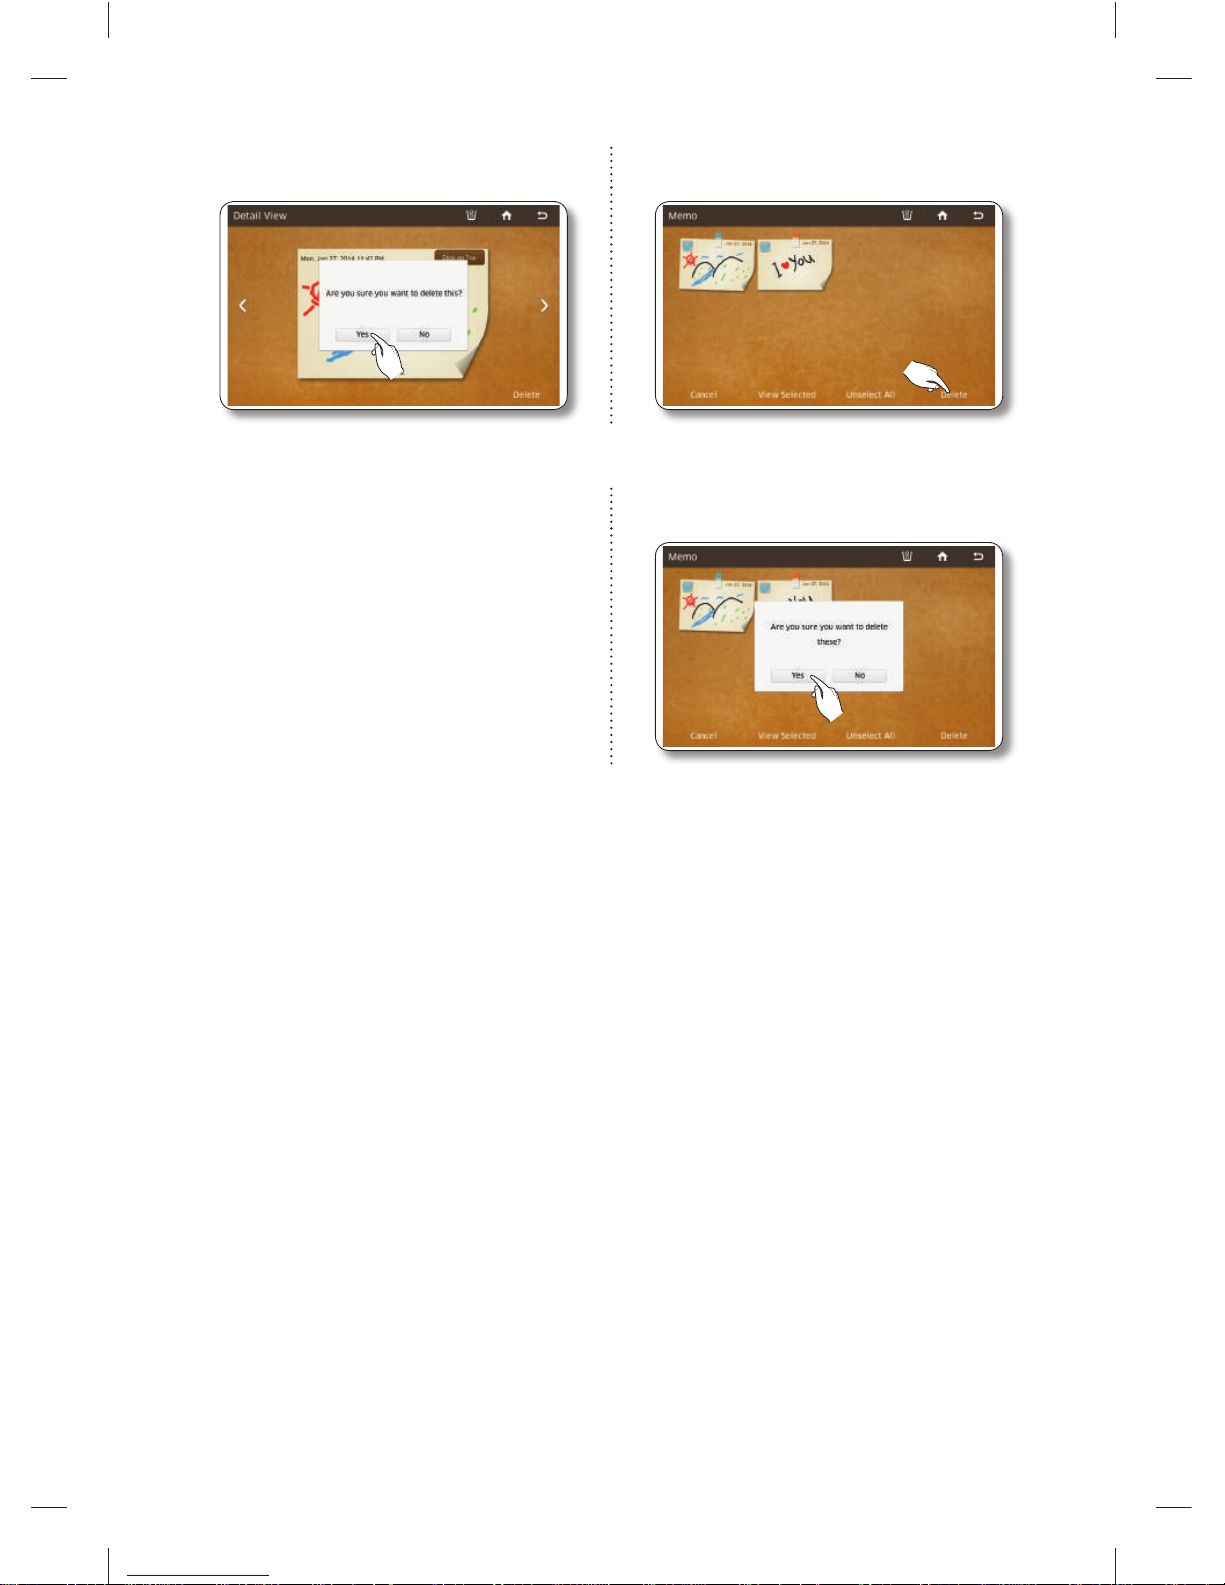
4. Press the [Yes] button. 4. Press the [Delete] button.
5. Press the [Yes] button.
DA68-03055A-06.indb 32DA68-03055A-06.indb 32 2015. 4. 23. 8:162015. 4. 23. 8:16
Page 33
English - 33
OPERATING
PANDORA (USA ONLY)
This function is only available when the refrigerator is connected to your wireless network (Wi-Fi).
For instructions explaining how to connect the refrigerator to your network, see page 79.
Through the Pandora service, you can enjoy your favorite songs free of charge.
The song selections are based on the analysis data collected by Pandora’s Music Genome
Project. Your individual song selections - used as feedback - can affect Pandora’s next song
selection.
How to Activate and Use Pandora Internet radio.
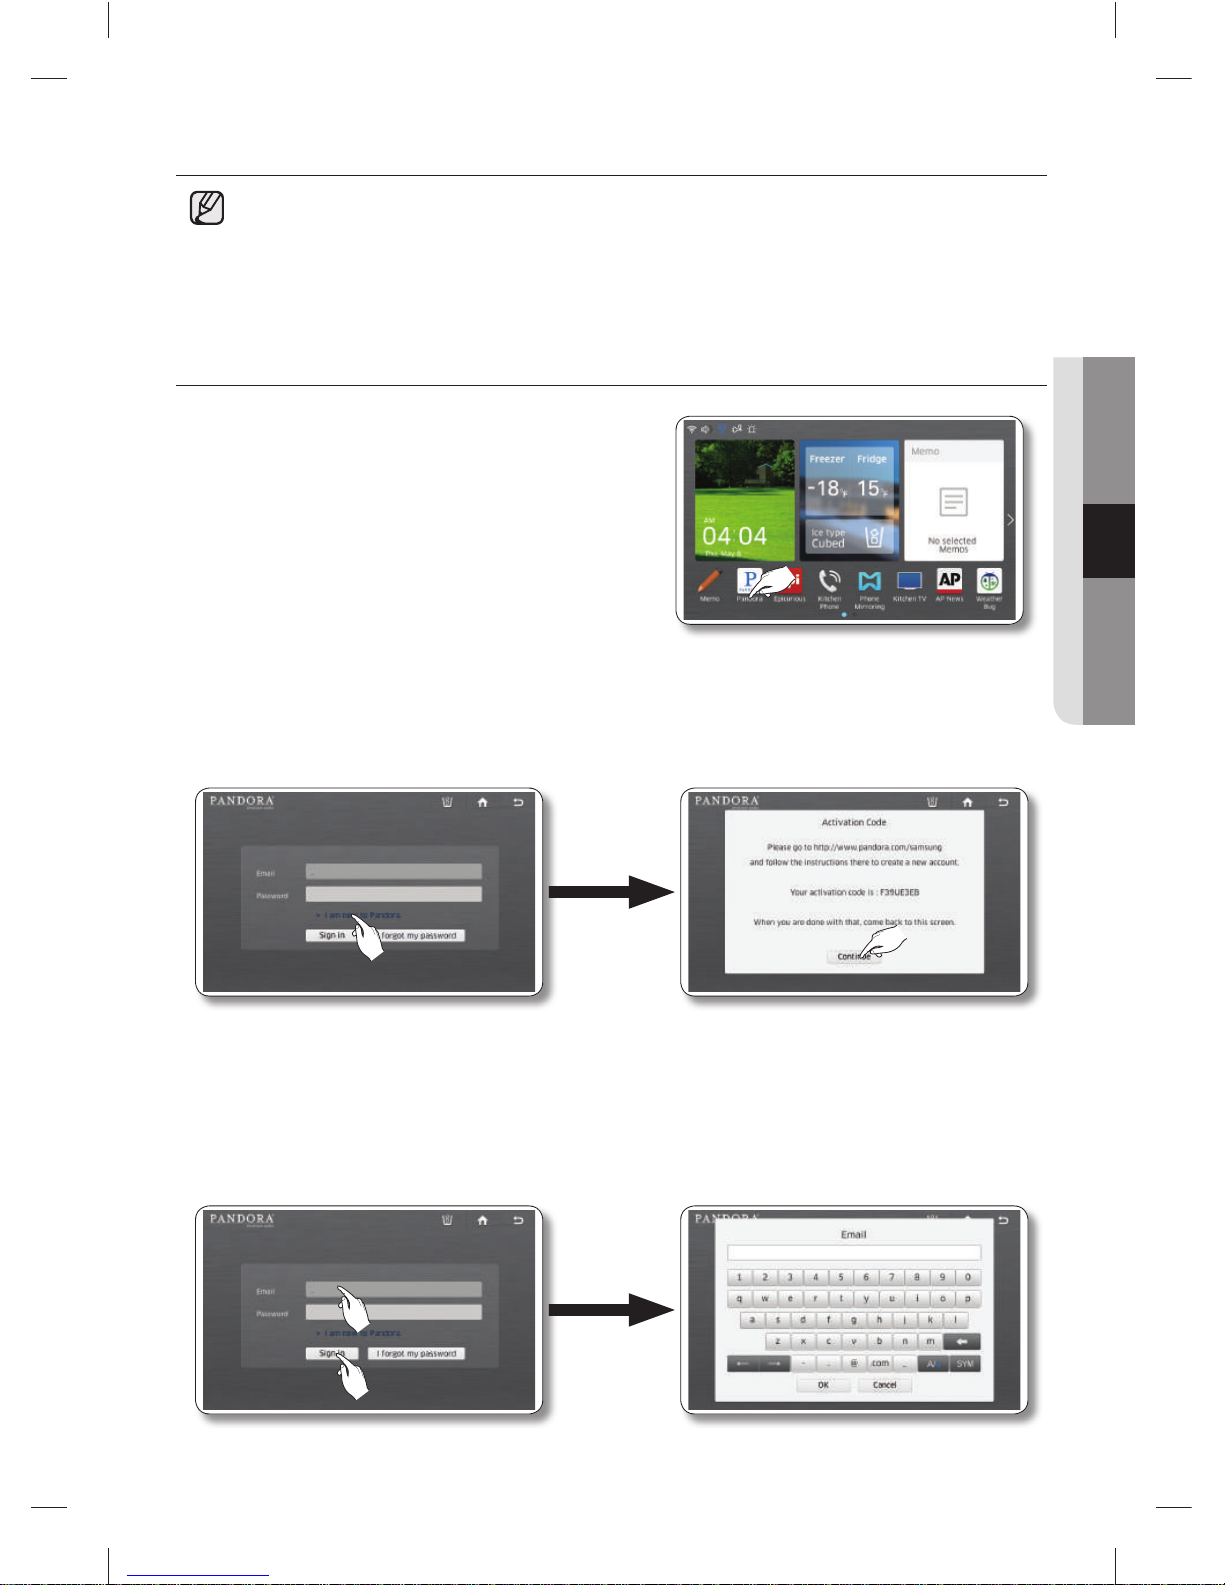
1. Select the [Pandora] button on the Home screen.
2. Select the ‘ I’m new to Pandora’ text. An Activation Code screen pops up. On your PC, go to the web
site listed in the pop-up, and then use the Code to set up and activate your Pandora account.
When done, Select the [Continue] button.
3. Select the Email input box. Enter your Pandora account ID using the on-screen keyboard.
Select the Password input box. Enter your Pandora password using the on-screen keyboard.
• If you do not have a Pandora account, you can also create one at http://www.pandora.com.
• In the Email input box, enter your Pandora account ID, for example, [email protected].
DA68-03055A-06.indb 33DA68-03055A-06.indb 33 2015. 4. 23. 8:162015. 4. 23. 8:16
Page 34
English - 34
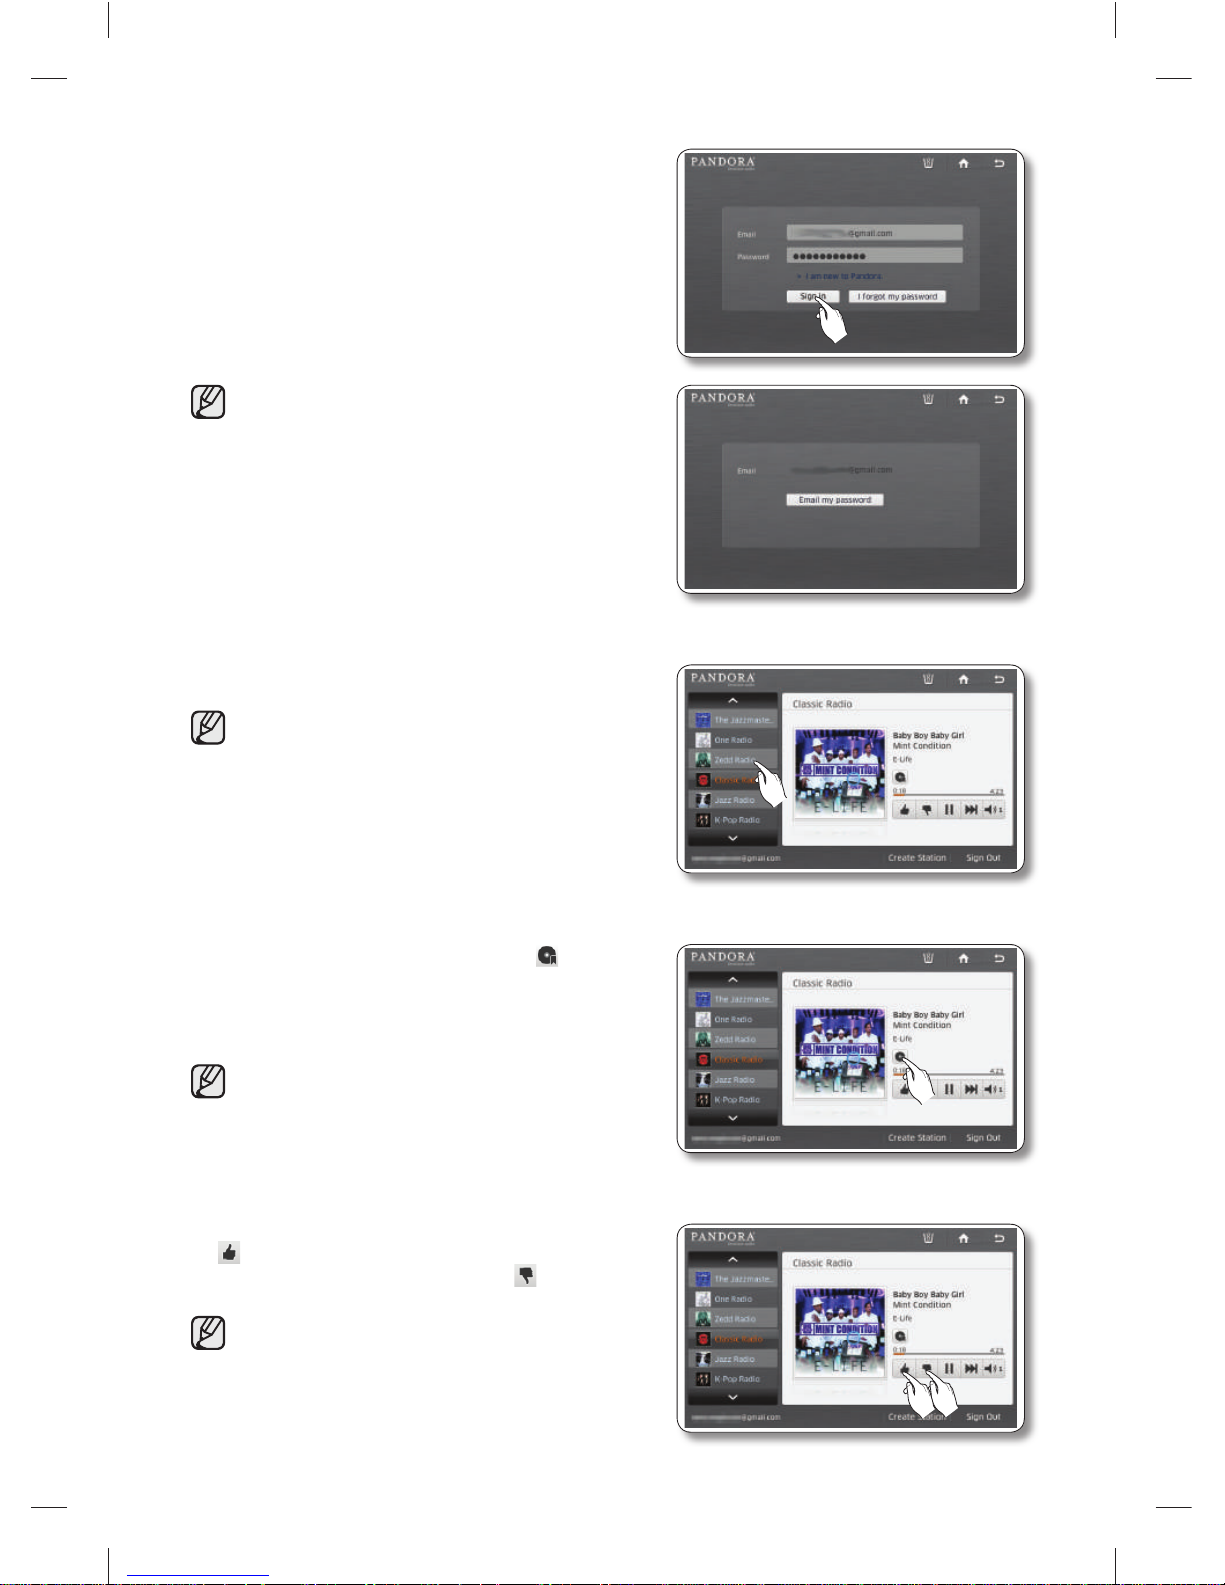
4. Press the [Sign in] button.
If you forget your password, press the “I forgot
my password” button to get an email with
your password sent to the email address you
registered with Pandora.
5. Select a station from the list on the left.
Pandora supports up to 100 stations.
You can create stations at www.pandora.com or
through mobile devices that support Pandora.
If you select other stations, you can to play the
selected songs on those stations.
6. When you select the Bookmark button( ) while
playing a song, the song is added to the Song
Bookmark List. You can view this list at the Pandora
site.
By bookmarking favorite songs, you can view the
song list and purchase albums with those songs
on the [Your Profi le] page at www.pandora.com.
7. If you like a song that’s playing, select the Thumb Up
( ) button.
Otherwise, select the Thumb Down ( ) button.
When you select the Thumb Up button, Pandora
creates a station with songs similar to the song
you approved.
DA68-03055A-06.indb 34DA68-03055A-06.indb 34 2015. 4. 23. 8:162015. 4. 23. 8:16
Page 35
English - 35
OPERATING
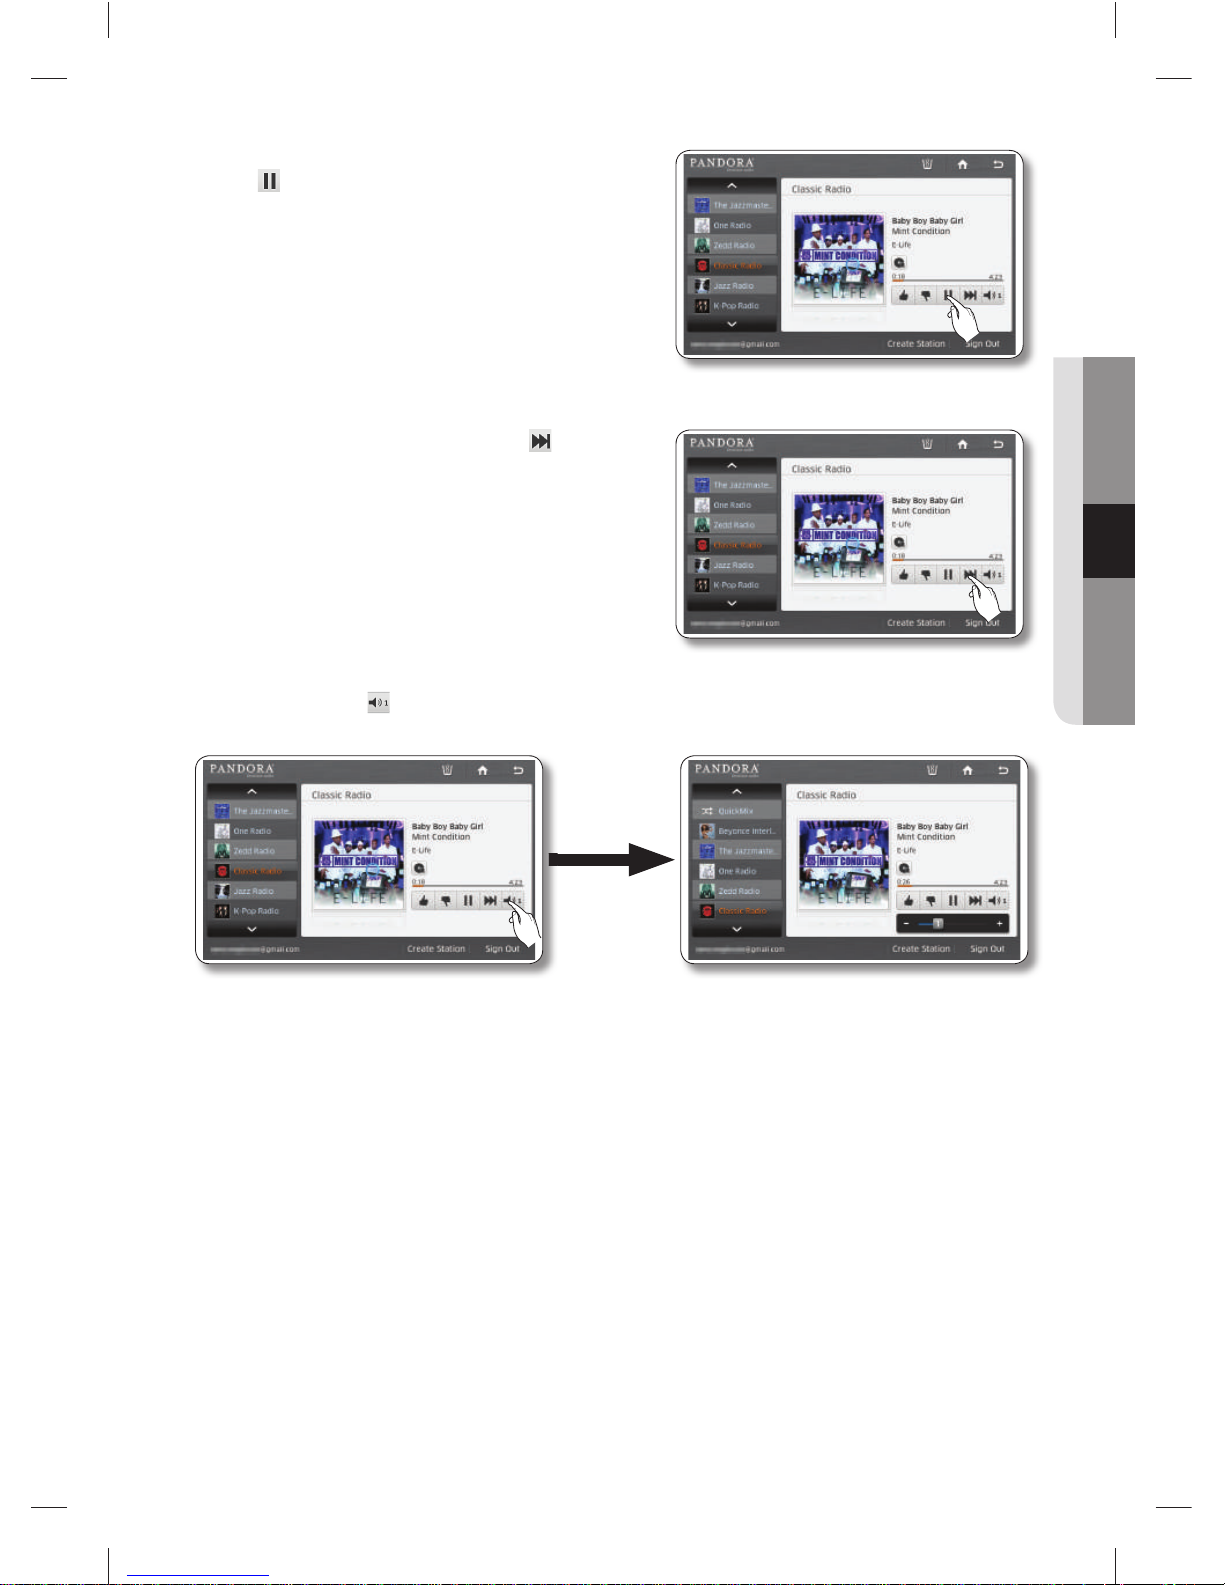
8. To put the currently playing song on hold, press the
hold ( ) button.
9. To play the next song, press the Next ( ) button.
• Unfortunately, our music licenses force us to
limit the number of songs you can skip in an
hour.
10. Press the speaker ( ) button to adjust the volume.
DA68-03055A-06.indb 35DA68-03055A-06.indb 35 2015. 4. 23. 8:162015. 4. 23. 8:16
Page 36
English - 36
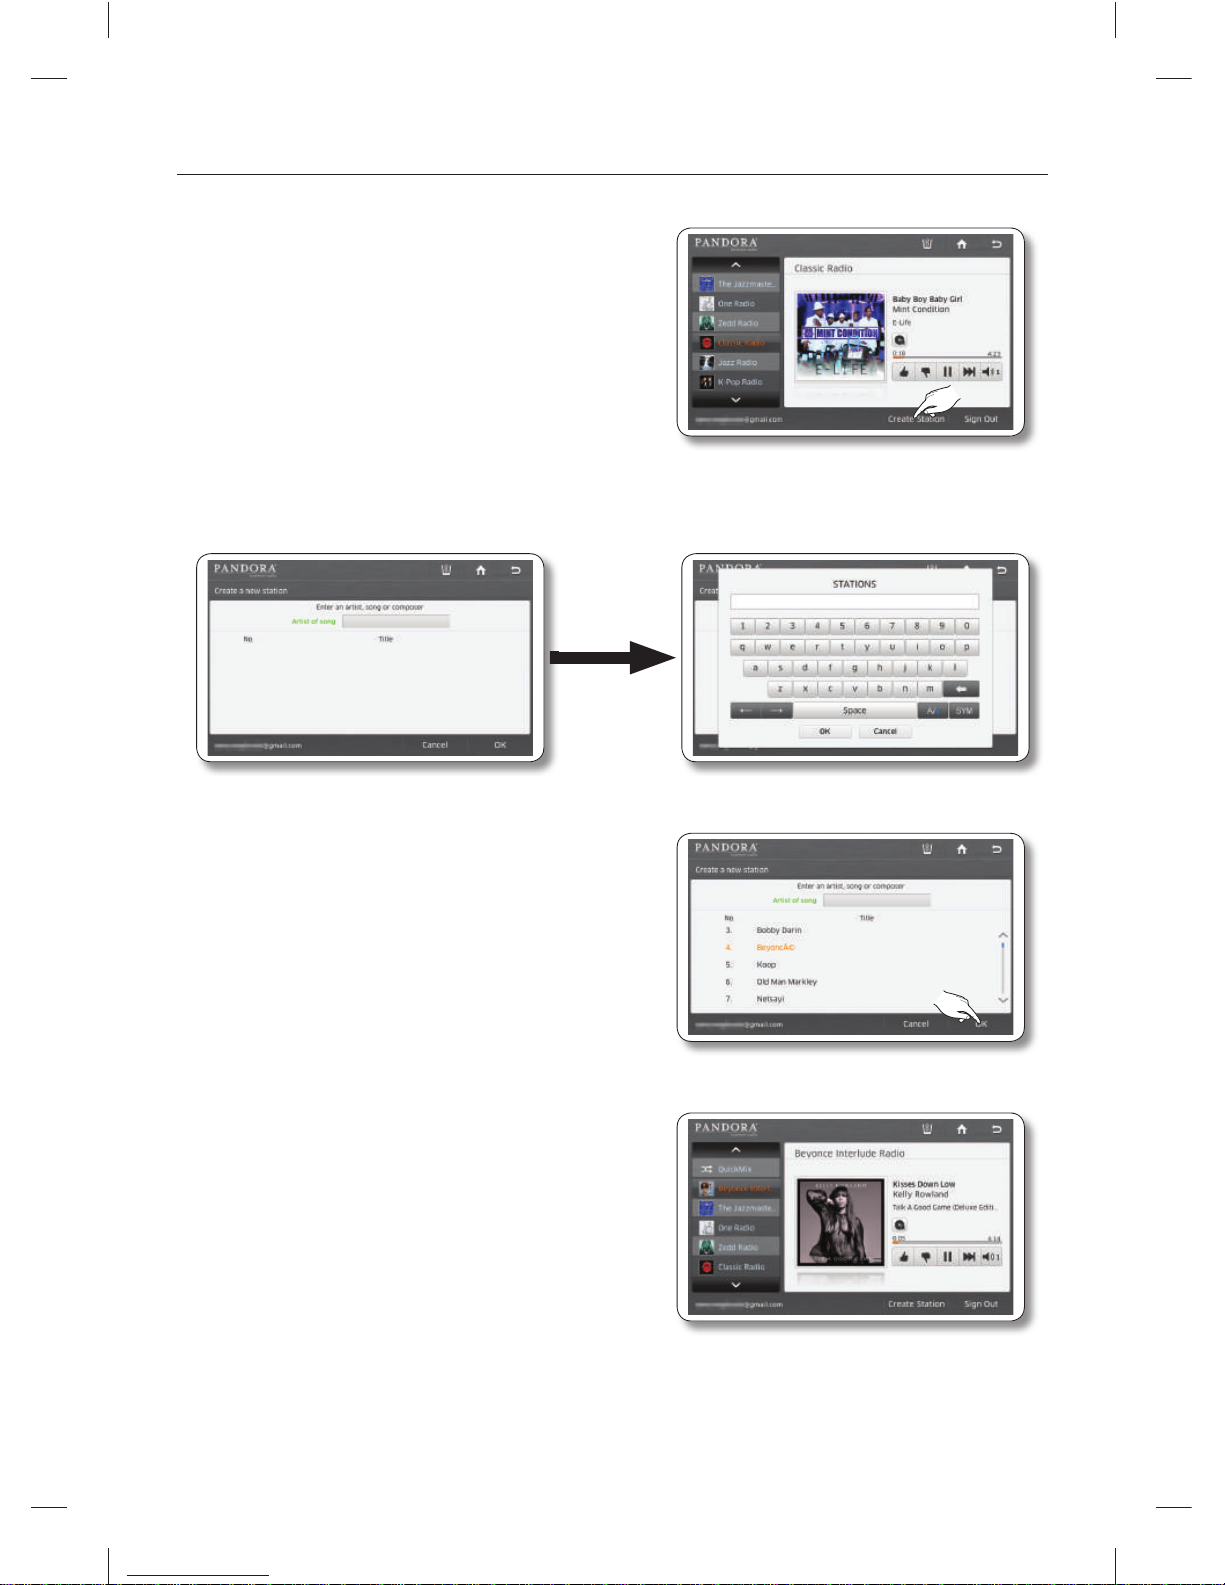
How to Create a Station in Pandora
1. Select the [Create Station] button at the bottom of the
Pandora screen.
2. Select the entry fi eld next to “Artist or Song” to bring up the Keyboard window.
Enter the name of an artist or the name of a song.
3. Select a station from the list that appears, and then
press the [OK] button.
4. Confi rm the newly added station on the left of the
Screen.
DA68-03055A-06.indb 36DA68-03055A-06.indb 36 2015. 4. 23. 8:162015. 4. 23. 8:16
Page 37
English - 37
OPERATING
TUNEIN (CANADA AND AUSTRALIA ONLY)
• This function is only available when the refrigerator is connected to your wireless network (Wi-Fi).
• Through the TuneIn service, you can enjoy your favorite songs free of charge.
• Occasionally a station may become unavailable at the broadcaster’s request, due to geographical
restrictions, or otherwise.
• Compatible fi le formats are WMA and MP3.
How to run or use the TuneIn Internet radio
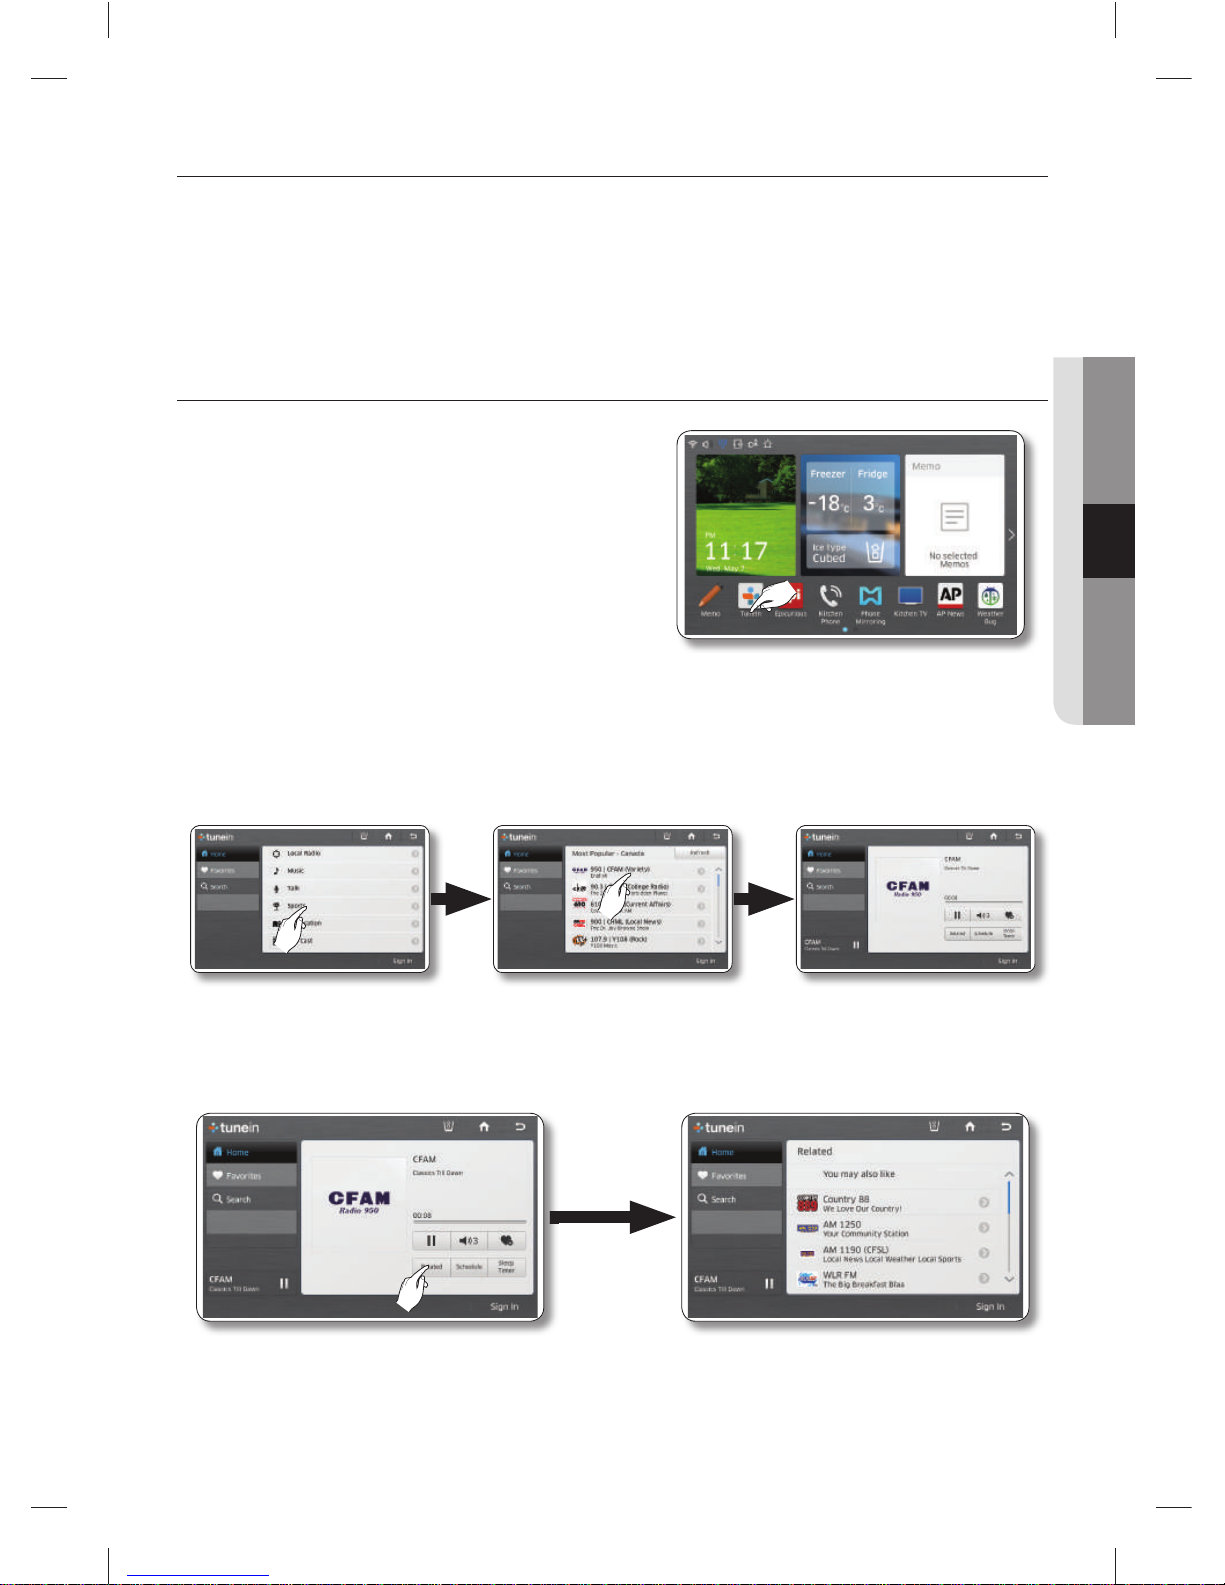
1. Select the [TuneIn] button on the Home screen.
2. When running the TuneIn, the [Home] category will be run.
When each category is selected, you can see the list of all the available broadcasting stations.
When a broadcasting station is selected, it will move to the Play screen and it will run.
3. To check the list of the related broadcasting stations press the [Related] button.
DA68-03055A-06.indb 37DA68-03055A-06.indb 37 2015. 4. 23. 8:172015. 4. 23. 8:17
Page 38
English - 38
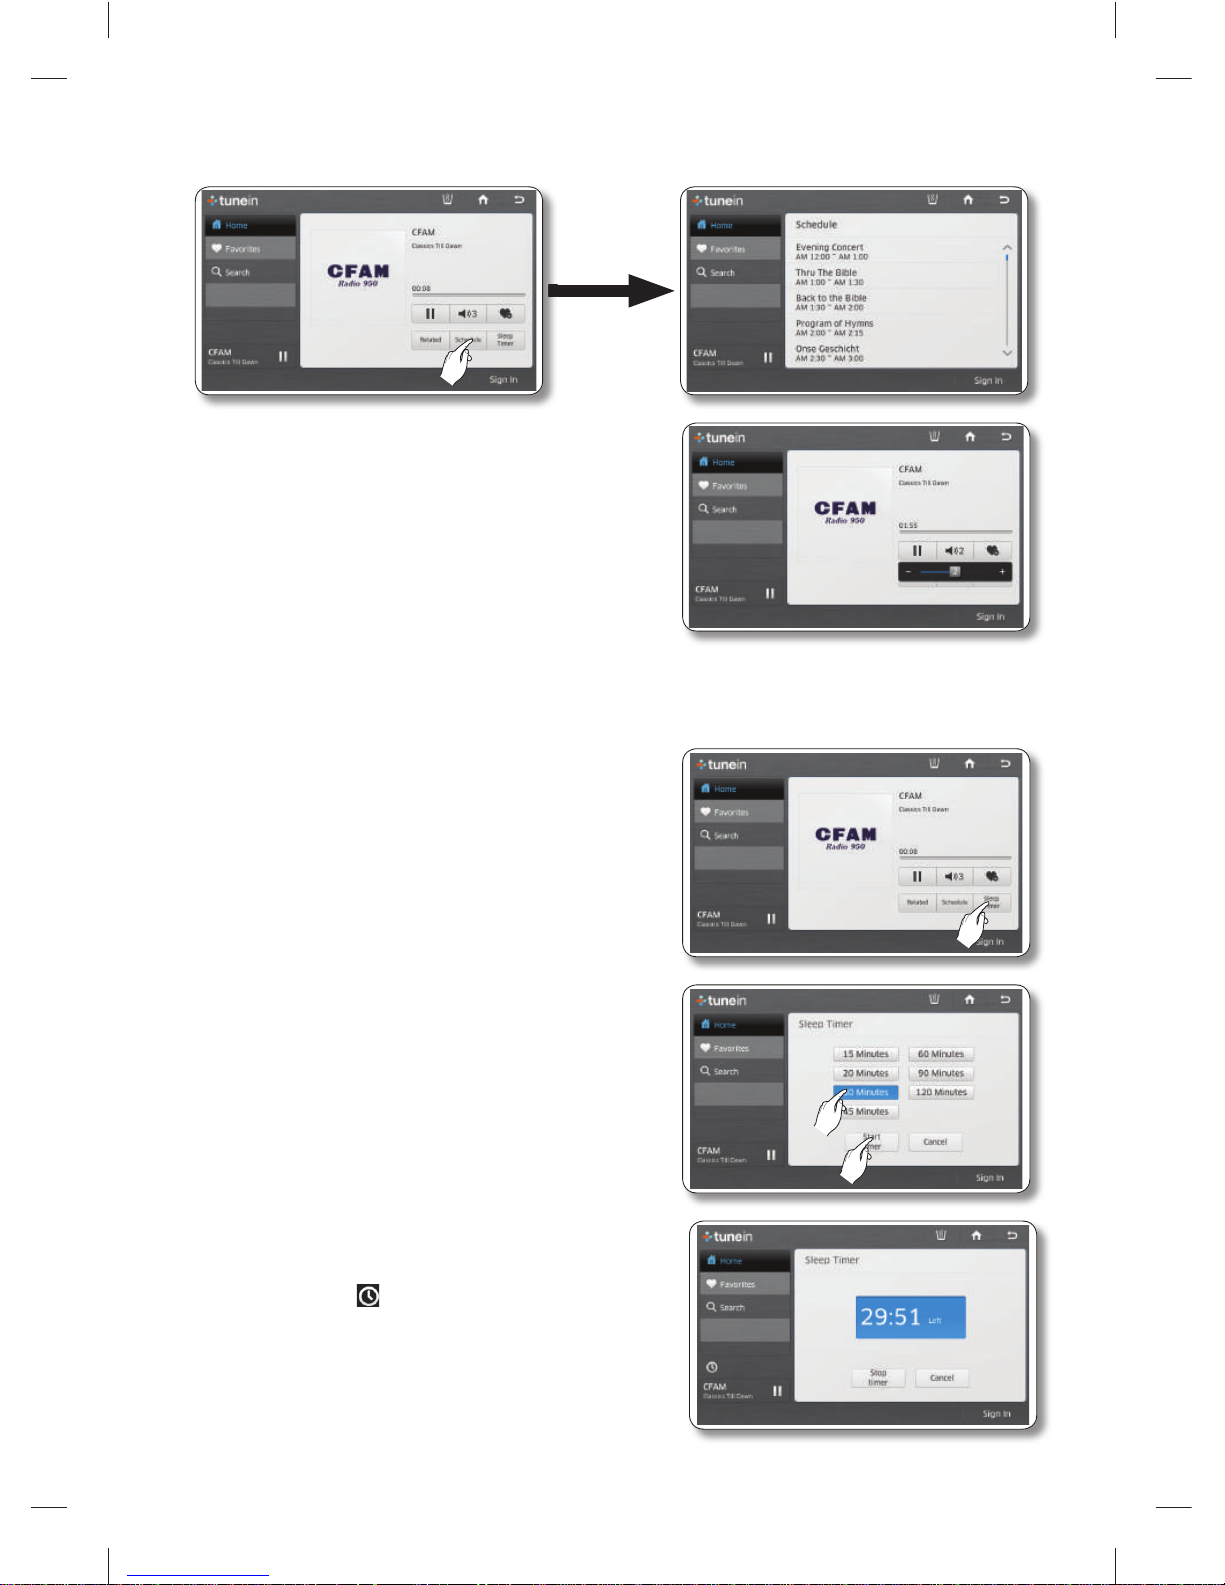
4. To check the schedule of the broadcasting Operator press the [Schedule] button.
5. To adjust the volume, select the volume button.
6. With the Sleep Timer function, it can be automatically turned off after the set time.
If the Sleep Timer is not set, it will stop in 60 minutes automatically.
6-1. To select the Sleep Timer, tap on the
[SleepTimer] button.
6-2. Set the desired time and tap on the [Start Timer]
button.
6-3. When selecting the [Sleep Timer] button again,
it will show the remaining time to the target time.
When the Sleep Timer is working, the Sleep
Timer Icon (
) will be shown on the display.
DA68-03055A-06.indb 38DA68-03055A-06.indb 38 2015. 4. 23. 8:172015. 4. 23. 8:17
Page 39
English - 39
OPERATING
My Presets
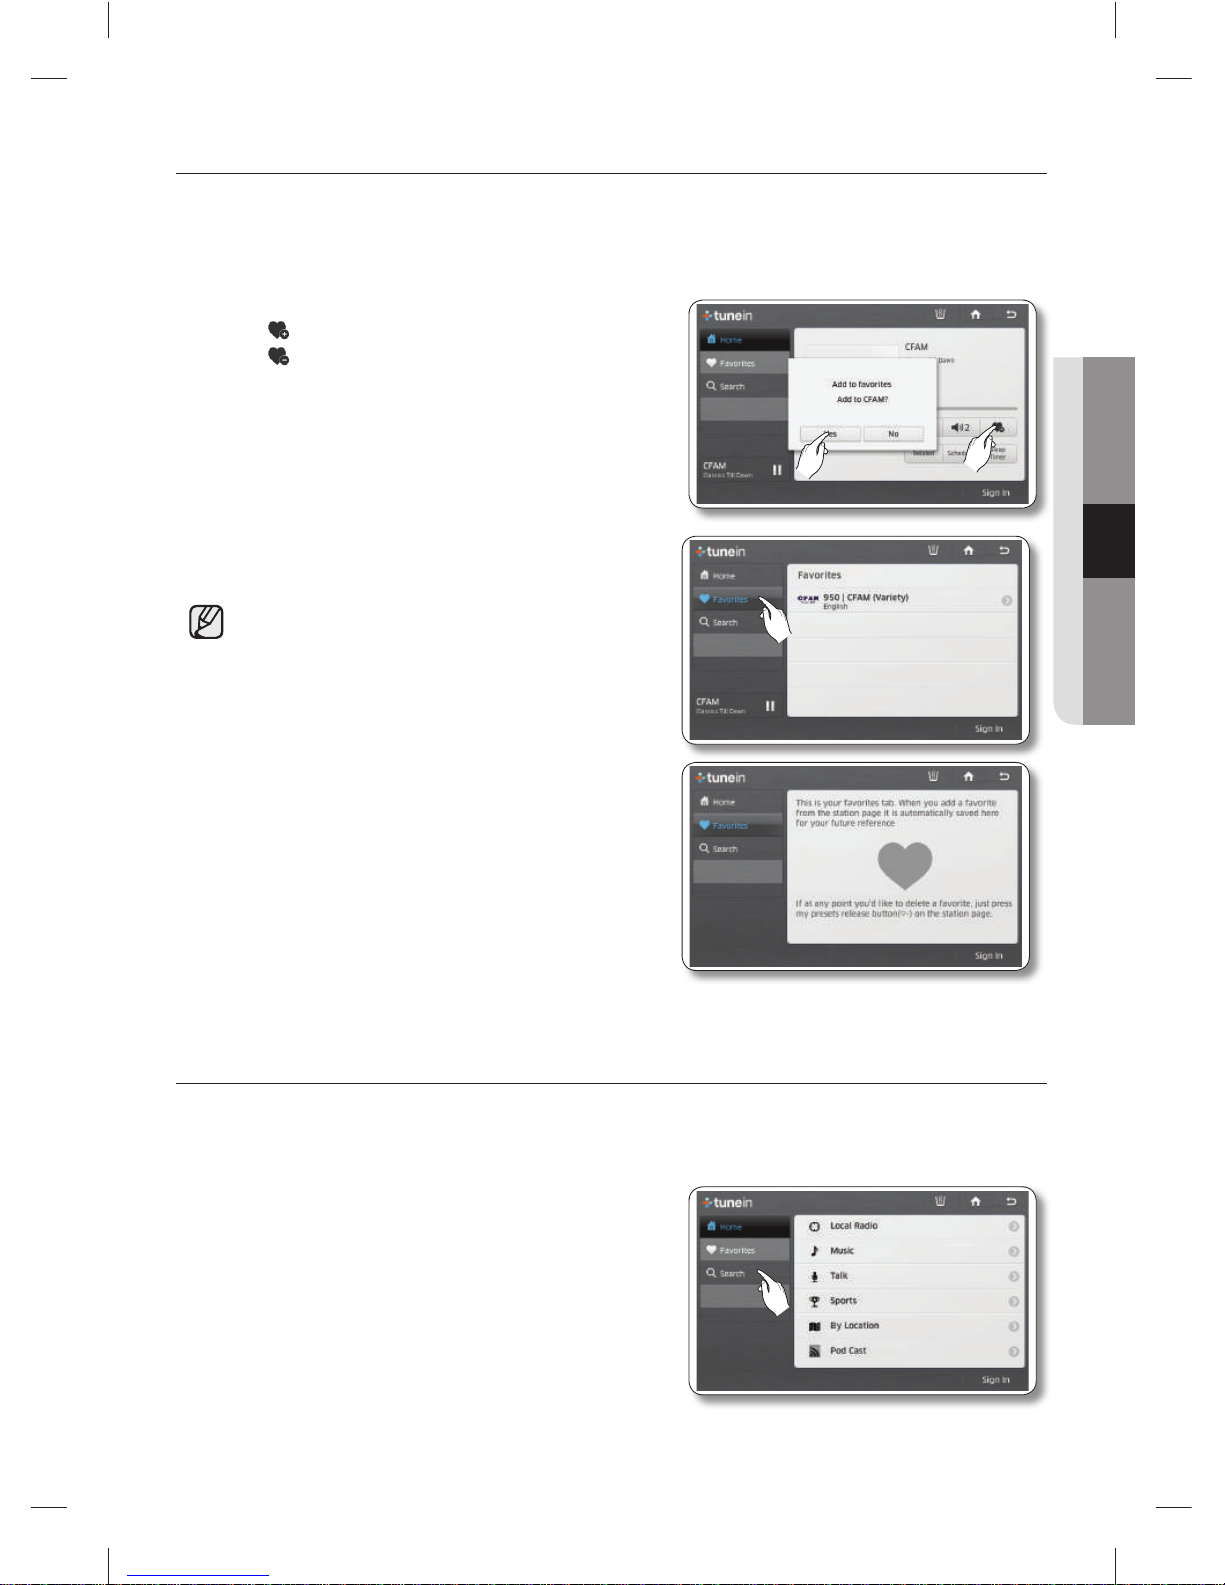
• If there are broadcasting stations to be added to the favorites, use the My Presets function. But, since
those being registered in the My Presets while you are signed out will be deleted when fi nishing the
TuneIn, register them while you are signed in with your TuneIn account if you want to use them later.
1. Select the Heart Icon button.
• : In status to be added to My Presets
• : In status to be removed from My Presets
2. The list registered to My Presets will be shown when
pressing the [My Presets] button on the left.
When there is no list registered in My Presets, an
information page will show up.
Search
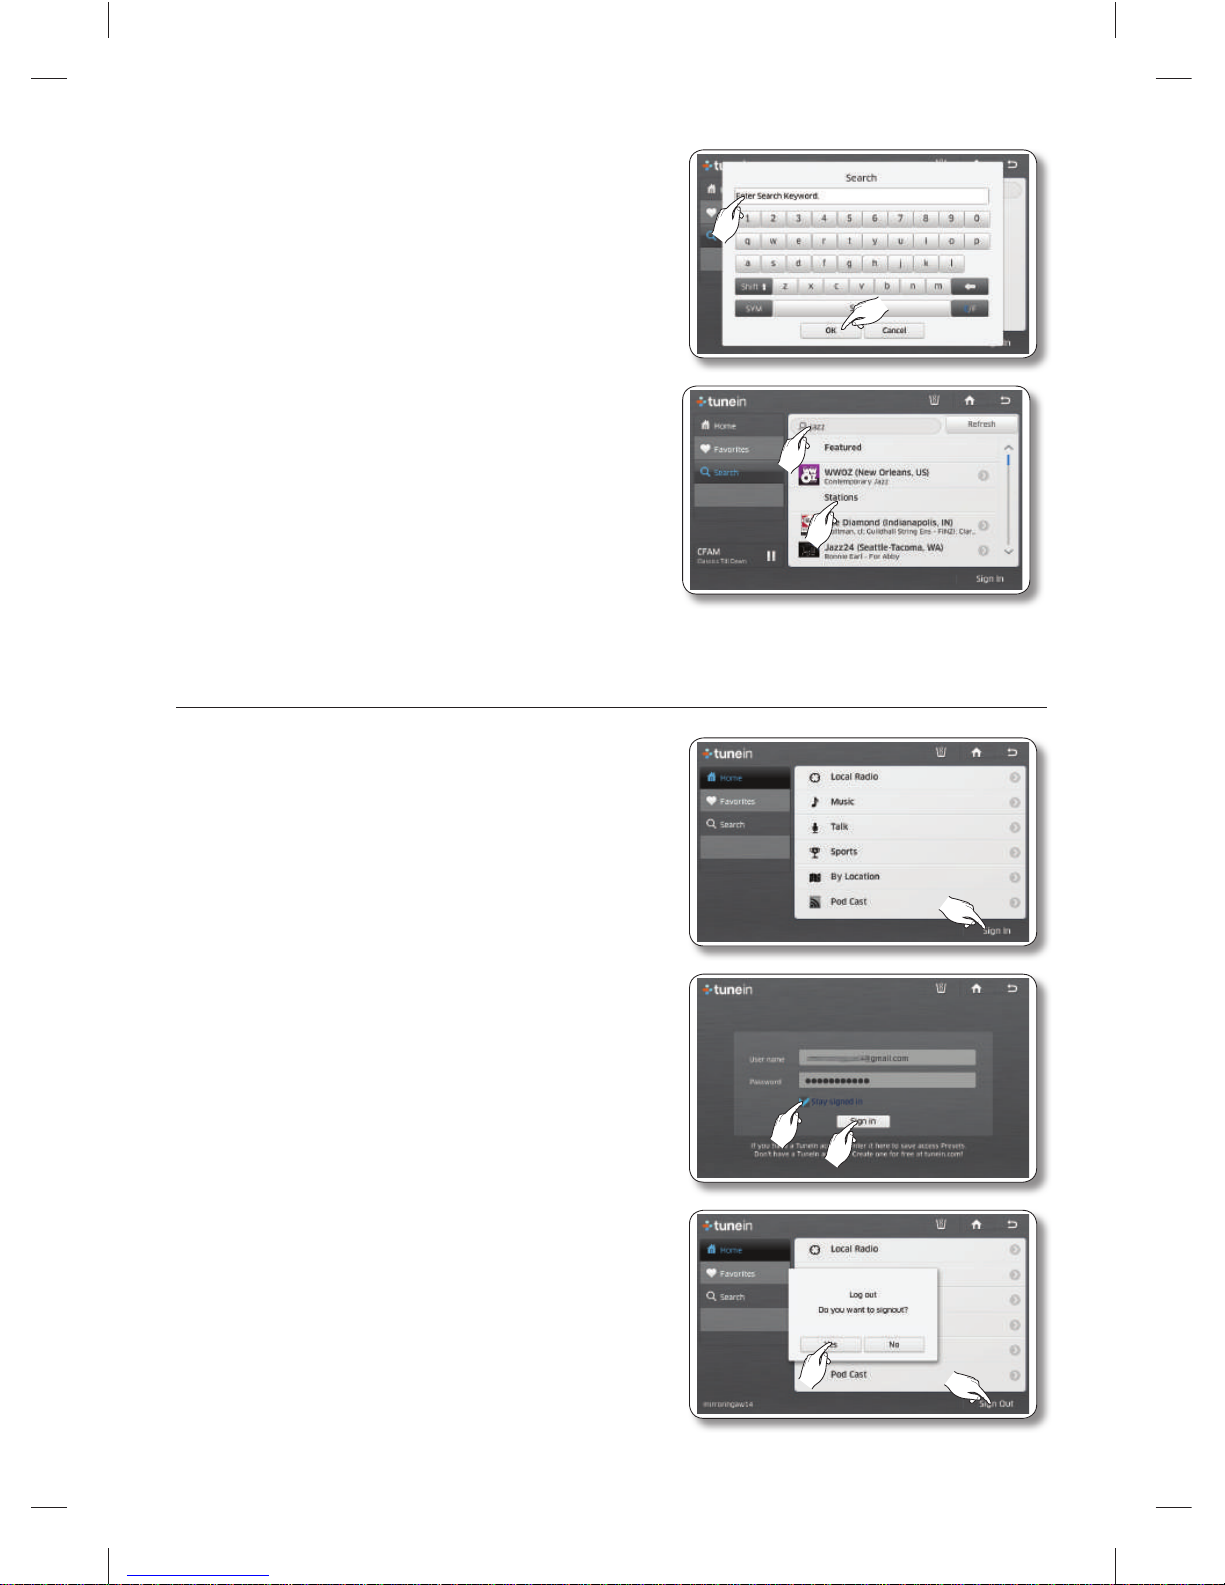
• When using the Search button, you can refer to a list of broadcasting stations related to the search
word.
1. Press the [Search] button.
DA68-03055A-06.indb 39DA68-03055A-06.indb 39 2015. 4. 23. 8:172015. 4. 23. 8:17
Page 40
English - 40
2. When the keyboard pops up, enter the search word
and press the [OK] button.
3. When selecting a desired broadcasting station on the
search results, you can listen to its broadcast radio.
When wanting to search again, press the [Search]
button or touch the Search bar. Then, the keyboard will
show up.
Sign In/Sign Out
1. To log on to the TuneIn account, press the [Sign In]
button.
If you do not have a TuneIn account, create one at the
www.tunein.com and use the program.
2. To sign in automatically when playing the TuneIn, check
in the [Stay signed in] checkbox.
3. To sign out, press the [Sign Out] button.
When a pop-up screen appears, press the [Yes]
button.
DA68-03055A-06.indb 40DA68-03055A-06.indb 40 2015. 4. 23. 8:172015. 4. 23. 8:17
Page 41
English - 41
OPERATING
EPICURIOUS
With the Epicurious service, you can easily to fi nd various recipes by ingredient, season, occasion, or
category.
This function is only available when the refrigerator is connected to your wireless network (Wi-Fi).
For instructions explaining how to connect the refrigerator to your network, see page 79.
How to use the Featured Recipes function
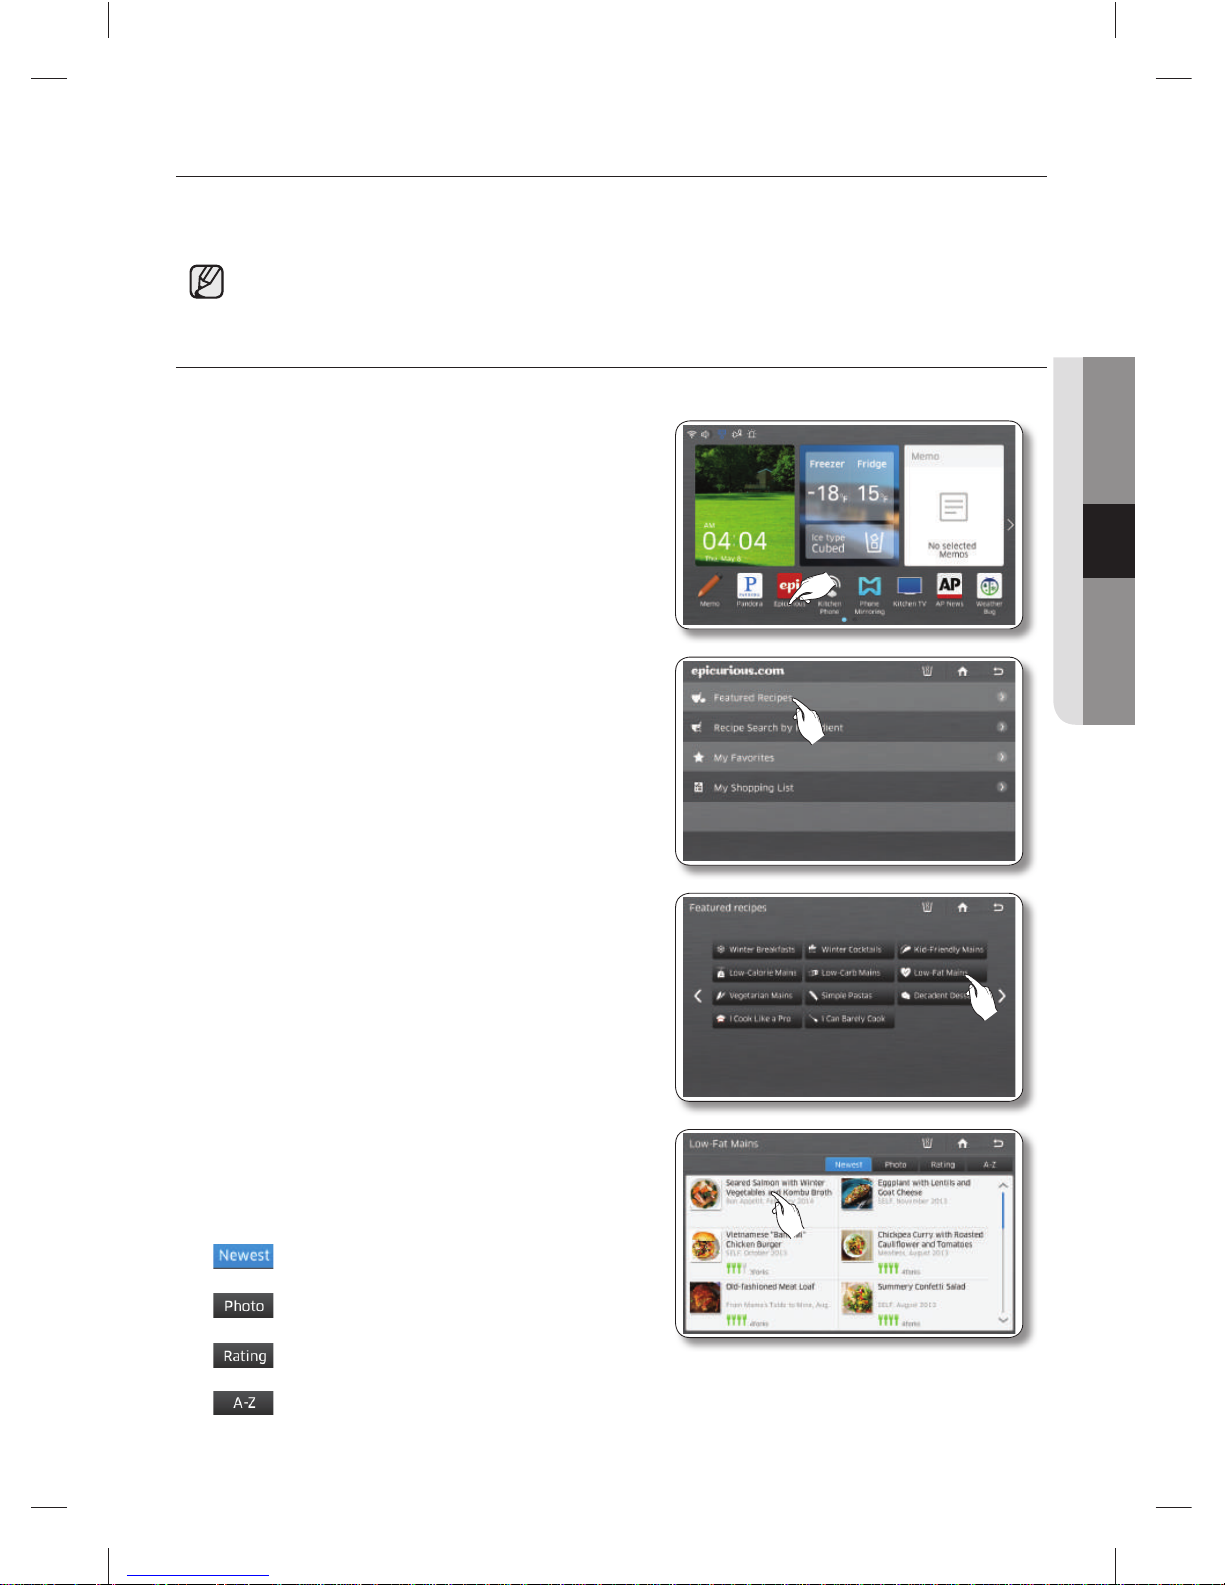
1. Select the [Epicurious] button on the Home screen
• There will be a 4-second commercial when you
start Epicurious.
2. Select [Featured Recipes] on the Epicurious list.
3. Select a Featured Recipes category.
The screen displays a list of recipes.
4. Select a recipe. The screen displays the recipe
ingredients and other details.
The popularity of a recipe is indicated by the number of
forks. Four forks is the highest.
: Select to show recipes with the newest fi rst.
: Select to show in order of photo information.
: Select to show recipes in order of popularity.
: Select to show recipes in alphabetical order.
DA68-03055A-06.indb 41DA68-03055A-06.indb 41 2015. 4. 23. 8:172015. 4. 23. 8:17
Page 42
English - 42
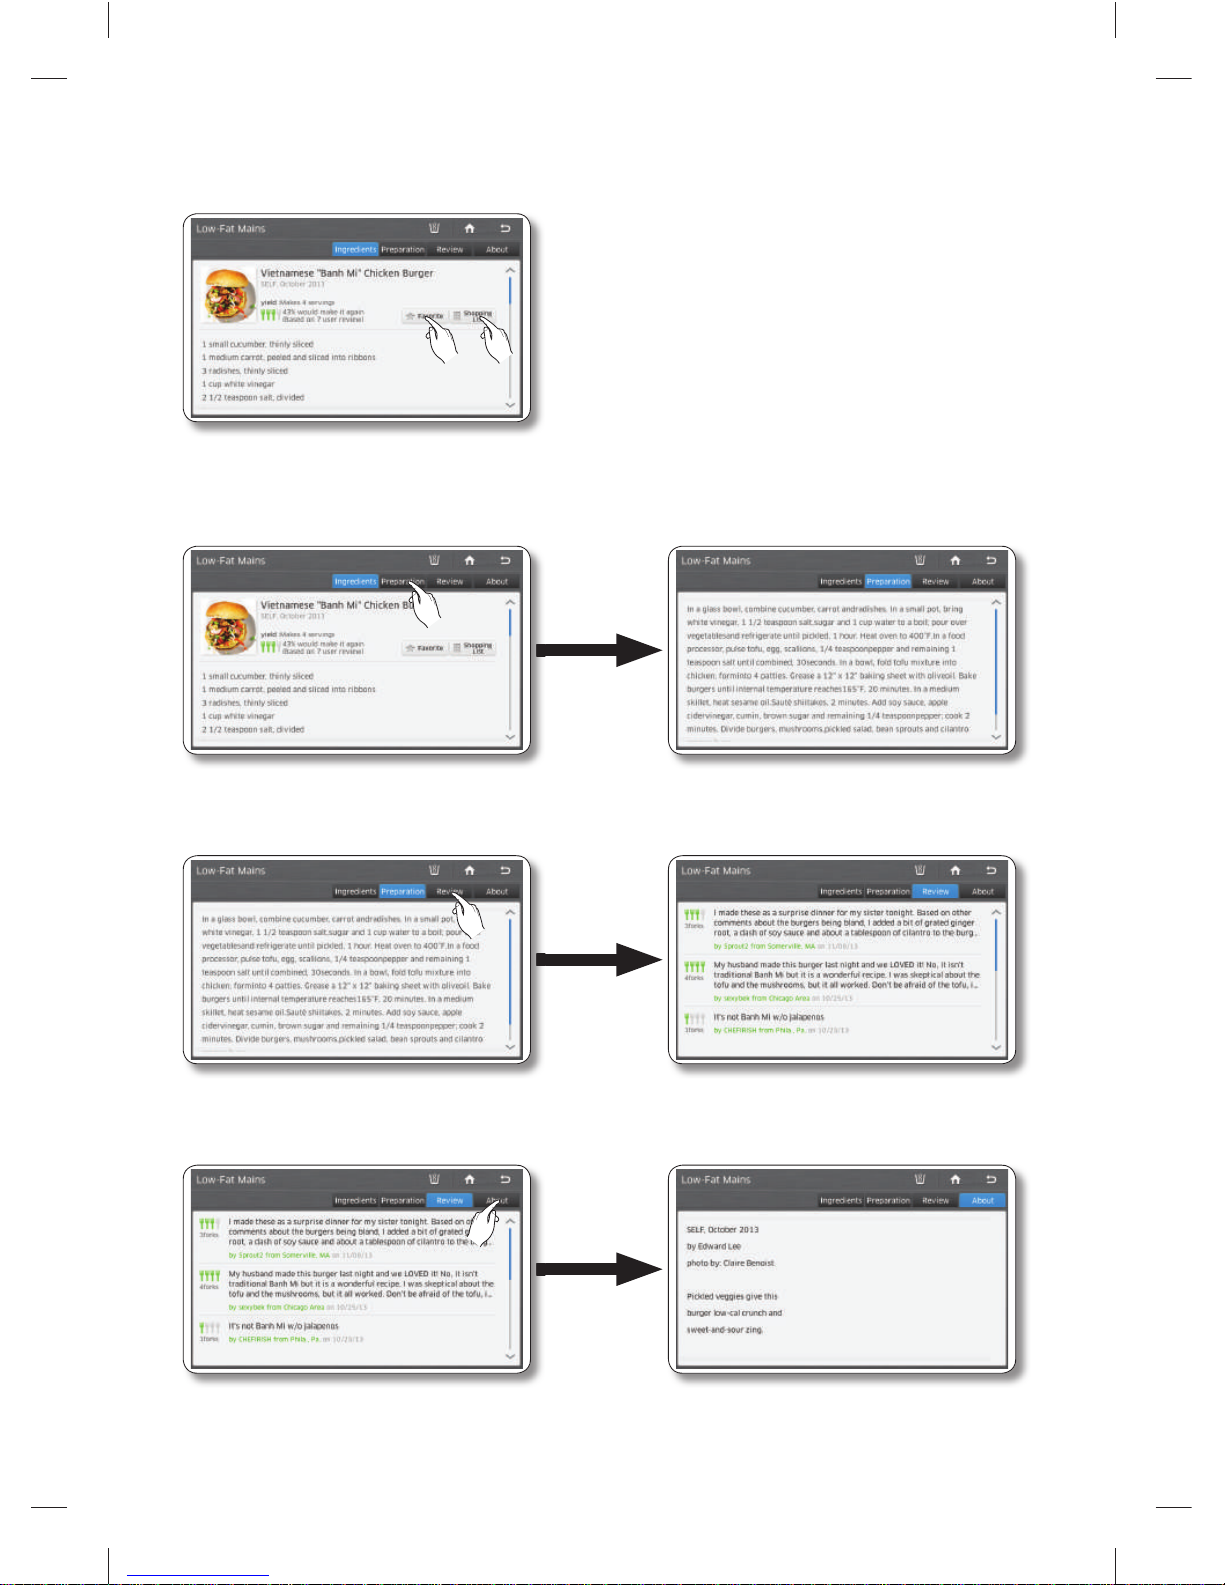
5. Press the [Favorite] button to add a recipe to your favorite list.
Press the [Shopping List] button to make a shopping list for a recipe.
6. Select the [Preparation] tab on the top of the page to view the recipe’s step by step preparation
instructions.
7. Select the [Review] tab on the top of the page to see reviews of the recipe by other users.
8. Select the [About] tab on the top of the page to view information about the author of the recipe.
DA68-03055A-06.indb 42DA68-03055A-06.indb 42 2015. 4. 23. 8:172015. 4. 23. 8:17
Page 43
English - 43
OPERATING
How to use Recipe Search by Ingredient.
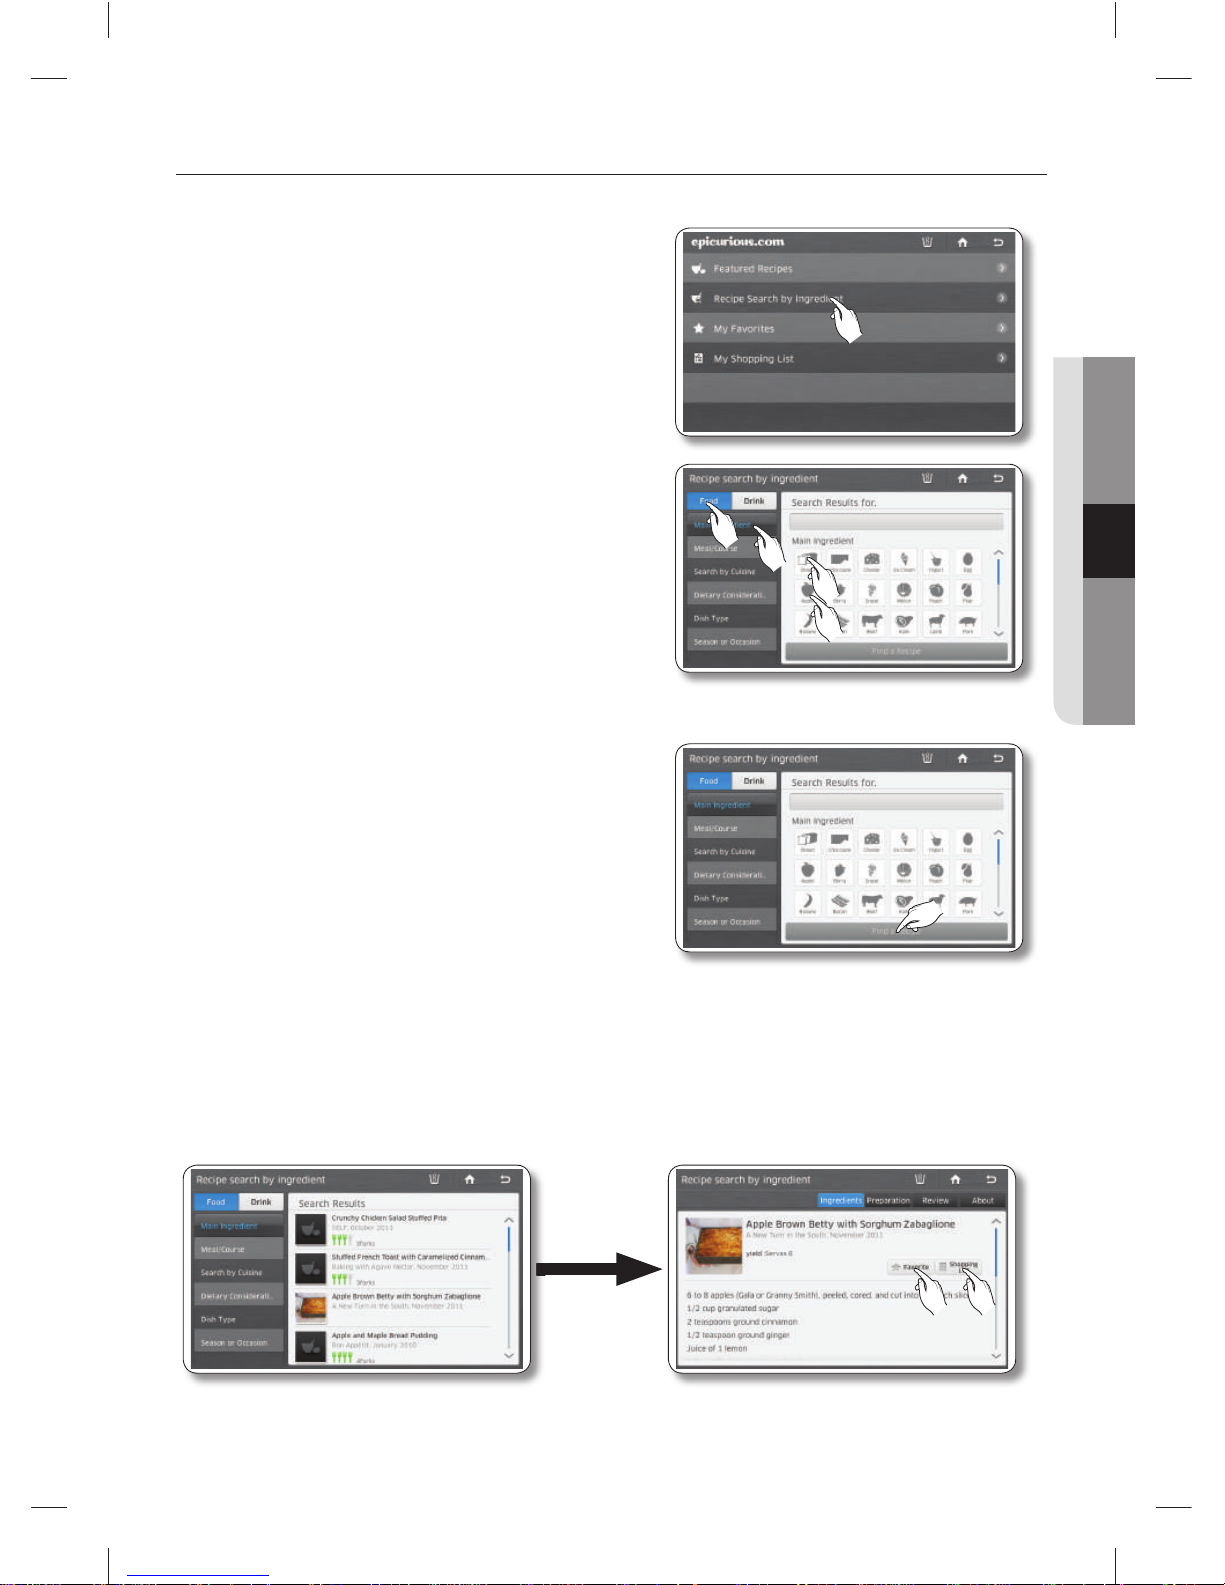
1. Select [Recipe Search by Ingredient] on the Epicurious
list.
2. Select the [Food] or [Drink] button, and then select the
[Food]/[Drink] type on the left of screen.
Next, select an ingredient icon on the right.
When you select an ingredient icon, the number of
recipes using that ingredient appears on the bottom of
the page.
You can select multiple ingredient icons.
3. Select the [View Recipe Results] button.
4. Select the recipe you want. The screen displays the ingredients and other detail information.
5. Select the [Favorite] button to add the recipe to your Favorites list.
Select the [Shopping List] button to view a shopping list for the recipe.
DA68-03055A-06.indb 43DA68-03055A-06.indb 43 2015. 4. 23. 8:172015. 4. 23. 8:17
Page 44
English - 44
How to use My Favorites.
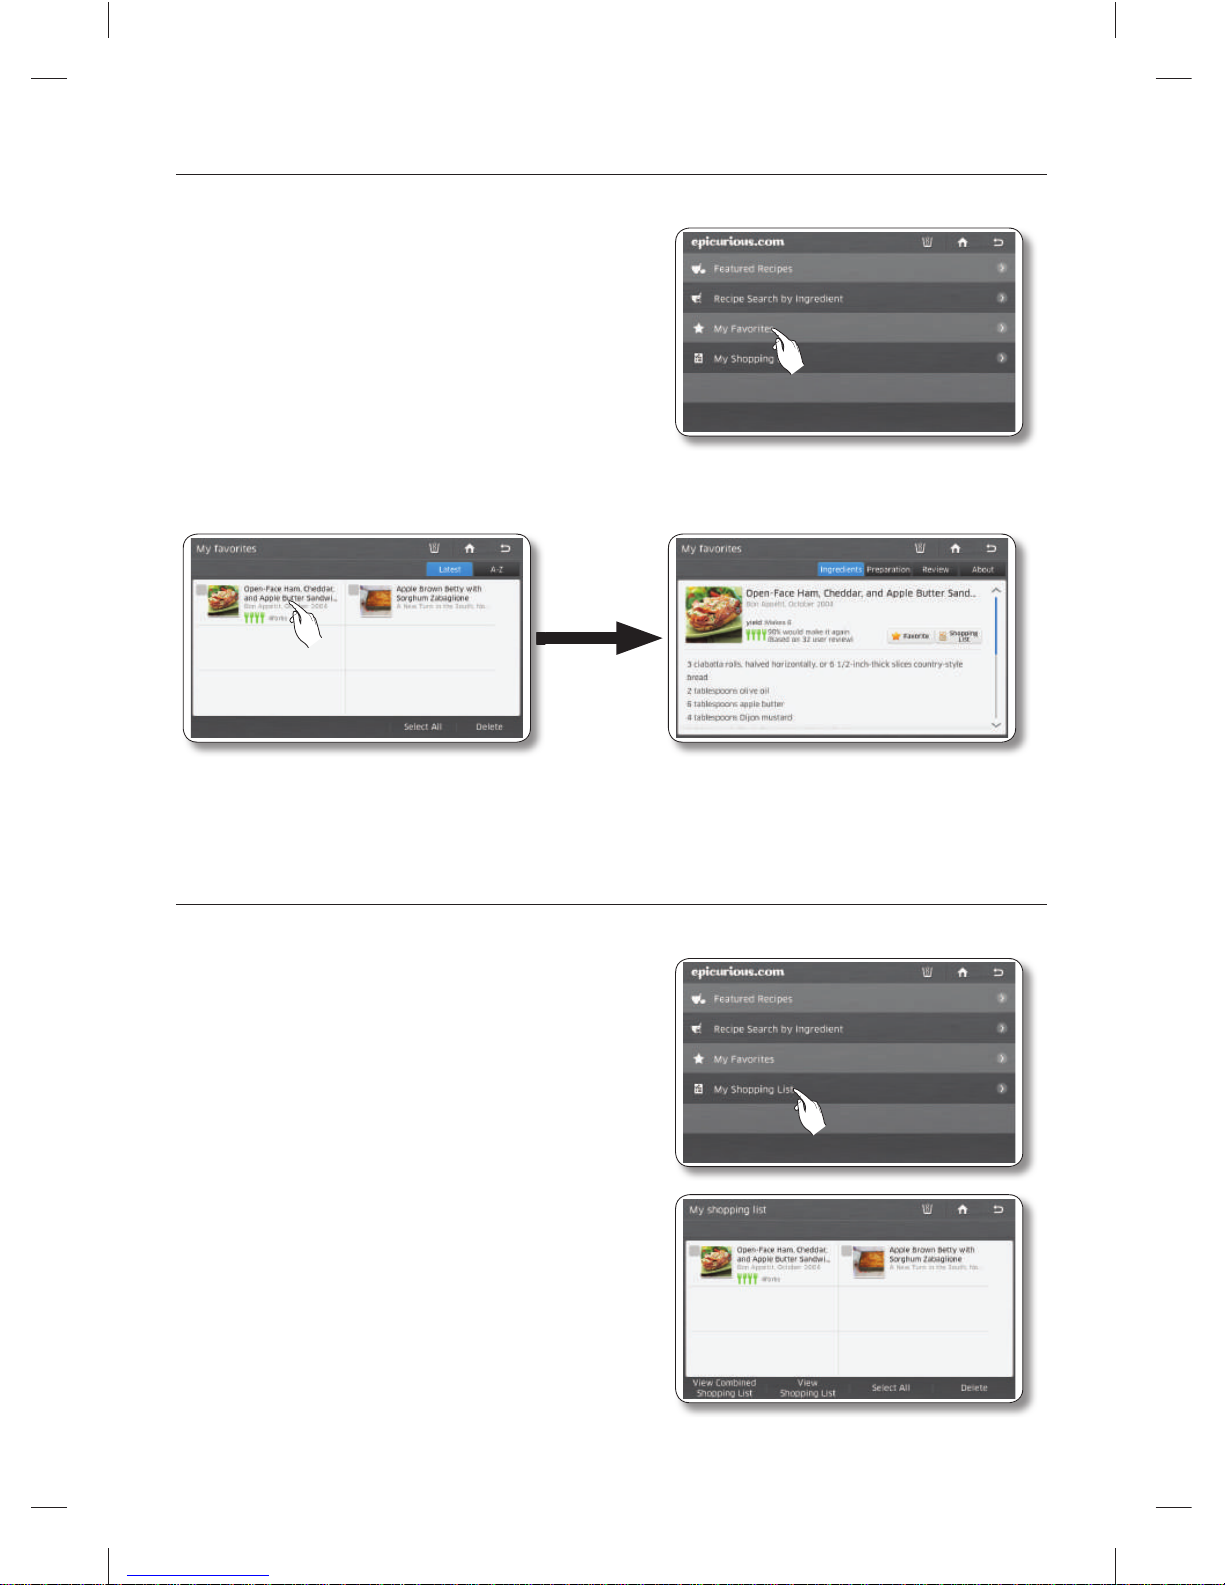
1. Select [My Favorites] on the Epicurious list.
• You can store up to 100 favorite recipes.
2. Select the recipe you want.
• Select the A-Z button on the right to arrange the favorites in the alphabetical order.
• To delete a recipe from your Favorites List, select a recipe, and then select the [Delete] button.
How to use My Shopping List.
1. Select [My Shopping List] on the Epicurious list.
• My Shopping List displays the ingredients for
recipes you select so you can create shopping
lists.
• You can store up to 100 shopping lists.
2. Select the recipe or recipes you want.
DA68-03055A-06.indb 44DA68-03055A-06.indb 44 2015. 4. 23. 8:172015. 4. 23. 8:17
Page 45
English - 45
OPERATING
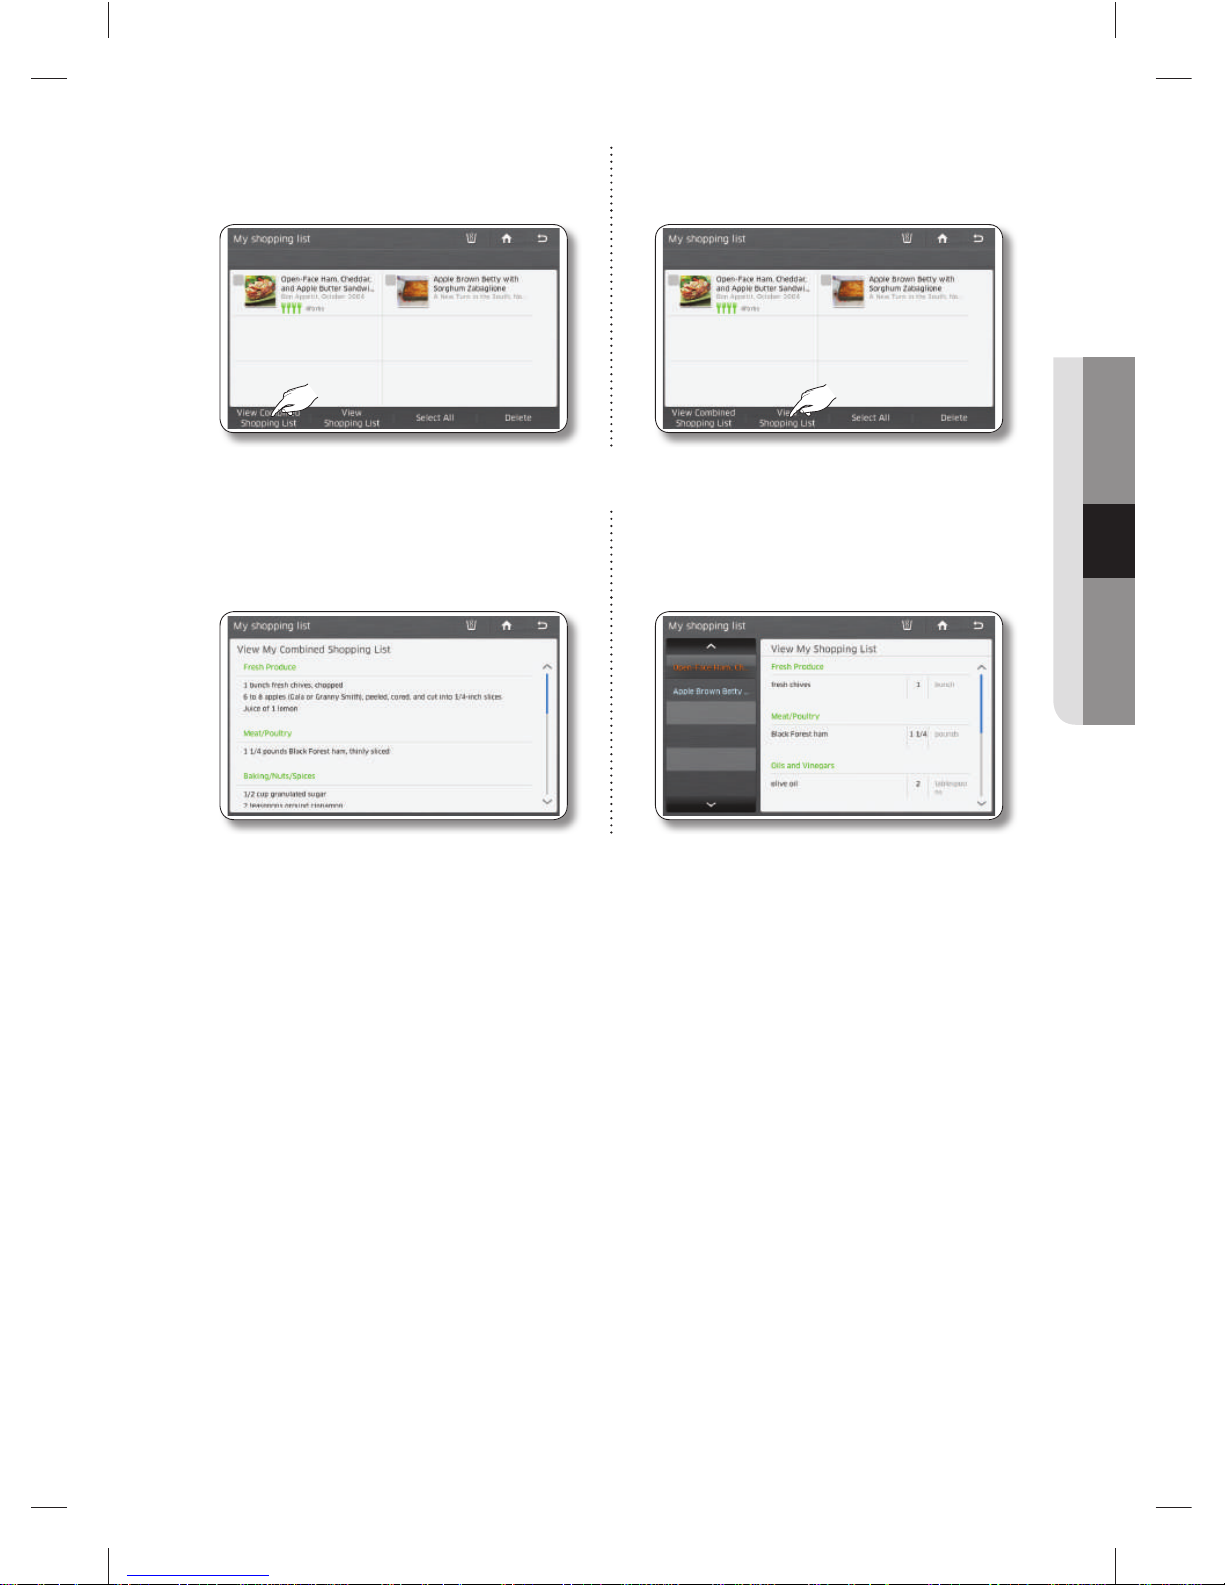
3. Select the [View Combined Shopping List]
button.
3. Select the [View Shopping List] button.
4. The screen displays the combined ingredient
list for all the recipes you selected.
4. Select a recipe on the left of screen.
The screen displays the ingredient list for the
recipe you selected.
DA68-03055A-06.indb 45DA68-03055A-06.indb 45 2015. 4. 23. 8:172015. 4. 23. 8:17
Page 46
English - 46
KITCHEN PHONE
The Kitchen Phone function lets you make and receive phone calls from the refrigerator via a Samsung
smart phone that is connected to the same Wi-Fi network as the refrigerator and is running the Samsung
Smart Home app.
For instructions explaining how to connect the refrigerator to your network, see page 79.
• Available on Galaxy S5 and Note3 or later running on Android OS 4.4 (Kitkat) or higher.
• The smartphone must be connected to the same network as the refrigerator.
• You must have has installed the Samsung Smart Home app on the phone and Kitchen Phone
must be activated on the phone.
• Be aware that hacking and privacy issues that apply to smartphones also apply to phone calls
made using Kitchen Phone.
Before you begin:
1. Download the Samsung Smart Home App to your Samsung Smartphone. See page 112.
2. Run the Kitchen Phone App on your smart phone and create a password.
How to connect your smartphone to Kitchen Phone
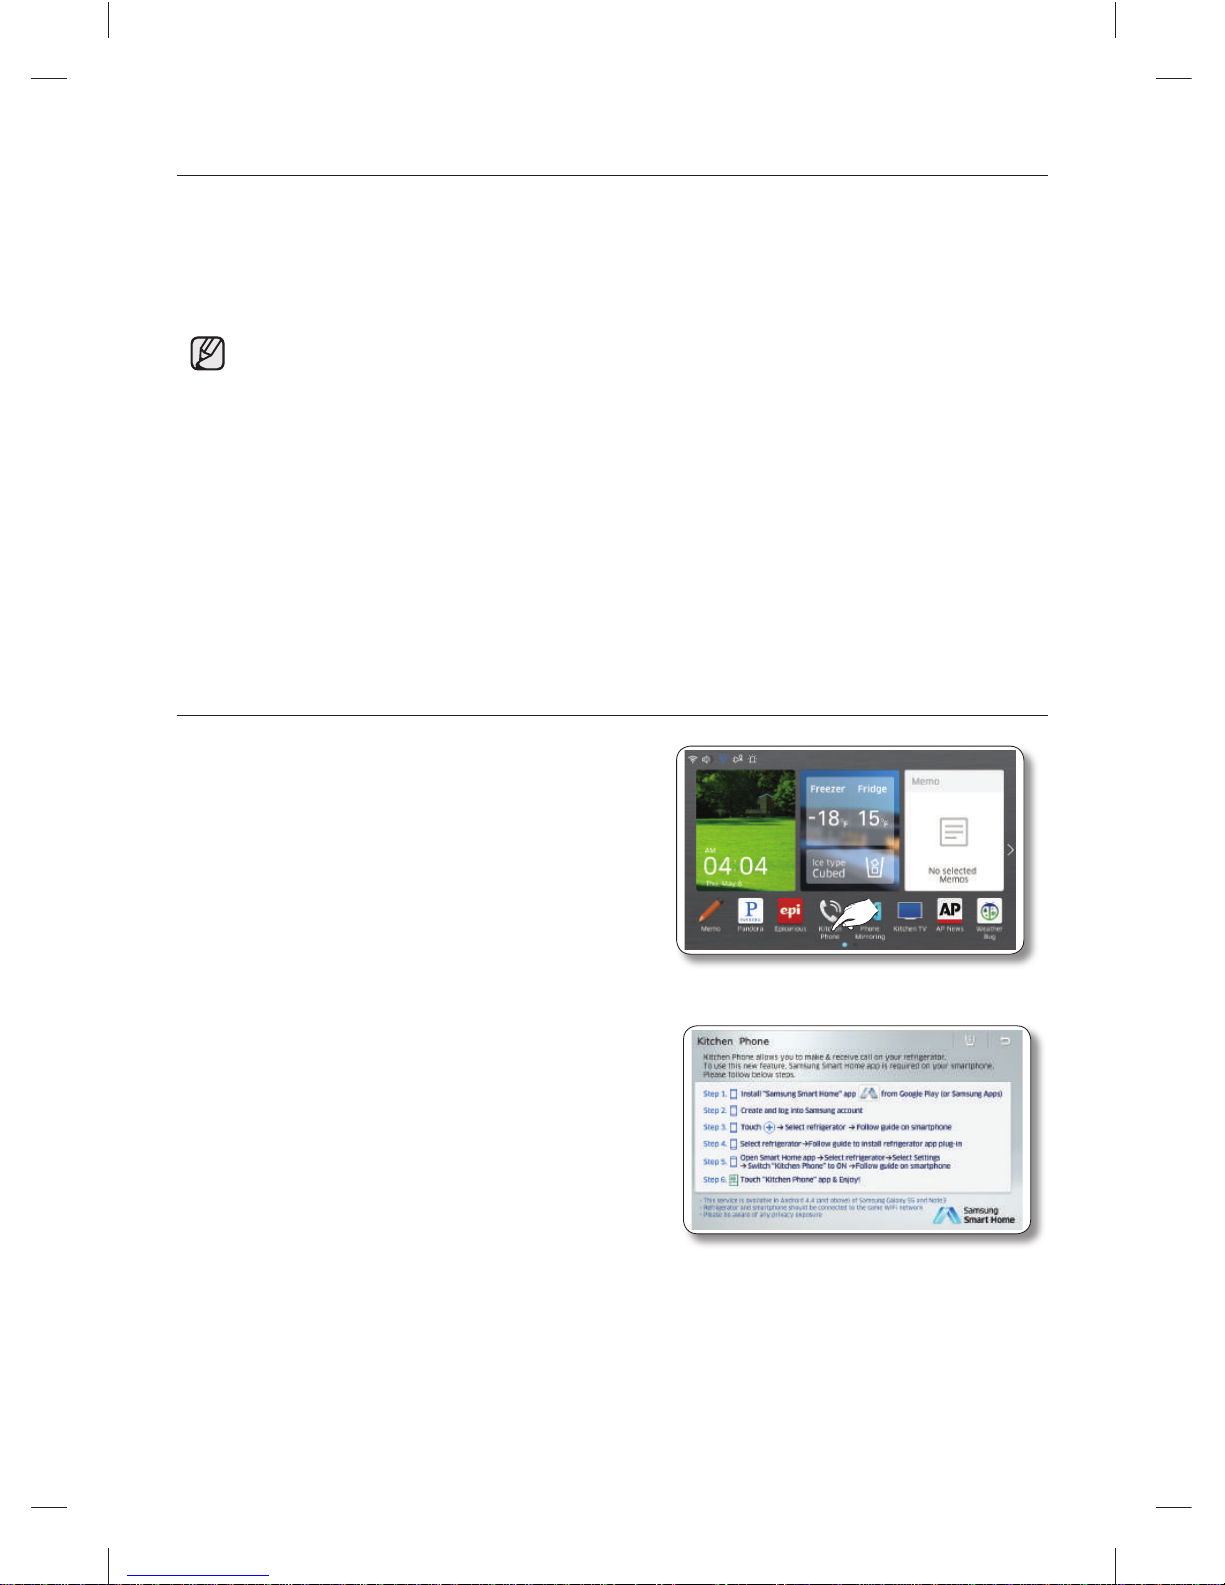
1. Turn on your smartphone, launch the Kitchen Phone
app, and then tap the Kitchen Phone icon on the
Home screen of the refrigerator.
2. You will be provided with the connection steps along
with the privacy notice.
DA68-03055A-06.indb 46DA68-03055A-06.indb 46 2015. 4. 23. 8:172015. 4. 23. 8:17
Page 47
English - 47
OPERATING
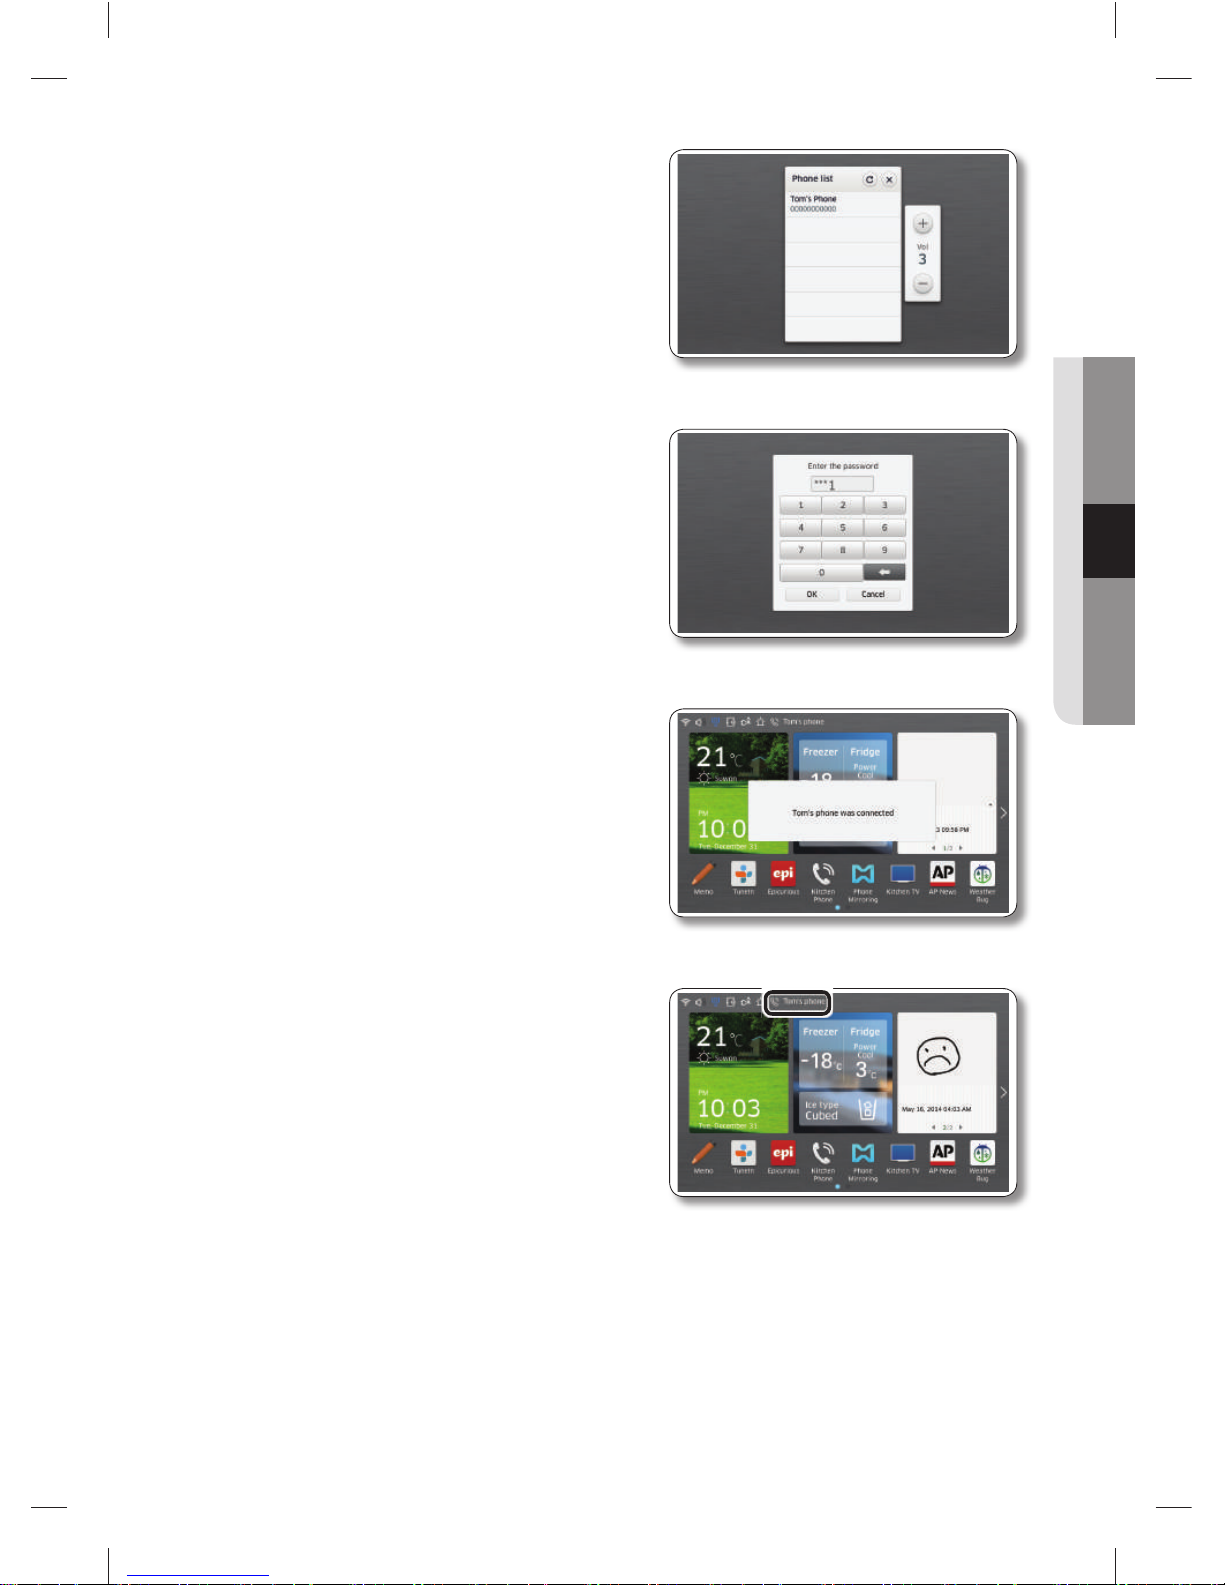
3. In a few moments, a list of available smartphones is
displayed.
4. Select a smartphone. The Password Input screen
appears.
5. Input a valid password. The “connected” message
appears.
6. The name of the connected smartphone appears in
the upper bar.
DA68-03055A-06.indb 47DA68-03055A-06.indb 47 2015. 4. 23. 8:172015. 4. 23. 8:17
Page 48
English - 48
Placing a call (A smartphone must be connected to Kitchen Phone.)
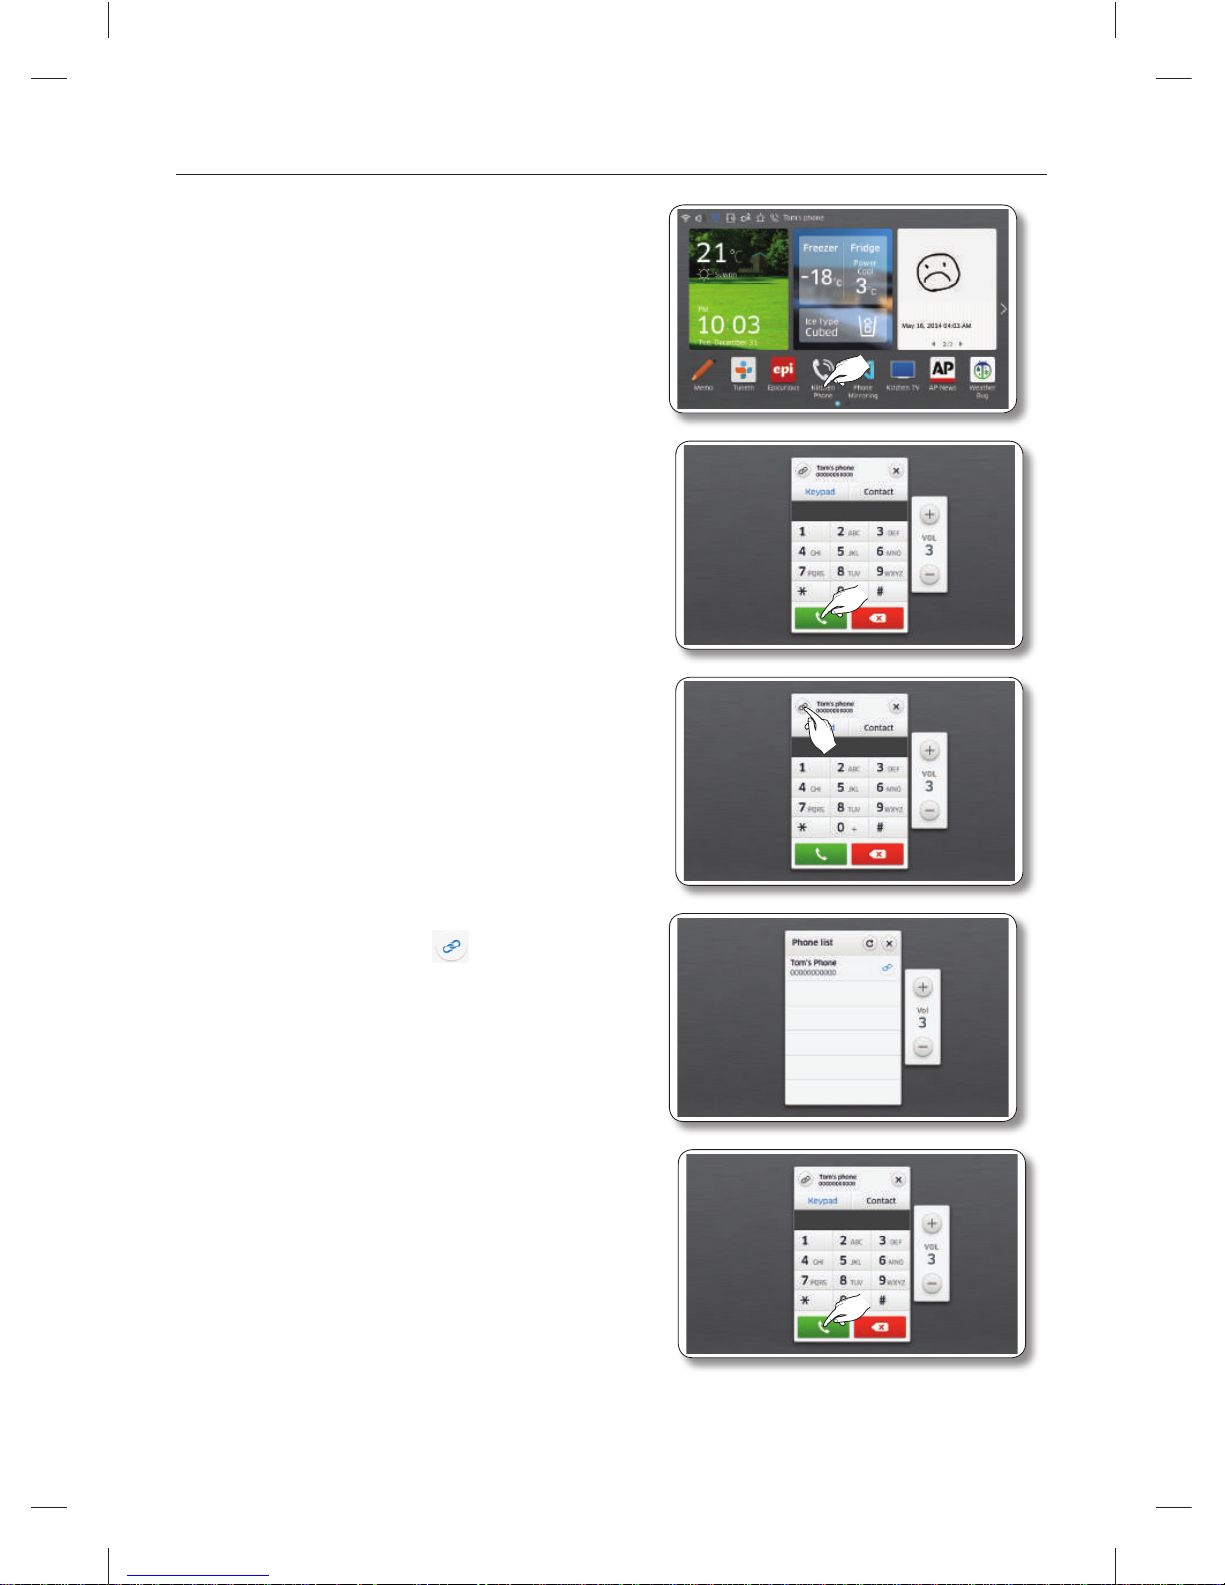
1. Tap the Kitchen Phone icon on the Home screen.
2. The name of the connected smartphone appears in
the upper bar and a keypad appears in the center of
the screen.
3. To use a different phone, tap the link icon in the top left
corner to display a list of available smartphones.
If you don’t want to use a diferent smartphone, go to
Step 5.
4. The currently connected smartphone is marked on
the right with the link icon ( ). To use another
smartphone on the list, tap it.
5. Enter a phone number on the key pad, and then touch
the green Call button.
DA68-03055A-06.indb 48DA68-03055A-06.indb 48 2015. 4. 23. 8:172015. 4. 23. 8:17
Page 49
English - 49
OPERATING
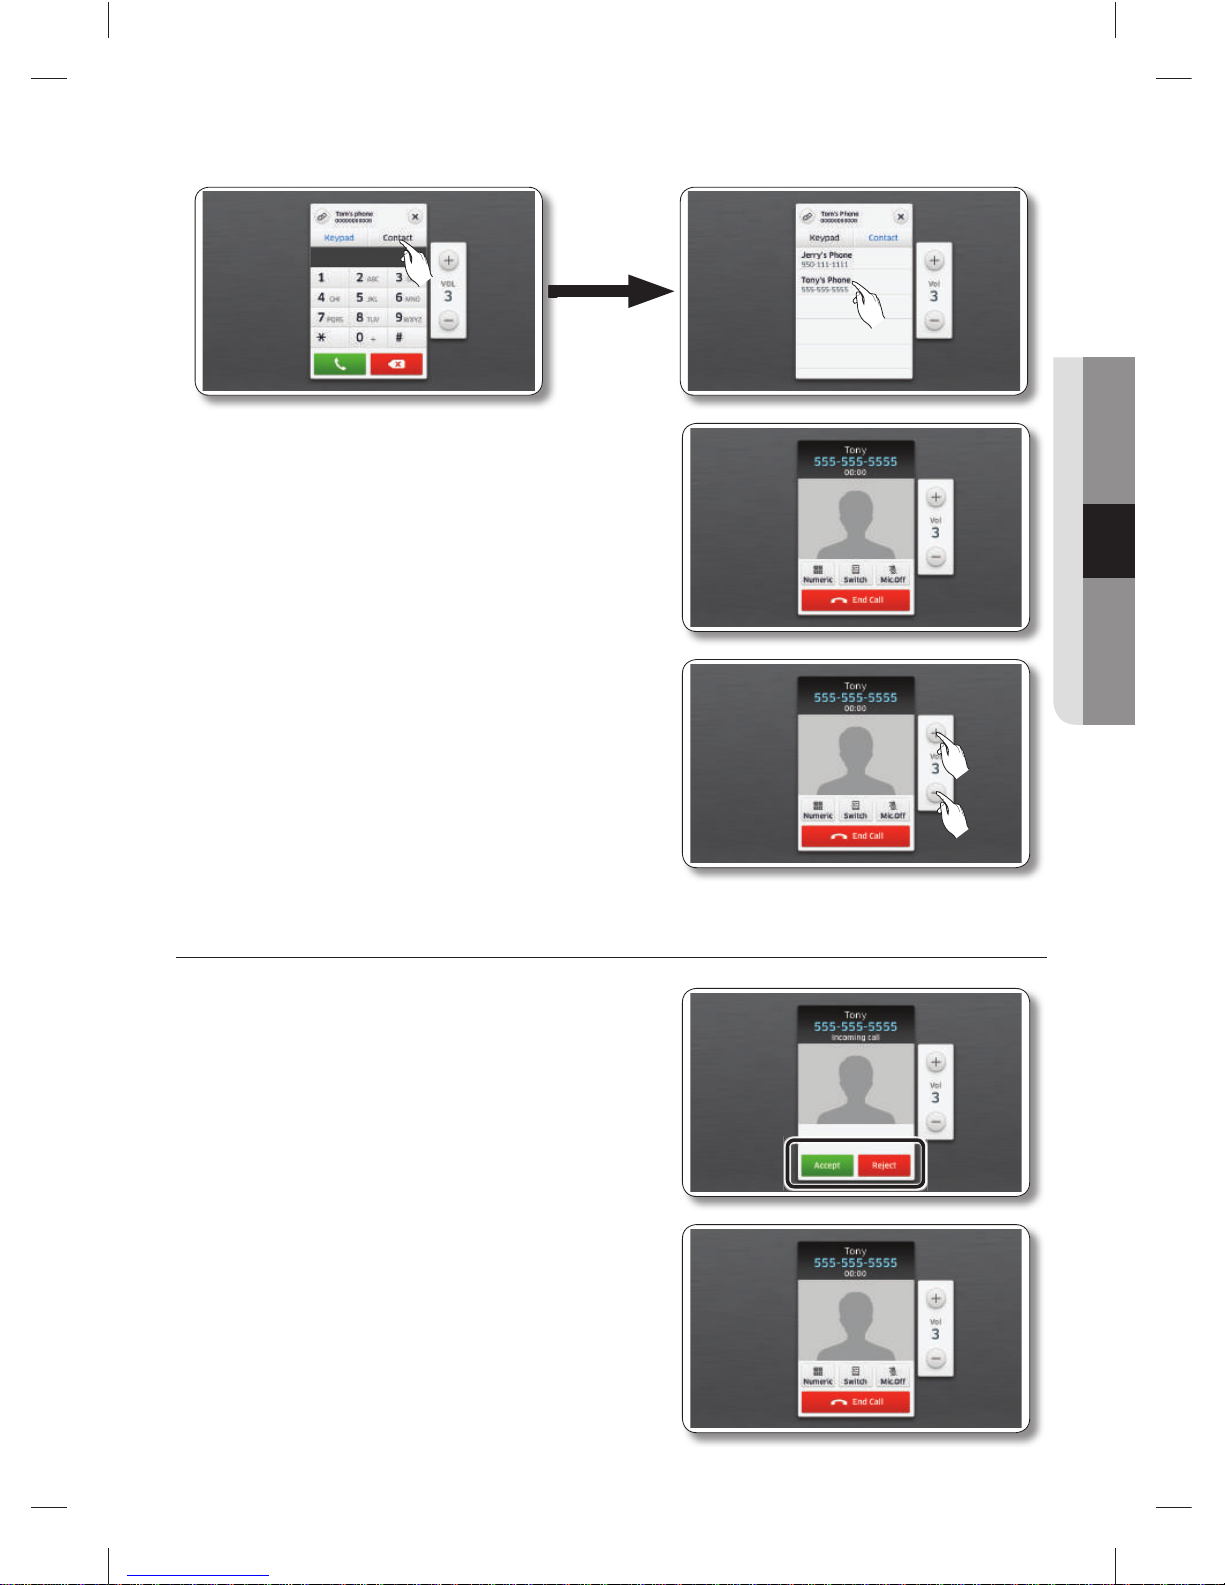
6. Alternately, tap Contact to display a list of contacts.Select one to place a call to that number.
7. The Call Screen appears.
8. Uss the volume control buttons on the right side of the
screen to control the call volume.
The default volume level is 3.
Answering a call (A smartphone must be connected to Kitchen Phone.)
1. When the smartphone is receiving a call, the Incoming
Call screen appears.
Tap Accept to switch to Conversation mode.
Tap Reject to refuse the incoming call and to move to
the Home screen.
DA68-03055A-06.indb 49DA68-03055A-06.indb 49 2015. 4. 23. 8:172015. 4. 23. 8:17
Page 50
English - 50
Conversation mode
(A smartphone must be connected to Kitchen Phone.)
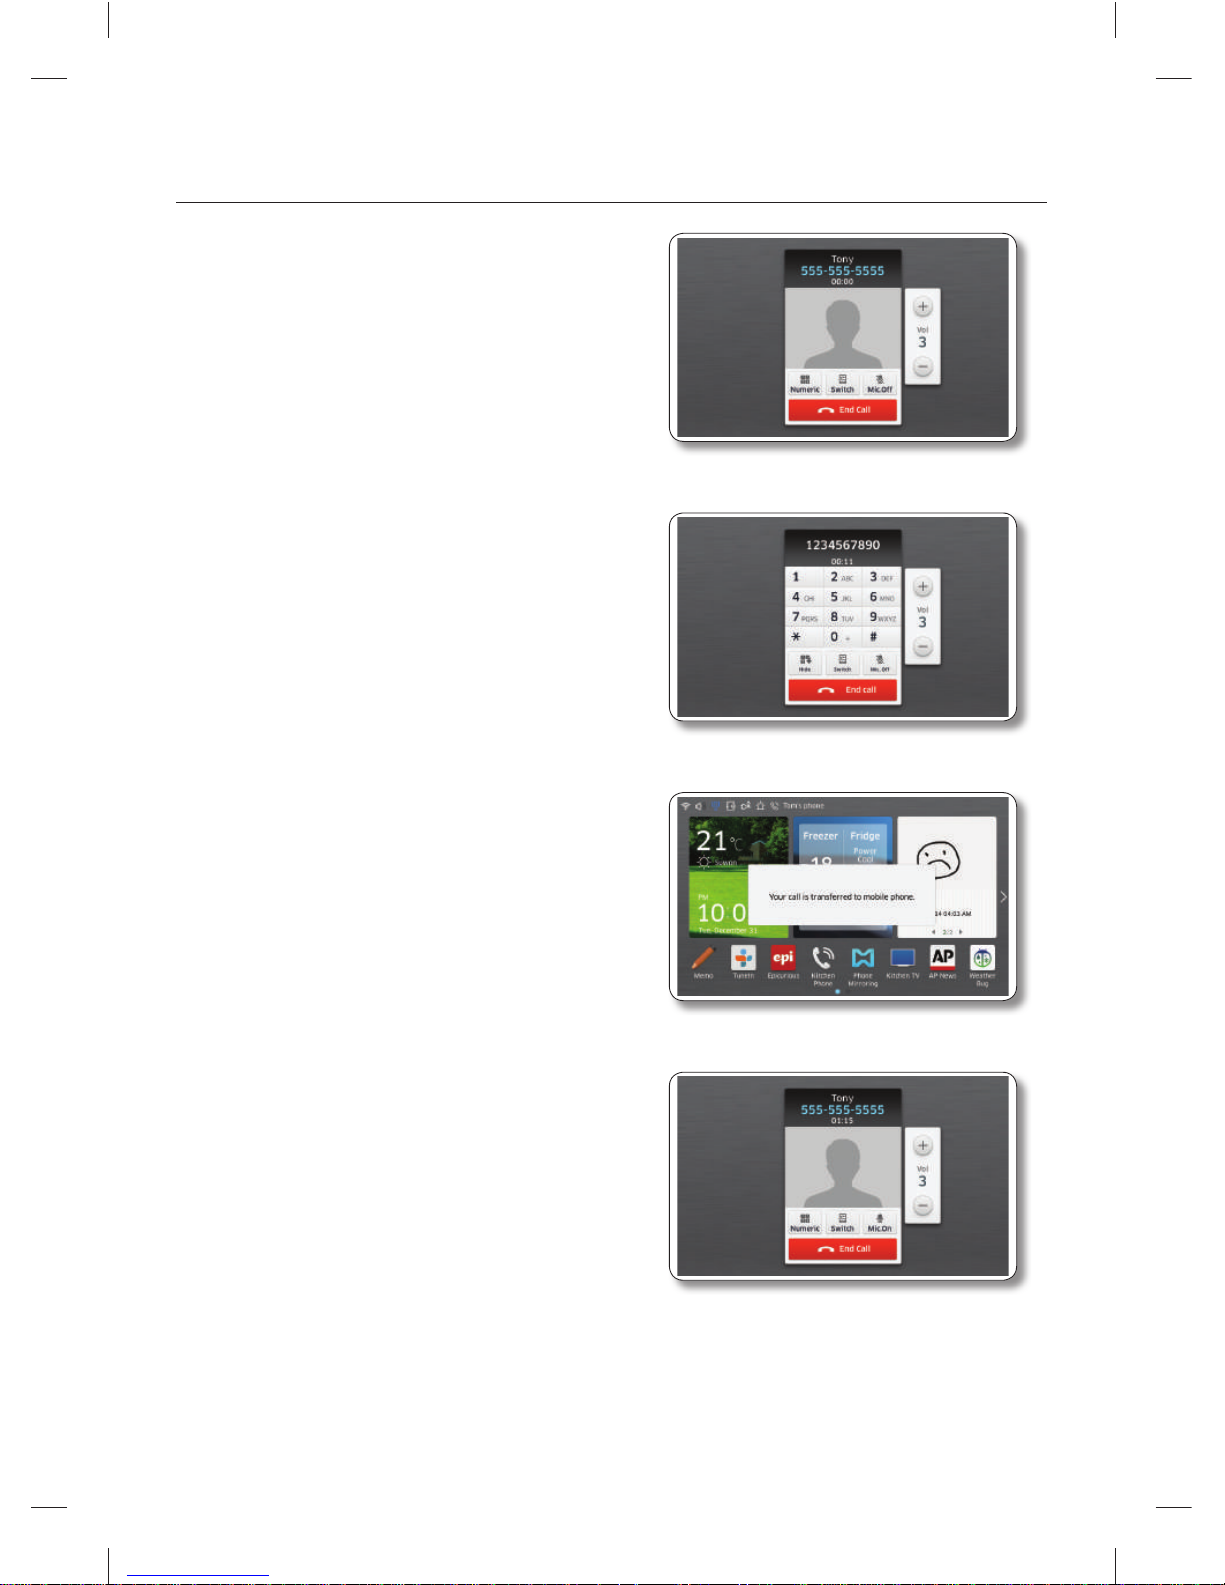
1. When you place or receive a call, the Conversation
screen appears.
2. To display the Numeric keypad and enter a phone
number, tap the Numeric button. You can also display
the Numeric keypad when you need to enter numbers
during a call. Tap hide to re-display the Conversation
screen.
3. Tap Switch on the Conversation screen to transfer the
call to the smartphone.
4. Tap Mic.Off on the Conversation screen to mute the
voice signal.
Tap Mic.On on the Conversation screen to unmute the
voice signal.
DA68-03055A-06.indb 50DA68-03055A-06.indb 50 2015. 4. 23. 8:172015. 4. 23. 8:17
Page 51
English - 51
OPERATING
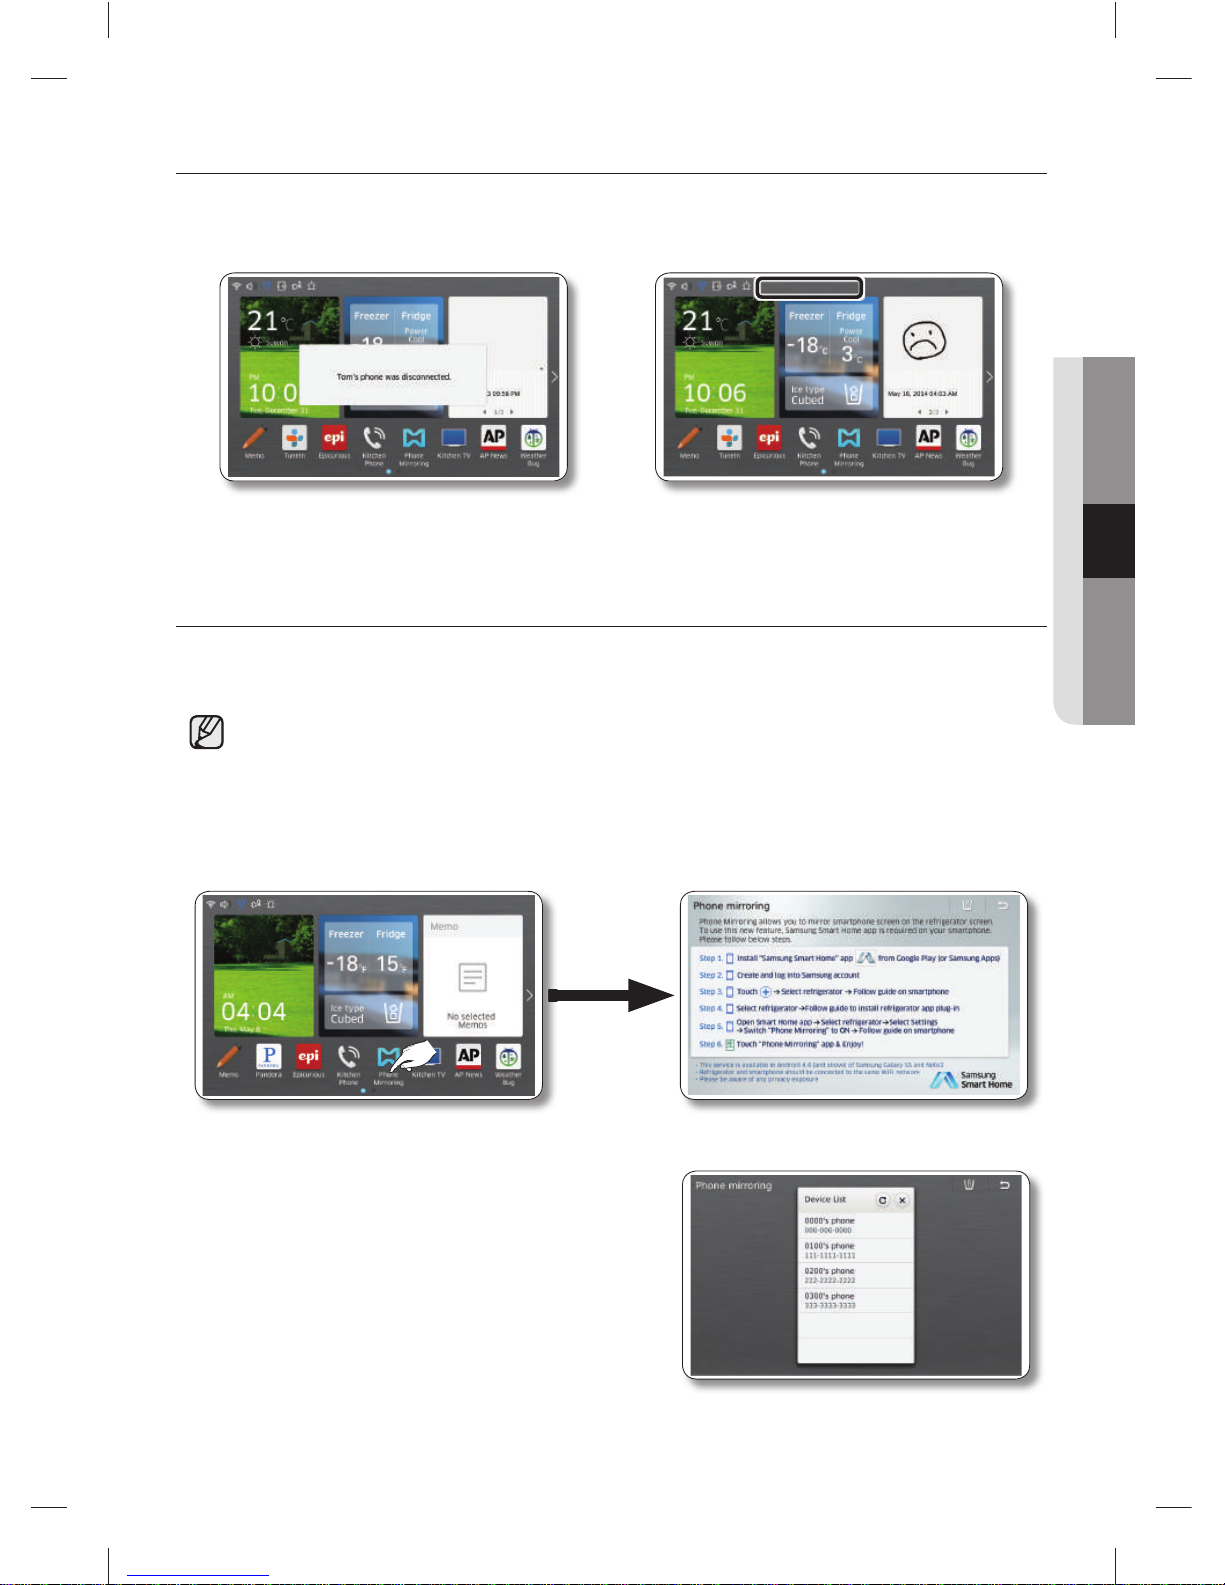
To terminate the connection between the smartphone and the Kitchen Phone
1. Exit the Smart Home app on the smartphone.
2. The connection is terminated and the disconnected message appears on the refrigerator.
PHONE MIRRORING
The Phone Mirroring function lets you display your smartphone’s screen on the refrigeratror.
• Available on Galaxy S5 and Note3 or later running on Android OS 4.4 (Kitkat) or higher.
• The smartphone must be connected to the same network as the refrigerator.
For instructions explaining how to connect the refrigerator to your network, see page 79.
• You must have installed the Samsung Smart Home app on the phone. See page 112.
Phone Mirroring must be activated on the phone.
1. Select the [Phone Mirroring] button on the Home screen.
2. A list of smartphones available for mirroring appears.
Select a smartphone from the list.
DA68-03055A-06.indb 51DA68-03055A-06.indb 51 2015. 4. 23. 8:172015. 4. 23. 8:17
Page 52
English - 52
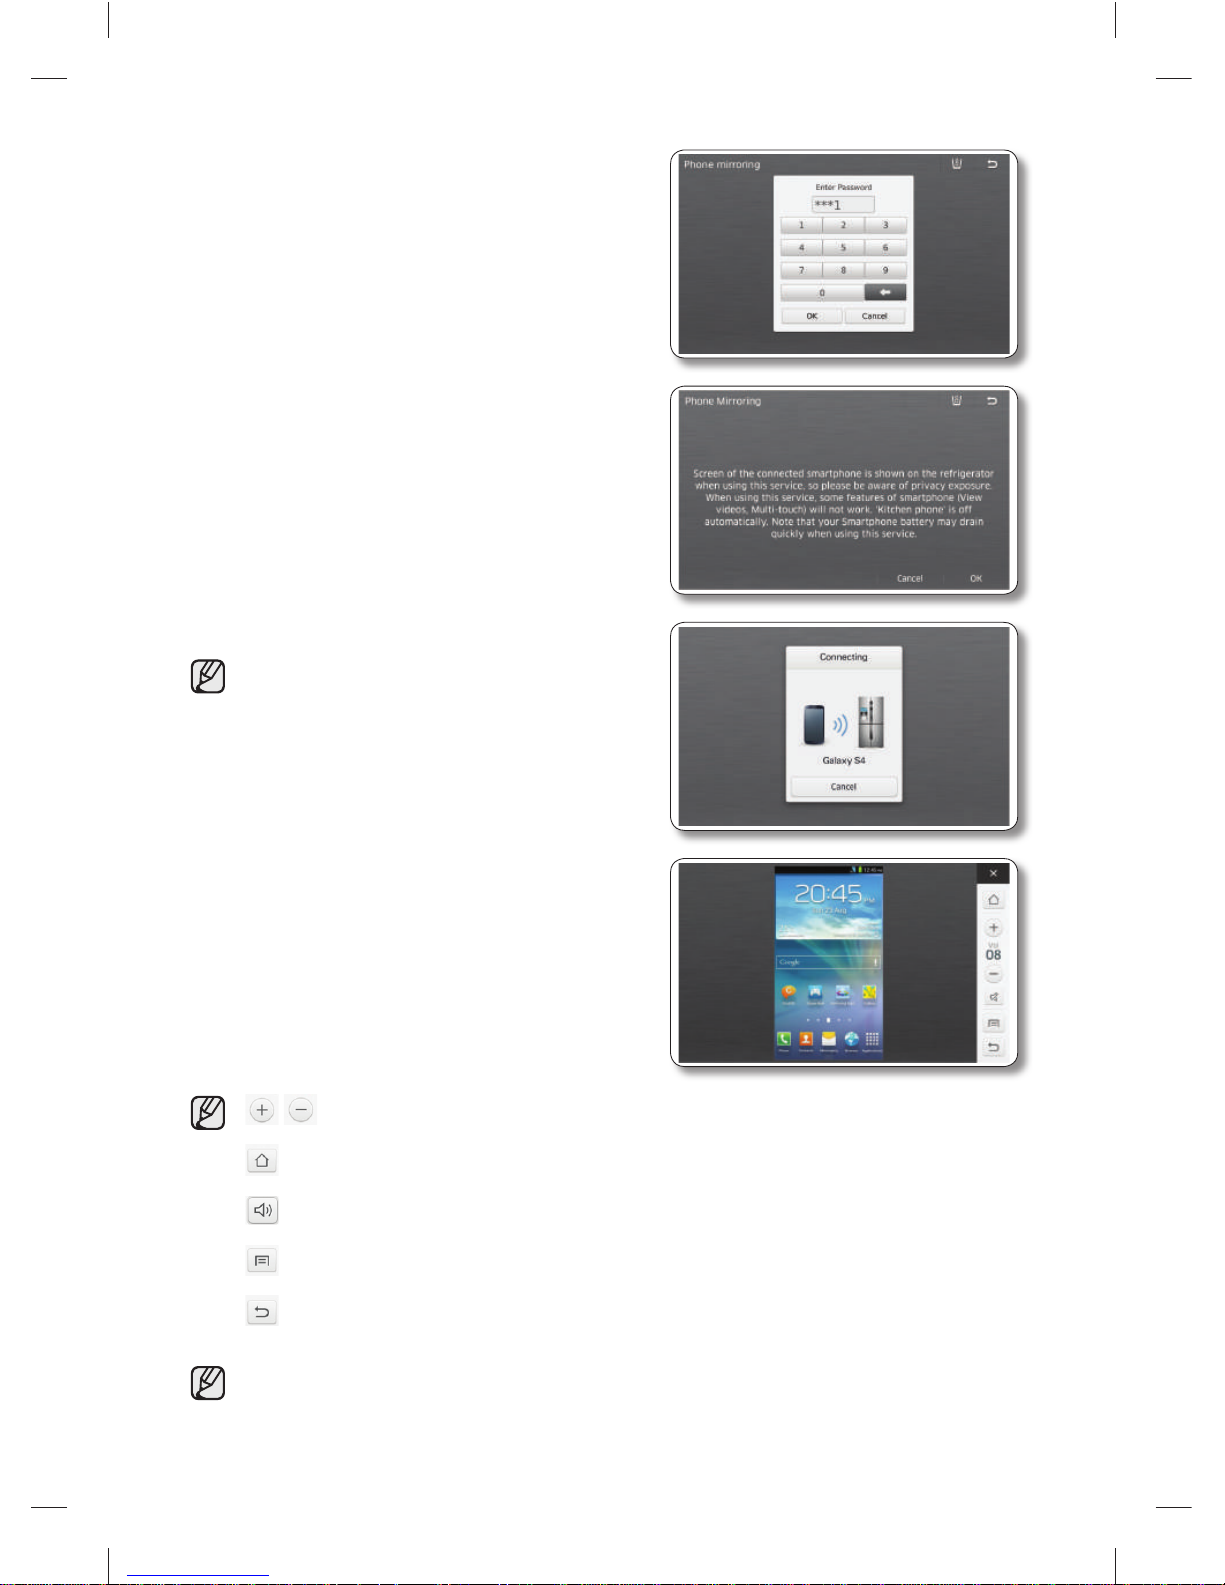
3. On the smartphone you chose, bring up the password
input screen.
Enter the password you have set in the Smart Home
app.
4. Read the privacy policies and the battery use
instructions, and then select OK.
5. The connection progress indicator appears.
The network connection may not operate
smoothly depending on the network environment.
If a connection is not established after an
extended period of time, tap Cancel to exit the
mirroring mode, and then try again.
6. The refrigerator displays the smartphone’s screen.
: Adjust the volume.
: Move to the Home menu of the smartphone.
: Mute
: Display the smartphone’s menu.
: Move to the previous screen of the smartphone.
The key may function differently depending on the model.
When the refrigerator is mirroing a smartphone, videos playing on the smarthpone screen may
not play properly. However, some videos from YouTube may play properly.
DA68-03055A-06.indb 52DA68-03055A-06.indb 52 2015. 4. 23. 8:172015. 4. 23. 8:17
Page 53
English - 53
OPERATING
KITCHEN TV
Kitchen TV lets you watch TV on your refrigerator.
It is available only if the refrigerator is connected to the same network as a compatible Samsung TV.
For instructions explaining how to connect the refrigerator to your network, see page 79.
Kitchen TV is available only with Samsung 6000 series Smart TVs released since 2013.
You can switch channels directly on the refrigerator. However, channel switching is enabled only if
the TV’s input is set to TV (Air/Cable). If the TV’s input is set to AV or Component Mode, you can
view the TV screen, but cannot switch channels.
The fi rst connection requires authentication.
- For Samsung TV models released in 2013
At the fi rst connection, you will see a window that asks you to allow external access to the TV.
- For TV models released in 2014
At the fi rst connection, you will see a PIN code on the TV. At the same time, the refrigerator will
display a PIN input screen. Enter the PIN code displayed on the TV into the refrigerator’s PIN
input screen.
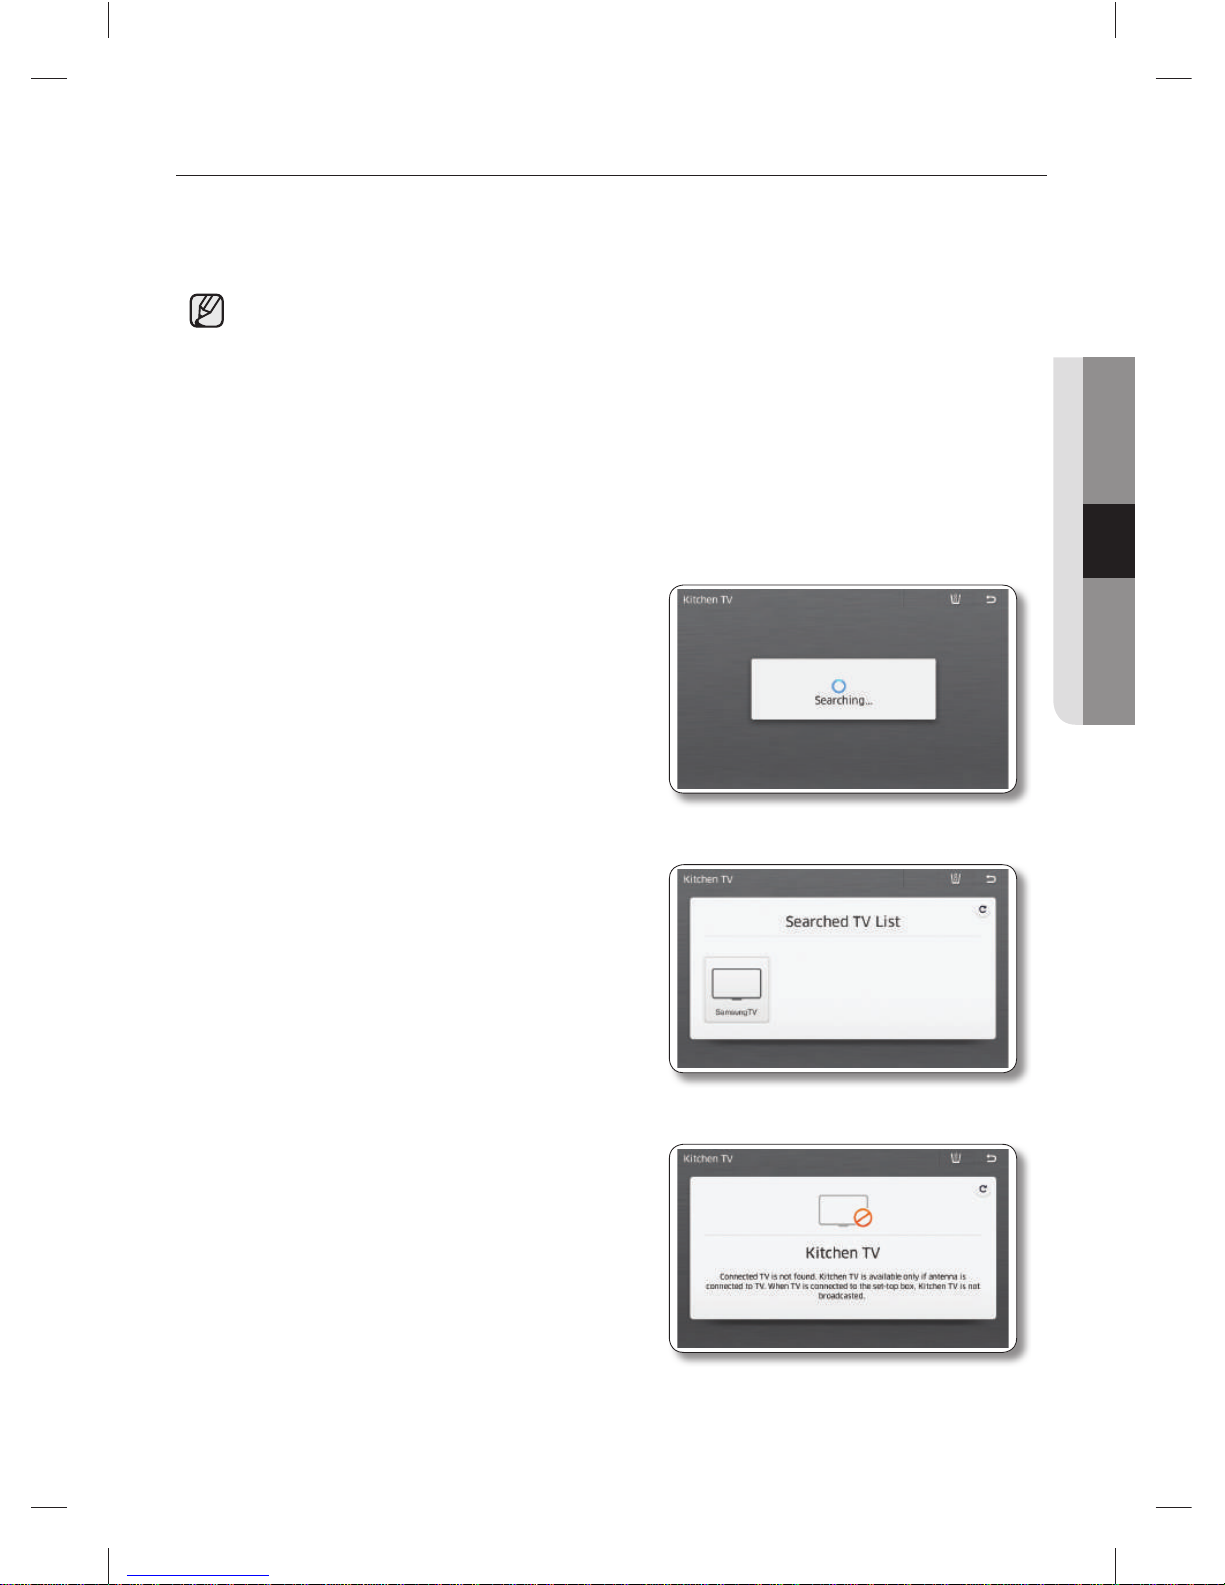
1. Turn on the TV, and then select the [Kitchen TV] button
on the Home screen.
2. The refrigerator scans for compatible TVs, and then
displays a list of TVs available.
2-1. After scanning for available TVs, the refrigerator
displays a guidance message if no TVs are found.
DA68-03055A-06.indb 53DA68-03055A-06.indb 53 2015. 4. 23. 8:172015. 4. 23. 8:17
Page 54
English - 54
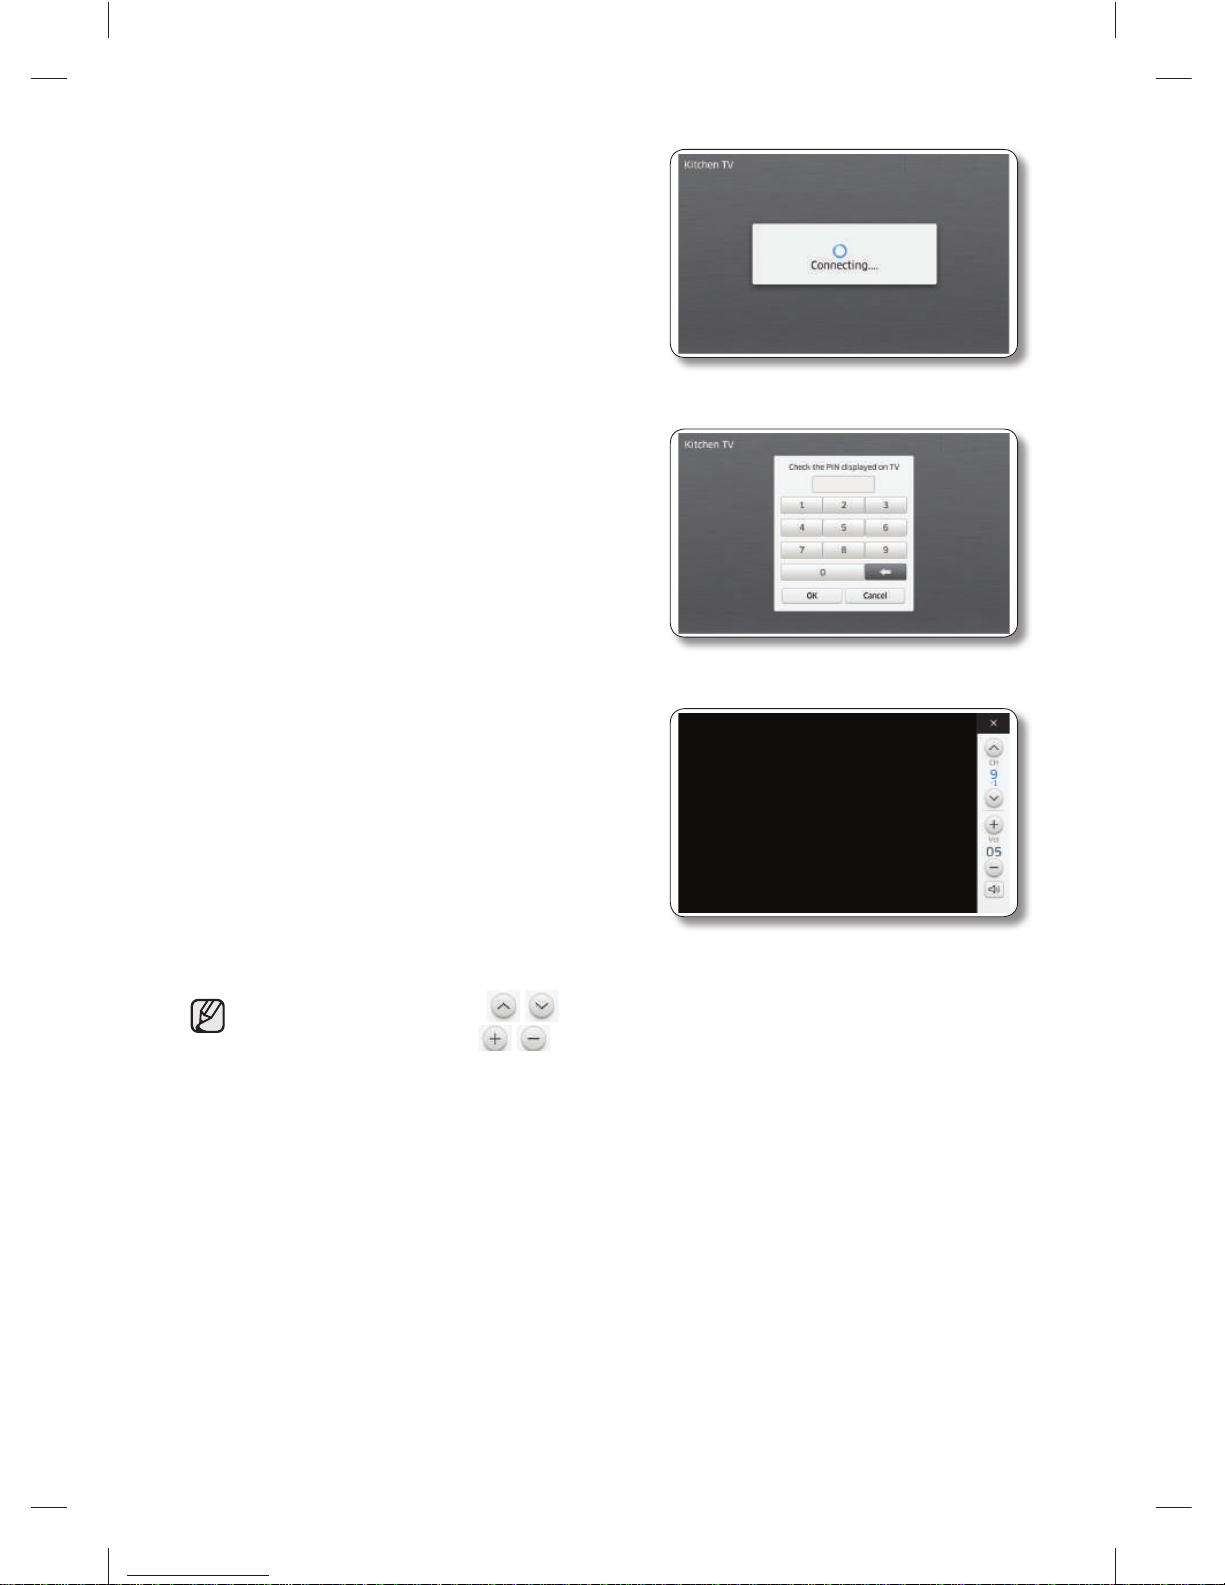
3. Select a TV in the Searched TV list to display the TV
screen.
3-1. A number pad appears on the refrigerator and a PIN
appears on the TV. Use the number pad to enter the
PIN into the refrigerator, and then tap OK.
4. When the connection is complete, the refrigerator
displays the TV screen.
• To switch the channel, tap .
• To adjust the volume, tap (The volume control on the TV is not available).
• There may be a timing difference between the video on the TV and the video on the
refrigerator, depending on the network status.
• Video playback may terminate or the quality of the video may be degraded, depending on the
network status. If this occurs, tap Exit in the top-right corner, and then run Kitchen TV again.
DA68-03055A-06.indb 54DA68-03055A-06.indb 54 2015. 4. 23. 8:172015. 4. 23. 8:17
Page 55
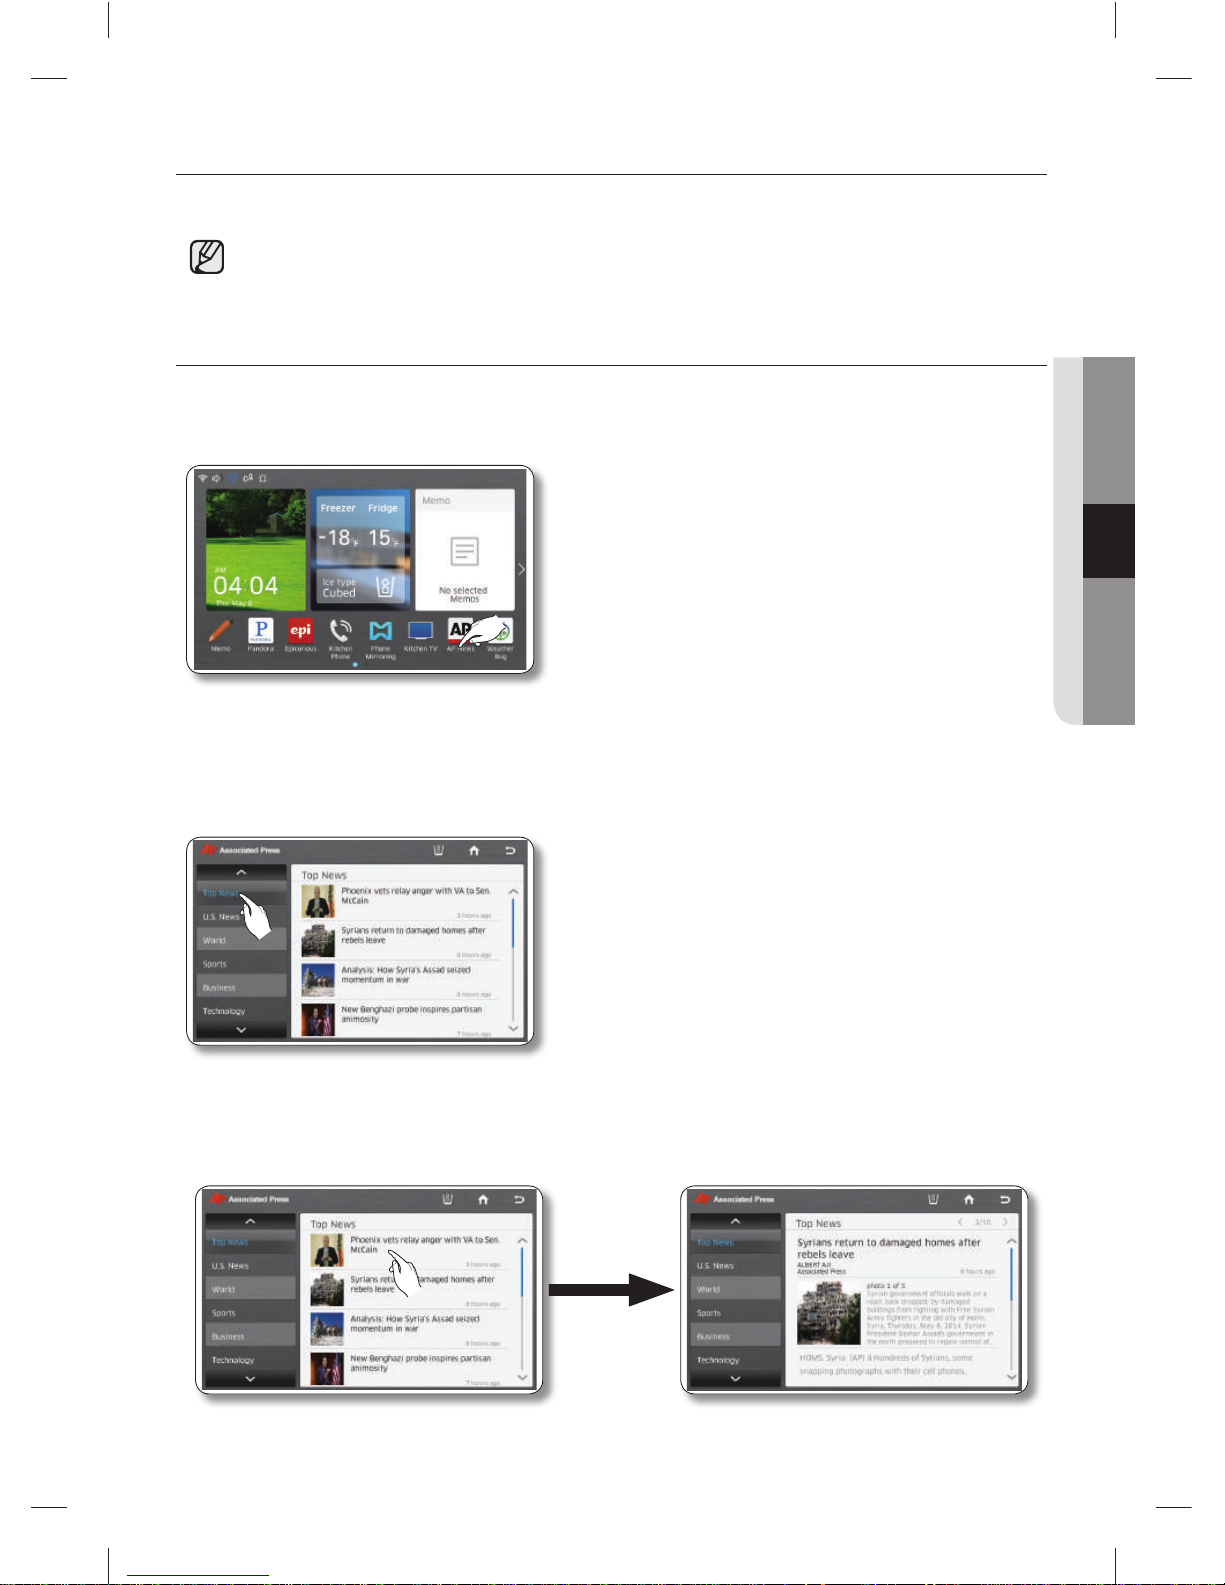
English - 55
OPERATING
AP NEWS
The Internet news service provides current news in up to 11 categories.
This function is only available when the refrigerator is connected to your wireless network (Wi-Fi).
For instructions explaining how to connect the refrigerator to your network, see page 79.
How to view news from AP News.
1. Select the [AP News] button on the Home screen.
2. Select a news category.
• When you select a category on the left, the screen displays the major news for that category.
3. Select the desired article.
DA68-03055A-06.indb 55DA68-03055A-06.indb 55 2015. 4. 23. 8:172015. 4. 23. 8:17
Page 56
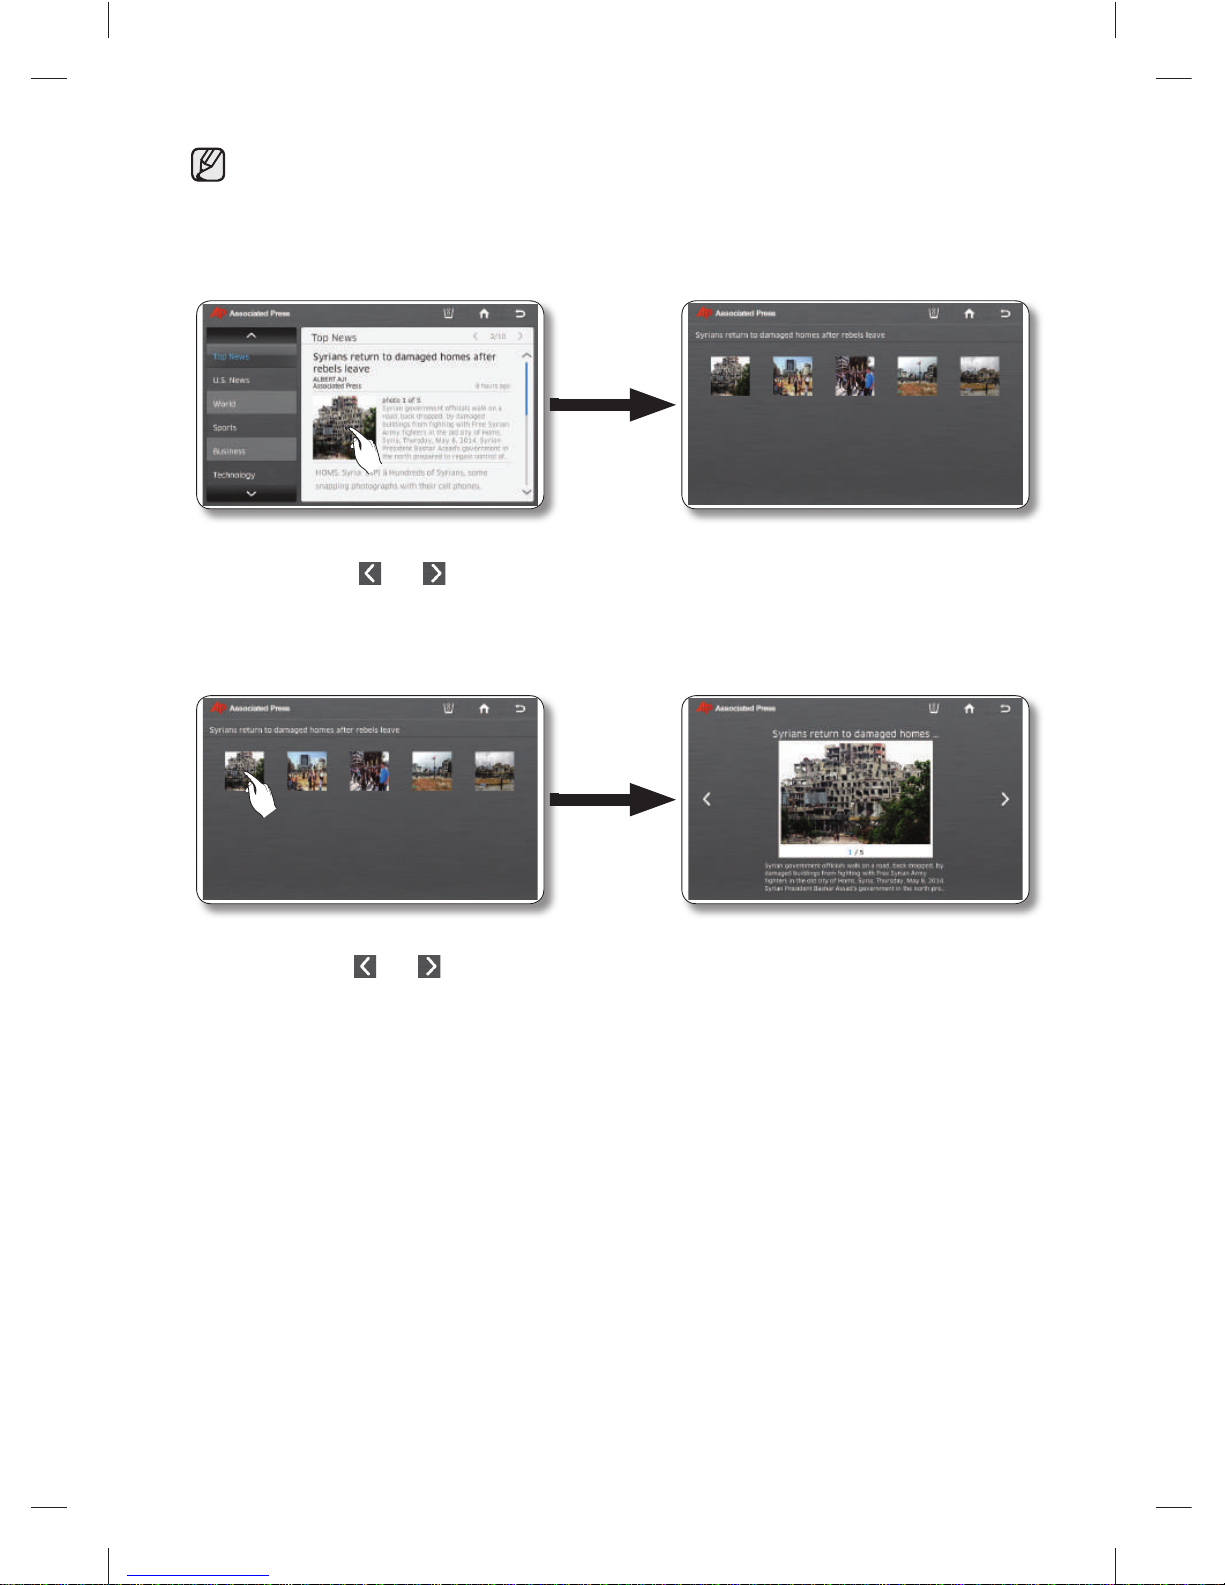
English - 56
The news article on the preview page shows the fi rst 2 lines of the entire article.
To view the article in detail, visit http://www.ap.org on your mobile phone or PC.
4. To see all the photos related to the article, select the main photo in the detail news article.
• Select the and buttons on the top right of the article to view other articles.
5. Select a photo to enlarge it.
• Press the and buttons to see other photos in enlarged view.
DA68-03055A-06.indb 56DA68-03055A-06.indb 56 2015. 4. 23. 8:172015. 4. 23. 8:17
Page 57
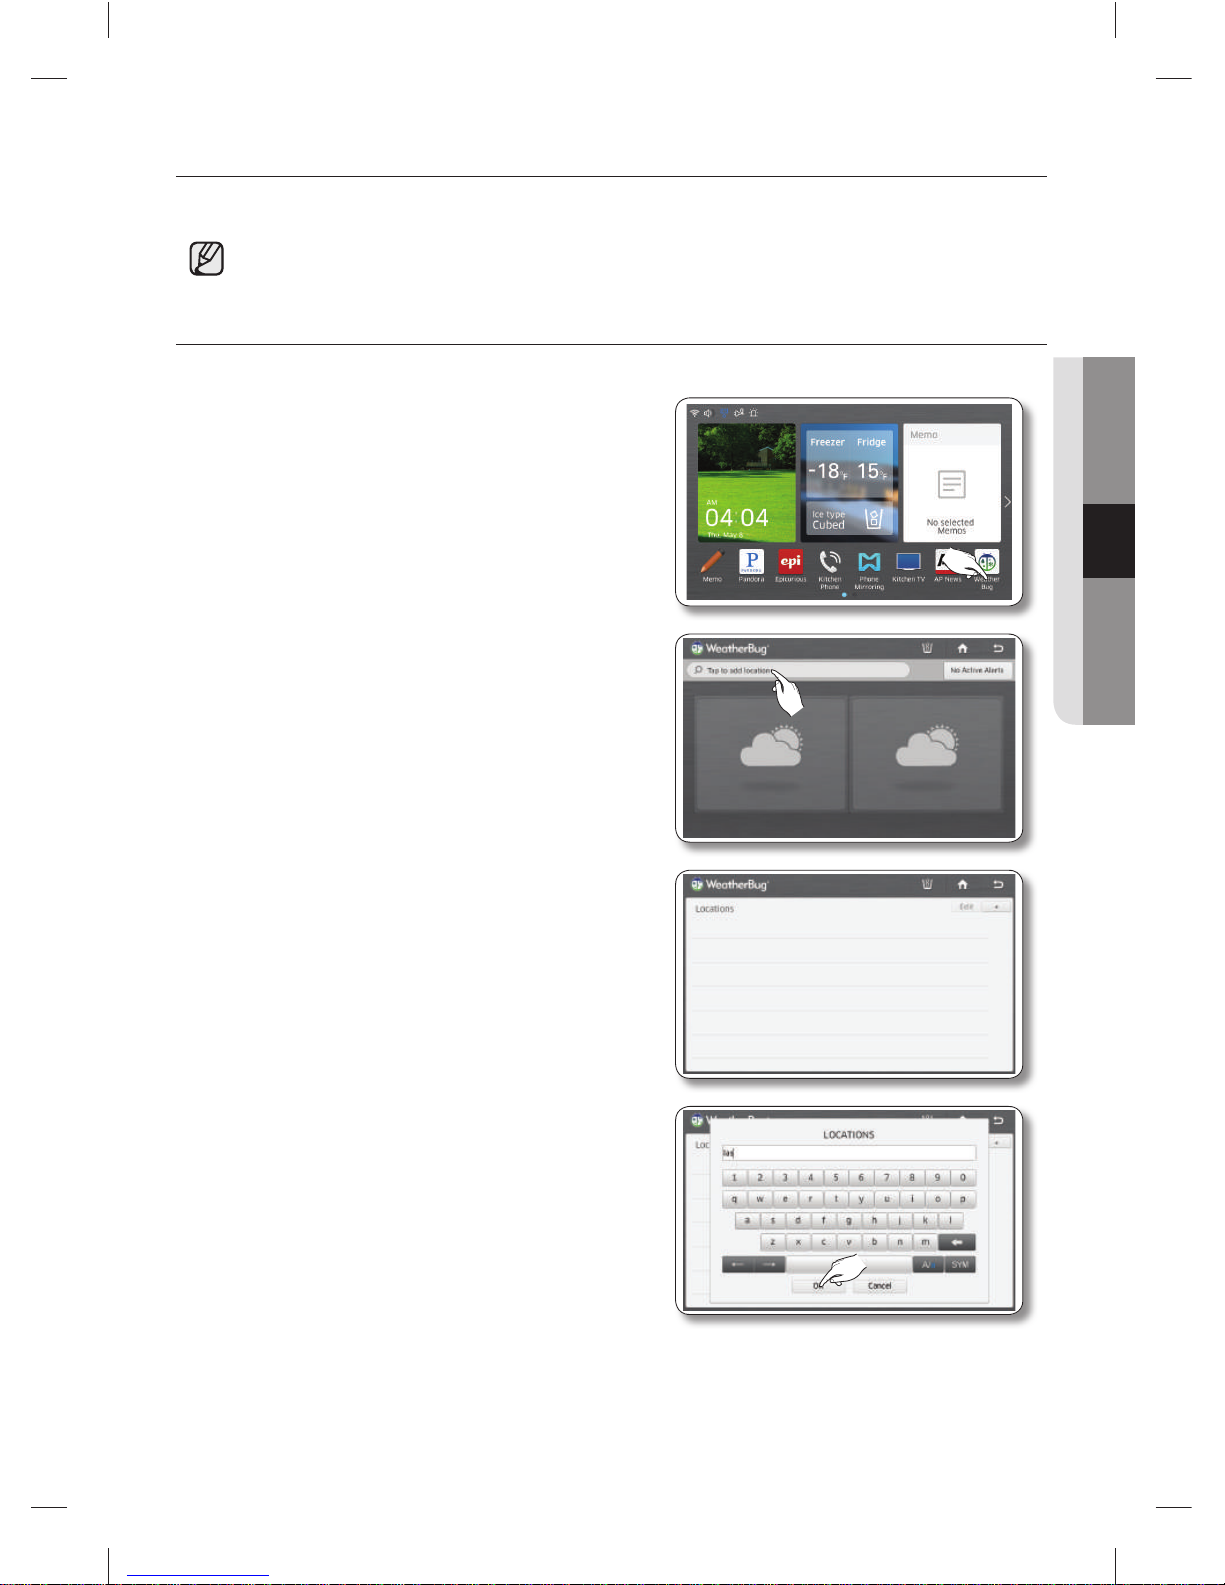
English - 57
OPERATING
WEATHERBUG
The Internet weather service provides current and weekly weather information by region.
This function is only available when the refrigerator is connected to your wireless network (Wi-Fi).
For instructions explaining how to connect the refrigerator to your network, see page 79.
How to add your Region to Weatherbug
1. Select the [WeatherBug] button on the Home screen.
• There will be a 4-second commercial ad when
you start WeatherBug.
2. Select the region search bar on the top left of the
screen.
3. Select the [+] button in the upper right corner of
screen.
4. Enter your location or zipcode (US Only) using the
onscreen keyboard, and then press the [OK] button.
DA68-03055A-06.indb 57DA68-03055A-06.indb 57 2015. 4. 23. 8:172015. 4. 23. 8:17
Page 58
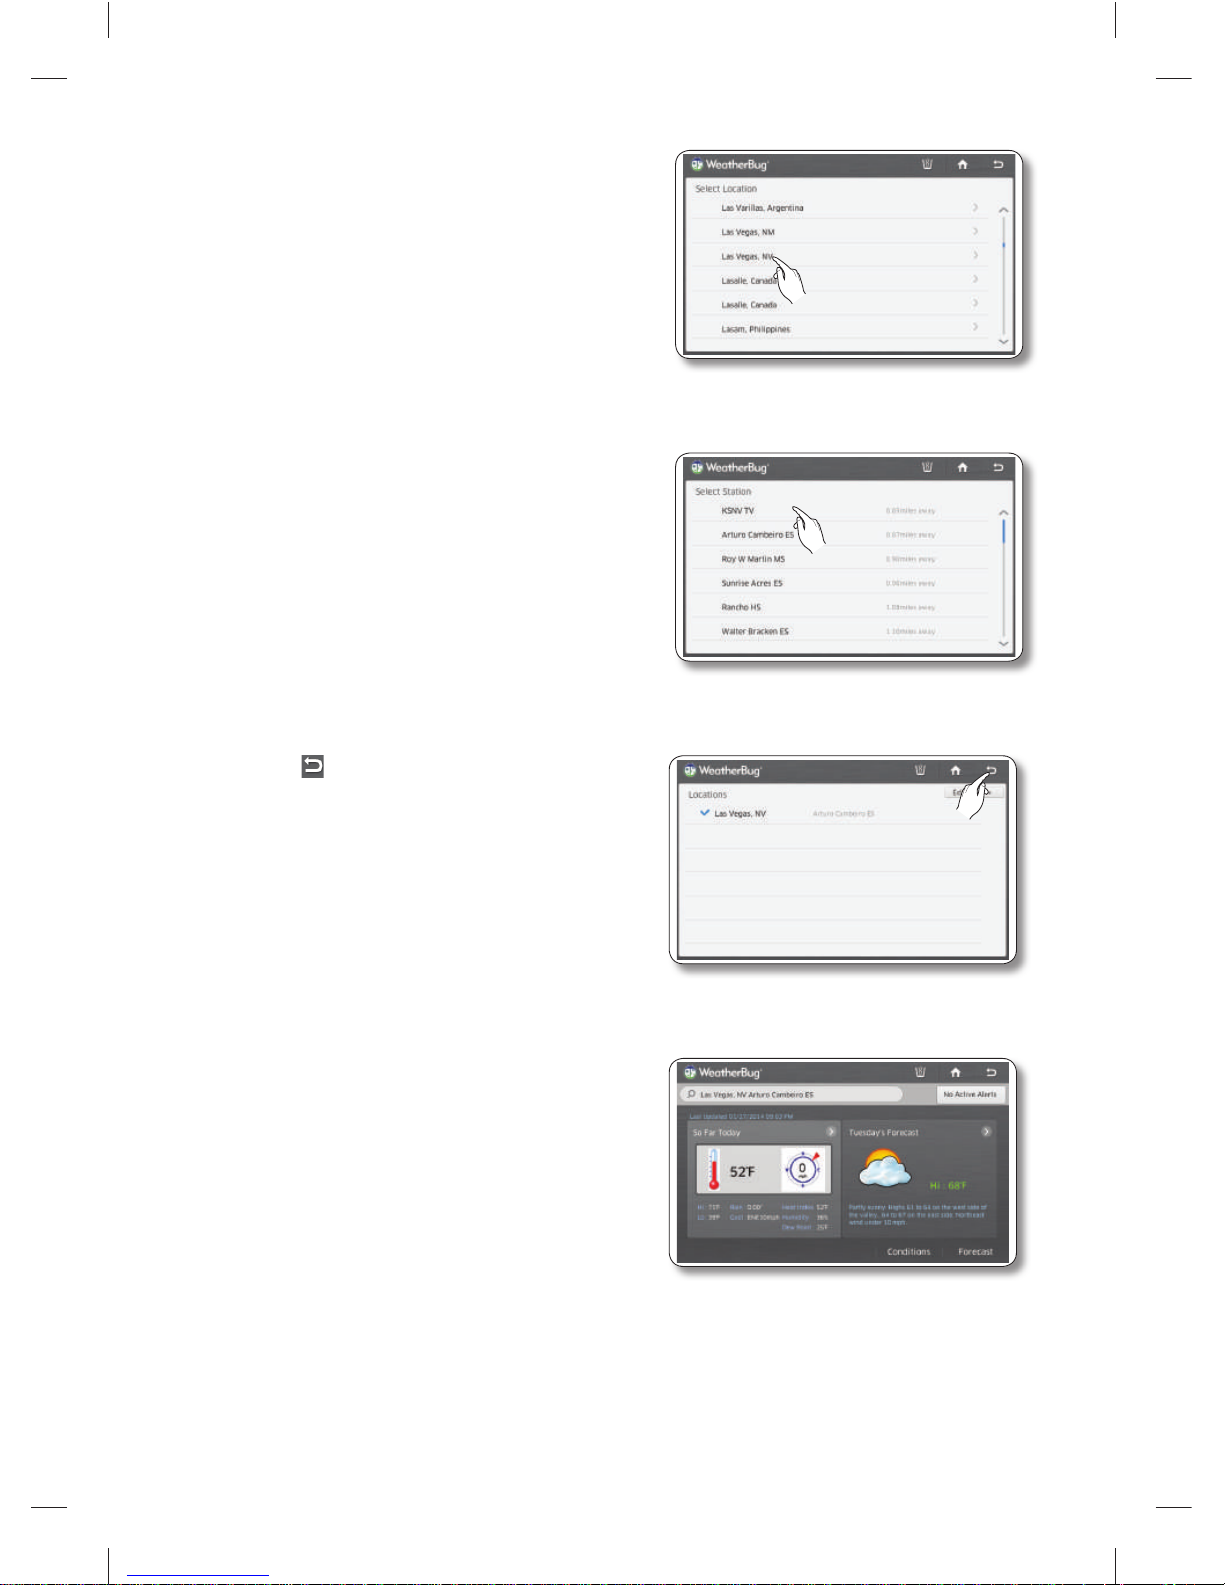
English - 58
5. Select your location.
6. Select a local weather station.
7. Select the “ ” button on the top right of the screen.
8. The display screen shows your local weather.
DA68-03055A-06.indb 58DA68-03055A-06.indb 58 2015. 4. 23. 8:172015. 4. 23. 8:17
Page 59
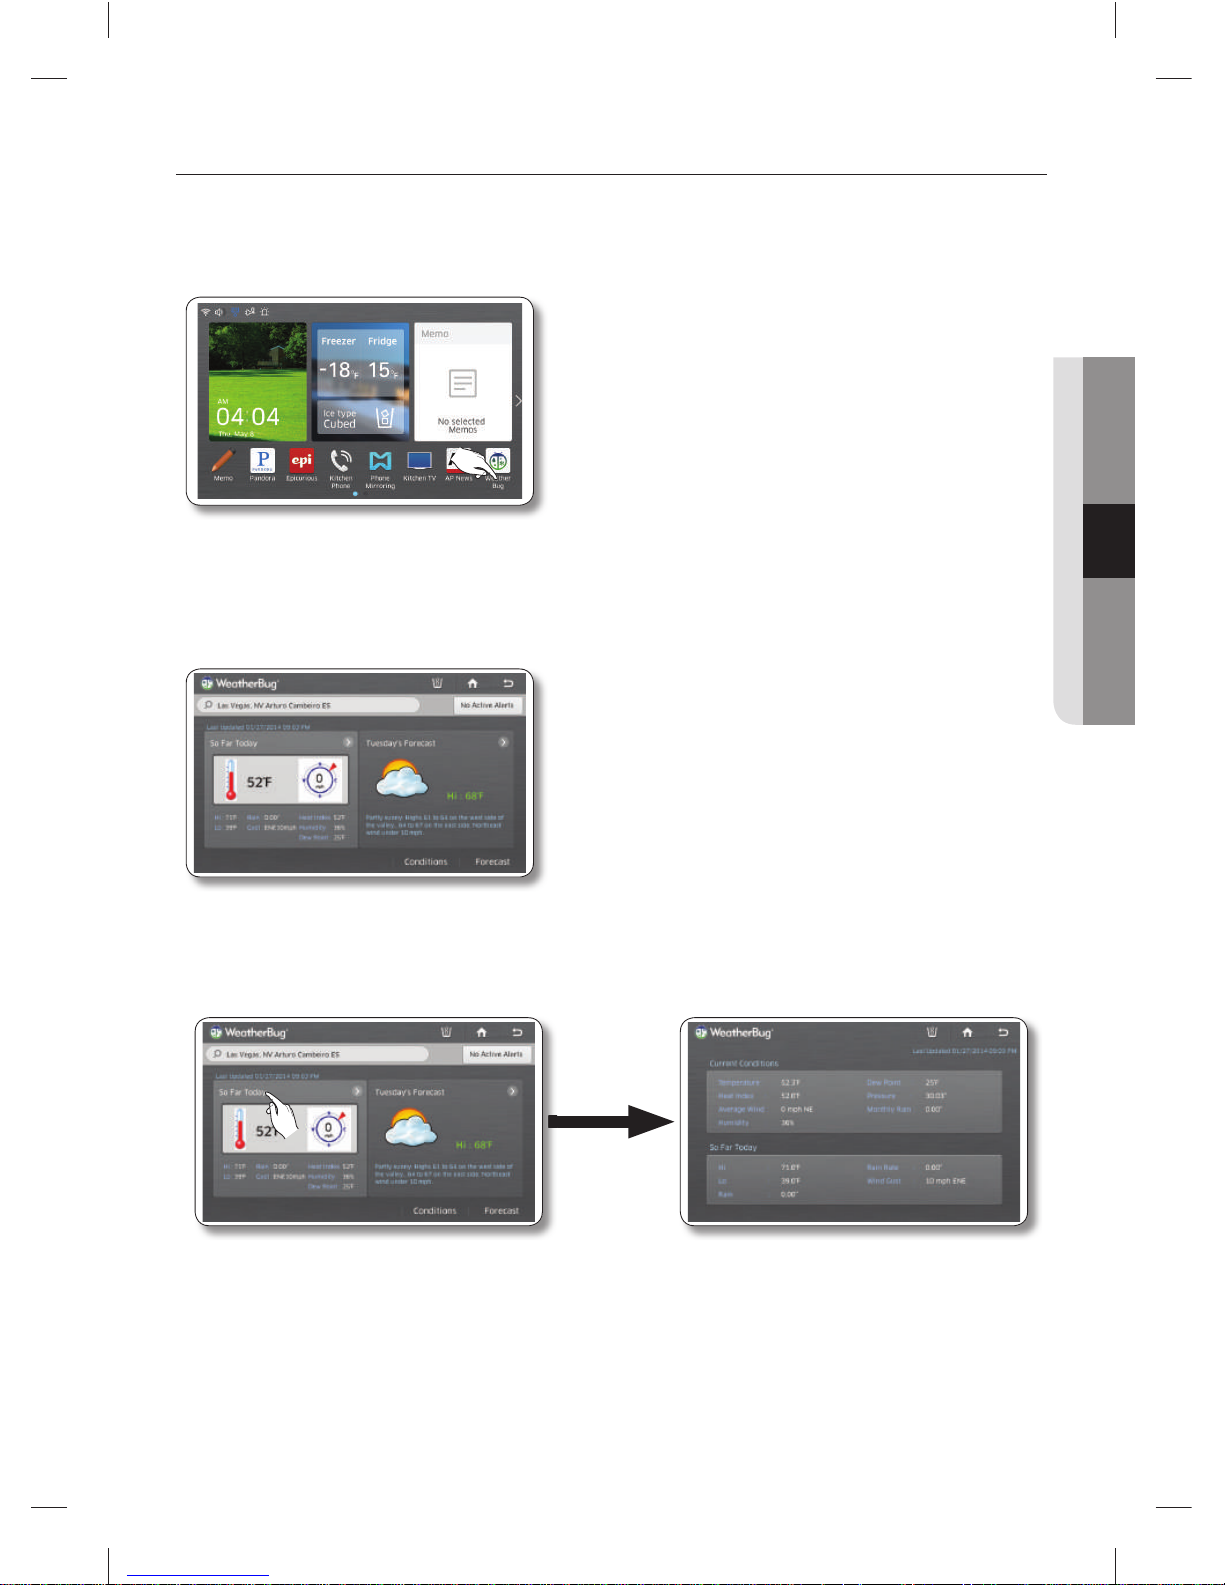
English - 59
OPERATING
How to view today’s weather.
1. Select the [WeatherBug] button on the Home screen.
There will be a 4-second commercial ad when you start WeatherBug.
2. The Weatherbug screen appears displaying your local weather.
If you select Active Alerts, the screen displays weather alerts.
3. Select [So Far Today]. The screen displays the current weather detail information.
DA68-03055A-06.indb 59DA68-03055A-06.indb 59 2015. 4. 23. 8:172015. 4. 23. 8:17
Page 60
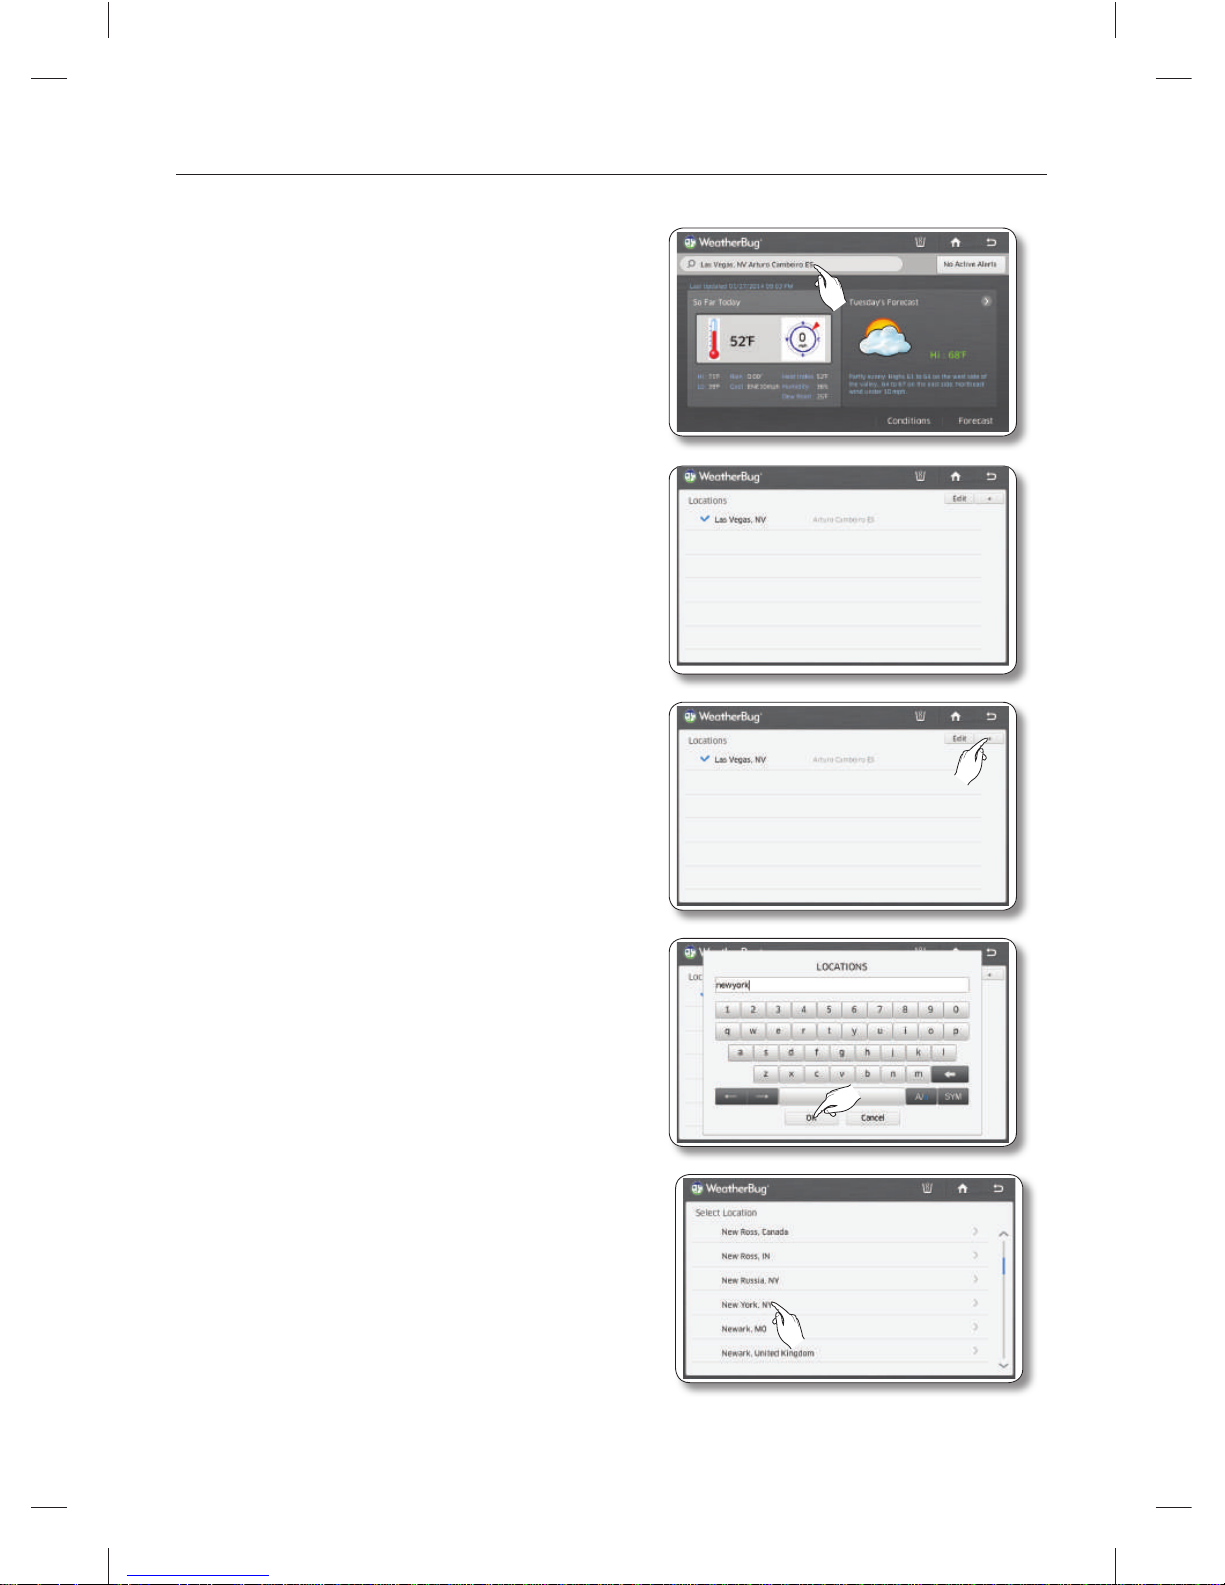
English - 60
How to add other Regions to Weatherbug
1. Select the region search bar on the top left of the
screen.
2. The current region information appears on the screen.
3. Select the [+] button in the upper right corner of the
screen.
4. Enter the location name or zipcode (US Only) using the
on-screen keyboard, and then press the [OK] button.
5. Select the desired location.
DA68-03055A-06.indb 60DA68-03055A-06.indb 60 2015. 4. 23. 8:172015. 4. 23. 8:17
Page 61
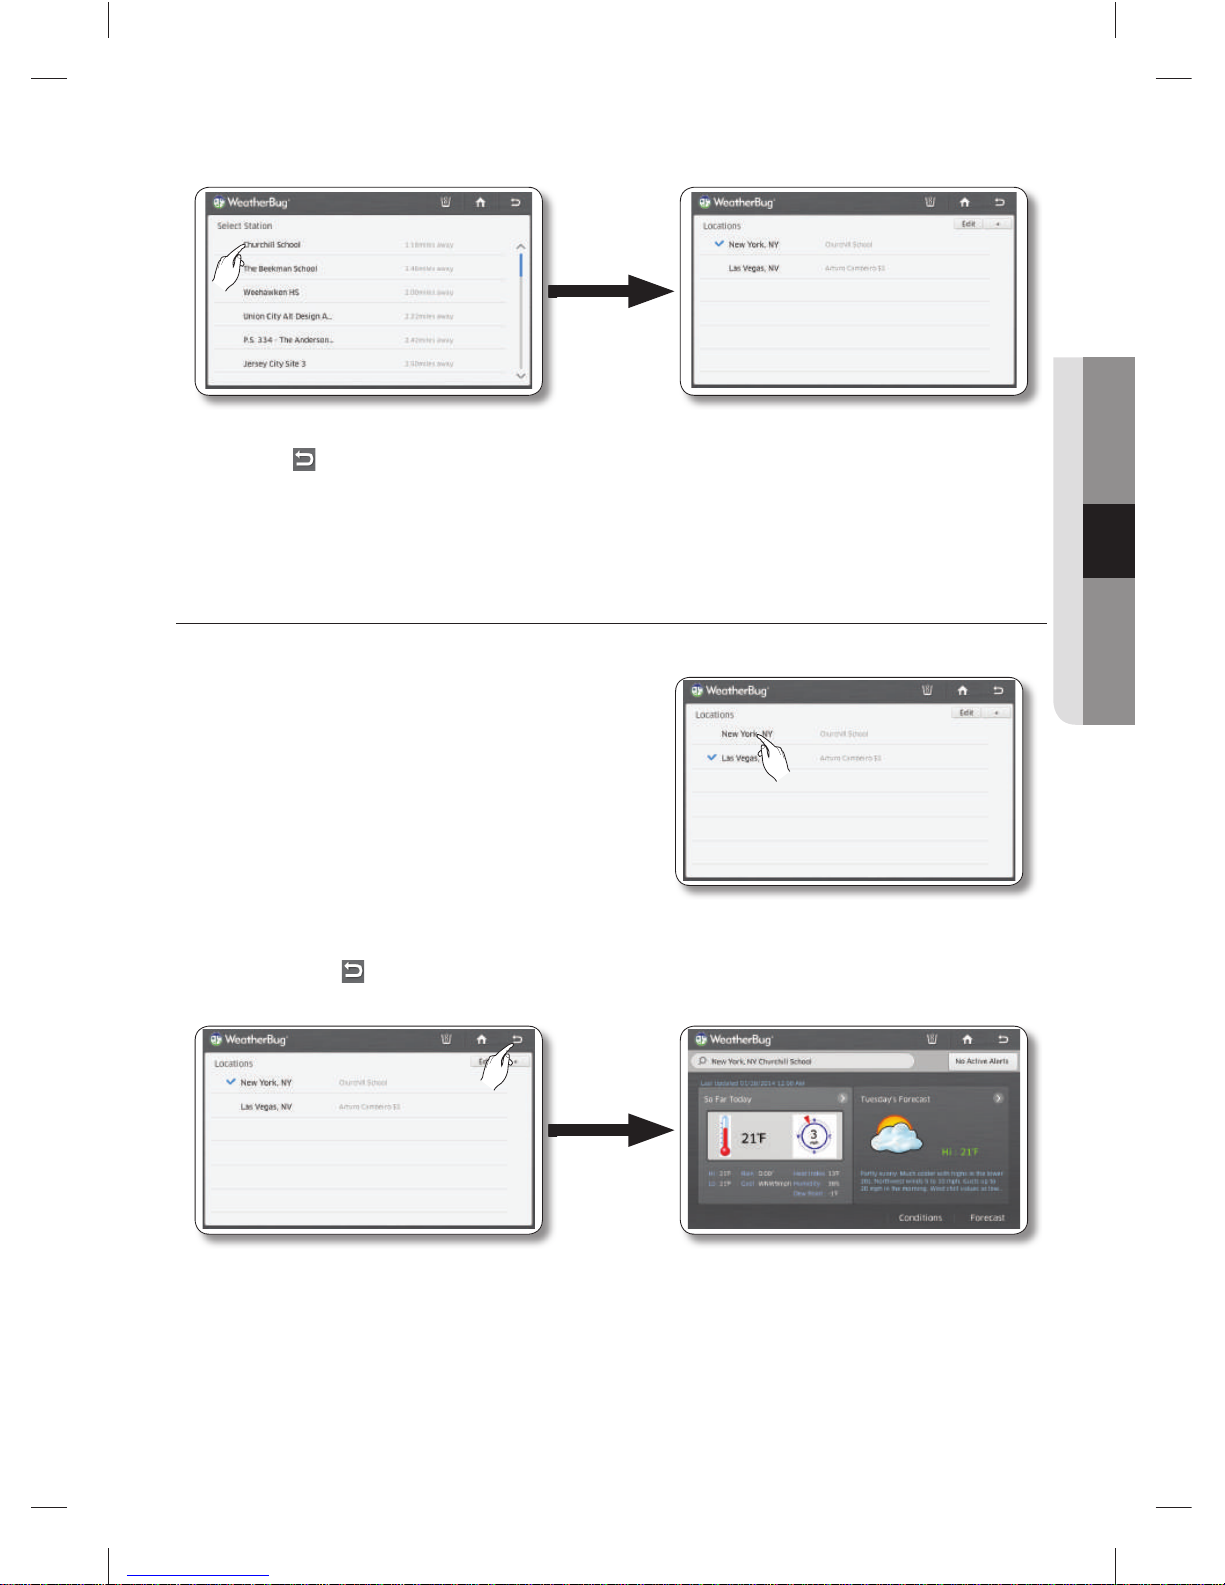
English - 61
OPERATING
6. Select the desired local weather station.
7. Press the “ ” button on the top right of the screen.
8. The screen displays the weather for the location you selected.
How to view Weather Information for a Region
1. Select the desired location on the location list.
2. Press the back ( ) button in the upper right corner.
The screen displays the weather for the location you selected.
DA68-03055A-06.indb 61DA68-03055A-06.indb 61 2015. 4. 23. 8:172015. 4. 23. 8:17
Page 62
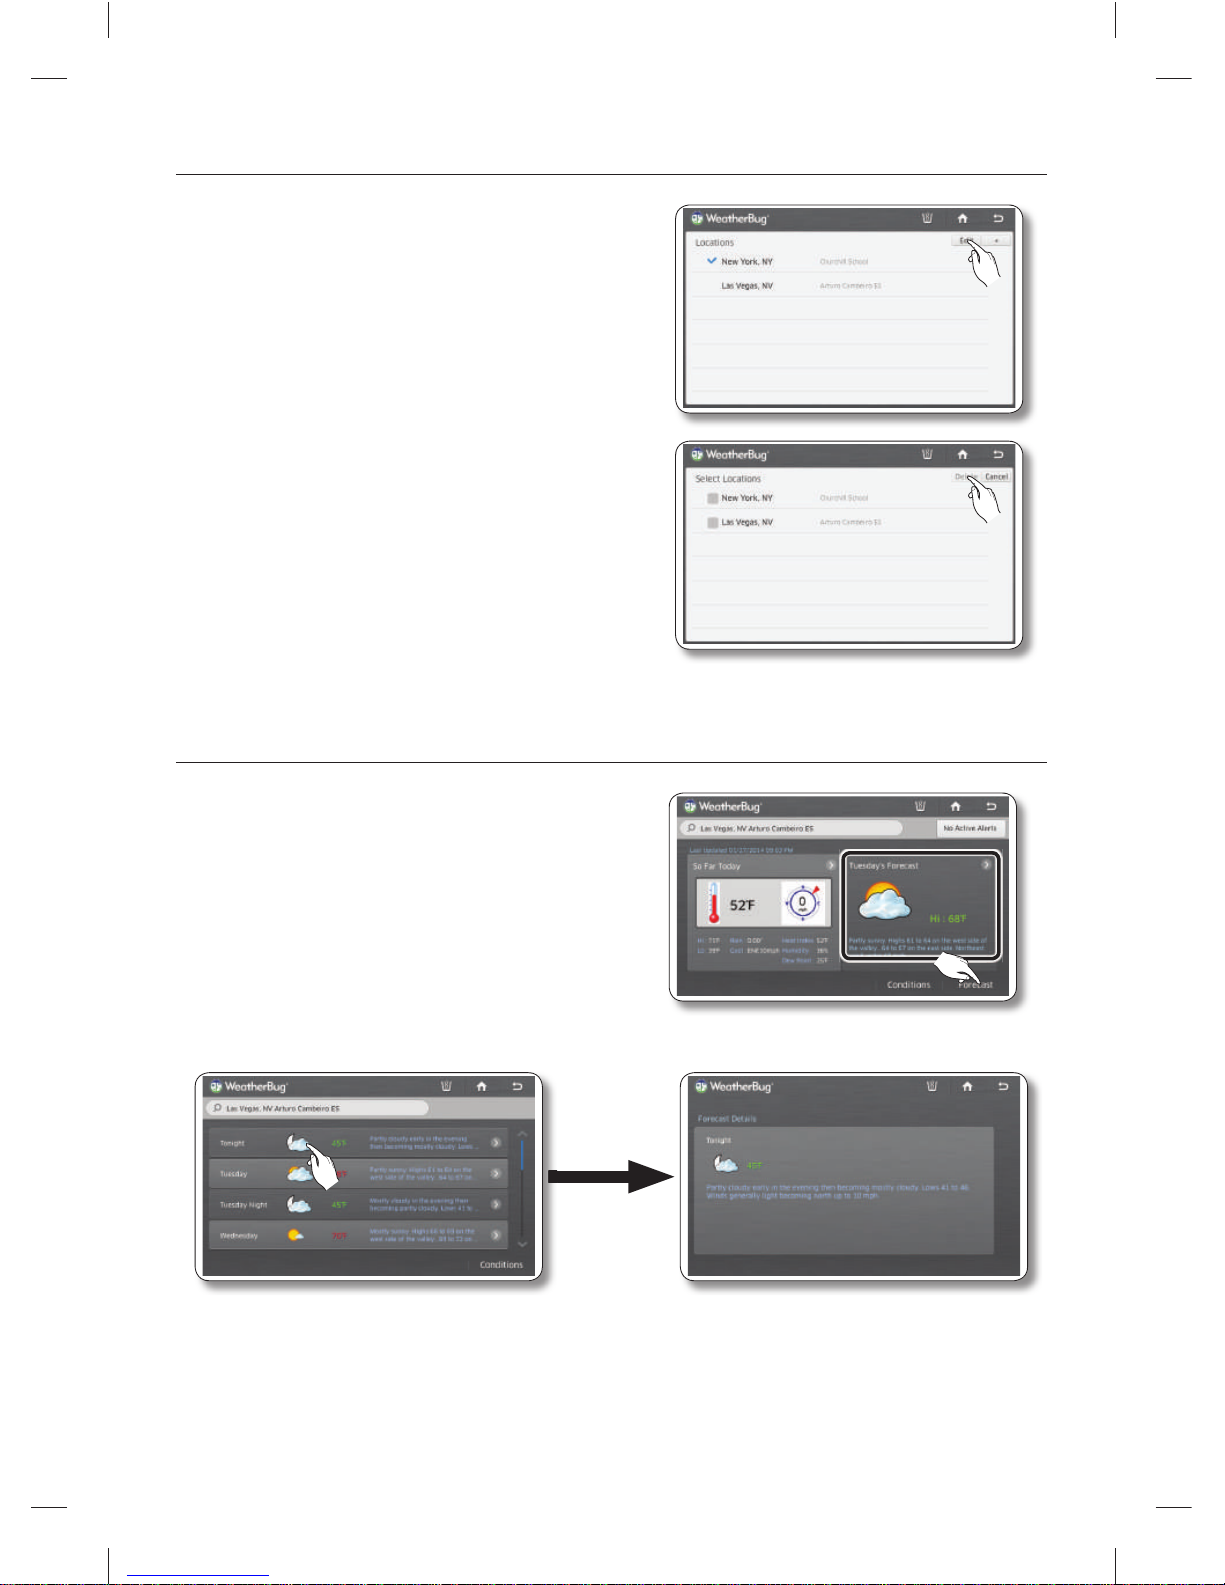
English - 62
How to delete Regions from Weatherbug
1. Select the [Edit] button in the upper right corner of
screen.
2. Select the check box on the left of the location you
want to delete, and then then select the Delete button.
How to view weather forecasts.
1. Select [Forecast], or the Forecast pane.
2. Select the desired forecast on the forecast list. The screen displays detailed forecast information.
• The forecast screen lists weather forecasts for 7 days.
• It displays the day, the Day / Night weather (US weather only), the weather condition icon, the
temperature, and the weather description.
• If you select the [Conditions] button on the lower right, the screen displays the current weather
information.
DA68-03055A-06.indb 62DA68-03055A-06.indb 62 2015. 4. 23. 8:172015. 4. 23. 8:17
Page 63
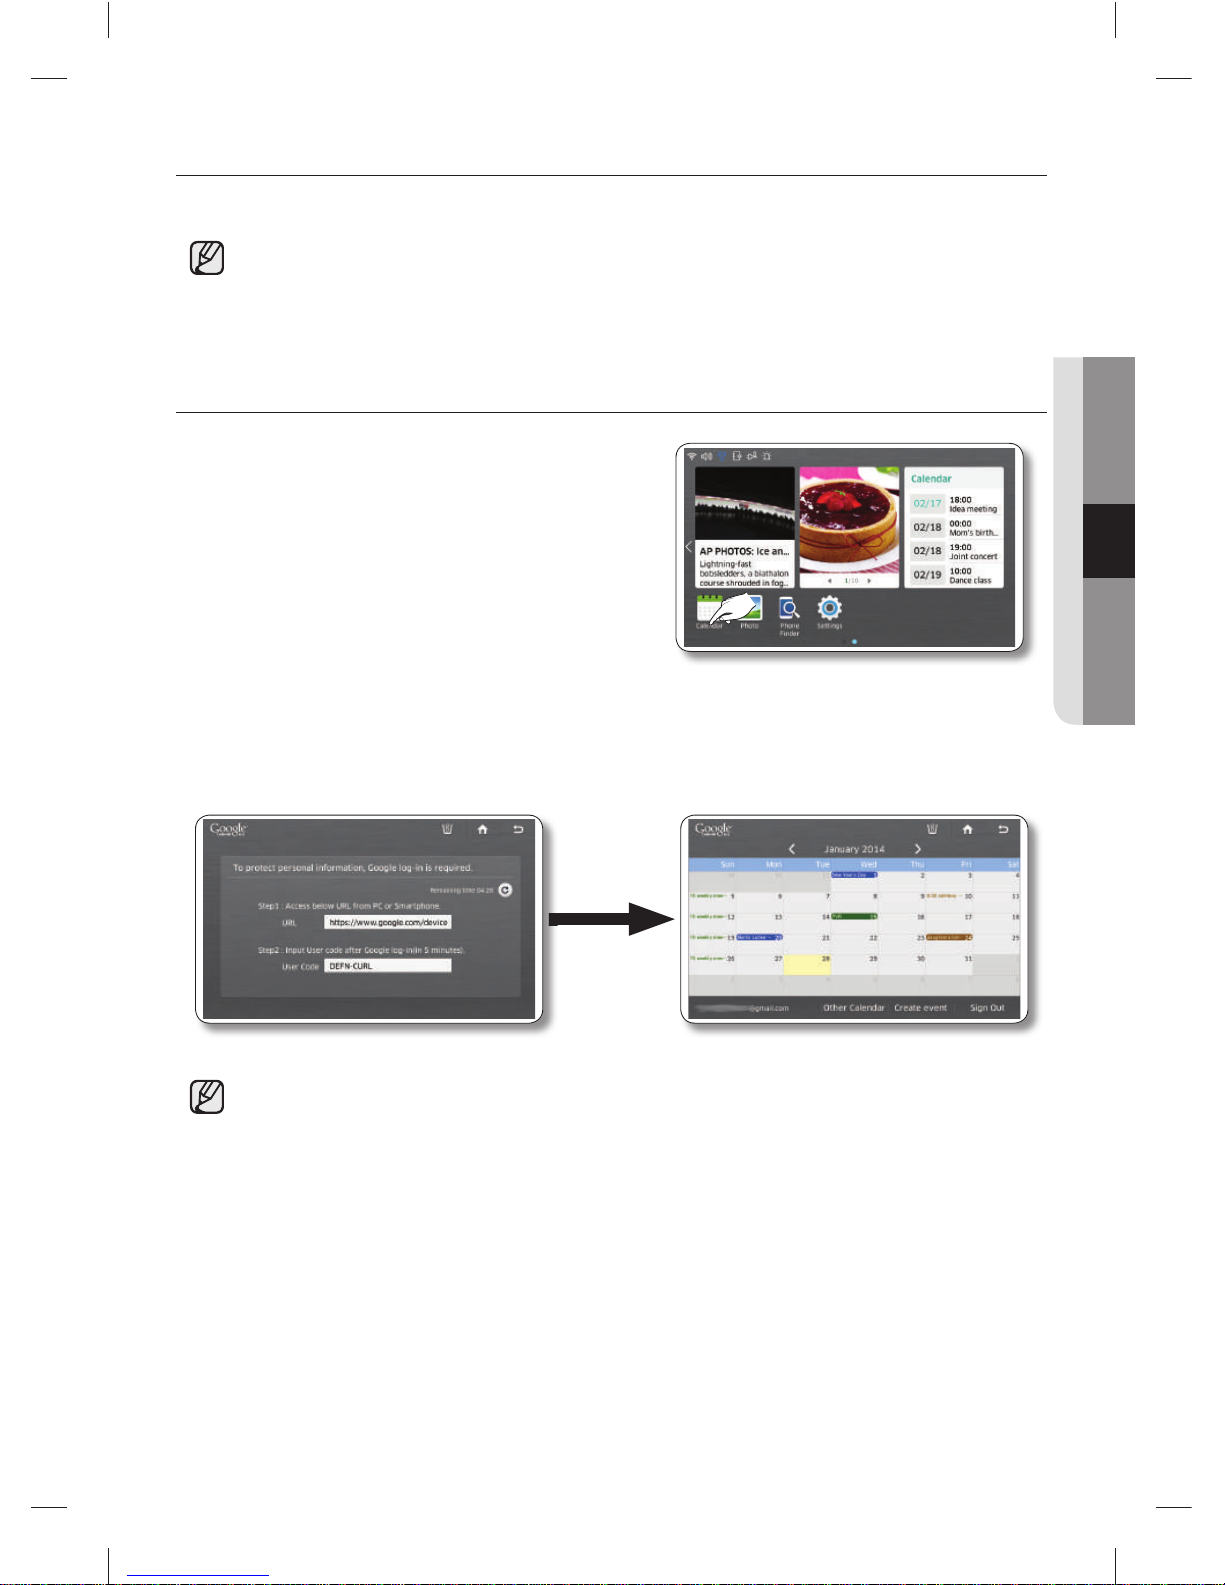
English - 63
OPERATING
CALENDAR
Displays the calendar from Google Calendar.
This function is only available when the refrigerator is connected to your wireless network (Wi-Fi).
For instructions explaining how to connect the refrigerator to your network, see page 79.
To use the Calendar function, you need a Google account.
The Calendar schedule supports dates from Jan 1970 to Dec 2037.
How to view the Google Calendar.
1. Select the [Calendar] button on the Home screen.
2. On your PC or smartphone, access the URL provided on the Calendar login screen. You will be
asked to enter a user code for authentication. When authentication is successful, you will move to the
Calendar schedule screen.
If you do not have a Google account, you can get one at http://calendar.google.com.
DA68-03055A-06.indb 63DA68-03055A-06.indb 63 2015. 4. 23. 8:172015. 4. 23. 8:17
Page 64
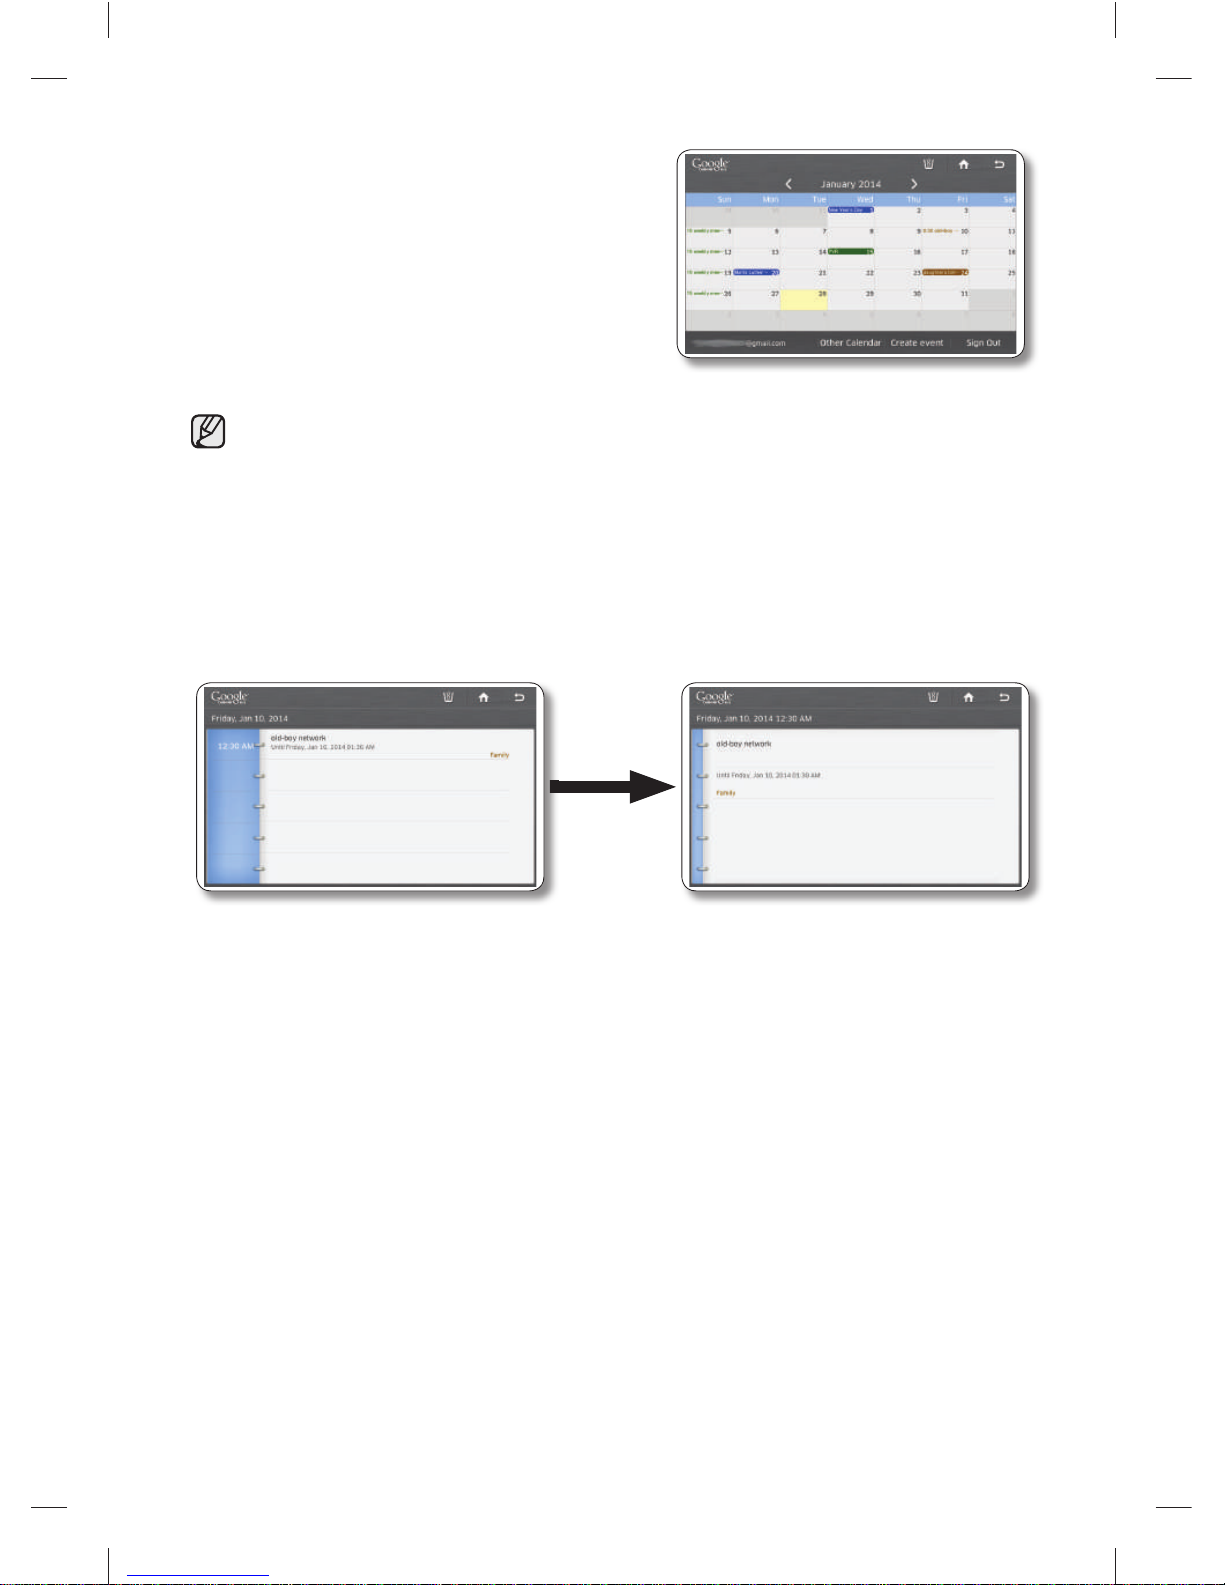
English - 64
3. To view your schedule, select a date. The screen
displays the daily schedule for the date you selected.
You cannot modify or erase the Google Calendar schedule through the refrigerator display
screen.
The display color of each scheduled event is the same as that in the Google Calendar application.
Press the left / right direction arrows to check the Monthly Schedule.
When there are more than 4 events within a day, the calendar indicates the excess with “+1
more”.
The schedule updates every 30 minutes.
4. Press the event you want to view. The event you selected appears on the screen.
DA68-03055A-06.indb 64DA68-03055A-06.indb 64 2015. 4. 23. 8:172015. 4. 23. 8:17
Page 65
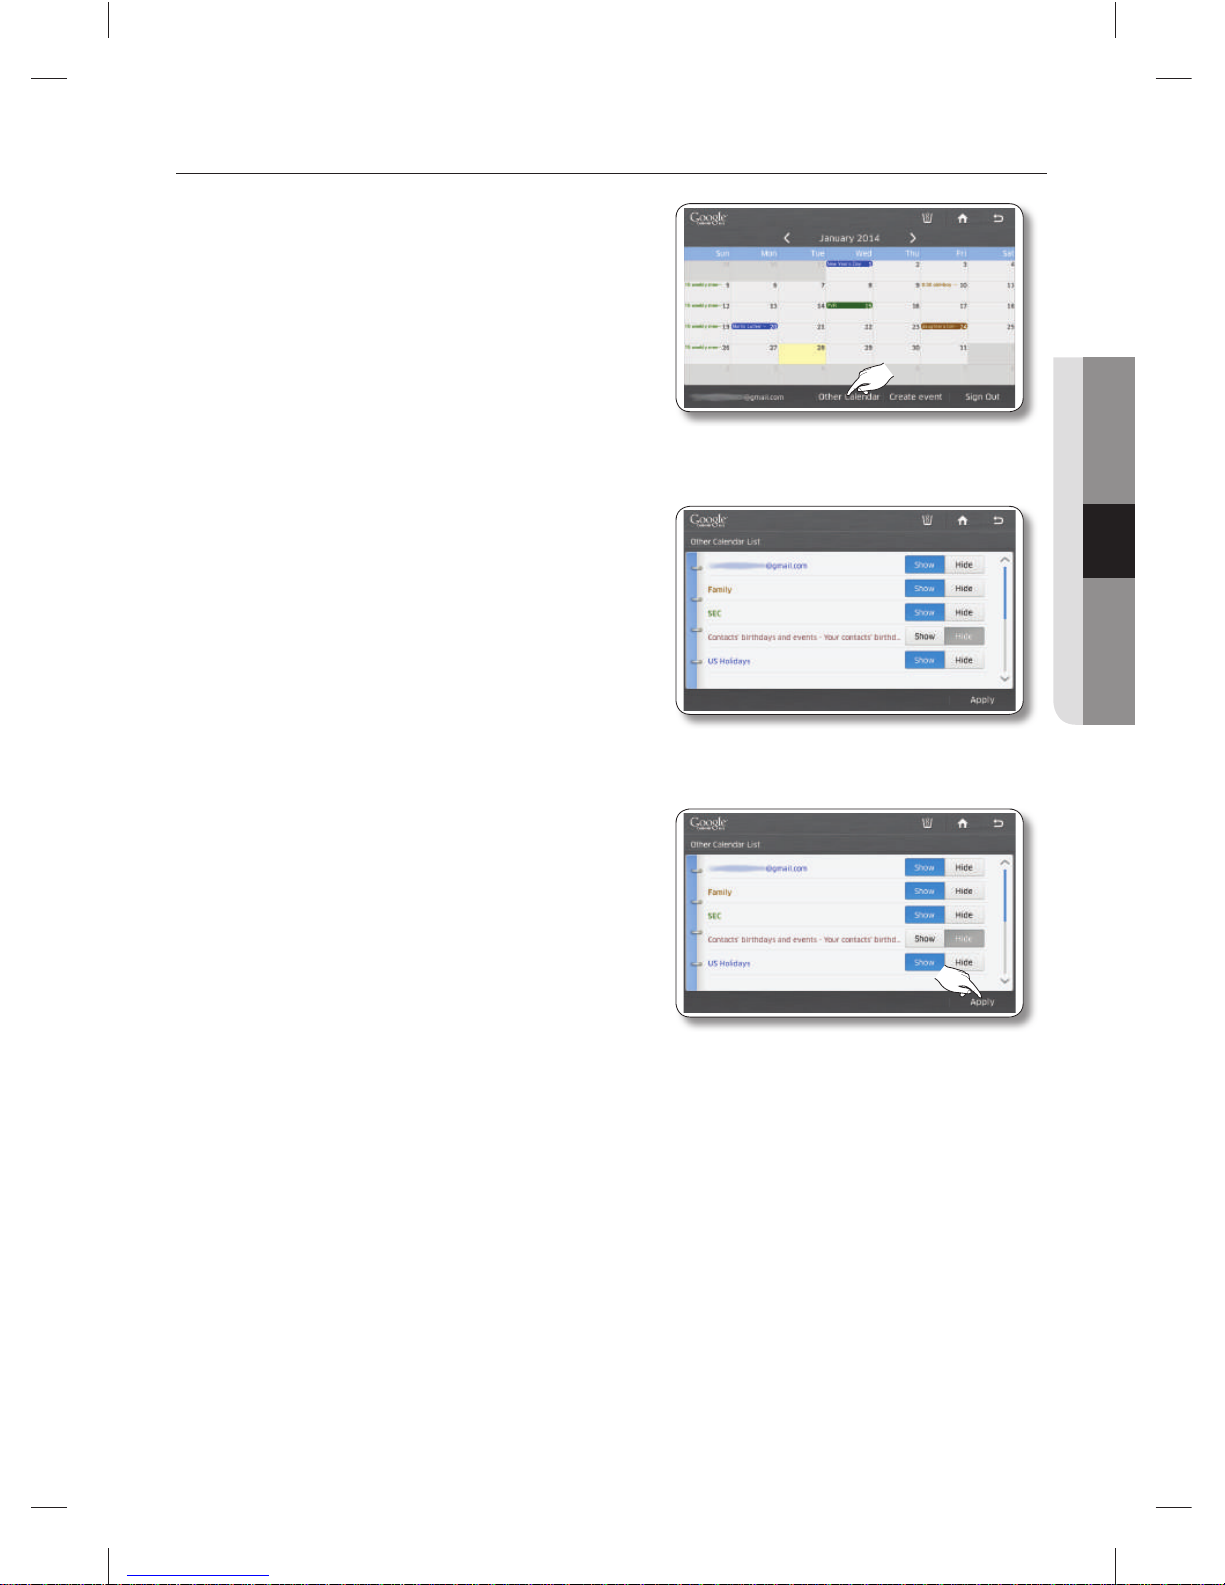
English - 65
OPERATING
How to manage a Shared Calendar
1. Select [Other Calendar].
2. Select a [Show] or [Hide] button.
• You can show or hide schedules from your
Google Web Calendar subscription list using
the Other Calendar List screen.
• If you change the Show / Hide setting here, it
does not change in the subscription list and
does not change the Show / Hide setting on
the Google Web Calendar.
3. Select the [Apply] button.
The Google Calendar re-appears with the displayed
schedule changed according to your selections.
DA68-03055A-06.indb 65DA68-03055A-06.indb 65 2015. 4. 23. 8:172015. 4. 23. 8:17
Page 66
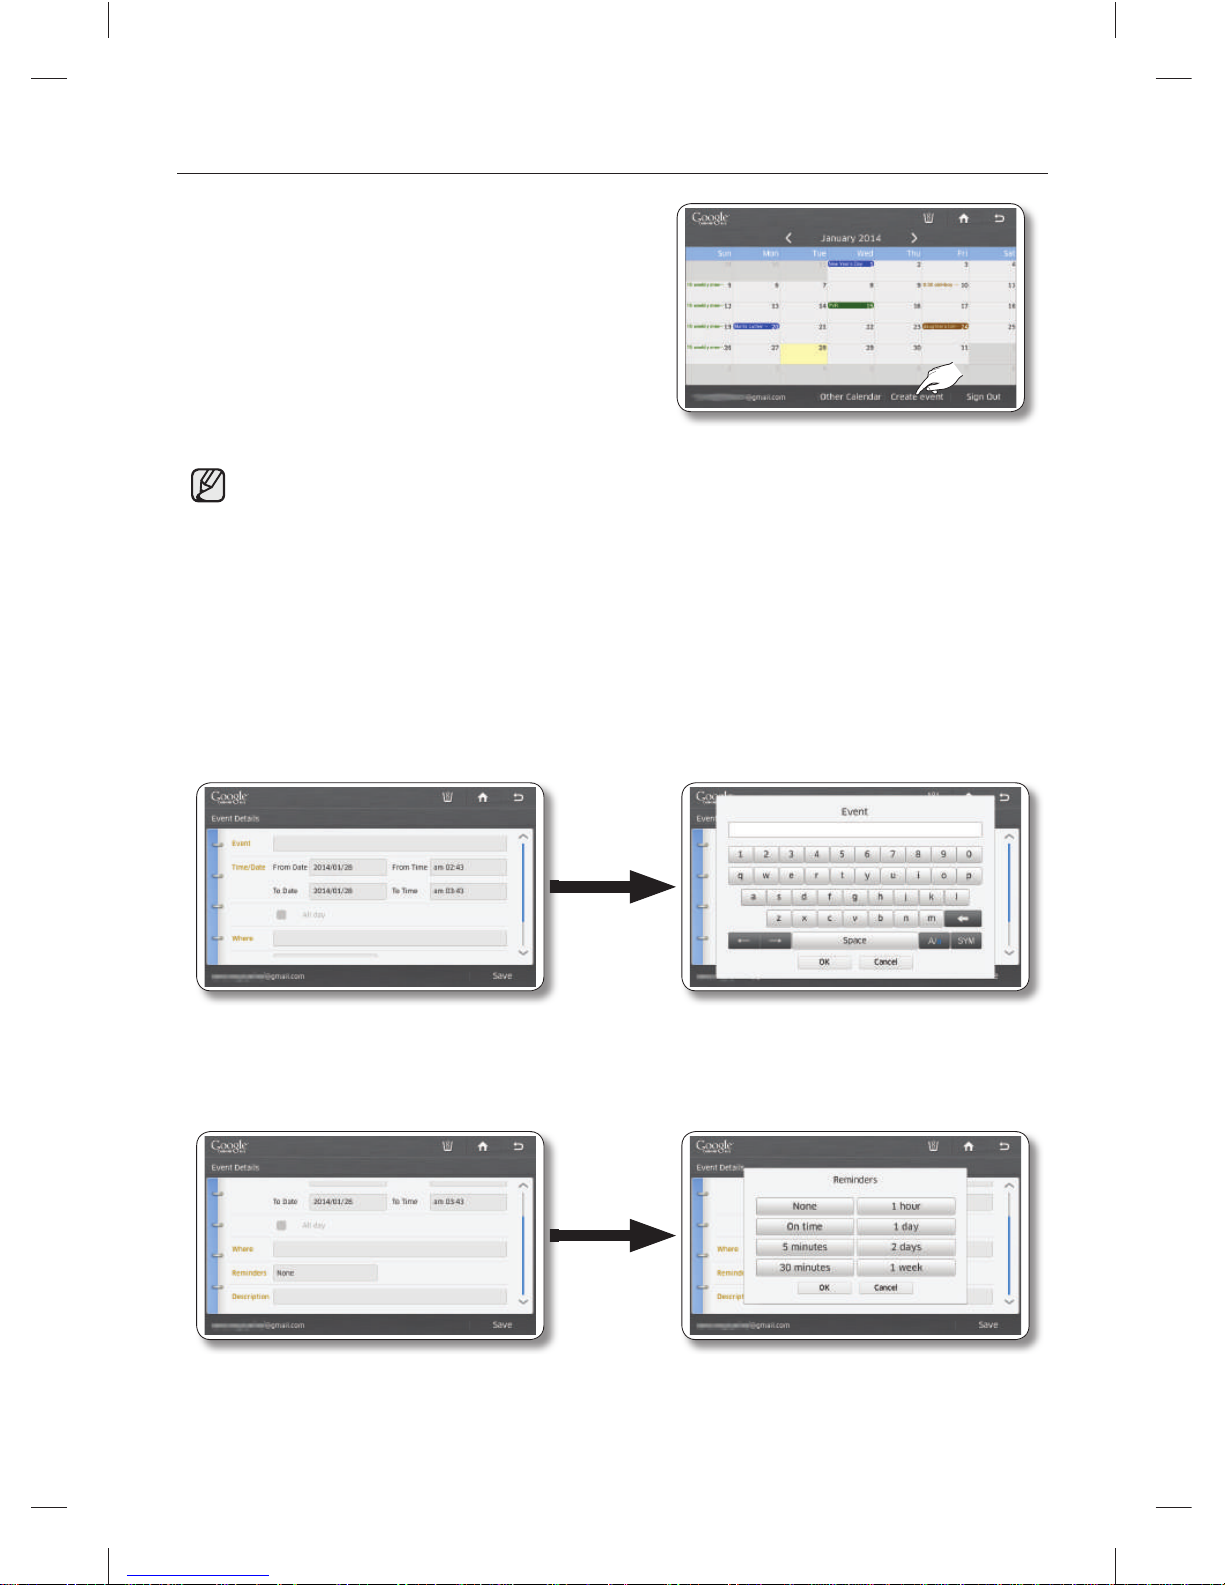
English - 66
How to create an event
1. Select the [Create event] button on the Calendar
screen.
You must be logged in onyour primary Gmail email address (***@gmail.com) to use the Create an
event feature.
To view the primary email address:
1. Log in to www.google.com.
2. Click the profi le in the top right corner to display the dropdown list. (Note that the verifi cation
method of the primary Gmail account may differ according to the Gmail provider’s policies.)
3. Click Account.
4. Look under [Email addresses and usernames] for the email address identifi ed as the Primary
Gmail.
2. Enter the Event Title, Date and Time, Location (Where), and Description in the corresponding entry
fi elds using the screen keyboard.
3. To set a reminder for a scheduled event, select the Reminders input box, and then select one of the
Reminder options.
4. When all settings are complete, select [Save].
DA68-03055A-06.indb 66DA68-03055A-06.indb 66 2015. 4. 23. 8:172015. 4. 23. 8:17
Page 67
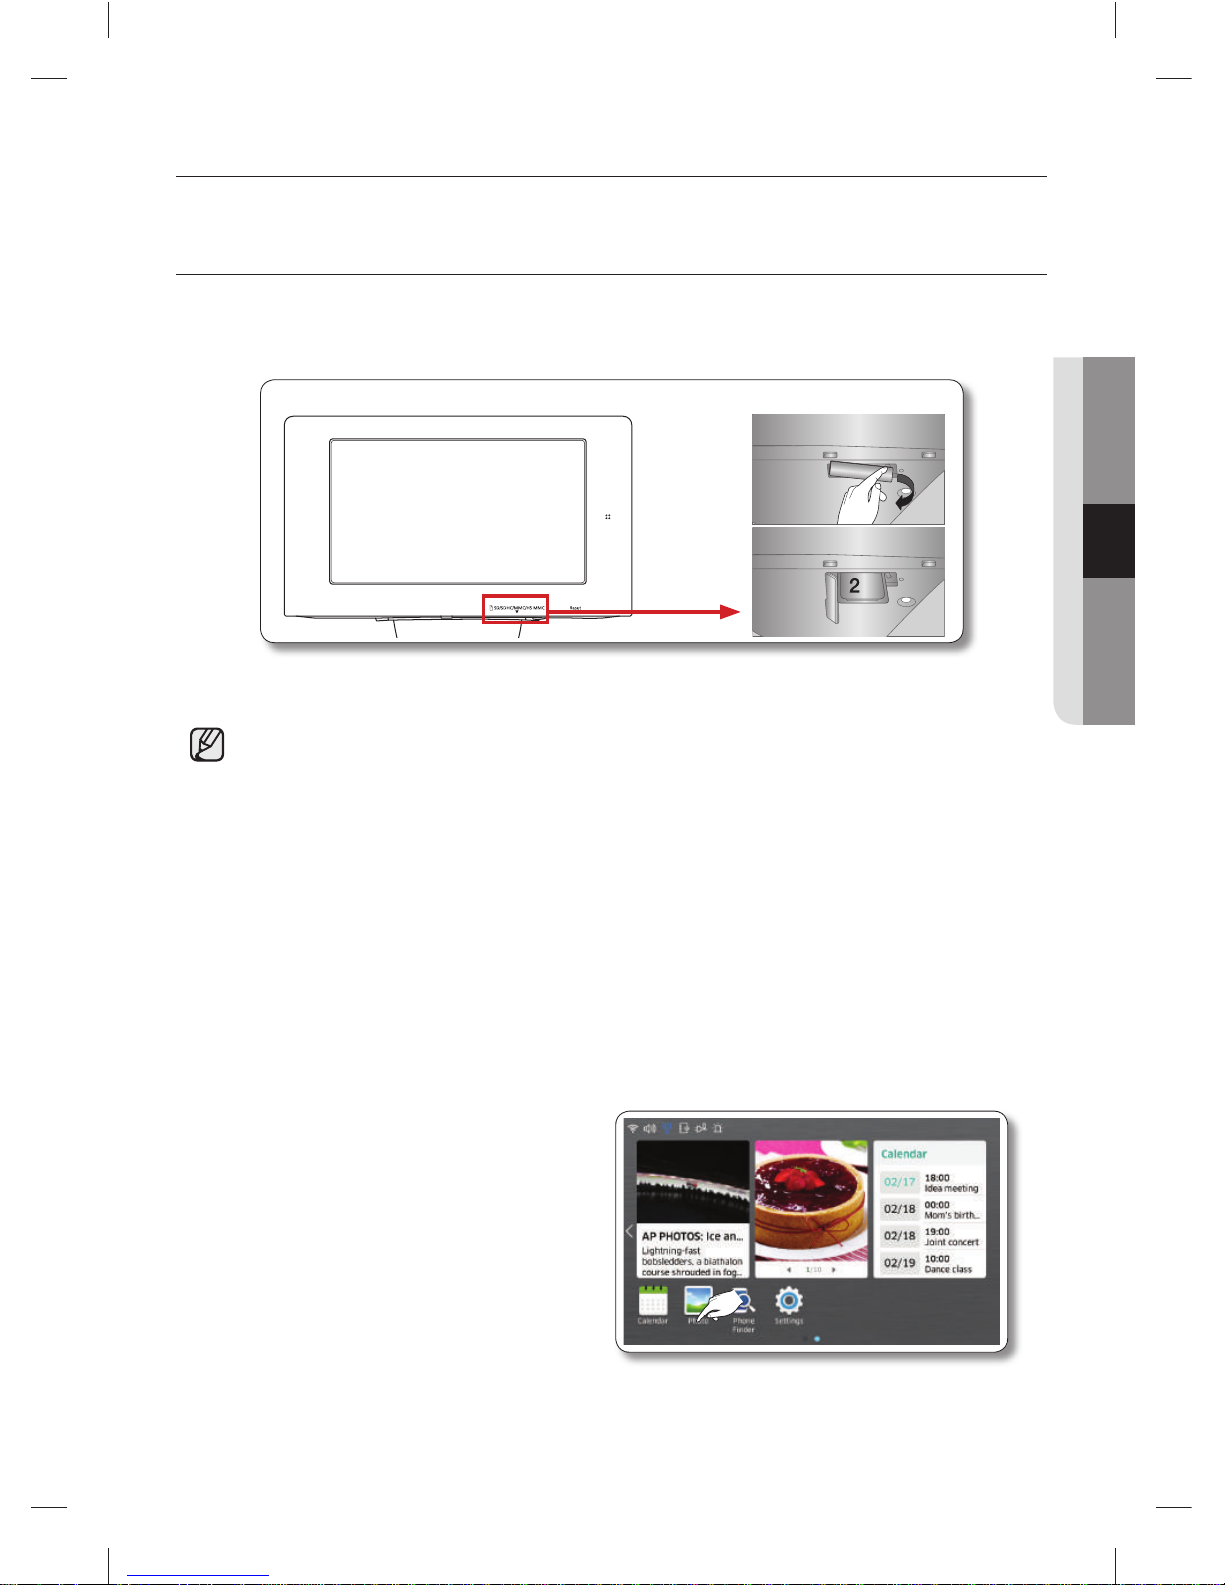
English - 67
OPERATING
PHOTO
You can upload photos from a Memory Card into My Album on your refrigerator.
How to Copy Photos from a Memory Card to My Album
1. Pull out the cover over the card slot and move it to the side.
2. Insert the memory card (SD/SDHC/MMC/HS MMC) with saved images into the card slot in the right
direction. The “A SD/MMC card is connected” message appears on the screen.
gb
The Memory slot is is compatible with SD/SDHC/MMC/HS MMC type memory cards only.
The slot can read only JPEG(JPG) images.
When saving photos from a memory card to My Album, the refrigerator automatically changes
the photo size to 800 x 480 pixels, regardless of the original size.
If there are many photos saved on the Memory card, it will take awhile for the preview function to
load.
If the Memory Card is removed while transferring images, My Album only shows the images that
have transferred completely. If no images have completely transferred, the display returns to the
Photos screen.
The saved images are fi t to the screen size. Depending on the size of an image, there may be
black bars on the top or sides.
Memory cards are not supplied with the refrigerator.
The refrigerator may not be able to read your SD/SDHC/MMC/HS MMC memory card,
depending on the type of card it is.
3. Select the [Photos] button on the Home screen.
DA68-03055A-06.indb 67DA68-03055A-06.indb 67 2015. 4. 23. 8:172015. 4. 23. 8:17
Page 68
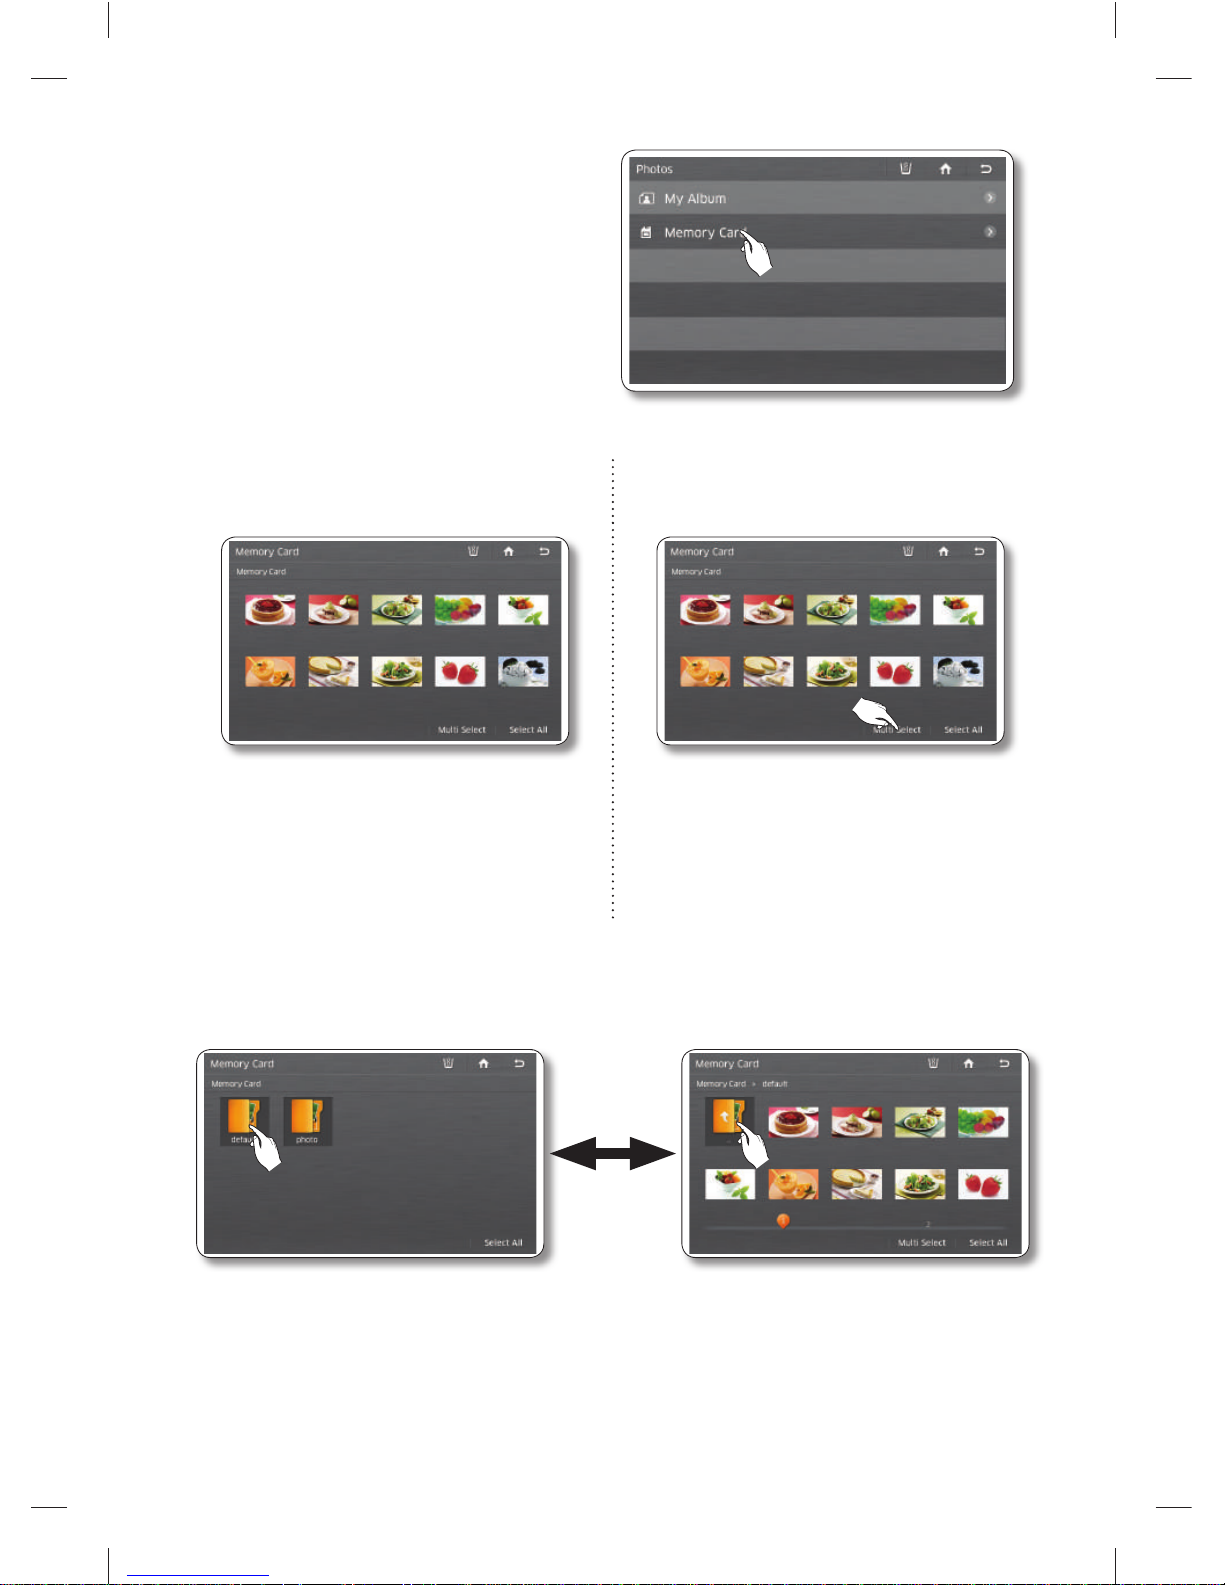
English - 68
4. Select [Memory Card] on the Photos list.
5. Select the photo you want to save to My
Album.
5. To store multiple photos, press the [Multi
Select] button.
• When you select the [Select All] button, the
Multi Selection screen appears.
• When there are multiple pages with many
photos, there will be page numbers on the
bottom of the screen. If you select the page
number, the screen shifts to that page.
• When there are folders in the Memory Card, the folder icons will appear on the screen.
• When you select a folder, you will see the photos stored in it.
• When you are in a sub-folder, you can move up to the folder that contains sub-folder by selecting
the icon on the sub-folder.
DA68-03055A-06.indb 68DA68-03055A-06.indb 68 2015. 4. 23. 8:172015. 4. 23. 8:17
Page 69
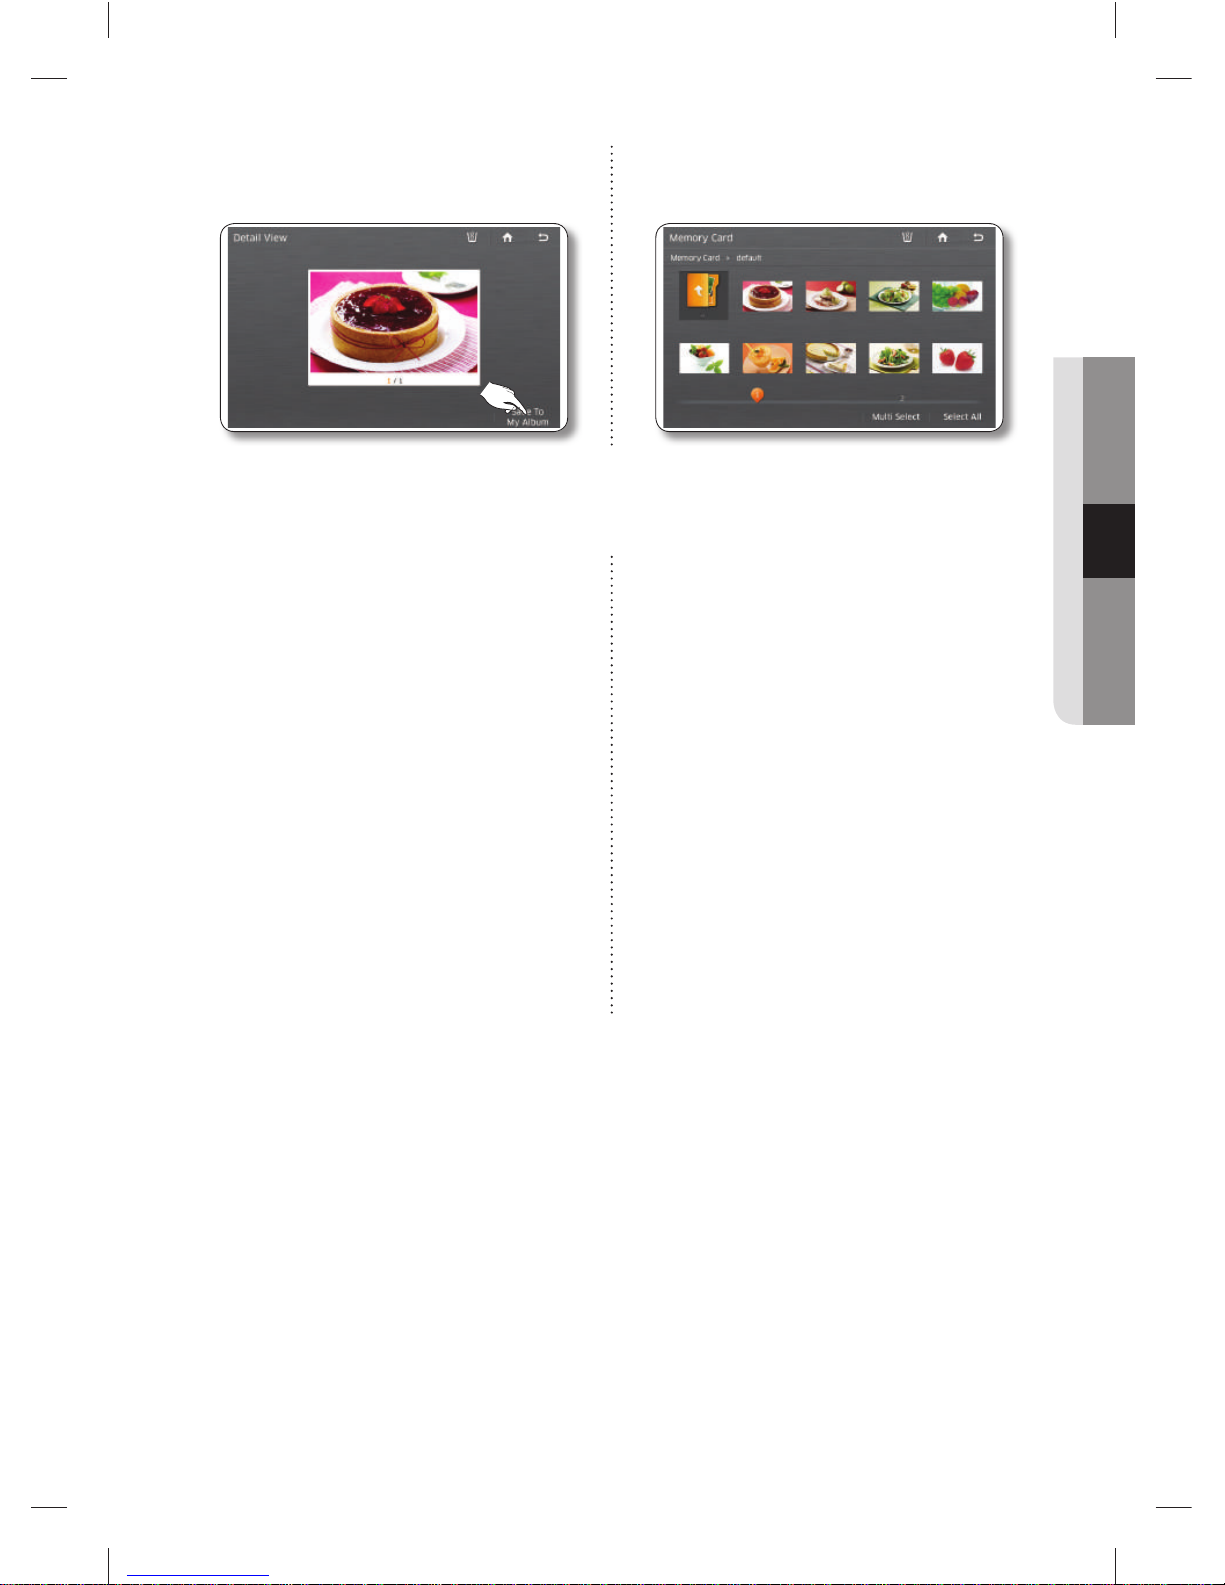
English - 69
OPERATING
6. Press the [Save To My Album] button. 6. Select all the photos you want to save to My
Album.
• When you select a photo, its detail information
will appear.
• When you select the [Select All] button, all the
photos on the current page are selected and
the [Select All] button shifts to the [Unselect All]
button.
• When you press the [View Selected] button,
you will see a larger version of a selected
photo.
• To exit the Multi Select screen, press the
[Cancel] button.
• To delete the check mark on a selected photo,
touch the photo again.
• When there are multiple pages with many
photos, there will be page numbers on the
bottom of the screen.
• If you have photos selected and move to
another folder, the selected photos will be
automatically unselected.
• When you touch the folder name above the
thumb-nails (Preview Photos), the screen
displays that folder.
DA68-03055A-06.indb 69DA68-03055A-06.indb 69 2015. 4. 23. 8:172015. 4. 23. 8:17
Page 70
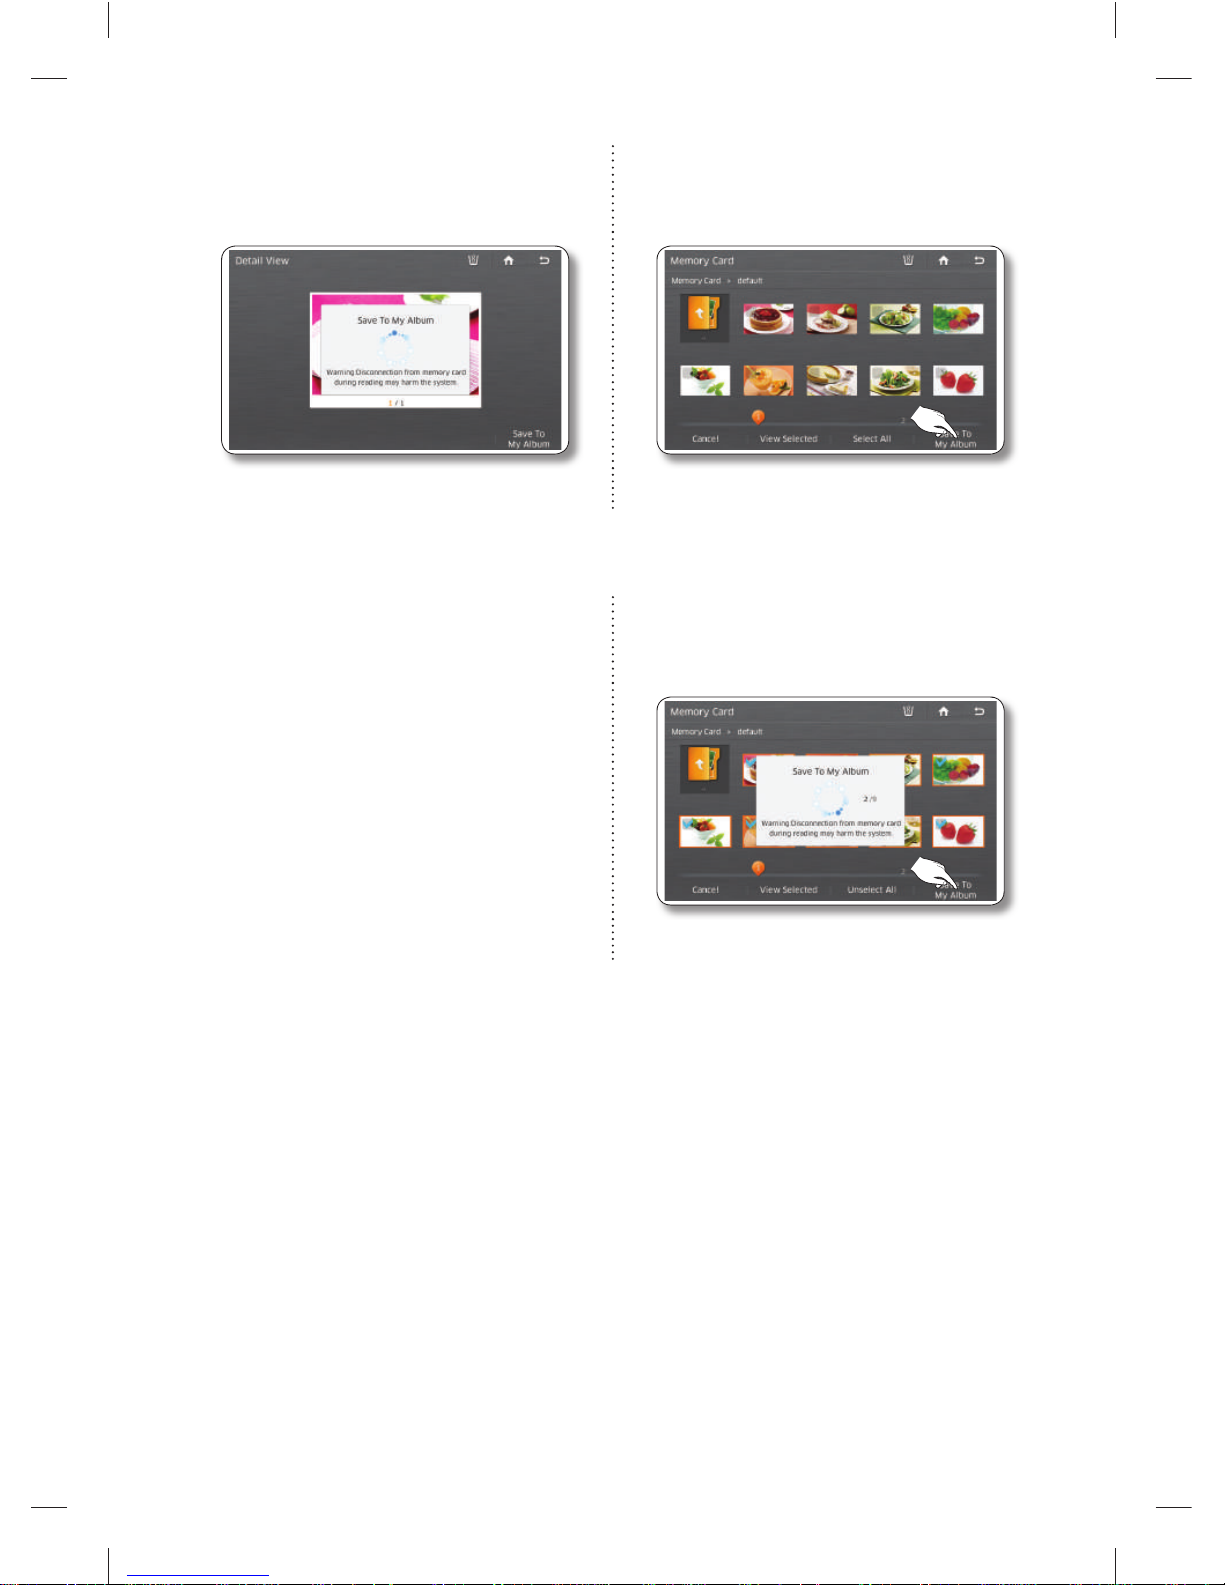
English - 70
7. While the photo uploads from the Memory
Card, the “Save To My Album” popup
appears on the screen.
7. Press the [Save To My Album] button.
• Larger photo sizes will take longer to upload.
8. While the photos upload from the Memory
Card, the “Save To My Album” popup
appears on the screen.
• Larger photo sizes will take longer to upload.
9. When the upload is complete, take the memory card out of the slot.
DA68-03055A-06.indb 70DA68-03055A-06.indb 70 2015. 4. 23. 8:172015. 4. 23. 8:17
Page 71
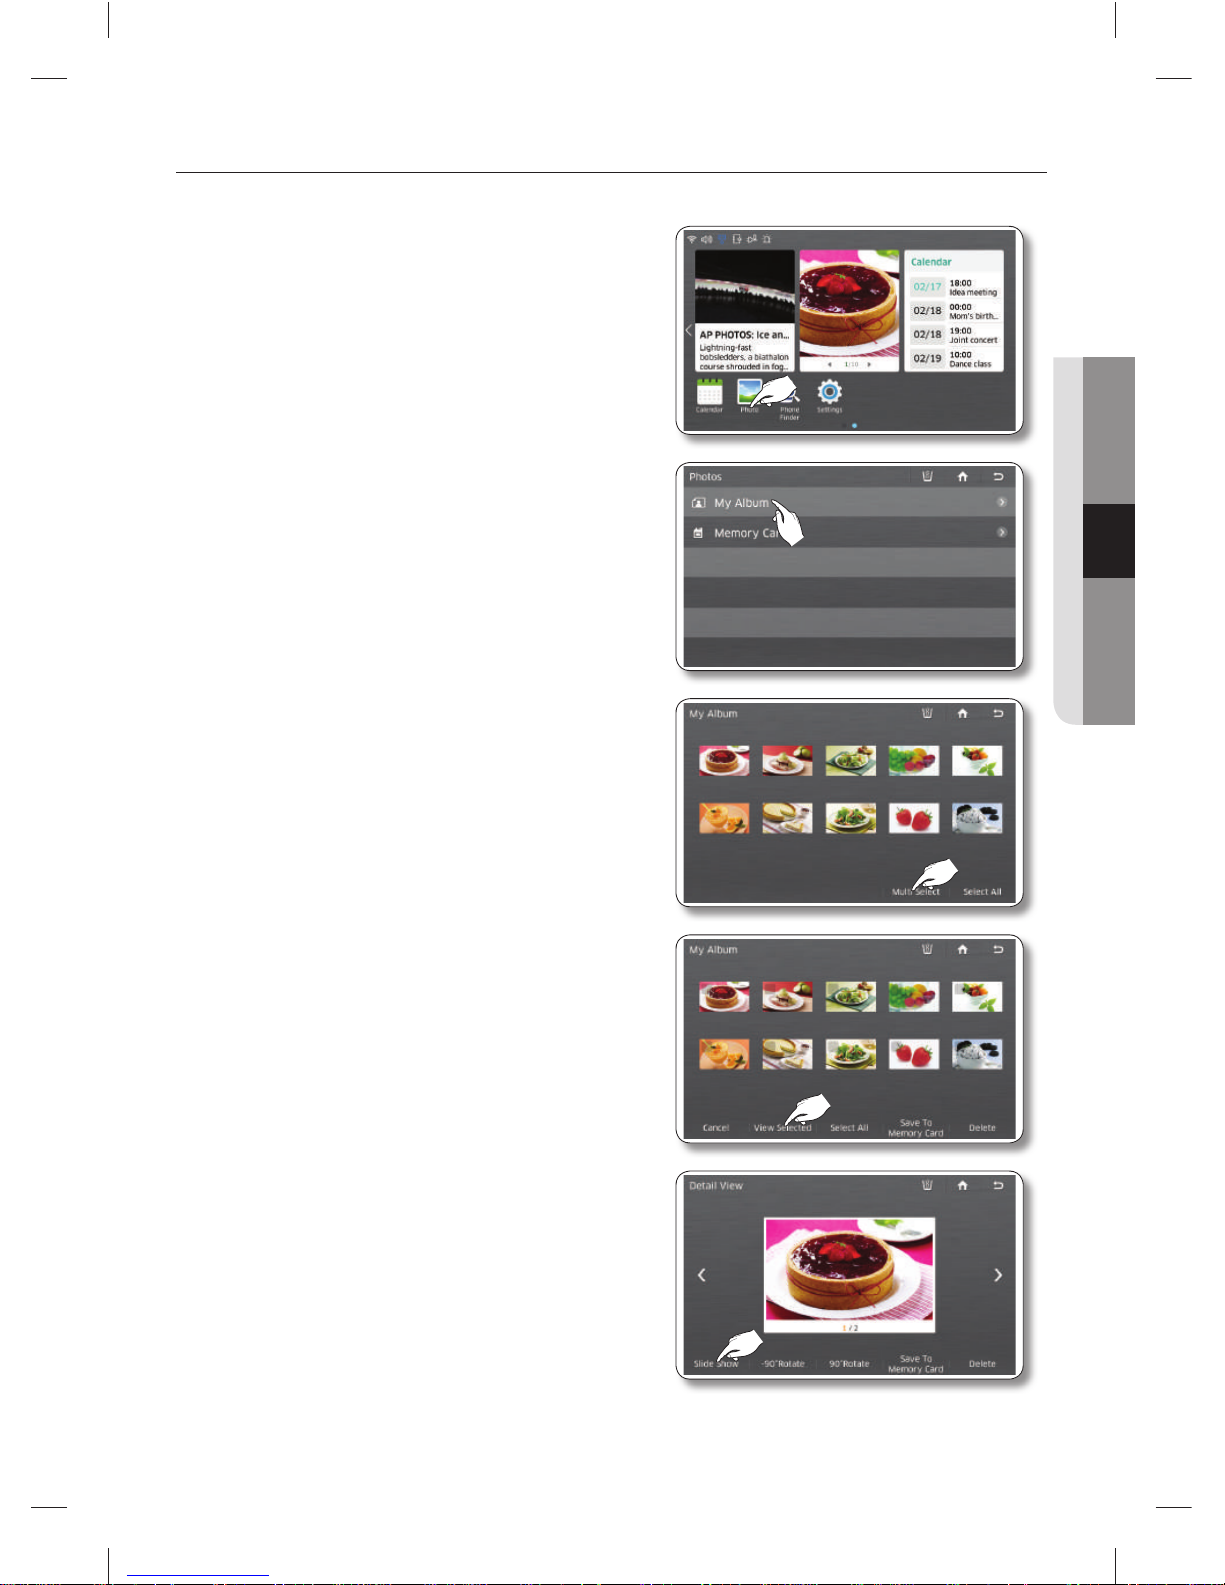
English - 71
OPERATING
How to run a slide show.
1. Select the [Photo] button on the Home screen.
2. Select [My Album] in the Photos list.
3. Select the [Multi Select] button.
4. Select the photos you want for the slide show, and
then press the [View Selected] button.
(Select more than two photos.)
• When you select a photo, its detail information
will appear.
5. Select the [Slide Show] button.
• Depending on a photo’s size (Width x Height),
the screen may display blank bars on the top or
sides of the image.
DA68-03055A-06.indb 71DA68-03055A-06.indb 71 2015. 4. 23. 8:172015. 4. 23. 8:17
Page 72
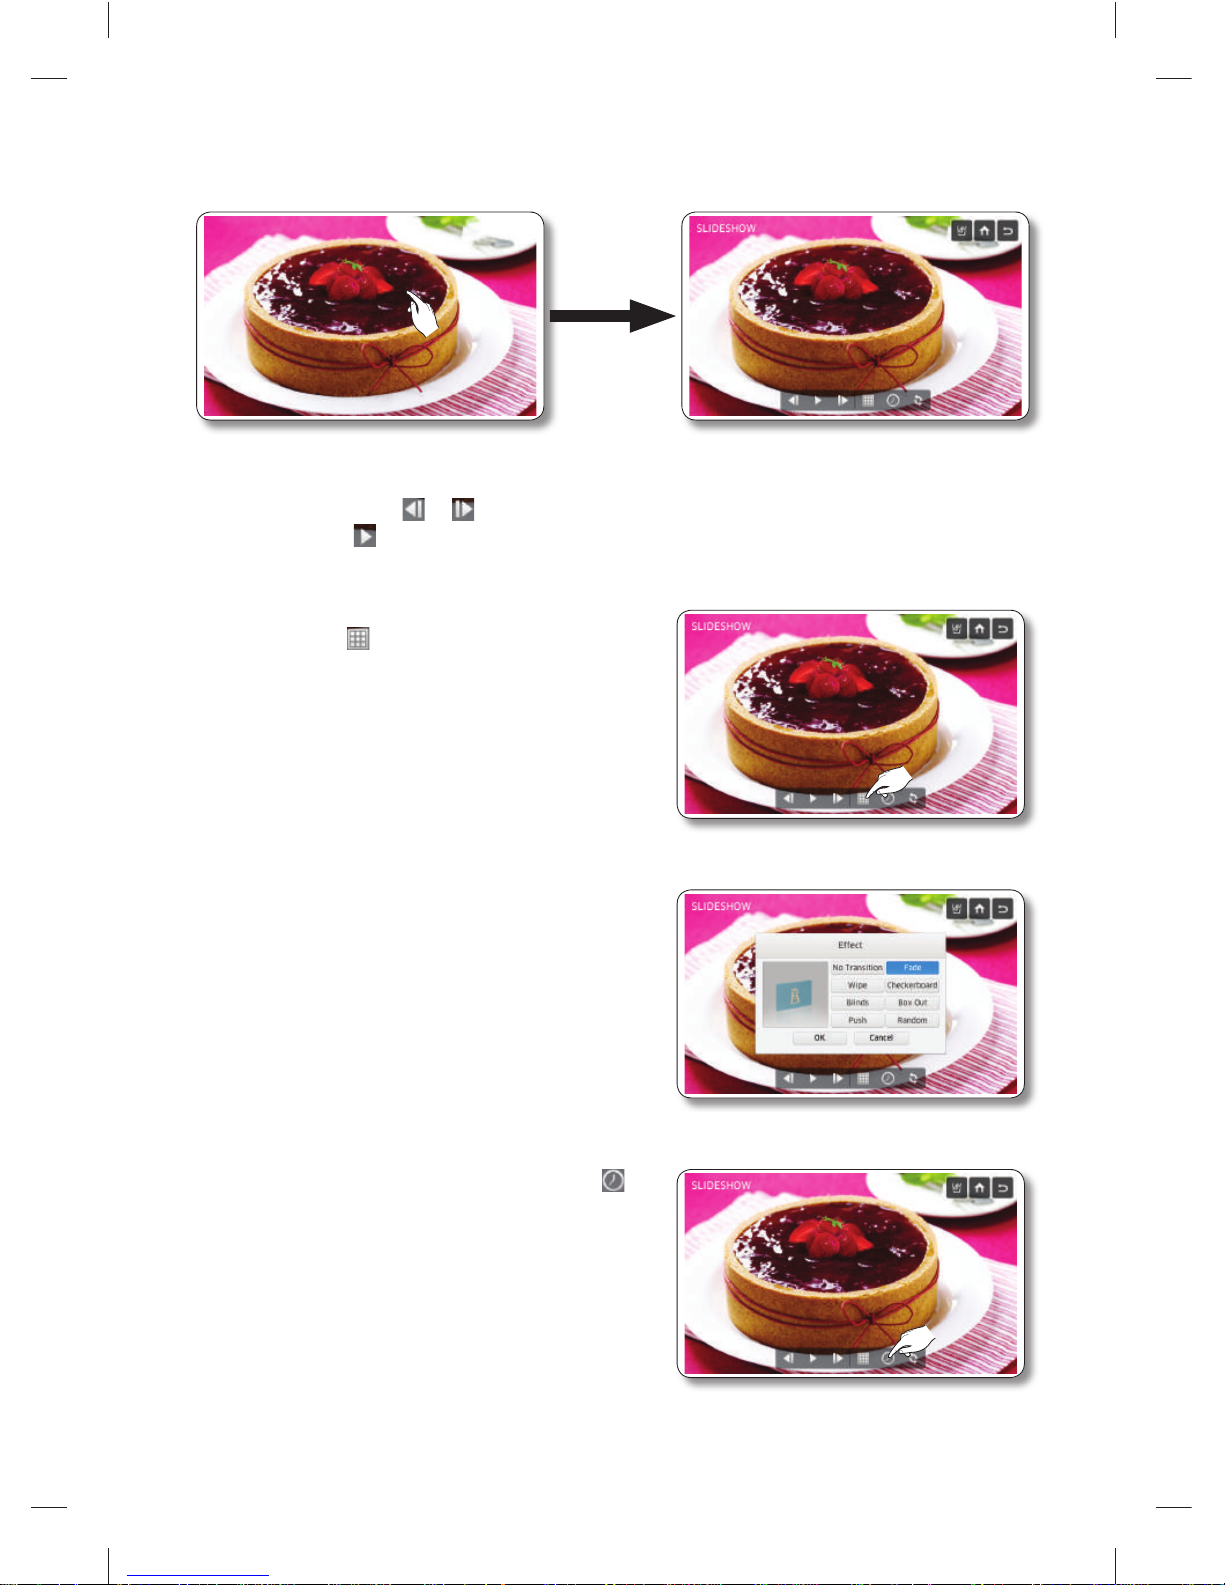
English - 72
6. The slide show starts. Select the screen to change the view option.
• The slide show runs once. When it fi nishes, the view options appear on the screen.
• By selecting the or button, you can move to the previous or next photo.
• Select the button to run the slide show again.
7. To change the screen transition effect of the slide
show, select the button.
8. Select the desired slide show transition effects, and
then press the [OK] button.
• You can preview the selected effect on the left
side of the screen.
• The Random effect runs the photos in a
random order.
9. To change the screen transition time, select the
button.
DA68-03055A-06.indb 72DA68-03055A-06.indb 72 2015. 4. 23. 8:172015. 4. 23. 8:17
Page 73
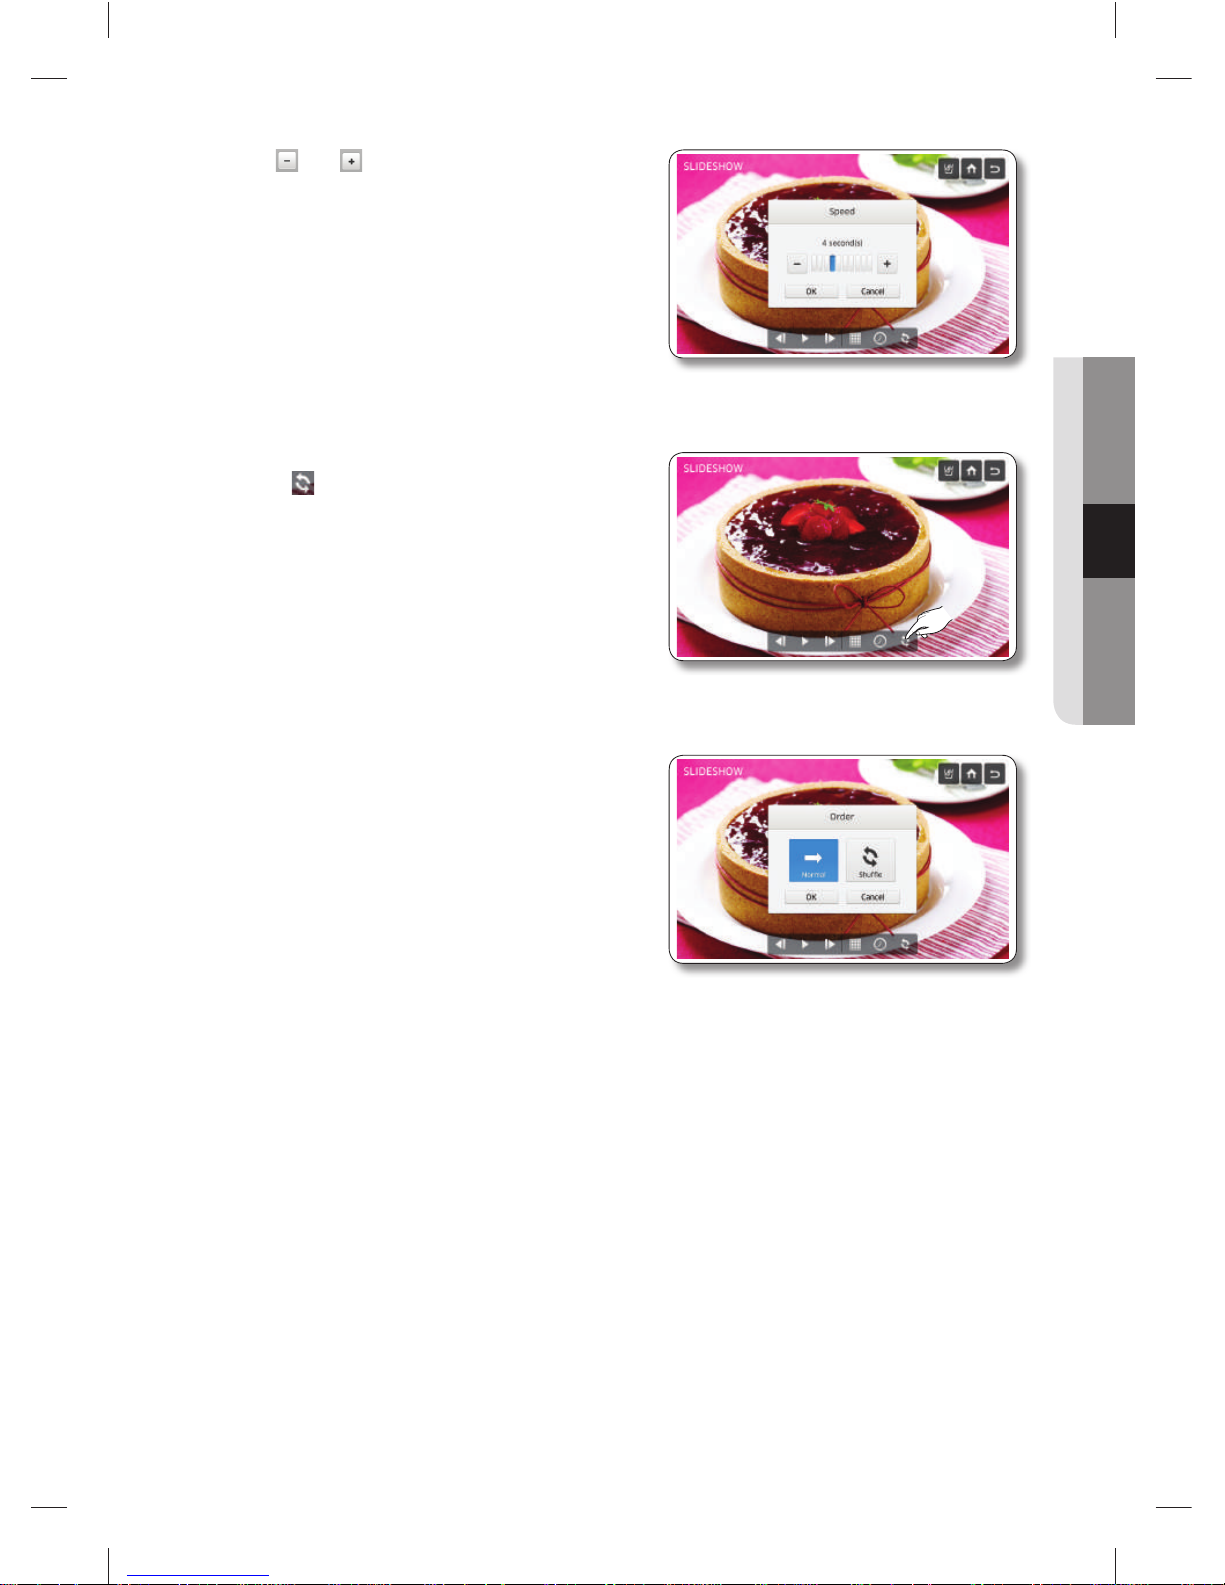
English - 73
OPERATING
10. Use the and buttons to change the slide show
transition time, and then press the [OK] button.
11. To change the order of the photos in the slide show,
select the button.
12. Select [Normal] or [Shuffl e], and then press the [OK]
button.
DA68-03055A-06.indb 73DA68-03055A-06.indb 73 2015. 4. 23. 8:172015. 4. 23. 8:17
Page 74
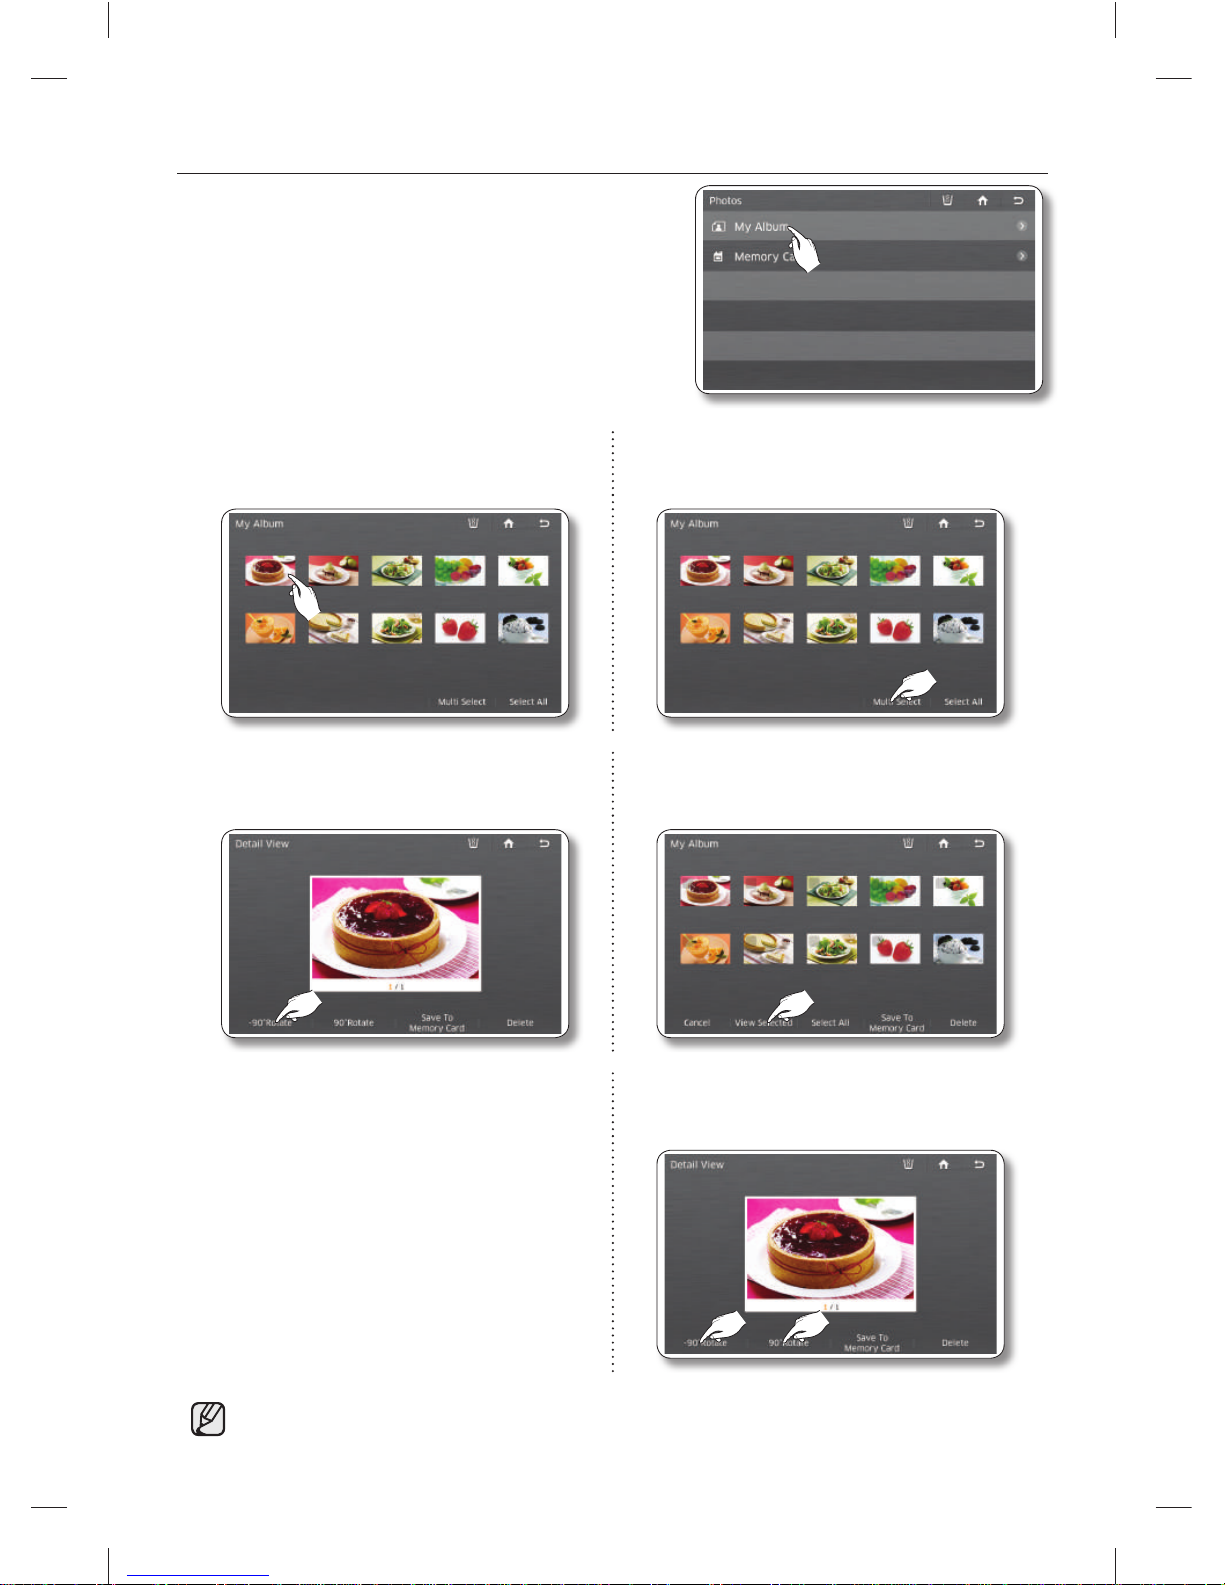
English - 74
How to rotate photos.
1. Select [My Album] in the Photos list.
2. Select the photo you want to rotate. 2. Select the [Multi Select] button to rotate
multiple photos.
3. Select the [-90° Rotate] or [90° Rotate]
button.
3. Select the photos you want to rotate, and
then press the [View Selected] button.
4. After selecting the photos you want to rotate,
select the [-90° Rotate] or [90° Rotate] button.
The system automatically stores the rotated photos, replacing the original photos.
DA68-03055A-06.indb 74DA68-03055A-06.indb 74 2015. 4. 23. 8:172015. 4. 23. 8:17
Page 75
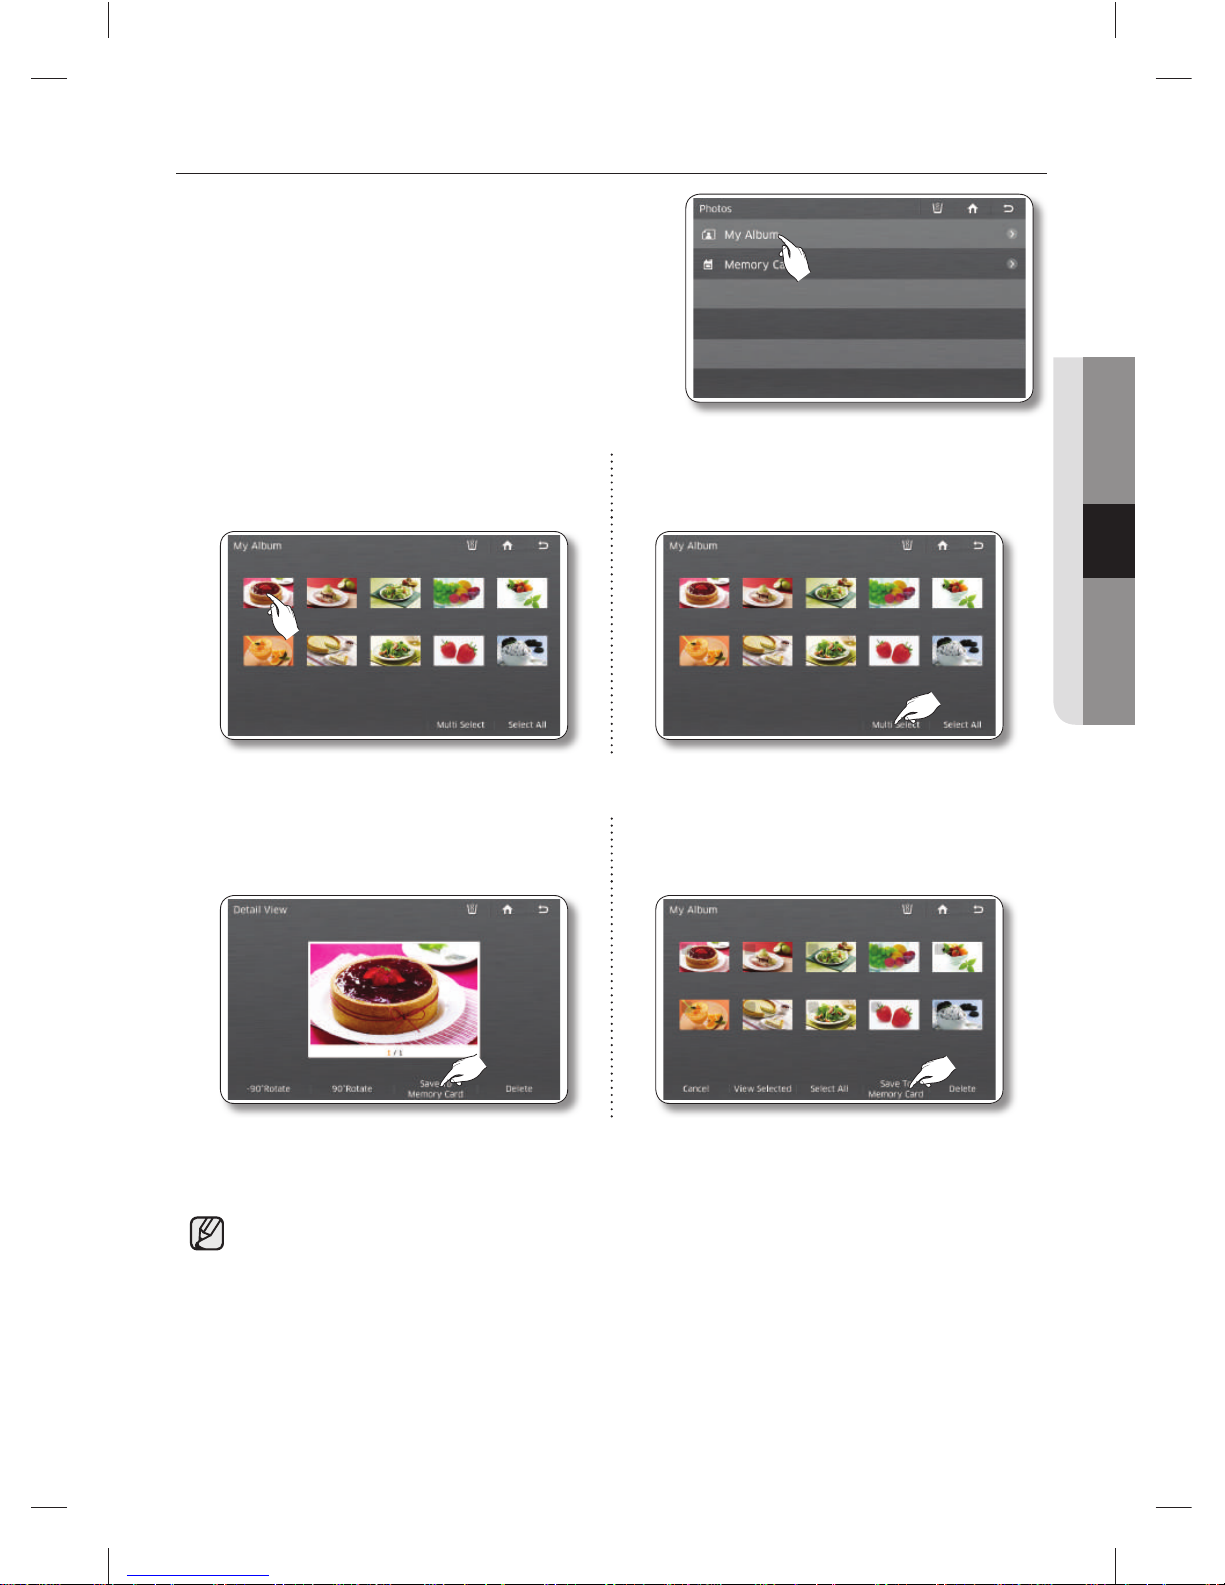
English - 75
OPERATING
Saving photos to a memory card.
1. Insert a memory card into the refrigerator’s memory card
slot.
2. Select [My Album] in the Photos list.
3. Select the photo you want to save. 3. To save multiple photos, select the [Multi
Select] button.
4. Press the [Save To Memory Card] button. 4. Select the photos you want to save, and then
press the [Save To Memory Card] button.
5. While the photos are being saved, “Save To Memory Card” appears on the screen.
You must insert a memory card into the memory card slot to use this function.
DA68-03055A-06.indb 75DA68-03055A-06.indb 75 2015. 4. 23. 8:172015. 4. 23. 8:17
Page 76
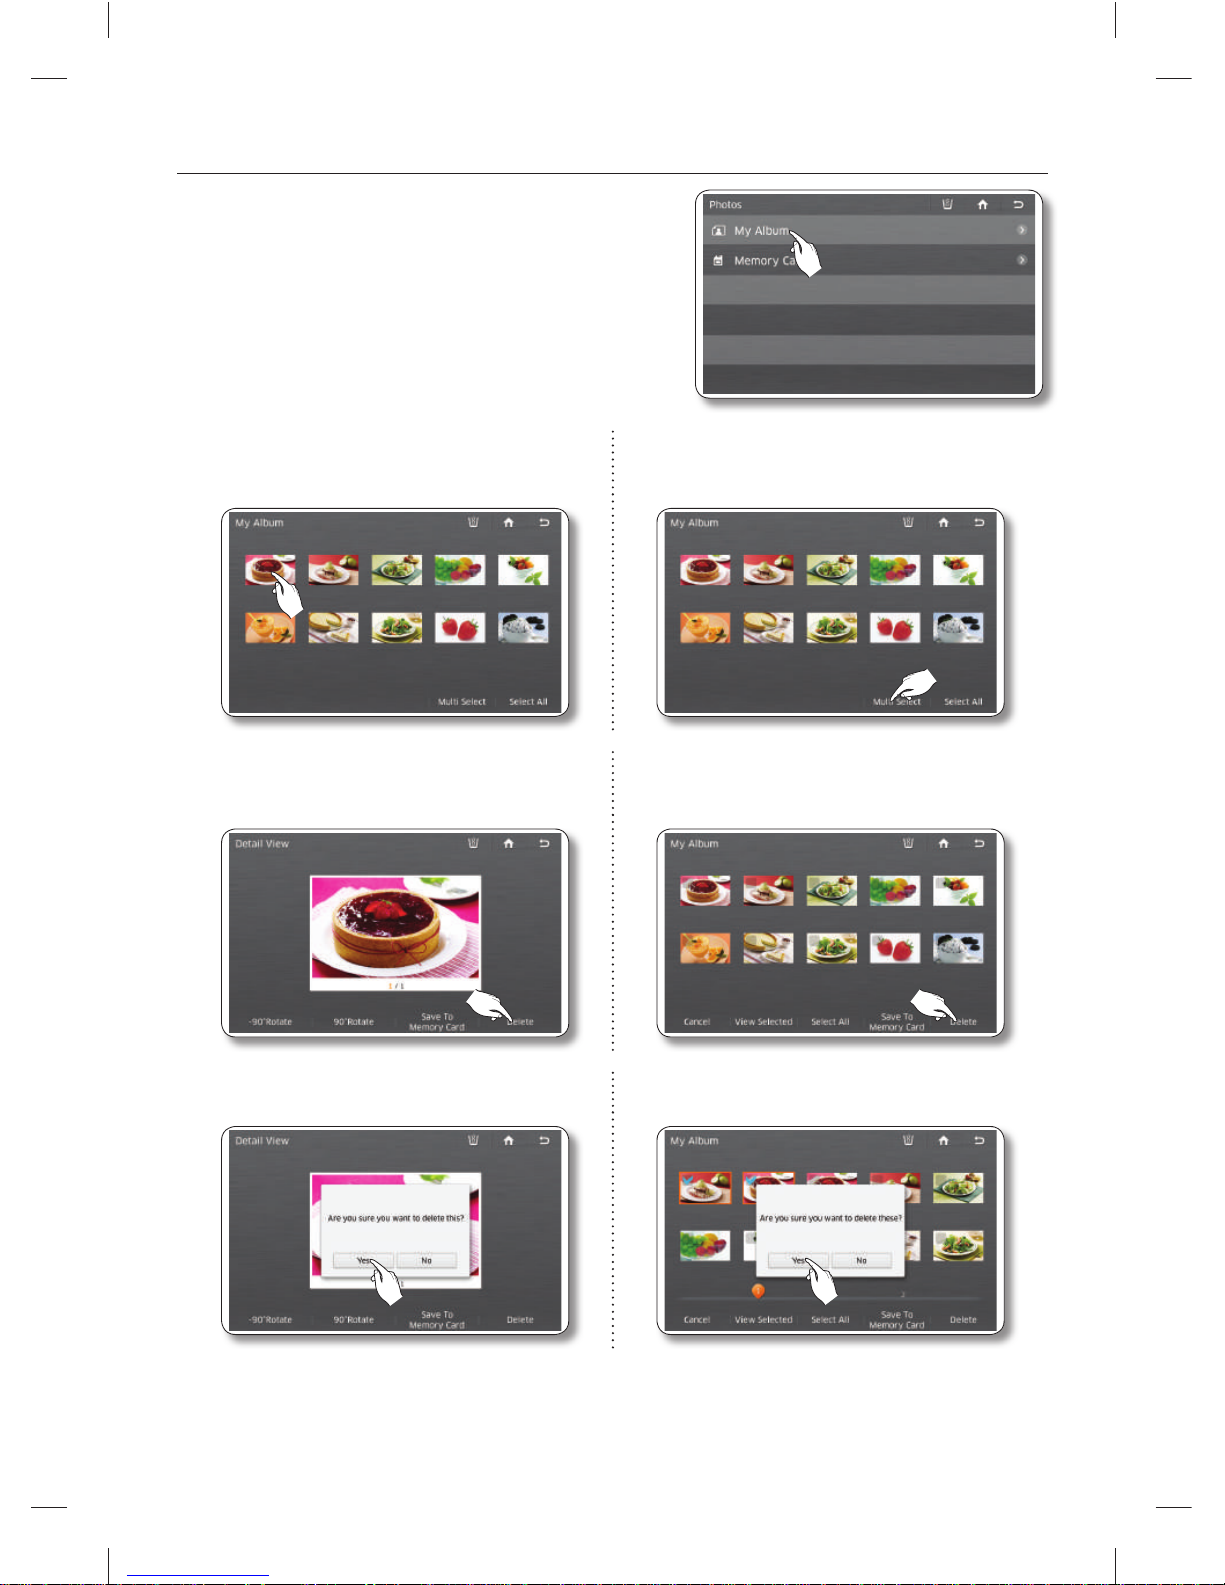
English - 76
How to delete photos.
1. Select [My Album] in the Photos list.
2. Select the photo you want to delete. 2. To delete multiple photos, press the [Multi
Select] button.
3. Press the [Delete] button. 3. Select the photos you want to delete, and
then press the [Delete] button.
4. Press the [Yes] button. 4. Press the [Yes] button.
• There are 10 photos that have been pre-loaded by Samsung.
These photos explain product features and cannot be deleted.
DA68-03055A-06.indb 76DA68-03055A-06.indb 76 2015. 4. 23. 8:172015. 4. 23. 8:17
Page 77
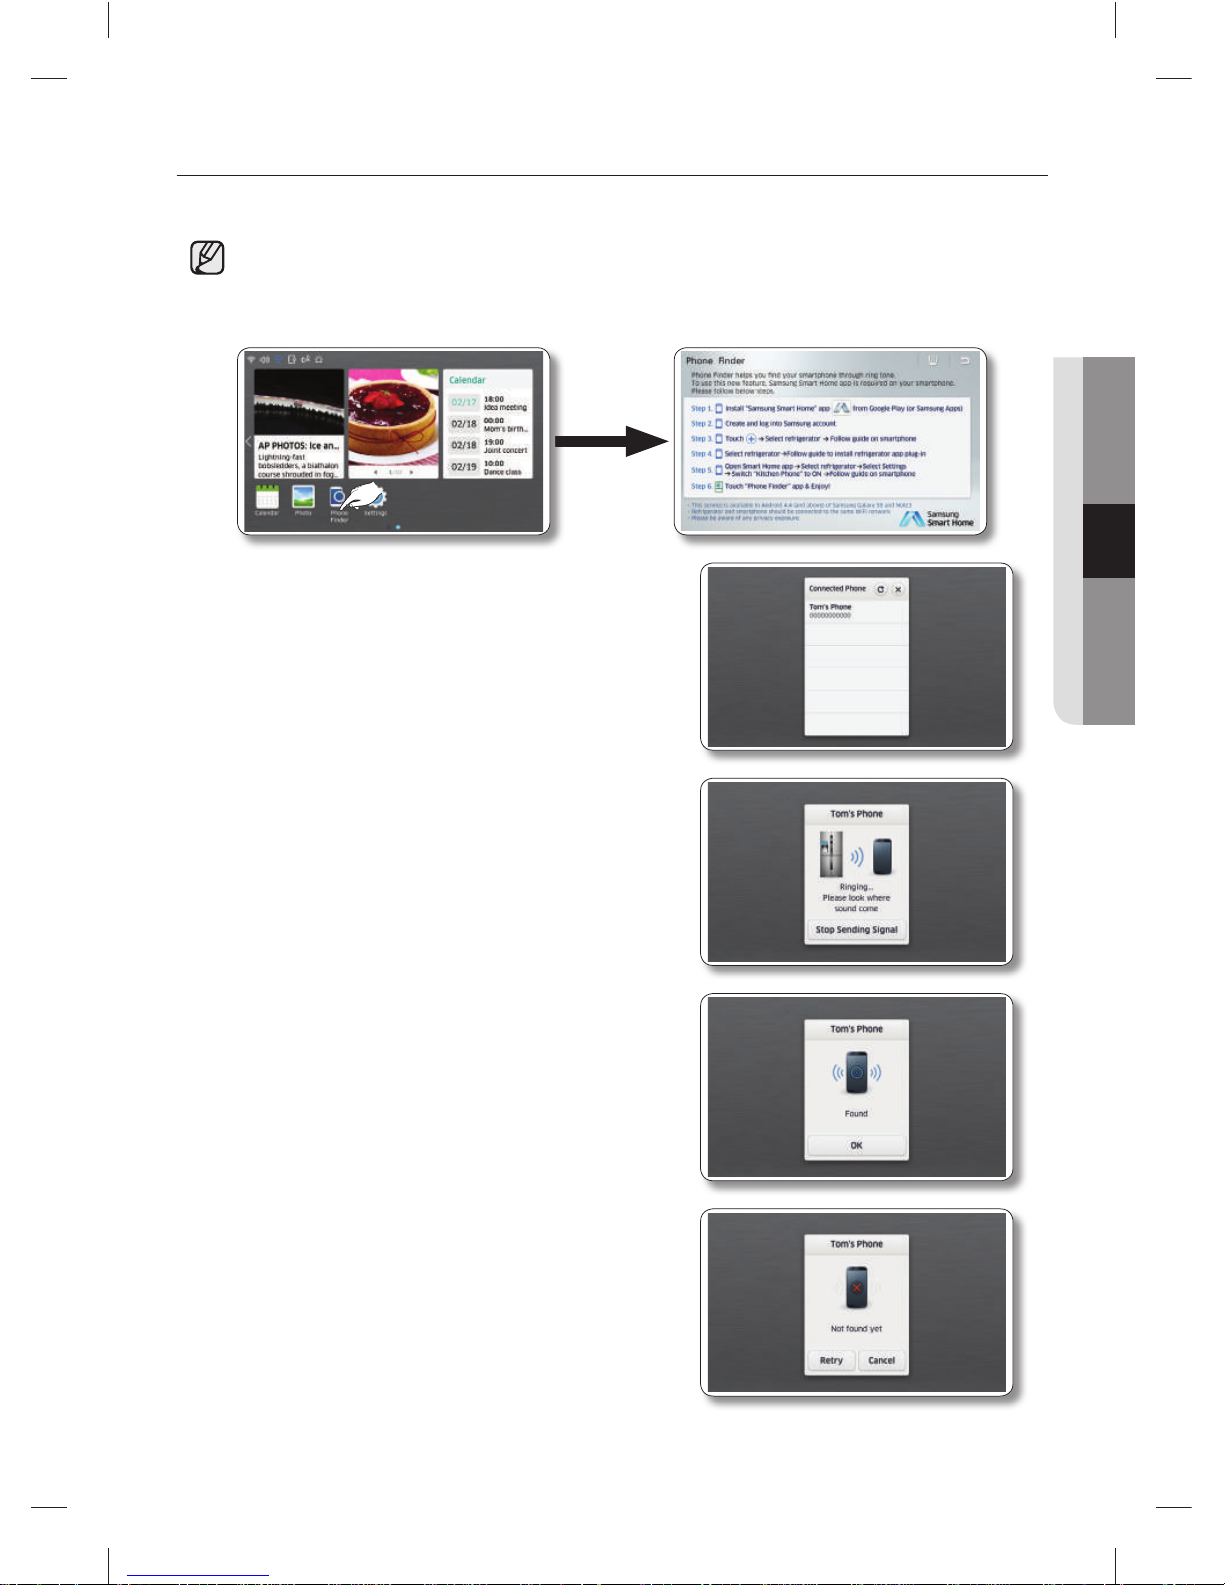
English - 77
OPERATING
PHONE FINDER
Use Phone Finder to fi nd a misplaced smartphone that is connected to the same network as the refrigerator.
For instructions explaining how to connect the refrigerator to your network, see page 79.
To use Phone Finder, the smartphone must be connected to the same network as the refrigerator and have
the Samsung Smart Home app installed. See page
112
. Kitchen Phone must be activated on the phone.
1. Select the [Phone Finder] button on the Home screen.
2. A list of smartphones available appears.
Select a smartphone from the list.
3. Select a smartphone. The Ringing screen appears and
the smartphone rings or beeps for 1 minute. Follow the
sound to fi nd the phone.
4. Tap Stop Sending Signal to display the Found screen.
Tap OK to exit the Found screen and return to the
Home screen.
5. If the Ringing screen (Step 3) is displayed for more than
one minute, the “Not found yet” screen appears.
Tap Retry to display Ringing screen again, and then try
to fi nd your smartphone.
Tap Cancel to return to the Home screen.
DA68-03055A-06.indb 77DA68-03055A-06.indb 77 2015. 4. 23. 8:172015. 4. 23. 8:17
Page 78
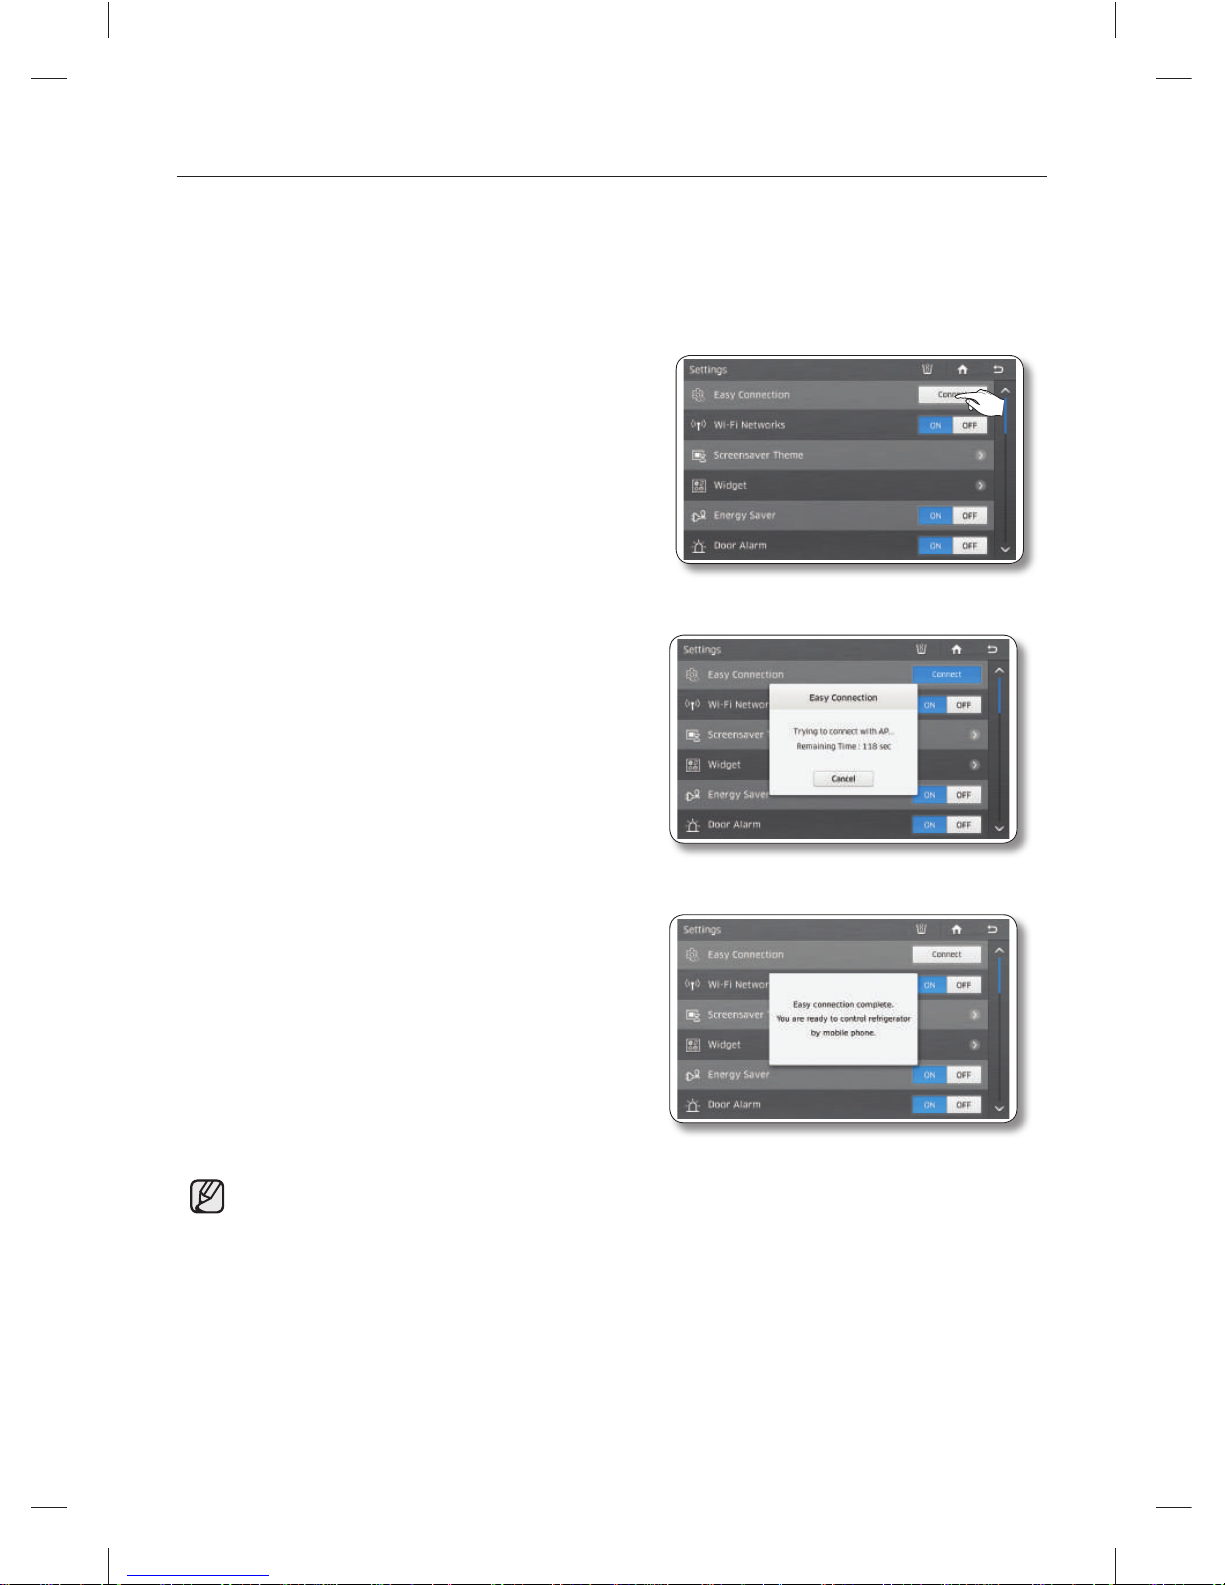
English - 78
EASY CONNECTION
Easy Connection enables you to connect the refrigerator to the Samsung server via a Wi-Fi connection.
Once the connection is established, you can check the status of the refrigerator and/or control its
functionality on a mobile device. A mobile device is required to enable this feature.
For instructions explaining how to connect the refrigerator to your network, see page 79.
1. In Settings, tap Connect next to the Easy Connection
menu item.
2. When the connection message appears on the
refrigerator, a connection notifi cation also appears on
your mobile device. Proceed with the Easy Connection
settings on the mobile device.
3. When the Wi-Fi connection is successfully established,
Easy Connection between the refrigerator and the
mobile device automatically starts.
The refrigerator displays the results of the Wi-Fi connection. The status of the server registration
or the connection between the two devices is available for review on the mobile device.
DA68-03055A-06.indb 78DA68-03055A-06.indb 78 2015. 4. 23. 8:172015. 4. 23. 8:17
Page 79
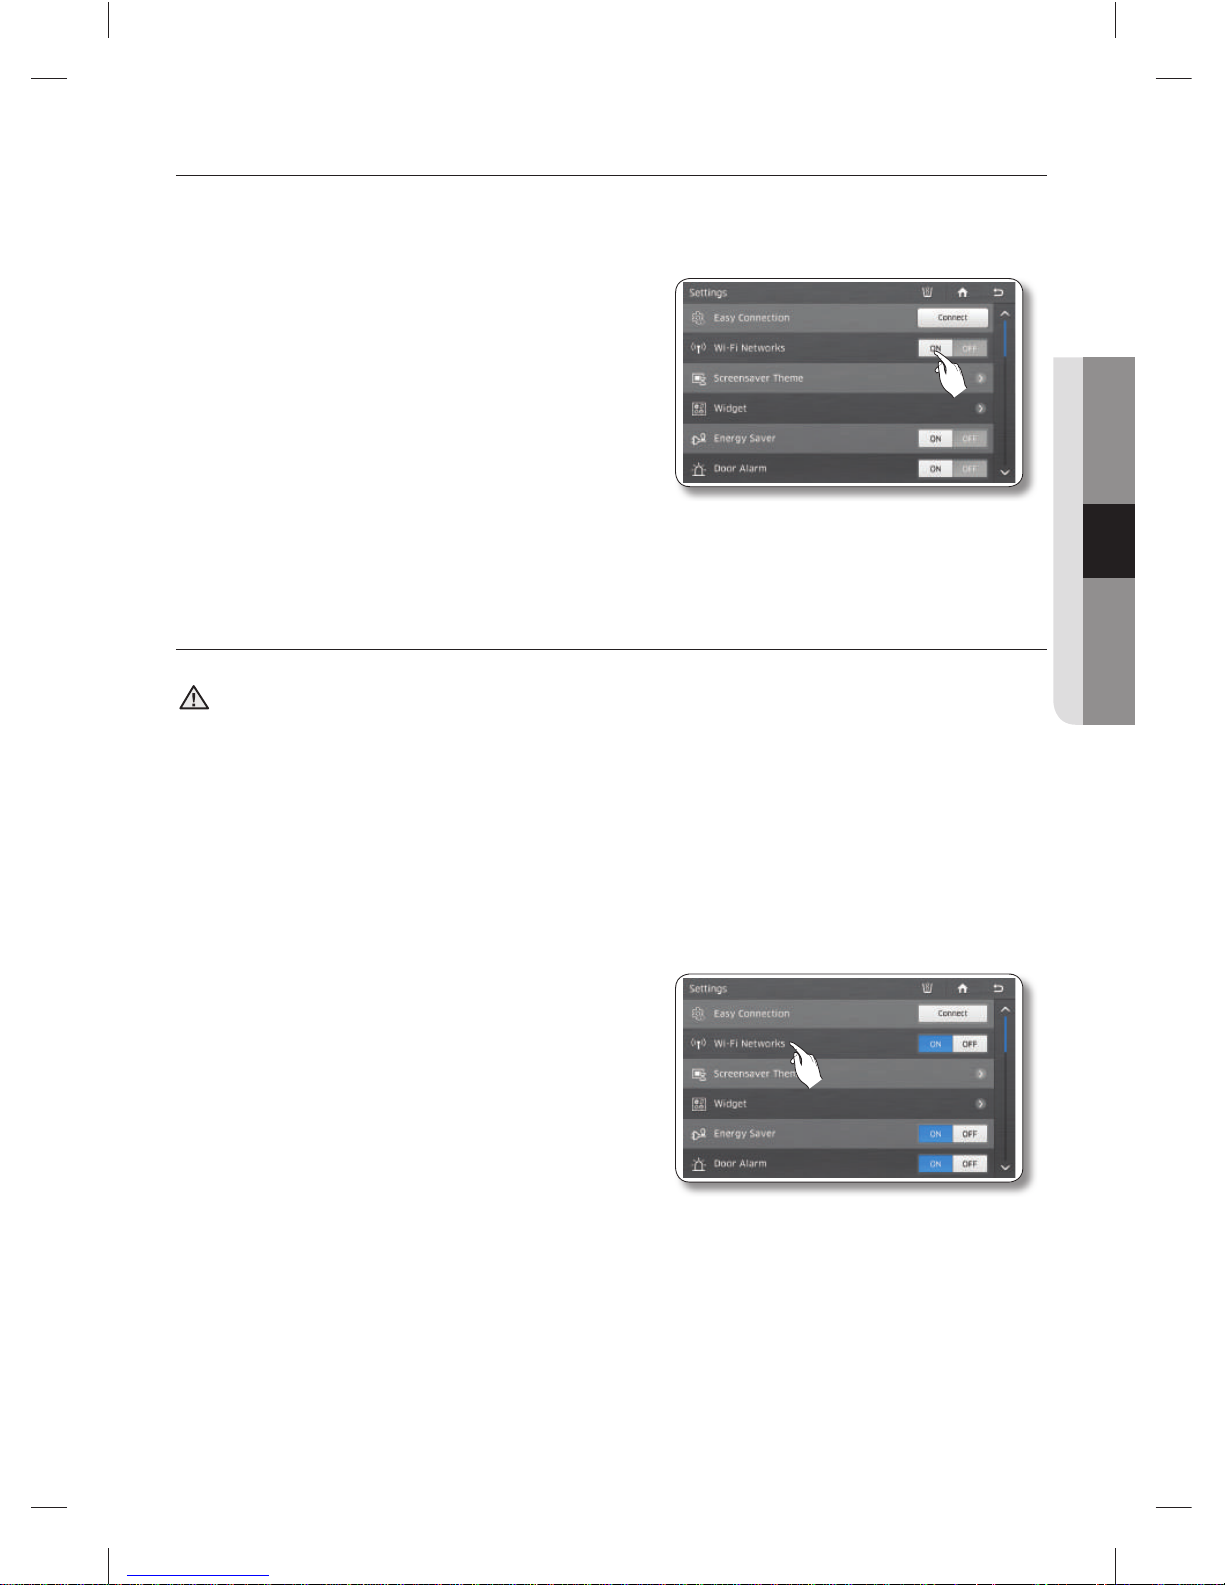
English - 79
OPERATING
WI-FI NETWORKS
When you set Wi-Fi ON, the refrigerator’s wireless network function searches for a wireless AP to connect
to.
1. Select On or OFF.
Connecting to a Wi-Fi Network
CAUTION
• In addition to the router installed in your home, your refrigerator can detect other wireless routers
installed in nearby houses or offi ces while connecting to your wireless network. It is illegal to use
another’s router without permission and can be subject to severe penalties. Consequently, you should
connect the refrigerator only to your own wireless router or to routers for which you have permission.
1. Select [Wi-Fi Networks] in the Settings list.
DA68-03055A-06.indb 79DA68-03055A-06.indb 79 2015. 4. 23. 8:172015. 4. 23. 8:17
Page 80
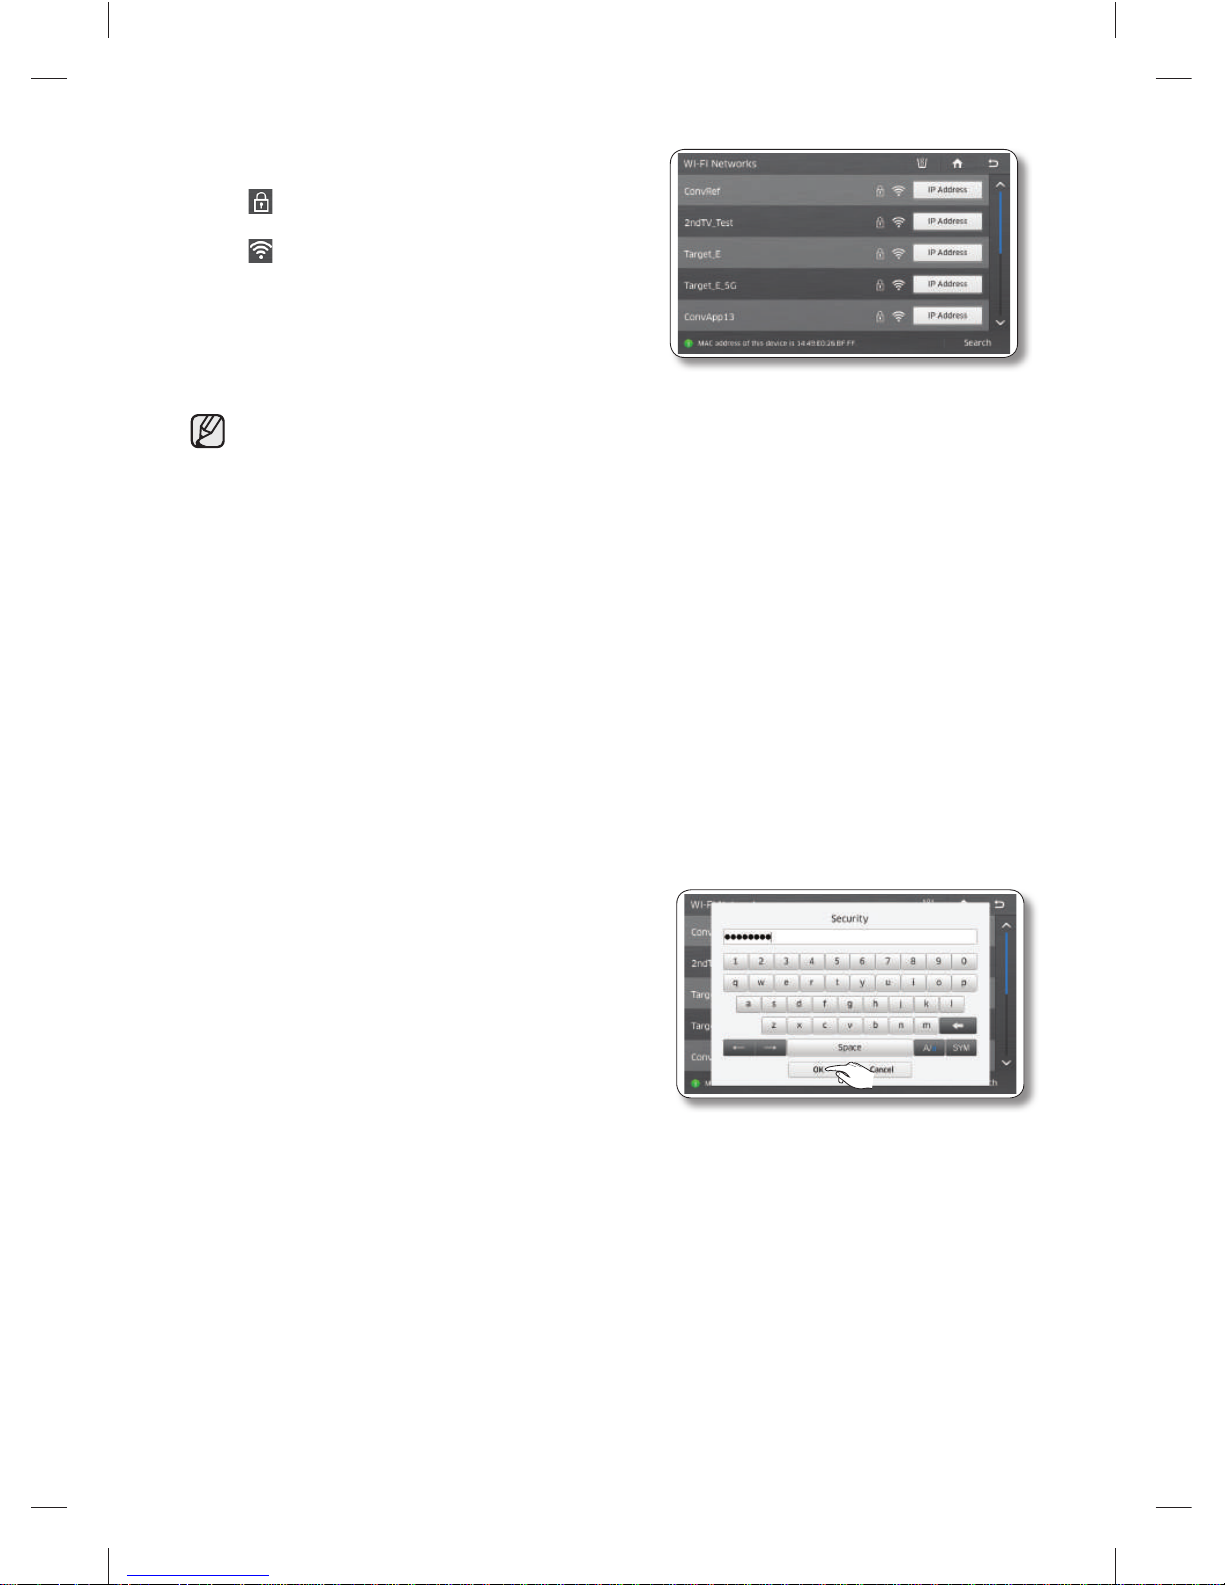
English - 80
2. Select the wireless AP you want to connect to.
: Locked with Security Code
: Signal Strength
• You can check the MAC address of the Fridge on the bottom of the Screen.
• If there are no APs showing on the screen, press the [Search] menu at the bottom.
• Depending on the wireless AP type, the refrigerator may not make a connection.
We recommended you use a wireless AP that supports IEEE802.11b/g/n.
• If you don’t have a wireless router, please contact your Internet provider or purchase and install
one yourself.
• If you can’t remember the name of your wireless network system (SSID) or its security code,
please see the user manual of your router.
• Radio frequency signals can interfere with any the wireless network system and they may affect
the network performance of your refrigerator.
• Obstacles such as concrete walls and metallic doors and radio and microwave interference
from devices such as microwave ovens can affect the operation of your wireless network
system.
• Depending on the type and location of your wireless network system and the surrounding
environment, the range and quality of your wireless network may vary.
3. If your wireless network has a security code enter the
security code, and then press the [OK] button.
In most cases, after you have entered the security
code, the refrigerator acquires the Network addresses
it needs (IP Address, Subnet Mask, Gateway, and
DNS) to connect to the network. If it does not or you
need to enter these values manually, go to Step 5.
DA68-03055A-06.indb 80DA68-03055A-06.indb 80 2015. 4. 23. 8:172015. 4. 23. 8:17
Page 81
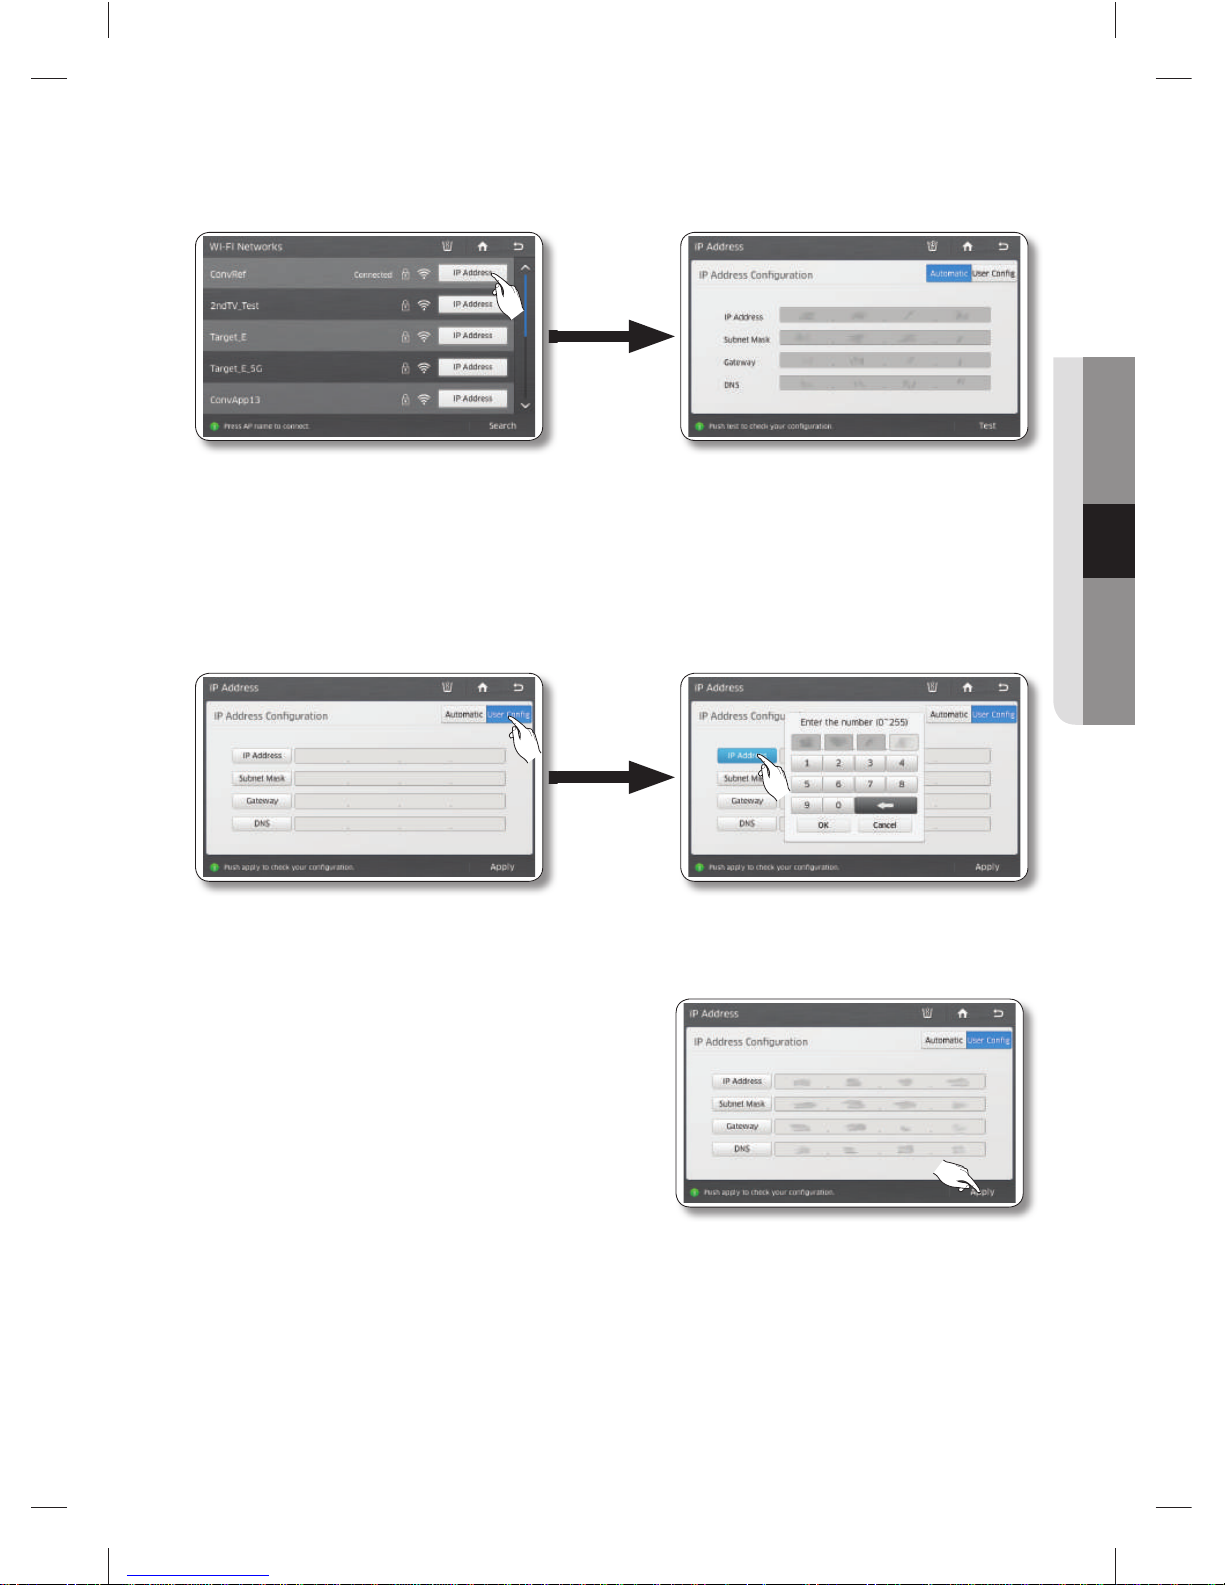
English - 81
OPERATING
4. After the refrigerator has connected to your network, you can select the [IP Address] button on the WiFi Networks screen to view the current IP address and Gateway values.
5. If you need to enter the IP Address, Subnet Mask, Gateway, and DNS manually, press the [User
Confi g] button on the IP Address screen. Then, select the [IP Address], [Subnet Mask], [Gateway], and
[DNS] buttons in turn and, using the keypad, enter the appropriate values. When you are done with
each entry, select the [OK] button on the keypad.
6. After entering the values for all four parameters, press
the [Apply] button.
DA68-03055A-06.indb 81DA68-03055A-06.indb 81 2015. 4. 23. 8:172015. 4. 23. 8:17
Page 82
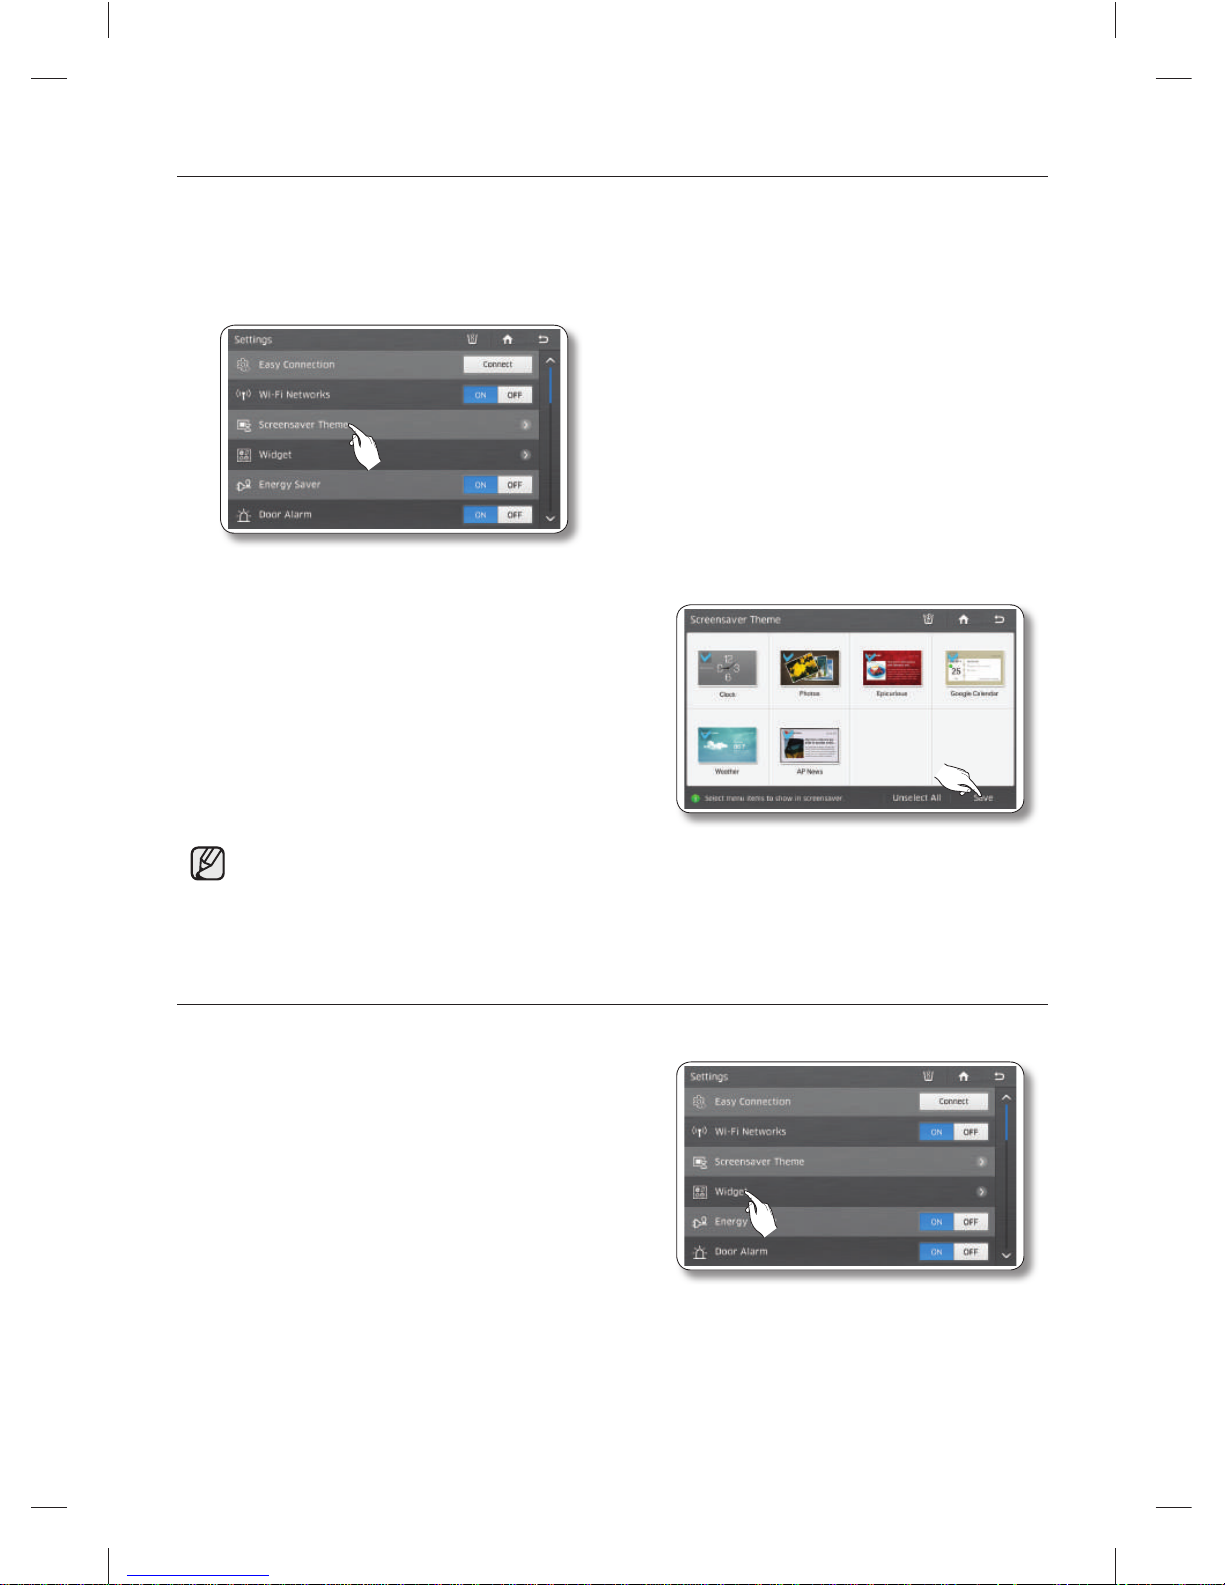
English - 82
SCREENSAVER THEME
Select the themes for the Display screen screensaver.
1. Select the [Settings] button.
2. Select the [Screensaver Theme] on the Settings list.
3. Select the theme(s) you want to use in the screensaver,
and then press the [Save] button.
Select at least two screensaver themes.
The themes you select may not display if the data underlying them is not ready or unavailable.
WIDGET
Use WIDGET to add widgets to the Home screen.
1. Tap Widget in the Settings menu.
DA68-03055A-06.indb 82DA68-03055A-06.indb 82 2015. 4. 23. 8:172015. 4. 23. 8:17
Page 83
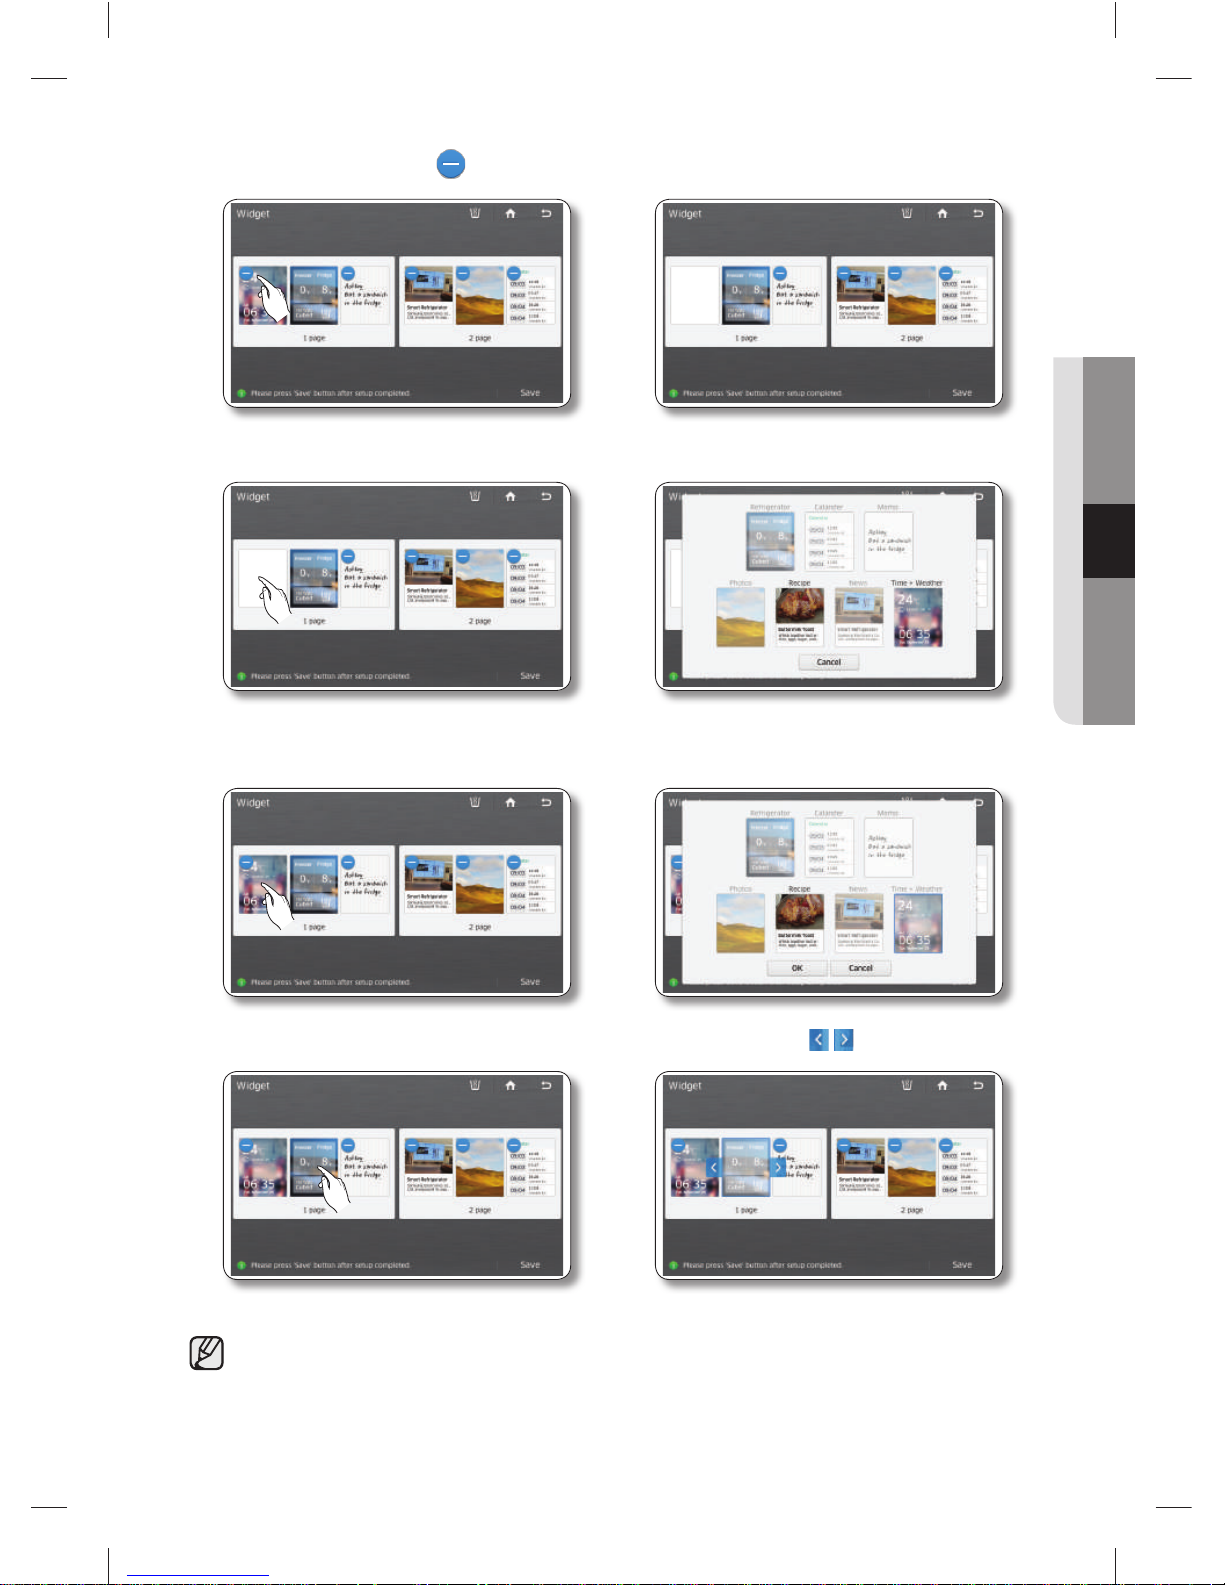
English - 83
OPERATING
• Tap to delete the blue icon ( ) in the upper corner of the widget.
• Select an empty area to add a widget there.
• Tap to change the widget.
• To change the order of a widget, tap and hold the widget. The blue icon ( , ) appears.
The default widgets on the refrigerator can be relocated but not deleted.
DA68-03055A-06.indb 83DA68-03055A-06.indb 83 2015. 4. 23. 8:172015. 4. 23. 8:17
Page 84
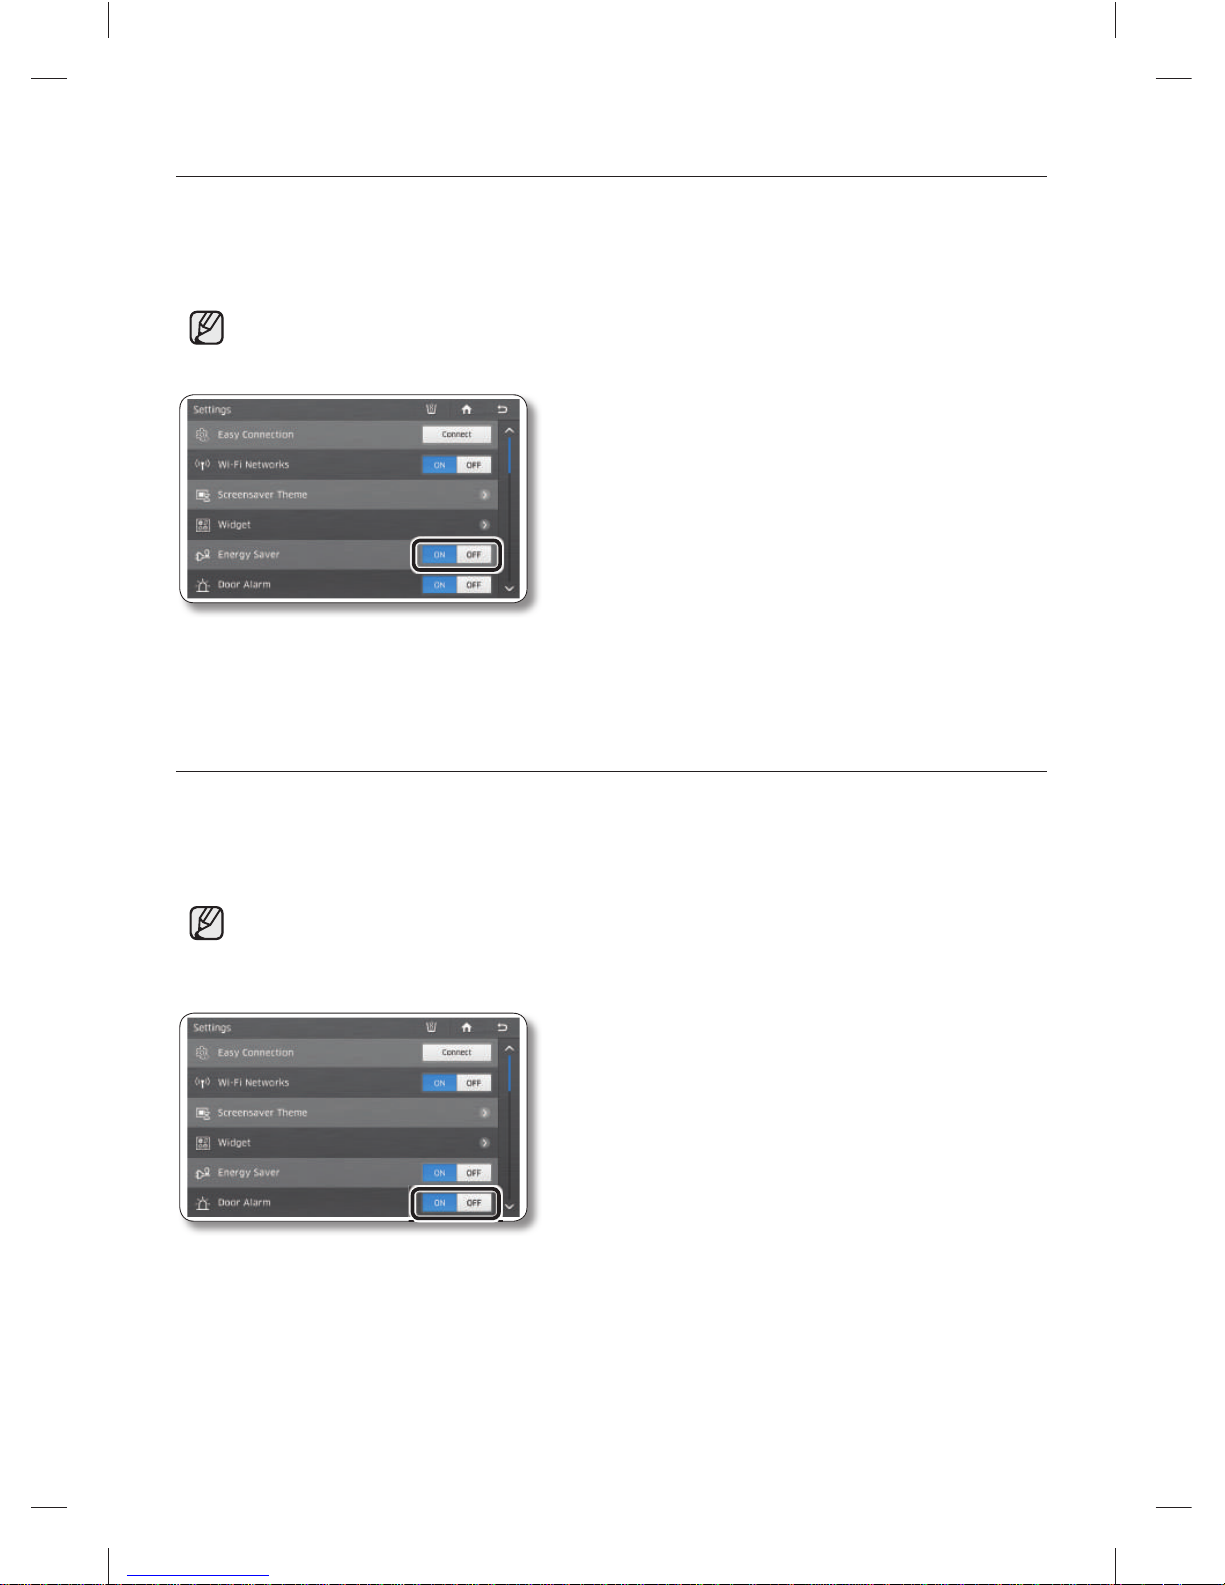
English - 84
ENERGY SAVER
Turns the Energy Saver function on and off. When Energy Saver is on, power consumption decreases.
1. Select the Energy Saver ON or OFF buttons on the Settings list.
The Energy Saver function is pre-set to ON in the factory.
If condensation or water drops appear on the doors, turn the Energy Saver mode off.
DOOR ALARM
Turns the Door Alarm on and off.
1. Select the Door Alarm ON or OFF buttons on the Settings list.
If the door alarm is set to ON, an alarm beeps if any door is left open for more than three minutes.
The beeping stops when you close the door. The door alarm function is pre-set to ON in the
factory.
DA68-03055A-06.indb 84DA68-03055A-06.indb 84 2015. 4. 23. 8:172015. 4. 23. 8:17
Page 85
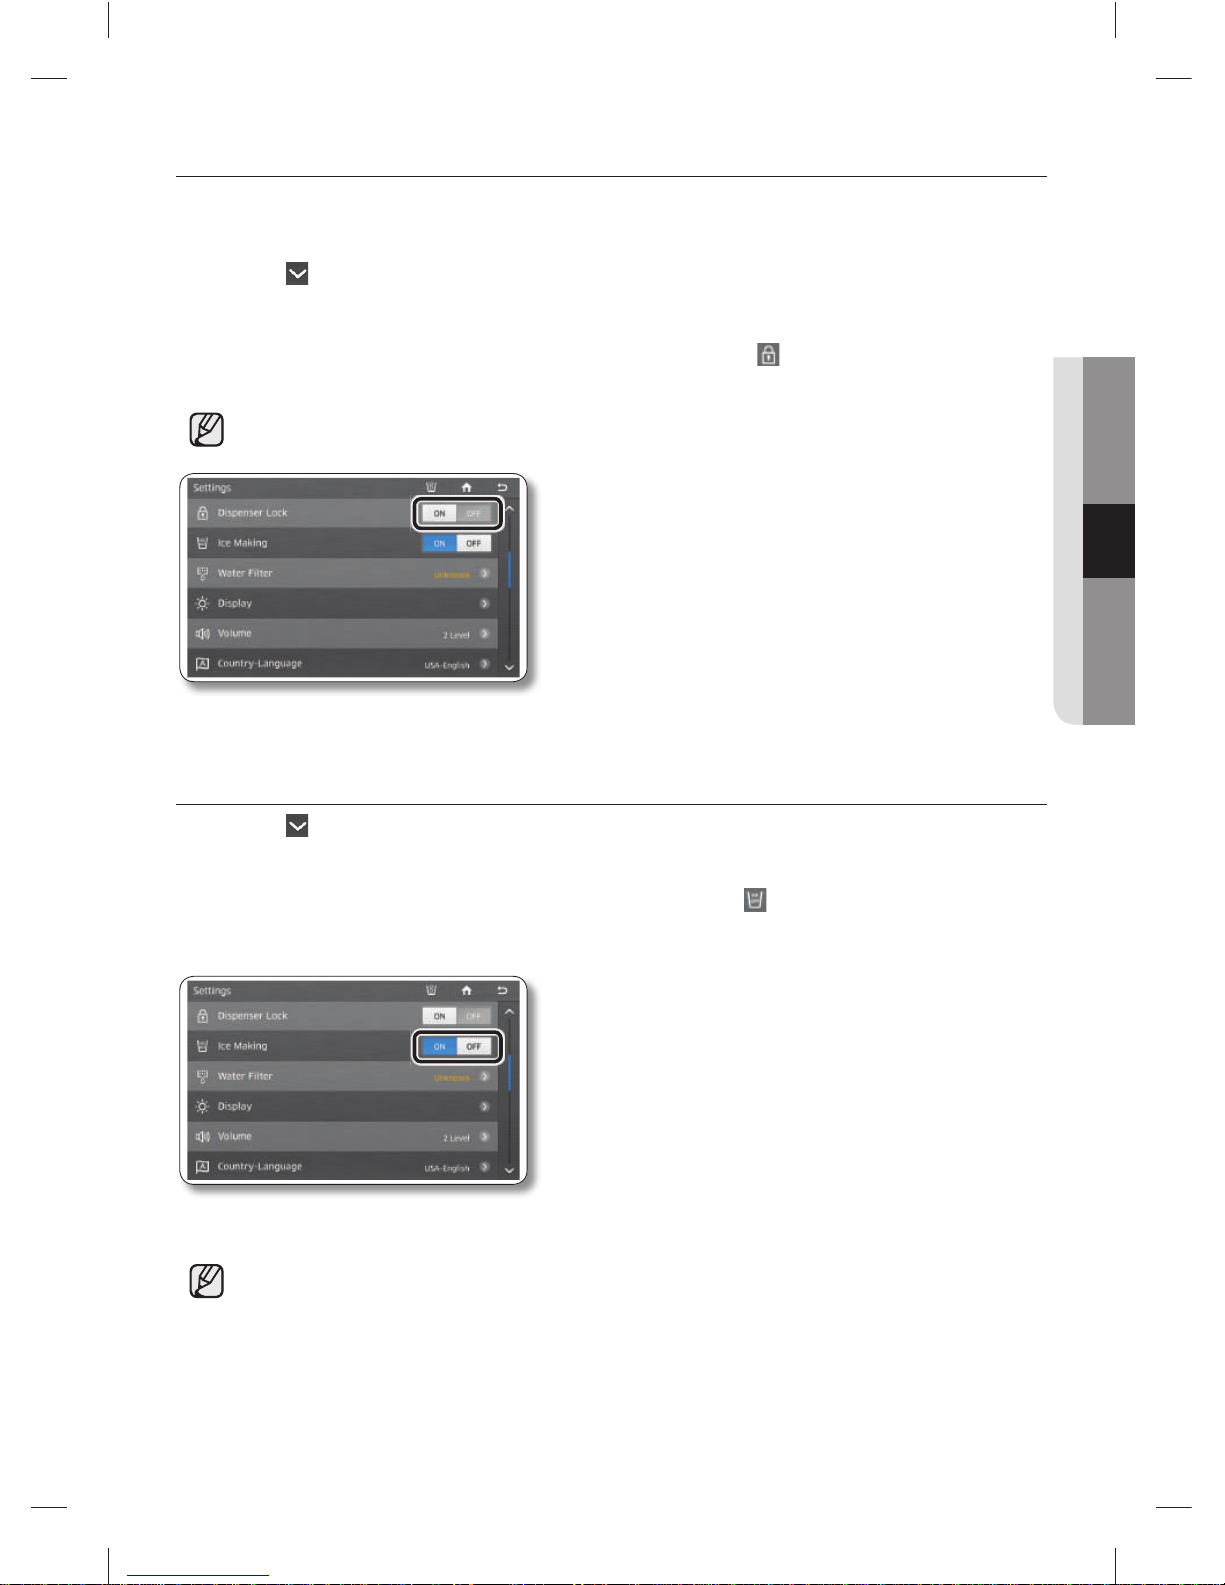
English - 85
OPERATING
DISPENSER LOCK
When you activate the Dispenser Lock function, the dispenser and the fl ex zone selection button will not
work.
1. Press the button in the right bottom corner of the Settings list.
2. Select the Dispenser Lock ON or OFF buttons on the Settings list.
• If you select the Dispenser Lock ON button, the Lock icon (
) appears in the upper left
corner of the Home screen.
If you suddenly can not use the dispenser, check whether the Dispenser Lock function is on.
ICE MAKING
1. Press the button in the right bottom corner of the Settings list.
2. Select the Ice Making ON or OFF button on the Settings list.
• If the ice maker function is OFF, the Ice Off indicator icon ( ) appears on the top left of the
Home screen.
We recommend you stop ice making if the following occur:
- There is enough ice in the ice bucket.
- You want to save water and energy.
- Water is not being supplied to the Ice maker.
If the ice maker function is ON, and the water line is not connected, there will be a water valve
noise from back of the unit. Touch the Ice Making OFF button in the settings list to turn the ice
maker off.
DA68-03055A-06.indb 85DA68-03055A-06.indb 85 2015. 4. 23. 8:172015. 4. 23. 8:17
Page 86
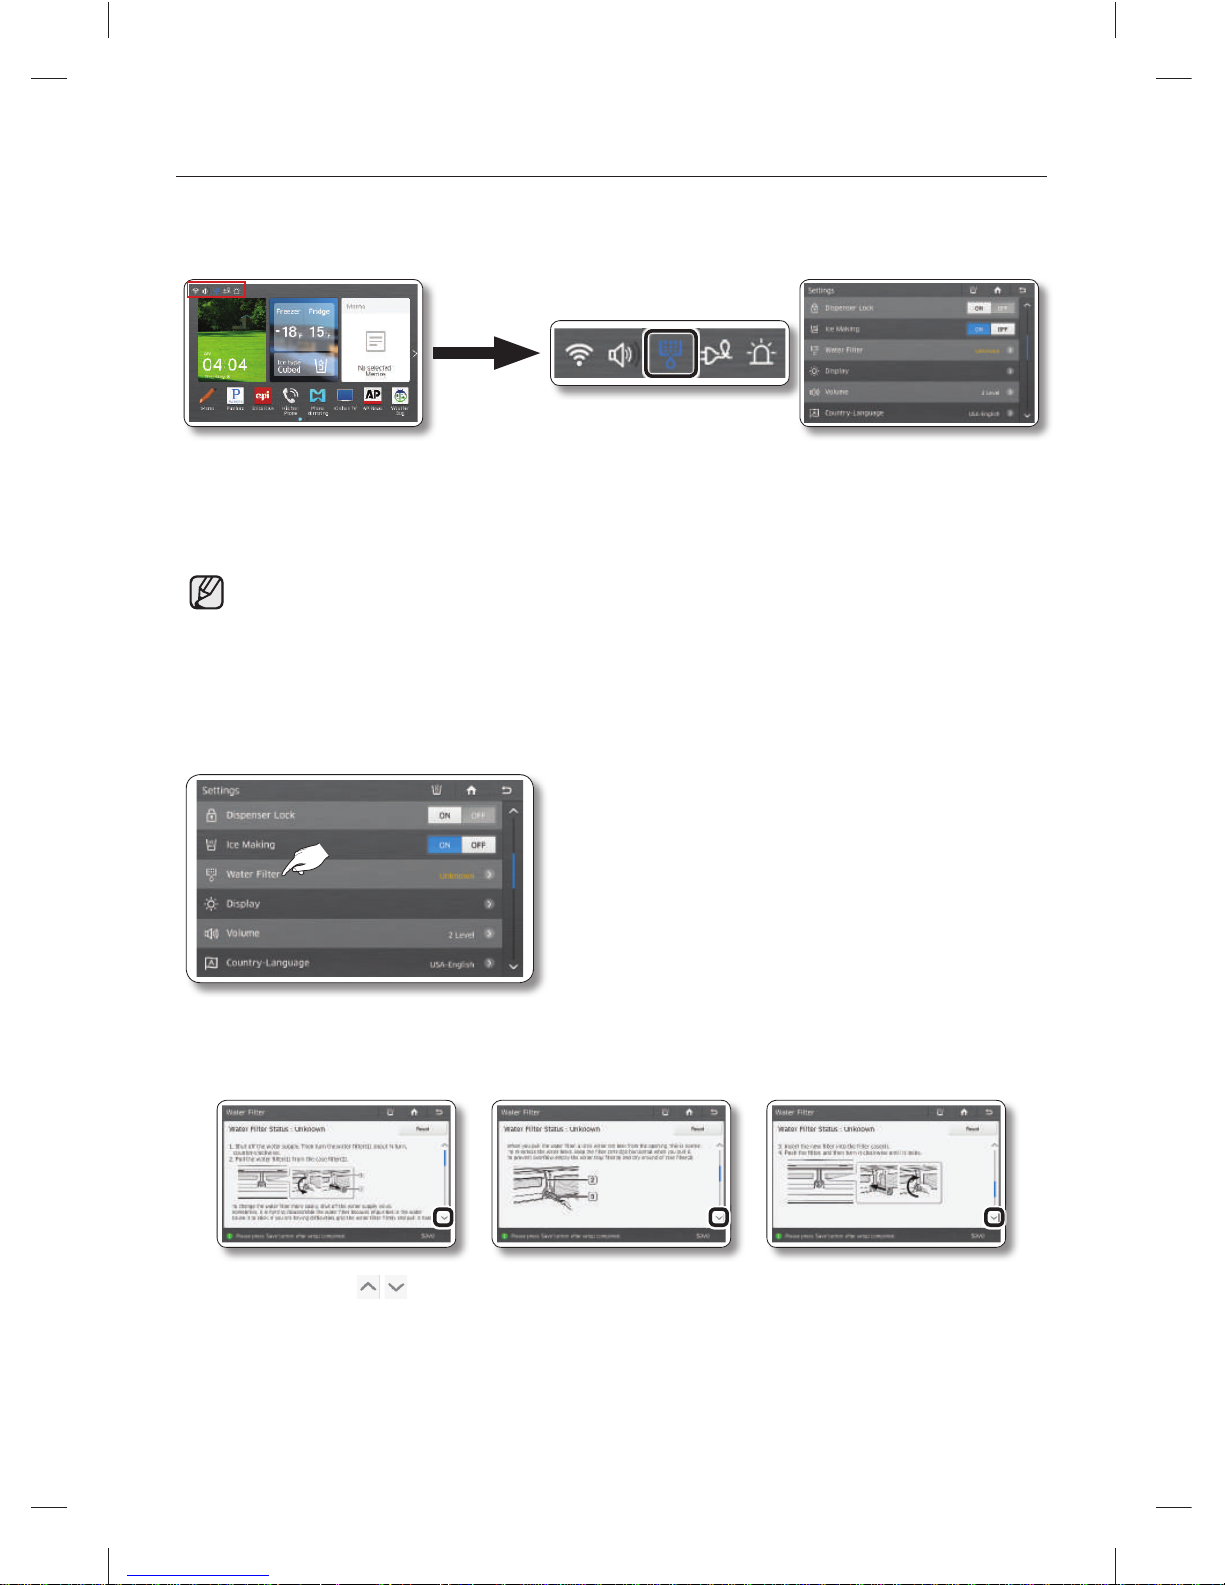
English - 86
WATER FILTER
The Water Filter status icon on the Home screen enables you to check the current status of the water
fi lter. Follow the instructions below to check and/or replace the water fi lter.
1. Check the water fi lter status in the Settings list or indicator icons on the upper left of Home screen.
The icon will blink red for several seconds when you open or close the door.
Good (Blue) : The fi lter does not need replacement. It is normal.
Order (Pink) : The fi lter needs replacement. Order a new fi lter.
Replace (Red) : The fi lter needs replacement immediately.
2. If the status reads “Order” or “Replace,” select the Water Filter on the Settings list to access the
replacement instructions.
3. Follow instructions in the Water Filter replacement guide to replace the Water Filter.
• Press the ( ) button to move to the next page of the instructions.
DA68-03055A-06.indb 86DA68-03055A-06.indb 86 2015. 4. 23. 8:172015. 4. 23. 8:17
Page 87
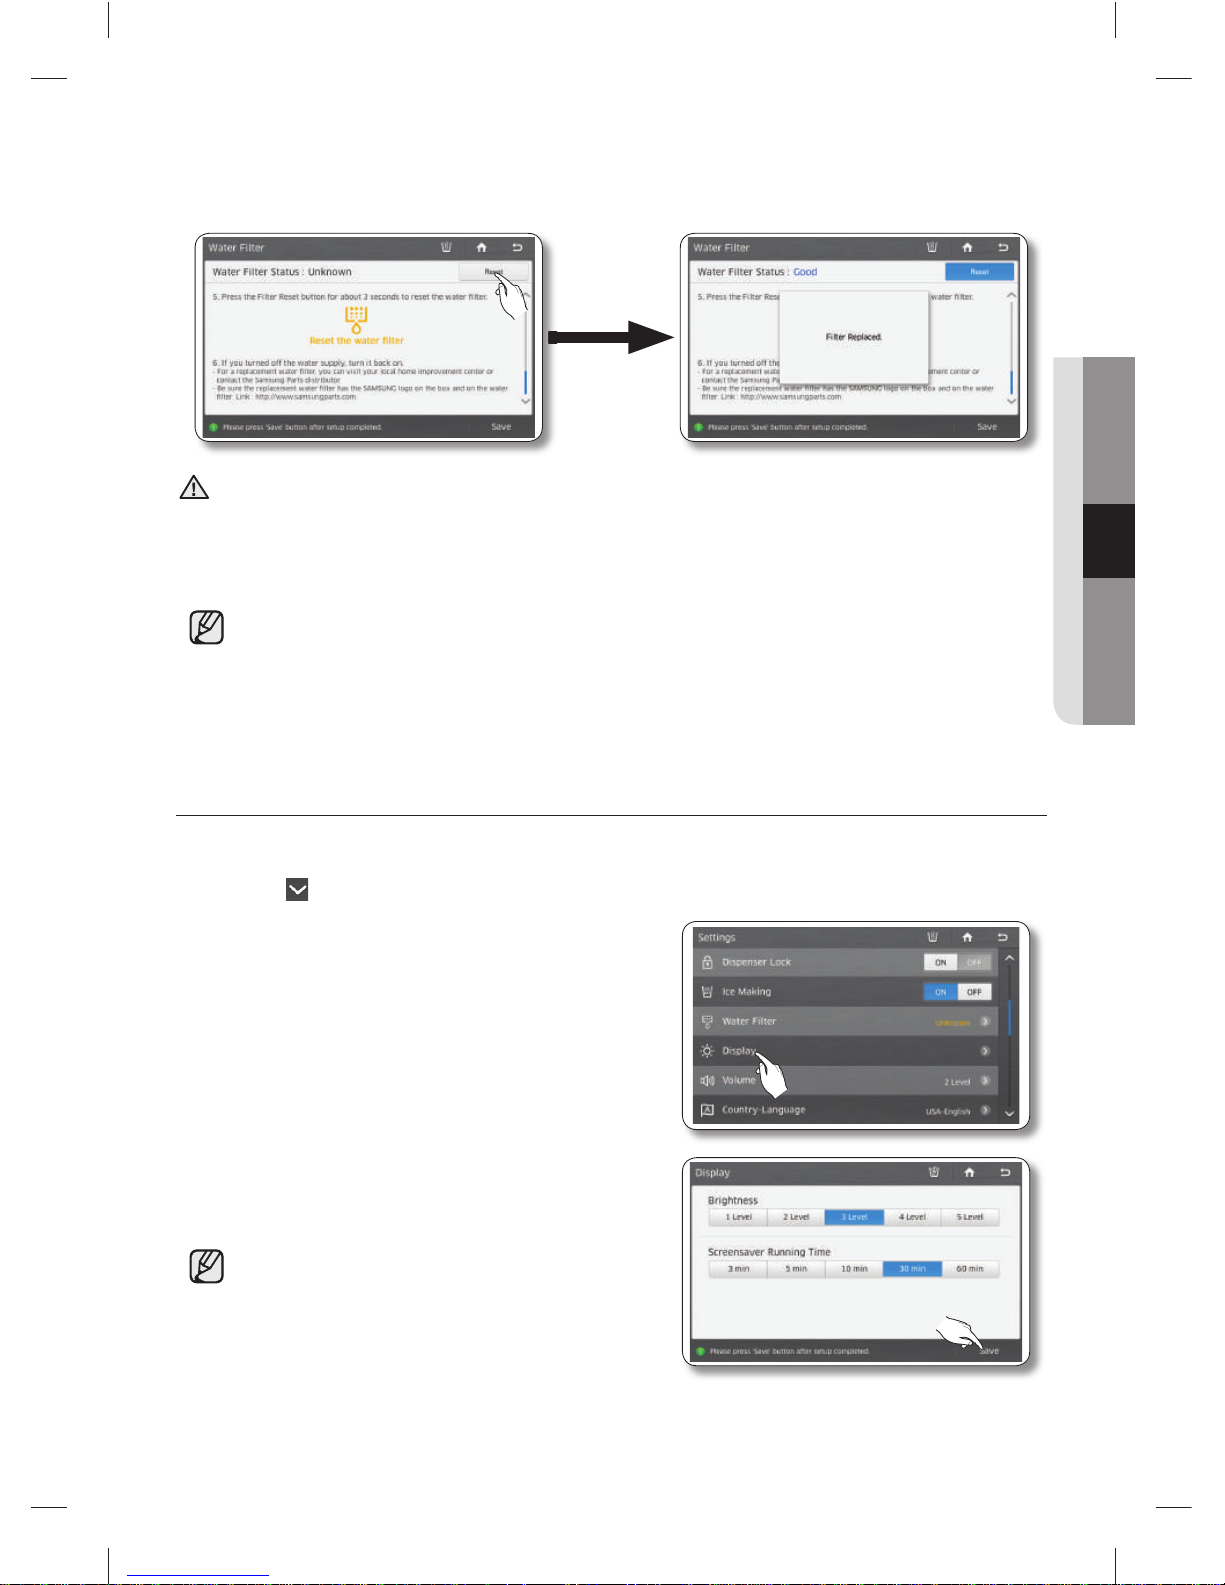
English - 87
OPERATING
4. When the replacement is done, press and hold ‘Reset the water fi lter’ at the center of the screen for 3
or more seconds to reset the water fi lter indicator.
CAUTION
DO NOT use the water or ice dispenser without a water fi lter cartridge. You can block the water line or
damage the dispenser.
Be sure to fl ush the dispenser thoroughly to prevent the dispenser from dripping.
If water drips from the dispenser, it means that there is still air in the line.
For a replacement water fi lter, visit your local home improvement center or Samsung’s offi cial online parts distributor at http://www.samsungparts.com.
Be sure the replacement water fi lter has the SAMSUNG logo on the box and on the water fi lter.
DISPLAY
Lets you set the brightness of the LCD and the running time of the Screensaver.
1. Press the button in the right bottom corner of the Settings list.
2. Select [Display] in the Settings list.
3. Select the Brightness level and/or Screensaver
Running Time you want, and then press the [Save]
button.
After 60 seconds, the Screen Saver runs for the
time you set, then the LCD panel turns off.
DA68-03055A-06.indb 87DA68-03055A-06.indb 87 2015. 4. 23. 8:172015. 4. 23. 8:17
Page 88
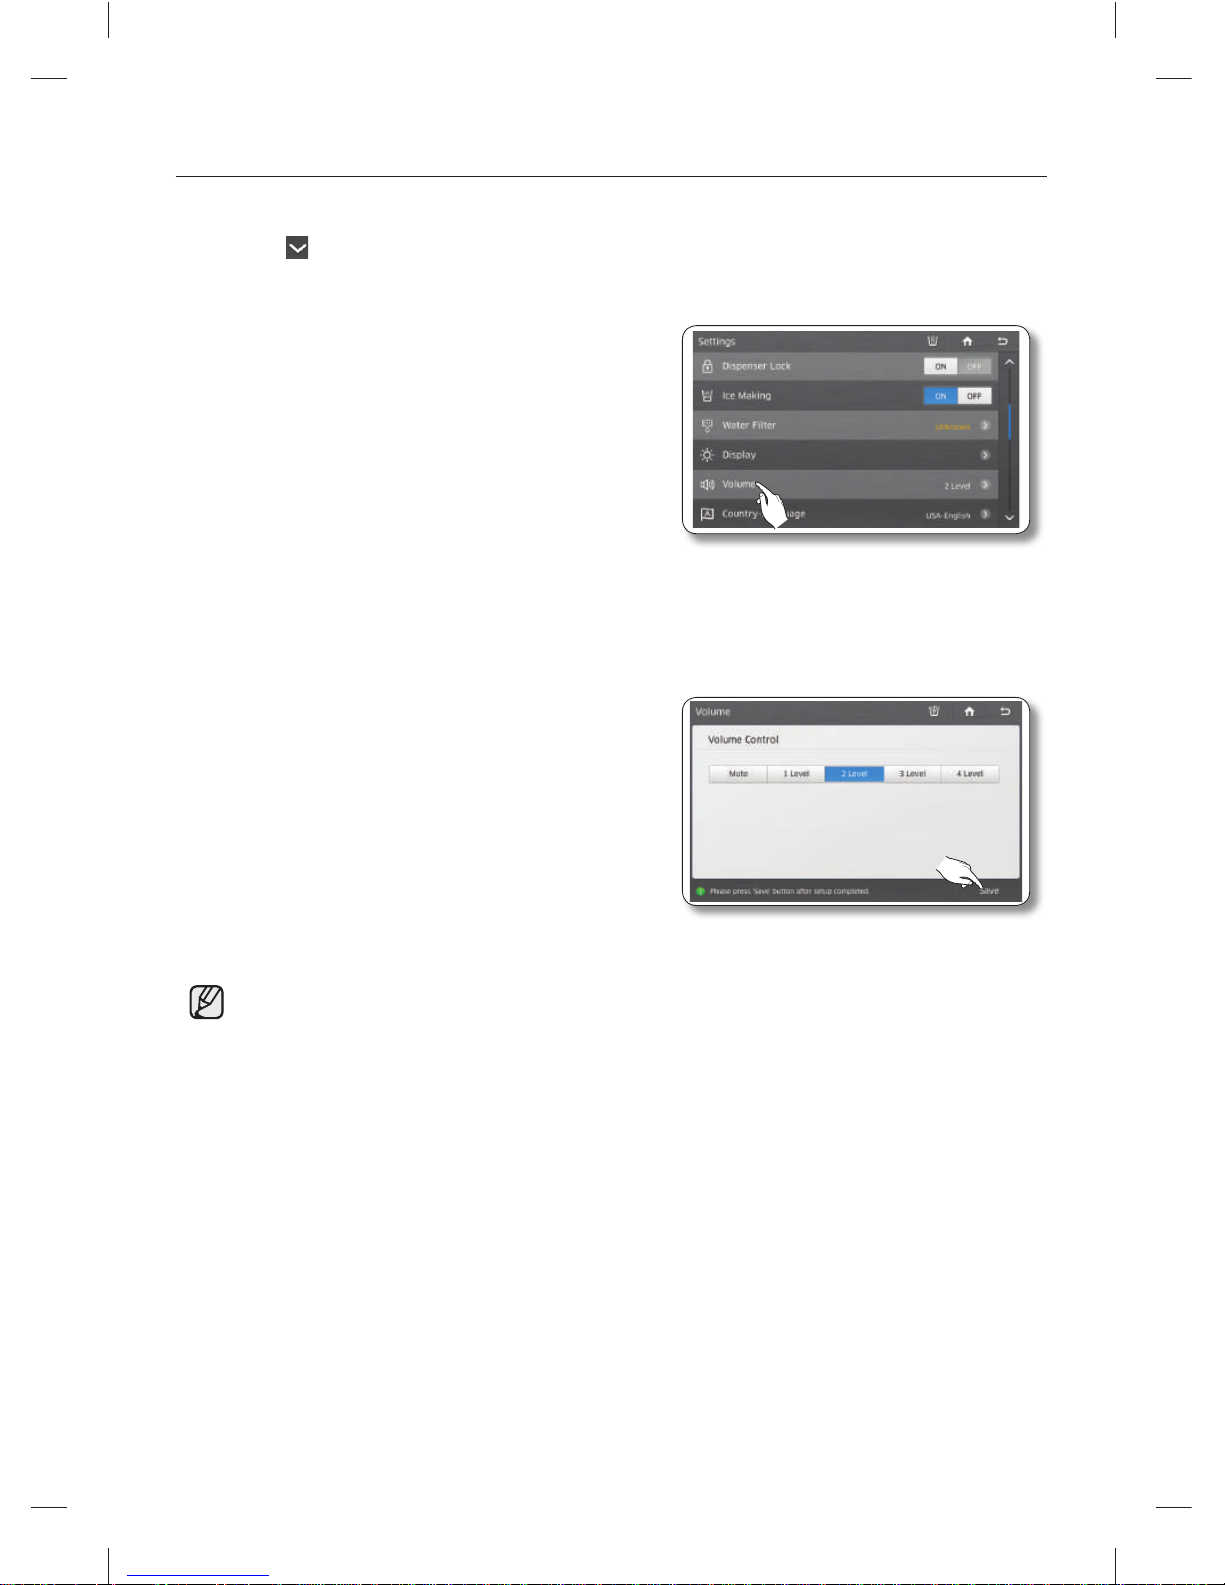
English - 88
VOLUME
Lets you control the volume of the alert sounds.
1. Press the button in the right bottom corner of the Settings list.
2. Select [Volume] in the Settings list.
3. Select a volume level button to change the alert sound level.
4. Press the [Save] button to set the new volume level.
An alert sounds whenever a button is touched or a message window or menu list appears.
DA68-03055A-06.indb 88DA68-03055A-06.indb 88 2015. 4. 23. 8:172015. 4. 23. 8:17
Page 89
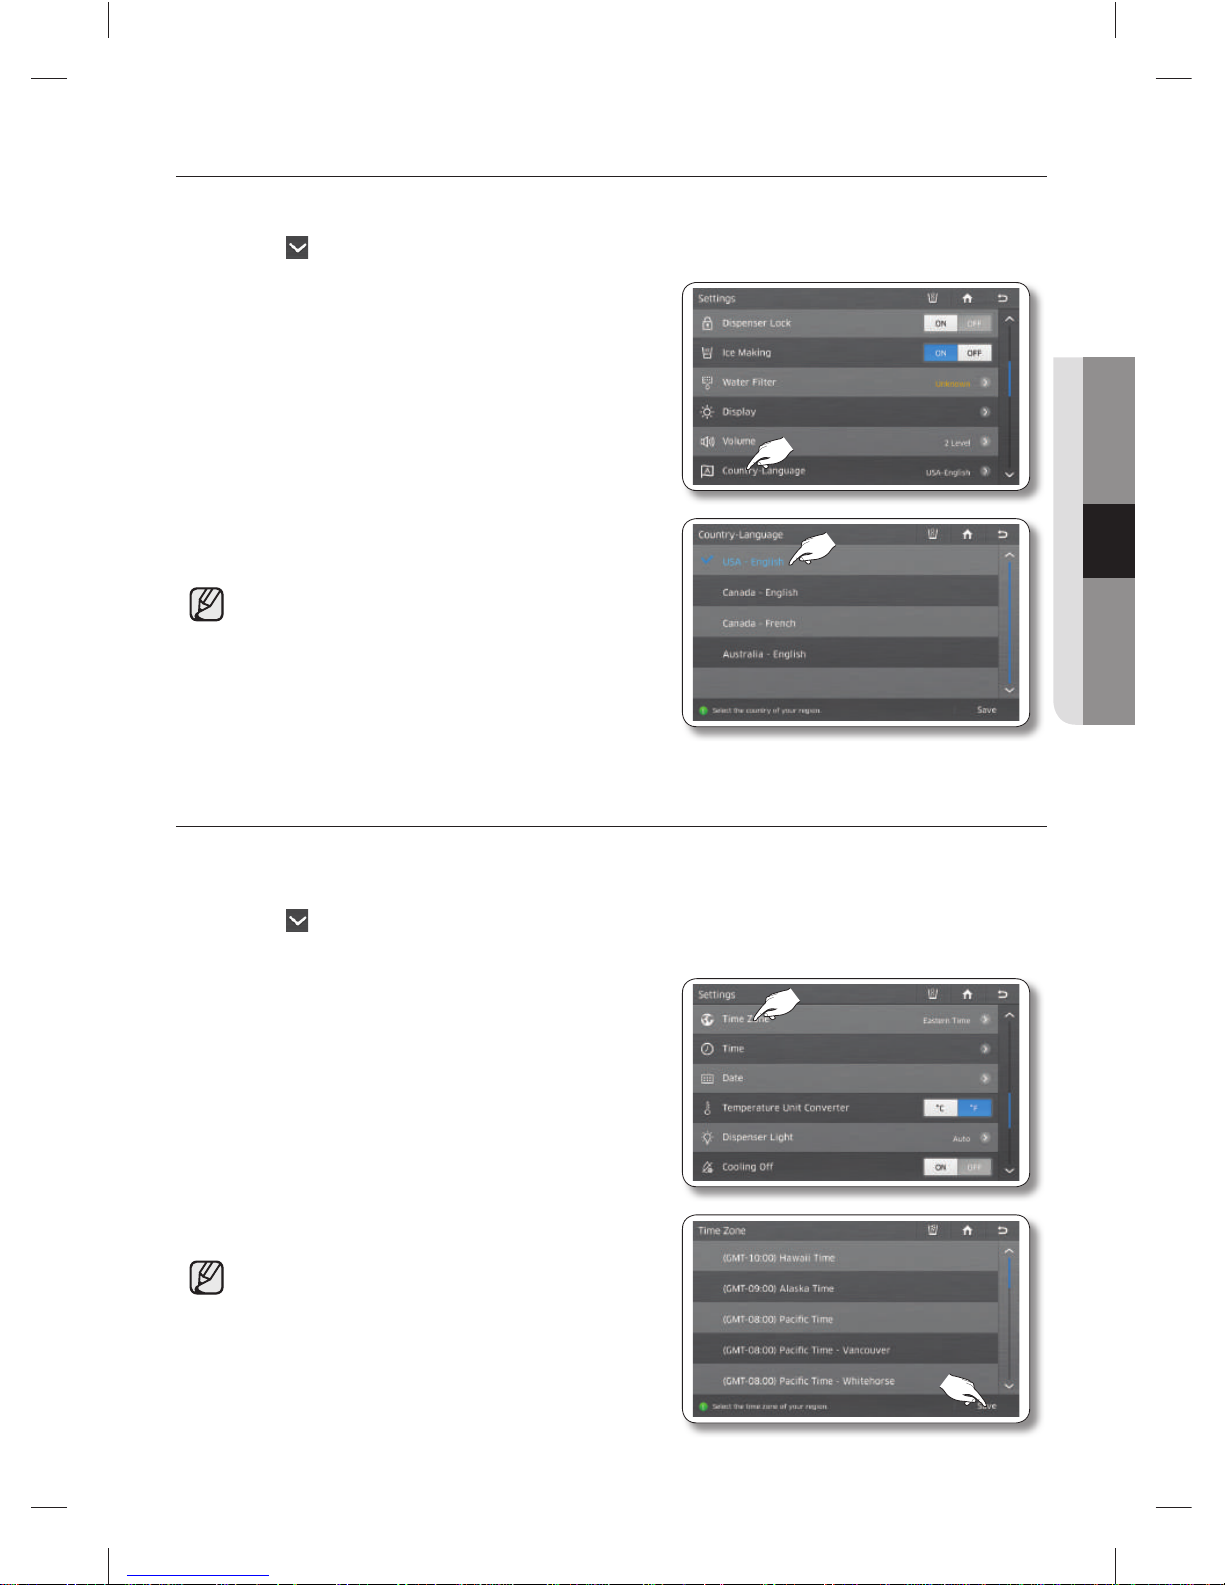
English - 89
OPERATING
COUNTRY-LANGAUGE
You can select a country and a preferred language.
1. Press the
button in the right bottom corner of the Settings list.
2. Select [Country-Langauge] in the Settings list.
3. To save the new Country-Langauge, press the
[Country-Langauge] button.
If you select USA, the Pandora service will be
activated; if selecting Canada and Australia, the
TuneIn service will be activated.
Some services such as AP News or Weather Bug
are available only in English.
TIME ZONE
You must select your time zone to use Google Calendar correctly.
To select your time zone, follow these steps:
1. Press the button in the right bottom corner of the Settings list.
2. Select [Time zone] in the Settings list.
3. To save the new time zone, press the [Save] button.
The Time Zone Setting screen may appear again
automatically after a software update.
DA68-03055A-06.indb 89DA68-03055A-06.indb 89 2015. 4. 23. 8:172015. 4. 23. 8:17
Page 90
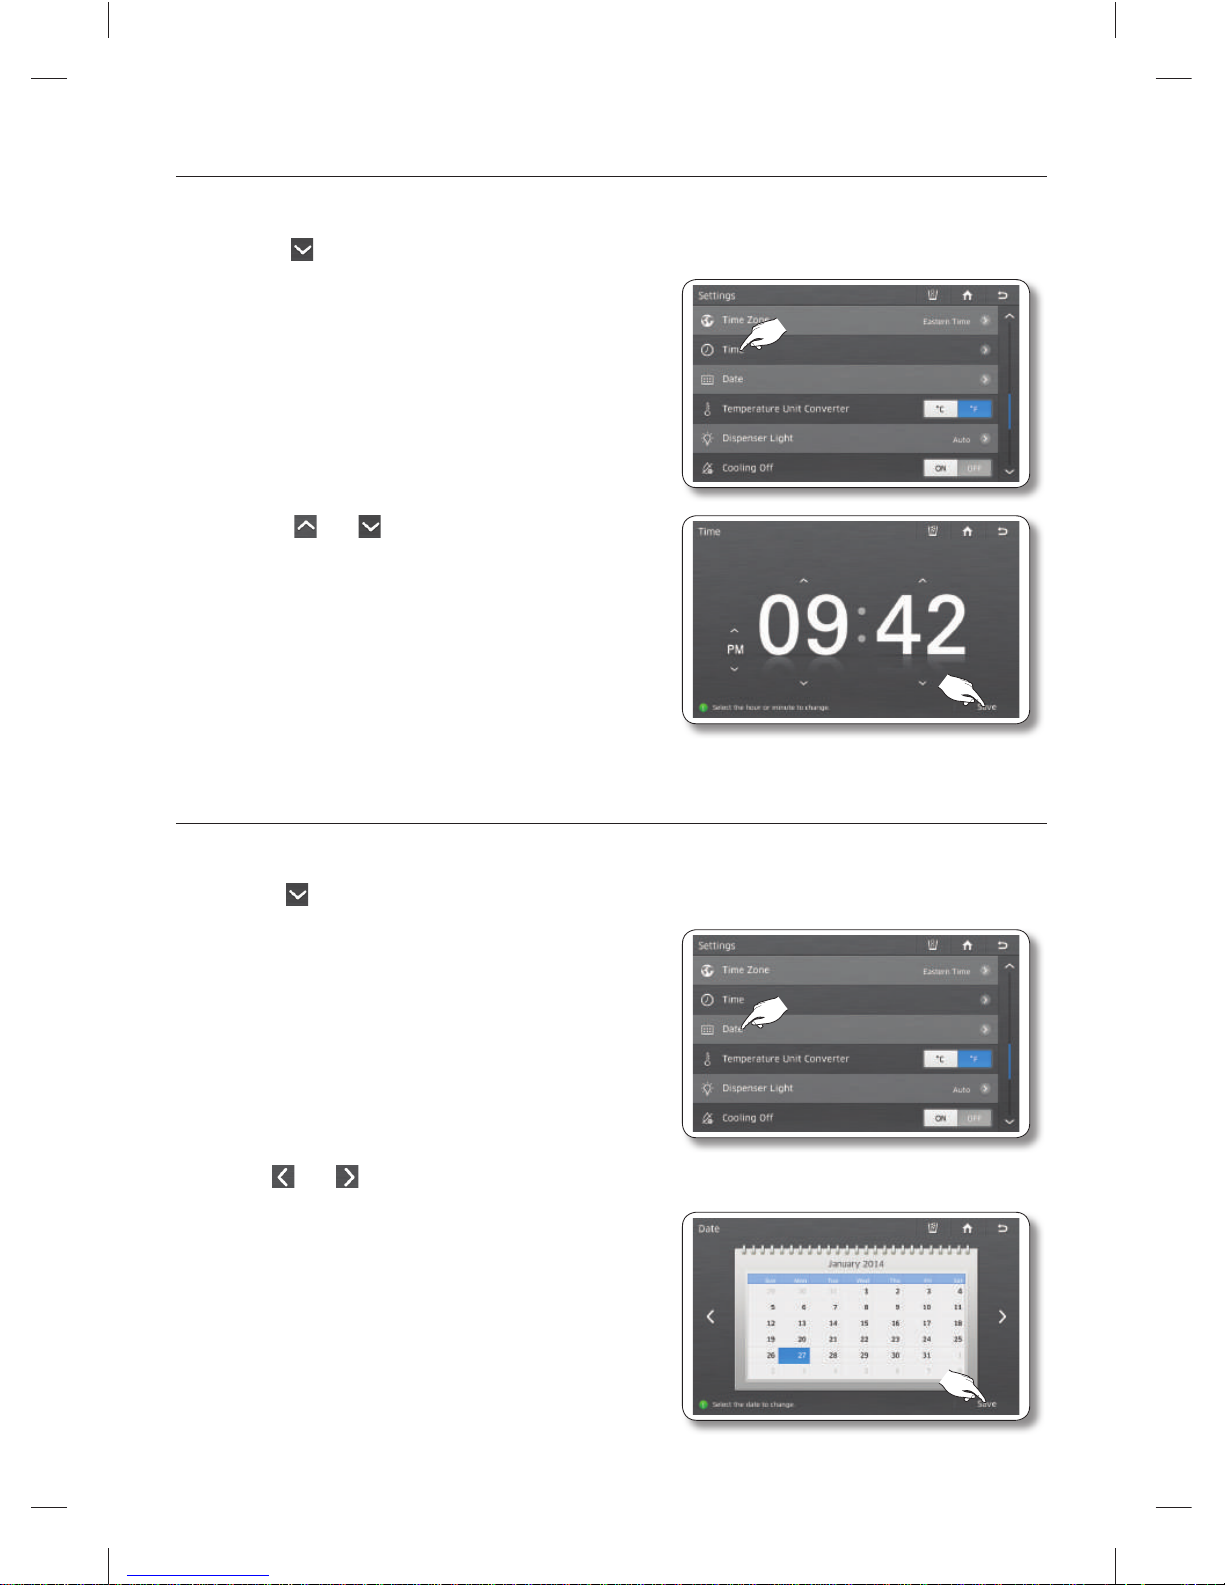
English - 90
TIME
Lets you set the current time.
1. Select the button in the bottom right corner of the Settings list.
2. Select [Time] in the Settings list.
3. Select the and buttons to revise the time
settings, and then press the [Save] button.
DATE
Lets you can set the current date.
1. Press the button in the right bottom corner of the Settings list.
2. Select [Date] in the Settings list.
3. Use the and buttons to revise the month.
4. Select the desired day, and then press the [Save]
button.
DA68-03055A-06.indb 90DA68-03055A-06.indb 90 2015. 4. 23. 8:172015. 4. 23. 8:17
Page 91
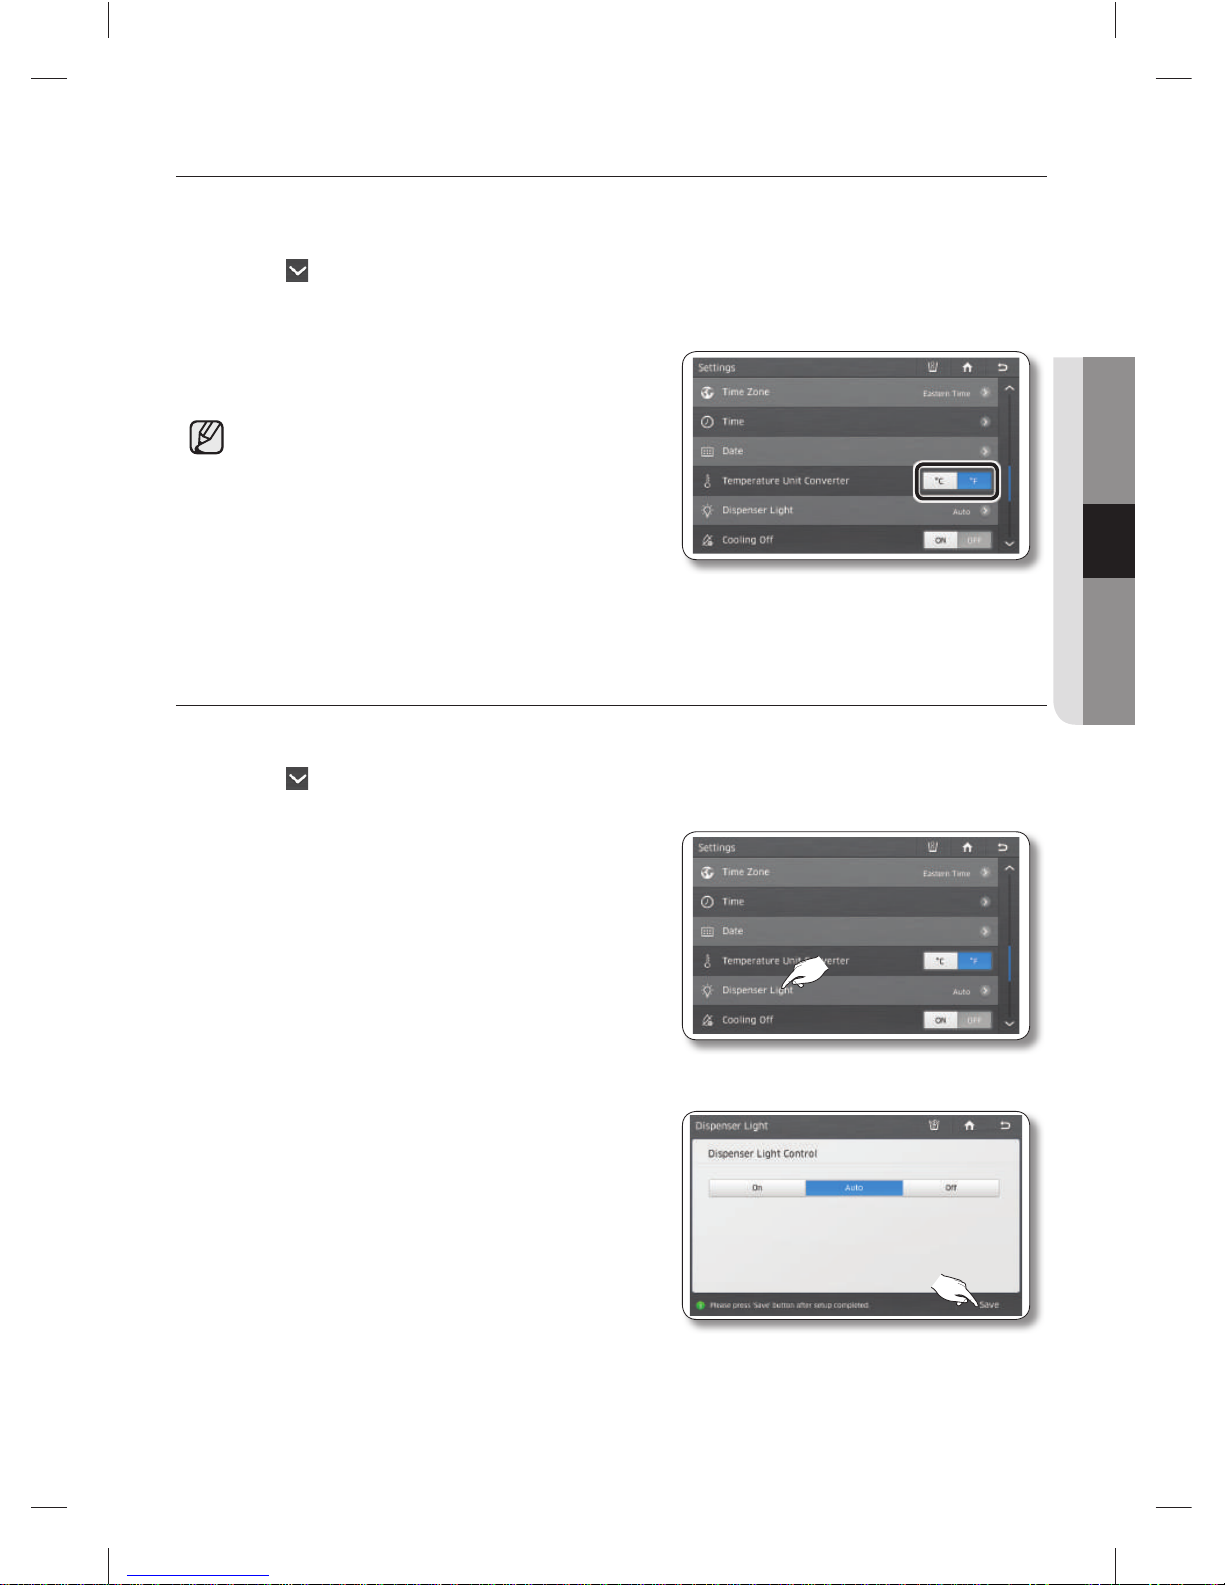
English - 91
OPERATING
TEMPERATURE UNIT CONVERTER
Lets you set the temperature display to Fahrenheit or Centigrade. The unit you select applies to the
Freezer / Fridge set temperature and the temperature displayed by the Weather function.
1. Press the
button in the right bottom corner of the Settings list.
2. Select the Temperature Unit Converter °C or °F button
in the Settings list.
If the refrigerator restarts after an extended time of
disuse with no power connection, the temperature
measurement may be reset to the factory default
(°F).
DISPENSER LIGHT
Lets you set the operation of the dispenser lamp light.
1. Press the button in the right bottom corner of the Settings list.
2. Select [Dispenser Light] in the Settings list.
3. Select the desired dispenser light status, and then
press the [Save] button.
• On : The Dispenser lamp is always on.
• Auto : The Dispenser lamp lights up when
you use the Dispenser. When you release the
Dispenser lever, the light goes off in 5 seconds.
• Off : The Dispenser lamp does not light up
when you use the Dispenser.
DA68-03055A-06.indb 91DA68-03055A-06.indb 91 2015. 4. 23. 8:172015. 4. 23. 8:17
Page 92
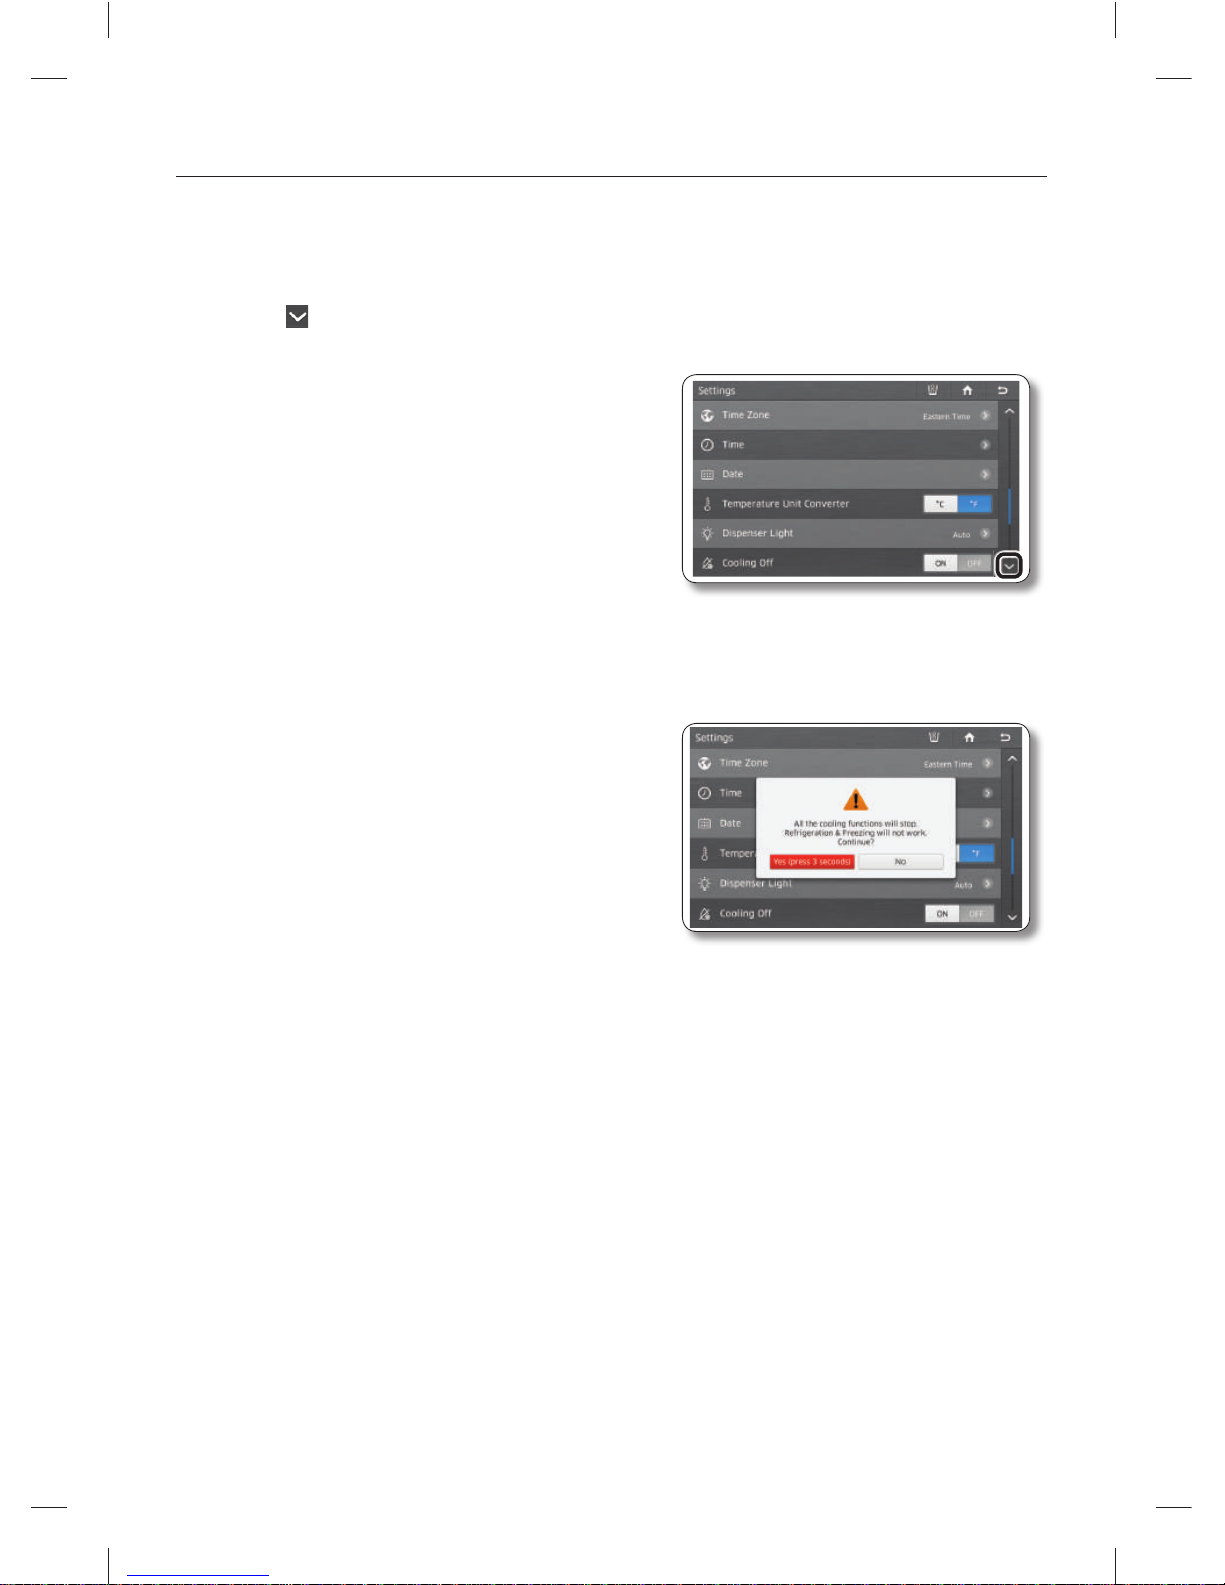
English - 92
COOLING OFF
The cooling off function shuts off the cooling mechanism in freezer and fridge compartments, but does
not shut off the electrical power to the refrigerator. This function is only used to demo refrigerator models
on showroom fl oors.
1. Press the
button in the right bottom corner of the Settings list.
2. Select the Cooling Off ON or OFF button in the settings
list.
• If you select the Cooling Off ON button, the
Home screen displays “OFF” on the freezer/
fridge temperature displays and the refrigerator
temperature functions are deactivated.
(The refrigerator and freezer do not get cold.)
3. If you select the [ON] button, the message window below appears.
4. Press the [Yes] button for more than 3 seconds to
confi rm.
DA68-03055A-06.indb 92DA68-03055A-06.indb 92 2015. 4. 23. 8:172015. 4. 23. 8:17
Page 93
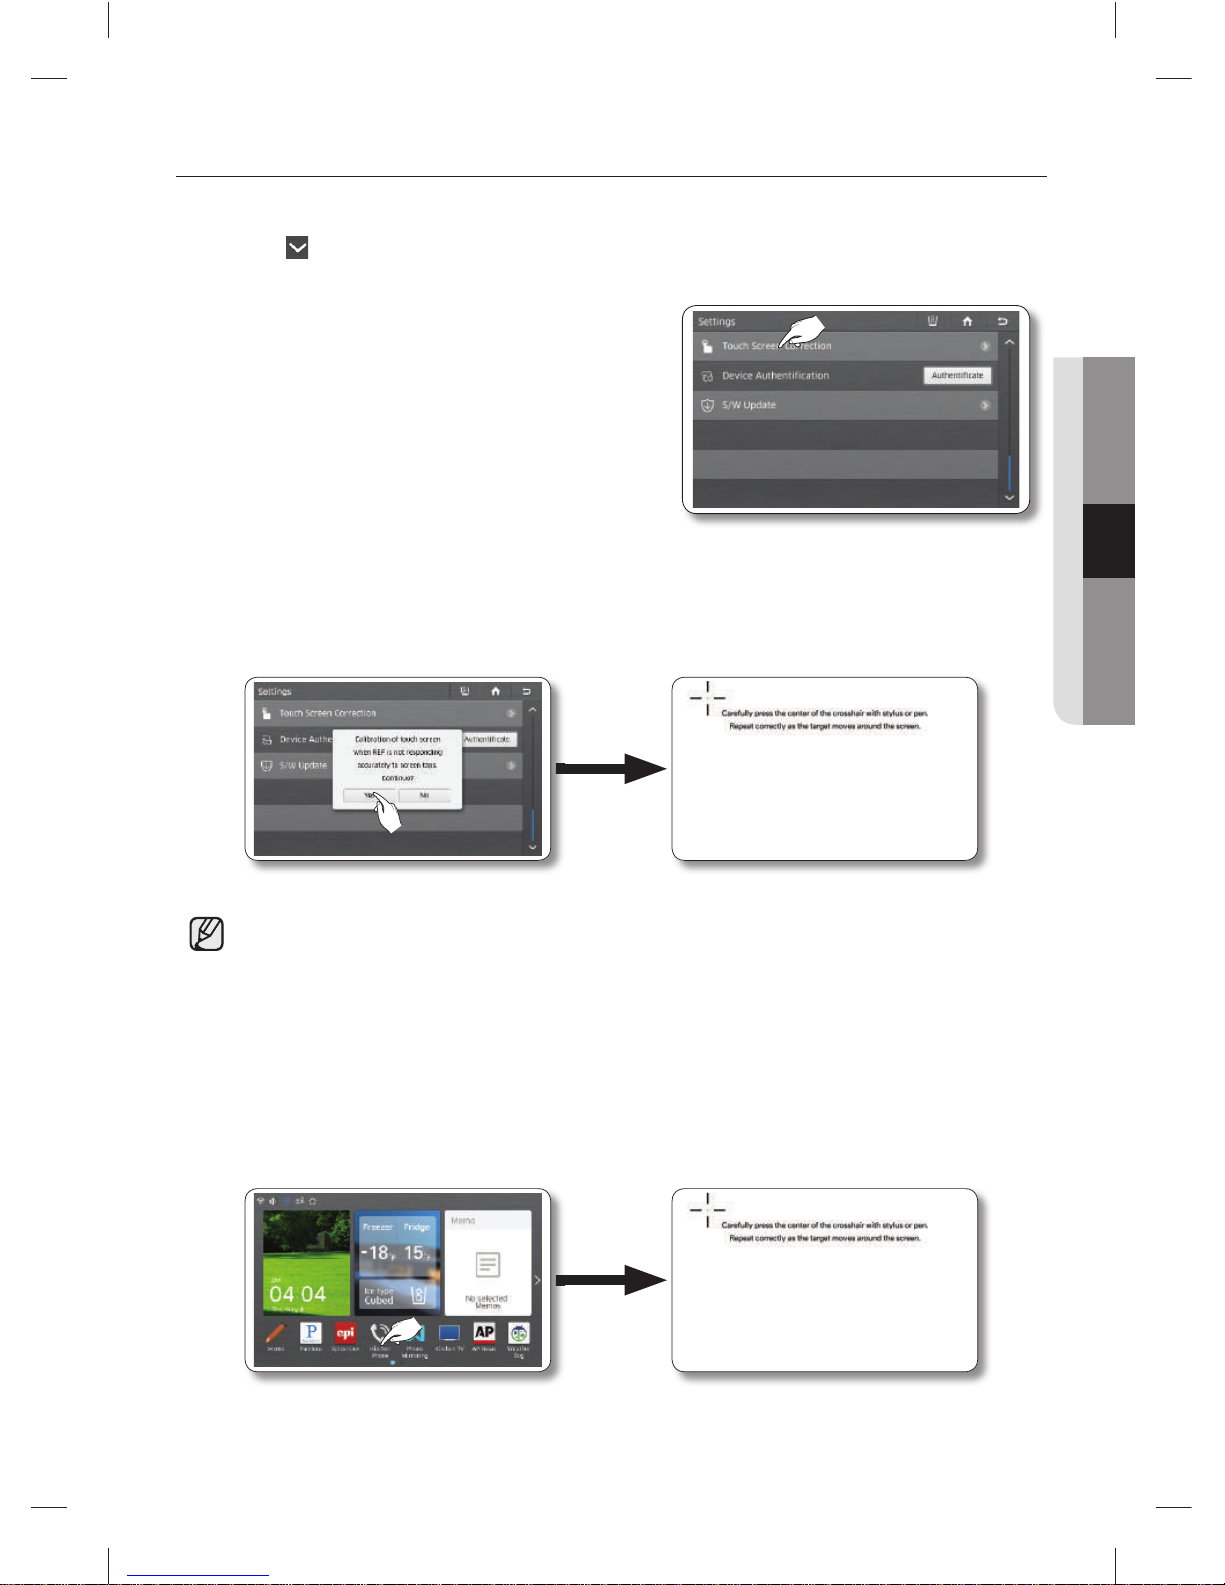
English - 93
OPERATING
TOUCH SCREEN CORRECTION
You can calibrate the touch point to best meet your needs. To adjust the touch point on the touch screen:
1. Press the
button in the right bottom corner of the Settings list.
2. Select [Touch Screen Correction] in the Settings list.
3. Press the [Yes] button. A screen appears with pointer instructions on the top.
4. Press down lightly on the center of the “+” mark. Repeat as the “+” mark moves across the screen.
If you do not press the center of the [+] properly, the cross mark appears repeatedly.
If you cannot run the Touch Screen Correction function in Settings because the touch screen input point
is incorrect:
1. Press and hold the Kitchen Phone icon on the home screen for 5 seconds.
This will launch the select screen calibration function.
2. The screen will display a series of cross icons.
Press the exact center of each cross icon as it appears on the screen.
DA68-03055A-06.indb 93DA68-03055A-06.indb 93 2015. 4. 23. 8:172015. 4. 23. 8:17
Page 94
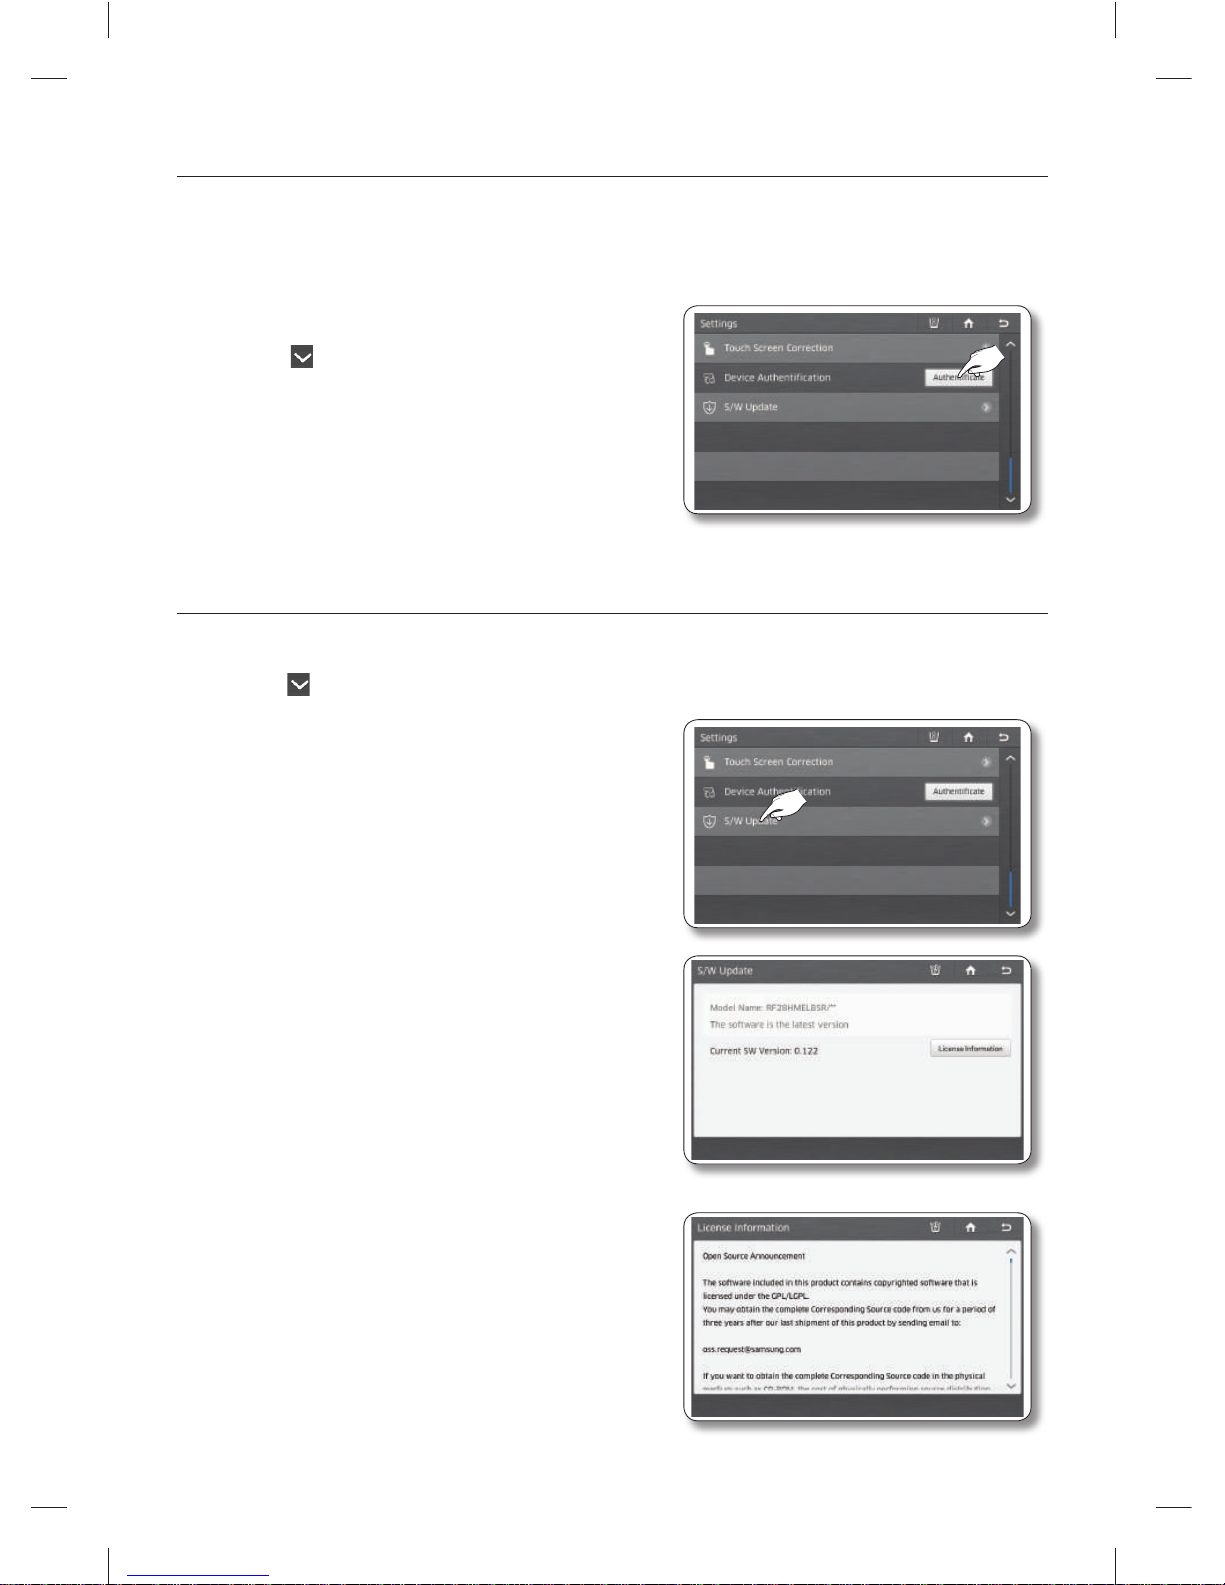
English - 94
DEVICE AUTHENTIFICATION
Lets you check the operational status of the refrigerator on a Samsung smart TV.
To access the refrigerator from the TV, you must go through the authentication procedure, which is
required just once, the fi rst time you use this function.
1. Select the refrigerator on the Smart Home on your
smartphone to proceed with the authentication.
2. Press the
button in the right bottom corner of the
Settings list.
3. Tap [Authenticate] to complete the authentication
procedure.
S/W UPDATE
Lets you check the current software version and update the software when a new version is available.
1. Press the button in the right bottom corner of the Settings list.
2. Select [S/W Update] in the Settings list.
• The software update is provided through the
wireless network. When updated software is
available, the [Upgrade] button on the bottom
right corner of the screen is activated.
When you press the [Upgrade] button, the
upgraded starts almost immediately (in about
10 seconds). When the update is complete,
the “Upgrade completed.” message appears
on the screen. Press the [Reboot] button in
the “Upgrade completed” message window to
fi nalize the upgrade.
• Open Source License Notice - This product
uses open source software. The Open Source
Licenses are available on the product menu.
Press [License Information] button to see the
detail information.
DA68-03055A-06.indb 94DA68-03055A-06.indb 94 2015. 4. 23. 8:172015. 4. 23. 8:17
Page 95
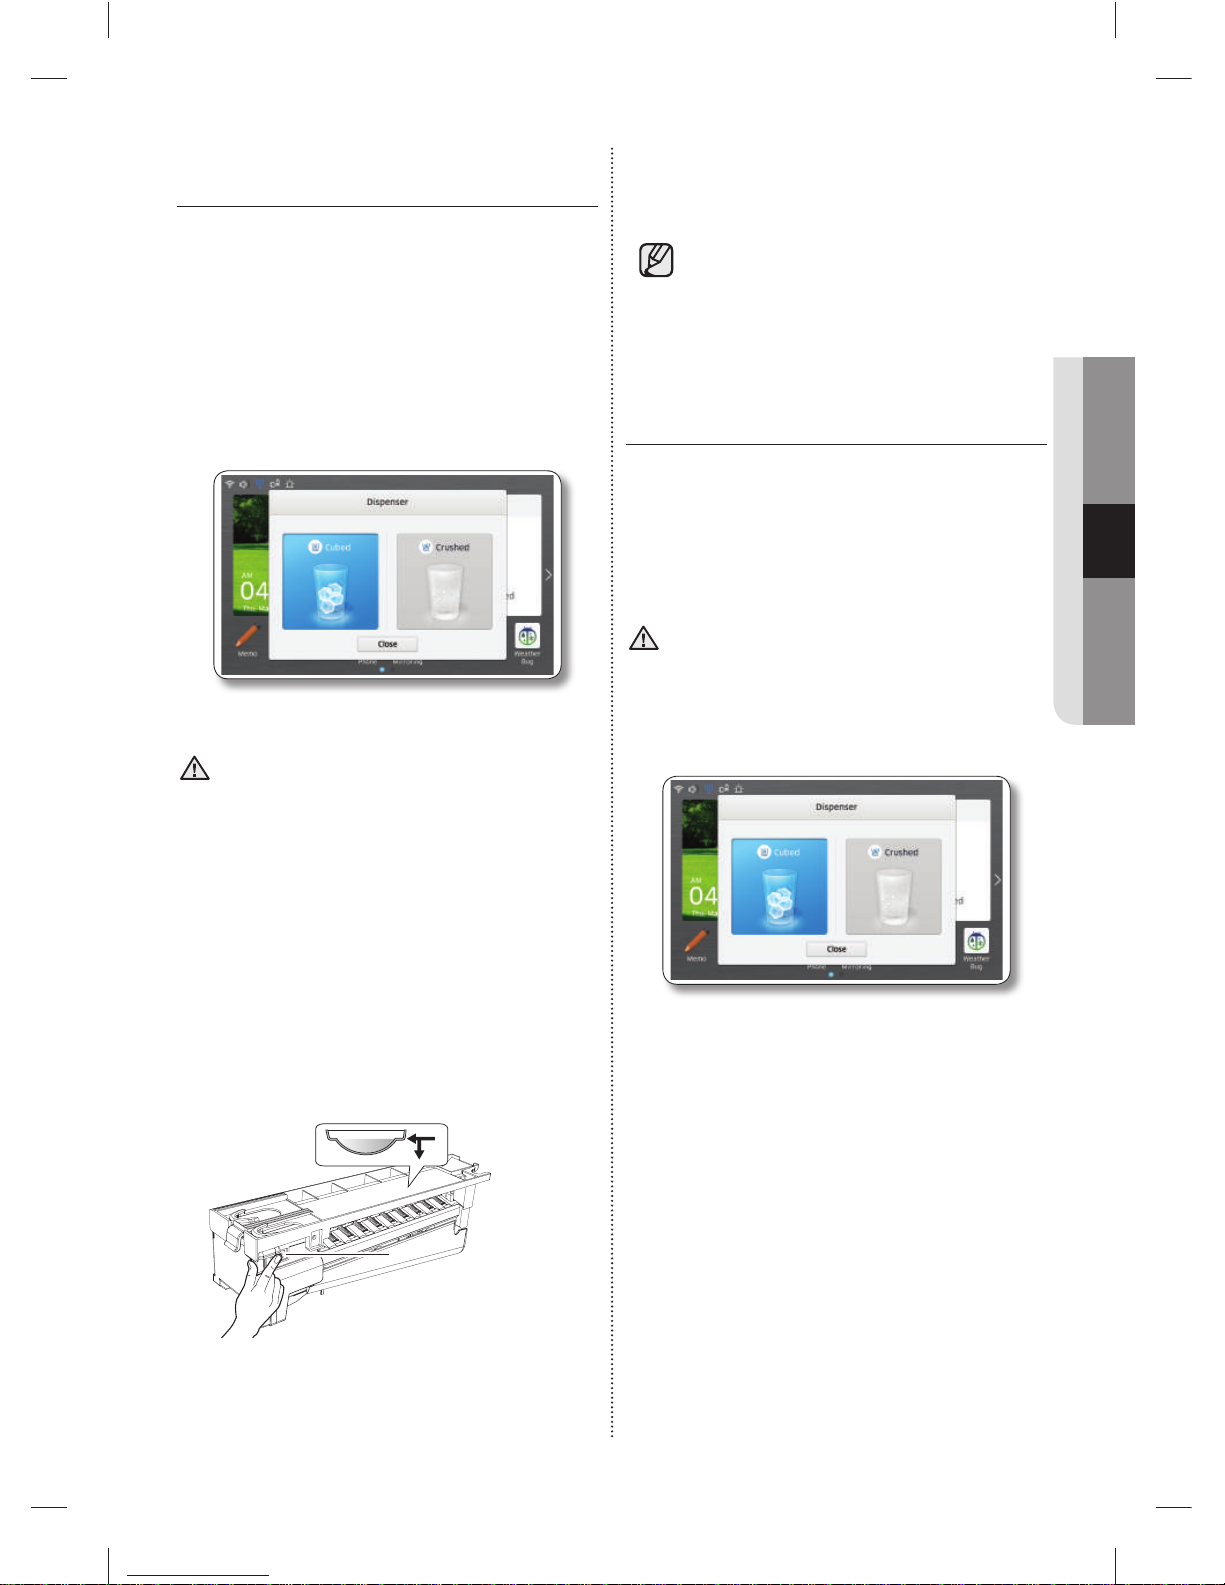
English - 95
OPERATING
HOW TO USE THE ICE
DISPENSER
Touch Dipenser Status on the Home screen to
select what you want to dispense. You can select
Cubed Ice or Crushed Ice.
Place your cup under the ice outlet and push
gently against the dispenser lever.
Make sure the glass is in line with the dispenser to
prevent the ice from bouncing out.
If you select Cubed Ice after using the Crushed Ice
feature, a small amount of residual crushed ice
might be produced.
CAUTION
• Please wait 2 seconds before removing the
glass under the dispenser to prevent spills.
If the Fridge door opens, the Dispenser does not
work.
• Do not pull the dispenser out.
You could damage or break the lever’s spring.
• To clean the ice bin/bucket, wash with a mild
detergent, rinse well, and dry thoroughly it.
Do not use harsh or abrasive cleaners or
solvents.
Check the water level
Check the water level
Test button
Test button
• In case ice doesn’t come out, pull out the ice
bucket, and then press the test button located
on the right side of ice maker.
• Do not press the test button continuously when
the tray is fi lled with ice or water.
Water may overfl ow or ice may jam the bucket.
When you select the Test button, you will
hear the refrigerator chime (ding-dong).
When the chime sounds, release the [Test]
button.
The chime sounds automatically again to
let you know the ice maker is working well.
If There is a Power Failure
If a power failure occurs, ice cubes may melt then
freeze together when the power comes back
on, causing the dispenser to jam. To prevent this
problem, after a power failure, pull out the ice
bucket and discard the residual ice or water.
CAUTION
After you dump the ice from the ice bucket, you
should press the dispenser lever once with the
‘CUBED’ or ‘CRUSHED’ function ON.
The ice maker will make new ice faster after you
return the ice bucket to the refrigerator.
• Normal Use
To fi ll the ice bucket to maximum capacity after
installation, follow these steps:
1. Allow your refrigerator to operate and cool
down for 24 hours (or 1 full day).
- Waiting 24 hours will allow your ice maker to
cool properly.
2. Dispense 4 to 6 ice cubes into a glass.
3. After 8, and then 16 hours, dispense a full glass
of ice.
DA68-03055A-06.indb 95DA68-03055A-06.indb 95 2015. 4. 23. 8:172015. 4. 23. 8:17
Page 96
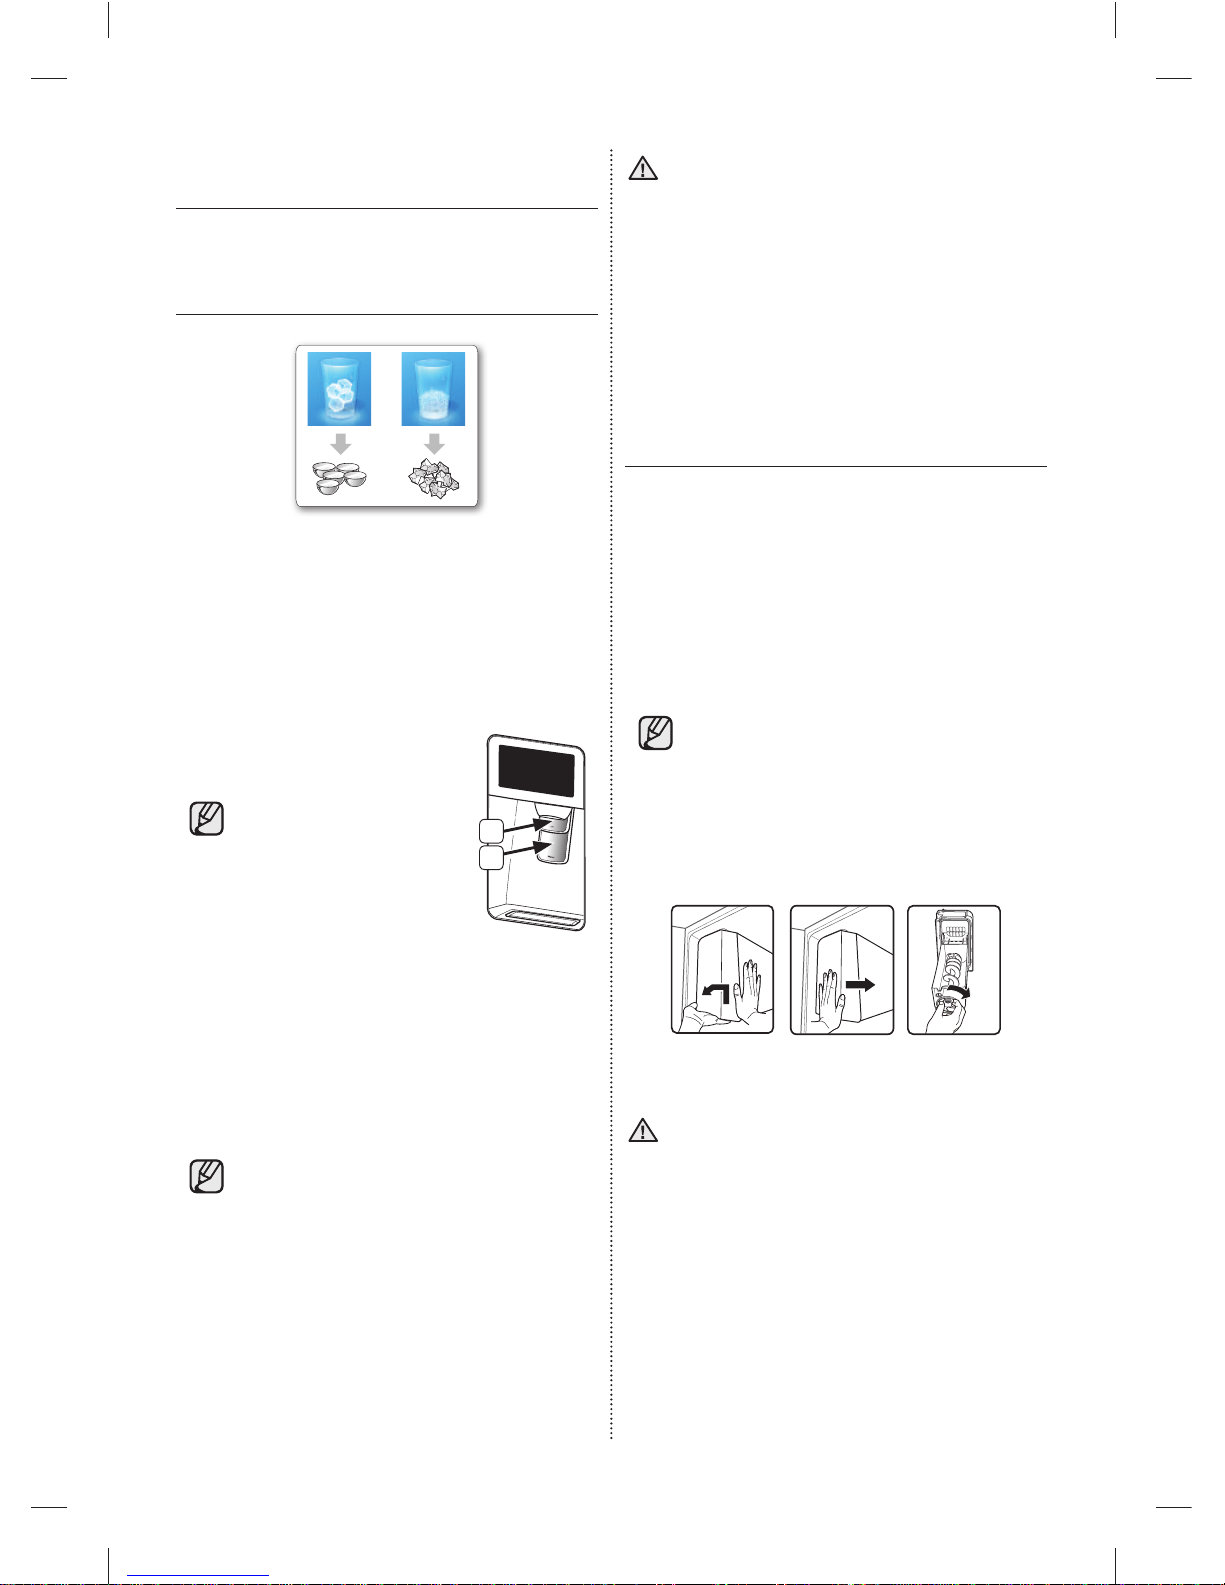
English - 96
USING THE TWO LEVER
DISPENSER
Push the appropriate ice type button
to select the type of ice you want
dispensed.
Using the ice lever (1)
Push the Ice lever dispenser (1) gently with your
glass. Ice will be released from the dispenser.
Using the Water lever (2)
Push the Water lever dispenser (2)
gently with your glass. Water will be
released from the dispenser.
If you push the
water and Ice lever nearly
simultaneously, the
dispenser operates only the
option you actually selected
or pushed fi rst.
1
2
Using the Ice & Water Dispenser together
To get Ice and water, push the Ice lever (1) fi rst
for ice, then move your glass down and press the
water dispenser lever (2) for water.
If you use all the ice at once, you must
repeat Steps 2 and 3 on the previous
page. However, only wait 8 hours before
dispensing the fi rst 4 to 6 ice cubes.
This will replenish the ice cubes and
ensure maximum ice production.
CAUTION
• To clean the ice bin/bucket, wash with a mild
detergent, rinse well, and dry thoroughly it. Do
not use harsh or abrasive cleaners or solvents.
• When you select Cubed Ice after using the
Crushed Ice mode, a small amount of residual
crushed ice might be produced.
Using the Ice Off Function
When you select the Ice Off mode, remove all ice
cubes from the bucket. If you leave the ice cubes
in the bucket, the ice cubes may clump together,
making it diffi cult to remove them. To remove
the ice bucket safely and avoid injury, hold the
bottom of the bucket with one hand and the side
of the bucket with the other. Then, lift up on the
ice bucket, and pull it straight out. To put the ice
bucket back in, push it fi rmly straight back.
If the ice bucket is not pushed fi rmly into
place, ice in the bucket can melt.
If the bucket does not fi t, turn the helix 90 degree
(see the last illustration on the right, below) and try
again.
CAUTION
• Use only the ice maker provided with the
refrigerator.
• The water supply to this refrigerator must only
be installed/connected by a suitably qualifi ed
person.
• Connect to a potable water supply only.
To operate the ice maker properly, water
pressure of 20 ~ 125psi is required.
DA68-03055A-06.indb 96DA68-03055A-06.indb 96 2015. 4. 23. 8:172015. 4. 23. 8:17
Page 97
English - 97
OPERATING
Going on vacation...
If you are going on a long vacation or business trip
and won’t use the water or ice dispensers for a
long time:
• Close the water valve. Otherwise, water
leakage may occur.
• Remove all food.
• Unplug the refrigerator.
• Wipe excess moisture from inside and leave
the doors open. Otherwise, odor and mold may
develop.
Ice Maker Do’s and Don’ts
• Do not put your fi ngers, hands, or any other
unsuitable objects in the chute or ice-maker
bucket.
- It may result in personal injury or material
damage.
• Never put your fi nger or any other objects in the
dispenser opening.
- It may cause injury.
• Do not try to disassemble the ice maker.
• Do not wash or spray the ice bucket with water
while it is in the refrigerator.
Remove it to clean it.
CAUTION
When you insert the Ice maker tray, be sure that
the tray is well centered at the entrance.
Otherwise, the tray may get stuck.
Water clouding phenomenon
All water provided to the refrigerator fl ows
through the core fi lter which is an alkaline
water fi lter.
In the fi ltering process, the pressure of
the water that has fl owed out of the fi lter
is increased, and the water becomes
saturated with oxygen and nitrogen.
When this water fl ows out into the air, the
pressure plummets and the oxygen and
nitrogen get supersaturated, which results
in gas bubbles.
The water may temporarily look misty or
cloudy due to these oxygen bubbles.
After a few seconds, the water will look
clear.
DA68-03055A-06.indb 97DA68-03055A-06.indb 97 2015. 4. 23. 8:172015. 4. 23. 8:17
Page 98
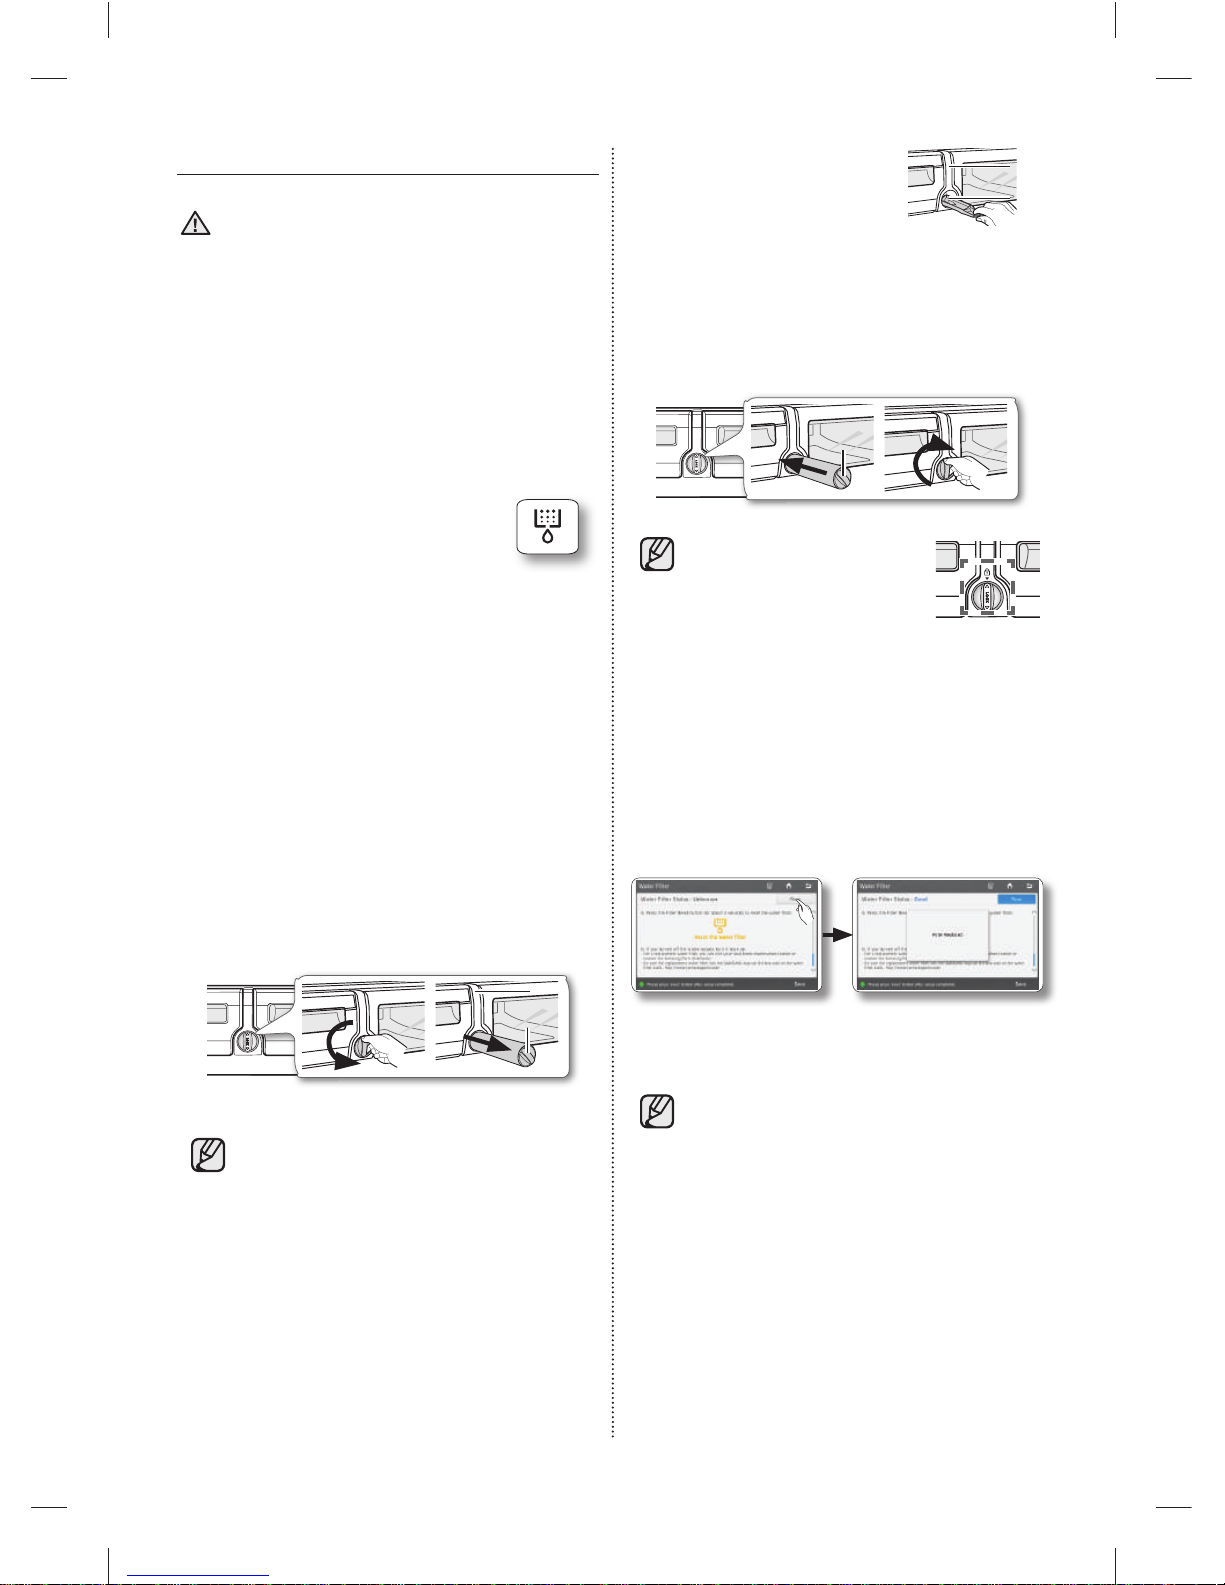
English - 98
CHANGING THE WATER FILTER
WARNING
To reduce risk of water damage to your property
DO NOT use generic brands of water fi lters in your
SAMSUNG Refrigerator. USE ONLY SAMSUNG
BRAND WATER FILTER. SAMSUNG is not
legally responsible for any damage, including,
but not limited to, property damage caused by
water leakage from use of a generic water fi lter.
SAMSUNG Refrigerators are designed to work
ONLY WITH SAMSUNG Water Filters.
The Water Filter status icon on the
Home screen enables you to check
the fi lter current status of the water
fi lter.
The Filter icon turns red to let you
know when it is time to change your
water fi lter cartridge.
To give you time to get a new fi lter,
the red icon comes on just before the
capacity of the current fi lter runs out.
Changing the fi lter on time provides
you with the freshest, cleanest water
from your refrigerator.
(Red)
(Red)
To change the water fi lter, follow these steps:
1. Shut off the water supply. Then, turn the water
fi lter (1) about 1/4 turn, counter-clockwise.
2. Pull the water fi lter (1) from the case fi lter (2).
(2)
(2)
(1)
(1)
• To change the water fi lter more easily,
shut off the water supply valve.
• Sometimes, it is hard to disassemble the water
fi lter because impurities in the water cause it to
stick. If you are having diffi culties, grip the water
fi lter fi rmly and pull it hard.
• When you pull the water fi lter, a little water can
leak from the opening. This is normal.
To minimize water leaks, keep the fi lter cartridge
horizontal when you pull it.
• To prevent overfl ow, empty
the water tray fi lter (3) and
dry around of case fi lter
(2).
(2)
(2)
(3)
(3)
3. Insert the new fi lter into the fi lter case (4).
4. Push the fi lter, and then turn it clockwise until
it locks.
(4)
(4)
• If you have trouble
inserting the water fi lter
because of high water
pressure, shut off the
water supply valve.
• The locked symbol should be lined up with the
indicator line.
5. When the replacement is done, press and hold
the ‘Reset the water fi lter’ simultaneously for 3
or more seconds at the center of the screen.
(Refer to the “WATER FILTER” part on this
manual.)
6. If you turned off the water supply, turn it back
on.
You can get replacement Samsung water
fi lters at your local home improvement
center or on line at http://www.
samsungparts.com, Samsung’s offi cial
on-line parts distributor. Be sure the
SAMSUNG logo is on the water fi lter and
on the water fi lter box.
DA68-03055A-06.indb 98DA68-03055A-06.indb 98 2015. 4. 23. 8:172015. 4. 23. 8:17
Page 99
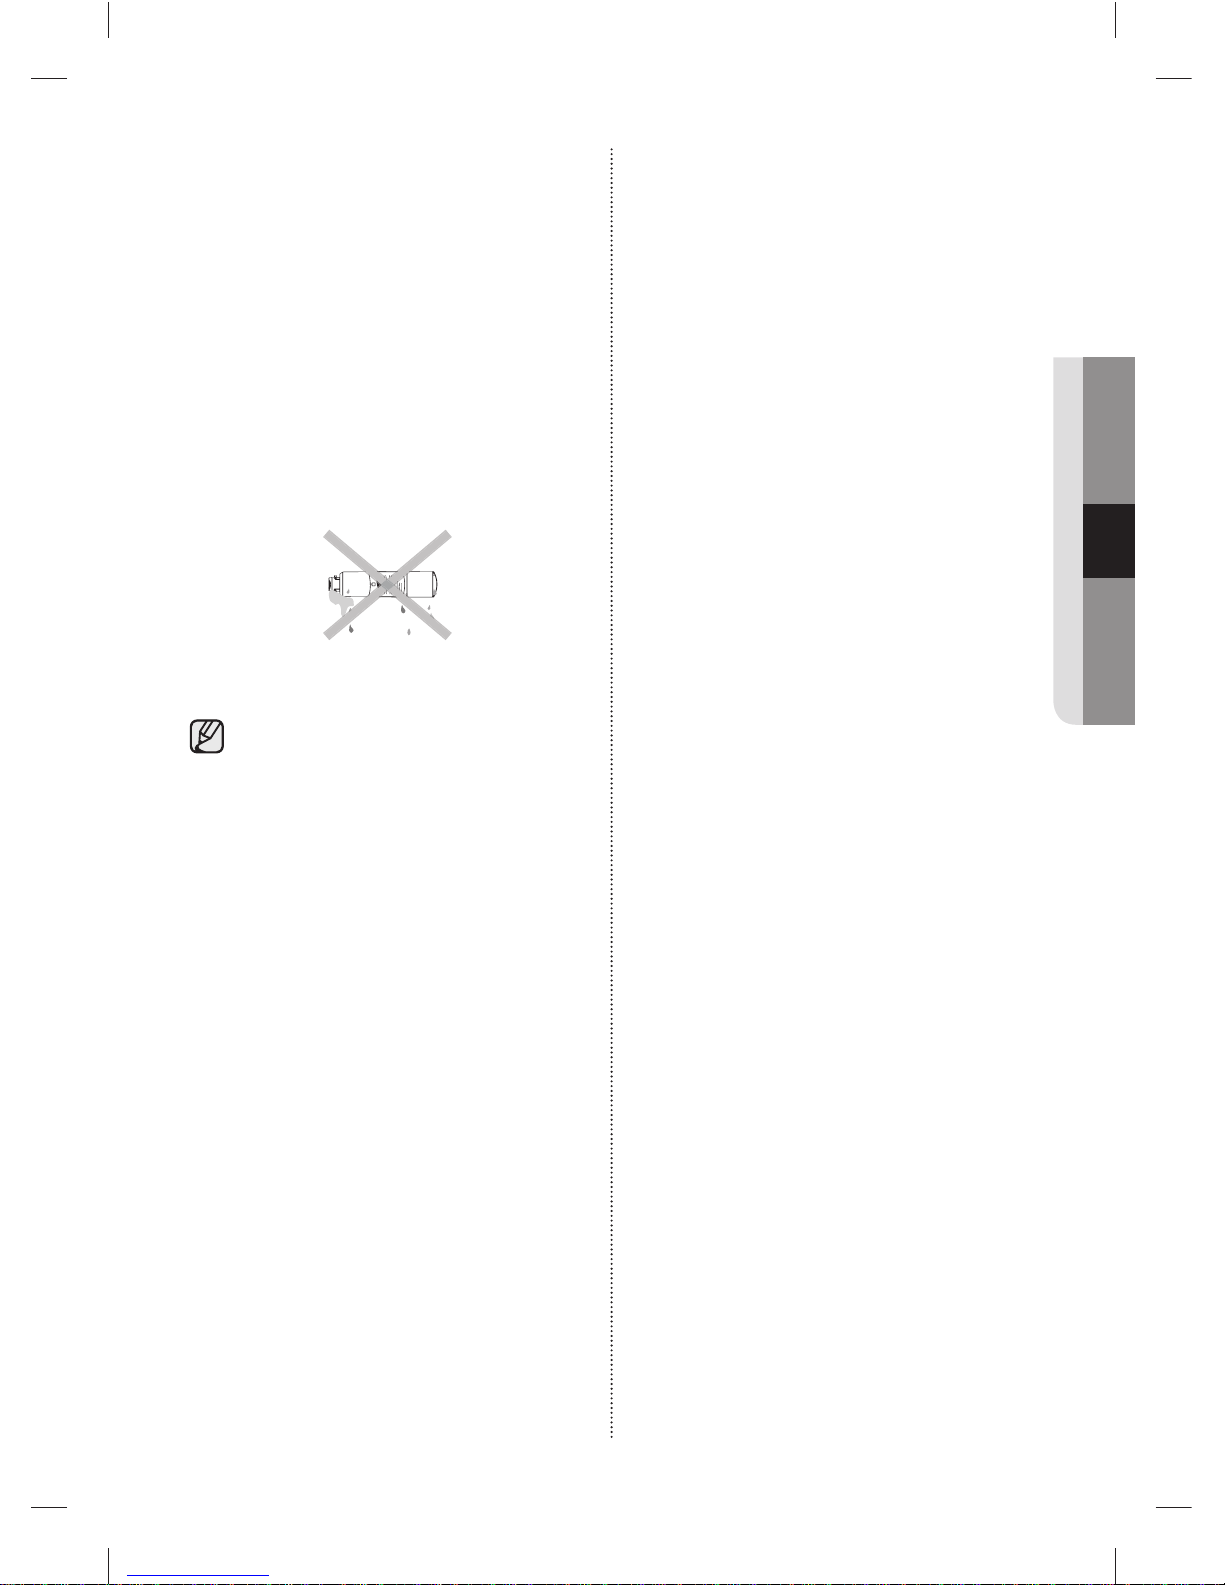
English - 99
OPERATING
Removing any residual matter inside
the water supply line after installing the
water fi lter.
1. Turn ON the main water supply.
2. Run water through the dispenser until the water
runs clear (approx. 6 to 7 minutes).
This will clean the water supply system and
remove air from the lines.
3. Additional fl ushing may be required in some
households.
4. Open the Refrigerator door and make sure
there are no water leaks coming from the water
fi lter.
Be sure to fl ush the dispenser thoroughly,
otherwise water may drip from the
dispenser. If water drips from the
dispenser, it means that there is still air in
the line.
Reverse Osmosis Water Supply
IMPORTANT : The pressure of the water supply
coming out of a reverse osmosis system going to
the water inlet valve of the refrigerator needs to be
between 35 and 120 psi (241 and 827 kPa).
If a reverse osmosis water fi ltration system is
connected to your cold water supply, the water
pressure to the reverse osmosis system needs to
be a minimum of 40 to 60 psi (276 to 414 kPa.)
If the water pressure to the reverse osmosis
system is less than 40 to 60 psi (276 to 414 kPa):
• Check to see whether the sediment fi lter in the
reverse osmosis system is blocked.
Replace the fi lter if necessary.
• Allow the storage tank on the reverse osmosis
system to refi ll after heavy usage.
• If your refrigerator has a water fi lter, it may
further reduce the water pressure when used
in conjunction with a reverse osmosis system.
Remove the water fi lter.
If you have questions about your water pressure,
call a licensed, qualifi ed plumber.
DA68-03055A-06.indb 99DA68-03055A-06.indb 99 2015. 4. 23. 8:172015. 4. 23. 8:17
Page 100
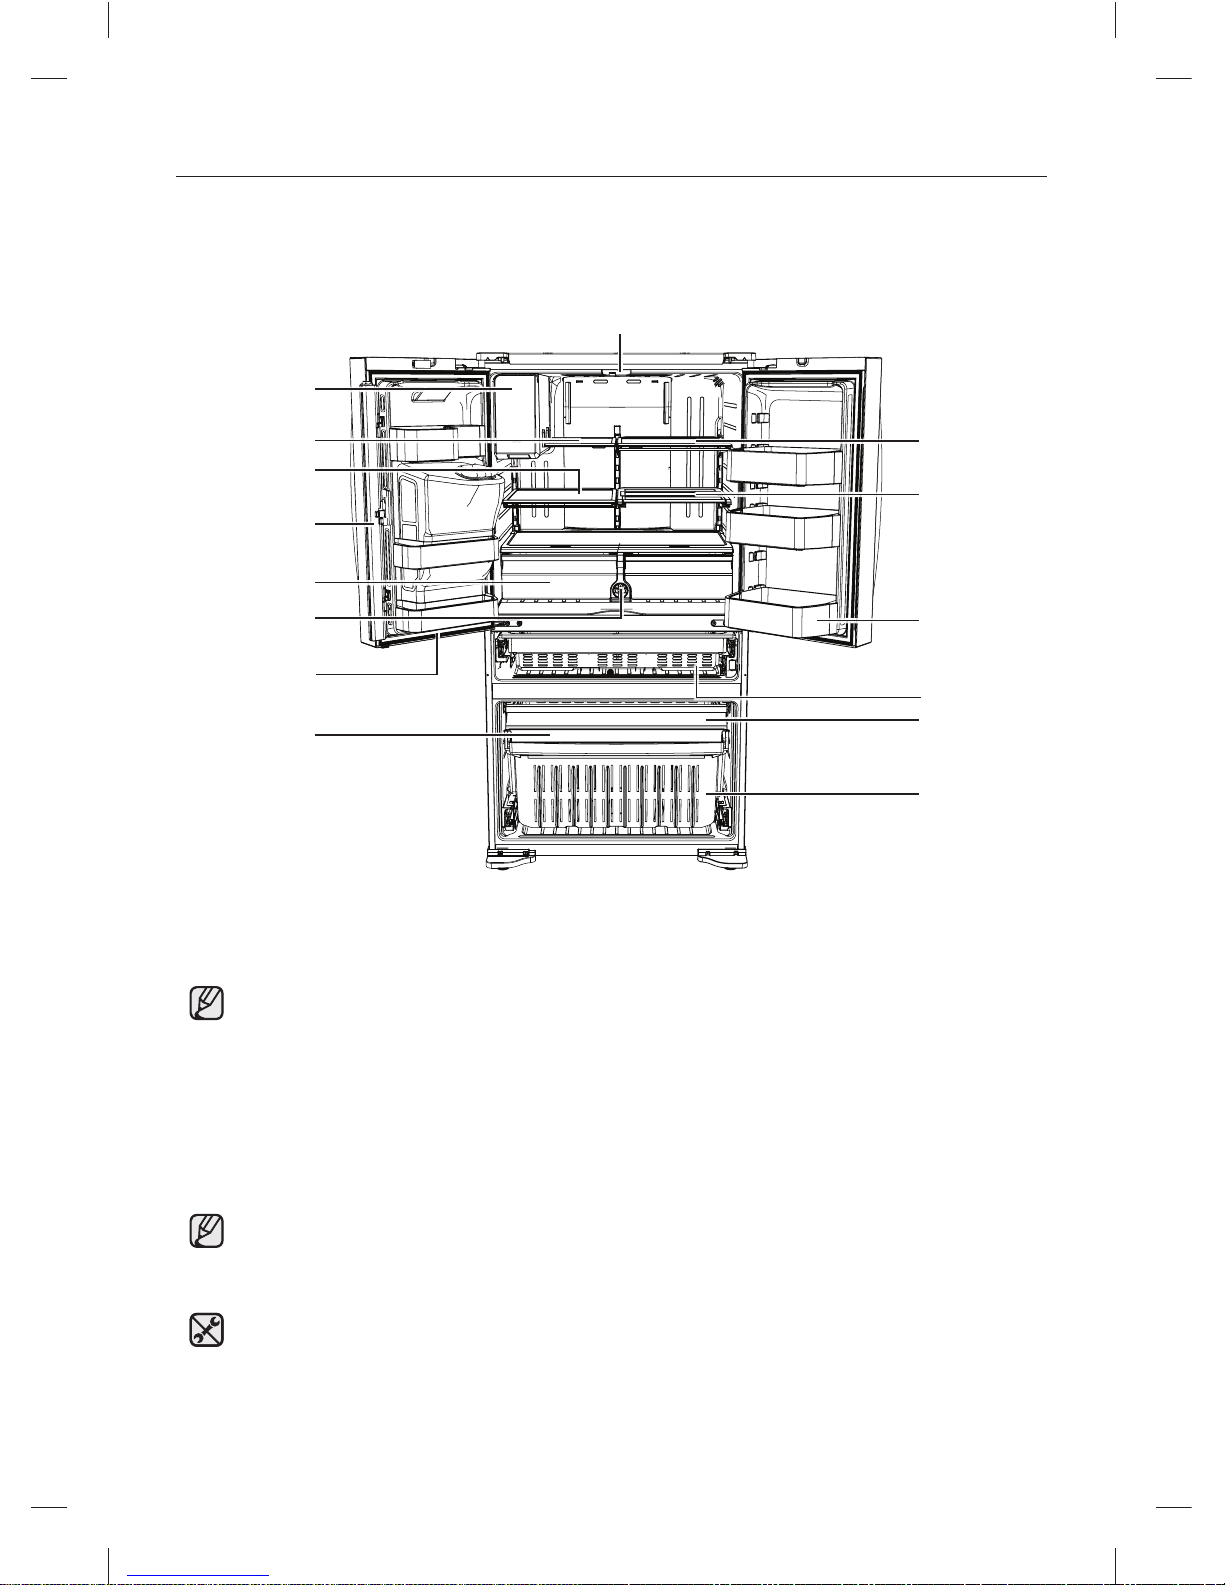
English - 100
PARTS AND FEATURES
Review the illustration below to become more familiar with the parts and features of your refrigerator.
When closing the door, make sure the Vertical Hinged Section is in the correct position to avoid
scratching the other door.
If the Vertical Hinged Section is reversed, put it back to the right position and close the door.
Moisture may appear at times on the Vertical Hinged Section.
The door handle may become loose over time. If this happens, tighten the bolts found on the
inside of the door.
If you close one door with too much force, the other door may open.
When the door opens, the interlock switch automatically turns off the auger motor in the ice
maker for safety reasons.
If the interior or exterior LED lamp has gone out, please contact Samsung Customer Support.
Vertical Hinged
Section
Vegetable &
Fruit Drawers
Water Filter
Guard
Foldable-Shelf
Fixed-Shelf
Slide-Shelf
Door Bins
Auto Pull Out
Drawer
Drawer
Freezer Drawer
Freezer Drawer
Bin
Bin
Quick-Space
Glass Shelf
FF Ice-Maker
Light
Light
Convertible Room
DA68-03055A-06.indb 100DA68-03055A-06.indb 100 2015. 4. 23. 8:172015. 4. 23. 8:17
 Loading...