

Samsung RF266ABRS/XAA-00, RF266ABBP/XAA-00, RF265ABWP/XAA-00, RF265ABPN/XAA-00, RF265ABBP/XAA-00 Owner’s Manual
imagine the possibilities
Thank you for purchasing your Samsung product
To receive more complete service,
please register your product at
www.samsung.com!global/register
KEY FEATURES OF YOUR NEW REFRIGERATOR
Your Samsung French Door Refrigerator comes equipped with various innovative storage and energy-efficient
features°
. Twin Cooling System
The Refrigerator and Freezer have separate evaporators Due to this independent cooling system,
the Freezer and Refrigerator cool more efficiently.
Additionally, this separate air flow system prevents food odor of one compartment from seeping into
other compartments..
° Cool Select Pantry TM
The Cool Select PantryTM is a fulFwidth drawer with adjustable temperature control,.
• Bigger & Wider Space
The wide shelf area and pantry provide enough space for larger items such as a pizza box, etc,
The wide freezer drawer also provides enough space for 2-3 turkeys..
o Secure Auto Close
The Secure Auto Close feature will automatically close a door that is slightly open.
o Digital Display and Temperature Control
, Water Filtration System
o Door Alarm
A helpful beeper alerts you if the door is ajar.
2_ Features
. Tilting Pocket
The Tilting pocket can be used to store up to a 16" pizza
• Auto Pull Out Drawer
The upper drawer in the freezer comes out automatically as you just open the freezer door,
• Easy Handle
Freezer door can be opened with tess effort,
. Energy Star
Energy star labeled this product could save your energy cost&
For easy future reference, write the model and
serial number down. You will find your model
number and serial number on the left side of the
refrigerator..
Model #
Serial #
SAFETY INFORMATION
Before using your new Samsung French Door Refrigerator, please read this manual thoroughly
to ensure that you know how to safely and efficiently operate the features and functions that your
new appliance offers.
Because the following instruction covers various models, the characteristics of your Refrigerator
may differ slightly from the Refrigerator described in this manual, If you have any question, contact
us at 1-800-SAMSUNG or find help and information online at vwzw.samsung.com,
What the icons and signs in this user manual mean :
WARNING
CAUTION damage.
CAUTION refrigerator, follow these basic safety precautions:
(_ Do NOT disassemble.
[_ Do NOT touch.
[_ Follow directions explicitly..
_} Unplug the power plug from the wall socket,
[_ Make sure the machine is grounded to prevent electric shock
(_ Call the service center for help.
These warning signs arehereto prevent injury to you and others.
Please follow them explicitly
Keep this manual in a safe place for future reference.
Hazards or unsafe practices that may result in severe personal injury or death,
Hazards or unsafe practices that may result in minor personal injury or property
To reduce the risk of fire, explosion, electric shock, or personal injury when using your
Do NOT attempt.
SEVERE WARNING SIGNS
Do not plug several appliances into the same power receptacle.
o Largeappliancesdrawa lotof power.Poweringmorethanoneapplianceor machinefromasinglepowersource
couldcauseoverheatingandcausea fire..
Make sure that the power plug is not kinked or damaged by the back of the Refrigerator.
,, A damagedpower plug mayoverheatand causea fire
Do not spray water directly into or on the outside of the Refrigerator/Freezer drawer,
a Watercould get into theinteriormachinepartsand cause electricshock,
Do not use aerosols near the Refrigerator.
= Aerosolsusednearthe Refrigeratormaycause an explosionor fire
Safety Inforrnation 3
Do not put undue stress on the power cord or place heaW articles on it.
• Ptacingheavyarticleson the powercord create theriskof explosionor fire.
Do not insert the power plug with wet hands.
° It maycause electricshock
Do not put a container filled with water on the Refrigerator.
° If itspills,it may causefireor electricshock,
Do not install the Refrigerator in a damp place or place where it may come in contact
with water.
• Wetand/or deterioratedinsulationof the internalelectricalpartsmay causeelectric shock or fire
Do not store volatile, flammable or high evaporating substances in the refrigerator.
° Storingbenzene,thinner,alcohol,ether, LPgas, dryice,andother such products maycause explosions.
Do not disassemble or repair the Refrigerator by yourself.
o You runthe riskof fire,appliancemalfunctionsand/or personalinjury°Calfyour nearestservicecenterfor
helpfrom a qualifiedservicetechnician.
[_ Unplug the Refrigerator before changing the interior light.
• ChangingthelightwhiletheRefrigeratoris pluggedin maycauseelectric shock
If you wish to dispose of the Refrigerator, remove the doors and seals before throwing
it away,
,, The doors(andtheirseals)can entrapa chifdif they climbinto the Refrigerator,
Makesurethat the doorsareoff, and ensurethat no one issuffocatedby being lockedinside
@
The Refrigerator must be safely grounded
° Always makesurethat you havegroundedthe Refrigeratorbeforeattemptingto investigateor repairany
part ofthe appliance.Powerleakagescancause severeelectricshock.
Never use gas pipes, telephone lines or other potential lightning attractors as an
electrical ground.
° Improperuseof the groundingplug can resultina risk of electricshock. If itis necessaryto use an
extensioncord to powerthe Refrigerator,useonlya 3-wire extensioncord that has a3-blade ground
plug and a 3-slot receptaclethatwillacceptthe plug on theappliance..Themarked ratingof the extention
cord shouldbe AC 115V-120V, 10A,or more.Additionally,if a groundingadapterisused, makesure the
receptaclebox isalsofullygrounded,
4_ Safety Information
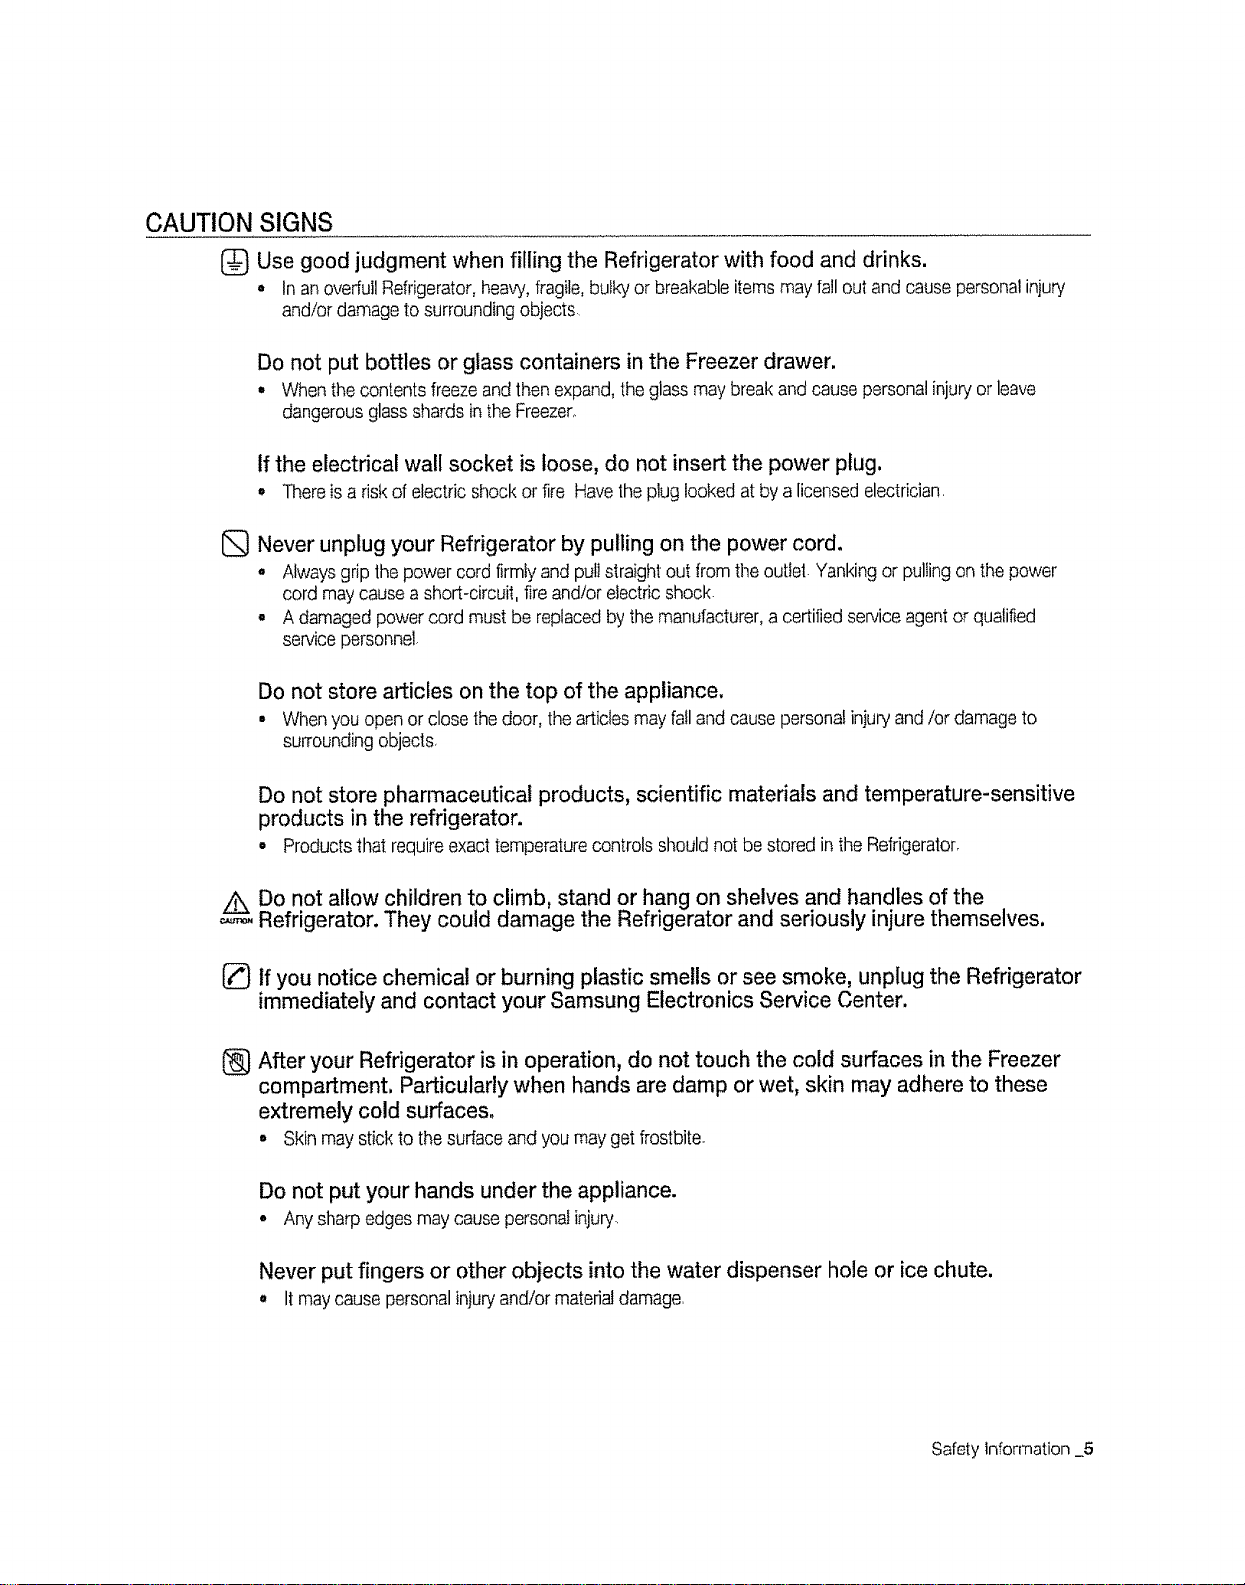
CAUTION SIGNS
1_ Use good judgment when filling the Refrigerator with food and drinks.
,, Inan overfullRefrigerator,heavy,fragile,bulky or breakableitemsmay fallout and causepersonalinjury
and/ordamageto surroundingobjects
Do not put bottles or glass containers in the Freezer drawer,
• Whenthe contentsfreezeandthen expand,the glassmay breakand cause personalinjuryor leave
dangerousglassshardsin the Freezer,.
If the electrical wall socket is loose, do not insert the power plug.
• Thereisa risk ofelectricshockor fire Havethe plug looked at by a licensedelectrician
Never unplug your Refrigerator by pulling on the power cord.
o Alwaysgrip the power cordfirmlyand pullstraightout from theoutiet Yankingor pullingon the power
cord maycausea short-circuit, fireand/or electricshock
° A damagedpowercord mustbe replacedby the manufacturer,a certifiedserviceagentor qualified
servicepersonnel
Do not store articles on the top of the appliance,
° Whenyou openor closethe door, the articlesmayfailandcause personalinjuryand/or damageto
surroundingobjects,
Do not store pharmaceutical products, scientific materials and temperature-sensitive
products in the refrigerator.
° Productsthat requireexacttemperaturecontrols shouldnot be stored in theRefrigerator,
Do not allow children to climb, stand or hang on shelves and handles of the
Refrigerator. They could damage the Refrigerator and seriously injure themselves.
[_ if you notice chemical or burning plastic smells or see smoke, unplug the Refrigerator
immediately and contact your Samsung Electronics Service Center.
After your Refrigerator is in operation, do not touch the cold surfaces in the Freezer
®
compartment. Particularly when hands are damp or wet, skin may adhere to these
extremely cold surfaces,
• Skinmay stickto thesuriaceand youmay getfrostbite
Do not put your hands under the appliance.
• Anysharpedgesmay causepersonalinjury,
Never put fingers or other objects into the water dispenser hole or ice chute.
• It maycausepersonalinjuryand/or materialdamage,
Safety Information _5
(_ If the Refrigerator will not be used for a long period of time (for example, over several
months), unplug the power from the wall.
• Overtime, deteriorationin tl_epowercord insulationmaycause fire
[_ Do not use a wet or damp cloth when cleaning the plug,
Remove any dust or foreign matter from the power plug pins.
• A Dirty power plug can increase the risk of fire.
If the Refrigerator is disconnected from the power supply, you should wait for at least
five minutes before plugging it back in.
[_ Do not place the equipment directly in sunlight,
The appliance must be positioned so that the power cord is accessible after
installation,
If the power cord is damaged, it must be replaced by the manufacturer, a certified
service agent or qualified service personnel.
If you have a long vacation planned, empty the Refrigerator and turn it off.
Wipeexcess moisturefromthe insideand leavethedoorsopento keep odor andmold from developing.
@
Service Warranty and Modification
• Anychangesor modificationsperformedbya 3rd partyon this finishedapplianceisnot coveredunder
Samsungwarrantyservice,nor canSamsungbe responsibleforsafetyissues1hatresultfrom 3rd party
modifications
ik
Children can get trapped inside Refrigerators.
¢,AUt_4
Before you throw away your old Refrigerator or Freezer, make sure that you;
• Takeoff thedoors
o Leavealtshelvesin placesso that childrenmay not easilyclimb insideandshutthe door whiletheyare
inside
(_ This app)iance is not intended for use by small children or infirm persons without capable, adult
supervision. Small children should be supervised when using the appliance.
[_ Do not block air holes
o If the air holesare blocked,especiallywith plasticbag, refrigeratorcan be overcooled
If thiscooling period lastslong,water filterwillbe brokenandcausewater leakage
6_ Safety Information
SETTING UP YOUR
FRENCH DOOR REFRIGERATOR
08 Getting readyto installthe refrigerator
09 Setting up the refrigerator
09 Removing the refrigerator doors
11 Reattaching the refrigeratordoors
13 Adjusting the doors
14 Making minor adjustments between doors
t 5 Adjusting the freezerdrawer
16 Checking the water dispenser line
17 Installingthe water line
OPERATING YOUR SAMSUNG
FRENCH DOOR REFRIGERATOR
TROUBLESHOOTING
31
WARRANTY
19 Using the control panel
20 Using the digital display
2t Controlling the temperature
2! Using the cold water dispenser
22 Parts and Features
23 Storing food
24 Using the Coo! Select PantryTM
25 Removing the refrigerator accessories
26 Using the doors
27 Removing the freezer drawer accessories
28 Cleaning the refrigerator
29 Changing the interiorlights
30 Changing the water filter
31 Troubleshooting
32 Warranty
32
Contents _7
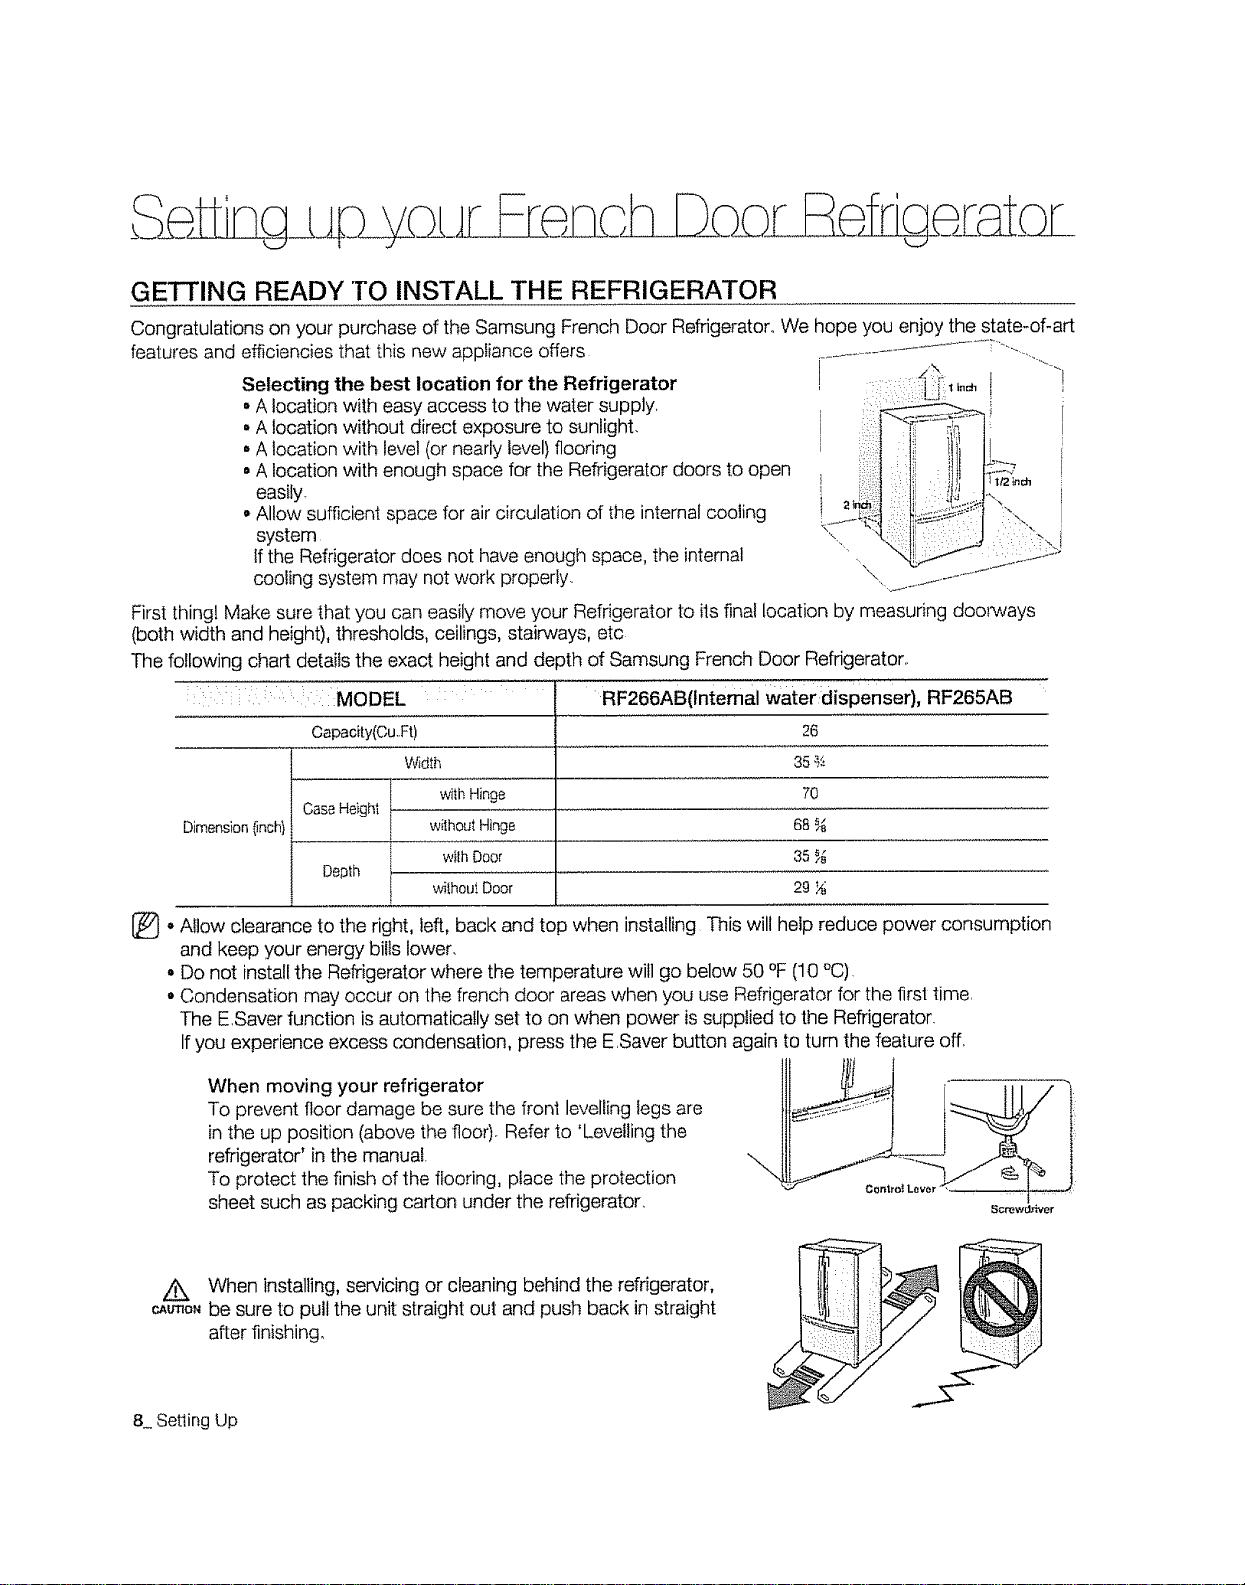
GETTING READY TO INSTALL THE REFRIGERATOR
Congratulations on your purchase of the Samsung French Door Refrigeraton We hope you enjoy the state-of-art
features and efficiencies that this new appliance offers ................................................
Selecting the best location for the Refrigerator ......... =._ "]
• A location with easy access to the water supply, :].............
• A location without direct exposure to sunlight.
° A location with level (or nearly level) flooring 1:
° A location with enough space for the Refrigerator doors to open _,_._,
easily_
° Allow sufficient space for air circulation of the internal cooling 2_,
system .. _..1
If the Refrigerator does not have enough space, the internal , .... 1 _-_
cooling system may not work properly.. \ ......._j.-
First thingl Make sure that you can easily move your Refrigerator to its final location by measuring doorways
(both width and height), thresholds, ceilings, stairways, etc
The following chart details the exact height and depth of Samsung French Door Refrigerator.,
:: ::: :(::MODEL : :: RF266AB(intemal waterdispenser), RF265AB
Capacity(Ou,,Ft) 26
W;dth 35 ,_
Dimension (inch} without Hinge 68 _
Case Height
Depth
with Hinge 70
wilh Door 35 ,%
_,_[houtDoor 29
(_ • Allow clearance to the right, left, back and top when installing This will help reduce power consumption
and keep your energy bills lower.
. Do not install the Refrigerator where the temperature will go below 50 °F (10 °C),
° Condensation may occur on the french door areas when you use Refrigerator for the first time,
The ESaver function is automatically set to on when power is supplied to the Refrigerator.
If you experience excess condensation, press the E,Saver button again to turn the feature off_
When moving your refrigerator
To prevent floor damage be sure the front levelling legs are
in the up position (above the floor). Refer to 'Levelling the
refrigerator' in the manual.
To protect the finish of the flooring, place the protection
sheet such as packing carton under the refrigerator,
Screwdriver
When installing, servicing or cleaning behind the refrigerator,
cAu_o,be sure to pull the unit straight out and push back in straight
after finishing.
8 Setting Up
i_¸

SETTING UP THE REFRIGERATOR
Now that you haveyournew Refrigeratorinstalledand in place,youare readyto set up and enjoytimefeaturesand
functionsof theappliance
Bycompletingtimefollowingsteps,your Refrigeratorshouldbe fullyoperational,
1. Placethe Refrigeratorinan appropriatelocation
with reasonableclearancebetweenthewalland
timeRefrigerator,Referto installationinstructionsin
thismanual
2 OncetheRefrigeratorisplugged in,makesure time
interiorlight comeson whenyouopen the doors.
3 SettheTemperaturecontrol to the coldest
temperatureandwait for an hour,TimeFreezerwill
getslightlychilledandthe motor willrun smoothly.
4. Afterpoweringthe Refrigerator,itwilltake a few
hoursto reachthe appropriatetemperature.You
canstorefoodand drinks in theRefrigeratoronce
thetemperatureis sufficientlycool.
(_ Check the accessorylist below
Wa_r filler
(DA29-000Q3B)
L
(DAB0-00002C) fiL'_ing nut
Hex wrench Compression Compression
Faslener Waster
(DA60*00143B) (DAS0-O0O02C}
(DA62-O0305A} (DA74-00D70B}
REMOVING THE REFRIGERATOR DOORS
If your entrance won't allow the Refrigerator to pass easily Tools you will need
through it, you can remove the doors _[_=======" __ L_
Philips screwdriver 10ram Socket Wrench Allen wrench(3/16"}
o.
63
c
Disassemble the Refrigerator doors
1oWith the door closed, remove the top table((_)
using a Philips screwdriver, and then disconnect the
wires(_)o Remove hinge screws((_}) and ground
screw((_))
2. Lift the door straight up to remove,,
3. With a Philips head screwdriver, remove the two
screws( ['_ ) attached to the lower left and right
door hinges,
With an Allen Wrench(3/16"), remove the two hex
head bolts(@) attached to the lower left and right
door hinges,
Remove the lower left and right door hinges( @ )
Flat-blade screwdriver Pliers
%
Setting Up 9
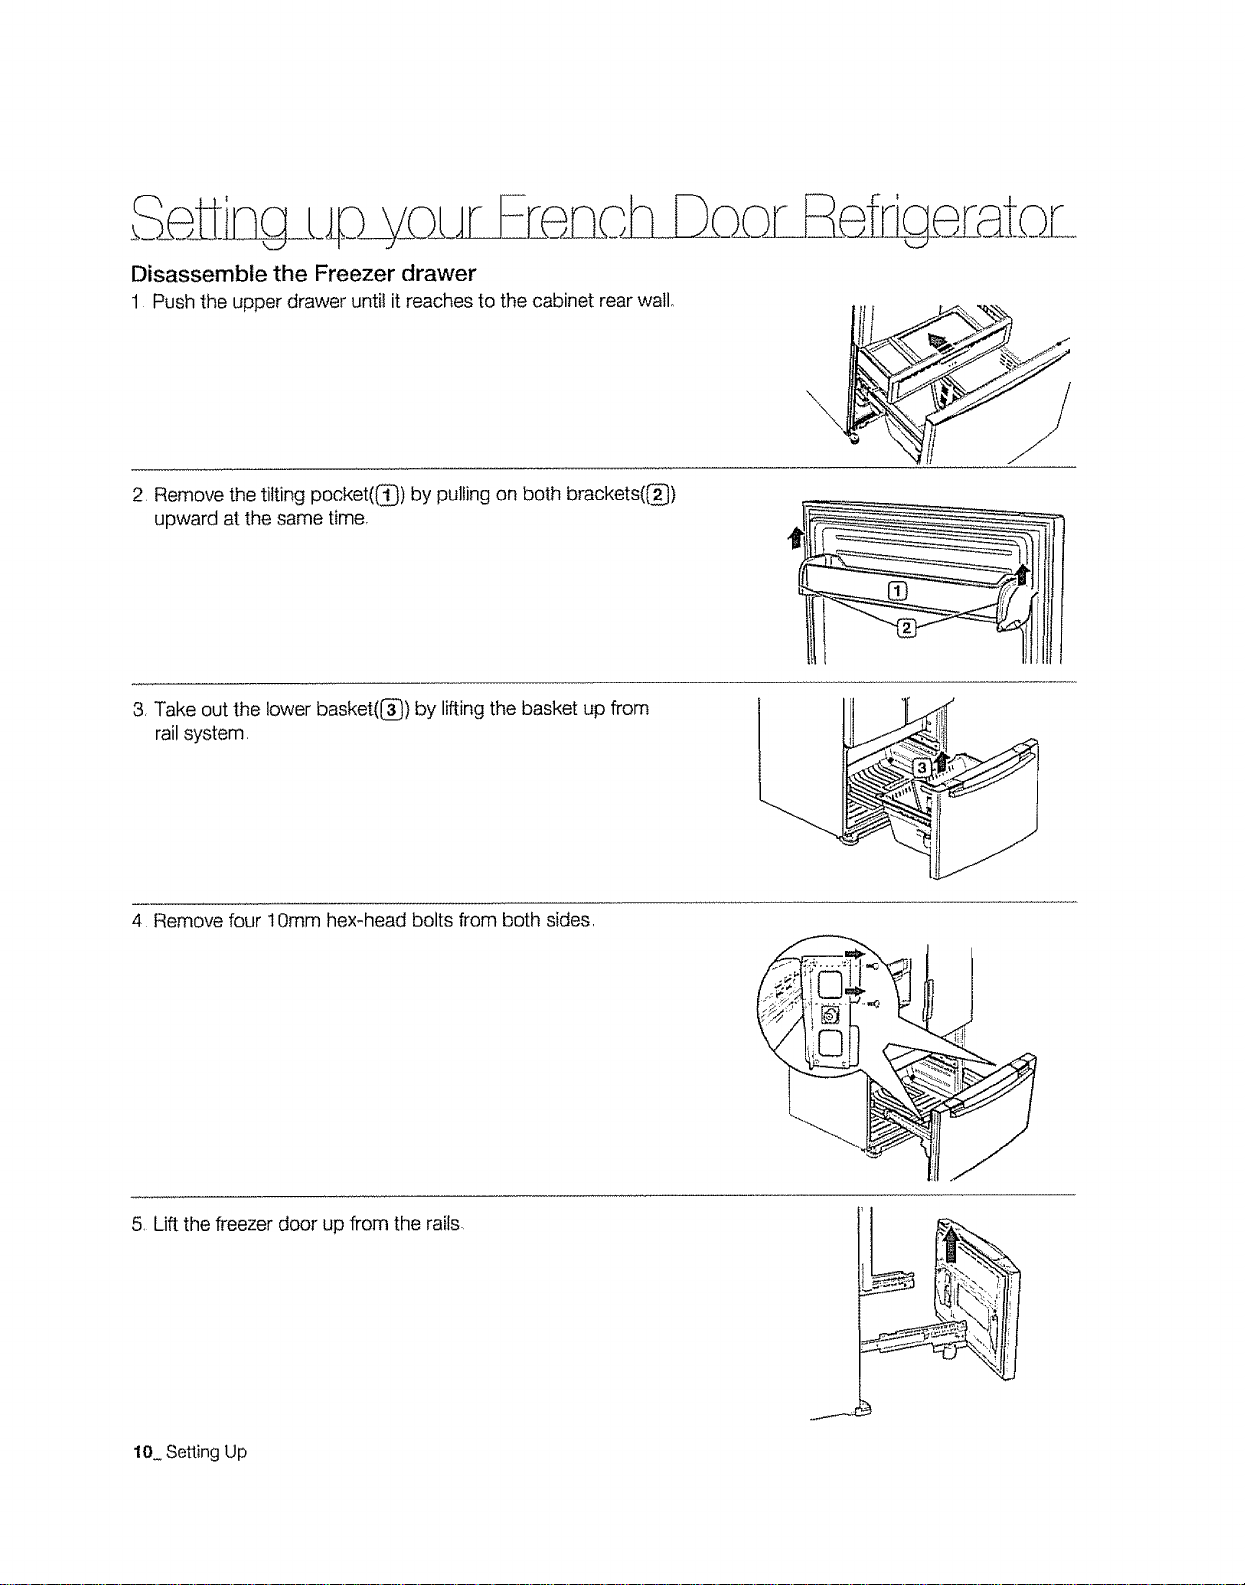
Disassemble the Freezer drawer
1 Push the upper drawer until it reaches to the cabinet rear wallo
2, Remove the tilting pocket(_-_) by pulling on both brackets(_)
upward at the same time,
3, Take out the lower basket(_) by lifting the basket up from
rail system,
4, Remove four 10mm hex-head bolts from both sides,
5, Uft the freezer door up from the rails,
10 Setting Up
REATTACHING THE REFRIGERATOR DOORS
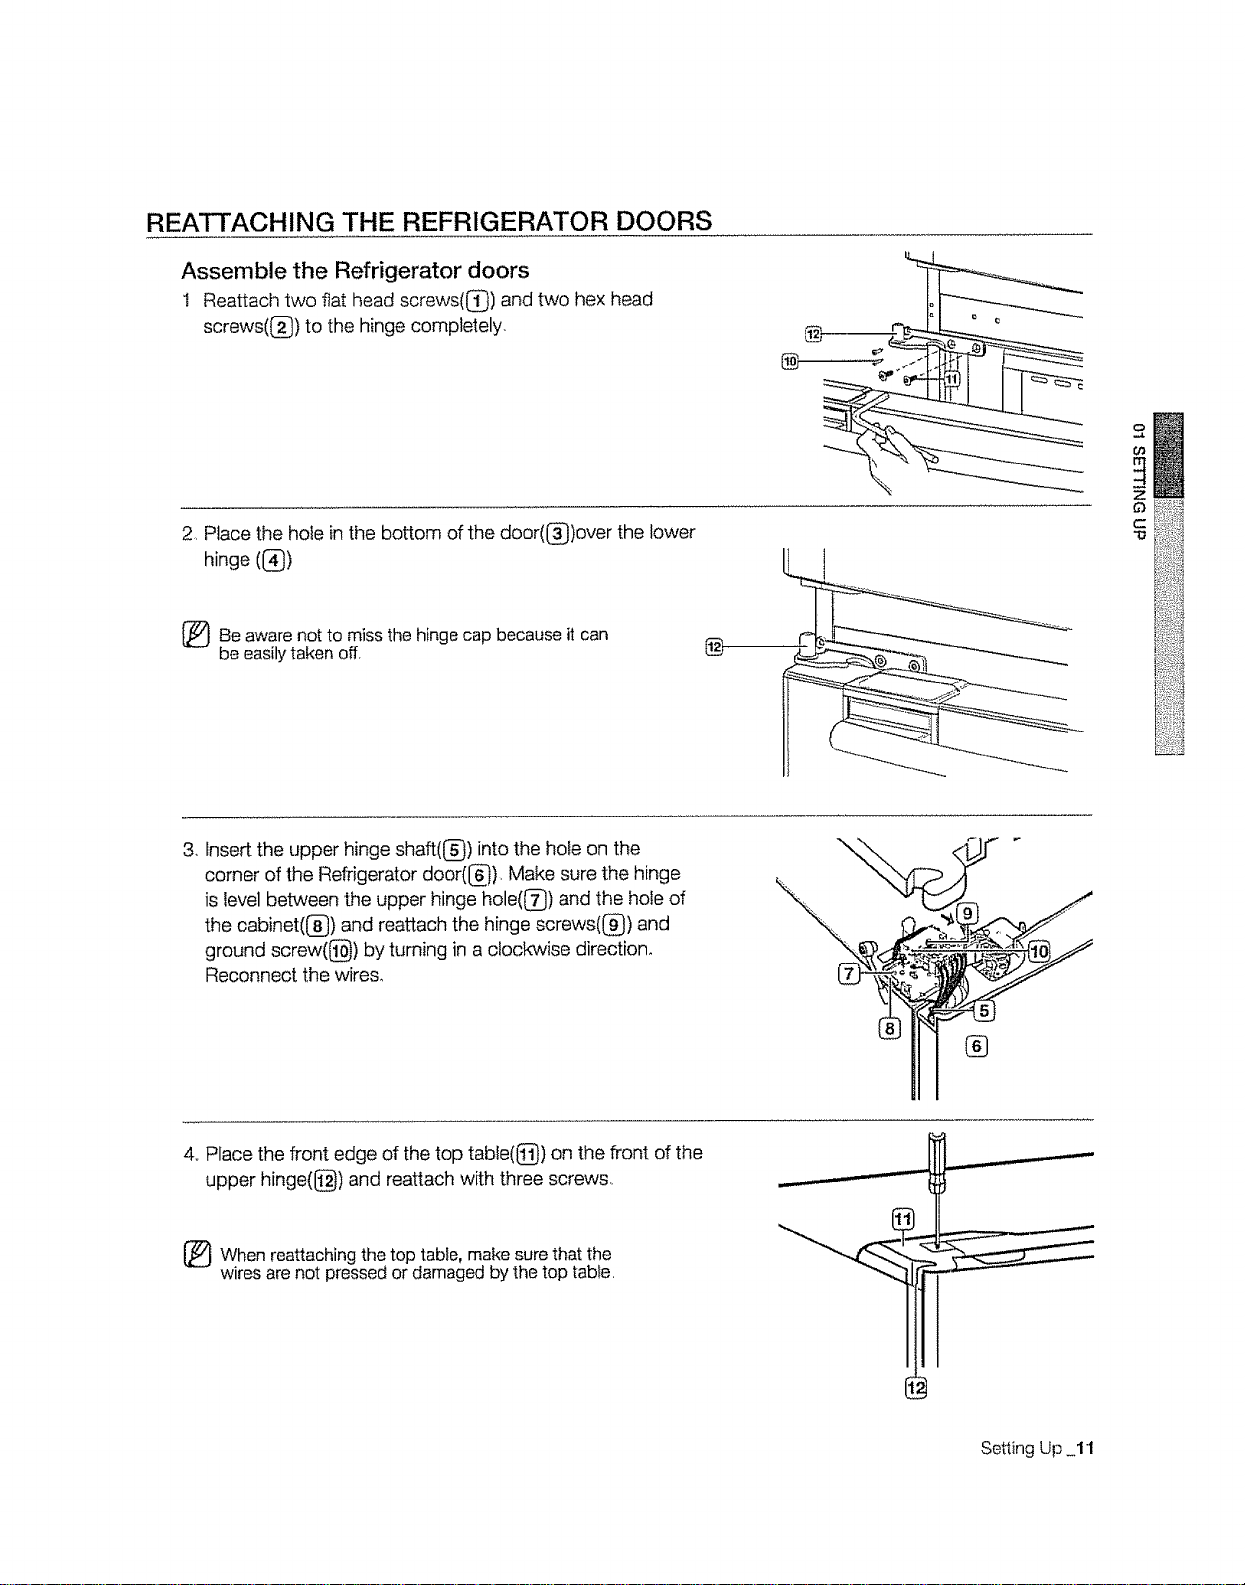
Assemble the Refrigerator doors
t Reattach two flat head screws(_) and two hex head
screws((_) to the hinge completely.
2 Place the hole in the bottom of the door((_)over the lower
hinge ((_)
@
@
(_Be aware not to miss the hinge cap because can
be easily taken off,
3, Insert the upper hinge shaft(_) into the hoseon the
corner of the Refrigerator door(_), Make sure the hinge
is level between the upper hinge hole((_) and the hole of
the cabinet((_) and reattach the hinge screws(_) and
ground screw((_) by turning in a clockwise direction_
Reconnect the wires,
4,,Place the front edge of the top table(@) on the front of the
upper hinge(@) and reattach with three screws,
it
®
_} When reattaching the top table, sure
wires are not pressed or damaged by the top table,
make that the
Setling Up 11

S_ettJngJ_JpS_c£_£E__e,_ZzDz_s__:__e_p_zat'" - " _'-
ASSEMBLE THE FREEZER DRAWER
1, Pull out the rails to the full length on each side of the cabinet evenly,
2_ Hang the freezer door front onto open slots on the sides.
3 Tighten four 10mm hex-head screws completely..
4. VViththe drawer pulled out fully, insert the lower basket (1_) into
the rail system.
5. Hook the ends of the tilting pocket ([Z}) into both brackets ([_),
and push down until they lock into place.
12 Setting Up

ADJUSTING THE DOORS
Now that the doors are back on the Refrigerator, you want to make sure the Refrigerator is level so you can
make final adjustments If the Refrigerator is not level, it will not be possible to get the doors perfectly even°
When the Left door is lower than the Right door.
Insert a flat-blade screwdriver into a notch on the left control lever, turn it clockwise or counter-clockwise
to level the left door,
Control Lever
Screwdriver
When the Left door is higher than the Right door.
Insert a fiat-blade screwdriver into a notch on the right control lever, turn it clockwise or counter-c!ockwise
to level the right door,
Control Lever ......
Screwdriver
_}We do not recommend making small adjustments with the control lever Instead, refer to the next page for the
best way to make minor adjustments to the doors,
Setting Up 13

&ek-t[. gp y" Ece Jt .D_ r Re£Jg_etoot
MAKING MINOR ADJUSTMENTS BETWEEN DOORS
Remember a level Refrigerator is necessary for getting the doors perfectly even, Ifyou need help, review the
previous section on leveling the Refrigerator°
When the left
door is lower
than the right
door..
'ii_Jdjustment
pad
1, If you open the drawer (1_}), you can see the lower hinge ((_),
2. Insert the supplied Allen Wrench(3/16") (J_}) into the shaft ((_) of the lower hinge,
3, Please adjust the height by turning the Allen Wrench(3/16") (_) cloclewise(_::::_}or
counter-clockwise(_:=sr:z),
®
When the left
door is higher
than the right
door
®
when you turn the Allen Wrench(3/16") counter_clockwise(_=¢7), the door will move up
1,,After adjusting the doors, please insert the supplied fastener-ring ((_) using a pair of pliers (_) in the
gap between the hinge-grommet (_) and the lower hinge((_) The number of fastener-rings you'll need
to insert depends on the gap,
O
Two fastener-rings are enclosed with the refrigerator
Thickness of each fastener-ring is 004 inch,
14 Setting Up

ADJUSTING THE FREEZER DRAWER LEVEL
Adiustmentpall I '
1.,Locate t_l_ight-ad_ster _)in the freezer
drawer,
Unscre@ _i_lfour Phillips screws ((_) slightly to loosen the door,
2. Loosen the controller screw((_)) with a Phillips
screwdriver,
3, Find the best level to align the door slope,,
FreezerDrawer
2
63
£;?;,y
®
L._
Example)The slope isabout2mm (008inch)as shown below,
plane
- Rotate the Height Adjuster to +2,0 to reduce the door
slope,
,,-* After adjustment, first tighten screw ((_) and then screw ((_)
Setting Up '15

CHECKING THE WATER DISPENSER LINE
A water dispenser isjust one of the helpful features on your new Samsung Refrigerator..To help promote better
health, the Samsung water filter removes unwanted particles from your water. However, it does not sterilize or
destroy microorganisms. You may need to purchase a water purifying system to do that.
Inorder for the ice maker to operate properly, a water pressure of 20-t 25 psi (pound per square inch) is
required.
Under normal conditions, a 170 cc (5.75 oz.) paper cup can be filled in 10 seconds.
If the Refrigerator is installed in an area with low water pressure (below 20psi), you can install a booster pump to
compensate for the tow pressure
Make sure the water storage tank inside the Refrigerator is properly filled. To do this, press the water dispenser
lever until the water runs from the water outlet
(_} Water line installation kits are available at extra cost your using a supply
contains copper tubing
from dealer We recommend water k_ that
Connecting to the water supply line
1, First, shut off the main water supply line and turn the ice-maker off
2, Locate the nearest cold, drinking water fine.
3 After connecting the water supply to the water filter, turn your main water supply back on and flush four
or more gallons into a bucket to clear and prime the water filter,
Water line installation kit
16_ Setting Up

INSTALLING THE WATER LINE
Connecting the water line to the Refrigerator.
There are several items that you need to purchase to complete this connection You
may find these items sold as a kit at your local hardware store_
• I/4" compression nut • copper tubing
°plastic tubing °ferrule
Plastic tubing@ ____ _.,_ Compression nutO
[Supplied) "-:_--J_ {1/4 "} (Supplied)
U
o.
Compression fitting
(Not supp ied)--Lj LJ/
!, Slip the
2, Tighten the
- If you are using
" nut ® through the suppit_plastic tubing ®,
ssion nut ® onto the l/4" com_,_sion fitting
tubing, slip the compression _ _ (not included) and ferrule (not included) on
copper tubing (not ,as shown.,
- If you are using I: insert the molded end of
fitting,
3, Tighten the compression nut ® )ression fitting, Do
4, Turn water on and check for any leakage,
(_ Onfy connect the water to a
if you have to repair or disassemble the water 3ine,cut
leak*free connection,
line drinkable
of the plastic tubing to rr sure you get a snug,
Installing the water filter.
1. Remove the water filter cover((_)
2 Remove the fixed cap by turning it counter clockwise°
Keep the cap in a safe place for later use if you don't
use the fitter,
3oRemove the water filter from the box and put a
replacement indicator sticker on the filter as shown.
Place a sticker on the filter that dates six months in (_
the future For example, if you install the water filter in
March, put the "SEP" sticker on the filter to remind you
to replace in September, That way you'll know when
it is time to replace the filter, Normally, a filter life is ----L_-
about 6 months, , ,
Compression nut@
(1/4") (Not supplied}
@,/_ (Supplied)
Plastic tubing@
® into the compression
hten the compression nut ®
, (monlh indicator)
®
sticker
63
c
33
Setting Up 17

4. Remove the filter cap and insert the filter into the filter
housing.
5. Slowly turn the water filter 90° clockwise to align with the
printing mark on the cover, locking the filter in position_
,_ ' I_
@ Cover lilter (_
Make sure to align the water filter label marl<with center of
cover filter printing as illustrated Remember, do not over-
tighten
_You should remove the right side upper glass shelf before installing water filters,
!,_! Turn unlil the label
i Separal_on
[ of red cap
Removing any residual matter inside the water
supply line after installing the water filter.
1 Turn ON the main water supply & turn ©FF the valve to
the water supply line.
2., Run water through the dispenser until the water runs clear
(approx. 6°7 minutes). This will clean the water supply
system and remove air from the lines.
3. Additional flushing may be required in some households°
4, Open the Refrigerator door and make sure there are no
water leaks coming from the water filter.
aligned
[_Be sure to flush the dispenser thoroughly or water may drip from the dispenser
This is due to the fact that there is still air in the line,
Z_ Test button
c^uno_ In case ice doesn't come out, pull out the ice bucket and press test button located on the right side of ice
maker
Test button
18_ Setting Up

Opera ng rSAMSU rench Door
...............................................................................................................................................................................................................
USING THE CONTROL PANEL
.......................7!
(@) Ice Off Button Press the Ice off button if you want to lure the ice-maker olf
Speeds up the time needed to freezeproducls in the Freezer It can be helpful ifyou need Io quickly
(I_) Power Freeze Button
freeze easilyspoiled ilems or if the temperature in lhe Freezerhas warmed dramatically (forexample, if
the door was left open)
o
t_
o
(@}) Freezer Button
((_) Fridge Button
((_}) Power Coo! Button
@_))E, Saver Button
Pressthe Freezer button to set the Freezerto your desired temperature You can set thetemperature
between 8°F and -14°F
Pressthe Ffidge bu_lon1oset the fridge to your desired temperature
You can set temperaturebe_,een 34°F and 46°F
Speeds up the time needed _ocool products inthe Refrigerator tl can be helpfulif you need to quickly
cool easilyspoiled ilems or if ',helemperalure in the fridge has warmed dramalically (Forexample, if lhe
door was lett open).
For belier energy efficiency, press E.Saver builon However. if condensation occurs on the door, turn
the E Sasverfunction off
Operating 19

S
USING THE DIGITAL DISPLAY
"Freezer Temp" indicates the current Freezer ternperature.
"Fridge Temp" indicates the current Refrigerator temperature+
French
Fridye Pow+++cool E Save_,X
0+0
-2*Fis _e_ommended 3B'F f_ Recommended
Power Freeze @
This icon will light up when you activate the "Power Freeze" feature "Power Freeze" is great whenyou
need a lot of ice,
When you have enough ice, just press the button again to cancel the "Power Freeze" mode,
tf you select "Power Freeze", the insidetemperature of the Freezerwil! decrease for about two and a half
hours,
Ice maker off
tf you don't need ice, press the "Ice off" button to save on water and energy consumption.
Power Cool
This icon will light up when you activate the "Power Cool" button For a quick fridge cool down, use
"Power Cool".
tf you select "Power Cool", the inside temperature of the Fridgewill decrease for about two and a half
hours
Filter Indicator
Filterd_JzrLqe(Hoicl 3 _.ec')
o)
When the filter indicator light is on, it is time to change the filter, Typically this happens about
every 6 months.
The filter Indicator will be Blue when you initially insert the water filter,
Timefilter indicator will be Light Pink when you have used your water filter for 5 months
The filter Indicator will be Red when you have used your water filter for 6 months,
After removing the old water filter and installing a new one (see page 30 for instructions on how to do
this), reset the indicator by pressing the "Fridge" and "Power Cool" button simultaneously for about 3
seconds+
Cooling off
Cooling off stops cooling in both the freezer and refrigerator compartments, but does not shut off
electrical power to the refrigerator, To use this feature, press Power Freeze and Freezer buttons
simultaneously for 3 seconds until an alert sound is heard. To cancel this mode, press the same
buttons again for 3 seconds, Even though power is turned off and then back on, it remains incooling
off mode,,
20 Operating

CONTROLLING THE TEMPERATURE
Controlling the Freezer temperature
The Freezer temperature can be set between 8°F and -14°F to suit your particular needs Press the
Freezer button repeatedly until the desired temperature is shown in the temperature display. Keep in
mind that foods like ice cream may melt at 4°F.
The temperature display will move sequentially from -14°F to 8°F,,When the display reaches 8°F, it wilt
begin again at -I4°F.
Five seconds after the new temperature is set, the display will again show the actual current freezer
temperature until the new temperature is reached.
Controlling the Refrigerator temperature
The Refrigerator temperature can be set between 46°F and 34°F to suit your particular needs Press
the Fridge button repeatedly until the desired temperature is shown in the temperature display,
The temperature control process for the Fridge works just like the Freezer process.
Press the Fridge button to set your desired temperature. After a few seconds, the Fridge will begin
adjusting towards the newly set temperature, This will be reflected in the digital display
[_) The temperature of the Freezer or the Refrigerator may rise from opening the doors too frequently, or if a
large amount of warm or hot food is placed ineither side.
This may cause the digital display to blink. Once the Freezer and Refrigerator temperature return to their
normal set temperatures, the blinking will stop
if the blinking continues, you may need to "reset" the Refrigerator Try unplugging the appliance, wait for
around 10 minutes and then plug the power cord back in
USING THE COLD WATER DISPENSER
Usingthe Water dispenser (RF266AB)
Place a glass underneath the water outlet and push gently
against the water dispenser lever with your glass, Make sure
the glass is in line with the dispenser to prevent the water from
splashing out
If you have just installed the Refrigerator or just installed a new
water filter, pour out the first six glassfuls of water to flush out
impurities in the water supply system Make sure water flows
cleanly before drinking,
Z_ If you have a long vacation or business trip, close the water
c^tmo_valve and shut off the water supply to the Refrigerator. This will help prevent accidental leakages
The water tank's capacity is approximately one third (I/3) of a gallon
Please wait I second before removing the cup after dispensing water to prevent spills
Operating 21

Opera-lingyour
PARTS AND FEATURES
Use this page to become more familiar with the parts and features of the Refrigerator,,
SU Fr®nohDoor
Spill
GlassShelf
Vertica! Hinged
Internal Water
D}spenser(RF266AB)
Vegetable & Fruit
Drawers
!ee
Ice Bin
(_ Tilling Pocket
Light
r_,_ ,_ = ,=IL_...__.__j ,=,,=,,= ,=,_ ,= 1
I!11_
Digita!Sensor
Control
Auto Door Closer
Dairy
/
Compartment(_
i
Water Filler
ItliftI Doo,Bins®
_' EggContainer _}
Cool Select
PantryTM [_
iht
Auto
Pull Out Drawer (_
22_ Operating
HH6BIBII!IOIIIBnl
Freezer Drawer Bin (_
I
Front Leg Cover

STORING FOOD IN THE REFRIGERATOR
((_)} DAIRY
COMPARTMENT
((_}) DOOR BINS
((_) TEMPERED GLASS
SHELVES
((_)) EGG CONTAINER
((_) VEGETABLE & FRUIT
DRAWERS
(_) COOL SELECT Can beused for large party trays, deti items, pizza, beverages or
PANTRY TM miscellaneousitems
(_Do not place any large articles of food under the lamp inthe Refrigerator An air sensor is located near the
lamp and if the sensor is blocked, your Refrigerator may become too cold Please place Vegetable and
Canbe used to storesmall dairy items like butter or margarine, yogurl or
cream cl_eesebricks
Designedlo handle large, bulky items such as gallons of milk or other large
bot%s and containers
Designedto be crack-resistant, the sh_ives can be used to store all types of food
and drinks Circular marks on the glass surface are anormal phenomenon
and can usuallybe wiped cleanwith adamp cloth
Best place to keep eggs
Piece the conlainer on theshelf lor easy access
Used to preservethe freshness of yourstored vegetablesand fruits
This drawer has been specil]caItydesigned to control the levelof humidity
within thecompadment Keep vegetables and fruits separate if possible
Fruits in the Vegetable and Fruits drawers to avoid freezing them, if the foods in your Refrigerator become
frozen, please set the temperature higher
z
63
STORING FOOD IN THE FREEZER DRAWER
: : :: :i:i Best use to store meats or dry foods Slored food shouldbe placed in
((_) AUTO PULL OUT : a container or wrapped securely usingfoil or other suitable wrapping
:::: ::DRAWER :::::
:::: .... : : materials.
:i_i::i:ii !::)/:!::::V!:: ::: :;'/!::i::i¸¸il¸
(_) TILTING POCKET:: Can beused for small packages of frozen food
: :: : : : i Youcan storea 16" pizza
:: :::::::::::::::::::::::::::::::::::: canbeusedtostoremea_anddryfoods
((_) FREEZER DRAWER :: Stored food shouldbe placed in a container or wrapped securely
:::: : :: i using foilor oilier suitablewrapping materiafs
_ Bottles shouldbe stored tightlytogether sothat they do not tip and fallout when the Refrigeratordoor is opened.
(_tf you plan to go away for a long time, empty the Refrigerator and turn it off. Wipe the excess moisture from
the inside of the appliance and leave the doors open. This helps keep odor and mold from developing
Operating _23

USING THE COOL SELECT PANTRY TM
The Cool Select PantryTM is a full-width drawer with adjustable
temperature control. This pantry can be used for large party
trays, dell items, pizza, beverages or miscellaneous items.
There is a temperature control which can adjust the amount of
cold air allowed into the pantry.
The control is located on the right sideof the pantry.
Selection Button
+
When "Deft" is selected, the temperature of the pantry can
be kept around 41°F(5°C)+This feature helps keep food
fresh for a long time.
Pantry temperature can be maintained under recommended
temperature setting(Freezer:-2°F, Fridge:38°F)
2..When "Fresh" is selected, the temperature of the pantry
can be kept around 38°F(3°C), This feature helps keep food
fresh for a longer time,
Pantry temperature can be maintained under recommended
temperature setting (Freezer : -2°F, Fridge : 38°F)
When "Chilled" is selected, the temperature of the pantry
can be kept around 34°F(1°C) This feature also helps keep
meat or fish fresh for a longer time.
Pantry temperature can be maintained under recommended
temperature setting (Freezer : -2°F, Fridge : 38°F)
Dell
pineapple
lemon
avocado
potato
®
Fruits and vegetables may be damaged when the "chilled" mode is set,
Do not store lettuce or other leafy produce in this pantry
Fresh Chilled
cucumbers +steaks
apples , hard cheeses
oranges cold cuts
grapes , bacon
zucchinis hot dogs
corn
\
Do not store glass bottles in this pantry If they are frozen, they can break and cause personal injury
USING THE TILTING POCKET
TheTilting Pocket can be used to store up to a 16" pizza if you
place it shown in the illustration,
24_ Operating
i

REMOVING THE REFRIGERATOR ACCESSORIES
1. Door Bins & Dairy Compartment
To remove - Simply lift the bin up and pull straight out
To replace * Slide it in above the desired location and push down
until it stops°
//_ Injury may occur if the door bins are not firmly assembled,
cAu_o_Do not allow children to play with bins Sharp comers of the bins
may cause injury
_) Do not adjust a bin that is loaded with food
2, Tempered Spill Proof Glass Shelves
To remove - Tilt up the frontof the shelf in the direction
shown ((_}) and lift it up vertically ((_), Pull
the shelf out,
To replace - Tilt the front of the shelf up and guide the
shelf hooks into the slots at a desired height
Then lower the frontof tile shelf so that the
hooks drop into the slots,
FrenchDoor
o
I'o
o
Z_ Glass shelves are heavy,
CA_ONUse special care when removing them.
3. Vegetable & Fruit Drawers
To remove - Pullthe drawer out to fullextension
Tilt up the front of drawer and pull straight out,
To replace - Insertthe drawer into the frame railsand push back
into place,
The glass shelf over the drawer is not firmly secured Be careful
c^u_o_when lifting,
Do not open the drawer while the pantry is open.
It may cause scratch or breakage to it's cover.
Operating 25

Ur
4. Cool Select Pantry TM
To remove the pantry- Pullthe pantry out to fullextension
Tilt up the front side of pantry and
pull straight out.
To replace the pantry - Push the rails to the back of the
Refrigerator, Place the drawer onto
the rails and slide the pantry back
until it is in place.
To remove the divider - Pull the pantry completely out to full extension and raisethe front side of the
divider to unhook itfrom the rearwail of the pantry, then lift the divider out,
S
French
To replace the divider - Hook the back of the dividerover the rearwall of the pantry and push the
USING THE DOORS
Tile Refrigeratordoors areequippedwith a doer openingand closingfeaturethat ensuresthat thedoorsclose allthe way
and aresecurelysealed.
Whenthe Refrigeratordoor is only partiallyopen, itwillautomaticallycloserThe door willstayopenwhenopened more than
around3 Inches.
divider down.
26 Operating

REMOVING THE FREEZER ACCESSORIES
1. Tilting Pocket
To remove - Pullthe brackets([_) upward untilyou heara
clicking sound and remove the pocket
To replace - Hook tile ends of the pocket into both brackets
((_]) and push down until it locks into place,
2. Auto Pull out Drawer
To remove - Pull the drawer out to full extension
Tilt up rear of drawer and lift straight out
To relocate - Placethe drawer onto the railsby tilting it up,
Lower the drawer into place until it is horizontal
and slidethe drawer in,
l
o
I'o
0
"o
m
3. Freezer Drawer Bin
To remove the drawer - Pullthe drawer out fully.
Tilt up the rear of the bin and lift it
out to remove
To replace the drawer - Piacethe bin into the rail assembly.
To remove the divider - Pull the divider straight up,
To replace the divider - Hook the top corners of dividerover
the hole of the bin.
Operating 27

Ope atngyour SUNOFreNchDoor
CLEANING THE REFRIGERATOR
Oaring for your Samsung French Door Refrigerator prolongs the life of your appliance and helps
keep it odor and germ-free,
Cleaning the Interior
Cleanthe inside walls and accessories with a mild
detergent and then wipe dry with a soft cloth..You can
remove the drawers and shelves for a more thorough
cteaning_Just make sure to dry drawers and shelves
before putting them back into place,
Cleaning the Exterior
Wipe timedigital panel and display panelwith a clean,
soft cloth. Spraywater onto the cleaning cloth instead
of spraying directly on the surface of timeRefrigerator.
It helpsensure an even distribution of moisture to the
sudace. The doors, handles and cabinet surfaces should
be cleanedwith a mild detergent and then wiped dry with
a soft clotheTo keep your appliance looking its best, the
exterior should be polished once or twice a year,
Z_ Do not use Benzene, Thinner or Clorox for cleaning. They may
cAu_o_damage the surface of the appliance and may cause fire.
Cleaning the water dispenser(RF266AB)
Use a damp cloth to clean the iceand water dispenser
Then wipe dry with a clean, soft cloth,
Cleaning the Rubber door seals
Ifthe rubberdoor seals are dirty, the doors may not close
properly, and the Refrigeratorwill not operate efficiently
Keep the door seals free of grit or grime by cleaning the
doors with a mild detergent and damp cloth. Wipe dry
with a clean, soft cloth.
Do not spray the Refrigerator with water while it is plugged in, as it may cause an electric shock
CAU_ONDOnot clean 1heRefrigerator with benzene, thinner or car detergent due to risk of fire.
Cleaning behind the Refrigerator
To keep cords and exposed parts free of dust and dirt accumulation, vacuum behind the appliance
once or twice a year
Do not removethe back cover Doingsomay causean electricshock
CAt.mON
28_ Operating

CHANGING THE INTERIOR LIGHTS
Z_ Before changing any of interior lights, unplug the Refrigerator from the power supply. If you are unsure
c,_rmNabout changing the lights after reading through these directions, contact your service center for help
Replacement bulbs for both freezer and fridge are available from your local home improvement or
electronics store Use replacement bulbs with size E26, maximum 60 watts.
o
o
"D
m
Changing the Interior Light in the Refrigerator
I. Unplug the power cord from the outlet,
2, Pullthe shield down while pushing it backwards to removeit.
3. Turn the bulb counterclockwise
4. Assembly is the reverse order of disassembly
Changing the Interior Lights in the Freezer Drawer
1, Unplug the power cord from the outlet
2.,Pull drawer out to full extension
3. Pull the shielddown while pushing it backwards to remove it.
4, Turn the butb counterclockwise,
5, Assembly is timereverseorder of disassembly,
z
Do not place fingers inside the cover. The lamp may be hot.
CAb_ON
Operating _29

Operatng rSAMSU FrenchDoor
..........................................................................................................................................................................................................................
CHANGING THE WATER FILTER
The "Filter Indicator" light lets you know when it is time to change your water filter cartridge° To
give you preparation time to get a new filter, the red light will come on just before the capacity
of the current filter runs out, Ohanging the filter on time provides you with the freshest, cleanest
water from your fridge,
1.Take a new water filterand put a month indicator sticker on the filter as shown.
The date onthe sticker must besix months fromthe current date, For example, if you are replacing
the water filter in March, put the "SEP" (September)sticker on the filter to remind you to replace in
September. Normal filterlife is about every 6 months.
2, Remove the new filter's protective cap and remove the old filter,.
3 Position and insertthe new filter into the filter housing
Slowly turn the water filter clockwise to alignwith the printing mark on the cover, locking the filter in
position Make sure to align the water filter label mark with the center of cover filter printing as illustrated,
Remember, do not over-tighteno
Cover filler
t ' ; ,obo,o,, oe,
indicator}
4, Once you havecompleted this process, hold the Fridge + Power Cool button simultaneously for 3
seconds to reset the filter schedule,.
3B'F is Re{ommended
5 Lastly, run about six glassfuls of water through water dispenser to cleanthe water supply system.
Make sure that water flows clearly again before drinking.
r_ Be sureto flushthedispenserthoroughlyor water may drip from the dispenser.
This is dueto the fact that there isstillair in the line.
Do NOTusethe water or icedispenserwithout a water filtercartridgebecausethe water linemay
become blocked
Ordering replacement Water Filter
For replacement waster filteryou can visit your local service center or contact the Samsung Parts distributor°
Be sure the replacement water filter has the SAMSUNG logo on the box and the water filter,
Link : http://wvcw,samsungparts.com
__)Fridge Power Cool E,Saver....
30 Operating

PROBLEM
TheRefrigeratordoesnotworkatall
oritdoesnotchiUsufficiently
Thefoodinthe
Refrigeratorisfrozen.
Youhearunusualnoiseorsounds,
SOLUTION : ........... : .... : ....
• Check that the power plug is properly connected
- Is the temperature control on the display panel set to the correct temperature?
Try setting it to a lower temperature
• Is the Refrigerator in direct sunlight or located near a Ileat source?
• Is the back of the Refrigerator too close to the wall and therefore keeping air frorn
circulation ?
• Is the temperature control on the display set to the correct temperature?
Trysetting it to a warmer temperature.
aIs the temperature in the room too low?
• Did you store the food with high water content in the coldest part of the
Refrigerator? Try moving those items into the body of the Refrigerator instead of
keeping them in the Cool Select PantryT_,L
• Check that the Refrigerator is teve!and stable
oIs the back of the Refrigerator too close the wail and therefore keeping air from
circulating?
° Was anyIhing dropped behind or under the Refrigerator?
. A "ticking" sound is heard from inside the Refrigerator Itis normal and occurs
because various accessories are contracting or expanding in relation to the
temperature of timeRefrigerator interior
o
--4
o
w
r-
I"11
60
3:
0
o
-4
Thefrontcornersandverticalhinged
• Some heat is normal asantFcondensators are installed in tt_evedical hinged section
sectionoftheappliancearehotand
condensationisoccumng,
Iceisnotharvesting,
Youcanhearwaterbubblinginthe
° Did you wait for t2 hours after installation of the water supply line before making ice?
• Is the water line connected and the shut-off valve open?
oDid you manually stop the ice making function?
• Is the Freezer temperature too warm? Try setting the Freezer temperature lower,
. This is normal, The bubbling comes from the Refrigerator coolant liquid circulating
Refrigerator.
ThereisabadsmellintheRefrigerator.
FrostformsonthewallsoftheFreezer,
Waterdispenserisnotfunctioning,
° Check for spoiled food
• Foods with strong odors(for example, fish)should be tightly covered
• Clean out your Freezer periodically and throw away any spoiled or suspect food,
,,Is the airvent blocked? Remove any obstructions so air can circulate freely
• Allow sufficient space between the foods stored for eflTcientair circulation.
ols the Freezerdrawer closed properly?
oIs the water lineconnected and the shuFoff valve open?
oHas thewater supply line tubing been crushed or kinked?
,,ls the waler tank frozenbecause the Refrigerator temperature is too low?
of the Refrigerator to prevent condensation
Is the Refrigerator door ajar?Condensation can occur when you leave the door open
for a long time
through the Refrigerator
Make sure the tubing is free and clear of any obstruction
Try selecting a warmer setting on the main display panel
Troubleshooting _31

\
SAMSUNG REFRIGERATOR_(26 C_UBIC F_ET AND LARGER CAPAClT'_
LIMITED WARRANTY TO ORIGINAL PURCHASER
This Samsung brand product, as supplied and distributed by Samsung Electronics America, Inc, (Samsung)
and delivered new, in the original carton to the original consumer purchaser, is warranted by Samsung against
manufacturing defects in materials and workmanship for a limited warranty period of:
One (1) Year Parts and Labor on Refrigerator
Five (5) Years Parts and Labor on Sealed Refrigeration System Only*
(*Compressor, evaporator, condenser, drier, connecting tubing)
This limited warranty begins on the original date of purchase, and isvalid only on products purchased and
used in the United States. To receive warranty service, the purchaser must contact Samsung for problem
determination and service procedures. Warranty service can only be performed by a Samsung authorized
service center. The original dated bil!of sale must be presented upon request as proof of purchase to Samsung
or Samsung authorized service center.
Samsung will repair or replace any part found to be defective, at our option and at no charge as stipulated
herein, with new or reconditioned parts during the limited warranty period specified above. All replaced parts
and products become the property of Samsung and must be returned to Samsung. Replacement parts and
products assume the remaining original warranty, or ninety (90) days, whichever is longer
In-home service will be provided during the warranty labor period subject to availability within the contiguous
United States° In-home service is not available in all areas..To receive in-home service, the product must be
unobstructed and accessible from floor level to service personnel If during in-home service repair cannot be
completed, it may be necessary to remove, repair and return the product. If in-home service is unavailable,
Samsung may elect, at our option, to provide for transportation of our choice to and from a Samsung
authorized service center..Otherwise, transportation to and from the Samsung authorized service center is the
responsibility of the purchaser
This limited warranty covers manufacturing defects in materials and workmanship encountered in normal,
noncommercial use of this product, and shall not apply to the following, including, but not limited to: damage
which occurs in shipment; delivery and installation; applications and uses for which this product was not
intended; altered product or serial numbers; cosmetic damage or exterior finish; accidents, abuse, neglect, fire,
water, lightning or other acts of nature; use of products, equipment, systems, utilities, services, parts, supplies,
accessories, applications, installations, repairs, external plumbing and leaks, external wiring, circuit breakers,
fuses or connectors not supplied and authorized by Samsung, or which damage this product or result in service
problems; incorrect electrical line voltage, fluctuations and surges; customer adjustments and failure to follow
operating instructions, cleaning, maintenance and environmental instructions that are covered and prescribed in
the instruction book; loss of food due to spoilage; consumable items including filters and light bulbs.
32 Troubleshooting

THERE ARE NO EXPRESSWARRANTIES OTHER THAN THOSE LISTED AND DESCRIBED ABOVE, AND
NO WARRANTIES WHETHER EXPRESS OR IMPLIED, INCLUDING, BUT NOT LIMITED TO, ANY IMPLIED
WARRANTIES OF MERCHANTABILITY OR FITNESS FOR A PARTICULAR PURPOSE, SHALL APPLY
AFTER THE EXPRESS WARRANTY PERIODS STATED ABOVE, AND NO OTHER EXPRESS WARRANTY
OR GUARANTY GIVEN BY ANY PERSON, FIRM OR CORPORATION WITH RESPECT TO THIS PRODUCT
SHALL BE BINDING ON SAMSUNG. SAMSUNG SHALL NOT BE LIABLE FOR LOSS OF REVENUE OR
PROFITS, FAILURE TO REALIZE SAVINGS OR OTHER BENEFITS, OR ANY OTHER SPECIAL, INCIDENTAL
OR CONSEQUENTIAL DAMAGES CAUSED BY THE USE, MISUSE OR INABILITY TO USETHIS PRODUCT,
REGARDLESS OF THE LEGAL THEORY ON WHICH THE CLAIM IS BASED, AND EVEN IF SAMSUNG
HAS BEEN ADVISED OF THE POSSIBILITY OF SUCH DAMAGES. NOR SHALL RECOVERY OF ANY KIND
AGAINST SAMSUNG BE GREATER IN AMOUNT THAN THE PURCHASE PRICE OF THE PRODUCT SOLD BY
SAMSUNG AND CAUSING THE ALLEGED DAMAGE. WITHOUT LIMITING THE FOREGOING, PURCHASER
ASSUMES ALL RISK AND LIABILITY"FORLOSS, DAMAGE OR INJURY TO PURCHASER AND PURCHASER'S
PROPERTY AND TO OTHERS AND THEIR PROPERTY ARISING OUT OF THE USE, MISUSE OR INABILITY TO
USE THIS PRODUCT SOLD BY SAMSUNG NOT CAUSED DIRECTLY BY THE NEGLIGENCE OF SAMSUNG
THIS LIMITED WARRANTY SHALL NOT EXTENDTO ANYONE OTHER THAN THE ORIGINAL PURCHASER
OF THIS PRODUCT, IS NONTRANSFERABLE AND STATES YOUR EXCLUSIVE REMEDY
Some states do not allow limitations on how long an implied warranty lasts, or the exclusion or limitation of
incidental or consequential damages, so the above limitations or exclusions may not apply to you. This warranty
gives you specific legal rights, and you may also have other rights, which vary from state to state.
To obtain warranty service, please contact Samsung at:
SAMSUNG CUSTOMER CARE CENTER
Samsung Electronics America, Inc. 400 Valley Road Suite 201 ML Arlington, NJ 07956
1-800-SAMSUNG (1_800-726-7864) and w-ww.samsung.com
o
4_
>
z
Troubleshooting _33


QUESTIONS OR COMMENTS?
COUNTRY
US
CANADA
CALL : OR VISIT US ONLINE AT
800-SAMSUNG
(800-726*7864) wve_vsamsung com
800-SAMSUNG
(800-726-7864) w_tw samsung com/ca
WRITE
Samsung Electronics America, Inc 400 Valley
Road Suite 201 Mt Arlington, NJ 07956
Samsung Electronics Canada lnc Customer
Service, 55 Standish Court Mississauga, Ontario
L5R 4B2 Canada
Code No, DA68-01739C REV(0,,5)
 Loading...