

100 % "
Recycled Paper
This manual is made with 100 % recycled paper.
,/
the possibilities
Thank you for purchasing this Samsung product.
Free Standing Appliance
Content
SAFETY INFORMATION ................................................................................................... 2
SETTING UP YOUR FRENCH DOOR REFRIGERATOR ......................................................... 9
OPERATING YOUR FRENCH DOOR REFRIGERATOR ......................................................... 22
TROUBLESHOOTING ................................................................................................... 50
SAFETY INFORMATION
Before using your new Samsung French Door
Refrigerator, please read this manual thoroughly to
ensure that you know how to operate the features
and functions that your new appliance offers
safely and efficiently.
This appliance is not intended for use by persons
(including children) with reduced physical,
sensory, or mental capabilities, or those who lack
experience and knowledge, unless they have
been given supervision or instruction concerning
the use of the appliance by a person responsible
for their safety.
Because the following instructions cover various
models, the characteristics of your refrigerator
may differ slightly from the refrigerator described
in this manual.
If you have any question, contact us at
1-800-SAMSUNG or find help and information
online at www.samsung.com
Important safety symbols and
precautions:
Z_ WARNING
Hazards or unsafe practices that may result in
severe personal injury or death.
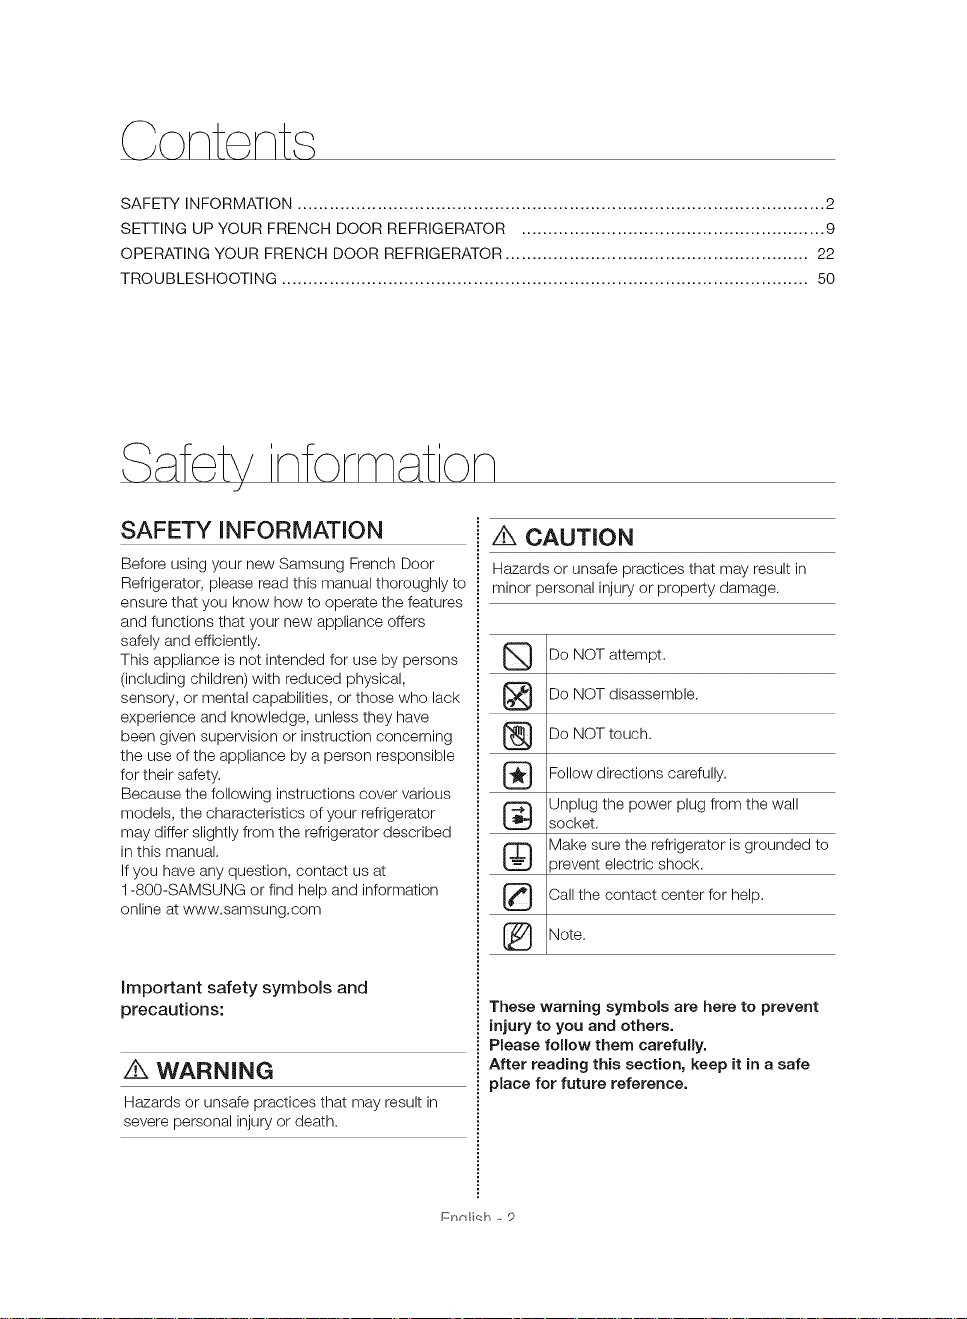
/t,, CAUTION
Hazards or unsafe practices that may result in
minor personal injury or property damage.
Do NOT attempt.
Do NOT disassemble.
Do NOT touch.
Follow directions carefully.
Unplug the power plug from the wall
socket.
Make sure the refrigerator is grounded to
)revent electric shock.
Call the contact center for help.
[_ Note.
These warning symbols are here to prevent
injury to you and others.
Please follow them carefully.
After reading this section, keep it in a safe
place for future reference.
Fr_liqh - 9
A WARNING
CRITICAL INSTALLATION
WARNINGS
• Do not install the refrigerator in a damp
location or place where it may come in
contact with water.
Deteriorated insulation on electrical parts may
cause an electric shock or fire.
• Do not place this refrigerator in direct sunlight
or expose itto the heat from stoves, room
heaters, or other appliances.
• Do not plug several appliances into the same
multiple power strip.
The refrigerator should always be plugged into
its own individual electrical outlet which has a
voltage rating that matches the voltage listed
on the refrigerator's rating plate.
This provides the best performance and
also prevents overloading of house wiring
circuits, which could cause a fire hazard from
overheated wires.
• Ifthe wall socket is loose, do not insert the
power plug.
There is a risk of electric shock of fire.
• Do not use a power cord that has cracks or
abrasion damage along its length or at either
end.
• Do not bend the power cord excessively or
place heavy objects on it.
• Do not twist or tie the power cord.
• Do not hook the power cord over a metal
object, place a heavy object on the power
cord, insert the power cord between objects,
or push the power cord into the space behind
the appliance.
• When moving the refrigerator, be careful not to
roll over or damage the power cord.
This may result in an electric shock or fire.
• Never unplug your refrigerator by pulling on the
power cord.
Always grip the plug firmly and pull straight out
from the outlet.
Damage to the cord may cause a short-circuit,
fire, and/or electric shock.
• Do not use aerosols near the refrigerator.
Using aerosols near the refrigerator may cause
an explosion or fire.
• Do not install this appliance near a heater or
inflammable material.
• Do not install this appliance in a humid, oily,
Engl sh -
or dusty location, or in a location exposed to
direct sunlight or water (rain, etc.).
Do not install this appliance in a location where
gas may leak.
This may result in an electric shock or fire.
This appliance should be positioned in such a
way that it is accessible to the power plug.
Failing to do so may result in an electric shock
or fire due to electric leakage.
• This refrigerator must be properly
located and installed in accordance
with the instructions in this manual
• Connect the power plug in the proper position
• When moving the refrigerator, be careful not to
• Make sure that the power plug is not crushed
• Keep the packing materials out of reach of
• The appliance must be positioned so that the
• You need to remove all the protective plastic
• Children should be supervised to ensure that
3
before you use it.
with the cord hanging down.
Ifyou connect the power plug upside down,
the wire can get cut off and cause a fire or
electric shock.
roll over or damage the power cord.
This constitutes a fire hazard.
or damaged by the back of the refrigerator.
children.
There is a risk of death from suffocation if a
child puts the packing materials on his or her
head.
plug is accessible after installation.
Failing to do so may result in an electric shock
or fire due to electric leakage.
film before you initially plug the product in.
they do not play with the fastener.
There is a risk of death from suffocation if a
child swallows the fastener.
Pay special attention to children because it can
be dangerous.
Keep the fastener out of reach of children.
• The refrigerator must be safely
grounded.
Always make sure that you have grounded the
refrigerator before attempting to investigate or
repair any part of the appliance.
Power leakages can cause severe electric
shock.
Never use gas pipes, telephone lines, or other
potential lightning attractors as an electrical
ground.
Improperuseofthegroundingplugcanresult
inariskofelectricshock.
Ifitisnecessarytouseanextensioncord,use
onlya3-wireextensioncordthathasa3-blade
groundingpluganda3-slotreceptaclethatwill
accepttheplugontheappliance.
Themarkedratingoftheextensioncord
shouldbeAC115-120V,10A,ormore.
Ifagroundingadapterisused,makesurethe
receptacleboxisfullygrounded.
Plugthepowerplugintothewallsocketfirmly.
Donotuseadamagedpowerplug,damaged
powercord,orloosewallsocket.
Thismayresultinanelectricshockorfire.
Ifthepowercordisdamaged,
haveitreplacedimmediatelybythe
manufactureroroneofitsservice
agents.
Z_ CAUTION
INSTALLATION CAUTIONS
• Allow sufficient space around the
refrigerator and install it on a flat
surface.
Ifyour refrigerator is not level, the internal
cooling system may not work correctly.
Keep the ventilation space in the appliance
enclosure or mounting structure clear of
obstructions.
• Allow the appliance to stand for 2 hours after
installation.
• We strongly recommend you have a qualified
technician or service company install the
refrigerator.
Failing to do so may result in an electric shock,
fire, explosion, problems with the product, or
injury.
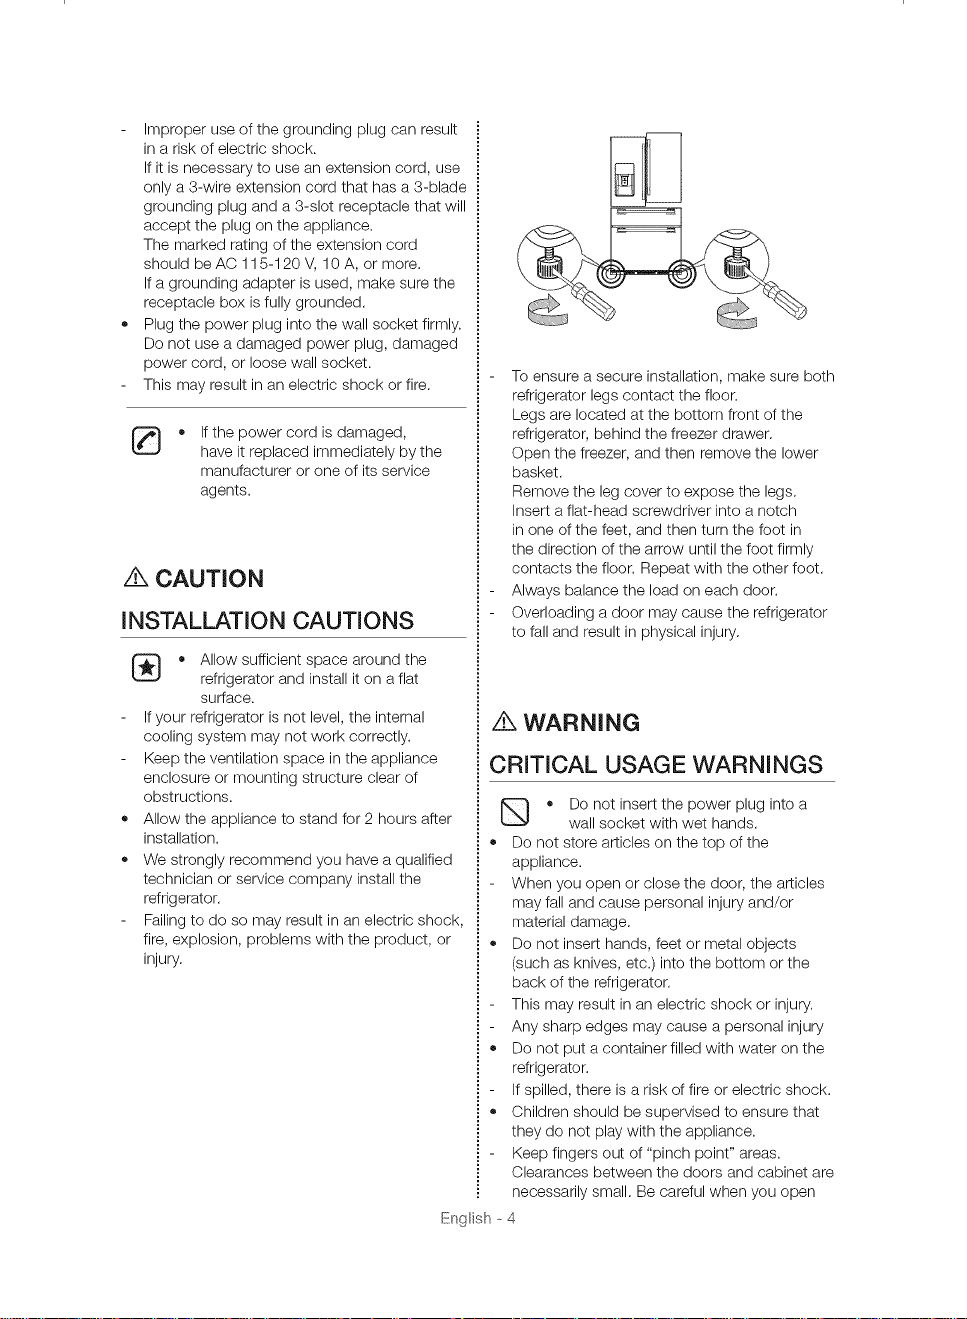
To ensure a secure installation, make sure both
refrigerator legs contact the floor.
Legs are located at the bottom front of the
refrigerator, behind the freezer drawer.
Open the freezer, and then remove the lower
basket.
Remove the leg cover to expose the legs.
Insert a flat-head screwdriver into a notch
in one of the feet, and then turn the foot in
the direction of the arrow until the foot firmly
contacts the floor. Repeat with the other foot.
Always balance the load on each door.
Overloading a door may cause the refrigerator
to fall and result in physical injury.
/K WARNING
CRITICAL USAGE WARNINGS
• Do not insert the power plug into a
wall socket with wet hands.
Do not store articles on the top of the
appliance.
When you open or close the door, the articles
may fall and cause personal injury and/or
material damage.
Do not insert hands, feet or metal objects
(such as knives, etc.) into the bottom or the
back of the refrigerator.
This may result in an electric shock or injury.
Any sharp edges may cause a personal injury
Do not put a container filled with water on the
refrigerator.
If spilled, there is a risk of fire or electric shock.
Children should be supervised to ensure that
they do not play with the appliance.
Keep fingers out of "pinch point" areas.
Clearances between the doors and cabinet are
necessarily small. Be careful when you open
Engl sh -
4
thedoorsifchildrenareinthearea.
• Donotletchildrenhangonthedoorordoor
bins.Aseriousinjurymayoccur.
• Donotletchildrengoinsidetherefrigerator.
Theycouldbecometrapped.
• Donotinsertyourhandsintothebottomarea
undertheappliance.
Anysharpedgesmaycausepersonalinjury.
• Donotletchildrensteponadrawer.
Thedrawermaybreakandcausethemtoslip.
• Donotoverfilltherefrigeratorwithfood.
Whenyouopenthedoor,anitemmayfallout
andcausepersonalinjuryormaterialdamage.
• Donottouchtheinsidewallsofthefreezeror
productsstoredinthefreezerwithwethands.
Thismaycausefrostbite.
• Neverputfingersorotherobjectsintothe
waterdispenserhole,icechute,oricemaker
bucket.
Itmaycausepersonalinjuryormaterial
damage.
• Donotuseorplaceanysubstancessensitive
totemperaturesuchasinflammablesprays,
inflammableobjects,dryice,medicine,or
chemicalsnearorinsideoftherefrigerator.
• Donotkeepvolatileorinflammableobjects
orsubstances(benzene,thinner,propane
gas,alcohol,ether,LPgas,andothersuch
products)intherefrigerator.
Thisrefrigeratorisforstoringfoodonly.
Thismayresultinfireorexplosion.
• Donotstorepharmaceuticalproducts,
scientificmaterials,ortemperaturesensitive
productsintherefrigerator.
Productsthatrequirestricttemperature
controlsmustnotbestoredintherefrigerator.
• Donotplaceoruseanelectricalappliance
insidetherefrigerator,unlessitisofatype
recommendedbythemanufacturer.
• Donotstandontopoftheapplianceorplace
objects(suchaslaundry,lightedcandles,
lightedcigarettes,dishes,chemicals,metal
objects,etc.)ontheappliance.
Thismayresultinanelectricshock,fire,
problemswiththeproduct,orinjury.
Donotputacontainerfilledwithwateronthe
appliance.
Ifspilled,thereisariskoffireorelectricshock.
• Donotusemechanicaldevicesoranyother
meanstoacceleratethedefrostingprocess,
otherthanthoserecommendedbythe
manufacturer.
• Donotdamagetherefrigerantcircuit.
• Donotsprayvolatilematerialsuchas
insecticideontothesurfaceoftheappliance.
Aswellasbeingharmfultohumans,it
mayalsoresultinanelectricshock,fire,or
problemswiththeproduct.
• NeverstaredirectlyattheUVLEDlampfor
longperiodsoftime.
Thismayresultineyestrainduetothe
ultravioletrays.
• Donotattempttorepair,disassemble,
ormodifytheapplianceyourself.
• Donotuseanyfuse(suchascooper,steel
wire,etc.)otherthanastandardfuse.
Ifyourapplianceneedstoberepairedor
reinstalled,contactyournearestservicecenter.
Failingtodosomayresultinanelectricshock,
fire,problemswiththeproduct,orinjury.
• IftheinteriororexteriorLEDlamphasgone
out,pleasecontactyournearestservice
center.
• Childrenshouldbesupervisedto
ensurethattheydonotplaywiththe
appliance.
Keepfingersoutof"pinchpoint"areas.
Clearancesbetweenthedoorsandcabinetare
necessarilysmall.Becarefulwhenyouopen
thedoorsifchildrenareinthearea.
• Donotletchildrenhangonthedoor.
Aseriousinjurymayoccur.
• Donotletchildrengoinsidetherefrigerator.
Theycouldbecometrapped.
• Bottlesshouldbestoredtightlytogetherso
thattheydonotfallout.
• Thisproductisintendedonlyforthestorageof
foodinadomesticenvironment.
• Ifagasleakisdetected,avoidanynaked
flamesorpotentialsourcesofignition,andair
theroominwhichtheapplianceisstandingfor
severalminutes.
Donottouchtheapplianceorpowercord.
Donotuseaventilatingfan.
Asparkmayresultinexplosionorfire.
UseonlytheLEDLampsprovidedbythe
manufactureroritsserviceagents.
Iftherefrigeratoremitsaburningsmell
orsmoke,unplugtherefrigerator
immediatelyandcontactyour
SamsungElectronicsservicecenter.
Englsh-5
• Ifyouexperiencedifficultychanginganon-LED
light,contactaSamsungservicecenter.
• IftheproductisequippedwithLEDLamps,do
notdisassembletheLampCoversandLED
Lampsyourself.
Pleasecontactyourserviceagents.
• Ifdustorwaterenterstherefrigerator,unplug
therefrigeratorandcontactyourSamsung
Electronicsservicecenter.
Thereisariskoffire.
/_ CAUTION
USAGE CAUTIONS
G • Do not re-freeze frozen foods that
• Use only the ice maker provided with the
• Have the refrigerator's water supply installed
• If you won't be using the refrigerator for a very
have thawed completely.
Do not place carbonated or fizzy
drinks in the freezer compartment.
Do not put bottles or glass containers
in the freezer.
When the contents freeze, the glass may break
and cause personal injury.
refrigerator.
by a suitably qualified person and connected
only to a potable water supply.
To operate the ice maker properly, water
pressure of 20 - 125 psi (138 - 862 kPa) is
required.
If you will be away from home for a long period
of time (on vacation, for example) and won't
be using the water or ice dispensers, close the
water valve.
Otherwise, water leakage may occur.
long period of time, (3 weeks or more) empty
the refrigerator, unplug it, close the water
valve, wipe excess moisture from the inside
walls, and leave the doors open to prevent
odors and mold.
Service Warranty and Modification.
Any changes or modifications
performed by a 3rd party on this
finished appliance are not covered
under Samsung warranty service, nor
is Samsung responsible for safety
issues that result from 3rd party
modifications.
• Do not block the air vents inside the
refrigerator.
If the air vents are blocked, especially with
a plastic bag, the refrigerator can be over
cooled.
If this cooling period lasts too long, the water
filter may break and cause water leakage.
• If the refrigerator is disconnected from the
power supply, you should wait for at least five
minutes before plugging it back in.
• If you have a long vacation planned or do
not intend to use the refrigerator for a long
period of time, (3 weeks or more) empty the
refrigerator, pull out the power plug, close
the water valve, wipe excess moisture from
the inside walls, and leave the doors open to
prevent odors and mold.
Letting the refrigerator run long periods of time
without using it can cause the insulation to
deteriorate and may cause a fire.
• To get the best performance from the product:
Do not place food too close to the vents at the
rear of the appliance as it can obstruct free air
circulation inthe refrigerator compartment.
Wrap food up properly or place it in airtight
containers before putting it into the refrigerator.
Do not place glass bottles or carbonated
beverages in the freezer.
They can freeze and break.
Broken beverage containers can cause injury.
Please observe maximum storage times and
expiration dates of frozen goods.
There is no need to disconnect the refrigerator
from the power supply if you will be away for
less than three weeks.
However, if you will be away for more than
three weeks, remove all the food, unplug the
refrigerator, close the water valve, wipe excess
moisture from the inside walls, and leave the
doors open to prevent odors and mold.
• Fillthe water tank and ice cube trays with
potable water only (tap water, mineral water, or
purified water).
Do not fill the tank with tea or a Sports drink.
This may damage the refrigerator.
• Do not strike or apply excessive force to any
glass surface.
Broken glass may result in a personal injury
and/or property damage.
• Ifthe product is flooded, make sure to
contact your nearest service center.
There is a risk of electric shock or fire.
Englsh - 6
/ik CAUTION
/_ WARNING
CLEANING CAUTIONS
• Do not spray water directly on the
inside or outside the refrigerator.
There is a risk of fire or electric shock.
• Do not use a hair dryer to dry the inside of the
refrigerator.
• Do not place a lighted candle in the refrigerator
to remove bad odors.
This may result in an electric shock or fire.
• Use a clean, dry cloth to remove any
foreign matter or dust from the power
plug blades.
Do not use a wet or damp cloth when
cleaning the plug.
Otherwise, there is a risk of fire or electric
shock.
• Before cleaning or performing
maintenance, unplug the appliance
from the wall socket.
Failing to do so may result in an electric shock
or fire.
z_ WARNING
• This product contains chemicals known to
the State of California to cause cancer and
reproductive toxicity.
CRITICAL DISPOSAL
WARNINGS
• DANGER : Risk of child entrapment.
Before you throw away your old
refrigerator or freezer:
Take off the doors and door latch.
Leave the shelves in place so that children
cannot easily climb inside.
Children trapped inside a refrigerator can hurt
themselves or suffocate to death.
Please dispose of the packaging material from
this product in an environmentally friendly
manner.
• Ensure that none of the pipes on the back of
the appliance are damaged prior to disposal.
• R-600a or R-134a is used as a refrigerant.
Check the compressor label on the rear of
the appliance or the rating label inside the
fridge to see which refrigerant is used for your
refrigerator.
Ifthis product contains flammable gas
(Refrigerant R-600a), contact your local
authority in regard to safe disposal of this
product.
• When disposing of this refrigerator, remove the
door/door seals and door latch so that small
children or animals cannot become trapped
inside.
Children should be supervised to ensure that
they do not play with the appliance.
Iftrapped inside, the child may get hurt or
suffocate to death.
• Cyclopentane is used in the insulation.
The gases inthe insulation material require a
special disposal procedure.
Please contact your local authorities in regard
to the environmentally safe disposal of this
product.
• Keep all packaging materials well out of the
reach of children, as packaging materials can
be dangerous to children.
Ifa child places a bag over his or her head, the
child could suffocate.
Engl sh- 7
ADDITIONAL TIPS FOR
PROPER USAGE
• In the event of a power failure, call the local
office of your Electricity Company and ask how
long it is going to last.
Most power failures that are corrected in an
hour or two will not affect your refrigerator
temperatures.
However, you should minimize the number of
door openings while the power is off.
Should the power failure last more than
24 hours, remove and discard all frozen food.
• If a key is provided with refrigerator, the keys
should be kept out of the reach of children and
not be kept in the vicinity of the appliance.
• The appliance might not operate consistently
(frozen contents can thaw or temperatures
can become too warm in the frozen food
compartment) when sited for an extended
period of time in a location where ambient
air temperatures are constantly below the
temperatures for which the appliance is
designed.
• Do not store food which goes bad easily at low
temperature, such as bananas and melons.
• Your appliance is frost free, which means there
is no need to manually defrost your appliance.
This will be carried out automatically.
• Temperature rise during defrosting complies
with ISO requirements.
But If you want to prevent an undue rise in the
temperature of frozen food while the appliance
defrosts, wrap the frozen food in several layers
of newspaper.
• Any increase in the temperature of frozen food
during defrosting can shorten its storage life.
• Do not re-freeze frozen foods that have thawed
completely.
Saving Energy Tips
Install the appliance in a cool, dry room with
adequate ventilation.
Ensure that it is not exposed to direct sunlight
and never put it near a direct source of heat (a
radiator, for example).
Never block any vents or grilles on the
appliance.
Allow warm food to cool down before placing
it in the appliance.
Put frozen food inthe refrigerator to thaw.
You can then use the low temperatures of the
frozen products to cool food in the refrigerator.
Do not keep the door of the appliance open
for too long when putting food in or taking
food out.
The shorter the time the door is open, the less
frost build-up you'll have in the freezer.
Provide sufficient clearance to the right, left,
top for air circulation when installing the
refrigerator.
This will help reduce power consumption and
keep your energy bills lower.
For the most efficient use of energy, please
keep all inner fittings, such as baskets,
drawers, and shelves, in their original positions.
Englsh - 8
GETTING READY TO INSTALL
THE REFRIGERATOR
Congratulations on your purchase of this
Samsung French Door Refrigerator.
We hope you enjoy the state-of-art features and
efficiencies that this new appliance offers.
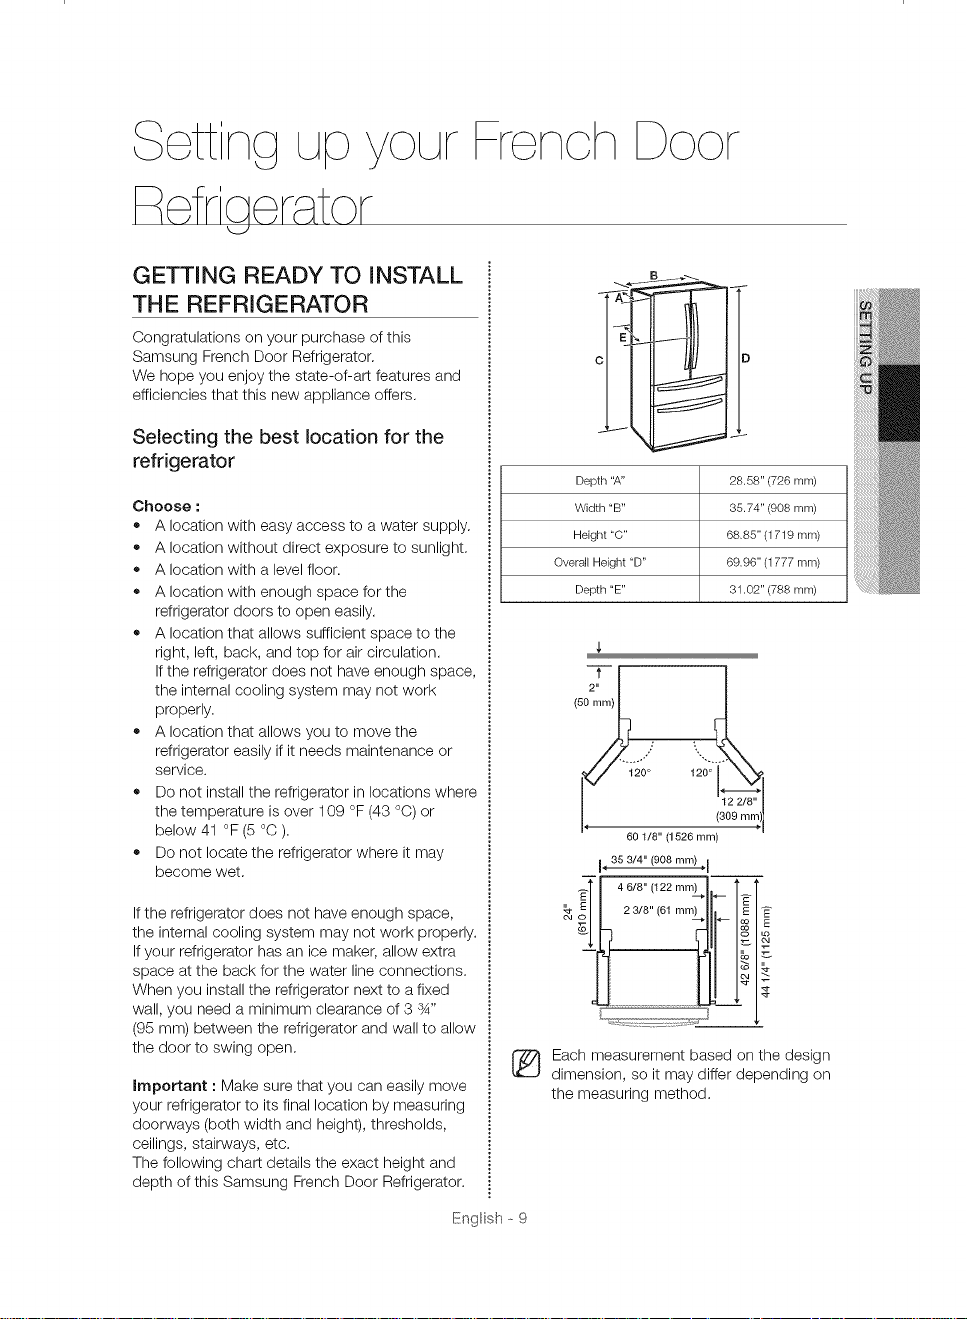
Selecting the best location for the
refrigerator
Choose :
• A location with easy access to a water supply.
• A location without direct exposure to sunlight.
• A location with a level floor.
• A location with enough space for the
refrigerator doors to open easily.
• A location that allows sufficient space to the
right, left, back, and top for air circulation.
Ifthe refrigerator does not have enough space,
the internal cooling system may not work
properly.
• A location that allows you to move the
refrigerator easily if it needs maintenance or
service.
• Do not install the refrigerator in locations where
the temperature is over 109 °F (43 °C) or
below 41 °F (5 °C ).
• Do not locate the refrigerator where it may
become wet.
French
Depth "A" 28.58" (726 mm)
Width "B" 35.74" (908 mm)
Height "C" 68.85" (1719 mm)
Overall Height "D" 69.96" (1777 mm)
Depth "E" 31.02" (788 mm)
85 8/4" (908 mrn)÷ I
If the refrigerator does not have enough space,
the internal cooling system may not work properly.
If your refrigerator has an ice maker, allow extra
space at the back for the water line connections.
When you install the refrigerator next to a fixed
wall, you need a minimum clearance of 3 3_,,
(95 mm) between the refrigerator and wall to allow
the door to swing open.
important : Make sure that you can easily move
your refrigerator to its final location by measuring
doorways (both width and height), thresholds,
ceilings, stairways, etc.
The following chart details the exact height and
depth of this Samsung French Door Refrigerator.
Engl sh- 9
ram) Ih 1 E
2 3/8" (61 --_ 4-- oo
_I 45/6,,1122m_.- l_
%
Each measurement based on the design
dimension, so it may differ depending on
the measuring method.
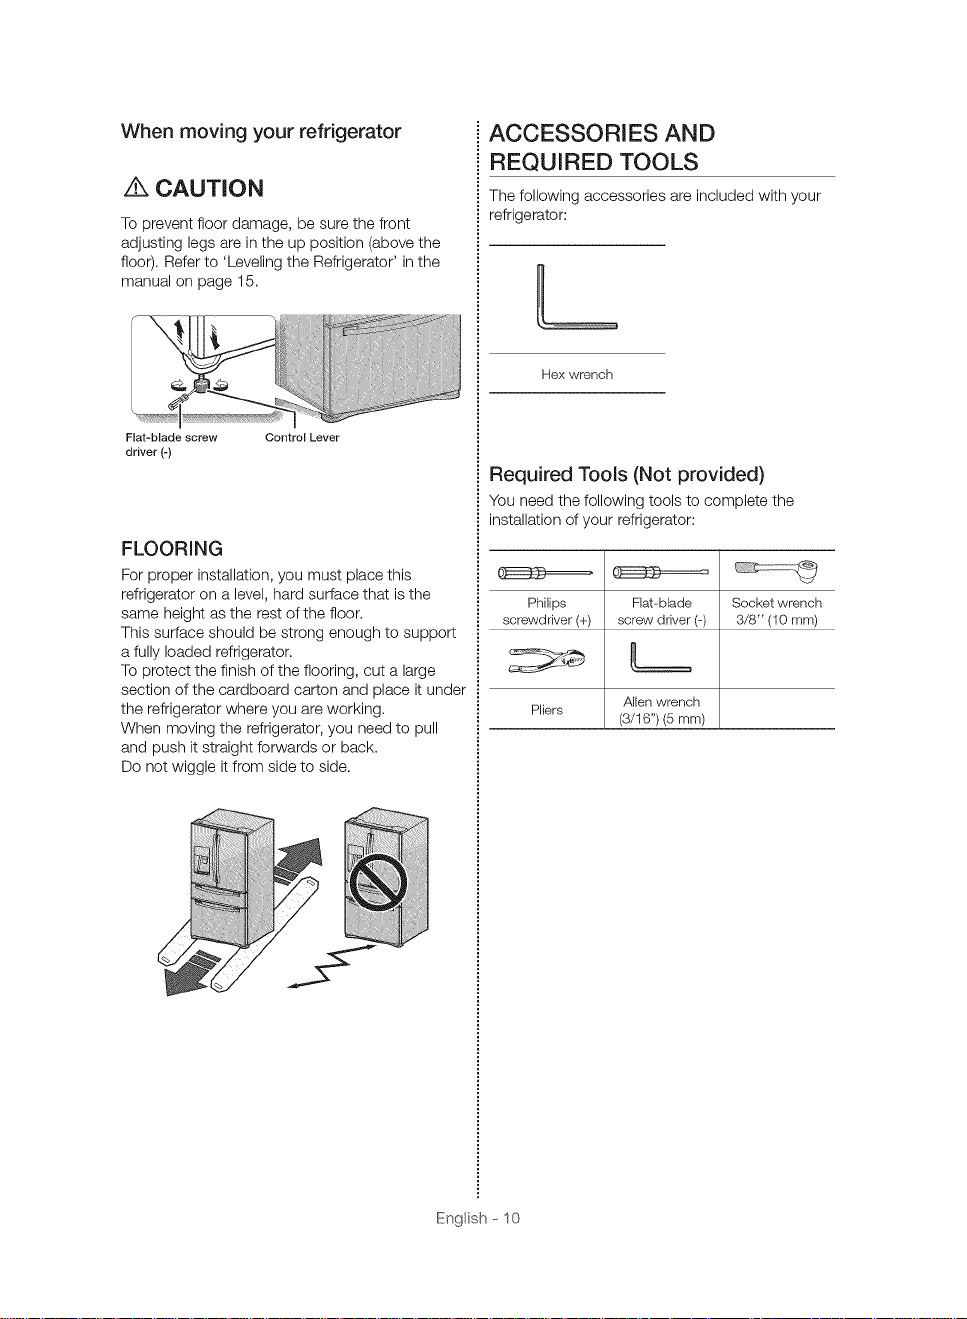
When moving your refrigerator
CAUTION
To prevent floor damage, be sure the front
adjusting legs are in the up position (above the
floor). Refer to 'Leveling the Refrigerator' in the
manual on page 15.
Flat-blade screw Control Lever
driver (-)
FLOORING
For proper installation, you must place this
refrigerator on a level, hard surface that is the
same height as the rest of the floor.
This surface should be strong enough to support
a fully loaded refrigerator,
To protect the finish of the flooring, cut a large
section of the cardboard carton and place it under
the refrigerator where you are working.
When moving the refrigerator, you need to pull
and push it straight forwards or back,
Do not wiggle it from side to side,
ACCESSORIES AND
REQUIRED TOOLS
The following accessories are included with your
refrigerator:
L
Hex wrench
Required Tools (Not provided)
You need the following tools to complete the
installation of your refrigerator:
Philips Flat-blade Socketwrench
screwdriver(+) screw driver (-) 3/8" (10 mm)
Pliers
Allenwrench
(3/16")(5 ram)
Engl sh - 10
REMOVING THE
REFRIGERATOR DOORS
For some installations, you need to remove the
fridge and freezer drawers so you can move the
refrigerator to its final location.
Do not remove the doors/drawer if you don't
need to.
If you need to remove the doors, continue below,
If you do not need to remove the refrigerator
doors, go to "Leveling the Refrigerator' on page
15.
Z_ WARNING
Disconnect power to the refrigerator before
removing the doors or drawer.
• Be careful not to drop, damage, or
scratch the doors/drawers while
removing them.
Use care when you remove the doors/drawers.
The doors are heavy and you could injure
yourself.
Reattach the doors/drawers properly to avoid:
Moisture from air leakage.
Uneven door alignment.
Wasting energy due to improper door seal.
Disassemble the refrigerator doors
WARNING
Be careful not to drop or scratch the doors while
removing them,
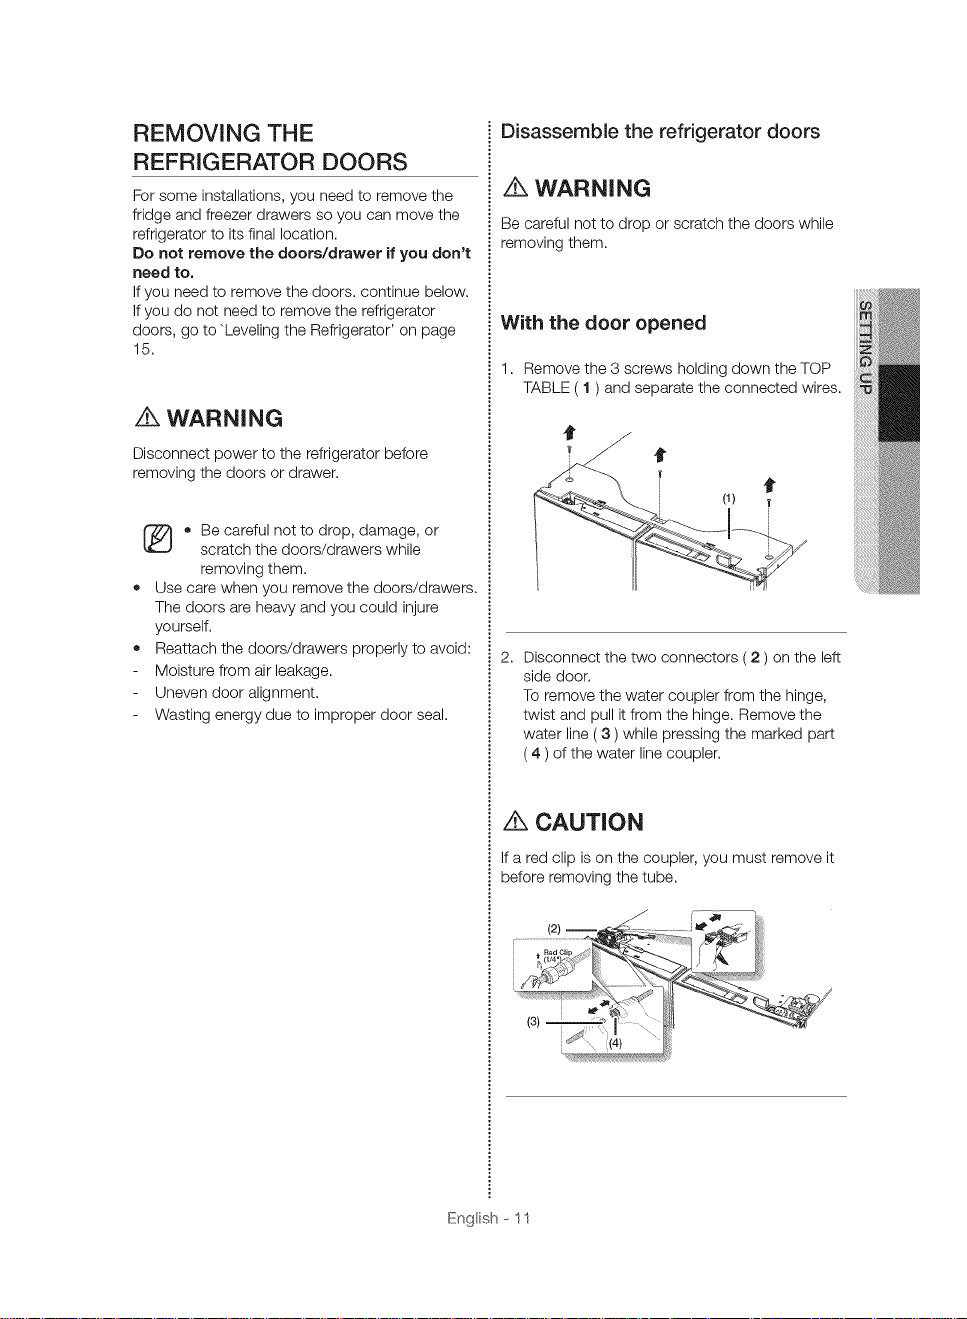
With the door opened
1. Remove the 3 screws holding down the TOP
TABLE ( 1 ) and separate the connected wires.
'
2. Disconnect the two connectors ( 2 ) on the left
side door.
To remove the water coupler from the hinge,
twist and pull it from the hinge. Remove the
water line ( 3 ) while pressing the marked part
(4 ) of the water line coupler.
CAUTION
If a red clip is on the coupler, you must remove it
before removing the tube.
Engl sh --11
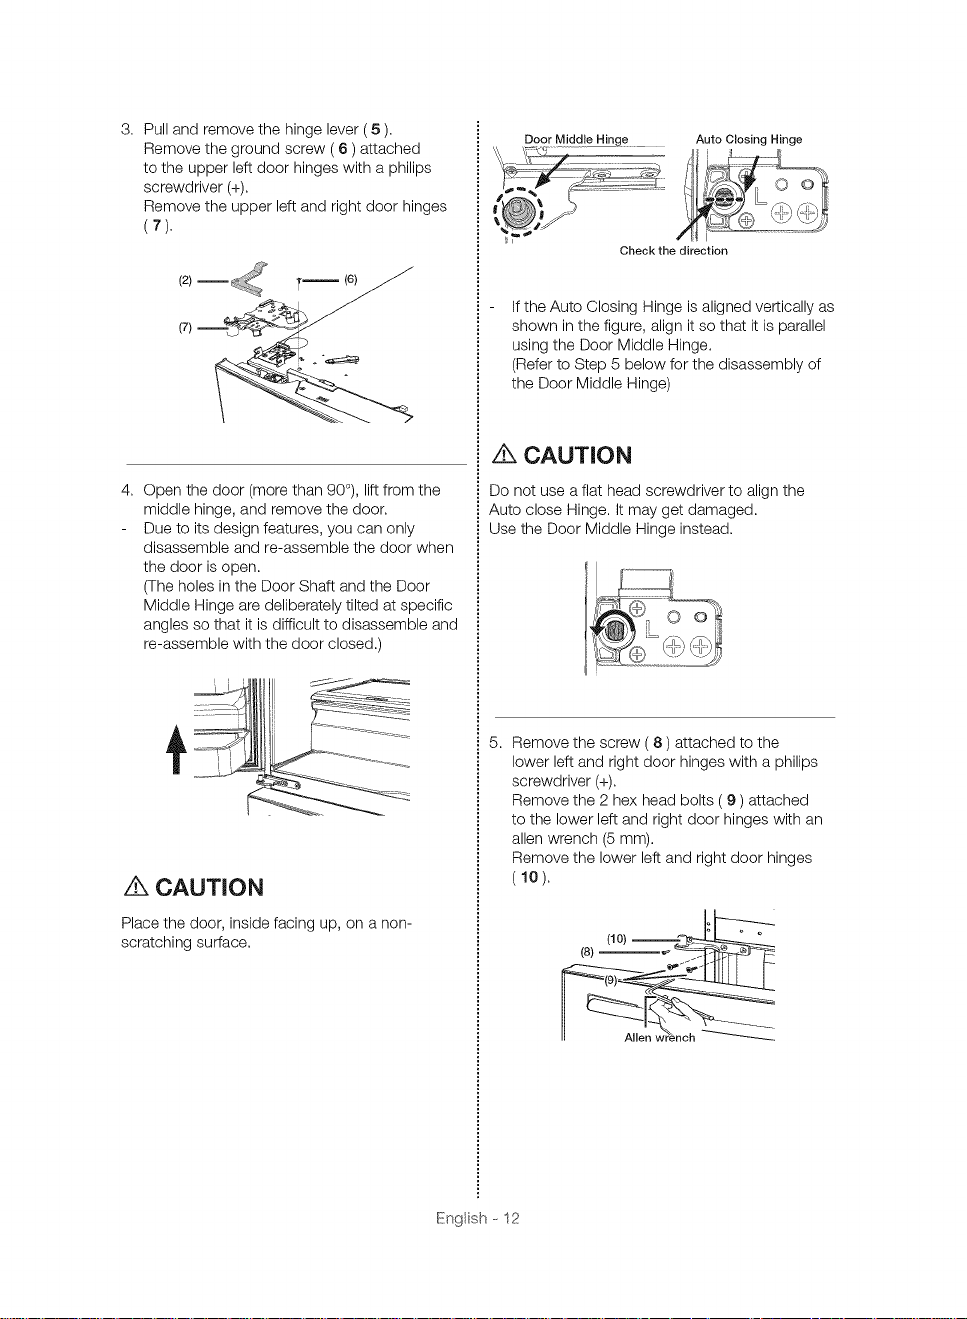
3.Pullandremovethehingelever(5).
Removethegroundscrew(6)attached
totheupperleftdoorhingeswithaphilips
screwdriver(+).
Removetheupperleftandrightdoorhinges
Door Middle Hinge Auto Closing Hinge
Cheek the direction
If the Auto Closing Hinge is aligned vertically as
shown in the figure, align it so that it is parallel
using the Door Middle Hinge.
(Refer to Step 5 below for the disassembly of
the Door Middle Hinge)
z_ CAUTION
4.Openthedoor(morethan90°),liftfromthe
middlehinge,andremovethedoor.
Duetoitsdesignfeatures,youcanonly
disassembleandre-assemblethedoorwhen
thedoorisopen.
(TheholesintheDoorShaftandtheDoor
MiddleHingearedeliberatelytiltedatspecific
anglessothatitisdifficulttodisassembleand
re-assemblewiththedoorclosed.)
I i I !
_lL_/_::.... _ ii ....... -_
CAUTION
Place the door, inside facing up, on a non-
scratching surface.
Do not use a flat head screwdriver to align the
Auto close Hinge. It may get damaged.
Use the Door Middle Hinge instead.
5. Remove the screw ( 8 ) attached to the
lower left and right door hinges with a philips
screwdriver (+).
Remove the 2 hex head bolts ( 9 ) attached
to the lower left and right door hinges with an
allen wrench (5 mm).
Remove the lower left and right door hinges
(10),
Engl sh --12
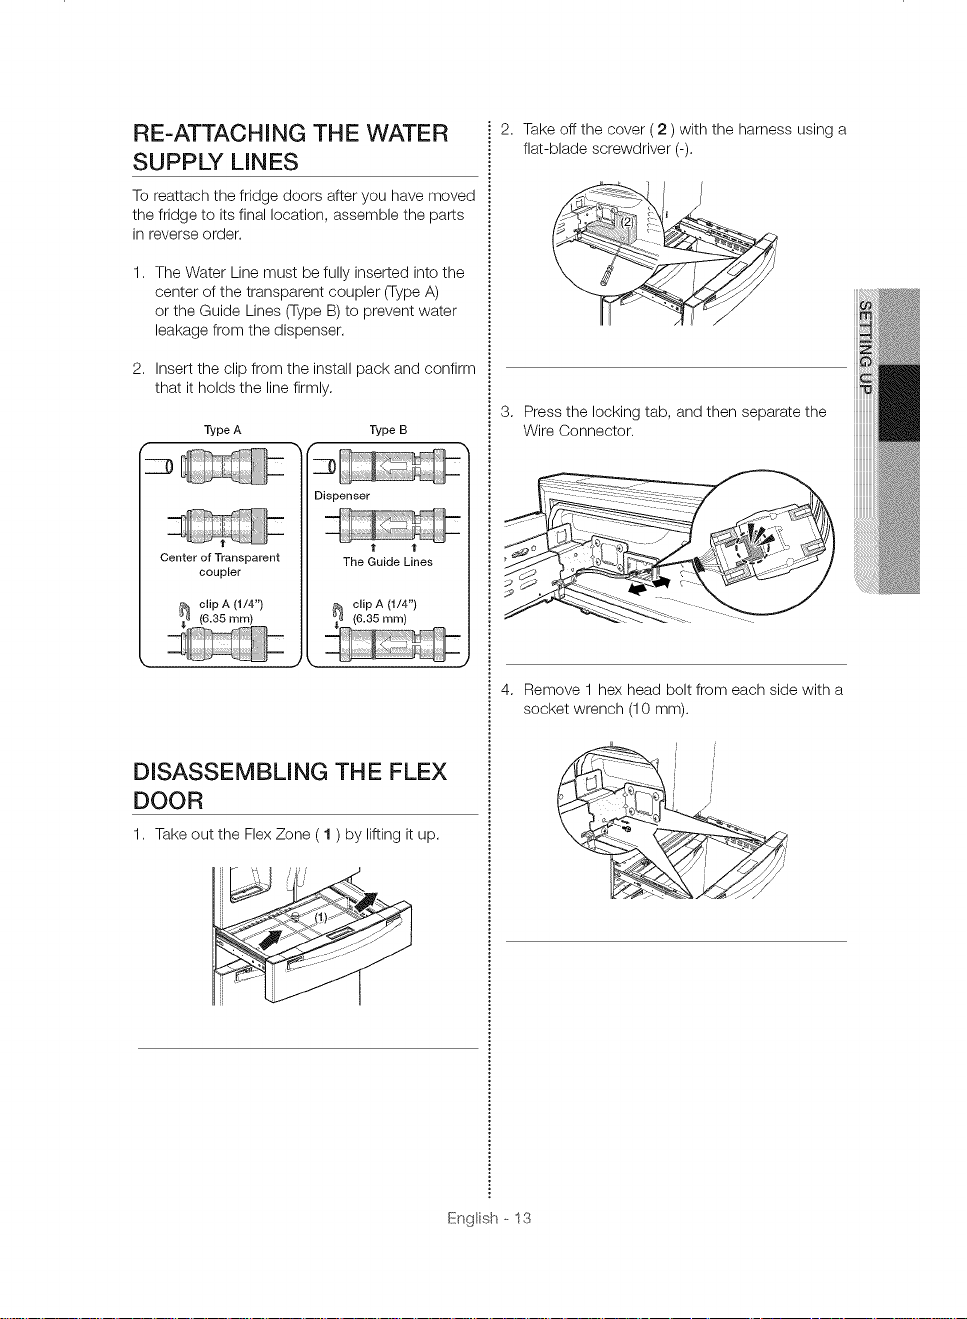
RE-ATTACHING TH E WATER
SUPPLY LINES
To reattach the fridge doors after you have moved
the fridge to its final location, assemble the parts
in reverse order.
1. The Water Line must be fully inserted into the
center of the transparent coupler (Type A)
or the Guide Lines (Type B) to prevent water
leakage from the dispenser.
2. Insert the clip from the install pack and confirm
that it holds the line firmly.
Type A Type B
Dispenser
2. Take off the cover ( 2 ) with the harness using a
flat-blade screwdriver (-).
3. Press the locking tab, and then separate the
Wire Connector.
Center of Transparent
coupler
clip A (1/4")
(6.35 ram)
t t
The Guide Lines
DISASSEMBLING THE FLEX
DOOR
1. Take out the Flex Zone ( 1 ) by lifting it up.
4. Remove 1 hex head bolt from each side with a
socket wrench (10 mm).
, /
English - 13
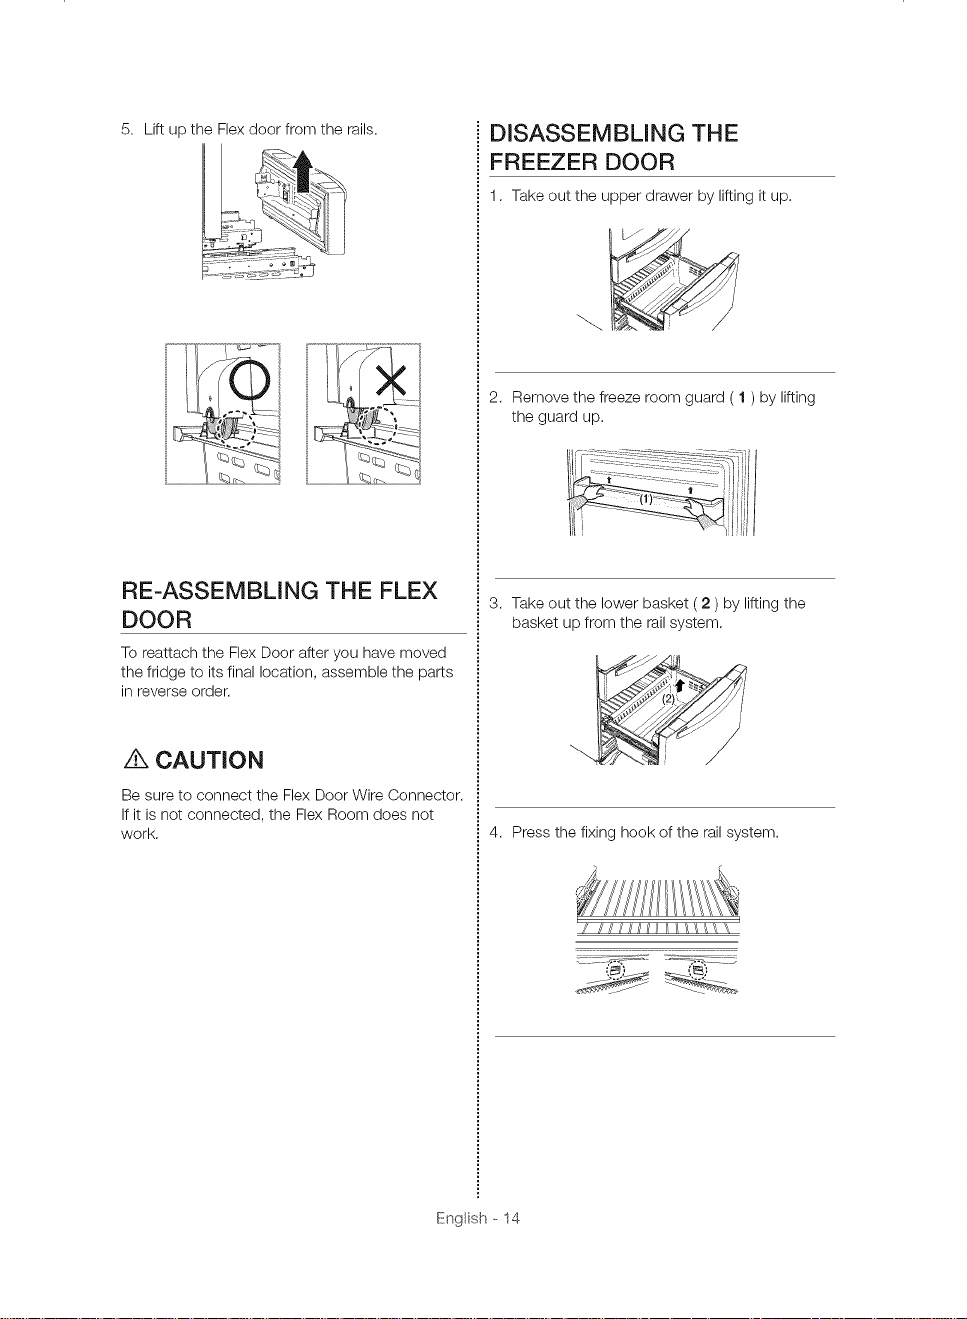
5. Lift up the Flex door from the rails.
DISASSEMBLING THE
FREEZER DOOR
1. Take out the upper drawer by lifting it up.
2. Remove the freeze room guard ( 1 ) by lifting
the guard up.
RE-ASSEMBLING THE FLEX
DOOR
To reattach the Flex Door after you have moved
the fridge to its final location, assemble the parts
in reverse order.
Z_ CAUTION
Be sure to connect the Flex Door Wire Connector.
Ifit is not connected, the Flex Room does not
work.
3. Take out the lower basket (2 ) by lifting the
basket up from the rail system.
4. Press the fixing hook of the rail system.
...... _:: ..............................................................
Engl sh - 14
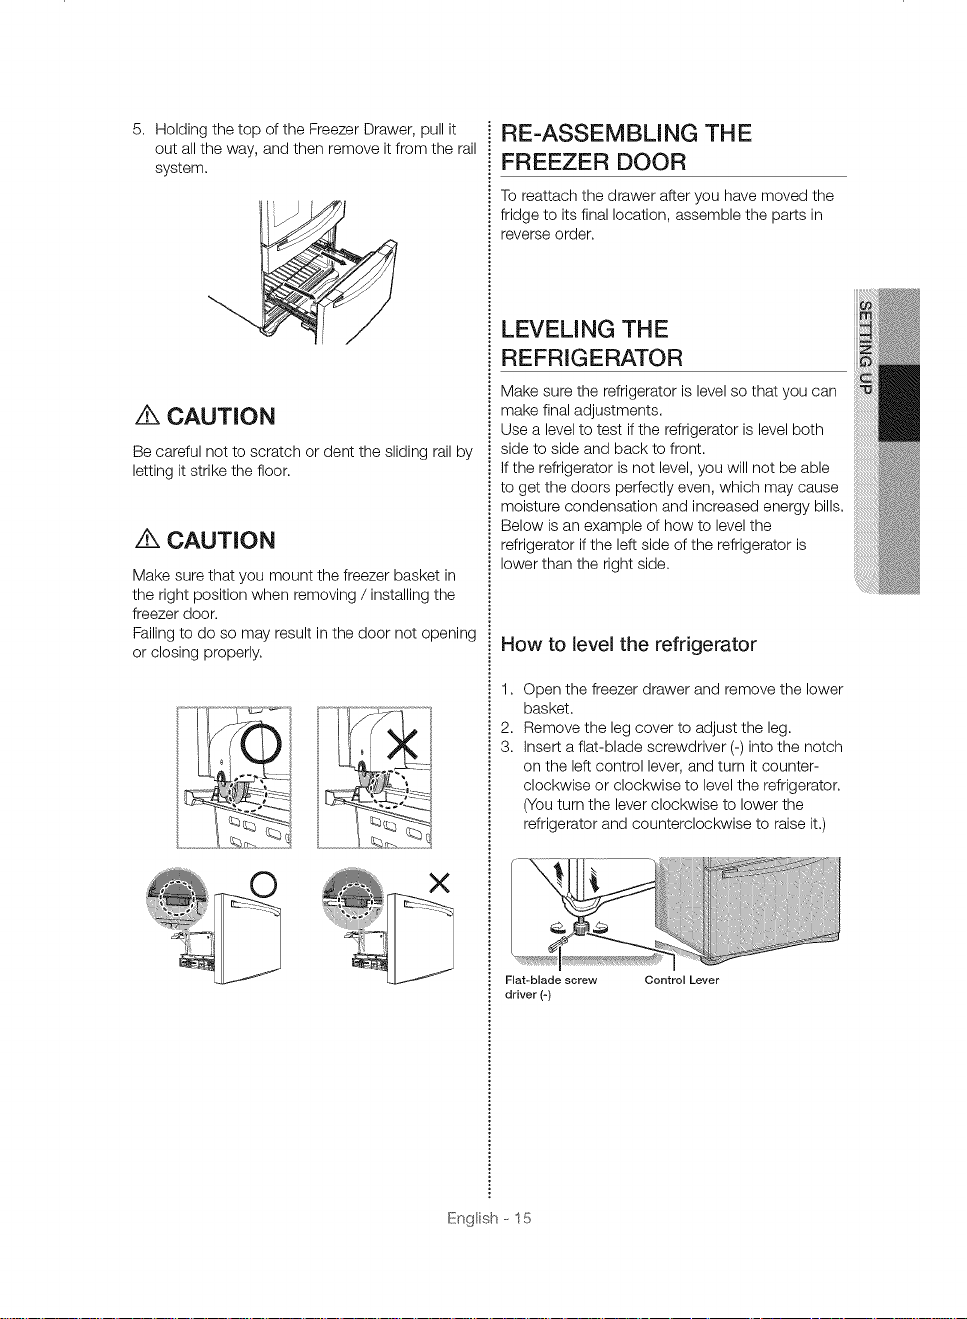
5.HoldingthetopoftheFreezerDrawer,pullit
outalltheway,andthenremoveitfromtherail
system.
CAUTION
Be careful not to scratch or dent the sliding rail by
letting it strike the floor.
,,"KCAUTION
Make sure that you mount the freezer basket in
the right position when removing / installing the
freezer door.
Failing to do so may result in the door not opening
or closing properly.
RE=ASSEMBLING THE
FREEZER DOOR
To reattach the drawer after you have moved the
fridge to its final location, assemble the parts in
reverse order.
LEVELING THE
REFRIGERATOR
Make sure the refrigerator is level so that you can
make final adjustments.
Use a level to test if the refrigerator is level both
side to side and back to front.
If the refrigerator is not level, you will not be able
to get the doors perfectly even, which may cause
moisture condensation and increased energy bills.
Below is an example of how to level the
refrigerator if the left side of the refrigerator is
lower than the right side.
How to level the refrigerator
1. Open the freezer drawer and remove the lower
basket.
2. Remove the leg cover to adjust the leg.
3. Insert a flat-blade screwdriver (-) into the notch
on the left control lever, and turn it counter-
clockwise or clockwise to level the refrigerator.
(Youturn the lever clockwise to lower the
refrigerator and counterclockwise to raise it.)
X
Engl sh --15
Flat-blade screw Control Lever
driver (-)
,g&CAUTION
To prevent the refrigerator from tipping over and
causing personal injury or property damage, both
control levers must be firmly touching the floor,
CAUTION
If the refrigerator is on an uneven floor, it may tilt,
To prevent this, adjust the legs so they contact
the floor firmly,
If the right side is lower, perform the same
procedure, but with the right control lever,
It is difficult to remove the front leg
cover from the refrigerator, so we do not
recommend making small adjustments
with the control lever,
Instead, refer to the next page for the best
way to make minor adjustments to the
doors,
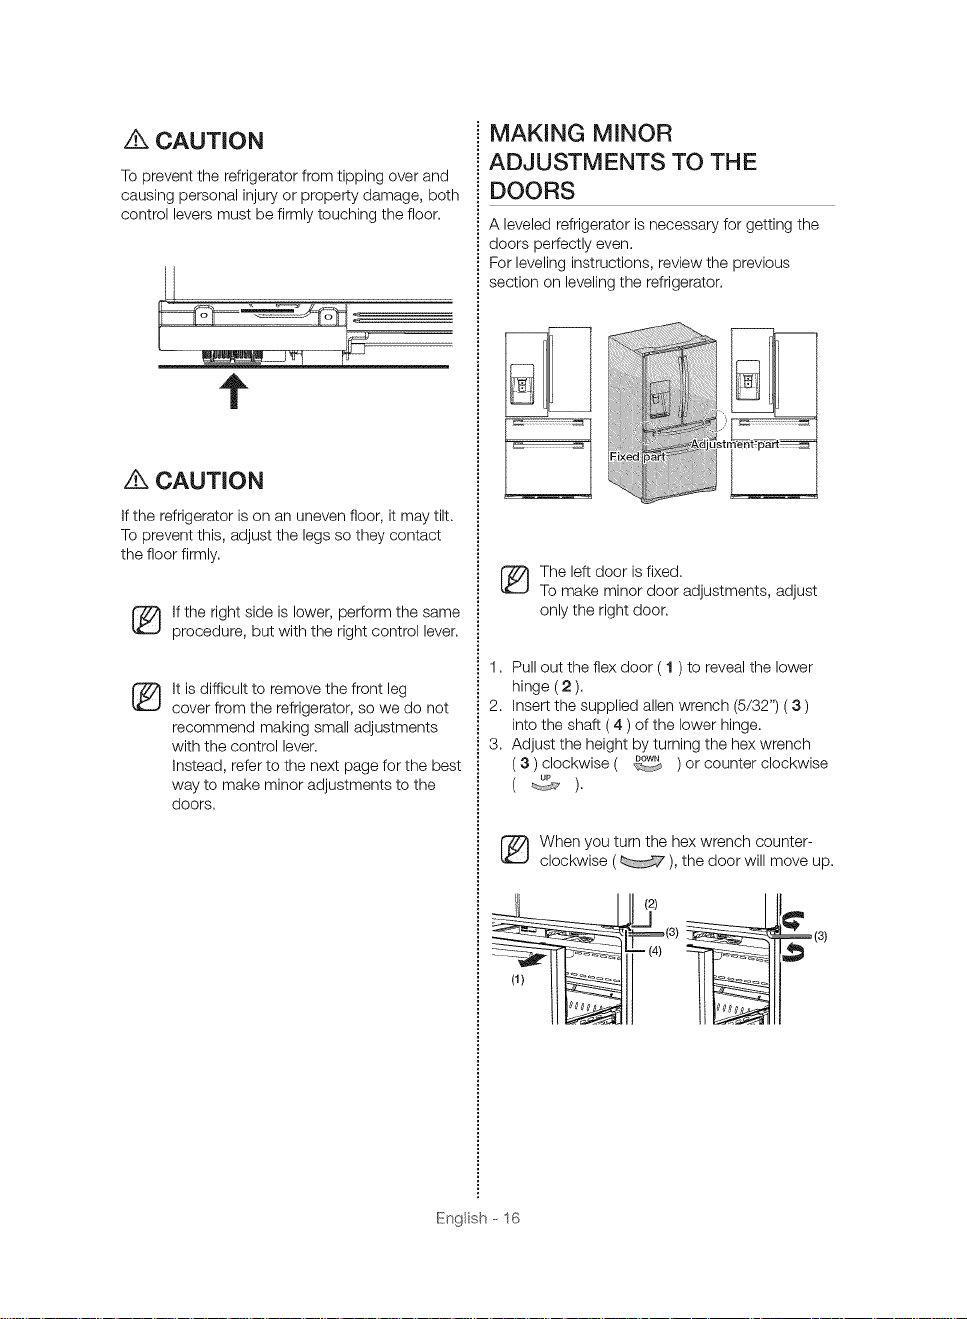
MAKING MINOR
ADJUSTMENTS TO THE
DOORS
A leveled refrigerator is necessary for getting the
doors perfectly even.
For leveling instructions, review the previous
section on leveling the refrigerator.
OH
The left door is fixed,
To make minor door adjustments, adjust
only the right door,
1. Pull out the flex door (1 ) to reveal the lower
hinge ( 2 ).
2. Insert the supplied allen wrench (5/32") ( 3 )
into the shaft (4 ) of the lower hinge.
3. Adjust the height by turning the hex wrench
( 3 ) clockwise ( _ ) or counter clockwise
__(4)(2)
Engl sh --16
When you turn the hex wrench counter-
clockwise ( ), the door will move up.
(3) (3)

INSTALL! NG TH E WATER
DISPENSER LINE
A water dispenser with a filter is one of the helpful
features on your new refrigerator.
To help promote better health, the water filter
removes unwanted particles from your water.
However, it does not sterilize the water or destroy
microorganisms.
You may need to purchase a water purifying
system to do that.
The water line also connects to the ice maker,
For the ice maker to operate properly, water
pressure of 20 - 125 psi (138 - 862 kPa) is
required.
If the refrigerator is installed in an area with low
water pressure (below 20 psi), you can install
a booster pump to compensate for the low
pressure.
After you have connected the water line, make
sure the water storage tank inside the refrigerator
is properly filled.
To do this, press the water dispenser lever until
the water runs from the water outlet,
Water line installation kits are available at
extra cost from your dealer.
We recommend using a water line
installation kit that contains copper tubing
and a 1A" compression nut,
3, Connect the water line installation kit to the
shut off valve,
Cold water line --
Water line installation kit
Pipe clamp --
Shut
Z_ CAUTION
The water line must be connected to the cold
water pipe.
if it is connected to the hot water pipe, it may
cause the filter to malfunction,
Connecting the water supply line to
the refrigerator
There are several items that you need to purchase
to complete this connection,
You may find these items sold as a kit at your local
hardware store,
Connecting to the water supply line
1, First, shut off the main water
supply,
2, Locate the nearest cold water drinking line and
install the pipe clamp and shut off valve,
Cold water line _
Pipe clamp __ ........
Shut off valve
Z
Engl sh --17
Use Copper Tubing Use Plastic Tubing
Y4"copper tubing • Y4"plastic tubing
Y4"compression nut _ Molded end (Bulb)
(1pc) • Y4"compression nut
Ferrule (2pc) (1pc)
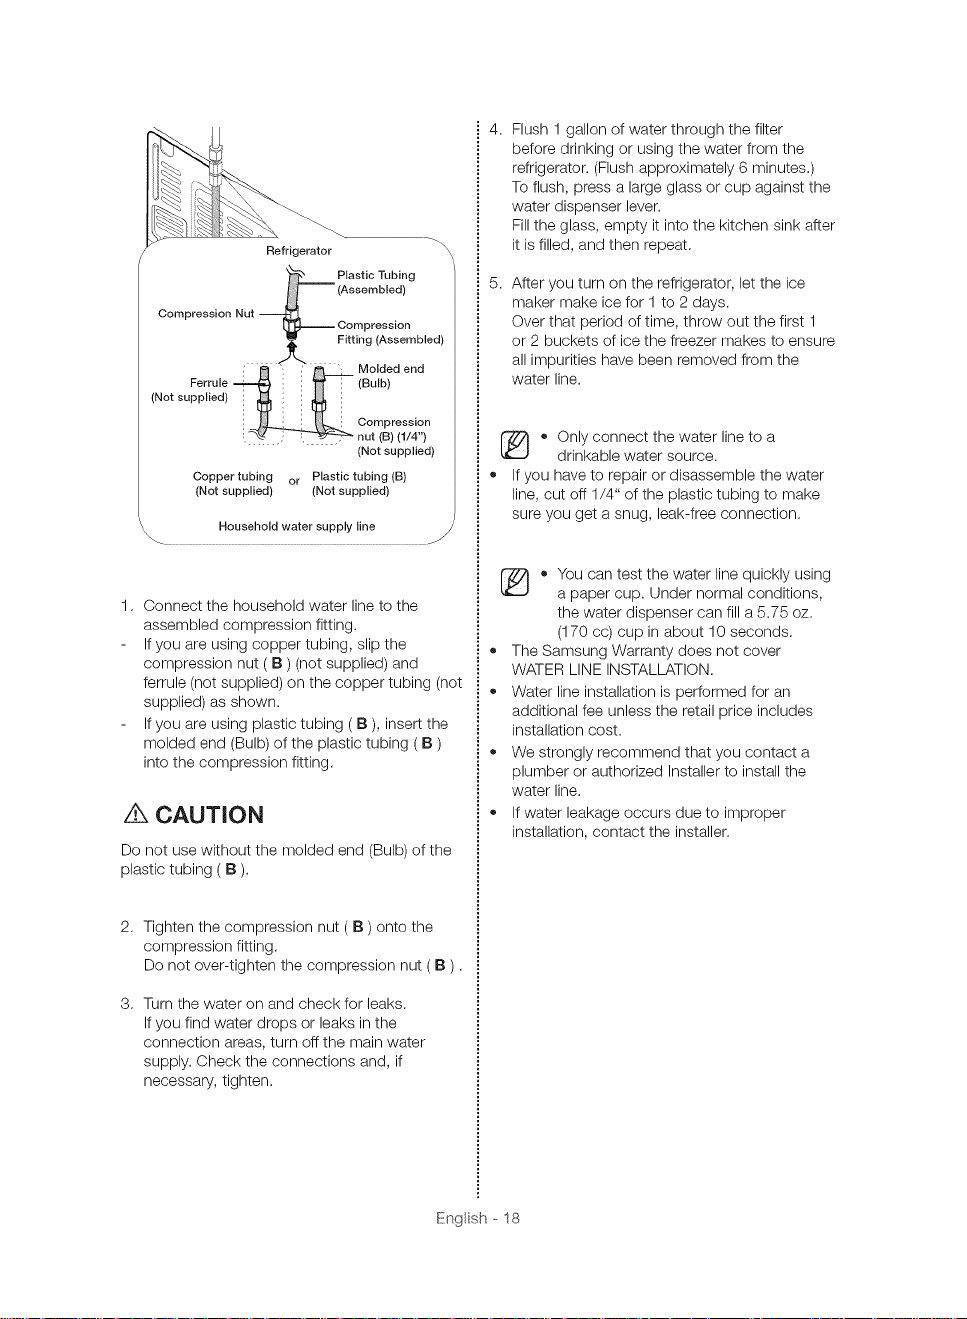
Refrigerator
Plastic Tubing
(Assembled)
Fitting (Assembled)
Molded end
(Not supplied)
i : nut (B) (1/4")
Copper tubing or Plastic tubing (B)
(Not supplied) (Not supplied)
Household water supply line
(Bulb)
Compression
(Not supplied)
Connect the household water line to the
assembled compression fitting.
Ifyou are using copper tubing, slip the
compression nut ( B ) (not supplied) and
ferrule (not supplied) on the copper tubing (not
supplied) as shown.
Ifyou are using plastic tubing ( B ), insert the
molded end (Bulb) of the plastic tubing ( B )
into the compression fitting.
/_ CAUTION
Do not use without the molded end (Bulb) of the
plastic tubing ( B ).
4.
Flush 1 gallon of water through the filter
before drinking or using the water from the
refrigerator. (Flush approximately 6 minutes.)
To flush, press a large glass or cup against the
water dispenser lever.
Fillthe glass, empty it into the kitchen sink after
it is filled, and then repeat.
5.
After you turn on the refrigerator, let the ice
maker make ice for 1 to 2 days.
Over that period of time, throw out the first 1
or 2 buckets of ice the freezer makes to ensure
all impurities have been removed from the
water line.
• Only connect the water line to a
drinkable water source.
• If you have to repair or disassemble the water
line, cut off 1/4" of the plastic tubing to make
sure you get a snug, leak-free connection.
• You can test the water line quickly using
a paper cup. Under normal conditions,
the water dispenser can fill a 5.75 oz.
(170 cc) cup in about 10 seconds.
• The Samsung Warranty does not cover
WATER LINE INSTALLATION.
• Water line installation is performed for an
additional fee unless the retail price includes
installation cost.
• We strongly recommend that you contact a
plumber or authorized Installer to install the
water line.
• If water leakage occurs due to improper
installation, contact the installer.
2. Tighten the compression nut ( B ) onto the
compression fitting.
Do not over-tighten the compression nut ( B ).
3. Turn the water on and check for leaks.
Ifyou find water drops or leaks in the
connection areas, turn off the main water
supply. Check the connections and, if
necessary, tighten.
Engl sh - 18
Installing a SodaStream 60 L CO 2 Carbonator
To use the Sparkling Water feature on your refrigerator, you need to install a SodaStream 60 L CO2
Carbonator.
You can pick up the SodaStream 60 L 002 Carbonator at retailer near you and your first Sodastream
CO2 Carbonator is free. (For further information, please visit "www.sodastream.com/samsung')
Purchasing SodaStream 60 L CO2 Carbonators
• Purchase SodaStream 60 L Carbonators at the nearest Sodastream retailer or on line.
Visit www.sodastream.com for more information.
• USE ONLY SODASTREAM 60 L CARBONATORS. SAMSUNG and SODASTREAM are not
legally responsible for any damage, including, but not limited to, property damage caused by gas
leakage from the use of generic carbonators (or CO 2cylinders). The sparkling water system in your
SAMSUNG refrigerator is designed to work ONLY WITH SODASTREAM 60 L CARBONATORS.
• We suggest buying extra Carbonators for later use.
Store extra Carbonators in a cool, open space, well out of the reach of children.
Do not store Carbonators in the refrigerator.
Ifsparkling water is produced when the internal refrigerator temperature or the temperature of
the SodaStream Carbonator is high, you may hear a "horn sound".
When you turn on your refrigerator for the first time, wait at least two hours before running the
sparkling water production function.
When you purchase a new SodaStream Carbonator, be sure to store it in a cool, dry place until
you are ready to install it (23 - 68 °F (-5 - 20 °O)).
Ifthe SodaStream Carbonator is stored in higher temperatures, it may build up extra internal
pressure, which could create a "horn sound" when the refrigerator produces sparkling water.
Water Line Hookup
• Make sure that you have connected the refrigerator to a water line before installing the Carbonator.
Engl sh - 19
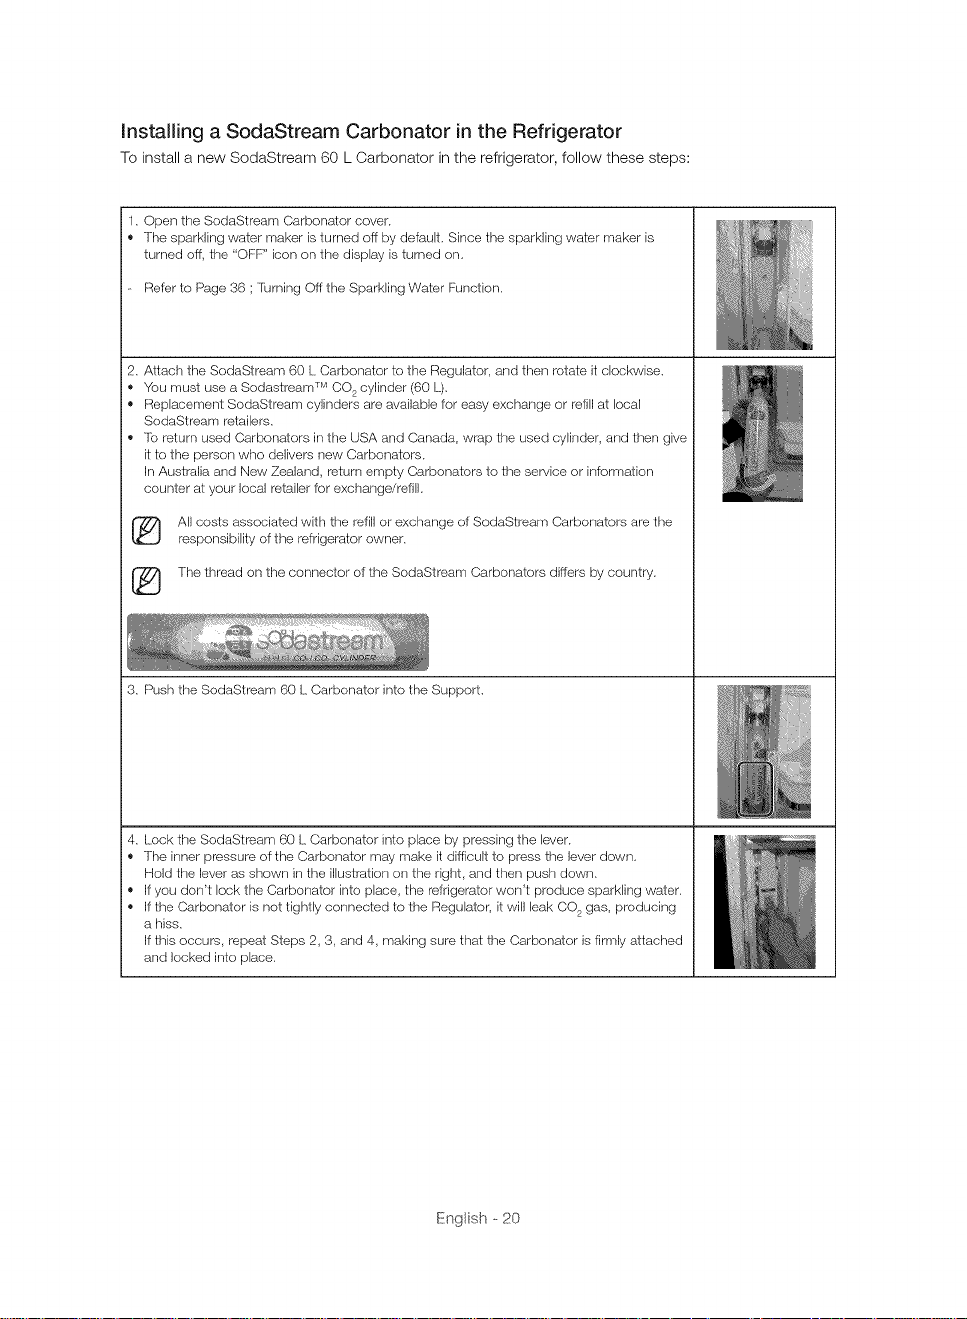
Insta,ing a SodaStream Carbonator in the Refrigerator
To install a new SodaStream 60 L Carbonator in the refrigerator, follow these steps:
1. Open the SodaStream Carbonator cover.
® The sparkling water maker is turned off by default. Since the sparkling water maker is
turned off, the "OFF" icon on the display is turned on.
- Refer to Page 36 ; turning Off the Sparkling Water Function.
2. Attach the SedaStream 60 L Carbonator to the Regulator, and then rotate it clockwise.
® You must use a Sedastream _MCO2cylinder (60 L).
® Replacement SedaStream cylinders are available for easy exchange or refill at local
SedaStream retailers.
® lo return used Carbonators in the USA and Canada, wrap the used cylinder, and then give
it to the person who delivers new Carbonators.
In Australia and New Zealand, return empty Carbenaters to the service or information
counter at your local retailer for exchange/refill.
All costs associated with the refill or exchange of SodaStream Carbenators are the
responsibility of the refrigerator owner.
(_ The thread on the connector of the SodaStream Carbenaters differs by country.
3. Push the SedaStream 60 L Carbenater into the Support.
4. Lock the SedaStream 60 L Carbonater into place by pressing the lever.
® The inner pressure of the Carbonator may make it difficult to press the lever down.
Hold the lever as shown in the illustration on the right, and then push down.
® If you don't lock the Carbonator into place, the refrigerator won't produce sparkling water.
® If the Carbonator is not tightly connected to the Regulator, it will leak CO2 gas, producing
a hiss.
If this occurs, repeat Steps 2, 3, and 4, making sure that the Carbonator is firmly attached
and locked into place.
Engl sh - 20
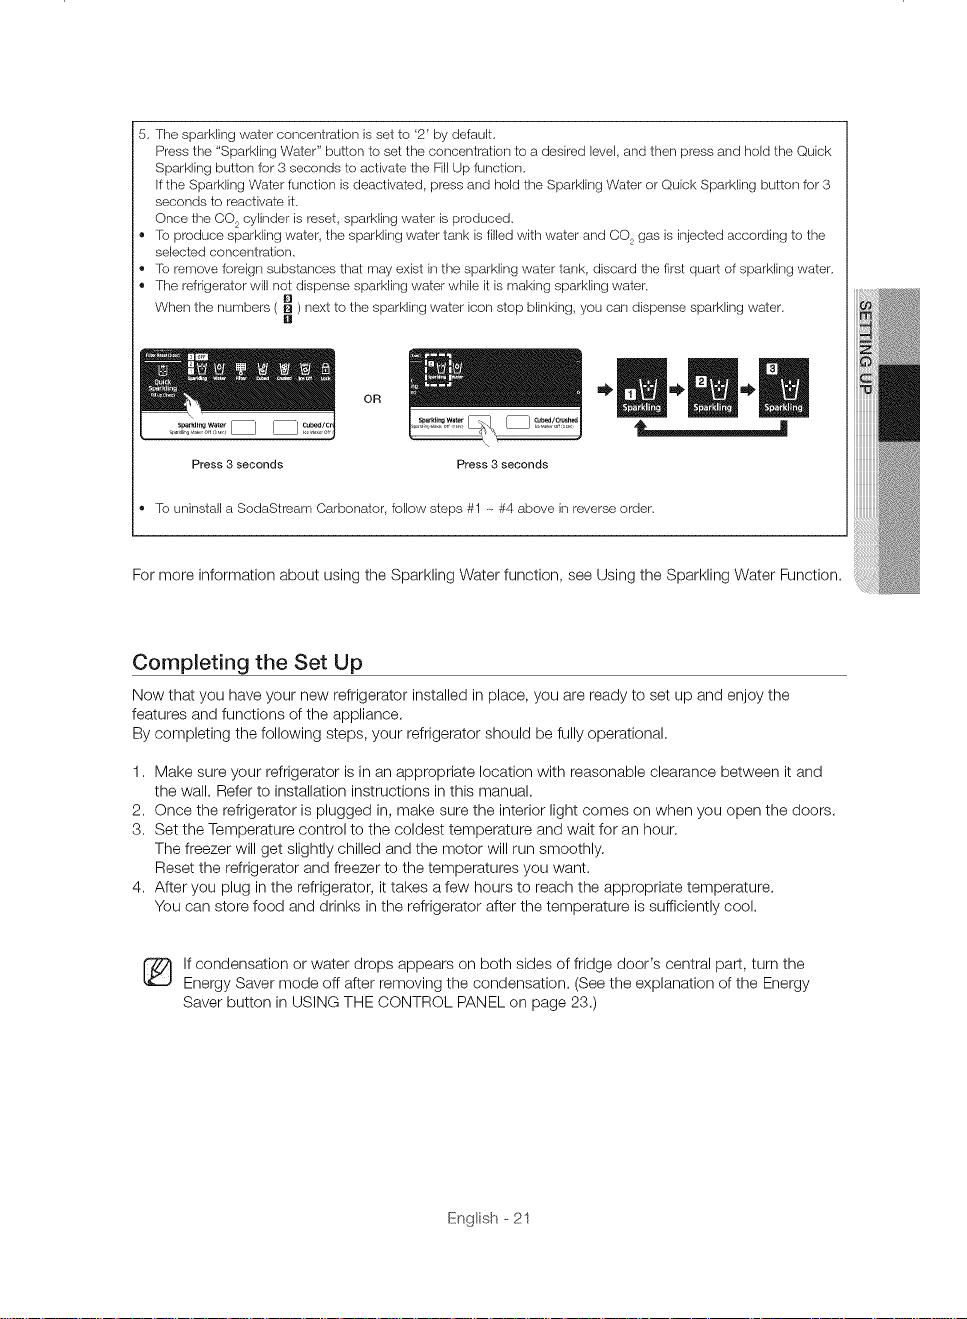
5,Thesparklingwaterconcentrationissetto'2'bydefault,
Pressthe"SparklingWater"button to set the concentration to adesired level,andthenpressand hold the Quick
Sparklingbuttonfor3 seconds to activatethe FillUp function,
IftheSparklingWaterfunction is deactivated, press and holdthe SparklingWaterorQuick Sparklingbuttonfor 3
seconds to reactivateit,
Oncethe CO2cylinderis reset, sparklklgwater is produced,
® to producesparklingwater,the sparklingwatertank isfilledwith water and CO2gas isinjectedaccordingto the
selectedconcentraiion,
® to removeforeignsubstancesthat may exist inthe sparklingwater tank, discardthe first quart of sparklingwater,
® The refrigeratorwillnot dispense sparklingwater while it ismaking sparkling water,
When the numbers ( _ ) next tothe sparklingwater icorsstopblinking, you carsdispensesparklingwater,
,, to uninstall a SodaStream Carbonator, follow steps #1 -_#4 above in reverse order,
For more information about using the Sparkling Water function, see Using the Sparkling Water Function.
Completing the Set Up
Now that you have your new refrigerator installed in place, you are ready to set up and enjoy the
features and functions of the appliance.
By completing the following steps, your refrigerator should be fully operational.
[]
OR
Press 3 seconds
1. Make sure your refrigerator is in an appropriate location with reasonable clearance between it and
the wall. Refer to installation instructions in this manual.
2. Once the refrigerator is plugged in, make sure the interior light comes on when you open the doors.
3. Set the Temperature control to the coldest temperature and wait for an hour.
The freezer will get slightly chilled and the motor will run smoothly.
Reset the refrigerator and freezer to the temperatures you want.
4. After you plug in the refrigerator, it takes a few hours to reach the appropriate temperature.
You can store food and drinks in the refrigerator after the temperature is sufficiently cool.
Ifcondensation or water drops appears on both sides of fridge door's central part, turn the
Energy Saver mode off after removing the condensation. (See the explanation of the Energy
Saver button in USING THE CONTROL PANEL on page 23.)
Engl sh - 21
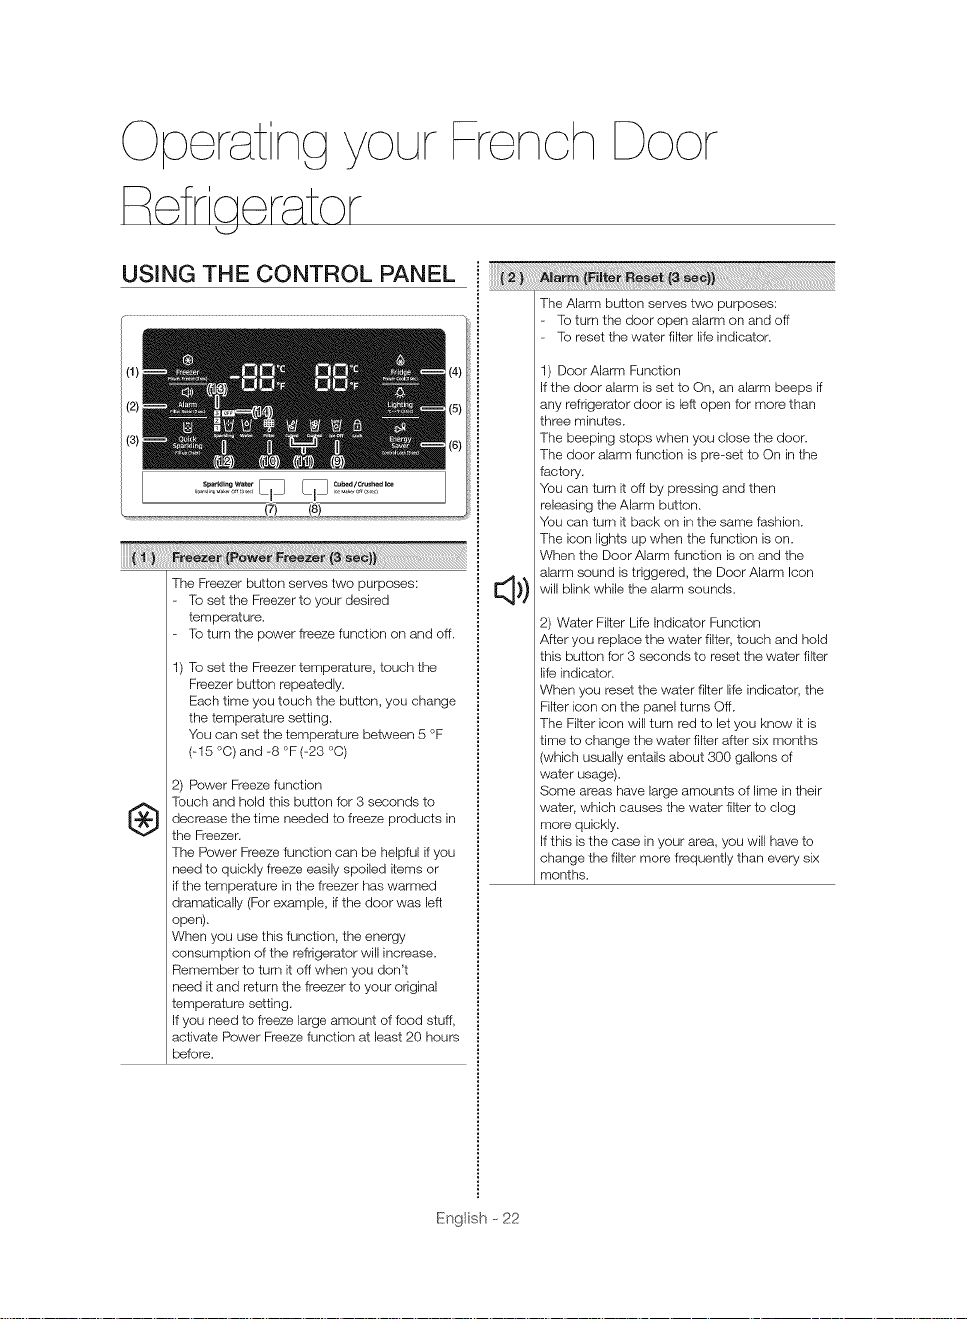
USING THE CONTROL PANEL
French Door
The Alarm button serves two purposes:
To turn the door open alarm on and off
To reset the water filter life indicator.
(1)
(2)
(3)
The Freezer button serves two purposes:
To set the Freezer to your desired
temperature.
To turn the power freeze function on and off.
1) To set the Freezer temperature, touch the
Freezer button repeatedly.
Each time you touch the button, you change
the temperature setting.
You can set the temperature between 5 °F
(-15 °C) and -8 °F (-23 °C)
2) Power Freeze function
Touch and hold this button for 3 seconds to
decrease the time needed to freeze products in
®
the Freezer.
The Power Freeze function can be helpful if you
need to quickly freeze easily spoiled items or
ifthe temperature in the freezer has warmed
dramatically (For example, ifthe door was left
open).
When you use this function, the energy
consumption of the refrigerator will increase.
Remember to turn it off when you don't
need it and return the freezer to your original
temperature setting.
If you need to freeze large amount of food stuff,
activate Power Freeze function at least 20 hours
before.
(4)
(5)
(6)
) Door Alarm Function
If the door alarm is set to On, an alarm beeps if
any refrigerator door is left open for more than
three minutes.
The beeping stops when you close the door.
The door alarm function is pre-set to On in the
factory.
You can turn it off by pressing and then
releasing the Alarm button.
You can turn it back on in the same fashion.
The icon lights up when the function is on.
When the Door Alarm function is on and the
alarm sound is triggered, the Door Alarm Icon
will blink while the alarm sounds.
2) Water Filter Life Indicator Function
After you replace the water filter, touch and hold
this button for 3 seconds to reset the water filter
life indicator.
When you reset the water filter life indicator, the
Filter icon on the panel turns Off.
The Filter icon will turn red to let you know it is
time to change the water filter after six months
(which usually entails about 300 gallons of
water usage).
Some areas have large amounts of lime in their
water, which causes the water filter to clog
more quickly.
If this is the case in your area, you will have to
change the filter more frequently than every six
months.
Engl sh --22
i
The Quick Sparkling button serves two
purposes:
To produce sparkling water rapidly.
To active the Fill Up function.
) Quick Sparkling Function
When you touch the Quick Sparkling button,
the ( _ ) icon lights and the refrigerator makes
sparkling water rapidly a! the level indicated by
the Sparkling Level icon.
If there is no sparHing water inthe Sparkling
Water tank, the refrigerator will begin making
sparkling water immediately.
If there is sparkling water in the tank, the
refrigerator applies the Quick Sparkling function
the next time it makes sparkling water.
2) Fill Up Function
When you replace the SodaStream carbonator,
press the 'Quick Sparkling/Fill up (3 sec)' button
for 3 seconds to active the Fill Up function.
The refrigerator will fill the sparkling water tank
with water and inject CO2gas into the water to
make sparkling water.
The sparkling level of the water may differ
from the set level, depending on the amount
and CO2concer_tration of the sparkling water
remaining inthe tank.
If the tank is empty or the concentration is very
low, the refrigerator will make sparkling water at
the level Indicated by the Sparkling Level icon.
If the sparkling level is not what you expected,
select the desired sparkling water carbonation
level (see page 24).
The next time the refrigerator makes sparkling
water, itwill make it at the level you selected.
) To set the Fridge temperature, press the
Fridge button repeatedly.
Each time you press the button, you change
the temperature setting.
You can set the temperature between 44 °F
(7 °C) and 34 °F (1 °C).
_i_"__' _!:;_ _ ! _ _ _ _ i_:_ ¸i_¸¸ _ i ii_7_! i_ __i_i_i
Lighting button serves two purposes:
To turn the dispenser light on and off
To switch the temperature units between °C
and °F
) Light Function
Tbuching the Lighting button turns on the
Dispenser LED lamp in continuous mode so
that it stays on continuously.
The button also lights up.
If you want the Dispenser lamp to come on only
- when someone uses the dispenser, press the
Lighting button to turn the continuous mode off.
2) To switch the temperature units between
°C and °F Touch and hold this button for 3
seconds to select the temperature display
you want.
Each time you press and hold the button, the
°C and °F temperature modes alternate and
the °C or °F icon lights up, indicating your
selection.
Energy Saver button serves two purposes:
To turn the Energy Saver mode on and off
To turn the Control Lock function on and off.
) Energy Saver Function
When you turn Energy Saver on, the Energy
Saver icon lights.
Turn Energy Saver off and the icon goes off.
The Energy Saver function is set to ON in the
factory.
If condensation or water drops appear on the
doors, turn the Energy Saver mode off.
2) Control Lock Function
Touch and hold this button for 3 seconds to
lock the display, the Flex Zone panel, and the
dispenser buttons so the buttons can not be
used.
When Control Lock is on, the refrigerator does
nol dispense ice, water, or sparkling water,
even ifthe Dispenser Lever is pressed.
The Control L..ockicon lights up to indicate
you've activated the Control Lock function.
Press 3 seconds to unlock.
2) Power Cool function
Touch and hold this button for 3 seconds to
decrease the time needed to cool products in
the Refrigerator.
It can be helpful if you need to quickly cool
easily spoiled items or if the temperature in the
fridge has warmed dramatically (For example, if
the door was left open).
Engl sh - 23
The Sparkling Water button serves three
purposes :
To dispense sparkling (carbonated) water.
To select the carbonation level of the
sparkling water.
To turn the Sparkling Water Productbn
Function on and off,
To dispense sparkling (carbonated) water.
[b dispense sparkling water, press the
Sparkling Water button.
When you press the Sparkling Water button
while either Cubed Ice or Crushed Ice is
selected, the Sparkling Icon will turn on.
When there is no sparkling water left or the
refrigerator is making sparkling water, the
dispenser does not dispense sparkling water.
2) To select the carbonation level of the
sparkling water,
When you press the Sparkling Water button
while the Sparkling Water Icon is turned on, the
Carbonation Level will change as fellows;
Medium (Level 2) _ Strong (Leveb3)
Weak (Level-1 ) _ Medium (Level-2),
The next time the refrigerator makes sparkling
water, it applies the new Carbonation Level,
If there is previously produced sparkling
waler inside the Sparkling Water tank, the
refrigerator dispenses sparkling water with
the previous carbonation level,
(Changes in the carbonation level do not
take effect until the next time the refrigerator
makes sparkling water,)
While the refrigerator is producing sparkling
water, the Carbonation Level icons light up
in rotation (Level-1 _ Level-2 _ Level-3
Level-1, etc,),
If you press the Sparkling Water button when
the refrigerator is making sparkling water,
the current carbonation level is displayed for
several seconds, and then the Carbonation
Level icon light rotation begins again,
If you press the Sparkling Water button again
while the current carbonation level is being
displayed, the carbonation level changes,
The change in the carbonation level will take
effect the next time the refrigerator makes
sparkling water,
3) Sparkling Water Production Functiorl On / OFF
Each time you press this button for 3 seconds,
you turn the Sparkling Water Production
function on or off,
When you turn on the Sparkling Water
Production function, the refrigerator begins to
make sparkling (carbonated) water,
(ll you turn off the Sparkling Water Production
function a few seconds after turning it on,
sparkling water productien will terminate.
If more than a few seconds pass, the
refrigerator will start producing sparkling water.
While the refrigerator is producing sparkling
water, it won't dispense sparkling water,)
When you turn off the Sparkling Water
Production function, the "OFF" Icon on the
Display Panel turns on,
When you turn on the Sparkling Water
Production function, the "OFF" Icon on the
Display Panel turns off,
When the Sparkling Water Production function
is off, the refrigerator does not make sparkling
water,
If you turn off the Iunction when the refrigerator
is in the middle of making sparkling water, it
halts the function after finishing the current
operation,
Your refrigerator was manufactured with the
Sparkling Water Production function set to
"OFF".
When you are connecting the water lines, or
mounting or replacing the CO2Cylinder, turn off
the Sparkling Water Production function before
you begin,
fL_m on the function only after you have
completed the work,
Tb produce sparkling water, you must install a
CO2Cylinder.
For instructions, see "lnslalling a SodaStream
Carbonator in the Refrigerator" on page 20.
Engl sh - 24
The Cubed/Crushed Ice button serves two
purposes:
re select the type of ice you want dispensed,
re turn the Ice maker on and off.
) Cubed / Crushed Function
lo Select the type of ice.
Press the Cubed/Crushed ice button to select
the type of ice you want dispensed,
Each time you press the button, the cubed and
crushed ice modes alternate and the Cubed
or Crushed ice icon lights up, indicating your
selection,
2) Ice Maker Off function
If you don't want to make more ice, touch and
hold this button for 3 seconds.
iiiiiii i
If you don't want to make more ice, [buch and
hold the Ice Maker Off button for 3 seconds.
See (8) above,
The icon lights and the IceMaker stops making
ice.
We recommend you stop ice making if
the following occur:
- There is enough ice in the ice bucket.
_J - You want to save water and energy,
Water is net being supplied to the
refrigerator.
To save electricity, the Panel Display turns off
automatically under the following conditions:
When no button has been pressed, when no
doors are open, or when no Dispenser Lever
has been pushed.
However, the icon indicating your cubed or
crushed ice selection, or sparkling water
selection, wil! stay on.
When you press a button, open a door, or
push a Dispenser Lever, the Panel Display will
turn on again.
All function keys will become operational after
you remove your finger from the button you
pressed.
This icon lights up when you need to change
the filter, usually after the refrigerator has
dispensed about 300 gallons of water (after
about 6 months),
After you install the new water filter, reset the
filter indicator by touching and holding the Hold
3sec fer Filter Reset button for 3 seconds.
If water is not dispensing or
dispensing slowly, you need to
replace the water filter because the
water filter is clogged,
Some areas have large amounts of
lime in their water, which causes the
water filter to clog more quickly,
ll the ice maker function is ON, and the
water line is not connected, there will
be a water valve noise from the back of
the unit.
If this occurs, press the Ice Maker Off
button for more than 3 seconds until the
Ice Off icon ( _ ) illuminates.
Press the Cubed/Crushed Ice button to select
the type of ice you want dispensed.
Cubed Each time you press the button, the cubed and
crushed ice modes alternate and the Cubed
or Crushed ice icon lights up, indicating your
Crushed se ect on,
Engl sh - 25
iiiiii_!_!_!_!!_!!ii!!i!!ii!i_!i_!_!i_i!_iii_i_:_ii!i_ii_i_ii_i_i_i_i_i_i_i_i_i__i__ _ililililililililililililililililililililililililililililililililililililililililililililil_I_I_!_iiiiiiii
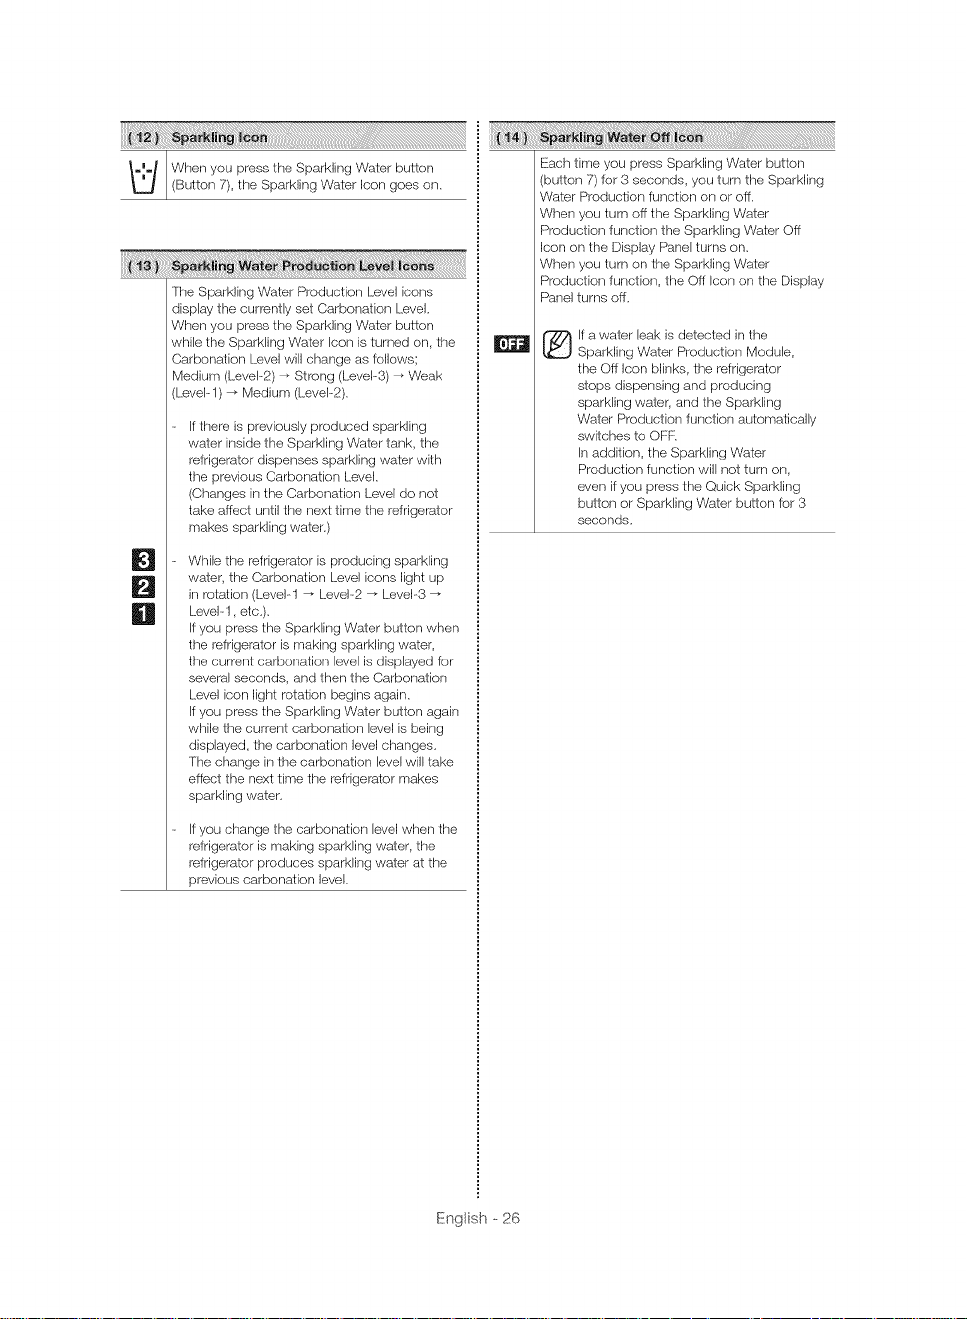
When you press the Sparkling Water button
Button 7, the Spark ng Water cots goes ors,
The Sparkling Water Production Level icons
display the currently set Carbonation Level,
When you press the Sparkling Water button
while the Sparkling Water Icon is turned on, the
Carbonation Level will change as follows;
Medium (Leveb2) _ Strong (Leveb3) _ Weak
(L.eveb1) _ Medium (Leveb2),
If there is previously produced sparkling
waler inside the Sparkling Water tank, the
refrigerator dispenses sparkling water with
the previous Carbonation Level,
(Changes in the Carbonation Level do not
take affect until the next time the refrigerator
makes sparkling water,)
[]
While the refrigerator is producing sparkling
water, the Carbonation Level icons light up
[]
in rotation (Level-1 _ Level-2 _ Level-3
Level-1, etc,),
[]
If you press the Sparkling Water button when
the refrigerator is making sparkling water,
tt_ecurreIit carboIlation I_vel is displayed for
several seconds, and then the Carbonation
Level icon light rotation begins again,
If you press the Sparkling Water button again
while the current carbonation level is being
displayed, the carbonation level changes,
The change in the carbonation level will take
effect the next time the refrigerator makes
sparkling water,
If you change the carbonation level when the
refrigerator is making sparkling water, the
refrigerator produces sparkling water at the
previous carbonation level,
Each time you press Sparkling Water butters
(button 7) for 3 seconds, you turn the Sparkling
Water Production function orsor off,
When you turn off the Sparkling Water
Production function the Sparkling Water Off
Icon on the Display Panel turns on,
When you turn on the Sparkling Water
Production function, the Off Icon on the Display
Panel turns off,
If a water leak is detected in the
®
Sparkling Water Production Module,
the Off Icon blinks, the refrigerator
stops dispensing and producing
sparkling water, and the Sparkling
Water Production function automatically
switches to OFR
In addition, the Sparkling Water
Production function will not turn ors,
even if you press the Quick Sparkling
button or Sparkling Water button for 3
seconds,
Engl sh - 26
CHANGING THE WATER
FILTER
WARNING
To reduce the risk water damage to your property
DO NOT use generic brands of water filters in your
SAMSUNG Refrigerator,
USE ONLY SAMSUNG BRAND
WATER FILTERS.
SAMSUNG is not legally responsible
for any damage, including, but not
limited to, property damage caused (Red)
by water leakage from the use of a
generic water filter.
SAMSUNG Refrigerators are designed to work
ONLY WITH SAMSUNG Water Filters.
The Filter light turns red to let you know when it is
time to change your water filter cartridge,
To give you time to get a new filter, the red light
comes on just before the capacity of the current
filter runs out.
Changing the filter on time provides you with the
freshest, cleanest water from your refrigerator.
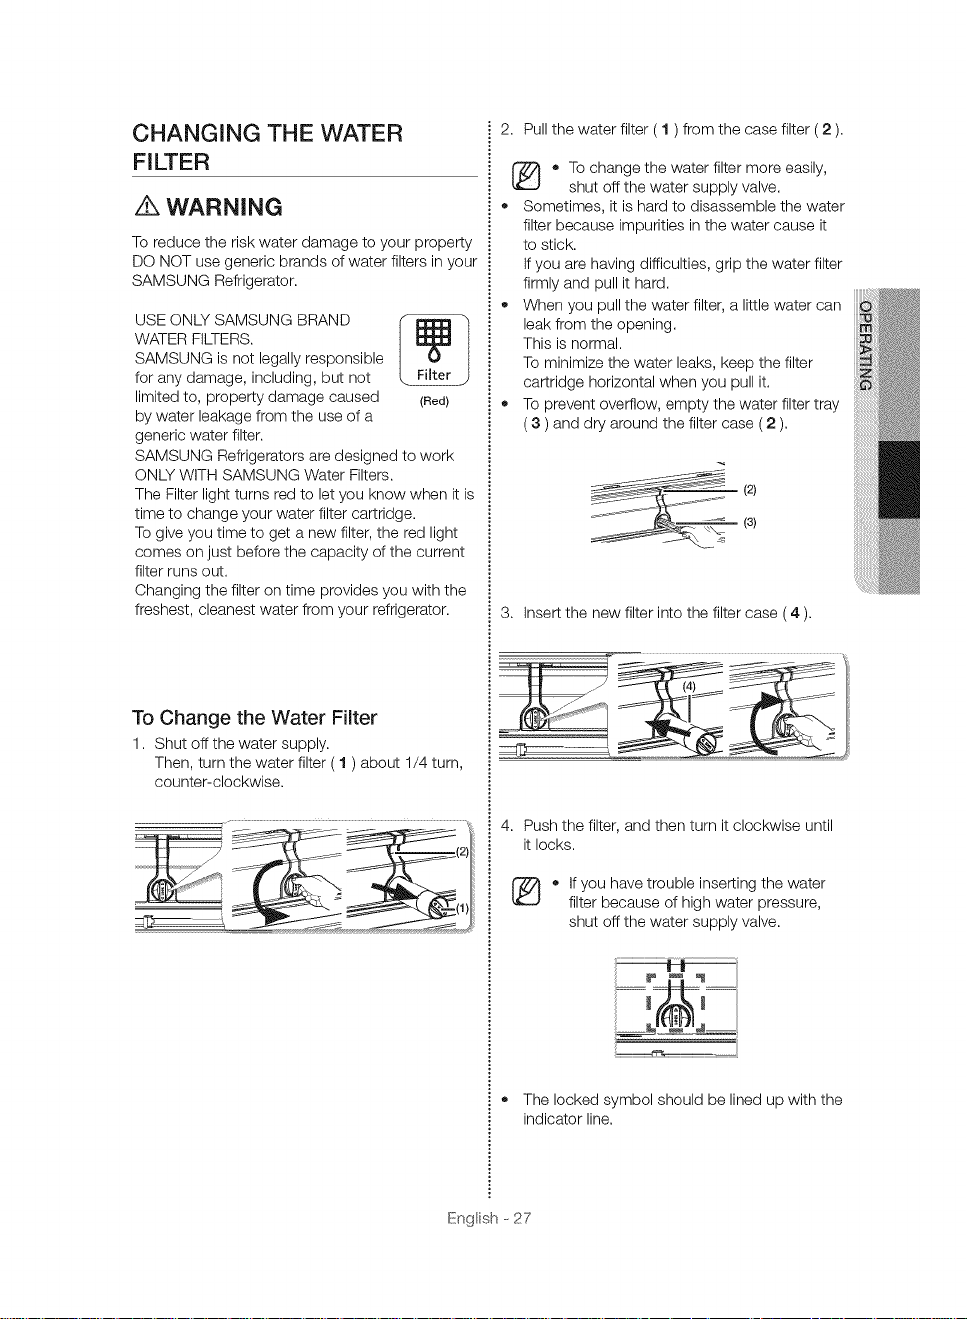
2, Pull the water filter ( 1 ) from the case filter ( 2 ),
• Tochange the water filter more easily,
• Sometimes, it is hard to disassemble the water
• When you pull the water filter, a little water can
3, Insert the new filter into the filter case ( 4 ).
shut off the water supply valve.
filter because impurities in the water cause it
to stick.
Ifyou are having difficulties, grip the water filter
firmly and pull it hard.
leak from the opening.
This is normal.
To minimize the water leaks, keep the filter
cartridge horizontal when you pull it.
To prevent overflow, empty the water filter tray
(3 ) and dry around the filter case ( 2 ),
-- (2)
(3)
To Change the Water Filter
1, Shut off the water supply.
Then, turn the water filter ( 1 ) about 1/4 turn,
counter-clockwise.
4, Push the filter, and then turn it clockwise until
it locks,
• If you have trouble inserting the water
filter because of high water pressure,
shut off the water supply valve,
The locked symbol should be lined up with the
indicator line,
Engl sh --27
5,Touchthe"Alarm/FilterReset(3sec)"
button( (FilterRe+et>)forabout3secondsto
q,)
resetthewaterfilter.
Thecoloroftheindicator(I_)changesfrom
redtooff.
Be sure to flush the dispenser thoroughly,
otherwise water may drip from the
dispenser.
This means that there is still air in the line.
6.Ifyouturnedoffthewatersupply,turnitback
on,
[_ or a replacement water filter, you can visit
your local home Improvement center or
contact the Samsung Parts distributor.
To order more water filter cartridges,
contact your authorized Samsung dealer.
Be sure the replacement water filter has
the SAMSUNG logo on the box and on the
water filter.
Removing any residual matter inside
the water supply line after installing
the water filter.
1. Turn ON the main water supply if you turned it
off when you installed the water filter.
2. Run water through the dispenser until the
water runs clear (approx. 6 to 7 minutes).
This will clean the water supply system and
remove air from the lines.
3. Additional flushing may be required in some
households.
Reverse Osmosis Water Supply
IMPORTANT:
The pressure of the water supply coming out of a
reverse osmosis system going to the water inlet
valve of the refrigerator needs to be between 35
and 120 psi (241 and 827 kPa).
Ifa reverse osmosis water filtration system is
connected to your cold water supply, the water
pressure to the reverse osmosis system needs to
be a minimum of 40 to 60 psi (276 to 414 kPa).
Ifthe water pressure to the reverse osmosis
system is less than 40 to 60 psi (276 to 414 kPa):
• Check to see whether the sediment filter in the
reverse osmosis system is blocked.
Replace the filter if necessary.
+ Allow the storage tank on the reverse osmosis
system to refill after heavy usage.
+ If your refrigerator has a water filter, it may
further reduce the water pressure when used
in conjunction with a reverse osmosis system.
Remove the water filter.
Ifyou have questions about your water pressure,
call a licensed, qualified plumber.
4. Open the Refrigerator door and make sure
there are no water leaks coming from the
water filter.
"+;;id,'iU&,....
+i.iiiit++,+,,/_
...........+i!i!i:;!:!,i:ii+++jii+_+..... _i+_:i,i;ii+++_,
,iig'; '%!?
Engl sh --28
CONTROLLING THE
TEMPERATURE
Recommended freezer and
refrigerator compartment
temperatures
The recommended temperatures for the Freezer
and Fridge compartments are 0 °F (-19 °C) and
37 °F (3 °C) respectively,
If the temperature in the Freezer or Fridge
compartments is too high or low, adjust the
temperature manually.
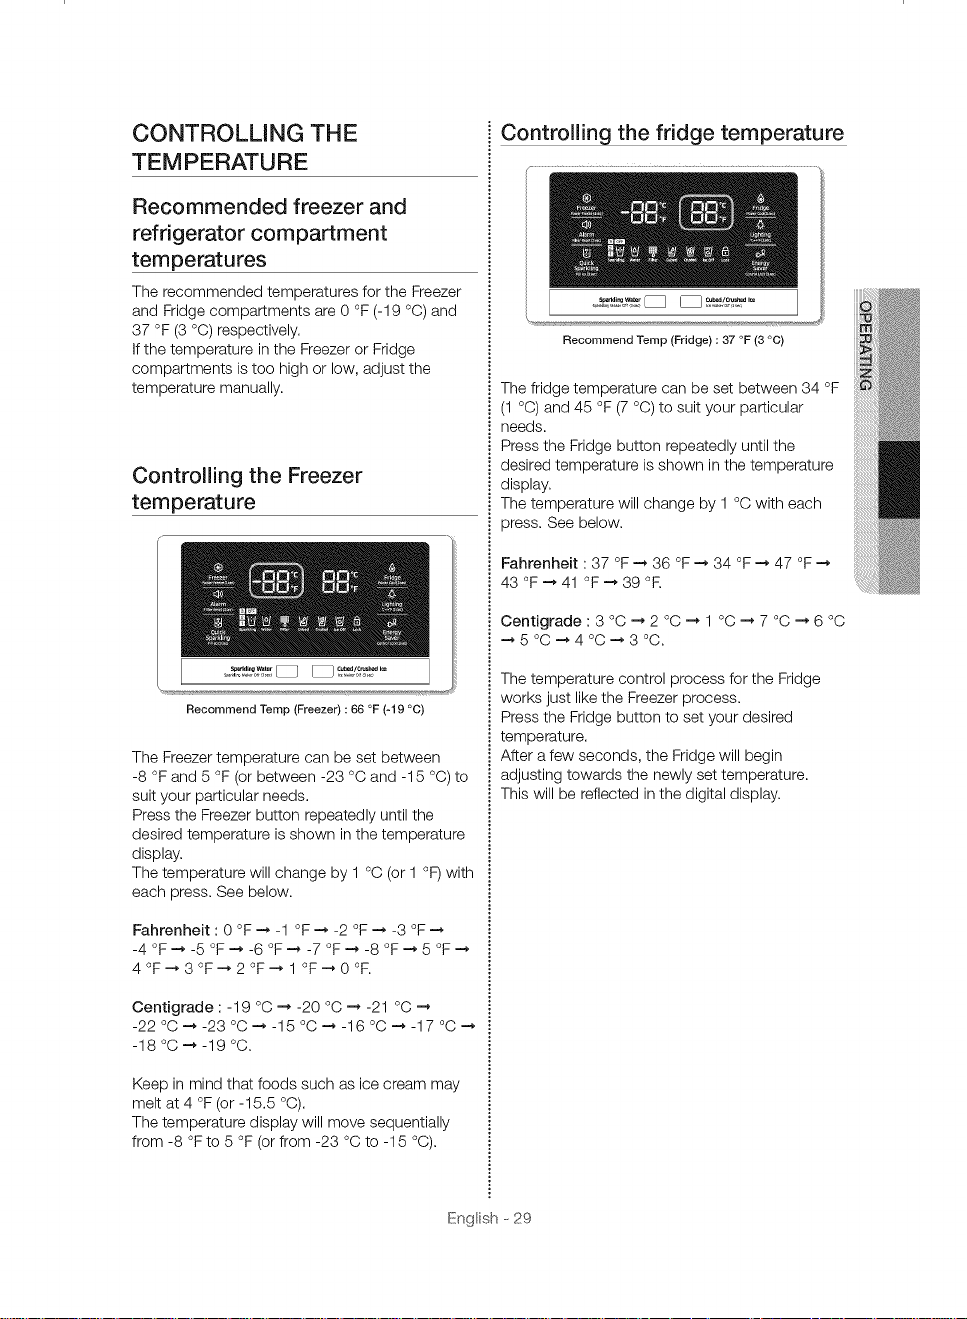
Controlling the Freezer
temperature
Recommend Temp (Freezer) : 66 °F (-19 °C)
The Freezer temperature can be set between
-8 °F and 5 °F (or between -23 °C and -15 °C) to
suit your particular needs.
Press the Freezer button repeatedly until the
desired temperature is shown in the temperature
display.
The temperature will change by 1 °C (or 1 °F) with
each press. See below.
Fahrenheit : 0 °F _ -1 °F ---*-2 °F _ -3 °F ---*
-4 °F ---*-5 °F ---*-6 °F _ -7 °F _ -8 °F ---*5 °F ---*
4OF.-,3OF-.,2OF-.,lOF.-,0o R
Controlling the fridge temperature
Recommend Temp (Fridge) : 37 °F (3 °C)
The fridge temperature can be set between 34 °F
(1 °C) and 45 °F (7 °C) to suit your particular
needs.
Press the Fridge button repeatedly until the
desired temperature is shown in the temperature
display.
The temperature will change by 1 °C with each
press. See below.
Fahrenheit :37 °F _ 36 °F ---*34 °F ---*47 °F ---*
43 °F ---*41 °F ---*39 °R
Centigrade : 3 °C _ 2 °C ---* 1 °C ---*7 °C ---*6 °C
.-, 5 oC-., 4 oC -., 3 oC.
The temperature control process for the Fridge
works just like the Freezer process.
Press the Fridge button to set your desired
temperature.
After a few seconds, the Fridge will begin
adjusting towards the newly set temperature.
This will be reflected in the digital display.
Centigrade: -19 °C _ -20 °C _ -21 °C
-22 °C ---*-23 °C ---*-15 °C ---*-16 °C ---*-17 °C ---*
-18 °C ---*-19 °C.
Keep in mind that foods such as ice cream may
melt at 4 °F (or -15.5 °C).
The temperature display will move sequentially
from -8 °F to 5 °F (or from -23 °C to -15 °C).
Engl sh --29
- ThetemperatureoftheFreezerorFridge
mayrisewhenyouopenthedoorstoo
frequently,orifalargeamountofwarm
orhotfoodisplacedinside.
Ariseintemperaturemaycausethedigital
displaytoblink.
OncetheFreezerandFridgetemperatures
returntotheirnormalsettemperatures,the
blinkingwillstop.
Iftheblinkingcontinues,youmayneedto
"reset"theRefrigerator.
Tryunpluggingtheappliance,waitingfor
around10minutesandthenpluggingthe
powercordbackin.
Ifthereisacommunicationerrorbetweenthe
DisplayandMainController,theConvertible
Displaylightmayblink.
Iftheblinkingcontinuesforalongperiodof
time,pleasecontactaSamsungElectronics
ServiceCenter.
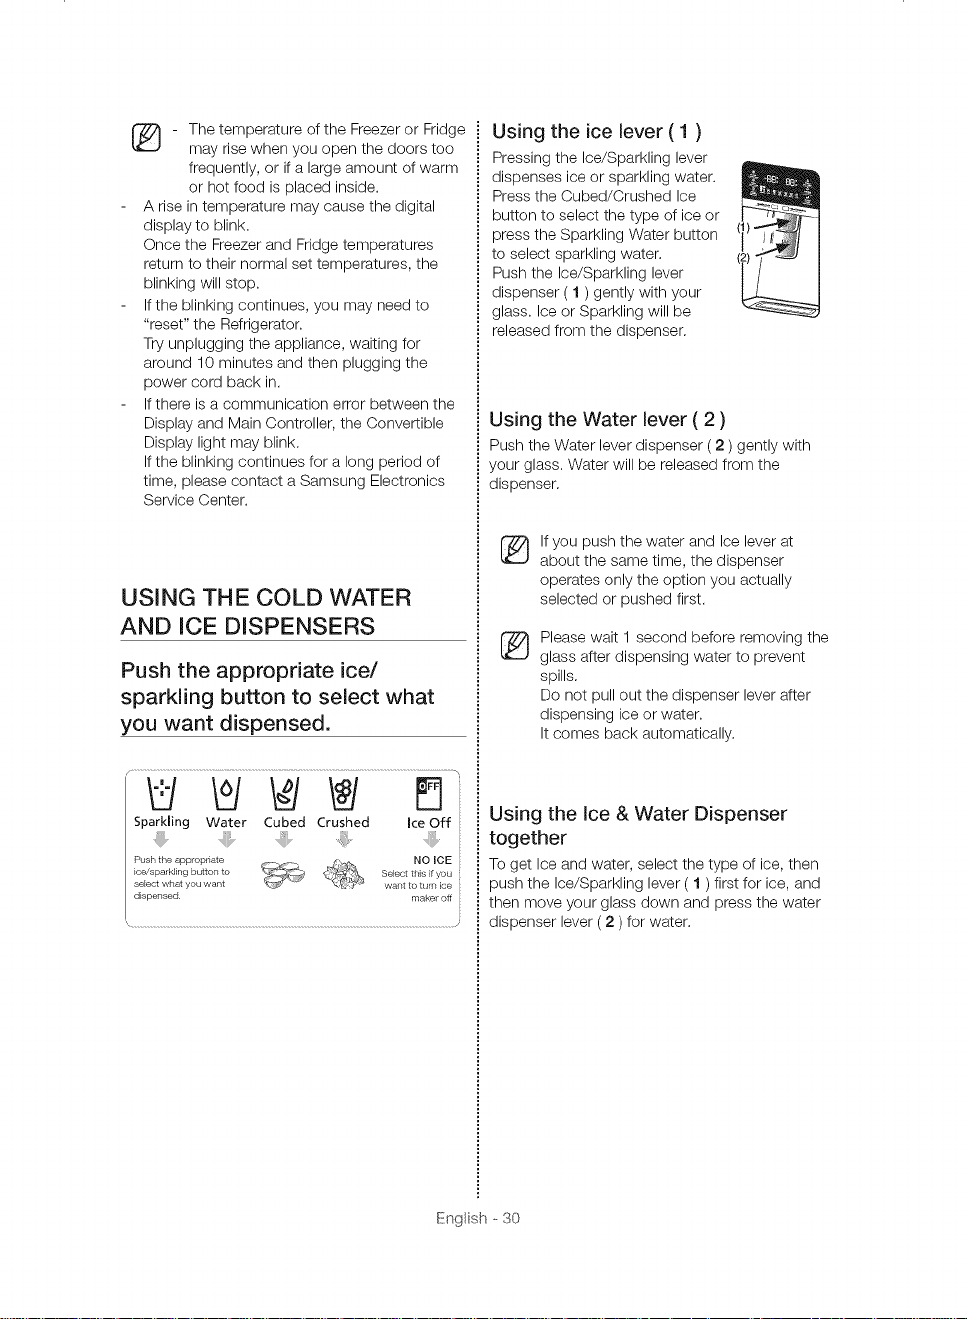
USING THE COLD WATER
AND ICE DISPENSERS
Push the appropriate ice/
sparkling button to select what
you want dispensed.
Using the ice lever ( 1 )
Pressing the Ice/Sparkling lever
dispenses ice or sparkling water.
Press the Cubed/Crushed Ice
button to select the type of ice or
press the Sparkling Water button
to select sparkling water.
Push the Ice/Sparkling lever
dispenser (1 ) gently with your
glass. Ice or Sparkling will be
released from the dispenser.
Using the Water lever ( 2 )
Push the Water lever dispenser (2 ) gently with
your glass. Water will be released from the
dispenser.
If you push the water and Ice lever at
®
about the same time, the dispenser
operates only the option you actually
selected or pushed first.
Please wait 1 second before removing the
glass after dispensing water to prevent
spills.
Do not pull out the dispenser lever after
dispensing ice or water.
It comes back automatically.
Sparkling Water Cubed Crushed IceOff
Push the appropriate <b-_. NO ICE
ice/sparkling button to _ Select this if you
select what you want want to turn ice
dispensed, maker off
Using the Ice & Water Dispenser
together
To get Ice and water, select the type of ice, then
push the Ice/Sparkling lever ( 1 ) first for ice, and
then move your glass down and press the water
dispenser lever (2 ) for water.
Engl sh - 30

Maintaining the ice Bucket
+ To clean the ice bin/bucket, wash with a mild
detergent, rinse well, and dry thoroughly it,
Do not use harsh or abrasive cleaners or
solvents,
+ Ice is made in cubes,
When you select "Crushed", the ice maker
grinds the ice cubes into crushed ice,
+ When you select Cubed Ice after using the
Crushed Ice mode, a small amount of residual
crushed ice might be produced,
+ The ice cubes generated by the rapid ice
making process will look white, which indicates
they were generated normally,
+ If you need a large amount of ice and the ice
maker is making ice cubes quickly, move
ice cubes from the refrigerator ice bin to
the freezer ice bin to open up space in the
refrigerator ice bin,
The ice maker will then make additional ice,
+ If ice doesn't come out, pull out the ice bucket
and press the test button located on the right
side of ice maker,
See the illustration on the right,
+ Do not press the test button continuously
when the tray is filled with ice or water,
Water may overflow or ice may jam tile bucket,
Making Ice
+ To fill the ice bucket to maximum capacity after
installation, follow these steps:
1, Allow your refrigerator to operate and cool
down for 24 hours (or 1 full day).
Waiting 24 hours will allow your ice maker to
cool properly,
2. Dispense 4 to 6 ice cubes into the glass.
3, After 8, and then 16 hours, dispense a full
glass of ice.
+ To test the ice maker, press the Test button on
the ice maker.
You will hear the refrigerator chime (ding-dong),
When the chime sounds, release the Test
button,
+ The chime sounds automatically again to let
you know the ice maker is working well,
the water level
/_ CAUTION
If you want to remove a large number of ice cubes
without removing the ice bucket, turn off the ice
maker, remove the ice maker's front cover, and
then carefully remove the ice cubes.
Replace the ice maker's front cover when you are
done. Note that the ice cubes inthe ice maker
can spill out over the drawer,
CAUTION
Do not put food in the ice bucket.
If you store food in the ice bucket, the food can
strike the ice maker when you open or close the
door, causing damage to the ice maker,
Engl sh +31

/_ CAUTION
Note that the ice cubes inthe ice bucket may
spill out over the drawer when you remove the ice
bucket from the drawer.
If this occurs, be sure to pick up the ice cubes
that spilled out of the drawer.
CAUTION
If a power failure occurs, ice cubes may melt, and
then freeze together when the power comes back
on, causing the dispenser to stop working.
To prevent this problem, after a power failure, pull
out the ice bucket as shown above, and then
discard the residual ice or water.
Ifyou use all the ice in the bucket at once,
you must repeat ice making Steps 2 and 3
on the previous page.
However, only wait 8 hours before
dispensing the first 4 to 6 ice cubes.
This will replenish the ice cubes and
ensure maximum ice production.
Using the ice Off Function
When you select the Ice Off mode, remove all ice
cubes from the bucket.
Ifyou leave the ice cubes in the bucket, the ice
cubes may clump together, making it difficult to
remove them.
To remove the ice bucket, push the button on the
upper right of the bucket (1 in the illustration inthe
left column.), lift up the bottom, and then pull out.
To put the bucket back in, push the bucket
straight back until you hear a click.
Ifthe bucket does not fit, turn the helix 90 degree
(seethe last illustration in the left column), and try
again.
z_ CAUTION
+ Use only the ice maker provided with the
refrigerator.
+ Have a suitably qualified person install
and connect the water supply line to the
refrigerator.
+ Connect the water supply line to a potable
water supply only.
+ To operate the ice maker properly, water
pressure of 20 + 125 psi is required.
Going on vacation...
Ifyou have a long vacation or business trip and
won't use the water or ice dispensers for a long
time:
Eng+sh +32
Close the water valve.
Otherwise, water leakage may occur.
Remove all food.
Unplug the refrigerator.
Wipe excess moisture from inside and leave
the doors open.
Otherwise, odor and mold may develop.

Ice Maker Do's and Don'ts
+ Do not put your fingers, hands, or any other
unsuitable objects in the chute or ice-maker
bucket.
It may result in personal injury or material
damage.
+ Never put your finger or any other objects in
the dispenser opening.
It may cause injury.
+ Do not try to disassemble the ice maker.
+ Do not wash or spray the ice bucket with
water while it is in the refrigerator.
Remove it to clean it
Z_ CAUTION
When you insert the Ice maker tray, be sure that
the tray is well centered at the entrance.
Otherwise, the tray may get stuck.
Water clouding phenomenon
All water provided to the refrigerator flows
®
through the core filter which is an alkaline
water filter.
Inthe filtering process, the pressure of
the water that has flowed out of the filter
is increased, and the water becomes
saturated with oxygen and nitrogen.
When this water flows out into the air, the
pressure plummets and the oxygen and
nitrogen get supersaturated, which results
in gas bubbles.
The water may temporarily look misty or
cloudy due to these oxygen bubbles.
After a few seconds, the water will look
clear.
Eng+sh +33

Using the Sparkling Water Function
With a Sodastream CO 2cylinder installed, your refrigerator can make and dispense sparkling
(carbonated) water.
Making Sparkling Water
Press and hold the Quick Sparkling button for 3 seconds to activate the Fill Up function.
If the Sparkling Water function is deactivated, press and hold the Sparkling Water or Quick Sparkling
button for 3 seconds to reactivate it.
When you turn on the function, the Carbonation Level icons light up in rotation (Level-1 _ Level-2
Level-3 _ Level-1, etc.) and, within a few seconds, the refrigerator begins to make sparkling water.
When production is complete, the Carbonation Level icon rotation stops.
If you leave the Sparkling Water Production function on, and the amount of Sparkling Water becomes
low, the refrigerator automatically enters the Sparkling Water production mode and makes more.
However, if you turn off the Sparkling Water Production function, the refrigerator will not automatically
make additional sparkling water, even if there is little sparkling water left in the Sparkling Water tank.
sparkling water
Press the Sparkling Water Button for 3 seconds
Press the Quick Sparkling Button for 3 seconds
Sparkling Water Production Time
Depending on the Carbonation (Sparkling) Level you set (See Controlling the Carbonation Level on page
35), the amount of time it takes the refrigerator to complete the sparkling water production process
changes. The table below lists the production times by Carbonation Level.
The refrigerator is pre-set at the factory to Level 2.
Carbonation Level Level 3 - High Level 2 -Mid Level 1 -Low Quick
Production Time About 30 mirlutes About 20 minutes About 10 minutes Less thar110 minutes
Available Capacity 1.16 quarts (1.1 _) 1.16 quarts (1.1 6) 1.16 quarts (1.1 _) 1.16 quarts (1.1 _)
Dispensing Sparkling Water
To dispense sparkling water, press the Sparkling Water button. Then, push the Ice/Sparkling Water lever
gently with a glass. As time passes, the sparkling water dispensing speed can change.
When the water tastes strongly carbonated, the dispensing speed can be faster.
When the carbonation is weaker, the dispensing speed can slow.
The dissolved CO2 in the sparkling water can also cause the water to pop out when you dispense it.
In addition, due to the pressure fluctuations in the Sparkling Water Tank, the water stream may shake or
become intermittent.
If you keep dispensing sparking water, the water stream may become unstable or break up.
This is caused by changes in pressure in the Sparkling Water Tank. It is not a defect.
Engl sh - 34

Water Dripping
Some time after you have dispensed sparkling water, a few drops of sparkling water can escape from
the dispenser. The water dripping is not a product defect, but a natural result of mixing CO 2 and water.
Controlling the Carbonation Level
When the Sparkling Water Icon is turned on, you can change the sparkling water's carbonation level by
pressing the Sparkling Water button for 3 seconds.
Each time you press the Spakling Water button, the carbonation level changes as follows:
Medium (Level-2) _ Strong (Level-3) _ Weak (Level-I) _ Medium (Level-2).
As you press the button, the small numbers on the right side of the button light up in succession,
indicating the level change.
Ifthere is previously produced sparkling water inside the Sparkling Water tank, the refrigerator
dispenses sparkling water with the previous carbonation level.
(Again, changes in the carbonation level do not take affect until the next time the refrigerator makes
sparkling water. The change does not affect sparkling water that is already made.)
While the refrigerator is producing sparkling water, the Sparkling Level icons light up in rotation
(Level-1 _ Level-2 _ Level-3 _ Level-l, etc.).
Ifyou press the Sparkling Water button when the refrigerator is making sparkling water, the current
carbonation level is displayed for several seconds.
Ifyou press the Sparkling Water button again while the carbonation level is being displayed, the
carbonation level changes. The change in the carbonation level will take affect the next time the
refrigerator makes sparkling water.
Ifyou change the carbonation level when the refrigerator is making sparkling water, the refrigerator
produces sparkling water at the previous carbonation level.
The Sparkling Level is set to Level 2 at the factory.
If the sparkling water tastes too strong or too weak, change the carbonation level.
Level 1 provides a milder carbonation, Level 3 a stronger carbonation.
• Ifthere is a power interruption when the refrigerator is making sparkling water, the refrigerator may
re-start the carbonation process when power returns and put too much carbonation into the water.
Ifthis occurs, we recommend throwing out the overly carbonated water and starting the process
again.
• The lifetime of the CO 2cylinder can vary, depending on the Sparkling Levels you choose.
Engl sh - 35

Turning Off the Sparkling Water Function
To turn off the Sparkling Water function, press the Sparkling Water
button for 3 seconds.
Any sparkling water remaining in the Sparkling Water tank after you
have turned off the Sparkling Water function can still be dispensed.
Ifyou turn off the function when the refrigerator is in the middle of
making sparkling water, it halts the function after finishing the current
operation.
Press for 3 seconds
How to set the Quick SparMing option
Quick Sparkling reduces the processing time for making sparkling water.
The Quick Sparkling function can produce sparkling water with a high sparkling level in 3 to 10 minutes,
regardless of the selected concentration.
Ifthe refrigerator is not currently making sparkling water, turning on the Quick Sparkling function
will reduce the processing time the next time the refrigerator makes sparkling water. When the
refrigerator finishes making sparkling water, the Quick Sparkling function turns off automatically.
Ifthe refrigerator is currently making sparkling water, turning on the Quick Sparkling function
will reduce the processing time. When the refrigerator finishes making sparkling water, the Quick
Sparkling function turns off automatically.
To cancel the Quick Sparkling function while the refrigerator is making sparkling water, press the
Quick Sparkling button again within 10 seconds.
After 10 seconds, the Quick Sparkling function will remain active even if the corresponding indicator
turns off.
The Quick Sparkling function repeatedly injects and discharges CO2 gas. This can cause a noticeable
noise. Quick Sparkling consumes approximately 35% more CO 2 gas than Sparkling Level 3.
Engl sh - 36

PARTS AND FEATURES
Review the illustration below to become more familiar with the parts and features of your refrigerator,
(8) Light
(3)
2 Step Foldable-
Shelf
Cylinder Cover
(Option)
(5)
-- (2)
Light
Auto CIose_
Water Filte_
When closing the door, make sure the Vertical Hinged Section is in the correct position to avoid
®
scratching the other door,
Auto Closer
(6)
(7)
Ifthe Vertical Hinged Section is reversed, put it back to the right position, and then close the
door.
Moisture may appear at times on the Vertical Hinged Section.
The door handle may become loose over time, If this happens, tighten the bolts found on the
inside of the door.
Ifyou close one door with too much force, the other door may open,
When the door opens, the interlock switch automatically turns off the auger motor in the ice
maker for safety reasons,
Ifthe interior or exterior LED lamp has gone out, please contact your service agent,
z_ CAUTION
When you open the door, you might hear the sound of sloshing water because the Sparkling Water
Tank is inside the door,
Engl sh --37

i ii i !i!i iiii!ii ii !i ii ! ii! !i !ii!ili iiiiiiiiiiiiiiiiiiiiiiiiiii ! i
Use the Sparkling Water Tank function, and
enioy the sparkling water directly from the tank
any time you want.
Designed to handle large, bulky items such
as gallons of milk or other large bottles and
containers.
Makes it easier to take out food.
The shelf functions as a full depth shelf or can
be tucked in to accommodate taller containers.
Used to preserve the freshness of your stored
vegetables and fruits.
i ii!i ! !!i!ii! i!ii! ! !i iii i ! i ! i! !!i!!!!!! ! i !i ! ! i! !! ! ! i i i !i ! ! ! i !ii!ii! i i !i !i ! i i i i i i ii ii i i ii iiiiiiiiiiiiiiii iiiiiii ii ii iiiiiiiiiiiiiiiiiiiiiiiiiiiiiiiiiiiiiiiiiiiiiiiiiiiiiiiiiiiiiiiiiiiiiiiiiiiiiiiiiiiiiiiiiiiiiiiiiiiiiiiiiiiiiiiiiiiiiiiiiiiiiiiiiiiiiiiiiiiiiiiiiiiiiiiiiiiiiiiiiii i i i i !!!!JJ!iiii
Best used to store meats or dry foods.
Stored food should be placed ina container or
wrapped securely using foil or other suitable
wrapping materials.
ilii_i¸!i_ii_!_!_!_i!_ii_ii_ii_ii_ii_ii_i:i_!_!_!!_i!i!!_!_!_!_i!i_iii_!_!i_!i__!!!!!
Best used to store meats or dry foods.
Stored food should be wrapped securely using
foil or other suitable wrapping materials or
containers.
Makes ice conveniently and continuously so you
can have ice when you need it.
Engl sh - 38

USING FLEX ZONE
The Flex Zone is a full-width drawer with an
adjustable temperature control.
You can use the Flex Zone for large party
trays, deli items, wines, pizzas, beverages, or
miscellaneous items.
There is a temperature sensor which lets you
adjust the amount of cold air allowed into the
Zone.
The control buttons are located on the cap door
center.
Temperature Selection Button
• Press the Temp. button repeatedly until your
desired mode is lit.
Each time you press the Temp. button, you
change the mode in this order :
Meat/Fish mode (29 °F or -1 °C), Cold Drinks
mode (33 °F or 1 °O), Deli/Snack mode (37 °F
or 3 °C), Wine/Party Dishes mode (42 °F or
5 °O).
Initially, the Cold Drinks mode is selected.
The refrigerator will adjust the temperature in
the Flex Zone automatically to the temperature
you selected.
The Flex Zone Temp.
Display may change depending on the number
of items inside, where they are located, the
ambient temperature, and how often the door
is opened.
1. When "Wine/Party Dishes" is selected,
the temperature of the Flex Zone will be kept
around 42 °F or 5 °C.
This feature helps keep food fresh for a long
time.
2. When "Deli/Snack" is selected, the
temperature of the Flex Zone will be kept
around 37 °F or 3 °C.
This feature helps keep food fresh for a longer
time.
3. When "Cold Drink" is selected, the
temperature of the Flex Zone will be kept
around 33 °F or 1 °C.
This feature helps keep drinks cold and
refreshing.
4. When "Meat/Fish" is selected, the
temperature of the Flex Zone will be kept
around 29 °F or -1 °C.
This feature helps keep meat or fish fresh for a
longer time.
Engl sh --39

ExamplesoffooditemsyoucanstoreintheFlex
Zone by temperature setting,
Wine Party Deli Snacks Cold Drinks Meat Fish
Dishes
wine • pineapples • bottled • steaks
cocktails • lemons • juice • cold cuts
cakes • biscuits • soft drinks • bacon
cheeses • potatoes • beer • chili dogs
Fruit and vegetables may be damaged if
stored under the "Meat Fish" setting.
Do not store lettuce or other leafy produce
in the Flex Zone,
CAUTION
Do not store glass bottles inthe Flex Zone under
the "Cold Drinks" or "Meat/Fish" setting.
If they are frozen, they can break and cause
personal injury,
RECOMMENDED LOCATION
FOR THE FOLDABLE SHELF
The Foldable Shelf folds up from the center, giving
you more storage area for tall items without your
having to re-arrange the shelves,
• Install the Foldable Shelf on the right side of
the refrigerator.
• Ifyou install the Foldable Shelf on the left side,
the ice maker will prevent the shelf from folding
completely.
• To use, push the front portion of the shelf
back gently so that the shelf folds up from the
middle,
water
REMOVING THE
REFRIGERATOR
ACCESSORIES
1. Door Bins
• Door Bins (1)
To remove : Simply lift the bin up and pull
straight out.
To relocate : Slide it in above the desired
location and push down until it stops,
Door Bins ( 2 )
To remove : Take the right side of the bin out
by lifting it at an angle along the guide, and
then take the left side out by pulling it from the
door,
To relocate : Slide it into the original location
and push down until it sticks,
Sparkling Water model door bins (2 )
To remove : Take the right side of the bin out
by lifting it at an angle along the guide, and
then take the left side out by pulling it from the
door,
To relocate : Align the positions of the Door
Bin's holes carefully, and then slide the bin in
above the desired location and push down
until it stops.
When removing and re-assembling the Bottom
Door Bin of the Sparkling Water model, open
the Cylinder Cover and tilt the Cylinder towards
the front first,
Engl sh --40

SparklingWatermodeldoorbins(3).
DonotremoveSparklingWatermodeldoor
bin(3).
Toclean,wipeitcompletelywithacleancloth
withoutremovingit.
2. Tempered Glass shelves
To remove : Tilt up the front of the shelf inthe
direction shown ( 1 ) and lift it up vertically (2 ).
Pull the shelf out.
To re-install : Tilt the front of the shelf up
and guide the shelf hooks into the slots at a
desired height.
Then lower the front of the shelf so that the
hooks can drop into the slots.
(1)
A CAUTION
Do not remove door bins ( 3 ).
Do not adjust a bin full of food.
Remove the food first.
To remove dust from the bins, remove the guard
and wash inwater.
CAUTION
Injuries can occur if large bottles inthe bottom
door bins fall over when you open the doors.
Open the doors carefully.
[_ njuries can occur if the door bins are not
firmly connected to the doors.
Do not allow children to play with the bins.
Sharp corners of the bins may cause
injury.
CAUTION
The Tempered Glass shelves are heavy.
Use special care when removing them.
3. Foldable Shelf
To remove : After removing the Shelf Front, lift
up the Shelf and remove it.
To re-install : Hook the Shelf on the Angle
Frame and re-attach the Shelf Front to the
Foldable Shelf.
Engl sh --41

z_ CAUTION
After sliding the foldable shelf in and folding it, the
Shelf Front can be removed for your convenience,
If you use the self without removing the Shelf
Front, be careful.
The Shelf Front can separate from the rest of the
shelf,
4. Vegetable & Fruit Drawers
Door Bins
Before removing the drawer, please remove
the door bins first as shown below.
To remove : Simply lift the bin up and pull
straight out,
Sparkling Water Model Door Bins
To remove : Take the right side of the bin out
by lifting it at an angle along the guide, and
then take the left side out by pulling it from the
door.
When removing and re-assembling the Bottom
Door Bin of the Sparkling Water model, open
the Carbonator Cover and tilt the Carbonator
towards the front first,
Tilt up the front of the drawer and pull it
straight out.
Then, move the drawer slightly in the direction
of the arrow and pull it out of the refrigerator,
See the illustration below,
To re-install
insert the drawer into the frame rails, and push
it back into place,
Slide each bin in above the desired location,
and then push down until it stops,
/_ CAUTION
The drawers need to be removed before the glass
shelf above them can be lifted out,
Engl sh --42

5. Flex Zone
To remove the Flex Zone : Pull the Flex door
out to full extension, Then, lift the Flex Zone
up, pulling it to your body with both hands,
To re-install the Flex Zone : Open the Flex
door to full extension.
Tilt the front of the Flex Zone up, place the
back of the Flex Zone onto the rails, and then
lower the front until the whole Zone rests on
the rails,
If the Flex Zone or LED lighting is not
working, check the connectors [ ( 1 ), ( 2 )
shown below ] for cracks or leaks.
Using the doors
Ensure that the doors close all the way and are
securely sealed.
When the refrigerator door is only partially open, it
will automatically close.
If the the door is opened more than its auto close
range, it will remain open.
You must close it manually,
REMOVING THE FREEZER
ACCESSORIES
1. Freezer Room Guard
To remove : Remove the freezer room guard
( 1 ) by lifting the guard up.
To re-install : Push down until the guard ( 1 )
locks into place,
1, Disassemble the Flex Door, Refer to to page
13 for disassembly instructions.
2, Open the cover rail cap with a flat-blade screw
driver to examine the connectors,
Engl sh - 43
2. Super Extended Drawer
To remove : Pull the drawer out to full
extension. Tilt up the rear of the drawer and lift
straight out.
To re-install : Place the drawer onto the rails
(4 ) by tilting it up.
Lower the drawer into place until it is horizontal
and slide the Drawer (3 ) in.

3. Freezer Drawer
To remove the freezer drawer : Pull the
freezer drawer out fully. Tilt up the rear of the
bin and lift it out to remove.
To re-instaU the freezer drawer : Place the
bin into the rail assembly.
Z_ CAUTION
You can scratch the side of the bin if you twist it
left or right when disassembling or re-assembling
it.
/K CAUTION
REPLACING A SODASTREAM
CARBONATOR
Ifthe carbonation level is abnormally low, this
means the Carbonator is empty and needs to be
replaced.
To replace a Carbonator, follow these steps:
Purchase SodaStream 60 L Carbonators at the
nearest Sodastream retailer or on line.
Visit www.sodastream.com for more information.
1. Lift up the [..ever holding the
Carbonator in place,
Do not allow babies or children go inside the
freezer drawer.
They could damage the refrigerator and seriously
injure themselves.
Do not sit on the freezer door.
The door may break.
Do not allow children to climb into the freezer
drawer.
CAUTION
Do not remove the divider.
/K CAUTION
If trapped inside, children may be injured or
suffocate to death.
2, Pull the Carbonator out of the
Support.
3. Rotate the Carbonator
counterclockwise to remove it from
the Regulator,
4.
lo installthe new Carbonator,followthe directions
for installinga Carbonatoron page 20.
5.
Pressandhold theQuick Sparklingbutton for 3
secondsto activatethe FillUp function.
Ifthe SparklingWater function is deactivated,press
andhold the SparklingWater or Quick Sparkling
button for 3 seconds to reactivateit.
Ifyou replace the CarbonatorduringSparkling
WaterProduction(indicatedby the Carbonation
Levelicons lightinginsuccession),wait until the
refrigeratorcompletes production befereturning
theSparklingWaterProductionfunction backon.
Becauseyouinterrupted production,the sparkling
water maybe overcarbonated. We recommendthat
you throw out the overlycarbonatedwater.
J
t
Engl sh - 44

SparMing Water: Operational Notes
+ Be sure to use genuine SodaStream Cylinders
from authorized resellers.
+ The refrigerator starts making sparkling water
about 10 seconds after you turn on the
Sparkling Water Production function.
+ Ifyou open the refrigerator door while the
refrigerator is making sparkling water, it will
stop. When you close the door, it will resume
making sparkling water in about a minute.
+ Ifthere is a power interruption when the
refrigerator is making sparkling water, the
refrigerator may re-start the carbonation
process when power returns and put too
much carbonation into the water.
Ifthis occurs, we recommend throwing out
the overly carbonated water and starting the
process again.
+ Ifyou keep dispensing sparkling water, the
water stream may become unstable or break
up.
This is caused by changes in pressure in the
Sparkling Water Tank. It is not a defect.
+ Ifthe water hose is kinked or water is not
supplied properly, the Carbonation Level of the
Sparkling Water will be high.
This occurs because the the same amount of
the carbon dioxide (002) is dispensed by the
Carbonator regardless of the amount of water
in the Production Tank.
+ The useful life of a SodaStream Carbonator will
vary, depending on the level of carbonation
you select.
+ Ifthe Sparkling Water function is on and you
dispense about 1.16 quarts (1.1 L) of sparkling
water, the refrigerator automatically begins
making more sparkling water.
+ Ifyou are not going to be home for a long
period of time, do not want to use the
Sparkling Water function any more, or you are
moving :
/k CAUTION
Remove the SodaStream Carbonator from the
compartment located in the left door of the
refrigerator before you transport the refrigerator.
1. Press the Sparkling Water button for three
seconds to turn off the Sparkling Water
function.
2. Empty the Sparkling Water tank by dispensing
all the water in the tank.
3. Remove the SodaStream Carbonator.
Eng+sh - 45

CLEANING THE
REFRIGERATOR
Caring for your Samsung French Door Refrigerator
prolongs its life and helps keep it free of odor and
germs.
Z_ WARNING
Do not use benzene, thinner, Clorox, or car
detergent to clean the refrigerator.
They can damage the surface of the appliance
and may cause a fire.
Do not spray the refrigerator with water while it is
plugged in.
This can cause an electric shock.
To clean the refrigerator, follow these steps:
1. Unplug the power cord of the refrigerator.
2. Slightly dampen a soft lint-free cloth or paper
towel with water.
Do not use any kind of detergent to clean
the refrigerator because that can discolor
or damage the refrigerator.
3. Wipe the inside and outside of refrigerator until
it is clean and dry.
4. Plug the power cord of the refrigerator back in.
Cleaning the Exterior
Wipe the control panel and digital display with a
damp, clean, soft cloth.
The doors, handles, and cabinet surfaces should
be cleaned with a mild detergent and then wiped
dry with a soft cloth.
To keep your appliance looking its best, polish the
exterior once or twice a year.
Z_ CAUTION
Do not spray water directly on the refrigerator.
Use a clean, damp cloth to clean.
z_ CAUTION
You can erase the printed letters
on the display if you apply stainless
cleaner directly to the area where
the letters are printed.
Cleaning the Interior
Clean the inside walls and accessories with a mild
detergent and then wipe dry with a soft cloth.
You can remove the drawers and shelves for a
more thorough cleaning.
Just make sure to dry drawers and shelves before
putting them back into place.
/
Engl sh - 46
Cleaning the Ice / Water Dispenser
Push down one end of the tray dispenser and
remove it.
Wipe the Ice / Water Dispenser with a clean, soft
cloth.
z_ CAUTION
When you dispense crushed ice
from the dispenser, some residual
ice chips may start to collect in the
ice chute.
To prevent that residual ice from
melting and running out of the
chute, you should clean out the
residual ice when you see it start to
collect in the ice chute.

Cleaning the Rubber door seals
If the rubber door seals are dirty, the doors may
not close properly, and the refrigerator will not
operate efficiently,
Keep the door seals free of dust or stains by
cleaning the doors using a mild detergent and
damp cloth, Wipe dry with a clean, soft cloth,
Z_ CAUTION
Do not clean the refrigerator with benzene,
thinner, or car detergent.
These substances could cause a fire,
Cleaning the rear side of the
refrigerator
To keep cords and exposed parts free of dust and
dirt accumulation, vacuum the rear side of the
appliance once or twice a year,
z_ CAUTION
Do not remove the back cover ( 1 ),
You could suffer an electric shock,
(2)
Engl sh --47

FOOD STORAGE TIPS
DAIRY PRODUCTS
Butter 2-3 Weeks 6-9 Months
Milk
Cream Cheese, cheese
feed, and cheese spread
Hard Cheese (unopened)
Hard Cheese (opened)
Cottage Cheese
Cream
Sour Cream
Cream Dips (opened)
Yogurt
1-2 Weeks
2-4 Weeks
3-4 Months
2 Months
10-15 Days
7-10 Days
2 Weeks
I Week
10-14 Days
Not recommended
Not recommended
6 Months
Not recommended
Not recommended
2 Months
Not recommended
Not recommended
Not recommended
Frozen Yogurt na 2 Months
EGGS
Eggs (uncooked) 3-4 Weeks Not recommended Store eggs in coldesl part of refrigerator and in
Eggs (cooked) I Week Not recommended Store in covered container
Leftover egg dishes 3-4 Days Not recommended Store in covered container
FRESH FRUITS
Apples I Month
Bananas 2-4 Days
Peaches, Melons, Pears,
Avocados 3-5 Days
Berries and Cherries 2-3 Days
Apricots 3-5 Days
Grapes 2-5 Days
Pineapple (un-cut) 2-3 Days
Pineapple (cut) 5-7 Days
Citrus 1-2 Weeks
Juice 6 Days
Frozen Juice Thawing only
Not recommended
Not recommended
Not recommended
12 Months
Not recommended
na
Not recommended
6-12 Months
Not recommended
Not recommended
12 Months Check date code, Do not re-freeze.
Wrap or cover tightly.
Check date code.
Most milk and similar products are sold in date-
coded cartons that indicate a products's peak
freshness,
Re seal with cap or wrap tightly.
Do not return unused portions to original
container,
Check (gate code,
Keep all cheese tightly packed in moisture proof
wrap
Check date code,
Most yogurt, creams, and similar products
are sold in date-coded cartons that indicate a
product's peak freshness,
Re seal or cover tightly,
Do not return unused portions to original
container,
Check (gate code, Keep covered,
Check date code,
their original container,
If storing in refrigerator, do not wash fruit before
storing.
Store in moisture resistant bags or containers,
Wrap cut fruits,
Some fruits darken when refrigerated,
Store uncovered,
Check date code and re-seal in original con-
tainer.
Do not return unused portions to original
container,
Engl sh - 48

FISH AND SHELLFISH
Fish
Fatty Fish (mackerel, trout,
salmon)
Lean Fish (cod, flounder,
etc)
Frozen or Breaded na 3 Months
Sheflfish
Shrimp (uncooked) 1-2 Days 12 Months
Crab 3-5 Days 10 Months
Cooked Fish or Shellfish 2-3 Days 3 Months
MEAT
Fresh, Uncooked
Chops
Ground
Roast
Bacon
Sausage
Steak
Poultry
Lunch meat
Cooked
Meat
Poultry
Ham
1-2 Days 2-3 Months
1-2 Days 6 Months
2-4 Days
1 Day
2-4 Days
1-2 Weeks
1-2 Days
2-4 Days
1 Day
3-5 Days
2-3 Days
2-3 Days
1-2 weeks
6-12 Months
3-4 Months
6-12 Months
1-2 Months
1-2 Months
6-9 Months
12 Months
I Month
2-3 Months
4-5 Months
1-2 Months
Keep in original wrapper and store in coldest
part of refrigerator.
Package in vapor-proof and moisture proof
wrap for freezing. Freeze at 0 °F (or -18 °C ).
Thaw in refrigerator or check date code. Freeze
in original packaging.
To freeze, package in vapor-proof and mob-
ture--proof container.
Check date code for use.
Store in coldest part of refrigerator in original
packaging.
Package in moisture--proof and vapor-proof
container for freezing.
Recommended refrigerator temperature 33 °F
to 36 °F (or I °C to 2 °C ) and freezer tempera-
ture 0 °F to 2 °F (or -18 °C to -16 °C)
Check date code for use.
Store in coldest part of refrigerator in original
packaging.
Package in moisture--proof and vapor-proof
container for freezing.
SOUrCeS:
American Meat Institute Foundation. 1994. Yellow pages: answers to predictable questions consumers
ask about meat and poultry. American Meat Institute Food Marketing Institute. 1999. The food
keeper. Food Marketing Institute, Washington, D.C. Freeland-Graves, J.H. and G.C. Peckham. 1996.
Foundations of food preparation, 6th ed. Prentice-Hall, Inc. Englewood Cliffs, NJ. Hillers, V.N. 1993.
Storing foods at home. Washington State University Cooperative Extension, Pullman, WA. Publ. EB
1205.
National Restaurant Association. 2001. Be cool-chill out! Refrigerate promptly. National Restaurant
Association Education FoundationlAs International Food Safety Council, Washington, D.C. USDA. 1997.
Basics for handling food safely. U.S. Department of Agriculture, Food Safety and Inspection Service,
Washington, D.C.
Engl sh - 49

Tr-oLJbeshoot ng
The refrigerator I
does not work i
at alor t i
does not chili !
s"fficiently:
The food in the i
fridge!sfrozen. i
You hear I
unusual noise i
or sounds. I
i}i iiiiiii!iiii }II}iilliill
i i i I
i ii
The cabinet-
door sealing I
area of the
appliance I
is hot and
Condensation is i
Occurring.
iceMakerisnot!
producing ice, i
!
Check if the power plug is properly connected.
• Check if the set temperature on the digital display is warmer than the freezer
or fridge inner temperature. If it is, set the refrigerator colder.
• Is the refrigerator in direct sunlight or located near a heat source?
• Is the back of the refrigerator too close to the wall, preventing proper
I
ventilation?
• Check if the set temperature on the digital display is too low.
• Try setting the refrigerator to a warmer temperature.
E
i
• Is the temperature in the fridge too low?
Set the refrigerator warmer.
• Did you store food with a high moisture content in the coldest part of the
refrigerator?
Try moving those items to the other shelves in the fridge instead of keeping
them in the colder areas or bins.
• Check if the refrigerator is level and stable.
• Is the back of the refrigerator too close to the wall, preventing proper
ventilation?
Try moving the back of the refrigerator at least 2 inches from the wall.
• Was anything dropped behind or under the refrigerator?
• Ifyou hear a "ticking" sound from inside the refrigerator, this is normal.
It occurs because various parts contract or expand in response to
temperature changes in the refrigerator interior.
• If it sounds as if something is hitting something else inside the refrigerator,
this is normal.
The sound iscaused by the compressor operating at high capacity.
• Some heat is normal as anti-condensators are installed in the vertical
hinged section of the refrigerator to prevent condensation.
Is the refrigerator door ajar?
Condensation can occur when you leave the door open for a long time.
• Did you wait for 12 hours after installation of the water supply line before
making ice?
i
• Is the water line connected and the shut-off valve opened?
• Did you manually stop the ice making function?
• Is the freezer temperature too warm?
Try setting the freezer temperature lower.
Engl sh - 50

You Can I
hear water
bubblingi n the i
refrigerator.
• [
There is a bad I
Sine, inthe I
refrigerator, i
• This is normal.
The bubbling comes from refrigerant circulating through the refrigerator.
i
• Check for spoiled food.
• Foods with strong odors (for example, fish) should be tightly covered.
I
Clean out your freezer periodically and throw away any spoiled or
i
suspicious food.
Frost forms on I
the walls of the i
freezer.
I
E
Water •
dispenser is not
functioning:,
Autoolo,e I -
System does •
not work with i
the freezer ,
door. I
i•
water is not i "
d spensed I ,
ii_!iill ii I _iii
I"
• Is the air vent blocked? Remove any obstructions so air can circulate freely.
• Allow sufficient space between the stored foods for efficient air circulation.
Is the freezer drawer closed properly?
Is the water line connected and the shut-off valve open?
Has the water supply line tubing been crushed or kinked?
Make sure the tubing is free and clear of any obstruction.
Is the water tank frozen because the fridge temperature is too low?
=
Try selecting a warmer setting on the Digital display.
e
Is the Control Lock on?
Is there an imbalance between the right and left parts of the door?
Open and close the door smoothly 1-2 times.
After you do this, the auto close system usually works properly again.
Try opening the door smoothly to avoid unbalancing the right part and the
left part of the door.
Is the water line connected and the shut-off valve open?
Is the Sparkling water icon selected?
Is the Sparkling Water Production Function Off icon on?
Press the Sparkling Water button for 3 seconds to turn on sparkling water
production.
The Sparkling Water Production function is set to OFF at the factory.
Set it ON to get sparkling water.
o
Are the Carbonation Level icons lighting in succession?
Ifthe Carbonation Level icons are lighting in succession, the refrigerator is in
the middle of producing sparkling water.
Please wait until the icons stop lighting.
Is the Sparkling Water Cylinder empty?
Ifthe SodaStream Carbonator runs out of 002, water might not be
dispensed or the dispensed water might be weak.
Please change the cylinder.
Is the refrigerator door open?
Ifthe door is open, Sparkling water/Water/Ice are not dispensed.
Is the cylinder lever unlocked?
Please open the cylinder cover and lock the cylinder lever.
Is the Control Lock on?
Engl sh - 51

iiii!i!i!ii!i! i! ! ! i !i i i!!!i!i!i!i!i!i!i!i!i!i!i!i!i!i!i !@ i!i! !i!! !@ i! i ! !! !! i ! ! !iiiiii i i iii iiiiiiiiiiiiiiiiiiiiiiiiiiiiiiiiiiiiiiiiiiiiiiiiiiiiiiiiiiiiiiiiiiiiiiiiiiiiiiiiiiiiiiiiiiiiiiiiiiiiiiiiiiiiiiiiiiiiiiiiiiiiiiiiiiiiiiiiiiiiiiiiiiiiiiiiiiiiiiiiiiiiiiiiiiiiiiiiiiiiiiiiiiiiiiiiiiiiiiiiiiiiiiiiiiiiiiiiiiiiiiiiiiiiiiiiiiiiiiiiiiiiiiiiiiiiiiiiiiiiiiiiiiiiiiiiiiiiiiiiiiiiiiiiiiiiiiiiiiiiiiiiiiiiiiiiiiiiiiiiiiiiiiiiiiiiiiiiiiiiiiiiiiiiiiiiiiiiiiiiiiiiiiiiiiiiiiiiiiiiiiiiiiiiiiiiiiiiiiiiiiiiiiiiiiiiiiiiiiiiiiiiiiiiiiiiiiiiiiiiiiiiiiiiiiiiiiiiiiiiiiiiiiiiiiiiiiiiiiiiiiiiiiiiiiiiiiiiiiiiiiiiiiiiiiiiiiiiiiiiiiiiiiiiiiiiiiiiiiiiiiiiiiiiiiiiiiiiiiiiiiiiiiiiiiiiiiiiiiiiiiiiiiiiiiiiiiiiiiiiiiiiiii
The Quick i
Sparkling i
funct on makes I • While the Quick Sparkling function is active, the Carbonator alternately
a wh r ng injects and discharges CO 2gas. This can cause a noise.
noise while in i
process. !
The taste of the I = Increase the Sparkling Level of the sparkling water.
sparkling water i _ When the taste of the sparkling water is too weak or there is no other taste
is weak. I than water, replace the SodaStream Carbonator with a new one.
Condensation '
or water drops • Condensation or water drops may form if the humidity is too high while the
forms on both refrigerator is operating.
sides of fddge " If condensation or water drops appears on both sides of fridge
door's central door's central part, turn the Energy Saver mode off after removing the
part. E condensation.
E
I
I
i • Ifyou use the Fill Up (3 sec) option after replacing the cylinder, the sparkling
water tastes stronger or weaker than normal, depending on the amount and
i concentration of the remaining gas in the water tank.
Engl sh - 52

WARRANTY ON SAMSUNG REFRIGERATOR
LIMITED WARRANrY TO ORIGINAL PURCHASER
This Samsung brand product, as supplied and distributed by Samsung Electronics America, Inc. (Samsung) and
delivered new, in the original carton to the original consumer purchaser, is warranted by Samsung against manufacturing
defects in materials and workmanship for a limited warranty period of:
One (1} year Parts and Labor on Refrigerator
Five (5} years Parts and Labor on sealed Refrigeration system only*
Ten (10) years Parts and Five (5) years Labor on Digital Inverter Compressor
(*Compressor, evaporator, condenser, drier, connecting tubing)
This limited warranty begins on the original dale of purchase, and is valid only on products purchased and used in the
United States. To receive warranty service, the purchaser must contact Samsung for problem determination and service
procedures. Warranty service can only be performed by a Sarnsung authorized service center. The original dated billof
sale must be presented upon request as proof of purchase to Samsung or Samsung authorized service center.
Samsung will repair or replace any part found to be defective, at our option and at no charge as stipulated herein, with
new or reconditioned paris during the limited warranty period specified above. All replaced parts and products become
the property of Samsung and must be returned to Samsung. Replacement parts and products assume the remaining
original warranty, or ninety (90) days, whichever is longer.
In-home service will be provided during the warranty labor period subject to availability within the contiguous United
Stales. In-home service is not available in all areas. To receive in-home service, the product must be unobstructed
and accessible from floor level to service personnel. If during in-home service repair cannot be completed, it may be
necessary to remove, repair and return the product, if in-home service is unavailable, Samsung may elect, at our option,
to provide for transportation of our choice to and from a Samsung authorized service center. Otherwise, transportation to
and from the Samsung authorized service center is the responsibility of the purchaser.
This limited warranty covers manufacturing defects in materials and workmanship encountered in normal,
noncommercial use of this product, and shall not apply to the following, including, but not limited to: damage which
occurs in shipment; delivery and installation; applications and uses for which this product was not intended; altered
product or serial numbers; cosmetic damage or exterior finish; accidents, abuse, neglect, fire, water, lightning or other
acts of nature; use of products, equipment, systems, utilities, services, parts, supplies, accessories, applications,
installations, repairs, external plumbing and leaks, external wiring, circuit breakers, fuses or connectors not supplied and
authorized by Samsung, or which damage this product or result in service problems; incorrect electrical line voltage,
fluctuations and surges; customer adjustments and failure to follow operating instructions, cleaning, maintenance
and environmental instructions that are covered and prescribed in the instruction book; loss of food due to spoilage;
consumable items irlcluding filters and light.
THERE ARE NO EXPRESS WARRANTIES OTHER THAN THOSE LISTED AND DESCRIBED ABOVE, AND NO
WARRANTIES WHETHER EXPRESS OR IMPLIED, INCLUDING, BUT NOT LIMITED fO, ANY IMPLIED WARRANTIES OF
MERCHAN1-ABILFFY OR FITNESS FOR A PARTICULAR PURPOSE, SHALL APPLY AFTER THE EXPRESS WARRANTY
PERIODS srT_rED ABOVE, AND NO OIHER EXPRESS WARRANTY OR GUARANTY GIVEN BY ANY PERSON, FIRM
OR CORPORAIION WITH RESPECI TO THIS PRODUCT SHALL BE BINDING ON SAMSUNG. SAMSUNG SHALL
NO] BE LIABLE FOR LOSS OF REVENUE OR PROFITS, FAILURE TO REALIZE SAVINGS OR OIHER BENEFITS, OR
ANY OTHER SPECIAL, INCIDENTAL OR CONSEQUENTIAL DAMAGES CAUSED BY THE USE, MISUSE OR INABILITY
TO USE THIS PRODUCT, REGARDLESS OF THE LEGAL THEORY ON WHICH THE CLAIM IS BASED, AND EVEN
IF SAMSUNG HAS BEEN ADVISED OF THE POSSIBILITY OF SUCH DAMAGES. NOR SHALL RECOVERY OF ANY
KIND AGAINST SAMSUNG BE GRE!A]ER IN AMOUNT THAN THE PURCHASE PRICE OF THE PRODUCT SOLD
BY SAMSUNG AND CAUSING THE ALLEGED DAMAGE. WITHOUT LIMITING THE FOREGOING, PURCHASER
ASSUMES ALL RISK AND LIABILITY FOR LOSS, r)AMAGE OR INJURY TO PURCHASER AND PURCHASER'S
PROPERTY AND TO OIHERS AND THEIR PROPERLY ARISING OUT OF THE USE, MISUSE OR INABILll-Y TO USE
THIS PRODUCT SOLD BY SAMSUNG NO] CAUSED DIRECTLY BY THE NEGLIGENCE OF SAMSUNG. THIS LIMITED
WARRANTY SHALL NOT D(TEND TO ANYONE OTHER THAN THE ORIGINAL PURCHASER OF THIS PRODUCT, IS
NONTRANSFERABLE AND S%dfES YOUR EXCLUSIVE REMEDY.
Some stales do not allow limitations on how long an implied warranty lasts, or the exclusion or limitation of incidental or
consequential damages, so the above limitations or exclusions may not apply to you. This warranty gives you specific
legal rights, and you may also have other rights, which vary from state to state.
To obtain warranty service, please contact Samsung at:
SAMSUNG CUSTOMER CARE CENTER
Samsung Electronics America, Inc. 85 Challenger Road Ridgefield Park, NJ 07660
1-800-SAMSUNG (1-800-726-7864) and www.samsung.com

f VOLAr e tor need,s ,servce
Do not hesitate to call any Samsung Authorized Service Center nearby giving them your name, address and telephone
number when your product is not functioning properly,
nform ton (CANADA!
Limited Warranty for Original Purchaser
This Samsung product iswarranted by Samsung Electronics Canada Inc, (hereafter referred to as SECA) against
manufacturing defects in material or workmanship for the following periods:
Labor : I years (in-home)
Parts : 1 years
Inverter Compressor : 10 years
SECA further warrants that ifthis product fails to operate properly within the specilied warranty period and the failure is
due to improper workmanship or defective material, SECA will repair or replace the product at its option,
In-home service is not available in all areas. Contact us to find out if in-home service is currently available inyour area by
using the contact information at the back of this warranty,
All warranty repairs or part replacements must be performed by a SECA Authorized Service Center, (Fo find the nearest
SECA Service Center, call 1-800-SAMSUNG (7267864) or visit our web site at www,samsung,com/ca)
Obligation to the Original Owner
The original dated sales receipt must be retained by the customer and is the only acceptable proof of purchase,
It must be presented to a SECA Authorized Service Center at the time service isrequested before warranty services are
rendered, On all carry-in models, transportation to and from the Authorized Service Center is the responsibility of the
customer,
Exclusions of the Warranty
This warranty does not cover damage due to accident, fire, flood, and/or other Acts of God, misuse, incorrect line
voltage, improper installation, improper or unauthorized repairs, commercial use, or damage that occurs during shipping,
Customer adjustments which are explained in this owners manual are not covered under the terms of this warranty,
This warranty will automatica.y be voided for any unit found with a missing or altered serial number,
This warranty is valid only on products purchased and used in the Canada.
Samsung Electronics Canada Inc. 2050 Derry Road West, Mississauga, Ontario LSN OB9 Canada
Customer Care Center 1-800-SAMSUNG (728-7864)
Customer Care Center Fax. 1-866-436-4617
If you have any questions or comments relating to Samsung products,
Samsung Electronics Canada Inc, 2050 Derry Road West, Mississauga, Ontario L5N 0B9 Canada
please contact the SAMSUNG customer care center.
TEL : 905v542--3535 FT_X:905-542-3835
1-800-SAMSUNG (726-7864)
www,samsung,com/us/support


www.samsung.com/spsn
toviewourhelpful
How-toVk_eosandLiveShows
ScantheQRcode*orvisit
*Requiresreadertobeinsta,edonyour
Scan this with your smartp none
Contact SAMSUNG WORLD WiDE
If you have any questions or comments relating to Samsung products, please contact the SAMSUNG
customer care center.
I I i
Country Contact Center Web Site I Subsidiaries office address
U.S.A (726-7864) www.samsung.com/us/suppert 85 Challenger Road Rk_gefield Park,
CANADA 1-800-SAMSUNG www.samsung.cem/ca!suppor_(English) Samsung Electronics Canada Inc. 2050
1-SOO-SAMSUNG Samsung Electronics America, Inc.
(726-7864) www.samsung.com/ca fr/support (French) LSN 0B9 Canada
smartphone
NJ 07660
Derry Road West, Mississauga, Ontario

manual del usuario
100 % ,,
Recycled Paper "
Este manual ha sido elaborado con pape1100% reciclado.
las posibilidades
Gracias pot adquirir este producto Samsung.
Electrodomestico independiente

INFORMACIONSOBRESEGURIDAD.................................................................................2
PUESTAAPUNTODELREFRIGERADORDEPUERTAFRANCESA..........................................9
FUNCIONAMIENTODELREFRIGERADORDEPUERTAFRANCESA....................................22
SOLUCIONDEPROBLEMAS.......................................................................................50
INFORMACION SOBRE
SEGURIDAD
Antes de utilizar su nuevo refrigerador de puerta
francesa Samsung, lea detenidamente este
manual a fin de aprender a usar las funciones que
ofrece de manera segura y eficiente.
Este electrodomestico no debe set utilizado
por personas (incluidos ni_os) con capacidades
mentales, sensoriales o ffsicas reducidas, ni
por personas que carezcan de experiencia y
conocimientos, a menos que se encuentren bajo
supervision o hayan recibido las instrucciones de
uso por parte de una persona responsable de su
seguridad.
Debido a que las siguientes instrucciones
corresponden a diversos modelos, es posible
que las caracterfsticas de su refrigerador difieran
ligeramente de las que se describen en este
manual.
Si tiene alguna duda, comunfquese con
nosotros al 1-800-SAMSUNG o busque ayuda e
informacion en Ifnea en www.samsung.com.
Simbolos y advertencias de seguridad
importantes:
/K ADVERTENClA
Riesgos o pr_.cticasinseguras que pueden causar
graves lesionespersonaleso incluso la muerte.
PRECAUClON
Riesgoso practicas insegurasque pueden causar
lesionespersonalesleves o dafios materiales.
NO Io intente.
NO Io desarme.
NO Io toque.
[_ Sigaatentamente las instrucciones.
Desconecte el enchufe del tomacorriente.
Asegorese de que el refrigeradoreste
conectado atierra paraevitar una descarga
electrica.
Comunfquesecon el centre de contacto
_araobtener ayuda.
Nota.
Estos simbolos de advertencia se incluyen aqui
para evitarles lesiones a usted y a terceros.
Sigalos atentamente.
Despu_s de leer esta secci6n, cons6rvela en un
lugar seguro para referencia futura.
EspaSol-2

z_ ADVERTENClA
ADVERTENCiASMUY iMPORTANTES
PARALA INSTALACION
,' No instaleei refrigeradoren un lugar
humedo ni donde pueda entrar en
contacto con agu&
Elaislamientodeficbnte de laspiezas eBctricas
puede provocar una descargaeBctrica oun
incendio.
* Noexponga este refrigeradora la luz solar
directa ni al calor de estufas, calefactores u otros
electrodomesticos.
* Noenchufevarios electrodomesticos en el mismo
tomacorrbnte multiple.
Elrefrigeradordebera,conectarsesbmpre a un
tomacorrbnte individualcuyo voltaje nominal
coincida con elvoltaje indicado en la piaca de datos
dei refrigerador
Asise obtiene el mejor desempeho y tambien
se evita que se sobrecarguen los circuitos dei
cabbado de la casa, Iocual podria provocar un
rbsgo de incendio a causadei recalentamientode
los cables.
* Si eltomacorriente estb.flojo,no conecte el cable.
Existeel rbsgo de que se produzca una descarga
eBctrica oun incendio.
* Noutiiice uncable de alimentacion queeste
da_ado o gastado en su extension o en cualquiera
de los extremos.
. No doble excesivamente el cable de alimentacion
ni coloque objetos pesados sobre 61.
* Noretuerzani amarre el cable de alimentacion.
* Nocoloque ei cable de alimentacion sobre un
objeto metalico; no coloque sobre el ningun
objeto pesado; no Iocoioque entre objetos ni
Ioempuje hacia el espacio que hay detra.sdei
electrodomestico.
* AImover el refrigerador,tenga cuidado de no
enroscar nida_ar ei cable de alimentacion.
Estopodriacausar unadescarga eBctrica oun
incendio.
* Nuncadesenchufeei refrigeradortirando del cable
de alimentacion. Siempresostenga ei enchufe con
firmezaytire para extraerlodel tomacorriente.
Losdanos al cable pueden provocar un
cortocircuito, unincendio o una descargaeBctrica.
* Noutilice aerosolescerca dei refrigerador.
Utilizaraerosobs cerca del refrigeradorpuede
causar unaexplosion o un incendio.
* Noinstaie este ebctrodomestico cerca de
calefactoreso materialesinfiamabbs.
Espa_io- 3
,, No instaleeste ebctrodomestico en un lugar
humedo,engrasadoo sucio, ni en unsitio con
exposiciona la luz solar directao al agua (lluvia,etc.).
* No instaleeste electrodomestico en un iugar donde
puedan haber fugas degas.
Estopodria causar una descarga eBctrica oun
incendio.
* Elrefrigeradordebe colocarse de maneratal que se
pueda acceder al enchufe.
Noseguir esta recomendacion puede causar una
descarga eBctrica oun incendio debido a una fuga
de eiectricidad.
* Antes de usarse, el refrigeradordebe
ubicarse e instalarsede manera apropiada
de acuerdo con iasinstrucciones de este
manual.
* Conecte el enchufeen ia posicion correcta con el
cable coigando hacia abajo.
Si conecta el enchufe al reves,el cable puede
cortarse y provocar unincendio o una descarga
eBctrica.
* AI mover el refrigerador,tenga cuidado de no
enroscar ni da_ar elcable de aiimentacbn.
Estorepresentaun riesgo de incendio.
* Asegurese de que el enchufe no este apiastado
ni hayasido da_ado por ia parte posterior dei
refrigerador.
o Mantengalos materiabs de empaque fuera dei
abance de los ni_os
Existe ei riesgo de muerte pot asfixiasi un nino se
coloca los materiales de empaque en la cabeza.
o Elebctrodomestico debe colocarse de manera tal
que se pueda acceder ai enchufe despues de ia
instalaci6n.
Noseguir esta recomendaci6n puede causar una
descarga el@trica oun incendio debido a una fuga
de electricidad.
o Esnecesarioquitartoda la peliculaplasticaprotectora
antes deenchufarelproducto por primeravez.
Se debera,vigilara los ni_os para asegurarse de que
nojueguen con el sujetador.
Existeriesgo demuerte por asfixia si un ni_o se Io
traga. Preste especialatenci6n a los ni_os ya que
puede resultar peligroso. Mantenga el sujetador
fuera del alcance de los ni_os.
,, El refrigeradordebeestar conectado a
tierra de manera segura.
Siempre aseguresede haber conectado el
refrigeradoratierra antes de intentarexaminaro
repararalguna pieza Las fugas de energia pueden
provocar unadescarga eBctrica grave

• Nuncautilicecomoconexi6natierratubosde
gas,I[neastelefonicasniotrasposiblesfuentesde
atraccionderayos.
Elusoinapropiadodelaconexionatierrapuede
traercomoconsecuenciaunriesgodedescarga
el@trica.
Sinecesitausaruncabledeextension,usesolo
unodetreshilosconunenchufequetengauna
tercerapuntaparaelpoloatierra;eltomacorriente
debera,tenet3ranurasparaadaptarsealenchufe
delelectrodomestico.
Lapotenciaindicadaenelcabledeextensiondebe
setCA115-120V,10Aosuperior.
Siseutilizaunadaptadordetierra,asegOresede
queelreceptaculoesteconectadototalmentea
tierra.
• Conectebienelenchufealatomadepared.No
utiliceenchufesocablesdealimentaci6ndafiados
nienchufesdeparedfiojos.
Estopodr[acausarunadescargael@tricaoun
incendio.
Sielcabledealimentacionestb.dafiado,
solicitesurempl_odeinmediatoal
fabricanteoaunodelosagentesde
serviciot@nico.
Parainstalarel refrigeradorde manera mas segura,
verifique que las patas del refrigeradortoquen el
piso. Las patas se encuentran enla partefrontal
inferiordel refrigerador,detrasde los cajonesdel
congelador.Abra el congelador y extraiga la cesta
inferior.Retire la cubierta de laspatas paradejarlas
al descubierto.
Inserte un desarmador de punta chata en una de
lasmuescas de la pata y gire esta en la direcci6n de
la fbcha hasta que contacte firmementecon el piso.
Equilibresiempre lacarga de cada puerta.
Sobrecargar una puertapuede provocar lacaida del
refrigeradorycausar fisicas.
PRECAUClON
PRECAUCIONES PARA LA
INSTALACION
• Dejeespacio suficiente alrededor del
refrigeradore instalelosobre unasuperficie
plana.
Siel refrigeradorno esta nivelado,es posibb que
el sistema de enfriamiento intemo no funcione
correctamente.
Mantenga librede obsta.culosel espacio de
ventilacion enel gabinete o la estructura de montaje
del ebctrodomestico.
o
Elebctrodomestico debe permanecer en posicbn
vertical durante 2 horas despues de la instalaci6n.
o
Recomendamos queel refrigeradorsea instalado
pot un t@nico calificado o una compafi[a de
servicios.
No seguiresta recomendaci6npuede causar
descargas el@tricas, incendios, explosiones,
probbmas con el producto o lesiones.
ADVERTENClA
ADVERTENCIAS MUY
IMPORTANTES PARA EL USO
• No conecte el enchufe en un
• No coloque objetos en la parte superior del
• No coloque un recipientecon agua sobre el
• Se debera vigilar a losniflos para asegurarsede que
Espa_ol_4
tomacorriente con las manos mojadas.
ebctrodomestico
Cadavez que abra o cierre lapuerta, estos podr[an
caersey provocar lesiones personales o da_os
materiales
No coloque lasmanos, los pies ni objetos metb.licos
(como cuchillos, etc.) en la parte inferioro posterior
del refrigerador
Esto podria causar una descarga el@trica o
lesionespersonales.
Las puntas filosaspueden provocar lesiones
personales.
refrigerador.
Si se derrama,existe el riesgode que se produzca
un incendioo unadescarga el@trica,
nojueguen con el electrodomestico.

Alejelosdedosdelos"puntosdeagarre".
Losespaciosentrelaspuertasyelgabineteson
inevitablementepeque_os.Abralaspuertascon
cuidadosihayni_oscerca,
• Nopermitaquelosni_ossecuelguendelapuerta
nideloscompartimentosdelapuerta.Pueden
producirselesionesgraves.
• Nopermitaquelosni_ossemetanenel
refrigerador.Podrianquedaratrapados.
• Nocoloquelasmanosdebajodelelectrodomestico.
Esposiblequealgunaspuntasfilosasleprovoquen
lesiones.
• Nopermitaquelosni_ossepatensobreuncaj6n.
Elcqonsepuederomperylosnihospuedencaerse.
Nosobrecargueelrefrigeradorconcomida.
Cuandoabralapuerta,algunelementopodria
caerseyprovocarlesionespersonalesoda_os
materiales.
• Notoquelasparedesinternasdelcongeladorni
losproductosalmacenadosenesteconlasmanos
mojadas.
Estopuedeprovocarquemadurasporfrio,
• Nuncacoloquelosdedosuotrosobjetosenel
orificiodeldispensadordeagua,enelrecipientede
hielonienlacubetadelafb.bricadehielo.
Estopodriaprovocarlesionespersonalesoda_os
materiales.
,, Noutilicenicoloqueningunasustanciasensibleala
temperatura,talescomopulverizadoresinflamables,
objetosinflamables,hieloseco,medicamentoso
productosqdmicos,cercaodentrodelrefrigerador.
• Noalmacenesustandasuobjetosvola.tileso
inflamables(benceno,solvente,gaspropano,
alcohol,eter,gaslicuadonicualquierottoproducto
deestetipo)enelrefrigerador.
Esterefrigeradorsedebeutilizarsolopara
almacenaralimentos.
Estopodriacausarunincendioounaexplosi6n.
• Noalmaceneenelrefrigeradorproductos
farmaceuticos,materialescient[ficosniproductos
sensiblesalatemperatura.
Nosedebenalmacenarproductosquerequieran
controlesestrictosdetemperatura.
,, Nocoloqueniutiliceaparatosel@tricosdentro
delrefrigerador,amenosqueseandeltipo
recomendadoporelfabrbante.
,, Noseparesobreelelectrodomesticonicoloque
objetos(talescomoropa,velasocigarrillos
encendidos,platos,productosquimicos,objetos
metb.licos,etc.)sobreelelectrodomestico.Esto
podriacausarunadescargaelectrica,unincendio,
problemasconelproductoolesiones.Nocoloque
unrecipienteconaguasobreelelectrodomestico.
Espa_ol_5
Sisederrama,existeelriesgodequeseproduzca
unincendioounadescargael@trica
• Noutilicedispositivosmecanicosniningun
otromedioparaacelerarelprocesode
descongelamientoquenoseanaquellos
recomendadosporelfabricante.
,, Nodareelcircuitodelrefrigerante.
,, Nopulvericematerialvola.til,talcomouninsecticida,
sobrelasuperficiedelelectrodomestico.
Ademasdeserperjudicialparalossereshumanos,
puedecausarunadescargael@trica,unincendioo
problemasconelproducto.
• NomirefijamentelaIb.mparaLEDUVdurante
muchotiempo.
Losrayosultravioletaspodr[anda_arlelavision.
,, Noutiliceningunfusible(talescomolosde
alambresdeacero,decobre,etc.)quenoseaun
fusibleestandar.
Siesnecesariorepararovolverainstalarel
electrodomestico,comuniqueseconsucentrode
serviciomascercano.
Noseguirestarecomendaci6npuedecausaruna
descargael@trica,unincendio,probbmasconel
productoolesiones.
,, SilaIb_mparaLEDinterioroexteriorsehaapagado,
comuniqueseconsucentrodeserviciorobscercano.
Alejelosdedosdelos"puntosdeagarre".
Losespaciosentrelaspuertasyelgabineteson
inevitablementepeque_os.Abralaspuertascon
cuidadosihayni_oscerca.
Nopermitaquelosni_ossecuelguendelapuerta.
Puedenprovocarselesionesgraves.
,, Nopermitaquelosni_ossemetanenel
refrigerador.Podrianquedaratrapados.
Lasbotellassedebenalmacenarunajuntoaotra
demaneratalquenosecaigan.
,, Esteproductosedebeutilizarsoloparaalmacenar
alimentosenunentornodomestico.
,, Sisedetectaunafugadegas,evitelasllamaso
posiblesfuentesdeignici6nyventiledurantevarios
minutoslahabitacionenlaqueseencuentrael
electrodomestico.
Notoqueelelectrodomesticonielcablede
alimentacion.
Noutiliceunventilador.
,, Nointentereparar,desarmarnimodificarel
electrodomesticoporsucuenta.
,, Sedeberavigilaralosni_ospara
asegurarsedequenojueguenconel
electrodomestico.

Unachispapuedeprovocarunaexplosi6noun
incendio.
UtilicesolamentelamparasLEDproporcionadaspor
elfabricanteosusagentesdeserviciot@nbo.
• Encasodesentiroloraquemadooa
humoenelrefrigerador,desenchofelode
inmediatoycomuniqueseconelcentrode
servbiodeSamsungElectronics.
• Sibresultadificilcambiarunaluzquenoseade
LED,comuniqueseconuncentrodeserviciode
Samsung.
• SielproductocuentaconlamparasLED,no
desarmelacubiertadelalamparanilalamparaLED
porsucuenta.
Oomuniqueseconsusagentesdeservicio.
• Sientrapolvooaguaalrefrigerador,desenchOfeloy
comuniqueseconelcentrodeserviciodeSamsung
Electronics.
Existeelriesgodequeseproduzcaunincendio.
PRECAUClON
PRECAUCIONES DE USO
• No vuelvaa congelar alhssentosque se
hayandescongelado compbtamente.
No coloque bebidas carbonatadas o con
gas en el congelador.No coloque botellas
ni recipientes devidrio en elcongelador.
Ouandoel contenido se congela, elvidrio puede
rompersey provocar lesionespersonabs.
Utilicesolamente la fabrica de hielo del refrigerador.
Contratea un t@nbo calificado para queconecte el
suministrode agua alsuministro de agua potable.
A fin de que la fabrba de hielofundone
correctamentese necesita una presi6n de agua de
20 - 125 psi (138 - 862 kPa).Si no estara,en su
casapor un tbmpo prolongado (por qemplo, de
vacaciones) y no usara los dispensadores de agua
o hielo, cierre la va.lvuladeagua.
De Iocontrario, pueden producirse fugas de agua.
Sino utilizaraelrefdgeradorpot un tbmpo prdongado
(3semanaso mas),vacblo, desenchufelo,cbrre la
%lvulade agua,retireelexcesode humedadde las
paredesinternasy dejelaspuertasabbrtas paraque
noaparezcanoloresnimoho.
®
Garantiade servicio y modificacion.
El serviciode garantiade Samsung no
cubre los cambios ni las modificaciones
realizadaspor un tercero a este
ebctrodomestico; Samsungtampoco
es responsablede los probbmas
relacionadoscon la seguridad que puedan
surgir a causa de modificaciones hechas
por terceros.
No obstruya lasrqillas de ventilaci6n dentro del
refrigerador.
Si lasrejillasdeventilacion estan bloqueadas, en
particularcon una bolsa de plastico, el refrigerador
se puede sobrecongelar.Si el periodo de
enfriambnto es demasiado prdongado, el filtro de
aguapuede romperse y provocar fugas de agua
• Si se desconecta el refrigeradordel suministrode
energia,espereal menos cinco minutos antes de
volver a enchufarlo
_, Si tiene planificado tomarse unas largas
vacaciones o si el refrigerador no se utilizara
durante un tiempo prolongado (3 semanas o
rob.s),debe vaciarlo, desenchufarlo, cerrar la
valvula de agua, retirar el exceso de humedad
de las paredes internas y dejar las puertas
abiertas para que no aparezcan olores ni moho.
Si se dqa el refrigeradorencendido por mucho
tiempo sin utilizarlo,se puede deteriorarel
ablambnto y provocar un incendio.
• Paraobtener el mejor desempe_iodel producto:
No coloque alimentosmuy cerca delas r@llasde
ventilaci6n de la parte posterior del refrigerador,ya
que pueden obstruir la librecirculaci6n del aire en el
refrigerador.
Envuelvalos alimentosadecuadamente o
cd6quelos en redpbntes hermeticos antes de
almacenarlosen el refrigerador.
No coloque botellas, redpbntes de vidrio ni bebidas
carbonatadas en el congelador.
Si se congelan, pueden romperse.
Los recipientes de bebidas rotos pueden provocar
lesionespersonabs.
Cumpla con lostbmpos maximos de
almacenamientoy las fechas de vencimbnto de los
alimentoscongelados.
No es necesario desenchufar el refrigeradorsi se
ausentaramenos de tres semanas.
Sinembargo, si se ausentara mas detres
semanas, retire todos losalimentos, desenchufe
el refrigerador,cbrre la va.lvuladeagua, retire el
exceso de humedad de las paredes internas y deje
laspuertas abbrtas para que no aparezcan olores
ni moho.
• Lbne el tanque de agua y la charola para el hielo
solamentecon agua potable (agua de la Ilave,agua
mineralo agua purificada).
No Ibne eltanque con te ni bebidas isot6nicas.
Esto podria da_ar el refrigerador.
Espafiol_6

Nogolpeeniapliqueunafuerzaexcesivasobre
ningunasuperficiedevidrio.
Unvidriorotopuedecausarlesionespersonaleso
da_osmateriales.
• SielproductoestaIlenodeagua,
comun[queseconelcentrodeservicio
mascercano.
Existeelriesgodequeseproduzcaunadescarga
electricaounincendio.
!K PRECAUClON
PRECAUCIONES PARA LA
LIMPIEZA
• No pulvericecon agua directamente
dentro ofuera del refrigerador.
Existeel riesgo de que se produzca unincendio o
unadescargaelectrica.
o
No utiliceunsecador decabello parasecar el
interiordel refrigeradoL
o
Nocoloque velas encendidas en el refrigerador para
eliminar los malos olores.
Estopodriacausar unadescarga electrica oun
incendio.
,, Use un path seco y Iimpio pararetirar
cualquier sustancia extra_a o polvode las
clavijasdel enchufe.
No utiliceun paso mojado ni humedo para
Iimpiarelenchufe.
DeIocontrario, existe el riesgo de que se produzca
unincendio o una descarga electrica.
• Antes de Iimpiaro realizarel
mantenimiento,desenchufe el
electrodomestico del tomacorriente.
Noseguir esta recomendacbn puede causar una
descarga electrica o un incendio.
/K ADVERTENClA
• Esteproducto contiene sustancias qdmicas que,
segun el estado de California, provocan cancer y
toxicidad reproductiva.
Z_ ADVERTENCIA
ADVERTENCIAS MUY
IMPORTANTES PARA DESECHAR
EL PRODUCTO
• PELIGRO: existeel riesgode que los
nitrosqueden encerrados. Antes de
desecharsu antiguo refrigeradoro
congelador:
Retirelaspuertas y los pestillos.
Dejelos estantes en su lugarde manera tal que los
ni_iosno puedan trepar facilmente en el interior.
Si algun nitroqueda atrapado dentro del
refrigerador,puede lastimarse o asfixiarse hasta
morir.
• Deseche el materialde empaque de este producto
de forma tal que no resulte nocivo parael medic
ambiente.
• Asegurese de que ninguno de los tubos que se
encuentran detras del electrodomestico esten
da_ados antes de desecharlos.
• Se utilizaR-6OOao R-134a como refrigerante.
Revisela etiqueta del compresor en la parte
posterior del electrodomestico o la etiqueta del
voltaje del interior para constatar que refrigerante
rue utilizadoen su refrigerador,
Si este producto contiene gas inflamable
(RefrigeranteR-6OOa),comuniquese con las
autoridades locales para desechar este producto de
forma segura.
• Cuando deseche este refrigerador,retirelapuerta,
losburletes y los pestillos de laspuertas de manera
tal quelos nihos pequehos o losanimales no
puedan quedar atrapados en el interior.
Se debera vigilara los nitros paraasegurarse de que
nojueguen con el electrodomestico.
Si quedan atrapados dentro, los ni_os pueden
lesionarseo sofocarse hasta morir.
• Se utilizaciclopentano como aislante.
Los gases del material de aislamiento requierenun
procedimientoespecial de eliminaci6n.
Oomuniquesecon las autoridades locales para
desechar este producto de maneraque no resulte
nocivo parael medic ambiente.
• Mantengalos materiales deempaque fuera del
alcance de los nihos, ya que pueden serpeligrosos
paraellos.
Si unnino se coloca unabolsa en la cabeza, puede
asfixiarse.
Espa_ol_7

[_ RECOMENDACIONES
ADICIONALES PARA EL
USO ADECUADO
• En caso de un corte de energia, comuniquesecon
su compa_ia de electricidad localy pregunte cub.nto
tbmpo durara,el corte.
Lamayoria de loscortes de energia que se
solucionan dentro del lapso de una hora o dos, no
afectanlas temperaturas del refrigerador.
Sinembargo, debera,abrir la puerta del refrigerador
la menor cantidad de veces posibb.
Sielcorte de energia dura ma.sde 24 horas, debera.
retirarydesechar toda la comida congelada.
• Sise propordona una Ilavecon el refrigerador,
debeestar fueradel alcance de los ni_os y le]os del
ebctrodomestico.
• Elebctrodomestico puede no funcionar de manera
uniforme (elcontenido puede descongelarse o
latemperatura enel compartimento de comidas
congeladaspuede ebvarse) cuando se Iocdoca
duranteun tbmpo prolongado en un sitio donde
latemperatura del ambbnte este constantemente
por debqo de las temperaturas para las que esta
dise_ado el ebctrodomestico.
No cdoque alimentos que se descompongan
fa.cilmentea bajas temperaturas corno, por ejemplo,
bananasy melones.
Elrefrigeradores "no frost", Io que significaque no
es necesario descongelarlo manualmente. Esto se
hardde forma automatica.
• Elaumento de temperatura durante el
descongelambnto cumpb con las normas ISO.
Sinembargo, si desea evitar un aumento excesivo
enla temperatura de los alimentos congelados
cuando descongela el ebctrodomestico, envuelva
losalimentos congelados con varias capas de papel
de periodico.
• Cualquieraumento en la temperaturadel alimento
congelado durante el descongelambnto puede
disminuirsu vida Litilen almacenamiento.
Novuelva a congelaralimentos que se hayan
descongeladocompbtamente.
Recomendaciones para el ahorro de energ[a
Instab el electrodomestico en una habitacion fresca
y seca con laventilaci6n adecuada.
Asegurese de que no este expuesto a la luz solar
directay nunca Io coloque cerca deuna fuente de
calor directa (como por ejemplo, un radiador).
Nunca obstruya la ventilaci6n ni las rejillas del
ebctrodomestico.
Dejeenfriar losalimentos calientes antes de
cdocarlos en el electrodomestico.
Coloque losalimentos congelados en el refrigerador
paradescongelarlos.
Puede utilizarlas temperaturas bajas de los
productos congelados para enfriarlos alimentosen
el refrigerador.
No deje la puerta del ebctrodomestbo abbrta
durantemucho tbmpo cuando coloque o saque
alimentos.
Cuanto menos tbmpo este abierta la puerta, menos
hielose formara,en el congelador.
Cuando realice la instalaci6n, deje suficbnte
espacio Iibrea la derecha, izqubrda y arriba del
refrigeradorpara que circub aire.
Estoayudara,a redudr el consumo de energiay
mantenerbajo el gasto delas bobtas de energ[a.
Paraun uso ma.seficientede la energ[a,conserve
todos los accesorios internos, como cestas,
cajonesy estantes, en sus posiciones originabs.
Espa_ol_8

refrgerador
de DLAer afrancesa
I
PREPARACION PARA
LA iNSTALACiON DEL
REFRiGERADOR
Felicitaciones por haber adquirido el refrigerador
de puerta francesa Samsung. Esperamos que
disfrute las funciones y ventajas de vanguardia
que ofrece este nuevo electrodomestico.
Selecci6n de ia mejor ubicaci6n para
ei refrigerador
Elija:
• Una ubicacion con facil acceso a un suministro
de agua.
• Una ubicacion sinexposicion directa a la luz
solar.
• Una ubicacion en la que el piso este nivelado.
,, Una ubicacion con suficiente espacio para
que las puertas del refrigerador se abran
facilmente.
• Una ubicacion con suficiente espacio libre
a la derecha, izquierda, atras y arriba del
refrigerador para la circulacion de aire.
Si el refrigerador no tiene el espacio suficiente,
es posible que el sistema de enfriamiento
intemo no funcione correctamente.
• Una ubicacion que permita mover facilmente
el refrigerador si necesita mantenimiento o
reparacion.
• No instale el refrigerador en un lugar donde la
temperatura sea superior a 109 °F (43 °C) o
inferior a 41 °F (5 °O).
• No coloque el refrigerador en un lugar en el
que pueda mojarse.
Si el refrigerador no cuenta con espacio suficiente,
es posible que el sistema de enfriamiento intemo
no funcione correctamente. Si su refrigerador
cuenta con una fabrica de hielo, deje un espacio
adicional en la parte posterior para las conexiones
de las tuberfas de agua. Si se instala el refrigerador
junto a una pared fija, se necesita una distancia
mfnima de 3 'X" (95 mm) entre el refrigerador y la
pared para poder abrir la puerta.
importante: asegurese de >oder mover el
refrigerador facilmente hasta su ubicacion
final midiendo las entradas (ancho y alto), los
umbrales, los techos, las escaleras, etc.
La siguiente tabla describe la altura y la
profundidad exactas del refrigerador de puerta
francesa Samsung.
[_ ada medicion se basa en el tama_o del
Profundidad "A" 28.58" (726 mm)
Ancho "B" 35.74" (908 mm)
AItura "O" 68.85" (1719 mm)
AItura total "D" 69.96" (1777 mm)
Profundidad "E" 31.02" (788 mm)
( 2'802_ ,.i _,,,
120
12 2/8"
(SO9
80 1/8" (1526 mm)
35 3/4" (908 mm) _I
4 8/8" (122 mn%)h, l
%
_°_ 28/8.181mn%,__i!_--
dise_o, por Io que puede variar segun el
metodo de medicion.
g
Espafiol_9

Cuando mueva el refrigerador
PRECAUCl6N
Para evitar que se dare el piso, asegurese de que
las patas de ajuste delanteras esten en posicion
vertical (sobre el piso). Consulte "Nivelacion del
refrigerador" en el manual (pagina 15).
ACCESORIOS Y
HERRAMIENTAS NECESARIAS
El refrigerador incluye los siguientes accesorios:
L
Llave Allen
Desarmador de punta Palanca de control
chata (-)
PISO
Para realizar una instalacion correcta, se debe
colocar el refrigerador sobre una superficie
nivelada de material r[gido que tenga la misma
altura que el resto del piso.
Esta superficie debe ser Io suficientemente
resistente como para soportar el peso de un
refrigerador completamente cargado,
Para proteger el acabado del piso, corte una
hoja grande de cart6n y coloquela debajo del
refrigerador mientras trabaja.
Cuando mueva el refrigerador, empuje en forma
recta hacia adelante o hacia atras,
No Io mueva de lado a lado,
Herramientas necesarias
(no provistas)
Se necesitan las siguientes herramientas para
finalizar la instalacion del refrigerador:
¢_ ======_
Desarmador Llavedetubo de
Philips(+) (_)
Pinzas
Desarmador
de punta chata 3/8" (10 mm)
LlaveAllen
(3/16")(5 ram)
Espa5ol-10

COMO RETIRAR LAS PUERTAS
DEL REFRIGERADOR
En algunas instalaciones es necesario retirar los
cajones del refrigerador y del congelador para
poder colocar el refrigerador en su ubicacion final.
No retire las puertas ni los cajones si no es
necesario.
Si necesita retirar las puertas, siga los pasos a
continuacion. Si no necesita retirar las puertas del
refrigerador, dirijase a la seccion "Nivelacion del
refrigerador" en la pagina 15.
ADVERTENCIA
Desenchufe el refrigerador antes de retirar la
puerta o el cajon.
• Tenga cuidado de no dejar caer, da_ar
ni rayar las puertas o los cajones al
retirarlos.
Tenga cuidado cuando retire las puertas o los
cajones. Las puertas son pesadas y podrfa
lesionarse.
Vuelva a colocar las puertas o los cajones
correctamente para evitar:
Humedad por fuga de aire.
Alineacion incorrecta de la puerta.
Perdida de energfa a causa de una puerta mal
cerrada.
Desarmar las puertas del refrigerador
ADVERTENClA
Tenga cuidado de no dejar caer o rayar las
puertas cuando las retira.
Con la puerta abierta
1. Retire los 3 tornillos sosteniendo hacia abajo
la PLACA SUPERIOR (1) y separe los cables
conectados.
2. Desconecte los dos conectores (2) de la
puerta izquierda.
Para retirar el acoplador de la tuber[a de agua
de la bisagra, gire y tire de el desde la bisagra.
Retire la tuberfa de agua (3) presionando la
pieza marcada (4) del acoplador de la tuberfa
de agua.
PRECAUCl6N
Antes de retirar el tubo, quite la grapa roja del
acoplador, siesta instalada.
Espa5ol-ll

3,Tiredelapalancadelabisagrayret[rela(5),
Retireeltornillodeconexionatierra(6)
conectadoalasbisagrassuperioresdela
puertaizquierdaconundesarmadorPhilips
(+).
Retire las bisagras superiores de las puertas
izquierda y derecha (7),
Bisagra del medio de la puerta Bisagra de cierre automatico
Verifique la direccion
Si la bisagra de cierre automatico esta
alineada para estar en posicion vertical, como
se muestra en la figura, alineela para que este
en paralelo usando la bisagra del medio de la
puerta.
(Consulte el punto n.° 5 para desarmar la
bisagra del medio de la puerta)
4, Abra la puerta (mas de 90°), levantela de la
bisagra del medio y retire la puerta,
Por sus caracter[sticas de dise_o, la puerta se
puede desarmar y volver a armar cuando esta
abierta,
(Los orificios del eje de la puerta y de la
bisagra del medio de la puerta estan inclinados
en angulos espedficos, por Io tanto, es dif[cil
realizar el armado y desarmado con la puerta
cerrada),
li L
PRECAUCION
Coloque la puerta, con la parte interior hacia
arriba, sobre una superficie que no raye,
A PRECAUCION
No utilice un desarmador de punta chata para
alinear la bisagra de cierre automatico, Podr[a
daSarla.
Use la bisagra del medio de la puerta,
5, Retire el tornillo (8)conectado alas bisagras
inferiores de las puertas izquierda y derecha
con un desarmador Phillips (+).
Retire los 2 tornillos de cabezal hexagonal (9)
conectados alas bisagras inferiores de las
puertas izquierda y derecha con una Ilave Allen
(5 mm).
Retire las bisagras inferiores de las puertas
izquierda y derecha (10),
Espa5ol-12

COMO VOLVER A
ENSAMBLAR LAS TUBERiAS
DE SUMINISTRO DE AGUA
Para volver a colocar las puertas del refrigerador
despues de haberlo movido hasta su ubicacion
final, monte las piezas en orden inverso.
1. La tuberfa de agua se debe insertar
completamente hasta el centro del acoplador
transparente (Tipo A) o las marcas de gufa
(Tipo B) para impedir que haya fugas de agua
del dispensador.
2. Inserte la grapa del paquete de instalacion y
compruebe que quede bien fija.
Tipo A Tipo B
Dispensador
2. Retire la cubierta (2) con el arnes con un
desarmador de punta chata (-).
3. Presione las lengOetas de cierre y separe el
conector del cable.
Centro del acoplador
transparente
grapa A (1/4")
(6.35 mm)
t t
Marcas de guia
COMO DESARMAR LA
PUERTA DEL CAJON FLEX
1. Retire el cajon Flex Zone (1) levantandolo.
4. Retire el tomillo de cabeza hexagonal de los
laterales con una Ilave de tubo (10 mm).
,i i
Espa_ol_13

5.Levantelapuertadelcaj6nFlexdelosrieles.
DESARMADO DE LAS
PUERTAS DEL CONGELADOR
1. Levante el caj6n superior y retfrelo.
2. Levante la guarda del compartimento del
congelador (1) y retfrela.
COMO VOLVER A ARMAR LA
PUERTA DEL CAJON FLEX
Para volver a colocar la puerta del caj6n Flex una
vez ubicado el refrigerador en su ubicacion final,
arme las piezas en orden inverso.
Z_ PRECAUClON
Asegurese de enchufar el conector del cable de la
puerta del caj6n Flex. De Io contrario, el caj6n Flex
no funcionara.
3. Extraiga la cesta inferior (2) levantandola de
los rieles.
4. Presione el gancho de fijaci6n de los rieles.
....... .................................................................

5.Mientrassostieneelcaj6ndelcongeladorpor
lapartesuperior,extraigalocompletamentey
retfrelodelosrieles.
Z_ PRECAUCION
Tenga cuidado de no rayar ni abollar el riel
deslizante ni golpearlo contra el suelo.
/!k PRECAUClON
Asegurese de instalar la cesta del congelador en
la posici6n correcta cuando retire/instale la puerta
del congelador.
No seguir esta recomendaci6n puede hacer que
la puerta no se abra o no se cierre correctamente.
COMO VOLVER A ARMAR LA
PUERTA DEL CONGELADOR
Para volver a colocar el caj6n cuando el
refrigerador se encuentra en su ubicaci6n final,
monte las piezas en orden inverso.
NIVELACION DEL
REFRIGERADOR
Asegurese de que el refrigerador este nivelado
antes de realizar los ajustes finales.
Utilice un nivelador para evaluar si el refrigerador
se encuentra nivelado tanto en los laterales como
en la parte trasera y delantera.
Si el refrigerador no esta nivelado, las puertas no
quedaran perfectamente alineadas, Io que podrfa
generar condensaci6n de humedad y costosas
boletas de energ[a.
A continuaci6n se explica c6mo nivelar el
refrigerador si el lado izquierdo esta a un nivel
inferior respecto del lado derecho.
C6mo nivelar el refrigerador
O
X
Espado --15
1.
Abra el cajon del congelador y extraiga la
cesta inferior.
2.
Retire la cubierta de las patas para ajustarlas.
3.
Inserte un desarmador de punta chata (-) en
la muesca dentro de la palanca de control
izquierda y gfrelo en el sentido de las agujas
del reloj o en el sentido contrario para nivelar el
refrigerador.
(Se debe girar la palanca en el sentido de las
agujas del reloj para bajar el refrigerador yen el
sentido contrario al de las agujas del reloj para
elevarlo).
Desarmador de punta Palanca de control
chata (-)

PRECAUCION
Ambas palancas de control deben tocar
firmemente el piso para impedir posibles lesiones
personales o da_os materiales a causa de la
inclinacion,
Z_ PRECAUCl0N
Si el refrigerador se ubica sobre un piso que no
este nivelado, puede inclinarse.
Para impedirlo, ajuste las patas de modo que
toquen firmemente el piso,
Si el lado derecho esta mas bajo, realice el
mismo procedimiento, pero con la palanca
de control derecha,
Es complicado quitar el frente de la
®
cubierta de las patas del refrigerador,
por Io tanto, no recomendamos realizar
peque_os ajustes con la palanca de
control.
Consulte en la pagina siguiente la mejor
manera de realizar peque_os ajustes en
las puertas,
COMO HACER PEQUENOS
AJUSTES EN LAS PUERTAS
Se necesita que el refrigerador este nivelado para
que las puertas esten perfectamente alineadas,
Para obtener instrucciones sobre la nivelacion,
revise la seccion anterior sobre la nivelacion del
refrigerador,
I
La puerta izquierda esta fija,
Para realizar peque_os ajustes en las
puertas, ajuste solamente lapuerta
derecha,
1, Extraiga la puerta del cajon Flex (1) para que
se vea la bisagra inferior (2),
2, Inserte la Ilave Allen (5/32") suministrada (3) en
el eje (4)de la bisagra inferior.
3, Ajuste la altura girando la Ilave Allen (3) en el
sentido de las agujas del reloj ( ,_ ) o en el
sentido contrario al de las agujas del reloj
[_ AI girar la Ilave Allen en el sentido contrario
al de las agujas del reloj ( ), la puerta
se movera hacia arriba,
Espado -- 16
(3) (3)
(2)

INSTALACION DE LA TUBERiA
DEL DISPENSADOR DE AGUA
Una de las caracter[sticas utiles de este nuevo
refrigerador es el dispensador de agua con filtro
incorporado.
El filtro de agua elimina las part[culas indeseables
del agua y ayuda a mejorar la salud.
Sin embargo, no esteriliza el agua ni destruye
microorganismos. Para ello deber[a adquirir un
sistema de purificacion del agua.
La conduccion de agua tambien conecta la
maquina de hielo.
Para que esta funcione correctamente, la
presion del agua debe ser de 20 - 125 psi
(138 - 862 kPa).
Si el refrigerador se instala en una zona donde la
presion del agua sea baja (menos de 20 psi), se
puede instalar una bomba para compensar la baja
presi6n.
Una vez conectada la conduccion de agua,
asegurese de que el deposito de agua del interior
del refrigerador se Ilene correctamente.
Para ello, pulse la palanca del dispensador de
agua hasta que salga agua del grifo.
Puede adquirir los kits de instalacion de la
conduccion de agua en su distribuidor.
Le recomendamos que utilice kits de
instalacion de tubos de cobre y tuerca de
compresion de 1A".
Conexi6n de la conducci6n del agua
1. En primer lugar, cierre la Ilave
principal del suministro de
agua.
3. Conecte el kit de instalacion de la conduccion
de agua en la Ilave de paso.
Conducci6n de
agua fria --
Abrazadera de
tubo --
Llave de
Kit de instalaci6n de la
conducci6n de agua
PRECAUClON
La tuber[a de agua debe conectarse a la tuber[a
de agua fr[a.
Si se conecta a la tuber[a de agua caliente, el filtro
puede funcionar mal.
Conexi6n de la conducci6n del agua
al refrigerador
Debera adquirir algunos elementos para realizar la
conexion.
Los encontrara en la ferreterfa.
Uso de tubo de cobre Uso de tubo de pl_stico
Tubo de cobre de Y4" • Tubo de plastico de 1A.
1 tuerca de _ extremo moldeado
compresi6n de 1A" (bulbo)
2 abrazaderas • 1 tuerca de
compresi6n de 1A"
2. Localice eltubo de conduccion de agua
potable mas cercano y monte una abrazadera
de tubo y una Ilave de paso.
Conducci6n de agua fria J I
Abrazadera de tabo
Llave de paso
Espado --17

Refrigeradov
Tuerca de (montado)
compresi6n (1/4")
(no suministrada) tJ_
(no (bulbo)
suministrada) Tuerca de
........ ' - ...... (B) (1/4") (no
Tubo de cobre o Tubo de plAstico (B)
(no suministrado) (no suministrado)
Conducci6n de agua domestica /
Tubo de plastico
de
Ajuste
compresi6n
(montado)
Extremo
moldeado
compresi6n
suministrada)
1. Conecte la conduccion de agua domestica al
ajuste de compresion montado.
Si utiliza tubo de cobre, deslice la tuerca
de compresion ( B ) (no suministrada) y la
abrazadera (no suministrada) en el tubo de
cobre (no suministrado) como se muestra en
la ilustracion.
Si utiliza tubo de plastico ( B ), inserte el
extremo moldeado (bulbo) del tubo de
plastico ( B ) en la junta de compresion.
PRECAUCKSN
No Io utilice sin el extremo moldeado (bulbo) del
tubo de plastico (B ).
4,
Haga cotter unos 4 litros de agua a traves
del filtro antes de beber o usar el agua del
refrigerador.
(Deje correr el agua unos 6 minutos.)
Para ello, presione con un vaso grande o una
taza la palanca del dispensador de agua.
Llene el vaso, vadelo en el fregadero y repita
la operaci6n.
5,
Despues de encender el refrigerador, deje la
maquina de hielo funcionando durante 1 o 2
dfas.
Despues de este tiempo, deseche los 1 o 2
primeros dep6sitos de hielo para asegurarse
de que se hayan eliminado todas las
impurezas de la conducci6n de agua.
• Conecte la conducci6n de agua solo a
una fuente de agua potable.
• Si debe reparar o desmontar la conducci6n de
agua, corte 1/4" (6.5 mm) del tubo de plastico
para realizar una conexi6n segura y sin fugas
de agua.
• Puede probar rapidamente la
conducci6n de agua con un vaso de
papel. En condiciones normales, en
unos 10 segundos se puede Ilenar un
vaso de 5.75 oz. (170 cc)
• La garantfa de Samsung no cubre la
INSTALACION DE LA TUBER[A DE AGUA.
• La instalacion de la tuberfa de agua tiene un
costo adicional, a menos que el precio de
venta incluya el costo de instalacion.
• Le recomendamos que contacte un fontanero
o un instalador autorizado para que instale la
tuberfa del agua.
• Si hay fugas de agua debidas a una instalacion
inadecuada, contacte con el instalador.
2. Apriete la tuerca de compresi6n ( B ) en la
junta de compresi6n. No apriete demasiado la
tuerca de compresi6n ( B ).
3. Abra el grifo del agua para ver si hay fugas.
Si gotea agua o hay algun escape de agua en
las zonas de conexi6n, cierre el suministro de
agua principal.
Compruebe las conexiones y, si es necesario,
aprietelas.
Espa_ol-18

Instalaci6n de un carbonatador de CO2SodaStream de 60 litros
Para utilizar la funcion de agua con gas del refrigerador, debe instalar un carbonatador de CO2
SodaStream de 60 litros.
Puede adquirir el carbonatador SodaStream de 002 de 60 litros en el distribuidor de SodaStream mas
cercano; el primer carbonatador de CO2es gratuito.
(Para obtener mas informacion, visite "www.sodastream.com/samsung")
Compra de un carbonatador de CO 2SodaStream de 60 litros
• Compre carbonatadores SodaStream de 60 litros en el distribuidor de SodaStream mas cercano o
en Intemet. Visite www.sodastream.com para obtener mas informacion.
• USE CARBONATADORES SODASTREAM DE 60 LITROS SOLAMENTE. SAMSUNG y
SODASTREAM no son legalmente responsables pot cualquier da_o, incluidos, entre otros, da_os
materiales causados por perdidas de gas debido al uso de carbonatadores genericos (o cilindros
de CO2). El sistema de agua con gas en su refrigerador SAMSUNG esta dise_ado para funcionar
0NICAMENTE CON CARBONATADORES SODASTREAM DE 60 LITROS.
Recomendamos que compre carbonatadores adicionales para su uso posterior.
Almacene los carbonatadores adicionales en un espacio abierto y frfo, fuera del alcance de los
ni_os. No almacene los carbonatadores en el refrigerador.
Si se produce agua con gas cuando la temperatura interna del refrigerador o la del cilindro de
CO 2 es alta, puede escuchar un sonido de "claxon".
Cuando encienda el refrigerador por primera vez, no genere agua con gas al menos hasta que
hayan pasado aproximadamente 2 horas.
Cuando compre un nuevo cilindro de 002, guardelo en un lugar seco y fresco (23 - 68 °F
[-5 - 20 °C]) hasta que este preparado para ser instalado.
Si guarda el cilindro en un lugar con temperaturas mas altas, se puede crear una presion externa
adicional, Io que generarfa un sonido de "claxon" al producir agua con gas.
Conexi6n a la tuberia de agua
• Asegurese de haber conectado el refrigerador a una tuberfa de agua antes de instalar el cilindro.
Espafiol_19

Instalaci6n de un carbonatador en el refngerador
Para instalar un nuevo carbonatador SodaStream de 60 litros en el refrigerador, siga estos pasos:
1. Abra la cubierta del carbonatador SodaStream.
® La fabrica de agua con gas se encuentra apagada de ferma predeterminada. Es per elle
que el fcono "OFF" (Apagade) del visor se encuentra encendido.
- Consulte la pagina 36 C6mo apagar lafunci6n de agua con gas.
2. Instale el carbenatador SodaStream de 60 litres en el regulader y girele en el sentido de
las agujas del relej.
® Debe utilizar un cilindro de CO 2Sodastrearrf M(60 L).
® Puede rempl_ar e rellenar los cilindros SedaStream en los comerciantes mineristas
locales de SodaStream.
® Para devolver carbonataderes usados en los EE.EE. y Canads., envuelva el cilindro usado
y entr6gueselo a la persona que preperciona los nuevos carbenatadores.
En Australia y Nueva Zelanda, devuelva los carbonafaderes vacios en el mestrader de
servicio o infermaci6n del comerciante minorista para reempl_arle e rellenarle.
[_ Todos los costos relacionados con el rellenado o el reempl_o de los
carbonatadores SodaStream corren a cuenta (gel propietario (gelrefrigerador.
[_ La rosca del conector del carbonatador SodaStream difiere segOn el pais.
3. Empuje el carbonatador SodaStream de 60 litros dentro del soporte.
4. Ajuste carbonatador SodaStream de 60 litros en el lugar presionando la palanca.
® La presi6n interna del carbonatador puede hacer que sea dificil presionar la palanca
haeia abajo. Sostenga la palanca come se muestra en la ilustraci6n a la derecha y, luego,
presi6nela hacia abajo.
® Si no ajusta el carbonafador en el lugar, el refrigerador no producira agua con gas.
® Si el carbonafador no esfs. conectado firmemente al regulador, perdera gas CO2, Io que
producira un silbido.
Si este ocurre, repita los pasos 2, 3 y 4, y asegOrese de que el carbonatador esfe
firmemente conectado y ajustado en su lugar.
Espafiol_20

5.Pordef_cto,laconcentraci6ndeaguacongasvieneconfiguradaen"2".
Presioneelbot6n"SparklingWater"(Aguacongas)paraconfigurarlaconcentraci6nenelniveldeseadoy
mantengapresionadoelbot6nQuickSparkling(Carbonataci6nrapida)durante3segundosparaactivarlaopci6n
FillUp(Llenar).Silafunci6ndeaguacongasestb_desactivada,mantengapresionadoelbot6nSparklingWater
(Aguacongas)oQuickSparkling(Carbonataci6nrapida)durante3segundosparareactivada.
UnavezrestablecidoelcilindrodeCO2,seproduceaguacongas.
®Paraproduciraguacongas,eltanquedeaguacongasseIlenaconaguayelgasCO2seinyectaseg0nla
concentraci6nconfigurada.
®Paraquitarlassustanciasextra,Msquepuedanhabereneltanquedeaguacongas,desechelospdmeros
1.2Iitrosdeaguacongas.
®Elrefrigeradornodispensaaguacongascuandoestb_haciendoaguacongas.
Cuandolosn0meros (_) junto alicono de agua con gas dejan de parpadear,se puede dispensar aguacon
® Para desinstalar un carbonatador SodaStream, siga los pasos 1 a 4 anteriores en orden inverso.
Para obtener mas informaci6n sobre c6mo utilizar la funci6n de agua con gas, vea Uso de la funci6n de
agua con gas.
El
O
Presionar durante 3 segundos
Finalizaci6n de la instalaci6n
Ahora que ya tiene el nuevo refrigerador instalado en su lugar, puede configurarlo y disfrutar de sus
funciones.
Complete los siguientes pasos para poner el refrigerador en funcionamiento.
gas,
1. Asegurese de que el refrigerador se encuentre en una ubicaci6n apropiada a una distancia razonable
de la pared. Consulte las instrucciones de instalaci6n de este manual.
2. Una vez enchufado, asegurese de que la luz interior se encienda cuando se abran las puertas.
3. Coloque el control de temperatura en la marca mas fffa y espere una hora.
El congelador comenzara a enfriarse y el motor funcionara adecuadamente.
Restablezca latemperatura deseada del refrigerador y del congelador.
4. Despues de enchufar el refrigerador, tardara algunas horas en alcanzar la temperatura adecuada.
Podra almacenar alimentos y bebidas en el refrigerador una vez que la temperatura sea Io
suficientemente baja.
(Consulte la explicaci6n del bot6n Energy Saver (Ahorro de energfa) en "USO DEL PANEL DE
CONTROL" en la pagina 23.)

Funaonarn ento de
refrcjerador
de LAertafrance a
I
USO DEL PANEL DE CONTROL
(1)
(2}
(3)
El bot6n Freezer (Congelador) tiene dos
funciones:
Ajustar el congelador a la temperatura
deseada.
Encender y apagar la funci6n de congelaci6n
rapida.
1) Para ajustar latemperatura del congelador,
toque el bot6n Freezer (Congelador) varias
veces. Cada vez que presiona este bot6n,
cambia el ajuste de la temperatura.
Puede ajustar la temperatura entre 5 °F
(-15 °C) y -8 °F (-23 °C)
2) Funci6n de congelaci6n rapida
Mantenga presionado este bot6n durante 3
®
segundos para reducir el tiempo necesario para
congelar los productos que se encuentran en el
congelador.
Puede set Otilsi necesita congelar rapidamente
alimentos que se deterioran con facilidad o si
la temperatura del congelador ha aumentado
drasticamente. (Pot ejemplo, si la puerta
qued6 abierta). Cuando utiliza esta funci6n, el
consumo de energ[a del refrigerador aumenta.
Recuerde desactivarla cuando no la necesite y
restablezca el ajuste de temperatura original del
congelador. Si necesita congelar gran cantidad
de alimentos, active la funci6n Power Freeze
(Congelaci6n rapida) como mfnimo 20 horas
antes.
(4)
(5)
(6)
El bot6n Alarm (Alarma) tiene dos funciones:
Encender y apagar la alarma de la puerta.
Restablecer el indicador de vida Otildel filtro
de agua.
) Funci6n de alarma de la puerta
Si la alarma de la puerta esta activada, cuando
cualquiera de las puertas del refrigerador quede
abierta durante mas de tres minutos, sonara
una alarma.
El sonido se detiene cuando se cierra la puerta.
La funci6n de alarma de la puerta ya viene
activada de fabrica.
Se puede desactivar presionando y liberando el
bot6n Alarm (Alarma).
Se puede volver a activar con el mismo
procedimiento.
El [cono se enciende cuando lafunci6n se
activa.
Cuando la funci6n de alarma de la puerta
esta activada y se oye el sonido de la alarma,
el fcono Door Alarm (Alarma de la puerta)
parpadea mientras suena la alarma.
2) Funci6n del indicador de vida Otildel filtro
de agua
Cuando se haya remplazado el filtro de agua,
mantenga presionado este bot6n durante 3
segundos para restablecer el indicador de vida
Otildel filtro de agua.
Cuando se restablece el indicador de vida Otil
del filtro de agua, el fcono Filter (Filtro) que se
encuentra en el panel se apaga.
El [cono Filter (Filtro) se tornara rojo para indicar
que debe cambiar el filtro de agua despues de
6 meses (aproximadamente 300 galones).
Algunas zonas poseen grandes cantidades de
cal en el agua, Io que provoca que el filtro de
agua se obstruya con mas rapidez.
Si este es el caso en su zona, debera cambiar
el filtro con una frecuencia inferior a seis meses.
Espafiol-22

El bot6n Quick Sparkling (Carbonataci6n rapida)
tiene dos funciones:
Producir agua con gas rapidamente.
Activar la funci6n de Ilenado.
) Funci6n de carbonataci6n rapida
Cuando se toca el bot6n Quick Sparkling
(Carbonataci6n rapida), el icono (-_-) se enciende
y el refrigerador hace agua con gas rapidamente
en el nivel que indica el icono Sparkling Level (Nivel
de agua con gas). Si no hay agua en el tanque de
agua con gas, el refrigerador comenzara a fabricarla
inmediatamente. Si hay agua con gas en el tanque,
el refrigerador aplicara la funci6n de Carbonataci6n
rapida la pr6xima vez que haga agua con gas.
2) Funci6n de Ilenado
U
AI remplazar el carbonatador SodaStream,
presiene el bot6n 'Quick Sparkling/Fill up (3 sec)'
(Carbonataci6n rapida/Llenar [3 segundos]) para
activar la funci6n de Ilenado. Elrefrigerador Ilena
de agua el tanque de agua con gas e inyecta
gas CO2 para convertir el agua en agua con gas.
El nivel de carbenataci6n del agua puede diferir
del establecido, dependiendo de la cantidad y
de la concentraci6n de CO2 del agua con gas
restante en el tanque. Si el tanque esta vac[o o la
concentraci6n es muy baja, el refdgerador hara
agua con gas en el nivel indicado per el ieono
Sparkling Level (Nivel de carbonataci6n). Si el nivel
de carbonataci6n no es el esperado, seleccione
el nivel que desee (consulte la pagina 24). La
pr6xima vez que el refrigerador haga agua cen gas,
esta tendra el nivel de carbonataci6n seleccionado.
El bot6n Lighting (Luz) tiene dos funciones:
Encender y apagar la luz del dispensador.
Cambiar las unidades de temperatura entre
°C y °F
) Funci6n de luz
AI tocar el bot6n Lighting (Luz), la luz LED del
dispensador se enciende en modo permanente
y queda encendida.
El bot6n tambien se ilumina.
Si desea que la luz del dispensador se encienda
solamente cuando se usa el dispensador, pulse
...6..
el bot6n Lighting (Luz) para desactivar el modo
de encendido permanente.
2) Para cambiar las unidades de temperatura
entre °C y _F mantenga presionado este
bot6n durante 3 segundos para seleccionar
el tipo de temperatura que desea que
se muestre. Cada vez que se mantiene
presionado el bot6n, se alternan los modos
de temperatura °C y °F y se iluminan los
iconos °C o °F para indicar la selecci6n.
El bot6n Energy Saver (Ahorro de energia) tiene
dos funciones:
Activar y desactivar el modo de ahorro de
energ[a.
Encender y apagar la funci6n de bloqueo de
control.
El bot6n Fridge (Refrigerador) tiene dos funciones:
Ajustar el refrigerador a latemperatura deseada.
Encender y apagar la funci6n de refrigeraci6n
rapida.
) Para ajustar la temperatura del refrigerador,
presione el bot6n Fridge (Refrigerador) varias
veces. Cada vez que presiona este bot6n, se
cambia el ajuste de la temperalura.
Puede ajustar la temperatura entre 44 °F
(7 °C) y 34 °F (1 °C).
2) Funci6n de refrigeraci6n rapida
Mantenga presionado este bot6n durante 3
segundos para reducir el tiempo necesario para
enfriar los productos que se encuentran en el
refrigerador. Puede ser Otil si necesita enfriar
rapidamente elementos que se echan a perder
con facilidad o si la temperatura del refrigerador
ha subido drasticamente (por ejemplo, si la
puerta qued6 abierta).
Espa_ol_23
) Funci6n de ahorro de energia
Cuando se activa el modo de ahorro de
energ[a, se enciende el icono Energy Saver
(Ahorro de energ[a).
Cuando se desactiva el modo de ahorro de
energ[a, el [cono se apaga.
La funci6n de ahorro de energia ya viene
activada de fg.brica.
Si hay condensaci6n o gotas de agua en las
puertas, apague el modo de ahorro de energia.
2) Funci6n de bloqueo de control
Mantenga presionado esfe bot6n durante 3
segundos para bloquear la pantalla, el panel del
caj6n Flex Zone y los botones del dispensador
a fin de que los botones no puedan utilizarse.
Cuando la funci6n de bloqueo de control esfa
activada, el refrigerador no dispensa hielo, agua
nl agua con gas aunque se presione la palanca
del dispensador.
El icono Control Lock (Bloqueo control) se
enciende para indicar que ests. activada la
funci6n de bloqueo de control.
Presione durante 3 segundos para desbloquear.

El bot6n Sparkling Water (Agua con gas) tiene
tres funciones:
Dispensar agua con gas (carbonatada).
Seleccionar el nivel de carbonataci6n del
agua con gas,
Encender y apagar la funci6n de producci6n
de agua con gas.
Dispensar agua con gas (carbonatada)
Para dispensar agua con gas, presione el bot6n
Sparkling Water (Agua con gas).
Si presiona el bot6n Sparkling Water (Agua con
gas) mbntras esta seleccionado Cubed Ice
(Hielo en cubos) o Crushed Ice (Hielo triturado),
se enciende el iceno Sparkling (Con gas).
Cuando no hay mas agua con gas o el
refrigerador la esta produciendo, no se
dispensa agua con gas.
2) Seleccionar el nivel de carbonatack'_n del
agua con gas
Cuando presiona el bot6n Sparkling Water
(Agua con gas) mientras esta encendido el
iceno Sparkling Water (Agua con gas), el
nivel de carbonataci6n cambia de la siguiente
manera:
Medic (Nivel-2) _ Fuerte (Nivel-3)
Debil (Nivel-1) _ Medic (Nivel-2).
La pr6xima vez que el refrigerader produce
agua con gas, utiliza el nuevo nivel de
carbonataci6n.
Si en el interior del tanque de agua con
gas hay agua producida anteriormente, el
refrigerador dispensa agua con gas con el
nivel de carbonataci6n anterior.
(L.asmodificaciones del nivel de
carbonataci6n no tbnen efecto hasta la
pr6xima vez que el refrigerador produce
agua con gas).
Cuando el refrigerador produce agua cen
gas, los iconos del nivel de carbonataci6n se
encienden en retaci6n (Nivel-1 _ Nivel-2
Nivel-3 _ Nivel-1, etc.).
Si presiona el bot6n Sparkling Water
(Agua con gas) cuando el refrigerador esta
produciendo agua con gas, el nivel de
carbonataci6n actual se muestra durante
unos segundos y luego se inicia nuevamente
la iluminaci6n en rotaci6n de los iconos del
nivel de carbonataci6n.
Si presiona nuevamente el bot6n Sparkling
Water (Agua con gas) mbntras se muestra el
nivel de carbonataci6n actual, este cambia.
Las modificaciones del nivel de
carbonataci6n no tbnen efecto hasta la
pr6xima vez que el refrigerador produce
agua con gas.
3) Encender y apagar la funci6n de producci6n
de agua con gas
Cada vez que presiona este bot6n durante 3
segundos, la funci6n de producci6n de agua
con gas se encbnde o se apaga.
Cuando se enciende la funci6n de producci6n
de agua con gas, el refrigerador comienza a
producir agua con gas (carbonatada).
(Si apaga la funci6n de producci6n de agua con
gas unos segundos despues de encenderla, se
termina la producci6n de agua con gas.
Si pasan ma.s de unos segundos, el refrigerador
comenzara a producir agua con gas.
Mientras el refrigerador produce agua con gas,
no podra dispensarla).
AI apagar la funci6n de producci6n de agua con
gas, el icono "OFF" (Apagado) se enciende en
el panel del visor.
AI encender la funci6n de producci6n de agua
con gas, el icono "OFF" (Apagado) se apaga en
el panel del visor.
Cuando la funci6n de producci6n de agua con
gas est6. apagada, el refrigerador no produce
agua con gas.
Si apaga la funci6n cuando elrefrigerador
esta. produciendo agua con gas, se detiene
la funci6n una vez finalizada la operaci6n en
CUFSO.
La funci6n de producci6n de agua con gas
viene desactivada de fabrica.
AI conectar las tuberias de agua, montar o
rempl_ar el cilindro de CO 2, apague la funci6n
de producci6n de agua con gas antes de
comenzar.
Encienda la funci6n solo una vez que haya
terminade.
Para producir agua con gas, debe instalar un
cilindro de CO2.
Para las instrucciones, vea "lnstalaci6n de un
carbonatador SodaStream en el refrigerador"
en la pa.(]ina 20.
Espa_ol_24

El bot6n Cubed/Crushed Ice (Hielo en cubos/
triturado) tiene dos funciones:
Seleccionar eltipo de hielo que desea
obtener.
Encender y apagar la fg.brica de hielo.
) Funci6n de hielo en cubos/triturado
Para seleccionar eltipo de hielo.
Presione el bot6n Cubed/Crushed lee (Hielo en
cubo.s/triturado) para seleccionar el tipo de hielo
que desea obtener.
Cada vez que presiona el bot6n, los modos de
hielo en cubos o triturado alternan y el fcono
correspondiente se enciende para indicar su
selecci6n.
2) Funci6n de fa.brica de hielo desactivada
SJno desea hacer mas hielo, mantenga
presionado este bot6n durante 3 segundos.
SJno desea hacer ma.shielo, mantenga
presionado el bot6n Ice Maker Off (Fabrica de
hielo desactivada) durante 3 segundos.
Vea (8) ma.s arriba.
El icono se encendera y la fg.brica de hielo se
detendra.
_ ecomendamos detener la fa.brica de
hielo si sucede Io siguiente:
Hay suficiente hielo en la cubeta.
Desea ahorrar agua y energ[a.
_./ - El refdgerador no esta recibiendo agua.
Para ahorrar electricidad, el visor del panel
se apaga automb, ticamente en las siguientes
condiciones: cuando no se presion6 ning_]n
bot6n, no se abrieron las puertas o no se
empuj6 la palanca del dispensador.
Sin embargo, el icono que indica la selecci6n
de hielo en cubos o triturado, o de agua con
gas, queda encendido.
Cuando presione un bot6n, abra una puerta o
empuje la palanca del dispensador, el visor del
panel volvera, a encenderse.
Todas las teclas de funci6n volvera.n a
funcionar cuando retire el dedo del bot6n que
presion6.
Este icono se enciende cuando es necesario
rempl_ar el filtro, normalmente despues de que
el refrigerador haya dispensado 300 galones de
agua (despues de aproximadamente 6 meses).
Despues de haber instalado el nuevo filtro
de agua, restablezca el indicador del filtro
manteniendo presionado el bot6n Filter Reset
:_establecer filtro) durante 3 segundos.
- Si el agua no sale del dispensador
o Io hace lentamente, es necesario
remplazar el filtro porque esta
obturado.
- Algunas zonas poseen grandes
cantidades de cal en el agua, Io
que provoca que el filtro de agua se
obstruya con mas rapidez.
Si la funci6n de fa.brica de hielo estb_
encendida y la tuberia de agua no esta.
conectada, se escuchara un sonido de
vaJvula de agua desde la parte posterior
de la unidad.
Si esto sucede, presione el bot6n Ice
Maker Off (Fabrica de hielo desactivada)
durante mas de 3 segundos hasta
que se ilumine el indicador de hielo
desactivado ( _ ).
_J cubos/triturado) para seleccionar el tipo de hielo
Cubed Cada vez que presiona el bot6n, los modos de
(:rushed se ecc (')n.
Espa(iol- 25
Presione el bot6n Cubed/Crushed Ice (Hielo en
que desea obtener.
hielo en cubos o triturado alternan y el icono
correspondiente se enciende para indicar su

Cuande se presiena el bot6n Sparkling Water
_J (Agua con gas) (Bet6n 7), se enciende el fcono
Spark ng Water Agua con gas.
Los fconos del nivel de producci6n de agua
con gas muestran el nivel de carbonataci6n
eslablecido actualmente. Cuando presiona el
bot6n Sparkling Water (Agua con gas) mientras
esta encendido el fcono Sparkling Water (Agua
con gas), el hive] de carbonataci6n cambia de
la siguiente manera:
Medic (Nivel 2) _ Fuerte (Nivel-3) _ Debil
(Nivel-1) _ Medic (Nivel-2).
Si en el interior del tanque de agua con
gas hay agua producida anteriormente, el
refrigerador dispensa agua con gas con el
nivel de carbonataci6n anterior.
(L.asmodificaciones del nivel de
carbonataci6n no tienen efecto hasta la
pr6xima vez que el refrigerador produce
agua con gas).
Q
Cuando el refrigerador produce agua cen
[]
gas, los [cones del nlvel de carbonalaci6n se
encienden en rotaci6n (Nivel-1 _ Nivel-2
n
Nivel-3 _ Nivel-1, etc.).
Si presiona el bot6n Sparkling Water
(Agua con gas) cuando el refrigerador ests.
produciendo agua con gas, el nivel de
carbonataci6n actual se muestra durante
unos segundos y luego se inicia nuevamente
la iluminaci6n en rotaci6n de los iconos del
nivel de carbonataci6n.
Si presiona nuevamente el bot6n Sparkling
Water (Agua con gas) mlentras se muestra el
nivel de carbonataci6n actual, este cambia.
La modificaci6n del nivel de carbonataci6n
tendra efecto la pr6xima vez que el
refrigerador produzca agua con gas.
Si cambia el nivel de carbonalaci6n cuando
el refrigerador ests. produciendo agua con
gas, se produce agua con gas de acuerdo
con el nivel de carbonataci6n anterior.
Cada vez que presiona el bot6n Sparkling
Waler (Agua con gas) (Bot6n 7) durante 3
segundos, la funci6n de producci6n de agua
con gas se enciende o se apaga.
AI apagar la funci6n de producci6n de agua
con gas, el icono OFF (Apagado) de Sparkling
Water (Agua con gas) se enciende en el panel
del visor.
AI encender la funci6n de producci6n de agua
con gas, el icono "OFF" (Apagado) se apaga en
el panel del visor.
_ Si se detecta una perdida en el m6dulo
de producci6n de agua con gas,
el [cone OFF (Apagado) parpadea,
el refrigerador deja de dispensary
producir agua con gas, y la funci6n
de producci6n de agua con gas pasa
automaticamente a"OFF" (Apagado).
Ademas, la funci6n de producci6n de
agua con gas no se encendera, incluso
si presiona el bot6n Quick Sparkling
(Carbonataci6n rapida) o el bot6n
Sparkling Water (Agua con gas) durante
3 segundos.
EspaBoJ_26

CAMBIO DEL FILTRO DE
AGUA
ADVERTENCIA
Para reducir el riesgo de da_os ocasionados por
el agua, NO use marcas genericas de filtros de
agua en su refrigerador SAMSUNG.
SOLO USE FILTROS DE AGUA
MARCA SAMSUNG.
SAMSUNG no sera legalmente
responsable por ningLinda_o,
incluidos, entre otros, da_os (Rojo)
materiales causados por perdidas
de agua debido al uso de un filtro de
agua generico.
Los refrigeradores SAMSUNG estan dise_ados
para funcionar SOLO CON filtros de agua
SAMSUNG.
La luz del filtro se pone roja para indicar que es
momento de cambiar el cartucho del filtro de
agua.
Para darle tiempo hasta que consiga un nuevo
filtro, la luz roja se enciende justo antes de que la
capacidad del filtro actual se acabe.
Cambiar elfiltro a tiempo hara que su refrigerador
provea agua mas fresca y mas limpia.
%
2. Extraiga el filtro de agua (1) del compartimento
(2)+
+ Para cambiar elfiltro de agua mas
facilmente, cierre la valvula del
suministro de agua.
+ Algunas veces, es diffcil retirar el filtro de agua
debido a que las impurezas en el agua hacen
que se pegue.
Si tiene dificultades, sostenga firmemente el
filtro de agua y jale con fuerza.
+ AI jalar el filtro de agua, puede filtrarse algo de
agua de la abertura. Esto es normal.
Para minimizar las filtraciones de agua,
mantenga el cartucho del filtro de agua en
forma horizontal al extraerlo.
+ Para impedir derrames, vacfe la charola
del filtro de agua (3) y seque alrededor del
compartimento del filtro (2).
-- (2)
(3)
3. Inserte el nuevo filtro en el compartimento (4).
Para cambiar el filtro de agua
1. Cierre el suministro de agua.
Luego gire el filtro de agua (1)
aproximadamente un cuarto de vuelta, en el
sentido contrario al de las agujas del reloj.
4. Presione el filtro y, luego, gfrelo en el sentido
de las agujas del reloj hasta que quede
ajustado.
[_ + Si tiene dificultades para insertar el filtro
debido a la alta presion de agua, cierre
la valvula de suministro de agua.
+ El sfmbolo de bloqueo debera estar alineado
con la Ifnea del indicador.
Espado --27

5.Presioneelboton"Alarm/FilterReset (3 sec}
(Alarma/Restablecer filtro [3 segundos]}"
4,) _durante aproximadamente
(RIterReset}(RestaMecerfiltro) !
3 segundos para restablecer el filtro del agua.
El color del indicador (I_ ) cambia de rojo a
apagado.
Limpie muy bien el dispensador para evitar
que se filtre agua.
Esto significa que aun hay aire en la
tuber[a.
6. Si desactivo el suministro de agua, act[velo
nuevamente.
Para remplazar el filtro del agua, puede
®
visitar su centro de ventas de art[culos
para el hogar local o comunicarse con el
distribuidor de piezas Samsung.
Para solicitar mas cartuchos del filtro de
agua, comun[quese con su distribuidor de
productos Samsung autorizado.
Asegurese de que el filtro de agua de
remplazo Ileve el logo SAMSUNG en la
caja y en el filtro.
EliminaciOn de los materiales
residuales que se encuentran dentro
de la tuberia del suministro de agua
despuOs de instalar el filtro de agua
1. Abra el suministro de agua principal si Io cerro
cuando instalo el filtro de agua.
2. Deje correr agua por el dispensador hasta que
se vea incolora (aprox. 6 a 7 minutos).
Este procedimiento limpiara el sistema de
suministro de agua y eliminara el aire de las
tuber[as.
Suministro de agua por Osmosis inversa
IMPORTANTE:
La presion del suministro de agua que sale del
sistema por Osmosis inversa que va a la valvula
de entrada de agua del refrigerador necesita estar
entre 35 y 120 psi (241 y 827 kPa).
Si se conecta un sistema de filtracion de agua
por Osmosis inversa al suministro de agua fr[a,
la presion de agua hacia el sistema de Osmosis
inversa debe tener un m[nimo de 40 a 60 psi (276
a 414 kPa).
Si la presion de agua hacia el sistema de Osmosis
inversa es menor de 40 a 60 psi (276 a 414 kPa):
• Verifique si el filtro de sedimentos en el sistema
de Osmosis inversa esta bloqueado.
Remplace elfiltro si es necesario.
• Llene nuevamente el tanque de
almacenamiento del sistema de Osmosis
inversa despues de un uso prolongado.
• Si el refrigerador cuenta con un filtro de agua,
es posible que la presion de agua disminuya
aun mas al usarlo con un sistema de Osmosis
inversa. Retire el filtro de agua.
Si tiene dudas sobre la presion del agua, Ilame a
un plomero calificado autorizado.
3. Es posible que se necesite realizar una
limpieza adicional en algunos hogares.
4. Abra la puerta del refrigerador y asegurese de
que no haya filtraciones de agua provenientes
del filtro de agua.
Espa5ol-28

CONTROL DE LA
TEMPERATURA
Temperaturas recomendadas
de los compartimientos del
congelador y del refngerador
La temperatura basica y la temperatura
recomendada de los compartimentos del
congelador y del refrigerador son 0 °F (-19 °C) y
37 °F (3 °C) respectivamente,
Si la temperatura de los compartimentos del
congelador y del refrigerador es demasiado alta o
baja, ajustela manualmente,
Control de la temperatura del
congelador
Control de la temperatura del
refrigerador
Temperatura recomendada (refrigerador): 37 °F (3 °C)
La temperatura del refrigerador puede
establecerse entre 34 °F (1 °C) y 45 °F (7 °C) para
satisfacer sus necesidades particulares.
Presione el boton Fridge (Refrigerador) varias
veces hasta que aparezca la temperatura
deseada en el visor.
Cada vez que presione el boton, latemperatura
cambiara en 1 °C. Vea a continuacion.
Fahrenheit: 37 °F _ 36 °F --* 34 °F --* 47 °F --*
43 °F --* 41 °F --* 39 °R
Centigrados: 3 °C --_ 2 °C --_ 1 °C --* 7 °C --*
6 °C --, 5 °C --, 4 °C --, 3 °C.
Temperatura recomendada (congelador): 66 °F (-19 °C)
La temperatura del congelador puede
establecerse entre -8 °F y 5 °F (o entre -23 °C
y -15 °C) para satisfacer sus necesidades
particulares.
Presione el boton Freezer (Congelador) varias
veces hasta que aparezca la temperatura
deseada en el visor.
Cada vez que presione el boton, latemperatura
cambiara en 1 °C (o 1 °F). Vea a continuacion.
Fahrenheit: -0 °F --* -1 °F --* -2 °F _ -3 °F --*
-4 °F --* -5 °F --* -6 °F _ -7 °F --* -8 °F --* 5 °F --*
4OF-.,3OF-.,2OF-.,lOF-.,0o R
Centigrados: -19 °C _ -20 °C _ -21 °C
-22 °C --* -23 °C --* -15 °C --* -16 °C --* -17 °C --*
-18 °C --* -19 °C.
Tenga en cuenta que algunos alimentos, tales
como el helado, pueden derretirse a 4 °F (o
-15.5 °C). El visor de la temperatura cambiara de
manera secuencial de -8 °F a 5 °F (o de -23 °C a
-15 °C).
Espadol-29
El proceso de control de temperatura para el
refrigerador es igual al del congelador.
Presione el boton Fridge (Refrigerador) para
ajustar la temperatura deseada.
Tras unos pocos segundos, el refrigerador
comenzara a ajustarse hacia la nueva temperatura
establecida.
Esto se reflejara en el visor digital.

(_ - Latemperaturadelcongeladorodel
refrigeradorpuedesubircuandose
abrenlaspuertascondemasiada
frecuenciaosisealmacenaunagran
cantidaddealimentoscalientes.
Unaumentodelatemperaturapuedehacer
queelvisordigitalparpadee.
Cuandolatemperaturadelcongeladorydel
refrigeradorvuelvaaltangoestablecido,el
visordejaradeparpadear.
Sielparpadeocontinua,debera"restablecer"
elrefrigerador.
Intentedesenchufarelrefrigerador,espere
unos10minutosyluegovuelvaaenchufarlo.
Siexisteunerrordecomunicacionentreel
visoryelreguladorprincipal,esposiblequela
luzdelvisorconvertibleparpadee.
Sicontinuaparpadeandodurantemucho
tiempo,comunfqueseconelCentrode
serviciodeSamsungElectronics.
USO DE LOS
DISPENSADORES DE HIELO Y
AGUA FRiA
Presione el bot6n adecuado
de hielo/agua con gas para
seleccionar Io que desea obtener.
/ ...................
' b i
U
Sparkling Water Cubed Crushed IceOff
_: ..... i .... .
Presione el bot6n YM_. SIN HIELO
adecuado de hielo/agua _ Seleccione esta
con gas para seleccionar opcbn si desea
Io que desea obtener, apagar la fabrica
de hielo.
Uso de la palanca de
hielo (1)
Presionando la palanca del hielo/
agua con gas, se dispensa
hielo o agua con gas. Presione
el boron Cubed/Crushed Ice
(Hielo en cubos/triturado) para
seleccionar eltipo de hielo o
presione el boton Sparkling
Water (Agua con gas) para
seleccionar agua con gas.
Empuje la palanca del
dispensador de hielo/agua con
gas (1) levemente con el vaso.
El hielo o el agua con gas saldra
del dispensador.
Uso de la palanca de agua (2)
Empuje suavemente la palanca del dispensador
de agua (2) con el vaso. Saldra agua del
dispensador.
Aunque empuje las palancas de agua y
®
hielo simultaneamente, el dispensador
activara solo la opci6n que se haya
seleccionado o presionado en primer
lugar.
Espere 1 segundo antes de retirar el vaso
®
despues de Ilenarlo de agua para evitar
derrames.
No tire de la palanca del dispensador
despues de sacar hielo o agua.
Vuelve automaticamente.
Uso simultAneo del dispensador de
hielo y de agua
Para obtener hielo y agua, seleccione el tipo de
hielo y empuje primero la palanca de hielo/agua
con gas (1) para obtener hielo y luego mueva
el vaso hacia abajo y empuje la palanca del
dispensador de agua (2) para obtener agua.
Espafiol_30

Mantenimiento de la cubeta de
hielo
• Para limpiar el caj6n/cubeta de hielo, utilice un
detergente suave, enjuague y seque bien.
No utilice limpiadores ni solventes abrasivos.
El hielo se fabrica en cubos.
Cuando selecciona "Crushed" (Triturado)la
fabrica de hielo tritura los cubos para obtener
hielo triturado.
Cuando selecciona el modo Hielo en cubos
despues de utilizar el modo Hielo triturado,
puede producirse una pequeSa cantidad de
hielo triturado residual.
Los cubos de hielo generados por el proceso
de fabricaci6n de hielo rapido sera.n blancos,
Io que indica que se han generado con
normalidad.
Si necesita gran cantidad de hielo y que
la fabrica de hielo haga cubos de hielo
rapidamente, mueva los cubos del caj6n del
refrigerador aldel congelador para liberar
espacio.
La fabrica de hielo hara mas hielo.
Si no sale hielo, extraiga la cubeta y pulse el
bot6n Test (Probar) ubicado a la derecha de la
fabrica de hielo.
Vea la ilustraci6n de la derecha.
No presione el bot6n de prueba
continuamente cuando la charola este Ilena de
hielo o agua.
El agua se puede desbordar o el hielo puede
atascar la cubeta.
F&brica de hielo
• Para Ilenar la cubeta de hielo hasta su
capacidad m$xima despues de la instalacion,
siga estos pasos:
1. Deje que el refrigerador funcione y se enfr[e
durante 24 horas (o 1 d[a entero).
Si espera 24 horas, la fabrica de hielo enfriara
correctamente.
2. Vierta de 4 a 6 cubos de hielo en el vaso.
3. Despues de 8 y, luego, 16 horas, dispense un
vaso de hielo completo.
Para probar la fabrica de hielo, presione el
boton Test (Probar) en la fabrica de hielo.
Escuchara el repique del refrigerador (talan,
talan).
Cuando escuche el sonido, suelte el boton
Test (Probar).
Se escuchara automaticamente un sonido que
indica que la fabrica de hielo esta funcionando
correctamente.
el nivel de
ar)
PRECAUCl6N
Si quiere retirar una gran cantidad de cubos
de hielo sin retirar la cubeta de hielo, apague la
fabrica de hielo, separe la cubierta frontal de la
fabrica de hielo y extraiga cuidadosamente los
cubos de hielo. A continuacion vuelva a colocar
la cubierta frontal de la fabrica de hielo. Tenga en
cuenta que los cubos de hielo de la fabrica de
hielo pueden derramarse sobre el cajon.
z_ PRECAUCl6N
No ponga alimentos en la cubeta de hielo.
Si almacena alimentos en la cubeta de hielo,
pueden golpear la fabrica de hielo al abrir o cerrar
la puerta y, de este modo, daSar la fabrica de
hielo.
Espa5ol-31

,_ PRECAUCl6N
Tenga en cuenta que los cubos de hielo de la
cubeta pueden derramarse sobre el caj6n al
retirar ia cubeta.
En este caso, debe retirar del caj6n los cubos de
hielo que se hayan derramado.
,_ PRECAUCl6N
En caso de corte de energfa, los cubos de
hielo pueden derretirse y luego congelarse en
bloque cuando vuelve la energfa y hacer que el
dispensador deje de funcionar.
Para evitar que esto suceda, despues de un corte
de energfa, extraiga la cubeta de hielo y deseche
el hielo y el agua residuales.
Si utiliza todo el hielo de la cubeta de
®
una sola vez, repita los pasos 2 y 3 de
fabricacion de hielo de la pagina anterior.
Sin embargo, espere solamente 8 horas
antes de extraer los primeros 4 a 6 cubos.
Este procedimiento repondra cubos de
hielo y garantizara su maxima produccion.
Uso de la funci6n ice Off
(Hielo desactivado)
AI seleccionar el modo de hielo desactivado, retire
todos los cubos de hielo de la cubeta.
Si deja los cubos de hielo en la cubeta, es posible
que se amontonen y sea diffcil retirarlos.
Para retirar la cubeta de hielo, pulse el boton en
la parte superior derecha de la cubeta (1 en la
ilustracion de la columna izquierda), levante la
parte inferior y luego jale.
Para volver a colocar la cubeta, empujela en su
lugar hasta que escuche un clic.
Si la cubeta no cabe, gire la helice 90 grados (vea
la ultima ilustracion de la columna izquierda) e
intente de nuevo.
PRECAUCl6N
• Utilice solamente la fabrica de hielo del
refrigerador.
• Contrate a un tecnico calificado para que
instale y conecte latuberfa del suministro de
agua al refrigerador.
• Conecte la tuberfa del suministro de agua
unicamente a un suministro de agua potable.
• Para que la fabrica de hielo funcione
correctamente, se necesita una presion de
agua de 20 - 125 psi.
Durante las vacaciones...
Si viaja por vacaciones o negocios y no utilizara
los dispensadores de agua o hielo por un perbdo
prolongado:
Espa[io- 32
Cierre la valvula de agua.
De Io contrario, pueden producirse fugas de
agua.
Retire todos los alimentos.
Desenchufe el refrigerador.
Retire el exceso de humedad del interior del
refrigerador y deje las puertas abiertas.
Si no Io hace, pueden aparecer olores y moho.

Recomendaciones acerca de la
fabnca de hielo
+ No coloque los dedos, las manos ni ningon
otto objeto inapropiado en el recipiente o en la
cubeta de la fabrica de hielo.
Pueden producirse lesiones personales o
daSos materiales.
+ Nunca coloque los dedos ni objetos en la
abertura del dispensador.
Pueden producirse lesiones.
+ No intente desarmar la fabrica de hielo.
+ No limpie ni pulverice la cubeta de hielo con
agua mientras esta dentro del refrigerador.
Retfrela para limpiarla.
PRECAUCION
Cuando inserte la charola de la fabrica de hielo,
asegurese de que este bien centrada.
De Io contrario, se podrfa trabar.
El fen6meno de turbidez del agua
El agua que ingresa al refrigerador circula
%
a traves del filtro principal que es un filtro
para agua alcalina.
Enel proceso de filtrado, la presion del
agua que sale del filtro aumenta y el agua
se satura con oxfgeno y nitrogeno.
Cuando esta agua entra en contacto con
el aire, la presion desciende rapidamente y
el oxfgeno y el nitrogeno se sobresaturan y
generan burbujas de gas.
Temporalmente, el agua puede tenet una
apariencia turbia debido a estas burbujas
de oxfgeno.
Despues de unos segundos, el agua sera
incolora.
Espa_o++33

Uso de la funci6n de agua con gas
Con un cilindro de CO 2SodaStream instalado, el refrigerador puede producir y dispensar agua con gas
(carbonatada).
C6mo producir agua con gas
Mantenga presionado el bot6n Quick Sparkling (Carbonataci6n rapida) durante 3 segundos para activar
la opci6n Fill Up (Llenar).
Si la funci6n de agua con gas esta desactivada, mantenga presionado el bot6n Sparkling Water (Agua
con gas) o Quick Sparkling (Carbonataci6n rapida) durante 3 segundos para reactivarla.
Cuando se activa la funci6n, los fconos del nivel de carbonataci6n se iluminan en rotaci6n (Nivel-1
Nivel-2 _ Nivel-3 _ Nivel-1, etc.) y despues de varios segundos el refrigerador comienza a producir
agua con gas. Una vez finalizado el proceso, la rotaci6n de los fconos del nivel de carbonataci6n se
detiene.
Si deja la funcion de produccbn de agua con gas encendida y la cantidad de agua con gas disminuye,
el refrigerador entra automaticamente en el mode de produccion de agua con gas y produce mas.
Sin embargo, si apaga la funcbn de produccion de agua con gas, el refrigerador no produce mas agua
con gas incluso si queda un poco en el tanque.
SparklingWater [_]
Presione el boton Sparkling Water (Agua con gas)
durante 3 segundos
Presione el boton Quick Sparkling (Carbonataci6n
rapida) durante 3 segundos
Tiempo de producci6n del agua con gas
Segun el nivel de carbonatacion (gas) que elija (vea Como controlar el nivel de carbonatacbn en la
pagina 35), cambiara eltiempo que tarda el refrigerador en completar el proceso de produccbn
de agua con gas. La tabla a continuacbn enumera los tiempos de produccbn segun el nivel de
carbonatacbn. El refrigerador ya viene configurado de fabrica en el nivel 2.
Nivei de carbonataci6n Nivei 3 - Alto Nivel 2 - Medio Nivei 1 - Bajo R_pido
Tiempo de producci6n minutos minutos minutes Menos de 10 mhlutos
Capacidad disponible (1.1 _) (1.16) (1.16) (1.1 _)
Alrededer de 30 Alrededor de 20 Alrededer de 10
1.16 cuarto de galon 1.16 cuarto de gal6n 1.16 cuarto de gal6n 1.16 cuarto de galon
C6mo dispensar agua con gas
Para dispensar agua con gas, presione el boton Sparkling Water (Agua con gas).
Luego presione suavemente la palanca de hielo/agua con gas con un vaso.
A medida que pasa el tiempo, la velocidad en la que se dispensa el agua con gas puede cambiar.
Cuando el agua esta muy carbonatada, la velocidad para dispensar puede ser mas rapida.
Cuando la carbonatacion es menor, la velocidad para dispensar puede set mas lenta.
El 002 disuelto en el agua con gas puede hacer que el agua burbujee al dispensarla.
Ademas, debido a las fluctuaciones de presion en el tanque de agua con gas, es posible que el chorro
de agua se vuelva inestable o intermitente.
Si sigue dispensando agua con gas, es posible que elchorro de agua se vuelva inestable o se quiebre.
Esto se debe a los cambios de presion en el tanque de agua con gas. No es un defecto.
Espa_ol_34

Goteo de agua
Cierto tiempo despues de haber dispensado agua con gas, es posible que se escapen unas gotas
de agua con gas del dispensador. El goteo de agua no es un defecto del produeto, sino un resultado
natural de la mezcla de CO 2con agua.
C6mo controlar el nivel de carbonataci6n
Cuando elfcono Sparkling Water (Agua con gas) esta encendido, puede cambiar el nivel de
earbonataci6n presionando el bot6n Sparkling Water (Agua con gas) durante 3 segundos.
Cada vez que presiona el bot6n Sparkling Water (Agua con gas), el nivel de earbonataci6n eambia de la
siguiente manera:
Medio (Nivel-2) _ Fuerte (Nivel-3) _ Debil (Nivel-1) _ Medio (Nivel-2).
Cuando presiona este bot6n, los numeros pequeSos del lade derecho del bot6n se eneienden de forma
sueesiva para indicar el eambio del nivel.
Si en el interior del tanque de agua con gas hay agua producida anteriormente, el refrigerador
dispensa agua con gas con el nivel de carbonatacion anterior.
(Nuevamente, las modificaciones del nivel de carbonatacion no tienen efecto hasta la proxima vez
que el refrigerador produce agua con gas. La modificacion no afecta al agua con gas ya producida).
Cuando el refrigerador produce agua con gas, los fconos del nivel de carbonatacbn se encienden
en rotacion (Nivel-1 _ Nivel-2 _ Nivel-3 _ Nivel-1, etc.).
Si presiona el boton Sparkling Water (Agua con gas) cuando el refrigerador esta produciendo agua
con gas, el nivel de carbonatacbn actual se muestra durante varios segundos.
Si presiona nuevamente el boton Sparkling Water (Agua con gas) mientras se muestra el nivel de
carbonatacbn, este cambia. La modificacion del nivel de carbonatacbn tendra efecto la pr6xima vez
que el refrigerador produzca agua con gas.
Si cambia el nivel de carbonatacbn cuando el refrigerador esta produciendo agua con gas, se
produce agua con gas de acuerdo con el nivel de carbonatacbn anterior.
.m.m.m
El nivel de carbonatacbn ya viene configurado de fabrica en el nivel 2.
Si el agua con gas tiene un sabot muy fuerte o muy suave, cambie el nivel de carbonatacion.
El Nivel 1 proporciona una carbonatacbn mas suave, mientras que el Nivel 3 proporciona una
carbonatacbn mas fuerte.
• Si se corta la electricidad cuando el refrigerador esta produciendo agua con gas, es posible que el
refrigerador vuelva a comenzar el proceso de carbonatacbn cuando vuelva la electricidad y ponga
demasiada carbonatacion en el agua. En ese caso, recomendamos desechar el agua demasiado
carbonatada y comenzar el proceso nuevamente.
• La vida util del cilindro de CO2 puede variar segun los niveles de carbonatacbn que seleccione.
Espa[io- 35

C6mo apagar la funci6n de agua con gas
Para apagar lafunci6n de agua con gas, presione el bot6n Sparkling
Water (Agua con gas) durante 3 segundos.
Es posible que se dispense cualquier resto de agua con gas que haya
quedado en el tanque despues de haber apagado la funci6n de agua
con gas.
Si apaga la funci6n cuando el refrigerador esta produciendo agua con
gas, detiene la funci6n una vez finalizada laoperaci6n en curso.
C6mo configurar la opci6n de carbonataci6n rapida
La carbonataci6n rapida reduce el tiempo de procesamiento de la producci6n de agua con gas.
Con la opci6n de carbonataci6n rapida se puede producir agua con gas con un nivel de carbonataci6n
alto en 3 a 10 minutes, independientemente de la concentraci6n seleccionada.
1. Presione este bot6n para encender el indicador.
Esta opci6n reduce el tiempo de procesamiento para el pr6ximo ciclo, si la producci6n de agua con
gas no esta activada. Una vez finalizada, esta opcion se apaga automaticamente.
2. Presione este bot6n para encender el indicador.
Esta opci6n reduce el tiempo de procesamiento para el ciclo actual, si la producci6n de agua con
gas ya esta activada. Una vez finalizada, esta opci6n se apaga automaticamente.
3. Para cancelar la carbonataci6n rapida mientras se produce agua con gas con esta opci6n, vuelva a
presionar el bot6n dentro de los 10 segundos.
4. Despues de 10 segundos, esta opci6n permanece activa incluso si se apaga el indicador
correspondiente.
Esta opci6n repite la inyecci6n y la descarga de gas CO 2, Io que puede generar un poco de ruido
debido al funcionamiento.
La carbonataci6n rapida consume aprox. 35% mas gas CO 2en comparaci6n con el procesamiento en
el nivel 3 de carbonataci6n.
Espa_ol_36

PIEZAS Y FUNCIONES
Observe esta ilustracion para familiarizarse con las piezas y las funciones del refrigerador,
(8) Luz
Tapa del m6dulo
de agua con gas __
(1)--
(4)
(3)
Seccidn de la-
bisagra vertical
Tapa del cilindro
(opcionaD
(5)
-- (2)
(3)
Estante plegabie
de 2 posiciones
Luz
Cierre automatico
Filtro de agua
Cierre automatico
(6)
(7)
I_ l_il/]!/(t!!i/ltlll_ilI'_1/_I1l_[I _
AI cerrar la puerta, asegurese de que la seccion de la bisagra vertical se encuentre en la
®
posicion correcta para impedir que raye la otra puerta.
Si la seccion de la bisagra vertical esta invertida, coloquela en la posicion correcta y cierre la
puerta.
Algunas veces puede aparecer humedad en esta seccion.
La manija de la puerta puede aflojarse con el tiempo. Si esto sucede, ajuste los tornillos que se
encuentran dentro de la puerta.
Si cierra una puerta con mucha fuerza, la otra puerta puede abrirse.
[_ uando se abre la puerta, el disyuntor apaga automaticamente el motor sinfin de la fabrica de
hielo por razones de seguridad.
Si la lampara de LED interior o exterior se ha apagado, comun[quese con un agente de servicio
tecnico.
Z_ PRECAUCION
Cuando abra la puerta, es posible que escuche el sonido de chapoteo de agua, ya que el tanque de
agua con gas se encuentra dentro de la puerta.
Espado - 37

Utilicelafunci6ndeltanquedeaguacongasy
disfrutedelaguadirectamentedesdeeltanque
cuandoIodesee.
Dise_adosparacolocarartfculosgrandesy
voluminososcomoenvasesgrandesdelecheu
otrasbotellasyrecipientesdegrancapacidad.
Losalimentossesacanfacilmente.
Sepuedeutilizartotalmentedesplegadoose
puedeplegarparaalmacenarrecipientesaltos.
Seutilizanparapreservarlafrescuradelas
frutasyvegetalesalmacenados.
Hacehielocontinuamenteyustedpuede
disponerdehielosiemprequeIodesee.
Idealparaalmacenarcarnesyalimentossecos.
Losalimentosquesealmacenanaqufdeben
colocarseenunrecipienteoenvolversede
maneraseguraconpapeldealuminioo
cualquierottotipodematerialapropiado.
Idealparaalmacenarcarnesyalimentossecos.
Losalimentosquesealmacenandeben
envolversebienconpapeldealuminioo
cualquierottotipodematerialorecipiente
apropiado.
Espa_ol_38

USO DEL CAJON FLEX ZONE
El Flex Zone es un caj6n completo con control de
temperatura regulable,
Puede utilizar el caj6n Flex Zone para grandes
bandejas de fiestas, comidas selectas, vinos,
pizzas, bebidas o artfculos varios.
Cuenta con un sensor de temperatura que le
permite regular la cantidad de aire frfo permitido
en este caj6n,
Los botones de control se encuentran en el centro
de la cubierta de la puerta,
Bot6n de selecci6n de latemperatura
* Presione el bot6n Temp, (Temperatura) varias
veces hasta que se ilumine el modo deseado,
* Cada vez que presiona este bot6n, el modo
cambia en este orden:
modo Meat/Fish (Carne/Pescado) (29 °F o
-1 °C), modo Cold Drinks (Bebidas frfas) (33 °F
o 1 °C), modo DeN/Snack (Comidas selectas/
Aperitivos) (37 °F o 3 °C), modo Wine/Party
Dishes (Vino/Platos para fiestas) (42 °F o 5 °O),
En primer lugar, se selecciona el modo Cold
Drinks (Bebidas frfas).
El refrigerador regulara automaticamente la
temperatura en el caj6n Flex Zone segun Io
que se haya seleccionado.
* El visor de temperatura del caj6n Flex Zone
puede cambiar segun lacantidad de artfculos
almacenados, su ubicaci6n, latemperatura
ambiente y la frecuencia con la que se abre la
puerta,
1, Cuando se selecciona "Wine/Party Dishes"
(Vino/Platos para fiestas), la temperatura del
caj6n Flex Zone se mantendra alrededor de los
42 °F o 5 °C,
Esta funci6n ayuda a mantener los alimentos
frescos por mucho tiempo.
2, Cuando se selecciona "Deli/Snack"
(Cornidas selectas/Aperitivos), la
temperatura del cajon Flex Zone se mantendra
alrededor de los 37 °F o 3 °C.
Esta funcion ayuda a mantener los alimentos
frescos por mucho mas tiempo.
3, Cuando se selecciona "Cold Drink" (Bebidas
frias}", la temperatura del cajon Flex Zone se
mantendra alrededor de los 33 °F o 1 °C.
Esta funcion ayuda a mantener las bebidas
frfas y frescas.
4, Cuando se selecciona "Meat/Fish" (Came/
Pescado), la temperatura del cajon Flex Zone
se mantendra alrededor de los 29 °F o -1 °C,
Esta funcion ayuda a mantener la came o el
pescado fresco durante mucho mas tiempo,
Espa5ol-39

Ejemplosdecomidasquepuedealmacenar
enelcajonFlexZonesegunlatemperatura
configurada,
Vine/Plates
_ara fiestas
Vine
Cocteles
Pasteles
Ouesos
[_ as frutas y los vegetales pueden
z_ PRECAUCION
No almacene botellas de vidrio en el cajon Flex
Zone bajo las configuraciones "Cold Drinks"
(Bebidas fr[as) o "Meat/Fish" (Carne/Pescado).
Si se congelan, pueden romperse y provocar
lesiones personales,
UBICACI0N RECOMENDADA
PARA EL ESTANTE PLEGABLE
El estante plegable se pliega desde el centre
hacia arriba, Io que proporciona una superficie
de almacenamiento mayor para art[culos altos sin
tener que reorganizar los estantes,
• Instale el estante plegable en la parte derecha
del refrigerador.
• Si Io instala en la pare izquierda, la fabrica de
hielo no permitira que el estante se pliegue
completamente,
• Para usarlo, empuje el frente del estante hacia
atras suavemente de mode que se pliegue
desde el medic,
Cemidas
seleetas/
Aperitives
* PiCas
Limones
Galletas
Papas
descomponerse si se selecciona la opcion
"Meat/Fish" (Carne/Pescado).
No almacene lechuga u otros vegetales de
hoja en el cajon Flex Zone,
Bebidas
frias
• Agua
embotellada
Jugo
mefrescos
Cerveza
Came/
Pescade
Bistec
Fiambres
Tooino
• Perros
calientes
con chile
COMe RETIRAR LOS
ACCESORIOS DEL
REFRIGERADOR
1. Compartimentos de las puertas
Compartimentos de las puertas (1)
Para retirar: simplemente levantelos y jale hacia
afuera,
Para volver a colocar: desl[celos per encima
de la ubicacion deseada y empuje hacia abajo
hasta que se traben,
Oompartimentos de las puertas (2)
Para retirar: quite el lade derecho del
compartimento levantandolo en angulo recto
a Io largo de la gu[a y, luego, quite el lade
izquierdo jalandolo de la puerta,
Para volver a colocar: desl[celos hasta la
ubicacion original y empuje hacia abajo hasta
que se traben,
Compartimentos de las puertas del modelo de
agua con gas (2)
Para retirar: quite el lade derecho del
compartimento levantandolo en angulo recto
a Io largo de la gu[a y, luego, quite el lade
izquierdo jalandolo de la puerta.
Para volver a colocar: alinee la posicion de los
orificios del compartimento de la puerta con
cuidado y, luego, desl[celo hasta la ubicacion
deseada y empuje hacia abajo hasta que se
trabe,
AI retirar y volver a colocar el compartimento
inferior de la puerta del modelo de agua con
gas, abra primero la tapa del cilindro e incline
el cilindro hacia adelante,
Espa5ol-40

Compartimentodelapuertadelmodelode
aguacongas(3).
Noretireelcompartimentodelapuertadel
modelodeaguacongas(3).
L[mpielocompletamenteconunpasolimpio
sinretirarlo.
2.
Estantes de vidrio templado
Para retirar: incline el frente del estante hacia
arriba en la direccion que se muestra en el
grafico (1) y leva.ntelo en forma vertical (2).
Extraiga el estante.
Para volver a colocar : incline el frente del
estante hacia arriba y deslice los ganchos
del estante dentro de las ranuras a la altura
deseada.
Luego, baje el frente del estante de manera tal
que los ganchos caigan dentro de las ranuras.
PRECAUCION
No retire los compartimentos de la puerta (3).
No ajuste un compartimento Ileno de alimentos.
Primero retire los alimentos.
Para retirar el polvo, quite la guarda y Iimpie con
agua.
/_ PRECAUCION
Pueden ocasionarse lesiones si hay botellas
grandes en los compartimentos inferiores y se
caen al abrir las puertas. Abra las puertas con
cuidado.
Pueden producirse lesiones si los
compartimentos de las puertas no estan
firmemente conectados alas puertas.
No permita que los ni_os jueguen con
los compartimentos. Sus esquinas filosas
pueden causar lesiones.
/_ PRECAUCl6N
Los estantes de vidrio templado son pesados.
Tenga mucho cuidado cuando los retire.
3. Estante plegable
Para retirar: despues de retirar el frente del
estante, levante el estante y ret[relo.
Para volver a colocar: enganche el estante
en el marco y monte el frente del estante al
estante plegable.
Espado --41

z_ PRECAUCION
Despues de deslizar el estante plegable y
plegarlo, puede retirar el estante delantero segun
su conveniencia.
Si usa el estante sin retirar el frente del estante,
tenga cuidado.
El frente del estante puede separarse.
4. Cajones de vegetales y frutas
Compartimentos de las puertas
Antes de retirar el cajon, retire los
compartimentos de las puertas como se
muestra a continuacion.
Para retirar: simplemente levantelos y jale hacia
afuera.
Incline el frente del cajon hacia arriba y ret[relo.
Luego mueva el cajon ligeramente en
la direccion de la flecha y extraigalo
completamente del refrigerador.
Vea la ilustracion que aparece a continuacion.
Para volver a colocar
Inserte el cajon dentro de los rieles y emp0jelo
hasta colocarlo nuevamente en su lugar.
Deslice el compartimento por encima de la
ubicacion deseada y empuje hacia abajo hasta
que se trabe.
/K PRECAUCION
Se deben retirar los cajones antes de levantar el
estante de vidrio que se encuentra sobre ellos.
Compartimentos de las puertas del modelo de
agua con gas
Para retirar: quite el lado derecho del
compartimento levantandolo en angulo recto
a Io largo de la gu[a y, luego, quite el lado
izquierdo jalandolo de la puerta.
AI retirar y volver a colocar el compartimento
inferior de la puerta del modelo de agua con
gas, abra primero latapa del cilindro e incline
el cilindro hacia adelante.
Espa5ol-42

5. Caj6n Flex Zone
Para retirar el caj6n Flex Zone: retire
totalmente la puerta del cajon, Levante el cajon
Flex Zone y jale hacia adelante con ambas
manos.
Rata volver a oolocar el caj6n Flex Zone:
abra completamente la puerta Flex.
Levante el frente del cajon Flex Zone, coloque
la pare posterior sobre los rieles y, luego, baje
el frente hasta que todo el cajon descanse
sobre los rieles.
Cuando el caj6n Flex Zone o la luz LED no
funcionen, verifique si los conectores [(1), (2}
a continuaci6n] tienen grietas o fugas.
Uso de las puertas
Asegurese de que las puertas se cierren completa
y hermeticamente.
Cuando la puerta del refrigerador esta
parcialmente abierta, se cierra automaticamente.
Si su angulo de apertura es mayor al alcance del
cierre automatico, permanecera abierta.
Debera cerrarla manualmente.
COMO RETIRAR LOS
ACCESORIOS DEL
CONGELADOR
1. Guarda del compartimento del
congelador
Para retirar: levante la guarda del
compartimento del congelador (1) y ret[rela.
Para volver a colocar: empuje hacia abajo
hasta que la guarda (1) se trabe en su lugar.
1. Desensamble de la puerta del cajon Flex.
Consulte la pagina 13 para obtener
instrucciones sobre como desensamblarlo.
2. Abra la cubierta del riel con un desarmador de
punta chata para ver los conectores.
Espadol-43
=
Caj6n superextensible
Para retirar: retire el cajon totalmente hacia
afuera. Incline la parte posterior del cajon hacia
arriba y levantelo.
Para volver a colocar: coloque el cajon
sobre los rieles (4) inclinandolo hacia arriba.
Baje el cajon y coloquelo en su lugar hasta
que se encuentre en posicion horizontal y,
luego, deslice el cajon hasta el tope (3).

3. Caj6n delcongelador
Para retirar eI caj6n deI congelador:
extraigalo completamente. Incline la parte
posterior del compartimento hacia arriba y
levantelo para retirarlo.
Para volver a colocar el caj6n del
congelador: inserte el compartimento en los
rieles.
z_ PRECAUCION
Puede rayar la parte lateral del compartimento si
Io gira a la izquierda o a la derecha al desarmarlo
o volver a armarlo.
z_ PRECAUCION
No permita que bebes o ni_os entren en el cajon
del congelador.
Pueden da_ar el refrigerador y lesionarse
gravemente.
No se siente en la puerta del congelador.
La puerta puede romperse.
No permita que los ni_os trepen alcajon del
congelador.
PRECAUCION
No retire el divisor.
REEMPLAZO DEL
CARBONATADOR
SODASTREAM
Si el nivel de carbonatacion es anormalmente
bajo, significa que se debe reemplazar el
carbonatador.
Para remplazar un cilindro, siga estos pasos:
Compre carbonatadores SodaStream de G0 litros
en el distribuidor de SodaStream mas cercano o
en Intemet.
Visite www.sodastream.com para obtener mas
informacion.
1. Levante la palanca que mantiene el
cilindro en su lugar.
2. Retire el cilindro (gelsopor_e.
3. Gire el cilindro en el sentido
contrario al de las agujas del reloj
para retirarlo del regulador.
z_ PRECAUCION
Si quedan atrapados dentro, los niSos pueden
lesionarse o asfixiarse hasta motif.
Espa_ol_44
4. Para instalar un nuevo carbonatador, siga las
indicaciones de instalaci6n de un cilindro en la
pagina 20.
5. Mantenga presionado el bot6n Quick Sparkling
(Carbonataci6n rapida) durante 3 segundos para
activar la opci6rl Fill Up (Lbnar).
Si la funci6n de agua con gas esta desactivada,
mantenga presionado el bot6n Sparkling Water
(Agua con gas) o Quick Sparkling (Carbonataci@l
rapida) durante 3 segundos para reactivada.
® Si cambia el carbonatador durante la producci@l de
agua con gas (los iconos del nivel de carbonataci6n
se encbnden sucesivamente), espere hasta que el
refrigerador termine la producci6n antes de volver a
activar la funci@l de Producci@l de agua con gas.
Si interrumpe la producci6n, el agua con gas puede
estar demasiado carbonalada. Le recemendamos
que deseche el agua demasiado carbonatada.
 Loading...