

Page 1

QLED TV
Project : QRQ90B
Chassis : QWD90
Model : QA65Q90RAK
QA75Q90RAK
QA82Q90RAK
SERVICE
QLED TV Contents
1. Precautions
2. Product specications
3. Disassembly and Reassembly
4. Troubleshooting
5. Wiring Diagram
Manual
QA82Q90RAK
Page 2

Contents
1. Precautions ....................................................................................................................... 1-1
1-1. Safety Precautions .......................................................................................................................1-1
1-1-1. Warnings
1-1-2. Servicing the LED TV
1-1-3. Fire and Shock Hazard
1-1-4. Product Safety Notices.................................................................................................... 1-2
1-2. Servicing Precautions
1-2-1. General Servicing Precautions
1-3. Static Electricity Precautions
1-4. Installation Precautions
2. Product Specications .................................................................................................... 2-1
2-1. Product Information .....................................................................................................................2-1
2-2. Product specication
2-3. Accessories
2-4. Viewing the Functions
.............................................................................................................................1-1
........................................................................................................1-1
......................................................................................................1-1
................................................................................................................. 1-3
...................................................................................... 1-3
.................................................................................................... 1-4
............................................................................................................. 1-5
..................................................................................................................2-2
................................................................................................................................. 2-14
.............................................................................................................. 2-15
2-4-1. 2019'
2-4-2. Quick Guides ..................................................................................................................2-22
2-4-3. The Samsung Smart Remote
2-4-4. Using the TV Controller
2-4-5. Rear View & One Connect
2-5. Supported subtitles
Concept ......................................................................................................2-15
...................................................................................... 2-31
................................................................................................2-33
............................................................................................2-34
..................................................................................................................2-35
3. Disassembly and Reassemble ........................................................................................ 3-1
3-1. TV Disassembly ............................................................................................................................ 3-1
3-2. One Connect Disassembly
........................................................................................................3-11
4. Troubleshooting ..............................................................................................................4-1
4-1. Function Control Operation Test ............................................................................................... 4-1
4-2. Power
4-3. Video
............................................................................................................................................4-2
4-2-1. TV POWER STANDBY
4-2-2. TV POWER ON SEQUENCE
4-2-3. One Connect POWER ON SEQUENCE
4-2-4. OCB Self Power Supply.................................................................................................4-10
4-2-5. BACKLIGHT Dimming Control & BL Supply Path
4-2-6. BACKLIGHT
4-2-7. Backlight Quick Test
...........................................................................................................................................4-18
4-3-1. ONE CONNECT
4-3-2. MAIN/T-CON BOARD
4-3-3. PANEL
4-3-4. Check Test Patterns
.....................................................................................................................4-14
.............................................................................................................................4-21
.......................................................................................................4-2
.............................................................................................4-5
..........................................................................4-9
...................................................... 4-12
...................................................................................................... 4-16
...............................................................................................................4-18
.................................................................................................... 4-19
......................................................................................................4-22
Page 3

4-4. Audio ...........................................................................................................................................4-23
4-5. Network
4-6. Smart Hub
4-7. BlueTooth / WiFi Module
4-8. Replacing Main Board
4-9. Factory Mode
4-10. Factory Mode Adjustments
4-10-1. Entering Factory Mode
4-10-2. Detail Factory Option
4-10-3. Factory Data
4-11. RS-232C
4-12. AV Control Tabe
4-13. Updating the TV’s Software
......................................................................................................................................4-24
..................................................................................................................................4-25
..........................................................................................................4-27
..............................................................................................................4-28
.............................................................................................................................4-32
...................................................................................................4-37
...............................................................................................4-37
.................................................................................................4-38
.................................................................................................................4-41
.....................................................................................................................................4-51
.......................................................................................................................4-52
...................................................................................................4-59
5. Wiring Diagram ................................................................................................................ 5-1
5-1. Wiring Diagram .............................................................................................................................5-1
5-2. Connector
5-2-1. Main Board........................................................................................................................5-8
5-2-2. LD/SMPS Board
5-2-3. Main Board_One Connect
5-2-4. SMPS Board_One Connect
.....................................................................................................................................5-8
............................................................................................................. 5-12
............................................................................................ 5-16
.......................................................................................... 5-18
Page 4

This Service Manual is a property of Samsung Electronics Co.,Ltd.
Any unauthorized use of Manual can be punished under applicable
International and/or domestic law.
© 2019 Samsung Electronics Co.,Ltd.
All rights reserved.
Printed in Korea
Page 5
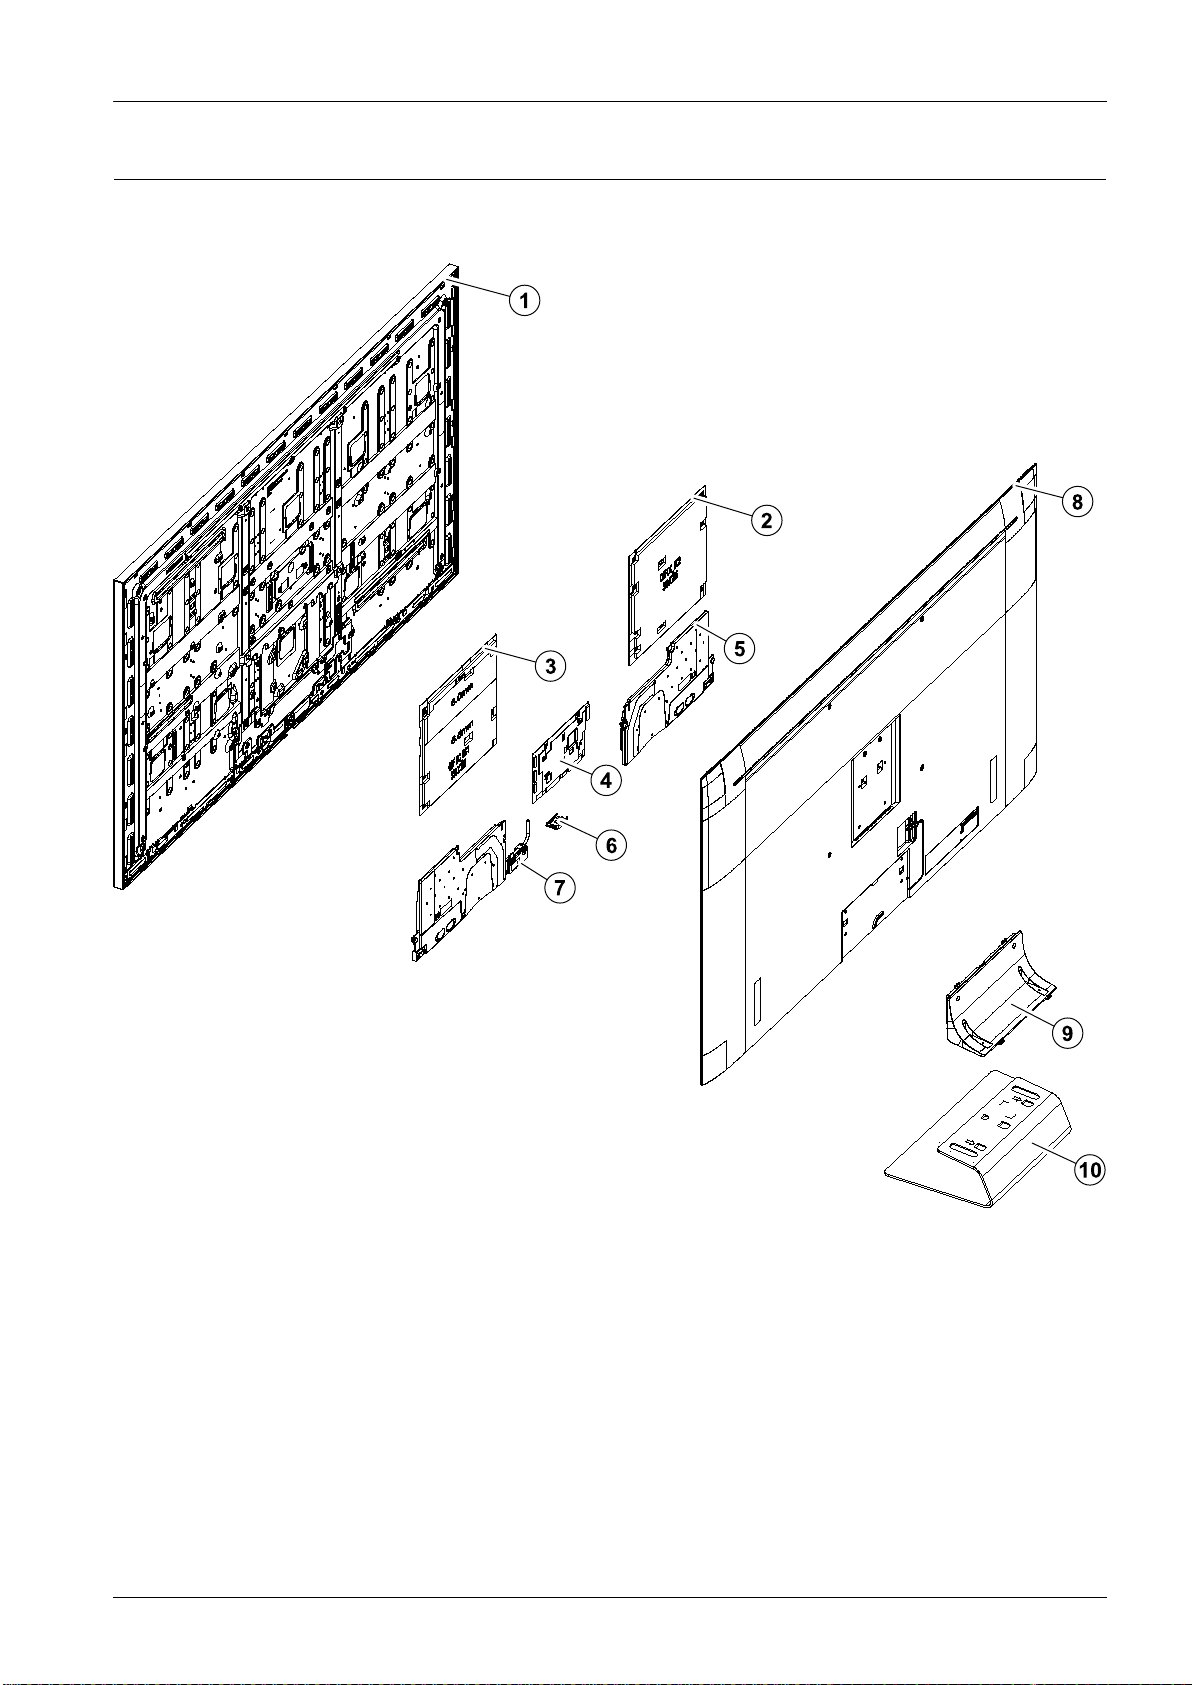
1.ExplodedView&PartList
ExplodedView
ExplodedViewsandPartsList
Copyright©1995-2019SAMSUNG.Allrightsreserved.1
Page 6

ExplodedViewsandPartsList
PartsList
No.Lvl.Loc.MaterialCodeDescription&SpecicationSNAQty.
11BN95-05486APRODUCTLCD-SDC;
CY-TR065FLL V1V/H,Q90,Bas
22BN44-00980CDCVSS-DRIVERBOARD;
L65S9NRA_RHS,DC/DC,3
32BN44-00980DDCVSS-DRIVERBOARD;
L65S9NRB_RHS,DC/DC,3
42M0014BN94-14716AASSYPCBMAIN;65Q90RA-XV ,BN94-14008SSA1
52BN96-45641CASSYSPEAKERP-FRONT ;
TV-SPK,Q90B,6ohm,10
62BN96-48728AASSYBOARDP-FUNCTIONTACT;Y19Q90
Funct
72BN59-01314ANETWORK-WLANCLIENT ;
WCP730M,78.3x29.3x7.
82R001ABN96-49062AASSYCOVERP-REAR;
65QRQ90B,PC+ABS+ED20%,
92BN96-49069AASSYSTANDP-COVERNECK;
65QRQ90B,PP+GF40
102BN96-49070AASSYSTANDP-COVERTOP;
65QRQ90B,SS400,CA
SA1
SA1
SA1
SA1
SA1
SA1
SA1
SA1
SA1
2Copyright©1995-2019SAMSUNG.Allrightsreserved.
Page 7
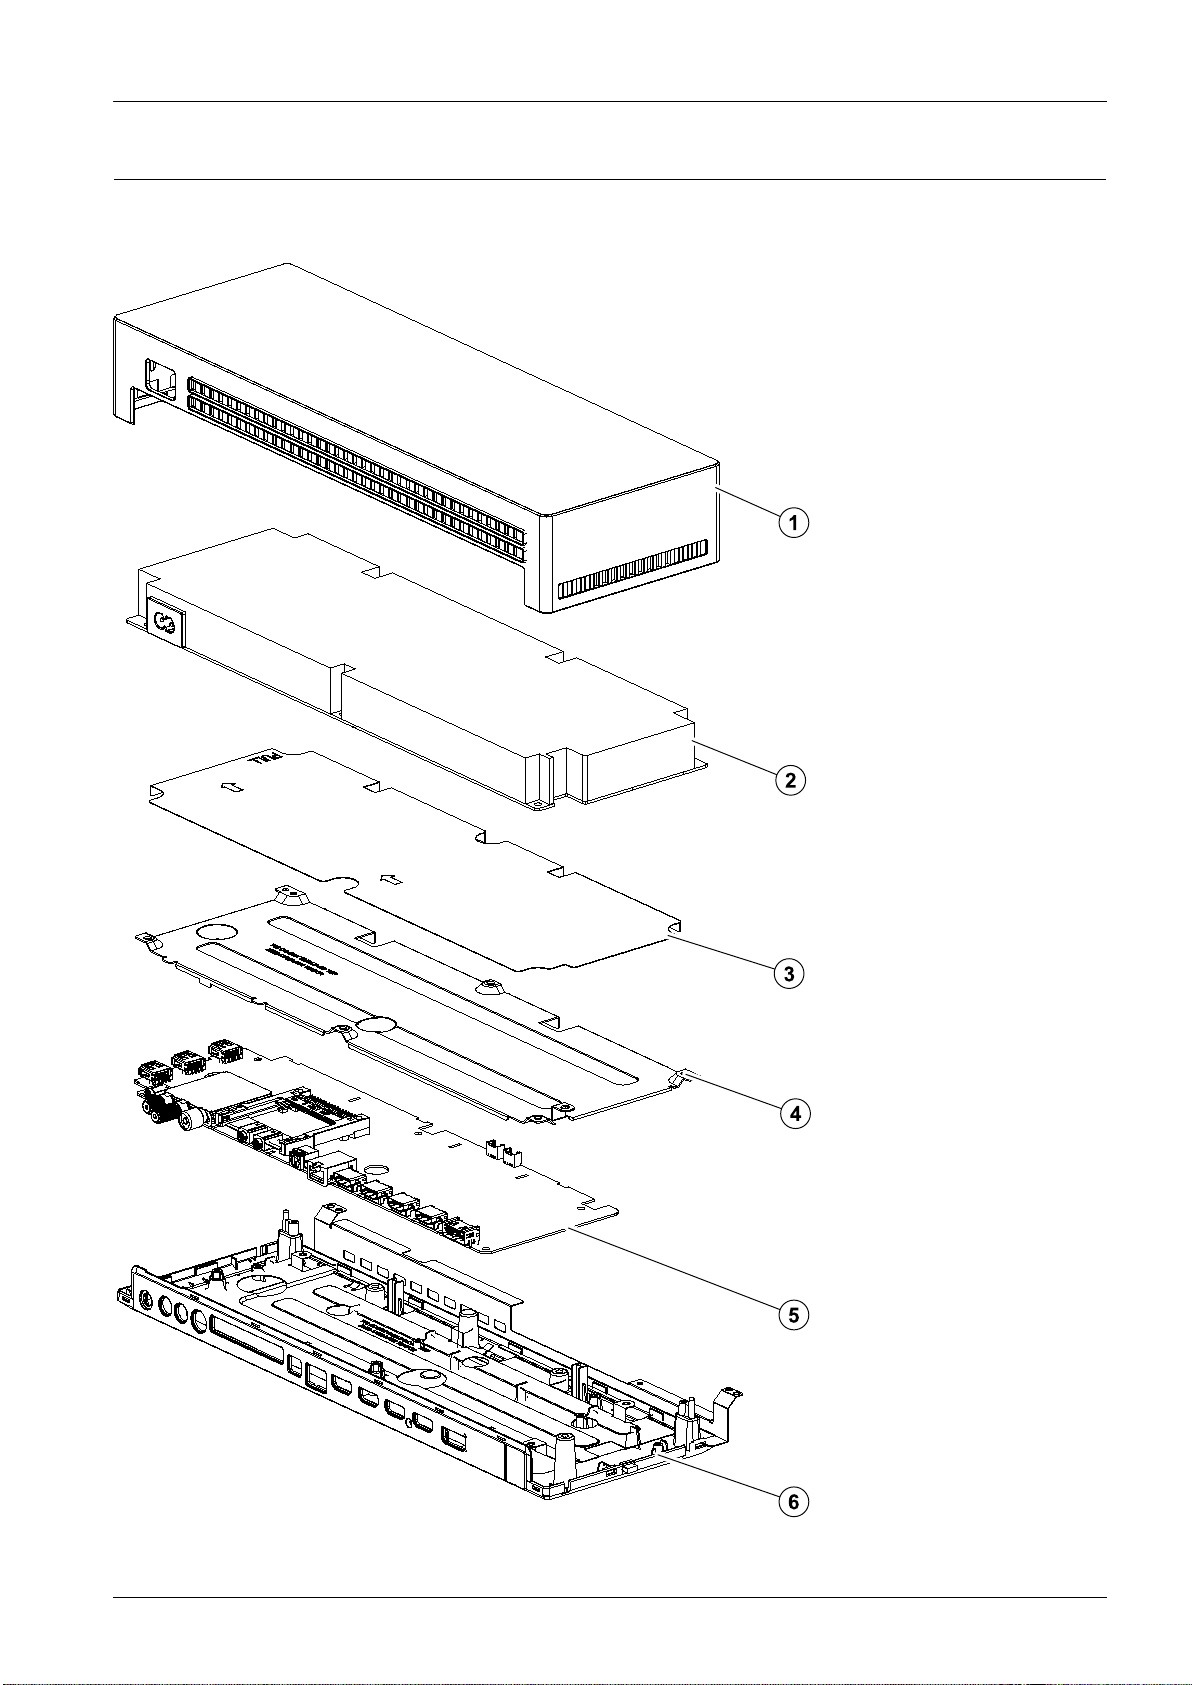
2.ONECONNECTExplodedView&PartList
ONECONNECTExplodedView
ExplodedViewsandPartsList
Copyright©1995-2019SAMSUNG.Allrightsreserved.3
Page 8

ExplodedViewsandPartsList
PartsList
No.Lvl.Loc.MaterialCodeDescription&SpecicationSNAQty.
12BN96-45940AASSYCOVERP-OCTOP;
65QNQ9FA,PC,V-2,TP00
22OC-SMPSBN44-00935BDCVSS-POWERBOARD;
P300NQB_NSM,AC/DC,360
32BN63-17541AINSULATOR-SMPS;
65QNQ9FA,PC,BLACK,L126.9,
42BN63-17538ASHIELD-OCTOP;65QNQ9FA,EGI-SECC,T0.8SA1
52BN94-14012EASSYPCBOC;QRQ85ESA1
62BN96-48511BASSYCOVERP-OCBOTTOM;
65QRQ90B,PC+ABS+G
SA1
SA1
SNA1
SA1
4Copyright©1995-2019SAMSUNG.Allrightsreserved.
Page 9

ExplodedViewsandPartsList
3.ElectricalPartsList
LevelLoc.PartCodeDescription&SpecicationQty.SA/SNA
QA65Q90RAKXXV(FA01)
1S001ABN90-10394MASSYSTAND;QRQ90B1SNA
.2BN96-49069AASSYSTANDP-COVERNECK;65QRQ90B,PP+GF401SA
..3BN63-18002ACOVER-STANDNECK;65QRQ90B,PP+GF40%,HB,BK1SNA
...40103-011475RESINPP;9500G40/9379B,Black,BK0020,HB,G663SNA
..3BN68-05603ALABEL-EPASS;ART,W/W,90g2SNA
..3BN69-08751BPACKINGSHRINKAGE;ST AND,PLASTIC,T0.015,W1SNA
..3BN96-49298AASSYACCESSORY-SCREW;65QRQ60T,ALL,W/W,602SNA
...4SCREW6003-001907SCREW-TAPTYPE;BH,+,S,M4,L14,ZPC(BLK),SWR8SA
...46902-003076BAGSCREW;LDPE,T0.05,W70,L90,TRP ,RECYCLE2SNA
.2BN96-49070AASSYSTANDP-COVERTOP;65QRQ90B,SS400,CA1SA
..30201-003279ADHESIVE-AA;UPUV,CLEAR0SNA
..3BN63-18011ACOVER-STANDTOP;65QRQ90B,SS400,T5,BLACK1SNA
..3RF01BN67-00459AFOOT -RUBBER;ST AND,Si,GRA Y ,T24SNA
..3BN69-19333ABAGACCESSORY;LDPE,T0.07,W360,L550,TRP ,R1SNA
1BN90-10949AASSYW/I;QRQ90B1SNA
.2BN81-08159ZA/SP ARTSET -ELECW/I;LEDTVELECspec-C1SNA
.2BN81-17116AA/SPARTSET -MECHW/I;QRQ90B,Q65RB*1SNA
1R001ABN90-10951GASSYCOVERREAR;QRQ90B1SNA
.2R001ABN96-49062AASSYCOVERP-REAR;65QRQ90B,PC+ABS+ED20%,1SA
..3R001BN63-17995ACOVER-REAR;65QRQ90B,PC+ABS+ED20%,V-1,BK01SNA
...40103-010818RESINPCABS;CM20G/BK00749,BLACK,BK0007,4638SNA
...4BN68-05603ELABEL-RESIN;ART ,W8,L50,ULLABEL(COVERR1SNA
..3BN68-09728ALABEL-STICKERW ARNING;55QRQ90B,PET ,T0.051SNA
1BN91-21121DASSYONECONNECT;QRQ90B1SNA
.20203-001598TAPE-SINGLEFACE;PP,T0.15,W12,N/A,CLEAR0SNA
.2SCREW6003-000282SCREW-TAPTYPE;BH,+,-,B,M3,L8,ZPC(BLK),SW3SA
.2SCREW6003-000283SCREW-TAPTYPE;BH,+,-,B,M3,L8,ZPC(WHT),SW11SNA
.26902-002905BAGPE;HDPE/PEFOAM,T0.015/T0.5,W500,L301SNA
.2M0131AA63-01071AGASKET-EMI;EMIShielding,ConductiveT ape1SNA
.2M0909AA63-01387AGASKET-EMI;EMIShielding,ConductiveT ape1SNA
.2BN02-00102BT APE-SINGLEFACE;OPP ,T0.15,W25,L50M,WHIT1SNA
.2BN39-02437ALEADCONNECTOR-POWER;QN65Q900R,UL21516,21SA
.2OC-SMPSBN44-00935BDCVSS-POWERBOARD;P300NQB_NSM,AC/DC,3601SA
.2BN62-00883APADGAP-THERMAL;QN65Q90RAFXZA,Si,T12.5,L1SNA
.2M0131BN63-02627AGASKET -EMI;Oxford,ConductiveFabric,T8,W4SNA
.2BN63-17538ASHIELD-OCTOP;65QNQ9FA,EGI-SECC,T0.81SA
.2BN63-17541AINSULATOR-SMPS;65QNQ9F A,PC,BLACK,L126.9,1SNA
Copyright©1995-2019SAMSUNG.Allrightsreserved.5
Page 10

ExplodedViewsandPartsList
LevelLoc.PartCodeDescription&SpecicationQty.SA/SNA
.2BN68-05458ALABEL-BARCODE;ALL,ART ,W45,L12,BLACK,WHIT1SNA
.2BN68-07104DLABEL-RATING;Monitor,WW ,PP,T0.161,W90,L51SNA
.2BN68-08730ALABEL-EPASS;QTV ,WW,ART,T0.161,W60,L15,P4SNA
.2BN69-17693CBOXACCESSORY ;65QRQ85E,CB,SW-E,NonStand1SNA
.2BN69-18324APAD;55QNQ7FC,EPS,W45,L390,H15,WHITE1SNA
.2BN94-14012EASSYPCBOC;QRQ85E1SA
..3BN97-15524DASSYSMD;QRQ85E1SNA
...4DS01A0401-001056DIODE-SWITCHING;MMBD4148SE,100V ,200mA,SO1SA
...40403-000489DIODE-ZENER;MMSZ5228B,3.705~4.095V ,500mW4SA
...40403-001783DIODE-ZENER;BZB84-C6V2,5.8~6.6V ,300mW ,SO3SNA
...40403-001785DIODE-ZENER;NZH5V1B,4.94~5.2V ,500mW ,SOD-3SA
...40406-001200DIODE-TVS;RClamp0504F ,6V ,1MA V ,TP6SA
...40406-001635DIODE-TVS;SMF5.0A,6.4V ,6.7V ,7V ,200MA V ,2014SA
...40406-001778DIODE-TVS;PUSB3FR4,6V ,9V ,0.2MA V ,0.7VP A,09SA
...40501-000462TR-SMALLSIGNAL;MMBT2907A,PNP ,350mW ,SOT -5SA
...40505-002598FET -SILICON;AP2317GN,P,20V ,-4.2A,0.052oh3SA
...40505-002893FET -SILICON;AO4801AS,P,30V ,-5A,2W,SOIC-81SA
...40601-003620LED-IR;SMDAngleType,1.4mm,200mW ,5V ,9402SA
...40903-002242IC-MICROCONTROLLER;UEI1704,QFN,20P ,4x4x01SA
...40904-002882IC-USC;GL852G-OHY38,QFN,28P ,5x5mm,12MHz,2SA
...41006-001595IC-DRIVER/RECEIVER;UT3221G-P16-R,TSSOP-11SA
...41203-009193IC-DC/DCCONVERTER;SYD113IADC,TSOT23-6,65SA
...41203-009194IC-DC/DCCONVERTER;SYD104IADC,TSOT23-6,63SA
...41204-003777IC-DECODER;SDP1805,FCBGA,490P ,21x21x1.541SA
...41205-005519IC-SWITCH;ET20163,SOT23-5,5P ,2.95x3.02mm3SA
...41205-005749IC-SWITCH;G2897KD1U,TDFN2X3-14,14P ,2x3mm2SA
...41405-001232V ARISTOR;6.4V ,5.6VDC,30A,1608,TP ,19V ,20018SNA
...41405-001381V ARISTOR;11V ,8VDC,30A,1608,TP ,25V ,500pF7SA
...41405-001382V ARISTOR;24.5V ,16VDC,120A,2012,TP ,42V ,404SA
...41405-001452V ARISTOR;15V ,12VDC,8A,1608,TP ,46V ,18pF8SA
...42007-000137R-CHIP;2Kohm,5%,1/16W ,TP,100512SA
...42007-000138R-CHIP;100ohm,5%,1/16W ,TP,1005,T0.3513SA
...42007-000143R-CHIP;4.7Kohm,5%,1/16W ,TP,1005,T0.3512SNA
...42007-000170R-CHIP;1Mohm,5%,1/16W ,TP,1005,T0.351SNA
...42007-000171R-CHIP;0ohm,5%,1/16W ,TP,1005,T0.3539SNA
...42007-000172R-CHIP;10ohm,5%,1/16W ,TP,1005,T0.353SA
...42007-000173R-CHIP;22ohm,5%,1/16W ,TP,1005,T0.352SA
...42007-000501R-CHIP;2.2ohm,1%,1/10W ,TP,16082SA
...42007-000779R-CHIP;33ohm,1%,1/10W ,TP,16088SNA
...42007-001116R-CHIP;680ohm,1%,1/10W,TP,16082SA
6Copyright©1995-2019SAMSUNG.Allrightsreserved.
Page 11

ExplodedViewsandPartsList
LevelLoc.PartCodeDescription&SpecicationQty.SA/SNA
...42007-001125R-CHIP;68Kohm,1%,1/10W ,TP,16084SA
...42007-001292R-CHIP;33ohm,5%,1/16W ,TP,1005,T0.359SA
...42007-007136R-CHIP;4.7Kohm,1%,1/16W ,TP,1005,T0.3576SA
...42007-007137R-CHIP;1.2Kohm,1%,1/16W ,TP,1005,T0.352SA
...42007-007138R-CHIP;27Kohm,1%,1/16W ,TP,1005,T0.354SA
...42007-007142R-CHIP;10Kohm,1%,1/16W ,TP,1005,T0.3543SA
...42007-007306R-CHIP;100ohm,1%,1/16W ,TP,1005,T0.3520SA
...42007-007309R-CHIP;12Kohm,1%,1/16W ,TP,1005,T0.357SA
...42007-007311R-CHIP;22Kohm,1%,1/16W ,TP,1005,T0.353SA
...42007-007312R-CHIP;20Kohm,1%,1/16W ,TP,1005,T0.3515SA
...42007-007318R-CHIP;1Kohm,1%,1/16W ,TP,1005,T0.3517SNA
...42007-007517R-CHIP;240ohm,1%,1/16W ,TP,1005,T0.355SNA
...42007-008015R-CHIP;75ohm,1%,1/16W ,TP,1005,T0.353SNA
...42007-008661R-CHIP;2.1Kohm,1%,1/10W ,TP,16081SA
...42007-008779R-CHIP;0ohm,1%,1/16W ,TP,10052SA
...42011-001344R-NETWORK;100ohm,5%,1/16W ,L,CHIP,8P ,TP ,22SA
...42011-001587R-NETWORK;100ohm,5%,1/16W ,L,CHIP,4P ,TP ,14SA
...42011-001590R-NETWORK;47Kohm,5%,1/16W ,L,CHIP,4P ,TP ,14SNA
...4AD4802203-000233C-CER,CHIP;0.1nF ,5%,50V ,C0G,TP ,1005,T0.514SNA
...4AD4802203-000254C-CER,CHIP;10nF ,10%,16V ,X7R,TP ,1005,T0.51SA
...4AD4802203-000359C-CER,CHIP;0.15nF ,5%,50V ,C0G,TP ,1005,T0.3SA
...4AD4802203-000438C-CER,CHIP;1nF ,10%,50V ,X7R,TP ,10055SA
...4AD4802203-000585C-CER,CHIP;0.22nF ,10%,50V ,X7R,TP ,10051SA
...4AD4802203-000627C-CER,CHIP;0.022nF ,5%,50V ,C0G,TP ,10058SA
...4AD4802203-001412C-CER,CHIP;0.03nF ,5%,50V ,C0G,TP ,10053SNA
...4AD4802203-006048C-CER,CHIP;100nF ,10%,10V ,X7R,TP ,1005,T0.35SNA
...4AD4802203-006126C-CER,CHIP;47nF ,10%,16V ,X7R,TP ,1005,T0.59SNA
...4AD4802203-006307C-CER,CHIP;1000nF ,10%,25V ,X5R,TP ,20122SNA
...4AD4802203-006474C-CER,CHIP;22000nF ,20%,6.3V ,X5R,TP ,2012,1SA
...4AD4802203-006562C-CER,CHIP;1000nF ,10%,10V ,X5R,TP ,1005,T036SA
...4AD4802203-006838C-CER,CHIP;2200nF ,10%,6.3V ,X5R,TP ,1005,T3SA
...4AD4802203-006841C-CER,CHIP;1000nF ,10%,16V ,X5R,TP ,1005,T027SNA
...4AD4802203-006890C-CER,CHIP;10000nF ,20%,6.3V ,X5R,TP ,16083SNA
...4AD4802203-007271C-CER,CHIP;2200nF ,10%,10V ,X5R,TP ,1005,T022SNA
...4AD4802203-007544C-CER,CHIP;100nF ,10%,50V ,X7R,TP ,1005,T0.48SA
...4AD4802203-008315C-CER,CHIP;22000nF ,20%,25V ,X5R,TP ,2012,T17SA
...42703-000158INDUCTOR-SMD;1uH,10%,0.4Ohm,50mA,45,Mult2SA
...42703-000213INDUCTOR-SMD;470nH,10%,1.35Ohm,35mA,15,M1SA
...42703-002269INDUCTOR-SMD;56nH,5%,1005,T0.5,1.4Ohm,153SA
...42703-005191INDUCTOR-SMD;1.5uH,20%,6060,T4.5,0.02Ohm5SA
Copyright©1995-2019SAMSUNG.Allrightsreserved.7
Page 12

ExplodedViewsandPartsList
LevelLoc.PartCodeDescription&SpecicationQty.SA/SNA
...42703-005193INDUCTOR-SMD;2.2uH,20%,6060,T4.5,0.024Oh2SA
...42801-000102CRYST AL-SMD;12MHz,30ppm,12pF ,100ohm,TP3SA
...43301-001901BEAD-SMD;220ohm,1608,TP ,220ohm/100MHz27SA
...43301-002039BEAD-SMD;26ohm,1608,TP55SA
...43601-001376FUSE-SURF ACEMOUNT;32V ,3A,FAST -ACTING,Hi2SA
...43701-001967CONNECTOR-HDMI;19P,A,FEMALE,AU,0.5mm,BLK4SA
...43707-001123CONNECTOR-OPTICAL;ANGLE,SPDIF,2.5PI1SA
...43710-004375CONNECTOR-SOCKET;34P ,2R,0.8mm,SMD-A,Au,B1SA
...43722-003199JACK-MODULAR;8P/8C,Y ,ANGLE,NONE,AU,1PORT1SA
...43722-003216JACK-PHONE;1P/7C,AU,BLK,SMD-A,3.6PI,10.21SA
...43722-003457JACK-USB;4P/1C,NI,BLK,ANGLE,A,2.0,13.1x13SA
...43722-003814JACK-PHONE;1P/7C,NI/SN,YEL,ANGLE,3.5PI,11SA
...4JACK3722-003873JACK-PHONE;1P/7C,AU/SN,BLU,ANGLE,3.5PI,11SA
...4BN40-00330BTUNER-DTVAIRCABLE;GTTH-7A11,DVB-TC,38.1SA
...4BN41-02698APCB-OC;Q90,Q85_OC,Q80_OC,FR-4,4L,T1.2,1SNA
...4BN97-15857AASSYMICOM;MMMICOM_OC_JP ,Q90R,EN25QH16B,1SNA
....51107-002587IC-NORFLASH;EN25QH16B,16MBit,SOP ,8P ,2.71SNA
.2BN96-45940AASSYCOVERP-OCTOP;65QNQ9FA,PC,V-2,TP001SA
..3BN61-15817ABRACKET-OCEMI;65QNQ9FA,STS,T0.3,NA TURAL1SNA
..3BN61-15818ABRACKET-OCEMICLIP;65QNQ9F A,STS,T0.3,NA2SNA
..3BN62-00850AHEATSINK-PS;65QNQ9F A,A1050,T1.5,W120,L31SNA
..3BN63-16151ASHEET-PROTECTIONCOVER;40K6200,PO,T0.0680SNA
..3BN63-17487ACOVER-OCTOP;65QNQ9FA,PC,V -1,TP0116,ONE1SNA
...40103-011270RESINPC;NH3022PN3/3354M,Violet,TP0116,V345SNA
..3BN63-17540AINSULATOR-SMPS;65QNQ9F A,PC,BLACK,L136,W31SNA
.2BN96-48511BASSYCOVERP-OCBOTTOM;65QRQ90B,PC+ABS+G1SA
..3BN62-00302APADGAP-THERMAL;SILICON,T8,L40,H40,GRA Y ,1SNA
..3BN62-00884APADGAP-THERMAL;QN65Q90RAFXZA,SI,T8,L40,1SNA
..3BN63-17244ASHEET-PROTECTIONCOVER;55LS003,PO,T0.06,0SNA
..3BN63-17488SCOVER-OCBOTTOM;65QRQ900A,PC+ABS+GF15%,T1SNA
...40103-010275RESINPCABS;235GNH15/6919H,Black,BK000750SNA
..3BN63-17520ASHIELD-OCBOTTOM;65QNQ9FA,EGI-SECC,T0.5,1SNA
..3BN63-17718ASHIELD-OCTOPFRONT;65QNQ9F A,EGI-SECC,T01SNA
..3RF01BN67-00327JFOOT -RUBBER;PE400,RUBBER,GRAY ,T2.5,,4SNA
1BN91-21269LASSYSHIELD;QRQ90B1SNA
.26001-003042SCREW-MACHINE;FH,+,M3,L10,ZPC(BLK),SWRCH9SNA
.2BN39-02309CLEADCONNECTOR-DIMMING;Q7F,Q7C,Q8C,UL2101SA
.2BN39-02403DLEADCONNECTOR-POWER;55LS03,UL21516,26P ,1SA
.2BN39-02463ALEADCONNECTOR-SUBASSY;QRQ90B,UL21016,11SA
.2BN39-02465ALEADCONNECTOR-SUBASSY ;49,55Q70,UL2141SA
8Copyright©1995-2019SAMSUNG.Allrightsreserved.
Page 13

ExplodedViewsandPartsList
LevelLoc.PartCodeDescription&SpecicationQty.SA/SNA
.2BN59-01314ANETWORK-WLANCLIENT;WCP730M,78.3x29.3x7.1SA
.2BN61-15727AHOLDER-WIFI;65QNQ9FA,ABS,BK0007,HB1SNA
..30103-004609RESINABS;HF-0680U,K21294,BK0007,HB,High11SNA
.2M0019BN68-00970ALABEL-SECURITY ;ALL,PET,T0.05,W60,L60,SEA1SNA
.2BN68-09258BLABELETC;ALLMODEL,PET,T0.05,W40,L40,YW1SNA
.2BN96-45641CASSYSPEAKERP-FRONT;TV-SPK,Q90B,6ohm,101SA
.2BN96-46132AFFCCABLE;Q7F/Q8C/Q9F,Straight,L115,96P ,2SA
.2BN96-48728AASSYBOARDP-FUNCTIONTACT;Y19Q90Funct1SA
1M0017BN91-21385AASSYCHASSIS;65Q90RA-XV ,BN91-20682S1SNA
.2M0014BN94-14716AASSYPCBMAIN;65Q90RA-XV ,BN94-14008S1SA
..3M0131AA63-01071AGASKET-EMI;EMIShielding,ConductiveTape2SNA
..3AH020BN62-00876AHEA TSINK;QN65Q90RAFXZA,A1050,W200,L110,1SNA
..3BN68-05458ALABEL-BARCODE;ALL,ART ,W45,L12,BLACK,WHIT2SNA
..3BN97-15515QASSYSMD;QRQ90B1SNA
...40202-001830SOLDER-CREAM;LFM-48WTM-HP ,D20~38um,96.56SNA
...40403-001779DIODE-ZENER;MMSZ5234BT1G,5.89~6.51V ,500m1SA
...40403-001797DIODE-ZENER;NZH3V0B,2.85~3.15V ,500mW ,SOD1SNA
...40403-002014DIODE-ZENER;KDZ16B,16.2~18.3V ,1000mW ,SOD1SNA
...40404-001404DIODE-SCHOTTKY ;BAT721C,40V ,200mA,SOT-23,1SA
...40404-001640DIODE-SCHOTTKY ;SS1060HEWS,60V ,1000mA,SOD2SA
...40404-001881DIODE-SCHOTTKY ;SS3040-HE,40V ,3000mA,SOD-2SA
...40404-001953DIODE-SCHOTTKY ;MBRA340F-HAF,40V ,3000mA,S3SA
...40404-001976DIODE-SCHOTTKY ;SV540,40V ,5000mA,TO-277,T1SA
...40406-001718DIODE-TVS;SMF36A,40V ,44.2V ,3.8MA V ,1.25VP2SA
...40406-001786DIODE-TVS;PJEC5V0V6TM,5V ,7V ,8V ,0.1MA V ,9V1SA
...40501-000445TR-SMALLSIGNAL;KTC3875S-Y ,NPN,150mW ,SOT8SA
...40504-000126TR-DIGIT AL;KSR1101,NPN,200mW ,4.7K/4.7K,S1SA
...40505-002660FET -SILICON;Si2308BDS,N,60V ,2.3A,0.156oh1SA
...40505-003205FET -SILICON;DMG4435SSS-13,P,30V ,-7.3A,1.1SA
...40505-003397FET -SILICON;2N7002K,N,60V ,0.38A,1.19ohm,9SA
...40505-003620FET -SILICON;AOD4286,N,100V ,14A,55.5mohm,1SA
...40505-003752FET -SILICON;PJL9409,P,30V ,50A,0.035ohm,33SNA
...41003-003030IC-LEVELDRIVER;VLS3RT ,QFN,40P ,6x6x0.9mm1SA
...41103-001564IC-EEPROM;S-24C512CI-J800,512Kbit,64Kx8,1SA
...41105-002989IC-DDR4SDRAM;MT53E384M32D2DS-053WT:E,L1SA
...41105-002992IC-DDR4SDRAM;MT53E256M32D2DS-053WT:B,L1SA
...41201-004170IC-AUDIOAMP;TAS880021A,TSSOP ,48P ,12.5x63SA
...41203-009063IC-DC/DCCONVERTER;VPM2SM,QFN,56P ,7x7x0.1SA
...41203-009186IC-POSI.ADJUSTREG.;TLV759P01PDRVR,TP ,6P4SA
...41203-009188IC-VOL.DETECTOR;G623F11U,TP ,8P ,4.9x6x1.2SA
Copyright©1995-2019SAMSUNG.Allrightsreserved.9
Page 14

ExplodedViewsandPartsList
LevelLoc.PartCodeDescription&SpecicationQty.SA/SNA
...41203-009197IC-DC/DCCONVERTER;R T6203E,SOP-8,8P ,5x4x1SA
...41203-009198IC-DC/DCCONVERTER;TPS549A20,VQFN-CLIP ,21SA
...41204-003775IC-DECODER;SDP1803,FCBGA,929P ,31x31x2.191SA
...4IS011209-002183IC-SENSOR;S-5851AAA-M6T1U,SOT,6Z30,2.9x11SA
...41404-001731THERMISTOR-NTC;33Kohm,4050K,1MWC,TP,1.6x1SNA
...41405-001185V ARISTOR;500V ,24VDC,1608,TP ,150V ,0.055pF1SA
...41405-001271V ARISTOR;35V ,20VDC,5A,1005,TP ,100V ,10pF22SA
...42007-000052R-CHIP;10Kohm,1%,1/10W ,TP,16081SA
...42007-000066R-CHIP;20Kohm,1%,1/10W ,TP,16081SA
...42007-000070R-CHIP;0ohm,5%,1/10W ,TP,1608,T0.459SA
...42007-000148R-CHIP;10Kohm,5%,1/16W ,TP,1005,T0.3517SA
...42007-000343R-CHIP;120ohm,1%,1/10W ,TP,16081SA
...42007-000772R-CHIP;33Kohm,1%,1/10W ,TP,16082SA
...42007-000932R-CHIP;470ohm,5%,1/16W ,TP,1005,T0.354SA
...42007-000979R-CHIP;5.6Kohm,1%,1/10W ,TP,16081SA
...42007-001298R-CHIP;51ohm,5%,1/16W ,TP,1005,T0.352SA
...42007-002899R-CHIP;10ohm,1%,1/10W ,TP,160816SA
...42007-002906R-CHIP;200Kohm,1%,1/10W ,TP,16081SA
...42007-007107R-CHIP;100Kohm,1%,1/16W ,TP,1005,T0.35,-34SA
...42007-007131R-CHIP;13Kohm,1%,1/16W ,TP,1005,T0.353SA
...42007-007139R-CHIP;47Kohm,1%,1/16W ,TP,1005,T0.352SA
...42007-007310R-CHIP;8.2Kohm,1%,1/16W ,TP,1005,T0.355SA
...42007-007313R-CHIP;6.8Kohm,1%,1/16W ,TP,1005,T0.3512SA
...42007-007316R-CHIP;3.3Kohm,1%,1/16W ,TP,1005,T0.355SNA
...42007-007520R-CHIP;20ohm,1%,1/10W ,TP,160813SA
...42007-007528R-CHIP;1.5Kohm,1%,1/16W ,TP,1005,T0.352SA
...42007-007588R-CHIP;1.8Kohm,1%,1/16W ,TP,1005,T0.33SA
...42007-007736R-CHIP;510Kohm,1%,1/10W ,TP,16082SA
...42007-007766R-CHIP;2Kohm,1%,1/16W ,TP,1005,T0.3525SA
...42007-007767R-CHIP;200ohm,1%,1/16W ,TP,10056SA
...42007-007798R-CHIP;10ohm,1%,1/16W ,TP,1005,T0.354SA
...42007-007992R-CHIP;1ohm,1%,1/10W ,TP,16084SA
...42007-008294R-CHIP;33ohm,1%,1/16W ,TP,1005,T0.355SA
...42007-008298R-CHIP;49.9ohm,1%,1/16W ,TP,1005,T0.359SA
...42007-008596R-CHIP;0.1ohm,1%,1/4W ,TP,32163SC
...42007-009322R-CHIP;1.3Kohm,1%,1/16W ,TP,10051SA
...42011-001264R-NETWORK;10ohm,5%,1/16W ,L,CHIP,8P ,TP ,2.14SNA
...42011-001448R-NETWORK;10ohm,5%,1/16W ,L,4P,TP ,1.0x1.03SA
...42011-001519R-NETWORK;33OHM,5%,1/16W ,L,CHIP,4P ,TP ,1.5SA
...42011-001527R-NETWORK;4.7Kohm,5%,1/16W ,L,CHIP,4P ,TP ,2SA
10Copyright©1995-2019SAMSUNG.Allrightsreserved.
Page 15

ExplodedViewsandPartsList
LevelLoc.PartCodeDescription&SpecicationQty.SA/SNA
...42011-001589R-NETWORK;0ohm,5%,1/16W ,L,CHIP,4P ,TP ,1.03SNA
...4AD4802203-000278C-CER,CHIP;0.01nF ,0.5pF ,50V ,C0G,TP ,10051SA
...4AD4802203-000425C-CER,CHIP;0.018nF ,5%,50V ,C0G,TP ,10058SA
...4AD4802203-000489C-CER,CHIP;2.2nF ,10%,50V ,X7R,TP ,10052SA
...4AD4802203-000812C-CER,CHIP;0.033nF ,5%,50V ,C0G,TP ,10051SA
...4AD4802203-000940C-CER,CHIP;0.47nF ,10%,50V ,X7R,TP ,1005,T07SNA
...4AD4802203-002285C-CER,CHIP;10nF ,10%,50V ,X7R,TP ,100519SNA
...4AD4802203-002525C-CER,CHIP;0.56nF ,10%,50V ,X7R,TP ,10051SA
...4AD4802203-002711C-CER,CHIP;100nF ,10%,25V ,X7R,TP ,16083SA
...4AD4802203-005057C-CER,CHIP;0.0082nF ,0.25pF ,50V ,C0G,TP ,104SA
...4AD4802203-005083C-CER,CHIP;220nF ,10%,50V ,X7R,TP ,1608,T0.12SNA
...4AD4802203-006158C-CER,CHIP;100nF ,10%,16V ,X7R,TP ,1005,T0.173SA
...4AD4802203-006391C-CER,CHIP;1000nF ,10%,10V ,X7R,TP ,16081SNA
...4AD4802203-006698C-CER,CHIP;1000nF ,10%,25V ,X7R,TP ,1608,T07SA
...4AD4802203-006844C-CER,CHIP;470nF ,10%,10V ,X5R,TP ,10051SA
...4AD4802203-007176C-CER,CHIP;10000nF ,10%,16V ,X5R,TP ,2012,T12SNA
...4AD4802203-007230C-CER,CHIP;47000nF ,20%,6.3V ,X5R,TP ,2012,12SA
...4AD4802203-007240C-CER,CHIP;22000nF ,20%,6.3V ,X5R,TP ,1608,75SA
...4AD4802203-007269C-CER,CHIP;22000nF ,20%,10V ,X5R,TP ,2012(225SA
...4AD4802203-007306C-CER,CHIP;10000nF ,10%,25V ,X5R,TP ,2012,T33SNA
...4AD4802203-007393C-CER,CHIP;4700nF ,10%,10V ,X5R,TP ,1005,T047SNA
...4AD4802203-007423C-CER,CHIP;10000nF ,10%,35V ,X7R,TP ,32164SA
...4AD4802203-007425C-CER,CHIP;2200nF ,10%,25V ,X5R,TP ,16081SNA
...4AD4802203-007795C-CER,CHIP;10000nF ,20%,10V ,X5R,TP ,1005,T55SA
...4AD4802203-008096C-CER,CHIP;2200nF ,10%,50V ,X5R,TP ,2012,1.2SA
...4AD4802203-008412C-CER,CHIP;4700nF ,10%,50V ,X5R,TP ,2012,T12SNA
...42409-001240C-ORGANIC,SMD;33uF ,20%,25V ,LR,TP ,73431SA
...42703-003747INDUCTOR-SMD;22uH,20%,6060,0.135ohm,13002SA
...42703-003862INDUCTOR-SMD;10uH,20%,6060,0.065ohm,19004SA
...42703-004724INDUCTOR-SMD;8.2uH,20%,5050,T4,0.072Ohm,12SA
...42703-005194INDUCTOR-SMD;3.3uH,20%,6060,T4.5,0.03Ohm2SA
...42703-005376INDUCTOR-SMD;10uH,20%,10.7x10mm,T3.8,0.01SA
...42703-005715INDUCTOR-SMD;820nH,20%,11x10mm,T3.8,0.001SNA
...42801-004021CRYST AL-SMD;24.576MHz,20ppm,28-AAN,12pF ,1SA
...42801-005372CRYST AL-SMD;24.576MHz,20ppm,HCX-3SB,12p1SA
...43301-001364BEAD-SMD;1000ohm,1608,TP ,1085ohm/108MHz,6SNA
...43601-001374FUSE-SURF ACEMOUNT;32V ,5A,FAST -ACTING,PL9SA
...43708-003241CONNECTOR-FPC/FFC/PIC;96P,0.5mm,SMD-A,AU2SNA
...43710-004374CONNECTOR-SOCKET;34P ,1R,0.8mm,SMD-A,Au,B1SA
...43711-007975CONNECTOR-HEADER;BOX,10P,1R,1.25mm,SMD-A2SA
Copyright©1995-2019SAMSUNG.Allrightsreserved.11
Page 16

ExplodedViewsandPartsList
LevelLoc.PartCodeDescription&SpecicationQty.SA/SNA
...4EH013711-008098HEADER-BOARDTOCABLE;BOX,20P ,1R,1.25mm,1SNA
...4EH013711-008488HEADER-BOARDTOCABLE;BOX,14P ,2R,2mm,ANG1SA
...4EH013711-008492HEADER-BOARDTOCABLE;BOX,26P ,2R,2mm,ANG2SA
...4EH013711-008659HEADER-BOARDTOCABLE;BOX,16P ,2R,2mm,ANG1SA
...46302-001376GASKET -SMD;SMTGasket,Sn/CuplatedPI-Fi15SNA
...4BN41-02697APCB-MAIN;MUSE-MOCMAIN,FR-4,4L,T1.6,1,21SNA
...4CB07BN61-13312BBRACKET -SCREWLESSPCB;55KS8000,SK5,T0.3,4SNA
...4BN97-15855AASSYMICOM;MMMICOM_OC_TV ,Q90/Q85,1107-001SNA
....51107-002226IC-NORFLASH;W25Q40CLSSIP ,4Mbit,SOIC,8P ,1SA
...4BN97-15858AASSYMICOM;Muse-MOCTCONFW1SNA
....51107-002339IC-NORFLASH;W25Q80DV ,8Mbit,SOP ,5.28x5.21SNA
....5BN46-01005AS/WMICOM;TCONFW,Muse-MOC1SNA
...4BN97-15895AASSYMICOM;T -MSMUABC,ASSYMICOM_MAIN,QRQ1SNA
....51107-002422IC-EMMC;8GB,64Gbx1,BGA,153P ,11.50x13.01SA
..3BN97-15725AASSYDRM;Muse-Mbuilt_in,ISDB,NagSam,MA1SNA
...4BN46-00109HKEYCODE-CERTIFICA TION;MAC,TV/A V ,General1SNA
...4BN46-00110PKEYCODE-CERTIFICA TION;MIRACAST(HDCP2.2)1SNA
...4BN46-00962AKEYCODE;Muse-Mbuilt_in,NagraCSCData,1SNA
..3BN97-15873AASSYMICOM;65A1QU9TR,65inchSDCQ90/Q851SNA
...4BN46-00999AS/WMICOM;65A1QU9TR,Muse-MOC,Q90/Q851SNA
..3M0131GK63-00069AGASKET-EMI;EMIShielding,Al,T1,W5,L28,GR2SNA
1BN92-24855HASSYLABEL;QRQ90B1SNA
.2BN68-08409BLABEL-RA TING;QTV ,WW ,PP,T0.161,W150,L48,T1SNA
.2BN68-09403ALABEL-ENERGY;QA65Q90RAKXXV ,VIETNAM,PET,1SNA
.2BN68-09497ALEAFLET-QUICKSETUPGUIDE;Q90R,OTHERS,WW1SNA
1ACCE1BN92-24856JASSYACCESSORY ;QRQ90B1SNA
.2BN39-02470AONECONNECTCABLE;QN65Q90RAFXZA,31P/31P ,L1SA
.2BN96-48612BASSYACCESSORYMANUALCABLE;QRQ90B1SNA
..3T02683903-001118POWERCORD-DT ;EUR,2P-F ,250V ,2.5A,BLK,L151SA
..34301-000103BA TTERY -ALKALINE;1.5V ,750mAH,LR03,10.2x42SNA
..3ANT04AA59-00853AMODULERF-SHIELDBOX;SGLBF-6B,P AL-BG,DK,1SA
..3EC03BN39-02189AGENDERCABLE;DCtoRCACable,3P,L100,UL21SA
..3EC03BN39-02190AGENDERCABLE;DCtoRCACable,2P,L100,UL21SA
..3BN59-01311EREMOCON-SMARTCONTROL;2019TV ,SAMSUNG,211SA
..3T0527BN68-00513ALABEL-EPASS;ALLMODEL,WW ,YUPO,W50,L15,W1SNA
..3BN68-08112ALABEL-SECURITY;ALL,PET,T0.05,W55,L52,GLO1SNA
..3BN68-09544FMANUALUSERS;Q90R,XV,VIETNAM,MOJO,0,1CO1SNA
..3BN68-09545BLEAFLET -ACCESSORYKIT ;QRQ90B,XY&MR&HC&
RQ
..3BN69-13935ABAGACCESSORY;LDPE,T0.07,W700,L350,TRP ,R1SNA
..3BN96-49199AASSYACCESSORY-FOOT;65QRQ90B,Si,W/W,W/W ,1SA
12Copyright©1995-2019SAMSUNG.Allrightsreserved.
1SNA
Page 17

ExplodedViewsandPartsList
LevelLoc.PartCodeDescription&SpecicationQty.SA/SNA
...46902-000683BAGPE;LDPE,T0.05,W60,L60,TRP,Bio.N,Zip3SNA
...4RF01BN67-00398LFOOT-RUBBER;UH6K,RUBBER,GRA Y ,T2,,4SNA
..3EH03ABN96-49241AASSYHOLDERP-RING;Q70,Q80,Q85,ABS,BK0001SA
...4BN61-16284AHOLDER-WALLRING;65QRQ70D,ABS,T2,BK0007,4SNA
....50103-004609RESINABS;HF-0680U,K21294,BK0007,HB,High3SNA
..3BN96-49362DASSYHOLDERP-OCCABLE;55QRQ85E,PC,TP0001SA
...4SCREW6003-001208SCREW-TAPTYPE;BH,+,S,M4,L12,ZPC(BLK),SWR1SA
...4AH089BN61-14021AHOLDER-CABLE;55KS8000,PA66,BK0007,V-21SA
...4BN61-15791AHOLDER-OCCABLE;65QNQ8CB,PC,TP0003,V-22SNA
1BN92-24917UASSYBOX;QRQ90B1SNA
.2BN68-07893ALABELBOX;ALL,THERMALP APER,W60,L110,WHT1SNA
.2BN68-07943ALABELBOX;ALL,XXV ,AR T ,W100,L150,150g1SNA
.2BN69-19144GBOXUNIT-OUT;65QRQ90B,CB,DW4,F3,L1606,W11SNA
1BN92-26126FASSYP/MATERIAL;QRQ90B1SNA
.26902-000379BAGAIR;LDPE,T0.13,W1000,L1800,TRP,Hole0SNA
.26902-000609BAGROLL;LDPE,T0.05,W2400,L1000,TRP ,RECY281SNA
.26902-002848BAGROLL;HDPE/PEFOAM+HDPE,T0.015/T0.05,2SNA
.26922-000013BAND;PP ,T0.8,W18,L2300M,TRP6SNA
.2BN02-00319BT APE-SINGLEFACE;OPP ,T0.05,W75,L800M,CLE2SNA
.2BN69-11504AWRAPVINYL;LDPE,T0.018,W500,L10000,Trans8SNA
.2BN69-17053QPACKINGANGLE;ALL,P APER,T3,W1800,L50,YEL0SNA
.2BN69-18700ACUSHION-SETSIDE;65QRQ90B,EPS,16.7g/l,WH1SNA
..3BN81-01918AA/S-RESIN;EPS,SG-3020SNA
.2BN69-18971ACUSHION-SETFRONT;65QRQ70D,EPS,16.7g/l,W1SNA
.2BN96-45139BASSYPACKINGP-P AD;65Q7F ,PP/EPE,WITHW AR2SNA
..3BN68-08908ALABELW ARNING;ALLMODEL,ART ,W70,L100,90g2SNA
..3BN69-16841BP AD-EPE;65Q7F,EPE,T1.2/T3,W100,L810,MIXE2SNA
.2BN96-49740AASSYPACKINGP-CUSHIONSET;65Q90,BN69-181SNA
..3BN69-18699ACUSHION-SET;65QRQ90B,EPS,16.7g/l,WHITE1SNA
...4BN81-01918AA/S-RESIN;EPS,SG-3021SNA
..3BN69-19145ABOXUNIT-IN;65QRQ90B,CB,DW1,C1,L1936,W511SNA
1BN95-05486APRODUCTLCD-SDC;CY -TR065FLL V1V/H,Q90,Bas1SA
.2BN39-02397ALEADCONNECTOR-DIMMING;Q9F_65,75,UL210161SNA
.2BN39-02405BLEADCONNECTOR-POWER;65Q9,UL21516,26P ,L71SA
.2BN44-00980CDCVSS-DRIVERBOARD;L65S9NRA_RHS,DC/DC,31SA
.2BN44-00980DDCVSS-DRIVERBOARD;L65S9NRB_RHS,DC/DC,31SA
..3BN97-00031KASSYMICOM-LD_FW;Y19_S90,19Y_Q902SNA
.2M0131BN63-00520AGASKET -EMI;APPOLO_PAL,ConductiveFabric,2SNA
.2BN63-17506BCOVER-SOURCEPCBLEFT;65QRQ90B,EGI-SECC,1SNA
.2BN63-17507BCOVER-SOURCEPCBRIGHT;65QRQ90B,EGI-SECC1SNA
Copyright©1995-2019SAMSUNG.Allrightsreserved.13
Page 18

ExplodedViewsandPartsList
LevelLoc.PartCodeDescription&SpecicationQty.SA/SNA
.2BN68-05722ALABEL-EP ASS;POL YPROPYLENE,NON-COA TING1SNA
.2BN74-00053ETAPE-SINGLEFACE;P APER,3M2307,T0.14,W20,0SNA
.2BN90-10338AASSYBACKLIGHTUNIT;65QRQ90B1SNA
..3BN02-00587ATAPESINGLEF ACE;75QNQ9F A,PET ,T0.05,W75,10SNA
..3BN61-15642ADIFFUSERPLA TE;18Y_Q9F_65INCH_D.PLA TE,PS1SNA
..3BN61-16181AOPTICALSHEET-HIGHCOLOR;19Y_65inch_Q70_1SNA
..3BN61-16196AOPTICALSHEET -COMPLEX;19Y_65inch_Q90_COM1SNA
..3BN61-16517AOPTICALSHEET -COMPLEX;Y19_65inch_Q900_CO1SNA
..3BN63-17875AINSULATOR-SMPS;55Q9F ,PC,BLACK,L340,W305,2SNA
..3BN96-47727AASSYMISCP-REFLECTOR;55inch_pieceree12SNA
..3BN96-48070AASSYFRAMEP-MIDDLEBOTTOM;65QRQ90B,PC+G1SNA
...40201-003279ADHESIVE-AA;UPUV ,CLEAR1SNA
...4BN02-00486ATAPE-DOUBLEFACE;PUFOAM,T0.5,W3.2,L33M,1SA
...4BN60-01115BSPACER-CONDUCTIVE;Y15J4101,CONDUCTIVEF2SNA
...4BN61-16106AFRAME-MIDDLEBOTTOM;65QRQ90B,PC+GF10%,V -1SNA
....50103-007368RESINPC;LS-3104G,K2495,BK0048,3.0mmV-265SNA
..3BN96-49077AASSYCHASSISREARP;65QRQ90B,EGI-SECC,LE1SNA
...46001-003336SCREW-MACHINE;CH,+,M3,L4,ZPC(WHT),SWRCH194SA
...4BN61-15555AFRAME-CHASSISREARBOTTOM;65QNQ9FA,PC+GF1SNA
....50103-011284RESINPC;LS-3104G/FW9931,White,WT0134,V -220SNA
...4BN61-15556AFRAME-CHASSISREARLEFTRIGHT;65QNQ9F A,P2SNA
...4BN63-17676BINSULA TOR-LEDPCB;65Q9F_VE,PET ,WHITE,L131SNA
...4BN95-05699AASSYLEDBAR;19Y_65Q90,LEDPLA TE1SNA
....5BN97-15840AASSYSMDBIN;19Y_65Q9010SNA
.....60202-001608SOLDER-WIREFLUX;LFC7-107,D0.8,99.3Sn/0.0SNA
.....60202-001830SOLDER-CREAM;LFM-48WTM-HP ,D20~38um,96.525SNA
.....60204-007920PASTESILICONE;Hi-poxy9600W ,30~40PaS,H1SNA
.....6DS01A0401-001099DIODE-SWITCHING;1N4148WS,75V ,150mA,SOD-330SA
.....60406-001823DIODE-TVS;PJUSB208,85V ,0.1MA V ,0.715VPA,220SA
.....60505-003397FET-SILICON;2N7002K,N,60V ,0.38A,1.19ohm,1440SA
.....60601-003771LED-BIN;SMD(TOPVIEW),BLU,waterdiff.,12480SNA
.....61003-002953IC-LEDDRIVER;AS3824A1-ZQFT,QFN,48P ,7x7x30SA
.....62007-000052R-CHIP;10Kohm,1%,1/10W,TP ,160860SA
.....62007-000074R-CHIP;100ohm,5%,1/10W,TP ,1608150SA
.....62007-000107R-CHIP;470Kohm,5%,1/10W,TP ,1608480SA
.....62007-000946R-CHIP;47ohm,1%,1/10W,TP ,160890SA
.....62007-001723R-CHIP;15ohm,1%,1/4W,TP ,32161440SA
.....6AD4802203-000236C-CER,CHIP;0.1nF ,5%,50V ,C0G,TP ,160860SA
.....6AD4802203-001607C-CER,CHIP;0.22nF ,5%,50V ,C0G,TP ,160860SNA
.....6AD4802203-006698C-CER,CHIP;1000nF ,10%,25V ,X7R,TP ,1608,T060SA
14Copyright©1995-2019SAMSUNG.Allrightsreserved.
Page 19

ExplodedViewsandPartsList
LevelLoc.PartCodeDescription&SpecicationQty.SA/SNA
.....6AD4802203-007370C-CER,CHIP;10000nF ,10%,10V ,X7R,TP ,2012120SA
.....63708-003322CONNECTOR-FPC/FFC/PIC;68P ,0.5mm,SMD-A,AU10SNA
.....6BN41-02649CPCB-LEDMODULE;19Y_65Q90,CEM-3,2L,T0.9,210SNA
.....6BN61-15965ASUPPORT-PLA TE;65QRQ900A,ABS+PMMA,V -2,WT060SNA
......70103-011254RESINPC;SA-1220/W98028,Ivory,WT0132,V-278SNA
.....6BN61-16034AOPTICALSHEET -REFLECTOR;18Y_Q9F_65INCH_R10SNA
.....6BN67-00561ALENS-OPTICALLED;Q9FB_VEModel,PMMA,CLEA480SNA
...4BN96-45838HASSYCHASSISREARP;65QRQ90,EGI-SECC,T0.1SNA
....5SCREW6001-003016SCREW-MACHINE;PWH,+,M3,L5.0,ZPC(WHT),SWR6SA
....5BN02-00102BTAPE-SINGLEF ACE;OPP ,T0.15,W25,L50M,WHIT4SNA
....5BN02-00608ATAPESINGLEFACE;55Q900,OPP ,T0.15,W75,L810SNA
....5BN60-00162VSPACER-FOAM;PEFOAM,L50M,GRAY ,T0.5,W102SNA
....5BN61-13557KBRACKET-WIRE;55KS7000,SW-C,T1,SIL VER,ZIN2SNA
....5BN61-13557PBRACKET-WIRE;75QNQ8CB,SW-C,T1,SIL VER,L663SNA
....5BN61-13557XBRACKET-WIRE;65UNU7100X,SW-C,T1,SIL VER,L2SNA
....5CB18BN61-16177ABRACKET-STANDLINK;65QRQ90B,HGI,T2.5,NA T1SNA
.....6BN61-15975ASTUD-PEM;65NU7100,SUM24L,T0.5,L8,HEAD7m4SNA
....5BN63-17635AINSULATOR-SOURCEPCBLEFT;65QNQ9F A,PET ,B1SNA
....5BN63-17636AINSULATOR-SOURCEPCBRIGHT;65QNQ9F A,PET ,1SNA
....5CC04BN64-04018ECHASSIS-REAR;65QRQ90B,EGI-SECC,-,T0.8,NA1SNA
.....6BN01-00549ASTEEL;65NU7100,EGI-SECC,L1495,0.8mm,880m1SNA
.....6CB20BN61-11982CBRACKET -W ALL;65QNQ7FC,CR-SPCC,BLACK,M8,L4SNA
.....6CB20BN61-15737ABRACKET -WALL;65QNQ9FA,CR-SPCC,T1.2,NA TUR4SNA
....5T0527BN68-00513ALABEL-EPASS;ALLMODEL,WW,YUPO,W50,L15,W1SNA
....5BN96-47672AFFCCABLE;Q9VE65,Fold,L650,68P ,#42SNA
....5BN96-47673AFFCCABLE;Q9VE65,Fold,L1100,68P ,#22SNA
....5BN96-47705AFFCCABLE;Q9VE65,Fold,L1430,68P ,#12SNA
....5BN96-47707AFFCCABLE;Q9VE65,Fold,L570,68P ,#52SNA
....5BN96-49236AFFCCABLE;Q9065,Fold,L860,68P,#32SNA
...4BN96-45851AASSYFRAMEP-CHASSISREARTOP;65QNQ9F A,P1SNA
....5AH63-04285ASHEET-EV A;W AM1500,EV A,T0.5,W8,L100000,BL0SNA
....5BN60-01459ASPACER-SILICONE;55PMF ,Si,L10,WHITE,T1.8,2SNA
....5BN61-15554AFRAME-CHASSISREARTOP;65QNQ9F A,PC+GF10%1SNA
.....60103-011284RESINPC;LS-3104G/FW9931,White,WT0134,V -144SNA
.2BN91-20636BASSYOPENCELL-DECORA TION;BN63-17656A,Y11SNA
..30201-003164ADHESIVE-UV ;190024,CLEAR,UV ,Acrylic2SNA
..3FD01BN63-17656ACOVER-DECORA TION;65QRQ90B,STS430J1L,T0.41SNA
..3BN96-48138AASSYOPENCELL;SDC,65Inch,Y19Newopenc1SNA
...4BN81-16264AA/S-ADHESIVE-A.C.F;ADHESIVE-A.C.F,0201-01SNA
...4BN81-16789AA/S-ADHESIVE-A.C.F;ADHESIVE-A.C.F,0201-01SNA
Copyright©1995-2019SAMSUNG.Allrightsreserved.15
Page 20

ExplodedViewsandPartsList
LevelLoc.PartCodeDescription&SpecicationQty.SA/SNA
...4BN81-17331AA/S-ICDRIVERSOURCE;ICDRIVERSOURCE,LJ1SNA
...4BN81-17332AA/S-ASSYPCB-SOURCE(F-L);ASSYPCB-SOURCE1SNA
...4BN81-17333AA/S-ASSYPCB-SOURCE(F-R);ASSYPCB-SOURCE1SNA
...4BN81-17334AA/S-ASSYPCB-SOURCE(B-L);ASSYPCB-SOURCE1SNA
...4BN81-17335AA/S-ASSYPCB-SOURCE(B-R);ASSYPCB-SOURCE1SNA
...4BN81-17493AA/S-POLARIZERC/F;POLARIZERC/F ,S010-1461SNA
...4BN81-17494AA/S-POLARIZERTFT;POLARIZERTFT,LJ01-1181SNA
.2BN96-48029AASSYCHASSISFRONTP;65QRQ90B,Al,Carbon1SNA
..36001-002912SCREW-MACHINE;CH,+,M3,L3,ZPC(BLK),SWRCH12SA
..3BN02-00074FTAPESINGLEFACE;65QRQ80C,PET,T0.05,W10,4SNA
..3BN02-00486ATAPE-DOUBLEFACE;PUFOAM,T0.5,W3.2,L33M,3SA
..3BN02-00595ATAPESINGLEF ACE;65QRQ80C,PET ,T0.2,W3,L23SNA
..3BN60-01539ESPACER-FOAM;PUFOAM,L12.5,BLACK,T0.5,W112SNA
..3BN60-01612BSP ACER-CONDUCTIVE;65QNQ7FC,CONDUCTIVEFA2SNA
..3BN63-17419BSHEET -PROTECTIONCOVER;Q9F,PO,T0.04,W20,3SNA
..3BN64-04022ACHASSIS-FRONTBOTTOM;65QNQ9F A,PC+GF10%,V1SNA
...40103-007368RESINPC;LS-3104G,K2495,BK0048,3.0mmV -249SNA
..3AC155BN64-04128ACHASSIS-FRONT;65QRQ90B,Al,-,-,NA TURAL,Ca1SNA
16Copyright©1995-2019SAMSUNG.Allrightsreserved.
Page 21
2. Product Specications
2-1. Product Information
Model QA**Q90RAK
2. Product specications
W
Front View
Detail View
Color Front : CARBON SILVER / Stand : DARK CARBON SILVER
Dimensions
(W x H x D)
H
* W : Width H : High D : Depth
Body 145.01 x 83.12 x 3.99 cm
65"
With Stand 145.01 x 92.10 x 28.53 cm
Body 167.58 x 96.17 x 3.99 cm
75"
With Stand 167.58 x 105.35 x 31.76 cm
D
Weight
82"
Body 183.54 x 105.51 x 4.33 cm
With Stand 183.54 x 114.70 x 36.52 cm
Without Stand 27.8 kg
65"
With Stand 34.7 kg
Without Stand 42.4 kg
75"
With Stand 52.4 kg
Without Stand 53.0 kg
82"
With Stand 66.1 kg
2-1
Page 22

2-2
2. Product specications
2-2. Product specication
NOTE
Design and specications are subject to change without prior notice.
Item QA65Q90RAKXXV
Last Update Date : 2019.03.14
General Information
Display
Video
Product QLED
Series Q
Country VIET NAM
Screen Size 65"
Resolution 3,840 x 2,160
Ultra Black Ye s
Screen Curvature N/A
Picture Engine Quantum Processor 4K
Motion Rate 200
PQI (Picture Quality Index) 4000
HDR (High Dynamic Range) Quantum HDR 16x
HDR 10+ Yes
Contrast Direct Full Array 16x
HLG (Hybrid Log Gamma) Yes
Color Color Volume 100% by Quantum Dot
Viewing Angle Ultra Viewing Angle
Micro Dimming Ultimate UHD Dimming
Local Dimming Direct Full Array Elite
Audio
Smart Service
Auto Depth Enhancer N /A
Contrast Enhancer Yes
Auto Motion Plus Yes
Film Mode Yes
Natural Mode Support Yes
Dolby Digital Plus Yes
DTS Codec N/A
Dialog Enhancement Yes
Audio Pre-selection Descriptor N/A
Sound Output (RMS) 60W
Speaker Type 4.2CH
Woofer Yes
Multiroom Link Yes
Blutooth Audio Yes
Samsung SMART TV Smart
Page 23
2-3
2. Product specications
Item QA65Q90RAKXXV
Smart Service
Convergence
US English, Korean, UK English, French,
Bixby
Voice Interaction VN, IN: Vietnamese
Far-Field Voice Interaction Yes
Works with Google Assistant Yes (SG only)
Works With Alexa N /A
TV Plus N/A
Web Browser Yes
SmartThings App Support Yes
SmartThings Yes
Universal Guide N/A
Gallery Yes
TV to Mobile - Mirroring Yes
Mobile to TV - Mirroring, DLNA Yes
360 Video Player Yes
360 Camera Support Yes
Bluetooth Low Energy Ye s
German, Italian, Spanish (features vary by
language)
Localization
Tuner/Broadcasting
Connectivity
WiFi Direct Yes
TV Sound to Mobile Yes
Sound Mirroring Yes
S-Share N/A
Auto Data Backup N/A
Dongle Compatibility (3G / LTE / WiFi) N/A
Analog Clean View Yes
Senior Mode N/A
Triple Protection Yes
Clean View N/A
Family TV 2.0 N/A
Local Cinema Mode N/A
Digital Broadcasting DVB-T2 (*VN: DVB-T2C)
Analog Tuner Yes
2 Tuner N/A
CI (Common Interface) N/A
Data Broadcasting HbbTV 1.5(SG)
TV Key Yes
HDMI 4
USB 3
Component In (Y/Pb/Pr) 1
Page 24

2-4
2. Product specications
Item QA65Q90RAKXXV
Connectivity
Design
Composite In (AV) 1 (Common Use for Component Y)
Ethernet (LAN) Yes
Audio Out (Mini Jack) N/A
Digital Audio Out (Optical) 1
RF In (Terrestrial / Cable input / Satellite input) 1/1(Common Use for Terrestrial)/0
Ex-Link ( RS-232C ) N/A
CI Slot N/A
HDMI A / Return Ch. Support Yes
HDMI Quick Switch Yes
Wireless LAN Built-in Yes
Anynet+ (HDMI-CEC) Yes
Design Q - Solid
Bezel Type 4 Bezel-less
Slim Type Slim
Front Color CARBON SILVER
Light Eect (Deco) N /A
Stand Type BENDING PLATE
Stand Color DARK CARBON SILVER
Additional Feature
Swivel (Left/Right) N/A
Intelligent Mode Yes
AI Upscale Yes
Art Mode (The Frame) N/A
Motion Detection (The Frame) N/A
Ambient Mode Yes
Ambient Mode Brightness/Color Sensor Yes
Learn menu screen(AU English,
Mandarin Chinese, Korean, (Singpore:
+France, Itally, Germany, Spain))/
SeeColors/ Negative colors/ Grayscale/
Voice guide(AU English, Mandarin
Accessibility
Digital Clean View Yes
Auto Channel Search Yes
Auto Power O Ye s
Chinese, Korean, (Singpore: +France,
Itally, Germany, Spain))/ Enlarge/ High
contrast/ Learn TV Remote(AU English,
Mandarin Chinese, Korean, (Singpore:
+France, Itally, Germany, Spain))/ Multi-
output Audio/ Key Repeat Delay
Caption (Subtitle) Yes
Connect Share™ (HDD) Yes
ConnectShare™ (USB 2.0) Yes
Page 25

2-5
2. Product specications
Item QA65Q90RAKXXV
Additional Feature
Eco Feature
Power
EPG Yes
Extended PVR Yes
Game Mode
Freesync FreeSync
OSD Language Local Languages
Picture-In-Picture N/A
BT HID Built-in Yes
USB HID Support Yes
Teletext (TTX) Yes
Time Shift Ye s
V-Chip N/A
IPv6 Support Yes
MBR Support Ye s
Ultra Clean View N /A
Eco Sensor Yes
Energy Efciency Class 5
Power Supply AC100-240V 50/60Hz
Yes (Auto Game Mode, Game Motion Plus,
Dynamic Black EQ, Game Enhancer)
Power Consumption (Max) 255 W
Power Consumption (Stand-by) N/A
Power Consumption (Energy Saving Mode) N/A
Power Consumption (Typical) N/A
Peak Luminance Ratio N /A
Yearly Power Consumption (EU standard) N/A
Page 26

2-6
2. Product specications
Last Update Date : 2019.03.11
Item QA75Q90RAKXXV
General Information
Display
Video
Product QLED
Series Q
Country VIET NAM
Screen Size 75"
Resolution 3,840 x 2,160
Ultra Black Ye s
Screen Curvature N/A
Picture Engine Quantum Processor 4K
Motion Rate 200
PQI (Picture Quality Index) 4000
HDR (High Dynamic Range) Quantum HDR 16x
HDR 10+ Yes
Contrast Direct Full Array 16x
HLG (Hybrid Log Gamma) Yes
Color Color Volume 100% by Quantum Dot
Viewing Angle Ultra Viewing Angle
Micro Dimming Ultimate UHD Dimming
Local Dimming Direct Full Array Elite
Audio
Smart Service
Auto Depth Enhancer N /A
Contrast Enhancer Yes
Auto Motion Plus Yes
Film Mode Yes
Natural Mode Support Yes
Dolby Digital Plus Yes
DTS Codec N/A
Dialog Enhancement Yes
Audio Pre-selection Descriptor N/A
Sound Output (RMS) 60W
Speaker Type 4.2CH
Woofer Yes
Multiroom Link Yes
Blutooth Audio Yes
Samsung SMART TV Smart
US English, Korean, UK English, French,
Bixby
Voice Interaction VN, IN: Vietnamese
German, Italian, Spanish (features vary by
language)
Far-Field Voice Interaction Yes
Page 27

2-7
2. Product specications
Item QA75Q90RAKXXV
Smart Service
Convergence
Localization
Works with Google Assistant Yes (SG only)
Works With Alexa N /A
TV Plus N/A
Web Browser Yes
SmartThings App Support Yes
SmartThings Yes
Universal Guide N/A
Gallery Yes
TV to Mobile - Mirroring Yes
Mobile to TV - Mirroring, DLNA Yes
360 Video Player Yes
360 Camera Support Yes
Bluetooth Low Energy Ye s
WiFi Direct Yes
TV Sound to Mobile Yes
Sound Mirroring Yes
S-Share N/A
Auto Data Backup N/A
Tuner/Broadcasting
Connectivity
Dongle Compatibility (3G / LTE / WiFi) N/A
Analog Clean View Yes
Senior Mode N /A
Triple Protection Yes
Clean View N/A
Family TV 2.0 N /A
Local Cinema Mode N/A
Digital Broadcasting DVB-T2 (*VN: DVB-T2C)
Analog Tuner Ye s
2 Tuner N/A
CI (Common Interface) N/A
Data Broadcasting HbbTV 1.5(SG)
TV Key Yes
HDMI 4
USB 3
Component In (Y/Pb/Pr) 1
Composite In (AV) 1 (Common Use for Component Y)
Ethernet (LAN) Yes
Audio Out (Mini Jack) N/A
Digital Audio Out (Optical) 1
RF In (Terrestrial / Cable input / Satellite input) 1/1(Common Use for Terrestrial)/0
Page 28
2-8
2. Product specications
Item QA75Q90RAKXXV
Connectivity
Design
Additional Feature
Ex-Link ( RS-232C ) N/A
CI Slot N/A
HDMI A / Return Ch. Support Yes
HDMI Quick Switch Yes
Wireless LAN Built-in Yes
Anynet+ (HDMI-CEC) Yes
Design Q - Solid
Bezel Type 4 Bezel-less
Slim Type Slim
Front Color CARBON SILVER
Light Eect (Deco) N /A
Stand Type BENDING PLATE
Stand Color DARK CARBON SILVER
Swivel (Left/Right) N/A
Intelligent Mode Yes
AI Upscale Yes
Art Mode (The Frame) N/A
Motion Detection (The Frame) N/A
Ambient Mode Yes
Ambient Mode Brightness/Color Sensor Yes
Learn menu screen(UK English, (Singpore:
+France, Spain))/ SeeColors/ Negative
colors/ Grayscale/ Voice guide(UK
English, Mandarin Chinese, Korean,
Accessibility
Digital Clean View Yes
Auto Channel Search Yes
Auto Power O Ye s
Caption (Subtitle) Yes
Connect Share™ (HDD) Yes
ConnectShare™ (USB 2.0) Yes
EPG Yes
Extended PVR Yes
Game Mode
Freesync FreeSync
(Singpore: +France, Itally, Germany,
Spain))/ Enlarge/ High contrast/ Learn TV
Remote(UK English, (Singpore: +France,
Spain))/ Multi-output Audio/ Key Repeat
Delay
Yes (Auto Game Mode, Game Motion Plus,
Dynamic Black EQ, Game Enhancer)
OSD Language Local Languages
Picture-In-Picture N/A
Page 29

2-9
2. Product specications
Item QA75Q90RAKXXV
Additional Feature
Eco Feature
Power
BT HID Built-in Yes
USB HID Support Yes
Teletext (TTX) Yes
Time Shift Ye s
V-Chip N/A
IPv6 Support Yes
MBR Support Ye s
Ultra Clean View N /A
Eco Sensor Yes
Energy Efciency Class 5
Power Supply AC100-240V 50/60Hz
Power Consumption (Max) 300 W
Power Consumption (Stand-by) N/A
Power Consumption (Energy Saving Mode) N/A
Power Consumption (Typical) N/A
Peak Luminance Ratio N /A
Yearly Power Consumption (EU standard) N/A
Page 30

2-10
2. Product specications
Last Update Date : 2019.03.14
Item QA82Q90RAKXXV
General Information
Display
Video
Product QLED
Series Q
Country VIET NAM
Screen Size 82"
Resolution 3,840 x 2,160
Ultra Black Ye s
Screen Curvature N/A
Picture Engine Quantum Processor 4K
Motion Rate 200
PQI (Picture Quality Index) 4000
HDR (High Dynamic Range) Quantum HDR 16x
HDR 10+ Yes
Contrast Direct Full Array 16x
HLG (Hybrid Log Gamma) Yes
Color Color Volume 100% by Quantum Dot
Viewing Angle Ultra Viewing Angle
Micro Dimming Ultimate UHD Dimming
Local Dimming Direct Full Array Elite
Audio
Smart Service
Auto Depth Enhancer N /A
Contrast Enhancer Yes
Auto Motion Plus Yes
Film Mode Yes
Natural Mode Support Yes
Dolby Digital Plus Yes
DTS Codec N/A
Dialog Enhancement Yes
Audio Pre-selection Descriptor N/A
Sound Output (RMS) 60W
Speaker Type 4.2CH
Woofer Yes
Multiroom Link Yes
Blutooth Audio Yes
Samsung SMART TV Smart
US English, Korean, UK English, French,
Bixby
Voice Interaction VN, IN: Vietnamese
German, Italian, Spanish (features vary by
language)
Far-Field Voice Interaction Yes
Page 31

2-11
2. Product specications
Item QA82Q90RAKXXV
Smart Service
Convergence
Localization
Works with Google Assistant Yes (SG only)
Works With Alexa N /A
TV Plus N/A
Web Browser Yes
SmartThings App Support Yes
SmartThings Yes
Universal Guide N/A
Gallery Yes
TV to Mobile - Mirroring Yes
Mobile to TV - Mirroring, DLNA Yes
360 Video Player Yes
360 Camera Support Yes
Bluetooth Low Energy Ye s
WiFi Direct Yes
TV Sound to Mobile Yes
Sound Mirroring Yes
S-Share N/A
Auto Data Backup N/A
Tuner/Broadcasting
Connectivity
Dongle Compatibility (3G / LTE / WiFi) N/A
Analog Clean View Yes
Senior Mode N /A
Triple Protection Yes
Clean View N/A
Family TV 2.0 N /A
Local Cinema Mode N/A
Digital Broadcasting DVB-T2 (*VN: DVB-T2C)
Analog Tuner Ye s
2 Tuner N/A
CI (Common Interface) N/A
Data Broadcasting HbbTV 1.5(SG)
TV Key Yes
HDMI 4
USB 3
Component In (Y/Pb/Pr) 1
Composite In (AV) 1 (Common Use for Component Y)
Ethernet (LAN) Yes
Audio Out (Mini Jack) N/A
Digital Audio Out (Optical) 1
Page 32

2-12
2. Product specications
Item QA82Q90RAKXXV
Connectivity
Design
Additional Feature
RF In (Terrestrial / Cable input / Satellite input) 1/1(Common Use for Terrestrial)/0
Ex-Link ( RS-232C ) N/A
CI Slot N/A
HDMI A / Return Ch. Support Yes
HDMI Quick Switch Yes
Wireless LAN Built-in Yes
Anynet+ (HDMI-CEC) Yes
Design Q - Solid
Bezel Type 3 Bezel-less
Slim Type Slim
Front Color CARBON SILVER
Light Eect (Deco) N /A
Stand Type BENDING PLATE
Stand Color DARK CARBON SILVER
Swivel (Left/Right) N/A
Intelligent Mode Yes
AI Upscale Yes
Art Mode (The Frame) N/A
Motion Detection (The Frame) N/A
Ambient Mode Yes
Ambient Mode Brightness/Color Sensor Yes
Learn menu screen(UK English, (Singpore:
+France, Spain))/ SeeColors/ Negative
colors/ Grayscale/ Voice guide(UK
English, Mandarin Chinese, Korean,
Accessibility
Digital Clean View Yes
Auto Channel Search Yes
Auto Power O Ye s
Caption (Subtitle) Yes
Connect Share™ (HDD) Yes
ConnectShare™ (USB 2.0) Yes
EPG Yes
Extended PVR Yes
Game Mode
Freesync FreeSync
(Singpore: +France, Itally, Germany,
Spain))/ Enlarge/ High contrast/ Learn TV
Remote(UK English, (Singpore: +France,
Spain))/ Multi-output Audio/ Key Repeat
Delay/ Learn TV Remote(AU English)/
Multi-output Audio
Yes (Auto Game Mode, Game Motion Plus,
Dynamic Black EQ, Game Enhancer)
Page 33

2-13
2. Product specications
Item QA82Q90RAKXXV
Additional Feature
Eco Feature
Power
OSD Language Local Languages
Picture-In-Picture N/A
BT HID Built-in Yes
USB HID Support Yes
Teletext (TTX) Yes
Time Shift Ye s
V-Chip N/A
IPv6 Support Yes
MBR Support Ye s
Ultra Clean View N /A
Eco Sensor Yes
Energy Efciency Class 5
Power Supply AC100-240V 50/60Hz
Power Consumption (Max) 435 W
Power Consumption (Stand-by) N/A
Power Consumption (Energy Saving Mode) N/A
Power Consumption (Typical) N/A
Peak Luminance Ratio N /A
Yearly Power Consumption (EU standard) N/A
Page 34

2-14
2. Product specications
2-3. Accessories
NOTE
The items’ colours and shapes may vary depending on the models.•
Cables not included can be purchased separately.•
Check for any accessories hidden behind or in the packing materials when opening the box.•
'One Invisible Connection' is communicated as 'One Clear Connection' in Australia and New Zealand.•
The code number can be changed, see • "Exploded Views" provided on the site.
Product Code. No Product Code. No
BN39-02470A(65")
One Invisible Connection
•
HOLDER-CABLE
• BN61-14021A Power Cable•
Samsung Smart Remote
• BN59-01311F Batteries (AAA x 2)• 4301-000103
User Manual
• BN68-09544F RUBBER-FOOT• BN96-49199A
Warranty Card / Regulatory Guide (Not available in some locations)
•
Image Product Code. No
BN39-02470A(75")
BN39-02436B(82")
•
One Connect
COMPONENT IN Adapter• BN39-02190A
AV IN Adapter• BN39-02189A
BN91-21121D(65")
BN90-10951H(75")
BN91-21171G(82")
3903-001118(65")
3903-001118(75")
3903-001110(82")
For Wall Mount
Product Code. No Product Code. No
Wall Mount Adapter (4 EA)
• BN61-16284A Bending Cover• BN61-15791A
Page 35

2-15
2. Product specications
2-4. Viewing the Functions
2-4-1. 2019' Concept
Colour Volume 100% by Quantum Dot
Colours as real as they should be. With Samsung’s unique Quantum Dot technology, QLED cranks the colour volume to a
full 100%, giving you realistic colours in dark or bright scene.
Quantum HDR 16X
Quantum HDR 16X oers a magnied range of brightness that expresses every scene as precisely as real life, with deep
contrasts and vivid and natural colours.
The range of Quantum HDR claims luminance based on internal testing standards and is subject to change
according to viewing environment or specic conditions.
Page 36

2-16
2. Product specications
Intelligent Mode
Conditions in your room can change, and your TV needs to adapt. QLED's Intelligent Mode adjusts brightness and
volume accordingly. It can even adjust the sound to match the TV content, such as clearing a dialogue in news programs
and highlighting a singer’s voice over the background concert.
See the bigger picture
Everything gets very real on a bigger screen. You’ll experience every goal, feel every explosion, and be right in the
middle of the action. You’ve never been closer than this.
Page 37

2-17
2. Product specications
Win more games, have more controls
Lower input lag gaming
Don’t let lag hold you back! Using FreeSync(VRR) technology, QLED reduces input lag to give you the real-time gaming
speed you need to climb to the top. Embrace QLED speed and get ready for some epic wins.
FreeSync technology reduces input lag, with less tearing and stuttering.
VRR (Variable Refresh Rate) lets a gaming source optimal video frame by each scene.
Game enhancer
To beat the competition, you have to have full control. Dynamic Black Equalizer gives you better visibility in the dark and
uses detailed scene analysis to optimize image quality. It even enhances the sound so you can immerse yourself in the
game.
The content within the screen are simulated images and are for demonstration purposes only.
Page 38

2-18
2. Product specications
Smart Hub & One Remote
QLED gets even smarter with Smart Hub and Samsung One Remote. They place all the content you want right at your
ngertips, from your set-top box to game console, apps, and live TV. All you need is one.
Smart service and GUI(Graphic User Interface) may vary by model and region.
Some features and functions provided by connected devices may not be supported or limited to use.
Universal Guide
Search less, enjoy more. QLED’s Universal Guide helps you nd your favorite content quickly and easily. It learns what
you like and curates everything in one place.
Content services may vary by regions and are subject to change without notications.
Page 39

2-19
2. Product specications
Ambient Mode
Even when QLED is turned o, it’s never simply still. Ambient Mode helps QLED mingle with your home décor for a
perfectly natural eect. Instead of a simple black screen, you’ll see meaningful images that match your lifestyle, with
easy settings and plenty of choices.
Décor
Set your screen with an interactive background that
matches your room décor perfectly.
My album
Display all your favorite photos from your mobile device.
It's your own personal gallery.
Info
You can display info like the time and date on a
beautiful background.
Artworks
Lovers of art will also enjoy beautiful pieces from well-
known photographers and artists, all grouped on a
variety of themes.
Page 40

2-20
2. Product specications
Bixby on TV
You can even talk to QLED. Bixby is the assistant to your needs that goes beyond controlling your TV. Just ask and get
more.
This feature is only available in certain languages.
The content within the screen are simulated images and are for demonstration purposes only.
SmartThings
A truly intelligent home, tailored to your life. With Samsung SmartThings built right in, QLED can connect you with
your IoT devices and sensors. You can turn on the lights, check what's in the fridge, and even control the robot vacuum
cleaner
Samsung SmartThings compatible devices may vary by region.
Page 41

2-21
2. Product specications
Works with
Life gets easier with expanded compatibility. QLED pairs quickly with a range of smart speakers, including ones made by
other brands, like Amazon’s Echo or Google Home, without any extra connectors.
Amazon, Alexa, and all related logos are trademarks of Amazon.com, Inc. or its afliates.
Google and related marks and logos are trademarks of Google LLC.
Some features and functions provided by connected devices may not be supported or limited to use.
Turn-on TV feature support may vary by model.
Page 42

2-22
2. Product specications
Quick Guides
You can learn quickly how to run and use the frequently used functions, such as Bixby, Ambient Mode, and Smart
Hub.
buttons simultaneously for 3 seconds or more.
2-4-2. Quick Guides
You can learn quickly how to run and use the frequently used functions, such as Bixby, Ambient Mode, and Smart Hub.
Connecting the Samsung Smart Remote to the TV
Connect the Samsung Smart Remote to your TV to operate the TV.
When you turn on the TV for the rst time, the Samsung Smart Remote pairs to the TV automatically. If the Samsung
Smart Remote does not pair to the TV automatically, point it at the front of the TV, and then press and hold the
buttons simultaneously for 3 seconds or more.
and
The images, buttons, and functions of the Samsung Smart Remote may dier with the model or geographical
area.
For more information about the Samsung Smart Remote that comes with the QLED TV, refer to "About the
Samsung Smart Remote (QLED TV)".
The Samsung Smart Remote may not be supported depending on the model or geographical area.
Page 43

2-23
2. Product specications
Using Smart Hub
Connect to Smart Hub for apps, games, movies, and more.
Enjoy the multiple functions provided by Smart Hub simultaneously on a single screen.
NOTE
The image on your TV may dier from the image above depending on the model and geographical area.•
When you press the button on your remote control, you can use the following functions and features.
Notication
1
You can view a list of notications for all events that occur on your TV. A notication appears on the screen when it is
time to broadcast a scheduled programme or when an event occurs on a registered device.
Settings
2
When the focus is moved to Settings (
quickly set frequently used functions by clicking the icons.
Source
3
You can select an external device connected to the TV.
Search
4
You can search for channels, programmes, movie titles, and apps from Smart Hub.
To use this feature, the TV must be connected to the Internet.
APPS
5
You can enjoy a wide range of content including news, sports, weather, and games by installing the corresponding apps
on your TV.
To use this feature, the TV must be connected to the Internet.
), a list of quick settings icons appears above the top of the menu. You can
Page 44

2-24
2. Product specications
Ambient Mode
6
You can elevate your living space with decorative content that matches the surroundings or life information such as
weather, time, and news on the TV screen when you are not watching TV.
To enter Ambient Mode, press the
button.
If you press the
If you use a remote control other than the Samsung Smart Remote, there may be restrictions to entering
Ambient mode.
Because this function is a QLED TV-specic function, it may not be supported depending on the model.
Universal Guide
7
Universal Guide is an app that allows you to search for and enjoy various content such as TV shows, dramas, and movies
in one place. Universal Guide can recommend content tailored to your preferences.
Images may look blurry depending on the service provider's circumstances.
This function may not be supported depending on the model or geographical area.
button when the TV is turned o, the TV turns on in Ambient Mode.
button. To return to the TV mode, press the button. To shut o the TV, press the
Page 45

2-25
2. Product specications
Ambient Mode
Learn about the functions available in Ambient Mode that are specic to the QLED TV.
• £ Ambient Mode
You can elevate your living space with decorative content that matches the surroundings or life information such as
weather, time, and news on the TV screen when you are not watching TV.
Because this function is a QLED TV-specic function, it may not be supported depending on the model.
Entering Ambient Mode
To enter Ambient Mode from the TV viewing screen, press the button, or select £ Ambient Mode.
If you press the
If you use a remote control other than the Samsung Smart Remote, there may be restrictions to entering
Ambient Mode.
Ambient Mode browser screen
button when the TV is turned o, the TV turns on in Ambient Mode.
NOTE
The image on your TV may dier from the image above depending on the model and geographical area.•
When you press the or button in Ambient Mode, the Ambient Mode browser screen appears at the bottom of the
screen. In the Ambient Mode browser screen, you can select content and change the Ambient Mode settings.
Function and content preview
1
When you select a category at the bottom of the screen, a preview of available functions and content appears here.
To view detailed information about a content item, move the focus to it, and then press the up directional button.
Page 46

2-26
2. Product specications
Ambient Settings
2
You can congure the following Ambient Mode settings:
•
Auto Brightness
Changes the auto brightness setting for Ambient Mode.
When this function is set to O, the brightness level of the TV screen is not automatically adjusted in
response to the surrounding light level.
•
Sleep After
Sets the time when the Ambient Mode screen turns o automatically.
If there is no remote control input for the set time, the screen goes o. To turn the screen back on in Ambient
Mode, press the
•
Reset All Photos
Resets the photos imported from your mobile device or Samsung Cloud.
TV
3
You can enter the TV viewing screen.
Selecting a content category
4
You can select your preferred content and background for the Ambient Mode screen.
button on the remote control.
Available content categories may dier depending on the model or geographical area.
•
Décor
Allows you to select content with a sensible and beautiful design.
•
Info
Allows you to select essential real-time information such as weather and news.
This function may not be supported depending on the geographical area.
•
Photo
Allows you to set a photo stored in your mobile device or Samsung Cloud as the wallpaper of the Ambient Mode
screen.
To import photos from your mobile device or Samsung Cloud, use the SmartThings app on your mobile device.
•
Trend
The TV provides pictures and storeys related to a specic topic or interest you select.
This function may not be supported depending on the model or geographical area.
•
Artwork
Allows you to select content such as world famous photos and artwork.
•
Background Theme
Allows you to set a background theme provided by Samsung as the background for content.
Take a picture of a wall using the SmartThings app on your mobile device to set it as the background of
Ambient Mode. When you use this function, there may be a delay in image transmission and optimisation
depending on network conditions.
About Ambient Mode
5
You can view information about Ambient Mode.
Page 47

2-27
2. Product specications
Shortcuts
You can easily use the contents of Sources without running a series of commands.
To display the Shortcuts menu screen, press and hold the
To return to the TV mode, press the
Because this function is a QLED TV-specic function, it may not be supported depending on the model.
button.
button for 1 second or more.
NOTE
The image on your TV may dier from the image above depending on the model and geographical area.•
Sources
1
You can select an external device connected to the TV.
Channels
2
Press the
e-Manual
3
Displays the e-Manual guide.
Settings
4
Displays the main on-screen menu.
Terrestrial, Cable, Satellite, or Service Provider
5
Choose the broadcast type of the content: Terrestrial, Cable, Satellite, or Service Provider.
button to add a broadcast channel. You can move or remove added broadcast channels.
This function may not be supported depending on the incoming broadcast signal.
Page 48

2-28
2. Product specications
Bixby
Speak into the microphone on your Samsung Smart Remote to control your TV.
Bixby is available only when the TV is connected to the Internet.
To use Bixby, you must register and sign in to your Samsung account.
The supported language may dier depending on the geographical area.
Bixby may not be supported depending on the model or geographical area.
Calling Bixby with voice
You can immediately start a conversation with Bixby by saying "Hi Bixby." Say "Hi Bixby", and the Bixby icon at the
bottom of the TV screen is activated in Listen mode and a beep sounds. Speak what you want. If Bixby does not respond
to your voice, turn on the Voice Wake-up function, and then try again. (
up)
Talking with Bixby using buttons
You can also make a conversation with Bixby using the Samsung Smart Remote buttons. Press and hold the
button on your Samsung Smart Remote, say a command, and then release the
command.
£ Explore Now £ Settings £ Voice Wake-
button. The TV recognises the voice
To view the Bixby guide, press the
• button, the Explore Now button appears at the bottom of the screen. Press the Select
When you press the
button to go to the Explore Bixby screen.
button once.
Page 49

2-29
2. Product specications
Learning about Explore Bixby Screen
NOTE
The image on your TV may dier from the image above depending on the model and geographical area.•
My Prole
1
Go to the My Prole screen to create a new account or register a voice ID. Sign in to your account with your voice, that is,
your registered voice ID.
If you are signed out of your Samsung account, select My Prole to sign in.
Settings
2
You can change the settings for using Bixby.
•
Language
You can change Bixby's language.
The languages of the TV and other apps will not change.
Bixby only supports some languages, and the supported functions may dier depending on the geographical
area.
•
Voice response
You can change Bixby's voice.
This function may not be supported depending on the selected Bixby's language.
•
Voice Wake-up
When you turn on the function, Bixby will respond to your voice.
This function may not be supported depending on the model or geographical area.
•
Sound feedback
You can set Bixby to tell you verbally when it starts hearing your voice.
•
Privacy
You can set whether to allow Bixby to use your personal information when using Bixby services.
Recommended commands
3
Displays recommended commands you can use to control the TV with Bixby given the current context.
Page 50

2-30
2. Product specications
All Services
4
You can learn the voice commands that let you use Bixby in various situations. Use the directional buttons to move to
the desired command, and then press the Select button. You can operate the TV with various voice commands.
View Tutorial
5
The popup window on using Bixby appears.
Page 51

2-31
2. Product specications
2-4-3. The Samsung Smart Remote
04 The Samsung Smart Remote
About the Buttons on the Samsung Smart Remote
࡙ The images, buttons, and functions of the Samsung Smart Remote may differ depending on the model.
࡙ The Universal Remote function operates normally only when you use the Samsung Smart Remote that
comes with the TV.
(Power)
Press to turn the TV on or off.
(Colour / Number button)
Each time you press this button, the
coloured buttons window and the
virtual numeric pad are displayed
alternately.
࡙ Use these coloured buttons to
access additional options specific
to the feature you are using.
࡙ Press to bring up the virtual
numeric pad on the screen. Use the
numeric keypad to enter numeric
values. Select numbers and then
select Done to enter a numeric
value. Use to change the channel,
enter a PIN, enter a ZIP code, etc.
࡙ When you press the button and
then select TTX/MIX from the popup list, the TTX menu appears.
(Return)
Returns to the previous menu. When
pressed for 1 second or more, the
running function is terminated. When
pressed while you are watching a
programme, the previous channel
appears.
(Play/pause)
When pressed, the playback controls
appear. Using these controls, you
can control the media content that is
playing.
(Smart Hub)
Returns to the Home Screen.
VOL (Volume)
Move the button up or down to adjust
the volume. To mute the sound, press
the button. When pressed for 1 second
or more, the Accessibility Shortcuts
menu appears.
CH (Channel)
Move the button up or down to change
the channel. To see the Guide or
Channel List screen, press the button.
(The Guide or Channel List
screen appears depending on the
geographical area.)
Press each button to run its function.
Select
Selects or runs a focused item. When
pressed while you are watching a
broadcast programme, detailed
programme information appears.
Directional pad (up/down/left/right)
Moves the focus and changes the
values seen on the TV's menu.
(Bixby)
Runs Bixby. Press and hold the button,
say a command, and then release the
button to run Bixby.
When you press the button, the
Explore Now menu appears at the
bottom of the screen.
࡙ The supported Bixby's languages
and features may differ by
geographical region.
(Ambient Mode)
In TV mode, press this button to enter
Ambient Mode.
If you press the button when the TV is
turned off, the TV turns on in Ambient
Mode.
࡙ For more information about the
Ambient Mode, refer to Smart
Features > Using the Ambient
Mode in the e-Manual.
The images, buttons, and functions of the Samsung Smart Remote may dier depending on the model.•
The Universal Remote function operates normally only when you use the Samsung Smart Remote that comes with •
the TV.
Page 52

2-32
2. Product specications
Pairing the TV to the Samsung Smart Remote
When you turn on the TV for the first time, the Samsung Smart Remote pairs
to the TV automatically. If the Samsung Smart Remote does not pair to the TV
automatically, point it at the remote control sensor of the TV, and then press
and hold the buttons labelled
and as shown in the figure on the left
simultaneously for 3 seconds or more.
Installing batteries into the Samsung Smart Remote
1
1
2
2
Pairing the TV to the Samsung Smart Remote
When you turn on the TV for the rst time, the Samsung Smart Remote pairs
to the TV automatically. If the Samsung Smart Remote does not pair to the TV
automatically, point it at the remote control sensor of the TV, and then press
and hold the buttons labeled
simultaneously for 3 seconds or more.
and as shown in the gure on the left
Installing batteries into the Samsung Smart Remote
Press the 1. button at the top rear of the Samsung Smart Remote. The body will pop out slightly from the body cover.
2.
Turn the remote over, and then slide the body of the remote upwards until the battery compartment is revealed.
If there are batteries in the remote, press the 3. r and l buttons on both sides of the battery compartment to remove the
existing batteries.
4.
Insert two new batteries (1.5V AAA type) into the battery compartment making sure that the batteries' polarities (+, -)
are oriented correctly. When done, slide the body of the remote until it is nearly in its original position.
5. button on the top rear, and then slide the body of the remote down into
Turn the remote over, press and hold the
place.
Alkaline batteries are recommended for longer battery life.
•
Page 53

2-33
2. Product specications
button on the Control S tick
button on the Control S tick
05 Running the Initial Setup
When you turn on your TV for the first time, it immediately starts the Initial Setup. The Initial Setup allows you
to configure the basic settings for the TV to operate, such as broadcast reception, channel search, and network
connection, at one time.
࡙ Before starting the Initial Setup, be sure to connect external devices first.
࡙ To use the TV's smart features, the TV must be connected to the Internet.
࡙ To perform Initial Setup using the SmartThings app, you must connect your mobile device via Wi-Fi.
࡙ If the pop-up for setup does not appear automatically on the SmartThings app on your mobile device,
continue setup manually after adding the TV using Add Device on the dashboard of the SmartThings app.
࡙ The SmartThings app is available for mobile devices running Android 6.0 or higher or iOS 10 or higher.
࡙ Noise may occur temporarily when the TV communicates with mobile devices.
You can also start the Initial Setup using the TV's menu (
> Settings > General > Reset).
Follow the instructions displayed on the Initial Setup screen and configure the TV's basic settings to suit your
viewing environment.
Using the TV Controller
You can use the TV Controller on the bottom of the TV instead of the remote control to control most of the
functions of your TV. While watching TV, you can change the channel by pressing the up and down directional
buttons on the TV Controller or adjust the volume by pressing the left and right directional buttons. Press the
on the TV Controller to display the Control menu.
To run an item on the menu, press the directional buttons on the TV Controller to move the focus to the item,
and then press the
button on the TV Controller.
࡙ The screen may dim if the protective film on the SAMSUNG logo or the bottom of the TV is not detached.
Please remove the protective film.
Control menu
:
Smart Hub
:
Source
:
Settings
:
Power off
:
Return
TV Controller / Remote control sensor
࡙ Press
button: Display the Control menu. / Select or run
a focused item on the menu.
࡙ Press and hold
button: The running function is
terminated.
࡙ Up/Down button: Changes the channel.
࡙ Left/Right button: Changes the volume.
The TV Controller is located on the bottom of the TV.
2-4-4. Using the TV Controller
You can use the TV Controller on the bottom of the TV instead of the remote control to control most of the functions
of your TV. While watching TV, you can change the channel by pressing the up and down directional buttons on the TV
Controller or adjust the volume by pressing the left and right directional buttons. Press the
display the Control menu.
To run an item on the menu, press the directional buttons on the TV Controller to move the focus to the item, and then
press the
•
The screen may dim if the protective lm on the SAMSUNG logo or the bottom of the TV is not detached.
lease remove the protective lm.
button on the TV Controller.
on the TV Controller to
Page 54

2-34
2. Product specications
2-4-5. Rear View & One Connect
The TV turns o when the One Invisible Connection cable is disconnected, and turns on when it is connected.
Page 55

2-35
2. Product specications
2-5. Supported subtitles
Subtitle formats
Name Format
MPEG-4 Timed text .ttxt
SAMI .smi
SubRip .srt
SubViewer .sub
Micro DVD .sub or .txt
SubStation Alpha .ssa
Advanced SubStation Alpha .ass
SMPTE-TT Text .xml
Video formats with subtitles
Name Format
Xsub AV I
SubStation Alpha MKV
Advanced SubStation Alpha MKV
SubRip MKV
VobSub MKV
MPEG-4 Timed text MP4
TTML in smooth streaming MP4
SMPTE-TT Text MP4
SMPTE-TT PNG MP4
Supported image formats and resolutions
File extension Format Resolution
*jpg
*jpeg
*png PNG 4096 x 4096
*bmp BMP 4096 x 4096
*mpo MPO 15360 x 8640
JPEG 15360 x 8640
The MPO format is supported partly.
Page 56

2. Product specications
Supported music formats and codecs
File extension Format Codec Note
*.mp3 MPEG MPEG1 Audio Layer 3
*.m4a
*.mpa
*.aac
*.ac FLAC FLAC Supports up to 2 channels
*.ogg OGG Vorbis Supports up to 2 channels
MPEG4 AAC
*.wma WMA WMA
*.wav wav wav
*.mid
*.midi
*.ape ape ape
*.aif
*.ai
*.m4a ALAC ALAC
midi midi
AIFF AIFF
WMA is supported up to 10 Pro 5.1 channels.
WMA lossless audio is not supported.
Supports type 0 and type 1.
Seek is not supported.
Supports USB device only.
Other Restrictions
Codecs may not function properly if there is a problem with the content.•
Video content does not play or does not play correctly if there is an error in the content or container.•
Sound or video may not work if they have standard bit rates/frame rates above the TV’s compatibility ratings.•
If the Index Table is has an error, the Seek (Jump) function will not work.•
When playing video over a network connection, the video may not play smoothly because of data transmission •
speeds.
•
Some USB/digital camera devices may not be compatible with the TV.
HEVC codec is only available in MKV / MP4 / TS containers.•
The MVC codec is supported partly.•
Video decoders
H.264 UHD is supported up to Level 5.1, and H.264 FHD is supported up to Level 4.1. (TV does not support FMO / ASO •
/ RS)
•
HEVC UHD is supported up to Level 5.1, and HEVC FHD is supported up to Level 4.1.
VC1 AP L4 is not supported.•
GMC 2 or above is not supported.•
Audio decoders
WMA is supported up to 10 Pro 5.1 channels.•
WMA1, WMA lossless / Voice are not supported.•
QCELP and AMR NB / WB are not supported.•
Vorbis is supported for up to 5.1 channels.•
Dolby Digital Plus is supported for up to 5.1 channels.•
The supported sample rates are 8, 11.025, 12, 16, 22.05, 24, 32, 44.1, and 48 KHz, and dier with the codec.•
2-36
Page 57

3. Disassembly and Reassemble
82″
3. Disassembly and Reassemble
This section of the service manual describes the disassembly and reassembly procedures for the LED TV.
Disconnect the LED TV from the power source before disassembly.1.
Follow these directions carefully.2.
Use the Samsung Open Jig and Cushion to remove the Rear Cover. -
CAUTION
3-1. TV Disassembly
Carefully position the TV so that the screen is
1
facing downwards.
Make sure to place the TV upon a soft •
cushion or any material that will prevent
damage to the screen.
Open Jig Tool, Protection Cushion (curved models Only)•
-
Recommended Torque for Cabinet/Stand screws : 10 ~ 12kgf
A strength of Torque can be changed depending on the situation.•
Description & Screws Picture Description
LowertheTVontotheooruprightinitsstand.
2
Remove 4 Stand screws to the bottom base.
ASSY ACCESSORY-SCREW
6003-001907
SCREW-TAPTYPE : M4 x L14, ZPC(BLK)
SET + STAND
•
With two people carefully lift the TV up while
3
sliding it away from the slots releasing it from
on the bottom base Stand.
3-1
Page 58

3-2
3. Disassembly and Reassemble
Description & Screws Picture Description
Place the TV face down onto a protective surface
4
and remove the 4 screws on the upper stand
mount from the TV.
ASSY ACCESSORY-SCREW
6003-001907
SCREW-TAPTYPE : M4 x L14, ZPC(BLK)
SET + STAND
•
Using Open Jig push in lightly at each bottom
5
locking tab to release.
Now Insert the Open Jig completely into the
bottom left corner tab then move up the left side
to release cover.
Insert Open Jig into bottom right corner tab
and continue following cover release directions
1→2→3.
Open Jigs
BN81-14946B
Locking tabs locations
Gently lift up the Rear Cover beginning at the
top to release all mounting clips as indicated by
Red Rectangles.
NOTE
Some tabs may break. OK to continue to •
use cover.
1
Jig Direction
Jig Direction
3
2
Jig Direction
Page 59

3-3
3. Disassembly and Reassemble
Description & Screws Picture Description
65 inches•
L : 7 point Locking
75 inches•
L : 8 point Locking
Top : 12 point Locking
Center : 3 Point Locking
R : 7 point Locking
Bottom : 8 point Locking
Top : 14 point Locking
Center : 2 Point Locking
R : 8 point Locking
Bottom : 8 point Locking
82 inches•
L : 9 point Locking
2
Top : 16 point Locking
Center : 5 Point Locking
R : 9 point Locking
Bottom : 12 point Locking
2
1
1
Page 60

3-4
3. Disassembly and Reassemble
Description & Screws Picture Description
Remove the ASSY COVER P-REAR.
6
65 inches•
75 inches•
82 inches•
Remove the ASSY SPEAKER P-FRONT.
7
• ASSY SPEAKER P-FRONT Cable
• : Assy SPK to Panel Hole 4 Points
ASSY SPEAKER P-FRONT Cable
ASSY SPEAKER P-FRONT
Page 61

3-5
3. Disassembly and Reassemble
Description & Screws Picture Description
Remove the NETWORK-WLAN CLIENT.
8
• LEAD CONNECTOR-SUB ASSY
LEAD CONNECTOR-SUB ASSY
<Disassemble WiFI>
NETWORK-WLAN CLIENT
Remove the ASSY BOARD P-FUNCTION TACT.
9
• ASSY BOARD P-FUNCTION TACT Cable
Screws
6001-003042
SCREW-MACHINE : M3 x L10, ZPC(BLK)
DECO+C/H FRONT
•
ASSY BOARD P-FUNCTION TACT Cable
ASSY BOARD P-FUNCTION TACT
<Disassemble Function/IR>
Page 62

3-6
3. Disassembly and Reassemble
Description & Screws Picture Description
Remove cables from TV MAIN, LD/SMPS (A/B)
10
Board.
• LEAD CONNECTOR-DIMMING
(Main - LD/SMPS B)
• LEAD CONNECTOR-POWER
(Main - LD/SMPS A)
• FFC Cables
Remove the ASSY PCB MAIN BOARD.
11
Gently lift up (Top Right corner) to release •
the lock.
Use both hands to hold the board and slide •
to the right to release the board.
2
Mounting slots (4EA)
1
Lift up
NOTE
When installing the ASSY PCB MAIN BOARD,
verify the board is properly positioned in all
4 mounting slots.
Remove the LD/SMPS (A/B) Board.
12
2
Slide to the right to release the board
Locking Fixing Hole
LD/SMPS B
LD/SMPS A
Page 63

3-7
3. Disassembly and Reassemble
Description & Screws Picture Description
Remove the power and OC (One Connect)
1.
cables connected to the TV panel, then use
the discharge tool to discharge power from
each board.
Measurement point
65" :
-
LD/SMPS B
Measurement point
75" : •
<Discharging>
Measurement point
LD/SMPS A
LD/SMPS B
<Discharging>
Measurement point
LD/SMPS A
Page 64

3-8
3. Disassembly and Reassemble
Description & Screws Picture Description
Measurement point
82" : •
<Discharging>
LD/SMPS A
Measurement point
Remove cables from LD/SMPS (A/B) Board.2.
• LEAD CONNECTOR-POWER
(LD/SMPS A - LD/SMPS B)
• LEAD CONNECTOR-DIMMING
(LD/SMPS A - LD/SMPS B)
• FFC Cables
Gently lift the 3. Right edge to unlock the
1
LD/SMPS B board. (
Locking
- / Fixing Hole
)
Remove the board by holding it with both
hands and sliding it to the Left (2 ).
LD/SMPS B : • 65" / 75"
Locking Fixing Hole
LD/SMPS B
LD/SMPS B
LD/SMPS B
LD/SMPS A
2 Slide to the Left to release the board
1
Locking
1
Fixing Hole
Page 65

3-9
3. Disassembly and Reassemble
Description & Screws Picture Description
LD/SMPS B : • 82"
Locking Fixing Hole
Gently lift the 4. Left edge to unlock the
1
LD/SMPS A board (
Locking
- / Fixing Hole
locking/ Fixing Hole).
Remove the board by holding it with both
hands and sliding it to the Right (2 ).
LD/SMPS A : • 65" / 75"
LD/SMPS B
1
Fixing Hole
2 Slide to the Left to release the board
1
Locking
1
Fixing Hole
Locking Fixing Hole
LD/SMPS A : • 82"
Locking Fixing Hole
1
Locking
2 Slide to the Right to release the board
1
Fixing Hole
1
Locking
LD/SMPS A
2 Slide to the Right to release the board
LD/SMPS A
Page 66

3-10
3. Disassembly and Reassemble
Description & Screws Picture Description
Completed the disassembly.
13
NOTE
Reassembly procedures are in the reverse order of disassembly procedures.
Page 67

3-11
3. Disassembly and Reassemble
3-2. One Connect Disassembly
Description & Screws Picture Description
Remove the 3 screws from ASSY COVER P-OC
1
BOTTO M.
Screws
6003-000282
SCREW-TAPTYPE : M3 x L8, ZPC(BLK)
C/BOTTOM+C/TOP
•
Use the Open Tool to unlock each corner.
2
Open Jigs
Use Open Jig Tool or a similar Tool.•
BN81-14946B
Turn One Connect Box upright and Remove Top
3
Cover.
WARNING
Before Removing SMPS Board
You have to discharge the SMPS by using •
service JIG.
If LED ON 9 : LED OFF, discharge is
completed.
A/S-DISCHARGE-JIG
BN81-12884A
Page 68

3-12
3. Disassembly and Reassemble
Description & Screws Picture Description
Remove the Cables.
4
5
One Connect power supply power cable.•
Remove the 5 screws at each marked screw
location on the board.
Screws
6003-000283
SCREW-TAPTYPE : M3 x L8, ZPC(WHT)
SMPS+S/TOP
•
CNW803 (20 Pin)
LEAD CONNECTOR-POWER
LiftotheblackInsulatorSheettapedtothe
6
plate assembly at "PULL" marked location. Be
careful not to tear it.
Remove the 2 screws on the plate Assembly
7
then remove the assembly.
Screws
6003-000283
SCREW-TAPTYPE : M3 x L8, ZPC(WHT)
S/TOP+C/BOTTOM
•
Page 69

3-13
3. Disassembly and Reassemble
Description & Screws Picture Description
Remove the 4 screws on the One Connect Board.
8
Screws
6003-000283
SCREW-TAPTYPE : M3 x L8, ZPC(WHT)
MAIN BOARD+C/BOTTOM
•
Completed the disassembly.
9
NOTE
Reassembly procedures are in the reverse order of disassembly procedures.
Page 70

4. Troubleshooting
4-1. Function Control Operation Test
<Standby LED Status> <5 Function Switch>
4. Troubleshooting
<To CN1501 Main Board>
CN1501 (FUNCTION & IR)
1 IR 2 IR_GND
3 A3.3V_PW 4 SENSOR_SCL_I2C
5 SENSOR_SDA_I2C 6 KEY_INPUT1
7 KEY_INPUT2 8 LED_STB_OUT
9 IR_OUT_1 10 IR_OUT_2
FUNCTION/IR Control Test
Place TV in Power Standby : 1.
Check 2. LED Status.
3. LED is OFF
If
9
LED 1.7Vdc (pin 8) and VCC for 3.3Vdc (pin 3)
If OK replace Function Assy. •
If Missing check Main Assy/Function Cable.•
If
4. LED is ON
9 5 Switch Operation Test Chart" for operation command changes.
Check "
P CMD Signal DC Voltage
6 Center Ke y 1 1.8V to 0 Vdc
7 Left Key 2 1.8V to 0.9Vdc
7 Right Key 2 1.8V to 1.3Vdc
7 Up Key 2 1.8V to 0 Vdc
7 Down Key 2 1.8V to 0.5Vdc
< 5 Switch Operation Test Chart>
If wrong or no change suspect a stuck switch which can hold data to Main Board preventing TV operation. •
Check
5. SDA, SCLforeective3.3Vdc.(afterpoweron)
Check 6. IRwithStandardRemotecommandchanges.(3.3Vto2.5VeectiveDC)
4-1
Page 71

4-2
4. Troubleshooting
4-2. Power
4-2-1. TV POWER STANDBY
65 inches : LD/SMPS A•
CNM803A
Main Connector (POWER)
75 inches : LD/SMPS A•
CN9003A
CNM803B
CNM803A
Main Connector (POWER)
CN9003A
CNM803B
Page 72

4-3
4. Troubleshooting
82 inches : LD/SMPS A•
CN9003A
CNM803B
CNM803A
Main Connector (POWER)
CNM803A (MAIN Connector)
1 B-GND 2 B-GND 3 N.C 4 N.C 5 B350V 6 B350V
7 N.C 8 N.C 9 GND 10 GND 11 VAMP 12 B13V
13 VAMP 14 B13V 15 VAMP 16 B13V 17 A13V 18 GND
19 PS_ON 20 POWER_LOW 21 N.C 22 N.C 23 GND 24 Fault
25 5.5V 26 N.C
CN9003A (LD/SMPS A Connector)
1 GND 2 SEAMLESS 3 GND 4 SCL_LED 5 BLU_ON/OFF 6 TEST_SD
7 SDA_LED 8 GND 9 TEST_LD 10 VSYNC_IN 11 SERIAL_STT 12 SERIAL_UHR
SERIAL_
13
13 VAMP 14 B13V 15 VAMP 16 B13V 17 GND 18 GND
19 N.C 20 N.C 21 B350V 22 B350V 23 N.C 24 N.C
25 B-GND 26 B-GND
DATA
1 5V 2 N.C 3 GND 4 Fault 5 N.C 6 N.C
7 PS_ON 8 POWER_LOW 9 N.C 10 GND 11 VAMP 12 B13V
14 GND 15 GND 16 CONTACT
CNM803B (LD/SMPS A Connector)
Page 73

4-4
4. Troubleshooting
TV in Standby1.
Check 9 Standby LED Indicator
2.
If Not Lit:
Check One Connect Box is Powered. 9
If OK•
Check OCB Cable to TV (Miss Connections or damaged cable)
9
If OK•
Check
9 A13 V CNM803A Pin
A13V is supplied from One Connect to SMPS & TV Board•
If A13V is missing on
3. LD/SMPS A
Remove • CNM803A Connector to LD/SMPS A
Check A13V on Cable or at TV Board
9
If A13 is now OK & Standby is now On, Replace Defective SMPS •
If A13 is still missing•
Check One Connect Operation / One Connect Cable
9
Perform One Connect Power Supply Stand Alone Test•
If OK Replace defective One Connect Cable or TV Main Board•
If A13 was OK on
4. LD/SMPS A
9
Check TV Main Board supply voltages to Function Control
If missing replace TV Main Board•
Check Standby LED voltage (1.7Vdc on Function Connector)
9
If OK replace Function Assy•
If missing replace TV Main Board•
on TV LD/ SMPS A
17
Page 74

4-2-2. TV POWER ON SEQUENCE
4-5
4. Troubleshooting
65 inches : LD/SMPS A•
FUSE
CNM803A
Main Connector (POWER)
VAMP / B13V
CNM803A (MAIN Connector)
1 B-GND 2 B-GND 3 N.C 4 N.C 5 B350V 6 B350V
7 N.C 8 N.C 9 GND 10 GND 11 VAMP 12 B13V
13 VAMP 14 B13V 15 VAMP 16 B13V 17 A13V 18 GND
19 PS_ON 20 POWER_LOW 21 N.C 22 N.C 23 GND 24 Fault
25 5.5V 26 N.C
Power On
65 inches : LD/SMPS B•
35Vdc LED Supply
CN9003B
LD/SMPS A Connector
CN9003B (LD/SMPS A Connector)
1 GND 2 CONTACT 3 SERIAL_DATA 4 GND 5 SERIAL_STT 6 SERIAL_UHR
7 TEST_LD 8 VSYNC_IN 9 SDA_LED 10 GND 11 BLU_ON/OFF 12 TEST_SD
13 GND 14 SCL_LED 15 GND 16 SEAMLESS
Backlight
Page 75

4-6
4. Troubleshooting
75 inches : LD/SMPS A•
Main Connector (POWER)
FUSE
CNM803A
VAMP / B13V
CNM803A (MAIN Connector)
1 B-GND 2 B-GND 3 N.C 4 N.C 5 B350V 6 B350V
7 N.C 8 N.C 9 GND 10 GND 11 VAMP 12 B13V
13 VAMP 14 B13V 15 VAMP 16 B13V 17 A13V 18 GND
19 PS_ON 20 POWER_LOW 21 N.C 22 N.C 23 GND 24 Fault
25 5.5V 26 N.C
Power On
75 inches : LD/SMPS B•
35Vdc LED Supply
CN9003B
LD/SMPS A Connector
CN9003B (LD/SMPS A Connector)
1 GND 2 CONTACT 3 SERIAL_DATA 4 GND 5 SERIAL_STT 6 SERIAL_UHR
7 TEST_LD 8 VSYNC_IN 9 SDA_LED 10 GND 11 BLU_ON/OFF 12 TEST_SD
13 GND 14 SCL_LED 15 GND 16 SEAMLESS
Backlight
Page 76

4-7
4. Troubleshooting
82 inches : LD/SMPS A•
FUSE
VAMP / B13V
CNM803A
Main Connector (POWER)
CNM803A (MAIN Connector)
1 B-GND 2 B-GND 3 N.C 4 N.C 5 B350V 6 B350V
7 N.C 8 N.C 9 GND 10 GND 11 VAMP 12 B13V
13 VAMP 14 B13V 15 VAMP 16 B13V 17 A13V 18 GND
19 PS_ON 20 POWER_LOW 21 N.C 22 N.C 23 GND 24 Fault
25 5.5V 26 N.C
Power On
82 inches : LD/SMPS B•
35Vdc LED Supply
CN9003B
LD/SMPS A Connector
CN9003B (LD/SMPS A Connector)
1 GND 2 CONTACT 3 SERIAL_DATA 4 GND 5 SERIAL_STT 6 SERIAL_UHR
7 TEST_LD 8 VSYNC_IN 9 SDA_LED 10 GND 11 BLU_ON/OFF 12 TEST_SD
13 GND 14 SCL_LED 15 GND 16 SEAMLESS
Backlight
Page 77

4-8
4. Troubleshooting
Power TV On1.
Check 9 A1 3V pin
If missing check One Connect Operation & Cables to the TV•
Check
9 PS_ON pin
NOTE
WillstayOnforshorttimewhenpoweredo.•
2.
If PS_ON Error (won’t change or missing voltages)
Check & perform " 9 Function Control Test" Operation
3.
If PS_ON is OK
Check 9 B350 (from OCB) for approx 346Vdc at pins
pins
If B350 & A13V are OK
4.
Check 9 B13V Switched Supplies for 12.8Vdc at pins
Check 9 Vamp (Audio amp supplies) for 18Vdc at pins
If no B13V or Vamp voltages5.
Check Resistance on 9 LD/SMPS A FUSEafterrstremoving
If wrong B13V or Vamp Voltages
6.
Check/Replace 9 LD/SMPS A
9
Check TV Main Board (If defective can load down SMPS)
7.
Backlight ON
Check 9 BLU_ON/OFF0V(whenO)to5Vdc(on)at
,
1
2
If missing check One Connect Operation & Cables to the TV ("PS_ON" activates B350V Supply in One Connect •
Box)
If fuse is open Replace • LD/SMPS A
If no change replace TV Main Board or OC Box•
(Supplied by One Connect Box)
17
0.2Vd c(wheno)changesto3.3Vdc (on)
19
, 6 while using important B-GND reference at
5
,
12
11
CN9003B
,
14
,
13
CNM803A
pin
16
,
15
11
NOTE
The Panel SMPS can be disconnected completely and the Panel will still have Standby Light and attempt Power •
On.
This is because the 13A Vdc supply is from the OCB and connects directly to the TV Main Board.•
Page 78

4-9
4. Troubleshooting
4-2-3. One Connect POWER ON SEQUENCE
65 / 75 / 82 inches : One Connect SMPS•
CNM803 (POWER)
1 IR_SMPS 2 FAIL COUNT 3 PS_ON 4 POWER_LOW 5 GND
6 GND 7 A1 3V 8 A1 3V 9 A13 V 10 A13 V
11 GND 12 GND 13 N.C 14 N.C 15 B350V
16 B350V 17 N.C 18 N.C 19 B_GND 20 B_GND
Power On
CNM803
Connect OCB to TV & Place in Power Standby 1.
Check 9 A1 3V for 12.8Vdc on pins
Press TV "Power On" by Remote Control or TV Function Assy.2.
Check 9 PS_ON pin
NOTE
WillstayOnforshorttimewhenpoweredo.•
3.
If PS_ON Error (won’t change or missing voltages)
Check OCB Cable Connection to the TV. 9
Should hear OCB relay activate with cable connection. •
If PS_ON is OK
4.
Check 9 B350 for approx 346Vdc at pins
pins
,
19
20
If missing perform "• OCB Self Power Supply".
0.2Vd c(wheno)changesto3.3Vdc (on)
3
,
7
15
,
8
,
9
10
,
is activated. while using important B-GND reference at
16
Page 79

4-10
4. Troubleshooting
4-2-4. OCB Self Power Supply
65 / 75 / 82 inches : One Connect SMPS•
CNM803 (POWER)
1 IR_SMPS 2 FAIL COUNT 3 PS_ON 4 POWER_LOW 5 GND
6 GND 7 A1 3V 8 A1 3V 9 A13 V 10 A13 V
11 GND 12 GND 13 N.C 14 N.C 15 B350V
16 B350V 17 N.C 18 N.C 19 B_GND 20 B_GND
CNM803
Remove AC Power to the OCB & Remove Cover (follow Disassembly Procedure).1.
Connect Discharge Tool across leads of each large Capacitors to remove its charge. 2.
Remove Connector 3.
4.
Connect TV Backlight Test Cable.
CNM803
Discharge Tool
(to activate OCB Power Supply when AC line is applied).
Check A13V for 12.8Vdc on pins
IMPORTANT• : For Safety NEVER Test CNM803 exposed connector pins without test cable connected.
Check
9 B350 for approx 346Vdc at pins
pins
,
20
.
19
If missing or errors, replace OCB Power Supply.•
,
,
,
7
8
9
,
15
at on test cable at OCB connector.
10
is activated. while using important B-GND reference at
16
Page 80

4-11
4. Troubleshooting
IF TEST CABLE IS NOT AVAILABLE
Perform steps 1 through 3.•
Check
9 A13 V f or 12.8Vdc at board locations Labeled A11.8V and GND (See the picture below.)
GND
13Vdc
Check 9 B350 for approx 360Vdc at board test wire locations Labeled B332V and BGND (See the picture below.)
350Vdc
350Vdc GND
Page 81

4-12
4. Troubleshooting
4-2-5. BACKLIGHT Dimming Control & BL Supply Path
Over 400 Sections of BACKLIGHT Control•
65 / 75 inches•
LD/SMPS B
1 2 3 4 5
<Example with panel ribbons removed from>
5 4 3 2 1
LD/SMPS A
LED Panel Connectors
1 2 3 4 5
35Vdc LED Supply
CN9003A
LD/SMPS B
Dimming BL Control
CN1102_SPI (DIMMING)
1 GND 2 GND
3 PWM_DIMMING_OUT12_SDATA 4 GND
5 PWM_DIMMING_OUT11_SSTT 6 PWM_DIMMING_OUT10_SCLK
7 N.C 8 PWM_DIMMING_OUT9_VSYNC
9 OVD_ONOFF_LD_SDA_I2C 10 GND
11 B5V_PW 12 N.C
13 GND 14 OVD_LEVEL_LD_SCL_I2C
15 GND 16 PWM_DIMMING_OUT8_SEAMLESS
CNM803A
CN9003B
Start
1 B-GND 2 B-GND
3 N.C 4 N.C
5 B350V 6 B350V
7 N.C 8 N.C
9 GND 10 GND
11 VAMP 12 B13V
13 VAMP 14 B13V
15 VAMP 16 B13V
17 A13V 18 GND
19 PS_ON 20 POWER_LOW
21 N.C 22 N.C
23 GND 24 Fault
25 5.5V 26 N.C
CN1102_SPI
CNM803A
LD/SMPS A
CN9003A CNM803B
CNM803A
VAMP / B13V
1 2 3 4 5
LED Panel Connectors
CN201
CN200
Optical / PWR Connector
35Vdc LED Supply
BL Control Path
BL Control Path
Start
BL Supply B350Vdc
A13V Supply
ONE CONNECT
Page 82

4-13
4. Troubleshooting
82 inches•
LD/SMPS B LD/SMPS A
3 2 1
4 5
LD/SMPS B LD/SMPS A
LED Panel Connectors
35Vdc LED Supply
1 2 3
123
CNM803A
5 4
<Example with panel ribbons removed from>
LED Panel Connectors
LD/SMPS A
CN9003A
45
4 5
LD/SMPS B
LED Panel Connectors
CN1102_SPI (DIMMING)
1 GND 2 GND
3 PWM_DIMMING_OUT12_SDATA 4 GND
5 PWM_DIMMING_OUT11_SSTT 6 PWM_DIMMING_OUT10_SCLK
7 N.C 8 PWM_DIMMING_OUT9_VSYNC
9 OVD_ONOFF_LD_SDA_I2C 10 GND
11 B5V_PW 12 N.C
13 GND 14 OVD_LEVEL_LD_SCL_I2C
15 GND 16 PWM_DIMMING_OUT8_SEAMLESS
CN9003B
CN9003A
Dimming BL Control
Start
CN1102_SPI
CN201
Start
CNM803B
CNM803A
1 2 3
LED Panel Connectors
CNM803A
1 B-GND 2 B-GND
3 N.C 4 N.C
5 B350V 6 B350V
7 N.C 8 N.C
9 GND 10 GND
11 VAMP 12 B13V
13 VAMP 14 B13V
15 VAMP 16 B13V
17 A13V 18 GND
19 PS_ON 20 POWER_LOW
21 N.C 22 N.C
23 GND 24 Fault
25 5.5V 26 N.C
CN200
Optical / PWR Connector
BL Supply B350Vdc
A13V Supply
VAMP / B13V
ONE CONNECT
35Vdc LED Supply
BL Control Path
BL Control Path
Page 83

4-14
4. Troubleshooting
4-2-6. BACKLIGHT
65 / 75 inches : LD/SMPS A/B•
35Vdc LED Supply
LD/SMPS B
CN9003B
LD/SMPS A Connector
VAMP / B13V
CNM803A
MAIN Connector
35Vdc (65")
LD/SMPS A
35Vdc LED Supply
CN9003B (LD/SMPS A Connector)
1 GND 2 CONTACT 3 SERIAL_DATA 4 GND 5 SERIAL_STT 6 SERIAL_UHR
7 TEST_LD 8 VSYNC_IN 9 SDA_LED 10 GND 11 BLU_ON/OFF 12 TEST_SD
13 GND 14 SCL_LED 15 GND 16 SEAMLESS
Backlight
CNM803A (MAIN Connector)
1 B-GND 2 B-GND 3 N.C 4 N.C 5 B350V 6 B350V
7 N.C 8 N.C 9 GND 10 GND 11 VAMP 12 B13V
13 VAMP 14 B13V 15 VAMP 16 B13V 17 A13V 18 GND
19 PS_ON 20 POWER_LOW 21 N.C 22 N.C 23 GND 24 Fault
25 5.5V 26 N.C
Page 84

4-15
4. Troubleshooting
If TV Powers On but BACKLIGHTS OFF 1.
Check 9 BLU_ON0V(whenO)to3.6Vdc(on)at
If no change replace TV Main Board or OC Box•
If BLU_ON is OK•
9
Check
CNM803A
If missing•
Check OCB Cable & One Connect Box:
9
Perform "One Connect Stand Alone Test" & "Backlight Test"•
If 350 Vdc is OK & BLU_ON is OK•
Check BL by removing
9
If backlights turn on replace defective TV Main Board, if not: •
Check with step "SMPS/Panel Operation Test"
9
2.
IF Backlights are ON but Panel Section (s) are OFF or not Changing level
Check correct model One Connect Box 9
If wrong model replace OCB. (can create miss backlight operation)•
If correct model continue "SMPS/Panel Operation test".•
SMPS/PANEL OPERATION TEST
3.
Check 9 Backlight Supply at each highlighted Capacitor on both LD/SMPS A & B Boards. All should measure the same
approx 35Vdc (65” TV)
IfanymissingorwrongvoltageturnTVpowerOandremovepanelconnectorsontherelatedLD/SMPS•
Board. Turn Power back on.
Check 35Vdc Supply.
9
If still error, replace defective LD/SMPS Board. If OK replace defective Panel. (In Some cases a shorted LED •
String can damage the SMPS Supply.)
B350Vdc Pins
CN9003A
,
5
CN9003B
with B-GND REF Pins
6
BL Control
pin
11
,
1
2
Use: MUTE £ 4 £ 1 £ 9 £ EXIT to test Panel Backlight
Page 85

4-16
4. Troubleshooting
4-2-7. Backlight Quick Test
One Connect Power Supply to TV SMPS•
CNM803
A13V
B350V
ONE CONNECT BOX
Remove AC Power to the OCB & Remove Cover (follow Disassembly Procedure).1.
Connect Discharge Tool across leads of each large Capacitors to remove its charge. 2.
ONE CONNECT BOX
CNM803 (POWER)
FAIL_COUNT 2 1 IR_SMPS
POWER_LOW 4 3 PS_ON
GND 6 5 GND
A13V 8 7 A13V
A13V 10 9 A1 3V
GND 12 11 GND
N.C 14 13 N.C
B350V 16 15 B350V
N.C 18 17 N.C
B_GND 20 19 B_GND
CNM803A
LD/SMPS A
Backlight Test Cable
CNM803 CNM803
Discharge Tool
Remove Connector 3.
4. Backlight Test Cable to Supply 350Vdc & 13Vdc directly to the TV Panel.
Connect TV
CNM803
.
Page 86

4-17
4. Troubleshooting
TV LD/SMPS A & LD/SMPS B
Remove TV Back Cover (Follow Repair Preparation Procedure).1.
Connect Discharge Tool across leads of each large Capacitors to remove its charge. 2.
Discharge Tool
Remove Connector 3.
Remove
4.
Connect TV side Backlight Test Cable to
5.
Apply One Connect AC Power and verify Backlight On.6.
CN9003A
CNM803A
on LD/SMPS B Board (Backlight Control).
on LD/SMPS A Board.
CNM803A
.
Page 87

4-18
4. Troubleshooting
4-3. Video
4-3-1. ONE CONNECT
Main Section
Video Operation
If No Video•
Check connection status of One Connect Cable
9
9
Reconnect One Connect Cable both side (TV and OCL)
If NG:•
Replace One Connect Box / Cable (defective)
9
9
TV MAIN (defective)
Cable
Page 88

4-3-2. MAIN/T-CON BOARD
4-19
4. Troubleshooting
Scaller & US Post of MUSE-M Main CPU Section• £ PRE FRC Main Section £ POST FRC Main Section £ T-CON Section
Scaller & US Post of MUSE-M Main CPU Section
Customer Picture Test 1 Mute > 1 > 4 > 7 > Mute
Video Operation
Generated on Main CPU Section.
If OK:•
Source & Input Cables
9
9
Other inputs
If Noisy:•
Pre Scaler Patterns
9
9
US Post Patterns
9
Pre FRC Pattern
PRE FRC Main Section
Video Operation
Generated at Pre FRC, in TV Main Board.
If OK:•
Check/Replace defective TV Main Board
9
If Noisy:•
Post FRC Pattern
9
PRE FRC (Factory Mode)
Page 89

4-20
4. Troubleshooting
POST FRC Main Section
Video Operation
Generated at Post FRC in TV Main Board
If OK:•
Check/Replace defective TV Main Board
9
If Noisy:•
Mute
9 £ 3 £ 6 £ 9 £ Mute
T-CON Section
POST FRC (Factory Mode)
[May not be available for Larger models over 70 inches.]
Video Operation
Generated at T-CON Section in TV Main/T-CON
If OK:
1.
Check/Replace defective TV Main/T-CON Board 9
2.
If Noisy:
9
Main/T-CON Board
9
Panel
Mute > 3 > 6 > 9 > Mute
Page 90

4-3-3. PANEL
4-21
4. Troubleshooting
If Noisy Video:1.
Soc T-CON Pattern in Factory Mode 9
Use type of Noise observed (Bars, single lines, video distortion, etc to help.)•
If noise is only on one half of screen check / swap panel cables.•
Verify Defective Panel Cables, TV Main/T-CON Board or Panel.•
If No Video & Back Lights are OK (on):
2.
If sound is OK check Panel 13Vdc supplies to Panel 9
9
If No sound replace TV Main Board
Page 91

4-22
4. Troubleshooting
4-3-4. Check Test Patterns
ENTER : • Factory mode £ SVC £ Test Pattern
Main Board
Muse-M
FRC
T-CON
Verify "1. Scaler Pattern" and "US Post Pattern"
2. FRC Pre Test Pattern"
Verify "
3. FRC Post Test Pattern"
Verify "
4. SoC TCON Test Pattern"
Verify "
1
Scaler Pattern / US Post Pattern
2
FRC Pre Test Pattern
3
FRC Post Test Pattern
4
SoC TCON Test Pattern
[Factory Mode]
Page 92

4-4. Audio
4-23
4. Troubleshooting
Source (One Connect)• £ One Connect/TV Main Board £ Speakers
Source (One Connect)
No TV Sound•
Menu
9 £ Audio £ Speaker Settings set to TV Speaker
Noisy / Distorted TV Audio•
Customer Menu
9 £ Support £ Sound Test
If Sound Test FAILS : (Missing / Noisy Audio)
-
Speakers (compare resistance/quality)
9
Compare audio level out to speakers with
multi meter.
Replace defective Speakers or Main Board or
9
Cable.
-
If Sound Test OK :
Audio Source & External Cables
9
9
With external Audio Generator (device or App)
9
Other Inputs
9
One Connect Mini
Optical Digital Out Errors•
Red light from Optical Digital Out.
9
If missing replace One Connect Mini•
One Connect/TV Main Board
No HDMI Audio •
Source / HDMI Cable & One Connect Mini Connectors
9
Swap with other HDMI Inputs / Sources.•
Perform • EDID Write in Factory Mode (Can restore missing HDMI Audio).
BulletinsandLatestrmwareonTV. 9
If not restored replace One Connect•
Check Audio Format PCM / Dolby based on external Receiver•
ARC Issues•
HDMI Cable is input to the ARC Designated HDMI port.
9
9
ARC (HDMI Control) is enabled on the external Receiver.
Bluetooth Audio "Sound Share" Connection Issues•
Sound Bar is in TV Mode.
9
To Connect, Press & Hold Play Button until Sound Bar pairing mode begins. •
Page 93

4-24
4. Troubleshooting
4-5. Network
<TV> <Router> <Internet>
TV to Router " Failure"
Check 9 Network Status
Check Network Status (TV Router Internet)
Wired & Wireless MAC Address 9 in Customer Support Menu.
No Wired MAC Address• : Replace Main Board.
No Wireless MAC Address• :
Module cabling & voltages from Main Board.
9
If operating voltages are OK but signal missing.•
Replace
9 WiFi Module (WiFi/Bluetooth Module).
9 security passcode
Proper
9 Wi-Fi signal strength at TV (use WiFi Analyzer or similar App).
Check
Try another source (Hot spot or Test Router)•
Check
9 related Bulletins.
9 Factory Mode→SVC→Info→WiFi Error Count (replace module for high error counts).
Check
Router to Network " Failure"
Check 9 Network Status
Check Network Status (TV Router Internet)
Instruct the customer the TV has proper connection to the router and is likely OK.•
Check
9 other devices using network are OK. If they test OK this does not mean the TV should be working.
Try another source (Hotspot) to test/show TV Network operation.•
Page 94

4-6. Smart Hub
4-25
4. Troubleshooting
Network Test/Gateway Test • £ DNS Test £ ISP Blocking £ Samsung Server Test £ Samsung Apps Test
<TV> <Samsung Server><Router> <Internet>
Go to Menu £ Support £ Self Diagnosis £ Smart Hub Connection Test
Network / Gateway
If it Fails:•
TV to Router Connection Test in "
9 Network Trouble shooting"
DNS Test
If it Fails:•
DNS
9 setting in "Network Settings"
If DNS is set manually:•
Settingsarecorrect(maybesetto8.8.8.8topreventNetixissues) 9
If it still fails:•
DNS Test with setting to Auto Mode
9
If it fails both Manual & Auto problem is ISP or Router.•
ISP Blocking
If it Fails:•
Internet Service Provider is Active.
9
9
With DNS setting at 8888.
9
With Hot Spot.
Samsung Server Test
If it Fails:•
Network Status.
9
If OK:•
Reset Smart Hub.
9
9
Terms of Agreement are accepted.
Samsung Apps
If it Fails:•
Reset
9 Smart Hub.
9
Samsung Apps load correctly.
9 Apps Reset" in Factory Mode.
Perform "
9
Go to Smart Hub and complete Terms of Agreement and set up information.
9
Samsung Apps load correctly.
9
Before selecting an App, allow Apps to load or failure wilre-occur.
Page 95

4-26
4. Troubleshooting
For Netix Operation/Connection Issues:
Check 9 Certicate&NetixESNStatusinFactoryMode.
IfCerticateandESNexists,"• CO", "NfO", change the DNS to 8.8.8.8
IfCerticateismissing,"• C/" replace the TV’s Main Board.
If ESN number is missing: • NF/ do not replace the Main Board.
ResetTVClockandcheckforcorrectTime&Date.Netixreliesoncorrectsettings. -
-
Reset Smart Hub. / Reset Apps In Factory Mode.
For Streaming Issues:
Go to TV Web Browser / Go to speedof.me / testmy.net•
Check Speed
9 for at least 5 Mbps(HD streaming) / 25 Mbps (4K Streaming).
9 for less than 50ms.
Check Latency
Page 96

4-7. BlueTooth / WiFi Module
4-27
4. Troubleshooting
Pin 1 ~ Pin 10
PIN
Pin Description
Pins Name Standby Power On
1 BT_WAK E 3.3 Vdc 3.3 Vdc
2 B T_UART_T XD 3.3 Vdc 3.3 Vdc
3 WIFI_PHY_ON 0 3.3 Vdc
4 GND 0 0
5 D+_USB_BTWIFI 0 Sig(DP)
6 D-_USB_BTWIFI 0 Sig(DM)
7 GND 0 0
8 WIFI_5V 5 Vdc 5 Vdc
9 WIFI_WOW 3.3 Vdc 3.3 Vdc
10 BTWIFI_NRESET 3.3 Vdc 3.3 Vdc
Contact Samsung
<
- Wired MAC Address : xx:xx:xx:xx:xx:xx
- Wireless MAC Address : xx:xx:xx:xx:xx:xx
- Bluetooth Address : xx:xx:xx:xx:xx:xx
Go to Menu £ Support £ Contact Samsung
9
Wireless MAC Address
9
Bluetooth Address
If • Bluetooth Address or Wireless MAC Address are missing or errors exist.
BT & Wi-Fi Connector Voltages.
9
If Voltages are OK but no BT or Wi-Fi Signals voltage(s), replace defective Module.•
Missing or Error : Replace 9 Main Board.
Page 97

4-28
4. Troubleshooting
4-8. Replacing Main Board
When replacing Main Board, certain values needs to be manually input in Factory menu to complete the replacement.
Steps to Replace Main Board
Enter Factory Menu (Use Factory Remote only).1.
Power TV on :• Select TV Source £ Info/Factory £ Option
Change Each value according to the TV Model.
2.
Type• , Writing Type, Local Set, SW Model, Model Code must be set to correct value.
Sample Model : QA82Q90RAKXXV •
Type
Check Panel label (located in the back chassis of panel) and choose same Type code from the list.•
CY-TR082FLLV1V/H
*****(***)
<Panel Label>
**XX
2018.01.XX
82A1QU9TR
**XX
2019.0X.XX
82A1QU9TR
Home Updates Exit
Factory Reset
Type 82A1QU9TR
Writing Type
Local Set ED_VIET
SW Model QRQ90
Model Code QA82Q90RAKXXV
TUNER -
Ch Table NONE
MRT Option
Production Option
Engineer Option
55A1QU7QN 55L1QU7QN
75L1QU7QN 55A1QU8XN
55L1QU7QN 55A1QU7QN
65A1QU9TR 65L1MU9TN
65L1QU9TR 65L1QU7QN
82A1QU9TR
65A1QU8XN 65L1QU8XN
55A6AU0NN 82A1QU9TR
<Type list in the Factory Menu>
Page 98

Writing Type
4-29
4. Troubleshooting
For Quick Entry of Type.•
Conrm1. Type from Option Byte Table for your TV.
2. Writing Type.
Select
3. Set Panel Type" appears.
"
4.
Enter exact Model Type using cursors.
Select 5. OK.
6. appears in the Option Table.
Writing Type Success
If the model Type you entered doesn’t exist it will not
load.
-
If you entered over 10 digits an Information screen box is
full appears.
Complete rest of Option Byte Table info.
7.
Presssoftpowerowithremotetoentersettings.8.
NOTE
When installing the ASSY PCB MAIN BOARD, verify the
board is properly positioned in all 4 mounting slots.
Home Updates Exit
Factory Reset
Type 82A1QU9TR
Writing Type
Local Set ED_VIET
SW Model QRQ90
Model Code QA82Q90RAKXXV
TUNER -
Ch Table NONE
MRT Option
Production Option
Engineer Option
82A1QU9TR
Local Set
<Set Writing Type>
Home Updates Exit
Factory Reset
Type 82A1QU9TR
Writing Type Success
Local Set ED_VIET
SW Model QRQ90
<Writing Type Success>
Information
The box is full. You can't enter any more text.
OK
<Writing Type digits exceeded>
Set according to Local region(country).•
Page 99

4-30
4. Troubleshooting
SW Model
Check Label Rating of the TV(located on the Rear Cover).•
- after "/" in Version No.
SW Model is digits
-
Choose same SW Model code from the list.
XXXX / QRQ90
Home Updates Exit
Factory Reset
Type 82A1QU9TR
Writing Type
Local Set ED_VIET
SW Model QRQ90
Model Code QA82Q90RAKXXV
TUNER -
Ch Table NONE
MRT Option
Production Option
Engineer Option
URU7300R QNQ6F
<"SW Model" in Label Rating>
QRQ60T QNQ75C
URU8000F QRQ80C
QRQ70D QNQ9F
QNQ8FB QNQ7F
URU7000JJ QRQ900Z
URU7100H QRQ90B
QRQ90
<SW Model list in the Factory Menu>
Page 100

Model Code
4-31
4. Troubleshooting
For Quick Entry of Model Code.•
Conrm1. Model Code from Option Byte Table for your TV.
2. Model Code.
Select
3. Set Model Code" appears.
"
4.
Enter exact Model Code using cursors.
If you entered over 19 digits an 5. Information screen box is full
appears.
IMPORTANT
- : It will accept wrong model code, be sure to
enter correct code
Complete rest of Option Byte Table info.
6.
Presssoftpowerowithremotetoentersettings.7.
Home Updates Exit
Factory Reset
Type 82A1QU9TR
Writing Type
Local Set ED_VIET
SW Model QRQ90
Model Code QA82Q90RAKXXV
TUNER -
Ch Table NONE
MRT Option
Production Option
Engineer Option
QA82Q90RAKXXV
<Set Model Code>
Home Updates Exit
Factory Reset
Type 82A1QU9TR
Writing Type
Local Set ED_VIET
SW Model QRQ90
Model Code !QA82Q90RAKXXV1
<Wrong Model Code Entry>
Information
The box is full. You can't enter any more text.
OK
<Model Code digits exceeded>
 Loading...