

Samsung QA83S90DAEXXY, QA55S90DAWXXY, QA65S90DAWXXY, QA75QN85DBWXXY, QA77S90DAEXXY User Manual
...
User guide
Thank you for purchasing this Samsung product.
To receive more complete service, please register your
product at
www.samsung.com
Model Serial No.
To directly go to the page that provides instructions on
how to use the manual for visually impaired users, select
the Menu Learning Screen link below.
"Menu Learning Screen
" Link

Contents
Guide
Connections
Connection Guide
6
8 Connecting an Antenna (Aerial)
Connecting to the network
9
13 Displaying your mobile device screen on the TV
15 Connecting to a Network via a Mobile Dongle (For India
Only)
Connection Cables for External Devices
16
ADB (Auto Data Backup) functions (For India Only)
18
Switching between external devices connected to the TV
19
Connection Notes
22
Remote Control and Peripherals
25 About the Samsung Smart Remote (QLED TV/The Frame/
LS01D/S8*D/S9*D/DU9/DU8 Series/DU77**/DUE77 model)
About the Samsung Smart Remote (DU76**/DUE76 model)
28
About the Remote Control (DU7 Series) (except for DU77**/
31
DU7600/DUE77/DUE76 model)
66 About the For You / Discover Home Screen
About the Live Home Screen
69
About the Apps Home Screen
70
About the Menu Home Screen
74
79 Using a Samsung account
Using Workspace
81
Using the User guide
87
Using the Internet
89
Using SmartThings
90
95 Using the Samsung Smart Upgrade (For India Only)
96 Playing pictures/video/music
Using Multi View
103
Using Bixby
105
Using Samsung Now+
110
112 Using the Game Bar
117 Using Auracast
TV Viewing and Recording
34 Connecting the Samsung Smart Remote to the TV
35 Controlling External Devices with a Samsung Remote
Control - Using the Universal remote setup
Learn how to use Samsung Smart Remote
35
Learn how to use Game Controller
35
Using Anynet+ (HDMI-CEC)
36
Controlling the TV with a Keyboard, Mouse or Gamepad
37
Entering Text using the On-Screen Virtual Keyboard
41
Smart Features
43 Using Smart Hub
48 Using Ambient Mode
54 Using Art Mode
62 About the Daily+ Home screen
63 Using Samsung Gaming Hub
Using the Guide
118
Recording Programmes
121
Setting Up Schedule Viewing
124
Using Timeshift
125
126 Buttons and functions available while recording a
programme or Timeshift
128 Using the Channel List
130 Using the channel edit function
131 Using a Personal Favourites List
132 TV-Viewing Support Functions
Picture and Sound
Using Intelligent Mode
140
Adjusting the Picture Quality
142
Picture Support Functions
146
65 Using the Home Function
Setting the Viewing Environment for External Devices
147

151 a Sound Mode and Expert Settings
Using the Sound Support Functions
153
System and Support
Using the Time Functions and the Timers
156
159 Using the Power and Energy Saving Functions
161 Using the Panel Care Functions
162 Updating the TV's Software
Using the Parental Settings function
164
Audio and Video Functions for the Visually or Hearing
165
Impaired
171 Using Voice Assistants on the TV
172 Using Other Functions
174 HbbTV
175 Using a TV Viewing Card (“CI or CI+ Card”) (For India Only)
178 Teletext Feature
Precautions and Notes
Before Using the Recording and Timeshift Functions
182
184 Supported broadcasting audio options
185 Read Before Using Apps
186 Read Before Using the Internet Function
Troubleshooting
Picture Issues
The screen is or has become dark
215
216 The picture is not bright, or the picture colours do not look
clear
216 The picture colours are black and white or do not look the
way they should look
217 The TV automatically turns off by itself
217 TV (The Frame TV) cannot be turned off.
217 Unable to power on
218 The TV remains on or does not turn on automatically.
Unable to a Channel
218
219 The TV image does not look as good as it did in the store.
219 Displayed video looks blurry
219 The picture is distorted.
220 There is a dotted line on the edge of the screen.
The picture won’t display in full screen.
220
The Subtitle function in the TV menu is deactivated.
220
Subtitles appear on the TV screen.
220
The HDR of the connected external device turns off.
220
188 Read Before Playing Photo, Video or Music Files
202 Read After Installing the TV
Supported Resolutions for UHD Input Signals
203
Resolutions for Input Signals supported by 8K models
204
(QN7**D Series or higher)
Supported Resolutions for FreeSync (VRR)
205
Read Before Connecting a Computer (Supported
207
Resolutions)
Supported Resolutions for Video Signals
210
Read Before Using Bluetooth Devices
212
: Parental Rating - Thailand only
213
Licences
214
Sound and Noise Issues
221 How can I connect an audio device to the TV?
221 There is no sound or the sound is too low at maximum
volume.
The picture is good but there is no sound.
221
HDMI (eARC/ARC) is connected, and there is no sound.
221
The speakers are making an odd sound.
222
The sound is interrupted.
222
Whenever a function is used on the TV or the channel is
222
changed, the TV voices the activity. The TV explains in voiceover the video scenes displayed on the screen.
222 The TV audio is not being played through the Soundbar or
A/V receiver.
223 The sound is not heard clearly.
223 The volume of the external device cannot be adjusted.
223 I want to turn the TV and audio device off and on at the
same time.

Channel and Broadcast Issues
231 The Timeshift or recording function cannot be used.
224 "Weak or No Signal" displayed in TV mode or cannot
channel.
224 The TV is not receiving all channels.
The subtitles are not provided on a digital channel.
224
224 Broadcasting is deactivated.
External Device Connectivity Issues
The "Mode Not Supported" message appears.
225
The video is OK but there is no audio.
225
I want to connect to a PC and mobile device via screen
225
mirroring.
226 No screen appears when connecting the TV to an external
device.
I want to connect to a Bluetooth speaker.
226
226 The PC screen does not appear or it
Network Issues
Cannot record videos received from an external device or
231
Samsung TV Plus.
231 The "Format Device" message appears when the Timeshift
or recording function is used.
231 The recorded on the TV are not played back on a PC.
Apps
I cannot the app I want.
232
I launched an app, but it's in a different language. How can I
232
change the language?
232 The app does not work properly. Its image quality is poor.
232 The Smart Hub Home Screen keeps appearing whenever you
turn on the TV.
Media Files
Some are interrupted during playback.
233
233 Some can't be played.
Wireless network connection failed. Unable to connect to a
227
wireless access point. Unable to connect to the network.
Wired network connection failed.
227
Connected to a local network, but not to the Internet.
227
Anynet+ (HDMI-CEC) Issues
228 What is Anynet+?
Anynet+ does not work. The connected device is not
228
displayed.
I want to start Anynet+. I also want the connected devices to
228
turn on when the TV is turned on.
229 I want to exit Anynet+. It is inconvenient to turn on other
devices because the TV also turns on. It is inconvenient
because the connected devices (e.g. set-top box) turn off
together.
229 The message "Connecting to Anynet+ device..." or
"Disconnecting from Anynet+ device" appears on the screen.
The Anynet+ device won't play.
229
Voice Assistant Issues
The microphone is off.
234
The voice commands do not work well.
234
Bixby/Alexa answers although I did not call it.
234
I spoke "Hi, Bixby/Alexa" but Bixby/Alexa does not answer.
235
Voice recognition does not work with the Samsung Smart
235
Remote unlike other features. There is no response even if
the Voice Assistant button is pressed.
During voice recognition, the heavy load message appears
235
and the function does not work.
I want to see weather information of the desired area.
235
Other issues
236 The TV is hot.
236 The TV smells like plastic.
236 The settings are lost after 5 minutes or every time the TV is
turned off.
Remote Control Issues
The remote control does not work.
230
External devices cannot be operated with the TV remote
230
control.
Recording Issues
236 The TV is tilted to the side.
236 The stand is wobbly or crooked.
237 I want to know how to attach and remove the TV stand.
237 A POP (TV’s internal banner ad) appears on the screen.
237 The TV is making a popping noise.

237 The TV is making a humming noise.
The TV narrates the screen events in voice-over.
237
Diagnosing TV operational issues
Self Diagnosis
238
240 Cannot select Broadcast Signal in Self Diagnosis.
240 Reset Smart Hub
240 Reset picture
Reset sound
240
Accessibility Guidance
Menu Learning Screen
Using the Remote control
242
244 Using the Accessibility menu
Using the TV with Voice Guide on
249
251 Using the guide
254 Using Schedule Viewing
255 Using the Channel List
Getting Support
Getting support through Remote Management
241
Finding the contact information for service
241
241 Requesting service
257 Recording
Using Smart Hub
260
Launching the User guide
262
Using Bixby
263

Guide
Learn how to use various features.
Connections
You can watch live broadcasts by connecting an antenna cable to your TV and can get access to the network by
using a LAN cable or wireless access point. Using various connectors, you can also connect external devices.
Connection Guide
You can view detailed information about external devices that can be connected to the TV.
(left directional button) Connected Devices Connection Guide Try Now
It shows you how to connect various external devices such as video devices, game consoles and PCs using pictures.
If you select the connection method and an external device, the connection details appear.
• Audio Device: HDMI (eARC/ARC), Optical, USB, Bluetooth, Wi-Fi
• Video Device: HDMI, AV
• Smartphone: Screen Sharing (Smart View), Screen Sharing (Tap View), Samsung DeX, SmartThings, Camera
Sharing, Apple AirPlay
• PC: HDMI, Screen Sharing (Wireless), Easy Connection to Screen, Apple AirPlay
• Input Device: Remote Control, USB Keyboard, USB Mouse, USB Gamepad, USB Camera, Bluetooth Device
• Game Console: HDMI, AV
- 6 -

• External Storage: USB Flash Drive, Hard Disk Drive (HDD)
Connection Guide
Audio Device
Video Device
Smartphone
PC
Input Device
Game Console
External Storage
HDMI (eARC)
Optical
USB
Bluetooth
Wi-Fi
HDMI Troubleshooting
Connect audio devices, such as speakers, soundbars,
headphones, or home theatres, to your TV.
Using HDMI Troubleshooting, you can check the connection to HDMI cable and external devices (takes approximately 2
minutes).
Some functions may not be supported depending on the model or geographical area.
The connection method and available external devices may differ depending on the model.
The image on your TV may differ from the image above depending on the model and geographical area.
- 7 -

Connecting an Antenna (Aerial)
You can connect an antenna cable to your TV.
An antenna connection is not necessary if you connect a cable box or satellite box.
– Do not use excessive force when connecting the antenna cable; excessive force may cause deformation of the port.
– To transport the product, first remove the antenna cable to prevent damage to the port.
The port on your TV may differ from the following depending on the product model and region.
A connection method may differ depending on the model or geographical area.
- 8 -
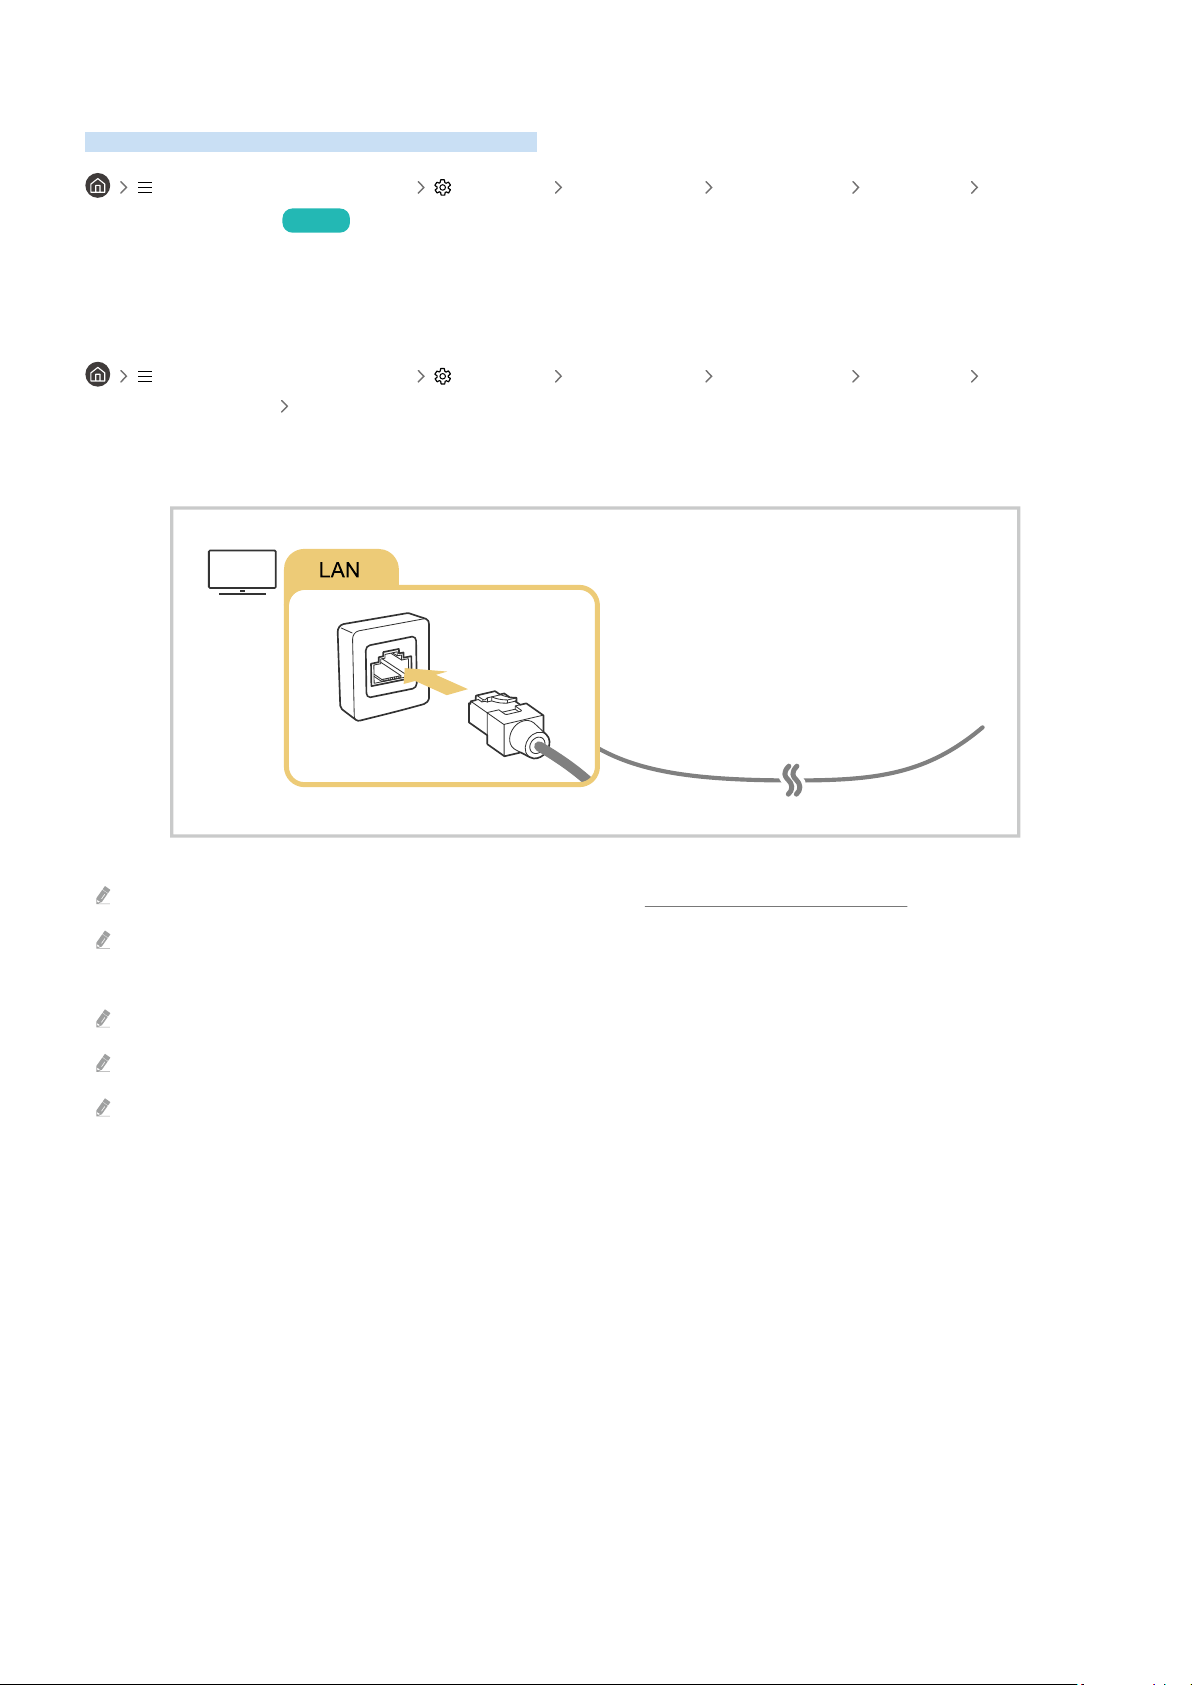
Connecting to the network
You can get access to the network through your TV.
(left directional button) Settings All Settings Connection Network Open
Network Settings Try Now
network settings to connect to an available network.
Establishing a wired network connection
(left directional button) Settings All Settings Connection Network Open
Network Settings Wired
If you connect a LAN cable, the TV automatically accesses the network.
If the TV does not automatically connect to the network, refer to "Wired network connection failed." in "Troubleshooting".
To connect a LAN cable, use a CAT 7 (*STP type) cable for the connection. (100/10 Mbps)
* Shielded Twisted Pair
The TV will not be able to connect to the network if your network speed is below 10 Mbps.
This function may not be supported depending on the model.
Wired networks are not supported by some models.
- 9 -

Establishing a wireless network connection
(left directional button) Settings All Settings Connection Network Open
Network Settings Wireless
Make sure that you have the wireless access point's name (SSID) and password settings before attempting to
connect. The network name (SSID) and security key are available on the wireless access point's
screen. See the wireless access point's user manual for more information.
- 10 -

The image on your TV may differ from the image above depending on the model and geographical area.
If no wireless access point is found, select Add Network at the bottom of the list and enter the network name (SSID).
If your wireless access point has a WPS or PBC button, select Use WPS at the bottom of the list, and then push the WPS or
PBC button on your access point within 2 minutes. The TV will connect automatically.
To view or delete previously connected network names (SSIDs), move the focus to Manage Saved Networks, and then press
the Select button.
To disconnect Wi-Fi, select Disconnect in (left directional button) Settings All Settings Connection
Network Network Status. Try Now
Checking the network connection status
(left directional button) Settings All Settings Connection Network Network
Status Try Now
View the current network status.
Resetting Your Network
(left directional button) Settings All Settings Connection Network Reset
Network Try Now
Restore the network settings to the factory default.
- 11 -

Turning on the TV with a mobile device
(left directional button) Settings All Settings Connection Network Expert
Settings Power On with Mobile Try Now
You can turn on the TV using a mobile device connected to the same network as the TV.
This function is available with a mobile device connected to the TV through the SmartThings app or the Apple AirPlay
function.
Apple AirPlay may not be supported depending on the model or geographical area.
Connecting an IP control device to the TV
(left directional button) Settings All Settings Connection Network Expert
Settings IP Remote Try Now
You can connect an IP control device to the TV remotely to manage your IP device.
To use this function, Power On with Mobile must be turned on.
Turning this feature on may allow other IP control devices to control your TV. We recommend turning this feature on only if
an authorised third-party custom controller is installed and for a Samsung TV and if your Wi-Fi
network is password protected.
This function may not be supported depending on the model or geographical area.
Allowing to connect a wireless network
(left directional button) Settings All Settings Connection Network Expert
Settings Wi-Fi Try Now
You can enable the connection to Wi-Fi.
To connect a wireless network, the function must be active.
Changing the name of the TV
(left directional button) Settings All Settings Connection Device Name Try Now
You can change the name of the TV on the network. Select User Input at the bottom of the list and change the
name.
- 12 -

Displaying your mobile device screen on the TV
You can watch the screen of your mobile device on the TV screen through Smart View, Apple AirPlay or Tap View.
When you start screen sharing with a mobile device (Smart View / Apple AirPlay / Tap View), the TV screen switches
to the Multi View or mobile device's screen. Watch multiple contents at the same time with the Multi View screen.
This function may not be supported depending on the model.
For more information, refer to "Using Multi View".
Using Screen Sharing (Smart View)
For information on how to share the screen with your mobile device, refer to
Connected Devices Connection Guide Smartphone Screen Sharing (Smart View). Try Now
• To turn off Screen Sharing (Smart View), disconnect the mobile device or press the button on the remote
control.
• Using the Smart View menu on your mobile device, you can change the settings such as aspect ratio.
(left directional button)
Using Apple AirPlay
Use AirPlay if you are an iPhone or iPad user. For more information, refer to (left directional button)
Connected Devices Connection Guide Smartphone Apple AirPlay. Try Now
This function may not be supported depending on the model or geographical area.
To use Apple AirPlay, make sure (left directional button) Settings All Settings Connection Apple
AirPlay Settings is enabled.
- 13 -

Using Screen Sharing (Tap View)
Tap your mobile device on the TV, you can watch the Multi View or mobile device's screen through the TV screen.
When you tap a mobile device on your TV while running a music app on your mobile device, the TV screen switches
to the Music Wall screen.
1.
Enable Tap View, Tap Sound on your mobile device.
For more information about refer to "Enabling Tap View".
2.
Turn on the screen of your mobile device.
3.
Tap your mobile device on the TV. The TV screen switches to Multi View, Music Wall or mobile device's screen.
When you perform Tap View while in Ambient mode or Art mode (only in The Frame models), only the mobile device's
screen appears on the TV.
4.
Watch the Multi View, Music Wall or mobile device's screen on the TV screen.
This function may not be supported depending on the model.
This function is available in Samsung mobile devices with Android 8.1 or higher.
Music Wall screen is a function that allows you to enjoy music along with visual video effects that change according to the
genre and beat of the music.
The displayed TV screen may differ depending on the model.
This function enables Screen/Sound Mirroring by detecting vibrations generated when you tap the mobile device on the TV.
Be sure to tap away from the TV screen and bezel corners. It may be scratched or broken to the TV or mobile device screen.
We recommend using your mobile device with the cover in place and lightly tap it on any external edge of the TV.
Enabling Tap View
Enable Tap View in the SmartThings app.
This function may not be supported depending on the model.
Depending on the SmartThings app version, you may need to register the TV with your mobile device.
1.
Launch the SmartThings app on your mobile device.
2.
Select Settings ( ) in SmartThings app on your mobile device.
3.
Set Tap View, Tap Sound to on.
Upon connection for the time, select Allow on a pop-up window of the TV.
- 14 -

Connecting to a Network via a Mobile Dongle (For India Only)
Make network connection by connecting a mobile dongle to the TV.
You can make the TV to connect to a network via a mobile device by connecting a mobile dongle to the TV. Connect
the mobile dongle to the USB port that are marked as Dongle in the TV.
This function is not available on certain models in geographical areas.
When you use a large mobile dongle(Data Card), USB devices may not work properly due to interferences among the USB
ports, or the wireless network may not work properly due to interferences from the peripherals and surroundings. In this
case, use a USB extension cable to connect a large mobile dongle to a USB port.
When using the optical cable or 3G dongle, interference may occur due to the large size of the dongle.
Channel-Bound Apps is not available when you set up mobile network.
If you have any problems using online services, please contact your Internet service provider.
To use a mobile dongle, connect the dongle to the USB (5V 0.5A) port. (For the CU8000 model, connect the dongle to the 5V
1A port.)
The mobile service providers and their devices that support this function are as follows:
• Airtel (Model No: E3276s LTE, E1731, E303C, E303U, E3131B, E3121B, E8221, E8231, E3276 LTE)
• Idea, Vodafone
- 15 -

Connection Cables for External Devices
You can view detailed information about the connection cables for external devices that can be connected to the TV.
Cable name Image Description
Each cable simultaneously transmits digital video and audio signals
from an external device to the HDMI port on the TV.
HDMI
to
HDMI
HDMI
to
MINI HDMI
Cables are divided into various types according to the types of input/
output ports on external devices.
HDMI
to
Micro HDMI
HDMI
to
USB Type-C
HDMI
to
DisplayPort
Mini DisplayPort
to
HDMI
- 16 -

Cable name Image Description
DVI
to
HDMI
Optical
Component
DVI to HDMI cables can transmit only digital video signals and not
audio signals. We recommend that you use HDMI to HDMI cables.
Optical cables are used to transmit audio signals to external
speakers with low signal loss.
Optical cables can't transmit video signals.
Component cables transmit analogue signals.
The video signal is separated and transmitted to the red, green and
blue terminals to provide HD (1080i) pictures. The audio signal is
transmitted to the red and white terminals.
Composite cables transmit analogue signals.
Composite
Available connection cables may differ depending on the model or geographical area.
The video signal is transmitted to the yellow terminal and the audio
signal is transmitted to the red and white terminals.
- 17 -

ADB (Auto Data Backup) functions (For India Only)
This function may not be supported depending on the model or geographical area.
Your mobile device comes close to the TV, the ADB (Auto Data Backup) feature backs up your mobile data such as
images and videos into a folder on a USB storage device or an external hard disk drive
connected to the TV. You can also transfer from the ADB (Auto Data Backup) folder to a Samsung mobile
device over Wi-Fi Direct.
• Transferring data from a mobile device to the TV
Your mobile device comes close to the TV, images and videos are copied from your mobile device to a USB
storage device or an external hard disk drive connected to the TV.
• Transferring data from the TV to a mobile device
You can select and transfer files from the ADB (Auto Data Backup) folder on the TV to a Samsung mobile device.
How to Use ADB (Auto Data Backup)
1.ADB (Auto Data Backup) Registration
First, register the TV using the USB Backup app, and then select a USB storage device or an external hard disk drive
connected to the TV. The ADB (Auto Data Backup) folder is automatically created on the selected storage device.
Then, select folders from your mobile device's gallery, set the password to open the ADB (Auto Data Backup) folder
on the selected storage device connected to the TV.
2.Auto File Copy
When your mobile device comes close to the TV, data are automatically copied from the selected folders on your
mobile device to the selected storage device connected to the TV.
3.Share les back from the ADB folder to a mobile device
You can also share back from ADB folder to Samsung Mobile, by connecting Samsung Mobile with TV over
Wi-Fi direct & then select the to be transferred from TV, and press "Share" option to send to connected
Mobile device.
- 18 -

Switching between external devices connected to the TV
You can switch between TV programmes and the content of external devices.
(left directional button) Connected Devices
When you select a connected external device on the Sources screen, the output of the selected device is displayed
on the TV's screen.
On the Standard Remote Control, press the SOURCE button.
To control a device (Blu-ray player, game console, etc.) that supports universal remote control with the TV's remote control,
connect the device to an HDMI port on the TV, and then turn on the device. The output displayed on the TV is automatically
switched to the output of the device or you can universal remote control for the device automatically. For more
information, refer to "Controlling External Devices with a Samsung Remote Control - Using the Universal remote setup".
When a USB device is connected to the USB port, a pop-up message appears that lets you switch easily to the media
content listed on the device.
This function may not be supported depending on the device and geographical area.
- 19 -

Editing the name and icon of an external device
(left directional button) Connected Devices
You can change the port name for a connected external device or add it to the Home Screen.
The image on your TV may differ from the image above depending on the model and geographical area.
1.
Move the focus to a connected external device.
2.
Press the down directional button. The following functions become available.
Available functions may differ depending on the port type.
1.Edit
You can rename the input ports and change the device icons.
2.Information
You can view detailed information about an external device.
3.Add to Home
You can add the port of an external device to the Home Screen for quick switching.
- 20 -

Using additional functions
You can use the SmartThings feature.
• SmartThings
It allows the TV to connect and control the detected various devices in the same space.
For more information, refer to "Using SmartThings."
This function may not be supported depending on the model or geographical area.
You can use the following features on the Sources screen.
• Camera Experience
Connect a USB camera, or use the SmartThings app on your mobile phone to connect a camera.
Connect a camera to use video call, home workout, and other new features.
For details on how to connect, refer to Camera Sharing ( (left directional button) Connected Devices
Connection Guide Smartphone Camera Sharing).
This function may not be supported depending on the model or geographical area.
• Connection Guide
Displays device connection instructions.
For more information, refer to "Connection Guide".
• Universal remote setup
Lets you register external devices to your Samsung remote control and control them using the Remote.
This function may not be supported depending on the model or geographical area.
For more information, refer to "Controlling External Devices with a Samsung Remote Control - Using the Universal
remote setup".
- 21 -

Connection Notes
When connecting an external device, note the following.
The number of connectors and their names and locations may differ with the model.
Refer to the external device's operating manual when connecting it to the TV. The number of external device connectors
and their names and locations may differ with the manufacturer.
Connection notes for HDMI
• The following types of HDMI cables are recommended:
– High Speed HDMI Cable
– High Speed HDMI Cable with Ethernet
– Premium High Speed HDMI Cable
– Premium High Speed HDMI Cable with Ethernet
– Ultra High Speed HDMI Cable
• Use an HDMI cable with a thickness of 17 mm or less.
• Using a non-certified HDMI cable may result in a blank screen or a connection error.
• Some HDMI cables and devices may not be compatible with the TV due to different HDMI specifications.
• This TV does not support HDMI Ethernet Channel. Ethernet is a Local Area Network (LAN) built with coaxial
cables standardised by the IEEE.
• Use a cable shorter than 3 m to get the best UHD viewing quality.
• Many computer graphics adapters do not have HDMI ports, but have DVI or DisplayPort ports instead. If your PC
does not support HDMI video out, connect your PC with a DVI to HDMI or HDMI to DisplayPort cable.
• When the TV is connected to an external device such as a DVD/BD player or a set-top box via HDMI, power sync
mode will be automatically activated. In the power sync mode, the TV continues to detect and connect external
devices via HDMI cable. This function can be deactivated by removing the HDMI cable of the connected device.
This function may not be supported depending on the model.
- 22 -

Connection notes for audio devices
• To obtain better TV audio quality, connect a soundbar or A/V receiver to the TV.
• If you connect an external audio device using an optical cable, the Sound Output setting automatically changes
to the connected device. However, to make this happen, you must turn on the external audio device before
connecting the optical cable. To manually change the Sound Output setting, do one of the following:
This function may not be supported depending on the model.
– Use the Quick Settings screen to change to the connected device:
Use the Select button to select Receiver (Optical) on the Sound Output menu. ( (left directional
button) Settings Sound Output Select button to toggle between sound output modes). Try Now
– Use the Settings screen to change to the connected device:
Select Receiver (Optical) on the Sound Output menu. ( (left directional button) Settings All
Settings Sound Sound Output). Try Now
Refer to the soundbar's user manual when connecting it to the TV.
• An unusual noise coming from a connected audio device while you are using it, may indicate a problem with the
audio device itself. If this occurs, ask for assistance from the audio device's manufacturer.
• Digital audio is only available with 5.1 channel broadcasts.
Connection notes for computers
• For the resolutions supported by the TV, refer to "
• If you want to connect your PC and TV wirelessly, both of them must be connected to each other on the same
network.
• When sharing content with other network-based devices such as those in an IP (Internet Protocol) storage
system, sharing may not be supported due to the network’s configuration, quality or functionality, for example, if
the network has a NAS (Network-Attached Storage) device.
Read Before Connecting a Computer (Supported Resolutions)".
- 23 -

Connection notes for mobile devices
• To use the Smart View function, the mobile device must support a mirroring function such as Screen Mirroring or
Smart View. To check whether your mobile device supports the mirroring function, refer to the mobile device's
user manual.
• The Screen Sharing (Smart View) feature may not operate smoothly in a 2.4 GHz environment. For better
experience, 5.0 GHz is recommended. 5 GHz may not be available depending on the model.
• To use Wi-Fi Direct, the mobile device must support the Wi-Fi Direct function. To check whether your mobile
device supports Wi-Fi Direct, refer to the mobile device's user manual.
• The mobile device and your Smart TV must be connected to each other on the same network.
• Use AirPlay if you are an iPhone or iPad user. For more information, refer to
Connected Devices Connection Guide Smartphone Apple AirPlay. Try Now
This function may not be supported depending on the model or geographical area.
• The video or audio may stop intermittently, depending on network conditions.
• When sharing content with other network-based devices such as those in an IP (Internet Protocol) storage
system, sharing may not be supported due to the network’s configuration, quality or functionality, for example, if
the network has a NAS (Network-Attached Storage) device.
(left directional button)
Connection notes for Portrait Mode
• If you connect the Auto Rotating Accessory (sold separately) to the TV, you can use the TV in Portrait Mode.
• To use the computer or console, connected via HDMI to the TV, in Portrait Mode, you need to change the device
setting. Change the screen to Portrait Mode from the computer or console.
Portrait Mode is supported when a computer that uses Windows 10 or later or a console that supports Portrait Mode is
connected.
This function may not be supported depending on the model.
- 24 -

Remote Control and Peripherals
You can control TV operations with your Samsung Smart Remote. Pair external devices such as a keyboard for ease
of use.
About the Samsung Smart Remote (QLED TV/The Frame/LS01D/S8*D/ S9*D/DU9/DU8 Series/DU77**/DUE77 model)
Learn about the buttons on the Samsung Smart Remote.
- 25 -

Button Description
Press to turn the TV on or off.
(Power)
For The Frame model, When watching TV, press to switch to Art mode. In Art mode, press to
switch to the Home screen. Press and hold to turn off the TV completely.
MIC / LED
(Voice Assistant)
(Settings / Number /
Colour button)
Directional button
(up/down/left/right)
Used as MIC when using voice recognition with the remote control.
• Do not impact the MIC hole or use a sharp object to poke into the hole.
Runs Voice Assistant. Press and hold the button, say a command, and then release the button to
run Voice Assistant.
The supported Voice Assistant's languages and features may differ by geographical
region.
You can access Setting menu / virtual numeric pad / Colour buttons / Option pad / SmartThings
directly.
• Accessing the SmartThings app using this button may not be supported, depending on the
model.
• Use this button to access additional options that are specific to the feature in use.
• Press to bring up the virtual numeric pad on the screen. Use the numeric keypad to enter
numeric values. Select numbers and then select Done or Enter Number to enter a numeric
value. Use to change the channel, enter a PIN, ZIP code and etc.
If the Colour Button appears with a number strip on the screen, select the Colour Button
and then select a colour by using the directional button (up/down/left/right).
Moves the focus.
Select
(Return)
(Smart Hub)
Selects or runs a focused item. When pressed while you are watching a broadcast programme,
detailed programme information appears.
Press to return to the previous menu. When pressed for 1 second or more, the running function
is terminated. When pressed while you are watching a programme, the previous channel
appears.
Press to switch to the Home Screen.
- 26 -

Button Description
When pressed, the playback controls appear. Using these controls, you can control the media
content that is playing.
(Play/pause)
(Volume)
(Channel)
Launch app button
Use the Samsung Smart Remote less than 6 m from the TV. The usable distance may vary with the wireless environmental
conditions.
The images, buttons and functions of the Samsung Smart Remote may differ with the model or geographical area.
Press the button to use the recording or Timeshift function while watching the broadcast.
To use Game Bar, press and hold the button in Game Mode.
Game Bar may not be supported depending on the model or geographical area.
Move the button up or down to adjust the volume. To mute the sound, press the button. When
pressed for 2 seconds or more, the Accessibility Shortcuts appears.
may not be present, depending on the model.
Move the button up or down to change the channel. To see the Guide or Channel List screen,
press the button. When pressed for 1 second or more, the Channel List screen appears.
Press and hold the button up or down to quickly change the channel.
Launch the app indicated by the button.
Available apps may differ depending on the geographical area or contents provider.
This function may not be supported depending on the model or geographical area.
To use the Samsung Smart Remote to control a compatible external device that does not support HDMI-CEC (Anynet+), you
must universal remote control for the device. For more information, refer to "Controlling External Devices with a
Samsung Remote Control - Using the Universal remote setup".
To use the Samsung Smart Remote to control a compatible external device that does support HDMI-CEC (Anynet+), connect
the device to an HDMI port on the TV using an HDMI cable. For more information, refer to "Using Anynet+ (HDMI-CEC)".
- 27 -

About the Samsung Smart Remote (DU76**/DUE76 model)
Learn about the buttons on the Samsung Smart Remote.
- 28 -

Button Description
(Power)
MIC / LED
(Voice Assistant)
(Settings / Number /
Option button)
Directional button
(up/down/left/right)
Select
(Return)
Press to turn the TV on or off.
Used as MIC when using voice recognition with the remote control.
• Do not impact the MIC hole or use a sharp object to poke into the hole.
Runs Voice Assistant. Press and hold the button, say a command, and then release the button to
run Voice Assistant.
The supported Voice Assistant's languages and features may differ by geographical
region.
You can access Setting menu / virtual numeric pad / Option pad / SmartThings directly.
• Accessing the SmartThings app using this button may not be supported, depending on the
model.
• Use this button to access additional options that are specific to the feature in use.
• Press to bring up the virtual numeric pad on the screen. Use the numeric keypad to enter
numeric values. Select numbers and then select Done or Enter Number to enter a numeric
value. Use to change the channel, enter a PIN, ZIP code and etc.
Moves the focus.
Selects or runs a focused item. When pressed while you are watching a broadcast programme,
detailed programme information appears.
Press to return to the previous menu. When pressed for 1 second or more, the running function
is terminated. When pressed while you are watching a programme, the previous channel
appears.
(Smart Hub)
Press to switch to the Home Screen.
- 29 -

Button Description
When pressed, the playback controls appear. Using these controls, you can control the media
content that is playing.
(Play/pause)
(Volume)
(Channel)
Launch app button
Use the Samsung Smart Remote less than 6 m from the TV. The usable distance may vary with the wireless environmental
conditions.
The images, buttons and functions of the Samsung Smart Remote may differ with the model or geographical area.
Press the button to use the recording or Timeshift function while watching the broadcast.
To use Game Bar, press and hold the button in Game Mode.
Game Bar may not be supported depending on the model or geographical area.
Move the button up or down to adjust the volume. To mute the sound, press the button. When
pressed for 2 seconds or more, the Accessibility Shortcuts appears.
may not be present, depending on the model.
Move the button up or down to change the channel. To see the Guide or Channel List screen,
press the button. When pressed for 1 second or more, the Channel List screen appears.
Press and hold the button up or down to quickly change the channel.
Launch the app indicated by the button.
Available apps may differ depending on the geographical area or contents provider.
This function may not be supported depending on the model or geographical area.
To use the Samsung Smart Remote to control a compatible external device that does not support HDMI-CEC (Anynet+), you
must universal remote control for the device. For more information, refer to "Controlling External Devices with a
Samsung Remote Control - Using the Universal remote setup".
To use the Samsung Smart Remote to control a compatible external device that does support HDMI-CEC (Anynet+), connect
the device to an HDMI port on the TV using an HDMI cable. For more information, refer to "Using Anynet+ (HDMI-CEC)".
- 30 -

About the Remote Control (DU7 Series) (except for DU77**/DU7600/DUE77/ DUE76 model)
Learn about the buttons on the Remote Control.
- 31 -

Button Description
(Power)
(Settings / Number /
Option button)
(Colour button)
Directional button
(up/down/left/right)
Select
(Return)
(Smart Hub)
Press to turn the TV on or off.
You can access Setting menu / virtual numeric pad / Option pad / SmartThings directly.
• Accessing the SmartThings app using this button may not be supported, depending on the
model.
• Use this button to access additional options that are specific to the feature in use.
• Press to bring up the virtual numeric pad on the screen. Use the numeric keypad to enter
numeric values. Select numbers and then select Done or Enter Number to enter a numeric
value. Use to change the channel, enter a PIN, ZIP code and etc.
When pressed, coloured buttons appear on the screen. Use this button to access additional
options that are to the feature in use.
Moves the focus.
Selects or runs a focused item. When pressed while you are watching a broadcast programme,
detailed programme information appears.
Press to return to the previous menu. When pressed for 1 second or more, the running function
is terminated. When pressed while you are watching a programme, the previous channel
appears.
Press to switch to the Home Screen.
- 32 -

Button Description
When pressed, the playback controls appear. Using these controls, you can control the media
content that is playing.
(Play/pause)
Press the button to use the recording or Timeshift function while watching the broadcast.
This function may not be supported depending on the model or geographical area.
(Volume)
(Channel)
(Launch app button)
The images, buttons and functions of the Remote Control may differ with the model or geographical area.
To use the Remote Control to control a compatible external device that does not support HDMI-CEC (Anynet+), you must
universal remote control for the device. For more information, refer to "Controlling External Devices with a
Samsung Remote Control - Using the Universal remote setup".
To use the Remote Control to control a compatible external device that does support HDMI-CEC (Anynet+), connect the
device to an HDMI port on the TV using an HDMI cable. For more information, refer to "Using Anynet+ (HDMI-CEC)".
Move the button up or down to adjust the volume. To mute the sound, press the button. When
pressed for 2 seconds or more, the Accessibility Shortcuts appears.
Move the button up or down to change the channel. To see the Guide or Channel List screen,
press the button. When pressed for 1 second or more, the Channel List screen appears.
Press and hold the button up or down to quickly change the channel.
Launch the app indicated by the button.
Available apps may differ depending on the geographical area or contents provider.
This function may not be supported depending on the model or geographical area.
- 33 -
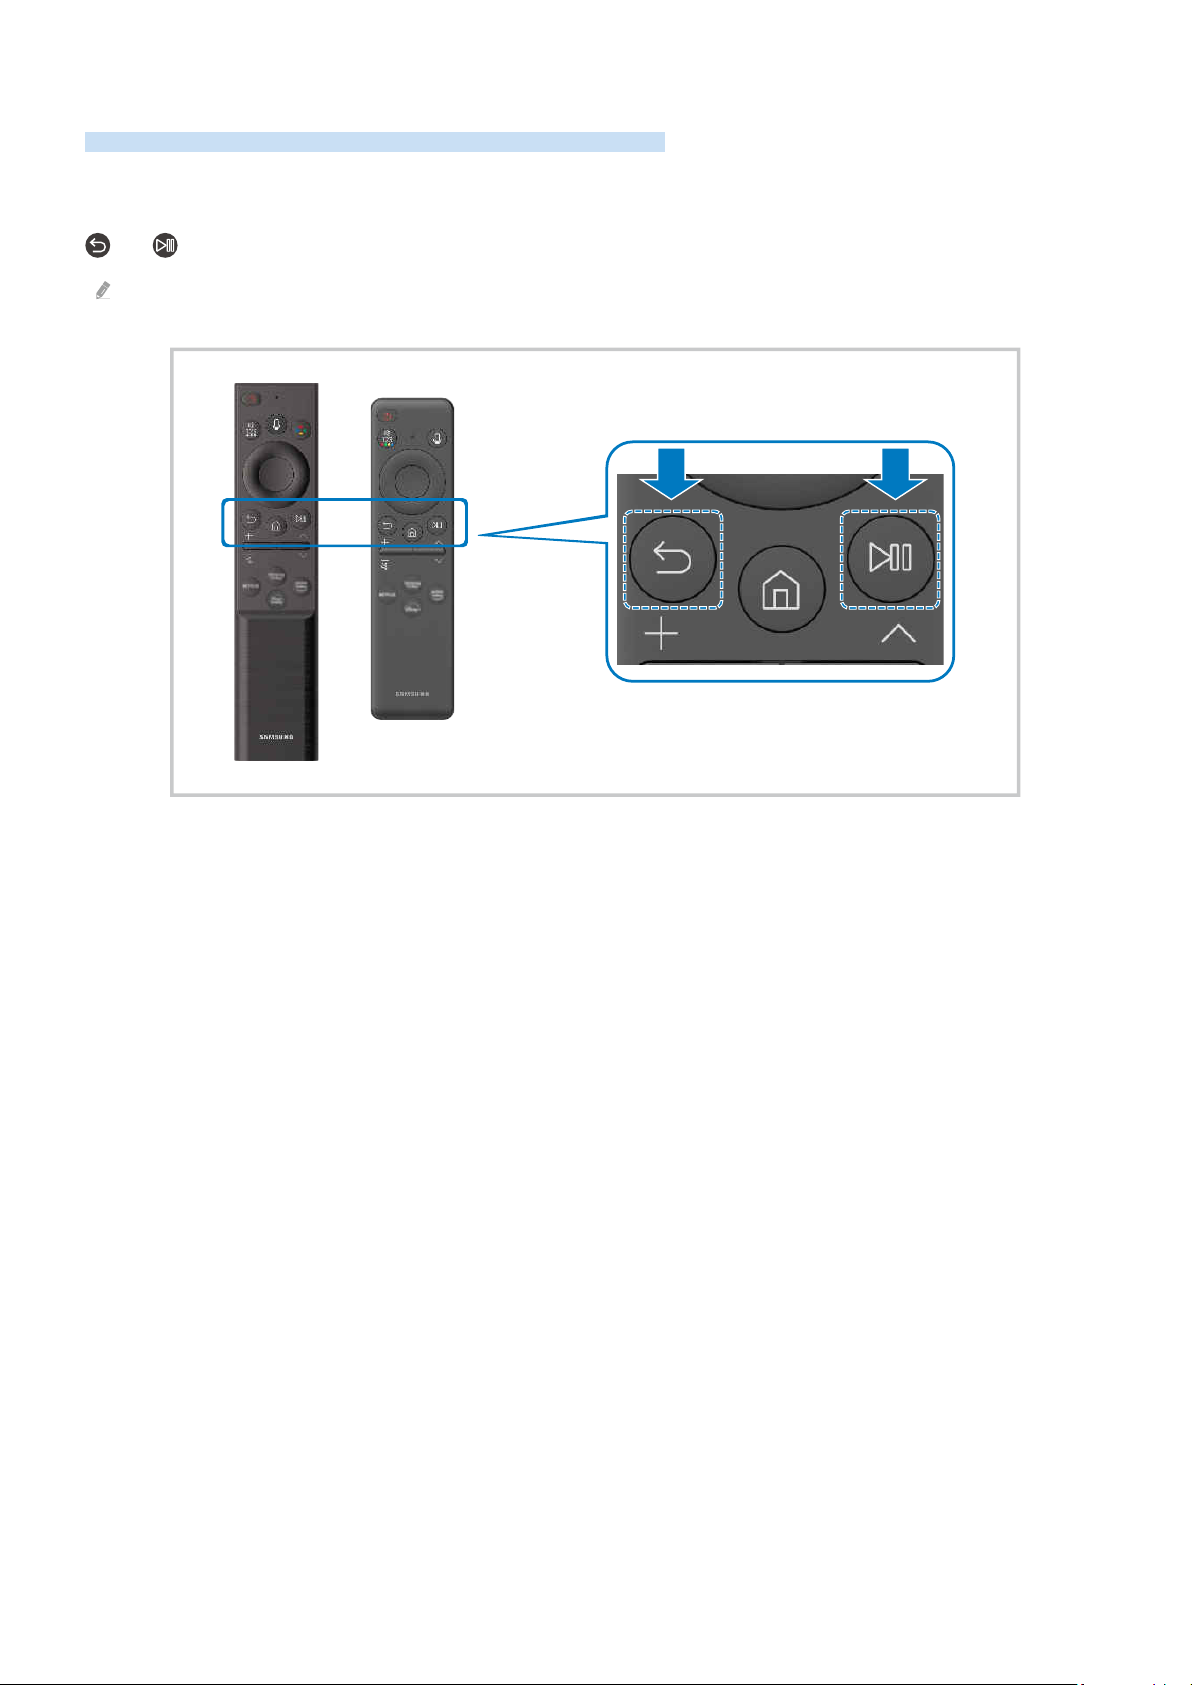
Connecting the Samsung Smart Remote to the TV
Connect the Samsung Smart Remote to your TV to operate the TV.
When you turn on the TV for the time, the Samsung Smart Remote pairs to the TV automatically. If the
Samsung Smart Remote does not pair to the TV automatically, point it at the front of the TV, then press and hold the
and buttons simultaneously for 3 seconds or more.
This function may not be supported depending on the model or geographical area.
- 34 -

Controlling External Devices with a Samsung Remote Control - Using the Universal remote setup
Control the TV and connected external devices with a Samsung remote control.
(left directional button) Connected Devices Universal remote setup
You can control all external devices connected to the TV using a single Samsung remote. Run the Universal remote
setup menu to register external devices.
This function may not be supported depending on the model or geographical area.
You can also use the Anynet+ (HDMI-CEC) function to operate external Samsung devices with your TV's remote control
without any additional setup. For more information, refer to "Using Anynet+ (HDMI-CEC)".
external devices connected to the TV may not support the universal remote feature.
Do not place any obstacles in front of an external device and TV's logo. It may cause improper transmitted signals from the
remote control.
If you have controlling external devices with the Universal Remote, try adjusting the positions of the external
devices.
This function may not operate properly depending on the TV installation environment and the features of external devices.
Learn how to use Samsung Smart Remote
You can learn how to use Samsung Smart Remote.
(left directional button) Settings Support Remote Control Guide
Find details on how to use the Samsung Smart Remote.
Press the menu to use a variety of functions of the Samsung Smart Remote.
This function may not be supported depending on the model.
Learn how to use Game Controller
You can learn how to use Game Controller.
(left directional button) Settings Support Game Controller Guide
Find details on how to use the Game Controller.
Press the menu to learn more about the functions of each Game Controller button.
This function may not be supported depending on the model.
Button layouts may vary between controllers.
- 35 -

Using Anynet+ (HDMI-CEC)
Control an external device connected via Anynet+ (HDMI-CEC) with the remote control.
You can use the TV's remote control to control external devices that are connected to the TV by an HDMI cable and
that support Anynet+ (HDMI-CEC). Note that you can only set up and operate Anynet+ (HDMI-CEC) with the remote
control.
Connecting an external device through Anynet+ and using their menus
(left directional button) Settings All Settings Connection External Device
Manager Anynet+ (HDMI-CEC) Try Now
1.
Set Anynet+ (HDMI-CEC) to On.
2.
Connect an HDMI-CEC-compliant device to the TV.
3.
Turn on the connected external device.
The device is automatically connected to the TV. After the connection process is you can access the menu
of the connected device using your TV remote and control the device.
The connecting process can take up to 2 minutes to complete.
Read before connecting an Anynet+ (HDMI-CEC) device
Anynet+ (HDMI-CEC)-enabled devices must be connected to the TV with an HDMI cable. Note that some HDMI cables may
not support Anynet+ (HDMI-CEC).
You can the TV's Universal Remote to control third-party cable boxes, Blu-ray players and home theatres that do
not support HDMI-CEC. For more information, refer to "Controlling External Devices with a Samsung Remote Control -
Using the Universal remote setup".
Anynet+ cannot be used to control external devices that do not support HDMI-CEC.
The TV remote control may not work under certain circumstances. If this occurs, set up the device as an Anynet+ (HDMI-
CEC)-enabled device again.
Anynet+ (HDMI-CEC) works only with external devices that support HDMI-CEC and when those devices are either in standby
mode or turned on.
Anynet+ (HDMI-CEC) can control up to 12 compliant external devices (up to 3 of the same type) except for home theatres.
Anynet+ (HDMI-CEC) can control only one home theatre system.
To listen to 5.1 channel audio from an external device, connect the device to the TV via an HDMI cable and connect a 5.1
home theatre system directly to the external device's digital audio output connector.
If an external device has been set up for both Anynet+ and a universal remote control, the device can be controlled only
with the universal remote control.
- 36 -

Controlling the TV with a Keyboard, Mouse or Gamepad
Connecting a keyboard, mouse or gamepad to make it easier to control the TV.
(left directional button) Settings All Settings Connection External Device
Manager Input Device Manager Try Now Try Now
You can connect a keyboard, mouse or gamepad to control the TV easily.
Connecting a USB keyboard, mouse or gamepad
Plug the keyboard, mouse or gamepad cable into the USB port.
If you connect a mouse, it is available only in the Internet app and Workspace function.
XInput USB gamepads are supported.
For more information, refer to Input Device in Connection Guide ( (left directional button) Connected Devices
Connection Guide Input Device).
Connecting a Bluetooth keyboard, mouse or gamepad
(left directional button) Settings All Settings Connection Bluetooth devices
Try Now
If your device was not detected, position the keyboard close to the TV, and then select Refresh. The TV scans for available
devices again.
If you connect a mouse, it is available in the Internet app and Workspace.
A maximum of four gamepads can be connected, regardless of connection method (e.g., USB or Bluetooth).
– When using two BT audio devices, it is best to use USB gamepads.
– When using one BT audio device, up to two BT gamepads can be connected.
For more information, refer to the Bluetooth device's user manual.
This function may not be supported depending on the model or geographical area.
- 37 -

Using the keyboard and mouse
Button Description
Directional keys Moves the focus
Enter key Selects or runs a focused item
ESC key Returns to the previous screen
Number keys Enter numbers
F1 key Turns on or off the TV
Displays the Settings menu / numeric keypad / Option pad / SmartThings app
F2 key
F3 key Plays/pauses
F4 key Displays the Settings screen
F5 key Displays the Home Screen
F6 key Displays the Sources screen
F7 key Displays the Channel List
F8 key Mutes the sound
F9 / F10 key Adjusts the volume
F11 / F12 key Changes the channel
Page Up / Page Down Scrolls a webpage displayed by the Internet app.
Each time you press this button, Settings menu / virtual numeric pad / Option pad /
SmartThings app are displayed alternately.
Selects and runs an item.
Left-click
The key operation may differ depending on some apps or the keyboard.
Available in the Internet app and Workspace.
You can click a menu or link to start a function as you do on a PC.
- 38 -

Using the Gamepad
Check the supported gamepads. Try Now
This function may not be supported depending on the model or geographical area.
Manufacturer Controllers Connection Force feedback
Xbox Series X/S controller BT O
Xbox One S controller
Microsoft
Xbox Elite Wireless Controller Series 2 BT O
Sony
Google Stadia controller
Amazon Luna controller
Joytron CYVOX DX USB O
Logitech
PowerA MOGA XP5-X Plus Bluetooth controller
Nvidia Shield controller
Nintendo
Xbox 360 controller USB O
Xbox Adaptive controller
Dualsense Edge
Dualsense
DualShock 4
F710 USB O
F510 USB O
F310 USB -
Nintendo Switch Pro
Nintendo Joy-Con(L/R) BT O
BT O
USB O
BT -
USB -
BT O
USB O
BT O
USB O
BT O
USB O
USB Not support
Wi-Fi Not support
BT O
USB O
Wi-Fi Not support
BT -
USB -
BT O
USB Not support
BT O
USB O
Some keys are not available on this product depending on controller.
Force feedback :
"Not support" (This product can’t support force feedback.)
"-" (Controllers don’t have force feedback function.)
Tizen TVs will support only XInput mode for the supported gamepads.
Xbox controllers may require updates.
Controller audio output (3.5 mm port) is not available on this product.
Other controllers may or may not work for cloud gaming.
- 39 -

Using the controller
Button Description
Left joystick and dpad 4 way navigation
• Up / Down : Volume control (Up / Down)
Right joystick
A button or X button (Sony Only) Enter (OK)
B button or O button (Sony Only) Return (Cancel)
Pressing and holding the B button or O
button (Sony Only)
• Left / Right : Channel control (Up / Down) on TV screen
• Select (press): Mute the sound
Exit
Home button
Pressing and holding the Home button (During cloud game play) Quick panel
Option button on the left Game Bar (when Game Mode is turned on and an external source is connected)
X button or button (Sony Only) Numeric buttons (123)
Pressing and holding the left and right
joysticks simultaneously
The button operation may differ depending on some apps or the controller.
If you connect controller to this product by Wi-Fi solution, you cannot use UI navigation function.
Gaming Hub and Cloud game may not be supported depending on the country.
Gaming Hub homepage (Gaming Hub supported countries)
Smart Hub homepage
Power off (Turning power on is not possible)
On The Frame models, the TV goes into Art mode.
- 40 -

Setting up the input devices
(left directional button) Settings All Settings Connection External Device
Manager Input Device Manager Try Now
• Keyboard Settings Try Now
You can set up the keyboard with the Keyboard Language and Keyboard type functions.
• Mouse Settings
You can set up the mouse with the Mouse Pointer Size, Primary Button and Pointer Speed functions.
Try Now
Entering Text using the On-Screen Virtual Keyboard
Use the virtual keyboard to enter text on your TV.
The image on your TV may differ from the image above depending on the model and geographical area.
1.Recommend text
When you type a word you want to use as a search term, this function displays related suggestions from which you
can choose one.
- 41 -

2.Editing Buttons
By selecting any of pop-up Editing Buttons after entering characters on the virtual keyboard, you can quickly
perform the editing function.
This function is only available when the Show Editing Buttons feature is turned on.
3.Settings
Select on the virtual keyboard screen. The following options are available:
The options available may differ depending on the function running currently.
• Recommend text
– Recommended text
– Reset Recommended Text Memory
– Show Editing Buttons
• Keypad Language
– Keypad Layout
Entering Text using the remote control's microphone and the on-screen virtual keyboard
When the virtual keyboard is on the screen, press and hold the button
the microphone on the Samsung Smart Remote, and then release the button. What you say appears on the screen as
text.
Entering text with your voice may not be supported for some functions.
This function may not be supported depending on the model or geographical area.
The Samsung Smart Remote may not be supported depending on the model or geographical area.
on the Samsung Smart Remote, speak into
- 42 -

Smart Features
You can enjoy various apps with Smart Hub.
Using Smart Hub
View descriptions of Smart Hub's basic functions.
From Smart Hub, you can use the Internet search function, install and use various apps, view photos and videos or
listen to music and perform more functions.
Some Smart Hub services are paid services.
To use smart functions, you should connect to a network, agree to the terms and conditions, and log in with your Samsung
account.
Some Smart Hub features may not be supported depending on the service provider, language or geographical area.
Smart Hub service outages can be caused by disruptions in your network service.
- 43 -

Displaying the Home Screen
Press the button.
The image on your TV may differ from the image above depending on the model and geographical area.
1.Samsung Account
Go to the Samsung Account screen to create a new account or sign out of your account.
For more information, refer to "Using a Samsung account".
2. Search
Search for channels, programmes, movies, and apps offered by Smart Hub.
To use the Search service, make sure the TV is connected to a network.
This function may not be supported depending on the model or geographical area.
3. Ambient
Set your TV to display content you desire, such as the time or weather, when the TV is not used.
To return to TV mode from Ambient mode, press the left directional button Home. Press the button to
turn off the TV.
This function may not be supported depending on the model or geographical area.
For more information, refer to "Using Ambient Mode".
- 44 -

. Art
When you are not watching TV or when the TV is turned off, you can use the Art mode function to edit image
content, such as artworks, photos, or to display the content.
This function is supported only in The Frame.
For more information, refer to "Using Art Mode".
4. Daily+
Offers a variety of practical apps, including a home workout app, video chat app and remote medical service app,
allowing you to conveniently experience different lifestyles at home.
This function may not be supported depending on the model or geographical area.
For more information, refer to "About the Daily+ Home screen".
5. Game
Play games from the TV screen by connecting a Controller to the TV. settings to optimise the Controller
and audio device for playing games.
This function may not be supported depending on the model or geographical area.
For more information, refer to "Using Samsung Gaming Hub".
6. Home
View a variety of TV programmes. Install various apps offered by Smart Hub, such as video, music and sports apps,
and use the apps from the TV.
For more information, refer to "Using the Home Function".
7. Menu
Manage external devices connected to the TV, and settings for various functions available on the TV.
For more information, refer to "About the Menu Home Screen".
8. Privacy Choices
From your TV, easily manage the privacy policy regarding services related to Smart Hub and verify how personal
information is protected.
To use Smart Hub, you must agree to the Smart Hub service agreement and the collection and use of personal information.
Without giving consent, you will not be able to use the additional features and services. You can view the entire text of the
Terms & Privacy by navigating to (left directional button) Settings All Settings General & Privacy
Terms & Privacy. Try Now
In order to rescind your consent to mandatory terms and conditions related to Smart Hub, launch Reset Smart Hub (
(left directional button) Settings Support Device Care Self Diagnosis Reset Smart Hub). Try Now
This function may not be supported depending on the model or geographical area.
- 45 -

Launching Smart Hub automatically
(left directional button) Settings All Settings General & Privacy Start Screen
Options Start with Smart Hub Home Try Now
Enabling Start with Smart Hub Home automatically launches Smart Hub when the TV is turned on. Navigate to this
option to enable or disable the feature.
Launching the last used app automatically
(left directional button) Settings All Settings General & Privacy Start Screen
Options Autorun Last App Try Now
If Autorun Last App is set to On, the last used app is automatically run when you turn on the TV. You can turn this
function on or off. Press the Select button at the current menu.
This function may not be supported depending on the app.
This function may not be supported depending on the model.
Automatic Mirroring from Multi View
(left directional button) Settings All Settings General & Privacy Start Screen
Options Autorun Multi View Mirroring
If you screen mirror your mobile device, the Multi View automatically displays the device screen. Navigate to this
option to enable or disable the feature.
This function may not be supported depending on the model or geographical area.
- 46 -
Automatic casting in Multi View
(left directional button) Settings All Settings General & Privacy Start Screen
Options Autorun Multi View Casting Try Now
Casting YouTube content from the mobile device automatically displays the content on Multi View.
It is available on the screen for any broadcast, external device, or app that supports Multi View.
This function may not be supported depending on the model.
Launching Multi View automatically When rotating
(left directional button) Settings All Settings General & Privacy Start Screen
Options Autorun Multi View When Rotating
Multi View runs automatically when you rotate the screen to portrait mode.
This function may not be supported depending on the model.
This function is activated when the Auto Rotating Accessory (sold separately) is connected.
Testing Smart Hub connections
(left directional button) Settings Support Device Care Self Diagnosis Smart
Hub Connection Test Try Now
Resetting Smart Hub
(left directional button) Settings Support Device Care Self Diagnosis Reset
Smart Hub Try Now
You can reset the Smart Hub settings. To reset Smart Hub, enter the PIN. The default PIN is "0000". You can set the PIN in
(left directional button) Settings All Settings General & Privacy System Manager Change PIN.
Try Now
Change PIN may not be supported depending on the model or geographical area.
- 47 -

Using Ambient Mode
Learn about the functions available in Ambient mode.
left directional button Ambient Try Now
Set your TV to display a photo or content you desire when the TV is not used.
This function may not be supported depending on the model.
On The Frame models, the Ambient mode is integrated in the Art mode.
Press the button in Ambient mode screen to enter to Ambient Home.
In Ambient mode, some functions may not be supported.
The image on your TV may differ from the image above depending on the model and geographical area.
1.Getting to Know Ambient Mode
Press View Help to view information about Ambient mode, including functions.
2.NFT app List
You can download images from the NFT apps and use them in Ambient mode. You can move the app to another
location by selecting Edit List located at the end of the list.
Supported NFT apps may vary, depending on the region.
Whenever a new NFT app is released, you can display a wider variety of NFT artworks.
- 48 -

3.Function and content preview
Select a preferred content and a preferred background and set them as your Ambient mode. While in Ambient
mode, press the Select button and then the Up directional button on the remote control to view the content details.
You can use the SmartThings app on a Mobile Device to select a desired content and change the settings. Indicates content
perfectly suited for the time of the day.
Available content categories may differ depending on the model or geographical area.
• Changing art work
Change the artwork to display in Ambient mode. Press the Select button on the remote control to move the
focus to an artwork. Use the left or right directional button to move to the desired art work, and then press
Select button on the remote control.
• View Details
View detailed information about the selected image.
• Favourite
Add or delete images in Favourite by pressing the Select button and then the Up directional button on
the remote control. To view items that are set as Favourites, navigate to Ambient
Favourite.
– Favourite: The item is not set as Favourite
– Favourite: The item is set as Favourite
- 49 -

• Edit
Customise the settings to suit your preferences.
Available functions may not be supported depending on the model or content.
– Weather Filter
You can add a weather effect to content.
– Time Filter
You can select any background time format for content.
– Colour
Changes the colour of the content.
– Vibes
Selects a mood that matches the content.
– Backgrounds
Changes the background of the content.
– Shadow Effects
Applies a shadow effect that you select to the content.
– Filter
You can select an image filter effect to content.
– BGM Mode
You can add a background music to content.
- 50 -

• Screen Settings
You can adjust the settings such as content brightness, saturation, and colour tone.
– Brightness
Adjusts the brightness of the content.
– Saturation
Adjusts the saturation of the content.
– Colour Tone
Adjusts the colours of the content.
– Red Tone / Green Tone / Blue Tone
Adjusts the red, green, blue contrast.
Selecting Content Category
Available content categories may differ depending on the model or geographical area.
• Promoted by NFT Apps
Browse a variety of new and adventurous content with an app that provides NFT works.
• Favourite
While in Ambient mode, press the Select button on the remote control and press Favourite to save the
displayed content to Favourite.
• Special Edition
Allows you to enjoy creative artwork and interior design content created by the world's artists and
designers.
This function may not be supported depending on the model or geographical area.
• Cinemagraph
Adds a looping animation to a part of the photo to make it more attention-grabbing.
• My Album
Allows you to set a photo stored in your mobile device or Samsung Cloud as the wallpaper of the Ambient
mode screen.
To import photos from your mobile device or Samsung Cloud, use the SmartThings app on your mobile device.
For more information about how to the photo settings, select How to Select Photos.
- 51 -

• Q Collection
Provides content that is dedicated to Samsung QLED.
This function may not be supported depending on the model or geographical area.
• Mood
Enjoy a range of options to create the right ambience to suit your mood.
This function may not be supported depending on the model or geographical area.
• Relaxation
Relax with a selection of calming content inspired by nature to soothe your mood.
This function may not be supported depending on the model or geographical area.
• Décor
Allows you to select content with a sensible and beautiful design.
This function may not be supported depending on the model or geographical area.
• Info
Allows you to select essential real-time information, such as weather, temperature, time and news.
This function may not be supported depending on the model or geographical area.
• Artwork
Allows you to select content such as world famous photos and artwork.
• Background Theme
Allows you to select a background theme provided by Samsung.
Take a picture of a wall using the SmartThings app on your mobile device to create a custom background theme. When
you use this function, there may be a delay in image transmission and optimisation depending on network conditions.
A created Background Theme can be set as the background for content. To set it as the background for content, press
the Select button on the remote control while in Ambient mode, and select Edit.
• Routine
Enjoy a range of routines, each displaying content to suit each part of your day or create your very own routines
via the SmartThings app.
This function may not be supported depending on the model or geographical area.
- 52 -

The image on your TV may differ from the image above depending on the model and geographical area.
4.Ambient Screen Options
Following Ambient mode options are
This menu can be found at the bottom of the Ambient home. To the option settings, scroll down to the far
bottom.
Available options may vary depending on the model.
• Auto Brightness
Changes the auto brightness setting for Ambient mode.
When this function is set to Off, the brightness level of the TV screen is not automatically adjusted in response to the
surrounding light level.
• Sleep After
Sets the time when the Ambient mode screen turns off automatically.
If there is no remote control input for the set time, the screen goes off.
• Reset My Album
Reset photos saved in My Album.
• What is Ambient?
view information about Ambient mode, including functions.
Entering the TV viewing screen from Ambient Mode
To access the TV screen from Ambient mode, press either the or button to redirect to the Ambient mode
Home Screen, press the left directional button on the remote control, and then select the Home.
If the TV is off and the button is pressed, the Home screen appears.
- 53 -

Using Art Mode
Learn about the functions available in Art Mode.
left directional button Art
This function is supported only in The Frame.
You can use Art mode function to display image content such as artworks or photos when you are not watching TV
in full screen mode.
• Press the button while using the TV, the TV switches to Art mode.
• Press the button in Art mode to enter to Home screen.
• Press the button in Art mode to enter to Art Home.
• To turn off the TV completely, press and hold the
button of the TV.
If you use a remote control other than the Samsung Smart Remote, the TV may not be turned off completely.
• In Art mode, the brightness and colour tone of your TV are automatically adjusted depending on the ambient,
and the TV can be automatically turned off.
The TV is set by default so that the screen turns off automatically when the ambient light dims in Art mode.
• Configure the motion sensor settings by using Art Mode Options ( left directional button Art Art
Mode Options) at the bottom of the Art home displayed on the TV or using the mobile SmartThings app. The TV
may automatically turn on or off by detecting user motions and other visual changes.
This function may not be supported depending on the model or geographical area.
• While in Art mode, use the SmartThings app on your mobile device to save photos on the device to the TV.
This function may not be supported depending on the TV model or mobile device.
Supported features may differ depending on the version of the SmartThings app.
button on the remote control, or press the TV Controller
- 54 -

About the Art Home screen
left directional button Art
The image on your TV may differ from the image above depending on the model and geographical area.
1.List of image categories
From the displayed list of categories, select an image and press the Select button to view details about the image.
Select Preview to preview the image in full screen for 30 seconds. If you like the image, you can keep it as an
artwork by purchasing it or subscribing to the Membership.
If you select a saved image, the TV goes into Art mode. In Art mode, press Select button on the remote control to
use the following menu options:
Available content categories may differ depending on the model or geographical area.
• Changing art work
Change the artwork to display in Art mode. Press the Select button on the remote control to move the focus to
an artwork. Use the left or right directional button to move to the desired art work, and then press Select
button on the remote control.
• View Details
View detailed information about the selected image.
- 55 -

• Favourite
Add or delete images in Favourite by pressing Select button on the remote control. To view items that
are set as Favourites, navigate to My Art Store Favourite.
Favourite: The item is not set as Favourite
–
– Favourite: The item is set as Favourite
• Mount
Customise the border style and colour to suit your preferences. To save changes, select the desired mat style
and colour, and press either the Select or button.
Supported border styles may differ if the image aspect ratio is not or the image resolution is lower than the
recommended resolution.
Recommended resolution: 1920 x 1080 (for LS03D models) or 3840 x 2160 (for 43-inch and larger models)
• Screen Settings
Customise the Art mode screen settings to suit your preferences.
– Brightness
Adjust the screen brightness. Press the Select button to save the change.
– Colour Tone
Adjust the image colours. Press the Select button to save the change.
– Brightness Reset
Reset the screen brightness to the default value.
• Recent
Manage recently displayed images.
- 56 -

The image on your TV may differ from the image above depending on the model and geographical area.
2.My Art Store
• Favourites
Manage images saved in Favourite.
– Display All / Resume Play
Play images in Favourite as a slideshow.
– Delete
Select and delete multiple images in Favourite simultaneously.
- 57 -

• Membership
If you sign up for Membership, you can use artwork without any restrictions. You can also replace it with new
artwork periodically to suit your preference.
Follow the on-screen instructions to proceed with the payment.
If you subscribe to a membership during your free trial period, your account is immediately switched to a membership
account regardless of the remaining trial period, and you can use a variety of artworks without any restrictions.
• Payment Info
View artwork purchase details, and easily purchase artworks by entering required payment information.
For details about payment information, visit Samsung Checkout (sbox.samsungcheckout.com).
• History
View the content you recently viewed in Art mode, in order.
3.Art Mode Options
options related to the Art mode screen.
This menu can be found at the bottom of the Art home. To the option settings, scroll down to the far bottom.
• Sleep Options
– Sleep After
The TV automatically turns off if no motion is detected around the TV for a specified period of time. Press
the Select button to specify a time period.
– Motion Detector
Set the Motion Detector for the motion sensor. Press the Select button to set the sensitivity level.
Motion Detector may not be supported depending on the model or geographical area.
– Night Mode
The TV automatically turns off if no light is detected around the TV. This mode detects lights around the TV
to automatically turn on or off the TV depending on the presence of light. Press the Select button to turn the
mode on or off.
- 58 -

• Art Effect
The Art Effect is turned on by default. This displays content as close as possible to the original artwork. If you
turn off the effect, content is displayed in the customised picture quality.
• Reset My Album
Reset your album and delete all records.
• What is Art
view information about Art mode, including functions.
- 59 -

Import images from USB memory
1.
Connect the USB memory device storing images to the TV.
2.
The USB memory is automatically recognised, and the screen displays a list of image, music, and video that
are stored in the USB memory.
An alternative way to run the USB memory is to navigate to (left directional button) Connected Devices
and select the USB memory.
3.
Navigate to the folder that contains the image you want to save to the TV, and then select Options Send
to Art Mode.
4.
Select the image and press Send. The image, stored in the USB memory, is saved under Art mode.
Recommended resolutions : 1920 x 1080 (32-inch model), 3840 x 2160 (43-inch or larger models)
Using Art mode with the SmartThings app
The features or terminology may vary depending on the version of the SmartThings app.
On tablet devices, Art mode features may not be supported by the SmartThings app.
Once you have installed the SmartThings app on your mobile device, you can use the following functions:
You can download the SmartThings app from Google Play Store, Samsung Apps, or the App Store.
If the TV is not registered in your SmartThings app, press (Add Device) and register the TV before using the mode.
• Selecting an image under Art mode.
• Saving photos from a mobile device to the TV: Use the Add picture function to save photos on a mobile device to
the TV.
– Add Picture
select 2 to 3 images Create Mount: Combine the 2 to 3 images to create a single image.
– My Album select content, such as Dynamic Filter or Auto Gallery, and then press Select Photo to set the
content as mobile photos.
• Subscribing to Art Mode Membership.
• Applying border styles and colours to images.
(more) Sleep Options
•
– Setting the brightness for Art mode.
– Setting Sleep After: When no motion is detected for the time specified in Art mode, the TV turns off
automatically.
- 60 -

– Setting Motion Detector: Set the sensor sensitivity so that the TV turns on or off automatically when motion is
detected in Art mode.
Motion Detector may not be supported depending on the model or geographical area.
– Setting Night Mode: This mode detects lights around the TV to automatically turn on or off the TV depending
on the presence of light.
Precautions when using Art mode
Motion Sensor may not be supported depending on the model or geographical area.
• The motion sensor is located at the bottom of the TV. Do not block the sensor at the front of the TV. The motion
sensor as well as the brightness and colour tone of the screen can be affected.
• Art mode uses algorithms to minimise image burn-in that can be caused by displaying still images on the screen
for long periods of time.
• The performance of the sensor may vary depending on the TV installation and operating environment.
– The screen brightness and colour tone may be affected depending on the colour of the floor on which the TV
stands.
– In an environment where special light sources other than standard light sources (halogen, fluorescent) are
used, the sensor's motion recognition performance may vary depending on the positions, types, and number
of the light sources.
– If the area around the TV is too dark or bright, the screen brightness may be limited or the sensor may not
work normally.
– If the TV is installed too high or too low, the sensor may not work normally.
– The motion sensor may sense motion from a flashing LED, a pet, a car moving outside the window or other
occurrence and start operating.
• Depending on the Auto Power Off function settings, the TV may turn off when there is no user input in Art mode,
such as inputs from the remote control (
& Privacy Power and Energy Saving Auto Power Off). Try Now
• The following functions are disabled in Art mode.
– (left directional button) Settings All Settings General & Privacy System Manager
Time Sleep Timer Try Now
–
Time Off Timer Try Now
(left directional button) Settings All Settings General & Privacy System Manager
(left directional button) Settings All Settings General
– (left directional button) Settings All Settings General & Privacy Power and Energy
Saving Screen Saver Try Now
- 61 -

About the Daily+ Home screen
Offers a variety of practical apps, including a home workout app, video chat app and remote medical service app,
allowing you to conveniently experience different lifestyles at home.
left directional button Daily+
This function may not be supported depending on the model or geographical area.
The image on your TV may differ from the image above depending on the model and geographical area.
• SmartThings
It allows the TV to connect and control the detected various devices in the same space.
For more information about SmartThings , refer to "Using SmartThings."
This function may not be supported depending on the model or geographical area.
• Workspace
Use the TV to access your PC via remote PC or Screen Sharing (Wireless).
For more information, refer to "Using Workspace."
- 62 -

Using Samsung Gaming Hub
Gamestream a wide variety of games right on your TV through Samsung Gaming Hub. Connect your controller
through Bluetooth or USB.
left directional button Game
This function may not be supported depending on the model or geographical area.
The image on your TV may differ from the image above depending on the model and geographical area.
1.Learn More
Provides information about Samsung Gaming Hub and details on how to use devices.
2.Accessories and Music / Accessories
• Controllers
Select a Controller to connect to the TV.
For more information about supported controllers, refer to "Using the Gamepad."
• Audio
Select an Audio Device (e.g. Gaming Headset) to connect to the TV.
• Music Player
Manage the music to play while playing a game.
This function may not be supported depending on the model or geographical area.
3.Apps and Devices
Install or remove apps or devices that are required to play games.
- 63 -

4.Game list
Purchase games or subscribe to service offered by the Samsung Gaming Hub. Select a game to view the game
details.
Installation of related apps is required to run some games.
The image on your TV may differ from the image above depending on the model and geographical area.
5.Game Activity and Options
This menu is provided at the very bottom of the Samsung Gaming Hub screen. To Game Activity and Options,
scroll down to the very bottom.
• Game Rating Lock
Set the age limit for playing games.
The age limit is only supported to cloud game browsing domain in Gaming Hub.
• Personalisation
Tailored content is recommended, according to the games recently played by the user and the content the user
is interested in.
• Tutorial
Provides information about the Samsung Gaming Hub and details on how to use devices.
- 64 -

Using the Home Function
View a variety of TV programmes. Install various apps offered by Smart Hub, such as video, music and sports apps,
and use the apps from the TV.
left directional button Home
The image on your TV may differ from the image above depending on the model and geographical area.
1.For You / Discover
The app makes personalised recommendations based on the user’s viewing experience. View currently popular
content, or add frequently used apps to the Home screen.
For more information about For You / Discover, refer to "About the For You / Discover Home Screen."
The name of this function may appear differently depending on the model or geographical area.
2.Live
Watch TV programmes currently on the air. Access the Guide screen to check the broadcast schedules and set up
scheduled viewing for the programmes you want.
For more information about Live, refer to "About the Live Home Screen."
This function may not be supported depending on the model or geographical area.
3.Apps
Install a variety of apps offered by Smart Hub, such as video, music, sports and game apps, and use the apps from
the TV.
For more information about Apps, refer to "About the Apps Home Screen."
- 65 -

About the For You / Discover Home Screen
This screen makes personalised recommendations based on the user’s viewing experience.
left directional button Home For You / Discover
The name of this function may appear differently depending on the model or geographical area.
The image on your TV may differ from the image above depending on the model and geographical area.
1.Recent
Access your last watched TV programme, app or last used input source.
2.Recommended for You / On Now
The name of this function may appear differently depending on the model or geographical area.
This function may not be supported, depending on the input signal and settings.
This function may not be supported depending on the model or geographical area.
• Recommended for You
Recommends content that are currently popular in many OTT services.
• On Now
Display a list of TV programmes or Samsung TV Plus content items currently being aired.
3.App List
Add frequently used apps or delete apps on the Home screen, to suit your preferences.
- 66 -

4.Edit List
• Moving an item on the Home Screen
From the end of the list, select Edit List. Move the focus to the app to relocate, and press the down directional
button on the remote control. Select Move from the option menu. Use the left or right button to reposition the
app and then press Select. This repositions the app on the Home Screen.
Alternatively, move the focus to the app to relocate, press and hold the Select button, and then select Move.
• Removing an item on the Home Screen
From the end of the list, select Edit List. Move the focus to the app to remove, and press the down directional
button on the remote control. Select Remove from the option menu. This removes the app from the Home
Screen list.
Alternatively, move the focus to the app to delete, press and hold the Select button, and then select Remove.
To add a deleted app back to the list or add a downloaded new app to the Home screen, refer to "Managing installed
apps."
5.Universal Guide
Universal Guide is a function that allows you to search for and enjoy various content, such as TV shows, dramas, and
movies, in one place. Universal Guide can recommend content tailored to your preferences.
You can use this feature on your mobile device with the Samsung SmartThings app.
To access Universal Guide, press the down directional button on the remote control in Home Screen.
To enjoy the content from these apps on your TV, they must be installed on the TV.
When you watch some paid content, you may need to make a payment using their associated app.
Some content may be restricted depending on your network conditions and your subscriptions to paid channels.
Parental control is necessary when children use this service.
Images may look blurry depending on the service provider's circumstances.
This function may not be supported depending on the model or geographical area.
All YouTube 8K content recommended and provided through the Home screen of 8K TV is attributed to YouTube.
The picture quality of YouTube 8K Content can be affected by a variety of factors, including location, Internet bandwidth
used at home, and Internet access speed.
Depending on your Internet connection environment, it may be temporarily played at a resolution rather than an 8K
resolution.
The recommended connection speed for receiving 8K image quality (8K resolution) is at least 80 Mbps.
The loading time it takes to start watching YouTube 8K Content may vary depending on the Internet bandwidth or Internet
access speed you are using at that time.
In the future, depending on the operation policy of Samsung and YouTube services, whether YouTube 8K content is
recommended through the Home screen may vary.
This function may not be supported depending on the model or geographical area.
- 67 -

.Media Options
This menu can be found at the bottom of the For You / Discover home. To the option settings, scroll down to the
far bottom.
This function may not be supported depending on the model or geographical area.
• Preferences: Select a preferred service to receive content recommendations to suit your preference.
• Continue Watching: Choose content providers for Continue Watching. You can continue watching different
shows in one place from all the Continue Watching-supported content providers listed below.
• Parental Lock: Redirect to the Parental Lock menu. Turn all parental control settings on or off.
• Auto Play Sound: When you browse and preview content, you can set the sound to come out or not
automatically.
- 68 -

About the Live Home Screen
View TV programmes currently on the air. Access the Guide screen to check the broadcast schedules and set up
scheduled viewing for the programmes you want.
left directional button Home Live
The image on your TV may differ from the image above depending on the model and geographical area.
This function may not be supported depending on the model or geographical area.
1.On Now
Display a list of TV programmes or Samsung TV Plus content items currently being aired.
This function may not be supported, depending on the input signal and settings.
2.Guide
See the programming schedules of different channels on a single screen. Use Guide to view the daily programme
schedule for each broadcaster. You can also out detailed information about programmes, watch a
programme, or schedule the recording of a programme.
For more information about Guide, refer to "Using the Guide."
3.Genre
Select a genre to sort and display channels to suit your preferences.
This function may not be supported depending on the model or geographical area.
- 69 -

About the Apps Home Screen
Download and run various apps from Smart Hub.
left directional button Home Apps
You can enjoy a wide range of content including video, music, sports and game apps by installing the corresponding
apps on your TV.
To use this feature, the TV must be connected to the network.
When Smart Hub is launched for the time, the default apps are automatically installed. The default apps may differ
depending on the model or geographical area.
The image on your TV may differ from the image above depending on the model and geographical area.
- 70 -

Installing an app
1.
Move to the app you want to install, and then press the Select button. The detailed information screen appears.
2.
Select Install. When the installation is complete, the Open menu appears.
3.
Select Open to run the app immediately.
You can view installed apps on the Settings screen.
If the TV's internal memory is you can install some apps on a USB device.
You can run an app installed on a USB device only when the USB device is connected to the TV. If the USB device is
disconnected while an app is running, the app is terminated.
You cannot run an app installed on a USB device on a PC or another TV.
Launching an app
You can run the app desired from Downloaded App.
The icons below appear within the selected app's icon and indicate the following:
• : The app is installed on a USB device.
• : The app has a password.
: The app needs to be updated.
•
• : The app supports the mirroring function.
- 71 -

Managing installed apps
To manage installed apps, access App Settings.
App Settings can be found at the bottom of the Apps screen. To access App Settings, scroll down to the bottom.
The image on your TV may differ from the image above depending on the model and geographical area.
1.Removing an app
1.
Select an app to delete.
2.
Select Delete.
The selected app is deleted.
Ensure that the related app data is also removed when you remove an app.
Standard apps cannot be uninstalled.
2.Adding apps to the Home Screen
1.
Select an app to add.
2.
Select Add to Home.
3.
After the Home Screen appears, move the selected app to the desired location.
4.
Press the Select button.
The selected app is added to the Home Screen.
If the selected app is already added to the Home Screen, this function is disabled.
- 72 -

3.Locking and unlocking apps
1.
Select an app to lock or unlock.
2.
Select Lock/Unlock.
The selected app is locked or unlocked.
To lock or unlock an app, enter the PIN. The default PIN is "0000". You can set the PIN in (left directional button)
Settings All Settings General & Privacy System Manager Change PIN. Try Now
Change PIN may not be supported depending on the model or geographical area.
4.Moving apps
1.
Select an app to move.
2.
Select Move.
3.
Move the app to the desired location.
4.
Press the Select button.
The selected app is moved.
This function may not be supported depending on the model or geographical area.
5.Reinstalling an app
1.
Select the app to install again.
2.
Select Reinstall.
Reinstallation starts.
6.Checking the app information details
1.
Select the app to check.
2.
Select View Details.
The app information screen appears.
You can rate an app on the View Details screen.
7.Automatically updating apps
To automatically update the installed apps, set Auto update to ON.
Automatic update is enabled only when the TV is connected to the network.
- 73 -

About the Menu Home Screen
Manage external devices connected to the TV, and settings for various functions available on the TV.
left directional button Menu
The image on your TV may differ from the image above depending on the model and geographical area.
1. Notication
You can view a list of for all events that occur on your TV. A appears on the screen when it
is time to schedule viewing, schedule recording, etc.
If you move the focus to Notication, and then press the Select button, a window appears on the right
and the following functions are available:
• Delete All
You can delete all your
Settings
•
You can select services you want to be about.
When you select Allow sound, are displayed with a sound.
- 74 -

2. Connected Devices
Select an external device that is connected to the TV.
For more information, refer to "Switching between external devices connected to the TV".
3. Settings
Move the focus to the Settings menu to display quick setting options below the menu. Quick Settings can be used to
quickly frequently used features.
The Settings items may not be supported depending on the model or geographical area.
• All Settings
Displays the Settings menu for settings.
• Sound Output
You can select which speakers the TV uses for audio output. To change the audio output, press the Select
button.
• Brightness
Easily the screen settings: Brightness, Contrast, Sharpness, Colour and Tint (G/R).
• Picture Mode
Change the picture mode for the optimal viewing experience. Press the Select button to change the Picture
Mode.
• Sound Mode
You can select a sound mode to optimise your listening experience. To change the sound mode, press the Select
button. To make adjustments, press the down directional button, and then select Equaliser Setup.
• Intelligent Mode
Improves your viewing experience by recognising your content, usage patterns, and the environment around
your TV.
This function may not be supported depending on the model or geographical area.
For more information about the Intelligent Mode, refer to "Using Intelligent Mode".
- 75 -

• Bluetooth devices
Connect your TV to Bluetooth devices. This can be done by selecting Bluetooth devices to automatically search
for Bluetooth devices.
Connecting Bluetooth devices may not be supported depending on the model or geographical area.
• Wi-Fi / LAN
Check your network connection. To check your network connection or change the connection settings, press
the down directional button, and select either Network Status or Network Settings.
This function may not be supported depending on the model or geographical area.
• Multi View
While watching the TV, you can simultaneously view multiple screens that are split.
For more information, refer to "Using Multi View".
This function may not be supported depending on the model or geographical area.
• Sleep Timer
You can turn off the TV automatically at a time. To change the sleep time, press the Select button. To
set the time at which the TV turns off automatically, press the down directional button, and then select
Set Up Off Timer.
• Game Mode
You can set the Game Mode to optimise the TV screen for better gaming performance. To turn Game Mode on
or off, press the Select button. To set the detailed options, press the down directional button, and then select
Go to Game Mode Settings.
This function is only available when an external input source is being used.
For more information, refer to "Setting the Viewing Environment for External Devices".
This function may not be supported depending on the model or geographical area.
• Subtitle
You can watch TV broadcasts with subtitles. To activate or deactivate the Subtitle function, press the Select
button. To run Accessibility Shortcuts, press the down directional button, and then select Accessibility
Shortcuts.
- 76 -

• Digital Output Audio Format
You can select an output format for digital audio. Note that the Dolby Digital+ option is only available via HDMI
(eARC) for external devices that support the Dolby Digital+ format.
This function may not be supported depending on the model or geographical area.
• Picture Clarity
You can optimise pictures that contain a lot of motions. To turn this function on or off, press the Select button.
To set the detailed options, press the down directional button, and then select Picture Clarity Settings.
This function may not be supported depending on the model or geographical area.
• Colour Tone
You can select a colour tone suitable for your viewing preferences. To change to a colour tone that you want,
press the Select button.
This function may not be supported depending on the model or geographical area.
• Energy Saving Solution
Reduce power consumption by adjusting brightness settings.
This function may not be supported depending on the model or geographical area.
• Power and Energy Saving
Display the Power and Energy Saving menu. Reduce energy consumption by changing your power preferences
and other energy-saving options.
This function may not be supported depending on the model or geographical area.
• Auracast
You can listen to the TV's audio by connecting to a Bluetooth audio device that supports Auracast.
This function may not be supported depending on the model or geographical area.
Some models support the Auracast feature. For more information about Auracast, refer to "Using Auracast".
- 77 -

• Support
Displays the Support settings menu.
These functions may not be supported depending on the model or geographical area.
• Audio Language
You can change to the audio language you want to hear. To make adjustments, press the down directional
button, and then select Go to Audio Options.
These functions may not be supported depending on the model or geographical area.
4.Edit List
From the end of the Settings list, select Edit List. You can change the location of functions in the Settings screen.
An alternative way to move a function is to move the focus to the function to move and then press and hold the Select
button.
- 78 -

Using a Samsung account
Create and manage your own Samsung account.
(left directional button) Settings All Settings General & Privacy System
Manager Samsung Account Try Now Try Now
You can view the entire text of the Terms & Policy in (left directional button) Settings All Settings
General & Privacy Terms & Privacy after logging in to your Samsung account.
Follow the instructions on your TV screen to create or log in to a Samsung account.
Samsung account can be used on TV, mobile device and website with one ID.
Signing in to a Samsung account
(left directional button) Settings All Settings General & Privacy System
Manager Samsung Account Sign In
Creating a new account
(left directional button) Settings All Settings General & Privacy System
Manager Samsung Account Create Account
Managing your Samsung account
(left directional button) Settings All Settings General & Privacy System
Manager Samsung Account My Account
When you sign in to your Samsung account, you can use the following functions:
• Edit profile
You can edit your account information.
To protect personal information, enter Edit profile and then Sign-in Method is set to Select your ID and input password
(high security).
If you want the TV to log you into your account automatically whenever you turn on the TV, click Stay Signed In.
When the TV is used by multiple people, turn off Stay Signed In to protect personal information.
- 79 -

• PIN Setting
Set or change your PIN.
• Payment Info
You can view or manage your payment information.
• Back up
You can back up the TV settings to your Cloud storage. When resetting or replacing the TV, you can also restore
its settings with the backed-up settings.
• Product Registration
You can register the current TV or see the registered information. You can easily receive services after product
registration.
You can see the registered information or delete it at the Samsung account website (https://account.samsung.com).
• Security and Privacy
You can read the Privacy Policy for Samsung accounts or change custom service settings.
• Sync Internet
Once you sign in to your Samsung account and configure the Sync Internet settings, you can share the favourites
and website bookmarks that you registered on other devices.
• About Samsung account
You can view the user agreement and privacy policy.
For more information about the terms and conditions, special terms, select View Details.
• Remove Account
You can delete an account from the TV. Although you have deleted your Samsung account from the TV, you are
not unsubscribed.
To unsubscribe from your Samsung account, visit the Samsung accounts website (https://account.samsung.com).
• Sign out
When multiple people share the TV, you can sign out of your account to prevent others from using it.
To sign out of your Samsung Account ( (left directional button) Settings All Settings General &
Privacy
button. When a pop-up window appears, select Sign out.
System Manager Samsung Account), move the focus to your account's icon, and then press the Select
- 80 -

Using Workspace
Use the remote function to connect to and use a Windows PC, Mac, or mobile device from the TV.
left directional button Daily+ Workspace Try Now
Connect a Windows PC, Mac, or mobile device to the TV to easily use the device.
For smooth use as in a computer, connect a keyboard and a mouse to your TV in advance.
Using Screen Sharing (Windows PC) / AirPlay (Mac)
left directional button Daily+ Workspace Windows PC Screen Sharing
left directional button Daily+ Workspace Mac Screen Mirroring
Follow the instructions on the screen to adjust the PC settings and wirelessly connect the TV to the PC.
This function is only available for PCs that support wireless screen sharing.
This function may not be supported depending on the model or geographical area.
Connection via Windows OS is available in Windows 10 and later versions only.
Connection via Mac OS is available in AirPlay.
Using Easy Connection to Screen
left directional button Daily+ Workspace Windows PC Easy Connection
You can easily use remote access function after installing Easy Connection to Screen on your PC.
Follow the instructions on the screen to download and install the Easy Connection to Screen PC app. Then you can
easily connect a remote PC.
1.
Download the Easy Connection to Screen PC app from http://smsng.co/easy and then install it on your PC.
2.
Log in to the same Samsung account for both TV and PC.
3.
When the PC is turned on and connected via the network, Workspace's Home Screen displays the PC.
The Easy Connection to Screen PC app is available in Windows 10 and later versions only.
Depending on the network environment including the router type, and wireless signal strength,
connection problems may occur, such as low speed, disconnection, or limited connection.
- 81 -

Connecting a Remote PC
left directional button Daily+ Workspace Windows PC Manual Connection Try Now
left directional button Daily+ Workspace Mac Remote Login Try Now
Provides Remote Desktop Connection (RDP) for remotely connecting to a PC running on Windows and Virtual
Network Computing (VNC) for a PC running on Mac. To remotely connect to a PC, you must enter the IP address of
the remote PC or select a saved Enter a correct username and password. If there is any computer that can
be accessed via the same network, the found IP is displayed.
To register a frequently used PC, move the focus to Manage User Proles, and then press the Select button. When a popup window appears, select Add, and then enter the PC information.
When your PC enters in power saving mode, connection is not available. It is recommended to cancel the power saving
mode.
It is recommended to connect the wired network because the screen or sound may be interrupted depending on the
network condition.
1.
your computer’s settings to use the Workspace function.
Connection to Windows via the RDP protocol is available in Windows 10 Professional or higher.
Remote connection to a PC running on Mac via the VNC protocol is only supported for Mac OS X 10.5 or later.
• Windows OS:
1)
Right-click the My PC icon on Desktop or Windows Explorer and then click Properties.
2)
Click Remote Desktop and select Activate Remote Desktop.
• Mac OS:
1)
Select Menu System Preferences and then click Sharing.
2)
Select the Screen Sharing and Remote Login check box.
3)
Run the resolution changing app downloaded from App Store and then change the resolution to 1440 x
900 or lower.
If you do not change the resolution in Mac OS, the previous image may appear while connecting a remote
computer.
- 82 -

2.
Enter the required settings for connecting the computer remotely.
The image on your TV may differ from the image above depending on the model and geographical area.
1.PC/Prole
Enter the IP address or of the PC you want to connect to.
• In case of Windows, when the computer to connect is within the same network (router/AP), run "cmd" command
in Settings
check the IPv4 address of the computer.
• In case of Mac, you can check the IP address in Settings Remote Access.
• When the TV and computer are not within the same network, it is required to know the public IP and configure
the router and AP. Check whether the router connected to the computer supports port forwarding. When the
company provides additional security features such as firewall, seek help from a security officer.
Network and Internet View Network Properties or in Start Run, and then run "ipconfig" to
Home
- 83 -

2.Username
Enter the Username of the computer. How to check the Username:
• Windows OS: Control Panel User Account Control
• Mac OS: System Preferences Users & Groups
3.Password
Enter the password for the login account.
For use of PIN, do not enter PIN but the password of the computer.
Playing Multimedia Content on a Remote PC
When you move the mouse cursor to the top of the screen after accessing a remote computer, the top bar appears.
When the sharing folder icon is clicked in the top bar, the folders shared on Windows or Mac OS appear. You can
play back any media content in a folder.
For more information about playing multimedia content, refer to "Playing pictures/video/music".
To use this function, the folder sharing option on the computer to access must have been enabled as shown below:
• Windows OS:
1.
Run Windows Explorer and then move to the folder to share.
2.
Right-click the folder and then click Properties.
3.
After the Properties window appears, click the Sharing tab and then click Advanced Sharing.
4.
After the Advanced Sharing window appears, select the Share this folder check box.
• Mac OS:
1.
Select Menu System Preferences and then click Sharing.
2.
Select the File Sharing check box.
3.
To add a folder to share, click the Add+ button at the bottom.
4.
Select a folder and then click Add+.
It is recommended to connect the wired network because the screen or sound may be interrupted depending on the
network condition.
When playing a video via a remote computer, the screen or sound breaking may be encountered.
- 84 -

Using Samsung DeX
Run Samsung DeX on your mobile device to connect the software to the TV.
Follow the on-screen instructions to connect Samsung DeX. Some models may not be searched when connecting
the TV from a mobile device through Samsung DeX. If that is the case, follow the instructions shown on the mobile
device screen to connect the software.
This function is available only on mobile devices that support the wireless Samsung DeX.
Using Microsoft 365
You can read or create a document after accessing the Microsoft 365 website.
Run the site in full screen mode.
URL is impossible in the Microsoft 365 page.
Adding the Web Service
Select the Add Web Service icon. Use the bookmarking function of the Workspace browser, you can add or delete
the web service link to or from Workspace.
To add the web service, you must be signed in to your Samsung account.
The number of web services that can be added to Workspace is limited.
Workspace browser not share data with Internet. (Web browser outside from Workspace)
- 85 -
Using Web Service
You can access the web service by selecting the web service icon added to Workspace.
The screen on the webpage may differ from that of a computer.
You can copy or paste any text. Some image formats are supported.
For easy and secured login in Web Service, Workspace Pass is additionally supported as well as Samsung Pass.
Setting Samsung Pass or Workspace Pass.
Set Samsung Pass or Workspace Pass to Use in left directional button Daily+ Workspace Run the
Workspace browser (Additionally select Microsoft 365 or Add Web Service) Internet Menu Settings General.
Workspace Pass allows you to easily manage the web service ID and password without biometric authentication on mobile
devices. For this purpose, you must be signed in to your Samsung account. The password is encrypted to be safely stored on
your TV.
However, the log in to Workspace Pass may not work depending on the site policy.
Workspace Pass only working on Workspace.
To securely access the web service, you can use the Workspace browser's automatic shutdown or clear the history logs.
Before accessing the web service, refer to "Read Before Using the Internet Function".
Workspace browser not share data with Internet. (Web browser outside from Workspace)
The web service supports the following keyboard shortcuts:
• F1: Returns to Workspace's Home Screen.
• F5: Refresh.
• F8: Mutes the sound.
• F9/F10: Adjusts the volume.
• F11: Switches between full screen or default screen.
- 86 -
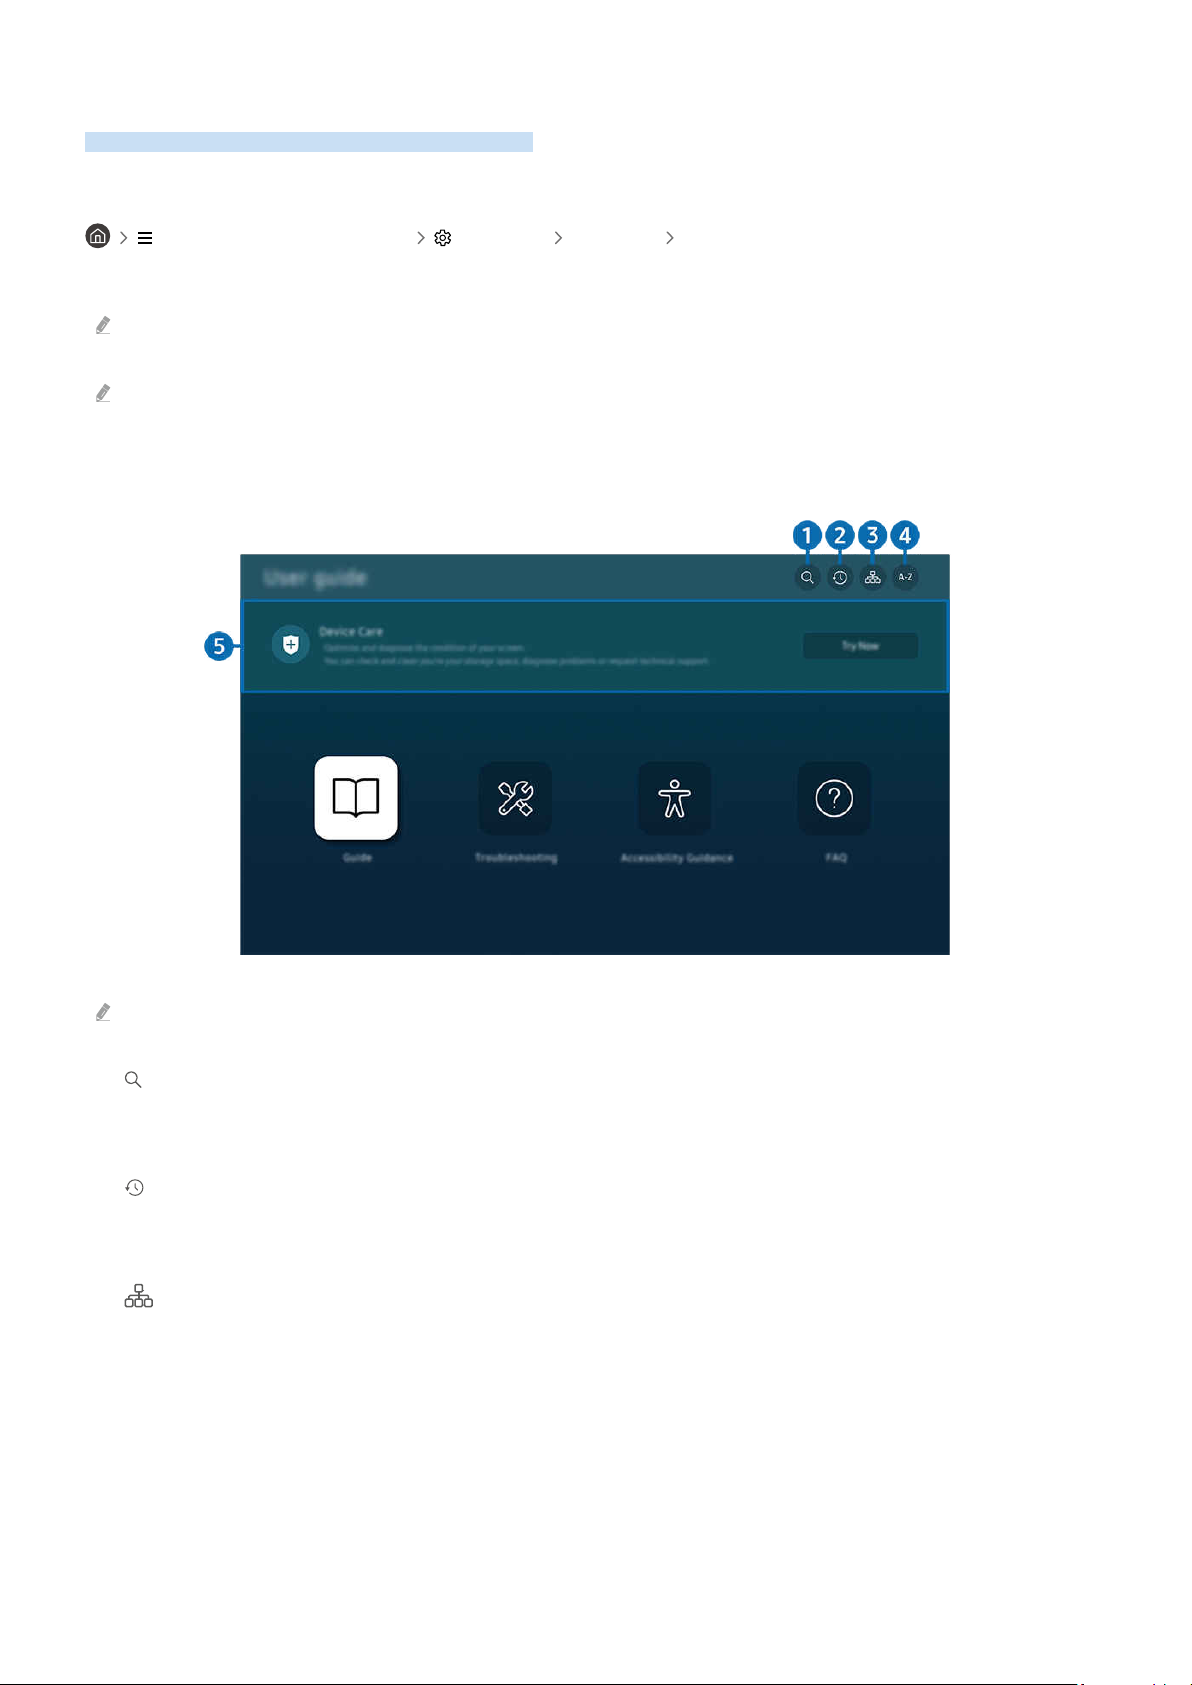
Using the User guide
Control and read the manual embedded in your TV.
Launching the User guide
(left directional button) Settings Support Open User guide
You can view the embedded User guide that contains information about your TV's key features.
You can download a copy of the User guide from Samsung's website to view or print on your PC or mobile device (https://
www.samsung.com).
Some menu screens cannot be accessed from the User guide.
Using the buttons in the User guide
The image on your TV may differ from the image above depending on the model and geographical area.
1. (Search)
Select an item from the search results to load the corresponding page.
2. (Recently Viewed Topics)
Select a topic from the list of recently viewed topics.
3.
It displays the lists for each item in User guide.
(Site Map)
- 87 -

4. (Index)
Select a keyword to navigate to the relevant page.
This function may not be supported depending on the model or geographical area.
5.Device Care
Optimise and diagnose the condition of your TV. You can check and clean your storage space, diagnose problems or
request technical support.
Words in blue (e.g., Internet) indicate a menu item.
The image on your TV may differ from the image above depending on the model and geographical area.
6. (Try Now)
Allows you to access the corresponding menu item and try out the feature right away.
7.
(Link)
Access an underlined topic referred to on an User guide page immediately.
- 88 -

Using the Internet
Surf the Internet on your TV.
left directional button Home Apps Internet
When you run Internet, you can see recently viewed websites or featured recommendations. When you select a
desired website, you can get immediate access to it.
You can use the Internet function more easily after connecting a keyboard and mouse.
You can scroll webpages with the directional button on the Samsung Smart Remote or Remote Control.
The webpages may differ from those on a PC.
Before using the Internet, refer to "Read Before Using the Internet Function".
The Internet app has an embedded Samsung Pass Settings ( left directional button Home Apps Internet
Internet Menu Settings Samsung Pass).
With Samsung Pass, you can log into the website easily and securely. When you visit the website again, you can log in with
Samsung Pass Biometrics Authentication on your mobile device without entering your ID and password.
However, this Samsung Pass login may not work depending on the website policy. For this purpose, you must have been
logged in the mobile device with a Samsung account registered in Samsung Pass.
- 89 -

Using SmartThings
Home
Favourites
Devices
Life
Routines
It allows the TV to connect and control the detected various devices in the same space.
(left directional button) Connected Devices SmartThings Try Now Try Now
left directional button Daily+ SmartThings Try Now Try Now
You can control the devices registered to the SmartThings cloud and devices directly connected to this product with
a remote control.
This function may not be supported depending on the product or model.
Functions that can be controlled by remote control may not work depending on the location of the device. In this case,
move the location of the device.
Power consumption may increase as SmartThings will operate when the TV is a low power or standby mode.
SmartThings
The image on your TV may differ from the image above depending on the model and geographical area.
1.Favourites
View devices or features that have been set as favourites from the Devices/Life/Routines tab.
- 90 -

2.Devices
View devices connected to SmartThings, and use the remote control to select and control any of the connected
devices. In Map View, you can check the status of registered devices.
If you log in with the same account used for the mobile SmartThings app, you can view devices, registered through
SmartThings, more intuitively from Map View.
.List of devices compatible with the TV
Type Description Detail
Devices for IR remote control
(IR
Bluetooth devices Bluetooth speaker, headset, Soundbar, keyboard, mouse, game pad
SmartThings devices
For a detailed list of supported devices, visit www.samsung.com.
This function may not be available depending on the external device.
Air conditioner, air robot vacuum cleaner, electric fan,
For details on SmartThings devices, access https://www.smartthings.com/products.
SmartThings devices can also be controlled from the mobile app.
3.Life
Displays recommended Life services that can be viewed or controlled from SmartThings.
Only Life services supported by the TV are displayed.
4.Routines
View or run scenes created from the Routines tab in the mobile SmartThings app.
- 91 -

5.Location or Device near TV
• Place
Displays all places connected via the SmartThings app.
• Devices near TV
Displays all the detected devices that can be connected and controlled.
You can run the control options after selecting a desired device.
Available options may differ depending on the device.
6.Add Device
Displays the list of devices that can be registered on your TV. You can register any by selecting a device.
7.Samsung Account
Go to the Samsung account screen to create a new account or sign out of your account.
If you are signed out of your Samsung account, select Sign In to sign in.
8.Settings
Edit devices connected to SmartThings, or settings for the devices. You can also turn on the
Sensors or the SmartThings hub feature.
SmartThings Quick access
Control most used devices by accessing the
(left directional button) Connected Devices
Use the SmartThings Hub features Try Now
Use the SmartThings Hub features on various Samsung products to connect IoT devices (e.g., light bulbs, plugs, or
sensors) that are supported by SmartThings.
(left directional button) Connected Devices SmartThings Settings SmartThings
Hub
DU7/DU8/DU9 Series, 32LS03D model: SmartThings Dongle required to connect Zigbee/Thread.
Make sure to log in to the same Samsung account on your TV as your mobile SmartThings app.
This function may not be supported depending on the connected device type.
Connected Devices menu, without having to access SmartThings.
- 92 -

Register and manage devices via SmartThings Try Now
Registering peripheral devices of the TV
1.
When there is a device detected near the TV, a registration pop-up appears on the TV screen.
When there is no device detected, the pop-up may not appear.
To connect a Bluetooth device, make sure that the device has been paired.
2.
Select Register to register the device.
To register an appliance, make sure that it uses IR and is detectable in the area around the TV. Supported devices and
options may differ depending on the model.
Select Close. Then the device registration pop-up does not appear.
You can register a device in (left directional button) Connected Devices SmartThings Add
Device.
(left directional button) Connected Devices SmartThings, you can see available options for each
device. Try Now
Supportable options may differ depending on the device.
Registering a TV / Smart Appliance / IoT device from the mobile app
Use the mobile SmartThings app to register your TV, smart appliances or various IoT devices. Some IoT devices can
only be registered using this mobile app. In the mobile app, tap the (Add Device) to register a device.
Connect a doorbell to your TV, to receive a of the doorbell video and speak with the visitor while
watching TV.
Only WWST (Works with SmartThings) doorbells are supported. Supported options may vary, depending on the
device.
- 93 -

Use the screen's sensors via SmartThings Try Now
When you activate the sensor, you can see the sensor device on the SmartThings Device tab. You can create various
IoT scenarios with TV without purchasing a separate IoT sensor.
(left directional button) Connected Devices SmartThings Settings Sensors
Each sensor can be activated with user consent.
Each sensor may not be supported depending on the model.
The sound sensor is supported when the microphone switch at the bottom of the TV is turned on. The TV microphone may
not be supported, depending on the model and region.
Control SmartThings with Bixby Try Now
With Bixby on the product, you can control devices connected to SmartThings, as well as the TV, using voice
commands.
This function may not be supported depending on the connected device type.
Control the display device from the mobile SmartThings app Try Now
From the mobile SmartThings App, use the TV remote control functionality, such as On/Off, Channel, Volume, and
four directional buttons. You can also use Search, Apps, Ambient mode, Mobile Cam, and other functions from the
mobile app.
Routines in the mobile SmartThings app allows you to automatically run apps installed on the TV.
With Routines, you can turn on the TV at your desired time and automatically run frequently used apps.
- 94 -

Using the Samsung Smart Upgrade (For India Only)
Smart Upgrade is a one-stop solution on smart TV. It can help you track payments, send timely
and renew your smart TV hassle-free.
It needs an internet connection for the latest information and device status. The device will get locked if the
internet is not connected for a long period.
This function may not be supported depending on the model or geographical area.
Registering Smart Upgrade
When TV is purchased via Smart Upgrade scheme, You must download the application.
1.
App is auto install if TV is registered via Samsung Smart Upgrade policy.
2.
After Install, you can add apps to the Home Screen.
When you select the Smart Upgrade App in Home Screen, the app will be launched with full payment and purchase
details pre-added.
Using Smart Upgrade
1.
Open Smart Upgrade App dashboard for detailed purchase information.
2.
Scan the QR code and make payments from the payment tab in the primary navigation menu when the
payment is due.
Troubleshooting
• Payment is due
The device gets locked when the payment date is overdue. To resolve this, make the payment and click Refresh
to unlock.
• No internet connection
The device gets locked when Smart upgrade is not able to get an update on payment status due to lack of
internet. To resolve this, connect the smart TV to the internet and the device will be unlocked automatically.
• Incorrect country selected
The device will be locked if the country name selected during setup does not match the country name on your
invoice. To unlock, setup the Smart Hub again with "Setup Smart Hub" and change the country as per your
invoice.
• Terms & Conditions not selected
The device will get locked if terms & conditions on smart upgrade are not accepted. To unlock, press on "Go to
T&C Setup" and follow the steps to do complete setup.
• Low Flash Memory
The device will be locked if App is deleted manually and there is no enough flash memory to download it. To
unlock, press on Reset Smart Hub to reset Smart Hub.
- 95 -

Playing pictures/video/music
Play media content stored on your TV, USB devices, mobile devices, cameras, PCs, etc.
(left directional button) Connected Devices Connected Device Try Now
You can play media content saved on storage devices, such as USB devices, mobile devices and cameras on the TV.
You cannot play media content if the content or the storage device is not supported by the TV. For more information, refer
to "Read Before Playing Photo, Video or Music Files".
Backup important before connecting a USB device. Samsung is not responsible for damaged or lost
You can use the following functions on the media content list screen of a storage device.
• Filter By
Filters the media content by type of media.
• Sort By
Sorts the content list.
This function may not be supported depending on the type of external device.
• Options
Deletes or plays the selected media content in the media content list. When you select Refresh, the content list
is reloaded.
You can delete only the recorded content. To delete content, change the Filter By option to Recorded.
Recorded may not be supported depending on the geographical area.
- 96 -

Playing multimedia content on a PC or mobile device
1.
Select a device with media content in (left directional button) Connected Devices Sources. The
media content list in the device appears.
2.
Select a media content item from the list.
The selected content is played.
The content may not be played depending on the encoding method or format. Furthermore, several functions may be
restricted.
Content on devices connected to the TV via your network may not play smoothly due to network communication problems.
If this occurs, use a USB device.
Playing multimedia content on a USB device
1.
Connect a USB device to the USB port.
2.
There is a content list browser shown directly.
If a USB device that contains the content you want to play is already connected to the TV, select the USB device in the
(left directional button) Connected Devices Sources screen.
3.
Select a content item to play from the list.
The selected content is played.
Listening to your mobile device sound through the TV speaker using Sound Mirroring
Enjoy listening to music in your living space. Visualisations are generated on your TV that alter and respond to the
frequency of your music.
1.
Search for and connect to your TV from the (Bluetooth) device list on your mobile device.
2.
Select media content to play on your mobile device.
The selected media is played through the TV speaker.
This function may not be supported depending on the model.
In some models, the image of the played content may differ depending on the mode.
If the TV and the soundbar are connected wirelessly, the operation may be restricted.
- 97 -

Tune Station (MusicTV) functions
Tune Station is an all-purpose dashboard to simplify the entire musical experience when user wants to play music
from USB source.
It provides feature to user like themes, concert mode control, external speakers indicator - all from single display
interface.
This function may not be supported depending on the model or geographical area.
How to use Tune Station
Tune Station Registration
1.
Search "Tune Station" from App Search and install Tune Station Launcher.
2.
After Install, add to home. Now Tune Station App Icon will show on Home Screen.
When you select the Tune Station App icon in Home Screen, app will be launched in full screen and all Music
will be loaded, if USB is attached to TV.
Launching Tune Station
You can launch Tune Station in following ways:
1.
Select Music on USB storage device or hard disk drive attached to TV. On clicking Music File Tune Station
App will be launched.
2.
You can manually launch Tune Station from Home Screen. On launch it shows Music if USB storage device
is attached to TV.
3.
On clicking any recent played songs from Home Screen, Tune Station App will be launched.
- 98 -

Buttons and functions available while playing multimedia content
Press the Select button while playing any video, photo or recorded content. The following buttons appear.
The provided buttons and functions may not be supported depending on the model or geographical area.
The available buttons and functions may differ with the content you are viewing or playing.
• Pause / Play
Pauses or plays the multimedia content.
• Jump Backward / Jump Forward
Press the up directional button to move the focus to the playback control bar, and then select the left or right
directional button in the playback control bar to move backward or forward by 10 seconds in the video.
• Move to a specific playback section, move up the focus on the playback bar, and then select one of the five
thumbnails.
This function may not be supported depending on the file format.
• Stop
Stop the contents being played.
• Previous / Next
Displays the previous or the next multimedia content file.
If video playback time is 3 seconds or shorter and you press the button, the video starts from the beginning.
• Rewind / Fast Forward
Rewinds or fast forwards the multimedia content. To increase the rewind or fast forward speed up to 3 times
faster than normal, select the button repeatedly. To return to normal speed, select the option or press the
button.
You can use the following functions when the video is paused. Note that with the video paused, the TV does not
play audio.
– Slow Rewind or Slow Forward: Allows you to play a video slowly backward or forward by selecting the
option. There are 3 playback speeds. To change the playback speed, press the option repeatedly. To
return to normal speed, select the
option or press the button.
or
- 99 -

• 360 Mode
Provides a 360-degree view for videos and photos.
This function may not be supported depending on the file format.
Video files using the mjpeg codec do not support a 360-degree view.
When a video or photo does not support a 360-degree view, applying 360 rotation to it may cause the screen to look
distorted.
Videos may be interrupted if 360 rotation is applied during double speed playback.
Videos that support a 360-degree view may be interrupted if 360 rotation is simultaneously applied with other
functions during playback.
This function may not be supported for some resolutions.
This function may not be supported depending on the model.
• 360 Auto Rotation
Automatically adjusts the video's viewing angle by analysing the amount of image changes during playback of a
video file that provides a 360-degree view. When this function is started, the rotation starts in a short time.
When 360 Auto Rotation is focused, press the Select button to change to the following modes:
– General
– Dynamic
– Natural
This function is only available when 360 Mode is selected.
When 360 Auto Rotation is activated, automatic adjustment is followed. The adjustment position may differ depending
on the image.
The video's viewing angle is manually adjusted in General mode.
This function may not be supported depending on the file format.
Video files that use the mjpeg codec do not support a 360-degree view.
When a video does not support a 360-degree view, applying 360 rotation to it may cause the screen to look distorted.
Videos may be interrupted if 360 rotation is applied during double speed playback.
Videos that support a 360-degree view may be interrupted if 360 rotation is simultaneously applied with other
functions during playback.
This function may not be supported for some resolutions.
This function may not be supported depending on the model.
- 100 -
 Loading...