

Page 1
E-MANUAL
Thank you for purchasing this Samsung product.
To receive more complete service, please register
your product at
www.samsung.com/register
Model _____________ Serial No. _____________
Page 2

Contents
Channel Menu
• Using the Channel Menu 1
• Memorizing Channels 14
• Other Features 15
Basic Features
• Changing the Preset Picture Mode 17
• Adjusting Picture Settings 18
• Changing the Picture Size 19
• Changing the Picture Options 24
• Setting up the TV with Your PC 31
• Changing the Preset Sound Mode 35
• Adjusting Sound Settings 36
Preference Features
• Connecting to a
Wired Network
For PDP 550 Series
44
• Connecting to a Wireless
Network
For PDP 550 Series
54
• Setting the Time 77
• Locking Programs 86
• Economical Solutions 88
• Picture In Picture (PIP) 90
• Other Features 93
• Support Menu 105
Advanced Features
• Using the 3D function
for PDP 490 Series and above
113
• AllShare™
for PDP 550 Series
125
• Setting Up AllShare™
for PDP 550 Series
127
• Anynet+ (HDMI-CEC) 131
• Setting Up Anynet+ 136
• Switching between Anynet+ Devices 138
• Listening through a Receiver 139
• Troubleshooting for Anynet+ 140
• Using the My Contents 143
• Connecting a USB Device 144
• Connecting to the
PC through network
For PDP 550 Series
145
• Screen Display 152
• Videos 153
• Music 160
• Photos 162
• My Contents - Additional Functions 164
Other Information
• Troubleshooting 170
• Anti-theft Kensington Lock 184
• License 186
Page 3
▶
English
❑Using the Channel Menu
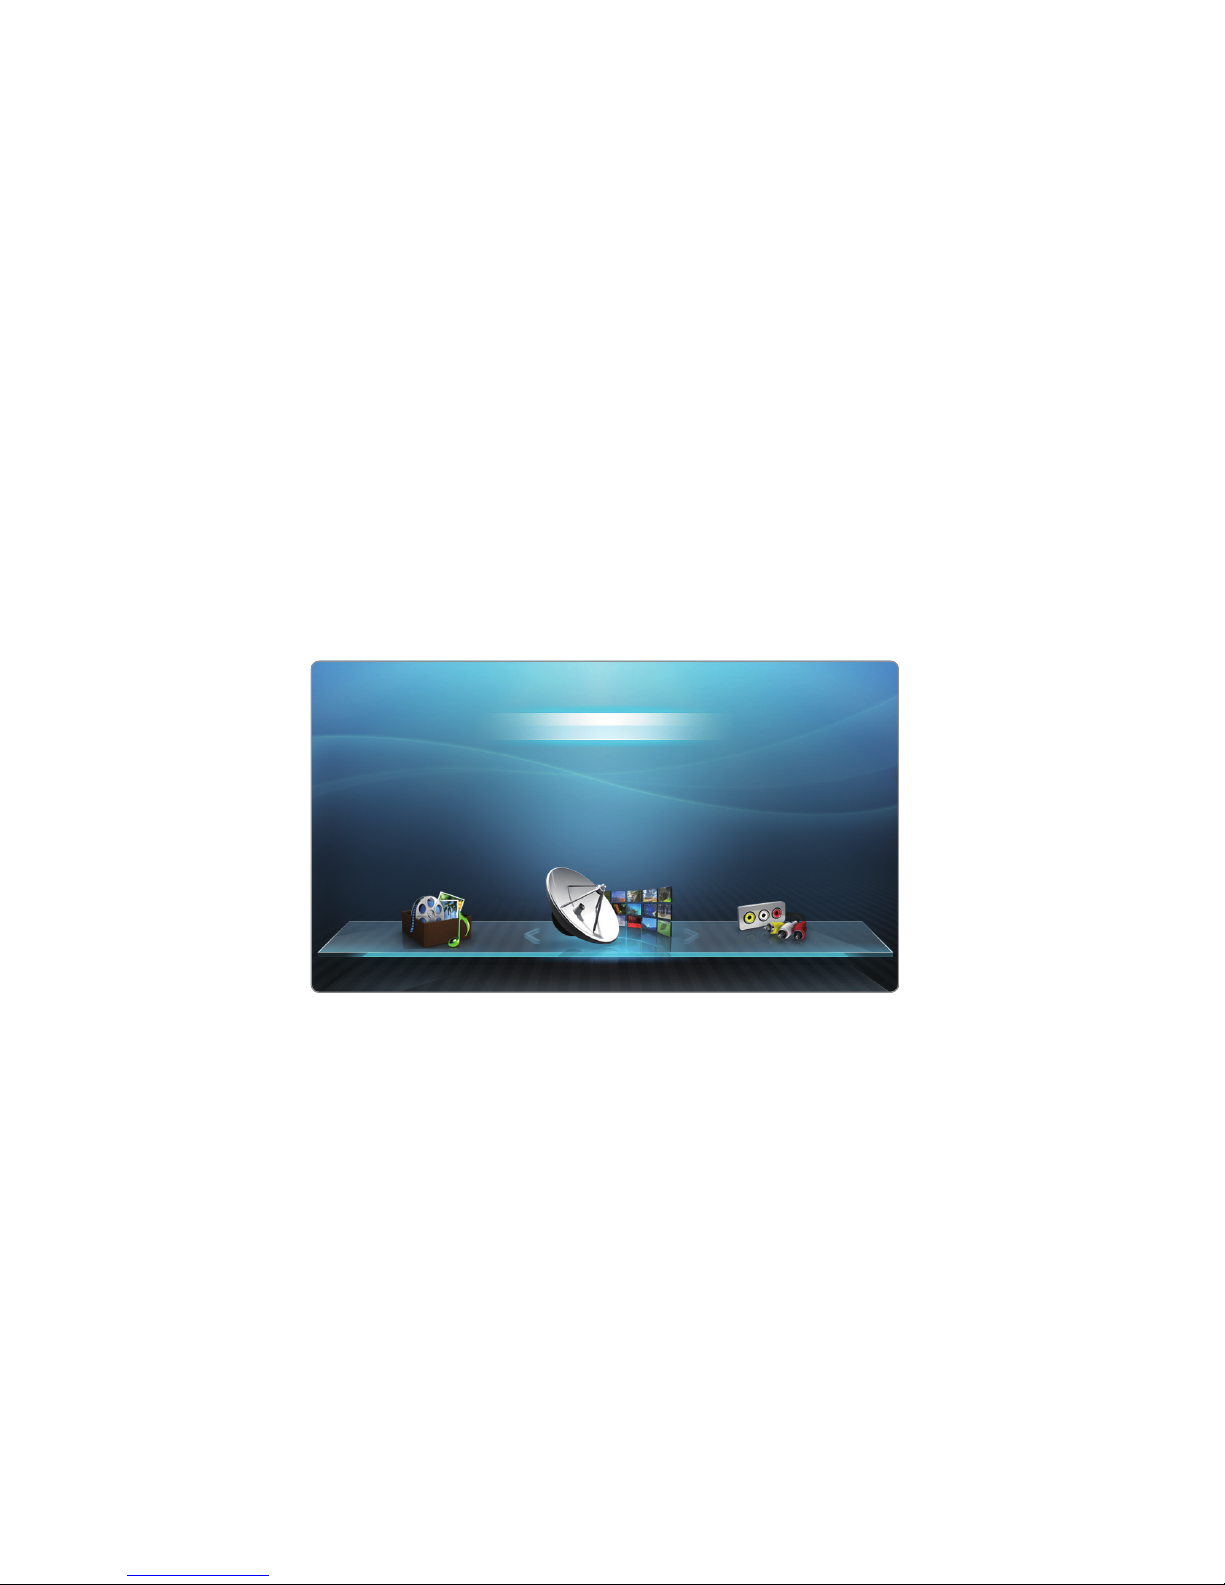
Press the CONTENT button to select Watch TV, and then select the menu you
want to use. Each screen will be displayed.
● The displayed image may differ depending on the model.
Channel Menu
Watch TV
Guide
Schedule Manager
Channel List
Channel Manager
My Contents Source
Page 4

◀
▶
English
■Guide
O
CONTENT → Watch TV → Guide → ENTER
E
The EPG (Electronic Programme Guide) information is provided by broadcasters.
Using program schedules provided by broadcasters, you can specify programs
you want to watch in advance so that the channel automatically changes to the
selected program channel at the specified time. Program entries may appear blank
or out of date depending on a channel status.
Page 5

◀ ▶
English
N
Using the operation buttons with the Guide.
●
a
Red (Schedule Mgr): Displays
the Schedule Manager.
●
b
Green (-2 Hours): Viewing the
list of program to be broadcasted
before 2 hours.
●
{
Yellow (+2 Hours): Viewing the
list of program to be broadcasted
after 2 hours.
●
}
Blue (Exit): Exits the guide.
●
`
Information: Displays details of the selected program.
●
k
(Page): Move to next or previous page.
●
E
(Watch / Schedule): When selecting the current program, you can watch
the selected program.
a
Schedule Mgr b -2 Hours { +2 Hours } Exit ` Information k Page E Schedule
DTV Air 05.1 Globo HD
TELA QUENTE (HD)
10:05 pm - 12:10 pm
10
DESVENTURAS EM SERIE (HD)
Today 10:00 pm
Guide
Fri, 1 Jan 2:10 am
Channel View - All
Programmes resume at 06:00
Home and...
No Information
QVC Selection
No Information
04.1 Globo HD
05.1 DiscoveryH&L
05.2 TV GloboSD
05.3 price-drop.tv
05.4 QVC
05.5 R4DTT
Tine Team
Fiv...No Information Dark Angel
American Chopper
10:30 pm 11:00 pm 11:30 pm
Page 6

◀
▶
English
■Schedule Manager
O
CONTENT → Watch TV → Schedule Manager → ENTER
E
You can view, modify or delete a channel you have reserved to watch.
Using the Timer Viewing
You can set a desired channel to be displayed automatically at the intended time.
Set the current time first to use this function.
1. Press the ENTER
E
button to add manual booking.
Page 7

◀ ▶
English
2. Press the l / r / u / d buttons to set the Antenna, Channel, Repeat, Date
or Start Time.
●
Antenna: Select the desired antenna source.
●
Channel: Select the desired channel.
●
Repeat: Select Once, Manual, Sat~Sun, Mon~Fri or Everyday to set at
your convenience. If you select Manual, you can set the day you want.
N
The c mark indicates the date is selected.
●
Date: You can set the desired date.
N
It is available when you select Once in Repeat.
●
Start Time: You can set the start time you want.
N
If you want to edit or cancel the schedule, select the reserved schedule on
the Schedule List, and select the Edit or Cancel Schedules.
Page 8

◀
▶
English
■Channel List
You can view channel information, Added
Channels or Favorite 1-5.
O
When you press the CH LIST button on the
remote control, Channel List screen will be
displayed at once.
●
Added Channels: Shows all currently
available channels.
●
Favorite: Shows all favorite channels when Favorite is set.
N
Favorite will be displayed when you set Add to Favorite Channel.
N
If you want to view favorite channels you added, press the CH LIST button
and use the l or r (CH Mode) button to move Favorite 1-5.
● The displayed image may differ depending on the
model.
Channel List
Added Channels
6.1 TV#6
7.1
ABC
a
3 Air
23.1 TV#6
33.1 TV#6
32.1 TV#6
a
9 Air
a
11 Air
a
Antenna { Program View
L
CH Mode E Watch k Page
Air
Page 9

◀ ▶
English
N
Using the color buttons with the Channel List.
●
a
Red (Antenna): Switches to Air or Cable.
●
{
Yellow (Program View / Channel View): Displays the program when
digital channel is selected. Returns to the channel view.
●
lr
(CH Mode / Channel): Move to the Favorite when Favorite Channel is
set.
●
E
(Watch / Information): Press to watch the channel you selected /
Displays details of the selected program.
●
k
(Page): Move to next or previous page.
Channel Status Display Icons
Icon Operations
a
An analog channel.
)
A reserved program.
Page 10

◀
▶
English
How to use Timer Viewing in Channel List (digital channels only)
When you set the Timer Viewing in Channel List, you can only set the program in
Program View.
1. Press the CH LIST button, then select a desired digital channel.
2. Press the { (Program View) button.
3. Press the u / d buttons to select the desired program, then press the ENTER
E
(Information) button.
4. Select Timer Viewing, then press the ENTER
E
button when done.
N
If you want to cancel Timer Viewing, follow steps 1 through 3. Select Cancel
Schedules.
Page 11
◀ ▶
English
■Channel Manager
O
CONTENT → Watch TV → Channel Manager → ENTER
E
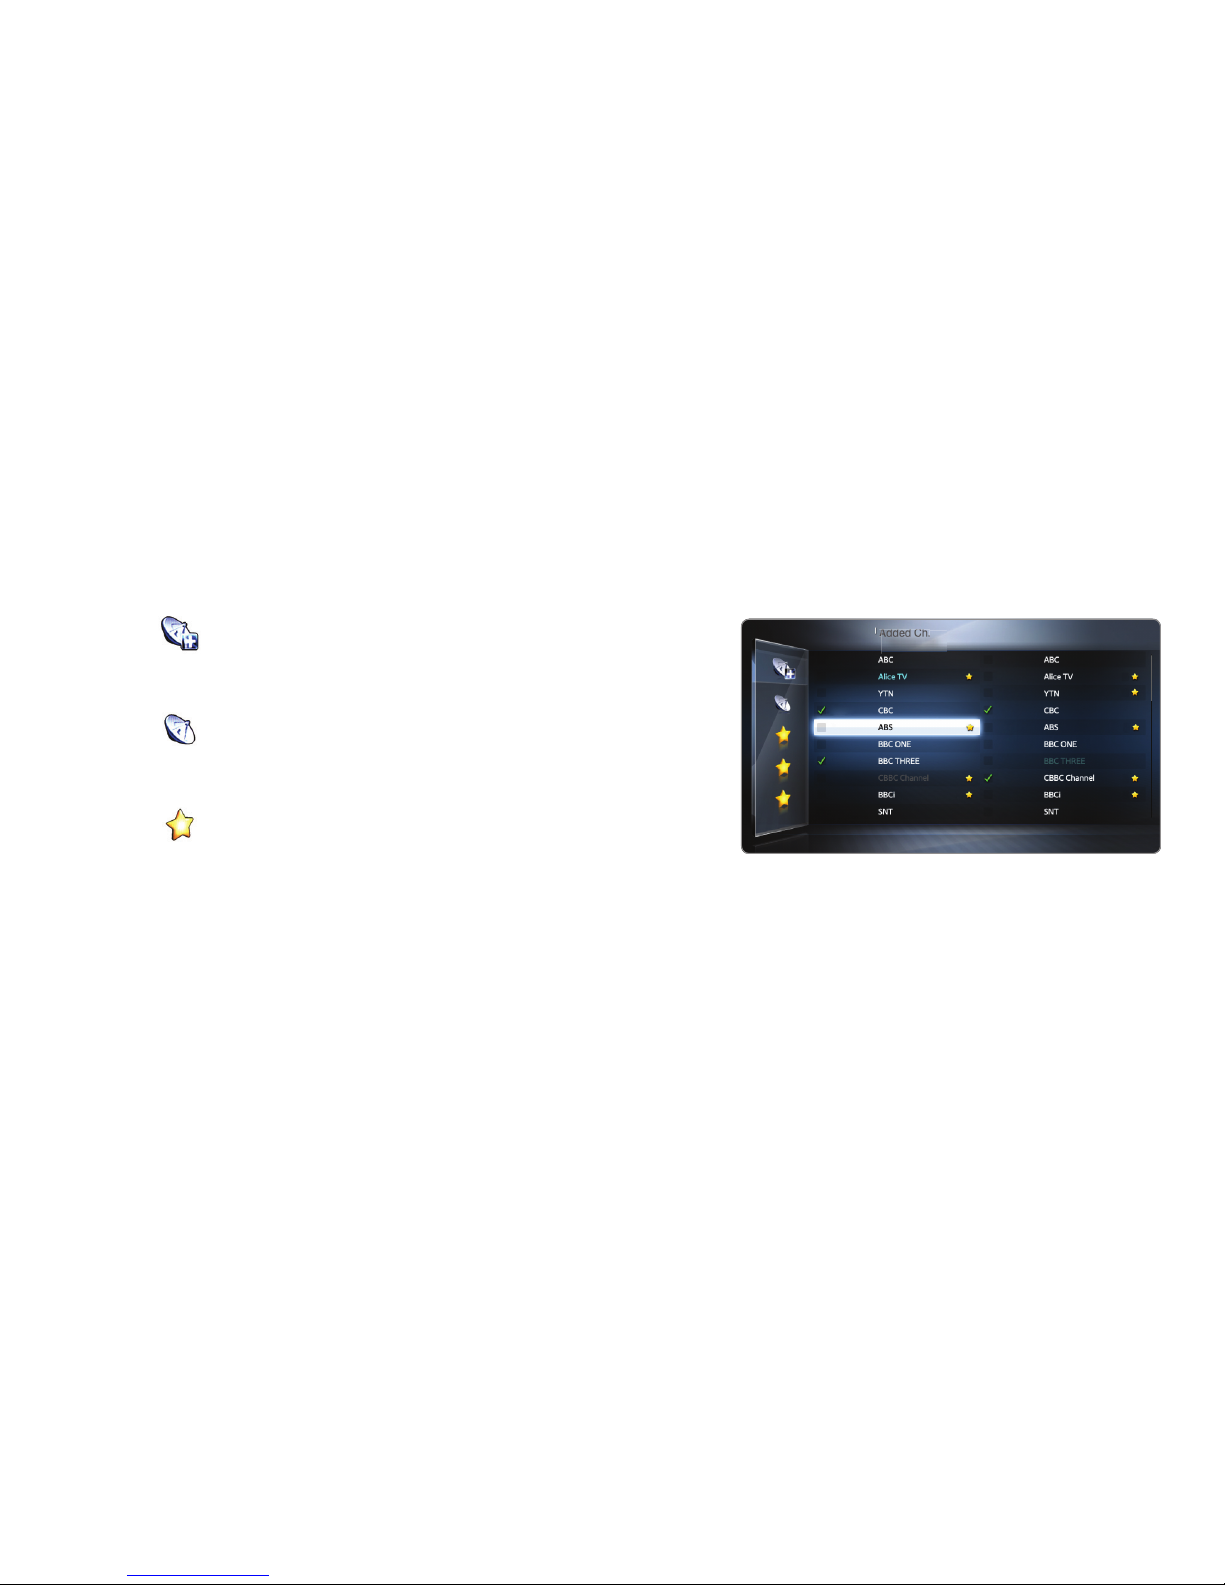
Add or edit the favorite channel and set the channels to Delete, Deselect All or
Select All. You can edit the channel name only for analog channels.
●
(
) Added Ch.: Shows all added
channels.
●
(
) All Channels: Shows all currently
available channels.
●
(
) Favorites 1-5: Shows favorite
channels.
6.1
10.1
12.1
17.1
19.1
23.1
25.1
8.1
14.1
21.1
7.1
11.1
13.1
18.1
20.1
24.1
26.1
9.1
15.1
22.1
Channel Manager
Added Ch.
Seclected item: 4 Channel number
1/1 page
a
Antenna } Sorting k Page E Select T Tools R Return
Air
● The displayed image may differ depending on the
model.
Page 12

◀
▶
English
N
Using the color buttons with the Channel Manager.
●
a
Red (Antenna): Switches to Air or Cable.
●
}
Blue (Sorting): Changes the list ordered by number or name.
Channel Status Display Icons
Icon Operations
a
An analog channel.
c
A channel selected.
F
A channel set as a favorite.
Page 13

◀ ▶
English
Channel Manager Option Menu
t
Set each channel using the Channel Manager menu options (Watch, Add to
Favorites / Edit Favorites, Channel Name Edit, Add / Delete, Select All). Option
menu items may differ depending on the channel status.
1. Select a channel and press the TOOLS button.
2. Select a function and change its settings.
Page 14

◀
▶
English
●
Watch: Watch the selected channel.
●
Add to Favorites / Edit Favorites: Set channels you watch frequently as favorites.
/ Add or Delete the selected channel in Favorites 1-5.
1. Select the Add to Favorites / Edit Favorites Channel, then press the
ENTER
E
button.
N
If the channel is already added to favorite channel, Edit Favorites will be
shown.
2. Press the ENTER
E
button to select Favorites 1-5, then press the OK button.
N
One favorite channel can be added in several of My Channels among
Favorites 1-5.
Page 15

◀ ▶
English
●
Channel Name Edit (analog channels only): Assign your own channel name.
●
Add / Delete: Delete or add a channel to display the channels you want.
N
NOTE
●
All deleted channels will be shown on the All Channels menu.
●
A gray-colored channel indicates the channel has been deleted.
●
The Add menu only appears for deleted channels.
●
Select All: Select all the channels in the channel list.
Page 16

◀
▶
English
❑Memorizing Channels
O
MENUm → Channel → ENTER
E
■Antenna (Air / Cable)
t
Before your television can begin memorizing the available channels, you must
specify the type of signal source that is connected to the TV (i.e. an Air or a Cable
system).
■Auto Program
●
Air: Air antenna signal.
●
Cable: Cable antenna signal.
N
After all the available channels are stored, it starts to remove scrambled
channels. The Auto Program menu then reappears.
Page 17

◀ ▶
English
❑Other Features
O
MENUm → Channel → ENTER
E
■Fine Tune
(analog channels only)
If the reception is clear, you do not have to fine tune the channel, as this is done
automatically during the search and store operation. If the signal is weak or
distorted, fine tune the channel manually. Scroll to the left or right until the image is
clear.
N
Settings are applied to the channel you’re currently watching.
N
Fine tuned channels that have been saved are marked with an asterisk “*” on
the right-hand side of the channel number in the channel banner.
N
To reset the fine-tuning, select Reset.
Page 18

◀ ▶
English
■Color System (Auto / PAL-M / PAL-N / NTSC)
Normally the TV can receive image and sound with good quality when in the
mode auto. This mode detects the signal color system automatically. In case of
some signal reception with color unsatisfactory, select the Color System Mode to
PAL-M, PAL-N or NTSC.
Page 19

◀ ▶
English
❑Changing the Preset Picture Mode
O
MENUm → Picture → Picture Mode → ENTER
E
■Picture Mode
Select your preferred picture type.
N
When connecting a PC, you can only select Standard and Entertain.
●
Dynamic: Suitable for a bright room.
●
Standard: Suitable for a normal environment.
●
Movie: Suitable for watching movies in a dark room.
●
Entertain (When connecting a PC): Suitable for watching movies and games.
Basic Features
Page 20

◀
▶
English
❑Adjusting Picture Settings
O
MENUm → Picture → ENTER
E
■Cell Light / Contrast / Brightness / Sharpness / Color / Tint (G/R)
Your television has several setting options for picture quality control.
N
When you make changes to Cell Light, Contrast, Brightness, Sharpness,
Color or Tint (G/R) the OSD will be adjusted accordingly.
N
When connecting a PC, you can only make changes to Cell Light, Contrast,
Brightness and Sharpness.
N
Settings can be adjusted and stored for each external device connected to the
T V.
N
Lowering picture brightness reduces power consumption.
Page 21

◀ ▶
English
❑Changing the Picture Size
O
MENUm → Picture → Screen Adjustment → ENTER
E
■Screen Adjustment
●
Picture Size: Your cable box / satellite receiver may have its own set of screen
sizes as well. However, we highly recommend you use 16:9 mode most of the
time.
16:9: Sets the picture to 16:9 wide mode.
Zoom1: Use for moderate magnification.
Zoom2: Use for a stronger magnification.
Wide Fit: Enlarges the aspect ratio of the picture to fit the entire screen.
N
Available with HD 1080i / 720p signals in 16:9 mode.
Page 22

◀
▶
English
4:3: Sets the picture to basic (4:3) mode.
N
Do not watch in 4:3 format for a long time. Traces of borders displayed on
the left, right and center of the screen may cause image retention (screen
burn) which are not covered by the warranty.
Screen Fit: Displays the full image without any cut-off when HDMI (720p /
1080i / 1080p) or Component (1080i / 1080p) signals are inputted.
Page 23

◀ ▶
English
N
NOTE
●
After selecting Zoom1, Zoom2 or Wide Fit:
1. Press the r button to select Position, and then press the ENTER
E
button.
2. Press the l or r button to move the picture up or down.
3. When done, Press the ENTER
E
button.
N
If you want to change the picture position to its default position, select
the Reset.
Page 24

◀
▶
English
●
After selecting Screen Fit in HDMI (1080i / 1080p) or Component (1080i /
1080p) mode, you may need to center the picture:
1. Press the l or r button to select Position, and then press the ENTER
E
button.
2. Press the u , d , l or r button to move the picture up or down.
3. When done, Press the ENTER
E
button.
N
If you want to change the picture position to its default position, select
the Reset.
Page 25

◀ ▶
English
●
HD (High Definition): 16:9 - 1080i / 1080p (1920x1080), 720p (1280x720)
●
Settings can be adjusted and stored for each external device you have
connected to an input on the TV.
Input Source Picture Size
ATV, AV, Component (480i, 480p) 16:9, Zoom1, Zoom2, 4:3
DTV(1080i), Component (1080i, 1080p),
HDMI (720p, 1080i, 1080p)
16:9, 4:3, Wide Fit, Screen Fit
PC 16:9, 4:3
Page 26

◀
▶
English
❑Changing the Picture Options
■Advanced Settings
O
MENUm → Picture → Advanced Settings → ENTER
E
(Advanced Settings are available in Standard / Movie mode)
Compared to previous models, new Samsung TVs have a more precise picture.
N
When connecting a PC, you can only make changes to Gamma and White
Balance.
Page 27

◀ ▶
English
●
Black Tone (Off / Dark / Darker / Darkest):
Select the black level to adjust the screen
depth.
●
Dynamic Contrast (Off / Low / Medium /
High): Adjust the screen contrast.
●
Gamma: Adjust the primary color intensity.
● The displayed image may differ depending on
the model.
Advanced Settings
Black Tone : Off
►
Dynamic Contrast : Medium
Gamma : 0
RGB Only Mode : Off
Color Space : Native
White Balance
Flesh Tone : 0
▼
U
Move E Enter R Return
Page 28

◀
▶
English
●
RGB Only Mode (Off / Red / Green / Blue): Displays the Red, Green and
Blue color for making fine adjustments to the hue and saturation.
●
Color Space (Auto / Native): Adjust the range of colors available to create the
image.
●
White Balance: Adjust the color temperature for a more natural picture.
R-Offset / G-Offset / B-Offset: Adjust each color’s (red, green, blue) darkness.
R-Gain / G-Gain / B-Gain: Adjust each color’s (red, green, blue) brightness.
Reset: Resets the White Balance to it’s default settings.
Page 29

◀ ▶
English
●
Flesh Tone: Emphasize pink “Flesh Tone.”
●
Edge Enhancement (Off / On): Emphasize object boundaries.
●
Motion Lighting (Off / On): Reduce power consumption by brightness control.
N
When changing a setting value of Contrast, Motion Lightning will be set to
Off.
Page 30

◀
▶
English
■Picture Options
O
MENUm → Picture → Picture Options → ENTER
E
N
When connecting a PC, you can only make changes to the Color Tone.
●
Color Tone (Cool / Standard / Warm1 / Warm2)
N
Warm1 or Warm2 will be deactivated
when the picture mode is Dynamic.
N
Settings can be adjusted and stored for
each external device connected to an
input on the TV.
Picture Options
Color Tone : Standard
►
Digital Noise Filter : Auto
MPEG Noise Filter : Auto
HDMI Black Level : Normal
Film Mode : Off
U
Move E Enter R Return
● The displayed image may differ depending on
the model.
Page 31

◀ ▶
English
●
Digital Noise Filter (Off / Low / Medium / High / Auto / Auto Visualization):
If the broadcast signal received by your TV is weak, you can activate the Digital
Noise Filter feature to reduce any static and ghosting that may appear on the
screen.
N
When the signal is weak, try other options until the best picture is displayed.
Auto Visualization: When changing analog channels, displays signal strength.
N
Only available for analog channels.
N
When bar is green, you are receiving the best possible signal.
●
MPEG Noise Filter (Off / Low / Medium / High / Auto): Reduces MPEG noise
to provide improved picture quality.
Page 32

◀
▶
English
●
HDMI Black Level (Low / Normal): Selects the black level on the screen to
adjust the screen depth.
N
Available only in HDMI mode.
●
Film Mode (Off / Auto1 / Auto2 / Cinema Smooth
For PDP 550 Series
): Sets the
TV to automatically sense and process film signals from all sources and adjusts
the picture for optimum quality. The Cinema Smooth function is only activated
when HDMI 24Hz signal is inputted.
N
Available in TV, AV, COMPONENT (480i / 1080i) and HDMI (1080i).
■Reset Picture (OK / Cancel)
Resets your current picture mode to its default settings.
Page 33

◀ ▶
English
❑Setting up the TV with Your PC
Set the input source to PC.
■Auto Adjustment
t
O
MENUm → Picture → Auto Adjustment → ENTER
E
Adjust frequency values / positions and fine tune the settings automatically.
N
Not available when connecting with an HDMI to DVI cable.
Page 34

◀
▶
English
■PC Screen Adjustment
O
MENUm → Picture → Screen Adjustment → PC Screen Adjustment →
ENTER
E
●
Coarse / Fine: Removes or reduces picture noise. If the noise is not removed
by Fine-tuning alone, then adjust the frequency as best as possible (Coarse)
and Fine-tune again. After the noise has been reduced, readjust the picture so
that it is aligned to the center of screen.
●
Position: Adjust the PC screen position with direction button (u / d / l / r).
●
Image Reset: Resets the image to default settings.
Page 35

◀ ▶
English
Using Your TV as a Computer (PC) Display
Setting Up Your PC Software (Based on Windows XP)
Depending on the version of Windows and the video card, the actual screens on your
PC may differ in which case the same basic set-up information will almost always be
applied. (If not, contact your computer manufacturer or Samsung Dealer.)
1. Click on “Control Panel” on the Windows start menu.
2. Click on “Appearance and Themes” in the “Control Panel” window and a display
dialog-box will appear.
Page 36

◀
▶
English
3. Click on “Display” and a display dialog box will appear.
4. Navigate to the “Settings” tab on the display dialog-box.
●
If a vertical-frequency option exists on your display settings dialog box, the
correct value is “60” or “60 Hz”. Otherwise, just click “OK” and exit the dialog
box.
Page 37

◀ ▶
EnglishSound Menu
❑Changing the Preset Sound Mode
O
MENUm → Sound → Sound Mode → ENTER
E
■Sound Mode
t
●
Standard: Selects the normal sound mode.
●
Music: Emphasizes music over voices.
●
Movie: Provides the best sound for movies.
●
Clear Voice: Emphasizes voices over other sounds.
●
Amplify: Increase the intensity of high-frequency sound to allow a better
listening experience for the hearing impaired.
N
If Speaker Select is set to External Speaker, Sound Mode is disabled.
Page 38

◀
▶
English
❑Adjusting Sound Settings
O
MENUm → Sound → ENTER
E
■SRS TruSurround HD (Off / On)
(standard sound mode only)
This function provides a virtual 5.1 channel surround sound experience through a
pair of speakers using HRTF (Head Related Transfer Function) technology.
N
If Speaker Select is set to External Speaker, SRS TruSurround HD is
disabled.
Page 39

◀ ▶
English
■SRS TruDialog (Off / On)
(standard sound mode only)
This function allows you to increase the intensity of a voice over background music
or sound effects so that dialog can be heard more clearly.
N
If Speaker Select is set to External Speaker, SRS TruDialog is disabled.
Page 40

◀
▶
English
■Equalizer
Adjusts the sound mode (standard sound mode only).
●
Balance L/R: Adjusts the balance between the right and left speaker.
●
100Hz / 300Hz / 1kHz / 3kHz / 10kHz (Bandwidth Adjustment): Adjusts the
level of specific bandwidth frequencies.
●
Reset: Resets the equalizer to its default settings.
N
If Speaker Select is set to External Speaker, Equalizer is disabled.
Page 41

◀ ▶
English
■Broadcast Audio Options
●
Audio Language
(digital channels only)
Change the default value for audio languages.
N
The available language may differ depending on the broadcast.
Page 42

◀
▶
English
●
Multi-Track Sound (MTS)
t
(analog channels only)
Mono: Choose for channels that are broadcasting in mono or if you are having
difficulty receiving a stereo signal.
Stereo: Choose for channels that are broadcasting in stereo.
SAP: Choose to listen to the Separate Audio Program, which is usually a
foreign-language translation.
N
Depending on the particular program being broadcast, you can listen to
Mono, Stereo or SAP.
Page 43

◀ ▶
English
■SPDIF Output
SPDIF (Sony Philips Digital Interface) is used to provide digital sound, reducing
interference going to speakers and various digital devices such as an A/V Receiver
/ Home theater.
●
Audio Format: You can select the Digital Audio output (SPDIF) format.
N
The available Digital Audio output (SPDIF) format may differ depending on
the input source.
●
Audio Delay: Correct audio-video sync problems, when watching TV or video,
and when listening to digital audio output using an external device such as an
AV receiver (0ms ~ 250ms).
Page 44

◀
▶
English
■Speaker Settings
●
Speaker Select (External Speaker / TV Speaker)
A sound echo may occur due to a difference in decoding speed between
the main speaker and the audio receiver. In this case, set the TV to External
Speaker.
N
When Speaker Select is set to External Speaker, the volume and MUTE
buttons will not operate and the sound settings will be limited.
N
When Speaker Select is set to External Speaker.
●
TV Speaker: Off, External Speaker: On
N
When Speaker Select is set to TV Speaker.
●
TV Speaker: On, External Speaker: On
N
If there is no video signal, both speakers will be mute.
Page 45

◀ ▶
English
●
Auto Volume (Off / Normal / Night)
To equalize the volume level on each channel, set to Normal.
Night: This mode provides an improved sound experience compared to
Normal mode, making almost no noise. It is useful at night.
■Sound Reset (OK / Cancel)
Reset all sound settings to the factory defaults.
Page 46
◀
▶
English
❑Connecting to a Wired Network
For PDP 550 Series
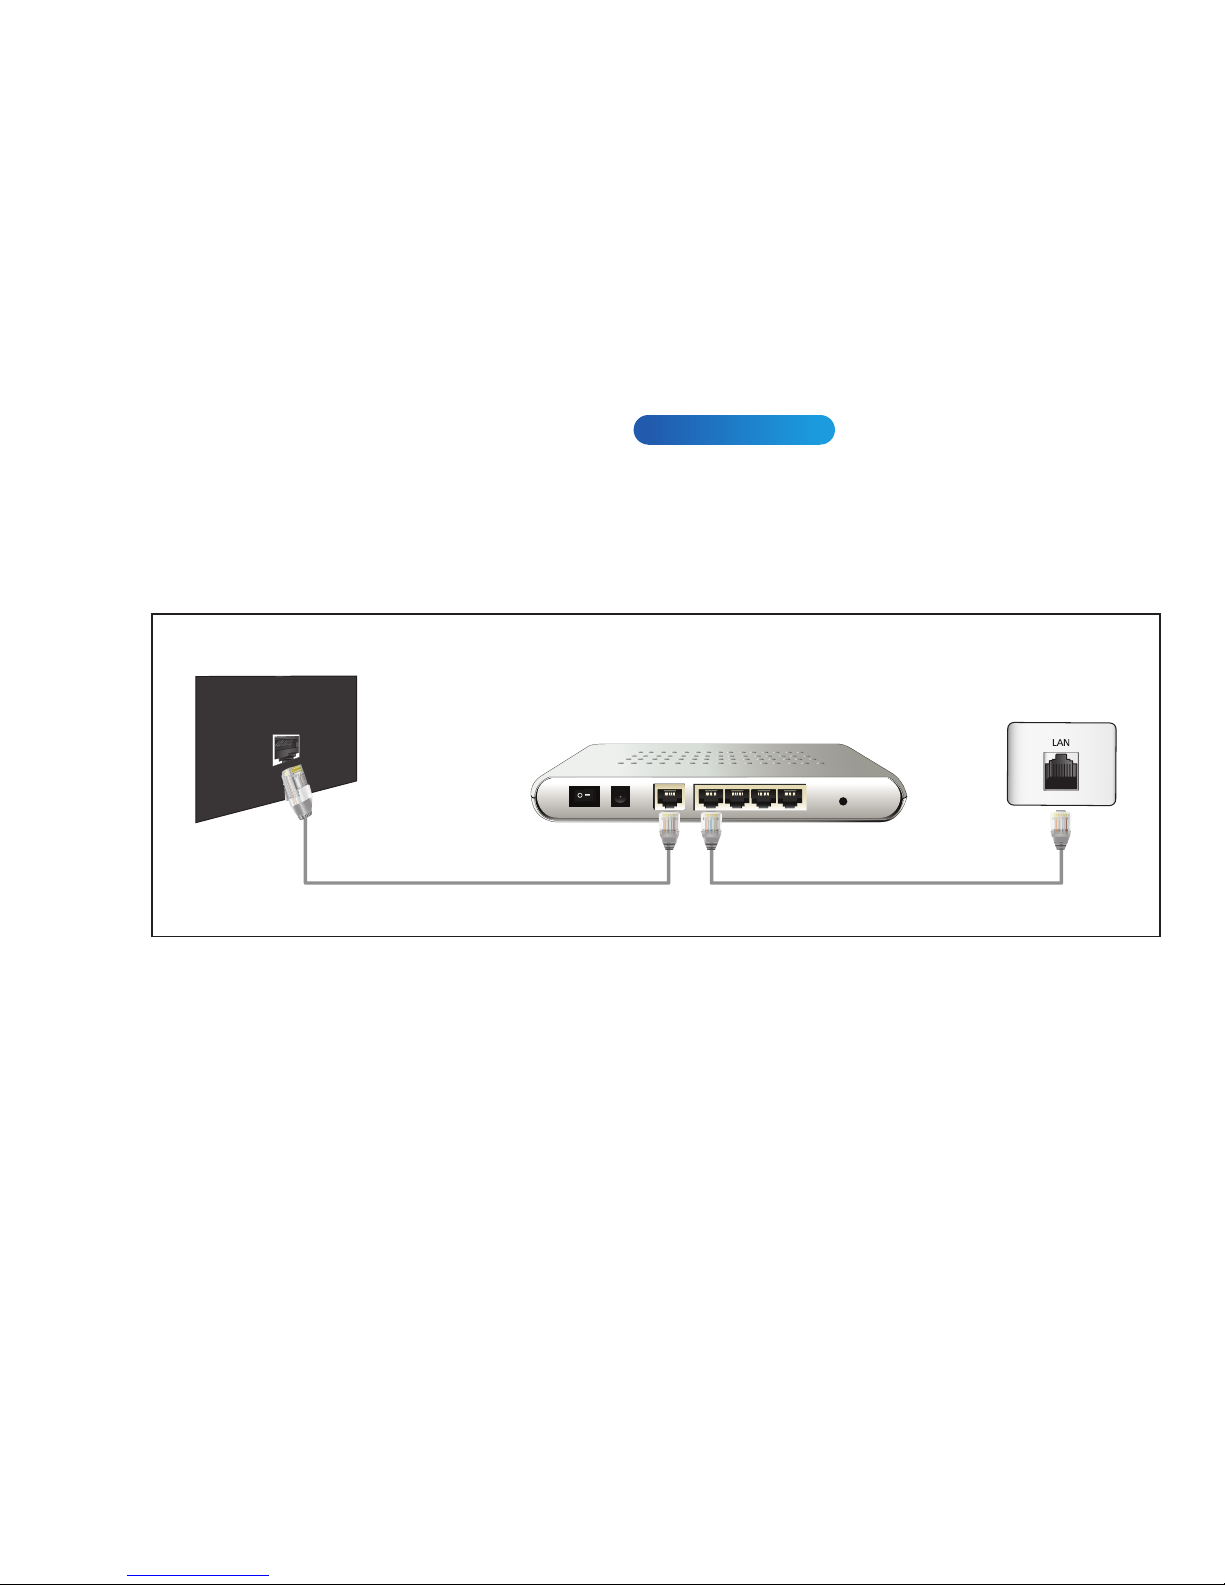
You can attach your TV to your LAN using cable in three ways:
●
You can attach your TV to your LAN by connecting the LAN port on the back of
your TV to an external modem using a LAN cable. See the diagram below.
The Modem Port on the Wall
LAN
LAN CableModem Cable
External Modem
(ADSL / VDSL / Cable TV)
Preference Features
Page 47
◀ ▶
English
●
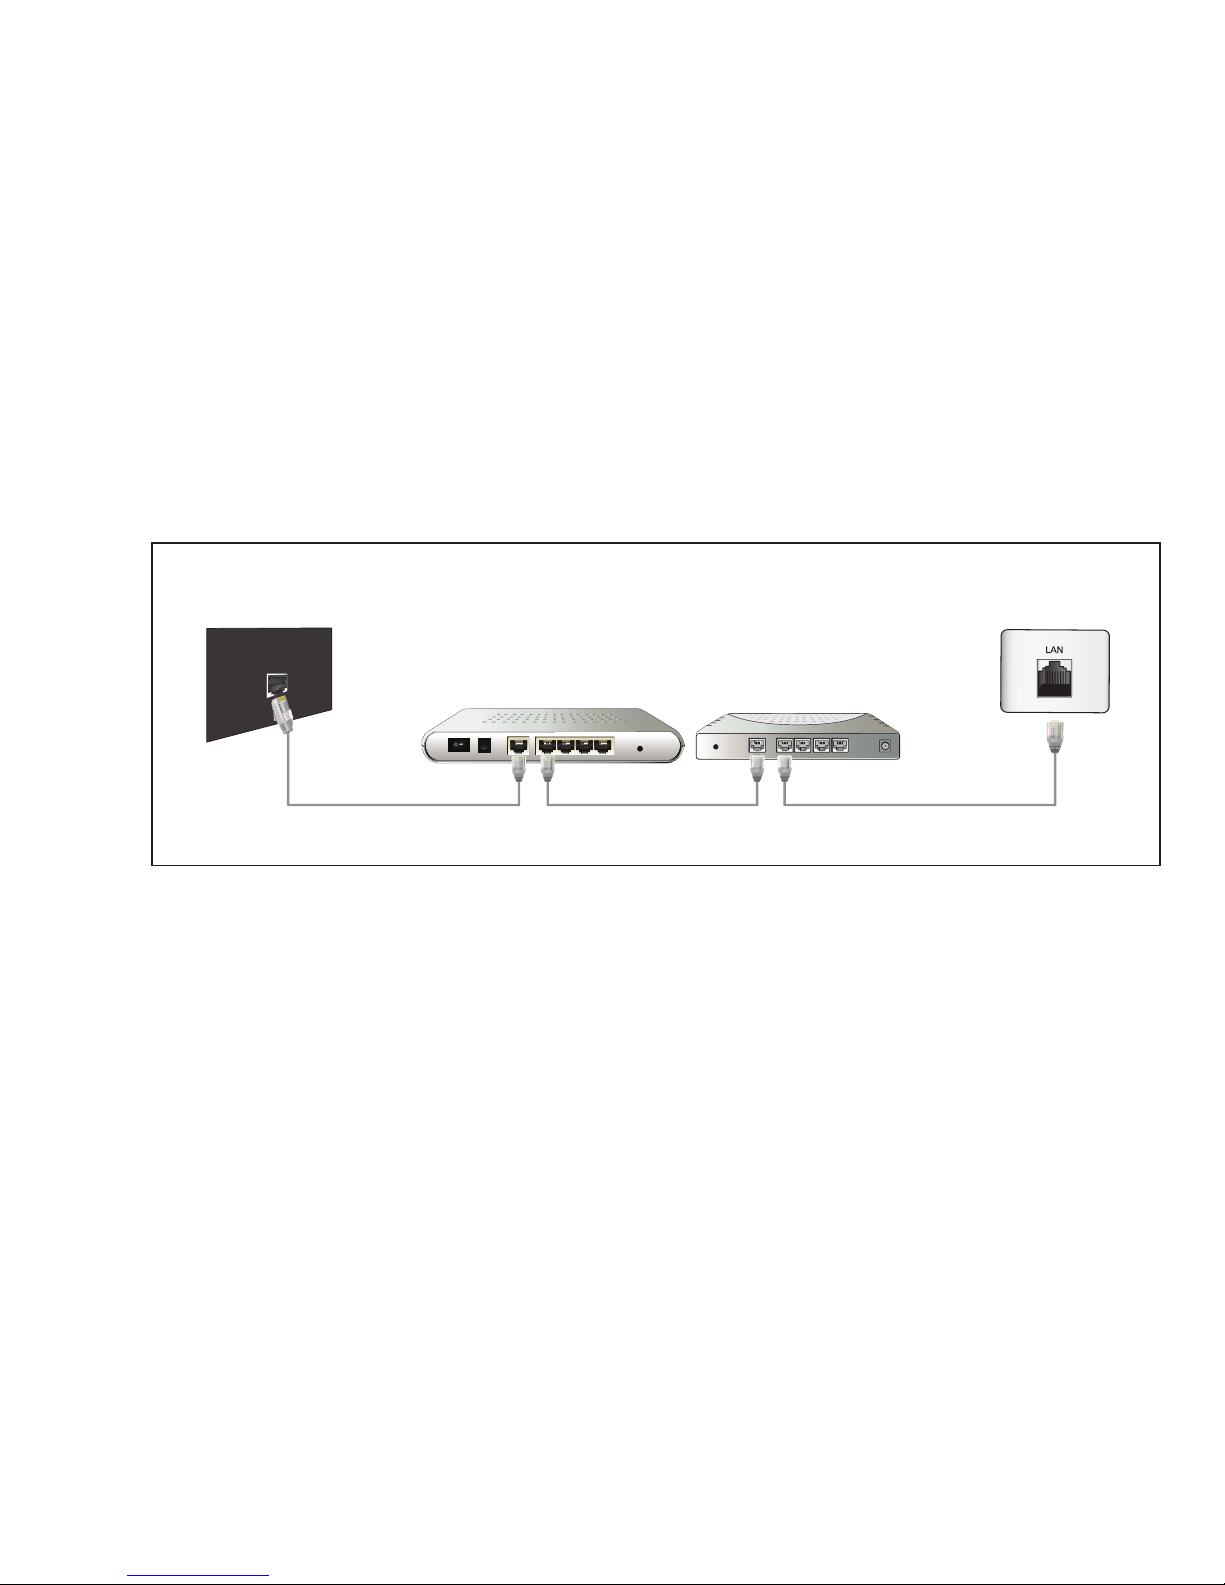
You can attach your TV to your LAN by connecting the LAN port on the back
of your TV to a IP Sharer which is connected to an external modem. Use LAN
cable for the connection. See the diagram below.
The Modem
Port on the Wall
LAN
LAN Cable LAN CableModem Cable
External Modem
(ADSL / VDSL / Cable TV)
IP Sharer
(having DHCP server)
Page 48
◀
▶
English
●
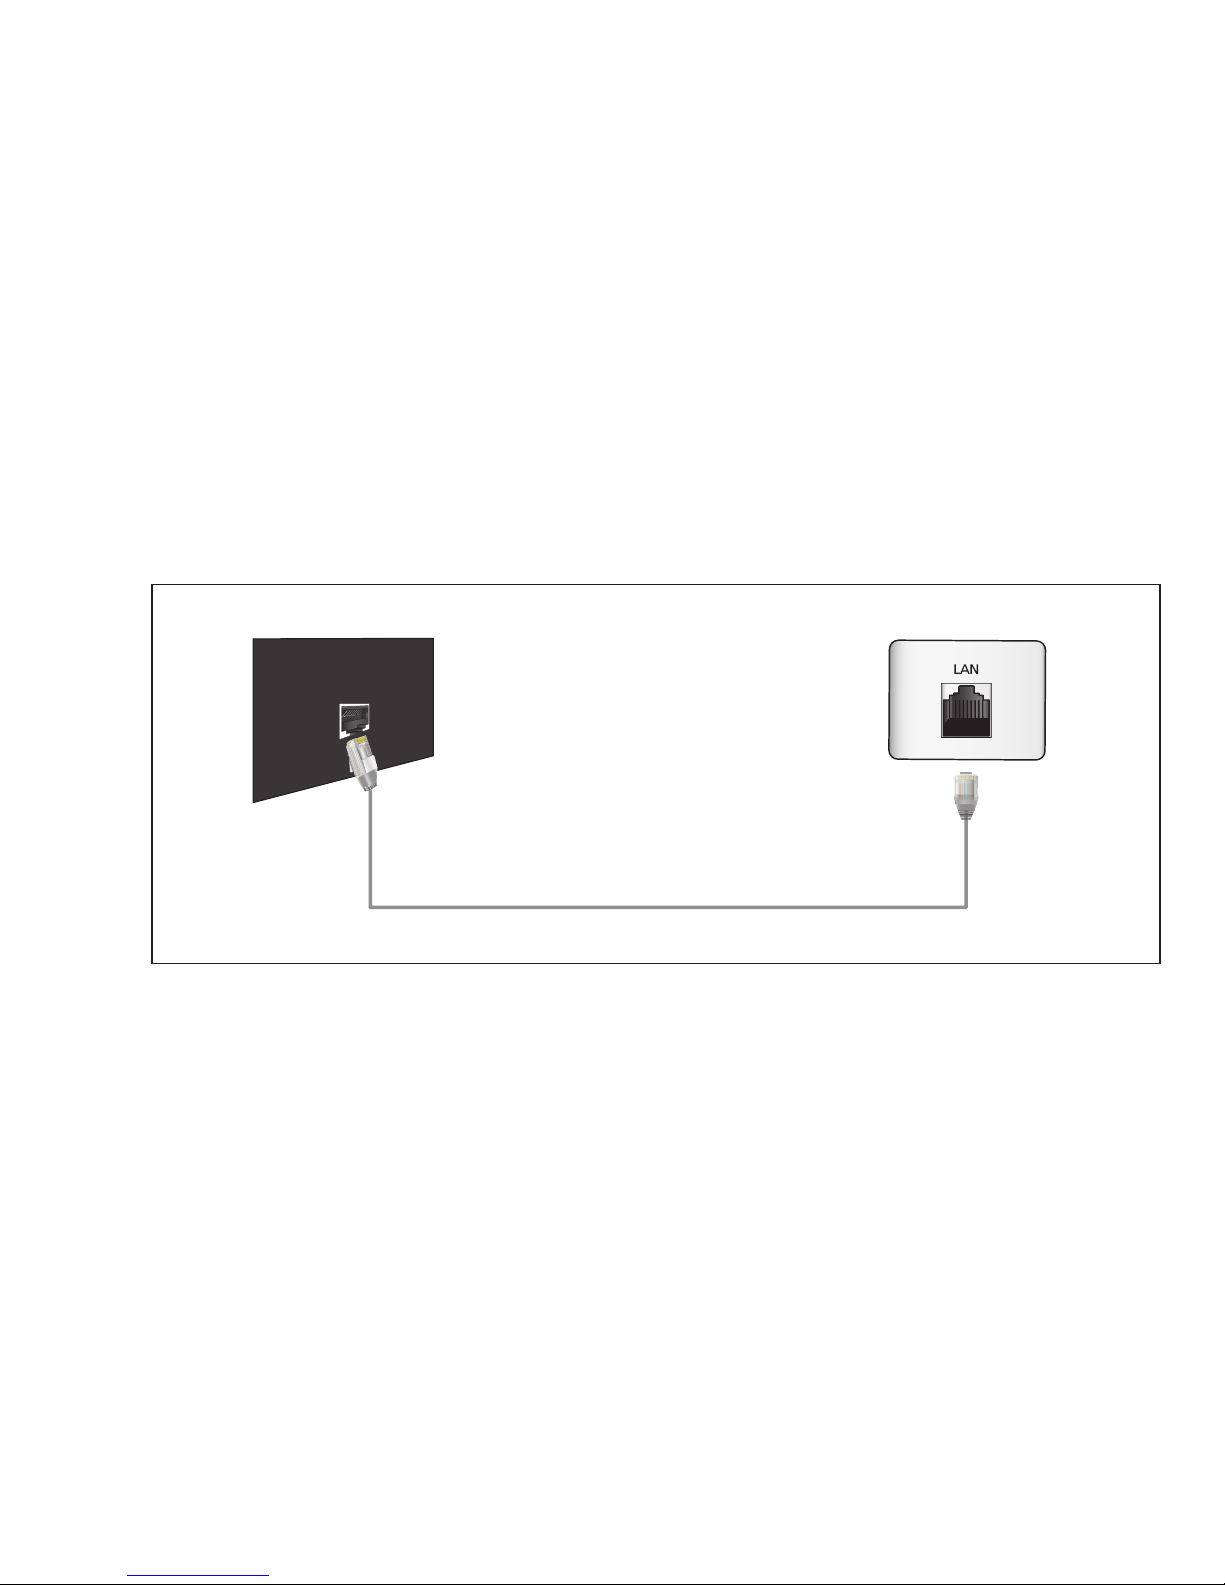
Depending on how your network is configured, you may be able to attach your
TV to your LAN by connecting the LAN port on the back of your TV directly to
a network wall outlet using a LAN cable. See the diagram below. Note that the
wall outlet is attached to a modem or router elsewhere in your house.
The LAN Port on the Wall
LAN
LAN Cable
Page 49

◀ ▶
English
●
If you have a Dynamic Network, you should use an ADSL modem or router
that supports Dynamic Host Configuration Protocol (DHCP). Modems and
routers that support DHCP automatically provide the IP address, subnet mask,
gateway, and DNS values your TV needs to access the Internet so you do not
have to enter them manually. Most home networks are Dynamic Networks.
Some networks require a Static IP address. If your network requires a Static
IP address, you must enter the IP address, subnet mask, gateway, and DNS
values manually on your TV’s Cable Setup Screen when you set up the network
connection. To get the IP address, subnet mask, gateway, and DNS values,
contact your Internet Service Provider (ISP). If you have a Windows computer,
you can also get these values through your computer.
N
You can use ADSL modems that support DHCP if your network requires a
Static IP address. ADSL modems that support DHCP also let you use Static
IP addresses.
Page 50

◀
▶
English
■Network Settings
O
MENUm → Network → Network Settings → ENTER
E
Set the network connection to use various Internet services such as My Contents,
AllShare™ and perform software upgrade.
■Network Status
O
MENUm → Network → Network Status → ENTER
E
You can check the current network and Internet status.
■AllShare Settings
O
MENUm → Network → AllShare Settings → ENTER
E
Selects whether to use media functions on the network. For details on set up
options, refer to the “AllShare™” instructions.
Page 51

◀ ▶
English
■Network Settings (Auto)
Use the Automatic Network Settings when connecting your TV to a network
that supports DHCP. To set up your TV’s cable network connection automatically,
follow these steps:
How to set up automatically
1. Go to Network Settings screen. To enter it, follow the directions of Network
Settings.
2. Select the Wired.
3. The network test screen appears, and
network setting is done.
● The displayed image may differ depending on the
model.
U
Move E Enter R Return
Network Settings
Select a network connection type.
Wired
Wireless(General)
WPS(PBC)
One Foot
Connection
Connect to the network using LAN cable. Please
make sure that the LAN cable is connected.
Page 52

◀
▶
English
N
If it fails to set automatically, check the
connection of LAN port.
N
If you cannot find network connection
values or if you want to set connection
manually, set it to Manual. Refer to following
“How to set up manually”.
● The displayed image may differ depending on the
model.
a
Previous E Enter R Return
Network Settings
Wired network and Internet connection completed.
IP Settings OK
MAC Address 00:40:30:30:20:10
IP Address 192.168.10.21
Subnet Mask 255.255.255.0
Gateway 192.168.10.1
DNS Server 203.248.252.2
Internet is connected successfully.
If you have a problem with using Internet service, contact your Internet service
provider.
Page 53

◀ ▶
English
■Network Settings (Manual)
Use the Manual Network Setup when connecting your TV to a network that
requires a Static IP address.
Getting the Network Connection Values
To get the Network connection values on most Windows computers, follow these
steps:
1. Right click the Network icon on the bottom right of the screen.
2. In the pop-up menu that appears, click Status.
3. On the dialog that appears, click the Support tab.
4. On the Support Tab, click the Details button. The Network connection values
are displayed.
Page 54

◀
▶
English
How to set up manually
To set up your TV’s cable network connection manually, follow these steps:
1. Follow Steps 1 through 2 in the “How to set up automatically” procedure.
2. Select the IP Settings on network test screen.
3. Set IP Mode to Manual.
4. Press the d button on your remote to go to the
IP Address.
U
Move E Enter R Return
IP Settings
Internet Protocol Setup : Manual
►
IP Address
. . .
Subnet Mask
. . .
Gateway
. . .
DNS : Manual
DNS Server
. . .
OK
● The displayed image may differ depending on
the model.
Page 55

◀ ▶
English
5. Enter the IP Address, Subnet Mask, Gateway, and DNS Server values. Use the
number buttons on your remote to enter numbers and the arrow buttons to move
from one entry field to another.
6. When done, select the OK.
7. The network test screen appears, and network setting is done.
Page 56
◀
▶
English
❑Connecting to a Wireless Network
For PDP 550 Series
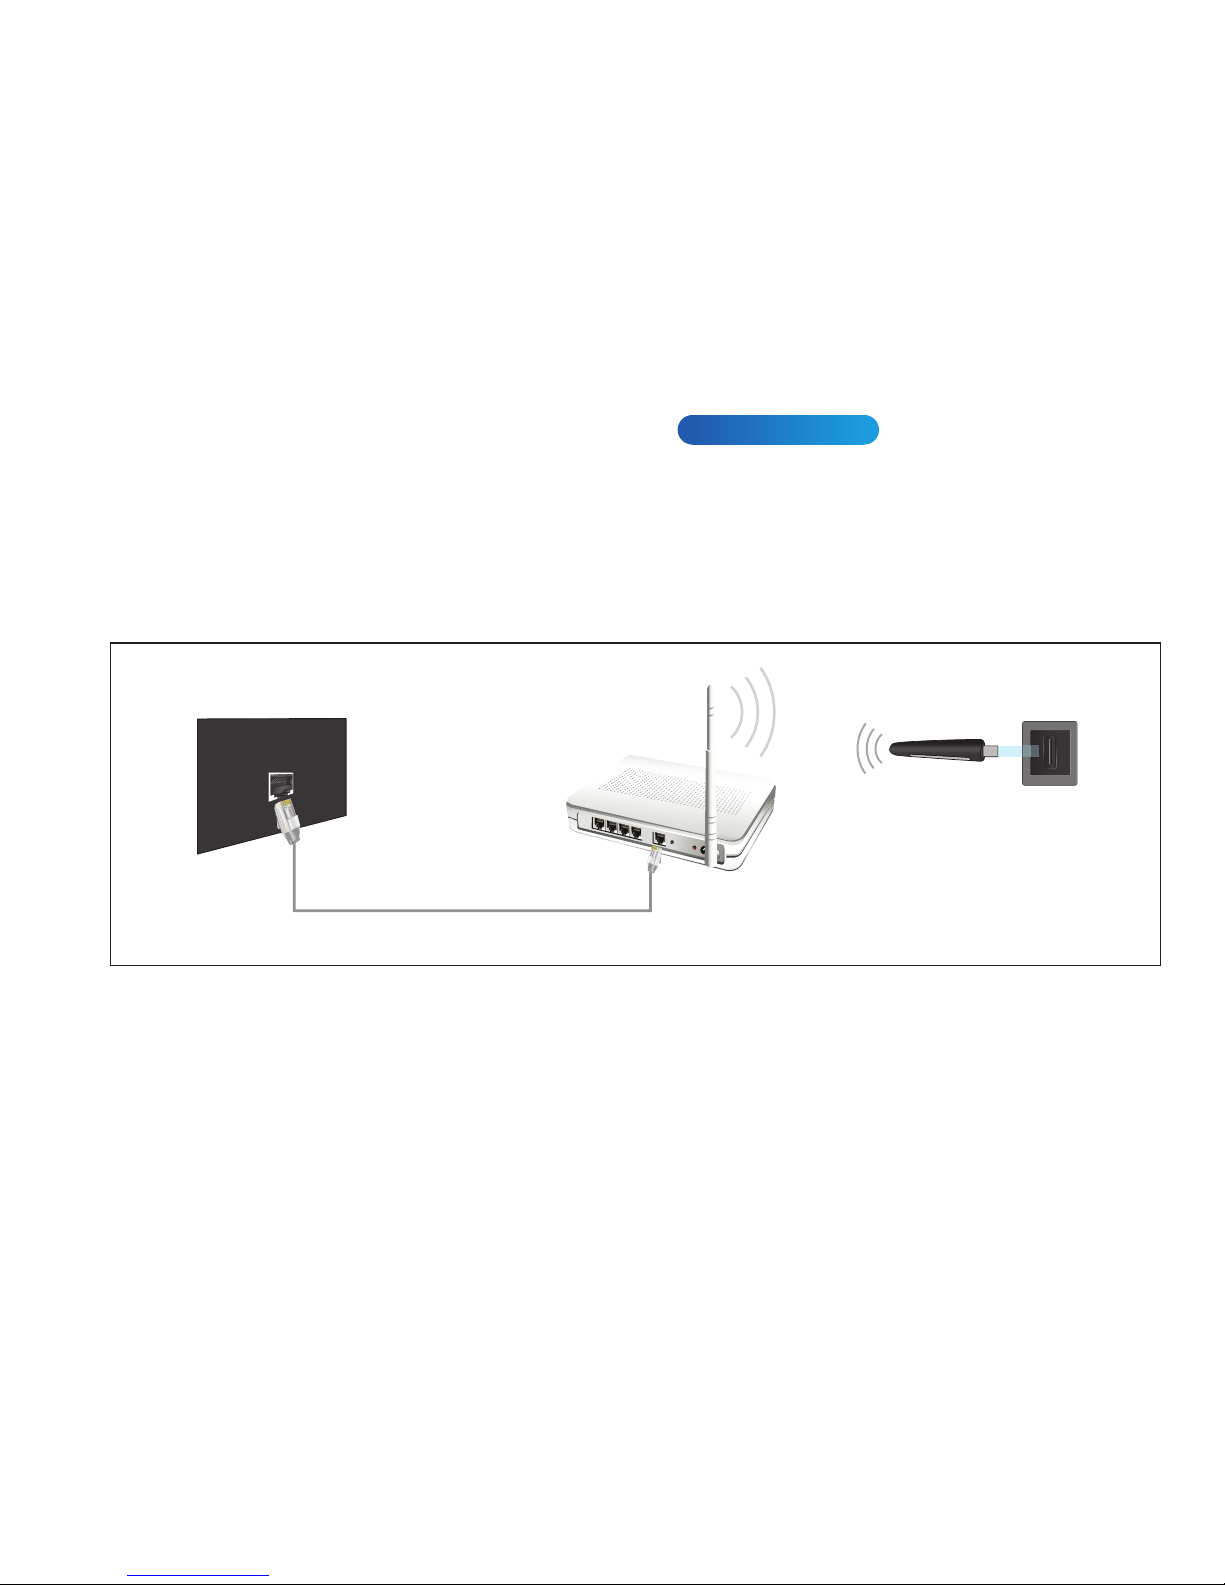
To connect your TV to your network wireless, you need a wireless router or
modem and a Samsung Wireless LAN adapter (WIS09ABGN, WIS09ABGN2,
WIS10ABGN), which you connect to your TV’s back or side panel USB jack. See
the illustration below.
The LAN Port on the Wall
LAN Cable
Wireless IP sharer
(router having DHCP server)
Samsung
Wireless LAN
adapter
TV Rear Panel
Page 57

◀ ▶
English
Samsung’s Wireless LAN adapter is sold separately and is offered by selected retailers,
Ecommerce sites and Samsungparts.com. Samsung’s Wireless LAN adapter supports
the IEEE 802.11a/b/g and n communication protocols. Samsung recommends using
IEEE 802.11n. When you play video over a IEEE 802.11b/g connection, the video may
not play smoothly.
N
NOTE
●
You must use the “Samsung Wireless LAN adapter” (WIS09ABGN,
WIS09ABGN2, WIS10ABGN) to use a wireless network.
Page 58

◀
▶
English
●
To use a wireless network, your TV must be connected to a wireless IP sharer
(either a router or a modem). If the wireless IP sharer supports DHCP, your
TV can use a DHCP or static IP address to connect to the wireless network.
Select a channel for the wireless IP sharer that is not currently being used. If the
channel set for the wireless IP sharer is currently being used by another device
nearby, this will result in interference and communication failure.
●
If you apply a security system other than the systems listed below, it will not
work with the TV.
Page 59

◀ ▶
English
●
If Pure High-throughput (Greenfield) 802.11n mode is selected and the
Encryption type is set to WEP, TKIP or TKIP AES (WPS2Mixed) for your AP,
Samsung TVs will not support a connection in compliance with new Wi-Fi
certification specifications.
●
If your AP supports WPS (Wi-Fi Protected Setup), you can connect to the
network via PBC (Push Button Configuration) or PIN (Personal Identification
Number). WPS will automatically configure the SSID and WPA key in either
mode. If your router, modem, or device is not certified, it may not connect to
the TV via the “Samsung Wireless LAN adapter.”
Page 60

◀
▶
English
●
Ensure the TV is turned off before you connect the Samsung Wireless LAN
adapter.
●
Connection Methods: You can setup the wireless network connection on five
ways.
–
Auto Setup (Using the Auto Network Search function)
–
Manual Setup
–
WPS (PBC)
–
One Foot Connection
–
Plug & Access
●
The Samsung Wireless LAN adapter may not be recognized when using a
connection via a USB hub or via a USB extension cable other than the cable
supplied.
Page 61
◀ ▶
English
Notice
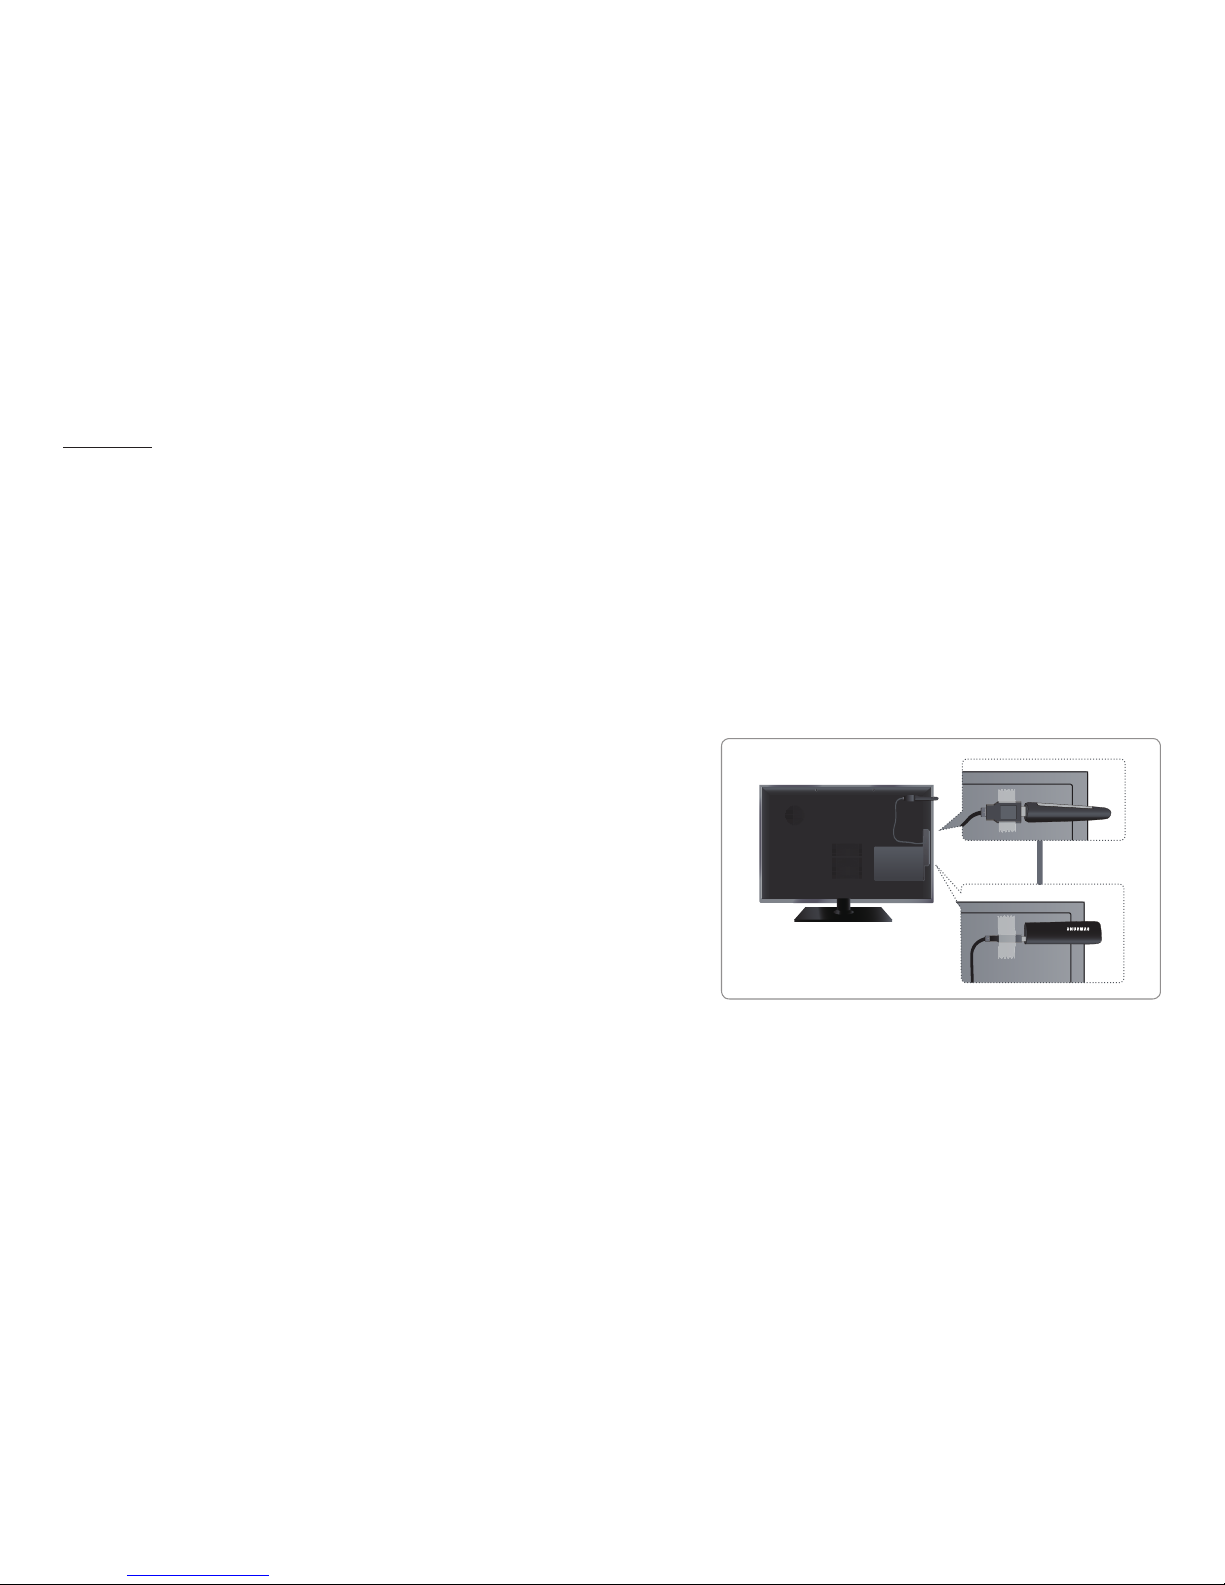
The picture may appear corrupted or have static for some channels when the TV is
connected to the Samsung Wireless LAN adapter. In such a case, connection using
one of the following methods or connect the Samsung Wireless LAN adapter using a
USB cable in a place that is not affected by radio interference.
To reconnect the Samsung Wireless LAN adapter using the extension cable, follow
these steps:
1. Connect the extension cable to the USB 1
(HDD) port.
2. Connect the extension cable and Samsung
Wireless LAN adapter.
3. Attach the Samsung Wireless LAN adapter
to the back of the TV near the top, using
double-sided adhesive tape.
● The displayed image may differ depending on the
model.
Page 62

◀
▶
English
■Network Settings (Auto)
Most wireless networks have an optional security system that requires devices that
access the network to transmit an encrypted security code called an Access or
Security Key. The Security Key is based on a Pass Phrase, typically a word or a
series of letters and numbers of a specified length you were asked to enter when
you set up security for your wireless network. If you use this method of setting up
the network connection, and have a Security Key for your wireless network, you
will have to enter the Pass Phrase during the setup process.
Page 63
◀ ▶
English
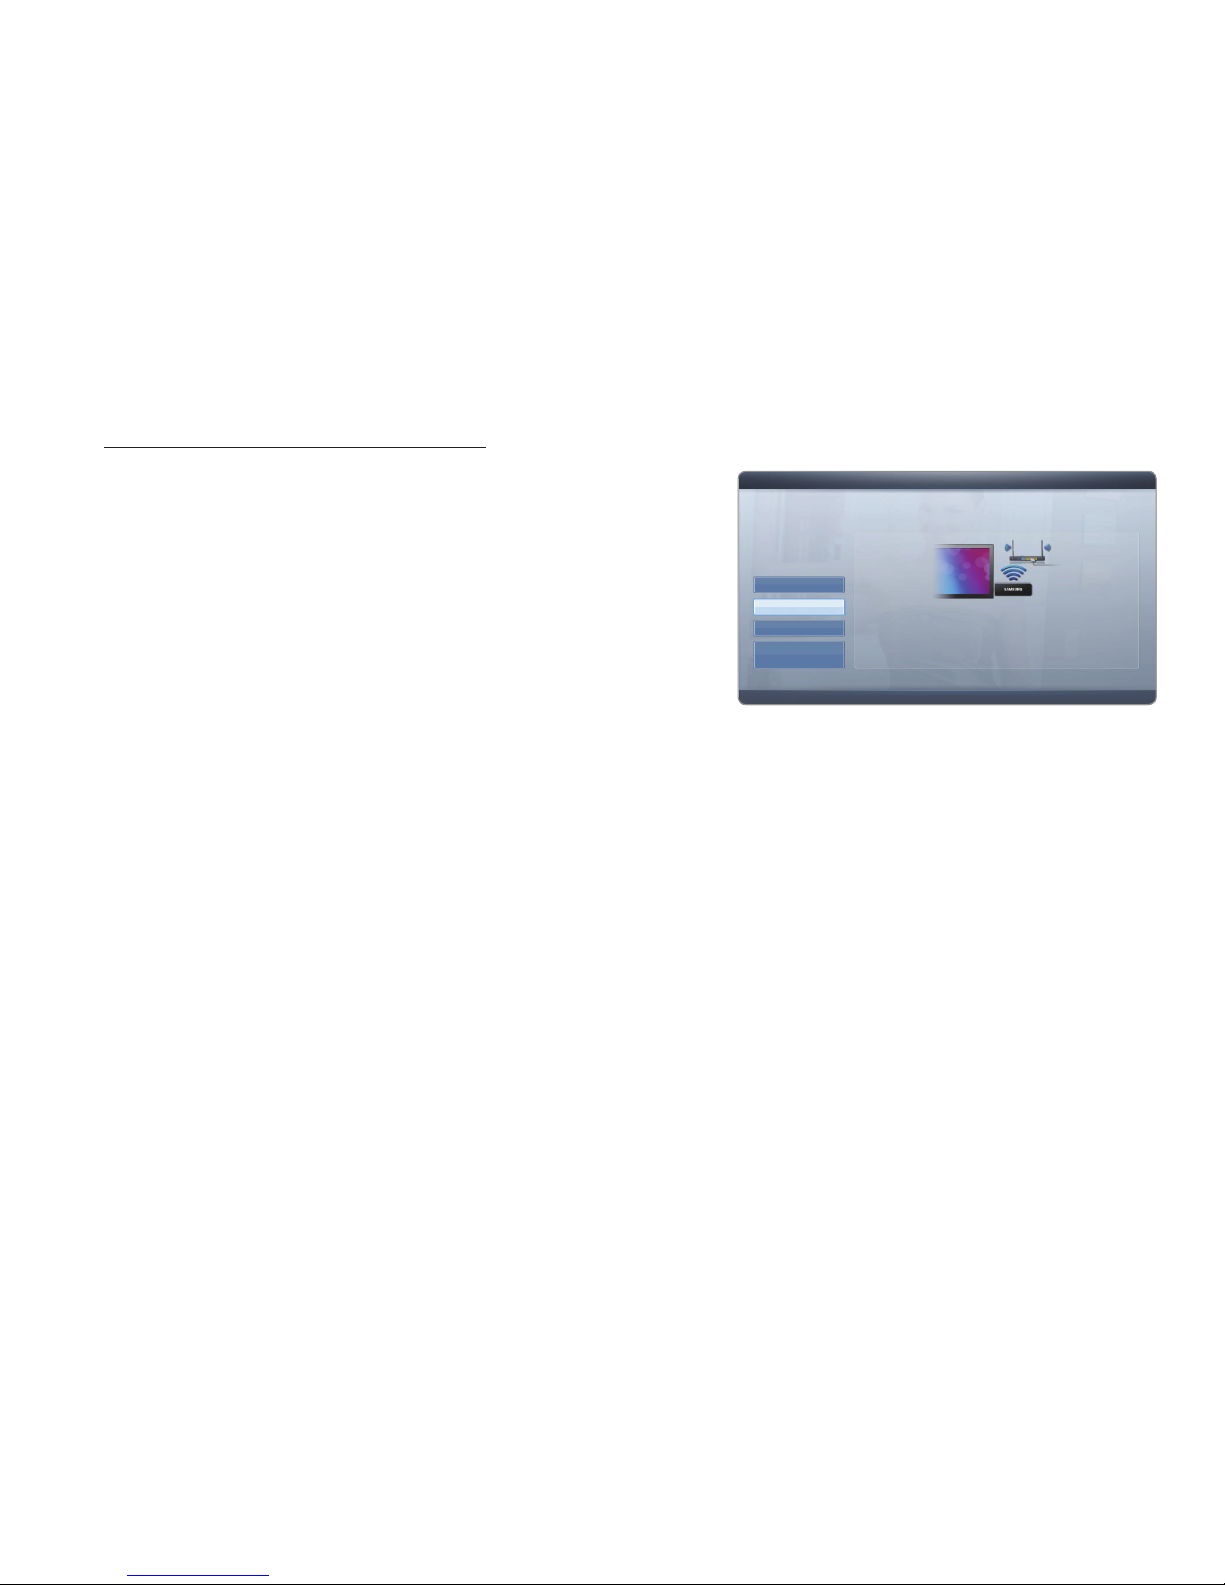
How to set up automatically
1. Go to Network Settings screen. To enter it,
follow the directions of Network Settings.
2. Select the Wireless.
3. The Network function searches for available
wireless networks. When done, it displays a
list of the available networks.
4. In the list of networks, press the u or d
button to select a network, and then press
the ENTER
E
button.
N
If the wireless router is set to Hidden (Invisible), you have to select Add
Network and enter the correct Network Name (SSID) and Security key to
establish the connection.
● The displayed image may differ depending on the
model.
U
Move E Enter R Return
Network Settings
Select a network connection type.
Wired
Wireless(General)
WPS(PBC)
One Foot
Connection
Set up wireless network by selecting your
Access Point. You may need to enter security key
depending on the setting of the Access Point.
Page 64

◀
▶
English
5. If the Security screen pop-up appears, go
to step 6. If you select the wireless router
which does not have security, go to step
10.
6. If the wireless router has security, enter the
Security key (Security or PIN), then select
Done.
N
When you enter the Security key
(Security or PIN), use u / d / l / r buttons on your remote to select
number/characters.
N
You should be able to find the Pass Phrase on one of the set up screens
you used to set up your router or modem.
● The displayed image may differ depending on the
model.
a
Previous n Move E Enter R Return
Network Settings
Enter security key.
0 entered
a
g
m
s
a/A
b
h
n
t
b
f
l
r
x
b
d
j
p
v
b
2
5
8
z
Done
c
i
o
u
b
1
4
7
y
b
e
k
q
w
b
3
6
9
0
Page 65

◀ ▶
English
7. The network test screen appears, and network setting is done.
N
If it fails to set Security key (Security or PIN), select Reset or IP Settings.
N
If you want to set connection manually, select the IP Settings. Refer to
following “How to set up manually”.
Page 66

◀
▶
English
■Network Setup (Manual)
Use the Manual Network Setup when connecting your TV to a network that
requires a Static IP address.
Getting the Network Connection Values
To get the Network connection values on most Windows computers, follow these
steps:
1. Right click the Network icon on the bottom right of the screen.
2. In the pop-up menu that appears, click Status.
3. On the dialog that appears, click the Support tab.
4. On the Support Tab, click the Details button. The Network connection values
are displayed.
Page 67

◀ ▶
English
How to set up manually
To set up your TV’s cable network connection manually, follow these steps:
1. Follow Steps 1 through 2 in the “How to set up automatically” procedure.
2. Select the IP Settings on network test screen.
3. Set IP Mode to Manual.
4. Press the d button on your remote to go to the IP Address.
5. Enter the IP Address, Subnet Mask, Gateway, and DNS Server values. Use
the number buttons on your remote to enter numbers and the arrow buttons to
move from one entry field to another.
6. When done, select the OK.
7. The network test screen appears, and network setting is done.
Page 68

◀
▶
English
■Network Setup (WPS(PBC))
How to set up using WPS(PBC)
If your router has a WPS (PBC) button, follow these steps:
1. Go to Network Settings screen. To enter it, follow the directions of Network
Settings.
2. Select the WPS(PBC).
3. Press the WPS(PBC) button on your router
within 2 minutes. Your TV automatically
acquires all the network setting values it
needs and connects to your network.
4. The network test screen appears, and
network setting is done.
U
Move E Enter R Return
Network Settings
Select a network connection type.
Wired
Wireless(General)
WPS(PBC)
One Foot
Connection
Connect to the Access Point easily by pressing the
WPS(PBC) button. Choose this if your Access Point
supports Push Button Configuration(PBC)
● The displayed image may differ depending on the
model.
Page 69

◀ ▶
English
■Network Settings (One Foot Connection)
The One Foot Connection function lets you connect your Samsung TV
automatically to Samsung wireless Router. If your Wireless Router does not
support One Foot Connection, you must connect using one of the other
methods.
N
You can check for equipment that supports One Foot Connection on www.
samsung.com.
Page 70
◀
▶
English
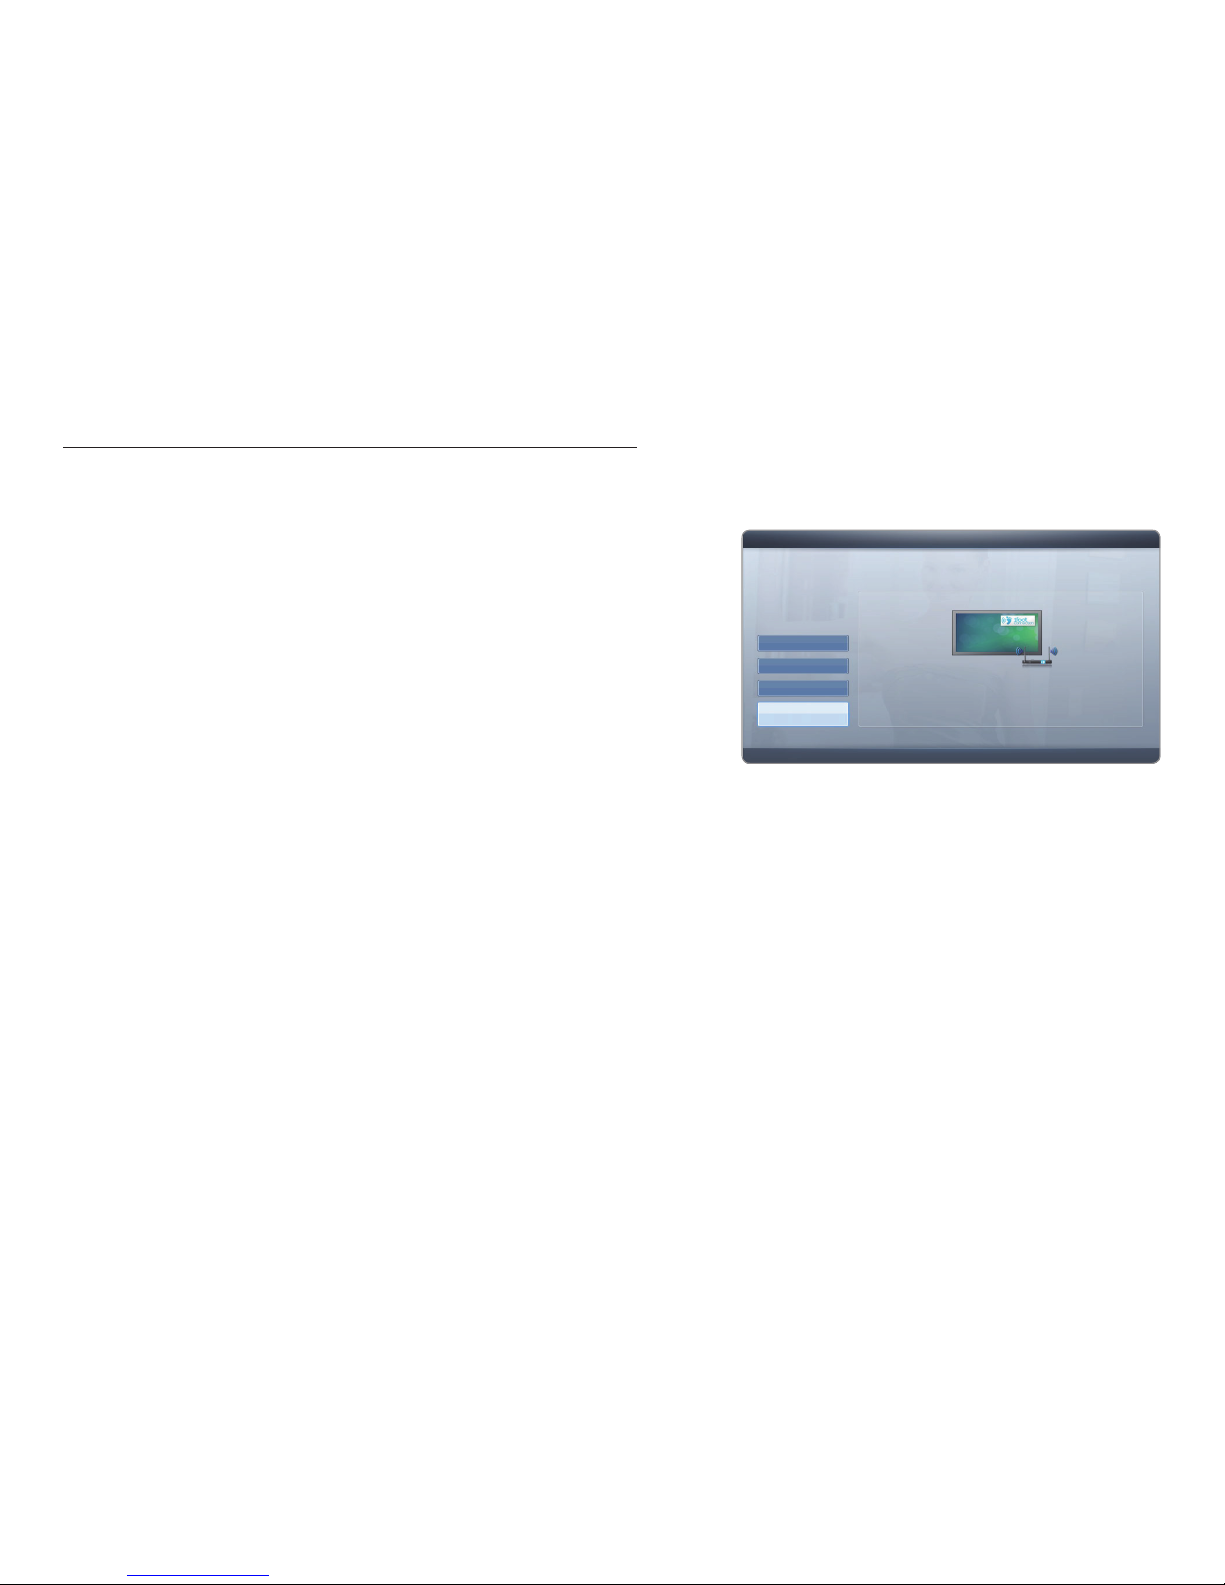
How to set up using One Foot Connection
Turn on the power of AP and TV.
1. Go to Network Settings screen. To enter it,
follow the directions of Network Settings.
2. Select the One Foot Connection.
3. Place the AP in parallel with the Samsung
Wireless LAN adapter giving a gap no larger
than 25cm.
U
Move E Enter R Return
Network Settings
Select a network connection type.
Wired
Wireless(General)
WPS(PBC)
One Foot
Connection
Connect to the wireless network automatically if your
access point supports One Foot Connection. Select
this connection type after placing the Access Point
within 10 inches (25cm) of your TV.
● The displayed image may differ depending on the
model.
Page 71

◀ ▶
English
N
If One Foot Connection does not connect your TV to your Router, a popup
window appears on the screen notifying you of the failure. If you want to try
using One Foot Connection again, reset the AP, disconnect the Samsung
Wireless LAN adapter and then try again from Step 1. You can also choose one
of the other connection setup methods.
4. The network test screen appears, and network setting is done.
5. Place the wireless Router in a desired location.
N
If the wireless Router settings change or you install a new wireless Router, you
must perform the One Foot Connection procedure again, beginning from
Step 1.
Page 72

◀
▶
English
■Network Setting (Plug & Access)
Plug & Access function lets you connect your Samsung wireless Router to
Samsung TV easily by using USB memory. If your non-Samsung AP does not
support Plug & Access, you must connect using one of the other methods.
N
You can check for equipment that supports Plug & Access on www.samsung.
com.
Page 73

◀ ▶
English
How to set up using Plug & Access function
Turn on the power of AP and TV.
1. Insert USB memory stick into our Samsung wireless APs and checking AP’s
PDP status (Blinking → On).
2. Then take USB memory out and insert your USB memory into Samsung TV.
3. Wait until the connection is automatically established.
N
If Plug & Access does not connect your TV to your AP, a pop-up window
appears on the screen notifying you of the failure. If you want to try using
Plug & Access a gain, reset the AP, disconnect the Samsung Wireless LAN
adapter and then try again from Step 1. You can also choose one of the
other connection setup methods.
Page 74

◀
▶
English
4. The network test screen appears, and network setting is done.
5. Place the AP in a desired location.
N
If the AP settings change or you install a new AP, you must perform the
Plug & Access procedure again, beginning from Step 1.
Page 75

◀ ▶
English
Priority QOS
Samsung wireless Router is optimized HD AV streaming for Samsung DTV
This is our product (CY-SWR1100)’s distinctive function.
Samsung wireless Router can be connected with many devices, such as
laptop, mobile phone, BD player etc.
In case of connecting Samsung TV to Samsung wireless Router while other
devices are connected, Samsung wireless Router gives Samsung TV a priority
connection than other devices.
This function ensures the best streaming contents and throughput speed.
●
Make your TV faster by giving priority bandwidth to your TV (on/off optional).
●
By giving priority to Samsung TVs, enjoy HD content without buffering.
●
Connection speed may vary based on the network environment.
Page 76

◀
▶
English
■Network Settings (Ad-Hoc)
You can connect to a mobile device supporting Ad-hoc without an wireless router
through the “Samsung Wireless LAN adapter”. When connecting mobile device,
you can use files on device or connect internet using AllShare or My Contents
function.
How to connect to new Ad-hoc
1. Go to Network Settings screen. To enter it, follow the directions of Network
Settings.
2. Select the Wireless.
Page 77

◀ ▶
English
3. When finished searching a mobile device, set the Network Name (SSID) and
Security key of the device, and then connect the network.
N
If network does not operate normally, check the Network Name (SSID) and
Security key again. An incorrect Security key may cause a malfunction.
N
If a device is connected once, it is displayed in Network Setting list. When
you connect it again, you can find it in network setting list.
Page 78

◀
▶
English
If Your TV Fails to Connect to the Internet
Your TV may not be able to connect to the Internet because your ISP has
permanently registered the MAC address (a unique identifying number) of your PC
or modem, which it then authenticates each time you connect to the Internet as a
way of preventing unauthorized access. As your TV has a different MAC address,
your ISP can not authenticate its MAC address, and your TV can not connect.
To resolve this problem, ask your ISP about the procedures required to connect
devices other than a PC (such as your TV) to the Internet.
If your Internet service provider requires an ID or password to connect to the
Internet, your TV may not be able to connect to the Internet. If this is the case, you
must enter your ID or password when connecting to the Internet.
The internet connection may fail because of a firewall problem. If this is the case,
contact your Internet service provider.
If you cannot connect to the Internet even after you have followed the procedures
of your Internet service provider, please contact Samsung Electronics at
1-800-SAMSUNG.
Page 79

◀ ▶
English
❑Setting the Time
O
MENUm → System →Time → ENTER
E
■Time
●
Clock: Setting the clock is for using various timer features of the TV.
O
The current time will appear every time you press the INFO button.
N
If you disconnect the power cord, you have to set the clock again.
Page 80

◀
▶
English
–
Clock Mode (Auto / Manual)
Auto: Set the current time automatically using the time from a digital
channel.
N
The antenna must be connected in order to set the time automatically.
Manual: Set the current time manually.
N
Depending on the broadcast station and signal, the auto time set up
may not be correct. In this case, set the time manually.
–
Clock Set: Set the Month, Day, Year, Hour, Minute and am/pm.
N
Available only when Clock Mode is set to Manual.
N
You can set the month, day, year, hour, minute and am/pm directly by
pressing the number buttons on the remote control.
Page 81

◀ ▶
English
–
Time Zone: Select your time zone.
N
This function is only available when the Clock Mode is set to Auto.
Using the Sleep Timer
O
MENUm → System → Time → Sleep Timer → ENTER
E
●
Sleep Timer
t
: Automatically shuts off the TV after a preset period of
time (30, 60, 90, 120, 150 and 180 minutes).
N
To cancel Sleep Timer, select Off.
Page 82

◀
▶
English
Setting the On / Off Timer
O
MENUm → System → Time → ENTER
E
●
On Timer 1 / On Timer 2 / On Timer 3:
Three different on timer settings can be
made. You must set the clock first.
Setup: Select Off, Once, Everyday,
Mon~Fri, Mon~Sat, Sat~Sun or Manual to
set at you convenience. If you select Manual,
you can set up the day you want to activate
the timer.
N
The c mark indicates the day is selected.
TV
2004 00 am
Cable 3
On Timer 1
Setup
Once
Source
VolumeOn Time
Antenna Channel
Sun Mon Tue Wed Thu Fri Sat
L
Move U Adjust E Enter R Return
● The displayed image may differ depending on
the model.
Page 83

◀ ▶
English
On Time: Set the hour, minute, and am/pm.
Volume: Set the desired volume level.
Source: Select TV or USB content to be played when the TV is turned on
automatically. (USB can be selected only when a USB device is connected to
the TV)
Antenna (when the Source is set to TV): Select Air or Cable.
Page 84

◀
▶
English
Channel (when the Source is set to TV): Select the desired channel.
Music / Photo (when the Source is set to USB): Select a folder in the USB
device containing music or photo files to be played when the TV is turned on
automatically.
N
Auto Power Off (available only when the TV is turned on by Timer): The
TV will be automatically turned off after 4 hours of being left idle to prevent
overheating.
Page 85

◀ ▶
English
N
NOTE
●
If there is no music file on the USB device or the folder containing a
music file is not selected, the Timer function does not operate correctly.
●
When there is only one photo file in the USB, the Slide Show will not
play.
●
If a folder name is too long, the folder cannot be selected.
Page 86

◀
▶
English
●
Each USB you use is assigned its own folder. When using more than one
of the same type of USB, make sure the folders assigned to each USB
have different names.
●
It is recommended that you use a USB memory stick and a multi card
reader when using On Timer. The On Timer function may not work
with USB devices with a built-in battery, MP3 players, or PMPs made
by some manufacturers because these devices take a long time to be
recognized.
Page 87

◀ ▶
English
N
Off Timer 1 / Off Timer 2 / Off Timer 3:
Three different off timer settings can be
made. You must set the clock first.
N
Setup: Select Off, Once, Everyday,
Mon~Fri, Mon~Sat, Sat~Sun or Manual
to set at you convenience. If you select
Manual, you can set up the day you want
to activate the timer.
N
The c mark indicates the day is selected.
Off Time: Set the hour, minute, and am/pm.
04 00 am
Off Timer 1
Setup
Once
Off Time
Sun Mon Tue Wed Thu Fri Sat
L
Move U Adjust E Enter R Return
● The displayed image may differ depending on
the model.
Page 88

◀
▶
English
❑Locking Programs
O
MENUm → System → Security → ENTER
E
■Security
The PIN input screen appears, Enter your 4 digit PIN number.
N
The default PIN number of a new TV set is “0-0-0-0”.
●
Channel (Off / On): Lock channels in Channel Manager, to prevent
unauthorized users, such as children, from watching unsuitable program.
N
Available only when the Source is set to TV.
Page 89

◀ ▶
English
●
Program Rating Lock (Allow All / 10 / 12 / 14 / 16 / 18): Prevent unauthorized
users, such as children, from watching unsuitable Program with a user
defined 4-digit PIN code. If selected channel is locked, the “\” symbol will be
displayed.
Allow All: Unlock All TV ratings.
●
Change PIN: The Change PIN screen will appear. Choose any 4 digits for your
PIN and enter them. As soon as the 4 digits are entered, the Confirm New
PIN screen appears. Re-enter the same 4 digits. When the Confirm screen
disappears, your PIN has been memorized.
N
If you forget the PIN, press the remote-control buttons in the following
sequence, which resets the pin to “0-0-0-0:” POWER (off) → MUTE → 8 → 2
→
4 → POWER (on)
Page 90

◀
▶
English
❑Economical Solutions
■Eco Solution
O
MENUm → System → Eco Solution → ENTER
E
●
Energy Saving (Off / Low / Medium / High / Picture Off): This adjusts the
brightness of the TV in order to reduce power consumption. If you select
Picture Off, the screen is turned off, but the sound remains on. Press any
button except volume button to turn on the screen.
●
Eco Sensor (Off / On)
for PDP 490 Series and above
: To enhance your power
savings; the picture settings will automatically adapt to the light in the room.
N
If you adjust the Cell Light, the Eco Sensor will be set to Off.
Page 91

◀ ▶
English
Min Cell Light: When Eco sensor is On, the minimum screen brightness can
be adjusted manually.
N
If Eco Sensor is On, the display brightness may change (become slightly
darker or brighter) depending on the surrounding light intensity.
●
No Signal Power Off (Off / 15 min. / 30 min. / 60 min.): To avoid unnecessary
energy consumption, set how long you want the TV to remain on if it’s not
receiving a signal.
N
Disabled when the PC is in power saving mode.
●
Auto Power Off (Off / On): The TV will be automatically turned off after 4 hours
of being left idle to prevent overheating.
Page 92

◀
▶
English
❑Picture In Picture (PIP)
■PIP
You can watch the TV tuner and one external video source simultaneously. PIP
(Picture-in-Picture) does not function in the same mode.
O
MENUm → System → PIP → ENTER
E
Page 93

◀ ▶
English
N
NOTE
●
For PIP sound, refer to the Sound Select instructions.
●
If you turn the TV off while watching in PIP mode, the PIP window will
disappear.
●
The PIP function is not available in 3D mode.
for PDP 490 series and above
●
You may notice that the picture in the PIP window becomes slightly
unnatural when you use the main screen to view a game or karaoke.
●
While Channel Lock is in operation, the PIP function cannot be used.
●
PIP Settings
Main picture Sub picture
Component, HDMI, PC TV
Page 94

◀
English
●
PIP (Off / On): Activate or deactivate the PIP function.
●
Air/Cable (Air / Cable): Select either Air or Cable as the input source for the
sub-screen.
●
Channel: Select the channel for the sub-screen.
●
Size (
õ
/
ã
): Select a size for the sub-picture.
●
Position (
ã
/
–
/
—
/
œ
): Select a position for the sub-picture.
●
Sound Select (Main / Sub): You can choose the desired sound (Main / Sub)
in PIP mode.
Page 95

◀ ▶
English
❑Other Features
O
MENUm → System → ENTER
E
■Menu Language
Set the menu language.
1. Select Menu Language and press the ENTER
E
button.
2. Choose desired language and press the ENTER
E
button.
N
Choose between English, Português and Français.
Page 96

◀
▶
English
■Caption
(On-Screen Text Messages)
●
Caption (Off / On): You can switch the caption function on or off. If captions
are not available, they will not be displayed on the screen.
N
The Caption feature doesn’t work in Component, HDMI or PC modes.
●
Caption Mode: You can select the desired caption mode.
N
The availability of captions depends on the program being broadcast.
Default / CC1~CC4 / Text1~Text4: (analog channels only) The Analog Caption
function operates in either analog TV channel mode or when a signal is supplied
from an external device to the TV. (Depending on the broadcasting signal, the
Analog Caption function may or may not work with digital channels.)
Page 97

◀ ▶
English
Service1~Service6 / CC1~CC4 / Text1~Text4: (digital channels only) The
Digital Captions function works with digital channels.
N
Service1~6 may not be available in digital caption mode depending on the
broadcast.
Page 98

◀
▶
English
Foreground Color: Options include Default, White, Black, Red, Green, Blue,
Yellow, Magenta and Cyan. You can change the color of the letter. The default
is White.
Background Color: Options include Default, White, Black, Red, Green, Blue,
Yellow, Magenta and Cyan. You can change the background color of the
caption. The default is Black.
Foreground Opacity: This adjusts the opacity of text. Options include Default,
Transparent, Translucent, Solid and Flashing.
Background Opacity: This adjusts the opacity of the caption background.
Options include Default, Transparent, Translucent, Solid and Flashing.
Page 99

◀ ▶
English
N
NOTE
●
Digital Caption Options are available only when Default and Service1
~ Service6 can be selected in Caption Mode.
●
The availability of captions depends on the program being broadcasted.
●
The Foreground and Background cannot be set to have the same color.
●
You cannot set both the Foreground Opacity and the Background
Opacity to Transparent.
Page 100

◀ ▶
English
■Screen Burn Protection
To reduce the possibility of screen burn, this unit is equipped with screen burn
prevention technology. The Time setting allows you to program the time between
movement of the picture in minutes.
●
Pixel Shift (Off / On): Using this function, you can minutely move pixels on the
PDP in horizontal or vertical direction to minimize after image on the screen.
N
Optimum condition for pixel shift
Item TV/AV/Component/HDMI/PC
Horizontal 0~4 4
Vertical 0~4 4
Time (minute) 1~4 min 4 min
 Loading...