

Page 1

PLASMA DISPLAY
Owner’s Instructions
Before operating the unit,
please read this manual thoroughly,
and retain it for future reference.
ENG
REMOTE CONTROL
ON-SCREEN MENUS
PICTURE IN PICTURE
TELETEXT
Page 2

2
ENG
Safety Instructions
◆ Do not place the PDP on an unstable cart, stand, tripod, bracket, table, or floor where it can fall.
◆ Do not expose the PDP to extreme temperature conditions or to extreme humidity conditions.
◆ Do not expose the PDP to direct sunlight and other sources of heat.
◆ Do not expose the PDP to any liquids.
◆ Never put objects of any kind into the television, and do not place a water-containing vessel on the
PDP.
◆ During a storm conditions (especially when there is lightning) unplug the PDP from the mains
socket and aerial.
◆ Do not step on or twist the power cord.
◆ Do not overload wall outlets or extension cords as this can result in a risk of fire or electric shock.
◆ Please use a soft and dry cloth (not containing volatile matter) when you clean the PDP.
◆ If the PDP is broken, do not try to repair it yourself. Contact qualified service personnel.
◆ If the remote control is not used for a long period of time, remove the batteries and store it in a
cool, dry place.
◆ Do not drop the remote control.
User Instructions
◆ Screen Image retention
Do not display a still image (such as on a video game or when hooking up a PC to this PDP) on the
plasma monitor panel for more than 2 hours as it can cause screen image retention. This image
retention is also known as “screen burn”. To avoid such image retention, reduce the degree of
brightness and contrast of this screen when displaying a still image.
◆ Cell Defect
The plasma display panel consists of fine cells. Although the panels are produced with more than
99.9 percent active cells, there may be some cells that do not produce light or remain lit.
◆ Height
The PDP can normally operate only under 2000m in height. It might abnormally function at a place
over 2000m in height and do not install and operate there.
◆ Warranty
- Warranty Period: One year starting from the purchase of your PDP.
- Warranty does not cover any damage caused by image retention.
- Burn-in is not covered by the warranty.
Page 3

3
ENG
Caution
CAUTION: TO PREVENT ELECTRICAL SHOCK, DO NOT
REMOVE REAR COVER, NO USER SERVICEABLE PARTS
INSIDE. REFER SERVICING TO QUALIFIED SERVICE
PERSONNEL.
RISK OF ELECTRIC SHOCK
DO NOT OPEN
!
CAUTION
The lightning flash and arrow head
within the triangle is a warning sign
alerting you of “dangerous voltage”
inside the product.
The exclamation point within the
triangle is a warning sign alerting
you of important instructions
accompanying the product.
☛
The main voltage is indicated on the
rear of the PDP and the frequency is
50 or 60Hz.
WARNING: TO PREVENT DAMAGE WHICH MAY
RESULT IN FIRE OR SHOCK HAZARD, DO NOT EXPOSE
THIS APPLIANCE TO RAIN OR MOISTURE.
!
Checking Parts
Owner’s Instructions
Remote Control/
AAA Batteries
Power Cord
AV Cables (RCA) S-VIDEO Cable
Download Cable
(RS-232C)
Install CD
(RS-232C)
2 Ferrite Cores for Speaker Wire
Ferrite Cores for SCART Cable
- 42” : 2 pieces
- 50” : 4 pieces
Page 4

4
ENG
Contents (continued)
◆ FOREWORD
■ Safety Instructions .................................................................................................... 2
■ User Instructions....................................................................................................... 2
■ Caution ..................................................................................................................... 3
■ Checking Parts ......................................................................................................... 3
◆ CONNECTING AND PREPARING YOUR DISPLAY
■ Your New Plasma Display Panel .............................................................................. 6
■ Remote Control Buttons ........................................................................................... 8
■ Inserting the Batteries in the Remote Control........................................................... 9
■ Installing the Display on the Wall Attachment Panel ................................................ 9
■ Separating the Display from the Wall Attachment Panel .......................................... 12
■ Before Connecting the Display to External Equipment............................................. 13
■ Connecting Speakers ............................................................................................... 14
■ Connecting Your VCR or Cable Box......................................................................... 15
■ Switching On and Off................................................................................................ 16
■ Viewing the Menus and Displays.............................................................................. 16
◆ USING YOUR DISPLAY
■ Choosing Your Language ......................................................................................... 17
■ Using the Various Setup Menus ............................................................................... 18
-
Color System / Digital NR / Auto Power ON / Panel Lock
■ Using Automatic Picture Settings ............................................................................. 19
■ Customizing the Picture............................................................................................ 20
■ Freezing the Current Picture..................................................................................... 20
■ Changing the Picture Format.................................................................................... 21
■ Adjusting the Volume................................................................................................ 22
■ Using Automatic Sound Settings .............................................................................. 23
■ Customizing the Sound............................................................................................. 23
■ Setting the Current Time........................................................................................... 24
■ Switching On and Off Automatically ......................................................................... 24
■ Setting the Sleep Timer ............................................................................................ 25
■ Viewing the Picture in Picture (PIP).......................................................................... 26
■ Displaying Informations ............................................................................................ 28
■ Viewing Pictures From External Sources ................................................................. 28
◆ USING THE TELETEXT FUNCTION
■ Teletext Feature........................................................................................................ 29
■ Displaying the Teletext Information .......................................................................... 30
■ Adjusting the Teletext Contrast................................................................................. 31
■ Selecting Display Options......................................................................................... 31
■ Selecting a Teletext Page......................................................................................... 32
Page 5

5
ENG
Contents
◆ CONNECTING AND OPERATING A PC
■ Connecting a PC....................................................................................................... 33
■ Setting up Your Display Plug and Play ..................................................................... 34
■ Setting up Your PC Software (Windows only) .......................................................... 34
■ PC Input Mode.......................................................................................................... 35
■ Controlling the Screen Color..................................................................................... 37
■ Adjusting the Screen Quality .................................................................................... 37
■ Changing the Screen Position .................................................................................. 38
■ Initializing the Frequency, Phase, and Position ........................................................ 39
■ Changing the Screen Size ........................................................................................ 40
■ Enjoying the PIP Feature in PC mode ...................................................................... 40
■ Power Saver (PC Mode Only) .................................................................................. 41
◆ MULTIPLE DISPLAY CONTROL (MDC) FUNCTION
■ Multiple Display Control (MDC) ................................................................................ 42
■ Setting the Multiple Display Control (MDC) .............................................................. 43
■ Installing the Multiple Display Control (MDC) ........................................................... 43
■ Viewing the Main Screen .......................................................................................... 45
■ Confirming the Port................................................................................................... 46
■ Changing the Port..................................................................................................... 46
■ Controlling the Power ............................................................................................... 47
■ Controlling the Input Source ..................................................................................... 48
■ Controlling the Aspect Ratio (Video/S-Video/AV2) ................................................... 49
■ Controlling the Aspect Ratio (PC)............................................................................. 49
■ Controlling the Time.................................................................................................. 50
■ Setting the Picture (Video/S-Video/AV2) .................................................................. 51
■ Setting the Picture RGB (PC) ................................................................................... 51
■ Setting the Audio ...................................................................................................... 52
■ Setting the Image Lock ............................................................................................. 52
■ Displaying the Setting Values of Various Displays ................................................... 53
■ Troubleshooting ........................................................................................................ 53
◆ RECOMMENDATIONS FOR USE
■ Care and Maintenance ............................................................................................. 54
■ Troubleshooting: Before Contacting Service Personnel ........................................... 54
■ Wiring the Mains Power Supply Plug (UK Only)....................................................... 55
Page 6

6
ENG
Your New Plasma Display Panel
POWER
Press to turn the
PDP on and off.
SPEAKER SPEAKER
Remote Control Signal Receiver
Aim the remote control towards this spot on
the PDP.
SOURCE
External input selection.
MENU
Menu display.
-
VOLUME +
Volume adjustment.
▼ SELECT ▲
Control the cursor in the Menu.
MUTE
Temporary sound switch-off.
Front Panel
Page 7
7
ENG
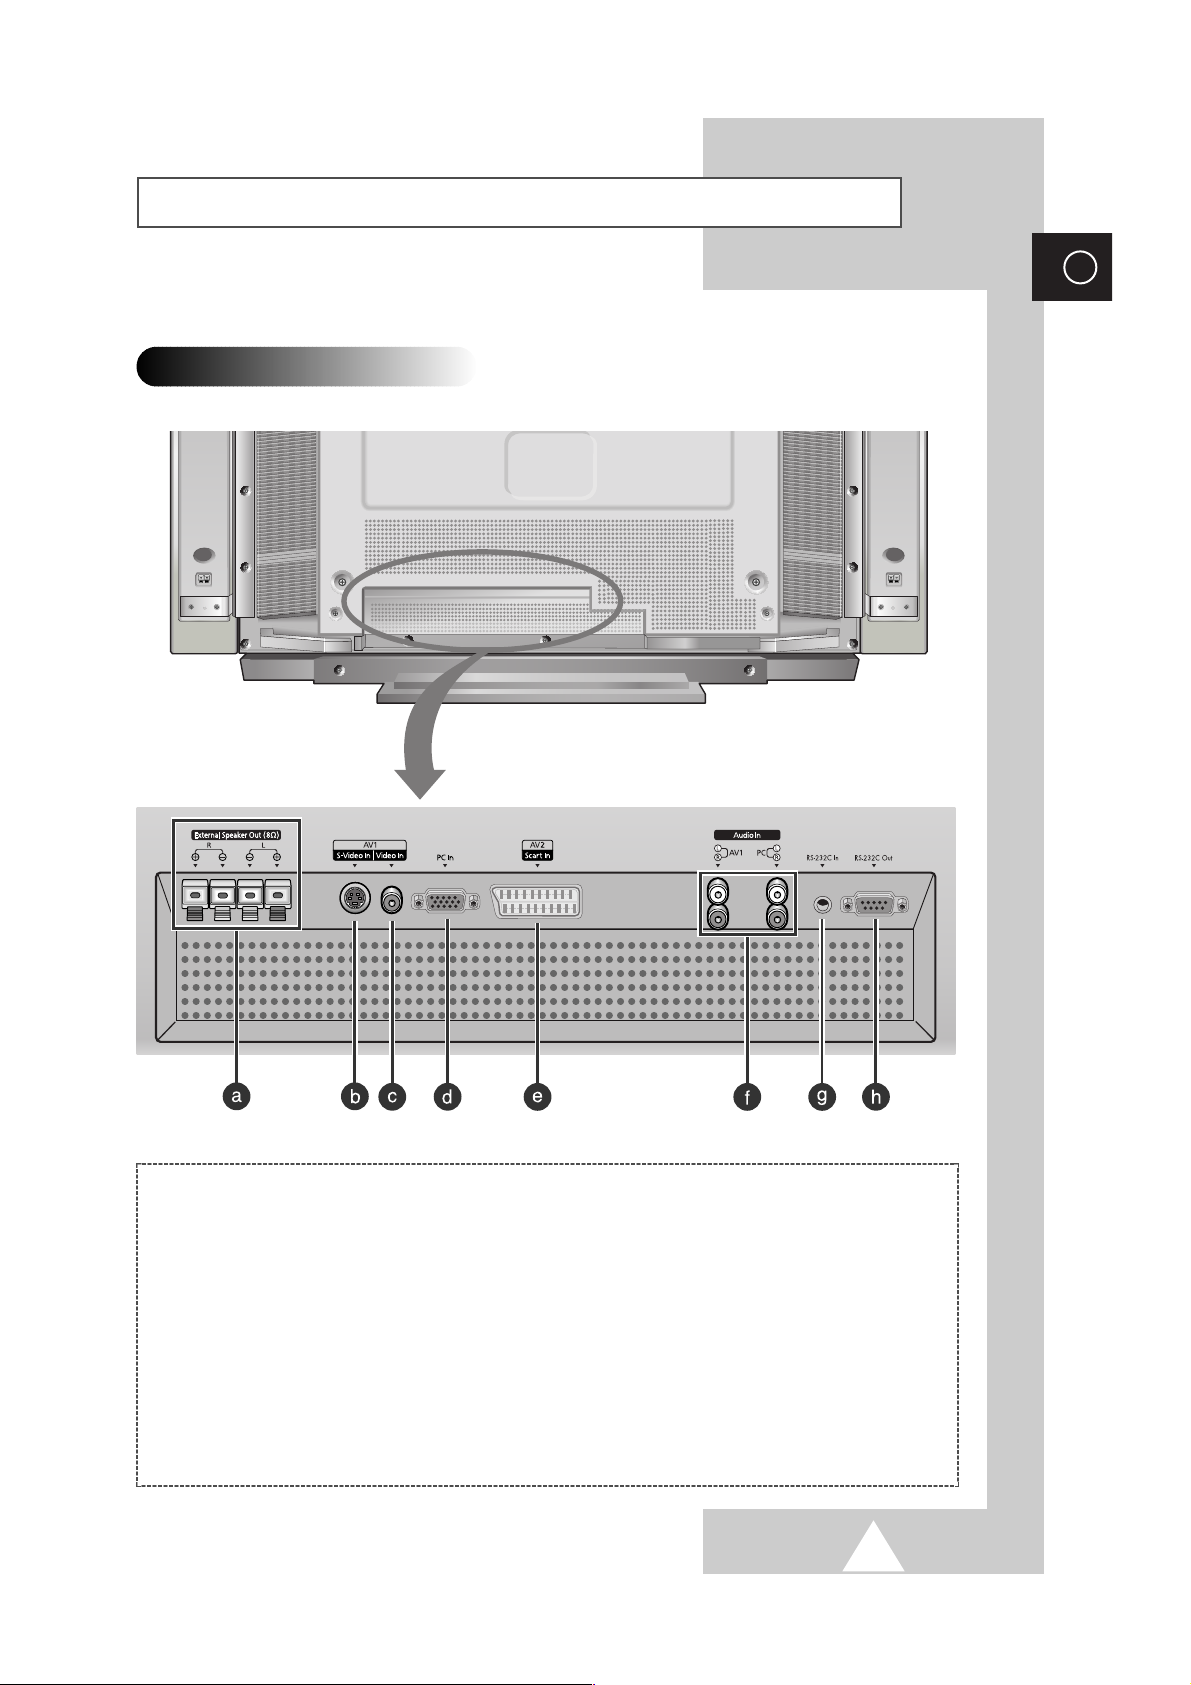
Your New Plasma Display Panel
Rear Panel
a) External Speaker Outputs (8Ω)
Connect external speakers.
b) S-VIDEO Input
Connect a S-Video signal from an S-VHS VCRs
or DVD players.
c) VIDEO Input
Connect a video signal from external sources
like VCRs or DVD players.
d) PC Input
Connect a PC signal from an PC.
e) SCART Input
Connect a audio, video, or RGB signal from
external sources like VCRs or DVD players.
(Signal Output does not operate).
f) Audio Inputs (Video/PC)
Connect a audio signal from external sources
like VCRs or PC.
g) RS-232C Input
Connect the RS-232C output of your PC.
h) RS-232C Output
Connect the RS-232C input of another PDP.
➢
The actual configuration on your PDP may be different,
depending on your model.
Page 8
8
ENG
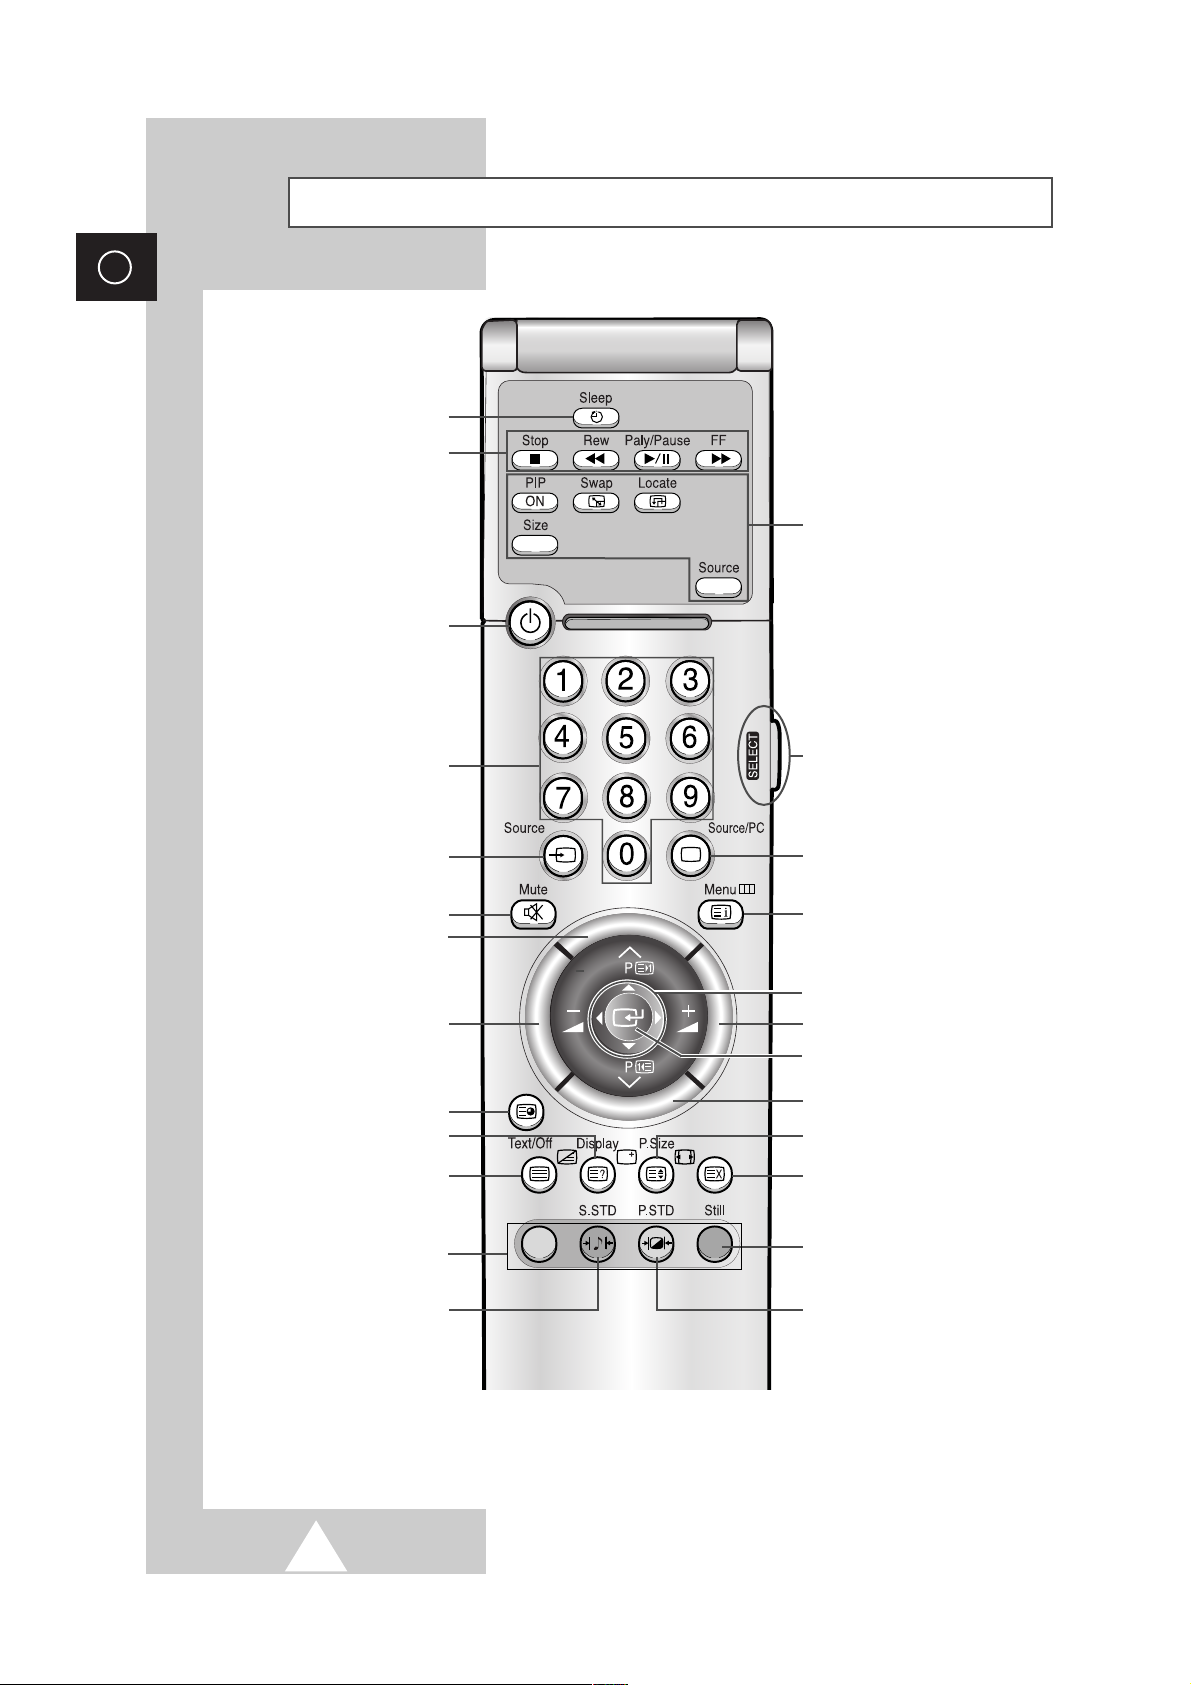
Remote Control Buttons
AUTOMATIC SWITCH-OFF
VCR/DVD FUNCTIONS;
- STOP
- REWIND
- PLAY/PAUSE/
- FAST-FORWARD
POWER ON/OFF
NUMERIC BUTTONS
TEMPORARY SOUND SWITCH OFF
VOLUME DECREASE
DISPLAYING INFORMATIONS/
TELETEXT REVEAL
SOUND EFFECT SELECTION
PICTURE EFFECT SELECTION
STILL THE MAIN PICTURE
PICTURE SIZE/
TELETEXT SIZE SELECTION
VOLUME INCREASE
CONTROL THE CURSOR IN THE MENU
MENU DISPLAY/
PROGRAMME SELECTION BY NAME
MAKE THE REMOTE CONTROL WORKS
FOR MONITOR, VCR, CABLE,
DVD PLAYER
EXTERNAL INPUT SELECTION
➢ It is possible that the work of the transmitter is dull or not operated normally
if the light of the Bulb is on around the PDP.
PIP FUNCTIONS;
- PIP ON/OFF
- INTERCHANGE THE MAIN AND THE
SUB PICTURE (SWAP)
- LOCATION SELECTION (LOCATE)
- SIZE SELECTION (SIZE)
- INPUT SOURCE SELECTION
(SOURCE)
CHANGE CONFIRMATION
SELECT TO THE PC MODE DIRECTLY
➢
Some remote control buttons do not operate with the PDP.
TELETEXT NEXT PAGE
TELETEXT PREVIOUS PAGE
TELETEXT SUB-PAGE
TELETEXT CANCEL
TELETEXT ON
VIDEO & TEXT
MIX
TELETEXT OFF
(Refer to page 30 for details)
FASTEXT TOPIC SELECTION
Power
Page 9
9
ENG
continued...
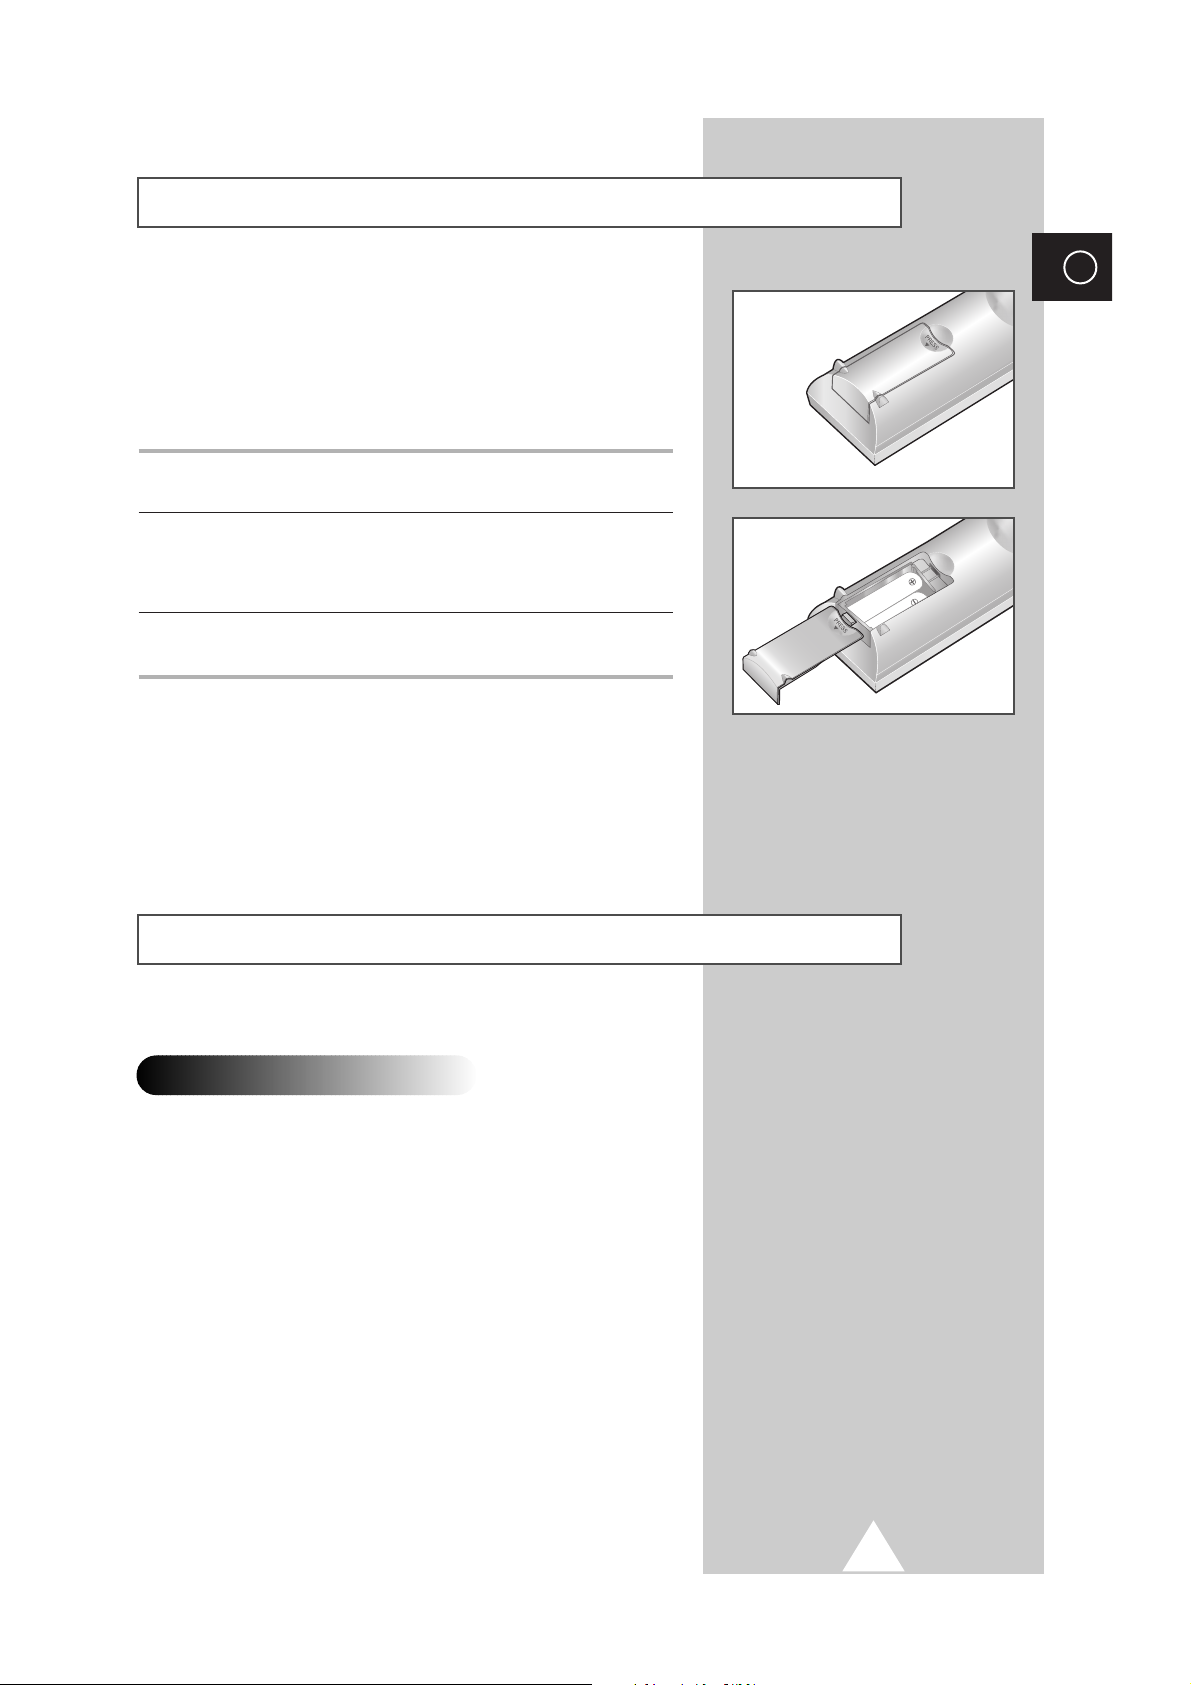
You must insert or replace the batteries in the remote control when
you:
◆ Purchase the PDP
◆ Find that the remote control is no longer operating
correctly
1 Remove the cover on the rear of the remote control by pressing
the symbol downwards and then pulling firmly to remove it.
2 Insert two R03, UM4, “AAA” 1.5V or equivalent batteries taking
care to respect the polarities:
◆ + on the battery against + on the remote control
◆ - on the battery against - on the remote control
3 Replace the cover by aligning it with the base of the remote
control and pressing it back into place.
➢
Do not mix battery types, i.e. alkaline and manganese.
Inserting the Batteries in the Remote Control
Installing the Display on the Wall Attachment Panel
◆
Do not install the PDP on any place other than vertical walls.
◆
To protect the performance of the PDP and prevent troubles, avoid the
followings:
-
Do not install next to smoke and fire detectors.
-
Do not install in an area subjected to vibration or high voltage.
-
Do not install in the wall.
-
Do not install near or around any heating apparatus.
◆
Use only recommended parts and components.
Installation Notes
➢
Wall attachment panel is sold separately. Check with your dealer.
Page 10

10
ENG
Installing the Display on the Wall Attachment Panel
➢
Wall attachment panel is sold separately. Check with your dealer
1 Check for the stability of the wall where the PDP is to be installed. If the wall is not enough strong to
support the PDP, strengthen the wall before installation.
2 Fix the wall attachment panel on the
wall using bolts as shown in the figure:
Fixing bolts must protrude from the
wall appox. 1.5cm.
3 Using the wall attachment panel, you may adjust the angle of the display from 0 to 20 degrees. The
angle can be set in 5 stages with 5 degrees of distance each using the angle control holes on the sides
of the panel.
When the angle has
been set to 5 degrees.
When the angle has
been set to 15 degrees.
When the panel hasn't
been tilted.
5 degrees of tilt
10 degrees of tilt
15 degrees of tilt
No tilt
20 degrees of tilt
Angle control holes
Page 11

11
Installing the Display on the Wall Attachment Panel
ENG
4 Remove four large screws from the rear side of the display.
Insert the bolts, dish-type washers, and insulation rubber
into the four screw-holes as shown in the figure:
5 Put the insulation rubber point
protruding from the rear top of the
display in the groove on the top of the
wall attachment panel. Lift up the
display a little bit so that the
insulation rubber point at the bottom
of the rear side of the display is put to
the groove at the bottom of the wall
attachment panel. (Do not lift the
display with any pressure. The
insulation rubber at the top may be
taken off.)
Bolt
Insulation rubber
´
Œ
Page 12

12
ENG
Separating the Display from the Wall Attachment Panel
Remove the fixing bolts from both sides (left and right) of the wall attachment panel. Lift and pull the
bottom of the display a small amount, to separate the insulation rubber point from the bottom of the
wall attachment panel.
Lift the display and separate the insulation rubber point from the groove on top of the wall
attachment panel.
´
Œ
Page 13
13
ENG
Before Connecting the Display to External Equipment
Carefully check the connectors for position and type before making any connections. Loose connectors
can result in picture or color problems. Make sure that all connectors are securely inserted into their
terminals.
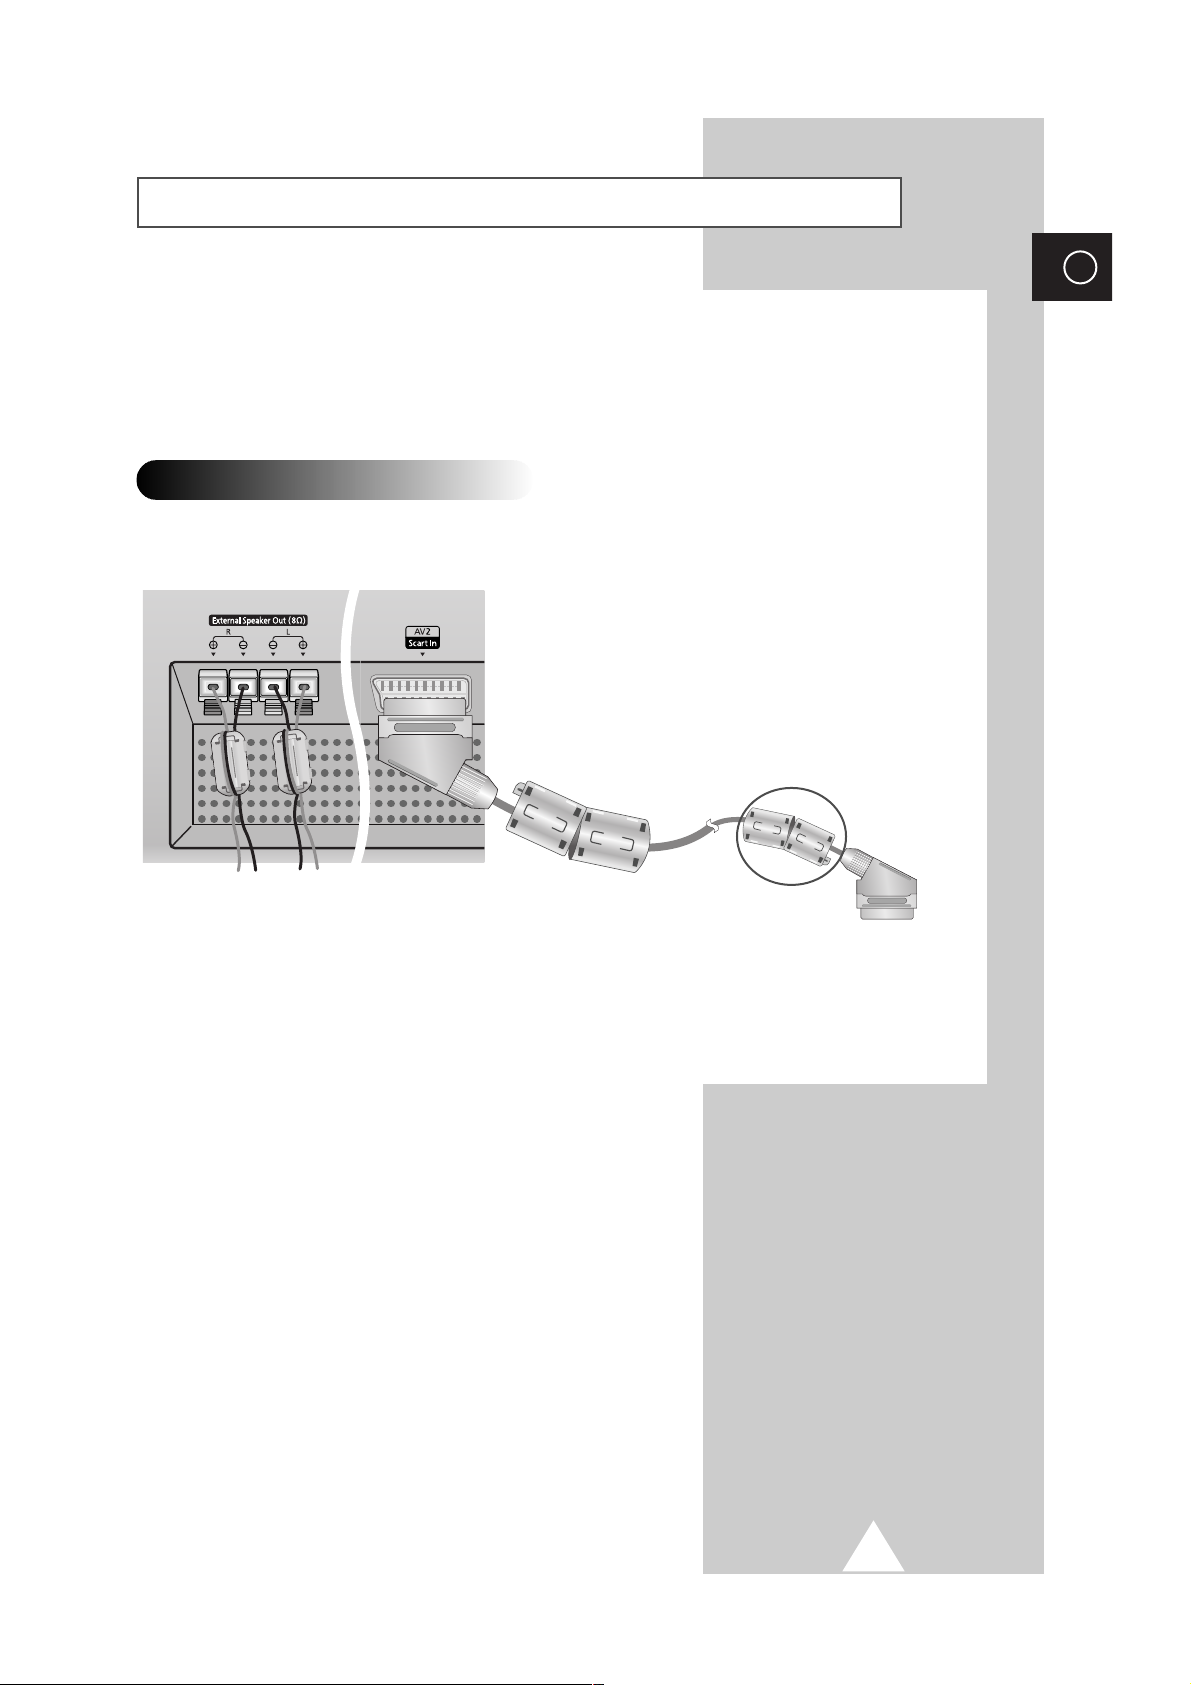
Ferrite Cores
The ferrite cores are used to attenuate undesired signals. When connecting cables, attach one of these ferrite
cores to the cable near the connector.
➢
When you connect the speaker wire to the
External Speaker Out connector, first bind the
speaker wire round the ferrite core to secure it.
Connect to external devices.
50” only
Page 14
14
ENG
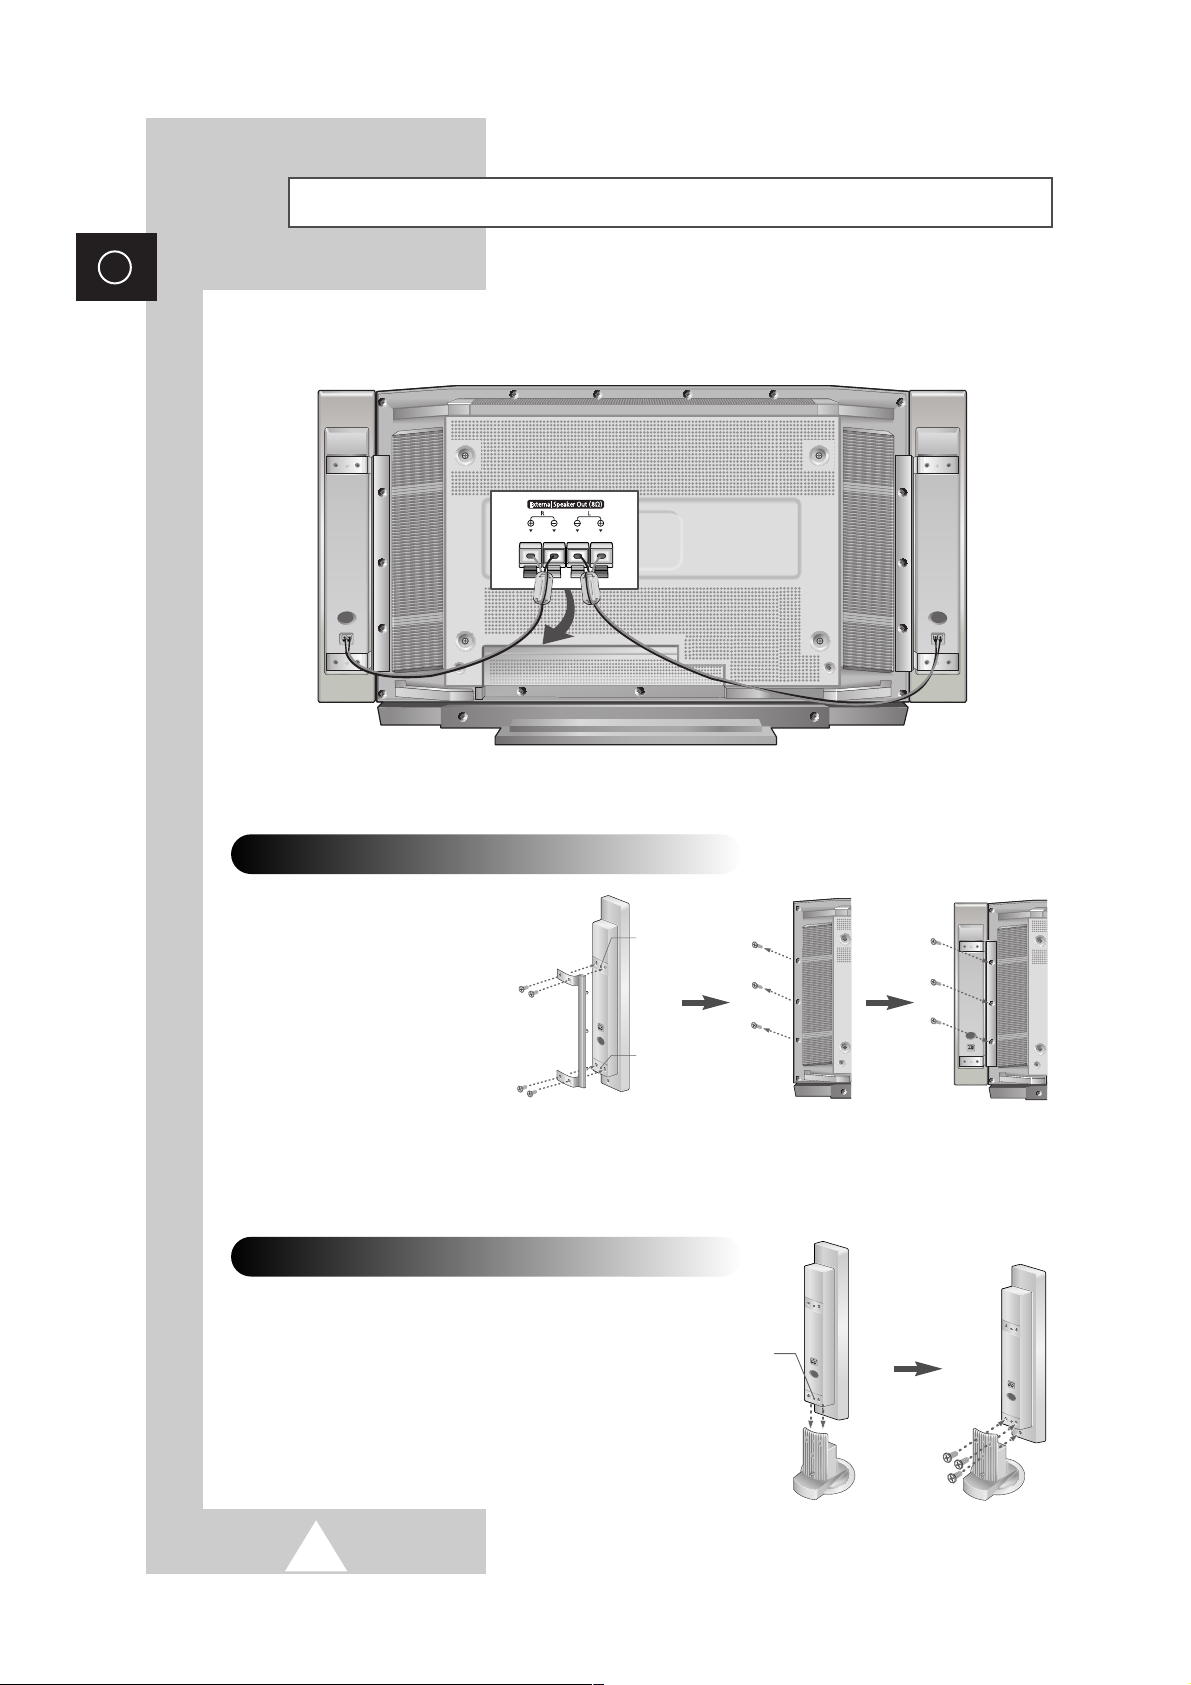
Connecting Speakers
Connect the speaker audio cable to the external speaker output jack on the rear of the PDP
matching the “+” and “
-
” ends of the cable with the diagram on the PDP.
Connecting PDP and Speakers
Fix the bracket onto the guide pole
located on the rear of speaker
and fasten the screws.
After removing the three screws
on the PDP, clamp the speaker
and the PDP together and fasten
the screws.
Guide pole
Guide pole
Connecting Stand and Speakers
Guide pole
➢
The speakers MUST have more than 7watts rating (impedance 8Ω).
➢
When moving your PDP, do NOT hold the speaker connected to your PDP. It may damage the bracket
clamping the speaker and your PDP together and result in a drop of your PDP and a risk of personal
damage and injury.
Page 15
15
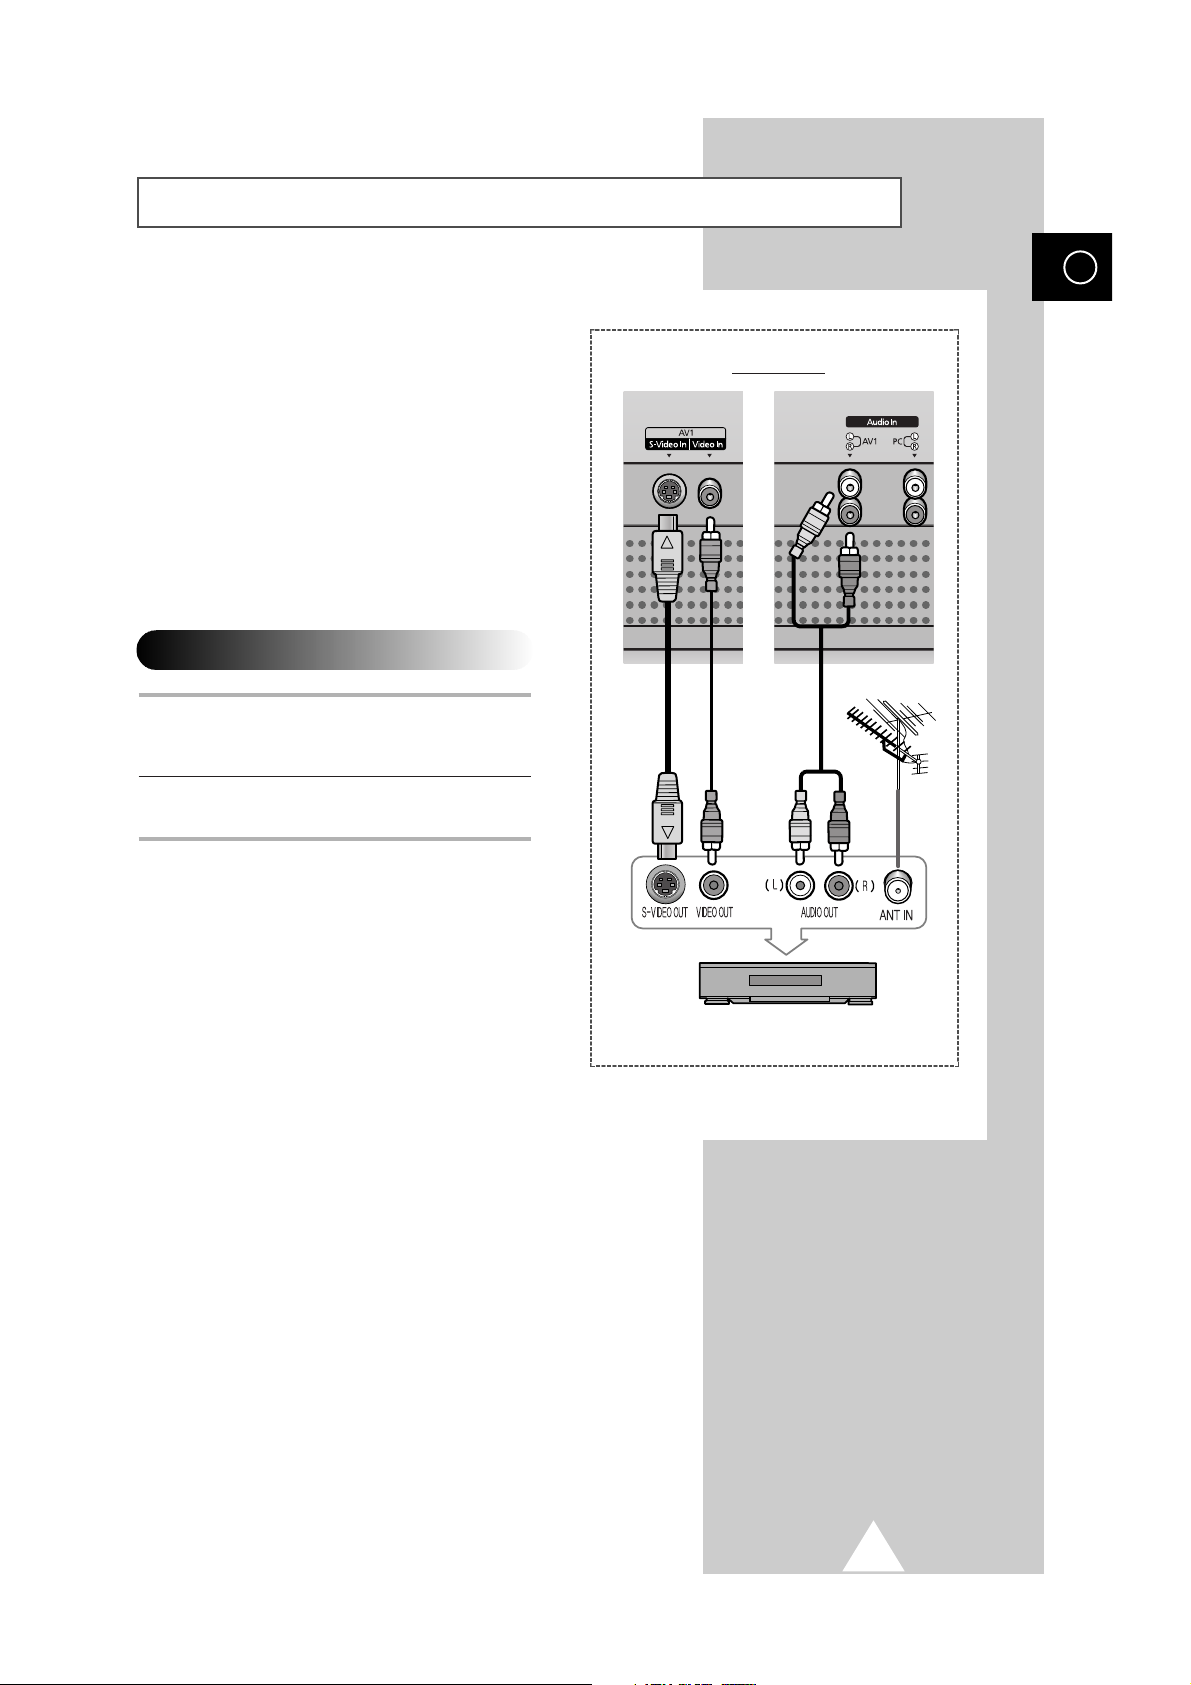
Connecting Your VCR or Cable Box
ENG
◆ Connect a Video/S-Video cable between the
Video/S-Video output jack on the VCR/Cable
box and the Video input jack on the PDP.
-
For better video, you can use a S-Video cable.
◆ Connect an Audio cable between the Audio
output jack on the VCR/Cable box and the
Audio input jack on the PDP.
Videotape Playback
1 Turn on PDP and select the Video or S-Video
mode (if S-Video jack is connected) by
pressing the
Source on the remote control.
2 Turn on your VCR, insert a videotape and
press the Play button.
Rear panel
VCR/Cable Box
Page 16

16
ENG
Switching On and Off
The mains lead is attached to the rear of the PDP.
☛
If you have purchased this PDP in the United Kingdom,
refer to page 55 for further instructions on plug wiring.
1 Plug the mains lead into an appropriate socket.
➢
The main voltage is indicated on the rear of the display and
the frequency is 50 or 60Hz.
2 Press the POWER ( ) button on the front panel or remote control
to switch the display on.
➣
If your Monitor isn’t turned on when the power button is
pressed...
press the SELECT button to check if the Monitor mode has
been chosen.
Front panel
Viewing the Menus and Displays
Your PDP has a simple, easy-to-use menu system that appears on
the PDP screen. This system makes it convenient and fast to use
features on the PDP. Your PDP also lets you display the status of
many of your PDP’s features.
1 With the power on, press the Menu button on the remote control.
The main menu appears on the screen.
2 Use the joystick (up, down) button to the move items in the menu.
Use the joystick (left, right) button to display, change, or use the
selected items. Press the joystick button to enter items in the
menu. On screen menus disappear from the screen automatically
after about thirty seconds, or you can press the
Menu button on
the remote control to exit the menu.
Page 17

17
Choosing Your Language
ENG
When you start using your PDP for the first time, you must select the
language which will be used for displaying menus and indications.
1 Press the Menu button.
Result:
The main menu is displayed.
2 Move the joystick up or down to select the SETUP menu and press
the joystick button.
3 Move the joystick up or down to select the Miscellaneous menu
and press the joystick button.
Result:
The options available in the Miscellaneous group are
displayed with the
Language option is selected.
4 Select the appropriate language by moving the joystick left or right
repeatedly.
PC Mode
Color System Auto
Digital NR Off
Auto Power On On
Panel Lock Off
Miscellaneous
Move Enter Exit
Language
TTX Contrast
ID Setup 0 0
ID Input
Move Select Exit
Image Lock
Scale 4:3
Auto Power On On
Panel Lock Off
Miscellaneous
Move Enter Exit
S E T U P
S E T U P
Ã
English
S E T U P
¨
Page 18
18
ENG
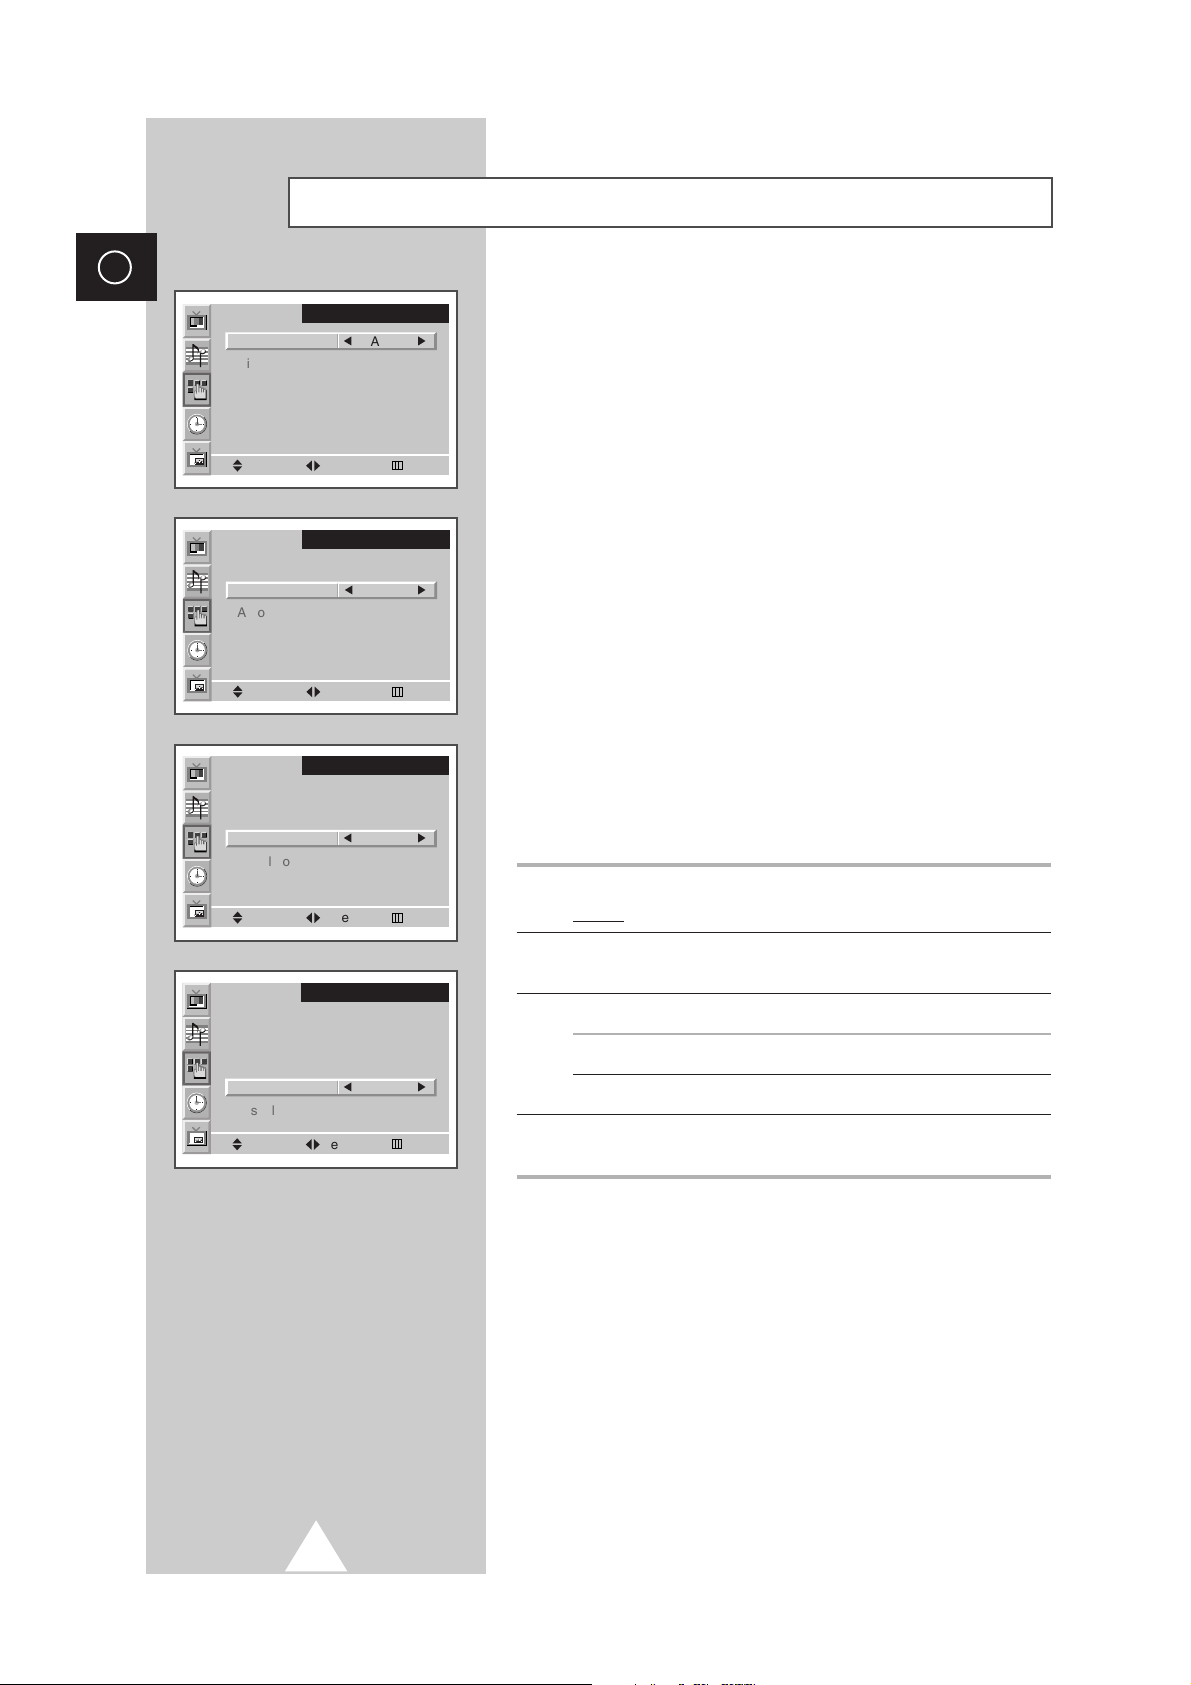
Using the Various Setup Menus
◆ Color System
You can use your PDP in many countries. Each country
has its own broadcasting standard. Depending on your
country, the color systems are displayed in the order
given.
➣
If an abnormal phenomenon appears on the screen
when
Auto is selected, then select the color system
manually.
◆ Digital NR
If the broadcast signal received is weak, you can activate
the Digital Noise Reduction feature to help reduce any
static and ghosting that may appear on the screen.
◆ Auto Power On
When you disconnect the power cord and re-connect it,
the PDP will be powered on automatically. You don’t
need to press the “POWER” button on the front panel or
remote control.
◆ Panel Lock
The front panel of the PDP can be locked to prevent it
from being used by young children, for example.
1 Press the Menu button.
Result:
The main menu is displayed.
2 Move the joystick up or down to select the SETUP menu and press
the joystick button.
3 To... Move the joystick...
Move to the each feature up or down.
Select the required option left or right.
4 When you have selected, press the Menu button repeatedly to
return to normal viewing.
Color System
Digital NR Off
Auto Power On On
Panel Lock Off
Miscellaneous
Move Select Exit
S E T U P
Ã
Auto
¨
S E T U P
Color System Auto
Ã
Digital NR
Auto Power On On
Panel Lock Off
Miscellaneous
Move Select Exit
On
¨
S E T U P
Color System Auto
Digital NR Off
Ã
Auto Power On
Panel Lock Off
Miscellaneous
Move Select Exit
On
¨
S E T U P
Color System Auto
Digital NR Off
Auto Power On On
Ã
Panel Lock
Miscellaneous
Move Select Exit
On
¨
Page 19
19
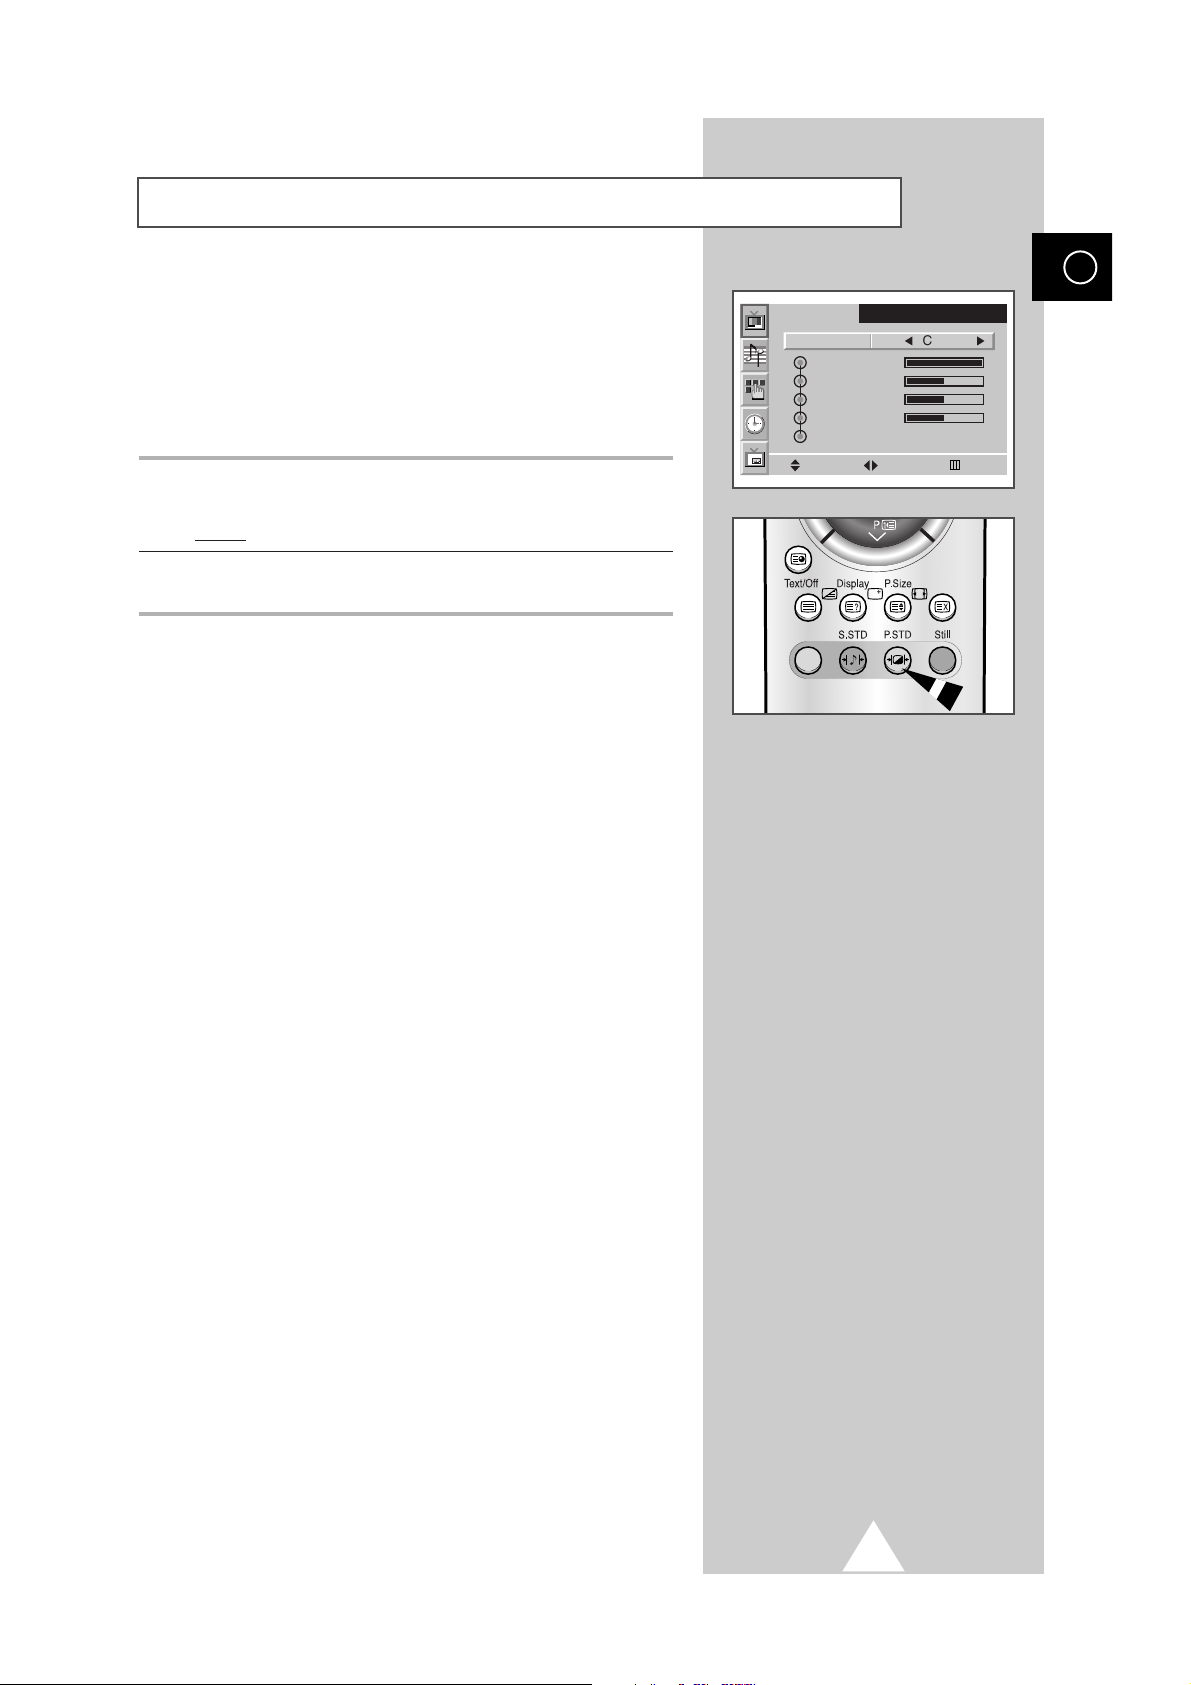
You can select the picture effect which best corresponds to your
viewing requirements. The following picture effects are available in
the order given:
◆ Custom, Standard, Sports, Movie, Mild, Dynamic.
➣
In the PC mode, you can select Custom, High , Middle or Low.
1 Press the Menu button, then press the joystick button to enter the
PICTURE menu.
Result:
The Select option is selected.
2 Select the required picture effect by moving the joystick left or right
repeatedly.
You can select the picture effect by simply pressing the “P.STD”
(Picture Standard) button on the remote control.
Using Automatic Picture Settings
ENG
P I C T U R E
Select ÃCustom
Contrast
Brightness
Sharpness
Color
Color Tone Normal
Move Select Exit
¨
Page 20

20
ENG
Your PDP has several settings which allow you to control picture
quality:
◆ Contrast, Brightness, Sharpness, Color,
Color Tone, Tint
(NTSC only)
.
➣
When the Select is set to Custom, the following settings can
be adjusted.
1 Press the Menu button, then press the joystick button to enter the
PICTURE menu.
2 Move the joystick up or down to select the required option.
3 To adjust the... Move the joystick...
◆ Contrast ◆ left or right.
◆ Brightness Result: The horizontal bar is displayed.
◆ Sharpness
◆ Color
◆ Color Tone ◆ left or right to select the required option
(
Normal, Warm1, Warm2, Cool1 , Cool2).
4 When you are satisfied with the settings, press the Menu button
repeatedly to return to normal viewing.
➣
◆ If you make any changes to these settings, the picture
standard is automatically switched to
Custom.
◆ In the PC mode, you can’t adjust the Color and Color
Tone
.
Customizing the Picture
Press the “Still” button to freeze the picture on a given frame.
To return to normal viewing, press the “Still” button again.
➣
In the PIP mode, both the main and sub pictures freeze.
Freezing the Current Picture
Select Custom
Contrast
Brightness
Sharpness
Color
Color Tone Normal
Move Adjust Exit
Contrast 100
P I C T U R E
P I C T U R E
Select Custom
Contrast
Brightness
Sharpness
Color
Color Tone ÃNormal
Move Select Exit
Normal
¨
Page 21

21
ENG
You can select the picture format which best corresponds to your
viewing requirements by simply pressing the “P.Size” button.
The following picture formats are available;
◆ Auto Wide, Wide, Panorama, 14:9, 4:3, Zoom1,
Zoom2, Stretch.
Changing the Picture format
Auto Wide / Wide
Sets the picture to 16:9 wide
mode.
Panorama
Use this mode for the wide aspect
ratio of a panoramic picture.
14:9
Magnify the size of the picture
more than
4:3.
4:3
Sets the picture to 4:3 normal
mode. This is a standard PDP
screen size.
Zoom1
Magnify the size of the picture
vertically on screen.
Zoom2
Magnify the size of the picture
more than
Zoom1.
➣
If you watch a still image, 14:9, or 4:3 mode for a long time, image
may be burned onto the screen, view the PDP in
Auto Wide,
Wide, or Panorama mode as possible.
Stretch
Using this mode, magnify the
picture vertically and horizontally
to be bigger than the picture in
Zoom2.
Page 22

22
ENG
◆ Press the + button to increase the volume (cursor moves to the right)
◆ Press the -button to decrease the volume (cursor moves to the left)
You can switch the sound off temporarily, for example you may
wish to answer the telephone.
1
Press the Mute button.
Result:
The sound is switched off and Mute is displayed.
2
When you wish to turn the sound back on at the same volume as
before, press the
Mute button again (or either of the volume
buttons).
➣
The volume setting is retained:
◆ When you switch off using the POWER button on the
front panel or remote control
◆ If there is a power failure.
Adjusting the Volume
Front panel
Page 23

23
ENG
Customizing the Sound
The sound settings can be adjusted to suit your personal preferences.
◆ Treble, Bass, Balance, Surround.
➣
When the Select is set to Custom, the following settings can
be adjusted.
1 Press the Menu button.
Result:
The menus available are displayed.
2 Move the joystick up or down to select the SOUND menu and press
the joystick button.
3 Move the joystick up or down to select your required option.
4 To adjust the... Move the joystick...
◆ Treble, Bass ◆ left or right.
and
Balance
◆ Surround ◆ left or right to select the required
option (
Off, Concert , Hall,
Stadium).
5 When you are satisfied with the settings, press the Menu button
repeatedly to return to normal viewing.
You can select the type of special sound effect to be used when
watching a given broadcast. The following sound effects are
available in the order given:
◆ Custom, Standard, Music, Movie, Speech.
1 Press the Menu button.
Result:
The menus available are displayed.
2 Move the joystick up or down to select the SOUND menu and press
the joystick button.
Result:
The Select option is selected.
3 Select the required picture effect by moving the joystick left or right
repeatedly.
You can select the type of special sound effect by simply pressing
the “S.STD” (Sound Standard) button on the remote control.
Using Automatic Sound Settings
S O U N D
Select ÃCustom
Treble 50
Bass 50
Balance 0
Surround Off
Move Select Exit
¨
S O U N D
Select Custom
Treble 50
Bass 50
Balance 0
Surround Off
Move Adjust Exit
S O U N D
Select Custom
Treble 50
Bass 50
Balance 0
Surround ÃConcert
Move Select Exit
¨
Page 24

24
ENG
Switching On and Off Automatically
You can set the On/Off timers so that the PDP will switch On and
Off automatically at the time you select.
1 Press the Menu button.
Result:
The menus available are displayed.
2 Move the joystick up or down to select the TIME menu and press
the joystick button.
3 Move the joystick up or down to select the On Time option and
press the joystick button.
4
To... Move the joystick...
Move to the each option left or right.
(hour, minute, and On/Off)
Set the each option up or down.
5
In the same way, set the time at which you wish to be switched Off
(
Off Time).
If you want to set the volume level when the PDP switches on,
move the joystick up or down to select the
On Time Volume and
adjust the volume level by moving the joystick left or right.
Setting the Current Time
You can set the clock so that the current time is displayed when
you press the “Display” button. You must also set the time if you
wish to use the automatic On/Off timers.
1 Press the Menu button.
Result:
The menus available are displayed.
2 Move the joystick up or down to select the TIME menu and press
the joystick button.
Result:
The Clock option is selected.
3
To... Move the joystick...
Move to the each option left or right.
(hour and minute)
Set the each option up or down.
Clock 10 : 30
On Time 0 : 00 Off
Off Time 0 : 00 Off
Sleep Timer Off
On Time Volume 10
Move Select Exit
T I M E
Clock 10 : 30
On Time 6 : 00 On
Off Time 0 : 00 Off
Sleep Timer Off
On Time Volume 10
Move Select Exit
T I M E
T I M E
Clock 10 : 30
On Time 6 : 00 On
Off Time 23 : 00 On
Sleep Timer 10 Min.
On Time Volume 10
Move Adjust Exit
Page 25
25
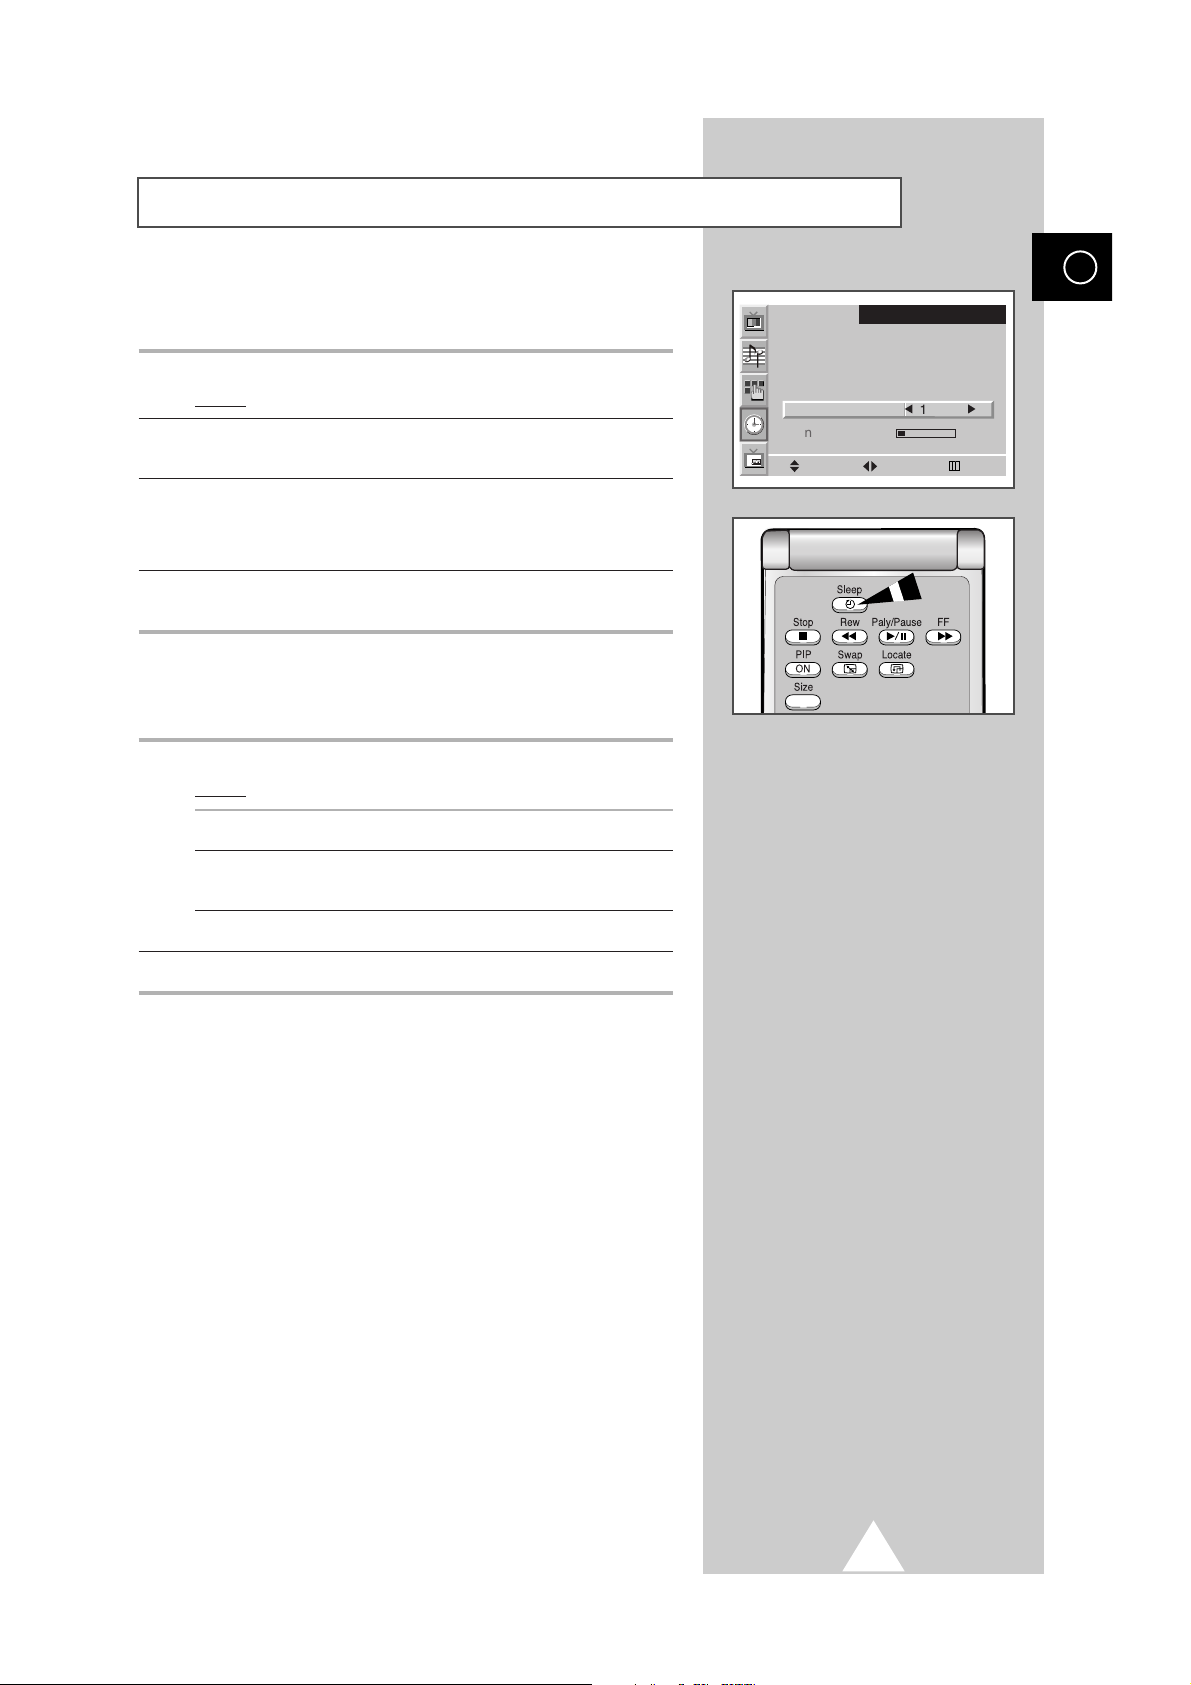
Setting the Sleep Timer
ENG
You can select a time period of between 10 and 360 minutes after
which the PDP automatically switches to Standby mode.
1 Press the Menu button.
Result:
The menus available are displayed.
2 Move the joystick up or down to select the TIME menu and press
the joystick button.
3 Move the joystick up or down to select the Sleep Timer option
and set the time interval for the PDP to stay on.
➣
To cancel the sleep timer function, select the Off.
4 When you are satisfied with the settings, press the Menu button
repeatedly to return to normal viewing.
You can set the sleep timer by simply pressing the “Sleep” button
on the remote control.
1
Press the Sleep button on the remote control.
Result:
If the sleep timer is... The screen displays...
Already set Time remaining before the PDP
will be placed in standby mode.
Not yet set Word Off.
2 Set the time interval for the PDP to stay on.
T I M E
Clock 10 : 30
On Time 6 : 00 On
Off Time 23 : 00 On
Ã
Sleep Timer
On Time Volume 10
Move Select Exit
10 Min.
¨
Page 26

26
ENG
You can display a “Picture-In-Picture” screen within the main
picture of input sources. In this way you can monitor the input
sources from any connected equipment.
➣
If you have not connected any equipment to the PDP’s input
jacks, you can not monitor the external sources of sub picture.
1 Press the Menu button.
Result:
The menus available are displayed.
2 Move the joystick up or down to select the PIP menu and press
the joystick button.
Result:
The Select option is selected.
3 Set to On by moving the joystick left or right.
Result:
The options available in the
PIP group are displayed.
4 Move the joystick up or down to select the Source option and
move the joystick left or right repeatedly.
Result:
The external sources of sub picture are displayed in the
following order.
AV1(Video ) ➞ AV1(S-Video) ➞ AV 2
5 Move the joystick up or down to select the Swap option and move
the joystick left or right.
Result:
The main picture and sub picture are interchanged.
6 Move the joystick up or down to select the Size option and move
the joystick left or right repeatedly.
Result:
The types of sub picture are displayed.
Double ➞ Large ➞ Small
➣
◆ In the PC mode, the size of sub picture may be different
depending on the type of PC Monitor and its resolution.
◆ If the system is different between the main picture and
the sub picture, the
Double mode is not selected.
7 Move the joystick up or down to select the Locate option and
move the joystick left or right repeatedly.
Result:
You can move the sub picture where you want.
➣
Not available in the
Double
mode.
8 When you have selected, press the Menu button repeatedly to
return to normal viewing.
Viewing the Picture in Picture (PIP)
➞
➞
➞
➞
Ã
Ã
P I P
On
P I P
AV 2
¨
¨
Select
Source AV 2
Swap
Size Double
Locate
Move Select Exit
Select On
Source
Swap
Size Double
Locate
Move Select Exit
P I P
Select On
Source AV 2
Swap
Size Double
Locate
Move Select Exit
P I P
Select On
Source AV 2
Swap
Size
Locate
Move Select Exit
Ã
Double
P I P
Select On
Source AV 2
Swap
Size Double
Locate
Move Select Exit
è
¨
Page 27

27
You can enjoy the “PIP” feature by simply using the remote
control.
Features Description
PIP ON Used to operate On/Off function of PIP directly.
Swap Used to interchange the main picture and the sub
picture.
Locate Used to move the sub picture.
➣
Not available in the
Double
mode.
Size Used to select the type of sub picture (Double, Large,
Small).
➣
If the system is different between the main picture
and the sub picture, the
Double mode is not
selected.
Source Used to assign a source of sub picture (
AV1(Video)
,
AV1(S-Video), AV 2
).
➣
If the main picture and the sub picture are different in
broadcasting system, the sub picture might stop
intermittently.
Viewing the Picture in Picture (PIP)
ENG
Power
Page 28

28
ENG
Once you have connected up your various audio and video systems,
you can view the different sources by selecting the appropriate input.
1
Check that all the necessary connections have been made.
2
Switch your PDP on, then press the SOURCE button repeatedly.
Result
: The input sources are displayed in the following
order:
AV1(Video)➞ AV1(S-Video)➞ AV 2➞ PC.
➣
If you change the external source while viewing, pictures might
take a short period of time to be switched.
Viewing Pictures From External Sources
Front panel
You can display the time and general informations by simply
pressing the “Display” button. The followings are available:
◆ Modes of selected picture, sound and surround
◆ Color system
◆ Horizontal and vertical resolutions (in PC mode)
◆ Sleep timer
◆ Current time (when the time is set)
◆ External input mode.
Displaying Informations
➞
➞
Picture Custom AV 2
Sound Custom
Surround Concert
Color System Auto
Sleep Timer Off
9 : 45
Picture Custom PC
Sound Custom
Surround Concert
H-Resolution 1024
V-Resolution 768
Sleep Timer Off
9 : 45
Page 29

29
Most television channels provide written information services via
teletext. Information provided includes:
◆
Television programme times
◆
News bulletins and weather forecasts
◆
Sports results
◆
Travel information
This information is divided into numbered pages (see diagram).
Part Contents
A Selected page number.
B Broadcasting channel identity.
C Current page number or search indications.
D Date and time.
E Text.
F Status information.
FASTEXT information.
➣
Teletext information is often divided between several
pages displayed in sequence, which can be accessed by:
◆ Entering the page number
◆ Selecting a title in a list
◆ Selecting a coloured heading (FASTEXT system)
Teletext Feature
ENG
Page 30

30
ENG
You can display Teletext information at any time on your television.
☛
For Teletext information to be displayed correctly,
channel reception must be stable; otherwise:
◆ Information may be missing
◆ Some pages may not be displayed
1 Press the Text/Off button to activate the teletext mode.
Result
:
The contents page is displayed. It can be redisplayed
at any time by pressing the (index) button.
2 Press the Text/Off button again.
Result
:
The screen will be split into two. This Double Teletext
feature lets you view the current input source and
teletext separately on the screen.
3 If you wish to display the current input source and teletext page
on a single screen, press the
Text/Off button again.
4 To exit from the teletext display, press the Text/Off button again.
Displaying the Teletext Information
Page 31

31
ENG
When you have displayed a Teletext page, you can select various
options to suit your requirements.
To display... Press the...
◆ Hidden text (reveal)
(answers to quiz games, for example)
◆ The normal screen (reveal) again
◆ A secondary page by entering its number (sub-page)
◆ The broadcast when searching for a page (cancel)
◆ The next page (page up)
◆ The previous page (page down)
◆ Double-size letters in the: (size)
• Upper half of the screen • Once
• Lower half of the screen • Twice
◆ The normal screen • Three times
Selecting Display Options
You can adjust the Contrast of Teletext display which best
corresponds to your viewing requirements.
1 Press the Menu button.
Result:
The main menu is displayed.
2 Move the joystick up or down to select the SETUP menu and press
the joystick button.
3 Move the joystick up or down to select the Miscellaneous menu
and press the joystick button.
Result:
The options available in the Miscellaneous group are
displayed.
4 Move the joystick up or down to select the TTX Contrast option.
5 Move the joystick left or right to adjust it.
Result:
The horizontal bar is displayed.
Adjusting the Teletext Contrast
S E T U P
Color System Auto
Digital NR Off
Auto Power On On
Panel Lock Off
Miscellaneous
Move Enter Exit
S E T U P
Language English
TTX Contrast
ID Setup 0 0
ID Input
Move Adjust Exit
TTX Contrast 2
Page 32

32
ENG
You can enter the page number directly by pressing the numeric
buttons on the remote control.
1 Enter the three-digit page number given in the content by
pressing the corresponding numeric buttons.
Result
:
The current page number is incremented until the
requested page is reached. That page is then
displayed. If the selected page is linked with several
secondary pages, the secondary pages are displayed
in turn.
2 If the FASTEXT system is used by the broadcasting company,
the different topics covered on a Teletext page are color-coded
and can be selected by pressing the coloured buttons on the
remote control.
Press the coloured button corresponding to the topic that you wish
to select; the available topics are given on the status line.
Result
: The page is displayed with other colored information
that can be selected in the same way.
3 To display the previous or next page, press the corresponding
coloured button.
4 To display the subpage, see the following steps.
◆
Press the (sub-page) button.
Result
: The available subpages appear.
◆
Select the required sub-page. Sub-pages can be scrolled by
using the or button.
5 Press the Text/Off button to exit from the teletext display.
Selecting a Teletext Page
Page 33

33
Connecting a PC
ENG
◆ Connect a PC cable (15pin) between the PC and
PDP.
◆ Connect an Audio cable between the Audio
output jack on the PC and the Audio input jack
(PC) on the PDP.
Viewing the PC screen:
1 Turn on PDP and select the PC mode by pressing
the
Source (or Source/PC) button on the remote
control.
2 Turn on PC and check for PC system
requirements. (Refer to pages 34~36 for PC
system requirements.)
3 Adjust the PC screen. (Refer to page 37.)
Rear panel
PC
1
2 3 4 5
6
7
8
10
11
12
131415
PC IN
Red (R)
Green (G)
Blue (B)
Grounding
Grounding (DDC)
Red (R) Grounding
Green (G) Grounding
Blue (B) Grounding
Reserved
Sync Grounding
Grounding
Data (DDC)
Horizontal sync.
Vertical sync.
Clock (DDC)
Pin No.
1
2
3
4
5
6
7
8
9
10
11
12
13
14
15
PC OUT
Red (R)
Green (G)
Blue (B)
Grounding
Grounding (DDC)
Red (R) Grounding
Green (G) Grounding
Blue (B) Grounding
Reserved
Sync Grounding
Grounding
Data (DDC)
Horizontal sync.
Vertical sync.
Clock (DDC)
Pin Configuration
15Pin Signal Cable
(based on protruded pin)
Page 34

34
ENG
Setting up Your Display Plug and Play
Our adoption of the new VESA® Plug and Play solution eliminates complicated and time consuming
setup. It allows you to install your monitor in a Plug and Play compatible system without the usual
hassles and confusion. Your PC system can easily identify and configure itself for use with your display.
This monitor automatically tells the PC system its Extended Display Identification data (EDID) using
Display Data Channel (DDC) protocols.
Setting up Your PC Software (Windows only)
The Windows display-settings for a typical computer are shown below. But the actual screens on your
PC will probably be different, depending upon your particular version of Windows and your particular
video card.
On the windows screen, select in the following sequence:
Start ➞ Settings ➞ Control Panel.
When the control panel screen appears, click on
Display
and a display dialog-box will appear.
Select the Settings tab in the display dialog-box.
The two key variables that apply the PDP-PC interface are
“Resolution” and “Colors”.
The correct settings for these two variables are:
◆ Size (sometimes called “Resolution”)
1024 x 768 pixels.
◆ Color
24-bit color
(might also be expressed as “16 million colors”)
Shown at left is a typical screen for
Display dialog box.
If a vertical-frequency option exists on your display settings
dialog box, the correct value is
60 or 60 Hz. Otherwise, just
click
OK and exit the dialog box.
Page 35

35
PC Input Mode (42”)
ENG
Both screen position and size will vary depending on the type of PC monitor and its resolution.
The table below shows all of the display modes that are supported:
(N: Negative / P: Positive)
◆ The interlace mode is not supported.
◆ The PDP might operate abnormally if a non-standard video format is selected.
◆ The 4:3 mode does not work with input signals from “720 x 400”.
Notes
◆ The text quality of PC screen is optimum in the VGA mode (640 x 480), the full size displayed PC mode
is optimum in the SVGA mode (800 x 600).
◆ When this PDP is used as a PC display, 24-bit color is supported (over 16 million colors).
◆ Your PC display screen might appear different depending on the manufacturer (and your particular version of
Windows). Check your PC instruction book for information about connecting your PC to a PDP.
◆ If a vertical and horizontal frequency-select mode exists, select 60Hz (vertical) and 31.5kHz (horizontal).
In some cases, abnormal signals (such as stripes) might appear on the screen when the PC power is turned
off (or if the PC is disconnected). If so, press the
Source button to enter the Video mode. Also, make sure that
the PC is connected.
◆ When connecting a notebook PC to the PDP, make sure that the PC screen is displayed through only the
PDP monitor (Otherwise, random signals might appear).
◆ When horizontal synchronous signals seem irregular in PC mode, check PC power saving mode or cable
connections.
Standard
VGA
SVGA
XGA
Dot x Line
640 x 480
720 x 400
800 x 600
1024 x 768
Vertical
frequency (Hz)
85.0
75.0
72.8
59.9
70.1
85.1
75.0
72.2
60.3
56.3
85.0
75.0
70.1
60.0
Horizontal
frequency (kHz)
43.3
37.5
37.9
31.5
31.5
53.7
46.9
48.1
37.9
35.2
68.7
60.0
56.5
48.3
Vertical
polarity
N
N
N
N
P
P
P
P
P
P
P
P
N
N
Horizontal
polarity
N
N
N
N
N
P
P
P
P
P
P
P
N
N
Page 36

36
ENG
PC Input Mode (50”)
(N: Negative / P: Positive)
Standard
VGA
W-VGA
SVGA
XGA
W-XGA
SXGA
WXGA+
Dot x Line
640 x 350
640 x 400
720 x 400
640 x 480
848 x 480
800 x 600
1024 x 768
1152 x 864
1280 x 768
1280 x 1024
1366 x 768
Vertical
frequency (Hz)
70.086
85.080
85.080
70.087
85.039
59.940
72.809
75.000
85.008
60.000
72.000
75.000
85.000
56.250
60.317
72.188
75.000
85.061
60.004
70.069
75.029
84.997
75.000
60.000
75.000
60.020
75.025
60.000
Horizontal
frequency (kHz)
31.469
37.861
37.861
31.469
37.927
31.469
37.861
37.500
43.269
29.838
35.156
36.072
37.650
42.925
37.879
48.077
46.875
53.674
48.363
56.476
60.023
68.677
67.500
47.700
60.150
63.981
79.976
48.200
Vertical
polarity
N
N
P
P
P
N
N
N
N
P
P
P
P
N/P
P
P
P
P
N
N
P
P
P
P
P
P
P
N
Horizontal
polarity
P
P
N
N
N
N
N
N
N
N
N
N
N
N/P
P
P
P
P
N
N
P
P
P
N
N
P
P
N
Notes
◆ The plasma panel of this monitor is composed 1366 pixels & 768 lines. That is, the best resolution is 1366 x
768
. Thus, select 1366 x 768 resolution when you control the display setting, if your video card does not
support 1366 x 768 resolution, the 1024 x 768 resolution is recommended.
◆ The 1366 x 768 mode is only supported by a particular video card (PIXEL PERFECT made by IMAGINE
GRAPHICS Ltd.
).
◆ The 4:3 mode does work at the standard resolutions (640x480, 800x600, 1024x768, 1280x1024).
Page 37

37
➢
Preset to the PC mode by using the Source button.
1 Press the Menu button, then press the joystick button to enter the
PICTURE menu.
2 Move the joystick up or down to select the Color Control menu
and move the joystick left or right.
3 To... Move the joystick...
Move to the each option up or down.
(
R-Red, G-Green, B-Blue)
Adjust the each option left or right.
4 When you are satisfied with the settings, press the Menu button
repeatedly to return to normal viewing.
Controlling the Screen Color
ENG
Adjusting the Screen Quality
This feature is to remove or reduce picture noise, causing a tremble
of screen and insecure boundary of image.
➢
Preset to the PC mode by using the Source button.
1 Press the Menu button.
Result:
The main menu is displayed.
2 Move the joystick up or down to select the SETUP menu and press
the joystick button.
Result:
The Image Lock menu is selected.
3 Press the joystick button again.
Result:
The options available in the IMAGE LOCK group are
displayed with the
Frequency option is selected.
4 To... Move the joystick...
Move to the Frequency or up or down.
Phase option
Adjust the each option left or right.
➢
If these adjustings are not set properly, vertical stripes
appears or the picture may be blurry.
5 When you are satisfied with the settings, press the Menu button
repeatedly to return to normal viewing.
P I C T U R E
Select Custom
Contrast
Brightness
Sharpness
Color Control
Move Adjust Exit
COLOR CONTROL
R50
G50
B50
Move Adjust Exit
Red 50
S E T U P
Image Lock
Scale 4:3
Auto Power On On
Panel Lock Off
Miscellaneous
Move Enter Exit
IMAGE LOCK
Frequency
Phase
Position
Auto Adjustment
Move Adjust Exit
Page 38

38
ENG
➢
Preset to the PC mode by using the Source button.
1 Press the Menu button.
Result:
The main menu is displayed.
2 Move the joystick up or down to select the SETUP menu and press
the joystick button.
Result:
The Image Lock menu is selected.
3 Press the joystick button again.
Result:
The options available in the IMAGE LOCK group are
displayed.
4 Move the joystick up or down to select the Position menu and
press the joystick button.
5 Move the required position by using the joystick.
6 When you are satisfied with the settings, press the Menu button
repeatedly to return to normal viewing.
Changing the Screen Position
Frequency
Phase
Position
Auto Adjustment
IMAGE LOCK
Move Enter Exit
POSITION
Up
RightLeft
Down
Move Exit
Page 39

39
➢
Preset to the PC mode by using the Source button.
1 Press the Menu button.
Result:
The main menu is displayed.
2 Move the joystick up or down to select the SETUP menu and press
the joystick button.
Result:
The Image Lock menu is selected.
3 Press the joystick button again.
Result:
The options available in the IMAGE LOCK group are
displayed.
4 Move the joystick up or down to select the Auto Adjustment
menu.
Result:
The Reset Freq./Phase/Position message is
displayed.
5 Press the joystick button again.
Result:
The screen becomes black and return to original view
about a few seconds later.
6 When you have finished, press the Menu button repeatedly to
return to normal viewing.
Initializing the Frequency, Phase, and Position
ENG
➢
Preset to the PC mode by using the Source button.
1 Press the Menu button.
Result:
The main menu is displayed.
2 Move the joystick up or down to select the SETUP menu and press
the joystick button.
3 Move the joystick up or down to select the Scale option.
4 Select the required option (Wide, 4:3 ) by moving the joystick left
or right repeatedly.
5 When you are satisfied with the settings, press the Menu button
repeatedly to return to normal viewing.
Changing the Screen Size
IMAGE LOCK
Frequency
Phase
Position
Auto Adjustment
Reset Freq./Phase/Position
Move Enter Exit
S E T U P
Image Lock
Ã
Scale
Auto Power On On
Panel Lock Off
Miscellaneous
Move Select Exit
4:3
¨
Page 40

40
ENG
➢
Preset to the PC mode by using the Source button.
1 Press the Menu button.
Result:
The menus available are displayed.
2 Move the joystick up or down to select the PIP menu and press
the joystick button.
Result:
The Select option is selected.
3 Set to On by moving the joystick left or right.
Result:
The options available in the PIP group are displayed.
4 Move the joystick up or down to select the Sound option and move
the joystick left or right repeatedly.
Result:
The followings are displayed. You can select your
required sound of main or sub picture.
Main↔Sub
5 Move the joystick up or down to select the Locate option and
move the sub picture where you want by using the joystick.
6 When you have selected, press the Menu button repeatedly to
return to normal viewing.
➣
◆ The size of sub picture can depend on the resolution of
PC.
◆ For selecting the external source and size of the sub
picture, refer to page 26.
Enjoying the PIP Feature in PC mode
Ã
P I P
Main
¨
Select On
Source AV 2
Sound
Size Large
Locate
Move Select Exit
P I P
Select On
Source AV 2
Sound Main
Size Large
Locate
Move Select Exit
PIP Panning
Adjust Exit
Page 41

41
Power Saver (PC Mode Only)
ENG
This monitor has a built-in power management system called Power Saver. This power management
system saves energy by switching your monitor into a low-power mode when it has not been used for a
certain amount of time. This power management system operates with a VESA DPMS compliant video
card installed in your computer. You use a software utility installed on your computer to set up this
feature.
Power-Saving Function mode
State
Normal
Stand-by Mode Suspend Mode Power-Off Mode
Operation
Position A1 Position A2
Horizontal Sync Active Inactive Active Inactive
Vertical Sync Active Active Inactive Inactive
Video Active Blanked Blanked Blanked
Power Indicator Green
Red Blinking Red Blinking Red Blinking
(1 sec interval) (1 sec interval) (1 sec interval)
➣
◆
This monitor automatically returns to normal operation when horizontal and vertical sync return.
◆
This occurs when moving the computer’s mouse or pressing a key on the keyboard.
◆
For energy conservation, turn your monitor OFF when it is not needed, or when leaving it
unattended for long periods.
Page 42

42
ENG
Multiple Display Control (MDC)
➣
◆
Before using the RS-232C control function, confirm whether each ID of the PDPs that you want to
control is set or not, and they are individual each other. If not, first set your ID number. (Refer to
“Setting the Multiple Display Control (MDC)” on page 43.)
◆
When controlling more than four PDPs or using an extra cable, not the serial cable which is
included in PDP, the MDC maybe operate abnormally.
A multiple display control is an application allowing
various displays to be easily and simultaneously operated
on a PC. RS-232C, a standard of serial communication, is
used for the communication between a PC and a display.
Therefore, a serial cable should be connected between
the serial port on a PC and the serial port on a display.
Page 43

43
Setting the Multiple Display Control (MDC)
ENG
1 Press the Menu button.
Result:
The main menu is displayed.
2 Move the joystick up or down to select the SETUP menu and press
the joystick button.
3 Move the joystick up or down to select the Miscellaneous menu
and press the joystick button.
4 Move the joystick up or down to select the ID Setup option.
Enter ID setup number by using the joystick.
5 Move the joystick up or down to select the ID Input option.
Enter ID setup number by using the numeric buttons.
➣
To operate the multi control function, PDP1 and PDP2 should
be set in the ID Setup mode. When entering the ID Input
number of PDP1 while the PDP is set in the ID Input mode,
only PDP1 is switched to the Menu screen and you can
operate the remote control. At this time, PDP2 doesn't operate
with the remote control and displays the standby mode of ID
Input.
Installing the Multiple Display Control (MDC) (continued)
☛
Computer Requirements (Recommended)
◆ OS : Windows 95, 98, ME, 2000, XP Home, XP Professional.
◆ CPU : Pentium II
◆ RAM : 64M
◆ VGA : 800 X 600, 256 Color
◆ CD-ROM : 4X
◆ Communication Port : RS-232C Compatible Serial Male Type 9Pin (COM1).
If RS-232C port on your PC is 25-pin type, you should use the
25-pin to 9-pin male converter.
➣
The proper operation of this product will not be guaranteed when users operate this program in
other models.
S E T U P
Language English
TTX Contrast
Ã
ID Setup
ID Input
Move Select Exit
Language English
TTX Contrast
ID Setup 0 1
ID Input
Enter ID Input Number.
0 1
S E T U P
Ã
- -
¨
¨
Page 44

44
ENG
Installing the Multiple Display Control (MDC)
1 Click the setup.exe file in CD-ROM, and the following
screen appears and then the basic files for setup are
copied.
2 Select the program installation folder of your
choice and click on the button to begin setup.
3 Select the program group of your choice and click the
Continue to continue installation.
4 If you see the message Version Conflict during installation, this
means that the version of the program is not compatible to the
existing program library in your system. Ignore the message and
click on
Yes.
5 You can run the program once installation is complete.
Page 45

45
Viewing the Main Screen
ENG
The program starts operating when entering the following sequence: Start ➜Program ➜Multiple
Display Control.
➣
The remote control Enable/Disable function operates whether or not the power is On/Off. This applies
to all the displays connected to the MDC. However, regardless of the status in which the MDC was
shut down, the remote control signal receiving function of all the displays is initialized to Enable when
the MDC is closed.
Descriptions
ΠMain icons :
Click the main icons to switch into each screen.
´ Display selection :
Select a display from Display Selection by marking ‘✔’.
ˇ Select button :
Click Select All, Clear All to select or clear all displays.
¨ Info grid :
Use Info Grid to see the brief information of selected display.
ˆ Control tools :
Use Control Tools to control displays.
Ø Title :
The current title to be controlled is displayed.
∏ Remote control :
It allows you to enable or disable the remote control signal receiving function of the
display unit.
+ This Program is for Samsung PDP (Scart) Model Only. Other Models are not appoved.
Page 46

46
ENG
Confirming the Port
◆ The Multiple Display Control uses only “COM1”. This
control operates with neither “COM2” nor another port.
◆ To check which port is installed, enter “Control Panel
➜
System ➜Device Manager ➜Ports”.
◆ If another port is installed except the “COM1” port, you can
change to “COM1” from the “Device Manager” if you’re
using Windows 2000 or XP (please refer to the following
chapter). For all other operating systems, the change may be
made from your PC BIOS Setup.
◆ Use the Exit menu to end the program. The Help menu
shows how to use the program and general information
about the program.
Changing the Port
◆ The Multiple Display Control uses only “COM1”. This control operates with neither “COM2” nor
another port.
◆ You can change the port to “COM1” in Windows 2000 or XP. For all other operating systems, the
change may be made from your PC BIOS Setup.
◆ Enter “Control Panel ➜System ➜Device Manager ➜Ports”. And then click the right of mouse to
enter “Properties
➜
Port Settings Tab ➜Advanced”.
◆ Select “COM1”.
Click the right of mouse!
Select
COM1!
Page 47

47
Controlling the Power
ENG
Click “Power Control” of the main icons and the Power Control screen appears.
Info Grid shows some basic information
necessary to Power Control.
ΠPower Status
´ Input Source
ˇ Aspect Ratio
¨ On Timer Status
ˆ Off Timer Status
Click “Select All” or mark ‘✔’ in the check box to select the display you want to control.
Power Control can control some functions of
the ‘
✔’ marked display.
ΠPower On/Off
-
Turns On/Off the power of the selected
display.
-
Turns on each set at one second interval to
prevent the power overload that might occur
when many sets turn on at the same time.
´ Volume Control
-
Controls the volume of the selected display.
-
It receives the volume value of the selected
display from the sets and displays it in the
slider. (When you release the selection or
choose Select All, the value will return to
default 10.)
ˇ Mute On/Off
-
Turns On/Off the mute of the selected display.
-
When selecting one set at a time, if the selected set is already set on MUTE, you must mark the MUTE
display. (if you undo the selections or choose
Select All, the values are returned to default settings).
➣
The Volume and Mute functions are available for only the displays are powered ON.
➣
The Power Control function is available for all the displays are
connected.
+ This Program is for Samsung PDP (Scart) Model Only. Other Models are not appoved.
+ This Program is for Samsung PDP (Scart) Model Only. Other Models are not appoved.
Page 48

48
ENG
Controlling the Input Source
Click “Input Source” of the main icons and the Input Source control screen appears.
Info Grid shows some basic information
necessary to Input Source control.
ΠPower :
Shows the power status of the
current display.
´ Input :
Shows what Input Source is used for
the current display.
Click “Select All” or mark ‘✔’ in the check box to select the display you want to control.
Input Source can control some functions
of the ‘
✔’ marked display.
ΠVideo :
Switches the input source of the
selected display into Video.
´ S-Video :
Switches the input source of
the selected display into S-Video.
ˇ AV2 :
Switches the input source of the
selected display into AV2.
¨ PC :
Switches the input source of the
selected display into PC.
The Input Source control function is available for only the displays are
powered On.
Page 49

49
Controlling the Aspect Ratio (Video/S-Video/AV2)
ENG
➣
This function doesn’t operate in TTX mode.
Click Aspect of the main icons and the Aspect Ratio control screen appears.
Info Grid shows some basic information
necessary to Aspect Ratio control.
ΠPower :
Shows the status of power of the
current display.
´ Aspect :
Shows which aspect ratio the
current display has.
ˇ Input :
Shows which input source the current
display has.
¨
Info Grid displays only the display having
Video, S-Video, or AV2 input source.
ˆ
When clicking Aspect Ratio, the Video,
S-Video, AV2 tab first shows.
-
The Aspect Ratio control button controls
Aspect Ratio available for Video, S-Video,
AV2.
Ø
Click the PC tab to control Aspect Ratio related to PC.
The Aspect Ratio control function is available for only the displays are
powered On.
Controlling the Aspect Ratio (PC)
Click “Select All” or mark ‘✔’ in the check box to select the display you want to control.
Info Grid shows some basic information
necessary to the Aspect Ratio control.
Œ
Click the PC tab to control Aspect Ratio
related to PC.
´
Info Grid displays only the display having
a PC input source.
ˇ
Click Wide to switch the aspect ratio of
the selected display into Wide.
¨
Click 4:3 to switch the aspect ratio of the
selected display into 4:3.
Page 50

50
ENG
Controlling the Time
➣
This function doesn’t operate in TTX mode.
Click “Time” of the main icons and the Time control screen appears.
Info Grid shows some basic information necessary to the Time control.
ΠCurrent Time :
Set the current time of the selected display. To change the current Time, first change the PC
Time.
´ On Time Setup :
Set the hour, minute of On Time, volume of the selected display.
ˇ Off Time Setup :
Set the hour, minute of Off Time of the selected display.
¨
Time control screen shows power On time in On timer, power On time in off timer, and the presence of use,
etc.
ˆ
Time control screen shows power Off time in Off timer, power Off time in off timer, and the presence of use,
etc.
The Time control function is available for only the displays are powered On.
Page 51

51
Setting the Picture (Video/S-Video/AV2)
ENG
➣
This function doesn’t operate in TTX mode.
Click “Settings” of the main icons and the Settings control screen appears.
Info Grid shows some basic information necessary to the Settings control.
When each of functions is selected, the set value of the selected function is displayed on the screen.
When
Select All is selected, the default value returns. If you change this value in this screen, it switches
to
CUSTOM in Picture setting mode automatically.
ΠPicture :
Control the picture having the Video,
S-Video, AV2 input source.
´ Contrast :
Adjusts the contrast of the selected
display.
ˇ Brightness :
Adjusts the brightness of the
selected display.
¨ Sharpness :
Adjusts the sharpness of the
selected display.
ˆ Color :
Adjusts the color of the selected display.
Ø Tint :
Adjusts the tint of the selected display.
(NTSC Only)
∏ Color Tone :
Adjusts the color tone of the selected
display. (PAL Only)
You can only control Displays for which the Power Status is ON. If you
have not selected a setup the value displayed will be the Factory Default
Value.
Setting the Picture RGB (PC)
ΠPicture RGB :
Controls the picture having the PC
input source.
´ Contrast :
Adjusts the contrast of the selected
display.
ˇ Brightness :
Adjusts the brightness of the
selected display.
¨ Red Gain :
Adjusts the red gain of the selected
display.
ˆ Green Gain :
Adjusts the green gain of the
selected display.
Ø Blue Gain :
Adjusts the blue gain of the selected
display.
Page 52

52
ENG
Setting the Audio
➣
This function doesn’t operate in TTX mode.
Click “Settings“ of the main icons and the Settings control screen appears.
Info Grid shows some basic information
necessary to the Settings control.
When each of unction is selected, the set
value of the selected function is displayed on
the screen. When
Select All is selected, the
default value returns. If you change this value
in this screen, it switches to
CUSTOM in
Picture setting mode automatically.
ΠAudio :
Control the audio of all input sources.
´ Treble :
Adjusts the treble of the selected
display.
ˇ Bass :
Adjusts the bass of the selected
display.
¨ Balance :
Adjusts the balance of the selected
display.
You can only control Displays for which the Power Status is ON. If you
have not selected a setup the value displayed will be the Factory Default
Value.
Setting the Image Lock
Click “Settings“ of the main icons and the Settings control screen appears.
Info Grid shows some basic information
necessary to the Settings control.
ΠImage Lock :
Controls the image lock of PC
input source.
´ Frequency :
Adjusts the frequency of the
selected display.
ˇ Phase :
Adjusts the phase of the selected
display.
¨ Position :
Adjusts the position of the
selected display.
ˆ Auto Adjustment :
Adjusts the picture
automatically.
The Setting control function is available for only the displays are powered On.
Page 53

53
Displaying the Setting Values of Various Displays
ENG
◆ No selection: It displays the factory default value.
◆ Select one display: It receives and displays the setting value for the selected one display.
◆ When you have already selected one display (ID1) and add to select another display (ID3):
The program, which have displayed the settings value of ID1, receives and displays the value of ID3.
◆ Select all sets at once by using “Select All”: It returns to the factory default value.
Troubleshooting
Œ The display you want to control doesn’t appear on the power control info grid.
-
Check RS-232C MUST be connected to the COM1 port.
-
Check the displays which have the same Set ID among the connected displays. If so, the displays are not
appeared properly in the program.
-
Check the set ID number is within 0 to 10. (You can adjust the set ID number on the menus of your display.)
-
The display Set ID should be set to between 0 and 10. If not, the value would be out of the range in MDC
system so that the display cannot be controlled. It is ensured that this program can operate the maximum of
4 displays at the same time. It may operate 4 to 10 displays simultaneously but not guarantee proper
operation in this model.
´ The display you want to control doesn’t appear on the other control info grids.
-
Check the display is powered ON. (You can check on the power control info grid.)
-
Check the input source of the display you want to control can be controlled.
ˇ The dialogue box appears repeatedly.
-
Check the display you want to control is marked.
¨ Both On Timer and Off Timer functions have been set, but a different time is applied.
-
Apply the current time to set the time of each display equal.
ˆ The remote control may not function properly if you disconnect the RS-232C cable or exit from the
programs in an irregular manner even with the remote control function is OFF.
-
Rerun program and turn the remote control function ON to restore normal functions.
Ø This program might malfunction because of a communicational control between PC and Display or
electromagnetic waves from peripherals.
∏ For further information, contact an authorized Samsung service center.
Page 54

54
ENG
Care and Maintenance
Troubleshooting
Before contacting Service Personnel, perform the following simple checks.
If you cannot solve the problem using the instructions below, note the model and serial number of the
PDP and contact your local dealer.
Possible Solution
◆ Check all wire connections.
◆ The monitor is using its power management system.
Check the power management utility on your computer.
◆ Press the SELECT button to put your remote control in the
Monitor mode.
◆ Make sure the wall outlet is working.
◆ Check to see that both the monitor and the source are plugged in
and turned on.
◆ Adjust the Picture settings.
◆ Adjust the Size settings.
Problem
Poor picture.
The power indicator is amber blinking.
Your remote control does not operate
the monitor.
The monitor won’t turn on.
There is no screen image.
The image is too light or too dark.
The image is too large or too small.
With proper care, your PDP will give you many years of service. Please follow these guidelines to get
the maximum performance from your PDP.
◆ Identifying Problems
- Do not put the PDP near extremely hot, cold, humid or dusty places.
- Do not put the PDP near appliances that create magnetic fields.
- Keep the ventilation openings clear.
- Do not place the PDP on a rough and slanted surface, such as cloth or paper.
◆ Liquids
- Do not handle liquids near or on the PDP.
◆ Cabinet
- Never open the cabinet or touch the parts inside.
- Wipe your PDP with a clean, dry cloth. Never use water, cleaning fluids, wax, or chemicals.
- Do not put heavy objects on top of the cabinet.
◆ Temperature
- If your PDP is suddenly moved from a cold to a warm place, unplug the power cord for at least
two hours so that moisture that may have formed inside the unit can dry completely.
Page 55

55
Wiring the Mains Power Supply Plug (UK Only)
ENG
◆ IMPORTANT NOTICE
The mains lead on this equipment is supplied with a moulded plug incorporating a fuse. The value of the fuse
is indicated on the pin face of the plug and, if it requires replacing, a fuse approved to BSI1362 of the same
rating must be used. Never use the plug with the fuse cover omitted if the cover is detachable.
If a replacement fuse cover is required, it must be of the same colour as the pin face of the plug. Replacement
covers are available from your dealer. If the fitted plug is not suitable for the power points in your house or the
cable is not long enough to reach a power point, you should obtain a suitable safety approved extension lead
or consult your dealer for assistance. However, if there is no alternative to cutting off the plug, remove the fuse
and then safely dispose of the plug. Do NOT connect the plug to a mains socket as there is a risk of shock
hazard from the bared flexible cord.
◆ IMPORTANT
The wires in the mains lead are coloured in accordance with the following code:
BLUE - NEUTRAL BROWN - LIVE
As these colours may not correspond to the coloured markings identifying the terminals in your plug,
proceed as follows:
The wire coloured BLUE must be connected to the terminal marked with the letter N or coloured BLUE or
BLACK. The wire coloured BROWN must be connected to the terminal marked with the letter L or coloured
BROWN or RED.
WARNING: DO NOT CONNECT EITHER WIRE TO THE EARTH TERMINAL, WHICH IS MARKED
WITH THE LETTER E OR BY THE EARTH SYMBOL , OR COLOURED GREEN OR
GREEN AND YELLOW.
Page 56

-
AFTER SALES SERVICE
-
Do not hesitate to contact your retailer or service agent
if a change in the performance of your product indicates
that a faulty condition may be present.
BN68-00348A-00 (ENG)
ELECTRONICS
Page 57

PLASMABILDSKÄRM
Användaranvisningar
Innan du använder enheten bör du läsa
igenom den här användarhandboken noggrant.
Spara även handboken för framtida referens.
SWE
FJÄRRKONTROLL
MENYER PÅ SKÄRMEN
BILD-I-BILDEN
TEXT-TV
Page 58

2
SWE
Säkerhetsanvisningar
◆ Placera inte plasmabildskärmen ovanpå en ostadig vagn, stativ, tripodstativ, konsol eller på ett ojämnt
golv, eftersom det finns risk för att den faller.
◆ Utsätt inte plasmabildskärmen för extrema temperaturer eller väldigt hög luftfuktighet.
◆ Utsätt inte plasmabildskärmen för direkt solljus eller andra värmekällor.
◆ Utsätt inte plasmabildskärmen för några vätskor.
◆ För aldrig in några föremål i TV-apparaten och placera inga kärl med vätska ovanpå plasmabildskärmen.
◆ Koppla ur nät- och antennsladden från plasmabildskärmen vid stormväder (särskilt när det blixtrar).
◆ Stå inte på nätsladden och vrid den inte.
◆ Överbelasta inte vägguttag eller förlängningssladdar, eftersom detta kan medföra brandfara eller elstöt.
◆ Använd en mjuk och torr trasa (som inte innehåller flyktiga ämnen) när du rengör plasmabildskärmen.
◆ Om plasmabildskärmen går sönder, ska du inte försöka att reparera den själv. Kontakta behörig
servicepersonal.
◆ Om du inte använder fjärrkontrollen under en längre tid, ska du ta ur batterierna och förvara den på en
sval, torr plats.
◆ Tappa inte fjärrkontrollen.
Användaranvisningar
◆ Bilden på skärmen behålls
Visa inte en stillbild (från t.ex. ett videospel, eller när du ansluter en dator till den här
plasmabildskärmen) på plasmabildskärmen i mer än 2 timmar, eftersom detta kan medföra att bilden på
skärmen behålls. Att bilden på skärmen behålls kallas även "bildskärmsbränning". Du kan undvika att
bilden behålls genom att minska på ljusstyrkan och kontrasten på bildskärmen när du visar stillbilder.
◆ Defekta celler
Plasmabildskärmen består av små celler. Även om bilderna skapas av mer än 99,9 % aktiva celler,
kan det finnas ett antal celler som inte alstrar ljus eller lyser.
◆ Höjd
Plasmabildskärmen fungerar i normala fall endast på höjder under 2000 m. På höjder över 2000 m
kan det hända att den inte fungerar som den ska. Du bör därför undvika att installera och använda
den på sådana höjder.
◆ Garanti
- Garantitid: Ett år med början från det datum då du köpte produkten.
- Garantin täcker inga skador som orsakas av att bilden behålls.
- Bildskärmsbränning täcks inte av garantin.
Page 59

3
SWE
Varning!
VARNING!:
FÖR ATT FÖRHINDRA ELSTÖTAR SKA DU INTE
AVLÄGSNA SKYDDSHÖLJET PÅ BAKSIDAN, DET FINNS INGA
DELAR I APPARATEN SOM KAN REPARERAS AV ANVÄNDAREN.
ÖVERLÅT REPARATIONER TILL BEHÖRIG SERVICEPERSONAL.
RISK FÖR ELSTÖTAR
ÖPPNA INTE
!
VARNING!
Symbolen med en blixt och en pilspets i en
triangel är ett varningsmärke som varnar
dig för att det finns "farlig spänning" inuti
produkten.
Utropstecknet i en triangel är ett
varningsmärke som uppmärksammar dig
på att viktiga användningsanvisningar
medföljer produkten.
☛
Huvudspänningen anges på
plasmabildskärmens baksida och
frekvensen är 50 eller 60 Hz.
VARNING!:FÖR ATT UNDVIKA SKADA SOM
KAN MEDFÖRA RISK FÖR BRAND ELLER ELSTÖTAR,
SKA DU INTE UTSÄTTA DEN HÄR APPARATEN FÖR
REGN ELLER FUKT.
!
Kontrollera delar
Användaranvisningar
Fjärrkontroll/ AAA-
batterier
Nätsladd
AV-kablar (RCA) Kabel för S-VIDEO
Ladda ner kabeln
(RS-232C)
Installera CD-enheten
(RS-232C)
2 ferritkärnor för högtalarsladd
Ferritkärnor för SCART-kabel
- 42” : 2 delar
- 50” : 4 delar
Page 60

4
SWE
Innehåll (fortsättning)
◆ FÖRORD
■ Säkerhetsanvisningar ............................................................................................... 2
■ Användaranvisningar ................................................................................................ 2
■ Varning! .................................................................................................................... 3
■ Kontrollera delar ....................................................................................................... 3
◆ ANSLUTA OCH FÖRBEREDA BILDSKÄRMEN
■ Din nya plasmabildskärm.......................................................................................... 6
■ Knappar på fjärrkontrollen ........................................................................................ 8
■ Sätta i batterierna i fjärrkontrollen............................................................................. 9
■ Montera bildskärmen på väggfästet.......................................................................... 9
■ Flytta ut bildskärmen från väggfästet........................................................................ 12
■ Innan du ansluter bildskärmen till extern utrustning ................................................. 13
■ Ansluta högtalare...................................................................................................... 14
■ Ansluta en video eller kabelbox ................................................................................ 15
■ Slå på och stänga av ................................................................................................ 16
■ Visa menyerna och olika visningslägen.................................................................... 16
◆ ANVÄNDA BILDSKÄRMEN
■ Välja språk ................................................................................................................ 17
■ Använda de olika installationsmenyerna .................................................................. 18
-
Färgsystem / Brusreduktion (Digital NR) / Autoström På / Panellås
■ Använda automatiska bildinställningar ..................................................................... 19
■ Anpassa bilden ......................................................................................................... 20
■ Frysa bilden som visas ............................................................................................. 20
■ Ändra bildformatet .................................................................................................... 21
■ Justera volymen........................................................................................................ 22
■ Använda automatiska ljudinställningar ..................................................................... 23
■ Anpassa ljudet .......................................................................................................... 23
■ Ställa in tiden ............................................................................................................ 24
■ Automatisk på-/avstängning ..................................................................................... 24
■ Ställa in väckningsfunktionen ................................................................................... 25
■ Visa bild-i-bilden (PIP) .............................................................................................. 26
■ Visa information ........................................................................................................ 28
■ Visa bilder från externa källor ................................................................................... 28
◆ ATT ANVÄNDA TEXT-TV-FUNKTIONEN
■ Text-TV-funktionen ................................................................................................... 29
■ Visa text-TV-informationen ...................................................................................... 30
■ Ställa in kontrasten för text-TV ................................................................................. 31
■ Välja visningsalternativ ............................................................................................. 31
■ Välj en text-TV-sida .................................................................................................. 32
Page 61

5
SWE
Innehåll
◆ ANSLUTA OCH ANVÄNDA EN DATOR
■ Ansluta en dator........................................................................................................ 33
■ Installera Plug and Play för bildskärmen .................................................................. 34
■ Installera programvaran............................................................................................ 34
■ Läge för datorindata.................................................................................................. 35
■ Ändra färgen på bildskärmen.................................................................................... 36
■ Justera bildkvaliteten ................................................................................................ 37
■ Byta bildskärmsläge.................................................................................................. 37
■ Initiera frekvens, fas och läge ................................................................................... 38
■ Byta bildforma........................................................................................................... 39
■ Utnyttja funktionen bild-i-bilden (PIP) i datorläge...................................................... 40
■ Strömsparare (endast PC-läge)............................................................................... 41
◆ FUNKTIONEN MULTIPLE DISPLAY CONTROL (MDC)
(STYRNING AV FLERA BILDSKÄRMAR)
■ Multiple Display Control (MDC) ................................................................................ 42
■ Ställa in Multiple Display Control (MDC)................................................................... 43
■ Installera Multiple Display Control (MDC)................................................................. 43
■ Visa huvudskärmen .................................................................................................. 45
■ Bekräfta porten ......................................................................................................... 46
■ Ändra porten ............................................................................................................. 46
■ Energistyrning........................................................................................................... 47
■ Styra ingångskällan .................................................................................................. 48
■ Styra bildkvoten (Video/S-Video/AV2) ...................................................................... 49
■ Styra bildkvoten (PC)................................................................................................ 49
■ Styra tiden................................................................................................................. 50
■ Ställa in bilden (Video/S-Video/AV2) ........................................................................ 51
■ Setting the Picture RGB (PC) ................................................................................... 51
■ Ställa in ljudet ........................................................................................................... 52
■ Visa de inställda värdena för olika bildskärmar ........................................................ 53
■ Felsökning ................................................................................................................ 53
◆ ANVÄNDNINGSREKOMMENDATIONER
■ Skötsel och underhåll ............................................................................................... 54
■ Felsökning ................................................................................................................ 54
Page 62

6
SWE
Din nya plasmabildskärm
POWER (Ström)
Tryck för att slå på och stänga
av plasmabildskärmen.
Högtalare Högtalare
Signalmottagare för fjärrkontrollen
Rikta fjärrkontrollen mot den här
punkten på plasmabildskärmen.
SOURCE
Välja extern indata.
MENU
Menyfönster.
-
VOLUME +
Justera volymen.
▼ SELECT ▲
Flytta markören i menyn.
MUTE
Stänga av ljudet tillfälligt.
Framsidan
Page 63

7
SWE
Din nya plasmabildskärm
Baksidan
a) Ingångar för externa högtalare (8Ω)
Ansluta externa högtalare.
b) Ingång för S-video
Ansluta en S-videosignal från S-VHS-videor eller
dvd-spelare.
c) Ingång för VIDEO
Ansluta en videosignal från externa källor, t.ex.
videor eller dvd-spelare.
d) Ingång för dator
Ansluta en datorsignal från en dator.
e) Ingång för SCART-kontakt, audio/video
Ansluta en audio- (ljud), video- eller RGB-signal
från externa källor, t.ex. videor eller dvd-spelare.
(Signalutgången går inte att använda).
f) Ingångar för audio (video/dator)
Ansluta en audiosignal från externa källor, t.ex.
videor eller dvd-spelare.
g) RS-232C-ingång
Anslut RS-232C-utgången på din PC
h) RS-232C-utgång
Anslut RS-232C-ingången på en annan
plasmabildskärm.
➢
Beroende på modellen kan den faktiska konfigurationen på din
plasmabildskärm vara annorlunda.
Page 64

8
SWE
Knappar på fjärrkontrollen
➢ Om lampan på plasmabildskärmen lyser, kan det hända
att sändaren är slö eller inte fungerar som den ska.
➢
Vissa knappar på fjärrkontrollen går inte att använda med plasmabildskärmen.
AUTOMATISK
AVSTÄNGNINGSFUNKTION
VIDEO-/DVD-FUNKTIONER;
- STOP
- REWIND
- PLAY/PAUSE
- FAST-FORWARD
STRÖM PÅ/AV (POWER ON/OFF)
NUMERISKA KNAPPAR
STÄNGA AV LJUDET TILLFÄLLIGT
VOLUME DECREASE
VISA INFORMATION/
TEXT-TV VISA
VÄLJA LJUDEFFEKT
VÄLJA BILDEFFEKT
FRYSA BILDEN (STILLBILD)
VÄLJA BILDFORMAT/
TEXT-TV STORLEKSVAL
HÖJA VOLYMEN
FLYTTA MARKÖREN PÅ MENYN
VISA MENYN/
PROGRAMVAL MED NAMN
VÄLJER ENHET SOM SKA STYRAS
MED FJÄRRKONTROLLEN:
BILDSKÄRM, VIDEO, KABEL-TV-BOX,
DVD-SPELARE
VÄLJA EXTERN INGÅNG
BILD-I-BILDEN-FUNKTIONER (PIP);
- SIGNAL PÅ/AV
- VÄXLA MELLAN HUVUD- OCH DEN
UNDERORDNADE BILDEN (Swap)
- PLATSVAL (Locate)
- STORLEKSVAL (Size)
- VAL AV INGÅNGSKÄLLA (Source)
ÅNGRA BEKRÄFTELSE
VÄLJA DATORLÄGE DIREKT
TEXT-TV NÄSTA SIDA
TEXT-TV FÖREGÅENDE SIDA
TEXT-TV (UNDERORDNAD SIDA)
AVBRYTA TEXT-TV
TEXT-TV PÅ
VIDEO & TEXT
BLANDNING
TEXT-TV FRÅN
(Läs mer om detta på sidan 30.)
FASTEXT (SNABBTEXT) ÄMNESVAL
Power
Page 65

9
SWE
fortsättning...
Du måste sätta i eller byta batterierna till fjärrkontrollen när du:
◆ Köper plasmabildskärmen
◆ Märker att fjärrkontrollen inte längre fungerar som den
ska
1 Ta bort luckan på baksidan av fjärrkontrollen genom att trycka
nedåt på symbolen. Dra sedan ordentligt för att ta bort luckan.
2 Sätt i två stycken R03-, UM4-, "AAA" 1,5 V-batterier eller
motsvarande. Se till att polerna på respektive batteri ligger rätt i
batterifacket:
◆+på batteriet mot +på fjärrkontrollen
◆-på batteriet mot -på fjärrkontrollen
3 Sätt tillbaka luckan genom att rikta in den mot undersidan på
fjärrkontrollen. Tryck därefter luckan på plats.
➢
Använd inte olika batterityper, t.ex. alkaliska batterier och
batterier som innehåller mangan.
Sätta i batterierna i fjärrkontrollen
Montera bildskärmen på väggfästet
◆
Installera endast plasmabildskärmen på lodrätta väggar.
◆
För att bibehålla plasmabildskärmens prestanda och förebygga
problem bör du undvika följande:
-
Installera inte bildskärmen intill rök- eller branddetektorer.
-
Installera inte bildskärmen där den utsätts för vibrationer eller
hög spänning.
-
Bygg inte in bildskärmen i väggen.
-
Installera inte bildskärmen i närheten av värmeapparater.
◆
Använd endast rekommenderade delar och komponenter.
Installationsanvisningar
➢
Väggfästet säljs separat. Hör efter hos din återförsäljare.
Page 66

10
SWE
Montera bildskärmen på väggfästet
➢
Väggfästet säljs separat. Fråga hos din återförsäljare.
1 Kontrollera att väggen som plasmabildskärmen ska monteras på är stabil. Om väggen inte bär
plasmabildskärmen, måste du förstärka den innan du monterar bildskärmen.
2 Fäst väggfästet på väggen med hjälp av
bultar, enligt bilden: Fästbultarna måste
sticka ut cirka 1,5 cm från väggen.
3 Om du använder väggfästet, kan vinkeln på bildskärmen ställas in mellan 0 till 20 grader. Vinkeln kan
ställas in i 5 olika lägen med ett avstånd på 5 grader mellan respektive läge. Vid inställningen används
hålen för vinkelinställning på sidan av väggfästet.
När en vinkel på 5
grader har ställts in.
När en vinkel på 15
grader har ställts in.
När bildskärmen inte
har vinklats.
En vinkel på 5 grader
En vinkel på 10 grader
En vinkel på 15 grader
Ingen vinkel
En vinkel på 20 grader
Hål för vinkelinställning
Page 67

11
Montera bildskärmen på väggfästet
SWE
4 Ta bort de fyra stora skruvarna från sidan på bildskärmen.
Sätt i bultarna, de runda brickorna och gummiisoleringen
i de fyra skruvhålen enligt bilden:
5 Sätt i gummiisoleringens spets, som
sticker ut från ovansidan av
bildskärmens baksida, i spåret på
väggfästets ovansida. Lyft upp
bildskärmen en aning så att
gummiisoleringens spets längst ned
på bildskärmens baksida hamnar i
spåret längst ned på väggfästet.
(Tryck inte hårt när du lyfter upp
bildskärmen. Gummiisoleringen på
ovansidan kan gå av.)
Bult
Gummiisolering
´
Œ
Page 68

12
SWE
Flytta ut bildskärmen från väggfästet
Ta bort fästbultarna från respektive sida (vänster och höger) på väggfästet. Lyft upp och dra ut
nederdelen på bildskärmen en aning för att skilja gummiisoleringens spets från nederdelen på
väggfästet.
Lyft upp bildskärmen och skilj gummiisoleringens spets från spåret överst på väggfästet.
´
Œ
Page 69

13
SWE
Innan du ansluter bildskärmen till externa utrustningar
Anslut till externa enheter.
Endast 50"
Kontrollera kontakternas läge och typ noggrant innan du gör några anslutningar. Lösa kontakter kan
medföra problem med bild och färg. Se till att alla kontakter har satts i ordentligt i respektive uttag.
Ferritkärnor
Ferritkärnorna används för att dämpa ut oönskade signaler. När du ansluter sladdar fäster du en av de här
ferritkärnorna på sladden närmast kontakten.
➢
När du ansluter högtalarsladden till utgången för
externa högtalare gör du en ögla på högtalarsladden
och fäster runt ferritkärnan för att säkra den.
Page 70

14
SWE
Ansluta högtalare
Anslut högtalarsladden till uttaget för externa högtalare på baksidan av plasmabildskärmen.
Se till att “+” och “
-
” på kabeln överensstämmer med schemat på plasmabildskärmen.
Ansluta plasmabildskärmen och högtalare
Fäst konsolen på styrstaget som
finns på baksidan av högtalaren
och skruva i skruvarna.
När du har tagit bort de tre
skruvarna på plasmabildskärmen,
sätter du ihop högtalaren och
bildskärmen och skruvar i
skruvarna.
Styrstag
Styrstag
Sätta ihop stativ och högtalare
Styrstag
➢
Högtalarna MÅSTE klara mer än 7 watt (impedans 8Ω).
➢
När du flyttar din plasmabildskärm ska du INTE hålla i högtalaren som är ansluten till
plasmabildskärmen. Detta kan skada konsolen som fäster högtalaren vid plasmabildskärmen
och kan medföra att plasmabildskärmen faller i golvet, vilket innebär risk för personskador.
Page 71

15
Ansluta en video eller kabelbox
SWE
◆ Anslut en video-/S-videokabel mellan video-/
S-videouttaget på videon/kabelboxen och
videoingången på plasmabildskärmen.
-
Om du vill få bättre bild på videon, kan du
använda en S-videokabel.
◆ Anslut en audiokabel mellan audioingången på
videon/kabelboxen och audioingången på
plasmabildskärmen.
Spela upp videokassetter
1 Slå på plasmabildskärmen och välj video- eller
S-videoläge (om S-videouttaget är anslutet)
genom att trycka på Källa (
Source) på
fjärrkontrollen.
2 Slå på videon, sätt i en videokassett och tryck
på Play-knappen.
Baksidan
Video/kabelbox
Page 72

16
SWE
Slå på och stänga av
Nätsladden är fäst på baksidan av plasmabildskärmen.
1 Sätt i nätsladden i lämpligt vägguttag.
➢
Huvudspänningen anges på bildskärmens baksida och
frekvensen är 50 eller 60 Hz.
2 Tryck på POWER-knappen på framsidan eller på fjärrkontrollen för
att slå på bildskärmen.
➣
Om bildskärmen inte slås på när du trycker på POWERknappen...
Tryck på knappen SELECT för att kontrollera att
bildskärmsläget har valts.
Framsidan
Visa menyerna och olika visningslägen
Den här plasmabildskärmen är utrustad med ett menysystem som
är enkelt att använda och som visas på skärmen. Med det här
systemet går det enkelt och snabbt att använda olika funktioner på
plasmabildskärmen. Du kan också visa status för många av
bildskärmsfunktionerna
1 När strömmen är påslagen trycker du på knappen Menu på
fjärrkontrollen. Huvudmenyn visas på skärmen.
2 Använd styrspaken (uppåt, nedåt) för att flytta alternativ på
menyn. Använd styrspaken (vänster, höger) för att visa, ändra
eller använda de alternativ som har valts. Tryck på knappen på
styrspaken för att bekräfta alternativ på menyn. Menyerna som
visas på skärmen försvinner automatiskt efter cirka trettio
sekunder, men du kan även trycka på knappen
Menu på
fjärrkontrollen om du vill lämna menyn.
Page 73

17
SWE
Välja språk
När du använder plasmabildskärmen för första gången måste du välja
vilket språk som ska användas vid menyvisning och indikeringar.
1 Tryck på knappen Menu.
Resultat:
Huvudmenyn visas.
2 Flytta styrspaken uppåt eller nedåt för att välja menyn för
INSTÄLLNINGAR och tryck på knappen på styrspaken.
3 Flytta styrspaken uppåt eller nedåt för att välja menyn för Övrigt
och tryck på knappen på styrspaken.
Resultat
: Alternativen i gruppen Övrigt visas. Alternativet
Menyspråk är markerat.
4 Välj önskad bildeffekt genom att flytta styrspaken flera gånger åt
vänster eller höger.
PC Mode
Page 74

18
SWE
Använda de olika installationsmenyerna
◆ Färgsystem
Den här plasmabildskärmen kan användas i många länder.
Varje land har sin egen sändningsstandard. Färgsystemen
visas i den förinställda ordningen beroende på ditt land.
➣
Om ett onormalt fenomen uppstår på skärmen när du
väljer
Auto, måste du välja färgsystem manuellt.
◆ Brusreduktion (Digital NR)
Om sändningssignalen som mottas är svag kan du
aktivera funktionen Digital Noise Reduction för att
minska statisk elektricitet eller spöktryck som kan uppstå
på skärmen.
◆ Autoström På (Auto Power On)
När du drar ur nätsladden och ansluter den igen sätts
plasmabildskärmen på automatiskt. Du behöver inte
trycka på POWER-knappen på framsidan eller på
fjärrkontrollen.
◆ Panellås
Framsidan på plasmabildskärmen kan låsas för att
förhindra att till exempel småbarn kommer åt den.
1 Tryck på knappen Menu.
Resultat:
Huvudmenyn visas.
2 Flytta styrspaken uppåt eller nedåt för att välja menyn för
INSTÄLLNINGAR och tryck på knappen på styrspaken.
3 För att... Flytta styrspaken...
Flytta till respektive funktion uppåt eller nedåt.
Välj önskat alternativ vänster eller höger.
4 När du har valt trycker du flera gånger på knappen Menu för att
återgå till normal visning.
Page 75

19
SWE
Du kan välja den bildeffekt som stämmer bäst överens med dina
krav. Du har tillgång till följande bildeffekter i den ordning som de
förekommer:
◆ Favorit, Standard, Sport, Film, Mjuk, Dynamisk.
➣
I datorläget kan du välja Favorit, Hög, Mellan eller Låg.
1 Tryck på knappen Menu och sedan på styrspaken för att öppna
menyn
BILD.
Resultat:
Alternativet Välj har valts.
2 Välj önskad bildeffekt genom att flytta styrspaken flera gånger åt
vänster eller höger.
Du väljer enkelt bildeffekt genom att trycka på knappen för
bildstandard, “P.STD” (Picture Standard), på fjärrkontrollen.
Använda automatiska bildinställningar
Page 76

20
SWE
På den här plasmabildskärmen finns det ett flertal
inställningsalternativ för att ange bildkvaliteten:
◆ Kontrast, Ljus, Skärpa, Färg, Färgton (Color Tone),
Färgton
(Tint; endast NTSC).
➣
När Välj har Välj in på Favorit, kan följande inställningar
ändras.
1 Tryck på knappen Menu och sedan på styrspaken för att öppna
menyn
BILD.
2 Flytta styrspaken uppåt eller nedåt för att välja önskat alternativ.
3 För att ändra... Flytta styrspaken...
◆ Kontrast ◆ vänster eller höger.
◆ Ljus Resultat: Det horisontella fältet visas.
◆ Skärpa
◆ Färg
◆ Färgton ◆ vänster eller höger för att välja önskat
alternativ (
Normal, Varm1, Varm2,
Sval1, Sval2).
4 När du är nöjd med inställningarna trycker du flera gånger på
knappen
Menu för att återgå till normal visning.
➣
◆ Om du ändrar några av dessa inställningar, ändras
bildstandarden automatiskt till
Favorit.
◆ Det går inte att justera Färg och Färgton.
Anpassa bilden
Tryck på knappen för stillbild (Still) för att frysa en viss bildruta.
Tryck på knappen för stillbild (Still) igen för att återgå till normal
visning.
➣
I PIP-läge (bild-i-bilden) fryser du både den större och den mindre
bilden.
Frysa bilden som visas
Page 77

21
SWE
Du kan välja det bildformat som stämmer bäst överens med dina
krav genom att bara trycka på knappen för bildformat, “P.Size”.
Du har tillgång till följande bildformat:
◆ Auto Wide, Bred, Panorama, 14:9, 4:3, Zoom1,
Zoom2, Expandera.
Ändra bildformatet
Auto Wide / Bred
Ställer in bilden i läge 16:9 wide.
Panorama
Använd det här läget när du vill att
bilden ska visas i det vidare
panoramaformatet.
14:9
Förstora bilden mer än 4:3.
4:3
Detta är standardbildformatet för
plasmabildskärmen.
Zoom1
Förstora bilden lodrätt på
bildskärmen.
Zoom2
Förstora bilden något mer än i
läge
Zoom1.
➣
Om du tittar på en stillbild i läge 14:9 eller 4:3 en längre tid,
kan bilden ”bränna fast” på skärmen. Du bör därför använda
plasmabildskärmen i lägena
Auto Wide, Bred eller Panorama om
det är möjligt.
Expandera
Om du använder det här läget,
förstoras bilden lodrätt och vågrätt
så att den blir större än i läge
Zoom2.
Page 78

22
SWE
◆ Tryck på knappen +om du vill höja volymen (markören flyttas åt
höger)
◆ Tryck på knappen -om du vill sänka volymen (markören flyttas åt
vänster)
Om du t.ex. behöver svara i telefon, kan du stänga av ljudet
tillfälligt.
1
Tryck på knappen Menu.
Resultat:
Ljudet stängs av och Tyst visas.
2
Om du vill sätta på ljudet igen och behå lla den tidigare
volyminställningen, trycker du på
Mute-knappen igen (eller på
någon av volymknapparna).
➣
Volyminställningen behålls:
◆ Om du stänger av med strömknappen (POWER) på
framsidan eller på fjärrkontrollen
◆ Om det blir strömavbrott.
Justera volymen
Framsidan
Page 79

23
SWE
Anpassa ljudet
Du kan ställa in ljudet efter dina speciella önskemål.
◆ Diskant, Bas, Balans, Surround.
➣
När Välj har ställts in på Favorit, kan följande inställningar
ändras.
1 Tryck på knappen Menu.
Resultat:
Menyerna visas.
2 Flytta styrspaken uppåt eller nedåt för att välja menyn för LJUD
och tryck på knappen på styrspaken.
3 Flytta styrspaken uppåt eller nedåt för att välja önskat alternativ.
4 För att ändra... Flytta styrspaken...
◆ Diskant, Bas och Balans ◆ vänster eller höger.
◆ Surround ◆ vänster eller höger för att
välja önskat alternativ (
Av,
Koncert, Sal, Stadion).
5 När du är nöjd med inställningarna trycker du flera gånger på
knappen
Menu för att återgå till normal visning.
Du kan välja vilken ljudeffekt som ska användas när du ser på ett
program. Du har tillgång till följande ljudeffekter i den ordning som
de förekommer:
◆ Favorit, Standard, Musik, Film, Tal.
1 Tryck på knappen Menu.
Resultat:
Menyerna visas.
2 Flytta styrspaken uppåt eller nedåt för att välja menyn för LJUD
och tryck på knappen på styrspaken.
Resultat:
Alternativet Välj väljs.
3 Välj önskad bildeffekt genom att flytta styrspaken flera gånger åt
vänster eller höger.
Du väljer enkelt specialljudeffekt genom att trycka på knappen för
ljudstandard, “S.STD” (Sound Standard), på fjärrkontrollen.
Använda automatiska ljudinställningar
Page 80

24
SWE
Automatisk på-/avstängning
Du kan ställa in timerfunktionen för på/av (On/Off) så att
plasmabildskärmen slås på och stängs av automatiskt vid de
tidpunkter som du väljer.
1 Tryck på knappen Menu.
Resultat
:
Menyerna visas.
2 Flytta styrspaken uppåt eller nedåt för att välja menyn för TID och
tryck på knappen på styrspaken.
3 Flytta styrspaken uppåt eller nedåt för att välja alternativet
Starttid och tryck på knappen på styrspaken.
4
För att... Flytta styrspaken...
Flytta till respektive alternativ vänster eller höger.
(timme, minut och Av/På)
Ställa in respektive alternativ uppåt eller nedåt.
5
Gör på samma sätt för att ställa in tidpunkten då du vill att enheten
stängs av (
Stopptid).
Om du vill ställa in volymen när plasmabildskärmen slås på, flyttar
du styrspaken uppåt eller nedåt för att välja volym när enheten slås
på
Timervolym och ställer in volymen genom att flytta styrspaken
åt vänster eller höger.
Ställa in tiden
Du kan ställa in klockan så att aktuell tid visas när du trycker på
knappen för bildskärm (Display). Du måste även ställa in tiden för
att kunna använda de automatiska på/av-inställningarna.
1 Tryck på knappen Menu.
Resultat:
Menyerna visas.
2 Flytta styrspaken uppåt eller nedåt för att välja menyn för TID och
tryck på knappen på styrspaken.
Resultat:
Alternativet Klocka.
3
För att... Flytta styrspaken...
Flytta till respektive alternativ vänster eller höger.
(timme och minut)
Ställa in respektive alternativ uppåt eller nedåt.
Page 81

25
Ställa in väckningsfunktionen
SWE
Du kan välja en tidsperiod på mellan 10 och 360 minuter, efter
vilken plasmabildskärmen automatiskt går över till Väntläge
(Standby mode)
1 Tryck på knappen Menu.
Resultat:
Menyerna visas.
2 Flytta styrspaken uppåt eller nedåt för att välja menyn för TID och
tryck på knappen på styrspaken.
3 Flytta styrspaken uppåt eller nedåt för att välja alternativet
Insomn. timer och ange under hur lång tid som
plasmabildskärmen ska vara påslagen.
➣
Om du vill avbryta väckningsfunktionen, väljer du läge Av.
4 När du är nöjd med inställningarna trycker du flera gånger på
knappen
Menu för att återgå till normal visning.
Du ställer enkelt in väckningsfunktionen genom att trycka på
knappen “Sleep” på fjärrkontrollen.
1
Tryck på knappen Sleep på fjärrkontrollen.
Resultat:
Om väckningsfunktionen... Visar skärmen...
Redan inställd Tid som återstår innan
plasmabildskärmen går över
i vänteläge (Standby).
Ännu ej inställd Ordet Av.
2 Ange under hur lång tid som plasmabildskärmen ska vara påslagen.
Page 82

26
SWE
Du kan visa ett bild-i-bilden-fönster ("Picture-In-Picture") inom den
större bilden för indatakällor. På det här sättet kan du övervaka
indatakällorna, oavsett vilken utrustning som har anslutits.
➣
Om du inte har anslutit någon utrustning till ingångarna på
plasmabildskärmen, kan du inte övervaka de externa källorna i
den mindre bilden.
1 Tryck på menyknappenMenu.
Resultat:
Menyerna visas.
2 Flytta styrspaken uppåt eller nedåt för att välja menyn för PIP och
tryck på knappen på styrspaken.
Resultat:
Alternativet
Välj väljs.
3 Ställ in på På genom att flytta styrspaken åt vänster eller höger.
Resultat:
Alternativen i gruppen PIP visas.
4 Flytta styrspaken uppåt eller nedåt för att välja alternativet Källa
och flytta styrspaken flera gånger till vänster eller höger.
Resultat:
De externa källorna i den mindre bilden visas i följande
ordning:
AV1(Video) ➞ AV1(S-Video) ➞ AV 2
5 Flytta styrspaken uppåt eller nedåt för att välja alternativet Skifta
och flytta styrspaken åt vänster eller höger.
Resultat:
Den större och den mindre bilden byter plats med
varandra.
6 Flytta styrspaken uppåt eller nedåt för att välja alternativet
Storlek och flytta styrspaken flera gånger åt vänster eller höger.
Resultat:
De olika formattyperna för den mindre bilden visas.
Dubbel ➞ Stor ➞ Liten
➣
Om systemet i huvudbilden och den underordnade bilden
inte är det samma kommer
Dubbel
-läget inte att väljas.
7 Flytta styrspaken uppåt eller nedåt för att välja alternativet
Lokalisera och flytta styrspaken flera gånger åt vänster eller höger.
Resultat:
Du kan flytta den mindre bilden dit du önskar.
➣
Ej tillgängligt i läget
Dubbel
.
8 När du har valt trycker du flera gånger på knappen Menu för att
återgå till normal visning.
Visa bild-i-bilden (PIP)
➞
➞
➞
➞
Page 83

27
Du kan utnyttja funktionen bild-i-bilden ("PIP") genom att använda
fjärrkontrollen.
Funktioner Beskrivning
PIP ON Används för att slå på/stänga av funktionen bild-i-bilden
(PIP) direkt.
Swap Används för att byta plats på den större och den mindre
bilden.
Locate Används för att flytta den mindre bilden.
➣
Ej tillgängligt i läget
Dubbel
.
Size Används för att välja formattyp på den mindre bilden
(
Dubbel, Stor, Liten
).
➣
Om systemet i huvudbilden och den underordnade
bilden inte är det samma kommer
Dubbel
-läget
inte att väljas.
Source Används för att tilldela den mindre bilden en källa
(
AV1(Video), AV1(S-Video), AV 2
).
➣
Om huvudbilden och den underordnade bilden använder
olika utsändningssystem kan den underordnade bilden
stanna intermittent.
Visa bild-i-bilden (PIP)
SWE
Power
Page 84

28
SWE
När du har anslutit dina olika audio- och videosystem kan du visa de
olika källorna genom att välja lämplig ingång.
1
Kontrollera att alla nödvändiga anslutningar har gjorts.
2
Tryck på knappen Source.
Resultat:
Ingångskällorna visas.
AV1(Video)➞ AV1(S-Video)➞ AV 2➞ PC
➣
Om du byter extern källa under visning, kan det dröja något
innan bildvisningen ändras.
Visa bilder från externa källor
Framsidan
Du visar enkelt tid och allmän information genom att trycka på
knappen för bildskärm, "Display". Följande funktioner finns:
◆ Lägen för vald bild, ljud och surround-ljud
◆ Färgsystem
◆ Horisontell och vertikal upplösning (i datorläge)
◆ Väckningsfunktion
◆ Aktuell tid (när tiden har ställts in)
◆ Välja extern ingång.
Visa information
➞
➞
Page 85

29
SWE
De flesta TV-kanaler erbjuder information i textform via Text-TV.
Den erbjudna informationen innehåller:
◆
Tv-programtider
◆
Nyhetsnotiser och väderleksrapporter
◆
Sportresultat
◆
Reseinformation
Denna information är uppdelad på numrerade sidor (se schemat).
Del Innehåll
A Valt sidnummer.
B TV-kanalens identitet.
C Aktuella sidnummer och sökstatus.
D Datum och tid.
E Text.
F Statusinformation.
FASTEXT (SNABBTEXT)-information
➣
Text-TV-informationen är ofta uppdelad på flera sidor
som visas i en följd. Du kan komma åt informationen
genom att:
◆ Ange sidnumret
◆ Välja en titel i en lista
◆ Välja en färgad rubrik (FASTEXT systemet)
Text-TV-funktionen
Page 86

30
SWE
Du kan när som helst visa text-TV-informationen på din TV.
☛
Kanalmottagningen måste vara stabil om text-TVinformationen skall visas korrekt. Om så inte är fallet:
◆ kan information saknas
◆ kan vissa sidor inte visas
1 Tryck på knappen Text/Off när du vill aktivera text-TV-läget.
Resultat
:
Innehållssidan visas. Den visas igen när som helst när
du trycker på knappen (innehåll).
2 Tryck på knappen Text/Off igen.
Resultat
:
Bildskärmen delas upp i två delar. Denna Dubbel textTV-funktion låter dig titta på den aktuella ingångskällan
samtidigt som du tittar på text-TV på skärmen.
3 Om du vill visa den aktuella ingångskällan och text-TV på en
enda skärm ska du trycka på
Text/Off igen.
4 Tryck på knappen Text/Off igen när du vill lämna text-TV-läget.
Visa text-TV-informationen
Page 87

31
SWE
När du visar en text-TV-sida kan du välja olika alternativ för att
anpassa bilden till dina krav
Om du vill visa ... Trycker du på ...
◆ Gömd text (t.ex. svar på frågetävlingar) (visa)
◆ Normal bildskärm (visa) igen
◆ En underordnad sida genom att
skriva in dess nummer (underordnad sida)
◆ Utsändningen medan du letar efter en sida (avbryta)
◆ Nästa sida (en sida uppåt)
◆ Föregående sida
(en sida nedåt)
◆ Dubbelt så stora bokstäver i: (storlek)
• Den övre halvan av skärmen • En gång
• Den nedre halvan av skärmen • Två gånger
◆ Normal bildskärm • Tre gånger
Välja visningsalternativ
Du kan ställa in kontrasten för text-TV så att den passar bäst för dina
visningskrav.
1 Tryck på knappen Menu.
Resultat:
Huvudmenyn visas.
2 Flytta styrspaken uppåt eller nedåt för att välja menyn för
INSTÄLLNINGAR och tryck på knappen på styrspaken.
3 Flytta styrspaken uppåt eller nedåt för att välja menyn för Övrigt
och tryck på knappen på styrspaken.
Resultat
: Alternativen i gruppen Övrigt visas.
4 Flytta styrspaken uppåt eller nedåt och välj alternativet TextTV
Kontr
.
5 Ställ in kontrasten genom att flytta styrspaken mot vänster eller
höger.
Resultat
: Det horisontella fältet visas.
Ställa in kontrasten för text-TV
Page 88

32
SWE
Du kan skriva in sidnumret direkt genom att trycka på sifferknappar
na på fjärrkontrollen.
1 Ange det tresiffriga sidonumret som anges under Innehåll genom
att trycka på motsvarande nummerknappar.
Resultat
:
Det aktuella sidnumret stegas tills den begärda sidan
nås.Därefter visas den sidan. Om den valda sidan
hänger ihop med fler sidor, visas de andra sidorna i en
följd.
2 Om TV-bolaget använder FASTEXT <SNABBTEXT>-systemet,
kommer de olika ämnena på en text-TV-sida att vara färgkodade.
Du kan välja dem genom att trycka på de färgade knapparna på
fjärrkontrollen.
Tryck på den färgade knappen som motsvarar ditt ämnesval
(tillgängliga ämnen visas i statusraden).
Resultat
: Sidan visas med ytterligare färgkodad information
som du kan välja på samma sätt.
3 Om du vill visa den föregående eller den nästa sidan trycker du
på motsvarande färgade knapp.
4 Om du vill visa den underordnade sidan gör du på följande sätt.
◆
Tryck på knappen (underordnad sida)
Resultat : De tillgängliga underordnade sidorna visas.
◆
Välj den underordnade sidan du vill visa. Du kan rulla
underordnade sidor genom att använda knapparna eller
.
5 Tryck på knappen Text/Off när du vill lämna text-TV-läget.
Välj en text-TV-sida
Page 89

33
Ansluta en dator
SWE
◆ Anslut en datorkabel (15 stifts) mellan datorn och
plasmabildskärmen.
◆ Anslut en audiokabel mellan audiouttaget på
datorn och audiouttaget på plasmabildskärmen.
Visa datorns bildskärm:
1 Slå på plasmabildskärmen och välj datorläget
genom att trycka på knappen
Source (eller
Source/PC) på fjärrkontrollen.
2 Slå på datorn och kontrollera datorns systemkrav.
(Mer information om systemkrav för datorer finns
på sidan 34~36.)
3 Ställ in datorns bildskärm. (Läs mer om detta på
sidan 37.)
Baksidan
Dator
Konfigurera stift
Signalkabel med 15 stift
(baserat på antal utskjutande stift)
Page 90

34
SWE
Ställa in Plug and Play-bildskärmen
Eftersom vi använder oss av den nya Plug and Play-lösningen VESA®, elimineras problemet med
komplicerade och tidskrävande installationer. Den gör att du kan installera din bildskärm i ett system
som är kompatibelt med Plug and Play, utan sedvanligt krångel och förvirring. Ditt datorsystem
identifierar och konfigurerar enkelt sig självt så att du ska kunna använda det tillsammans med din
bildskärm. Den här bildskärmen skickar automatiskt sina data för utökad bildskärmsidentifiering
(Extended Display Identification (EDID)) till datorsystemet via ett särskilt kanalprotokoll för
bildskärmsdata (Display Data Channel (DDC)).
I Windows-fönstret väljer du i följande ordning: Start
➞ Settings (Inställningar) ➞ Control Panel
(Kontrollpanelen).
När fönstret för kontrollpanelen visas klickar du på
Display. En dialogruta för bildskärmen visas.
Välj fliken
Settings i dialogrutan för bildskärmen.
De två viktigaste variablerna som är tillämpliga på
gränssnittet PDP-PC är
“Resolution”
och
“Colors”
.
De korrekta inställningarna för dessa två variabler är:
◆ Size (ibland kallat "Upplösning")
1024 x 768 pixlar.
◆ Color
24 bitars färg (uttrycks även som "16 miljoner
färger") Till vänster visas en typisk skärmbild för
dialogrutan
Display.
Om det finns ett alternativ för vertikal frekvens i
dialogrutan för bildskärmsinställningar, är det
korrekta värdet
60 eller 60 Hz. I annat fall klickar du
bara på
OK och lämnar dialogrutan.
Installera programvaran (endast Windows)
Windows bildskärmsinställningar för en typisk dator visas nedan. Fönstren som visas på din dator skiljer
sig troligtvis från dessa, beroende på vilken Windows-version och vilket videokort som du använder.
Page 91

35
SWE
Läge för datoringång (42”)
Såväl bildskärmsläge som format varierar beroende på vilken datorbildskärm som används och på dess
upplösning. Tabellen nedan visar alla bildskärmslägen som kan användas:
(N: Negativ / P: Positiv)
◆ Läget för radsprång kan inte användas.
◆ Om ett videoformat som inte är standard väljs, kan det hända att plasmabildskärmen inte fungerar som den ska.
◆ 4:3-läget fungerar inte med ingångssignaler från "720 x 400".
Anteckningar
◆ Textkvaliteten på datorbildskärmen är bäst i VGA-läge (640 x 480), bild som visas i full storlek i
datorläget är bäst i SVGA-läge (800 x 600).
◆ När den här plasmabildskärmen används som datorbildskärm kan du använda 24 bitars färg (mer än 16 miljoner
färger).
◆ Utseendet på din datorbildskärm kan variera beroende på tillverkare (och på den Windows-version som du
använder). Mer information om hur du ansluter din dator till en plasmabildskärm finns i instruktionsboken till
datorn.
◆ Om du kan välja läge för vertikal och horisontell frekvens, väljer du 60 Hz (vertikalt) och 31,5 kHz (horisontellt).
I vissa fall kan onormala signaler (i form av t.ex. ränder) uppstå på skärmen när datorn är avstängd (eller om
datorn har kopplats ur). I så fall ska du trycka på knappen
Source för att aktivera videoläget. Kontrollera även att
datorn är ansluten.
◆ Om du ansluter en bärbar dator till plasmabildskärmen bör du se till att datorbildskärmen endast visas via
plasmabildskärmen (i annat fall kan slumpmässiga signaler uppstå).
◆ Om du upplever att de horisontella, synkroniserade signalerna är oregelbundna i datorläge, ska du kontrollera
datorns energisparläge eller kabelanslutningarna.
Standard
VGA
SVGA
XGA
Bildpunkter
640 x 480
720 x 400
800 x 600
1024 x 768
Vertikal
frekvens (Hz)
85.0
75.0
72.8
59.9
70.1
85.1
75.0
72.2
60.3
56.3
85.0
75.0
70.1
60.0
Horisontell
frekvens (kHz)
43.3
37.5
37.9
31.5
31.5
53.7
46.9
48.1
37.9
35.2
68.7
60.0
56.5
48.3
Vertikal
polaritet
N
N
N
N
P
P
P
P
P
P
P
P
N
N
Horisontell
polaritet
N
N
N
N
N
P
P
P
P
P
P
P
N
N
Page 92

36
SWE
Läge för datoringång (50”)
(N: Negativ / P: Positiv)
Standard
VGA
W-VGA
SVGA
XGA
W-XGA
SXGA
WXGA+
Bildpunkter
640 x 350
640 x 400
720 x 400
640 x 480
848 x 480
800 x 600
1024 x 768
1152 x 864
1280 x 768
1280 x 1024
1366 x 768
Vertikal
frekvens (Hz)
70.086
85.080
85.080
70.087
85.039
59.940
72.809
75.000
85.008
60.000
72.000
75.000
85.000
56.250
60.317
72.188
75.000
85.061
60.004
70.069
75.029
84.997
75.000
60.000
75.000
60.020
75.025
60.000
Horisontell
frekvens (kHz)
31.469
37.861
37.861
31.469
37.927
31.469
37.861
37.500
43.269
29.838
35.156
36.072
37.650
42.925
37.879
48.077
46.875
53.674
48.363
56.476
60.023
68.677
67.500
47.700
60.150
63.981
79.976
48.200
Vertikal
polaritet
N
N
P
P
P
N
N
N
N
P
P
P
P
N/P
P
P
P
P
N
N
P
P
P
P
P
P
P
N
Horisontell
polaritet
P
P
N
N
N
N
N
N
N
N
N
N
N
N/P
P
P
P
P
N
N
P
P
P
N
N
P
P
N
Anteckningar
◆ Bildskärmens plasmaskärm utgörs av 1366 bildpunkter och 768 linjer. Det vill säga, den bästa upplösningen
är
1366 x 768.Välj därför 1366 x 768 när du gör inställningarna för bildskärmen. Om videokortet inte stöder
1366 x 768 rekommenderas i stället upplösningen 1024 x 768.
◆ Läget 1366 x 768 stöds endast av ett särskilt videokort (PIXEL PERFECT som tillverkas av IMAGINE
GRAPHICS Ltd
.).
◆ 4:3-läget fungerar inte i standardupplösningarna (640x480, 800x600, 1024x768, 1280x1024).
Page 93

37
➢
Se till att förinställningen ställs in på datorläge med hjälp av knappen
Source.
1 Tryck på knappen Menu och sedan på styrspaken för att öppna
menyn
BILD.
2 Flytta styrspaken uppåt eller nedåt för att välja alternativet
Färgkontroll och flytta styrspaken åt vänster eller höger.
3 För att... Flytta styrspaken...
Flytta till respektive alternativ uppåt eller nedåt.
(
R-Röd, G-Grön, B-Blå)
Ställa in respektive alternativ vänster eller höger.
4 När du är nöjd med inställningarna trycker du flera gånger på
knappen
Menu för att återgå till normal visning.
Ändra färgen på bildskärmen
SWE
Justera bildskärmskvaliteten
Den här funktionen tar bort eller minskar bildstörningar som gör
att bilden hoppar samt korrigerar ojämna bildkanter.
➢
Se till att förinställningen ställs in på datorläge med hjälp av
knappen
Source.
1 Tryck på knappen Menu.
Resultat: Huvudmenyn visas.
2 Flytta styrspaken uppåt eller nedåt för att välja menyn för
INSTÄLLNINGAR och tryck på knappen på styrspaken.
Resultat:
Menyn Lås bild väljs.
3 Tryck på knappen på styrspaken på nytt.
Resultat: Alternativen i gruppen
LÅS BILD visas tillsammans med
det alternativ som har valts för
Frekvens.
4 För att... Flytta styrspaken...
Flytta till Frekvens eller alternativet Fas uppåt eller nedåt.
Ställ in respektive alternativ vänster eller höger.
➢
Om dessa inställningar inte har ställts in på rätt sätt, visas
lodräta ränder eller så är bilden suddig.
5 När du är nöjd med inställningarna trycker du flera gånger på
knappen
Menu för att återgå till normal visning.
Page 94

38
SWE
➢
Se till att förinställningen ställs in på datorläge med hjälp av knappen
för
Source.
1 Tryck p knappen Menu.
Resultat:
Huvudmenyn visas.
2 Flytta styrspaken uppåt eller nedåt för att välja menyn för
INSTÄLLNINGAR och tryck på knappen på styrspaken.
Resultat:
Menyn Lås bild väljs.
3 Tryck en gång till på knappen på styrspaken.
Resultat:
Alternativen i gruppen LÅS BILD visas.
4 Flytta styrspaken uppåt eller nedåt för att välja menyn för Läge
och tryck på knappen på styrspaken.
5 Flytta till önskat läge med hjälp av styrspaken.
6 När du är nöjd med inställningarna trycker du flera gånger på
knappen
Menu för att återgå till normal visning.
Byta bildskärmsläge
Page 95

39
SWE
➢
Se till att förinställningen ställs in på datorläget med hjälp av
knappen
Source.
1 Tryck på knappen Menu.
Resultat:
Huvudmenyn visas.
2 Flytta styrspaken uppåt eller nedåt för att välja menyn för
INSTÄLLNINGAR och tryck på knappen på styrspaken.
Resultat:
Menyn Lås bild väljs.
3 Tryck en gång till på knappen på styrspaken.
Resultat:
Alternativen i gruppen LÅS BILD visas.
4 Flytta styrspaken uppåt eller nedåt för att välja menyn Auto
justering
.
Resultat:
Meddelandet Ställ om frekvens/fas/läge visas.
5 Tryck på knappen på styrspaken på nytt.
Resultat:
Skärmen blir svart och återgår till ursprunglig visning
efter några sekunder.
6 När du är klar trycker du flera gånger på knappen Menu för att
återgå till normal visning.
Initiera frekvens, fas och läge
➢
Se till att förinställningen ställs in på datorläget med hjälp av
knappen
Source.
1 Tryck på knappen Menu.
Resultat:
Huvudmenyn visas.
2 Flytta styrspaken uppåt eller nedåt för att välja menyn för
INSTÄLLNINGAR och tryck på knappen på styrspaken.
3 Flytta styrspaken uppåt eller nedåt för att välja alternativet Skala.
4 Välj önskat alternativ (Bred, 4:3) genom att flytta styrspaken flera
gånger åt vänster eller höger.
5 När du är nöjd med inställningarna trycker du flera gånger på
knappen
Menu för att återgå till normal visning.
Ändra bildformat
Page 96

40
SWE
Utnyttja funktionen bild-i-bilden (PIP) i datorläge
➢
Se till att förinställningen ställs in på datorläget med hjälp av
knappen
Source.
1 Tryck på knappen Menu.
Resultat:
Menyerna visas.
2 Flytta styrspaken uppåt eller nedåt för att välja menyn för PIP och
tryck på knappen på styrspaken.
Resultat:
Alternativet Välj väljs.
3 Ställ in på På genom att flytta styrspaken åt vänster eller höger.
Resultat:
Alternativen i gruppen PIP visas.
4 Flytta styrspaken uppåt eller nedåt för att välja alternativet Ljud
och flytta styrspaken åt vänster eller höger.
Resultat:
Följande visas: Du kan välja ljud till den större eller
mindre bilden.
Huvud↔Under
5 Flytta styrspaken uppåt eller nedåt för att välja alternative
Lokalisera och placera den mindre bilden där du vill ha den med
hjälp av styrspaken.
6 När du har valt trycker du flera gånger på knappen Menu för att
återgå till normal visning.
➣
◆ Vilket format som den mindre bilden visas i kan bero på
upplösningen på datorn.
◆ Mer information om hur du väljer extern källa och ställer in
formatet på den mindre bilden finns på sidan 26.
Page 97

41
SWE
Strömsparare (endast PC-läge)
Denna bildskärm har ett inbyggt energihanteringssystem som heter Power Saver <Strömspararen>.
Detta energihanteringssystem spar energi genom att ställa om din bildskärm till lågeffektläge när du
inte har använt den under en viss tid. Detta energihanteringssystem fungerar tillsammans med ett
installerat videokort som är VESA DPMS-kompatibelt i din dator.
Du använder den programvara som finns i din dator för att aktivera denna funktion.
Energisparläge
Läge
Normal
Viloläge Viloläge, Avstängt läge,
drift
position A1 position A2
Horisontell synk. Aktiv Inaktiv Aktiv Inaktiv
Vertikal synk. Aktiv Aktiv Inaktiv Inaktiv
Video Aktiv Tom Tom Tom
Strömindikator Grön
Blinkar rött Blinkar rött Blinkar rött
(1 sekunds intervall) (1 sekunds intervall) (1 sekunds intervall)
➣
◆
Denna bildskärm återgår automatiskt till normal drift när den horisontella och den vertikala
synksignalen återkommer.
◆
Detta sker när du rör på datorns mus eller när du trycker på en knapp på tangentbordet.
◆
För att spara energi bör du stänga av din bildskärm när du inte behöver den, eller när du lämnar
den obevakad under längre perioder.
Page 98

42
SWE
Multiple Display Control (MDC) <Styrning av flera bildskärmar>
➣
◆
Innan du använder styrfunktionen i RS-232C skall du kontrollera om ID för var och en av de
plasmabildskärmar du vill styra är inställda eller inte, och att de är olika varandra. Om så inte är
fallet måste du ställa in dina ID-nummer.(Se "Ställa in Multiple Display Control (MDC) <Styrning av
flera bildskärmar>" på sidan 43.)
◆
Om du skall styra mer än fyra plasmabildskärmar, eller om du använder en extra kabel, inte den
seriella kabeln som följde med plasmabildskärmen, kan MDC fungera på ett felaktigt sätt.
Styrning av flera bildskärmar är en funktion som låter dig
ha mer än en bildskärm på din PC.
RS-232C, en standard för seriell kommunikation,
används för kommunikationen mellan en PC och en
bildskärm.
Du måste därför ansluta en seriell kabel mellan den
seriella porten på en PC och den seriella porten på en
bildskärm.
Page 99

43
SWE
Ställa in Multiple Display Control (MDC) <Styrning av flera bildskärmar>
1 Tryck på knappen Menu.
Resultat:
Huvudmenyn visas.
2 Flytta styrspaken uppåt eller nedåt för att välja menyn för
INSTÄLLNINGAR och tryck på knappen på styrspaken.
3 Flytta styrspaken uppåt eller nedåt för att välja menyn för Övrigt
och tryck på knappen på styrspaken.
4 Flytta styrspaken uppåt eller nedåt och välj alternativet ID
instålln
. Ange ID-numret med hjälp av styrspaken.
5 Flytta styrspaken uppåt eller nedåt och välj alternativet Ange ID.
Ange ID-numret med hjälp av sifferknapparna.
➣
När du vill styra flera bildskärmar bör du ställa in PDP1 och
PDP2 i läget för inställning av ID. När du anger ID-numret för
PDP1 medan plasmabildskärmen står i läge för inmatning av
ID, kommer bara PDP1 att övergå till menyskärmen, och du
kan använda fjärrkontrollen. Just nu fungerar inte PDP2 med
fjärrkontrollen. Den visar viloläget för inmatning av ID-nummer.
Installera Multiple Display Control (MDC) <Styrning av flera bildskärmar>
☛
Krav på datorn (rekommenderade)
◆ Operativsysten: Windows 95, 98, ME, 2000, XP Home, XP Professional.
◆ CPU : Pentium II
◆ RAM : 64 M
◆ VGA : 800 x 600, 256 färger
◆ CD-ROM : 4X
◆ Kommunikationsport: RS-232C-kompatibel, seriell, stift, 9-polig (COM1)Om RS-232C-
porten på din PC är 25-polig bör du använda en 25- till 9-polig
adapter.
➣
Vi kan inte garantera att denna produkt fungerar korrekt när du använder detta program på
andra modeller.
Page 100

44
SWE
Installera Multiple Display Control (MDC) <Styrning av flera bildskärmar> (fortsättning)
1 Klicka på filen setup.exe på CD-skivan. Den följande
skärmen visas, och grundfilerna för inställningen
installeras.
3 Välj den programgrupp du vill använda och klicka på
Continue . Nu fortsätter installationen.
2 Välj installationsmapp och klicka på knappen.
Nu startar installationen.
4 Om du får meddelandet Version Conflict medan installationen
pågår, betyder det att programmets version inte är kompatibel
med det programbibliotek du har i din dator. Bry dig inte om
meddelandet. Klicka på
Yes.
5 Du kan köra programmet så snart installationen är avslutad.
 Loading...