

Samsung PN51E8000, PN60E8000, PN64E8000 User Manual

Plasma TV
SUPPORT
user manual
Thank you for purchasing this Samsung product.
To receive more complete service, please register
your product at
✎ If you have any questions, please call us at 1-800-SAMSUNG (1-800-726-7864) for assistance.
www.samsung.com/register
Model _____________ Serial No. _____________
A detailed User’s Manual is built into your TV. For more information about how to view this e-Manual see page 48.
Figures and illustrations in this User Manual are provided for reference only and may differ from actual product appearances. Product design and
specifications may be changed without notice.
Important Warranty Information Regarding Television Format Viewing
See the warranty card for more information on warranty terms.
✎
Wide screen format PDP Displays (with 16:9 aspect ratios, the ratio of the screen width to height) are primarily designed to view wide screen format fullmotion video. The images displayed on them should primarily be in the wide screen, 16:9 ratio format, or expanded to fill the screen, if your model offers
this feature, with the images constantly in motion. Displaying stationary graphics and images on the screen, such as the dark sidebars on non-expanded
standard format television video and programming, should be limited to no more than 5% of the total television viewing per week.
Additionally, viewing other stationary images and text such as stock market reports, video game displays, station logos, web sites or computer graphics
and patterns, should be limited as described above for all televisions. Displaying stationary images that exceed the above guidelines can cause uneven
aging of PDP Displays that leave subtle, but permanent burned-in ghost images in the PDP picture. To avoid this, vary the programming and images, and
primarily display full screen moving images, not stationary patterns or dark bars. On PDP models that offer picture sizing features, use these controls to
view different formats as a full screen picture.
Be careful about the television formats you select and the length of time you view them. Uneven PDP aging as a result of format selection and use, as
well as burned in images, are not covered by your Samsung limited warranty.
Ř SAMSUNG ELECTRONICS NORTH AMERICAN LIMITED WARRANTY STATEMENT
Subject to the requirements, conditions, exclusions and limitations of the original Limited Warranty supplied with Samsung Electronics (SAMSUNG)
products, and the requirements, conditions, exclusions and limitations contained herein, SAMSUNG will additionally provide Warranty Repair Service
in the United States on SAMSUNG products purchased in Canada, and in Canada on SAMSUNG products purchased in the United States, for the
warranty period originally specified, and to the Original Purchaser only.
The above described warranty repairs must be performed by a SAMSUNG Authorized Service Center. Along with this Statement, the Original Limited
Warranty Statement and a dated Bill of Sale as Proof of Purchase must be presented to the Service Center. Transportation to and from the Service
Center is the responsibility of the purchaser. Conditions covered are limited only to manufacturing defects in material or workmanship, and only those
encountered in normal use of the product.
Excluded, but not limited to, are any originally specified provisions for, in-home or on-site services, minimum or maximum repair times, exchanges or
replacements, accessories, options, upgrades, or consumables.
For the location of a SAMSUNG Authorized Service Center, please call toll-free:
– In the United States : 1-800-SAMSUNG (1-800-726-7864)
– In Canada : 1-800-SAMSUNG
User Instructions
Ř Screen Image retention
Do not display a still image (such as on a video game) on the plasma display panel for more than several minutes as it can cause screen image
retention. This image retention is also known as ‘screen burn’. To avoid such image retention, refer to e-Manual to reduce the degree of brightness
and contrast of the screen when displaying a still image.
Ř Heat on the top of the Plasma TV
The top side of the product may be hot after long periods of use as heat dissipates from the panel through the vent hole in the upper part of the
product. This is normal and does not indicate any defect or operation failure of the product. However, children should be prevented from touching
the upper part of the TV.
Ř The TV is making a ‘cracking’ noise.
A ‘cracking’ noise may occur when the product contracts or expands due to a change in the surrounding environment such as temperature or
humidity. This is normal and not a defect of the unit.
Ř Cell Defects
Your plasma TV has a panel containing 2,360,000 (HD-level) to 6,221,000 (FHD-level) pixels which require sophisticated technology to produce.
However, there may be a few bright or dark pixels on the screen. These pixels will have no impact on the performance of the product.
Ř Avoid operating the TV at temperatures below 41°F (5°C)
Ř A still image displayed too long may cause permanent damage to the PDP Panel.
Watching the Plasma TV in 4:3 format for a long period of time may leave traces of borders displayed on the left, right and center of
the screen caused by the difference of light emission on the screen. Playing a DVD or a game console may cause similar effects to
the screen. Damages caused by the above effect are not covered by the Warranty.
Ř After-images on the Screen.
Displaying still images from Video games or a PC for longer than a certain period of time may produce partial after-images.
To prevent this effect, reduce the ‘brightness’ and ‘contrast’ when displaying still images for a long time.
Ř Warranty
Warranty does not cover any damage caused by image retention. Burn-in is not covered by the warranty.
Ř Caution
The glass screen of your PDP TV can break if you accidently drop the TV. Handle the TV with care.
When moving the TV, always have two or more people pick it up and carry it as a safety precaution. Do not lay the TV flat on its
face or back.
Your Samsung Plasma TV is a high quality television that has been carefully packaged to protect the integrity of its glass panel and component parts
during shipment. It is, nonetheless, a fragile piece of electronics that requires careful handling. Refrain from putting undue stress on any part of the
packaging when shipping or unpacking the TV. Use care when installing the TV. Avoid placing the TV in a location where it may be struck, exposed to
sharp impacts, or fall. Panel breakage caused by a fall or impact strike is not covered under the manufacturer's warranty.
English - 2

Contents
Ř Important Warranty Information
Regarding Television Format Viewing ..............2
Ř User Instructions ............................................. 2
Ř Contents ......................................................... 3
Ř List of Features ............................................... 4
Ř Accessories and Cables .................................. 5
Ř Installing the Stand ......................................... 7
Ř Installing the Wall Mount (Optional) .................. 9
Ř Providing Proper Ventilation for Your TV ........ 11
Ř Using the TV's Controller (Panel Key) ............ 12
Ř Connecting the Power Cord
and the Antenna or Cable Connection ..........13
Ř The Standard Remote Control ...................... 14
Ř How to Navigate Menus ................................ 16
Ř Configuring
the Basic Settings in Initial Setup ..................17
Ř Connecting to AV Devices
(Blu-ray Players, DVD Players, etc.) ............... 21
Ř Connecting to Audio Devices ........................ 23
Ř Connecting to a PC ......................................24
Ř The EX-Link Cable Connection ....................24
Ř Changing the Input Source ........................... 25
Ř Using Smart Hub .......................................... 26
Ř SMART Interaction ........................................ 27
− Voice Control ........................................... 27
− Motion Control ........................................30
− Face recognition ...................................... 32
Ř The Evolution Kit Slot (Kit Sold Separately) .... 34
Ř Connecting to a Network .............................. 35
Ř Configuring Network Connections ................. 37
Ř The Smart Touch Control .............................. 39
Ř The IR Blaster ............................................... 43
Ř Setting up the Universal Remote Control ....... 45
Ř Using the Search
for Recommended Model Code .................... 47
Ř How to view the e-Manual ............................48
Ř Troubleshooting ............................................ 50
Ř Licenses ....................................................... 53
Ř Storage and Maintenance ............................. 53
Ř Specifications - Smart Touch Control ............ 56
Ř Specifications - IR Blaster ............................. 56
Ř Specifications ............................................... 57
Ř Display Resolution ........................................ 58
Ř Video Codec ................................................. 59
Ř Dimensions ................................................... 60
Ř Index ............................................................ 61
English - 3

List of Features
Ř 3D: This exciting new feature enables you to view 3D content.
Ř SMART HUB: Your gateway to all your content, integrated in one place.
− Provides diverse entertainment choices.
− Lets you control your entertainment life with an easy-to-use, user friendly user interface.
− Gives you easy access to diverse apps, with more being added every day.
− Lets you customize your TV by grouping and sorting apps to your taste.
Ř AllShare Play: Lets you access, view, or play photos, videos, or music located on USB devices,
digital cameras, cell phones, and PCs. PCs and cell phones can be accessed wirelessly, through your
wireless network.
Ř Anynet+ (HDMI-CEC): Allows you to control all connected Samsung devices that support Anynet+
with your Samsung TV’s remote.
Ř e-Manual: Provides a detailed, on-screen user's manual that's built into your TV. (page 48)
Ř SMART Interaction: Using this function, you can access and control menu options and functions
using speech or motions. (page 27)
English - 4

Accessories and Cables
Please make sure the following items are included with your TV. If any items are missing, contact your
✎
dealer.
The items’ colors and shapes may vary depending on the model.
✎
Make sure that there are no accessories hidden behind or under packing materials after you open the
✎
box.
Ř Smart Touch Control (AA59-00626A) & Batteries (AA x 2)
Ř IR Blaster (BN96-22897A) & Batteries (AA x 4)
Ř Remote Control (AA59-00637A) & Batteries (AAA x 2)
Ř User Manual
Ř Cleaning Cloth (BN63-01798B)
Ř Warranty Card / Safety Guide
Ř 3D Active Glasses
Ř Power Cord
Input Cables (Sold Separately)
You will need one or more of these cables to connect your TV to your antenna or cable outlet and your
peripheral devices (Blu-ray players, DVD players, etc.)
To purchase the RS232 cable, contact www.SamsungParts.com.
RS232 (AA39-00311A) HDMI HDMI-DVI Audio
Component Composite (AV) Coaxial (RF)
English - 5

Make sure you have the correct cable before plugging it in. Illustrations of common plugs and jacks
✎
are below.
Cable Plugs Ports / Jacks
HDMI
USB
Optical
Do not plug cables in upside down.
Be sure to check the orientation of the plug before plugging it in.
Warning
Wireless Keyboard (Sold Separately)
Wireless Keyboard
English - 6
Stand Parts: 51 inches model only
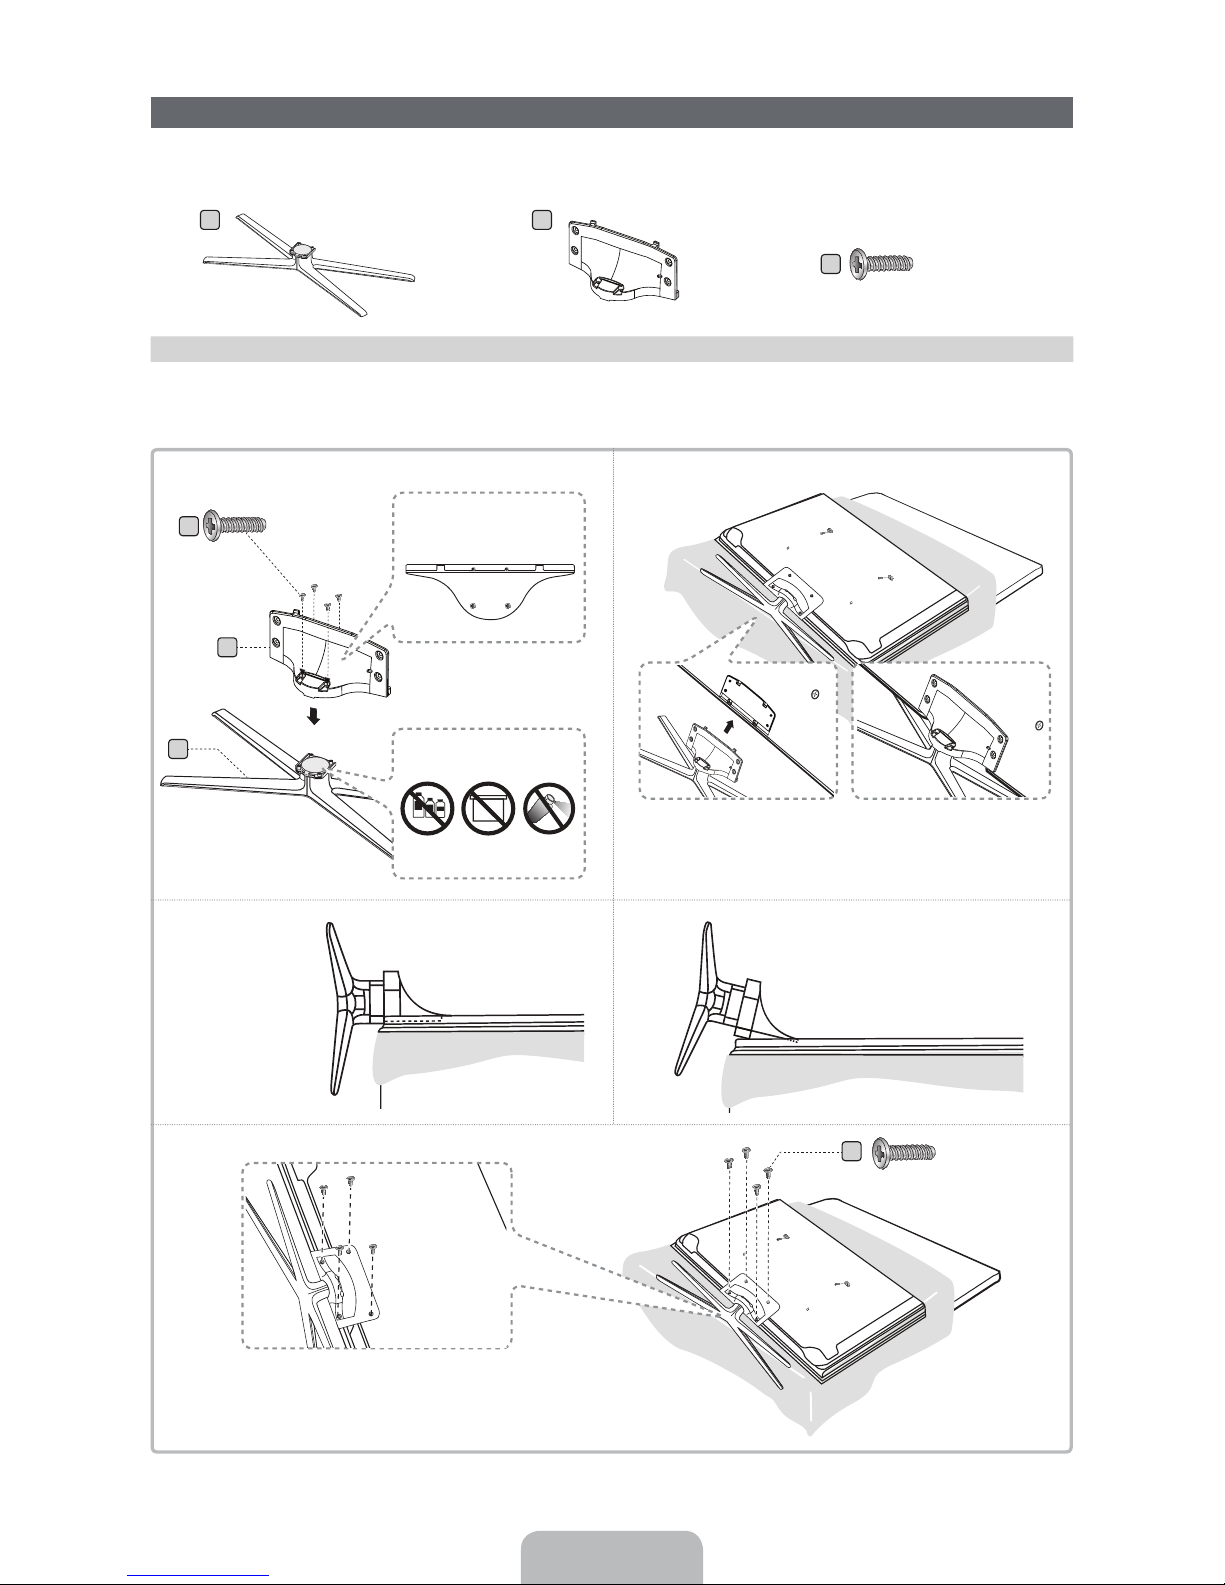
Installing the Stand
A
Stand x 1 Guide Stand x 1 Screws x 8
B
C
(M4 X L12)
Follow the steps below to connect the TV to the stand. For more detailed instructions, see the separate
stand installation guide.
1
A
B
x4 (M4 X L12)
Front
Top View
ATTENTION
C
2
3
4
Side View
Rear
DO NOT USE
DO NOT USE
CHEMICALS
GREASE
(Correct assembly)
DO NOT
USE OIL
Place a sof t cloth over a table to protect the TV, and then
✎
place the TV on the cloth screen side down.
Insert the Stand Guide into the slot on the TV's bottom.
✎
(Incorrect assembly)
C
x4 (M4 X L12)
English - 7

Stand Parts: 60, 64 inches model only
A
Stand x 1 Guide Stand x 1 Screws x 8
B
C
D
x 4 (M4 X L10)
x 4 (M4 X L12)
Follow the steps below to connect the TV to the stand. For more detailed instructions, see the separate
stand installation guide.
1
A
B
x4 (M4 X L10)
Front
Top View
ATTENTION
C
2
3
4
Side View
Rear
DO NOT USE
DO NOT USE
CHEMICALS
GREASE
(Correct assembly)
DO NOT
USE OIL
Place a sof t cloth over a table to protect the TV, and then
✎
place the TV on the cloth screen side down.
Insert the Stand Guide into the slot on the TV's bottom.
✎
(Incorrect assembly)
D
x4 (M4 X L12)
English - 8

NOTE
✎
Ř Make sure to distinguish between the front and back of each component when assembling them.
Ř Make sure that at least two people lift and move the TV.
Ř Stand the product up before you tighten the screws. If you tighten the screws with the TV lying
down, it may lean to one side when you stand it up.
Do not insert your fingers into the stand base slot of the TV when installing the stand base.
[
Installing the Wall Mount (Optional)
Wall or Ceiling Mounting
If you mount this product on a wall, it should be mounted only as recommended by the
manufacturer. Unless it is correctly mounted, the product may slide or fall, causing serious
injury to a child or adult, and serious damage to the product.
Installing the Wall Mount Kit
The wall mount kit (sold separately) lets you mount the TV on the wall.
For detailed information about installing the wall mount, see the instructions provided with the wall mount.
We recommend you contact a technician for assistance when installing the wall mount bracket. We do not
advise you to do it yourself. Samsung Electronics is not responsible for any damage to the product or injury
to yourself or others if you elect to install the wall mount on your own.
To order the wall mount kit, contact Samsung Customer Care at 1-800-SAMSUNG (1-800-726-7864).
VESA Wall Mount Kit Notes and Specifications
Install your wall mount on a solid wall perpendicular to the floor. Before attaching the wall mount to
✎
surfaces other than plaster board, please contact your nearest dealer for additional information. If you
install the TV on a ceiling or slanted wall, it may fall and result in severe personal injury.
NOTE
✎
Ř Standard dimensions for wall mount kits are shown in the table below.
Ř Samsung wall mount kits contain a detailed installation manual and all parts necessary for assembly
are provided.
Ř Do not use screws that do not comply with the VESA standard screw specifications.
Ř Do not use screws that are longer than the standard length or do not comply with the VESA
standard screw specifications. Screws that are too long may cause damage to the inside of the TV
set.
Ř For wall mounts that do not comply with the VESA standard screw specifications, the length of the
screws may differ depending on the wall mount specifications.
Ř Do not fasten the screws too firmly. This may damage the product or cause the product to fall,
leading to personal injury. Samsung is not liable for these kinds of accidents.
English - 9
Ř Samsung is not liable for product damage or personal injury when a non-VESA or non-specified
wall mount is used or the consumer fails to follow the product installation instructions.
Ř Do not mount the TV at more than a 15 degree tilt.
Ř Always have two people mount the TV on a wall.
Product Family
PDP TV
[Ultra-Slim]
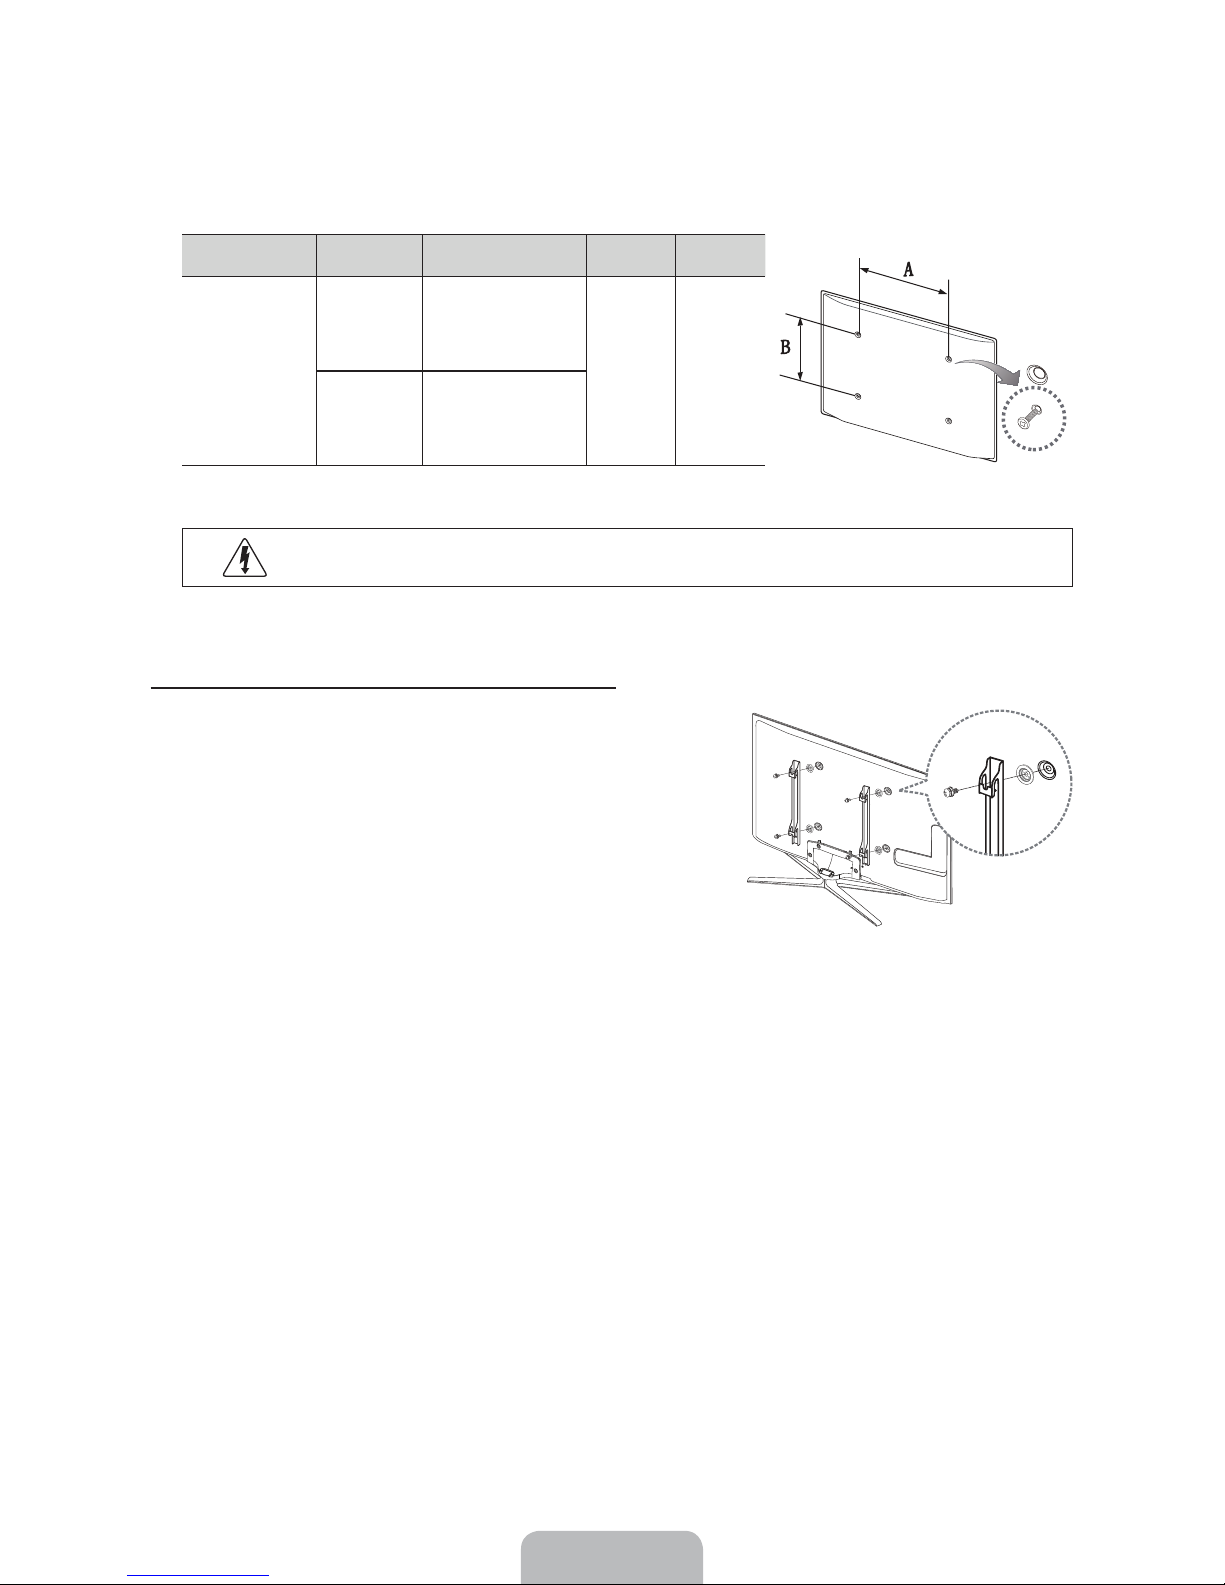
Remove the screws in the mounting holes before you install the wall mount.
✎
TV size in
inches
~51 400 X 400
59~64 600 X 400
VESA screw hole specs
(A * B) in millimeters
Standard
Screw
M8 4
Quantity
Do not install your Wall Mount Kit while your TV is turned on. It may result in personal
injury due to electric shock.
Installing a Wall Mount from Another Manufacturer
To install a wall-mount from another manufacturer, use the HolderRing.
English - 10

Providing Proper Ventilation for Your TV
When you install your TV, maintain a distance of at least 4 inches between the TV and other objects (walls,
cabinet sides, etc.) to ensure proper ventilation. Failing to maintain proper ventilation may result in a fire or a
problem with the product caused by an increase in its internal temperature.
Whether you install your TV using a stand or a wall-mount, we strongly recommend you use parts
✎
provided by Samsung Electronics only.
Ř If you use parts provided by another manufacturer, it may cause difficulties with the product or result
in injury caused by the product falling.
Installation with a stand. Installation with a wall-mount.
4 inches
4 inches
4 inches
4 inches
Other Warnings
The actual appearance of the TV may differ from the images in this manual, depending on the model.
✎
Be careful when you touch the TV. Some parts can be somewhat hot.
✎
4 inches
4 inches
4 inches
English - 11

Using the TV's Controller (Panel Key)
The TV's Controller, a small joy stick like button on the bottom left side of the TV, lets you control the TV
without the remote control.
The product color and shape may vary depending on the model.
✎
Camera
mR
P
Function menu
Down (Front)
RightLeft
TV Controller
Up (Rear)
Follow these instructions facing the front of your TV.
✎
When selecting the function by moving the controller to the up/down/left/right directions, be sure
✎
Remote control sensor
When you use the Smart Touch Control,
a standby LED does not work (except
P button).
not to press the controller. If you press it first, you cannot operate it to move the up/down/left/right
directions.
When you use a TV camera, you should check whether a tape attached or not in rear of the TV
✎
camera, and then you can use a TV camera after adjust a camera angle. When you don't want to
use a TV camera, we recommend to use after a camera lens fixes to upwards. In this case, Face
recognition and Motion Control are not available.
Power on Turn the TV on by pressing the Controller when the TV is in standby
mode.
Adjusting the volume Adjust the volume by moving the Controller from side to side when
the power is on.
Selecting a channel Select a channel by moving the Controller backwards and forwards
when the power is on.
Using the Function menu To view and use the Function menu, press and release the Controller
when the power is on. To close the Function menu, press and release
the Controller again.
Selecting the SMART HUB (
™) With the Function menu visible, select SMART HUB (™) by moving
the Controller backwards. The SMART HUB main screen appears.
Select an application by moving the Controller, and then pressing the
Controller.
English - 12
Selecting the MENU (m) With the Function menu visible, select the MENU (m) by moving the
Controller to the left. The OSD (On Screen Display) Menu appears.
Select an option by moving the Controller to the right. Move the
Controller to the right or left, or backwards and forwards to make
additional selections. To change a parameter, select it, and then press
the Controller.
Selecting a Source (
s) With the Function menu visible, open the Source (s) list by moving
the Controller to the right. The Source list screen appears. To select
a source, move the Controller back and forth. When the source you
want is highlighted, press the Controller.
Power Off (
P) With the Function menu visible, select Power Off (P) by moving the
Controller forwards, and then press the Controller.
To close the Menu, Smart Hub, or Source, press the Controller for more than 1 second.
✎
Standby mode
Your TV enters Standby mode when you turn it off and continues to consume a small amount of electric
power. To be safe and to decrease power consumption, do not leave your TV in standby mode for long
periods of time (when you are away on vacation, for example). It is best to unplug the power cord.
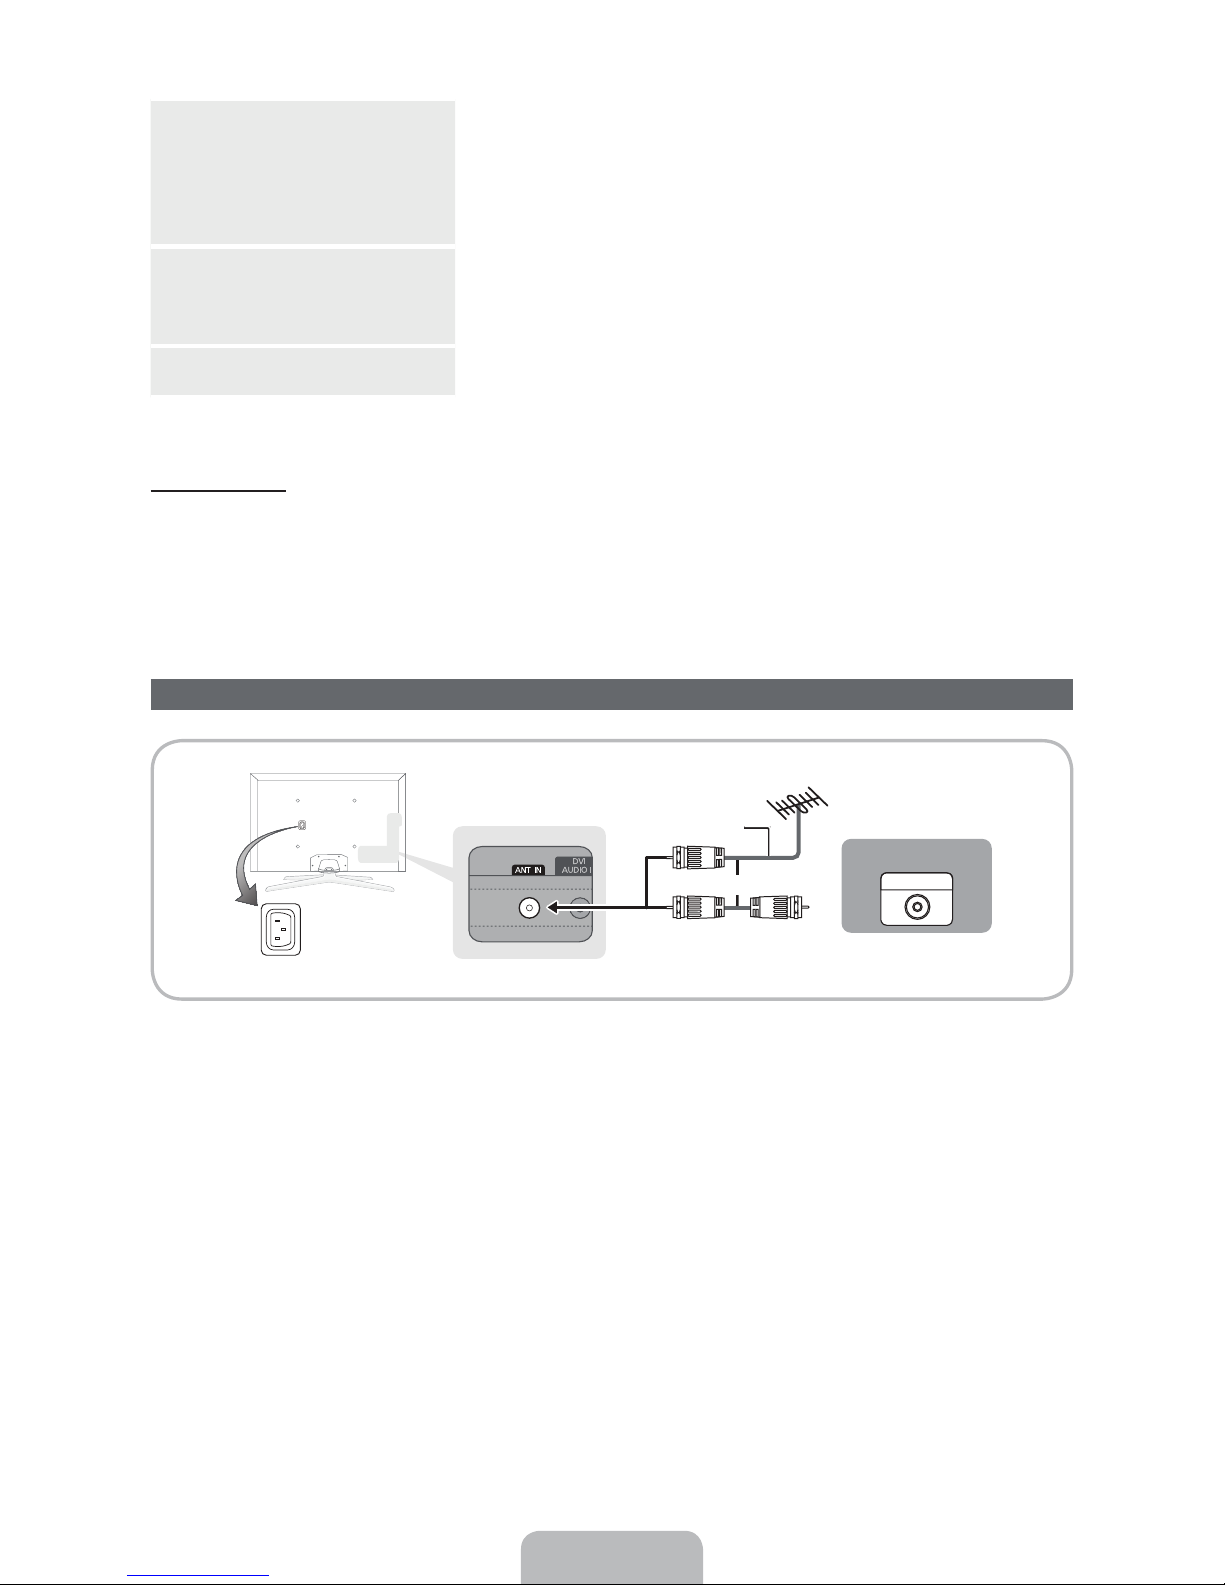
Connecting the Power Cord and the Antenna or Cable Connection
VHF/UHF Antenna
Antenna Cable (Not Supplied)
Cable
or
Power Input
Plug the power cord into a wall outlet only after you have made all other connections.
✎
If you are connecting your TV to a cable or satellite box using HDMI, Component, or Composite
✎
connections, you do not need to connect the ANT IN jack to an antenna or a cable connection.
The Plasma TV may interfere with an amateur radio or AM radio.
✎
Using two-way radio mobile and portable units or amateur radio or AM radio near your TV may cause
✎
the TV to malfunction.
Use caution when you move or swivel the TV if the antenna cable is tightly connected. You could
✎
break the antenna jack off the TV.
ANT OUT
English - 13

The Standard Remote Control
Learn where the function buttons are on your remote. Especially note SOURCE, MUTE, VOL, CH, MENU,
TOOLS, E, INFO, CH LIST, RETURN, and EXIT.
This remote control has Braille points on the Power, Channel, and Volume buttons and can be used
✎
by visually impaired persons.
Turns the TV on and off.
Displays and selects the available video
sources. (page 25)
Gives direct access to channels.
Press to select additional digital
channels being broadcast by the same
digital station. For example, to select
channel ‘54-3’, press ‘54’, then press
‘-’ and ‘3’.
Adjusts the volume.
Displays channel lists on the screen.
Opens the OSD (Menu).
Quickly select frequently used functions.
Use this button in a specific feature. For
details, refer to the e-Manual.
Moves the cursor, selects the on-screen
menu items, and changes the values
seen on the TV's menu.
Returns to the previous menu.
MENU
RETURN
SOURCE
MUTE
M
CH
LIST
PRE-CH
HISTORY
INFOTOOLS
EXIT
Turns the remote control light on or
off. When on, the buttons become
illuminated for a moment when pressed.
(Using the remote control with this
button set to On will reduce the battery
usage time.)
Returns to the previous channel.
Cuts off the sound temporarily.
Changes channels.
Brings up the Smart Hub applications.
See e-Manual chapter Advanced
Features ĺ Smart Hub.
Displays a list of recently used functions.
You can select a function again easily
and quickly.
Displays information on the TV screen.
Exits the menu.
Use these buttons according to the
directions on the TV's screen.
Use these buttons in a specific feature.
For details, refer to the e-Manual.
BCD
Family Story
SUPPORT P.SIZE
l
SEARCH CAMERA
l
English - 14
Family Story: Connect to the Family
Story application. See e-Manual chapter
Advanced Features ĺ Family Story.
l
l
SEARCH: Starts search function. See
e-Manual chapter Advanced Features
ĺ Search.
CAMERA: Connect to camera
application.
SUPPORT: Lets you use various
support functions including the
e-Manual. (page 48)
P.SIZE: Lets you select the Picture
Size. See e-Manual chapter Basic
Feature ĺ Changing the Picture Size.
X
: Turns the 3D image on or off. See
e-Manual chapter Advanced Features ĺ
Using the 3D function.
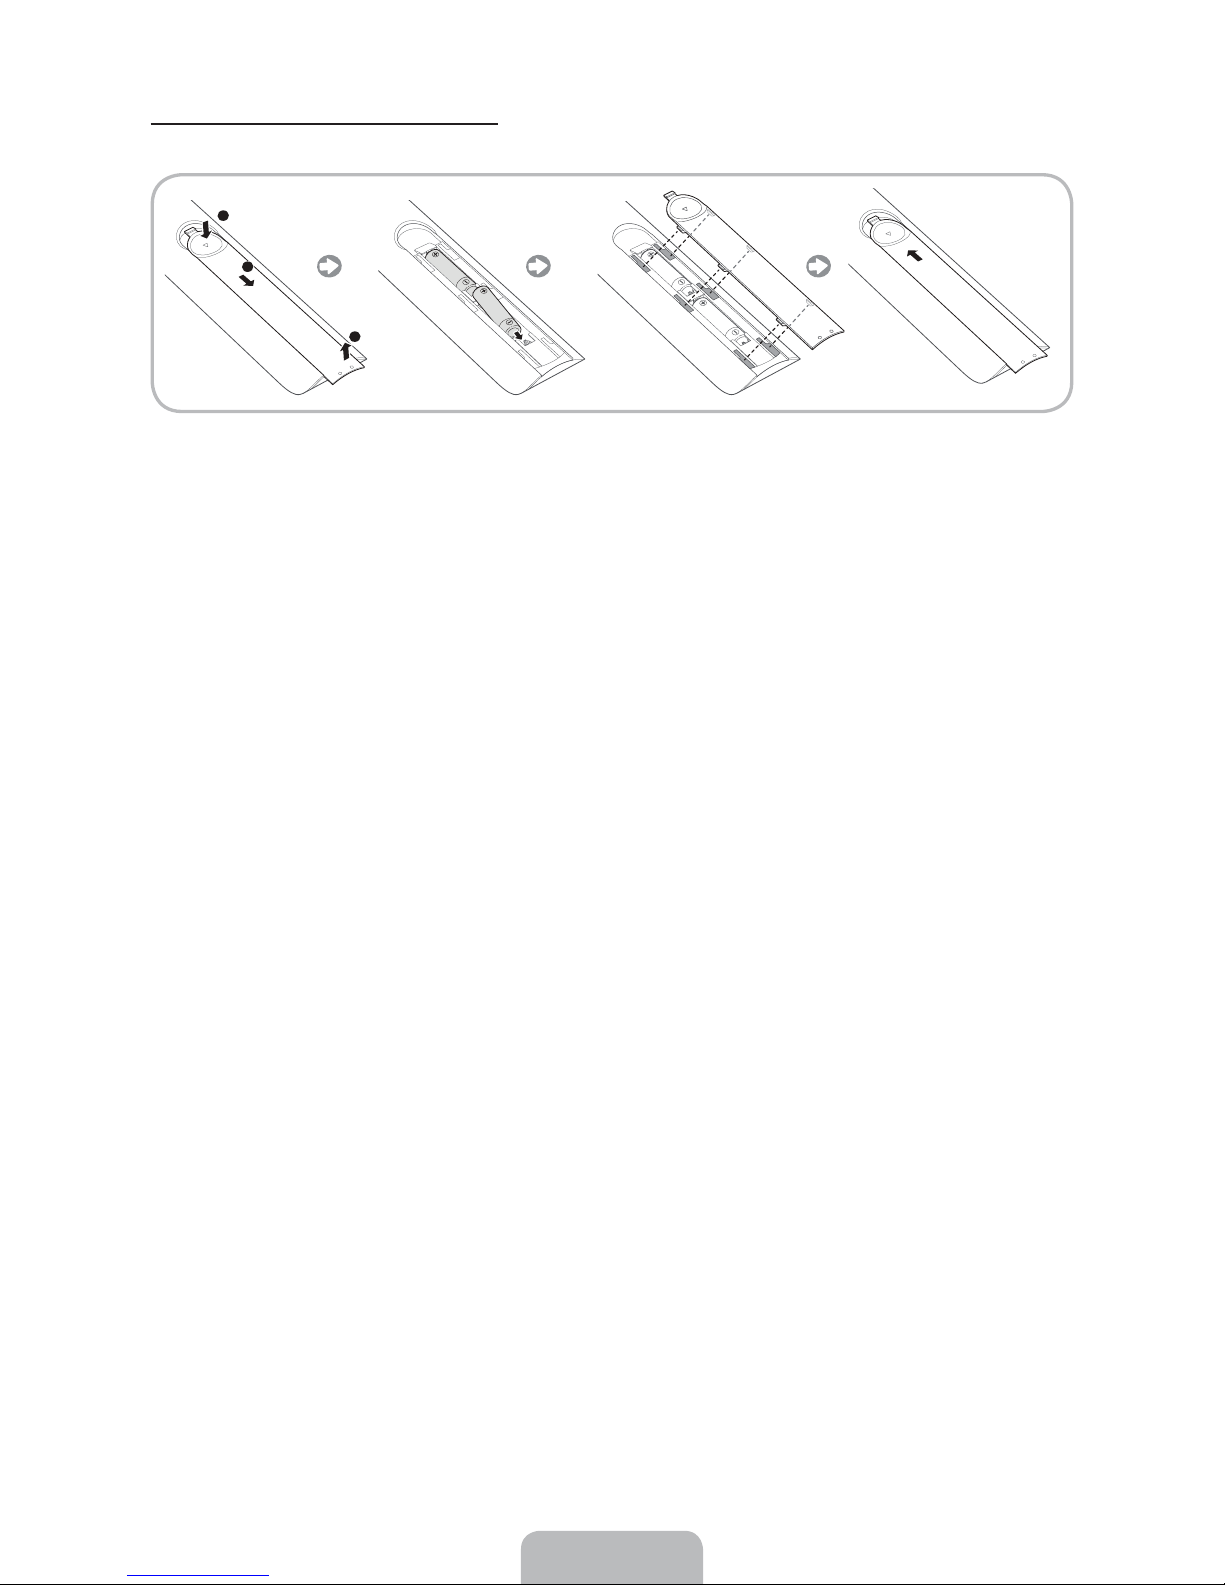
Installing batteries (Battery size: AAA)
Match the polarity of the batteries to the symbols in the battery compartment.
Your TV also comes with a Smart Touch Control. For information about the Smart Touch Control, see
✎
page 39.
NOTE
✎
Ř Install the batteries so that the polarity of the batteries (+/-) matches the illustration in the battery
compartment.
Ř Use the remote control within 23 feet of the TV.
Ř Bright light may affect the performance of the remote control. Avoid using it near fluorescent lights
or neon signs.
Ř The color and shape of the remote may vary depending on the model.
English - 15

How to Navigate Menus
O
H
Your TV’s Main and Tools menus contains functions that let you control the TV’s features. For example, in
the Main menu you can change the size and configuration of the picture, its brightness, its contrast and so
on. There are also functions that let you control the TV’s sound, channel configuration, energy use, and a
host of other features. To access the main, on-screen menu, press the
To access Tools menus, press the TOOLST button. Tools menus are available when the TOOLST menu
Icon is displayed on the bottom right of the screen.
The illustration below displays the buttons on the standard remote you use to navigate the menus and
select and adjust different functions. For information about using the Smart Touch Control, see page 39.
MENUm button on your remote.
1
2
3
4
1 MENUm button: Displays the main on-screen menu.
TOOLST button: Displays the Tools menus when available.
2
3
E and Direction buttons: Use the Direction buttons to move the cursor and highight an item. Use the
Enter button to select an item or confirm the setting.
RETURNR button: Returns to the previous menu.
4
EXITe button: Exits the on-screen menu.
5
How to Operate the Main Menu (OSD - On Screen Display) Using the Standard Remote
MENU
TOOLS
RETURN
ISTORY
INF
EXIT
5
The access steps may differ depending on the menu option you select.
MENUm
1
u / d Select a main menu option on the left side of the screen with the u or d
2
E Press E to access the sub-menus.
3
u / d Select the desired submenu with the u or d button.
4
u / d / l / r Adjust the value of an item with the l, r, u, or d button. The
5
E Press E to confirm the selection.
6
EXITe Press EXITe.
7
The main menu options appear on the screen:
Picture, Sound, Channel, Network, System, Support.
button.
adjustment in the OSD may differ depending on the selected menu.
English - 16

Configuring the Basic Settings in Initial Setup
When you turn the TV on for the first time, a sequence of screens and on-screen prompts will assist you in
configuring the TV’s basic settings. Plug the power cord into a wall outlet, and then press the
turn on the TV.
Use the standard remote to run the Initial Setup.
✎
Setup is available only when the input source is set to TV. See "Changing the Input Source" (page 25).
✎
To return to the previous step in the Setup sequence, select Previous.
✎
If you are not using a cable box or satellite box, make sure you have connected the TV to an antenna
✎
or cable connection before you turn on the TV. See page 13 for instructions.
If you want to configure a wired network connection during Setup, make sure you've connected a
✎
LAN cable to your TV. See pages 36 for instructions. If you want to configure a wireless network
connection during Setup, make sure your wireless modem or router is on and working.
P button to
Menu Language:
1
Select a Language.
Use Mode: Select
2
the Home Use
Mode.
Network Settings:
3
Configure the
network settings.
To configure
✎
later, select Skip.
You can set up
the network
connection later
using the onscreen Network
menu.
After you press the
to continue. The Menu Language screen appears. Select the menu
language you want using your remote, and then select Next. The TV will
display on-screen menus using the language you select beginning with
the next step in the Setup process.
On the Use Mode screen, select the Home Use using your remote, and
then select Next. The Network Settings screen appears.
Store Demo is for retail environments only. If you select Store
✎
Demo, some functions will not work, and the TV will reset all
functions to their factory default after a certain period of time. For
more information about Store Demo, go to the end of this section.
To configure your network settings, select Next using your remote, and
then go to 3A - Wireless Network or 3B - Wired Network on the next
page.
If you do not know your network configuration information or want to
configure the settings later, or do not have a network, select Skip, and
then go to 5 - Auto Program (1) on page 19.
To configure network settings later, refer to “Setting up the Wired or
Wireless Network” in the e-Manual or see the Network Connection
sections in this manual (pages 35 and 37).
P button, the Start screen appears. Select Next
English - 17

3
Wireless Network 1. The TV searches for and then displays all the wireless networks
a
within range. When done, it displays a list of the networks. In the list
of networks, move the Highlight to select a network, and then select
Next. If the selected network requires a Security Key, the Security
Key screen appears.
If you have a WPS(PBC) compatible router, select WPS(PBC)
✎
instead, and then follow the directions on the screen. When
done, go to Step 4.
2. Enter your network security key or WPS PIN using your remote.
Enter numbers and letters using your remote.
✎
Ř If you are using the standard remote, you can enter numbers
by pressing the number buttons on the remote.
Ř To enter a letter, move the Highlight to the letter, and then
select it. You can enter numbers in the same fashion if you
choose.
To display capital letters (or redisplay small letters if capital letters
✎
are displayed), select Caps or Shift.
To display symbols and punctuation, select 1F. To redisplay
✎
letters, select 1F again.
3. When done, select Next if you have entered a security key or WPS
PIN if you have entered a WPS PIN.
3
4. The TV checks the wireless connection. If the connection is
successful, the You are connected to the Internet. If you have any
problems using online services, please contact your Internet
Service Provider. message appears. Select Next, and then go to 4
Software Upgrade Step.
If the connection fails, select Previous, repeat Step 1 and 2,
✎
carefully re-enter your security key or WPS PIN, then repeat
Steps 3 and 4. If it fails again, select Next on the “Connection
Failed” screen, and then go to 5 - Auto Program (1) on the next
page. Configure your network later through Network Settings
in the TV’s Menu. For more information, refer to “Setting up the
Wired or Wireless Network” in the e-Manual or see the Network
Connection sections in this manual (pages 35 and 37).
Wired Network The TV checks the network connection, then displays the You are
b
connected to the Internet. If you have any problems using online
services, please contact your Internet Service Provider. message
appears. Select Next. The Software Upgrade screen appears.
English - 18

Software Upgrade:
4
Update the software
to the latest version.
To update later,
✎
select Skip.
When Network Settings is complete, your TV will check for a new
software version automatically. If new software is available, the TV
downloads and installs the new software. When the download is
complete, select Next.
If you want to upgrade later, select Skip. For more information, refer
✎
to Software Update (Preference Features ĺ Support Menu) in the
e-Manual.
This may take some time, depending on your network status.
✎
You can only upgrade software if your TV has an active network
✎
connection.
If no new update software is available, a no new updates message
✎
appears on the screen. Select OK.
Auto Program (1):
5
Select where your
TV signal comes
from.
Auto Program (2):
6
Select the search
options.
Auto Program (3):
7
Channel
memorization
Select the appropriate option for your TV using your remote, and then
select Next.
Ř Yes, I need to.: Select if you have an antenna or a cable connection
without a set-top box. If you select this option, go to 6 - Auto
Program (2) Step.
Ř No, I don’t need to.: Select if you have a satellite or cable set-top
box. You do not need to run Auto Program. If you select this option,
go to 8 - Clock on the next page.
1. Select Air or Cable using your remote. A check appears on your
selection. When done, select Next. You can check both if you have
both connected.
2. If you selected Air, go to 7 - Auto Program (3).
3. If you selected Cable, you’ll go to the cable system screen. Select
Digital Cable System. The option window appears. Select the
correct cable signal format; STD, HRC, or IRC. Most cable systems
use STD (Standard). Repeat the same process with Analog Cable
System.
4. When done, select Next.
Channel memorization stars. Channel memorization can take up to 45
minutes, depending on your cable system.
For more information, refer to Auto Program (Channel Menu ĺ
Memorizing Channels) in the e-Manual.
Select Stop at any time to halt the memorization process.
✎
English - 19

Clock: Set the
8
Clock.
Select Auto or Manual, and then select Next.
If you selected No, I don’t need to. in 5 - Auto Program (1), you can
✎
only set the current time and date manually, using your remote.
Auto
If you selected Auto, the TV will automatically download the correct time
from a digital channel. The Time Zone screen will appear. Select your
Time Zone, and then select Next. The DST (Daylight Savings Time)
screen will appear. The DST function sets the time ahead one hour to
adjust the clock for Daylight Savings Time. Select On if you want to turn
the DST adjustment on. Select Off to turn off the DST adjustment. You
can also turn the DST function on through the TV's on screen menu
(Menu ĺ System ĺ Time ĺ Clock ĺ DST).
Manual
If you selected Manual, you’ll go to the Clock screen. Select Date or
Time. You can set the current date and time using your remote. When
done setting the Date and Time, select Next.
Voice and Motion
9
Control: Setting the
Voice and Motion
Control function.
Setup: Complete Review the Setup data, and then select Close to finish.
10
11
If You Want to Rerun Setup...
Menu ĺ System ĺ Setup
If You Want to Turn the Store Demo Mode On or Off.
To set or unset Store Demo mode outside of Setup, press and release the Controller when the power is
on. The Function menu screen appears. Push the Controller to the left (to MENU (
than 5 seconds. The Store Demo mode is set. To cancel Store Demo, bring up the Function menu using
the Controller, push the Controller to the right (to Source (
page 12 for information about the Controller.
Set the Universal
Remote.
You can turn the Voice and Motion Control function on or off. Select Off
or On, and then select Next.
The completed settings are displayed.
✎
1. Turn on the POWER button on the bottom of the IR Blaster, and then
press the
2. Select Ye s to start the Universal Remote Setup.
For more detailed information about the Universal Remote Setup,
✎
refer to "Setting up the Universal Remote Control" section in the
manual (page 45).
PAIRING button.
m)) and hold for more
s)) and hold for more than 5 seconds. See
English - 20

Connecting to AV Devices (Blu-ray Players, DVD Players, etc.)
Using an HDMI Cable for an HD connection (up to 1080p, HD digital signals)
For the best quality HD picture, we recommend using an HDMI connection.
Use with DVD players, Blu-ray players, HD cable boxes, and HD Set-Top-Box satellite receivers.
Device
Device
HDMI IN 1 (DVI), HDMI IN 2 (ARC), HDMI IN 3 (MHL)
✎
HDMI Cable (Not Supplied)
HDMI OUT
Ř For the best picture and audio quality, connect digital devices to the TV using HDMI cables.
Ř An HDMI cable supports digital video and audio signals, and does not require an audio cable.
− To connect the TV to a digital device that does not support HDMI output, use an HDMI to DVI
cable and audio cables.
Ř If you connect an external device to the TV that uses an older version of HDMI, the video and audio
may not work. If this occurs, ask the manufacturer of the device about the HDMI version and, if it is
out of date, request an upgrade.
Ř Be sure to purchase a certified HDMI cable. Otherwise, the picture may not display or a connection
error may occur.
Ř We recommend using a basic high-speed HDMI cable or an HDMI cable that is Ethernet
compatible. Note that this product does not support the Ethernet function via HDMI.
Ř This product supports the 3D and ARC (Audio Return Channel) functions via an HDMI cable. Note
that the ARC function is supported by the
HDMI IN 2 (ARC) port only.
Ř The ARC function allows digital audio to output via the
enabled only when the TV is connected with an audio receiver that supports the ARC function.
HDMI IN 2 (ARC) port on the TV. It can be
English - 21
Ř This product supports the Mobile High-Definition Link (MHL) function via an HDMI-MHL cable. Note
that the MHL function is supported by the HDMI IN 3 (MHL) port only.
Ř The MHL function lets you display a mobile device's screen via the
HDMI IN 3 (MHL) port on the
TV. It can be enabled only when the TV is connected with a mobile device that supports the MHL
function. For more detailed information, see "Using the MHL function" in e-Manual.
Ř When you use MHL devices via a MHL cable, Picture Size is set to Screen Fit automatically. But
if you use MHL devices via an HDMI cable, Picture Size is not set to Screen Fit automatically.
To view an original size, select Screen Fit in the Picture Size menu (Menu ĺ Picture ĺ Picture
Size).
Ř If you use MHL devices via an HDMI cable, The TV will be recognized as the HDMI input. In this
case, the TV may work differently than when you use MHL devices via a MHL cable.
For the best cable connection to this product, use cables no thicker than the cable illustrated below:
✎
Ř Maximum thickness - 0.55 inches (14mm)
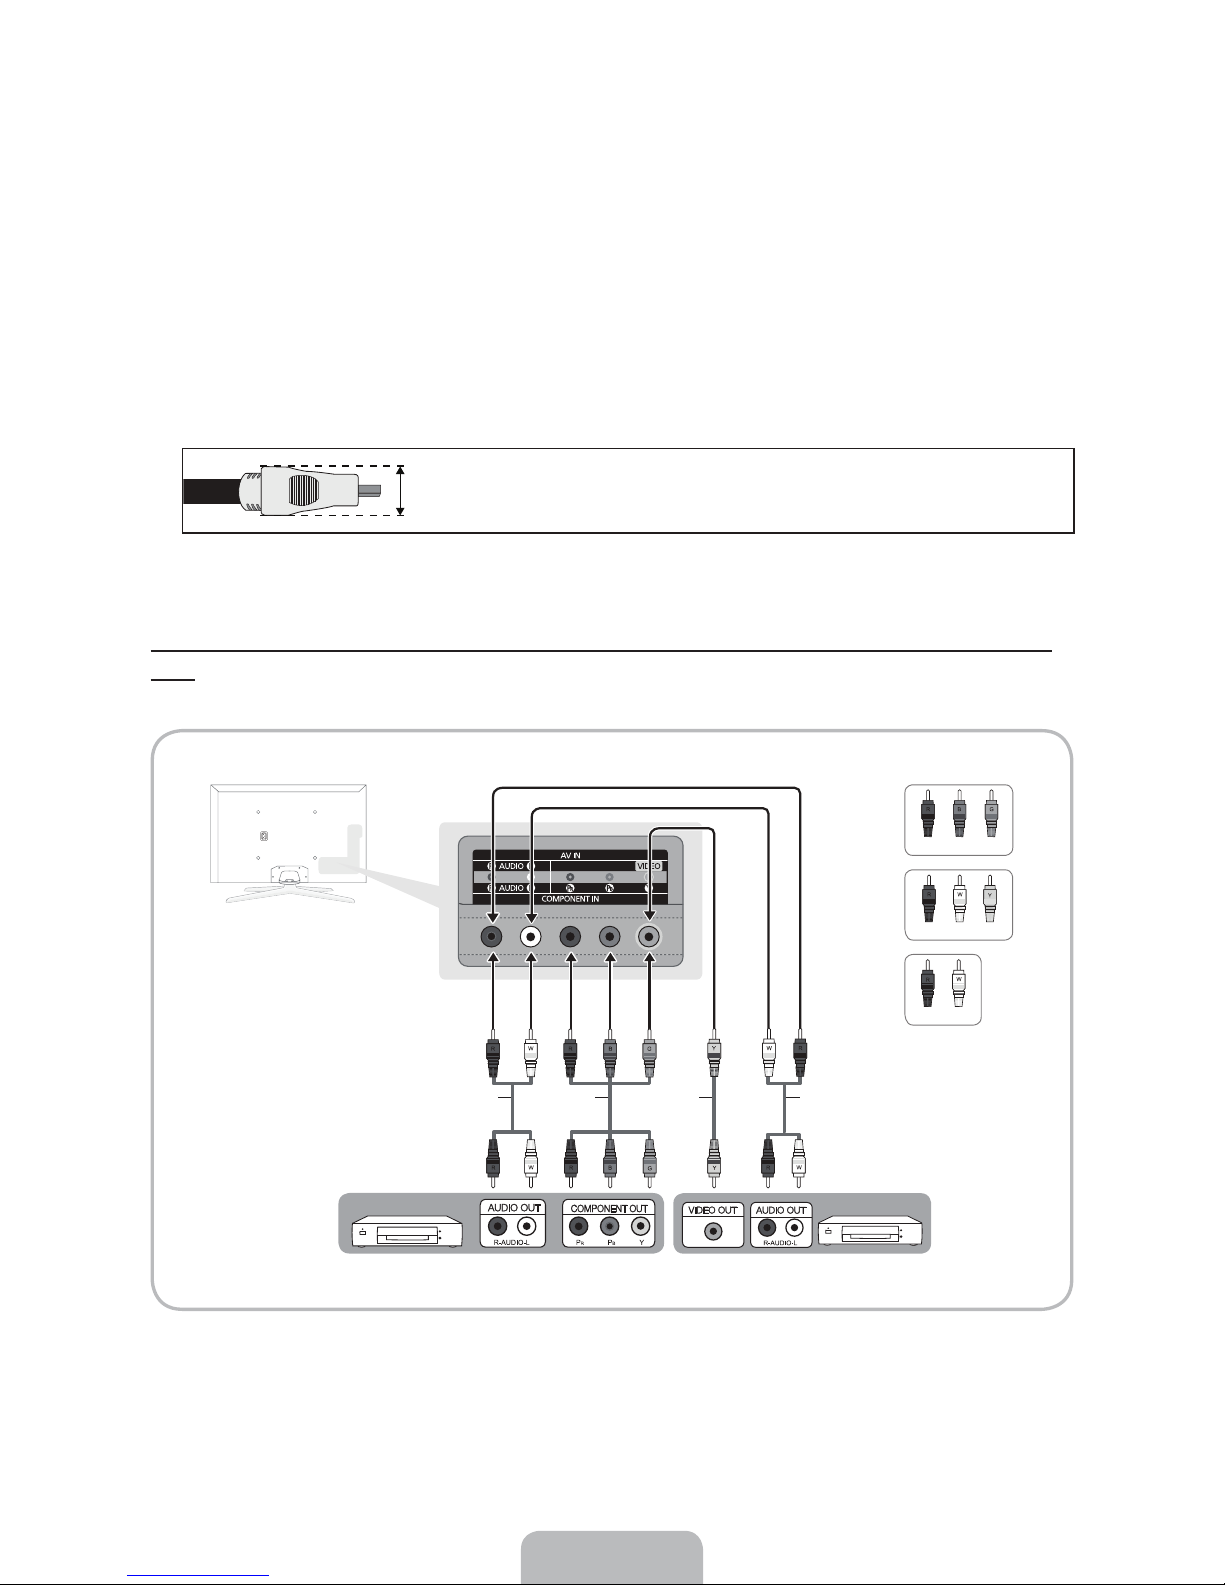
Using a Component Cable (up to 1080p HD signals) or an Audio/Video Cable (480i analog signals
only)
Use with DVD players, Blu-ray players, cable boxes, STB satellite receivers, VCRs.
Red
Blue
Green
Red
White
Yellow
Red White
Audio Cable (Not Supplied) Audio Cable (Not Supplied)
Device Device
For better picture quality, we recommend the Component connection over the A/V connection.
✎
When you connect a Video cable to AV IN, the color of the AV IN [VIDEO] jack (green) will not match
✎
Component Cable
(Not Supplied)
Video Cable
(Not Supplied)
the video cable (yellow).
English - 22

Connecting to Audio Devices
Using an Optical (Digital) Cable Connection
Use with Digital Audio Systems, Amplifiers, and Home Theaters.
Digital Audio System
DIGITAL AUDIO OUT (OPTICAL)
✎
Optical Cable (Not Supplied)
OPTICAL
Ř When you connect a Digital Audio System to the DIGITAL AUDIO OUT (OPTICAL) jack, decrease
the volume of both the TV and the system.
Ř 5.1 CH (channel) audio is available when you connect the TV to an external device supporting 5.1
CH.
Ř When the receiver (or home theater) is set to on, you can hear sound output from the TV’s optical
jack. When the TV is receiving a DTV signal, the TV will send 5.1 CH sound to the home theater
receiver. When the source is a digital component such as a DVD player / Blu-ray player / cable box
/ STB (Set-Top-Box) satellite receiver and you connected it to the TV via HDMI, you will only hear
2 CH audio from the home theater receiver. If you want to hear 5.1 CH audio, connect the digital
audio out jack from your DVD / Blu-ray player / cable box / STB satellite receiver directly to an
amplifier or home theater.
English - 23

Connecting to a PC
AUDIO OUT
DVI OUT
HDMI OUT
Using an HDMI cable or an HDMI to DVI cable
Your PC may not support an HDMI connection.
✎
Use your PC speakers for audio.
✎
HDMI Cable (Not Supplied)
HDMI to DVI Cable (Not Supplied)
Audio Cable (Not Supplied)
The optimal resolution is 1920 X 1080 @ 60 Hz. See the Display Resolution page for all available
resolutions (page 58).
NOTE
✎
Ř For an HDMI to DVI cable connection, you must use the
HDMI IN 1 (DVI) jack.
Ř For PCs with DVI video out jacks, use an HDMI to DVI cable to connect the DVI out on the PC to
the
HDMI IN 1 (DVI) jack on the TV. Use the PC's speakers for audio.
Ř PC (D-Sub) input is not supported.
The EX-Link Cable Connection
The EX-LINK connection is for service only.
English - 24

Changing the Input Source
Source
™ ĺSource
When you are watching TV and you want to watch a movie on your DVD player or Blu-ray player or switch
to your cable box or STB satellite receiver, you need to change the Source.
■ TV / HDMI1/DVI / HDMI2 / HDMI3 / AV / Component
1. Press the
2. Select Source. The Source screen appears.
3. Select a desired external input source.
Alternatively, you can access the Source screen by selecting the SOURCEs button on your
✎
standard remote or selecting Source with the Smart Touch Control (see page 39).
You can only choose external devices that are connected to the TV. In the displayed Source list,
✎
connected inputs are highlighted.
How to Use Edit Name
Edit Name lets you associate a device name to an input source. To access Edit Name, open the Tools
menu when the Source list is displayed. The following selections appear under Edit Name:
■ VCR / DVD / Cable STB / Satellite STB / PVR STB / AV Receiver / Game / Camcorder / PC / DVI
PC / DVI Devices / TV / IPTV / Blu-ray / HD DVD / DMA: Select an input jack, and then select the
name of the device connected to that jack from the list that appears. For example, if you have your Bluray player attached to
If you connect a PC to the HDMI IN 1 (DVI) port with an HDMI cable, assign PC to HDMI1/DVI in
✎
Edit Name.
If you connect a PC to the HDMI IN 1 (DVI) port with an HDMI to DVI cable, assign DVI PC to
✎
HDMI1/DVI in Edit Name.
If you connect an AV device to the HDMI IN 1 (DVI) port with an HDMI to DVI cable, assign DVI
✎
Devices to HDMI1/DVI in Edit Name.
™ button on your remote. The Smart Hub screen appears.
HDMI IN 2 (ARC), select Blu-ray for that input.
Information
You can see detailed information about the selected external device.
Refresh
If the external devices are not displayed in the Source list, open the Tools menu, select Refresh, and then
search for the connected devices.
Alternatively, you can refresh the Source list by selecting a using your remote.
✎
English - 25

Using Smart Hub
Smart Hub provides easy, on-screen access to five functions that let you manage and access channels,
set favorite channels, access photos, videos, or music on USB devices, cameras, and PCs, select video
sources, and set the TV to turn on automatically when a show you want to watch is on. The five functions
are listed below:
Ř Channel: Lets you manage channels, select favorite channels, add channels to and delete channels
from the Added Ch. list (the channels that appear when you press the
Ř Web Browser: Lets you browse the Internet.
Ř Schedule Manager: Lets you schedule shows and channels for viewing.
Ř Source: Lets you select a connected external video source to view.
Ř AllShare Play: Lets you access, view, or play photos, videos, or music located on USB devices,
digital cameras, cell phones, and PCs. PCs and cell phones can be accessed wirelessly, through your
wireless network.
Smart Hub also provides an easy-to-use gateway to a host of on-line media and entertainment including
apps from the Samsung Apps store, streaming videos and movies, kids sites, and more.
To acc e ss Smart Hub, press the ™ button on your remote.
✎
For more information about Smart Hub, see the e-Manual.
✎
z button.)
English - 26

SMART Interaction
Using this function, you can access and control menu options and functions using speech, motions or face
recognition.
INFORMATION BOOKLET DISCLAIMER
Ř Face recognition Log-in
In order for Face recognition to function, a thumbnail image of your face will be stored in your TV for
logging-in purposes.
Logging into the Smart Hub using Face recognition may be less secure than using an ID and
password.
Ř TV Camera Usage
Before using the TV Camera, you should be aware that under some circumstances and under certain
legal conditions your misuse of the TV Camera can result in legal liability for you. By using the TV
Camera, you agree that you will not use the camera (i) in locations where cameras are generally
prohibited (such as bathrooms, locker rooms or changing rooms), (ii) in any manner that will result in an
invasion of a person’s privacy or (iii) in violation of any applicable laws, regulations or statutes.
When you use a TV camera, you should check whether a tape attached or not in rear of the TV
camera, and then you can use a TV camera after adjust a camera angle. When you don't want to use a
TV camera, we recommend to use after a camera lens fixes to upwards. In this case, Face recognition
and Voice and Motion Control are not available.
Voice Control
Menu ĺ System ĺ Voice and Motion Control ĺ Voice Control
Enable or disable the voice recognition function. Lets you access and control menu options and functions
by speaking letters or words.
For accurate voice recognition, refer to the Standard Voice Command list at the Samsung web site
✎
(www.samsung.com ĺ support ĺ Manuals & Downloads).
Voice Control function can be affected recognition by unclear pronunciation, voice level, or
✎
surrounding noise.
To use Voice Control, you must pronounce words and phrases clearly and correctly in the language
✎
you selected in Language.
Ambient noise may cause Voice Control to malfunction. (Appropriate surrounding noise: Below
✎
40dB)
Your TV can "hear" your voice commands in two ways:
− Using the TV’s microphone. (Distant Recognition)
We are recommended using Voice Control function within about 13 ft with your TV. You can
✎
check the usable distance by using Voice Control Environment Test (System ĺ Voice and
Motion Control ĺ Voice Control ĺ Voice Control Environment Test).
English - 27

− Using the
✎
✎
✎
If a menu option or function is not supported by the Voice Control function, we suggest trying the
✎
Motion Control function. To use the Motion Control, raise your hand while opening it toward the
screen, hold it for a moment and then wave it 3 – 4 time to the left and right. Motion Control starts. If
the Motion Control starts, the cursor is displayed at the center of the screen and the Motion Guide
Bar Size is at the bottom of the screen.
■ Voice Control
Turns the Voice Control function on or off.
✎
■ Language
Select the recognition language you want to use.
■ Trigger Words
You can select the Trigger Words that start the Voice Control function.
Alternatively you can turn on your TV using the Trigger Words if Voice Control function is set to On.
VOICE˜ button on your remote. (Close Proximity Recognition)
When you use the TV's microphone, the words may not be recognized because of ambient noise.
If this occurs, try using the
voice command more easily.
The VOICE˜ button on your remote is always activated. If you want to use the TV's microphone,
turn on Voice Control (System ĺ Voice and Motion Control ĺ Voice Control).
Say a voice command to proper volume into the microphone of your remote within 0.3 – 0.4 ft. If
voice level is too small or large, voice command may not be recognized.
The VOICE˜ button on your remote is always activated.
VOICE˜ button on your remote. The TV will be able to recognize a
− If the Trigger Words is set to Hi TV, say Hi TV Power On.
− If the Trigger Words is set to Smart TV, say Smart TV Power On.
■ Voice Command Bar Size
Set the Voice Command Bar Size mode to Minimum or Full. Minimum displays the least number of
words and phrases you can use. Full displays all the words and phrases.
■ Voice Sensitivity
You can configure the sensitivity of Voice recognition.
− Howling: Select howling levels.
− Recognition responsiveness: Select the responsiveness level of Voice recognition.
English - 28

■ Voice Control Environment Test
You can test the amount of ambient noise level detected by the TV microphone.
− Noise Test: This test checks the amount of ambient noise detected by the TV microphone. Too
much ambient noise will prevent Voice Command from functioning. To run, select Next using your
remote. The test starts and takes a few seconds. Please keep as quiet as possible during the test.
− Mic & Speaker Test: Determines if the sound from the TV speakers picked up by the TV
microphone will disrupt Voice Command. To run, select Start using your remote. The test starts and
takes a few seconds. Please keep as quiet as possible during the test.
Available only when Speaker Select is set to TV Speaker.
✎
− Voice Control Test: This test checks the volume level and clarity of your voice for use with Voice
Control. Select Start using your remote. After the test starts, say the test words listed in the
instructions as loudly and clearly as you can.
If the test is not successful, select Retest, and then say the words loudly and clearly again.
✎
To use the Voice Control function, follow these steps:
If Voice Control function is set to On, the TV may be turned on automatically by effect of the ambient
✎
environment.
1. Speak the Trigger Words that you selected into the microphone embedded in the TV or press the
VOICE˜ button on your remote. The TV displays the Voice Command Bar Size.
When you use the Voice Control, the volume is set to 5 automatically.
✎
2. Say a word or phrase listed in the Voice Command Bar Size.
Pronounce the word or phrase clearly and correctly in the language you selected in Language.
✎
3. Wait until recognition is complete, and then say the next command in the same fashion.
To exit the Voice Control mode, speak the Trigger Words or "Cancel" using the TV's
✎
microphone, or press the
Using the Voice Text Input Mode
1. Say "Search All" while in the Voice Control mode.
When you use a QWERTY keypad screen, you can use the Voice Text Input Mode. Say the
✎
Trigger Words that you selected into the microphone embedded in the TV or press the VOICE˜
button on your remote. You cannot use it for some UIs such as URL input boxes.
2. Say the word or phrase you wish to search for.
3. The TV executes the spoken function.
Voice Control performance levels will vary based on the language spoken.
✎
RETURNR button.
English - 29

Motion Control
Menu ĺ System ĺ Voice and Motion Control ĺ Motion Control
Enable or disable the Motion Control function. Lets you control your TV by moving the TV cursor using
specific motions.
Motion Control function can be affected recognition by motion posture, or ambient brightness
✎
conditions.
Some applications may not support Motion Control.
✎
You may experience physical fatigue when you use the Motion Control for a long time.
✎
To use the Motion Control, please avoid direct sunlight.
✎
We are recommended using Motion Control function within about 5 – 13 ft with your TV. TV
✎
Camera's recognition range may differ depending on the angle of camera or other conditions. You
can check the recognition range of TV camera by using Motion Control Environment Test (System
ĺ Voice and Motion Control ĺ Motion Control ĺ Motion Control Environment Test).
■ Motion Control
Turns the Motion Control function on or off.
■ Motion Guide Bar Size
Set the Motion Guide Bar Size mode between Minimum or Full.
■ Motion Control Environment Test
You can test the brightness of room and the camera angle.
− Brightness Test: This test checks to see if your room is bright enough for Motion Control to work
properly. Select Start using your remote. The test will starts and should take only a few seconds.
(Appropriate ambient brightness: 50 – 500 Lux)
Do not illuminating a sunlight or lights directly into the camera lens.
✎
Make sure that the camera lens is cloaked by an object.
✎
− Camera Angle Test: On the Camera Angle Test screen, select Start using your remote. A
rectangle appears on the screen. Move yourself into the rectangle by adjusting the camera or
moving yourself in front of the camera. If you are not within the rectangle position, the test may not
work properly. After aligning your body with the TV, raise your hand while opening it toward the
screen, hold it for a moment and then wave it 3 – 4 times to the left and right.
To use the Motion Control function, follow these steps:
1. To use the Motion Control, raise your hand while opening it toward the screen, hold it for a moment
and then wave it 3 – 4 time to the left and right. Motion Control starts. If the Motion Control starts,
the cursor is displayed at the center of the screen and the Motion Guide Bar Size is at the bottom of
the screen.
2. Control the TV using your hands.
Note that the Motion Control function closes if your hands go out of the camera range.
✎
While using the Motion Control, if you use the other devices (i.e. remote control, keyboard, etc.),
✎
Motion Control closes.
English - 30
 Loading...