

Page 1
E-MANUAL
Contact SAMSUNG WORLDWIDE
If you have any questions or comments relating to Samsung products, please contact the SAMSUNG customer care center.
Comment contacter Samsung dans le monde
Si vous avez des suggestions ou des questions concernant les produits Samsung, veuillez contacter le Service Consommateurs
Samsung.
Comuníquese con SAMSUNG WORLD WIDE
Si desea formular alguna pregunta o comentario en relación con los productos de Samsung, comuníquese con el centro de
atención al cliente de SAMSUNG.
Country
CANADA 1-800-SAMSUNG (726-7864) www.samsung.com Samsung Electronics Canada Inc., Customer Service
U.S.A 1-800-SAMSUNG (726-7864) www.samsung.com Samsung Electronics America, Inc. 85 Challenger
Customer Care Center
Web Site Address
55 Standish Court Mississauga, Ontario L5R 4B2
Canada
Road Ridge eld Park, NJ 07660-2112
Plasma TV
user manual
© 2011 Samsung Electronics Co., Ltd. All rights reserved.
imagine the possibilities
Thank you for purchasing this Samsung product.
To receive more complete service, please register
your product at
www.samsung.com/register
Model _____________ Serial No. _____________
BN68-03383A-01
Page 2
Figures and illustrations in this User Manual are provided for reference only and may differ from actual product appearance.
Product design and specifications may be changed without notice.
Important Warranty Information Regarding Television Format Viewing
See the warranty card for more information on warranty terms.
✎
Wide screen format PDP Displays(with 16:9 aspect ratios, the ratio of the screen width to height) are primarily designed to view wide screen format fullmotion video. The images displayed on them should primarily be in the wide screen 16:9 ratio format, or expanded to fill the screen if your model offers
this feature, with the images constantly in motion. Displaying stationary graphics and images on the screen, such as the dark side bars on non- expanded
standard format television video and programming, should be limited to no more than 5% of the total television viewing per week.
Additionally, viewing other stationary images and text such as stock market crawls, video game displays, station logos, web sites or computer graphics
and patterns, should be limited as described above for all televisions. Displaying stationary images for more than 5% of total viewing time can cause
uneven aging of your PDP display and leave subtle, but permanent burned-in ghost images in the PDP picture. To avoid this, vary the programming and
images, and primarily display full screen moving images, not stationary patterns or dark bars.
On PDP models that offer picture sizing features, use these controls to view different formats as a full screen picture.
Be careful about the television formats you select and the length of time you view them. Uneven PDP aging as a result of format selection and use, as well
as burned in images, are not covered by your Samsung limited warranty.
• SAMSUNG ELECTRONICS NORTH AMERICAN LIMITED WARRANTY STATEMENT
Subject to the requirements, conditions, exclusions and limitations of the original Limited Warranty supplied with Samsung Electronics (SAMSUNG)
products, and the requirements, conditions, exclusions and limitations contained herein, SAMSUNG will additionally provide Warranty Repair Service
in the United States on SAMSUNG products purchased in Canada, and in Canada on SAMSUNG products purchased in the United States, for the
warranty period originally specified, and to the Original Purchaser only.
The above described warranty repairs must be performed by a SAMSUNG Authorized Service Center. Along with this Statement, the Original Limited
Warranty Statement and a dated Bill of Sale as Proof of Purchase must be presented to the Service Center. Transportation to and from the Service
Center is the responsibility of the purchaser. Conditions covered are limited only to manufacturing defects in material or workmanship, and only those
encountered in normal use of the product.
Excluded, but not limited to, are any originally specified provisions for, in-home or on-site services, minimum or maximum repair times, exchanges or
replacements, accessories, options, upgrades, or consumables.
For the location of a SAMSUNG Authorized Service Center, please call toll-free:
– In the United States : 1-800-SAMSUNG (1-800-726-7864)
– In Canada : 1-800-SAMSUNG
Important User Information
• Screen Image retention
Do not display a still image (such as that from a video game) on the plasma display panel for more than a few minutes. Still images can cause screen
image retention (burn in). This image retention is also known as ‘screen burn’. To avoid image retention, refer to e-Manual to learn how to reduce the
brightness and contrast of the screen when displaying a still image.
• Heat on the top of the Plasma TV
The top side of the TV may become hot after long periods of use as heat dissipates from the panel through the vent hole in the upper part of the TV.
This is normal and does not indicate any defect or operational failure of unit.
However, children should be prevented from touching the upper part of the TV.
• The TV is making a ‘cracking’ noise.
A ‘cracking’ noise may occur when the TV contracts or expands due to a change in the surrounding environment such as temperature or humidity.
This is normal and not a defect.
• Cell Defects
The PDP uses a panel consisting of 2,360,000 (HD-level) to 6,221,000 (FHD-level) pixels which require sophisticated technology to produce.
However, there may be a few bright or dark pixels on the screen. These pixels will have no impact on the performance of the product.
• Avoid operating the TV at temperatures below 41°F (5°C)
• A still image displayed too long may cause permanent damage to the PDP Panel.
Watching the Plasma TV in 4:3 format for a long period of time may leave traces of the borders on the left, right, top, or bottom of
the screen caused by the difference of light emission on the screen. Playing a DVD or a game console may have a similar effect.
Damage caused by the above effect is not covered by the warranty.
• After-images on the Screen.
Displaying still images from Video games and PC for longer than a certain period of time may produce partial after-images.
To prevent this effect, reduce the ‘brightness’ and ‘contrast’ when displaying still images for a long time.
• Warranty
Warranty does not cover any damage caused by image retention.
Burn-in is not covered by the warranty.
English - 2
Page 3
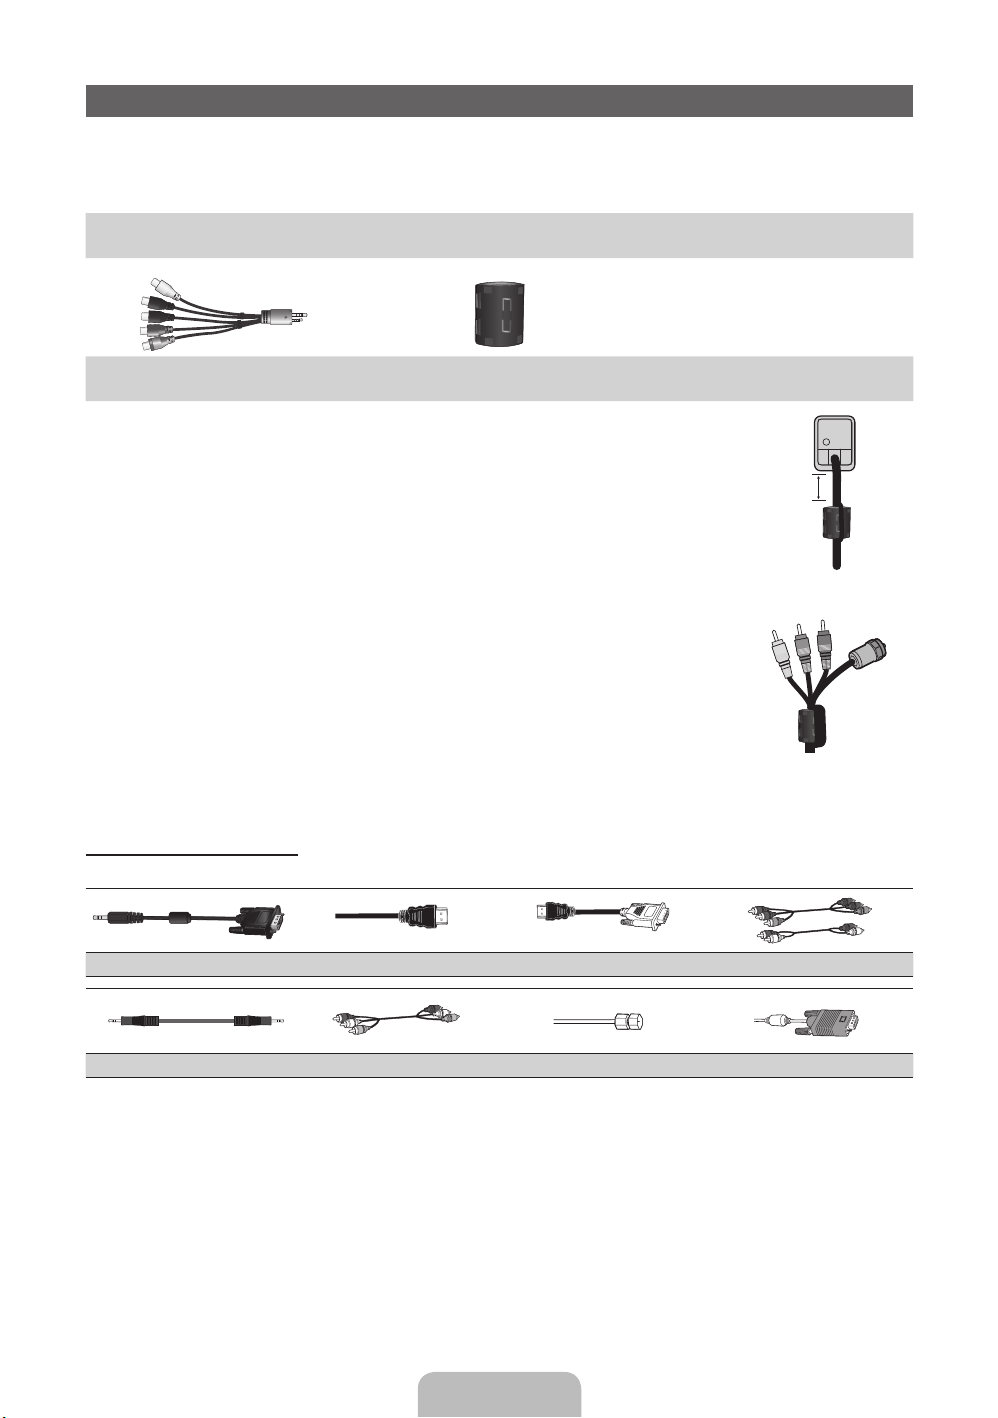
Accessories
✎
Please make sure the following items are included with your TV. If any items are missing, contact your dealer.
✎
The items’ colors and shapes may vary depending on the model.
✎
Check that there are no accessories hidden behind or under packing materials when you open the box.
y QWERTY Remote (BN59-01134B) & Batteries (AAA x 4)
y Owner’s Instructions
y Warranty Card / Safety Guide
y Cleaning Cloth
AV/Component Adapter
(BN39-01154W)
✎
Ferrite Core for Power Cord: The ferrite cores are used to shield the cables from interference.
When connecting the ferrite core to a cable, open the ferrite core and clip it around the cable
near the plug as shown in the figure.
A Maximum distance between the ferrite core and the end of the cord inserted in the TV:
x
6~8 inches
✎
Ferrite Core : The ferrite cores are used to shield the cables from interference. When
connecting a cable, open the ferrite core and clip it around the cable near the plug as shown
in the figure.
Input Cables (Sold Separately)
To purchase the RS232 cable, contact www.SamsungParts.com.
Ferrite Core (2EA)
(3301-002049)
A
Power Cord
Antenna Cable/
Component Cable
(sold separately)
RS232 (AA39-00311A) HDMI HDMI-DVI Component
Audio Cable Composite (AV) Coaxial (RF) VGA
English - 3
Page 4
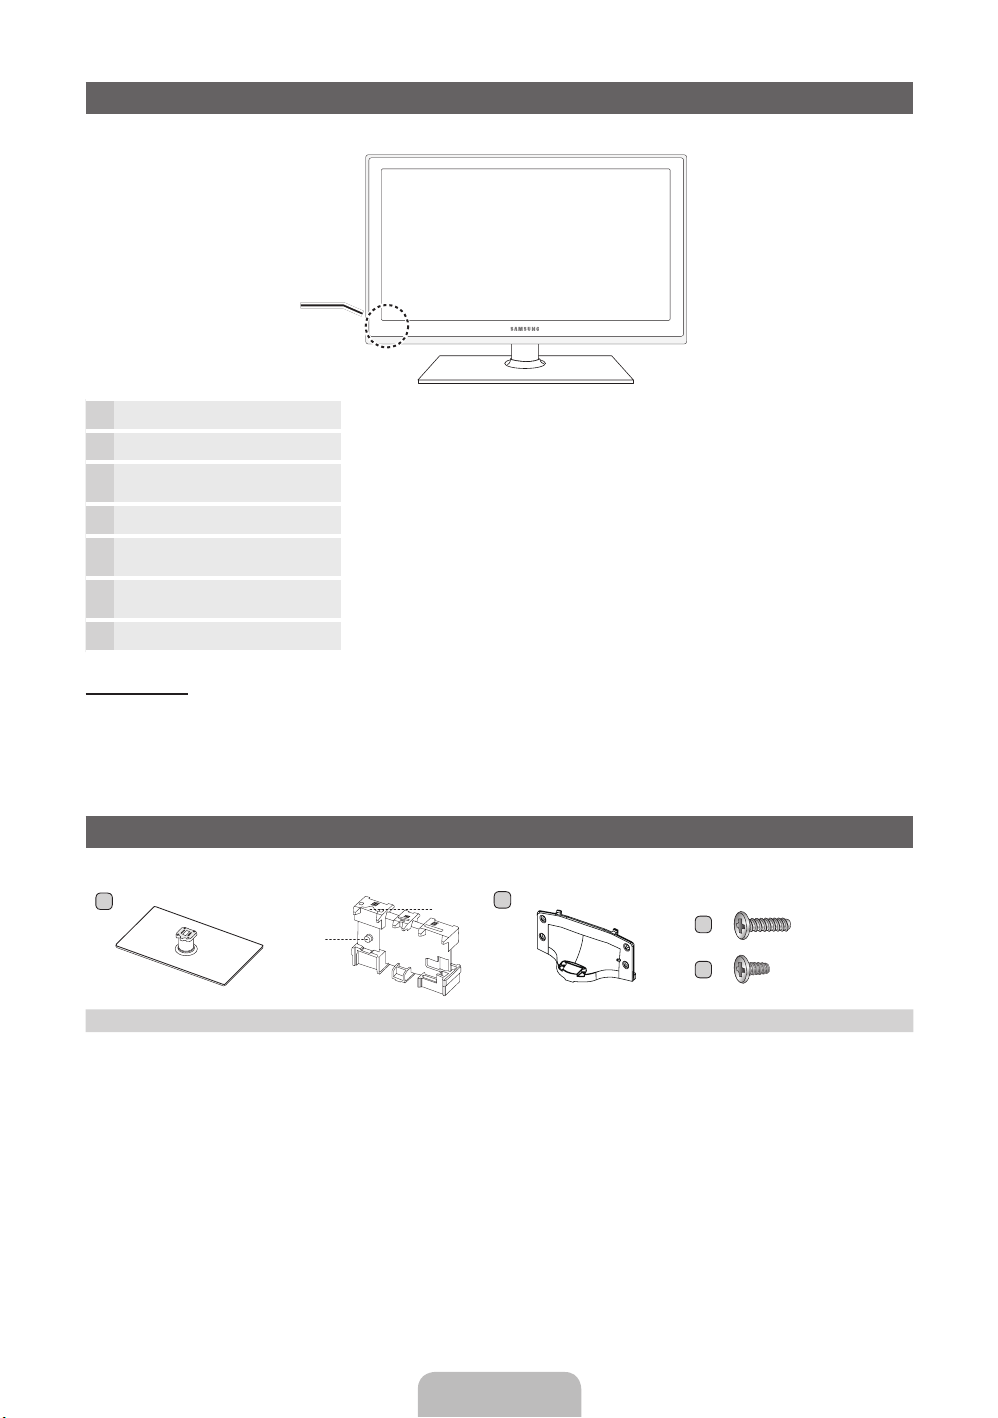
Viewing the Control Panel
✎
The product color and shape may vary depending on the model.
Control Panel
Remote control sensor Aim the remote control towards this spot on the TV.
Power Indicator Blinks and turns off when the power is on and lights up in standby mode.
SOURCE
m
MENU
y
z
P
(Power)
E
Toggles between all the available input sources. In the on-screen menu, use this
button as you would use the ENTERE button on the remote control.
Displays an on-screen menu, the OSD (on screen display) of your TV’s features.
Adjusts the volume. In the OSD, use the
◄ and ► buttons on the remote control.
Changes the channels. In the OSD, use the
▼ and ▲ buttons on the remote control.
Turns the TV on or off.
y
z
buttons as you would use the
buttons as you would use the
Standby mode
Your TV enters Standby mode when you turn it off and continues to consume a small amount of electric power. To be safe and
to decrease power consumption, do not leave your TV in standby mode for long periods of time (when you are away on
vacation, for example). It is best to unplug the power cord.
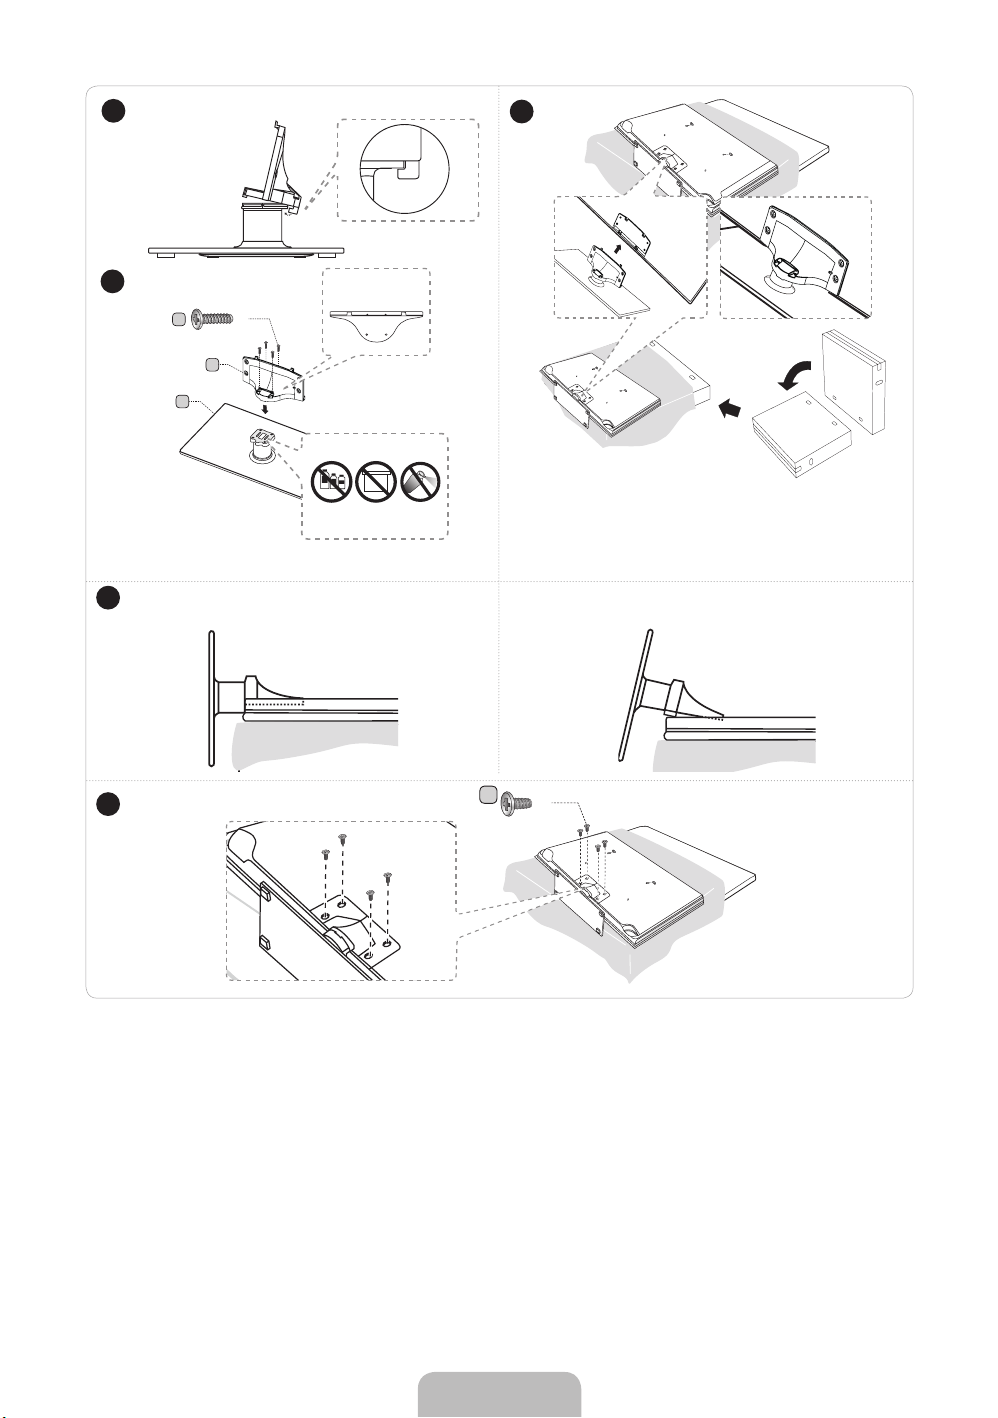
Install the Stand
See the separate stand installation guide for more detailed instructions.
B
A
1 EA
A
Stand (depending on the model) Guide Stand Screws
B
1 EA
C
D
x4 (M4 X L12)
x4 (M4 X L8)
English - 4
Page 5
1
3
2
4
5
Side View
C
(M4 X L12)
A
Top View
x4
B
Front
ATTENTION
Rear
DO NOT USE
DO NOT USE
GREASE
DO NOT USE
OIL
CHEMICALS
(Correct assembly) (Incorrect assembly)
D
(M4 X L8)
✎
Pl
ace a soft cloth over the table to protect the TV, and
then place the TV on the cloth screen side down.
✎
Insert the Stand Guide into the slot of TV bottom side.
x4
✎
NOTE
Make sure to distinguish between the front and back of the Stand and Guide Stand when assembling them.
x
Make sure that at least two people lift and move the TV.
x
Stand the product up when you fasten the screws. If you fasten the screws with the TV lying down, it may lean to one
x
side when you stand it up.
Do not insert your fingers into the stand base slot of the TV when installing the stand base.
[
English - 5
Page 6
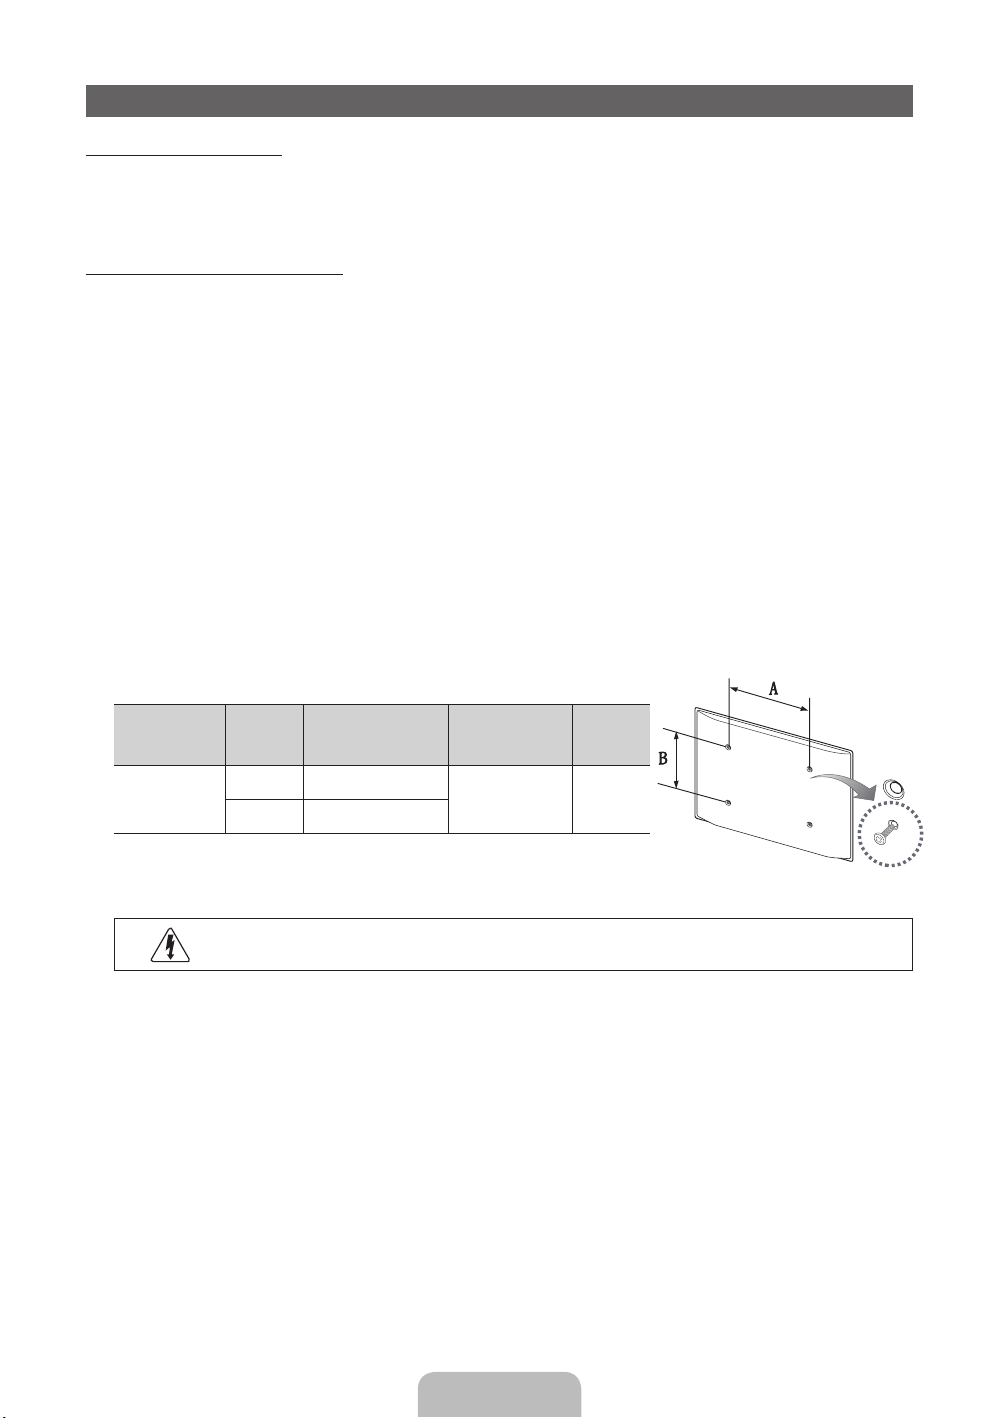
Installing the Wall Mount
Installing the Wall Mount Kit
The wall mount kit (sold separately) allows you to mount the TV on the wall.
For detailed information on installing the wall mount, see the instructions provided with the wall mount. We recommend you
contact a technician for assistance when installing the wall mount bracket. Samsung Electronics is not responsible for any
damage to the product or injury to yourself or others if you elect to install the wall mount on your own.
Wall Mount Kit Specifications (VESA)
Install your wall mount on a solid wall perpendicular to the floor. Before attaching the wall mount to surfaces other than plaster
board, please contact your nearest dealer for additional information. If you install the TV on a ceiling or slanted wall, it may fall
and result in severe personal injury.
✎
NOTE
Standard dimensions for wall mount kits are shown in the table below.
x
Samsung wall mount kits contain a detailed installation manual and all parts necessary for assembly are provided.
x
Do not use screws that do not comply with the VESA standard screw specifications.
x
Do not use screws that are longer than the standard length or do not comply with the VESA standard screw
x
specifications. Screws that are too long may cause damage to the inside of the TV set.
For wall mounts that do not comply with the VESA standard screw specifications, the length of the screws may differ
x
depending on the wall mount specifications.
Do not fasten the screws too firmly. This may damage the product or cause the product to fall, leading to personal
x
injury. Samsung is not liable for these kinds of accidents
Samsung is not liable for product damage or personal injury when a non-VESA or non-specified wall mount is used or
x
the consumer fails to follow the product installation instructions.
Our 59” models do not comply with VESA Specifications.
x
Do not mount the TV at more than a 15 degree tilt.
x
Always have two people mount the TV on a wall.
x
Product Family
PDP TV
[Ultra-Slim]
✎
Remove the screws in the mounting holes before you install the wall mount.
TV size in
inches
51 400 X 400
59~64 600 X 400
Do not install your Wall Mount Kit while your TV is turned on. It may result in personal injury due to
electric shock.
VESA scew hole
specs (A * B) in
millimeters
Standard Screw Quantity
M8 4
English - 6
Page 7
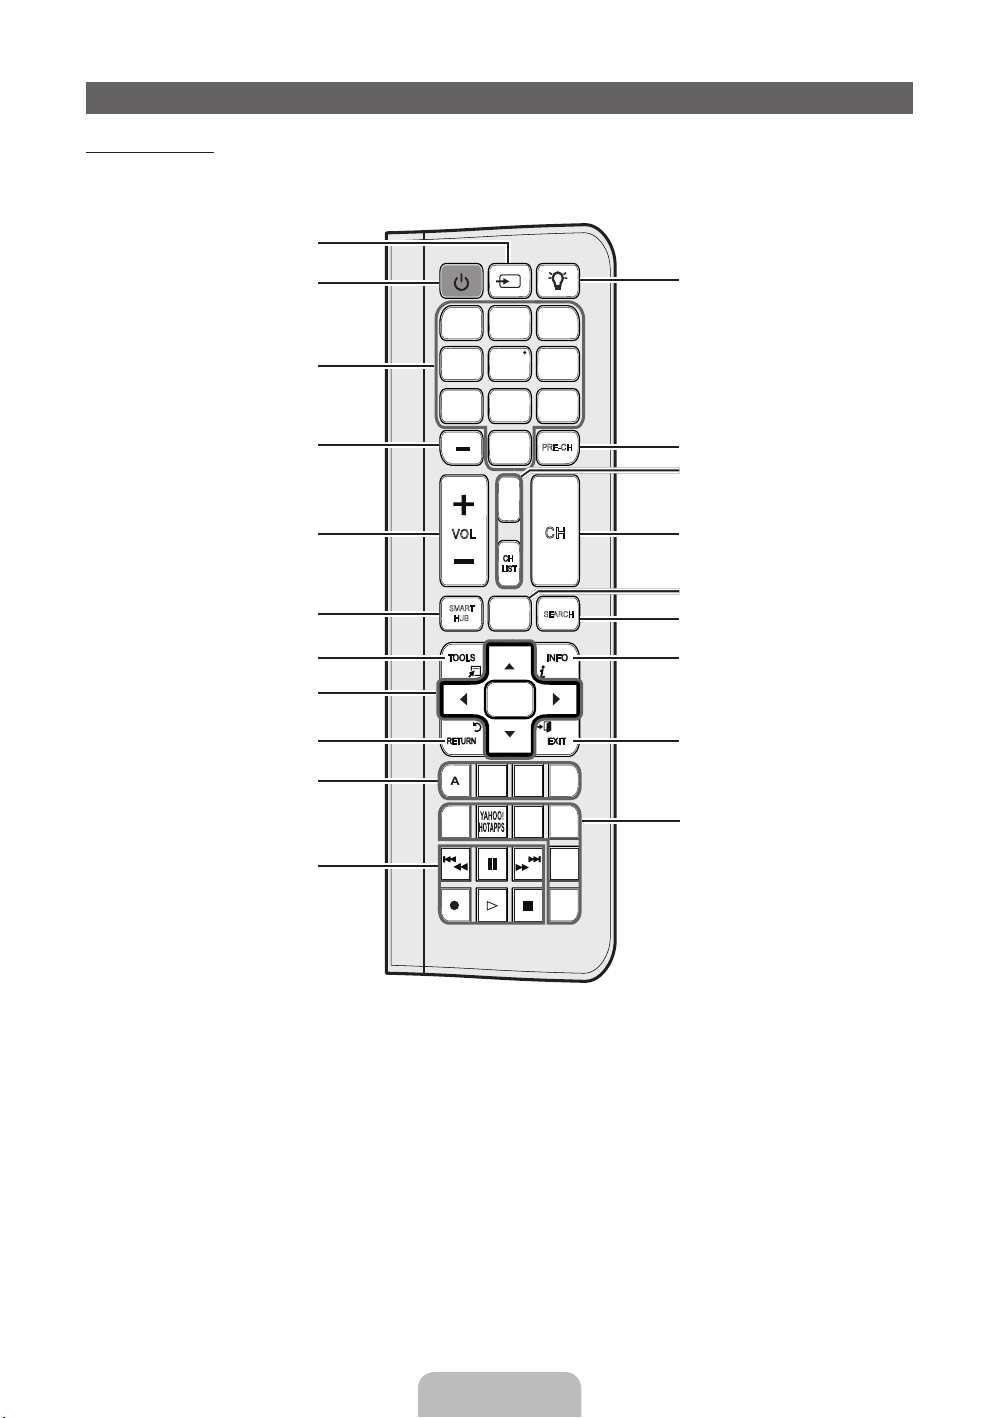
Remote Side View
PRE-CH
CH
LIST
142
3
5
6
7 8
9
0
MUTE
M
MENU
m
SOURCEPOWER ON/OFF
SMART
HUB
l
B
X
E-MANUAL
P.SIZE
CC
SOCIAL
TV
C D
VOL
<
<
CH
SEARCH
E
QWERTY Remote (RMC-QTD1)
Displays and selects the available video
Turns the TV on and off.
Gives direct access to channels.
Press to select additional digital channels
being broadcast by the same station. For
example, to select channel ‘54-3’, press
Quickly select frequently used functions.
Selects the on-screen menu items and
changes the values seen on the menu.
Use these buttons in SMART HUB and
‘54’, then press ‘-’ and ‘3’.
Adjusts the volume.
Link to various application services.
Returns to the previous menu.
Buttons used in the Channel and
SMART HUB menu, etc.
Anynet+ (HDMI-CEC) modes.
sources.
Turns the remote control light on or
off. When on, the buttons become
illuminated for a moment when pressed.
(Using the remote control with this button
set to On will reduce the battery usage
time.)
Returns to the previous channel.
MUTE: Cuts off the sound temporarily.
CH LIST: Displays channel lists on the
screen.
Changes channels.
Opens the OSD.
Support to recommendation search
word and search function.
Displays information on the TV screen.
Exits the menu.
SOCIAL TV: Connect to Social TV
application.
YAHOO!: Runs Yahoo widget.
X
: Turns the 3D image on or off.
E-MANUAL: Displays the e-Manual.
P.SIZE: Lets you select the Picture Size.
CC: Displays digital subtitles.
English - 7
Page 8
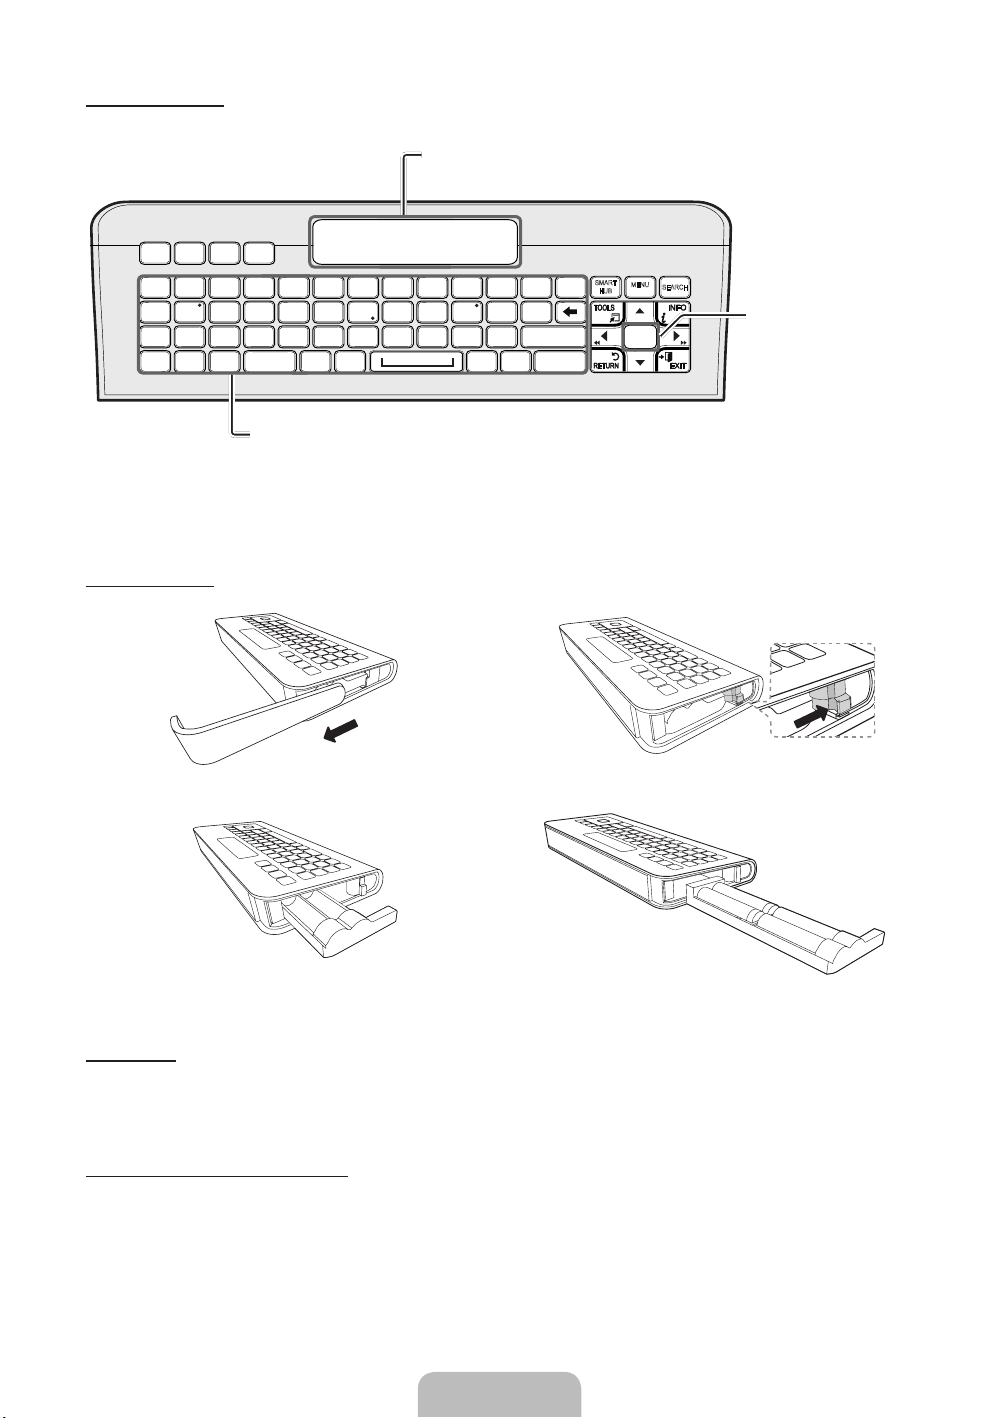
QWERTY Side View
Displays the characters the user typed in.
When the user presses ENTER
E
, all characters
on the screen are removed.
D
WQ E
#!
^%
CAPS SHIFT SHIFTSYM SYM.COM
)
-_+
SA D
~`
Z
TAP ENTER
X
TR Y
[=]
GF H
;
VC B
,
/
>
<
@
.
IU O
KJ L
MN
P
}{ |
/
‘: “
?
SMART
HUB
ESC
$
& (*
BA C
21 3
@
54 6
807 9
Convenient QWERTY keyboard to type characters in SMART HUB and
SOCIAL TV menu, etc.
SYM: Enables the symbol printed on the lower right side of each button.
✎
NOTE
y The remote side doesn’t work when the QWERTY side is up, and vice versa.
Inserting Batteries
1 2
y Slide out the battery cover. y Push the button right.
3 4
MENU
m
E
SEARCH
OFN(Optical Finger
Navigation) Sensor
In full browser function,
it can be used as the
pointer. If the user
doesn’t press any button
during 30 seconds,
the sensor will be off
automatically.
To wake up the sensor,
press any button on the
QWERTY side.
y Pull the battery tray out. y Insert 4 AAA batteries in the tray, insert the battery tray
into the QWERTY Remote and put the cover back on.
Initial Pairing
1.
When the user inserts batteries into the QWERTY Remote, “NEED PAIRING PRESS SYM+TAB” will be displayed on the screen.
2. Press the SYM and TAB buttons at the same time for more than 2 seconds.
✎
The TV can be paired with only one QWERTY remote. Start the pairing process approximately 30 seconds after turning
on the TV.
Performing the Pairing Process Again
1. If the QWERTY Remote has been paired before, press @ and ← on the QWERTY side for more than 3 seconds.
“RESET OK” will be displayed on the LCD screen of the QWERTY remote.
2. Press MUTE, 0, MUTE and 0 on the remote side of the QWERTY Remote as it faces the TV. This sequence must be
completed within 4 seconds.
✎
There might be a slight delay between input and the response from the OSD. Do not wait for visual confirmation on the
screen.
3. Follow the initial pairing process within 3 minutes. If the initial pairing process does not finish within 3 minutes, the whole
process must be performed again.
English - 8
Page 9
✎
For the best cable connections to this product, be sure to use cables no thicker than 0.55 inches (14mm).
y Maximum thickness - 0.55 inches (14mm)
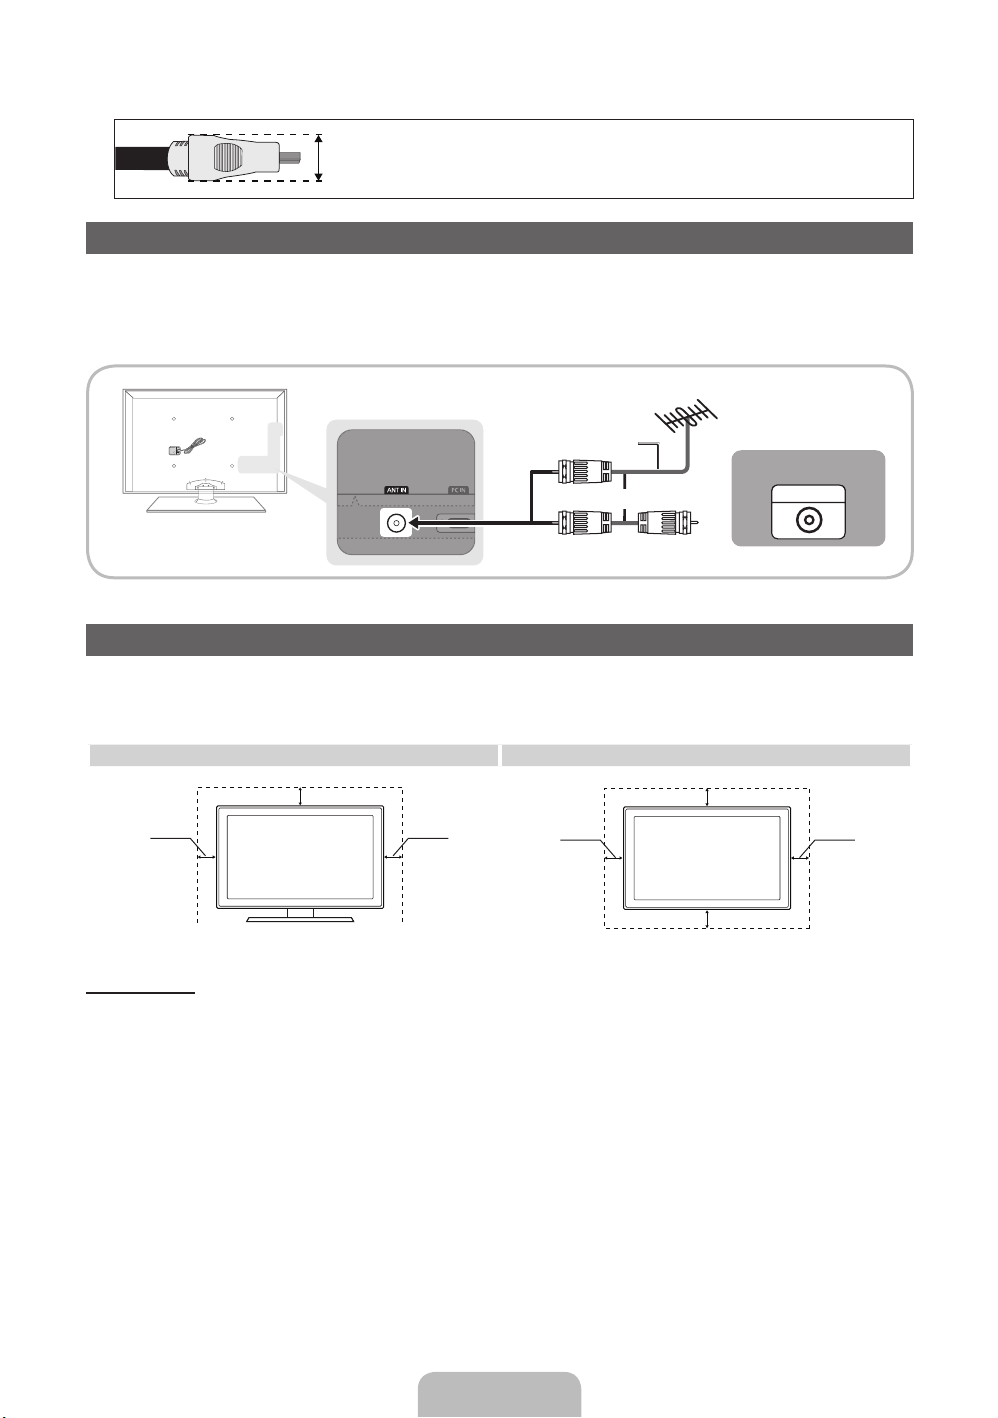
Connecting to an Antenna or Cable Connection
Connecting the power cord and an antenna or cable connection.
✎
The PDP device may interfere with an amateur radio or AM radio.
✎
Using two-way radio mobile and portable units or amateur radio or AM radio near your TV may cause the TV to
malfunction.
VHF/UHF Antenna
Antenna Cable (Not Supplied)
Cable
or
ANT OUT
Securing the Installation Space
Keep the required distances between the TV, the wall, and other objects to ensure proper ventilation. Failing to do so may result in a fire or a problem with
the TV caused by an increase in its internal temperature.
When using a stand or wall-mount, use parts provided by Samsung Electronics only.
✎
• If you use parts provided by another manufacturer, it may result in a problem with the product or an injury due to the product falling.
Installation with a stand. Installation with a wall-mount.
4 inches
4 inches
Other Warnings
✎
The actual appearance of the TV may differ from the images in this manual, depending on the model.
✎
Be careful when you touch the TV. Some parts can be somewhat hot.
4 inches
4 inches
4 inches
4 inches
4 inches
English - 9
Page 10
Plug & Play (Initial Setup)
When you turn the TV on for the first time, a sequence of on-screen prompts will assist in configuring basic settings. To turn on
the TV, press the POWERP button.
✎
Plug & Play is available only when the Source is set to TV.
✎
To return to the previous step in the Plug & Play sequence, select Previous, and then press ENTERE.
✎
Before turning on the TV, make sure you have connected the TV to an antenna or cable connection (p. 9).
Selecting the OSD
1
Language
Setting up Network
2
Software Upgrade When network connection settings are complete, Software Upgrade is available.
3
Selecting the usage
4
mode
Setting the Clock
5
Mode
Selecting search
6
options for auto tuning
Selecting and
7
memorizing channels
Enjoy your TV. If you want to watch a broadcast program, select Close. If you want to enjoy Smart Hub,
8
Press the ▲ or ▼ button to select a language. Press ENTER
Set up your network connection. Press the ENTER
your network set up information or want to set to it later, select Skip. We suggest you skip
network connection setup now and refer to “Network menu” in the e-Manual for set up
requirements and instructions, and the Network Connection section of this manual (Page
16). You can set up the network connection later using the Network menu.
Select Next to upgrade TV software. Your TV will automatically upgrade, if your TV need a
software upgrade. If you want to upgrade later, select the Skip. For more information, refer
to “Software Upgrade” (Preference Features → Support Menu) in the e-Manual.
✎
This may take some time, depending on network status.
Press the ▲ or ▼ button to select, and then press the ENTER
y Select the Home Use mode. Store Demo mode is for retail environments.
Press the ▲ or ▼ button to select Auto or Manual, and then press ENTER
✎
If you selected Auto, you’ll go to the Time Zone and DST screen. Select Time Zone
or DST, and then press ENTERE. On the Time Zone screen, use the ▲ or ▼
button to select your zone, and then press ENTERE. On the DST screen, press,
ENTERE, then select whether to turn DST (Daylight Savings Time) on or off. When
done, press ENTERE.
✎
If you selected Manual, you’ll go to the Date and Time screen. Select Date or Time,
and then press ENTERE. Then, use the number buttons or the ▲ or ▼ button to
set the date or time. Use the ◄ or ► button to move between entry fields. When
done setting the Date and Time, select Next, and then press ENTERE.
Press the ▲ or ▼ button to select Air or Cable, and then press ENTERE. A check
appears on your selection. Select Next, and then press the ENTER
check both if you have both connected.
✎
If you selected Cable, you’ll go to the Cable System screen. Use the ▲ or ▼ button
to select Digital or Analog, and then press. ENTERE. Use the ▲ or ▼ button
to select the correct cable signal format - STD, HRC, or IRC - and then press
ENTERE. Most cable systems use STD. Select the correct cable signal format for
both the Digital and Analog systems.
When done, select Next, and the press ENTER
The channel search will start automatically. This can take up to 30 minutes.
For more information, refer to Channel → Auto Program in the e-Manual.
✎
Press the ENTERE button at any time to interrupt the memorization process.
select Smart Hub. Smart Hub will start. For more detailed information, refer to “Smart Hub”
in the e-Manual.
E
E
twice when done.
button to start. If you do not know
E
button twice.
E
twice.
E
button. You can
E
.
If You Want to Rerun Plug & Play...
O
MENU → System → Plug & Play → ENTER
✎
NOTE
y To change the TV’s setting from Store Demo to Home Use when not in Plug & Play, press the volume button on the TV.
When you see the volume bar on the screen, press and hold the MENU button on the TV for 5 sec.
E
English - 10
Page 11
Connecting to an AV Device
R-AUDIO-L
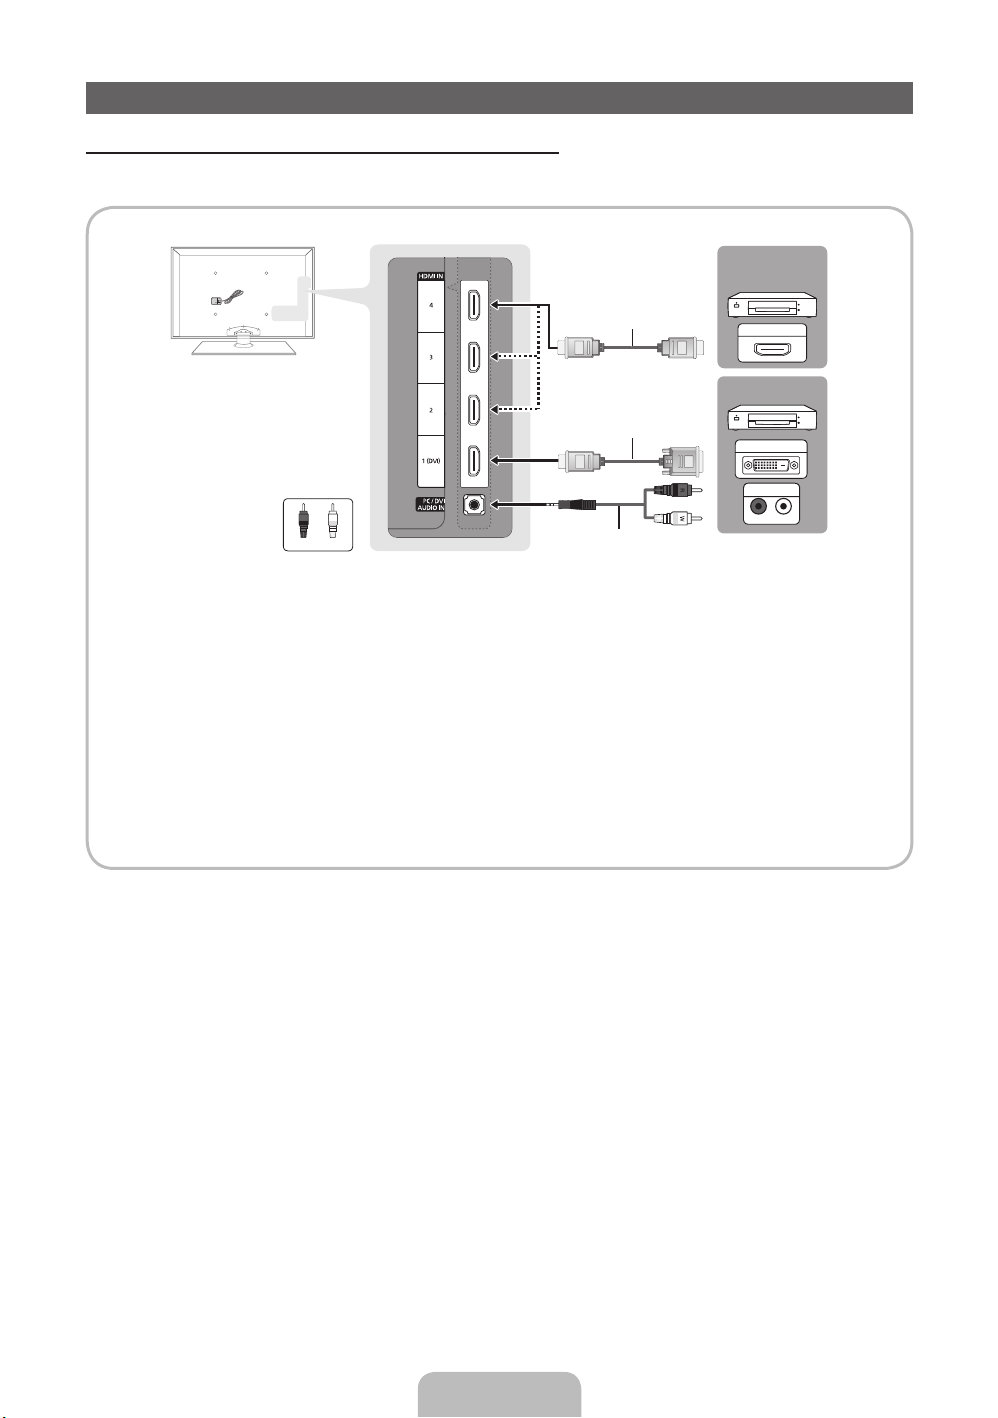
Using an HDMI or an HDMI/DVI Cable: HD connection (up to 1080p)
We recommend using the HDMI connection for the best quality HD picture.
Available devices: DVD player, Blu-ray player, HD cable box, HD STB (Set-Top-Box) satellite receiver
Device
HDMI Cable (Not Supplied)
HDMI OUT
Device
HDMI to DVI Cable (Not Supplied)
WR
WhiteRed
✎
HDMI IN 1 (DVI), 2, 3, 4 / PC/DVI AUDIO IN
For better picture and audio quality, connect to a digital device using an HDMI cable.
x
An HDMI cable supports digital video and audio signals, and does not require an audio cable.
x
Audio Cable (Not Supplied)
DVI OUT
AUDIO OUT
– To connect the TV to a digital device that does not support HDMI output, use an HDMI/DVI and audio cables.
The picture may not display normally (if at all) or the audio may not work if you connect an external device that
x
uses an older version of HDMI mode to the TV. If such a problem occurs, ask the manufacturer of the external
device about the HDMI version and, if out of date, request an upgrade.
Be sure to purchase a certified HDMI cable. Otherwise, the picture may not display or a connection error may
x
occur.
We recommend using a basic high-speed HDMI cable or an HDMI cable that supports Ethernet. Note that this
x
TV does not support the Ethernet function via HDMI.
English - 11
Page 12
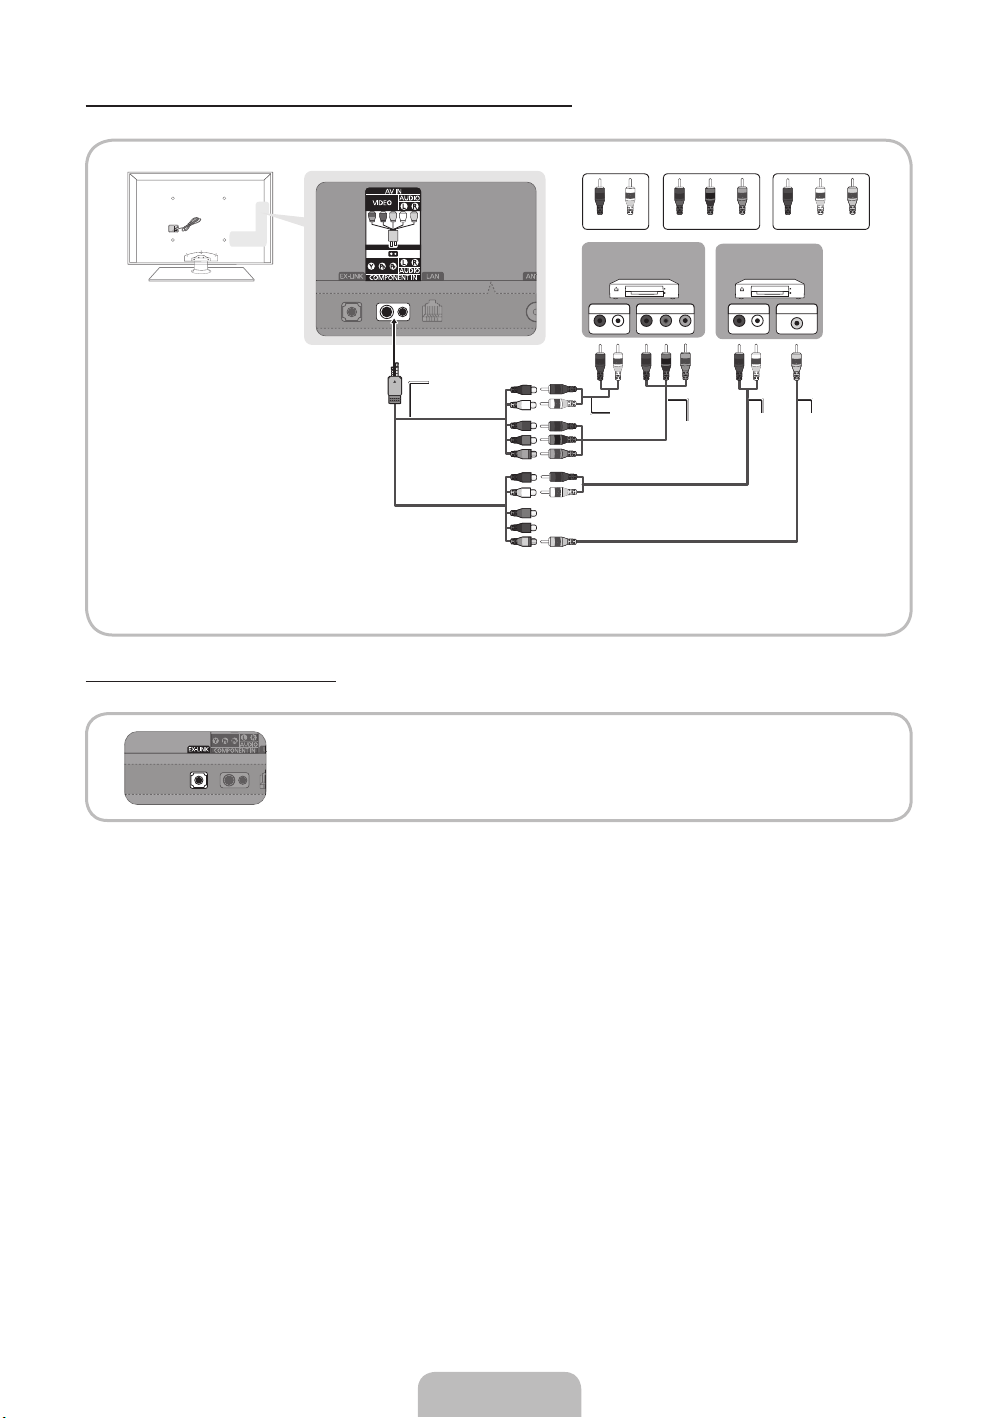
Using a Component (up to 1080p) or an Audio/Video (480i only) Cable
Available devices: DVD player, Blu-ray player, cable box, STB satellite receiver, VCR
R W R
R
G
B
Red White Red RedBlue WhiteGreen Yellow
AUDIO OUT
COMPONENT OUT
R-AUDIO-L
B
RRRW
Component Adapter
(Supplied)
✎
For better picture quality, we recommend the Component connection over the A/V connection.
✎
When connecting to AV IN, the color of the AV IN [VIDEO] jack (green) will not match the video cable (yellow).
W
Audio Cable
(Not Supplied)
R
B
G
R
W
Y
Component Cable
(Not Supplied)
R-AUDIO-LPR PB
Y
G
R
Using an EX-Link Cable Connection
Available Devices: External devices that support EX-Link.
DeviceDevice
W
Audio Cable
(Not Supplied)
R
VIDEO OUTAUDIO OUT
Y
W
W
Video Cable
(Not Supplied)
Y
Y
EX-LINK: Connector for service only.
English - 12
Page 13
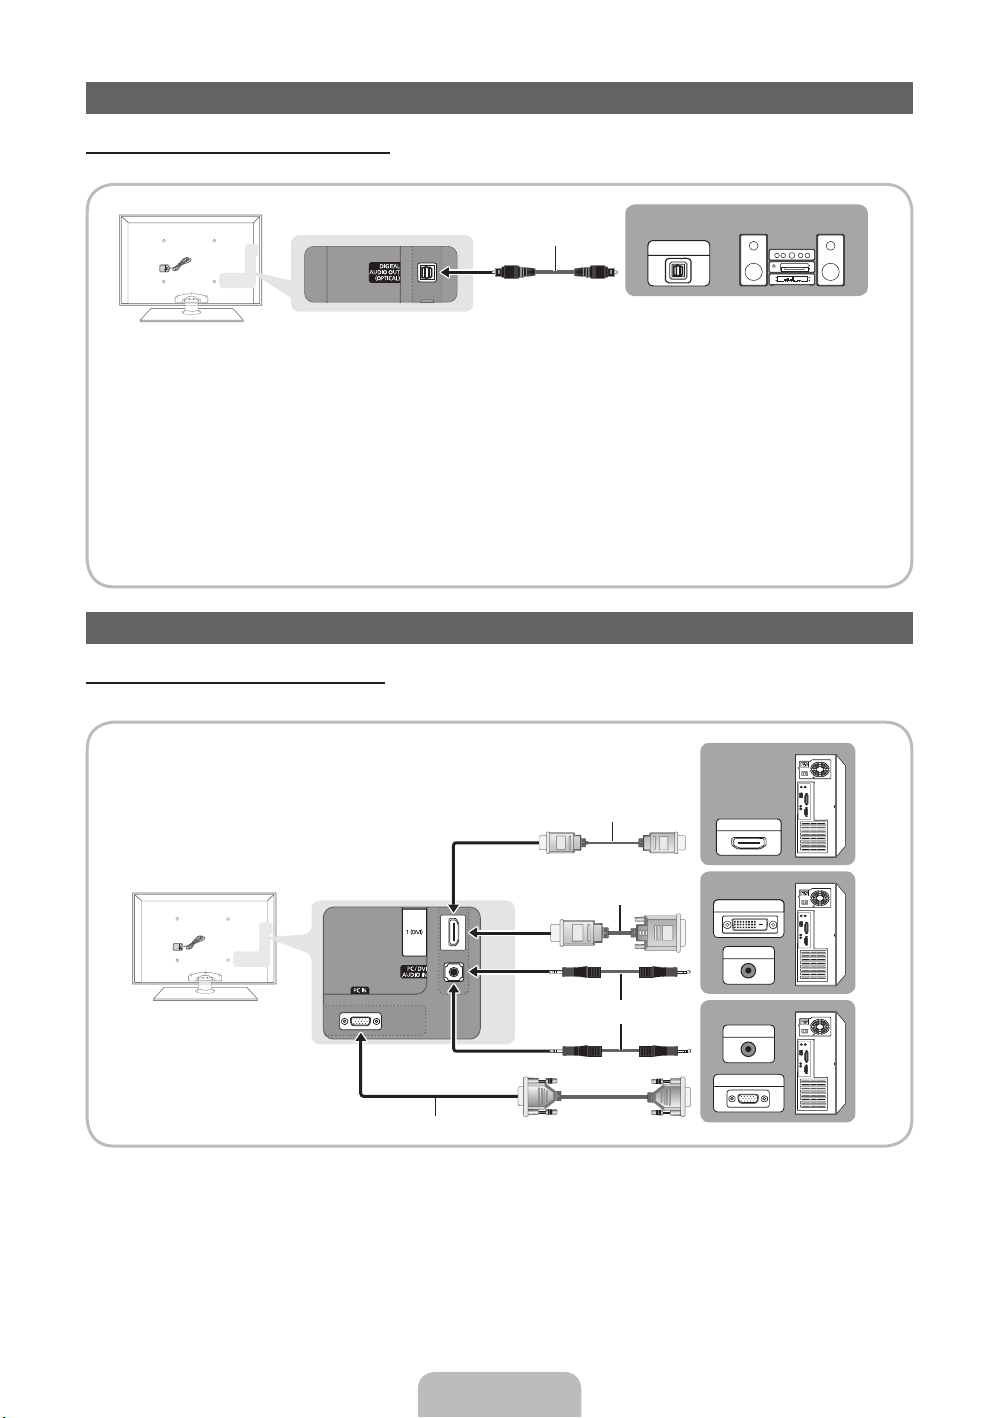
Connecting to an Audio Device
Using an Optical (Digital) Cable Connection
Available devices: Digital Audio System, Amplifier, DVD home theater
✎
DIGITAL AUDIO OUT (OPTICAL)
When you connect a Digital Audio System to the DIGITAL AUDIO OUT (OPTICAL) jack, decrease the volume
x
of both the TV and the system.
5.1 CH (channel) audio is available when you connect the TV to an external device supporting 5.1 CH.
x
When the receiver (home theater) is set to on, you can hear sound output from the TV’s optical jack. When the
x
TV is receiving a DTV signal, the TV will send 5.1 CH sound to the home theater receiver. When the source is a
digital component such as a DVD player / Blu-ray player / cable box / STB (Set-Top-Box) satellite receiver and
you connected it to the TV via HDMI, you will only hearf 2 CH audio from the home theater receiver. If you want
to hear 5.1 CH audio, connect the digital audio out jack from your DVD player/ Blu-ray player / cable box / STB
satellite receiver directly to an amplifier or home theater.
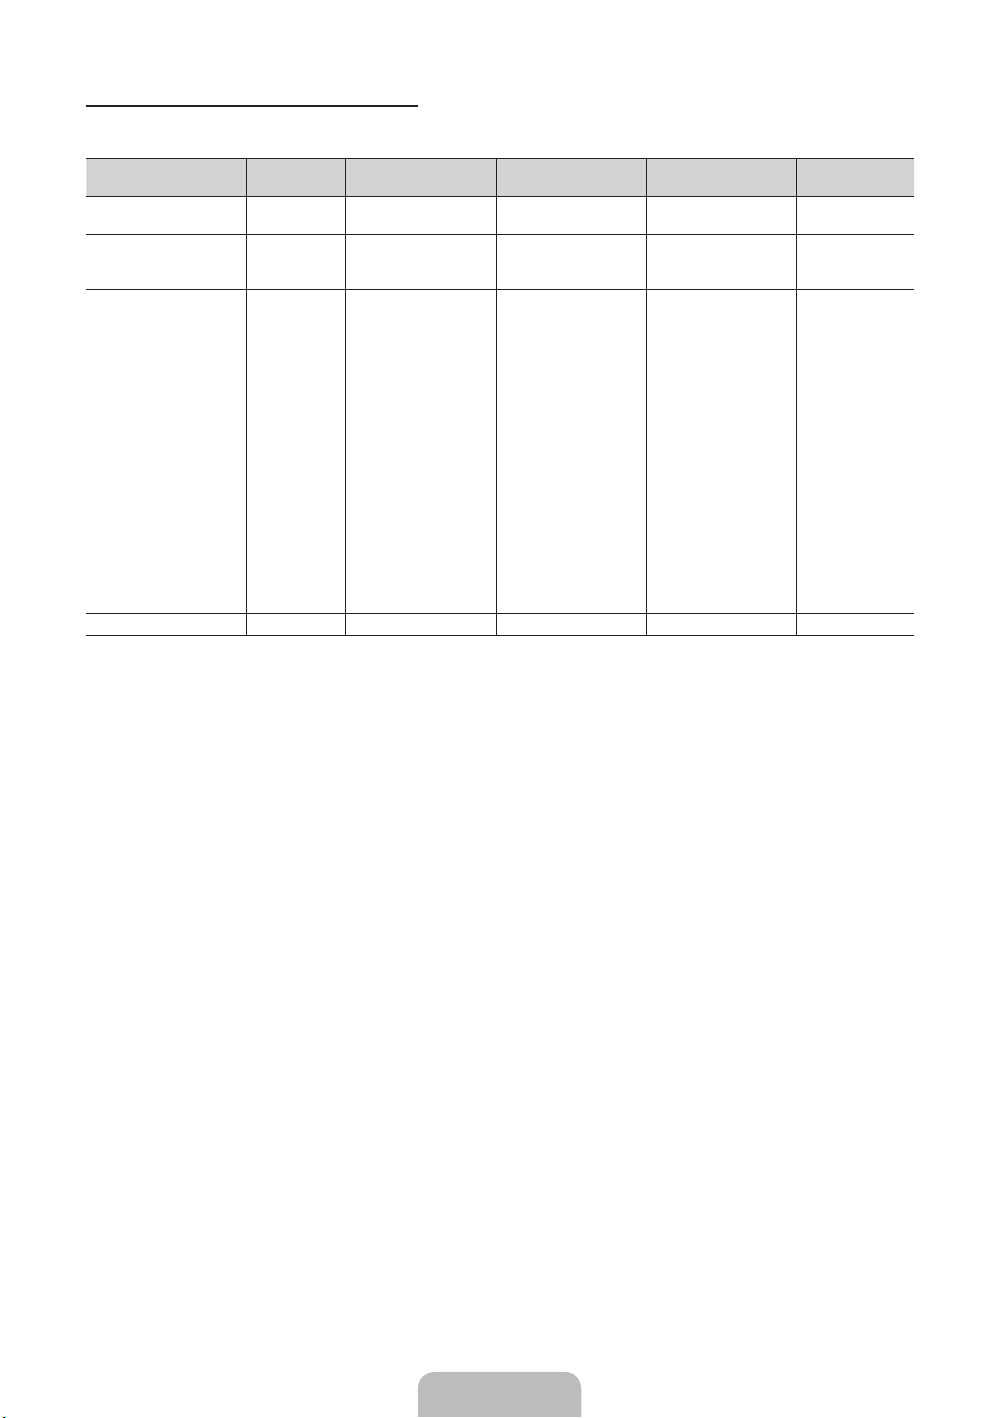
Using an HDMI/DVI cable or a D-sub cable
✎
Your PC may not support an HDMI connection.
Optical Cable (Not Supplied)
Connecting to a PC
Digital Audio System
OPTICAL
D-Sub Cable (Not Supplied)
English - 13
HDMI Cable (Not Supplied)
HDMI to DVI Cable (Not Supplied)
Audio Cable (Not Supplied)
HDMI OUT
DVI OUT
AUDIO OUT
AUDIO OUT
PC OUT
Page 14
PC Display Modes (D-Sub and HDMI/DVI Input)
Optimal PC resolution is 1920 X 1080 @ 60 Hz. You can also select one of the standard resolutions listed in the Resolution
column. The TV will automatically adjust to the resolution you choose.
Mode Resolution
IBM
MAC
VESA DMT
VESA DMT / DTV CEA
✎
NOTE
For HDMI/DVI cable connection, you must use the HDMI IN 1 (DVI) jack.
x
The interlaced mode is not supported.
x
The set may operate abnormally if you select a non-standard video format.
x
Separate and Composite modes are supported. SOG (Sync On Green) is not supported.
x
640 x 350
720 x 400
640 x 480
832 x 624
1152 x 870
640 x 480
640 x 480
640 x 480
800 x 600
800 x 600
800 x 600
1024 x 768
1024 x 768
1024 x 768
1152 x 864
1280 x 1024
1280 x 1024
1280 x 800
1280 x 800
1280 x 960
1360 x 768
1440 x 900
1440 x 900
1680 x 1050
1920 x 1080p 67.500 60.000 148.500 +/+
Horizontal Frequency
(KHz)
31.469
31.469
35.000
49.726
68.681
31.469
37.861
37.500
37.879
48.077
46.875
48.363
56.476
60.023
67.500
63.981
79.976
49.702
62.795
60.000
47.712
55.935
70.635
65.290
Vertical Frequency
(Hz)
70.086
70.087
66.667
74.551
75.062
59.940
72.809
75.000
60.317
72.188
75.000
60.004
70.069
75.029
75.000
60.020
75.025
59.810
74.934
60.000
60.015
59.887
74.984
59.954
Pixel Clock Frequency
(MHz)
25.175
28.322
30.240
57.284
100.000
25.175
31.500
31.500
40.000
50.000
49.500
65.000
75.000
78.750
108.000
108.000
135.000
83.500
106.500
108.000
85.500
106.500
136.750
146.250
Sync Polarity
(H / V)
+/-
-/+
-/-
-/-
-/-
-/-
-/-
-/+/+
+/+
+/+
-/-
-/+/+
+/+
+/+
+/+
-/+
-/+
+/+
+/+
-/+
-/+
-/+
English - 14
Page 15
Changing the Input Source
SOURCE
Source
Use to select TV or an external input
source such as a DVD player / Blu-ray
player / cable box / STB satellite receiver.
1. Press the SOURCE button on your
remote.
2. Select a desired external input source.
■■ TV / PC / AV / Component /
HDMI1/DVI / HDMI2 / HDMI3 /
HDMI4 / USB / AllShare
✎
You can only choose external devices that are
connected to the TV. In Source, connected inputs will
be highlighted.
✎
In Source, PC is always stays activated.
Edit Name
Edit Name lets you associate a device name to an input
source. To access Edit Name, press the TOOLS button In
Source. The following selections appear under Edit Name:
■ VCR / DVD / Cable STB / Satellite STB / PVR STB /
AV Receiver / Game / Camcorder / PC / DVI PC / DVI
Devices / TV / IPTV / Blu-ray / HD DVD / DMA: Name
the device connected to the input jacks to make your
input source selection easier.
✎
If you have connected a PC to the HDMI IN 1 (DVI)
port with an HDMI cable, select PC under Edit Name
to enter a device name.
✎
If you have connected a PC to the HDMI IN 1 (DVI)
port with an HDMI to DVI cable, select DVI PC under
Edit Name to enter a device name.
✎
If you connected an AV device to the HDMI IN 1 (DVI)
port with an HDMI to DVI cable, select DVI Devices
under Edit Name to enter a device name.
Edit Favorites
In Source, press the TOOLS button to select Edit
Favorites. You can set an external input source as a
Favorites.
Information
You can see detailed information about the selected external
device.
Refresh
In Source, If the external devices are not displayed,
press the TOOLS button to select Refresh, then search for
the connected devices.
English - 15
Page 16
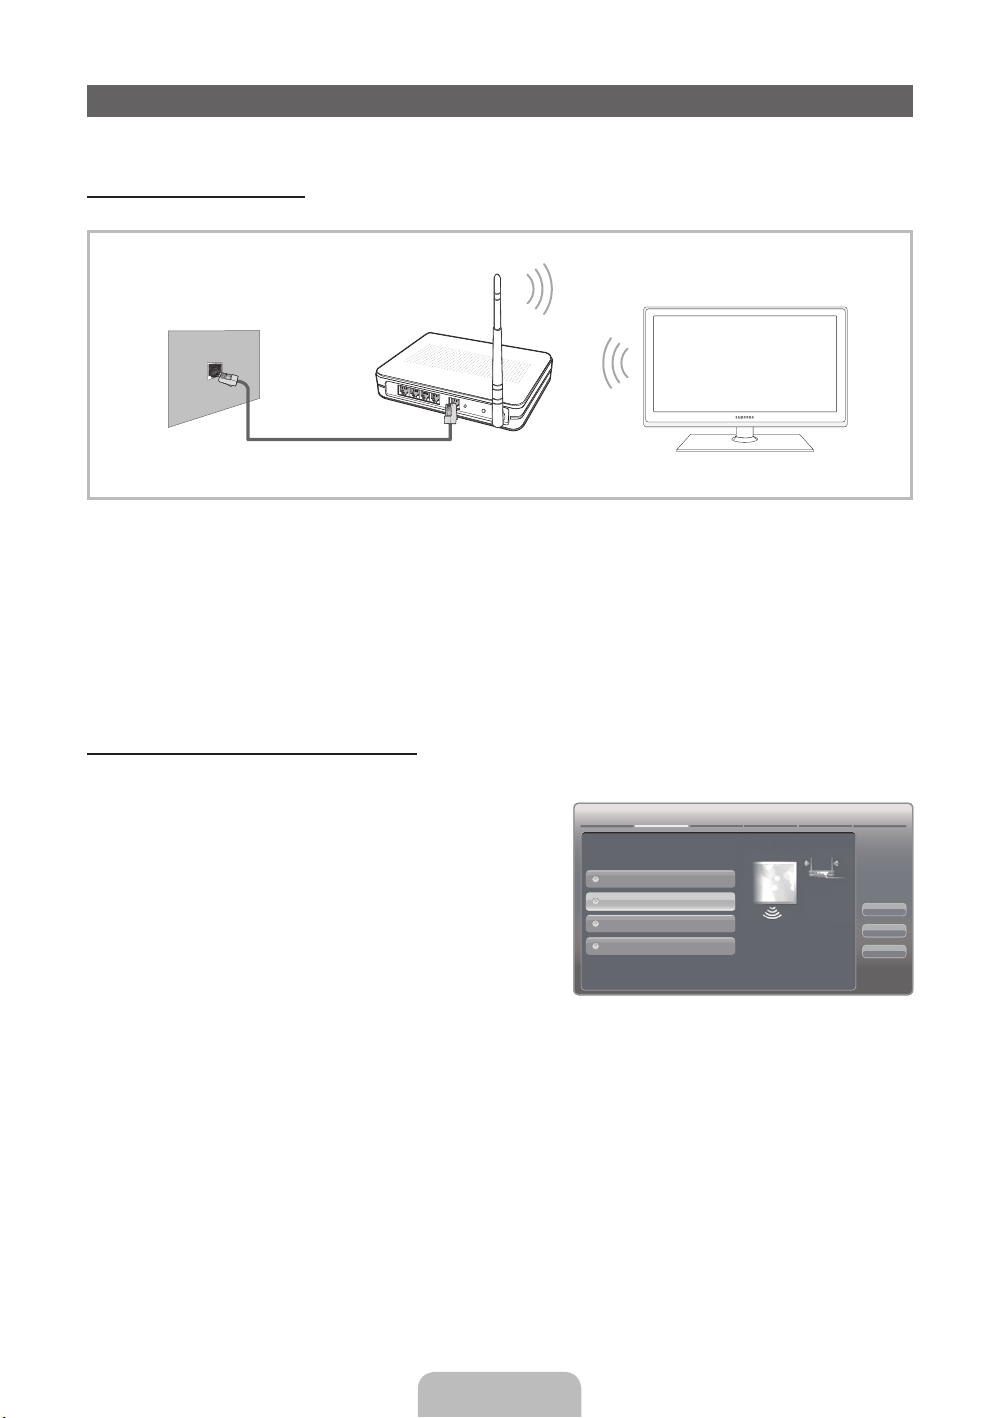
Network Connection
You can set up your TV so that it can access the Internet through your local area network (LAN) using a wired or wireless
connection.
Network Connection - Wireless
You can connect your TV to your LAN through a standard wireless router or modem.
Wireless IP Sharer
The LAN Port on the Wall
This TV supports the IEEE 802.11a/b/g and n communication protocols. Samsung recommends using IEEE 802.11n. When
you play video over a IEEE 802.11b/g connection, the video may not play smoothly.
Most wireless network systems incorporate a security system that requires devices that access the network through an access
point or AP (typically a wireless IP Sharer - router or modem) to transmit an encrypted security code called an access key.
Your TV is compatible with the following security protocols:
y Authentication Mode: OPEN, SHARED, WPAPSK, WPA2PSK
y Encryption Type: WEP, TKIP, AES
If you select Pure High-throughput (Greenfield) 802.11n mode and the Encryption type is set to WEP, TKIP or TKIP AES
(WPS2Mixed) on your AP or wireless router, Samsung TVs will not support a connection in compliance with new Wi-Fi
certification specifications.
Configuring the Network Connection - Wireless
The instructions below are for networks that use the Dynamic Host Configuration Protocol (DHCP) to configure network
connections automatically. If your have a Static IP network, see your user’s manual for configuration instructions.
To configure your network connection for a network that uses DHCP,
follow these steps:
1. Connect your TV to your network as shown in the illustration
above.
2. Turn on your TV, press the MENU button on your remote, and the
select Networks → Network Settings.
3. Select the Wireless (General), press ENTER
ENTER
E
again.
4. The Network function searches for available wireless network.
When done, it displays a list of the available networks.
5. In the list of networks, press the ▲ or ▼ button to select a
network, select Next, and then press ENTER
6. If you have selected a wireless router that has security, the
Security Key screen appears. Enter the Security key (Security
key or PIN), select Next, and then press ENTER
✎
When you enter the Security Key (Security key or PIN), the use ▲/▼/◄/► buttons on your remote to select
numbers and characters.
7. The Network Connection screen appears and verifies the network connection. When the connection has been verified, the
“Internet connection successful.” message appears. Network set up is complete.
✎
For more detailed information, see “Wireless Network Connection” in the e-Manual.
(AP having DHCP Server)
LAN Cable (Not Supplied)
E
E
, and then press
.
E
.
Network Setting
Select a network connection type.
Wired
Wireless(General)
WPS(PBC)
One Foot Connection
✎
The displayed imange may differ depending
Set up wireless network by
selecting your Access Point.
you may need to enter security
key depending on the setting of
the Access Point.
on the model.
Previous
Next
Cancel
English - 16
Page 17
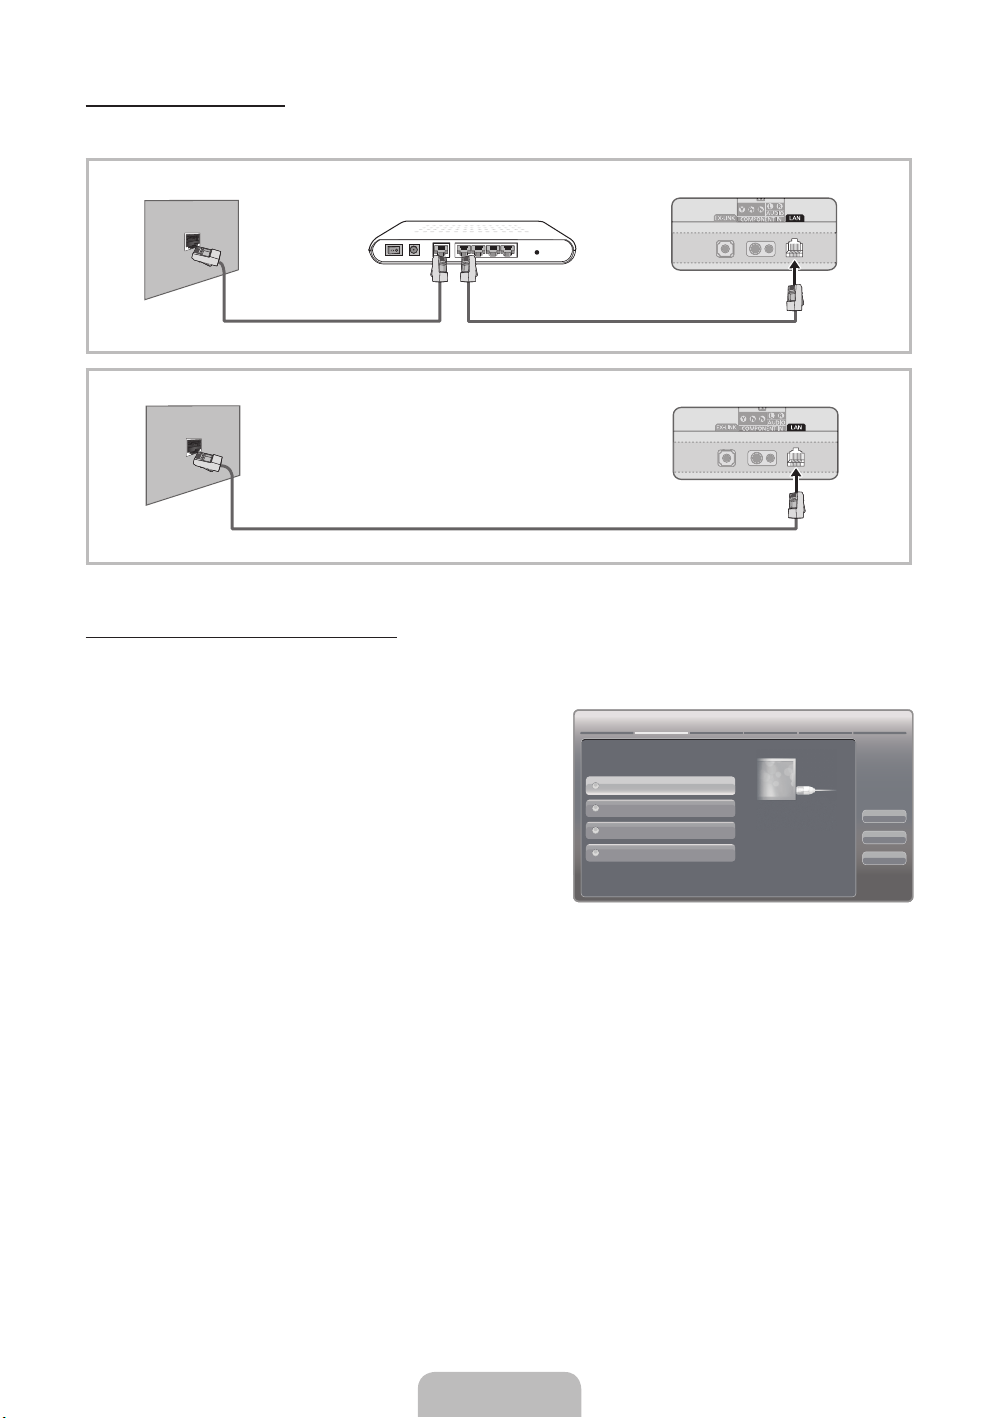
Network Connection - Wired
There are two main ways to connect your TV to your network using cable, depending on your network setup. They are
illustrated below:
The Modem Port on the Wall
The LAN Port on the Wall TV Rear Panel
✎
A network speed of lower of than 10 Mbps is not supported.
Extternal Modem
(ADSL / VDSL / Cable TV)
LAN Cable (Not Supplied)Modem Cable (Not Supplied)
LAN Cable (Not Supplied)
TV Rear Panel
Configuring the Network Connection - Wired
Most home networks use the Dynamic Host Configuration Protocol (DHCP) to configure network connections. Home networks
that support DHCP automatically provide the IP address, subnet mask, gateway, and DNS values your TV needs to access the
Internet so you don’t have to enter them manually.
To configure your network connection for a network that uses DHCP,
follow these steps:
1. Connect your TV to your network as shown in one of the
illustrations above.
2. Turn on your TV, press the MENU button on your remote, and then
select Network → Network Settings. The Network Settings
screen will appear.
3. Select Wired, press ENTER
E
, and then press ENTERE again.
Network Setting
Select a network connection type.
Wired
Wireless(General)
WPS(PBC)
One Foot Connection
Connect to the network using LAN
cable. Please make sure that the
LAN cable is connected.
Previous
Next
Cancel
4. The network connection screen appears, and verifies the network
connection. When the connection has been verified, the “Internet
connection successful.” message appears. Network set up is
completed.
✎
If your TV cannot acquire network the connection values
✎
The displayed imange may differ depending
on the model.
automatically or if you want to set the connection manually,
select IP Settings on the network test screen. Set Internet Protocol Setup to Manual. You must enter the IP
Address, Subnet Mask, Gateway, and DNS Server manually.
✎
For more detailed information, refer to see “Wired Network Connection” in the e-Manual.
English - 17
Page 18
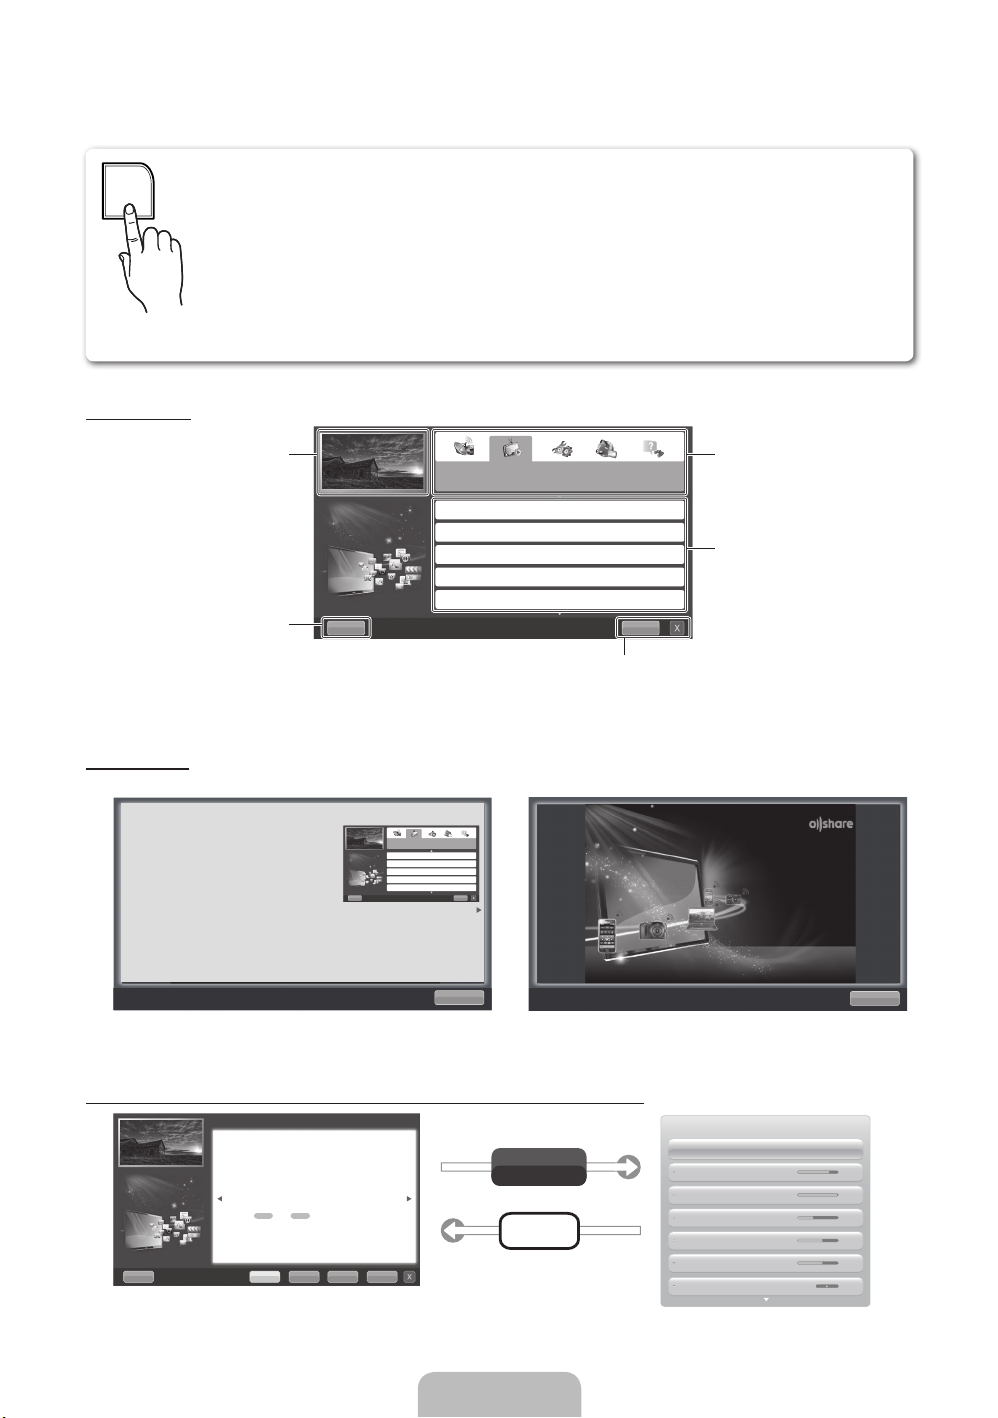
How to view the e-Manual
You can fi nd instructions for your TV’s features in the e-Manual in your TV. To use the e-Manual, press
E-MANUAL
the E-MANUAL button on your remote. Move the cursor using the u / d /
category, then a topic, and then press the ENTER
to see.
You can also access it through the menu:
O
MENUm → Support → e-Manual → ENTER
✎
If you want to return to the e-Manual, press the E-MANUAL button on your remote.
✎
You cannot use Try now function if the menu is not activated.
Screen Display
TV Screen: Displays the program,
movie, video, etc. you are currently
Help: Displays the e-Manual
Guide or Product Guide. Press
ENTER
watching.
E
button.
E
button. The e-Manual displays the page you want
E
Basic Features
Changing the Preset Picture Mode
Adjusting Picture Settings
Changing the Picture Size
Changing the Picture Options
Using the TV with Your PC
r
/ l buttons to highlight a
The category list. Press
button to select the ategory you
want.
Displays the sub-menu list. Use
the arrow buttons on your remote
to move the cursor. Press the
ENTER
E
IndexHelp
menu you want.
Index: Displays the Index screen.
X: Exit the e-Manual.
l
or r
button to select the sub-
Using the Help
Display the e-Manual Guide & the Product Guide by pressing Help.
How to View the e-Manual
You can fi nd instructions for your TV’s features in
the e-Manual in your TV. To use the e-Manual, press
the E-MANUAL button on your remote. Move the
cursor using the u / d / l / r buttons to highlight a
category, then a topic, and then press the ENTERE
button. The e-Manual displays the page you want
to see.
You can also access it through the menu:
m
→ Support → e-Manual → ENTER
O MENU
✎ If you want to ret urn to the e-Manual, p ress the E-MANUA L button on your
remote.
✎ You can’t use the Try No w function if the me nu is not activated.
E
Basic Features
Changing the Preset Picture Mode
Adjusting Picture Settings
Changing the Picture Size
Changing the Picture Options
Using the TV with Your PC
IndexHelp
Return
<e-Manual Guide>
The e-Manual guide appears as above.
The product guide appears as above.
How to toggle between an e-Manual topic and the corresponding OSD menu(s).
Basic Features > Changing the Preset Picture Mode (1/1)
Changing the Preset Picture Mode
O MENUm → Picture → Picture Mode → ENTER
■
Picture Mode
Picture modes apply preset adjustments to the picture. Select a mode using the up
and down arrow keys, and then press the ENTERE button.
N In PC mode, you can only select Entertain and Standard.
• Dynamic: Suitable for a bright room.
• Standard: Suitable for a normal environment.
for LED TV
/ Relax
• Natural
• Movie: Suitable for watching movies in a dark room.
• Entertain (In PC mode only): Suitable for watching movies and games.
Help Try Now Home Zoom Index
✎
This function is not enabled in some menus.
for PDP TV
: Suitable for reducing eye strain.
E
Try Now
E-MANUAL
Sync media from multiple devices with AllShare
AllShare™ syncs your digital devices so you can
enjoy music, movies and photos from your PC,
camera and mobile devices, on your larger TV
screen. Connects you to multiple PCs, as well.
<Product Guide>
Picture
Picture Mode Standard
Cell Light 14
Contrast 100
Brightness 45
Sharpness 50
Color 50
Tint (G/R) G 50 R 50
Return
English - 18
Page 19
Method 1 Method 2
1. Select Try Now, if you want to execute the
corresponding menu(s).
2. To return to the e-Manual screen, press the E-MANUAL
button.
Viewing the Contents
Basic Features > Changing the Preset Picture Mode (1/1)
Changing the Preset Picture Mode
O MENUm → Picture → Picture Mode → ENTER
■
Picture Mode
Picture modes apply preset adjustments to the picture. Select
a mode using the up and down arrow keys, and then press the
ENTER
E
button.
N In PC mode, you can only select Entertain and Standard.
• Dynamic: Suitable for a bright room.
• Standard: Suitable for a normal environment.
for LED TV
for PDP TV
• Natural
• Movie: Suitable for watching movies in a dark room.
• Entertain (In PC mode only): Suitable for watching movies and
Help Try Now Home Zoom Index
/ Relax
games.
Try Now: Displays the OSD menu that corresponds to the topic. To
return to the e-Manual screen, press the E-MANUAL button.
Home: Moves to the e-Manual home screen.
Zoom: Magnifies a screen.
Index: Displays the Index screen.
E
: Suitable for reducing eye strain.
1. Press the ENTER
E
button when a topic is displayed.
“Do you want to execute this?” appears. Select Yes,
and then press the ENTERE button. The OSD window
appears.
2. To return to the e-Manual screen, press the E-MANUAL
button.
Contents Area: Contains the topic contents
if you selected a sub-menu. To move to the
previous or next page, press the l or r button.
Using the Zoom mode
E
Select Zoom, and then press ENTER
screen. You can scroll through the magnified screen by using
the u or d buttons.
✎
To return to the screen to normal size, press the
RETURN button.
to magnify the
Changing the Preset Picture Mode
O MENUm → Picture → Picture Mode → ENTER
■
Picture Mode
Picture modes apply preset adjustments to the picture. Select a mode using the up and
down arrow keys, and then press the ENTER
N In PC mode, you can only select Entertain and Standard.
• Dynamic: Suitable for a bright room.
• Standard: Suitable for a normal environment.
for LED TV
• Natural
• Movie: Suitable for watching movies in a dark room.
• Entertain (In PC mode only): Suitable for watching movies and games.
/ Relax
for PDP TV
E
: Suitable for reducing eye strain.
How to search for a topic on the index page
1. To search for a topic, press the left or right arrow button to select a letter, and then press ENTER
list of topics and keywords that begin with the letter you selected.
2. Press the
u
or d button to select a highlight a topic you want, and then press the ENTERE button to select a topic
you want to see.
3. The e-Manual page with the topic appears.
✎
To close the Index screen, press the RETURN button.
E
button.
E
. The Index displays a
Return
English - 19
Page 20

Troubleshooting
If the TV seems to have a problem, first review this list of possible problems and solutions. Also review the Troubleshooting
section in the e-Manual. If none of the troubleshooting tips apply, visit “www.samsung.com,” and then click on Support, or call
Samsung customer service at 1-800-SAMSUNG.
Issues Solutions and Explanations
The TV won’t turn on. • Make sure the AC power cord is securely plugged in to the wall outlet and the TV.
There is no picture/video. • Check the cable connections. Remove and reconnect all cables connected to the TV and external
The remote control does not work. • Replace the remote control batteries. Make sure the batteries are installed with their poles (+/–) in the
The cable/set top box remote control
doesn’t turn the TV on or off, or adjust the
volume.
✎
Some functions and pictures shown in this manual are available on specific models only.
✎
To keep your TV in optimum condition, upgrade to the latest firmware on the Samsung web site by USB
(samsung.com → Support → Downloads).
• Make sure the wall outlet is working.
• Try pressing the POWER button on the TV to make sure the problem is not the remote. If the TV turns
on, refer to “Remote control does not work” below.
devices.
• Set the video outputs of your external devices (Cable/Sat Box, DVD, Blu-ray etc) to match the TV
input connections. For example, if an external device’s output is HDMI, it should be connected to an
HDMI input on the TV.
• Make sure your connected devices are powered on.
• Be sure to select the correct input source by pressing the SOURCE button on the remote control.
• Reboot the connected device by unplugging and then reconnecting the device’s power cable.
correct direction.
• Clean the sensor’s transmission window on the remote.
• Try pointing the remote directly at the TV from 5~6 feet away.
• Program the Cable/Set remote control to operate the TV. Refer to the Cable/Set user manual for the
SAMSUNG TV code.
License
List of Features
y Excellent Digital Interface & Networking: With a built-in HD digital tuner, your TV lets you watch non-subscription HD
broadcasts without a cable box or STB (Set-Top-Box) satellite receiver.
y 3D: This exciting new feature enables you to view 3D content.
y SMART HUB: Your Gateway to all your content, integrated in one place.
– Provides diverse entertainment choices.
– Lets you control your entertainment life with an easy-to-use, user friendly UI.
– Gives you easy access to diverse Apps, with more being added every day.
– Lets you customize your TV by grouping and sorting Apps to your taste.
y AllShare™: AllShare™ connects your TV and compatible Samsung mobile phones/devices through a network.
y Anynet+(HDMI-CEC): Allows you to control all connected Samsung devices that support Anynet+ with your Samsung
TV’s remote.
English - 20
Page 21
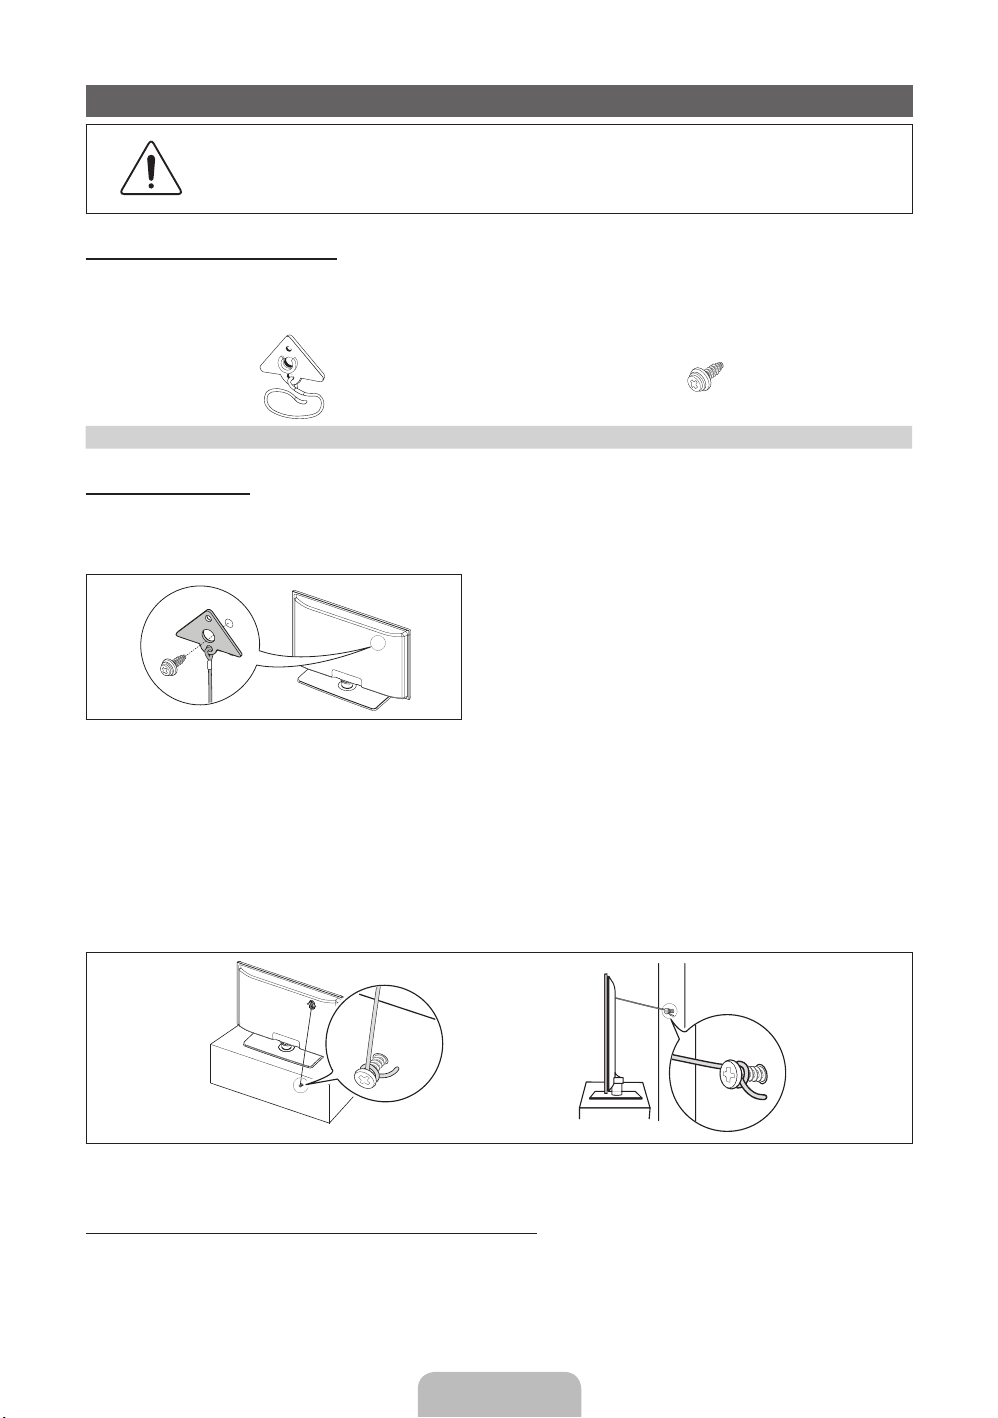
Securing the TV to the Wall
Caution: Pulling, pushing, or climbing on the TV may cause the TV to fall. In particular, ensure your
children do not hang over or destabilize the TV. Doing so may cause the TV to tip over, causing serious
injuries or death. Follow all safety precautions provided in the included Safety Flyer with your TV. For
added stability and safety, you can purchase and install the anti fall device as described below.
The TV-Holder Kit (Sold Separately):
The parts below are included in the TV Holder kit. In addition, you need to provide a wood screw, screw and molly, or other
screw appropriate for the wall or cabinet you intend to secure the TV-Holder string to. We recommend a size M4xL20 wood
screw.
TV-Holder (BN96-15753A) Screw (M8 X L19)
Installing the TV-Holder
1. Remove the screw attached to the back of your TV, and then connect the TV-Holder to the TV with the screw included in
the TV-Holder Kit that is designated for your TV.
✎
Make sure to use only the appropriate supplied screw. If you use a different screw, you can damage your TV.
2. Firmly fasten the screw you provided (size M4xL20 or similar) to the wall or cabinet where the TV is to be installed.
✎
If you fasten the screw to the wall, we recommend you drive the screw into a stud. If that is not possible, use a
molly to anchor the screw.
3. Tie the TV-Holder cord to the screw fastened on the wall or cabinet so that the TV is fixed. See the illustrations below.
✎
Install the TV close to the wall so that it does not fall.
✎
When attaching the TV-Holder cord to the wall, tie the cord level with the ground or slanted downwards for safety
purposes.
✎
Check the cord occasionally to make sure it is secure.
✎
Before moving the TV, separate the connected cord first.
4. Verify all connections are properly secured. Periodically check the connections for any sign of fatigue or failure. If you have
any doubt about the security of your connections, contact a professional installer.
To purchase the TV-Holder Kit, contact Samsung Customer Care
In the United States: 1-800-SAMSUNG (1-800-726-7864)
–
In Canada: 1-800-SAMSUNG (1-800-726-7864)
–
English - 21
Page 22

Storage and Maintenance
✎
If you attached some stickers on the TV screen, it remains some debris after removing the sticker. Please clean it to
watch TV.
Do not spray water or a cleaning agent directly onto the
product. Any liquid that goes into the product may cause a
Clean the product with a soft cloth dampened with a small
amount of water.
failure, fire, or electric shock.
Specifications - Qwerty Remote
Model Name RMC-QTD1
Battery AAA x 4
Dimension(WxDxH) 2.4 X 1.0 X 6.0 inches
Weight 0.295 lbs (134 g)
To extend the battery life, use of alkaline battery is recommended.
(60.9 x 24.36 x 152.2 mm)
Specifications
Display Resolution 1920 x 1080
Environmental Considerations
Operating Temperature
Operating Humidity
Storage Temperature
Storage Humidity
Stand Swivel (Left / Right) -20˚ ~ 20˚
Model Name PN51D6900 PN59D6900
Screen Size
(Diagonal)
Sound
(Output) 10 W X 2 15 W X 2
Dimensions (WxDxH)
Body
With stand
Weight
Without Stand
With Stand
51” Class
(50.7” measured diagonally)
47.0 x 1.4 x 28.3 inches
(1195.9 x 38.0 x 719.4 mm)
47.0 x 12.0 x 30.8 inches
(1195.9 x 305.0 x 783.1 mm)
49.3 lbs (22.4 kg)
59.7 lbs (27.1 kg)
50°F to 104°F (10°C to 40°C)
10% to 80%, non-condensing
-4°F to 113°F (-20°C to 45°C)
5% to 95%, non-condensing
59” Class
(59.0” measured diagonally)
54.2 x 1.4 x 32.5 inches
(1378.4 x 38.0 x 827.3 mm)
54.2 x 13.1 x 34.8 inches
(1378.4 x 335.0 x 886.3 mm)
67.4 lbs (30.6 kg)
80.6 lbs (36.6 kg)
✎
Design and specifications are subject to change without prior notice.
✎
This device is a Class B digital apparatus.
✎
For information about the power supply, and more about power consumption, refer to the label attached to the product.
Dispose unwanted electronics through an approved recycler.
To find the nearest recycling location, go to our website:
www.samsung.com/recyclingdirect Or call, (877) 278 - 0799
English - 22
Page 23

■ Front view / Side view
Dimensions
7
1
2
5
6
8
Model name
3
4
1 2 3 4 5 6 7 8
PN51D6900 47.0 44.5 24.9 20.0 28.3 30.8 1.4 12.0
PN59D6900 54.2 51.7 29.2 21.2 32.5 34.8 1.4 13.1
■ Rear view
1
2
3
5
4
6
(Unit: inches)
(Unit: inches)
Model name
1 2 3 4 5 6
PN51D6900 15.7 15.7 32.1 10.5 4.3 2.6
PN59D6900 23.6 15.7 39.5 14.7 5.0 3.1
NOTE: All drawings are not necessarily to scale. Some dimensions are subject to change without prior notice. Refer to the
dimensions prior to performing installation of your TV. Not responsible for typographical or printed errors.
© 2011 Samsung Electronics America, Inc
English - 23
Page 24

Notice
FCC Statement
Federal Communication Commission Interference Statement
This equipment has been tested and found to comply with the limits for a Class B digital device, pursuant to Part 15 of the
FCC Rules. These limits are designed to provide reasonable protection against harmful interference in a residential installation.
This equipment generates, uses and can radiate radio frequency energy and, if not installed and used in accordance with the
instructions, may cause harmful interference to radio communications. However, there is no guarantee that interference will
not occur in a particular installation. If this equipment does cause harmful interference to radio or television reception, which
can be determined by turning the equipment off and on, the user is encouraged to try to correct the interference by one of the
following measures:
y Reorient or relocate the receiving antenna.
y Increase the separation between the equipment and receiver.
y Connect the equipment into an outlet on a circuit different from that to which the receiver is connected.
y Consult the dealer or an experienced radio/TV technician for help.
FCC Caution: Any changes or modifications not expressly approved by the party responsible for compliance could void the
user’s authority to operate this equipment.
This device complies with Part 15 of the FCC Rules. Operation is subject to the following two conditions: (1) This device may
not cause harmful interference, and (2) this device must accept any interference received, including interference that may
cause undesired operation.
IC Statement
This Class B digital apparatus complies with Canadian ICES-003.
Operation is subject to the following two conditions: (1) this device may not cause interference, and (2) this device must accept
any interference, including interference that may cause undesired operation of the device.
Cet appareil numérique de la classe B est conforme á la norme NMB-003 du Canada.
This device and its antenna(s) must not be co-located or operation in conjunction with any other antenna or transmitter.
Conformité aux normes FCC Part 15 Class B
Cet appareil et ses accessoires sont conformes aux normes FCC Part 15 Class B de la Federal Communications Commission
et à la norme NMB-003 classe B d’Industrie Canada sur les appareils numériques.
Son fonctionnement est sujet aux deux conditions suivantes :(1) Cet appareil et ses accessoires ne doivent pas provoquer de
brouillage préjudiciable, et (2) cet appareil et ses accessoires doivent accepter toutes les interférences reçues, y compris celles
pouvant causer un fonctionnement indésirable.
English - 24
Page 25

Las figuras y las ilustraciones de este Manual del usuario se proporcionan como referencia solamente y pueden ser
diferentes del aspecto real del producto. El diseño y las especificaciones del producto están sujetos a cambios sin previo
aviso.
Información importante sobre la garantía relativa al formato de visualización del televisor
Para obtener más información sobre los términos de la garantía, consulte la tarjeta de garantía.
✎
Las pantallas PDP con formato de pantalla panorámica (16:9, la relación de aspecto ancho:alto de la pantalla) están diseñadas principalmente para
visualizar vídeos de movimiento de formato panorámico. Las imágenes deben estar principalmente en el formato panorámico de relación 16:9, o
ampliadas para llenar la pantalla si el modelo tiene esta opción y las imágenes están en movimiento constante. La visualización de imágenes y gráficos
estáticos en la pantalla, como las barras oscuras laterales en programación y vídeos de televisión en formato estándar no ampliados, debe limitarse a no
más del 5% del tiempo total de visualización del televisor por semana.
Asimismo, la visualización de otras imágenes estáticas y de texto, como informes bursátiles, pantallas de videojuegos, logotipos comerciales, sitios web
o gráficos y patrones de ordenador, se debe limitar en todos los televisores al tiempo especificado más arriba. La visualización de imágenes estáticas
durante más de 5% del tiempo de visualización puede producir un envejecimiento desigual de las pantallas PDP, lo que provocará una reproducción
superpuesta sutil pero permanente de la imagen de la PDP. Para evitarlo, varíe la programación y las imágenes y, sobre todo, visualice imágenes en
movimiento a toda pantalla, no gráficos estáticos ni barras oscuras.
En modelos de PDP que ofrezcan opciones para el tamaño de la imagen, utilice estos controles para ver los distintos formatos como imagen a toda
pantalla.
Tenga cuidado al seleccionar los formatos de televisión que va a utilizar para la visualización y con el tiempo que dedica a verlos. La garantía limitada de
Samsung no cubre el envejecimiento desigual de la pantalla PDP como resultado de la selección y uso de formatos, así como otras imágenes retenidas.
• DOCUMENTO DE GARANTÍA LIMITADA PARA NORTEAMÉRICA DE SAMSUNG ELECTRONICS
De acuerdo con los requisitos, condiciones, exclusiones y limitaciones de la Garantía limitada original suministrada con los productos de Samsung
Electronics (SAMSUNG), así como los requisitos, condiciones, exclusiones y limitaciones incluidos en el presente documento, SAMSUNG
proporcionará adicionalmente un servicio de reparación de garantía en EE.UU. para los productos de SAMSUNG adquiridos en Canadá, y en
Canadá respecto a los productos de SAMSUNG adquiridos en EE.UU., para el período de garantía especificado originalmente, y sólo para el
comprador original.
Las reparaciones en garantía descritas anteriormente deben realizarse en centros de servicio técnico autorizados de SAMSUNG. Junto con este
documento, se debe presentar un documento de garantía limitada original y una factura con fecha como prueba de compra en el centro de servicio
técnico. El transporte a y desde el centro de servicio técnico es responsabilidad del comprador. Las condiciones cubiertas se limitan solamente a
defectos de fabricación en material y mano de obra, y sólo los que se hayan producido con un uso normal del producto.
Excluidas, pero no limitadas a ellas, se encuentran las disposiciones originales especificadas para los servicios a domicilio o en las instalaciones de la
empresa, tiempos máximos y mínimos de reparación, cambios o sustituciones, accesorios, opciones, actualizaciones o consumibles.
Para conocer la ubicación de un centro de servicio técnico autorizado de SAMSUNG, llame al número gratuito indicado:
– En EE. UU.: 1-800-SAMSUNG (1-800-726-7864)
– En Canadá: 1-800-SAMSUNG
Información importante para el usuario
• Retención de imágenes en la pantalla
No deje imágenes fijas (como las de los videojuegos) en el panel de la pantalla de plasma durante varios minutos. Las imágenes fijas pueden causar
retenciones de imágenes (desgaste). Este fenómeno de retención de imágenes también se denomina ‘quemadura de pantalla’. Para evitar la
retención de la imagen, consulte la e-Manual para ver cómo se reduce el brillo y el contraste de la pantalla al mostrar una imagen fija.
• Calor en la parte superior del TV de plasma
La parte superior del televisor puede calentarse tras un uso prolongado ya que el calor se disipa desde el panel a través de los orificios de ventilación
de la parte superior del aparato.
Esto es normal y no indica ningún defecto ni fallo de funcionamiento de la unidad.
No obstante, debe evitarse que los niños toquen la parte superior del televisor.
• El televisor emite una especie de ‘crujido’.
El ruido similar a un crujido puede producirse cuando el televisor se contrae o se expande debido a un cambio ambiental de temperatura o
humedad. Este hecho es normal y no se trata de ningún defecto.
• Defectos de celda
La PDP utiliza un panel compuesto de 2.360.000 (nivel HD) a 6.221.000 (nivel FHD) píxeles que requieren una sofisticada tecnología para su
producción. No obstante, puede que existan algunos píxeles brillantes u oscuros en la pantalla. Estos píxeles no influirán en el rendimiento del
aparato.
• Evite que el televisor funcione a temperaturas por debajo de 41 °F (5 °C)
• La imagen fija visualizada durante demasiado tiempo puede causar daños permanentes en el panel de la PDP.
El uso del televisor de plasma en formato 4:3 durante un tiempo prolongado puede dejar rastros de bordes en las partes izquierda,
derecha y central de la pantalla debido a las diferencias en la emisión lumínica de la pantalla. Reproducir un DVD o el uso de una
consola pueden tener el mismo efecto.
La garantía no cubre los daños causados por dichos efectos.
• Imágenes fantasma en la pantalla.
Ver imágenes fijas de videojuegos y PC durante más tiempo del indicado puede producir imágenes fantasma parciales.
Para evitar este efecto, reduzca el ‘brillo’ y el ‘contraste’ al mostrar imágenes fijas durante tiempo prolongado.
• Garantía
La garantía no cubre ningún daño causado por la retención de imágenes.
La garantía no cubre el desgaste de la pantalla.
Español - 2
Page 26

Accesorios
✎
Compruebe que los artículos siguientes vengan incluidos con su televisor. Si falta alguno, póngase en contacto con su
distribuidor.
✎
El color y la forma de los componentes pueden variar según el modelo.
✎
Cuando abra la caja compruebe que no haya accesorios ocultos detrás o debajo de los materiales del embalaje.
y QWERTY Remote (BN59-01134B) y pilas (4 x AAA)
y Manual del usuario
y Tarjeta de garantía/Guía de seguridad
y Paño de limpieza
AV/Adaptador de componentes
(BN39-01154W)
✎
Núcleo de ferrita para cable de alimentación: El núcleo de ferrita se utiliza para proteger los
cables de las interferencias. Cuando conecte el núcleo de ferrita a un cable, abra el núcleo
de ferrita y sujételo al cable cerca del enchufe, tal como se muestra en la ilustración.
A Distancia máxima entre el núcleo de ferrita y el extremo del cable conectado al televisor:
x
6~8 pulgadas
✎
Núcleo de ferrita: El núcleo de ferrita se utiliza para proteger los cables de las interferencias.
Cuando conecte un cable, abra el núcleo de ferrita y sujételo al cable cerca del enchufe, tal
como se muestra en la ilustración.
Cables de entrada (se venden por separado)
Para adquirir el cable RS232, póngase en contacto con www.SamsungParts.com.
Núcleo de ferrita (2 unid.)
(3301-002049)
A
Cable de alimentación
Cable de antena/ cable de
componentes
(se vende por separado).
RS232 (AA39-00311A) HDMI HDMI/DVI Componente
Cable de audio Compuesto (AV) Coaxial (RF) VGA
Español - 3
Page 27

Aspecto general del panel de control
✎
El color y la forma del producto pueden variar según el modelo.
Panel de control
Sensor del mando a distancia El mando a distancia debe dirigirse hacia este punto del televisor.
Indicador de encendido Parpadea y se apaga cuando se enciende el aparato y se ilumina en el modo en
SOURCE
MENU Muestra un menú en pantalla, la OSD (visualización en pantalla), de las funciones del
y
z
P
E
(Encendido)
espera.
Cambia entre todas las fuentes de entrada disponibles. En el menú de la pantalla,
utilice este botón de igual modo que el botón ENTERE del mando a distancia.
TV.
Ajusta el volumen. En la OSD, utilice los botones
botones ◄ y ► del mando a distancia.
Cambian los canales. En la OSD, utilice los botones
botones ▼ y ▲ del mando a distancia.
Enciende o apaga el televisor.
y
de igual modo que los
z
de igual modo que los
Modo de espera
El televisor se pone en el modo de espera cuando se apaga y continúa consumiendo una cantidad pequeña de energía.
Para ahorrar y gastar menos energía, no deje el televisor en modo de espera durante períodos prolongados (cuando vaya de
vacaciones, por ejemplo).
vacation, for example). Se recomienda desenchufar el cable de alimentación.
Install the Stand
See the separate stand installation guide for more detailed instructions.
A
1 EA
B
A
Soporte (según el modelo) Soporte de la guía Tornillos
B
1 EA
C
D
x4 (M4 X L12)
x4 (M4 X L8)
Español - 4
Page 28

1
3
2
4
Vista lateral
5
C
(M4 X L12)
B
A
Parte posterior
Vista superior
x4
Frontal
ATENCIÓN
✎ Ponga un paño suave encima de la mesa para
NO UTILIZAR
NO UTILIZAR
GRASAS
NO UTILIZAR
PETRÓLEO
D
PRODUCTOS
QUÍMICOS
(Montaje correcto) (Montaje incorrecto)
proteger el televisor y luego coloque éste encima
con la pantalla hacia abajo.
✎
Introduzca el soporte de la guía en la ranura de la
parte inferior del televisor.
x4
(M4 X L8)
✎
NOTA
Para realizar el montaje debe tener en cuenta cuál es la parte frontal y cuál la posterior del soporte y el soporte de la
x
guía.
Asegúrese de que al menos dos personas levanten y muevan el televisor.
x
Levante el producto cuando apriete los tornillos. Si aprieta los tornillos con el TV recostado, éste puede inclinarse
x
hacia uno de los lados cuando lo vuelva a levantar.
No introduzca los dedos en la ranura de la base del soporte del televisor cuando esté montando ésta.
[
Español - 5
Page 29

Instalación del montaje mural
Instalación del equipo de montaje mural
El kit de montaje mural (se vende por separado) permite instalar el televisor en una pared.
Si desea más información sobre la instalación de los componentes para el montaje mural, consulte las instrucciones que se
facilitan con dichos elementos. Le aconsejamos que se ponga en contacto con un técnico para instalar el soporte de montaje
mural. Samsung Electronics no se hace responsable de los daños causados al producto o al usuario si éste ha efectuado la
instalación del montaje mural.
Especificaciones del equipo de montaje mural (VESA)
Instale el montaje mural en una pared sólida, perpendicular al suelo. Si va a instalar el soporte de montaje mural en una
superficie que no sea de placas de yeso, póngase en contacto con el distribuidor más cercano para obtener más información.
Si instala el televisor en el techo o en una pared inclinada, puede caerse y causar graves lesiones personales.
✎
NOTA
Las dimensiones estándar de los equipos de montaje mural se muestran en la tabla siguiente.
x
Los equipos de montaje mural de Samsung incluyen un manual de instalación detallado y todas las piezas
x
necesarias para la instalación.
No use tornillos que no cumplan las especificaciones de tornillos estándar VESA.
x
No use tornillos con una longitud superior a la medida estándar o que no cumplan con las especificaciones de
x
tornillos estándar VESA. Los tornillos que sean demasiado largos pueden causar daños en el interior del televisor.
Para montajes murales que no cumplen las especificaciones de tornillos estándar VESA, la longitud de éstos puede
x
variar dependiendo de las especificaciones del montaje mural.
No apriete los tornillos demasiado fuerte. Podría dañar el producto o provocar la caída de éste con el riesgo de
x
causar lesiones personales. Samsung no se hace responsable de este tipo de accidentes.
Samsung no se hace responsable de daños o lesiones personales cuando se usa un montaje mural que no cumple
x
las especificaciones VESA o si el cliente no sigue las instrucciones de instalación del producto.
El modelo de 59” no es compatible con las especificaciones VESA.
x
No monte el televisor con una inclinación de más de 15 grados.
x
Siempre son necesarias dos personas para montar el televisor en la pared.
x
Tamaño
Familia de
producto
Televisor PDP
[Ultra delgado]
✎
Desenrosque los tornillos del kit antes de instalar el montaje mural en la pared.
del
televisor
en
pulgadas
51 400 x 400
59~64 600 x 400
No instale el equipo de montaje mural mientras el televisor está encendido. Se podría producir una
descarga eléctrica con riesgo de causar lesiones personales.
Las
especificaciones (A
* B) de los orificios
de los tornillos
VESA están en
milímetros
Tornillo estándar Cantidad
M8 4
Español - 6
Page 30

Vista lado mando a distancia
PRE-CH
CH
LIST
142
3
5
6
7 8
9
0
MUTE
M
MENU
m
SOURCEPOWER ON/OFF
SMART
HUB
l
B
X
E-MANUAL
P.SIZE
CC
SOCIAL
TV
C D
VOL
<
<
CH
SEARCH
E
QWERTY Remote (RMC-QTD1)
Muestra y selecciona las fuentes de
Enciende y apaga el televisor.
Proporciona acceso directo a los
Pulse este botón para seleccionar canales
adicionales digitales emitidos por la misma
emisora. Por ejemplo, para seleccionar el
canal '54-3', pulse '54', '-' y '3'.
Enlazar con diferentes servicios de
Seleccionar rápidamente las funciones
que se usan con mayor frecuencia.
Selecciona los elementos del menú
en pantalla y cambia los valores que
Botones que se utilizan en los menús
Utilice estos botones en los modos
SMART HUB y Anynet+ (HDMI-CEC).
vídeo disponibles.
Ajusta el volumen.
aplicaciones.
aparecen en el menú.
Vuelve al menú anterior.
Canal y SMART HUB , etc.
canales.
Activa o desactiva la luz del mando
a distancia. Cuando está activada,
los botones se iluminan durante un
momento cuando se pulsan. (El uso
del mando a distancia con los botones
iluminados reduce el tiempo de uso de
las pilas.)
Vuelve al canal anterior.
MUTE: Corta temporalmente el sonido.
CH LIST: Muestra las listas de canales
en la pantalla.
Cambia los canales.
Abre la pantalla OSD.
Admite funciones de búsqueda y
búsqueda por palabra recomendada.
Muestra información en la pantalla del
televisor.
Sale del menú.
SOCIAL TV: Conectar a la aplicación
Social TV.
YAHOO!: Ejecuta el widget de Yahoo.
X
: Activa o desactiva la imagen 3D.
E-MANUAL: Muestra el Manual
electrónico.
P.SIZE: Permite seleccionar Imagen
Tamaño.
CC: Muestra los subtítulos digitales.
Español - 7
Page 31

Vista lado QWERTY
Muestra los caracteres que escribe el usuario.
Cuando se pulsa ENTER
E
se borran todos los
caracteres de la pantalla.
D
WQ E
#!
^%
CAPS SHIFT SHIFTSYM SYM.COM
)
-_+
SA D
~`
Z
TAP ENTER
X
TR Y
[=]
GF H
;
VC B
,
/
>
<
@
.
IU O
KJ L
MN
P
}{ |
/
‘: “
?
SMART
HUB
MENU
m
E
SEARCH
ESC
$
& (*
BA C
21 3
@
54 6
807 9
Útil teclado QWERTY para escribir caracteres en los menús SMART
HUB y SOCIAL TV, etc.
SYM: Habilita el símbolo impreso en la parte inferior derecha de cada
botón.
✎
NOTA
y El lado mando a distancia no funciona cuando el lado QWERTY está cara arriba y viceversa.
Inserción de las pilas
1 2
y Deslice la tapa de las pilas. y Pulse el botón derecho.
3 4
Sensor OFN (Optical
Finger Navigation)
En la función de
explorador completo,
se puede utilizar como
el puntero. Si el usuario
no pulsa ningún botón
durante 30 segundos
el sensor se desactiva
automáticamente.
Para activar el sensor,
pulse cualquier botón en
el lado QWERTY.
y Extraiga la bandeja de las pilas. y Inserte 4 pilas AAA en la bandeja, inserte ésta en el
QWERTY Remote y vuelva a poner la tapa.
Vinculación inicial
1. Cuando se insertan las pilas en el QWERTY Remote, en la pantalla se muestra el mensaje
“NEED PAIRING PRESS SYM+TAB”.
2. Pulse los botones SYM y TAB al mismo tiempo durante más de 2 segundos.
✎
El televisor se puede emparejar sólo con un QWERTY Remote. Inicie el proceso de emparejamiento unos 30 segundos
después de encender el televisor.
Nueva ejecución del proceso de emparejamiento
1. Si QWERTY Remote ya se ha emparejado antes, pulse @ y ← en el lado QWERTY durante más de 3 segundos.
Se mostrará “RESET OK” en la LCD del QWERTY Remote.
2. Pulse MUTE, 0, MUTE y 0 en el lado a distancia del QWERTY Remote encarado al televisor. Esta secuencia se debe
completar en menos de 4 segundos.
✎
Puede haber un ligero retardo entre la entrada y la respuesta de la OSD. No espere confirmación visual en la pantalla.
3. El proceso inicial de emparejamiento se efectúa antes de 3 minutos. Si el proceso de emparejamiento inicial no se finaliza
antes de 3 minutos, deberá volver a realizarlo.
Español - 8
Page 32

✎
Para conseguir la mejor conexión por cable con este producto, utilice cables con un grosor máximo que no supere los
0,55 pulgadas (14 mm).
y Grosor máximo: 0,55 pulgadas (14 mm)
Conexión a una antena o cable.
Conexión del cable de alimentación a una antena o un sistema de cable.
✎
El dispositivo PDP puede causar interferencias con una radio de aficionados o AM.
✎
Cuando se utilizan unidades portátiles o móviles de radio de dos vías o aparatos de radio AM y de radioaficionados
cerca del televisor, éste puede funcionar mal.
Antena VHF/UHF
Cable
o
ANT OUT
Seguridad en el espacio de instalación
Mantenga la distancia requerida entre el televisor, la pared y otros objetos para asegurar la ventilación adecuada. En caso contrario, se podría producir un
incendio o un problema con el televisor por un incremento de la temperatura interna del producto.
Cuando utilice un soporte o un montaje mural, use sólo las piezas proporcionadas por Samsung Electronics.
✎
• Si utiliza piezas proporcionadas por otros fabricantes, podría tener problemas con el producto o éste se podría caer con el riesgo de causar
lesiones personales.
Instalación con un soporte Instalación con un montaje mural
4 pulgadas
4 pulgadas
Otras advertencias
✎
Según el modelo, el aspecto real del televisor puede diferir del que se muestra en las ilustraciones de este manual.
✎
Tenga cuidado al tocar el televisor. Algunas partes pueden estar calientes.
4 pulgadas
4 pulgadas
4 pulgadas
4 pulgadas
Español - 9
4 pulgadas
Page 33

Plug & Play (configuración inicial)
Cuando el televisor se enciende por primera vez, una secuencia de indicaciones en pantalla permite configurar los parámetros
básicos. Para encender el televisor, pulse el botón POWERP.
✎
Plug & Play está disponible sólo cuando Origen está establecido como TV.
✎
Para volver al paso anterior en la secuencia Plug & Play, seleccione Anterior y pulse ENTERE.
✎
Antes de encender el televisor, debe haber conectado a éste una antena o un sistema de cable (pág. 9).
Selección del idioma de
1
la OSD
Configuración de la red
2
Actualización del
3
software
Selección del modo
4
de uso
Configuración del
5
Modo Reloj
Selección de las
6
opciones de búsqueda
para la sintonización
automática
Selección y
7
memorización de los
canales
Disfrute de su
8
televisor.
Pulse los botones ▲ o ▼ para seleccionar un idioma. Una vez haya terminado, pulse el
botón ENTER
C
onfigure la conexión de red. Pulse el botón ENTERE para iniciar. Si no conoce la
información de configuración de la red o desea configurar ésta más adelante, seleccione
Omitir. Le aconsejamos que de momento deje la configuración de conexión de la red y
consulte "Conexión de la red" en el manual electrónico para conocer los requisitos y las
instrucciones sobre la configuración; consulte también el apartado Conexión de la red de este
manual (pág. 16) Puede configurar la red más adelante mediante el menú Red.
Cuando se completa la configuración de la conexión de red, está disponible Actualización del
software. Seleccione Siguiente para actualizar el software del televisor. Si el televisor necesita
una actualización de software, la efectuará automáticamente. Si desea realizar la actualización
en otro momento, seleccione Omitir. Para obtener más información consulte “Actualización
del software” (Funciones preferidas → Menú de soporte técnico) en el manual electrónico.
✎
Puede tardar un poco según el estado de la red.
Pulse los botones ▲ o ▼ para seleccionar y pulse ENTER
Seleccione el modo Uso domiciliario. El modo Demo comercio se utiliza en los entornos
comerciales.
Pulse los botones ▲ o ▼ para seleccionar Auto o Manual y, a continuación, pulse el botón
ENTERE
✎
S
o DST y pulse ENTERE. En la pantalla Zona Tiempo, utilice los botones ▲ o ▼ para
seleccionar la zona y pulse ENTERE. En la pantalla DST pulse ENTERE y elija si desea
activar o desactivar DST(horario de verano). Una vez haya terminado, pulse ENTERE.
✎
Si ha seleccionado Manual, irá a las pantallas Fecha y Hora. Seleccione Fecha u
Hora y pulse
la fecha o la hora. Utilice los botones ◄ o ► para desplazarse entre los campos de
entrada. Una vez configuradas Fecha y Hora, seleccione Siguiente y pulse ENTER.
P
ulse los botones ▲ o ▼ para seleccionar Aire o Cable y pulse
selección. Seleccione Siguiente y pulse ENTERE. Puede marcar ambos si los dos están conectados.
✎
Si selecciona Cable, deberá ir a la pantalla del sistema del cable. Utilice los botones
▲ o ▼ para seleccionar Digital o Analógico y pulse ENTERE. Utilice los botones
▲ o ▼ para seleccionar el formato de la señal correcta del cable - STD, HRC o IRC
- y pulse
formato de la señal correcta del cable para los sistemas digital y analógico.
Una vez hecho esto, seleccione Siguiente y pulse
La búsqueda de canales se iniciará automáticamente. Puede tardar hasta 30 minutos.
Para obtener más información, consulte Canal → Prog. Auto en el manual electrónico.
✎
Pulse el botón ENTERE en cualquier momento para interrumpir el proceso de
memorización.
Si desea ver un programa en emisión, seleccione Cerrar. Si desea utilizar Smart Hub,
Seleccione Smart Hub. Se iniciará Smart Hub. Para obtener más información, consulte
“Reproductor multimedia”. Muestra el Manual electrónico.
E
.
E
dos veces.
dos veces.
i ha seleccionado Auto, irá a las pantallas Zona Tiempo y DST. Seleccione Zona Tiempo
ENTERE
ENTERE
. A continuación, utilice los botones ▲ o ▼ para establecer
ENTERE. Aparece una marca en su
. La mayoría de los sistemas de cable utilizan STD. Seleccione el
ENTERE
.
Si desea volver a ejecutar Plug & Play...
O
MENU → Sistema → Plug & Play → ENTER
✎
NOTA
y Si desea cambiar la configuración del televisor de Demo comercio a Uso domiciliario cuando no esté en Plug &Play,
pulse el botón del volumen del televisor. Cuando vea el volumen en la OSD, mantenga pulsado el botón MENU durante 5
segundos.
E
Español - 10
Page 34

Conexión a un dispositivo AV
R-AUDIO-L
Uso de un cable HDMI o HDMI/DVI: Conexión HD (hasta 1080p)
Para conseguir una mejor calidad de imagen HD es aconsejable utilizar la conexión HDMI.
Dispositivos disponibles: reproductores DVD y Blu-ray, receptor por cable HD y por satélite HD STB (decodificador).
Dispositivo
HDMI OUT
Dispositivo
DVI OUT
AUDIO OUT
WR
BlancoRojo
✎
HDMI IN 1(DVI), 2, 3, 4/PC/DVI AUDIO IN
Para obtener una mejor calidad de imagen y de audio, conecte un dispositivo digital mediante un cable HDMI.
x
Un cable HDMI admite señales de audio y de vídeo y no requiere un cable de audio.
x
– Para conectar el televisor a un dispositivo digital que no admita la salida HDMI, utilice cables HDMI/DVI y de
audio.
La imagen quizás no se muestre correctamente (o no se muestre en absoluto) o el audio puede que no
x
funcione si se conecta al televisor un dispositivo externo que utiliza una versión más antigua del modo HDMI.
En tales casos, consulte al fabricante del dispositivo externo acerca de la versión HDMI y, si ésta es antigua,
solicite una actualización.
Debe adquirir un cable certificado HDMI. De lo contrario, la imagen puede no mostrarse o producirse un error
x
de conexión.
Recomendamos utilizar un cable HDMI de alta velocidad o un cable HDMI que admita Ethernet. Este producto
x
no admite la función Ethernet a través de HDMI.
Español - 11
Page 35

Uso de un cable de componentes (hasta 1080p) o de audio/vídeo (sólo 480i)
Dispositivos disponibles: Reproductor DVD y Blu-ray, decodificador por cable, receptor por satélite STB, aparato de vídeo
VCR
R W R
R
G
B
Rojo Blanco Rojo RojoAzul BlancoVerde Amarillo
DispositivoDispositivo
AUDIO OUT
COMPONENT OUT
R-AUDIO-L
B
RRRW
W
R
B
G
R
W
Y
✎
Para obtener la mejor calidad de imagen, se recomienda la conexión de componentes antes que la conexión
R-AUDIO-LPR PB
Y
G
R
A/V.
✎
Cuando se conecta a AV IN el color (verde) del terminal AV IN [VIDEO] no coincide con el cable de vídeo
(amarillo).
Uso de una conexión de cable EX-Link
Dispositivos disponibles: Dispositivos externos que admiten Ex-Link.
R
VIDEO OUTAUDIO OUT
W
Y
W
Y
W
Y
EX-LINK: Conector sólo para servicio.
Español - 12
Page 36

Conexión a un dispositivo de audio
Uso de una conexión de cable óptico (digital)
Dispositivos disponibles: sistema de audio digital, amplificador, sistema Home Theater DVD
OPTICAL
✎
DIGITAL AUDIO OUT (OPTICAL)
Cuando conecte un sistema de audio digital al terminal DIGITAL AUDIO OUT (OPTICAL), reduzca el volumen
x
del televisor y del sistema.
El audio de 5.1 canales está disponible cuando se conecta el televisor a un dispositivo externo que admite
x
audio de 5.1 canales.
Cuando el receptor (sistema Home Theater) está encendido, se puede oír la salida de sonido del terminal
x
óptico del televisor. Cuando el televisor recibe una señal DTV, envía el sonido de 5.1 canales al receptor
del sistema Home Theater. Cuando la fuente es un componente digital, como un reproductor DVD/Blu-ray/
receptor de cable o satélite (decodificador), y está conectada al televisor a través de HDMI, sólo se oye el
sonido de 2 canales del receptor del sistema Home Theater. Si desea oír el audio de 5.1 canales, conecte
el terminal de la salida de audio digital del reproductor DVD/Blu-ray/decodificador/receptor por satélite STB
directamente al amplificador o al sistema Home Theater.
Conexión a un PC
Sistema de audio digital
Uso de cables HDMI/DVI o D-sub
✎
El PC quizás no admita una conexión HDMI.
HDMI OUT
DVI OUT
AUDIO OUT
AUDIO OUT
PC OUT
Español - 13
Page 37

Modos de visualización del PC (entradas D-Sub y HDMI/DVI)
La resolución óptima del PC es 1920 x 1080 a 60 Hz. También puede seleccionar alguna de las resoluciones estándar
relacionadas en la columna Resolución. El televisor se ajusta automáticamente a la resolución elegida.
Modo Resolución
IBM
MAC
VESA DMT
VESA DMT/DTV CEA
Frecuencia horizontal
(KHz)
640 x 350
720 x 400
640 x 480
832 x 624
1152 x 870
640 x 480
640 x 480
640 x 480
800 x 600
800 x 600
800 x 600
1024 x 768
1024 x 768
1024 x 768
1152 x 864
1280 x 1024
1280 x 1024
1280 x 800
1280 x 800
1280 x 960
1360 x 768
1440 x 900
1440 x 900
1680 x 1050
1920 x 1080p 67,500 60,000 148,500 +/+
31,469
31,469
35,000
49,726
68,681
31,469
37,861
37,500
37,879
48,077
46,875
48,363
56,476
60,023
67,500
63,981
79,976
49,702
62,795
60,000
47,712
55,935
70,635
65,290
Frecuencia vertical
(Hz)
70,086
70,087
66,667
74,551
75,062
59,940
72,809
75,000
60,317
72,188
75,000
60,004
70,069
75,029
75,000
60,020
75,025
59,810
74,934
60,000
60,015
59,887
74,984
59,954
Frecuencia de reloj de
píxeles
(MHz)
25,175
28,322
30,240
57,284
100,000
25,175
31,500
31,500
40,000
50,000
49,500
65,000
75,000
78,750
108,000
108,000
135,000
83,500
106,500
108,000
85,500
106,500
136,750
146,250
Polaridad de
sincronización
(H/V)
+/-
-/+
-/-
-/-
-/-
-/-
-/-
-/+/+
+/+
+/+
-/-
-/+/+
+/+
+/+
+/+
-/+
-/+
+/+
+/+
-/+
-/+
-/+
✎
NOTA
En una conexión de cable HDMI/DVI, se debe utilizar el terminal HDMI IN 1(DVI).
x
No se admite el modo entrelazado.
x
El equipo puede funcionar incorrectamente si se selecciona un formato de vídeo que no sea estándar.
x
Los modos Independiente y Compuesto no se admiten. SOG (Sincronización en verde) no se admite.
x
Español - 14
Page 38

Cambio de la fuente de entrada
SOURCE
Origen
Se utiliza para seleccionar TV u otras
fuentes de entrada externas como
reproductores de DVD/Blu-ray/
receptores de televisión por cable/satélite
(decodificador).
1. Pulse el botón SOURCE del mando a
distancia.
2. Seleccione la fuente de entrada
externa que desee.
■■ TV / PC / AV / Componente / HDMI1/DVI / HDMI2 /
HDMI3 / HDMI4 / USB / AllShare
✎
Puede elegir solamente dispositivos externos que
estén conectados al televisor. En Origen se resaltan las
entradas conectadas.
✎
En Origen, PC siempre está activado.
Editar Nombre
Editar Nombre permite asociar un nombre de dispositivo a la
fuente de entrada. Para acceder a Editar Nombre, pulse el
botón TOOLS en Origen. Bajo Editar Nombre aparecen las
siguientes opciones:
■ Vídeo/DVD/Cable STB/Satélite STB/PVR STB/
Receptor AV/Juego/Filmadora/PC/DVI PC/
Dispositivos DVI/TV/IPTV/Blu-ray/HD DVD/DMA: Dé
un nombre al dispositivo conectado en las tomas de
entrada; de esta manera será más fácil seleccionar el
dispositivo de entrada.
✎
Si ha conectado un PC en el puerto HDMI IN 1 (DVI)
con un cable HDMI a DVI, seleccione PC en Editar
Nombre para escribir el nombre de un dispositivo.
✎
Si ha conectado un PC en el puerto HDMI IN 1 (DVI)
con un cable HDMI a DVI, seleccione DVI PC en Editar
Nombre para escribir el nombre de un dispositivo.
✎
Si ha conectado un dispositivo AV en el puerto HDMI
IN 1 (DVI) con un cable HDMI a DVI, seleccione
Dispositivos DVI en Editar Nombre para escribir el
nombre del dispositivo.
Edit. favoritos
En Origen, pulse el botón TOOLS para seleccionar Edit.
favoritos. Puede establecer una fuente de entrada externa
como Favoritos.
Información
Puede ver información detallada acerca del dispositivo
externo seleccionado.
Actualizar
En Origen, si no se muestran los dispositivos externos, pulse
el botón TOOLS para seleccionar Actualizar.
Español - 15
Page 39

Conexión de la red
Puede configurar el televisor de forma que se pueda acceder a Internet a través de la red de área local (LAN) mediante una
conexión con o sin cable.
Conexión con la red - Inalámbrica
Puede conectar el televisor a la LAN mediante un módem o enrutador inalámbrico estándar.
Compartidor IP inalámbrico
Puerto LAN en la pared
Este televisor admite los protocolos de comunicaciones IEEE 802.11a/b/g y n. Samsung recomienda el uso de IEEE 802.11n.
Si reproduce un vídeo a través de una conexión IEEE 802.11b/g, es posible que el vídeo no se reproduzca correctamente.
La mayoría de los sistemas de red inalámbricos incorporan un sistema de seguridad que requiere que los dispositivos
que acceden a la red a través de un punto de acceso o PA (generalmente un compartidor IP, un enrutador o un módem
inalámbricos) transmitan un código de seguridad cifrado llamado clave de acceso.
Este televisor es compatible con los siguientes protocolos de seguridad:
y Modo de autenticación: OPEN, SHARED, WPAPSK, WPA2PSK
y Tipo de cifrado: WEP, TKIP, AES
Si se selecciona el modo 802.11n (Greenfield) puro de gran procesamiento y se configura el tipo de codificación WEP, TKIP
o TKIP-AES (WPS2Mixed) en el enrutador inalámbrico, los televisores Samsung no admitirán una conexión con las nuevas
especificaciones de la certificación Wi-Fi.
Configuración de la conexión de red - Inalámbrico
Las instrucciones que puede ver a continuación se refieren a las redes que utilizan el protocolo de configuración dinámica
de host (DHCP) para configurar automáticamente las conexiones de red. Si dispone de una red de IP estática, consulte en el
manual del usuario las instrucciones de configuración.
Siga estos pasos para configurar la conexión de una red que utiliza
DHCP:
1. Conecte el televisor a la red, tal como se indica en las ilustraciones
anteriores.
2. Encienda el televisor, pulse el botón MENU del mando a distancia
y seleccione Red → Configuración de red.
3. Seleccione Inalámb. (General), pulse ENTER
E
ENTER
.
4. La función Red busca redes inalámbricas disponibles. Cuando
termina, muestra una lista de las redes disponibles.
5. En la lista de redes, pulse los botones▲ o ▼ para seleccionar
una red y, a continuación, seleccione Siguiente y pulse
ENTER
E
.
6. Si ha seleccionado un enrutador inalámbrico con clave de
seguridad, aparece la pantalla de la clave de seguridad. Introduzca la Clave segur. (Clave segur. o PIN)´, seleccione
Siguiente y pulse ENTER
✎
Una vez haya escrito la Clave segur. (Clave segur. o PIN) utilice los botones ▲/▼/◄/► del mando a distancia para
seleccionar números y caracteres.
7. Aparece la pantalla de conexión de red y comprueba la conexión de la red. Una vez comprobada la conexión de la red, se
muestra el mensaje “Internet se conectó correctamente.” Se completa la configuración de la red.
✎
Para obtener más información, consulte, “Conexión de la red inalámbrica” en el manual electrónico.
(Servidor DHCP con PA)
Cable LAN (no suministrado)
E
E
.
y vuelva a pulsar
Conguración de red
Seleccione un tipo de conexión de red.
Cable
Inalámb. (General)
WPS(PBC)
One Foot Connection
✎
La imagen mostrada puede variar según el
Congure la red inalámbrica
seleccionando su punto de
acceso. Según la conguración
del punto de acceso, es posible
que deba introducir la clave de
seguridad.
modelo.
Anterior
Siguiente
Cancelar
Español - 16
Page 40

Conexión de la red - Cable
Hay dos formas principales de conectar el televisor a la red mediante cable, según la configuración de la red. Se muestran a
continuación:
Puerto de módem en la pared
Puerto LAN en la pared Panel posterior del TV
✎
No se admite una velocidad de red inferior a 10 Mbps.
Módem externo
(ADSL/VDSL/TV por cable)
Cable LAN (no suministrado)Cable de módem (no suministrado)
Cable LAN (no suministrado)
Panel posterior del TV
Configuración de la conexión de red - Cable
La mayoría de las redes domésticas utilizan el protocolo de configuración dinámica de host (DHCP) para configurar las
conexiones de red. Las redes domésticas compatibles con DHCP proporcionan automáticamente la dirección IP, la máscara
de subred, la puerta de enlace y los valores de DNS que el televisor necesita para acceder a Internet, de manera que no es
necesario especificarlos manualmente.
Siga estos pasos para configurar la conexión de una red que utiliza
DHCP:
1. Conecte el televisor a la red, tal como se indica en una de las
ilustraciones anteriores.
2. Encienda el televisor, pulse el botón MENU del mando a distancia y
seleccione Red → Configuración de red. Se muestra la pantalla
Configuración de red.
3. Seleccione Cable, pulse ENTER
E
y vuelva a pulsar ENTERE.
Conguración de red
Seleccione un tipo de conexión de red.
Cable
Inalámb. (General)
WPS(PBC)
One Foot Connection
Conéctese a la red mediante un
cable LAN. Asegúrese de que el
cable LAN esté conectado.
Anterior
Siguiente
Cancelar
4. Aparece la pantalla de conexión de red y comprueba la conexión
de la red. Una vez comprobada la conexión de la red, se muestra
el mensaje “Internet se conectó correctamente.” Se completa la
configuración de la red.
✎
Si el televisor no adquiere automáticamente los valores de la
✎
La imagen mostrada puede variar según el
modelo.
conexión de la red o si se desea configurar ésta manualmente,
seleccione Ajustes IP en la pantalla de prueba de la red. Establezca Config. protocolo Internet como Manual.
Especifique los valores de Dirección IP, Máscara de subred, Puerta de enlace y Servidor DNS manualmente.
✎
Para obtener más información, consulte “Conexión de la red cableada” en el manual electrónico.
Español - 17
Page 41

Uso del manual electrónico
Encontrará instrucciones sobre las funciones del televisor en el manual electrónico del televisor. Para
E-MANUAL
Pantalla de visualización
utilizar el manual electrónico, pulse el botón E-MANUAL del mando a distancia. Mueva el cursor con
los botones u / d / r / l para resaltar una categoría, luego un tema y pulse el botón ENTERE Se
muestra la página del manual electrónico que desea ver.
También puede acceder a través del menú:
O
MENUm → Soporte técnico → Manual electrónico → ENTER
✎
Si desea volver al e-Manual, pulse el botón E-MANUAL del mando a distancia.
✎
No puede utilizar la función Int. Ahora si el menú no está activado.
E
Pantalla del televisor: Muestra el
programa, la película, el vídeo, etc.
que se está viendo.
Funciones básicas
Cambio del modo preestablecido de la imagen
Ajuste de los valores de la imagen
Cambio del tamaño de la imagen
Cambio de las opciones de la imagen
Ajuste del televisor con el ordenador
Ayuda: Muestra la Guía e-Manual
o la Guía del producto. Pulse el
botón ENTER
E
.
Uso de la Ayuda
Mostrar la guía del manual electrónico o del producto pulsando Ayuda.
Uso del manual electrónico
E
ncontrará instrucciones sobre las funciones del televisor
en el manual electrónico del televisor. Para utilizar el manual
electrónico, pulse el botón E-MANUAL del mando a
distancia. Mueva el cursor con los botones u / d / r / l
para resaltar una categoría, luego un tema y pulse el botón
ENTERE. Se muestra la página del manual electrónico
que desea ver.
También puede acceder a través del menú:
O MENU
m
→ Soporte técnico → e-Manual → ENTER
✎ Si desea vo lver al e-Manu al, pulse el botón E-M ANUAL del mando a di stancia.
✎ No podrá ut ilizar Int. Ahor a directamente s i TV está config urada como una fue nte
de entrada e xterna.
Ayuda
E
Funciones básicas
Cambio del modo preestablecido de la imagen
Ajuste de los valores de la imagen
Cambio del tamaño de la imagen
Cambio de las opciones de la imagen
Ajuste del televisor con el ordenador
Índice
Regresar
<Guía del manual electrónico>
La guía del manual electrónico tiene este aspecto.
La lista de categorías. Pulse los
l
o r para seleccionar la
botones
categoría que desee.
Muestra la lista de menús
secundarios. Utilice los botones de
fl echa del mando a distancia para
mover el cursor. Pulse el botón
E
ÍndiceAyuda
ENTER
secundario que desee.
para seleccionar el menú
Índice: Muestra la pantalla del índice.
X: Salir del manual electrónico.
Sincronización de recursos de varios dispositivos con AllShare
AllShare™ sincroniza los dispositivos digitales para que se pueda
reproducir en la pantalla más grande del televisor la música,
las películas y las fotos almacenados en el PC, la cámara y los
dispositivos móviles. Permite asimismo conectarse a varios PC.
<Guía del producto>
La guía del producto tiene este aspecto.
Regresar
Cómo conmutar entre un tema del manual electrónico y los menús de la OSD correspondientes.
Funciones básicas > Cambio del modo preestablecido de la imagen (1/1)
Cambio del modo preestablecido de la imagen
O MENUm → Imagen → Modo de Imagen → ENTER
■
Modo de Imagen
Los modos de la imagen aplican a ésta los ajustes predefi nidos. Seleccione un
modo mediante las fl echas de arriba y abajo y pulse el botón ENTERE.
N En el modo PC sólo se pueden seleccionar Diversión y Normal.
• Dinámico: Adecuado para un entorno iluminado.
• Normal: Adecuado para un entorno normal.
para LED TV
/Relax
• Natural
• Película: Adecuado para ver películas en un entorno oscuro.
• Diversión (Sólo en el modo PC): Adecuado para ver películas y para juegos.
Ayuda Int. Ahora Inicio Zoom Índice
✎
Esta función no está habilitada en algunos menús.
para PDP TV
: Adecuado para reducir la fatiga ocular.
E
Int. Ahora
E-MANUAL
Imagen
Modo de Imagen Normal
Luz de la celda 14
Contraste 100
Brillo 45
Defi nición 50
Color 50
Tinte (V/R) G 50 R 50
Español - 18
Page 42

Método 1 Método 2
1. Seleccione Int. Ahora si desea ejecutar el menú
correspondiente.
2. Para volver a la pantalla del manual electrónico, pulse el
botón E-MANUAL.
Visualización de los contenidos
Funciones básicas > Cambio del modo preestablecido de la imagen (1/1)
Cambio del modo preestablecido de la imagen
O MENUm → Imagen → Modo de Imagen → ENTER
■
Modo de Imagen
Los modos de la imagen aplican a ésta los ajustes predefinidos.
Seleccione un modo mediante las flechas de arriba y abajo y pulse el
E
.
botón ENTER
N En el modo PC sólo se pueden seleccionar Diversión y Normal.
• Dinámico: Adecuado para un entorno iluminado.
• Normal: Adecuado para un entorno normal.
para LED TV
para PDP TV
la fatiga ocular.
y para juegos.
/Relax
• Natural
• Película: Adecuado para ver películas en un entorno oscuro.
• Diversión (Sólo en el modo PC): Adecuado para ver películas
Ayuda Int. Ahora Inicio Zoom Índice
Int. Ahora: Muestra el menú de la OSD que corresponda al tema. Para regresar a la pantalla
del manual electrónico, pulse el botón E-MANUAL.
Inicio: Va a la pantalla de inicio del manual electrónico.
Zoom: Agranda una pantalla.
Índice: Muestra la pantalla del índice.
E
: Adecuado para reducir
1. Pulse el botón ENTER
E
cuando se muestre un
tema. “Aparece el mensaje ¿Desea ejecutar esto?”.
Seleccione Sí y pulse el botón ENTERE. Aparece la
ventana de la OSD.
2. Para volver a la pantalla del manual electrónico, pulse el
botón E-MANUAL.
Área de contenidos: Incluye los contenidos del
tema, si ha seleccionado un menú secundario.
Para ir a la página anterior o siguiente, pulse los
botones l o r.
Uso del modo Zoom
E
Seleccione Zoom y pulse ENTER
pantalla. Se puede desplazar por la pantalla agrandada con
los botones u o d.
✎
Para recuperar el tamaño normal de la pantalla, pulse el
botón RETURN.
para agrandar la
Cambio del modo preestablecido de la imagen
O MENUm → Imagen → Modo de Imagen → ENTER
■
Modo de Imagen
Los modos de la imagen aplican a ésta los ajustes predefinidos. Seleccione un modo
mediante las flechas de arriba y abajo y pulse el botón ENTER
N En el modo PC sólo se pueden seleccionar Diversión y Normal.
• Dinámico: Adecuado para un entorno iluminado.
• Normal: Adecuado para un entorno normal.
para LED TV
• Natural
• Película: Adecuado para ver películas en un entorno oscuro.
• Diversión (Sólo en el modo PC): Adecuado para ver películas y para juegos.
/Relax
para PDP TV
: Adecuado para reducir la fatiga ocular.
E
E
.
Cómo buscar un tema en la página del índice
1. Para buscar un tema pulse el botón de flecha izquierda o derecha para seleccionar una letra y pulse ENTER
muestra una lista de temas y palabras clave que comienzan con la letra que se haya seleccionado.
2. Pulse los botones
u
o d para seleccionar un tema o una palabra clave y pulse el botón ENTERE para seleccionar el
tema que desee ver.
3. Aparece la página del manual electrónico con el tema.
✎
Para cerrar la pantalla Índice pulse el botón RETURN.
E
. El índice
Regresar
Español - 19
Page 43

Solución de problemas
Si cree que el televisor tiene un problema, revise primero esta lista de posibles problemas y soluciones. Repase también la
sección Solución de problemas del manual electrónico. Si ninguno de los consejos funciona, visite “www.samsung.com” y
haga clic en Atención al cliente o póngase en contacto con el centro de llamadas de Samsung al 1-800-SAMSUNG.
Problemas Soluciones y explicaciones
El televisor no se enciende. • Compruebe que el cable de alimentación CA esté bien conectado en la toma de la pared y en el
No hay imagen ni vídeo. • Compruebe las conexiones de los cables. Desconecte y vuelva a conectar todos los cables del
El mando a distancia no funciona. • Sustituya las pilas del mando a distancia. Instale las pilas con las polaridades (+/–) en la dirección
El mando a distancia del cable/
decodificador no enciende ni apaga el
televisor ni ajusta el volumen.
televisor.
• Compruebe que la toma de la pared funcione.
• Intente pulsar el botón POWER del televisor para asegurarse de que el problema no está en el
mando a distancia. Si el televisor se enciende, consulte “El mando a distancia no funciona” a
continuación.
televisor y los dispositivos externos.
• Establezca la salida de vídeo de los dispositivos externos (receptor de cable/satélite, DVD, Blu-ray,
etc.) de modo que coincida con las conexiones de la entrada de TV. Por ejemplo, si la salida de un
dispositivo externo es HDMI, se debe conectar a una entrada HDMI en el televisor.
• Compruebe que los dispositivos externos estén encendidos.
• Asegúrese de seleccionar la fuente de entrada correcta pulsando el botón SOURCE del mando a
distancia.
• Reinicie el dispositivo conectado; para ello desenchufe y vuelva a enchufar el cable de alimentación
del dispositivo.
correcta.
• Limpie la ventana de transmisión del sensor del mando a distancia.
• Apunte con el mando a distancia directamente al televisor desde una distancia de 5~6 pies (1,5 ~2
metros).
• Programe el mando a distancia del decodificador de cable/satélite para que haga funcionar el
televisor. Consulte el manual del decodificador de cable/satélite para conocer el código del TV
SAMSUNG.
✎
Algunas de las imágenes y funciones mostradas en este manual sólo están disponibles en unos modelos
determinados.
✎
Puede mantener su televisor en un estado óptimo actualizando por USB el último firmware en la página web (samsung.
com → Atención al cliente → Descargas).
Licencia
Listado de características
y Excelente interfaz digital y capacidad de trabajo en red: El sintonizador digital HD incorporado permite ver las emisiones
HD que no exigen una suscripción sin que sea necesario disponer de un receptor de televisión por cable/satélite
(decodificador).
y 3D : Esta impactante nueva función permite ver contenido 3D.
y SMART HUB: La puerta de enlace para todo el contenido integrado en un único lugar.
– Proporciona distintas opciones de entretenimiento.
– Permite controlar las opciones de entretenimiento con una interfaz de usuario cómoda y sencilla.
– Proporciona fácil acceso a diversas aplicaciones, así como a las que se van añadiendo cada día.
– Permite personalizar el televisor agrupando y ordenando las aplicaciones como se desee.
y AllShare™: AllShare™ conecta el televisor y los dispositivos/teléfonos móviles compatibles de Samsung a través de una
red.
y Anynet+ (HDMI-CEC): Permite controlar con el mando a distancia del televisor Samsung todos los dispositivos de
Samsung conectados que sean compatibles con Anynet+.
Español - 20
Page 44

Fijación del televisor a la pared
Precaución: Tirar del televisor, empujarlo o colgarse de él puede provocar su caída. En especial,
impida que los niños se cuelguen del televisor o lo desestabilicen. El televisor podría caerse sobre
ellos y causarles lesiones graves o incluso la muerte. Siga las precauciones de seguridad del folleto
de seguridad incluido con el televisor. Para mejorar la estabilidad y la seguridad puede adquirir un
dispositivo antivuelco e instalarlo como se explica a continuación.
Kit de soporte del televisor (se vende por separado):
La piezas siguientes se incluyen en el kit de soporte del televisor. Además, deberá proveerse de un tornillo para madera, un
tornillo y un perno u otro tipo de tornillo adecuado para la pared o el armario donde vaya a asegurar el soporte del televisor.
Recomendamos un tornillo para madera de tamaño M4xL20.
Soporte del televisor (BN96-15753A) Tornillo (M8 x L19)
Instalación del soporte del televisor
1. Saque el tornillo montado en la parte posterior del televisor y monte el soporte del televisor en éste con el tornillo incluido
con el kit del soporte del televisor y que esté diseñado para su televisor.
✎
Use sólo el tornillo suministrado. Si utiliza un tornillo diferente podría dañar el televisor.
2. Apriete firmemente el tornillo suministrado (tamaño M4xL20 o similar) en la pared o en el mueble donde vaya a instalar el
televisor.
✎
Si va a utilizar el tornillo sobre una pared es aconsejable montarlo sobre un montante. Si esto no es posible, utilice
un perno para anclar el tornillo.
3. Asegure el cable del soporte del televisor y el tornillo de la pared o del mueble para que el televisor quede bien sujeto. Vea
las ilustraciones siguientes.
✎
Instale el televisor cerca de la pared para que no caiga.
✎
Cuando instale el soporte del televisor en la pared, asegure el cable nivelado respecto al suelo o inclinado hacia
abajo por motivos de seguridad.
✎
Compruebe de vez en cuando que el cable esté firme.
✎
Cuando desee mover el televisor, debe quitar, primero, el cable de conexión.
4. C
ompruebe que todas las conexiones estén bien aseguradas. Compruebe las conexiones periódicamente para detectar cualquier
signo de fatiga o de fallo. Si tiene dudas sobre la seguridad de la instalación, póngase en contacto con un instalador profesional.
Para adquirir el kit del soporte del televisor, póngase en contacto con el centro de atención al cliente de Samsung.
En EE.UU.: 1-800-SAMSUNG (1-800-726-7864)
–
En Canadá: 1-800-SAMSUNG (1-800-726-7864)
–
Español - 21
Page 45

Almacenamiento y mantenimiento
✎
Si ha pegado algunas pegatinas en la pantalla del televisor, al extraerlas quedaran restos. Limpie la pantalla para ver la
television.
No rocíe agua ni ningún producto limpiador directamente
sobre el producto. Si penetra líquido en el producto se puede
Limpie el producto con un paño suave ligeramente
humedecido con agua.
originar un problema en el funcionamiento, un incendio o una
descarga eléctrica.
Especificaciones - QWERTY Remote
Nombre modelo RMC-QTD1
Pilas AAA x 4
Dimensiones (An x Pr x Al) 2,4 x 1 x 6 pulgadas
Peso 0,295 lbs (134 g)
Para ampliar la vida de las pilas se recomienda utilizar pilas alcalinas.
(60,9 x 24,36 x 152,2 mm)
Especificaciones
Resolución de pantalla 1920 x 1080
onsideraciones medioambientales
C
T
emperatura de funcionamiento
H
umedad de funcionamiento
Temperatura de almacenamiento
H
umedad de almacenamiento
Giro del soporte
(izquierda/derecha) -20˚ ~ 20˚
Nombre modelo PN51D6900 PN59D6900
Tamaño de pantalla
(diagonal)
Sonido
(salida) 10 W x 2 15 W x 2
Dimensiones (An x Pr x Al)
Cuerpo principal
Con el soporte
Peso
Sin el soporte
Con el soporte
Modelo de 51"
(50,7" medidas diagonalmente)
47,0 x 1,4 x 28,2 pulgadas
(1195,9 x 38,0 x 719,4 mm)
47,0 x 12,0 x 30,8 pulgadas
(1195,9 x 305,0 x 783,1 mm)
49,3 lbs (22,4 kg)
59,7 lbs (27,1 kg)
50 °F a 104 °F (10 °C a 40 °C)
10% al 80%, sin condensación
-4 °F a 113 °F (-20 °C a 45 °C)
5% al 95%, sin condensación
Modelo de 59"
(59,0" medidas diagonalmente)
54,2 x 1,4 x 32,5 pulgadas
(1378,4 x 38,0 x 827,3 mm)
54,1 x 13,0 x 34,7 pulgadas
(1378,4 x 335,0 x 886,3 mm)
67,4 lbs (30,6 kg)
80,6 lbs (36,6 kg)
✎
El diseño y las especificaciones pueden cambiar sin previo aviso.
✎
Este dispositivo es un aparato digital de la Clase B.
✎
Para obtener más información sobre la fuente de alimentación y el consumo de energía, consulte la etiqueta adherida al
producto.
Español - 22
Page 46

■ Vista frontal/Vista lateral
Dimensiones
7
1
2
3
4
5
6
8
(Unidad: pulgadas)
Nombre del modelo
1 2 3 4 5 6 7 8
PN51D6900 47,0 44,5 24,9 20,0 28,3 30,8 1,4 12,0
PN59D6900 54,2 51,7 29,2 21,2 32,5 34,8 1,4 13,1
■ vista posterior
1
2
3
5
4
6
(Unidad: pulgadas)
Nombre del modelo
1 2 3 4 5 6
PN51D6900 15,7 15,7 32,1 10,5 4,3 2,6
PN59D6900 23,6 15,7 39,5 14,7 5,0 3,1
NOTA: No todos los dibujos están necesariamente a escala. Algunas dimensiones están sujetas a cambio sin previo aviso.
Consulte las dimensiones antes de efectuar la instalación del televisor. La empresa no se responsabiliza de los errores
tipográficos o de impresión.
© 2011 Samsung Electronics America, Inc.
Español - 23
Page 47

Les figures et illustrations de ce mode d’emploi ne sont fournies qu’à titre de référence. L’apparence réelle du produit
pourrait être différente. Le design et les caractéristiques techniques du produit peuvent être modifiés sans préavis.
Remarques importantes sur la garantie relative au format de l'image du téléviseur
Consultez la carte de garantie afin d'obtenir de plus amples renseignements sur les conditions de la garantie.
✎
Le format écran large des écrans à plasma (16:9, soit le rapport hauteur/largeur de l'image) est conçu principalement pour les vidéos plein écran à écran
large. Les images affichées devraient être en format écran large 16:9 ou agrandi afin de remplir l'écran si votre modèle offre cette caractéristique et que les
images sont constamment en mouvement. L'affichage de graphiques et d'images fixes, comme les barres noires des vidéos et émissions de télévision en
format standard non agrandi, doit être limité au maximum à 5% du temps d'écoute hebdomadaire.
De plus, il faut limiter l’affichage des autres images et textes fixes, comme les rapports boursiers, les affichages de jeux vidéo, les logos des stations, les
sites Web ou les images graphiques et les schémas des ordinateurs, tel qu'indiqué ci-dessus, et ce pour tous les téléviseurs. L'affichage d'images fixes
pendant une durée supérieure à 5 % du temps d'écoute total peut entraîner un vieillissement inégal de l'écran à plasma en y créant des images fantôme
subtiles mais permanentes. Pour éviter ce problème, faites varier les émissions et les images et regarder principalement des images plein écran en
mouvement et non pas des images ou des barres foncées fixes.
Sur les modèles d’écran à plasma dotés de fonctions de redimensionnement de l’image, ces commandes permettent d’afficher différents formats en plein
écran.
Prenez garde au choix des formats que vous utilisez pour regarder la télévision et à leur durée d'utilisation. Un vieillissement inégal résultant du choix et de
l’utilisation d’un format, tout comme les images rémanentes, ne sont pas couverts par la garantie limitée de Samsung.
• ÉNONCÉ DE GARANTIE LIMITÉE DE SAMSUNG ELECTRONICS POUR L'AMÉRIQUE DU NORD
Assujettie aux exigences, conditions, exclusions et limitations de la garantie limitée originale fournie avec les produits de Samsung Electronics
(SAMSUNG) et les exigences, conditions, exclusions et limitations de la présente garantie, SAMSUNG offrira en plus un service de réparation sous
garantie aux États-Unis pour les produits achetés au Canada et un service de réparation sous garantie au Canada pour les produits achetés aux
États-Unis pendant la période de garantie précisée à l'origine et pour l'acheteur initial seulement.
Les réparations sous garantie décrites ci-dessus doivent être effectuées dans un centre de réparation agréé SAMSUNG. En plus de la présente
garantie, la garantie limitée originale et une facture datée en tant que preuve d'achat doivent être présentées au centre de réparation. Le transport
de l'appareil à destination et en provenance du centre de réparation incombe à l'acheteur. Les conditions couvertes ne sont limitées qu'aux vices de
matériaux et de fabrication dans des conditions d'utilisation normale.
Exclues, mais sans s'y limiter, sont les dispositions précisées à l'origine pour le service à domicile ou sur place, durées de réparation minimales et
maximales, échanges ou remplacements, accessoires, options, mises à niveau ou produits non durables.
Pour obtenir le nom d'un centre de réparation agréé Samsung, composez les numéros sans frais suivants:
– Aux États-Unis: 1-800-SAMSUNG (1-800-726-7864)
– Au Canada : 1-800-SAMSUNG
Renseignements à l’intention de l’utilisateur
• Rémanence à l’écran
N’affichez pas d’images fixes (comme celle des jeux vidéos) sur un écran à plasma pendant plus que quelques minutes. les images fixes peuvent
causer une image rémanente. Cette rémanence est également connue sous le nom de «brûlure d’écran ». Pour éviter une telle rémanence, reportezvous à la page 15 pour réduire le niveau de luminosité et de contraste de l’écran pendant l’affichage d’une image fixe.
• Chaleur dans le haut du téléviseur à plasma
Le dessus du téléviseur peut devenir chaud après un fonctionnement prolongé alors que la chaleur se dissipe par les orifices de ventilation aménagés
dans la partie supérieure de l'écran.
Cet état est normal et n'est pas le signe d'une défectuosité du produit.
Toutefois, il faut empêcher les enfants de toucher la partie supérieure de l'écran.
• Le téléviseur laisse entendre un craquement.
Un craquement peut se produire lorsque le téléviseur se contracte ou se dilate à la suite d’un changement dans le milieu ambiant, comme la
température ou le niveau d’humidité. Ceci est normal; ce n’est pas un défaut.
• Défaillance de cellules
L’écran à plasma comporte de 2360000 pixels (haute définition) à 6221000 pixels (haute définition intégrale) dont la création nécessite une
technologie hautement perfectionnée. Il se peut toutefois que certains pixels s’assombrissent ou deviennent plus lumineux à l’écran. Ce phénomène
n’a aucune incidence sur la performance de l’appareil.
• Éviter de faire fonctionner le téléviseur à une température inférieure à 5°C (41 °F)
• Une image fixe affichée trop longtemps peut endommager l’écran en permanence.
Le fait de regarder l’écran à plasma en format 4:3 durant une longue période peut laisser des traces de bordures à gauche, à droite
et au centre de l’écran causées par une différence d’émission de lumière à l’écran. La lecture d'un DVD ou une console de jeu
peuvent causer les mêmes effets à l'écran.
Les dommages résultant d’une telle utilisation ne sont pas couverts par la garantie.
• Rémanence à l’écran.
Les images fixes des jeux vidéo et des ordinateurs affichées durant une longue période peuvent causer des images rémanentes partielles.
Pour éviter cet effet, réduisez la luminosité et le contraste lorsque des images fixes doivent rester longtemps à l’écran.
• Garantie
La garantie ne couvre pas les dommages causés par la rémanence d'images.
Les brûlures d'écran ne sont pas couvertes par la garantie.
Français - 2
Page 48

Accessoires
✎
Veillez à ce que les articles suivants soient inclus avec votre téléviseur. Si des éléments sont manquants, communiquez
avec le détaillant.
✎
La forme et la couleur des articles peuvent varier selon le modèle.
✎
Vérifiez qu'il ne reste aucun accessoire dans les emballages après avoir ouvert la boîte.
y QWERTY Remote (BN59-01134B) et piles (AAA x 4)
y Guide de l’utilisateur
y Carte de garantie / Guide de sécurité
y Chiffon de nettoyage
AV/Adaptateur composantes
(BN39-01154W)
✎
Tore de ferrite pour le câble d’alimentation: les tores de ferrite protègent les câbles contre les
interférences. Lorsque vous branchez un câble, ouvrez le tore de ferrite et fixez-le autour du
câble, près de la fiche, conformément à l’illustration.
A
Distance maximale entre le tore magnétique et l’extrémité du câble branché au téléviseur:
x
6~8 pouces
✎
Tore magnétique: Les tores de ferrite protègent les câbles contre les interférences. Lorsque
vous branchez un câble, ouvrez le tore de ferrite et fixez-le autour du câble, près de la fiche,
conformément à l'illustration.
Câbles d'entrée (vendus séparément)
Pour l'achat du câble RS232, consultez www.SamsungParts.com.
Tore de ferrite (2EA)
(3301-002049)
A
Cordon d’alimentation
Câble d'antenne/Câble
composante
(vendu séparément)
RS232 (AA39-00311A) HDMI HDMI-DVI Composante
Câble audio Composite (AV) Coaxial (RF) VGA
Français - 3
Page 49

Présentation du panneau de configuration
✎
La couleur et la forme du produit peuvent varier en fonction du modèle.
Panneau de commande
Capteur pour la télécommande Orientez la télécommande vers le capteur sur le téléviseur.
Indicateur d'alimentation Clignote puis s'éteint lorsque le téléviseur est allumé. S'allume en mode veille.
SOURCE
MENU Affiche le menu à l'écran, OSD (On Screen Display), des fonctions de votre téléviseur.
y
z
P
E
(Alimentation)
Permet de passer d'une source d'entrée à l'autre. Dans le menu à l’écran, cette
touche a la même fonction que la touche ENTERE de la télécommande.
Permet de régler le volume. Dans le menu à l'écran, utilisez les touches
la même manière que les touches ◄ et ► de la télécommande.
Permet de changer de chaîne. Dans le menu à l'écran, utilisez les touches
de la même manière que les touches ▼ et ▲ de la télécommande.
Appuyez sur cette touche pour mettre le téléviseur sous tension ou hors tension.
y
z
de
Mode veille
Le téléviseur passe en mode veille lorsque vous l’éteignez et continue de consommer une petite quantité d’électricité. Par
mesure de sécurité et pour réduire votre consommation électrique, ne laissez pas votre téléviseur en mode veille durant de
longues périodes (par exemple lorsque vous partez en vacances).
vacation, for example). Il est conseillé de débrancher le cordon d'alimentation.
Installation du support
Reportez-vous au guide séparé pour des instructions détaillées sur l’installation du support.
B
A
1 EA
A
Support (Selon le modèle) Guide du support Vis
B
1 EA
C
D
x4 (M4 X L12)
x4 (M4 X L8)
Français - 4
Page 50

1
3
2
4
5
C
(M4 X L12)
A
Vue latérale
Vue de dessus
x4
B
Front
ATTENTION
Rear
NE PAS
UTILISER
DE PRODUITS
CHIMIQUES
NE PAS
UTILISER
DE GRAISSE
NE PAS
UTILISER
D’HUILE
✎
P
our protéger le téléviseur, posez un tissu doux sur la table
et placez le téléviseur écran vers le bas sur ce dernier.
✎
Insérez le guide du support dans la fente située sur
la partie inférieure du téléviseur.
(Assemblage approprié) (Assemblage inadéquat)
D
x4
(M4 X L8)
✎
REMARQUE
Assurez-vous de bien distinguer le devant et l’arrière de la base et du guide de celle-ci à l’assemblage.
x
Assurez-vous qu'au moins deux personnes soulèvent et déplacent le téléviseur.
x
Lorsque vous vissez les vis, maintenez le téléviseur à la verticale. Si vous vissez les vis lorsque le téléviseur est en
x
position horizontale, il pourrait pencher vers un côté au moment où vous le replacez à la verticale.
Ne mettez pas vos doigts dans la fente du support du téléviseur au moment de l'installation.
[
Français - 5
Page 51

Installation du support mural
Installation de l’ensemble de fixation murale
L'ensemble de fixation murale (vendu séparément) permet de fixer le téléviseur au mur.
Pour obtenir des instructions détaillées sur l'installation du support mural, consultez les instructions fournies avec l'ensemble.
Nous recommandons de demander l'aide d'un technicien pour l'installation de ce support. Samsung Electronics n’est pas
responsable des dommages causés à l’appareil ni des blessures possibles occasionnées si vous tentez d’installer le support
vous-même.
Spécifications de l'ensemble de fixation murale (VESA)
Installez le support mural sur un mur massif perpendiculaire au plancher. Avant de fixer le support à un matériau autre que le
placoplâtre, veuillez communiquer avec votre détaillant local. Si vous installez le téléviseur à la hauteur du plafond ou sur un
mur incliné, il risque de tomber et de causer des blessures.
✎
REMARQUE
Les dimensions standard pour les ensembles de fixation murale figurent dans le tableau ci-dessous.
x
Les ensembles de fixation murale de Samsung sont fournis avec un guide d'installation détaillé et toutes les pièces
x
nécessaires à l’assemblage.
N'utilisez pas de vis non conformes aux spécifications de vis standard VESA.
x
N’utilisez pas de vis plus longues que les longueurs standard ou non conformes aux spécifications VESA de vis
x
standard. Des vis trop longues pourraient endommager l'intérieur du téléviseur.
En ce qui a trait aux supports muraux non conformes aux spécifications de vis de la norme VESA, la longueur des vis
x
peut différer selon les spécifications du support mural.
Ne serrez pas trop les vis; cela pourrait endommager le produit ou provoquer sa chute et causer des blessures.
x
Samsung décline toute responsabilité dans le cas où de tels accidents se produisent.
Samsung ne saurait être tenu responsable des dommages au produit ou des blessures occasionnés par l'utilisation
x
d'un support mural non conforme aux spécifications VESA ou non recommandé, ou si le consommateur ne suit pas
les instructions d'installation du produit.
Notre modèle de 160cm (59po) n'est pas conforme aux spécifications VESA.
x
N'installez pas le téléviseur à un angle d'inclinaison de plus de 15 degrés.
x
Deux personnes sont nécessaires pour fixer le téléviseur au mur.
x
Type de
produit
Téléviseur à
écran plasma
[Ultra-Fin]
✎
Dévissez le trou avant d’installer le support mural sur le mur.
Taille du
téléviseur
en
pouces
51 400 X 400
59~64 600 X 400
N’installez pas le support mural lorsque le téléviseur est sous tension. Il pourrait survenir des blessures
causées par un choc électrique.
Spécifications
VESA de l’orifice de
passage des vis (A *
B) en millimètres
Vis standard Quantité
M8 4
Français - 6
Page 52

Vue latérale de la télécommande
PRE-CH
CH
LIST
142
3
5
6
7 8
9
0
MUTE
M
MENU
m
SOURCEPOWER ON/OFF
SMART
HUB
l
B
X
E-MANUAL
P.SIZE
CC
SOCIAL
TV
C D
VOL
<
<
CH
SEARCH
E
Télécommande QWERTY (RMC-QTD1)
Permet d'afficher et de sélectionner les
des chaînes numériques supplémentaires
diffusées par la même station. Par exemple,
Permet de sélectionner rapidement les
menu à l'écran et de modifier les valeurs
Permet de retourner au menu précédent.
Touches utilisées dans le menu Chaîne
SMART HUB et Anynet+ (HDMI-CEC).
sources vidéo disponibles.
Permet de mettre le téléviseur sous
Permet d'accéder directement aux
Appuyez sur cette touche pour choisir
Permet de sélectionner les options de
tension et hors tension.
pour sélectionner la chaîne «54-3»,
appuyez sur «54», puis sur «3».
Permet de régler le volume.
Permet d'établir un lien vers divers
services d'application.
fonctions fréquemment utilisées.
et SMART HUB , etc.
Utilisez ces touches dans les modes
chaînes.
affichées.
Permet d'allumer ou d'éteindre
l'éclairage de la télécommande.
Lorsque cette touche est activée,
les touches s'illuminent pendant un
moment lorsqu'on appuie sur celles-ci.
(L’utilisation de la télécommande alors
que le rétroéclairage est activé réduit le
temps d’utilisation des piles.)
Permet de retourner à la chaîne précédente.
MUTE: Permet de couper
temporairement le son.
CH LIST: permet d'afficher la liste des
chaînes à l'écran.
Permet de changer de chaîne.
Permet d'afficher le menu des fonctions.
Soutien pour les fonctions de recherche
recommandées (recherche de mot par exemple).
Permet d'afficher l'information à l'écran
du téléviseur.
Permet de quitter le menu.
SOCIAL TV: permet de se connecter à
l’application Social TV.
YAHOO!: exécute l’objet fenêtre Yahoo.
X
: permet d’activer ou de désactiver
les images 3D.
E-MANUAL: permet d’afficher le guide
e-Manual.
P.SIZE: permet de sélectionner l’option
Image Format.
CC: permet d’afficher les sous-titres
numériques.
Français - 7
Page 53

Vue latérale du clavier QWERTY
Permet d'afficher les caractères saisis.
Lorsque vous appuyez sur ENTER
E
, tous les
caractères affichés à l'écran sont supprimés.
Fonction de navigation
BA C
21 3
@
54 6
$
8
7 9
& (*
0
ESC
)
D
WQ E
#!
^%
CAPS SHIFT SHIFTSYM SYM.COM
-_+
SA D
~`
Z
TAP ENTER
X
TR Y
[=]
GF H
;
VC B
,
/
>
<
@
.
IU O
}{ |
KJ L
‘: “
MN
?
SMART
P
/
MENU
HUB
SEARCH
m
E
optique commandée par
le doigt (Optical Finger
Navigation); elle peut servir
de pointeur. La fonction
de navigation complète
peut servir de pointeur.
Si l'utilisateur n'appuie
pas sur une touche
durant 30 secondes, le
capteur se désactivera
automatiquement. Pour
réactiver le capteur,
appuyez sur une touche
située sur le côté du
clavier QWERTY.
✎
REMARQUE
Le clavier QWERTY permet de taper des caractères dans le menu
SMART HUB et SOCIAL TV, etc.
SYM: permet d'activer le symbole imprimé sur le côté inférieur droit de
chaque touche.
y La télécommande ne fonctionne pas lorsque le côté du clavier QWERTY est vers le haut ou vers le bas.
Insertion des piles
1 2
y Faites glisser le couvercle de la pile vers l'extérieur. y Poussez le bouton vers la droite.
3 4
y Retirez le logement des piles.
Pairage initial
1.
Lorsque les piles sont insérées dans la QWERTY Remote, le message «NEED PAIRING PRESS SYM+TAB» s’affiche à l’écran.
2. Appuyez sur les touches SYM et TAB en même temps plus de 2 secondes.
✎
Le pairage du téléviseur ne peut se faire qu’avec une seule Qwerty remote. Lorsque vous mettez le téléviseur sous
tension, démarrez le processus de pairage après 30 secondes environ.
Exécuter de nouveau le processus de pairage
1. Si vous avez déjà procédé au pairage du QWERTY Remote, appuyez sur @ et ← sur le côté du QWERTY durant plus de 3
secondes. Le message «RESET OK» s’affichera à l’écran de QWERTY remote.
2. Appuyez sur MUTE, 0, MUTE et 0 sur le côté de QWERTY Remote face au téléviseur. Cette opération doit être exécutée
en 4 secondes.
✎
Il se peut qu’il y ait un léger retard entre l’entrée et la réponse de l’affichage à l’écran. N’attendez pas la confirmation
visuelle à l’écran.
3. Suivez la procédure de pairage initiale durant trois minutes. Si le pairage initial ne se termine pas au bout de 3 minutes,
recommencez le processus.
y Insérez quatre piles AAA dans le logement, puis insérez ce
dernier dans la QWERTY Remote et remettez le couvercle.
Français - 8
Page 54

✎
Afin d'assurer une connexion optimale des câbles à ce produit, assurez-vous d'utiliser des câbles ayant une épaisseur
maximale de 14mm (0,55po).
y Largeur maximale - 14 mm (0,55 pouce)
Connexion à une antenne ou un câble
Branchement du cordon d’alimentation à la connexion antenne ou câble
✎
L'écran peut interférer avec une autre radio amateur ou AM.
✎
Si vous utilisez des radios bidirectionnelles (mobiles et portatives) ou une radio amateur ou AM près du téléviseur, cela
pourrait entraîner un mauvais fonctionnement de ce dernier.
Antenne VHF/UHF
Câble
ou
ANT OUT
Sécurisation de l’espace d’installation
Respectez les distances requises entre le téléviseur et le mur et d’autres objets afin d’assurer une bonne ventilation. Le non-respect de ces distances
pourrait faire augmenter la température interne du produit et causer un incendie ou endommager le téléviseur.
Lorsque vous utilisez une base ou un support mural, utilisez seulement les pièces fournies par Samsung Electronics.
✎
• Si vous utilisez des pièces fournies par un autre fabricant, cela pourrait endommager le produit ou causer des blessures engendrées par la chute
de ce dernier.
Installation sur une base. Installation sur un support mural.
4 pouces
4 pouces
Autres avertissements
✎
L’aspect réel du téléviseur peut différer des illustrations dans le présent guide selon le modèle choisi.
✎
Faites attention lorsque vous touchez le téléviseur, car certaines parties peuvent être chaudes.
4 pouces
4 pouces
Français - 9
4 pouces
4 pouces
4 pouces
Page 55

Prêt à l'emploi (réglage initial)
La première fois que vous mettez le téléviseur sous tension, une série de messages s'affiche pour faciliter la configuration des
réglages de base. Pour mettre le téléviseur sous tension, appuyez sur la touche POWERP.
✎
La fonction Prêt à l’emploi n’est disponible que lorsque Source est réglée à TV.
✎
P
our revenir à l’étape précédente de la marche à suivre « Prêt à l’emploi », sélectionnez Précédent, puis appuyez sur
ENTERE.
✎
A
vant de mettre le téléviseur sous tension, assurez-vous qu’il est branché à une antenne ou au câble (p. 9).
Sélection de la langue
1
d'affichage
Configuration du réseau
2
Mise à niveau du logiciel
3
Sélection du mode
4
d’utilisation
Réglage du Mode
5
horloge
Sélection des options
6
de recherche pour
la syntonisation
automatique
Sélection et
7
mémorisation des
chaînes
En mode diffusion. Si vous souhaitez regarder une émission télévisée, sélectionnez Fermer. Si vous voulez
8
Si vous voulez relancer la fonction Prêt à l'emploi...
O
MENU → Système → Prêt à l'emploi → ENTER
✎
REMARQUE
y Pour modifier le réglage du téléviseur de Démo magasin à Util. à domicile lorsque vous n'êtes pas en mode Prêt à l'emploi,
appuyez sur la touche du volume du téléviseur. Lorsque la barre du volume s'affiche à l'écran, appuyez sur la touche MENU du
téléviseur et maintenez-là enfoncée pendant 5 secondes.
Appuyez sur la touche ▲ ou ▼ pour choisir une langue. Appuyez sur ENTER
vous avez terminé.
Configurez votre connexion réseau. Appuyez sur ENTER
connaissez pas les paramètres de configuration de votre réseau ou souhaiter effectuer plus
tard cette opération, sélectionnez Passer. Nous vous suggérons de sauter dans l'immédiat
la configuration du réseau et de consulter le menu « Réseau» dans le Guide électronique
pour connaître les exigences et les instructions relatives à la configuration, ainsi que la
section «Connexion au réseau» du présent guide (page16). Reportez-vous au menu
«Réseau» pour configurer ultérieurement cette connexion.
Lorsque les réglages de la connexion réseau sont terminés, la nouvelle version est disponible.
Sélectionnez Suivant pour installer la dernière version du logiciel. Si le téléviseur requière une
mise à niveau du logiciel, celui-ci s’installera automatiquement. Si vous voulez mettre à niveau
plus tard, sélectionnez Sauter. Pour plus de détails, reportez-vous à la section «Mise à niveau
du logiciel» (Fonctions de préférence → Menu Soutien technique) dans le guide électronique.
✎
L’opération prendra plus ou moins longtemps selon l’état du réseau.
Appuyez sur la touche ▲ ou ▼ pour sélectionner, puis appuyez sur ENTER
reprises.
y Sélectionnez le mode Util. à domicile. Le mode Démo magasin est réservé à
l'utilisation en magasin.
Appuyez sur la touche ▲ ou ▼ pour sélectionner Auto ou Manuel, puis appuyez deux fois
sur ENTER
A
ppuyez sur la touche ◄ ou ► pour sélectionner Air ou Câble, puis appuyez sur ENTERE.
Une coche apparaît sur votre sélection. Sélectionnez Suivant, puis appuyez sur ENTERE.
Vous pouvez cocher les deux si vous disposez de ces deux types de connexion.
La recherche des chaînes commence automatiquement. L'opération peut durer jusqu'à 30minutes.
Pour plus de détails, reportez-vous à la section Chaîne → Prog. auto dans le guide
électronique.
utiliser le service Smart Hub, sélectionnez Smart Hub. La fonction Smart Hub démarre.
Pour plus de détails, consultez la section «Smart Hub» dans le guide électronique.
E
.
✎
S
i vous avez sélectionné Auto, l'écran Fuseau hor. et H. d'été apparaît. Sélectionnez
l'option Fuseau hor. ou H. d'été, puis appuyez sur ENTERE. À l'écran Fuseau hor.,
utilisez la touche ▲ ou ▼ pour sélectionner votre zone, puis appuyez sur ENTERE. À
l'écran H. d'été, appuyez sur ENTERE, puis choisissez d'activer ou de désactiver la
fonction H. d'été (heure d'été). Une fois l'opération terminée, appuyez sur ENTERE.
✎
Si vous avez sélectionné Auto, l'écran Date et Heure apparaît. Sélectionnez Date
ou Heure, puis appuyez sur ENTERE. Utilisez ensuite les touches numériques
ou la touche ▲ ou ▼ pour régler la date ou l'heure. Appuyez sur la touche ◄ ou ►
pour vous déplacer d'un champ à l’autre. Une fois le réglage Date et Time, terminé,
sélectionnez Suivant, puis appuyez sur ENTERE.
✎
Si vous avez sélectionné Câble, l'écran de sélection du système de câblodistribution
apparaît. Utilisez la touche ▲ ou ▼ pour sélectionner « Analogique » ou « Numérique
», puis appuyez sur ENTERE. Appuyez sur la touche ▲ ou ▼ pour sélectionner
le format de signal pertinent - STD, HRC, ou IRC - puis appuyez sur ENTERE.
La plupart des systèmes de câblodistribution utilisent l'option STD. Sélectionnez le
format de signal pertinent pour les deux systèmes (numérique et analogique).
Une fois terminé, sélectionnez Suivant, puis appuyez sur ENTER
✎
A
ppuyez sur ENTERE à n'importe quel moment pour interrompre la mémorisation des chaînes.
E
E
pour commencer. Si vous ne
E
E
lorsque
E
à deux
.
Français - 10
Page 56

Branchement à un appareil audiovisuel
R-AUDIO-L
Utilisation d'un câble HDMI/DVI : Branchement HD (jusqu’à 1080p)
Nous recommandons l’utilisation de la connexion HDMI pour obtenir une image HD de qualité optimale.
Appareils disponibles : lecteur DVD, lecteur Blu-ray, câblosélecteur ou récepteur satellite (boîtier décodeur) HD
Appareil
HDMI OUT
Appareil
DVI OUT
AUDIO OUT
WR
BlancRouge
✎
HDMI IN 1 (DVI), 2, 3, 4 / PC/DVI AUDIO IN
Pour une image et un son de meilleure qualité, branchez le téléviseur à un appareil numérique à l'aide d'un
x
câble HDMI.
Un câble HDMI prend en charge les signaux vidéo et audio numériques; un câble audio n'est pas nécessaire.
x
– Pour brancher le téléviseur à un appareil numérique qui ne prend pas en charge une sortie HDMI, utilisez des
câbles HDMI/DVI et audio.
Il est possible que l'image soit anormale (s'il y a une image) ou que le son ne fonctionne pas si vous branchez
x
un appareil externe utilisant une ancienne version du mode HDMI au téléviseur. Si un tel problème survient,
renseignez-vous sur la version HDMI auprès du fabricant de l'appareil externe et, si elle trop ancienne,
demandez une mise à niveau.
Vérifiez que vous achetez un câble HDMI certifié. Sinon, l'image risque de ne pas s'afficher ou une erreur de
x
connexion peut survenir.
Il est recommandé d'utiliser un câble HDMI haute vitesse de base ou un câble Ethernet. Veuillez noter que ce
x
téléviseur ne prend pas en charge la fonction ethernet par le biais d'un câble HDMI.
Français - 11
Page 57

Utilisation d'un câble composante (jusqu'à 1080p) ou audio/vidéo (480i seulement).
Appareils disponibles : magnétoscope, lecteur DVD, lecteur Blu-ray, câblosélecteur et récepteur satellite (boîtier décodeur)
R W R
R
G
B
Rouge Blanc Rouge RougeBleu BlancVert Jaune
AppareilAppareil
AUDIO OUT
COMPONENT OUT
R-AUDIO-L
B
RRRW
W
R
B
G
R
W
Y
✎
Le branchement par composante est conseillé plutôt que le branchement A/V pour obtenir la meilleure qualité
R-AUDIO-LPR PB
Y
G
W
R
d'image.
✎
Pour le branchement à la prise AV IN, la couleur de la prise d'entrée AV IN [VIDEO] (vert) ne correspond pas à la
couleur du câble vidéo (jaune).
Connexion avec câble EX-Link
Appareils disponibles : appareils externes compatibles avec EX-Link.
R
VIDEO OUTAUDIO OUT
Y
W
Y
W
Y
EX-LINK: Connecteur utilisé à des fins de réparation seulement.
Français - 12
Page 58

Branchement à un appareil audio
À l'aide d'un câble optique (numérique)
Appareils disponibles : chaîne audio numérique, amplificateur, cinéma maison à DVD
✎
DIGITAL AUDIO OUT (OPTICAL)
Lorsque vous connectez une chaîne audio numérique à la prise DIGITAL AUDIO OUT (OPTICAL), réduisez le
x
volume du téléviseur et de la chaîne.
Vous pouvez utiliser un son en 5.1 chaînes lorsque votre téléviseur est raccordé à un appareil externe offrant
x
cette fonction audio.
Lorsque le récepteur (cinéma maison) est activé, il est possible d’entendre le son provenant de la prise
x
optique du téléviseur. Lorsque le téléviseur reçoit des signaux numériques, il transmet le son en 5.1 canaux au
récepteur de la chaîne de cinéma maison. Lorsque la source est un composant numérique, comme un lecteur
DVD, un lecteur Blu-ray, un câblosélecteur ou un récepteur satellite (boîtier décodeur), et que cet appareil est
branché au téléviseur par câble HDMI, le récepteur de la chaîne de cinéma maison ne fera entendre qu'un
son en deux canaux. Pour entendre le son en 5.1 canaux, branchez directement la prise Digital Audio Out
du lecteur DVD/Blu-Ray, câblosélecteur ou récepteur satellite à un amplificateur ou une chaîne de cinéma
maison.
Branchement à un PC
Système audionumérique
OPTICAL
À l'aide d'un câble HDMI/DVI ou câble D-sub
✎
Votre ordinateur peut ne pas prendre en charge une connexion HDMI.
HDMI OUT
DVI OUT
AUDIO OUT
AUDIO OUT
PC OUT
Français - 13
Page 59

Modes d'affichage de l'ordinateur (Entrée D-Sub et HDMI/DVI)
La résolution optimale est 1920 x 1080 @ 60 Hz. Vous pouvez choisir une des résolutions standard indiquées dans la colonne
Résolution. Le téléviseur se réglera automatiquement à la résolution choisie.
Mode Résolution
IBM
MAC
VESA DMT
VESA DMT / DTV CEA
Fréquence horizontale
(kHz)
640 x 350
720 x 400
640 x 480
832 x 624
1152 x 870
640 x 480
640 x 480
640 x 480
800 x 600
800 x 600
800 x 600
1024 x 768
1024 x 768
1024 x 768
1152 x 864
1280 x 1024
1280 x 1024
1280 x 800
1280 x 800
1280 x 960
1360 x 768
1440 x 900
1440 x 900
1680 x 1050
1920 x 1080p 67.500 60.000 148.500 +/+
31.469
31.469
35.000
49.726
68.681
31.469
37.861
37.500
37.879
48.077
46.875
48.363
56.476
60.023
67.500
63.981
79.976
49.702
62.795
60.000
47.712
55.935
70.635
65.290
Fréquence verticale
(Hz)
70.086
70.087
66.667
74.551
75.062
59.940
72.809
75.000
60.317
72.188
75.000
60.004
70.069
75.029
75.000
60.020
75.025
59.810
74.934
60.000
60.015
59.887
74.984
59.954
Fréquence d'horloge
des pixels
(MHz)
25.175
28.322
30.240
57.284
100.000
25.175
31.500
31.500
40.000
50.000
49.500
65.000
75.000
78.750
108.000
108.000
135.000
83.500
106.500
108.000
85.500
106.500
136.750
146.250
Polarité
synchronisée
(H / V)
+/-
-/+
-/-
-/-
-/-
-/-
-/-
-/+/+
+/+
+/+
-/-
-/+/+
+/+
+/+
+/+
-/+
-/+
+/+
+/+
-/+
-/+
-/+
✎
REMARQUE
Pour brancher un câble HDMI/DVI, utilisez la prise HDMI IN 1(DVI).
x
Le mode entrelacé n’est pas pris en charge.
x
Si vous sélectionnez une résolution non standard, votre téléviseur peut ne pas fonctionner correctement.
x
Les modes séparé et composé sont pris en charge. Le mode synchronisation au vert n'est pas pris en charge.
x
Français - 14
Page 60

Modification de la source d'entrée
SOURCE
Source
Permet de sélectionner le téléviseur ou
une autre source d’entrée externe comme
un lecteur DVD, un lecteur Blu-ray, un
câblosélecteur ou un récepteur satellite.
1. Appuyez sur la touche SOURCE de la
télécommande.
2. Permet de sélectionner la source
externe de signal d’entrée désirée.
■■ TV / PC / AV / Composante / HDMI1/DVI / HDMI2 /
HDMI3 / HDMI4 / USB / AllShare
✎
Seuls les appareils externes branchés au téléviseur
peuvent être sélectionnés. Dans Source, les entrées
branchées sont en surbrillance.
✎
Dans Source, PC est toujours activée.
Entrer le nom
Le fonction Entrer le nom vous permet d’associer un nom
de dispositif à une source d’entrée. Pour accéder à Entrer
le nom, appuyez sur la touche TOOLS dans Source. Les
sélections ci-dessous apparaissent sous Entrer le nom:
■ Magnétoscope / DVD / Câble STB / Satellite STB /
PVR STB / Récepteur A/V / Jeu / Caméscope / PC /
DVI PC / appareils DVI / TV / IPTV / Blu-ray / HD DVD
/ DMA : Entrez le nom de l'appareil connecté aux prises
d'entrée pour faciliter la sélection de la source d'entrée.
✎
Si vous avez connecté un ordinateur à une prise HDMI
IN 1 (DVI) à l’aide d’un câble HDMI, sélectionnez
l’option PC sous Entrer le nom pour entrer le nom d'un
appareil.
✎
Si vous avez connecté un ordinateur à une prise HDMI
IN 1 (DVI) à l’aide d’un câble HDMI, sélectionnez
l’option DVI PC sous Entrer le nom pour entrer le nom
d'un appareil.
✎
Si vous avez connecté un appareil audiovisuel à une
prise HDMI IN 1 (DVI), sélectionnez Appareil DVI sous
Entrer le nom pour entrer le nom d'un appareil.
Modifier favori
Dans Source, appuyez sur la touche TOOLS pour
sélectionner Modifier favori. Cette fonction vous permet de
régler la source d’entrée à Favoris.
Information
Permet d'obtenir des informations détaillées sur l'appareil
externe choisi.
Rafraîchir
Dans Source, si les appareils externes ne s'affichent pas,
appuyez sur la touche TOOLS pour sélectionner Rafraîchir
pour rechercher les appareils branchés.
Français - 15
Page 61

Connexion au réseau
Vous pouvez configurer le téléviseur pour qu'il puisse accéder à Internet par l'entremise de votre réseau à l'aide d'une
connexion sans fil ou câblée.
Connexion au réseau - sans fil
Vous pouvez connecter votre téléviseur à votre réseau LAN par l'intermédiaire d'un routeur sans fil ou d'un modem standard.
Routeur IP sans fil
(Point d'accès pourvu d'un serveur
Prise LAN murale
Ce téléviseur prend en charge les protocoles de communication IEEE 802.11a/b/g et n. Samsung recommande l'utilisation
du protocole IEEE 802.11n. Lorsque vous regardez une vidéo à partir de la connexion IEEE 802.11b/g, des problèmes
d'interférence pourraient survenir pendant la lecture.
La plupart des systèmes de réseau sans fil comportent un système de sécurité intégré qui exige que les appareils accédant au
réseau par un point d'accès (en règle générale, un routeur IP sans fil ou un modem) transmettent un code de sécurité crypté
appelé clé d'accès.
Votre téléviseur est compatible avec les protocoles de sécurité suivants:
y Mode d'authentification: OPEN, SHARED, WPAPSK, WPA2PSK
y Type de cryptage: WEP, TKIP, AES
Si le mode 802.11n à débit élevé pur (Greenfield) est sélectionné et que le type de chiffrement est réglé à WEP, TKIP ou
TKIPAES (WPS2 mixte) pour votre routeur sans fil, les téléviseurs Samsung ne reconnaîtront pas la connexion conformément
aux nouvelles spécifications de certification de produits sans fil.
Configuration de la connexion au réseau - sans fil
Les instructions ci-dessous concernent les réseaux qui utilisent le protocole DHCP (Dynamic Host Configuration Protocol) pour
configurer automatiquement les connexions au réseau. Si votre réseau est un réseau à adresse IP statique, reportez-vous au
guide de l'utilisateur pour les instructions de configuration.
Pour configurer la connexion à un réseau utilisant un protocole DHCP,
procédez de la manière suivante:
1. Connectez votre téléviseur au réseau conformément aux
illustrations ci-dessus.
2. Mettez votre téléviseur sous tension, appuyez sur la touche MENU
de la télécommande, puis sélectionnez Réseau → Paramètres
réseau.
3. Sélectionnez Sans fil (généraux), appuyez sur ENTER
nouveau sur ENTERE.
4. La fonction « Réseau » recherche tous les réseaux sans fil
disponibles. Une fois l'opération de recherche terminée, une liste
des réseaux disponibles s'affiche.
5. À partir de la liste de réseaux, appuyez sur la touche ▲ ou ▼
pour sélectionner un réseau, Suivant, puis appuyez sur ENTER
6. Si vous avez sélectionné un routeur sans fil avec un code de sécurité, l’écran Code de sécurité s’affiche. Entrez le Code
de sécurité(code de sécurité ou NIP), sélectionnez Suivant, puis appuyez sur ENTER
✎
Au moment d'entrer le Code sécurité (code de sécurité ou NIP), utilisez les touches ▲ / ▼ / ◄ / ► de votre
télécommande pour sélectionner les chiffres et les caractères.
7. L’écran de connexion au réseau apparaît et vérifie cette connexion. Une fois la connexion vérifiée, le message «La
connexion à Internet a réussi. » s’affiche. La configuration réseau est terminée.
✎
Pour de plus amples renseignements, consultez la section «Connexion à un réseau sans fil» dans le guide
électronique.
utilisant le protocole DHCP)
Câble LAN (non fourni)
E
, puis de
E
Paramètres réseau
Sélectionnez un type de connexion
au réseau.
Câble
Sans-l (généraux)
WPS (PBC)
One Foot Connection
✎
L’image affichée peut varier selon le modèle.
Congurez le réseau sans l en
sélectionnant votre point d'accès.
Vous devrez peut-être entrer le
code de sécurité selon le réglage
du point d'accès.
.
E
.
Préc.
Suivant
Annuler
Français - 16
Page 62

Connexion au réseau - câblé
Il existe deux manières de connecter votre téléviseur par le câble, selon la configuration de votre réseau. Ces deux méthodes
sont illustrées ci-dessous:
Prise de modem murale
Prise LAN murale Panneau arrière du téléviseur
✎
Une vitesse de réseau inférieure à 10 Mbps n’est pas compatible.
Modem externe
(ADSL / VDSL / câblodistribution)
Câble LAN (non fourni)Câble de modem (non fourni)
Câble LAN (non fourni)
Panneau arrière du téléviseur
Configuration de la connexion au réseau - câblé
La plupart des réseaux domestiques utilisent un protocole DHCP (Dynamic Host Configuration Protocol) pour configurer
les connexions au réseau. Les réseaux domestiques qui prennent en charge le protocole DHCP fournissent l'adresse IP, le
masque de sous-réseau, la passerelle et les valeurs DNS dont votre téléviseur a besoin pour accéder à Internet, de sorte que
vous n'avez pas à les entrer manuellement.
Pour configurer la connexion à un réseau utilisant un protocole DHCP,
procédez de la manière suivante:
1. Connectez votre téléviseur au réseau conformément à une des
méthodes présentées dans les illustrations ci-dessus.
2. Mettez votre téléviseur sous tension, puis appuyez sur la
touche MENU de la télécommande et sélectionnez Réseau →
Paramètres réseau. L'écran Paramètres réseau s'affichera.
3. Sélectionnez Câble, appuyez sur ENTER
E
ENTER
.
E
, puis de nouveau sur
Paramètres réseau
Sélectionnez un type de connexion
au réseau.
Câble
Sans-l (généraux)
WPS (PBC)
One Foot Connection
Se connecter au réseau à l'aide
d'un câble de réseau local sans
l. Assurez-vous que le câble
est branché.
Préc.
Suivant
Annuler
4. L’écran de connexion au réseau apparaît et vérifie cette
connexion. Une fois la connexion vérifiée, le message «La
✎
L’image affichée peut varier selon le modèle.
connexion à Internet a réussi. » s’affiche. La configuration réseau
est terminée.
✎
Si votre téléviseur ne peut acquérir automatiquement les valeurs de connexion au réseau ou si vous souhaitez
configurer manuellement cette connexion, sélectionnez Paramètres IP à l'écran d'essai du réseau. Réglez l'option
Réglage pr. Internet à Manuel. Vous devez alors entrer les valeurs Adresse IP, Masq. sous-réseau, Passerelle et
Serveur DNS manuellement.
✎
Pour en savoir plus sur les options de configuration, consultez la section «Connexion au réseau câblé» dans le guide
électronique.
Français - 17
Page 63

Comment affi cher le guide électronique
Vous trouverez dans le guide électronique toutes les instructions concernant les fonctions de votre
E-MANUAL
Affi chage à l'écran
téléviseur. Pour utiliser ce guide électronique, appuyez sur la touche E-MANUAL de la télécommande.
Pour mettre en surbrillance une catégorie, puis une rubrique, déplacez le curseur à l'aide des touches u /
d / r / l, puis appuyez sur ENTERE. Le guide électronique affi che la page que vous voulez voir.
Vous pouvez également y accéder à l'aide du menu:
O
MENUm → Support technique → e-Manual → ENTER
✎
Si vous voulez retourner au e-Manual, appuyez sur la touche E-MANUAL de la télécommande.
✎
Vous ne pouvez pas utiliser la fonction Essayer si le menu n'est pas activé.
E
Écran du téléviseur : Affi che
l'émission, le fi lm, la vidéo, etc. que
vous êtes en train de regarder.
Aide: Affi che le Guide e-Manual ou
le Guide de produit. Appuyez sur
ENTER
E
.
Fonctions de base
Modi cation du mode d'image préréglé
Ajustement des paramètres de l'image
Modi cation de la taille de l’image
Modi cation des options de l'image
Con guration du téléviseur avec un ordinateur
IndexAide
Index: Permet d'affi cher un écran d'index.
X: Permet de quitter le guide électronique.
Utilisation du menu Aide
Pour affi cher le guide électronique et le guide du produit en appuyant sur la touche Aide.
C
omment affi cher le guide électronique
Vous trouverez dans le guide électronique toutes les
instructions concernant les fonctions de votre téléviseur.
Pour utiliser le guide électronique, appuyez sur la touche
E-MANUAL de la télécommande. Pour mettre en surbrillance
une catégorie, puis une rubrique, déplacez le curseur à l’aide
des touches u / d / r / l, puis appuyez sur ENTERE. Le
guide électronique affi che la page que vous voulez consulter.
Vous pouvez également y accéder à l’aide du menu:
m
→ Support technique → e-Manual → ENTER
O MENU
✎ Si vous voul ez retourner au e- Manual, appuyez s ur la touche E-MAN UAL de la
télécom mande.
✎ Vous ne pouve z pas utiliser dire ctement la foncti on Essayer si le télé viseur est
réglé sur u ne source d’entrée exte rne.
<Guide e-Manual>
Le guide électronique s'affi che tel qu'illustré ci-dessus.
Fonctions de base
Modi cation du mode d'image préréglé
Ajustement des paramètres de l'image
Modi cation de la taille de l’image
Modi cation des options de l'image
Con guration du téléviseur avec un PC
E
IndexAide
Retour
<Guide de produit>
Le guide du produit s'affi che tel qu'illustré ci-dessus.
Liste des catégories. Appuyez sur la
l
ou r pour sélectionner la
touche
catégorie que vous voulez.
Affi che la liste du sous-menu.
Utilisez les touches fl échées de
votre télécommande pour déplacer
le curseur. Appuyez sur ENTER
E
pour sélectionner le sous-menu
désiré.
Synchronisation média entre plusieurs appareils avec AllShare
AllShareMC synchronise vos appareils numériques, ce qui vous permet
d'écouter de la musique et de visionner des lms et des photos sur le grand
écran de votre téléviseur à partir de votre ordinateur, appareil photo ou
tout appareil mobile. Cette fonction vous permet également de brancher
plusieurs ordinateurs.
Retour
Comment permuter entre une rubrique du guide électronique et le(s) menu(s) d'affi chage correspondant(s).
Fonctions de base > Modi cation du mode d'image préréglé (1/1)
Modifi cation du mode d’image préréglé
O MENUm → Image → Image Mode → ENTER
■
Image Mode
Les modes Image appliquent à l’image les réglages préalablement défi nis.
Sélectionnez un mode à l’aide des touches fl échées vers le haut et vers le bas,
puis appuyez sur ENTERE.
N En mode PC, vous ne pouvez sélectionner que les options Divertiss.
et Standard.
• Dynamique : Convient aux pièces bien éclairées.
• Standard : Convient aux environnements habituels.
pour téléviseur à DEL
• Naturel
pas fatiguer la vue.
• Cinéma : Convient aux pièces sombres utilisées pour regarder des fi lms.
• Divertiss. (Disponible en mode PC seulement): Convient au visionnement
de fi lms et aux jeux.
Aide Essayer Accueil Zoom Index
✎
Dans certains menus, cette fonction n'est pas activée.
/ Détente
E
pour téléviseur à écran plasma
: Pour ne
Essayer
E-MANUAL
Image
Image Mode Standard
Lumière de cellule 14
Contraste 100
Luminosité 45
Netteté 50
Couleur 50
Teinte (V/R) G 50 R 50
Français - 18
Page 64

Méthode n°1: Méthode n°2:
1. Appuyez sur la touche rouge pour sélectionner Essayer,
si vous voulez exécuter les menus correspondants.
2. Pour retourner à l'écran du guide électronique, appuyez
sur la touche E-MANUAL.
Affichage du contenu
Fonctions de base > Modication du mode d'image préréglé (1/1)
Modification du mode d’image préréglé
O MENUm → Image → Image Mode → ENTER
■
Image Mode
Les modes Image appliquent à l’image les réglages préalablement
définis. Sélectionnez un mode à l’aide des touches fléchées vers le haut
et vers le bas, puis appuyez sur ENTER
N En mode PC, vous ne pouvez sélectionner que les options
Divertiss. et Standard.
• Dynamique : Convient aux pièces bien éclairées.
• Standard : Convient aux environnements habituels.
pour téléviseur à DEL
• Naturel
Pour ne pas fatiguer la vue.
onvient aux pièces sombres utilisées pour regarder des films.
• Cinéma : C
• Divertiss. (Disponible en mode PC seulement): Convient au
visionnement de films et aux jeux.
Aide Essayer Accueil Zoom Index
Essayer: Affiche le menu d'affichage correspondant à la rubrique recherchée.
Accueil: Permet de passer à l'écran d'accueil du E-MANUAL.
Zoom: Permet d'agrandir l'écran.
Index: Permet d'afficher un écran d'index.
E
/ Détente
E
.
pour téléviseur à écran plasma
1. Appuyez sur ENTER
E
lorsqu'une rubrique s'affiche.
“Le message «Exécuter cette opération?» apparaît.
Sélectionnez Oui, puis appuyez sur ENTERE. La
fenêtre d'affichage s'ouvre.
2. Pour retourner à l'écran du guide électronique, appuyez
sur la touche E-MANUAL.
Zone de contenu: Contient le contenu de la
rubrique si vous avez sélectionné un sous-menu.
Pour passer à la page précédente ou suivante,
appuyez sur la touche l ou r.
:
Utilisation du mode Zoom
E
Sélectionnez Zoom, puis appuyez sur ENTER
agrandir l'écran. Vous pouvez parcourir l'écran agrandi à l'aide
des touches u ou d.
✎
Pour retourner à la taille d'écran normale, appuyez sur la
touche RETURN.
pour
Modification du mode d’image préréglé
O MENUm → Image → Image Mode → ENTER
■
Image Mode
L
es modes Image appliquent à l’image les réglages préalablement définis. Sélectionnez un
mode à l’aide des touches fléchées vers le haut et vers le bas, puis appuyez sur ENTERE.
N En mode PC, vous ne pouvez sélectionner que les options Divertiss. et Standard.
• Dynamique : Convient aux pièces bien éclairées.
• Standard : Convient aux environnements habituels.
pour téléviseur à DEL
aturel
• N
• Cinéma : Convient aux pièces sombres utilisées pour regarder des films.
• Divertiss. : Convient au visionnement de films et aux jeux.
/ Détente
E
pour téléviseur à écran plasma
: Pour ne pas fatiguer la vue.
Comment chercher un mot clé à l'aide de la page d'index
1. Pour rechercher une rubrique, utilisez la touche fléchée gauche/droite pour sélectionner une lettre, puis appuyez sur
ENTER
E
. La fenêtre Index affiche une liste de rubriques et de mots clés commençant par la lettre sélectionnée.
2. Appuyez sur la touche
u
ou d pour sélectionner la rubrique ou le mot clé que vous voulez, puis appuyez sur ENTERE.
3. La page du guide électronique contenant la rubrique apparaît.
✎
Pour fermer l'écran Index, appuyez sur la touche RETURN.
Retour
Français - 19
Page 65

Dépannage
Si le téléviseur semble présenter un problème, essayez d'abord de le corriger à l'aide de la présente liste des problèmes et
solutions possibles. Consultez également la section «Dépannage» dans le guide électronique. Si aucun de ces conseils de
dépannage ne fonctionne, consultez le site «www.samsung.com», puis cliquez sur Support technique ou communiquez avec
le service à la clientèle de Samsung en composant le 1-800-SAMSUNG.
Problèmes Solutions et explications
Le téléviseur ne s’allume pas. • Assurez-vous que le cordon d'alimentation c.a. est bien branché à la prise de courant murale et au
Il n’y a pas d'image. • Vérifiez le branchement des câbles. Débranchez et branchez à nouveau tous les câbles du téléviseur
La télécommande ne fonctionne pas. • Remplacez les piles de la télécommande. Lorsque vous insérez les piles, assurez-vous de respecter
La télécommande du câblosélecteur ou
récepteur numérique ne commande pas la
mise sous tension ou la mise hors tension
du téléviseur, ou ne règle pas le volume.
téléviseur.
• Assurez-vous que la prise de courant murale est sous tension.
• Appuyez sur la touche POWER du téléviseur pour vous assurer que la télécommande fonctionne
correctement. Si le téléviseur s'allume, reportez-vous à la section « La télécommande ne fonctionne
pas » ci-dessous.
et des appareils externes.
• Réglez la sortie vidéo de votre appareil externe (câblosélecteur, récepteur satellite, lecteur DVD,
lecteur Blu-ray, etc.) afin qu'elle corresponde à l'entrée vidéo du téléviseur. Par exemple, si l’appareil
externe a une sortie HDMI, il faut le brancher à une entrée HDMI du téléviseur.
• Assurez-vous que les appareils branchés sont sous tension.
• Assurez-vous de choisir la source appropriée du téléviseur en appuyant sur la touche SOURCE de la
télécommande.
• Réinitialisez l'appareil connecté en débranchant puis en rebranchant son cordon d'alimentation.
les polarités appropriées (+/– ).
• Nettoyez la fenêtre de transmission de la télécommande.
• Essayez de pointer la télécommande directement vers le téléviseur d'une distance de 1,5 à 1,8m (5
à 6 pi).
• Programmer la télécommande du câblosélecteur ou récepteur satellite pour faire fonctionner le
téléviseur. Consultez le guide d'utilisation du câblosélecteur ou récepteur satellite pour obtenir le code
de téléviseur SAMSUNG.
✎
Certaines des images et fonctions présentées dans ce guide sont disponibles sur des modèles particuliers seulement.
✎
Pour optimiser les performances de votre téléviseur, utilisez la dernière version du micrologiciel, téléchargeable à partir du
site Samsung à l'aide d'un clé USB (samsung.com → Support technique → Downloads).
Licence
Caractéristiques
y Interface numérique et réseautage excellents : Grâce au syntoniseur numérique HD intégré, vous pouvez écouter des
émissions en HD non payantes sans câblosélecteur ni récepteur satellite.
y 3D : Cette nouvelle fonctionnalité excitante vous permet de visionner le contenu en 3D.
y SMART HUB : La passerelle pour tout le contenu intégré dans un seul emplacement.
– Offre divers choix de divertissement.
– Vous permet de commander votre mode de divertissement grâce à une interface utilisateur conviviale.
– Vous permet d'accéder facilement aux diverses applications dont le nombre s'ajoute chaque jour.
– Vous permet de personnaliser votre téléviseur en regroupant et en triant les applications selon votre choix.
y AllShareMC : AllShareMC relie votre téléviseur à vos téléphones cellulaires et appareils mobiles par le biais d'un réseau.
y Anynet+(HDMI-CEC) : Permet de commander tous les appareils Samsung branchés qui prennent en charge Anynet+ à
l’aide de la télécommande Samsung.
Français - 20
Page 66

Fixation du téléviseur au mur
Mise en garde: Le fait de tirer, de pousser ou de monter sur le téléviseur peut en provoquer la chute.
Assurez-vous notamment que vos enfants ne se suspendent pas au téléviseur ni le déséquilibrent. Il
pourrait basculer et causer des blessures sérieuses ou un décès. Suivez toutes les mesures de sécurité
indiquées dans la brochure de votre téléviseur. Pour une stabilité et une sécurité accrues, vous pouvez
acheter et installer un dispositif anti-chute tel que décrit ci-dessous.
Dispositif de retenue pour téléviseur (vendu séparément)
Les pièces ci-dessous sont incluses dans l'ensemble du dispositif de retenue pour téléviseur. De plus, vous aurez besoin
d'une vis à bois, d'une vis et d'une cheville Molly ou d'un autre type de vis convenant à l'armoire ou au mur auquel vous avez
l'intention de fixer le cordon du dispositif de retenue. Nous recommandons l'utilisation d'une vis à bois M4xL20.
Support du téléviseur (BN96-15753A) Vis (M8 X L19)
Installation du dispositif de retenue
1. Retirez la vis fixée à l'arrière de votre téléviseur, puis reliez le dispositif de retenue à ce dernier à l'aide de la vis incluse dans
l'ensemble du dispositif qui convient à votre appareil.
✎
Veillez à utiliser uniquement la vis fournie appropriée. Si vous utilisez une vis différente, vous risquez
d'endommager votre téléviseur.
2. Vissez fermement la vis que vous avez fournie (taille M4 x L20 ou similaire) à l'armoire ou au mur sur lequel le téléviseur
doit être installé.
✎
Si vous vissez la vis dans un mur, il est préférable qu'elle pénètre dans un montant. Si cela est impossible, utilisez
une cheville Molly pour ancrer la vis.
3. Attachez le cordon du dispositif de retenue à la vis fixée au mur ou à l'armoire afin d'immobiliser le téléviseur. Voir les
illustrations ci-dessous.
✎
Installez le téléviseur à proximité du mur de sorte qu’il ne se renverse pas.
✎
Lorsque vous attachez le cordon du dispositif au mur, fixez-le de manière qu’il soit parallèle au sol ou incliné vers le
bas pour des raisons de sécurité.
✎
Vérifiez le cordon de temps en temps pour s'assurer qu'il est bien ancré.
✎
Avant de déplacer le téléviseur, détachez d’abord le cordon.
4.
Assurez-vous que tous les points d’ancrage sont solides. Vérifiez périodiquement les points d'ancrage afin de détecter tout
signe de fatigue ou de bris. En cas de doute au sujet des points d’ancrage, communiquez avec un installateur professionnel.
Pour acheter le dispositif de retenue pour téléviseur, communiquez avec le centre de service à la clientèle SAMSUNG.
Aux États-Unis: 1-800-SAMSUNG (1-800-726-7864)
–
Au Canada : 1-800-SAMSUNG (1-800-726-7864)
–
Français - 21
Page 67

Entreposage et entretien
✎
Si vous essayez de détacher une vignette que vous avez fixée sur l’écran du téléviseur, certains débris restent encore
collés. Nettoyez-les pour pouvoir regarder la télévision.
Ne vaporisez pas de l'eau ou un produit nettoyant
directement sur l'appareil. Tout liquide qui s'infiltre dans
Nettoyez l'appareil à l'aide d'un chiffon doux légèrement
humidifié.
l'appareil risque de provoquer une défaillance, un incendie ou
un choc électrique.
Spécifications - QWERTY Remote
Nom du modèle RMC-QTD1
Pile AAA x 4
Dimensions (L x P x H) 60.9 x 24.36 x 152.2 mm
Poids 134 g (0.295 lb)
Il est recommandé d'utiliser des piles alcalines pour prolonger le cycle de vie de celles-ci.
(2.4 x 1.0 x 33.6 pouces)
Spécifications
Résolution d'affichage 1920 x 1080
Facteurs environnementaux
Température de fonctionnement
Niveau d'humidité en fonctionnement
Température d'entreposage
Niveau d’humidité en entreposage
Pivotement du support
(Gauche/Droite) -20˚ ~ 20˚
Nom du modèle PN51D6900 PN59D6900
Taille de l'écran
(diagonale)
Son
(sortie) 10 W x 2 15 W x 2
Dimensions (L x P x H)
Boîtier
Avec support
Poids
Sans support
Avec support
Classe 51 pouces
(50.7 pouces en diagonale)
47.0 x 1.4 x 28.2 pouces
(1195.9 x 38.0 x 719.4 mm)
47.0 x 12.0 x 30.8 pouces
(1195.9 x 305.0 x 783.1 mm)
22.4 kg (49.3 lb)
27.1 kg (59.7 lb)
50°F à 104°F (10°C à 40°C)
10 à 80 %. sans condensation
-20 à 45 °C (-4 à 113 °F)
5 à 95 %. sans condensation
Classe 59 pouces
(59.0 pouces en diagonale)
54.2 x 1.4 x 32.5 pouces
(1378.4 x 38.0 x 827.3 mm)
54.2 x 13.1 x 34.8 pouces
(1378.4 x 335.0 x 886.3 mm)
30.6 kg (67.4 lb)
36.6 kg (80.6 lb)
✎
Le design et les spécifications peuvent faire l'objet de modifications sans préavis.
✎
Cet appareil est un appareil numérique de catégorie B.
✎
Pour les caractéristiques d’alimentation et de consommation électrique, voir l’étiquette fixée au produit.
Français - 22
Page 68

■ Vue avant / vue latérale
Dimensions
1
2
7
5
3
6
4
8
(Unité : pouces)
Nom de modèle
1 2 3 4 5 6 7 8
PN51D6900 47.0 44.5 24.9 20.0 28.3 30.8 1.4 12.0
PN59D6900 54.2 51.7 29.2 21.2 32.5 34.8 1.4 13.1
■ vue arrière
1
2
3
5
4
6
(Unité : pouces)
Nom de modèle
1 2 3 4 5 6
PN51D6900 15.7 15.7 32.1 10.5 4.3 2.6
PN59D6900 23.6 15.7 39.5 14.7 5.0 3.1
REMARQUE: Les dessins ne sont pas nécessairement à l’échelle. Certaines dimensions pourraient être modifiées sans
préavis. Vérifiez les dimensions avant d’installer votre téléviseur. Nous ne sommes pas responsables des erreurs de
typographie ou d’impression.
© 2011 Samsung Electronics America, Inc
Français - 23
 Loading...