

Page 1
Contact SAMSUNG WORLD-WIDE
If you have any questions or comments relating to Samsung products, please contact the SAMSUNG customer care center.
Comment contacter Samsung dans le monde
Si vous avez des suggestions ou des questions concernant les produits Samsung, veuillez contacter le Service
Consommateurs Samsung.
Country
U.S.A 1-800-SAMSUNG(726-7864) www.samsung.com/us
CANADA 1-800-SAMSUNG(726-7864) www.samsung.com/ca
Customer Care Center
Web Site Address
Samsung Electronics America, Inc. 105 Challenger Road
Ridgefield Park, NJ 07660-0511
Samsung Electronics Canada Inc., Customer Service 55
Standish Court Mississauga, Ontario L5R 4B2 Canada
Samsung Electronique Canada Inc., Service à la Clientèle
55 Standish Court Mississauga, Ontario L5R 4B2
Canada
Plasma TV
user manual
BN68-02025B-00
imagine the possibilities
Thank you for purchasing this Samsung product.
To receive more complete service, please
register your product at
w
ww.samsung.com/register
Model Serial No.
Page 2

Important Warranty Information Regarding Television Format Viewing
Wide screen format PDP Displays (16:9, the aspect ratio of the screen width to height) are primarily designed to view wide
screen format full-motion video. The images displayed on them should primarily be in the wide screen 16:9 ratio format,
or expanded to fill the screen if your model offers this feature and the images are constantly moving. Displaying stationary
graphics and images on screen, such as the dark side-bars on nonexpanded standard format television video and
programming, should be limited to no more than 5% of the total television viewing per week.
Additionally, viewing other stationary images and text such as stock market reports, video game displays, station logos,
web sites or computer graphics and patterns, should be limited as described above for all televisions. Displaying stationary
images that exceed the above guidelines can cause uneven aging of PDP Displays that leave subtle, but permanent
burned-in ghost images in the PDP picture. To avoid this, vary the programming and images, and primarily display
full screen moving images, not stationary patterns or dark bars.
On PDP models that offer picture sizing features, use these controls to view different formats as a full screen picture.
Be careful in the selection and duration of television formats used for viewing. Uneven PDP aging as a result of format
selection and use, as well as burned-in images, are not covered by your Samsung limited warranty.
U.S.A Only
The product unit accompanying this user manual is licensed under certain intellectual property rights of certain third parties.
In particular, this product is licensed under the following US patents: 5,991,715, 5,740,317, 4,972,484, 5,214,678, 5,323,396,
5,539,829, 5,606,618, 5,530,655, 5,777,992, 6,289,308, 5,610,985, 5,481,643, 5,544,247, 5,960,037, 6,023,490, 5,878,080, and
under US Published Patent Application No. 2001-44713-A1.
This license is limited to private non-commercial use by end-user consumers for licensed contents. No rights are granted for
commercial use. The license does not cover any product unit other than this product unit and the license does not extend to any
unlicensed product unit or process conforming to ISO/IEC 11172-3 or ISO/IEC 13818-3 used or sold in combination with this product
unit. The license only covers the use of this product unit to encode and/or decode audio files conforming to the ISO/IEC 11172-3
or ISO/IEC 13818-3. No rights are granted under this license for product features or functions that do not conform to the ISO/IEC
11172-3 or ISO/IEC 13818-3.
Other countries
The product unit accompanying this user manual is licensed under certain intellectual property rights of certain third parties. This
license is limited to private non-commercial use by end-user consumers for licensed contents. No rights are granted for commercial
use. The license does not cover any product unit other than this product unit and the license does not extend to any unlicensed
product unit or process conforming to ISO/IEC 11172-3 or ISO/IEC 13818-3 used or sold in combination with this product unit. The
license only covers the use of this product unit to encode and/or decode audio files conforming to the ISO/IEC 11172-3 or ISO/IEC
13818-3. No rights are granted under this license for product features or functions that do not conform to the ISO/IEC 11172-3 or
ISO/IEC 13818-3.
© 2009 Samsung Electronics Co., Ltd. All rights reserved.
English - 2
Page 3
English - 3
User Instructions
Screen Image retention
Do not display a still image (such as on a video game) on the plasma display panel for more than several minutes as it can cause
screen image retention. This image retention is also known as “screen burn”. To avoid such image retention, refer to page 24 of this
manual to reduce the degree of brightness and contrast of the screen when displaying a still image.
Altitude
The PDP can only operate normally at heights under 6500ft.
Heat on the top of the Plasma TV
The top side of the product may be hot after long periods of use as heat dissipates from the panel through the vent hole in the upper
part of the product.
This is normal and does not indicate any defect or operation failure of the product.
However, children should be prevented from touching the upper part of the product.
The product is making a ‘cracking’ noise.
A ‘cracking’ noise may occur when the product contracts or expands due to a change in the surrounding environment such as
temperature or humidity. This is normal and not a defect of the unit.
Cell Defects
The PDP uses a panel consisting of 2,360,000(HD-level) to 6,221,000(FHD-level) pixels which require sophisticated technology to
produce. However, there may be a few bright or dark pixels on the screen. These pixels will have no impact on the performance of the
product.
Avoid operating the TV at temperatures below 41°F (5°C)
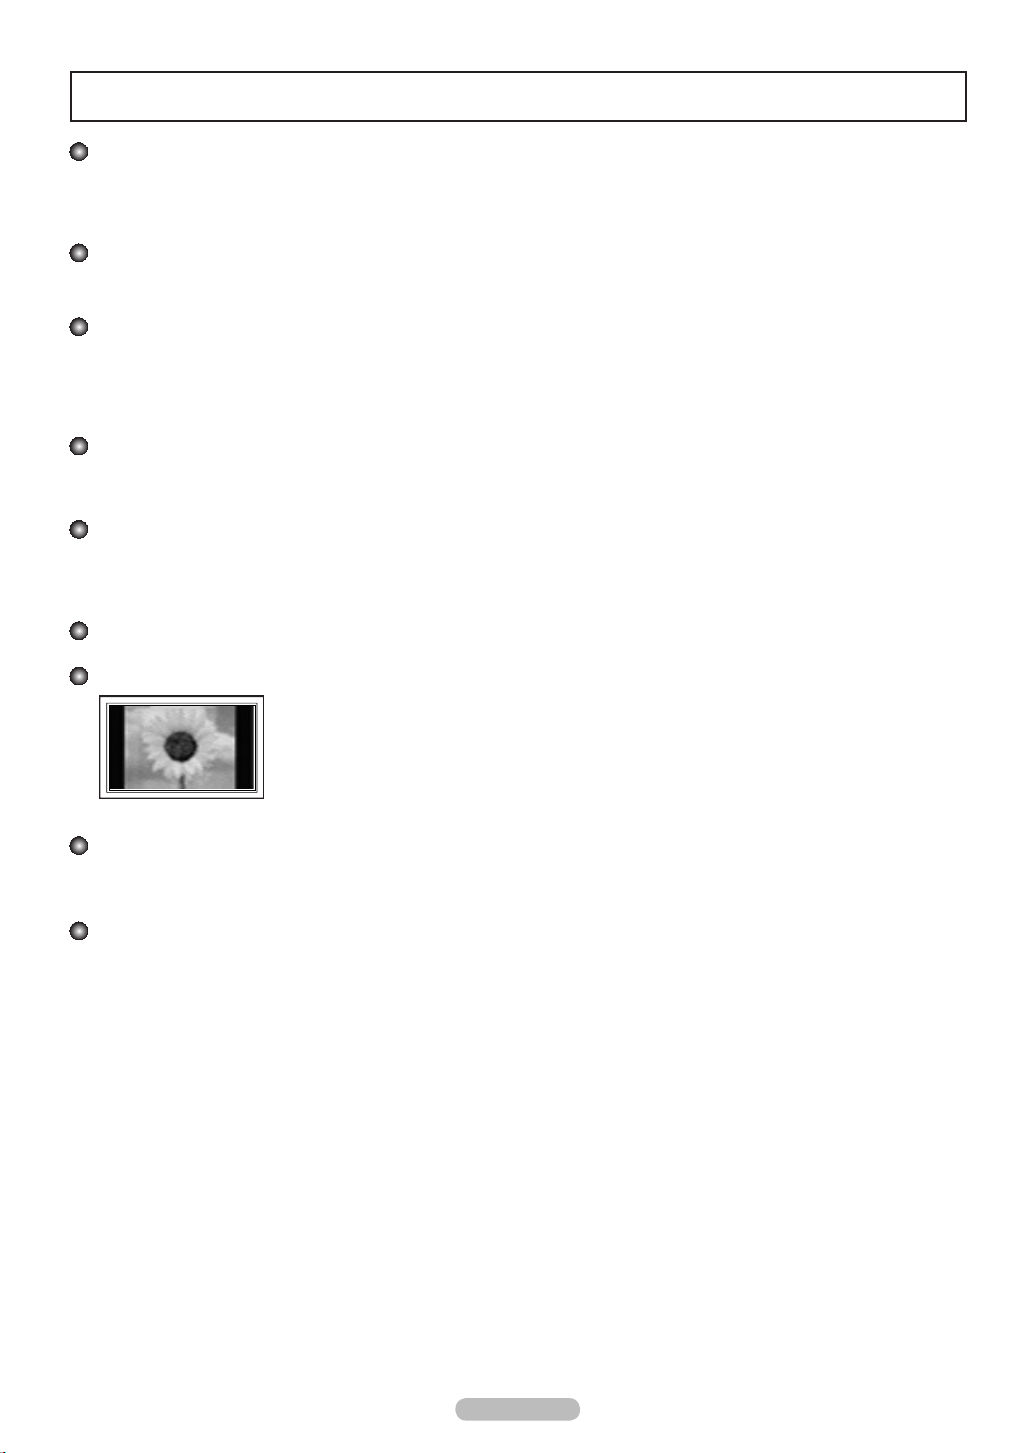
A still image displayed too long may cause permanent damage to the PDP Panel.
Watching the Plasma TV in 4:3 format for a long period of time may leave traces of borders displayed on
the left, right and center of the screen caused by the difference of light emission on the screen.
Playing a DVD or a game console may cause similar effects to the screen.
Damages caused by the above effect are not covered by the Warranty.
After-images on the Screen.
Displaying still images from Video games and PC for longer than a certain period of time may produce partial after-images.
To prevent this effect, reduce the ‘brightness’ and ‘contrast’ when displaying still images for a long time.
Warranty
Warranty does not cover any damage caused by image retention.
Burn-in is not covered by the warranty.
Page 4

Contents
Connecting and Preparing Your TV
English
List of Features ..........................................................................5
■
Checking Parts ..........................................................................5
■
Using the Stand-Base ...............................................................5
■
Viewing the Control Panel .........................................................6
■
Viewing the Connection Panel...................................................7
■
Remote Control .........................................................................8
■
Connections
Connecting VHF and UHF Antennas .........................................9
■
Connecting Cable TV ................................................................9
■
Connecting a DVD / Blu-Ray Player or Cable Box / Satellite
■
receiver (Set-Top Box) via HDMI ............................................. 11
Connecting a DVD /Blu-Ray Player or Cable Box / Satellite
■
receiver (Set-Top Box) via DVI ................................................ 11
Connecting a DVD / Blu-Ray Player or Cable Box / Satellite
■
receiver (Set-Top Box) via Component cables ........................ 12
Connecting a Camcorder ........................................................12
■
Connecting a VCR ...................................................................13
■
Connecting a Digital Audio System .........................................14
■
Connecting an Amplier / DVD Home Theater ........................14
■
Connecting a PC .....................................................................15
■
Operation
Turning the TV On and Off ......................................................16
■
Changing Channels ................................................................. 16
■
Adjusting the Volume ...............................................................16
■
Using the TOOLS Button .........................................................17
■
Viewing the Display .................................................................17
■
Viewing the Menus ..................................................................18
■
Plug & Play Feature ................................................................19
■
Picture Control
Changing the Picture Settings ................................................. 22
■
Sound Control
Changing the Sound Settings ..................................................26
■
Function Description
Conguring the Setup Menu ....................................................27
■
Setting the Time ......................................................................31
■
Source List / Edit Name ...........................................................32
■
Using Your TV as a Computer (PC) Display ............................32
■
PC Display
Display Modes ......................................................................... 33
■
Support .................................................................................... 33
■
+
Anynet
Connecting Anynet+ Devices ..................................................35
■
Troubleshooting for Anynet
■
+ ...................................................38
Appendix
Troubleshooting .......................................................................39
■
Preparation before installing the Wall-Mount ...........................40
■
How to attach the Stand-Base .................................................40
■
Securing the TV to the Wall .....................................................41
■
Wall Mount Kit Specications (VESA) .....................................42
■
Specications ..........................................................................43
■
Dimensions (PN42B430P2D) .................................................. 44
■
Dimensions (PN50B430P2D) .................................................. 45
■
Channel Control
Storing Channels ..................................................................... 20
■
Managing Channels ................................................................20
■
Symbol
Press Note One-Touch Button TOOLS
N O T
English - 4
Page 5
English - 5
Connecting and Preparing Your TV
List of Features
Adjustable picture settings that can be stored in the TV’s memory.
•
Automatic timer to turn the TV on and off.
•
A special sleep timer.
•
V-Chip function.
•
Excellent Digital Interface & Networking :
•
With a built-in HD digital tuner, non-subscription HD broadcasts can be viewed with no Cable Box/Satellite receiver (Set-Top Box)
needed.
HDMI/DVI connection of your PC to this TV.
•
SRS TruSurround HD provides a virtual surround system.
•
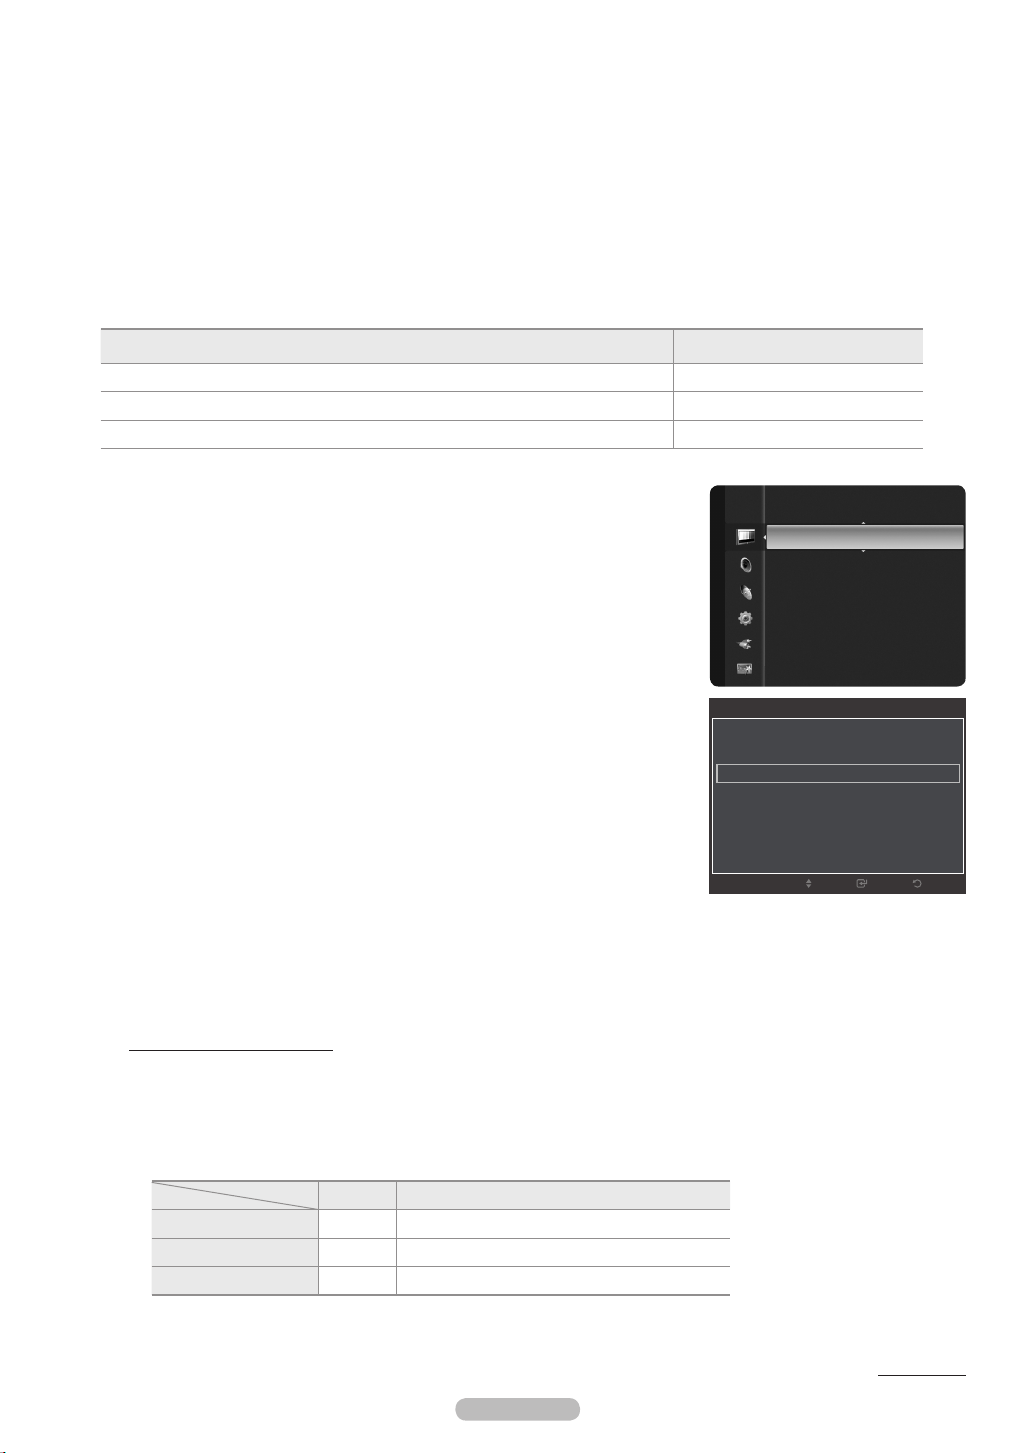
Checking Parts
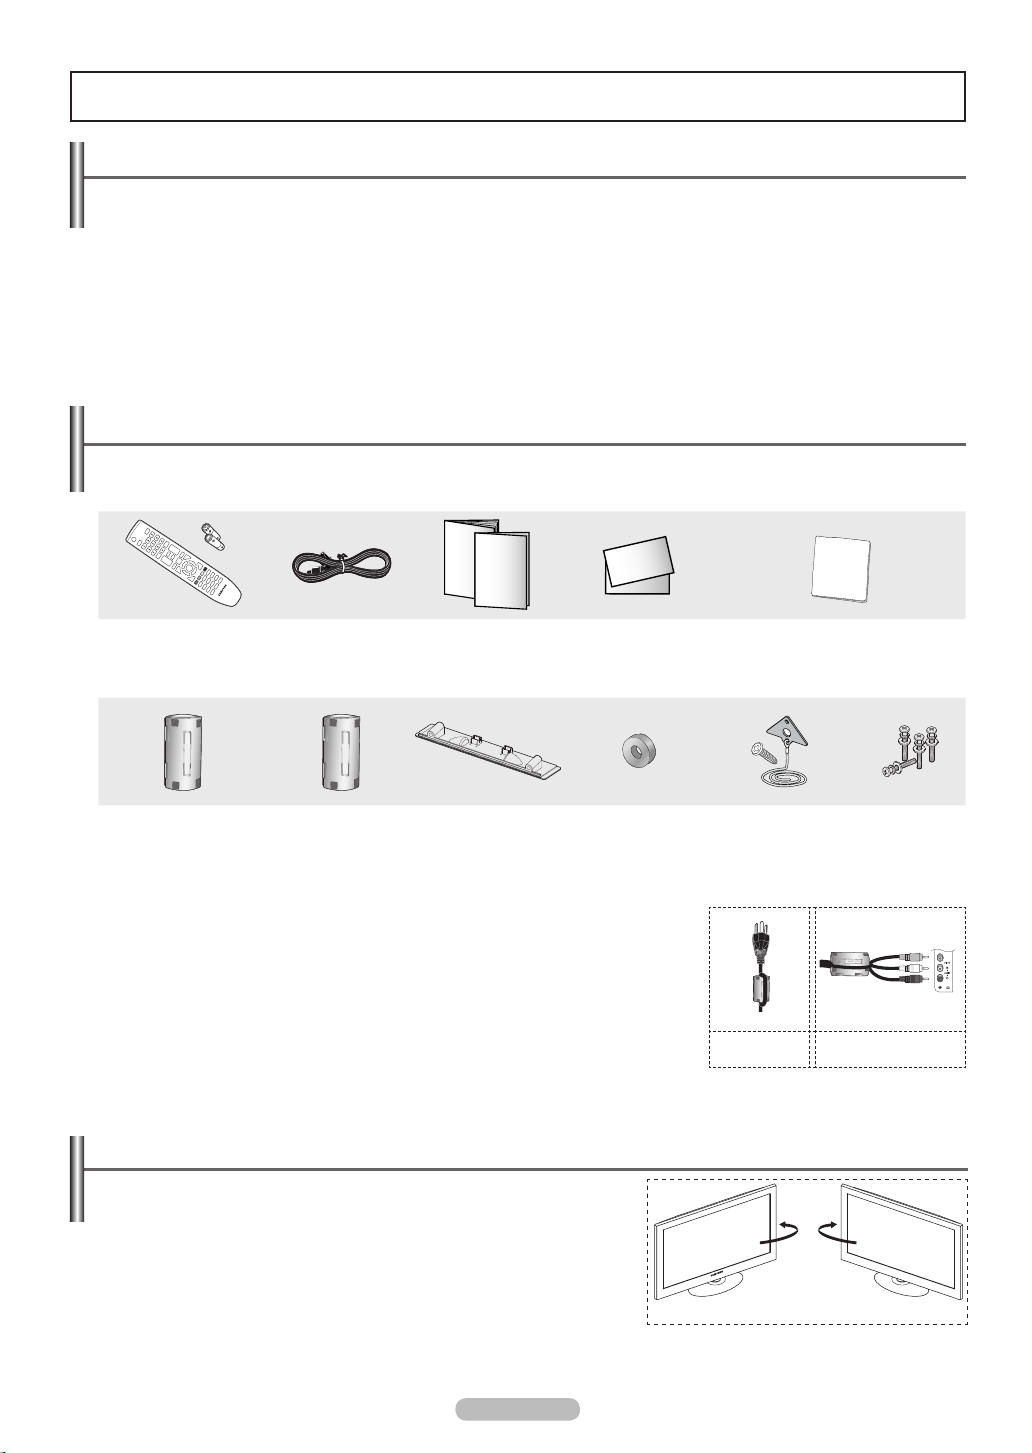
Please make sure the following items are included with your TV. If any items are missing, contact your dealer.
The items' color and shape may vary depending on the model.
N
Remote Control
(BN59-00856A) /
AAA Batteries (4301-000103)
Ferrite Core for Power Cord
(3301-001305)
Ferrite Core
N
The ferrite cores are used to shield the cables from interference.
When connecting a cable, open the ferrite core and clip it around the cable near the plug.
Power Cord
(3903-000144
Ferrite Core
for Side-AV
(3301-001201)
)
Owner’s Instructions /
Quick Setup Guide
Cover-Bottom
(Refer to page 40)
Warranty Card /
Safety Guide Manual
(Not available in all loca-
Holder-Ring (4ea)
(Refer to page 40)
Using the Stand-Base
Two or more people should carry the PDP. Never lay the PDP on the oor
N
because of possible damage to the screen. Always keep the PDP upright.
The PDP can rotate 20 degrees in right and left directions.
N
tions)
Cleaning Cloth
(BN63-01798B)
TV-Holder / Screw
(BN96-10788A)
(Refer to page 41)
Power Cord
Screw (4ea)
Audio Cable /
Video Cable
-20° ~ 20°
Page 6
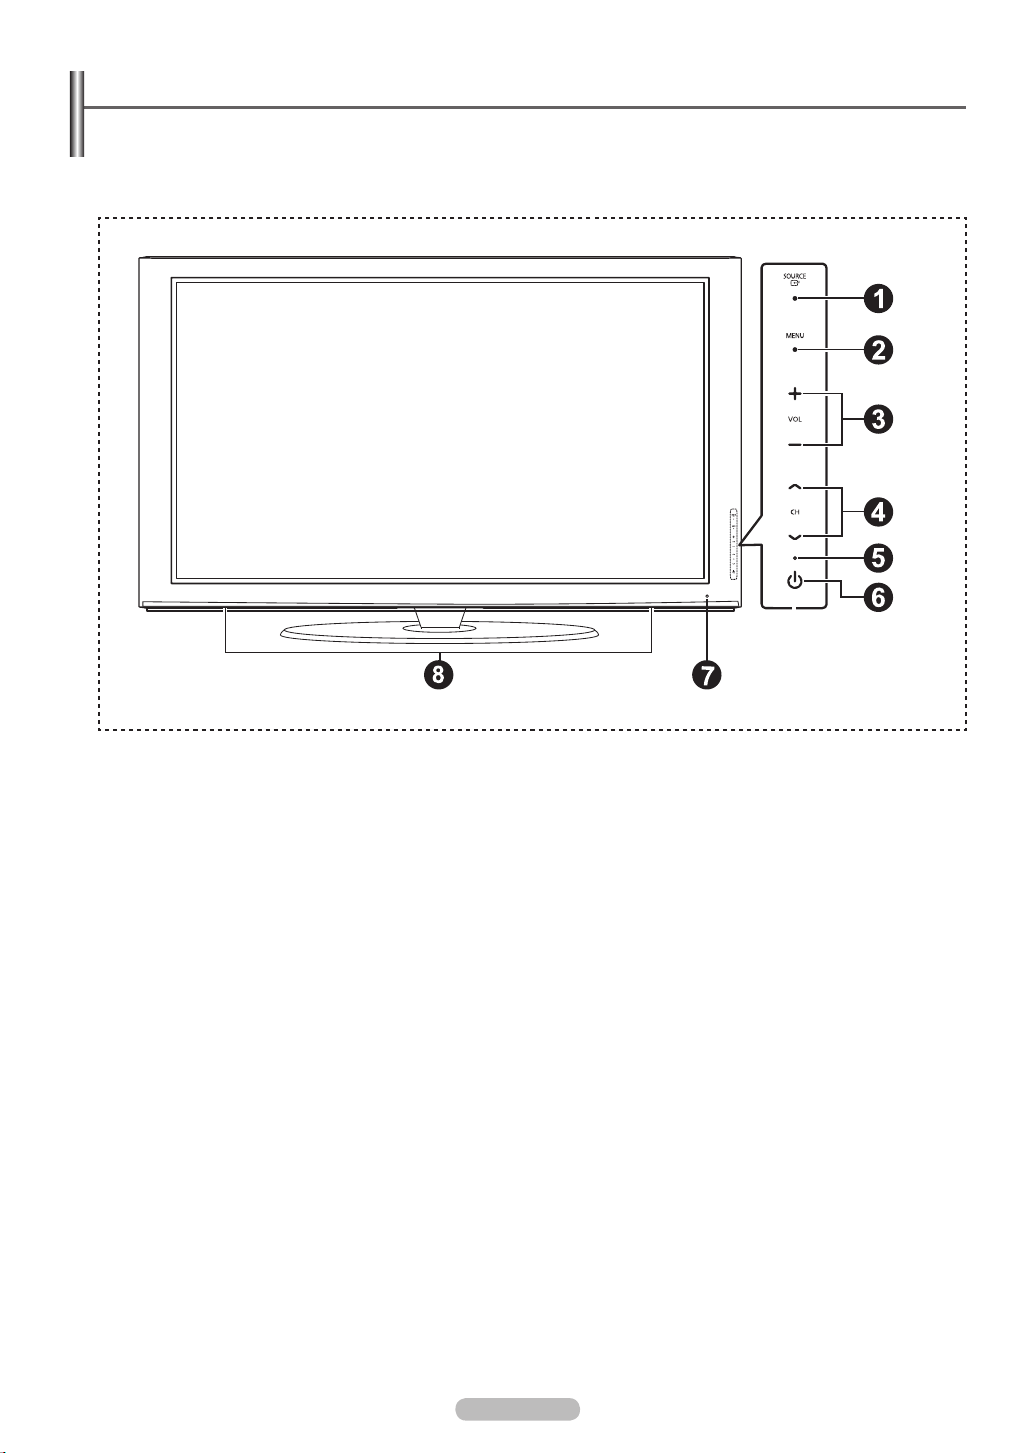
Viewing the Control Panel
The buttons on the lower-right panel control your TV’s basic features, including the on-screen menu.
To use the more advanced features, you must use the remote control.
The product color and shape may vary depending on the model.
N
If you touch the front panel button, the each button will be operated.
N
SOURCE E
1
Toggles between all the available input sources
(TV, AV, Component1, Conponent2, HDMI1, HDMI2/DVI).
In the on-screen menu, use this button as you use the ENTERE button on the remote control.
MENU
2
Press to see an on-screen menu of your TV’s features.
+ VOL –
3
Press to increase or decrease the volume. In the on-screen menu, use the + VOL – buttons as you would use the
◄ and ► buttons on the remote control.
< CH >
4
Press to change channels. In the on-screen menu, use the < CH > buttons as you would use the ▲ and ▼ buttons on the
remote control.
POWER INDICATOR
5
Blinks and turns off when the power is on and lights up in stand-by mode.
P (POWER)
6
Press to turn the TV on and off.
REMOTE CONTROL SENSOR
7
Aim the remote control towards this spot on the TV.
SPEAKERS
8
English - 6
Page 7
English - 7
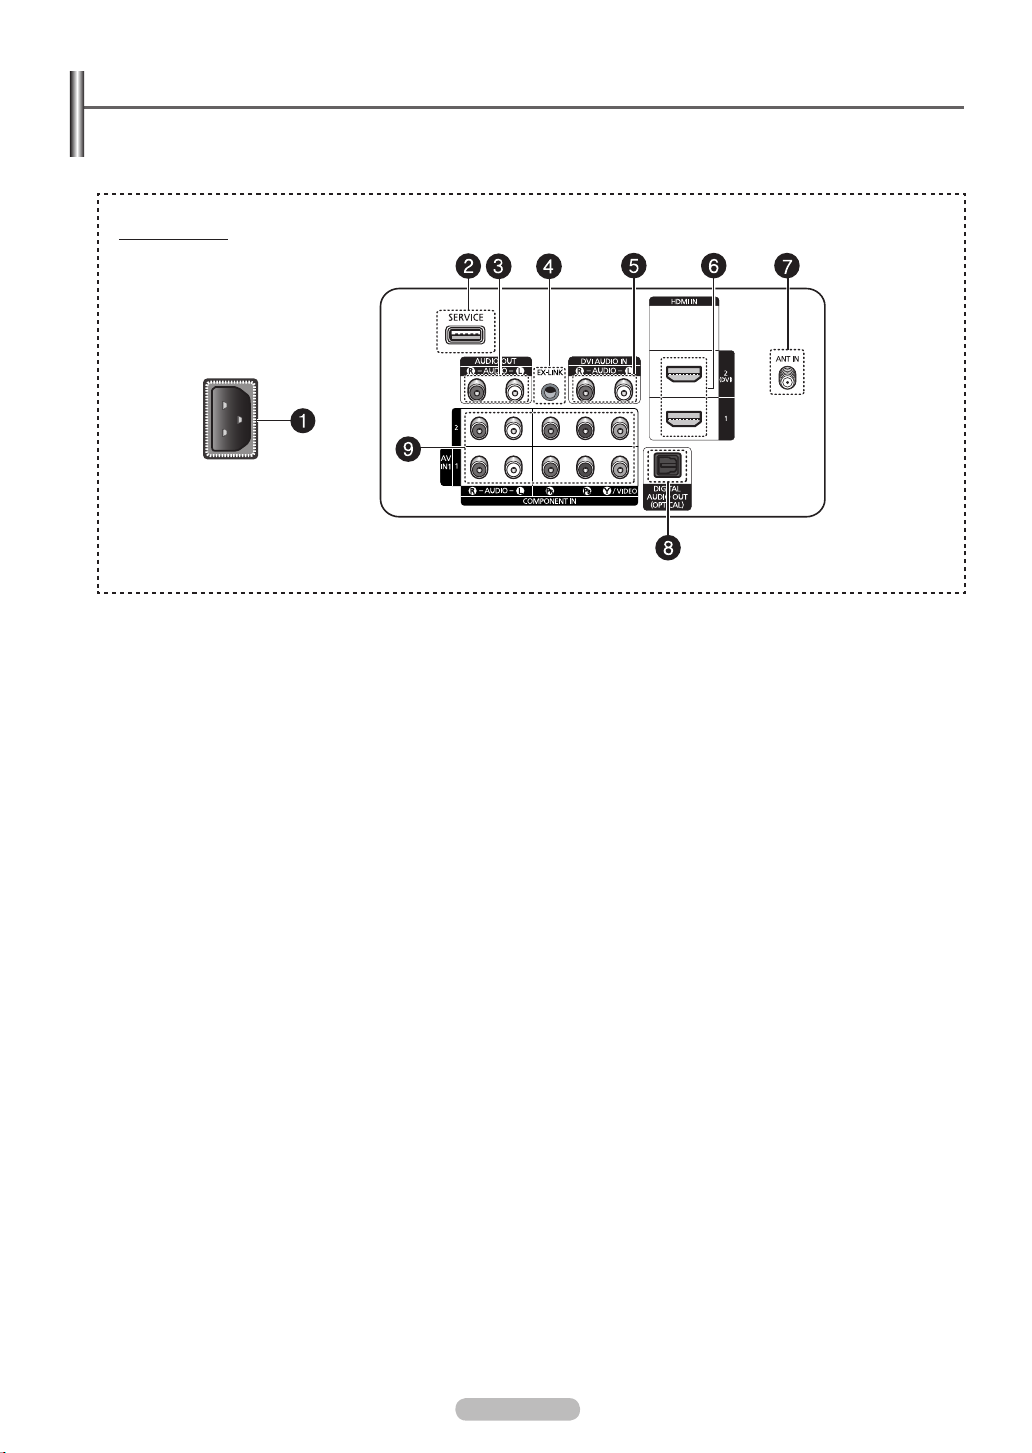
Viewing the Connection Panel
Use the connection panel jacks to connect A/V components that will be connected continuously, such as Blu-Ray DVD Players
or a VCR.
The product color and shape may vary depending on the model.
N
TV Rear Panel
1
POWER IN
Connects the supplied power cord.
SERVICE
2
Used for service only.
3
AUDIO OUT
Connect to a Digital Audio component.
4
EX-LINK
Used for service only.
DVI AUDIO IN (AUDIO-R/L)
5
Connect to the DVI audio output jack of an external device.
HDMI IN 1, 2(DVI)
6
Connect to the HDMI jack of a device with an HDMI output.
HDMI 2 can also be used as a DVI connection with
separate analog audio inputs. An optional HDMI/DVI
cable will be necessary to make this connection.
When using an optional HDMI/DVI adapter, the DVI
analog audio inputs on your TV allow you to receive left
and right audio from your DVI device.
ANT IN
7
Uses a 75Ω Coaxial connector for an Air/Cable Network.
8
DIGITAL AUDIO OUT (OPTICAL)
Connects to a Digital Audio component.
9
COMPONENT IN 1, 2 / AV IN 1
Connects Component video / audio. The COMPONENT IN 1
jack is also used as the AV IN 1 jack.
Connect the video cable to the COMPONENT IN 1
N
[Y/VIDEO] jack and the audio cable to the COMPONENT
IN 1 [R-AUDIO-L] jacks.
Page 8
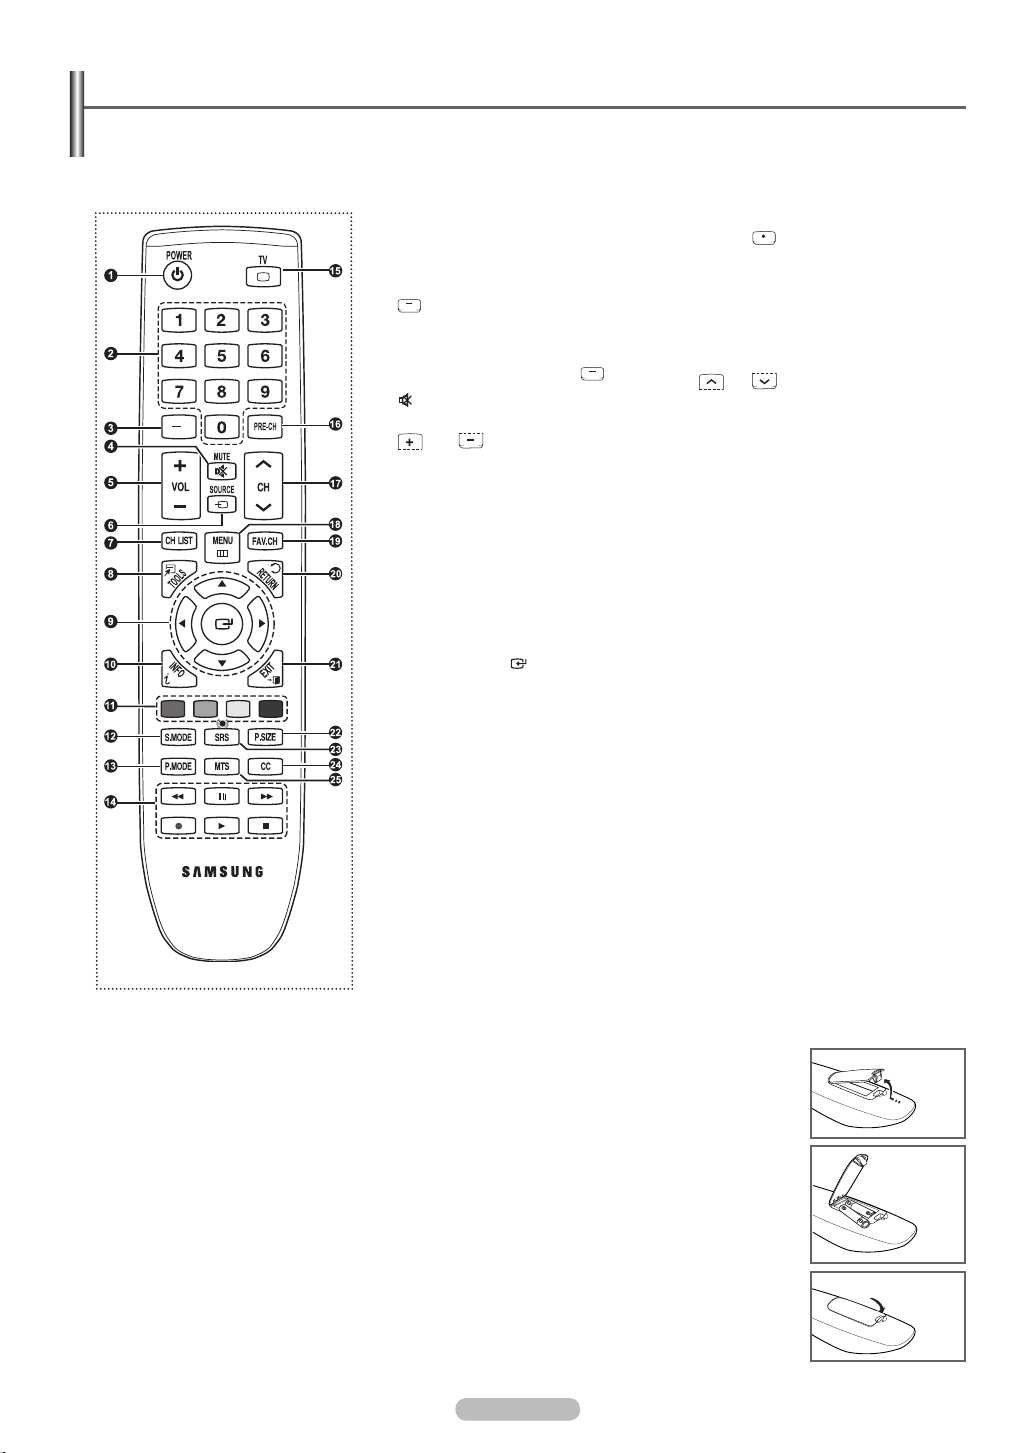
Remote Control
You can use the remote control up to a distance of about 23 feet from the TV.
The product color and shape may vary depending on the model.
N
The performance of the remote control may be affected by bright light.
N
POWER
1
Turns the TV on and off.
NUMERIC BUTTONS
2
Press to change the channel.
3
Press to select additional channels (digital
and analog) being broadcast by the same
station. For example, to select channel
“54-3”, press “54”, then press “ ” and “3”.
MUTE
4
Press to temporarily cut off the sound.
VOL
5
Press to increase or decrease the volume.
SOURCE
6
Press to display and select the available
video sources.
CH LIST
7
Used to display Channel Lists on the screen.
TOOLS
8
Use to quickly select frequently used
functions.
UP▲/DOWN▼/LEFT◄/
9
RIGHT►/ENTER
Use to select on-screen menu items and
change menu values.
INFO
0
Press to display information on the TV
screen.
COLOR BUTTONS
!
Use these buttons in the Channel list.
@
S.MODE
Press to select the sound mode.
#
P.MODE
Press to select the picture mode.
Use these buttons in the DMA, Anynet+
$
modes. ( : This remote can be used to
control recording on Samsung recorders
with the Anynet+ feature)
TV
%
Selects the TV mode directly.
PRE-CH
^
Tunes to the previous channel.
CH
&
Press to change channels.
MENU
*
Displays the on-screen menu.
FAV.CH
(
Press to switch to your favorite channels.
RETURN
)
Returns to the previous menu.
EXIT
a
Press to exit the menu.
b
P.SIZE
Picture size selection.
c
SRS
Selects SRS TruSurround HD mode.
d
CC
Controls the caption decoder.
e
MTS
Press to choose stereo, mono or Separate
Audio Program (SAP broadcast).
Installing Batteries in the Remote Control
❑
1. Lift the cover at the back of the remote control upward as shown in the gure.
2. Install two AAA size batteries.
N
Make sure to match the “+” and “–” ends of the batteries with the diagram inside the compartment.
3. Close the cover as shown in the gure.
Remove the batteries and store them in a cool, dry place if you won’t be using the remote control for a
N
long time. (Assuming typical TV usage, the batteries should last for about one year.)
If the remote control doesn’t work, check the following
N
1. Is the TV power on?
2. Are the plus and minus ends of the batteries reversed?
3. Are the batteries drained?
4. Is there a power outage or is the power cord unplugged?
5. Is there a special uorescent light or neon sign nearby?
English - 8
Page 9
English - 9
Connections
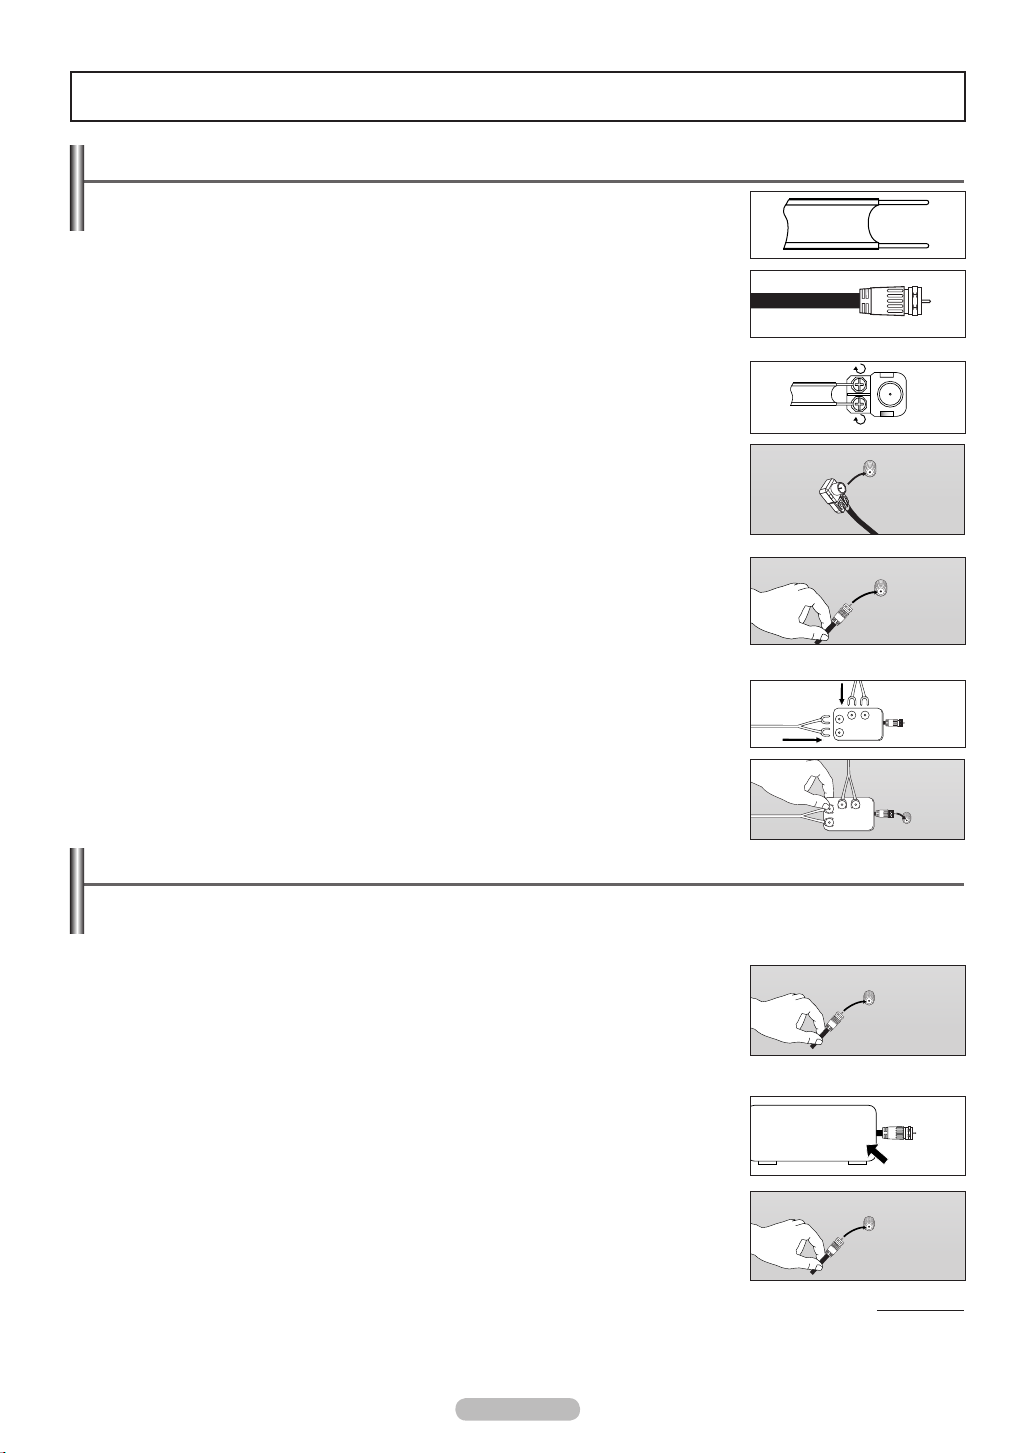
Connecting VHF and UHF Antennas
If your antenna has a set of leads that look like this, see “Antennaswith300ΩFlatTwin
Leads” below.
Ifyourantennahasoneleadthatlookslikethis,see“Antennaswith75ΩRoundLeads.”
If you have two antennas, see “Separate VHF and UHF Antennas.”
Antennaswith300ΩFlatTwinLeads
❑
Ifyouareusinganoff-airantenna(suchasaroofantennaorrabbitears)thathas300Ω
twin flat leads, follow the directions below.
1. Place the wires from the twin leads under the screws on a 300-75 Ω adapter (not supplied).
Use a screwdriver to tighten the screws.
2. Plug the adaptor into the ANT IN terminal on the back of the TV.
Antennaswith75ΩRoundLeads
❑
Plug the antenna lead into the ANT IN terminal on the back of the TV.
Separate VHF and UHF Antennas
❑
If you have two separate antennas for your TV (one VHF and one UHF), you must
combine the two antenna signals before connecting the antennas to the TV. This
procedure requires an optional combiner-adaptor (available at most electronics shops).
1. Connect both antenna leads to the combiner.
2. Plug the combiner into the ANT IN terminal on the bottom of the back panel.
ANT IN
ANT IN
UHF
VHF
ANT IN
UHF
VHF
Connecting Cable TV
To connect to a cable TV system, follow the instructions below.
Cable without a Cable Box
❑
Plug the incoming cable into the ANT IN terminal on the back of the TV.
N
Because this TV is cable-ready, you do not need a cable box to view unscrambled cable
channels.
Connecting to a Cable Box that Descrambles All Channels
❑
1. Find the cable that is connected to the ANT OUT terminal on your cable box.
This terminal might be labeled “ANT OUT”, “VHF OUT” or simply, “OUT”.
N
2. Connect the other end of this cable to the ANT IN terminal on the back of the TV.
ANT IN
ANT IN
ANT OUT
ANT IN
Continued...
Page 10
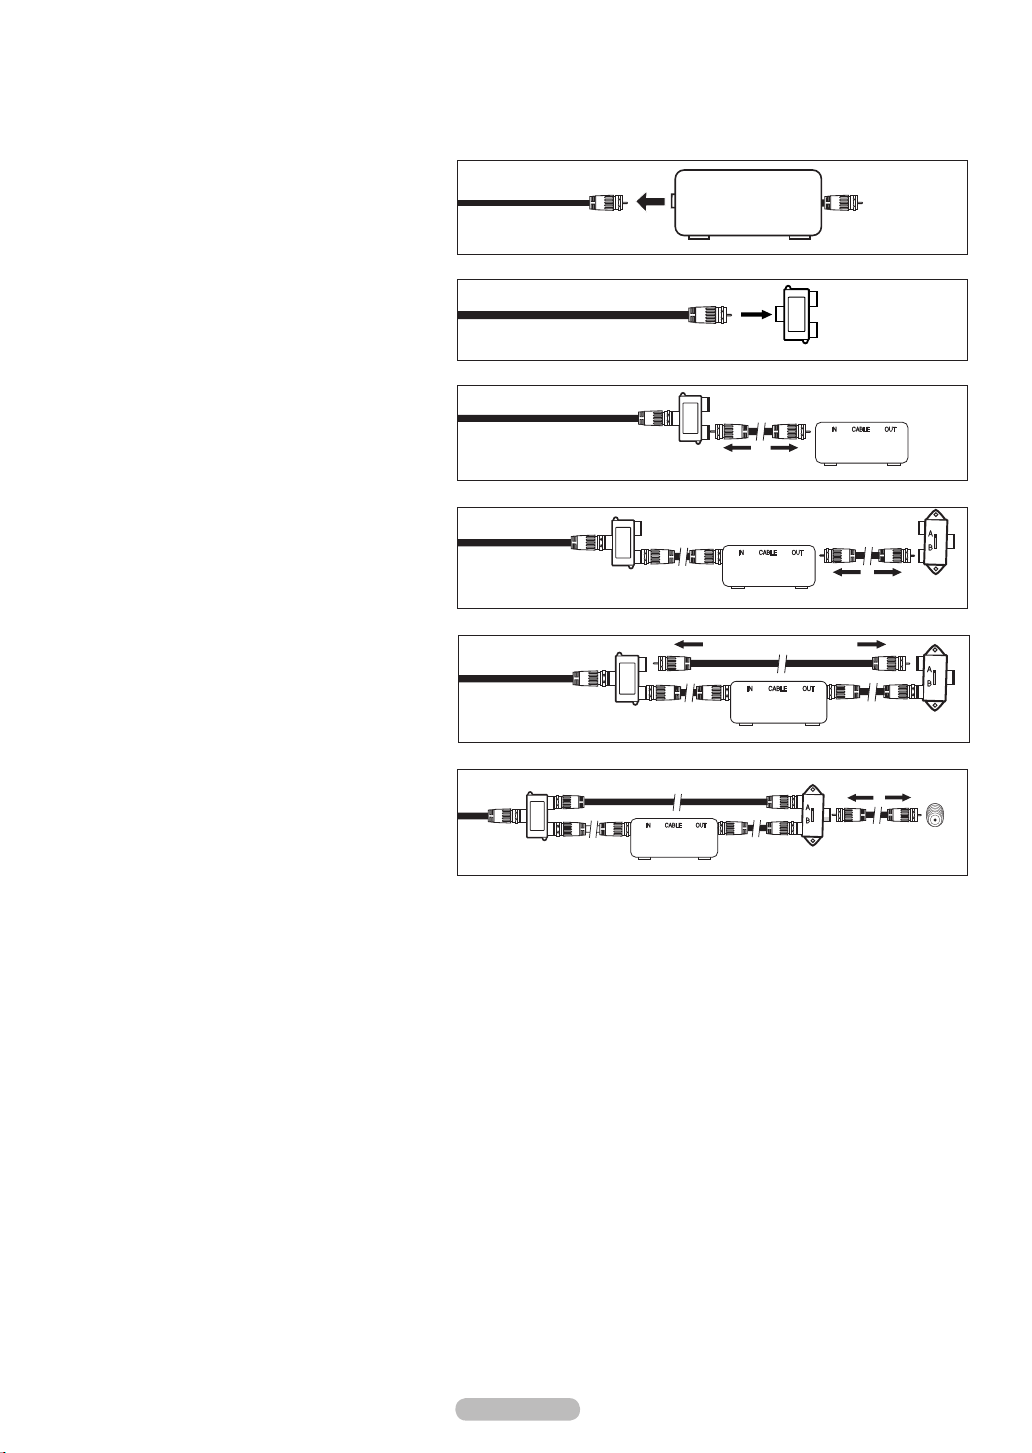
Connecting to a Cable Box that Descrambles Some Channels
❑
If your cable box descrambles only some channels (such as premium channels), follow the instructions below. You
will need a two-way splitter, an RF (A/B) switch, and four lengths of Antenna cable. (These items are available at most
electronics stores.)
1. Find and disconnect the cable that is
connected to the ANT IN terminal on your
cable box.
N
This terminal might be labeled “ANT IN”,
“VHF IN” or simply, “IN”.
2. Connect this cable to a two-way splitter.
3. Connect an Antenna cable between the
OUTPUT terminal on the splitter and the IN
terminal on the cable box.
4. Connect an Antenna cable between the ANT
OUT terminal on the cable box and the B–IN
terminal on the RF(A/B) switch.
5. Connect another cable between the other
OUT terminal on the splitter and the A–IN
terminal on the RF (A/B) switch.
Incoming
cable
Incoming
cable
Incoming
cable
Splitter
Splitter
ANT IN
Incoming
Splitter
cable
Cable Box
Cable Box
Splitter
Cable Box
RF (A/B)
Switch
RF (A/B)
Switch
6. Connect the last Antenna cable between the
OUT terminal on the RF (A/B) switch and the
ANT IN terminal on the rear of the TV.
Incoming
cable
Splitter
RF (A/B)
Switch
TV Rear
ANT IN
After you have made this connection, set the A/B switch to the “A” position for normal viewing. Set the A/B switch to the “B” position
to view scrambled channels. (When you set the A/B switch to “B”, you will need to tune your TV to the cable box’s output channel,
which is usually channel 3 or 4.)
English - 10
Page 11
English - 11
Connecting a DVD / Blu-Ray Player or Cable Box / Satellite receiver
(Set-Top Box) via HDMI
This connection can only be made if there is an HDMI Output jack on the external device. This connection will provide the
highest quality picture.
1. Connect an HDMI Cable between the HDMI IN 1 or 2(DVI) jack on the TV and the HDMI jack on the DVD / Blu-Ray Player or Cable
Box / Satellite receiver (Set-Top Box).
DVD/Blu-Ray Player or Cable
Box / Satellite receiver
1
HDMI Cable (Not supplied)
What is HDMI?
N
HDMI, or high-denition multimedia interface, is an interface that enables the transmission of digital audio and video signals using a
•
TV Rear Panel
single cable.
The difference between HDMI and DVI is that the HDMI device is smaller in size and has the HDCP (High Bandwidth Digital Copy
•
Protection) coding feature installed.
Each DVD Player or Cable Box / Satellite receiver (Set-Top Box) has a different back panel conguration.
N
The TV may not output sound and pictures may be displayed with abnormal color when DVD / Blu-Ray Player or Cable Box /
N
Satellite receiver supporting HDMI versions older than 1.3 are connected. When connecting an older HDMI cable and there is no
sound, connect the HDMI cable to the HDMI IN 2(DVI) jack and the audio cables to the DVI AUDIO IN [R-AUDIO-L] jacks on the
back of the TV. If this happens, contact the company that provided the DVD / Blu-Ray Player or Cable Box / Satellite receiver to
conrm the HDMI version, then request an upgrade.
HDMI cables that are not 1.3 may cause annoying icker or no screen display.
N
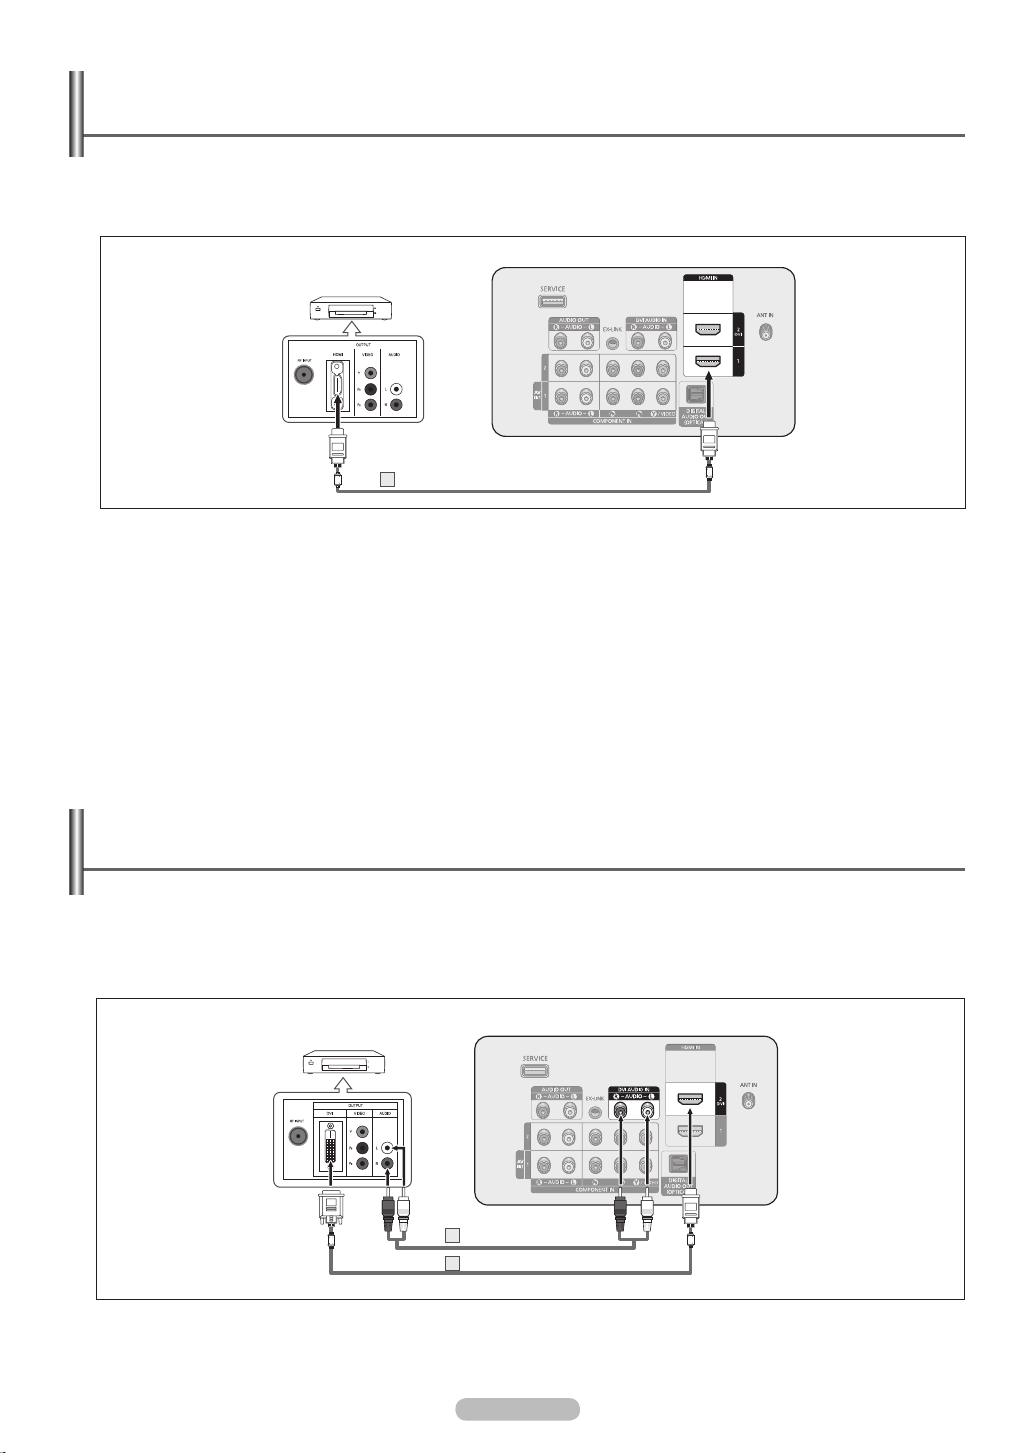
Connecting a DVD /Blu-Ray Player or Cable Box / Satellite receiver
(Set-Top Box) via DVI
This connection can only be made if there is a DVI Output jack on the external device.
1. Connect a HDMI/DVI Cable or DVI-HDMI Adapter between the HDMI IN 2(DVI) jack on the TV and the DVI jack on the DVD /
Blu-Ray Player or Cable Box/Satellite receiver (Set-Top Box).
2. Connect Audio Cables between the DVI AUDIO IN [R-AUDIO-L] jack on the TV and the DVD / Blu-Ray Player or Cable Box /
Satellite receiver.
DVD/Blu-Ray Player or Cable Box /
Satellite receiver
Audio Cable (Not supplied)2
HDMI/DVI Cable (Not supplied)
1
N
Each DVD / Blu-Ray Player or Cable Box / Satellite receiver (Set-Top Box) has a different back panel conguration.
N
When connecting a DVD Player or Cable Box / Satellite receiver (Set-Top Box), match the color of the connection terminal to the
TV Rear Panel
cable.
N
When using an HDMI / DVI cable connection, you must use the HDMI IN 2(DVI) jack.
Page 12
Connecting a DVD / Blu-Ray Player or Cable Box / Satellite receiver
(Set-Top Box) via Component cables
The rear panel jacks on your TV make it easy to connect a DVD/Blu-Ray Player or Cable Box / Satellite receiver (Set-Top Box)
to your TV.
1. Connect Component Cable between the COMPONENT IN (1 or 2) [Y, PB, PR] jacks on the TV and the COMPONENT [Y, PB, PR]
jacks on the DVD / Blu-Ray Player or Cable Box / Satellite receiver(Set-Top Box).
2. Connect Audio Cables between the COMPONENT IN (1 or 2) [R-AUDIO-L] jacks on the TV and the AUDIO OUT jacks on the DVD /
Blu-Ray Player or Cable Box / Satellite receiver (Set-Top Box).
TV Rear Panel
DVD / Blu-Ray Player or Cable Box
/ Satellite receiver
Audio Cable (Not supplied)2
Component Cable (Not supplied)1
Component video separates the video into Y (Luminance (brightness)), PB (Blue) and PR (Red) for enhanced video quality. Be sure
N
to match the component video and audio connections. For example, if connecting the video cable to COMPONENT IN 1, connect
the audio cable to COMPONENT IN 1 also.
Each DVD / Blu-Ray Player or Cable Box / Satellite receiver (Set-Top Box) has a different back panel conguration.
N
When connecting a DVD / Blu-Ray Player or Cable Box / Satellite receiver (Set-Top Box), match the color of the connection terminal
N
to the cable.
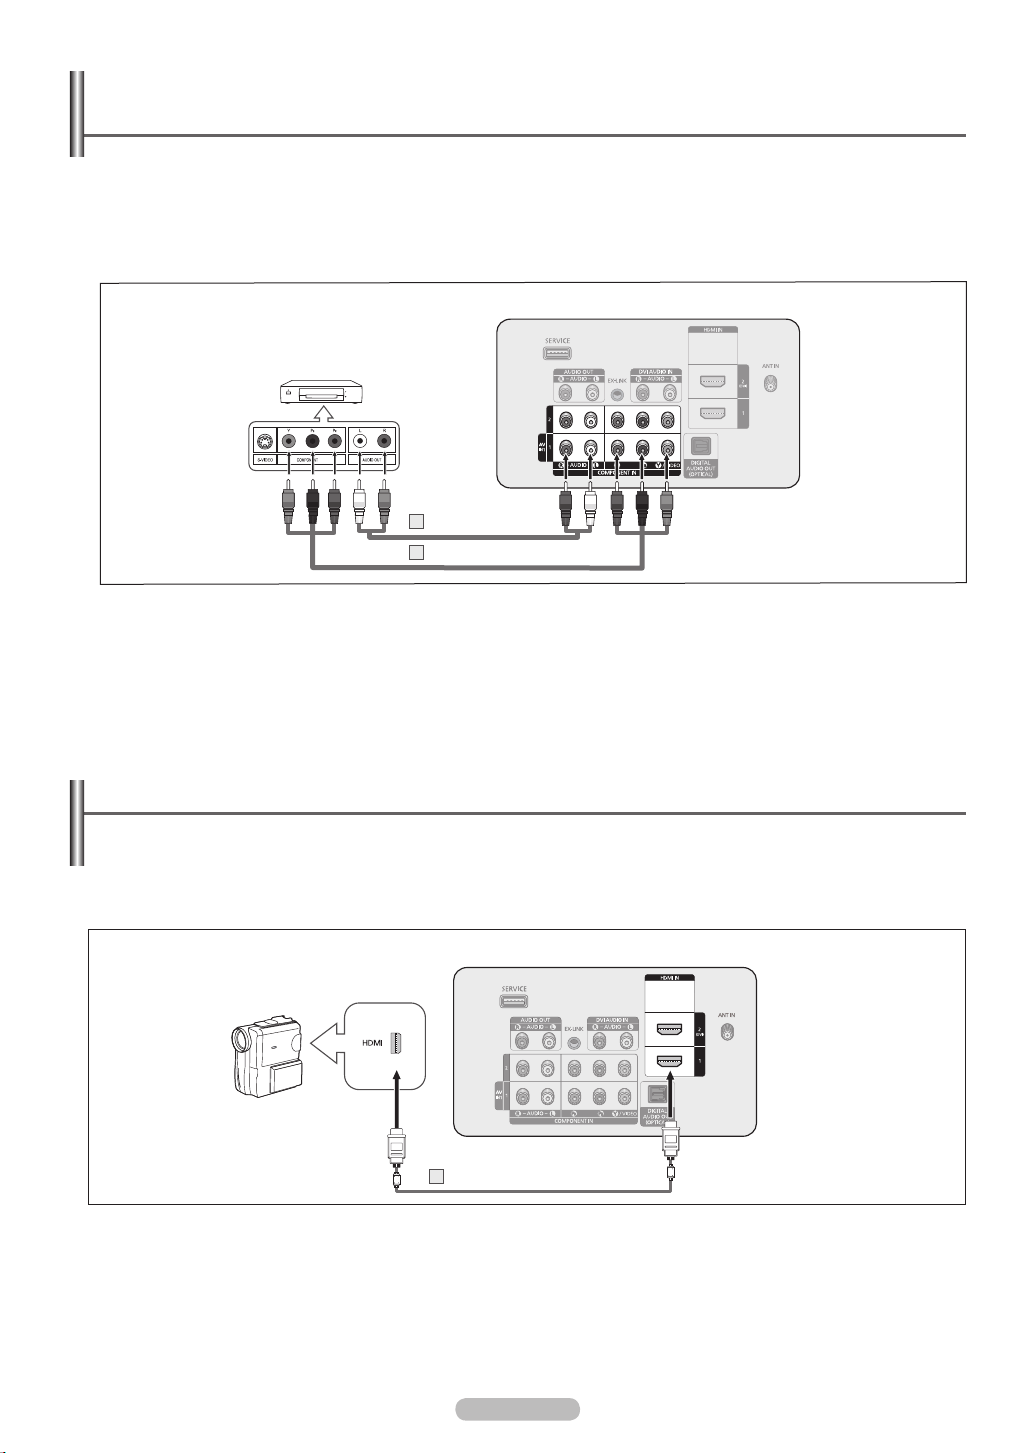
Connecting a Camcorder
The side and rear panel jacks on your TV make it easy to connect a camcorder to your TV.
Using an HDMI Cable
❑
1. Connect an HDMI Cable between the HDMI IN 1 or 2(DVI) jack on the TV and the HDMI jack on the camcorder.
TV Rear Panel
Camcorder
HDMI Cable (Not supplied)1
N
Each Camcorder has a different back panel conguration.
English - 12
Page 13
English - 13
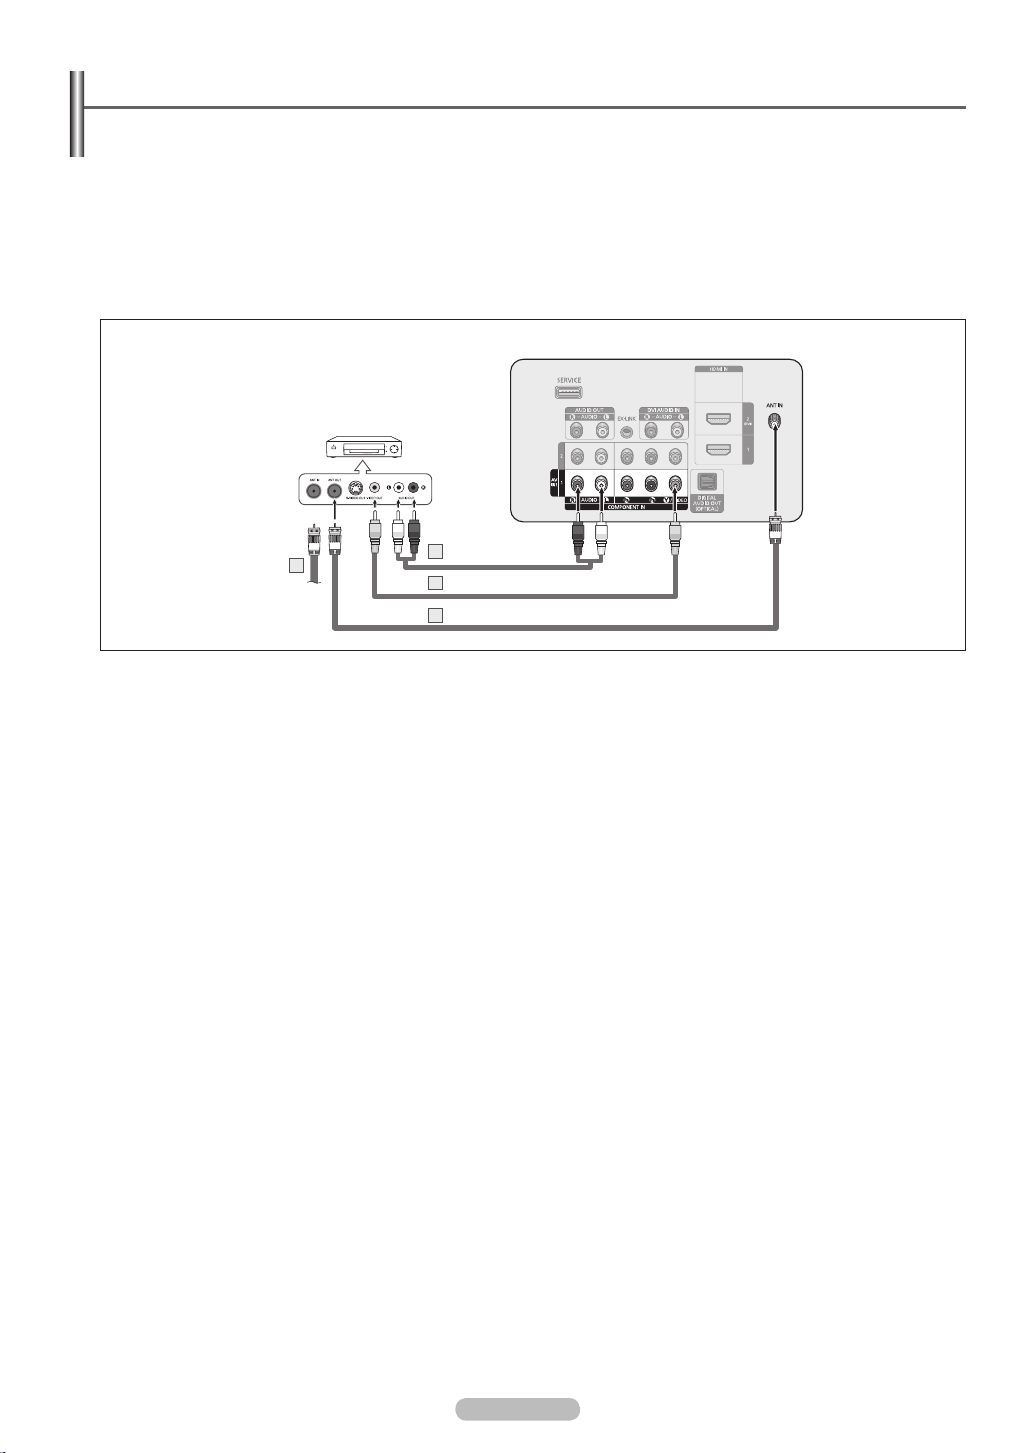
Connecting a VCR
Video Connection
❑
These instructions assume that you have already connected your TV to an antenna or a cable TV system (according to the
instructions on pages 9~10). Skip step 1 if you have not yet connected to an antenna or a cable system.
1. Unplug the cable or antenna from the back of the TV.
2. Connect the cable or antenna to the ANT IN terminal on the back of the VCR.
3. Connect an Antenna Cable between the ANT OUT terminal on the VCR and the ANT IN terminal on the TV.
4. Connect a Video Cable between the AV IN 1 [Y/VIDEO] jack on the TV and the VIDEO OUT jack on the VCR.
5. Connect Audio Cables between the AV IN 1 [R-AUDIO-L] jacks on the TV and the AUDIO OUT jacks on the VCR
TV Rear Panel
VCR Rear Panel
2
If you have a “mono” (non-stereo) VCR, use a Y-connector (not supplied) to connect to the right and left audio input jacks of the
N
Audio Cable(Not supplied)5
Video Cable(Not supplied)4
Antenna cable(Not supplied)3
TV. Alternatively, connect the cable to the “R” jack.
If your VCR is stereo, you must connect two cables.
Each VCR has a different back panel conguration.
N
When connecting a VCR, match the color of the connection terminal to the cable.
N
When connecting to AV IN 1, the color of the AV IN 1 [Y/VIDEO] jack (Green) does not match the color of the video cable (Yellow).
N
Page 14
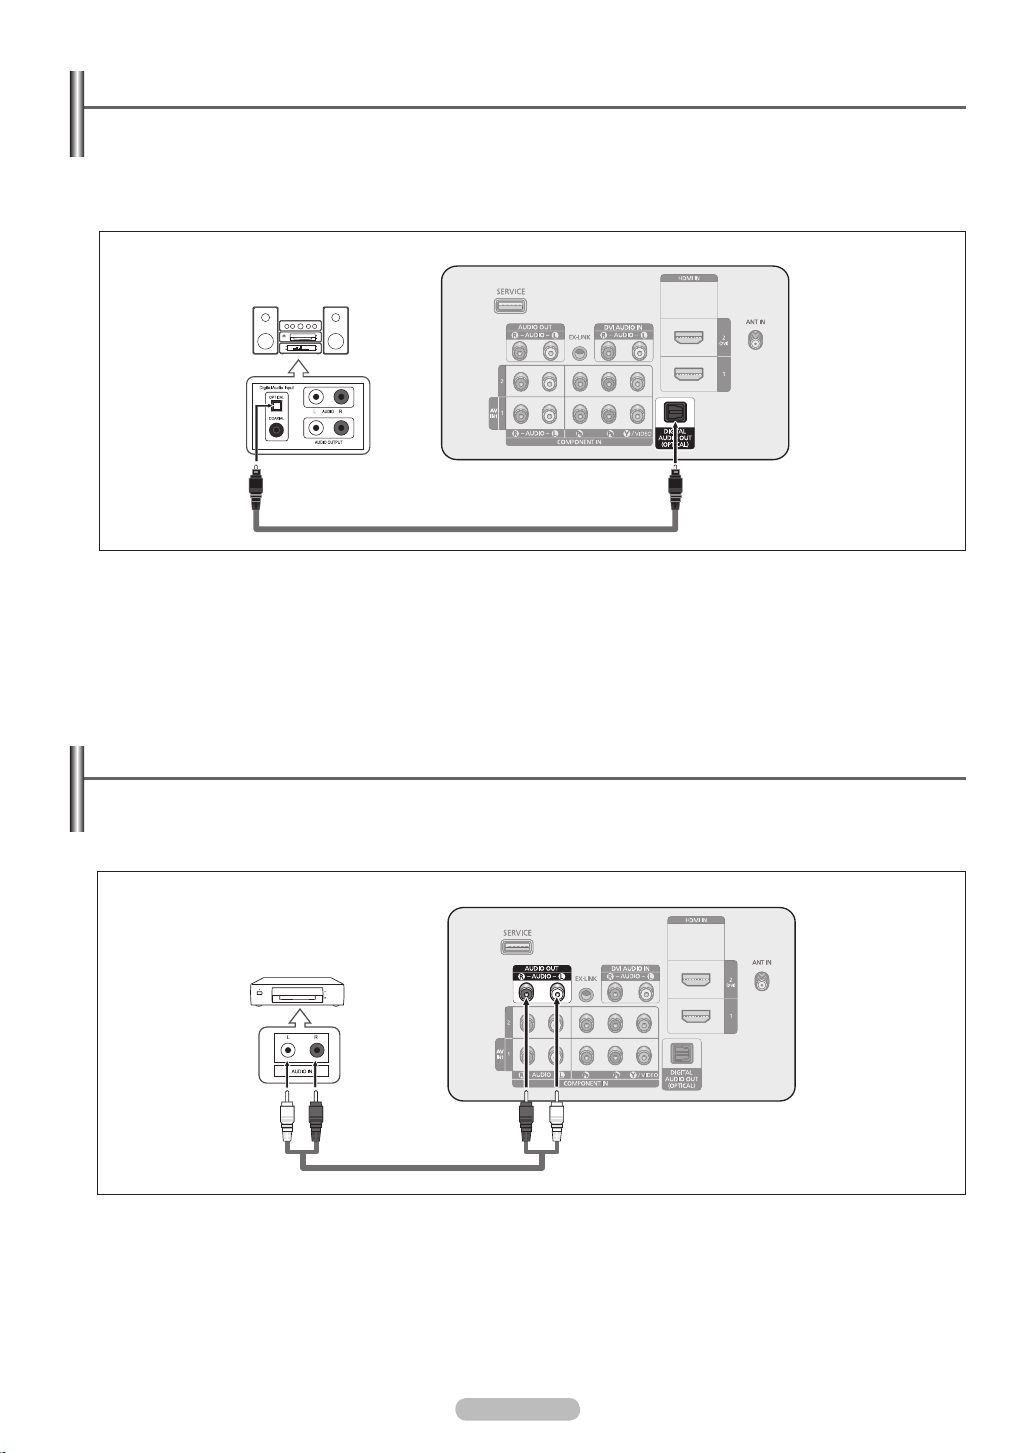
Connecting a Digital Audio System
The rear panel jacks on your TV make it easy to connect a Digital Audio System(Home theater/Receiver) to your TV.
1. Connect an Optical Cable between the DIGITAL AUDIO OUT (OPTICAL) jacks on the TV and the Digital Audio Input (OPTICAL)
jacks on the Digital Audio System.
When a Digital Audio System is connected to the DIGITAL AUDIO OUT (OPTICAL) jack : Decrease the volume of the TV, and
adjust the volume level with the system’s volume control.
TV Rear Panel
Digital Audio System
Optical Cable (Not supplied)
5.1CH audio is possible when the TV is connected to an external device supporting 5.1CH.
N
Each Digital Audio System has a different back panel conguration.
N
When the receiver (home theater) is set to On, you can hear sound output from the TV’s Optical jack. When the TV is displaying a
N
DTV(air) signal, the TV will send out 5.1 channel sound to the Home theater receiver. When the source is a digital component such
as a DVD and is connected to the TV via HDMI, only 2 channel sound will be heard from the Home Theater receiver.
If you want to hear 5.1 channel audio, connect the DIGITAL AUDIO OUT (OPTICAL) jack on the DVD / Blu-Ray player or Cable/
Satellite Box directly to an Amplier or Home Theater, not the TV.
Connecting an Amplifier / DVD Home Theater
1. Connect Audio Cables between the AUDIO OUT [R-AUDIO-L] jacks on the TV and AUDIO IN [L-AUDIO-R] jacks on the Amplier/
DVD Home Theater.
When an audio amplier is connected to the AUDIO OUT [R-AUDIO-L] jacks terminals : Decrease the volume of the TV, and adjust
the volume level with the Amplier’s volume control.
TV Rear Panel
Amplifier / DVD Home Theater
Audio Cable (Not supplied)
Each Amplier / DVD Home Theater has a different back panel conguration.
N
When connecting an Amplier / DVD Home Theater, match the color of the connection terminal to the cable.
N
English - 14
Page 15

English - 15
Connecting a PC
Using an HDMI Cable
❑
1. Connect an HDMI/DVI cable between the HDMI IN 2(DVI) jack on the TV and the PC output jack on your computer.
2. Connect a 3.5 mm Stereo plug to 2RCA cable between the DVI AUDIO IN [R-AUDIO-L] jack on the TV and the Audio Out jack of
the sound card on your computer.
TV Rear Panel
PC
3.5 mm Stereo plug to 2 RCA Cable (Not supplied)
2
HDMI/DVI Cable (Not supplied)1
Each PC has a different back panel conguration.
N
When connecting a PC, match the color of the connection terminal to the cable.
N
When using an HDMI/DVI cable connection, you must use the HDMI IN 2(DVI) terminal.
N
Page 16
Operation
VOL CH
VOL CH
VOL CH
VOL CH
VOL CH
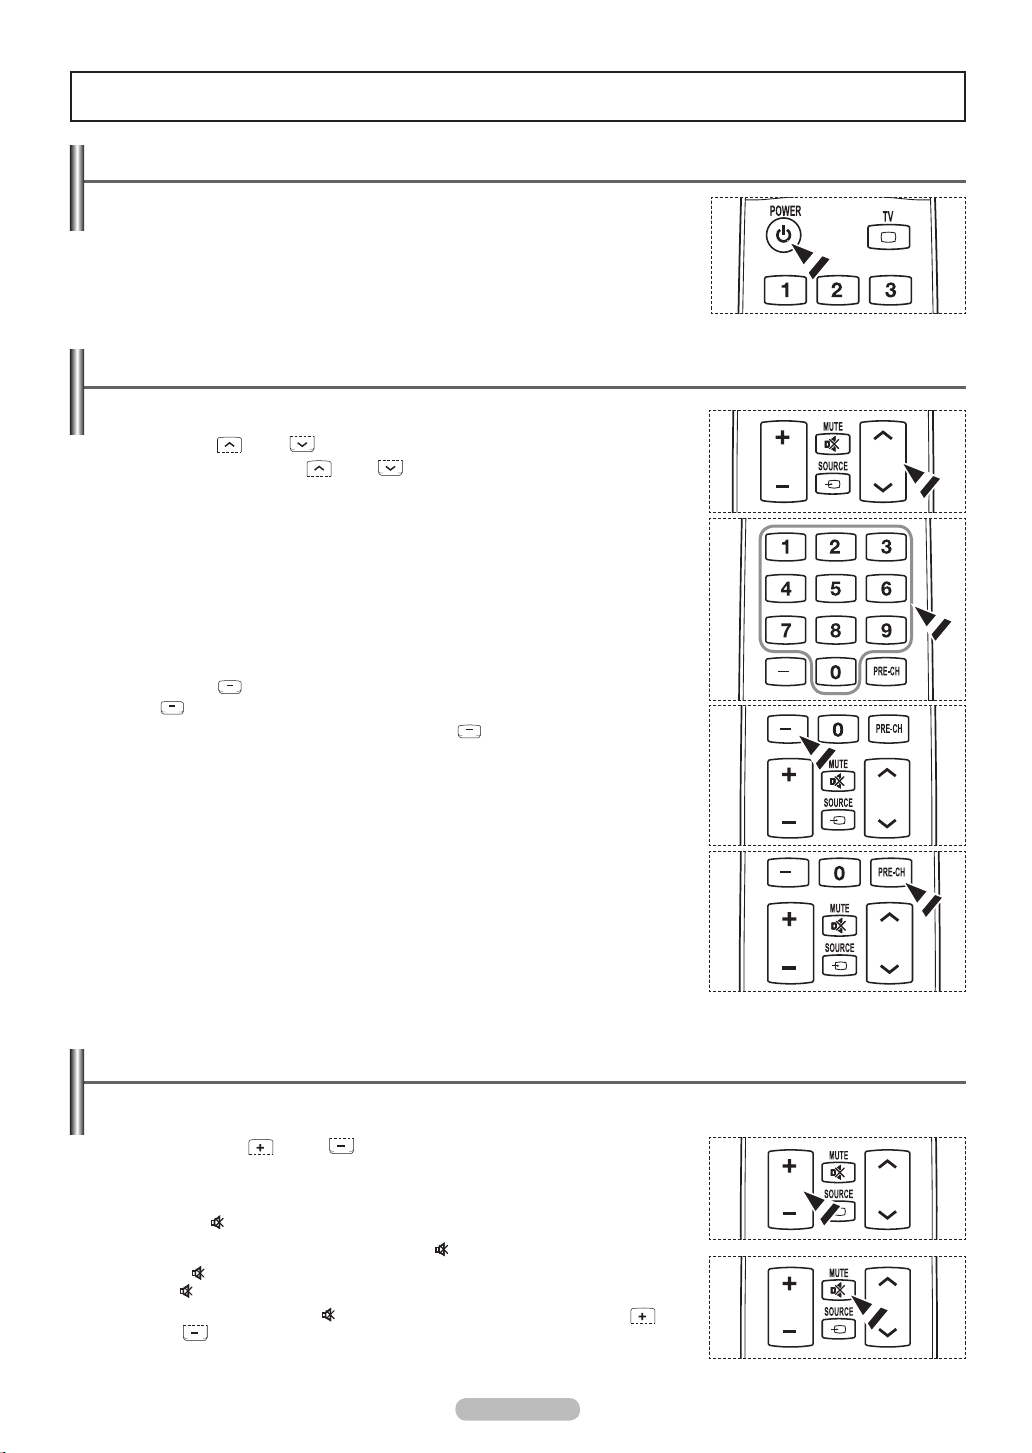
Turning the TV On and Off
Press the POWER button on the remote control. You can also use the POWER button
on the TV.
It may take a while for your TV to power on.
N
Changing Channels
Using the Channel Buttons
❑
Press the CH or CH button to change channels.
N
When you press the CH or CH button, the TV changes channels in
sequence. You will see all the channels that the TV has memorized. (The TV must
have memorized at least three channels). You will not see channels that were either
erased or not memorized. See page 20 to memorize channels.
Using the Number Buttons
❑
Press the number buttons to go directly to a channel. For example, to select channel “27”,
press “2”, then “7”.
N
For quick channel change, press the number buttons, then press the ENTERE
button.
Using the “ ” Button
❑
The “ ” button is used to select stations that broadcast a digital signal.
1. For example, for Channel "7-1", press "7", then " ”, then ", then "1".
N
HD indicates the TV is receiving a Digital High Denition signal.
SD indicates the TV is receiving a Standard Denition signal.
N
For quick channel change, press the number buttons, then press the ENTERE
button.
Using the PRE-CH Button to select the Previous Channel
❑
1. Press the PRE-CH button. The TV will switch to the last channel viewed.
N
To quickly switch between two channels that are far apart, tune to one channel, then
use the number button to select the second channel. Then use the PRE-CH button
to quickly alternate between them.
Adjusting the Volume
Using the Volume Buttons
❑
1. Press the VOL or VOL button to increase or decrease the volume.
❑
Using the MUTE Button
At any time, you can cut off the sound using the MUTE button.
1. Press MUTE button and the sound cuts off.
The will displayed on the screen.
2. To turn mute off, press the MUTE button again, or simply press the VOL or
VOL button.
English - 16
Page 17
English - 17
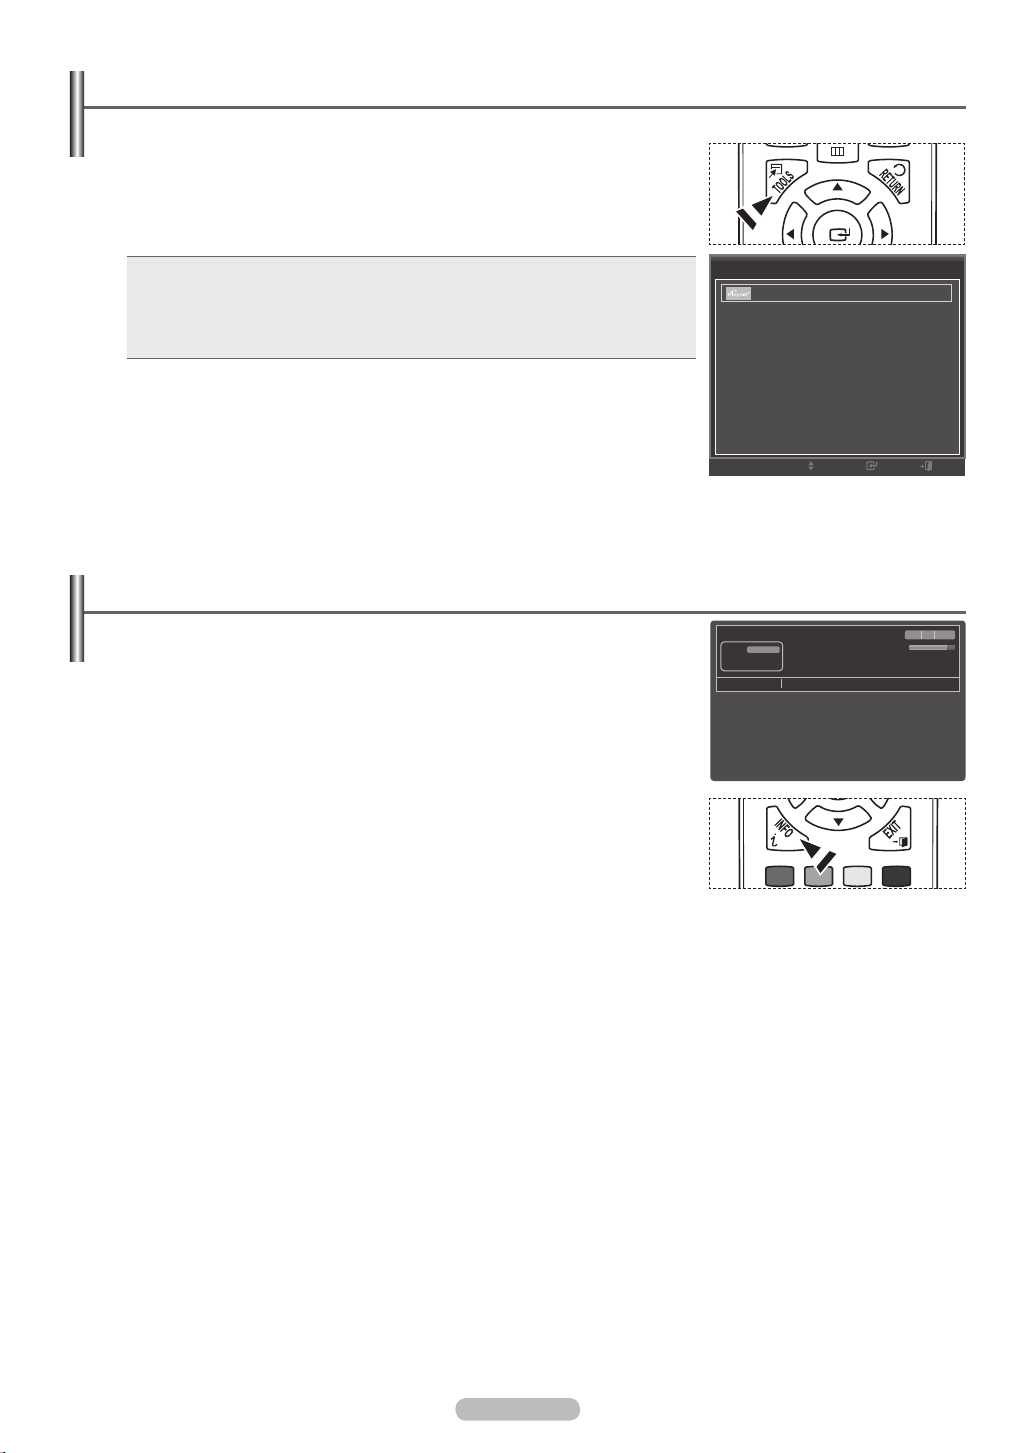
Using the TOOLS Button
VOL CH
CHLIST
MENU
FAV.CH
VOL CH
CHLIST
MENU
FAV.CH
You can use the TOOLS button to select your frequently used functions quickly and easily. The Tools menu changes
depending on which external input mode you are viewing.
1. Press the TOOLS button. The Tools menu will appear.
2. Press the ▲/▼ button to select a menu, then press the ENTERE button.
3. Press the ▲/▼/◄/►/ ENTERE buttons to display, change, or use the selected items.
For a more detailed description of each function, refer to the corresponding page.
Anynet+ (HDMI-CEC), see page 36
•
Sleep Timer, see page 31
•
Add to Favorite (or Delete from Favorite), see page 21
•
Switch to Cable (or Air), see page 20
•
Anynet+ (HDMI-CEC)
Sleep Timer : Off
Add to Favorite
Switch to Cable
Tools
Viewing the Display
The display identifies the current channel and the status of certain audio-video
settings.
1. Press the INFO button on the remote control. The TV will display the channel, the type of
sound, and the status of certain picture and sound settings.
Press the INFO button once more or wait approximately 10 seconds and it disappears
O
automatically.
TV #1
DTV Air
13-1
Dolby Digital
Next Program
Move Enter
Fri, Dec 19 2:05 am
M. Spillane’s Mike Hammer
Bonocrunch
Prison Break
1:55 am - 2:55 am
Exit
1080i 16:9 English
2:55 am - 3:55 m
Page 18
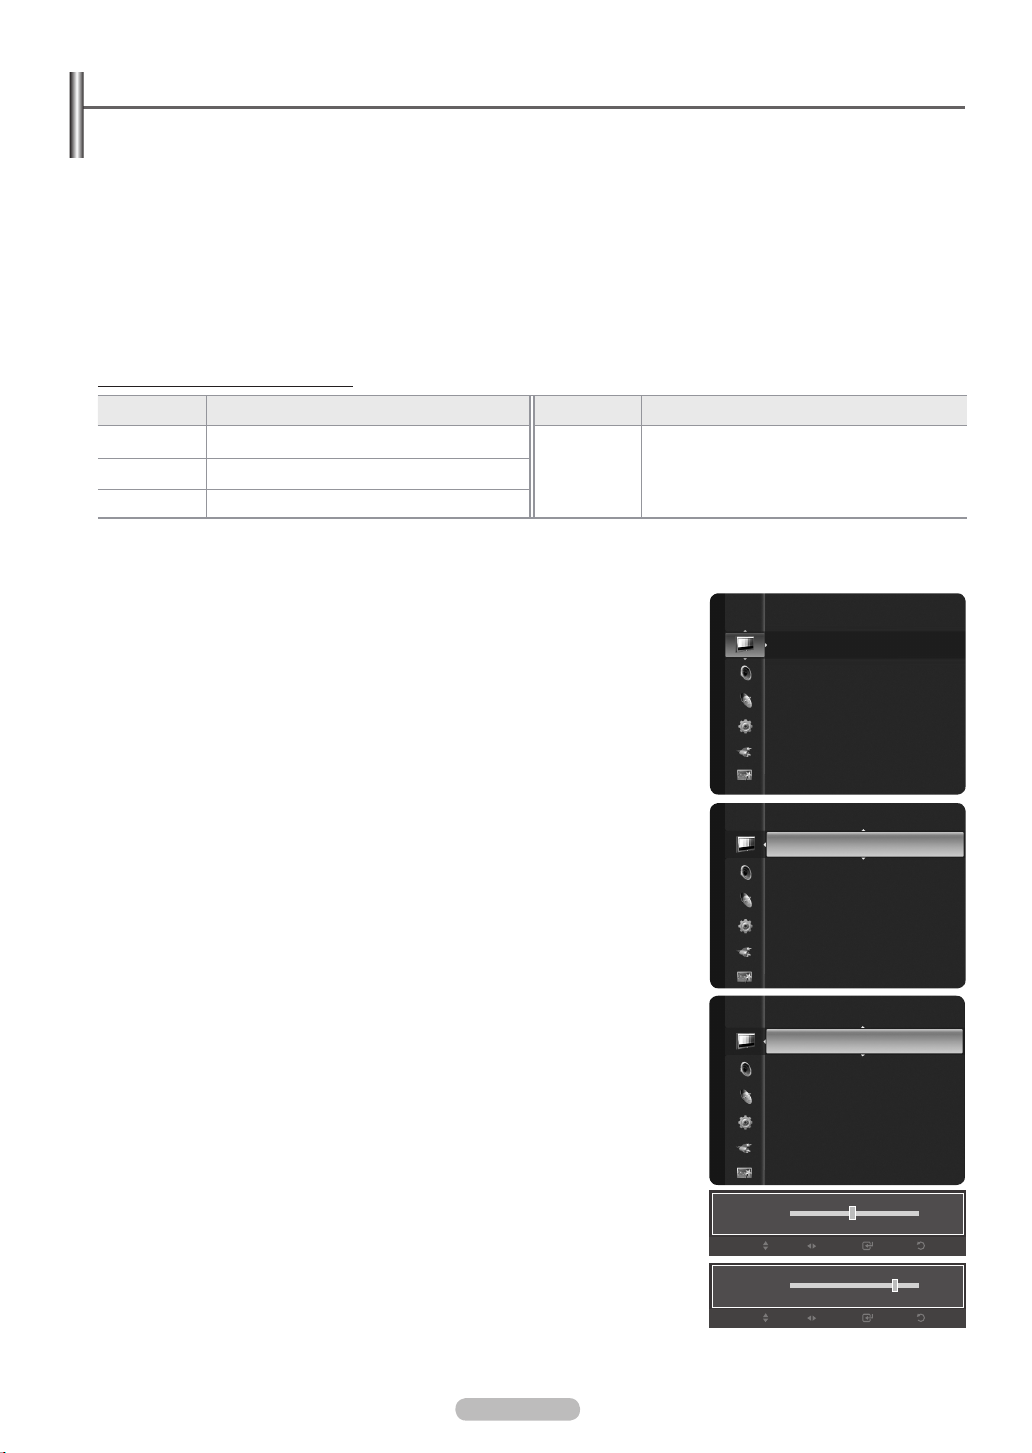
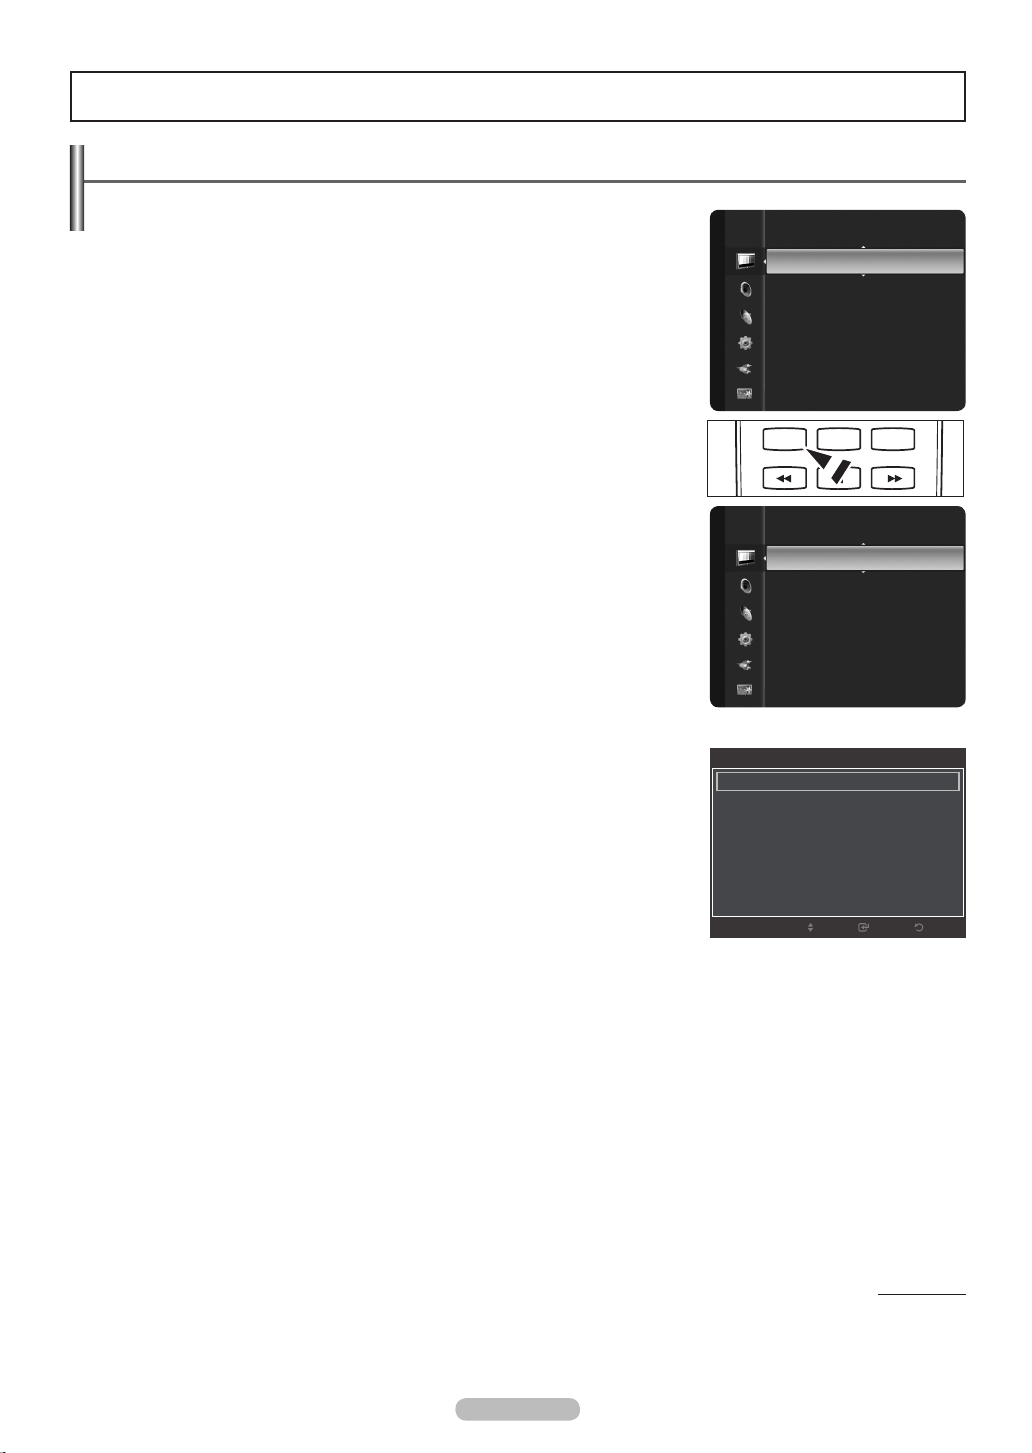
Viewing the Menus
Before using the TV, follow the steps below to learn how to navigate the menu in order to select and adjust different functions.
1. Press the MENU button.
The main menu is displayed on the screen. Its left side has the following icons: Picture, Sound, Channel , Setup, Input,
Application, Support.
2. Press the ▲ or ▼ button to select one of the icons.
Press the ◄ or ► button to access the icon’s sub-menu.
3. Press the ▲ or ▼ button to move to items in the menu.
Press the ENTERE button to enter items in the menu.
4. Press the ▲/▼/◄/► button to change the selected items.
Press the RETURN button to return to the previous menu.
5. Press the EXIT button to exit from the menu.
Using the remote control buttons
Button Operations Button Operations
MENU Display the main on-screen menu.
RETURN Return to the previous menu.
EXIT Exit the on-screen menu.
Example: Setting the TV’s Brightness in the Picture Menu
❑
Adjusting the Brightness to 80
1. Press the MENU button to display the menu.
▲/▼/◄/►/
ENTERE
Move the cursor and select an item.
Select the currently selected item.
Confirm the setting.
Picture
Mode : Standard
Cell Light : 4
Contrast : 95
Brightness : 45
Sharpness : 50
Color : 50
Tint (G/R) : G50/R50
2. Press the ENTERE button to select Picture.
3. Press the ▲ or ▼ button to select Brightness.
4. Press the ENTERE button.
5. Press the ◄ or ► button until the Brightness changes to 80.
6. Press the ENTERE button.
N
Press the EXIT button to exit from the menu.
Picture
Mode
Cell Light : 4
Contrast : 95
Brightness : 45
Sharpness : 50
Color : 50
Tint (G/R) : G50/R50
Cell Light : 4
Contrast : 95
Picture
Brightness : 45
Sharpness : 50
Color : 50
Tint (G/R) : G50/R50
Advanced Settings
Picture Options
Picture Reset
▲
Brightness
▼
Move
▲
Brightness
▼
Move
:
Adjust
Adjust
Standard
Enter
Enter
►
►
45
Return
80
Return
English - 18
Page 19
English - 19
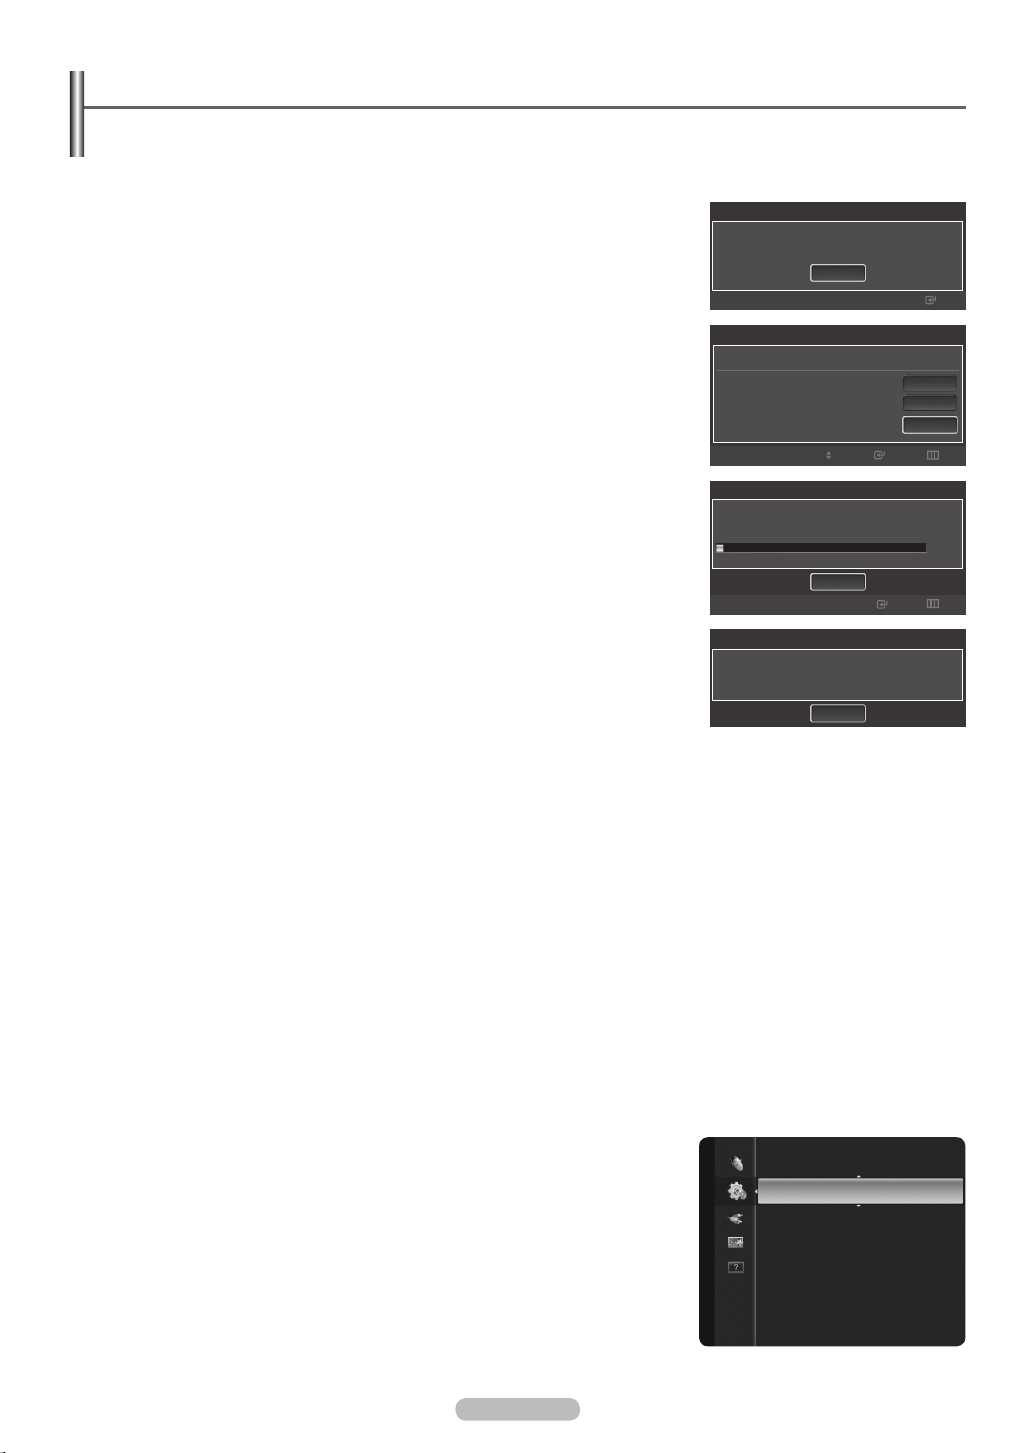
Plug & Play Feature
When the TV is initially powered on, basic settings proceed automatically and subsequently.
The Screen Saver is activated if there is no remote control key input for longer than 1 minute while Plug & Play is running.
N
The Screen Saver is activated if there is no operating signal for longer than 15 minutes.
N
1. Press the POWER button on the remote control.
The message Menu Language, Store Demo, Channels, and Time will be set. is
displayed.
Menu Language, Store Demo, Channels, and Time will be set.
2. Press the ENTERE button, then Select Language of the OSD. menu is automatically
displayed. Press the ENTERE button.
Press the ▲ or ▼ button to select language, then press the ENTERE button.
The message Select ‘Home Use’ when installing this TV in your home. is displayed.
3. Press the ◄ or ► button to select Store Demo or Home Use, then press the ENTERE
button.
We recommend setting the TV to Home Use mode for the best picture in your home
environment.
Store Demo mode is only intended for use in retail environments.
N
Select the Antenna source to memorize.
Air
Cable
Auto
If the unit is accidentally set to Store Demo mode and you want to return toreturn to Home
Use (Standard): Press the Volume button on the TV. When the volume OSD is
displayed, press and hold the MENU button on the TV for 5 seconds.
4. The message Select the Antenna source to memorize. is displayed.
Press the ▲ or ▼ button to memorize the channels of the selected connection.
Press the ENTERE button to select Start.
Air: Air antenna signal.
•
Cable: Cable antenna signal.
•
Auto: Air and Cable antenna signals.
•
In Cable mode, you can select the correct signal source among STD, HRC, and
N
Auto Program in Progress.
DTV Air : -DTV Cable : --
IRC by pressing the ▲, ▼, ◄ or ► button, then press the ENTERE button. If you
have Digital cable, select the cable system signal source for both Analog and Digital.
Contact your local cable company to identify the type of cable system that exists in
your particular area.
5. The TV will begin memorizing all of the available channels.
To stop the search before it has nished, press the ENTERE button with Stop
N
selected.
After all the available channels are stored, it starts to remove scrambled channels. The Auto program menu then reappears.
N
Press the ENTERE button when channel memorization is complete.
6. The message Set the Clock Mode. is displayed. Press the ENTERE button.
Press the ▲ or ▼ button to select Auto, then Press the ENTERE button. The message Set to daylight saving time. is displayed.
If you select Manual, Set current date and time is displayed. For detailed descriptions about the Manual, refer to page 31.
7. Press the ▲ or ▼ button to select Off, On, or Auto, then press the ENTERE button.
The image to select time zone in which you live is automatically displayed.
8. Press the ▲ or ▼ button to select the time zone, then press the ENTERE button.
If you have received a digital signal, the time will be set automatically. If not, see page 31 to set the clock.
9. The brief instruction on How to get the best performance from your new HDTV is displayed.
Press the ENTER
This menu is available HD connection Guide in the Support menu.
N
E
button.
10. Press the ENTERE button. The message Enjoy your TV. is displayed. When you have nished, press the ENTERE button.
Plug & Play
Start
Plug & Play
Plug & Play
Air : 8
Cable : --
Stop
Plug & Play
Enjoy your TV.
OK
Start
Start
Start
Enter
3%
Enter
SkipEnterMove
11Air
Skip
If you want to reset this feature...
1. Press the MENU button to display the menu. Press the ▲ or ▼ button to select Setup,
then press the ENTERE button.
2. Press the ENTERE button again to select Plug & Play. For further details on setting
up options, press the ENTERE button again.
The Plug & Play feature is only available in the TV mode.
N
Setup
Plug & Play
Language : English
Time
Game Mode : Off
V-Chip
Caption
Melody : Medium
►
Page 20
Channel Control
VOL CH
CHLIST
MENU
FAV.CH
Storing Channels
Antenna→Air/Cable
❑
Before your television can begin memorizing the available channels, you must specify the
type of signal source that is connected to the TV (i.e. an Air or a Cable system).
Press the TOOLS button to display Tools menu.
T
You can also switch the antenna by selecting Tools → Switch to Cable (or Air)
Auto Program
❑
Air: Air antenna signal.
•
Cable: Cable antenna signal.
•
Auto: Air and Cable antenna signals
•
STD, HRC and IRC identify various types of cable TV systems. Contact your local
N
cable company to identify the type of cable system that exists in your particular area.
At this point the signal source has been selected.
After all the available channels are stored, it starts to remove scrambled channels.
N
The Auto program menu then reappears.
If you want to stop Auto Programming, press the ENTERE button.
N
The Stop Auto Program? message will be displayed. Select Yes by pressing the
◄ or ► button, then press the ENTERE button.
Clearing Scrambled Channel (Digital)
❑
The Clear Scrambled Channel function is used to lter out scrambled channels after
Auto Program is completed.
This process may take up to 20~30 minutes.
N
To stop searching scrambled channels: Press the ENTERE button to select Stop.
Press the ◄ button to select Yes, then press the ENTERE button.
N
This function is only available in Cable mode.
Fine Tune (Analog)
❑
Use ne tuning to manually adjust a particular channel for optimal reception.
If you do not store the ne-tuned channel in memory, adjustments are not saved.
N
“*” will appear next to the name of ne-tuned channels.
N
To reset the ne tuning setting, press the ▼ button to select Reset, then press the
N
ENTERE button.
Channel
Antenna : Air
Auto Program
Clear Scrambled Channel
Channel List
Fine Tune
Clear Scrambled Channel
Removing scrambled channel.
Stop
Fine Tune
Air 6*
Reset
Move
Adjust
DTV Cable 122
3%
Enter Return
Fine Tuned
+5
Return
Save
►
Managing Channels
Channel List
❑
Using this menu, you can Add / Delete or set Favorite channels and use the program guide for digital broadcasts.
•
•
•
•
O
Using the Color buttons with the Channel List
•
•
•
N
Channel Status Display Icons
All Channels: Shows all currently available channels.
Added Channels: Shows all added channels.
Favorite: Shows all favorite channels.
Programmed: Shows all current reserved programs.
Press the CH LIST button on the remote control to bring up the channel lists.
Green (Zoom): Enlarges or shrinks a channel number.
Yellow (Select): Selects multiple channel lists.
TTOOLS (Tools): Displays the Add (or Delete), Add to Favorite (or Delete from Favorite), Timer Viewing, Channel Name
Edit, Select All, Deselect All, and Auto Program menus (The Options menus may differ depending on the situation.)
A channel set as a Favorite.
♥
)
A reserved program
c
A channel selected by pressing the yellow button.
(
A program currently being broadcast.
Continued...
English - 20
Page 21
English - 21
Channel List Tools Menu (in All Channels / Added Channels / Favorite)
VOL CH
CHLIST
MENU
FAV.CH
❑
Press the TOOLS button to use the option menu.
N
Option menu items may differ depending on the channel status.
N
Add / Delete
You can delete or add a channel to display the channels you want.
All deleted channels will be shown on All Channels menu.
N
A gray-colored channel indicates the channel has been deleted.
N
The Add menu only appears for deleted channels.
N
You can also delete a channel to the Added Channels or Favorite menu in the same
N
manner.
Add to Favorite / Delete from Favorite
You can set channels you watch frequently as favorites.
Press the TOOLS button to display Tools menu.
T
You can also set the favorite channel by selecting
Tools → Add to Favorite (or Delete from Favorite)
The “♥” symbol will be displayed and the channel will be set as a favorite.
N
All favorite channels will be shown on Favorite menu.
N
To select the favorite channels you have set up, press the FAV.CH button on the
O
remote control.
Timer Viewing
If you reserve a program you want to watch, the channel is automatically switched to the
reserved channel in the Channel List; even when you are watching another channel.
To reserve a program , set the current time rst.
Only memorized channels can be reserved.
N
You can set the channel, month, day, year, hour and minute directly by pressing the
N
number buttons on the remote control.
Reserving a program will be shown on Programmed menu.
N
Digital Program Guide and Viewing Reservation: When a digital channel is
N
selected, and you press the ► button, the Program Guide for the channel appears.
You can reserve a program according to the procedures described above.
All Channels
Air Zoom
All Channels
Air Zoom
All Channels
Air Zoom
6 Air
6-1 ♥ TV #6
7 Air
7-1 ♥ TV #7
9 Air
9-1 ♥ TV #9
10 Air
10-1 ♥ TV #10
11-1 ♥ TV #11
19 Air
6 Air
6-1 ♥ TV #6
7 Air
7-1 ♥ TV #7
9 Air
9-1 ♥ TV #9
10 Air
10-1 ♥ TV #10
11-1 ♥ TV #11
19 Air
6 Air
6-1 ♥ TV #6
7 Air
7-1 ♥ TV #7
9 Air
9-1 ♥ TV #9
10 Air
10-1 ♥ TV #10
11-1 ♥ TV #11
19 Air
Delete
Add to Favorite
Timer Viewing
Channel Name Edit
Select All
Auto Program
Select T Tools
Delete
Add to Favorite
Timer Viewing
Channel Name Edit
Select All
Auto Program
Select T Tools
Delete
Add to Favorite
Timer Viewing
Channel Name Edit
Select All
Auto Program
Select T Tools
Select All / Deselect All
•
•
N
N
N
Channel Name Edit (Analog)
Channels can labeled so that their call letters appear whenever the channel is selected.
N
Channel List Tools Menu (in Programmed)
❑
You can view, modify or delete a reservation.
N
Change Info
Select to change a viewing reservation.
Cancel Schedules
Select to cancel a viewing reservation.
Information
Select to view a viewing reservation. (You can also change the reservation information.)
Select All / Deselect All
You can select (or deselect) all channels in the channel list.
Select All: You can select all the channels in the channel list.
Deselect All: You can deselect all the selected channels in the channel list.
You can perform the add / delete, add to Favorite / delete from Favorite function for multiple channels at the same time. Select
the required channels and press the yellow button to set all the selected channels at the same time.
The c mark appears to the left of the selected channels.
You can only select Deselect All when there is a selected channel.
The names of digital broadcasting channels are automatically assigned and cannot be labeled.
Programmed
9/20/2009
Press the TOOLS button to use the option menu.
5:02 pm 3
9/19/2009
5:20 pm
Air Zoom
Change Info
Cancel Schedules
Information
Select All
Select T Tools E Information
Page 22
Picture Control
VOL CH
CHLIST
MENU
FAV.CH
P.SIZE
MTS
SRS
P.MODE
CC
S.MODE
Changing the Picture Settings
Mode
❑
You can select the type of picture which best corresponds to your viewing requirements.
Dynamic: Select a high-definition picture for bright environments.
•
Standard: Selects the optimal picture display for normal environments. This
•
setting is convenient for most situations.
Movie: Selects a comfortable picture display for dark environments.
•
You can select these options simply by pressing the P.MODE button on the remote
O
control.
Cell Light / Contrast / Brightness / Sharpness / Color / Tint (G/R)
❑
Your television has several setting options that allow you to control the picture quality.
Cell Light: Adjusts the pixel brightness. 10 is the brightest setting.
•
Contrast: Adjusts the contrast level.
•
Brightness: Adjusts the brightness level.
•
Sharpness: Adjusts the sharpness.
•
Color: Adjusts the color saturation of the picture using the bar on the screen.
•
Tint (G/R): The closer to Red 100, the more saturated the red color becomes.
•
When you make changes to Cell Light, Contrast, Brightness, Sharpness, Color or
N
Tint (G/R), the OSD will be adjusted accordingly.
Settings can be adjusted and stored for each external device you have connected to
N
an input of the TV.
The energy consumed during use can be signicantly reduced if thebrightness level is
N
lowered, which will reduce the overall running cost.
Advanced Settings
❑
You can adjust the detailed settings for your screen including the color and contrast.
Advanced Settings is available in Standard or Movie mode.
N
Black Tone
You can select the black level on the screen to adjust the screen depth.
Off: Turns the Black Adjust function off.
•
Dark: Sets the black color depth to dark.
•
Darker: Sets the black color depth to darker.
•
Darkest: Sets the black color depth to darkest.
•
Dynamic Contrast
You can adjust the screen contrast so that the optimal contrast is provided.
Off: Turns the Dynamic Contrast function off.
•
Low: Sets Dynamic Contrast to low.
•
Medium: Sets Dynamic Contrast to medium.
•
High: Sets Dynamic Contrast to high.
•
Picture
Mode
:
Cell Light : 4
Contrast : 95
Brightness : 45
Sharpness : 50
Color : 50
Tint (G/R) : G50/R50
Mode : Standard
Picture
Cell Light : 4
Contrast : 95
Brightness : 45
Sharpness : 50
Color : 50
Tint (G/R) : G50/R50
Advanced Settings
Advanced Settings
Black Tone : Off ►
Dynamic Contrast : Medium
Gamma : 0
Color Space : Native
White Balance
Flesh Tone : 0
Edge Enhancement : On
Move
Standard
►
►
ReturnEnter
Gamma
You can adjust the Primary Color (Red, Green, Blue) Intensity.
Color Space
Color Space is a color matrix composed of red, green and blue colors. Select your Favorite color space to experience the most
natural color.
Native: Sets the color range wider than that of the input video source.
•
Auto: Automatically sets the color range depending on the input video source.
•
English - 22
Continued...
Page 23
English - 23
White Balance
VOL CH
CHLIST
MENU
FAV.CH
P.SIZE
MTS
SRS
P.MODE
CC
S.MODE
You can adjust the color temperature for more natural picture colors.
R-Offset: Adjust the low level red intensity.
•
G-Offset: Adjust the low level green intensity.
•
B-Offset: Adjust the low level blue intensity.
•
R-Gain: Adjusts the high level red intensity.
•
G-Gain: Adjusts the high level green intensity.
•
B-Gain: Adjusts the high level blue intensity.
•
Reset: Resets the default white balance.
•
Changing the adjustment value will refresh the adjusted screen.
N
Flesh Tone
You can emphasize the pink esh tone in the picture.
Changing the adjustment value will refresh the adjusted screen.
N
EdgeEnhancement→Off/On
You can emphasize object boundaries in the picture.
Advanced Settings
Black Tone : Off
Dynamic Contrast : Medium
Gamma : 0
Color Space : Native
White Balance ►
Flesh Tone : 0
Edge Enhancement : On
Move
ReturnEnter
Picture Options
❑
ColorTone→Cool/Normal/Warm1/Warm2
You can select the most comfortable color tone for viewing.
Warm1 or Warm2 is only activated when the picture mode is Movie.
N
Settings can be adjusted and stored for each external device you have connected to
N
an input of the TV.
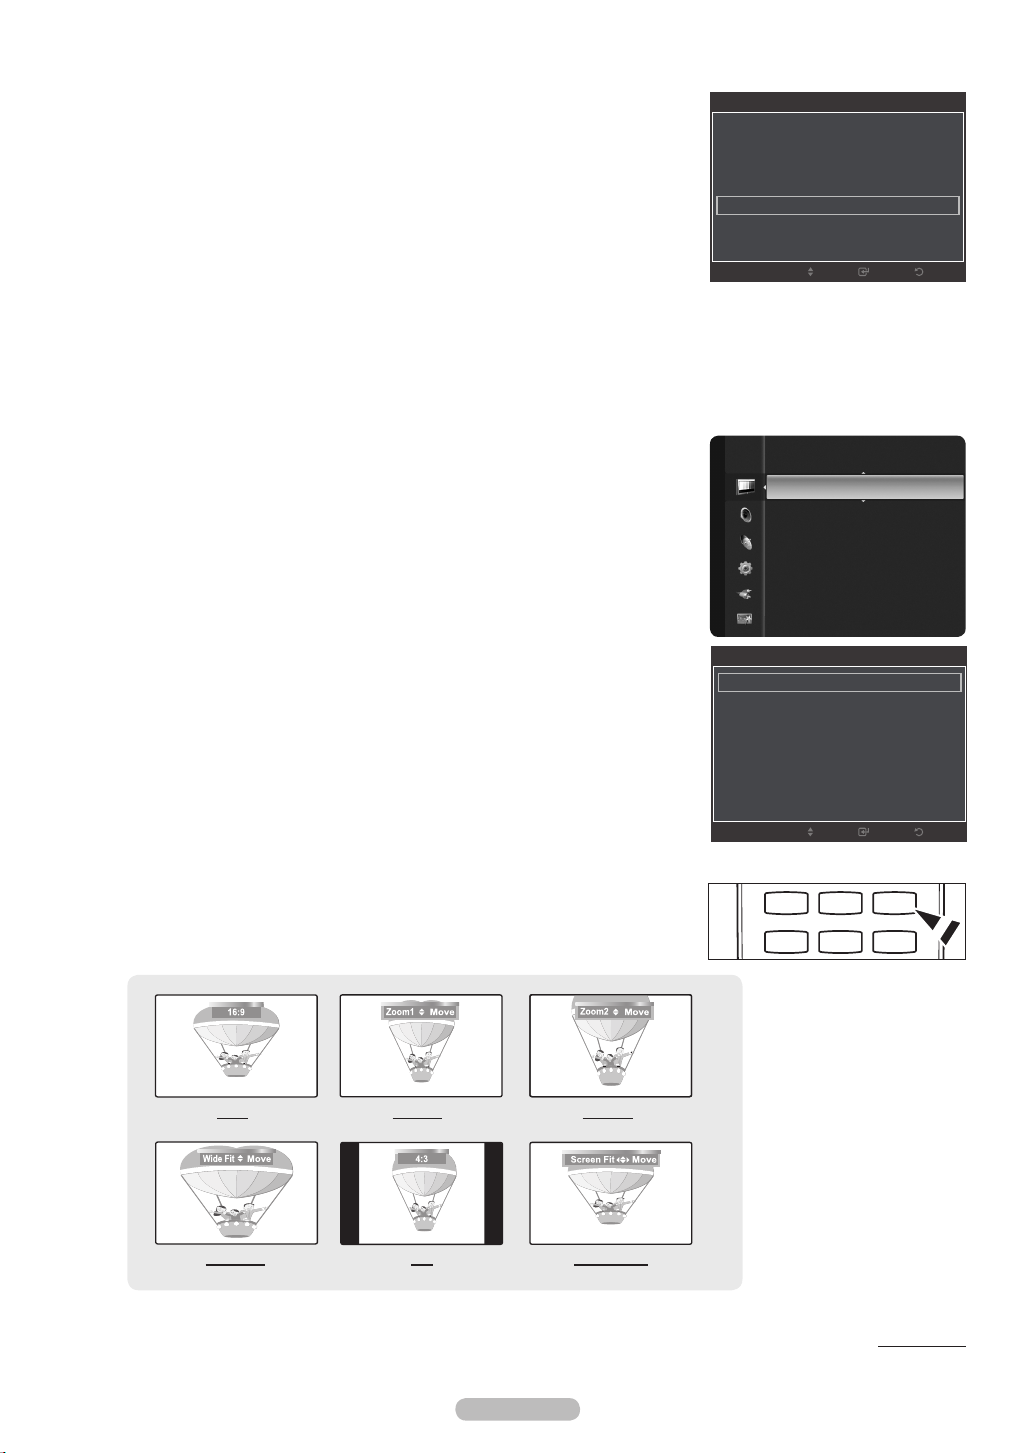
Size
Occasionally, you may want to change the size of the image on your screen. Your TV
comes with six screen size options, each designed to work best with specic types
of video input. Your satellite receiver may have its own set of screen sizes as well. In
general, though, you should view the TV in 16:9 mode as much as possible.
16:9: Sets the picture to the 16:9 aspect ratio.
•
Zoom1: Stretches the 16:9 aspect ratio picture vertically.
•
Zoom2: Stretches the Zoom 1 picture vertically.
•
Wide Fit: Stretches the picture both horizontally and vertically to display
•
the optimal picture.
4:3: Sets the picture to the 4:3 aspect ratio.
•
Screen Fit: Displays the full native HD signal that cannot be viewed
•
using a normal TV.
Alternately, you can press the P.SIZE button on the remote control repeatedly to
O
change the picture size.
Tint (G/R) : G50/R50
Advanced Settings
Picture
Picture Options
Picture Reset
Picture Options
Color Tone : Normal ►
Size : 16:9
Digital NR : Auto
HDMI Black Level : Normal
Film Mode : Off
Screen Burn Protection
Move
►
ReturnEnter
16:9 Zoom1 Zoom2
Wide Fit 4:3 Screen Fit
Continued...
Page 24
Temporary image retention may occur when viewing a static image on the set for more than two hours.
N
After selecting Zoom1, Zoom2 or Wide Fit:
N
Press the ◄ or ► button to select Position, then press the ENTERE button.
Press the ▲ or ▼ button to move the picture up and down.
Reset: Press the ◄ or ► button to select Reset, then press the ENTERE button.
You can initialize the setting.
After selecting Screen Fit in HDMI (1080i/1080p) or Component (1080i/1080p) mode, you made need to center the picture:
N
Press the ◄ or ► button to select Position, then press the ENTERE button.
Press the ▲, ▼, ◄ or ►button to move the picture.
Reset: Press the ◄ or ► button to select Reset, then press the ENTERE button. The TV will be reset to 16:9.
HD (High Denition): 16:9 - 1080i/1080p (1920x1080), 720p (1280x720)
N
Settings can be adjusted and stored for each external device you have connected to an input of the TV.
N
Settings can be adjusted and stored for each external device you have connected to an input of the TV.
Input Source Picture Size
ATV, Video, Component (480i, 480p) 16:9, Zoom1, Zoom2, 4:3
Component (720p) 16:9, Wide Fit, 4:3
DTV(1080i), Component (1080i, 1080p), HDMI (720p, 1080i, 1080p) 16:9, 4:3, Wide Fit, Screen Fit
Digital NR
If the broadcast signal received by your TV is weak, you can activate the Digital Noise
Reduction feature to help reduce any static and ghosting that may appear on the screen.
Off: Turns the Digital NR function off.
•
Low: Sets Digital NR to low.
•
Medium: Sets Digital NR to medium.
•
High: Sets Digital NR to high.
•
Auto: Sets Digital NR to Auto.
•
HDMI Black Level
Tint (G/R) : G50/R50
Picture
Advanced Settings
Picture Options
Picture Reset
You can directly select the black level on the screen to adjust the screen depth.
Normal: The screen gets brighter.
•
Low: The screen gets darker.
•
This function is active only when an external device is connected to the TV via HDMI.
N
HDMI Black Level function may not be compatible with all external devices.
Film Mode
The TV can be set to automatically sense and process lm signals from all sources and
adjust the picture for optimum quality.
Off: Basic video image processing applied and No auto-detection for
•
lm-based programs.
Auto: Automatically adjusts for the best image quality between lm and
•
Color Tone : Normal
Size : 16:9
Digital NR : Auto ►
HDMI Black Level : Normal
Film Mode : Off
Screen Burn Protection
Picture Options
Move
video programs.
Film mode is supported in TV, Video, Component (480i / 1080i) and HDMI (1080i).
N
►
ReturnEnter
Screen Burn Protection
Congures the Screen Burn Protection options to prevent and reduce pixel burn.
When an image remains in one position too long, it may cause a permanent burn on the screen.
Preventing Screen Burn-in
To reduce the possibility of screen burn, this unit is equipped with screen burn prevention technology. This technology enables you
to set picture movement up/down (Vertical Line) and side to side (Horizontal Dot).
The Time setting allows you to program the time between movement of the picture in minutes.
Pixel Shift: Using this function, you can minutely move pixels on the PDP in horizontal or vertical direction to prevent after-
•
images on the screen.
Optimum condition for pixel shift;
N
Item TV/AV/Component/HDMI
Horizontal 0~4 2
Vertical 0~4 2
Time(min.) 1~4 min. 2 min.
Continued...
English - 24
Page 25

English - 25
Side Gray: When you watch TV with the screen ratio of 4:3, the screen is prevented from any damage by adjusting the white
•
balance on both extreme left and right sides. To prevent the screen burn from happening, select Dark or Light.
Dark: When you set the screen ratio to 4:3, it darkens the left and right sides.
-
Light: When you set the screen ratio to 4:3, it brightens the left and right sides.
-
Reducing the Effects of Screen Burn
If screen burn has occurred, you can select scrolling to help remove screen burn artifacts.
Scrolling: This function removes after-images on the screen by moving all the pixels on the PDP according to a pattern. Use
•
this function when there are remaining after-images or symbols on the screen, especially when you displayed a still image on
the screen for a long time.
The after-image removal function has to be executed for a long time (approximately 1 hour) to effectively remove after-images
N
on the screen. If the after-image is not removed after performing the function, repeat the function again.
Press any key on the remote control to cancel this feature.
N
Page 26
VOL CH
CHLIST
MENU
FAV.CH
P.SIZE
MTS
SRS
P.MODE
CC
S.MODE
Sound Control
VOL CH
CHLIST
MENU
FAV.CH
P.SIZE
MTS
SRS
P.MODE
CC
S.MODE
VOL CH
CHLIST
MENU
FAV.CH
P.SIZE
MTS
SRS
P.MODE
CC
S.MODE
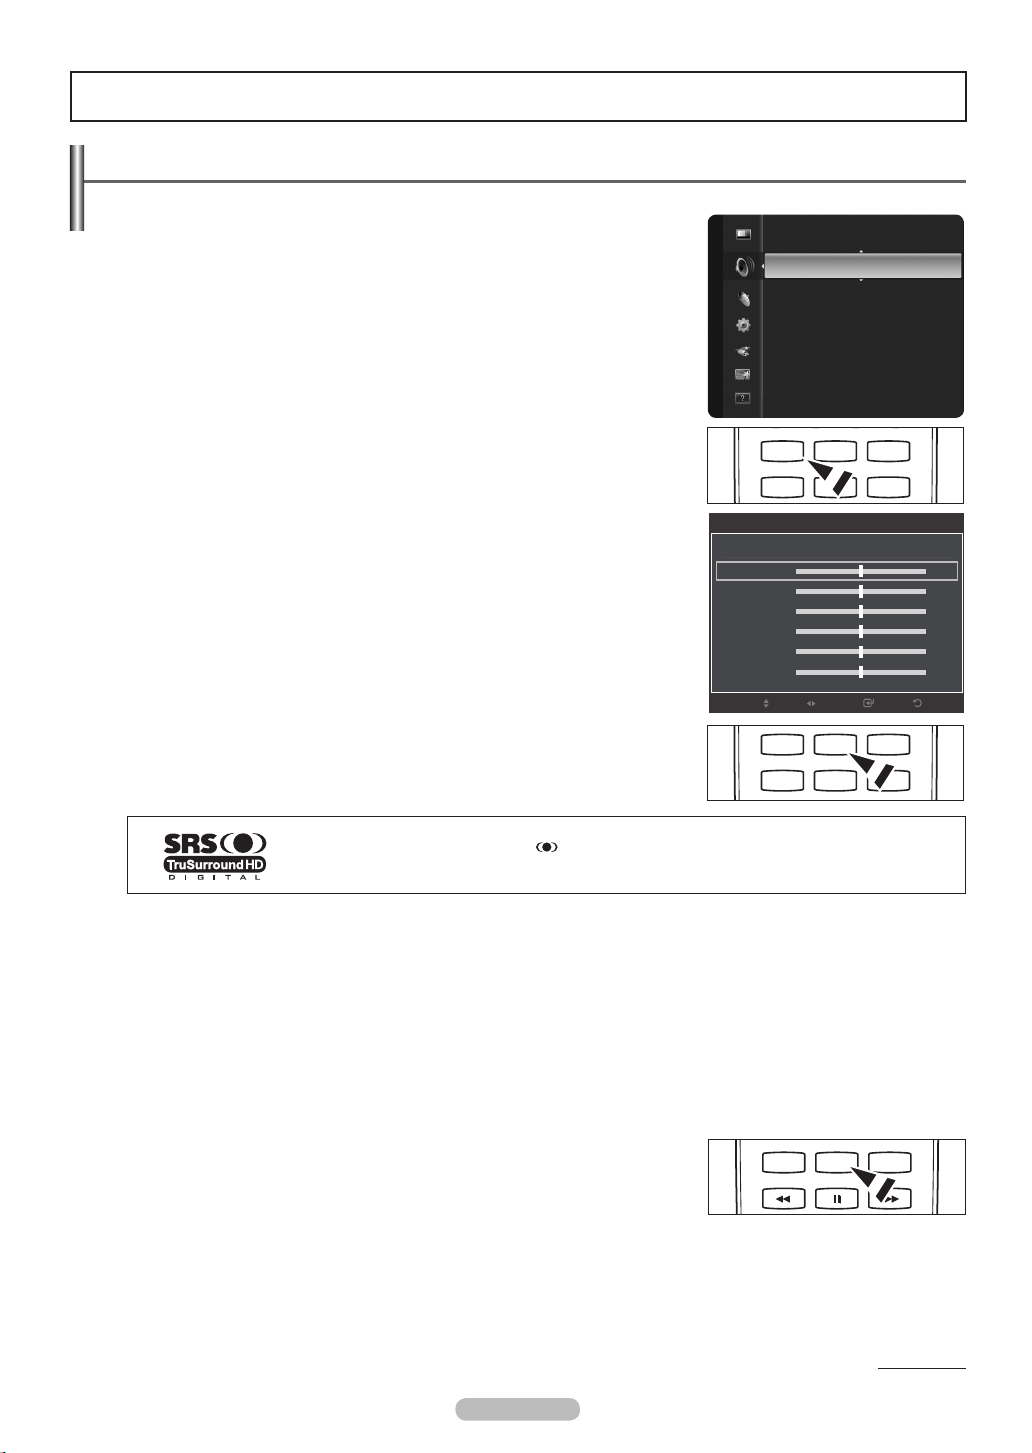
Changing the Sound Settings
Mode
❑
You can select the sound mode to best suit the programming you’re watching.
Standard: This sound mode is for general purposes.
•
Music: Music mode enables you to listen to music as if you are sitting
•
in a concert hall.
Movie: Movie mode enables you to experience live and full movie sound as if you are
•
sitting in a movie theater.
Clear Voice: Emphasizes voice over other sounds. Select this sound mode when
•
watching news, soap operas, or documentaries.
Custom: You can customize the sound settings to suit your personal preferences.
•
You can select these options simply by pressing the S.MODE button on the remote
O
control.
Equalizer
❑
The sound settings can be adjusted to suit your personal preferences.
Mode: Selects the sound mode among the predened settings.
•
Balance L/R: Adjusts the balance between the right and left speaker.
•
100Hz, 300Hz, 1kHz, 3kHz, 10kHz (Bandwidth Adjustment): Adjusts the level of
•
different bandwidth frequencies.
Reset: Resets the equalizer settings to the default values.
•
SRSTruSurroundHD→Off/On
❑
SRS TruSurround HD enables you to enjoy a virtual 5.1 Surround Sound effect over the
TV's two speakers.
This function provides not only rich deep bass also improves high frequency resolution.
Sound
Mode : Costom
Equalizer
SRS TruSurround HD : Off
Preferred Language : English
Multi-Track Sound : Stereo
Auto Volume : Off
Speaker Select : TV Speaker
Equalizer
Mode : Custom
Balance L R
100Hz - +
300Hz - +
1kHz - +
3kHz - +
10kHz - +
▼
AdjustMove
ReturnEnter
►
O
Preferred Language (Digital)
❑
Digital-TV broadcasts are capable of simultaneous transmission of many audio tracks (for example, simultaneous translations of the
program into foreign languages).
N
O
Multi-Track Sound (MTS) (Analog)
❑
•
•
•
N
O
AutoVolume→Off/On
❑
Each broadcasting station has its own signal conditions, and so it is not easy to adjust the volume every time the channel is
changed. This feature lets you automatically adjust the volume of the desired channel by lowering the sound output when the
modulation signal is high or by raising the sound output when the modulation signal is low.
You can select these options simply by pressing the SRS button on the remote
control.
TruSurround HD, SRS and the symbol are trademarks of SRS Labs, Inc.
TruSurround HD technology is incorporated under license from SRS Labs, Inc.
You can only select the language from among the actual languages being broadcast.
You can listen in a language other than the Preferred Language by pressing the MTS button on the remote control.
Mono: Choose for channels that are broadcasting in mono or if you are having difculty receiving a stereo signal.
Stereo: Choose for channels that are broadcasting in stereo.
SAP: Choose to listen to the Separate Audio Program, which is usually a foreign-
language translation.
Depending on the particular program being broadcast, you can listen to Mono,
Stereo, or SAP.
Press the MTS button on the remote control repeatedly to select Mono, Stereo, or
SAP.
Continued...
English - 26
Page 27
English - 27
Speaker Select
❑
When you watch TV with it connecting to a Home theater, turn the TV speakers off so you
can listen to sound from the Home theater’s (external) speakers.
External Speaker: Uses the external speakers(Home Theater) to output sound.
•
TV Speaker: Uses the TV speakers to output sound.
•
If you select External Speaker in the Speaker Select menu, the sound settings will
N
be limited.
The volume buttons and MUTE buttons do not operate when the Speaker Select
N
is set to External Speaker.
Please set the volume on your Home theater.
TV's Internal Speakers Audio Out (Optical, L / R Out) to Sound System
TV / AV / Component / HDMI TV / AV / Component / HDMI
TV Speaker Speaker Output Sound Output
External Speaker Mute Sound Output
Video No Signal Mute Mute
Manufactured under license from Dolby Laboratories.
Dolby and the double-D symbol are trademarks of Dolby Laboratories.
Sound Reset
❑
You can restore the Sound settings to the factory defaults.
Reset All: All the sound values return to default settings.
•
Reset Sound Mode: Current sound values return to default settings.
•
Cancel: Select the sound reset options.
•
Multi-Track Sound : Stereo
Auto Volume : Off
Sound
Speaker Select : TV Speaker
Sound Reset
►
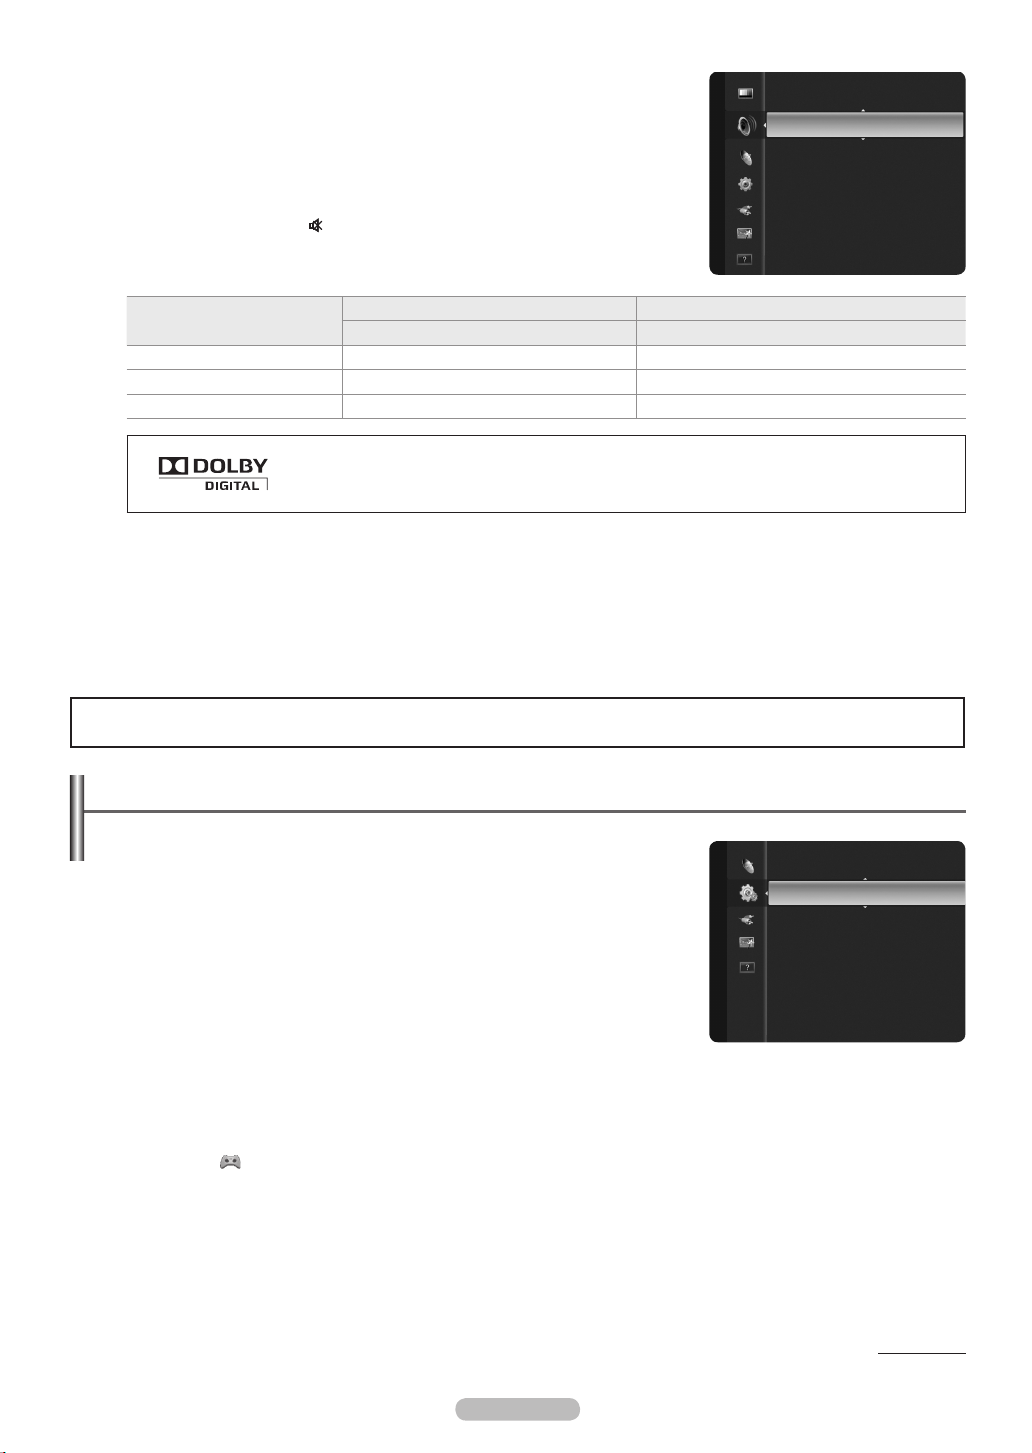
Function Description
Configuring the Setup Menu
Language
❑
You can set the menu language.
GameMode→Off/On
❑
When connecting to a game console such as PlayStationTM or XboxTM, you can enjoy a
more realistic gaming experience by selecting the game menu.
When the Game Mode is On
Picture mode is automatically changed to Standard and cannot be changed.
•
Sound mode is automatically changed to Custom and cannot be changed.
•
Adjust the sound using the equalizer.
The Reset in the Sound menu is activated. Reset function initializes the Equalizer settings to the factory default setting.
•
Game Mode is not available in regular TV mode.
N
If the picture is poor when an external device is connected to the TV, check if Game Mode is On.
N
If you display the TV menu in Game mode, the screen shakes slightly.
N
The mark ( ) appears on the screen which means that Game Mode is on with the selected source.
N
This function supports only game function.
N
Setup
Plug & Play
Language : English
Time
Game Mode : Off
V-Chip
Caption
Melody : Medium
Energy Saving : Off
►
Continued...
Page 28
V-Chip
❑
The V-Chip feature automatically locks out programs that are deemed inappropriate for children. The user must enter a PIN
(personal ID number) before any of the V-Chip restrictions are set up or changed.
V-Chip function is not available in HDMI or Component mode.
N
The default PIN number of a new TV set is ‘0-0-0-0’.
N
If you forget the PIN, press the remote-control buttons in the following sequence,
N
which resets the pin to ‘0-0-0-0’ : Power Off. → MMUTE → 8 → 2 → 4 → Power On.
Allow all: Press to unlock all TV ratings. / Block all: Press to lock all TV ratings.
N
V-ChipLock→Off/On
Turns the V-Chip function on/off.
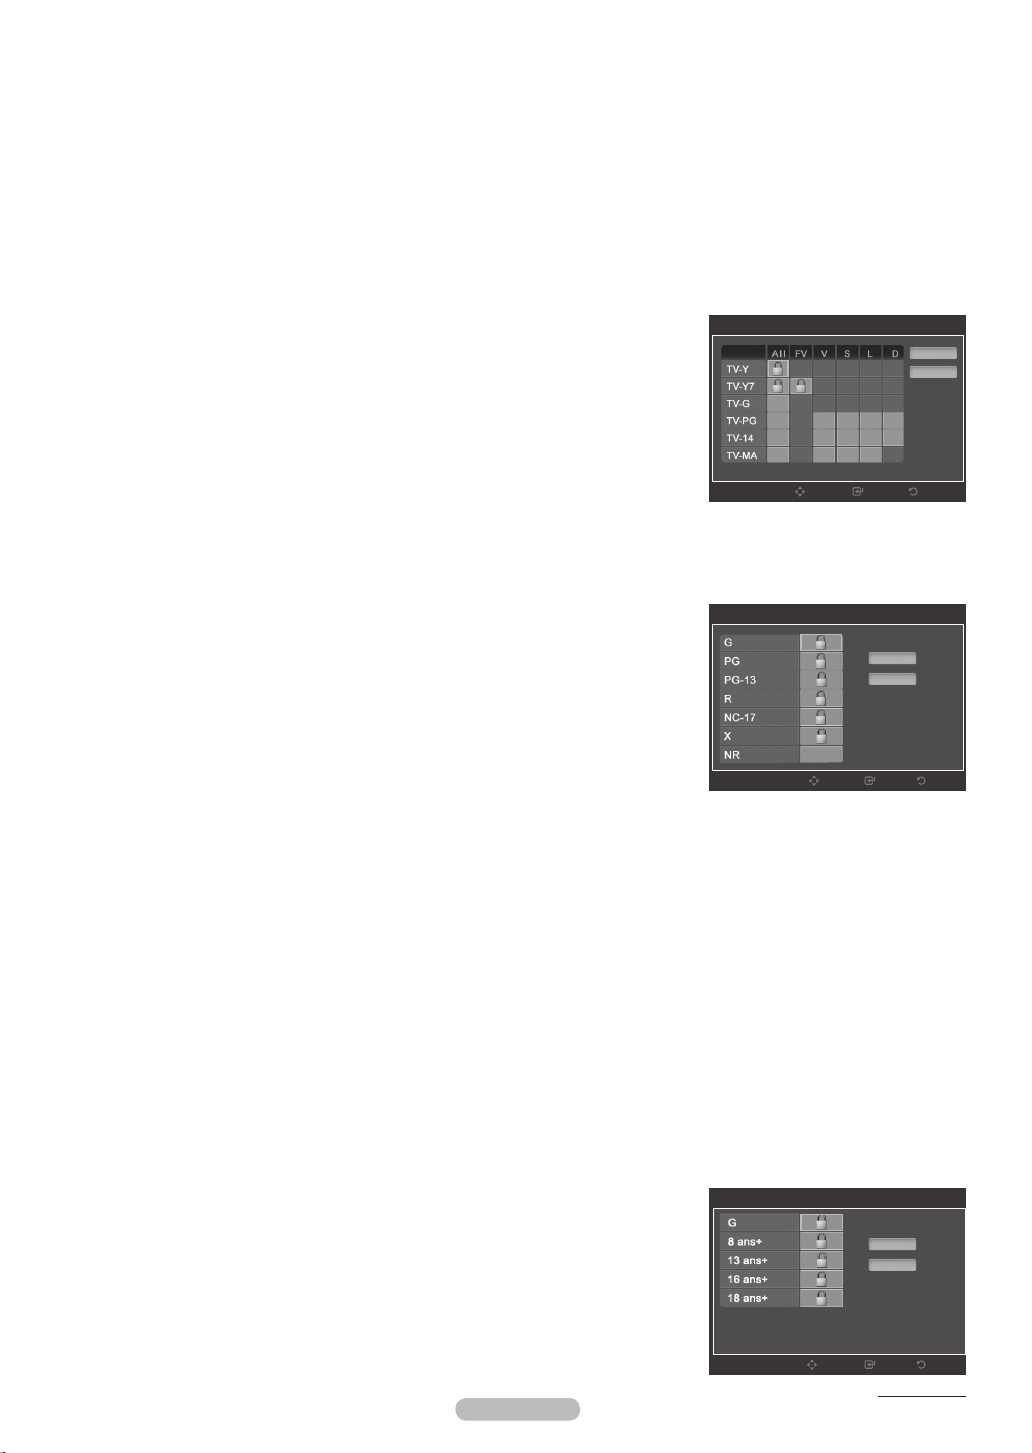
TV Parental Guidelines
TV Parental Guidelines
First, set up a personal identication number (PIN) and enable the V-Chip.
Parental restrictions can be set up using either of two methods: The TV guidelines or the
MPAA rating.
Base Categories
•
TV-Y: Young children / TV-Y7: Children 7 and over / TV-G: General audience /
-
TV-PG: Parental guidance / TV-14: Viewers 14 and over / TV-MA: Mature audience
Sub-ratings
•
All: Lock all TV ratings. / FV: Fantasy violence / V: Violence / S: Sexual situation
-
/ L: Adult Language / D: Sexually Suggestive Dialog
The V-Chip will automatically block certain categories that are more restrictive.
N
Move
For example, if you block TV-Y category, then TV-Y7 will automatically be blocked. Similarly, if you block the TV-G category,
then all the categories in the young adult group will be blocked (TV-G, TV-PG, TV-14 and TVMA). The sub-ratings (D, L, S, V)
work together similarly.
MPAA Rating
MPAA Rating
The MPAA rating system uses the Motion Picture Association of America (MPAA)
system and its main application is for movies. When the V-Chip lock is on, the TV will
automatically block any programs that are coded with objectionable ratings
(either MPAA or TV-Ratings).
G: General audience (no restrictions).
•
PG: Parental guidance suggested.
•
PG-13: Parents strongly cautioned.
•
R: Restricted. Children under 17 should be accompanied by an adult.
•
NC-17: No children under age 17.
•
X: Adults only.
•
NR: Not rated.
•
While a particular category is selected, press the ENTERE button to activate it.
N
Move
The “ \ ” symbol will be displayed. Press the ENTERE button to block or unblock the category.
The V-Chip will automatically block any category that is More restrictive.
N
For example, if you block the PG-13 category, then R, NC-17 and X will automatically be blocked also.
Allow All
Block All
ReturnEnter
Allow All
Block All
ReturnEnter
Canadian English
You can block TV programs depending on their Canadian English rating.
C: Programming intended for children under age 8.
•
C8+: Programming generally considered acceptable for children 8 years and over to watch on their own.
•
G: General programming, suitable for all audiences.
•
PG: Parental Guidance.
•
14+: Programming contains themes or content which may not be suitable for viewers under the age of 14.
•
18+: Adult programming.
•
The V-Chip will automatically block any category that is More restrictive.
N
For example, if you block G category, then PG, 14+ and 18+ will automatically be blocked also.
Canadian French
You can block TV programs depending on their French Canadian rating.
G: General
•
8 ans+: Programming generally considered acceptable for children 8 years and over
•
to watch on their own.
13 ans+: Programming may not be suitable for children under the age of 13.
•
16 ans+: Programming is not suitable for children under the age of 16.
•
18 ans+: Programming restricted to adults.
•
The V-Chip will automatically block any category that is More restrictive.
N
For example, if you block 8 ans+ category, then 13 ans+, 16 ans+ and 18 ans+ will
automatically be blocked also.
English - 28
Canadian French
Move
Allow All
Block All
ReturnEnter
Continued...
Page 29

English - 29
VOL CH
CHLIST
MENU
FAV.CH
P.SIZE
MTS
SRS
P.MODE
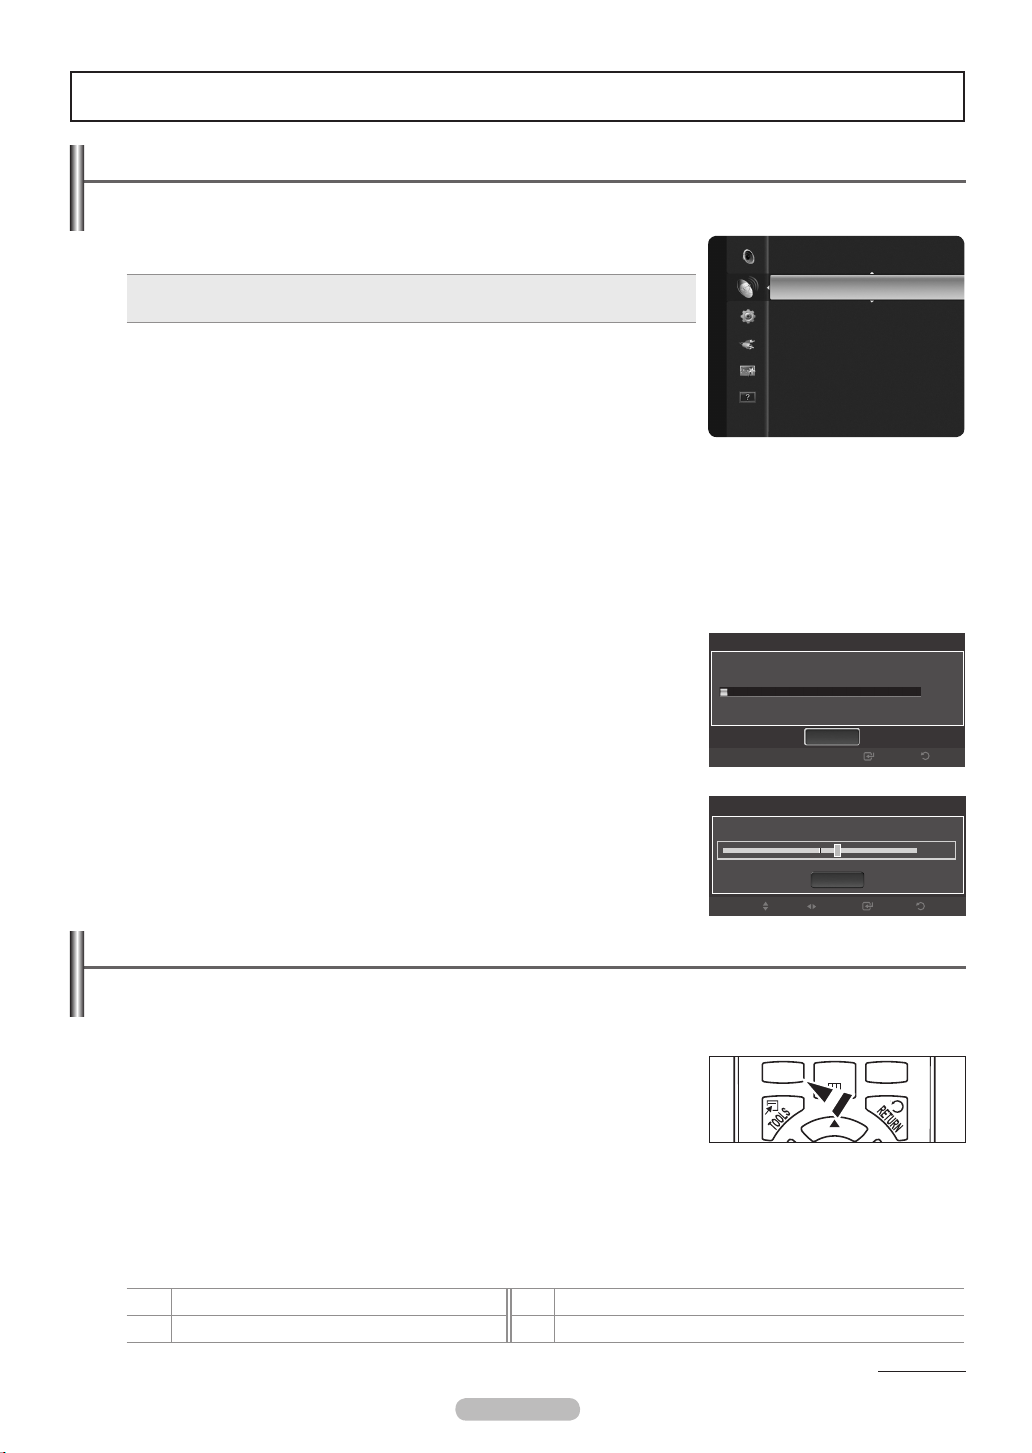
CC
S.MODE
Downloadable U.S. Rating
Parental restriction information can be used while watching DTV channels
N
If information is not downloaded from the broadcasting station, the Downloadable U.S.
Rating menu is deactivated.
N
Parental restriction information is automatically downloaded while watching DTV channels.
It may take several seconds.
N
The Downloadable U.S. Rating menu is available for use after information is downloaded
from the broadcasting station. However, depending on the information from the
broadcasting station, it may not be available for use.
N
Parental restriction levels differ depending on the broadcasting station. The default
menu name and Downloadable U.S. Rating changes depending on the downloaded
information.
N
Even if you set the On-screen display to your desired language, the Downloadable U.S.
Rating menu will appear in English only.
N
The rating will automatically block certain categories that are more restrictive.
The rating titles (For example: Humor Level..etc) and TV ratings
N
(For example: DH, MH, H..etc) may differ depending on the broadcasting station.
Change PIN
You can change four-digit code to use the V-Chip function.
The default PIN code for a new TV set is ‘0-0-0-0’.
N
If you change the PIN code completely, the message PIN is changed successfully. is displayed.
N
How to Reset the TV after the V-Chip Blocks a Channel (Emergency Escape)
If the TV is tuned to a restricted channel, the V-Chip will block it. The screen will go blank and
the following message will appear.
1. Enter your PIN.
To resume normal viewing, tune to a different channel using CH > button. Under certain
conditions (depending on the rating of the local TV programs) the V-Chip might lock out all
the channels. In this case, use the V-Chip function for an “emergency escape”:
If you forget the PIN, press the remote-control buttons in the following sequence,
N
which resets the pin to ‘0-0-0-0’: Power Off. → MMUTE → 8 → 2 → 4 → Power On.
Rating title
Downloadable U.S. Rating
►
Humor Level
DH
MH
H
VH
EH
The number of
current rating
Move
The number of all
rating information
1/2
Allow All
Block All
ReturnEnter
information
This channel is blocked by a Parental Lock. Please enter the PIN to
unblock.
Received Rating :TV-14/NL
CH
Change
0~9
Enter PIN
Caption (On-Screen Text Messages)
❑
The Caption feature doesn’t work in Component or HDMI modes.
N
The availability of captions depends on the program being broadcast.
N
Press the CC button on the remote control to turn the Caption On or Off.
O
Analog
The Analog Caption function operates in either analog TV channel mode or when a signal is
supplied from an external device to TV. (Depending on the broadcasting signal, the Analog
Caption function may operate on digital channels.)
Caption Mode: Default, CC1~CC4, Text1~Text4
•
Digital
The Digital Captions function operates on digital channels.
Caption Mode: Default, Service1~Service6, CC1~CC4, Text1~Text4
•
Digital Caption Options
•
Size : You can select the caption font size.
-
Font Style: You can select the caption font.
-
Foreground Color: You can select the color of the captions.
-
Background Color: You can select the background color for the captions.
-
Foreground Opacity: You can select the opacity of the caption foreground.
-
Background Opacity: You can select the opacity of the background for the captions.
-
Return to Default: Returns to the default settings of the broadcasting station for the
captions.
Digital Caption Options are available only when Default and Service1~Service6 can be selected in Caption Mode.
N
Service1~6 in digital caption mode may not be available depending on the broadcast.
N
Default means to follow the standard set by the broadcaster.
N
Foreground and Background cannot be set to have the same color.
N
Foreground Opacity and Background Opacity cannot be both set to Transparent.
N
Game Mode : Off
Setup
V-Chip
Caption
Melody : Medium
Energy Saving : Off
Caption
Caption : On
Caption Mode : Default ►
Digital Caption Options
Move
ReturnEnter
►
Page 30

❑
Melody
A melody sound can be set to come on when the TV is powered On or Off.
Off: Turns off the melody function.
•
Low: Sets the melody volume to low.
•
•
Medium: Sets the melody volume to medium.
•
High: Sets the melody volume to high.
The Melody does not play.
N
When no sound is output from the TV because the MUTE button has been
-
Setup
pressed,
When no sound is output from the TV because the volume has been reduced to
-
minimum with the VOL button.
When the TV is turned off with the Sleep Timer function.
-
Energy Saving
❑
This feature adjusts the brightness of the TV in order to reduce power consumption. When watching TV at night,
set the Energy Saving mode option to High to reduce eye fatigue as well as power consumption.
Off: Turns the Energy Saving function off.
•
Low: Sets the Energy Saving function to low.
•
Medium: Sets the Energy Saving function to medium.
•
High: Sets the Energy Saving function to maximum.
•
V-Chip
Caption
Melody : Medium
Energy Saving : Off
English - 30
Page 31

English - 31
Setting the Time
Setting the clock is necessary in order to use the various timer features of the TV. Also, you can check the time while watching
the TV. (Just press the INFO button.)
Time
❑
1. Press the MENU button to display the menu.
2. Press the ▲ or ▼ button to select Setup, then press the ENTERE button.
Setup
3. Press the ▲ or ▼ button to select Time, then press the ENTERE button.
Clock
Clock Mode → Auto / Manual
•
You can set up the current time manually or automatically.
Clock Set
•
You can set the current time manually.
N
This function is only available when Clock Mode is set to Manual.
N
You can set the Month, Day, Year, Hour, or Minute directly by pressing the
number buttons on the remote control.
Time Zone
•
Select your time zone.
N
This function is only available when Clock Mode is set to Auto.
N
Depending on the broadcast station and signal, the auto time may not be set
correctly. If this occurs, set the time manually.
N
The Antenna or cable must be connected in order to set the time automatically.
DST (Daylight Saving Time) → Off / On / Auto
•
Switches the Daylight Saving Time function on or off.
N
This function is only available when Clock Mode is set to Auto.
Sleep Timer
The sleep timer automatically shuts off the TV after a preset time
(30, 60, 90, 120, 150 and 180 minutes).
Press the TOOLS button to display Tools menu.
T
You can also set the sleep timer by selecting Tools → Sleep Timer
Timer 1 / Timer 2 / Timer 3
Use this feature to set the TV to turn on or off at a desired time. 3 different On/Off times
can be set. You must set the clock rst.
•
On Time: Set the Hour, Minute, am/pm, and Activate/Inactivate.
(To activate timer with the setting you’ve chosen, set to Activate.)
Off Time: Set the Hour, Minute, am/pm, and Activate/Inactivate.
•
(To activate timer with the setting you’ve chosen, set to Activate.)
Volume: Set the required volume level.
•
Antenna: Select Air or Cable.
•
•
Channel: Select the desired channel.
•
Repeat: Select Once, Everyday, Mon~Fri, Mon~Sat, Sat~Sun, or Manual.
N
When Manual is selected, press the ►button to select the desired day of the
week. Press the ENTERE button over the desired day and the c mark will
appear.
You can set the hour, minute and channel by pressing the number buttons on the remote control.
N
N
Auto Power Off
When you set the timer On, the television will eventually turn off, if no controls are operated for 3 hours after the TV was turned
on by the timer. This function is only available in timer On mode and prevents overheating, which may occur if a TV is on for too
long time.
Plug & Play
Language :English
Time
Game Mode : Off
V-Chip
Caption
Melody : Medium
Energy Saving : Off
Clock
Clock Mode : Auto ►
Clock Set
Time Zone : Eastern
DST : Off
Move
Off
Time
Mon
Move
Timer 1
Air
Adjust
Tue
30 min.
60 min.
90 min.
120 min.
150 min.
180 min.
Wed
Clock
Sleep Timer
Timer 1
Timer 2
Timer 3
On Time
12 00 am Inactivate
Off Time
12 00 am Inactivate
Volume Antenna
10
Repeat
Sun
Once
Move
ReturnEnter
ReturnEnter
Channel
3
The
Fri
ReturnEnter
Sat
►
Page 32

Source List / Edit Name
Source List
❑
Use to select TV or other external input sources such as DVD / Blu-Ray players / Cable
Boxes / Satellite / receivers (Set-Top Box) connected to the TV. Use to select the input
source of your choice.
TV, AV, Component1, Component2, HDMI1, HDMI2/DVI.
You can choose only those external devices that are connected to the TV. In the
N
Source List, connected inputs will be highlighted and sorted to the top. Inputs that
are not connected will be sorted to the bottom.
Using the Color buttons on the remote with the Source list
N
Red (Refresh): Refreshes the connected external devices.
•
Press this if your Source is on and connected, but does not appear in the list.
T
TOOLS (Tools): Displays the Edit Name and Information menus.
•
Press the SOURCE button on the remote control to view an external signal source.
O
Edit Name
❑
You can name the device connected to the input jacks to make your input source
selection easier.
VCR / DVD / Cable STB / Satellite STB / PVR STB / AV Receiver / Game /
Camcorder / PC / DVI PC / DVI / TV / IPTV / Blu-ray / HD DVD / DMA
When a PC with a resolution of 640x480@60Hz is connected to the HDMI IN 2(DVI)
N
port, you should set the HDMI2/DVI mode to PC in the Edit Name menu.
Input
Source List
Edit Name
AV
Component1
Component2
HDMI1
HDMI2/DVI
Edit Name
----
VCR
DVD
Cable STB
Satellite STB
▼
PVR STB
Enter ReturnMove
PC Display
Using Your TV as a Computer (PC) Display
Setting Up Your PC Software (Based on Windows XP)
The Windows display-settings for a typical computer are shown below. The actual screens on
your PC will probably be different, depending upon your particular version of Windows and your
particular video card. However, even if your actual screens look different, the same basic set-up
information will apply in almost all cases.
(If not, contact your computer manufacturer or Samsung Dealer.)
1. First, click on Control Panel on the Windows start menu.
2. When the control panel window appears, click on Appearance and Themes and a display
dialog-box will appear.
3. When the control panel window appears, click on Display and a display dialog-box will appear.
4. Navigate to the Settings tab on the display dialog-box. The correct size setting (resolution)
Optimum: PN42B430P2D : 1024x768 pixels, PN50B430P2D : 1360x768 pixels
If a verticalfrequency option exists on your display settings dialog box, the correct value is 60 or
60 Hz. Otherwise, just click OK and exit the dialog box.
Continued...
English - 32
Page 33

English - 33
Display Modes
If the signal from the system equals the standard signal mode, the screen is adjusted automatically. If the signal from the system
doesn’t equal the standard signal mode, adjust the mode by referring to your videocard user guide; otherwise there may be no video.
For the display modes listed below, the screen image has been optimized during manufacturing.
HDMI/DVI Input
Mode Resolution
IBM
MAC
VESA DMT
VESA CVT
VESA GTF 1280 x 720 52.500 70.000 89.040 - / +
When using an HDMI/DVI cable connection, you must use the HDMI IN 2(DVI) terminal.
N
640 x 350 31.469 70.086 25.175 + / -
720 x 400 31.469 70.087 28.322 - / +
640 x 480 35.000 66.667 30.240 - / -
832 x 624 49.726 74.551 57.284 - / -
640 x 480
800 x 600
1024 x 768
1360 x 768 47.712 60.015 85.500 + / +
720 x 576 35.910 59.950 32.750 - / +
1280 x 720
Horizontal
Frequency (kHz)
31.469 59.940 25.175 - / -
37.861 72.809 31.500 - / -
37.500 75.000 31.500 - / -
37.879 60.317 40.000 + / +
48.077 72.188 50.000 + / +
46.875 75.000 49.500 + / +
48.363 60.004 65.000 - / -
56.476 70.069 75.000 - / -
60.023 75.029 78.750 + / +
44.772 59.855 74.500 - / +
56.456 74.777 95.750 - / +
Vertical
Frequency (Hz)
Pixel Clock
Frequency (MHz)
Sync Polarity
(H/V)
PN42B430P2D PN50B430P2D
✓ ✓
✓ ✓
✓ ✓
✓ ✓
✓ ✓
✓ ✓
✓ ✓
✓ ✓
✓ ✓
✓ ✓
✓ ✓
✓ ✓
✓ ✓
✓
✓ ✓
✓
✓
✓
Support
Self Diagnosis
❑
Picture Test
If you think you have a picture problem, perform the picture test. Check the color pattern on the screen to see if the problem still
exists.
Does the problem still exist with this test photo? appears on the screen.
N
If the test pattern does not appear or there is noise in the test pattern, select Yes
If the test pattern is properly displayed, select No
Yes: There may be a problem with the TV. Contact the Samsung Call center.
•
No: There may be a problem with your external equipment. Please check your
•
connections.
If the problem still persists, refer to the external device’s user manual.
Sound Test
If you think you have a sound problem, please perform the sound test. You can check the
sound by playing a built-in melody sound through the TV.
Does the problem still exist with this sound test? appears on the screen.
N
If during the sound test you can hear sound only from one speaker or not at all, select
Yes.
If you can hear sound from the speakers, select No.
Yes: There may be a problem with the TV. Contact the Samsung Call center.
•
No: There may be a problem with your external equipment. Please check your
•
connections. If the problem still persists, refer to the external device’s user manual.
If you hear no sound from the TV’s speakers, before performing the sound test, make sure Speaker Select is set to TV speaker
N
in the Sound menu.
The melody will be heard during the test even if Speaker Select is set to External Speaker or the sound is muted by pressing
N
the MUTE button.
Support
Self Diagnosis
Software upgrade
HD connection Guide
Contact Samsung
Self Diagnosis
Picture Test ►
Sound Test
Signal Strength
Move
▶
ReturnEnter
Continued...
Page 34

Signal Strength (Digital)
Unlike analog channels, which can vary in reception quality from snowy to clear, digital
(HDTV) channels have either perfect reception quality or you will not receive them at all.
So, unlike analog channels, you cannot ne tune a digital channel. You can, however,
adjust your antenna to improve the reception of available digital channels.
If the signal strength meter indicates that the signal is weak, physically adjust your
N
antenna to increase the signal strength. Continue to adjust the antenna until you nd
the best position with the strongest signal.
Software Upgrade
❑
Samsung may offer upgrades for your TV’s rmware in the future. Please visit Samsung.
com or contact the Samsung call center at 1-800-SAMSUNG (726-7864) to receive
information about downloading upgrades and using a USB drive. Upgrades will be
possible by connecting a USB drive to the USB port.
Please be careful not to disconnect the power or remove the USB drive while
N
upgrades are being applied. The TV will shut off and turn on automatically after
completing the rmware upgrade.
When software is upgraded, video and audio settings you have made will return to
N
their default (factory) settings.
We recommend you write down your settings so that you can easily reset them after
N
the upgrade.
Signal Strength
OK
Enter Return
USB Drive
TV Panel
Self Diagnosis
Support
Software upgrade
HD connection Guide
Contact Samsung
Software Upgrade
Scanning for USB It may take up to 30 seconds.
▶
HD Connection Guide
❑
A brief instruction on How to get the best performance from your new
HDTV. is displayed.
Follow the guide for the best connection method for your HD devices..
Contact Samsung
❑
You can know the Samsung Call center, website and information for product.
N
You can move the previous or next page by pressing the ▲ or ▼ button.
English - 34
HD Connection Guide
How to get the best performance from your new HDTV.
Step 1. Connect the HD box to the TV using the Component video (Red
audio (Red, White) cables or HDMI Cable.
▼
HD box
Step 2. Press the Source button on the Remote to select HDMI or
Component Input.
●
Depending on your location, HD programming may also be viewed using an
antenna.
●
For more details, please refer to HD Connections in the Owner Manual.
Please contact Samsung if you are having problems operating this TV.
Contact Samsung :
- Call Center : 1-800-SAMSUNG (7267864)
- Web Site : www.samsung.com
To obtain latest rmware of your TV, please visit the Samsung website.
www.samsung.com >“Support”> “Download Center”
HDMI Cable
Component Cable
Contact Samsung
OK
Page Up/Down
,Green, Blue) and
▼
TV rear view
off-air
Return
1/2
ReturnEnter
Page 35

English - 35
Anynet+
TV
Anynet+ Device 1 Anynet+ Device 2
HDMI 1.3 Cable
HDMI 1.3 Cable
TV
TV
Anynet+ Device 1 Anynet+ Device 2
HDMI 1.3 Cable
HDMI 1.3 Cable
Anynet+ Device 1
Anynet+ Device 1
HDMI 1.3 Cable
HDMI 1.3 Cable
Optical Cable
Home Theater
HDMI 1.3 Cable
Connecting Anynet+ Devices
Anynet+ is a function that enables you to control all connected Samsung devices that support Anynet+ with your Samsung
TV’s remote.
The Anynet+ system can be used only with Samsung devices that have the Anynet+ feature. To be sure your Samsung device
has this feature, check if there is an Anynet+ logo on it.
To connect to a TV
1. Connect the HDMI IN 1 or 2(DVI) jack on the TV and the HDMI OUT jack of the corresponding Anynet+ device using an HDMI
cable.
To connect to a Home Theater
1. Connect the HDMI IN 1 or 2(DVI) jack on the TV and the HDMI OUT jack of the corresponding Anynet+ device using an HDMI
cable.
2. Connect the HDMI IN jack of the home theater and the HDMI OUT jack of the corresponding Anynet+ device using an HDMI
cable.
Connect an Optical cable between the DIGITAL AUDIO OUT (OPTICAL) jack on your TV and the Digital Audio Input on the
N
Home Theater.
When following the connection above, the Optical jack only outputs 2 channel audio. You will only hear sound from the Home
N
Theater’s Front Left and Right speakers and the subwoofer. If you want to hear 5.1 channel audio, connect the DIGITAL AUDIO
OUT (OPTICAL) jack on the DVD / Satellite Box (ie Anynet Device 1 or 2) directly to the Ampli er or Home Theater, not the TV.
Connect only one Home Theater.
N
You can connect an Anynet+ device using the HDMI 1.3 cable. Some HDMI cables may not support Anynet+ functions.
N
Anynet+ works when the AV device supporting Anynet+ is in the Standby or On status.
N
Anynet+ supports up to 12 AV devices in total. Note that you can connect up to 3 devices of the same type.
N
Continued...
Page 36

Setting Up Anynet+
❑
The following settings help set the Anynet+ functions.
Press the TOOLS button to display Tools menu.
T
You can also set the Anynet+ by selecting Tools → Anynet+ (HDMI-CEC)
To use the Anynet+ Function, Anynet+ (HDMI-CEC) must be set to On
Application
Anynet+ (HDMI-CEC)
1. Press the MENU button. Press the ▲ or ▼ button to select Application, then press the
ENTERE button.
2. Press the ▲ or ▼ button to select Anynet+ (HDMI-CEC), then press the ENTERE
button.
3. Press the ▲ or ▼ to select Setup, then press the ENTERE button.
4. Press the ENTERE button to select Anynet+ (HDMI-CEC).
5. Press the ▲ or ▼ button to select On, then press the ENTERE button.
The Anynet+ (HDMI-CEC) function is enabled.
N
If you select Off, Anynet+ (HDMI-CEC) is disabled.
N
When the Anynet+ (HDMI-CEC) function is disabled, all the Anynet+ related operations
N
are deactivated.
Setting an Anynet+ Device to turn Off Automatically when the TV is Turned Off
1. Press the ▲ or ▼ button to select Auto Turn Off, then press the ENTERE button.
2. Press the ▲ or ▼ button to select Yes, then press the ENTERE button.
N
The Auto Turn Off function is enabled.
N
If you select No, the Auto Turn Off function is canceled.
Device List
Setup
Move
Setup
Anynet+ (HDMI - CEC) : On ▶
Auto Turn Off : Yes
Move
3. Press the EXIT button to exit.
The active source on the TV remote must be set to TV to use the Anynet+ function.
N
If you set Auto Turn Off to Yes, connected external devices are also turned off when the TV is turned off. If an external device is
N
still recording, it may or may not turn off.
▶
ReturnEnter
ReturnEnter
Scanning and Switching between Anynet+ Devices
❑
1. Press the TOOLS button. Press the ▲ or ▼ button to select Device List, then press
the ENTERE button.
N
Anynet+ devices connected to the TV are listed.
N
If you cannot nd a device you want, press the red button to scan for devices.
2. Press the ▲ or ▼ button to select to a particular device and press the ENTERE
button. It is switched to the selected device.to the selected device.
N
Only when you set Anynet+ (HDMI-CEC) to On in the Application menu, the
Device List menu appears.
Switching to the selected devices may take up to 2 minutes. You cannot cancel the
N
operation during the switching operation.
The time required to scan for devices is determined by the number of connected devices.
N
When the device scan is complete, the number of devices found are not displayed.
N
Although the TV automatically scans devices when it is turned on using the POWER button, devices connected when the TV is
N
View TV
Device List
Recording : DVDR
DVDR MENU
DVDR INFO
Receiver : On
Setup
Move
already on are not displayed in the device list. In this case, select the Searching Connections menu to search devices.
If you have selected external input mode by pressing the SOURCE button, you cannot use the Anynet+ function. Make sure to
N
switch to an Anynet+ device by using the TOOLS button.
TV Remote Control Buttons Available in Anynet+ Mode
Device Type Operating Status Available Buttons
Anynet+ Device
Device with built-in Tuner
After switching to the device, when the
menu of the corresponding device is
displayed on the screen.
After switching to the device, while
playing a file
After switching to the device, when you
are watching a TV program
Numeric buttons ▲/▼/◄/►/ENTERE buttons
Color buttons / EXIT button
(Backward search) / (Forward search)
(Stop) / (Play) / (Pause)
CH / CH button
ReturnEnter
Audio Device When Receiver is activated
English - 36
VOL / VOL / MUTE button
Continued...
Page 37

English - 37
The Anynet+ function only works when the active source on the TV remote control is set to TV.
N
The button works only while in the recordable state.
N
You cannot control Anynet+ devices using the buttons on the TV. You can control Anynet+ devices only using the TV remote
N
control.
The TV remote control may not work under certain conditions. In this case, reselect the Anynet+ device.
N
The Anynet+ functions do not operate with other manufacturers’ products.
N
The , operations may differ depending on the device.
Anynet+ Menu
The Anynet+ menu changes depending on the type and status of the Anynet+ devices connected to the TV.
Anynet+ Menu Description
View TV Switches from Anynet+ to TV broadcast mode.
Device List Displays the Anynet+ device list.
Recording Starts a recording. (This menu works only for a device supporting recording.)
Menu
INFO
Shows the menu of the connected device.
Example: When a DVD Recorder is connected, the DVD Recorder’s title menu appears.
Shows the play control menu of the connected device.
Example: When a DVD Recorder is connected, the play control menu of the DVD Recorder appears.
Timer Recording Allows reserving a recording. (This menu works only for a device supporting recording reservations.)
Stop Recording
Stops recording.
Receiver Sound is output through the receiver (home theater).
Setup You can set the Anynet+ (HDMI-CEC), auto turn off, and searching connections for using Anynet+.
Recording
❑
You can make a recording of a TV program using a Samsung recorder.
1. Press the TOOLS button.
2. Press the ▲ or ▼ button to select Recording Immediately and press the ENTERE
button. Recording begins.
When there is more than one recording device
When multiple recording devices are connected, the recording devices are listed.
Press the ▲ or ▼ button to select a recording device and press the ENTERE
button. Recording begins.
When the recording device is not displayed
View TV
Device List
Recording : DVDR
DVDR MENU
DVDR INFO
Receiver : On
Setup
Move
Select Device List and press the red button to search devices
3. Press the EXIT button to exit.
Pressing the button will record whatever you are currently watching. If you are watching video from another device, the video
N
from the device is recorded.
Before recording, check whether the antenna jack is properly connected to the recording device. To properly connect an antenna
N
to a recording device, refer to the recording device’s users manual.
Listening through a Receiver (Home theater)
❑
You can listen to sound through a receiver instead of the TV speaker.
1. Press the TOOLS button. Press the ▲ or ▼ button to select Receiver.
2. Press the ◄ or ► button to select to On.
Now you can listen to sound through the receiver.
3. Press the EXIT button to exit.
N
If your receiver supports audio only, it may not appear in the device list.
N
The receiver will work when you have properly connected the Optical IN jack of the receiver to the Optical Out jack of the TV.
N
When the receiver (home theater) is set to On, you can hear sound output from the TV’s Optical jack. When the TV is
displaying a DTV(air) signal, the TV will send out 5.1 channel sound to the Home theater receiver. When the source is a digital
component such as a DVD and is connected to the TV via HDMI, only 2 channel sound will be heard from the Home Theater
receiver.
N
When listening through the receiver, there are restrictions for using the audio-related (MTS, Preferred language) menus.
N
If there is a power interruption to the TV when the Receiver is set to On (by disconnecting the power cord or a power failure),
the Speaker Select may be set to External Speaker when you turn the TV on again.
ReturnEnter
Page 38

Troubleshooting for Anynet
Symptom Solution
Anynet+ does not work. Check if the device is an Anynet+ device. The Anynet+ system supports Anynet+ devices
I want to start Anynet+. Check if the Anynet+ device is properly connected to the TV and check if the Anynet+
I want to exit Anynet+. Select View TV in the Anynet+ menu.
The message Connecting to
Anynet+
device... appears on the screen.
The Anynet+ device does not play. You cannot use the play function when Plug & Play is in progress.
The connected device is not
displayed.
The TV program cannot be
recorded.
The TV sound is not output
through the receiver.
+
•
only.
Connect only one receiver (home theater).
•
Check if the Anynet+ device power cord is properly connected.
•
Check the Anynet+ device’s Video/Audio/HDMI 1.3 cable connections.
•
Check whether Anynet+ (HDMI-CEC) is set to On in the Anynet+ setup menu.
•
Check whether the TV remote control is in TV mode.
•
Check whether it is Anynet+ exclusive remote control.
•
Anynet+ doesn’t work in certain situations. (Searching channels, Operating, Plug & Play,
•
etc.)
When connecting or removing the HDMI 1.3 cable, please make sure to search devices
•
again or turn your TV off and on again.
Check if the Anynet+ Function of Anynet+ device is set on.
•
•
(HDMI-CEC) is set to On in the Anynet+ Setup menu.
Press the TV button on the TV remote control to switch to TV. Then press the TOOLS
•
button to show the Anynet+ menu and select a menu you want.
•
Press the SOURCE button on the TV remote control and select a device other than
•
Anynet+ devices.
Press CH, CH LIST, PRE-CH, and FAV.CH to change the TV mode.
•
(Note that the channel button operates only when a tuner-embedded Anynet+ device is not
connected.)
You cannot use the remote control when you are conguring Anynet+ or switching to a view
•
mode.
Use the remote control when the Anynet+ setting or switching to view mode is complete.
•
Check whether or not the device supports Anynet+ functions.
•
Check whether or not the HDMI 1.3 cable is properly connected.
•
Check whether Anynet+ (HDMI-CEC) is set to On in the Anynet+ setup menu.
•
Search Anynet+ devices again.
•
You can connect an Anynet+ device using the HDMI 1.3 cable only. Some HDMI cables
•
may not support Anynet+ functions.
If it is terminated by an abnormal situation such as disconnecting the HDMI cable or power
•
cord or a power failure, please repeat the device scan.
Check whether the antenna jack on the recording device is properly connected.
Connect the optical cable between TV and the receiver.
English - 38
Page 39

English - 39
Appendix
Troubleshooting
If the TV seems to have a problem, first try this list of possible problems and solutions.
If none of these troubleshooting tips apply, call Samsung customer service at 1-800-SAMSUNG.
Problem Possible Solution
Poor picture quality. Try another channel. Adjust the antenna. Check all wire connections.
Poor sound quality. Try another channel. Adjust the antenna.
No picture or sound. Try another channel.
No sound or sound is too low at
maximum volume.
Picture rolls vertically. Check all connections.
The TV operates erratically. Unplug the TV for 30 seconds, then try operating it again.
The TV won’t turn on. Make sure the wall outlet is working.
Remote control malfunctions Replace the remote control batteries.
Digital broadcasting screen
problem.
The image is too light or too dark. Adjust the Brightness and Contrast.
The image is too large or too small. Adjust the Size settings.
The visual qualities of digital
channels vary.
Screen is black and power
indicator light blinks steadily.
Although the TV caption shows
HD, the visual quality is not
satisfactory.
A distorted picture appears in the
corner of the screen.
A strange sound is heard. This is caused by minor systems operation and is not a defect.
Pixels are visible on the screen. There may be few bright or dark pixels on the screen. These pixels will have no impact on the
The "Resets all settings to the
default values" message appears.
Press the SOURCE button.
Make sure the TV is plugged in.
Check the antenna connections.
Make sure the MUTE button is off.
First, check the volume of units connected to your TV (digital broadcasting receiver, DVD,
cable broadcasting receiver, VCR, etc.). Then, adjust the TV volume accordingly.
Clean the upper edge of the remote control (transmission window).
Check the battery terminals.
Press the TV button to put your remote control in the TV mode.
Make sure the remote has batteries.
Check that the “+” and “-” ends of the batteries are inserted correctly.
Please check the digital signal strength and antenna input.
Adjust the Fine tuning.
The visual qualities of digital channels may vary depending on the original production method
(analog or digital).
- If the original production method is digital: High visual quality.
- If the original production method is analog: The digital program displayed on the screen is
originally an analog program which has been converted to digital.
The visual quality is of an SD(Standard Definition) grade.
On your computer; check the Power and Signal Cable.
The TV is using its power management system.
Move the computer’s mouse or press any key on the keyboard.
On your equipment check (STB, DVD, etc) ; Power and Signal Cable.
The TV is using its power management system.
Press the SOURCE button on the panel or remote control.
Turn the TV off and on.
The HD(High Definition) caption that appears when switching channels or when pressing the
Information button on the remote control means the selected channel is a digital channel. If
the broadcasting station converts an analog signal into digital and transmits the signal, the
visual quality may not be perfect.
If Screen Fit is selected in some external devices, a distorted picture may appear in the
corner of the screen. This symptom is caused by external devices, not the TV.
performance of the product.
This appears when you press and hold the EXIT button for a while. The product settings are
reset to the factory defaults.
Page 40

Preparation before installing the Wall-Mount
Case A. Installing the SAMSUNG Wall-Mount Case B. Installing another company’s Wall-Mount
1. Install the Wall Mount with a torque range of 15kgf·cm or less. Use care as the parts can be damaged if the torque is out of the
specied range.
2. Accessory Kit contains Holder–Ring
Screw down the hole [①] when installing wall-mount on the wall.
N
] for installing other company’s Wall-Mount on Samsung TV. (Case B)
[
②
How to attach the Stand-Base
Using the screws for securing the stand base and the TV, firmly attach the TV to the
stand base.
(The exterior of the set may be different fr om the picture.)
Warning
Firmly secure the stand to the TV
before moving it, as the stand may
fall and could cause serious injury.
Two or more people should
N
carry the TV. Never lay the TV
on the oor because of possible
damage to the screen. Always
store the TV upright.
When mounting your TV on a wall, install
the cover (➊) on the stand-base using two
screws.
English - 40
Page 41

English - 41
Securing the TV to the Wall
Pulling, pushing, or climbing on the TV may cause the TV to fall. In particular, ensure your children do not hang
over or destabilize the TV; doing so may cause the TV to tip over, causing serious injuries or death. Follow all safety
precautions provided on the included Safety Flyer. For added stability, install the anti-fall device for safety purposes,
Caution
Accessaries
Holder-TV (1 item) /
Screw 1 (M4X16)
To prevent the TV from falling
1. Attach the TV-Holder to the TV by fastening the screws 1 (M4*16) into the holes in the center of the TV.
N
N
2. Firmly fasten the screws to the wall or cabinet where the TV is to be installed. Tie the TV-Holder attached to the TV and the
screws fastened on the wall or cabinet so that the TV is xed.
N
N
N
N
N
as follows.
42", 50" 58", 63"
42˝, 50˝ : Unscrew a screw attached on the back of your TV before attaching the TV-Holder.
Make sure to only use the supplied screw.
Purchase the screws to be used on the wall or cabinet separately.
Install the TV close to the wall so that it does not fall.
When attaching the TV to the wall, tie the cord level with the ground or slanted downwards for safety purposes.
Conrm that the cord or link does not come loose frequently.
Before moving the TV, separate the connected cord rst.
42", 50"
58", 63"
Wall
Wall
3. Verify all connections are properly secured. Periodically check connections for any sign of fatigue or failure. If you have any
doubt about the security of your connections, contact a professional installer.
Page 42

Wall Mount Kit Specifications (VESA)
Install your wall mount on a solid wall perpendicular to the floor.
When attaching to other building materials, please contact your nearest dealer.
If installed on a ceiling or slanted wall, it may fall and result in severe personal injury.
Product Family inch VESA Spec. (A * B) Standard Screw Quantity
19" ~22" 100 * 100
M4
23"~29" 200 * 100
30"~40" 200 * 200 M6
LCD-TV
46"~55" 400 * 400
4
M857"~70" 800 * 400
80" ~ 1400 * 800
42"~ 50" 400 * 400
58"~ 63" 600 * 400
PDP-TV
M8 4
70" ~ 800 * 400
80" ~ 1400 * 800
N
The standard dimensions for wall mount kits are shown in the table above.
N
When purchasing our wall mount kit, a detailed installation manual and all parts necessary for assembly are provided.
N
Do not use screws longer than the standard dimension, as they may cause damage to the inside of the TV set.
N
For wall mounts that do not comply with the VESA standard screw specications, the length of the screws may differ depending on
their specications.
Do not use screws that do not comply with the VESA standard screw specications.
N
Do not use fasten the screws too strongly, this may damage the product or cause the product to fall, leading to personal injury.
Samsung is not liable for these kinds of accidents.
N
Samsung is not liable for product damage or personal injury when a non-VESA or non-specied wall mount is used or the consumer
fails to follow the product installation instructions.
N
Our 57” and 63” models do not comply with VESA Specications. Therefore, you should use our dedicated wall mount kit for this
model.
Do not exceed 15 degrees tilt when mounting this TV.
N
Do not install your Wall Mount Kit while your TV is turned on.
It may result in personal injury due to electric shock.
English - 42
Page 43

English - 43
Specifications
Model Name PN42B430P2D PN50B430P2D
Screen Size (Diagonal) 42 inch (42.3 inches measured diagonally) 50 inch (49.9 inches measured diagonally)
PC Resolution 1024x768 @ 60 Hz 1360x768 @ 60 Hz
Sound (Output) 10W x 2 10W x 2
Dimension (W x H x D)
Body
With stand
Weight
Body
With stand
Environmental Considerations
Operating Temperature
Operating Humidity
Storage Temperature
Storage Humidity
This device is a Class B digital apparatus.
N
Design and specications are subject to change without prior notice.
N
For the power supply and Power Consumption, refer to the label attached to the product.
N
When using an HDMI/DVI cable connection, you must use the HDMI IN 2(DVI) terminal.
N
41.5 x 26.6 x 2.8 inches
(1055.0 x 667.4 x 73 mm)
41.5 x 28.6 x 12.4 inches
(1055.5 x 728.7 x 316 mm)
53.5 lbs (24.3 kg)
61.7 lbs (28.0 kg)
50 °F to 104 °F (10 °C to 40 °C)
10% to 80%, non-condensing
-4 °F to 113 °F (-20 °C to 45 °C)
5% to 95%, non-condensing
48.4 x 29.7 x 2.8 inches
(1230.2 x 755.7 x 73 mm)
48.4 x 32.1 x 12.4 inches
(1230.2 x 816.8 x 316 mm)
70.1 lbs (31.8 kg)
78.2 lbs (35.5 kg)
50 °F to 104 °F (10 °C to 40 °C)
10% to 80%, non-condensing
-4 °F to 113 °F (-20 °C to 45 °C)
5% to 95%, non-condensing
Page 44

Dimensions (PN42B430P2D)
TOP VIEW FRONT VIEW
JACK PANEL DETAIL 7.2 x 3.7 inches
SIDE VIEW REAR VIEW
NOTE: All drawings not necessarily to scale. Some
dimensions are subject to change without prior notice.
Refer to dimensions on each unit prior to performing
any carpentry. Not responsible for typographical or
printed errors.
© 2009 Samsung Electronics America, Inc.
English - 44
Page 45

English - 45
Dimensions (PN50B430P2D)
TOP VIEW FRONT VIEW
JACK PANEL DETAIL 7.2 x 3.7 inches
SIDE VIEW REAR VIEW
NOTE: All drawings not necessarily to scale. Some
dimensions are subject to change without prior notice.
Refer to dimensions on each unit prior to performing
any carpentry. Not responsible for typographical or
printed errors.
© 2009 Samsung Electronics America, Inc.
Page 46

Téléviseur à
écran à plasma
Guide de l’utilisateur
Imaginez les possibilités
Merci d’avoir acheté ce produit Samsung.
Pour obtenir un service complet, veuillez
enregistrer votre produit à :
www.samsung.com/register
Modèle : N° de série :
Page 47

Information importante sur la garantie relative au format de l’image du téléviseur
Le format écran large des écrans à plasma (16:9, soit le rapport hauteur/largeur de l’image) est conçu principalement pour le visionnement
de vidéos plein écran. Les images affichées sur ces écrans devraient être principalement au format d’écran large de rapport 16:9, ou
élargies pour remplir l’écran, si votre modèle offre cette fonction et si les images sont continuellement en mouvement. L’affichage de
graphiques et d’images fixes à l’écran, comme les barres noires latérales des vidéo formatés pour les téléviseurs standard et les émissions
de ce format, doit être limité à 5 % du temps d’écoute hebdomadaire.
En outre, l’affichage d’autres images et textes fixes, comme des rapports boursiers, des jeux vidéos, le logo des stations, des sites Web
ou des graphiques et fonds d’écran d’ordinateur doit respecter la limite ci-dessus sur tous les téléviseurs. L’affichage d’images fixes
qui ne respecte pas les directives ci-dessus peut causer un vieillissement inégal des écrans à plasma en y créant des images
rémanentes subtiles, mais permanentes. Pour éviter ce problème, variez les émissions et les images et visionnez principalement
des images en mouvement en plein écran et non pas des fonds d’écran fixes ou des barres noires.
Sur les modèles d’écran à plasma dotés de fonctions de redimensionnement de l’image, ces commandes permettent d’afficher différents
formats en plein écran.
Prenez garde au choix du format et à leur durée d’utilisation. La garantie limitée de Samsung ne couvre pas le vieillissement inégal d’un
écran à plasma causé par la sélection et l’utilisation d’un format, ni par les images rémanentes.
États-Unis seulement
L’appareil qui accompagne ce guide de l’utilisateur est fabriqué sous licence en vertu de droits de propriété intellectuelle de certaines
tierces parties. Ce produit est protégé en vertu des brevets américains suivants : 5 991 715, 5 740 317, 4 972 484, 5 214 678,
5 323 396, 5 539 829, 5 606 618, 5 530 655, 5 777 992, 6 289 308, 5 610 985, 5 481 643, 5 544 247, 5 960 037, 6 023 490,
5 878 080, ainsi que par la demande de brevet en instance 2001-44713-A1, déposée aux États-Unis.
Cette licence se limite à une utilisation non commerciale, par le consommateur final, du contenu sous licence. Aucun droit n’est
octroyé à l’égard d’une utilisation commerciale. Cette licence ne couvre aucun autre appareil et ne s’applique ni aux produits ou
processus non pourvus d’une licence, conformément à la norme ISO/IEC 11172-3 ou ISO/IEC 13818-3 et utilisé ou vendu de pair
avec ce produit. La licence ne couvre que l’utilisation de cet appareil à des fins d’encodage ou de décodage de fichiers audio,
conformément à la norme ISO/IEC 11172-3 ou ISO/IEC 13818-3. Elle n’octroie aucun droit en ce qui a trait aux caractéristiques ou
fonctions du produit non conformes à la norme ISO/IEC 11172-3 ou ISO/IEC 13818-3.
Autres pays
L’appareil qui accompagne ce guide de l’utilisateur est fabriqué sous licence en vertu de droits de propriété intellectuelle de certaines
tierces parties. Cette licence se limite à une utilisation non commerciale, par le consommateur final, du contenu sous licence.
Aucun droit n’est octroyé à l’égard d’une utilisation commerciale. Cette licence ne couvre aucun autre appareil et ne s’applique ni
aux produits ou processus non pourvus d’une licence, conformément à la norme ISO/IEC 11172-3 ou ISO/IEC 13818-3 et utilisé
ou vendu de pair avec ce produit. La licence ne couvre que l’utilisation de cet appareil à des fins d’encodage ou de décodage de
fichiers audio, conformément à la norme ISO/IEC 11172-3 ou ISO/IEC 13818-3. Elle n’octroie aucun droit en ce qui a trait aux
caractéristiques ou fonctions du produit non conformes à la norme ISO/IEC 11172-3 ou ISO/IEC 13818-3.
SAMSUNG ELECTRONICS GARANTIE LIMITÉE POUR L’AMÉRIQUE DU NORD
Assujettie aux exigences, conditions, exclusions et limitations de la garantie limitée originale fournie avec les produits de Samsung
Electronics (SAMSUNG) et les exigences, conditions, exclusions et limitations de la présente garantie, SAMSUNG offrira en plus un
service de réparation sous garantie aux États-Unis pour les produits achetés au Canada et un service de réparation sous garantie
au Canada pour les produits achetés aux États-Unis pendant la période de garantie précisée à l’origine et pour l’acheteur initial
seulement.
Les réparations sous garantie décrites ci-dessus doivent être effectuées dans un centre de réparation agréé SAMSUNG. En plus de
la présente garantie, la garantie limitée originale et une facture datée en tant que preuve d’achat doivent être présentées au centre
de réparation. Le transport de l’appareil au et à partir du centre de réparation demeure la responsabilité de l’acheteur. Les conditions
couvertes ne sont limitées qu’aux vices de matériaux et de fabrication dans des conditions d’utilisation normale.
Exclues, mais non pas limitées à, sont les dispositions précisées à l’origine pour le service à domicile ou sur place, durées de
réparation minimales et maximales, échanges ou remplacements, accessoires, options, extensions ou produits non durables.
Pour obtenir le nom d’un centre de réparation agréé Samsung, appelez sans frais:
Aux États-Unis : 1-800-SAMSUNG (1-800-726-7864) Au Canada : 1-800-SAMSUNG
Voir le bon de garantie pour avoir plus d’information sur les conditions de garantie.
➢
© 2009 Samsung Electronics Co., Ltd. Tous droits réservés.
Français - 2
Page 48

Mode d’emploi
Français - 3
Rémanence à l’écran
N’afchez pas d’images xes (comme celle des jeux vidéos) sur un écran à plasma pendant plus que quelques minutes. Cela pourrait
causer une rémanence à l’écran. Cette rémanence est également connue sous le nom de “brûlure à l’écran”. Pour éviter une telle
rémanence, reportez-vous à la page 23 pour réduire le niveau de luminosité et de contraste de l’écran pendant l’afchage d’une image
xe.
Altitude
L’écran à plasma ne fonctionne normalement qu’à une altitude inférieure à 1 981, 2 m (6 500 pi).
Chaleur dans le haut du téléviseur à plasma
Le dessus de l’appareil peut chauffer après une longue période d’utilisation. La chaleur s’échappe du panneau par l’orice d’aération
situé dans la portion supérieure du téléviseur.
Ce phénomène est normal et n’indique aucune défectuosité ou mauvais fonctionnement de l’appareil.
Évitez toutefois que des enfants ne touchent la portion supérieure de l’appareil.
L’appareil laisse entendre un craquement.
Un craquement peut se produire lorsque l’appareil se contracte ou se dilate à la suite d’un changement dans le milieu ambiant, comme
la température ou le niveau d’humidité. Ce phénomène est normal; il ne s’agit pas d’une défectuosité de l’appareil.
Défaillance de cellules
L’écran à plasma fait appel à un panneau comportant entre 1,230,000 pixels (dénition standard) et 3,150,000 pixels (haute dénition)
produits par une technologie de pointe. Il se peut toutefois que certains pixels s’assombrissent ou soient plus lumineux à l’écran.
Ce phénomène n’a aucune incidence sur la performance de l’appareil.
Évitez de faire fonctionner votre téléviseur à des températures inférieures à 5°C (41°F).
Une image fixe affichée trop longtemps peut endommager l’écran à plasma de façon permanente.
Le fait de regarder l’écran à plasma en format 4:3 durant une longue période peut laisser des traces de
bordures à gauche, à droite et au centre de l’écran, étant donné les variantes de luminosité à l’écran.
La lecture d’un DVD ou une console de jeu peuvent causer les mêmes effets à l’écran.
Ces dommages ne sont pas couverts par la garantie.
Rémanence à l’écran.
L’afchage sur une longue période des images xes des jeux vidéo et des ordinateurs peut causer une rémanence à l’extinction
partielle.
Pour éviter cet effet, réduisez la luminosité et le contraste pendant l’afchage prolongé d’images xes.
Garantie
La garantie ne couvre pas les dommages causés par la rémanence.
La brûlure d’écran n’est pas couverte par la garantie
Page 49

Table des matières
Branchement et préparation de votre téléviseur
Liste des caractéristiques .......................................................... 5
■
Français
Vérication des pièces ..............................................................5
■
Utilisation du support ................................................................. 5
■
Présentation du panneau de commande ..................................6
■
Présentation du panneau de branchement ...............................7
■
Télécommande ..........................................................................8
■
Branchements
Branchement des antennes VHF et UHF .................................. 9
■
Branchement à la câblodiffusion ...............................................9
■
Branchement d’un lecteur DVD/Blu-Ray, d’un câblosélecteur
■
ou d’unrécepteur satellite (boîtier décodeur) par HDMI .......... 11
Branchement d’un lecteur DVD/Blu-Ray, d’un câblosélecteur
■
ou d’un récepteur satellite (boîtier décodeur) par DVI ............. 11
Branchement d’un lecteur DVD/Blu-Ray, d’un câblosélecteur
■
ou d’un récepteur satellite (boîtier décodeur) par les câbles
de composante ........................................................................ 12
Branchement d’un caméscope ................................................ 12
■
Branchement d’un magnétoscope ...........................................13
■
Branchement d’un système audionumérique ..........................14
■
Branchement d’un amplicateur, d’un cinéma maison ou
■
d’un lecteur DVD .....................................................................14
Branchement d’un ordinateur .................................................15
■
Fonction
Mise sous tension et hors tension du téléviseur ......................16
■
Changement de canal .............................................................16
■
Réglage du volume .................................................................16
■
La touche TOOLS ....................................................................17
■
Visualisation de l’afchage ......................................................17
■
Visualisation des menus ..........................................................18
■
Fonction Prêt à l’emploi ........................................................... 19
■
Commande de l’image
Modication des paramètres de l’image .................................. 22
■
Commande du son
Modication des paramètres du son .......................................26
■
Description des fonctions
Réglage du menu Conguration ..............................................27
■
Réglage de l’horloge ...............................................................31
■
Liste source / Entrer le nom ....................................................32
■
Écran d’ordinateur
Utilisation de votre téléviseur comme écran d’ordinateur (PC) ....32
■
Modes d’afchage ..................................................................33
■
Support technique ...................................................................33
■
+
Anynet
+
Branchement de dispositifs Anynet
■
Dépannage de la fonction Anynet
■
......................................
+ .........................................38
Annexe
Dépannage .............................................................................. 39
■
Préparation avant l’installation du support mural ....................40
■
Assemblage du socle ..............................................................40
■
Fixation du téléviseur au mur ..................................................41
■
Spécications pour la trousse de xation murale (VESA) .......42
■
Spécications ..........................................................................43
■
Dimensions (PN42B430P2D) .................................................. 44
■
Dimensions (PN50B430P2D) .................................................. 45
■
35
Commande des canaux
Enregistrement des canaux ....................................................20
■
Gestion des canaux .................................................................20
■
Symbole
Appuyer Remarque Touche à efeurement OUTILS
N O T
Français - 4
Page 50

Branchement et préparation de votre téléviseur
Français - 5
Liste des caractéristiques
Paramètres d’image réglables pouvant être enregistrés dans la mémoire du téléviseur.
•
Minuterie automatique pour mettre le téléviseur sous tension et hors tension.
•
Minuterie de mise en veille spéciale.
•
Fonction de contrôle parental V-Chip.
•
Interface numérique et de réseau exceptionnelle :
•
grâce au syntoniseur numérique HD intégré, la programmation HD non payante peut être visualisée sans câblosélecteur ou
récepteur satellite (boîtier décodeur).
Branchement HDMI/DVI entre votre ordinateur et votre téléviseur.
•
La technologie SRS TruSurround HD offre un son ambiophonique virtuel.
•
Vérification des pièces
Veillez à ce que les articles suivants soient inclus avec votre téléviseur. S’il en manque, communiquez avec votre détaillant.
La forme et la couleur des articles peuvent varier selon le modèle.
N
Télécommande
(BN59-00856A) /
Piles AAA (4301-000103)
Tore magnétique pour
le cordon d’alimentation
(3301-001305)
Tore magnétique
N
Cordon d’alimentation
(3903-000144)
Tore magnétique pour
la prise AV latérale
(3301-001201)
Mode d’emploi/
Guide de configuration
rapide
Panneau du fond
(reportez-vous à la
page 40)
Anneau de support (4ea)
(reportez-vous à la
page 40)
Les tores magnétiques servent à protéger les câbles des interférences.
Lorsque vous branchez un câble, ouvrez la tore magnétique et attachez-la autour du
câble, près de la fiche.
Utilisation du support
Deux personnes ou plus devraient soutenir le téléviseur. Ne déposez jamais
N
le téléviseur sur le sol an d’éviter d’endommager l’écran. Maintenez toujours
l’écran à plasma en position verticale.
L’écran à plasma peut pivoter sur 20 degrés vers la droite et la gauche.
N
Carte de garantie/
Guide de sécurité
(n’est pas offert dans toutes
les régions)
Support du téléviseur
(BN96-10788A)
(reportez-vous à la
page 41)
Cordon d’
alimentation
Linge de nettoyage
(BN63-01798B)
Vis (4ea)
Câble audio/câble vidéo
-20° ~ 20°
Page 51

Présentation du panneau de commande
Les touches du panneau inférieur droit permettent de commander les principales fonctions du téléviseur, y compris le menu à
l’écran.
Pour accéder aux fonctions plus avancées, utilisez la télécommande.La couleur et la forme du produit peuvent varier selon le
N
modèle.
Si vous appuyez sur la touche du panneau frontal, chaque touche devient active.
N
SOURCEE
1
Appuyez sur cette touche pour passer d’une source d’entrée à une autre
(TV, AV, Composante1, Composante2, HDMI1, HDMI2/DVI).
Dans le menu à l’écran, cette touche fonctionne comme la touche ENTEREde la télécommande.
MENU
2
Appuyez sur cette touche pour afcher le menu des fonctions de votre téléviseur.
+ VOL –
3
Appuyez sur ces touches pour augmenter ou baisser le volume. Dans le menu à l’écran, les touches + VOL – fonctionnent comme
les touches ◄ et ► de la télécommande.
< CH >
4
Appuyez sur ces touches pour changer de canal. Dans le menu à l’écran les touches < CH > fonctionnent comme les touches
▲ et ▼ de la télécommande.
TÉMOIN D’ALIMENTATION
5
Ce témoin clignote et s’éteint pour indiquer que le téléviseur est sous tension et il s’allume en mode veille.
P (ALIMENTATION)
6
Appuyez sur cette touche pour mettre le téléviseur sous tension et hors tension.
CAPTEUR DE LA TÉLÉCOMMANDE
7
Pointez la télécommande vers ce capteur sur le téléviseur.
HAUT-PARLEURS
8
Français - 6
Page 52

Français - 7
Présentation du panneau de branchement
Les prises du panneau de branchement vous permettent de brancher des composantes AV qui doivent l’être en permanence,
comme des lecteurs Blu-Ray/DVD ou un magnétoscope.
La couleur et la forme du produit peuvent varier selon le modèle.
N
Panneau arrière du téléviseur Panneau latéral du téléviseur
POWER IN
1
À brancher au cordon d’alimentation fourni avec le téléviseur.
SERVICE
2
Connecteur pour entretien seulement..
AUDIO OUT
3
À brancher à une composante audionumérique.
EX-LINK
4
Ce connecteur ne sert qu’aux réparations.
DVI IN (HDMI 2) (AUDIO-R/L)
5
À brancher à la prise de sortie audio DVI d’un appareil
externe.
HDMI IN 1, 2(DVI)
6
À brancher à la prise HDMI d’un appareil pourvu d’une sortie
HDMI.
HDMI 2 peut également servir de branchement DVI avec
deux entrées audio analogiques distinctes. Un câble
HDMI/DVI en option est nécessaire pour effectuer ce
branchement.
Lorsque l’adaptateur HDMI/DVI en option est utilisé, les
entrées audio analogiques DVI du téléviseur permettent
de recevoir le son des sorties gauche et droite de l’
appareil DVI.
ANT IN
7
Cette prise utilise un connecteur coaxial de 75Ω pour l’
antenne et le réseau câblé.
DIGITAL AUDIO OUT (OPTICAL)
8
À brancher à une composante audionumérique.
COMPONENT IN 1, 2 / AV IN 1
9
À brancher à une composante vidéo ou audio. La prise
COMPONENT IN 1 sert également de prise d’entrée AV IN 1.
Branchez le câble vidéo à la prise de composante
N
COMPONENT IN 1 [Y/VIDEO] et le câble audio aux
prises de composante droite et gauche COMPONENT IN
1 [R-AUDIO-L].
Page 53

Télécommande
La distance maximale à laquelle vous pouvez utiliser la télécommande est d’environ 7 m (23 pieds).
La couleur et la forme du produit peuvent varier selon le modèle.
N
Une lumière intense peut nuire au bon fonctionnement de la télécommande.
N
POWER
1
Appuyez sur cette touche pour mettre le
téléviseur sous tension et hors tension.
TOUCHES NUMÉRIQUES
2
Appuyez sur ces touches pour changer de
canal.
3
Appuyez sur cette touche pour sélectionner
des canaux supplémentaires (numériques et
analogiques) diffusés par une même station.
Par exemple, pour sélectionner le canal 54-3,
appuyer sur 54, puis sur “ ” et sur 3.
MMUTE
4
Appuyez sur cette touche pour couper
temporairement le son.
VOL
5
Appuyez sur ces touches pour augmenter ou
baisser le volume.
SOURCE
6
Appuyez sur cette touche pour afcher et
choisir les sources vidéo accessibles.
CH LIST
7
Appuyez sur cette touche pour afcher les
listes de canaux à l’écran.
TOOLS
8
Appuyez sur cette touche pour sélectionner
rapidement les fonctions les plus courantes.
HAUT ▲ / BAS ▼ / GAUCHE ◄ /
9
DROITE ► / ENTER
Appuyez sur ces touches pour sélectionner les
éléments du menu à l’écran et en modier la
valeur.
INFO
0
Appuyez sur cette touche pour afcher de l’
information à l’écran.
TOUCHES DE COULEUR
!
Utiliser ces touches à partir de la liste des
canaux.
S.MODE
@
Appuyez sur cette touche pour sélectionner le
mode de son.
P.MODE
#
Appuyez sur cette touche pour sélectionner le
mode de l’image.
Ces touches fonctionnent dans les modes
$
DMA et Anynet+. ( : Cette télécommande
peut commander la fonction d’enregistrement
des enregistreurs Samsung dotés de la
fonction Anynet+)
TV
%
Appuyez sur cette touche pour sélectionner
directement le mode TV.
PRE-CH
^
Appuyez sur cette touche pour revenir au canal
précédent.
CH
&
Appuyez sur ces touches pour changer de canal.
MENU
*
Appuyez sur cette touche pour afcher le menu
à l’écran.
FAV.CH
(
Appuyez sur cette touche pour naviguer dans
vos canaux favoris.
RETURN
)
Appuyez sur cette touche pour revenir au menu
précédent.
EXIT
a
Appuyez sur cette touche pour quitter le menu.
P.SIZE
b
Appuyez sur cette touche pour sélectionner
le format de l’image.
SRS
c
Appuyez sur cette touche pour sélectionner
le mode SRS TruSurround HD.
CC
d
Appuyez sur cette touche pour régler la
fonction de sous-titrage.
MTS
e
Appuyez sur cette touche pour sélectionner
le mode stéréo, le mode mono ou le mode
de diffusion de la seconde piste audio
(SAP).
Insertion des piles dans la télécommande
❑
1. Soulevez le couvercle à l’arrière de la télécommande, comme illustré.
2. Insérez deux piles AAA.
Veillez à ce que les bornes + et – des piles correspondent à ceux du schéma dessiné à l’intérieur du
N
compartiment.
3. Fermez le couvercle, comme illustré.
Si vous ne comptez pas utiliser la télécommande pendant une longue période, retirez les piles et
N
rangez-les dans un endroit frais et sec. (Si le téléviseur est utilisé de façon normale, les piles ont une
durée de vie d’environ un an.)
N
Si la télécommande ne fonctionne pas, vériez les éléments suivants
1. Le téléviseur est-il sous tension?
2. Les pôles + et - des piles sont-ils inversés?
3. Les piles sont-elles à plat?
4. Y a-t-il une panne de courant? Le cordon d’alimentation est-il débranché?
5. Y a-t-il une lampe uorescente ou un néon à proximité?
Français - 8
Page 54

Branchements
Français - 9
Branchement des antennes VHF et UHF
Si votre antenne est dotée de pattes de branchement semblables à celles-ci, reportez-vous à
la rubrique “Antenne 300 Ω à deux pattes de branchement plates” ci-dessous.
Si votre antenne est dotée d’une patte de branchement semblable à celle-ci, reportez-vous à
la rubrique “Antenne 75 Ω à patte de branchement ronde”.
Si le téléviseur est pourvu de deux antennes, reportez-vous à la rubrique “Antennes VHF et
UHF distinctes”.
Antennes 300 Ω à deux pattes de branchement plates
❑
Si vous utilisez une antenne conventionnelle (comme une antenne de toit ou des
“oreilles de lapin”) dotée de deux pattes de branchement plates de 300 Ω procédez
comme suit :
1. Placez les ls des deux pattes de branchement sous les vis d’un adaptateur de 300-75 Ω
(non compris).
Serrez les vis à l’aide d’un tournevis.
2. Branchez l’adaptateur dans la borne ANT IN située à l’arrière du téléviseur.
ANT IN
Antennes 75 Ω à pattes de branchement rondes
❑
Branchez le câble de l’antenne dans la borne ANT IN située à l’arrière du téléviseur.
Antennes VHF et UHF distinctes
❑
Si vous avez deux antennes de téléviseur distinctes (VHF et UHF), vous devez combiner
les deux signaux d’antenne avant de brancher les antennes au téléviseur. Pour cette
opération, vous aurez besoin d’un multiplexeur-adaptateur en option (en vente dans la
plupart des magasins d’électronique).
1. Branchez les pattes de branchement des deux antennes au multiplexeur.
2. Branchez le multiplexeur dans la borne ANT IN située dans le bas du panneau arrière.
Branchement à la câblodiffusion
Suivez les instructions ci-dessous pour brancher votre téléviseur à la câblodiffusion.
Câblodiffusion sans câblosélecteur
❑
Branchez le câble d’arrivée dans la borne ANT IN située à l’arrière du téléviseur.
N
Ce téléviseur étant conguré pour la câblodiffusion, vous n’avez pas besoin d’un
câblosélecteur pour recevoir les canaux de câblodistribution débrouillés.
Branchement à un câblosélecteur de débrouillage de tous les canaux
❑
1. Repérez le câble branché à la borne ANT OUT de votre câblosélecteur.
Cette borne peut s’appeler ANT OUT, VHF OUT ou simplement OUT.
N
ANT IN
UHF
VHF
UHF
VHF
ANT OUT
ANT IN
ANT IN
ANT IN
2. Branchez l’autre extrémité de ce câble à la borne d’antenne ANT IN, située à l’arrière du
téléviseur.
ANT IN
Suite...
Page 55

Branchement à un câblosélecteur de débrouillage de certains canaux
❑
Si votre câblosélecteur débrouille seulement certains canaux (comme les canaux spécialisés), suivez les directives
ci-dessous. Un répartiteur à deux voies, un commutateur RF (A/B) et quatre câbles d’antenne sont nécessaires. (Ces
articles sont vendus dans la plupart des magasins d’électronique.)
1. Repérez et débranchez le câble branché à la
borne ANT IN du câblosélecteur.
N
Cette borne peut porter l’inscription ANT
ANT IN
IN, VHF IN ou simplement IN.
2. Branchez ce câble à un répartiteur à deux
voies.
Câble d’
entrée
Répartiteur
3. Branchez un câble d’antenne entre la borne
OUTPUT du répartiteur et la borne IN du
câblosélecteur.
Câble d’entrée
Répartiteur
IN CABLE OUT
Câblosélecteur
4. Branchez un câble d’antenne entre la borne
ANT OUT du câblosélecteur et la borne B-IN
du commutateur RF (A/B).
Câble d’
entrée
IN CABLE OUT
Répartiteur
Câblosélecteur
A
B
RF (A/B)
Commutateur
5. Branchez un autre câble entre borne OUT du
répartiteur et la borne A–IN du commutateur
RF (A/B).
6. Branchez le dernier câble d’antenne entre la
borne OUT du commutateur RF (A/B) et la
borne ANT IN située à l’arrière du téléviseur.
Câble d’entrée
Câble d’
entrée
Répartiteur
Répartiteur
IN CABLE OUT
IN CABLE OUT
Câblosélecteur
RF (A/B)
Commutateur
A
B
A
B
RF (A/B)
Commutateur
Arrière du
téléviseur
ANT IN
Après ce branchement, réglez l’interrupteur A/B à la position A pour le visionnement normal. Réglez le commutateur A/B à la
position B pour visionner les canaux brouillés. (Lorsque vous placez l’interrupteur A/B à la position B, vous devez syntoniser votre
téléviseur sur le canal de sortie du câblosélecteur, habituellement le canal 3 ou 4.)
Français - 10
Page 56

Français - 11
Branchement d’un lecteur DVD/Blu-Ray, d’un câblosélecteur ou d’un
récepteur satellite (boîtier décodeur) par HDMI
Ce branchement n’est possible que si l’appareil externe est pourvu d’une prise de sortie HDMI. Il offre la meilleure qualité d’
image.
1. Branchez un Câble HDMI entre la prise HDMI IN 1 ou 2(DVI) du téléviseur et la prise HDMI du lecteur DVD/ Blu-Ray, du
câblosélecteur ou du récepteur satellite (boîtier décodeur).
Lecteur DVD/Blu-Ray,
câblosélecteur ou récepteur
satellite
Câble HDMI (non compris)1
Que signie HDMI?
N
La HDMI est une interface multimédia à haute dénition qui permet la transmission de signaux numériques audio et vidéo à
•
Panneau arrière du téléviseur
l’aide d’un seul câble.
La différence entre les interfaces HDMI et DVI réside dans le fait que les appareils HDMI sont plus petits et qu’ils sont dotés de
•
la fonction de codage HDCP (protection contre la copie numérique à large bande passante).
La conguration du panneau arrière de chaque lecteur DVD, câblosélecteur ou récepteur satellite (boîtier décodeur) varie.
N
Le téléviseur peut ne pas émettre de son ou afcher des images de couleur anormale si le lecteur DVD, le câblosélecteur ou le
N
récepteur satellite prennent en charge des versions HDMI antérieures à la version 1.3. Lorsque vous branchez un câble HDMI
doté d’une version antérieure et qu’aucun son n’est émis, branchez le câble HDMI à la prise HDMI IN 2(DVI) et les câbles audio
aux prises droite et gauche DVI IN (HDMI2) [R-AUDIO-L] situées à l’arrière du téléviseur. Dans ce cas, contactez le fournisseur du
lecteur DVD/Blu-Ray, du câblosélecteur ou du récepteur satellite an de conrmer la version de HDMI et pour demander une mise
à jour.
Les câbles HDMI de versions autres que 1.3 peuvent provoquer un papillotement ou l’absence de l’image.
N
Branchement d’un lecteur DVD/Blu-Ray, d’un câblosélecteur ou d’un
récepteur satellite (boîtier décodeur) par DVI
Ce branchement n’est possible que si l’appareil externe est pourvu d’une prise de sortie DVI.
1. Branchez un câble HDMI/DVI ou un adaptateur HDMI-DVI entre la prise HDMI IN 2(DVI) du téléviseur et la prise DVI du lecteur
DVD / Blu-Ray, du câblosélecteur ou du récepteur satellite (boîtier décodeur).
2. Branchez les câbles audio entre les prises droite et gauche DVI IN (HDMI 2) [R-AUDIO-L] du téléviseur et le lecteur DVD / Blu-Ray,
le câblosélecteur ou le récepteur satellite.
Lecteur DVD/Blu-Ray, câblosélecteur
ou récepteur satellite
Câble audio (non compris)
2
Câble HDMI/DVI (non compris)1
N
La conguration du panneau arrière de chaque lecteur DVD/Blu-Ray, câblosélecteur ou récepteur satellite (boîtier décodeur) varie.
N
Au moment du branchement d’un lecteur DVD, d’un câblosélecteur ou d’un récepteur satellite (boîtier décodeur), faites
Panneau arrière du téléviseur
correspondre les couleurs du câble et de la borne de branchement.
N
Utilisez la prise d’entrée HDMI IN 2(DVI) pour le branchement à l’aide d’un câble HDMI/DVI.
Page 57

Branchement d’un lecteur DVD/Blu-Ray, d’un câblosélecteur ou d’un
récepteur satellite (boîtier décodeur) par les câbles de composante
Les prises du panneau arrière du téléviseur sont conçues pour faciliter le branchement d’un lecteur DVD/Blu-Ray, d’un
câblosélecteur ou d’un récepteur satellite (boîtier décodeur).
1. Branchez un câble de composante entre les prises COMPONENT IN (1 or 2) [Y, PB, PR] du téléviseur et les prises COMPONENT
[Y, PB, PR] du lecteur DVD/Blu-Ray, du câblosélecteur ou du récepteur satellite (boîtier décodeur).
2. Branchez les câbles audio entre les prises droite et gauche COMPONENT IN (1 ou 2) [R-AUDIO-L] du téléviseur et les prises
AUDIO OUT du lecteur DVD/Blu- Ray, du câblosélecteur ou du récepteur satellite (boîtier décodeur).
Panneau arrière du téléviseur
Lecteur DVD/Blu-Ray,
câblosélecteur ou récepteur
satellite
Câble audio (non compris)
2
Câble de composante (non compris)
1
La composante vidéo sépare la vidéo en Y (Luminance (luminosité)), PB (bleu) et PR (rouge) pour offrir une qualité d’image
N
supérieure. Veillez à faire correspondre les branchements audio et vidéo. Par exemple, si le câble vidéo est branché à la prise
COMPONENT IN 1, le câble audio doit également être branché à la prise COMPONENT IN 1.
La con guration du panneau arrière de chaque lecteur DVD/Blu-Ray, câblosélecteur ou récepteur satellite (boîtier décodeur) varie.
N
Au moment du branchement d’un lecteur DVD/Blu-Ray, d’un câblosélecteur ou d’un récepteur satellite (boîtier décodeur), faites
N
correspondre les couleurs du câble et de la borne de branchement.
Branchement d’un caméscope
Les prises du panneau latéral de votre téléviseur facilitent le branchement d’un d’un caméscope.
À l’aide d’un câble HDMI
❑
1. Branchez un câble HDMI entre la prise d’entrée HDMI IN 1 or 2(DVI) du téléviseur et la prise de sortie HDMI OUT du
caméscope.
Panneau arrière du téléviseur
Caméscope
Câble HDMI (non compris)1
N
La con guration arrière de chaque caméscope varie.
Français - 12
Page 58

Français - 13
Branchement d’un magnétoscope
Branchement vidéo
❑
Ces instructions supposent que le téléviseur est déjà branché à une antenne ou à un système de câblodiffusion (conformément aux
instructions des pages 9 et 10). Ignorez l’étape 1 si le téléviseur n’est pas branché à une antenne ou un système de câblodiffusion.
1. Débranchez le câble ou l’antenne de l’arrière du téléviseur.
2. Branchez le câble ou l’antenne à la borne ANT IN située à l’arrière du magnétoscope.
3. Branchez un câble d’antenne entre la borne ANT OUT du magnétoscope et la borne ANT IN du téléviseur.
4. Branchez un câble vidéo entre la prise AV IN 1 [Y/VIDEO] du téléviseur et la prise VIDEO OUT du magnétoscope.
5. Branchez les câbles audio entre les prises droite et gauche AV IN 1 [R-AUDIO-L] du téléviseur et les prises AUDIO OUT du
magnétoscope.
Panneau arrière du téléviseur
Panneau arrière du
magnétoscope
Câble audio (non compris)
2
5
Câble vidéo (non compris)
4
Câble d’antenne (non compris)3
Si le magnétoscope est un modèle “mono” (non stéréo), branchez les prises d’entrée audio droite et gauche du téléviseur à
N
l’aide d’un connecteur en Y (non compris). Il est également possible de brancher le câble à la prise R.
Si le magnétoscope fonctionne en stéréo, vous devez brancher deux câbles.
La conguration du panneau arrière de chaque magnétoscope varie.
N
Lorsque vous branchez un magnétoscope, faites correspondre la couleur de la borne de branchement au câble.
N
Lorsque vous branchez le câble à la prise AV IN 1, la couleur de la prise AV IN 1 [Y/VIDEO] (verte) ne correspond pas à la
N
couleur du câble vidéo (jaune).
Page 59

Branchement d’un système audionumérique
Les prises du panneau arrière du téléviseur facilitent le branchement d’un système audionumérique (cinéma maison/
récepteur).
1. Branchez un câble optique entre les prises DIGITAL AUDIO OUT (OPTICAL) du téléviseur et les prises DIGITAL AUDIO INPUT
(OPTICAL) du système audionumérique.
Lorsqu’un système audionumérique est branché à la prise DIGITAL AUDIO OUT (OPTICAL) : baissez le volume du téléviseur, puis
réglez-le à l’aide de la commande de volume du système.
Panneau arrière du téléviseur
Système
audionumérique
Câble optique (non compris)
La diffusion audio en 5.1 canaux est possible lorsque le téléviseur est branché à un appareil externe prenant en charge cette
N
fonction audio.
La conguration du panneau arrière de chaque système audionumérique varie.
N
Lorsque le récepteur (cinéma maison) est réglé à On, il est possible d’entendre du son provenant de la prise optique du téléviseur.
N
Lorsque le téléviseur reçoit des signaux numériques (air), il transmet le son en 5.1 canaux au récepteur du cinéma maison. Lorsque
la source est une composante numérique, comme un lecteur DVD et qu’elle est branchée au téléviseur à l’aide d’un câble HDMI, le
récepteur du cinéma maison ne peut émettre qu’un son à 2 canaux.
Pour entendre le son en 5.1 canaux, reliez directement la prise DIGITAL AUDIO OUT (OPTICAL) du lecteur DVD/Blu-Ray, du
câblosélecteur ou du récepteur satellite à un amplicateur ou à un cinéma maison et non pas au téléviseur.
Branchement d’un amplificateur, d’un cinéma maison ou d’un lecteur DVD
1. Branchez les câbles audio entre les prises droite et gauche AUDIO OUT [R-AUDIO-L] du téléviseur et les prises droite et gauche
AUDIO IN [L-AUDIO-R] de l’amplicateur, du cinéma maison ou du lecteur DVD.
Lorsque vous branchez un amplicateur audio aux bornes droite et gauche des prises AUDIO OUT [R-AUDIO-L] : Baissez le
volume du téléviseur et réglez-le ensuite à l’aide de la commande de volume de l’amplicateur.
Panneau arrière du téléviseur
Amplificateur, cinéma maison
ou lecteur DVD
Câble audio (non compris)
N
La conguration du panneau arrière de chaque amplicateur, cinéma maison ou lecteur DVD varie.
N
Lorsque vous branchez un amplicateur, un cinéma maison ou un lecteur DVD/Blu-Ray, faites correspondre la couleur de la borne
et du câble.
Français - 14
Page 60

Français - 15
Branchement d’un ordinateur
À l’aide d’un câble HDMI/DVI
❑
1. Branchez un câble HDMI/DVI entre la prise HDMI IN 2(DVI) du téléviseur et la prise de sortie PC de l’ordinateur.
2. Branchez un câble stéréo à che de 3,5 mm/2RCA entre les prises droite et gauche DVI IN (HDMI2) [R-AUDIO-L] du téléviseur
et la prise Audio Out de la carte son de votre ordinateur.
Panneau arrière du téléviseur
Ordinateur
2
Câble stéréo à fiche de 3,5 mm 2 RCA (non compris)
Câble HDMI/DVI (non compris)1
La conguration du panneau arrière de chaque ordinateur varie.
N
Lorsque vous branchez un ordinateur, faites correspondre la couleur de la borne et du câble.
N
Utilisez la borne HDMI IN 2(DVI) pour le branchement à l’aide d’un câble HDMI/DVI.
N
Page 61

Fonction
VOL CH
VOL CH
VOL CH
VOL CH
VOL CH
Mise sous tension et hors tension du téléviseur
Appuyez sur la touche POWER de la télécommande. Vous pouvez également appuyer
sur la touche POWER du téléviseur.
Votre téléviseur peut prendre un certain temps avant de se mettre sous tension.
N
Changement de canal
À l’aide des touches de canal
❑
Appuyez sur la touche CH ou CH pour changer de canal.
N
Lorsque vous appuyez sur la touche CH ou CH , le téléviseur change de
canal en séquence. Tous les canaux mémorisés par le téléviseur délent à l’écran.
(Au trois canaux doivent être mémorisés dans le téléviseur.) Vous ne verrez pas les
canaux effacés ou non mémorisés. Reportez-vous à la consulter la page 20 pour la
mémorisation des canaux.
À l’aide des touches numériques
❑
À l’aide des touches numériques, entrez directement le numéro du canal. Par exemple,
pour sélectionner le canal “27”, appuyer sur “2”, puis sur “7”.
N
Pour changer rapidement de canal, appuyez sur les touches numériques, puis sur la
touche ENTERE.
À l’aide de la touche “ ”
❑
La touche “ ” permet de choisir les stations qui diffusent un signal numérique.
1. Par exemple, pour sélectionner le canal “7-1”, appuyez sur “7”, puis sur “ ” et
enn sur 1.
N
Le code HD indique que le téléviseur reçoit un signal numérique à haute dénition.
Le code SD indique que le téléviseur reçoit un signal de dénition standard.
N
Pour changer rapidement de canal, appuyez sur la touche ENTERE.
Revenir au canal précédent à l’aide de la touche PRE-CH
❑
1. Appuyez sur la touche PRE-CH. Le téléviseur syntonise le canal visionné
précédemment.
N
Pour passer rapidement d’un canal à un autre canal qui en est éloigné, accédez au
premier canal, puis choisissez le second canal à l’aide des touches numériques.
Appuyez ensuite sur la touche PRE-CH pour passer de l’un à l’autre.
Réglage du volume
❑
À l’aide des touches de volume
1. Appuyez sur la touche VOL ou VOL pour augmenter ou baisser le volume.
❑
À l’aide de la touche M MUTE
Vous pouvez couper le son en tout temps à l’aide de la touche MMUTE.
1. Appuyez sur la touche MMUTE. Le son est coupé.
Le symbole M MUTE s’afche à l’écran.
2. Pour annuler la sourdine, appuyez à nouveau sur la touche MMUTE, ou encore sur la
touche VOL ou VOL .
Français - 16
Page 62

Français - 17
La touche TOOLS
VOL CH
CH LIST
MENU
FAV.CH
VOL CH
CH LIST
MENU
FAV.CH
La touche TOOLS facilite la sélection rapide des fonctions courantes. Le menu Outils varie selon le mode d’entrée externe
visionné.
1. Appuyez sur la touche TOOLS. Le menu Outils s’afche.
2. Appuyez sur les touches ▲/▼ pour sélectionner un menu, puis sur la touche ENTERE.
3. Appuyez sur les touches ▲/▼/◄/►/
ENTERE pour afcher, modier ou utiliser les
éléments sélectionnés.
Pour une description plus détaillée de chaque fonction, reportez-vous à la page
correspondante.
Anynet+ (HDMI-CEC), consulter la page 36
•
Mise en veille, consulter la page 31
•
Ajouter aux favoris (ou Supprimer des favoris), consulter la page 21
•
Passer au câble (ou Passer à Air), consulter la page 20
•
Anynet+ (HDMI-CEC)
Mise en veille : Off
Ajouter aux favoris
Effacer des favoris
Outils
U Dépl.
Intro.
e
Quitter
Visualisation de l’affichage
L’affichage indique le canal actif et l’état de certains réglages audiovisuels.
1. Appuyez sur la touche INFO de la télécommande. Le téléviseur afche alors le canal,
le type de son et l’état de certains paramètres de son et d’image.
Appuyez une fois de plus sur la touche INFO ou attendez environ 10 secondes :
O
l’information disparaît automatiquement.
TV #1
DTV Air
Dolby Digital
13-1
Programme suivant
Ven, déc. 19 2:05 am
M. Spillane’s Mike Hammer
Bonocrunch
Prison Break
1:55 am - 2:55 am
1080i 16:9 Français
2:55 am - 3:55 am
Page 63

Visualisation des menus
Avant d’utiliser votre téléviseur, suivez ces étapes pour comprendre la navigation dans le menu, pour sélectionner et régler
différentes fonctions.
1. Appuyez sur la touche MENU.
Le menu principal s’afche. Ces icônes gurent sur le côté gauche du menu : Image, Son, Chaîne, Configuration, Entrée,
Application, Support technique.
2. Appuyez sur la touche ▲ ou ▼ pour sélectionner une icônes.
Appuyez sur la touche ◄ ou ► pour accéder au sous-menu de l’icône.
3. Appuyez sur la touche ▲ ou ▼ pour accéder aux éléments du menu.
Appuyez sur la touche ENTERE pour accéder aux éléments du menu.
4. Appuyez sur les touches ▲/▼/◄/► pour modier les éléments sélectionnés.
Appuyez sur la touche RETURN pour revenir au menu précédent.
5. Appuyez sur la touche EXIT pour quitter le menu.
Les touches de la télécommande
Touche Fonctions Touche Fonctions
MENU Afficher le menu principal à l’écran.
RETURN Revenir au menu précédent.
EXIT Quitter le menu à l’écran.
Exemple : Réglage de la luminosité du téléviseur dans le menu Image.
❑
Réglage de la luminosité à 80
1. Appuyez sur la touche MENU pour afcher le menu.
▲/▼/◄/►/
ENTERE
Déplacer le curseur et choisir un élément.
Choisir l’élément en surbrillance.
Confirmer le réglage.
Image
Mode : Standard
Lumière cellule : 4
Contraste : 95
Luminosité : 45
Netteté : 50
Couleur : 50
Teinte (V/R) : V50/R50
2. Appuyez sur la touche ENTERE pour sélectionner Image.
3. Appuyez sur la touche ▲ ou ▼pour sélectionner
Luminosité.
4. Appuyez sur la touche ENTERE.
5. Appuyez sur la touche◄ ou ► jusqu’à ce que la valeur de la luminosité soit 80.
6. Appuyez sur la touche ENTERE.
N
Appuyez sur la touche EXIT pour quitter le menu.
Image
Mode
Lumière cellule : 4
Contraste : 95
Luminosité : 45
Netteté : 50
Couleur : 50
Teinte (V/R) : V50/R50
Lumière cellule : 4
Image
Contraste : 95
Luminosité : 45
Netteté : 50
Couleur : 50
Teinte (V/R) : V50/R50
Réglages avancés
Options d’image
Réinitialisation de l’image
▲
Luminosité
▼
Dépl.
▲
Luminosité
▼
Dépl.
:
Réglage
Réglage
Standard
Intro.
Intro.
►
►
45
Retour
80
Retour
Français - 18
Page 64

Français - 19
Fonction Prêt à l’emploi
À la mise sous tension initiale du téléviseur, les paramètres de base sont automatiquement réglés. D’autres paramètres sont
réglés en cours d’utilisation.
N
L’écran de veille est activé si le téléviseur ne reçoit aucune commande de la télécommande pendant plus d’une minute alors que la
fonction Prêt à l’emploi est activée.
N
L’écran de veille est activé s’il n’y a pas de signal de fonctionnement pendant plus de
15 minutes.
1. Appuyez sur la touche POWER de la télécommande.
Le message Menu Language, Store Demo, Channels, and Time will be set.
Les modes Langue des menus, Démo en magasin, Canaux
et Heure sont réglés.
s’afche.
2. Appuyez sur la touche ENTERE et le menu Select Language of the OSD.
s’afche automatiquement.
Appuyez sur la touche ENTERE.
Appuyez sur la touche ▲ ou ▼ pour sélectionner la langue, puis sur la touche
ENTERE. Le message Choisir ‘Utilisation à domicile’ pour un téléviseur à la maison.
s’afche.
3. Appuyez sur la touche ◄ ou ► pour sélectionner
Démo magasin ou Util. à domicile,
puis sur la touche ENTERE.
Mémoriser une source d’antenne.
Air
Câble
Auto
Nous vous recommandons de régler le téléviseur au mode Util. à domicile an d’
obtenir la meilleure qualité d’image dans votre demeure.
N
Le mode Démo magasin ne doit être utilisé qu’en magasin.
Si l’appareil est réglé par inadvertance au mode Démo magasin et que vous voulez
revenir au mode Util. à domicile (Standard) : appuyez sur la touche de volume du
téléviseur. Lorsque le réglage du volume est afché à l’écran, appuyez sur la touche
Progr. Aut. en cours
DTV Air : -DTV Câble :
MENU du téléviseur pendant 5 secondes.
4. Le message Mémoriser une source d’antenne..
Appuyez sur la touche ▲ ou ▼ pour mémoriser les canaux du branchement sélectionné.
Appuyez sur la touche ENTERE pour sélectionner Démarrer.
•
Air : Signal d’antenne de type Air.
•
Câble : Signal d’antenne de type Câble.
•
Auto : Signaux d’antenne de type Air et Câble.
N
En mode Câble, vous pouvez choisir la source de signal appropriée parmi
STD, HRC et IRC en appuyant sur la touche ▲, ▼, ◄ ou ►, puis sur la touche
ENTERE. Si vous recevez un un signal de câble numérique, sélectionnez le
système de câblodiffusion pour recevoir les diffusions analogique et numérique.
Communiquez avec votre câblodistributeur pour déterminer le système de câblodiffusion de votre région.
5. Le téléviseur commence la mémorisation des canaux accessibles.
N
Pour arrêter la recherche avant la n, appuyez sur la touche ENTERE lorsque Arrêt est sélectionné.
N
Une fois tous les canaux mémorisés, le téléviseur commence à éliminer les canaux brouillés. Le menu de programmation
automatique s’afche alors de nouveau.
Appuyez sur la touche ENTERE une fois la mémorisation des canaux terminée.
6. Le message Régler le mode horloge. s’afche. Appuyez sur la touche ENTERE.Appuyez sur la touche ▲ ou ▼ pour
sélectionner Auto, puis sur la touche ENTERE. Le message Régler sur l’utilisation de l’heure d’été s’afche.
Si vous choisissez Manuel, le message Régler la date et l’heure du jour s’afche. Pour une description détaillée de l’option
Manuel, consultez la page 31.
7. Appuyez sur la touche ▲ ou ▼ pour sélectionner Off, On ou Auto, puis sur la touche ENTERE.
L’image de sélection du fuseau horaire s’afche automatiquement.
8. Appuyez sur lest touches ▲ ou ▼ pour sélectionner votre fuseau horaire, puis sur la touche ENTERE.
Si vous recevez un signal numérique, l’horloge se règle automatiquement. Dans le cas contraire, reportez-vous à la page 31 pour
savoir comment régler l’horloge.
La courte directive Comment utiliser de manière optimale votre TVHD s’afche.
9.
Appuyez sur la touche ENTERE.
N
Vous pouvez accéder au Guide de connexion HD du menu Support technique.
10. Appuyez sur la touche ENTERE. Le message En mode diffusion. s’afche.
Lorsque vous avez terminé, appuyez sur la touche ENTERE.
Prêt à l’emploi
Démarrer
Prêt à l’emploi
U Dépl.
Prêt à l’emploi
Air : 8
Câble : --
Arrêt
Prêt à l’emploi
En mode diffusion.
OK
Intro.
Intro.
Intro.
Démarrer
Démarrer
Démarrer
Omitir
11Air
3%
Omitir
Si vous souhaitez réinitialiser ce paramètre...
1. Appuyez sur la touche MENU pour afcher le menu. Appuyez sur la touche ▲ ou ▼
pour sélectionner Choisir, puis sur la touche ENTERE.
2. Appuyez sur la touche ENTERE de nouveau pour sélectionner Prêt à l’emploi. Pour
plus d’informations sur les options de conguration initiale, appuyez de nouveau sur la
touche ENTERE.
N
La fonction Prêt-à-l’emploi n’est accessible qu’en mode TV.
Conguration
Prêt à l’emploi
Langue : Français
Heure
Mode Jeu : Off
V-Chip
Sous-titres
Mélodie : Moyen
►
Page 65

Commande des canaux
VOL CH
CH LIST
MENU
FAV.CH
Enregistrement des canaux
Antenne → Air / Câble
❑
Avant que votre téléviseur ne puisse mémoriser les canaux accessibles, vous devez
préciser le type de la source de signal branchée au téléviseur (c’est-à-dire une antenne
ou un système de câblodiffusion).
Appuyez sur la touche TOOLS pour afcher le menu Outils.
T
Il est également possible de régler l’antenne en choisissant Outils →
passer au Câble ou Passer à l’antenne.
Prog. auto
❑
Air : Signal d’antenne de type Air.
•
Câble : Signal d’antenne de type Câble.
•
Auto : Signaux d’antenne de type Air et Câble.
•
STD, HRC et IRC désignent différents systèmes de câblodiffusion. Communiquez avec votre câblodistributeur pour déterminer
N
le système de câblodiffusion de votre région. La sélection de la source de signal est maintenant terminée.
Une fois tous les canaux mémorisés, le téléviseur commence à éliminer les canaux brouillés.
N
Le menu de programmation automatique s’afche alors de nouveau.
Pour arrêter la programmation automatique, appuyez sur ENTERE.
N
Le message Arrêter Prog. auto? s’afche. Répondes Oui en appuyant sur la touche
◄ ou ►, puis sur ENTERE.
Effacer les canaux brouillés (Numérique)
❑
La fonction Effacer les canaux brouillés permet d’éliminer les canaux brouillés une fois
la Prog. auto terminée.
Cette procédure peut prendre de 20 à 30 minutes.
Pour arrêter la recherche des canaux brouillés : Appuyez sur
N
sélectionner Arrêt.
Appuyez sur la touche ◄ pour sélectionner Oui, puis sur la touche ENTERE.Cette
N
fonction n’est accessible qu’en mode Câble.
Syn. Précise (Analogique)
❑
La syntonisation de précision permet de régler manuellement un canal pour en optimiser
la réception.
Si vous n’enregistrez pas les canaux syntonisés avec précision dans la mémoire, les
N
réglages ne sont pas sauvegardés.
Le symbole “*” s’afche à côté du nom des canaux syntonisés avec précision.
N
Pour rétablir les paramètres de syntonisation de précision, appuyez sur la touche ▼ pour sélectionner Rétablir, puis sur
N
ENTERE.
ENTERE pour
Chaîne
Antenne : Air
Prog. auto
Effacer les canaux brouillés
Liste des canaux
Syn. Précise
Effacer les canaux brouillés
Supprime les canaux brouillés.
Arrêt
Syn. Précise
Air 8*
Régler
UDépl.
L Réglage
DTV Câble 122
3%
Intro.
Syn. Précise
Enregistrer
►
Retour
+5
Retour
Gestion des canaux
Liste des canaux
❑
Ce menu permet d’ajouter, de supprimer ou de dénir les canaux favoris et d’utiliser le télé-horaire des diffusions numériques.
•
•
•
•
O
Les touches de couleur dans la liste des canaux
•
•
•
N
Tous les canaux : Afche tous les canaux actuellement accessibles.
Canaux ajoutés : Afche tous les canaux ajoutés.
Favori : Afche tous les canaux favoris.
Enregistrement par minuterie : Afche toutes les émissions réservées.
Appuyez sur la touche CH LIST de la télécommande pour afcher les listes de canaux.
Verte (Zoom) : Agrandir ou réduire un numéro de canal.
Jaune (Choisir) : Choisir plusieurs listes de canaux.
TTOOLS (Outils) : Afcher les menus Ajouter(ou Supprimer), Ajouter aux favoris (ou Effacer des favoris), Écoute
par minuterie, Édition du nom du canal, Choisir tout, Déselect. tout, et Prog. auto (les options peuvent varier selon la
situation).
Icônes d’afchage de l’état des canaux
Un canal défini comme favori.
♥
)
Une émission réservée
c
(
Français - 20
Un canal sélectionné en appuyant sur la touche jaune.
Une émission en cours.
Page 66

Français - 21
Option du menu de la liste des canaux (dans Tous les canaux/Canaux ajoutés/Favori)
VOL CH
CH LIST
MENU
FAV.CH
❑
Appuyez sur la touche TOOLS pour utiliser le menu.
N
Les options du menu peuvent varier selon l’état du canal.
N
Ajouter ou Supprimer
Il est possible d’ajouter ou de supprimer un canal an d’afcher seulement les canaux
désirés.
Tous les canaux supprimés sont afchés dans le menu Tous les canaux.
N
Un canal afché en gris indique qu’il a été supprimé.
N
Le menu Ajouter ne s’afche que pour les canaux supprimés.
N
Il est également possible de supprimer un canal du menu Canaux ajoutés ou Favori.
N
Ajouter aux favoris / Supprimer des favoris
Vous pouvez établir comme favoris les canaux souvent visionnés.
T
Appuyez sur la touche TOOLS pour afcher le menu Outils.
Vous pouvez également établir un canal comme favori en choisissant Outils
→ Ajouter aux favoris (ou Supprimer des favoris)
Le symbole ♥ s’afche et le canal est enregistré comme canal favori.
N
Tous les canaux favoris sont afchés dans le menu Favori.
N
O
Pour sélec tionner les canaux fav oris, appuyez sur la touche FAV.CH d e la
Tous les canaux
Air Zoom
Tous les canaux
Air Zoom
6 Air
6-1 ♥ TV #6
7 Air
7-1 ♥ TV #7
9 Air
9-1 ♥ TV #9
10 Air
10-1 ♥ TV #10
11-1 ♥ TV #11
19 Air
Choisir T Outils
6 Air
6-1 ♥ TV #6
7 Air
7-1 ♥ TV #7
9 Air
9-1 ♥ TV #9
10 Air
10-1 ♥ TV #10
11-1 ♥ TV #11
19 Air
Choisir T Outils
Supprimer
Ajouter aux favoris
Écoute par minuterie
Modifier le nom du canal
Choisir tout
Prog. auto
Supprimer
Ajouter aux favoris
Écoute par minuterie
Modifier le nom du canal
Choisir tout
Prog. auto
télécommande.
Écoute par minuterie
Si vous réservez un visionnement d’émission, le téléviseur passe automatiquement au
canal réservé dans la liste des canaux, même si vous visionnez une autre émission
sur un autre canal.
Pour réserver une émission, réglez d’abord l’horloge.
Seuls les canaux mémorisés peuvent être réservés.
N
Il est possible de régler directement le canal, le jour, le mois, l’année, l’heure et les
N
minutes à l’aide des touches numériques de la télécommande.
N
La réservation d’une émission s’afche dans le menu Enregistrement par minuterie.
N
Télé-horaire numérique et réservation d’émissions : Lorsqu’un canal numérique
Tous les canaux
Air Zoom
6 Air
6-1 ♥ TV #6
7 Air
7-1 ♥ TV #7
9 Air
9-1 ♥ TV #9
10 Air
10-1 ♥ TV #10
11-1 ♥ TV #11
19 Air
Choisir T Outils
Supprimer
Ajouter aux favoris
Écoute par minuterie
Modifier le nom du canal
Choisir tout
Prog. auto
est sélectionné et que la touche ► est enfoncée, le télé-horaire du canal s’afche.
Il est possible de réserver une émission en suivant les procédures ci-dessus.
Sélect. tout / Désélect. tout
•
Sélect. tout : Vous pouvez choisir tous les canaux dans la liste des canaux.
Désélect. tout : Vous pouvez désélectionner tous les canaux choisis dans la liste des canaux.
•
N
Vous pouvez ajouter / supprimer, ajouter aux favoris / supprimer des favoris plusieurs canaux à la fois. Choisissez les canaux
désirés. Appuyez ensuite sur la touche jaune pour régler tous les canaux choisis en même temps.
N
Le symbole c s’afche à la gauche des canaux choisis.
Seule l’option Désélect. tout peut être choisie lorsqu’un canal est sélectionné.
N
Édition du nom du canal (canaux analogiques)
Les canaux peuvent être nommés de sorte que leur indicatif d’appel s’afche chaque fois que le canal est sélectionné.
N
Le nom des canaux numériques est automatiquement assigné et ne peut être modié.
❑
Options du menu de la liste des canaux (dans Enregistrement par minuterie)
Il est possible d’afcher, de modier ou de supprimer une réservation.
Appuyez sur la touche TOOLS pour utiliser le menu.
N
Modifier l’info
Choisissez cette option pour modier une réservation d’émission.
Enregistrement par minuterie
9/20/2009
5:02 pm 3
9/19/2009
5:20 pm
Information, modification
Annuler horaires
Information
Choisir tout
Annuler les réservations
Choisissez cette option pour annuler une réservation d’émission.
Air Zoom
Choisir T Outils E Information
Information
Choisissez cette option pour afcher une réservation d’émission. (Vous pouvez également modier l’information relative à une
réservation.)
Sélect. tout / Désélect. tout
Vous pouvez sélectionner ou désélectionner tous les canaux de la liste.
Page 67

Commande de l’image
VOL CH
CH LIST
MENU
FAV.CH
P.SIZE
MTS
SRS
P.MODE
CC
S.MODE
Modification des paramètres de l’image
Mode
❑
Vous pouvez choisir le type d’image qui correspond le mieux à vos exigences.
Dynamique: Choisir une image de haute définition pour les endroits très éclairés.
•
Standard: Choisir la qualité d’image optimale pour un environnement normal.
•
Ce réglage convient à la plupart des situations.
Cinéma: Choisir la qualité d’image optimale pour un environnement sombre.
•
Vous pouvez choisir ces options en appuyant sur la touche P.MODE de la
N
télécommande
Lumière cellule/Contraste/Luminosité/Netteté/Couleur/Teinte (V/R)
❑
Le téléviseur offre plusieurs options de réglage de la qualité de l’image.
Lumière cellule : Régler la luminosité des pixels. Le paramètre de luminosité
•
Contraste : Régler le niveau de contraste.
•
Luminosité : Régler le niveau de luminosité.
•
Netteté : Régler la netteté de l’image.
•
Couleur : Régler la saturation des couleurs de l’image à l’aide de la barre à l’écran.
•
Teinte (V/R) : Plus cette valeur s’approche de Rouge 100, plus la couleur rouge est
•
Lorsque vous apportez des modications à Lumière cellule, Contraste, Luminosité,
N
Netteté, Couleur ou Teinte (V/R), l’image à l’écran est réglée en conséquence.
Les paramètres peuvent être réglés et mémorisés pour chaque appareil externe
N
branché à une entrée du téléviseur.
Il est possible de réduire considérablement la consommation d’énergie en
N
diminuant le niveau de luminosité de l’image, ce qui diminue également les coûts du
fonctionnement dans son ensemble.
maximal est 10.
saturée.
Image
Mode
Lumière cellule : 4
Contraste : 95
Luminosité : 45
Netteté : 50
Couleur : 50
Teinte (V/R) : V50/R50
Mode : Standard
Image
Lumière cellule : 4
Contraste : 95
Luminosité : 45
Netteté : 50
Couleur : 50
Teinte (V/R) : V50/R50
:
Standard
►
►
Réglages avancés
❑
Vous pouvez régler les paramètres détaillés, notamment la couleur et le contraste.
N
Tonalité noire
Vous pouvez choisir le niveau de noir à l’écran pour régler la profondeur de l’image.
•
•
•
•
Contraste dynam.
Vous pouvez optimiser le contraste à l’écran.
•
•
•
•
Gamma
Vous pouvez régler l’intensité des couleurs primaires (rouge, vert, bleu).
Espace couleur
L’espace couleur est une matrice composée des couleurs rouge, vert et bleu. Choisissez votre espace couleur préféré et jouissez
des couleurs les plus naturelles.
•
•
La fonction Réglages avancés est accessible dans les modes Standard ou Film.
Off : Désactiver la fonction de réglage du noir.
Foncé : Régler la profondeur du noir sur foncé.
Plus foncé : Régler la profondeur du noir sur plus foncé.
Tonalité noire : Off
Contraste dynam. : Moyen
Gamma : 0
Espace couleur : Standard
Équilibrage du blanc
Ton chair : 0
Amélioration des bords : On
Le plus foncé : Régler la profondeur du noir au niveau le plus foncé.
Off : Désactiver la fonction de contraste dynamique.
Basse : Régler le contraste dynamique à faible
Moyen : Régler le contraste dynamique au niveau.
Haute : Régler le contraste dynamique au niveau élevé.
Standard : Choisir une gamme de couleurs plus étendue que celle de la source vidéo d’entrée.
Auto : Choisir la gamme de couleurs automatiquement, selon la source vidéo d’entrée.
Réglages avancés
Dépl.
►
RetourIntro.
Suite...
Français - 22
Page 68

Français - 23
Équilibrage du blanc
VOL CH
CH LIST
MENU
FAV.CH
P.SIZE
MTS
SRS
P.MODE
CC
S.MODE
Vous pouvez régler la température de la couleur pour obtenir des couleurs d’image plus
naturelles.
Décal.-R : Régler le niveau inférieur d’intensité du rouge.
•
Décal.-V : Régler le niveau inférieur d’intensité du vert.
•
Décal.-B : Régler le niveau inférieur d’intensité du bleu.
•
Gain-R : Régler le niveau supérieur d’intensité du rouge.
•
Gain-V : Régler le niveau supérieur de l’intensité du vert.
•
Gain-B : Régler le niveau supérieur de l’intensité du bleu.
•
Régler : Rétablir équilibrage du blanc par défaut.
•
Une modication de la valeur des réglages entraîne un rafraîchissement de l’écran.
N
Ton chair
Vous pouvez rehausser le ton chair (rose) de l’image.
Une modication de la valeur des réglages entraîne un rafraîchissement de l’écran.
N
Amélioration des bords → Off / On
Vous pouvez accentuer le bord des objets sur l’image.
Réglages avancés
Tonalité noire : Off
Contraste dynam. : Moyen
Gamma : 0
Espace couleur : Standard
Équilibrage du blanc
Ton chair : 0
Amélioration des bords : On
Dépl.
►
RetourIntro.
Options d’image
❑
Nuance coul. → Froide / Normal / Chaude1 / Chaude2
Vous pouvez choisir la nuance couleur la plus confortable pour vos yeux.
Chaude1 ou Chaude2 ne s’activent que si le mode d’image est Film.
N
Les paramètres peuvent être réglés et mémorisés pour chaque appareil externe
N
branché à une entrée du téléviseur.
Format
Vous pourrez parfois désirer modier le format de l’image à l’écran. Votre téléviseur offre
plusieurs options de format d’écran, chacune étant conçue pour fonctionner au mieux
avec des types d’entrées vidéo particulières. Votre récepteur satellite peut également
offrir ses propres tailles d’écran. En règle générale, toutefois, il est conseillé d’utiliser le
mode 16:9, autant que possible.
16:9 : Régler l’image au format 16:9.
•
Zoom1 : Étirer l’écran à la verticale pour l’amener au rapport 16:9.
•
Zoom2 : Étirer l’image Zoom1 à la verticale.
•
Format large : Étirer l’image à l’horizontale et à la verticale pour un afchage optimal.
•
4:3 : Régler l’image au format 4:3.
•
Plein écran : Afcher le signal HD standard intégral, impossible à visionner à l’aide d’un
•
téléviseur ordinaire.
O
Il est possible d’appuyer à répétition sur la touche P.SIZE de la télécommande pour
modier le format de l’image.
Teinte (V/R) : V50/R50
Réglages avancés
Image
Options d’image
Réinitialisation de l’image
Options d’image
Nuance coul. : Normal
Format : 16:9
Réduct. bruit num. : Auto
Nv nr HDMI : Normal
Mode Film : Off
Protection grillage écran
Dépl.
►
►
RetourIntro.
16:9 Zoom1 Zoom2
Format large 4:3 Plein écran
Suite...
Page 69

Une rémanence temporaire peut se produire si une image xe est afchée à l’écran pendant plus de deux heures.
N
Après avoir sélectionné Zoom1, Zoom2 ou Format large :
N
Appuyez sur la touche◄ ou ► pour sélectionner Position, puis sur la touche ENTERE.
Appuyez sur la touche ▲ ou ▼ pour déplacer l’image de haut en bas.Après avoir sélectionné
Régler : Appuyez sur la touche ◄ ou ► pour sélectionner Régler, puis sur ENTERE.
N
Plein écran en mode HDMI (1080i/1080p) ou Composante (1080i/1080p), il est possible que vous deviez centrer l’image :
Appuyez sur la touche ◄ ou ► pour sélectionner Position, puis sur ENTERE.
Appuyez sur les touches ▲, ▼, ◄ ou ► pour déplacer l’image.
Régler : Appuyez sur la touche ◄ ou ► pour sélectionner Régler, puis sur ENTERE. Le téléviseur retourne au format 16:9.
N
HD (Haute dénition) : 16:9 - 1080i/1080p (1920x1080), 720p (1280x720)
Les paramètres peuvent être réglés et mémorisés pour chaque appareil externe branché à une entrée du téléviseur.
N
Source d’entrée Format de l’image
ATV, Vidéo, Composante (480i, 480p) 16:9, Zoom1, Zoom2, 4:3
Composante (720p)
16:9, Format large, 4:3
DTV(1080i), Composante (1080i, 1080p), HDMI (720p, 1080i, 1080p) 16:9, 4:3, Format large, Plein écran
Réduct. bruit num.
Si le signal de diffusion capté par votre téléviseur est faible, vous pouvez activer la fonction de réduction des bruits numériques
pour tenter d’éliminer les parasites et les images fantômes de l’écran.
Off : Désactiver la fonction Réduct. bruit num.
•
Basse : Régler la réduction de bruit numérique au niveau inférieur.
•
Moyen : Régler la réduction de bruit numérique au niveau moyen.
•
Haute : Régler la réduction de bruit numérique au niveau supérieur.
•
Auto : Le niveau de réduction de bruit numérique est réglé automatiquement.
•
Nv nr HDMI
Teinte (V/R) : V50/R50
Réglages avancés
Image
Options d’image
Réinitialisation de l’image
Il est possible de régler directement le niveau de noir de l’écran an d’en modier la
profondeur.
Normal : L’écran est plus lumineux.
•
Basse : L’écran est plus sombre.
•
Cette fonction est active seulement si un appareil externe est branché à un téléviseur
N
par un câble HDMI. Il se peut que la fonction
Nv nr HDMI ne soit pas compatible avec tous les appareils externes.
Mode Film
Le téléviseur peut détecter et traiter automatiquement les signaux de lm provenant
de toutes les sources, pour ensuite régler automatiquement l’image pour obtenir une
Nuance coul. : Normal
Format : 16:9
Réduct. bruit num. : Auto
Nv nr HDMI : Normal
Mode Film : Off
Protection grillage écran
Options d’image
►
dénition optimale.
Off : Le traitement d’image vidéo de base s’applique et le téléviseur ne détecte pas
•
automatiquement les lms.
Auto : Le téléviseur choisit automatiquement la meilleure qualité d’image entre les
•
Dépl.
émissions lm et vidéo.
L’option
N
Protection contre la brûlure d’écran
Film mode (mode film) est accessibles dans les modes TV, Vidéo, Composante (480i/1080i) et HDMI (1080i).
Congurez les options de Protection grillage écran pour éviter et réduire le risque que des pixels ne grillent. Une image fixe
trop longtemps peut causer une brûlure permanente de l’écran.
Prévention de la brûlure d’écran
Pour réduire les risques de brûlure d’écran, cet appareil est doté d’une technologie de protection.
Cette technologie permet de régler le déplacement de l’image de haut en bas (des lignes verticales) et de droite à gauche (des
points horizontaux). L’option Time (Délai) vous permet de programmer le délai, en minutes, entre chaque mouvement de l’image.
Déplac. Point : Cette fonction permet de déplacer les pixels sur l’écran à plasma, avec une très grande précision.
•
Ce déplacement vertical ou horizontal permet d’éviter la rémanence à l’écran.
Conditions optimales pour le déplacement des pixels :
N
Valeur TV/AV/Composante/HDMI
Horizontal 0~4 2
Vertical 0~4 2
Délai (min) 1~4min 2 min
►
RetourIntro.
Français - 24
Suite...
Page 70

Français - 25
Bords gris : Le visionnement du téléviseur en format 4:3, l’équilibrage du blanc de l’extrême gauche et de l’extrême droite
•
permet d’éviter d’endommager l’écran. Pour éviter la brûlure d’écran, sélectionner Foncé ou Clair.
Foncé : Lorsque le format de l’image est réglé à 4:3, les côtés gauche et droit sont plus foncés.
-
Clair : Lorsque le format de l’image est réglé à 4:3, les côtés gauche et droit sont plus clairs.
-
Réduction des effets de la brûlure d’écran
S’il y a eu brûlure d’écran, le délement ou les bords gris aident à en supprimer les résidus.
Défilement : Cette fonction permet de supprimer les images rémanentes en déplaçant tous les pixels à l’écran à plasma,
•
selon un parcours prédéni. Utilisez cette fonction lorsque l’écran afche des symboles ou des images rémanentes, tout
particulièrement après l’afchage prolongé d’une image xe. Supprimez les effets de la rémanence à l’aide de la fonction
Délement.
N
La fonction de suppression de la rémanence doit être exécutée sur une longue période (environ 1 heure) pour être efcace.
Si les images rémanentes ne sont pas éliminées à la suite de l’exécution de la fonction, recommencez.
N
Appuyez sur n’importe quelle touche de la télécommande pour annuler cette fonction.
Page 71

Commande du son
VOL CH
CH LIST
MENU
FAV.CH
P.SIZE
MTS
SRS
P.MODE
CC
S.MODE
VOL CH
CH LIST
MENU
FAV.CH
P.SIZE
MTS
SRS
P.MODE
CC
S.MODE
VOL CH
CH LIST
MENU
FAV.CH
P.SIZE
MTS
SRS
P.MODE
CC
S.MODE
Modification des paramètres du son
Mode
❑
Vous pouvez choisir le mode sonore qui correspond le mieux à l’émission visionnée.
Standard : Ce mode sonore convient à l’usage général.
•
Musique : Le mode Musique vous permet d’écouter de la musique, comme si vous
•
étiez au concert.
Cinéma : Le mode Cinéma vous permet de vivre une expérience sonore intégrale,
•
comme si vous étiez au cinéma.
Voix claire : Accentuer les dialogues par rapport aux autres sons. Sélectionnez ce
•
mode lorsque vous regardez les nouvelles, des télé-romans ou des documentaires.
Personnel : Vous pouvez personnaliser le mode sonore selon vos préférences.
•
Vous pouvez choisir ces options en appuyant sur la touche S.MODE de la
N
télécommande
Égaliseur
❑
Vous pouvez régler les paramètres sonores selon vos préférences.
Mode : Choisir le mode Son parmi des réglages prédénis.
•
Balance G/D : Régler la balance entre les haut-parleurs droit et gauche.
•
100Hz, 300Hz, 1kHz, 3kHz, 10kHz (réglage de la largeur de bande) : Régler le
•
niveau des différentes fréquences de largeur de bande.
Régler : Rétablir tous les réglages par défaut de l’égaliseur.
•
SRS TruSurround HD → Off / On
❑
SRS TruSurround HD vous permet de jouir d’une ambiophonie virtuelle 5.1
par les deux haut-parleurs de votre téléviseurs.
Cette fonction offre non seulement des basses riches et profondes, mais elle améliore en
plus la résolution des hautes fréquences.
Son
Mode
: Personnel
Égaliseur
SRS TruSurround HD : Off
Langue privilégiée : Français
Son multi-piste : Stéréo
Volume auto : Off
Sélect. le haut-parleur : Haut-parleur TV
Égaliseur
Mode : Personnel
Balance L R
100Hz - +
300Hz - +
1kHz - +
3kHz - +
10kHz - +
▼
RéglageDépl.
►
RetourIntro.
O
Langue privilégiée (canaux numériques)
❑
La télédiffusion numérique assure la transmission simultanée de plusieurs pistes de son (par exemple, la traduction simultanée
d’une émission en langues étrangères).
N
O
Son multi-piste (MTS) (canaux analogiques)
❑
•
•
•
N
O
Volume auto → Off / On
❑
L’amplitude du signal audio étant différente pour chaque station de télédiffusion, il peut être fastidieux de régler le volume chaque
fois que vous changez de canal. Cette fonction permet de régler automatiquement l’intensité du signal sonore du canal désiré en
baissant le volume s’il est trop élevé ou en l’augmentant si le signal modulé est trop faible.
Vous pouvez choisir ces options en appuyant sur la touche SRS de la télécommande.
TruSurround HD, SRS et le symbole sont des marques de commerce de SRS Labs, Inc.
La technologie TruSurround HD est intégrée sous licence de SRS Labs, Inc.
Vous pouvez choisir uniquement une langue faisant partie des langues diffusées.
Vous pouvez écouter une émission dans une langue autre que la Langue privilégiée en appuyant sur la touche MTS de la
télécommande.
Mono : Choisissez ce réglage pour les canaux diffusés en monophonie ou en cas de difcultés avec la la réception d’un signal
stéréophonique.
Stéréo : Choisissez ce réglage pour les canaux diffusés en stéréophonie.
SAP : Choisissez ce réglage pour écouter une seconde piste audio,
habituellement un doublage en langue étrangère.
Selon le cas, une émission peut être écoutée en mode Mono, Stéréo ou SAP.
Appuyez à répétition sur la touche MTS de la télécommande pour sélectionner Mono,
Stéréo ou SAP.
Français - 26
Suite...
Page 72

Français - 27
❑
Sélect. le haut-parleur
Lorsque vous visionnez une émission sur un téléviseur branché à un cinéma maison,
coupez le son des haut-parleurs du téléviseur an d’entendre celui des haut-parleurs
(externes) du cinéma maison.
•
Haut-p. externe : Utiliser les haut-parleurs externes (cinéma maison) pour la sortie du son.
•
Haut-parleur TV : Utiliser les haut-parleurs du téléviseur pour la sortie du son.
Si vous choisissez Haut-p. externe dans le menu Sélect. le haut-parleur, les
N
réglages du son seront limités.
Les touches de volume et MMUTE ne fonctionnent pas lorsque la fonction Sélect. le
N
haut-parleur est réglée à Haut-p. externe.
Réglez le volume sur votre cinéma maison.
Haut-parleurs internes du téléviseur Sortie audio (optique, sortie G/D) vers la chaîne audio
TV / AV / Composante / HDMI TV / AV / Composante / HDMI
Haut-parleur TV Sortie des haut-parleurs Sortie du son
Haut-p. externe Sourdine Sortie du son
Aucun signal vidéo Sourdine Sourdine
Fabriqué sous licence par Dolby Laboratories.
Dolby et le symbole double D sont des marques de commerce de Dolby Laboratories.
Réinitialisation du son
❑
Vous pouvez rétablir les paramètres audio par défaut.
Réinitial. tout : Tous les paramètres audio par défaut sont rétablis.
•
Réinit. mode son : Les paramètres sonores par défaut des valeurs actuelles sont rétablis.
•
Effacer : Choisir les options de réinitialisation du son.
•
Son multi-piste : Stéréo
Volume auto : Off
Son
Sélect. le haut-parleur : Haut-parleur TV
Réinitialisation du son
►
Description des fonctions
Réglage du menu Configuration
Langue
❑
Vous pouvez régler la langue de menu.
Mode Jeu → Off / On
❑
Lorsqu’une console de jeu, comme PlayStationMC ou XboxMC, est branchée, la sélection du
menu.
Jeu permet de vivre une expérience de jeu plus réaliste.
Si le Mode Jeu est activé,le mode Image passe automatiquement à Standard et il ne
•
peut pas être modié.
le mode Son passe automatiquement à Personnel et il ne peut pas être modié.
•
Régler le son à l’aide de l’égaliseur.
La fonction Régler du menu Son est activée. La fonction Régler rétablit les paramètres par défaut de l’option Égaliseur.
•
N
Le Mode Jeu n’est pas disponible en mode TV standard ou lorsqu’il est désactivé.
N
Si l’image est de mauvaise qualité lorsqu’un appareil externe est branché au téléviseur, vériez si le Mode Jeu est réglé sur On.
N
Si vous afchez le menu TV en Mode Jeu, l’écran oscille légèrement.
N
Le symbole ( ) s’afche à l’écran, indiquant que le Mode Jeu est activé avec la source sélectionnée.
N
Cette option ne prend en charge que la fonction de jeu.
Conguration
Prêt à l’emploi
Langue : Français
Heure
Mode Jeu : Off
V-Chip
Sous-titres
Mélodie : Moyen
Économiseur énergie : Off
►
Suite...
Page 73

❑
V-Chip
La fonction V-Chip bloque automatiquement la diffusion d’émissions pouvant ne pas convenir aux enfants. L’utilisateur doit entrer
un NIP (numéro d’identication personnel) avant de congurer ou modier les restrictions de la fonction V-Chip.
N
La fonction V-Chip n’est pas accessible dans les modes HDMI, ou Composante.
N
Le NIP par défaut d’un nouveau téléviseur est “0-0-0-0”.
N
Si vous avez oublié le NIP, appuyez sur les touches de la télécommande dans l’ordre suivant
pour rétablir le code “0-0-0-0” : POWER : hors tension. →
N
Perm. tout : Appuyez sur cette touche pour débloquer toutes les classications du téléviseur. / Bloq. tout : Appuyez sur cette
M
MUTE → 8 → 2 → 4 → POWER : sous tension.
touche pour bloquer toutes les classications du téléviseur.
Blocage V-Chip → Off / On
Active ou désactive la fonction V-Chip
Cont. paren. TV
Réglez d’abord le numéro d’identication personnel (NIP) et activez la fonction V-Chip.
Cont. paren. TV
Le contrôle parental peut être réglé selon l’une de ces deux méthodes : à l’aide du
contrôle parental du téléviseur ou à l’aide des classications de la MPAA.
•
Catégories de base
-
TV-Y : Jeunes enfants / TV-Y7 : Enfants de 7 ans et plus / TV-G : Grand public/
TV-PG : Surveillance parentale/TV-14 : Téléspectateurs de plus de 14 ans / TVMA : Adultes
Sous-catégories
•
Tout : Blocage de toutes les classications. / FV : Fantastique et violence / V :
-
Violence / S : Scènes à caractère sexuel
/ L : Langage adulte / D : Dialogue sexuellement explicite
La fonction V-Chip permet de bloquer automatiquement certaines classications plus restrictives.
N
Dépl.
Par exemple, si vous bloquez la catégorie TV-Y, la catégorie TV-Y7 sera automatiquement bloquée. De la même façon, si vous
bloquez la catégorie TV-G, toutes les catégories du groupe “jeunes adultes” seront bloquées (TV-G, TV-PG, TV-14- et TV-MA).
Les sous-catégories (D, L, S, V) fonctionnent de la même façon.
Classif. MPAA
Le système de classication MPAA, basé sur les codes établis par la Motion Picture
Association of America (MPAA), s’applique surtout aux longs métrages. Quand le blocage
V-Chip est activé, le téléviseur bloque automatiquement toutes les émissions codées
avec des évaluations douteuses (classications MPAA ou du téléviseur).
G : Public de tous âges (aucune restriction).
•
PG : Surveillance parentale recommandée.
•
•
PG-13 : Supervision des parents fortement recommandée.
R : Avec restriction. Les enfants de moins de 17 ans devraient être accompagnés d’un
•
Classif. MPAA
Perm. tout
Bloq. tout
adulte.
NC-17 : Non recommandé pour les jeunes de moins de 17 ans.
•
X : Adultes seulement.
•
NR : Non classé.
•
Lorsqu’une catégorie particulière est sélectionnée, appuyez sur la touche ENTERE pour l’activer.
N
Dépl.
Le symbole \ s’afche. Appuyez sur la touche ENTERE pour bloquer ou débloquer la catégorie.
La fonction V-Chip bloque automatiquement toutes les catégories plus restrictives.
N
Par exemple, si vous bloquez la classication PG-13, les classications R, NC-17 et X sont également bloquées.
Anglais canadien
Vous pouvez bloquez des émissions selon leur classication en anglais canadien.
C : Émissions destinées aux enfants de moins de 8 ans.
•
C8+ : Émissions convenant généralement aux enfants de 8 ans et plus, sans surveillance.
•
G : Émissions grand public convenant à tous les auditoires.
•
PG : Surveillance parentale.
•
14+ : Émissions dont la teneur peut ne pas convenir aux spectateurs de moins de 14 ans.
•
18+ : Émissions pour adultes.
•
La fonction V-Chip bloque automatiquement toutes les catégories plus restrictives.
N
Par exemple, si vous bloquez la classication G, les classications PG, 14+ et 18+ sont automatiquement bloquées.
Français canadien
Vous pouvez bloquer des émissions selon leur classication en français canadien.
G : Général
•
8 ans+ : Émissions convenant généralement aux enfants de 8 ans et plus, sans
•
surveillance.
•
13 ans+ : Émissions pouvant ne pas convenir aux enfants de moins de 13 ans.
16 ans+ : Émissions ne convenant pas aux enfants de moins de 16 ans.
•
18 ans+ : Émissions pour adultes.
•
La fonction V-Chip bloque automatiquement toutes les catégories plus restrictives.
N
Par exemple, si vous bloquez la catégorie 8 ans+, les catégories 13 ans+, 16 ans+ et
18 ans+ seront automatiquement bloquées.
Français canadien
Perm. tout
Bloq. tout
Dépl.
Perm. tout
Bloq. tout
RetourIntro.
RetourIntro.
RetourIntro.
Français - 28
Suite...
Page 74

Français - 29
VOL CH
CH LIST
MENU
FAV.CH
P.SIZE
MTS
SRS
P.MODE
CC
S.MODE
Catég. américaine téléchargeable
Il est possible d’utiliser l’information du contrôle parental en visionnant des canaux
numériques.
N
Si l’information n’est pas téléchargée à partir de la station de télédiffusion, le menu Catég.
américaine téléchargeable est désactivé.
N
L’information du contrôle parental est téléchargée automatiquement pendant le
visionnement de canaux numériques. Cela peut prendre quelques secondes.
N
Le menu Catég. américaine téléchargeable est accessible après téléchargement de l’
information à partir de la station de télédiffusion. Cependant, selon la station émettrice, la
fonction pourrait ne pas être accessible.
N
Les niveaux de contrôle parental varient selon la station de télédiffusion. Le nom du menu
par défaut et les options Catég. américaine téléchargeable varient selon les données
téléchargées.
N
Même si vous réglez la langue de l’afchage à l’écran, le menu Catég. américaine
téléchargeable s’afche en anglais seulement.
N
La classication bloque automatiquement certaines catégories plus restrictives.
N
Les classications (par exemple : Humour) et les classications du téléviseur
(par exemple : DH, MH, H) peuvent varier selon la station de télédiffusion.
Changer NIP
Vous pouvez modier le code à quatre chiffres de la fonction V-Chip.
N
Le NIP par défaut d’un nouveau téléviseur est “0-0-0-0”.
N
Si vous modiez le NIP, le message NIP modié avec succès s’afche.
Comment réinitialiser le téléviseur lorsque la fonction V-Chip bloque un canal
(solution d’urgence)
Si un canal à accès restreint est syntonisé, la fonction V-Chip le bloque. L’écran devient vide
et le message suivant s’afche :
1. Entrez NIP
Pour rétablir le visionnement normal, choisissez un autre canal à l’aide des touches
CH >. Dans certains cas (selon la classication des émissions locales), la fonction
V-Chip pourrait bloquer tous les canaux. Dans un tel cas, utilisez la fonction V-Chip en
guise de solution d’urgence.
N
Si vous avez oublié le NIP, appuyez sur les touches de la télécommande dans l’ordre suivant
pour rétablir le code “0-0-0-0” : POWER : hors tension. → MMUTE → 8 → 2 → 4 → POWER : sous tension.
Classification
Catég. américaine téléchargeable
►
Humor Level
DH
MH
H
VH
EH
Dépl.
Nombre total de
classifications
actuelles
Classif. obtenue : TV-14/NL
Ce canal est bloque en mode puce V. Veuillez entrer un
NIP pour débloquer.
La quantité de
toute l’information
de classification
CH
Changer
1/2
Perm. tout
Bloq. tout
0~9
Entrez NIP
RetourIntro.
Sous-titres (texte à l’écran)
❑
Les Sous-titres ne fonctionnent pas dans les modes Composante, ou HDMI.
N
L’option de sous-titrage accessible dépend de l’émission diffusée.
N
Appuyez sur la touche CC de la télécommande pour régler la fonction des sous-titres à
O
On ou Off.
Analogique
La fonction de sous-titrage analogique fonctionne pour les canaux analogiques ou lorsque le
signal capté par le téléviseur provient d’un appareil externe. (Selon le signal émetteur, le soustitrage analogique peut fonctionner sur les canaux numériques.)
Mode ss-titres codés : Par défaut, CC1~CC4, Texte1~Texte4
•
Numérique
Les sous-titres numériques fonctionnent seulement avec les canaux numériques.
Mode ss-titres codés : Par défaut, Service1~Service6, CC1~CC4, Texte1~Texte4
•
Options de sous-titrage numérique
•
Format :
-
Style des polices :
-
Couleur avant-plan : Vous pouvez choisir la couleur des sous-titres.
-
Couleur arrière-plan : Vous pouvez choisir la couleur d’arrière-plan des sous-titres.
-
Opacité avant-plan : Vous pouvez choisir l’opacité de l’avant-plan des sous-titres.
-
Opacité arrière-plan : Vous pouvez choisir l’opacité de l’arrière-plan des sous-titres.
-
Retour par défaut : Les valeurs par défaut de la station de télédiffusion pour sous-titres
-
Les Options de sous-titrage numérique sont accessibles uniquement si Par défaut ou Service1~Service6 peuvent être
N
sélectionnés dans le Mode ss-titres codés.
Service1~Service6 en mode de sous-titres numériques pourraient ne pas être accessibles, selon la diffusion.
N
L’option Par défaut respecte le standard établi par le télédiffuseur.
N
L’avant-plan et l’arrière plan ne peuvent pas être de la même couleur.
N
Les paramètres Opacité avant-plan et Opacité arrière-plan ne peuvent être tous deux réglés sur Transparent
N
Vous pouvez choisir la taille de la police des sous-titres.
Vous pouvez choisir la police des sous-titres.
sont rétablis.
Mode Jeu : Off
Conguration
V-Chip
Sous-titres
Mélodie : Moyen
Économiseur énergie : Off
Sous-titres
Sous-titres : On
Mode ss-titres codés : Par défaut
Options de sous-titrage numérique
Dépl.
►
►
RetourIntro.
Page 75

Mélodie
❑
Vous pouvez choisir et congurer une mélodie qui se déclenchera à la mise sous tension
et hors tension du téléviseur.
Off : Désactiver la fonction Mélodie.
•
Basse : Régler le volume de la mélodie au niveau inférieur.
•
Moyen : Régler le volume de la mélodie au niveau moyen.
•
Haute : Régler le volume de la mélodie au niveau supérieur.
•
La mélodie ne joue pas.
N
Le téléviseur n’émet aucun son parce que vous avez appuyé sur la touche MMUTE.
-
Le téléviseur n’émet aucun son parce que le volume a été réduit au minimum à l’
-
Conguration
V-Chip
Sous-titres
Mélodie : Moyen
Économiseur énergie : Off
aide de la touche VOL .
Le téléviseur est mis hors tension par la fonction Mise en veille.
-
Économiseur énergie
❑
Cette option permet de régler la luminosité de l’écran an de réduire la consommation d’énergie. Si vous écoutez la télévision le
soir, réglez l’option du mode Économiseur énergie à Haute pour réduire la fatigue oculaire et la consommation d’énergie.
Off :
Désactiver la fonction Économiseur énergie.
•
Basse :
•
•
•
Régler la fonction Économiseur énergie à son niveau inférieur.
Moyen :
Régler la fonction Économiseur énergie à son niveau moyen.
Haute :
Régler la fonction Économiseur énergie à son niveau supérieur.
►
Français - 30
Page 76

Français - 31
Réglage de l’horloge
Le réglage de l’horloge est nécessaire pour utiliser les diverses fonctions de
minuterie du téléviseur. Cette fonction permet également de vérifier l’heure pendant le
visionnement. (Il vous suffit d’appuyer sur la touche INFO).
Heure
❑
1. Appuyez sur la touche MENU pour afcher le menu.
2. Appuyez sur la touche ▲ ou ▼ pour sélectionner Conguration, puis sur la touche
ENTERE.
3.
Appuyer sur la touche ▲ ou ▼ pour sélectionner Heure, puis sur la touche ENTERE.
Horloge
Mode horloge → Auto / Manuel
•
Vous pouvez régler l’heure manuellement ou automatiquement.
Réglage Horloge
•
Vous pouvez régler l’heure manuellement.
N
Cette fonction n’est accessible que lorsque la fonction Mode horloge est réglée à
Manuel.
N
Vous pouvez régler directement les valeurs Mois, Jour, Année, Heure et Minute en appuyant sur les touches numériques
de la télécommande.
•
Fuseau hor.
Choisissez votre fuseau horaire.
N
Cette fonction n’est accessible que lorsque la fonction Mode horloge est réglée à Auto.
N
En fonction de la station émettrice et du signal, il est possible que le réglage automatique de l’horloge ne fonctionne pas
correctement. Le cas échéant, réglez l’horloge manuellement.
N
L’antenne ou le câble doivent être branchés pour le réglage automatique de l’horloge.
•
DST (observation de l’heure d’été) → Off / On / Auto
Activer ou désactiver la fonction d’observation de l’heure d’été.
N
Cette fonction n’est accessible que lorsque la fonction Mode horloge est réglée à Auto.
Prêt à l’emploi
Conguration
Langue : Français
Heure
Mode Jeu : Off
V-Chip
Sous-titres
Mélodie : Moyen
Économiseur énergie : Off
Horloge
Mode horloge : Auto ►
Réglage Horloge
Fuseau hor. : Est
H. d’été : Off
Dépl.
RetourIntro.
►
Mise en veille
La mise en veille éteint automatiquement le téléviseur après le délai choisi
(30, 60, 90, 120, 150 ou 180 minutes).
Heure
Dim
Off
30 min.
60 min.
90 min.
120 min.
150 min.
180 min.
Dépl.
Minuterie 1
Air
Lun
Mar
Réglage
Canal
Mar
Jeu
Appuyez sur la touche TOOLS pour afcher le menu Outils.
T
Vous pouvez également régler la mise en veille en choisissant Outils → Mise en
veille.
Minuterie 1 / Minuterie 2 / Minuterie 3
Cette fonction permet de mettre le téléviseur sous tension ou hors tension au moment
Horloge
Mise en veille
Minuterie 1
Minuterie 2
Minuterie 3
désiré. Trois moments de mise sous tension et hors tension distincts
peuvent être réglés. Vous devez d’abord régler l’horloge.
•
Mise en marche : Régler les paramètres Heure, Minute, am/pm et Activer/Désactiver.
(Pour activer la minuterie avec le réglage choisi, réglez à Activer.)
•
Arrêt : Régler les paramètres Heure, Minute, am/pm et Activer/Désactiver.
(Pour activer la minuterie avec le réglage choisi, réglez à Activer.)
•
Volume : Réglez le niveau de volume désiré.
•
Canal : Choisir le canal désiré.
•
Répéter : Choisir Une fois, Chaque jour, Lun~Ven, Lun~Sam, Sam~Dim ou
Manuel.
N
Lorsque vous choisissez Manuel, appuyez sur la touche ► pour sélectionner le
jour de la semaine désiré.
Appuyez sur la touche ENTERE sur le jour voulu. Le symbole c s’afche.
N
Vous pouvez régler les heures, les minutes et les canaux directement à l’aide du pavé numérique de la télécommande.
N
Auto Power Off (Arrêt automatique)
Mise en marche
12 00 am
Arrêt
12 00 am
Volume Antena
10
Répéter
Une fois
Dépl.
Si la minuterie est activée et qu’elle met le téléviseur sous tension, le téléviseur se met automatiquement hors tension après
trois heures si aucune commande ne lui est envoyée. Cette fonction est accessible uniquement lorsque la minuterie est réglée à
On; elle permet d’éviter une surchauffe occasionnée par une utilisation prolongée du téléviseur.
RetourIntro.
Désactiver
Désactiver
3
Ven
Sam
RetourIntro.
Page 77

Liste source / Entrer le nom
Liste source
❑
Cette fonction permet de sélectionner le téléviseur ou une autre source d’entrée
externe branchée au téléviseur, comme un lecteur DVD/Blu-Ray, un magnétoscope, un
câblodistributeur, ou un récepteur satellite (boîtier décodeur). Cette fonction permet de
choisir la source d’entrée désirée.
TV, AV, Composante1, Composante2, HDMI1, HDMI2/DVI.
Seuls les appareils externes branchés au téléviseur peuvent être sélectionnés. Dans
N
l’option Liste source, les entrées branchées sont en surbrillance et gurent en haut de
la liste. Les entrées non branchées gurent au bas de la liste.
Utilisation des touches de couleur de la télécommande avec l’option Liste
N
source
Rouge (Rafraîchir) : Rafraîchir la liste des appareils externes branchés.
•
Appuyez sur cette touche si la source est branchée et activée, mais qu’elle n’
apparaît pas dans la liste.
T
TOOLS (Outils) : Afche les menus Entrer le nom et Information.
•
Appuyez sur la touche SOURCE de la télécommande pour sélectionner une source
O
de signal externe.
Entrer le nom
❑
Il est possible de nommer l’appareil branché aux prises d’entrée pour en faciliter la
sélection.
Magnétoscope / DVD / Câble STB / Satellite STB / PVR STB / Récepteur A/V /
Jeu / Caméscope / PC / DVI PC / DVI / TV / IPTV / Blu-ray / HD DVD / DMA
Lorsqu’un PC de résolution de 640x480 à 60 Hz est branché au port HDMI IN 2(DVI),
N
réglez le mode HDMI2/DVI à PC dans le menu Entrer le nom.
Entrée
Liste source
Entrer le nom
Entrer le nom
AV
Composante1
Composante2
HDMI1
HDMI2/DVI
▼
----
Magnétoscope
DVD
Câble STB
Satellite STB
PVR STB
Intro. RetourDépl.
Écran d’ordinateur
Utilisation de votre téléviseur comme écran d’ordinateur (PC)
Configuration du logiciel sur votre PC (sous Windows XP)
Les paramètres d’afchage de Windows pour un ordinateur type gurent ci-dessous. Les
fenêtres afchées sur votre PC auront probablement un aspect différent, selon la version de
Windows et votre carte vidéo. Toutefois, même si les fenêtres semblent différentes, les mêmes
données de conguration de base s’appliquent dans la plupart des cas.
(Sinon, communiquez avec le fabricant ou avec votre détaillant Samsung.)
1. Cliquez d’abord sur Panneau de configuration dans le menu Démarrer de Windows.
2. Lorsque la fenêtre du panneau de conguration s’afche, cliquez sur Apparence et thèmes.
La boîte de dialogue du même nom s’afche.
3. Cliquez sur
4. Cliquez sur l’onglet Paramètres de la boîte de dialogue Afchage. Réglage du format
approprié (résolution) optimal : PN42B430P2D : 1024x768 pixels, PN50B430P2D : 1360x768
pixels. Si la boîte de dialogue comporte une option de fréquence de rafraîchissement vertical,
la valeur appropriée est 60 ou 60 Hz. Sinon, cliquez sur OK pour quitter la boîte de dialogue.
Affichage pour afcher la boîte de dialogue du même nom.
Français - 32
Suite...
Page 78

Français - 33
Modes d’affichage
Si le signal en provenance du système équivaut au mode de signal standard, l’écran est réglé automatiquement. Si le signal du système
ne correspond pas au signal standard, réglez le mode en vous reportant au mode d’emploi votre la carte vidéo; sinon, l’image pourrait
ne pas apparaître. L’image à l’écran a été optimisée en usine pour les modes d’affichage ci-dessous.
Entrée de HDMI/DVI
Mode Résolution
IBM
MAC
VESA DMT
VESA CVT
VESA GTF 1280 x 720 52.500 70.000 89.040 - / +
La prise d’entrée HDMI IN 2(DVI) doit être utilisée pour un branchement de câble HDMI/DVI.
N
640 x 350 31.469 70.086 25.175 + / -
720 x 400 31.469 70.087 28.322 - / +
640 x 480 35.000 66.667 30.240 - / -
832 x 624 49.726 74.551 57.284 - / -
640 x 480
800 x 600
1024 x 768
1360 x 768 47.712 60.015 85.500 + / +
720 x 576 35.910 59.950 32.750 - / +
1280 x 720
Fréquence
horizontale (kHz)
31.469 59.940 25.175 - / -
37.861 72.809 31.500 - / -
37.500 75.000 31.500 - / -
37.879 60.317 40.000 + / +
48.077 72.188 50.000 + / +
46.875 75.000 49.500 + / +
48.363 60.004 65.000 - / -
56.476 70.069 75.000 - / -
60.023 75.029 78.750 + / +
44.772 59.855 74.500 - / +
56.456 74.777 95.750 - / +
Fréquence
verticale (Hz)
Fréquence
d’horloge des
pixels (MHz)
Polarité
synchronisée
(H/V)
PN42B430P2D PN50B430P2D
✓ ✓
✓ ✓
✓ ✓
✓ ✓
✓ ✓
✓ ✓
✓ ✓
✓ ✓
✓ ✓
✓ ✓
✓ ✓
✓ ✓
✓ ✓
✓
✓ ✓
✓
✓
✓
Support technique
Autodiagnostic
❑
Essai d’image
Si vous croyez qu’il y a un problème d’image, procédez à l’essai d’image. Vériez le
modèle de couleur à l’écran pour voir si le problème persiste.
Le message Le problème persiste-t-il après cet essai photo? apparaît à l’écran.
N
Si la le modèle d’essai ne s’afche pas ou s’il y a du bruit dans le modèle, choisissez
Oui. Si la le modèle d’essai s’afche correctement, choisissez Non.
Oui : Il est possible que votre téléviseur soit défectueux. Communiquez avec le centre
•
d’appel Samsung
Non : Il est possible qu’un appareil externe soit défectueux. Veuillez vérier les
•
branchement. Si le problème persiste, consultez le guide d’utilisation de l’appareil
externe.
Essai de son
Si vous croyez qu’il y a un problème de son, effectuez un essai de son. Pour vérier le
son, vous pouvez faire jouer une mélodie préenregistrée dans le téléviseur.
Le message Le problème persiste-t-il après cet essai de son? apparaît à l’écran.
N
Si, pendant l’essai de son, un seul haut-parleur émet du son ou si aucun haut-parleur
n’émet de son, choisissez Oui.
Si vous entendez le son des haut-parleurs, choisissez Non.
Oui : Il est possible que votre téléviseur soit défectueux. Communiquez avec le centre d’appel Samsung.
•
Non : Il est possible qu’un appareil externe soit défectueux. Veuillez vérier les branchement. Si le problème persiste, consultez
•
le guide d’utilisation de l’appareil externe.
Si les haut-parleurs du téléviseur n’émettent aucun son, assurez-vous que le mode Sélect. le haut-parleur est réglé à
N
Haut-parleur TV dans le menu Son.
Vous entendrez la mélodie durant l’essai même si le Sélect. le haut-parleur est réglé à Haut-p. externe ou si vous avez coupé
N
le son avec la touche MMUTE.
Support technique
Autodiagnostic
Mise à jour du logiciel
Guide de connexion HD
Contacter Samsung
Autodiagnostic
Essai d’image ►
Essai de son
Puissance signal
Dépl.
►
RetourIntro.
Page 79

Puissance du signal (canaux numériques)
Contrairement aux canaux analogiques, dont la qualité de réception peut varier, de
“enneigée” à claire, les canaux numériques (HDTV) offrent soit une réception parfaite,
soit aucune réception. Ainsi, contrairement aux canaux analogiques, vous ne pouvez
pas procéder à une syntonisation de précision pour les canaux numériques. Cependant,
vous pouvez régler votre antenne pour améliorer la réception des canaux numériques
accessibles.
Si le témoin de puissance du signal indique que le signal est faible, déplacez
N
l’antenne de manière à augmenter la puissance du signal. Continuez à déplacer
l’antenne jusqu’à ce que vous trouviez la position offrant le signal le plus puissant.
Mise à jour du logiciel
❑
Samsung peut offrir des mises à jour du micrologiciel dans le futur. Veuillez visiter
Samsung.com ou communiquer avec le centre d’appel Samsung au 1-800-SAMSUNG
(726-7864) pour obtenir de l’information sur le téléchargement des mises à jour et sur
l’utilisation d’une clé USB. Les mises à jour sont accessibles en branchant une clé USB
dans le port USB.
Prenez soin de ne pas couper l’alimentation et de ne pas retirer la clé USB
N
pendant l’application des mises à jour. Le téléviseur s’éteint et se remet en marche
automatiquement une fois la mise à jour du microprogramme terminée.
Au moment de la mise à jour du micrologiciel, vos réglages vidéo et audio seront
N
remplacés par les réglages par défaut.
Nous vous recommandons de prendre en note vos réglages an de pouvoir les
N
rétablir facilement après la mise à jour.
Puissance signal
OK
Clé USB
Panneau latéral
du téléviseur
Autodiagnostic
Support technique
Mise à jour du logiciel
Guide de connexion HD
Contacter Samsung
Mise à jour du logiciel
Recherche du dispositif USB par balayage
Cela peut prendre jusqu’à 30 secondes.
Intro. Retour
►
Guide de connexion HD
❑
De courtes instructions portant sur Comment obtenir une performance
optimale pour votre nouveau téléviseur HD s’afche.
Suivez le guide pour connaître la meilleure méthode de branchement de vos
appareils HD.
Contacter Samsung
❑
Cette option afche les coordonnées du centre d’appel Samsung, du site
Web, ainsi que des informations sur le produit.
Appuyez sur la touche ▲ ou ▼ pour changer de page.
N
Comment utiliser de manière optimale votre TVHD
Étape 1. Branchez le sélecteur HD au téléviseur à l’aide des câbles
des composants vidéo (rouge, vert et bleu) et audio (rouge
et blanc).
▼
Sélecteur HD
Étape
2. Appuyez sur la touche Source de la télécommande pour
choisir HDMI ou Entrée composante.
■
Selon votre emplacement, il est possible de voir les émissions en HD à l’aide
d’une antenne.
■
Pour obtenir de plus amples détails, consultez Connexions HD dans le menu
ou le guide d’utilisation.
Veuillez communiquer avec Samsung si difcultés à faire fonctionner ce téléviseur.
Contacter Samsung :
- Centre d’appel : 1-800-SAMSUNG (7267864)
- Site Internet : www.samsung.com
Pour obtenir la dernière version du micrologiciel pour votre TV, allez sur le site Samsung.
www.samsung.com > “Soutien technique” > “Espace de téléchargement”
Guía de conexión HD
HDMI Câble
▼
Component Câble
HDMI Câble
Component Câble
Contacter Samsung
Vue arrière du téléviseur
OK
Page haut/bas
Retour
RetourIntro.
1/2
Français - 34
Page 80

Anynet+
TV
Anynet+ Appareil 1 Anynet+ Appareil
2
Câble HDMI 1.3
Câble HDMI 1.3
TV
TV
Anynet+ Appareil 1 Anynet+ Appareil
2
Câble HDMI 1.3
Câble HDMI 1.3
Anynet+ Appareil 1
Anynet+ Appareil 1
Câble HDMI 1.3
Câble HDMI 1.3
Câble optique
Cinéma maison
Câble HDMI 1.3
Français - 35
Branchement de dispositifs Anynet
+
Anynet+ est une fonction qui permet de commander, à l’aide de la télécommande de votre téléviseur Samsung,
tous vos appareils Samsung prenant en charge Anynet+. Pour vérifier si votre appareil Samsung est doté de cette fonction,
vérifiez la présence d’un logo Anynet+ sur l’appareil.
Branchement au téléviseur
1. Branchez un câble HDMI entre la prise HDMI IN 1 or 2(DVI) du téléviseur et la prise HDMI OUT de l’appareil Anynet+
correspondant.
Branchement d’un cinéma maison
1. Branchez un câble HDMI entre la prise HDMI IN 1 or 2(DVI) du téléviseur et la prise HDMI OUT de l’appareil Anynet+
correspondant. (DVI)
2. Branchez un câble HDMI entre la prise HDMI IN du cinéma maison et la prise HDMI OUT de l’appareil Anynet+ correspondant.
Branchez un câble optique entre la prise DIGITAL AUDIO OUT (OPTICAL) de votre téléviseur et l’entrée audionumérique de
N
votre cinéma maison.
Si vous procédez au branchement ci-dessus, la prise optique n’offre que deux canaux audio. Vous entendrez du son
N
uniquement au niveau des haut-parleurs gauche et droit frontaux de votre cinéma maison et du caisson d’extrêmes graves.
Pour avoir le son en 5.1 canaux, branchez la prise de sortie DIGITAL AUDIO OUT (OPTICAL) du lecteur DVD ou du récepteur
satellite (c.-à-d. l’appareil Anynet 1 ou 2) directement sur l’ampli cateur ou sur le cinéma maison, et non sur téléviseur.
Ne branchez qu’un seul cinéma maison.
N
Il est possible de brancher un appareil Anynet+ à l’aide du câble HDMI 1.3 Certains câbles HDMI ne prennent pas en charge
N
des fonctions Anynet+.
Anynet+ fonctionne lorsque l’appareil AV compatible est en mode Veille ou en mode Marche.
N
Anynet+ prend en charge un maximum de 12 appareils audiovisuels. Veuillez prendre note que vous pouvez brancher un
N
maximum de 3 appareils de même type.
Suite...
Page 81

Configuration d’Anynet+
❑
Les réglages suivants permettent de congurer les fonctions Anynet+.
Appuyez sur la touche TOOLS pour afcher le menu Outils.
T
Application
Anynet+ (HDMI-CEC)
Vous pouvez également choisir Anynet+ en choisissant Outils→ Anynet+ (HDMI-CEC).
Pour utiliser la fonction Anynet+, Anynet+ (HDMI-CEC) doit être activé.
1 Appuyez sur la touche MENU. Appuyez sur la touche ▲ ou ▼ pour sélectionner
Application, puis sur la touche ENTERE.
2. Appuyez sur la touche ▲ ou ▼ pour sélectionner Anynet+ (HDMI-CEC), puis sur la
touche ENTERE.
3. Appuyez sur la touche ▲ ou ▼ pour sélectionner
ENTERE.
4. Appuyez sur la touche ENTERE pour sélectionner Anynet+ (HDMI-CEC).
Configuration, puis sur la touche
Liste appareils
Configuration
5. Appuyez sur la touche ▲ ou ▼ pour sélectionner On, puis sur la touche ENTERE.
La fonction Anynet+ (HDMI-CEC) est activée.
N
Si vous choisissez Off, la fonction Anynet+ (HDMI-CEC) est désactivée.
N
Lorsque la fonction Anynet+ (HDMI-CEC) est désactivée, toutes les opérations Anynet+
N
connexes sont désactivées.
Configuration d’un appareil Anynet+ pour qu’il s’arrête automatiquement à la
mise hors tension du téléviseur
Anynet+ (HDMI - CEC) : On
Arrêt automatique : Oui
Dépl.
Configuration
Dépl.
1. Appuyez sur la touche ▲ ou ▼ pour sélectionner Arrêt automatique, puis sur la touche ENTERE.
2. Appuyez sur la touche ▲ ou ▼ pour sélectionner Oui, puis sur la touche ENTERE.
N
La fonction Arrêt automatique est activée.
N
Si vous choisissez Non, la fonction Arrêt automatique est annulée.
3. Appuyez sur la touche
La source active de la télécommande du téléviseur doit être réglée à TV pour utiliser la fonction Anynet+.
N
Si vous réglez Arrêt automatique à Oui, les appareils externes branchés au téléviseurs se mettes hors tension en même temps
N
EXIT pour quitter le menu.
que le téléviseur. Cependant, si un appareil est en mode d’enregistrement, il pourrait ne pas s’éteindre.
►
Retour Intro.
►
Retour Intro.
Balayage et permutation entre les appareils Anynet+
❑
1. Appuyez sur la touche TOOLS. Appuyez sur la touche ▲ ou ▼ pour sélectionner Liste
appareils, puis sur la touche ENTERE.
N
La liste des appareils Anynet+ branchés au téléviseur s’afche.
N
S’il est impossible de trouver l’appareil désiré, appuyez sur la touche rouge pour
effectuer un balayage des appareils.
2. Appuyez sur la touche ▲ ou ▼ pour sélectionner un appareil particulier, puis sur la
touche ENTERE. Le système commande alors l’appareil sélectionné.
N
Ce n’est qu’après avoir réglé Anynet+ (HDMI-CEC) à On dans le menu Application
que la Liste appareils s’afche.
Permuter vers les appareils sélectionnés peut prendre jusqu’à 2 minutes. Il n’est pas
N
Regarder téléviseur
Liste appareils
Enregistrer : DVDR
DVDR MENU
DVDR INFO
Récepteur : On
Configuration
Dépl.
possible d’annuler l’opération de permutation.
La durée nécessaire au balayage dépend du nombre d’appareils branchés.
N
Lorsque le balayage est terminé, le nombre d’appareils trouvés ne s’afche pas.
N
Bien que le téléviseur recherche automatiquement tous les appareils à sa mise sous tension à l’aide de la touche POWER, les
N
appareils branchés lorsque le téléviseur est déjà en marche ne gurent pas dans la liste des appareils. Dans ce cas, choisissez
Recherche de connexions pour détecter les appareils.
Si vous avez sélectionné un appareil externe en appuyant sur la touche SOURCE, vous ne pouvez pas utiliser la fonction
N
Anynet+. Assurez-vous de permuter vers l’appareil Anynet+ à l’aide de la touche TOOLS.
Touches de la télécommande du téléviseur accessibles en mode Anynet+
Type d’appareil État de fonctionnement Touches accessibles
Après une permutation vers l’appareil,
lorsque le menu de l’appareil
Appareil Anynet+
correspondant s’affiche à l’écran.
Après la permutation vers l’appareil,
pendant la lecture d’un fichier
Appareil avec syntoniseur
intégré
Après la permutation vers l’appareil,
pendant l’écoute d’une émission
télévisée
Appareil audio Lorsque le récepteur est activé
Touches numériques ▲/▼/◄/► ENTERE
touches de couleur / EXIT
(recherche vers l’arrière / (recherche vers
l’avant) (Arrêt) / (Lecture) / (Pause)
CH / CH
VOL / VOL / MMUTE
Retour Intro.
Français - 36
Suite...
Page 82

Français - 37
La fonction Anynet+ ne fonctionne que lorsque la source active de la télécommande du téléviseur est réglée à TV.
N
La touche ne fonctionne qu’en mode d’enregistrement.
N
Il est impossible de commander des appareils Anynet+ à l’aide des touches du téléviseur. Seule la télécommande du téléviseur
N
permet de commander les appareils Anynet+.
Il est possible que la télécommande du téléviseur ne fonctionne pas dans certaines conditions. Le cas échéant, sélectionnez à
N
nouveau l’appareil Anynet+.
Les fonctions Anynet+ ne fonctionnent pas avec des produits d’autres marques.
N
Les fonctions
Menu Anynet+
,
peuvent varier selon l’appareil.
Le menu Anynet+ varie selon le type d’appareil Anynet+ et l’état de l’appareil branché au téléviseur.
Menu Anynet+ Description
Regarder téléviseur Permuter d’Anynet+ vers le mode de télédiffusion (TV).
Liste appareils Afficher la liste des appareils Anynet+.
Enregistrement Démarrer un enregistrement. (Ce menu ne fonctionne que pour les appareils d’enregistrement.)
Menu
Afficher le menu de l’appareil branché.
Exemple : Lorsqu’un enregistreur DVD est branché, le menu principal de l’enregistreur DVD s’affiche.
Afficher le menu de commande de la lecture de l’appareil branché.
INFO
Exemple : enregistreur DVD est branché, le menu de commande de la lecture de l’enregistreur DVD
s’affiche.
Enregistrement par
minuterie
Arrêter
l’enregistrement
Programmer un enregistrement. (Ce menu ne fonctionne que pour les appareils qui prennent en
charge la programmation d’enregistrements.)
Arrêter l’enregistrement.
Récepteur Le son est émis par le récepteur (cinéma maison).
Configuration
Vous pouvez régler les fonctions Anynet+ (HDMI-CEC), Arrêt automatique et Recherche de
connexions pour Anynet+.
Enregistrement
❑
Vous pouvez enregistrer une émission télévisée à l’aide d’un enregistreur Samsung.
1. Appuyez sur la touche TOOLS.
2. Appuyez sur la touche ▲ ou ▼ pour sélectionner Enregistrer Immediately
(immédiatement), puis sur la touche ENTERE. L’enregistrement commence.
Lorsque plus d’un appareil d’enregistrement est branché
Lorsque plusieurs appareils d’enregistrement sont branchés, la liste des appareils s
’affiche à l’écran. Appuyez sur la touche ▲ ou ▼ pour sélectionner un appareil
d’enregistrement, puis sur ENTERE. L’enregistrement commence.
Lorsque l’appareil branché n’est pas affiché
Regarder téléviseur
Liste appareils
Enregistrer : DVDR
DVDR MENU
DVDR INFO
Récepteur : On
Configuration
Dépl.
Choisissez Liste appareils et appuyez sur la touche rouge pour rechercher les appareils.
3. Appuyez sur la touche EXIT pour quitter le menu.
Vous pouvez enregistrer le visionnement en cours en appuyant sur la touche . Si vous regardez une vidéo sur un autre
N
appareil, la vidéo de cet appareil est enregistrée.
Avant d’enregistrer, vériez si la prise d’antenne est correctement branchée à l’appareil enregistreur. Pour brancher correctement
N
une antenne à un appareil d’enregistrement, consultez le guide d’utilisation de l’appareil.
Écoute par l’intermédiaire d’un récepteur (cinéma maison)
❑
Vous pouvez écouter le son par l’intermédiaire d’un récepteur, plutôt que par les haut-parleurs du téléviseur.
1. Appuyez sur la touche TOOLS. Appuyez sur la touche ▲ ou ▼ pour sélectionner Récepteur.
2. Appuyez sur la touche ◄ ou ► pour sélectionner On.
Vous pouvez maintenant écouter le son par le récepteur.
3. Appuyez sur la touche
N
Si votre récepteur ne prend en charge que le son, il pourrait ne pas gurer dans la liste des appareils.
N
Le récepteur fonctionnera lorsque la prise OPTICAL IN sera reliée à la prise OPTICAL OUT du téléviseur.
N
Lorsque le récepteur (cinéma maison) est réglé à On, il est possible d’entendre le son provenant de la prise optique du
EXIT pour quitter le menu.
téléviseur. Lorsque le téléviseur émet des signaux numériques (air), il transmet le son en 5.1 canaux au récepteur du cinéma
maison. Lorsque la source est une composante numérique, comme un lecteur DVD, et qu’elle est branchée au téléviseur à l’
aide d’un câble HDMI, le son produit par le cinéma maison sera un son à 2 canaux.
N
En mode d’écoute par le récepteur, certaines restrictions relatives à la fonction ISI et aux fonctions audio (MTS, Langue
privilégiée) s’appliquent.
N
S’il y a une interruption de l’alimentation au téléviseur lorsque la fonction Récepteur est réglée à On (si le cordon d’
alimentation est débranché ou en cas de panne de courant), la fonction Sélect. le haut-parleur peut être réglée à Haut-p.
externe lorsque vous remettez le téléviseur sous tension.
Retour Intro.
Page 83

Dépannage de la fonction Anynet
Symptôme Solution
Anynet+ ne fonctionne pas. Vérier si l’appareil est bien un appareil Anynet+. Le système Anynet+ ne prend en charge
Je souhaite lancer Anynet+. Vériez si l’appareil Anynet+ est correctement branché au téléviseur et si le Anynet+
Je souhaite quitter Anynet+. Sélectionner Regarder téléviseur dans le menu Anynet+.
Le message Connexion à l’
appareil Anynet+... s’affiche à l’
écran.
L’appareil Anynet+ ne lit pas. Vous ne pouvez pas utiliser la fonction de lecture lorsque le mode Prêt-à-l’emploi est en cours
L’appareil branché n’est pas
affiché.
L’émission ne peut pas être
enregistrée.
Le son du téléviseur ne sort pas
par le récepteur.
•
que les appareils Anynet+.
Branchez un seul récepteur (cinéma maison).
•
Vériez si le cordon d’alimentation de l’appareil Anynet+ est bien branché.
•
Vériez les branchements des câbles vidéo/audio/HDMI 1.3 de l’appareil Anynet+.
•
Vériez si l’option Anynet+ (HDMI-CEC) est réglée sur On dans le menu de configuration
•
d’Anynet+.
Vérifiez si la télécommande est en mode TV.
•
Vérifier s’il s’agit de la télécommande exclusive Anynet+.
•
Anynet+ ne fonctionne pas dans certaines situations. (recherche de canaux, fonction, Prêt
•
à l’emploi, etc.)
Au moment du branchement ou du débranchement du câble HDMI 1.3, assurez-vous
•
d’effectuer une nouvelle recherche des appareils ou mettez le téléviseur hors tension et
redémarrez-le.
Vériez si la fonction Anynet+ de l’appareil Anynet+ est activée.
•
•
(HDMI-CEC) est réglé sur On dans le menu Conguration d’Anynet+.
Appuyez sur la touche TV de la télécommande du téléviseur pour permuter vers le
•
téléviseur. Appuyez ensuite sur la touche TOOLS pour afficher le menu Anynet+ et
sélectionner le menu désiré.
•
Appuyez sur la touche SOURCE de la télécommande du téléviseur et choisissez un
•
appareil autre que les appareils Anynet+.
Appuyez sur les touches CH, CH LIST, PRE-CH et FAV.CH pour changer le mode du
•
téléviseur.
(Remarque : la touche des canaux ne fonctionne que si aucun appareil Anynet+ à
syntoniseur intégré n’est branché.)
Vous ne pouvez utiliser la télécommande pendant la conguration d’Anynet+ ou pour
•
permuter vers un mode de visionnement.
Utilisez la télécommande lorsque le réglage d’Anynet+ ou la permutation vers le mode de
•
visionnement sont terminés.
d’exécution.
Vériez si l’appareil prend en charge les fonctions Anynet+.
•
Vériez si le câble HDMI 1.3 est bien branché.
•
Vériez si l’option Anynet+ (HDMI-CEC) est réglée sur On dans le menu de configuration
•
d’Anynet+.
Rechercher les appareils Anynet+ de nouveau.
•
Seul le câble HDMI 1.3 permet de brancher un appareil Anynet+. Certains câbles HDMI ne
•
prennent pas en charge des fonctions Anynet+.
S’il y a interruption suite à une anomalie, par exemple si le câble HDMI ou le cordon
•
d’alimentation sont débranchés, ou en cas de panne de courant, répétez le balayage des
appareils.
Vérifiez si la prise d’antenne de l’appareil enregistreur est branchée correctement.
Branchez le câble optique entre le téléviseur et le récepteur.
+
Français - 38
Page 84

Annexe
Français - 39
Dépannage
Le tableau ci-dessous dresse la liste des problèmes courants et suggère des solutions.
Si aucun de ces conseils de dépannage ne permet de corriger le problème, communiquez avec le service à la clientèle de
Samsung en composant le 1-800-SAMSUNG.
Problème Solution possible
Image de mauvaise qualité. Essayez un autre canal.
Son de qualité médiocre. Essayez un autre canal.
Aucune image ou aucun son. Essayez un autre canal.
Il n’y a pas de son ou le son est
trop bas alors que le volume est
réglé au maximum.
L’image roule verticalement. Vérifiez toutes les branchements de câble.
Le téléviseur fonctionne de
manière erratique.
Le téléviseur ne se met pas sous
tension.
La télécommande fonctionne mal. Remplacez les piles de la télécommande.
Problème d’écran en télédiffusion
numérique.
L’image est trop claire ou trop
sombre.
L’image est trop grande ou trop
petite.
La qualité visuelle des canaux
numériques varie.
L’écran est noir et le témoin
d’alimentation clignote
régulièrement.
Bien que le téléviseur affiche HD
(haute définition), la qualité des
images n’est pas satisfaisante.
L’image semble déformée dans un
angle de l’écran.
Un son étrange se fait entendre. Ce son est produit par le fonctionnement des appareils; il ne s’agit pas d’une défectuosité.
Pixels visibles à l’écran. Il se peut qu’il y ait à l’écran quelques pixels lumineux ou sombres. Ces pixels n’ont aucune
Le message Resets all settings to
the default values (Rétablit tous les
paramètres aux valeurs par défaut)
s’affiche.
Réglez l’antenne.
Vérifiez tous les branchements de câble.
Réglez l’antenne.
Appuyez sur la touche SOURCE.
Vérifiez si le téléviseur est branché.
Vérifiez les branchements de l’antenne.
Vérifiez que la touche MMUTE n’active pas la sourdine.
Dans un premier temps, vérifiez le volume des éléments branchés sur votre téléviseur
(récepteur numérique, DTV, lecteur DVD, câblosélecteur, magnétoscope, etc.). Réglez ensuite
le volume du téléviseur en conséquence.
Débranchez le téléviseur pendant 30 secondes et essayez de nouveau.
Vérifiez que la prise électrique fonctionne correctement.
Nettoyez l’extrémité supérieure de la télécommande (fenêtre de transmission).
Vérifiez les bornes des piles.
Appuyez sur la touche TV pour régler la télécommande au mode TV.
Vérifiez s’il y a des piles dans la télécommande.
Vérifiez que les bornes “+” et “-” des piles sont dans le bon sens.
Vérifiez la puissance du signal numérique et l’entrée de l’antenne.
Réglez la luminosité et le contraste.
Réglez la syntonisation de précision.
Réglez les paramètres de format.
La qualité visuelle des canaux numériques peut varier selon le mode de production d’origine
(analogue ou numérique).
- Si le mode de production d’origine est numérique : Émission de qualité visuelle supérieure.
- Si le mode de production d’origine est analogique : L’émission numérique affichée à l’écran
était une émission analogue à l’origine, convertie au format numérique.
La qualité visuelle est de calibre SD (définition standard).
Sur l’ordinateur, vérifiez l’alimentation et le câble de signal.
Le téléviseur est en mode d’économie d’énergie.
Déplacez la souris de l’ordinateur ou appuyez sur une touche du clavier.
Sur votre équipement, vérifier le mode (STB, DVD etc.), l’alimentation et le câble de signal.
Le téléviseur est en mode d’économie d’énergie.
Appuyez sur la touche SOURCE du panneau ou de la télécommande.
Mettez le téléviseur hors tension et rallumez-le.
L’indication HD (haute définition) affichée lors d’un changement de canal ou lorsque la
touche INFO de la télécommande est enfoncée signifie que le canal sélectionné est un
canal numérique. Si le télédiffuseur convertit un signal analogique au format numérique et le
transmet, il est possible que la qualité visuelle ne soit pas parfaite.
Si vous choisissez le format Plein écran pour certains appareils externes, une image
déformée pourrait apparaître dans un angle de l’écran. Ce problème est causé par les
appareils externes et non par le téléviseur.
incidence sur la performance de cet appareil.
Ce message s’affiche lorsqu’on maintient la touche EXIT enfoncée pendant quelques instants.
Les paramètres par défaut réglés en usine sont rétablis.
Page 85

Préparation avant l’installation du support mural
Cas A. Installation du support mural Samsung Cas B. Installation du support mural d’une autre marque
1 Installez le support mural à l’aide d’une plage de couple maximale de 15 kgf/cm. Soyez prudent : les pièces pourraient être
endommagées par un couple situé à l’extérieur de la plage indiquée.
2. La trousse d’accessoires contient un anneau de support [②] pour l’installation d’un support mural de marque autre. (Cas B)
N
Vissez dans le trou
] lorsque vous installez le support mural sur le mur.
[
①
Assemblage du socle
À l’aide des vis servant à immobiliser le socle et le téléviseur, fixez fermement le
téléviseur au socle.
(L’aspect extérieur du produit peut être différent de celui illustré.)
Dans le cas d’une installation murale du
téléviseur, fixez le couvercle (➊) sur le
socle à l’aide de deux vis.
Français - 40
Page 86

Français - 41
Fixation du téléviseur au mur
Le fait de tirer, de pousser ou de monter sur le téléviseur peut en provoquer la chute. Plus particulièrement, veillez
à ce que vos enfants ne grimpent pas sur le téléviseur et qu’ils ne le déstabilisent pas : il pourrait se renverser et
causer des blessures grave, voire la mort. Respectez toutes les mesures de sécurité indiquées dans le dépliant sur
Avertissement
Accessoires
Supportdu téléviseur
1
(M4X 16)
Pour empêcher le renversement du téléviseur :
1. TPour empêcher que le téléviseur ne tombe :
1. Fixez le support au téléviseur en insérant les vis 1 (M4X 16) dans les trous situés au milieu du téléviseur.
N
N
2. Vissez à fond les vis sur le mur ou l’armoire où le téléviseur doit être installé. Pour immobiliser le téléviseur, xez le cordon relié
au téléviseur aux vis vissées dans le mur ou sur l’armoire.
N
N
N
N
N
la sécurit inclus. Pour une stabilité accrue, installez un dispositif antichute de sécurité, comme suit.
42", 50" 58", 63"
42 po, 50 po : Dévissez une vis xée à l’arrière de votre téléviseur avant de xer le dispositif de retenue.
Veillez à utiliser uniquement les vis fournies.
Achetez séparément les vis de xation au mur ou sur l’armoire.
Installez le téléviseur à proximité du mur de manière qu’il ne se renverse pas.
Lorsque vous attachez le téléviseur au mur, xez le cordon de manière qu’il soit parallèle au sol ou incliné.
Vers le bas pour des raisons de sécurité.Vériez à intervalles réguliers que le cordon ou le l ne se détendent pas.
Avant de déplacer le téléviseur, détachez d’abord le cordon.
42", 50"
58", 63"
Mur
Mur
3. Assurez-vous que tous les points d’ancrage sont solides. Vous devez les vérier périodiquement an de détecter tout signe de
fatigue. En cas de doute au sujet des points d’ancrage, communiquez avec un installateur professionnel.
Page 87

Spécifications pour la trousse de fixation murale (VESA)
Installez votre support mural sur un mur massif perpendiculaire au plancher.
Pour le xer à d’autres matériaux, veuillez communiquer avec votre détaillant.
Si vous l’installez au plafond ou sur un mur incliné, il risque de tomber et de causer des blessures.
Type de produits pouces Spéc. VESA (A * B) Vis standard Quantité
19" ~22" 100 * 100 M4
23"~29" 200 * 100 M6
TV ACL
30"~40" 200 * 200
46"~55" 400 * 400
4
M8
57"~70" 800 * 400
42"~ 50" 400 * 400
58"~ 63" 600 * 400
Téléviseur à écran à
plasma
M8 4
70" ~ 800 * 400
80" ~ 1400 * 800
N
Les dimensions standard pour les trousses de xation murale gurent dans le tableau ci-dessus.
N
Un manuel d’installation détaillé et toutes les pièces nécessaires à l’assemblage sont comprises à l’achat de notre trousse de
xation murale.
N
N’utilisez pas de vis plus longues que les dimensions standard : elles pourraient endommager l’intérieur du téléviseur.
N
En ce qui a trait aux supports muraux non conformes aux spécications de vis de la norme VESA, la longueur des vis peut varier
selon leurs spécications.
N’utilisez pas de vis non conformes aux spécications de vis de la norme VESA.
N
Ne serrez pas trop les vis : cela pourrait endommager le produit ou en provoquer la chute et causer des blessures.
Samsung décline toute responsabilité dans le cas où de tels accidents se produisent.
N
Samsung ne saurait être tenu responsable des dommages au produit ou des blessures occasionnés par l’utilisation d’un support
mural non conforme aux spécications VESA ou non recommandé, ou si le consommateur ne suit pas les instructions d’installation
du produit.
N
Nos modèles de 145 cm (57 po) et 160 cm (63 po) ne sont pas conformes aux spécications VESA. Par conséquent, vous devez
utiliser notre ensemble de xation conçu pour ces modèles.
Au montage, l’inclinaison du téléviseur ne doit pas dépasser 15 degrés.
N
N’installez pas le support mural lorsque le téléviseur est sous tension.
Vous pourriez subir une électrocution.
Français - 42
Page 88

Spécifications
Français - 43
Modèle PN42B430P2D PN50B430P2D
Taille de l’écran (en diagonal) 42 pouces (42.3 pouces en diagonale) 50 pouces (49.9 pouces en diagonale)
Résolution de l’ordinateur 1024x768 à 60 Hz 1360x768 à 60 Hz
Son (Sortie) 10W x 2 10W x 2
Dimensions (l x H x P)
Téléviseur
Avec support
Poids
Téléviseur
Avec support
Facteurs environnementaux
Température de fonctionnement
Niveau d’humidité pour le
fonctionnement
Température pour l’entreposage
Niveau d’humidité pour l’
entreposage
Cet appareil est un appareil numérique de catégorie B.
N
Le design et les spécications peuvent changer sans préavis.
N
Pour les caractéristiques d’alimentation et de consommation électrique, voir l’étiquette xée au produit.
N
La prise d’entrée HDMI IN 2(DVI) doit être utilisée pour un branchement de câble HDMI/DVI.
N
41.5 x 26.6 x 2.8 pouces
(1055.0 x 667.4 x 73 mm)
41.5 x 28.6 x 12.4 pouces
(1055.5 x 728.7 x 316 mm)
53.5 lb (24.3 kg)
61.7 lb (28.0 kg)
50 °F to 104 °F (10 °C to 40 °C)
10% to 80%,
-4 °F to 113 °F (-20 °C to 45 °C)
5% to 95%,
sans condensation
sans condensation
48.4 x 29.7 x 2.8 pouces
(1230.2 x 755.7 x 73 mm)
48.4 x 32.1 x 12.4 pouces
(1230.2 x 816.8 x 316 mm)
70.1 lb (31.8 kg)
78.2 lb (35.5 kg)
50 °F to 104 °F (10 °C to 40 °C)
10% to 80%,
-4 °F to 113 °F (-20 °C to 45 °C)
5% to 95%,
sans condensation
sans condensation
Page 89

Dimensions (PN42B430P2D)
VUE EN PLONGÉE VUE AVANT
DÉTAILS DU PANNEAU DES PRISES 7,2 x 3,7 POUCES
VUE LATÉRALE VUE ARRIÈRE
REMARQUE : Tous les dessins ne sont pas nécessairement
des représentations à l’échelle. Certaines dimensions sont
susceptibles de changer sans préavis.
Vériez les dimensions de chaque unité avant de procéder.
à des travaux de menuiserie. Nous ne sommes pas responsables des erreurs de typographie ou d’impression.
© 2009 Samsung Electronics America, Inc.
Français - 44
Page 90

Dimensions (PN50B430P2D))
Français - 45
VUE EN PLONGÉE VUE AVANT
DÉTAILS DU PANNEAU DES PRISES 7,2 x 3,7 POUCES
VUE LATÉRALE VUE ARRIÈRER
REMARQUE : Tous les dessins ne sont pas nécessairement
des représentations à l’échelle. Certaines dimensions sont
susceptibles de changer sans préavis.
Vériez les dimensions de chaque unité avant de procéder.
à des travaux de menuiserie. Nous ne sommes pas responsables des erreurs de typographie ou d’impression.
© 2009 Samsung Electronics America, Inc.
Page 91

Cette page est laissée
intentionnellement en blanc.
Français - 46
 Loading...