

Page 1

1-800-SAMSUNG (7267864)
Samsung Electronics America, Inc.
105 Challenger Road Ridgefield Park, NJ 07660-0511
Samsung Electronics Canada Inc., Customer Service
55 Standish Court Mississauga, Ontario L5R 4B2
Call center hours of operation (Mon-Sun 9AM-12AM EST).
www.samsung.com/register.
Rear Panel Jacks
PN42B400P3D/ PN50B400P3D
1
POWER IN
2
SERVICE
3
DIGITAL AUDIO OUT (OPTICAL)
4
ANT IN
5
HDMI IN 1 (DVI), 2
6
DVI AUDIO IN
7
COMPONENT IN / AV IN
8
EX-LINK
English - 1
Page 2
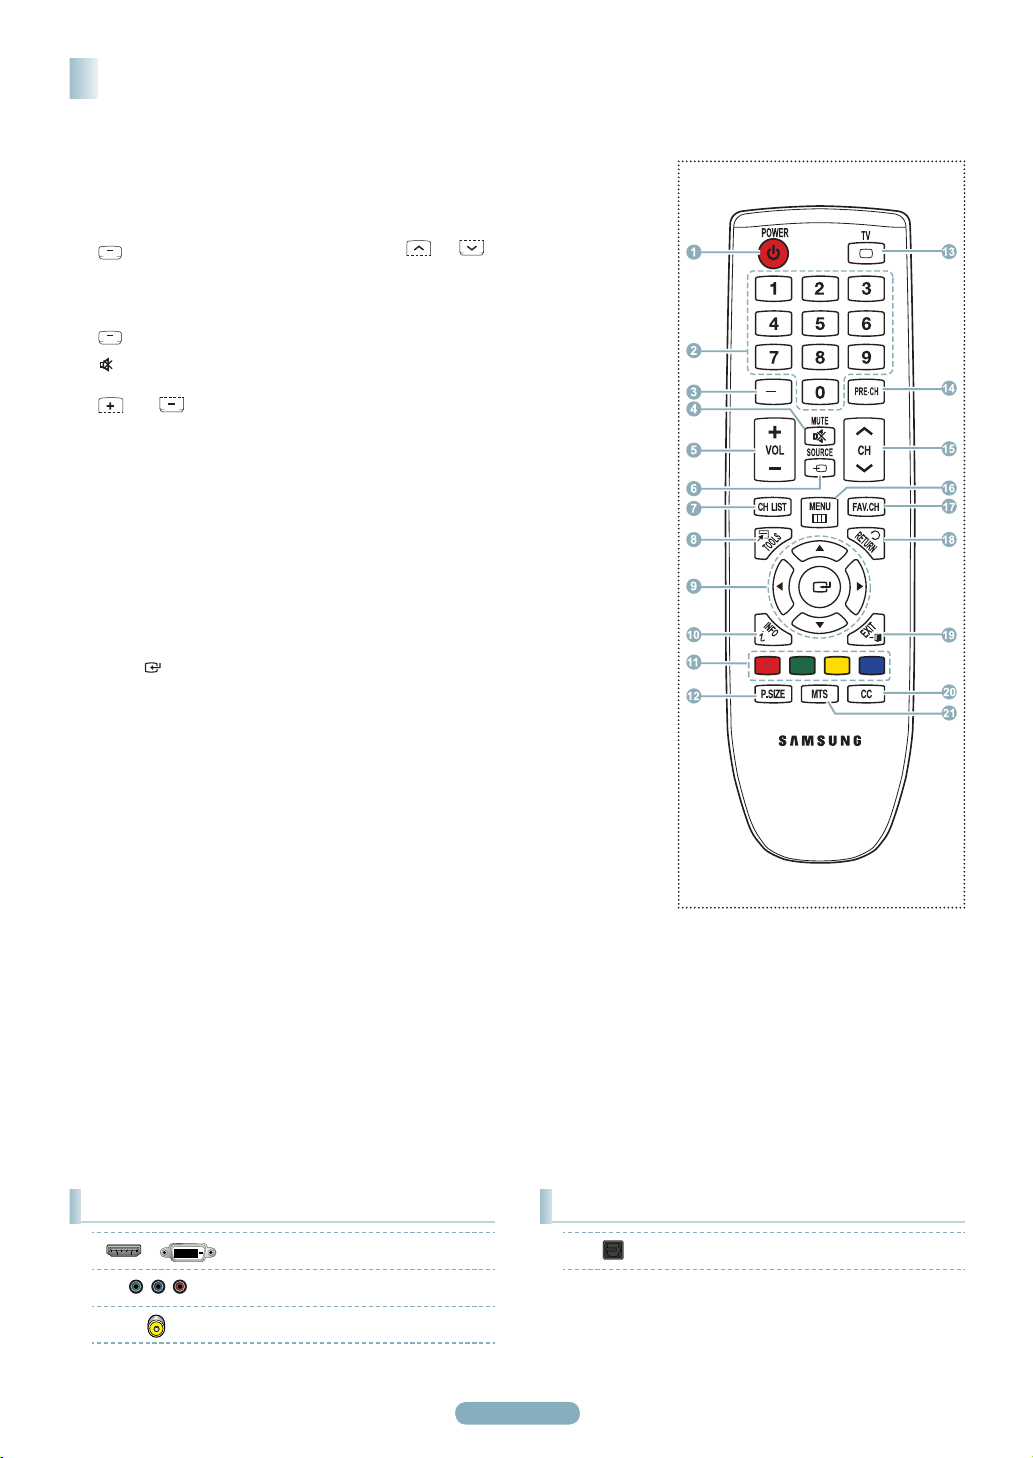
Remote Control Buttons
You can use the remote control up to a distance of about 23 feet from the TV.
1
POWER
Turns the TV on and off.
2
NUMERIC BUTTONS
Press to change the channel.
3
Press to select additional channels
(digital and analog) being broadcast by
the same station. For example, to select
channel “54-3”, press “54”, then press “
” and “3”.
4
MUTE
Press to temporarily cut off the sound.
5
VOL
Press to increase or decrease the
volume.
6
SOURCE
Press to display and select the available
video sources.
7
CH LIST
Used to display Channel Lists on the
screen.
8
TOOLS
Use to quickly select frequently used
functions.
9
UP▲/DOWN▼/LEFT◄/RIGHT►/
ENTER
Use to select on-screen menu items
and change menu values.
0
INFO
Press to display information on the TV
screen.
!
COLOR BUTTONS
Use these buttons in the Channel list.
@
P.SIZE
Picture size selection.
#
TV
Selects the TV mode directly.
$
PRE-CH
Tunes to the previous channel.
%
CH
Press to change channels.
^
MENU
Displays the on-screen menu.
&
FAV.CH
Press to switch to your favorite
channels.
*
RETURN
Returns to the previous menu.
(
EXIT
Press to exit the menu.
)
CC
Controls the caption decoder.
a
MTS
Press to choose stereo, mono or
Separate Audio Program (SAP
broadcast).
Video Input Performance Comparison
/
HDMI/DVI Best
COMPONENT Better
VIDEO Normal
Audio Output Performance Comparison
OPTICAL (Digital) Best
English - 2
Page 3
English - 3
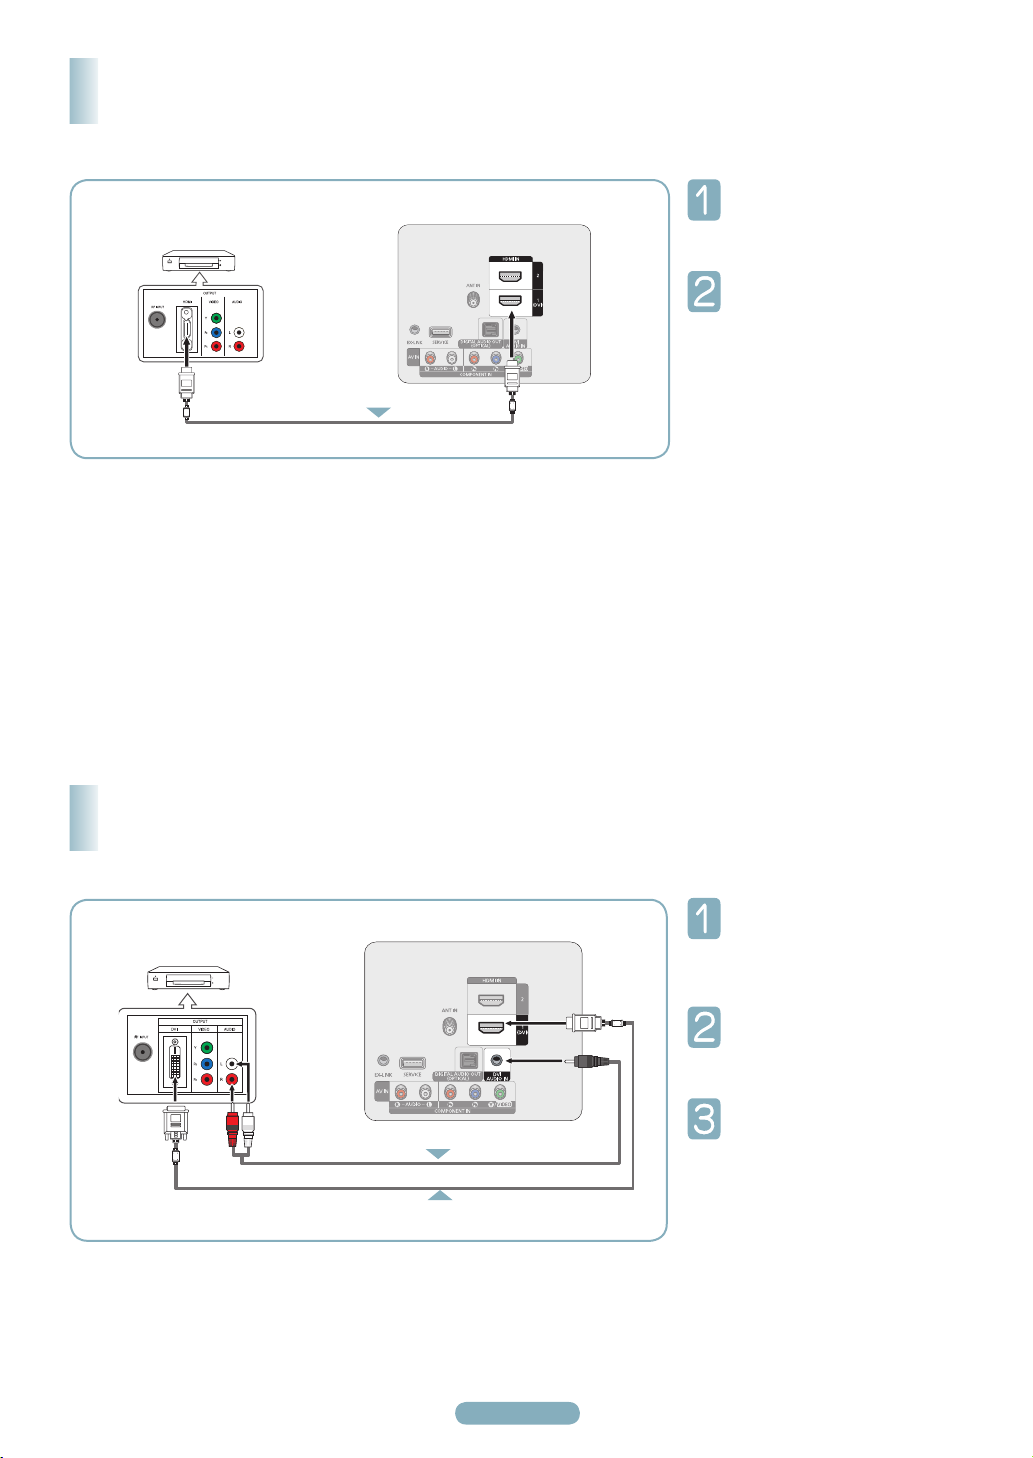
Connecting a DVD / Blu-Ray or Cable Box /
Satellite receiver (Set-Top Box) via HDMI
Using the HDMI (High Definition Multimedia Interface) Cable
DVD Player or Cable Box /
Satellite receiver (Set-Top Box)
TV Rear Panel
Connect an HDMI Cable between
the HDMI IN (1(DVI), 2) jack on the
TV and the HDMI jack on the DVD
/ Blu-Ray Player or Cable Box /
Satellite receiver (Set-Top Box).
Press the SOURCE button on the
remote control until you see the
Set-Top Box signal (see “To Select
the Source” on page 9).
HDMI Cable (Not supplied)
1
What is HDMI?
• HDMI, or high-definition multimedia interface, is an interface that enables the transmission of digital audio and video
signals using a single cable.
• The difference between HDMI and DVI is that the HDMI device is smaller in size and
Digital Copy Protection) coding feature installed.
➢
Each DVD / Blu-Ray Player or Cable Box / Satellite receiver (Set-Top Box) has a different back panel configuration.
➢
The TV may not output sound and pictures may be displayed with abnormal color when DVD Player or Cable Box / Satellite
receivers supporting HDMI versions older than 1.3 are connected. When connecting an older HDMI cable and there is no sound,
connect the HDMI cable to the HDMI IN 1(DVI) jack and the audio cables to the DVI AUDIO IN jacks on the back of the TV. If this
happens, contact the company that provided the DVD Player or Cable Box / Satellite receiver to confirm the HDMI version, then
request an upgrade.
➢
HDMI cables that are not 1.3 may cause annoying flicker or no screen display.
h
as the HDCP (High Bandwidth
Connecting a DVD / Blu-Ray Player or Cable Box /
Satellite receiver (Set-Top Box) via DVI
Using the DVI (Digital Visual Interface) Cable
DVD Player or Cable Box /
Satellite receiver (Set-Top Box)
Audio Cable (Not supplied)
HDMI/DVI Cable (Not supplied)
TV Rear Panel
2
Connect a HDMI/DVI Cable or
DVI-HDMI Adapter between the
HDMI IN 1(DVI) jack on the TV and
the DVI jack on the DVD /
Blu-Ray Player or Cable Box/
Satellite receiver (Set-Top Box).
Connect Audio Cables between the
DVI AUDIO IN jack on the TV and
the DVD / Blu-Ray Player or Cable
Box / Satellite receiver (Set-Top
Box).
Press the SOURCE button on the
remote control until you see the
Set-Top Box signal (see “To Select
the Source” on page 9).
1
➢
Each DVD / Blu-Ray Player or Cable Box / Satellite receiver (Set-Top Box) has a different back panel configuration.
➢
When connecting a DVD / Blu-Ray Player or Cable Box / Satellite receiver (Set-Top Box), match the color of the connection
terminal to the cable.
➢
When using an HDMI / DVI cable connection, you must use the HDMI IN 1(DVI) jack.
Page 4
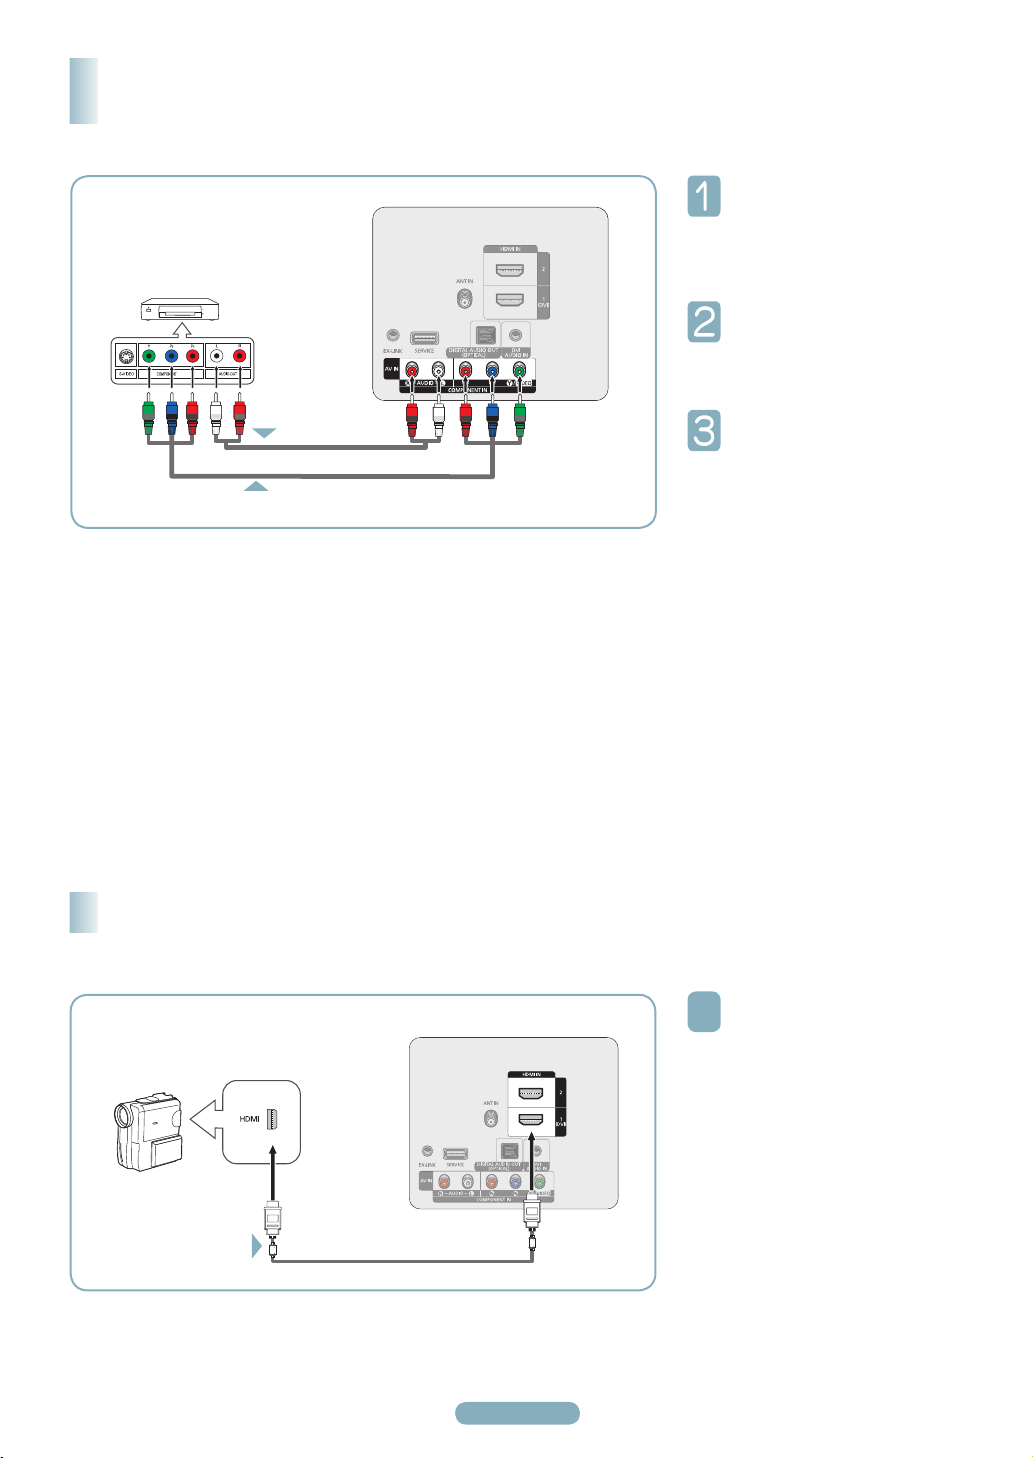
Connecting a DVD / Blu-Ray Player or Cable Box /
Satellite receiver (Set-Top Box) via Component cables
Using the Component Cable
TV Rear Panel
DVD Player or Cable Box/
Satellite receiver (Set-Top Box)
2
Audio Cable (Not supplied)
Component Cable (Not supplied)
1
➢
Component video separates the video into Y (Luminance (brightness), PB (Blue) and PR (Red) for enhanced video quality.
➢
Each DVD / Blu-Ray Player or Cable Box / Satellite receiver (Set-Top Box) has a different back panel configuration.
➢
When connecting a DVD / Blu-Ray Player or Cable Box / Satellite receiver (Set-Top Box), match the color of the connection
terminal to the cable.
Connect a Component Cable
between the COMPONENT IN [Y,
PB, PR] jacks on the TV and the
COMPONENT IN [Y, PB, PR] jacks
on the DVD / Blu-Ray Player or
Cable Box / Satellite receiver(SetTop Box).
Connect Audio Cables between
the COMPONENT IN [R-AUDIO-L]
jacks on the TV and the AUDIO
OUT jacks on the DVD / Blu-Ray
Player or Cable Box / Satellite
receiver (Set-Top Box).
Press the SOURCE button on the
remote control until you see the
Set-Top Box signal. (see “To Select
the Source” on page 9).
Connecting a Camcorder
Using an HDMI Cable
Camcorder
1
➢
Each Camcorder has a different back panel configuration.
HDMI Cable (Not supplied)
TV Rear Panel
English - 4
Connect an HDMI Cable between
the HDMI IN (1(DVI), 2) jack on
1
the TV and the HDMI jack on the
camcorder.
Page 5
English - 5
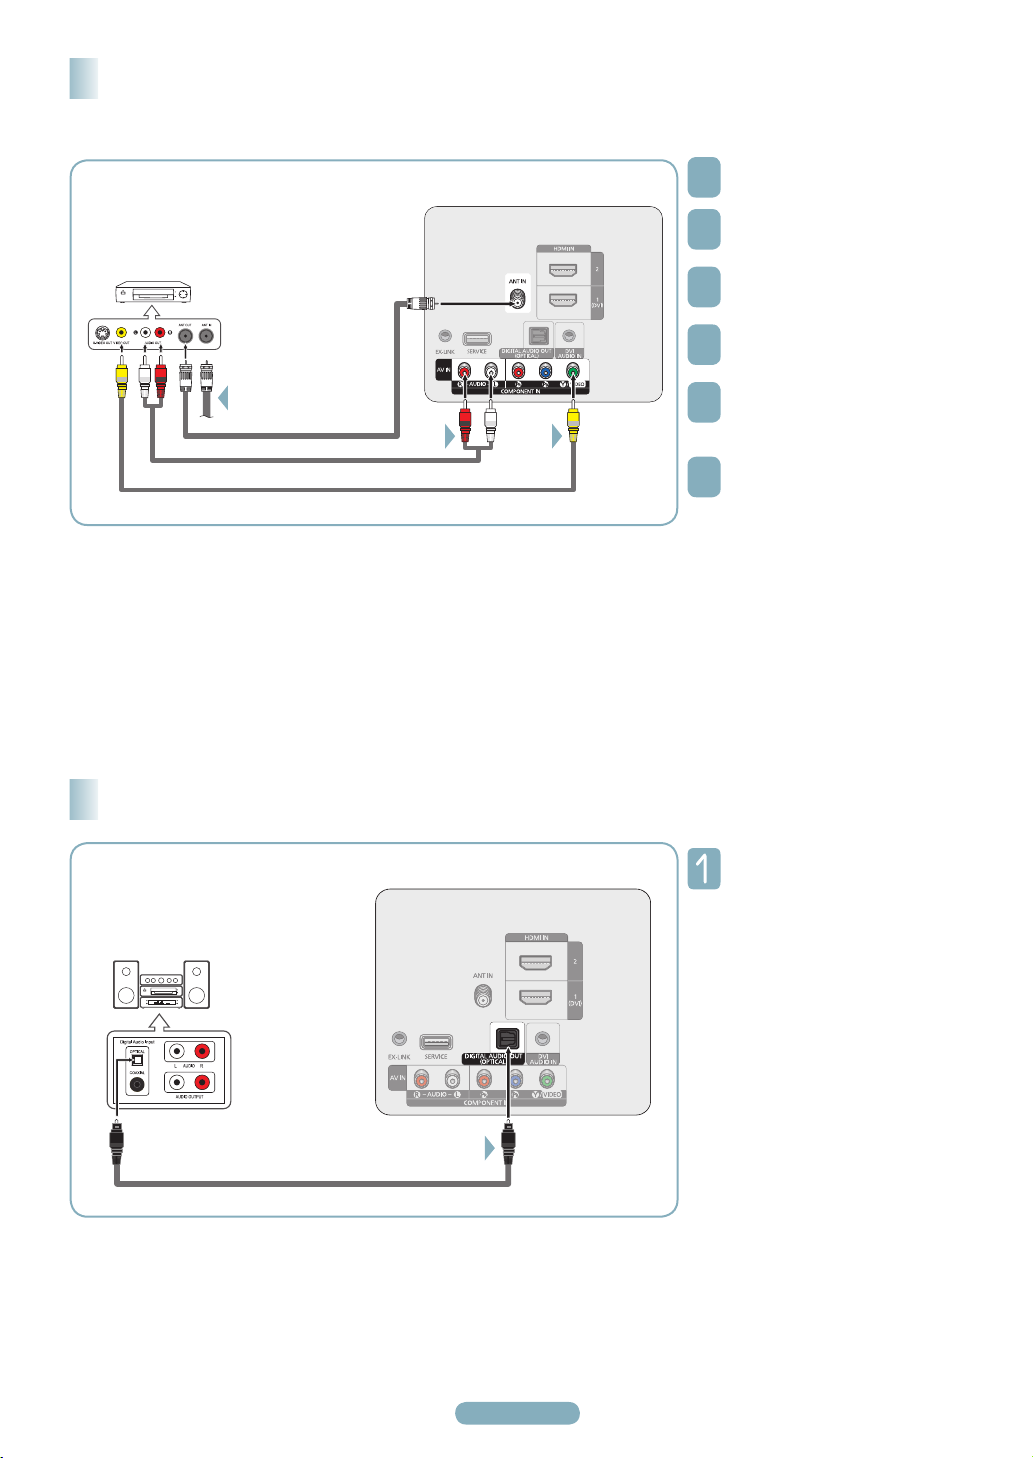
Connecting a VCR
Using a Video Cable
Unplug the cable or antenna from
TV Rear Panel
VCR Rear Panel
3
Antenna cable (Not supplied)
Audio Cable (Not supplied)
Video Cable (Not supplied)
➢
If you have a “mono” (non-stereo) VCR, use a Y-connector (not supplied) to connect to the right and left audio input jacks of the
TV. Alternatively, connect the cable to the “R” jack. If your VCR is stereo, you must connect two cables.
➢
Each VCR has a different back panel configuration.
➢
When connecting a VCR, match the color of the connection terminal to the cable.
➢
When connecting to AV IN , the color of the AV IN [Y/VIDEO] jack (Green) does not match the color of the video cable (Yellow).
5
4
the back of the TV.
1
Connect the cable or antenna to the
ANT IN terminal on the back of the
2
VCR.
Connect an Antenna Cable between
the ANT OUT terminal on the VCR
3
and the ANT IN terminal on the TV.
Connect a Video Cable between the
VIDEO OUT jack on the VCR and
4
the AV IN [Y/VIDEO] jack on the TV.
Connect Audio Cables between the
AUDIO OUT jacks on the VCR and
5
the AV IN [R-AUDIO-L] jacks on the
TV.
Press the SOURCE button on the
remote control until you see the
6
VCR signal (see “To Select the
Source” on page 9).
Connecting a Digital Audio System
TV Rear Panel
Digital Audio System
Optical Cable (Not supplied)
5.1CH audio is possible when the TV is connected to an external device supporting 5.1CH.
➢
Each Digital Audio System has a different back panel configuration.
➢
When the receiver (home theater) is set to On, you can hear sound output from the TV’s Optical jack. When the TV is displaying a
➢
DTV(air) signal, the TV will send out 5.1 channel sound to the Home theater receiver. When the source is a digital component such
as a DVD and is connected to the TV via HDMI, only 2 channel sound will be heard from the Home Theater receiver.
If you want to hear 5.1 channel audio, connect the DIGITAL AUDIO OUT (OPTICAL) jack on the DVD player or Cable/Satellite Box
directly to an Amplifier or Home Theater, not the TV.
1
Connect an Optical Cable
between the DIGITAL AUDIO OUT
(OPTICAL) jack on the TV and the
Digital Audio Input (OPTICAL) jacks
on the Digital Audio System.
When a Digital Audio System is
connected to the DIGITAL AUDIO
OUT (OPTICAL) jack: Decrease
the volume of the TV, and adjust
the volume level with the system’s
volume control.
What is OPTICAL?
• Anopticalcableconvertsan
electric signal into an optical
light signal, and transmits it
through glass fibers. S/PDIF is
a transmission system of digital
audio in the form of a light wave
that uses a glass conductor.
Page 6
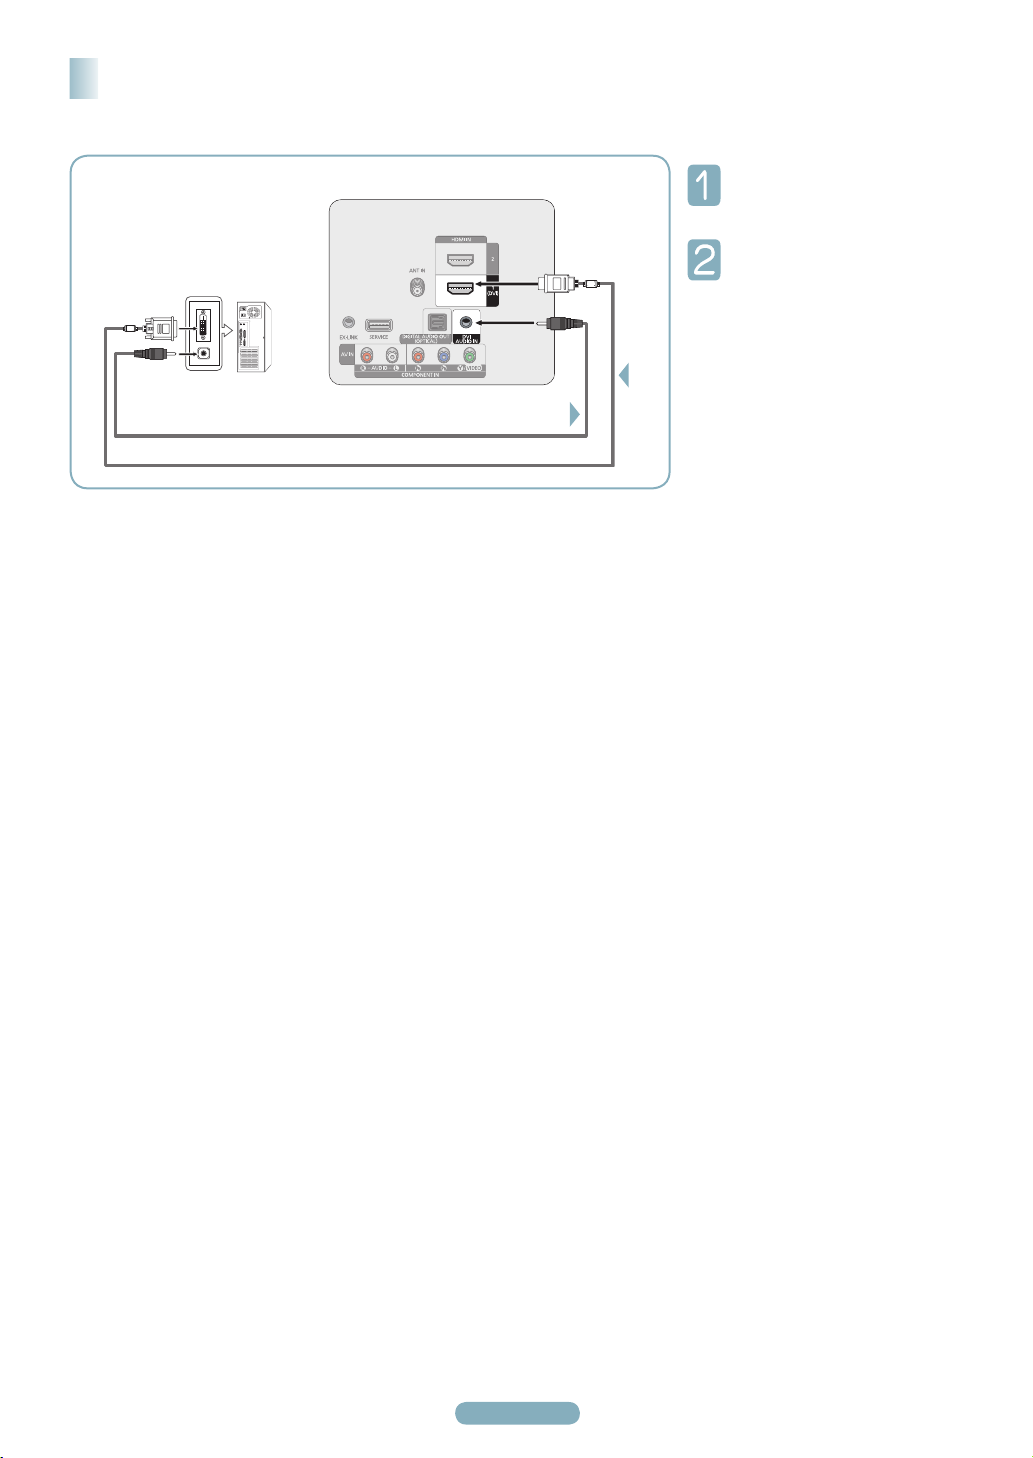
Connecting a PC
Using an HDMI/DVI Cable
PC
TV Rear Panel
Connect an HDMI/DVI cable
between the HDMI IN 1(DVI) jack
on the TV and the PC output jack on
your computer.
Connect a 3.5 mm Stereo plug
between the DVI AUDIO IN jack on
the TV and the Audio Out jack of the
sound card on your computer.
1
3.5 mm Stereo plug (Not supplied)
HDMI/DVI Cable (Not supplied)
➢
Each PC has a different back panel configuration.
➢
When connecting a PC, match the color of the connection terminal to the cable.
➢
When using an HDMI/DVI cable connection, you must use the HDMI IN 1(DVI) terminal.
2
English - 6
Page 7
Turning the TV On and Off
Press the POWER button on the remote control.
You can also use the POWER button on the TV.
➢ It may take a while for the picture to appear.
Viewing the Displays and Menus
Viewing the Display
Press theINFO button on the remote control.
The TV will display the channel, the type of sound,
and the status of certain picture and sound settings.
TV #1
DTV Air
13-1
Dolby Digital
Next Program
Fri, Dec 19 2:05 am
M. Spillane’s Mike Hammer
Bonocrunch
Prison Break
1:55 am - 2:55 am
1080i 16:9 English
2:55 am - 3:55 m
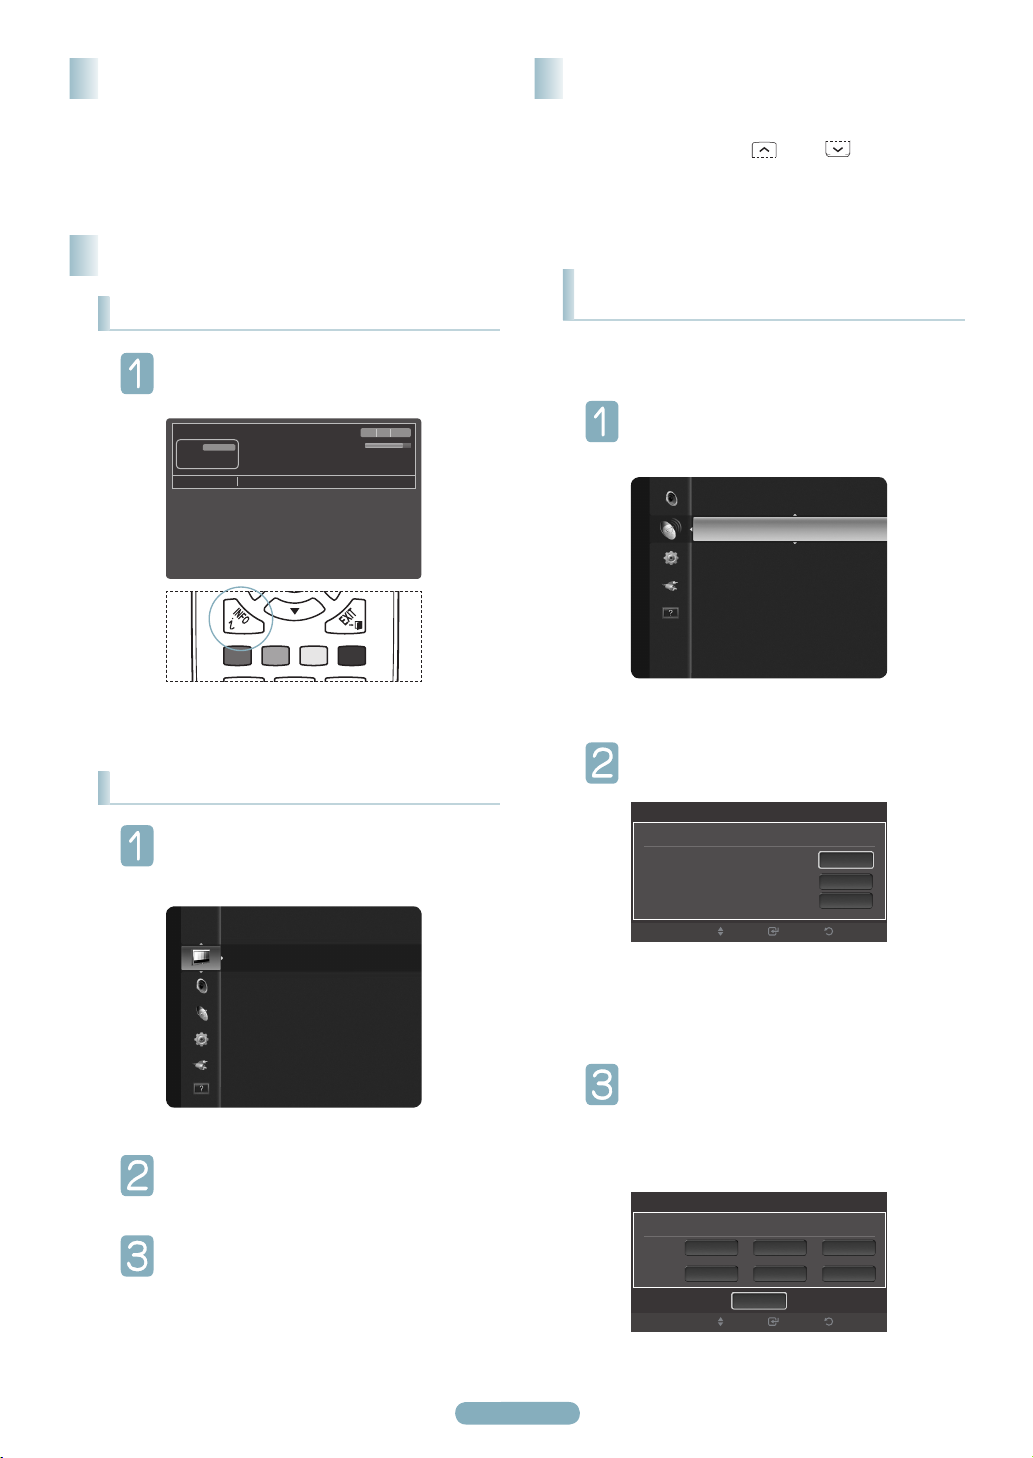
Memorizing the Channels
Your TV can memorize and store all of the available channels
for both air and cable channels. After the available channels
are memorized, use the CH or CH button to scan
through the channels. This eliminates the need to change
channels by entering the channel digits. There are three
steps for memorizing channels: selecting a broadcast source,
memorizing the channels (automatic) and adding and deleting
channels (Channel Lists).
Storing Channels in Memory
(Automatic Method)
Before your television can begin memorizing the available
channels, you must specify the type of signal source that is
connected to the TV (i.e. an Air or a Cable system).
Press the MENU button to display the menu.
Pressthe▲or▼buttontoselectChannel, then
press the ENTERE button.
Channel
Antenna : Air ►
Auto Program
Clear Scrambled Channel
Channel List
Fine Tune
Viewing the Menus
With the power on, press the MENU button.
The main menu appears on the screen. The menu’s
left side has icons: Picture, Sound, Channel,
Setup, Input, Support.
Picture
Mode : Standard
Cell Light : 4
Contrast : 95
Brightness : 45
Sharpness : 50
Color : 50
Tint (G/R) : G50/R50
Pressthe▲or▼buttontoselectoneoftheicons.
Then press the ENTERE button to access the
icon’s sub-menu.
Press the EXIT button to exit.
➢
It takes about one minute until the on-screen
menu disappears.
Pressthe▲or▼buttontoselectAuto Program,
then press the ENTERE button.
Auto Program
Select the Antenna source to memorize.
Air
Cable
Auto
Pressthe▲or▼buttontoselectanantenna
Start
Start
Start
ReturnEnterMove
connection, then press the ENTERE button.
➢
Air: Air antenna signal.
Cable: Cable antenna signal.
Auto: Air and Cable antenna signals.
Auto Program
Select the cable system.
Analog
Digital
STD
HRC IRC
HRC IRCSTD
Start
ReturnEnterMove
English - 7
Page 8
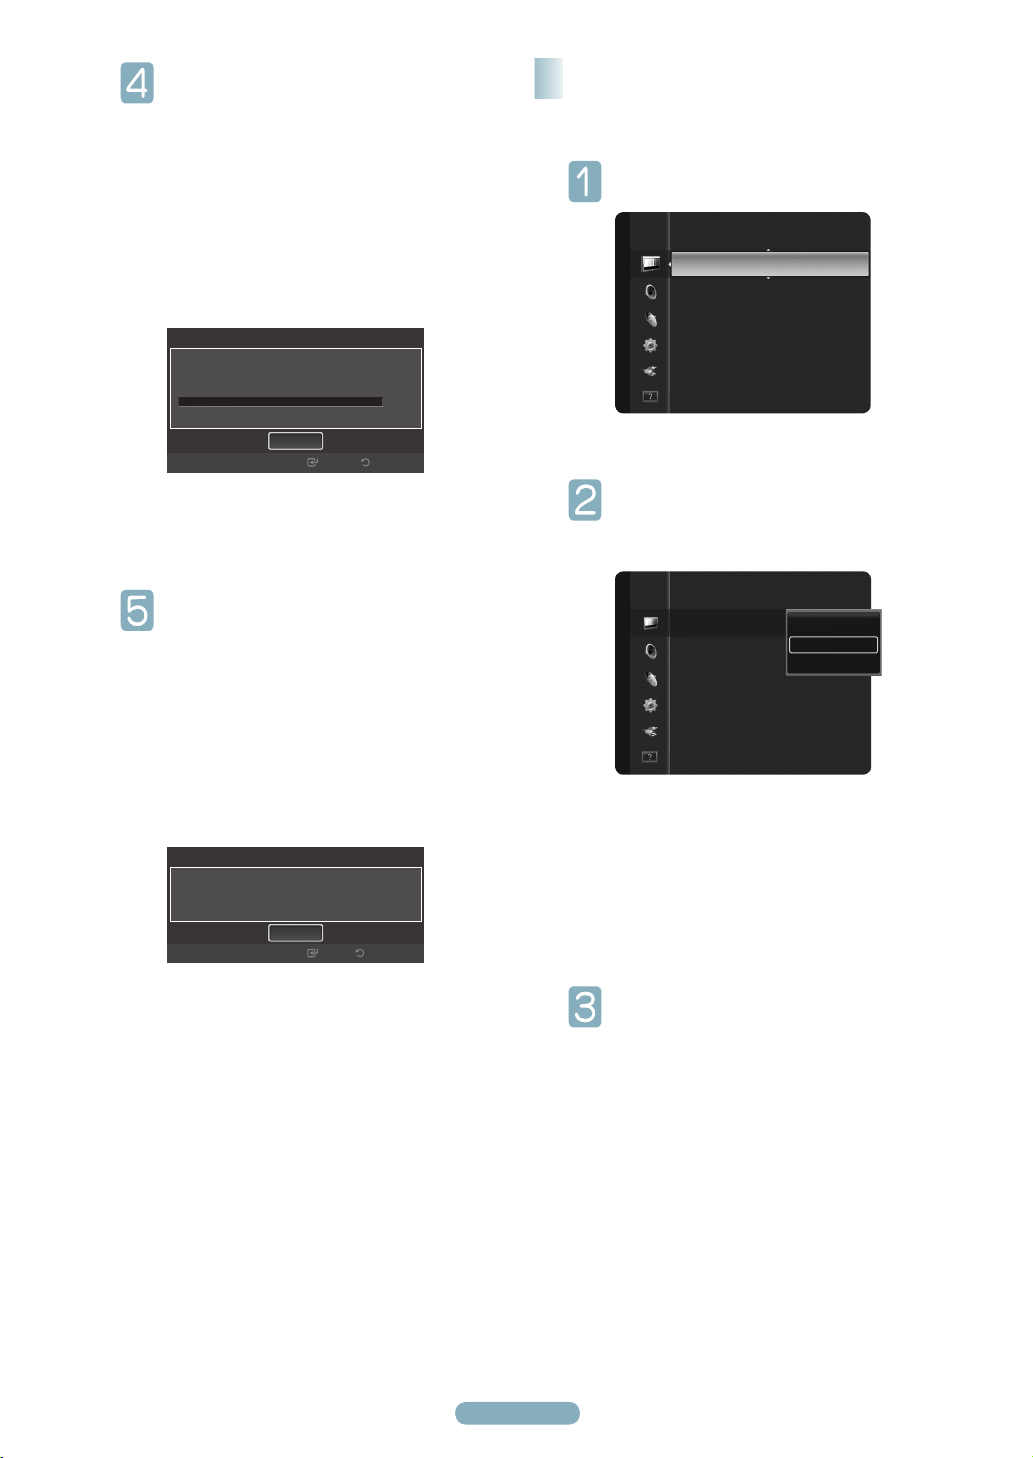
W h e n s e l e c t i n g t h e C a b l e T V s y s t e m :
Press the ENTERE button to start the auto
program. Pressthe◄or►toselectthecorrect
analog signal cable system source among STD,
HRC, and IRC, then press the ENTERE button.
If you have Digital cable TV, select the cable system
signal source for both Analog and Digital.
➢
STD, HRC, and IRC identify various types of
cable TV systems. Contact your local cable
company to identify the type of cable system
that exists in your particular area. At this point
the signal source has been selected.
Auto Program
Auto Program in Progress.
DT V Air : 5 Ai r : 4
DT V Ca ble : -- Cab le : --
Stop
Enter Return
The TV begins memorizing all available stations.
➢
After all the available channels are stored, it
11
Air
3%
starts to remove scrambled channels. The Auto
program menu then reappears.
➢
If you want to stop Auto Programming,
press the ENTERE button. The Stop Auto
Program? message will be displayed. Select
Yesbypressingthe◄or►button,thenpress
the ENTERE button.
Changing the Picture Standard
You can select the type of picture which best corresponds to
your viewing requirements.
Press the MENU button to display the menu.
Press the ENTERE button to select Picture.
Picture
Mode
:
Cell Light : 4
Contrast : 95
Brightness : 45
Sharpness : 50
Color : 50
Tint (G/R) : G50/R50
Press the ENTER button to select Mode.
Standard
Pressthe▲or▼buttontoselectDynamic,
Standard, or Movie.
Press the ENTERE button.
Picture
Mode
:
Cell Light : 7
Contrast : 80
Brightness : 45
Sharpness : 50
Color : 50
Tint (G/R) : G50/R50
Dynamic
Standard
Movie
►
Press the EXIT button to exit.
Auto Program is completed.
56 channels are memorized.
DTV Air : 20 Air : 11
DTV Cable : 15 Cable : 10
Auto Program
OK
●
Dynamic: Select a high-definition picture for
bright environments.
●
Standard: Selects the optimal picture display for
normal environments. This setting is convenient
for most situations.
●
Movie: Selects a comfortable picture display for
dark environments.
ReturnEnter
Press the EXIT button to exit.
English - 8
Page 9
English - 9
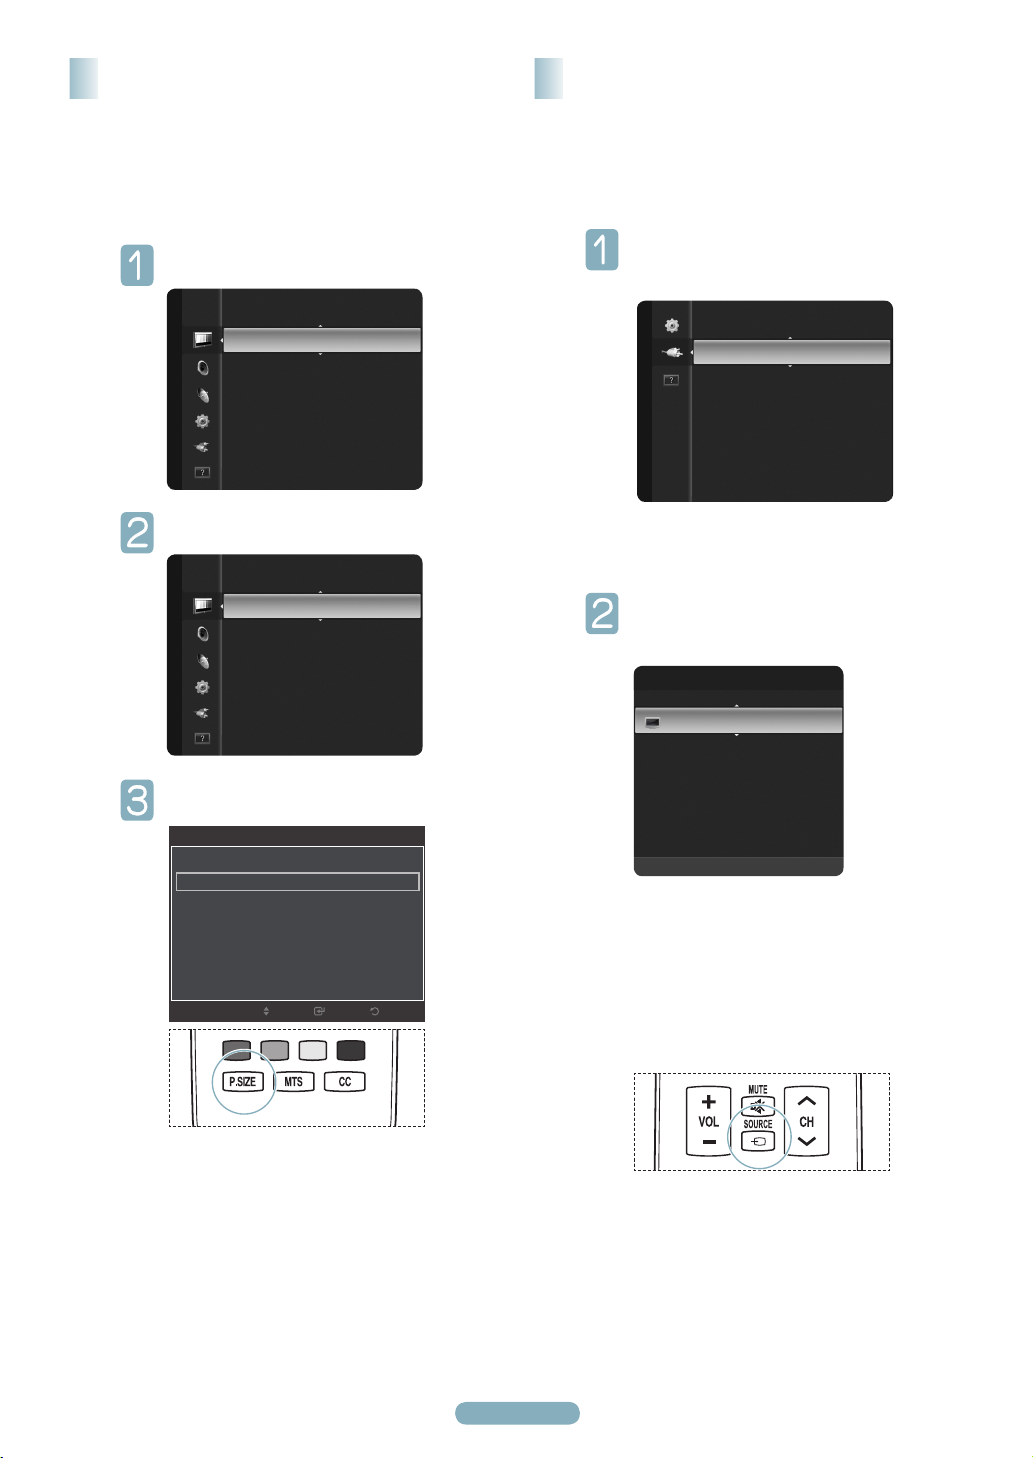
Setting the Picture Size
Occasionally, you may want to change the size of the image
on your screen. Your TV comes with six screen size options,
each designed to work best with specific types of video input.
Your satellite receiver may have its own set of screen sizes
as well. In general, though, you should view the TV in 16:9
mode as much as possible
Press the MENU button to display the menu.
Press the ENTERE button to select Picture.
To Select the Source
Use to select TV or other external input sources such as
DVD players or Cable Box/Satellite receivers (Set-Top Box)
connected to the TV. Use to select the input source of your
choice.
Press the MENU button to display the menu.
Pressthe▲or▼buttontoselect Input, then press
the ENTERE button.
Picture
Mode
:
Cell Light : 4
Contrast : 95
Brightness : 45
Sharpness : 50
Color : 50
Tint (G/R) : G50/R50
Pressthe▲or▼buttontoselectPicture Option,
Standard
►
then press the ENTERE button.
Tint (G/R) : G50/R50
Advanced Settings
Picture
Picture Options
Picture Reset
Pressthe▲or▼buttontoselectSize, then press
►
the ENTERE button.
Picture Options
Color Tone : Normal
Size : 16:9 ►
Digital NR : Auto
HDMI Black Level : Normal
Film Mode : Off
Screen Burn Protection
Move
ReturnEnter
Input
Source List
Edit Name
Press the ENTERE button to select Source List.
Pressthe▲or▼buttontoselectthesignalsource,
then press the ENTERE button.
Soutce List
TV
AV
Component
HDMI1/DVI
HDMI2
➢
Available signal sources: TV, AV, Component,
----
----
----
----
T Tools
HDMI1/DVI, HDMI2.
➢
You can choose only those external devices
that are connected to the TV. In the Source
List, connected inputs will be highlighted and
sorted to the top.
Inputs that are not connected will be sorted to
the bottom.
➢
Alternately, you can press the P.SIZE button
on the remote control repeatedly to change the
picture size.
● 16:9 : Sets the picture to the 16:9 aspect ratio.
● Zoom1: Stretches the 16:9 aspect ratio picture
vertically.
● Zoom2: Stretches the Zoom 1 picture vertically.
● WideFit: Stretches the picture both horizontally
and vertically to display the optimal picture.
● 4:3: Sets the picture to the 4:3 aspect ratio.
● ScreenFit: Displays the full native HD signal that
cannot be viewed using a normal TV.
Page 10

Troubleshooting
If the TV seems to have a problem, first try this list of possible problems and solutions.
If none of these troubleshooting tips apply, call your nearest Samsung service center.
Problem Possible Solution
Poor picture quality. Try another channel.
Poor sound quality. Try another channel.
No picture or sound. Try another channel.
No sound or sound is too low at
maximum volume.
Picture rolls vertically. Check all connections.
The TV operates erratically. Unplug the TV for 30 seconds, then try operating it again.
The TV won’t turn on. Make sure the wall outlet is working.
Remote control malfunctions Replace the remote control batteries.
Digital broadcasting screen problem. Please check the digital signal strength and antenna input.
The image is too light or too dark. Adjust the Brightness and Contrast.
The image is too large or too small. Adjust the Size settings.
The visual qualities of digital
channels vary.
Screen is black and power indicator
light blinks steadily.
Although the TV caption shows HD,
the visual quality is not satisfactory.
The distorted picture appears in the
corner of the screen.
A strange sound is heard. This is caused by minor systems operation and is not a defect.
Pixels are visible on the screen. There may be few bright or dark pixels on the screen.
The "Resets all settings to the
default values" message appears.
Adjust the antenna.
Check all wire connections.
Adjust the antenna.
Press the SOURCE button.
Make sure the TV is plugged in.
Check the antenna connections.
Make sure the MMUTE button is off.
First, check the volume of units connected to your TV (digital broadcasting receiver,
DVD, cable broadcasting receiver, VCR, etc.). Then, adjust the TV volume accordingly.
Clean the upper edge of the remote control (transmission window).
Check the battery terminals.
Press the TV button to put your remote control in the TV mode.
Make sure the remote has batteries.
Check that the “+” and “-” ends of the batteries are inserted correctly.
Adjust the Fine tuning.
The visual qualities of digital channels may vary depending on the original production
method (analog or digital).
- If the original production method is digital: High visual quality.
- If the original production method is analog: The digital program displayed on the
screen is originally an analog program which has been converted to digital.
The visual quality is of an SD(Standard Definition) grade.
On your computer; check the Power and Signal Cable.
The TV is using its power management system.
Move the computer’s mouse or press any key on the keyboard.
On your equipment check (STB, DVD, etc) ; Power and Signal Cable.
The TV is using its power management system.
Press the SOURCE button on the panel or remote control.
Turn the TV off and on.
The HD(High Definition) caption that appears when switching channels or when
pressing the INFO button on the remote control means the selected channel is a digital
channel. If the broadcasting station converts an analog signal into digital and transmits
the signal, the visual quality may not be perfect.
If ScreenFit is selected in some external devices, a distorted picture may appear in
the corner of the screen. This symptom is caused by external devices, not the TV.
These pixels will have no impact on the performance of the product.
This appears when you press and hold the EXIT button for a while. The product
settings are reset to the factory defaults.
➢
This Plasma panel uses a panel consisting of sub pixels (2,359,296 pixels (for 42 inch models) / 3,147,264 pixels (for 50 inch
models)) which require sophisticated technology to produce. However, there may be few bright or dark pixels on the screen.
These pixels will have no impact on the performance of the product.
English - 10
Page 11

Page 12

Guía rápida de configuraciónGuía rápida de configuración
1-800-SAMSUNG (7267864)
Detener
Detener
No devuelva esta
unidad
No devuelva esta
unidad
Si tiene problemas con el
funcionamiento del televisor,
llame a:
Si tiene problemas con el
funcionamiento del televisor,
llame a:
Para obtener ayuda en la web, visite
Para obtener ayuda en la web, visite
Samsung Electronics America, Inc.
105 Challenger Road Ridgefield Park, NJ 07660-0511
Samsung Electronics Canada Inc.,
Servicio de atención al cliente
55 Standish Court Mississauga, Ontario L5R 4B2
Horario de atención del centro de servicio
(Lun-dom 9 AM-12 AM ESTE).
www.samsung.com/register.
Tomas del panel posterior
PN42B400P3D/ PN50B400P3D
1
POWER IN
2
SERVICE
3
DIGITAL AUDIO OUT (OPTICAL)
4
ANT IN
5
HDMI IN 1 (DVI), 2
6
DVI AUDIO IN
7
COMPONENT IN / AV IN
8
EX-LINK
Español - 12
Page 13

Español - 13
Mando a distancia
Puede utilizar el mando a una distancia del televisor de hasta 7 metros.
1
POWER
Enciende y apaga el televisor.
2
BOTONES NUMÉRICOS
Permiten cambiar de canal.
3
Permite seleccionar canales adicionales
(digitales y analógicos) emitidos por
la misma emisora. Por ejemplo, para
seleccionar el canal
“54-3”, pulse “54” y después pulse “
” y “3”.
4
MMUTE
Interrumpe temporalmente el sonido.
5
VOL
Permiten subir o bajar el volumen.
6
SOURCE
Permite ver y seleccionar las fuentes de
vídeo disponibles.
7
CH LIST
Muestra las listas de canales en la
pantalla.
8
TOOLS
Permite seleccionar rápidamente las
funciones que se usan con mayor
frecuencia.
9
ARRIBA▲/ABAJO▼/IZQUIERDA◄/
DERECHA►/ENTER
Permiten seleccionar los elementos del
menú en pantalla y cambiar los valores
del menú.
0
INFO
Muestra información en la pantalla del
televisor.
!
BOTONES DE COLORES
Use estos botones en la lista de
canales.
@
P.SIZE
Selección del tamaño de la imagen.
#
TV
Selecciona directamente el modo TV.
$
PRE-CH
Sintoniza el canal anterior.
%
CH
Permiten cambiar de canal.
^
MENU
Muestra el menú en la pantalla.
&
FAV.CH
Permite sintonizar los canales favoritos.
*
RETURN
Vuelve al menú anterior.
(
EXIT
Se pulsa para salir del menú.
)
CC
Controlaeldecodicadordesubtítulos.
a
MTS
Permite elegir estéreo, monoaural o
un programa de audio independiente
(emisión SAP).
Comparación del rendimiento de las
entradas de vídeo
/
HDMI/DVI Óptima
COMPONENT Mejor
VIDEO Normal
Comparación del rendimiento de las
salidas de audio
OPTICAL (Digital) Óptima
Page 14

Conexión de un reproductor de DVD/Blu-ray o receptor por cable/
satélite (decodificador) a través de HDMI
Uso del cable HDMI (interfaz multimedia de alta definición)
Conecte un cable HDMI entre
Reproductor de DVD/
Blu-ray o receptor por cable/satélite
Cable HDMI (No suministrado)
Panel posterior del TV
1
¿Qué es HDMI?
•HDMI, o interfaz multimedia de alta definición, es una interfaz que permite la transmisión de señales digitales de audio
y de vídeo mediante un solo cable.
•La diferencia entre los dispositivos HDMI y DVI es que el HDMI es más pequeño y tiene instalada la función de
codificación HDCP (protección alta de la copia digital del ancho de banda).
➢
Cada reproductor DVD o receptor por cable/satélite (decodificador) tiene una configuración diferente del panel posterior.
➢
Puede que el televisor no proporcione salida de sonido y muestre imágenes con colores anómalos si se han conectado
reproductores DVD/Blu-ray o receptores por cable/satélite que admiten versiones de HDMI anteriores a la versión 1.3. Si se
conecta un cable antiguo HDMI y no hay sonido, conecte el cable HDMI al terminal HDMI IN 1 (DVI) y los cables de audio a
los terminales DVI AUDIO IN de la parte posterior del televisor. Si ocurriera esto, póngase en contacto con la empresa que
suministró el reproductor de DVD/Blu-ray o receptor por cable/satélite para confirmar la versión HDMI y solicite una actualización.
➢
Los cables HDMI que no son 1.3 pueden causar un molesto parpadeo o que no se muestre la pantalla.
el terminal HDMI IN 1 (DVI) o 2
del televisor y el terminal HDMI
del reproductor de DVD/Blu-ray
o receptor por cable/satélite
(decodificador).
Pulse el botón SOURCE del mando
a distancia hasta que pueda ver la
señal del decodificador (consulte
“Para seleccionar la fuente” en la
página 9).
Conexión de un reproductor de DVD/Blu-ray o receptor por cable/
satélite (decodificador) a través de DVI
Uso del cable DVI (interfaz visual digital)
Reproductor de DVD/
Blu-ray o receptor por cable/satélite
Cablede audio (no suministrado)
Cable HDMI/DVI (no suministrado)
Panel posterior del TV
2
1
➢
Cada reproductor de DVD/Blu-ray o receptor por cable/satélite (decodificador) tiene una configuración diferente del panel
posterior.
➢
Cuando conecte un reproductor de DVD o receptor de televisión por cable/satélite (decodificador), debe hacer coincidir los
colores del terminal de conexión y del cable.
➢
Cuando se usa una conexión de cable HDMI/DVI, se debe conectar en el terminal HDMI IN 1(DVI).
Conecte un cable HDMI/DVI
o un adaptador de DVI-HDMI
entre el terminal HDMI IN 1(DVI)
del televisor y el terminal DVI
del reproductor de DVD / Bluray o receptor por cable/satélite
(decodificador).
Conecte los cables de audio entre
el terminal DVI AUDIO IN del
televisor y del reproductor de DVD /
Blu-ray o receptor por cable/satélite
(decodificador).
Pulse el botón SOURCE del mando
a distancia hasta que pueda ver la
señal del aparato de vídeo (consulte
“Para seleccionar la fuente” en la
página 9).
Español - 14
Page 15

Español - 15
Conexión de un reproductor de DVD/Blu-ray o receptor por cable/
satélite (decodificador) a través de los cables de componentes
Usar un cable Componente
Panel posterior del TV
Reproductor de DVD/
Blu-ray o receptor por cable/satélite
2
Cablede audio (no suministrado)
Cable de componentes (no suministrado)
1
➢
El vídeo de componentes divide las señales de vídeo en Y (Luminancia (brillo)), PB (azul) y PR (rojo) para mejorar la calidad del
vídeo.
➢
Cada reproductor de DVD/Blu-ray o receptor por cable/satélite (decodificador) tiene una configuración diferente del panel
posterior.
➢
Cuando conecte un reproductor de DVD/Blu-ray o receptor por cable/satélite (decodificador), debe hacer coincidir los colores del
terminal de conexión y del cable.
Conecte los cables de los
componentes entre los terminales
COMPONENT IN [Y, PB, PR]
del televisor y los terminales
COMPONENT [Y, PB, PR] del
reproductor de DVD/Blu-Ray
o receptor por cable/satélite
(decodificador).
Conecte los cables de audio entre
los terminales COMPONENT
IN [R-AUDIO-L] del televisor y
los terminales AUDIO OUT del
reproductor de DVD/Blu-Ray
o receptor por cable/satélite
(decodificador).
Pulse el botón SOURCE del mando
a distancia hasta que pueda ver la
señal del aparato de vídeo (consulte
“Para seleccionar la fuente” en la
página 9).
Conexión a una videocámara
Mediante el cable HDMI
Panel posterior del TV
Videocámara
1
➢
Cada videocámara tiene una configuración diferente del panel posterior.
Cable HDMI (No suministrado)
Conecte un cable HDMI entre el
terminal HDMI IN 1(DVI) o 2del
1
televisor y el terminal HDMI de la
videocámara.
Page 16

Conexión de un aparato de vídeo
Usar un cable Video
Desenchufe el cable o la antena de
Panel posterior del TV
Panel posterior del vídeo
3
Cable de antena (no suministrado)
Cable de audio (no suministrado)
Cable de vídeo (no suministrado)
➢
Si tiene un vídeo “mono” (sin estéreo), use un conector Y (no suministrado) para conectar los terminales de entrada de audio
derecho e izquierdo del TV. También se puede conectar el cable al terminal “R”.
Si el vídeo es estéreo, tendrá que conectar dos cables.
➢
Cada aparato de vídeo tiene una configuración diferente del panel posterior.
➢
Cuando conecte un aparato de vídeo, debe hacer coincidir los colores del terminal de conexión y del cable.
➢
Cuando se conecta a AV IN, el color (verde) del terminal AV IN [Y/VIDEO] no coincide con el color (amarillo) del cable de vídeo.
5
4
la parte posterior del TV.
1
Enchufe el cable o la antena en
el terminal ANT IN de la parte
2
posterior del aparato de vídeo.
Conecte un cable de antena entre
el terminal ANT OUT del aparato
3
de vídeo y el terminal ANT IN del
televisor.
Conecte un cable de vídeo entre
el terminal AV IN [Y/VIDEO] del
4
televisor y el terminal VIDEO OUT
del aparato de vídeo.
Conecte cables de audio entre los
terminales AV IN [R-AUDIO-L] del
5
televisor y los terminales AUDIO
OUT del aparato de vídeo
Pulse el botón SOURCE del mando
a distancia hasta que pueda ver la
6
señal del aparato de vídeo (consulte
“Para seleccionar la fuente” en la
página 9).
Conexión de un sistema de audio digital
Panel posterior del TV
Sistema de audio digital
Cable óptico (no suministrado)
El audio de 5.1 canales es posible cuando el televisor está conectado a un dispositivo externo que admita 5.1 canales.
➢
Cada sistema de audio digital tiene una configuración diferente del panel posterior.
➢
Cuando el receptor (sistema Home Cinema) está activado, se puede oír la salida de sonido desde el terminal óptico del televisor.
➢
Cuando se ve la televisión a través de un DTV (aéreo), el televisor envía el sonido de 5.1 canales al receptor del sistema Home
Cinema. Cuando la fuente es un componente digital, como un DVD, y está conectada al televisor a través de HDMI, sólo se oye el
sonido de 2 canales del receptor del sistema Home Cinema.
Si desea oír audio de 5.1 canales, conecte el terminal DIGITAL AUDIO OUT (OPTICAL) del reproductor de DVD/Blu-ray o del
decodificador por cable/satélite directamente a un amplificador o un sistema de Home Cinema, no al televisor.
1
Conecte un cable óptico entre los
terminales DIGITAL AUDIO OUT
(OPTICAL) y los terminales de
entrada de audio digital (OPTICAL)
del sistema de audio digital.
Cuando un sistema de audio digital
se conecta al terminal DIGITAL
AUDIO OUT (OPTICAL): Reduzca
el volumen del TV y ajuste el
volumen con el control del sistema.
¿Qué quiere decir OPTICAL?
• Uncableópticoconvierteuna
señal eléctrica en una señal de
luz óptica que se transmite a
través de fibra óptica. S/PDIF
es un sistema de transmisión
de audio digital en el formato de
una onda de luz que utiliza un
conductor de vidrio.
Español - 16
Page 17

Español - 17
Conexión a un PC
Uso del cable HDMI/DVI
PC
Panel posterior del TV
Conecte un cable HDMI/DVI entre
el terminal HDMI IN 1(DVI) del
televisor y el terminal de salida PC
del ordenador.
Conecte un cable estéreo
miniclavija de 3,5 mm entre el
terminal DVI AUDIO IN del televisor
y el terminal de salida de audio de
la tarjeta de sonido del ordenador.
1
Conector estéreo de 3,5 mm para el cable (no suministrado)
Cable HDMI/DVI (no suministrado)
➢
Cada ordenador tiene una configuración diferente del panel posterior.
➢
Cuando conecte un ordenador, debe hacer coincidir los colores del terminal de conexión y del cable.
➢
Cuando se usa una conexión de cable HDMI/DVI, se debe conectar en el terminal HDMI IN 1(DVI).
2
Page 18

Encendido y apagado del televisor
Pulse el botón POWER del mando a distancia.
También puede usar el botón POWER del televisor.
➢ El televisor puede tardar unos segundos en encenderse.
Visualización de las opciones en
pantalla y los menús
Visualización de la pantalla
Pulse el botón INFO del mando a distancia.
El televisor mostrará el canal, el tipo de sonido y el
estado de ciertos ajustes de imagen y sonido.
TV #1
DTV Aire
13-1
Dolby Digital
Next Program
Vie, Dic 19 2:05 am
M. Spillane’s Mike Hammer
Bonocrunch
Prison Break
1:55 am - 2:55 am
1080i 16:9 Español
2:55 am - 3:55 am
Memorización de los canales
El TV puede memorizar y almacenar todos los canales
disponibles, tanto “aéreos” (antena) como de cable.
Una vez memorizados los canales disponibles, use los
botones CH o CH para explorarlos. De este modo,
no es necesario introducir dígitos para cambiar los canales.
La memorización de canales implica tres pasos: seleccionar
una emisora de origen, memorizar los canales (automático) y
añadir o suprimir canales (manual)
Almacenamiento de los canales en la
memoria (método automático).
Antes de empezar a memorizar los canales disponibles,
debe indicar el tipo de origen de la señal conectada al TV
(es decir, antena o sistema de cable).
Pulse el botón MENU para ver el menú.
Pulselosbotones▲o▼paraseleccionarCanal y,
a continuación, pulse el botón ENTERE.
Canall
Antena : Aire ►
Prog. Auto
Borrar canal encriptado
Lista de canales
Sintonia Fina
Visualización de los menús
Con el aparato encendido, pulse el botón MENU.
El menú principal se muestra en la pantalla.
En el lado izquierdo hay los siguientes iconos:
Imagen, Sonido, Canal, Configuración, Entrada,
Soporte técnico.
Imagen
Modo : Normal
Luz de la celda : 4
Contraste : 95
Brillo : 45
Denición :50
Color : 50
Tinte (V/R) : V50/R50
Pulselosbotones▲o▼paraseleccionarunode
los iconos.
Después pulse el botón ENTERE para acceder al
submenú del icono.
Pulse el botón EXIT para salir.
➢
El menú en pantalla tarda alrededor de un
minuto en desaparecer.
Pulselosbotones▲o▼paraseleccionarProg.
Auto y pulse el botón ENTERE.
Prog. Auto
Seleccione la fuente de antena a menorizar.
Aire
Cable
Auto
Pulselosbotones▲o▼paraseleccionarla
Iniciar
Iniciar
Iniciar
RegresarIngresarMover
conexión de la antena y pulse el botón ENTERE.
➢
Aire: Señal de antena Aire.
Cable: Señal de antena de Cable.
Auto: Señales de antena Aire y por Cable.
Prog. Auto
Seleccione sistema de cable.
Analógico
Digital
STD
HRC IRC
HRC IRCSTD
Iniciar
RegresarIngresarMover
Español - 18
Page 19

Español - 19
Cuando seleccione el sistema de cable:
Pulse el botón ENTERE para iniciar la
programación automática.
Pulse◄o►paraseleccionarlafuentedelsistema
de cable de señal analógica correcta entre STD,
HRC e IRC y, a continuación, pulse el botón
ENTERE. Si tiene un televisor de cable digital,
seleccione la fuente de la señal del sistema de
cable analógica y digital.
➢
STD, HRC y IRC identifican los distintos
tipos de sistemas de TV por cable. Póngase
en contacto con su proveedor de cable para
averiguar el tipo de sistema de cable existente
en su zona. En este momento ya se ha
seleccionado el origen de la señal.
Prog. Auto
La programación automática está en progreso.
Aire DTV : 5 Aire : 4
Cable DTV : -- Cable : --
Dentener
Ingresar Regresar
Aire
11
3%
Utilización de los ajustes de
imagen automáticos
Puede seleccionar el tipo de imagen que mejor cumpla sus
requisitos de visualización.
Pulse el botón MENU para ver el menú.
Pulse el botón ENTERE para seleccionar Imagen.
Imagen
Modo : Normal
Luz de la celda : 4
Contraste : 95
Brillo : 45
Denición :50
Color : 50
Tinte (V/R) : V50/R50
Pulse el botón ENTERE para seleccionar Modo.
Pulselosbotones▲o▼paraseleccionarDinámico,
Normal o Cine.
Pulse el botón ENTERE.
El televisor empieza a memorizar todas las
emisoras disponibles.
➢
Una vez guardados todos los canales
disponibles, se inicia la eliminación de los
canales codificados. Vuelve a mostrarse el
menú de programación automática.
➢
Si desea detener la programación automática,
pulse el botón ENTERE. Aparece el mensaje
¿Detener programación automática?.
Seleccione Síconlosbotones◄o►y,a
continuación, pulse el botón ENTERE.
Pulse el botón EXIT para salir.
La programación automática ha finalizado.
56 canales.
Aire DTV : 20 Aire : 11
Cable DTV : 15 Cable : 10
Prog. Auto
Aceptar
RegresarIngresar
Imagen
Modo
:
Luz de la celda : 7
Contraste : 80
Brillo : 45
Definición : 50
Color : 50
Tinte (V/R) : V50/R50
●
Dinámico: Selecciona una imagen de alta
Dinámico
Normal
Cine
definición para entornos muy iluminados.
●
Normal: Selecciona la mejor visualización de la
imagen para entornos normales.
Esta configuración es la más conveniente en la
mayoría de situaciones.
●
Cine: Selecciona una visualización de imagen
confortable en entornos oscuros.
Pulse el botón EXIT para salir.
Page 20

Ajuste del tamaño de la imagen
Es posible que alguna vez desee cambiar el tamaño de la
imagen en la pantalla. El televisor se suministra con seis
opciones de tamaño de la pantalla, cada una diseñada
para que funcione lo mejor posible con tipos específicos
de entrada de vídeo. Es posible que el receptor de satélite
tenga también su propia gama de tamaños de pantalla. Sin
embargo, en general, debe ver el televisor en el modo 16:9
tanto como sea posible.
Pulse el botón MENU para ver el menú.
Pulse el botón ENTERE para seleccionar Imagen.
Para seleccionar la fuente
Se utiliza para seleccionar TV u otras fuentes de entrada
externas como reproductores DVD/Blu-ray/receptores por
cable/ satélite (decodificadores) conectados al televisor.
Permite seleccionar la fuente de entrada que se prefiera.
Pulse el botón MENU para ver el menú.
Pulselosbotones▲o▼paraseleccionarEntrada
y, a continuación, pulse el botón ENTERE.
Imagen
Modo
:
Luz de la celda : 4
Contraste : 95
Brillo : 45
Definición : 50
Color : 50
Tinte (V/R) : V50/R50
Pulselosbotones▲o▼paraseleccionar
Normal
►
Opciones de imagen, y pulse el botón ENTERE.
Tinte (V/R) : V50/R50
Conguraciónavanzada
Imagen
Opciones de imagen
Reinicio de la imagen
Pulselosbotones▲o▼paraseleccionarTamaño
►
y, a continuación, pulse el botón ENTERE.
Opciones de imagen
Tono Color : Normal
Tamaño : 16:9 ►
Digital NR : Auto
N.neg HDMI : Normal
Modo película : Apagado
Protección de pantalla
Mover
RegresarIngresar
Entrada
Lista de Entradas
Editar Nombre
Pulse el botón ENTERE para seleccionar Lista de
Origen.Pulselosbotones▲o▼paraseleccionar
la fuente de la señal y, a continuación, pulse el
botón ENTERE.
Lista de Entradas
TV
AV
Componente
HDMI1/DVI
HDMI2
➢
Fuentes de señal disponibles: TV, AV,
----
----
----
----
T Herramientas
Componente, HDMI1/DVI, HDMI2.
➢
Sólo se puede elegir los dispositivos externos
que estén conectados al televisor. En Lista de
Entradas, las entradas conectadas se resaltan
y se ordenan en la parte superior. Las entradas
que no están conectadas se ordenan en la
parte inferior.
➢
O bien, puede pulsar repetidamente el botón
P.SIZE del mando a distancia para cambiar el
tamaño de la imagen.
● 16:9 : Configura la imagen en una relación de
aspecto 16:9.
● Zoom1: Alarga verticalmente la relación de
aspecto 16:9.
● Zoom2: Alarga verticalmente una imagen
ampliada con la función Zoom1.
● Ajusteancho: Alarga horizontal y verticalmente
una imagen para mostrarla mejor.
● 4:3: Configura la imagen en una relación de
aspecto 4:3.
● Ajustepantalla: Muestra la señal HD nativa
completa que no se puede ver en un televisor
normal.
Español - 20
Page 21

Español - 21
Resolución de problemas
Si cree que el televisor tiene un problema, compruebe primero esta lista de posibles problemas y soluciones.
Si no funciona ninguno de estos consejos, llame al centro de servicio técnico Samsung más cercano.
Problema Posible solución
Mala calidad de imagen. Intente sintonizar otro canal.
Calidad de sonido deficiente. Intente sintonizar otro canal.
No hay imagen ni sonido. Intente sintonizar otro canal.
No se percibe ningún sonido, o muy
bajo, con el volumen al máximo.
Las imágenes de desplazan
verticalmente.
El TV funciona de forma irregular. Desenchufe el TV durante 30 segundos e inténtelo de nuevo.
El televisor no se enciende Compruebe si la toma de pared funciona.
El mando a distancia funciona mal Sustituya las pilas del mando a distancia.
Problema en pantalla con la emisión
digital.
La imagen es demasiado clara o
demasiado oscura.
La imagen es demasiado grande o
demasiado pequeña.
La calidad visual de los canales
digitales puede variar.
La pantalla está en blanco y el
indicador de encendido parpadea
constantemente.
Aunque el subtítulo del televisor
muestre HD (Alta definición), la
calidad visual no es satisfactoria.
Aparece una imagen distorsionada
en la esquina de la pantalla.
Se oye un ruido extraño. La causa es un menor funcionamiento del sistema y no se trata de ningún defecto.
Hay píxeles visibles en la pantalla. Puede que existan unos cuantos píxeles brillantes u oscuros en la pantalla.
Se muestra el mensaje “Resets
all settings to the default values”
(“Restablece todos los valores
predeterminados”).
Ajuste la antena.
Compruebe todas las conexiones de cable.
Ajuste la antena.
Pulse el botón SOURCE.
Compruebe que el televisor esté enchufado.
Compruebe las conexiones de la antena.
Compruebe que el botón MMUTE esté desactivado.
Primero, compruebe el volumen de los aparatos conectados al TV (por ejemplo, un
receptor digital, DVD, receptor de cable, reproductor de vídeo, etc.). A continuación,
ajuste el volumen del TV según sea más conveniente.
Compruebe todas las conexiones.
Limpie el borde superior del mando a distancia (ventana de transmisión).
Compruebe los terminales de las pilas.
Pulse el botón TV del mando a distancia para ponerlo en el modo TV.
Asegúrese de que el mando a distancia tenga pilas.
Compruebe que los polos “+” y “-” de las pilas estén correctamente colocados.
Compruebe la potencia de la señal digital y la antena de entrada.
Ajuste el brillo y el contraste.
Realice una sintonización fina.
Ajuste los parámetros de tamaño.
La calidad visual de los canales digitales puede variar según el método original de
producción (analógico o digital).
- Si el método de producción original es digital: Calidad visual alta.
- Si el método de producción original es analógico: El programa digital mostrado en la
pantalla es originalmente un programa analógico que se ha convertido a digital.
La calidad visual es de grado SD (definición estándar).
En el ordenador, compruebe los cables de señal y de alimentación.
El televisor está usando su sistema de gestión de energía.
Mueva el ratón del ordenador o pulse cualquier tecla.
En el equipo, compruebe (STB, DVD, etc.); el cable de señal y el de alimentación.
El televisor está usando su sistema de gestión de energía.
Pulse el botón SOURCE del mando a distancia o del panel.
Encienda y apague el televisor.
El subtítulo HD (Alta definición) que aparece al cambiar de canal o al pulsar el botón
INFO del mando a distancia significa que el canal seleccionado es un canal digital. Si
la emisora convierte una señal analógica en digital y la transmite, es posible que la
calidad visual no sea perfecta.
Si la función Ajustar a pantalla está seleccionada en varios dispositivos externos,
puede aparecer una imagen distorsionada en la esquina de la pantalla. Este síntoma
se origina en los dispositivos externos, no en el televisor.
Estos píxeles no influirán en el rendimiento del aparato.
Aparece cuando el botón EXIT se mantiene pulsado durante unos momentos.
La configuración del producto se reinicia con los valores predeterminados.
➢
Este panel de plasma consta de subpíxeles (2.359.296 píxeles (modelos de 42 pulgadas)/3.147.264 píxeles (modelos de 50
pulgadas) que requieren tecnología sofisticada para su fabricación. No obstante, puede que existan unos cuantos píxeles
brillantes u oscuros en la pantalla. Estos píxeles no influirán en el rendimiento del aparato.
Page 22

Page 23

1-800-SAMSUNG (7267864)
Samsung Electronics America, Inc.
105 Challenger Road Ridgefield Park, NJ 07660-0511
Samsung Electronics Canada Inc., Customer Service
55 Standish Court Mississauga, Ontario L5R 4B2
Centre d’appel – heures de service (du lundi au dimanche,
de 9 h à 12 h (HNE))
www.samsung.com/global/register.
Prises du panneau arrière
PN42B400P3D/ PN50B400P3D
1
POWER IN
2
SERVICE
3
DIGITAL AUDIO OUT (OPTICAL)
4
ANT IN
5
HDMI IN 1 (DVI), 2
6
DVI AUDIO IN
7
COMPONENT IN / AV IN
8
EX-LINK
Français-23
Page 24

Touches de la télécommande
La télécommande peut être utilisée jusqu’à une distance d’environ 7 mètres (23 pieds) du téléviseur.
1
POWER
Permet d’allumer et d’éteindre le
téléviseur.
2
NUMERIC BUTTONS
Pour changer le canal.
3
Pour sélectionner des canaux
supplémentaires (numériques
et analogiques) diffusés par la
même station. Par exemple, pour
sélectionner le canal “54-3”, appuyer
sur “54”, puis sur “
4
MUTE
Permet de couper le son
temporairement et de le rétablir.
5
VOL
Appuyer sur ces touches pour
augmenter ou diminuer le volume.
6
SOURCE
Appuyer sur cette touche pour
afficher et choisir les sources vidéo
accessibles.
7
CH LIST
Afficher la liste des canaux à l’écran.
8
TOOLS
Permettent de sélectionner les
fonctions fréquemment utilisées.
9
UP▲/DOWN▼/LEFT◄/
RIGHT►/ENTER
Appuyez sur ces touches pour
sélectionner les éléments du menu à
l’écran et en modifier la valeur.
0
INFO
Appuyer sur cette touche pour
afficher de l’information à l’écran.
!
COLOR BUTTONS
Utiliser ces touches à partir de la liste
des canaux, WISELINK, etc.
@
P.SIZE
Appuyez sur cette touche pour
sélectionner le format de l’image.
” et sur “3”.
#
TV
Pour sélectionner directement le
mode TV.
$
PRE-CH
Permet d’écouter le canal précédent.
%
CH
Permettent de changer de canal.
^
MENU
Afficher le menu à l’écran principal.
&
FAV.CH
Naviguer entre les canaux favoris.
*
RETURN
Retourner au menu précédent.
(
EXIT
Appuyez sur cette touche pour quitter
le menu.
)
CC
Appuyez sur cette touche pour régler
la fonction de sous-titrage.
a
MTS
Appuyez sur cette touche pour
sélectionner le mode stéréo, le mode
mono ou le mode de diffusion de la
seconde piste audio (SAP).
Entrée vidéo – tableau comparatif des Performances
/
HDMI/DVI La meilleure
COMPONENT Excellente
VIDEO Normale
Français-24
Sortie audio – tableau comparatif des performances
OPTICAL (Digital) La meilleure
Page 25

Français-25
Branchement d’un DVD/Blu-Ray ou d'un câblosélecteur ou
récepteur (décodeur) à l’aide d’un câble HDMI
Raccordement aux prises HDMI (High Definition Multimedia Interface)
Brancher un câble HDMI entre la
DVD/Blu-Ray ou câblosélecteur /
Récepteur (décodeur)
Panneau arrière du téléviseur
prise d'entrée HDMI IN (1(DVI), 2)
du téléviseur et la prise HDMI du
DVD/Blu-Ray ou du câblosélecteur
ou récepteur (décodeur).
Appuyez sur la touche SOURCE de
la télécommande jusqu’à que vous
voyiez le signal du boîtier décodeur
(voir "Pour sélectionner la source" à
la page 9).
Câble HDMI (non fourni)
1
Qu’est-ce que la HDMI?
•
La HDMI est une interface multimédia à haute définition qui permet la transmission de signaux numériques audio et vidéo à l’aide d’
un seul câble.
•
La différence entre les interfaces HDMI et DVI réside dans le fait que la HDMI est de plus petites dimensions, qu’elle est dotée du
composant de codage HDCP (protection contre la copie numérique à large bande passante).
➢
La configuration du panneau arrière de chaque DVD/Blu-Ray ou câblosélecteur ou récepteur (décodeur) est différente.
➢
Le téléviseur peut ne pas émettre de son ou afficher des images de couleur anormale lorsqu’est branché un DVD/Blu-Ray ou un
câblosélecteur ou récepteur prenant en charge des versions HDMI antérieures à la version 1.3. Si l’on branche un câble HDMI d’une
version antérieure et qu’il n’y a pas de son, il faut brancher le câble HDMI à la prise d’entrée HDMI IN 1(DVI) et les câbles audio
aux prises DVI AUDIO IN sur le panneau arrière du téléviseur. Si cela se produit, communiquer avec le fournisseur du DVD/
Blu-Ray ou du câblosélecteur ou récepteur afin de confirmer la version HDMI, puis demander une mise à niveau.
➢
Si les câbles HDMI ne sont pas compatibles avec la version 1.3, il peut y avoir des scintillements désagréables à l’écran ou il n’y
a pas d’image.
Branchement d’un DVD/Blu-Ray, câblosélecteur ou récepteur
(décodeur) à l’aide d’un câble DVI
Connexion à l'entrée d'interface vidéo numérique (DVI)
Brancher un câble de raccordement
HDMI/DVI ou un adaptateur
DVI-HDMI entre la prise d'entrée
HDMI IN 1(DVI) du téléviseur et
la prise DVI du DVD/Blu-Ray,
câblosélecteur ou récepteur
(décodeur).
Branchez les câbles audio entre les
prises droite et gauche DVI AUDIO
IN du téléviseur et le lecteur DVD
/ Blu-Ray, le câblosélecteur ou le
récepteur satellite.
Appuyez sur la touche SOURCE de
la télécommande jusqu’à que vous
voyiez le signal du boîtier décodeur
(voir "Pour sélectionner la source" à
la page 9).
DVD/Blu-Ray ou câblosélecteur /
Récepteur (décodeur)
Câble audio (non fourni)
Câble HDMI/DVI (non fourni))
Panneau arrière du téléviseur
2
1
➢
La configuration du panneau arrière de chaque DVD/Blu-Ray ou câblosélecteur ou récepteur (décodeur) est différente.
➢
Au moment de brancher un DVD/Blu-Ray ou câblosélecteur ou récepteur (décodeur), les couleurs du câble et de la borne de
raccordement doivent correspondre.
➢
Dans le cas d’une connexion de câble HDMI/DVI, il faut utiliser la prise d'entrée HDMI IN 1(DVI).
Page 26

Branchement d’un DVD/Blu-Ray, câblosélecteur ou récepteur (décodeur) à
l’aide de câbles de composant
À l’aide du câble Component
Panneau arrière du téléviseur
Lecteur DVD ou câblosélecteur /
Récepteur (décodeur)
2
Câble audio (non fourni)
Câble de composant (non fourni)
1
➢
La composante vidéo sépare la vidéo en Y (Luminance (luminosité)), PB (bleu) et PR (rouge) pour offrir une qualité d’image
supérieure.
➢
La configuration du panneau arrière de chaque DVD/Blu-Ray ou câblosélecteur ou récepteur (décodeur) est différente.
➢
Au moment de brancher un DVD/Blu-Ray ou câblosélecteur ou récepteur (décodeur), les couleurs du câble et de la borne de
raccordement doivent correspondre.
Branchez un câble de composante
entre les prises COMPONENT IN
[Y, PB, PR] du téléviseur et les
prises COMPONENT IN [Y, PB,
PR] du lecteur DVD/Blu-Ray, du
câblosélecteur ou du récepteur
satellite (boîtier décodeur).
Branchez les câbles audio
entre les prises droite et gauche
COMPONENT IN [R-AUDIO-L]
du téléviseur et les prises AUDIO
OUT du lecteur DVD/Blu- Ray, du
câblosélecteur ou du récepteur
satellite (boîtier décodeur).
Appuyez sur la touche SOURCE de
la télécommande jusqu’à que vous
voyiez le signal du boîtier décodeur
(voir "Pour sélectionner la source" à
la page 9).
Branchement d’un caméscope
À l’aide d’un câble HDMI
Panneau arrière du téléviseur
Caméscopes
Câble HDMI (non fourni)
1
➢
Chaque caméscope possède une configuration de panneau arrière différente..
Français-26
Branchez un câble HDMI entre la
prise d’entrée HDMI IN (1(DVI), 2)
1
du téléviseur et la prise de sortie
HDMI OUT du caméscope.
Page 27

Français-27
Branchement d’un magnétoscope
Branchement Vidéo
Débrancher le câble ou l’antenne à
Panneau arrière du téléviseur
Panneau arrière du
magnétoscope
3
Câble d’antenne (non fourni)
Câble audio (non fourni)
Câble vidéo (non fourni)
➢
Si le magnétoscope est un modèle “mono” (non stéréo), relier les prises d’entrée audio droite et gauche du téléviseur au moyen d’un
connecteur en Y (non fourni). Il est également possible de brancher le câble à la prise “R”.
➢
Le panneau arrière de chaque magnétoscope est différent.
➢
Lors du branchement d’un magnétoscope, les couleurs du câble et de la borne de branchement doivent correspondre.
➢
La couleur de la prise d’entrée AV IN [Y/VIDEO] (vert) ne correspond pas à la couleur du câble vidéo (jaune).
5
4
l’arrière du téléviseur.
1
Brancher le câble ou l’antenne
à l'entrée ANT IN à l’arrière du
2
magnétoscope.
Reliez au moyen d’un câble
d’antenne la borne ANT OUT du
3
magnétoscope et la borne ANT IN
du téléviseur.
Relier au moyen d’un câble
vidéo la prise de sortie vidéo du
4
magnétoscope et la prise AV IN
[Y/VIDEO] du téléviseur.
Raccorder les câbles audio
entre les sorties AUDIO OUT du
5
magnétoscope et les entrées AV IN
[R-AUDIO-L] du téléviseur.
Appuyez sur la touche SOURCE de
la télécommande jusqu’à que vous
6
voyiez le signal du boîtier décodeur
(voir "Pour sélectionner la source" à
la page 9).
Branchement d’un système audionumérique
Panneau arrière du téléviseur
Système
audionumérique
Câble optique (non fourni)
➢
La diffusion audio en 5.1 canaux est possible lorsque le téléviseur est raccordé à un appareil externe doté de cette fonction audio.
➢
La configuration du panneau arrière de chaque système audionumérique est différente.
➢
Lorsque le récepteur (cinéma maison) est réglé sur “On”, vous pouvez entendre du son provenant de la prise optique du téléviseur.
Lorsque le téléviseur émet des signaux numériques (antenne), il transmet le son en 5.1 canaux au récepteur du cinéma maison.
Lorsque la source est un composant numérique, comme un lecteur DVD, et que ce dernier est branché au téléviseur à l’aide d’un
câble HDMI, seul un son deux canaux sera émis par le récepteur du cinéma maison. Pour entendre le son en 5.1 canaux, brancher
la prise de sortie optique DIGITAL AUDIO OUT (OPTICAL) du DVD/Blu-Ray ou du câblosélecteur/récepteur satellite sur un
amplificateur ou une chaîne de cinéma maison, et non pas sur le téléviseur.
1
Brancher un câble optique entre les
prises de sortie numérique optique
DIGITAL AUDIO OUT (OPTICAL)
du téléviseur et les prises d'entrée
audionumérique du système
audionumérique.
Lorsqu'un système audionumérique
est branché à la prise DIGITAL
AUDIO OUT (OPTICAL) : Réduire
le volume du téléviseur et régler
ensuite le niveau du volume à l’aide
du contrôle de volume du système.
Que signifie OPTIQUE?
• Un câble optique convertit un
signal électrique en un signal
lumineux optique et le transmet
par des fibres de verre. Un
système transmet des signaux
audionumériques sous forme
d’ondes lumineuses, le format
S/PDIF, par le biais d’un
conducteur en verre.
Page 28

Branchement d’un ordinateur
À l’aide du câble HDMI/DVI
Panneau arrière du téléviseur
PC
1
Câble stéréo de 3,5 mm (non fourni)
Câble HDMI/DVI (non fourni)
➢
La configuration du panneau arrière de chaque ordinateur est différente.
➢
Lors du branchement d’un ordinateur, les couleurs du câble et de la borne de branchement doivent correspondre.
➢
Il faut brancher un câble HDMI/DVI dans la prise HDMI IN 1(DVI).
2
Brancher un câble HDMI/DVI entre
la prise d’entrée HDMI IN 1(DVI)
du téléviseur et la prise de sortie
PC de l’ordinateur.
Branchez un câble stéréo à fiche
de 3,5 mm entre les prises droite et
gauche DVI AUDIO IN du téléviseur
et la prise Audio Out de la carte son
de votre ordinateur.
Français-28
Page 29

Mise sous tension/hors tension du téléviseur
Appuyer sur la touche POWER de la télécommande.
Il est aussi possible d’utiliser la touche POWER du téléviseur.
➢ Le téléviseur peut prendre un certain temps avant de
'allumer.
Visualisation de l’affichage
Appuyez sur la touche INFO de la télécommande.
Le téléviseur affiche alors le canal, le type de son et
l’état de certains paramètres de son et d’image.
TV #1
DTV Air
Dolby Digital
13-1
Programme suivant
Ven, déc. 19 2:05 am
M. Spillane’s Mike Hammer
Bonocrunch
1:55 am - 2:55 am
1080i 16:9 Français
2:55 am - 3:55 am
Mémorisation des canaux
Le téléviseur peut mémoriser tous les canaux captés par
l’antenne ou le câble. Une fois les canaux mémorisés,
la touche CH
successivement, ce qui évite de syntoniser chaque canal
manuellement avec les touches numériques. La mémorisation
des canaux s’effectue en trois étapes : sélection de la source
de diffusion, mémorisation automatique des canaux et ajout
ou suppression manuelle de canaux (listes des canaux).
Mémorisation des canaux
(méthode automatique)
Pour que le téléviseur puisse mémoriser les canaux
accessibles, il faut préciser la
source de signal à laquelle il est raccordé (air ou câble).
ou CH
permet de les parcourir
Appuyer sur la touche MENU pour afficher le menu.
Appuyersurlatouche▲ou▼poursélectionner
Chaîne, suivie de la touche ENTERE.
Chaîne
Antenne : Air ►
Prog. auto
Effacer les canaux brouillés
Liste des canaux
Syn. Précise
Affichage des menus
Alors que le téléviseur est allumé, appuyer sur la
touche MENU. Le menu principal apparaît à l’écran.
Le côté gauche du menu présente des icônes :
Image, Son, Chaîne, Configuration, Entrée,
Support.
Image
Mode : Standard
Lumière cellule : 4
Contraste : 95
Luminosité : 45
Netteté : 50
Couleur : 50
Teinte (V/R) : V50/R50
Sélectionner une des cinq icônes à l’aide des
touches▲et▼.Ensuite,appuyersurENTERE
pour accéder au sous-menu de l’icône.
Appuyer sur la touche EXIT pour quitter le menu.
➢
Le menu à l'écran disparaît après environ une
minute.
Appuyersurlatouche▲ou▼poursélectionner
Prog. Auto, suivie de la touche ENTERE.
Prêt à l’emploi
Mémoriser une source d’antenne.
Air
Câble
Auto
Appuyersurlatouche▲ou▼poursélectionner
Démarrer
Démarrer
Démarrer
Omitir
le branchement d'antenne, suivie de la touche
ENTERE.
➢
Air: Signal d’antenne Air.
Câble: Signal d'antenne Câble.
Auto: Signaux d'antenne de type Air et Câble.
Prog. auto
Choisir le tableau de câblodiffusion.
Analogique
Numérique
STD
HRC IRC
HRC IRCSTD
Démarrer
OmitirIntro.Dépl.
Français-29
Page 30

Au moment de la sélection du système de télévision
par câble : Appuyer sur ENTERE pour amorcer
la programmation automatique. Appuyer sur les
touches◄ou►tpourchoisirlasourcedusignal
analogique appropriée (STD, HRC ou IRC), puis sur
ENTERE. Si le câble est numérique, sélectionner
la source de signal pour une diffusion analogique et
numérique.
➢
STD, HRC et IRC désignent différents
systèmes de câblodistribution. Pour
connaître le système utilisé dans un
secteur particulier, communiquer avec le
câblodistributeur. La sélection de la source
de signal est maintenant terminée.
Prog. auto
Progr. Aut. en cours
DT V Air : -- Air : 4
DT V Câ ble : Câ ble : --
Arrêt
Intro. Omitir
Le téléviseur commence alors à mémoriser tous les
11
Air
3%
canaux disponibles.
➢
Une fois tous les canaux mémorisés, le
téléviseur commence à éliminer les canaux
brouillés. Puis le menu Prog. auto s’affiche.
➢
Si vous voulez arrêter la programmation
automatique, appuyez sur ENTERE.
le message Arrêter la programmation
automatique? s’affiche. Appuyer sur la touche
◄ou►poursélectionnerOui,suiviedela
touche ENTERE.
Appuyer sur la touche EXIT pour quitter.
Progr. Aut. Non terminée
56 Canaux sont mémorisés.
DTV Air : 20 Air : 11
DTV Cable : 15 Cable : 10
Prog. auto
OK
OmitirIntro.
Changement du format normal
de l'image
Il est possible de choisir le type d’image qui correspond le
plus à ses exigences.
Appuyer sur la touche MENU pour afficher le menu.
Appuyer sur la touche ENTERE pour choisir Image.
Image
Mode : Standard
Lumière cellule : 4
Contraste : 95
Luminosité : 45
Netteté : 50
Couleur : 50
Teinte (V/R) : V50/R50
Appuyer sur ENTERE pour choisir Mode.
Appuyersurlatouche▲ou▼poursélectionnerle
réglage d’image Dynamique, Standard ou Cinéma.
Appuyer sur la touche ENTERE.
Image
Mode
:
Lumière cellule : 4
Contraste : 95
Luminosité : 45
Netteté : 50
Couleur : 50
Teinte (V/R) : V50/R50
●
Dynamique: Choisit l’image pour la haute
Standard
Dynamique
Standard
Naturel
définition dans une pièce claire.
●
Standard
: Choisit la meilleure image possible dans
un environnement normal.
●
Cinéma: Choisit la meilleure image pour regarder
des films dans une pièce sombre.
Appuyer sur la touche EXIT pour quitter.
►
Français-30
Page 31

Français-31
Modification du format de l’image
Vous pourrez parfois désirer modifier le format de l’image
à l’écran. Votre téléviseur offre plusieurs options de format
d’écran, chacune étant conçue pour fonctionner au mieux
avec des types d’entrées vidéo particulières. Votre récepteur
satellite peut également offrir ses propres tailles d’écran. En
règle générale, toutefois, il est conseillé d’utiliser le mode
16:9, autant que possible.
Appuyer sur la touche MENU pour afficher le menu.
Appuyer sur la touche ENTERE pour choisir
Image.
Pour choisir la source
Utiliser cette fonction pour sélectionner le téléviseur ou une
autre source d’entrée externe branchée au téléviseur, comme
un lecteur DVD/Blue-Ray, un câblosélecteur ou un récepteur.
Sélectionner pour choisir la source d'entrée désirée.
Appuyer sur la touche MENU pour afficher le menu.
Appuyersurlatouche▲ou▼poursélectionner
Entrée, suivie de la touche ENTERE.
Image
Mode : Standard
Lumière cellule : 4
Contraste : 95
Luminosité : 45
Netteté : 50
Couleur : 50
Teinte (V/R) : V50/R50
Appuyersurlatouche▲ou▼poursélectionner
Picture Option, puis sur la touche ENTERE.
Teinte (V/R) : V50/R50
Réglages avancés
Image
Options d’image
Réinitialisation de l’image
Appuyersurlatouche▲ou▼poursélectionner
►
Size, puis sur la touche ENTERE.
Options d’image
Nuance coul. : Normal
Format : 16:9 ►
Réduct. bruit num. : Auto
Nv nr HDMI : Normal
Mode Film : Off
Protection grillage écran
Dépl.
RetourIntro.
Entrée
Liste source
Entrer le nom
Appuyer sur ENTERE pour choisir Liste des
sources.Appuyersurlatouche▲ou▼pour
sélectionner la source du signal, suivie de la touche
ENTERE.
Liste source
TV
AV
Component
HDMI1/DVI
HDMI2
➢
Il est possible de choisir entre les jeux de
----
----
----
----
T Outils
prises suivants: TV, AV, Component,
HDMI1/DVI, HDMI2.
➢
Seuls les appareils externes branchés au
téléviseur peuvent être sélectionnés.
Les entrées raccordées sont surlignées et
figurent au haut de la Liste source.
Les entrées non raccordées figurent à la fin.
➢
Il est possible d’appuyer à répétition sur la
touche P.SIZE de la télécommande pour
modifier le format de l’image.
● 16:9 : Régler l’image au format 16:9.
● Zoom1: Étirer l’écran à la verticale pour l’amener
au rapport 16:9.
● Zoom2: Étirer l’image Zoom1 à la verticale.
● Formatlarge: Étirer l’image à l’horizontale et à la
verticale pour un affichage optimal.
● 4:3: Régler l’image au format 4:3.
● Pleinécran: Afficher le signal HD standard
intégral, impossible à visionner à l’aide d’un
téléviseur ordinaire.
Page 32

Dépannage
Le tableau ci-dessous dresse la liste des problèmes courants et suggère des solutions.
Si aucun de ces conseils ne permet de corriger le problème, communiquer avec le centre de service Samsung le plus près.
Problème Solution possible
Image de mauvaise qualité.
Son de mauvaise qualité.
Pas d’image ni de son.
Pas de son ou le son est trop faible au
volume maximum.
Défilement vertical de l’image.
Fonctionnement anormal du téléviseur.
Le téléviseur ne s’allume pas.
La télécommande fonctionne mal.
Problème d’écran en diffusion numérique.
L’image est trop pâle ou trop foncée.
L'image est trop grande ou trop petite.
La qualité visuelle des canaux
numériques varie.
L'écran est noir et le
témoind'alimentation clignote.
Bien que le téléviseur affiche HD (haute
définition), la qualité des images n’est
pas satisfaisante.
L’image détériorée apparaît dans un
angle de l’écran.
Un son étrange se fait entendre.
Ce panneau à plasma est constitué
de sous-pixels, produits par une
technologie évoluée.
Le message “rétablit tous les
paramètres aux réglages prédéfinis”
s’affiche.
- Essayer un autre canal.
- Réorienter l’antenne.
- Vérifier tous les branchements de câbles.
- Essayer un autre canal.
- Réorienter l’antenne.
- Essayer un autre canal.
- Appuyer sur la touche SOURCE.
- Vérifier que le téléviseur est branché.
- Vérifier les connexions de l’antenne.
- Vérifier que la touche MMUTE n’est pas enfoncée.
En premier lieu, vérifier le volume des appareils branchés au téléviseur (récepteur
numérique, lecteur DVD, câblosélecteur, magnétoscope, etc.). Régler ensuite le
volume du téléviseur en conséquence.
Vérifier tous les branchements de câbles.
Débrancher le téléviseur pendant 30 secondes, le rebrancher et le rallumer.
Vérifier si la prise électrique fonctionne.
- Remplacer les piles de la télécommande.
- Nettoyer l’extrémité supérieure de la télécommande (d’où le signal est transmis).
- Vérifier les bornes des piles.
- Appuyer sur la touche TV pour régler la télécommande au mode TV.
- S’assurer qu’il y a des piles dans la télécommande.
- Vérifier si les bornes « + » et « - » des batteries sont insérées correctement.
Vérifier la puissance du signal numérique et l’entrée de l’antenne.
- Régler la luminosité et le contraste.
- Utiliser le réglage de précision.
Redimensionner l'image.
La qualité des images des canaux peut varier en fonction du mode de diffusion
(analogique ou numérique).
- Si la méthode de production d’origine est numérique : Qualité visuelle supérieure.
- Si la méthode de production d’origine est analogique : L’émission numérique affichée
à l’écran est une émission analogue à l’origine, mais convertie au format numérique.
La qualité visuelle est de calibre SD (définition standard).
Sur l’ordinateur, vérifier l’alimentation et le câble de signal.
Le téléviseur est en mode d’économie d’énergie.
Déplacer la souris ou appuyer sur une touche du clavier.
Sur le matériel, vérifier le mode (STB, DVD, etc.), l’alimentation et le signal du câble.
Le téléviseur est en mode d’économie d’énergie.
Appuyer sur la touche SOURCE du panneau ou de la télécommande.
Éteindre le téléviseur et le rallumer.
L’indication HD (haute définition) affichée lors d’un changement de poste ou lorsque
la touche INFO de la télécommande est enfoncée signifie que le canal sélectionné
est un canal numérique. Si le diffuseur convertit un signal analogue au format
numérique et transmet ce signal, il est possible que la qualité visuelle ne soit pas
parfaite.
Si la fonction Numérisation seulement est sélectionnée sur un appareil externe, l’
image détériorée peut apparaître dans un angle de l’écran. Ce dommage est causé
par les appareils externes et non par le téléviseur.
Cela est causé par le fonctionnement des appareils; il ne s’agit pas d’une défectuosité.
Toutefois, il peut y avoir des pixels plus lumineux ou plus sombres à l’écran. Ces
pixels n’ont aucune incidence sur le rendement du produit.
Ce message s’affiche lorsque vous appuyez et maintenez la touche EXIT enfoncée
pendant un moment. Les valeurs par défaut du produit sont rétablies selon les
paramètres prédéfinis à l’usine.
➢
Cet écran à plasma comporte des sous-pixels (2,359,296 pixels (pour les modèles de 42 po) / 3,147,264 pixels (pour les
modèles de 50 po)) dont la production exige une technologie de pointe. Toutefois, il peut y avoir des pixels plus lumineux ou
plus sombres à l’écran. Ces derniers n’ont aucune incidence sur le rendement du produit.
Français-32
Page 33

Cette page est laissée
intentionnellement en blanc.
Page 34

Cette page est laissée
intentionnellement en blanc.
Page 35

Contact SAMSUNG WORLD-WIDE
If you have any questions or comments relating to Samsung products, please contact the SAMSUNG customer care center.
Country
CANADA 1-800-SAMSUNG (7267864) www.samsung.com/ca
U.S.A 1-800-SAMSUNG (7267864) www.samsung.com
Customer Care Center
Web Site Address
Samsung Electronics Canada Inc., Customer Service 55
Standish Court Mississauga, Ontario L5R 4B2 Canada
Samsung Electronique Canada Inc., Service à la Clientèle
55 Standish Court Mississauga, Ontario L5R 4B2
Canada
Samsung Electronics America, Inc. 105 Challenger Road
Ridgefield Park, NJ 07660-0511
BN68-02444A-00
 Loading...