

Page 1

Contact SAMSUNG WORLDWIDE
If you have any questions or comments relating to Samsung products, please contact the SAMSUNG customer care center.
Comuníquese con SAMSUNG WORLD WIDE
Si desea formular alguna pregunta o comentario en relación con los productos de Samsung, comuníquese con el centro de
atención al cliente de SAMSUNG.
Country
CANADA 1-800-SAMSUNG (726-7864) www.samsung.com Samsung Electronics Canada Inc., Customer Service
MEXICO 01-800-SAMSUNG (726-7864) www.samsung.com C.P 11570 AV. Presidente Masaryk No.111, Int. 701
U.S.A 1-800-SAMSUNG (726-7864) www.samsung.com Samsung Electronics America, Inc. 105 Challenger
IMPORTADO POR: SAMSUNG ELECTRONICS MÉXICO S.A. de C.V.
AV. PRESIDENTE MASARIK #111 INT701
COL. CHAPULTEPEC MORALES C.P.11570
DELEGACION MIGUEL HIDALGO MEXICO. DISTRITO FEDERAL
Tel: 01-55-5747-5100 / 01-800-726-7864
Customer Care Center
Web Site Address
55 Standish Court Mississauga, Ontario L5R 4B2
Canada
Col. Chapultepec Morales, Delegacion Miguel Hidalgo
Mexico D.F
Road Ridgeeld Park, NJ 07660-0511
Plasma TV
user manual
© 2010 Samsung Electronics Co., Ltd. All rights reserved.
imagine the possibilities
Thank you for purchasing this Samsung product.
To receive more complete service, please register
your product at
www.samsung.com/register
Model _____________ Serial No. _____________
BN68-02615A-02
Page 2

Figures and illustrations in this User Manual are provided for reference only and may differ from actual product appearance.
Product design and specifications may be changed without notice.
User Instructions
• Screen Image retention
Do not display a still image (such as on a video game) on the plasma display panel for more than several minutes as it can cause screen image
retention. This image retention is also known as “screen burn”. To avoid such image retention, refer to page 14 of this manual to reduce the degree of
brightness and contrast of the screen when displaying a still image.
• Heat on the top of the Plasma TV
The top side of the product may be hot after long periods of use as heat dissipates from the panel through the vent hole in the upper part of the
product.
This is normal and does not indicate any defect or operation failure of the product.
However, children should be prevented from touching the upper part of the product.
• The product is making a “cracking” noise.
A “cracking” noise may occur when the product contracts or expands due to a change in the surrounding environment such as temperature or
humidity. This is normal and not a defect of the unit.
• Cell Defects
The PDP uses a panel consisting of 2,360,000(HD-level) to 6,221,000(FHD-level) pixels which require sophisticated technology to produce. However,
there may be a few bright or dark pixels on the screen. These pixels will have no impact on the performance of the product.
• Avoid operating the TV at temperatures below 41°F (5°C)
• A still image displayed too long may cause permanent damage to the PDP Panel.
Watching the Plasma TV in 4:3 format for a long period of time may leave traces of borders displayed on the left, right and center of
the screen caused by the difference of light emission on the screen. Playing a DVD or a game console may cause similar effects to
the screen.
Damages caused by the above effect are not covered by the Warranty.
• After-images on the Screen.
Displaying still images from Video games and PC for longer than a certain period of time may produce partial after-images.
To prevent this effect, reduce the “brightness” and “contrast” when displaying still images for a long time.
• Warranty
Warranty does not cover any damage caused by image retention.
Burn-in is not covered by the warranty.
2
English
Page 3

Contents
Getting Started
y List of Features .........................................................4
y Accessories .............................................................. 4
y Install the Stand ........................................................ 5
y Viewing the Control Panel .........................................6
y Viewing the Remote Control ...................................... 7
y Connecting to an Antenna ........................................ 8
y Plug & Play (Initial Setup) ...........................................8
Connections
y Connecting to an AV Device ...................................... 9
y Connecting to an Audio Device ............................... 10
y Connecting to a PC ................................................ 11
y Changing the Input Source ..................................... 12
Basic Features
y How to Navigate Menus .......................................... 12
y Channel Menu ........................................................ 13
Seeing Channels 13
Using Favorite Channels 13
Memorizing channels 13
Editing Channels 14
Other Features 14
y Picture Menu .......................................................... 15
Changing the Preset Picture Mode 15
Adjusting Picture Settings 15
Economical Solutions 15
Changing the Picture Options 16
Setting up the TV with Your PC 18
y Sound Menu ........................................................... 19
Changing the Preset Sound Mode 19
Adjusting Sound Settings 19
Sound Settings 19
y Setup Menu ............................................................ 20
Setting the Time 20
Using the Sleep Timer 20
Setting the On / Off Timer 20
Locking Programs 21
Other Features 22
Picture In Picture (PIP) 24
y Support Menu ......................................................... 24
Advanced Features
y Network Connection ............................................... 26
Connecting to a Wired Network 26
Connecting to a Wireless Network 28
y Media Play .............................................................. 31
Connecting a USB Device 31
Connecting to your PC through a network 31
Screen Display 33
Playing Multiple Files 36
Media Play - Additional Functions 36
y Anynet+ .................................................................. 38
Setting Up Anynet+ 39
Switching between Anynet+ Devices 39
Recording 39
Listening through a Receiver 40
Troubleshooting for Anynet+ 40
y AllShare ..................................................................41
About AllShare 41
Setting Up AllShare 41
Other Information
y Installing the Wall Mount ......................................... 43
y Assembling the Cables ........................................... 44
y Securing the Installation Space ............................... 44
y Securing the TV to the wall ..................................... 45
To Avoid the TV from Falling 45
y Troubleshooting ...................................................... 46
y Specifications ......................................................... 49
y License ................................................................... 49
y Index ...................................................................... 50
ENGLISH
TOOLS
This function can be used by pressing the
TOOLS button on the remote control.
Check the Symbol!
Note
Indicates additional information.
Step by Step Guide
Check here for instructions on how to open
the relevant submenu within the OSD (on
screen display).
English
3
Page 4

Getting Started
List of Features
y Excellent Digital Interface & Networking never put a space before punctuation: With a built-in HD digital tuner,
nonsubscription HD broadcasts can be viewed without a cable box / STB (Set-Top-Box) satellite receiver.
y Media Play: Allows you to play music files, pictures, and movies saved on a USB device (p. 31).
y AllShare: AllShare connects your TV and compatible Samsung mobile phones/devices through a network (p. 41).
y Self Diagnosis: You can check to make sure picture and sound operate normally (p. 24).
Accessories
✎
Please make sure the following items are included with your PDP TV. If any items are missing, contact your dealer.
✎
The items’ colors and shapes may vary depending on the models.
y Remote Control & Batteries (AAA x 2)
y Owner’s Instructions
y Warranty Card / Safety Guide / Quick Setup Guide
Blanking Bracket Cable Tie
Ferrite Core for Power Cord (2EA)
y Cleaning Cloth
y Power Cord
✎
Ferrite Core for Power Cord: The ferrite cores are used to shield the cables from interference.
When connecting a cable, open the ferrite core and clip it around the cable near the plug as
shown in the figure.
A (Distance between the ferrite core and one end of the cord put into the TV set): below
x
50mm
B (Distance between the ferrite core and the other end of the cord put into the outlet): below
x
20mm
A
B
4
English
Page 5
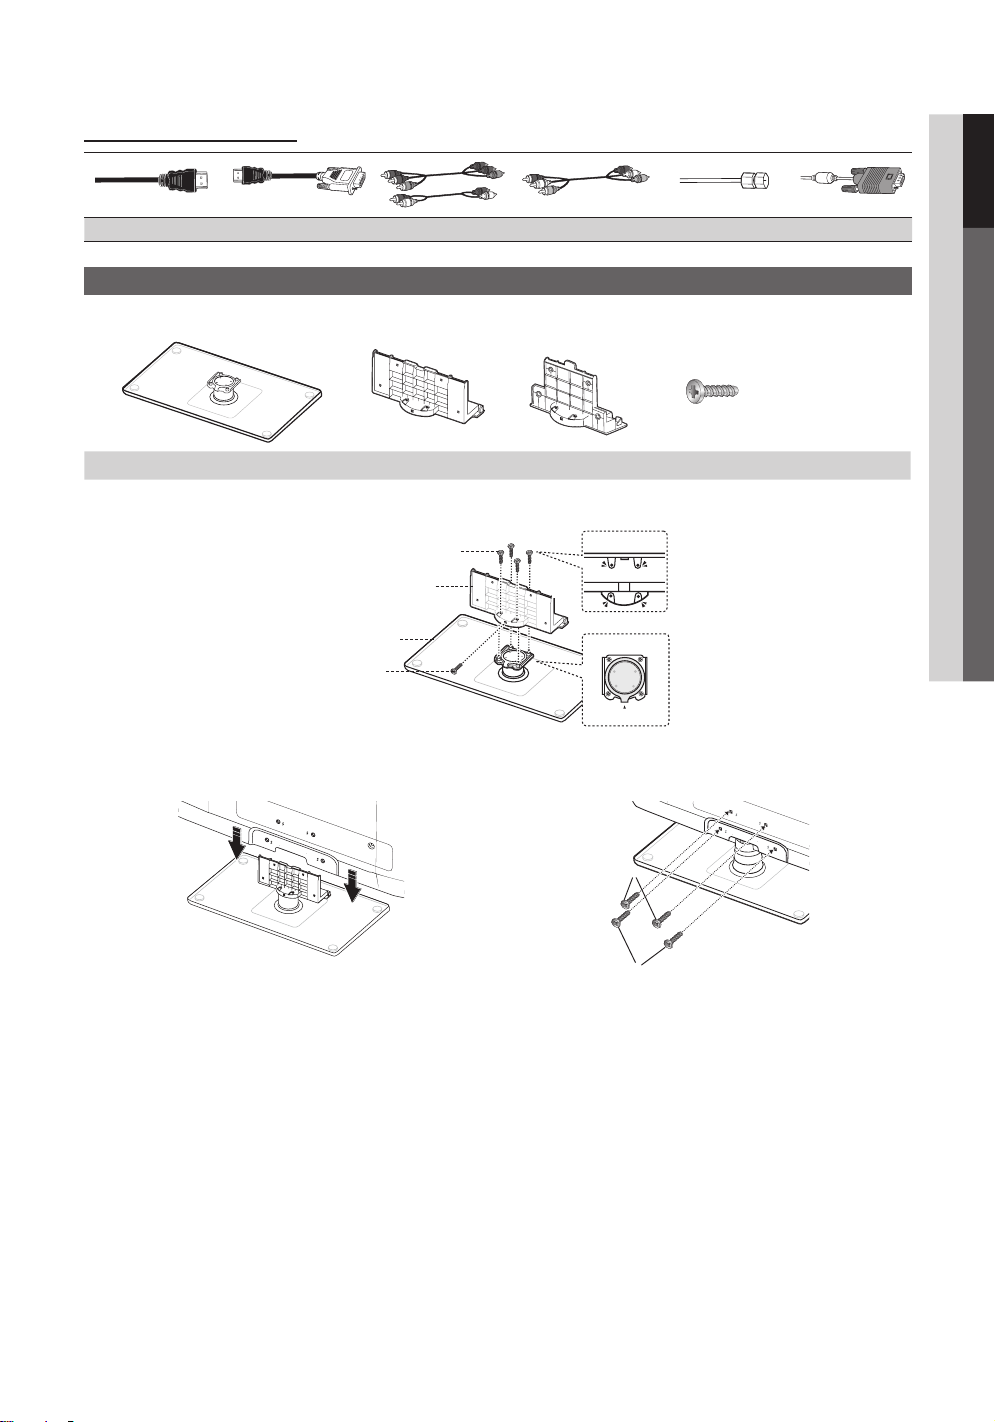
Input Cables (Sold Separately)
HDMI HDMI-DVI Component Composite (AV) Coaxial (RF) VGA
Install the Stand
See separate guide for installing the stand.
01 Getting Started
or
Stand (1EA) Guide Stand (1EA) Screws (9EA)
Follow the steps below to connect the TV to the stand.
Screws (M4 X L12)
Guide Stand
Stand
Screws (M4 X L12)
Rear
1. Connect the Guide Stand to the Stand using five screws (M4 X L12) as shown.
Top view
(M4 X L12)
Front
Rear
2
1
2. With your TV upright, connect the TV to the Stand as
shown.
✎
NOTE
Make sure to distinguish between the front and back of the Stand and Guide Stand when assembling them.
x
Make sure that at least two persons lift and move the PDP TV.
x
Stand the product up and fasten the screws. If you fasten the screws with the PDP TV placed down, it may lean to
x
one side.
3. Fasten two screws (M4 X L12) at position 1, and then
fasten two screws (M4 X L12) at position 2.
English
5
Page 6
Getting Started
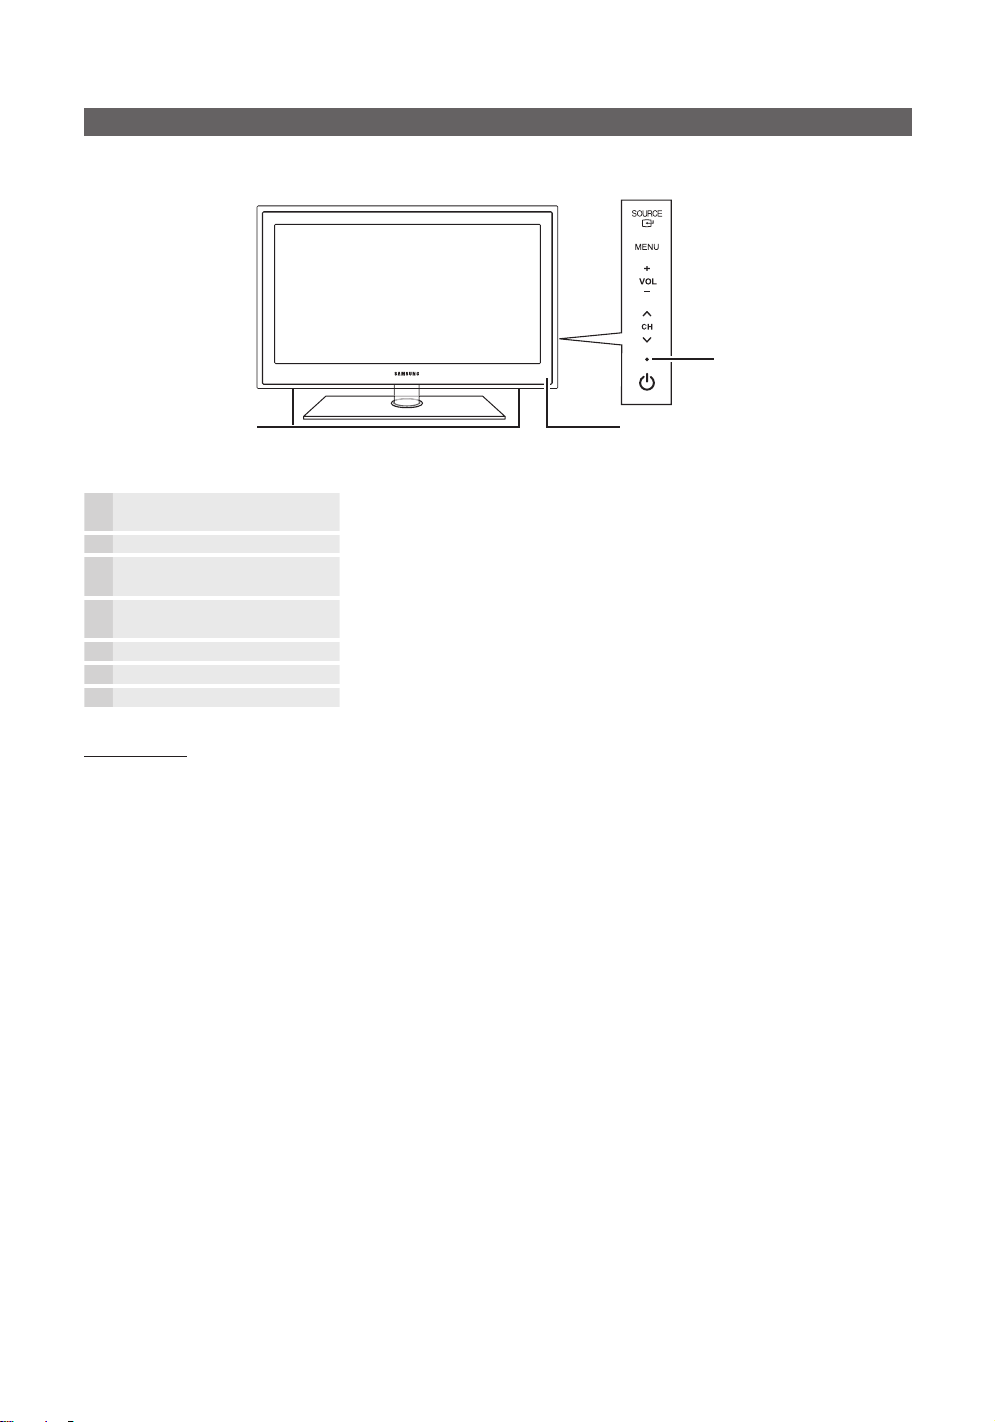
Viewing the Control Panel
✎
The product color and shape may vary depending on the model.
Power Indicator
Speakers
SOURCE
MENU Displays an on-screen menu, the OSD (on screen display) of your TV’s features.
Power Indicator Blinks and turns off when the power is on and lights up in standby mode.
Remote control sensor Aim the remote control towards this spot on the TV.
Standby mode
Do not leave your TV in standby mode for long periods of time (when you are away on a holiday, for example). A small amount
of electric power is still consumed even when the power button is turned off. It is best to unplug the power cord.
(Power)
Toggles between all the available input sources. In the on-screen menu, use this
button as you would use the ENTER button on the remote control.
Adjusts the volume. In the OSD, use the
◄ and ► buttons on the remote control.
Changes the channels. In the OSD, use the
▼ and ▲ buttons on the remote control.
Turns the TV on or off.
Remote control sensor
buttons as you would use the
buttons as you would use the
6
English
Page 7

Viewing the Remote Control
✎
This is a special remote control for the visually impaired and has Braille points on the Power, Channel and Volume
buttons.
01 Getting Started
Turns the TV on and off .
Displays and selects the available video
sources (p. 12).
Press to directly access channels.
Press to select additional channels
(digital) being broadcasted by the
same station. For example, to select
channel “54-3”, press “54”, then press
“-” and “3”.
Adjusts the volume.
Brings up the OSD.
Displays Media Play (p. 31).
Quickly select frequently used functions.
Returns to the previous menu.
Buttons used in the Channel list, Media
Play (USB) menu, etc.
Use these buttons in Media Play (USB)
and Anynet+ (HDMI-CEC) modes
(p. 31, 38). (: Controls recording
for Samsung recorders that have the
Anynet+ feature
POWER
SOURCE
CH LIST
MENU
MEDIA.P
TOOLS
RETURN
A B C D
S.MODE
P.MODE
SLEEP
P.SIZE
ON/OFF
PRE-CH
FAV.CH
INFO
EXIT
MTS
CC
Turns the remote control light on or
off. When on, the buttons become
illuminated for a moment when pressed.
(Using the remote control with this button
set to off will reduce the battery usage
time.)
Returns to the previous channel.
Cuts off the sound temporarily.
Changes channels.
Displays the channel list on the screen
(p. 13).
Displays Favorite Channel Lists on the
screen (p. 13).
Displays information on the TV screen.
Selects the on-screen menu items and
changes the values seen on the menu.
Exits the menu.
S.MODE: Press to select the sound
mode (p. 19).
SLEEP: Automatically shuts off the TV
at a preset time. (p. 20).
MTS: Press to choose stereo,
mono or Separate Audio Program
(SAP broadcast) (p. 19).
P.MODE: Press to select the picture
mode (p. 15).
P.SIZE: Selects the picture size (p. 17).
CC: Controls the caption
decoder (p. 22).
Installing batteries (Battery size: AAA)
✎
NOTE
Use the remote control within 23 feet from the TV.
x
Bright light may affect the performance of the remote
x
control. Avoid use when nearby fluorescent lights or neon
signs.
The color and shape may vary depending on the model.
x
English
7
Page 8
Getting Started
POWER
INFO GUIDE
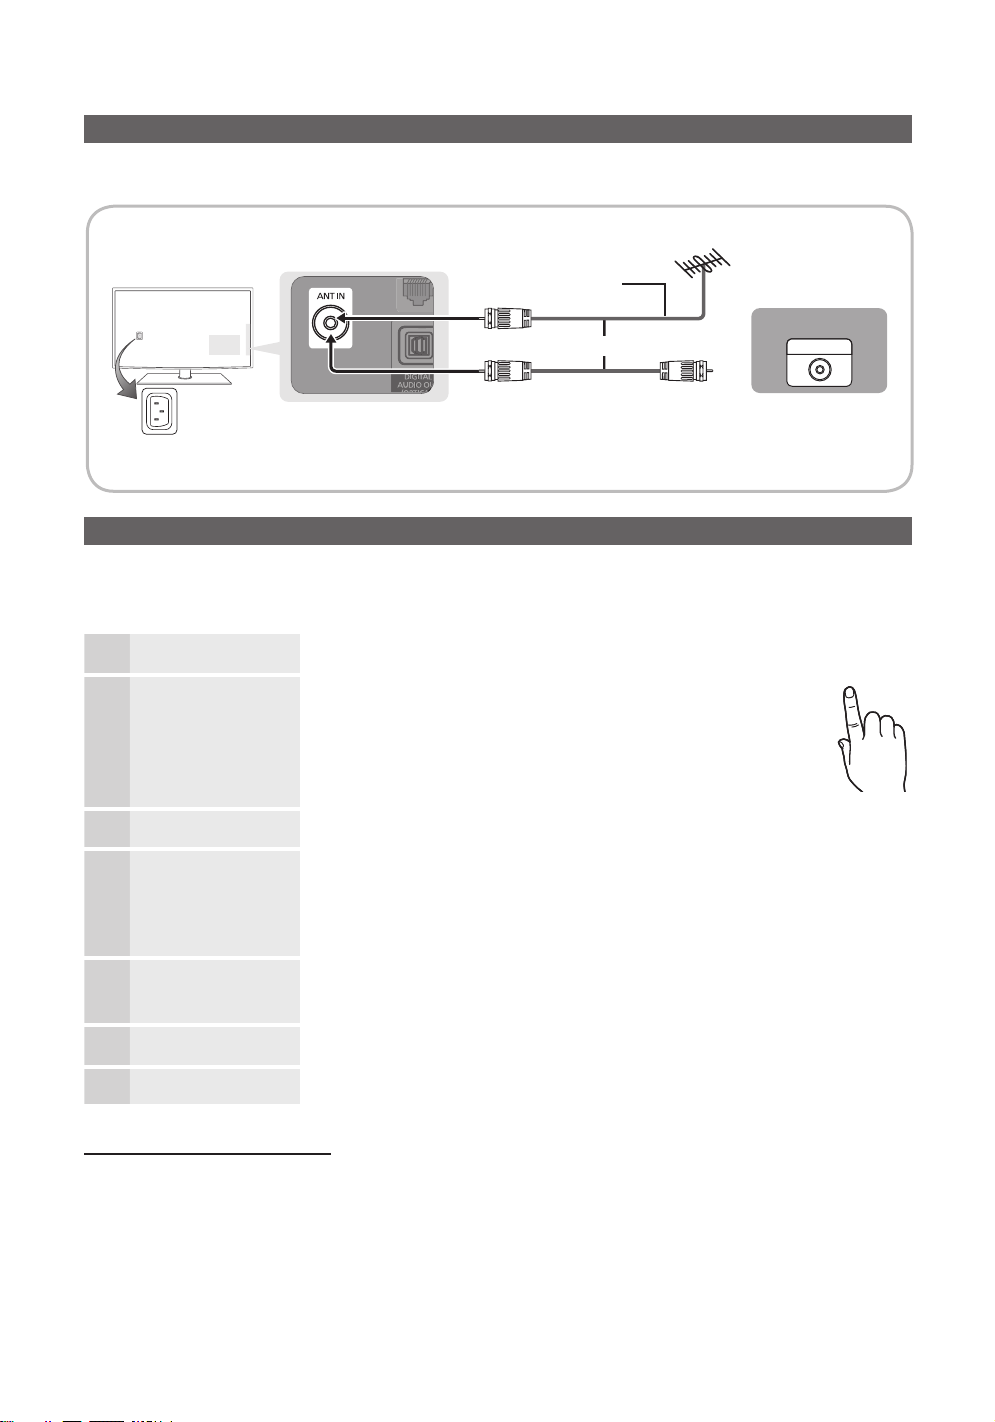
Connecting to an Antenna
When the TV is initially powered on, basic settings proceed automatically.
✎
Connecting the power cord and antenna.
Antenna Cable (Not Supplied)
VHF/UHF Antenna
or
Power Input
Plug & Play (Initial Setup)
When the TV is initially powered on, a sequence of on-screen prompts will assist in configuring basic settings. Press the
POWER button. Plug & Play is available only when the Input source is set to TV.
✎
To return to the previous step, press the Red button.
Selecting a language
1
Selecting Store Demo
2
or Home Use
Selecting an antenna
Press the ▲ or ▼ button, then press the ENTER
Select the desired OSD (On Screen Display) language.
Press the ◄ or ► button, then press the ENTER
y Select the Home Use mode. Store Demo Mode is for retail
environments.
y To return the unit’s settings from Store Demo to Home Use
(standard): Press the volume button on the TV. When you
see the volume OSD, press and hold MENU for 5 sec.
Press the ▲ or ▼ button, then press the ENTER
button.
button.
button. Select Air, Cable or Auto.
Cable
ANT OUT
P
3
Selecting a channel
4
Setting the Clock
5
Mode
Viewing the HD
6
Connection Guide.
Enjoy your TV.
Press the ▲ or ▼ button, then press the ENTER
to memorize. When setting the antenna source to Cable, a step appears allowing you to
assign numerical values (channel frequencies) to the channels. For more information, refer to
Channel → Auto Program (p. 13).
✎
Press the ENTER button at any time to interrupt the memorization process.
Set the Clock Mode automatically or manually.
y Auto: Allows you to select DST (Daylight Saving Time) mode and time zone
y Manual: Allows you to manually set the current date and time (p. 20).
The connection method for the best HD screen quality is displayed.
Press the ENTER
button.
button. Select the channel source
7
If You Want to Reset This Feature...
MENU
→ Setup → Plug & Play → ENTER
English
8
Page 9
Connections
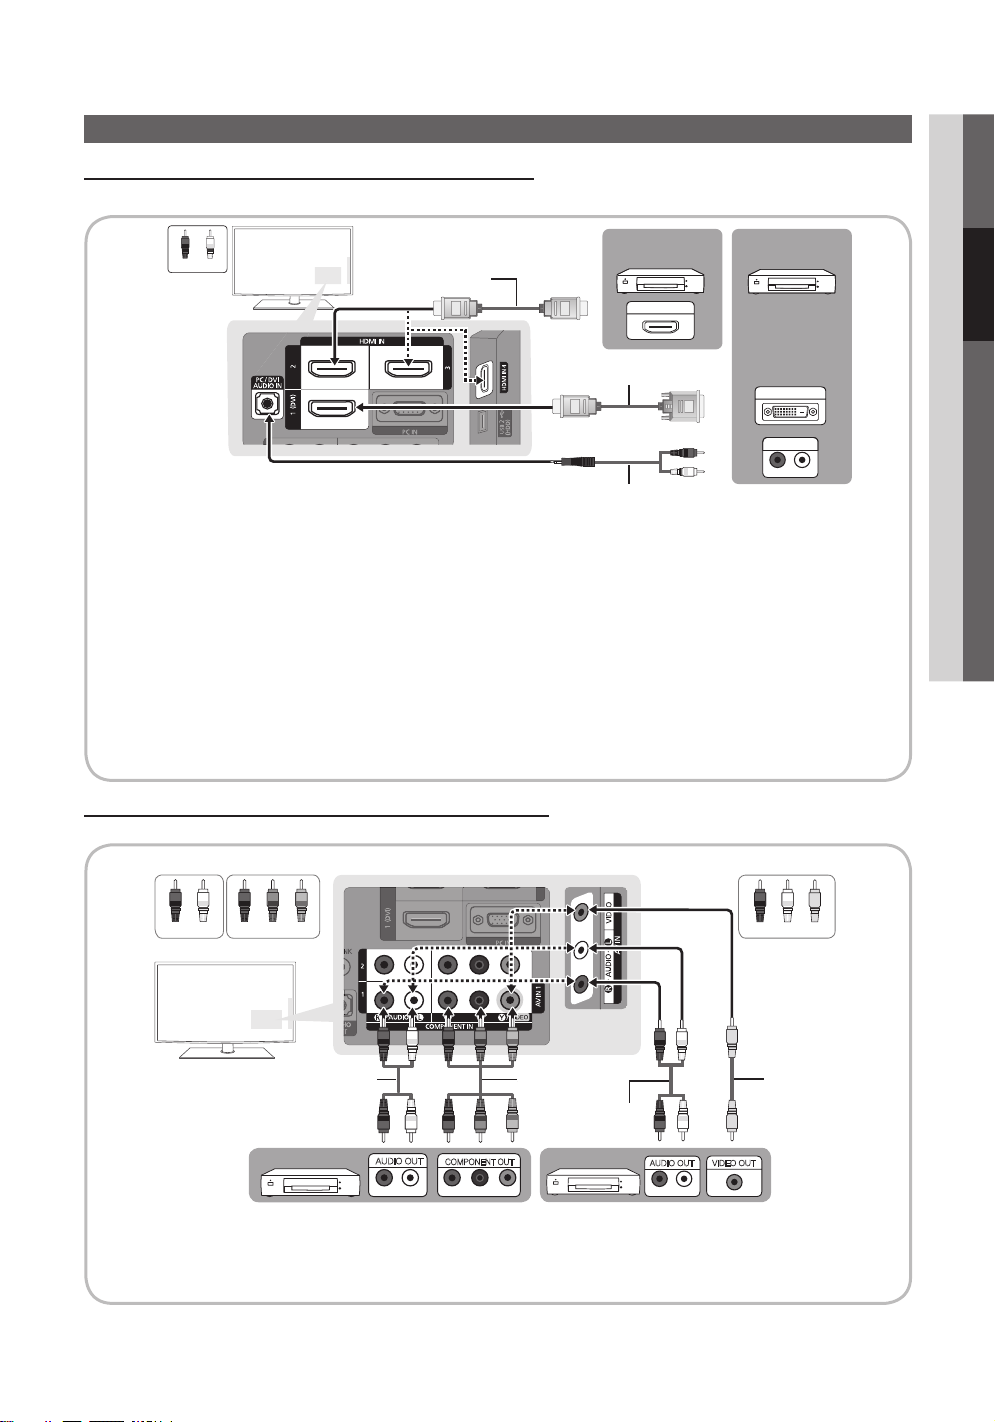
Connecting to an AV Device
Using an HDMI or HDMI/DVI cable: HD connection (up to 1080p)
Available devices: DVD, Blu-ray player, HD cable box, HD STB (Set-Top-Box) satellite receiver.
WR
Red White
HDMI Cable (Not Supplied)
Device
HDMI OUT
02 Connections
Device
HDMI to DVI Cable (Not Supplied)
✎
HDMI IN 1(DVI), 2, 3, 4, PC/DVI AUDIO IN
When using an HDMI/DVI cable connection, you must use the HDMI IN 1(DVI) jack for video. A DVD, Blu-ray
x
player, HD cable box, HD STB satellite receiver may require a DVI-HDMI (DVI to HDMI) cable or DVI-HDMI (DVI
to HDMI) adapter. The PC/DVI AUDIO IN jack is required for audio.
If an external device such as a DVD / Blu-ray player / cable box / STB satellite receiver supporting HDMI
x
versions older than 1.3 is connected, the TV may operate abnormally (e.g. no screen display / no sound /
annoying flicker / abnormal color).
If there is no sound after connecting an HDMI cable, check the HDMI version of the external device. If you
x
suspect the version is older than 1.3, contact the provider of the device to confirm the HDMI version and
request an upgrade.
It is recommended you purchase an HDMI-certified cable. Otherwise, the screen may appear blank or a
x
connection error may occur.
Using a Component (up to 1080p) or Audio/Video (480i only) Cable
Available devices: DVD, Blu-ray player, cable box, STB satellite receiver, VCR
W
White
R GB
Red
Blue Green
R
Red
Audio Cable (Not Supplied)
R
W
DVI OUT
AUDIO OUT
R-AUDIO-L
R W
Red White Yellow
Y
W
R
Audio Cable (Not Supplied) Component Cable
R
Device
✎
COMPONENT IN 1, 2 / AV IN 1: When connecting to AV IN 1, the color of the AV IN 1 [Y/VIDEO] jack (green)
AUDIO OUT
R-AUDIO-L
W
R GB
R B G
COMPONENT OUT
PR PB Y
(Not Supplied)
Device
Audio Cable
(Not Supplied)
AUDIO OUT
R-AUDIO-L
Y
WR
Video Cable
(Not Supplied)
Y
WR
VIDEO OUT
will not match the video cable (yellow).
✎
For better picture quality, the Component connection is recomended over the A/V connection.
English
9
Page 10
Connections
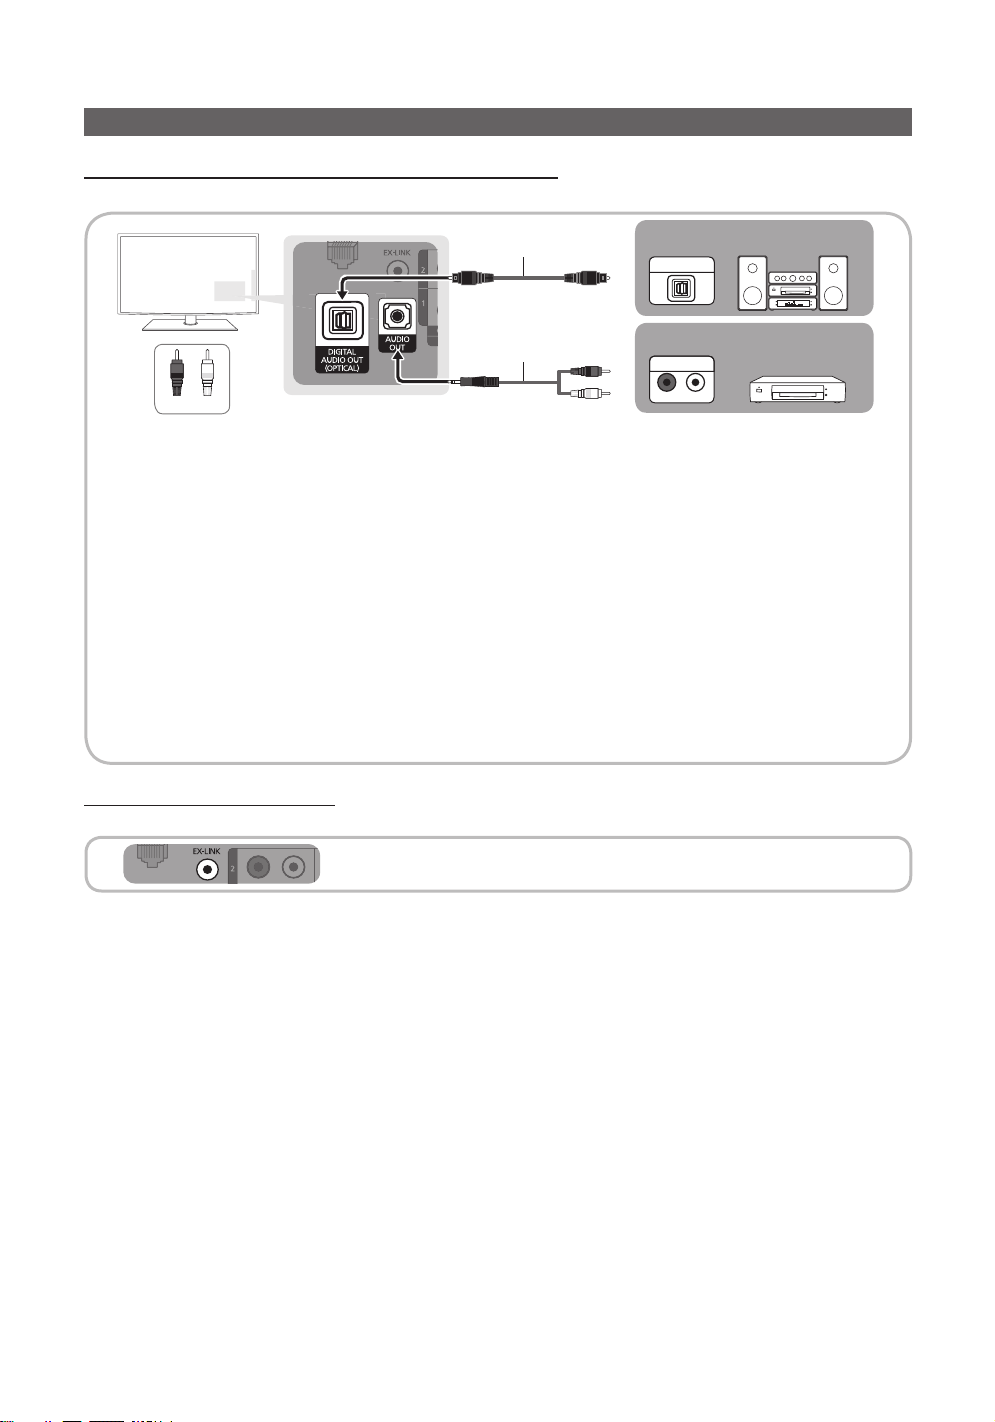
Connecting to an Audio Device
Using an Optical Cable (Digital) or Audio (Analog) Cable Connection
Available devices: Digital Audio System, Amplifier, DVD home theater
Optical Cable (Not Supplied)
W
R
Red White
✎
DIGITAL AUDIO OUT (OPTICAL)
When a Digital Audio System is connected to the DIGITAL AUDIO OUT (OPTICAL) jack, decrease the volume
x
of both the TV and the system.
5.1 CH (channel) audio is available when the TV is connected to an external device supporting 5.1 CH.
x
When the receiver (home theater) is set to on, you can hear sound output from the TV’s optical jack. When the
x
TV is receiving a DTV signal, the TV will send 5.1 CH sound to the home theater receiver. When the source is
a digital component such as a DVD / Blu-ray player / cable box / STB (Set-Top-Box) satellite receiver and is
connected to the TV via HDMI, only 2 CH audio will be heard from the home theater receiver. If you want to
hear 5.1 CH audio, connect the digital audio out jack from your DVD / Blu-ray player / cable box / STB satellite
receiver directly to an amplifier or home theater.
✎
AUDIO OUT: Connects to the audio input jacks on your amplifier/DVD home theater.
When connecting, use the appropriate connector.
x
When an audio amplifier is connected to the AUDIO OUT jacks: Decrease the volume of the TV and adjust the
x
volume level with the amplifier's volume control.
Using an EX-Link Cable Connection
Available Devices: External devices that support EX-Link
Audio Cable (Not Supplied)
Digital Audio System
OPTICAL
R
W
AUDIO IN
R-AUDIO-L
Amplifier / DVD home
theater
10
English
EX-LINK: Connector for service only.
Page 11

Using an HDMI/DVI cable or a D-sub cable
Display Modes (D-Sub and HDMI/DVI Input)
Optimal resolution is 1920 X 1080 @ 60 Hz.
Mode Resolution
IBM
MAC
VESA CVT
VESA DMT
VESA GTF
VESA DMT / DTV CEA
640 x 350
720 x 400
640 x 480
832 x 624
1152 x 870
720 x 576
1152 x 864
1280 x 720
1280 x 960
640 x 480
640 x 480
640 x 480
800 x 600
800 x 600
800 x 600
1024 x 768
1024 x 768
1024 x 768
1152 x 864
1280 x 1024
1280 x 1024
1280 x 720
1280 x 800
1280 x 800
1280 x 960
1360 x 768
1440 x 900
1440 x 900
1680 x 1050
1280 x 720
1280 x 1024
1920 x 1080p 67.500 60.000 148.500 +/+
Horizontal Frequency
Connecting to a PC
Audio Cable (Not Supplied)
Audio Cable (Not Supplied)
Vertical Frequency
(KHz)
31.469
31.469
35.000
49.726
68.681
35.910
53.783
56.456
75.231
31.469
37.861
37.500
37.879
48.077
46.875
48.363
56.476
60.023
67.500
63.981
79.976
45.000
49.702
62.795
60.000
47.712
55.935
70.635
65.290
52.500
74.620
HDMI to DVI Cable (Not Supplied)
D-Sub Cable (Not Supplied)
Pixel Clock Frequency
(Hz)
70.086
70.087
66.667
74.551
75.062
59.950
59.959
74.777
74.857
59.940
72.809
75.000
60.317
72.188
75.000
60.004
70.069
75.029
75.000
60.020
75.025
60.000
59.810
74.934
60.000
60.015
59.887
74.984
59.954
70.000
70.000
(MHz)
25.175
28.322
30.240
57.284
100.000
32.750
81.750
95.750
130.000
25.175
31.500
31.500
40.000
50.000
49.500
65.000
75.000
78.750
108.000
108.000
135.000
74.250
83.500
106.500
108.000
85.500
106.500
136.750
146.250
89.040
128.943
02 Connections
AUDIO OUT
DVI OUT
PC OUT
AUDIO OUT
Sync Polarity
(H / V)
+/-
-/+
-/-
-/-
-/-
-/+
-/+
-/+
-/+
-/-
-/-
-/+/+
+/+
+/+
-/-
-/+/+
+/+
+/+
+/+
+/+
-/+
-/+
+/+
+/+
-/+
-/+
-/+
-/+
-/-
✎
NOTE
For HDMI/DVI cable connection, you must use the HDMI IN 1(DVI) jack.
x
The interlace mode is not supported.
x
The set may operate abnormally if a non-standard video format is selected.
x
Separate and Composite modes are supported. SOG(Sync On Green) is not supported.
x
English
11
Page 12
Connections
SOURCE
POWER
S
POWER
POWERPOWER
S
OURC
E
ON/OFF
P
RE-CH
MENU
O
CH
MEDIA.P
C
H LIST
RETURN
Changing the Input Source
Source List
Use to select TV or an external input sources
such as a DVD / Blu-ray player / cable box /
STB satellite receiver.
MENU → Input → Source List →
ENTER
■ TV / PC / AV1 / AV2 / Component1 /
Component2 / HDMI1/DVI / HDMI2 / HDMI3 / HDMI4
/ USB
✎
You can only choose external devices that
are connected to the TV. In the Source List,
connected inputs will be highlighted.
✎
In the Source List, PC is always activated.
Basic Features
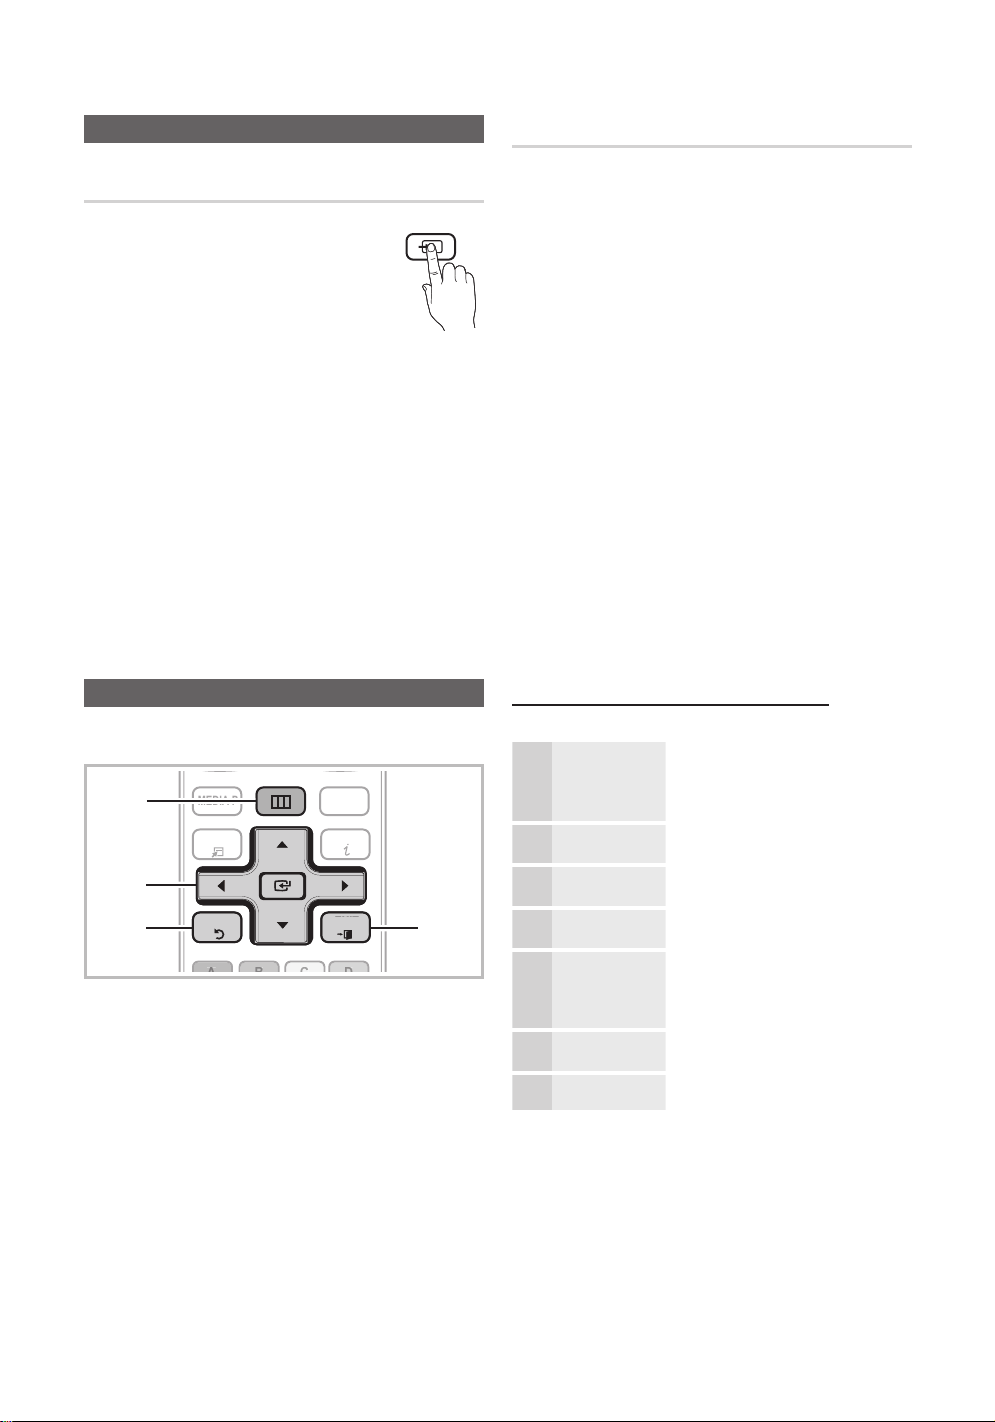
How to Navigate Menus
Before using the TV, follow the steps below to learn how to
navigate the menu and select and adjust different functions.
MENU
1
TOOL
2
3
1 MENU button: Displays the main on-screen menu.
2 ENTER
select an item. Confirm the setting.
3 RETURN button: Returns to the previous menu.
4 EXIT button: Exits the on-screen menu.
RETURN
/ Direction button: Move the cursor and
FAV.
INF
EXIT
EXIT
4
Edit Name
MENU → Input → Edit Name → ENTER
■ VCR / DVD / Cable STB / Satellite STB / PVR STB
/ AV Receiver / Game / Camcorder / PC / DVI PC /
DVI Devices / TV / IPTV / Blu-ray / HD DVD / DMA:
Name the device connected to the input jacks to make
your input source selection easier.
✎
When a PC with a resolution of 1920 x 1080 @ 60Hz is
connected to the HDMI IN 1(DVI) port, you should set
to DVI PC mode under Edit Name.
✎
When connecting an HDMI/DVI cable to the HDMI IN
1(DVI) port, you should set to DVI PC or DVI Devices
mode under Edit Name.
How to Operate the OSD (On Screen Display)
The access step may differ depending on the selected menu.
MENU
1
▲ / ▼ Select an icon with the ▲ or ▼
2
ENTER
3
▲ / ▼
4
◄ / ►
5
ENTER
6
EXIT
The main menu options appear on
the screen:
Picture, Sound, Channel, Setup,
Input, Application, Support.
button.
Press ENTER to access the
sub-menu.
Select the desired submenu with
the ▲ or ▼ button.
Adjust the value of an item with the
◄ or ► button. The adjustment in
the OSD may differ depending on
the selected menu.
Press ENTER to confirm the
selection.
Press EXIT.
7
12
English
Page 13

Channel Menu
B
Seeing Channels
Channel List
Add, delete or set Favorite channels and use
the program guide for digital broadcasts.
MENU → Channel → Channel List
→ ENTER
Select a channel in the All Channels,
Added Channels, Favorite or Programmed
screen by pressing the ▲ / ▼ and ENTER
buttons. Then you can watch the selected channel.
Added Channels
6 Air
6-1 * TV #6
7 Air
8 Air
9 Air
9-1 * TV #9
10 Air
10-1 * TV #10
11-1 * TV #11
Air Antenna B Zoom Select Page
All Channels: Shows all currently available
■
channels.
Added Channels: Shows all added channels.
■
■
Favorite: Shows all favorite channels.
■
Programmed: Shows all currently reserved
programs.
✎
Using the color buttons with the Channel List
Red (Antenna): Switches to Air or Cable.
x
Green (Zoom): Enlarges or shrinks a channel
x
number.
Yellow (Select): Selects multiple channel lists.
x
Select desired channels and press the Yellow button
to set all the selected channels at the same time. The
mark appears to the left of the selected channels.
(Page): Move to next or previous page.
x
(Tools): Displays the Channel List option menu.
x
(The options menus may differ depending on the
situation.)
CH LIST
Tools
Channel Status Display Icons
Icons Operations
A channel selected.
A channel set as a Favorite.
A reserved Program.
Using Favorite Channels
MENU → Channel → Channel List → ENTER
Add to Favorite / Delete from Favorite
Set channels you watch frequently as Favorites.
1. Select a channel and press the TOOLS button.
2. Add or delete a channel using the Add to Favorite or
Delete from Favorite menu respectively.
Added Channels
Air Antenna B Zoom Select Page
To show all Favorite channels, click on the
button shown on the rignt.
6 Air
6-1 * TV #6
7 Air
8 Air
9 Air
9-1 * TV #9
10 Air
10-1 * TV #10
11-1 * TV #11
Delete
Add to Favorite
Timer Viewing
Channel Name Edit
Select All
Tools
FAV.CH
Memorizing channels
MENU → Channel → ENTER
Antenna (Air / Cable)
Before your television can begin memorizing the available
channels, you must specify the type of signal source that is
connected to the TV (i.e. an Air or a Cable system).
03 Basic Features
Auto Program
■ Air: Air antenna signal.
■ Cable: Cable antenna signal.
■ Auto: Air and Cable antenna.
English
13
Page 14

Basic Features
■ NOTE
When selecting the Cable TV system: STD, HRC
x
and IRC identify various types of cable TV systems.
Contact your local cable company to identify the
type of cable system that exists in your particular
area. At this point, the signal source has been
selected.
After all the available channels are stored, it starts
x
to remove scrambled channels. The Auto program
menu then reappears.
Editing Channels
MENU → Channel → Channel List → ENTER
Channel Name Edit
1. Select a channel and press the TOOLS button.
2. Edit the channel name using the Channel Name Edit
menu.
■ Channel Name Edit (analog channels only): Assign your
own channel name.
Other Features
MENU → Channel → ENTER
Clear Scrambled Channel
This function is used to filter out scrambled channels after
Auto Program is completed. This process may take up to
20~30 minutes.
How to Stop Searching Scrambled Channels
1. Press the ENTER
2. Press the ◄ button to select Yes.
3. Press the ENTER
✎
This function is only available in Cable mode.
button to select Stop.
button.
Channel List
Channel List Option Menu
Set each channel using the Channel List menu options (Add
/ Delete, Timer Viewing, Select All / Deselect All). Option
menu items may differ depending on the channel status.
1. Select a channel and press the TOOLS button.
2. Select a function and change its settings.
■ Add / Delete: Delete or add a channel to display the
channels you want.
✎
NOTE
All deleted channels will be shown on the
x
All Channels menu.
A gray-colored channel indicates the channel
x
has been deleted.
The Add menu only appears for deleted
x
channels.
Delete a channel from the Added Channels or
x
Favorite menu in the same manner.
■ Timer Viewing: You can set a desired channel to be
displayed automatically at the reserved time. Set the
current time first to use this function.
1. Press the ◄ / ► / ▲ / ▼ buttons to select the
desired channel in Channel List.
2. Press the TOOLS button, then select
Timer Viewing.
3. Scroll up or down to adjust the settings in the box,
or use the numeric buttons on your remote for
entering the date and time.
✎
If you selected Once, Every Week, or
Every Day in Repeat, you can enter the date
you want.
4. Select OK, then press the ENTER
done.
button when
14
English
Page 15

✎
NOTE
Only memorized channels can be reserved.
x
Reserved programs will be displayed in the
x
Programmed menu.
When a digital channel is selected, press the ►
x
button to view the digital program.
■ Select All: Select all the channels in the channel list.
■ Deselect All: Deselect all the selected channels.
✎
You can only select Deselect All when one or
more channels are selected.
Programmed
(in Channel List)
You can view, modify or delete a show you have reserved
to watch. Programmed timer viewing is displayed here.
Highlight a program and press the TOOLS button to display
Options.
■ Change Info: Change a show you have reserved to
watch. Begin with step 3 of “Timer Viewing,” above.
■ Cancel Schedules: Cancel a show you have reserved
to watch.
✎
This deletes the highlighted or selected
program(s).
■ Information: Display a show you have reserved
to watch. (You can also change the reservation
Information.)
✎
Alternatively, you can view Information by
highlighting a program and pressing the
ENTER button.
■ Select All / Deselect All: Select or deselect all reserved
programs.
Picture Menu
Changing the Preset Picture Mode
MENU → Picture → Mode → ENTER
Mode
Select your preferred picture type.
■ Dynamic: Suitable for a bright room.
■ Standard: Suitable for a normal
environment.
■ Movie: Suitable for watching movies in a
dark room.
Adjusting Picture Settings
MENU → Picture → ENTER
P.MODE
Cell Light / Contrast / Brightness /
Sharpness / Color / Tint (G/R)
Your television has several setting options for picture quality
control.
✎
NOTE
When you make changes to Cell Light, Contrast,
x
Brightness, Sharpness, Color or Tint (G/R) the
OSD will be adjusted accordingly.
In PC mode, you can only make changes to
x
Cell Light, Contrast and Brightness.
Settings can be adjusted and stored for each
x
external device connected to the TV.
03 Basic Features
Fine Tune
(analog channels only)
If the reception is clear, you do not have to fine tune the
channel, as this is done automatically during the search and
store operation. If the signal is weak or distorted, fine tune
the channel manually. Scroll to the left or right until the image
is clear.
✎
Settings are applied to the channel your currently
watching.
✎
Fine tuned channels that have been saved are marked
with an asterisk “*” on the right-hand side of the
channel number in the channel banner.
✎
To reset the fine-tuning, select Reset.
Economical Solutions
MENU → Picture → Eco Solution → ENTER
Eco Solution
■ Energy Saving (Off / Low / Medium / High / Picture
Off): This adjusts the brightness of the TV in order to
reduce power consumption. If you select Picture Off,
the screen is turned off, but the sound remains on. Press
any button to turn on the screen again. Until the screen
turns on again, a distorted picture will be displayed for
about 4 seconds.
English
15
Page 16

Basic Features
■ Eco Sensor (Off / On): To enhance your power savings;
the picture settings will automatically adapt to the light
in the room.
✎
If you adjust the Cell Light, the Eco Sensor will
be set to Off.
Min Cell Light: When Eco sensor is On, the minimum
screen brightness can be adjusted manually.
✎
If Eco Sensor is On, the display brightness
may change (become slightly darker or brighter)
depending on the surrounding light intensity.
■ No Signal Power Off (Off / 15 min. / 30 min. / 60
min.): To avoid unnecessary energy consumption,
set how long you want the TV to remain on if it's not
receiving a signal.
✎
Disabled when the PC is in power saving mode.
Changing the Picture Options
Advanced Settings
MENU → Picture → Advanced Settings →
ENTER
(Advanced Settings are available in Standard / Movie mode)
Compared to previous models, new Samsung TVs have a
more precise picture.
✎
In PC mode, you can only make changes to Dynamic
Contrast, Gamma and White Balance.
Advanced Settings
Black Tone : Off ►
Dynamic Contrast : Medium
Gamma : 0
RGB Only Mode : Off
Color Space : Native
White Balance
Flesh Tone : 0
▼
Move
Enter
Return
■ Color Space (Auto / Native): Adjust the range of colors
available to create the image.
■ White Balance: Adjust the color temperature for a more
natural picture.
R-Offset / G-Offset / B-Offset: Adjust each color’s (red,
green, blue) darkness.
R-Gain / G-Gain / B-Gain: Adjust each color’s (red,
green, blue) brightness.
Reset: Resets the White Balance to it’s default settings.
■ Flesh Tone: Emphasize pink “Flesh Tone.”
■ Edge Enhancement (Off / On): Emphasize object
boundaries.
Picture Options
MENU → Picture → Picture Options →
ENTER
✎
In PC mode, you can only make changes to the Color
Tone, Size and Screen Burn Protection.
Picture Options
Color Tone : Normal ►
Size : 16:9
Digital Noise Filter : Auto
MPEG Noise Filter : Auto
HDMI Black Level : Normal
Film Mode : Off
Screen Burn Protection
Move
Enter
Return
■ Color Tone (Cool / Normal / Warm1 / Warm2)
✎
Warm1 or Warm2 will be deactivated when the picture
mode is Dynamic.
✎
Settings can be adjusted and stored for each external
device connected to an input on the TV.
■ Black Tone (Off / Dark / Darker / Darkest): Select the
black level to adjust the screen depth.
■ Dynamic Contrast (Off / Low / Medium / High): Adjust
the screen contrast.
■ Gamma: Adjust the primary color intensity.
■ RGB Only Mode (Off / Red / Green / Blue): Displays
the Red, Green and Blue color for making fine
adjustments to the hue and saturation.
English
16
Page 17
■ Size: Your cable box/satellite receiver may
have its own set of screen sizes as well.
However, we highly recommend you use
16:9 mode most of the time.
16:9: Sets the picture to 16:9 wide mode.
Zoom1: Use for moderate magnification.
Zoom2: Use for a stronger magnification.
Wide Fit: Enlarges the aspect ratio of the picture to fit
the entire screen.
✎
Available for HD 1080i / 720p signal in 16:9 mode.
4:3: Sets the picture to basic (4:3) mode.
✎
Do not watch in 4:3 format for a long time. Traces
of borders displayed on the left, right and center
of the screen may cause image retention(screen
burn) which are not covered by the warranty.
Screen Fit: Displays the full image without any cut-off
when HDMI (720p / 1080i / 1080p) or Component
(1080i / 1080p) signals are inputted.
✎
NOTE
After selecting Zoom1, Zoom2 or Wide Fit:
x
1. Press the ► button to select Position.
2. Press the ENTER
3. Press the ▲ or ▼ button to move the picture up
or down.
4. Press the ENTER
5. Press the ► button to select Reset.
6. Press the ENTER
to its default position.
After selecting Screen Fit in HDMI (1080i/1080p) or
x
Component (1080i/1080p) mode, you made need to
center the picture:
1. Press the ◄ or ► button to select Position.
2. Press the ENTER
3. Press the ▲, ▼, ◄ or ► button to move the
picture.
4. Press the ENTER
5. Press the ◄ or ► button to select Reset.
6. Press the ENTER
HD (High Definition): 16:9 - 1080i/1080p (1920x1080),
x
720p (1280x720)
button.
button.
button to reset the picture
button.
button.
button.
P.SIZE
Settings can be adjusted and stored for each
x
external device you have connected to an input on
the TV.
Input Source Picture Size
ATV, AV,
Component (480i, 480p)
DTV(1080i),
Component (1080i, 1080p),
HDMI (720p, 1080i, 1080p)
PC 16:9, 4:3
■ Digital Noise Filter (Off / Low / Medium / High /
Auto / Auto Visualization): If the broadcast signal
received by your TV is weak, you can activate the
Digital Noise Filter feature to reduce any static and
ghosting that may appear on the screen.
✎
When the signal is weak, try other options until the
best picture is displayed.
Auto Visualization: When changing analog channels,
displays the intensity of the current signal and defines
the screen noise filter.
✎
Only available for analog channels.
✎
When bar is green, is that the best possible signal.
■ MPEG Noise Filter (Off / Low / Medium / High /
Auto): Reduces MPEG noise to provide improved
picture quality.
■ HDMI Black Level (Normal / Low): Selects the black
level on the screen to adjust the screen depth.
✎
Available only in HDMI mode.
■ Film Mode (Off / Auto1 / Auto2 / Cinema Smooth):
Sets the TV to automatically sense and process film
signals from all sources and adjusts the picture for
optimum quality.
✎
Available in TV, AV, COMPONENT (480i / 1080i)
and HDMI (480i / 1080i).
■ Screen Burn Protection: To reduce the possibility of
screen burn, this unit is equipped with screen burn
prevention technology. The Time setting allows you to
program the time between movement of the picture in
minutes.
16:9, Zoom1,
Zoom2, 4:3
16:9, 4:3, Wide Fit,
Screen Fit
03 Basic Features
English
17
Page 18

Basic Features
Pixel Shift (Off / On): Using this function, you can
minutely move pixels on the PDP in horizontal or vertical
direction to minimize after images on the screen.
✎
Optimum condition for pixel shift
Item
Horizontal 0~4 4
Vertical 0~4 4
Time (minute) 1~4 min. 4 min.
✎
The Pixel Shift value may differ depending on the
TV size (inches) and mode.
✎
This function is not available in the Screen Fit
mode.
Auto Protection Time (10 min. / 20 min. / 40 min. / 1
hour / Off): Set the time the screen remains idle with a
still image until the screen saver is activated. The Screen
Saver prevents the formation of ghost images on the
screen.
Scrolling: This function removes after-images on the
screen by moving all the pixels on the PDP according
to a pattern. Use this function when there are remaining
after-images or symbols on the screen, especially when
you displayed a still image on the screen for a long time.
✎
The after-image removal function has to be
executed for a long time (approximately 1 hour)
to effectively remove after-images on the screen.
If the after-image is not removed after performing
the function, repeat the function again.
✎
Press any key on the remote control to cancel this
feature.
Side Gray (Light / Dark): When you watch TV with the
screen ratio set to 4:3, the screen is prevented from any
damage by adjusting the white balance on both extreme
left and right sides.
TV/AV/Component/
HDMI/PC
Picture Reset (OK / Cancel)
Resets your current picture mode to its default settings.
Setting up the TV with Your PC
Set the input source to PC.
MENU → Picture → ENTER
Auto Adjustment
Adjust frequency values/positions and fine tune the settings
automatically.
✎
Not available when connecting with an HDMI/DVI cable.
Screen
■ Coarse / Fine: Removes or reduces picture noise. If the
noise is not removed by Fine-tuning alone, then adjust
the frequency as best as possible (Coarse) and Finetune again. After the noise has been reduced, readjust
the picture so that it is aligned to the center of screen.
■ Position: Adjust the PC’s screen positioning if it does
not fit the TV screen. Press the ▲ or ▼ button to adjust
the Vertical-Position. Press the ◄ or ► button to adjust
the Horizontal-Position.
■ Image Reset: Resets the image to default settings.
Using Your TV as a Computer (PC) Display
Setting Up Your PC Software (Based on Windows XP)
Depending on the version of Windows and the video card,
the actual screens on your PC will probably look different, but
the same basic set-up information will apply in most cases.
(If not, contact your computer manufacturer or Samsung
Dealer.)
1. Click on “Control Panel” on the Windows start menu.
2. Click on “Appearance and Themes” in the “Control
Panel” window and a display dialog-box will appear.
3. Click on “Display” and a display dialog box will appear.
4. Navigate to the “Settings” tab on the display dialog-box.
y The correct size setting (resolution) [Optimum: 1920 X
1080 pixels]
y If a vertical-frequency option exists on your display
settings dialog box, the correct value is “60” or “60 Hz”.
Otherwise, just click “OK” and exit the dialog box.
18
English
Page 19
Sound Menu
Changing the Preset Sound Mode
MENU → Sound → Mode →ENTER
Dialog Clarity (Off / On)
03 Basic Features
(standard sound mode only)
This function allows you to increase the intensity of a voice
over background music or sound effects so that dialog can
be heard more clearly.
Mode
(standard sound mode only)
■ Standard: Selects the normal sound mode.
■ Music: Emphasizes music over voices.
■ Movie: Provides the best sound for movies.
■ Clear Voice: Emphasizes voices over other
sounds.
■ Amplify: Increase the intensity of high-
frequency sound to allow a better listening experience
for the hearing impaired.
S.MODE
Adjusting Sound Settings
MENU → Sound → Equalizer →ENTER
Equalizer
Adjusts the sound mode (standard sound mode only).
■ Balance L/R: Adjusts the balance between the right and
left speaker.
■ 100Hz / 300Hz / 1kHz / 3kHz / 10kHz (Bandwidth
Adjustment): Adjusts the level of specific bandwidth
frequencies.
■ Reset: Resets the equalizer to its default settings.
Sound Settings
MENU → Sound → ENTER
Virtual Surround (Off / On)
(standard sound mode only)
This function provides a virtual 5.1 channel surround sound
experience through a pair of speakers or headphones using
HRTF (Head Related Transfer Function) technology.
Preferred Language
(digital channels only)
Digital-TV broadcasts are capable of
simultaneous transmission of many audio tracks
(for example, simultaneous translations of the
program into foreign languages).
✎
You can only select a language among the
ones being broadcasted.
MTS
Multi-Track Sound (MTS)
(analog channels only)
■ Mono: Choose for channels that are
broadcasting in mono or if you are having
difficulty receiving a stereo signal.
■ Stereo: Choose for channels that are
broadcasting in stereo.
■ SAP: Choose to listen to the Separate
Audio Program, which is usually a foreign-language
translation.
✎
Depending on the particular program being broadcast,
you can listen to Mono, Stereo or SAP.
MTS
Auto Volume (Off / Normal / Night)
To equalize the volume level on each channel, set to Normal.
■ Night: This mode provides an improved sound
experience compared to Normal mode, making almost
no noise. It is useful at night.
Speaker Select (External Speaker / TV
Speaker)
A sound echo may occur due to a difference in decoding
speed between the main speaker and the audio receiver. In
this case, set the TV to External Speaker.
✎
When Speaker Select is set to External Speaker, the
volume and MUTE buttons will not operate and the
sound settings will be limited.
✎
When Speaker Select is set to External Speaker
TV Speaker: Off, External Speaker: On
x
English
19
Page 20

Basic Features
✎
When Speaker Select is set to TV Speaker
TV Speaker: On, External Speaker: On
x
✎
If there is no video signal, both speakers will be mute.
SPDIF Output
SPDIF (Sony Philips Digital Interface) is used to provide digital
sound, reducing interference going to speakers and various
digital devices such as an A/V Receiver/Home theater.
■ Audio Format: During the reception of a digital TV
broadcast, you can select the Digital Audio output
(SPDIF) format from the options PCM or Dolby Digital.
■ Audio Delay: Correct audio-video sync problems, when
watching TV or video, and when listening to digital audio
output using an external device such as an AV receiver
(0ms ~ 250ms).
Sound Reset (OK / Cancel)
Reset all sound settings to the factory defaults.
Setup Menu
Setting the Time
MENU → Setup → Time → ENTER
Time
■ Clock: Setting the clock is for using various timer
features of the TV.
The current time will appear every time you press
the INFO button.
✎
If you disconnect the power cord, you have to set
the clock again.
Clock Mode (Auto / Manual)
− Auto: Set the current time automatically using the
time from a digital channel.
✎
The antenna must be connected in order to set
the time automatically.
− Manual: Set the current time manually.
✎
Depending on the broadcast station and signal,
the auto time set up may not be correct. In this
case, set the time manually.
Clock Set: Set the Month, Day, Year, Hour, Minute
and am/pm manually.
✎
Available only when Clock Mode is set to
Manual.
✎
You can set the Month, Day, Year, Hour, and
Minute directly by pressing the number buttons
on the remote control.
DST (Daylight Saving Time) (Off / On): Switches the
Daylight Saving Time function on or off.
✎
This function is only available when the
Clock Mode is set to Auto.
Time Zone: Select your time zone.
✎
This function is only available when the
Clock Mode is set to Auto.
Using the Sleep Timer
MENU → Setup → Time → Sleep Timer →
ENTER
■ Sleep Timer: Automatically shuts off the
TV after a preset period of time (30, 60, 90,
120, 150 and 180 minutes).
✎
To cancel the Sleep Timer, select Off.
SLEEP
Setting the On / Off Timer
MENU → Setup → Time → Timer 1→ ENTER
■ Timer 1 / Timer 2 / Timer 3: Three different on / off
timer settings can be made. You must set the clock first.
Timer 1
On Time
▲
Inactivate
▼
Off Time
Inactivate
Volume
10 TV Cable 1
Repeat
Once
00
00 am
Source Antenna Channel
Sun Mon Tue Wed Thu Fri Sat
Move
00 am
00
Adjust
Enter
Return
20
English
Page 21

On Time / Off Time: Set the hour, minute, and activate
/ inactivate. (To activate the timer with the setting you’ve
chosen, set to Activate.)
Volume: Set the desired volume level.
Source: Select TV or USB content to be played when
the TV is turned on automatically. (USB can be selected
only when a USB device is connected to the TV)
Antenna (when the Source is set to TV): Select Air or
Cable.
Channel (when the Source is set to TV): Select the
desired channel.
Contents (when the Source is set to USB): Select a
folder in the USB device containing music or photo files
to be played when the TV is turned on automatically.
✎
NOTE
If there is no music file on the USB device or the
x
folder containing a music file is not selected, the
Timer function does not operate correctly.
When there is only one photo file in the USB,
x
the Slide Show will not play.
If a folder name is too long, the folder cannot be
x
selected.
Each USB you use is assigned its own folder.
x
When using more than one of the same type of
USB, make sure the folders assigned to each
USB have different names.
Repeat: Select Once, Everyday, Mon~Fri, Mon~Sat,
Sat~Sun or Manual to set at you convenience. If you
select Manual, you can set up the day you want to
activate the timer.
✎
The mark indicates the day is selected.
✎
Auto Power Off (available only when the TV is turned
on by the Timer): The TV will be automatically turned off
after 3 hours of being left idle to prevent overheating.
Locking Programs
MENU → Setup → Security → ENTER
Security
■ V-Chip: The V-Chip feature automatically locks out
programs that are deemed inappropriate for children.
The user must enter a PIN (personal identification
number) before any of the V-Chip restrictions are set up
or changed.
✎
NOTE
V-Chip is not available in HDMI, Component
x
or PC mode.
The default PIN number of a new TV set is
x
“0-0-0-0”.
Allow All: Press to unlock all TV ratings.
x
Block All: Press to lock all TV ratings.
x
V-Chip Lock (Off / On): You can block rated TV
Programs.
TV Parental Guidelines: You can block TV programs
depending on their rating. This function allows you to
control what your children are watching.
− TV-Y: Young children / TV-Y7: Children 7 and over /
TV-G: General audience / TV-PG: Parental guidance
/ TV-14: Viewers 14 and over / TV-MA: Mature
audience
− ALL: Lock all TV ratings. / FV: Fantasy violence /
V: Violence / S: Sexual situation / L: Adult Language /
D: Sexually Suggestive Dialog
✎
The V-Chip will automatically block certain
categories dealing with more sensitive material.
For example, if you block the TV-Y category,
then TV-Y7 will automatically be blocked.
Similarly, if you block the TV-G category, then
all the categories in the young adult group will
be blocked (TV-G, TV-PG, TV-14 and TV-MA).
The sub-ratings (D, L, S, V) work similarly. So,
if you block the L sub-rating in TV-PG, then
the L sub-ratings in TV-14 and TV-MA will
automatically be blocked.
MPAA Rating: You can block movies depending on their
MPAA rating. The Motion Picture Association of America
(MPAA) has implemented a rating system that provides
parents or guardians with advanced information on
which films are appropriate for children.
− G: General audience (no restrictions). / PG: Parental
guidance suggested. / PG-13: Parents strongly
cautioned. / R: Restricted. Children under 17 should
be accompanied by an adult. / NC-17: No children
under age 17. / X: Adults only. / NR: Not rated.
✎
The V-Chip will automatically block any
category that deals with more sensitive material.
For example, if you block the PG-13 category,
then R, NC-17 and X will automatically be
blocked.
03 Basic Features
English
21
Page 22

Basic Features
Canadian English: You can block TV programs
depending on their Anglophone Canadian ratings.
− C: Programming intended for children under age 8. /
C8+: Programming generally considered acceptable
for children 8 years and over to watch on their own.
/ G: General programming, suitable for all audiences.
/ PG: Parental Guidance. / 14+: Programming
contains themes or content which may not be
suitable for viewers under the age of 14. / 18+: Adult
programming.
✎
The V-Chip will automatically block any
category that deals with more sensitive material.
For example, if you block the G category, then
PG, 14+ and 18+ will automatically be blocked.
Canadian French: You can block TV programs
depending on their French Canadian rating.
− G: General / 8 ans+: Programming generally
considered acceptable for children 8 years and over
to watch on their own. / 13 ans+: Programming may
not be suitable for children under the age of 13. / 16
ans+: Programming is not suitable for children under
the age of 16. / 18 ans+: Programming restricted to
adults.
✎
The V-Chip will automatically block any
category that deals with more sensitive material.
For example, if you block the 8 ans+ category,
then 13 ans+, 16 ans+ and 18 ans+ will
automatically be blocked also.
Downloadable U.S. Rating: Parental restriction
information can be used while watching DTV channels.
✎
NOTE
If information is not downloaded
x
from the broadcasting station, the
Downloadable U.S. Rating menu is
deactivated.
Parental restriction information is automatically
x
downloaded while watching DTV channels. It
may take several seconds.
The Downloadable U.S. Rating menu
x
is available for use after information is
downloaded from the broadcasting station.
However, depending on the information from
the broadcasting station, it may not be available
for use.
Parental restriction levels differ depending on
x
the broadcasting station. The default menu
name and Downloadable US Rating change
depending on the downloaded information.
Even if you set the on-screen display to another
x
language, the Downloadable U.S. Rating
menu will appear in English only.
The rating will automatically block certain
x
categories that deal with more sensitive
material.
The rating titles (For example: Humor Level..etc)
x
and TV ratings (For example: DH, MH, H..etc)
may differ depending on the broadcasting
station.
■ Change PIN: The Change PIN screen will appear.
Choose any 4 digits for your PIN and enter them. As
soon as the 4 digits are entered, the Confirm New
PIN screen appears. Re-enter the same 4 digits. When
the Confirm screen disappears, your PIN has been
memorized.
How to watch a restricted channel
If the TV is tuned to a restricted channel, the V-Chip will
block it. The screen will go blank and the following message
will appear:
This channel is blocked by V-Chip. Please enter the PIN to
unblock.
✎
If you forget the PIN, press the remote-control buttons
in the following sequence, which resets the pin to “0-00-0”: POWER (off) → MUTE → 8 → 2 → 4 → POWER
(on)
Other Features
MENU → Setup → ENTER
Menu Language
Set the menu language.
1. Select Menu Language and press the ENTER
button.
2. Choose desired language and press the ENTER
button.
✎
Choose between English, Español and Français.
Caption
(On-Screen Text Messages)
■ Caption (Off / On): You can switch the
caption function on or off. If captions are
not available, they will not be displayed on
the screen.
✎
The Caption feature doesn’t work in
Component, HDMI or PC modes.
CC
22
English
Page 23

■ Caption Mode: You can select the desired caption
mode.
✎
The availability of captions depends on the
program being broadcast.
Default / CC1~CC4 / Text1~Text4: (analog channels
only) The Analog Caption function operates in either
analog TV channel mode or when a signal is supplied
from an external device to the TV. (Depending on the
broadcasting signal, the Analog Caption function may or
may not work with digital channels.)
Default / Service1~Service6 / CC1~CC4 /
Text1~Text4: (digital channels only) The Digital Captions
function works with digital channels.
✎
Service1~6 may not be available in digital caption
mode depending on the broadcast.
■ Digital Caption Options: (digital channels only)
Size: Options include Default, Small, Standard and
Large. The default is Standard.
Font Style: Options include Default and Styles 0 to 7.
The default is Style 0.
Foreground Color: Options include Default, White,
Black, Red, Green, Blue, Yellow, Magenta and Cyan. You
can change the color of the letter. The default is White.
Background Color: Options include Default, White,
Black, Red, Green, Blue, Yellow, Magenta and Cyan.
You can change the background color of the caption.
The default is Black.
Foreground Opacity: This adjusts the opacity of text.
Options include Default, Transparent, Translucent, Solid
and Flashing.
Background Opacity: This adjusts the opacity of
the caption background. Options include Default,
Transparent, Translucent, Solid and Flashing.
Return to Default: This option sets each Size, Font
Style, Foreground Color, Background Color, Foreground
Opacity and Background Opacity to its default.
✎
NOTE
Digital Caption Options are available only
x
when Default and Service1 ~ Service6 can be
selected in Caption Mode.
The availability of captions depends on the
x
program being broadcasted.
The Default setting follows the standards set by
x
the broadcaster.
The Foreground and Background cannot be set
x
to have the same color.
You cannot set both the Foreground Opacity
x
and the Background Opacity to Transparent.
Network (Network Type / Network Setup
/ Network Test)
For details on set up options, refer to the “Network
Connection” instructions (p. 26).
General
■ Game Mode (Off / On): When connecting to a game
console such as PlayStation™ or Xbox™, you can enjoy
a more realistic gaming experience by selecting the
game mode.
✎
NOTE
Restrictions on game mode (caution)
x
– To disconnect the game console and connect
another external device, set Game Mode to Off in
the setup menu.
– If you display the TV menu in Game Mode, the
screen shakes slightly.
Game Mode is not available when the input source
x
is set to TV or PC.
After connecting the game console, set Game Mode
x
to On. Unfortunately, you may notice reduced picture
quality.
If Game Mode is On:
x
– Picture mode is set to Standard and Sound mode
is set to Movie.
– Equalizer is not available.
■ Menu Transparency (Bright / Dark): Set the
Transparency of the menu.
■ Melody (Off / Low / Medium / High): Set so that a
melody plays when the TV is turned on or off.
03 Basic Features
English
23
Page 24

Advanced Features
Picture In Picture (PIP)
PIP
You can watch the TV tuner and one external video source
simultaneously. PIP (Picture-in-Picture) does not function in
the same mode.
MENU → Setup → PIP → ENTER
✎
NOTE
For PIP sound, refer to the Sound Select
x
instructions.
If you turn the TV off while watching in PIP mode, the
x
PIP window will disappear.
You may notice that the picture in the PIP window
x
becomes slightly unnatural when you use the main
screen to view a game or karaoke.
While V-Chip is in operation, the PIP function cannot
x
be used.
PIP Settings
x
Main picture Sub picture
Component, HDMI1/
DVI, HDMI2, HDMI3, PC,
HDMI4
■ PIP (Off / On): Activate or deactivate the PIP function.
■ Air/Cable (Air / Cable): Select either Air or Cable as the
input source for the sub-screen.
■ Channel: Select the channel for the sub-screen.
■ Size (
■ Position (
sub-picture.
■ Sound Select (Main / Sub): You can choose the
desired sound (Main / Sub) in the PIP mode.
■ Wireless Remote Control (On/Off): Turn on/off or
give permission to Samsung mobile phones/devices.
You must have a Samsung Mobile phone/device which
supports Wireless Remote Control. For more details,
refer to each device's manual.
/ ): Select a size for the sub-picture.
/ / / ): Select a position for the
TV
Support Menu
MENU → Support → ENTER
Self Diagnosis
✎
Self Diagnostic might take few seconds, this is part of
the normal operation of the TV.
■ Picture Test: Use to check for picture problems.
Yes: If the test pattern does not appear or there is
noise in the test pattern, select Yes. There may be a
problem with the TV. Contact Samsung’s Call Center for
assistance.
No: If the test pattern is properly displayed, select No.
There may be a problem with your external equipment.
Please check your connections. If the problem still
persists, refer to the external device’s user manual.
■ Sound Test (Yes / No): Use the built-in melody sound to
check for sound problems.
✎
If you hear no sound from the TV’s speakers,
before performing the sound test, make sure
Speaker Select is set to TV Speaker in the
Sound menu.
✎
The melody will be heard during the test even if
Speaker Select is set to External Speaker or the
sound is muted by pressing the MUTE button.
Yes: If you can hear sound only from one speaker or not
at all during the sound test, select Yes. There may be a
problem with the TV. Contact Samsung’s Call Center for
assistance.
No: If you can hear sound from the speakers, select No.
There may be a problem with your external equipment.
Please check your connections. If the problem still
persists, refer to the external device’s user manual.
■ Signal Information: (digital channels only) An HD
channel’s reception quality is either perfect or the
channels are unavailable. Adjust your antenna to
increase signal strength.
■ Troubleshooting: If the TV seems to have a problem,
refer to this description.
✎
If none of these troubleshooting tips apply, contact
the Samsung customer service center.
24
English
Page 25
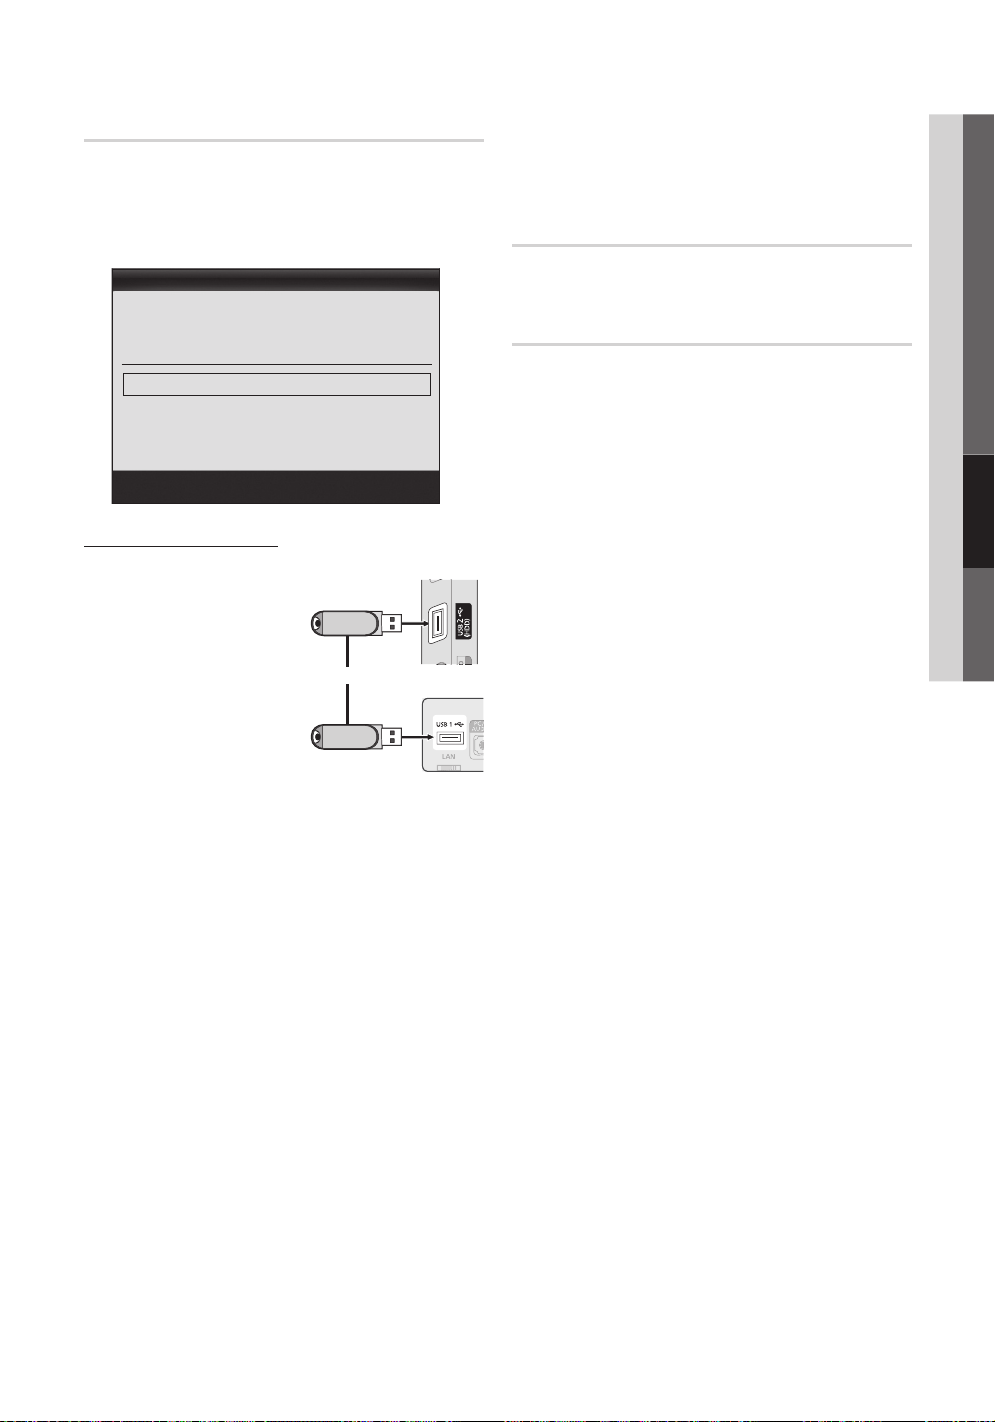
Software Upgrade
Software Upgrade can be performed by network
connection or downloading the latest firmware from “www.
samsung.com,” to a USB memory device.
Current Version - the software already installed in the TV.
✎
Software is represented as “Year/Month/Day_Version”.
Software Upgrade
Current Version 2010/01/18_000001
By USB ►
By Online
Alternative Software ----/--/--_-----
■ Alternative Software (backup): Displays the software
version downloaded through By Online. During the
software upgrading, When the Upgrade will discontinue
from last step, this function be activated.
HD Connection Guide
Refer to this information when connecting external devices
to the TV.
Contact Samsung
View this information when your TV does not work properly
or when you want to upgrade the software. You can find
information regarding our call centers, and how to download
products and software.
04 Advanced Features
Installing the Latest Version
■ By USB: Insert a USB
drive containing the
firmware upgrade file,
downloaded from “www.
samsung.com,” into the
TV. Please be careful not
to disconnect the power or
remove the USB drive until
upgrades are complete.
The TV will be turned off
and on automatically after
completing the firmware
upgrade. When software is
upgraded, video and audio settings you have made will
return to their default settings. We advise you to write
down your settings so that you can easily reset them
after the upgrade.
■ By Online: Upgrade the software using the Internet.
✎
First, configure your network. For detailed
procedures on using the Network Setup, refer to
the “Network Connection” instructions.
✎
If the internet connection doesn’t operate properly,
the connection may be broken. Please retry
downloading. If the problem persists, download by
USB and upgrade.
Enter
or
USB Drive
Return
TV Side Panel
TV Rear Panel
English
25
Page 26
Advanced Features
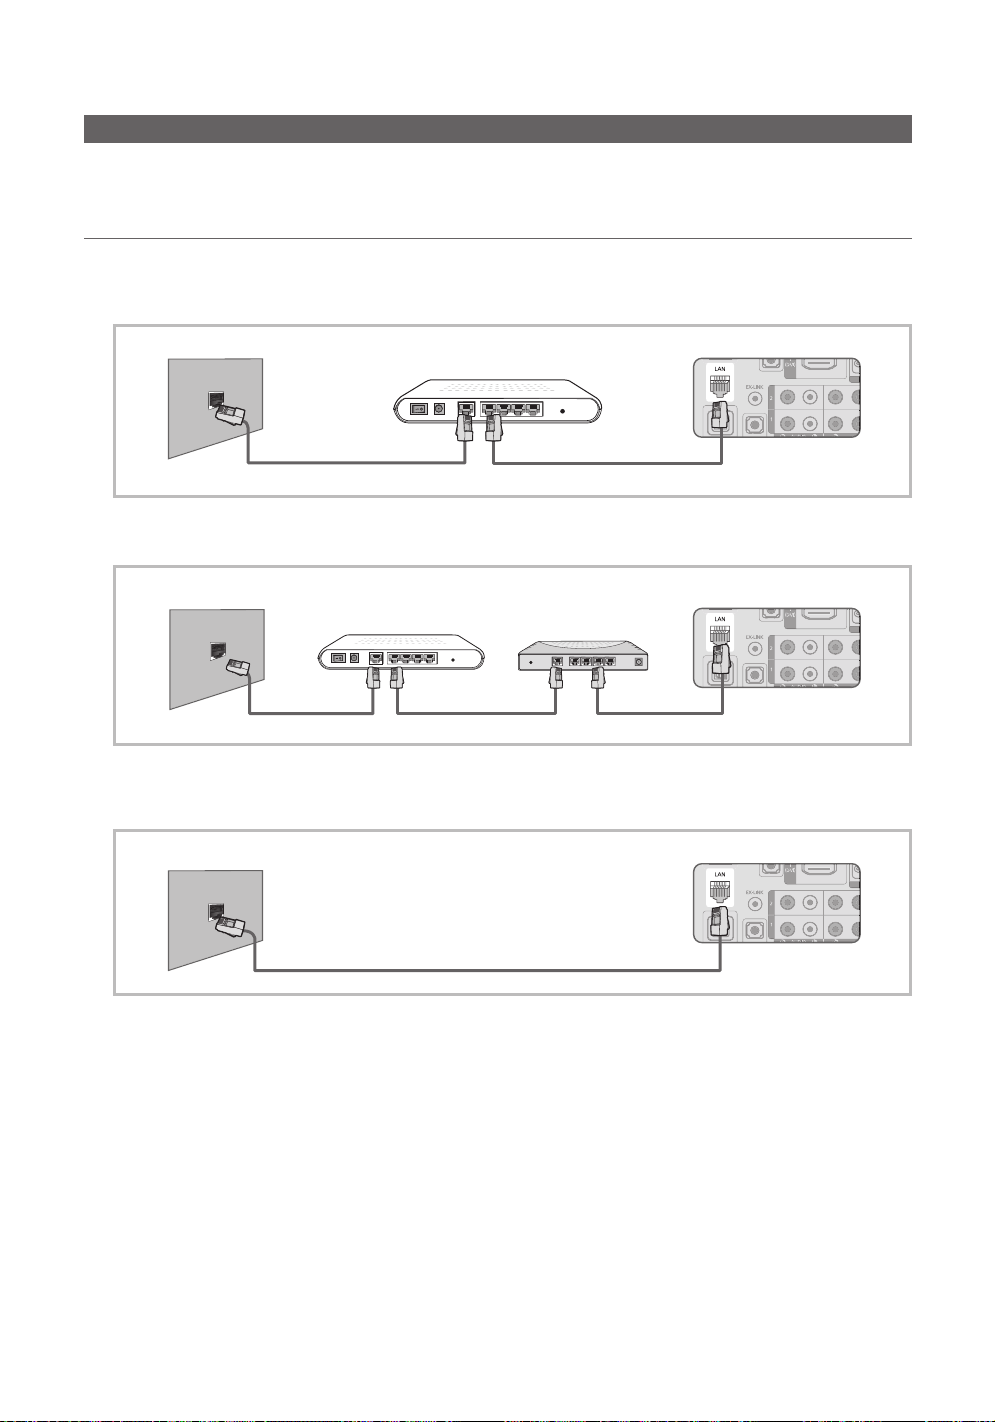
Network Connection
You can set up your TV so that it can access the Internet through your local area network (LAN) using a wired or wireless
connection.
Connecting to a Wired Network
You can attach your TV to your LAN using cable in three ways:
y You can attach your TV to your LAN by connecting the LAN port on the back of your TV to an external modem using a Cat
5 cable. See the diagram below.
The Modem Port on the Wall TV Rear Panel
y You can attach your TV to your LAN by connecting the LAN port on the back of your TV to a IP Sharer which is connected
to an external modem. Use Cat 5 cable for the connection. See the diagram below.
The Modem Port on the Wall TV Rear Panel
y Depending on how your network is configured, you may be able to attach your TV to your LAN by connecting the LAN
port on the back of your TV directly to a network wall outlet using a Cat 5 cable. See the diagram below. Note that the wall
outlet is attached to a modem or router elsewhere in your house.
The LAN Port on the Wall TV Rear Panel
External Modem
(ADSL / VDSL / Cable TV)
External Modem
(ADSL / VDSL / Cable TV)
LAN Cable (Not Supplied)Modem Cable (Not Supplied)
IP Sharer
(having DHCP server)
LAN Cable (Not Supplied)LAN Cable (Not Supplied)Modem Cable (Not Supplied)
LAN Cable (Not Supplied)
If you have a Dynamic Network, you should use an ADSL modem or router that supports Dynamic Host Configuration
Protocol (DHCP). Modems and routers that support DHCP automatically provide the IP address, subnet mask, gateway,
and DNS values your TV needs to access the Internet so you don’t have to enter them manually. Most home networks are
Dynamic Networks.
Some networks require a Static IP address. If your network requires a Static IP address, you must enter the IP address,
subnet mask, gateway, and DNS values manually on your TV’s Cable Setup Screen when you set up the network
connection. To get the IP address, subnet mask, gateway, and DNS values, contact your Internet Service Provider (ISP). If
you have a Windows computer, you can also get these values through your computer.
✎
You can use ADSL modems that support DHCP if your network requires a Static IP address. ADSL modems that
support DHCP also let you use Static IP addresses.
English
26
Page 27

Network Setup (Auto)
Use the Automatic Network Setup when connecting your
TV to a network that supports DHCP. To set up your TV’s
cable network connection automatically, follow these steps:
How to set up automatically
1. Connect your TV to your LAN as described in the
previous section.
2. Turn on your TV, press the MENU button on your
remote, use the ▲ or ▼ button to select Setup, and
then press the ENTER
3. Use the ▲ or ▼ button to select Network in the Setup
menu, and then press the ENTER
Network screen appears.
Network Type : Wired ►
Network Setup
Network Test
4. On the Network screen, select Network Type.
5. Set Network Type to Wired.
6. Select Network Setup. The Network Setup screen
appears.
Internet Protocol Setup : Auto ►
IP Address :
Subnet Mask :
Gateway :
DNS : Auto
DNS Server :
button.
Network
Move
Network Setup
button. The
Enter
Return
Network Setup (Manual)
Use the Manual Network Setup when connecting your TV to
a network that requires a Static IP address.
Getting the Network Connection Values
To get the Network connection values on most Windows
computers, follow these steps:
1. Right click the Network icon on the bottom right of the
screen.
2. In the pop-up menu that appears, click Status.
3. On the dialog that appears, click the Support tab.
4. On the Support Tab, click the Details button. The
Network connection values are displayed.
How to set up manually
To set up your TV’s cable network connection manually,
follow these steps:
1. Follow Steps 1 through 6 in the “How to set up
automatically” procedure.
2. Set Internet Protocol Setup to Manual.
3. Press the ▼ button on your remote to go to the first
entry field.
4. Enter the IP Address, Subnet Mask, Gateway, and
DNS Server values. Use the number buttons on your
remote to enter numbers and the arrow buttons to move
from one entry field to another.
5. When done, press the RETURN button on your remote.
6. Select Network Test to check the Internet connectivity.
04 Advanced Features
Move
Enter
Return
7. Set Internet Protocol Setup to Auto.
8. Auto acquires and enters the needed Internet values
automatically.
9. When done, press the RETURN button on your remote.
10. Select Network Test to check the Internet connectivity.
11. If the Network Function has not acquired the network
connection values, go to the directions for Manual.
English
27
Page 28
Advanced Features
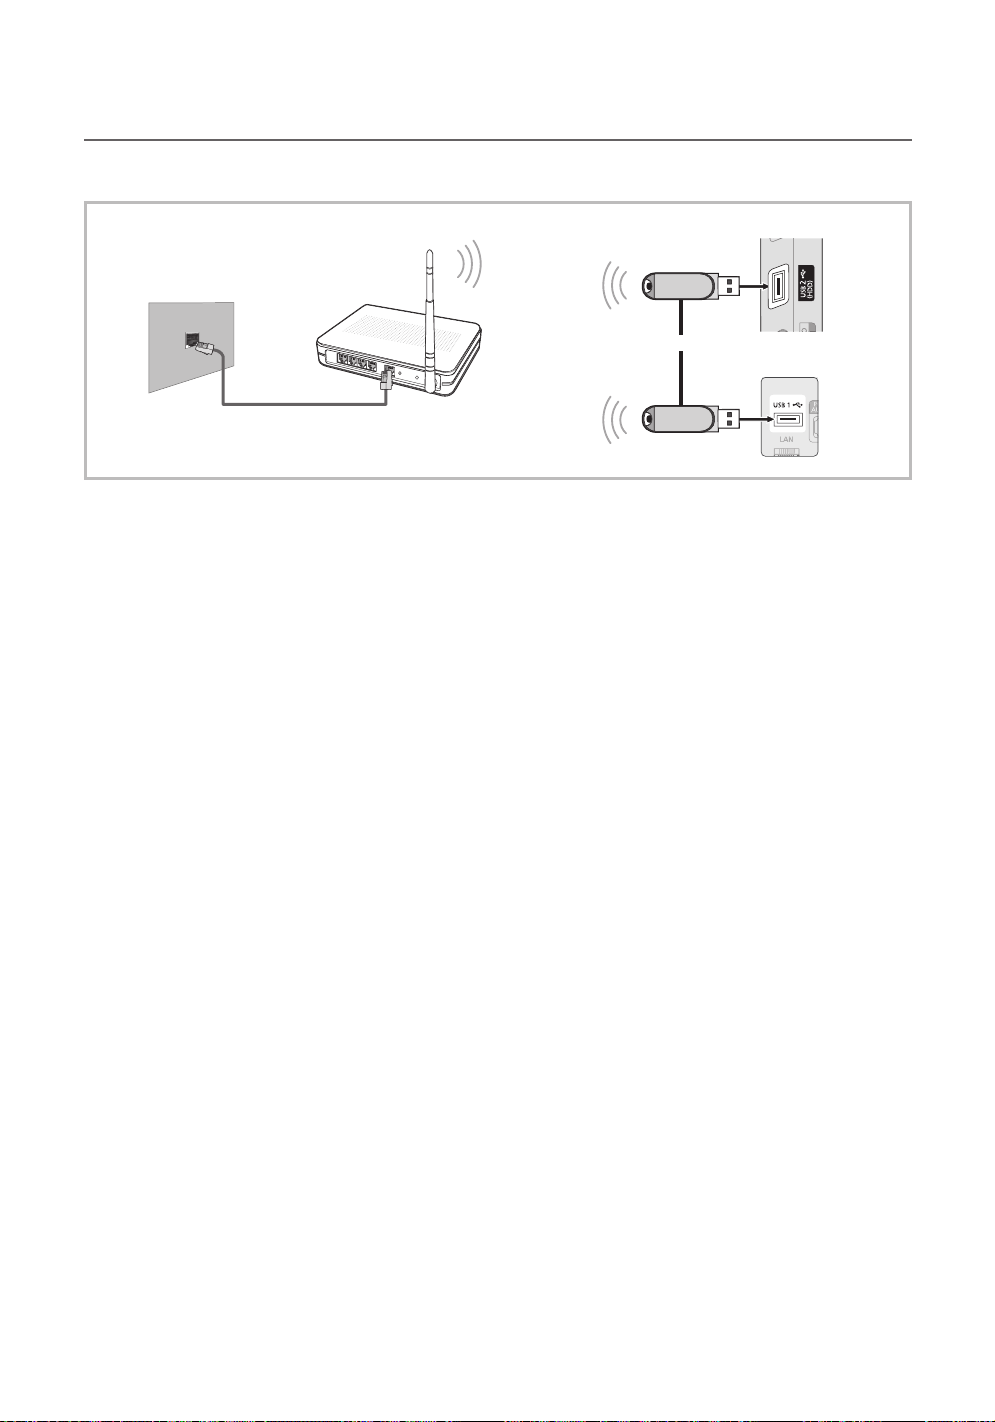
Connecting to a Wireless Network
To connect your TV to your network wirelessly, you need a wireless router or modem and a Samsung Wireless LAN Adapter
(WIS09ABGN), which you connect to your TV’s back or side panel USB jack. See the illustration below.
TV Side Panel
The LAN Port on the
Wall
LAN Cable (Not Supplied)
Samsung’s Wireless LAN adapter is sold separately and is offered by select retailers, Ecommerce sites and Samsungparts.
com. Samsung’s Wireless LAN adapter supports the IEEE 802.11A/B/G and N communication protocols. Samsung
recommends using IEEE 802.11N. When you play the video over a IEEE 802.11B/G connection, the video may not play
smoothly.
✎
NOTE
You must use the “Samsung Wireless LAN Adapter” (WIS09ABGN) to use a wireless network.
x
Samsung’s Wireless LAN adapter is sold separately. The WIS09ABGN Wireless LAN adapter is offered by select
x
retailers, Ecommerce sites and Samsungparts.com.
To use a wireless network, your TV must be connected to a wireless IP sharer. If the wireless IP sharer supports
x
DHCP, your TV can use a DHCP or static IP address to connect to the wireless network.
Select a channel for the wireless IP sharer that is not currently being used. If the channel set for the wireless IP sharer
x
is currently being used by another device nearby, this will result in interference and communication failure.
If you apply a security system other than the systems listed blow, it will not work with the TV.
x
If Pure High-throughput (Greenfield) 802.11n mode is selected and the Encryption type is set to WEP, TKIP or TKIP-
x
AES (WPS2Mixed) for your AP, Samsung TVs will not support a connection in compliance with new Wi-Fi certification
specifications.
If your AP supports WPS (Wi-Fi Protected Setup), you can connect to the network via PBC (Push Button
x
Configuration) or PIN (Personal Identification Number). WPS will automatically configure the SSID and WPA key in
either mode.
If your router, modem, or device isn’t certified, it may not connect to the TV via the “Samsung Wireless LAN Adapter.”
x
Connection Methods: You can setup the wireless network connection 4 ways.
x
– PBC (WPS)
– Auto Setup (Using the Auto Network Search function)
– Manual Setup
– Ad-Hoc
Wireless IP sharer
(AP having DHCP server)
Samsung Wireless
LAN Adapter
or
TV Rear Panel
28
English
Page 29

Network Setup (PBC (WPS))
B
How to set up using PBC (WPS)
If your router has a PBC (WPS) button, follow these steps:
1. Connect your TV to your LAN as described in the
previous section.
2. Turn on your TV, press the MENU button on your
remote, use the ▲ or ▼ button to select Setup, and
then press the ENTER
3. Use the ▲ or ▼ button to select Network in the Setup
menu, and then press the ENTER
4. On the Network screen, select Network Type.
5. Set Network Type to Wireless.
6. Select Network Setup. The Network Setup screen
appears.
Select a network : Not Selected ►
Internet Protocol Setup : Auto
IP Address :
Subnet Mask :
Gateway :
DNS Setup : Auto
DNS Server :
7. Press the Red button on your remote.
8. Press the PBC (WPS) button on your router within 2
minutes. Your TV player automatically acquires all the
network setting values it needs and connects to your
network.
9. After the network connection is set up, press the
RETURN button to exit the Network Setup screen.
button.
Network Setup
PBC(WPS)
Move
button.
Enter
Return
How to set up automatically
To set up the wireless connection automatically, follow these
steps:
1. Follow Steps 1 through 6 in the “How to set up using
PBC (WPS)” procedure.
2. Press the ▼ button to select Internet Protocol Setup,
and then press the ENTER
button. Press the ▲ or
▼ button to select Auto, and then press the ENTER
button.
3. Press the ▲ button to go to Select a Network, and
then press the ENTER
button. The Network function
searches for available wireless networks. When done, it
displays a list of the available networks.
4. In the list of networks, press the ▲ or ▼ button to select
a network, and then press the ENTER
✎
If the AP is set to Hidden (Invisible), you have
button.
to select Add Network and enter the correct
Network Name (SSID) and Security Key to
establish the connection.
5. If the Security/PIN pop-up appears, go to Step 6. If the
Network Connecting Screen appears, go to Step 10.
6. Press the ▲ or ▼ button to select Security or PIN. For
most home networks, you would select Security (for
Security Key). The Security Screen appears.
Network Setup
Security Key
0 entered
0~9
A B C D E F G
H I J K L M N
O P Q R S T U
V W X Y Z
Number
Lower case
Delete
Space
Move Enter Return
04 Advanced Features
Network Setup (Auto)
Most wireless networks have an optional security system
that requires devices that access the network to transmit
an encrypted security code called an Access or Security
Key. The Security Key is based on a Pass Phrase, typically
a word or a series of letters and numbers of a specified
length you were asked to enter when you set up security for
your wireless network. If you use this method of setting up
the network connection, and have a Security Key for your
wireless network, you will have to enter the Pass Phrase
during the setup process.
7. On the Security screen, enter your network’s Pass
Phrase.
✎
You should be able to find the Pass Phrase on
one of the set up screens you used to set up your
router or modem.
8. To enter the Pass Phrase, follow these general
directions:
− Press the number buttons on your remote to enter
numbers.
− Use the direction buttons on your remote to move
from button to button on the Security Key screen.
− Press the Red button to change case or display
symbols/characters.
− To a enter letter or symbol, move to the letter or
symbol, and then press the ENTER
button.
− To delete the last letter or number you entered, press
the Green button on your remote.
English
29
Page 30

Advanced Features
9. When done, press the Blue button on your remote. The
Network Connecting screen appears.
10. Wait until the connection confirmation message is
displayed, and then press the ENTER
Network Setup screen re-appears.
11. To test the connection, press the RETURN button to
select Network Test, and then press the ENTER
button.
button. The
Network Setup (Ad-Hoc)
You can connect to a mobile device without an access point
through the “Samsung Wireless LAN Adapter” by using a
peer to peer network.
How to connect to new Ad-hoc device
1. Follow Steps 1 through 6 in the “How to set up using
PBC (WPS)” (p. 29).
2. Choose Select a network. A list of devices/networks
appears.
3. While in the device list, press the Blue button on the
remote.
✎
The message The existing network system
may have limited functionality. Do you want to
change the network connection? is displayed.
4. Input the generated Network Name (SSID) and
Security Key into the device you want to connect.
How to connect an existing Ad-hoc device
1. Follow Steps 1 through 6 in the “How to set up using
PBC (WPS)” (p. 29).
2. Choose Select a network. The Device/Network list
appears.
3. Select the device you want in the Device list.
4. If security key is required, input the security key.
✎
If network doesn’t operate normally, check
the Network Name (SSID) and Security Key
again. An incorrect Security Key may cause a
malfunction.
Network Setup (Manual)
If the other methods do not work, you need to enter the
Network setting values manually.
Getting the Network Connection Values
To get the Network connection values on most Windows
computers, follow these steps:
1. Right click the Network icon on the bottom right of the
screen.
2. In the pop-up menu, click Status.
3. On the dialog that appears, click the Support tab.
4. On the Support tab, click the Details button. The
Network settings are displayed.
How to set up manually
To enter the Network connection values manually, follow
these steps:
1. Follow Steps 1 through 6 in the “How to set up using
PBC (WPS)” (p. 29).
2. Press the ▼ button to select Internet Protocol Setup,
and then press the ENTER
▲ or ▼ button to select Manual, and then press the
ENTER
button.
3. Press the ▼ button to go to the first entry field (IP
Address).
4. Use the number buttons to enter numbers.
5. When done with each field, use the ► button to move
successively to the next field. You can also use the other
arrow buttons to move up, down, and back.
6. Enter the IP Address, Subnet Mask, and Gateway
values.
7. Press the ▲ or ▼ button to go to DNS.
8. Press the ▼ button to go to the first DNS entry field.
Enter the numbers as above.
9. When done, press the ▲ button to go to
Select a Network. Select your network, and then press
the ENTER
10. Go to Step 4 in the “How to set up automatically”
(p. 29), and follow the directions from that point on.
If Your TV Fails to Connect to the Internet
Your TV may not be able to connect to the Internet
because your ISP has permanently registered the
MAC address (a unique identifying number) of your
PC or modem, which it then authenticates each time
you connect to the Internet as a way of preventing
unauthorized access. As your TV has a different MAC
address, your ISP can not authenticate its MAC address,
and your TV can not connect.
To resolve this problem, ask your ISP about the
procedures required to connect devices other than a PC
(such as your TV) to the Internet.
If your Internet service provider requires an ID or password
to connect to the Internet, your TV may not be able to
connect to the Internet. If this is the case, you must enter
your ID or password when connecting to the Internet.
The internet connection may fail because of a firewall
problem. If this is the case, contact your Internet service
provider.
If you cannot connect to the Internet even after you have
followed the procedures of your Internet service provider,
please contact Samsung Electronics at 1-800-SAMSUNG.
button.
button. Press the
30
English
Page 31
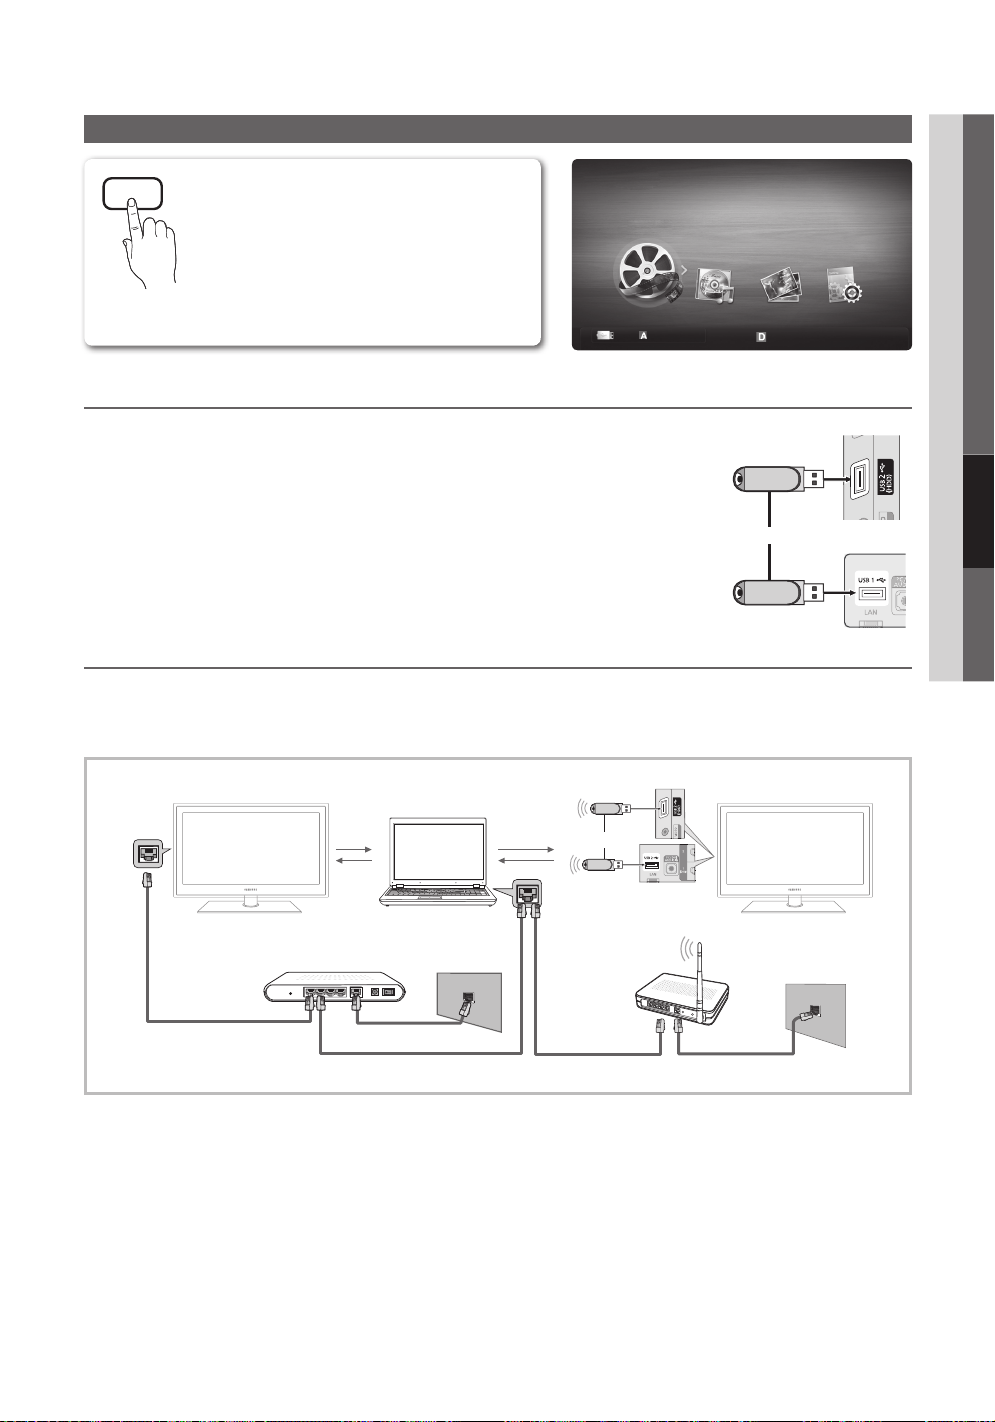
Media Play
SUM
04 Advanced Features
MEDIA.P
Enjoy photos, music and/or movie fi les saved on
a USB Mass Storage Class (MSC) device and/
or your PC.
MENU → Application → Media Play
(USB) → ENTER
MediaPlay
Videos
Change Device
View Devices
Enter
Connecting a USB Device
1. Turn on your TV.
2. Connect a USB device containing photo, music and/or movie fi les to the USB 1
or USB 2 (HDD) jack on the side of the TV.
3. When USB is connected to the TV, popup window appears. Then you can select
Media Play.
or
USB Drive
TV Side Panel
TV Rear Panel
Connecting to your PC through a network
You can play pictures, music and videos saved on your PC through a network connection in the Media Play (USB) mode.
✎
If you want to use Media Play to play files saved on your PC over your TV, you should download “PC Share Manager”
and users manual from “www.samsung.com.”
Return
TV Side Panel
PC
LAN
External Modem
(ADSL/VDSL/Cable TV)
or
Samsung
Wireless
LAN
Adapter
TV Rear Panel
Wireless IP sharer
LAN Cable (Not Supplied)
1. For more information on how to confi gure your network, refer to “Network Connection” (p. 26).
− You are recommended to locate both the TV and the PC in same subnet. The fi rst 3 parts of the subnet address of the
TV and the PC IP addresses should be the same and only the last part (the host address) should be changed. (e.g. IP
Address: 123.456.789.**)
2. Using a LAN cable, connect between the external modem and the PC onto which the Samsung PC Share Manager
Program will be installed.
− You can connect the TV to the PC directly without connecting it through a Sharer (Router).
English
31
Page 32

Advanced Features
✎
Functions that are not supported when connecting to a PC through a network:
The Background Music and Background Music Setting functions.
x
Sorting files by preference in the Photos, Music, and Videos folders.
x
The (REW) or (FF) button while a movie is playing.
x
✎
The Divx DRM, Multi-audio, embedded caption is not supported.
✎
Samsung PC Share manager should be permitted by the firewall program on your PC.
✎
When you use Media Play mode through a network connection, depending on the functions of the provided server:
The sorting method may vary.
x
The scene search function may not be supported.
x
The Play Continuously function, which resumes playing of a video, may not be supported.
x
– The Play Continuously function does not support multiple users. (It will have only memorized the point where the
most recent user stopped playing.)
The ◄ or ► buttons may not work depending on the content information.
x
If you experience any file stuttering issue while playing a video over a wireless network, we recommend using a wired
x
network.
✎
It might not work properly with unlicensed multimedia files.
✎
Need-to-Know List before using Media Play (USB)
MTP (Media Transfer Protocol) is not supported.
x
The file system supports FAT16, FAT32 and NTFS.
x
Certain types of USB Digital camera and audio devices may not be compatible with this TV.
x
Media Play only supports USB Mass Storage Class (MSC) devices. MSC is a Mass Storage Class Bulk-Only
x
Transport device. Examples of MSC are Thumb drives, Flash Card Readers and USB HDD (USB HUB are not
supported). Devices should be connected directly to the TV’s USB port.
Before connecting your device to the TV, please back up your files to prevent them from damage or loss of data.
x
SAMSUNG is not responsible for any data file damage or data loss.
Connect a USB HDD to the dedicated port, USB 2 (HDD) port.
x
Do not disconnect the USB device while it is loading.
x
The higher the resolution of the image, the longer it takes to display on the screen.
x
The maximum supported JPEG resolution is 15360X8640 pixels.
x
For unsupported or corrupted files, the “Not Supported File Format” message is displayed.
x
If the files are sorted by Basic View, up to 1000 files can be displayed in each folder.
x
MP3 files with DRM that have been downloaded from a non-free site cannot be played. Digital Rights Management
x
(DRM) is a technology that supports the creation, distribution and management of the content in an integrated and
comprehensive way, including the protection of the rights and interests of the content providers, the prevention of the
illegal copying of contents, as well as managing billings and settlements.
If more than 2 PTP devices are connected, you can only use one at a time.
x
If more than two MSC devices are connected, some of them may not be recognized. A USB device that requires high
x
power (more than 500mA or 5V) may not be supported.
If an over-power warning message is displayed while you are connecting or using a USB device, the device may not
x
be recognized or may malfunction.
If the TV has been no input during time set in Auto Protection Time, the Screensaver will run.
x
The power-saving mode of some external hard disk drives may be released automatically when connected to the TV.
x
If a USB extension cable is used, the USB device may not be recognized or the files on the device may not be read.
x
If a USB device connected to the TV is not recognized, the list of files on the device is corrupted or a file in the list is
x
not played, connect the USB device to the PC, format the device and check the connection.
If a file deleted from the PC is still found when Media Play is run, use the “Empty the Recycle Bin” function on the PC
x
to permanently delete the file.
32
English
Page 33
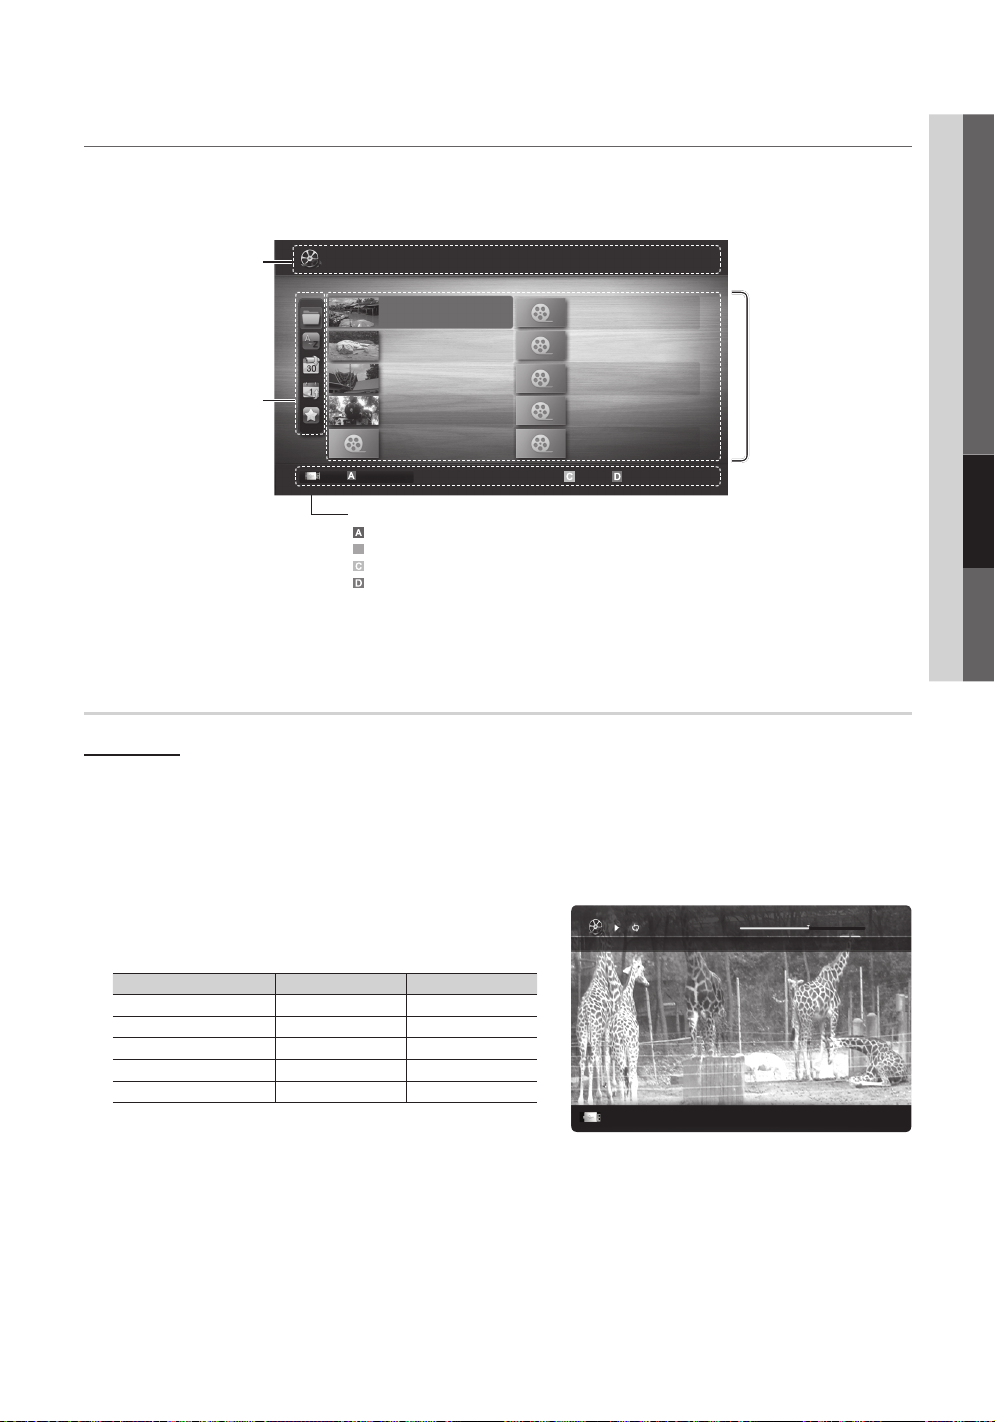
Screen Display
B
Movie 01.avi
00:04:03 / 00:07:38 1/1
SUM
Move to the desired file using the up/down/right/left buttons and then press the ENTER or (Play) button. The file is
played.
✎
Supports the View Devices and Home in Media Play homepage.
You can ascertain the selected
file name and the number of files
Displays the sorting standard.
The sorting standard is
✎
different depending on the
contents.
Information:
and page.
Sort List Section:
Videos
SUM
Change Device
/Movie 01.avi 1/1
Movie 01.avi
Movie 03.avi
Movie 05.avi
Movie 07.avi
Movie 09.avi
Jan.10.2010
Jan.10.2010
Jan.10.2010
Jan.10.2010
Jan.10.2010
Movie 02.avi
Movie 04.avi
Movie 06.avi
Movie 08.avi
Movie 10.avi
Select Sorting
Jan.10.2010
Jan.10.2010
Jan.10.2010
Jan.10.2010
Jan.10.2010
Tools
Page
Operation Buttons
Red (Change Device): Selects a connected device.
Green (Preference): Sets the file preference. (not supported in Basic view)
Yellow (Select): Selects multiple files from file list. Selected files are marked with a symbol.
Blue (Sorting): Selects the sort list.
Tools: Displays the option menu.
Using the (REW) or (FF) button, file list can move to next or previous page.
✎
File List Section:
You can confirm the files and
groups that are sorted by
category.
04 Advanced Features
Videos
Playing Video
1. Press the ◄ or ► button to select Videos, then press the ENTER
2. Press the ◄/►/▲/▼ button to select the desired video in the file list.
3. Press the ENTER
− The selected file is displayed on the top with its playing time.
− If video time information is unknown, play time and progress bar are not displayed.
− During video playback, you can search using the ◄ and ► button.
✎
In this mode, you can enjoy movie clips contained on a Game,
but you cannot play the Game itself.
y Supported Subtitle Formats
MPEG-4 time-based text .ttxt XML
SubViewer .sub string-based
Micro DVD .sub or .txt string-based
button or (Play) button.
Name File extension Format
SAMI .smi HTML
SubRip .srt string-based
button in the Media Play menu.
Pause
Jump
Tools
Return
English
33
Page 34
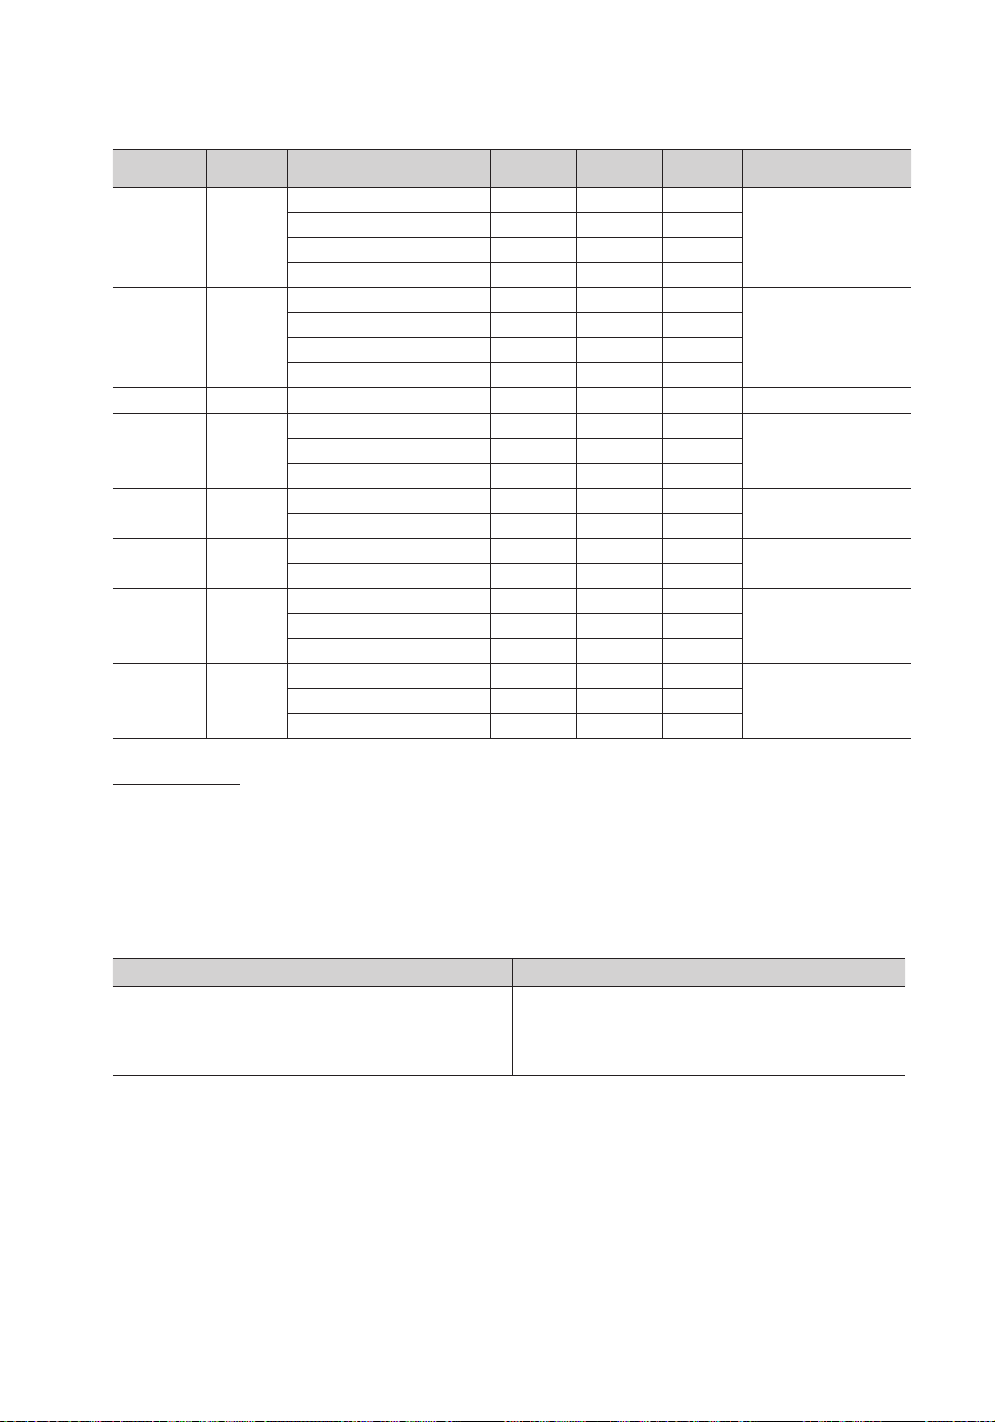
Advanced Features
y Supported Video Formats
File Extension Container Video Codec Resolution
Divx 3.11 / 4.x / 5.1 / 6.0 1920x1080 6 ~ 30 8
*.avi
*.mkv
*.asf ASF
*.wmv ASF Window Media Video v9 1920x1080 6 ~ 30 25 WMA
*.mp4 MP4
*.3gp 3GPP
*.vro
*.mpg
*.mpeg
*.ts
*.tp
*.trp
AVI
MKV
VRO
VOB
PS
TS
XviD 1920x1080 6 ~ 30 8
H.264 BP / MP / HP 1920x1080 6 ~ 30 25
MPEG4 SP / ASP 1920x1080 6 ~ 30 8
Divx 3.11 / 4.x / 5.1 / 6.0 1920x1080 6 ~ 30 8
XviD 1920x1080 6 ~ 30 8
H.264 BP / MP / HP 1920x1080 6 ~ 30 25
MPEG4 SP / ASP 1920x1080 6 ~ 30 8
H.264 BP / MP / HP 1920x1080 6 ~ 30 25
XVID 1920x1080 6 ~ 30 8
H.264 BP / MP / HP 1920x1080 6 ~ 30 25
MPEG4 SP / ASP 1920x1080 6 ~ 30 8
MPEG1 1920x1080 24 / 25 / 30 30
MPEG2 1920x1080 24 / 25 / 30 30
MPEG1 1920x1080 24 / 25 / 30 30
H.264 1920x1080 6 ~ 30 25
MPEG2 1920x1080 24 / 25 / 30 30
H.264 1920x1080 6 ~ 30 25
VC1 1920x1080 6 ~ 30 25
Frame rate
(fps)
Bit rate
(Mbsp)
Audio Codec
MP3 / AC3 / LPCM /
ADPCM / DTS Core
MP3 / AC3 / LPCM /
ADPCM / WMA
MP3 / ADPCM / AACMPEG4 SP / ASP 1920x1080 6 ~ 30 8
ADPCM / AAC / HE-AAC
AC3 / MPEG / LPCM
AC3 / MPEG / LPCM / AACMPEG2 1920x1080 24 / 25 / 30 30
AC3 / AAC / MP3 / DD+ /
HE-AAC
Other Restrictions
✎
NOTE
If there are problems with the contents of a codec, the codec will not be supported.
x
If the information for a Container is incorrect and the file is in error, the Container will not be able to play
x
correctly.
Sound or video may not work if the contents have a standard bitrate/frame rate above the compatible Frame/sec
x
listed in the table above.
If the Index Table is in error, the Seek (Jump) function is not supported.
x
Video Decoder Audio Decoder
• Supports up to H.264, Level 4.1
• H.264 FMO / ASO / RS, VC1 SP / MP / AP L4 and AVCHD are not
supported.
• GMC is not supported.
• H.263 is not supported.
English
34
• Supports up to WMA 7, 8, 9, STD
• WMA 9 PRO does not support 2 channel excess multi channel or
lossless audio.
• WMA sampling rate 22050Hz mono is not supported.
Page 35
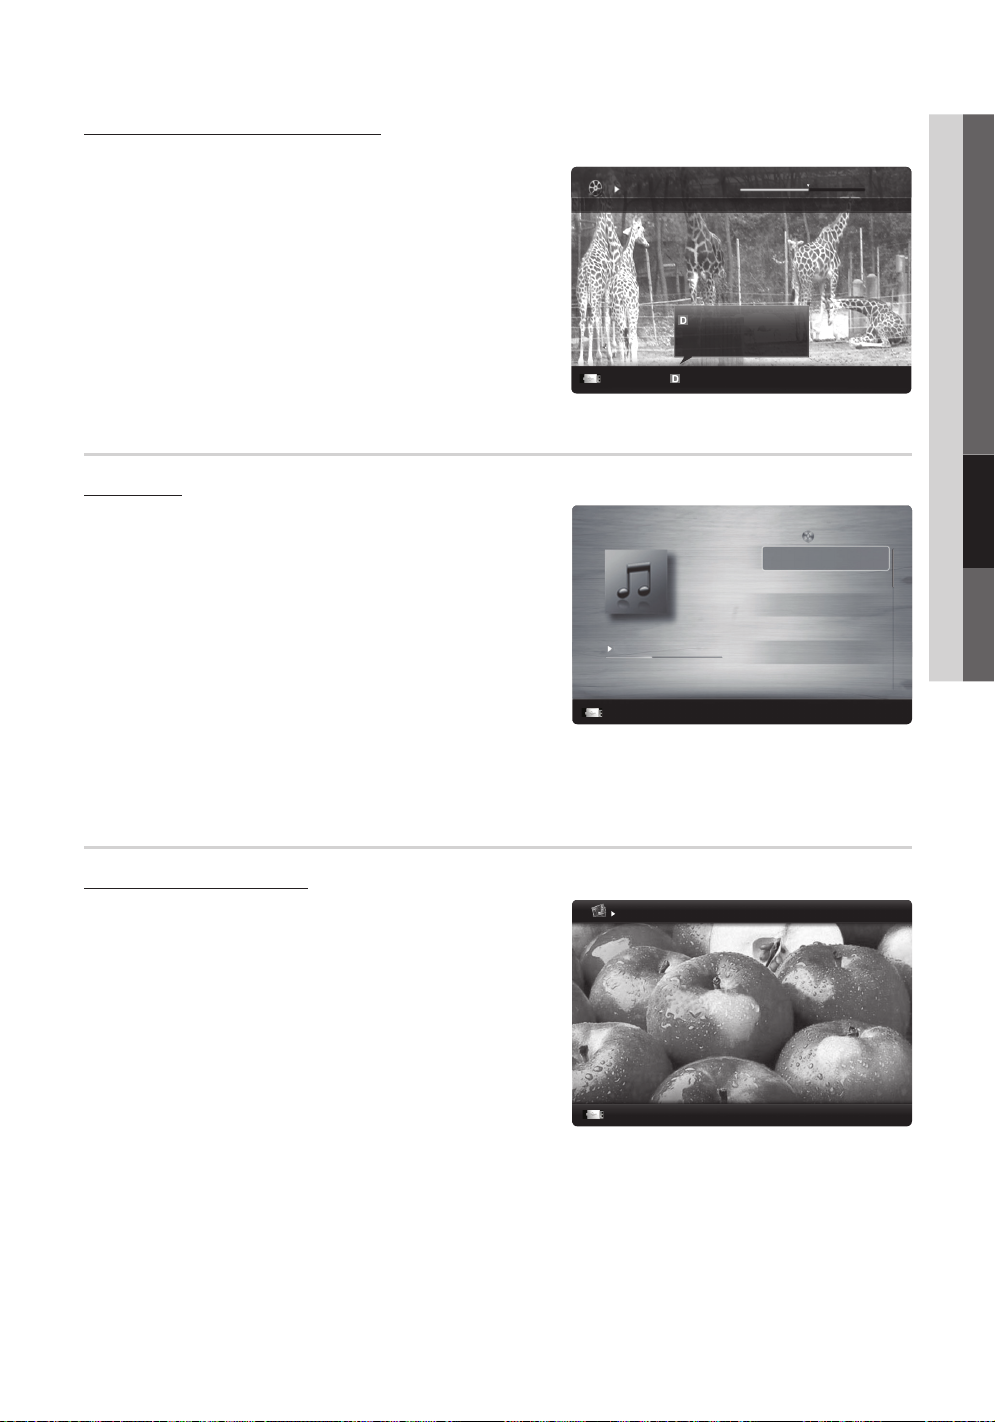
Playing movie continuously (Resume Play)
Movie 01.avi
00:04:03 / 00:07:38 1/1
SUM
3/15
I Love you
Jhon
Music 1
No Singer
Music 2
No Singer
Music 3
No Singer
Music 4
No Singer
Music 5
No Singer
I Love You
Jhon
1st Album
Pop
2010
4.2MB
01:10 / 04:02
SUM
Image1024.jpg 1024x768 2010/2/1 3/15
SUM
If you exit the playing movie function, the movie can be played later from the point where it was stopped.
1. Select the movie file you want to play continuously by pressing
the ◄ or ► button to select it from the file list section.
2. Press the
(Play) / ENTER button.
3. Select Play Continuously (Resume Play) by pressing the Blue
button. The Movie will begin to play from where it was stopped.
✎
The Blue button is available when resuming play.
✎
If the Continuous Movie Play Help function is set to On
in the Settings menu, a pop-up message will appear
when you resume play a movie file.
Play continuously
Resumes playing from the last viewed
scene.
Play continuously
Pause
Jump
Music
Playing Music
1. Press the ◄ or ► button to select Music, then press the
ENTER
button in the Media Play menu.
2. Press the ◄/►/▲/▼ button to select the desired Music file in
the file list.
3. Press the ENTER
button or (Play) button.
− During music playback, you can search using the ◄ and ►
button.
−
(REW) and (FF) buttons do not function during play.
✎
Only displays the files with MP3 and PCM file extension. Other
file extensions are not displayed, even if they are saved on the
same USB device.
✎
If the sound is abnormal when playing MP3 files, adjust the Equalizer in the Sound menu. (An over-modulated MP3 file
may cause a sound problem.)
Pause
Playlist
Jump
Tools
Tools
04 Advanced Features
Return
Return
Photos
Viewing a Photo (or Slide Show)
1. Press the ◄ or ► button to select Photos, then press the
ENTER
button in the Media Play menu.
2. Press the ◄/►/▲/▼ button to select the desired photo in the
file list.
3. Press the ENTER
✎
Music files can be automatically played during the Slide Show if
the Background Music is set to On.
✎
The BGM Mode cannot be changed until the BGM has finished
loading.
− While a photo list is displayed, press the
ENTER button on the remote control to start the slide
show.
− All files in the file list section will be displayed in the slide show.
− During the slide show, files are displayed in order.
button or (Play) button.
(Play) /
Normal
Pause
Previous/Next
Tools
English
Return
35
Page 36
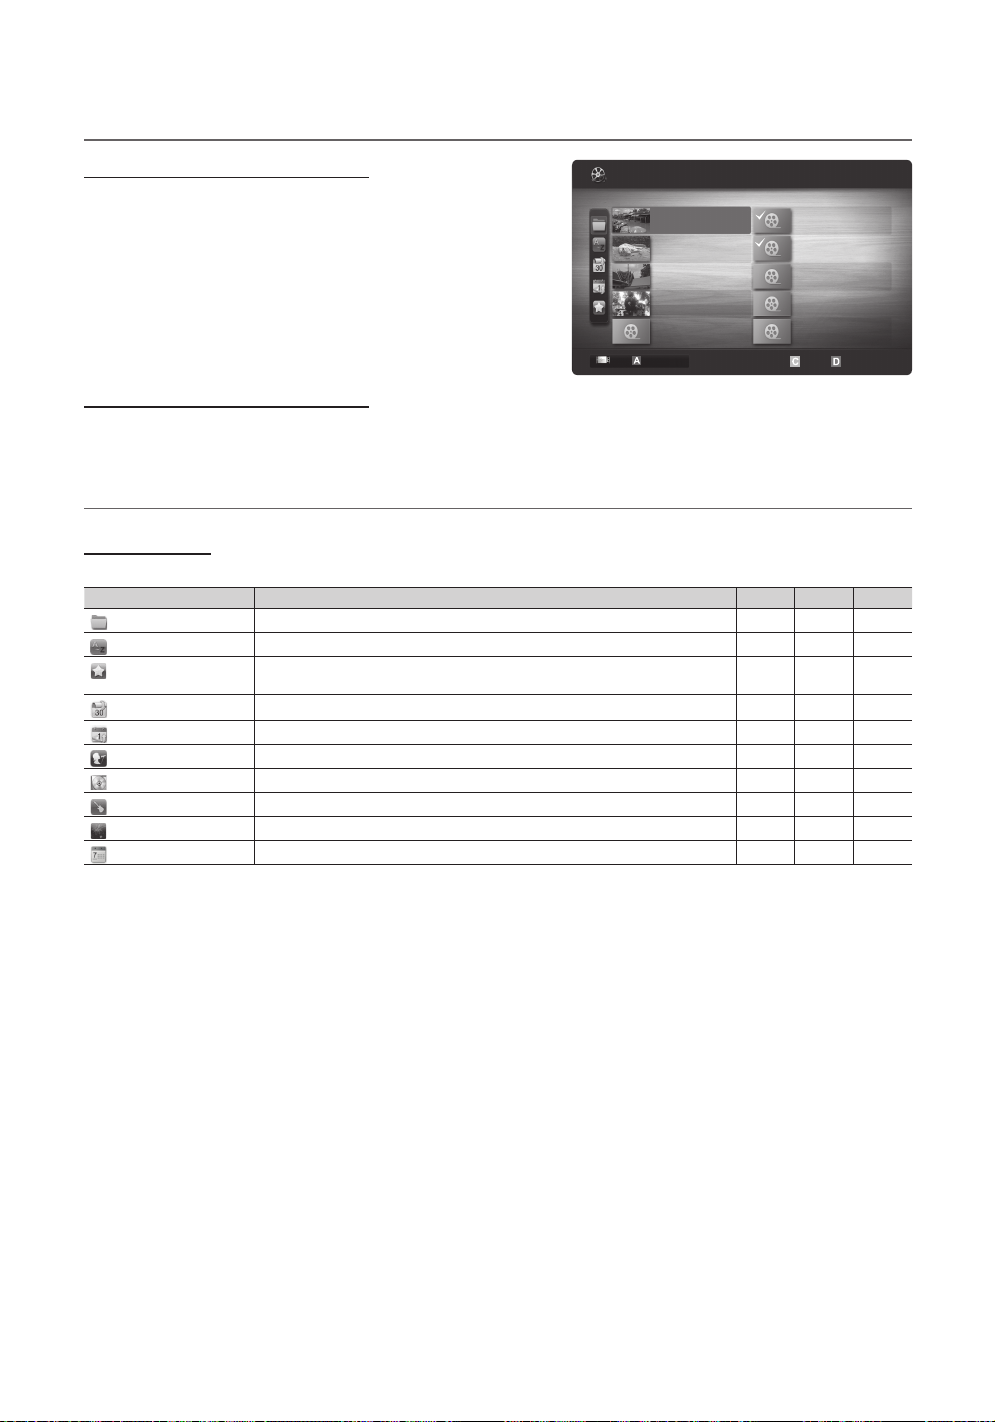
Advanced Features
1/1
/Movie 01.avi
SUM
Movie 01.avi
Jan.10.2010
Jan.10.2010
Jan.10.2010
Jan.10.2010
Jan.10.2010
Jan.10.2010
Jan.10.2010
Jan.10.2010
Jan.10.2010
Jan.10.2010
Movie 03.avi
Movie 05.avi
Movie 07.avi
Movie 09.avi
Movie 02.avi
Movie 04.avi
Movie 06.avi
Movie 08.avi
Movie 10.avi
Playing Multiple Files
Playing selected video/music/photo files
1. Press the Yellow button in the file list to select the desired file.
Videos
2 les selected Page
2. Repeat the above operation to select multiple files.
✎
NOTE
The mark appears to the left of the selected files.
x
To cancel a selection, press the Yellow button again.
x
To deselect all selected files, press the TOOLS button
x
and select Deselect All.
3. Press the TOOLS button and select Play Selected Contents.
Change Device
Select Sorting
Playing the video/music/photo file group
1. While a file list is displayed, move to any file in the desired group.
2. Press the TOOLS button and select Play Current Group.
Media Play - Additional Functions
Sorting the file list
Press the Blue button in the file list to sort the files.
Category Operation Videos Music Photos
Basic View
Title
Preference
Latest Date
Earliest Date
Artist
Album
Genre
Mood
Monthly
Displays the whole folder. You can view the photo by selecting the folder.
Sorts and displays the file title in Symbol/Number/Alphabet/Special order.
Sorts and displays the file by preference. You can change the file preference in the file
list section using the Green button.
Sorts and shows files by the latest date.
Sorts and shows files by the earliest date.
Sorts the music file by artist in alphabetical order.
Sorts the music file by album in alphabetical order.
Sorts music files by the genre.
Sorts music files by the mood. You can change the music mood information.
Sorts and shows photo files by month.
Tools
36
English
Page 37
Videos/Music/Photos Play Option menu
During file playback, press the TOOLS button.
Category Operation Videos Music Photos
Title You can move the other file directly.
Repeat Mode You can play movie and music files repeatedly.
Picture Size
(Mode1 / Mode2 / Original)
Picture Setting You can adjust the picture setting. (p. 15, 16, 17, 18)
Sound Setting You can adjust the sound setting. (p. 19, 20)
Subtitle Setting You can play the video with Subtitles. This function only works if the subtitles are the
Stop Slide Show /
Start Slide Show
Slide Show Speed You can select the slide show speed during the slide show.
Background Music You can set and select background music when watching a slide Show.
Zoom You can zoom into images in full screen mode.
Rotate You can rotate images in full screen mode.
Information You can see detailed information about the played file.
You can adjust the picture size to your preference.
same file name as the video.
You can start or stop a slide Show.
Settings
Using the Setup Menu
■ Continuous Movie Play Help (Resume Play) (On / Off): Select to display the help pop-up message for continuous movie
playback.
■ Get DivX® VOD registration code: Shows the registration code authorized for the TV. If you connect to the DivX web site
and register, you can download the VOD registration file. If you play the VOD registration using Media Play, the registration
is completed.
✎
For more information on DivX® VOD, visit “www.DivX.com.”
■ Get DivX® VOD deactivation code: When DivX® VOD is not registered, the registration deactivation code is displayed. If
you execute this function when DivX® VOD is registered, the current DivX® VOD registration is deactivated.
■ Information: Select to view information about the connected device.
04 Advanced Features
English
37
Page 38
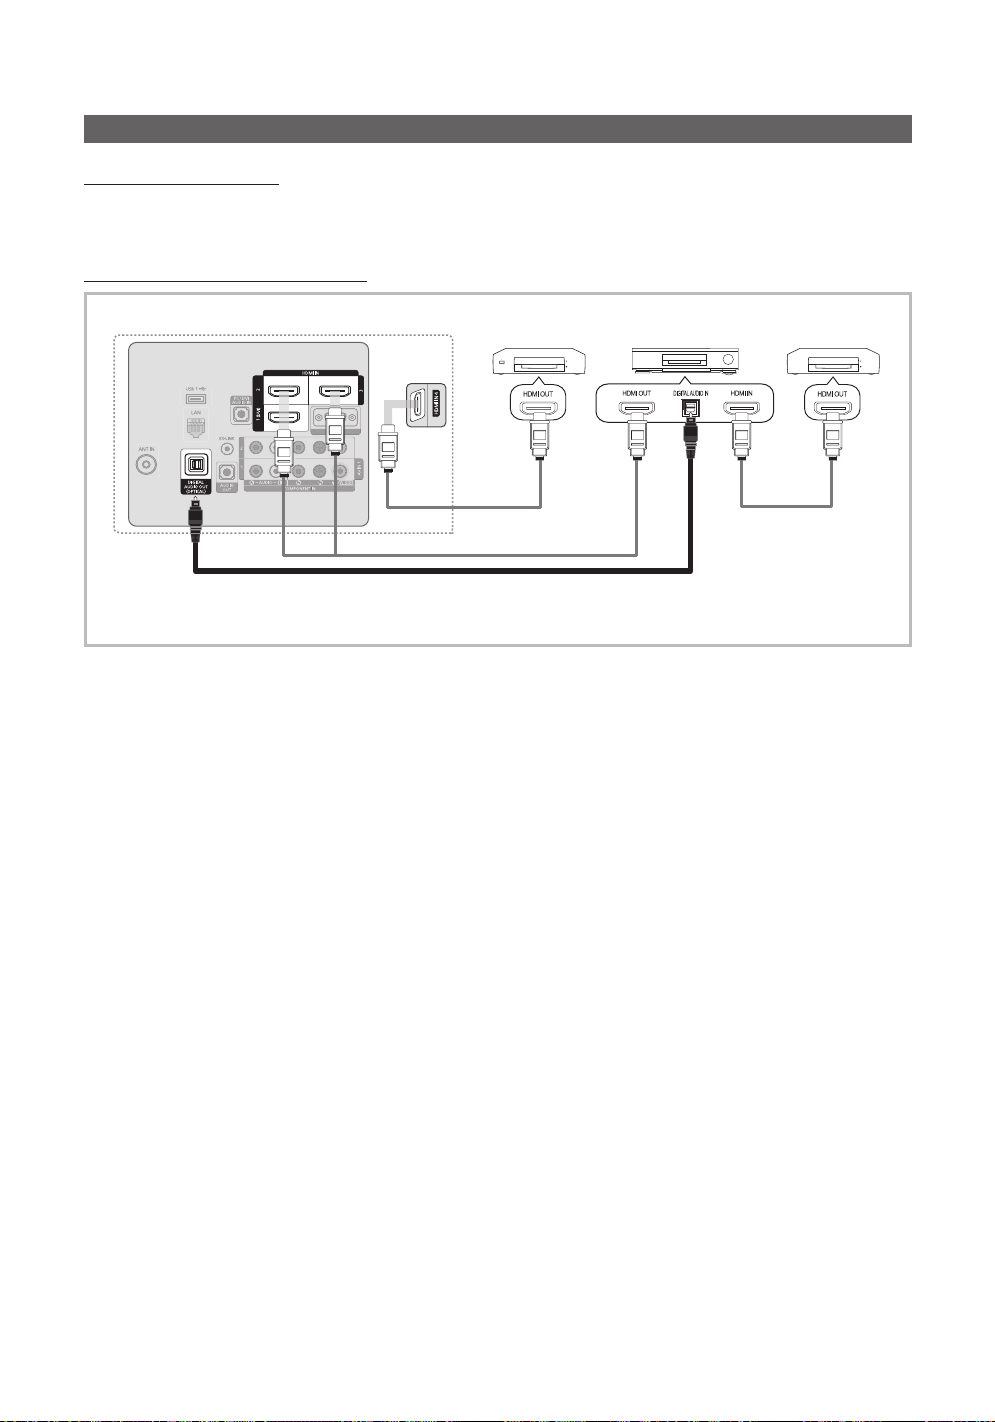
Advanced Features
Anynet+
What is Anynet+?
Anynet+ is a function that enables you to control all connected Samsung devices that support Anynet+ with your Samsung
TV’s remote. The Anynet+ system can be used only with Samsung devices that have the Anynet+ feature. To be sure your
Samsung device has this feature, check if there is an Anynet+ logo on it.
To connect to a Samsung Home Theater
1. Connect the HDMI IN (1(DVI), 2, 3 or 4) jack on the TV and the HDMI OUT jack of the corresponding Anynet+ device
using an HDMI cable.
2. Connect the HDMI IN jack of the home theater and the HDMI OUT jack of the corresponding Anynet+ device using an
HDMI cable.
✎
NOTE
Connect the Optical cable between the DIGITAL AUDIO OUT (OPTICAL) jack on your TV and the Digital Audio Input
x
on the Home Theater.
When following the connection above, the Optical jack only outputs 2 channel audio. You will only hear sound from
x
the Home Theater’s Front, Left and Right speakers and the subwoofer. If you want to hear 5.1 channel audio, connect
the DIGITAL AUDIO OUT (OPTICAL) jack on the DVD / Satellite Box (i.e. Anynet Device 1 or 2) directly to the
Amplifier or Home Theater, not the TV.
You can connect only one Home Theater.
x
You can connect an Anynet+ device using the HDMI cable. Some HDMI cables may not support Anynet+ functions.
x
Anynet+ works when the AV device supporting Anynet+ is in the standby or on status.
x
Anynet+ supports up to 12 AV devices in total. Note that you can connect up to 3 devices of the same type.
x
TV Rear Panel
Optical Cable (Not Supplied)
Anynet+ Device 1
HDMI cable (Not Supplied)
HDMI cable (Not Supplied)
Home Theater
Anynet+ Device
2, 3, 4
HDMI cable (Not Supplied)
38
English
Page 39

Anynet+ Menu
The Anynet+ menu changes depending on the type and status of the Anynet+ devices connected to the TV.
Anynet+ Menu Description
View TV Changes Anynet+ mode to TV broadcast mode.
Device List Shows the Anynet+ device list.
(device_name) MENU Shows the connected device menus. E.g. If a DVD recorder is connected, the disc menu of
(device_name) INFO Shows the play menu of the connected device. E.g. If a DVD recorder is connected, the
Recording: (*recorder) Starts recording immediately using the recorder. (This is only available for devices that
Stop Recording: (*recorder) Stops recording.
Receiver Sound is played through the receiver.
If more than one recording device is connected, they are displayed as (*recorder) and if only one recording device is
connected, it will be represented as (*device_name).
the DVD recorder will appear.
play menu of the DVD recorder will appear.
support the recording function.)
Setting Up Anynet+
MENU → Application → Anynet+ (HDMI-CEC) → ENTER
■ Setup
Anynet+ (HDMI-CEC) (Off / On): To use the Anynet+ Function, Anynet+ (HDMI-CEC) must be set to On.
✎
When the Anynet+ (HDMI-CEC) function is disabled, all the Anynet+ related operations are deactivated.
Auto Turn Off (No / Yes): Setting an Anynet+ Device to turn off automatically when the TV is turned off.
✎
The active source on the TV must be set to TV to use the Anynet+ function.
✎
Even if an external device is still recording, it may turn off.
04 Advanced Features
Switching between Anynet+ Devices
1. Anynet+ devices connected to the TV are listed.
✎
If you cannot find a device you want, press the Red button to refresh the list.
2. Select a device and press the ENTER
✎
Only when you set Anynet+ (HDMI-CEC) to On in the Application menu, the Device List menu appears.
Switching to the selected device may take up to 2 minutes. You cannot cancel the operation during the switching
x
operation.
If you have selected external input mode by pressing the SOURCE button, you cannot use the Anynet+ function.
x
Make sure to switch to an Anynet+ device by using the Device List.
button. You can switch to the selected device.
Recording
You can make a recording of a TV Program using a Samsung recorder.
1. Select Recording.
✎
When there are more than two recording devices
When multiple recording devices are connected, the recording devices are listed. Select one recording device in
x
the Device List.
✎
When the recording device is not displayed, select Device List and press the Red button to search devices.
2. Press the EXIT button to exit.
✎
You can record the source streams by selecting Recording: (device_name).
✎
Pressing the (REC) button will record whatever you are currently watching. If you are watching video from
another device, the video from the device is recorded.
✎
Before recording, check whether the antenna jack is properly connected to the recording device. To properly
connect an antenna to a recording device, refer to the recording device’s users manual.
English
39
Page 40

Advanced Features
Listening through a Receiver
You can listen to sound through a receiver (i.e Home Theater) instead of the TV Speaker.
1. Select Receiver and set to On.
2. Press the EXIT button to exit.
✎
If your receiver supports audio only, it may not appear in the device list.
✎
The receiver will work when you have properly connected the optical in jack of the receiver to the
DIGITAL AUDIO OUT (OPTICAL) jack of the TV.
✎
When the receiver (i.e Home Theater) is set to On, you can hear sound output from the TV’s Optical jack. When
the TV is displaying a DTV (air) signal, the TV will send out 5.1 channel sound to the receiver. When the source is a
digital component such as a DVD and is connected to the TV via HDMI, only 2 channel sound will be heard from
the receiver.
✎
NOTE
You can only control Anynet+ devices using the TV remote control, not the buttons on the TV.
x
The TV remote control may not work under certain conditions. If this occurs, reselect the Anynet+ device.
x
The Anynet+ functions do not operate with other manufacturers’ products.
x
Troubleshooting for Anynet+
Problem Possible Solution
Anynet+ does not work. • Check if the device is an Anynet+ device. The Anynet+ system supports Anynet+ devices only.
I want to start Anynet+. • Check if the Anynet+ device is properly connected to the TV and check if the Anynet+ (HDMI-CEC) is set to
I want to exit Anynet+. • Select View TV in the Anynet+ menu.
The message “Connecting to
Anynet+ device...” appears on the
screen.
The Anynet+ device does not play. • You cannot use the play function when Plug & Play (initial setup) is in progress.
• Only one receiver (home theater) can be connected.
• Check if the Anynet+ device power cord is properly connected.
• Check the Anynet+ device’s Video/Audio/HDMI cable connections.
• Check whether Anynet+ (HDMI-CEC) is set to On in the Anynet+ setup menu.
• Check whether the TV remote control is in TV mode.
• Check whether the remote control is Anynet+ compatible.
• Anynet+ doesn’t work in certain situations. (Searching channels, operating Media Play or Plug & Play (initial
setup), etc.)
• When connecting or removing the HDMI cable, please make sure to search devices again or turn your TV off
and on again.
• Check if the Anynet+ Function of Anynet+ device is set on.
On in the Anynet+ Setup menu.
• Press the TOOLS button to display the Anynet+ menu and select a menu you want.
• Press the SOURCE button on the TV remote control and select a non- Anynet+ device.
• Press
only when a tuner-embedded Anynet+ device is not connected.)
• You cannot use the remote control when you are configuring Anynet+ or switching to a view mode.
• Use the remote control when the Anynet+ setting or switching to view mode is complete.
, PRE-CH, and FAV.CH to change the TV mode. (Note that the channel button operates
The connected device is not
displayed.
The TV Program cannot be
recorded.
The TV sound is not output
through the receiver.
English
40
• Check whether or not the device supports Anynet+ functions.
• Check whether or not the HDMI cable is properly connected.
• Check whether Anynet+ (HDMI-CEC) is set to On in the Anynet+ setup menu.
• Search Anynet+ devices again.
• You can connect an Anynet+ device using the HDMI cable only. Some HDMI cables may not support Anynet+
functions.
• If connection is terminated because there has been a power interruption or the HDMI cable has been
disconnected, please repeat the device scan.
• Check whether the antenna jack on the recording device is properly connected.
• Connect the optical cable between TV and the receiver.
Page 41

AllShare
AllShare™
3/7
MENU → Application → Content View →
AllShare → ENTER
About AllShare
AllShare connects your TV and compatible Samsung mobile
phones / devices through a network. On your TV, you can
view call arrivals, SMS messages and schedules set on your
mobile phones. In addition, you can play media contents
including videos, photos and music saved on your mobile
phones or the other devices (such as your PC) by controlling
them on the TV via the network. Additionally, you can use
your TV for browsing web pages in your mobile phones.
✎
For more information, visit “www.samsung.com” or
contact the Samsung call center. Mobile devices may
need additional software installation. For details, refer to
each device’s user’s guide.
Setting Up AllShare
Setup
■ Message (On / Off): Enables or disables the message
function (for call arrivals, SMS messages and schedules
set on your mobile phones).
■ Media (On / Off): Enables or disables the media
function. When the media function is on, it plays videos,
photos and music from a mobile phone or other device
that supports AllShare.
■ ScreenShare (On / Off): Enables or disables the
ScreenShare function for using mobile phone as a
remote control.
■ TV name: Sets the TV name so you can find it easily on
a mobile device.
✎
If you select User Input, you can type on the TV
using the OSK (On Screen Keyboard).
Setup
Message : On
Media : On
Message
Media
ScreenShare : On
TV name : Home TV
ScreenShare
Message / Media / ScreenShare
Shows a list of mobile phones or connected devices which
have been set up with this TV for using the Message,
Media, or ScreenShare function.
✎
The Media function is available in all mobile devices
which support AllShare.
■ Allowed / Denied: Allows/Blocks the mobile phone.
■ Delete: Deletes the mobile phone from the list.
✎
This function only deletes the name of the mobile
from the list. If the deleted mobile device is turned
on or trys to connect to the TV, it may appear on
the list again.
Using the Message Function
Using this function, you view call arrivals, SMS messages
and schedules set on the mobile phone through the alarm
window while watching TV.
✎
NOTE
To disable the alarm window, set Message to Off in
x
Setup of AllShare.
If OK is selected, or if OK is not selected after the
x
message has appeared three times, the message
will be deleted. The message is not deleted from the
mobile phone.
The alarm window can be displayed while using
x
some applications such as Media Play etc. To view
the contents of a message, switch to TV viewing
mode.
When a message from an unknown mobile phone is
x
displayed, select the mobile phone on the message
menu in AllShare and select Denied to block the
phone.
Message View
If a new SMS message arrives while you are watching
TV, the alarm window appears. If you click the OK
button, the contents of the message are displayed.
✎
You can configure the viewing settings for SMS
messages on your mobile phones. For the
procedures, refer to the mobile phone manual.
✎
Some types of characters may be displayed as
blank or broken characters.
04 Advanced Features
Select
Return
Exit
Setup
Return
English
41
Page 42
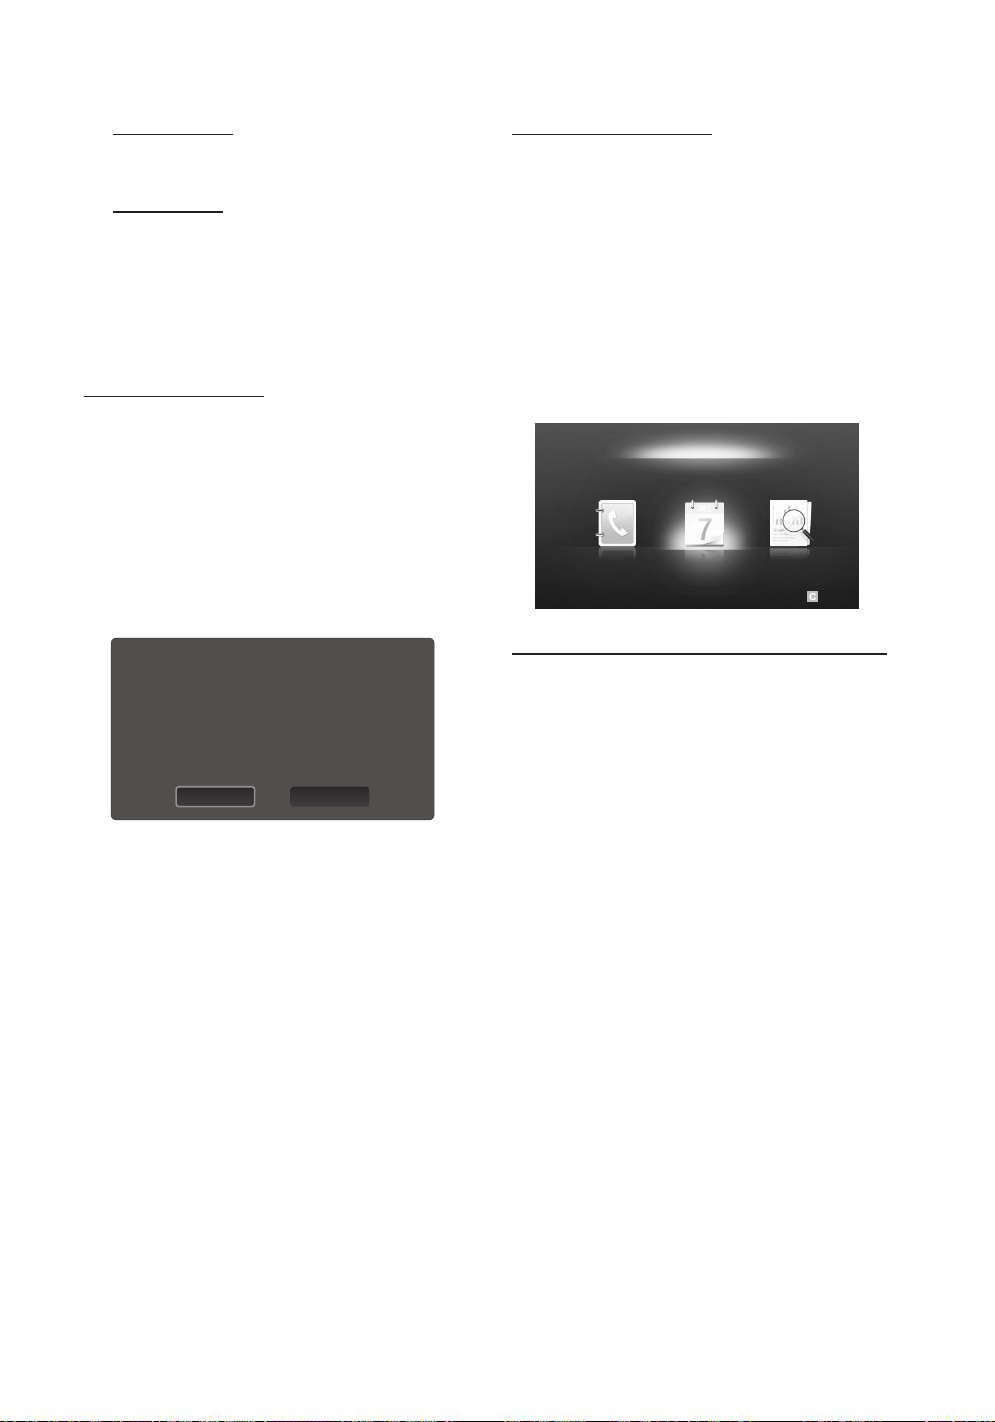
Advanced Features
Call Arrival Alarm
If a call arrives while you are watching TV, the alarm
window appears.
Schedule Alarm
While you are watching TV, the alarm window appears to
display the registered event.
✎
You can configure viewing settings for schedule
contents on your mobile phones. For the
procedures, refer to the mobile phone manual.
✎
Some special characters may be displayed as
blank or broken characters.
Using the Media Function
An alarm window appears informing the user that the media
contents (videos, photos, music) sent from a mobile phone
will be displayed on your TV. The contents are played
automatically 3 seconds after the alarm window appears.
If you press the RETURN or EXIT button when the alarm
window appears, the media contents are not played.
✎
NOTE
If the media function executes for the first time,
x
the warning popup windows appears. Press the
ENTER button to select Allow, then you can use
Media function on that device.
“Unknown Device 0” is requesting that the media le be allowed to play.
If you wish to allow the media le to be played at your device, please press
“Allow”, otherwise press “Deny”.
You can also change the setting (or resetting) of this feature at “AllShare
Setup”.
Warning: Please note that if your device is connected to unsecured or
unfamiliar network, unwanted or inappropriate contents might be played.
If you are not sure about the network's identity or content’s appropriateness,
we strongly recommend that you do not “Allow” the request to play.
DenyAllow
To turn off the media contents transmission from
x
the mobile phone, set Media to Off in the AllShare
setup.
Contents may not be played on your TV depending
x
on their resolution and format.
The ENTER and ◄ / ► buttons may not work
x
depending on the type of media content.
Using the mobile device, you can control the media
x
playing. For details, refer to each mobile’s user’s
guide.
When you want to play media contents from
x
your PC, select the PC icon on the main display
of AllShare. Then the TV’s Media Play menu
automatically changes. For more detail information,
refer to “Media Play” (p. 31).
Using ScreenShare Function
Using ScreenShare, you can browse various web contents
provided by the mobile phone. For example, the image
below displays an access page for contents on a mobile.
You can read the mobile’s files and view the phone book and
calendar on the TV. Also, in the phone book, you can make a
call to another person, or send to SMS.
✎
NOTE
You must have ScreenShare installed on your
x
Samsung Mobile phone/device to use this feature.
Doc Viewer can read files in doc format, but cannot
x
modify them.
The screen display may differ depending on the
x
connected device.
My Mobile
Contacts Calendar Doc Viewer
Select Return
Using your Samsung phone to control your TV Simply
Before you can use this feature, you must connect to
a Samsung mobile phone that supports ScreenShare
functions. When operating the TV with your mobile phone,
only the POWER,
are supported.
✎
Even if you keep pressing down on a control button
(channel or volume) on the mobile phone, the value will
only go up or down by one unit.
,
and MUTE buttons
42
English
Page 43
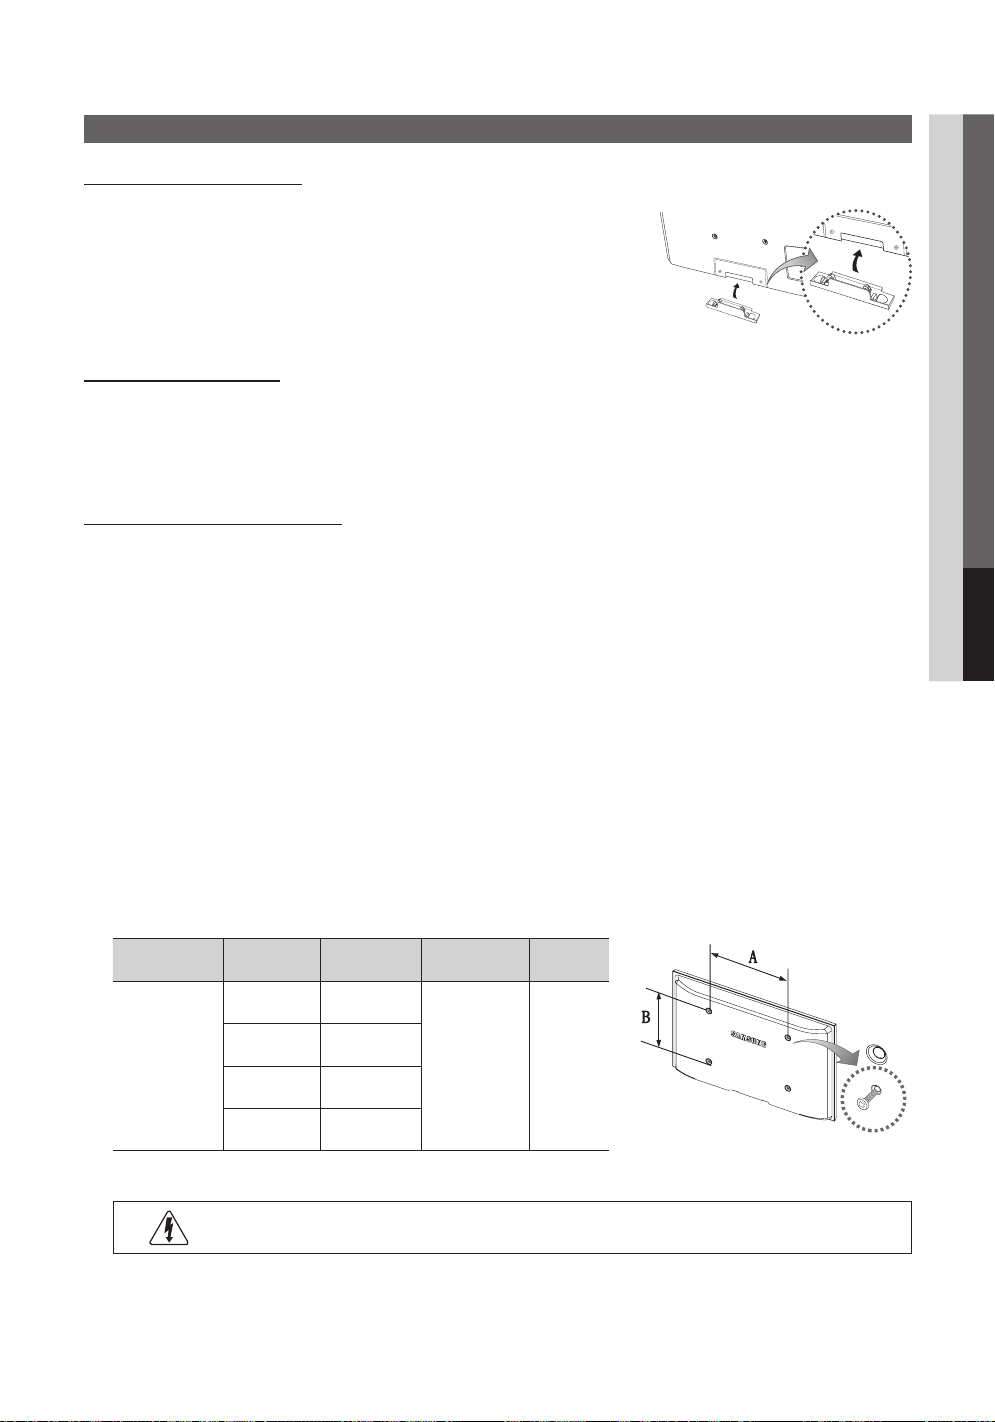
Other Information
Installing the Wall Mount
Attaching the Blanking Bracket
When installing the TV onto a wall, attach the Blanking Bracket as shown.
Blanking Bracket
Installing the Wall Mount Kit
The wall mount kit (sold separately) allow you to mount the TV on the wall.
For detailed information on installing the wall mount, see the instructions provided with the wall mount. Contact a technician for
assistance when installing the wall mount bracket.
Samsung Electronics is not responsible for any damage to the product or injury to yourself or others if you elect to install the
TV on your own.
Wall Mount Kit Specifications (VESA)
✎
The wall mount kit is not supplied, but sold separately.
Install your wall mount on a solid wall perpendicular to the floor. When attaching to other building materials, please contact
your nearest dealer. If installed on a ceiling or slanted wall, it may fall and result in severe personal injury.
✎
NOTE
Standard dimensions for wall mount kits are shown in the table below.
x
When purchasing our wall mount kit, a detailed installation manual and all parts necessary for assembly are provided.
x
Do not use screws that do not comply with the VESA standard screw specifications.
x
Do not use screws that are longer than the standard dimension or do not comply with the VESA standard screw
x
specifications. Screws that are too long may cause damage to the inside of the TV set.
For wall mounts that do not comply with the VESA standard screw specifications, the length of the screws may differ
x
depending on the wall mount specifications.
Do not fasten the screws too strongly this may damage the product or cause the product to fall, leading to personal
x
injury. Samsung is not liable for these kinds of accidents.
Samsung is not liable for product damage or personal injury when a non-VESA or non-specified wall mount is used or
x
the consumer fails to follow the product installation instructions.
Do not mount the TV at more than a 15 degree tilt.
x
Always use two people to mount the TV to a wall.
x
05 Other Information
Product Family inches
42~50 400 X 400
58~63 600 X 400
PDP TV
70~79 800 X 400
80~ 1400 X 800
✎
Unscrew the hole around before installing Wall-Mount on the wall.
Do not install your Wall Mount Kit while your TV is turned on. It may result in personal injury due to
electric shock.
VESA Spec.
(A * B)
Standard
Screw
M8 4
Quantity
English
43
Page 44
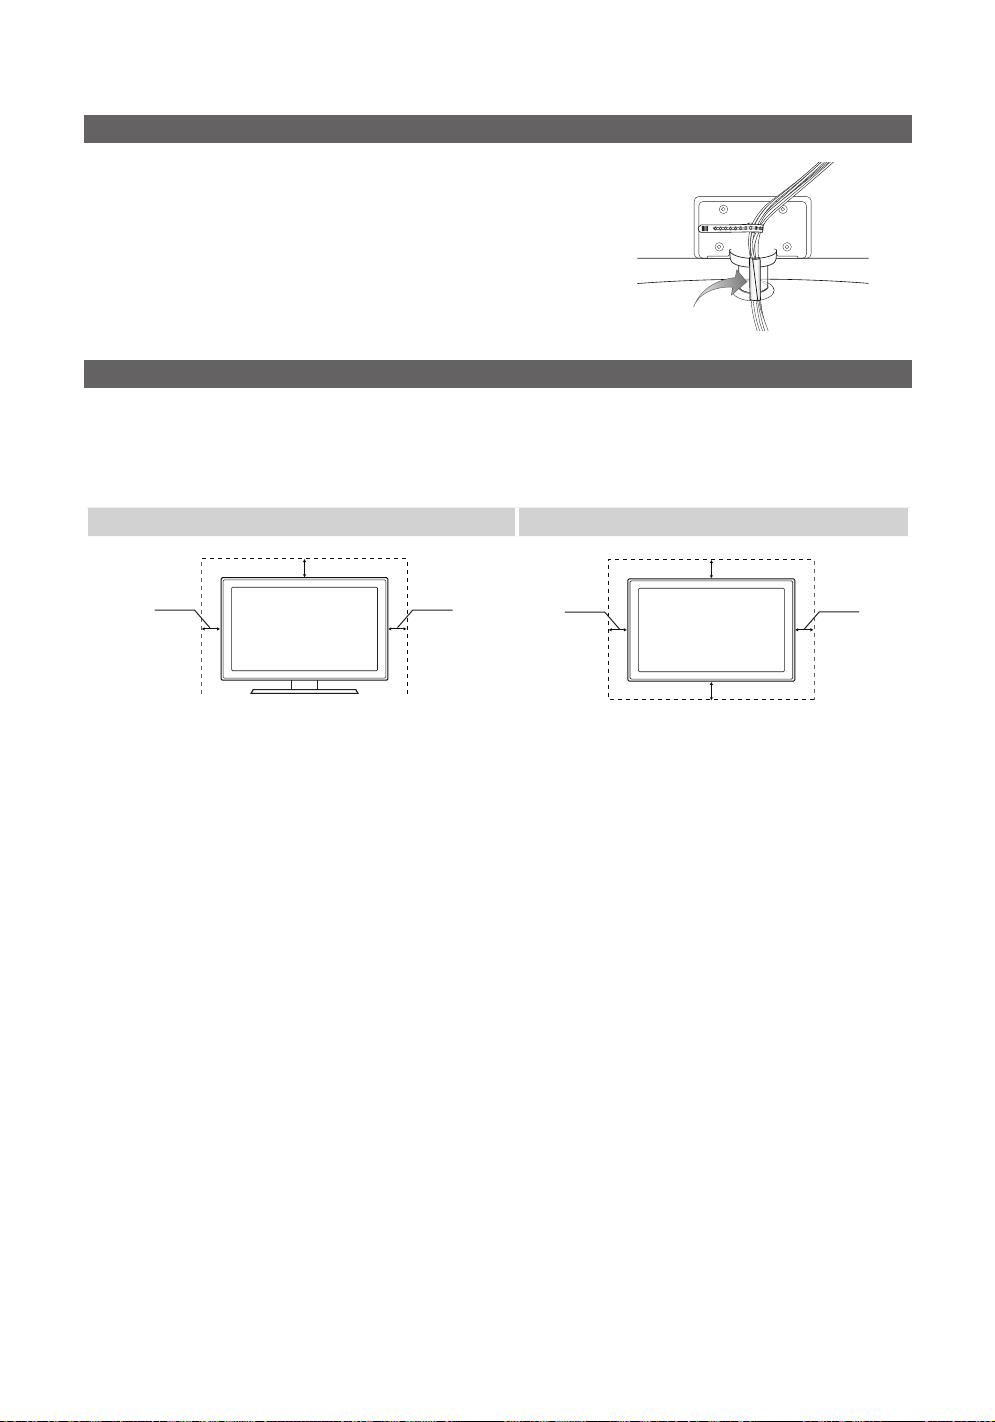
Other Information
Assembling the Cables
Enclose the cables in the Cable tie so that the cables are not visible through
the transparent stand. Overly rigid or thick cables can damage input jacks
over long term use.
Cable Tie
Securing the Installation Space
Keep the required distances between the product and other objects (e.g. walls) to ensure proper ventilation.
Failing to do so may result in fire or a problem with the product due to an increase in the internal temperature of the product.
When using a stand or wall-mount, use parts provided by Samsung Electronics only.
✎
If you use parts provided by another manufacturer, it may result in a problem with the product or an injury due to the product falling.
x
The appearance may differ depending on the product.
✎
Installation with a stand. Installation with a wall-mount.
4 inches
4 inches
4 inches
4 inches
4 inches
4 inches
4 inches
44
English
Page 45
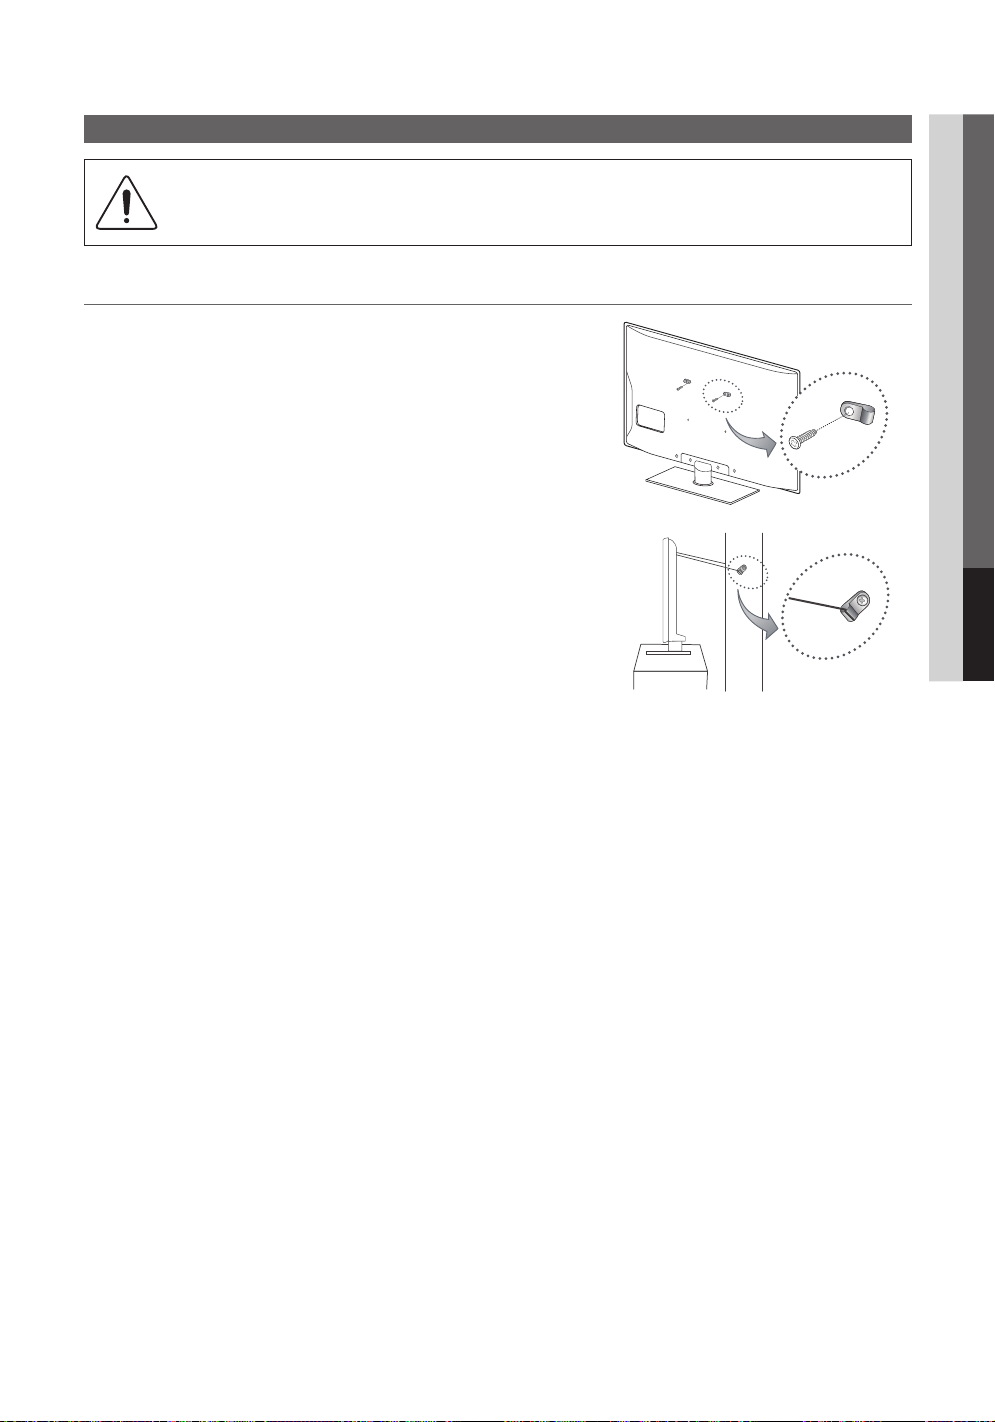
Securing the TV to the wall
Caution: Pulling, pushing, or climbing onto the TV may cause the TV to fall. In particular, ensure that your
children do not hang over or destabilize the TV; doing so may cause the TV to tip over, resulting in serious
injuries or death. Follow all safety precautions provided in the included Safety Flyer. For added stability and
safety, install the anti-fall device as follows.
To Avoid the TV from Falling
1. Put the screws into the clamps and firmly fasten them onto the wall.
Confirm that the screws have been firmly installed onto the wall.
✎
You may need additional material such as an anchor depending on
the type of wall.
✎
Since the necessary clamps, screws, and string are not supplied,
please purchase these additionally.
2. Remove the scres from the back center of the TV, put the screws into the
clamps, and then fasten the screws onto the TV again.
✎
Screws may not be supplied with the product. In this case, please
purchase the screws of the following specifications.
3. Connect the clamps fixed onto the TV and the clamps fixed onto the wall
with a strong cable and then tie the string tightly.
✎
NOTE
Install the TV near to the wall so that it does not fall backwards.
x
It is safe to connect the string so that the clamps fixed on the
x
wall are equal to or lower than the clamps fixed on the TV.
Untie the string before moving the TV.
x
4. Verify all connections are properly secured. Periodically check
connections for any sign of fatigue for failure. If you have any doubt about
the security of your connections, contact a professional installer.
05 Other Information
English
45
Page 46

Other Information
Troubleshooting
If the TV seems to have a problem, first try this list of possible problems and solutions. If none of these troubleshooting tips
apply, visit "www.samsung.com,” then click on Support, or contact a Samsung customer service center.
Issues Solutions and Explanations
Poor picture First of all, please perform the Picture Test and confirm that your TV is properly displaying the test image.
The TV image does not look as good as it
did in the store.
The picture is distorted: macro block error,
small block, dots, pixelization.
Color is wrong or missing. • If you’re using Component connection, make sure the component cables are connected to the
There is poor color or brightness. • Adjust the Picture options in the TV menu. (go to Picture mode / Color / Brightness / Sharpness)
There is a dotted line on the edge of the
screen.
The picture is black and white. • If you are using an AV composite input, connect the video cable (yellow) to the Green jack of
When changing channels, the picture
freezes or is distorted or delayed.
Sound Problem First of all, please perform the Sound Test to confirm that your TV audio is properly operating.
There is no sound or the sound is too low
at maximum volume.
The picture is good but there is no sound. • Set the Speaker Select option to TV Speaker in the Sound menu (p. 19).
The speakers are making an inappropriate
noise.
No Picture, No Video
The TV won’t turn on. • Make sure the AC power cord is securely plugged in to the wall outlet and the TV.
(go to MENU - Support - Self Diagnosis - Picture Test) (p. 24)
If the test image is properly displayed, the poor picture may be caused by the source or signal.
• If you have an analog cable/satellite box, upgrade to an HD digital set top box. Use HDMI or
Component cables to deliver HD (high definition) picture quality.
• Cable/Satellite subscribers: Try HD stations from the channel line up.
• Antenna connection: Try HD stations after performing Auto program.
Many HD channels are up scaled from SD(Standard Definition) contents.
✎
• Adjust the Cable/Sat box video output resolution to 1080i or 720p.
• Compression of video contents may cause picture distortion, especially in fast moving pictures such
as sports and action movies.
• Low signal level can cause picture distortion. This is not a TV problem.
correct jacks. Incorrect or loose connections may cause color problems or a blank screen.
(p. 15)
• Adjust Energy Saving option in the TV menu. (go to MENU - Picture - Eco Solution - Energy
Saving) (p. 15)
• Try resetting the picture to view the default picture settings. (go to MENU - Picture - Picture Reset)
(p. 18)
• If the picture size is set to Screen Fit, change it to 16:9 (p. 17).
• Change cable/satellite box resolution.
component input 1 on the TV.
• If connected to a cable box, please try to reset it. (reconnect the AC cord and wait until the cable box
reboots. It may take up to 20 minutes)
• Set the output resolution of the cable box to 1080i or 720p.
(go to MENU - Support - Self Diagnosis - Sound Test) (p. 24)
If the audio is OK, the sound problem may caused by the source or signal.
• Please check the volume of the device (Cable/Sat Box, DVD, Blu-ray etc) connected to your TV.
• If you are using an external device, make sure the audio cables are connected to the correct audio
input jacks on the TV.
• If you are using an external device, check the device’s audio output option (ex. you may need to
change your cable box’s audio option to HDMI when you have a HDMI connected to your TV).
• If you are using a DVI to HDMI cable, a separate audio cable is required.
• If your TV has a headphone jack, make sure there is nothing plugged into it.
• Reboot the connected device by reconnecting the device’s power cable.
• Check cable connections. Make sure a video cable is not connected to an audio input.
• For antenna or Cable connections, check the signal strength. Low signal level may cause sound
distortion.
• Perform the Sound Test as explained above.
• Make sure the wall outlet is working.
• Try pressing the POWER button on the TV to make sure the problem is not the remote. If the TV turns
on, refer to “Remote control does not work” below.
46
English
Page 47
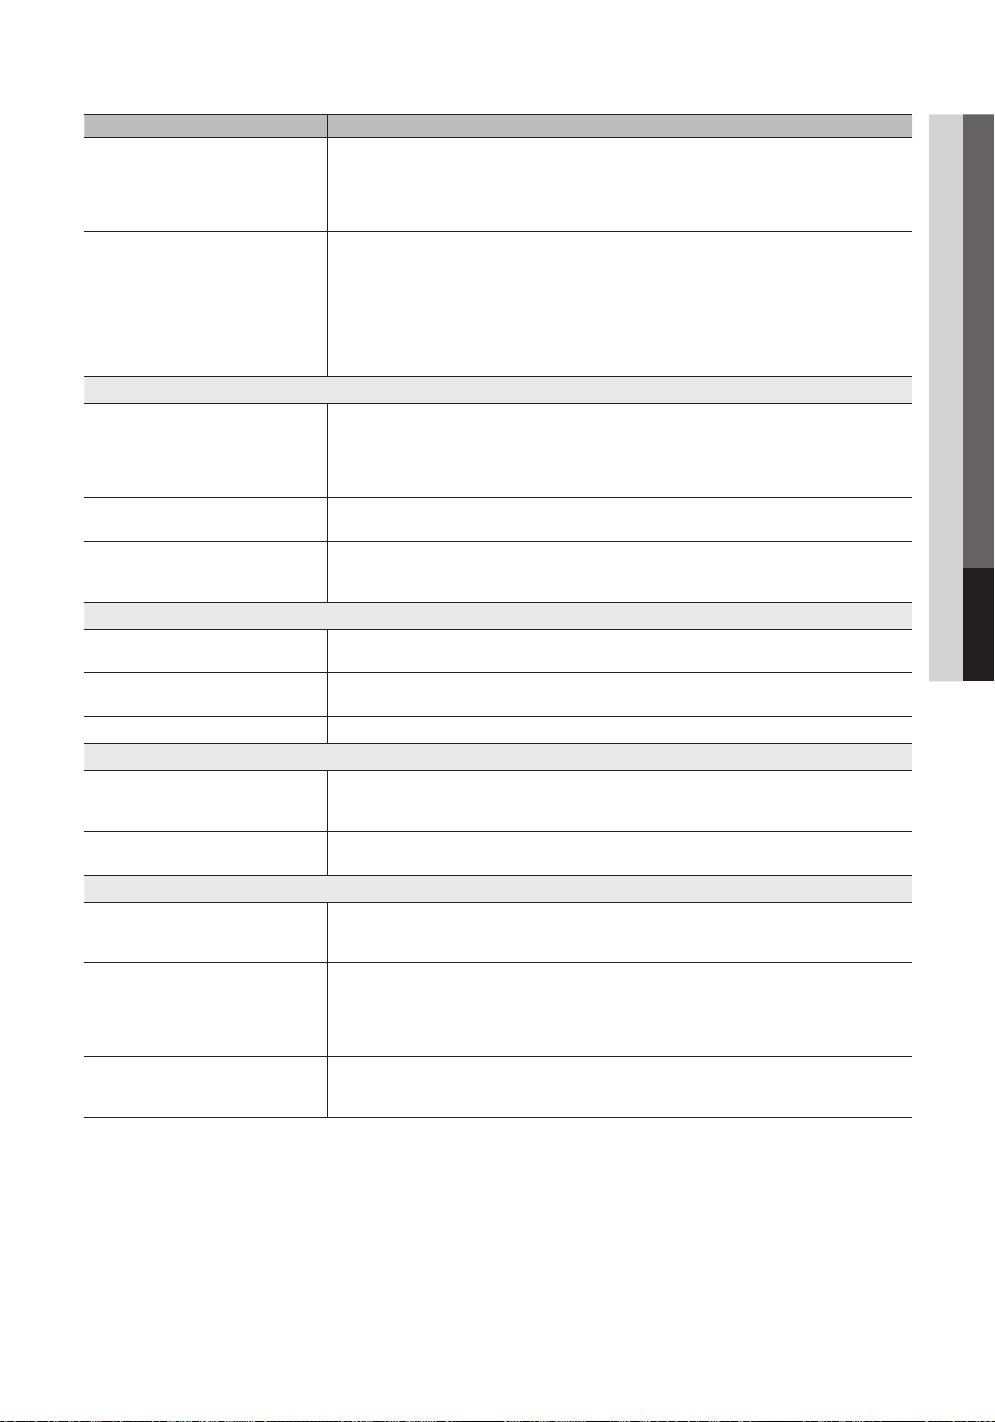
Issues Solutions and Explanations
The TV turns off automatically. • Ensure the Sleep Timer is set to Off in the Setup menu (p. 20).
There is no picture/video. • Check cable connections (remove and reconnect all cables connected to the TV and external
RF(Cable/Antenna) Connection
The TV is not receiving all channels. • Make sure the coaxial cable is connected securely.
No Caption on digital channels. • Check Caption Setup menu. Try changing Caption Mode Service1 to CC1 to (p. 23).
The picture is distorted: macro block error,
small block, dots, pixelization.
PC Connection
A “Mode Not Supported” message
appears.
“PC” is always shown on the source list,
even if a PC is not connected.
The video is OK but there is no audio. • If you are using an HDMI connection, check the audio output setting on your PC.
Network Connection
Wireless network connection failure. • The Samsung Wireless USB dongle is required to use a wireless network.
Software Upgrade over the network fails. • Try network test in Setup menu (p. 23).
Others
Purple/green rolling horizontal bars and
buzzing noise from the TV speakers with
Component cable connection.
The picture won’t display in full screen. • HD channels will have black bars on either side of the screen when displaying up scaled SD (4:3)
The remote control does not work. • Replace the remote control batteries with correct the poles (+/–) in the right direction.
• If your PC is connected to the TV, check your PC power settings.
• Make sure the AC power cord is plugged in securely to the wall outlet and the TV.
• When watching TV from an antenna or cable connection, the TV will turn off after 10 - 15 minutes if
there is no signal.
devices).
• Set your external device’s (Cable/Sat Box, DVD, Blu-ray etc) video outputs to match the connections
to the TV input. For example, if an external device’s output is HDMI, it should be connected to an
HDMI input on the TV.
• Make sure your connected devices are powered on.
• Be sure to select the TV’s correct source by pressing the SOURCE button on the remote control.
• Reboot the connected device by reconnecting the device’s power cable.
• Please try Auto Program to add available channels to the channel list. Go to MENU - Channel -
Auto Program then select Auto and make sure the correct Cable TV signal type is set in the menu.
There are 3 options (STD, HRC and IRC) (p. 14).
• Verify the Antenna is positioned correctly.
• Some channels may not have caption data.
• Compression of video contents may cause picture distortion, especially with fast moving pictures
such as sports and action movies.
• A low signal can cause picture distortion. This is not a TV problem.
• Set your PC’s output resolution so it matches the resolutions supported by the TV (p. 11).
• This is normal; “PC” is always shown on the source list, regardless of whether a PC is connected.
• Make sure Network Connection is set to Wireless (p. 28).
• TV must be connected to a wireless IP sharer (router).
• If you have latest SW version, SW upgrade will not proceed.
• Remove the left and right audio connections from the set-top-box. If the buzzing stops, this indicates
that the set-top-box has a grounding issue. Replace the Component video cables with an HDMI
connection.
contents.
• Black bars on the top and bottom will appear during movies that have aspect ratios different from
your TV.
• Adjust the picture size options on your external device or TV to full screen.
• Clean the sensor’s transmission window on the remote.
• Try pointing the remote directly at the TV from 5~6 feet away.
05 Other Information
English
47
Page 48

Other Information
Issues Solutions and Explanations
Plasma TV is making humming noise. • Plasma TVs typically make a soft humming sound. This is normal. It’s caused by the electrical charges
Image Retention (Burn In) Issue. • To minimize the possibility of screen burn, this unit is equipped with screen burn reduction technology.
The cable/set top box remote control
doesn’t turn the TV on or off, or adjust the
volume.
Caption on TV menu is greyed out. • Caption can not be selected in the TV menu when connected via HDMI or Component (p. 22).
A “Mode Not Supported” message
appears.
There is a plastic smell from the TV. • This smell is normal and will dissipate over time.
The TV Signal Information is unavailable
in the Self Diagnostic Test menu.
The TV is tilted to the side. • Remove the base stand from the TV and reassemble it.
The channel menu is greyed out
(unavailable).
Your settings are lost after 30 minutes or
every time the TV is turned off.
You have intermittent loss of audio or
video.
You see small particles when you look
closely at the edge of the frame of the TV.
The PIP menu is not available. • PIP functionality is only available when you are using a HDMI, PC or Component source.
POP (TV’s internal banner ad) appears on
the screen.
that are used to create the images on the screen.
• If the humming sound is loud, you may have set the brightness on the TV too high. Try setting the
brightness lower.
• You can also have loud humming if the back of your Plasma TV is too close to a wall or other hard
surface. Also try rerouting your connection cables.
• Improper installation of wall mount can create excessive noise.
Pixel Shift technology enables you to set picture movement up/down (Vertical Line) and side to side
(Horizontal Dot).
• Program the Cable/Set remote control to operate the TV. Refer to the Cable/Set user manual for the
SAMSUNG TV code.
• Caption must be activated on the external device (p. 22).
• Check the supported resolution of the TV, and adjust the external device’s output resolution
accordingly. Refer to the resolution settings on page 8 of this manual.
• This function is only available with digital channels from an Antenna / RF/Coax connection (p. 24).
• The Channel menu is only available when the TV source is selected.
• If the TV is in the Store Demo mode, it will reset audio and picture settings every 30 minutes. Change
the settings from Store Demo mode to Home Use mode in the Plug & Play procedure. Press the
SOURCE button to select TV mode, and go to MENU → Setup → Plug & Play → ENTER
• Check the cable connections and reconnect them.
• Loss of audio or video can be caused by using overly rigid or thick cables. Make sure the cables are
flexible enough for long term use. If mounting the TV to a wall, we recommend using cables with 90
degree connectors.
• This is part of the product’s design and is not a defect.
• Select Home Use under Plug & Play mode. For details, refer to Plug & Play Feature (p. 8).
(p. 8).
✎
Some of above pictures and functions are available at specific models only.
English
48
Page 49
Specifications
Panel native 1920 x 1080 @ 60 Hz
Environmental Considerations
Operating Temperature
Operating Humidity
Storage Temperature
Storage Humidity
Stand Swivel (Left / Right) -20˚ ~ 20˚
Model Name PL50C550
Screen Size
(Diagonal)
Sound
(Output) 10 W X 2
Dimensions (WxDxH)
Body
With stand
Weight
Without Stand
With Stand
✎
Design and specifications are subject to change without prior notice.
✎
For information about power supply, and more about power consumption, refer to the label attached to the product.
50°F to 104°F (10°C to 40°C)
10% to 80%, non-condensing
-4°F to 113°F (-20°C to 45°C)
5% to 95%, non-condensing
50 inches
(50,2 inches measured diagonally)
47,8 x 28,8 x 2,8 inches
(1214,5 x 732,5 x 71 mm)
47,8 x 31,4 x11,4 inches
(1214,5 x 797,5 x 290 mm)
52,9 lbs (24 Kg)
62,8 lbs (28,5 Kg)
License
Manufactured under license from Dolby Laboratories. Dolby and the double-D symbol are
trademarks of Dolby Laboratories.
05 Other Information
Manufactured under license under U.S. Patent #’s: 5,451,942; 5,956,674; 5,974,380; 5,978,762;
6,487,535 & other U.S. and worldwide patents issued & pending. DTS and the Symbol are
registered trademarks. & DTS 2.0+ Digital Out and the DTS logos are trademarks of DTS, Inc.
Product Includes software. © DTS, Inc. All Rights Reserved.
DivX Certified to play DivX video up to HD 1080p, including premium content.
ABOUT DIVX VIDEO: DivX® is a digital video format created by DivX,Inc. This is an official DivX Certified device that
plays DivX video. Visit www.divx.com for more information and software tools to convert your files into DivX video.
ABOUT DIVX VIDEO-ON-DEMAND: This DivX Certified® device must be registered in order to play DivX Video-onDemand (VOD) content. To generate the registration code, locate the DivX VOD section in the device setup menu.
Go to vod.divx.com with this code to complete the registration process and learn more about DivX VOD.
Pat. 7,295,673; 7,460,688; 7,519,274
Open Source License Notice
In the case of using open source software, Open Source Licenses are available on the product menu.
Open Source License Notice is written only English.
English
49
Page 50

Other Information
Index
A
AllShare 41
Amplify 19
Antenna 13
Anynet+ 38
AUDIO OUT 10
Auto Adjustment 18
Auto Volume 19
B
Background Music 37
Balance L/R 19
Basic View 36
Batteries 7
Black Tone 16
Blanking Bracket 43
Brightness 15
C
Cable Tie 4, 44
Change PIN 22
Channel Menu 13
Clock 20
Color Tone 16
Component 9
Connecting to a PC 10
Connecting to an Audio Device 9
D
DIGITAL AUDIO OUT 10, 38
DivX® VOD 37
D-sub 11
Dynamic 15
Dynamic Contrast 16
E
Eco Sensor 16
Edit Name 12
Editing Channels 14
Energy Saving 15
Equalizer 19
External Speaker 19
F
Favorite Channel 13
Film Mode 17
Fine Tune 15
Flesh Tone 16
Frequency 11
H
HDMI 9, 38
Home theater 10, 38
I
Installation Space 44
L
Language 22
License 49
M
Media Play 31
Melody 23
Menu Transparency 23
Mono 19
Music 35
N
Navigate 12
Network Connection 26
Network Setup 27
O
ON/OFF button 7
Optimal resolution 11
P
Photos 35
Picture Size 17, 37
PIP 24
Plug & Play 8
Power Indicator 6
R
Receiver 40
Recording 39
Remote Control 7
Repeat Mode 37
RGB Only Mode 16
Rotate 37
S
Select All 15
Self Diagnosis 24
Sharpness 15
Signal Information 24
Sleep Timer 20
Slide Show 35
Software Upgrade 25
Source List 12
Speaker Select 19
Specifications 49
Standby mode 6
Symbol 3
T
Timer 20
Title 37
Tools 3
Troubleshooting 46
TV Speaker 19
U
USB Drive 25, 31
V
Video Formats 34
Videos 33
Virtual Surround 19
Volume 19
W
Wall Mount 43
Warm 16
White Balance 16
50
English
Page 51

This page is intentionally
left blank.
Page 52
Las figuras y las ilustraciones de este Manual del usuario se proporcionan como referencia solamente y pueden ser
diferentes del aspecto real del producto. El diseño y las especificaciones del producto están sujetos a cambios sin previo
aviso.
Antes de usar el equipo lea este manual para evitar fallas y guarde para futuras referencias.
Instrucciones para el usuario
• Retención de imágenes en la pantalla
No deje imágenes fijas visibles (como las de un videojuego) en el panel de la pantalla de plasma durante mucho tiempo, ya que se podría producir
la retención de la imagen en la misma. Este fenómeno de retención de imágenes también se denomina “quemadura de pantalla”. Para evitar dicha
retención de la imagen, consulte la página 14 de este manual para reducir el grado de brillo y contraste de la pantalla al mostrar una imagen fija.
• Calor en la parte superior del TV de plasma
La parte superior del aparato puede calentarse tras un uso prolongado ya que el calor se disipa desde el panel a través de los orificios de ventilación
de la parte superior del aparato.
Esto es normal y no indica ningún defecto ni fallo de funcionamiento del aparato.
No obstante, debe evitarse que los niños toquen la parte superior del aparato.
• El aparato emite una especie de ‘crujido’.
El ruido similar a un crujido puede producirse cuando el aparato se contrae o se expande debido a un cambio ambiental de temperatura o humedad.
Este hecho es normal y no se trata de ningún defecto en la unidad.
• Defecto de celda
La PDP utiliza un panel compuesto de 2.360.000 píxeles (nivel HD) a 6.221.000 (nivel FHD) que requieren una sofisticada tecnología para su
producción. No obstante, puede que existan unos cuantos píxeles brillantes u oscuros en la pantalla. Estos píxeles no influirán en el rendimiento del
aparato.
• Evite que el televisor funcione a temperaturas por debajo de 41 °F (5 °C)
• La imagen fija visualizada durante demasiado tiempo puede causar daños permanentes en el panel de la PDP.
Ver el TV de plasma en formato 4:3 durante un tiempo prolongado puede dejar rastros de bordes en la izquierda, derecha o centro
de la pantalla causados por la diferencia de emisión de luz en la pantalla. La reproducción de un DVD o el uso de una consola de
videojuegos pueden provocar un efecto similar en la pantalla.
Los daños provocados por los efectos mencionados no quedan cubiertos por la garantía.
• Imágenes fantasma en la pantalla.
Ver imágenes fijas de videojuegos y PC durante más tiempo del indicado puede producir imágenes fantasma parciales. Para evitar este efecto,
reduzca el ‘brillo’ y el ‘contraste’ al mostrar imágenes fijas durante tiempo prolongado.
• Garantía
La garantía no cubre ningún daño causado por la retención de imágenes.
La garantía no cubre el desgaste de la pantalla.
2
Español
Page 53

Contenido
Introducción
y Listado de características ......................................... 4
y Accesorios ................................................................ 4
y Instale el soporte ....................................................... 5
y Aspecto general del panel de control ........................6
y Aspecto general del mando a distancia ..................... 7
y Conexión de una antena ........................................... 8
y Plug & Play (configuración inicial)............................... 8
Conexiones
y Conexión a un dispositivo AV .................................... 9
y Conexión a un dispositivo de audio ......................... 10
y Conexión a un PC ................................................... 11
y Cambio de la fuente de entrada .............................. 12
Funciones básicas
y Cómo desplazarse por los menús ........................... 12
y Menú de canales .................................................... 13
Visualización de canales 13
Uso de los canales favoritos 13
Memorización de canales 13
Edición de canales 14
Otras funciones 14
y Menú de la imagen ................................................. 15
Cambio del modo de imagen preseleccionado 15
Ajuste de la configuración de la imagen 15
Soluciones económicas 15
Cambio de las opciones de la imagen 16
Ajuste del televisor con el ordenador 18
y Menú del sonido ..................................................... 19
Cambio del modo de sonido preseleccionado 19
Ajuste de la configuración del sonido 19
Configuración del sonido 19
y Menú de configuración ........................................... 20
Configuración de la hora 20
Uso del temporizador de desconexión 20
Activación y desactivación del temporizador 20
Programas de bloqueo 21
Otras funciones 22
Picture In Picture (PIP) 24
y Menú de asistencia técnica ..................................... 24
Advanced Features
y Conexión de la red .................................................. 26
Conexión a una red por cable 26
Conexión a una red inalámbrica 28
y Media Play .............................................................. 31
Conexión de un dispositivo USB 31
Conexión al PC a través de una red 31
Pantalla de visualización 33
Reproducción de varios archivos 36
Reproductor multimedia - Funciones adicionales 36
y Anynet+ .................................................................. 38
Configuración de Anynet+ 39
Conmutación entre dispositivos Anynet+ 39
Grabación 39
Escucha a través de un receptor 40
Solución de problemas de Anynet+ 40
y AllShare ..................................................................41
Acerca de AllShare 41
Configuración de AllShare 41
Información adicional
y Instalación del montaje mural .................................. 43
y Montaje de los cables ............................................. 44
y Seguridad en el espacio de instalación ................... 44
y Fijación del televisor a la pared ................................ 45
Para impedir que el televisor se caiga 45
y Solución de problemas ........................................... 46
y Especificaciones ..................................................... 49
y Licencia .................................................................. 49
y Índice ...................................................................... 50
ESPAÑOL
TOOLS
Esta función se puede utilizar pulsando el
botón TOOLS del mando a distancia.
¡Compruebe este símbolo!
Nota
Indica información adicional.
Guía paso a paso
Consulte aquí las instrucciones para
abrir el submenú pertinente en la OSD
(visualización en pantalla).
Español
3
Page 54
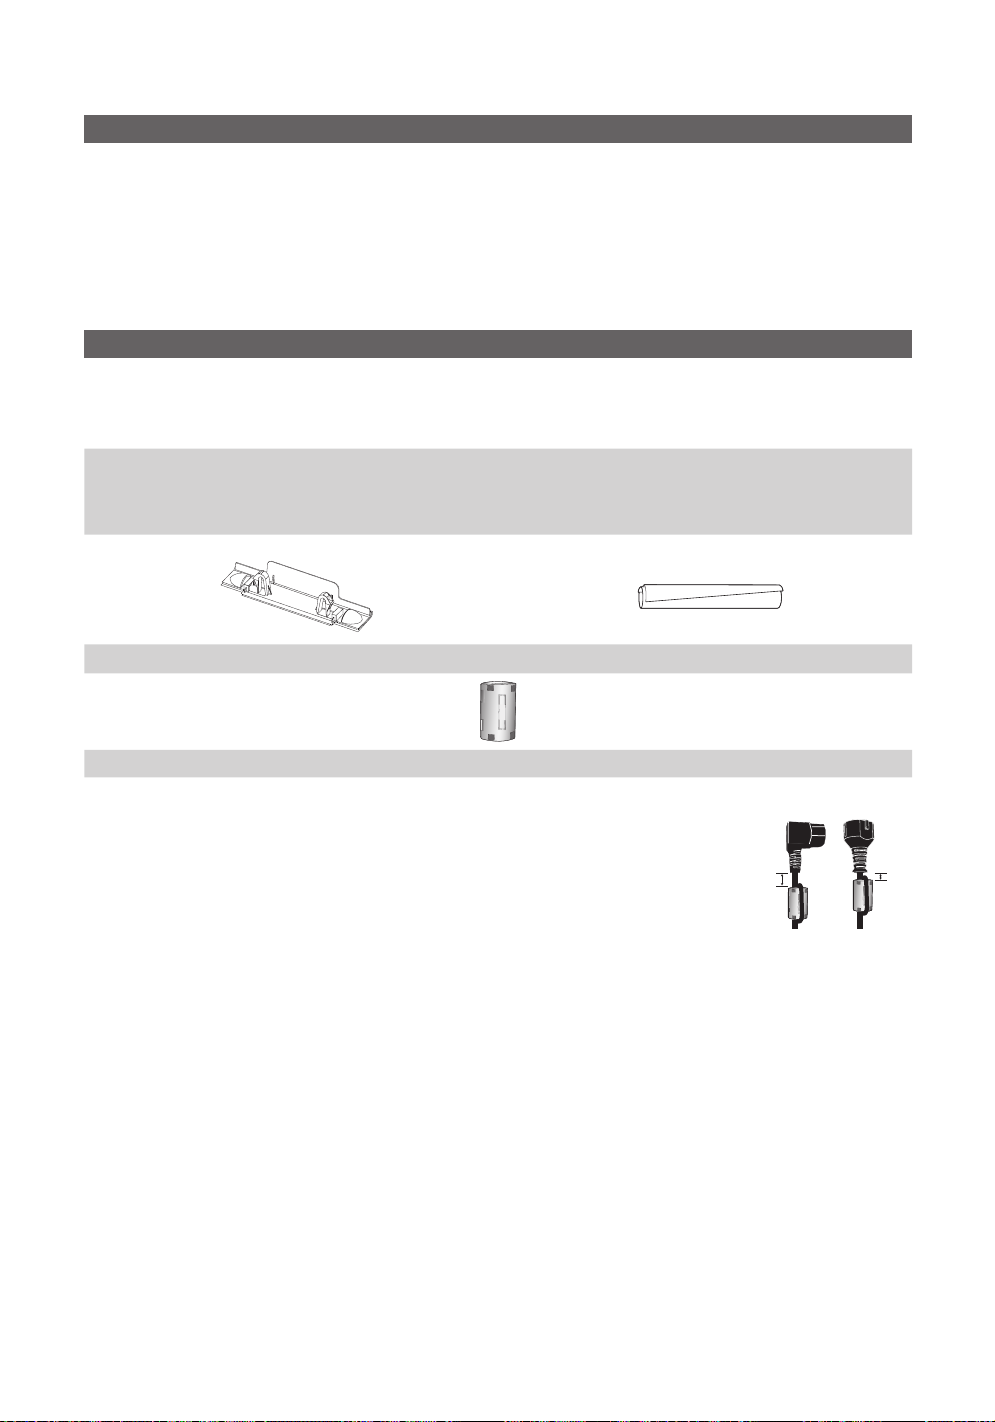
Introducción
Listado de características
y Excelente interfaz digital y capacidad de trabajo en red: El sintonizador digital HD incorporado permite ver las emisiones
HD que no exigen una suscripción sin que sea necesario disponer de un receptor de televisión por cable/satélite
(decodificador).
y Media Play: Permite reproducir algunos archivos de música, imágenes y películas guardados en un dispositivo USB
(pág. 31).
y AllShare: AllShare conecta el televisor y los dispositivos/teléfonos móviles compatibles de Samsung a través de una red
(pág. 41).
y Autodiagnóstico: Permite comprobar si la imagen y el sonido funcionan normalmente (pág. 24).
Accesorios
✎
Compruebe que los artículos siguientes vengan incluidos con su TV PDP. Si falta alguno, póngase en contacto con su
distribuidor.
✎
El color y la forma de los componentes pueden variar según los modelos.
y Mando a distancia y pilas (2 x AAA)
y Manual del usuario
y Tarjeta de garantía / Guía de seguridad / Guía rápida de
configuración
Soporte de protección Sujetacables
y Paño de limpieza
y Cable de alimentación
Núcleo de ferrita para cable de alimentación (2 unidades)
✎
Núcleo de ferrita para cable de alimentación: El núcleo de ferrita se utiliza para proteger los
cables de las interferencias. Cuando conecte un cable, abra el núcleo de ferrita y sujételo al
cable cerca del enchufe, tal como se muestra en la ilustración.
A (Distancia entre el núcleo de ferrita y un extremo del cable conectado al televisor): inferior
x
a 50mm
B (Distancia entre el núcleo de ferrita y el otro extremo del cable conectado a la toma):
x
inferior a 20mm
Español
4
A
B
Page 55
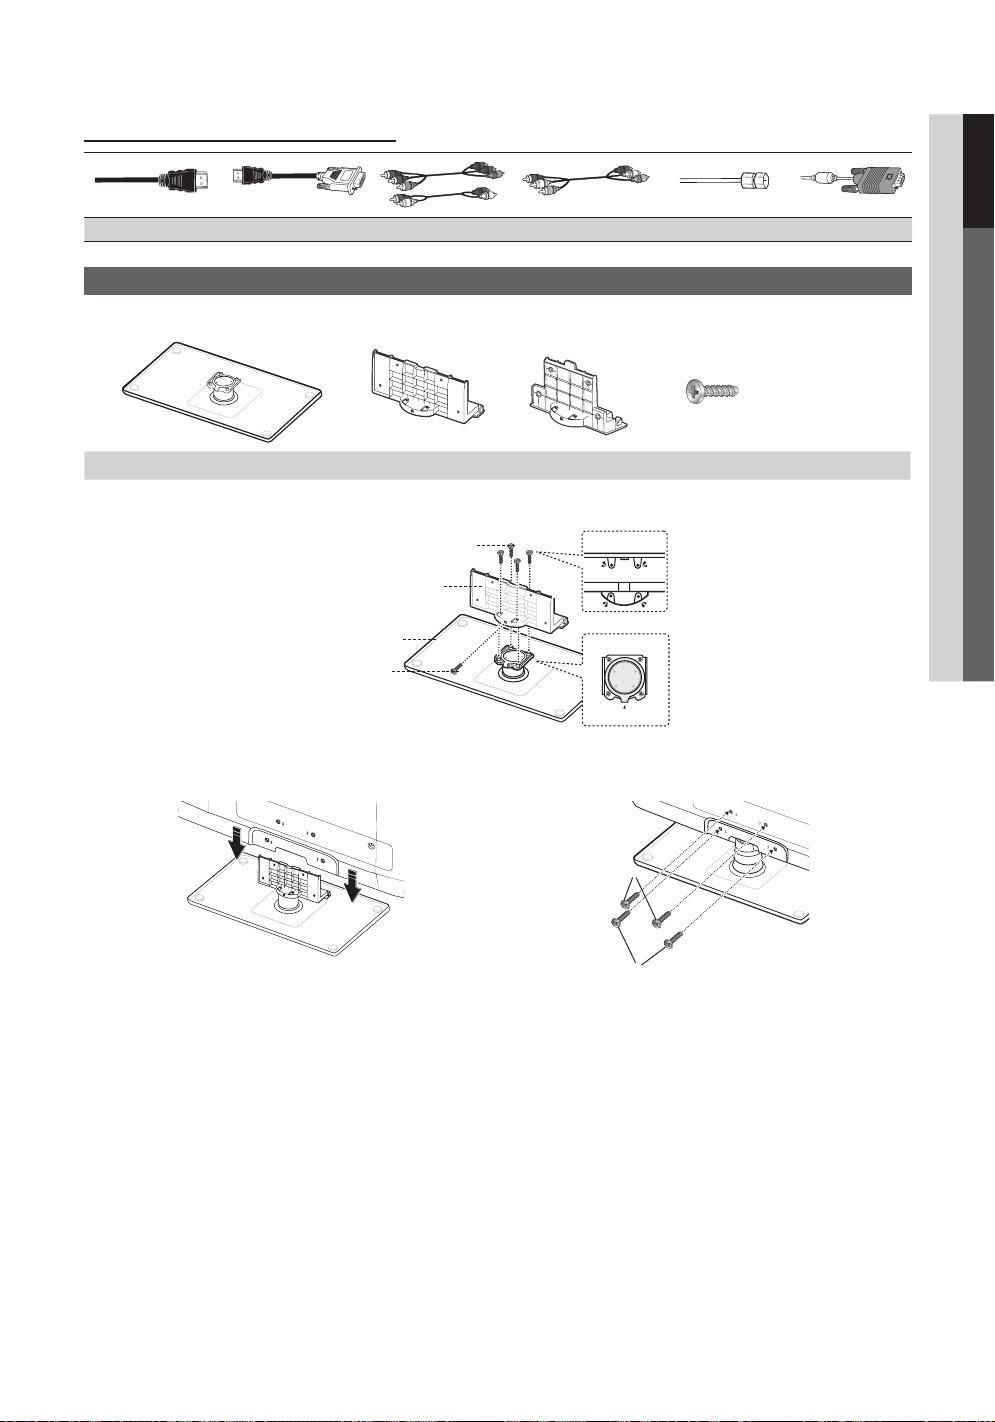
Cables de entrada (se venden por separado)
HDMI HDMI-DVI Component Composite (AV) Coaxial (RF) VGA
Instale el soporte
Consulte la guía para instalar el soporte.
01 Introducción
o
Soporte (1 unidad) Soporte de la guía (1 unidad) Tornillos (9 unid.)
Siga los pasos que se indican a continuación para conectar el televisor al soporte.
Tornillos (M4 x L12)
Soporte de la guía
Soporte
Tornillos (M4 x L12)
Parte posterior
1. Conecte el soporte de la guía con el soporte mediante cinco tornillos (M4 x L12), tal como se muestra.
Vista superior
Parte frontal
Parte posterior
2
1
(M4 x L12)
2. Con el televisor levantado, conéctelo al soporte, tal
como se muestra.
✎
NOTA
Para realizar el montaje debe tener en cuenta cuál es la parte frontal y cuál la posterior del soporte y el soporte de la guía.
x
Asegúrese de que al menos dos personas levanten y muevan el TV PDP.
x
Levante el producto y apriete los tornillos. Si aprieta los tornillos sin levantar el TV PDP, éste puede inclinarse hacia
x
uno de los lados.
3. Atornille los dos tornillos (M4 x L12) en la posición 1 y
los otros dos (M4 x L12) en la posición 2.
Español
5
Page 56
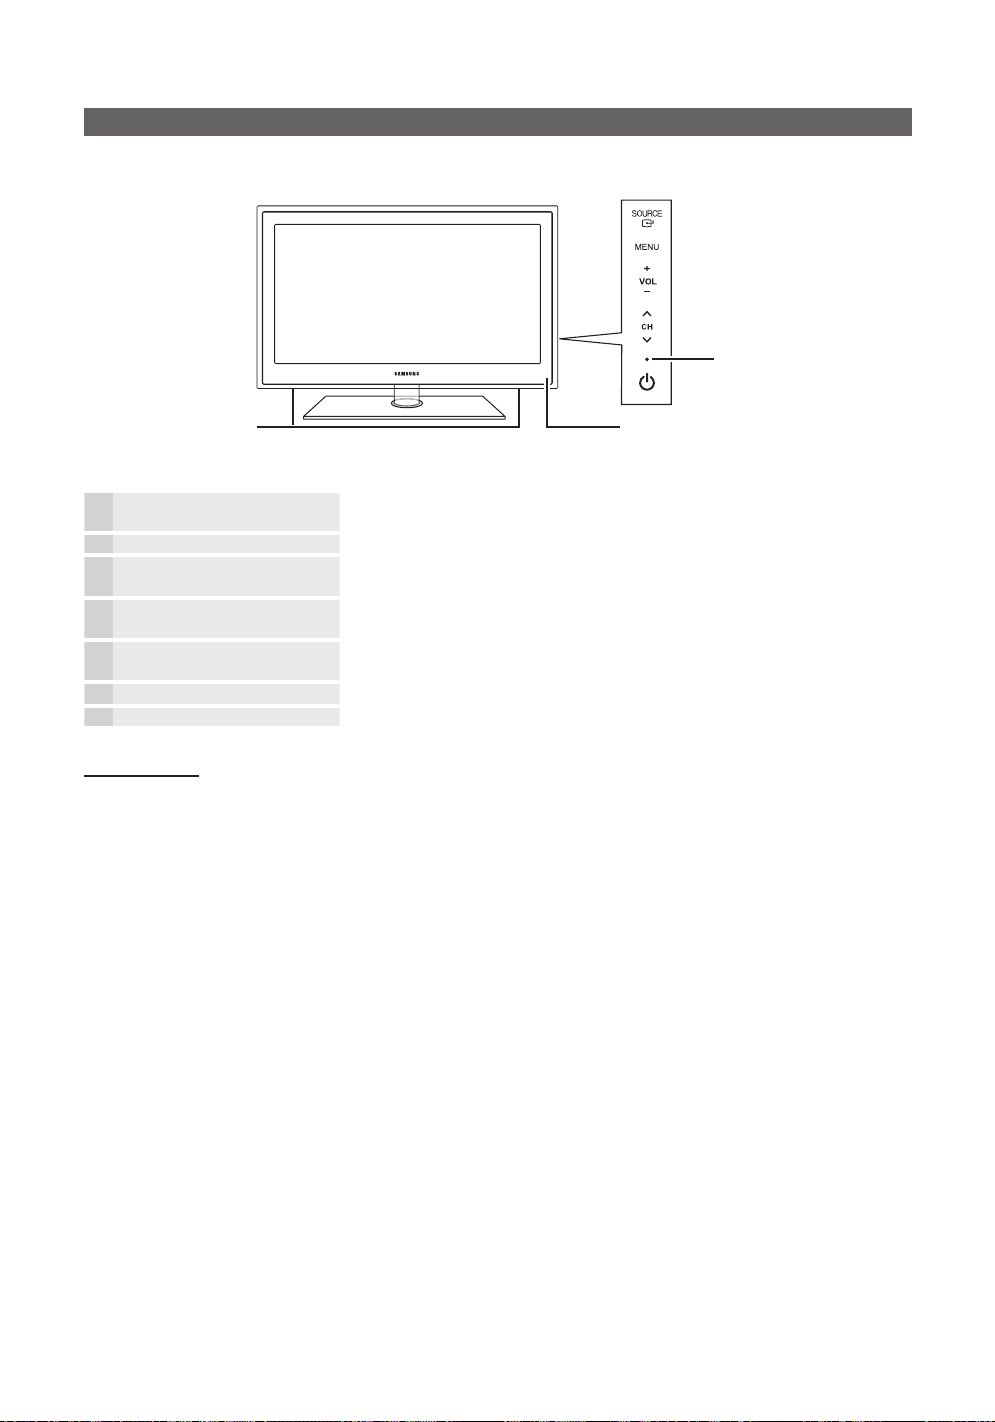
Introducción
Aspecto general del panel de control
✎
El color y la forma del producto pueden variar según el modelo.
Indicador de encendido
Altavoces
SOURCE
MENU
Indicador de encendido Parpadea y se apaga cuando se enciende el aparato y se ilumina en el modo en
Sensor del mando a distancia El mando a distancia debe dirigirse hacia este punto del televisor.
Modo de espera
No deje el televisor en modo de espera durante períodos largos de tiempo (cuando esté de vacaciones, por ejemplo). Aunque
esté apagado continúa consumiendo una pequeña cantidad de energía. Se recomienda desenchufar el cable de alimentación.
(Encendido)
Cambia entre todas las fuentes de entrada disponibles. En el menú en pantalla, utilice
este botón como lo haría con el botón ENTER del mando a distancia.
Muestra un menú en pantalla, la OSD (visualización en pantalla), de las funciones del TV.
Ajustar el volumen. En la OSD, utilice los botones
botones ◄ y ► del mando a distancia.
Cambian los canales. En la OSD, utilice los botones
botones ▼ y ▲ del mando a distancia.
espera.
Enciende o apaga el televisor.
Sensor del mando a distancia
de igual modo que los
de igual modo que los
6
Español
Page 57
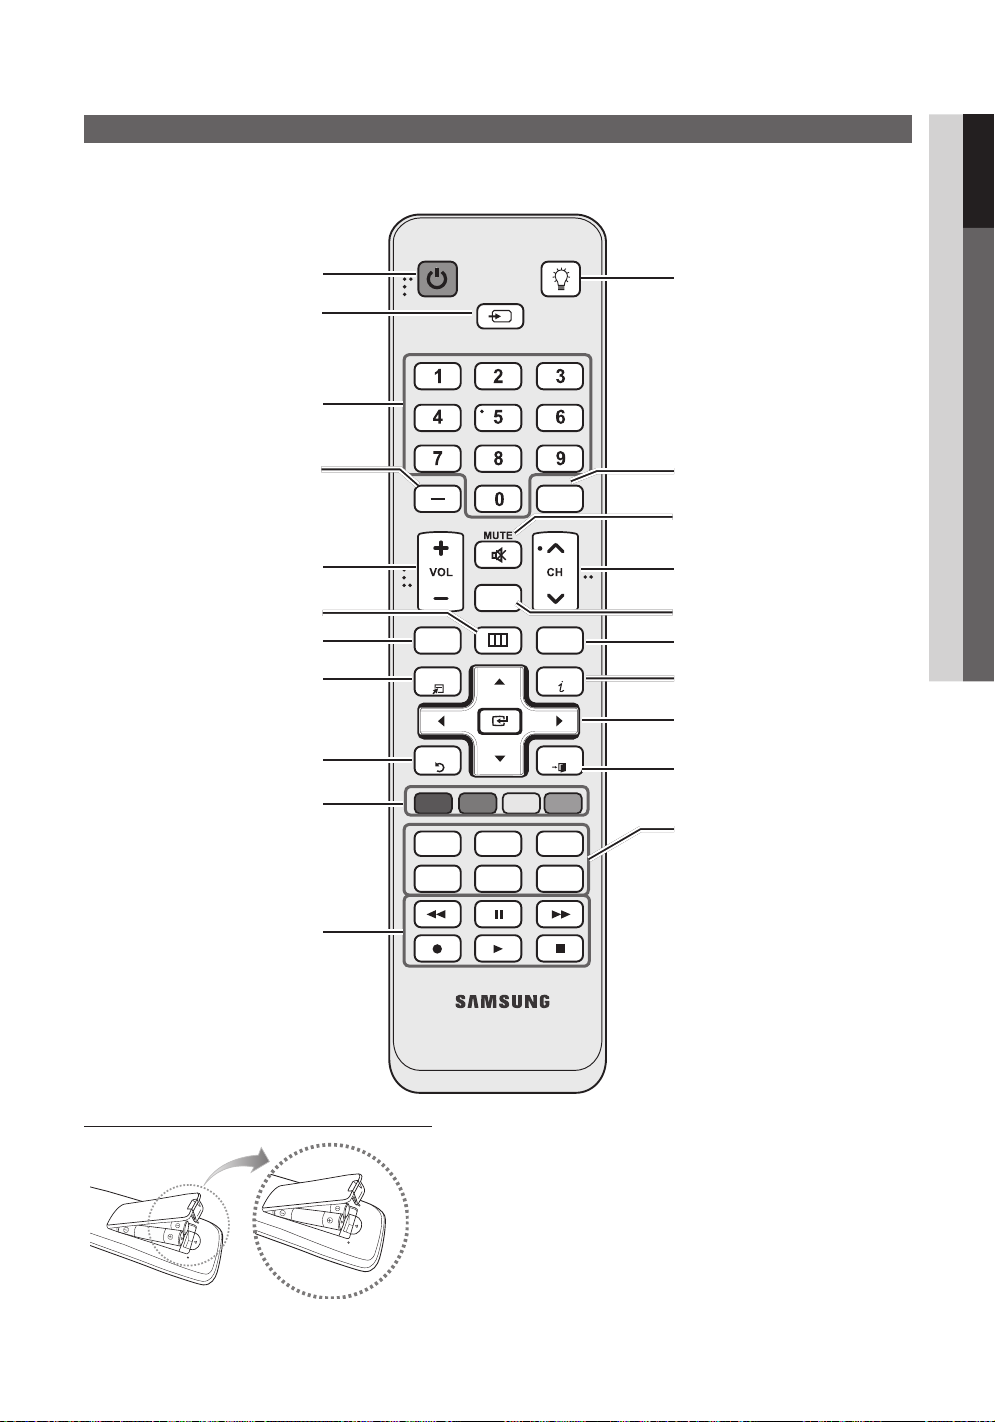
Aspecto general del mando a distancia
✎
Este mando a distancia es especial para personas con discapacidades visuales y presenta puntos Braille en los
botones de encendido, de canales y del volumen.
01 Introducción
Enciende y apaga el televisor.
Muestra y selecciona las fuentes de
vídeo disponibles (pág. 12).
Pulse para acceder directamente a los
canales.
Pulse este botón para seleccionar
canales adicionales (digitales) emitidos
por la misma emisora. Por ejemplo,
para seleccionar el canal "54-3", pulse
“54”, “-“ y “3”.
Ajustar el volumen.
Hace que aparezca la OSD.
Muestra Media Play (pág. 31).
Seleccionar rápidamente las funciones
que se usan con mayor frecuencia.
Vuelve al menú anterior.
Botones que se utilizan en los menús
Lista de canales, Media Play (USB), etc.
Utilice estos botones en los
modos Media Play (USB) y
Anynet+ (HDMI-CEC) (pág. 31, 38).
(: controla la grabación de las
grabadoras de Samsung con la función
Anynet+)
POWER
SOURCE
CH LIST
MENU
MEDIA.P
TOOLS
RETURN
A B C D
S.MODE
P.MODE
SLEEP
P.SIZE
ON/OFF
PRE-CH
FAV.CH
INFO
EXIT
MTS
CC
Activa o desactiva la luz del mando
a distancia. Cuando está activada,
los botones se iluminan durante un
momento cuando se pulsan.
(El uso del mando a distancia con los
botones iluminados reduce el tiempo de
uso de las pilas.)
Vuelve al canal anterior.
Corta temporalmente el sonido.
Cambia los canales.
Muestra la lista de canales en la pantalla
(pág. 13).
Muestra la lista de canales favoritos en la
pantalla (pág. 13).
Muestra información en la pantalla del
televisor.
Selecciona los elementos del menú
en pantalla y cambia los valores que
aparecen en el menú.
Sale del menú.
S.MODE: Se pulsa para seleccionar el
modo del sonido (pág. 19).
SLEEP: Apaga automáticamente el
televisor a la hora establecida. (pág. 20).
MTS: Púlselo para elegir estéreo,
monoaural o un programa de audio
independiente (emisión SAP) (pág. 19).
P.MODE: Se pulsa para seleccionar el
modo de la imagen (pág. 15).
P.SIZE : Selecciona el tamaño de
imagen (pág. 17).
CC: Controla el decodificador de
subtítulos (pág. 22).
Instalación de las pilas (tamaño de las pilas: AAA)
✎
NOTA
Utilice el mando a distancia a menos de 7 metros (23 pies)
x
del televisor.
Una luz muy brillante puede afectar al funcionamiento del
x
mando a distancia. No lo utilice cerca de luces fluorescentes
o de neón.
El color y la forma pueden variar según el modelo.
x
Español
7
Page 58
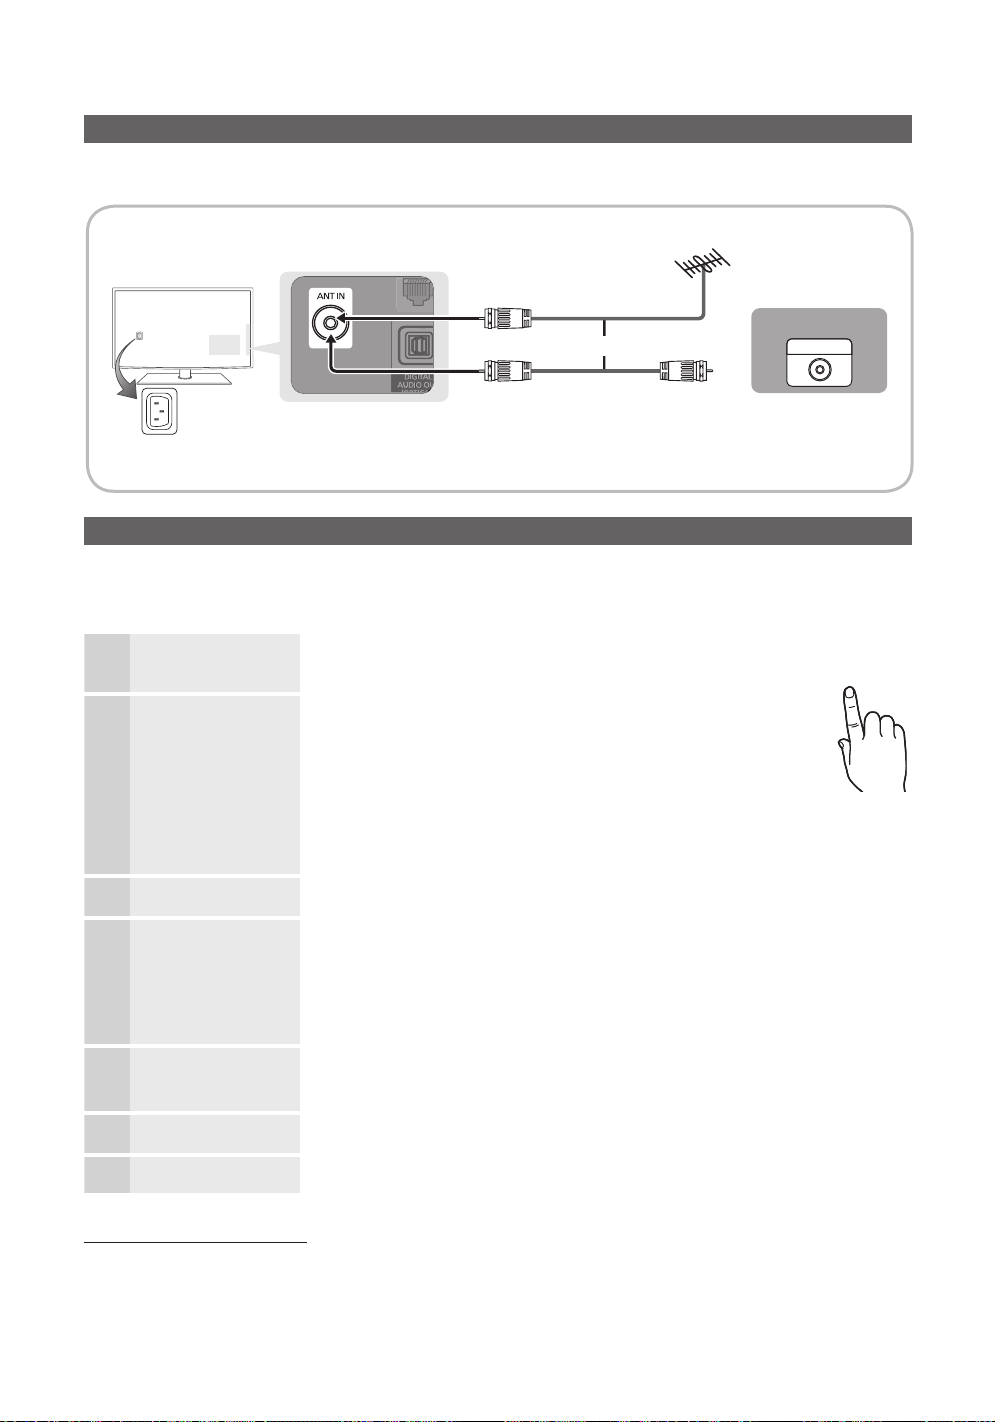
Introducción
POWER
INFO GUIDE
Conexión de una antena
Cuando el televisor se enciende por primera vez, los parámetros básicos se inician de forma automática.
✎
Conexión del cable de alimentación y la antena.
Antena VHF/UHF
o
Entrada de alimentación
Plug & Play (configuración inicial)
Cuando el televisor se enciende por primera vez, una secuencia de indicaciones en pantalla permite configurar los parámetros
básicos. Pulse el botón POWER. Plug & Play sólo está disponible cuando la fuente Entrada está configurada como TV.
✎
Para volver al paso anterior, pulse el botón Rojo.
Selección de un idioma
1
Selección de Demo
2
tienda o Uso
doméstico
Selección de una
3
antena
Selección de un canal
4
Configuración del
5
Modo de reloj
Visualización de la Guía
6
de conexión HD.
Disfrute de su TV.
Pulse los botones ▲ o ▼ y a continuación pulse el botón
ENTER
(presentación en pantalla).
Pulse los botones ◄ o ► y a continuación pulse el botón
ENTER
Pulse los botones ▲ o ▼ y a continuación pulse el botón ENTER
Aire, Cable o Auto.
Pulse los botones ▲ o ▼ y a continuación pulse el botón ENTER
del canal que desea memorizar. Al configurar la fuente de la antena en Cable, se muestra
un paso que le permite asignar valores numéricos (frecuencias de los canales) a los canales.
Para obtener más información, consulte Canal → Prog. Auto (pág. 13).
Configure el Modo Reloj automática o manualmente.
Se muestra el modo de conexión para obtener una mejor calidad de pantalla HD.
Pulse el botón ENTER
. Seleccione el idioma deseado para la OSD
.
y Seleccione el modo Uso domiciliario. El modo
Demo comercio se utiliza en los entornos comerciales.
y Recupere la configuración de la unidad desde
Demo comercio a Uso domiciliario (estándar): Pulse el
botón del volumen del televisor. Cuando vea la OSD del
volumen mantenga pulsado el botón MENUdurante 5
segundos.
✎
Pulse el botón ENTER en cualquier momento para interrumpir el proceso de
memorización.
y Auto: Permite seleccionar el modo Horario de Verano y la zona horaria.
y Manual: Permite configurar manualmente la hora y la fecha actuales (pág. 20).
.
Cable
ANT OUT
P
. Permite seleccionar
. Seleccione la fuente
7
Si desea reiniciar esta función...
MENU
→ Configuración → Plug & Play → ENTER
Español
8
Page 59
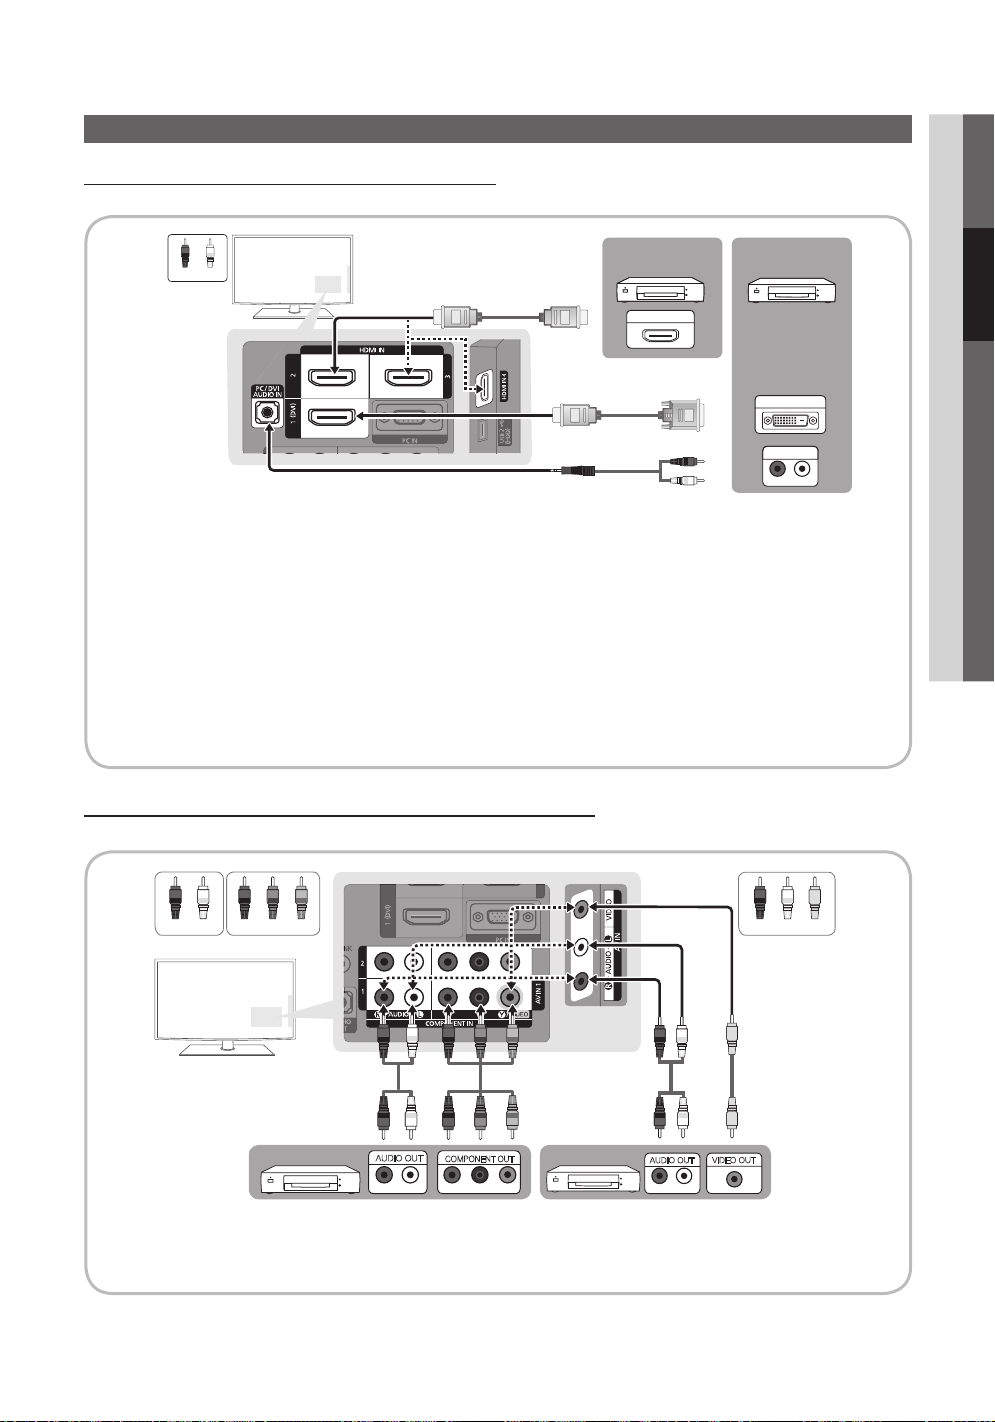
Conexiones
Conexión a un dispositivo AV
Mediante un cable HDMI / DVI: Conexión HD (hasta 1080p)
Dispositivos disponibles: DVD, reproductor Blu-ray, receptor por cable HD, receptor por satélite HD STB (decodificador).
02 Conexiones
WR
Rojo Blanco
✎
HDMI IN 1(DVI), 2, 3, 4, PC/DVI AUDIO IN
Cuando se usa una conexión de cable HDMI/DVI, se debe conectar en el terminal HDMI IN 1(DVI) para vídeo. Es posible
x
Dispositivo
HDMI OUT
R
W
que un reproductor de DVD, Blu-ray, receptor por cable HD, receptor por satélite HD STB necesite un cable DVI-HDMI (de
DVI a HDMI) o un adaptador DVI-HDMI (de DVI a HDMI). Se necesita el terminal PC/DVI AUDIO IN para el sonido.
Si se conecta un dispositivo externo como un reproductor DVD/Blu-ray/decodificador/receptor por satélite STB que admita
x
versiones HDMI anteriores a 1.3, el televisor quizás no funcione normalmente (por ejemplo, no se muestre la pantalla/no
haya sonido/parpadeos molestos/colores anormales).
Si tras conectar un cable HMDI no hay sonido, compruebe la versión HDMI del dispositivo externo. Si sospecha que es
x
una versión anterior a 1.3, póngase en contacto con el proveedor del dispositivo para confirmar la versión de HDMI y
solicitar una actualización.
Es aconsejable adquirir un cable certificado HDMI. De lo contrario, la pantalla puede aparecer vacía o producirse un error
x
de conexión.
Uso de un cable de componentes (hasta 1080p) o audio/vídeo (sólo 480i)
Dispositivos disponibles: Reproductor de DVD, Blu-ray, decodificador, receptor por satélite STB, VCR
Dispositivo
DVI OUT
AUDIO OUT
R-AUDIO-L
W
Blanco
R GB
Rojo
Azul Verde
Dispositivo
R
R
AUDIO OUT
R-AUDIO-L
W
W
R GB
R B G
COMPONENT OUT
PR PB Y
Dispositivo
WR
WR
AUDIO OUT
R-AUDIO-L
R
Rojo
✎
COMPONENT IN 1, 2 / AV IN 1: Cuando se conecta a, AV IN 1 el color (verde) del terminal AV IN 1 [Y/VIDEO]
Rojo Blanco Amarillo
Y
Y
VIDEO OUT
R W
Y
no coincide con el cable de vídeo (amarillo).
✎
Para obtener la mejor calidad de imagen, se recomienda la conexión de componentes antes que la conexión A/V.
Español
9
Page 60
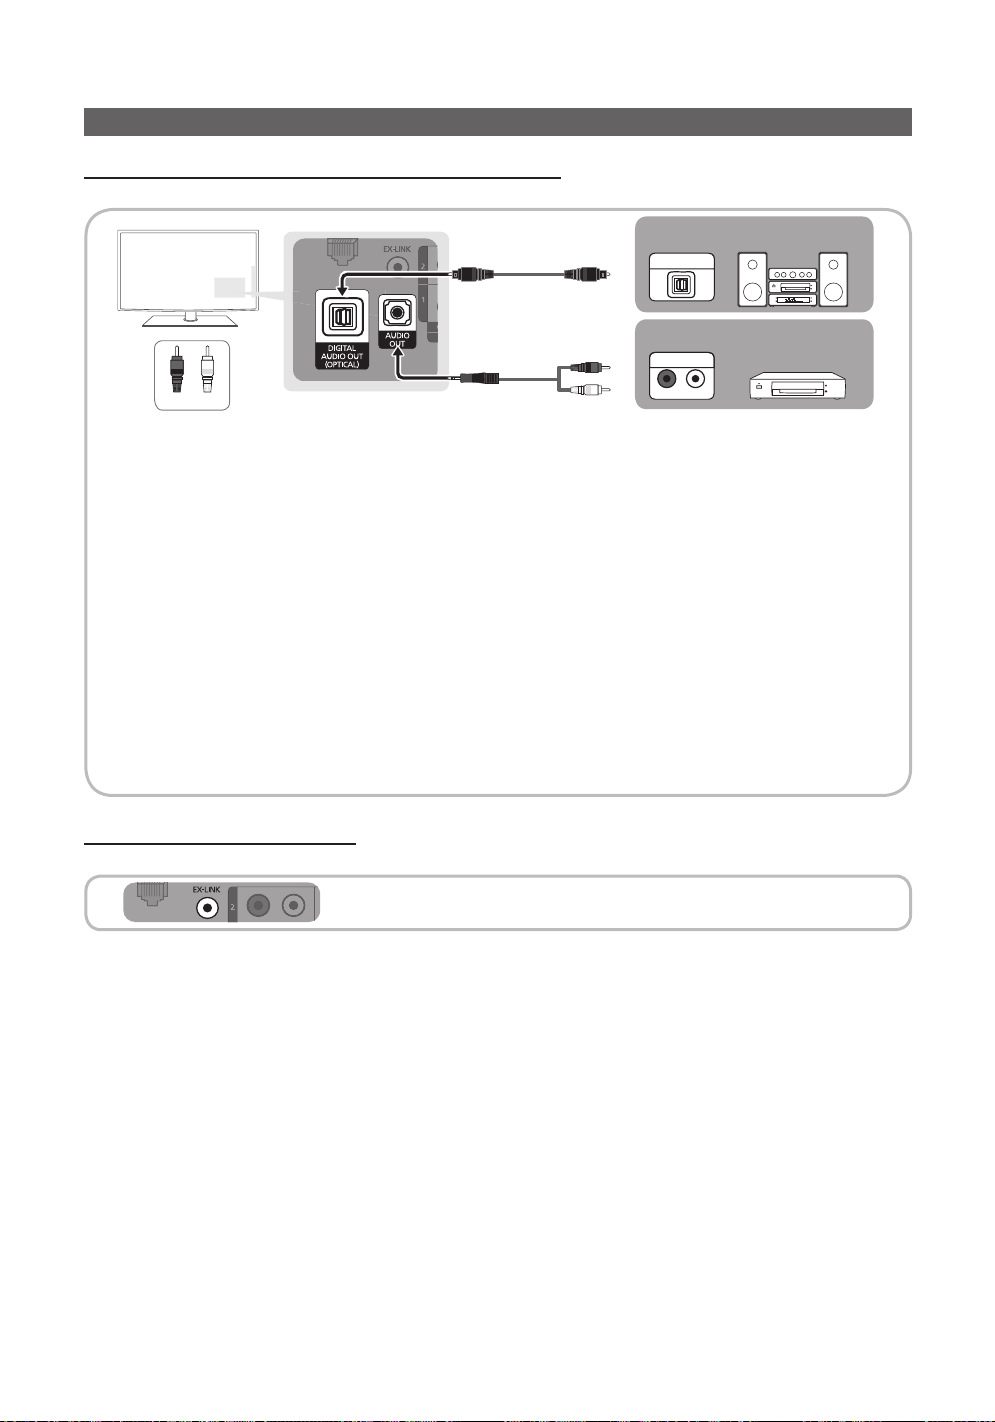
Conexiones
Conexión a un dispositivo de audio
Uso de una conexión de cable óptico (digital) o de audio (analógico)
Dispositivos disponibles: sistema de audio digital, amplificador, sistema Home Theater DVD
OPTICAL
Sistema de audio
digital
W
R
Rojo Blanco
✎
DIGITAL AUDIO OUT (OPTICAL)
Cuando un sistema de audio digital se conecta al terminal DIGITAL AUDIO OUT (OPTICAL), se reduce el
x
volumen del televisor y del sistema.
El audio de 5.1 canales está disponible cuando el televisor se conecta a un dispositivo externo que admite
x
audio de 5.1 canales.
Cuando el receptor (sistema Home Theater) está encendido, se puede oír la salida de sonido del terminal
x
óptico del televisor. Cuando el televisor recibe una señal DTV, envía el sonido de 5.1 canales al receptor
del sistema Home Theater. Cuando la fuente es un componente digital, como un reproductor DVD/Blu-ray/
receptor de cable o satélite (decodificador), y está conectada al televisor a través de HDMI, sólo se oye el
sonido de 2 canales del receptor del sistema Home Theater. Si desea oír el audio de 5.1 canales, conecte
el terminal de la salida de audio digital del reproductor DVD/Blu-ray/decodificador/receptor por satélite STB
directamente al amplificador o al sistema Home Theater.
✎
AUDIO OUT: Permite conectar los terminales de la entrada de audio del amplificador/sistema Home Theater DVD.
En la conexión, utilice el conector apropiado.
x
Cuando un amplificador de audio se conecta a los terminales AUDIO OUT: Reduzca el volumen del televisor y
x
ajuste el volumen con el control de volumen del amplificador.
Uso de una conexión de cable EX-Link
Dispositivos disponibles: Dispositivos externos que admiten Ex-Link
EX-LINK: Conector sólo para servicio.
R
W
AUDIO IN
amplificador/DVD para
R-AUDIO-L
Home Theater
10
Español
Page 61
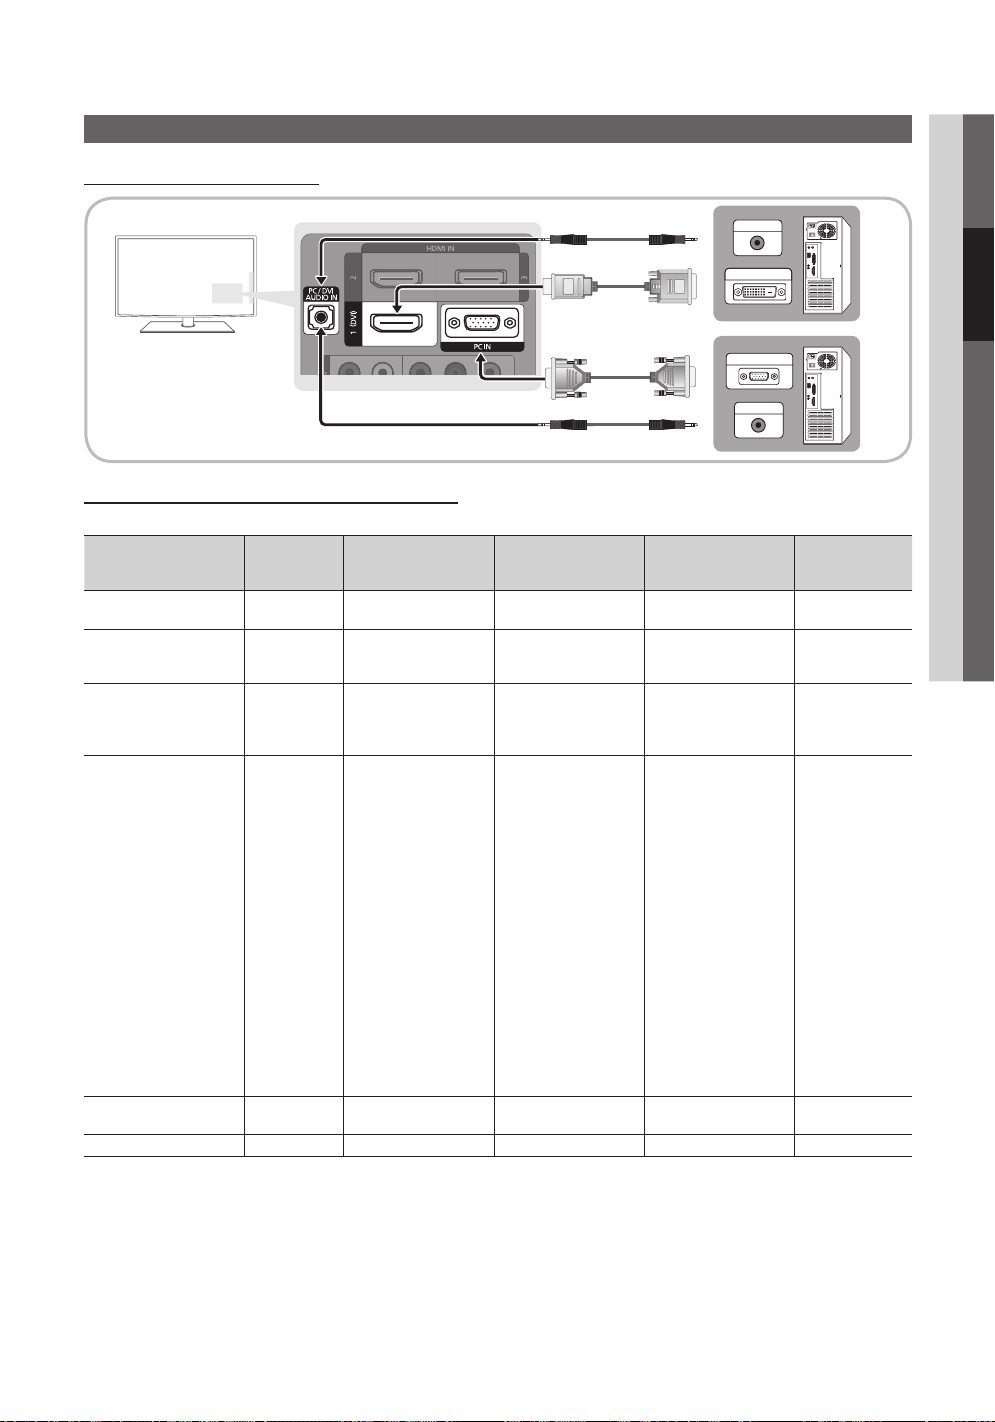
Conexión a un PC
Uso de cables HDMI/DVI o D-sub
Modos de visualización (entradas D-Sub y HDMI/DVI)
La resolución óptima es 1920 x 1080 a 60 Hz.
Modo Resolución
IBM
MAC
VESA CVT
VESA DMT
VESA GTF
VESA DMT / DTV CEA
640 x 350
720 x 400
640 x 480
832 x 624
1152 x 870
720 x 576
1152 x 864
1280 x 720
1280 x 960
640 x 480
640 x 480
640 x 480
800 x 600
800 x 600
800 x 600
1024 x 768
1024 x 768
1024 x 768
1152 x 864
1280 x 1024
1280 x 1024
1280 x 720
1280 x 800
1280 x 800
1280 x 960
1360 x 768
1440 x 900
1440 x 900
1680 x 1050
1280 x 720
1280 x 1024
1920 x 1080p 67.500 60.000 148.500 +/+
Frecuencia horizontal
(kHz)
31.469
31.469
35.000
49.726
68.681
35.910
53.783
56.456
75.231
31.469
37.861
37.500
37.879
48.077
46.875
48.363
56.476
60.023
67.500
63.981
79.976
45.000
49.702
62.795
60.000
47.712
55.935
70.635
65.290
52.500
74.620
Frecuencia vertical (Hz)
70.086
70.087
66.667
74.551
75.062
59.950
59.959
74.777
74.857
59.940
72.809
75.000
60.317
72.188
75.000
60.004
70.069
75.029
75.000
60.020
75.025
60.000
59.810
74.934
60.000
60.015
59.887
74.984
59.954
70.000
70.000
AUDIO OUT
DVI OUT
PC OUT
AUDIO OUT
Frecuencia de reloj de
píxeles (MHz)
25.175
28.322
30.240
57.284
100.000
32.750
81.750
95.750
130.000
25.175
31.500
31.500
40.000
50.000
49.500
65.000
75.000
78.750
108.000
108.000
135.000
74.250
83.500
106.500
108.000
85.500
106.500
136.750
146.250
89.040
128.943
02 Conexiones
Polaridad de
sincronización
(H/V)
+/-
-/+
-/-
-/-
-/-
-/+
-/+
-/+
-/+
-/-
-/-
-/+/+
+/+
+/+
-/-
-/+/+
+/+
+/+
+/+
+/+
-/+
-/+
+/+
+/+
-/+
-/+
-/+
-/+
-/-
✎
NOTA
En una conexión de cable HDMI/DVI, se debe utilizar el terminal HDMI IN 1(DVI).
x
No se admite el modo entrelazado.
x
Es posible que el aparato funcione incorrectamente si se selecciona un formato de vídeo que no sea estándar.
x
Los modos Independiente y Compuesto no se admiten. SOG (Sync On Green) no se admite.
x
Español
11
Page 62
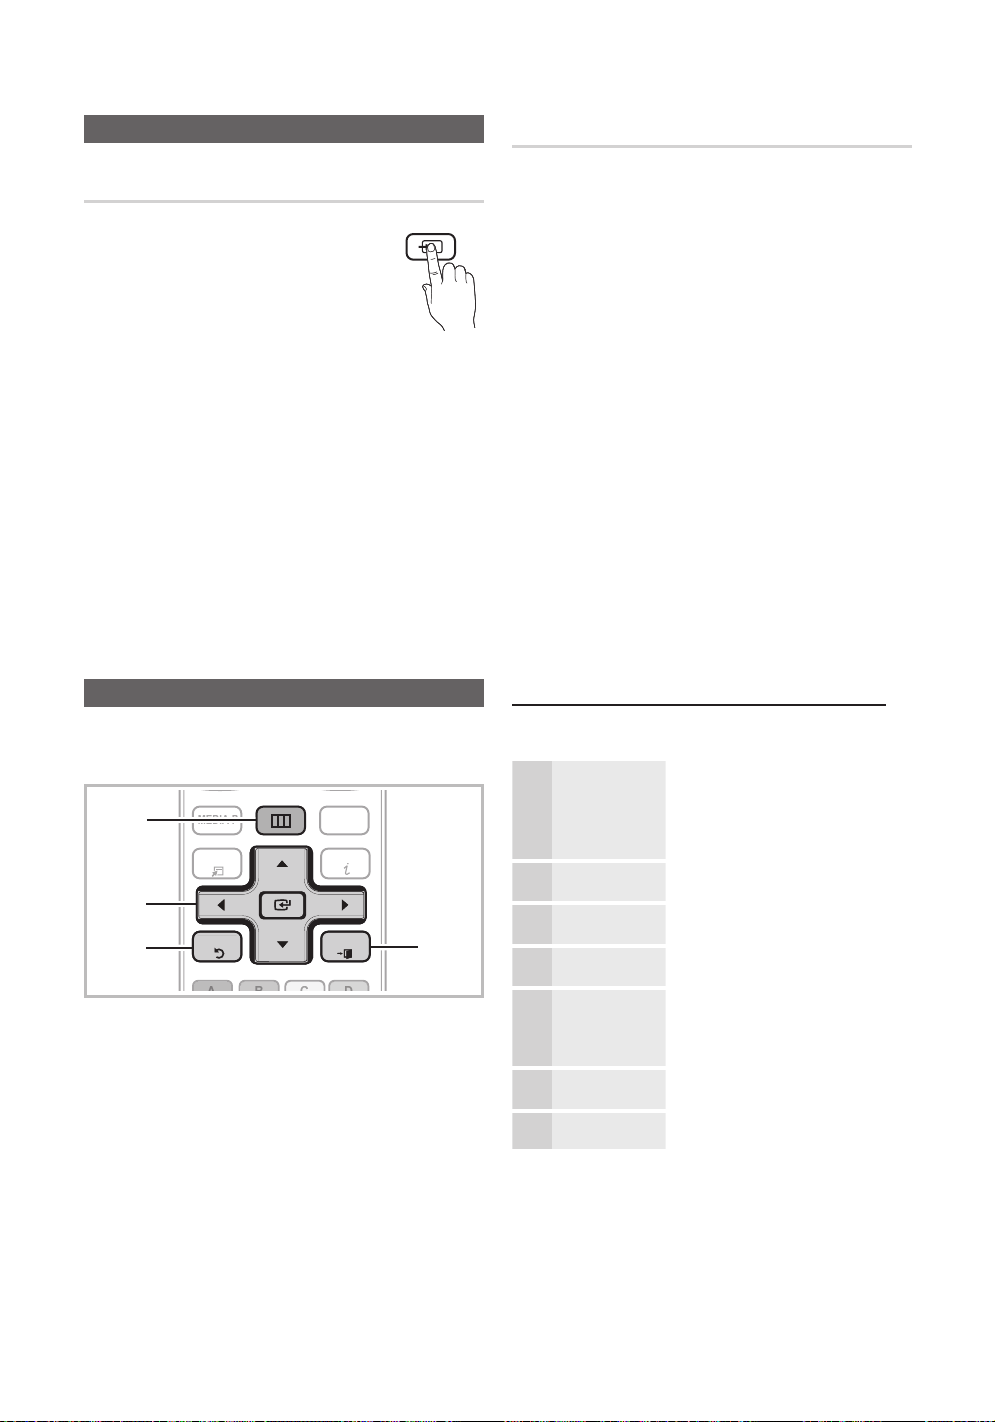
Conexiones
SOURCE
POWER
S
POWER
POWERPOWER
S
OURC
E
ON/OFF
P
RE-CH
MENU
O
CH
MEDIA.P
C
H LIST
EXIT
RETURN
Cambio de la fuente de entrada
Lista de fuentes
Se utiliza para seleccionar TV u otras fuentes
de entrada externas como reproductores de
DVD/Blu-ray/decodificadores o receptores por
satélite STB.
MENU → Entrada → Lista de
canales → ENTER
■ TV / PC / AV1 / AV2 / Componente1 / Componente2 /
HDMI1/DVI / HDMI2 / HDMI3 / HDMI4 / USB
✎
Puede elegir solamente dispositivos externos
que estén conectados al televisor. En
Lista de Entradas, se resaltan las entradas
conectadas.
✎
En Lista de Entradas, PC siempre está activado.
Funciones básicas
Cómo desplazarse por los menús
Antes de usar el televisor, siga los pasos siguientes para
conocer cómo explorar el menú y seleccionar y ajustar las
diversas funciones.
MENU
1
TOOL
2
3
1 MENU botón: Muestra el menú principal en pantalla.
2 ENTER
seleccione una opción. Confirme la configuración.
3 RETURN botón: Vuelve al menú anterior.
4 EXIT botón: Sale del menú en pantalla.
RETURN
/ Botón direccionales : Mueva el cursor y
FAV.
INF
EXIT
EXIT
4
Edición del nombre
MENU → Entrada → Editar Nombre →
ENTER
■ Vídeo/DVD / Cable STB / Satélite STB / PVR STB
/ Receptor AV / Juego / Filmadora / PC / DVI PC /
Dispositivos DVI / TV / IPTV / Blu-ray / HD DVD /
DMA: Dé un nombre al dispositivo conectado en las
tomas de entrada; de esta manera será más fácil
seleccionar el dispositivo de entrada.
✎
Cuando se conecta un ordenador con una resolución
de 1920 x 1080 a 60 Hz al HDMI IN 1(DVI), se debe
configurar el puerto en el modo DVI PC en Editar
nombre.
✎
Cuando se conecta un cable HDMI/DVI al puerto
HDMI IN 1(DVI), se debe configurar el puerto en el
modo DVI PC o Dispositivos DVI en Editar Nombre.
Funcionamiento de la OSD (presentación en pantalla)
El procedimiento de acceso puede variar según el menú
seleccionado.
1
2
3
4
5
6
MENU
▲ / ▼
ENTER
▲ / ▼
◄ / ►
ENTER
EXIT
Las opciones del menú principal se
muestran en la pantalla:
Imagen, Sonido, Canal,
Configuración, Entrada,
Aplicaciones, Soporte técnico.
Seleccione un icono con los
botones ▲ o ▼.
Pulse ENTER para acceder al
menú secundario.
Seleccione un menú secundario
con los botones ▲ o ▼.
Ajuste el valor de un elemento con
los botones ◄ o ►. El ajuste de
la visualización en pantalla puede
variar según el menú seleccionado.
Pulse ENTER para confirmar
una selección.
Pulse EXIT.
7
12
Español
Page 63
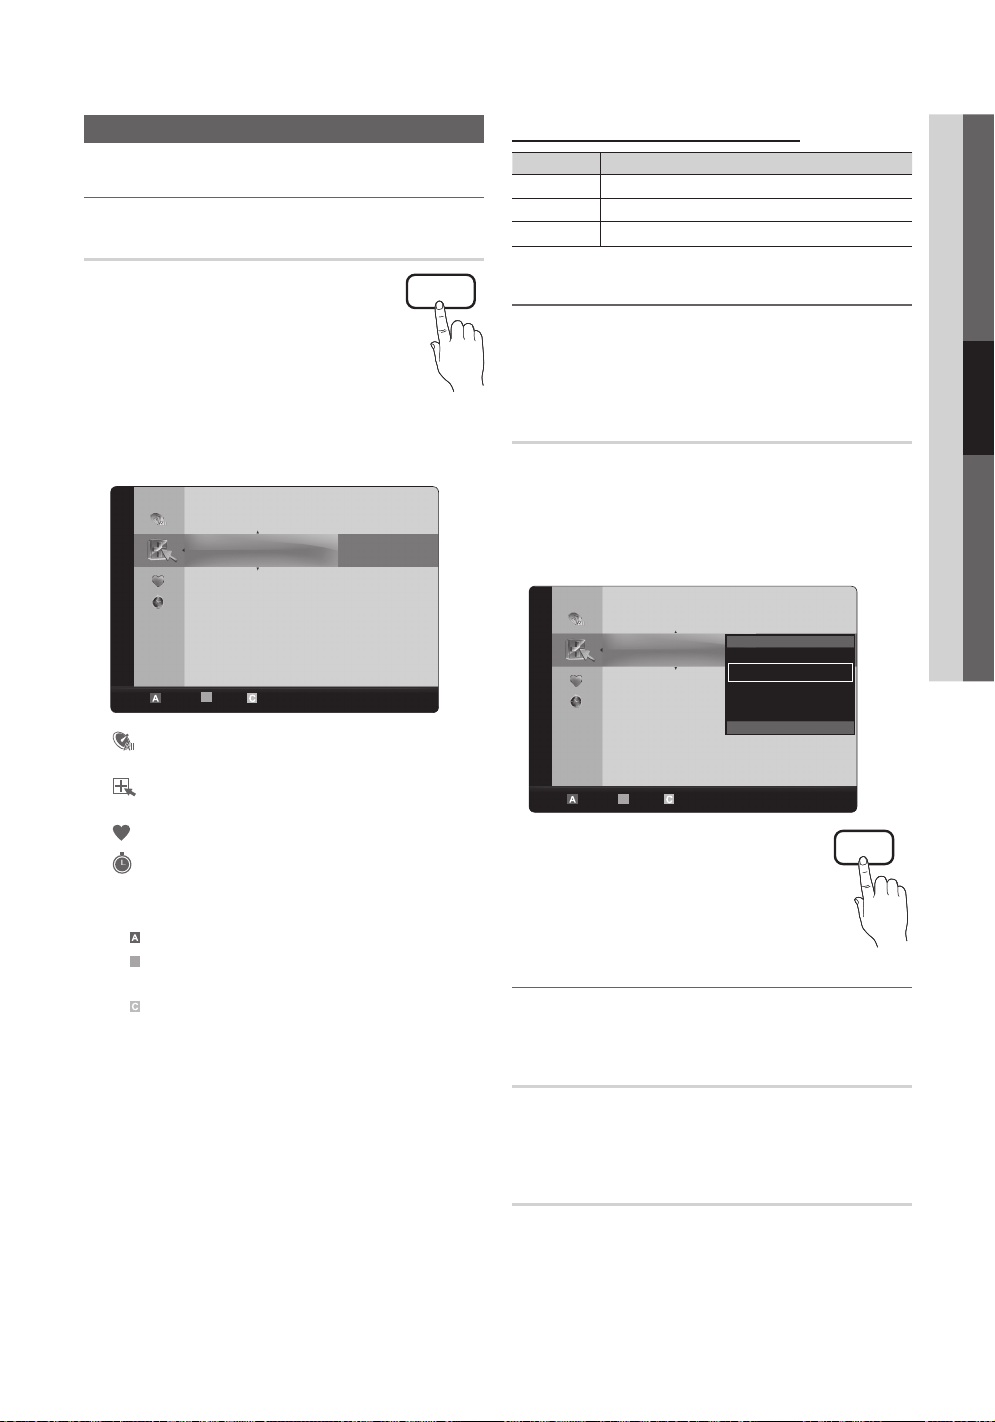
Menú de canales
B
Visualización de canales
Lista de canales
Añadir, borrar o establecer los canales favoritos
y usar la guía de programas de las emisiones
digitales.
MENU → Canal → Lista de canales
→ ENTER
Seleccione un canal en la pantalla
Todos los canales, Canales agregados,
Favoritos o Grabación con temporizador mediante
la pulsación de los botones ▲ / ▼ y ENTER. A
continuación puede ver el canal seleccionado.
Canales agregados
6 Air
6-1 * TV #6
7 Air
8 Air
9 Air
9-1 * TV #9
10 Air
10-1 * TV #10
11-1 * TV #11
Aire Antena B Zoom Seleccionar Página Herramientas
Todos los canales: Muestra todos los canales
■
disponibles actualmente.
Canales agregados: Muestra todos los canales
■
añadidos.
Favoritos: Muestra todos los canales favoritos.
■
Grabación con temporizador: Muestra todos los
■
programas actualmente reservados.
✎
Uso de los botones de colores en la Lista de canales
Rojo (Antena ): Cambia a Aire o Cable.
x
Verde (Zoom ): Aumenta o disminuye el número
x
del canal.
Amarillo (Seleccionar): Selecciona varias listas de
x
canales. Seleccione los canales que desee y pulse
el botón amarillo para configurar todos los canales
seleccionados al mismo tiempo. La marca
aparece a la izquierda de los canales seleccionados.
(Página): Vaya a la página siguiente o anterior.
x
(Herramientas): Muestra el menú de opciones
x
Lista de canales. (Los menús de las opciones
pueden cambiar, dependiendo de la situación.)
CH LIST
Iconos de la pantalla de estado del canal
Iconos Función
Canal seleccionado.
Canal configurado como favorito.
Programa reservado.
Uso de los canales favoritos
MENU → Canal → Lista de canales →
ENTER
Agregar a Favoritos / Borrar de Favoritos
Configure los canales que vea con más frecuencia como
favoritos.
1. Seleccione un canal y pulse el botón TOOLS.
2. Añada o borre un canal mediante el menú
Agregar a Favoritos o Borrar de Favoritos,
respectivamente.
Canales agregados
Aire Antena B Zoom Seleccionar Página Herramientas
Para que aparezcan todos los canales
favoritos, haga clic en el botón que se
muestra a la derecha.
6 Air
6-1 * TV #6
7 Air
8 Air
9 Air
9-1 * TV #9
10 Air
10-1 * TV #10
11-1 * TV #11
Borrar
Agregar a Favoritos
Visual. tempor.
Edición de nombre de canal
Seleccionar todo
FAV.CH
Memorización de canales
MENU → Canal → ENTER
Antena (Aire / Cable)
Antes de empezar a memorizar los canales disponibles,
debe indicar el tipo de origen de la señal conectada al TV (es
decir, aérea o sistema de cable).
Prog. Auto
■ Aire : Señal de antena aérea.
■ Cable : Señal de antena del cable.
■ Auto: Antena aérea y de cable.
03 Funciones básicas
Español
13
Page 64

Funciones básicas
■ NOTA
Al seleccionar el sistema de TV de cable: STD, HRC
x
e IRC identifican los diversos tipos de sistemas de
televisión por cable. Póngase en contacto con su
proveedor de cable para averiguar el tipo de sistema
de cable existente en su zona. En este momento ya
se ha seleccionado el origen de la señal.
Una vez guardados todos los canales disponibles,
x
se inicia la eliminación de los canales codificados.
Vuelve a mostrarse el menu Prog. Auto.
Edición de canales
MENU → Canal → Lista de canales →
ENTER
Edición de nombre de canal
1. Seleccione un canal y pulse el botón TOOLS.
2. Edite el nombre del canal mediante el menú
Edición de nombre de canal.
■ Edición de nombre de canal (sólo canales analógicos):
Asigne un nombre de canal personal.
Otras funciones
MENU → Canal → ENTER
Borrar canal encriptado
Esta función se usa para filtrar los canales codificados
después de que la programación automática haya finalizado.
Puede tardar de 20 a 30 minutos.
Cómo detener la búsqueda de canales codificados
1. Pulse el botón ENTER
2. Pulse el botón ◄ para seleccionar Sí.
3. Pulse el botón ENTER
✎
Esta función sólo está disponible en el modo Cable.
para seleccionar Detener.
.
Lista de canales
Menú de opciones de Lista de canales
Establezca cada canal mediante las opciones del menú
Lista de canales: (Añadir / Borrar, Visual. tempor.,
Seleccionar todo / Deseleccionar todos). Los elementos
del menú de opciones pueden variar según el estado del
canal.
1. Seleccione un canal y pulse el botón TOOLS.
2. Seleccione una función y cambie la configuración.
■ Añadir / Borrar : Suprima o añada un canal para que se
muestren los canales que desee.
✎
NOTA
Todos los canales borrados se mostrarán en el
x
menú Todos los canales.
Un canal de color gris quiere decir que se ha
x
suprimido.
El menú Añadir sólo aparece con los canales
x
borrados.
Suprima un canal del menú
x
Canales agregados o Favoritos de la misma
manera.
■ Visual. tempor. : Se puede establecer que el canal
que se desee se muestre automáticamente a una hora
reservada. Para utilizar esta función, en primer lugar
configure la hora actual.
1. Pulse los botones ◄ / ► / ▲ / ▼ para seleccionar
el canal que desee en la Lista de canales.
2. Pulse el botón TOOLS y seleccione Visual. tempor.
3. Desplácese arriba o abajo para ajustar la
configuración en la caja o utilice los botones
numéricos del mando a distancia para introducir la
fecha y la hora.
✎
Si selecciona Una vez, Cada semana o
Cada día en Repetir, puede introducir la fecha
que desee.
4. Seleccione Aceptar y pulse el botón ENTER
cuando haya terminado.
14
Español
Page 65
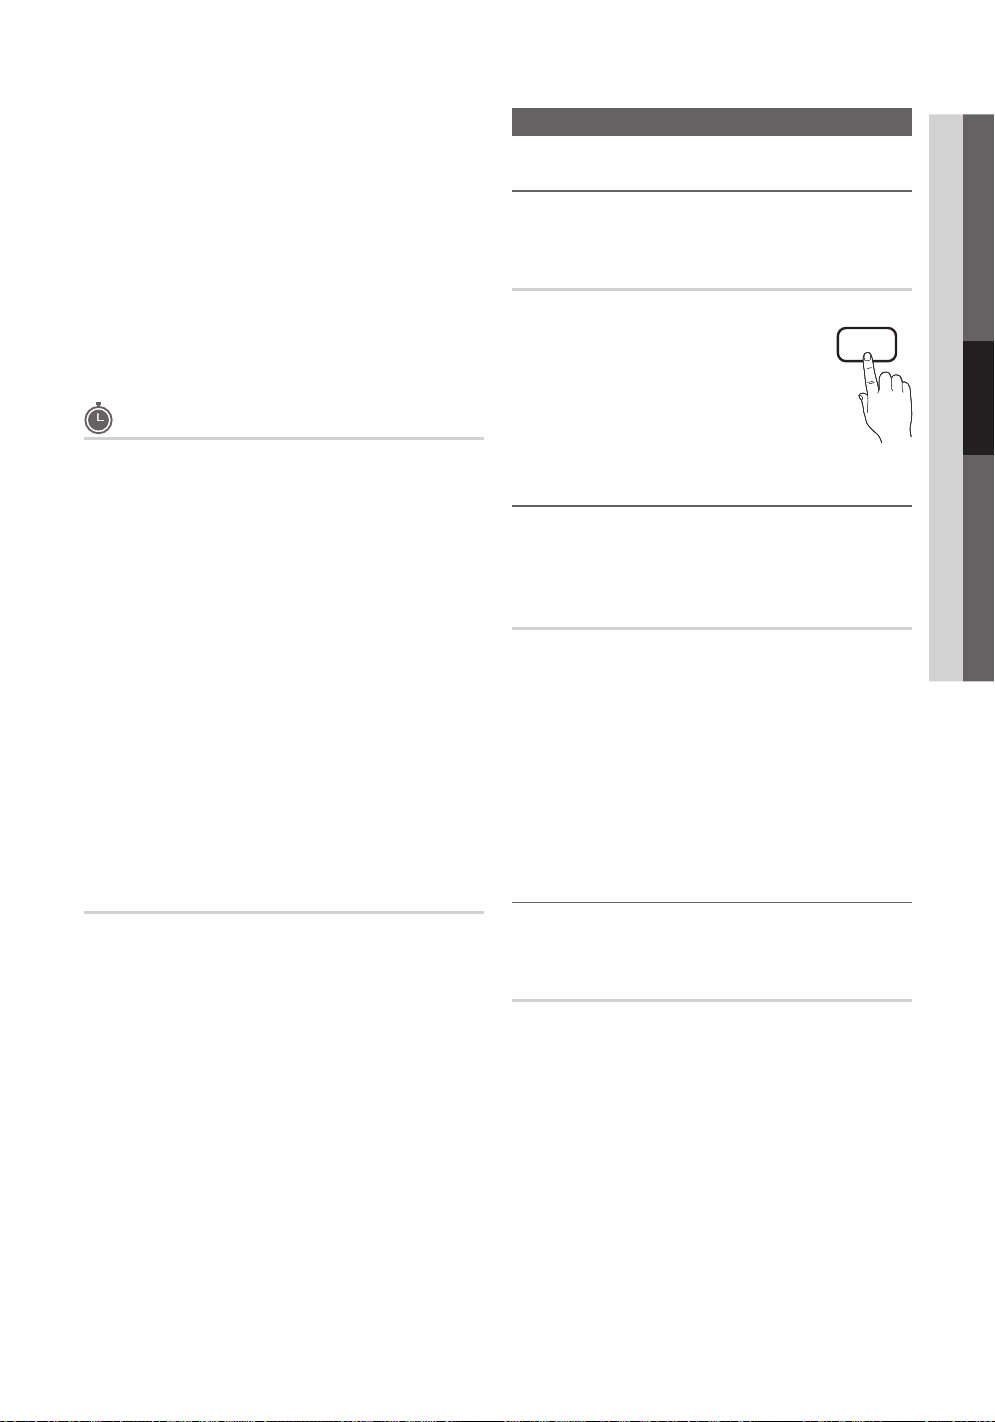
✎
NOTA
Sólo se pueden reservar los canales
x
memorizados.
Los programas reservados se mostrarán en el
x
menú Grabación con temporizador.
Cuando se ha seleccionado un canal digital,
x
pulse el botón ► para ver el programa digital.
■ Seleccionar todos: Seleccione todos los canales de la lista.
■ Deseleccionar todos : Cancele todas las selecciones
de canales.
✎
Sólo se puede seleccionar Deseleccionar todos
si hay uno o más canales seleccionados.
Grabación con temporizador
(en Lista de canales)
Puede ver, modificar o borrar un programa que
haya reservado para ver. La visualización de
Grabación con temporizador. Resalte un programa y pulse
el botón TOOLS para mostrar las opciones.
■ Cambiar información: Cambie un programa que haya
reservado para ver. Comience en el paso 3 de “Visual.
tempor.” anterior.
■ Cancelar programaciones: Cancele un programa que
haya reservado para ver.
✎
Así se borran los programas resaltados o
seleccionados.
■ Información: Muestre un programa que haya reservado
para ver. (También se puede cambiar la información de
reserva.)
✎
También puede ver la información resaltando un
programa y pulsando el botón ENTER.
■ Seleccionar todo / Deseleccionar todos: Seleccione o
deseleccione todos los programas reservados.
Menú de la imagen
Cambio del modo de imagen preseleccionado
MENU → Imagen → Modo → ENTER
Modo
Seleccione el tipo de imagen preferido.
■ Dinámico : Adecuado para un entorno
iluminado.
■ Normal: Adecuado para un entorno
normal.
■ Cine: Adecuado para ver películas en un
entorno oscuro.
P.MODE
Ajuste de la configuración de la imagen
MENU → Imagen → ENTER
Luz de la celda / Contraste / Brillo /
Definición / Color / Tinte (V/R)
El televisor tiene diferentes opciones de configuración para
controlar la calidad de la imagen.
✎
NOTA
Cuando haga cambios en Luz de la celda,
x
Contraste, Brillo, Definición, Color o Tinte (V/R) la
OSD también se ajustará.
En el modo PC, sólo se pueden realizar cambios en
x
las opciones Luz de la celda, Contraste y Brillo.
La configuración de cada dispositivo externo
x
conectado al televisor se puede ajustar y guardar.
03 Funciones básicas
Sintonia Fina
(sólo canales analógicos)
Si la recepción es clara, no tiene que realizar la sintonización
fina del canal, ya que esta operación se hace de forma
automática durante la búsqueda y la memorización. Si la
señal es débil o está distorsionada, realice manualmente
la sintonización fina del canal. Desplácese a izquierda o
derecha hasta que la imagen se vea clara.
✎
La configuración se aplica al canal que se está viendo.
✎
Los canales que se han ajustado con sintonización fina
se marcan con un asterisco “*” a la derecha del número
de canal en la banda del canal.
✎
Para reiniciar la sintonía fina, seleccione Reiniciar.
Soluciones económicas
MENU → Imagen → Solución Eco → ENTER
Solución Eco
■ Ahorro energía (Apagado / Bajo / Medio / Alto /
Imag. desact.): De este modo se ajusta el brillo del
televisor, lo cual reduce el consumo de energía. Si se
selecciona Imag. desact., la pantalla se apaga, pero
se oye el sonido. Pulse cualquier botón para volver
a encender la pantalla. Mientras la pantalla se vuelve
a encender, se mostrará una imagen distorsionada
durante aproximadamente 4 segundos.
Español
15
Page 66

Funciones básicas
■ Sensor Eco (Apagado / Encendido) : Para mejorar
el ahorro de energía, la configuración de la imagen
se adapta automáticamente a la iluminación de la
habitación.
✎
Si se ajusta la Luz de la celda el Sensor Eco se
debe establecer como Apagado.
Luz mín celular: Cuando Sensor Eco está configurado
como Encendido, el brillo mínimo de la pantalla se
puede ajustar manualmente.
✎
Si el Sensor Eco está configurado como
Encendido, el brillo de la pantalla puede cambiar
(ligeramente más oscuro o más brillante) según la
intensidad de la iluminación del entorno.
■ Espera sin señal (Apagado / 15 min / 30 min / 60 min )
evitar un consumo de energía innecesario, establezca
cuánto tiempo desea que el televisor permanezca
encendido si no recibe ninguna señal.
✎
Deshabilitado cuando el PC está en el modo de
ahorro de energía.
: Para
Cambio de las opciones de la imagen
Configuración avanzada
MENU → Imagen → Configuración avanzada →
ENTER
(La configuración avanzada está disponible en los modos
Normal / Cine)
Si se comparan con los modelos anteriores, los nuevos
televisores de Samsung muestran una imagen más precisa.
✎
En el modo PC, sólo se pueden cambiar
Contraste Dinám., Gamma y Balance de blanco.
Conguración avanzada
Tono del negro : Apagado ►
Contraste Dinám. : Bajo
Gamma : 0
Sólo modo RGB : Apagado
Espacio de color : Nativo
Balance de blanco
Tono Piel : 0
▼
Mover
Entrar
Regresar
■ Espacio de color (Auto / Nativo): Ajuste la gama de
colores disponibles para crear la imagen.
■ Balance de blanco : Ajuste la temperatura del color
para obtener una imagen más natural.
Bal. Rojo / Bal. Verde / Bal. Azul: Ajuste la intensidad
de cada color (rojo, verde, azul).
Gan. Rojo / Gan. Verde / Gan. Azul: Ajuste el brillo de
cada color (rojo, verde, azul).
Reiniciar : Restablece los valores predeterminados del
balance de blanco.
■ Tono Piel : Mejore el tono rosado de la piel.
■ Mejora de perfiles (Apagado / Encendido): Mejora los
bordes del objeto.
Opciones de imagen
MENU → Imagen → Opciones de imagen →
ENTER
✎
En el modo PC sólo se pueden cambiar Tono Color,
Tamaño y Protección de pantalla.
Opciones de imagen
Tono Color : Normal ►
Tamaño : 16:9
Digital Noise Filter : Auto
Filtro de ruido MPEG : Auto
Nivel de negro HDMI : Normal
Modo película : Apagado
Protección de pantalla
Mover
Entrar
Regresar
■ Tono Color (Frío / Normal / Tibio1 / Tibio2)
✎
Tibio1 o Tibio2 se desactivan cuando el modo de
imagen es Dinámico.
✎
La configuración de cada dispositivo externo
conectado a una entrada del televisor se puede ajustar
y guardar.
■ Tono del negro (Apagado / Oscuro / Más oscuro / El
más oscuro): Seleccione el nivel de negro para ajustar
la profundidad de la pantalla.
■ Contraste Dinám. (Apagado / Bajo / Medio / Alto):
Ajuste el contraste de la pantalla.
■ Gamma : Ajuste la intensidad del color primario.
■ Modo Sólo RGB (Apagado / Rojo / Verde / Azul):
Muestra los colores Rojo, Verde y Azul para afinar los
ajustes del tono y la saturación.
Español
16
Page 67

■ Tamaño : Es posible que el receptor
de satélite o cable tenga también su
propia gama de tamaños de pantalla. Sin
embargo, es muy aconsejable utilizar el
modo 16:9 la mayoría de las veces.
16:9 : Ajusta la imagen al modo básico
(16:9).
Zoom1 : Permite una ampliación moderada.
Zoom2 : Permite una ampliación más potente.
Ajuste ancho : Amplía la relación de aspecto de la
imagen para que se ajuste al ancho total de la pantalla.
✎
Disponible para las señales HD 1080i/720p en el
modo 16:9.
4:3 : Ajusta la imagen al modo básico (4:3).
✎
No vea la televisión en formato 4:3 durante largos
periodos de tiempo. Los rastros de bordes a
la izquierda, derecha o centro de la pantalla
pueden provocar un desgaste de la pantalla por la
retención de la imagen que no está cubierto por
la garantía.
Ajuste pantalla : Muestra la imagen completa
sin cortes cuando la entrada de la señal es HDMI
(720p/1080i/1080p) o Componente (1080i/1080p).
✎
NOTA
Después de seleccionar Zoom1, Zoom2 o
x
Ajuste ancho:
1. Pulse el botón ► para seleccionar Posición.
2. Pulse el botón ENTER
3. Pulse los botones ▲ o ▼ para desplazar la
imagen hacia arriba o hacia abajo.
4. Pulse el botón ENTER
5. Pulse el botón ► para seleccionar Rein..
6. Pulse el botón ENTER
imagen su posición predeterminada.
Después de seleccionar Ajuste pantalla en
x
los modos HDMI (1080i/1080p) o Componente
(1080i/1080p), quizá deba centrar la imagen:
1. Pulse los botones ◄ o ► para seleccionar
Posición.
2. Pulse el botón ENTER
3. Pulse los botones ▲, ▼, ◄ o ► para mover la
imagen.
4. Pulse el botón ENTER
5. Pulse los botones ◄ o ► para seleccionar Rein..
6. Pulse el botón ENTER
HD (alta definición): 16:9 - 1080i/1080p (1920x1080),
x
720p (1280x720)
.
.
para devolver a la
.
.
.
P.SIZE
La configuración de cada dispositivo externo
x
conectado a una entrada del televisor se puede
ajustar y guardar.
Fuente entrada Tamaño de imagen
ATV, AV,
Componente (480i, 480p)
DTV(1080i),
Componente (1080i/1080p),
HDMI (720p, 1080i, 1080p)
PC 16:9, 4:3
■ Digital Noise Filter (Apagado / Bajo / Medio / Alto
/ Auto / Auto Visualization): Si la señal de emisión
que recibe el televisor es débil, puede activarse la
función Digital Noise Filter para reducir la estática y
las imágenes superpuestas que pueden aparecer en la
pantalla.
✎
Cuando la señal sea débil, intente otras opciones
hasta que se vea una imagen de mejor calidad.
Auto Visualization: Cuando se cambian los canales
analógicos, muestra la intensidad de la señal actual y
define el filtro del ruido de la pantalla.
✎
Sólo disponible en los canales analógicos.
✎
Una barra verde indica que es la mejor señal
posible.
■ Filtro de ruido MPEG (Apagado / Bajo / Medio / Alto
/ Auto): Reduce el ruido MPEG para proporcionar una
mejor calidad de imagen.
■ Nivel de negro HDMI (Normal / Bajo) : Selecciona el
nivel de negro en la pantalla para ajustar la profundidad
de ésta.
✎
Disponible sólo en el modo HDMI.
■ Modo película (Apagado / Auto1 / Auto2 / Cinema
Smooth): Configura el televisor para detectar
automáticamente y procesar las señales de las películas
procedentes de todas las fuentes, y ajusta la imagen
para conseguir una calidad óptima.
✎
Disponible en TV, AV, COMPONENT (480i/1080i) y
HDMI(480i/1080i).
■ Protección de pantalla : Esta pantalla está equipada
con tecnología de prevención para reducir la posibilidad
de que se queme. El ajuste de tiempo permite
programar intervalos temporales entre los movimientos
de la imagen en minutos.
16:9, Zoom1,
Zoom2, 4:3
16:9, 4:3, Ajuste
ancho, Ajuste
pantalla
03 Funciones básicas
Español
17
Page 68

Funciones básicas
Cambio de píxel (Apagado / Encendido) : Con esta
función podrá mover píxeles de forma detallada en la
PDP, en sentido horizontal o vertical, para minimizar
restos de imágenes en la pantalla.
✎
Condición óptima para cambio de píxel
Elemento
Horizontal 0~4 4
Vertical 0~4 4
Tiempo (minutos)
✎
El valor Cambio de píxel puede variar según el
tamaño (pulgadas) del monitor y el modo.
✎
Esta función no está disponible en el modo
Ajuste pantalla.
Tpo. protección auto (10 min. / 20 min. / 40 min.
/ 1 hour / Apagado): Establece el tiempo en que la
pantalla permanece inactiva con una imagen fija hasta
que se activa el salvapantallas. El salvapantallas evita la
formación de imágenes superpuestas en la pantalla.
Desplazamiento : Esta función suprime los restos de
imágenes en la pantalla moviendo todos los píxeles del
PDP de acuerdo con un patrón. Utilice esta función
si hay restos de imágenes o símbolos en la pantalla,
especialmente después de haber mostrado una imagen
fija en la pantalla durante un largo tiempo.
✎
La función de supresión de restos de
imágenes debe aplicarse durante largo tiempo
(aproximadamente 1 hora) para que sea efectiva.
Si los restos de imágenes no desaparecen
después de ejecutar la función, repita el proceso.
✎
Pulse cualquier tecla del mando a distancia para
cancelar esta función.
Lateral gris(Claro / Oscuro): Cuando se ve la televisión
con una relación de pantalla establecida en 4:3, ésta
se puede proteger de un posible daño si se ajusta el
balance de blanco en ambos extremos, el izquierdo y el
derecho.
1~4 min. 4 min.
TV/AV/Componente/
HDMI/PC
Reinicio de la imagen (Aceptar / Cancelar)
Restablece la configuración predeterminada del modo de la
imagen actual.
Ajuste del televisor con el ordenador
Defina la fuente de entrada al PC.
MENU → Imagen → ENTER
Ajuste Automático
Ajuste automáticamente los valores y las posiciones de la
frecuencia y afine la configuración.
✎
No disponible en las conexiones a través del cable
HDMI/DVI.
Pantalla
■ Grueso / Fino: Elimina o reduce el ruido de la imagen.
Si el ruido no desaparece sólo con la sintonización
fina, realice los ajustes de frecuencia hasta el máximo
(Grueso) y vuelva a realizar la sintonización fina.
Después de reducir el ruido, vuelva a ajustar la imagen
para que quede alineada en el centro de la pantalla.
■ Posición: Ajuste la posición de la pantalla del PC si
no se acopla a la pantalla del TV. Pulse los botones
▲ o ▼ para ajustar la posición vertical. Pulse los
botones ◄ o ► para ajustar la posición horizontal.
■ Reiniciar Imagen: Restablece la configuración
predeterminada de la imagen.
Uso del televisor como una pantalla de ordenador (PC)
Configuración del software del PC (basado en Windows XP)
Según la versión de Windows y la tarjeta de vídeo, las
pantallas reales del PC pueden ser diferentes, pero se
aplicará casi siempre la misma información de configuración
básica. (En caso contrario, póngase en contacto con el
fabricante del ordenador o con el distribuidor de Samsung.)
1. Haga clic en "Panel de control" en el menú de inicio de
Windows.
2. Haga clic en "Apariencia y temas" en la ventana "Panel
de control" y aparecerá un cuadro de diálogo.
3. Haga clic en “Pantalla” y aparecerá una cuadro de
diálogo sobre la pantalla.
4. Seleccione la ficha “Configuración” en el cuadro de
diálogo.
y Configuración correcta del tamaño (resolución) [Óptima:
1920 x 1080 píxeles]
y Si existe una opción de frecuencia vertical en el cuadro
de diálogo de configuración de la pantalla, el valor
correcto es “60” o “60 Hz”. Si no, haga clic en “Aceptar”
y salga del cuadro de diálogo.
18
Español
Page 69
Menú del sonido
Cambio del modo de sonido preseleccionado
MENU → Sonido → Modo →ENTER
Claridad diálogo (Apagado / Encendido)
03 Funciones básicas
(sólo modo de sonido estándar)
Esta función permite aumentar la intensidad de las voces por
encima de la música de fondo o los efectos de sonido a fin
de que el diálogo se pueda oír más claramente.
Modo
(sólo modo de sonido estándar)
■ Normal: Selecciona el modo de sonido
normal.
■ Música : Refuerza la música por encima
de las voces.
■ Cine: Ofrece el mejor sonido para películas.
■ Voz clara : Realza las voces respecto de
los sonidos.
■ Amplificar: Aumenta la intensidad del sonido de
alta frecuencia para permitir una mejor audición a las
personas con problemas de audición.
S.MODE
Ajuste de la configuración del sonido
MENU → Sonido → Ecualizador →ENTER
Ecualizador
Ajuste el modo de sonido (sólo modo de sonido normal).
■ Balance I/D : Ajusta el balance entre los altavoces
izquierdo y derecho.
■ 100Hz / 300Hz / 1kHz / 3kHz / 10kHz (ajuste de ancho
de banda): Ajusta el nivel de frecuencias específicas de
ancho de banda.
■ Reiniciar : Restablece la configuración del ecualizador.
Configuración del sonido
Idioma preferido
(sólo canales digitales)
El sistema de emisión de TV digital permite
transmitir simultáneamente muchas pistas de
audio (por ejemplo, traducciones simultáneas
del programa en otros idiomas).
✎
Sólo se puede seleccionar uno de los
idiomas que ofrece la emisora.
MTS
Sonid Multi-track ( MTS )
(sólo canales analógicos)
■ Mono : Elija para canales que emiten en
monoaural o si tiene dificultades con la
recepción de señales estéreo.
■ Estéreo: Elija para canales que emiten en
estéreo.
■ SAP: Elija esta opción para escuchar el
programa de audio independiente, que normalmente es
una traducción de otro idioma.
✎
En función del programa concreto que se emita, puede
escuchar en modo Mono, Estéreo o SAP.
MTS
Vol.Auto (Apagado / Normal / Noche)
Para equilibrar el nivel del volumen de cada canal, se ha de
configurar como Normal.
■ Noche: Este modo proporciona una sensación de
sonido mejorada en comparación al modo Normal, ya
que casi no se produce ruido. Es útil por la noche.
MENU → Sonido → ENTER
Virtual Surround (Apagado / Encendido)
(sólo modo de sonido estándar)
Esta función proporciona una sensación de sonido surround
virtual de 5.1 canales a través del par de altavoces o de
los auriculares mediante la tecnología HRTF (función de
transferencia relativa a la cabeza).
Seleccionar altavoz (Altavoz externo /
Altavoz de TV)
Debido a las diferencias en la velocidad de decodificación
entre el altavoz principal y el receptor de audio se puede
originar un eco. En tales casos, establezca TV como
Altavoz externo.
✎
Cuando Seleccionar altavoz está establecido como
Altavoz externo, los botones de volumen y MUTE no
funcionan y se limita la configuración del sonido.
✎
Compruebe si Seleccionar altavoz está establecido
como Altavoz externo.
Altavoz de TV: Apagado, Altavoz externo:
x
Encendido
Español
19
Page 70
Funciones básicas
✎
Compruebe si Seleccionar altavoz está establecido
como Altavoz de TV.
Altavoz de TV: Encendido, Altavoz externo:
x
Encendido
✎
Si no hay señal de vídeo, ambos altavoces se silencian.
Salida de SPDIF
SPDIF (Interfaz digital de Sony Philips) se utiliza para
proporcionar sonido digital, mediante la reducción de las
interferencias entre los altavoces y los distintos dispositivos
digitales, como un receptor de A/V o Home Theater.
■ Formato de audio: Durante la recepción de una
emisión de TV digital se puede seleccionar el formato de
salida de audio digital (SPDIF) entre las opciones PCM o
Dolby Digital.
■ Retraso de audio: Corrija los problemas de
sincronización entre audio y vídeo, cuando vea la
televisión o un vídeo, y cuando escuche un salida de
audio digital mediante un dispositivo externo, como un
receptor AV (0ms ~ 250ms).
Reinicio del sonido (Aceptar / Cancelar)
Restablezca todas las configuraciones de sonido
predeterminadas de fábrica.
Menú de configuración
Configuración de la hora
− Manual: Establezca la hora actual manualmente.
✎
Según la emisora y la señal, la hora automática
no se puede ajustar correctamente. En este caso,
ajuste la hora manualmente.
Config. Reloj : Configure manualmente Mes, Día, Año,
Hora, Minuto y am/pm.
✎
Sólo disponible si Modo Reloj está configurado
como Manual.
✎
Puede ajustar Mes, Día, Año, Hora y Minuto
directamente pulsando los botones numéricos del
mando a distancia.
Horario de Verano (Apagado / Encendido): Activa o
desactiva la función del horario de verano.
✎
Esta función sólo está disponible si el Modo Reloj
está configurado como Auto.
Zona Tiempo: Seleccione la zona horaria.
✎
Esta función sólo está disponible si el Modo Reloj
está configurado como Auto.
Uso del temporizador de desconexión
MENU → Configuración → Hora →
Temporizador → ENTER
■ Temporizador: Apaga automáticamente el
televisor después de un período prefijado
(30, 60, 90, 120, 150 y 180 minutos).
✎
Para cancelar Temporizador
seleccione Apagado.
SLEEP
Activación y desactivación del
temporizador
MENU → Configuración → Hora → ENTER
Hora
■ Reloj : La configuración del reloj se utiliza en diferentes
funciones del temporizador del televisor.
La hora actual aparecerá siempre que se pulse el
botón INFO.
✎
Si desconecta el cable de alimentación, debe
configurar el reloj de nuevo.
Modo Reloj (Auto / Manual)
− Auto: Configure la hora automáticamente con la hora
de un canal digital.
✎
La antena debe estar conectada para poder
ajustar la hora automáticamente.
Español
20
MENU → Configuración → Hora →
Temporizador 1→ ENTER
■ Temporizador 1 / Temporizador 2 / Temporizador
3: La activación y desactivación del temporizador se
puede configurar de tres maneras. Debe ajustar el reloj
en primer lugar.
Temporizador 1
Hora de encendido
▲
Inactivo
▼
Hora de apagado
Inactivo
Volumen
10 TV Cable 1
Repetir
Una vez
00
00 am
Origen Antena Canal
Dom Lun Mar Mié Jue Vie Sáb
Mover
Ajustar
00 am
00
Entrar
Regresar
Page 71

Hora de encendido / Hora de apagado : Puede
configurar la hora y los minutos y activar o desactivar
el temporizador. (Para activar el temporizador con la
configuración deseada, establézcalo en Activar.)
Volumen: Configure el nivel de volumen deseado.
Origen: Seleccione el contenido TV o USB que se
ha de reproducir cuando el televisor se encienda
automáticamente. (USB se puede seleccionar sólo
cuando el dispositivo USB está conectado al televisor)
Antena (cuando Origen está configurado como TV):
Permite seleccionar Aire o Cable.
Canal (cuando Origen está configurado como TV)
Permite seleccionar el canal deseado.
Contenido (cuando Origen está configurado como
USB.): Seleccione una carpeta en el dispositivo USB
que contenga archivos de música o de fotos que se
han de reproducir cuando el televisor se encienda
automáticamente.
✎
NOTA
Si no hay archivos de música en el dispositivo
x
USB o no se ha seleccionado la carpeta
que contenga los archivos de música, el
temporizador no funciona correctamente.
Si sólo hay un archivo de fotos en el USB, la
x
presentación no se reproducirá.
Si el nombre de la carpeta es demasiado largo,
x
ésta no se seleccionará.
Cada USB que se utiliza está asignado a su
x
propia carpeta. Cuando se utiliza más de
un mismo tipo de USB, asegúrese de que la
carpeta asignada a cada dispositivo USB tenga
un nombre diferente.
Repetir: Seleccione Una vez, Cada día, Lun~Vie,
Lun~Sáb, Sáb~Dom o Manual para configurarlo
como más le convenga. Si selecciona Manual, puede
configurar el día en que desee activar el temporizador.
✎
La marca indica que se ha seleccionado el día.
✎
Apagado automático (sólo disponible cuando el
televisor se ha encendido con el temporizador): El
televisor se apagará automáticamente 3 horas después
de que se haya dejado inactivo para prevenir un
sobrecalentamiento.
Programas de bloqueo
MENU → Configuración → Seguridad →
ENTER
Seguridad
■ V-Chip: La opción V-Chip bloquea automáticamente los
programas que no se consideran apropiados para los
menores. El usuario debe introducir primero un código
PIN (número de identificación personal) para configurar o
cambiar las restricciones de V-Chip.
✎
NOTA
V-Chip no está disponible en los modos HDMI,
x
Componente o PC.
El código PIN predeterminado para un televisor
x
nuevo es “0-0-0-0”.
Perm. todo: Se pulsa para desbloquear todos
x
los programas de televisión.
Bloq. todo: Se pulsa para bloquear todos los
x
programas de televisión.
Bloqueo V-Chip (Apagado / Encendido): Puede
bloquear los programas de TV clasificados.
Guías pater. TV: Puede bloquear los programas de TV
según su clasificación. Esta función permite controlar lo
que los niños pueden ver.
− TV-Y : Niños pequeños / TV-Y7 : Niños de más
de 7 años / TV-G : Todos los públicos / TV-PG :
Supervisión paterna / TV-14 : Mayores de 14 años /
TV-MA : Audiencia adulta
− ALL : Bloquea todas las clasificaciones de TV. / FV
: Violencia y fantasía / V : Violencia / S : Contenido
sexual / L : Lenguaje grosero/D : Diálogo de
contenido sexual
✎
La función V-Chip bloqueará automáticamente
determinadas categorías que traten material
más sensible. Por ejemplo, si bloquea
la categoría TV-Y, automáticamente se
bloqueará TV-Y7. De manera similar, si
bloquea la categoría TV-G , todas las
categorías del grupo “adolescente” quedarán
bloqueadas (TV-G, TV-PG, TV-14 y
TV-MA). Las subclasificaciones (D, L, S,
V) funcionan de manera similar. Por ello, si
bloquea la subclasificación L en TV-PG, las
subclasificaciones L en TV-14 y TV-MA se
bloquearán automáticamente.
Clas. MPAA : Puede bloquear las películas según su
clasificación. La Asociación americana de cinematografía
(MPAA) ha creado un sistema de clasificación que
proporciona a padres y tutores información sobre qué
películas son apropiadas para los niños.
− G : Todos los públicos (sin restricciones). / PG : Se
sugiere la compañía de un adulto. / PG-13 : Menores
acompañados de un adulto. / R : Restringido.
Menores de 17 acompañados por un adulto. / NC-17
: Prohibido a menores de 17 años. / X : Sólo adultos.
/ NR : Sin clasificar.
✎
La función V-Chip bloqueará automáticamente
cualquier categoría que trate material
más sensible. Por ejemplo, si bloquea la
categoría PG-13, también se bloquearán
automáticamente R, NC-17 y X.
03 Funciones básicas
Español
21
Page 72

Funciones básicas
Inglés Canadiense : Puede bloquear los programas de
TV según la clasificación Inglés Canadiense.
− C : Programación para niños menores de 8 años.
/ C8+ : Programación generalmente considerada
aceptable para niños mayores de 8 años sin
acompañamiento de adultos. / G : Programación
general, ideal para todas las audiencias. / PG
: Supervisión paterna. / 14+: La programación
contiene temas y contenidos que puede que no
sean adecuados para menores de 14 años. / 18+ :
Programación para adultos.
✎
La función V-Chip bloqueará automáticamente
cualquier categoría que trate material más
sensible. Por ejemplo, si bloquea la categoría
G, automáticamente también se bloqueará PG,
14+ y 18+.
Francés Canadiense: Puede bloquear los programas
de TV según la clasificación Francés Canadiense.
− G : General / 8 ans+ : Programación generalmente
considerada aceptable para niños mayores de 8
años sin acompañamiento de adultos. / 13 ans+ :
Es posible que la programación no sea adecuada
para niños menores de 13 años. / 16 ans+ : La
programación no es adecuada para niños menores
de 16 años. / 18 ans+ : Programación restringida
para adultos.
✎
La función V-Chip bloqueará automáticamente
cualquier categoría que trate material más
sensible. Por ejemplo, si bloquea la categoría 8
ans+, también se bloquearán automáticamente
13 ans+, 16 ans+ y 18 ans+.
Clasificación U.S. Descargable : La información de la
restricción de bloqueo se puede usar mientras se ven
los canales DTV.
✎
NOTA
Si la información no se descarga
x
desde la emisora, el menú
Clasificación U.S. Descargable está
desactivado.
La información de la restricción de bloqueo se
x
puede descargar automáticamente mientras se
ven los canales DTV. Esto puede tardar algunos
segundos.
El menú Clasificación U.S. Descargable
x
está disponible después de que la información
se haya descargado desde la emisora. Sin
embargo, según el tipo de información de la
emisora, el menú podría no estar disponible
para su uso.
Los niveles de restricción de bloqueo
x
difieren según la emisora. El nombre de
menú predeterminado y Clasificación U.S.
Descargable cambian según la información
descargada.
Aunque configure la visualización en pantalla
x
en otro idioma, el menú Clasificación U.S.
Descargable siempre lo verá en inglés.
La clasificación bloqueará automáticamente
x
determinadas categorías que traten material
más sensible.
Los títulos de clasificación (por ejemplo,
x
nivel de humor, etc.) y las clasificaciones de
televisión (por ejemplo, DH, MH, H, etc.) pueden
diferir según la emisora.
■ Cambiar Código : Aparecerá la pantalla para cambiar
el código. Escriba un nuevo código PIN de 4 dígitos.
En cuanto se introducen los 4 dígitos, aparece la
pantalla Confirmar Nuevo Código. Vuelva a escribir
los 4 dígitos. Cuando desaparezca la pantalla de
confirmación, el código quedará memorizado.
Cómo ver un canal restringido.
Si el TV se sintoniza en un canal restringido, V-Chip lo
bloqueará. La pantalla quedará en blanco y aparecerá el
siguiente mensaje: Este canal esta bloqueado por el V-Chip.
Introduzca PIN para desbloquear.
✎
Si olvida su código PIN, pulse los botones del mando
a distancia siguiendo la secuencia siguiente, que
restablece el código a “0-0-0-0”: POWER (apagar) →
MUTE → 8 → 2 → 4 → POWER(encender)
Otras funciones
MENU → Configuración → ENTER
Idioma del menú
Ajuste el idioma de los menús.
1. Seleccione Idioma del menú del menú y pulse el botón
ENTER
.
2. Seleccione el idioma que desee y pulse el botón
ENTER
.
✎
Elija una opción entre English, Español y
Français.
Subtítulo
(Mensajes de texto en pantalla)
■ Subtítulo (Apagado / Encendido):
Puede activar o desactivar la función
de subtítulos. Si los subtítulos no están
disponibles, no se mostrarán en la pantalla.
✎
La función de subtítulos no
está disponible en los modos
Componente, HDMI ni PC.
CC
22
Español
Page 73

■ Modo de Subtítulo: Puede seleccionar el modo de
subtítulo deseado.
✎
La disponibilidad de los subtítulos depende del
programa que se esté emitiendo.
Programado / CC1~CC4 / Texto1~Texto4: (sólo
canales analógicos) La función de subtítulos analógicos
funciona tanto en el modo de canal de televisión
analógica como cuando la señal se dirige de un
dispositivo externo al televisor. (Según la señal de
transmisión, la función de subtítulos analógicos puede
funcionar con canales digitales.)
Programado / Servicio1~Servicio6 / CC1~CC4 /
Texto1~Texto4: (sólo canales digitales) La función de
subtítulos digitales funciona con canales digitales.
✎
Es posible que Servicio 1~6 no estén disponibles
en el modo de subtítulos digitales según el tipo de
emisión.
■ Opciones - Subtítulos Dig.: (sólo canales digitales)
Tamaño : Las opciones incluyen Programado, Pequeño,
Normal y Grande. El valor predeterminado es Normal.
Estilo fuente: Las opciones incluyen Programado y
Estilo del 0 al 7. El valor predeterminado es Estilo0.
Color de primer plano: Las opciones incluyen
Programado, Blanco, Negro, Rojo, Verde, Azul, Amarillo,
Magenta, Cian. Puede cambiar el color del texto. El valor
predeterminado es Blanco.
Color de fondo: Las opciones incluyen Programado,
Blanco, Negro, Rojo, Verde, Azul, Amarillo, Magenta,
Cian. Puede cambiar el color del fondo de los subtítulos.
El valor predeterminado es Negro.
Opacidad de primer plano: Ajusta la opacidad del
texto. Las opciones incluyen Programado, Transparente,
Traslúcido, Sólido e Intermitente.
Opacidad de fondo: Ajusta la opacidad del fondo
de los subtítulos. Las opciones incluyen Programado,
Transparente, Traslúcido, Sólido e Intermitente.
Regresar al Predeterminado: Esta opción reajusta las
opciones Tamaño, Estilo fuente, Color de primer plano,
Color de fondo, Opacidad de primer plano y Opacidad
de fondo a sus valores predeterminados.
✎
NOTA
Las Opciones - Subtítulos Dig. sólo
x
están disponibles cuando Programado y
Servicio1~Servicio6 se pueden seleccionar en
el Modo de Subtítulo.
La disponibilidad de los subtítulos depende del
x
programa que se esté emitiendo.
El valor Programado sigue los estándares
x
establecidos por el emisor.
Las opciones de color de primer plano y color
x
de fondo no se pueden ajustar con el mismo
color.
No puede establecer la Opacidad de
x
primer plano y la Opacidad de fondo como
Transparente.
Red (Tipo de red / Configuración de red /
Prueba de red)
Para obtener más información sobre las opciones de
configuración, consulte las instrucciones "Conexión de la
red" (pág. 26).
General
■ Modo Juego (Apagado / Encendido): Cuando se
conecta una videoconsola como PlayStation™ o
Xbox™, se puede experimentar una sensación más
realista al seleccionar el modo de juegos.
✎
NOTA
Restricciones respecto al modo de juego
x
(precaución)
– Si desea desconectarse de la consola de
videojuegos y conectarse a otro dispositivo
externo, ajuste la opción Modo Juego como
Apagado en el menú de configuración.
– Si visualiza el menú de TV en el Modo Juego, la
pantalla tiembla ligeramente.
Modo Juego no está disponible cuando la fuente de
x
entrada está en el modo TV o PC.
Tras conectar la consola de videojuegos, configure
x
Modo Juego como Activado. Desgraciadamente,
puede que advierta una reducción en la calidad de
la imagen.
Si Modo Juego se configura como Activado:
x
– El modo Imagen se configura como Estándar y el
de Sonido como Película.
– Ecualizador no está disponible.
■ Transparenc. menú (Claro / Oscuro): Establezca la
transparencia del menú.
■ Melodía (Apagado / Bajo / Medio / Alto): Establezca
que una melodía se oiga cuando el televisor se encienda
o se apague.
03 Funciones básicas
Español
23
Page 74

Funciones avanzadas
Picture In Picture (PIP)
PIP
Puede ver simultáneamente el sintonizador de televisión y
otra fuente de vídeo externa. PIP, imagen sobre imagen, no
se admite en el mismo modo.
MENU → Configuración → PIP → ENTER
✎
NOTA
Para obtener información sobre el sonido de PIP,
x
consulte las instrucciones de Sel. Sonido.
Si apaga el televisor mientras mira la televisión en el
x
modo PIP, la ventana PIP desaparecerá.
Puede notar que la imagen de la ventana PIP llega
x
a ser ligeramente artificial cuando utiliza la pantalla
principal para visualizar juegos o karaoke.
Cuando V-Chip está funcionando, no se puede
x
utilizar la función PIP.
Configuración de PIP
x
Imagen principal Imagen secundaria
Componente, HDMI1/
DVI, HDMI2, HDMI3, PC,
HDMI4
■ PIP (Apagado / Encendido): Active o desactive la
función PIP.
■ Aire/Cable (Aire / Cable): Puede seleccionar Aire o
Cable como la fuente de entrada de la subpantalla.
■ Canal: Seleccione el canal de la pantalla secundaria.
■ Tamaño (
imagen secundaria.
■ Posición (
posición para la imagen secundaria.
■ Sel. Sonido (Principal / Sub): Puede elegir el sonido
que desee (Principal / Sub ) en el modo PIP.
■ Contr. remoto inalámbrico (Encendido / Apagado):
Apagar y encender o dar permisos a los dispositivos/
teléfonos móviles de Samsung. Debe tener un
dispositivo/teléfono móvil de Samsung que admita
un mando a distancia Contr. remoto inalámbrico.
Para obtener más información, consulte el manual del
dispositivo.
/ ): Seleccione un tamaño para la
/ / / ): Seleccione una
TV
Menú de asistencia técnica
MENU → Soporte técnico → ENTER
Autodiagnóstico
✎
El autodiagnóstico puede tardar unos segundos; es
parte del funcionamiento normal del televisor.
■ Prueba de imagen (Si / No): Se utiliza para comprobar
si hay problemas en la imagen.
Sí: Si no se muestra el patrón de prueba o hay ruido
en el patrón de prueba, seleccione Sí. Puede haber un
problema en el televisor. Póngase en contacto con el
centro de llamadas de Samsung para obtener ayuda.
No: Si el patrón de prueba se muestra correctamente,
seleccione No. Puede haber un problema en el equipo
externo. Compruebe las conexiones. Si persiste el
problema, consulte el manual del usuario del dispositivo
externo.
■ Prueba de sonido (Sí / No): Utilice el sonido de la
melodía incorporada para comprobar si hay problemas
con el sonido.
✎
Si no oye sonido en los altavoces del televisor,
antes de realizar la prueba de sonido, asegúrese
de que Seleccionar altavoz esté configurado
como Altavoz de TV en el menú Sonido.
✎
La melodía se oirá durante la prueba aunque
Seleccionar altavoz esté establecido como
Altavoz externo o se haya silenciado el sonido
con el botón MUTE.
Sí: Si sólo puede oír sonido de un altavoz o no se oye
sonido durante la prueba de sonido, seleccione Sí.
Puede haber un problema en el televisor. Póngase en
contacto con el centro de llamadas de Samsung para
obtener ayuda.
No: Si puede oír sonido de los altavoces, seleccione
No. Puede haber un problema en el equipo externo.
Compruebe las conexiones. Si persiste el problema,
consulte el manual del usuario del dispositivo externo.
■ Información señal: (sólo canales digitales) La calidad de
la recepción de un canal HD es perfecta o los canales
no están disponibles. Ajuste la antena para aumentar la
intensidad de la señal.
■ Solución de problemas: Si parece que hay problemas
en el televisor, consulte este apartado.
✎
Si no se puede aplicar ninguno de los consejos
para solucionar los errores, póngase en contacto
con el centro de atención al cliente de Samsung.
24
Español
Page 75
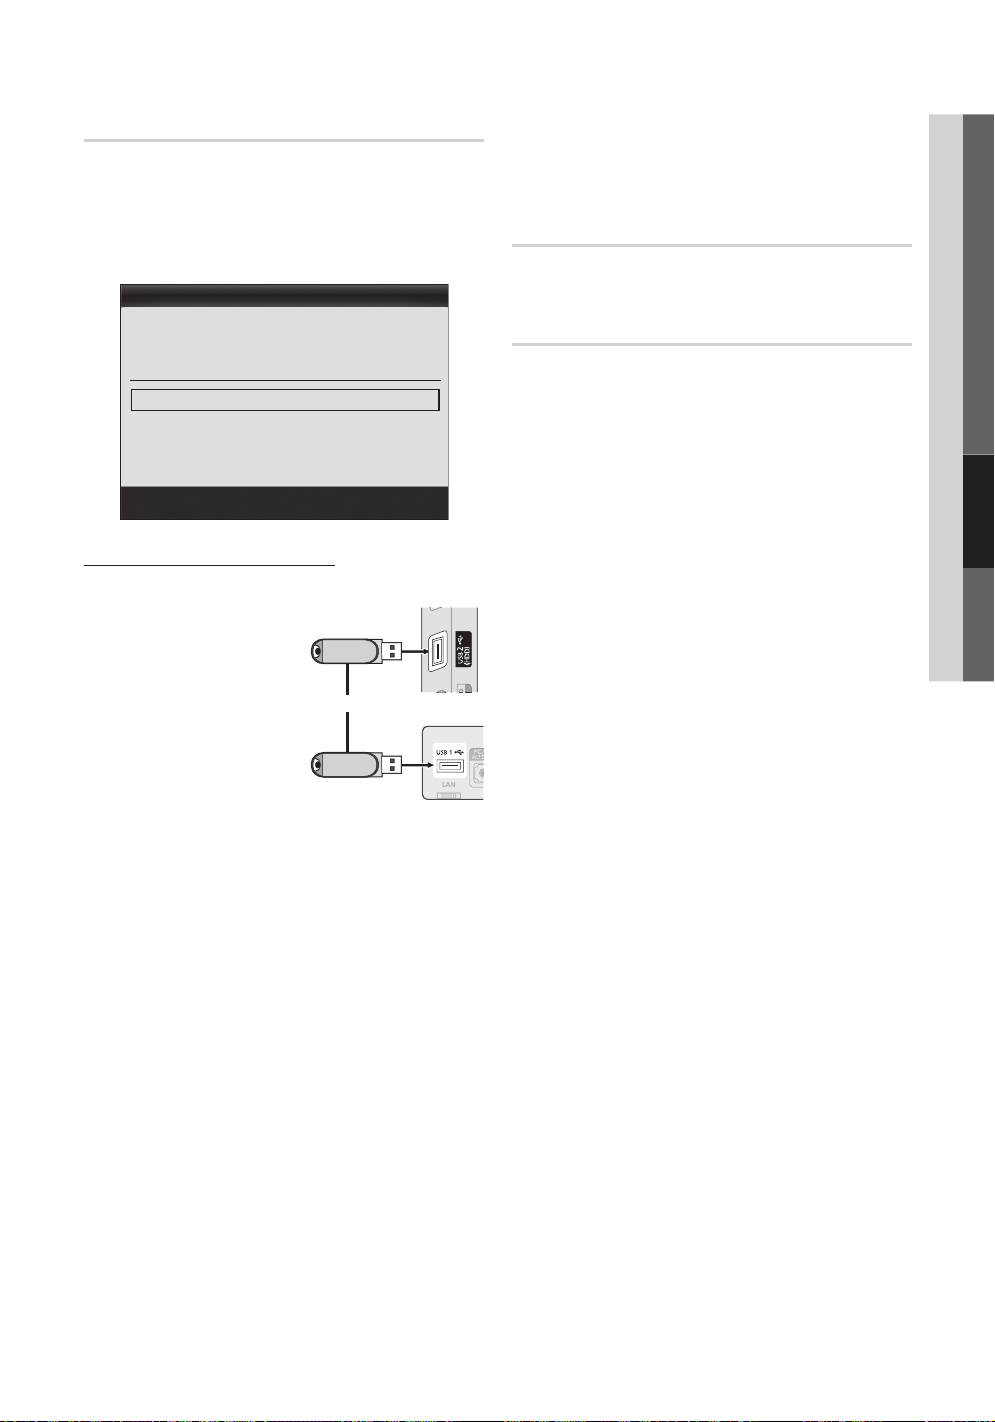
Actualización del software
Actualización del software se puede efectuar a través de
una conexión de red o descargando el último firmware desde
“www.samsung.com,” en un dispositivo de memoria USB.
Versión actual - es el software ya instalado en el televisor.
✎
El software se representa como “Año/Mes/Día_
Versión”.
Actualización del software
Versión actual 2010/01/18_000001
Por USB ►
En línea
Software alternativo ----/--/--_-----
■ Software alternativo (copia de seguridad): Muestra la
versión de software descargada a través de En línea.
Durante la actualización del software, cuando ésta se
interrumpa en el último paso, se activará esta función.
Guía de conexión HD
Consulte esta información cuando conecte dispositivos
externos al televisor.
Contacto con Samsung
Consulte esta información si el televisor no funciona
adecuadamente o si desea actualizar el software. Puede
buscar información relacionada con nuestros centros de
llamadas, para descargar los productos y el software.
04 Funciones avanzadas
Instalación de la versión más actual
■ Por USB: Inserte la unidad
USB que contenga el
archivo de la actualización
del firmware descargado
desde “www.samsung.
com” en el televisor. No
desconecte la alimentación
ni extraiga la unidad USB
antes de finalizar las
actualizaciones. El televisor
se apagará y se encenderá
automáticamente
después de completar la
actualización del firmware.
Cuando se actualiza el software, la configuración del
vídeo y del audio que se haya efectuado vuelve a la
configuración predeterminada. Le aconsejamos que
anote la configuración para recuperarla fácilmente
después de la actualización.
■ En línea: Actualice el software a través de Internet.
✎
Primero, configure la red. Para conocer el
procedimiento detallado sobre cómo configurar la
red, consulte las instrucciones de “Conexión de
la red”.
✎
Si la conexión de Internet no funciona
adecuadamente, se puede interrumpir. Vuelva
a intentar la descarga. Si el problema persiste,
haga la descarga mediante USB y lleve a cabo la
actualización.
Entrar
o
Unidad USB
Regresar
Panel lateral del TV
Panel posterior
del TV
Español
25
Page 76
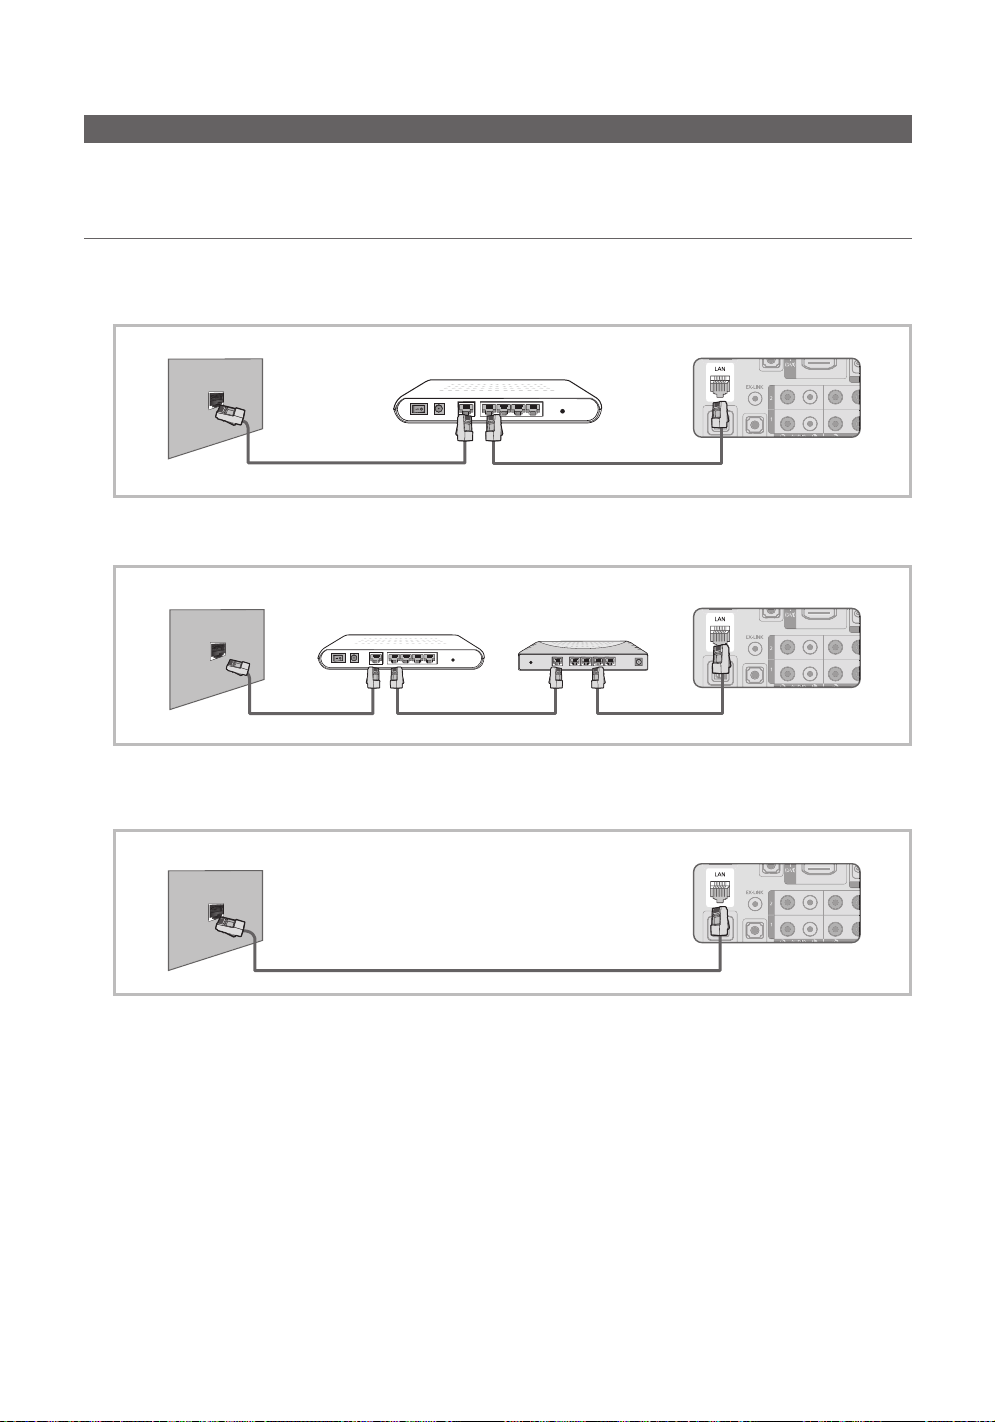
Advanced Features
Conexión de la red
Puede configurar el televisor de forma que se pueda acceder a Internet a través de la red de área local (LAN) mediante una
conexión con o sin cable.
Conexión a una red por cable
Puede conectar el televisor o la red LAN mediante un cable de tres modos:
y Puede conectar el televisor a la red LAN si conecta el puerto LAN de la parte posterior del televisor con un módem
externo, mediante un cable Cat 5. Véase el siguiente diagrama.
Puerto de módem en la pared Panel posterior del TV
y Puede conectar el televisor a la red LAN si conecta el puerto LAN de la parte posterior del televisor con un enrutador que
esté conectado con un módem externo. Para la conexión, utilice un cable Cat 5. Véase el siguiente diagrama.
Puerto de módem en la pared Panel posterior del TV
y Según cómo esté configurada la red, puede conectar el televisor a la red LAN si conecta el puerto LAN de la parte
posterior del televisor directamente a una toma de red de pared mediante un cable Cat 5. Véase el siguiente diagrama. La
toma de pared está conectada a un módem o enrutador en cualquier lugar de su casa.
Puerto LAN en la pared Panel posterior del TV
Módem externo
(ADSL/VDSL/TV por cable)
Módem externo
(ADSL/VDSL/TV por cable)
Cable LANCable de módem
Compartidor IP
Cable LANCable LANCable de módem
Cable LAN
Si dispone de red dinámica, debe usar un enrutador o módem ADSL que admita el protocolo de configuración dinámica
de host (DHCP). Los módems y los enrutadores compatibles con DHCP proporcionan automáticamente la dirección IP, la
máscara de subred, la puerta de enlace y los valores de DNS que el televisor necesita para acceder a Internet, de manera
que no es necesario especificarlos manualmente. La mayoría de las redes domésticas son dinámicas.
Algunas redes necesitan una dirección IP estática. Si la red necesita una dirección IP estática, debe especificar
manualmente en la pantalla de configuración de cable del televisor la dirección IP, la máscara de subred, la puerta de
enlace y los valores DNS cuando configure la conexión de red. Para conocer la dirección IP, la máscara de subred, la
puerta de enlace y los valores DNS, póngase en contacto con el proveedor de servicios de Internet (ISP). Si tiene un
ordenador con Windows, también puede conseguir estos valores a través del ordenador.
✎
También puede usar módems ADSL compatibles con DHCP si la red necesita una dirección IP estática. Los
módems ADSL compatibles con DHCP también permiten el uso de direcciones IP estáticas.
Español
26
Page 77
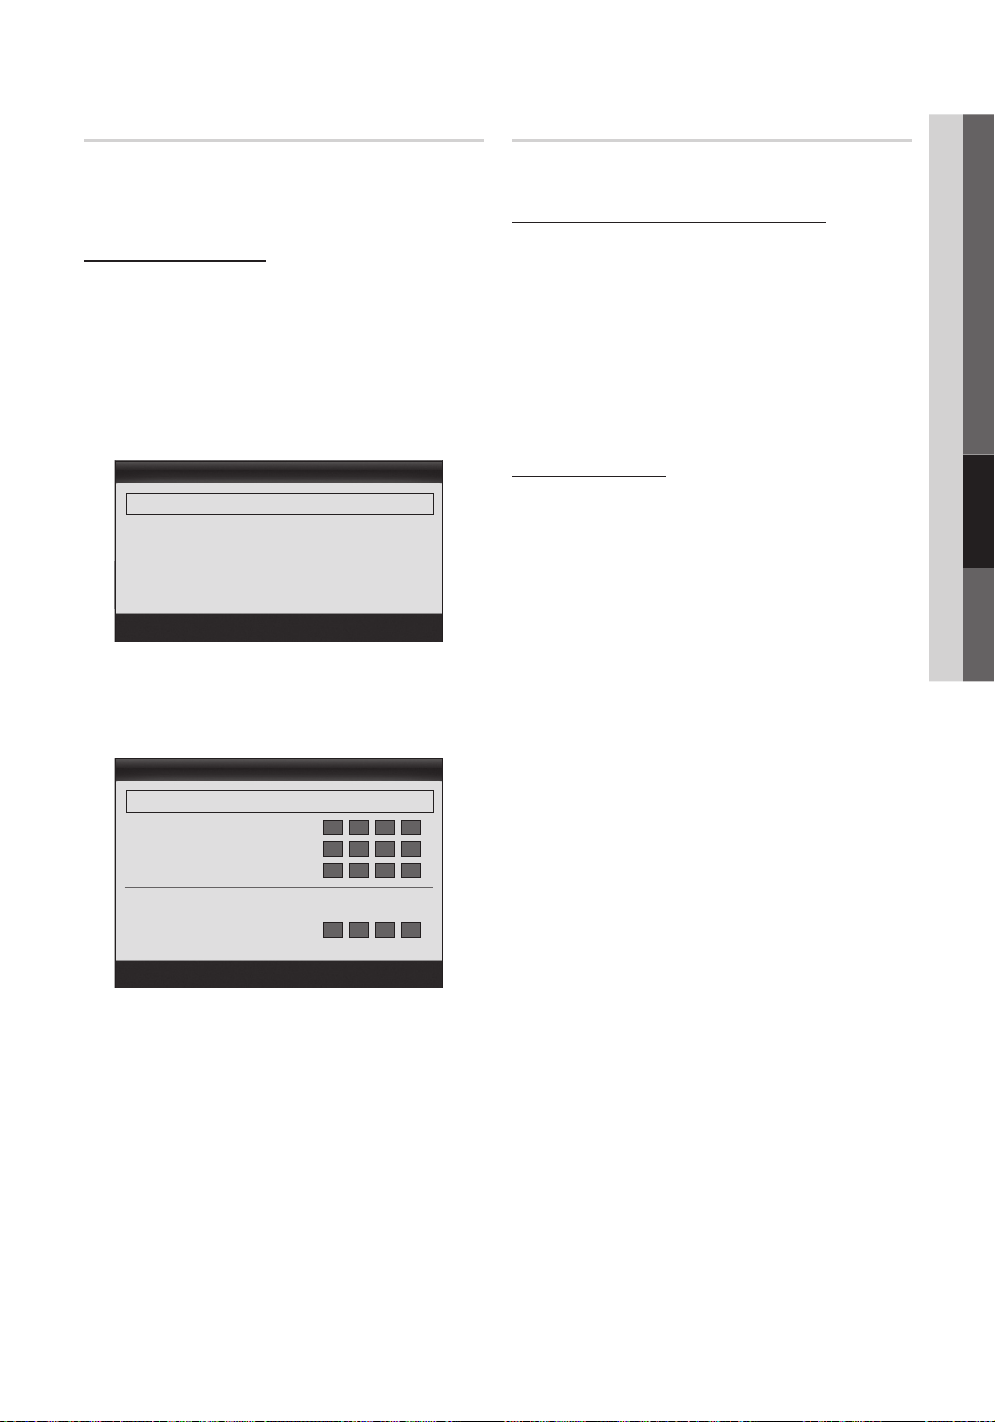
Configuración de red (Auto)
Utilice la Configuracion de red automática cuando conecte
el televisor a una red que sea compatible con DHCP. Para
configurar automáticamente la conexión de red con cable del
televisor, siga estos pasos:
Configuración automática
1. Conecte el televisor a la red LAN, tal como se indica en
la sección anterior.
2. Encienda el televisor, pulse el botón MENU del mando
a distancia, utilice los botones ▲ o ▼ para seleccionar
Configuración y, a continuación, pulse el botón
ENTER
.
3. Utilice los botones ▲ o ▼ para seleccionar Red en el
menú Configuración y, a continuación, pulse el botón
ENTER
. Aparece la pantalla de la red.
Red
Tipo de red : Cable ►
Conguración de red
Prueba de red
Mover
Entrar
Regresar
4. En la pantalla Red, seleccione Tipo de red.
5. Establezca Tipo de red como Cable.
6. Seleccione Configuración de red. Aparece la pantalla
Configuracion de red.
Conguracion de red
Cong. protocolo Internet :
Dirección IP :
Máscara de subred :
Puerta de enlace :
DNS : Auto
Servidor DNS :
Auto
►
Configuración de red (Manual)
Utilice la Configuracion de red manual cuando conecte el
televisor a una red que necesite una dirección IP estática.
Obtención de los valores de conexión de red
Para obtener los valores de conexión de red en la mayoría de
ordenadores con Windows, siga estos pasos:
1. Haga clic con el botón derecho en el icono de Red, en la
esquina inferior derecha de la pantalla.
2. En el menú emergente que aparece, haga clic en
Estado.
3. En el cuadro de diálogo que aparece, haga clic en la
ficha Soporte.
4. En la ficha Soporte, haga clic en el botón Detalles. Se
muestran los valores de la conexión de red.
Configuración manual
Para configurar manualmente la conexión de red con cable
del televisor, siga estos pasos:
1. Siga los pasos del 1 al 6 del procedimiento
“Configuración automática”.
2. Establezca Config. protocolo Internet como Manual.
3. Pulse el botón ▼ del mando a distancia para ir al primer
campo de entrada.
4. Especifique los valores de Dirección IP,
Máscara de subred, Puerta de enlace y
Servidor DNS. Utilice los botones numéricos del mando
a distancia para especificar los números, y los botones
de flecha para ir de un campo de entrada a otro.
5. Cuando haya terminado, pulse el botón RETURN del
mando a distancia.
6. Seleccione Prueba de red para comprobar la
conectividad de Internet.
04 Funciones avanzadas
Mover
Entrar
Regresar
7. Establezca Config. protocolo Internet como Auto.
8. Auto obtiene y especifica automáticamente los valores
necesarios para Internet.
9 Cuando haya terminado, pulse el boton RETURN del
mando a distancia.
10. Seleccione Prueba de red para comprobar la
conectividad de Internet.
11. Si la función Red no ha conseguido los valores de
conexión de red, consulte las instrucciones que se
indican a continuación para la Manual.
Español
27
Page 78
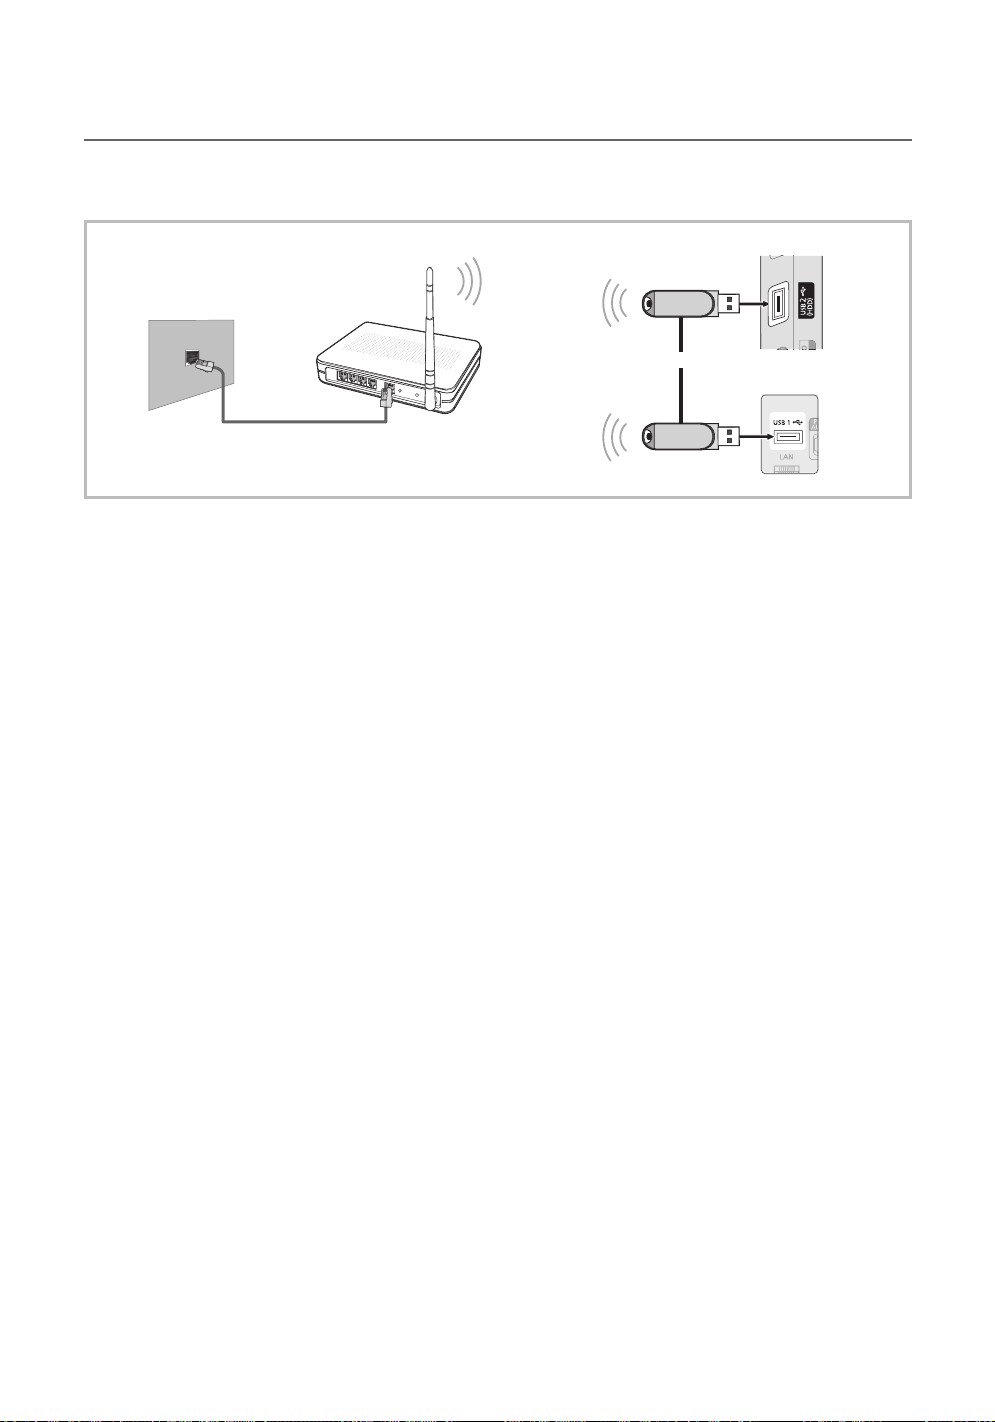
Funciones avanzadas
Conexión a una red inalámbrica
Si desea conectar sin cables el televisor a la red, necesita un módem o enrutador inalámbrico y un adaptador LAN inalámbrico
de Samsung (WIS09ABGN), que debe conectar al terminal USB del panel lateral o posterior del televisor. Véase la siguiente
ilustración.
Panel lateral del TV
Puerto LAN en la pared
Cable LAN (no suministrado)
El adaptador LAN inalámbrico de Samsung se vende por separado y se ofrece en distribuidores seleccionados, sitios
de comercio electrónico y Samsungparts.com. El adaptador LAN inalámbrico de Samsung admite los protocolos de
comunicación IEEE 802.11A/B/G y N. Samsung recomienda el uso de IEEE 802.11N. Si reproduce un vídeo en una conexión
IEEE 802.11B/G, es posible que el vídeo no se reproduzca correctamente.
✎
NOTA
Para utilizar una red inalámbrica necesita el “adaptador de LAN inalámbrica de Samsung” (WIS09ABGN).
x
El adaptador de LAN inalámbrica de Samsung se vende por separado. El adaptador de LAN inalámbrica
x
WIS09ABGN se ofrece a través de distribuidores seleccionados, sitios web de comercio electrónico y Samsungparts.
com.
Para utilizar una red inalámbrica, el televisor debe estar conectado a un compartidor IP inalámbrico. Si el
x
compartidor IP inalámbrico admite DHCP, el televisor puede utilizar DHCP o una dirección IP estática para
conectarse a la red inalámbrica.
Seleccione un canal para el compartidor IP inalámbrico que no se esté usando en ese momento. Si el canal
x
ajustado para el compartidor IP inalámbrico lo está usando en ese momento otro dispositivo cercano, se producirán
interferencias y la comunicación se interrumpirá.
Si se aplica un sistema de seguridad distinto de los sistemas que se muestran a continuación, no funcionará con el
x
televisor.
Si se selecciona el modo 802.11n (Greenfield) puro de gran procesamiento y se configura el tipo de codificación
x
WEP, TKIP o TKIP-AES (WPS2Mixed) para el PA, los televisores Samsung no admitirán una conexión con las nuevas
especificaciones de la certificación Wi-Fi.
Si el punto de acceso admite WPS (Configuración protegida Wi-Fi), puede conectarse a la red vía PBC (Configuración
x
del botón) o PIN (Número de identificación personal). De cualquier modo, WPS configurará automáticamente las
claves SSID y WPA.
Si el enrutador, el módem o el dispositivo no están certificados, puede que no se conecte al televisor mediante el
x
“adaptador de LAN inalámbrica de Samsung”.
Métodos de conexión: Puede configurar la conexión de red inalámbrica de 4 formas.
x
– PBC (WPS)
– Configuración automática (mediante la función de búsqueda de red automática)
– Configuración manual
– Ad hoc
Compartidor IP
inalámbrico
Adaptador de LAN
inalámbrica de Samsung
o
Panel posterior del TV
28
Español
Page 79
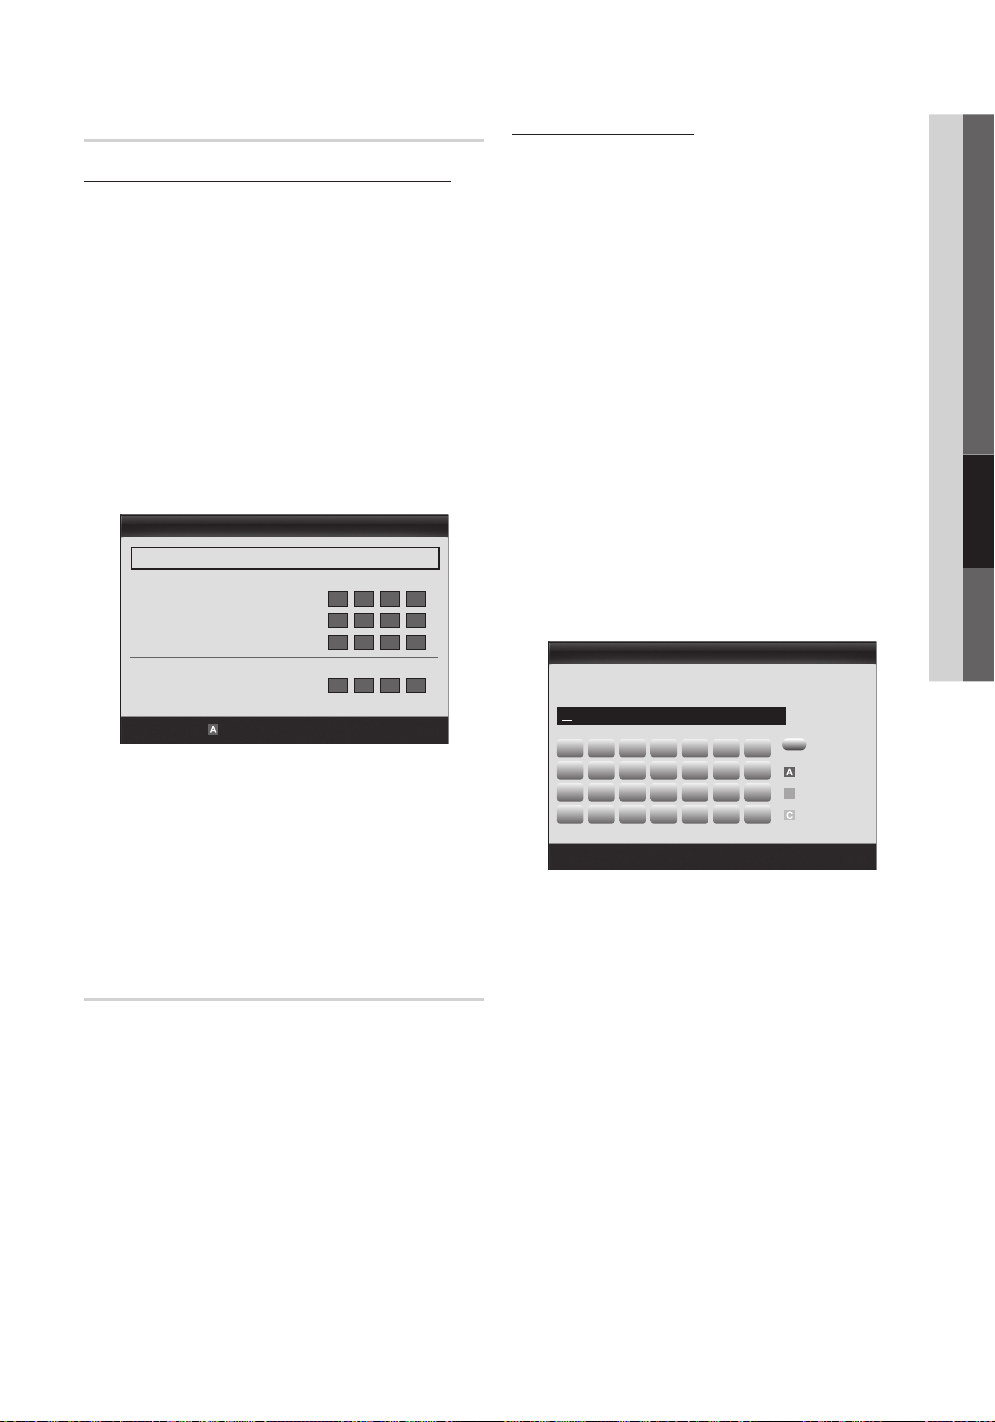
Configuración manual (PBC (WPS))
B
Cómo realizar la configuración mediante PBC (WPS)
Si el enrutador tiene un botón de PBC (WPS), siga estos
pasos:
1. Conecte el televisor a la red LAN, tal como se indica en
la sección anterior.
2. Encienda el televisor, pulse el botón MENU del mando
a distancia, utilice los botones ▲ o ▼ para seleccionar
Configuración y, a continuación, pulse el botón
ENTER
.
3. Utilice los botones ▲ o ▼ para seleccionar Red en el
menú Configuración y, a continuación, pulse el botón
ENTER
.
4. En la pantalla Red, seleccione Tipo de red.
5. Establezca Tipo de red como Inalámbrico.
6. Seleccione Configuración de red. Aparece la pantalla
Configuracion de red.
Conguracion de red
Seleccionar una red : No seleccionado ►
Mover
Auto
Entrar
Regresar
Cong. protocolo Internet :
Dirección IP :
Máscara de subredk :
Puerta de enlace :
DNS : Auto
Servidor DNS :
PBC (WPS)
7. Pulse el botón rojo del mando a distancia.
8. Pulse el botón PBC (WPS) del enrutador antes de que
transcurran 2 minutos. El reproductor de televisión
obtiene automáticamente todos los valores de
configuración de la red que necesita y se conecta a la
red.
9. Después de configurar la conexión de red,
pulse el botón RETURN para salir de la pantalla
Configuración de red.
Configuración de red (Auto)
La mayoría de las redes inalámbricas disponen de un
sistema de seguridad opcional que precisa dispositivos
que accedan a la red, con el fin de transmitir un código de
seguridad cifrado llamado clave de seguridad o de acceso.
Esta clave de seguridad se basa en una contraseña,
normalmente una palabra o una serie de letras y números
con una longitud determinada que se le pidió especificar
cuando configuró la seguridad de la red inalámbrica. Si
utiliza este método para configurar la conexión de red, y
dispone de una clave de seguridad para la red inalámbrica,
deberá especificar la contraseña durante el proceso de
configuración.
Configuración automática
Para establecer una conexión inalámbrica automáticamente,
siga estos pasos:
1.
Siga los pasos del 1 al 6 de la sección anterior “Cómo realizar
la configuración mediante PBC (WPS)”.
2. Pulse el botón ▼ o para seleccionar Config. protocolo
Internet y, a continuación, pulse el botón ENTER. Pulse el
botón ▲ o ▼ para seleccionar Auto y, a continuación, pulse el
botón ENTER.
3. Pulse el botón ▲ para ir a Seleccionar una red y, a
continuación, pulse el botón ENTER. La función Red busca
redes inalámbricas disponibles. Cuando termina, muestra una
lista de las redes disponibles.
4. En la lista de redes, pulse los botones ▲ o ▼ para seleccionar
una red y, a continuación, pulse el botón ENTER.
✎
Si el PA está configurado como oculto (invisible), se
debe seleccionar Agregar red e introducir el Nombre
de red y la Clave de seguridad correctos para
establecer la conexión.
5. Si aparece la ventana emergente de Seguridad/PIN vaya al
paso 6. Si aparece la pantalla de conexión de red, vaya al paso
10.
6. Pulse los botones ▲ o ▼ para seleccionar PIN o Seguridad.
En la mayoría de las redes domésticas, seleccionaría Seguridad
(para Clave de seguridad). Aparece la pantalla Seguridad.
Conguración de red
Clave seguridad
0 ingr.
0~9
A B C D E F G
H I J K L M N
O P Q R S T U
V W X Y Z
Mover Entrar Regresar
7. En la pantalla Seguridad, especifique la contraseña de la red.
✎
Busque la contraseña en una de las pantallas de
configuración que utilizó para configurar el módem o el
enrutador.
8. Para especificar la contraseña, siga estas indicaciones
generales:
− Pulse los botones numéricos del mando a distancia para
especificar los números.
− Use los botones de dirección del mando a distancia para ir
de un botón a otro en la pantalla Clave seguridad.
− Pulse el botón rojo para cambiar entre mayúsculas y
minúsculas o mostrar símbolos/caracteres.
− Para especificar una letra o un símbolo, selecciónelo y pulse
el botón ENTER.
− Para eliminar la última letra o el último número que
especificado, pulse el botón verde del mando a
distancia.
Número
Minúsculas
Borrar
Espacio
haya
04 Funciones avanzadas
Español
29
Page 80

Funciones avanzadas
9. Cuando haya terminado, pulse el botón azul del mando
a distancia. Aparece la pantalla de conexión de red.
10. Espere a que aparezca el mensaje de confirmación de la
conexión y, a continuación, pulse el botón ENTER
Vuelve a aparecer la pantalla Configuración de red.
11. Para probar la conexión, pulse el botón RETURN para
seleccionar Prueba de red y, a continuación, pulse el
botón ENTER
.
.
Configuración de red (Ad hoc)
Puede conectarse a un dispositivo móvil sin punto de acceso
a través del “adaptador de LAN inalámbrica de Samsung”
mediante una red par a par.
Cómo conectarse a un nuevo dispositivo Ad-hoc
1. Siga los pasos del 1 al 6 de la sección anterior “Cómo
realizar la configuración mediante PBC (WPS)” (pag. 29).
2. Elija Seleccionar una red. Se muestra una lista de
dispositivos/redes.
3. En la lista de dispositivos, pulse el botón azul del mando
a distancia.
✎
Se muestra el mensaje El sistema de red
existente puede tener una funcionalidad
limitada. ¿Desea cambiar la conexión de red?
4. Introduzca el Nombre de red y la Clave de seguridad
generados en el dispositivo con el que se desea
conectar.
Cómo conectarse a un dispositivo Ad-hoc existente
1. Siga los pasos del 1 al 6 de la sección anterior “Cómo
realizar la configuración mediante PBC (WPS)” (pag. 29).
2. Elija Seleccionar una red. Se muestra la lista de
dispositivos/redes.
3. Seleccione el dispositivo que desee en la lista.
4. Si se solicita una clave de seguridad, introdúzcala.
✎
Si la red no funciona normalmente, compruebe
de nuevo Nombre de red y Clave de seguridad.
Una Clave seguridad incorrecta puede causar un
mal funcionamiento.
Configuración de red (Manual)
Si los otros métodos no funcionan, debe especificar
manualmente los valores de configuración de la red.
Obtención de los valores de conexión de red
Para obtener los valores de conexión de red en la mayoría de
ordenadores con Windows, siga estos pasos:
1. Haga clic con el botón derecho en el icono de Red, en la
esquina inferior derecha de la pantalla.
2. En el menú emergente, haga clic en Estado.
3. En el cuadro de diálogo que aparece, haga clic en la
ficha Soporte.
4. En la ficha Soporte, haga clic en el botón Detalles. Se
muestra la configuración de la red.
Configuración manual
Para introducir los valores de conexión de la red
manualmente, siga estos pasos:
1. Siga los pasos del 1 al 6 de “Cómo realizar la
configuración mediante PBC (WPS)” (pág. 29).
2. Pulse el botón ▼ o para seleccionar Config. protocolo
Internet y, a continuación, pulse el botón ENTER
Pulse el botón ▲ o ▼ para seleccionar Manual y, a
continuación, pulse el botón ENTER
3. Pulse el botón ▼ para ir al primer campo de entrada
(Dirección IP).
4. Utilice los botones numéricos para introducir los
números.
5. Cuando acabe con cada campo, utilice el botón ► para
ir sucesivamente al campo siguiente. También puede
usar los otros botones de flecha para subir, bajar e ir
hacia atrás.
6. Especifique los valores de Dirección IP,
Máscara de subred y Puerta de enlace.
7. Pulse los botones ▲ o ▼ para ir a DNS.
8. Pulse el botón ▼ para ir al primer campo de entrada
de DNS. Escriba los números como se ha indicado
anteriormente.
9. Cuando termine, pulse el botón ▲ para ir a
Seleccionar una red. Seleccione su red y, a
continuación, pulse el botón ENTER
10. Siga los pasos del 1 al 6 de “Cómo realizar la
configuración mediante PBC (WPS)” (pág. 29).
Si el televisor no se conecta a Internet
Es posible que el televisor no pueda conectarse a
Internet porque su proveedor de servicios de Internet
haya registrado permanentemente la dirección MAC
(un número de identificación exclusivo) del ordenador
o del módem, el cual se autentica cada vez que se
conecta a Internet como forma de impedir accesos no
autorizados. Puesto que el televisor tiene una dirección
MAC diferente, su proveedor de servicios de Internet
no puede autenticar su dirección MAC, y el televisor no
puede conectarse. Para solucionar este problema, solicite
a su proveedor de servicios de Internet que le explique
el procedimiento necesario para conectar dispositivos
que no sean un ordenador (por ejemplo su televisor) a
Internet. Si su proveedor de servicios de Internet necesita
un ID o una contraseña para conectarse a Internet, su
televisor quizá no pueda conectarse a Internet. Si éste
fuera el caso, d ebe escribir su ID o contraseña cuando
se conecte a Internet. La conexión de Internet puede
fallar por problemas del servidor de seguridad. Si éste
fuera el caso, póngase en contacto con el proveedor de
servicios de Internet. Si no puede conectarse a Internet
aunque haya seguido el procedimiento de su proveedor
de servicios de Internet, debe ponerse en contacto con
el centro de servicio técnico de Samsung Electronics a
través del número 1-800-SAMSUNG.
.
.
.
30
Español
Page 81
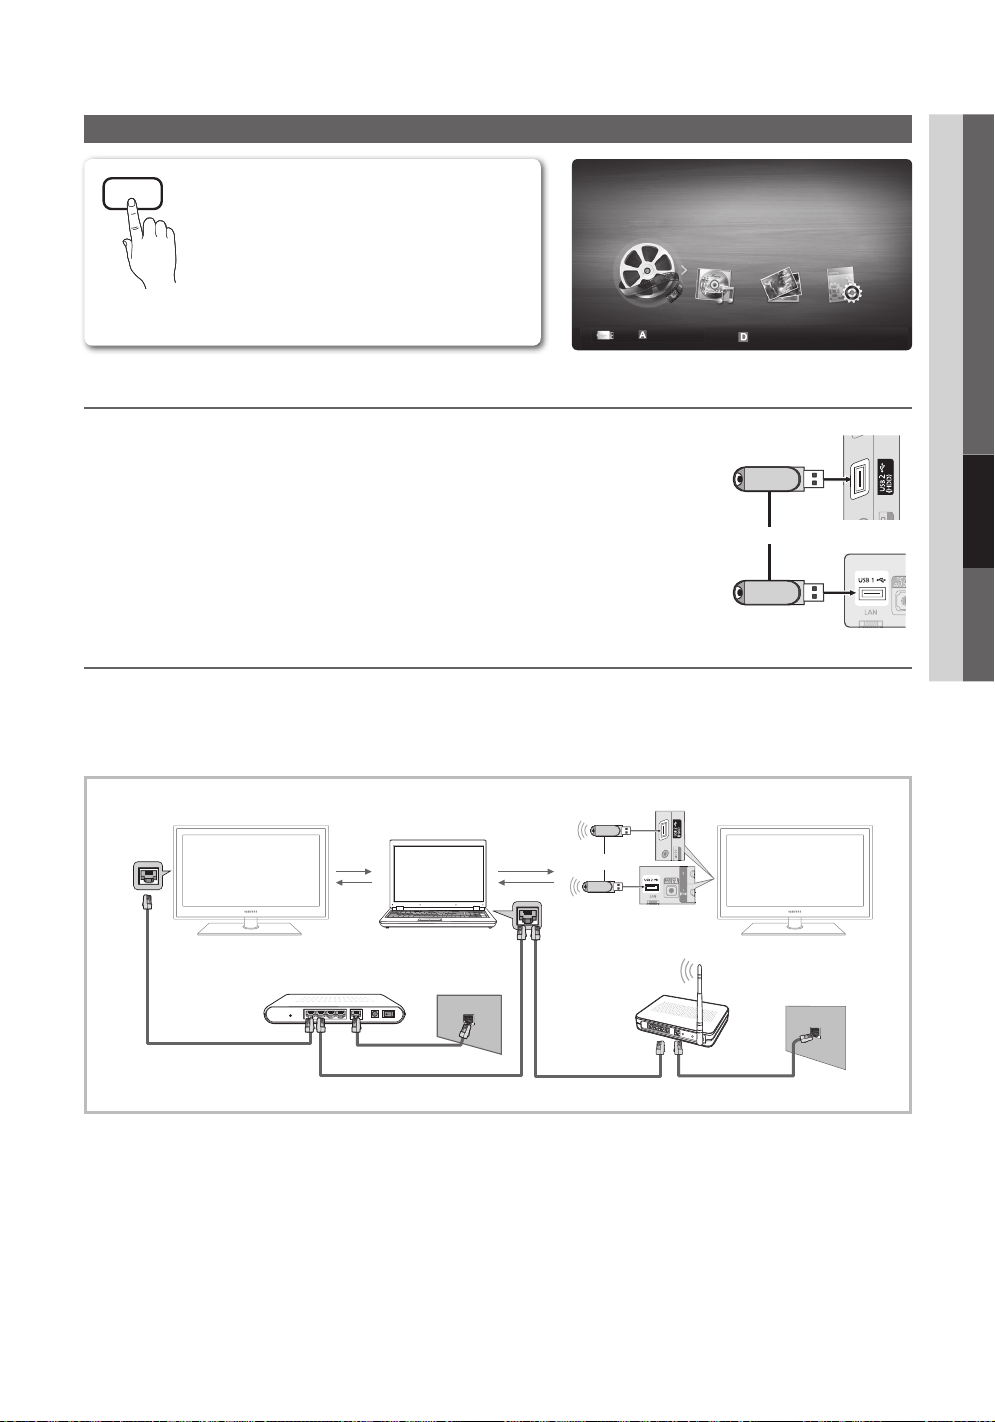
Media Play
SUM
04 Funciones avanzadas
MEDIA.P
Disfrute de archivos de fotos, música y películas
almacenados en un dispositivo de clase de
almacenamiento masivo (MSC) USB o en su PC.
MENU → Application → Media Play
(USB) → ENTER
MediaPlay
Vídeos
Cambiar disp.
Ver dispositivos
Entrar
Regresar
Conexión de un dispositivo USB
1. Encienda el televisor.
2. Conecte un dispositivo USB que contenga archivos de fotos, música o películas
al terminal USB 1 o USB 2 (HDD) que se encuentra en el lateral del televisor.
3. Cuando el USB está conectado al televisor, aparece una ventana emergente. A
continuación puede seleccionar Media Play.
Unidad USB
Panel lateral del TV
o
Panel posterior
del TV
Conexión al PC a través de una red
Puede reproducir imágenes, música y vídeos guardados en el ordenador o en el televisor a través de una conexión de red en
el modo Media Play (USB).
✎
Si desea utilizar Media Play para reproducir archivos guardados en el ordenador a través del televisor, debe descargar
“PC Share Manager” y el manual del usuario de “www.samsung.com”.
Panel lateral del TV
PC
LAN
Módem externo
(ADSL/VDSL/TV por cable)
o
Adaptador
de LAN
inalámbrica
de Samsung
Panel posterior
del TV
Compartidor IP inalámbrico
Cable LAN (no suministrado)
1. Para obtener más información sobre cómo confi gurar la red, consulte “Conexión de la red” (pág. 26).
− Se le recomienda que ubique el televisor y el ordenador en la misma subred. Las 3 primeras partes de la dirección de
la subred del televisor y las direcciones IP del PC deben ser iguales; sólo la última parte (la dirección host) se debe
cambiar. (Por ejemplo, dirección IP: 123.456.789.**)
2.
Conecte el ordenador en el que se instalará el programa Samsung PC Share Manager y el módem externo con un cable LAN.
− Se puede conectar el televisor al ordenador directamente sin usar compartidor (enrutador).
Español
31
Page 82

Funciones avanzadas
✎
Funciones que no se admiten al conectarse al ordenador a través de la red:
Las funciones Musique de fond y Configuración de la música de fondo.
x
Clasificación de archivos por preferencias en las carpetas Fotos, Música y Videos.
x
Los botones (REW) o (FF) durante la reproducción de una película.
x
✎
No se admite el subtítulo incorporado, Multi-audio ni DivX DRM.
✎
Samsung PC Share Manager debe ser compatible con el programa cortafuegos del ordenador.
✎
Cuando utilice el modo Media Play a través de una conexión de red, de acuerdo con las funciones del servidor
proporcionado:
El método de clasificación puede variar.
x
Es posible que la función de búsqueda de escenas no sea compatible.
x
Es posible que la función Contin., que reanuda la reproducción de un vídeo, no sea compatible.
x
– La función Contin. no admite varios usuarios. (Sólo habrá memorizado el punto donde detuvo la reproducción el
usuario más reciente.)
Es posible que los botones
x
Si durante la reproducción de un vídeo en una red inalámbrica se advierte cualquier vacilación, es aconsejable utilizar
x
una red por cable.
✎
Puede que no funcione correctamente con archivos multimedia sin licencia.
✎
Lista de lo que debe saber antes de utilizar Media Play (USB)
MTP (Protocolo de transferencia de recursos) no se admite.
x
El sistema de archivos admite FAT16, FAT32 y NTFS.
x
Ciertos tipos de cámara digital USB y dispositivos de audio quizás no sean compatibles con este televisor.
x
Media Play sólo admite dispositivos USB de clase de almacenamiento masivo (MSC). MSC es un dispositivo de
x
clase de almacenamiento masivo sólo de transporte de gran capacidad. Ejemplos de MSC son las unidades de
almacenamiento en miniatura, los lectores de tarjetas Flash y las unidades de disco duro de USB (no se admiten
concentradores de USB). Los dispositivos se deben conectar directamente al puerto USB del televisor.
Antes de conectar el dispositivo al televisor, haga una copia de seguridad de sus archivos para evitar daños o
x
pérdidas de datos. SAMSUNG no se hace responsable por cualquier daño en los archivos o pérdida de datos.
Conecte un disco duro de USB al puerto reservado, el puerto USB 2 (HDD).
x
No desconecte el dispositivo USB mientras se esté cargando.
x
Cuanto mayor sea la resolución de la imagen, más tiempo tardará en visualizarse en la pantalla.
x
La resolución JPEG máxima admitida es 15360 x 8640 píxeles.
x
Con archivos dañados o que no se admiten, se muestra el mensaje “Formato de archivo no admitido”.
x
Si los archivos están ordenados por la vista básica, se pueden mostrar hasta 1000 archivos en cada carpeta.
x
Los archivos MP3 con DRM descargados desde un sitio de pago no se pueden reproducir. La tecnología Gestión de
x
derechos digitales (DRM) admite la creación, la distribución y la gestión de contenidos de modo integrado y general,
incluida la protección de los derechos e intereses de los proveedores de los contenidos, la prevención de copias
ilegales de los contenidos, así como la gestión de cobros y acuerdos.
Si hay más de 2 dispositivos PTP conectados, sólo se puede utilizar uno al mismo tiempo.
x
Si se ha conectado más dos dispositivos MSC, alguno de ellos puede que no se reconozca. Un dispositivo que exija
x
mucha energía (más de 500mA o 5 V), quizás no se admita.
Si se muestra un mensaje de advertencia de sobrealimentación al conectar o usar un dispositivo USB, es posible
x
que el dispositivo no se reconozca o que funcione incorrectamente.
Si el televisor no recibe señal de entrada durante el tiempo establecido en Tpo. protección auto., se iniciará el
x
salvapantallas.
El modo de ahorro de energía de algunas unidades de disco duro externas se puede desactivar automáticamente
x
cuando éstas se conectan al televisor.
Si se utiliza un cable de extensión USB, es posible que el dispositivo USB no se reconozca o que los archivos del
x
dispositivo no se puedan leer.
Si no se reconoce un dispositivo USB conectado al televisor, la lista de archivos del dispositivo está dañada o un archivo de
x
la lista no se reproduce, conecte el dispositivo USB al ordenador, formatee el dispositivo y compruebe la conexión.
Si un archivo borrado del PC aún se encuentra cuando se ejecuta el reproductor multimedia, utilice la función "Vaciar
x
la papelera de reciclaje" del PC para borrar permanentemente el archivo.
◄ o ►
no funcionen, según la información del contenido.
32
Español
Page 83
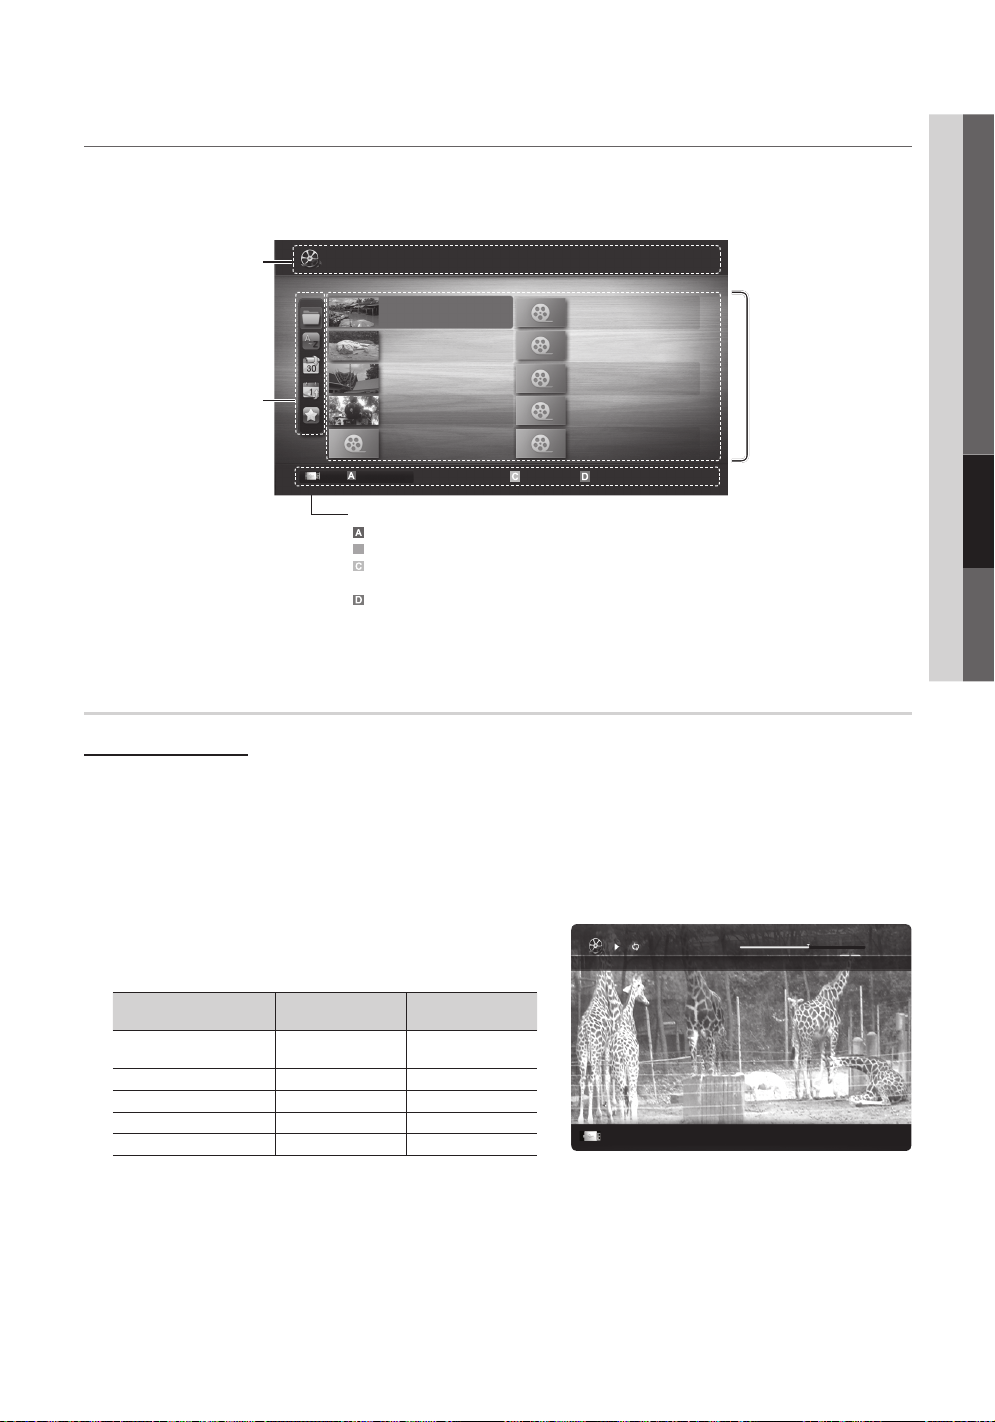
Pantalla de visualización
B
Movie 01.avi
00:04:03 / 00:07:38 1/1
SUM
Vaya al archivo que desee mediante los botones arriba/abajo/derecha/izquierda y, a continuación, pulse el botón ENTER o
(Reproducir). El archivo se reproduce.
✎
Admite Ver dispositivos y Inicio en la página de inicio de Media Play.
Puede confirmar el nombre
del archivo seleccionado y el
número de archivos y páginas.
clasificación: Muestra la norma
La norma de clasificación
✎
es diferente según los
contenidos.
Información:
Sección de la lista de
de clasificación.
Vídeos
SUM
Cambiar dispvo.
/Movie 01.avi 1/1
Movie 01.avi
Movie 03.avi
Movie 05.avi
Movie 07.avi
Movie 09.avi
Jan.10.2010
Jan.10.2010
Jan.10.2010
Jan.10.2010
Jan.10.2010
Movie 02.avi
Movie 04.avi
Movie 06.avi
Movie 08.avi
Movie 10.avi
Seleccionar Organiz.
Jan.10.2010
Jan.10.2010
Jan.10.2010
Jan.10.2010
Jan.10.2010
Herramientas
Página
Sección de la lista de
archivos:
Puede confirmar los archivos
y grupos que se han
ordenado por categoría.
Funcionamiento de los botones
Rojo (Cambiar dispvo.): Selecciona un dispositivo conectado.
Verde(Preferencia): Establece la preferencia del archivo (no se admite en la vista básica)
Amarillo (Seleccionar): Selecciona varios archivos de la lista de archivos. Los archivos seleccionados
se marcan con un símbolo.
Azul (Organiz.): Selecciona la lista de clasificación.
Herramientas : Muestra el menú de opciones.
Gracias a los botones (REW) o (FF), la lista de archivos se puede mover a la página
✎
siguiente o anterior.
04 Funciones avanzadas
Vídeos
Reproducción de vídeo
1. Pulse los botones ◄ o ► para seleccionar Vídeos y, a continuación, pulse el botón ENTER
2. Pulse los botones ◄/►/▲/▼ para seleccionar el vídeo que desee en la lista de archivos.
3. Pulse los botones ENTER
− El archivo seleccionado se visualiza en la parte superior con su tiempo de reproducción.
− Si se desconoce la información de la hora del vídeo, no se muestran ni el tiempo de reproducción ni la barra de
progreso.
− Durante la reproducción de vídeos, se puede realizar búsquedas con los botones ◄ y ►.
✎
En este modo, se pueden ver clips de películas contenidos en
un juego, pero no se puede reproducir éste.
y Formatos de subtítulo admitidos
Nombre
Texto basado en tiempo
MPEG-4
SAMI .smi HTML
SubRip .srt basado en cadenas
SubViewer .sub basado en cadenas
Micro DVD .sub o .txt basado en cadenas
o (reproducir).
Extensión del
archivo
.ttxt XML
Formato
en el menú Media Play.
Pausa
Saltar
Herramientas
Regresar
Español
33
Page 84
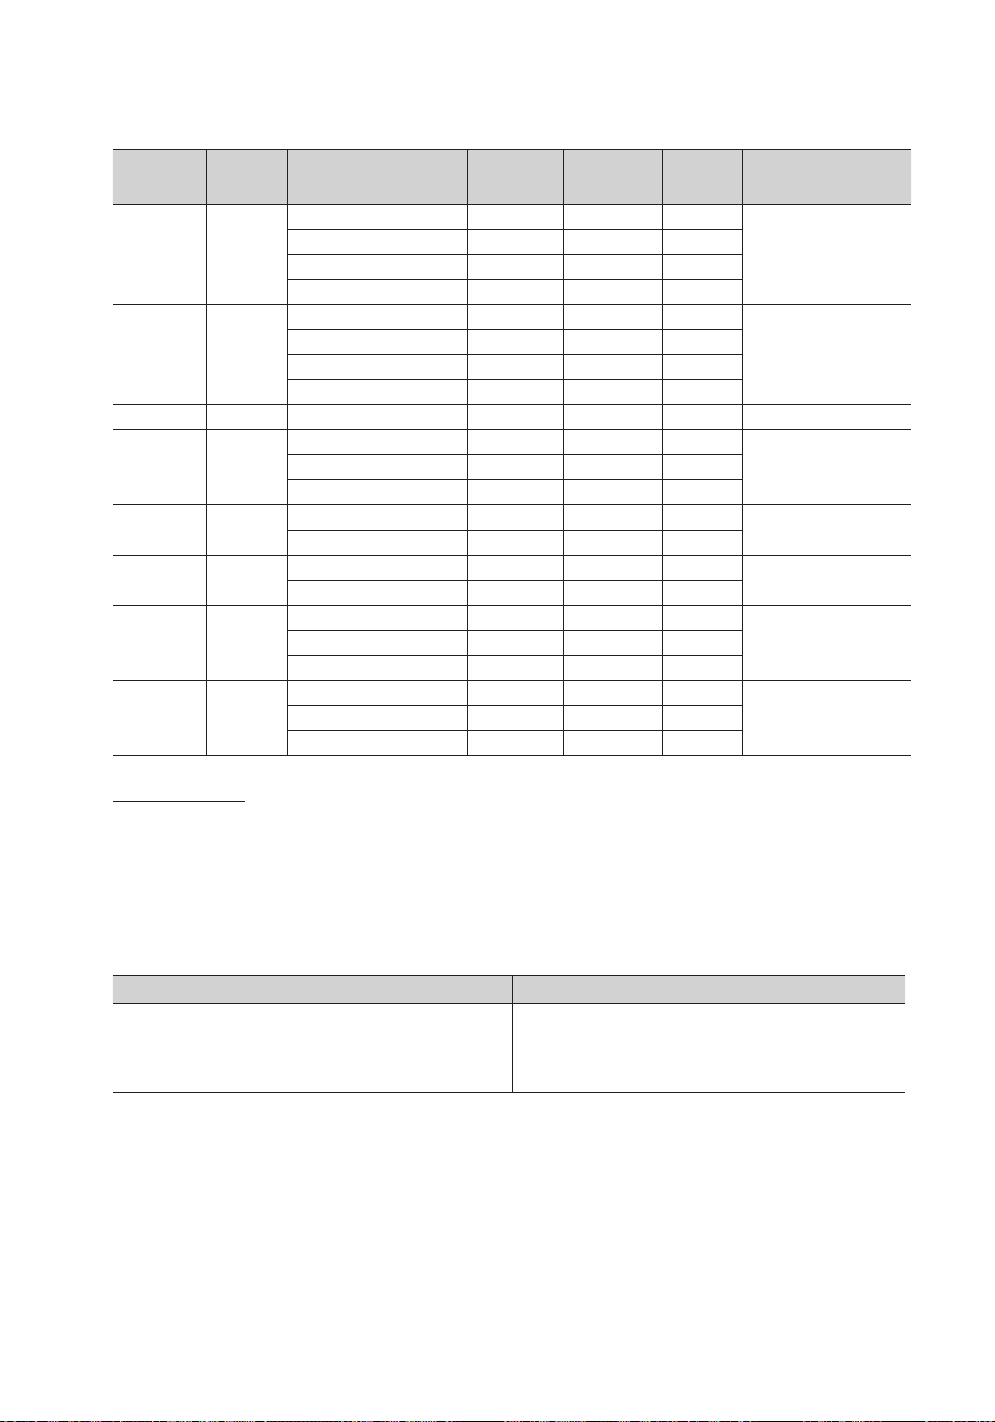
Funciones avanzadas
y Formatos de vídeo admitidos
Extensión del
archivo
*.avi *.mkv AVI MKV
*.asf ASF
*.wmv ASF Window Media Video v9 1920 x 1080 6 ~ 30 25 WMA
*.mp4 MP4
*.3gp 3GPP
*.vro VRO VOB
*.mpg
*.mpeg
*.ts
*.tp
*.trp
Contenedor Códec de vídeo Resolución
Divx 3.11/4.x/5.1/6.0 1920 x 1080 6 ~ 30 8
XviD 1920 x 1080 6 ~ 30 8
H.264 BP/MP/HP 1920 x 1080 6 ~ 30 25
MPEG4 SP/ASP 1920 x 1080 6 ~ 30 8
Divx 3.11/4.x/5.1/6.0 1920 x 1080 6 ~ 30 8
XviD 1920 x 1080 6 ~ 30 8
H.264 BP/MP/HP 1920 x 1080 6 ~ 30 25
MPEG4 SP/ASP 1920 x 1080 6 ~ 30 8
H.264 BP/MP/HP 1920 x 1080 6 ~ 30 25
XVID 1920 x 1080 6 ~ 30 8
H.264 BP/MP/HP 1920 x 1080 6 ~ 30 25
MPEG4 SP/ASP 1920 x 1080 6 ~ 30 8
MPEG1 1920 x 1080 24 / 25 / 30 30
MPEG2 1920 x 1080 24 / 25 / 30 30
MPEG1 1920 x 1080 24 / 25 / 30 30
PS
H.264 1920 x 1080 6 ~ 30 25
MPEG2 1920 x 1080 24 / 25 / 30 30
TS
H.264 1920 x 1080 6 ~ 30 25
VC1 1920 x 1080 6 ~ 30 25
Velocidad de
transferencia
(fps)
Velocidad
en bits
(Mbsp)
Códec de audio
MP3/AC3/LPCM/ADPCM/
DTS Core
MP3/AC3/LPCM/ADPCM/
WMA
MP3/ADPCM/AACMPEG4 SP/ASP 1920 x 1080 6 ~ 30 8
ADPCM/AAC/HE-AAC
AC3/MPEG/LPCM
AC3/MPEG/LPCM/AACMPEG2 1920 x 1080 24 / 25 / 30 30
AC3/AAC/MP3/DD+/HE-
AAC
Otras restricciones
✎
NOTA
Si hay problemas con el contenido de un códec, éste no será compatible.
x
Si la información de un contenedor es incorrecta y el archivo presenta errores, no se podrá reproducir
x
correctamente el contenedor.
El sonido y el vídeo pueden no funcionar si el contenido tiene una velocidad de bits y de transferencia superior a
x
la de marco/segundo relacionada en la tabla anterior.
Si hay un error en la tabla de índice, la función de búsqueda (omitir) no se admite.
x
Decodificador de vídeo Decodificador de audio
• Admite hasta H.264, nivel 4.1
• H.264 FMO/ASO/RS, VC1 SP/MP/AP L4 y AVCHD no se admiten.
• GMC no se admite.
• H.263 no se admite.
Español
34
• Admite hasta WMA 7, 8, 9, STD
• WMA 9 PRO no admite multicanal superior a 2 canales o audio
sin pérdida.
• La frecuencia de muestreo de WMA de 22050 Hz mono no se
admite.
Page 85
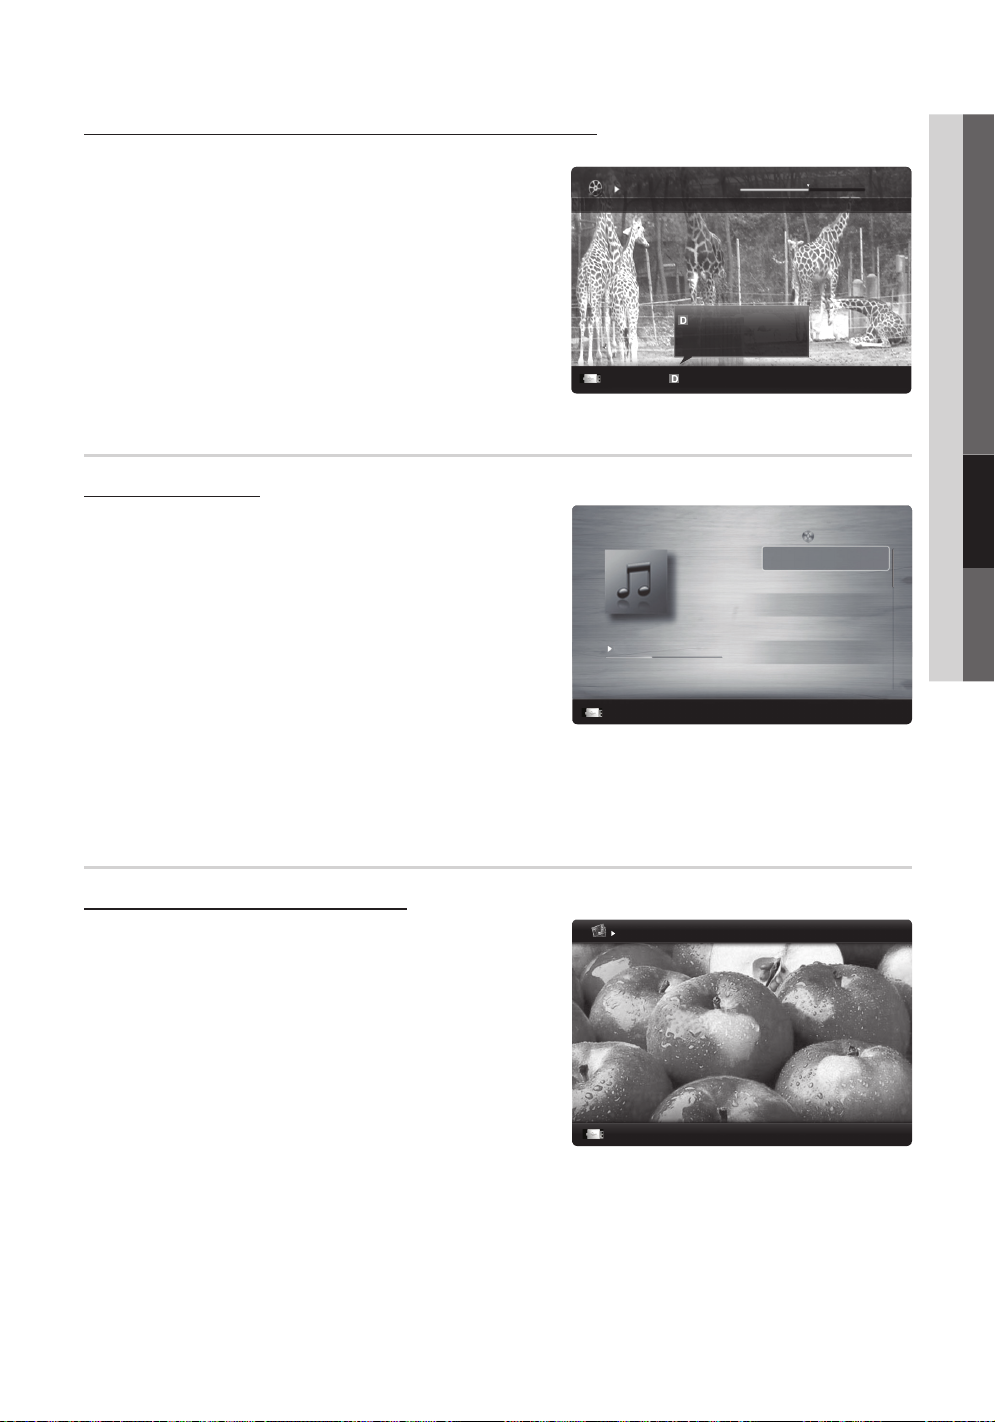
Continuación de la reproducción de una película (reanudar reproducción)
Movie 01.avi
00:04:03 / 00:07:38 1/1
SUM
3/15
I Love you
Jhon
Music 1
No Singer
Music 2
No Singer
Music 3
No Singer
Music 4
No Singer
Music 5
No Singer
I Love You
Jhon
1st Album
Pop
2010
4.2MB
01:10 / 04:02
SUM
Image1024.jpg 1024x768 2010/2/1 3/15
SUM
Si sale de la función de reproducción de la película, ésta se puede reproducir posteriormente desde el punto en que se detuvo.
1. Seleccione el archivo de película que desee seguir
reproduciendo pulsando los botones ◄ o ► en la sección de la
lista de archivos.
2. Pulse el botón
(Reproducir) / ENTER.
3. Seleccione Contin. (reanudar reproducción) con el botón azul.
La película se reproducirá desde el punto en que se detuvo.
✎
El botón azul está disponible al reanudar la reproducción.
✎
Si la función Recordatorio cont. pelíc. está configurada
Contin.
Reanuda últ. escena
como Encendido en el menú Config., aparecerá un
mensaje emergente cuando se reanude la reproducción
de un archivo de película.
Contin.
Pausa
Saltar
Herramientas
Regresar
Música
Reproducción de música
1. Pulse los botones ◄ o ► para seleccionar Música y, a
continuación, pulse el botón ENTER
2. Pulse los botones ◄/►/▲/▼ para seleccionar el música que
desee en la lista de archivos.
3. Pulse los botones ENTER
− Durante la reproducción de música, se puede realizar
búsquedas con los botones ◄ y ►.
− Los botones
(REW) y (FF) no funcionan durante la
reproducción.
✎
Sólo se muestran los archivos con la extensión MP3 y PCM.
Los archivos con otras extensiones no se muestran, aunque se
hayan guardado en el mismo dispositivo USB.
✎
Si, al reproducir archivos MP3, el sonido no se oye correctamente, ajuste Ecualizador en el menú Sonido. (Un archivo
MP3 demasiado modulado puede ocasionar problemas de sonido.)
en el menú Media Play.
o (reproducir).
Pausa
Saltar
Mi lista
Herramientas
Regresar
04 Funciones avanzadas
Fotos
Visualización de una foto (o una presentación)
1. Pulse los botones ◄ o ► para seleccionar Fotos y, a
continuación, pulse el botón ENTER
2. Pulse los botones ◄/►/▲/▼ para seleccionar el foto que desee
en la lista de archivos.
3. Pulse los botones ENTER
− Mientras se muestra una lista de fotos, pulse los botones
(reproducir) / ENTER del mando a distancia para iniciar la
presentación.
− En la presentación se usan todos los archivos de la sección
de la lista de archivos.
− Durante la presentación, los archivos se muestran
ordenadamente.
✎
Los archivos de música se pueden reproducir automáticamente
durante la presentación si Música de fondo está configurado
como Encendido.
✎
El Modo BGM no se puede cambiar mientras no haya
finalizado la carga de BGM.
en el menú Media Play.
o (reproducir).
Normal
Pausa
Anterior/Siguiente
Herramientas
Español
Regresar
35
Page 86
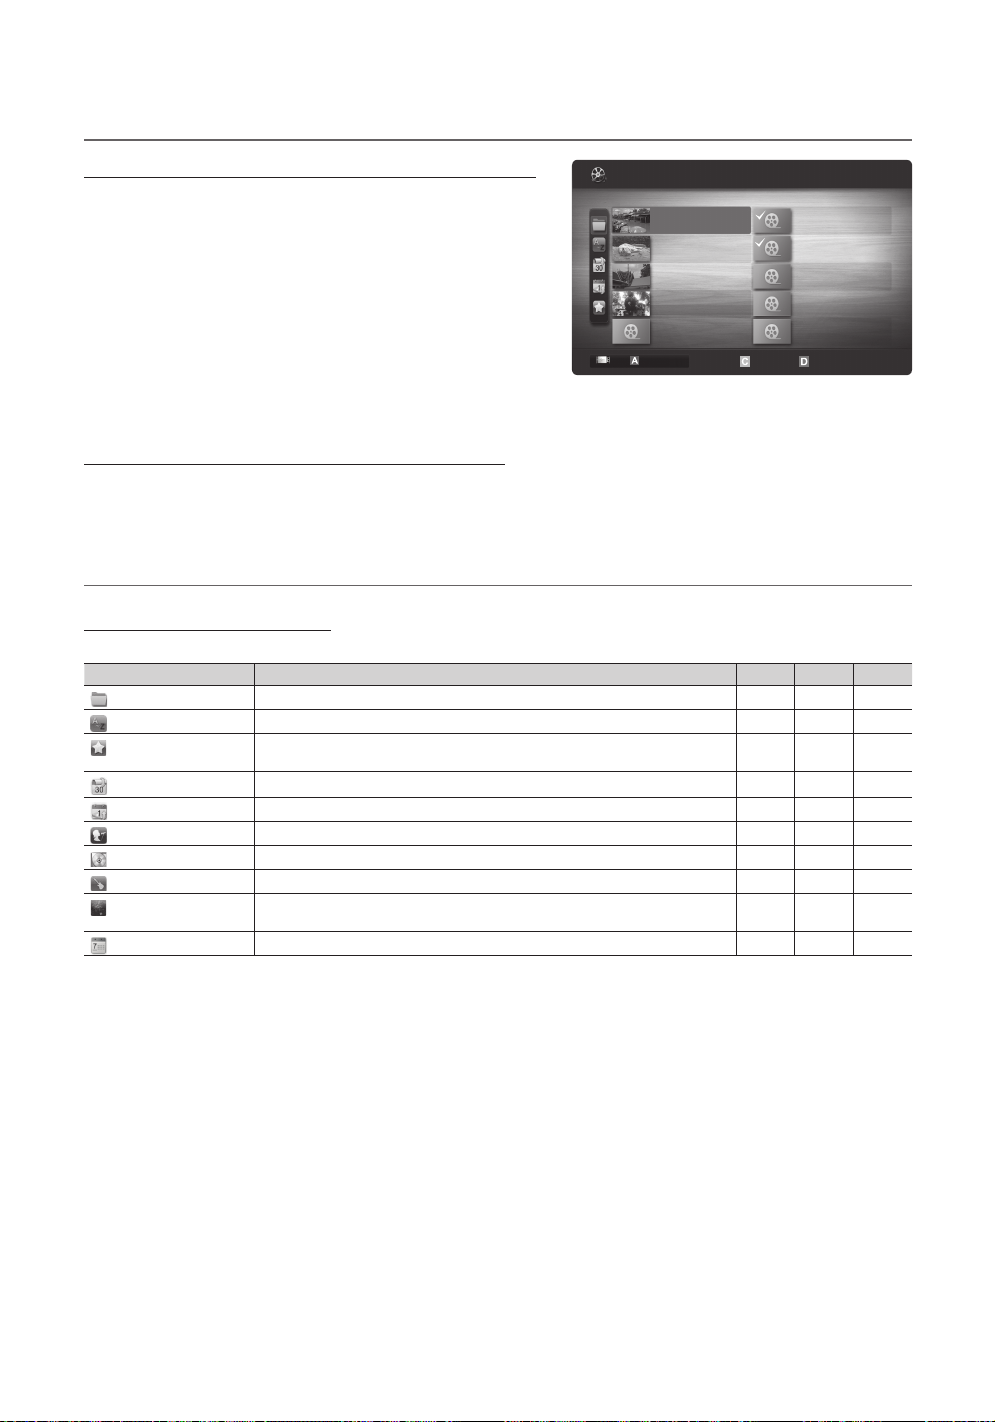
Funciones avanzadas
1/1
/Movie 01.avi
SUM
Movie 01.avi
Jan.10.2010
Jan.10.2010
Jan.10.2010
Jan.10.2010
Jan.10.2010
Jan.10.2010
Jan.10.2010
Jan.10.2010
Jan.10.2010
Jan.10.2010
Movie 03.avi
Movie 05.avi
Movie 07.avi
Movie 09.avi
Movie 02.avi
Movie 04.avi
Movie 06.avi
Movie 08.avi
Movie 10.avi
Reproducción de varios archivos
Reproducción de archivos de vídeo/música/fotos seleccionados
1. Pulse el botón amarillo en la lista de archivos para seleccionar el
Vídeos
Archivos 2 sel. Página
archivo que desee.
2. Repita el proceso anterior para seleccionar varios archivos.
✎
NOTA
La marca aparece a la izquierda de los archivos
x
seleccionados.
Para cancelar la selección, pulse de nuevo el botón
x
amarillo.
Para cancelar la selección de todos los archivos, pulse
x
Cambiar dispvo.
Seleccionar Organiz.
Herramientas
el botón TOOLS y seleccione Deseleccionar todos.
3. Pulse el botón TOOLS y seleccione Reproducir conten. selec..
Reproducción de grupos de archivos de vídeo/música/fotos
1. Cuando se muestre una lista de archivos, vaya a cualquier
archivo del grupo deseado.
2. Pulse el botón TOOLS y seleccione Repr. grupo actual.
Reproductor multimedia - Funciones adicionales
Clasificación de la lista de archivos
Pulse el botón azul en la lista de archivos para ordenarlos.
Categorías Funcionamiento Vídeos Música Fotos
Vista básica
Título
Preferencias
Fecha rec.
Fecha lejana
Artista
Álbum
Género
Ánimo
Mensual
Muestra toda la carpeta. Puede ver una foto seleccionando la carpeta.
Ordena y muestra los títulos de archivos por símbolo/número/orden alfabético/especial.
Ordena y muestra los archivos por preferencias. Puede cambiar la preferencia del
archivo en la sección de la lista de archivos con el botón verde.
Ordena y muestra los archivos por la fecha más reciente.
Ordena y muestra los archivos por la fecha más antigua.
Ordena los archivos de música por artista y en orden alfabético.
Ordena los archivos de música por álbum y en orden alfabético.
Ordena los archivos de música por género.
Ordena los archivos de música por el estado de ánimo. Puede cambiar la información
del tipo de música.
Ordena y muestra los archivos de fotos por meses.
36
Español
Page 87
Menú de opciones de reproducción de vídeos/música/fotos
Pulse el botón TOOLS durante la reproducción de un archivo.
Categorías Funcionamiento Vídeos Música Fotos
Título Puede ir a otro archivo directamente.
Modo de repetición Puede reproducir archivos de películas o de música repetidamente.
Imagen Tamaño (Modo1 /
Modo2 / Original)
Configuración de la imagen Puede ajustar la configuración de la imagen. (pág. 15, 16, 17, 18)
Configuración del sonido Puede ajustar la configuración del sonido. (pág. 19, 20)
Configuración de subtítulos Puede reproducir los vídeos con subtítulos. Esta función sólo se activa si los subtítulos
Detener visionado
automático / Inic. vis. aut.
Veloc.vis.aut Puede seleccionar la velocidad de presentación durante la misma.
Música de fondo Puede seleccionar una música de fondo para la presentación.
Zoom Puede ampliar las imágenes en el modo de pantalla completa.
Girar Puede girar las imágenes en el modo de pantalla completa.
Información Puede ver información detallada acerca del archivo reproducido.
Puede ajustar el tamaño de la imagen según las preferencias.
tienen el mismo nombre de archivo que el vídeo.
Se puede iniciar o detener una presentación.
Configuración
Uso del menú de configuración
■ Recordatorio cont. pelíc. (reanudar reproducción.) (Encendido / Apagado): Seleccionar para mostrar el mensaje de
ayuda emergente para la reproducción de una película desde el punto en que se dejó de ver anteriormente.
■ Obtener codigo de registro DivX® VOD: Muestra el código de registro autorizado para el televisor. Si se conecta al
sitio web de DivX y se registra, se puede descargar el archivo de registro VOD. Si reproduce el registro VOD mediante el
reproductor multimedia, el registro se ha terminado.
✎
Para obtener más información sobre DivX® VOD, visite “www.DivX.com”.
■ Obtener código de desactivación DivX® VOD: Si DivX® VOD no está registrado, aparece el código de desactivación
de registro. Si ejecuta esta función cuando DivX® VOD se ha registrado, el registro actual de DivX® VOD se desactiva.
■ Información: Seleccione para ver la información del dispositivo conectado.
04 Funciones avanzadas
Español
37
Page 88
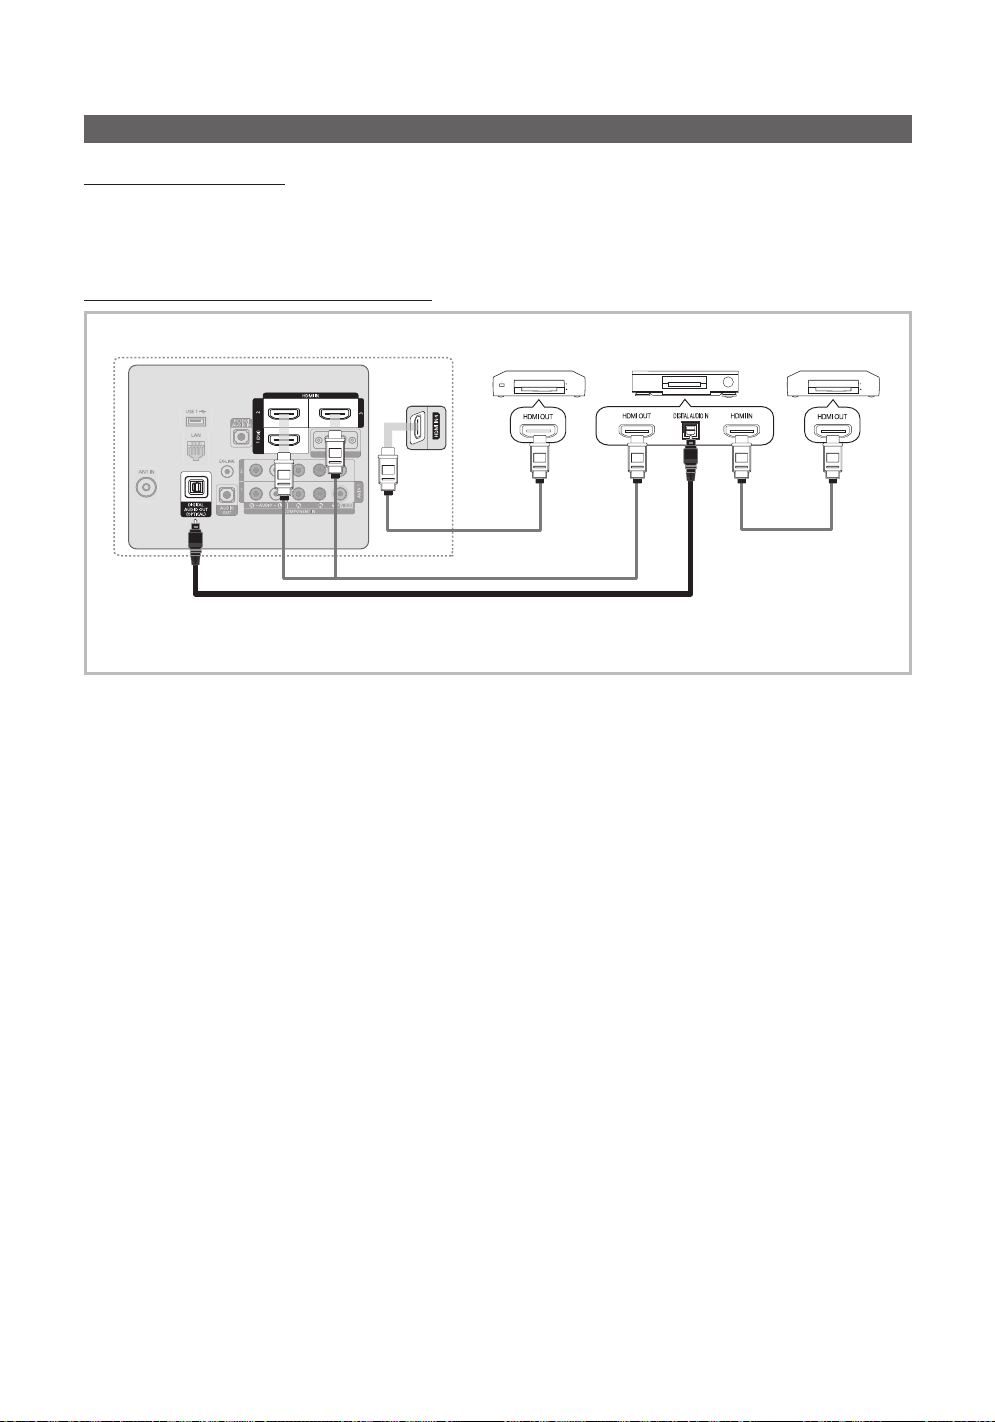
Funciones avanzadas
Anynet+
¿Qué es Anynet+?
Anynet+ es una función que permite controlar con el mando a distancia del televisor Samsung todos los dispositivos de
Samsung conectados que sean compatibles con Anynet+. El sistema Anynet+ sólo se puede usar con dispositivos de
Samsung que tengan la función Anynet+. Para asegurarse de que el dispositivo de Samsung tenga dicha función, compruebe
si lleva el logotipo Anynet+.
Para conectar al sistema Home Theater Samsung
1. Conecte los terminales HDMI IN (1(DVI), 2, 3 o 4) del televisor y el terminal HDMI OUT del dispositivo Anynet+
correspondiente mediante un cable HDMI.
2. Conecte el terminal HDMI IN del sistema Home Theater y el terminal HDMI OUT del dispositivo Anynet+ correspondiente
mediante un cable HDMI.
✎
NOTA
Conecte el cable óptico entre el terminal DIGITAL AUDIO OUT (OPTICAL) del televisor y el terminal Digital Audio Input del sistema
x
Home Theater.
Si se sigue la conexión anterior, el terminal Optical sólo produce la salida de 2 canales de audio. Sólo oirá sonido de los
x
altavoces frontales izquierdo y derecho y el subwoofer del sistema Home Theater. Para escuchar el canal de audio 5.1, conecte el
terminal DIGITAL AUDIO OUT (OPTICAL) del DVD/decodificador de satélite (es decir, dispositivo Anynet 1 o 2) directamente al
amplificador o al sistema Home Theater, no al televisor.
Puede conectar sólo un sistema Home Theater.
x
Puede conectar un dispositivo Anynet+ mediante el cable HDMI. Algunos cables HDMI pueden no admitir las funciones Anynet+.
x
Anynet+ funciona cuando el dispositivo de AV que admite Anynet+ se encuentra en estado de espera o de encendido.
x
Anynet+ admite hasta 12 dispositivos de AV en total. Tenga en cuenta que puede conectar hasta 3 dispositivos del mismo tipo.
x
Panel posterior del TV
Cable óptico
Dispositivo Anynet+ 1
Cable HDMI
Cable HDMI
Home Theater
Dispositivo Anynet+
2, 3, 4
Cable HDMI
38
Español
Page 89
Menú Anynet+
El menú Anynet+ cambia según el tipo y el estado de los dispositivos Anynet+ conectados al televisor.
Menú Anynet+ Descripción
Ver TV Cambia el modo Anynet+ al modo de emisión de TV.
Lista Disp. Muestra la lista de dispositivos de Anynet+.
MENU (nombre_dispositivo) Muestra los menús del dispositivo conectado. Por ejemplo, si se ha conectado un grabador
INFO (nombre_dispositivo) Muestra el menú de reproducción del dispositivo conectado. Por ejemplo, si se ha
Grabación : (*grabador) Inicia inmediatamente la grabación en el grabador. (Sólo está disponible en los dispositivos
Detener la grabación:
(*grabador)
Receptor La reproducción del sonido se efectúa a través del receptor.
Cuando hay conectados varios dispositivos de grabación, éstos se muestran como (*grabador), pero si sólo hay conectado un
dispositivo, éste se muestra como (*nombre_dispositivo).
de DVD, se muestra el menú del disco del grabador de DVD.
conectado un grabador de DVD, se muestra el menú del disco del grabador de DVD.
que admiten la función de grabación.)
Detiene la grabación.
Configuración de Anynet+
MENU → Aplicaciones → Anynet+ (HDMI-CEC) → ENTER
■ Configuración
Anynet+ (HDMI-CEC) (Apagado / Encendido): Para usar la función Anynet+, Anynet+ (HDMI-CEC) debe estar
configurado como Encendido.
✎
Cuando la función Anynet+ (HDMI-CEC) está desactivada, todas las operaciones relacionadas con Anynet+ se desactivan.
Apagado automático (No / Sí): Configuración de un dispositivo Anynet+ para que se desactive automáticamente cuando
el televisor se apaga.
✎
La fuente activa del televisor se debe configurar para que éste utilice la función Anynet+.
✎
Aunque un dispositivo externo aún esté grabando, se puede apagar.
04 Funciones avanzadas
Conmutación entre dispositivos Anynet+
1. Se muestran todos los dispositivos Anynet+ conectados al televisor.
✎
Si no encuentra el dispositivo que desea, pulse el botón rojo para actualizar la lista.
2. Seleccione un canal y pulse el botón ENTER
✎
Sólo cuando Anynet+ (HDMI-CEC) se configura como Encendido en el menú Aplicaciones, aparece el menú Lista Disp..
El cambio al dispositivo seleccionado puede tardar unos 2 minutos. No se puede cancelar la operación de cambio
x
de dispositivo mientras ésta se está efectuando.
Si ha seleccionado el modo de entrada externa pulsando el botón SOURCE, no podrá usar la función Anynet+.
x
Asegúrese de cambiar al dispositivo Anynet+ mediante la Lista Disp..
. Puede cambiar al dispositivo seleccionado.
Grabación
La grabadora de Samsung permite efectuar una grabación de un programa de televisión.
1. Seleccione Grabando.
✎
Cuando hay más de dos dispositivos de grabación
Cuando hay varios dispositivos de grabación conectados, éstos se muestran en una lista. Seleccione un
x
dispositivo de grabación en Lista Disp..
✎
Si no se muestra el dispositivo de grabación, seleccione Lista Disp. y pulse el botón rojo para buscar los dispositivos.
2. Pulse el botón EXIT para salir.
✎
Se pueden grabar las transmisiones de la fuente seleccionando Grabación: (nombre_dispositivo).
✎
Si pulsa el botón (REC), grabará lo que está viendo en ese momento. Si está viendo un vídeo desde otro
dispositivo, se graba el vídeo de éste.
✎
Antes de grabar, compruebe si la toma de antena está conectada correctamente al dispositivo de grabación. Para conectar
correctamente una antena a un dispositivo de grabación, consulte el manual del usuario del dispositivo de grabación.
Español
39
Page 90

Funciones avanzadas
Escucha a través de un receptor
Se puede escuchar sonido a través de un receptor (como Home Theater) en lugar de hacerlo mediante el Altavoz de TV.
1. Seleccione Receptor y configure como Encendido.
2. Pulse el botón EXIT para salir.
✎
Si el receptor sólo admite audio, quizás no se muestre la lista de dispositivos.
✎
El receptor no funcionará si no se ha conectado correctamente el terminal de entrada óptico del receptor con el
terminal DIGITAL AUDIO OUT (OPTICAL) del televisor.
✎
Cuando el receptor (sistema Home Theater) está establecido en Encendido, se puede oír la salida de sonido del
terminal óptico del televisor. Cuando se ve la televisión a través de un DTV (aire), el televisor envía el sonido de 5.1
canales al receptor. Cuando la fuente es un componente digital, como un DVD, y está conectada al televisor a
través de HDMI, sólo se oye el sonido de 2 canales del receptor.
✎
NOTA
Sólo puede controlar los dispositivos Anynet+ mediante el mando a distancia del televisor, no con los botones de éste.
x
El mando a distancia del televisor puede no funcionar en determinadas circunstancias. En ese caso, vuelva a
x
seleccionar el dispositivo Anynet+.
Las funciones Anynet+ no funcionan con los productos de otros fabricantes.
x
Solución de problemas de Anynet+
Problema Posible solución
Anynet+ no funciona. • Compruebe si el dispositivo es un dispositivo Anynet+. El sistema Anynet+ sólo admite dispositivos Anynet+.
Deseo iniciar Anynet+. • Compruebe si el dispositivo Anynet+ está debidamente conectado al TV y si la opción Anynet+ (HDMI-CEC)
Deseo salir de Anynet+. • Seleccione Ver TV en el menú Anynet+.
En la pantalla aparece el mensaje
“Conectando al dispositivo
Anynet+...”.
El dispositivo Anynet+ no funciona. • No se puede utilizar la función de reproducción si se está ejecutando Plug & Play (configuración inicial).
• Sólo se puede conectar un receptor (sistema Home Theater).
• Compruebe si el cable de alimentación de Anynet+ está debidamente conectado.
• Compruebe las conexiones de los cables de vídeo/audio/HDMI del dispositivo Anynet+.
• Compruebe si Anynet+ (HDMI-CEC) está establecido en Encendido en el menú de configuración de
Anynet+.
• Compruebe si el mando a distancia del televisor está en modo TV.
• Compruebe si el mando a distancia es compatible con Anynet+.
• Anynet+ no funciona en algunas situaciones. (Búsqueda de canales, funcionamiento de Media Play o
Plug & Play, (configuración inicial), etc.)
• Cuando se conecta o se desconecta el cable HDMI, se han de buscar de nuevo los dispositivos o volver a
apagar y encender el televisor.
• Compruebe si la función Anynet+ del dispositivo Anynet+ está activada.
del menú de configuración está establecida en Encendido.
• A continuación pulse el botón TOOLS para mostrar el menú Anynet+ y seleccionar el menú que desee.
• Pulse el botón SOURCE del mando a distancia del televisor y seleccione un dispositivo que no sea Anynet+.
• Pulse
funciona cuando no hay ningún dispositivo Anynet+ con sintonizador incorporado conectado.)
• El mando a distancia no se puede utilizar cuando se está configurando Anynet+ o cambiando a un modo de
visualización.
• Utilice el mando a distancia cuando haya terminado la configuración de Anynet+ o el cambio al modo de
visualización.
, PRE-CH y FAV.CH para cambiar el modo TV. (Tenga en cuenta que el botón de canal sólo
El dispositivo conectado no se
muestra.
El programa de televisión no se
puede grabar.
El sonido del televisor no sale a
través del receptor.
Español
40
• Compruebe si el dispositivo admite las funciones Anynet+.
• Compruebe si el cable HDMI está debidamente conectado.
• Compruebe si Anynet+ (HDMI-CEC) está establecido en Encendido en el menú de configuración de
Anynet+.
• Vuelva a efectuar una búsqueda de dispositivos Anynet+.
• Sólo puede conectar un dispositivo Anynet+ mediante el cable HDMI. Algunos cables HDMI pueden no
admitir las funciones Anynet+.
• Si la conexión se corta por una interrupción de la corriente o porque se ha desconectado el cable HDMI,
deberá repetir la búsqueda del dispositivo.
• Compruebe la conexión de la toma de antena del dispositivo de grabación.
• Conecte el cable óptico entre el televisor y el receptor.
Page 91

AllShare
AllShare™
3/7
MENU → Application → Vista de contenido →
AllShare → ENTER
Acerca de AllShare
AllShare conecta el televisor y los dispositivos/teléfonos
móviles compatibles de Samsung a través de una red. En el
televisor se pueden ver la llamadas entrantes, los mensajes
de SMS y las planificaciones de los teléfonos móviles.
Asimismo, se puede reproducir el contenido multimedia
guardado en los móviles y otros dispositivos (por ejemplo,
un PC), como vídeos, fotos y música controlándolo en
el televisor a través de la red. Además, se puede utilizar
el televisor para examinar páginas web en los teléfonos
móviles.
✎
Para obtener más información, visite “www.samsung.
com” o póngase en contacto con el centro de llamadas
de Samsung. Es posible que los dispositivos móviles
requieran la instalación de software adicional. Para
obtener más información, consulte la guía del usuario
de cada dispositivo.
Configuración de AllShare
Configuración
■ Mensaje ( Encendido / Apagado ): Habilita o inhabilita
la función de mensajes (para llamadas entrantes,
mensajes de SMS y las planificaciones de los teléfonos
móviles).
■ Multim. (Encendido / Apagado): Habilita o inhabilita
la función multimedia. Cuando ésta está habilitada,
se pueden reproducir vídeos, fotos y música desde el
teléfono móvil u otro dispositivo que admita AllShare.
■ ScreenShare ( Encendido / Apagado ): Habilita o
inhabilita la función ScreenShare para usar el teléfono
móvil como mando a distancia.
■ Nombre TV: Establece el nombre del televisor para que
resulte más fácil buscarlo en el teléfono móvil.
✎
Si selecciona Entrada usuario, puede escribir
el nombre del televisor mediante el teclado en
pantalla (OSK).
Mensaje / Multim. / ScreenShare
Muestra una lista de teléfonos móviles o dispositivos
conectados que se han configurado en el televisor para
utilizar las funciones Mensaje, Multim. o ScreenShare.
✎
La función Multim. está disponible en todos los
dispositivos móviles que admiten AllShare.
■ Permitido / Negado: Permite/bloquea el teléfono móvil.
■ Borrar: Elimina el teléfono móvil de la lista.
✎
Esta función sólo borra de la lista el nombre del
teléfono móvil. Si el dispositivo móvil borrado se
enciende o intenta conectarse con el televisor,
puede que aparezca de nuevo en la lista.
Uso de la función Mensaje
Mediante esta función puede ver las llamadas entrantes, los
mensajes de SMS y las planificaciones programadas en el
teléfono móvil a través de la ventana de alarma mientras ve
la televisión.
✎
NOTA
Para inhabilitar la ventana de la alarma, establezca
x
Mensaje como Apagado en Configuración de
AllShare.
Si se selecciona Aceptar, o bien si no se ha
x
seleccionado Aceptar después de que el mensaje
aparezca tres veces, el mensaje se borrará. El
mensaje no se elimina del teléfono móvil.
La ventana de alarma se puede ver mientras se usan
x
algunas aplicaciones como Media Play etc. Para
ver el contenido del mensaje, cambie al modo de
visualización de televisión.
Cuando se muestre un mensaje de un teléfono móvil
x
desconocido, seleccione el teléfono móvil en el
menú del mensaje en AllShare y seleccione Negado
para bloquear el teléfono.
Visualización de mensajes
Si llega un nuevo mensaje de SMS mientras ve la
televisión, aparece la ventana de alarma. Si hace clic en
el botón Aceptar, aparecerá el contenido del mensaje.
✎
Puede configurar la visualización de los mensajes
de SMS en su teléfono móvil. Para conocer el
procedimiento, consulte el manual del teléfono
móvil.
✎
Es posible que algunos caracteres se muestren en
blanco o dañados.
04 Funciones avanzadas
Conguración
Mensaje : Encendido
Multim. : Encendido
Mensaje
Multim.
ScreenShare : Encendido
Nombre TV : TV casa
ScreenShare
Seleccionar
Regresar
Salir
Conguración
Regresar
Español
41
Page 92
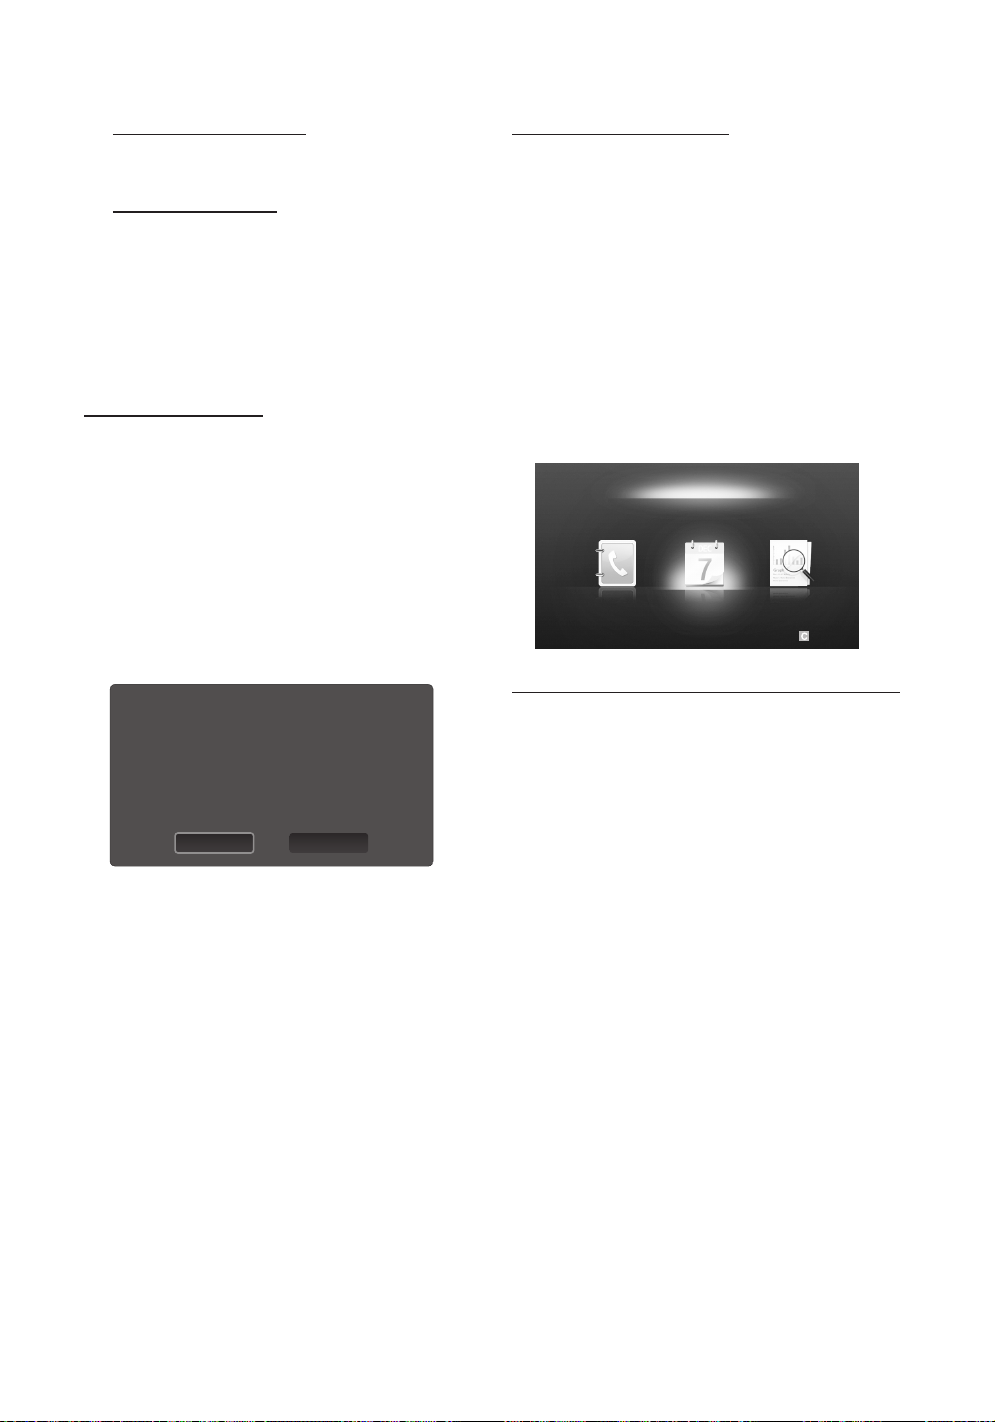
Funciones avanzadas
Alarma de llamada entrante
Si entra una llamada mientras ve la televisión, aparece la
ventana de alarma.
Alarma de planificación
Mientras ve la televisión, aparece la ventana de alarma
para mostrar el evento registrado.
✎
Puede configurar la visualización de los
contenidos planificados de su teléfono móvil. Para
conocer el procedimiento, consulte el manual del
teléfono móvil.
✎
Es posible que algunos caracteres especiales se
muestren en blanco o dañados.
Uso de la función Multim.
Aparece una ventana de alarma para informar al usuario
de que el contenido multimedia (vídeos, fotos, música)
enviado desde un teléfono móvil aparecerá en el televisor.
El contenido se reproduce automáticamente 3 segundos
después de que aparezca la ventana de alarma. Si pulsa
el botón RETURN o EXIT cuando aparece la ventana de
alarma, no se reproduce el contenido multimedia.
✎
NOTA
Si la función multimedia se ejecuta por primera vez,
x
aparece la ventana emegente de advertencia. Pulse
el botón ENTER para seleccionar Permtir; a
continuación se podrá utilizar la función Multimedia
en dicho dispositivo.
"Disp. desconocido 0" solicita autorización para reproducir el archivo
multimedia. Si desea autorizar la reproducción del archivo multimedia en
su dispositivo, presiones "Permtir"; en caso contrario, presione "Negar".
También puede cambiar la conguración (o volver a congurar) de esta
función en "AllShare Conguración".
Advertencia: tenga en cuenta que si su dispositivo está conectado a una
red no segura o desconocida, se puede reproducir contenido no deseado
o inapropiado. Si no está seguro acerca de la identidad de la red o la
propiedad del contenido, le recomendamos categóricamente que no
"Permtir" la solicitud de reproducción.
BloquerPermettre
Uso de la función ScreenShare
Mediante ScreenShare, se pueden examinar diferentes
contenidos web proporcionados por el teléfono móvil. Por
ejemplo, la imagen siguiente muestra una página de acceso
a los contenidos en un teléfono móvil. Puede leer archivos
del teléfono móvil y ver la agenda y el calendario en el
televisor. Asimismo, en la agenda, puede hacer una llamada
a otra persona o enviarle un SMS.
✎
NOTA
Se debe tener instalado ScreenShare en el
x
dispositivo/teléfono móvil de Samsung para utilizar
esta función.
Doc Viewer puede leer archivos con formato .doc,
x
pero no los puede modificar.
La pantalla puede variar según el dispositivo
x
conectado.
My Mobile
Contacts Calendar Doc Viewer
Seleccionar Regresar
Uso del teléfono móvil de Samsung para hacer funcionar el televisor
Antes de utilizar esta función, se debe establecer una
conexión con un teléfono móvil de Samsung que admita
las funciones ScreenShare. Cuando utilice el televisor con
el teléfono móvil, sólo se admiten los botones POWER,
,
✎
Aunque siga pulsando un botón de control (canal o
volumen) en el teléfono móvil, el valor sólo subirá o
bajará una unidad.
y MUTE.
Para desactivar la transmisión del contenido
x
multimedia desde el teléfono móvil, configure
Multim. como Apagado en la configuración de
AllShare.
Es posible que el contenido no se reproduzca en el
x
televisor, según la resolución y el formato.
Los botones ENTER y ◄/► puede que no
x
funcionen, según el tipo de contenido multimedia.
Mediante el dispositivo móvil se puede controlar la
x
reproducción de archivos multimedia. Para obtener
más información, consulte la guía del usuario del
teléfono móvil.
Cuando desee reproducir contenido multimedia
x
en el PC, seleccione el icono del PC en la pantalla
principal de AllShare. El menú Media Play del
televisor cambia automáticamente. Para obtener
más información, consulte “Media Play” (pág. 31).
Español
42
Page 93
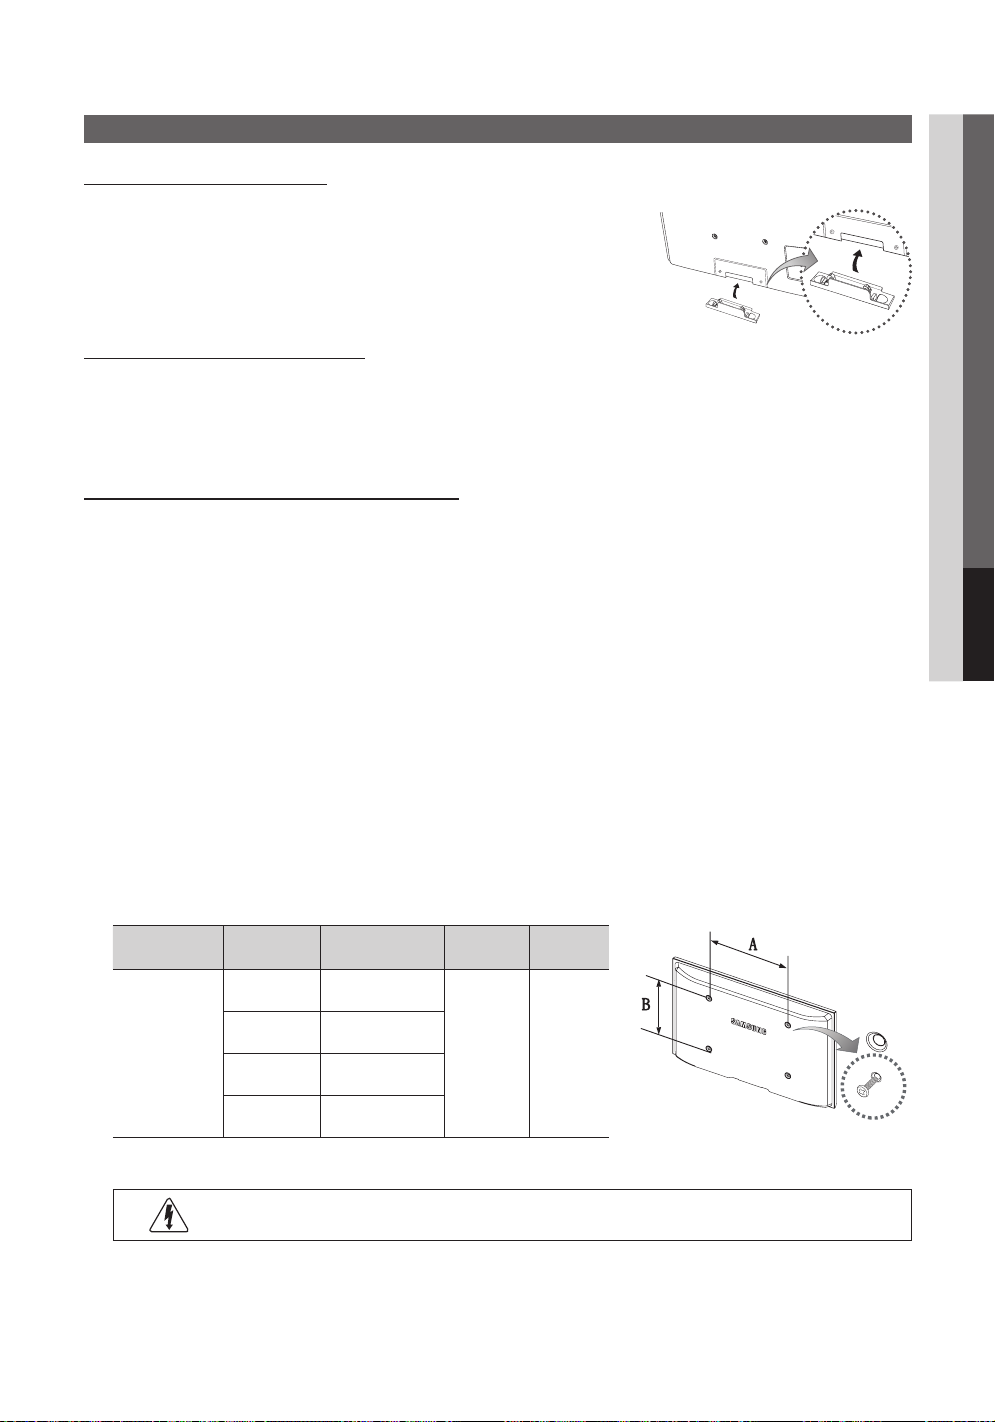
Información adicional
Instalación del montaje mural
Montaje del soporte de protección
Al instalar el televisor en una pared, coloque el soporte de protección como
se indica.
Soporte de protección
Instalación del equipo de montaje mural
El kit de montaje mural (se vende por separado) permite instalar el televisor en una pared.
Si desea más información sobre la instalación de los componentes para el montaje mural, consulte las instrucciones que se
facilitan con dichos elementos. Si necesita ayuda con la instalación del soporte mural, póngase en contacto con un técnico.
Samsung Electronics no se hace responsable de los daños causados al producto o al usuario si éste ha efectuado la
instalación del televisor.
Especificaciones del equipo de montaje mural (VESA)
✎
El kit de montaje mural se vende por separado.
Instale el montaje mural en una pared sólida, perpendicular al suelo. Para colocarlo en otros materiales de construcción,
póngase en contacto con el distribuidor más cercano. Si se instala en el techo o en una pared inclinada, puede caerse y
causar graves lesiones personales.
✎
NOTA
Las dimensiones estándar de los equipos de montaje mural se muestran en la tabla siguiente.
x
Al adquirir el equipo de montaje mural, también se distribuye un manual de instalación detallado y todas las piezas
x
necesarias para el montaje.
No use tornillos que no cumplan las especificaciones de tornillos estándar VESA.
x
No use tornillos con una longitud superior a la medida estándar o que no cumplan con las especificaciones de
x
tornillos estándar VESA. Los tornillos que sean demasiado largos pueden causar daños en el interior del televisor.
Para montajes murales que no cumplen las especificaciones de tornillos estándar VESA, la longitud de éstos puede
x
variar dependiendo de las especificaciones del montaje mural.
No apriete excesivamente los tornillos, ya que podría dañar el producto o provocar la caída de éste con riesgo de
x
causar lesiones personales. Samsung no se hace responsable de este tipo de accidentes.
Samsung no se hace responsable de daños o lesiones personales cuando se usa un montaje mural que no cumple
x
las especificaciones VESA o si el cliente no sigue las instrucciones de instalación del producto.
No monte el televisor con una inclinación de más de 15 grados.
x
Son necesarias dos personas para montar el televisor en la pared.
x
05 Información adicional
Familia de
producto
Televisor PDP
✎
Desenrosque los tornillos del kit antes de instalar el montaje mural en la pared.
pulgadas
42~50 400 x 400
58~63 600 x 400
70~79 800 x 400
80~ 1400 x 800
No instale el equipo de montaje mural mientras el televisor está encendido. Se podría producir una
descarga eléctrica con riesgo de causar lesiones personales.
Especificaciones
VESA (A * B)
Tornillo
estándar
M8 4
Cantidad
Español
43
Page 94
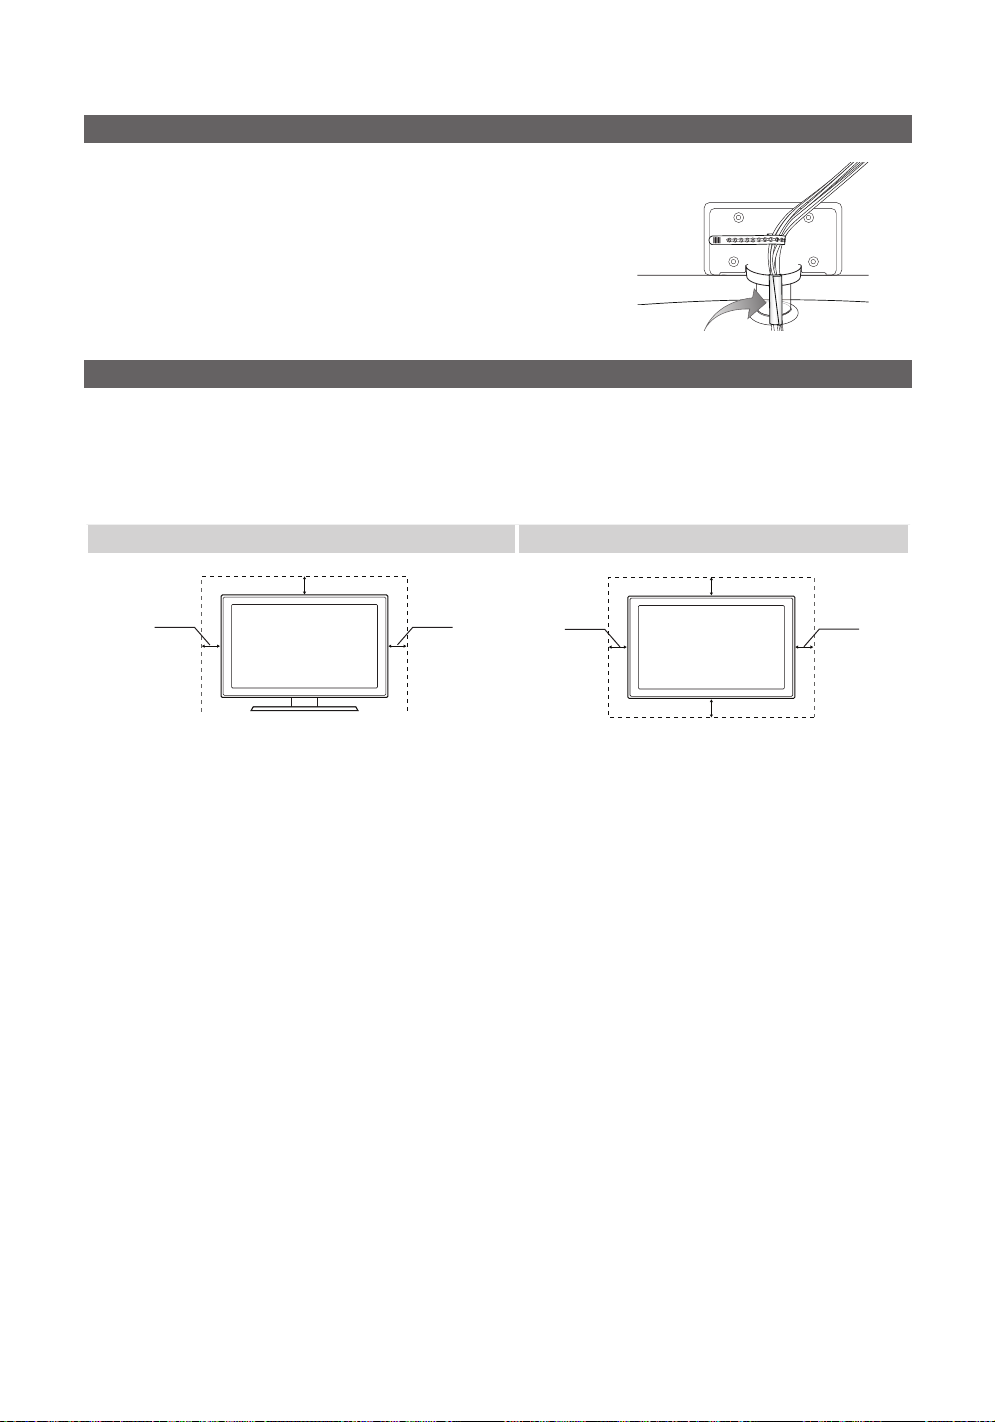
Información adicional
Montaje de los cables
Sujete los cables con el sujetacables para que éstos no sean visibles a través
del soporte transparente. Los cables demasiados rígidos o gruesos pueden
dañar los terminales de entrada después de un largo tiempo de uso.
Sujetacables
Seguridad en el espacio de instalación
Mantenga la distancia requerida entre el producto y otros objetos (por ejemplo, paredes) para asegurar la ventilación adecuada.
En caso contrario, se podría producir un incendio por un incremento de la temperatura interna del producto.
Cuando utilice un soporte o un montaje mural, use sólo las piezas proporcionadas por Samsung Electronics.
✎
Si utiliza piezas proporcionadas por otros fabricantes, podría tener problemas con el producto o éste se podría caer con el riesgo de causar
x
lesiones personales.
El aspecto puede variar según el producto.
✎
Instalación con un soporte Instalación con un montaje mural
4 pulgadas
4 pulgadas
4 pulgadas
4 pulgadas
4 pulgadas
4 pulgadas
4 pulgadas
44
Español
Page 95
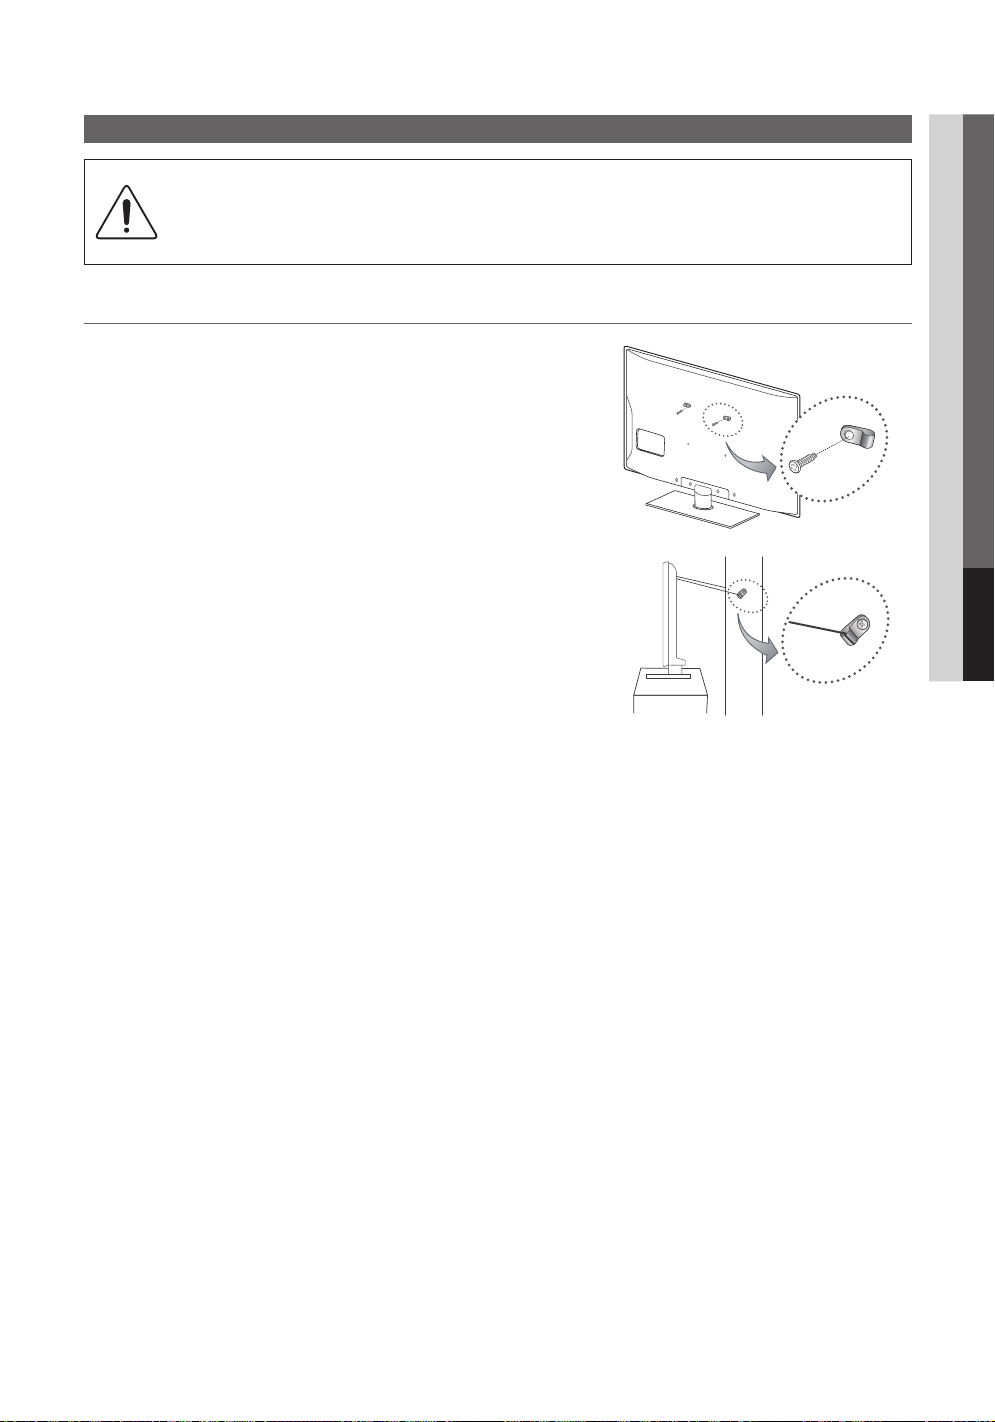
Fijación del televisor a la pared
Precaución: Tirar del televisor, empujarlo o colgarse de él puede provocar su caída. IEn especial, procure
que los niños no se cuelguen del televisor ni lo desestabilicen; éste podría caerse sobre ellos y causarles
lesiones graves o incluso la muerte. Siga las precauciones de seguridad del folleto de seguridad incluido con
el producto. Para mejorar la estabilidad y la seguridad instale un dispositivo antivuelco, como se explica a
continuación.
Para impedir que el televisor se caiga
1. Apriete firmemente las grapas sobre la pared con los tornillos. Asegúrese
de que los tornillos estén bien afirmados en la pared.
✎
Según el tipo de pared quizás necesite algún material adicional
para el anclaje.
✎
Las grapas, los tornillos y la cadena no se suministran con el
producto; deberá adquirirlos por separado.
2. Quite los tornillos de la parte central posterior del televisor y con ellos
monte las grapas en el televisor.
✎
Quizás con el televisor no vayan incluidos los tornillos. En tal caso
debe adquirirlos por separado con estas especificaciones.
3. Monte una cadena fuerte entre las grapas del televisor y de la pared de
manera que quede bien tensada.
✎
NOTA
Instale el televisor cerca de la pared para evitar que caiga hacia
x
atrás.
Las grapas de la pared han de estar a la misma o a menor altura
x
que las grapas del televisor.
Cuando desee mover el televisor deberá aflojar la cadena.
x
4. Compruebe que todas las conexiones estén bien aseguradas.
Compruébelas periódicamente para detectar cualquier signo de fatiga o
de fallo. Si tiene dudas sobre la seguridad de la instalación, póngase en
contacto con un instalador profesional.
05 Información adicional
Español
45
Page 96
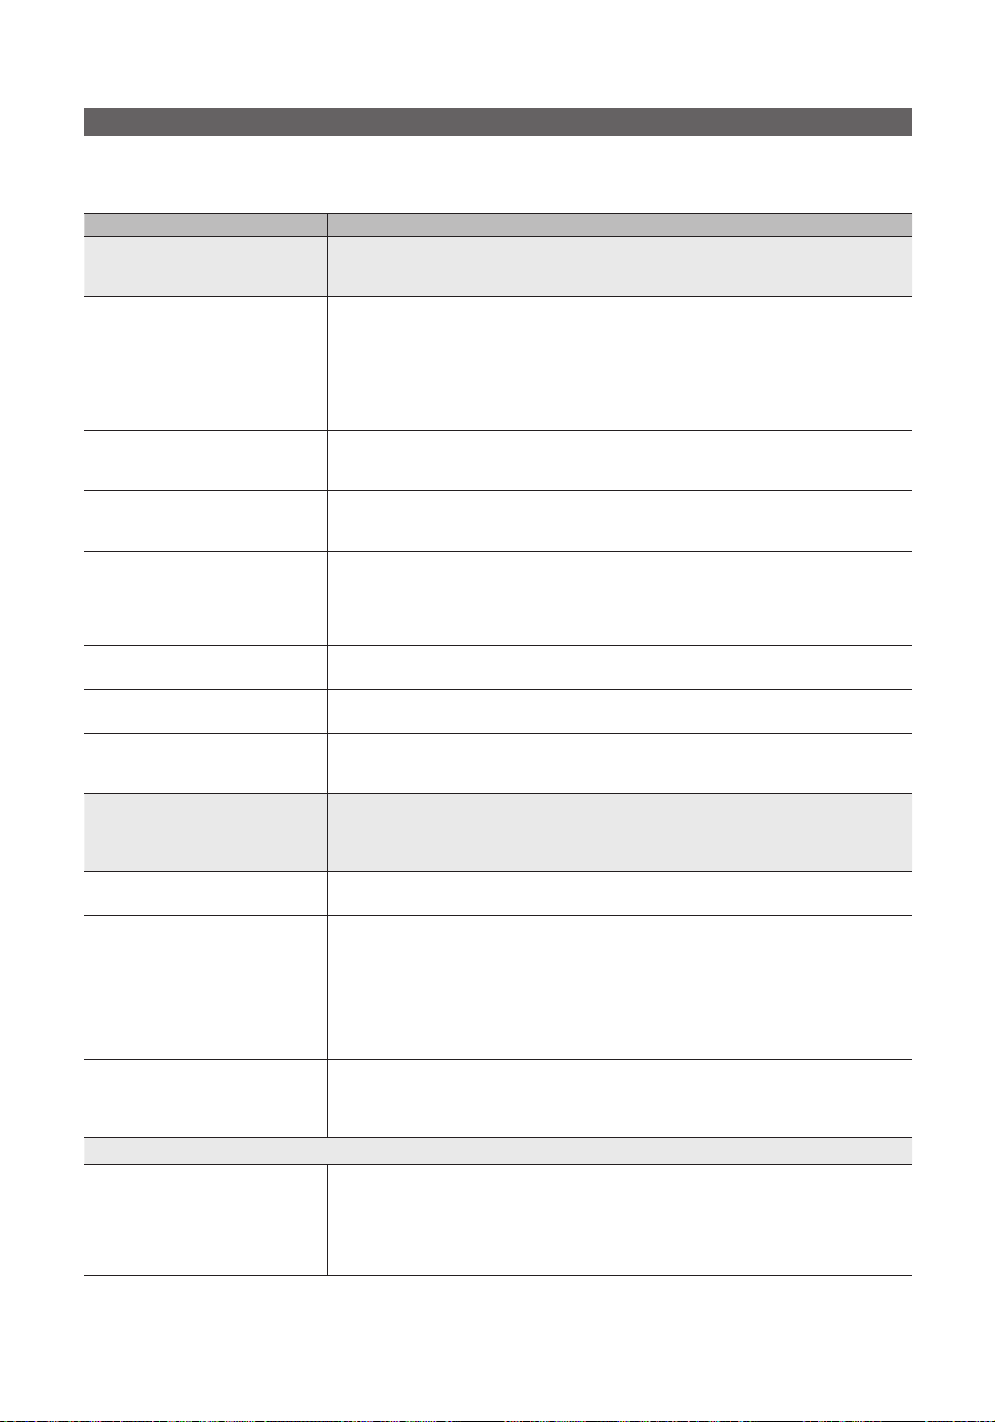
Información adicional
Solución de problemas
Si cree que el televisor tiene un problema, compruebe primero esta lista de posibles problemas y soluciones. Si ninguno de los
consejos funciona, visite “www.samsung.com” y haga clic en Support o llame al centro de atención al cliente de Samsung al
1-800-SAMSUNG.
Problemas Soluciones y explicaciones
Imagen deficiente
La imagen del televisor no se ve tan bien
como en la tienda.
La imagen se ve distorsionada: error de
macrobloques, microbloques, puntos,
pixelización.
El color es de mala calidad o falta. • Si utiliza una conexión de componentes, compruebe que los cables de los componentes estén
El color o el brillo es de mala calidad. • Ajuste las opciones de Imagen en el menú del TV. (vaya a los modos Imagen/Color/Brillo/
Hay una línea de puntos en el borde la
pantalla.
La imagen se ve sólo en blanco y negro. • Si está utilizando una entrada compuesta AV, conecte el cable de vídeo (amarillo) en el terminal verde
Al cambiar de canal, la imagen se congela,
se ve distorsionada o aparece con retraso.
Problemas del sonido En primer lugar, ejecute la Prueba de sonido para confirmar que el audio del televisor funciona
No hay sonido o se oye demasiado bajo
con el volumen al máximo.
La imagen es buena pero no hay sonido.
Los altavoces hacen un ruido inapropiado.
No hay imagen, no hay vídeo
El televisor no se enciende. • Compruebe que el cable de alimentación CA esté bien conectado en la toma de la pared y en el
En primer lugar, ejecute la Prueba de imagen para confirmar que el televisor muestre correctamente la imagen
de prueba. (Vaya a MENU - Soporte técnico - Autodiagnóstico - Prueba de imagen) (pág. 24)
Si la imagen de la prueba se muestra correctamente, la imagen deficiente puede provenir de la fuente o la señal.
• Si tiene un decodificador por cable/satélite analógico, cámbielo por un decodificador digital HD. Utilice un
cable HDMI o de componentes para conseguir una calidad de imagen de alta definición (HD).
• Suscriptores de cable/satélite: Pruebe con estaciones de alta definición (HD) en la oferta de canales.
• Conexión de antena: Pruebe con emisoras de alta definición (HD) después de ejecutar la programación
automática.
Muchos canales de alta definición (HD) mejoran los contenidos SD (definición estándar).
✎
• Ajuste la resolución de la salida de vídeo del decodificador de cable o satélite en 1080i o 720p.
• La compresión de los contenidos de vídeo puede causar imágenes distorsionadas, especialmente en
las escenas de movimiento rápido, como en los deportes y las películas de acción.
• Un nivel de señal débil puede causar imágenes distorsionadas. No es un problema del televisor.
conectados en los terminales correctos. Las conexiones incorrectas o sueltas pueden originar
problemas en el color o que la pantalla se quede en blanco.
Definición) (pág. 15)
• Vaya a MENU - Imagen - Solución Eco - Ahorro energía) (pág. 15)
• Intente reiniciar la imagen para ver la configuración de imagen predeterminada. (vaya a MENU Imagen - Reinicio de la imagen) (pág. 18)
• Si el tamaño de la imagen está establecido en Ajuste pantalla, cámbielo a 16:9 (pág. 17).
• Cambie la resolución del decodificador de cable/satélite.
de la entrada 1 de componentes del televisor.
• Si está conectado al receptor de cable, reinicie éste. (vuelva a conectar el cable de alimentación y
espere a que el decodificador se reinicie. Puede tardar unos 20 minutos.)
• Establezca la resolución de salida del decodificador de cable en 1080i o 720p.
correctamente.
(Vaya a MENU - Soporte técnico - Autodiagnóstico - Prueba de sonido) (pág. 24)
Si el audio es correcto, el problema del sonido puede provenir de la fuente o la señal.
• Compruebe el volumen del dispositivo (decodificador de cable/satélite, DVD, Blu-ray, etc.) conectado
al televisor.
• Configure la opción Seleccionar altavoz como Altavoz de TV en el menú de Sonido (pág. 19).
• Si utiliza un dispositivo externo, compruebe que los cables de audio estén conectados a los terminales de entrada de
audio correctos del televisor.
• Si utiliza un dispositivo externo, compruebe que la opción de salida de audio del dispositivo (por ejemplo, quizás deba
cambiar la opción de audio del decodificador de cable a HDMI si tiene conectado HDMI al televisor).
• Si se utiliza un cable DVI a HDMI, se necesita un cable de audio independiente.
• Si el televisor tiene un terminal de auriculares, asegúrese de que éstos no estén conectados.
• Reinicie el dispositivo conectado volviendo a conectar el cable de alimentación del dispositivo.
• Compruebe las conexiones del cable Compruebe que no haya un cable de vídeo conectado a una entrada de audio.
• Para la conexión de la antena o el cable, compruebe la potencia de señal. Un nivel de señal débil puede causar
distorsiones en el sonido.
• Ejecute la Prueba de sonido como se ha explicado anteriormente.
televisor.
• Compruebe que la toma de la pared funcione.
• Intente pulsar el botón POWER del televisor para asegurarse de que el problema no está en el
mando a distancia. Si el televisor se enciende, consulte “El mando a distancia no funciona” a
continuación.
46
Español
Page 97
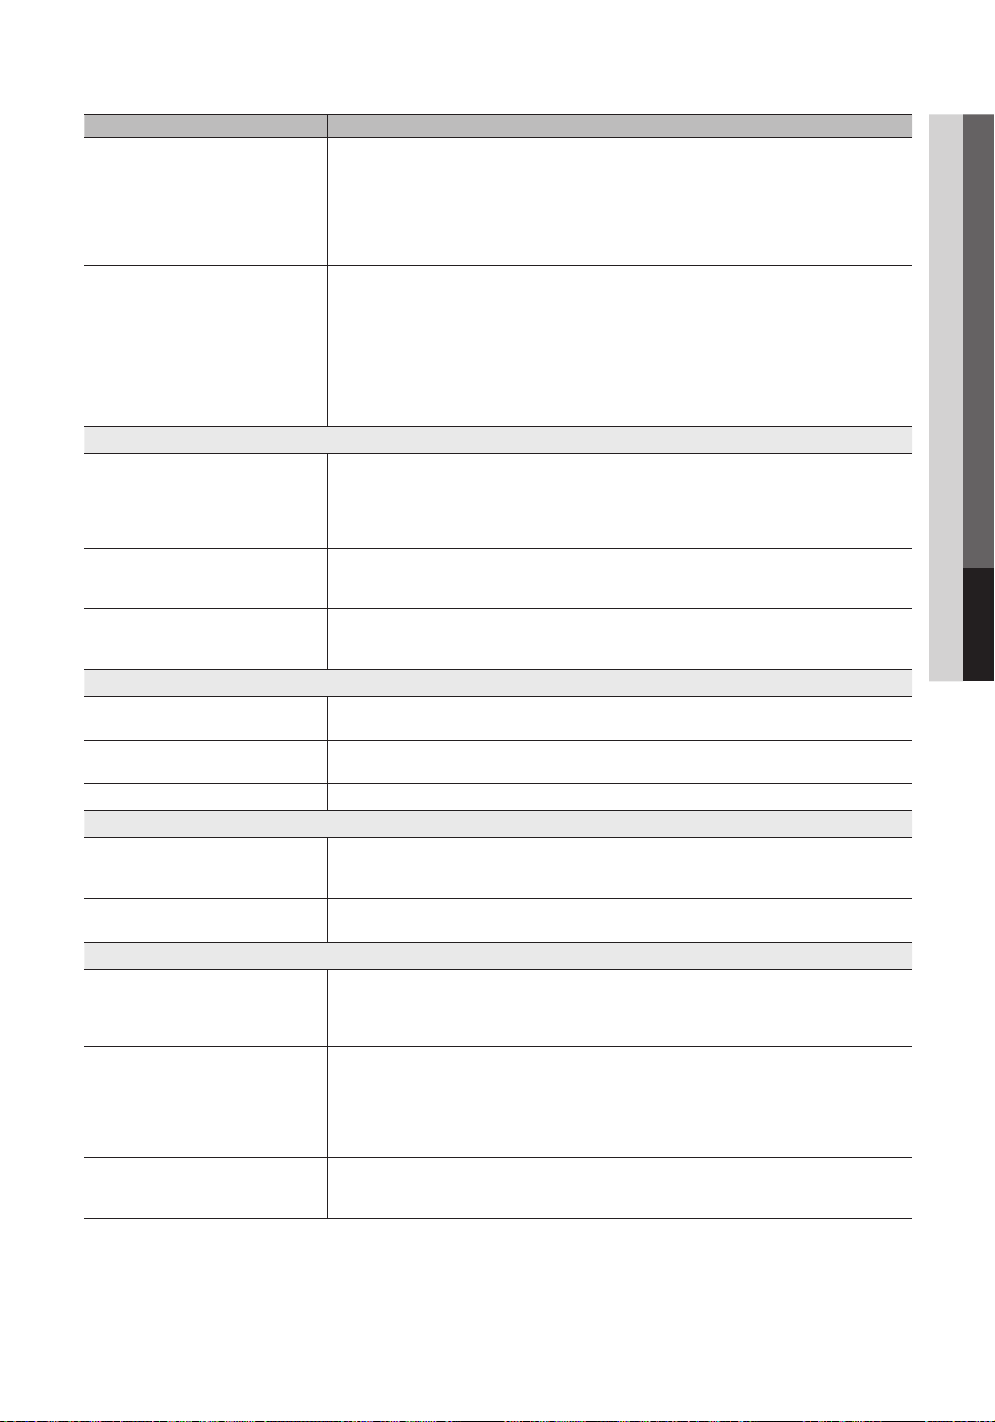
Problemas Soluciones y explicaciones
El televisor se apaga automáticamente. • Compruebe si la opción Temporizador está establecida en Apagado en el menú Configuración
No hay imagen ni vídeo. • Compruebe las conexiones de los cables (desconecte y vuelva a conectar todos los cables del
Conexión RF (Cable/Antena)
El televisor no recibe todos los canales. • Compruebe que el cable coaxial esté firmemente conectado.
No hay subtítulos en los canales digitales. • Compruebe el menú de configuración de los subtítulos. Intente cambiar el modo Modo de Subtítulo
La imagen se ve distorsionada: error de
macrobloques, microbloques, puntos,
pixelización.
Conexión de PC
Aparece un mensaje de “Modo no
compatible".
“PC” siempre aparece en la lista de fuentes
aunque el PC no esté conectado.
La imagen es buena pero no hay sonido. • Si utiliza una conexión HDMI, compruebe la configuración del audio del PC.
Conexión de la red
Fallo en la conexión de la red inalámbrica. • Para utilizar la red inalámbrica se requiere la mochila USB inalámbrica Samsung.
Error al actualizar el software a través de
la red.
Otros
Barras horizontales rodantes de color
púrpura/verde y zumbidos en los altavoces
del televisor con la conexión del cable de
componentes.
La imagen no se muestra en pantalla
completa.
El mando a distancia no funciona. • Cambie las pilas del mando a distancia; haga coincidir los polos (+/–).
(pág. 20).
• Si el televisor está conectado a un PC, compruebe la configuración de la alimentación de éste.
• Compruebe que el cable de alimentación CA esté bien conectado en la toma de la pared y en el
televisor.
• Cuando se ve la televisión con una conexión de antena o cable, el televisor se apaga tras 10-15
minutos si no hay señal.
televisor y de los dispositivos externos).
• Establezca la salida de vídeo del dispositivo externo (decodificador de cable/satélite, DVD, Blu-ray,
etc.) de modo que coincida con las conexiones de la entrada de TV. Por ejemplo, si la salida de un
dispositivo externo es HDMI, se debe conectar a una entrada HDMI en el televisor.
• Compruebe que los dispositivos externos estén encendidos.
• Asegúrese de seleccionar la fuente correcta del TV pulsando el botón SOURCE del mando a
distancia.
• Reinicie el dispositivo conectado volviendo a conectar el cable de alimentación del dispositivo.
• Ejecute Prog. Auto para añadir los canales disponibles a la lista de canales. Vaya a MENU - Canal
- Prog. Auto, seleccione Auto y asegúrese de que en el menú esté establecido el tipo correcto de
señal de TV por cable. Hay 3 opciones (STD, HRC e IRC) (pág. 14)
• Compruebe la posición de la antena.
de Servicio1 a CC1 (p. 23).
• Algunos canales no tienen datos de subtítulos.
• La compresión de los contenidos de vídeo puede causar imágenes distorsionadas especialmente en
las escenas de movimiento rápido, como en los deportes y las películas de acción.
• Un nivel de señal débil puede causar imágenes distorsionadas. No es un problema del televisor.
• Establezca la resolución de salida del PC de modo que coincida con la resolución admitida por el
televisor (pág. 11).
• Esto es normal; “PC” siempre aparece en la lista de fuentes aunque no haya ningún PC conectado.
• Compruebe que la conexión de la red esté establecida como Inalámbrico (pág. 28).
• El televisor se debe conectar a un compartidor (enrutador) IP inalámbrico.
• Realice la prueba de la red en el menú Configuración (pág. 23).
• Si tiene la versión más actual del software, no se realizará la actualización de éste.
• Desconecte los terminales de audio izquierdo y derecho del decodificador. Si los zumbidos cesan,
esto indica que el decodificador tiene un problema en la conexión a tierra. Sustituya los cables de
vídeo de componentes por una conexión HDMI.
• En cada lado se muestran barras negras en los canales de alta definición (HD) cuando se muestran
contenidos SD mejorados (4:3).
• Barras negras en las partes inferior y superior cuando se ven películas que tienen diferentes formatos
que el televisor.
• Ajuste la opción del tamaño de imagen del dispositivo externo o del televisor al modo de pantalla
completa.
• Limpie la ventana de transmisión del sensor del mando a distancia.
• Apunte con el mando a distancia directamente al televisor desde una distancia de 1,5 -2 metros.
05 Información adicional
Español
47
Page 98

Información adicional
Problemas Soluciones y explicaciones
El televisor de plasma emite un zumbido. • Los televisores de plasma normalmente emiten un zumbido suave. Esto es normal. Lo causan las
Problema de retención de imagen
(desgaste).
El mando a distancia del cable/
decodificador no enciende ni apaga el
televisor ni ajusta el volumen.
Subtítulo en el menú del televisor aparece
atenuado.
Aparece un mensaje de “Modo no
compatible".
Se advierte un olor a plástico que proviene
del televisor.
La Información señal del televisor no
está disponible en el menú de prueba de
autodiagnóstico.
El televisor está inclinado hacia un lado. • Retire la base del soporte de televisor y vuelva a montarla.
El menú del canal se ve atenuado (no
disponible)
La configuración se pierde después de
30 minutos o cada vez que se apaga el
televisor.
Pérdida intermitente de audio o vídeo. • Compruebe las conexiones de los cables y vuelva a conectarlos.
Puede ver pequeñas partículas si mira de
cerca el borde del marco del televisor
El menú PIP no está disponible. • La función PIP sólo está disponible cuando se utiliza una fuente HDMI, PC o de componentes.
Aparece en la pantalla POP (anuncio de
rótulo interno del televisor).
cargas eléctricas que se utilizan para crear las imágenes en la pantalla.
• Si el zumbido es fuerte, quizás se haya configurado el brillo del televisor demasiado alto. Pruebe a
establecer un nivel de brillo menor.
• También se puede originar un zumbido fuerte si la parte posterior del televisor de plasma está
demasiado cerca de la pared o de otra superficie dura. También puede probar a cambiar el recorrido
de los cables de conexión.
• Una instalación inadecuada del montaje mural puede crear un ruido excesivo.
• Esta pantalla está equipada con tecnología de reducción de la "quemadura de pantalla" para reducir
la posibilidad de que se queme. La tecnología Cambio de píxel permite definir el movimiento de la
imagen arriba o abajo (línea vertical) y de lado a lado (punto horizontal).
• Programe el mando a distancia del decodificador de cable/satélite para que haga funcionar el
televisor. Consulte el manual del decodificador de cable/satélite para conocer el código del TV
SAMSUNG.
• No se puede seleccionar Caption Subtítulo en el menú del televisor cuando está conectado a través
de HDMI o Component (pág. 22).
• Se debe activar Subtítulo en el dispositivo externo (pág. 22).
• Compruebe la resolución que admite el televisor y ajuste en consecuencia la resolución de salida del
dispositivo externo. Consulte cómo configurar la resolución en la página 10 de este manual.
• Este olor es normal y desaparece con el tiempo.
• Esta función sólo está disponible en los canales digitales con las conexiones de antena/RF/Coaxial
(pág. 24).
• El menú Canal sólo está disponible cuando está seleccionada la fuente TV.
• Si el televisor está en el modo Demo comercio, la configuración del audio y la imagen se
restablecerá cada 30 minutos. Cambie la configuración del modo Demo comercio al modo Uso
domiciliario en el procedimiento Plug & Play. Pulse el botón SOURCE para seleccionar el modo TV;
vaya a MENU → Configuración → Plug & Play → ENTER
• La pérdida de audio o vídeo se puede deber a que los cables son demasiado rígidos o gruesos.
Debe asegurarse de que los cables sean lo suficientemente flexibles para un largo periodo de uso. En
un montaje mural del televisor, es aconsejable utilizar cables con conectores de 90 grados.
• Esto es una particularidad del diseño del producto y no es un defecto.
• Seleccione el modo Uso domiciliario en el modo Plug & Play. Para obtener información, consulte la
función Plug & Play (pág. 9).
(pág. 8).
✎
Algunas de las imágenes y funciones mostradas sólo están disponibles en unos modelos determinados.
Español
48
Page 99
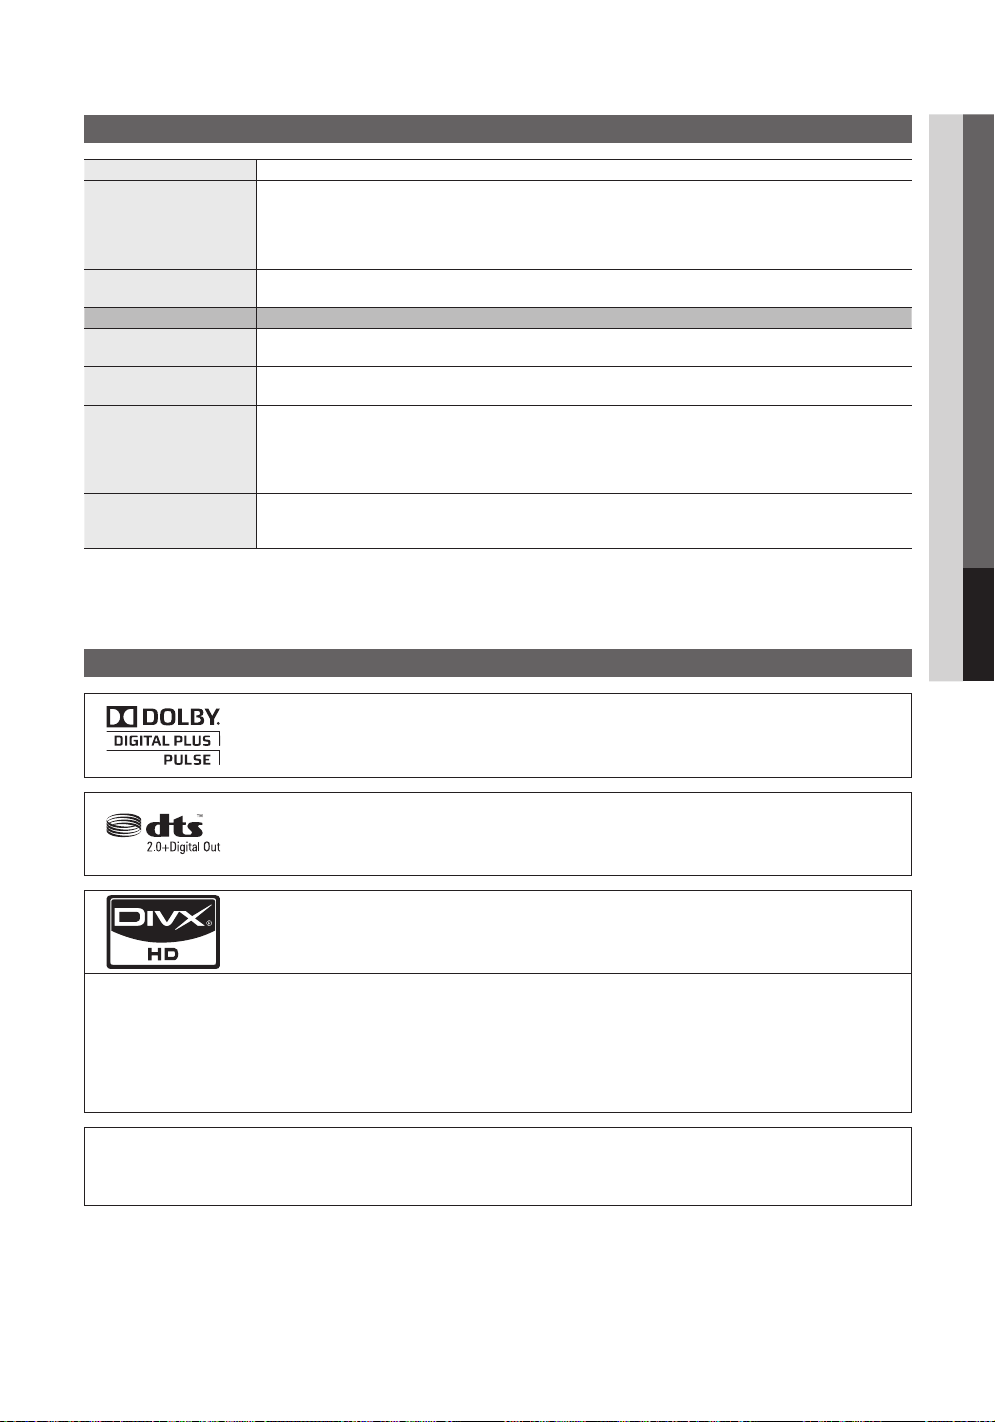
Especificaciones
Panel nativo 1920 x 1080 a 60 Hz
Consideraciones medioambientales
Temperatura de funcionamiento
Humedad de funcionamiento
Temperatura de almacenamiento
Humedad de almacenamiento
Soporte giratorio
(izquierda / derecha) -20˚ ~ 20˚
Nombre del modelo PL50C550
Tamaño de pantalla
(diagonal)
Sonido
(salida) 10 W x 2
Dimensiones (An x Pr x Al)
Cuerpo principal
Con el soporte
Peso
Sin el soporte
Con el soporte
✎
El diseño y las especificaciones pueden cambiar sin previo aviso.
✎
Para obtener más información sobre la fuente de alimentación y el consumo de energía, consulte la etiqueta adherida al
10°C a 40°C (50°F a 104°F)
10% al 80%, sin condensación
-20°C a 45°C (-4°F a 113°F)
5% al 95%, sin condensación
50 pulgadas
(50,2 pulgadas medidas diagonalmente)
47,8 x 28,8 x 2,8 pulgadas
(1214,5 x 732,5 x 71 mm)
47,8 x 31,4 x 11,4 pulgadas
(1214,5 x 797,5 x 290 mm)
52,9 lbs (24 Kg)
62,8 lbs (28,5 Kg)
producto.
Licencia
05 Información adicional
Fabricado bajo licencia de Dolby Laboratories. Dolby y el símbolo de la doble D son marcas
comerciales de Dolby Laboratories.
Manufactured under license under U.S. Patent #’s: 5,451,942; 5,956,674; 5,974,380; 5,978,762;
6,487,535 & other U.S. and worldwide patents issued & pending. DTS and the Symbol are
registered trademarks. & DTS 2.0+ Digital Out and the DTS logos are trademarks of DTS, Inc.
Product Includes software. © DTS, Inc. All Rights Reserved.
DivX Certified to play DivX video up to HD 1080p, including premium content.
ABOUT DIVX VIDEO: DivX® is a digital video format created by DivX,Inc. This is an official DivX Certified device that
plays DivX video. Visit www.divx.com for more information and software tools to convert your files into DivX video.
ABOUT DIVX VIDEO-ON-DEMAND: This DivX Certified® device must be registered in order to play DivX Video-onDemand (VOD) content. To generate the registration code, locate the DivX VOD section in the device setup menu.
Go to vod.divx.com with this code to complete the registration process and learn more about DivX VOD.
Pat. 7,295,673; 7,460,688; 7,519,274
Aviso de la licencia del código abierto
En el caso de que se utilice un software de código abierto, la licencia sobre éste está disponible en el menú del producto.
El aviso de la licencia del código abierto sólo está disponible en inglés.
Español
49
Page 100

Información adicional
Índice
A
Actualización del software 25
Ahorro energía 15
Ajuste automático 18
AllShare 41
Altavoz de TV 19
Altavoz externo 19
Amplificar 19
Antena 13
Anynet+ 39
AUDIO OUT 10
Autodiagnóstico 24
B
Balance de blanco 16
Balance I/D 19
Botón ON/OFF 7
Brillo 15
C
Cambiar Código 22
Canal favorito 13
Componente 9
Conexión a un dispositivo de audio 9
Conexión a un PC 10
Conexión de la red 26
Configuración de red 27
Contraste Dinám. 16
D
Definición 15
DIGITAL AUDIO OUT 10, 38
Dinámico 15
DivX® VOD 37
D-sub 11
E
Ecualizador 19
Edición de canales 14
Edición del nombre 12
Espacio de instalación 44
Especificaciones 50
F
Formatos de vídeo 34
Fotos 35
Frequency 11
G
Girar 37
Grabación 39
H
HDMI 9, 38
Herramientas 3
Home Theater 10, 38
I
Idioma 22
Indicador de encendido 6
Información de señal 24
L
License 49
Lista de fuentes 12
M
Mando a distancia 7
Melodía 23
Menú de canales 13
Modo de espera 6
Modo de repetición 37
Modo película 17
Mono 19
Montaje mural 43
Música 35
Música de fondo 37
N
Navegar 12
P
Pilas 7
PIP 24
Plug & Play 8
R
Receptor 40
Reloj 20
Reproductor multimedia 31
Resolución óptima 11
S
Secuencia 35
Seleccionar altavoz 19
Seleccionar todo 15
Sensor Eco 16
Símbolo 3
Sintonización fina 15
Sólo modo RGB 16
Solución de problemas 46
Soporte de protección 43
Sujetacables 4, 44
T
Tamaño de imagen 17, 37
Temporizador 20
Temporizador 20
Tibio 16
Título 37
Tono Color 16
Tono del negro 16
Tono Piel 16
Transparenc. menú 23
U
Unidad USB 25, 31
V
Vídeos 33
Virtual Surround 19
Vista básica 36
Vol.Auto 19
Volumen 19
50
Español
 Loading...