

Page 1

Contact SAMSUNG WORLD-WIDE
If you have any questions or comments relating to Samsung products, please contact the SAMSUNG customer care center.
Contacte con SAMSUNG WORLD WIDE
Si tiene alguna pregunta o comentario referente a nuestros productos, por favor contacte con nuestro Servicio de Atención
al Cliente.
Country
ARGENTINE 0800-333-3733 www.samsung.com/ar
BRAZIL
CHILE 800-SAMSUNG(726-7864) www.samsung.com/cl
COLOMBIA 01-8000112112 www.samsung.com.co
COSTA RICA 0-800-507-7267 www.samsung.com/latin
ECUADOR 1-800-10-7267 www.samsung.com/latin
EL SALVADOR 800-6225 www.samsung.com/latin
GUATEMALA 1-800-299-0013 www.samsung.com/latin
HONDURAS 800-7919267 www.samsung.com/latin
JAMAICA 1-800-234-7267 www.samsung.com/latin
MEXICO 01-800-SAMSUNG(726-7864) www.samsung.com/mx
NICARAGUA 00-1800-5077267 www.samsung.com/latin
PANAMA 800-7267 www.samsung.com/latin
PUERTO RICO 1-800-682-3180 www.samsung.com/latin
REP. DOMINICA 1-800-751-2676 www.samsung.com/latin
TRINIDAD & TOBAGO 1-800-SAMSUNG(726-7864) www.samsung.com/latin
VENEZUELA 0-800-100-5303 www.samsung.com/latin
Customer Care Center
0800-124-421
4004-0000
www.samsung.com/br
Web Site
Plasma TV
user manual
BN68-01924A-00
imagine the possibilities
Thank you for purchasing this Samsung product.
To receive more complete service, please
register your product at
www.samsung.com/global/register
Model Serial No.
Page 2

Important Warranty Information Regarding Television Format Viewing
Wide screen format PDP Displays (16:9, the aspect ratio of the screen width to height) are primarily designed to view wide
screen format full-motion video. The images displayed on them should primarily be in the wide screen 16:9 ratio format,
or expanded to fill the screen if your model offers this feature and the images are constantly moving. Displaying stationary
graphics and images on screen, such as the dark side-bars on nonexpanded standard format television video and
programming, should be limited to no more than 5% of the total television viewing per week.
Additionally, viewing other stationary images and text such as stock market reports, video game displays, station logos,
web sites or computer graphics and patterns, should be limited as described above for all televisions. Displaying stationary
images that exceed the above guidelines can cause uneven aging of PDP Displays that leave subtle, but permanent
burned-in ghost images in the PDP picture. To avoid this, vary the programming and images, and primarily display
full screen moving images, not stationary patterns or dark bars.
On PDP models that offer picture sizing features, use these controls to view different formats as a full screen picture.
Be careful in the selection and duration of television formats used for viewing. Uneven PDP aging as a result of format
selection and use, as well as burned-in images, are not covered by your Samsung limited warranty.
© 2009 Samsung Electronics Co., Ltd. All rights reserved.
English - 2
Page 3

User Instructions
English - 3
Screen Image retention
Do not display a still image (such as on a video game) on the plasma display panel for more than several minutes as it can cause
screen image retention. This image retention is also known as “screen burn”. To avoid such image retention, refer to page 23 of this
manual to reduce the degree of brightness and contrast of the screen when displaying a still image.
Altitude
The PDP can only operate normally at heights under 6500ft.
Heat on the top of the Plasma TV
The top side of the product may be hot after long periods of use as heat dissipates from the panel through the vent hole in the upper
part of the product.
This is normal and does not indicate any defect or operation failure of the product.
However, children should be prevented from touching the upper part of the product.
The product is making a ‘cracking’ noise.
A ‘cracking’ noise may occur when the product contracts or expands due to a change in the surrounding environment such as
temperature or humidity. This is normal and not a defect of the unit.
Cell Defects
The PDP uses a panel consisting of 2,360,000(HD-level) to 6,221,000(FHD-level) pixels which require sophisticated technology to
produce. However, there may be a few bright or dark pixels on the screen. These pixels will have no impact on the performance of the
product.
Avoid operating the TV at temperatures below 41°F (5°C)
A still image displayed too long may cause permanent damage to the PDP Panel.
Watching the Plasma TV in 4:3 format for a long period of time may leave traces of borders displayed on
the left, right and center of the screen caused by the difference of light emission on the screen.
Playing a DVD or a game console may cause similar effects to the screen.
Damages caused by the above effect are not covered by the Warranty.
After-images on the Screen.
Displaying still images from Video games and PC for longer than a certain period of time may produce partial after-images.
To prevent this effect, reduce the ‘brightness’ and ‘contrast’ when displaying still images for a long time.
Warranty
Warranty does not cover any damage caused by image retention.
Burn-in is not covered by the warranty.
Installation
Be sure to contact an authorized service centre, when installing your set in a location with heavy dust, high or low temperatures, high
humidity, chemical substance and where it operates continually such as the airport, the train station etc. Failure to do so may cause a
serious damage to your set.
Page 4

Contents
Connecting and Preparing Your TV
English
List of Features ..........................................................................5
■
Checking Parts ..........................................................................5
■
Viewing the Control Panel .........................................................6
■
Viewing the Connection Panel...................................................7
■
Remote Control .........................................................................8
■
Connections
Connecting VHF and UHF Antennas .........................................9
■
Connecting Cable TV ................................................................9
■
Connecting a DVD / Blu-Ray Player or Cable Box / Satellite
■
receiver (Set-Top Box) via HDMI ............................................. 11
Connecting a DVD /Blu-Ray Player or Cable Box / Satellite
■
receiver (Set-Top Box) via DVI ................................................ 11
Connecting a DVD / Blu-Ray Player or Cable Box / Satellite
■
receiver (Set-Top Box) via Component cables ........................12
Connecting a Camcorder ........................................................12
■
Connecting a VCR ...................................................................13
■
Connecting an Amplier / DVD Home Theater ........................14
■
Connecting a PC .....................................................................15
■
Operation
Turning the TV On and Off ......................................................16
■
Changing Channels ................................................................. 16
■
Adjusting the Volume ...............................................................16
■
Using the TOOLS Button .........................................................17
■
Viewing the Display .................................................................17
■
Viewing the Menus ..................................................................18
■
Plug & Play Feature ................................................................19
■
Channel Control
Storing Channels ..................................................................... 20
■
Managing Channels ................................................................20
■
PC Display
Using Your TV as a Computer (PC) Display ............................25
■
Display Modes ......................................................................... 26
■
Setting up the TV with your PC ...............................................26
■
Sound Control
Changing the Sound Settings ..................................................27
■
Function Description
Conguring the Setup Menu ....................................................29
■
Viewing the Picture in Picture (PIP).........................................31
■
Setting the Time ......................................................................32
■
Source List / Edit Name ...........................................................33
■
+
Anynet
Connecting Anynet+ Devices ..................................................34
■
Setting Up Anynet+ .................................................................35
■
Scanning and Switching between Anynet+ Devices................35
■
Recording ................................................................................36
■
Listening through a Receiver (Home theater) .........................37
■
Troubleshooting for Anynet+ ..................................................37
■
Appendix
Troubleshooting .......................................................................38
■
Preparation before installing the Wall-Mount ...........................39
■
Using the Stand-Base .............................................................39
■
How to attach the Stand-Base .................................................39
■
Securing the TV to the Wall .....................................................40
■
Securing the Installation Space ............................................... 40
■
Wall Mount Kit Specications (VESA) .....................................41
■
Specications ..........................................................................42
■
Picture Control
Changing the Picture Settings ................................................. 21
■
Using the 3D Function ............................................................. 24
■
Symbol
Press Note One-Touch Button TOOLS
N O T
English - 4
Page 5

Connecting and Preparing Your TV
English - 5
List of Features
Adjustable picture settings that can be stored in the TV’s memory.
•
Automatic timer to turn the TV on and off.
•
A special sleep timer.
•
Excellent Digital Interface & Networking :
•
With a built-in HD digital tuner, non-subscription HD broadcasts can be viewed with no Cable Box/Satellite receiver (Set-Top Box)
needed.
HDMI/DVI connection of your PC to this TV.
•
SRS TruSurround HD provides a virtual surround system.
•
Checking Parts
Please make sure the following items are included with your TV. If any items are missing, contact your dealer.
The items' color and shape may vary depending on the model.
N
Remote Control /
AAA Batteries (Not available in all
locations)
Cleaning Cloth Cover-Bottom
Power Cord Owner’s Instructions Warranty Card /
(Refer to page 39)
Holder-Ring (4ea)
(Refer to page 39)
Safety Guide Manual
(Not available in all locations)
Page 6

Viewing the Control Panel
The buttons on the lower-right panel control your TV’s basic features, including the on-screen menu.
To use the more advanced features, you must use the remote control.
The product color and shape may vary depending on the model.
N
If you touch the front panel button, the each button will be operated.
N
SOURCE E
1
Toggles between all the available input sources
(TV, AV1, AV2, Component1, Conponent2, PC, HDMI1, HDMI2/DVI, HDMI3).
In the on-screen menu, use this button as you use the ENTERE button on the remote control.
MENU
2
Press to see an on-screen menu of your TV’s features.
+ VOL –
3
Press to increase or decrease the volume. In the on-screen menu, use the + VOL – buttons as you would use the
◄ and ► buttons on the remote control.
< CH >
4
Press to change channels. In the on-screen menu, use the < CH > buttons as you would use the ▲ and ▼ buttons on the
remote control.
POWER INDICATOR
5
Blinks and turns off when the power is on and lights up in stand-by mode.
P (POWER)
6
Press to turn the TV on and off.
REMOTE CONTROL SENSOR
7
Aim the remote control towards this spot on the TV.
SPEAKERS
8
English - 6
Page 7

Viewing the Connection Panel
English - 7
Use the connection panel jacks to connect A/V components that will be connected continuously, such as Blu-Ray DVD Players
or a VCR.
The product color and shape may vary depending on the model.
N
TV Rear Panel TV Side Panel
1
POWER IN
Connects the supplied power cord.
SERVICE
2
Connect for service only.
PC IN
3
Connects to the video output jacks on your PC.
PC/DVI (HDMI2) AUDIO IN
4
Connect to the audio output jack on your PC.
This jack is also used as DVI audio output jack.
HDMI IN 1, 2, 3
5
Connect to the HDMI jack of a device with an HDMI output.
(HDMI 2 supports HDMI-DVI IN and connection from a PC.)
HDMI 2 can also be used as a DVI connection with
separate analog audio inputs. An optional HDMI/DVI
cable will be necessary to make this connection.
When using an optional HDMI/DVI adapter, the DVI
analog audio inputs on your TV allow you to receive left
and right audio from your DVI device.
6
ANT IN
Uses a 75Ω Coaxial connector for an Air/Cable Network.
7
AUDIO OUT (R/L)
Audio outputs to external devices.
8
3D SYNC OUT
Connect to 3D IR Emitter.
9
HEADPHONES JACK
You can connect a set of headphones if you wish to watch a
television programme without disturbing the other people in
the room.
Prolonged use of headphones at a high volume may
N
damage your hearing.
0
COMPONENT IN 1, 2 / AV IN 1
Connects Component video / audio. The COMPONENT IN 1
jack is also used as the AV IN 1 jack.
Connect the video cable to the COMPONENT IN 1
N
[Y/VIDEO] jack and the audio cable to the COMPONENT
IN 1 [R-AUDIO-L] jacks.
AV IN 2 (VIDEO / AUDIO R/L)
!
Video and audio inputs for external devices.
Page 8

Remote Control
You can use the remote control up to a distance of about 23 feet from the TV.
The product color and shape may vary depending on the model.
N
The performance of the remote control may be affected by bright light.
N
POWER
1
Turns the TV on and off.
NUMERIC BUTTONS
2
Press to change the channel.
3
Use to select a channel over 100.
For example, for channel 122, press “-”,
then “2”, then “2”.
MUTE
4
Press to temporarily cut off the sound.
VOL
5
Press to increase or decrease the volume.
SOURCE
6
Press to display all of the available video
sources.
CH LIST
7
Use to display Channel Lists on the screen.
TOOLS
8
Use to quickly select frequently used
functions.
UP▲/DOWN▼/LEFT◄/
9
RIGHT►/ENTER
Use to select on-screen menu items and
change menu values.
INFO
0
Press to display information on the TV
screen.
COLOR BUTTONS
!
Use these buttons in the Channel list.
MEDIA.P
@
Not available.
MTS
#
Press to choose stereo, mono or Separate
Audio Program (SAP broadcast).
Use these buttons in the DMA, Anynet+
$
modes. ( : This remote can be used to
control recording on Samsung recorders
with the Anynet+ feature)
TV
%
Selects the TV mode directly.
PRE-CH
^
Tunes to the previous channel.
CH
&
Press to change channels.
MENU
*
Displays the main on-screen menu.
FAV.CH
(
Press to switch to your favorite channels.
RETURN
)
Returns to the previous menu.
EXIT
a
Press to exit the menu.
b
P.SIZE
Press to change the screen size.
c
SRS
Selects SRS TruSurround HD mode.
d
CC
Controls the caption decoder.
e
GUIDE
Not available
Installing Batteries in the Remote Control
❑
1. Lift the cover at the back of the remote control upward as shown in the gure.
2. Install two AAA size batteries.
N
Make sure to match the “+” and “–” ends of the batteries with the diagram inside the compartment.
3. Close the cover as shown in the gure.
Remove the batteries and store them in a cool, dry place if you won’t be using the remote control for a
N
long time. (Assuming typical TV usage, the batteries should last for about one year.)
If the remote control doesn’t work, check the following
N
1. Is the TV power on?
2. Are the plus and minus ends of the batteries reversed?
3. Are the batteries drained?
4. Is there a power outage or is the power cord unplugged?
5. Is there a special uorescent light or neon sign nearby?
English - 8
Page 9
Connections
English - 9
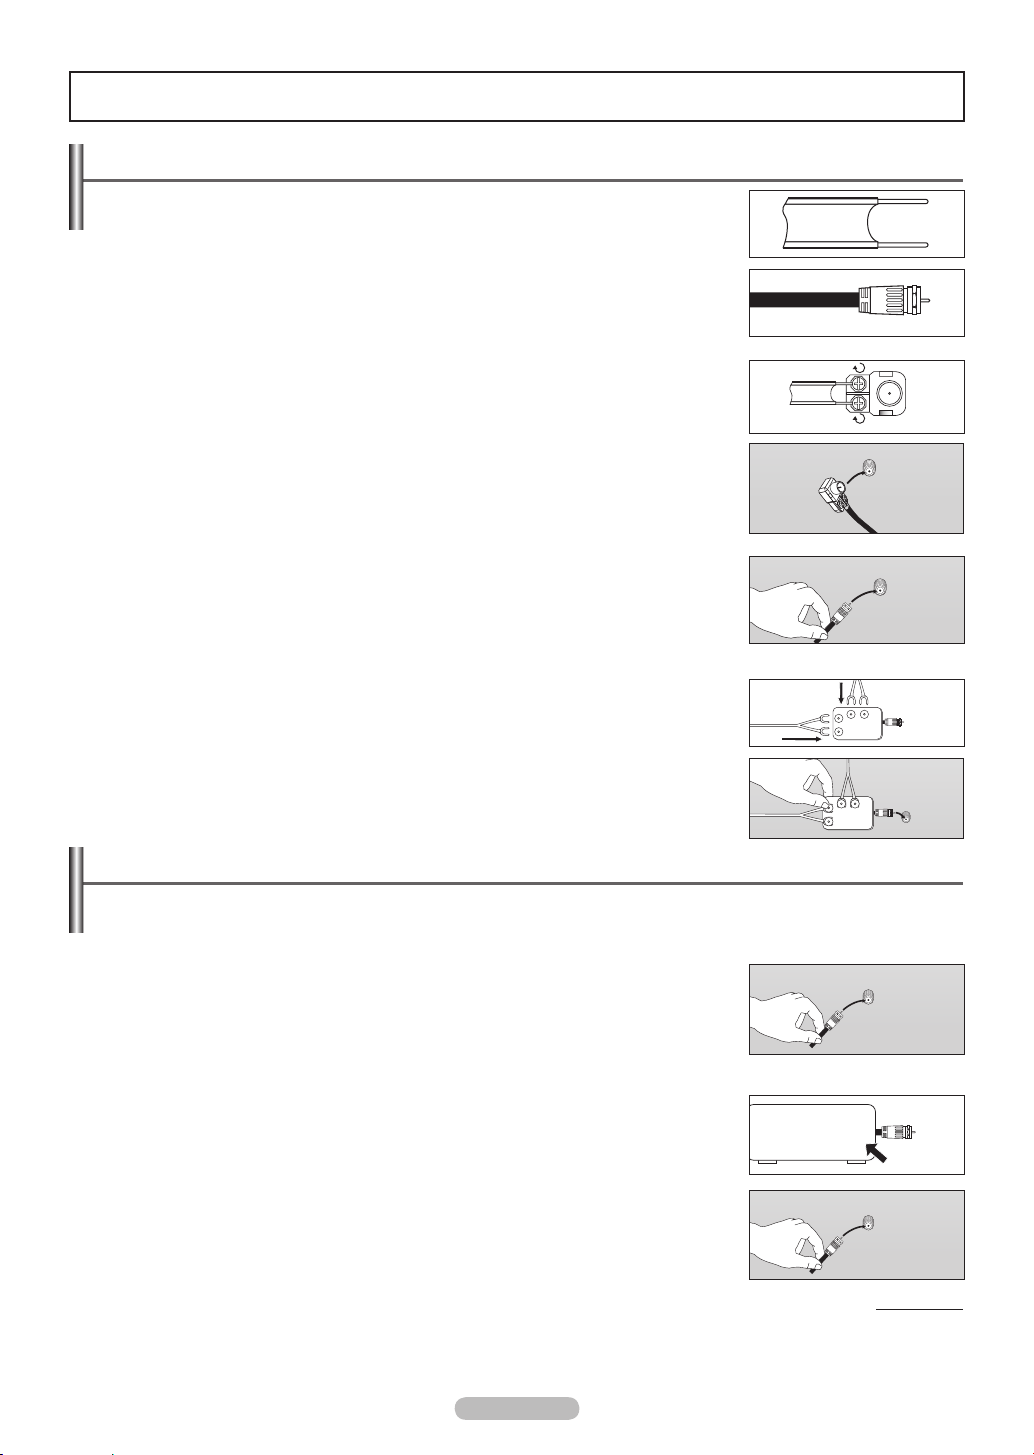
Connecting VHF and UHF Antennas
If your antenna has a set of leads that look like this, see “Antennaswith300ΩFlatTwin
Leads below.”
Ifyourantennahasoneleadthatlookslikethis,see“Antennaswith75ΩRoundLeads.”
If you have two antennas, see “Separate VHF and UHF Antennas.”
Antennaswith300ΩFlatTwinLeads
❑
Ifyouareusinganoff-airantenna(suchasaroofantennaorrabbitears)thathas300Ω
twin flat leads, follow the directions below.
1. Place the wires from the twin leads under the screws on a 300-75 Ω adapter (not supplied).
Use a screwdriver to tighten the screws.
2. Plug the adaptor into the ANT IN terminal on the back of the TV.
Antennaswith75ΩRoundLeads
❑
Plug the antenna lead into the ANT IN terminal on the back of the TV.
Separate VHF and UHF Antennas
❑
If you have two separate antennas for your TV (one VHF and one UHF), you must
combine the two antenna signals before connecting the antennas to the TV. This
procedure requires an optional combiner-adaptor (available at most electronics shops).
1. Connect both antenna leads to the combiner.
2. Plug the combiner into the ANT IN terminal on the bottom of the back panel.
ANT IN
ANT IN
UHF
VHF
ANT IN
UHF
VHF
Connecting Cable TV
To connect to a cable TV system, follow the instructions below.
Cable without a Cable Box
❑
Plug the incoming cable into the ANT IN terminal on the back of the TV.
N
Because this TV is cable-ready, you do not need a cable box to view unscrambled cable
channels.
Connecting to a Cable Box that Descrambles All Channels
❑
1. Find the cable that is connected to the ANT OUT terminal on your cable box.
This terminal might be labeled “ANT OUT”, “VHF OUT” or simply, “OUT”.
N
2. Connect the other end of this cable to the ANT IN terminal on the back of the TV.
ANT IN
ANT IN
ANT OUT
ANT IN
Continued...
Page 10

Connecting to a Cable Box that Descrambles Some Channels
❑
If your cable box descrambles only some channels (such as premium channels), follow the instructions below. You
will need a two-way splitter, an RF (A/B) switch, and four lengths of Antenna cable. (These items are available at most
electronics stores.)
1. Find and disconnect the cable that is
connected to the ANT IN terminal on your
cable box.
N
This terminal might be labeled “ANT IN”,
“VHF IN” or simply, “IN”.
2. Connect this cable to a two-way splitter.
3. Connect an Antenna cable between the
OUTPUT terminal on the splitter and the IN
terminal on the cable box.
4. Connect an Antenna cable between the ANT
OUT terminal on the cable box and the B–IN
terminal on the RF(A/B) switch.
5. Connect another cable between the other
OUT terminal on the splitter and the A–IN
terminal on the RF (A/B) switch.
Incoming
cable
Incoming
cable
Incoming
cable
Splitter
Splitter
ANT IN
Incoming
Splitter
cable
Cable Box
Cable Box
Splitter
Cable Box
RF (A/B)
Switch
RF (A/B)
Switch
6. Connect the last Antenna cable between the
OUT terminal on the RF (A/B) switch and the
ANT IN terminal on the rear of the TV.
Incoming
cable
Splitter
RF (A/B)
Switch
TV Rear
ANT IN
After you have made this connection, set the A/B switch to the “A” position for normal viewing. Set the A/B switch to the “B” position
to view scrambled channels. (When you set the A/B switch to “B”, you will need to tune your TV to the cable box’s output channel,
which is usually channel 3 or 4.)
English - 10
Page 11

Connecting a DVD / Blu-Ray Player or Cable Box / Satellite receiver
English - 11
(Set-Top Box) via HDMI
This connection can only be made if there is an HDMI Output jack on the external device. This connection will provide the
highest quality picture.
1. Connect an HDMI Cable between the HDMI IN (1, 2(DVI), or 3) jack on the TV and the HDMI jack on the Connecting the DVD / Blu-
Ray Player or Cable Box / Satellite receiver (Set-Top Box).
DVD/Blu-Ray Player or Cable
Box / Satellite receiver
1
HDMI Cable (Not supplied)
What is HDMI?
N
HDMI, or high-de nition multimedia interface, is an interface that enables the transmission of digital audio and video signals using a
•
TV Rear Panel TV Side Panel
or
single cable.
The difference between HDMI and DVI is that the HDMI device is smaller in size and has the HDCP (High Bandwidth Digital Copy
•
Protection) coding feature installed.
Each DVD Player or Cable Box / Satellite receiver (Set-Top Box) has a different back panel con guration.
N
The TV may not output sound and pictures may be displayed with abnormal color when DVD / Blu-Ray Player or Cable Box /
N
Satellite receiver supporting HDMI versions older than 1.3 are connected. When connecting an older HDMI cable and there is no
sound, connect the HDMI cable to the HDMI IN 2 jack and the audio cables to the DVI IN (HDMI2) [R-AUDIO-L] jacks on the back
of the TV. If this happens, contact the company that provided the DVD / Blu-Ray Player or Cable Box / Satellite receiver to con rm
the HDMI version, then request an upgrade.
HDMI cables that are not 1.3 may cause annoying icker or no screen display.
N
Connecting a DVD /Blu-Ray Player or Cable Box / Satellite receiver
(Set-Top Box) via DVI
This connection can only be made if there is a DVI Output jack on the external device.
1. Connect a HDMI/DVI Cable or DVI-HDMI Adapter between the HDMI IN 2(DVI) jack on the TV and the DVI jack on the DVD / Blu-
Ray Player or Cable Box/Satellite receiver (Set-Top Box).
2. Connect Audio Cables between the DVI IN (HDMI 2) [R-AUDIO-L] jack on the TV and the DVD/Blu-Ray Player or Cable Box /
Satellite receiver.
DVD/Blu-Ray Player or Cable Box /
Satellite receiver
Audio Cable (Not supplied)2
HDMI/DVI Cable (Not supplied)
1
N
Each DVD / Blu-Ray Player or Cable Box / Satellite receiver (Set-Top Box) has a different back panel con guration.
N
When connecting a DVD Player or Cable Box / Satellite receiver (Set-Top Box), match the color of the connection terminal to the
TV Rear Panel
cable.
N
When using an HDMI / DVI cable connection, you must use the HDMI IN 2(DVI) jack.
Page 12

Connecting a DVD / Blu-Ray Player or Cable Box / Satellite receiver
(Set-Top Box) via Component cables
The rear panel jacks on your TV make it easy to connect a DVD/Blu-Ray Player or Cable Box / Satellite receiver (Set-Top Box)
to your TV.
1. Connect Component Cable between the COMPONENT IN (1 or 2) [Y, PB, PR] jacks on the TV and the COMPONENT [Y, PB, PR]
jacks on the DVD Player or Cable Box / Satellite receiver(Set-Top Box).
2. Connect Audio Cables between the COMPONENT IN (1 or 2) [R-AUDIO-L] jacks on the TV and the AUDIO OUT jacks on the DVD
Player or Cable Box / Satellite receiver (Set-Top Box).
TV Rear Panel
DVD / Blu-Ray Player or Cable Box
/ Satellite receiver
Audio Cable (Not supplied)
2
Component Cable (Not supplied)1
Component video separates the video into Y (Luminance (brightness)), PB (Blue) and PR (Red) for enhanced video quality. Be sure
N
to match the component video and audio connections. For example, if connecting the video cable to COMPONENT IN 1, connect
the audio cable to COMPONENT IN 1 also.
Each DVD / Blu-Ray Player or Cable Box / Satellite receiver (Set-Top Box) has a different back panel con guration.
N
When connecting a DVD / Blu-Ray Player or Cable Box / Satellite receiver (Set-Top Box), match the color of the connection terminal
N
to the cable.
Connecting a Camcorder
The side panel jacks on your TV make it easy to connect a camcorder to your TV.
They allow you to view the camcorder tapes without using a VCR.
Using the Video / Audio Cable
❑
1. Connect a Video Cable between the AV IN 2 [VIDEO] jack on the TV and the VIDEO OUT jack on the camcorder.
2. Connect Audio Cables between the AV IN 2 [L-AUDIO-R] jacks on the TV and the AUDIO OUT jacks on the Camcorder.
N
Each Camcorder has a different back panel con guration.
N
When connecting a Camcorder, match the color of the connection terminal to the cable.
TV Side Panel
Camcorder
Video Cable (Not supplied)1
Audio Cable (Not supplied)2
English - 12
Page 13

❑
English - 13
Using the HDMI Cable
1. Connect an HDMI Cable between the HDMI IN (1, 2(DVI) ou 3) jack on the TV and the HDMI jack on the camcorder.
Camcorder
HDMI Cable (Not supplied)1
N
Each Camcorder has a different back panel con guration.
TV Rear Panel
or
TV Side Panel
Connecting a VCR
Video Connection
❑
These instructions assume that you have already connected your TV to an antenna or a cable TV system (according to the
instructions on pages 9~10). Skip step 1 if you have not yet connected to an antenna or a cable system.
1. Unplug the cable or antenna from the back of the TV.
2. Connect the cable or antenna to the ANT IN terminal on the back of the VCR.
3. Connect an Antenna Cable between the ANT OUT terminal on the VCR and the ANT IN terminal on the TV.
4. Connect a Video Cable between the AV IN 1 [Y/VIDEO] or AV IN 2 [VIDEO] jack on the TV and the VIDEO OUT jack on the
VCR.
5. Connect Audio Cables between the AV IN 1 (or AV IN 2) [R-AUDIO-L] jacks on the TV and the AUDIO OUT jacks on the VCR
TV Rear Panel
VCR Rear Panel
2
If you have a “mono” (non-stereo) VCR, use a Y-connector (not supplied) to connect to the right and left audio input jacks of the
N
Audio Cable(Not supplied)
5
Video Cable(Not supplied)
4
Antenna cable(Not supplied)3
TV Side Panel
TV. Alternatively, connect the cable to the “R” jack.
If your VCR is stereo, you must connect two cables.
Each VCR has a different back panel con guration.
N
When connecting a VCR, match the color of the connection terminal to the cable.
N
When connecting to AV IN 1, the color of the AV IN 1 [Y/VIDEO] jack (Green) does not match the color of the video cable (Yellow).
N
Page 14

Connecting an Amplifier / DVD Home Theater
1. Connect Audio Cables between the AUDIO OUT [R-AUDIO-L] jacks on the TV and AUDIO IN [L-AUDIO-R] jacks on the Ampli er/
DVD Home Theater.
When an audio ampli er is connected to the AUDIO OUT [R-AUDIO-L] jacks terminals : Decrease the volume of the TV, and adjust
the volume level with the Ampli er’s volume control.
TV Rear Panel
Amplifier / DVD Home Theater
Audio Cable (Not supplied)
N
Each Ampli er / DVD Home Theater has a different back panel con guration.
N
When connecting an Ampli er / DVD Home Theater, match the color of the connection terminal to the cable.
English - 14
Page 15

Connecting a PC
English - 15
Using the D-Sub Cable
❑
1. Connect a D-Sub Cable between PC IN [PC] jack on the TV and the PC output jack on your computer.
2. Connect a PC Audio Cable between the PC IN [AUDIO] jack on the TV and the Audio Out jack of the sound card on your
computer.
TV Rear Panel
PC
D-Sub Cable (Not supplied)1
PC Audio Cable (Not supplied)
2
Using the HDMI/DVI Cable
❑
1. Connect a HDMI/DVI cable between the HDMI IN 2(DVI) jack on the TV and the PC output jack on your computer.
2. Connect a 3.5 mm Stereo plug to 2RC
the sound card on your computer.
Each PC has a different back panel con guration.
N
A cable between the DVI IN (HDMI2) [R-AUDIO-L] jack on the TV and the Audio Out jack of
TV Rear Panel
PC
3.5 mm Stereo plug to 2 RCA Cable (Not supplied)2
HDMI/DVI Cable (Not supplied)1
When connecting a PC, match the color of the connection terminal to the cable.
N
When using an HDMI/DVI cable connection, you must use the HDMI IN 2(DVI) terminal.
N
Page 16

Operation
Turning the TV On and Off
Press the POWER button on the remote control. You can also use the POWER button
on the TV.
It may take a while for your TV to power on.
N
Changing Channels
Using the Channel Buttons
❑
Press the CH or CH button to change channels.
N
When you press the CH or CH button, the TV changes channels in
sequence. You will see all the channels that the TV has memorized. (The TV must
have memorized at least three channels). You will not see channels that were
either erased or not memorized. See page 20 to memorize channels.
Using the Number Buttons
❑
Press the number buttons to go directly to a channel. For example, to select channel
“27”, press “2”, then “7”.
N
For quick channel change, press the number buttons, then press the ENTERE
button.
❑
Using the “ ” Button
The “ ” button is used to select a channel over 100.
For example, to select a channel over 100, for channel 122, press “-”, then “2”, then “2”.
❑
Using the PRE-CH Button to select the Previous Channel
1. Press the PRE-CH button. The TV will switch to the last channel viewed.
N
To quickly switch between two channels that are far apart, tune to one channel,
then use the number button to select the second channel. Then use the PRE-CH
button to quickly alternate between them.
Adjusting the Volume
Using the Volume Buttons
❑
1. Press the VOL or VOL button to increase or decrease the volume.
Using the MUTE Button
❑
At any time, you can cut off the sound using the MUTE button.
1. Press MUTE button and the sound cuts off.
The will displayed on the screen.
2. To turn mute off, press the
VOL button.
MUTE button again, or simply press the VOL or
English - 16
Page 17

Using the TOOLS Button
English - 17
You can use the TOOLS button to select your frequently used functions quickly and easily. The Tools menu changes
depending on which external input mode you are viewing.
1. Press the TOOLS button. The Tools menu will appear.
2. Press the ▲/▼ button to select a menu, then press the ENTERE button.
3. Press the ▲/▼/◄/►/
ENTERE buttons to display, change, or use the selected items.
For a more detailed description of each function, refer to the corresponding page.
Anynet+ (HDMI-CEC), see page 35
•
Picture Mode, see page 21
•
Sound Mode, see page 27
•
Sleep Timer, see page 32
•
SRS TS HD, see page 27
•
Energy Saving, see page 30
•
MTS, see page 27
•
PIP, see page 31
•
Anynet+ (HDMI-CEC)
Picture Mode : Dynamic
Sound Mode : Standard
Sleep Timer : Off
SRS TS HD : Off
Energy Saving : Off
MTS : Stereo
TOOLS
Move
Enter Exit
Viewing the Display
The display identifies the current channel and the status of certain audio-video
settings.
1. Press the INFO button on the remote control. The TV will display the channel, the type
of sound, and the status of certain picture and sound settings.
Press the INFO button once more or wait approximately 10 seconds and it disappears
O
automatically.
Air 55
Mono
Picture : Dynamic
Sound : Standard
MTS : Stereo
SRS TS HD : Off
12 : 00 am
Page 18

Viewing the Menus
Before using the TV, follow the steps below to learn how to navigate the menu in order to select and adjust different functions.
1. Press the MENU button.
The main menu is displayed on the screen. Its left side has the following icons: Picture, Sound, Channel , Setup, Input.
2. Press the ▲ or ▼ button to select one of the icons.
Press the ◄ or ► button to access the icon’s sub-menu.
3. Press the ▲ or ▼ button to move to items in the menu.
Press the ENTERE button to enter items in the menu.
4. Press the ▲/▼/◄/► button to change the selected items.
Press the RETURN button to return to the previous menu.
5. Press the EXIT button to exit from the menu.
Using the remote control buttons
Button Operations Button Operations
MENU Display the main on-screen menu.
RETURN Return to the previous menu.
EXIT Exit the on-screen menu.
Example: Setting the TV’s Brightness in the Picture Menu
❑
▲/▼/◄/► Move the cursor and select an item.
ENTERE
Select the currently selected item.
Confirm the setting.
Adjusting the Brightness to 60
1. Press the MENU button to display the menu.
2. Press the
3. Press the ▲ or ▼ button to select
ENTERE button to select Picture.
Brightness.
4. Press the ENTERE button.
T V
Mode : Standard
Picture
Cell Light 8
Contrast 95
Brightness 45
Sound
Sharpness 50
Color 50
Channel
Tint (G/R) G 50 R 50
Advanced Settings
Setup
Picture Options
Reset : OK
Input
T V
Mode : Standard
Picture
Cell Light 8
Contrast 95
Brightness 45
Sound
Sharpness 50
Color 50
Channel
Tint (G/R) G 50 R 50
Advanced Settings
Setup
Picture Options
Reset : OK
Input
T V
Mode : Standard
Picture
Cell Light 8
Contrast 95
Brightness 45
Sound
Sharpness 50
Color 50
Channel
Tint (G/R) G 50 R 50
Advanced Settings
Setup
Picture Options
Reset : OK
Input
Move
Move
Move
Picture
Picture
Picture
Enter
Enter
Enter
Exit
Return
Return
5. Press the ◄ or ► button until the Brightness changes to 60.
6. Press the
N
ENTERE button.
Press the EXIT button to exit from the menu.
English - 18
Brightness
Brightness
Move
Move
Adjust
Adjust
45
Return
60
Return
Page 19

Plug & Play Feature
English - 19
When the TV is initially powered on, basic settings proceed automatically and subsequently.
The Screen Saver is activated if there is no remote control key input for longer than 1 minute while Plug & Play is running.
N
The Screen Saver is activated if there is no operating signal for longer than 15 minutes.
N
1. Press the POWER button on the remote control.
Language menu is displayed.
2. Select the appropriate language by pressing the ▲ or ▼ button. Press the
ENTERE
button.
The message Select ‘Home Use’ when installing this TV in your home. is displayed.
3. Press the ◄ or ► button to select
Store Demo or Home Use, then press the ENTERE
button.
We recommend setting the TV to Home Use mode for the best picture in your home
N
environment.
Store Demo mode is only intended for use in retail environments.
N
If the unit is accidentally set to Store Demo mode and you want to return to Home
Use (Standard): Press the Volume button on the TV. When the volume OSD is
displayed, press and hold the MENU button on the TV for 5 seconds.
4. The message Check antenna input. is displayed with OK selected. Press the ENTERE
button.
5. Press the ▲ or ▼ button to Air, STD, HRC, or IRC, then press the ENTERE button.
6. Press the
ENTERE button to select Start. The TV will begin memorizing all of the
available channels.
To stop the search before it has nished, press the ENTERE button with Stop
N
selected.
Press the ◄ or ► button to select Month, Day, Year, Hour, Minute or am/pm. Set these
7.
by pressing the ▲ or ▼ button.
8. Press the
ENTERE button to conrm your setting. The message Enjoy your watching.
is displayed. When you have nished, press the ENTERE button.
Even if the ENTERE button is not pressed, the message will automatically disappear
N
after several seconds.
Language
Air/Cable
Auto Program
Plug & Play
Move
Plug & Play
Move
Plug & Play
Stop
Enjoy your watching.
English
Español
Português
Enter
STD
HRC
IRC
Enter
Enter
OK
Air
Skip
Air 51
Skip
Return
If you want to reset this feature...
1. Press the MENU button to display the menu. Press the ▲ or ▼ button to select Setup,
then press the ENTERE button.
2. Press the
ENTERE button again to select Plug & Play. For further details on setting
up options.
The Plug & Play feature is only a vailable in the TV mode.
N
T V
Plug & Play
Picture
Language : English
Time
Child Lock : On
Sound
Change PIN
Caption
Channel
Game Mode : Off
Melody : Medium
Energy Saving : Off
Setup
AV Color System : Auto
PIP
Input
Move
Setup
Enter
Return
Page 20
Channel Control
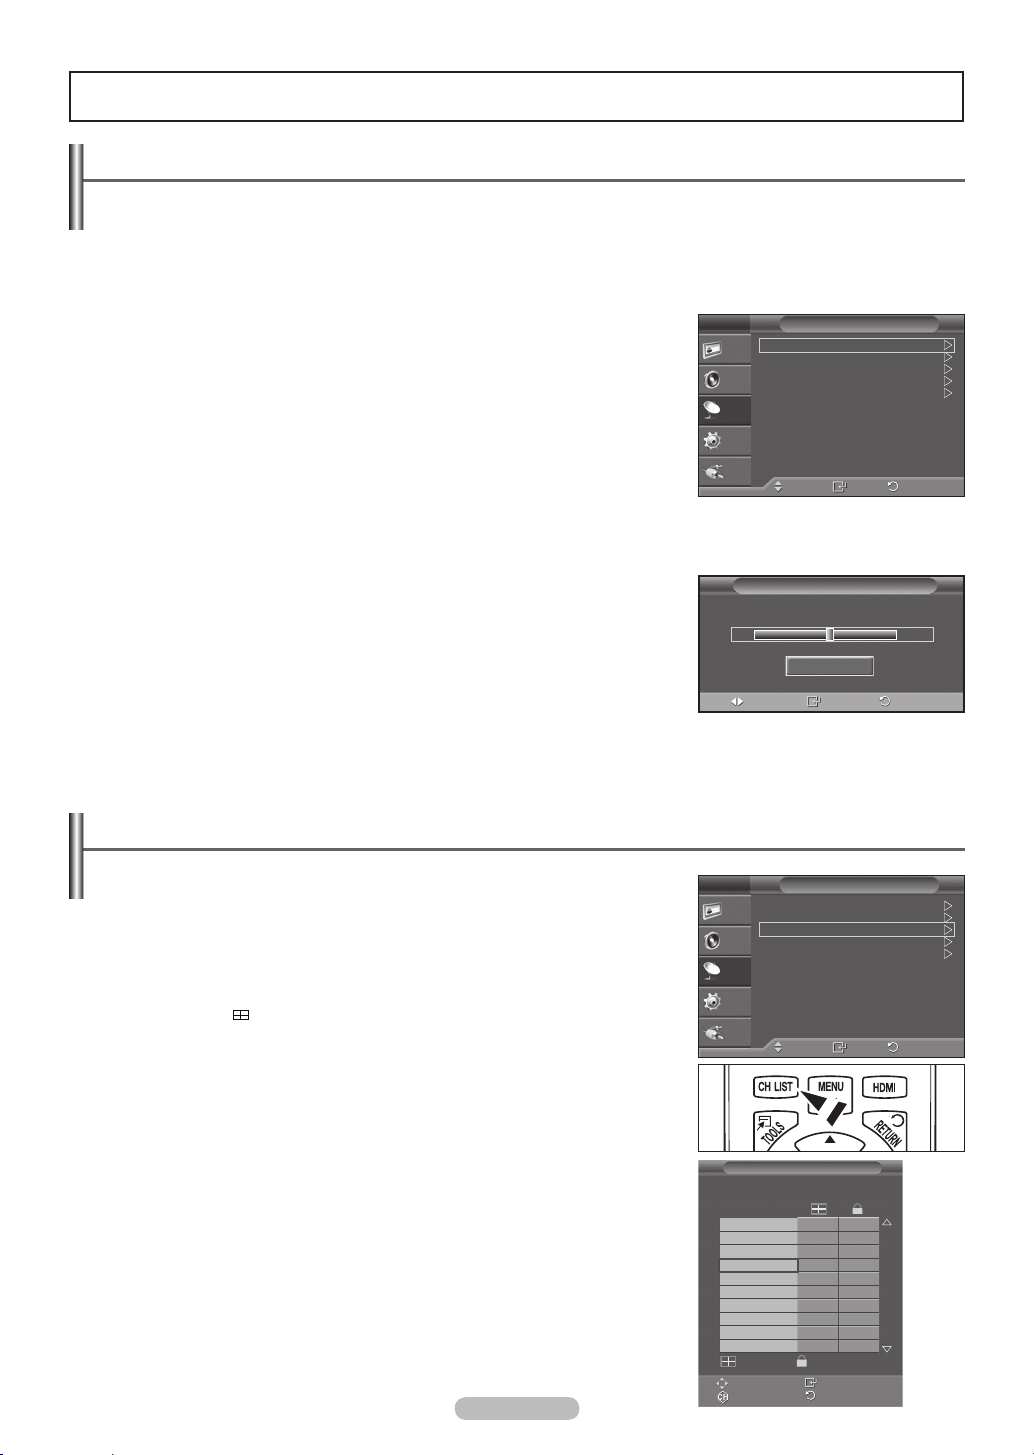
Storing Channels
Your TV can memorize and store all of the available channels for both air and cable channels. After the available channels
arememorized,usetheCH▲orCH▼buttontoscanthroughthechannels.Thiseliminatestheneedtochangechannelsby
entering the channel digits. There are three steps for memorizing channels: selecting a broadcast source, memorizing the
channels and adding and deleting channels.
Air/Cable→Air/STD/HRC/IRC
❑
Before your television can begin memorizing the available channels, you must specify
the type of signal source that is connected to the TV (i.e. an Air or a Cable system).
STD, HRC and IRC identify various types of cable TV systems. Contact your local
N
cable company to identify the type of cable system that exists in your particular area.
At this point the signal source has been selected.
Auto Program
❑
The TV will begin memorizing all of the available channels. After all the available
channels are stored, the Auto program menu reappears.
All available channels are automatically stored in memory. It takes approximately
N
3 to 10 minutes to memorize channels.
If you want to stop Auto Programming, press the ENTERE button.
N
T V
Air/Cable : Air
Picture
Auto Program
Channel List
Fine Tune
Sound
Color System : Auto
Channel
Setup
Input
Move
Channel
Enter
Return
Fine Tune (Analog)
❑
Use ne tuning to manually adjust a particular channel for optimal reception.
If you do not store the ne-tuned channel in memory, adjustments are not saved.
N
“*” will appear next to the name of ne-tuned channels.
N
To reset the ne tuning setting, press the ▼ button to select Reset, then press the
N
ENTERE button.
ColorSystem→Auto,PAL-M,PAL-N,NTSC
❑
Air
Adjust
55
Normally the TV can receive image and sound with good quality in Auto mode. This mode detects the color signal
sources automatically. If the color implementation is unsatisfactory, select any of PAL-M, PAL-N or NTSC.
Managing Channels
Channel List
❑
Using this menu, you can conveniently add/delete or lock/unlock channels.
Press the CH LIST button on the remote control to bring up the channel lists.
O
Adding / Deleting channels
Using the Channel List, you can add or delete channels.
N
Move to the ( ) eld by pressing the ▲/▼/◄/► buttons, select a channel to be
added, and press the ENTERE button to add the channel.
N
If you press the ENTERE button again, the (c) symbol next to the channel
disappears and the channel is not added.
Locking / Unlocking channels
This feature allows you to prevent unauthorized users, such as children, from watching
unsuitable programmes by muting out video and audio. This function is available only
when the Child Lock is set to on. (see page 29)
N
Move to the (\) eld by pressing the ▲/▼/◄/► buttons, select a channel to be
locked, and press the ENTERE button.
N
The PIN number input screen appears. Enter your 4 digit PIN number.
N
The default PIN number of a new TV set is 0-0-0-0. You can change the PIN, by
selecting Change PIN from the menu.
N
If you press the ENTERE button again, the (c) symbol next to the channel
disappears and the channel lock is canceled.
N
A blue screen is displayed when Child Lock is activated.
English - 20
T V
Air/Cable : Air
Picture
Auto Program
Channel List
Fine Tune
Sound
Color System : Auto
Channel
Setup
Input
Air 55
Ch.
Air 52
Air 53
Air 54
Air 55
Air 56
Air 57
Air 58
Air 59
Air 60
Air 61
Move
Channel List
Add
Move Enter
Page
Fine Tune
Reset
Save
Channel
6 / 7
Lock
Return
Enter
0
Return
Return
Page 21

Picture Control
English - 21
Changing the Picture Settings
Mode
❑
You can select the type of picture which best corresponds to your viewing requirements.
Dynamic: Select a high-definition picture for bright environments.
•
Standard: Selects the optimal picture display for normal environments. This
•
setting is convenient for most situations.
Movie: Selects a comfortable picture display for dark environments.
•
T
Press the TOOLS button to display Tools menu.
You can also select the picture mode by selecting Tools → Picture Mode
You can select these options simply by pressing the P.MODE button on the remote
O
T V
Mode : Standard
Picture
Cell Light 8
Contrast 95
Brightness 45
Sound
Sharpness 50
Colour 50
Channel
Tint G 50 R 50
Advanced Settings
Setup
Picture Options
Reset : OK
Input
Move
Picture
Enter
control.
Cell Light / Contrast / Brightness / Sharpness / Color / Tint (G/R)
❑
Your television has several setting options that allow you to control the picture quality.
Cell Light: Adjusts the pixel brightness. 10 is the brightest setting.
•
Contrast: Adjusts the contrast level.
•
Brightness: Adjusts the brightness level.
•
Sharpness: Adjusts the sharpness.
•
Color: Adjusts the color saturation of the picture using the bar on the screen.
•
Tint (G/R): The closer to Red 100, the more saturated the red color becomes.
•
When you make changes to Cell Light, Contrast, Brightness, Sharpness, Color
N
or Tint (G/R), the OSD will be adjusted accordingly.
When in PC mode, Tint (G/R), Sharpness and Color are not available.
N
Settings can be adjusted and stored for each external device you have connected to an input of the TV.
N
The energy consumed during use can be signicantly reduced if thebrightness level is lowered, which will reduce the overall
N
T V
Mode : Standard
Picture
Cell Light 8
Contrast 95
Brightness 45
Sound
Sharpness 50
Colour 50
Channel
Tint G 50 R 50
Advanced Settings
Setup
Picture Options
Reset : OK
Input
Move
Picture
Enter
running cost.
Advanced Settings
❑
You can adjust the advanced settings for your screen including the color and contrast.
Advanced Settings is available in Standard or Movie mode.
N
In PC mode, you can only make changes to Gamma and White Balance from among
N
the Advanced Settings items.
Black Tone
You can Enhance the picture depth by adjusting the black color density.
Off: Turns the Black Tone function off.
•
Dark: Sets the black color depth to dark.
•
Darker: Sets the black color depth to darker.
•
Darkest: Sets the black color depth to darkest.
•
T V
Picture
Sound
Channel
Setup
Input
Advanced Settings
Black Tone : Off
Dynamic Contrast : High
Gamma : 0
Color Space : Native
White Balance
Flesh Tone : 0
Edge Enhancement : On
Move
Enter
Exit
Return
Return
Dynamic Contrast
You can adjust the screen contrast so that the optimal contrast is provided.
Off: Turns the Dynamic Contrast function off.
•
Low: Sets Dynamic Contrast to low.
•
Medium: Sets Dynamic Contrast to medium.
•
High: Sets Dynamic Contrast to high.
•
Gamma
You can adjust the Primary Color (Red, Green, Blue) Intensity.
Color Space
Color Space is a color matrix composed of red, green and blue colors. Select your favorite color space to experience the most
natural color.
Native: Sets the color range wider than that of the input video source.
•
Auto: Automatically sets the color range depending on the input video source.
•
Continued...
Page 22

White Balance
You can adjust the color temperature for more natural picture colors.
R-Offset: Adjust the low level red intensity.
•
G-Offset: Adjust the low level green intensity.
•
B-Offset: Adjust the low level blue intensity.
•
R-Gain: Adjusts the high level red intensity.
•
G-Gain: Adjusts the high level green intensity.
•
B-Gain: Adjusts the high level blue intensity.
•
Reset: Resets the default white balance.
•
Changing the adjustment value will refresh the adjusted screen.
N
Flesh Tone
You can emphasize the pink esh tone in the picture.
Changing the adjustment value will refresh the adjusted screen.
N
EdgeEnhancement→Off/On
You can emphasize object boundaries in the picture.
T V
Black Tone : Off
Picture
Dynamic Contrast : High
Gamma : 0
Color Space : Native
Sound
White Balance
Flesh Tone : 0
Channel
Edge Enhancement : On
Setup
Input
Advanced Settings
Move
Enter
Return
Picture Options
❑
In PC mode, you can only make changes to the Color Tone, Size and Screen Burn
N
Protection from among the items in Picture Options.
ColorTone→Cool/Normal/Warm1/Warm2
You can select the most comfortable color tone for viewing.
Warm1 or Warm2 is only activated when the picture mode is Movie.
N
Settings can be adjusted and stored for each external device you have connected to
N
an input of the TV.
Size
Occasionally, you may want to change the size of the image on your screen. Your TV
comes with six screen size options, each designed to work best with specic types
of video input. Your satellite receiver may have its own set of screen sizes as well. In
general, though, you should view the TV in 16:9 mode as much as possible.
16:9
: Sets the picture to the 16:9 aspect ratio.
•
Wide Zoom: Magnify the size of the picture more than 4:3.
•
Zoom: Magnies the size of the picture on the screen.
•
4:3
: Sets the picture to the 4:3 aspect ratio.
•
Screen Fit: Use the function to see the full image without any cutoff when HDMI
•
(720p/1080i), Component (1080i) signals are input.
T
Press the TOOLS button to display Tools menu.
You can also set the picture size by selecting Tools → Picture Size
Alternately, you can press the P.SIZE button on the remote control repeatedly to
O
change the picture size.
T V
Mode : Standard
Picture
Cell Light 8
Contrast 95
Brightness 45
Sound
Sharpness 50
Colour 50
Channel
Tint G 50 R 50
Advanced Settings
Setup
Picture Options
Reset : OK
Input
T V
Color Tone : Cool
Picture
Size : 16:9
Digital NR : Off
HDMI Black Level : Normal
Sound
Film Mode : Off
Screen Burn Protection
Channel
3D Effect
Setup
Input
Move
Picture Options
Move
Picture
Enter
Enter
Return
Return
16:9
Sets the picture to 16:9
wide mode.
4:3
Sets the picture to 4:3
normal mode.
Wide Zoom
Magnify the size of the
picture more than 4:3.
Screen Fit
Use the function to see the
full image without any cutoff
when HDMI (720p/1080i),
Component (1080i) signals
are input.
English - 22
Zoom
The screen size when
Wide screen is vertically
enlarged.
Continued...
Page 23

Temporary image retention may occur when viewing a static image on the set for more than two hours.
English - 23
N
After selecting “Wide Zoom” mode:
N
Press the ► button to select ( ), then press the ENTERE button.
Press the ▲ or ▼ button to move the picture up and down.
After selecting “Zoom” mode:
N
Select ( ) by pressing the ◄ or ► button. Use the ▲ or ▼ button to move the picture up and down. After selecting ( ), use
the ▲ or ▼ button to magnify or reduce the picture size in the vertical direction.
After selecting “Screen Fit” in HDMI (1080i) or Component (1080i) mode:
N
Press the ◄ or ► button to select
, then press the ENTERE button.
Press the ▲, ▼, ◄ or ► button to move the picture up, down, left and right.
Reset: Press the ◄ or ► button to select Reset, then press the ENTERE button. You can initialize the setting to 16:9.
HD(HighDenition):
N
16:9 - 1080i (1920x1080), 720p (1280x720)
Settings can be adjusted and stored for each external device you have connected to an input of the TV.
N
In PC Mode, only 16:9 and 4:3 mode can be adjusted.
Settings can be adjusted and stored for each external device you have connected to an input of the TV.
N
Input Source Picture Size
TV, AV, Component (480i, 480p) 16:9, Wide Zoom, Zoom, 4:3
Component (1080i), HDMI (720p, 1080i) 16:9, Wide Zoom, Zoom, 4:3, Screen Fit
PC 16:9, 4:3
Digital NR
If the broadcast signal received by your TV is weak, you can activate the Digital Noise
Reduction feature to help reduce any static and ghosting that may appear on the screen.
Off: Turns the Digital NR function off.
•
Low: Sets Digital NR to low.
•
Medium: Sets Digital NR to medium.
•
High: Sets Digital NR to high.
•
Auto: Sets Digital NR to Auto.
•
HDMI Black Level
You can directly select the black level on the screen to adjust the screen depth.
Normal: The screen gets brighter.
•
Low: The screen gets darker.
•
This function is active only when an external device is connected to the TV via HDMI.
N
HDMI Black Level function may not be compatible with all external devices.
Film Mode
The TV can be set to automatically sense and process lm signals from all sources and
adjust the picture for optimum quality.
Off: Basic video image processing applied and No auto-detection for lm-based
•
programs.
Auto: Automatically adjusts for the best image quality between lm and video programs.
•
Film mode is supported in TV, Video, Component (480i / 1080i) and HDMI (1080i).
N
Screen Burn Protection
Congures the Screen Burn Protection options to prevent and reduce pixel burn.
When an image remains in one position too long, it may cause a permanent burn on the screen.
Pixel Shift: Shift the picture to prevent and reduce pixel burn.
•
Optimum condition for pixel shift;
N
Item TV/AV/Component/HDMI/PC
Horizontal 0~4 2
Vertical 0~4 2
Time(min.) 1~4 Minute 2 Minute
T V
Mode : Standard
Picture
Cell Light 8
Contrast 95
Brightness 45
Sound
Sharpness 50
Colour 50
Channel
Tint G 50 R 50
Advanced Settings
Setup
Picture Options
Reset : OK
Input
T V
Color Tone : Normal
Picture
Size : 16:9
Digital NR : Off
HDMI Black Level : Normal
Sound
Film Mode : Off
Blue Only Mode : Off
Channel
Screen Burn Protection
3D Effect
Setup
Input
Move
Picture Options
Move
Picture
Enter
Enter
Return
Return
Continued...
Page 24

Scrolling: This function removes after-images on the screen by moving all the pixels on the PDP according to a pattern. Use
•
this function when there are remaining after-images or symbols on the screen, especially when you displayed a still image on
the screen for a long time.
Side Gray: When you watch TV with the screen ratio of 4:3, the screen is prevented from any damage by adjusting the white
•
balance on both extreme left and right sides. To prevent the screen burn from happening, select Dark or Light.
- Dark: When you set the screen ratio to 4:3, it darkens the left and right sides.
- Light: When you set the screen ratio to 4:3, it brightens the left and right sides.
To remove after-images on the screen, use the Scrolling function.
N
The after-image removal function has to be executed for a long time (approximately 1 hour) to effectively remove after-images
N
on the screen. If the after-image is not removed after performing the function, repeat the function again.
Press any key on the remote control to cancel this feature.
N
Using the 3D Function
You can enjoy 3D movies and games on your TV. The 3D effects function enables you to view 3D images using special 3D
glasses.
Connections
❑
3D Glasses
(Not supplied)
TV Rear Panel
3D IR Emitter
(Not supplied)
PC
3.5 mm Stereo plug to 2 RCA Cable (Not supplied)2
HDMI/DVI Cable (Not supplied)1
The appearance of the 3D glasses (including Emitter) may differ depending on the model of your glasses.
N
1. Connect a HDMI/DVI cable between the HDMI IN 2 jack on the TV and the PC output jack on your computer.
2. Connect a 3.5mm Stereo plug to 2RCA cable between the DVI IN (HDMI 2) [R-AUDIO-L] jack on the TV and the Audio Out jack of
the sound card on your computer.
3. Connect the Emitter to the 3D SYNC OUT port on the rear panel of the TV.
4. Turn the TV on and set the source of the TV to HDMI2/DVI.
For more information on the 3D glasses (including the Emitter), refer to the user manual of your 3D glasses.
N
Adjust the PC resolution: - PL42B450B1: 1024 x 768@60Hz
N
- PL50B450B1: 1024 x 768@60Hz,1360 x 768@60Hz
Optimum PC resolution for PL50B450B1 is 1360x768. When 1024x768 signal is connected in 3D mode, the picture will be shown in
N
4:3 format with left and right side grey bars appeared.
The 3D IR Emitter communicates with the 3D glasses.
N
Therefore, the 3D IR Emitter should be located near the 3D glasses.
It is activated when the HDMI or DVI input signal is RGB, and DVI Sound is supported.
N
When the power is turned on or off, the mode changes to the default (Off) and the Format is saved.
N
To use the 3D Effect function, a graphics card supporting 3D or 3D software is required.
N
The 3D glasses and the Emitter must be manufacturer by the same company.
N
If you play a game or watch TV while wearing the 3D glasses for long periods of time, you may experience eyestrain or a headache.
N
3D glasses (including the Emitter) not manufactured by Samsung may not be supported.
N
If you nd the screen ickering while the 3D function is used, change the environmental lighting darker or turn off the uorescent
N
lamp to watch the screen for its best condition.
Continued...
English - 24
Page 25

Changing the Mode
English - 25
❑
Provides the function to turn on the 3D Effect. You can choose between Mode1 and
Mode2. To achieve the 3D effect, the 3D glasses shutter back and forth from the left to
right and vice versa (left/right sync).
Off: Turns the 3D effect function off.
•
Mode1: Mode 1 operates with right sync rst.
•
Mode2
•
•
: Mode 2 operates with left sync rst.
2D
: Provides picture converted 3D to 2D. You can choose
this to watch 2D picture temporally when you feel dizzy, but you should
choose Off to end 3D effect completely.
N
You should choose Off to end 3D effect completely.
N
If the 3D effect is not working properly, it means the Mode and 3D glasses may not
be syncing properly. To put them in sync, switch to the other mode.
Changing the Format
❑
Select the optimal input format to match your graphic cards or 3D software.
Checker Board: If the output format of your graphic card or 3D software is Checker
•
Board, select this input format.
Horizontal: If the output format of your graphic card or 3D software is Horizontal
•
interleaved, select this input format.
Vertical: If the output format of your graphic card or 3D software is Vertical
•
interleaved, select this input format.
T V
Picture
Sound
Channel
Setup
Input
T V
Picture
Sound
Channel
Setup
Input
Picture Options
Color Tone : Normal
Size : 16:9
Digital NR : Off
HDMI Black Level : Normal
Film Mode : Off
Screen Burn Protection
3D Effect
Move
Picture Options
Mode : Mode 1
Format :
Move
Enter
Checker Board
Horizontal
Enter
Vertical
Return
Return
Reset→OK/Cancel
❑
Resets all picture settings to the default values.
Select a picture mode to be reset. The reset is performed for each picture mode.
N
PC Display
Using Your TV as a Computer (PC) Display
Setting Up Your PC Software (Based on Windows XP)
The Windows display-settings for a typical computer are shown below. The actual screens on
your PC will probably be different, depending upon your particular version of Windows and your
particular video card. However, even if your actual screens look different, the same basic set-up
information will apply in almost all cases.
(If not, contact your computer manufacturer or Samsung Dealer.)
1. First, click on Control Panel on the Windows start menu.
2. When the control panel window appears, click on
dialog-box will appear.
3. When the control panel window appears, click on
appear.
4. Navigate to the Settings tab on the display dialog-box. The correct size setting (resolution)
Optimum: PL42B450B1 : 1024x768 pixels, PL50B450B1 : 1360x768 pixels
If a verticalfrequency option exists on your display settings dialog box, the correct value is 60
or 60 Hz. Otherwise, just click OK and exit the dialog box.
Appearance and Themes and a display
Display and a display dialog-box will
T V
Mode : Standard
Picture
Cell Light 8
Contrast 95
Brightness 45
Sound
Sharpness 50
Colour 50
Channel
Tint G 50 R 50
Advanced Settings
Setup
Picture Options
Reset : OK
Input
Move
Picture
Enter
Return
Continued...
Page 26
Display Modes
If the signal from the system equals the standard signal mode, the screen is adjusted automatically. If the signal from the system
doesn’t equal the standard signal mode, adjust the mode by referring to your videocard user guide; otherwise there may be no video.
For the display modes listed below, the screen image has been optimized during manufacturing.
D-Sub and HDMI/DVI Input
Mode Resolution
IBM
MAC
VESA DMT
VESA CVT
VESA GTF 1280 x 720 52,500 70,000 89,040 - / +
When using an HDMI/DVI cable connection, you must use the HDMI IN 2(DVI) terminal.
N
The interlace mode is not supported.
N
The TV operates abnormally if a non-standard video format is selected.
N
N
The " c "mark means that this mode is supported.
640 x 350 31,469 70,086 25,175 + / 720 x 400 31,469 70,087 28,322 - / +
640 x 480 35,000 66,667 30,240 - / 832 x 624 49,726 74,551 57,284 - / -
640 x 480
800 x 600
1024 x 768
1360 x 768 47,712 60,015 85,500 + / +
720 x 576 35,910 59,950 32,750 - / +
1280 x 720
Horizontal
Frequency (kHz)
31,469 59,940 25,175 - / 37,861 72,809 31,500 - / 37,500 75,000 31,500 - / 37,879 60,317 40,000 + / +
48,077 72,188 50,000 + / +
46,875 75,000 49,500 + / +
48,363 60,004 65,000 - / 56,476 70,069 75,000 - / 60,023 75,029 78,750 + / +
44,772 59,855 74,500 - / +
56,456 74,777 95,750 - / +
Vertical
Frequency (Hz)
Pixel Clock
Frequency (MHz)
Sync Polarity
(H/V)
PN42B450B1D
✓ ✓
✓ ✓
✓ ✓
✓ ✓
✓ ✓
✓ ✓
✓ ✓
✓ ✓
✓ ✓
✓ ✓
✓ ✓
✓ ✓
✓ ✓
✓
✓ ✓
✓
✓
✓
PN50B450B1D
Setting up the TV with your PC
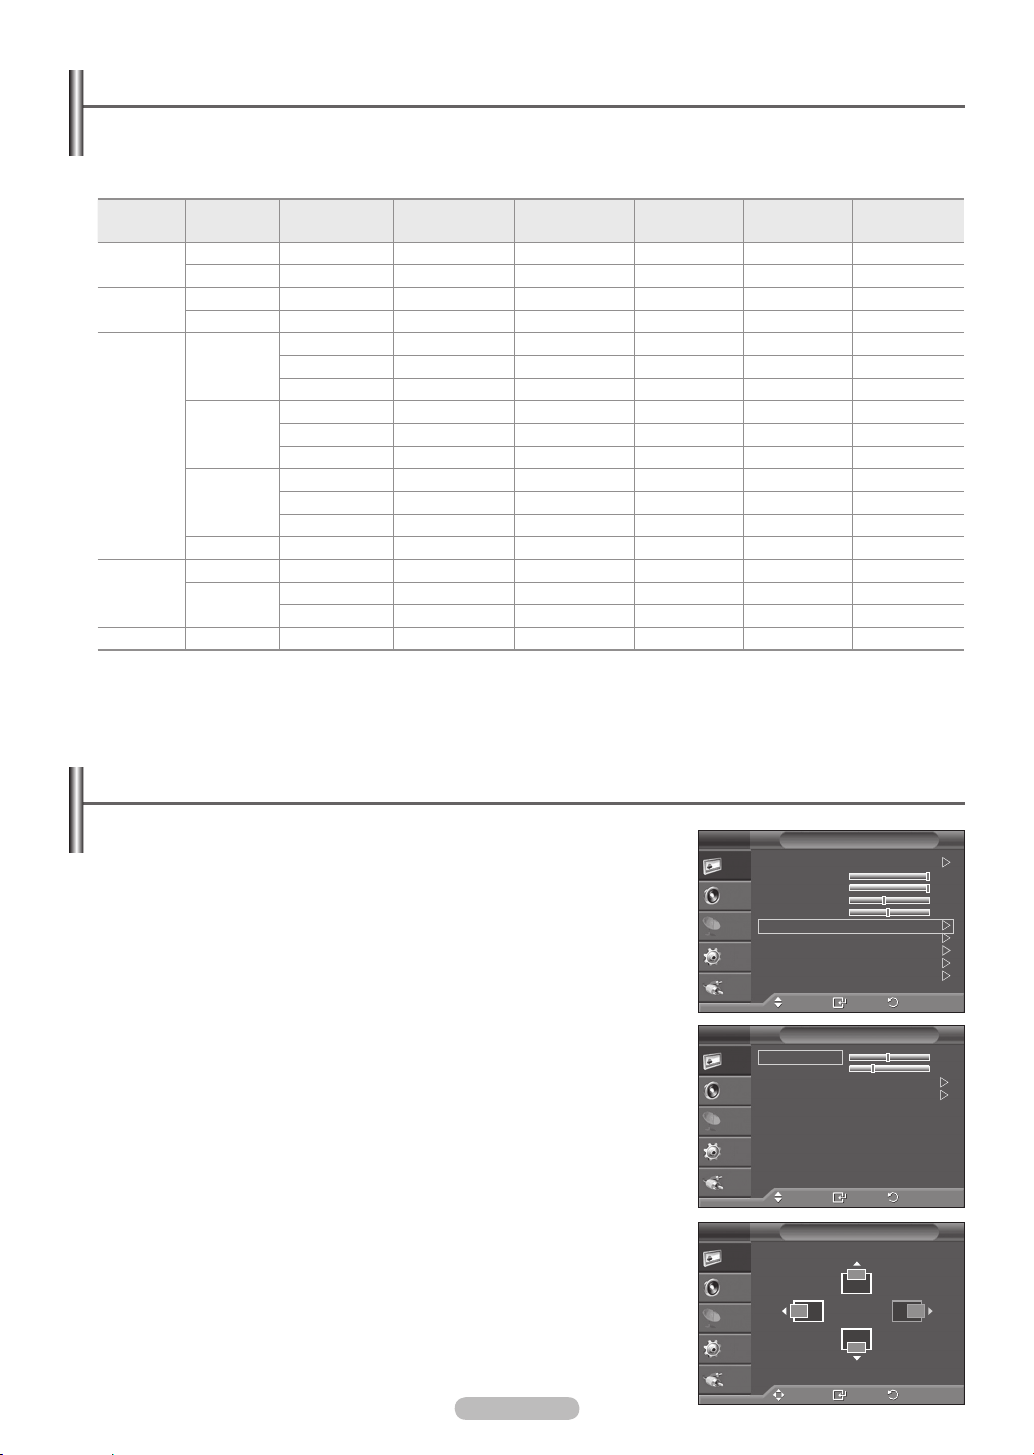
Auto Adjustment
❑
Use the auto adjustment function to have the TV set automatically adjust the video
signals it receives. The function also automatically ne-tunes the settings and adjusts the
frequency values and positions.
Preset: Press the SOURCE button to select PC mode.
N
This function does not work in DVI-Digital mode.
N
Screen
❑
The purpose of the picture quality adjustment is to remove or reduce picture noise.
If the noise is not removed by ne tuning alone, then make the vertical frequency
adjustments on your PC and ne tune again.
After the noise has been reduced, re-adjust the picture so that it is aligned on the center
of the screen.
Preset: Press the SOURCE button to select PC mode.
N
Coarse
Adjusts the frequency when vertical noise appears on the screen.
Fine
Adjusts the screen to be clearer.
PC Position
Adjust the PC’s screen positioning if it does not t the TV screen. Press the ▲ or
▼ button to adjusting the Vertical-Position. Press the ◄ or ►button to adjust the
Horizontal-Position.
Image Reset
You can replace all image settings with the factory default values.
English - 26
T V
Mode : Dynamic
Picture
Cell Light 10
Contrast 100
Brightness 45
Sound
Sharpness 50
Auto Adjustment
Channel
Screen
Advanced Settings
Setup
Picture Options
Reset : OK
Input
T V
Coarse 50
Picture
Fine
Position
Image Reset
Sound
Channel
Setup
Input
T V
Picture
Sound
Channel
Setup
Input
Move
Move
Move
Picture
Enter
Screen
Enter
Position
Enter
Return
29
Return
Return
Page 27

Sound Control
English - 27
Changing the Sound Settings
Mode
❑
You can select the sound mode to best suit the programming you’re watching.
Standard: This sound mode is for general purposes.
•
Music: Music mode enables you to listen to music as if you are sitting
•
in a concert hall.
Movie: Movie mode enables you to experience live and full movie sound as if you are
•
sitting in a movie theater.
Clear Voice: Emphasizes voice over other sounds. Select this sound mode when
•
watching news, soap operas, or documentaries.
Custom: You can customize the sound settings to suit your personal preferences.
•
T
Press the TOOLS button to display Tools menu.
You can also select the sound mode by selecting Tools → Sound Mode
You can select these options simply by pressing the S.MODE button on the remote
O
control.
Equalizer
❑
The sound settings can be adjusted to suit your personal preferences.
Balance L/R: Adjusts the balance between the right and left speaker.
•
100Hz, 300Hz, 1KHz, 3KHz, 10KHz (Bandwidth Adjustment): Adjusts the level of
•
different bandwidth frequencies.
If you make any changes to the equalizer settings, the sound mode is automatically
O
switched to the Custom mode.
SRSTruSurroundHD→Off/On
❑
SRS TruSurround HD is the combined technology of TruSurround and FOCUS, TruBass.
TruSurround is virtual sound effect under guarantee of Dolby that makes the virtual 5.1
channel via two speaker. FOCUS makes improve the degree of denition of sound and
TruBass reinforcements the low pitched sound.
SRS TruSurround HD enables you to enjoy a virtual 5.1 Surround Sound effect over the
TV's two speakers. This function provides not only rich deep bass also improves high frequency resolution.
T
Press the TOOLS button to display Tools menu.
You can also set the auto adjustment by selecting Tools → SRS TruSurround HD
You can select these options simply by pressing the SRS button on the remote control.
O
T V
Channel
T V
Channel
Sound
Mode : Standard
Picture
Equalizer
SRS TS HD : Off
MTS : Stereo
Sound
Auto Volume : Off
Select Speaker : TV Speaker
Sound Selext : Main
Setup
Input
Picture
Sound
Setup
Input
R
L
Balance
Move
Equalizer
+
0
-
100Hz 300Hz 1kHz 3kHz 10kHz
Move
Adjust
Enter
Return
+
0
-
Return
TruSurround HD, SRS and the symbol are trademarks of SRS Labs, Inc.
TruSurround HD technology is incorporated under license from SRS Labs, Inc.
MTS (Multi-Track Sound)
❑
Mono: Choose for channels that are broadcasting in mono or if you are having difculty receiving a stereo signal.
•
Stereo: Choose for channels that are broadcasting in stereo.
•
SAP: Choose to listen to the Separate Audio Program, which is usually a foreign-language translation.
•
MTS is available only in TV mode.
N
Depending on the particular program being broadcast, you can listen to Mono, Stereo, or SAP.
N
T
Press the TOOLS button to display Tools menu.
You can also set the MTS mode by selecting Tools → MTS
Press the MTS button on the remote control repeatedly to select Mono, Stereo, or
O
SAP.
AutoVolume→Off/On
❑
Each broadcasting station has its own signal conditions, and so it is not easy to adjust the
volume every time the channel is changed. This feature lets you automatically adjust the volume of the desired channel by lowering
the sound output when the modulation signal is high or by raising the sound output when the modulation signal is low.
Continued...
Page 28

Select Speaker
❑
When you watch TV with it connecting to a Home theater, turn the TV speakers off so
you can listen to sound from the Home theater’s (external) speakers.
External Speaker: Uses the external speakers(Home Theater) to output sound.
•
TV Speaker: Uses the TV speakers to output sound.
•
If you select External Speaker in the Select Speaker menu, the sound settings will
N
be limited.
The volume buttons and MUTE buttons do not operate when the Select Speaker
N
is set to External Speaker.
Please set the volume on your Home theater.
TV's Internal Speakers Audio Out (Optical, L / R Out) to Sound System
TV / AV / Component / PC / HDMI TV / AV / Component / PC / HDMI
TV Speaker Speaker Output Sound Output
External Speaker Mute Sound Output
Video No Signal Mute Mute
Sound Select
❑
When the PIP feature is activated, you can listen to the sound of the sub (PIP) picture.
Main: Use to listen to the sound of the main picture.
•
Sub: Use to listen to the sound of the sub picture.
•
You can select this option when PIP is set to On.
N
T V
Mode : Standard
Picture
Equalizer
SRS TS HD : Off
MTS : Stereo
Sound
Auto Volume : Off
Select Speaker : TV Speaker
Channel
Sound Selext : Main
Setup
Input
Move
Sound
Enter
Return
English - 28
Page 29

Function Description
English - 29
Configuring the Setup Menu
Language
❑
You can set the menu language.
ChildLock→Off/On
❑
This feature allows you to prevent unauthorized users, such as children, from watching
unsuitable programmes by muting out video and audio.
N
Before the setup screen appears, the PIN number input screen appears. Enter your
4 digit PIN number.
N
The default PIN number of a new TV set is ‘0-0-0-0’. You can change the PIN by
selecting Change PIN from the menu.
N
You can lock some channels in Channel List. (refer to page 20)
N
Child Lock is available only in TV mode. .
Change PIN
❑
You can change your personal ID number that is required to set up the TV.
N
Before the setup screen appears, the PIN number input screen appears. Enter your 4 digit PIN number.
N
The default PIN number of a new TV set is ‘0-0-0-0’.
If you forget the PIN code, press the remote control buttons in the following sequence, which resets the PIN to ‘0-0-0-0’:
N
POWER (Off), MMUTE, 8, 2, 4, POWER (On).
Caption
❑
Your TV decodes and displays the closed captions that are broadcast with certain TV
shows. These captions are usually subtitles for the hearing impaired or foreign language
translations. All VCRs record the closed caption signal from television programs, so
home-recorded video tapes also provide closed captions. Most prerecorded commercial
video tapes provide closed captions as well. Check for the closed caption symbol in
your television schedule and on the tape’s packaging: .
N
The Caption feature doesn’t work in Component, HDMI or PC modes.
N
The availability of captions depends on the program being broadcast.
Caption : Off / On
•
•
Mode : Caption / Text
Channel : 1, 2
•
Field: 1, 2
•
N
Different channels and elds display different information: Field 2 carries additional
information that supplements the information in Field 1. (For example, Channel 1
may have subtitles in English, while Channel 2 has subtitles in Spanish.)
T V
Plug & Play
Picture
Language : English
Time
Child Lock : On
Sound
Change PIN
Caption
Channel
Game Mode : Off
Melody : Medium
Energy Saving : Off
Setup
AV Color System : Auto
PIP
Input
T V
Picture
Sound
Channel
Setup
Input
T V
Picture
Sound
Channel
Setup
Input
Move
Plug & Play
Language : English
Time
Child Lock : On
Change PIN
Caption
Game Mode : Off
Melody : Medium
Energy Saving : Off
AV Color System : Auto
PIP
Move
Caption
Caption : On
Mode : Caption
Channel : 1
Field : 1
Move
Setup
Enter
Setup
Enter
Enter
Return
Return
Return
Page 30

GameMode→Off/On
❑
When connecting to a game console such as PlayStationTM or XboxTM, you can enjoy a more realistic gaming experience by
selecting the game menu.
When the Game Mode is On
Picture mode is automatically changed to Standard and cannot be changed.
•
Sound mode is automatically changed to Custom and cannot be changed the mode. Adjust the sound using the equalizer.
•
Game Mode is not available in regular TV mode.
N
If the picture is poor when an external device is connected to the TV, check if Game Mode is On.
N
Set Game Mode to Off and connect external devices.
If you display the TV menu in Game mode, the screen shakes slightly.
N
The mark ( ) appears on the screen which means that Game Mode is on with the selected source.
N
Melody
❑
A melody sound can be set to come on when the TV is powered On or Off.
Off: Turns off the melody function.
•
Low: Sets the melody volume to low.
•
Medium: Sets the melody volume to medium.
•
High: Sets the melody volume to high.
•
N
The Melody does not play.
When no sound is output from the TV because the MUTE button has been
-
pressed,
When no sound is output from the TV because the volume has been reduced to
-
T V
Plug & Play
Picture
Language : English
Time
Child Lock : On
Sound
Change PIN
Caption
Channel
Game Mode : Off
Melody : Medium
Energy Saving : Off
Setup
AV Color System : Auto
PIP
Input
Move
Setup
Enter
minimum with the VOL button.
When the TV is turned off with the Sleep Timer function.
-
Energy Saving
❑
This feature adjusts the brightness of the TV in order to reduce power consumption. When watching TV at night,
set the Energy Saving mode option to High to reduce eye fatigue as well as power consumption.
Off: Turns the Energy Saving function off.
•
Low: Sets the Energy Saving function to low.
•
Medium: Sets the Energy Saving function to medium.
•
High: Sets the Energy Saving function to maximum.
•
T
Press the TOOLS button to display TOOLS menu.
You can also set the Energy Saving option by selecting TOOLS → Energy Saving
Return
AV Color System → Auto, PAL-M, PAL-N, NTSC
❑
You can set the color encoding standards for external signal inputs.
Normally the TV can receive image and sound with good quality in Auto mode. This mode detects the color signal sources
automatically. If the color implementation is unsatisfactory, select any of PAL-M, PAL-N or NTSC.
N
This function is available only in AV mode.
English - 30
Page 31

Viewing the Picture in Picture (PIP)
English - 31
You can display a sub picture within the main picture of set programme me or video input. In this way, you can watch the picture of set
programme me or video input from any connected equipment while watching the main picture.
N
You may notice that the picture in the PIP window becomes slightly unnatural when you use the main screen to view a game or
karaoke.
T
Press the TOOLS button to display TOOLS menu. You can also congure PIP
related settings by selecting TOOLS → PIP.
PIP→On/Off
❑
You can activate or deactivate the PIP function.
Main picture Sub picture
Component1, Component2
HDMI 1, HDMI2/DVI, HDMI 3
TV, AV1, AV2
PC
Source→TV/AV1/AV2
You can select a source of the sub-picture.
N
You can select these options simply by pressing the SOURCE button on the remote
control.
Size→ / /
You can select a size of the sub-picture.
N
If main picture is in PC and Component mode, Size is not available.
Position→ / / /
You can select a position of the sub-picture.
N
In Double ( , ) mode, Position cannot be selected.
Channel
You can select a channel of the sub-picture only when the Source is set to TV.
T V
Plug & Play
Picture
Language : English
Time
Child Lock : On
Sound
Change PIN
Caption
Channel
Game Mode : Off
Melody : Medium
Energy Saving : Off
Setup
AV Color System : Auto
PIP
Input
T V
PIP : On
Picture
Source : TV
Size :
Position :
Sound
Channel : Air 53
Channel
Setup
Input
Move
Move
Setup
Enter
PIP
Enter
Return
Return
Page 32

Setting the Time
Setting the clock is necessary in order to use the various timer features of the TV. Also, you can check the time while watching
the TV. (Just press the INFO button.)
❑
Time
1. Press the MENU button to display the menu.
2.
Press the ▲ or ▼ button to select Setup, then press the ENTERE button.
3.
Press the ▲ or ▼ button to select Time, then press the ENTERE button.
Clock Set
You can set the current time manually.
N
You can set the month, day, year, hour, minute directly by pressing the number
buttons on the remote control.
N
The current time will appear every time you press the INFO button.
Sleep Timer
The sleep timer automatically shuts off the TV after a preset time
(Off, 30, 60, 90, 120, 150 and 180 minutes).
Press the TOOLS button to display Tools menu.
T
You can also set the sleep timer by selecting Tools → Sleep Timer
Timer 1 / Timer 2 / Timer 3
Use this feature to set the TV to turn on or off at a desired time.
You must set the clock rst.
•
On Time: Set the Hour, Minute, am/pm, and Activate/Inactivate.
(To activate timer with the setting you’ve chosen, set to Activate.)
•
Off Time: Set the Hour, Minute, am/pm, and Activate/Inactivate.
(To activate timer with the setting you’ve chosen, set to Activate.)
•
Repeat: Select Once, Everyday, Mon~Fri, Mon~Sat, Sat~Sun, or Manual.
•
Volume: Set the required volume level.
•
Channel: Select the desired channel.
N
You can set the hour, minute and channel by pressing the number buttons on the
remote control.
N
Auto Power Off
When you set the timer On, the television will eventually turn off, if no controls are
operated for 3 hours after the TV was turned on by the timer. This function is only
available in timer On mode and prevents overheating, which may occur if a TV is on
for too long time.
T V
Plug & Play
Picture
Language : English
Time
Child Lock : On
Sound
Change PIN
Caption
Channel
Game Mode : Off
Melody : Medium
Energy Saving : Off
Setup
AV Color System : Auto
PIP
Input
T V
Picture
Sound
Channel
Setup
Input
T V
Picture
Sound
Channel
Setup
Input
T V
Picture
Sound
Channel
Setup
Input
Move
Clock Set : 12 : 05 am
Sleep Timer : Off
Timer 1 : Inactivated
Timer 2 : Inactivated
Timer 3 : Inactivated
Move
Clock Set : 12 : 05 am
Sleep Timer : Off
Timer 1 : Inactivated
Timer 2 : Inactivated
Timer 3 : Inactivated
Move
On Time
:
00 Inactivatedam
12
Off Time
:
12 00 Inactivatedam
Repeat
Once
Volume
10
Move
Air
Setup
Enter
Time
Enter
Time
Enter
Time 1
Channel
Adjust
03
Return
Return
Off
30
60
90
120
150
180
Return
Return
English - 32
Page 33

Source List / Edit Name
English - 33
Source List
❑
Use to select TV or other external input sources such as DVD / Blu-Ray players / Cable
Boxes / Satellite / receivers (Set-Top Box) connected to the TV. Use to select the input
source of your choice.
TV, AV1, AV2, Component1, Component2, PC, HDMI1, HDMI2/DVI, HDMI3.
You can choose only those external devices that are connected to the TV. In the
N
Source List, connected inputs will be highlighted and sorted to the top.
Press the SOURCE button on the remote control to view an external signal source.
O
Press the HDMI button on the remote control to select the HDMI mode directly.
O
Edit Name
❑
You can name the device connected to the input jacks to make your input source
selection easier.
VCR / DVD / Cable STB / Satellite STB / PVR STB / AV Receiver / Game /
Camcorder / PC / TV / IPTV / Blu-Ray / HD DVD / DMA
When a PC with a resolution of 640x480@60Hz is connected to the HDMI IN 2 port,
N
you should set the HDMI2/DVI mode to PC in the Edit Name menu.
T V
Source List : TV
Picture
Edit Name
Anynet + (HDMI-CEC)
Sound
Channel
Setup
Input
T V
AV1 : DMA
Picture
AV2 : - - Component1 : - - Component2 : - - -
Sound
PC : - - HDMI1 :
Channel
HDMI2/DVI :
HDMI3 :
Setup
Input
Move
Move
Input
Enter
Input
Enter
- - - - - - -
-
-
-
-
-
-
-
Return
Return
Page 34

Anynet+
Connecting Anynet+ Devices
Anynet+ is a function that enables you to control all connected Samsung devices that support Anynet+ with your Samsung
TV’s remote.
The Anynet+ system can be used only with Samsung devices that have the Anynet+ feature. To be sure your Samsung device
has this feature, check if there is an Anynet+ logo on it.
To connect to a TV
1. Connect the [HDMI 1], [HDMI 2] or [HDMI 3] jack on the TV and the HDMI OUT jack of the corresponding Anynet+ device using
an HDMI cable.
HDMI 1.3 Cable
To connect to a Home Theater
TV
Anynet+ Device 1
HDMI 1.3 Cable
Anynet+ Device 2 Anynet+ Device 3
HDMI 1.3 Cable
1. Connect the [HDMI IN 1], [HDMI IN 2] or [HDMI IN 3] jack on the TV and the HDMI OUT jack of the corresponding Anynet+
device using an HDMI cable.
2. Connect the HDMI IN jack of the home theater and the HDMI OUT jack of the corresponding Anynet+ device using an HDMI
cable.
TV
HDMI 1.3 Cable
Anynet+ Device 1 Anynet+ Device2
HDMI 1.3 Cable
Home Theatre
Anynet+ Device 3
HDMI 1.3 Cable
Connect only one Home Theater.
N
You can connect an Anynet+ device using the HDMI 1.3 cable. Some HDMI cables may not support Anynet+ functions.
N
Anynet+ works when the AV device supporting Anynet+ is in the Standby or On status.
N
Anynet+ supports up to 12 AV devices in total. Note that you can connect up to 3 devices of the same type.
N
English - 34
HDMI 1.3 Cable
Continued...
Page 35

Setting Up Anynet+
English - 35
Anynet+ is a function that enables you to control all connected Samsung devices
that support Anynet+ with your Samsung TV’s remote.
T
Press the TOOLS button to display TOOLS menu.
You can also display Anynet+ menu by selecting TOOLS → Anynet+(HDMI-CEC).
Setup
❑
You can set the environment for using Anynet+.
1. Press the MENU button to display the menu. Press the ▲ or ▼ button to select Input,
then press the ENTERE button.
2.
Press the ▲ or ▼ button to select Anynet+ (HDMI-CEC), then press the ENTERE
button.
3.
Press the ▲ or ▼ button to select Setup, then press the ENTERE button.
Anynet+(HDMI-CEC)→Off/On
To use the Anynet+ Function, Anynet+ (HDMI-CEC) must be set to On.
N
When the Anynet+ (HDMI-CEC) function is disabled, all the Anynet+ related
operations are deactivated.
AutoTurnOff→No/Yes
Setting an Anynet+ Device to turn Off Automatically when the TV is Turned Off
N
The active source on the TV remote must be set to TV to use the Anynet+ function.
N
If you set Auto Turn Off to Yes, connected external devices are also turned off when
the TV is turned off. If an external device is still recording, it may or may not turn off.
Searching Connections
Searches the all connected devices.
When searching devices completes, the connected devices are listed in the Anynet+ menu.
T V
Source List : TV
Picture
Edit Name
Anynet + (HDMI-CEC)
Sound
Channel
Setup
Input
TV P 1
View TV
Select Device
Record
Menu on Device
Device Operation
Receiver :Off
Setup
Move
Return
Anynet+ (HDMI-CEC) : On
Auto Turn Off : Yes
Searching Connections
Move
Move
Enter
Setup
Enter
Input
Enter
Return
Return
Scanning and Switching between Anynet+ Devices
1. Press the TOOLS button. Press the ENTERE button to select
Anynet+ (HDMI-CEC).
2.
Press the ▲ or ▼ button to select Select Device, then press the ENTERE button.
N
Anynet+ devices connected to the TV are listed. If you cannot nd a device you want,
press the red button to scan for devices.
N
Only when you set Anynet+ (HDMI-CEC) to On in the Setup menu, the Device List
menu appears.
Press the ▲ or ▼ button to select to a particular device and press the ENTERE button.
3.
It is switched to the selected device.
4. If you cannot nd a device you want, press the ▲ or ▼ button to select Searching
Connections, then press the ENTERE button.
5. The meassage Configuring Anynet+ connection is displayed. When searching devices
completes, the connected devices are listed in the Anynet+ menu.
N
Switching to the selected devices may take up to 2 minutes. You cannot cancel the
operation during the switching operation.
N
The time required to scan for devices is determined by the number of connected devices.
N
When the device scan is complete, the number of devices found are not displayed.
N
Although the TV automatically searches the device list when the TV is turned on via the
power button, devices connected to the TV when the TV is on or under some conditions
are not automatically displayed in the device list. Press the red button to search for the
connected device.
N
If you have selected external input mode by pressing the SOURCE button, you cannot use
the Anynet+ function. Make sure to switch to an Anynet+ device by using the Device List.
TV P 1
View TV
Select Device
Record
Menu on Device
Device Operation
Receiver :Off
Setup
Move
Return
Anynet+ (HDMI-CEC) : On
Auto Turn Off : Yes
Searching Connections
Move
Enter
Setup
Enter
Return
Page 36

Anynet+ Menu
❑
The Anynet+ menu changes depending on the type and status of the Anynet+ devices connected to the TV.
Anynet+ Menu Description
View TV Switches from Anynet+ to TV broadcast mode.
Select Device Your TV connects to the corresponding device.
Record Starts a recording. (This menu works only for a device supporting recording.)
Menu on Device Shows the menu of the connected device.
Example. When a DVD Recorder is connected, the DVD Recorder’s title menu appears.
Device Operation Shows the play control menu of the connected device.
Example. When a DVD Recorder is connected, the play control menu of the DVD Recorder
appears.
Receiver Sound is output through the receiver.
Setup You can set the environment for using Anynet+.
TV Remote Control Buttons Available in Anynet+ Mode
❑
Device Type Operating Status Available Buttons
After switching to the device, when the menu of the
corresponding device is displayed on the screen.
Anynet+ Device
After switching to the device, while playing a file
Numeric buttons
▲/▼/◄/►/ENTERE
buttons
Colour buttons / EXIT button
(Backward search) / (Forward search) /
(Stop) / (Play) / (Pause)
Device with builtin Tuner
Audio Device When Receiver is activated
N
The Anynet+ function only works when the active source on the TV remote control is set to TV.
N
The button works only while in the recordable state.
N
You cannot control Anynet+ devices using the buttons on the TV. You can control Anynet+ devices only using the TV remote control.
N
The TV remote control may not work under certain conditions. In this case, reselect the Anynet+ device.
N
The Anynet+ functions do not operate with other manufacturers’ products.
N
In Anynet+ mode, the colour buttons may not work properly.
The , operations may differ depending on the device.
N
After switching to the device, when you are watching a TV
programme
P / button
= / button
M MUTE button
Recording
You can make a recording of a TV programme using a Samsung recorder.
1. Press the TOOLS button. Press the ENTERE button to select Anynet+ (HDMI-CEC).
2.
Press the ▲ or ▼ button to select Record, then press the ENTERE button. Recording begins.
N
When there is more than one recording device
When multiple recording devices are connected, the recording devices are listed. Press the ▲ or ▼
button to select a recording device and press the ENTERE button. Recording begins.
N
When the recording device is not displayed
Select Select Device and press the red button to search devices.
N
You can record the source streams by selecting Record.
N
Pressing the button will record whatever you are currently watching. If you are watching video from
another device, the video from the device is recorded.
N
Before recording, check whether the antenna jack is properly connected to the recording device. To properly connect an antenna to
a recording device, refer to the recording device’s users manual.
TV P 1
View TV
Select Device
Record
Menu on Device
Device Operation
Receiver :Off
Setup
Move
Return
Enter
English - 36
Page 37

Listening through a Receiver (Home theater)
English - 37
You can listen to sound through a receiver instead of the TV speaker.
1. Press the TOOLS button. Press the ENTERE button to select Anynet+ (HDMI-CEC).
2.
Press the ▲ or ▼ button to select Receiver. Press the ◄ or ► button to select On or Off.
N
If your receiver supports audio only, it may not appear in the device list.
N
When listening through the receiver, there are restrictions for using the PIP and audio-related (MTS,
Preferred language) menus.
N
If there is a power interruption to the TV when the Receiver is set to On (by disconnecting the power
cord or a power failure), the Select Speaker may be set to External Speaker when you turn the TV on
again.
TV P 1
View TV
Select Device
Record
Menu on Device
Device Operation
Receiver :Off
Setup
Move
Return
Enter
Troubleshooting for Anynet+
Symptom Solution
Anynet+ does not work. Check if the device is an Anynet+ device. The Anynet+ system supports Anynet+ devices only.
I want to start Anynet+. Check if the Anynet+ device is properly connected to the TV and check if the Anynet+
I want to exit Anynet+. Select View TV in the Anynet+ menu.
The message Connecting to
Anynet+ device...
appears on the screen.
The Anynet+ device does not
play.
The connected device is not
displayed.
The TV programme cannot be
recorded.
•
Connect only one receiver (home theater).
•
Check if the Anynet+ device power cord is properly connected.
•
Check the Anynet+ device’s Video/Audio/HDMI 1.3 cable connections.
•
Check whether Anynet+ (HDMI-CEC) is set to On in the Anynet+ setup menu.
•
Check whether the TV remote control is in TV mode.
•
Check whether it is Anynet+ exclusive remote control.
•
Anynet+ doesn’t work in certain situations. (Searching channels, Plug & Play, etc.)
•
When connecting or removing the HDMI 1.3 cable, please make sure to search devices again
•
or turn your TV off and on again.
Check if the Anynet+ Function of Anynet+ device is set on.
•
•
(HDMI-CEC) is set to On in the Anynet+ Setup menu.
Press the TV button on the TV remote control to switch to TV. Then press the TOOLS button
•
to show the Anynet+ menu and select a menu you want.
•
Press the SOURCE button on the TV remote control and select a device other than Anynet+
•
devices.
(Note that the channel button operates only when a tuner-embedded Anynet+ device is not
•
connected.)
You cannot use the remote control when you are conguring Anynet+ or switching to a view
•
mode.
Use the remote control when the Anynet+ setting or switching to view mode is complete.
•
You cannot use the play function when Plug & Play is in progress.
•
Check whether or not the device supports Anynet+ functions.
•
Check whether or not the HDMI 1.3 cable is properly connected.
•
Check whether Anynet+ (HDMI-CEC) is set to On in the Anynet+ setup menu.
•
Search Anynet+ devices again.
•
You can connect an Anynet+ device using the HDMI 1.3 cable only. Some HDMI cables may
•
not support Anynet+ functions.
If it is terminated by an abnormal situation such as disconnecting the HDMI cable or power
•
cord or a power failure, please repeat the device scan.
Check whether the antenna jack on the recording device is properly connected.
•
Page 38

Appendix
Troubleshooting
If the TV seems to have a problem, first try this list of possible problems and solutions.
If none of these troubleshooting tips apply, call Samsung customer service at 1-800-SAMSUNG.
Problem Possible Solution
Poor picture quality. Try another channel.
Poor sound quality. Try another channel.
No picture or sound. Try another channel.
No sound or sound is too low at
maximum volume.
Picture rolls vertically. Check all connections.
The TV operates erratically. Unplug the TV for 30 seconds, then try operating it again.
The TV won’t turn on. Make sure the wall outlet is working.
Remote control malfunctions Replace the remote control batteries.
Digital broadcasting screen
problem.
The image is too light or too dark. Adjust the Brightness and Contrast.
The image is too large or too small. Adjust the Size settings.
The visual qualities of digital
channels vary.
Screen is black and power
indicator light blinks steadily.
Although the TV caption shows
HD, the visual quality is not
satisfactory.
A distorted picture appears in the
corner of the screen.
A strange sound is heard. This is caused by minor systems operation and is not a defect.
Pixels are visible on the screen. There may be few bright or dark pixels on the screen. These pixels will have no impact on the
The Resets all settings to the
default values message appears.
Adjust the antenna.
Check all wire connections.
Adjust the antenna.
Press the SOURCE button.
Make sure the TV is plugged in.
Check the antenna connections.
Make sure the MUTE button is off.
First, check the volume of units connected to your TV (digital broadcasting receiver, DVD,
cable broadcasting receiver, VCR, etc.). Then, adjust the TV volume accordingly.
Clean the upper edge of the remote control (transmission window).
Check the battery terminals.
Press the TV button to put your remote control in the TV mode.
Make sure the remote has batteries.
Check that the “+” and “-” ends of the batteries are inserted correctly.
Please check the digital signal strength and input antenna.
Adjust the Fine tuning.
The visual qualities of digital channels may vary depending on the original production method
(analog or digital).
- If the original production method is digital: High visual quality.
- If the original production method is analog: The digital program displayed on the screen is
originally an analog program which has been converted to digital.
The visual quality is of an SD(Standard Definition) grade.
On your computer; check the Power and Signal Cable.
The TV is using its power management system.
Move the computer’s mouse or press any key on the keyboard.
On your equipment check (STB, DVD, etc) ; Power and Signal Cable.
The TV is using its power management system.
Press the SOURCE button on the panel or remote control.
Turn the TV off and on.
The HD(High Definition) caption that appears when switching channels or when pressing the
Information button on the remote control means the selected channel is a digital channel. If
the broadcasting station converts an analog signal into digital and transmits the signal, the
visual quality may not be perfect.
If Screen Fit is selected in some external devices, a distorted picture may appear in the
corner of the screen. This symptom is caused by external devices, not the TV.
performance of the product.
This appears when you press and hold the EXIT button for a while. The product settings are
reset to the factory defaults.
English - 38
Page 39

Preparation before installing the Wall-Mount
English - 39
Case A. Installing the SAMSUNG Wall-Mount Case B. Installing another company’s Wall-Mount
1. Install the Wall Mount with a torque range of 15kgf·cm or less. Use care as the parts can be damaged if the torque is out of the
specied range.
2. Accessory Kit contains Holder–Ring
Screw down the hole [①] when installing wall-mount on the wall.
N
] for installing other company’s Wall-Mount on Samsung TV. (Case B)
[
②
Using the Stand-Base
N
Two or more people should carry the PDP. Never lay the PDP on the oor because of possible damage to the screen. Always keep
the PDP upright.
N
The PDP can rotate 20 degrees in right and left directions.
How to attach the Stand-Base
Using the screws for securing the stand base and the TV, firmly attach the TV to the
stand base.
(The exterior of the set may be different fr om the picture.)
Warning
Firmly secure the stand to the TV before moving it, as the stand may fall and could
cause serious injury.
Two or more people should carry the TV. Never lay the TV on the oor because of
N
possible damage to the screen. Always store the TV upright.
-20° ~ 20°
When mounting your TV on a wall, install
the cover (➊) on the stand-base using two
screws.
Page 40

Securing the TV to the Wall
10 cm
10 cm
10 cm
10 cm
10 cm
10 cm
10 cm
10 cm
10 cm
10 cm
10 cm
Pulling, pushing, or climbing on the TV may cause the TV to fall. In particular, ensure your children do not hang
over or destabilize the TV; doing so may cause the TV to tip over, causing serious injuries or death. Follow all safety
precautions provided on the included Safety Flyer. For added stability, install the anti-fall device for safety purposes,
Caution
To avoid the TV from falling
1. Put the screws into the clamps and rmly fasten them onto the wall. Conrm that the screws
have been rmly installed onto the wall.
N
You may need additional material such as an anchor depending on the type of wall.
N
Since the necessary clamps, screws, and string are not supplied, please purchase
these additionally.
Remove the screws from the center back of the TV, put the screws into the clamps, and then
2.
fasten the screws onto the TV again.
N
Screws may not be supplied with the product.
Connect the clamps xed onto the TV and the clamps xed onto the wall with a strong wire
3.
and then tie the string tightly.
N
Install the TV near to the wall so that it does not fall backwards
N
It is safe to connect the string so that the clamps xed on the wall are equal to or lower
than the clamps xed on the TV.
N
Untie the string before moving the TV.
as follows.
.
Wall
4. Verify all connections are properly secured. Periodically check connections for any sign of
fatigue or failure. If you have any doubt about the security of your connections, contact a
professional installer.
Wall
Securing the Installation Space
Keep the required distances between the product and other objects (e.g. walls) to ensure proper ventilation.
Failing to do so may result in fire or a problem with the product due to an increase in the internal temperature of the product.
Install the product so the required distances shown in the figure are kept.
N
When using a stand or wall-mount, use parts provided by Samsung Electronics only.
If you use parts provided by another manufacturer, it may result in a problem with the product or an injury due to the product
falling.
If you use parts provided by another manufacturer, it may result in a problem with the product or re due to an increase in the
internal temperature of the product due to poor ventilation.
N
The appearance may differ depending on the product.
When installing the product with a stand
When installing the product with a wall-mount
English - 40
Page 41

Wall Mount Kit Specifications (VESA)
English - 41
Install your wall mount on a solid wall perpendicular to the floor.
When attaching to other building materials, please contact your nearest dealer.
If installed on a ceiling or slanted wall, it may fall and result in severe personal injury.
Product Family inch VESA Spec. (A * B) Standard Screw Quantity
23 ~ 26 200 * 100 M4
32 ~ 40 200 * 200 M6
46 ~ 52
LCD-TV
57
400 * 400
600 * 400
700 * 400
(No VESA)
4
M8
57 ~ 70 800 * 400
80 ~ 1400 * 800
42 ~ 58
400 * 400
600 * 400
4
63 600 * 400 6
PDP-TV
M8
63 ~ 70 800 * 400 4
80 ~ 1400 * 800 4
N
The standard dimensions for wall mount kits are shown in the table above.
N
When purchasing our wall mount kit, a detailed installation manual and all parts necessary for assembly are provided.
N
Do not use screws longer than the standard dimension, as they may cause damage to the inside of the TV set.
N
For wall mounts that do not comply with the VESA standard screw specications, the length of the screws may differ depending on
their specications.
N
Do not use screws that do not comply with the VESA standard screw specications.
Do not use fasten the screws too strongly, this may damage the product or cause the product to fall, leading to personal injury.
Samsung is not liable for these kinds of accidents.
N
Samsung is not liable for product damage or personal injury when a non-VESA or non-specied wall mount is used or the consumer
fails to follow the product installation instructions.
N
Our 57” and 63” models do not comply with VESA Specications. Therefore, you should use our dedicated wall mount kit for this
model.
N
Do not exceed 15 degrees tilt when mounting this TV.
Do not install your Wall Mount Kit while your TV is turned on.
It may result in personal injury due to electric shock.
Page 42

Specifications
Model Name PL42B450B1 PL50B450B1
Screen Size (Diagonal) 42 inch 50 inch
PC Resolution 1024x768 @ 60 Hz 1360x768 @ 60 Hz
Sound (Output) 10W x 2 10W x 2
Dimension (W x H x D)
Body
With stand
Weight
Body
With stand
Environmental Considerations
Operating Temperature
Operating Humidity
Storage Temperature
Storage Humidity
This device is a Class B digital apparatus.
N
Design and specications are subject to change without prior notice.
N
For the power supply and Power Consumption, refer to the label attached to the product.
N
41.5 x 25.9 x 2.9 inches
(1055.5 x 660 x 74 mm)
41.5 x 28.4 x 12.4 inches
(1055.5 x 721 x 316 mm)
53.1 lbs (24.1 kg)
61.3 lbs (27.8 kg)
50 °F to 104 °F (10 °C to 40 °C)
10% to 80%, non-condensing
-4 °F to 113 °F (-20 °C to 45 °C)
5% to 95%, non-condensing
48.0 x 29.4 x 2.9 inches
(1220.8 x 748.8 x 74 mm)
48.0 x 31.8 x 12.4 inches
(1220.8 x 810 x 316 mm)
69.0 lbs (31.3 kg)
77.2 lbs (35.0 kg)
50 °F to 104 °F (10 °C to 40 °C)
10% to 80%, non-condensing
-4 °F to 113 °F (-20 °C to 45 °C)
5% to 95%, non-condensing
English - 42
Page 43

This page is intentionally
left blank.
Page 44

Informações importantes sobre a garantia em relação à visualização no
formato da TV
Os monitores PDP formato widescreen (16:9, relação de largura x altura da tela) são projetados essencialmente para visualizar vídeo
full motion (de movimento total) no formato widescreen. As imagens exibidas na tela devem estar no formato widescreen 19:9, ou no
formato expandido para preencher a tela, se o modelo oferecer este recurso, e as imagens estiverem em movimento constante. A exibição
de gráficos e imagens paradas na tela, como as barras laterais escuras nas programações e vídeos da da TV em formato padrão não
expandido, deverá ser limitada a não mais do que 5% da exibição total da televisão por semana.
Além disso, a exibição de outras imagens e textos parados, como relatórios de bolsas de valores, videogames, logotipos de emissoras,
sites ou gráficos e padrões de computadores, deve se limitar ao que está descrito acima para todos os televisores. A exibição de imagens
paradas que ultrapassem as orientações acima pode causar um desgaste irregular dos monitores de plasma, que resulta em
imagens fantasmas permanentes na tela. Para evitar que isto ocorra, varie a programação e as imagen, exibindo principalmente
imagens em movimento, em tela cheia, ao inves de imagens paradas ou barras escuras.
Nos modelos PDP que oferecem recursos de enquadramento de imagem, utilize esses controles para visualizar formatos diferentes como
uma imagem em tela cheia.Seja cauteloso na seleção e duração de formatos de televisão utilizados para a visualização. O desgaste
irregular do monitor PDP como resultado da seleção e do uso de formato, bem como imagens fantasmas permanentes, não são cobertas
pela garantia limitada da Samsung.
© 2009 Samsung Electronics Co., Ltd. Todos os direitos reservados.
Português - 2
Page 45

Instruções ao usuário
Português - 3
Retenção da imagem na tela
Não exiba uma imagem estática (como em um videogame) no painel do monitor de plasma por mais de alguns minutos, pois isso pode
causar retenção da imagem na tela. Essa retenção também é conhecida como “queima de tela”. Para evitar esse tipo de retenção da
imagem, consulte a página 23 deste manual para reduzir o grau de brilho e contraste da tela ao exibir uma imagem estática.
Altitude
O monitor só poderá operar normalmente em altitudes inferiores a 2.000 metros.
Aquecimento da parte superior da TV de Plasma
A parte superior do produto pode aquecer após um longo período de utilização, pois o calor é dissipado da tela através da saída de
ventilação na parte superior do produto.
Isso é normal e não indica que o produto possua algum defeito ou alguma falha de funcionamento.
No entanto, crianças não devem tocar essa parte do produto.
O produto está fazendo um ruído de “estalo”.
Um ruído de “estalo” pode ocorrer quando há contração ou expansão do produto devido a uma mudança do ambiente ao redor, como
temperatura ou umidade. Isso é normal e não um defeito da unidade.
Defeitos na célula
O PDP utiliza um painel composto de 2,360,000 (nível-HD) a 3.6,221,000 (nível-FHD) pixels que requerem uma tecnologia sosticada
para produção. Entretanto, pode haver poucos pixels luminosos ou escuros na tela. Esses pixels não causarão nenhum impacto no
desempenho do produto.
Evite operar a TV em temperaturas abaixo de 5°C (41°F)
Uma imagem estática exibida por muito tempo pode causar dano permanente no Painel PDP.
Assistir a uma TV de Plasma no formato 4:3 por muito tempo poderá deixar marcas de bordas exibidas à
esquerda, direita e no centro da tela, causadas pela diferença de emissão de luz na tela.
Reproduzir um DVD ou usar consoles de jogos pode originar um efeito similar na tela.
Os danos causados pelo efeito acima não são cobertos pela Garantia.
Retenção de imagens na tela.
A exibição de imagens estáticas de videogames e PC por um tempo maior do que o determinado poderá ocasionar retenção parcial
das imagens.
Para evitar esse tipo de efeito, diminua o “brilho” e o “contraste” ao exibir imagens estáticas um longo período.
Garantia
A garantia não cobre qualquer dano causado pela retenção de imagem.
A queima de tela também não é coberta pela garantia.
Instalação
Certique-se de entrar em contato com uma assistência técnica autorizada para instalar seu aparelho em um local exposto a muita
poeira, temperaturas altas ou baixas, umidade elevada, substâncias químicas e em locais onde o funcionamento é contínuo, como
aeroportos, estações ferroviárias, etc. Se isso não for feito, o aparelho poderá apresentar danos graves.
Page 46

ÍNDICE
INFORMAÇÕES GERAIS
Lista de funções ........................................................................5
■
Português
Acessórios ................................................................................. 5
■
Visualizando o Painel de Controle.............................................6
■
Visualizando o Painel de Conexão ............................................7
■
Controle remoto .........................................................................8
■
CONEXÕES
Conectando antenas VHF e UHF ..............................................9
■
Conectando uma TV a cabo ......................................................9
■
Conectando o DVD / Blu-Ray Player ou receptor/decodicador
■
de Satélite (Set-Top) via HDMI
Conectando o DVD / Blu-Ray Player ou receptor/decodicador
■
de Satélite (Set-Top) via DVI
Conectando o DVD / Blu-Ray Player ou receptor/decodicador
■
de Satélite (Set-Top) via cabos Componente
Conectando uma lmadora .....................................................12
■
Conectando um Videocassete.................................................13
■
Conectando um amplicador/DVD Home Theater ..................14
■
Conectando um PC .................................................................15
■
................................................... 11
...................................................... 11
..............................12
OPERAÇÃO
Ligar e desligar a TV ...............................................................16
■
Mudar de Canal ....................................................................... 16
■
Ajustando o volume ................................................................. 16
■
Utilizando o botão TOOLS ......................................................17
■
Informações .............................................................................17
■
Ver os menus ..........................................................................17
■
Visualização dos menus ..........................................................18
■
Recurso Plug & Play ...............................................................19
■
CONTROLE DE CANAL
Armazenando canais ...............................................................20
■
Gerenciando canais ................................................................20
■
EXIBIÇÃO DO PC
Utilizando sua TV como monitor de computador (PC) ............25
■
Modos de visualização ............................................................26
■
Conguração da TV com o seu PC ......................................... 26
■
CONTROLE DE SOM
Alterando as congurações de som ........................................27
■
DESCRIÇÃO DAS FUNCÕES
Utilizando o menu de conguração .........................................29
■
Visualizando Picture in Picture (PIP) .......................................31
■
Ajustando a hora .....................................................................32
■
Lista de Entradas/Editar Nome ...............................................33
■
SOBRE O Anynet
Conectando dispositivos Anynet+ ...........................................34
■
Congurando o Anynet+ .........................................................35
■
Procurar e alternar entre dispositivos Anynet+........................35
■
Gravação ................................................................................. 36
■
Como ouvir através do receiver (Home theater) .....................37
■
Solução de problemas do Anynet+ .........................................37
■
+
APÊNDICE
Solução de problemas .............................................................38
■
Preparação antes da montagem na parede ............................ 39
■
Utilizar a base de suporte ........................................................39
■
Como xar a Base ................................................................... 39
■
Como prender com segurança a TV à parede ........................40
■
Segurança do espaço de instalação ....................................... 40
■
Especicações do kit de montagem na parede (VESA) ..........41
■
Especicações ........................................................................42
■
CONTROLE DE IMAGEM
Alterando o padrão de imagem ...............................................21
■
Utilizando a Função 3D ...........................................................24
■
símbolo
Pressione Nota Botão de um toque Ferramentas
N O T
Português - 4
Page 47

Informações gerais
Português - 5
Lista de funções
Imagem ajustável e denições de som que podem ser armazenadas na memória da TV.
•
Temporizador automático para ligar e desligar a TV.
•
Sleep Timer especial.
•
Excelente qualidade de imagem Imagens n? tidas e reais sao proporcionadas pela tecnologia DNIe
•
Conexão HDMI/DVI do seu PC para esta TV.
•
A tecnologia SRS TruSurround HD oferece um sistema virtual surround.
•
Acessórios
Verifique se os itens a seguir foram incluídos com a TV. Se algum item estiver faltando, entre em contato com o representante.
Controle remoto/
Pilhas AAA
Pano de limpeza Parafusos (4ea)
Cabo de Alimentação Manual do Usuário Certicado de garantia /
(Consulte a página 39)
Tampa da parte inferior
(Consulte a página 39)
Guia de segurança
Suporte-Anel (4ea)
(Consulte a página 39)
Page 48

Visualizando o Painel de Controle
Os botões da parte inferior à direita do painel controlam as cararacterísticas básicas da sua TV, inclusive o menu digital na
tela. Para utilizar as funções mais avançadas é preciso usar o controle remoto.
A cor e o formato do produto podem variar, dependendo do modelo.
N
SOURCE E
1
Alterna entre todas as entradas disponíveis
(TV, AV1, AV2, Componente1, Componente2, PC, HDMI1, HDMI2/DVI, HDMI3).
No menu de tela, use este botão da mesma forma que utiliza o botão ENTERE no controle remoto.
MENU
2
Pressione este botão para ver um menu das funções do televisor.
+ VOL –
3
Pressione este botão para aumentar ou diminuir o volume. No menu de tela, use os botões + VOL – para substituir os botões
◄ e ► no controle remoto.
< CH >
4
Pressione este botão para mudar de canal. No menu de tela, use os botões < CH > para substituir os botões ▲ e ▼ no controle
remoto.
INDICADOR DE ENERGIA
5
Pisca quando recebe informações do controle remoto, apaga quando a TV está ligada e acente em modo stand-by.
P ALIMENTAÇÃO
6
Pressione para ligar e desligar a TV.
SENSOR DO CONTROLE REMOTO
7
Posicione o controle remoto em direção a este local no televisor.
ALTO-FALANTES
8
Português - 6
Page 49

Visualizando o Painel de Conexão
Português - 7
Utilize as tomadas do painel traseiro para ligar permanentemente um componente A/V, como Blu-Ray, DVD Players ou
Videocassetes.
Tomadas do Painel Traseiro Tomadas do Painel Lateral
1
ENTRADA DE ENERGIA
Conecte o cabo de força fornecido.
SERVICE
2
Conector apenas para MANUTENÇÃO.
PC IN
3
Conecte as tomadas de saída de vídeo ao seu PC.
PC/DVI AUDIO IN
4
Conecte a tomada de saída de áudio ao seu PC.
HDMI IN 1, 2(DVI), 3
5
Conecte à tomada HDMI de um dispositivo com saída HDMI.
(HDMI 2 suporta HDMI-DVI IN e conexão a partir de um PC.)
O HDMI 2 também pode ser utilizado como uma conexão
DVI com entradas de áudio analógicas separadas. Será
necessário um cabo HDMI/DVI opcional para fazer essa
conexão.
Ao usar um adaptador HDMI/DVI opcional, as entradas
de áudio analógicas DVI da TV permitem receber áudio
esquerdo e direito do dispositivo DVI.
6
ANT IN
Conecte uma antena ou sistema de TV a cabo.
7
AUDIO OUT (R/L)
Conecte as saídas de audio da TV nas entradas no
Amplicador/Home Theater.
8
3D SYNC OUT
Conecte ao Emissor de IR 3D.
9
TOMADA DOS FONES DE OUVIDO
Você poderá conectar um conjunto de fones de ouvido se
quiser assistir a um programa de TV sem perturbar outras
pessoas no mesmo recinto.
A utilização prolongada de fones de ouvido com som alto
N
pode danicar sua audição.
0
COMPONENT IN 1, 2 / AV IN 1
Conecta Componente Vídeo / Áudio. A tomada do
COMPONENT IN 1 também é utilizada na tomada AV IN 1.
Conecte o cabo de vídeo à tomada do COMPONENT
N
IN 1 [Y/VIDEO] e o cabo de áudio às tomadas do
COMPONENT IN 1 [R-AUDIO-L].
AV IN 2 (VIDEO / AUDIO R/L)
!
Entradas de vídeo e áudio para dispositivos externos.
Page 50

Controle remoto
Use o controle remoto até uma distancia de aproximadamente 7 metros da TV.
A cor e o formato do produto podem variar, dependendo do modelo.
N
Pode acontecer do funcionamento do controle remoto ser alterado por luz clara.
N
POWER
1
Liga e desliga a TV.
BOTÕES NUMÉRICOS
2
Pressione para mudar de canal.
3
Use para selecionar os canais acima
de 100.
Por exemplo, para o canal 122, pressione
“-”, seguido de “2” e “2”.
MUTE
4
Pressione este botão para cortar
temporariamente o som.
VOL
5
Pressione este botão para aumentar ou
diminuir o volume.
SOURCE
6
Pressione para exibir todas as fontes de
vídeo disponíveis.
CH LIST
7
Utilize para exibir as Listas de Canais na
tela.
TOOLS
8
Use esta opção para selecionar
rapidamente as funções usadas com mais
freqüência.
SOBE▲/DESCE▼/ESQUERDA◄/
9
DIREITA►/ENTER
Utilize para selecionar os itens do menu
de tela e alterar valores no menu.
INFO
0
Pressione para exibir informações na tela
da TV.
BOTÕES DE COR
!
Utilize esses botões na lista de canais.
MEDIA.P
@
Não disponível.
MTS
#
Pressione para selecionar estéreo, mono ou
programa de áudio separado (transmissão
SAP).
Use estes botões nos modos DMA e
$
Anynet+. ( : Este controle remoto pode
ser usado para controlar a gravação nos
gravadores Samsung que tenham o recurso
Anynet+).
TV
%
Seleciona O modo TV diretamente.
PRE-CH
^
Sintoniza o canal anterior.
CH
&
Pressione para mudar de canal.
MENU
*
Mostra o menu principal.
FAV.CH
(
Pressione para alternar entre seus canais
favoritos.
RETURN
)
Volta ao menu anterior.
EXIT
a
Pressione para sair do menu.
b
P.SIZE
Pressione para alterar o tamanho da tela.
c
SRS
Seleciona o modo SRS TruSurround HD.
d
CC
Controla o decodicador de legenda.
e
GUIDE
Não disponível
Colocando pilhas no controle remoto
❑
1. Levante a tampa localizada na parte traseira do controle remoto, conforme mostrado na gura.
2. Coloque duas pilhas de tamanho AAA.
N
Certique-se de combinar os pólos “+” e “-” das pilhas com o diagrama no interior do compartimento.
3. Feche a tampa, conforme mostrado na gura.
Remova as pilhas e guarde-as em um local fresco e seco, se não for utilizar o controle remoto por um
N
longo período. (Considerando a utilização normal da TV, as pilhas podem durar aproximadamente um
ano.)
Se o controle remoto não funcionar, verique o seguinte:
N
1. A TV está ligada?
2. Os pólos mais e menos das pilhas estão invertidos?
3. As pilhas estão esgotadas?
4. Há falta de energia ou o cabo de energia está fora da tomada?
5. As pilhas estão perto de alguma lâmpada uorescente ou de um sinal de neon especial?
Português - 8
Page 51

Conexões
Português - 9
Conectando antenas VHF e UHF
Se a antena tiver um conjunto de cabos condutores similar ao da ilustração, consulte a
seção.“Antenascomcabocondutorduplohorizontalde300Ω”aseguir.
Se a sua antena tiver um cabo condutor como o da ilustração da direita, consulte “Antenas
comcaboscondutoresredondosde75Ω.”
Se você possuir duas antenas, consulte “Antenas VHF e UHF separadas.”
Antenascomcabocondutorduplohorizontalde300Ω
❑
Caso esteja sendo utilizada uma antena externa (como uma antena de telhado ou
“antenaemV”)quetenhaumcabocondutorparaleloduplode300Ω,sigaasinstruções
a seguir.
1. Introduzir os dois cabos por baixo dos pararafusos em um transformador de 300-75 Ω (não
fornecido).
Utilize uma chave de fenda para apertar os parafusos.
2. Conecte o adaptador ao terminal ANT IN na parte traseira da TV.
Antenascomcabosredondosde75Ω
❑
Conecte o cabo da antena ao terminal ANT IN na parte traseira da TV.
Antenas VHF e UHF separadas
❑
Se você possuir duas antenas separadas para sua TV (uma VHF e outra UHF), é preciso
combinar os dois sinais de antena antes de conectar as antenas à TV. Este procedimento
exige um adaptador-combinador opcional (disponível na maioria das lojas de eletrônica).
1. Ligar ambos os cabos da antena ao combinador.
2. Conecte o adaptador ao terminal ANT IN na parte inferior do painel traseiro.
ANT IN
ANT IN
UHF
VHF
ANT IN
UHF
VHF
Conectando uma TV a cabo
Para fazer a ligação de um sistema de televisão a cabo, seguir as intruções abaixo.
Ligação a cabo sem utilizar um decodificador
❑
Conecte o cabo de entrada ao terminal ANT IN na parte traseira da TV.
N
Não é necessário um decodicador para visualizar os canais a cabo decodicados.
Conectando um decodificador que decodifica todos os canais
❑
1. Localize o cabo conectado ao terminal ANT OUT no decodicador.
Esse terminal pode ser identicado como “ANT OUT”, “VHF OUT” ou, simplesmente,
N
“OUT”.
2. Conecte a outra extremidade do cabo ao terminal da ANT IN na parte traseira da TV.
ANT IN
ANT IN
ANT OUT
ANT IN
Continuação...
Page 52

Fazendo a ligação a um decodificador que serve para alguns canais
❑
Se o decodificador decodificar somente alguns canais (como os canais premium), siga as instruções a seguir. Será
necessário divisor de duas vias, um alternador RF (A/B) e quatro metros de cabo RF. (Esses itens podem ser adquiridos
na maioria das lojas de eletrônica.)
1. Localizar e desligar o cabo conectado ao
terminal ANT IN no decodicador.
N
Esse terminal pode ser identicado como “
ANT IN”, “VHF IN” ou, simplesmente, “IN”.
2. Conecte o cabo ao divisor de duas vias.
3. Conecte um cabo de antena entre o terminal
OUTPUT (Saída) no divisor e o terminal IN
(Entrada) no decodicador.
4. Conecte um cabo de antena entre o terminal
ANT OUT no decodicador e o terminal B–IN
(Entrada) no Alternador RF (A/B).
5. Conecte outro cabo entre o terminal OUT
no divisor e o terminal A–IN (entrada) no
Alternador RF (A/B).
Cabo de
entrada
Cabo de
entrada
Cabo de
entrada
Divisor
Divisor
ANT IN
Cabo de
entrada
Divisor
Divisor
Decodificador
Decodificador
Decodificador
RF (A/B)
Alternador
RF (A/B)
Alternador
6. Conecte o último cabo de antena entre o
terminal OUT no Alternador RF (A/B) e o
terminal ANT IN na parte traseira da TV.
Cabo de
entrada
Divisor
RF (A/B)
Alternador
Parte
traseira da
TV
ANT IN
Após essa conexão, ajuste o Alternador A/B na posição “A” para a visualização normal. Coloque o interruptor A/B na posição “B”
para visualizar os canais codicados. (Ao ajustar o Alternador A/B em “B”, você precisará sintonizar a TV com o canal de saída do
decodicador, que normalmente é o canal 3 ou 4.)
Português - 10
Page 53

Conectando o DVD / Blu-Ray Player ou receptor/decodificador de Satélite
Português - 11
(Set-Top Box) via HDMI
Essa conexão só pode ser feita se houver um conector de saída HDMI no dispositivo externo.
1. Conecte um cabo HDMI entre a tomada HDMI IN (1, 2(DVI) ou 3) na TV e a tomada HDMI no DVD / Blu-Ray Player ou receptor/
decodicador de Satélite (Set-Top Box).
DVD / Blu-Ray Player ou receptor/
decodificador de Satélite (Set-Top Box)
Cabo HDMI (não fornecido)1
O que é HDMI?
N
HDMI ou interface multimédia de alta denição é uma interface que permite a transmissão digital de sinais de vídeo e de áudio com
•
Painel traseiro da TV Painel lateral da TV
ou
apenas um cabo.
A diferença entre HDMI e DVI é que o dispositivo HDMI é menor e tem instalado o recurso de codicação HDCP (High Bandwidth
•
Digital Copy Protection – Proteção de Conteúdo Digital de Alta Largura de Banda).
Cada DVD Player ou receptor/decodicador de Satélite (Set-Top Box) possui uma conguração de painel traseiro diferente.
N
Cabos HDMI diferentes da versão 1.3 podem causar distúrbios na imagem ou no som.
N
Conectando o DVD / Blu-Ray Player ou receptor/decodificador de Satélite
(Set-Top Box) via DVI
Essa conexão só pode ser feita se houver um conector de saída DVI no dispositivo externo.
1. Conecte um cabo HDMI/DVI ou um adaptador DVI-HDMI entre a tomada HDMI IN 2(DVI) na TV e o conector DVI no DVD / Blu-
Ray Player ou receptor/decodicador de Satélite (Set-Top Box).
2. Conecte os cabos de áudio entre o conector
decodicador de Satétite (Set-Top Box).
DVI IN (HDMI 2) [R-AUDIO-L]na TV e o DVD / Blu-Ray Player ou receptor/
DVD / Blu-Ray Player ou receptor/
decodificador de Satétite (Set-Top Box)
Cabo de áudio (não fornecido)2
Cabo HDMI/DVI (não fornecido)1
N
Cada DVD / Blu-Ray Player ou receptor/decodicador de Satélite (Set-Top Box) possui uma conguração de painel traseiro
Painel traseiro da TV
diferente.
N
Ao conectar um DVD Player ou um receptor/decodicador de Satélite (Set-Top Box), use um terminal de conexão com a mesma
cor do cabo.
N
Ao usar uma conexão a cabo HDMI/DVI, será necessário utilizar o conector HDMI IN 2(DVI).
Page 54

Conectando o DVD / Blu-Ray Player ou receptor/decodificador de Satélite
(Set-Top Box) via cabos Componente
As entradas do painel traseiro na TV facilitam a conexão do DVD / Blu-Ray Player ou receptor/decodificador de Satélite (SetTop Box) com a sua TV.
1. Conecte Os cabos componentes entre os conectores COMPONENT IN (1 ou 2) [Y, PB, PR] na TV e os conectores COMPONENTE
[Y, PB, PR] no DVD Player ou receptor/decodicador de Satélite (Set-Top Box).
2. Conecte os cabos de áudio entre os conectores COMPONENT IN (1 ou 2) [R-AUDIO-L] na TV e os conectores AUDIO OUT no
DVD Player ou receptor/decodicador de Satélite (Set-Top Box).
Painel traseiro da TV
DVD / Blu-Ray Player ou receptor/
decodificador de Satélite (Set-Top Box)
Cabo de áudio (não fornecido)
2
Cabo Componente (não fornecido)
1
O Componente Video separa o vídeo em Y (luminância(brilho)), PB (azul) e PR (vermelho) para obter uma qualidade de vídeo
N
superior. Verique se as conexões de Componente Vídeo e Áudio são iguais. Por exemplo, se conectar o cabo de vídeo em
COMPONENT IN 1, conecte o cabo de áudio também em COMPONENT IN 1.
Cada DVD / Blu-Ray Player ou receptor/decodicador de Satélite (Set-Top Box) possui uma conguração de painel traseiro
N
diferente.
Ao conectar um DVD / Blu-Ray Player ou um receptor/decodicador de Satélite (Set-Top Box), use um terminal de conexão com a
N
mesma cor do cabo.
Conectando uma filmadora
Os conectores do painel lateral da TV facilitam a conexão de uma filmadora à sua TV.
Eles permitem a visualização das fitas da filmadora sem utilizar um VCR.
Utilizando o Cabo Vídeo / Áudio
❑
1. Conecte um cabo de vídeo entre o conector AV IN 2 [VIDEO] na TV e o conector VIDEO OUT na lmadora.
2. Conecte os cabos de áudio entre as tomadas AV IN 2 [L-AUDIO-R] na TV e as tomadas AUDIO OUT na lmadora.
N
Cada lmadora possui uma conguração diferente para o painel traseiro.
N
Ao conectar uma lmadora, use um terminal de conexão com a mesma cor do cabo.
Painel lateral da TV
filmadora
Cabo de vídeo (não fornecido)1
Cabo de áudio (não fornecido)2
Português - 12
Page 55

Português - 13
❑
Usando o cabo HDMI
1. Conecte um cabo HDMI entre o conector HDMI IN (1, 2(DVI) ou 3) na TV e o conector HDMI na lmadora.
Painel traseiro da TV
filmadora
Cabo HDMI (não fornecido)1
N
Cada lmadora possui uma conguração diferente para o painel traseiro.
Painel lateral da TV
ou
Conectando um Vídeo cassete
Conexão de vídeo
❑
Nestas instruções, parte-se do princípio que o televisor já esta ligado a uma antena ou sistema de televisão a cabo (conforme
instruções nas páginas 9~10). Ignore a etapa 1 se você ainda não tiver feito a conexão à antena ou ao sistema a cabo.
1. Desconecte o cabo ou a antena da parte traseira da TV.
2. Conecte o cabo ou a antena ao terminal ANT IN na parte traseira do Vídeo cassete.
3. Conecte um cabo de antena entre o terminal ANT OUT no Vídeo cassete e o terminal ANT IN na TV.
4. Conecte um cabo de vídeo entre a tomada AV IN 1 [Y/VIDEO] ou AV IN 2 [VIDEO] na TV e a tomada VIDEO OUT no Vídeo
cassete.
5. Conecte os cabos de áudio entre as tomadas AV IN 1 (ou AV IN 2) [R-AUDIO-L] na TV e as tomadas AUDIO OUT no Vídeo
cassete.
Painel traseiro da TV
Painel traseiro do Vídeo cassete
2
Se você possuir um Vídeo cassete “mono” (não estéreo), use um conector Y (não fornecido) para conectá-lo às tomadas de
N
Cabo de áudio (não fornecido)
5
Cabo de vídeo (não fornecido)
4
Cabo de antena (não fornecido)3
Painel lateral da TV
entrada de áudio direita e esquerda da TV. Também é possível conectar o cabo ao conector “R”.
Se o seu Vídeo cassete for estéreo, conecte dois cabos.
Cada Vídeo cassete possui uma conguração diferente para o painel traseiro.
N
Ao conectar um Vídeo cassete, use um terminal de conexão com a mesma cor do cabo.
N
Page 56

Conectando um amplificador/DVD Home Theater
1. Conecte os cabos Audio entre os conectores AUDIO OUT [R-AUDIO-L] na TV e os conectores AUDIO IN [L-AUDIO-R] no
amplicador/DVD Home Theater.
Quando houver um amplicador de áudio conectado aos terminais de conectores AUDIO OUT [R-AUDIO-L] : Diminua o volume da
TV e ajuste o nível do volume com o controle de volume do amplicador.
Painel traseiro da TV
Amplificador/DVD Home Theater
Cabo de áudio (não fornecido)
N
Cada Amplicador/DVD Home Theater possui uma conguração diferente para o painel traseiro.
N
Ao conectar um Amplicador/DVD Home Theater, use um terminal de conexão com a mesma cor do cabo.
Português - 14
Page 57

Português - 15
Conectando um PC
Usando o cabo D-Sub
❑
1. Conecte um cabo D-Sub entre o conector PC IN [PC] na TV e o conector de saída PC no seu computador.
2. Conecte um cabo de áudio PC entre o conector
computador.
PC
Cabo D-Sub (não fornecido)1
Cabo de áudio PC (não fornecido)
2
Usando o cabo HDMI/DVI
❑
1. Conecte um cabo HDMI/DVI entre o conector HDMI IN 2(DVI) na TV e o conector de saída PC no seu computador.
2. Conecte um cabo mini-plug Stereo/2RCA de 3,5mm
da placa de som no seu computador.
PC IN [AUDIO] na TV e o conector Audio Out da placa de som no seu
Painel traseiro da TV
entre o conector DVI IN (HDMI2) [R-AUDIO-L] na TV e o conector Audio Out
Painel traseiro da TV
PC
Cabo mini-plug Stereo/2RCA de 3,5mm (não fornecido)
2
Cabo HDMI/DVI (não fornecido)1
Cada PC possui uma conguração diferente para o painel traseiro.
N
Ao conectar um PC, use um terminal de conexão com a mesma cor do cabo.
N
Ao usar uma conexão com cabo HDMI/DVI, é necessário utilizar um terminal HDMI IN 2(DVI).
N
Page 58

OPERAÇÃO
Ligar e desligar a TV
Pressione o botão POWER no controle remoto. Você também pode usar o botão
POWER no painel frontal.
A imagem completa pode demorar um pouco a aparecer.
N
Mudar de canal
Utilizando os botões de canais
❑
Pressione os botões CH ou CH para mudar de canal.
N
Pressionando-se os botões CH ou CH , a TV muda os canais em
seqüência. Você visualizará todos os canais memorizados pela TV. (A TV deve
memorizar, no mínimo, três canais.) Não serão visualizados os canais apagados
ou não memorizados. Consulte a página 20 para obter informações sobre como
memorizar canais.
Utilizando os botões de números
❑
Pressione os botões de números para ir diretamente para um canal. Por exemplo,
para selecionar o canal 27, pressione “2” e em seguida “7”.
N
Para uma rápida mudança de canal, pressione os botões de números, em seguida,
pressione o botão ENTERE.
Utilizando o botão “ ”
❑
O botão “ ” é utilizado para selecionar um canal acima de 100.
Por exemplo, para o canal 122, pressione “-”, seguido de “2” e “2”.
Utilizando o botão PRE-CH para selecionar o canal anterior
❑
1. Pressione o botão PRE-CH. A TV alternará para o último canal visualizado.
N
Para alternar rapidamente entre dois canais distantes, sintonize um canal e utilize
o botão de número para selecionar o segundo canal. Em seguida, utilize o botão
PRE-CH para alternar rapidamente entre eles.
Ajustando o volume
Utilizando os botões de volume
❑
1. Pressione o botão VOL ou VOL para aumentar ou diminuir o volume.
Utilizando o botão MUTE
❑
A qualquer momento o som pode ser bloqueado temporariamente pressionando o botão
MUTE.
1. Pressione o botão MUTE e o som é interrompido.
aparecerá na tela.
2. Para desativar o Mute, pressione novamente o botão
MUTE ou apenas pressione o botão VOL ou VOL .
Português - 16
Page 59

Utilizando o botão TOOLS
Português - 17
Você pode utilizar o botão TOOLS para selecionar as funções mais utilizadas de maneira rápida e fácil. O menu Ferramentas é
alterado, dependendo do modo de entrada externa que você estiver assitindo.
1. Pressione o botão TOOLS. O menu Ferramentas será exibido.
2. Pressione o botão ▲/▼ para selecionar um menu e, em seguida, pressione ENTERE.
3. Pressione os botões ▲/▼/◄/►/
ENTERE para exibir, alterar ou usar os itens
selecionados. Para obter uma descrição mais detalhada de cada função, consulte a
página correspondente.
Anynet+ (HDMI-CEC), consulte a página 35
•
Modo de imagem, consulte a página 21
•
Modo de som, consulte a página 27
•
Sleep Timer, consulte a página 32
•
Economia de energia, consulte a página 30
•
Auto Ajuste, consulte a página 26
•
PIP, consulte a página 31
•
Anynet+ (HDMI-CEC)
Modo de Imagem : Padrão
Modo de Som : Padrão
Sleep Timer : Desligado
Economia de Energia : Desligado
Ferramentas
Mover
Entrar Sair
Informações
A tela identifica o canal atual e o status de determinadas definições de áudio-vídeo.
1. Pressione o botão INFO no controle remoto. A TV exibirá o canal, o tipo de som e o
estado de certas programações de imagem e som.
Pressione novamente o botão INFO ou aguarde aproximadamente 10 segundos e a
O
imagem desaparece automaticamente.
Ver os menus
1. Com o televisor ligado, pressione o botão MENU.
O menu principal aparecerá na tela. O lado esquerdo do menu possui os ícones
Imagem, Som, Canal, Configuração, Entrada.
2. Utilizar os botões ▲ ou ▼ para selecionar um dos ícones.
Em seguida, pressione o botão ENTERE para acessar o sub-menu de ícone.
3. Pressione o botão
O menu na tela leva aproximadamente um minuto para desaparecer.
N
Utilizando o botão do controle remoto com cada menu
❑
EXIT para sair.
1. Você pode navegar no menu pressionando o botão ▲/▼.
2. Você poderá ajustar cada valor pressionando o botão
3. Também é possível selecionar cada item pressionando
4. Para retornar para o menu anterior, pressione o botão RETURN.
5. Para sair do menu, pressione o botão EXIT.
◄/►.
ENTERE.
Ar 55
Mono
Modo de Imagem : Padrão
Modo de Som : Padrão
Som de Várias Faixas : Estéreo
SRS TruSurround HD : Desligado
12 : 00 am
T V
Modo : Padrão
Imagem
Luz da Célula 8
Contraste 95
Brilho 45
Som
Nitidez 50
Cor 50
Canal
Matiz Vd 50 Vm 50
Configurações Avançadas
Conguração
Opções de Imagem
Rest. Padrões : OK
Entrada
Mover
Imagem
Entrar
Sair
Page 60

Ver os menus
Antes de usar a TV, siga os passos abaixo para aprender a navegar no menu e poder selecionar e ajustar diferentes funções.
1. Pressione o botão MENU.
O menu principal é exibido na tela. Sua lateral esquerda possui os seguintes ícones: Imagem,Som,Canal,Conguração,
Entrada.
2. Pressione o botão ▲ ou ▼ para selecionar um dos ícones.
Pressione o botão ◄ ou ► para acessar o submenu do ícone.
3. Pressione o botão ▲ ou ▼ para navegar entre os itens do menu.
Pressione o botão ENTERE para selecionar itens no menu.
4. Pressione o botão ▲/▼/◄/► para alterar os itens selecionados.
Pressione o botão RETURN para voltar ao menu anterior.
5. Pressione o botão EXIT para sair do menu.
Utilização dos botões do controle remoto
Botão Operações Botão Operações
MENU Exibe o menu principal na tela.
RETURN Volta para o menu anterior.
EXIT Sai do menu de tela.
Exemplo: Ajuste do Brilho da TV no Menu Imagem
❑
Ajuste do brilho para 60
1. Pressione o botão MENU para exibir o menu.
2. Pressione o botão
3. Pressione o botão ▲ ou ▼ para selecionar
4. Pressione o botão ENTERE.
ENTERE para selecionar Imagem.
Brilho.
▲/▼/◄/►/
ENTERE
Move o cursor e seleciona um item.
Seleciona o item atualmente selecionado.
Confirma o ajuste.
T V
Modo : Padrão
Imagem
Luz da Célula 8
Contraste 95
Brilho 45
Som
Nitidez 50
Cor 50
Canal
Matiz Vd 50 Vm 50
Configurações Avançadas
Conguração
Opções de Imagem
Rest. Padrões : OK
Entrada
T V
Modo : Padrão
Imagem
Luz da Célula 8
Contraste 95
Brilho 45
Som
Nitidez 50
Cor 50
Canal
Matiz Vd 50 Vm 50
Configurações Avançadas
Conguração
Opções de Imagem
Rest. Padrões : OK
Entrada
T V
Modo : Padrão
Imagem
Luz da Célula 8
Contraste 95
Brilho 45
Som
Nitidez 50
Cor 50
Canal
Matiz Vd 50 Vm 50
Configurações Avançadas
Conguração
Opções de Imagem
Rest. Padrões : OK
Entrada
Mover
Mover
Mover
Imagem
Entrar
Imagem
Entrar
Imagem
Entrar
Sair
Retornar
Retornar
5. Pressione o botão ◄ ou ► até que o brilho mude para 60.
6. Pressione o botão
N
Pressione o botão EXIT para sair do menu.
ENTERE.
Português - 18
Brilho
Brilho
Mover
Mover
Ajustar
Ajustar
45
Retornar
60
Retornar
Page 61

Recurso Plug & Play
Português - 19
QuandoaTVéligadapelaprimeiravez,diversosajustebásicossãoautomaticamenterealizadosemsequenciaparaocliente:
1. Pressione o botão POWER no controle remoto. A mensagem Iniciar Plug and Play é
exibida. Selecionar OK pressionandoo botão ENTERE. O menu Idioma será exibido.
2. Selecione o idioma desejado, pressionando o botão ▲ ou ▼. Pressione
ENTERE.
Será exibida a mensagem Selecione “Casa” ao instalar a TV em sua Casa.
3. Pressione o botão ◄ ou ► para selecionar
Loja ou Casa e em seguida pressione
ENTERE.
Recomendamos congurar a TV no modo Casa para obter a melhor imagem em sua
N
casa.
O modo Loja serve apenas para uso em ambiente de vendas.
N
Se a unidade for, acidentalmente, congurada para o modo Loja e você quiser
retornar ao Casa (Padrão): Pressione o botão Volume da TV. Quando o OSD do
volume for exibido, mantenha pressionado o botão MENU na TV durante 5 segundos.
4. A mensagem Verif. entrada de antena será exibida, com o OK selecionado. Pressione
ENTERE.
5. Pressione o botão ▲ ou ▼ para Ar, STD, HRC ou IRC e, em seguida, pressione
ENTERE.
6. Pressione
ENTERE para selecionar Iniciar. A TV começa a memorizar todos os canais
disponíveis.
Para interromper a busca antes de terminar, pressione ENTERE com Parar
N
selecionado.
Pressione o botão ◄ ou ► para selecionar Mês, Dia, Ano, Hora, Minuto o am/pm.
7.
Dena esses dados pressionando o botão ▲ ou ▼.
8. Pressione
ENTERE para conrmar a conguração. A mensagem Bom Filme será
exibida. Ao concluir, pressione ENTERE.
Mesmo se você não pressionar ENTERE, a mensagem irá automaticamente
N
desaparecer após alguns segundos.
Plug & Play
Idioma
Mover
Ar/Cabo
Mover
Prog. Auto
Plug & Play
Plug & Play
Parar
Aproveite a sua TV!
English
Español
Português
Entrar
Ar
STD
HRC
IRC
Entrar
Entrar
OK
Ar 51
Retornar
Ignorar
Ignorar
Se você quiser redefinir esse recurso...
1. Pressione o botão MENU para exibir o menu. Pressione o botão ▲ ou ▼ para
selecionar Configuração e, em seguida, pressione ENTERE.
2. Pressione novamente
ENTERE para selecionar Plug & Play. Para obter mais
informações sobre as opções de conguração.
O recurso Plug & Play está disponível somente no modo TV.
N
T V
Imagem
Som
Canal
Conguração
Entrada
Configuração
Plug & Play
Idioma : Português
Tempo
Bloqueio Crianças : Ligado
Mudar Senha
Closed Caption
Modo Jogo : Desligado
Melodia : Desligada
Economia de Energia
Sistema de Cor AV : Auto
PIP
Mover
: Desligado
Entrar
Retornar
Page 62

CONTROLE DE CANAL
Armazenando canais
A sua TV pode memorizar e armazenar todos os canais disponíveis para os canais da TV aberta e a cabo. Após a memorização
doscanais,utilizeobotãoCH▲ouCH▼parafazerumavarreduradoscanais.Issoeliminaanecessidadedemudarcanais
inserindo os dígitos do canal. Há três etapas para memorizar canais: seleção de uma fonte de transmissão, memorização dos
canais e adição e exclusão de canais.
Ar/Cabo→Ar/STD/HRC/IRC
❑
Antes que o televisor possa iniciar a memorização dos canais disponíveis, é preciso
especicar o tipo de fonte de sinal conectada à TV (isto é, Air ou sistema Cable).
STD, HRC e IRC identicam vários tipos de sistema de TV a cabo. Entre em contato
N
com a empresa local de TV a cabo para identicar o tipo de sistema a cabo existente
em sua área especíca.
Neste ponto, a fonte do sinal foi selecionada.
Prog. Auto
❑
A TV começa a memorizar todos os canais disponíveis. Após a memorização dos canais
disponíveis, o menu Prog. Auto reaparece.
Todos os canais disponíveis são automaticamente armazenados na memória.
N
São necessários de 3 a 10 minutos para memorizar canais.
Se você quiser interromper a programação automática, pressione ENTERE.
N
Sintonia Fina(Analógica)
❑
Utilize a sintonização na para ajustar manualmente um determinado canal para uma
melhor recepção.
Se você não armazenar na memória o canal com a sintonização na ajustada, as
N
alterações não serão salvas.
“*” aparecerá junto ao nome dos canais com sintonia na.
N
Para redenir essa conguração, pressione o botão ▼ para selecionar Redefinir e,
N
em seguida, pressione ENTERE.
T V
Imagem
Som
Canal
Conguração
Entrada
Ar/Cabo : Ar
Prog. Auto
Lista de Canais
Sintonia Fina
Sistema de Cor : Auto
Ar
Ajustar
Mover
Sintonia Fina
55
Redefinir
Salvar
Canal
Entrar
Retornar
Retornar
0
Sistemadecor→Auto/PAL-M/PAL-N/NTSC
❑
Normalmente, a TV pode receber imagem e som de boa qualidade quando está no modo Auto. Esse modo detecta
automaticamente as fontes de sinal de cor. Se a implementação de cor não for satisfatória, selecione em PAL-M, PAL-N ou NTSC.
Gerenciando canais
Lista de Canais
❑
Utilizando esse menu, você pode, como bem quiser, adicionar/excluir ou bloquear/
desbloquear canais.
Pressione o botão CH LIST no controle remoto para exibir as Listas de canais.
O
Adicionando / Excluindo canais
Utilizando a Lista de Canais, você poderá adicionar ou excluir canais.
N
Mova para o campo ( ) pressionando os botões ▲/▼/◄/►, selecione um canal a
ser adicionado e pressione ENTERE para conrmar a operação.
N
Se você pressionar novamente o botão ENTERE, o símbolo (c) ao lado do canal
irá desaparecer e o canal não será adicionado.
Bloqueando / Desbloqueando canais
Este recurso permite que usuários não autorizados, como crianças, sejam impedidos de
assistirem a programas inadequados ao ativar o mute do vídeo e do áudio. Essa função
estará disponível somente quando Bloqueio Crianças estiver congurada para Ligado.
(consulte a página 29)
N
Mova para o campo (\) pressionando os botões ▲/▼/◄/►, selecione um canal a
ser bloqueado e pressione ENTERE.
N
A tela de entrada do número PIN aparecerá. Digite sua senha de 4 dígitos.
N
O número PIN padrão de uma nova TV é ‘0-0-0-0’. Você poderá alterar a senha
selecionando Mudar Senha no menu.
N
Se você pressionar novamente o botão ENTERE, o símbolo (c) ao lado do canal
irá desaparecer e a operação de bloqueio do canal será cancelada.
N
Uma tela azul é exibida quando Bloqueio Crianças estiver ativada.
Português - 20
T V
Ar/Cabo : Ar
Imagem
Prog. Auto
Lista de Canais
Sintonia Fina
Som
Sistema de Cor : Auto
Canal
Conguração
Entrada
Lista de Canais
Ar 55
Ch.
Ar 52
Ar 53
Ar 54
Ar 55
Ar 56
Ar 57
Ar 58
Ar 59
Ar 60
Ar 61
Adicionar
Mover Entrar
Página
Mover
6 / 7
Bloquear
Retornar
Canal
Entrar
Retornar
Page 63

CONTROLE DE IMAGEM
Português - 21
Alterando o padrão de imagem
❑
Modo
Você pode selecionar o tipo de imagem que melhor corresponde aos seus requisitos de
visualização.
•
Dinâmico: Seleciona uma imagem de alta definição para ambientes claros.
•
Padrão: Seleciona a melhor exibição de imagem para ambientes normais.
Essa configuração é a mais apropriada para a maioria das situações.
•
Filme: Seleciona uma exibição de imagem confortável para ambientes escuros.
T
Pressione o botão TOOLS para exibir o menu Ferramentas.
Você também poderá escolher o modo de imagem selecionando Ferramentas
→ Modo de Imagem
O
Você também pode denir essas opções pressionando o botão P.MODE no controle
remoto.
❑
Luz da Célula / Contraste / Brilho / Nitidez / Cor /Matiz (Vd/Vm)
A TV tem diversas opções de denições que permitem controlar a qualidade da imagem.
•
Luz da Célula: Ajusta o brilho da luz de fundo da tela. A maior conguração é 10.
•
Contraste: Ajusta o nível de contraste.
•
Brilho: Ajusta o nível de brilho.
•
Nitidez: Ajuste a nitidez.
•
Cor: Ajusta a saturação de cor da imagem utilizando a barra na tela.
•
Matiz (Vd/Vm): Quanto mais próximo ao Vermelho 100, mais saturada a cor
vermelha cará.
N
Ao alterar Luz da Célula, Contraste, Brilho, Nitidez, Cor ou Matiz (Vd/Vm), o OSD
será ajustado em conformidade.
N
No modo PC, Matiz (Vd/Vm), Brilho e Cor não estão disponíveis.
N
As denições podem ser ajustadas e armazenadas em cada dispositivo externo conectado a uma entrada da TV.
N
A energia consumida durante o uso pode ser signicativamente reduzida se o nível de brilho for menor, o que irá reduzir o custo
de execução geral.
T V
Modo : Padrão
Imagem
Luz da Célula 8
Contraste 95
Brilho 45
Som
Nitidez 50
Cor 50
Canal
Matiz Vd 50 Vm 50
Configurações Avançadas
Conguração
Opções de Imagem
Rest. Padrões : OK
Entrada
T V
Modo : Padrão
Imagem
Luz da Célula 8
Contraste 95
Brilho 45
Som
Nitidez 50
Cor 50
Canal
Matiz Vd 50 Vm 50
Configurações Avançadas
Conguração
Opções de Imagem
Rest. Padrões : OK
Entrada
Mover
Mover
Imagem
Imagem
Entrar
Entrar
Sair
Retornar
❑
Configurações Avançadas
Você pode ajustar as congurações avançadas para sua tela incluindo a cor e o contraste.
N
ConguraçõesAvançadas está disponível no modo Padrão ou Filme.
N
No modo PC, você somente poderá fazer alterações em Gamma e Estabilidade de
Branco a partir de itens em ConguraçõesAvançadas.
Tom de Preto
Você poderá melhorar a profundidade da imagem ajustando a densidade da cor preta.
•
Desligado: Desativa a função do tom de preto.
•
Escuro: Dene a profundidade da cor preta como escuro.
•
Escurecido: Dene a profundidade da cor preta como escurecida.
•
Mais escuro: Dene a profundidade da cor preta como mais escura.
Contraste Dinâmico
T V
Imagem
Som
Canal
Conguração
Entrada
Configurações Avançadas
Tom de Preto : Desligado
Contraste Dinâmico : Alto
Gamma : 0
Espaço de Cores : Nativo
Estabilidade de Branco
Tom de Pele : 0
Aprim. da Margem : Ligado
Mover
Entrar
Você pode ajustar o contraste da tela para obter um excelente contraste.
•
Desligado: Desativa a função de contraste automático.
•
Baixo: Dene o contraste dinâmico como baixo.
•
Médio: Dene o contraste dinâmico como médio.
•
Alto: Dene o contraste dinâmico como alto.
Gamma
Você pode ajustar a intensidade da cor principal (Vermelho, Verde, Azul).
Espaço de Cores
O espaço de cores é uma matriz de cores composta pelas cores vermelho, verde e azul. Selecione o espaço de cores de sua
preferência e experimente as cores mais naturais.
•
Auto: O espaço de cores automático faz o ajuste automático à tonalidade de cor mais natural com base em fontes de
programa.
•
Nativo: O espaço de cores Nativo oferece tonalidades de cores intensas e sosticadas.
Retornar
Continuação...
Page 64

Estabilidade de Branco
Você pode ajustar a temperatura da cor para obter imagens com cores mais naturais.
Verm.-Offset: Ajusta a tonalidade da cor vermelho.
•
Verde-Offset: Ajusta a tonalidade da cor verde.
•
Azul-Offset: Ajusta a tonalidade da cor azul.
•
Verm.-Gain: Ajusta a tonalidade da cor vermelho.
•
Verde-Gain: Ajusta a tonalidade da cor verde.
•
Azul-Gain: Ajusta a tonalidade da cor azul.
•
Restaurar Padrões: A estabilidade de branco retornará aos padrões de fábrica.
•
A alteração do valor de ajuste atualizará a tela ajustada.
N
Tom de Pele
Você pode realçar a tonalidade de pele na imagem.
A alteração do valor de ajuste atualizará a tela ajustada.
N
Aprim.daMargem→Desligado/Ligado
Você pode destacar as margens de um objeto da imagem.
Opções de Imagem
❑
No modo PC, você apenas poderá alterar Tonalidade de Cor, Tamanho e Proteção
N
de Tela dentre os itens apresentados em Opções de Imagem.
TonalidadedeCor→Frio/Normal/Quente1/Quente2
Você poderá selecionar o tom de cor mais confortável para exibição.
N
Quente1ouQuente2
As denições podem ser ajustadas e armazenadas em cada dispositivo externo
N
cam ativados somente quando o modo de imagem for Filme.
conectado a uma entrada da TV.
Tamanho
É possível que você queira alterar o tamanho da imagem na tela. A sua TV vem com
seis opções de tamanho de tela, projetadas para o melhor desempenho com tipos
especícos de entrada de vídeo. O receptor de satélite também pode ter a própria
conguração de tamanhos de tela. Geralmente, você deve visualizar a TV no modo
16:9 sempre que possível.
: Dene a imagem para a relação de aspecto de 16:9.
•
16:9
Zoom Amplo: Amplia o tamanho da imagem mais de 4:3.
•
Zoom: Amplia o tamanho da imagem na tela.
•
: Dene a imagem para a relação de aspecto de 4:3.
•
4:3
Ajuste à tela: Use esta função para ver a imagem inteira sem cortes,
•
quando houver a entrada dos sinais HDMI (720p/1080i), Componente (1080i).
Você também pode pressionar o botão P.SIZE no controle remoto para alterar o
O
tamanho da imagem.
T V
Imagem
Som
Canal
Conguração
Entrada
T V
Imagem
Som
Canal
Conguração
Entrada
T V
Imagem
Som
Canal
Conguração
Entrada
Configurações Avançadas
Tom de Preto : Desligado
Contraste Dinâmico : Alto
Gamma : 0
Espaço de Cores : Nativo
Estabilidade de Branco
Tom de Pele : 0
Aprim. da Margem : Ligado
Mover
Imagem
Modo : Padrão
Luz da Célula 8
Contraste 95
Brilho 45
Nitidez 50
Cor 50
Matiz Vd 50 Vm 50
Configurações Avançadas
Opções de Imagem
Rest. Padrões : OK
Mover
Opções de Imagem
Tonalidade de Cor : Normal
Tamanho : 16:9
Digital NR : Desligado
Nível de Preto HDMI : Normal
Modo Filme : Desligado
Proteção de Tela
Efeito 3D
Mover
Entrar
Entrar
Entrar
Retornar
Retornar
Retornar
16:9
Ajusta a imagem para o
modo amplo 16:9.
4:3
Ajusta a imagem no
modo normal 4:3.
Zoom Amplo
Amplia o tamanho da
imagem mais de 4:3.
Zoom
O tamanho da tela
quando a widescreen
está verticalmente
ampliada.
Ajuste à tela
Use esta função para ver a
imagem inteira sem cortes,
quando houver a entrada dos
sinais HDMI (720p/1080i),
Componente (1080i).
Português - 22
Continuação...
Page 65

A retenção da imagem temporária pode ocorrer ao visualizar uma imagem estática no aparelho por mais de duas horas.
Português - 23
N
Após selecionar o modo Zoom Amplo:
N
Pressione o botão ► para selecionar e, em seguida, pressione ENTERE.
Pressione ▲ ou ▼ para mover a imagem para cima ou para baixo.
Após selecionar o modo “Zoom”:
N
Selecione pressionando o botão ◄ ou ►. Use o botão ▲ ou ▼ para mover a imagem para cima e para baixo. Após
selecionar , utilize o botão ▲ ou ▼ para aumentar ou reduzir o tamanho da imagem no sentido vertical.
Após selecionar “Ajuste à tela” no HDMI (1080i) ou no modo Componente (1080i):
N
Pressione o botão ◄ ou ► para selecionar
, e em seguida pressione ENTERE.
Pressione o botão ▲, ▼, ◄ ou ► para mover a gura para cima, para baixo, para a esquerda e para a direita.
Restaurar: Pressione o botão ◄ ou ► para selecionar Reset e em seguida pressione ENTERE. Você poderá inicializar a
conguração como 16:9.
HD(Altadenição):
N
16:9 - 1080i (1920x1080), 720p (1280x720)
As denições podem ser ajustadas e armazenadas em cada dispositivo externo conectado a uma entrada da TV.
N
No modo PC, somente os modos 16:9 e 4:3 podem ser ajustados.
As denições podem ser ajustadas e armazenadas em cada dispositivo externo conectado a uma entrada da TV.
N
Fonte de entrada Tamanho da imagem
TV, AV, Componente (480i, 480p) 16:9, Zoom Amplo, Zoom, 4:3
Componente (1080i), HDMI (720p, 1080i) 16:9, Zoom Amplo, Zoom, 4:3, Ajuste à tela
PC 16:9, 4:3
Digital NR (Redução do ruído digital)
Se o sinal de transmissão recebido pela TV estiver fraco, você poderá ativar o recurso
de redução de ruído digital para ajudar a reduzir qualquer imagem fantasma e estática
na tela.
Desligado: Desativa a função de redução de ruído na tela.
•
Baixo: Reduz o ruído da tela em nível baixo.
•
Médio: Reduz o ruído da tela em nível médio.
•
Alto: Reduz o ruído da tela em nível alto.
•
Auto: Reconhece e reduz automaticamente o ruído da tela.
•
Nível de Preto HDMI
Você pode selecionar o nível de preto diretamente na tela para ajustar a profundidade
da tela.
Normal: A tela ca mais brilhante.
•
Baixo: A tela ca mais escura.
•
Esta função somente está ativa quando um dispositivo externo estiver conectado à
N
TV via HDMI. A função Nível de Preto HDMI pode não ser compatível com todos
os dispositivos externos.
Modo Filme
A TV pode ser congurada para detectar e processar automaticamente sinais de vídeo
T V
Modo : Padrão
Imagem
Luz da Célula 8
Contraste 95
Brilho 45
Som
Nitidez 50
Cor 50
Canal
Matiz Vd 50 Vm 50
Configurações Avançadas
Conguração
Opções de Imagem
Rest. Padrões : OK
Entrada
T V
Tonalidade de Cor : Normal
Imagem
Tamanho : 16:9
Digital NR : Desligado
Nível de Preto HDMI : Normal
Som
Modo Filme : Desligado
Proteção de Tela
Canal
Efeito 3D
Conguração
Entrada
Imagem
Mover
Opções de Imagem
Mover
de todas as fontes e ajustar a imagem para obter a melhor qualidade.
Desligado: Processamento básico de imagem aplicado e Sem detecção automática
•
para programas baseados em lme.
Auto: Ajusta automaticamente para a melhor qualidade de imagem entre programas de vídeo e lme.
•
O modo
N
Modo Filme é suportado em TV, Vídeo, Componente (480i / 1080i) e HDMI (1080i).
Entrar
Entrar
Retornar
Retornar
Proteção de Tela
Congura as opções de Proteção de Tela para evitar e reduzir a queima de pixels.
Quando uma imagem permanecer por muito tempo em uma posição, poderá causar uma queima permanente na tela.
Deslocamento de Pixel: Desloca a gura para evitar ou reduzir a queima de pixels.
•
Condição ideal para deslocamento de pixels;
N
Item TV/AV/Componente/HDMI/PC
Horizontal 0~4 2
Vertical 0~4 2
Tempo (Minutos) 1~4 min. 2 min.
Continuação...
Page 66

Rolagem: Esta função remove pós-imagens na tela, movendo todos os pixels no monitor PDP segundo um Padrão. Utilize
•
essa função quando houver retenção de imagens ou símbolos remanescentes na tela, especialmente quando uma imagem
estática tiver permanecido na tela por um longo período.
Cinza lateral: Ao assistir à TV com a relação de tela 4:3, a tela é protegida contra qualquer dano ajustando o equilíbrio do
•
branco nos extremos esquerdo e direito. Para impedir a ocorrência da queima de tela, selecione Escuro ou Claro.
- Escuro: Quando a relação da tela é denida para 4:3, ela escurece os lados esquerdo e direito.
- Claro: Quando a relação da tela é denida para 4:3, ela clareia os lados esquerdo e direito.
Para remover pós-imagens da tela, utilize a função Rolagem.
N
A função de remoção de pós-imagem deve ser executada por um longo período (cerca de 1 hora) para remover com ecácia
N
as pós-imagens da tela. Se uma pós-imagem não for removida após executar a função, execute-a novamente.
Usando a Função 3D
Você poderá usufruir de filmes e jogos 3D na sua TV. A função de efeitos 3D possibilita a visualização de imagens em 3D
utilizando óculos especiais.
Conexões
❑
Óculos 3D
(não fornecido)
Painel traseiro da TV
Emissor de IR 3D
(não fornecido)
PC
Cabo mini-plug Stereo/2RCA de 3,5mm (não fornecido)
2
Cabo HDMI/DVI (não fornecido)1
A aparência dos óculos de 3D (incluindo o Emissor) pode ser diferente dependendo do modelo dos seus óculos.
N
1. Conecte um cabo HDMI/DVI entre o conector HDMI IN 2(DVI) na TV e o conector de saída PC no seu computador.
2. Conecte um Cabo mini-plug Stereo/2RCA de 3,5mm entre o conector PC / DVI AUDIO IN na TV e o conector Audio Out da placa
de som no seu computador.
3. Conecte o Emissor à porta 3D SYNC OUT no painel dianteiro da TV.
4. Ligue a TV e congure a fonte da TV para HDMI2/DVI.
Para obter mais informações sobre os óculos 3D (inclusive sobre o Emissor), consulte o manual do usuário dos óculos 3D.
N
Ajuste da resolução do PC: - PL42B450B1: 1024 x 768@60Hz
N
- PL50B450B1: 1024 x 768@60Hz,1360 x 768@60Hz
A melhor resolução de PC para PL50B450B1 é 1360x768. Quando o sinal de 1024x768 estiver conectado no modo 3D, a gura
N
será exibida no formato 4:3 com as barras laterais esquerda e direita cinzas aparecendo.
O Emissor de IR 3D se comunica com os óculos 3D.
N
Portanto, esse emissor deve estar localizado próximo ao óculos 3D.
Ele é ativado quando o sinal de entrada HDMI ou DVI for RGB e houver suporte para DVI Sound.
N
Quando a energia estiver ligada ou desligada, o modo muda para o padrão Desligado e o Formato é salvo.
N
Para utilizar a função Efeito 3D, será necessário ter uma placa gráca que suporte 3D ou software 3D.
N
Os óculos 3D e o Emissor devem ser fabricados pela mesma empresa.
N
Se você executar um jogo ou assistir TV enquanto utiliza os óculos 3D por muito tempo, poderá ter cansaço nos olhos ou dor de
N
cabeça.
Os óculos 3D e o Emissor não fabricados pela Samsung podem não ser compativeis.
N
Se a tela tremular enquanto a função 3D estiver em uso, escureça a iluminação ambiental ou desligue a luz uorescente para obter
N
a melhor condição da tela.
Continuação...
Português - 24
Page 67

Alterando o modo
Português - 25
❑
Oferece a função de ativar o Efeito 3D. Você pode escolher entre o Modo1 e o Modo2.
Para obter o efeito 3D, mova os óculos de trás para a frente, da esquerda para a direita
e vice-versa (esquerda/direita sincronizados).
Desligado: Desativa a função Efeito 3D.
•
Modo1: O Modo 1 opera com a sicronização direita primeiro.
•
Modo2
•
•
: O Modo 2 opera com a sicronização esquerda primeiro.
2D
: Converte a imagem 3D para 2D. É possível escolher
esta para ver temporariamente a imagem 2D quando tiver tonturas, mas deverá
escolher Desligado pra desligar completamente o Efeito 3D.
N
Se o efeito 3D não estiver funcionando corretamente, signica que o Modo e os
óculos 3D podem não estão sincronizados de maneira apropriada. Para sincronizálos, alterne para outro modo.
Alterando o formato
❑
Selecione o melhor formato de entrada para sua placa de vídeo ou software 3D.
Tabuleiro de Xadrez: Se o formato de saída da sua placa gráca ou do software 3D
•
for Tabuleiro de Xadrex, selecione esse formato de entrada.
Horizontal: Se o formato de saída da sua placa gráca ou do software 3D for
•
horizontal entrelaçado, selecione esse formato de entrada.
Vertical: Se o formato de saída da sua placa gráca ou do software 3D for vertical
•
entrelaçado, selecione esse formato de entrada.
Rest.Padrões→OK/Cancelar
❑
Restaura todas as congurações de imagem para os valores padrão.
Selecione um modo de imagem a ser restaurado. Todos os modos podem ser
N
restaurados.
T V
Imagem
Som
Canal
Conguração
Entrada
T V
Imagem
Som
Canal
Conguração
Entrada
T V
Imagem
Som
Canal
Conguração
Entrada
Opções de Imagem
Tonalidade de Cor : Normal
Tamanho : 16:9
Digital NR : Desligado
Nível de Preto HDMI : Normal
Modo Filme : Desligado
Proteção de Tela
Efeito 3D
Mover
Efeito 3D
Modo : Modo 1
Formato :
Mover
Imagem
Modo : Padrão
Luz da Célula 8
Contraste 95
Brilho 45
Nitidez 50
Cor 50
Matiz Vd 50 Vm 50
Configurações Avançadas
Opções de Imagem
Rest. Padrões : OK
Mover
Entrar
Retornar
Tabuleiro de Xadrez
Entrar
Retornar
Entrar
Retornar
EXIBIÇÃO DO PC
Utilizando sua TV como monitor de computador (PC)
Configurando o software do PC (baseado no Windows XP)
Os ajustes de exibição do Windows para um computador Padrão são exibidos a seguir. As telas
do PC provavelmente serão diferentes, dependendo da versão do Windows e da placa de vídeo.
Entretanto, as mesmas informações de conguração básica serão aplicadas na maioria dos
casos, ainda que as telas sejam diferentes.
(Caso contrário, entre em contato com o fabricante do computador ou com o representante da
Samsung.)
1. Primeiramente, clique em Painel de Controle no menu Iniciar do Windows.
2. Quando a janela do painel de controle aparecer, clique em
uma caixa de diálogo.
3. Quando a janela do painel de controle for exibida, clique em
de diálogo.
4. Selecione a guia Configurações na caixa de diálogo. A conguração de tamanho correta
(resolução) Melhor: PL42B450B1 : 1024x768 pixels, PL50B450B1 : 1360x768 pixels
Se houver uma opção de freqüência vertical na sua caixa de diálogo de congurações,
o valor correto é 60 ou 60 Hz. Caso contrário, apenas clique em OK e feche a caixa de diálogo.
Aparência e Temas e aparecerá
Monitor e aparecerá uma caixa
Continuação...
Page 68

Modos de visualização
Se o sinal do sistema for igual ao modo de sinal Padrão, a tela se ajusta automaticamente. Se o sinal do sistema
não for igual ao modo de sinal padrão, ajuste o modo consultando o guia do usuário da placa de vídeo; caso contrário, poderá não
haver vídeo. Para os modos de visualização abaixo, a imagem da tela foi otimizada durante a fabricação.
D-Sub e HDMI/DVI Input
Modo Resolução
IBM
MAC
VESA DMT
VESA CVT
VESA GTF 1280 x 720 52.500 70.000 89.040 - / +
Ao usar uma conexão a cabo HDMI/DVI, é necessário utilizar a entrada HDMI IN 2(DVI).
N
O modo entrelaçado não é compatível.
N
N
A TV pode operar de forma anormal se for selecionado um formato de vídeo fora do padrão.
N
O sinal “ c “ signica que esse modo é suportado.
640 x 350 31.469 70.086 25.175 + / 720 x 400 31.469 70.087 28.322 - / +
640 x 480 35.000 66.667 30.240 - / 832 x 624 49.726 74.551 57.284 - / -
640 x 480
800 x 600
1024 x 768
1360 x 768 47.712 60.015 85.500 + / +
720 x 576 35.910 59.950 32.750 - / +
1280 x 720
Freqüência
Horizontal
(kHz)
31.469 59.940 25.175 - / -
37.861 72.809 31.500 - / -
37.500 75.000 31.500 - / -
37.879 60.317 40.000 + / +
48.077 72.188 50.000 + / +
46.875 75.000 49.500 + / +
48.363 60.004 65.000 - / -
56.476 70.069 75.000 - / -
60.023 75.029 78.750 + / +
44.772 59.855 74.500 - / +
56.456 74.777 95.750 - / +
Freqüência
Vertical
(Hz)
Freqüência
(MHz)
Polaridade Sincr
(H/V)
PN42B450B1D
✓ ✓
✓ ✓
✓ ✓
✓ ✓
✓ ✓
✓ ✓
✓ ✓
✓ ✓
✓ ✓
✓ ✓
✓ ✓
✓ ✓
✓ ✓
✓
✓ ✓
✓
✓
✓
PN50B450B1D
Ajustando a TV com o seu PC
Auto Ajuste
❑
Utilize a função Ajuste automático para que a TV ajuste automaticamente os sinais de
vídeo que recebe. Essa função também faz a sintonia na automática das congurações
e ajusta as posições e os valores de frequencia.
Predenição: Pressione o botão SOURCE para selecionar o modo PC.
N
Essa função não funciona no modo DVI-Digital.
N
T
Pressione o botão TOOLS para exibir o menu Ferramentas. Você também
poderá fazer o Ajuste automático de imagem selecionando Ferramentas →
Auto Ajuste
Tela
❑
O objetivo do ajuste da qualidade da imagem é a remoção ou redução das interferências
da imagem.
Se a interferência não for removida somente com a sintonia na, então faça os ajustes
de freqüência vertical no PC e efetue novamente a sintonia na.
Após ter reduzido a interferência, ajuste novamente a imagem de modo que ela que
centralizada na tela.
Predenição: Pressione o botão SOURCE para selecionar o modo PC.
N
Grosso
Ajusta a freqüência quando houver interferência vertical na tela.
Ajuste Fino
Ajusta a tela para que ela que mais nítida.
Posição do PC
Ajusta o posicionamento de tela do PC se não se encaixar na tela da TV. Pressione o
botão ▲ ou ▼ para ajustar a posição vertical. Pressione o botão ◄ ou ► para ajustar a
posição horizontal.
Restaurar Imagem
É possível retornar todos os ajustes de imagem aos valores denidos de fábrica.
Português - 26
T V
Modo : Dinâmico
Imagem
Luz da Célula 10
Contraste 100
Brilho 45
Som
Nitidez 50
Auto Ajuste
Canal
Tela
Configurações Avançadas
Conguração
Opções de Imagem
Rest. Padrões : OK
Entrada
T V
Grosso 50
Imagem
Ajuste Fino
Posição do PC
Restaurar Imagem
Som
Canal
Conguração
Entrada
T V
Imagem
Som
Canal
Conguração
Entrada
Mover
Mover
Mover
Imagem
Entrar
Tela
Entrar
Posição do PC
Entrar
Retornar
29
Retornar
Retornar
Page 69

CONTROLE DE SOM
Português - 27
Alterando o padrão de som
❑
Modo
Você pode selecionar o modo de som mais adequado para o tipo de programação que
estiver assistindo.
•
Padrão: Seleciona o modo se som normal.
•
Música: Esse modo permite que você ouça música como se estivesse assistindo a
um show no local.
•
Filme: Esse modo permite que você tenha uma experiência de som “ao vivo” como
se estivesse em um cinema.
•
Voz destacada: Destaca a voz dos outros sons. Selecione este modo de som
quando assistir a noticiários, novelas ou documentários.
•
Personalizado: Você pode personalizar as congurações de som para que elas
T V
Modo : Padrão
Imagem
Equalizador
SRS TruSurround HD
Som de Várias Faixas
Som
Volume Automático : Desligado
Selecionar Alto-falante
Canal
Seleção do Som : Principal
Conguração
Entrada
Mover
Som
: Desligado
: Estéreo
: Alto-falante TV
Entrar
atendam às suas preferências.
T
Pressione o botão TOOLS para exibir o menu Ferramentas.
Você também poderá escolher o modo de som selecionando
Ferramentas → Modo de Som
O
Você também pode denir essas opções pressionando o botão S.MODE no controle
remoto.
❑
Equalizador
É possível ajustar o som de acordo com as preferências pessoais.
•
Balanço D/E: Ajusta o equilíbrio entre o alto-falante direito e esquerdo.
•
100Hz, 300Hz, 1KHz, 3KHz, 10KHz (Ajuste da largura de banda): Ajusta o nível de
diferentes freqüências de largura de banda.
O
Se os ajustes do equalizador forem alterados, o modo de som passará
T V
Imagem
E
Som
Canal
D
Conguração
Balanço 100Hz 300Hz 1kHz 3kHz 10kHz
Entrada
Mover
Equalizador
+
0
-
Ajustar
automaticamente para o modo Personalizado.
❑
SRSTruSurroundHD→Desligado/Ligado
O SRS TruSurround HD é uma tecnologia combinada de TruSurround, FOCUS e TruBass.
O TruSurround apresenta efeito de som virtual com garantia da Dolby, que torna o canal 5.1 virtual possível meio de dois altofalantes. O FOCUS melhora o grau de denição do som e o TruBass reforça os sons graves. O
SRS TruSurround HD permite que você tenha um efeito 5.1 Surround Sound virtual nos dois alto-falantes da TV.
O
Você também pode denir essas opções pressionando o botão SRS no controle
remoto.
Retornar
+
0
-
Retornar
TruSurround HD, SRS e o símbolo são marcas registradas da SRS Labs, Inc.
❑
Som de Várias Faixas
•
Mono: Selecione para canais transmitidos em mono, ou se houver algum problema na recepção do sinal estéreo.
•
Estéreo: Selecione para canais transmitidos em estéreo.
•
SAP: Selecione para ouvir o Programa de áudio separado; que é normalmente em língua estrangeira.
N
Som de Várias Faixas está disponível somente no modo TV.
N
Dependendo do programa especíco transmitido, é possível ouvi-lo em Mono, Estéreo, ou SAP.
O
Pressione o botão MTS no controle remoto para selecionar Mono, Estéreo ou SAP.
❑
VolumeAutomático→Desligado/Ligado
A tecnologia TruSurround HD está incorporada sob licença da SRS Labs, Inc.
Este recurso permite ajustar automaticamente o volume do canal desejado, diminuindo a
saída de som quando o sinal de modulação estiver alto, ou aumentando a saída de som
quando o sinal de modulação estiver baixo.
Continuação...
Page 70

Selecionar Alto-falante
❑
Quando você assistir TV conectada a um Home theater, desligue os alto-falantes da
TV para que você possa ouvir melhor o som que sai dos alto-falantes do Home theater
(externo)
Alto-falante Ext: Utiliza os alto-falantes externos (Home Theater) para a saída do
•
som.
Alto-falante TV: Utiliza os alto-falantes da TV para a saída do som
•
Se você selecionar Alto-falante Ext no menu Selecionar Alto-falante as
N
congurações de som serão limitadas.
Os botões de volume e os botões MUTE não funcionam quando a função
N
Selecionar Alto-falante estiver configurada para Alto-falantes externos.
Dena o volume no seu Home theater.
Alto-falantes internos da TV Áudio externo (Ótico, E/D externo) para o sistema de som
TV / AV / Componente / PC / HDMI TV / AV / Componente / PC / HDMI
Alto-falante TV Saída do alto-falante Saída de som
Alto-falante Ext Mute Saída de som
Video sem Sinal Mute Mute
Seleção do Som
❑
Quando o recurso PIP estiver ativado, você pode ouvir o som da subtela (PIP).
Principal: Utilizado para ouvir o som da imagem principal.
•
Subtela: Utilizado para ouvir o som da subtela.
•
Você poderá selecionar essa opção quando PIP estiver congurado como Ligado.
N
T V
Modo : Padrão
Imagem
Equalizador
SRS TruSurround HD
Som de Várias Faixas
Som
Volume Automático : Desligado
Selecionar Alto-falante
Canal
Seleção do Som : Principal
Conguração
Entrada
Mover
Som
: Desligado
: Estéreo
: Alto-falante TV
Entrar
Retornar
Português - 28
Page 71

DESCRIÇÃO DAS FUNÇÕES
Português - 29
Utilizando o menu de configuração
Idioma
❑
Você pode congurar o idioma do menu.
BloqueioCrianças→Desligado/Ligado
❑
Este recurso permite que você impeça usuários não autorizados, como crianças, de
assistirem a programas inadequados.
N
Antes de a tela de conguração aparecer, a tela de entrada da senha aparecerá.
Digite sua senha de 4 dígitos.
N
A senha padrão de uma TV nova é “0-0-0-0”. Você poderá alterar a senha
T V
Imagem
Som
Canal
Conguração
Entrada
Configuração
Plug & Play
Idioma : Português
Tempo
Bloqueio Crianças : Ligado
Mudar Senha
Closed Caption
Modo Jogo : Desligado
Melodia : Desligado
Economia de Energia
Sistema de Cor AV : Auto
PIP
Mover
selecionando Mudar Senha no menu.
N
Você pode bloquear alguns canais na lista de canais. (consulte a página 20)
N
Bloqueio Crianças está disponível somente no modo TV.
Mudar Senha
❑
Você poderá alterar sua senha, necessária para congurar a TV.
N
Antes de a tela de conguração aparecer, a tela de entrada da senha aparecerá. Digite sua senha de 4 dígitos.
N
A senha padrão de uma TV nova é “0-0-0-0”.
Se você esquecer a sua senha, pressione os botões do controle remoto, na seqüência a seguir, para redenir a senha ao
N
número inicial “0-0-0-0”:
POWER (Desligado), MMUTE, 8, 2, 4, POWER (Ligado).
Closed Caption
❑
Sua TV decodica e exibe o recurso closed captions transmitido em determinadas
apresentações de TV. Essas legendas são geralmente voltadas aos decientes
auditivos ou traduções de idiomas estrangeiros. Todos os VCRs gravam o sinal closed
caption de programas de TV, assim, as tas de vídeo gravadas também fornecem
closed captions. A maioria das tas de vídeo comerciais pré-gravadas também fornece
legendas. Verique a existência do símbolo da legenda na sua programação de
televisão e na embalagem do vídeo: .
N
A função Caption não funciona nos modos Componente, HDMI ou PC.
N
A disponibilidade das legendas depende do programa que está sendo transmitido.
Closed Caption: Desligada/ligada
•
•
Modo: Closed Caption / Texto
Canal: 1, 2
•
Campo: 1, 2
•
N
Os diferentes canais e campos exibem informações diferentes: O Campo 2 oferece
informações que suplementam as do Campo 1.
(Por exemplo: o canal 1 pode ter legendas em inglês, enquanto o canal 2 tem
legendas em espanhol).
T V
Imagem
Som
Canal
Conguração
Entrada
T V
Imagem
Som
Canal
Conguração
Entrada
Configuração
Plug & Play
Idioma : Português
Tempo
Bloqueio Crianças : Ligado
Mudar Senha
Closed Caption
Modo Jogo : Desligado
Melodia : Desligado
Economia de Energia
Sistema de Cor AV : Auto
PIP
Mover
Closed Caption
Closed Caption : Ligado
Modo : Closed Caption
Canal : 1
Campo : 1
Mover
: Desligado
Entrar
: Desligado
Entrar
Entrar
Retornar
Retornar
Retornar
Page 72

ModoJogo→Desligado/Ligado
❑
Ao se conectar a um jogo como Playstation TM ou Xbox TM, você poderá ter uma experiência mais real selecionando o menu jogo.
QuandooModoJogoestáLigado
O modo Imagem muda automaticamente para Padrão e não pode ser alterado.
•
O modo Som muda automaticamente para Personalizado e não pode ser alterado. Ajuste o som usando o equalizador.
•
O Modo Jogo não está disponível no modo TV.
N
Se a imagem estiver ruim quando um dispositivo externo for conectado à TV, verique se o modo Jogo está Ligado.
N
Dena o modo Jogo como desligado e conecte os dispositivos externos.
Se você exibir o menu da TV no modo Jogo, a tela oscilará levemente.
N
A marca ( ) é exibida na tela, o que signica que o Modo Jogo está ativado com a fonte selecionada.
N
Melodia
❑
É possível fazer com que uma melodia seja tocada quando a TV for ligada ou desligada.
Desligada: Desliga a função melodia.
•
Baixa: Dene o volume da melodia como baixo.
•
Média: Dene o volume da melodia como médio.
•
Alto: Dene o volume da melodia como alto.
•
N
A melodia não é reproduzida quando a TV é desligada pela função Sleep Timer
(temporizador para desligamento automático).
Quando a TV não emitir nenhum som é porque o botão MUTE foi pressionado.
-
Quando a TV não emitir nenhum som é porque o volume foi reduzido ao nível
-
T V
Imagem
Som
Canal
Conguração
Entrada
Configuração
Plug & Play
Idioma : Português
Tempo
Bloqueio Crianças : Ligado
Mudar Senha
Closed Caption
Modo Jogo : Desligado
Melodia : Desligada
Economia de Energia
Sistema de Cor AV : Auto
PIP
Mover
: Desligada
Entrar
Retornar
mínimo com o botão VOL .
Economia de Energia
❑
Este recurso ajusta o brilho da TV para reduzir o consumo de energia. Ao assistir TV a noite,
dena a opção de modo Economia de Energia para Alto para reduzir o cansaço visual e também economizar energia.
Desligado: Desliga a função de economia de energia.
•
Baixo: Opera no modo padrão
•
Médio: Entra no modo de economia de Energia média.
•
Alto: Entra no modo de economia de Energia máxima.
•
T
Pressione o botão TOOLS para exibir o menu Ferramentas.
Você poderá também denir a opção de economia de energia selecionando Ferramentas →
Economia de Energia
SistemadeCorAV→ Auto / PAL-M / PAL-N / NTSC
❑
Você pode denir os padrões de codicação de cor para entradas externas de sinal.
Normalmente, a TV pode receber imagem e som de boa qualidade quando está no modo Auto. Esse modo detecta
automaticamente as fontes de sinal de cor. Se a implementação de cor não for satisfatória, selecione PAL-M, PAL-N ou NTSC.
N
Essa função está disponível somente no modo AV.
Português - 30
Page 73

Visualizando Picture in Picture (PIP)
Português - 31
É possível exibir uma subtela dentro da imagem principal. Desta forma, é possível assistir um programa de TV e monitorar a entrada de
qualquer dispositivo conectado.
T
Pressione o botão TOOLS para exibir o menu Ferramentas.
Você também poderá denir as congurações relacionadas ao PIP
selecionando Ferramentas → PIP.
PIP→Ligado/Desligado
❑
Você pode ativar ou desativar a função PIP.
Imagem principal Subtela
Componente1, Componente2
HDMI 1, HDMI2, HDMI 3
TV, AV1, AV2
PC
Entrada→TV/AV1/AV2
Você pode selecionar uma fonte da subtela.
N
Você pode selecionar essas opções pressionando o botão SOURCE no controle
remoto.
Tamanho→ / /
Você pode selecionar um tamanho da subtela.
N
Se a imagem principal estiver no modo PC e Componente, a função Tamanho não estará disponível.
Posição→ / / /
Você pode selecionar uma posição da subtela.
N
No modo Duplo ( , ), a função Posição não poderá ser selecionada.
Canal
Você pode selecionar um canal da subtela, apenas quando Entrada estiver denido para TV.
T V
Imagem
Som
Canal
Conguração
Entrada
T V
Imagem
Som
Canal
Conguração
Entrada
Configuração
Plug & Play
Idioma : Português
Tempo
Bloqueio Crianças : Ligado
Mudar Senha
Closed Caption
Modo Jogo : Desligado
Melodia : Desligado
Economia de Energia
Sistema de Cor AV : Auto
PIP
Mover
PIP : Ligado
Entrada : TV
Tamanho :
Posição :
Canal : Ar 53
Mover
: Desligado
Entrar
PIP
Entrar
Retornar
Retornar
Page 74

Ajustando a hora
É necessário configurar o relógio para se poder utilizar os diversos recursos de temporização da TV. Você também pode
verificar o temporizador enquanto assiste TV. (Basta pressionar o botão INFO.)
❑
Tempo
1. Pressione o botão MENU para exibir o menu.
2.
Pressione o botão ▲ ou ▼ para selecionar Configuração e, em seguida, pressione
ENTERE.
3.
Pressione o botão ▲ ou ▼ para selecionar Tempo e em seguida pressione
ENTERE.
Config. Relógio
O horário pode ser congurado manualmente.
N
É possível ajustar diretamente Mês, Dia, Ano, Hora, Minuto pressionando as teclas
numéricas do controle remoto.
N
O horário aparecerá sempre que você pressionar o botão INFO.
Sleep Timer
O sleep timer desliga automaticamente a TV depois de um tempo predenido
(Desligado, 30, 60, 90, 120, 150 e 180 minutos).
Pressione o botão TOOLS para exibir o menu Ferramentas.
T
Você também poderá denir o sleep timer selecionando Ferramentas →
Sleep Timer
Temporizador 1 / Temporizador 2 / Temporizador 3
Utilize este recurso para ajustar a TV para ligar ou desligar em uma hora desejada.
É preciso ajustar o relógio primeiro.
•
Hora de Ligar: Dene a hora, o minuto, am/pm e a ativação/desativação.
(Para ativar o temporizador com a conguração correspondente, congure para
Ativado.)
•
Hora de Desligar: Dene a hora, o minuto, am/pm e a ativação/desativação.
(Para ativar o temporizador com a conguração correspondente, congure para
Ativado.)
•
Repetir: Selecione Uma vez, Diário, Seg~Sex, Seg~Sáb, Sáb~Dom ou Manual.
•
Volume: Dene o nível de volume ao ligar a TV.
•
Canal: Seleciona o canal desejado.
N
Dena diretamente a hora e os minutos, pressionando os botões numéricos no
controle remoto.
N
Desligamento automático
Quando você deixar o temporizador ligado, a televisão irá desligar se nenhum
controle for utilizado por um período de 3 horas após o temporizador ter sido ligado.
Essa função está disponível somente no modo temporizador Ligado e impede o
superaquecimento que
pode ocorrer se a TV permanecer ligada por muito tempo.
T V
Imagem
Som
Canal
Conguração
Entrada
T V
Imagem
Som
Canal
Conguração
Entrada
T V
Imagem
Som
Canal
Conguração
Entrada
T V
Imagem
Som
Canal
Conguração
Entrada
Configuração
Plug & Play
Idioma : Português
Tempo
Bloqueio Crianças : Ligado
Mudar Senha
Closed Caption
Modo Jogo : Desligado
Melodia : Desligado
Economia de Energia
Sistema de Cor AV : Auto
PIP
Mover
Config. Relógio : 12 : 05 am
Sleep Timer : Desligado
Temporizador 1 : Desativado
Temporizador 2 : Desativado
Temporizador 3 : Desativado
Mover
Config. Relógio : 12 : 05 am
Sleep Timer : Desligado
Temporizador 1 : Desativado
Temporizador 2 : Desativado
Temporizador 3 : Desativado
Mover
Hora de Ligar
:
00 Desativadoam
12
Hora de Desligar
:
12 00 Desativadoam
Repetir
Uma vez
Volume
10
Mover
: Desligado
Entrar
Tempo
Entrar
Tempo
Entrar
Tempo 1
Canal
Ar
Ajustar
Desligado
03
Retornar
Retornar
30 min.
60 min.
90 min.
120 min.
150 min.
180 min.
Retornar
Retornar
Português - 32
Page 75

Lista de Entradas/Editar Nome
Português - 33
Lista de Entradas
❑
Use para selecionar o modo TV ou outras fontes de entrada externa como DVD / BluRay players ou cabos/receptores de satélite (Set-Top Box) conectadas à TV.
TV, AV1, AV2, Componente1, Componente2, PC, HDMI1, HDMI2/DVI, HDMI3.
Só é possível escolher entre os dispositivos externos que estão conectados à TV.
N
Em Lista de Entradas, as entradas conectadas estarão destacadas e posicionadas
na parte superior.
Pressione o botão SOURCE no controle remoto para visualizar uma fonte externa
O
de sinal.
Pressione o botão HDMI no controle remoto para selecionar diretamente o modo
O
HDMI.
Editar Nome
❑
Você pode nomear o dispositivo de entrada conectado aos respectivos conectores para
facilitar a seleção da fonte de entrada.
VCR / DVD / Sinal Cabo / Sinal Satélite / PVR STB / Receptor AV / Jogo /
Filmadora / PC / TV / IPTV / Blu-Ray / HD DVD / DMA
Quando um PC com uma resolução de PL42B450B1: 640x480@60Hz,
N
PL50B450B1: 640x480@60Hz, 1280x720@60Hz está conectado à porta HDMI IN
2(DVI), será necessário denir o modo HDMI2 para o PC no menu Editar Nome.
T V
Lista de Entradas : TV
Imagem
Editar Nome
Anynet + (HDMI-CEC)
Som
Canal
Conguração
Entrada
T V
AV1 : DMA
Imagem
AV2 : - - Componente1 : - - Componente2 : - - -
Som
PC : - - HDMI1 :
Canal
HDMI2/DVI :
HDMI3 :
Conguração
Entrada
Mover
Mover
Entrada
Entrar
Entrada
Entrar
- - - - - - -
-
-
-
-
-
-
-
Retornar
Retornar
Page 76

Anynet+
Conectando dispositivos Anynet
+
Anynet+ é uma função que permite o controle de todos os dispositivos da Samsung conectados que suportam o Anynet+ com
o controle remoto da TV Samsung.
O sistema Anynet+ pode ser utilizado somente com dispositivos Samsung que tenha o recurso Anynet+. Para vefificar se o
dispositivo Samsung possui este recurso, verifique se ele possui o logotipo Anynet+.
Para conectar à TV
1. Conecte [HDMI IN 1], [HDMI IN 2(DVI)], ou [HDMI IN 3] à TV e HDMI OUT do dispositivo Anynet+ correspondente utilizando um
cabo HDMI.
Cabo HDMI 1.3
Para conectar a um Home Theater
TV
Cabo HDMI 1.3
Dispositivo
Anynet+ 1
Cabo HDMI 1.3
Dispositivo
Anynet+ 2
Dispositivo
Anynet+ 3
1. Conecte [HDMI IN 1], [HDMI IN 2(DVI)], ou [HDMI IN 3] à TV e HDMI OUT do dispositivo Anynet+ correspondente utilizando um
cabo HDMI.
2. Conecte o HDMI IN do home theater e o HDMI OUT do dispositivo Anynet+ correspondente utilizando um cabo HDMI.
TV
Cabo HDMI 1.3
Home Theater
Cabo HDMI 1.3
Conecte apenas um Home Theater.
N
Você pode conectar um dispositivo Anynet+ usando o cabo HDMI 1.3. Existem alguns cabos HDMI que não suportam funções
N
Dispositivo
Anynet+ 1
Cabo HDMI 1.3
Cabo HDMI 1.3
Dispositivo
Anynet+ 2
Dispositivo
Anynet+ 3
Anynet+.
O Anynet+ funciona quando o dispositivo de AV que suporta Anynet+ está no estado de Standby (Espera) ou Ligado (On).
N
O sistema Anynet+ suporta até 12 dispositivos AV. Você pode conectar até 3 dispositivos do mesmo tipo.
N
Português - 34
Continuação...
Page 77

Configuração o Anynet+
Português - 35
Anynet+ é uma função que permite o controle de todos os dispositivos Samsung
conectados que suportam Anynet+ com o controle remoto da TV Samsung.
T
Pressione o botão TOOLS para exibir o menu Ferramentas.
Também é possível exibir o menu Anynet+ selecionando Ferramentas →
Anynet+(HDMI-CEC).
Configuração
❑
É possível denir o ambiente para usar o Anynet+.
1. Pressione o botão MENU para exibir o menu. Pressione o botão ▲ ou ▼ para
selecionar Entrada e em seguida pressione ENTERE.
2. Pressione o botão ▲ ou ▼ para selecionar
pressione ENTERE.
3. Pressione o botão ▲ ou ▼ para selecionar
ENTERE.
Anynet+(HDMI-CEC)→Desligado/Ligado
Para usar a função Anynet+, a opção Anynet+ (HDMI-CEC) deve ser ajustada como
Ligado
N
Quando a função Anynet+ (HDMI-CEC) estiver desativada, todas as operações
relacionadas ao Anynet+ estarão desativadas.
DesligamentoAutomático→Não/Sim
Congurando um dispositivo Anynet+ para desligar automaticamente ao desligar a TV
N
Se você denir Desligamento Automático para Sim, os dispositivos externos
conectados também serão desligados quando a TV for desligada. Se um dispositivo
externo ainda estiver gravando, pode ser ou não desligado.
Procurando Conexões Anynet
+
Procura todos os dispositivos conectados.
Quando o a procura terminar, os dispositivos conectados são listados no menu do Anynet+.
Anynet+ (HDMI-CEC) e em seguida
Conguração e em seguida pressione
T V
Lista de Entradas : TV
Imagem
Editar Nome
Anynet + (HDMI-CEC)
Som
Canal
Conguração
Entrada
TV P 1 55
Ver TV
Selecionar o dispositivo
Gravar
Menu do dispositivo
Oper. do dispositivo
Receiver :Desligado
Configuração
Mover
Retornar
Anynet+ (HDMI-CEC) : Ligado
Desligamento Automático : Sim
Procurando conexões
Mover
Mover
Entrar
Configuração
Entrar
Entrada
Entrar
Retornar
Retornar
Procurar e Alternar entre dispositivos Anynet+
1. Pressione o botão TOOLS. Em seguida, pressione ENTERE para selecionar
Anynet+ (HDMI-CEC).
Pressione o botão ▲ ou ▼ para selecionar Selecionar o dispositivo e em seguida
2.
pressione ENTERE.
N
Será exibida uma lista com os dispositivos Anynet+ conectados à TV. Caso você
não encontre o dispositivo desejado, pressione o botão vermelho para procurar
dispositivos.
N
Somente quando você denir Anynet+ (HDMI-CEC) para Ligado no menu
Conguração, o menu Lista de dispositivos aparecerá.
Pressione o botão ▲ ou ▼ para selecionar um determinado dispositivo e em seguida
3.
pressione ENTERE. A conguração muda para o dispositivo selecionado.
4. Caso você não encontre o dispositivo desejado, pressione o botão ▲ ou ▼ para
selecionar Procurando conexões e em seguida pressione ENTERE.
5. A mensagem Configurando conexão Anynet+ será exibida. Quando a busca por
dispositivos estiver concluída, os dispositivos conectados encontram-se listados no
menu Anynet+.
N
A mudança para o dispositivo selecionado pode demorar até 2 minutos. Não é possível
cancelar a operação enquanto está mudando de função.
N
O tempo necessário para procurar os dispositivos depende da quantidade de dispositivos
conectados.
N
Quando a busca por dispositivos estiver concluída, o número de dispositivos encontrados
não é exibido.
N
Mesmo que a TV pesquise automaticamente a lista de dispositivos quando a TV for
ligada, os dispositivos conectados na TV quando ela estiver em certas condições não
serão automaticamente exibidos na lista de dispositivos. Pressione o botão vermelho para
pesquisar pelo dispositivo conectado.
N
Se você selecionou o modo de entrada externa pressionando o botão SOURCE, não será
possível utilizar a função Anynet+. Certique-se de mudar para um dispositivo Anynet+
utilizando Lista de dispositivos.
TV P 1 55
Ver TV
Selecionar o dispositivo
Gravar
Menu do dispositivo
Oper. do dispositivo
Receiver :Desligado
Configuração
Mover
Retornar
Anynet+ (HDMI-CEC) : Ligado
Desligamento Automático : Sim
Procurando conexões
Mover
Entrar
Configuração
Entrar
Retornar
Page 78

Menu Anynet
❑
+
O menu Anynet+ muda de acordo com o tipo e o estado dos dispositivos Anynet+ conectados à TV.
Menu Anynet+ Descrição
Ver TV Muda de Anynet+ para modo de transmissão TV.
Selecionar o dispositivo A TV conecta-se ao dispositivo correspondente.
Gravar Inicia uma gravação. (Este menu somente funciona para um dispositivo que realiza gravação.)
Menu do dispositivo Mostra o menu do dispositivo conectado.
Exemplo. Quando houver um gravador de DVD conectado, o menu de título desse gravador
aparecerá.
Oper. do dispositivo Mostra o menu de controle de execução do dispositivo conectado.
Exemplo. Quando houver um gravador de DVD conectado, será exibido o menu de controle de
reprodução desse gravador.
Receiver Saída do som pelo receptor.
Configuração Pode-se definir o ambiente para usar o Anynet+.
Botões do controle remoto da TV disponíveis no modo Anynet+
❑
Tipo de dispositivo Estado de funcionamento Botões disponíveis
Botões numéricos
▲/▼/◄/►/ENTERE
botões de cor / EXIT
(Procura para trás) / (Procura para
frente) / (Parar) / (Reproduzir) /
(Pausar)
Botão P /
Dispositivo Anynet+
Dispositivo com
sintonizador interno
Após mudar para o dispositivo, quando o menu do dispositivo
correspondente é exibido na tela.
Após mudar para o dispositivo durante a reprodução de um
arquivo
Após mudar para o dispositivo, quando se está assistindo um
programa de TV
Dispositivo de áudio Com o receptor ativado
N
A função Anynet+ somente funciona quando a fonte ativa no controle remoto estiver ajustada para TV.
N
O botão funciona somente enquanto estiver no estado de gravação.
N
Não é possível controlar dispositivos Anynet+ usando os botões da TV. Só é possível controlar dispositivos Anynet+ com o controle
Botão= /
M MUTE
remoto da TV.
N
O controle remoto da TV pode não funcionar em determinadas condições. Nesse caso, selecione o dispositivo Anynet+ novamente.
N
As funções Anynet+ não funcionam com produtos de outros fabricantes.
N
No modo Anynet+, pode acontecer que os botões de cor não funcionem corretamente.
As operações , podem ser diferentes, dependendo do dispositivo.
N
Gravação
Você pode gravar um programa da TV utilizando um gravador da Samsung.
1. Pressione o botão TOOLS. Em seguida, pressione ENTERE para selecionar Anynet+ (HDMI-CEC).
2.
Pressione o botão ▲ ou ▼ para selecionar Gravar e em seguida pressione ENTERE. Inicia a gravação.
N
Quandohouvermaisdeumdispositivodegravação
Quando houver vários dispositivos de gravação conectados, todos eles serão listados. Pressione o
botão ▲ ou ▼ para selecionar um dispositivo de gravação e em seguida pressione ENTERE. Inicia a
gravação.
N
Quandoodispositivodegravaçãonãoforexibido
Selecione Selecionar o dispositivo e pressione o botão vermelho para procurar dispositivos.
N
Você pode gravar as transmissões de origem selecionando Gravar.
N
Se você pressionar o botão será gravado o que você estiver assistindo atualmente. Ao assistir um vídeo a partir de um outro
dispositivo, o vídeo do dispositivo é gravado.
N
Antes de gravar, verique se o conector da antena está corretamente conectada ao dispositivo de gravação. Para conectar uma
antena corretamente a um dispositivo de gravação, consulte o manual do usuário de dispositivos de gravação.
TV P 1 55
Ver TV
Selecionar o dispositivo
Gravar
Menu do dispositivo
Oper. do dispositivo
Receiver :Desligado
Configuração
Mover
Retornar
Entrar
Português - 36
Page 79

Como ouvir através do receiver (Home theater)
Português - 37
É possível ouvir o som por meio de um receiver em vez dos alto-falantes da TV.
1. Pressione o botão TOOLS. Em seguida, pressione ENTERE para selecionar Anynet+ (HDMI-CEC).
2.
Pressione o botão ▲ ou ▼ para selecionar Receiver. Pressione o botão ◄ ou ► para selecionar Ligado
ou Desligado.
N
Se o seu receptor suporta apenas áudio, ele pode não aparecer na lista de dispositivos.
N
Ao ouvir por meio do receptor, existem restrições para o uso do PIP e dos menus relacionado ao áudio
(MTS, idioma preferido).
N
Se houver interrupção de energia quando o Receiver estiver congurado para Ligado (desconectando
o cabo de energia ou uma falha de energia), o Selecionar Alto-falante deve estar congurado para
Alto-falante Ext ao ligar novamente a TV.
TV P 1
Ver TV
Selecionar o dispositivo
Gravar
Menu do dispositivo
Oper. do dispositivo
Receiver :Desligado
Configuração
Mover
Retornar
Solução de problemas do Anynet+
Sintoma Solução
O Anynet+ não está
funcionando.
QueroiniciaroAnynet.+. Verique se o dispositivo Anynet+ está conectado corretamente à TV, e se o Anynet+
QuerosairdoAnynet.+. Selecione Ver TV no menu Anynet+.
A mensagem “Conectando ao
dispositivo Anynet+...”
aparece na tela.
O dispositivo Anynet+ não toca. Não se pode usar a função reproduzir quando o Plug & Play estiver em progresso.
Verique se o dispositivo é um Anynet+. O sistema Anynet+ é compatível somente com
•
dispositivos Anynet+.
Conectar somente um receiver (home theater).
•
Verique se o cabo de força do dispositivo Anynet+ está conectado corretamente.
•
Verique as conexões dos cabos do dispositivo Anynet+ de vídeo/áudio/HDMI 1.3.
•
Verique se o Anynet+ (HDMI-CEC) está congurado para Ligado no menu de conguração
•
do Anynet+.
Verique se o controle remoto da TV está no modo TV.
•
Verique se é um controle remoto exclusivo Anynet+.
•
O Anynet+ não funciona em determinadas situações. (Busca de canais, Plug & Play, etc.)
•
Ao conectar ou remover o cabo HDMI 1.3, procure novamente dispositivos ou desligue a TV e
•
ligue-a novamente.
Verique se a Função Anynet+ do dispositivo Anynet+ está congurada.
•
•
(HDMI-CEC) está congurado em Ligado no menu de conguração do Anynet+.
Pressione o botão TV no controle remoto da TV para mudar para TV. Em seguida, pressione
•
o botão TOOLS para exibir o menu do Anynet+ e selecione o menu desejado.
•
Pressione o botão SOURCE no controle remoto da TV e selecione um dispositivo que não
•
seja Anynet+.
(Note que o botão de canal somente funciona quando um dispositivo Anynet+ com
•
sintonizador interno não estiver conectado.)
Não é possível usar o controle remoto quando estiver congurando o Anynet+ ou mudar para
•
um modo de visualização.
Use o controle remoto quando a conguração do Anynet+ ou a mudança para modo de
•
visualização tiver sido concluída.
•
Entrar
O dispositivo conectado não é
exibido.
Não é possível gravar o
programa de TV.
Verique se o dispositivo suporta ou não as funções do Anynet+.
•
Verique se o cabo HDMI 1.3 está conectado corretamente.
•
Verique se o Anynet+ (HDMI-CEC) estiver congurado para On (Ligado) no menu de
•
conguração do Anynet+.
Procure novamente dispositivos Anynet+.
•
É possível conectar um dispositivo Anynet+ utilizando somente o cabo HDMI 1.3. Alguns
•
cabos HDMI não suportam as funções do Anynet+.
Se for nalizada devido a uma situação anormal, como por exemplo desconexão do cabo
•
HDMI ou cabo de força ou falha de energia, repita a varredura do dispositivo.
Verique se a tomada da antena no dispositivo de gravação está devidamente conectada.
•
Page 80

Apêndice
Solução de problemas
Se a TV aparentar ter algum problema, experimente primeiro verificar esta lista de possíveis problemas e soluções.
Se nenhuma dessas dicas de solução de problemas se aplicar ao seu caso, entre em contato com o centro de atendimento ao
cliente Samsung mais próximo.
Problema Possível solução
Má qualidade de imagem Tente outro canal.
Qualidadedosomruim.
Sem imagem ou som. Tente outro canal.
Sem som ou som muito baixo no
volume máximo.
A imagem rola verticalmente. Verifique todas as conexões.
A TV funciona de maneira irregular. Desligue a TV por 30 segundos, em seguida, tente ligá-la novamente.
A TV não quer ligar. Certifique-se de que a tomada de parede esteja funcionando.
Problemas no funcionamento do
controle remoto
A imagem está muito clara ou
muito escura.
A imagem está muito grande ou
muito pequena.
As qualidades visuais de canais
digitais variam.
A tela está preta e a luz do
indicador de energia pisca
regularmente.
Uma distorção da imagem aparece
no canto da tela.
Ouve-se um ruído estranho. Isso é causado pela operação de sistemas inferiores e não é um defeito.
Os pixels ficam visíveis na tela. Pode haver poucos pixels luminosos ou escuros na tela. Esses pixels não causarão nenhum
A mensagem “Reconfigurar tudo
para valores Padrão” é exibida.
Ajuste a antena.
Verifique todas as conexões da fiação.
Tente outro canal.
Ajuste a antena.
Pressione o botão SOURCE.
Certifique-se de que a TV esteja ligada na tomada.
Verifique as conexões da antena.
Verifique se o botão MUTE está desligado.
Verifique primeiro o volume das unidades conectadas à TV (receptor de transmissão digital,
DVD, receptor de transmissão a cabo, Vídeo cassete, etc.). Em seguida, ajuste o volume da
TV.
Substitua as pilhas do controle remoto.
Limpe a extremidade superior do controle remoto (janela de transmissão).
Verifique os terminais das pilhas.
Pressione o botão TV para colocar o seu controle remoto no modo TV.
Verifique se o controle remoto está com pilhas.
Verifique se os pólos “+” e “-” das pilhas estão posicionados corretamente.
Ajuste o Brilho e o Contraste.
Ajuste a sintonização fina.
Ajuste as definições de Tamanho.
As qualidades visuais de canais digitais podem variar dependendo do método de produção
original (analógico ou digital).
- Se o método de produção original for digital: Alta qualidade visual.
- Se o método de produção original for analógico: O programa digital exibido na tela é
originalmente um programa analógico que foi convertido para digital.
A qualidade visual é de grau SD (Definição Padrão).
Verifique no seu computador os Cabos da energia e do sinal.
A TV está utilizando o sistema de gerenciamento de energia.
Mova o mouse do computador ou pressione uma tecla do teclado.
No seu equipamento (STB, DVD, etc), verifique a energia e o sinal do cabo.
A TV está utilizando o sistema de gerenciamento de energia.
Pressione o botão SOURCE no painel ou no controle remoto.
Ligue e desligue a TV.
Se Ajuste à tela estiver selecionado em alguns dispositivos externos, poderá haver distorção
de imagem no canto da tela. Esse problema é causado por dispositivos externos, não pela
TV.
impacto no desempenho do produto.
Essa mensagem aparece quando você mantêm o botão EXIT pressionado por um tempo. As
configurações do produto são reconfiguradas para o Padrão de fábrica.
Português - 38
Page 81

Preparação antes da montagem na parede
Português - 39
Caso A. Instalando o suporte de parede da SAMSUNG Caso B. Instalando o Suporte de Parede de outra marca
1. Instale o suporte de parede com a faixa de torque de 15 kgf.cm ou menor. Verique se as peças não estão danicadas caso o
torque esteja fora da faixa especicada.
2. O Kit de acessórios contém Suporte-Anel
Mova o parafuso para o fundo do buraco [①] ao realizar a instalação na parede.
N
] para a instalação de suportes de outra empresa na TV Samsung. (Caso B)
[
②
Utilizar a base de suporte
O plasma deve ser transportado por duas ou mais pessoas. Nunca deite o
N
plasma no chão, porque pode danicar o ecrã. Mantenha sempre o plasma na
vertical.
O plasma pode rodar 20 graus para a esquerda e para a direita.
N
Como fixar a Base
Utilizando os parafusos para prender a base e a TV, fixe firmemente a TV à base.
(A parte exterior do conjunto pode ser diferente do que é apresentado na figura.)
Aviso
Prenda firmemente o suporte à TV antes de movê-lo, para evitar que ele caia e cause
ferimentos graves.
Duas ou mais pessoas devem carregar a TV. Nunca deite a TV no chão para
N
evitar danos à tela. Sempre armazene a TV na posição vertical.
-20° ~ 20°
Ao montar a TV na parede, instale
a tampa (➊) na base utilizando dois
parafusos.
Page 82

10 cm
10 cm
10 cm
10 cm
10 cm
10 cm
10 cm
10 cm
10 cm
10 cm
10 cm
주의
Como prender com segurança a TV à parede
Puxar, empurrar ou subir na TV pode fazer com que ela caia. Fique atento para que as crianças não subam ou
mexam na TV, pois se elas fizerem isso, a TV poderá cair e causar ferimentos graves, podendo até levar à morte.
Siga todas as precauções de segurança fornecidas no folheto de segurança incluso. Para maior estabilidade,
Cuidado
Para evitar que a TV caia
1. Coloque os parafusos em grampos e prenda-os bem na parede. Verique se os parafusos
estão bem presos à parede.
Talvez seja necessário mais material, como um chumbador, dependendo do tipo da
N
parede.
Compre os grampos, parafusos e os arames necessários, pois eles não são fornecidos.
N
2. Remova os parafusos da parte traseira central da TV, coloque-os em grampos e aperte-os
novamente na TV.
Os parafusos podem não ser fornecidos com o produto.
N
3. Conecte os grampos xados na TV e os que estão xados na parede com um forte arame
e prenda-os bem.
Instale a TV perto da parede para que ela não caia para trás
N
É seguro conectar o arame para que os grampos xados na parede sejam iguais ou
N
inferiores àqueles xados na TV.
Solte o arame antes de movimentar a TV.
N
instale um dispositivo anti-queda para fins de segurança, da seguinte maneira.
.
Parede
Parede
4. Verique se todas as conexões estão seguras. Verique periodicamente as conexões para
evitar qualquer sinal de fadiga ou falha. Caso haja alguma dúvida sobre a segurança das
conexões, entre em contato com um prossional de instalação.
Segurança do espaço de instalação
Mantenha as distâncias exigidas entre o produto e outros objetos (paredes, por exemplo) para garantir a ventilação apropriada.
A falta disso pode resultar em incêndio ou algum problema com o produto devido a um aumento da temperatura interna do produto.
Instale o produto de modo que as distâncias exigidas mostradas na figura sejam mantidas.
N
Ao usar um suporte ou suporte de parede, utilize somente as peças fornecidas pela Samsung Electronics.
Se você usar peças fornecidas por outro fabricante, isto pode resultar em algum problema com o produto ou ferimento
ocasionado pela queda do produto.
Se você usar peças fornecidas por outro fabricante, isto pode resultar em algum problema com o produto ou incêndio
-
ocasionado por um aumento da temperatura interna do produto devido a ventilação insuciente.
N
A aparência pode diferir dependendo do produto.
Instalação do produto com um suporte
Instalação do produto com um suporte de parede
Português - 40
Page 83

Especificações do kit de montagem na parede (VESA)
Português - 41
Instale seu suporte de montagem em uma parede sólida e perpendicular ao chão.
Ao instalar em outros tipos de materiais ou construção, entre em contato com o respectivo fornecedor mais próximo.
Se instalado em um teto ou em uma parede com inclinação, ele poderá cair e ocasionar algum dano pessoal grave.
Família de produto polegadas Especif. VESA (A * B) Parafuso Padrão Quantidade
19” ~22” 100 * 100
M4
23”~29” 200 * 100
30”~40” 200 * 200 M6
LCD-TV
4
46”~55” 400 * 400
57”~70” 800 * 400
M8
80” ~ 1400 * 800
42”~ 50” 400 * 400
58”~ 63” 600 * 400
PDP-TV
M8 4
70” ~ 800 * 400
80” ~ 1400 * 800
N
As medidas padrão para kits de montagem na parede são mostradas na tabela acima.
N
Ao adquirir o nosso kit para montagem na parede, serão também fornecidos um manual de instalação detalhado e todas as peças
necessárias.
N
Não use parafusos maiores do que a medida padrão, pois eles podem danicar a parte interna da TV.
N
Para montagens em paredes que não estejam em conformidade com essas especificações VESA de parafuso padrão, o
comprimento dos parafusos pode ser diferente, dependendo das especicações de cada uma delas.
N
Não use parafusos que não atendam às especicações de parafuso padrão VESA.
Não aperte os parafusos com muita força, pois isso pode danicar o produto ou ocasionar a queda dele, o que pode resultar em
ferimentos pessoais. A Samsung não se responsabiliza por esses tipos de acidentes.
N
A Samsung não se responsabiliza por danos ao produto nem ferimentos pessoais quando for usado um suporte para parede que
não seja VESA ou não seja o especicado, ou no caso de o cliente não seguir as instruções de instalação do produto.
N
Nossos modelos de 57” e 63” não estão em conformidade com as especicações VESA. Por isso, é necessário utilizar o nosso kit
especial de montagem na parede indicado para este modelo.
N
Não ultrapasse 15 graus de inclinação ao montar esta TV.
Não instale seu kit de montagem na parede enquanto a TV estiver ligada.
Isso pode causar ferimentos pessoais devido a choques elétricos.
Page 84

Especificações
Nome do modelo PL42B450B1 PL50B450B1
Tamanho da tela (Diagonal) 42 polegadas 50 polegadas
Resolução do PC 1024x768 @ 60 Hz 1360x768 @ 60 Hz
Som (Saída) 10W x 2 10W x 2
Dimensão (L x A x P)
Corpo
Com suporte
Peso
Corpo
Com suporte
Considerações ambientais
Temperatura de funcionamento
Umidade de funcionamento
Temperatura de armazenamento
Umidade de armazenamento
Este dispositivo é um equipamento digital classe B.
N
Design e especicações estão sujeitos a alterações sem aviso prévio.
N
Para obter dados sobre a fonte de alimentação e o consumo de energia, consulte a etiqueta que está no produto.
N
1055.5 x 660 x 74 mm
1055.5 x 721 x 316 mm
de 10% a 80%, sem condensação
de 5% a 95%, sem condensação
1220.8 x 748.8 x 74 mm
1220.8 x 810 x 316 mm
24.1 kg
27.8 kg
de 10 °C a 40 °C
de 10% a 80%, sem condensação
de -20 °C a 45 °C
de 5% a 95%, sem condensação
31.3 kg
35 kg
de 10 °C a 40 °C
de -20 °C a 45 °C
Português - 42
Page 85

This page is intentionally
left blank.
 Loading...