

Page 1
© 2012 Samsung Electronics Co., Ltd. All rights reserved.
BN68-04070B-00
Contact SAMSUNG WORLDWIDE
If you have any questions or comments relating to Samsung products, please contact the SAMSUNG customer care center.
Contacte con SAMSUNG WORLD WIDE
Si tiene alguna pregunta o comentario referente a nuestros productos, por favor contacte con nuestro Servicio de Atención al Cliente.
Country
Customer Care Center
Web Site
ARGENTINA 0800-333-3733 www.samsung.com
BRAZIL
0800-124-421
4004-0000
www.samsung.com
CHILE 800-SAMSUNG(726-7864) www.samsung.com
COLOMBIA 01-8000112112 www.samsung.com
COSTA RICA 0-800-507-7267 www.samsung.com
DOMINICA 1-800-751-2676
www.samsung.com
ECUADOR 1-800-10-7267 www.samsung.com
EL SALVADOR 800-6225 www.samsung.com
GUATEMALA 1-800-299-0013 www.samsung.com
HONDURAS 800-7919267 www.samsung.com
JAMAICA 1-800-234-7267 www.samsung.com
NICARAGUA 00-1800-5077267 www.samsung.com
PANAMA 800-7267 www.samsung.com
PERU 0-800-777-08 www.samsung.com
PUERTO RICO 1-800-682-3180 www.samsung.com
TRINIDAD & TOBAGO 1-800-SAMSUNG(726-7864) www.samsung.com
VENEZUELA 0-800-100-5303 www.samsung.com
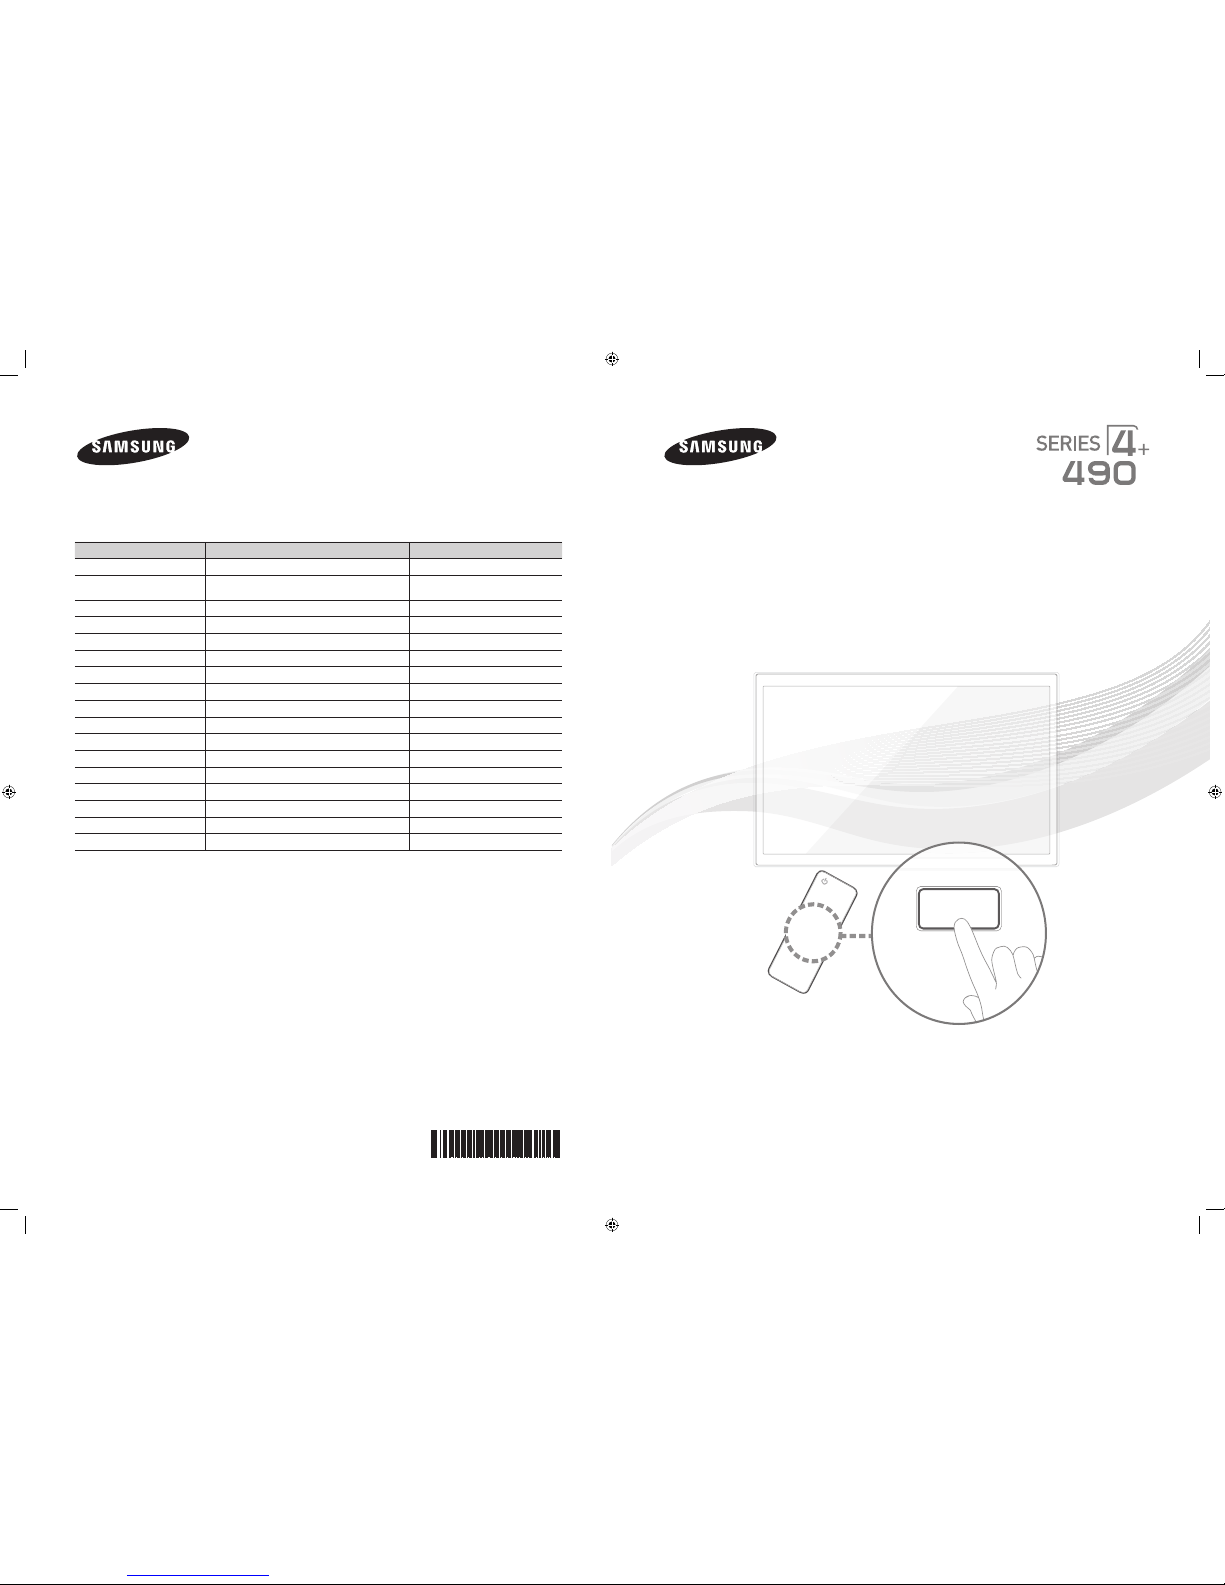
LED TV
User Manual
imagine the possibilities
Thank you for purchasing this Samsung product.
To receive more complete service, please register
your product at
www.samsung.com/register
Model _____________ Serial No. _____________
E-MANUAL
[PD490-ZS]BN68-04070B.indb 1 2012-01-30 �� 2:06:46
Page 2
English - 2
For more information on how to view the e-Manual (P. 12)
Figures and illustrations in this User Manual are provided for reference only and may differ from actual product appearance.
Product design and specifications may be changed without notice.
Important User Information
• Screen Image retention
Do not display a still image (such as that from a video game) on the plasma display panel for more than a few minutes. Still images can cause screen
image retention (burn in). To avoid such image retention, reduce the degree of brightness and contrast of the screen when displaying a still image.
• Heat on the top of the Plasma TV
The top side of the TV may become hot after long periods of use as heat dissipates from the panel through the vent hole in the upper part of the TV.
This is normal and does not indicate any defect or operational failure of unit.
However, children should be prevented from touching the upper part of the TV.
• The TV is making a ‘cracking’ noise.
A ‘cracking’ noise may occur when the TV contracts or expands due to a change in the surrounding environment such as temperature or humidity.
This is normal and not a defect.
• Cell Defects
The PDP uses a panel consisting of 2,360,000 (HD-level) to 6,221,000 (FHD-level) pixels which require sophisticated technology to produce.
However, there may be a few bright or dark pixels on the screen. These pixels will have no impact on the performance of the product.
• Avoid operating the TV at temperatures below 41°F (5°C)
• A still image displayed too long may cause permanent damage to the PDP Panel.
Watching the Plasma TV in 4:3 format for a long period of time may leave traces of the borders on the left, right, top, or bottom of
the screen. Playing a DVD or a game console may have a similar effect.
Damage caused by the above effect is not covered by the warranty.
• After-images on the Screen.
Displaying still images from Video games and PC for longer than a certain period of time may produce partial after-images.
To prevent this effect, reduce the ‘brightness’ and ‘contrast’ when displaying still images for a long time.
• Warranty
Warranty does not cover any damage caused by image retention.
Burn-in is not covered by the warranty.
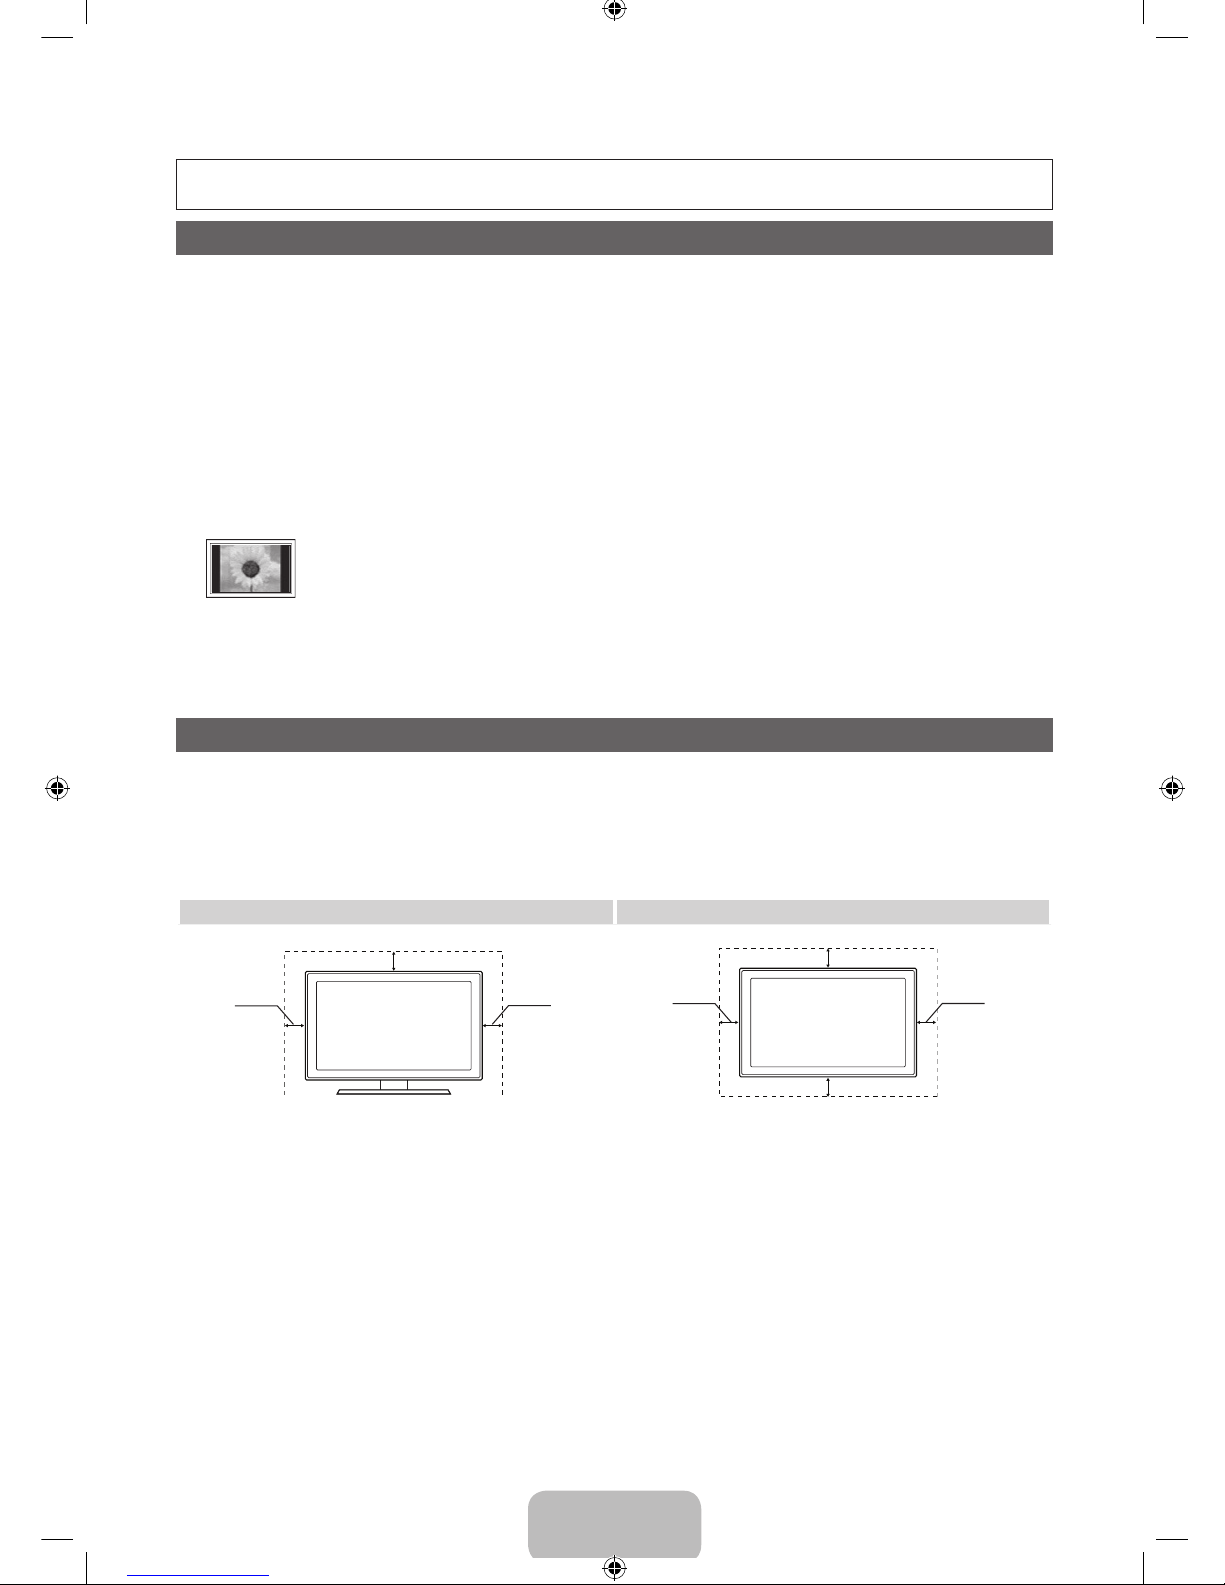
Securing the Installation Space
Keep the required distances between the product and other objects (e.g. walls) to ensure proper ventilation.
Failing to do so may result in fire or a problem with the product due to an increase in the internal temperature of the product.
✎
When using a stand or wall-mount, use parts provided by Samsung Electronics only.
• If you use parts provided by another manufacturer, it may result in a problem with the product or an injury due to the product falling.
✎
The appearance may differ depending on the product.
✎
Be careful when you contact the TV because some parts can be somewhat hot.
Installation with a stand. Installation with a wall-mount.
4 inches
4 inches
4 inches
4 inches
4 inches
4 inches
4 inches
[PD490-ZS]BN68-04070B.indb 2 2012-01-30 �� 2:06:46
Page 3
English - 3
Accessories
✎
Please make sure the following items are included with your TV. If any items are missing, contact your dealer.
✎
The items’ colors and shapes may vary depending on the models.
✎
Check that there are no accessories hidden behind packing materials when you open the box.
y Remote Control & Batteries (AAA x 2)
y Owner’s Instructions
y Warranty Card / Safety Guide (Not available in some locations)
y Cleaning-Cloth
y Power Cord
y 3D Glasses
Input Cables (Sold Separately)
HDMI HDMI-DVI Component Composite (AV) Coaxial (RF)
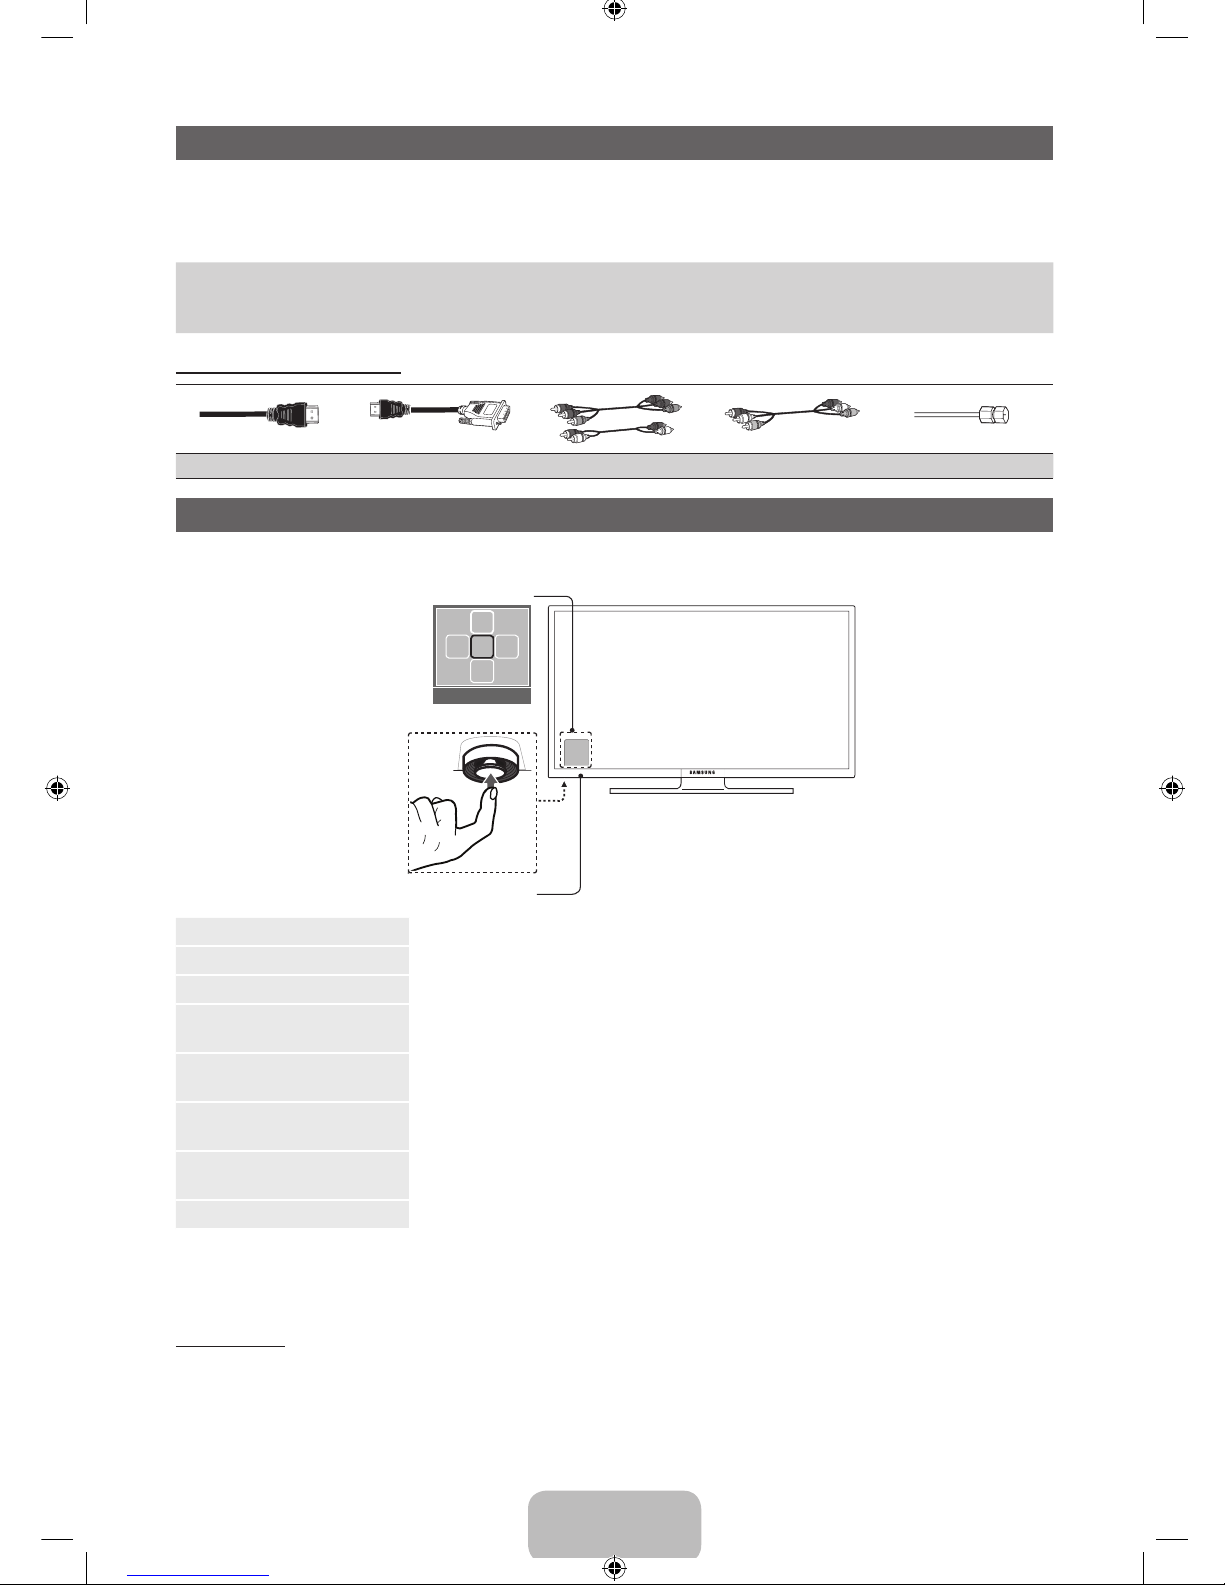
Viewing the Control Panel
✎
The product color and shape may vary depending on the model.
Power on Turns the TV on by pressing the controller in standby mode.
Adjusting the volume Adjusts the volume by moving the controller from side to side when the power is on.
Selecting a channel Selects a channel by moving the controller up and down when the power is on.
Using the function menu
Press the controller when the power is on, then the function menu screen appears. If you press it again,
the function menu screen disappears.
Selecting the MENU (m)
Selects the MENU(m) by moving the controller in the function menu screen. The OSD(On Screen
Display) of your TV’s feature appears.
Selecting the CONTENT
Selects the CONTENT by moving the controller in the function menu screen. The Contents Home main
screen appears.
Selecting the Source (s)
Selects the Source(s) by moving the controller in the function menu screen. The Source list screen
appears.
Power Off (P) Selects the Power Off (P) to turn the TV off by moving the controller in the function menu screen.
✎
Exits the menu when pressing the controller more than 1 second.
✎
When selecting the function by moving the controller to the up/down/left/ right directions, be sure not to press the
controller. If you press it first, you cannot operate it to move the up/down/left/right directions.
Standby mode
Your TV enters Standby mode when you turn it off and continues to consume a small amount of electric power. To be safe
and to decrease power consumption, do not leave your TV in standby mode for long periods of time (when you are away on
vacation, for example). It is best to unplug the power cord.
Function menu
TV Controller
Remote control sensor
CONTENT
m R s
P
Return
[PD490-ZS]BN68-04070B.indb 3 2012-01-30 �� 2:06:48
Page 4
English - 4
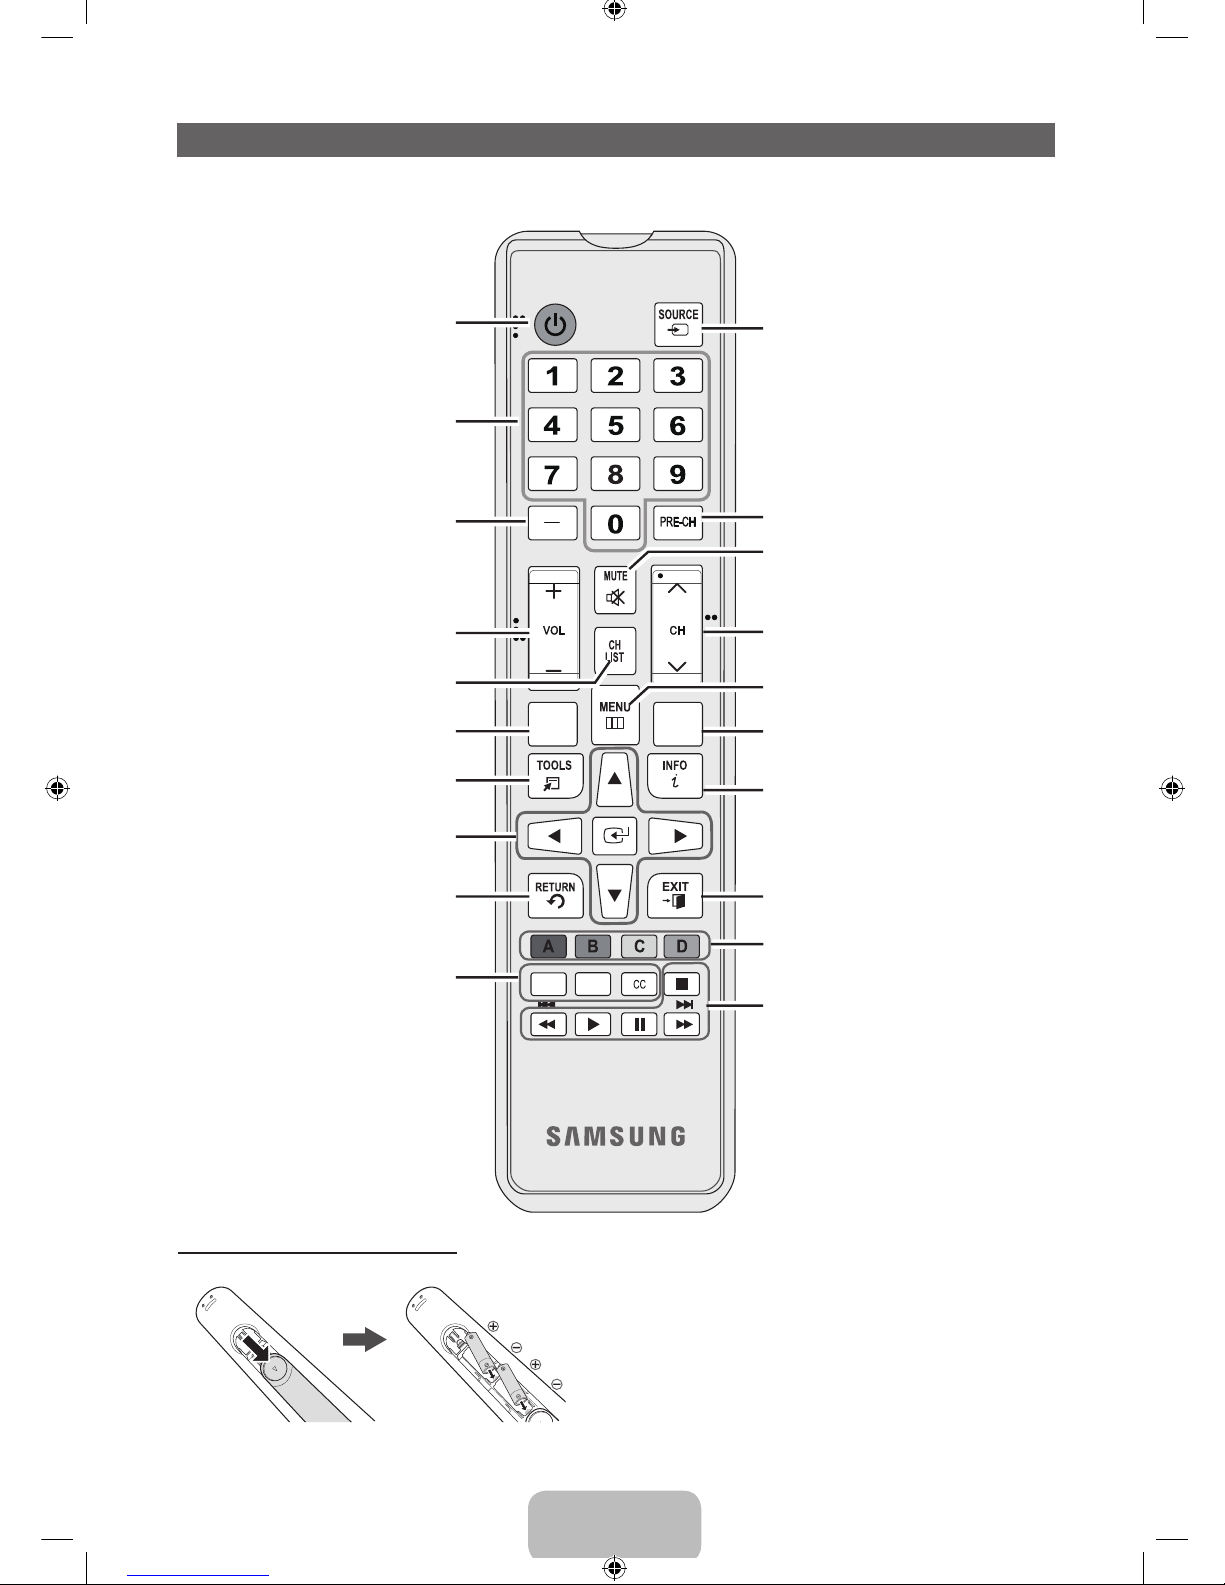
Remote Control Buttons
✎
This remote control has Braille points on the Power, Channel, and Volume buttons and can be used by visually impaired
persons.
Installing batteries (Battery size: AAA)
✎
NOTE
x
Use the remote control within 23 feet of the TV.
x
Bright light may affect the performance of the remote
control. Avoid using when near special fluorescent lights or
neon signs.
x
The color and shape may vary depending on the model.
Press to select additional channels
(digital) being broadcast by the same
station. For example, to select channel
‘54.3’, press ‘54’, then press ‘-’ and
‘3’.
Return to the previous channel.
Press to directly access to channels.
Turns the TV on and off.
Use these buttons in a specific feature.
E-MANUAL: Displays the e-Manual.
3D: Turns the 3D image on or off.
CC: Controls the caption decoder.
Cut off the sound temporarily.
Display the EPG (Electronic Program
Guide).
Displays the channel list on the screen.
Press to display information on the TV
screen.
Quickly select frequently used
functions.
Selects the on-screen menu items and
changes the values seen on the menu.
Exit the menu.
Return to the previous menu.
Display and select the available video
sources.
Use these buttons according to the
direction on screen.
Change channels.
Displays the main on-screen menu.
View the Contents Home.
Adjusts the volume.
E-MANUAL
GUIDE
CONTENT
X
[PD490-ZS]BN68-04070B.indb 4 2012-01-30 �� 2:06:48
Page 5

English - 5
Connecting to an Antenna
When the TV is initially powered on, basic settings proceed automatically.
✎
Connecting the power cord and antenna.
✎
The PDP device may interfere with an amateur radio or AM radio.
✎
When using two-way radio mobile and portable units or amateur radio or AM radio near by your TV, this may cause the
TV to malfunction.
Setup (Initial Setup)
When the TV is initially powered on, a sequence of on-screen prompts will assist in configuring basic settings. Press the
POWERP button. Setup is available only when the Source is set to TV.
✎
To start the Setup, enter the password using the remote control. The default password is 0-0-0-0.
✎
To return to the previous step, press the Previous button.
1
Menu Language:
Selecting a menu
language
Press the ▲ or ▼ button, then press the ENTERE button. Select the
desired OSD (On Screen Display) language.
POWER
INFO
GUIDE
2
Use Mode: Selecting
the usage mode
Press the ▲ or ▼ button, then press the ENTERE button.
y Select the Home Use mode. Store Demo Mode is for retail
environments.
y When pressing TV controller, the function menu screen appears. Select
the MENU(m) and press it more than 5 seconds using the controller.
The Store Demo mode is set. Cancel the Store Demo by selecting
Source(s) and pressing it more than 5 seconds.
y Store Demo is only for shop display. If you select it, several functions
are not able to use. Please select Home Use when you watch at home.
3
Network Settings:
Configure network
settings
1. Connect LAN Cable or Samsung Wireless LAN Adaptor, select the Next, then press the
ENTERE button.
✎
If you select the Skip, you have to set network in the Network Settings
respectively. For more information, refer to “Setting the Wired Network / Setting
the Wireless Network” in the e-Manual.
2. Complete the network settings in accordance with your desired way.
4
Software Upgrade:
Upgrading the software
to latest version
When checking software version if there is a brand-new version, upgrade the software to
latest version by pressing Upgrade Now.
✎
Press Upgrade Later to upgrade later. For more information, refer to “Software
Upgrade” in the e-Manual.
✎
You can only upgrade software, when the Network Settings is successfully
completed.
ANT OUT
VHF/UHF Antenna
Power Input
or
Cable
Antenna Cable (Not Supplied)
[PD490-ZS]BN68-04070B.indb 5 2012-01-30 �� 2:06:50
Page 6

English - 6
5
Auto Program (1):
Selecting how you
watch your TV
y I use an aerial cable to connect to TV.: Memorize all of the available channels using
RF cable.
y I use a set-top box.: Do not need Auto program when connecting a TV to set-top box.
✎
You can complete Setup by selecting it.
6
Auto Program
(2): Selecting and
memorizing channels
Select the Next to run Auto Program.
Press the ▲ or ▼ button to select Air or Cable, and then press the ENTERE button.
The channel search will start automatically.
For more information, refer to Channel → Auto Program.
✎
Press the ENTERE button at any time to interrupt the memorization process.
7
Clock: Setting the
Clock Mode
Set the Clock Mode automatically or manually.
y Auto : Select the time zone where you live. (for Brazil, Chile)
y Manual : Allows you to manually set the current date and time.
8
Setup Complete
Press the ENTERE button.
✎
The completed settings are displayed.
If You Want to Reset This Feature...
O
MENUm → System → Setup → ENTER
E
[PD490-ZS]BN68-04070B.indb 6 2012-01-30 �� 2:06:50
Page 7

English - 7
Connecting to an AV Device
¦ Available devices: DVD, Blu-ray player, HD cable box, HD STB (Set-Top-Box) satellite
receiver
Using an HDMI or an HDMI to DVI Cable: HD connection (up to 1080p)
✎
HDMI IN 1(DVI), 2 / DVI AUDIO IN
x
If an HDMI to DVI cable is connected to the HDMI IN 1(DVI) port, the audio does not work.
x
The picture may not display normally (if at all) or the audio may not work if an external device that uses an older
version of HDMI mode is connected to the TV. If such a problem occurs, ask the manufacturer of the external
device about the HDMI version and, if out of date, request an upgrade.
x
Be sure to purchase a certified HDMI cable. Otherwise, the picture may not display or a connection error may
occur.
x
A basic high-speed HDMI cable or one with ethernet is recommended. This product does not support the
ethernet function via HDMI.
¦ Available devices: DVD, Blu-ray player, cable box, STB satellite receiver, VCR
Using a Component (up to 1080p) or an Audio/Video Cable (480i only)
✎
When connecting to AV IN, the color of the AV IN [Y/VIDEO] jack (green) will not match the video cable (yellow).
✎
For better picture quality, we recommend the Component connection over the A/V connection.
Device
Device
Red
Red
White
White Yellow
Red Blue Green
Audio Cable
(Not Supplied)
Audio Cable
(Not Supplied)
Video Cable
(Not Supplied)
Component Cable
(Not Supplied)
WR
HDMI OUT
DVI OUT
9$
9$
Device
Device
WhiteRed
Audio Cable (Not Supplied)
HDMI Cable (Not Supplied)
HDMI to DVI Cable (Not Supplied)
[PD490-ZS]BN68-04070B.indb 7 2012-01-30 �� 2:06:52
Page 8
English - 8
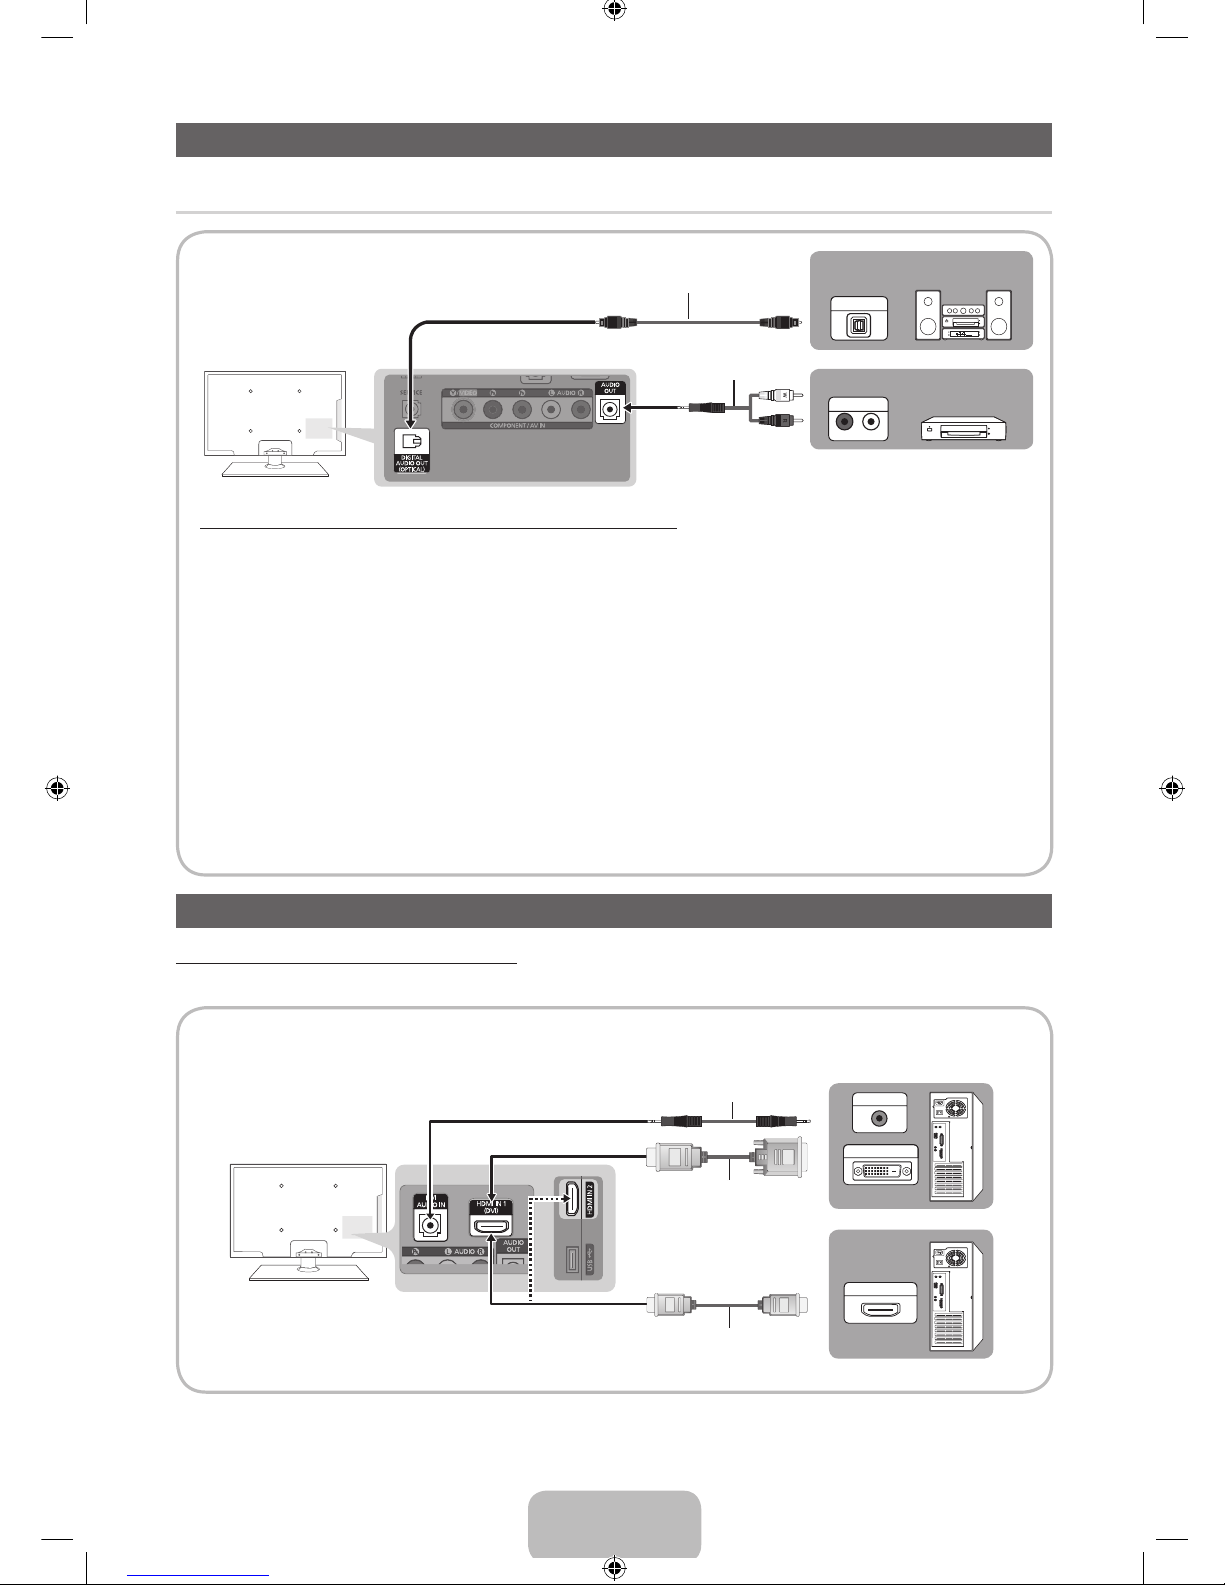
Connecting to an Audio Device
¦ Available devices: Digital Audio System, Amplifier, DVD home theater
Using an Optical (Digital) or an Audio (Analog) Cable Connection
✎
DIGITAL AUDIO OUT (OPTICAL)
x
When a Digital Audio System is connected to the DIGITAL AUDIO OUT (OPTICAL) jack, decrease the volume
of both the TV and the system.
x
5.1 CH (channel) audio is available when the TV is connected to an external device supporting 5.1 CH.
x
When the receiver (home theater) is set to on, you can hear sound output from the TV’s optical jack. When the
TV is receiving a DTV signal, the TV will send 5.1 CH sound to the home theater receiver. When the source is
a digital component such as a DVD / Blu-ray player / cable box / STB (Set-Top-Box) satellite receiver and is
connected to the TV via HDMI, only 2 CH audio will be heard from the home theater receiver. If you want to
hear 5.1 CH audio, connect the digital audio out jack from your DVD / Blu-ray player / cable box / STB satellite
receiver directly to an amplifier or home theater.
✎
AUDIO OUT: Connects to the audio input jacks on your amplifier/DVD home theater.
x
When connecting, use the appropriate connector.
x
When an audio amplifier is connected to the AUDIO OUT jacks: Decrease the volume of the TV and adjust the
volume level with the amplifier’s volume control.
Connecting to a PC
Using an HDMI cable or an HDMI to DVI cable
✎
Connecting through the HDMI cable may not be supported depending on the PC.
HDMI OUT
DVI OUT
AUDIO OUT
Audio Cable (Not Supplied)
HDMI to DVI Cable (Not Supplied)
HDMI Cable (Not Supplied)
OPTICAL
R-AUDIO-L
AUDIO IN
Optical Cable (Not Supplied)
Audio Cable (Not Supplied)
Digital Audio System
Amplifier / DVD home theater
[PD490-ZS]BN68-04070B.indb 8 2012-01-30 �� 2:06:57
Page 9
English - 9
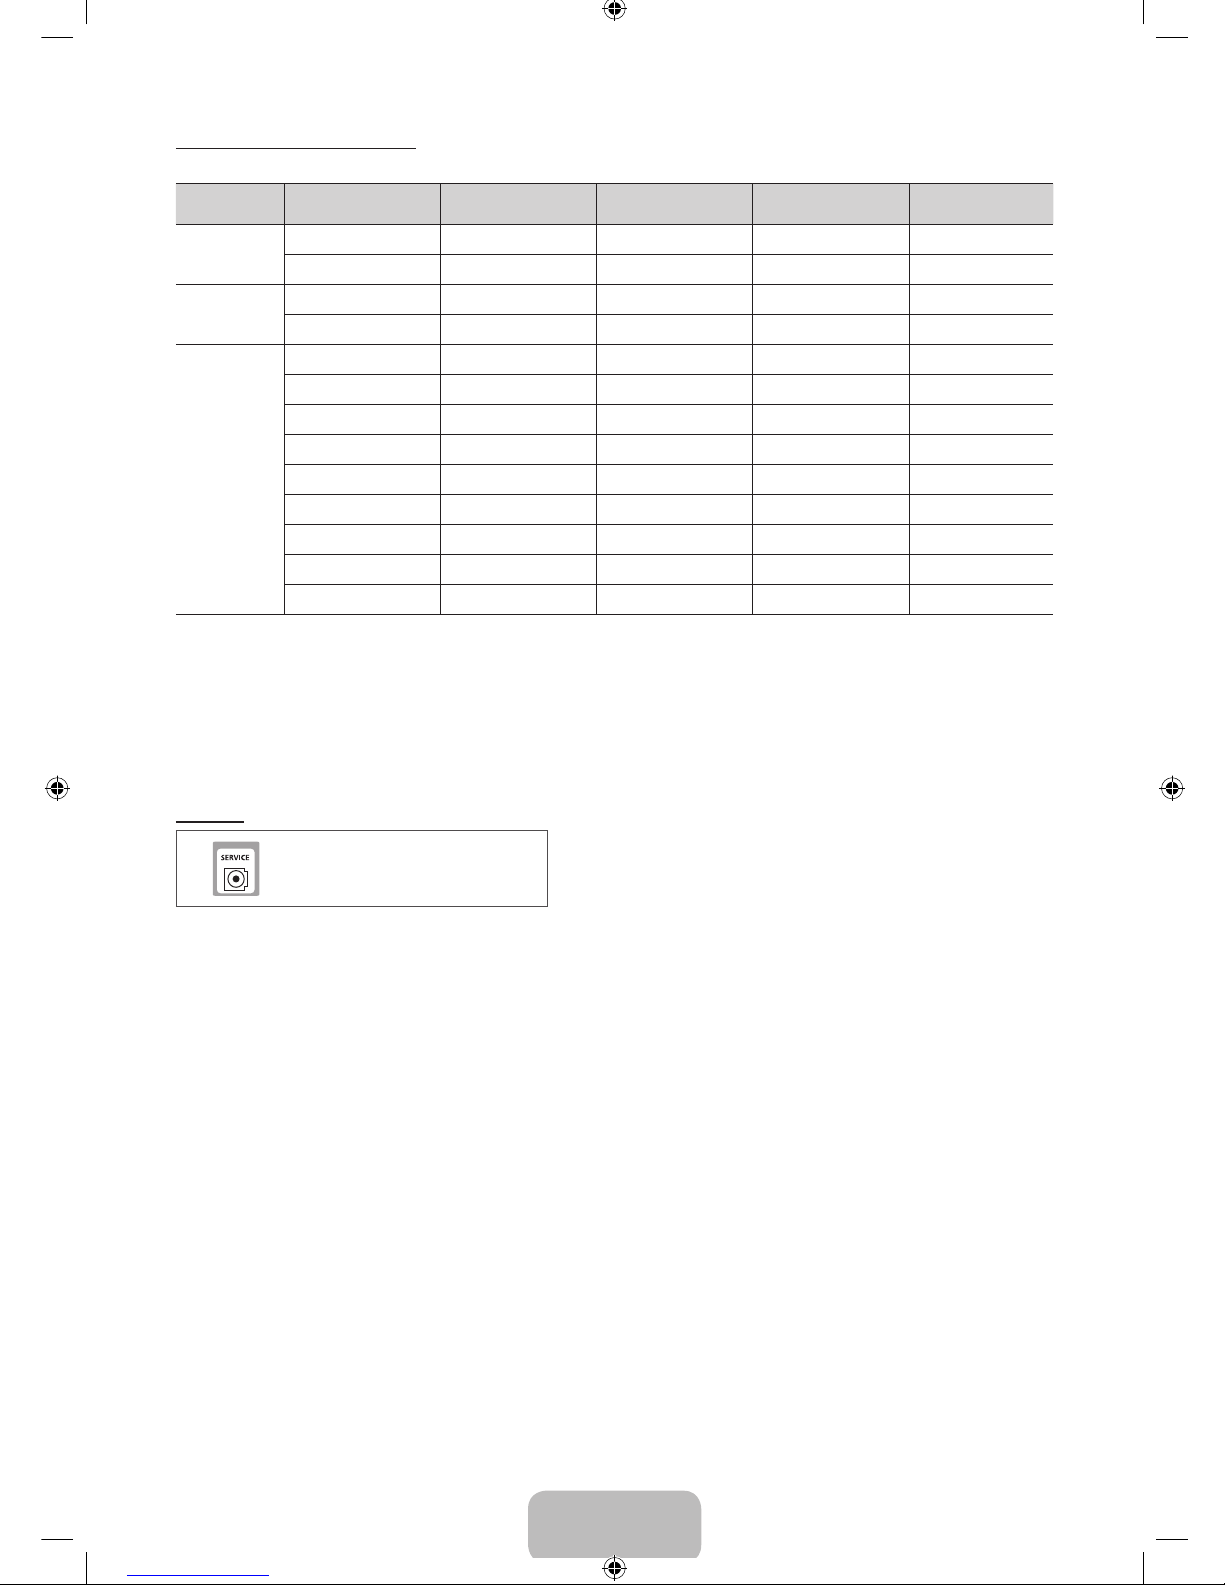
Display Modes (HDMI/DVI Input)
Optimal resolution is 1024 x 768@60Hz.
Mode Resolution
Horizontal Frequency
(KHz)
Vertical Frequency
(Hz)
Pixel Clock Frequency
(MHz)
Sync Polarity
(H / V)
IBM
640 x 350 31.469 70.086 25.175 +/-
720 x 400 31.469 70.087 28.322 -/+
MAC
640 x 480 35.000 66.667 30.240 -/-
832 x 624 49.726 74.551 57.284 -/-
VESA DMT
640 x 480 31.469 59.940 25.175 -/-
640 x 480 37.861 72.809 31.500 -/-
640 x 480 37.500 75.000 31.500 -/-
800 x 600 37.879 60.317 40.000 +/+
800 x 600 48.077 72.188 50.000 +/+
800 x 600 46.875 75.000 49.500 +/+
1024 x 768 48.363 60.004 65.000 -/-
1024 x 768 56.476 70.069 75.000 -/-
1024 x 768 60.023 75.029 78.750 +/+
✎
NOTE
x
For HDMI/DVI cable connection, you must use the HDMI IN 1(DVI) jack.
x
If an HDMI to DVI cable is connected to the HDMI IN 1(DVI) port, the audio does not work.
x
The interlace mode is not supported.
x
The set might operate abnormally if a non-standard video format is selected.
x
PC(D-Sub) input is not supported.
SERVICE
Connector for service only.
[PD490-ZS]BN68-04070B.indb 9 2012-01-30 �� 2:06:58
Page 10
English - 10
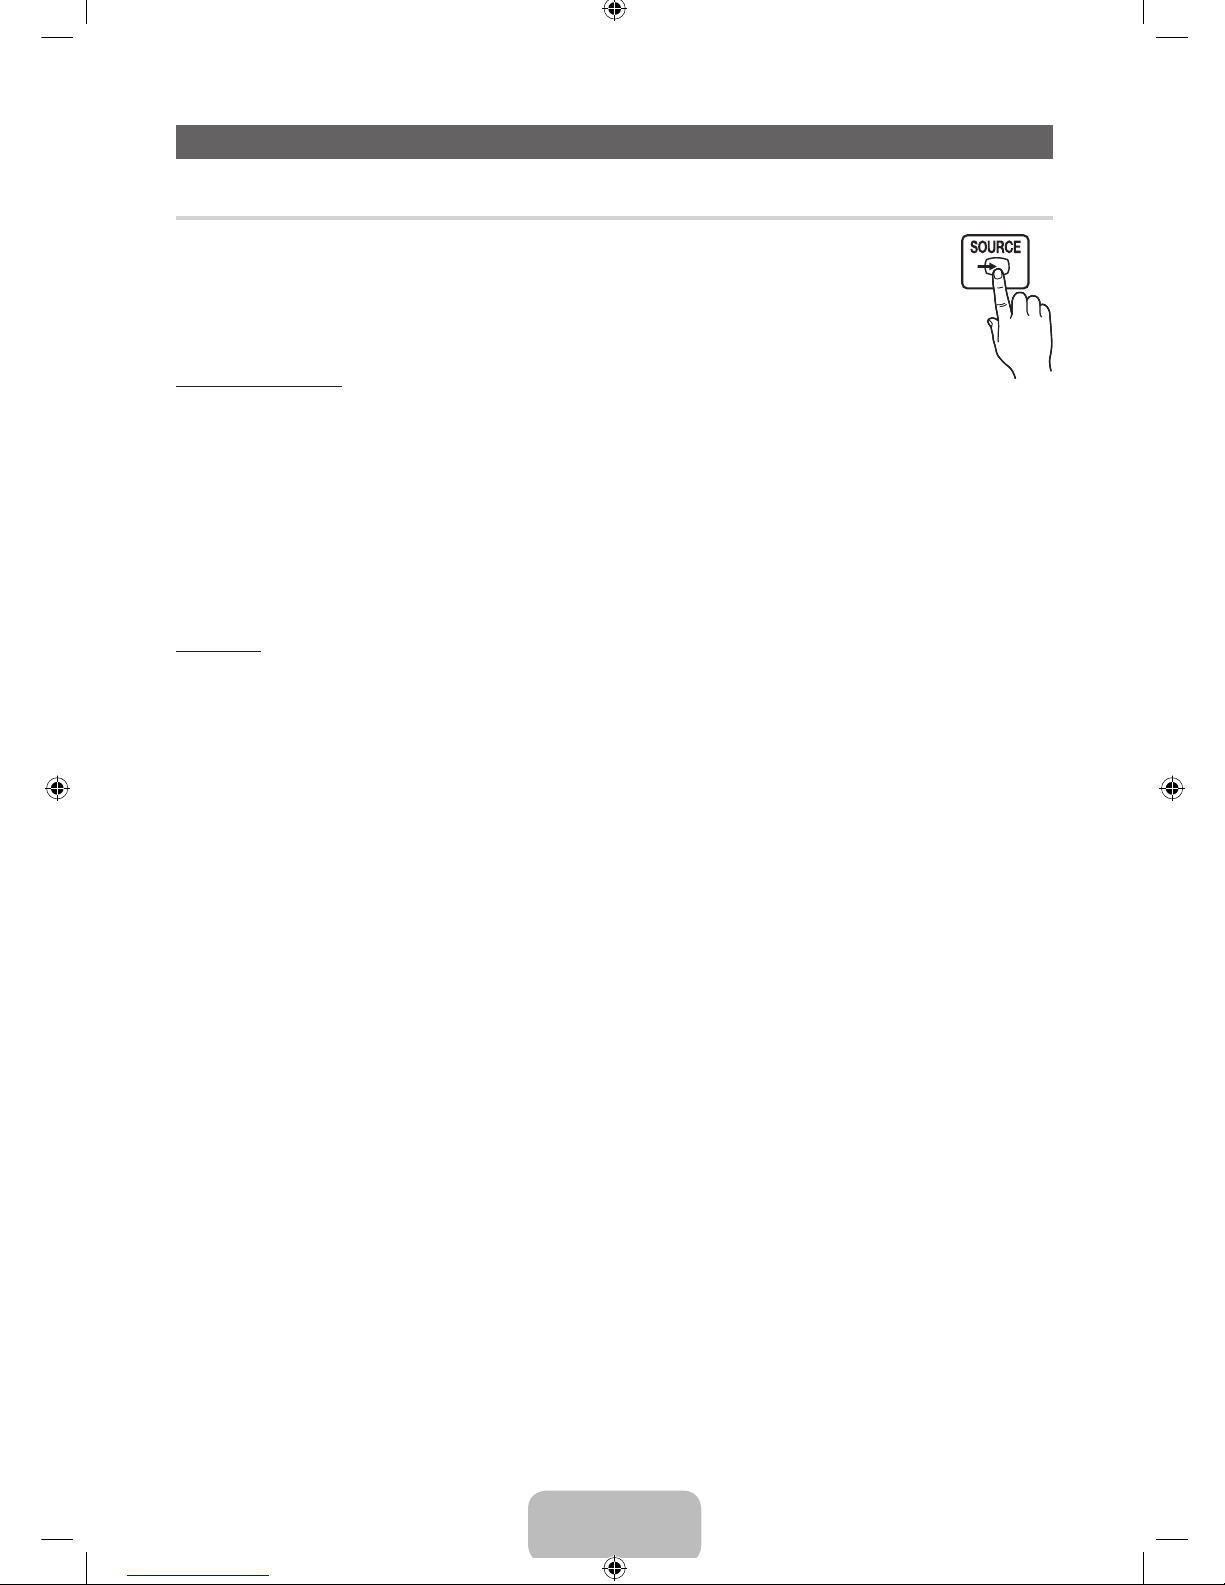
Changing the Input Source
Source
Use to select TV or other external input sources such as DVD / Blu-ray players / cable box / STB satellite
receiver connected to the TV.
■■ TV / HDMI1/DVI / HDMI2 / AV / Component
✎
In the Source, connected inputs will be highlighted.
✎
PC(D-Sub) input is not supported. If you want to connect PC to the TV, use HDMI1/DVI input.
How to use Edit Name
In the Source, press the TOOLS button, and then you can set an external input sources name you want.
■ VCR / DVD / Cable STB / Satellite STB / PVR STB / AV Receiver / Game / Camcorder / PC / DVI PC / DVI Devices /
TV / IPTV / Blu-ray / HD DVD / DMA: Name the device connected to the input jacks to make your input source selection
easier.
✎
When connecting a PC to the HDMI IN 1(DVI) port with HDMI cable, you should set the TV to PC mode under Edit Name.
✎
When connecting a PC to the HDMI IN 1(DVI) port with HDMI to DVI cable, you should set the TV to DVI PC mode under
Edit Name.
✎
When connecting an AV devices to the HDMI IN 1(DVI) port with HDMI to DVI cable, you should set the TV to DVI
Devices mode under Edit Name.
Information
You can see detailed information about the connected external device.
[PD490-ZS]BN68-04070B.indb 10 2012-01-30 �� 2:06:58
Page 11
English - 11
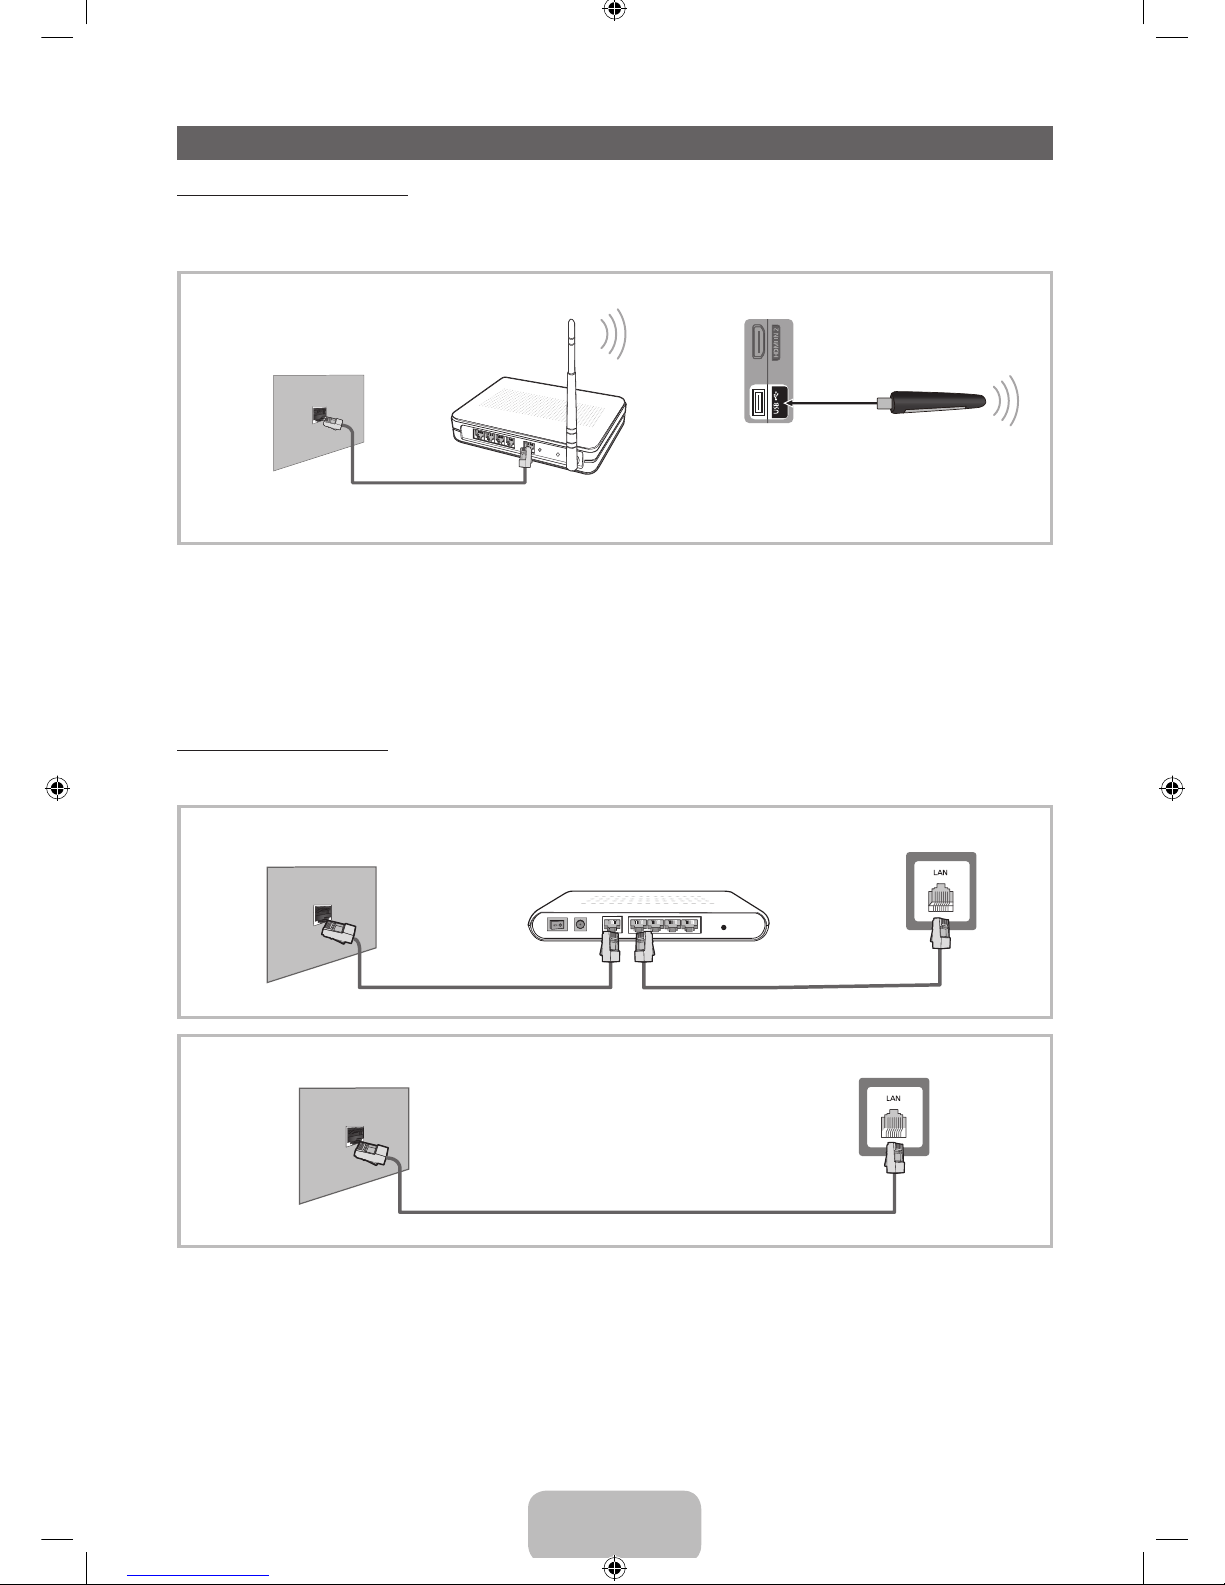
Network Connection
Network Connection - Wireless
You can connect your TV to your LAN through a standard wireless router or modem. To connect wirelessly, you must first
attach a “Samsung Wireless LAN Adapter” (WIS09ABGN, WIS09ABGN2, WIS10ABGN - sold separately) to the USB port on
the side of your TV. See the illustration below.
Samsung’s Wireless LAN adapter is sold separately and is offered by select retailers, Ecommerce sites. Samsung’s Wireless
LAN adapter supports the IEEE 802.11a/b/g and n communication protocols. Samsung recommends using IEEE 802.11n.
When you play video over a network connection, the video may not be played smoothly.
Most wireless network systems incorporate a security system that requires devices that access the network through an access
point or wireless router (typically a wireless IP Sharer) to transmit an encrypted security code called an access key.
If Pure High-throughput (Greenfield) 802.11n mode is selected and the Encryption type is set to WEP, TKIP or TKIP AES
(WPS2Mixed) for your wireless router, Samsung TVs will not support a connection in compliance with new Wi-Fi certification
specifications.
Network Connection - Wired
There are two main ways to connect your TV to your network using cable, depending on your network setup. They are
illustrated below:
✎
It is not supported when the network speed is below or equal to 10Mbps.
✎
Use Cat 5(*STP Type) cable for the connection. (*Shielded Twist Pair)
The Modem Port on the Wall
TV Rear Panel
LAN CableModem Cable
External Modem
(ADSL / VDSL / Cable TV)
The LAN Port on the Wall
TV Rear Panel
LAN Cable
9$
Wireless IP Sharer
(AP having DHCP Server)
Samsung Wireless
LAN Adapter
TV Side Panel
The LAN Port on the Wall
LAN Cable (Not Supplied)
[PD490-ZS]BN68-04070B.indb 11 2012-01-30 �� 2:06:59
Page 12
English - 12
How to view the e-Manual
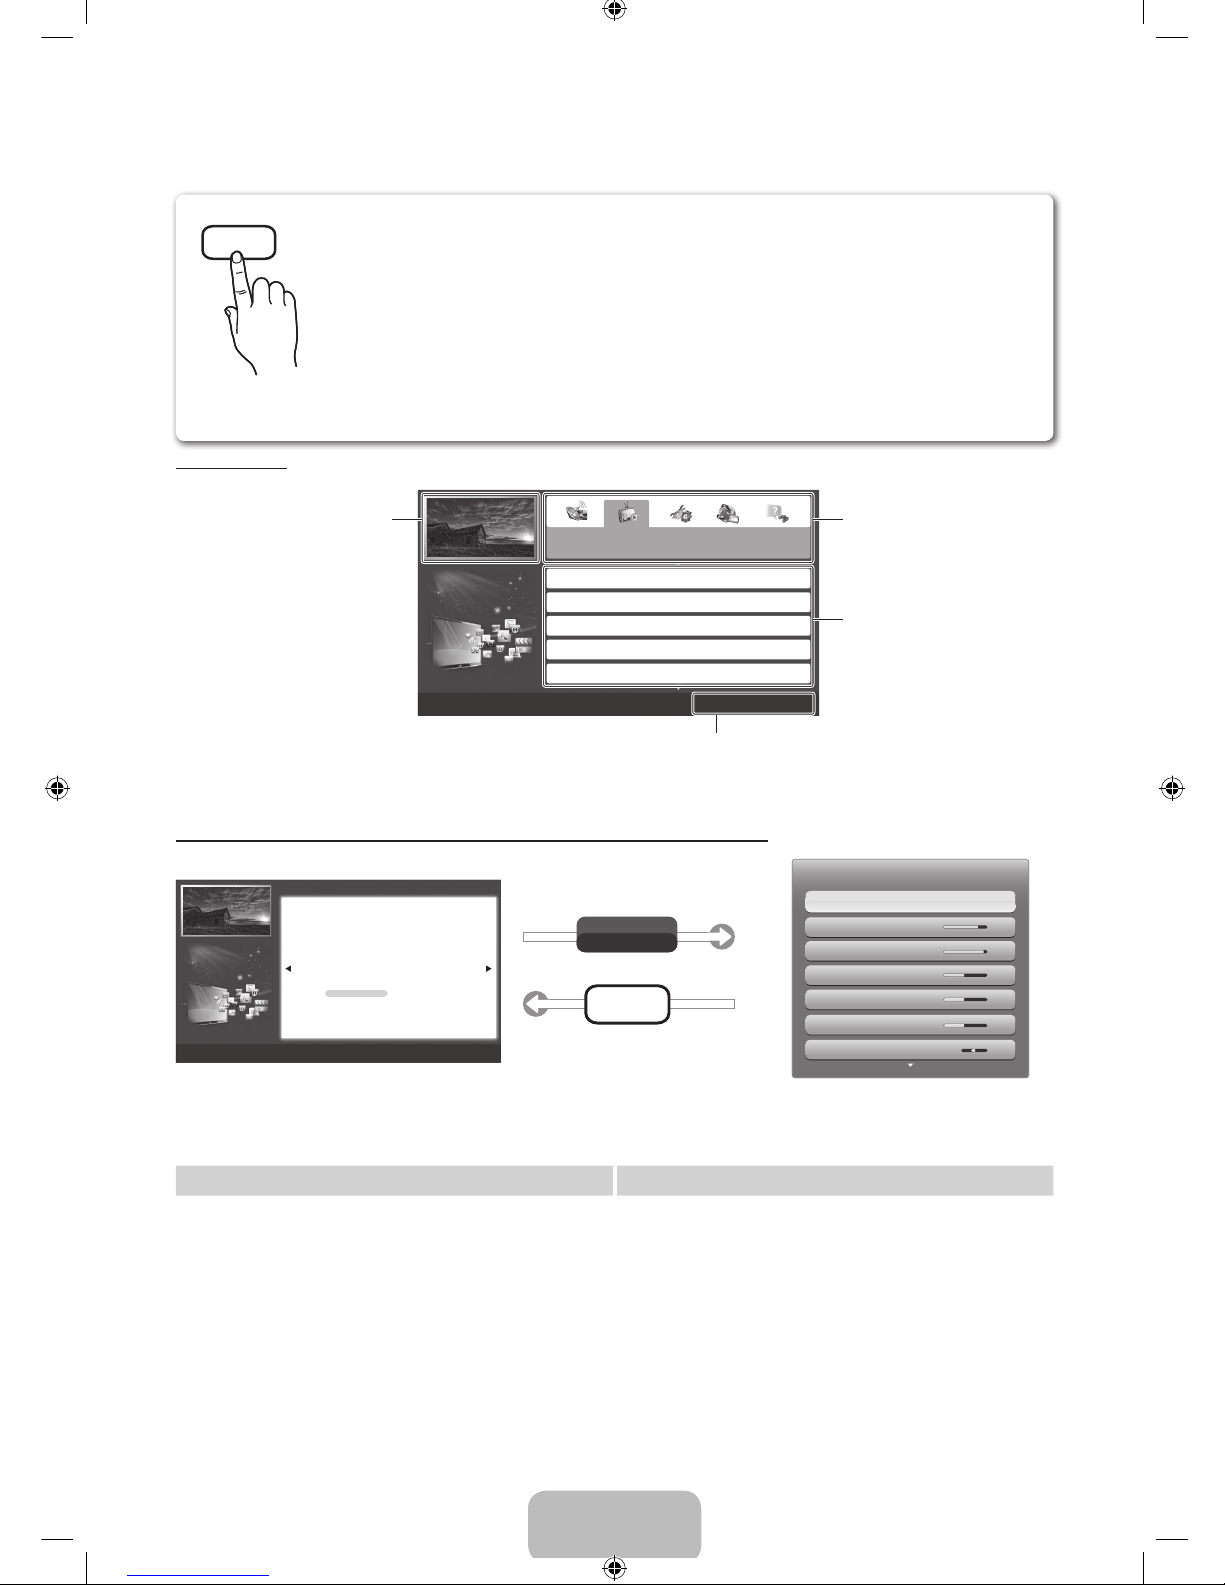
Screen Display
How to toggle between an e-Manual topic and the corresponding OSD menu(s).
✎
This function is not enabled in some menus.
Method 1 Method 2
1. If you want to use the menu that corresponds to an
e-Manual topic, press the red button to select Try Now.
2. To return to the e-Manual screen, press the E-MANUAL
button.
1. Press the ENTERE button when a topic is displayed.
“Do you want to execute this?” appears. Select Yes,
and then press the ENTERE button. The OSD window
appears.
2. To return to the e-Manual screen, press the E-MANUAL
button.
Basic Features
Changing the Preset Picture Mode
Adjusting Picture Settings
Changing the Picture Options
Changing the Preset Sound Modes
Sound Settings
}
Index E Enter e Exit
You can find instructions for your TV’s features in the e-Manual in your TV. To use,
press the E-MANUAL button on your remote. Move the cursor using the up/down/
right/left buttons to highlight a category, then a topic, and then press the ENTERE
button. The e-Manual displays the page you want to see.
You can also access it through the menu:
O
MENUm → Support → e-Manual → ENTER
E
✎
If you want to return to the e-Manual, press the E-MANUAL button on your remote.
✎
You can not use Try Now function if the menu is not activated.
TV Screen: Displays the program,
movie, video, etc. you are currently
watching.
The category list. Press l or r
button to select the category you
want.
Displays the sub-menu list. Use the
arrow buttons on your remote to
move the cursor.
Press the ENTERE button to
select the sub-menu you want.
Operation Buttons:
}
Blue (Index): Displays index screen.
E
Enter: Select a category or sub-menu.
e
Exit: Exit the e-Manual.
E-MANUAL
E-MANUAL
Try Now
a
Try Now b Home { Zoom } Index L Page e Exit
Basic Features > Changing the Preset Picture Mode (1/1)
Changing the Preset Picture Mode
■
Picture Mode
t
O MENUm → Picture → Picture Mode → ENTER
E
Select your preferred picture type.
N When connecting a PC, you can only make changes to the Entertain
and Standard.
• Dynamic: Suitable for a bright room.
• Standard: Suitable for a normal environment.
• Natural for LED 5000, 6000 series : Suitable for an eye comfortable display.
• Movie: Suitable for watching movies in a dark room.
• Entertain: Suitable for watching movies and games.
N It is only available when connecting a PC.
Picture
Picture Mode Standard
Cell Light 10
Contrast 95
Brightness 45
Color 50
Tint (G/R) R50 R50
Sharpness 50
[PD490-ZS]BN68-04070B.indb 12 2012-01-30 �� 2:07:06
Page 13
English - 13
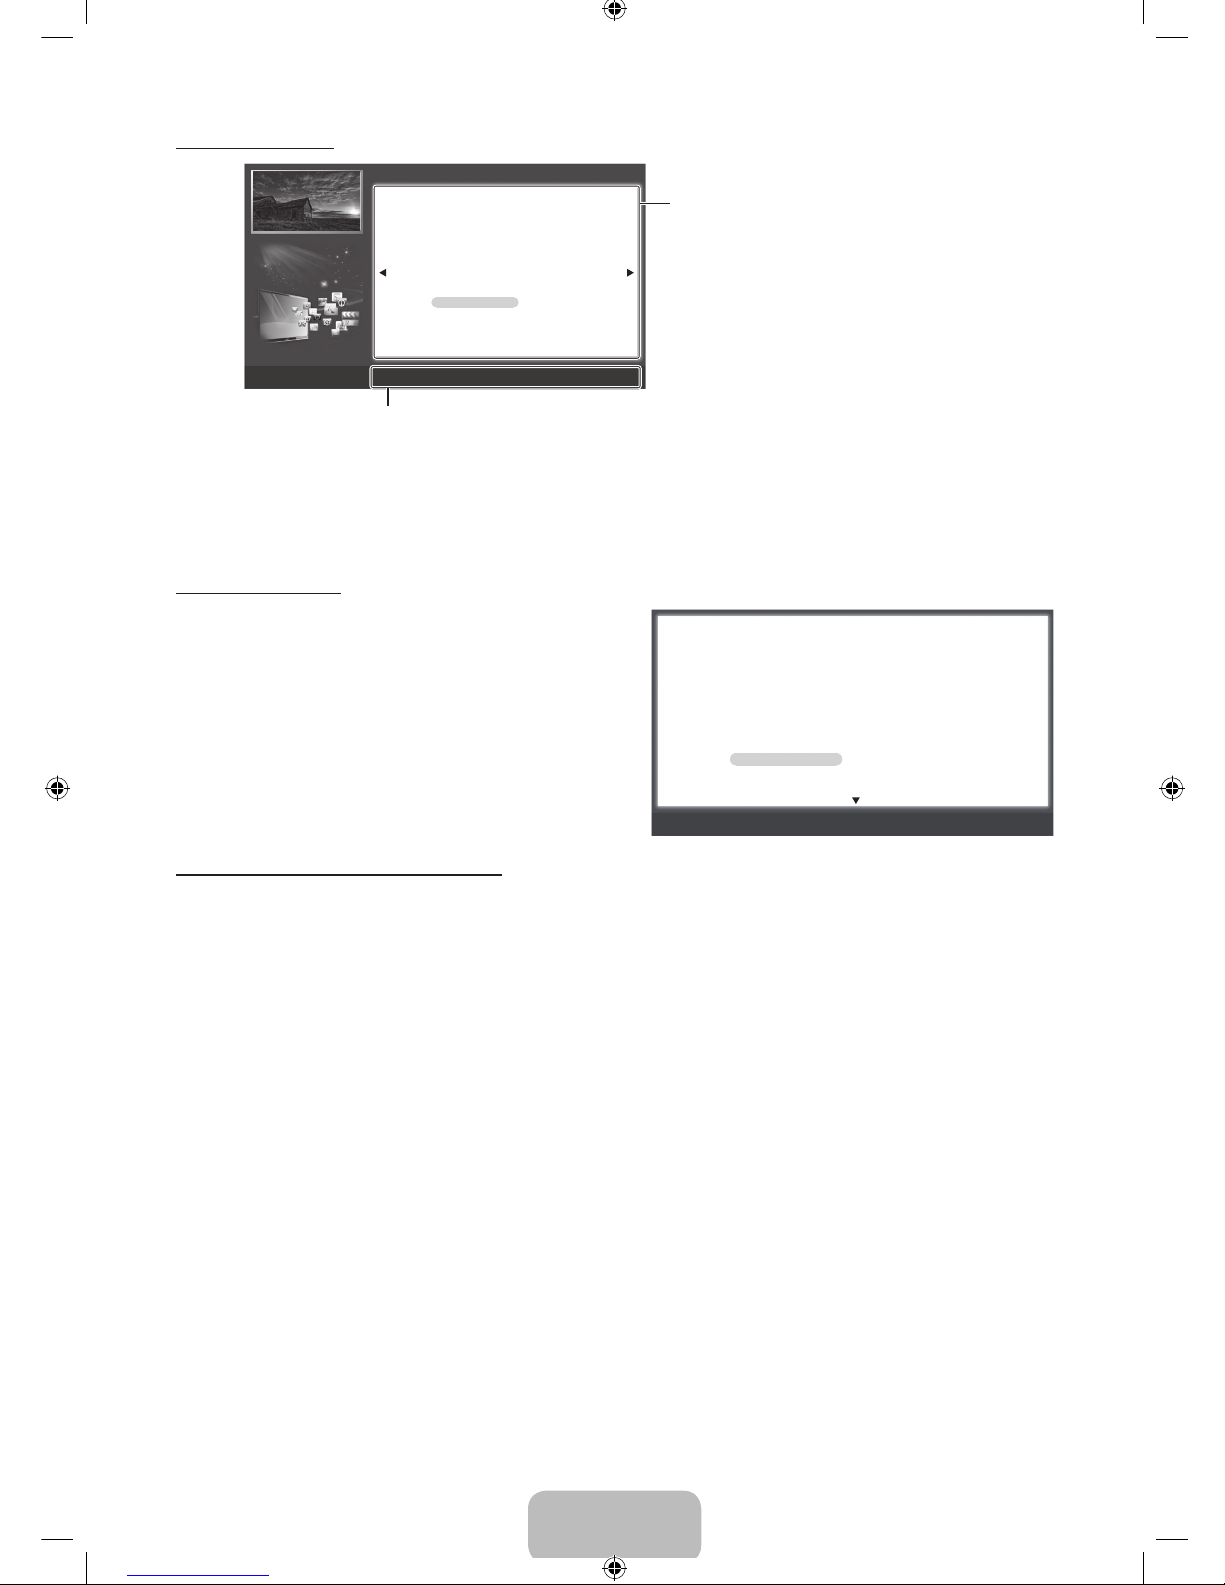
Viewing the Contents
Using the Zoom mode
When you are viewing an e-Manual instruction page, press
the ENTERE button to magnify the screen. You can scroll
through the magnified screen by using the u or d buttons.
✎
To return to the screen to normal size, press the
RETURN button.
How to search for a topic on the index page
1. To search for a topic, press the left or right arrow button to select a letter. The Index displays a list of topics and keywords
that begin with the letter you selected.
2. Press the up or down arrow button to select a topic or keyword you want, and then press the ENTERE button to select
a topic you want to see.
3. The e-Manual page with the topic appears.
✎
To close the Index screen, press the RETURN button.
a
Try Now b Home { Zoom } Index L Page e Exit
Basic Features > Changing the Preset Picture Mode (1/1)
Contents Area: Contains the topic contents
if you selected a sub-menu. To move to the
previous or next page, press the l or r button.
Operation Buttons:
a
Red (Try Now): Displays the OSD menu that corresponds to the topic. To return to the e-Manual
screen, press the E-MANUAL button.
b
Green (Home): Moves to the e-Manual home screen.
{
Yellow (Zoom): Magnifies a screen.
}
Blue (Index): Displays the Index screen.
L
(Page): Moves to previous or next page.
e
(Exit): Exit the e-Manual.
U
Move R Return
Changing the Preset Picture Mode
■
Picture Mode
t
O MENUm → Picture → Picture Mode → ENTER
E
Select your preferred picture type.
N When connecting a PC, you can only make changes to the Entertain
and Standard.
• Dynamic: Suitable for a bright room.
• Standard: Suitable for a normal environment.
• Natural for LED 5000, 6000 series : Suitable for an eye comfortable
display.
• Movie: Suitable for watching movies in a dark room.
• Entertain: Suitable for watching movies and games.
N It is only available when connecting a PC.
Changing the Preset Picture Mode
■
Picture Mode
t
O MENUm → Picture → Picture Mode → ENTER
E
Select your preferred p icture type.
N When connecting a PC, you can on ly make change s to the Enter tain and
Standard .
• Dynamic: Suitable for a bright room.
• Standard: Suitable for a normal environment.
• Natural for LED 5000, 6000 series : Suitable for an eye comfortable display.
• Movie: Suitable for watching movies in a dark room.
[PD490-ZS]BN68-04070B.indb 13 2012-01-30 �� 2:07:07
Page 14
English - 14
Installing the Wall Mount
Wall or Ceiling Mounting
The product should be mounted to a wall or ceiling only as recommended by the manufacturer. Unless it is correctly
mounted, the product may slide or fall, causing serious injury to a child or adult, and serious damage to the product.
Installing the Wall Mount Kit
The wall mount kit (sold separately) allows you to mount the TV on the wall.
For detailed information on installing the wall mount, see the instructions provided with the wall mount. We recommend you
contact a technician for assistance when installing the wall mount bracket. Samsung Electronics is not responsible for any
damage to the product or injury to yourself or others if you elect to install the wall mount on your own.
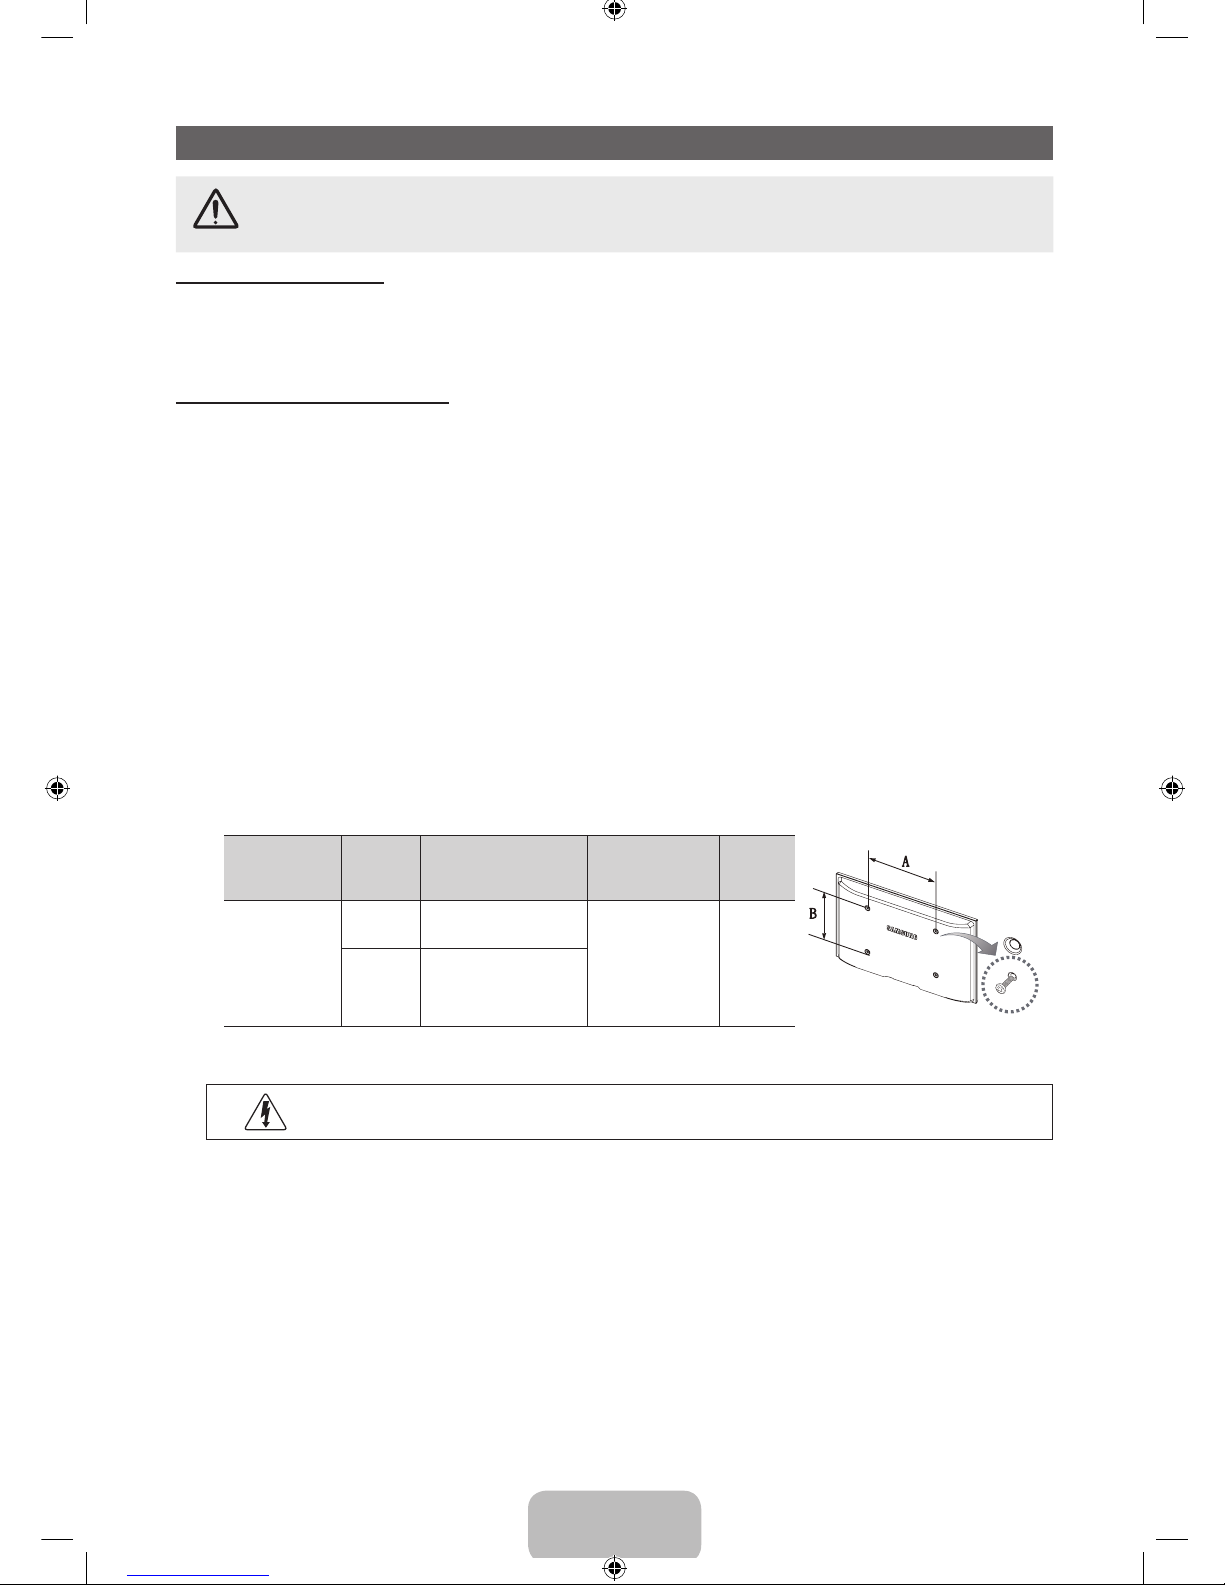
Wall Mount Kit Specifications (VESA)
✎
The wall mount kit is not supplied, but sold separately. Install your wall mount on a solid wall perpendicular to the floor.
When attaching to other building materials, please contact your nearest dealer. If installed on a ceiling or slanted wall, it
may fall and result in severe personal injury.
✎
NOTE
x
Standard dimensions for wall mount kits are shown in the table below.
x
When purchasing our wall mount kit, a detailed installation manual and all parts necessary for assembly are provided.
x
Do not use screws that do not comply with the VESA standard screw specifications.
x
Do not use screws that are longer than the standard dimension or do not comply with the VESA standard screw
specifications. Screws that are too long may cause damage to the inside of the TV set.
x
For wall mounts that do not comply with the VESA standard screw specifications, the length of the screws may differ
depending on the wall mount specifications.
x
Do not fasten the screws too strongly; this may damage the product or cause the product to fall, leading to personal
injury. Samsung is not liable for these kinds of accidents.
x
Samsung is not liable for product damage or personal injury when a non-VESA or non-specified wall mount is used or
the consumer fails to follow the product installation instructions.
x
Do not mount the TV at more than a 15 degree tilt.
x
Always use two people to mount the TV to a wall.
Product Family
TV size in
inches
VESA screw hole
specs (A * B) in
millimeters
Standard Screw Quantity
PDP-TV
43~51 400 X 400
M8 4
60~64 600 X 400
✎
Remove the screws in the mounting holes before you install the wall mount.
Do not install your Wall Mount Kit while your TV is turned on. It may result in personal injury due to
electric shock.
[PD490-ZS]BN68-04070B.indb 14 2012-01-30 �� 2:07:08
Page 15
English - 15
Troubleshooting
If the TV seems to have a problem, first try this list of possible problems and solutions. If none of these troubleshooting tips
apply, visit “www.samsung.com,” then click on Support, or call Samsung customer service.
Issues Solutions and Explanations
The TV won’t turn on. • Make sure the AC power cord is securely plugged in to the wall outlet and the TV.
• Make sure the wall outlet is working.
• Try pressing the POWER button on the TV to make sure the problem is not the remote. If
the TV turns on, refer to “Remote control does not work” below.
There is no picture/video. • Check cable connections (remove and reconnect all cables connected to the TV and
external devices).
• Set your external device’s (Cable/Sat Box, DVD, Blu-ray etc) video outputs to match
the connections to the TV input. For example, if an external device’s output is HDMI, it
should be connected to an HDMI input on the TV.
• Make sure your connected devices are powered on.
• Be sure to select the TV’s correct source by pressing the SOURCE button on the remote
control.
• Reboot the connected device by reconnecting the device’s power cable.
The remote control does not work. • Replace the remote control batteries with the poles (+/–) in the right direction.
• Clean the sensor’s transmission window on the remote.
• Try pointing the remote directly at the TV from 5~6 feet away.
The cable/set top box remote control
doesn’t turn the TV on or off, or
adjust the volume.
• Program the Cable/Set remote control to operate the TV. Refer to the Cable/Set user
manual for the SAMSUNG TV code.
✎
Some functions and pictures shown in this manual are available on specific models only.
✎
You can keep your TV as optimum condition to upgrade the latest firmware on web site (samsung.com -> Support ->
Downloads) by USB.
License
List of Features
y 3D: This exciting new feature enables you to view 3D content.
y AllShare Play: AllShare Play connects your TV and compatible Samsung mobile phones/devices through a network. This
feature enables you to enjoy the various media contents (videos, photos, music).
[PD490-ZS]BN68-04070B.indb 15 2012-01-30 �� 2:07:09
Page 16
English - 16
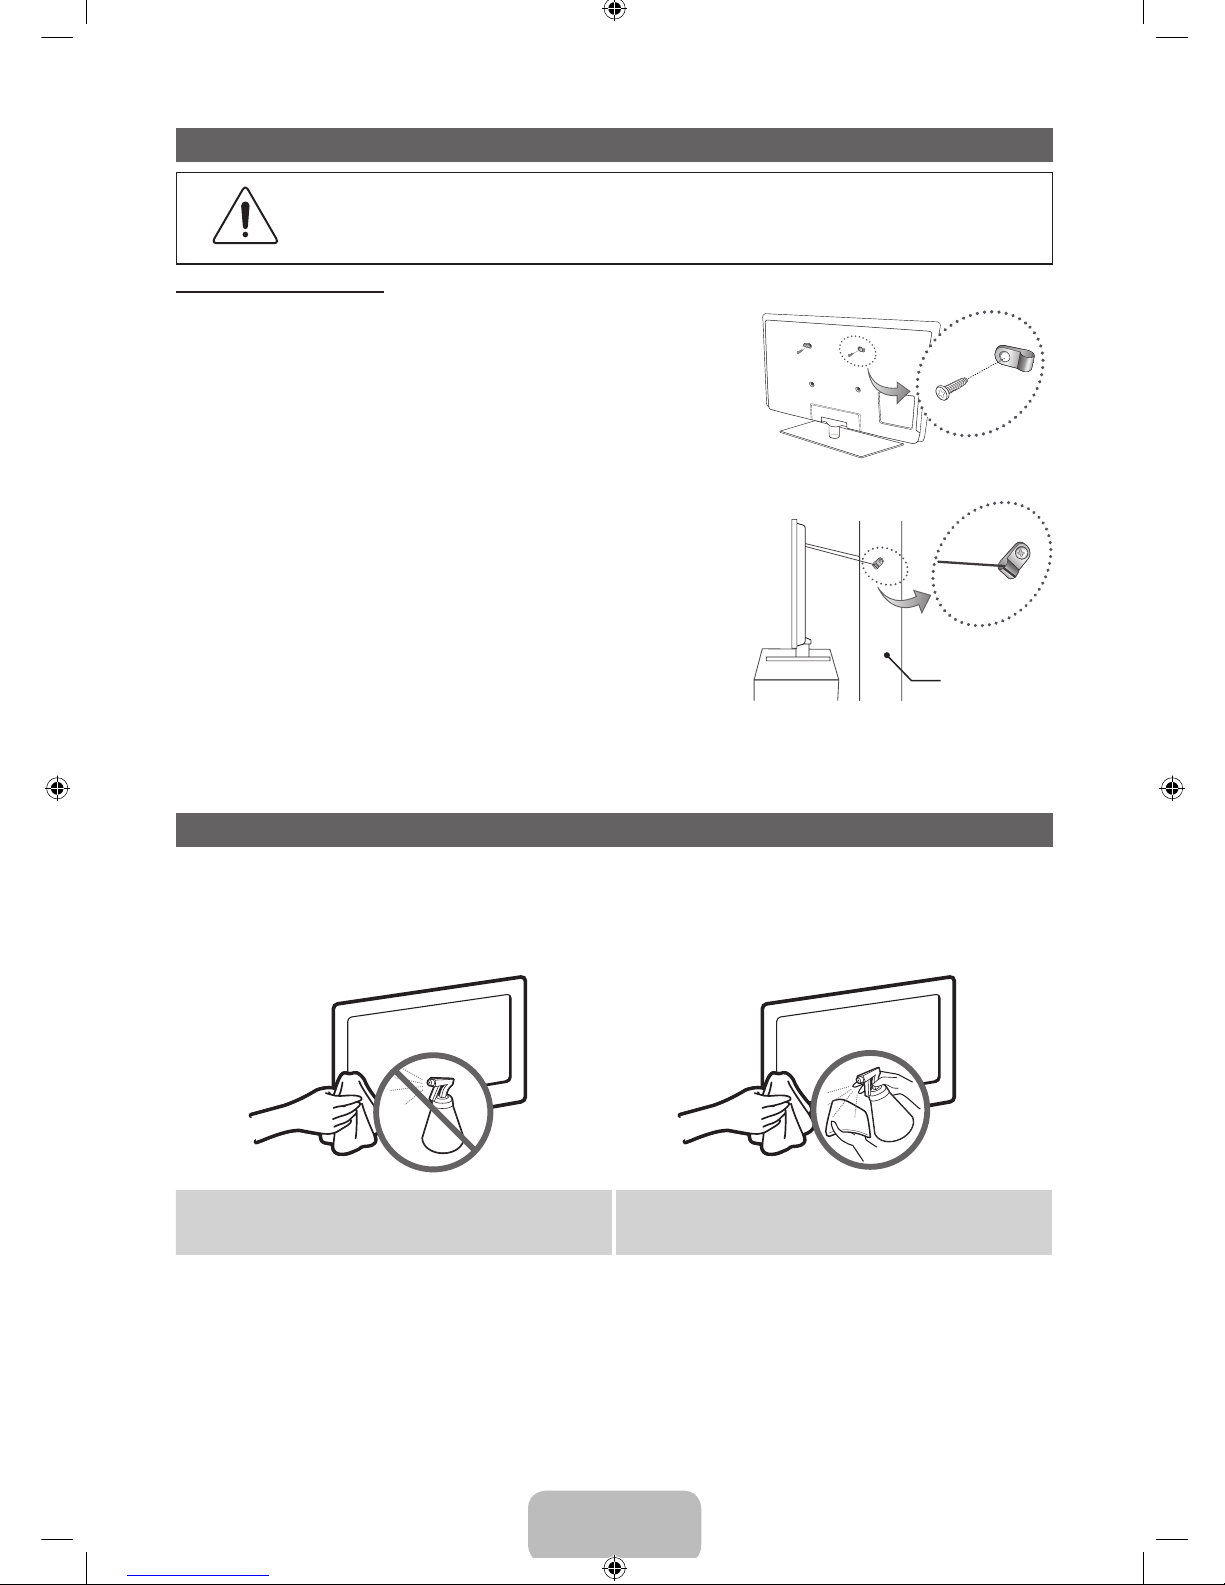
Securing the TV to the Wall
Caution: Pulling, pushing, or climbing on the TV may cause the TV to fall. In particular, ensure your
children do not hang over or destabilize the TV; doing so may cause the TV to tip over, resulting serious
injuries or death. Follow all safety precautions provided on the included Safety Flyer. For added stability,
install the anti-fall device for safety purposes, as follows.
To Avoid the TV from Falling
1. Put the screws into the clamps and firmly fasten them onto the wall. Confirm
that the screws have been firmly installed onto the wall.
✎
You may need additional material such as an anchor depending on the
type of wall.
✎
Since the necessary clamps, screws, and string are not supplied,
please purchase these additionally.
2. Remove the screws from the back center of the TV, put the screws into the
clamps, and then fasten the screws onto the TV again.
✎
Screws may not be supplied with the product. In this case, please
purchase the screws of the following specifications.
✎
Screw Specifications
•
For a 43 ~ 51 inch PDP TV: M8
3 Connect the clamps fixed onto the TV and the clamps fixed onto the wall
with a strong cable and then tie the string tightly.
✎
NOTE
•
Install the TV near to the wall so that it does not fall backwards.
•
It is safe to connect the string so that the clamps fixed on the wall
are equal to or lower than the clamps fixed on the TV.
•
Untie the string before moving the TV.
4 Verify all connections are properly secured. Periodically check connections for any sign of fatigue for failure. If you have any
doubt about the security of your connections, contact a professional installer.
Storage and Maintenance
✎
If you attached some stickers on the TV screen, it remains some debris after removing the sticker. Please clean it to
watch TV.
✎
The exterior and screen of the product can get scratched during cleaning. Be sure to wipe the exterior and screen
carefully using the cloth provided or a soft cloth to prevent scratches.
Do not spray water directly onto the product. Any liquid that
goes into the product may cause a failure, fire, or electric
shock.
Clean the product with a soft cloth dampened with a
small amount of water. Do not use a flammable liquid (e.g.
benzene, thinners) or a cleaning agent.
wall
[PD490-ZS]BN68-04070B.indb 16 2012-01-30 �� 2:07:10
Page 17
English - 17
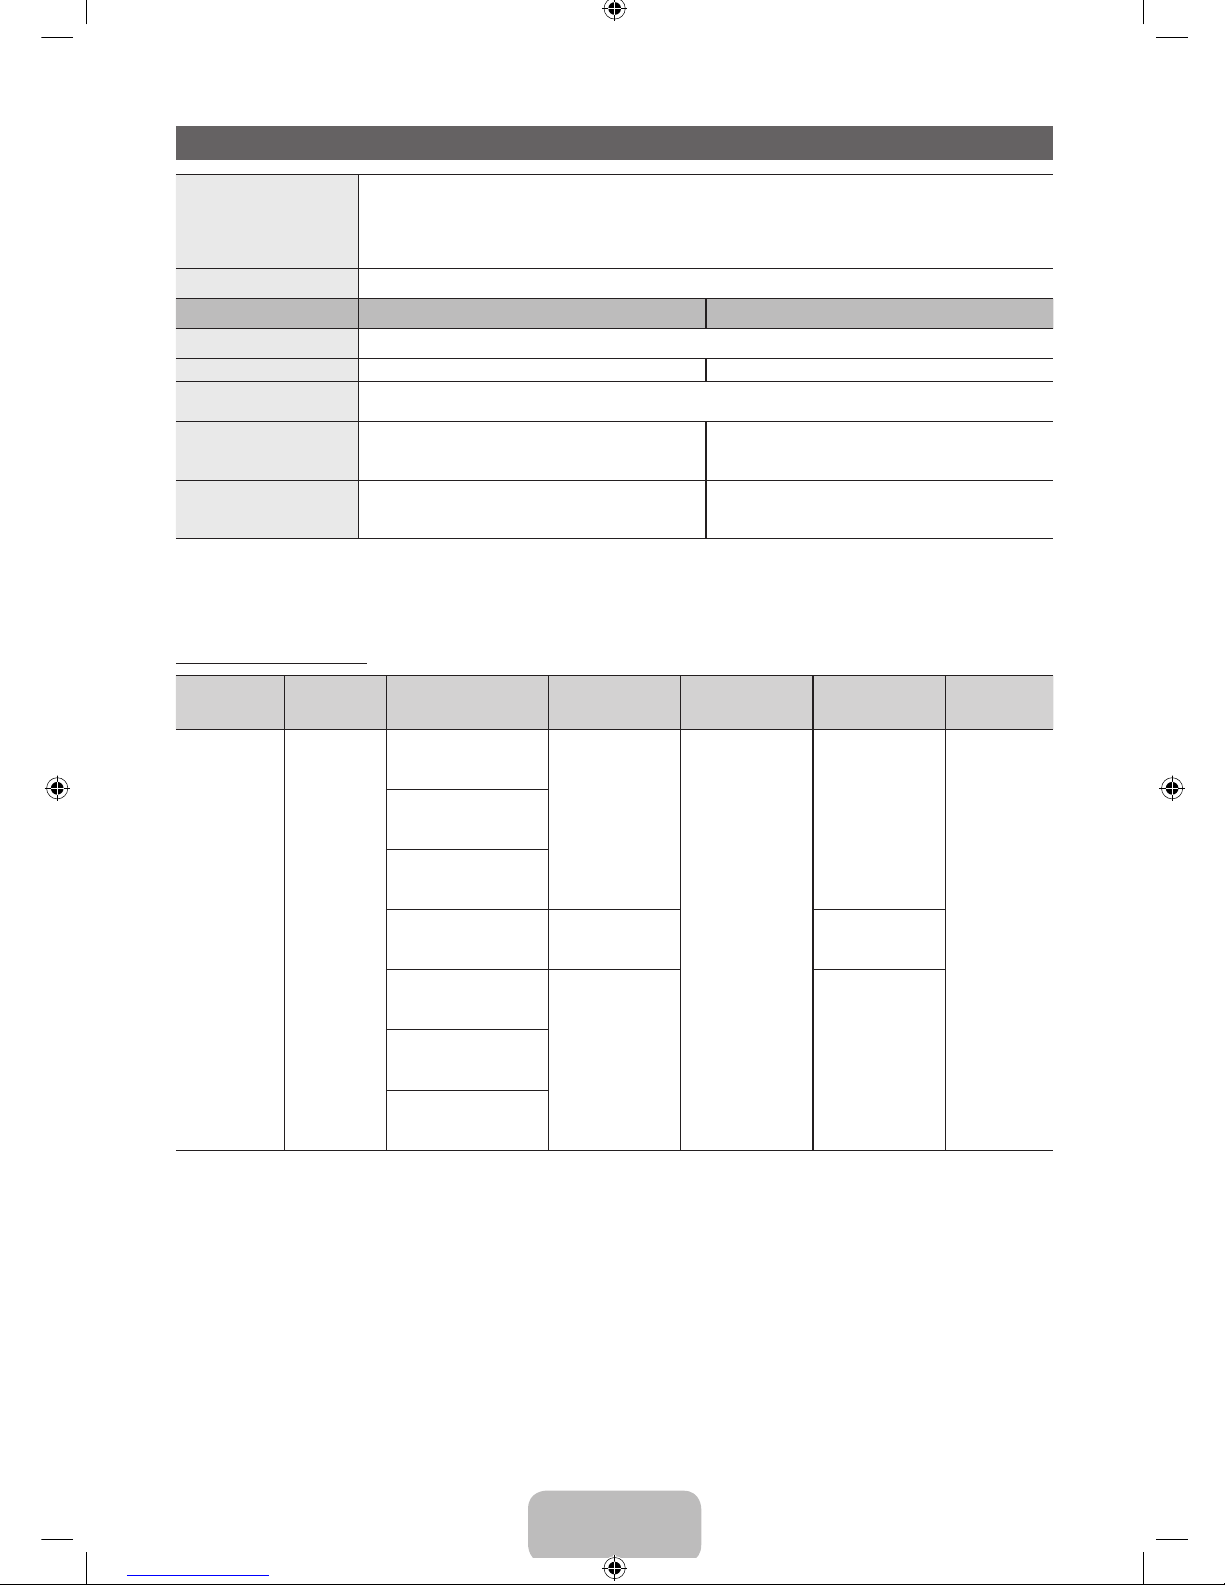
Specifications
Environmental Considerations
Operating Temperature
Operating Humidity
Storage Temperature
Storage Humidity
50°F to 104°F (10°C to 40°C)
10% to 80%, non-condensing
-4°F to 113°F (-20°C to 45°C)
5% to 95%, non-condensing
Stand Swivel (Left / Right) -20˚ ~ 20˚
Model Name PL43E490 PL51E490
Display Resolution 1024 x 768
Screen Size 43 inches 51 inches
Sound
(Output) 10 W x 2
Dimensions (WxDxH)
Body
With stand
1011.8 X 56.0 X 622.4 mm
1011.8 X 305.0 X 697.7 mm
1187.8 X 56.0 X 706.6 mm
1187.8 X 305.0 X 782.9 mm
Weight
Without Stand
With Stand
14.2 kg
18.2 kg
19.6 kg
23.6 kg
✎
Design and specifications are subject to change without prior notice.
✎
For information about power supply, and more about power consumption, refer to the label attached to the product.
Supported Video Formats
File Extention Container Video Codec Resolution Frame rate (fps) Bit rate (Mbps) Audio Codec
*.avi
*.mkv
*.asf
*.wmv
*.mp4
*.3gp
*.vro
*.mpg
*.mpeg
*.ts
*.tp
*.trp
*.m2ts
*.mts
*.divx
AVI
MKV
ASF
MP4
3GP
VRO
VOB
PS
TS
DivX 3.11/4.x/5.x/6.1
1920 x 1080
6~30
30
AC3
LPCM
ADMPCM
(IMA, MS)
AAC
HE-AAC
WMA
DD+
MPEG(MP3)
DTS Core
MPEG4 SP/ASP
H.264 BP/MP/HP
Motion JPEG 640 x 480 8
Window Media Video v9
1920 x 1080 30MPEG2
MPEG1
[PD490-ZS]BN68-04070B.indb 17 2012-01-30 �� 2:07:10
Page 18
Español - 2
Para obtener más información sobre cómo ver el e-Manual (P. 12)
Las figuras e ilustraciones de este Manual del usuario se ofrecen como referencia solamente y pueden ser distintas del
aspecto real del producto. El diseño y las especificaciones del producto están sujetos a cambios sin previo aviso.
Información importante para el usuario
• Retención de imágenes en la pantalla
No deje imágenes fijas (como las de los videojuegos) en el panel de la pantalla de plasma durante varios minutos. Las imágenes fijas pueden causar
retenciones de imágenes (desgaste). Para evitar que se produzca esa persistencia de la imagen, reduzca el nivel de brillo y de contraste de la
pantalla cuando muestre imágenes fijas.
• Calor en la parte superior del TV de plasma
La parte superior del televisor puede calentarse tras un uso prolongado ya que el calor se disipa desde el panel a través de los orificios de ventilación
de la parte superior del aparato.
Esto es normal y no indica ningún defecto ni fallo de funcionamiento de la unidad.
No obstante, debe evitarse que los niños toquen la parte superior del televisor.
• El televisor emite una especie de ‘crujido’.
Es posible que el ‘crujido’ se produzca cuando el televisor se contrae o expande debido a un cambio en el ambiente que lo rodea, por ejemplo, en la
temperatura o humedad. Esto es normal y no constituye un defecto.
• Defectos de celda
La PDP utiliza un panel compuesto de 2.360.000 (nivel HD) a 6.221.000 (nivel FHD) píxeles que requieren una sofisticada tecnología para su
producción. No obstante, es posible que existan algunos píxeles brillantes u oscuros en la pantalla. Estos píxeles no influirán en el rendimiento del
producto.
• Evite que el televisor funcione a temperaturas por debajo de 41°F (5°C)
• La imagen fija visualizada durante demasiado tiempo puede causar daños permanentes en el panel de la PDP.
Ver el televisor de plasma en formato 4:3 durante un tiempo prolongado puede dejar rastros de bordes en la izquierda, derecha,
arriba o abajo de la pantalla. Reproducir un DVD o el uso de una consola pueden tener el mismo efecto.
La garantía no cubre los daños causados por dichos efectos.
• Imágenes fantasma en la pantalla.
Visualizar imágenes fijas de videojuegos y computadora por un período superior al determinado puede producir imágenes fantasma parciales.
Para evitar este efecto, reduzca el brillo y el contraste cuando visualice imágenes fijas durante un tiempo prolongado.
• Garantía
La garantía no cubre ningún daño causado por la retención de imágenes.
La garantía no cubre el desgaste de la pantalla.
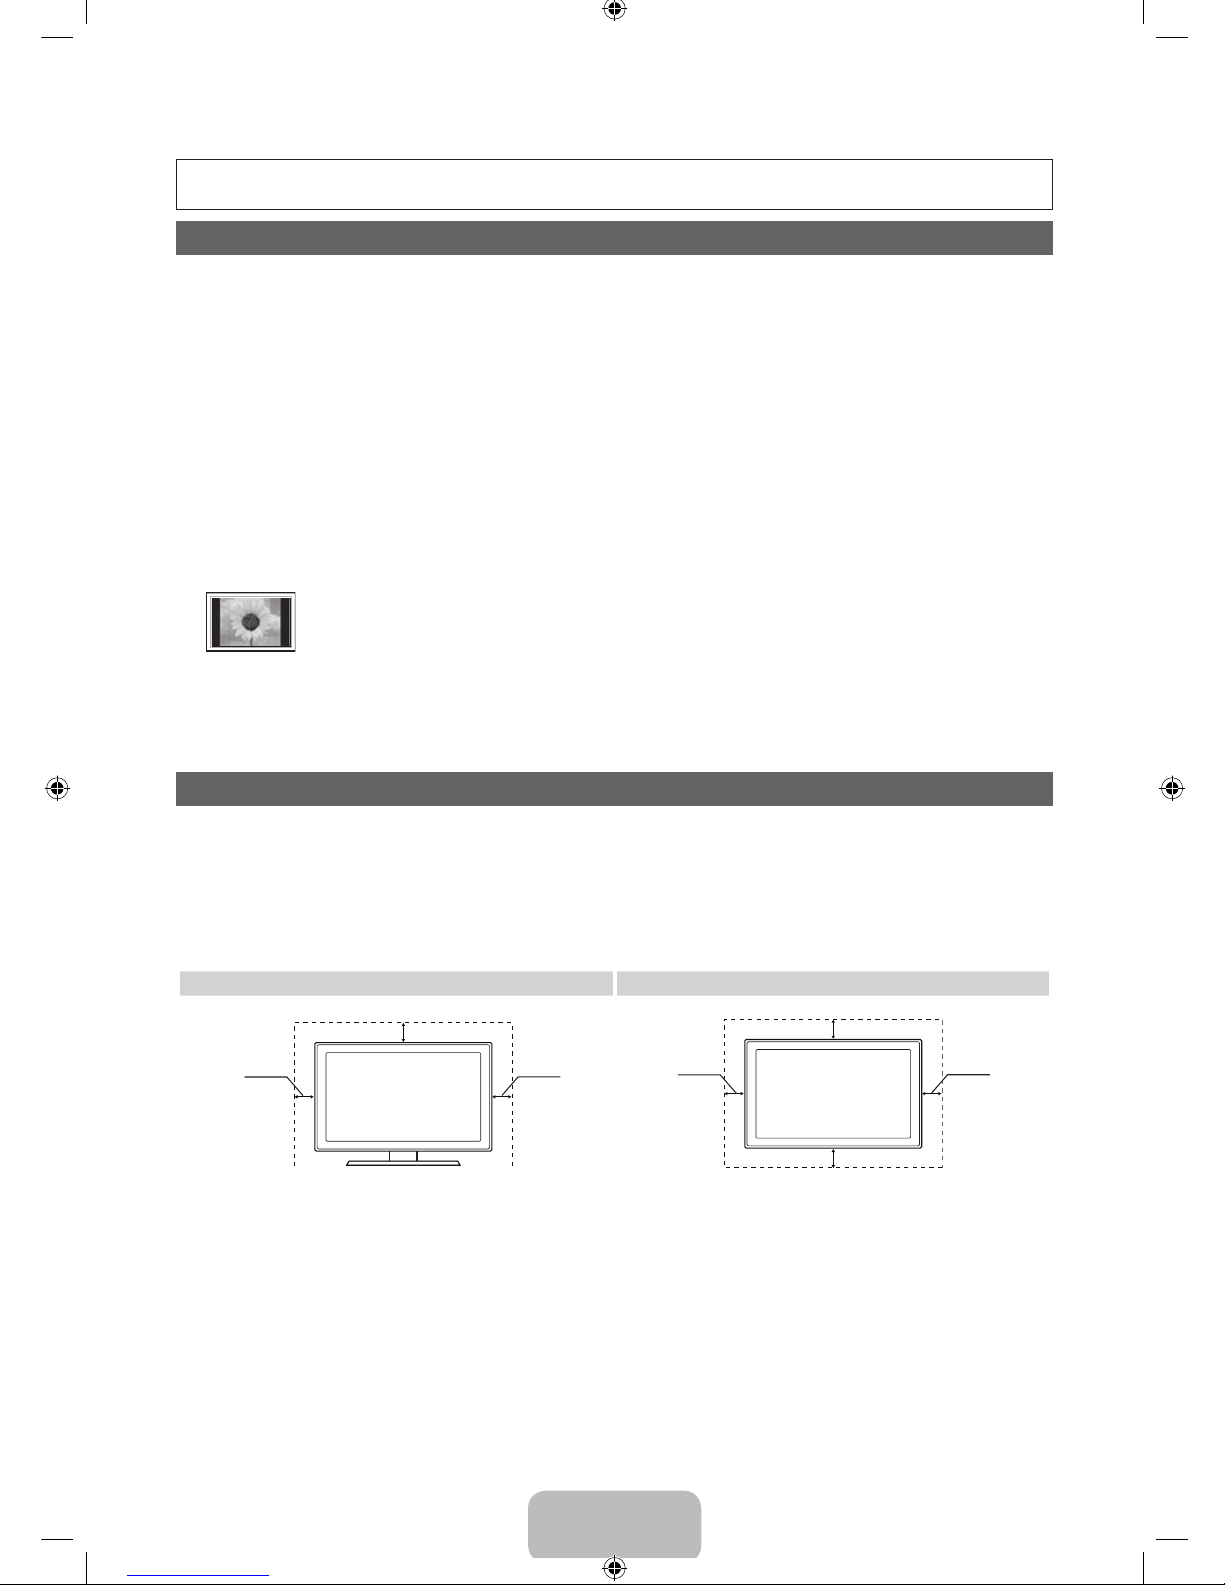
Seguridad en el espacio de instalación
Mantenga las distancias requeridas entre el producto y otros objetos (por ejemplo, paredes) para asegurar la ventilación adecuada.
En caso contrario, podría producirse un incendio o podría surgir un problema en el producto, debido a un incremento en la temperatura interna del
producto.
✎
Cuando utiliza un soporte o un montaje de pared, utilice únicamente las piezas proporcionadas por Samsung Electronics.
• Si utiliza piezas proporcionadas por otro fabricante, podría tener problemas con el producto o sufrir una lesión debido a la caída del producto.
✎
El aspecto puede variar según el producto.
✎
Tenga cuidado cuando conecte el televisor debido a que algunas partes pueden estar algo calientes.
Instalación con un soporte. Instalación con un montaje de pared.
10 centímetros
10 centímetros
10 centímetros
10 centímetros
10 centímetros
10 centímetros
10 centímetros
[PD490-ZS]BN68-04070B.indb 2 2012-01-30 �� 2:07:11
Page 19
Español - 3
Accesorios
✎
Asegúrese de que los siguientes elementos estén incluidos con su televisor. Si falta algún elemento, comuníquese con
su distribuidor.
✎
Los colores y las formas pueden variar según el modelo.
✎
Verifique que no haya ningún accesorio oculto detrás o debajo de los materiales de embalaje cuando abra la caja.
y Control remoto y pilas (AAA x 2)
y Manual del usuario
y Tarjeta de garantía / Guía de seguridad (No disponible en algunos lugares)
y Paño de limpieza
y Cable de alimentación
y Anteojos 3D
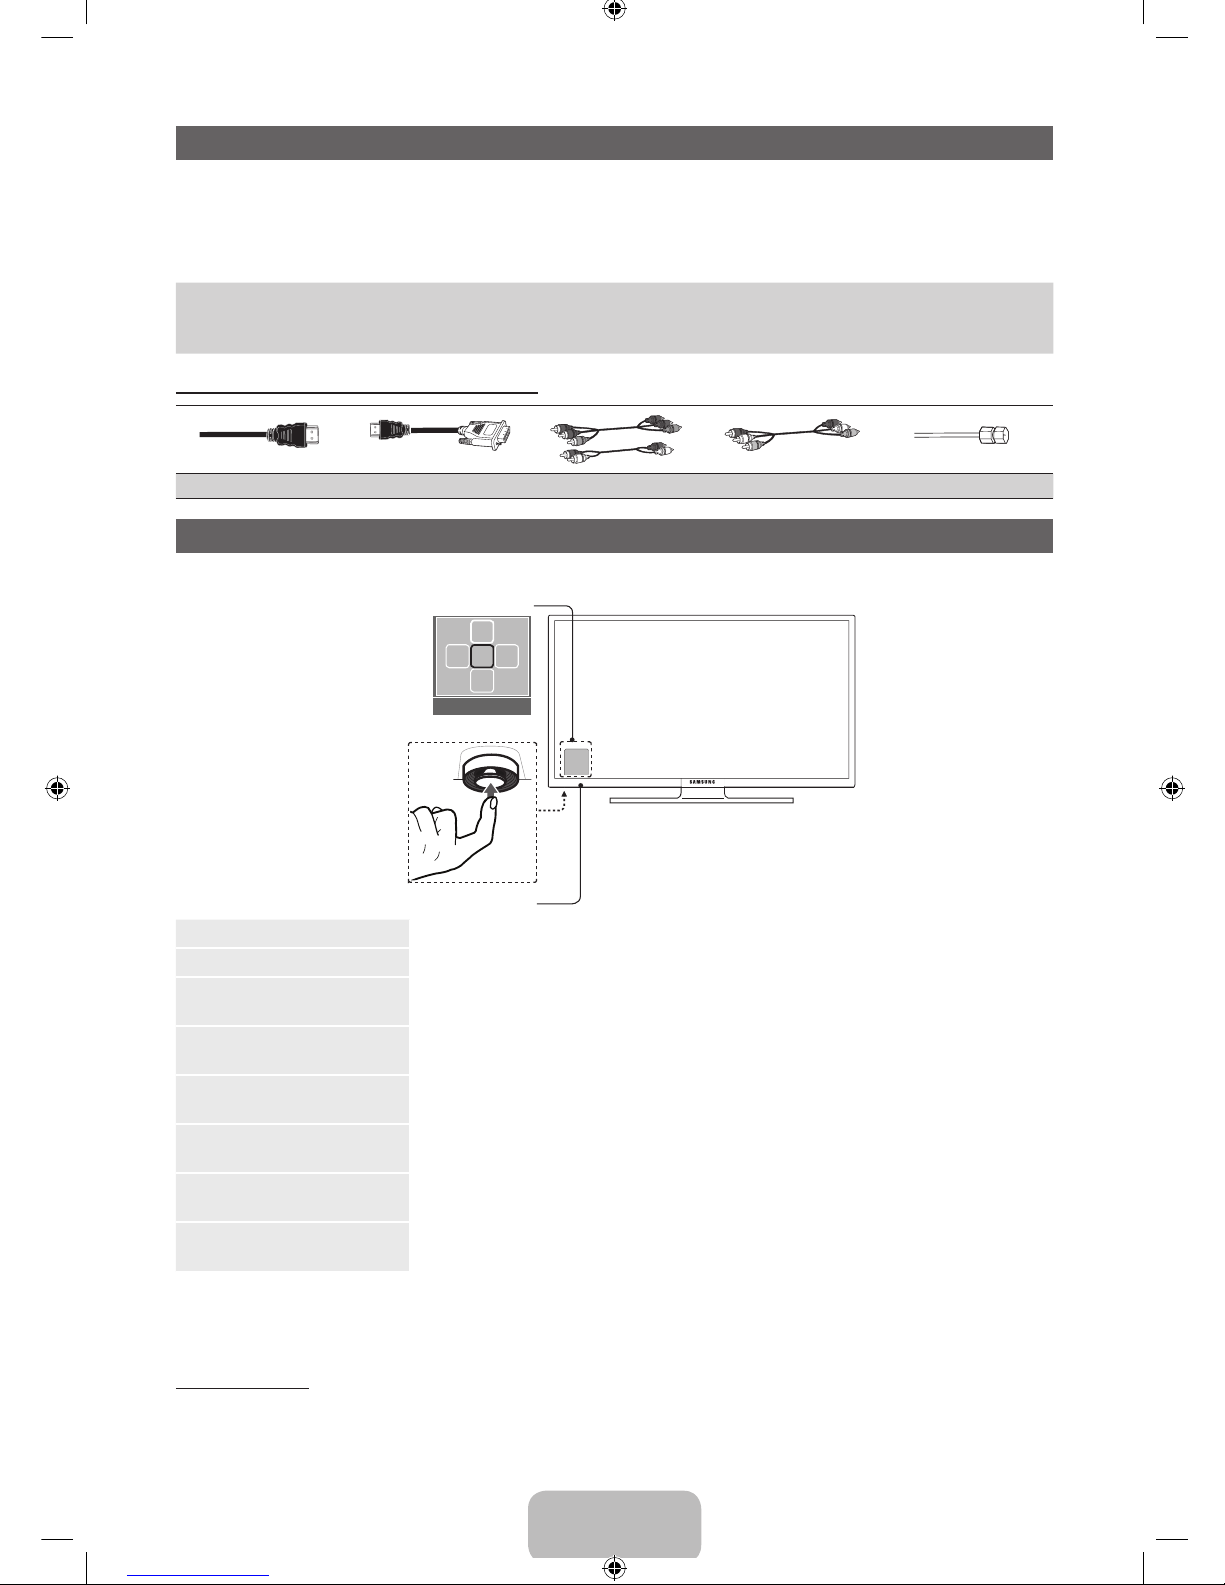
Cables de entrada (vendidos en forma separada)
HDMI HDMI-DVI Componente Cable mixto (AV) Cable coaxial (RF)
Visualización del panel de control
✎
El color y la forma del producto pueden variar según el modelo.
Encendido Enciende el televisor pulsando el controlador en modo de espera.
Ajuste del volumen Ajusta el volumen moviendo el controlador de lado a lado cuando el televisor está encendido.
Selección de un canal
Selecciona un canal moviendo el controlador hacia arriba y hacia abajo cuando el televisor está
encendido.
Uso del menú de funciones
Pulse el controlador cuando el televisor está encendido, luego aparece la pantalla del menú de
funciones. Si lo vuelve a pulsar, la pantalla del menú de funciones desaparece.
Selección del MENÚ (m)
Seleccione MENÚ(m) moviendo el controlador en la pantalla del menú de funciones. Aparece la OSD
(presentación en pantalla) de las características de su televisor.
Selección del CONTENT
Selecciona CONTENT moviendo el controlador en la pantalla del menú de funciones. Aparece la
pantalla principal Inicio de contenido.
Selección del Origen (s)
Selecciona Origen(s) moviendo el controlador en la pantalla del menú de funciones. Aparece la
pantalla Origen.
Apagar (P)
Seleccione Apagar (P) para apagar el televisor moviendo el controlador en la pantalla del menú de
funciones.
✎
Sale del menú cuando pulsa el controlador más de 1 segundo.
✎
Al seleccionar la función moviendo el controlador en la dirección arriba/abajo/izquierda/derecha, no se debe presionar
el controlador. Si lo presiona antes, no estará operativo para moverlo hacia arriba/abajo/izquierda/derecha.
Modo suspensión
Su televisor ingresa en el modo Suspensión cuando lo apaga y continúa consumiendo una pequeña cantidad de energía
eléctrica. Por motivos de seguridad y para disminuir el consumo de energía, no deje su televisor en modo Suspensión durante
períodos prolongados (cuando se va de vacaciones, por ejemplo). Es mejor desenchufar el cable de alimentación.
Menú de funciones
Controlador del televisor
Sensor de control remoto
CONTENT
m R s
P
Regresar
[PD490-ZS]BN68-04070B.indb 3 2012-01-30 �� 2:07:12
Page 20
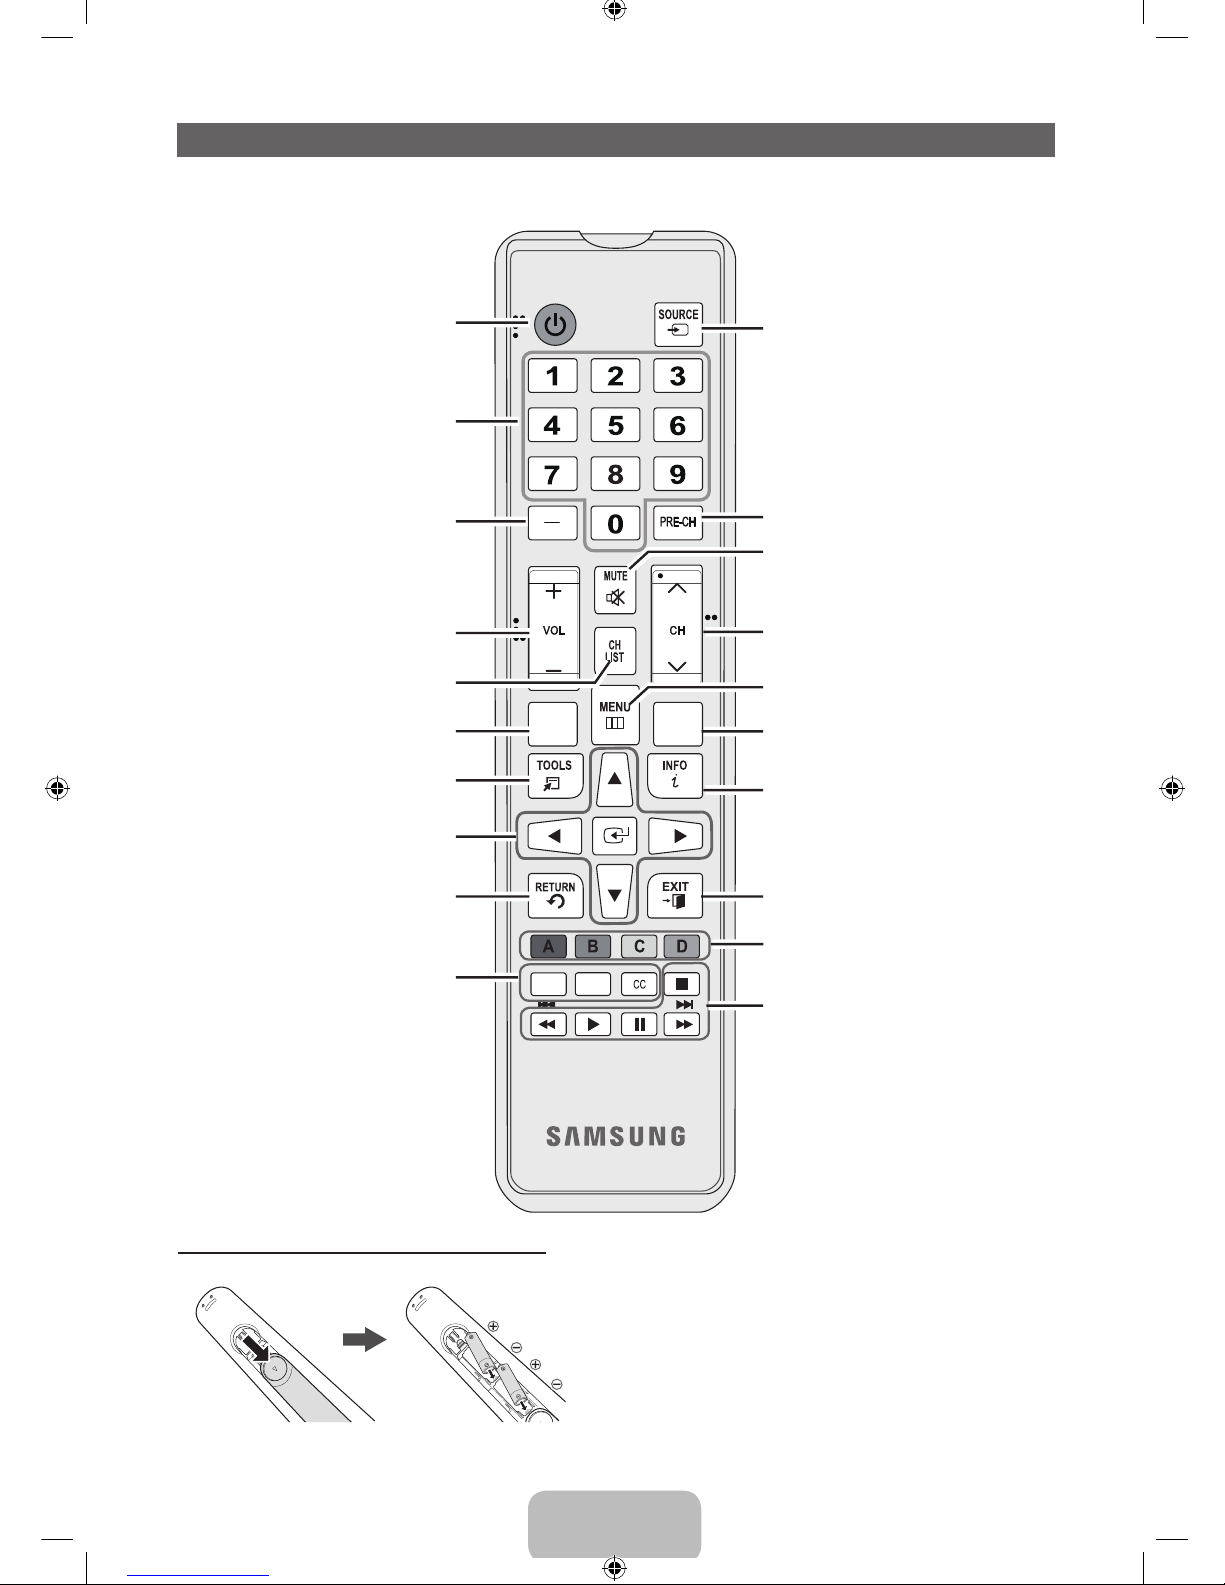
Español - 4
Botones del control remoto
✎
Este control remoto tiene puntos Braille en los botones de encendido, de canales y de volumen, y puede ser utilizado
por personas con discapacidades visuales.
Instalación de las pilas (tamaño de las pilas: AAA)
✎
NOTA
x
Utilice el control remoto a menos de 7 metros (23 pies) del
televisor.
x
La luz brillante puede afectar el funcionamiento del
control remoto. Evite utilizarlo cuando esté cerca de luces
fluorescentes especiales o carteles de neón.
x
El color y la forma pueden variar según el modelo.
Pulse este botón para seleccionar
canales adicionales (digitales) emitidos
por la misma emisora. Por ejemplo,
para seleccionar el canal ‘54.3’, pulse
‘54’, luego pulse ‘-’ y ‘3’.
Volver al canal anterior.
Pulse para acceder directamente a los
canales.
Enciende y apaga el televisor.
Utilice estos botones en una función
específica.
E-MANUAL: Muestra el e-Manual.
3D: Enciende y apaga la imagen 3D.
CC: Controla el decodificador de
subtítulos digitales.
Cortar el sonido temporalmente.
Muestra la EPG (Guía electrónica de
programas).
Muestra la lista de canales en la pantalla.
Muestra la información en la pantalla del
televisor.
Selecciona rápidamente las funciones
usadas con más frecuencia.
Selecciona los elementos del menú en
pantalla y cambia los valores que se
ven en el menú.
Salir del menú.
Volver al menú anterior.
Mostrar y seleccionar las fuentes de
video disponibles.
Utilice estos botones de acuerdo con la
indicación en pantalla.
Cambiar los canales.
Muestra el menú principal en pantalla.
Ver el Inicio de contenido.
Ajusta el volumen.
E-MANUAL
GUIDE
CONTENT
X
[PD490-ZS]BN68-04070B.indb 4 2012-01-30 �� 2:07:13
Page 21
Español - 5
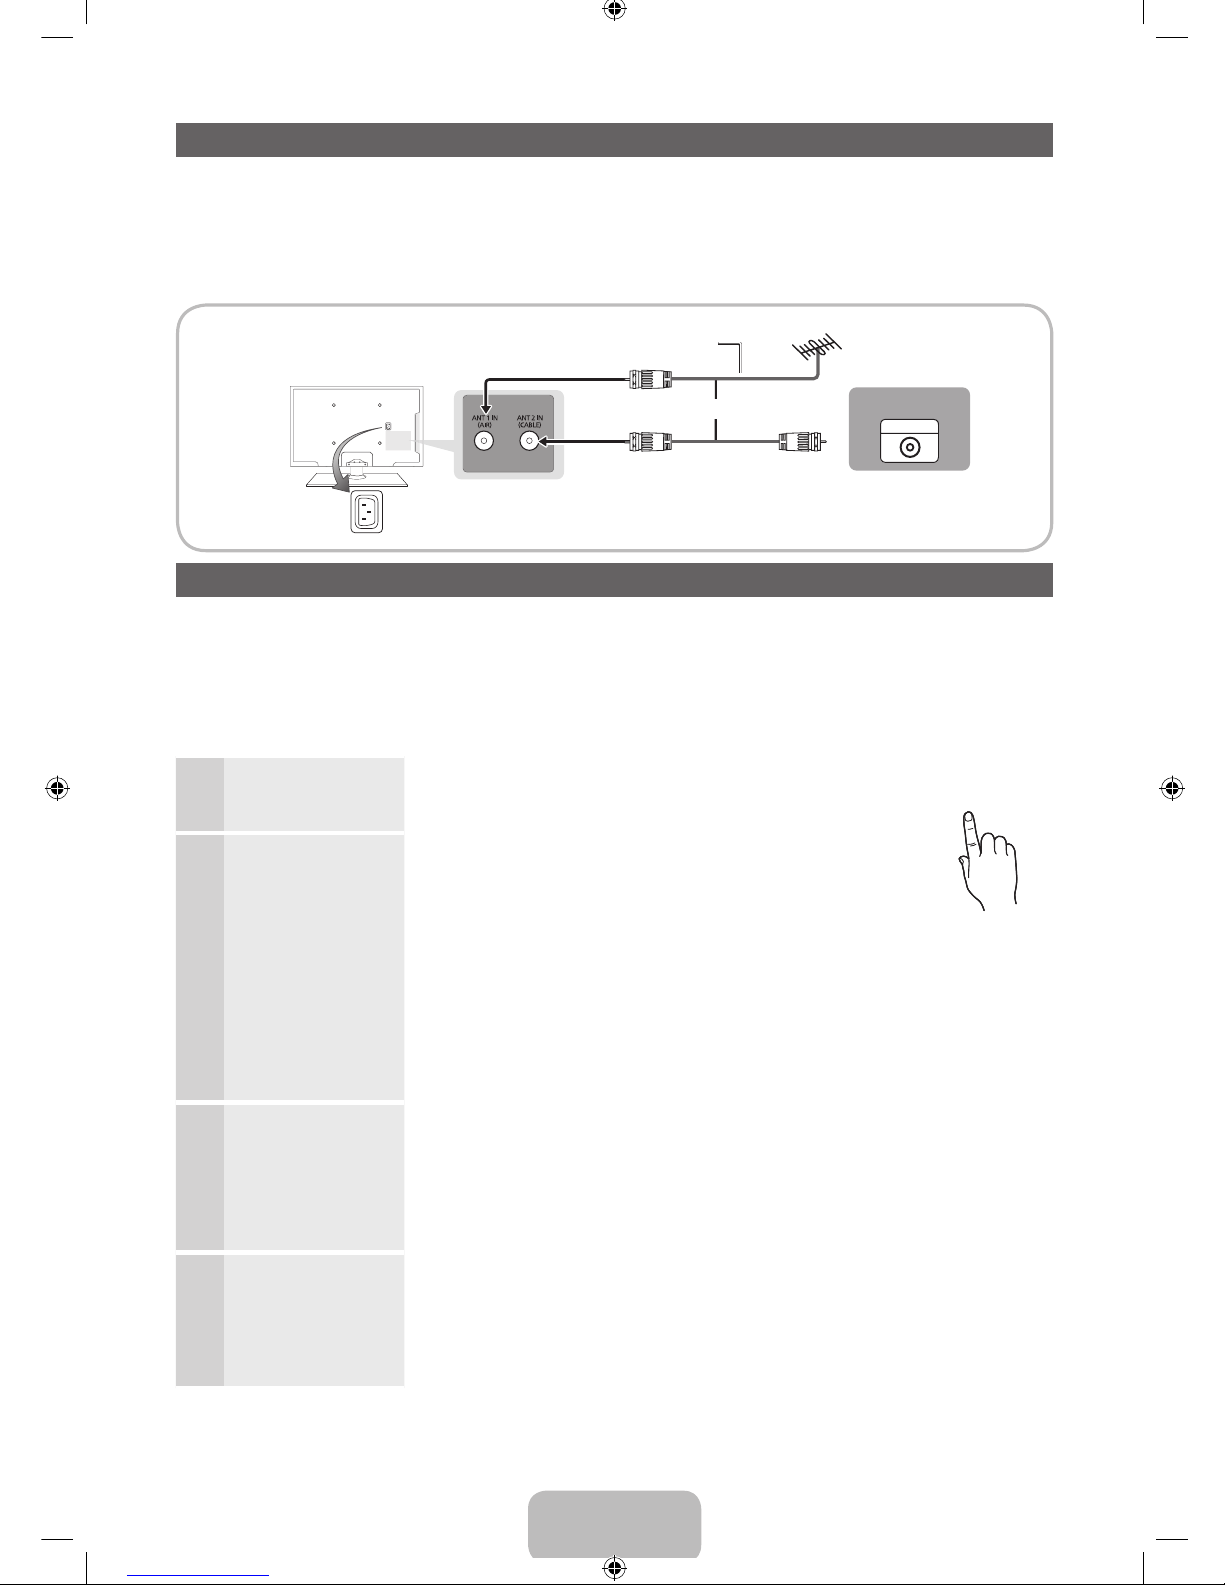
Conexión a una antena
Cuando se enciende el televisor por primera vez, los parámetros de configuración básicos se establecen automáticamente.
✎
Conexión del cable de alimentación y la antena.
✎
El dispositivo PDP puede interferir con una radio amateur o radio AM.
✎
Usar unidades portátiles y móviles emisoras/receptoras o radios amateur o AM cerca de su televisor puede hacer que
el televisor funcione incorrectamente.
Configuración (Configuración inicial)
Cuando se enciende el televisor por primera vez, una secuencia de indicaciones en pantalla le ayuda a configurar los
parámetros de configuración básicos. Pulse el botón
POWERP
. Configuración está disponible sólo cuando el Origen está
establecido como TV.
✎
Para iniciar la función Configuración, ingrese la contraseña usando el control remoto. La contraseña predeterminada
es 0-0-0-0.
✎
Para regresar al paso anterior, pulse el botón Anterior.
1
Idioma del menú:
Seleccionar un idioma
del menú
Pulse el botón ▲ o ▼, luego pulse el botón ENTERE. Seleccione el
idioma de la OSD (presentación en pantalla).
POWER
INFO
GUIDE
2
Modo de uso:
Seleccionar el modo
de uso
Pulse el botón ▲ o ▼, luego pulse el botón ENTERE.
y Seleccione el modo Uso domiciliario. El modo Demo comercio
se utiliza en entornos de comercios minoristas.
y Al pulsar el controlador del televisor, aparece la pantalla del menú
de funciones. Seleccione el botón MENU(m) y manténgalo
pulsado más de 5 segundos utilizando el controlador. El modo
Demo comercio queda configurado. Cancele el Demo comercio
seleccionando Origen(s) y manteniéndolo pulsado más de 5
segundos.
y Demo comercio es sólo para la exhibición en el comercio. Si lo
selecciona, no se podrán utilizar varias funciones. Seleccione Uso
domiciliario para mirar televisión en su casa.
3
Configuración de red:
Realizar la configuración
de red
1. Conecte el cable LAN o el adaptador de LAN inalámbrica de Samsung, seleccione
Siguiente, luego pulse el botón ENTERE.
✎
Si selecciona Omitir, debe configurar la red en Configuración de red
respectivamente. Para obtener más información, consulte “Configuración de la
red cableada / Configuración de la red inalámbrica” en el e-Manual.
2. Complete la configuración de red de la manera deseada.
4
Actualización del
software:
Actualizar el software a
la última versión
Al comprobar la versión del software si hay una versión nueva, actualice el software a la
última versión pulsando Actualizar ahora.
✎
Pulse Actualizar luego para actualizar en otro momento. Para obtener más
información, consulte “Actualización del software” en el e-Manual.
✎
Sólo puede actualizar software, cuando la Configuración de red se realizó con éxito.
ANT OUT
Antena VHF/UHF
Entrada de alimentación
o
Cable
Cable de antena (no suministrado)
[PD490-ZS]BN68-04070B.indb 5 2012-01-30 �� 2:07:13
Page 22

Español - 6
5
Prog. Automática(1):
Seleccionar cómo mira
televisión
y Utilizo un cable aéreo para conectarlo al TV.: Memorizar todos los canales
disponibles usando el cable RF.
y Utilizo un decodificador.: No se necesita el Ajuste automático cuando se conecta un
televisor al receptor de satélite.
✎
Puede completar el Configuración seleccionándolo.
6
Prog. Automática
(2) : Seleccionar y
memorizar canales
Seleccione el botón Siguiente para ejecutar la Prog. Automática.
Pulse el botón ▲ o ▼ para seleccionar Aire o Cable y luego pulse el botón ENTERE.
La búsqueda de canales comenzará automáticamente.
Para obtener más información, consulte Canal → Prog. Automática.
✎
Pulse el botón ENTERE en cualquier momento para interrumpir el proceso de
memorización.
7
Reloj : Configuración
del Modo Reloj
Configure el Modo Reloj en forma automática o manual.
y Automático : Seleccione la zona horaria donde vive. (para Brasil, Chile)
y Manual : Le permite configurar la fecha y hora actual en forma automática.
8
Configuración
Completada
Pulse el botón ENTERE.
✎
Se muestra la configuración terminada.
Si desea restablecer esta función...
O
MENUm → Sistema → Configuración → ENTER
E
[PD490-ZS]BN68-04070B.indb 6 2012-01-30 �� 2:07:14
Page 23
Español - 7
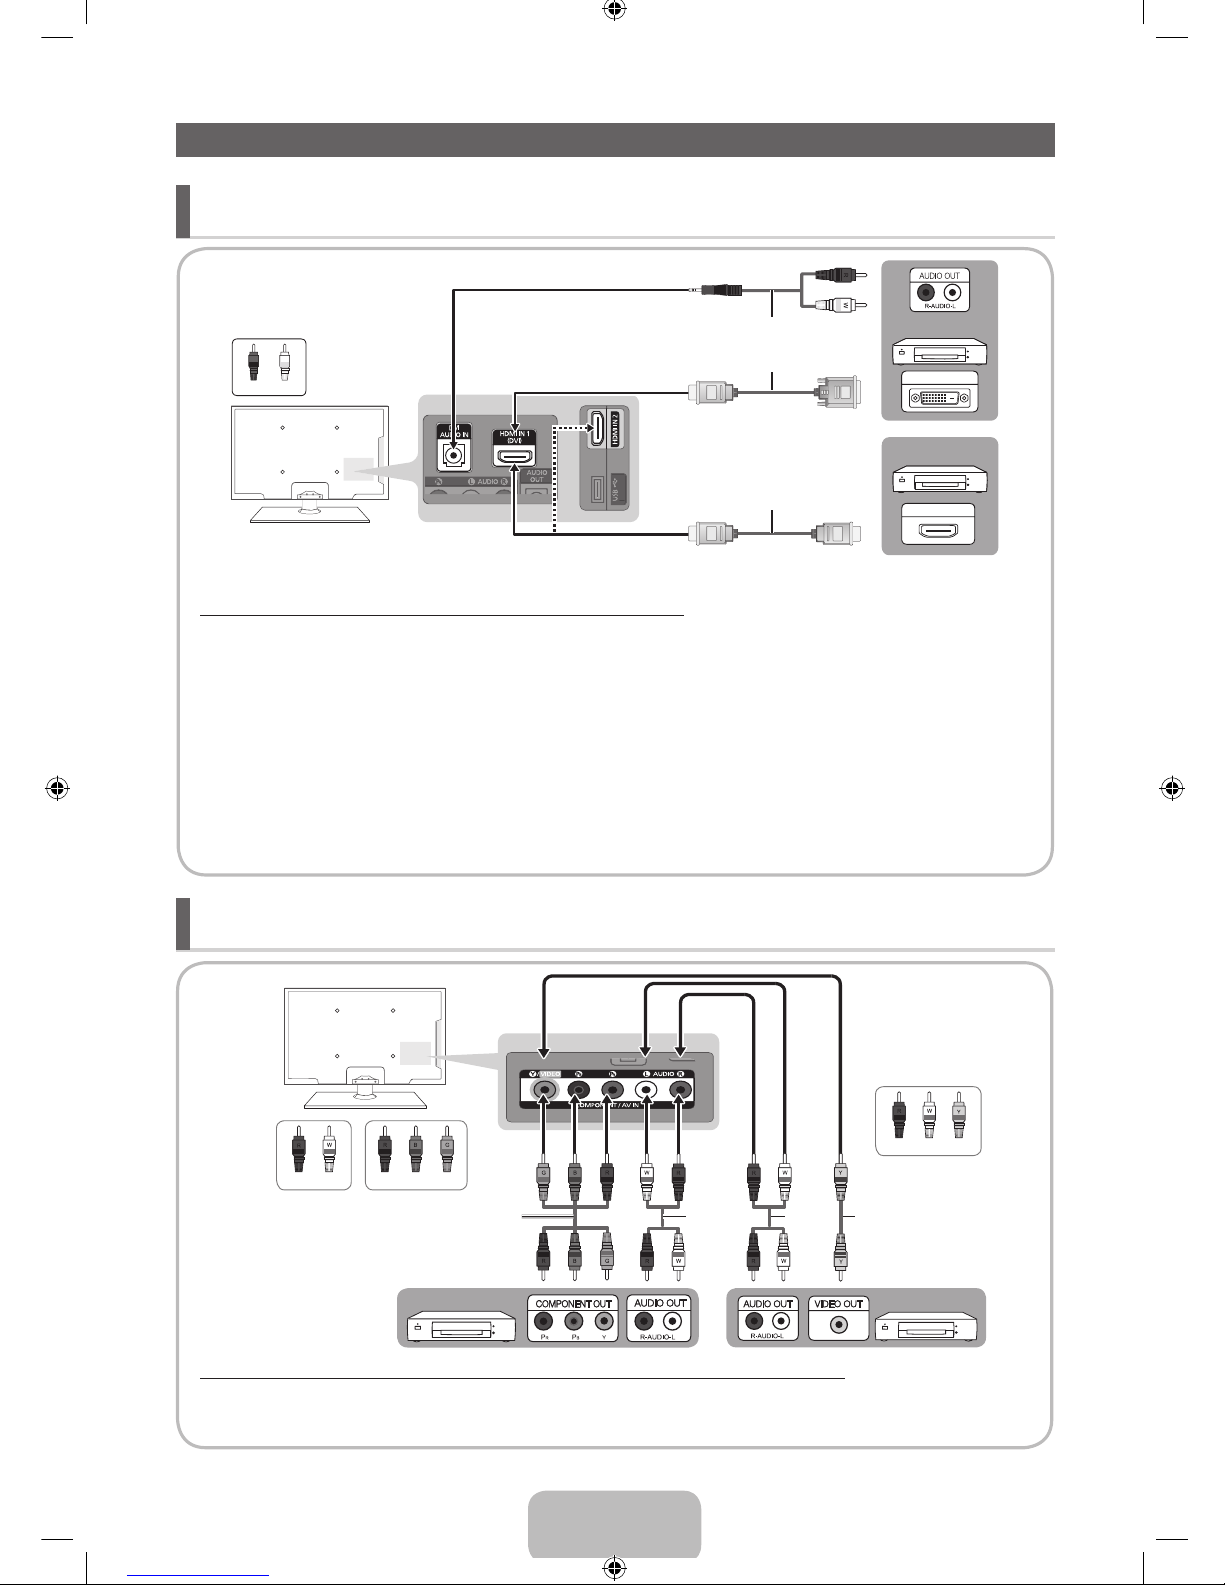
Conexión a un dispositivo AV
¦ Dispositivos disponibles: DVD, reproductor de Blu-ray, receptor de cable HD, receptor de
satélite HD STB (Set-Top-Box)
Uso de un cable HDMI o HDMI a DVI: Conexión HD (hasta 1080p)
✎
HDMI IN 1(DVI), 2 / DVI AUDIO IN
x
Si se conecta un cable HDMI a DVI al puerto HDMI IN 1(DVI), el audio no funciona.
x
Es posible que la imagen no se visualice normalmente (si se visualiza) o que el audio no funcione si se conecta
al televisor un dispositivo externo que utiliza una versión más antigua del modo HDMI. En este caso caso,
póngase en contacto con el fabricante del dispositivo externo para confirmar la versión HDMI y, si está
desactualizada, solicitar una actualización.
x
Asegúrese de comprar un cable HDMI certificado. De lo contrario, la imagen puede no aparecer o puede
producirse un error de conexión.
x
Se recomienda usar un cable HDMI básico de alta velocidad o un cable HDMI con Ethernet. Este producto no
admite la función Ethernet a través de HDMI.
¦ Dispositivos disponibles: reproductor de DVD, reproductor de Blu-ray, receptor de cable,
receptor de satélite STB, VCR.
Uso de un cable de componentes (hasta 1080p) o un cable de audio a video (sólo 480i)
✎
Cuando se conecta a AV IN, el color de la entrada AV IN [Y/VIDEO] (verde) no coincide con el cable de video (amarillo).
✎
Para una mejor calidad de imagen, se recomienda la conexión de componentes antes que la conexión A/V.
Dispositivo
Dispositivo
Rojo
Rojo
Blanco
Blanco Amarillo
Rojo Azul Verde
Cable de audio
(no suministrado)
Cable de audio
(no suministrado)
Cable de video
(no suministrado)
Cable de componente
(no suministrado)
WR
HDMI OUT
DVI OUT
9$
9$
Dispositivo
Dispositivo
BlancoRojo
Cable de audio (no suministrado)
Cable HDMI (no suministrado)
Cable HDMI a DVI (no suministrado)
[PD490-ZS]BN68-04070B.indb 7 2012-01-30 �� 2:07:15
Page 24
Español - 8
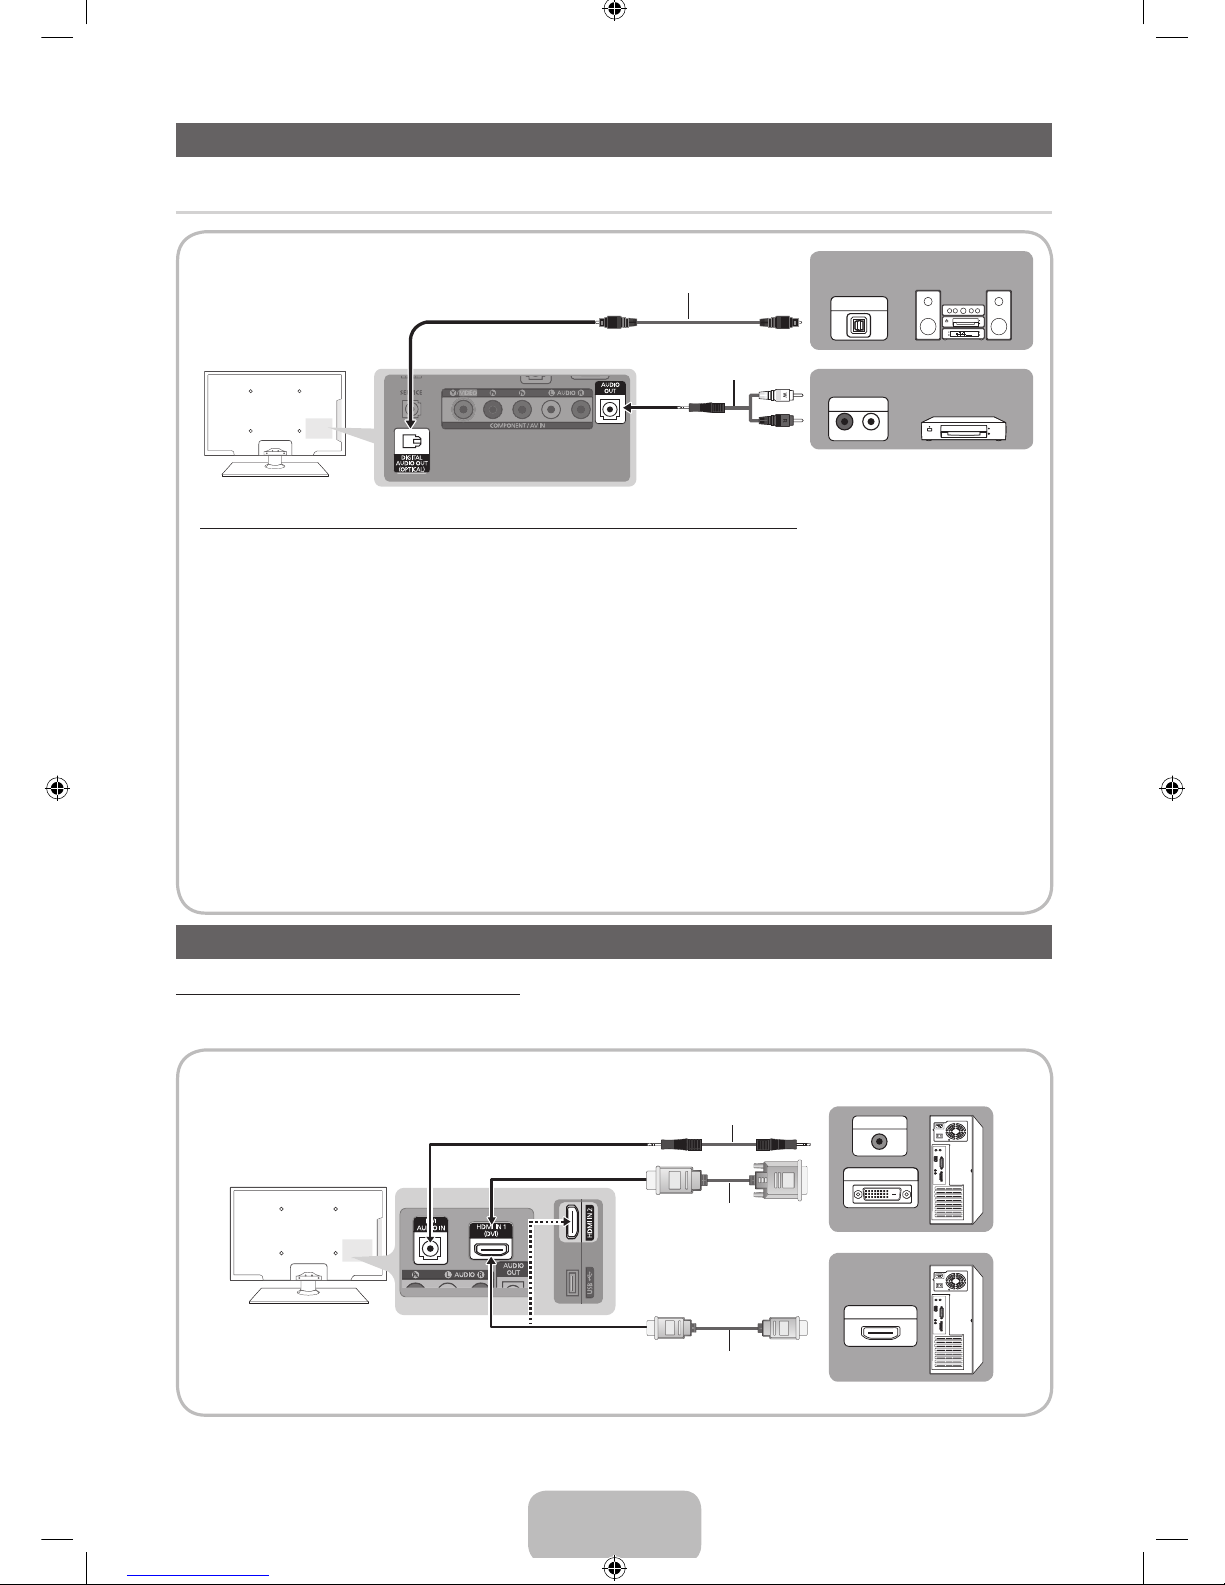
Conexión a un dispositivo de audio
¦ Dispositivos disponibles: sistema de audio digital, amplificador, DVD home theater
Uso de una conexión de cable óptico (digital) o de un cable de audio (analógico)
✎
DIGITAL AUDIO OUT (OPTICAL)
x
Cuando un sistema de audio digital se conecta a la entrada DIGITAL AUDIO OUT (OPTICAL), se reduce el
volumen del televisor y el sistema.
x
El audio de 5.1 canales está disponible cuando el televisor se conecta a un dispositivo externo que admite
audio de 5.1 canales.
x
Cuando el receptor (home theater) está encendido, se puede oír la salida de sonido de la entrada óptica del
televisor. Cuando el televisor recibe una señal DTV, envía el sonido de 5.1 canales al receptor de home theater.
Cuando el origen es un componente digital como un reproductor de DVD / reproductor de Blu-ray / receptor
de cable / receptor de satélite STB (Set-Top-Box) y está conectada al televisor a través de HDMI, sólo se oye
el sonido de 2 canales del receptor del home theater. Si desea oír el audio de 5.1 canales, conecte la salida de
audio digital de su DVD / reproductor de Blu-ray / receptor de cable / receptor de satélite STB directamente a
un amplificador o home theater.
✎
AUDIO OUT: Permite conectar las entradas de audio del amplificador/DVD home theater.
x
En la conexión, utilice el conector apropiado.
x
Cuando se conecta un amplificador de audio a las entradas AUDIO OUT: Reduzca el volumen del televisor y
ajuste el nivel de volumen con el control de volumen del amplificador.
Conexión a una PC
Uso de un cable HDMI o un cable HDMI a DVI:
✎
Es posible que no se admita la conexión a través del cable HDMI dependiendo de la PC.
HDMI OUT
DVI OUT
AUDIO OUT
Cable de audio (no suministrado)
Cable HDMI a DVI (no suministrado)
Cable HDMI (no suministrado)
OPTICAL
R-AUDIO-L
AUDIO IN
Cable óptico (no suministrado)
Cable de audio (no suministrado)
Sistema de audio digital
Amplificador / DVD home theater
[PD490-ZS]BN68-04070B.indb 8 2012-01-30 �� 2:07:21
Page 25
Español - 9
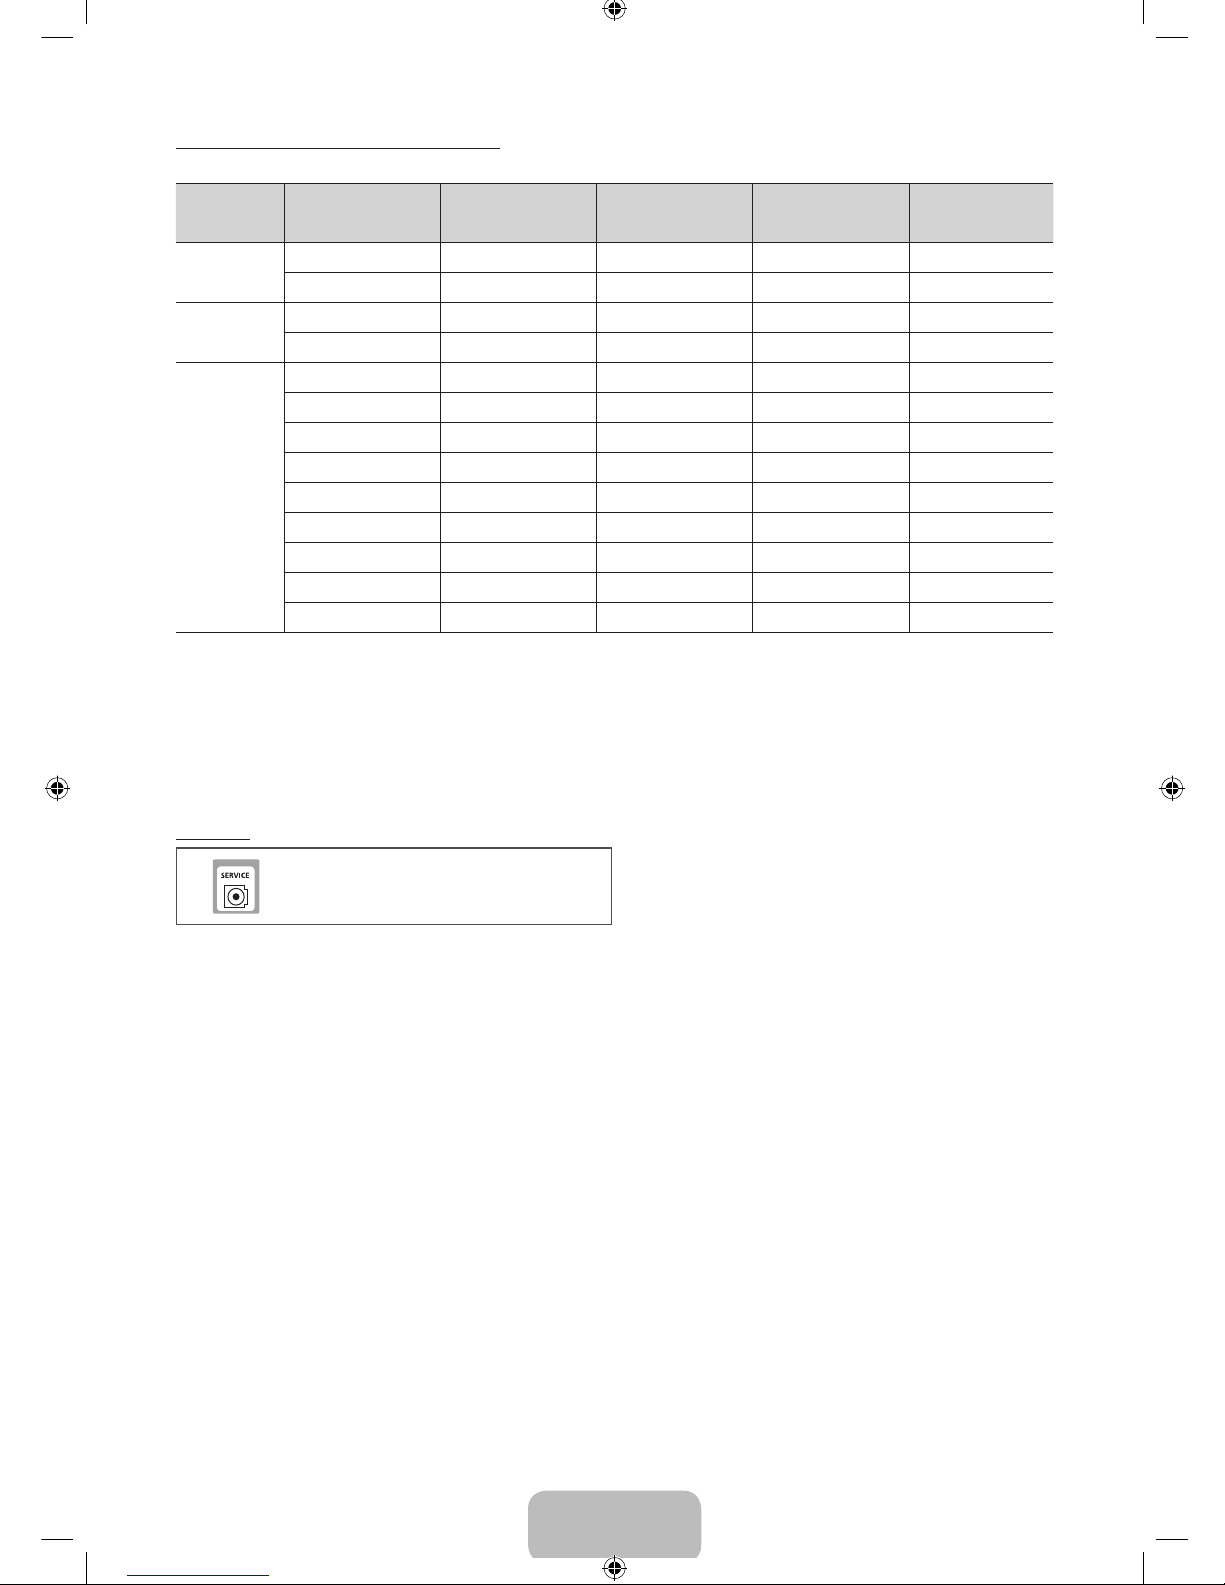
Modos de visualización (Entrada HDMI/DVI)
La resolución óptima es 1024 x 768@60Hz.
Modo Resolución
Frecuencia horizontal
(KHz)
Frecuencia vertical
(Hz)
Frecuencia de reloj de
píxeles
(MHz)
Polaridad de
sincronización
(H / V)
IBM
640 x 350 31.469 70.086 25.175 +/-
720 x 400 31.469 70.087 28.322 -/+
MAC
640 x 480 35.000 66.667 30.240 -/-
832 x 624 49.726 74.551 57.284 -/-
VESA DMT
640 x 480 31.469 59.940 25.175 -/-
640 x 480 37.861 72.809 31.500 -/-
640 x 480 37.500 75.000 31.500 -/-
800 x 600 37.879 60.317 40.000 +/+
800 x 600 48.077 72.188 50.000 +/+
800 x 600 46.875 75.000 49.500 +/+
1024 x 768
48.363 60.004 65.000 -/-
1024 x 768 56.476 70.069 75.000 -/-
1024 x 768 60.023 75.029 78.750 +/+
✎
NOTA
x
En una conexión de cable HDMI/DVI, debe utilizarse la entrada HDMI IN 1(DVI).
x
Si se conecta un cable HDMI a DVI al puerto HDMI IN 1(DVI), el audio no funciona.
x
No se admite el modo entrelazado.
x
El aparato puede funcionar incorrectamente si se selecciona un formato de video que no sea estándar.
x
No se admite la entrada PC(D-Sub).
SERVICIO
Conector para servicio solamente.
[PD490-ZS]BN68-04070B.indb 9 2012-01-30 �� 2:07:21
Page 26
Español - 1010
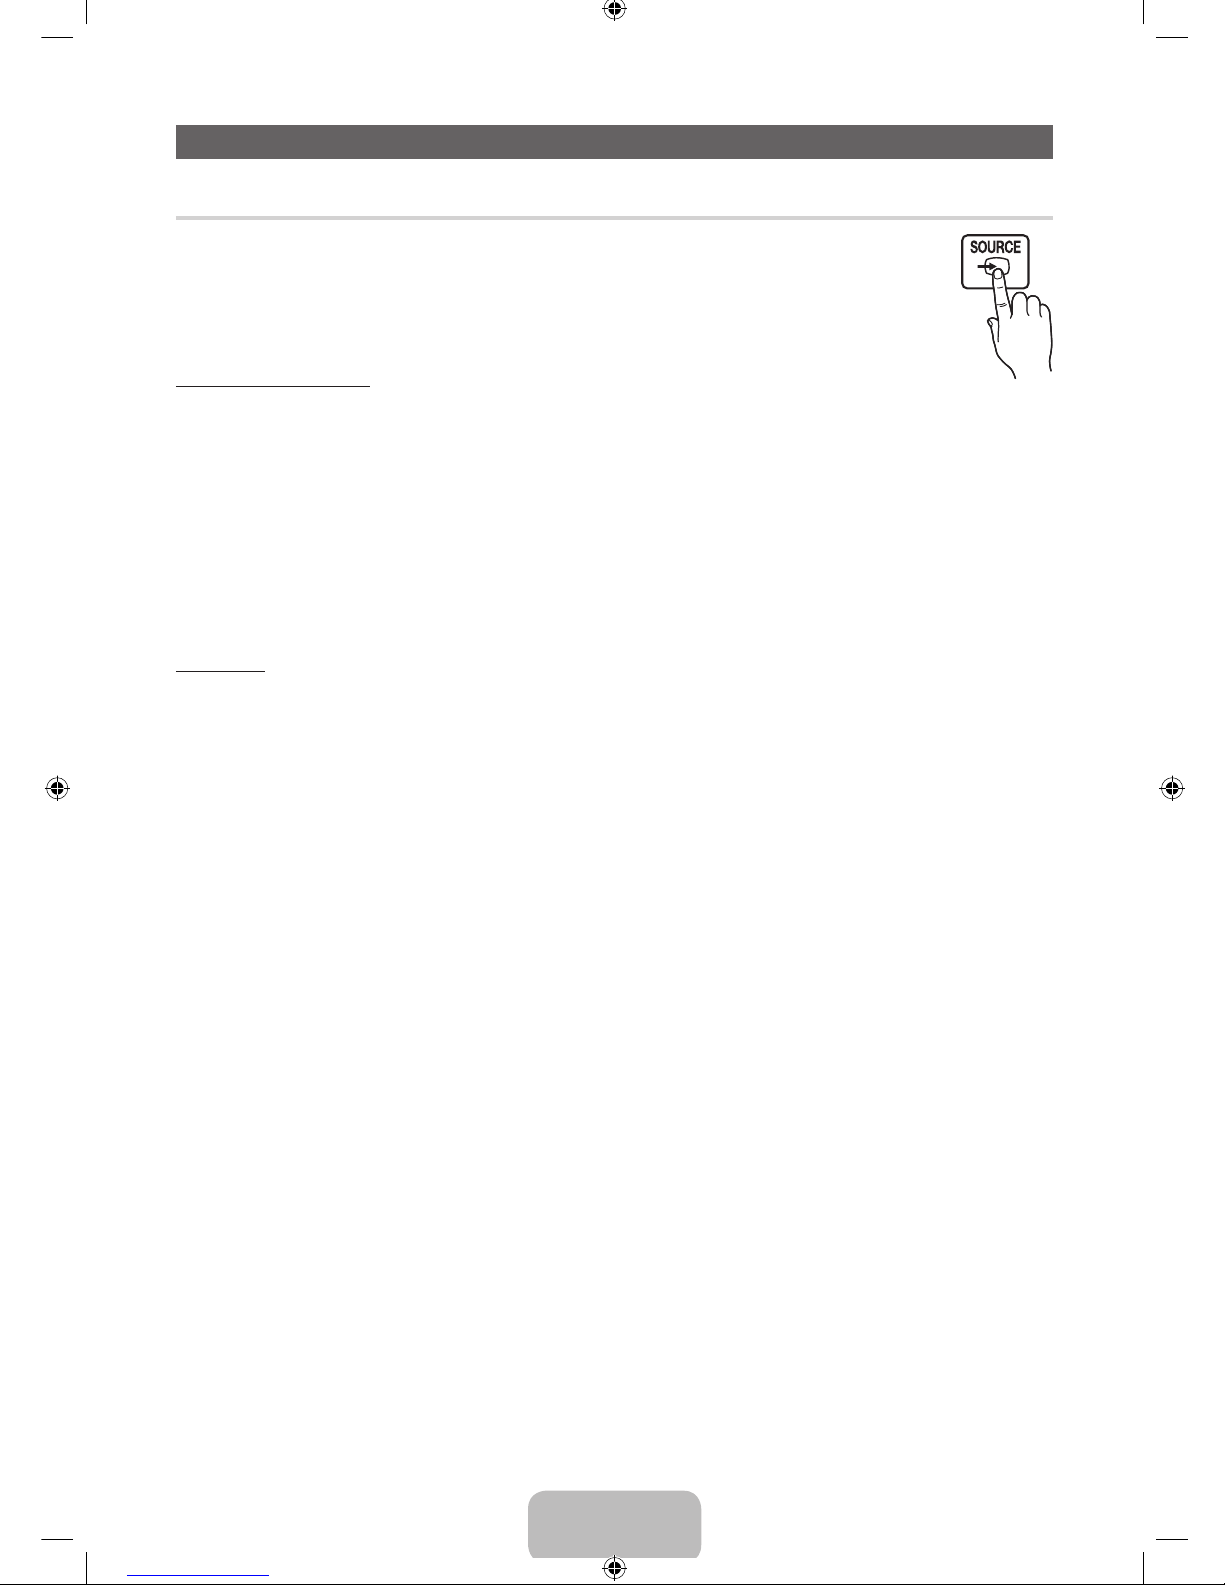
Cambiar la fuente de entrada
Origen
Se utiliza para seleccionar el televisor u otra fuente de entrada externa como DVD / reproductores de Blu-ray /
receptor de cable / receptor de satélite STB conectado al televisor.
■■ TV / HDMI1/DVI / HDMI2 / AV / Componente
✎
En Origen, se resaltan las entradas conectadas.
✎
No se admite la entrada PC(D-Sub). Si desea conectar la PC al televisor, use la entrada HDMI1/DVI.
Cómo usar Editar Nombre
En Origen, pulse el botón TOOLS, y luego podrá configurar el nombre de las fuentes de entrada externas que desee.
■ VCR / DVD / STB cable / STB satélite / STB PVR / Receptor AV / Juego / Filmadora / PC / DVI PC / Dispositivos
DVI / TV / IPTV / Blu-ray / HD DVD / DMA: Dé un nombre al dispositivo conectado a las tomas de entrada para facilitar
su elección de la fuente de entrada.
✎
Cuando conecta una PC al puerto HDMI IN 1(DVI) con un cable HDMI, debe configurar el televisor en modo PC en Editar
Nombre.
✎
Cuando conecta una PC al puerto HDMI IN 1(DVI) con un cable HDMI a DVI, debe configurar el televisor en modo DVI
PC en Editar Nombre.
✎
Cuando conecta dispositivos AV al puerto HDMI IN 1(DVI) con un cable HDMI a DVI, debe configurar el televisor en
modo Dispositivos DVI en Editar Nombre.
Información
Puede ver información detallada acerca del dispositivo externo conectado.
[PD490-ZS]BN68-04070B.indb 10 2012-01-30 �� 2:07:21
Page 27
Español - 1111
Conexión de red
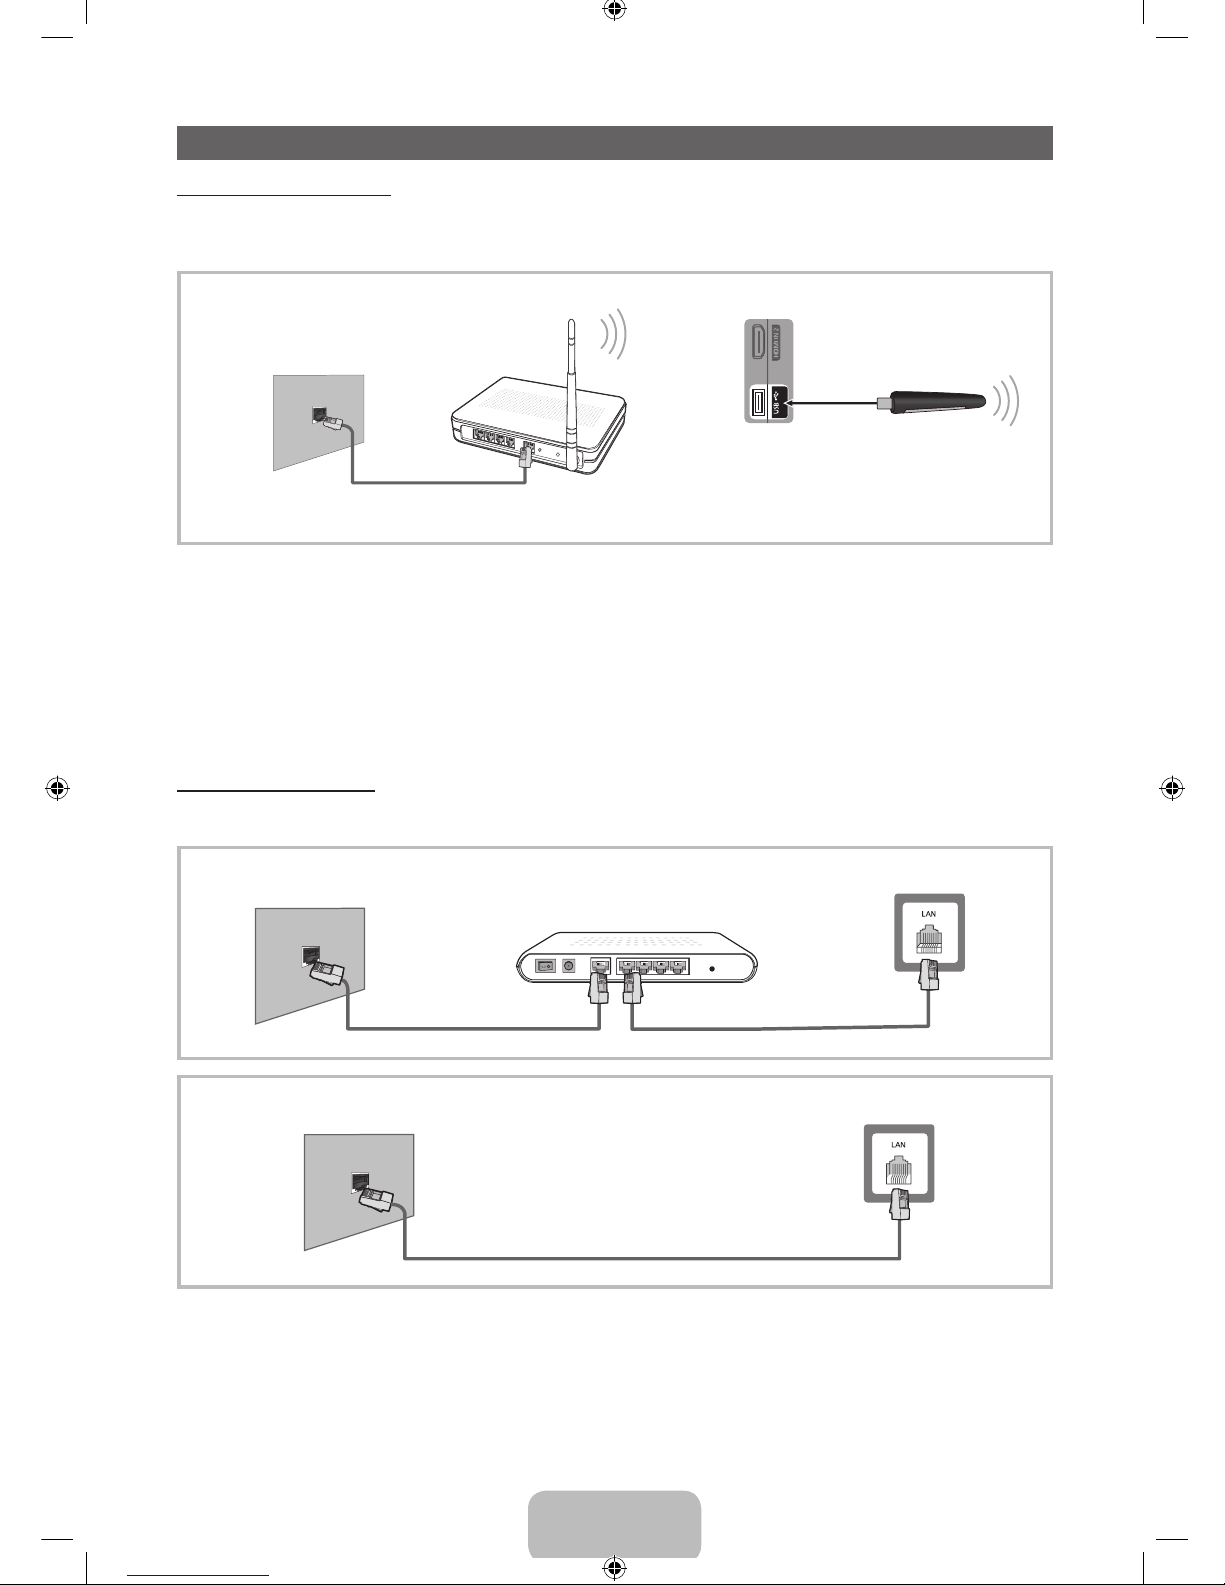
Conexión de red inalámbrica
Puede conectar el televisor a la LAN mediante un módem o enrutador inalámbrico estándar. Para conectarlo de manera
inalámbrica, primero debe conectar un “Adaptador de LAN inalámbrica de Samsung” (WIS09ABGN, WIS09ABGN2 o
WIS10ABGN - se venden por separado) al puerto USB en la parte lateral de su televisor. Vea las ilustraciones a continuación.
El adaptador de LAN inalámbrica Samsung se vende por separado y se ofrece a través de minoristas selectos, sitios de
comercio electrónico. El adaptador de LAN inalámbrica Samsung admite los protocolos de comunicación IEEE 802.11a/b/g
y n. Samsung recomienda el uso de IEEE 802.11n. Si reproduce un video a través de una conexión de red, es posible que el
video no se reproduzca correctamente.
La mayoría de los sistemas de red inalámbricos incorporan un sistema de seguridad que necesita que los dispositivos que
acceden a la red a través de un punto de acceso o enrutador inalámbrico (habitualmente un compartidor IP inalámbrico)
transmitan un código de seguridad cifrado llamado clave de acceso.
Si se selecciona el modo 802.11n (Greenfield) puro de gran procesamiento y se configura el tipo de codificación WEP, TKIP o
TKIP-AES (WPS2Mixed) en su enrutador inalámbrico, los televisores Samsung no admitirán una conexión de acuerdo con las
nuevas especificaciones de la certificación Wi-Fi.
Conexión de red por cable
Existen dos formas principales para conectar el televisor a la red utilizando un cable, dependiendo de su configuración de red.
Estos se ilustran a continuación:
Puerto de módem en la pared
Panel posterior del TV
Cable LANCable del módem
Módem externo
(ADSL / VDSL / TV por cable)
Puerto LAN en la pared
Panel posterior del TV
Cable LAN
✎
No se admite cuando la velocidad de la red es inferior o igual a 10Mbps.
✎
Use un cable Cat 5 (*tipo STP) para la conexión. (*Par de torsión blindado)
9$
Compartidor IP inalámbrico
(Servidor DHCP con PA)
Adaptador de LAN
inalámbrica Samsung
Panel lateral del TV
Puerto LAN en la pared
Cable LAN (no suministrado)
[PD490-ZS]BN68-04070B.indb 11 2012-01-30 �� 2:07:22
Page 28
Español - 1212
Cómo ver el e-Manual
E-MANUAL
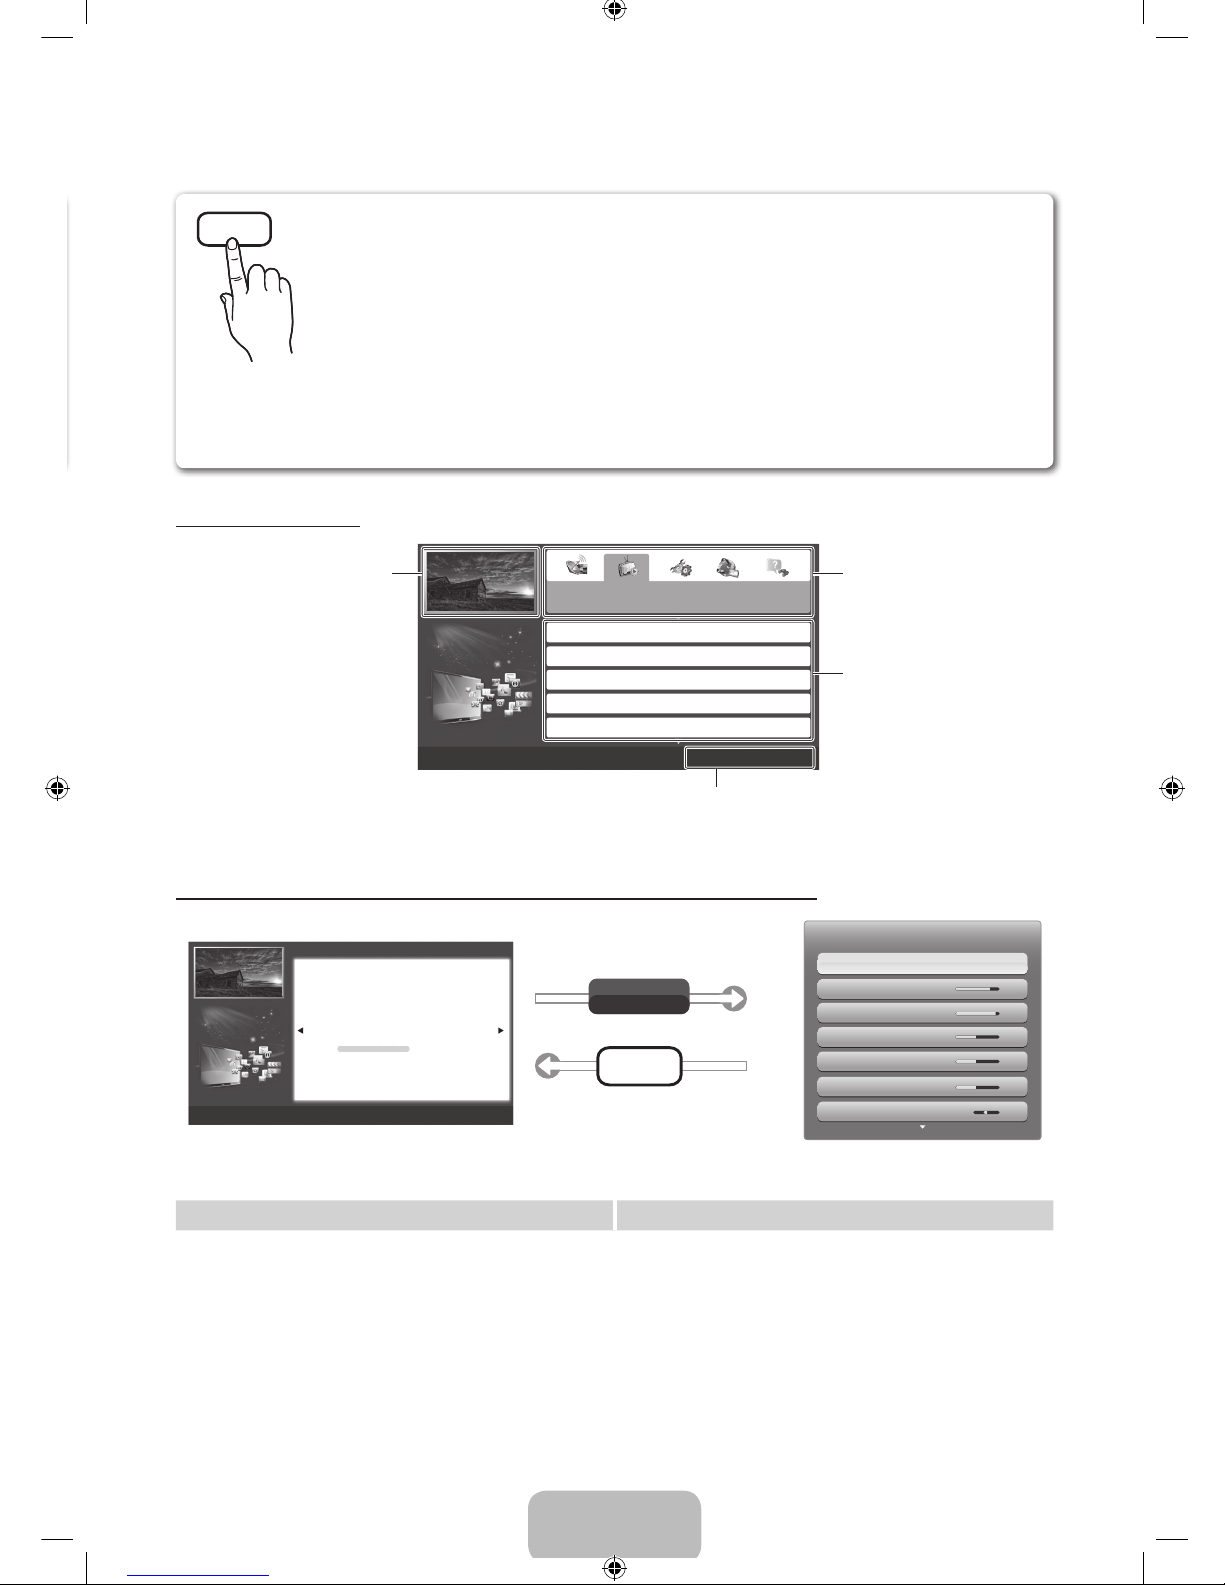
Puede encontrar instrucciones para las funciones de su televisor en el e-Manual de
su televisor. Para usarlo, pulse el botón E-MANUAL de su control remoto. Mueva el
cursor con los botones arriba/abajo/derecha/izquierda para resaltar una categoría,
luego un tema y pulse el botón ENTERE. Se muestra la página del e-Manual que
desea ver.
También puede acceder a través del menú:
O
MENUm → Soporte técnico → e-Manual → ENTER
E
✎
Si desea regresar al e-Manual, pulse el botón E-MANUAL de su control remoto.
✎
No puede utilizar la función Int. Ahora si el menú no está activado.
Visualización de pantalla
Funciones básicas
Cambio del modo preestablecido de la imagen
Ajuste de configuración de imagen
Cambio de las opciones de imagen
Cambio de los modos preestablecidos de sonido
Configuración de sonido
}
Índice E Entrar e Salir
Pantalla de TV: Muestra el programa,
película, video, etc. que está
mirando actualmente.
La lista de categorías. Pulse el botón
l
o r para seleccionar la categoría
que desea.
Muestra la lista de submenús. Utilice
los botones de flecha en su control
remoto para desplazar el cursor.
Pulse el botón ENTER
E
para
seleccionar el submenú que desee.
Botones de operación:
}
Azul (Índice): Mostrar la pantalla del índice.
E
Entrar: Seleccionar una categoría o submenú.
e
Salir: Sale del e-Manual.
Cómo conmutar entre un tema del e-Manual y los menús de la OSD correspondientes.
E-MANUAL
Int. Ahora
a
Int. Ahora b Inicio { Zoom } Índice L Página e Salir
Funciones básicas > Cambio del modo preestablecido de la imagen (1/1)
Cambio del modo preestablecido de la imagen
■
Modo de Imagen
t
O MENUm → Imagen → Modo de Imagen → ENTER
E
Seleccione el tipo de imagen preferido.
N Cuando conecta una PC, sólo puede hacer cambios en Diversión y Normal.
• Dinámico: Adecuado para un entorno iluminado.
• Normal: Adecuado para un entorno normal.
• Natural para las series LED 5000, 6000 : Adecuado para visualización
cómoda para la vista.
• Película: Adecuado para ver películas en un entorno oscuro.
• Diversión: Adecuado para ver películas y juegos.
N Sólo está disponible cuando conecta una PC.
Imagen
Modo de Imagen Normal
Luz de la celda 10
Contraste 95
Brillo 45
Color 50
Tinte (V/R) R50 R50
Definición 50
✎
Esta función no está habilitada en algunos menús.
Método 1 Método 2
1. Si desea usar el menú que corresponde a un tema
del e-Manual, pulse el botón rojo para seleccionar Int.
Ahora.
2. Para volver a la pantalla del e-Manual, pulse el botón
E-MANUAL.
1. Pulse el botón ENTERE cuando se muestre un
tema. Aparece el mensaje “¿Desea ejecutar esto?”.
Seleccione Sí y luego pulse el botón ENTERE.
Aparece la ventana de la OSD.
2. Para volver a la pantalla del e-Manual, pulse el botón
E-MANUAL.
[PD490-ZS]BN68-04070B.indb 12 2012-01-30 �� 2:07:28
Page 29
Español - 1313
Ver el contenido
Usar el modo Zoom
Cuando visualiza una página de instrucciones en el
e-Manual, pulse el botón ENTERE para ampliar la
pantalla. Puede desplazarse a través de la pantalla ampliada
utilizando los botones u o d.
✎
Para regresar la pantalla a su tamaño normal, pulse el
botón RETURN.
Cómo buscar un tema en la página de índice
1. Para buscar un tema, pulse el botón de flecha hacia la izquierda o hacia la derecha para seleccionar una letra. El Índice
muestra una lista de temas y palabras clave que comienzan con la letra que seleccionó.
2. Pulse el botón de flecha hacia arriba o hacia abajo para seleccionar un tema o una palabra clave que desee y luego pulse
el botón ENTERE para seleccionar un tema que desee ver.
3. Aparece la página del e-Manual con el tema.
✎
Para cerrar la pantalla Índice, pulse el botón RETURN.
a
Int. Ahora b Inicio { Zoom } Índice L Página e Salir
Funciones básicas > Cambio del modo preestablecido de la imagen (1/1)
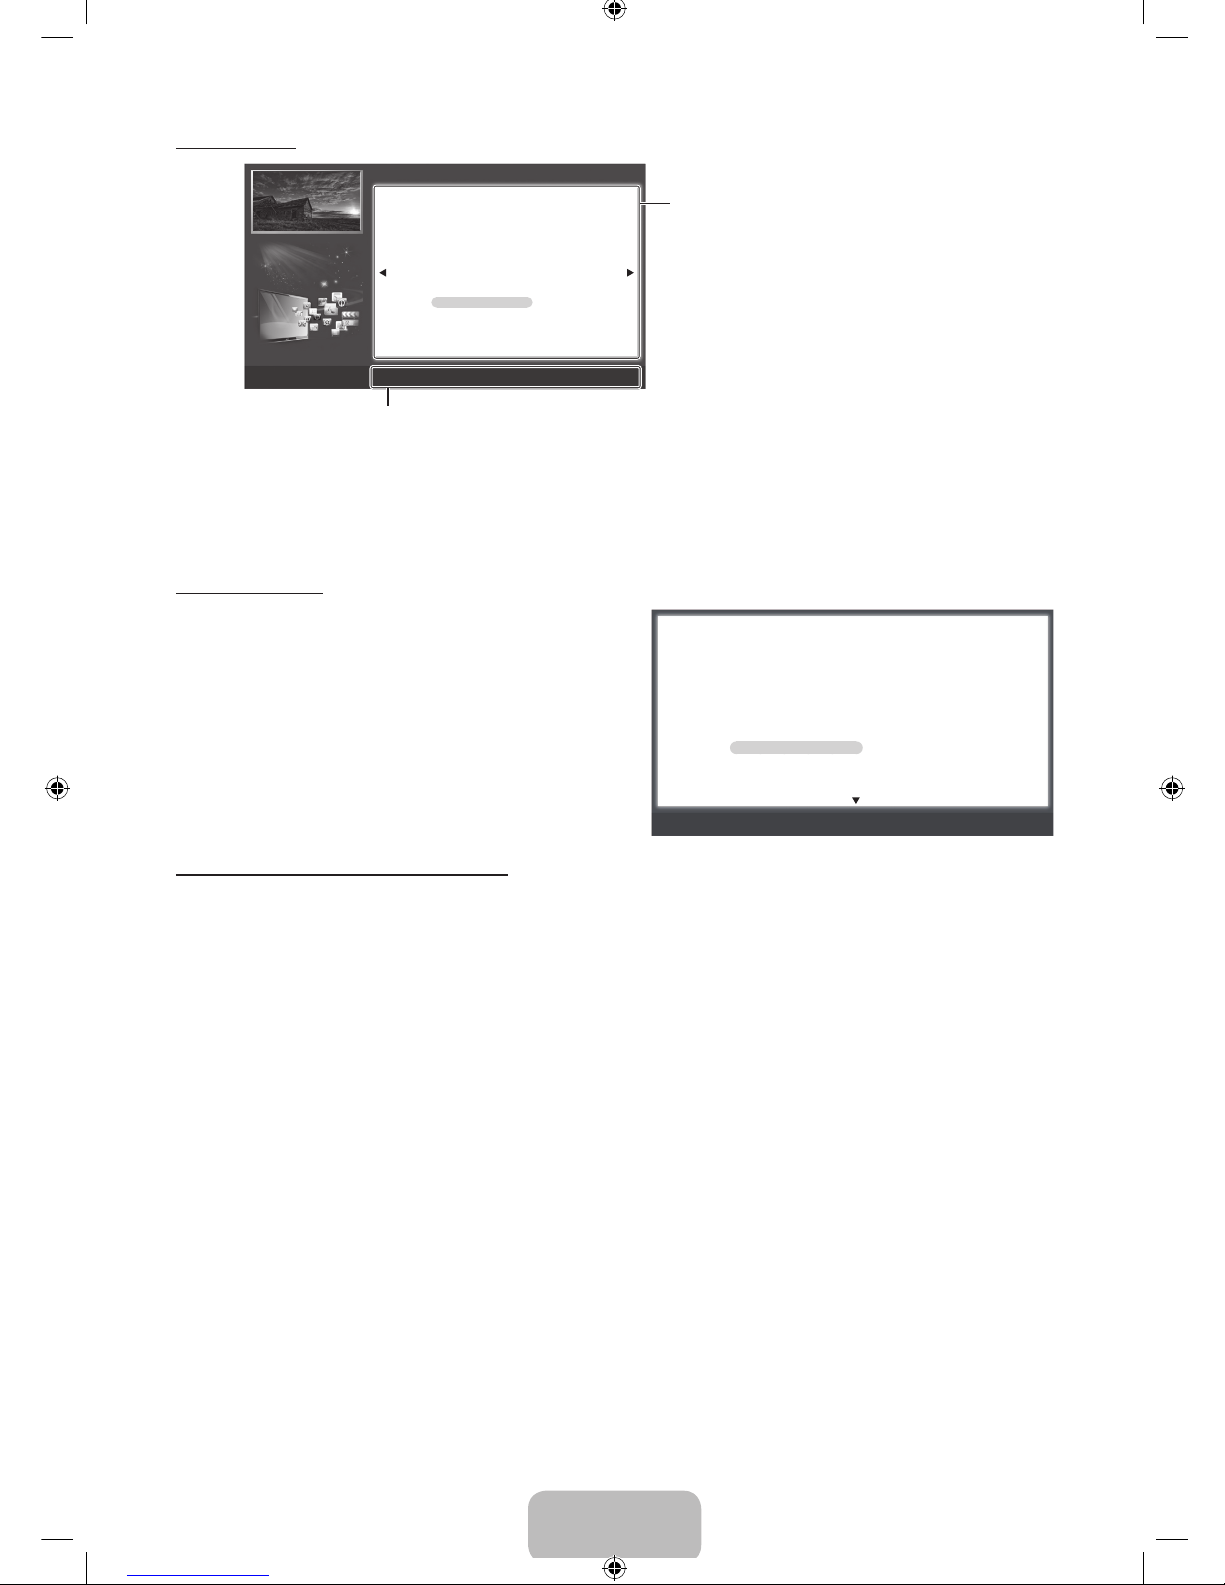
Área de contenido: Contiene el contenido del
tema si seleccionó un submenú. Para pasar a
la página anterior o siguiente, pulse el botón
l
o r .
Botones de operación:
a
Rojo (Int. Ahora): Muestra el menú OSD que corresponde al tema. Para volver a la pantalla del
e-Manual, pulse el botón E-MANUAL.
b
Verde (Inicio): Pasa a la pantalla de inicio del e-Manual.
{
Amarillo (Zoom): Amplía la pantalla.
}
Azul (Índice): Muestra la pantalla del índice.
L
(Página): Pasa a la página anterior o siguiente.
e
(Salir): Sale del e-Manual.
U
Mover R Regresar
Cambio del modo preestablecido de la imagen
■
Modo de Imagen
t
O MENUm → Imagen → Modo de Imagen → ENTER
E
Seleccione el tipo de imagen preferido.
N Cuando conecta una PC, sólo puede hacer cambios en Diversión
y Normal.
• Dinámico: Adecuado para un entorno iluminado.
• Normal: Adecuado para un entorno normal.
• Natural para las series LED 5000, 6000 : Adecuado para visualización
cómoda para la vista.
• Película: Adecuado para ver películas en un entorno oscuro.
• Diversión: Adecuado para ver películas y juegos.
N Sólo está disponible cuando conecta una PC.
Cambio del modo preestablecido de la imagen
■
Modo de Imagen
t
O MENUm → Imagen → Modo de Imagen → ENTER
E
Selecci one el tipo de imagen preferi do.
N Cuand o conecta una PC, sólo pued e hacer cambio s en Diversión y Normal.
• Dinámico: Adecuado para un entorno iluminado.
• Normal: Adecuado para un entorno normal.
• Natural para las series LED 5000, 6000 : Adecuado para visualización cómoda
para la vista.
• Película: Adecuado para ver películas en un entorno oscuro.
[PD490-ZS]BN68-04070B.indb 13 2012-01-30 �� 2:07:29
Page 30
Español - 1414
Instalación del montaje de pared
Montaje en pared o techo
Se debe instalar el producto en una pared o techo sólo según la recomendación del fabricante. A menos que se
instale correctamente, el producto puede deslizarse o caerse, provocando lesiones graves a niños o adultos, y daños
importantes en el producto.
Instalación del kit de montaje de pared
El kit de montaje de pared (se vende por separado) le permite instalar el televisor en una pared.
Si desea más información sobre la instalación del montaje de pared, consulte las instrucciones que se facilitan con dichos
elementos. Si necesita ayuda con la instalación del soporte de pared, póngase en contacto con un técnico. Samsung
Electronics no se hace responsable de los daños causados al producto o al usuario si éste ha optado por instalar el montaje
de pared por su cuenta.
Especificaciones del kit de montaje de pared (VESA)
✎
El kit de montaje de pared se vende por separado. Instale el montaje de pared en una pared sólida, perpendicular al
suelo. Para colocarlo en otros materiales de construcción, póngase en contacto con el distribuidor más cercano. Si
instala el televisor en el techo o en una pared inclinada, puede caerse y causar graves lesiones personales.
✎
NOTA
x
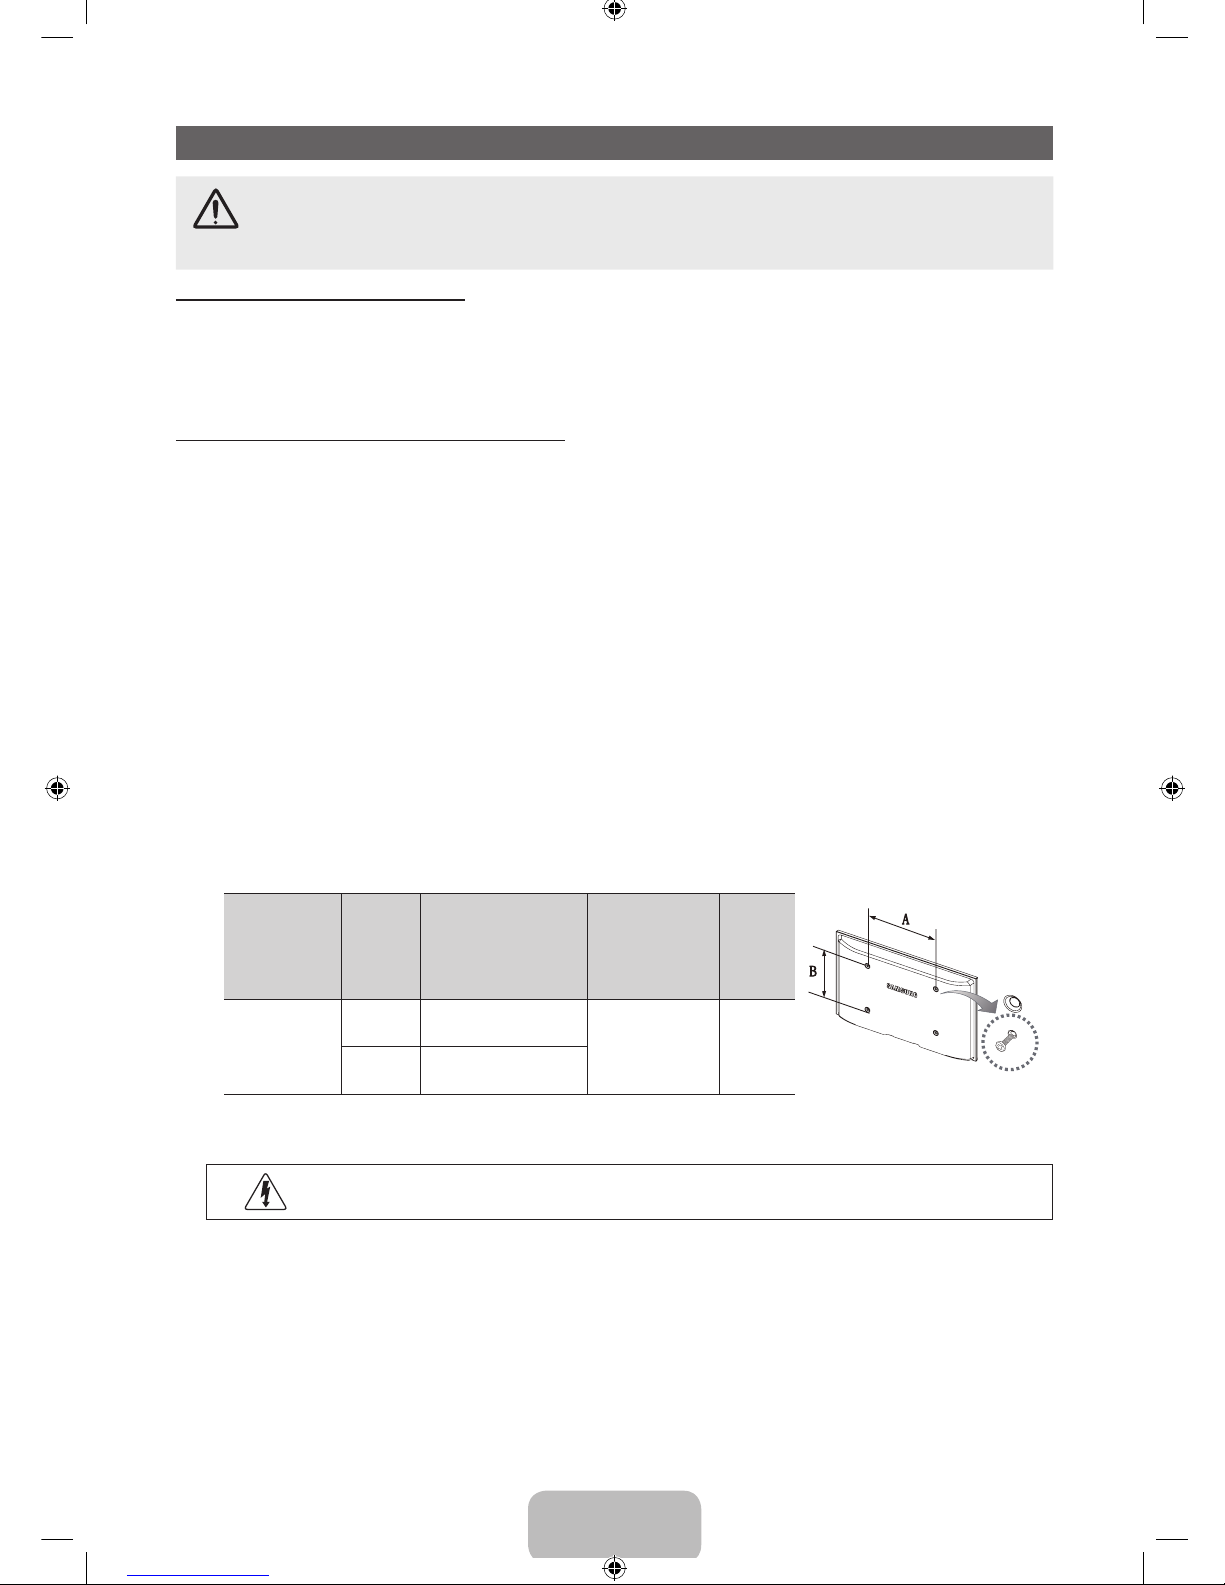
Las dimensiones estándar de los kits de montaje de pared se muestran en la tabla que sigue.
x
Al adquirir el kit de montaje de pared, también se distribuye un manual de instalación detallado y todas las piezas
necesarias para el montaje.
x
No use tornillos que no cumplan las especificaciones de tornillos estándar VESA.
x
No use tornillos con una longitud superior a la medida estándar o que no cumplan con especificaciones de tornillos
estándar VESA. Los tornillos que sean demasiado largos pueden causar daños en el interior del televisor.
x
Para montajes de pared que no cumplen las especificaciones de tornillos estándar VESA, la longitud de éstos puede
variar dependiendo de las especificaciones del montaje de pared.
x
No apriete excesivamente los tornillos; esto puede provocar daños en el producto o hacer que el producto se caiga y
causar lesiones. Samsung no se hace responsable de este tipo de accidentes.
x
Samsung no se hace responsable de daños o lesiones personales cuando se usa un montaje de pared que no
cumple las especificaciones VESA o si el cliente no sigue las instrucciones de instalación del producto.
x
No monte el televisor con una inclinación de más de 15 grados.
x
Siempre son necesarias dos personas para montar el televisor en la pared.
Familia de
producto
Tamaño
del
televisor
en
pulgadas
Especificaciones
VESA (A * B) en
milímetros
Tornillo estándar Cantidad
TV PDP
43~51 400 X 400
M8 4
60~64 600 X 400
✎
Retire los tornillos de los orificios de montaje antes de instalar el montaje de pared.
No instale el equipo de montaje de pared mientras el televisor está encendido. Se podría producir una
descarga eléctrica con riesgo de causar lesiones personales.
[PD490-ZS]BN68-04070B.indb 14 2012-01-30 �� 2:07:30
Page 31
Español - 1515
Solución de problemas
Si cree que el televisor tiene un problema, compruebe primero esta lista de posibles problemas y soluciones. Si ninguna de
estas sugerencias de solución de problemas funciona, visite “www.samsung.com,” y haga clic en Soporte técnico o llame al
centro de atención al cliente de Samsung.
Problemas Soluciones y explicaciones
El televisor no se enciende. • Compruebe que el cable de alimentación CA esté bien conectado en la toma de la pared
y en el televisor.
• Asegúrese de que la toma de pared funcione.
• Pruebe pulsar el botón POWER del televisor para asegurarse de que el problema no
esté en el control remoto. Si el televisor se enciende, consulte la sección "El control
remoto no funciona" a continuación.
No hay imagen ni video. • Compruebe las conexiones de los cables. (Desconecte y vuelva a conectar todos los
cables del televisor y de los dispositivos externos.)
• Establezca la salida de video del dispositivo externo (receptor de cable/satélite, DVD,
Blu-ray, etc.) de modo que coincida con las conexiones de la entrada del televisor. Por
ejemplo, si la salida de un dispositivo externo es HDMI, se debe conectar a una entrada
HDMI en el televisor.
• Compruebe que los dispositivos externos estén encendidos.
• Asegúrese de seleccionar la fuente correcta del televisor pulsando el botón SOURCE del
control remoto.
• Reinicie el dispositivo conectado volviendo a conectar el cable de alimentación del
dispositivo.
El control remoto no funciona. • Coloque las pilas del control remoto con los polos (+/–) en la dirección correcta.
• Limpie la ventana de transmisión del sensor en el control remoto.
• Apunte con el control remoto directamente al televisor desde una distancia de 1,5 - 2
metros.
El control remoto del receptor de
cable/satélite no enciende ni apaga el
televisor, ni ajusta el volumen.
• Programe el control remoto del receptor de cable/satélite para que haga funcionar el
televisor. Consulte el manual del usuario del receptor de cable/satélite para conocer el
código del televisor Samsung.
✎
Algunas funciones e imágenes que aparecen en este manual están disponibles en modelos específicos solamente.
✎
Puede mantener su televisor en óptimas condiciones para actualizar el último firmware en el sitio Web (samsung.com →
Soporte técnico → Descargas) por USB.
Licencia
Lista de funciones
y 3D: Esta impactante nueva función permite ver contenidos 3D.
y AllShare Play: AllShare Play conecta el televisor y los dispositivos/teléfonos móviles compatibles de Samsung a través de
una red. Esta función permite disfrutar de varios contenidos de medios (videos, fotos, música).
[PD490-ZS]BN68-04070B.indb 15 2012-01-30 �� 2:07:31
Page 32
Español - 1616
Fijación del televisor a la pared
Precaución: Tirar del televisor, empujarlo o colgarse de él puede provocar su caída. En especial, procure
que los niños no se cuelguen del televisor ni lo desestabilicen, ya que el televisor podría caerse sobre
ellos y causarles lesiones graves o incluso la muerte. Siga las precauciones de seguridad del folleto de
seguridad incluido con el producto. Para mejorar la estabilidad instale un dispositivo antivuelco, como se
explica a continuación.
Para impedir que el televisor se caiga
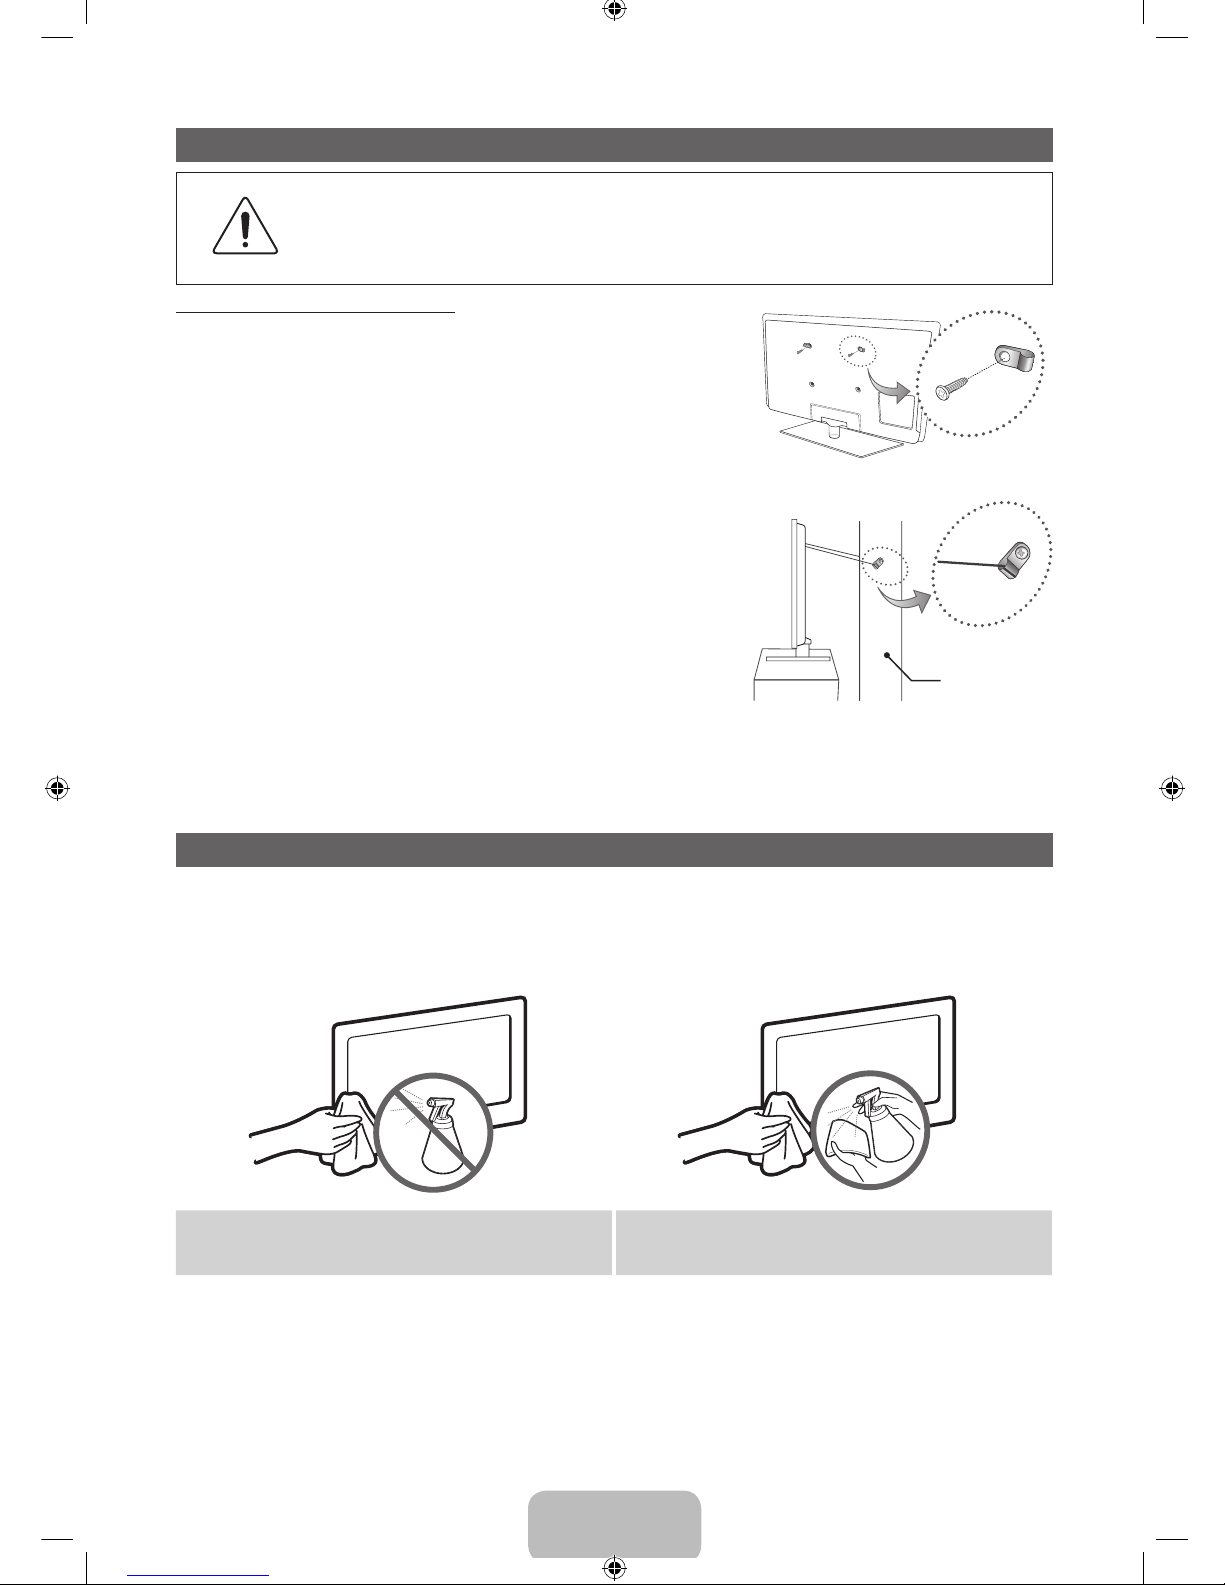
1. Coloque firmemente las grapas sobre la pared con los tornillos. Confirme que
los tornillos se hayan instalado firmemente en la pared.
✎
Según el tipo de pared quizás necesite algún material adicional para
el anclaje.
✎
Dado que las grapas, los tornillos y la cadena necesarios no se
suministran con el producto, deberá adquirirlos por separado.
2. Quite los tornillos de la parte central posterior del televisor, colóquelos en las
grapas y luego vuelva a ajustar los tornillos en el televisor.
✎
Los tornillos pueden no suministrarse con el producto. En ese caso,
compre tornillos de las siguientes especificaciones.
✎
Especificaciones de tornillos
•
Para un TV PDP de 43 ~ 51 pulgadas: M8
3 Conecte las grapas unidas al televisor y las grapas unidas a la pared con una
cadena fuerte y ténsela firmemente.
✎
NOTA
•
Instale el televisor cerca de la pared para evitar que se caiga hacia
atrás.
•
Las grapas de la pared deben estar a la misma o a menor altura que las grapas del televisor.
•
Cuando desee mover el televisor deberá desatar la cadena.
4 Verifique que todas las conexiones estén bien aseguradas. Compruébelas periódicamente para detectar cualquier signo
de fatiga o falla. Si tiene alguna duda sobre la seguridad de sus conexiones, comuníquese con un instalador profesional.
Almacenamiento y mantenimiento
✎
Si ha pegado algunas pegatinas en la pantalla del televisor, al extraerlas quedarán restos. Limpie la pantalla para ver
televisión.
✎
La parte exterior y la pantalla del producto podrían rayarse durante la limpieza. Asegúrese de limpiar el exterior y la
pantalla con cuidado utilizando el paño suministrado o un paño suave para evitar que se raye.
No rocíe agua directamente sobre el producto. Cualquier
líquido que ingrese al producto puede ocasionar fallas,
incendio o descarga eléctrica.
Limpie el producto con un paño suave humedecido con una
pequeña cantidad de agua. No utilice líquidos inflamables
(como benceno o solventes) ni agentes limpiadores.
Pared
[PD490-ZS]BN68-04070B.indb 16 2012-01-30 �� 2:07:31
Page 33
Español - 1717
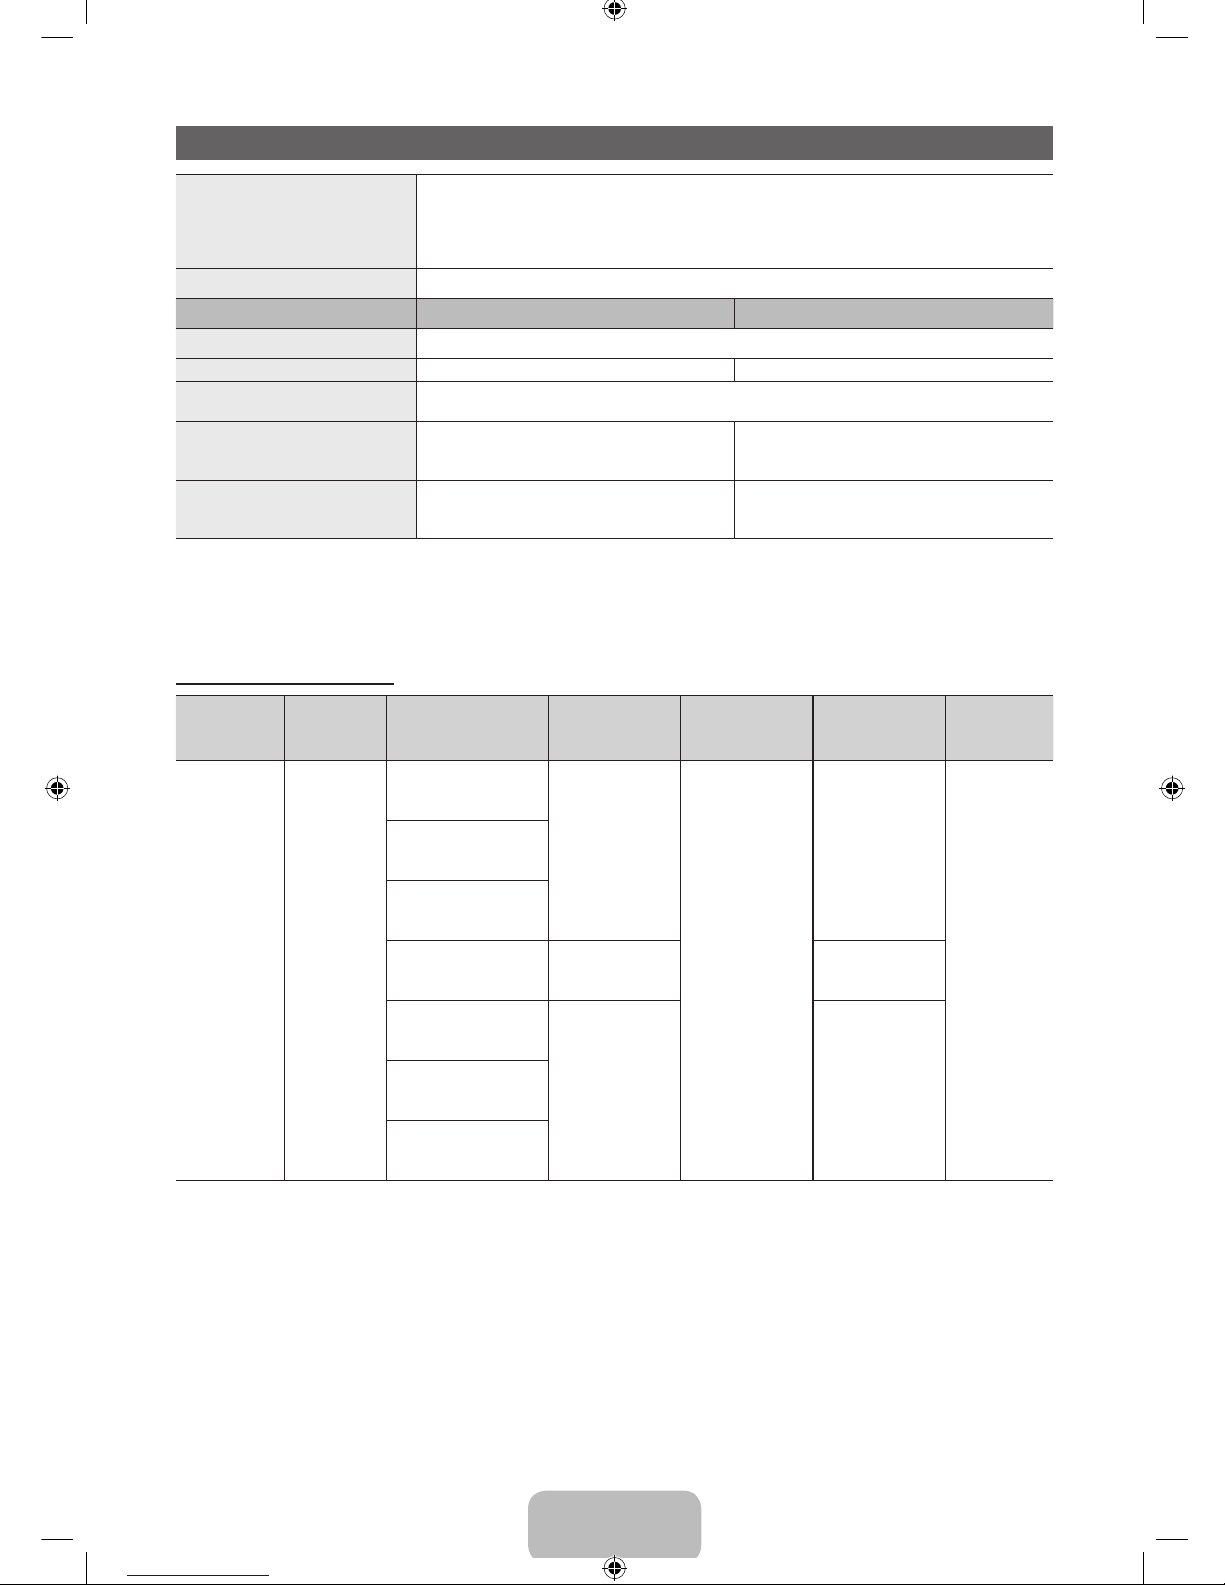
Especificaciones
Consideraciones ambientales
Temperatura de funcionamiento
Humedad de funcionamiento
Temperatura de almacenamiento
Humedad de almacenamiento
10ºC a 40ºC (50ºF a 104ºF)
10% a 80%, sin condensación
-20ºC a 45ºC (-4ºF a 113ºF)
5% a 95%, sin condensación
Soporte giratorio (Izquierda / Derecha) -20˚ ~ 20˚
Nombre del modelo PL43E490 PL51E490
Resolución de pantalla 1024 x 768
Tamaño de pantalla 43 pulgadas 51 pulgadas
Sonido
(Salida) 10 W x 2
Dimensiones (An x Pr x Al)
Cuerpo principal
Con el soporte
1011.8 X 56.0 X 622.4 mm
1011.8 X 305.0 X 697.7 mm
1187.8 X 56.0 X 706.6 mm
1187.8 X 305.0 X 782.9 mm
Peso
Sin el soporte
Con el soporte
14.2 kg
18.2 kg
19.6 kg
23.6 kg
✎
El diseño y las especificaciones pueden cambiar sin previo aviso.
✎
Para obtener información sobre la fuente de alimentación y el consumo de energía, consulte la etiqueta adherida al
producto.
Formatos de video admitidos
Extensión del
archivo
Contenedor Códec de video Resolución
Velocidad de
transferencia (fps)
Velocidad en bits
(Mbps)
Códec de
audio
*.avi
*.mkv
*.asf
*.wmv
*.mp4
*.3gp
*.vro
*.mpg
*.mpeg
*.ts
*.tp
*.trp
*.m2ts
*.mts
*.divx
AVI
MKV
ASF
MP4
3GP
VRO
VOB
PS
TS
DivX 3.11/4.x/5.x/6.1
1920 x 1080
6~30
30
AC3
LPCM
ADMPCM
(IMA, MS)
AAC
HE-AAC
WMA
DD+
MPEG (MP3)
DTS Core
MPEG4 SP / ASP
H.264 BP/MP/HP
Motion JPEG 640 x 480 8
Window Media Video v9
1920 x 1080 30MPEG2
MPEG1
[PD490-ZS]BN68-04070B.indb 17 2012-01-30 �� 2:07:32
 Loading...