

Page 1

Contact SAMSUNG WORLDWIDE
If you have any questions or comments relating to Samsung products, please contact the SAMSUNG
customer care center.
Comment contacter Samsung dans le monde
Si vous avez des suggestions ou des questions concernant les produits Samsung, veuillez contacter le Service Consommateurs
Samsung.
Country
CANADA 1-800-SAMSUNG(726-7864) www.samsung.com/ca Samsung Electronics Canada Inc., Customer
U.S.A 1-800-SAMSUNG(726-7864) www.samsung.com/us Samsung Electronics America, Inc.
Customer Care Center
Web Site
Address
Service 55 Standish Court Mississauga, Ontario
L5R 4B2 Canada
85 Challenger Road
Ridgeeld Park, NJ 07660-2112
Plasma TV
user manual
© 2010 Samsung Electronics Co., Ltd. All rights reserved.
imagine the possibilities
Thank you for purchasing this Samsung product.
To receive more complete service, please register
your product at
www.samsung.com/register
Model _____________ Serial No. _____________
BN68-02577B-06
Page 2

Figures and illustrations in this User Manual are provided for reference only and may differ from actual product appearance.
Product design and specifications may be changed without notice.
Important Warranty Information Regarding Television Format Viewing
See the warranty card for more information on warranty terms.
✎
Wide screen format PDP Displays (16:9, the aspect ratio of the screen width to height) are primarily designed to view wide screen format full-motion video.
The images displayed on them should primarily be in the wide screen 16:9 ratio format, or expanded to fill the screen if your model offers this feature and
the images are constantly moving. Displaying stationary graphics and images on screen, such as the dark side bars on no expanded standard format
television video and programming, should be limited to no more than 5% of the total television viewing per week.
Additionally, viewing other stationary images and text such as stock market reports, video game displays, station logos, web sites or computer graphics
and patterns, should be limited as described above for all televisions. Displaying stationary images that exceed the above guidelines can cause uneven
aging of PDP Displays that leave subtle, but permanent burned-in ghost images in the PDP picture. To avoid this, vary the programming and images, and
primarily display full screen moving images, not stationary patterns or dark bars.
On PDP models that offer picture sizing features, use these controls to view different formats as a full screen picture.
Be careful in the selection and duration of television formats used for viewing. Uneven PDP aging as a result of format selection and use, as well as burned
in images, are not covered by your Samsung limited warranty.
• SAMSUNG ELECTRONICS NORTH AMERICAN LIMITED WARRANTY STATEMENT
Subject to the requirements, conditions, exclusions and limitations of the original Limited Warranty supplied with Samsung Electronics (SAMSUNG)
products, and the requirements, conditions, exclusions and limitations contained herein, SAMSUNG will additionally provide Warranty Repair Service
in the United States on SAMSUNG products purchased in Canada, and in Canada on SAMSUNG products purchased in the United States, for the
warranty period originally specified, and to the Original Purchaser only.
The above described warranty repairs must be performed by a SAMSUNG Authorized Service Center. Along with this Statement, the Original Limited
Warranty Statement and a dated Bill of Sale as Proof of Purchase must be presented to the Service Center. Transportation to and from the Service
Center is the responsibility of the purchaser. Conditions covered are limited only to manufacturing defects in material or workmanship, and only those
encountered in normal use of the product.
Excluded, but not limited to, are any originally specified provisions for, in-home or on-site services, minimum or maximum repair times, exchanges or
replacements, accessories, options, upgrades, or consumables.
For the location of a SAMSUNG Authorized Service Center, please call toll-free:
– In the United States : 1-800-SAMSUNG (1-800-726-7864)
– In Canada : 1-800-SAMSUNG
User Instructions
• Screen Image retention
Do not display a still image (such as on a video game) on the plasma display panel for more than several minutes as it can cause screen image
retention. This image retention is also known as ‘screen burn’. To avoid such image retention, refer to page 15 of this manual to reduce the degree of
brightness and contrast of the screen when displaying a still image.
• Heat on the top of the Plasma TV
The top side of the product may be hot after long periods of use as heat dissipates from the panel through the vent hole in the upper part of the
product.
This is normal and does not indicate any defect or operation failure of the product.
However, children should be prevented from touching the upper part of the product.
• The product is making a ‘cracking’ noise.
A ‘cracking’ noise may occur when the product contracts or expands due to a change in the surrounding environment such as temperature or
humidity. This is normal and not a defect of the unit.
• Cell Defects
The PDP uses a panel consisting of 2,360,000(HD-level) to 6,221,000(FHD-level) pixels which require sophisticated technology to produce. However,
there may be a few bright or dark pixels on the screen. These pixels will have no impact on the performance of the product.
• Avoid operating the TV at temperatures below 41°F (5°C)
• A still image displayed too long may cause permanent damage to the PDP Panel.
Watching the Plasma TV in 4:3 format for a long period of time may leave traces of borders displayed on the left, right and center of
the screen caused by the difference of light emission on the screen. Playing a DVD or a game console may cause similar effects to
the screen.
Damages caused by the above effect are not covered by the Warranty.
• After-images on the Screen.
Displaying still images from Video games and PC for longer than a certain period of time may produce partial after-images.
To prevent this effect, reduce the ‘brightness’ and ‘contrast’ when displaying still images for a long time.
• Warranty
Warranty does not cover any damage caused by image retention.
Burn-in is not covered by the warranty.
2
English
Page 3

Contents
Getting Started
y List of Features .........................................................4
y Accessories ..............................................................4
y Install the Stand ........................................................5
y Viewing the Control Panel .........................................6
y Viewing the Remote Control ...................................... 7
y Connecting to an Antenna ........................................ 8
y Plug & Play (Initial Setup) ...........................................8
Connections
y Connecting to an AV Device ......................................9
y Connecting to an Audio Device ............................... 10
y Connecting to a PC ................................................ 11
y Changing the Input Source ..................................... 12
Basic Features
y How to Navigate Menus .......................................... 12
y Channel Menu ........................................................ 13
Seeing Channels 13
Using Favorite Channels 13
Memorizing Channels 13
Editing Channels 14
Other Features 14
y Picture Menu .......................................................... 15
Changing the Preset Picture Mode 15
Adjusting Picture Settings 15
Changing the Picture Options 15
Setting up the TV with your PC 17
y Sound Menu ........................................................... 17
Changing the Preset Sound Mode 17
Adjusting Sound Settings 18
Sound Settings 18
y Setup Menu ............................................................ 18
Setting the Time 18
Using the Sleep Timer 19
Setting the On / Off Timer 19
Locking Programs 19
Economical Solutions 21
Other Features 21
y Support Menu ......................................................... 22
Advanced Features
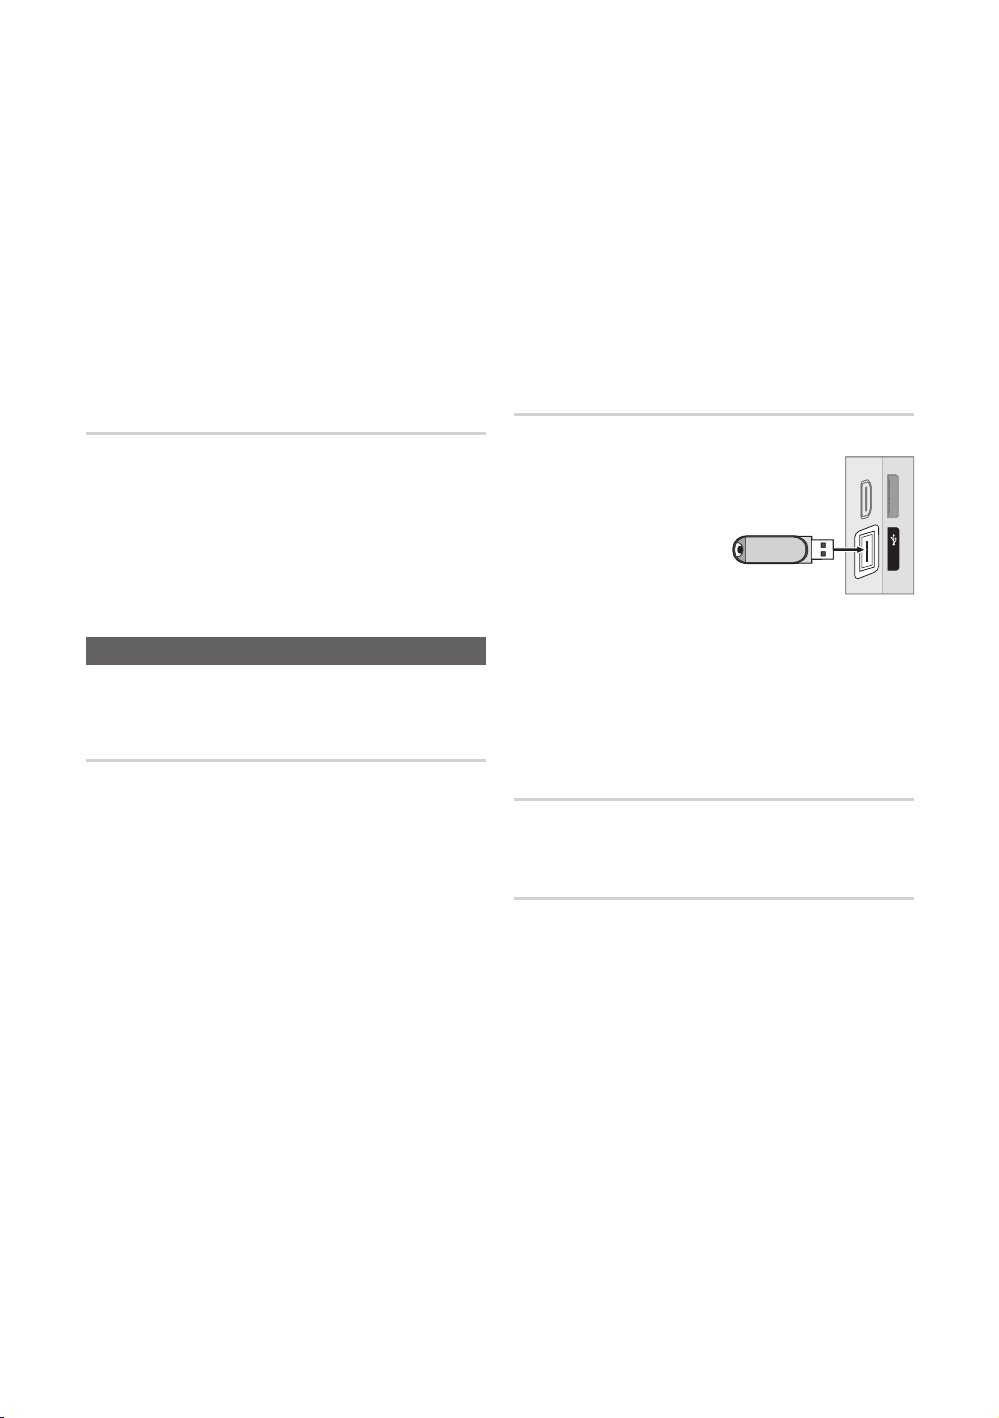
y Media Play .............................................................. 23
Connecting a USB Device 23
y Anynet+ .................................................................. 26
Setting Up Anynet+ 27
Switching between Anynet+ Devices 28
Recording 28
Listening through a Receiver 28
Troubleshooting for Anynet+ 29
Other Information
y Installing the Wall Mount ......................................... 30
y Securing the Installation Space ............................... 31
y Securing the TV to the Wall ..................................... 32
y Troubleshooting ...................................................... 33
Storage and Maintenance 35
y License ................................................................... 36
y Specifications ......................................................... 36
y Dimensions ............................................................. 37
y Index ...................................................................... 38
ENGLISH
t
This function can be used by pressing the
TOOLS button on the remote control.
Check the Symbol!
Note Step by Step Guide
Indicates additional information. Check here for instructions on how to open
the relevant submenu within the OSD (on
screen display).
English
3
Page 4
Getting Started
List of Features
y Excellent Digital Interface & Networking: With a built-in HD digital tuner, nonsubscription HD broadcasts can be viewed
without a cable box / STB (Set-Top-Box) satellite receiver.
y SRS TruSurround HD provides a virtual surround system (p 18).
y Media Play: Allows you to play music files, pictures saved on a USB device (p. 23).
y Self Diagnosis: You can check to make sure picture and sound operate normally (p. 22).
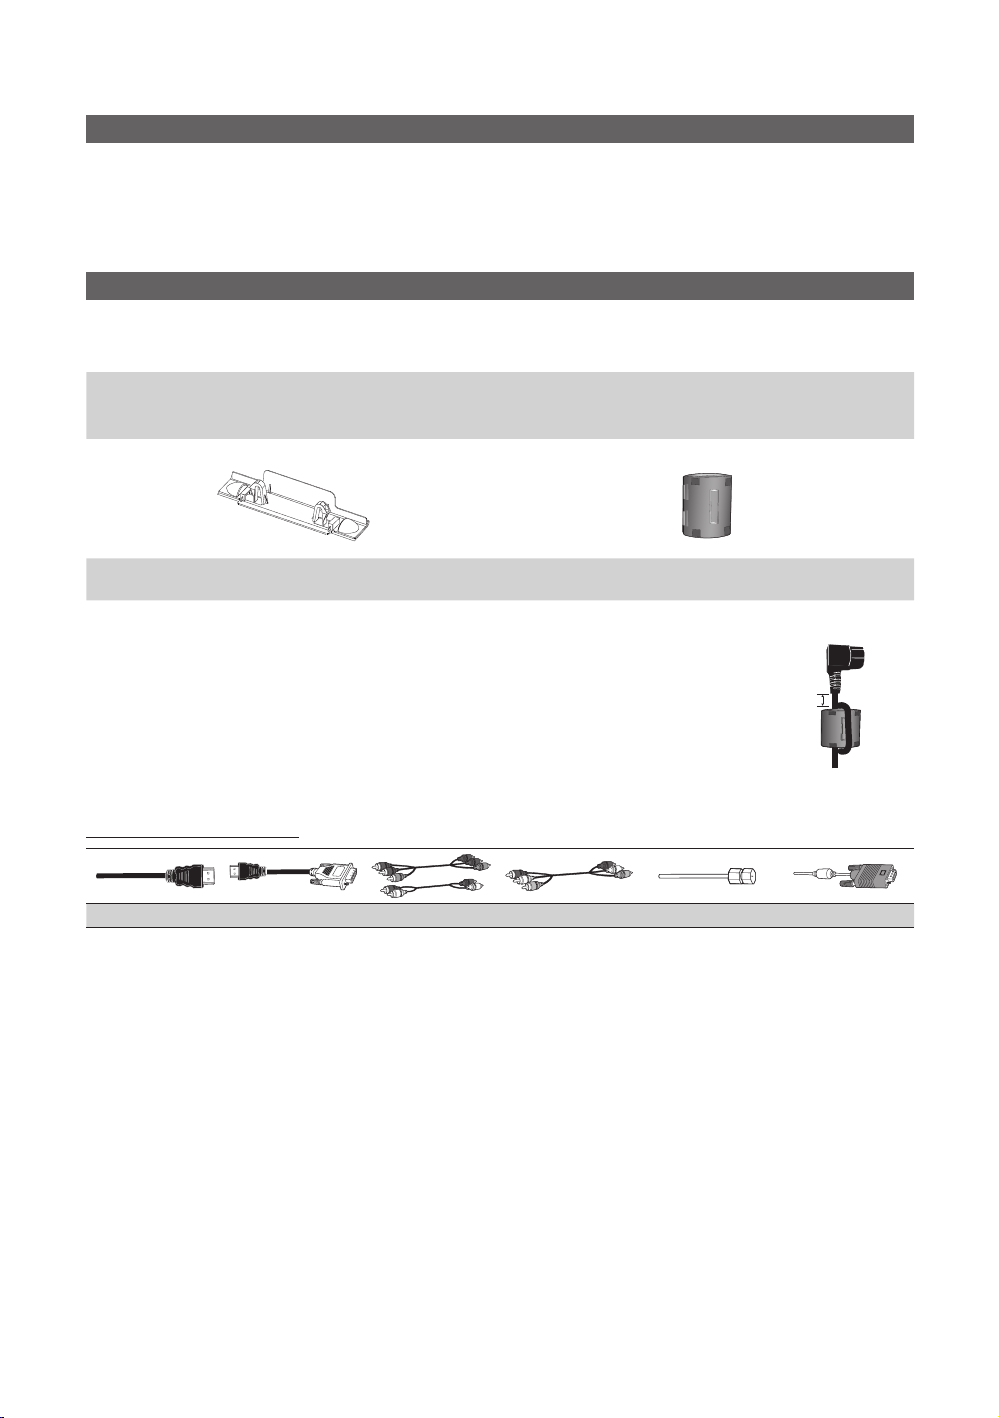
Accessories
✎
Please make sure the following items are included with your PDP TV. If any items are missing, contact your dealer.
✎
The items' colors and shapes may vary depending on the models.
y Remote Control (BN59-00997A) & Batteries (AAA x 2)
y Owner’s Instructions
y Warranty Card / Safety Guide / Quick Setup Guide
y Cleaning Cloth (BN63-01798B)
y Power Cord
Blanking Bracket (BN63-06456A) Ferrite Core for Power Cord (1EA)
✎
Ferrite Core for Power Cord: The ferrite cores are used to shield the cables from interference.
When connecting a cable, open the ferrite core and clip it around the cable near the plug as
shown in the figure.
A Maximum distance between the ferrite core and the end of the cord inserted in the TV: 2
x
inches
Input Cables (Sold Separately)
HDMI HDMI-DVI Component Composite (AV) Coaxial (RF) VGA
(3301-002049)
A
Power Cord
4
English
Page 5
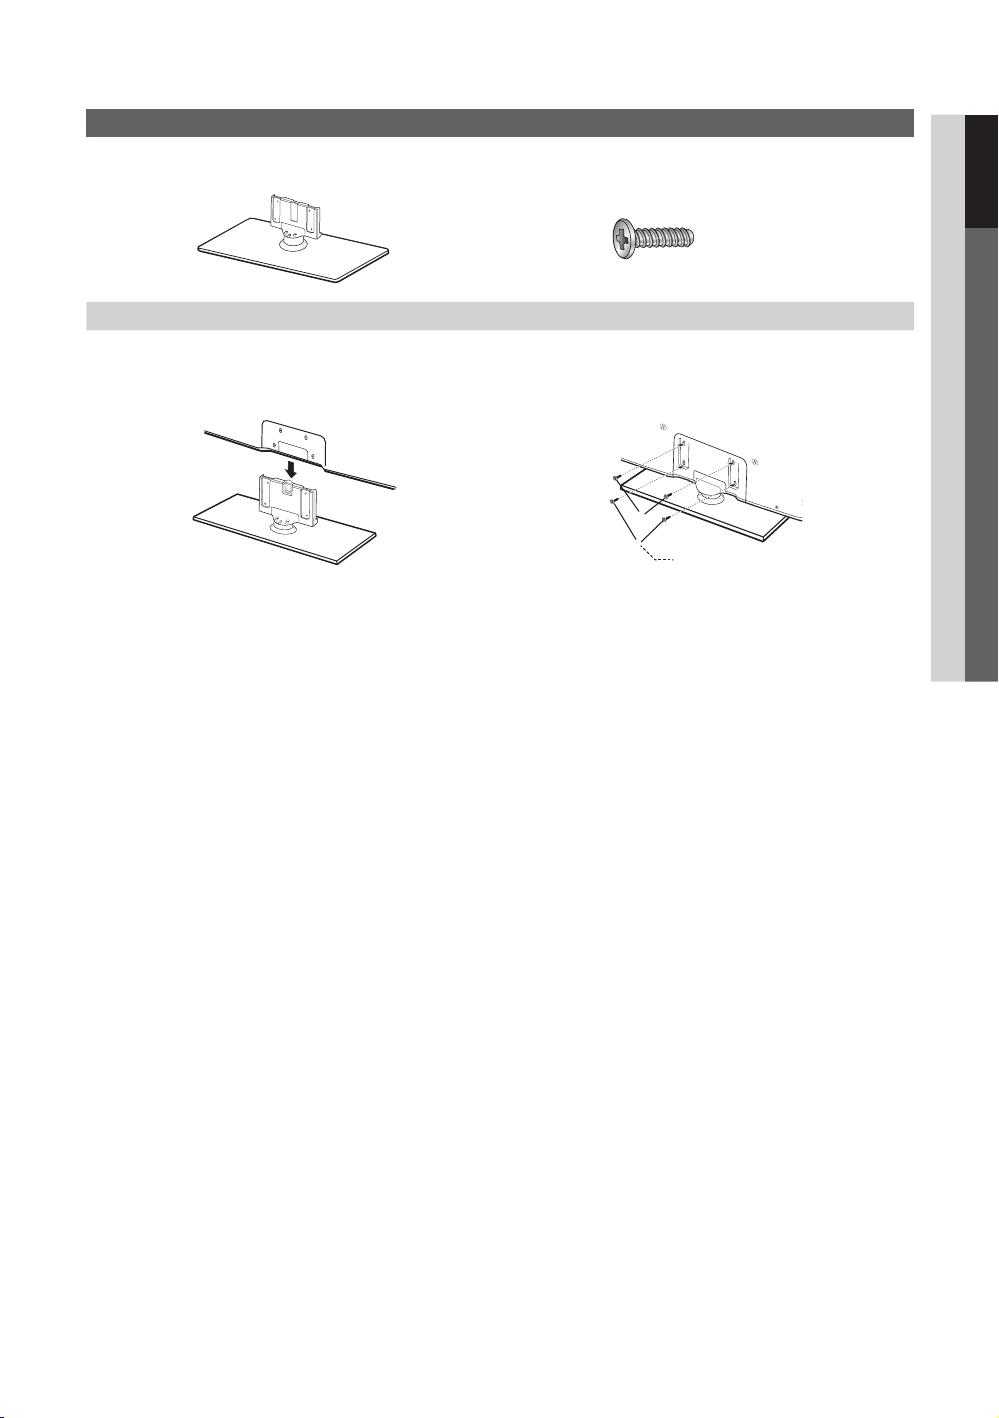
Install the Stand
s
s
s
s
s
s
s
s
1
2
See separate guide for installing the stand.
Stand (1EA) Screws (4EA)
Follow the steps below to connect the TV to the stand.
01 Getting Started
(M4 X L16)
Screws (M4 X L16)
1. With your TV upright, connect the TV to the Stand as
shown.
✎
NOTE
Make sure to distinguish between the front and back of the Stand and Guide Stand when assembling them.
x
Make sure that at least two persons lift and move the PDP TV.
x
Stand the product up and fasten the screws. If you fasten the screws with the PDP TV placed down, it may lean to
x
2. Fasten two screws (M4 X L16) at position 1, and then
fasten two screws (M4 X L16) at position 2.
one side.
Do not insert your fingers into the stand base slot of the TV when installing the stand base.
English
5
Page 6
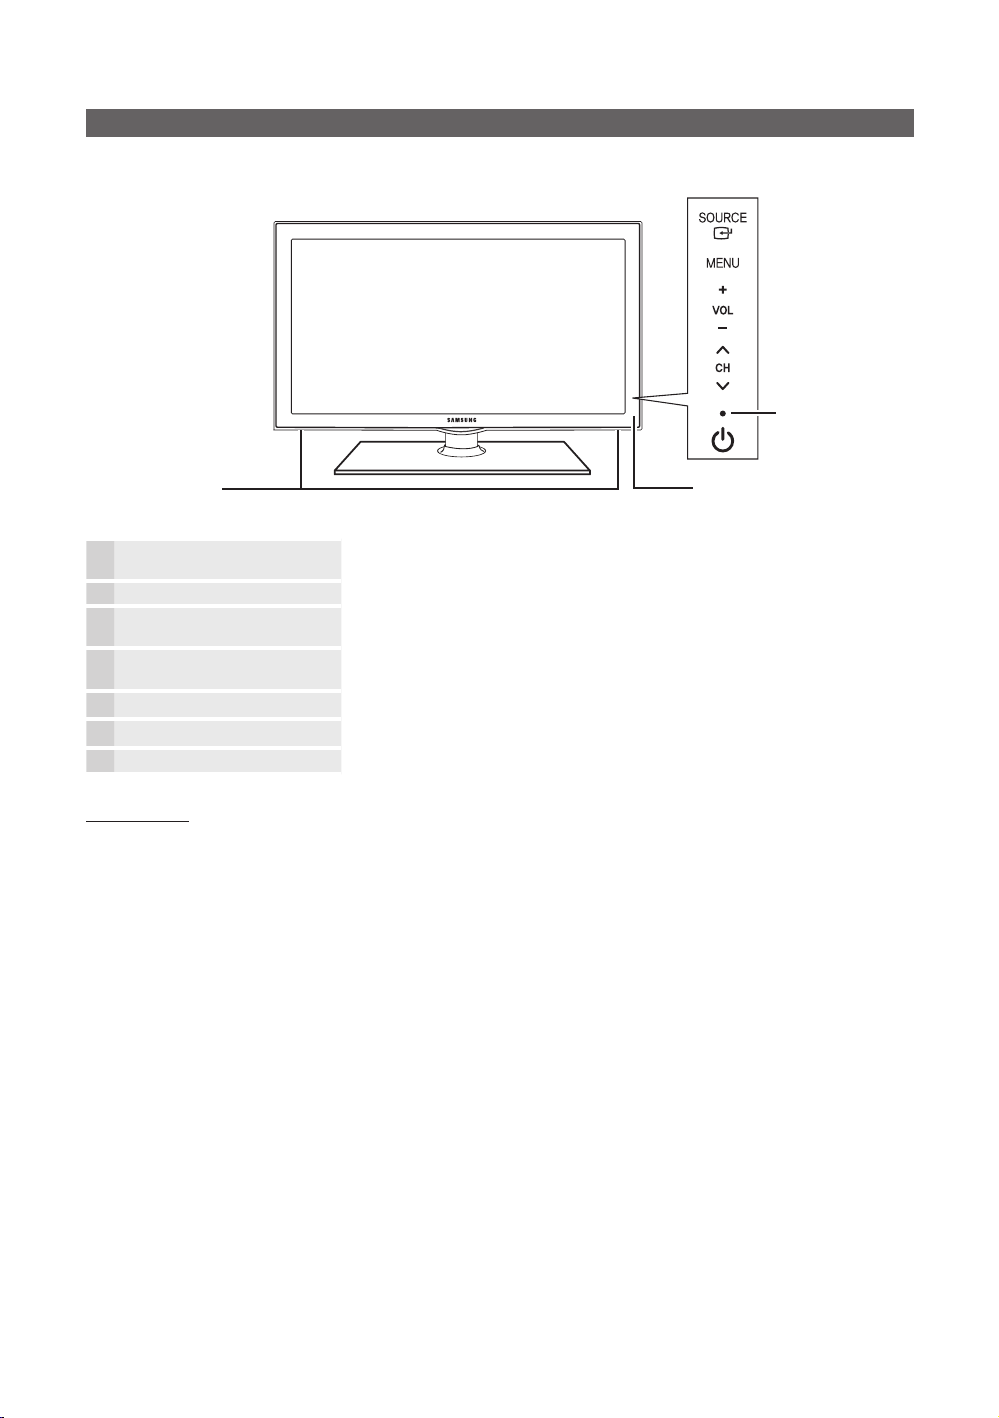
Getting Started
Viewing the Control Panel
✎
The product color and shape may vary depending on the model.
Power Indicator
Speakers
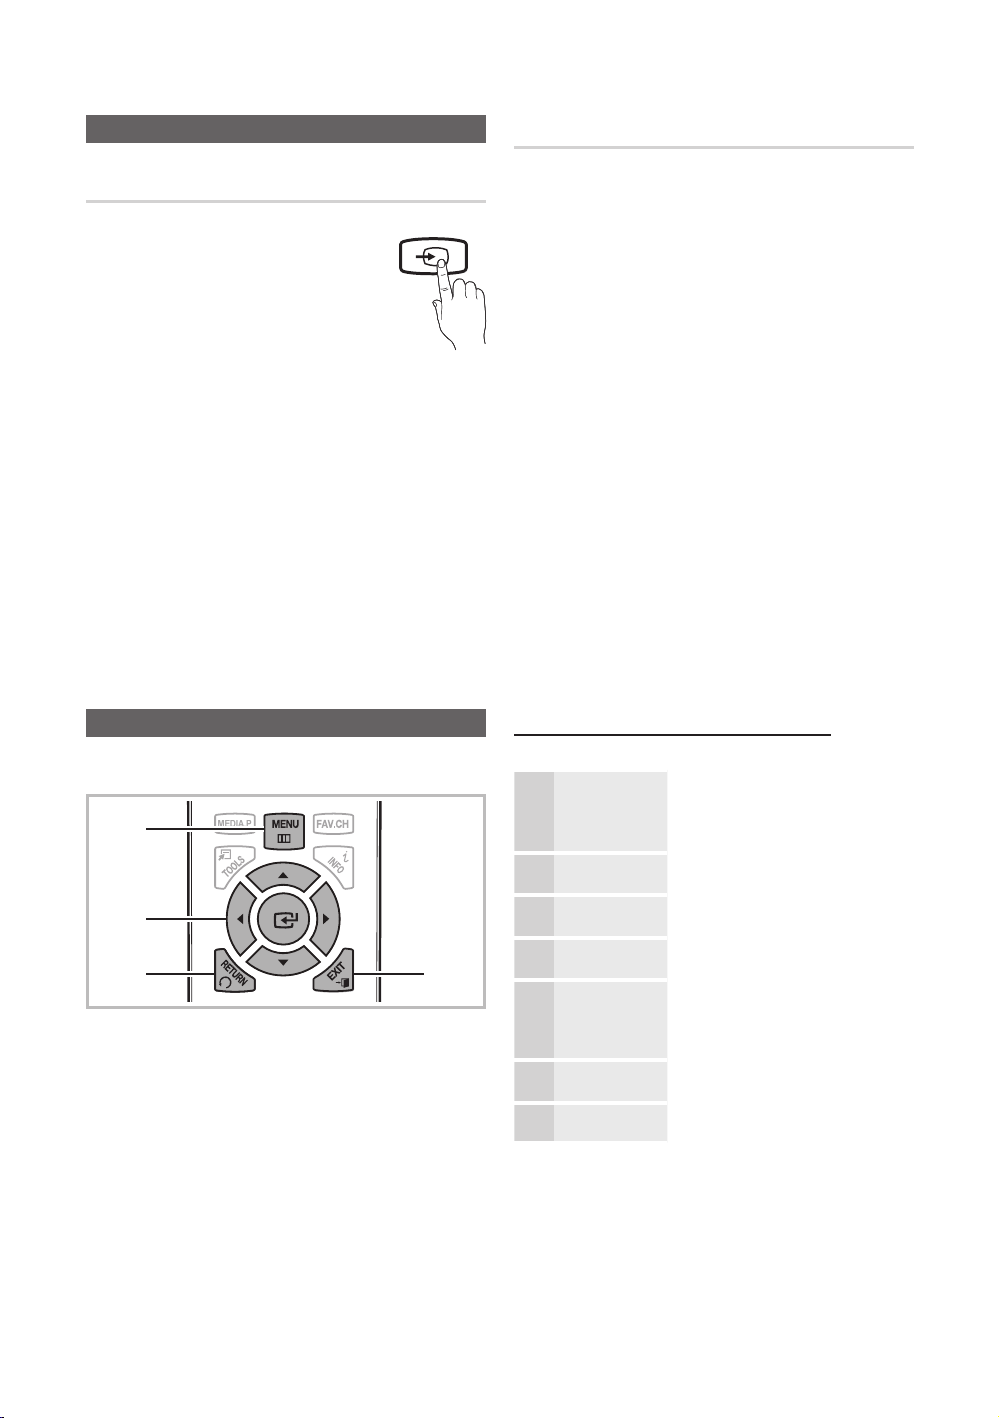
SOURCE
MENU Displays an on-screen menu, the OSD (on screen display) of your TV’s features.
Power Indicator Blinks and turns off when the power is on and lights up in standby mode.
Remote control sensor Aim the remote control towards this spot on the TV.
Standby mode
Do not leave your TV in standby mode for long periods of time (when you are away on a holiday, for example). A small amount
of electric power is still consumed even when the power button is turned off. It is best to unplug the power cord.
(Power)
Toggles between all the available input sources. In the on-screen menu, use this
button as you would use the ENTER button on the remote control.
Adjusts the volume. In the OSD, use the
◄ and ► buttons on the remote control.
Changes the channels. In the OSD, use the
▼ and ▲ buttons on the remote control.
Turns the TV on or off.
Remote control sensor
buttons as you would use the
buttons as you would use the
6
English
Page 7
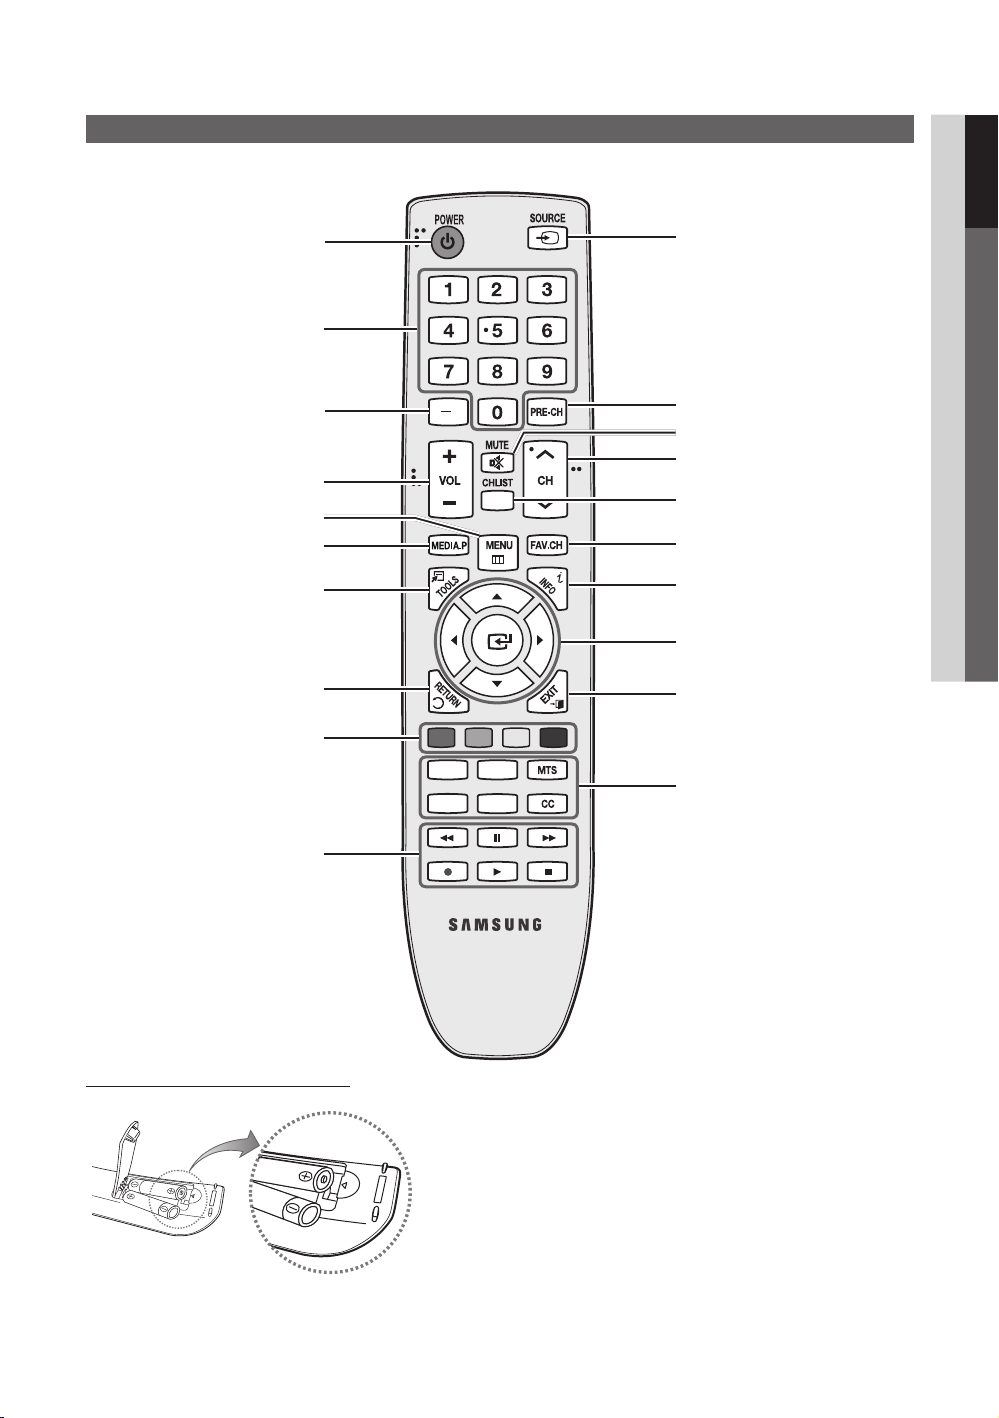
Viewing the Remote Control
✎
This is a special remote control for the visually impaired and has Braille points on the Power, Channel and Volume
buttons.
01 Getting Started
Turns the TV on and off.
Press to directly access channels.
Press to select additional channels
(digital) being broadcasted by the same
station. For example, to select channel
“54-3”, press “54”, then press “–” and
“3”.
Adjusts the volume.
Brings up the OSD.
Displays Media Play (USB) (p. 23).
Quickly select frequently used functions.
Returns to the previous menu.
Buttons used in the Channel list,
Media Play (USB) menu, etc.
Use these buttons in Media Play (USB)
and Anynet+ (HDMI-CEC) modes
(p. 23, 26).
(: Controls recording for Samsung
recorders that have the Anynet+ feature)
A B C D
S.MODE SLEEP
P.MODE P.SIZE
Displays and selects the available video
sources (p. 12).
Returns to the previous channel.
Cuts off the sound temporarily.
Changes channels.
Displays the channel list on the screen
(p. 13).
Displays Favorite Channel Lists on the
screen (p. 13).
Displays information on the TV screen.
Selects the on-screen menu items and
changes the values seen on the menu.
Exits the menu.
S.MODE: Press to select the sound
mode (p. 17).
SLEEP: Automatically shuts off the TV at
a preset time (p. 19).
MTS: Press to choose stereo, mono
or Separate Audio Program (SAP
broadcast) (p. 18).
P.MODE: Press to select the picture
mode (p. 15).
P.SIZE: Selects the picture size (p. 16).
CC: Controls the caption decoder (p.
21).
Installing batteries (Battery size: AAA)
✎
NOTE
Use the remote control within 23 feet from the TV.
x
Bright light may affect the performance of the remote
x
control. Avoid use when nearby fluorescent lights or neon
signs.
The color and shape may vary depending on the model.
x
English
7
Page 8
Getting Started
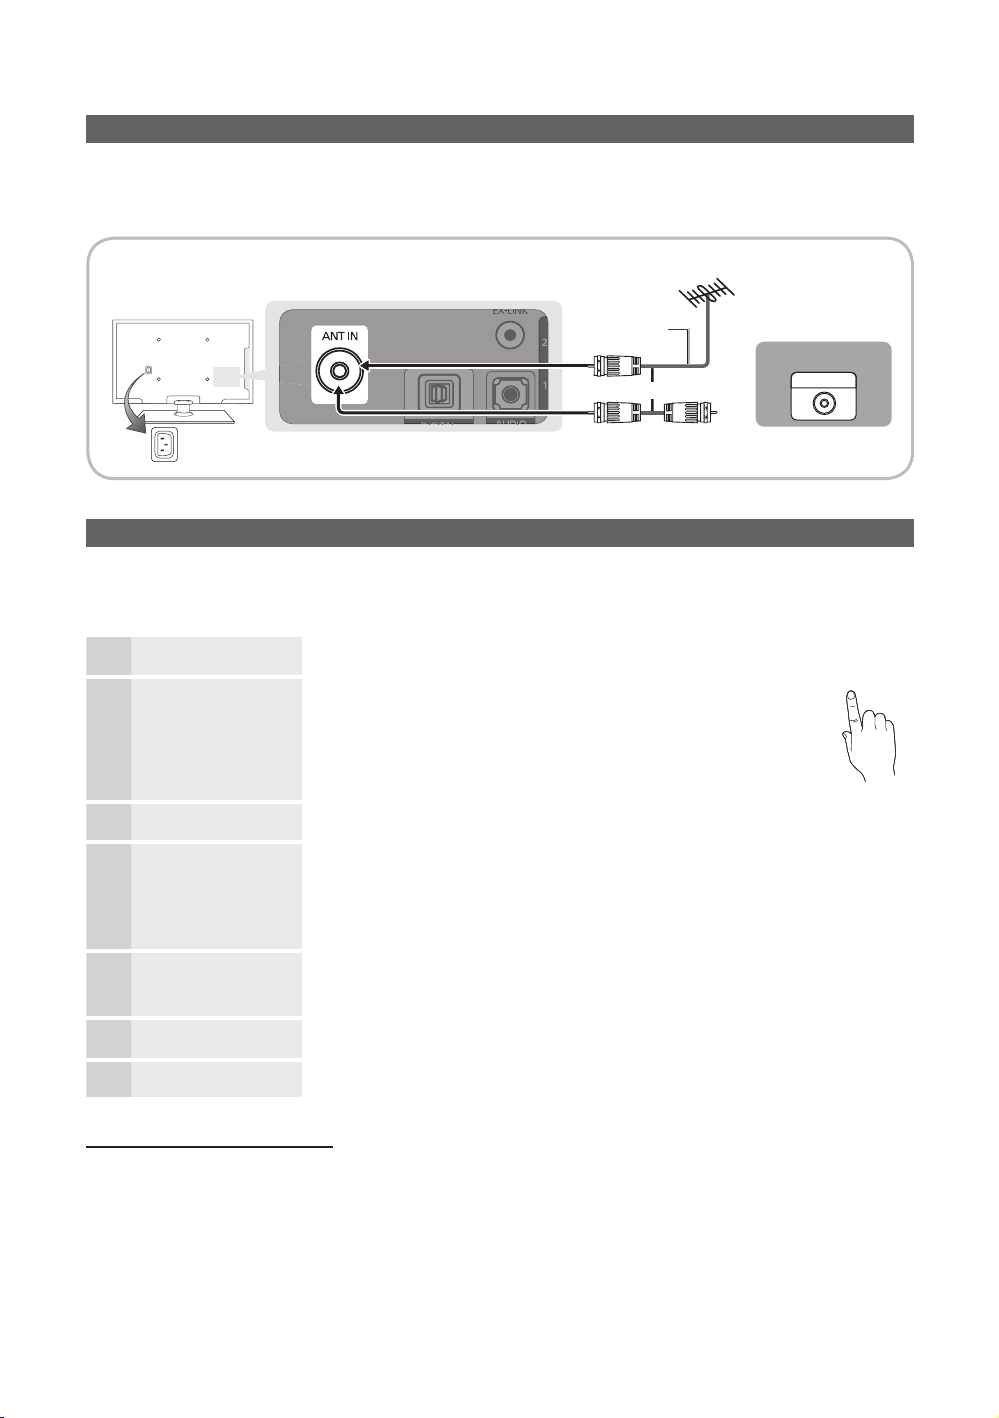
Connecting to an Antenna
When the TV is initially powered on, basic settings proceed automatically.
✎
Connecting the power cord and antenna.
✎
The PDP device may interfere with an amateur radio or AM radio.
VHF/UHF Antenna
Antenna Cable (Not Supplied)
Cable
or
Power Input
Plug & Play (Initial Setup)
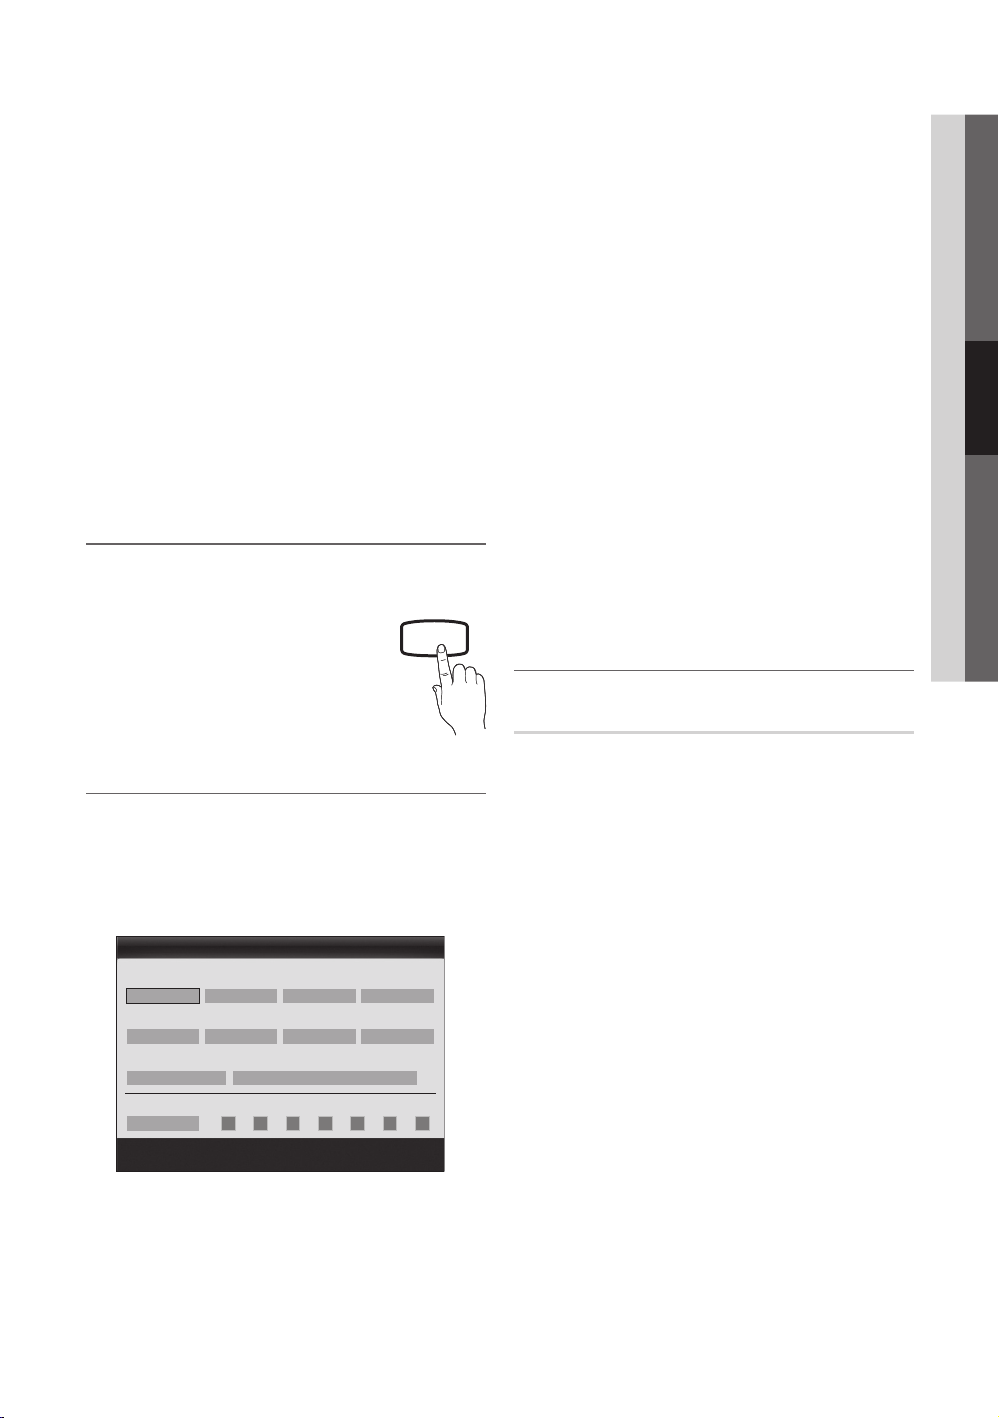
When the TV is initially powered on, a sequence of on-screen prompts will assist in configuring basic settings. Press the
POWER button. Plug & Play is available only when the Input source is set to TV.
✎
To return to the previous step, press the Red button.
Selecting a language
1
Selecting Store Demo
2
or Home Use
Selecting an antenna
Press the ▲ or ▼ button, then press the ENTER
Select the desired OSD (On Screen Display) language.
Press the ◄ or ► button, then press the ENTER
y Select the Home Use mode. Store Demo mode is for retail
environments.
y To return the unit’s settings from Store Demo to Home Use
(standard): Press the volume button on the TV. When you
see the volume OSD, press and hold MENU for 5 sec.
Press the ▲ or ▼ button, then press the ENTER
button.
button.
button. Select Air, Cable or Auto.
ANT OUT
POWER
P
3
Selecting a channel
4
Setting the
5
Clock Mode
View the
6
HD Connection Guide.
Enjoy your TV.
Press the ▲ or ▼ button, then press the ENTER
to memorize. When setting the antenna source to Cable, a step appears allowing you to
assign numerical values (channel frequencies) to the channels. For more information, refer to
Channel → Auto Program (p. 13).
✎
Press the ENTER button at any time to interrupt the memorization process.
Set the Clock Mode automatically or manually.
y Auto: Allows you to select DST (Daylight Saving Time) mode and time zone.
y Manual: Allows you to manually set the current date and time. (p. 19).
The connection method for the best HD screen quality is displayed.
Press the ENTER
button.
button. Select the channel source
7
If You Want to Reset This Feature...
MENU → Setup → Plug & Play → ENTER
English
8
Page 9
Connections
USB
HDMI IN 3
Connecting to an AV Device
Using an HDMI or HDMI/DVI cable: HD connection (up to 720p/1080i)
We recommend using the HDMI connection for the best quality HD picture.
Available devices: DVD, Blu-ray player, HD cable box, HD STB (Set-Top-Box) satellite receiver.
02 Connections
HDMI Cable (Not Supplied)
W
R
Red White
✎
HDMI IN 1(DVI), 2, 3, PC/DVI AUDIO IN
When using an HDMI/DVI cable connection, you must use the HDMI IN 1(DVI) jack for video. A DVD, Blu-ray
x
player, HD cable box, or HD STB satellite receiver may require a DVI-HDMI (DVI to HDMI) cable or DVI-HDMI
(DVI to HDMI) adapter. The PC/DVI AUDIO IN jack is required for audio.
The picture may not display normally (if at all) or the audio may not work if an external device that uses an older
x
version of HDMI mode is connected to the TV. If such a problem occurs, ask the manufacturer of the external
device about the HDMI version and, if out of date, request an upgrade.
Be sure to purchase a certified HDMI cable. Otherwise, the picture may not display or a connection error may
x
occur.
Using a Component (up to 720p/1080i) or Audio/Video (480i only) Cable
Available devices: DVD, Blu-ray player, cable box, STB satellite receiver, VCR
Device
HDMI OUT
HDMI to DVI Cable (Not Supplied)
R W
Audio Cable (Not Supplied)
Device
DVI OUT
AUDIO OUT
R-AUDIO-L
W
R
Red White
W R
Y
Video Cable
(Not Supplied)
Y
VIDEO OUT
✎
When connecting to AV IN, the color of the AV IN [Y/VIDEO] jack (green) will not match the video cable (yellow).
✎
For better picture quality, the Component connection is recommended over the A/V connection.
W R
AUDIO OUT
R-AUDIO-L
Audio Cable
(Not Supplied)
Device
R
RW
AUDIO OUT
R-AUDIO-L
W
R GB
RBG
COMPONENT OUT
PR PB Y
Component Cable
(Not Supplied)
Device
R GB
Red Blue Green
R W
Y
Red White Yellow
English
9
Page 10
Connections
R-AUDIO-L
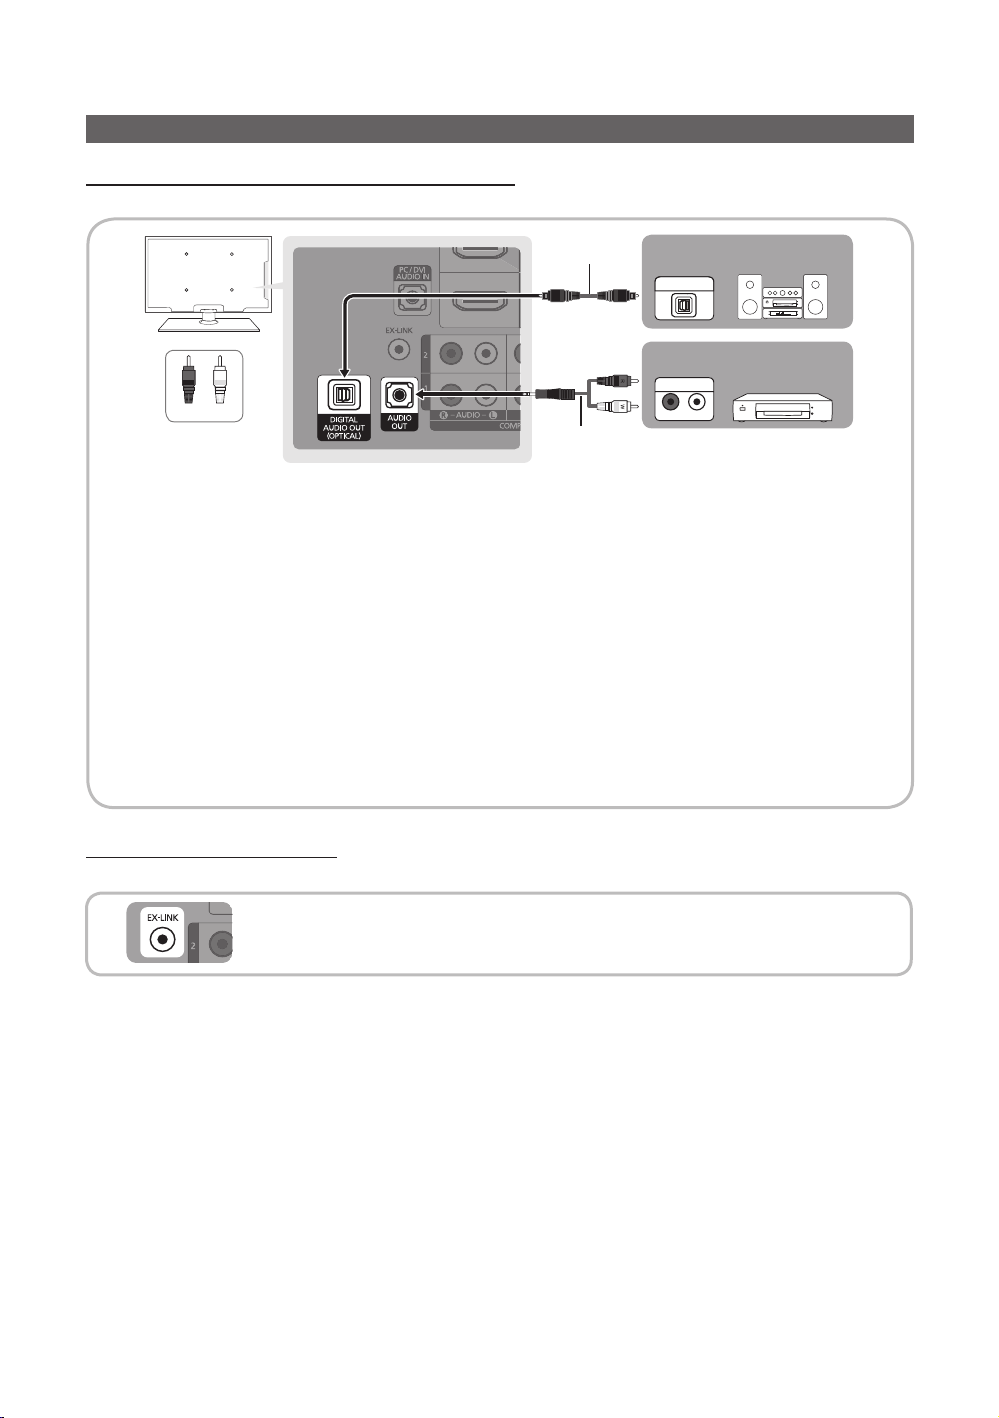
Connecting to an Audio Device
Using an Optical (Digital) or Audio (Analog) Cable Connection
Available devices: Digital Audio System, Amplifier, DVD home theater
Optical Cable (Not Supplied)
W
R
Red White
✎
DIGITAL AUDIO OUT (OPTICAL)
When a Digital Audio System is connected to the DIGITAL AUDIO OUT (OPTICAL) jack, decrease the volume
x
of both the TV and the system.
5.1 CH (channel) audio is available when the TV is connected to an external device supporting 5.1 CH.
x
When the receiver (amplifier or DVD home theater) is set to on, you can hear sound output from the TV’s
x
optical jack. When the TV is receiving a DTV signal, the TV will send 5.1 CH sound to the amplifier or DVD
home theater. When the source is a digital component such as a DVD / Blu-ray player / cable box / STB
(Set-Top-Box) satellite receiver and is connected to the TV via HDMI, only 2 CH audio will be heard from the
amplifier or DVD home theater. If you want to hear 5.1 CH audio, connect the digital audio out jack from your
DVD / Blu-ray player / cable box / STB satellite receiver directly to an amplifier or home theater.
✎
AUDIO OUT: Connects to the audio input jacks on your amplifier/DVD home theater.
When connecting, use the appropriate connector.
x
When an audio amplifier is connected to the AUDIO OUT jacks: Decrease the volume of the TV and adjust the
x
volume level with the amplifier’s volume control.
Audio Cable (Not Supplied)
Digital Audio System
OPTICAL
Amplifier / DVD home theater
AUDIO IN
Using an EX-Link Cable Connection
Available Devices: External devices that support EX-Link
EX-LINK: Connector for service only.
English
10
Page 11
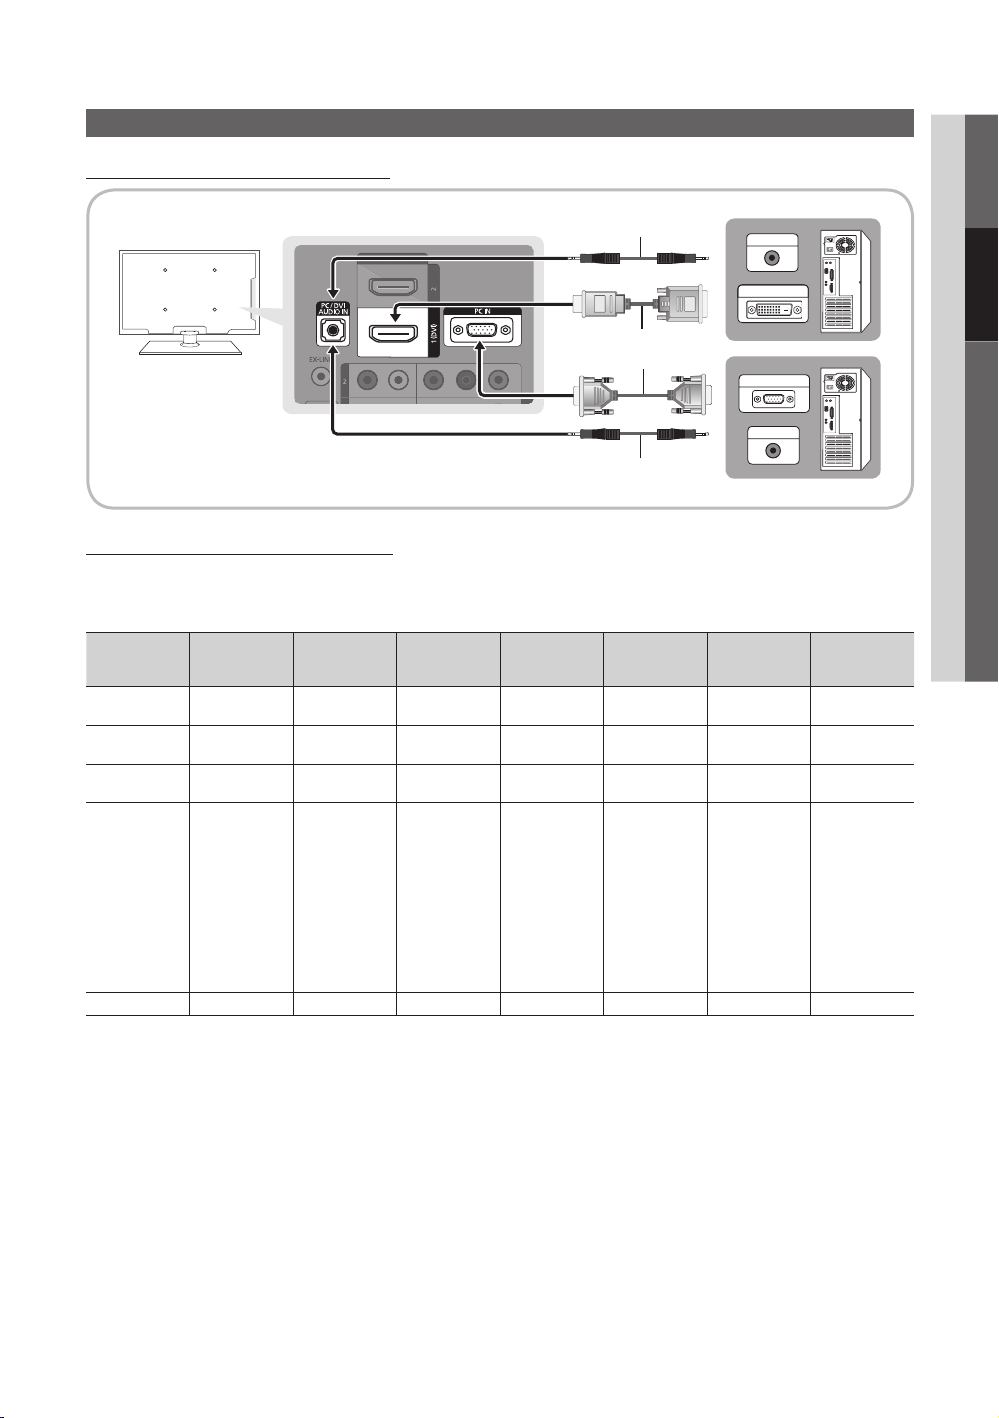
Using an HDMI/DVI Cable or a D-sub Cable
Connecting to a PC
02 Connections
Display Modes (D-Sub and HDMI/DVI Input)
Optimal resolution
y PN42C450: 1024 X 768 @ 60Hz
y PN50C450: 1360 X 768 @ 60Hz
Mode Resolution
IBM
MAC
VESA CVT
VESA DMT
VESA GTF
640 x 350
720 x 400
640 x 480
832 x 624
720 x 576
1280 x 720
640 x 480
640 x 480
640 x 480
800 x 600
800 x 600
800 x 600
1024 x 768
1024 x 768
1024 x 768
1280 x 720
1360 x 768
1280 x 720 52.500 70.000 89.040 -/+
Horizontal
Frequency
(KHz)
31.469
31.469
35.000
49.726
35.910
56.456
31.469
37.500
37.861
37.879
46.875
48.077
48.363
56.476
60.023
45.000
47.712
Vertical
Frequency
(Hz)
70.086
70.087
66.667
74.551
59.950
74.777
59.940
75.000
72.809
60.317
75.000
72.188
60.004
70.069
75.029
60.000
60.015
Pixel Clock
Frequency
(MHz)
25.175
28.322
30.240
57.284
32.750
95.750
25.175
31.500
31.500
40.000
49.500
50.000
65.000
75.000
78.750
74.250
85.500
Audio Cable (Not Supplied)
HDMI to DVI Cable (Not Supplied)
D-Sub Cable (Not Supplied)
Audio Cable (Not Supplied)
Sync Polarity
(H / V)
+/-
-/+
-/-
-/-
-/+
-/+
-/-
-/-
-/+/+
+/+
+/+
-/-
-/+/+
+/+
+/+
AUDIO OUT
DVI OUT
PC OUT
AUDIO OUT
PN42C450 PN50C450
✎
NOTE
For HDMI/DVI cable connection, you must use the HDMI IN 1(DVI) jack.
x
The interlace mode is not supported.
x
The set may operate abnormally if a non-standard video format is selected.
x
Separate and Composite modes are supported. SOG(Sync On Green) is not supported.
x
English
11
Page 12
Changing the Input Source
SOURCE
Source List
Use to select TV or an external input sources
such as a DVD / Blu-ray player / cable box /
STB satellite receiver.
MENU → Input → Source List →
ENTER
■ TV / PC / AV / Component1 / Component2 /
HDMI1/DVI / HDMI2 / HDMI3 / USB
✎
You can only choose external devices that
are connected to the TV. In the Source List,
connected inputs will be highlighted.
✎
In the Source List, PC is always activated.
Basic Features
Edit Name
MENU → Input → Edit Name → ENTER
■ VCR / DVD / Cable STB / Satellite STB / PVR STB /
AV Receiver / Game / Camcorder / PC / DVI PC /
DVI Devices / TV / IPTV / Blu-ray / HD DVD / DMA:
Name the device connected to the input jacks to make
your input source selection easier.
✎
When connecting an HDMI/DVI cable to the
HDMI IN 1(DVI) port, you should set the TV to DVI PC
or DVI Devices mode under Edit Name.
How to Navigate Menus
Before using the TV, follow the steps below to learn how to
navigate the menu and select and adjust different functions.
1
2
3 4
1 MENU button: Displays the main on-screen menu.
2 ENTER
3 RETURN button: Returns to the previous menu.
4 EXIT button: Exits the on-screen menu.
12
select an item. Confirm the setting.
/ Direction button: Move the cursor and
English
How to Operate the OSD (On Screen Display)
The access step may differ depending on the selected menu.
MENU
1
▲ / ▼ Select an icon with the ▲ or ▼
2
ENTER
3
▲ / ▼
4
◄ / ►
5
ENTER
6
EXIT
The main menu options appear on
the screen:
Picture, Sound, Channel, Setup,
Input, Application, Support.
button.
Press ENTER to access the
sub-menu.
Select the desired submenu with
the ▲ or ▼ button.
Adjust the value of an item with the
◄ or ► button. The adjustment in
the OSD may differ depending on
the selected menu.
Press ENTER to confirm the
selection.
Press EXIT.
7
Page 13
Channel Menu
CHLIST
Seeing Channels
Using Favorite Channels
MENU → Channel → Channel List → ENTER
03 Basic Features
Channel List
Add, delete or set Favorite channels and use
the program guide for digital broadcasts.
MENU → Channel → Channel List
→ ENTER
Select a channel in the All Channels,
Added Channels, Favorite or Programmed
screen by pressing the ▲ / ▼ and
ENTER buttons. Then you can watch the
selected channel.
Added Channels
■ All Channels: Shows all currently available channels.
■
■
■
programs.
✎
Using the color buttons with the Channel List
x
number.
x
Select desired channels and press the Yellow button
to set all the selected channels at the same time. The
x
(The options menus may differ depending on the
situation.)
Channel Status Display Icons
Icons Operations
6 Air
6-1 * TV #6
7 Air
8 Air
9 Air
9-1 * TV #9
10 Air
10-1 * TV #10
11-1 * TV #11
Air Zoom Select
Added Channels: Shows all added channels.
Favorite: Shows all favorite channels.
Programmed: Shows all currently reserved
Green (Zoom): Enlarges or shrinks a channel
Yellow (Select): Selects multiple channel lists.
mark appears to the left of the selected channels.
(Tools): Displays the Channel List option menu.
A channel selected.
A channel set as a Favorite.
A reserved Program.
Tools
Add to Favorite / Delete from Favorite
Set channels you watch frequently as Favorites.
1. Select a channel and press the TOOLS button.
2. Add or delete a the channel using the Add to Favorite
or Delete from Favorite menu respectively.
Added Channels
To show all Favorite channels, click on
the button shown on the right.
6 Air
6-1 * TV #6
7 Air
8 Air
9 Air
9-1 * TV #9
10 Air
10-1 * TV #10
11-1 * TV #11
Air Zoom Select
Delete
Add to Favorite
Timer Viewing
Channel Name Edit
Select All
Auto Program
Tools
FAV.CH
Memorizing Channels
MENU → Channel → ENTER
Antenna (Air / Cable)
Before your television can begin memorizing the available
channels, you must specify the type of signal source that is
connected to the TV (i.e. an Air or a Cable system).
Auto Program
■ Air: Air antenna signal.
■ Cable: Cable antenna signal.
■ Auto: Air and Cable antenna.
English
13
Page 14

Basic Features
✎
NOTE
When selecting the Cable TV system: STD, HRC
x
and IRC identify various types of cable TV systems.
Contact your local cable company to identify the
type of cable system that exists in your particular
area. At this point, the signal source has been
selected.
After all the available channels are stored, it starts
x
to remove scrambled channels. The Auto Program
menu then reappears.
Editing Channels
MENU → Channel → Channel List → ENTER
Channel Name Edit
1. Select a channel and press the TOOLS button.
2. Edit the channel name using the Channel Name Edit
menu.
■ Channel Name Edit (analog channels only): Assign your
own channel name.
Other Features
MENU → Channel → ENTER
Clear Scrambled Channel
This function is used to filter out scrambled channels after
Auto Program is completed. This process may take up to
20~30 minutes.
How to Stop Searching Scrambled Channels
1. Press the ENTER
2. Press the ◄ button to select Yes.
3. Press the ENTER
✎
This function is only available in Cable mode.
button to select Stop.
button.
Channel List
Channel List Option Menu
Set each channel using the Channel List menu options (Add
/ Delete, Timer Viewing, Select All / Deselect All). Option
menu items may differ depending on the channel status.
1. Select a channel and press the TOOLS button.
2. Select a function and change its settings.
■ Add / Delete: Delete or add a channel to display the
channels you want.
✎
NOTE
All deleted channels will be shown on the
x
All Channels menu.
A gray-colored channel indicates the channel
x
has been deleted.
The Add menu only appears for deleted
x
channels.
Delete a channel from the Added Channels or
x
Favorite menu in the same manner.
■ Timer Viewing: You can set a desired channel to be
displayed automatically at the reserved time. Set the
current time first to use this function.
1. Press the ◄ / ► / ▲ / ▼ buttons to select the
desired channel in Channel List.
2. Press the TOOLS button, then select
Timer Viewing.
3. Scroll up or down to adjust the settings in the box,
or use the numeric buttons on your remote to enter
the date and time.
✎
If you selected Once, Every Week or Everyday
in Repeat, you can enter the date you want.
4. Select OK, then press the ENTER
done.
✎
NOTE
Only memorized channels can be reserved.
x
Reserved programs will be displayed in the
x
Programmed menu.
When a digital channel is selected, press the ►
x
button to view the digital program.
■ Select All: Select all the channels in the channel list.
■ Deselect All: Deselect all the selected channels.
✎
You can only select Deselect All when one or
more channels are selected.
button when
Programmed
(in Channel List)
You can view, modify or delete a show you have reserved
to watch. Programmed timer viewing is displayed here.
Highlight a program and press the TOOLS button to display
options.
■ Change Info: Change a show you have reserved to
watch. Begin with step 3 of “Timer Viewing,” above.
■ Cancel Schedules: Cancel a show you have reserved
to watch.
✎
This deletes the highlighted or selected
program(s).
■ Information: Display a show you have reserved
to watch. (You can also change the reservation
Information.)
✎
Alternatively, you can view Information by
highlighting a program and pressing the
ENTER
■ Select All / Deselect All: Select or deselect all reserved
programs.
button.
14
English
Page 15
Fine Tune
(analog channels only)
If the reception is clear, you do not have to fine tune the
channel, as this is done automatically during the search and
store operation. If the signal is weak or distorted, fine tune
the channel manually. Scroll to the left or right until the image
is clear.
✎
Settings are applied to the channel you're currently
watching.
✎
Fine tuned channels that have been saved are marked
with an asterisk “*” on the right-hand side of the
channel number in the channel banner.
✎
To reset the fine-tuning, select Reset.
Picture Menu
Changing the Preset Picture Mode
MENU → Picture → Mode → ENTER
Changing the Picture Options
Advanced Settings
MENU → Picture → Advanced Settings →
ENTER
(Advanced Settings are available in Standard / Movie mode)
Compared to previous models, new Samsung TVs have a
more precise picture.
✎
In PC mode, you can only make changes to Gamma
and White Balance.
Advanced Settings
Black Tone : Off ►
Dynamic Contrast : Medium
Gamma : 0
Color Space : Native
White Balance
Flesh Tone : 0
Edge Enhancement : On
03 Basic Features
Mode
Select your preferred picture type.
■ Dynamic: Suitable for a bright room.
■ Standard: Suitable for a normal
environment.
■ Movie: Suitable for watching movies in
a dark room.
Adjusting Picture Settings
MENU → Picture → ENTER
P.MODE
Cell Light / Contrast / Brightness /
Sharpness / Color / Tint (G/R)
Your television has several setting options for picture quality
control.
✎
NOTE
When you make changes to Cell Light, Contrast,
x
Brightness, Sharpness, Color or Tint (G/R), the
OSD will be adjusted accordingly.
In PC mode, you can only make changes to
x
Cell Light, Contrast and Brightness.
Settings can be adjusted and stored for each
x
external device connected to the TV.
Move
Enter
Return
■ Black Tone (Off / Dark / Darker / Darkest): Select the
black level to adjust the screen depth.
■ Dynamic Contrast (Off / Low / Medium / High): Adjust
the screen contrast.
■ Gamma: Adjust the primary color intensity.
■ Color Space (Auto / Native / Custom): Adjust the
range of colors available to create the image. To adjust
Color, Red, Green, Blue and Reset, set Color Space
to Custom.
■ White Balance: Adjust the color temperature for a more
natural picture.
R-Offset / G-Offset / B-Offset: Adjust each color’s (red,
green, blue) darkness.
R-Gain / G-Gain / B-Gain: Adjust each color’s (red,
green, blue) brightness.
Reset: Resets the White Balance to it’s default settings.
■ Flesh Tone: Emphasize pink “Flesh Tone.”
■ Edge Enhancement (Off / On): Emphasize object
boundaries.
English
15
Page 16
Basic Features
Picture Options
MENU → Picture → Picture Options →
ENTER
✎
In PC mode, you can only make changes to the Color
Tone, Size and Screen Burn Protection.
Picture Options
Color Tone : Normal ►
Size : 16:9
Digital Noise Filter : Auto
HDMI Black Level : Normal
Film Mode : Off
Screen Burn Protection
Move
Enter
Return
■ Color Tone (Cool / Normal / Warm1 / Warm2)
✎
Warm1 or Warm2 will be deactivated when the picture
mode is Dynamic or Standard.
✎
Settings can be adjusted and stored for each external
device connected to an input on the TV.
■ Size: Your cable box/satellite receiver
may have its own set of screen sizes as
well. However, we highly recommend you
use 16:9 mode most of the time.
16:9 : Sets the picture to 16:9 wide
mode.
Zoom1: Use for moderate magnification.
Zoom2: Use for a stronger magnification.
Wide Fit: Enlarges the aspect ratio of the picture to fit
the entire screen.
✎
Available with HD 1080i / 720p signals in 16:9
mode.
4:3 : Sets the picture to basic (4:3) mode.
✎
Do not watch in 4:3 format for a long time. Traces
of borders displayed on the left, right and center
of the screen may cause image retention(screen
burn) which are not covered by the warranty.
Screen Fit: Displays the full image without any cut-off
when HDMI (720p / 1080i / 1080p) or Component
(1080i / 1080p) signals are inputted.
✎
NOTE
After selecting Zoom1, Zoom2 or Wide Fit:
x
1. Press the ► button to select Position.
2. Press the ENTER
3. Press the ▲ or ▼ button to move the picture up
or down.
button.
P.SIZE
4. Press the ENTER
5. Press the ► button to select Reset.
6. Press the ENTER
to its default position.
After selecting Screen Fit in HDMI (1080i/1080p) or
x
Component (1080i/1080p) mode, you may need to
center the picture:
1. Press the ◄ or ► button to select Position.
2. Press the ENTER
3. Press the ▲, ▼, ◄ or ► button to move the
picture.
4. Press the ENTER
5. Press the ◄ or ► button to select Reset.
6. Press the ENTER
HD (High Definition): 16:9 - 1080i/1080p (1920x1080),
x
720p (1280x720)
Settings can be adjusted and stored for each
x
external device you have connected to an input on
the TV.
Input Source Picture Size
ATV, AV,
Component (480i, 480p)
DTV(1080i),
Component (1080i, 1080p),
HDMI (720p, 1080i, 1080p)
PC 16:9, 4:3
■ Digital Noise Filter (Off / Low / Medium / High / Auto
/ Auto Visualization): If the broadcast signal received by
your TV is weak, you can activate the
Digital Noise Filter feature to reduce any static and
ghosting that may appear on the screen.
✎
When the signal is weak, try other options until the
best picture is displayed.
Auto Visualization: When changing analog channels,
displays signal strength.
✎
Only available for analog channels.
✎
When bar is green, is that the best possible signal.
■ HDMI Black Level (Normal / Low): Selects the black
level on the screen to adjust the screen depth.
✎
Available only in HDMI mode.
■ Film Mode (Off / Auto): Sets the TV to automatically
sense and process film signals from all sources and
adjusts the picture for optimum quality.
✎
Available in TV, AV, COMPONENT (480i / 1080i)
and HDMI (480i / 1080i).
■ Screen Burn Protection: To reduce the possibility of
screen burn, this unit is equipped with screen burn
prevention technology. The Time setting allows you to
program the time between movement of the picture in
minutes.
button.
button to reset the picture
button.
button.
button.
16:9, Zoom1,
Zoom2, 4:3
16:9, 4:3, Wide Fit,
Screen Fit
16
English
Page 17
Pixel Shift (Off / On): Using this function, you can
minutely move pixels on the PDP in horizontal or vertical
direction to minimize after images on the screen.
✎
Optimum condition for pixel shift
Item
Horizontal 0~4 4
Vertical 0~4 4
Time (minute) 1~4 min 4 min
✎
The Pixel Shift value may differ depending on the
TV size (inches) and mode.
✎
This function is not available in the Screen Fit
mode.
Auto Protection Time (10 min / 20 min / 40 min /
1 hour / Off): If the screen remains idle with a still image
for a certain period of time defined by the user, the
screen saver is activated to prevent the formation of
ghost images on the screen.
Scrolling: This function removes after-images on the
screen by moving all the pixels on the PDP according
to a pattern. Use this function when there are remaining
after-images or symbols on the screen, especially when
you displayed a still image on the screen for a long time.
✎
The after-image removal function has to be
executed for a long time (approximately 1 hour)
to effectively remove after-images on the screen.
If the after-image is not removed after performing
the function, repeat the function again.
✎
Press any key on the remote control to cancel this
feature.
Side Gray (Dark / Light): When you watch TV with the
screen ratio set to 4:3, the screen is prevented from any
damage by adjusting the white balance on both extreme
left and right sides.
TV/AV/Component/
HDMI/PC
Picture Reset (Reset Picture Mode /
Cancel)
Resets your current picture mode to its default settings.
Setting up the TV with your PC
Set the input source to PC.
MENU → Picture → ENTER
Auto Adjustment
Adjust frequency values/positions and fine tune the settings
automatically.
✎
Not available when connecting with an HDMI/DVI cable.
Screen
■ Coarse / Fine: Removes or reduces picture noise. If the
noise is not removed by Fine-tuning alone, then adjust
the frequency as best as possible (Coarse) and Finetune again. After the noise has been reduced, readjust
the picture so that it is aligned to the center of screen.
■ Position: Adjust the PC’s screen positioning if it does
not fit the TV screen. Press the ▲ or ▼ button to adjust
the Vertical-Position. Press the ◄ or ► button to adjust
the Horizontal-Position.
■ Image Reset: Resets the image to default settings.
Using Your TV as a Computer (PC) Display
Setting Up Your PC Software (Based on Windows XP)
Depending on the version of Windows and the video card,
the actual screens on your PC will probably look different, but
the same basic set-up information will apply in most cases.
(If not, contact your computer manufacturer or Samsung
Dealer.)
1. Click on “Control Panel” on the Windows start menu.
2. Click on “Appearance and Themes” in the “Control
Panel” window and a display dialog-box will appear.
3. Click on “Display” and a display dialog box will appear.
4. Navigate to the “Settings” tab on the display dialog-box.
y The correct size setting (resolution) [Optimum:
PN42C450: 1024 X 768 @ 60Hz, PN50C450: 1360 X
768 @ 60Hz]
y If a vertical-frequency option exists on your display
settings dialog box, the correct value is “60” or “60 Hz’.
Otherwise, just click “OK” and exit the dialog box.
Sound Menu
Changing the Preset Sound Mode
MENU → Sound → Mode → ENTER
Mode
■ Standard: Selects the normal sound
mode.
■ Music: Emphasizes music over voices.
■ Movie: Provides the best sound for
movies.
■ Clear Voice: Emphasizes voices over
other sounds.
■ Custom: Increase the intensity of
high-frequency sound to allow a better
listening experience for the hearing
impaired.
S.MODE
03 Basic Features
English
17
Page 18
Basic Features
Adjusting Sound Settings
MENU → Sound → Equalizer → ENTER
Equalizer
Adjusts the sound mode.
■ Balance L/R: Adjusts the balance between the right and
left speaker.
■ 100Hz / 300Hz / 1kHz / 3kHz / 10kHz (Bandwidth
Adjustment): Adjusts the level of specific bandwidth
frequencies.
■ Reset: Resets the equalizer to its default settings.
Sound Settings
MENU → Sound → ENTER
SRS TruSurround HD (Off / On)
This function provides a virtual 5.1 channel surround sound
experience through a pair of speakers using HRTF (Head
Related Transfer Function) technology.
Preferred Language
(digital channels only)
Digital-TV broadcasts are capable of
simultaneous transmission of many audio
tracks (for example, simultaneous translations
of the program into foreign languages).
✎
You can only select a language among
the ones being broadcasted.
MTS
Auto Volume (Off / On)
Because each broadcasting station has its own signal
conditions, the volume can vary as you switch between
channels. This feature lets you automatically adjust the
volume of the desired channel by lowering the sound output
when the modulation signal is high or by raising the sound
output when the modulation signal is low.
Speaker Select (External Speaker /
TV Speaker)
A sound echo may occur due to a difference in decoding
speed between the main speaker and the audio receiver. In
this case, set the TV to External Speaker.
✎
When Speaker Select is set to External Speaker, the
volume and MUTE buttons will not operate and the
sound settings will be limited.
✎
When Speaker Select is set to External Speaker.
TV Speaker: Off, External Speaker: On
x
✎
When Speaker Select is set to TV Speaker.
TV Speaker: On, External Speaker: On
x
✎
If there is no video signal, both speakers will be mute.
Sound Reset (Reset All /
Reset Sound Mode / Cancel)
■ Reset All: Restore all sound settings to the factory
defaults.
■ Reset Sound Mode: Returns all sound values in the
currently selected mode to the default settings.
Setup Menu
Multi-Track Sound (MTS)
(analog channels only)
■ Mono: Choose for channels that are
broadcasting in mono or if you are having
difficulty receiving a stereo signal.
■ Stereo: Choose for channels that are
broadcasting in stereo.
■ SAP: Choose to listen to the Separate
Audio Program, which is usually a
foreign-language translation.
✎
Depending on the particular program being broadcast,
you can listen to Mono, Stereo or SAP.
English
18
MTS
Setting the Time
MENU → Setup → Time → ENTER
Time
■ Clock: Setting the clock is for using various timer
features of the TV.
The current time will appear every time you press
the INFO button.
✎
If you disconnect the power cord, you have to set
the clock again.
Clock Mode (Auto / Manual)
– Auto: Set the current time automatically using the
time from a digital channel.
✎
The antenna must be connected in order to set
the time automatically.
Page 19
– Manual: Set the current time manually.
✎
Depending on the broadcast station and signal,
the auto time set up may not be correct. In this
case, set the time manually.
Clock Set: Set the Month, Day, Year, Hour, Minute and
am/pm manually.
✎
Available only when Clock Mode is set to
Manual.
✎
You can set the Month, Day, Year, Hour and
Minute directly by pressing the number buttons
on the remote control.
Time Zone: Select your time zone.
✎
This function is only available when the
Clock Mode is set to Auto.
DST (Daylight Saving Time) (Off / On / Auto):
Switches the Daylight Saving Time function on or off.
✎
This function is only available when the
Clock Mode is set to Auto.
Using the Sleep Timer
MENU → Setup → Time → Sleep Timer →
ENTER
■ Sleep Timer: Automatically shuts off the
TV after a preset period of time. (30, 60,
90, 120, 150 and 180 minutes).
✎
To cancel the Sleep Timer, select
Off.
SLEEP
Setting the On / Off Timer
MENU → Setup → Time → Timer 1 →
ENTER
You can set the TV to turn on automatically at a preset time.
■ Timer 1 / Timer 2 / Timer 3: Three different on / off
timer settings can be made. You must set the clock first.
On Time
▲
00 00 am
▼
Off Time
00 00 am
Volume
20 TV Cable 3
Repeat
Once
On Time / Off Time: Set the hour, minute, and activate
/ inactivate. (To activate the timer with the setting you’ve
chosen, set to Activate.)
Timer 1
Inactivate
Inactivate
Contents
Sun Mon Tue Wed Thu Fri Sat
Move
Adjust
Enter
Return
Volume: Set the desired volume level.
Contents: Select a folder in the USB device containing
music or photo files to be played when the TV is turned
on automatically.
✎
NOTE
If there is no music file on the USB device or the
x
folder containing a music file is not selected, the
Timer function does not operate correctly.
When there is only one photo file in the USB,
x
the Slide Show will not play.
If a folder name is too long, the folder cannot be
x
selected.
Each USB you use is assigned its own folder.
x
When using more than one of the same type of
USB, make sure the folders assigned to each
USB have different names.
Repeat: Select Once, Everyday, Mon~Fri, Mon~Sat,
Sat~Sun or Manual to set at you convenience. If you
select Manual, you can set up the day you want to
activate the timer.
✎
The mark indicates the day is selected.
✎
Auto Power Off (available only when the TV is turned
on by the Timer): The TV will be automatically turned off
after 3 hours of being left idle to prevent overheating.
Locking Programs
V-Chip
The V-Chip feature automatically locks out programs that
are deemed inappropriate for children. The user must enter a
PIN (personal identification number) before any of the V-Chip
restrictions are set up or changed.
✎
NOTE
V-Chip is not available in HDMI, Component or PC
x
mode.
The default PIN number of a new TV set is “0-0-0-0”
x
Allow All: Press to unlock all TV ratings.
x
Block All: Press to lock all TV ratings.
x
■ V-Chip Lock (Off / On): You can block rated TV
Programs.
TV Parental Guidelines: You can block TV programs
depending on their rating. This function allows you to
control what your children are watching.
– TV-Y: Young children / TV-Y7: Children 7 and over /
TV-G: General audience / TV-PG: Parental guidance
/ TV-14: Viewers 14 and over / TV-MA: Mature
audience
– ALL: Lock all TV ratings. / FV: Fantasy violence /
V: Violence / S: Sexual situation / L: Adult Language /
D: Sexually Suggestive Dialog
03 Basic Features
English
19
Page 20

Basic Features
✎
The V-Chip will automatically block certain
categories dealing with more sensitive material.
For example, if you block the TV-Y category,
then TV-Y7 will automatically be blocked.
Similarly, if you block the TV-G category, then all
the categories in the young adult group will be
blocked (TV-G, TV-PG, TV-14 and TV-MA). The
sub-ratings (D, L, S, V) work similarly. So, if you
block the L sub-rating in TV-PG, then the L subratings in TV-14 and TV-MA will automatically be
blocked.
MPAA Rating: You can block movies depending on
their MPAA rating. The Motion Picture Association of
America(MPAA) has implemented a rating system that
provides parents or guardians with advanced information
on which films are appropriate for children.
– G: General audience (no restrictions). / PG: Parental
guidance suggested. / PG-13: Parents strongly
cautioned. / R: Restricted. Children under 17 should
be accompanied by an adult. / NC-17: No children
under age 17. / X: Adults only. / NR: Not rated.
✎
The V-Chip will automatically block any category
that deals with more sensitive material. For
example, if you block the PG-13 category, then R,
NC-17 and X will automatically be blocked.
Canadian English: You can block TV programs
depending on their Anglophone Canadian ratings.
– C: Programming intended for children under age 8. /
C8+: Programming generally considered acceptable
for children 8 years and over to watch on their own.
/ G: General programming, suitable for all audiences.
/ PG: Parental Guidance. / 14+: Programming
contains themes or content which may not be
suitable for viewers under the age of 14. / 18+: Adult
programming.
✎
The V-Chip will automatically block any category
that deals with more sensitive material. For
example, if you block the G category, then
PG, 14+ and 18+ will automatically be blocked.
Canadian French: You can block TV programs
depending on their Anglophone Canadian ratings.
– G: General / 8 ans+: Programming generally
considered acceptable for children 8 years and over
to watch on their own. / 13 ans+: Programming may
not be suitable for children under the age of 13. /
16 ans+: Programming is not suitable for children
under the age of 16. / 18 ans+: Programming
restricted to adults.
✎
The V-Chip will automatically block any category
that deals with more sensitive material. For
example, if you block the 8 ans+ category, then
13 ans+, 16 ans+ and 18 ans+ will automatically
be blocked also.
Downloadable U.S. Rating: Parental restriction
information can be used while watching DTV channels.
✎
NOTE
If information is not downloaded from the
x
broadcasting station, the
Downloadable U.S. Rating menu is
deactivated.
Parental restriction information is automatically
x
downloaded while watching DTV channels. It
may take several seconds.
The Downloadable U.S. Rating menu
x
is available for use after information is
downloaded from the broadcasting station.
However, depending on the information from
the broadcasting station, it may not be available
for use.
Parental restriction levels differ depending on
x
the broadcasting station. The default menu
name and Downloadable US Rating change
depending on the downloaded information.
Even if you set the on-screen display to another
x
language, the Downloadable U.S. Rating
menu will appear in English only.
The rating will automatically block certain
x
categories that deal with more sensitive
material.
The rating titles (For example: Humor Level..etc)
x
and TV ratings (For example: DH, MH, H..etc)
may differ depending on the broadcasting
station.
■ Change PIN: The Change PIN screen will appear.
Choose any 4 digits for your PIN and enter them. As
soon as the 4 digits are entered, the
Confirm New PIN screen appears. Re-enter the same
4 digits. When the Confirm screen disappears, your PIN
has been memorized.
How to watch a restricted channel
If the TV is tuned to a restricted channel, the V-Chip will
block it. The screen will go blank and the following message
will appear:
This channel is blocked by V-Chip. Please enter the PIN to
unblock.
✎
If you forget the PIN, press the remote-control buttons
in the following sequence, which resets the pin to
“0-0-0-0:” POWER (off) → MUTE → 8 → 2 → 4 →
POWER(on)
20
English
Page 21
Economical Solutions
MENU → Setup → ENTER
The Eco Function can be used to enhance your power
savings.
Energy Saving (Off / Low / Medium /
High)
This adjusts the brightness of the TV in order to reduce
power consumption. Until the screen turns on again, a
distorted picture will be displayed for about 4 seconds.
Eco Sensor (Off / On)
Eco Sensor detects surrounding light intensity using an
optical sensor and adjusts the screen’s brightness.
■ Eco Sensor (Off / On): Turns the sensor off or on.
✎
If you adjust the Cell Light, the Eco Sensor will
be set to Off.
■ Min Cell Light: Manually adjust the screen brightness
(0~10).
✎
If Eco Sensor is On, the display brightness
may change (become slightly darker or brighter)
depending on the surrounding light intensity.
Other Features
MENU → Setup → ENTER
Language
Set the menu language.
1. Select Language and press the ENTER
2. Choose desired language and press the ENTER
button.
✎
Choose between English, Español and Français.
button.
Game Mode (Off / On)
When connecting to a game console such as PlayStation™
or Xbox™, you can enjoy a more realistic gaming experience
by selecting the game mode.
✎
NOTE
Precautions and limitations for game mode.
x
– To disconnect the game console and connect
another external device, set Game Mode to Off in
the setup menu.
– If you display the TV menu in Game Mode, the
screen shakes slightly.
Game Mode is not available when the input source
x
is set to TV or PC.
After connecting the game console, set Game Mode
x
to On. Unfortunately, you may notice reduced picture
quality.
If Game Mode is On:
x
– Picture mode is set to Standard and Sound mode
is set to Movie.
– Equalizer is not available.
Caption
(On-Screen Text Messages)
■ Caption (Off / On): You can switch the
caption function on or off. If captions are
not available, they will not be displayed
on the screen.
✎
The Caption feature doesn’t work in Component,
HDMI or PC modes.
■ Caption Mode: You can select the desired caption
mode.
✎
The availability of captions depends on the
program being broadcast.
Default / CC1~CC4 / Text1~Text4: (analog channels
only) The Analog Caption function operates in either
analog TV channel mode or when a signal is supplied
from an external device to the TV. (Depending on the
broadcasting signal, the Analog Caption function may
not work with digital channels.)
Default / Service1~Service6 / CC1~CC4 /
Text1~Text4: (digital channels only) The Digital Captions
function works with digital channels.
✎
Service1~6 may not be available in digital caption
mode depending on the broadcast.
■ Digital Caption Options: (digital channels only)
Size: Options include Default, Small, Standard and
Large. The default is Standard.
Font Style: Options include Default and Styles 0 to 7.
The default is Style 0.
Foreground Color: Options include Default, White,
Black, Red, Green, Blue, Yellow, Magenta and Cyan. You
can change the color of the letter. The default is White.
Background Color: This adjusts the opacity of text.
Options include of Default, White, Black, Red, Green,
Blue, Yellow, Magenta and Cyan. You can change the
background color of the caption. The default is Black.
Foreground Opacity: Options include Default,
Transparent, Translucent, Solid and Flashing.
Background Opacity: This adjusts the opacity of
the caption background. Options include Default,
Transparent, Translucent, Solid and Flashing.
Return to Default: This option sets each Size,
Font Style, Foreground Color, Background Color,
Foreground Opacity and Background Opacity to its
default.
CC
03 Basic Features
English
21
Page 22
Basic Features
IN
3
✎
NOTE
Digital Caption Options are available only
x
when Default and Service1 ~ Service6 can be
selected in Caption Mode.
The availability of captions depends on the
x
program being broadcasted.
The Default setting follows the standards set by
x
the broadcaster.
The Foreground and Background cannot be set
x
to have the same color.
You cannot set both the Foreground Opacity
x
and the Background Opacity to Transparent.
Melody (Off / Low / Medium / High)
Set so that a melody plays when the TV is turned on or off.
✎
The Melody does not play.
When no sound is output from the TV because the
x
MUTE button has been pressed.
When no sound is output from the TV because the
x
volume has been reduced to minimum with the VOL
– button.
When the TV is turned off by Sleep Timer function.
x
Support Menu
MENU → Support → ENTER
Self Diagnosis
Yes: If you can hear sound only from one speaker or not
at all during the sound test, select Yes. There may be a
problem with the TV. Contact Samsung’s Call Center for
assistance (1-800-SAMSUNG).
No: If you can hear sound from the speakers, select No.
There may be a problem with your external equipment.
Please check your connections. If the problem persists,
refer to the external device’s user manual.
■ Signal Strength: (Digital channels only) An HD channel’s
reception quality is either perfect or the channels are
unavailable. Adjust your antenna to increase signal
strength.
Software Upgrade
Samsung may offer upgrades
for your TV’s firmware in
the future. Please visit
Samsung.com or contact
the Samsung call center at
1-800-SAMSUNG (726-7864)
to receive information about
downloading upgrades and
using a USB drive. Upgrades
will be possible by connecting
a USB drive to the USB port.
✎
When software is upgraded, video and audio settings
you have made will return to their default (factory)
settings.
✎
We recommend you write down your settings so that
you can easily reset them after the upgrade.
USB Drive
TV Side Panel
HDMI IN 3
USB
✎
Self Diagnostic might take few seconds, this is part of
the normal operation of the TV.
■ Picture Test (Yes / No): Use to check for picture
problems.
Yes: If the test pattern does not appear or there is
noise in the test pattern, select Yes. There may be a
problem with the TV. Contact Samsung’s Call Center for
assistance (1-800-SAMSUNG).
No: If the test pattern is properly displayed, select No.
There may be a problem with your external equipment.
Please check your connections. If the problem persists,
refer to the external device’s user manual.
■ Sound Test (Yes / No): Use the built-in melody sound to
check for sound problems.
✎
If you hear no sound from the TV’s speakers,
before performing the sound test, make sure
Speaker Select is set to TV Speaker in the
Sound menu.
✎
The melody will be heard during the test even if
Speaker Select is set to External Speaker or the
sound is muted by pressing the MUTE button.
English
22
HD Connection Guide
Refer to this information when connecting external devices
to the TV.
Contact Samsung
View this information when your TV does not work properly
or when you want to upgrade the software. You can find
information regarding our call centers and how to download
products and software.
Page 23
Advanced Features
IN
3
Music
Photo Music Setup
SUM
307.2MB/973.7MB
USB
Media Play
04 Advanced Features
MEDIA.P
Enjoy photos and/or music files saved on a USB
Mass Storage Class (MSC) device.
MENU → Application → Media Play
(USB) → ENTER
Device Name
USB
SUM
315.0MB/495.0MB Free
Connecting a USB Device
1. Turn on your TV.
2. Connect a USB device containing photo and/or music files to the USB jack on the
side of the TV.
3. When the Input selection screen is displayed, press the ► button to select Media
Play (USB), then press the ENTER
button.
USB Drive
Using the Media Play Menu
Viewing a Photo (or Slide Show)
1. Press the MENU button. Press the ▲ or ▼ button to select Input,
then press the ENTER
button.
2. Press the ▲ or ▼ button to select Media Play (USB), then press the
ENTER
button.
3. Press the ▲ or ▼ button to select the corresponding USB Memory
Device, then press the ENTER
✎
The Media Play menu differs depending on the USB Memory
button.
Device connected to TV.
✎
Some devices may not be supported due to compatibility
problems.
4. Press the ◄ or ► button to select an icon (Photo, Music, Setup),
then press the ENTER
✎
It might not work properly with unlicensed multimedia files.
✎
Need-to-Know List before using Media Play (USB)
Only alphanumeric characters must be used as a folder name or file name (photo, music).
x
The file system only supports FAT16/32 (The NTFS file system is not supported) Certain types of USB Digital camera
x
button.
and audio devices may not be compatible with this TV.
Media Play (USB) only supports the USB Mass Storage Class device (MSC). MSC is a Mass Storage Class Bulk-
x
Only Transport device. Examples of MSC are Thumb drives and Flash Card Readers (Both USB and HUB are not
supported.)
Before connecting your device to the TV, please back up your files to prevent them from damage or loss of data.
x
SAMSUNG is not responsible for any data file damage or data loss.
Please connect directly to the USB port of your TV. If you are using a separate cable connection, there may be a USB
x
Compatibility problem.
Photo
SUM
307.2MB/973.7MB
Photo Music Setup
Move
Enter
Exit
TV Side Panel
Play
Return
HDMI IN 3
USB
English
23
Page 24

Advanced Features
Photo
Photo Music Setup
SUM
307.2MB/973.7MB
Music
Photo Music Setup
SUM
307.2MB/973.7MB
USB
Only MP3 and JPEG file formats are supported.
x
The Media Play (USB) mp3 format only supports music files with a high sampling frequency (32 kHz, 44.1 kHz, or 48
x
kHz).
We recommend the sequential jpeg format.
x
Do not disconnect the USB device while it is loading.
x
MSC supports MP3 and JPEG files, and the PTP device supports JPEG files only.
x
MTP (Media Transfer Protocol) is not supported.
x
The playing duration of an mp3 file may be displayed as “00:00:00” if its playing time information is not found at the
x
start of the file.
The higher the resolution of the image, the longer it takes to display on the screen.
x
The Photo or Music List displays up to 300 folders or files.
x
Loading may take some time depending on the size of the file.
x
MP3 files with DRM that have been downloaded from a non-free site cannot be played.
x
Digital Rights Management (DRM) is a technology that supports the creation, distribution and management of the
x
content in an integrated and comprehensive way, including the protection of the rights and interests of the content
providers, the prevention of the illegal copying of contents, as well as managing billings and settlements.
The power-saving mode of some external hard disk drives may be released automatically when connected to the TV.
x
If a USB extension cable is used, the USB device may not be recognized or the files on the device may not be read.
x
If a USB device connected to the TV is not recognized, the list of files on the device is corrupted or a file in the list is
x
not played, connect the USB device to the PC, format the device and check the connection.
If a file deleted from the PC is still found when Media Play is run, use the “Empty the Recycle Bin” function on the PC
x
to permanently delete the file.
Photo
button.
button to make a change.
button to make a change.
Photo
440
580
*
78.0KB
Jan 7, 2010
03 / 14
SUM
307.2MB/973.7MB
DSC_0558.JPG
Upper Fold... Folder
File.....jpg File.....jpg
Free
File.....jpg File.....jpg File.....jpg
Select Move Option
File.....jpg
File.....jpg File.....jpg File.....jpg
File.....jpg File.....jpg
Viewing a Photo (or Slide Show)
1. Press the INFO button to display the option View, Start Slide Show,
Delete, Delete All, Deselect All.
2. Press the ▲ or ▼ button to select Start Slide Show then press the
ENTER
✎
During the slide show, files are displayed in order from the
currently shown file.
✎
MP3 files can be automatically played during the Slide Show
if the Default Background Music is set to On. To enable this
function, MP3 files and other photo files must be located in the
same folder on the USB Memory Device.
✎
Press the INFO button during the slide show to set the following options Slide Show Speed, Background Music,
Background Music Setting, List. Press the ▲ or ▼ button to select the option, then press the ENTER button.
– After setting the option press the ENTER
✎
Press the INFO button during the photo view to set the following options Start Slide Show, Zoom, Rotate, List. Press
the ▲ or ▼ button to select the option, then press the ENTER button.
– After setting the option press the ENTER
1/1 Page
File.....jpg File.....jpg
Play
Return
24
English
Page 25

Music
Photo
Photo Music Setup
SUM
307.2MB/973.7MB
Music
Photo Music Setup
SUM
307.2MB/973.7MB
DSC_0558.JPG
580
440
78.0KB
03 / 14
SUM
*
Photo
307.2MB/973.7MB
File.....jpg File.....jpg File.....jpg
File.....jpg File.....jpg File.....jpg
File.....jpg File.....jpg
File.....jpg File.....jpg
File.....jpg File.....jpg File.....jpg
USB
Using the MP3 List
04 Advanced Features
Folder icon
Music
SUM
307.2MB/973.7MB
Music list icon
Move to the previous folder stage icon
✎
Press the (REW) or (FF) buttons to change pages.
✎
The selected file is displayed on the top with its playing time.
1. To select all files or a file, press the INFO button to display the Music
menus.
Press the ENTER
Files), Repeat Music, Delete (or Delete Selected File), Delete All or
button to select Play (or Play the Selected
Deselect All.
2. Press the ▲ or ▼ button to move to an icon, then press the
ENTER
button.
Pressing the ENTER
button over a musical note icon immediately
plays the music file.
Pressing the ENTER
button over a folder icon shows the music
Photo Music Setup
Music
4.3MB
Jan 7, 2010
2 / 31
Play the selected le
Repeat Music : Off
Delete Selected File
Delete All
SUM
307.2MB/973.7MB
Deselect All
06-I Will Carry You.mp3 00:00:00
Upper Folder
Folder
01-The Way.mp3 00:03:25
02-Run To Me.mp3 00:03:25
03-No More Sad Songs.mp3 00:03:25
04-Interference-gold.mp3 00:03:25
05-marketa_irglova-The_hill.mp3 00:03:25
06-I Will Carry You.mp3 00:03:25
07-marketa_irglova.mp3 00:03:25
08-Super World.mp3 00:03:25
Select Move Option
Exit
Move
Play
Play
files included in the folder.
■ Play: Select to play MP3 files.
✎
This menu only shows files with the MP3 file extension. Files with other file extensions are not displayed, even if
they are saved on the same USB device.
✎
To adjust the music volume, press the
MUTE button on the remote control.
button on the remote control. To mute the sound, press the
■ Repeat Music (On / Off): Select to repeatedly play MP3 files in the current folder.
Playing Music
y Only displays files with the MP3 file extension. Other file extensions are not displayed, even if they are saved on the same
USB device.
y If the sound is strange when playing MP3 files, adjust the Equalizer and SRS TruSurround HD in the Sound menu. (An
over-modulated MP3 file may cause a sound problem.)
y Music function information icons
Return
1/4 Page
Return
Repeat Music is On.
Repeat Music is Off.
When pressing the (Play) / (Pause) button on the remote control while music is playing.
When pressing the (Stop) button on the remote control, the music stops.
English
25
Page 26

Advanced Features
HDMI IN 3
Photo
Photo Music Setup
SUM
307.2MB/973.7MB
Music
Photo Music Setup
SUM
307.2MB/973.7MB
DSC_0558.JPG
580
440
78.0KB
03 / 14
SUM
*
Photo
307.2MB/973.7MB
File.....jpg File.....jpg File.....jpg
File.....jpg File.....jpg File.....jpg
File.....jpg File.....jpg
File.....jpg File.....jpg
File.....jpg File.....jpg File.....jpg
Music
4.3MB
2 / 31
06-I Will Carry You.mp3 00:00:00
01-The Way.mp3 00:03:25
02-Run To Me.mp3 00:03:25
03-No More Sad Songs.mp3 00:03:25
04-Interference-gold.mp3 00:03:25
05-marketa_irglova-The_hill.mp3 00:03:25
06-I Will Carry You.mp3 00:03:25
07-marketa_irglova.mp3 00:03:25
08-Super World.mp3 00:03:25
SUM
307.2MB/973.7MB
USB
Setup
Using the Setup Menu
■ Slide Show speed: Select to control the slide show speed. You can
select Fast, Normal or Slow.
■ Background Music: Select to determine whether to play an MP3 file
during a slide show. You can select Music On or Music Off.
■ Background Music Setting: While a slide show is in progress, use
the Background Music Setting to select a music file to listen to.
Select an MP3 file as the background music.
■ Repeat Music: Select to determine whether to repeat playing the
music when all MP3 files in the current folder have been played.
■ Screen Saver: Select to set the waiting time before the screen saver appears. The screensaver will appear when no
button is pressed for 10 min, 20 min, 40 min, 1 hour or Off.
■ Safe Remove: You can remove the device safely from the TV.
Playing the selected photos / music files
1. Press the Yellow button.
2. Repeat the above operation to select desired photos / music files.
✎
3. Press the
What is Anynet+?
Anynet+ is a function that enables you to control all connected Samsung devices that support Anynet+ with your Samsung
TV’s remote. The Anynet+ system can be used only with Samsung devices that have the Anynet+ feature. To be sure your
Samsung device has this feature, check if there is an Anynet+ logo on it.
To connect to a Samsung Home Theater
Setup
Selected photos or files are marked with the symbol . To cancel a selection, press the Yellow button again.
(Play) / ENTER button to play the selected photos or files.
Slide show Speed : Fast
Background Music : On
Background Music Setting
Repeat Music : On
Screen Saver : 10 min
Safe Remove
Move
Enter
Anynet+
Return
TV
HDMI Cable (Not Supplied)
Optical Cable (Not Supplied)
Anynet+ Device 1
HDMI Cable (Not Supplied)
Home Theater
Anynet+ Device
2, 3
HDMI Cable (Not Supplied)
1. Connect the HDMI IN (1(DVI), 2, 3) jack on the TV and the HDMI OUT jack of the corresponding Anynet+ device using an
HDMI cable.
2. Connect the HDMI IN jack of the home theater and the HDMI OUT jack of the corresponding Anynet+ device using an
HDMI cable.
English
26
Page 27

✎
NOTE
Connect the Optical cable between the DIGITAL AUDIO OUT (OPTICAL) jack on your TV and the Digital Audio Input
x
on the Home Theater.
When following the connection above, the Optical jack only outputs 2 channel audio. You will only hear sound from
x
the Home Theater’s Front, Left and Right speakers and the subwoofer. If you want to hear 5.1 channel audio, connect
the DIGITAL AUDIO OUT (OPTICAL) jack on the DVD / Satellite Box (i.e. Anynet Device 1 or 2) directly to the
Amplifier or Home Theater, not the TV.
You can connect only one Home Theater.
x
You can connect an Anynet+ device using the HDMI cable. Some HDMI cables may not support Anynet+ functions.
x
Anynet+ works when the AV device supporting Anynet+ is in the standby or on status.
x
Anynet+ supports up to 12 AV devices in total. Note that you can connect up to 3 devices of the same type.
x
Anynet+ Menu
The Anynet+ menu changes depending on the type and status of the Anynet+ devices connected to the TV.
Anynet+ Menu Description
View TV Changes Anynet+ mode to TV broadcast mode.
Device List Shows the Anynet+ device list.
(device_name) MENU Shows the connected device menus. E.g. If a DVD recorder is connected, the disc menu of
(device_name) INFO Shows the play menu of the connected device. E.g. If a DVD recorder is connected, the
Recording: (*recorder) Starts recording immediately using the recorder. (This is only available for devices that
Stop Recording: (*recorder) Stops recording.
Receiver Sound is played through the receiver.
If more than one recording device is connected, they are displayed as (*recorder) and if only one recording device is
connected, it will be represented as (*device_name).
the DVD recorder will appear.
play menu of the DVD recorder will appear.
support the recording function.)
04 Advanced Features
Setting Up Anynet+
MENU → Application → Anynet+ (HDMI-CEC) → ENTER
■ Setup
Anynet+ (HDMI-CEC) (Off / On): To use the Anynet+ Function, Anynet+ (HDMI-CEC) must be set to On.
✎
When the Anynet+ (HDMI-CEC) function is disabled, all the Anynet+ related operations are deactivated.
Auto Turn Off (No / Yes): Setting an Anynet+ Device to turn off automatically when the TV is turned off.
✎
If Auto Turn Off is set to Yes, running external devices will turn off at the same time as the TV powers off.
However, a device may not turn off if recording is in progress.
✎
May not be enabled depending on the device.
English
27
Page 28

Advanced Features
Switching between Anynet+ Devices
1. Anynet+ devices connected to the TV are listed.
✎
If you cannot find a device you want, press the Red button to refresh the list.
2. Select a device and press the ENTER
✎
The Device List menu will only appear when you set Anynet+ (HDMI-CEC) to On in the Application menu.
Switching to the selected device may take up to 2 minutes. You cannot cancel the operation during the switching
x
operation.
If you have selected external input mode by pressing the SOURCE button, you cannot use the Anynet+ function.
x
Make sure to switch to an Anynet+ device by using the Device List.
Recording
You can make a recording of a TV Program using a Samsung recorder.
1. Select Recording.
✎
When there are more than two recording devices
When multiple recording devices are connected, the recording devices are listed. Select one recording device in
x
the Device List.
✎
When the recording device is not displayed, select Device List and press the Red button to search devices.
2. Press the EXIT button to exit.
✎
You can record the source streams by selecting Recording: (device_name).
✎
Pressing the (REC) button will record whatever you are currently watching. If you are watching video from
another device, the video from the device is recorded.
✎
Before recording, check whether the antenna jack is properly connected to the recording device. To properly
connect an antenna to a recording device, refer to the recording device’s users manual.
button. You can switch to the selected device.
Listening through a Receiver
You can listen to sound through a receiver (i.e Home Theater) instead of the TV Speaker.
1. Select Receiver and set to On.
2. Press the EXIT button to exit.
✎
If your receiver supports audio only, it may not appear in the device list.
✎
The receiver will work when you have properly connected the optical in jack of the receiver to the DIGITAL AUDIO
OUT (OPTICAL) jack of the TV.
✎
When the receiver (i.e Home Theater) is set to On, you can hear sound output from the TV’s Optical jack. When
the TV is displaying a DTV (air) signal, the TV will send out 5.1 channel sound to the receiver. When the source is a
digital component such as a DVD and is connected to the TV via HDMI, only 2 channel sound will be heard from
the receiver.
✎
NOTE
You can only control Anynet+ devices using the TV remote control, not the buttons on the TV.
x
The TV remote control may not work under certain conditions. If this occurs, reselect the Anynet+ device.
x
The Anynet+ functions do not operate with other manufacturers’ products.
x
28
English
Page 29

Troubleshooting for Anynet+
Problem Possible Solution
Anynet+ does not work. • Check if the device is an Anynet+ device. The Anynet+ system supports Anynet+ devices only.
I want to start Anynet+. • Check if the Anynet+ device is properly connected to the TV and check if the Anynet+ (HDMI-CEC) is set to
I want to exit Anynet+. • Select View TV in the Anynet+ menu.
The message “Connecting to
Anynet+ device...” appears on the
screen.
The Anynet+ device does not play. • You cannot use the play function when Plug & Play (initial setup) is in progress.
• Only one receiver (home theater) can be connected.
• Check if the Anynet+ device power cord is properly connected.
• Check the Anynet+ device’s Video/Audio/HDMI cable connections.
• Check whether Anynet+ (HDMI-CEC) is set to On in the Anynet+ setup menu.
• Check whether the TV remote control is in TV mode.
• Check whether the remote control is Anynet+ compatible.
• Anynet+ doesn’t work in certain situations. (Searching channels, operating Media Play (USB) or Plug & Play
(initial setup), etc.)
• When connecting or removing the HDMI cable, please make sure to search devices again or turn your TV off
and on again.
• Check if the Anynet+ Function of Anynet+ device is set on.
On in the Anynet+ Setup menu.
• Press the TOOLS button to display the Anynet+ menu and select a menu you want.
• Press the SOURCE button on the TV remote control and select a non- Anynet+ device.
• Press
only when a tuner-embedded Anynet+ device is not connected.)
• You cannot use the remote control when you are configuring Anynet+ or switching to a view mode.
• Use the remote control when the Anynet+ setting or switching to view mode is complete.
, PRE-CH, and FAV.CH to change the TV mode. (Note that the channel button operates
04 Advanced Features
The connected device is not
displayed.
The TV Program cannot be
recorded.
The TV sound is not output
through the receiver.
• Check whether or not the device supports Anynet+ functions.
• Check whether or not the HDMI cable is properly connected.
• Check whether Anynet+ (HDMI-CEC) is set to On in the Anynet+ setup menu.
• Search Anynet+ devices again.
• You can connect an Anynet+ device using the HDMI cable only. Some HDMI cables may not support Anynet+
functions.
• If connection is terminated because there has been a power interruption or the HDMI cable has been
disconnected, please repeat the device scan.
• Check whether the antenna jack on the recording device is properly connected.
• Connect the optical cable between TV and the receiver.
English
29
Page 30

Other Information
Installing the Wall Mount
Attaching the Blanking Bracket
When installing the TV onto a wall, attach the Blanking Bracket as shown.
Blanking Bracket
Installing the Wall Mount Kit
The wall mount kit (sold separately) allows you to mount the TV on the wall.
For detailed information on installing the wall mount, see the instructions provided with the wall mount. Contact a technician for
assistance when installing the wall mount bracket.
Samsung Electronics is not responsible for any damage to the product or injury to yourself or others if you elect to install the
TV on your own.
Wall Mount Kit Specifications (VESA)
✎
The wall mount kit is not supplied, but sold separately.
Install your wall mount on a solid wall perpendicular to the floor. When attaching to other building materials, please contact
your nearest dealer. If installed on a ceiling or slanted wall, it may fall and result in severe personal injury.
✎
NOTE
Standard dimensions for wall mount kits are shown in the table below.
x
When purchasing our wall mount kit, a detailed installation manual and all parts necessary for assembly are provided.
x
Do not use screws that do not comply with the VESA standard screw specifications.
x
Do not use screws that are longer than the standard dimension or do not comply with the VESA standard screw
x
specifications. Screws that are too long may cause damage to the inside of the TV set.
For wall mounts that do not comply with the VESA standard screw specifications, the length of the screws may differ
x
depending on the wall mount specifications.
Do not fasten the screws too strongly; this may damage the product or cause the product to fall, leading to personal
x
injury. Samsung is not liable for these kinds of accidents.
Samsung is not liable for product damage or personal injury when a non-VESA or non-specified wall mount is used or
x
the consumer fails to follow the product installation instructions.
Do not mount the TV at more than a 15 degree tilt.
x
Always use two people to mount the TV to a wall.
x
30
English
Page 31

Product Family inches
42~50 400 X 400
58~63 600 X 400
PDP TV
70~79 800 X 400
80~ 1400 X 800
✎
Unscrew the hole around before installing Wall-Mount on the wall.
Do not install your Wall Mount Kit while your TV is turned on. It may result in personal injury due to
electric shock.
VESA Spec.
(A * B)
Standard
Screw
M8 4
Quantity
Securing the Installation Space
Keep the required distances between the product and other objects (e.g. walls) to ensure proper ventilation.
Failing to do so may result in fire or a problem with the product due to an increase in the internal temperature of the product.
✎
When using a stand or wall-mount, use parts provided by Samsung Electronics only.
If you use parts provided by another manufacturer, it may result in a problem with the product or an injury due to the
x
product falling.
✎
The appearance may differ depending on the product.
✎
Be careful when you contact the TV because some parts can be somewhat hot.
Installation with a stand. Installation with a wall-mount.
05 Other Information
4 inches
4 inches
4 inches
4 inches
4 inches
4 inches
4 inches
English
31
Page 32

Other Information
Securing the TV to the Wall
Caution: Pulling, pushing, or climbing on the TV may cause the TV to fall. In particular, ensure your children do
not hang over or destabilize the TV. Doing so may cause the TV to tip over, causing serious injuries or death.
Follow all safety precautions provided in the included Safety Flyer with your TV. For added stability and safety,
you can purchase and install the anti fall device as described below.
The TV-Holder Kit (Sold Separately):
The parts below are included in the TV Holder kit. In addition, you need to provide a wood screw, screw and molly, or other screw
appropriate for the wall or cabinet you intend to secure the TV-Holder string to. We recommend a size M4xL20 wood screw.
TV-Holder (BN96-15753A) Screw (M8 x L19)
Installing the TV-Holder
1. Remove the screw attached to the back of your TV, and then connect the TV-Holder to the TV with the screw included in the TV-
Holder Kit that is designated for your TV.
✎
Make sure to use only the appropriate supplied screw. If you use a different screw, you can damage your TV.
2. Firmly fasten the screw you provided (size M4xL20 or similar) to the wall or cabinet where the TV is to be installed.
✎
If you fasten the screw to the wall, we recommend you drive the screw into a stud. If that is not possible, use a molly to
anchor the screw.
3. Tie the TV-Holder cord to the screw fastened on the wall or cabinet so that the TV is fixed. See the illustrations below.
✎
Install the TV close to the wall so that it does not fall.
✎
When attaching the TV-Holder cord to the wall, tie the cord level with the ground or slanted downwards for safety purposes.
✎
Check the cord occasionally to make sure it is secure.
✎
Before moving the TV, separate the connected cord first.
4. Verify all connections are properly secured. Periodically check the connections for any sign of fatigue or failure. If you have any doubt
about the security of your connections, contact a professional installer.
To purchase the TV-Holder Kit, contact Samsung Customer Care
– In the United States: 1-800-SAMSUNG (1-800-726-7864)
– In Canada: 1-800-SAMSUNG (1-800-726-7864)
English
32
Page 33

Troubleshooting
If the TV seems to have a problem, first try this list of possible problems and solutions. If none of these troubleshooting tips
apply, visit “www.samsung.com,” then click on Support, or call Samsung customer service at 1-800-SAMSUNG.
Issues Solutions and Explanations
Poor picture First of all, please perform the Picture Test and confirm that your TV is properly displaying the test image.
The TV image does not look as good as it
did in the store.
The picture is distorted: macro block error,
small block, dots, pixelization.
Color is wrong or missing. • If you’re using Component connection, make sure the component cables are connected to the
There is poor color or brightness. • Adjust the Picture options in the TV menu. (go to Picture mode / Color / Brightness / Sharpness)
There is a dotted line on the edge of the
screen.
The picture is black and white. • If you are using an AV composite input, connect the video cable (yellow) to the Green jack of
When changing channels, the picture
freezes or is distorted or delayed.
Sound Problem First of all, please perform the Sound Test to confirm that your TV audio is properly operating.
There is no sound or the sound is too low
at maximum volume.
The picture is good but there is no sound. • Set the Speaker Select option to TV Speaker in the Sound menu (p. 18).
The speakers are making an inappropriate
noise.
(go to MENU - Support - Self Diagnosis - Picture Test) (p. 22)
If the test image is properly displayed, the poor picture may be caused by the source or signal.
• If you have an analog cable/satellite box, upgrade to an HD digital set top box. Use HDMI or
Component cables to deliver HD (high definition) picture quality.
• Cable/Satellite subscribers: Try HD stations from the channel line up.
• Antenna connection: Try HD stations after performing Auto program.
Many HD channels are up scaled from SD (Standard Definition) contents.
✎
• Adjust the Cable/Sat box video output resolution to 1080i or 720p.
• Compression of video contents may cause picture distortion, especially in fast moving pictures such
as sports and action movies.
• Low signal level can cause picture distortion. This is not a TV problem.
• Mobile phones used close to the TV (up to 3.3 ft) may cause noise in picture on analog and digital TV.
correct jacks. Incorrect or loose connections may cause color problems or a blank screen.
(p. 15)
• Adjust Energy Saving option in the Setup menu (p. 21)
• Try resetting the picture to view the default picture settings. (go to MENU - Picture - Picture Reset)
(p. 17)
• If the picture size is set to Screen Fit, change it to 16:9 (p. 16).
• Change cable/satellite box resolution.
component input 1 on the TV.
• If connected to a cable box, please try to reset it. (reconnect the AC cord and wait until the cable box
reboots. It may take up to 20 minutes)
• Set the output resolution of the cable box to 1080i or 720p.
(go to MENU - Support - Self Diagnosis - Sound Test) (p. 22)
If the audio is OK, the sound problem may caused by the source or signal.
• Please check the volume of the device (Cable/Sat Box, DVD, Blu-ray etc) connected to your TV.
• If you are using an external device, make sure the audio cables are connected to the correct audio
input jacks on the TV.
• If you are using an external device, check the device’s audio output option (ex. you may need to
change your cable box’s audio option to HDMI when you have a HDMI connected to your TV).
• If you are using a DVI to HDMI cable, a separate audio cable is required.
• If your TV has a headphone jack, make sure there is nothing plugged into it.
• Reboot the connected device by reconnecting the device’s power cable.
• Check cable connections. Make sure a video cable is not connected to an audio input.
• For antenna or Cable connections, check the signal strength. Low signal level may cause sound
distortion.
• Perform the Sound Test as explained above.
05 Other Information
English
33
Page 34

Other Information
Issues Solutions and Explanations
No Picture, No Video
The TV won’t turn on. • Make sure the AC power cord is securely plugged in to the wall outlet and the TV.
The TV turns off automatically. • Ensure the Sleep Timer is set to Off in the Setup menu (p. 19).
There is no picture/video. • Check cable connections (remove and reconnect all cables connected to the TV and external
RF(Cable/Antenna) Connection
The TV is not receiving all channels. • Make sure the coaxial cable is connected securely.
No Caption on digital channels. • Check Caption Setup menu. Try changing Caption Mode Service1 to CC1 (p. 21).
The picture is distorted: macro block error,
small block, dots, pixelization.
PC Connection
A “Mode Not Supported” message
appears.
“PC” is always shown on the source list,
even if a PC is not connected.
The video is OK but there is no audio. • If you are using an HDMI connection, check the audio output setting on your PC.
Others
Purple/green rolling horizontal bars and
buzzing noise from the TV speakers with
Component cable connection.
The picture won’t display in full screen. • HD channels will have black bars on either side of the screen when displaying up scaled SD (4:3)
The remote control does not work. • Replace the remote control batteries with the poles (+/–) in the right direction.
The TV is making a humming noise. • Plasma TVs typically make a soft humming sound. This is normal. It’s caused by the electrical charges
• Make sure the wall outlet is working.
• Try pressing the POWER button on the TV to make sure the problem is not the remote. If the TV turns
on, refer to “Remote control does not work” below.
• If your PC is connected to the TV, check your PC power settings.
• Make sure the AC power cord is plugged in securely to the wall outlet and the TV.
• When watching TV from an antenna or cable connection, the TV will turn off after 10 - 15 minutes if
there is no signal.
devices).
• Set your external device’s (Cable/Sat Box, DVD, Blu-ray etc) video outputs to match the connections
to the TV input. For example, if an external device’s output is HDMI, it should be connected to an
HDMI input on the TV.
• Make sure your connected devices are powered on.
• Be sure to select the TV’s correct source by pressing the SOURCE button on the remote control.
• Reboot the connected device by reconnecting the device’s power cable.
• Please try Auto Program to add available channels to the channel list. Go to MENU - Channel -
Auto Program then select Auto and make sure the correct Cable TV signal type is set in the menu.
There are 3 options (STD, HRC and IRC) (p. 13).
• Verify the Antenna is positioned correctly.
• Some channels may not have caption data.
• Compression of video contents may cause picture distortion, especially with fast moving pictures
such as sports and action movies.
• A low signal can cause picture distortion. This is not a TV problem.
• Set your PC’s output resolution so it match the resolutions supported by the TV (p. 11).
• This is normal; “PC” is always shown on the source list, regardless of whether a PC is connected.
• Remove the left and right audio connections from the set-top-box. If the buzzing stops, this indicates
that the set-top-box has a grounding issue. Replace the Component video cables with an HDMI
connection.
contents.
• Black bars on the Top & Bottom will be shown on movies that have aspect ratios different from your
TV.
• Adjust the picture size options on your external device or TV to full screen.
• Clean the sensor’s transmission window on the remote.
• Try pointing the remote directly at the TV from 5~6 feet away.
that are used to create the images on the screen.
• If the humming sound is loud, you may have set the brightness on the TV too high. Try setting the
brightness lower.
• You can also have loud humming if the back of your Plasma TV is too close to a wall or other hard
surface. Also try rerouting your connection cables.
• Improper installation of wall mount can create excessive noise.
34
English
Page 35

Issues Solutions and Explanations
Image Retention (Burn In) Issue. • To minimize the possibility of screen burn, this unit is equipped with screen burn reduction technology.
The cable/set top box remote control
doesn’t turn the TV on or off, or adjust the
volume.
A “Mode Not Supported” message
appears.
Caption on TV menu is greyed out. • Caption can not be selected in the TV menu when connected via HDMI or Component (p. 21).
There is a plastic smell from the TV. • This smell is normal and will dissipate over time.
The TV Signal Strength is unavailable in
the Self Diagnostic Test menu.
The TV is tilted to the side. • Remove the base stand from the TV and reassemble it.
The channel menu is greyed out
(unavailable).
Your settings are lost after 30 minutes or
every time the TV is turned off.
You have intermittent loss of audio or
video.
You see small particles when you look
closely at the edge of the frame of the TV.
Pixel Shift technology enables you to set picture movement up/down (Vertical Line) and side to side
(Horizontal Dot).
• Program the Cable/Set remote control to operate the TV. Refer to the Cable/Set user manual for the
SAMSUNG TV code.
• Check the supported resolution of the TV, and adjust the external device’s output resolution
accordingly. Refer to the resolution settings on page 11 of this manual.
• Caption must be activated on the external device (p. 21).
• This function is only available with digital channels from an Antenna / RF/Coax connection (p. 22).
• The Channel menu is only available when the TV source is selected.
• If the TV is in the Store Demo mode, it will reset audio and picture settings every 30 minutes. Change
the settings from Store Demo mode to Home Use mode in the Plug & Play procedure. Press the
SOURCE button to select TV mode, and go to MENU → Setup → Plug & Play → ENTER
• Check the cable connections and reconnect them.
• Loss of audio or video can be caused by using overly rigid or thick cables. Make sure the cables are
flexible enough for long term use. If mounting the TV to a wall, we recommend using cables with 90
degree connectors.
• This is part of the product’s design and is not a defect.
E
(p. 8).
05 Other Information
POP (TV’s internal banner ad) appears on
the screen.
✎
Some of above pictures and functions are available at specific models only.
• Select Home Use under Plug & Play mode. For details, refer to Plug & Play Feature (p. 8).
¦ Storage and Maintenance
Do not spray water or a cleaning agent directly onto the
product. Any liquid that goes into the product may cause a
failure, fire, or electric shock.
Clean the product with a soft cloth dapped in a small amount
of water.
English
35
Page 36

Other Information
License
TruSurround HD, SRS and symbol are trademarks of SRS Labs, Inc.
TruSurround HD technology is incorporated under license from SRS Labs, Inc.
Manufactured under license from Dolby Laboratories. Dolby and the double-D symbol are
trademarks of Dolby Laboratories.
Open Source License Notice
In the case of using open source software, Open Source Licenses are available on the product menu.
Open Source License Notice is written only English.
Specifications
Environmental Considerations
Operating Temperature
Operating Humidity
Storage Temperature
Storage Humidity
Stand Swivel (Left / Right) 0˚
Model Name PN42C450 PN50C450
Screen Size
(Diagonal)
Sound
(Output) 10 W X 2 10 W X 2
Dimensions (WxDxH)
Body
With stand
Weight
Without Stand
With Stand
Display Resolution 1024 X 768 1360 X 768
(42.3 inches measured diagonally)
42 inches
40.6 x 2.8 x 24.8 inches
(1031 x 70.9 x 631.0 mm)
40.6 x 11.2 x 27.4 inches
(1031 x 284.5 x 695.5 mm)
38.6 Ibs (17.5 kg)
43.0 Ibs (19.5 kg)
50°F to 104°F (10°C to 40°C)
10% to 80%, non-condensing
-4°F to 113°F (-20°C to 45°C)
5% to 95%, non-condensing
50 inches
(49.9 inches measured diagonally)
47.3 x 2.7 x 28.4 inches
(1202.6 x 69.5 x 720.5 mm)
47.3 x 11.2 x 31.0 inches
(1202.6 x 284.3 x 786.3 mm)
50.7 Ibs (23 kg)
55.1 Ibs (25 kg)
✎
Design and specifications are subject to change without prior notice.
✎
This device is a Class B digital apparatus.
✎
For information about power supply, and more about power consumption, refer to the label attached to the product.
English
36
Page 37

■ Front view / Side view`
Dimensions
05 Other Information
7
8
Model name
1
2
3
4
5
6
1 2 3 4 5 6 7 8
PN42C450 40.6 37.0 21.1 23.3 24.8 27.4 2.8 11.2
PN50C450 47.3 43.7 24.6 23.3 28.4 31.0 2.7 11.2
■ Jack panel detail / Rear view
5
6
1
4
2
3
(Unit: inches)
(Unit: inches)
Model name
1 2 3 4 5 6
PN42C450 15.2 3.4 3.2 29.2 15.7 15.7
PN50C450 19.4 3.7 2.5 35.7 15.7 15.7
NOTE: All drawings are not necessarily to scale. Some dimensions are subject to change without prior notice. Refer to the
dimensions prior to performing installation of your TV. Not responsible for typographical or printed errors.
© 2010 Samsung Electronics America, Inc
English
37
Page 38

Other Information
Index
A
Antenna 13
Anynet+ 26
AUDIO OUT 10
Auto Adjustment 17
Auto Volume 18
B
Background Music 26
Balance L/R 18
Batteries 7
Black Tone 15
Blanking Bracket 30
Brightness 15
C
Change PIN 20
Channel Menu 13
Clock 18
Color Tone 16
Component 9
Connecting to a PC 11
Connecting to an Audio Device 10
D
DIGITAL AUDIO OUT 10, 26
D-sub 11
Dynamic 15
Dynamic Contrast 15
E
Eco Sensor 21
Edit Name 12
Editing Channels 14
Energy Saving 21
Equalizer 18
External Speaker 18
F
FAV.CH button 7, 13
Film Mode 16
Fine Tune 15
Flesh Tone 15
Frequency 11
H
HDMI 9, 26
Home Theater 10, 26
I
Installation Space 31
L
Language 21
License 36
M
Media Play 23
Melody 22
Mono 18
Music 25
N
Navigate 12
O
Optimal resolution 11
P
Photo 24
Picture Size 16
Plug & Play 8
Power Indicator 6
R
Receiver 28
Recording 28
Remote Control 7
Repeat Music 25
S
Select All 14
Self Diagnosis 22
Sharpness 15
Sleep Timer 19
Slide Show 24
Software Upgrade 22
Source List 12
Speaker Select 18
Specifications 36
Standby mode 6
Symbol 3
T
Timer 19
Tools 3
Troubleshooting 33
TV Speaker 18
U
USB Drive 22, 23
V
Volume 6
W
Wall Mount 30
Warm 16
White Balance 15
38
English
Page 39

Téléviseurs à écran plasma
Guide de l’utilisateur
Imaginez les possibilités
Merci d’avoir acheté un produit Samsung. Pour
obtenir un service complet, veuillez enregistrer
votre produit à:
www.samsung.com/register
Modèle N° de série
Page 40

Les figures et les illustrations de ce mode d’emploi ne sont fournies qu’à titre de référence. L’apparence réelle du produit pourrait être différente. Le
design et les spécifications du produit peuvent être modifiés sans préavis.
Remarques importantes sur la garantie relative au format de l'image du téléviseur
Voir le bon de garantie pour avoir plus d'information sur les conditions de garantie.
✎
Le format écran large des écrans à plasma (16:9, soit le rapport hauteur/largeur de l’image) est conçu principalement pour les vidéos plein écran à écran large. Les images
affichées devraient être en format écran large 16:9 ou agrandi afin de remplir l'écran si votre modèle offre cette caractéristique et que les images sont constamment en
mouvement. L’affichage de graphiques et d’images fixes, comme les barres noires des vidéos et des programmes de télévision en format standard non agrandi doit être limité
au maximum à 5% du temps d’écoute hebdomadaire.
De plus, il faut limiter l’affichage d’images et de textes fixes, comme les rapports boursiers, les affichages de jeux vidéo, les logos des stations, les sites Web ou les images
graphiques et les schémas des ordinateurs, tel qu'indiqué ci-dessus, et ce pour tous les téléviseurs. L’affichage d’images fixes qui ne respecte pas les directives ci-dessus
peut causer un vieillissement inégal des écrans à plasma en y créant des images fantôme subtiles mais permanentes. Pour éviter ce problème, faites varier les émissions et
les images et regarder principalement des images plein écran en mouvement et non pas des images ou des barres foncées fixes.
Sur les modèles d’écran à plasma dotés de fonctions de redimensionnement de l’image, ces commandes permettent d’afficher différents formats en plein écran.
Prendre garde au choix des formats et à leur durée d'utilisation. Un vieillissement inégal résultant du choix et de l’utilisation d’un format, tout comme les images rémanentes,
ne sont pas couverts par la garantie limitée de Samsung.
• ÉNONCÉ DE GARANTIE LIMITÉE DE SAMSUNG ELECTRONICS POUR L'AMÉRIQUE DU NORD
Assujettie aux exigences, conditions, exclusions et limitations de la garantie limitée originale fournie avec les produits de Samsung Electronics (SAMSUNG) et les
exigences, conditions, exclusions et limitations de la présente garantie, SAMSUNG offrira en plus un service de réparation sous garantie aux États-Unis pour les produits
achetés au Canada et un service de réparation sous garantie au Canada pour les produits achetés aux États-Unis pendant la période de garantie précisée à l'origine et
pour l'acheteur initial seulement.
Les réparations sous garantie décrites ci-dessus doivent être effectuées dans un centre de réparation agréé SAMSUNG. En plus de la présente garantie, la garantie
limitée originale et une facture datée en tant que preuve d'achat doivent être présentées au centre de réparation. Le transport de l'appareil au et à partir du centre
de réparation demeure la responsabilité de l'acheteur. Les conditions couvertes ne sont limitées qu'aux vices de matériaux et de fabrication dans des conditions
d'utilisation normale.
Exclues, mais non pas limitées à, sont les dispositions précisées à l'origine pour le service à domicile ou sur place, durées de réparation minimales et maximales,
échanges ou remplacements, accessoires, options, extensions ou produits non durables.
Pour obtenir le nom d'un centre de réparation agréé Samsung, composez les numéros sans frais suivants:
– Aux États-Unis: 1-800-SAMSUNG (1-800-726-7864)
– Au Canada : 1-800-SAMSUNG
Mode d’emploi
• Rémanence à l’écran
N’affichez pas d’images fixes (comme celle des jeux vidéos) sur un écran à plasma pendant plus que quelques minutes. Cela pourrait causer une rémanence à l’écran.
Cette rémanence est également connue sous le nom de «brûlure d’écran”. Pour éviter une telle rémanence, reportez-vous à la page 15 pour réduire le niveau de
luminosité et de contraste de l’écran pendant l’affichage d’une image fixe.
• Chaleur dans le haut du téléviseur à plasma
Le dessus de l'appareil peut devenir chaud après un fonctionnement prolongé alors que la chaleur se dissipe par les orifices de ventilation aménagés dans la partie
supérieure de l'écran.
Cet état est normal et n'est pas le signe d'une défectuosité du produit.
Toutefois, il faut empêcher les enfants de toucher cette partie de l'écran.
• L’appareil laisse entendre un craquement.
Un craquement peut se produire lorsque l’appareil se contracte ou se dilate à la suite d’un changement dans le milieu ambiant, comme la température ou le niveau
d’humidité. Ce phénomène est normal; il ne s’agit pas d’une défectuosité de l’appareil.
• Défaillance de cellules
L’écran à plasma comporte de 2,360,000 pixels (haute définition) à 6,221,000 pixels (haute définition intégrale) dont la création nécessite une technologie hautement
perfectionnée. Il se peut toutefois que certains pixels s’assombrissent ou soient plus lumineux à l’écran. Ce phénomène n’a aucune incidence sur la performance de
l’appareil.
• Éviter de faire fonctionner le téléviseur à une température inférieure à 5°C (41°F)
• Une image fixe affichée trop longtemps peut endommager l’écran à plasma de façon permanente.
Le fait de regarder l’écran à plasma en format 4:3 durant une longue période peut laisser des traces de bordures à gauche, à droite et au centre de
l’écran causées par une différence d’émission de lumière à l’écran. Un DVD ou un jeu vidéo peut avoir le même effet sur l'écran. Ces dommages ne
sont pas couverts par la garantie.
• Rémanence à l’écran.
L’affichage d’images fixes provenant de jeux vidéo et d’ordinateurs au-delà d’une certaine période peut provoquer une rémanence partielle.
Pour éviter cet effet, réduisez la luminosité et le contraste lorsque des images fixes doivent rester longtemps à l’écran.
• Garantie
La garantie ne couvre pas les dommages causés par la rémanence d'images.
Les brûlures d'écran ne sont pas couvertes par la garantie.
Français
2
Page 41

Table des matières
Mise en route
y Caractéristiques ........................................................ 4
y Accessoires ..............................................................4
y Installation de la base ................................................ 5
y Présentation du panneau de commande ................... 6
y Présentation de la télécommande ............................. 7
y Branchement à une antenne ..................................... 8
y Prêt-à-l’emploi (Mise en marche initiale) .................... 8
Branchements
y Branchement à un appareil audiovisuel .................... 9
y Branchement à un appareil audio ............................ 10
y ranchement d’un PC ............................................... 11
y Modification de la source d'entrée........................... 12
Fonctions de base
y Navigation dans les menus ..................................... 12
y Menu des canaux ................................................... 13
Affichage des canaux 13
Utilisation des canaux favoris 13
Mémorisation des canaux 13
Modification des canaux 14
Autres fonctions 14
y Menu Image ............................................................ 15
Modification du mode d'image préréglé 15
Ajustement des réglages de l'image 15
Changement des options de l'image 15
Configuration du téléviseur avec un PC 17
y Menu Son ............................................................... 17
Modification du mode Son préréglé 17
Ajustement des réglages du son 18
Réglage du son 18
y Menu de configuration ............................................ 18
Réglage de l’horloge 18
Utilisation de la fonction de veille 19
Réglage de la mise en marche et de l'arrêt de la
minuterie 19
Exclusion automatique de programmes 19
Solutions économiques 21
Autres fonctions 21
y Menu Soutien technique ......................................... 22
Fonctions avancées
y Media Play .............................................................. 23
Branchement d’un dispositif USB 23
y Anynet+ .................................................................. 26
Configuration de la fonction Anynet+ 27
Permutation entre appareils Anynet+ 28
Enregistrement 28
Écoute par l'intermédiaire d'un récepteur 28
Dépannage de la fonction Anynet+ 29
Autre information
y Installation de l’ensemble de fixation murale ............ 30
y Sécurisation de l’espace d’installation ..................... 31
y Stabilisation du téléviseur par rapport au mur .......... 32
y Dépannage ............................................................. 33
Entreposage et entretien 35
y Licence ................................................................... 36
y Spécifications techniques........................................ 36
y Dimensions ............................................................. 37
y Index ...................................................................... 38
FRANÇAIS
Vérifiez le symbole!
t
Appuyez sur la touche TOOLS de la télécommande
pour utiliser cette fonction.
Remarque Guide étape par étape
Indique des renseignements supplémentaires. Lisez les instructions figurant à cet endroit pour
savoir comment ouvrir le sous-menu pertinent.
Français
3
Page 42

Mise en route
Caractéristiques
y Interface numérique et réseautique de qualité exceptionnelle: grâce au syntoniseur numérique HD intégré, la programmation HD non payante
peut être visionnée sans câblosélecteur ou récepteur satellite.
y La technologie SRS TruSurround HD offre un son ambiophonique virtuel (p. 18).
y Media Play : Lecture de certains fichiers musicaux, photos et films enregistrés sur un dispositif USB (p. 23).
y Autodiagnostic : Vous pouvez vérifier si le fonctionnement de l'image et du son est normal (p. 22).
Accessoires
✎
Veillez à ce que les articles suivants soient inclus avec votre téléviseur à écran à plasma. Si des éléments sont manquants, communiquez avec le détaillant.
✎
La forme et la couleur des articles peuvent varier selon le modèle.
y Télécommande (BN59-00997A) et piles (AAA x 2)
y Guide de l’utilisateur
y Carte de garantie / Guide de sécurité / Guide de configuration rapide
Support d'obturation (BN63-06456A) Tore de ferrite pour le cordon d’alimentation (1EA)
✎
Tore magnétique pour le cordon d’alimentation : Les tores magnétiques protègent les câbles contre les
interférences. Lorsque vous branchez un câble, ouvrez le tore magnétique et fixez-le autour du câble, près de la
fiche, conformément à l'illustration.
A Distance maximale entre le tore magnétique et l'extrémité du câble branché au téléviseur : 2 pouces
x
Câbles d'entrée (vendus séparément)
HDMI HDMI-DVI Composantes Composite (AV) Coaxial (RF) VGA
y Chiffon de nettoyage (BN63-01798B)
y Cordon d’alimentation
(3301-002049)
A
Cordon d’alimentation
4
Français
Page 43

Installation de la base
s
s
s
s
s
s
s
s
1
2
Reportez-vous au guide séparé pour l'installation du support.
Support (1EA) Vis (4EA)
Suivez les étapes ci-dessous pour fixer le téléviseur à la base.
01 Mise en route
(M4 X L16)
Vis (M4 X L16)
1. Fixez le téléviseur sur la base en la maintenant à la verticale, tel
qu'illustré.
✎
REMARQUE
Assurez-vous de bien distinguer le devant et l’arrière de la base et du guide de celle-ci à l’assemblage.
x
Assurez-vous qu'au moins deux personnes soulèvent et déplacent le téléviseur à écran plasma.
x
Placez l’appareil à la verticale, puis serrez les vis. Si vous vissez les vis lorsque le téléviseur est en position horizontale, il pourrait pencher vers un
x
2. Resserrez les deux vis (M4 X L16) à la position 1, puis resserrez
les deux vis (M4 X L16) à la position 2.
côté.
Ne mettez pas vos doigts dans la fente du support du téléviseur au moment de l'installation.
Français
5
Page 44

Mise en route
Présentation du panneau de commande
✎
La couleur et la forme du produit peuvent varier en fonction du modèle.
Indicateur d'alimentation
Haut-parleurs
SOURCE
MENU Affiche le menu à l'écran, OSD (On Screen Display), des fonctions de votre téléviseur.
Indicateur d'alimentation Clignote puis s'arrête lorsque le téléviseur est allumé. S'allume en mode de veille.
(Alimentation)
Capteur de télécommande Orienter la télécommande vers le capteur sur le téléviseur.
Mode veille
Ne laissez par votre téléviseur en mode d’attente durant de longues périodes (lorsque vous partez en vacances, par exemple). Une petite quantité
d'électricité est consommée même lorsque le téléviseur est éteint. Il est conseillé de débrancher le cordon d'alimentation.
Permet de passer d'une source d'entrée à l'autre. Dans le menu à l’écran, cette touche a la même
fonction que la touche ENTER de la télécommande.
Permet de régler le volume. Dans le menu à l'écran, utilisez les touches
manière que les touches ◄ et ► de la télécommande.
Change de canal. Dans le menu à l'écran, utilisez les touches
les touches ▼ et ▲ de la télécommande.
Appuyer sur cette touche pour mettre le téléviseur sous tension ou hors tension.
Capteur de télécommande
de la même manière que
de la même
6
Français
Page 45

Présentation de la télécommande
✎
Cette télécommande a été spécialement conçue pour les personnes ayant une déficience visuelle. Elle comporte des points en braille sur les
touches Power, Channel et Volume.
01 Mise en route
Permet de mettre le téléviseur sous tension et
Appuyez pour accéder directement à un canal.
Appuyez sur cette touche pour sélectionner des
canaux supplémentaires (numériques) diffusés
par une même station. Par exemple, pour choisir
le canal 54-3, appuyer sur 54, puis sur - et sur 3.
Permet de régler le volume.
Affiche Media Play (USB) (p. 23).
Sélectionne rapidement les fonctions
Permet de retourner au menu précédent.
Touches du menu Liste des canaux,
Utilisez ces touches dans les modes
Media Play (USB) et Anynet+ (HDMI-CEC)
(
: Contrôle la fonction d’enregistrement
des enregistreurs Samsung dotés de la fonction
hors tension.
Affiche le menu OSD.
fréquemment utilisées.
Media Play (USB), etc.
(p. 23, 26).
Anynet+.)
A B C D
S.MODE SLEEP
P.MODE P.SIZE
Affiche et sélectionne les sources vidéo
disponibles (p. 12).
Permet d’écouter le canal précédent.
Coupe temporairement le son.
Change de canal.
Affiche la liste de vos canaux à l'écran (p. 13).
Affiche la liste de vos canaux favoris à l'écran
(p. 13).
Affiche l’information à l’écran.
Sélectionne les options de menu à l'écran et
modifie les valeurs affichées.
Quitte le menu.
S.MODE : Sélectionner le mode sonore
(p. 17).
SLEEP : Éteint automatiquement le téléviseur
après le délai choisi (p. 19).
MTS : Appuyez sur cette touche pour choisir
entre les modes stéréo, mono ou diffusion
SAP (seconde piste audio) (p. 18).
P.MODE : Sélectionne le mode d'image
(p. 15).
P.SIZE : Sélectionne le format de l'image
(p. 16).
CC : Permet de régler la fonction de sous-
titrage (p. 21).
Insertion des piles (piles : AAA)
✎
REMARQUE
Utilisez la télécommande à une distance maximale du téléviseur d'environ
x
7 m.
Une lumière vive peut entraver le bon fonctionnement de la
x
télécommande. Évitez de l'utiliser près d'une source lumineuse
fluorescente ou une enseigne au néon.
La couleur et la forme peuvent varier en fonction du modèle.
x
Français
7
Page 46

Mise en route
Branchement à une antenne
Au moment de la première mise en marche du téléviseur, les réglages de base s’effectuent automatiquement.
✎
Branchement du cordon d'alimentation et de l'antenne.
✎
L'écran peut interférer avec une autre radio amateur ou AM.
Antenne VHF/UHF
Câble
ou
Puissance consommée
Prêt-à-l’emploi (Mise en marche initiale)
Une série de messages s'affichera à l'écran pour vous assister pour la configuration des réglages de base lors de la mise sous tension initiale de votre
téléviseur. Appuyez sur la touche POWER. La fonction Prêt à l'emploi n'est disponible que lorsque la source Entrée est réglée à TV.
✎
Appuyez sur la touche rouge pour revenir à l'étape précédente.
Sélection de la langue
1
Sélection du mode Démo
2
magasin ou Util. à domicile
Choix d'une antenne
Appuyez sur la touche ▲ ou ▼, puis sur la touche ENTER
la langue d'affichage à l'écran désirée.
Appuyez sur la touche ◄ ou ►, puis sur la touche ENTER
y Sélectionnez le mode Util. à domicile. Le mode Démo magasin ne
doit être utilisé qu’en magasin.
y Revenir au mode Util. à domicile à partir du mode Démo magasin
(standard) : appuyez sur la touche de volume du téléviseur. Lorsque le
réglage du volume est affiché à l’écran, appuyez sur la touche MENU
du téléviseur pendant 5 secondes.
Appuyez sur la touche ▲ ou ▼, puis sur la touche ENTER
. Sélectionnez
.
. Sélectionnez Air, Câble ou Auto.
ANT OUT
POWER
P
3
Choix d'un canal
4
Réglage du Mode horloge Règle le Mode horloge manuellement ou automatiquement.
5
Affichage du Guide de
6
connexion HD.
En mode diffusion
Appuyez sur la touche ▲ ou ▼, puis sur la touche ENTER
mémoriser. Lorsque vous réglez la source d'antenne à Câble, vous pouvez également régler les valeurs
numériques (fréquence des canaux) aux canaux. Pour plus de détails, reportez-vous à la section Chaîne →
Prog. auto (p. 13).
✎
Appuyez sur ENTER à n'importe quel moment pour interrompre la mémorisation des canaux.
y Auto : Vous permet de sélectionner le mode H. d'été (heure avancée) ainsi que le fuseau horaire.
y Manuel : Vous permet de régler manuellement l'heure et la date actuelles. (p. 19).
Méthode de branchement vous assurant que la meilleure qualité HD s’affiche.
Appuyez sur la touche ENTER
.
. Sélectionnez la source d'antenne à
7
Si vous souhaitez réinitialiser ce paramètre...
MENU → Configuration → Prêt à l'emploi → ENTER
Français
8
Page 47

Branchements
USB
HDMI IN 3
Branchement à un appareil audiovisuel
Utilisation d'un câble HDMI ou HDMI/DVI: Branchement HD (jusqu’à 720p/1080p)
Nous recommandons l’utilisation de la connexion HDMI pour obtenir une image HD de qualité optimale.
Appareils disponibles : lecteur DVD, lecteur Blu-ray, câblosélecteur HD ou récepteur satellite (boîtier décodeur) HD.
02 Branchements
Appareil
HDMI OUT
W
R
Rouge Blanc
✎
HDMI IN 1(DVI), 2, 3, PC/DVI AUDIO IN
Il faut utiliser la prise d’entrée HDMI IN 1(DVI) pour le vidéo dans le cas d’un branchement au câble HDMI/DVI. Un lecteur DVD, lecteur Blu-
x
ray, câblosélecteur ou un récepteur satellite (boîtier décodeur) HD peut nécessiter un câble DVI-HDMI (de DVI vers HDMI) ou un adaptateur
DVI-HDMI (de DVI vers HDMI). Une prise PC/DVI AUDIO IN est nécessaire pour l'audio.
Il est possible que l'image soit anormale (s'il y a une image) ou que le son ne fonctionne pas si un appareil externe utilisant une ancienne
x
version du mode HDMI est branché au téléviseur. Si un tel problème survient, renseignez-vous sur la version HDMI auprès du fabricant de
l'appareil externe et, si elle trop ancienne, demandez une mise à niveau.
Vérifiez que vous achetez un câble HDMI certifié. Sinon, l'image risque de ne pas s'afficher ou une erreur de connexion peut survenir.
x
Utilisation d'un câble composante (jusqu'à 720p/1080i) ou audio/video (480i seulement)
Appareils disponibles : lecteur de DVD , lecteur Blu-ray, câblosélecteur et récepteur satellite, magnétoscope
Appareil
DVI OUT
R W
AUDIO OUT
R-AUDIO-L
W
R
Rouge Blanc
W R
Y
Y
VIDEO OUT
✎
Lorsque le branchement est effectué à la prise AV IN, la couleur de la prise d'entrée AV IN [Y/VIDEO] (vert) ne correspond pas à la
AUDIO OUT
R-AUDIO-L
W R
Appareil
R
RW
AUDIO OUT
R-AUDIO-L
W
R GB
RBG
COMPONENT OUT
PR PB Y
Appareil
R GB
Rouge Bleu Verte
R W
Y
Rouge Blanc Jaune
couleur du câble vidéo (jaune).
✎
Le branchement par composante est conseillé plutôt que le branchement A/V pour obtenir la meilleure qualité d'image.
Français
9
Page 48

Branchements
R-AUDIO-L
Branchement à un appareil audio
Utilisation d'un câble optique (numérique) ou audio (analogique)
Appareils disponibles: Chaîne audio numérique, Amplificateur, Cinéma maison à DVD
Système audio numérique
OPTICAL
W
R
Rouge Blanc
✎
DIGITAL AUDIO OUT (OPTICAL)
Lorsqu’une chaîne audio numérique est branchée à la prise DIGITAL AUDIO OUT (OPTICAL), réduisez le volume du téléviseur et de la
x
chaîne.
Le son en 5.1 canaux est possible lorsque le téléviseur est raccordé à un appareil externe doté de cette fonction audio.
x
Lorsque le récepteur (amplificateur ou lecteur de DVD de la chaîne de cinéma maison) est activé, il est possible d’entendre le son provenant
x
de la prise optique du téléviseur. Lorsque le téléviseur reçoit des signaux numériques, il transmet le son en 5,1 canaux à l'amplificateur
ou lecteur de DVD de la chaîne de cinéma maison. Lorsque la source est un composant numérique, comme un lecteur DVD/Blu-ray,
un câblosélecteur ou un récepteur satellite (boîtier décodeur), et que ce dernier est branché au téléviseur à l'aide d'un câble HDMI,
l'amplificateur ou lecteur de DVD de la chaîne de cinéma maison ne fera entendre qu'un son en deux canaux. Pour entendre le son en 5.1
canaux, branchez directement la prise Digital Audio Out du lecteur DVD/Blu-Ray, câblosélecteur ou récepteur satellite à un amplificateur ou
une chaîne de cinéma maison.
✎
AUDIO OUT: Se branche aux prises d’entrée audio de votre amplificateur/chaîne de cinéma maison à DVD.
Utilisez le connecteur approprié pour le branchement.
x
Lorsqu’un amplificateur audio est branché aux prises de sortie gauche et droite AUDIO OUT Réduisez le volume du téléviseur, puis réglez
x
le niveau du volume à l’aide de la commande de volume de l’amplificateur.
Connexion avec câble EX-Link
Appareils disponibles : appareils externes compatibles avec EX-Link
Amplificateur, chaîne de cinéma maison
AUDIO IN
à DVD
10
EX-LINK: Connecteur utilisé à des fins de réparation seulement.
Français
Page 49

À l'aide d'un câble HDMI/DVI / câble D-sub
Modes d'affichage (Entrée D-Sub et HDMI/DVI)
Résolution optimale
y PN42C450 : 1024 X 768 à 60 Hz
y PN50C450 : 1360 X 768 à 60 Hz
Mode Résolution
IBM
MAC
VESA CVT
VESA DMT
VESA GTF
640 x 350
720 x 400
640 x 480
832 x 624
720 x 576
1280 x 720
640 x 480
640 x 480
640 x 480
800 x 600
800 x 600
800 x 600
1024 x 768
1024 x 768
1024 x 768
1280 x 720
1360 x 768
1280 x 720 52.500 70.000 89.040 -/+
Fréquence
horizontale (kHz)
31.469
31.469
35.000
49.726
35.910
56.456
31.469
37.500
37.861
37.879
6.875
48.077
48.363
56.476
60.023
45.000
47.712
ranchement d’un PC
Fréquence
verticale
(Hz)
70.086
70.087
66.667
74.551
59.950
74.777
59.940
75.000
72.809
60.317
75.000
72.188
60.004
70.069
75.029
60.000
60.015
Fréquence
d'horloge des
pixels
(MHz)
25.175
28.322
30.240
57.284
32.750
95.750
25.175
31.500
31.500
40.000
49.500
50.000
65.000
75.000
78.750
74.250
85.500
Polarité
synchronisée
(H / V)
+/-
-/+
-/-
-/-
-/+
-/+
-/-
-/-
-/+/+
+/+
+/+
-/-
-/+/+
+/+
+/+
AUDIO OUT
DVI OUT
PC OUT
AUDIO OUT
PN42C450 PN50C450
02 Branchements
✎
REMARQUE
Il faut utiliser la prise d’entrée HDMI IN 1(DVI) dans le cas d’un branchement au câble HDMI/DVI.
x
Le mode interface n’est pas pris en charge.
x
Le téléviseur peut fonctionner de façon anormale si un format vidéo non standard est sélectionné.
x
Les modes séparé et composé sont pris en charge. Le mode SOG (Sync On Green) n'est pas pris en charge.
x
Français
11
Page 50

Modification de la source d'entrée
SOURCE
Liste source
Sélectionner le téléviseur ou une autre source
d’entrée externe comme un lecteur DVD/Blu-ray,
câblosélecteur ou récepteur satellite.
MENU → Entrée → Liste source →
ENTER
■ TV / PC / AV / Composante1 / Composante2 / HDMI1/DVI /
HDMI2 / HDMI3 / USB
✎
Seuls les appareils externes branchés au téléviseur peuvent
être sélectionnés. Dans la Liste source, les entrées
branchées sont en surbrillance.
✎
L'option PC est toujours activée dans la Liste source.
Fonctions de base
Entrer le nom
MENU → Entrée → Entrer le nom → ENTER
■ Magnétoscope / DVD / Câble STB / Satellite STB / PVR STB
/ Récepteur A/V / Jeu / Caméscope / PC / DVI PC / appareils
DVI / TV / IPTV / Blu-ray / HD DVD / DMA: Entrez l'appareil
connecté aux prises d'entrée pour faciliter la sélection de la source
d'entrée.
✎
Lorsqu’un câble HDMI/DVI est branché au port d’entrée
HDMI IN 1(DVI), vous devez régler le mode DVI PC or
Appareils DVI à Entrer le nom.
Navigation dans les menus
Avant d'utiliser le téléviseur, suivez les étapes ci-dessous pour apprendre
comment naviguer dans les menus et sélectionner et ajuster différentes
fonctions.
1
2
3 4
1 Touche MENU : Affiche le menu à l’écran principal.
2 ENTER
3 Touche RETURN : Permet de retourner au menu précédent.
4 Touche EXIT : Quitte le menu de l’écran.
12
sélectionner un élément. Confirme le réglage.
/ touche de direction: Permet de déplacer le curseur et
Français
Utilisation de l'affichage à l'écran OSD (On Screen Display)
La méthode d'accès varie en fonction du menu sélectionné.
MENU
1
▲ / ▼
2
ENTER
3
▲ / ▼
4
◄ / ► Appuyez sur la touche ◄ ou ► pour
5
ENTER
6
EXIT
Les options du menu principal
apparaissent:
Image, Son, Chaîne, Configuration,
Entrée, Application, Soutien technique.
Sélectionnez une icône à l'aide de la
touche ▲ ou ▼.
Appuyez sur ENTER pour accéder au
sous-menu.
Sélectionnez le sous-menu voulu à l'aide
de la touche ▲ ou ▼.
choisir la valeur d'une option. Le réglage
du menu OSD varie en fonction du menu
sélectionné.
Appuyez sur la touche ENTER pour
confirmer la sélection.
Appuyez sur la touche EXIT.
7
Page 51

Menu des canaux
CHLIST
Affichage des canaux
Utilisation des canaux favoris
MENU → Chaîne → Liste des canaux → ENTER
03 Fonctions de base
Liste des canaux
Ajoutez, supprimez ou définissez vos canaux favoris et
utilisez le télé-horaire des diffusions numériques.
MENU→ Chaîne → Liste des canaux →
ENTER
Sélectionnez un canal dans la liste Tous les canaux,
Canaux ajoutés, Favori ou Enregistrement par
minuterie en appuyant sur les touches ▲ / ▼ et
ENTER. Vous pouvez alors visionner le canal
sélectionné.
Canaux ajoutés
■ Tous les canaux: Affiche tous les canaux actuellement
accessibles.
Canaux ajoutés: Affiche tous les canaux ajoutés.
■
■
Favori: Affiche tous les canaux favoris.
■
Enregistrement par minuterie: Affichage de toutes les
émissions réservées.
✎
Utilisation des touches de couleur avec la Liste des canaux
Verte (Zoom): Agrandit ou rapetisse un numéro de canal.
x
Jaune (Sélectionner): Sélectionne plusieurs listes de canaux.
x
Sélectionnez les canaux désirés. Appuyez ensuite sur la touche
jaune pour régler simultanément tous les canaux choisis. Le
symbole
x
menus d'options peuvent différer selon la situation.)
Icônes d'affichage de statut des canaux
Icônes Fonctions
6 Air
6-1 * TV #6
7 Air
8 Air
9 Air
9-1 * TV #9
10 Air
10-1 * TV #10
11-1 * TV #11
Air Zoom Sélectionner
s’affiche à la gauche des canaux choisis.
(Outils): Affiche le menu d'options Liste des canaux. (Les
Un canal sélectionné.
Un canal défini en tant que favori.
Une émission réservée.
Outils
Ajouter aux favoris / Effacer des favoris
Définir comme favoris les canaux que vous regardez fréquemment.
1. Sélectionnez un canal et appuyez sur la touche TOOLS.
2. Ajouter ou supprimer un canal à partir des menus Ajouter aux
favoris ou Effacer des favoris.
Canaux ajoutés
Pour afficher tous les canaux Favoris, cliquez sur
bouton illustré à droite.
6 Air
6-1 * TV #6
7 Air
8 Air
9 Air
9-1 * TV #9
10 Air
10-1 * TV #10
11-1 * TV #11
Air Zoom Sélectionner
Supprimer
Ajouter aux favoris
Écoute minut.
Modier le nom du canal
Choisir tout
Prog. auto.
Outils
FAV.CH
Mémorisation des canaux
MENU → Chaîne → ENTER
Antenne (Air / Câble)
Avant que votre téléviseur ne puisse commencer à mémoriser les
canaux disponibles, vous devez spécifier le type de la source de signal
branchée au téléviseur (c'est-à-dire une antenne ou le câble).
Prog. auto.
■ Air : Signal d'antenne de type air.
■ Câble : Signal d'antenne de type câble.
■ Auto : Signaux d'antenne de type Air et Câble.
Français
13
Page 52

Fonctions de base
✎
REMARQUE
Au moment de la sélection du système de télévision par
x
câble: STD, HRC et IRC désignent différents systèmes de
câblodistribution. Communiquez avec votre câblodistributeur pour
déterminer le système de câble de votre région. La sélection de la
source de signal est maintenant terminée.
Une fois tous les canaux mémorisés, le téléviseur commence à
x
éliminer les canaux brouillés. Puis le menu Prog. auto s'affiche de
nouveau.
Modification des canaux
MENU → Chaîne → Liste des canaux → ENTER
Modifier le nom du canal
1. Sélectionnez un canal et appuyez sur la touche TOOLS.
2. Modifiez le nom du canal à partir du menu Modifier le nom du
canal.
■ Modifier le nom du canal (canaux analogiques seulement) :
assignez un nom personnalisé au canal.
Autres fonctions
MENU → Chaîne → ENTER
Effacer les canaux brouillés
Cette fonction permet d'éliminer les canaux brouillés après la
programmation automatique. Cette procédure peut prendre de 20 à 30
minutes.
Arrêter la recherche de canaux brouillés.
1. Appuyez sur ENTER
2. Appuyez sur la touche ◄ pour sélectionner Oui.
3. Appuyez sur la touche ENTER
✎
Cette fonction n’est disponible qu’en mode Câble.
pour sélectionner Arrêt.
.
Liste des canaux
Liste des canaux Menu d'options
Réglez chaque canal à l'aide des options du menu Liste de canaux
(Ajouter / Supprimer, Écoute minut., Choisir tout / Désélect. Tout ).
Les options du menu peuvent varier selon le statut du canal.
1. Sélectionnez un canal et appuyez sur la touche TOOLS.
2. Choisissez une fonction et modifiez les paramètres.
■ Ajouter / Supprimer: Ajoutez ou de supprimez un canal afin
d'afficher seulement les canaux désirés.
✎
REMARQUE
Tous les canaux supprimés sont affichés dans le menu
x
Tous les canaux.
Un canal affiché en gris indique que celui-ci a été
x
supprimé.
Le menu Ajouter ne s’affiche que pour les canaux
x
supprimés.
Il est également possible de supprimer un canal du
x
menu Canaux ajoutés ou Favori.
■ Écoute minut. : Vous pouvez faire afficher automatiquement un
canal à l'heure voulue. Vous devez régler l'horloge avant d'utiliser
cette fonction.
1. Appuyer sur la touche ◄ / ► / ▲ / ▼ pour choisir le canal
voulu dans la Liste des canaux.
2. Appuyez sur la touche TOOLS puis sélectionnez Écoute
minut..
3. Faites défiler vers le haut ou le bas pour ajuster les réglages
dans la boîte ou appuyez sur les touches numériques de la
télécommandes pour entrer la date et l'heure.
✎
Si vous sélectionnez Une fois, Hebdomadaire ou
Quotid. dans Répéter, vous pouvez entrer la date que
vous voulez.
4. Sélectionnez OK, puis appuyez sur la touche ENTER
fois terminé.
✎
REMARQUE
Seuls les canaux mémorisés peuvent être réservés.
x
Les émissions réservées s'afficheront dans le menu
x
Enregistrement par minuterie.
Lorsqu'un canal numérique est sélectionné, appuyez sur
x
la touche ► pour regarder l'émission numérique.
■ Choisir tout : Sélectionne tous les canaux dans la liste des canaux.
■ Désélect. Tout : Désélectionne tous les canaux sélectionnés.
✎
L’option Désélect. Tout ne peut être choisie que lorsqu'un
canal ou plus est sélectionné.
une
Enregistrement par minuterie
(dans la Liste des canaux)
Vous pouvez regarder, modifier ou supprimer une émission réservée
pour l'écoute. L'option Enregistrement par minuterie s'affiche ici.
Sélectionnez un programme et appuyez sur la touche TOOLS pour
afficher les options.
■ Information, modification : Modifie une émission réservée pour
l'écoute. Commencez par l'étape 3 de l' “Écoute minut.” ci-dessus.
■ Annuler horaires : Annule une émission réservée pour l'écoute.
✎
Cette fonction permet de supprimer le ou les programmes
sélectionnés ou mis en surbrillance.
■ Information : Affiche une émission réservée pour l'écoute. (Il
est également possible de modifier l'information relative à une
émission.)
✎
Il est possible de visualiser l'information en sélectionnant un
programme et en appuyant sur la touche ENTER
■ Choisir Tout / Désélect. Tout : Sélectionne ou désélectionne tous
les programmes réservés.
.
14
Français
Page 53

Syn. Précise
(canaux analogiques seulement)
Si la réception est bonne, aucun réglage manuel n’est nécessaire; les
réglages sont effectués automatiquement durant la recherche et la
mémorisation. Si le signal d'un canal est faible ou de mauvaise qualité,
effectuez un réglage manuel. Faites défiler à gauche ou à droite jusqu'à
ce que l'image soit claire.
✎
Les paramètres sont appliqués au canal en cours de diffusion.
✎
Les canaux syntonisés mémorisés sont marqués d'un astérisque
“*” à droite de leur numéro, dans la zone d'affichage des canaux.
✎
Pour rétablir la syntonisation de précision, sélectionnez Régler.
Changement des options de l'image
Réglages avancés
MENU → Image → Réglages avancés → ENTER
(L'option Réglages avancés est disponible en mode Standard ou
Cinéma)
Le nouveau téléviseur Samsung permet d’effectuer des réglages
d’image encore plus précis que les modèles précédents.
✎
En mode PC, il est possible de modifier uniquement les fonctions
Gamma et Équilibrage du blanc.
Menu Image
Modification du mode d'image préréglé
MENU → Image → Mode → ENTER
Mode
03 Fonctions de base
Réglages avancés
Tonalité noire : Off ►
Contraste dynam. : Moyen
Gamma : 0
Espace couleur : Standard
Équilibrage du blanc
Ton chair : 0
Amélioration des bords : On
Sélectionnez le type d'image que vous préférez.
■ Dynamique: Convient aux pièces claires.
■ Standard: Convient aux environnement
normaux.
■ Cinéma: Pour regarder des films dans une
pièce sombre.
P.MODE
Ajustement des réglages de l'image
MENU → Image → ENTER
Lumière cellule / Contraste / Luminosité / Netteté
/ Couleur / Teinte (V/R)
Votre téléviseur est doté d'options de réglage qui vous permettent de
régler la qualité de l'image.
✎
REMARQUE
Lorsque vous apportez des modifications aux options Lumière
x
cellule, Contraste, Luminosité, Netteté, Couleur ou Teinte (V/R)
l’image s’ajuste en conséquence.
En mode PC, il est possible de modifier uniquement les fonctions
x
Lumière cellule, Contraste et Luminosité.
Ces réglages peuvent être ajustés et conservés pour chaque
x
appareil externe branché au téléviseur.
Dépl.
Entrer
Retour
■ Tonalité noire (Off / Foncé / Plus foncé / Le plus foncé) :
Choisissez le niveau de noir à l'écran pour régler la profondeur de
ce dernier.
■ Contraste dynam. (Off / Basse / Moyen / Haute) : Règle le
contraste de l'image.
■ Gamma : Règle l’intensité de la couleur primaire.
■ Espace couleur (Auto / Standard / Personnel) : Règle la
gamme de couleurs disponibles pour créer l'image. Pour ajuster la
Couleur, Rouge, Vert, Bleu et Régler, réglez Espace couleur à
Personnel.
■ Équilibrage du blanc : Règle la température de la couleur pour
une image plus naturelle.
Décal.-R / Décal.-V / Décal.-B : Règle la profondeur de chaque
couleur (rouge, vert, bleu).
Gain-R / Gain-V / Gain-B : Règle la luminosité de chaque couleur
(rouge, vert, bleu).
Régler : Rétablit tous les réglages Équilibrage du blanc aux
réglages par défaut.
■ Ton chair : Rehausse le “ton chair” (rose) de l’image.
■ Amélioration des bords (Off / On) : Souligne le contour des
objets.
Français
15
Page 54

Fonctions de base
Options d'image
MENU → Image → Options d'image → ENTER
✎
En mode PC, il est possible de modifier uniquement les fonctions
Nuance coul., Taille et Protection grillage écran.
Options d'image
Nuance coul. : Normal ►
Taille : 16:9
Digital Noise Filter : Auto
Nv nr HDMI : Normal
Mode Film : Off
Protection grillage écran
Dépl.
■ Nuance Coul. (Froide / Normal / Chaude1 / Chaude2)
✎
Chaude1 ou Chaude2 ne s’activent que si le mode d’image est
Dynamique ou Standard.
✎
Ces réglages peuvent être ajustés et conservés pour chaque
appareil externe branché au téléviseur.
■ Taille : Votre câblosélecteur ou récepteur satellite
peut également disposer de ses propres tailles
d'écran. Toutefois, nous vous recommandons
d'utiliser le mode 16:9 la plupart du temps.
16:9 : Pour régler l'image en mode 16:9.
Zoom1 : Pour un agrandissement modéré.
Zoom2 : Pour un plus grand agrandissement.
Format large : Augmente le facteur de forme de l'image pour
qu'elle remplisse l'écran en entier.
✎
Disponible pour le signal HD 1080i / 720p en mode 16:9
4:3 : Pour régler l'image en mode 4:3.
✎
Ne pas utiliser le format d'image 4:3 pendant de longues
périodes. Les bordures à gauche, à droite et au centre de
l'écran peuvent laisser des traces à cause de la rétention
d'image sur l'écran qui n'est pas couvert par la garantie.
Plein écran : Affiche l'image entière non tronquée lors d'une entrée
de signaux HDMI (720p / 1080i / 1080p) ou composante (1080i /
1080p).
✎
REMARQUE
Après avoir sélectionné Zoom1, Zoom2 ou Format large :
1. Appuyez sur la touche ► pour sélectionner Position.
2. Appuyez sur la touche ENTER
3. Appuyez sur la touche ▲ ou ▼ pour déplacer l’image vers
le haut ou le bas.
.
Entrer
Retour
P.SIZE
4. Appuyez sur la touche ENTER
5. Appuyez sur la touche ► pour sélectionner Régler.
6. Appuyez sur la touche ENTER
sa position par défaut.
Après avoir sélectionné Plein écran en mode HDMI (1080i/1080p)
x
ou Composante (1080i/1080p), il est possible que vous deviez
centrer l'image :
1. Appuyez sur la touche ◄ ou ► pour sélectionner
Position.
2. Appuyez sur la touche ENTER
3. Appuyer sur la touche ▲, ▼, ◄ ou ► pour déplacer
l'image.
4. Appuyez sur la touche ENTER
5. Appuyez sur la touche ◄ ou ► pour sélectionner Régler.
6. Appuyez sur la touche ENTER
HD (Haute définition) : 16:9 - 1080i/1080p (1920x1080), 720p
x
(1280x720)
Les réglages peuvent être définis et mémorisés pour chacun des
x
appareils externes branchés à une entrée sur le téléviseur.
Source d'entrée Format de l'image
ATV, AV, Composante (480i,
480p)
DTV (1080i), Composante (1080i,
1080p), HDMI (720p, 1080i,
1080p)
PC 16:9, 4:3
■ Digital Noise Filter (Off / Basse / Moyen / Haute / Auto / Auto
Visualization) : Si le signal de diffusion capté par le téléviseur est
faible, il est possible d'activer la fonction de Digital Noise Filter
pour aider à éliminer les parasites et les images rémanentes qui
apparaissent à l’écran.
✎
Lorsque le signal est faible, sélectionnez une des autres
options jusqu'à ce que la meilleure image soit affichée.
Auto Visualization : Pendant le changement de canal analogique,
affiche l'intensité du signal courant et définit l'option de réduction
numérique des bruits.
✎
Disponible seulement pour les canaux analogiques.
✎
Lorsque la barre est verte, cela correspond au meilleur
signal possible.
■ Nv nr HDMI (Normal / Basse) : Choisit le niveau de noir à l'écran
pour régler la profondeur de ce dernier.
✎
Disponible seulement en mode HDMI.
■ Mode Film (Off / Auto) : Le téléviseur détecte et traite
automatiquement les signaux de film provenant de toutes les
sources et règle l'image pour obtenir une définition optimale.
✎
Disponible avec les modes TV, AV, COMPOSANTE (480i /
1080i) et HDMI (480i / 1080i).
■ Protection grillage écran : Pour réduire le risque de rémanence,
cet appareil est doté d'une technologie de prévention de brûlure
d’écran. L’option Time (Délai) vous permet de programmer le délai,
en minutes, entre chaque mouvement de l’image.
.
pour replacer l'image à
.
.
.
16:9, Zoom1, Zoom2,
4:3
16:9, 4:3, Format large,
Plein écran
16
Français
Page 55

Déplac. Point (Off / On): Cette fonction permet de déplacer avec
une très grande précision les points à l’écran, verticalement et
horizontalement, afin d’éviter la présence d’images rémanentes.
✎
Conditions optimales pour le déplacement des points à
l’écran
Option
Horizontalement 0~4 4
Verticalement 0~4 4
Temps (minutes) 1~4 min. 4 min
✎
La valeur paramétrée pour le Déplac. Point diffère selon le
mode et les dimensions (en pouces) du moniteur.
✎
Cette fonction n’est pas accessible en mode Plein écran.
Délai protect. auto. (10 min. / 20 min. / 40 min. / 1 heures /
Off) : L'économiseur d'écran est activé après une certaine période
définie par l'utilisateur après l'affichage d'images fixes à l'écran afin
d'éviter la formation d'images rémanentes sur l'écran.
Défilement : Cette fonction permet de supprimer les images
rémanentes en déplaçant tous les points à l'écran au plasma sur
un parcours prédéfini. Utilisez cette fonction lorsque l’écran affiche
des symboles ou des images rémanentes, tout particulièrement
après l’affichage prolongé d’une image fixe.
✎
La fonction de suppression de la rémanence d’images
doit être exécutée pendant une longue période (environ 1
heure) pour avoir une efficacité suffisante. Si les images
rémanentes n'ont pas été supprimées après avoir exécuté la
fonction, recommencez l'opération.
✎
Appuyez sur n'importe quelle touche de la télécommande
pour annuler cette fonction.
Bords gris (Foncé / Clair) : Lorsque l'on regarde une émission en
format d'écran 4:3, on peut prévenir les dommages à l'écran en
ajustant l'équilibre des blancs de l'extrême gauche et de l'extrême
droite.
Téléviseur / appareils
audio-vidéo / Composante /
HDMI / PC
Réinitialisation de l'image (Réinitial. mode image
/ Annuler)
Rétablit le mode d'image courant à ses réglages par défaut.
Configuration du téléviseur avec un PC
Écran
■ Grain / Affiné : Élimine ou réduit les parasites. Si le bruit n'est
pas éliminé en effectuant uniquement un réglage précis, réglez
la fréquence le mieux possible (Grain), puis procédez à une
syntonisation de nouveau. Une fois les parasites réduits, réajustez
l'image pour la centrer sur l'écran.
■ Position : Régler la position de l’écran de l’ordinateur s’il ne
correspond pas à celui du téléviseur. Appuyez sur la touche
▲ ou ▼ pour régler la position verticale. Appuyez sur la touche
◄ ou ► pour régler la position horizontale.
■ Rétablir l'image : Rétablit l'image en fonction des réglages par
défaut.
Utilisation du téléviseur comme écran PC
Configuration du logiciel sur votre PC (sous Windows XP)
Selon la version de Windows et la carte vidéo, les écrans affichés
peuvent différer, mais les mêmes renseignements de configuration de
base s’appliquent dans la plupart des cas. (Sinon, communiquez avec le
fabricant de l'ordinateur ou votre détaillant Samsung.)
1. Cliquez sur “Panneau de configuration” dans le menu Démarrer de
Windows.
2. Cliquez sur “Apparence et Thèmes” dans la fenêtre “Panneau de
configuration” et la boîte de dialogue “Propriétés de l’affichage”
apparaît.
3. Cliquez sur “Affichage” et la boîte de dialogue “Propriétés de
l’affichage” apparaît.
4. Cliquez sur l'onglet “Paramètres” dans la boîte de dialogue
“Propriétés de l’affichage”
y Réglage du format approprié (résolution) [optimal : PN42C450 :
1024 X 768 à 60 Hz / PN50C450: 1360 x 768 à 60Hz
y Si la boîte de dialogue comporte une option de fréquence de
rafraîchissement verticale, la valeur appropriée est “60” ou “60Hz”.
Sinon, cliquez sur OK pour fermer la boîte de dialogue.
03 Fonctions de base
Menu Son
Modification du mode Son préréglé
MENU → Son → Mode → ENTER
Règle la source d'entrée à PC.
MENU → Image → ENTER
Réglage Auto
Règle automatiquement les paramètres, les fréquences et les positions.
✎
Cette fonction n'est pas disponible lorsqu'un câble HDMI/DVI est
branché.
Mode
■ Standard: Choisit le mode sonore normal.
■ Musique: Accentue la musique par rapport aux
dialogues.
■ Cinéma: Offre le meilleur son pour les films.
■ Voix claire: Accentue les dialogues par rapport
aux autres sons.
■ Personnel: Augmente l'intensité des sons aigus
afin d'offrir aux personnes malentendantes une
meilleure expérience d'écoute.
Français
S.MODE
17
Page 56

Fonctions de base
Ajustement des réglages du son
MENU → Son → Égaliseur → ENTER
Égaliseur
Règle le mode sonore.
■ Balance G/D : Règle la balance entre les haut-parleurs droit et
gauche.
■ 100Hz / 300Hz / 1kHz / 3kHz / 10kHz (Réglage de la largeur de
bande) : Règle le niveau des fréquences de largeur de bande.
■ Régler : Rétablit les valeurs par défaut des réglages de l'égaliseur.
Volume auto (Off / On)
Chaque station de diffusion ayant son propre type de signal, le volume
peut varier chaque fois que l'on change de canal. Cette fonction permet
de régler automatiquement l’intensité du signal sonore du canal désiré
en baissant le volume s’il est trop élevé ou en l’augmentant si le signal
modulé est trop faible.
Sélect. le haut-parleur (Haut-p. externe / Hautparleur TV)
Vous pourriez entendre un écho du son en raison d'une différence de
vitesse de décodage du haut-parleur principal et du récepteur audio. Si
c'est le cas, réglez le téléviseur à Haut-p. externe.
Réglage du son
MENU → Son → ENTER
SRS TruSurround HD (Off / On)
Cette fonction offre une qualité audio virtuelle à 5.1 canaux avec une
chaîne à deux enceintes grâce à la technologie HRTF (Head Related
Transfer Function).
Langue privilégiée
(canaux numériques seulement)
La télédiffusion numérique assure la transmission
simultanée de plusieurs pistes de son (par exemple,
la traduction simultanée de l’émission en langues
étrangères).
✎
La langue sélectionnée doit faire partie de la
liste des langues diffusées.
MTS
Réinitialisation du son (Réinitial. tout / Réinit.
mode son / Annuler)
✎
Lorsque l'option Sélect. le haut-parleur est réglée à Haut-p.
externe, les touches de volume et MUTE ne fonctionneront pas
et les réglages du son seront limités.
✎
Lorsque la fonction Sélect. le haut-parleur est réglée à Haut-p.
externe.
Haut-parleur TV : Off, Haut-p. externe : On
x
✎
Lorsque la fonction Sélect. le haut-parleur est réglée à Haut-
parleur TV.
Haut-parleur TV : On, Haut-p. externe : On
x
✎
Si vous ne recevez aucun signal sonore, le son sera coupé dans
les deux haut-parleurs.
■ Réinitial. tout : Rétablit tous les réglages de l'image aux réglages
prédéfinis par défaut en usine.
■ Réinit. mode son : Rétablit toutes les valeurs pour le son dans le
mode sélectionné aux valeurs par défaut.
Son multi-piste (MTS)
(canaux analogiques seulement)
■ Mono : Choisissez ce réglage pour les canaux
diffusés en monophonie ou en cas de difficultés
avec la réception d’un signal stéréophonique.
■ Stéréo : Choisissez ce réglage pour les canaux
diffusés en stéréophonie.
■ SAP : Choisissez ce réglage pour écouter une
émission diffusée en mode SAP (Separate Audio
Program), habituellement un doublage en langue
étrangère.
✎
Selon le cas, une émission peut être écoutée en mode Mono,
Stéréo ou SAP.
Français
18
MTS
Menu de configuration
Réglage de l’horloge
MENU → Configuration → Heure → ENTER
Heure
■ Horloge: Le réglage de l'horloge est nécessaire pour pouvoir
utiliser les diverses fonctions de minuterie du téléviseur.
L'heure s'affiche chaque fois que vous appuyez sur le
bouton INFO.
✎
Si vous débranchez le cordon d'alimentation, vous devez
régler l'horloge de nouveau.
Mode horloge (Auto / Manuel)
– Auto : Permet de régler l’heure automatiquement en utilisant
l’heure du signal d'une chaîne numérique.
✎
L'antenne doit être branchée pour que le réglage
automatique de l'horloge s’effectue.
Page 57

– Manuel : Réglez l’heure manuellement.
✎
En fonction de la station émettrice et du signal, il est
possible que la fonction de réglage automatique de
l'heure ne fonctionne pas correctement. Dans un tel cas,
réglez l’horloge manuellement.
Réglage Horloge : Réglez les options Mois, Jour, Année, Heure,
Minute et am/pm manuellement.
✎
Cette fonction n’est disponible que lorsque la fonction
Mode horloge est réglée à Manuel.
✎
Vous pouvez régler directement le Mois, Jour, Année,
Heure, et Minute en appuyant sur les touches numériques
de la télécommande.
Fuseau hor. : Choisissez votre fuseau horaire.
✎
Cette fonction n’est accessible que lorsque la fonction
Mode horloge est réglée à Auto.
H. d'été (Daylight Saving Time) (Off / On / Auto) : Permet
d'activer et de désactiver la fonction de l'heure avancée.
✎
Cette fonction n’est accessible que lorsque la fonction
Mode horloge est réglée à Auto.
Utilisation de la fonction de veille
MENU → Configuration → Heure → Mise en veille →
ENTER
■ Mise en veille
automatiquement le téléviseur après le délai
choisi. (30, 60, 90, 120, 150 et 180 minutes).
✎
Pour désactiver la fonction Mise en
veille, sélectionnez Off.
: Éteint
SLEEP
Volume: Sélectionner le niveau sonore désiré.
Contenu (lorsque la fonction Source est réglée sur USB):
Choisissez un dossier sur un dispositif USB qui contiendra les
fichiers musicaux ou les photos à lire lors de la mise sous tension
automatique du téléviseur.
✎
REMARQUE
Si le dispositif USB ne contient aucun fichier musical
x
ou que le dossier contenant le fichier musical n'est
pas sélectionné, la fonction Timer (Veille ou Réveil) ne
fonctionnera pas correctement.
Il est impossible de créer un diaporama s’il n’y a qu’un
x
seul fichier photo dans le dispositif USB.
Si le nom du dossier est trop long, il ne peut être
x
sélectionné.
Chaque dispositif USB utilisé reçoit son propre dossier.
x
Lorsque vous utilisez plus d'un dispositif USB d'un
même type, assurez-vous que chaque dossier assigné à
chaque dispositif USB reçoit un nom différent.
Répéter : Sélectionnez Une fois, Quotid., Lun~Ven, Lun~Sam,
Sam~Dim ou Manuel selon vos besoins. Sélectionnez la fonction
Manuel afin de choisir le jour auquel vous voulez activer la
minuterie.
✎
Le symbole indique le jour sélectionné.
✎
Arrêt automatique (disponible seulement lorsque le téléviseur est
mis sous tension par la fonction de minuterie) : Le téléviseur se
met automatiquement hors tension après trois heures si aucune
commande ne lui est envoyée.
Exclusion automatique de programmes
03 Fonctions de base
Réglage de la mise en marche et de l'arrêt de la
minuterie
MENU → Configuration → Heure → Minuterie 1 →
ENTER
Vous pouvez régler le téléviseur de manière qu’il s’allume
automatiquement à une heure prédéfinie.
■ Minuterie 1 / Minuterie 2 / Minuterie 3 : Trois réglages de
minuterie (mise en marche/arrêt) peuvent être effectués. Tout
d’abord, vous devez régler l’horloge.
Marche
▲
00 00 am
▼
Arrêt
00 00 am
Volume
20 TV Cable 3
Répéter
Une fois
Marche / Arrêt: Réglez l’heure, les minutes et activer/désactiver.
(Pour activer le minuteur avec le réglage choisi, réglez à Activer.)
Minuterie 1
Désactiver
Désactiver
Contenu
Dim Lun Mar Mer Jeu Ven Sam
Dépl.
Réglage
Entrer
Retour
V-Chip
La fonction V-Chip bloque automatiquement la diffusion d’émissions
pouvant ne pas convenir aux enfants. L’utilisateur doit entrer un numéro
d’identification personnel (NIP) avant de pouvoir configurer ou modifier
les restrictions relatives à la fonction V-Chip.
✎
REMARQUE
La fonction V-Chip n'est pas disponible en mode HDMI,
x
Composante ou PC.
Le PIN par défaut d’un nouveau téléviseur est 0-0-0-0.
x
Perm. tout : Déverrouille toutes les classifications du téléviseur.
x
Bloq. tout : Verrouille toutes les classifications du téléviseur.
x
■ Blocage V-Chip (Off / On): Vous pouvez bloquer des émissions
selon un système de classification.
Cont. paren. TV: Vous pouvez bloquer des émissions selon
leur classification. Cette fonction vous permet de contrôler les
émissions que vos enfants regardent.
– TV-Y: Jeunes enfants / TV-Y7: Enfants de plus de 7 ans / TV-G:
Tout public / TV-PG: Surveillance parentale recommandée / TV-
14: Téléspectateurs de plus de 14 ans / TV-G: Adultes
– ALL: Blocage de toutes les classifications. / FV: Fantastique et
Violence / V: Violence / S: Scènes de sexe / L: Langage adulte /
D: Dialogues à caractère sexuel
Français
19
Page 58

Fonctions de base
✎
La fonction V-Chip permet de bloquer automatiquement
certaines classifications avec un contenu de nature délicate.
Par exemple, si vous bloquez la catégorie TV-Y, la catégorie
TV-Y7 sera automatiquement bloquée. De la même façon,
si vous bloquez la catégorie TV-G, toutes les catégories
dans le groupe des jeunes adultes seront alors bloquées
(TV-G, TV-PG, TV-14 et TV-MA). Les sous-catégories
(D, L, S, V) fonctionnent de la même façon. Par exemple,
si vous bloquez la sous-classification L sous TVPG, alors
les sous-classifications L sous TV-14 et TV-MA sont
automatiquement bloquées.
Classif. MPAA : Vous pouvez bloquer les films en fonction de la
classification MPAA. La Motion Picture Association of America
(MPAA) a établi un système de classification qui fournit aux parents
ou adultes exerçant une surveillance des renseignements sur les
films convenant aux enfants.
– G : Public de tous âges (aucune restriction). / PG : Surveillance
parentale recommandée. / PG-13 : Supervision des parents
fortement recommandée. / R: Avec restriction. Les enfants de
moins de 17 ans devraient être accompagnés d’un adulte. /
NC-17 : Non recommandé pour les enfants de moins de 17
ans. / X : Adultes seulement. / NR : Non classé.
✎
La fonction V-Chip permet de bloquer automatiquement
toute classification avec un contenu de nature délicate.
Par exemple, si la classification PG-13 est bloquée, les
classifications R, NC-17 et X sont automatiquement
bloquées.
Anglais canadien : Vous pouvez bloquer des émissions selon leur
classification en anglais canadien.
– C : Émissions destinées aux enfants de moins de 8 ans. / C8+:
Émissions convenant généralement aux enfants de 8 ans et
plus, sans surveillance. / G : Émissions grand public convenant
à tous les auditoires. / PG: Surveillance parentale. / 14+ :
Émissions dont la teneur peut ne pas convenir, en tout ou en
partie, aux enfants de moins de 14 ans. / 18+ : Émissions pour
adultes.
✎
La fonction V-Chip permet de bloquer automatiquement
toute classification avec un contenu de nature délicate.
Par exemple, si la classification G est bloquée, les
classifications PG, 14+et 18+ sont automatiquement
bloquées.
Français canadien : Vous pouvez bloquer des émissions selon
leur classification en anglais canadien.
– G: Général / 8 ans+ : Émissions convenant généralement
aux enfants de 8 ans et plus, sans surveillance. / 13 ans+ :
Émissions pouvant ne pas convenir aux enfants de moins de 13
ans. / 16 ans+ : Émissions pouvant ne pas convenir aux enfants
de moins de 16 ans. / 18 ans+ : Émissions pour adultes.
✎
La fonction V-Chip permet de bloquer automatiquement
toute classification avec un contenu de nature délicate. Par
exemple, si vous bloquez la catégorie 8 ans+, les catégories
13 ans+, 16 ans+ et 18 ans+ seront automatiquement
bloquées.
Catég. américaine téléchargeable : Il est possible d’utiliser de
l’information sur le contrôle parental tout en regardant des canaux
numériques.
✎
REMARQUE
Si l’information n’est pas téléchargée à partir de la
x
station de radiodiffusion, le menu Catég. américaine
téléchargeable est désactivé.
L'information relative au contrôle parental est
x
automatiquement téléchargée pendant le visionnement
de canaux numériques. Cela peut prendre quelques
secondes.
Le menu Catég. américaine téléchargeable peut être
x
utilisé après le téléchargement de l’information à partir
de la station de télédiffusion. Cependant, selon la station
émettrice, la fonction pourrait ne pas être accessible.
Les niveaux de contrôle parental diffèrent selon la station
x
de radiodiffusion. Le nom de menu par défaut et les
modifications de Catég. américaine téléchargeable
varient selon les informations téléchargées.
Même si vous réglez l’affichage à l’écran dans une autre
x
langue, le menu Catég. américaine téléchargeable
s’affiche en anglais seulement.
Le classement permet de bloquer automatiquement
x
certaines classifications avec un contenu de nature
délicate.
Les catégories (par exemple: Humor Level., etc) et les
x
niveaux de classification (par exemple: DH, MH, H, etc)
peuvent différer selon la station de télédiffusion.
■ Changer NIP : L’écran Changer NIP s’affiche. Choisissez un code
NIP à quatre chiffres et saisissez-le. Lorsque vous avez entré
le code NIP à quatre chiffres, l'écran Confirmer NIP apparaît.
Saisissez de nouveau les quatre chiffres. Quand l’écran de
confirmation disparaît, le NIP est mémorisé.
Visionnement d'un canal à accès restreint
Si un canal à accès restreint est syntonisé, la fonction V-Chip le bloque.
L’écran devient vide et le message suivant s’affiche:
Ce canal est bloque en mode V-Chip. Veuillez entrer un NIP pour
débloquer.
✎
Si vous avez oublié votre NIP, appuyez sur les touches de la
télécommande dans l’ordre suivant pour rétablir le code 0-0-0-0.
POWER (off) → MUTE → 8 → 2 → 4 → POWER (on)
20
Français
Page 59

Solutions économiques
MENU → Configuration → ENTER
Vous pouvez utiliser la fonction Eco pour augmenter les économies
d'énergie.
x
x
Écon. Énergie (Off / Basse / Moyen / Haute)
Cette option permet de régler la luminosité de l’écran afin de réduire
la consommation d’énergie. Jusqu’à ce que l'écran soit rallumé de
nouveau, une image déformée s’affichera pendant environ 4 secondes.
Capteur Eco (Off / On)
Le capteur Eco détecte l'intensité lumineuse ambiante à l'aide d'un
capteur optique et ajuste la luminosité de l'écran en conséquence.
■ Capteur Eco (Off / On) : Active ou désactive le capteur.
✎
Si vous réglez l'option Lumière cellule, le Capteur Eco
sera réglé à Off.
■ Lumière cell. min. : Ajuste manuellement la luminosité de l'écran
(0~10).
✎
Si Capteur Eco est réglé sur On, la luminosité de l'affichage
risque de changer (elle devient légèrement plus sombre
dans la plupart des cas) selon l'intensité de l'éclairage
ambiant.
Autres fonctions
MENU → Configuration → ENTER
Sous-titres
(texte à l’écran)
■ Sous-titres (Off / On) : Vous pouvez activer
ou désactiver la fonction des sous-titres. Si la
fonction des sous-titres n'est pas disponible, il
n'y a pas d'affichage à l'écran.
■ Mode ss-titres codés : Vous pouvez sélectionner le mode de
sous-titrage souhaité.
Par défaut / CC1~CC4 / Texte1~Texte4 : (canaux analogiques
seulement) La fonction de sous-titrage analogique fonctionne
en mode canaux analogiques ou lorsqu'un signal est fourni au
téléviseur à partir d'un appareil externe. (Selon le signal émetteur, le
sous-titrage analogique peut peut-être fonctionner sur les canaux
numériques.)
Par défaut / Service1~Service6 / CC1~CC4 / Texte1~Texte4
: (canaux numériques seulement) La fonction des sous-titres
numériques fonctionne seulement sur les canaux numériques.
Langue
Règlage de la langue de menu.
1. Sélectionnez la l Langue puis appuyez sur la touche ENTER
2. Choisissez la langue voulue puis appuyez sur la touche
ENTER
.
✎
Vous pouvez choisir English, Español ou Français.
Mode Jeu (Off / On)
En sélectionnant le mode Jeu, lorsque vous branchez une console de
jeu comme PlayStationMC ou XboxMC, vous pouvez vivre une expérience
de jeu plus réaliste.
✎
REMARQUE
Précautions à prendre et limites du mode Jeu.
x
– Pour débrancher la console de jeu et brancher un autre
appareil externe, désactivez le Mode Jeu à Off dans le menu
de configuration.
– Si le menu du téléviseur est affiché en Mode Jeu, l'écran
vibre légèrement.
Mode jeu n’est pas disponible si la source d’entrée est réglée sur
x
TV ou PC.
.
■ Options de sous-titrage numérique : (canaux numériques
seulement)
Taille : Les options sont : Par défaut, Petit, Standard et Grand. La
valeur par défaut est Standard.
Style des polices : Les options sont : Par défaut et Styles de 0 à
7. La valeur par défaut est Style 0.
Couleur avant-plan : Les options sont : Par défaut, Blanc, Noir,
Rouge, Vert, Bleu, Jaune, Magenta et Cyan. Vous pouvez modifier
la couleur des caractères. La couleur par défaut est Blanc.
Couleur arrière-plan : Les options sont : Par défaut, Blanc, Noir,
Rouge, Vert, Bleu, Jaune, Magenta et Cyan. Vous pouvez modifier
la couleur de l’arrière-plan des sous-titres. La valeur par défaut est
Noir.
Opacité avant-plan : Les options sont : Par défaut, Transparent,
Translucide, Opaque et Clignotement.
Opacité arrière-plan : Ajuste l’opacité d’arrière-plan du soustitrage. Les options sont : Par défaut, Transparent, Translucide,
Opaque et Clignotement.
Retour par défaut : Cette option rétablit les paramètres par
défaut des fonctions suivantes Taille, Style des polices, Couleur
avant-plan, Couleur arrière-plan, Opacité avant-plan et Opacité
arrière-plan.
Après avoir branché la console de jeu, réglez l'option Mode Jeu
à On. Malheureusement, vous pourriez noter une altération de
l'image.
Si le Mode Jeu est activé à On:
– Le mode Image est réglé sur Standard et le mode Son est
réglé sur Cinéma.
– L'option Égaliseur n'est pas disponible.
CC
✎
L'option Sous-titres ne fonctionne pas dans les modes
Composante, HDMI ou PC.
✎
L'option de sous-titrage disponible dépend de l'émission
diffusée.
✎
Les paramètres Service1 ~ 6 en mode Sous-titres
numériques ne sont pas toujours disponibles, selon le
système de diffusion utilisé.
03 Fonctions de base
Français
21
Page 60

Fonctions de base
IN
3
✎
REMARQUE
Les Options de sous-titrage numérique sont
x
accessibles uniquement lorsque les options Par défaut
et Service1 ~ Service6 peuvent être sélectionnées en
Mode ss-titres codés.
L'option de sous-titrage disponible dépend de l'émission
x
diffusée.
L’expression Par défaut signifie revenir aux choix de
x
sous-titrage initiaux déterminés par le diffuseur.
L’avant-plan et l’arrière plan ne peuvent pas être
x
configurés de la même couleur.
Vous ne pouvez pas définir Opacité avant-plan et
x
Opacité arrière-plan à Transparent.
Mélodie (Off / Basse / Moyen / Haute)
Permet au téléviseur de faire jouer une mélodie lorsque vous l’allumez
et l’éteignez.
✎
La Mélodie ne joue pas.
Lorsque le téléviseur n’émet aucun son parce que l’on a appuyé
x
sur la touche MUTE.
Le téléviseur n’émet aucun son parce que le volume a été réduit au
x
minimum à l’aide de la touche VOL –.
Lorsque la fonction Mise en veille met le téléviseur hors tension.
x
Menu Soutien technique
MENU → Support technique → ENTER
Autodiagnostic
Mise à niveau du logiciel
Samsung peut offrir des mises
à jour du micrologiciel de
votre téléviseur dans le futur.
Veuillez visiter Samsung.com ou
communiquer avec le centre d’appel
Samsung au 1-800-SAMSUNG
(1-800-726-7864) pour obtenir de
l’information sur le téléchargement
des mises à jour et sur l’utilisation
d’une clé USB. Les mises à jour
sont accessibles en branchant une
clé USB dans le port USB.
Oui : Si, au cours de l'essai de son, un seul haut-parleur
émet du son ou si les deux haut-parleurs n'émettent aucun
son, sélectionnez Oui. Il est possible que votre téléviseur soit
défectueux. Communiquez avec le centre d'appel de Samsung
pour obtenir de l'assistance (1-800-SAMSUNG).
Non : Si les haut-parleurs émettent un son normal, sélectionnez
Non. Il est possible qu'un appareil externe soit défectueux. Veuillez
vérifier les connexions. Si le problème persiste, consultez le guide
d’utilisation de l’appareil externe.
■ Puissance signal : (canaux numériques seulement) Les canaux
HD ont une réception parfaite ou ne sont pas captés du tout.
Déplacez l'antenne de manière à augmenter la puissance du signal.
Panneau latéral du téléviseur
HDMI IN 3
Clé USB
✎
Au moment de la mise à niveau du micrologiciel, les réglages
vidéo et audio que vous avez effectués seront remplacés par les
réglages par défaut (définis en usine).
✎
Il est recommandé de prendre en note les réglages afin de
pouvoir les rétablir facilement après la mise à niveau.
USB
✎
L'autodiagnostic peut prendre quelques secondes; cela fait partie
du fonctionnement normal du téléviseur.
■ Essai d'image (Oui / Non) : Utilisez cette fonction pour vérifier les
problèmes d'image.
Oui : Si le parcours ne s’affiche pas ou s’il y a du bruit dans la
mire, sélectionnez Oui. Il est possible que votre téléviseur soit
défectueux. Communiquez avec le centre d'appel de Samsung
pour obtenir de l'assistance (1-800-SAMSUNG).
Non : Si la mire s'affiche correctement, sélectionnez Non. Il est
possible qu'un appareil externe soit défectueux. Veuillez vérifier les
connexions. Si le problème persiste, consultez le guide d’utilisation
de l’appareil externe.
■ Essai de son (Oui / Non) : Utilise la mélodie intégrée pour vérifier
les problèmes de son.
✎
Si les haut-parleurs du téléviseur n’émettent aucun son,
assurez-vous que le mode Sélect. le haut-parleur est réglé
à Haut-parleur TV dans le menu Son.
✎
Vous entendrez la mélodie durant l’essai même si le Sélect.
le haut-parleur est réglé à Haut-p. externe ou si vous avez
coupé le son avec la touche MUTE.
Français
22
Guide de connexion HD
Reportez-vous à cette rubrique lorsque vous branchez des appareils
externes au téléviseur.
Contact Samsung
Consultez cette rubrique lorsque votre téléviseur ne fonctionne pas
correctement ou lorsque vous souhaitez mettre à niveau le logiciel. Vous
y trouverez de l'information sur nos centres d'appel et sur la façon de
télécharger des produits et logiciels.
Page 61

Fonctions avancées
IN
3
Music
Photo Music Setup
SUM
307.2MB/973.7MB
USB
Media Play
04 Fonctions avancées
MEDIA.P
Visualisez des photographies et lisez des fichiers musicaux
enregistrés sur un dispositif USB à mémoire de grande
capacité (MSC).
MENU → Application → Media Play (USB)
→ ENTER
Nom app.
USB
SUM
315.0MB/495.0MB libre
Branchement d’un dispositif USB
1. Mettez le téléviseur en marche.
2. Branchez un dispositif USB contenant des photos, de la musique ou des fichiers vidéo dans la prise
USB, située sur le côté du téléviseur.
3. Lorsque l'écran de sélection Entrée s'affiche, appuyez sur la touche ► pour sélectionner Media
Play (USB), puis appuyez sur ENTER
.
Panneau latéral du téléviseur
Clé USB
Utilisation du menu Media Play
Lecture d’une photo (ou d’un Diaporama)
1. Appuyez sur la touche MENU. Appuyez sur la touche ▲ ou ▼ pour sélectionner
Entrée, puis sur ENTER
.
2. Appuyez sur la touche ▲ ou ▼ pour sélectionner Media Play (USB), puis sur
ENTER
.
3. Appuyez sur la touche ▲ ou ▼ pour sélectionner le dispositif de mémoire USB
correspondant, puis appuyez sur la touche ENTER
✎
Le menu Media Play varie en fonction du dispositif de mémoire USB
.
branché au téléviseur.
✎
Certains dispositifs peuvent ne pas être pris en charge en raison d'un
problème de compatibilité.
4. Appuyez sur la touche ◄ ou ►, pour passer à une icône (Photo, Music, Setup),
puis appuyer sur la touche ENTER
✎
Il est possible que cela ne fonctionne pas correctement avec des fichiers multimédias non autorisés.
✎
À savoir avant d'utiliser Media Play (USB)
Vous ne devez utiliser que des caractères alphanumériques pour nommer les dossiers ou fichiers (photo, musique).
x
Le système de fichiers ne prend en charge que le format FAT16/32 (le système de fichiers NTFS n'est pas pris en charge). Certain types d'appareil
x
.
audio ou d'appareil photo numérique USB ne sont pas compatibles avec ce téléviseur.
La fonction Media Play (USB) ne prend en charge que les dispositifs USB à mémoire de grande capacité (MSC). Le dispositif MSC (“Mass Storage
x
Class”) est un dispositif de mémoire de grande capacité en bloc seulement. Parmi les exemples de MSC, on trouve les disques Thumb et les
lecteurs de cartes Flash (USB et HUB ne sont pas pris en charge).
Avant de brancher le dispositif au téléviseur, veiller à effectuer une copie de sauvegarde des fichiers afin d'éviter toute perte ou dommage.
x
SAMSUNG ne saurait être tenue responsable des dommages aux fichiers ou de perte de données.
Veuillez vous brancher directement au port USB de votre téléviseur. Il peut y avoir un problème de compatibilité USB si vous utilisez un branchement
x
par câble distinct.
Photo
SUM
307.2MB/973.7MB
Photo Music Setup
Dépl.
Intro.
Lecture
Quitter
HDMI IN 3
USB
Retour
Français
23
Page 62

Fonctions avancées
Photo
Photo Music Setup
SUM
307.2MB/973.7MB
Music
Photo Music Setup
SUM
307.2MB/973.7MB
USB
Seuls des formats de fichier MP3 et JPEG sont pris en charge.
x
Le format MP3 Media Play (USB) ne prend en charge que les fichiers musicaux avec une fréquence d'échantillonnage élevée (32 kHz, 44,1 kHz, ou
x
48 kHz).
Nous vous recommandons le format JPEG séquentiel.
x
Ne débranchez pas le dispositif USB pendant son chargement.
x
MSC prend en charge les fichiers MP3 et JPEG, tandis qu’un dispositif PTP ne prend en charge que les fichiers JPEG.
x
Le MTP (protocole de transfert de média) n’est pas pris en charge.
x
Le temps de lecture d’un fichier mp3 peut s’afficher sous la forme “00:00:00” si l’information relative au temps de lecture n’est pas détectée au début
x
du fichier.
Plus la résolution de l’image est élevée, plus elle prend du temps à s’afficher à l’écran.
x
La liste de fichiers musicaux ou de photos contient jusqu'à 300dossiers ou fichiers.
x
Le chargement peut prendre quelque secondes, selon la taille du fichier.
x
Les fichiers MP3 protégés par DRM, téléchargés de sites payants, ne peuvent être lus.
x
La gestion des droits numériques (DRM) est une technologie qui soutient la création, la distribution et la gestion du contenu de façon intégrée et
x
globale, notamment par la protection des droits et intérêts des fournisseurs de contenu, la prévention de la copie illégale du contenu, ainsi que la
gestion de la facturation et des règlements.
Le mode d'économie d'énergie de certains disques durs externes peut être activé automatiquement lorsqu'ils sont branchés au téléviseur.
x
Si un câble de rallonge USB est utilisé, l'appareil USB pourrait ne pas être reconnu ou les fichiers sur l'appareil pourraient ne pas être lus.
x
Si le dispositif USB branché au téléviseur n'est pas reconnu, la liste des fichiers dans le dispositif est corrompue ou qu'un fichier dans la liste n'est
x
pas lu, branché le dispositif USB à un ordinateur, formatez-le et vérifiez la connexion.
Si un fichier supprimé sur l'ordinateur est toujours présent lorsque vous exécutez la fonction Media Play, supprimez le fichier de façon permanente
x
sur l'ordinateur à l'aide de l'option “Vider la corbeille”.
Photo
Lecture d’une photo (ou d’un Diaporama)
1. Appuyez sur la touche INFO pour afficher l'option Afficher, Dém. Diaporama,
Supprimer, Supprimer tout, Désélect. Tout.
2. Appuyez sur la touche ▲ ou ▼ pour sélectionner Dém. Diaporama, puis sur
ENTER
✎
Pendant le diaporama, les fichiers s’affichent dans l’ordre, à partir du fichier
affiché.
✎
Il est possible de lire des fichiers MP3 automatiquement pendant un
diaporama si la fonction Musique de fond par défaut est réglée à On. Pour
activer cette fonction, les fichiers MP3 et les autres fichiers photo doivent
se trouver dans le même dossier du dispositif à mémoire USB.
✎
Appuyez sur la touche INFO pendant le diaporama pour régler les options suivantes Vitesse du diaporama, Musique de fond, Sélection
musique de fond, Liste. Appuyez sur la touche ▲ ou ▼ pour sélectionner d'options, puis sur ENTER.
– Après avoir réglé l'option, appuyez sur la touche ENTER
✎
Appuyez sur la touche INFO pendant le diaporama pour régler les options suivantes : Dém. Diaporama, Zoom, Rotation, Liste. Appuyez sur
la touche ▲ ou ▼ pour sélectionner d'options, puis sur ENTER.
– Après avoir réglé l'option, appuyez sur la touche ENTER
Photo
440
580
*
78.0KB
Janv. 7, 2010
.
pour effectuer la modification.
pour effectuer la modification.
03 / 14
SUM
307.2MB/973.7MB
DSC_0558.JPG
Dossier supér... Dossier
File.....jpg File.....jpg
libre
File.....jpg File.....jpg File.....jpg
Choisir Dépl. Option
File.....jpg
File.....jpg File.....jpg File.....jpg
File.....jpg File.....jpg
1/1 Page
File.....jpg File.....jpg
Lecture
Retour
24
Français
Page 63

Music
Photo
Photo Music Setup
SUM
307.2MB/973.7MB
Music
Photo Music Setup
SUM
307.2MB/973.7MB
DSC_0558.JPG
580
440
78.0KB
03 / 14
SUM
*
Photo
307.2MB/973.7MB
File.....jpg File.....jpg File.....jpg
File.....jpg File.....jpg File.....jpg
File.....jpg File.....jpg
File.....jpg File.....jpg
File.....jpg File.....jpg File.....jpg
USB
Utilisation de la liste MP3
04 Fonctions avancées
Icône de dossier
Music
SUM
307.2MB/973.7MB
Icône Liste de fichiers musicaux
Passer à l’icône de dossier de l’étape précédente
✎
Appuyez sur la touche (REW) ou (FF) pour changer de page.
✎
Le fichier sélectionné est affiché en tête de liste avec sa durée de lecture.
1. Pour choisir tous les fichiers ou un fichier, appuyez sur la touche INFO pour afficher
les menus Musique.
Appuyez sur la touche ENTER
sélectionné), Reprise de la musique, Supprimer (o Effacer fichier sél.)
pour sélectionner Lecture (o Lire le fichier
Supprimer tout. o Désélect. tout.
2. Appuyez sur la touche ▲ ou ▼, pour passer à une icône, puis appuyer sur la
touche ENTER
Appuyez sur la touche ENTER
.
sur une icône de note de musique pour lire
immédiatement le fichier de musique.
Si vous appuyez sur la touche ENTER
pendant qu’un dossier est en
Photo Music Setup
Music
4.3MB
Janv. 7, 2010
2 / 31
Lire le chier sélectionné
Reprise de la musique : Off
Effacer chier sél.
Supprimer tout
SUM
307.2MB/973.7MB
Deselect. tout
Sélectionner Dépl. Option
06-I Will Carry You.mp3 00:00:00
Dossier supérieur
Dossier
01-The Way.mp3 00:03:25
02-Run To Me.mp3 00:03:25
03-No More Sad Songs.mp3 00:03:25
04-Interference-gold.mp3 00:03:25
05-marketa_irglova-The_hill.mp3 00:03:25
06-I Will Carry You.mp3 00:03:25
07-marketa_irglova.mp3 00:03:25
08-Super World.mp3 00:03:25
Quitter
Dépl.
Lecture
Lecture
Retour
1/4 Page
Retour
surbrillance, les fichiers musicaux qu’il contient s’affichent.
■ Lecture: Sélectionner pour lire des fichiers MP3.
✎
Ce menu affiche uniquement les fichiers pourvus d’une extension MP3. Les fichiers comportant d’autres extensions ne sont pas
affichés, même s’ils sont mémorisés sur le même dispositif USB.
✎
Pour régler le volume de la musique, appuyez sur la touche
MUTE de la télécommande.
de la télécommande. Pour couper le son, appuyez sur la touche
■ Reprise de la musique (On / Off): Sélectionner pour répéter la lecture des fichiers MP3 dans le dossier courant.
Lecture musicale
y N'affiche que les fichiers dont l'extension est MP3. Les fichiers comportant d’autres extensions ne sont pas affichés, même s’ils sont mémorisés
sur le même dispositif USB.
y Si le volume semble étrange pendant la lecture de fichiers MP3, réglez les options Égaliseur et SRS TruSurround HD dans le menu Son. (Un
fichier MP3 surmodulé peut être à l’origine des problèmes sonores)
y Icône d’information de la fonction Musique
Reprise de la musique est réglé à On:
Reprise de la musique est réglé à Off:
La touche (Lecture) / (Pause) de la télécommande est enfoncée pendant la lecture de la musique.
Lorsque vous appuyez sur la touche (Arrêt) de la télécommande, la musique s’arrête.
Français
25
Page 64

Fonctions avancées
HDMI IN 3
Photo
Photo Music Setup
SUM
307.2MB/973.7MB
Music
Photo Music Setup
SUM
307.2MB/973.7MB
DSC_0558.JPG
580
440
78.0KB
03 / 14
SUM
*
Photo
307.2MB/973.7MB
File.....jpg File.....jpg File.....jpg
File.....jpg File.....jpg File.....jpg
File.....jpg File.....jpg
File.....jpg File.....jpg
File.....jpg File.....jpg File.....jpg
Music
4.3MB
2 / 31
06-I Will Carry You.mp3 00:00:00
01-The Way.mp3 00:03:25
02-Run To Me.mp3 00:03:25
03-No More Sad Songs.mp3 00:03:25
04-Interference-gold.mp3 00:03:25
05-marketa_irglova-The_hill.mp3 00:03:25
06-I Will Carry You.mp3 00:03:25
07-marketa_irglova.mp3 00:03:25
08-Super World.mp3 00:03:25
SUM
307.2MB/973.7MB
USB
Configuration
Utilisation du menu Configuration
■ Vitesse du diaporama : Sélectionnez cette option pour commander la vitesse du
diaporama. Sélectionnez la fonction Rapide, Normal ou Lent.
■ Musique de fond : Sélectionner pour déterminer si un fichier MP3 seral lu pendant
un diaporama. Il est possible de sélectionner Musique On ou Musique Off.
■ Sélection musique de fond : Pendant le visionnement d’un diaporama, utilisez
l'option Sélection musique de fond pour sélectionner un fichier musical.
Sélectionner un fichier MP3 comme musique de fond.
■ Reprise de la musique : Sélectionner pour déterminer si vous voulez que la
lecture de la musique soit répétée après que tous les fichiers MP3 dans le dossier
courant ont été entendus.
■ Écran de veille : Choisir cette option pour fixer le temps d’attente avant le démarrage de l’écran de veille. L'écran de veille apparaîtra si vous
n'appuyez sur aucune touche après 10 min, 20 min, 40 min ou 1 h ou Off.
■ Supp. sécurité : Il est possible de retirer le dispositif du téléviseur de façon sûre.
Lecture des fichier musicaux / photos sélectionnés
1. Appuyez sur la touche jaune.
2. Répéter l’étape précédente pour sélectionner les fichiers musicaux ou photos souhaités.
✎
3. Appuyer sur la touche
Qu’est-ce qu’Anynet+?
Anynet+ est une fonction qui permet, à l’aide de la télécommande Samsung, de commander tous les appareils audiovisuels Samsung raccordés. Le
système Anynet+ peut être utilisé uniquement avec les appareils Samsung dotés de la fonction Anynet+. Pour vérifier si un appareil Samsung en est
pourvu, vérifiez la présence d'un logo Anynet+ sur celui-ci.
Branchement à une chaîne de cinéma maison Samsung
Setup
Les fichiers sélectionnés sont marqués du symbole . Appuyez sur la touche jaune pour annuler la sélection.
(Lecture) / ENTER pour lire les fichiers ou photos sélectionnés.
Vitesse du diaporama : Rapide
Musique de fond : On
Sélection musique de fond
Reprise de la musique : On
Écran de veille : 10 min
Supp. sécurité
Anynet+
Dépl.
Entrer
Retour
TV
Appareil Anynet+ 1
Câble HDMI
Câble optique
Cinéma maison
Câble HDMI
Appareil Anynet+
2, 3
Câble HDMI
1. Raccordez la prise HDMI IN (1(DVI), 2, 3) du cinéma maison et la prise HDMI OUT de l'appareil Anynet+ correspondant à l’aide du câble HDMI.
2. Raccordez la prise d'entrée HDMI IN de la chaîne de cinéma maison et la prise de sortie HDMI OUT de l'appareil Anynet+ correspondant à l'aide
d'un câble HDMI.
Français
26
Page 65

✎
REMARQUE
Branchez le câble optique entre la prise de sortie DIGITAL AUDIO OUT (OPTICAL) du téléviseur et la prise d'entrée audio numérique de la chaîne
x
de cinéma maison.
Si vous procédez au branchement ci-dessus, la prise optique n’offre que deux canaux audio. Vous entendrez du son uniquement au niveau des
x
haut-parleurs gauche et droit avant de votre chaîne de cinéma maison et du caisson d'extrêmes graves. Pour avoir le son en 5.1 canaux, branchez la
prise de sortie DIGITAL AUDIO OUT (OPTICAL) du récepteur DVD ou satellite (c.-à-d. l'appareil Anynet 1 ou 2) directement à l'amplificateur ou à la
chaîne de cinéma maison, et non au téléviseur.
Vous ne pouvez brancher qu'une seule chaîne de cinéma maison.
x
Vous pouvez utiliser un câble HDMI pour brancher un appareil Anynet+. Certains câbles HDMI ne prennent pas en charge les fonctions Anynet+.
x
Anynet+ fonctionne lorsque l’appareil audiovisuel compatible Anynet+ est en mode Veille ou Activé.
x
Anynet+ prend en charge un maximum de 12 appareils audio-vidéo. Notez que vous pouvez connecter jusqu’à trois appareils de même type.
x
Menu Anynet+
Le menu Anynet+ varie selon le type et l'état des appareils Anynet+ branchés au téléviseur.
Menu Anynet+ Description
Regarder téléviseur Passage du mode Anynet+ au mode de télédiffusion.
Liste appareils Affiche la liste des appareils Anynet+.
MENU (nom_appareil) Affiche les menus des appareils branchés. Par exemple, si un enregistreur DVD est branché, le menu du
INFO (non_appareil) Affiche les menus de lecteur des appareils branchés. Par exemple, si un enregistreur DVD est branché, le
Enregistrement : (*recorder) Lance aussitôt l’enregistrement sur l’enregistreur. (Disponible seulement pour les appareils avec fonction
Arrêter l'enregistrement :
(*recorder)
Récepteur Le son est émis par le récepteur.
Si plusieurs appareils d'enregistrement sont branchés, ils s'affichent comme (*recorder). Si un seul appareil est branché, il est représenté comme suit :
(*nom_appareil).
disque de celui-ci s’affiche.
menu de lecture du disque de celui-ci s’affiche.
d’enregistrement.)
Arrête l'enregistrement.
04 Fonctions avancées
Configuration de la fonction Anynet+
MENU→ Application → Anynet+ (HDMI-CEC) → ENTER
■ Configuration
Anynet+ (HDMI-CEC) (Off / On): Pour utiliser la fonction Anynet+, le Anynet+ (HDMI-CEC) doit être On.
✎
Lorsque la fonction Anynet+ (HDMI-CEC) est désactivée, toutes les opérations Anynet+ connexes sont désactivées.
Arrêt automatique (No / Oui): Configuration d’un appareil Anynet+ pour qu’il s’arrête automatiquement à la mise hors tension du téléviseur.
✎
Si la fonction Arrêt automatique est réglée sur Oui, les appareils externes en marche sont mis hors tension en même temps que le
téléviseur. Toutefois, si un enregistrement est en cours, l'appareil n'est pas mis hors tension.
✎
Il est possible qu'elle ne soit pas être activée selon l'appareil.
Français
27
Page 66

Fonctions avancées
Permutation entre appareils Anynet+
1. La liste des appareils Anynet+ branchés au téléviseur s’affiche.
✎
S'il est impossible de trouver l'appareil désiré, appuyez sur la touche rouge pour rafraîchir la liste.
2. Sélectionnez un canal et appuyez sur la touche ENTER
✎
La Liste appareils du menu s'affiche seulement lorsque vous réglez Anynet+ (HDMI-CEC) à On dans le menu Application.
La permutation vers l'appareil sélectionné peut prendre jusqu’à deuxminutes. Il n’est pas possible d’annuler l’opération de permutation.
x
Si vous avez sélectionné un appareil externe en appuyant sur la touche SOURCE, vous ne pouvez pas utiliser la fonction Anynet+. Assurez-vous de
x
permuter vers l’appareil Anynet+ à l’aide de la Liste appareils.
Enregistrement
Vous pouvez enregistrer une émission télévisée à l'aide d'un enregistreur Samsung.
1. Sélectionne Enregistrement.
✎
Lorsque plus de deux appareils d'enregistrement sont branchés
Lorsque plusieurs appareils sont connectés, les appareils d’enregistrement sont indiqués. Sélectionnez l'appareil d'enregistrement
x
voulu dans la Liste appareils.
✎
Lorsque l'appareil d’enregistrement n'est pas affiché, sélectionnez Liste appareils et appuyez sur la touche rouge pour rechercher les
appareils.
2. Appuyez sur la touche EXIT pour quitter le menu.
✎
Il est possible d'enregistrer les trains binaires source en choisissant Enregistrement: (device_name).
✎
Appuyez sur la touche (REC) pour enregistrer ce que vous écouter présentement. Si vous regardez une vidéo sur un autre appareil,
la vidée de cet appareil est enregistrée.
✎
Avant d’enregistrer, vérifiez si la prise d’antenne est correctement branchée à l’appareil enregistreur. Pour brancher correctement une
antenne à un appareil d’enregistrement, consultez le guide d’utilisation de l’appareil.
. Vous pouvez maintenant choisir l’appareil sélectionné.
Écoute par l'intermédiaire d'un récepteur
Il est à présent possible d'écouter le son par l'intermédiaire d’un récepteur (par ex., cinéma maison) au lieu des Haut-parleur TV.
1. Sélectionnez Récepteur et ON.
2. Appuyez sur la touche EXIT pour quitter le menu.
✎
Si votre récepteur ne prend en charge que le son, il peut ne pas figurer dans la liste des appareils.
✎
Le récepteur fonctionne lorsque la prise d’entrée optique est reliée à la prise de sortie optique DIGITAL AUDIO OUT (OPTICAL) du
téléviseur.
✎
Lorsque le récepteur (p. ex., cinéma maison) est activé, il est possible d’entendre le son provenant de la prise optique du téléviseur.
Lorsque le téléviseur émet des signaux numériques (air), il transmet le son en 5.1 canaux au récepteur. Lorsque la source est un
composant numérique, comme un lecteur DVD, et que ce dernier est branché au téléviseur à l'aide d'un câble HDMI, seul un son deux
canaux sera émis par le récepteur de la chaîne.
✎
REMARQUE
Vous ne pouvez commander les appareils Anynet+ qu'à l'aide de la télécommande, et non les touches du téléviseur.
x
Il est possible que la télécommande du téléviseur ne fonctionne pas dans certaines conditions. Le cas échéant, sélectionnez à nouveau l’appareil
x
Anynet+.
Les fonctions Anynet+ ne fonctionnent pas avec des produits d'autres marques.
x
28
Français
Page 67

Dépannage de la fonction Anynet+
Problème Solution possible
Anynet+ ne fonctionne pas. • Vérifier si l’appareil est bien un appareil Anynet+. Le système Anynet+ ne prend en charge que les appareils Anynet+.
Je souhaite lancer Anynet+. • Vérifiez si l’appareil Anynet+ est correctement branché au téléviseur et si le Anynet+ (HDMI-CEC) est réglé sur On dans le
Je souhaite quitter Anynet+. • Sélectionner Regarder téléviseur dans le menu Anynet+.
Le message “Connexion à l’appareil
Anynet+...” s'affiche à l'écran.
L’appareil Anynet+ ne fonctionne pas
en mode lecture.
L'appareil branché n'est pas affiché. • Vérifiez si l’appareil prend en charge les fonctions Anynet+.
L’émission ne peut pas être
enregistrée.
Le récepteur n'émet pas le son
provenant du téléviseur.
• Vous ne pouvez brancher qu’un seul récepteur (cinéma maison).
• Vérifiez si le cordon d’alimentation de l’appareil Anynet+ est bien branché.
• Vérifiez les branchements des câbles vidéo/audio/HDMI de l’appareil Anynet+.
• Vérifier si Anynet+ (HDMI-CEC) est On dans le menu Configuration d'Anynet+.
• Vérifier si la télécommande est en mode TV.
• Vérifiez si la télécommande est en mode Anynet + compatible.
• Anynet+ ne fonctionne pas dans certaines situations. (recherche de canaux, utilisation Media Play (USB) ou Prêt-à-
l’emploi (mise en marche initiale), etc.)
• Au moment du branchement ou du débranchement du câble HDMI, s'assurer d’effectuer une nouvelle détection des
appareils ou de mettre le téléviseur hors tension et le redémarrer.
• Vérifiez si la fonction Anynet+ de l’appareil Anynet+ est activée.
menu Configuration d’Anynet+.
• Appuyez ensuite sur la touche TOOLS pour afficher le menu Anynet+ et sélectionner le menu désiré.
• Appuyez sur la touche SOURCE de la télécommande du téléviseur pour sélectionner un appareil autre qu'un appareil
Anynet+.
• Appuyez sur les touches
canaux ne fonctionne que si aucun appareil à syntoniseur intégré Anynet+ n'est branché.)
• Vous ne pouvez pas utiliser la télécommande pendant la configuration d'Anynet+ ou pour la permutation vers un mode de
visionnement.
• Utilisez la télécommande lorsque le réglage d’Anynet+ ou la permutation vers le mode de visionnement sont terminés.
• Vous ne pouvez pas utiliser la fonction lecture lorsque le mode Prêt-à-l’emploi (mise en marche initiale) est en cours
d’exécution.
• Vérifier si le câble HDMI est correctement branché.
• Vérifier si Anynet+ (HDMI-CEC) est On dans le menu Configuration d'Anynet+.
• Rechercher les appareils Anynet+ de nouveau.
• Seul le câble HDMI permet de brancher un appareil Anynet+. Certains câbles HDMI ne prennent pas en charge les
fonctions Anynet+.
• Répéter le balayage de détection si la connexion a été interrompue suite à une interruption de l'alimentation ou que le câble
HDMI a été déconnecté.
• Vérifier si la prise d'antenne sur l'appareil enregistreur est branchée correctement.
• Branchez le câble optique entre le téléviseur et le récepteur.
, PRE-CH et FAV.CH pour changer de mode au téléviseur. (Remarque: le bouton des
04 Fonctions avancées
Français
29
Page 68

Autre information
Installation de l’ensemble de fixation murale
Fixation du support d'obturation
Fixez le support d'obturation lors de l'installation du téléviseur sur un mur.
Support d'obturation
Installation de l’ensemble de fixation murale
L'ensemble de fixation murale (vendu séparément) permet de fixer le téléviseur au mur.
Pour obtenir des instructions détaillées sur l'installation du support mural, reportez-vous aux instructions fournies avec l'ensemble. Demandez l'aide
d'un technicien pour l'installer.
Samsung Electronics n’est pas responsable des dommages causés à l’appareil ni des blessures si vous tentez d’installer le support vous-même.
Spécifications de l'ensemble d'installation murale (VESA)
✎
La trousse d'installation murale n'est pas incluse. Elle est vendue séparément.
Installez votre support mural sur un mur massif perpendiculaire au plancher. Pour le fixer sur d'autres types de matériaux, veuillez communiquer avec
votre détaillant. Si vous l’installez au plafond ou sur un mur incliné, il risque de tomber et de causer des blessures.
✎
REMARQUE
Les dimensions standard pour les ensembles de fixation murale figurent dans le tableau ci-dessous.
x
Un manuel d'installation détaillée et toutes les pièces nécessaires à l'assemblage sont comprises à l'achat de l'ensemble d'installation murale.
x
N'utilisez pas de vis non conformes aux spécifications de vis standard VESA.
x
N’utilisez pas de vis plus longues que les dimensions standard ou non conformes aux spécifications VESA de vis standard. Des vis trop longues
x
pourraient endommager l'intérieur du téléviseur.
En ce qui a trait aux supports muraux non conformes aux spécifications de vis de la norme VESA, la longueur des vis peut différer selon les
x
spécifications du support mural.
Ne serrez pas trop les vis, cela pourrait endommager le produit ou provoquer sa chute et causer des blessures. Samsung décline toute
x
responsabilité dans le cas où de tels accidents se produisent.
Samsung ne saurait être tenu responsable des dommages au produit ou des blessures occasionnés par l'utilisation d'un support mural non
x
conforme aux spécifications VESA ou non recommandé, ou si le consommateur ne suit pas les instructions d'installation du produit.
Ne pas installer le téléviseur à un angle d'inclinaison de plus de 15 degrés.
x
Il faut deux personnes pour fixer le téléviseur sur un mur.
x
30
Français
Page 69

Type de produit pouces
42~50 400 X 400
Spéc. VESA
(A * B)
05 Autre information
Vis standard Quantité
Téléviseur à écran
plasma
✎
Dévissez le trou avant d'installer le support mural sur le mur.
58~63 600 X 400
M8 4
70~79 800 X 400
80~ 1400 X 800
N’installez pas le support mural lorsque le téléviseur est sous tension. Il pourrait survenir des blessures corporelles
causées par un choc électrique.
Sécurisation de l’espace d’installation
Respectez les distances requises entre le produit et les autres objets (p. ex., les murs) afin d'assurer une bonne ventilation. Le non-respect de ces
distances pourrait faire augmenter la température interne du produit et causer un incendie ou endommager le produit.
✎
Lorsque vous utilisez un support ou un support mural, utilisez seulement les pièces fournies par Samsung Electronics.
Si vous utilisez des pièces fournies par un autre fabricant, cela pourrait endommager le produit ou causer des blessures engendrées par la chute du
x
produit.
✎
L’aspect peut différer selon le produit.
✎
Faites attention lorsque vous touchez le téléviseur, car certaines pièces peuvent être chaudes.
Installation sur un support. Installation murale.
4 pouces
4 pouces
4 pouces
4 pouces
4 pouces
4 pouces
4 pouces
Français
31
Page 70

Autre information
Stabilisation du téléviseur par rapport au mur
Mise en garde: Le fait de tirer, de pousser ou de monter sur le téléviseur peut en provoquer la chute. Assurez-vous
notamment que vos enfants ne se suspendent pas au téléviseur ni le déséquilibrent, car il pourrait basculer et causer des
blessures sérieuses ou un décès. Suivez toutes les mesures de sécurité indiquées dans la brochure de votre téléviseur. Pour
une stabilité et une sécurité accrues, vous pouvez acheter et installer un dispositif anti-chute tel que décrit ci-dessous.
Dispositif de retenue pour téléviseur (vendu séparément)
Les pièces ci-dessous sont incluses dans l’ensemble du dispositif de retenue pour téléviseur. De plus, vous aurez besoin d’une vis à bois, d’une vis et d’une cheville
Molly ou d’un autre type de vis convenant à l’armoire ou au mur auquel vous avez l’intention de fixer le cordon du dispositif de retenue. Nous recommandons
l’utilisation d’une vis à bois M4xL20.
Support pour téléviseur (BN96-15753A) Vis (M8 x L19)
Installation du dispositif de retenue
1. Retirez la vis fixée à l’arrière de votre téléviseur, puis reliez le dispositif de retenue à ce dernier à l’aide de la vis incluse dans l’ensemble du dispositif qui convient
à votre appareil.
✎
Veillez à utiliser uniquement la vis fournie appropriée. Si vous utilisez une vis différente, vous risquez d’endommager votre téléviseur.
2. Vissez fermement la vis que vous avez fournie (taille M4xL20 ou similaire) à l’armoire ou au mur sur lequel le téléviseur doit être installé.
✎
Si vous vissez la vis dans un mur, il est préférable qu’elle pénètre dans un montant. Si cela est impossible, utilisez une cheville Molly pour ancrer la vis.
3. Attachez le cordon du dispositif de retenue à la vis fixée au mur ou à l’armoire afin d’immobiliser le téléviseur. Voir les illustrations ci-dessous.
✎
Installez le téléviseur à proximité du mur de manière qu’il ne se renverse pas.
✎
Lorsque vous attachez le cordon du dispositif au mur, fixez-le de manière qu’il soit parallèle au sol ou incliné vers le bas pour des raisons de sécurité.
✎
Vérifiez le cordon à l’occasion pour vous assurer qu’il est bien fixé.
✎
Avant de déplacer le téléviseur, détachez d’abord le cordon.
4. Vérifiez l’état des connexions. Vérifiez périodiquement les points d’ancrage afin de détecter tout signe de fatigue ou de bris. En cas de doute au sujet des
points d’ancrage, communiquez avec un installateur professionnel.
Pour acheter le dispositif de retenue pour téléviseur, communiquez avec le centre de service à la clientèle SAMSUNG.
– Aux États-Unis: 1-800-SAMSUNG (1-800-726-7864)
– Au Canada: 1-800-SAMSUNG (1-800-726-7864)
Français
32
Page 71

Dépannage
05 Autre information
Si le téléviseur semble éprouver un problème, essayez d'abord de le corriger à l'aide de la présente liste des problèmes et solutions possibles. Si
aucun de ces conseils de dépannage ne fonctionne, consultez le site “www.samsung.com”, puis cliquez sur Assistance ou communiquez avec le
service à la clientèle de Samsung en composant le 1-800-SAMSUNG.
Problèmes Solutions et explications
Image médiocre Procédez d'abord au Essai d'image pour confirmer que votre téléviseur affiche correctement l'image d'essai. (allez à
L'image du téléviseur n'est pas aussi belle qu'en
magasin.
L'image est déformée: erreur macrobloc, petit
bloc, points, effet d'escalier.
Les couleurs sont faussées ou absentes. • Si vous avez une connexion avec des câbles composantes, assurez-vous que les câbles sont branchés aux
Couleurs ou luminosité médiocres. • Réglez les options Image dans le menu du téléviseur. (Allez à mode Image / Couleur / Luminosité / Netteté)
Ligne pointillée sur le bord de l'écran. • Si la taille de l'image est réglée à Plein écran, passez à 16:9 (p. 16).
L’image est en noir et blanc. • Si vous utilisez une entrée AV composite, branchez le câble vidéo (jaune) à la prise verte de l'entrée composante
L'image fige ou est déformée durant les
changements de canaux ou son affichage est
retardé.
Problème de son Procédez d'abord au Sound Test (Essai de son) pour confirmer que le son de votre téléviseur fonctionne correctement.
Il n’y a pas de son ou le son est trop bas alors
que le volume est réglé au maximum.
L'image est bonne, mais pas de son. • Réglez l'option Sélect. le haut-parleur à Haut-parleur TV dans le menu Son (p. 18).
Les haut-parleurs émettent des bruits
inappropriés.
MENU - Support technique - Autodiagnostic - Essai d'image) (p. 22)
Si l'image d'essai s'affiche correctement, le problème d'image peut être causé par la source ou le signal.
• Si vous avez un câblosélecteur ou un récepteur satellite analogique, procurez-vous un récepteur numérique HD.
Utilisez des câbles HDMI ou composantes pour obtenir une image de qualité HD (haute définition).
• Abonnés au câble ou au satellite : Essayez les canaux HD de l'attribution des canaux.
• Antenne: Essayez les canaux HD après exécution de la programmation automatique.
De nombreux canaux HD sont soumis à une interpolation à partir du contenu SD (définition standard).
✎
• Réglez la résolution de sortie vidéo du câblosélecteur ou récepteur satellite à 1080i ou 720p.
• La compression du contenu vidéo peut causer une déformation de l'image, surtout lorsque les mouvements sont
rapides, comme dans les films de sport et d'action.
• Un signal faible peut causer une déformation de l'image. Il ne s'agit pas d'un problème du téléviseur.
• L'utilisation de téléphones cellulaires à proximité de téléviseurs analogiques ou numériques (jusqu'à une distance
de 1 m) peut causer des parasites à l'écran.
prises correspondantes. Des connexions incorrectes ou lâches peuvent causer des problèmes de couleur ou une
absence d'image.
(p. 15)
• Réglez l'option Écon. Énergie dans le menu Configuration (p. 21).
• Essayez de réinitialiser l'image pour voir les réglages d'image par défaut. (Allez à MENU - Image - Réinitialisation
de l'image) (p. 17)
• Modifiez la résolution du câblosélecteur ou récepteur satellite.
1 du téléviseur.
• Si le téléviseur est branché à un câblosélecteur, essayez de réinitialiser ce dernier. (Rebranchez le cordon
d'alimentation c.a. et attendez le redémarrage du câblosélecteur. Cela peut prendre jusqu'à 20minutes.)
• Réglez la résolution de sortie du câblosélecteur à 1080i ou 720p.
(allez à MENU - Support technique - Autodiagnostic - Essai de son) (p. 22)
Si le son est parfait, le problème peut provenir de la source ou du signal.
• Vérifiez le volume de l'appareil (câblosélecteur, récepteur satellite, lecteur DVD, lecteur Blu-ray, etc.) branché à
votre téléviseur.
• Si vous utilisez un appareil externe, assurez-vous que les câbles audio sont connectés aux bonnes prises d'entrée
audio du téléviseur.
• Si vous utilisez un appareil externe, vérifiez l'option de sortie audio de l'appareil (p. ex., vous devrez peut-être
modifier l'option audio de votre câblosélecteur à HDMI si un câble HDMI est branché à votre téléviseur.)
• Si vous utilisez un câble DVI à HDMI, un câble audio distinct est nécessaire.
• Si votre téléviseur est doté d'une prise pour casque d'écoute, assurez-vous que rien n'y est branché.
• Réinitialisez l'appareil connecté en branchant à nouveau son cordon d'alimentation.
• Vérifiez le branchement des câbles. Assurez-vous qu'un câble vidéo n'est pas branché à une entrée audio.
• Si le téléviseur est branché à une antenne ou un câblosélecteur, vérifiez l'intensité du signal. Un signal faible peut
causer une distorsion sonore.
• Procédez à Essai de son tel qu'expliqué ci-dessus.
Français
33
Page 72

Autre information
Problèmes Solutions et explications
Pas d'image
Le téléviseur ne s’allume pas. • Assurez-vous que le cordon d'alimentation c.a. est bien branché à la prise de courant murale et au téléviseur.
Le téléviseur s'éteint automatiquement. • Assurez-vous que le réglage Mise en veille est à Off dans le menu Configuration (p. 19).
Il n’y a pas d'image. • Vérifiez les connexions (débranchez puis branchez à nouveau tous les câbles du téléviseur et des appareils
Connexion RF (câble/antenne)
Le téléviseur ne reçoit pas tous les canaux. • Assurez-vous que le câble coaxial est bien branché.
Pas de sous-titres aux canaux numériques. • Vérifiez le menu de configuration des sous-titres. Essayez de modifier le mode Sous-titres de Service 1 à CC1
L'image est déformée: erreur macrobloc, petit
bloc, points, effet d'escalier.
Connexion au PC
Le message “Mode non disponible” s’affiche. • Réglez la résolution de sortie de votre PC de façon qu'elle corresponde aux résolutions prises en charge par le
“PC” figure toujours dans la liste source même
lorsqu'il n'est pas branché.
L'image est bonne, mais pas de son. • Si vous avez connecté le PC à l'aide d'un câble HDMI, vérifiez le réglage de sortie audio de votre PC.
Autres
Défilement de barres horizontales mauves et
vertes et bourdonnement provenant des hautparleurs du téléviseur avec connexion par câble
composantes.
L'image ne s'affiche en mode plein écran. • Des barres noires apparaissent de chaque côté de l'image des canaux HD durant l'affichage d'un contenu SD
La télécommande ne fonctionne pas. • Replacez les piles de la télécommande en vérifiant la polarité appropriée (+/–).
Le téléviseur émet un bourdonnement. • Les téléviseurs à écran plasma émettent généralement un léger bourdonnement. Cela est normal. Le
• Assurez-vous que la prise de courant murale est sous tension.
• Appuyez sur la touche POWER du téléviseur pour vous assurer que la télécommande fonctionne correctement. Si
le téléviseur s'allume, reportez-vous à la section “La télécommande ne fonctionne pas” ci-dessous.
• Si votre PC est branché au téléviseur, vérifiez les réglages de mise sous tension de ce dernier.
• Assurez-vous que le cordon d'alimentation c.a. est bien branché à la prise de courant murale et au téléviseur.
• Lorsque vous regardez la télévision à partir d'une connexion par câble ou antenne, le téléviseur s'éteint
automatiquement après de 10 à 15 minutes s'il ne reçoit aucun signal.
externes).
• Réglez la sortie vidéo de votre appareil externe (câblosélecteur, récepteur satellite, lecteur DVD, lecteur Blu-ray,
etc.) afin qu'elle corresponde aux connexions à l'entrée du téléviseur. Par exemple, si l’appareil externe a une
sortie HDMI, il faut le brancher à une entrée HDMI de la télé.
• Assurez-vous que les appareils branchés sont sous tension.
• Assurez-vous de choisir la source appropriée du téléviseur en appuyant sur la touche SOURCE de la
télécommande.
• Réinitialisez l'appareil connecté en branchant à nouveau son cordon d'alimentation.
• Essayez l'option Prog. auto pour ajouter les canaux disponibles à la liste des canaux. Allez à MENU - Canal -
Prog. auto, puis sélectionnez Auto et assurez-vous que le type de signal de câble approprié est choisi dans le
menu. Il existe trois options : (STD, HRC et IRC) (p. 13)
• Vérifiez si l'antenne est bien positionnée.
(p. 21).
• Il est possible que certains canaux n'aient pas de sous-titres.
• La compression du contenu vidéo peut causer une déformation de l'image, surtout lorsque les mouvements sont
rapides, comme dans les films de sport et d'action.
• Un signal faible peut causer une déformation de l'image. Il ne s'agit pas d'un problème du téléviseur.
téléviseur (p. 11).
• Cela est normal; PC figure toujours dans la liste source même lorsqu'il n'est pas branché.
• Débranchez les connexions audio gauche et droite du boîtier numérique. Si le bourdonnement s'arrête, cela
indique que le boîtier est défectueux. Remplacez les câbles vidéo composantes par un câble HDMI.
(4:3) soumis à une interpolation.
• Des barres noires dans le haut et le bas de l'image apparaissent dans les films dont les rapports de forme sont
différents de ceux du téléviseur.
• Réglez l'option de taille de l'image de votre appareil externe ou téléviseur au plein écran.
• Nettoyez la fenêtre de transmission de la télécommande.
• Essayez de pointer la télécommande directement vers le téléviseur d'une distance de 1,5 à 1,8 m.
bourdonnement est causé par les charges électriques utilisées pour créer les images à l’écran.
• Si le bourdonnement est fort, il est possible que la luminosité du téléviseur soit réglée à un niveau trop élevé.
Essayez de réduire la luminosité.
• Un bourdonnement élevé peut également se produire si votre téléviseur est placé trop près d'un mur ou d’une
autre surface dure. Essayez également de modifier le parcours de vos câbles de connexion.
• Un support mural mal installé peut causer un bruit excessif.
34
Français
Page 73

Problèmes Solutions et explications
Problème de rémanence (brûlure d’écran) • Pour réduire le risque de rémanence, cet appareil est doté d'une technologie de réudtion de brûlure d’écran. La
La télécommande du câblosélecteur ou
récepteur numérique ne commande pas la
mise sous tension ou la mise hors tension du
téléviseur, ou ne règle pas le volume.
Le message “Mode non disponible” s’affiche. • Vérifiez la résolution prise en charge par le téléviseur et réglez la résolution de sortie de l'appareil externe en
L'option Sous-titres dans le menu du téléviseur
est grisée.
Le téléviseur dégage une odeur de plastique. • Cette odeur est normale et disparaîtra avec le temps.
L'option Puissance signal du téléviseur
n'est pas disponible dans le menu Essai
d’autodiagnostic.
Le téléviseur est incliné d'un côté. • Retirez le pied du téléviseur et assemblez-le de nouveau.
Le menu des canaux est grisé (non disponible). • Le menu Chaîne n'est disponible que lorsque la source du téléviseur est sélectionnée.
Vos réglages sont perdus après 30 minutes ou
chaque fois que le téléviseur est éteint.
Perte intermittente du son ou de l'image. • Vérifiez les connexions des câbles et refaites les branchements.
Vous remarquez de petites particules en
examinant minutieusement le bord du cadre
entourant l'écran du téléviseur.
Une bannière publicitaire interne du téléviseur
(POP) apparaît à l'écran.
technologie anti-brûlure permet de régler le mouvement de l'image vers le haut et le bas (ligne verticale) et d’un
côté à l’autre (point horizontal).
• Programmer la télécommande du câblosélecteur ou récepteur satellite pour faire fonctionner le téléviseur.
Consultez le guide d'utilisation du câblosélecteur ou récepteur satellite pour obtenir le code de téléviseur
SAMSUNG.
conséquence. Consultez les réglages des résolutions à la page 11 du présent guide.
• Il est impossible de sélectionner l'option Sous-titres dans le menu du téléviseur si ce dernier est branché au
moyen d'un câble HDMI ou composantes (p. 21).
• L'option Sous-titres doit être activée sur l'appareil externe (p. 21).
• Cette option n'est offerte qu'avec les canaux numériques et une antenne / RF / câble coaxial) (p. 22).
• Si le téléviseur est réglé au mode Démo magasin, il réinitialise les réglages du son et de l'image toutes les 30
minutes. Passez du mode Démo magasin au mode Util. à domicile dans la procédure Prêt à l'emploi. Appuyez
sur la touche SOURCE pour sélectionner le mode TV et allez à MENU → Configuration → Prêt -à-l'emploi →
E
(p. 8).
ENTER
• La perte du son ou de l'image peut être causée par l'utilisation de câbles trop rigides ou trop épais. Assurezvous que les câbles sont suffisamment souples pour une utilisation à long terme. Pour la fixation murale, nous
recommandons l'utilisation de câbles avec des connecteurs à 90 degrés.
• Cela fait partie de la conception du produit et ne constitue pas un défaut.
• Sélectionnez l'option Util. à domicile à partir du mode Prêt à l'emploi. Pour de plus amples détails, reportez-
vous à la section Prêt à l'emploi (p. 8).
05 Autre information
✎
Certaines des images et fonctions ci-dessus sont disponibles sur des modèles particuliers seulement.
¦ Entreposage et entretien
Ne vaporisez pas de l'eau ou un produit nettoyant directement sur
l'appareil. Tout liquide qui s'infiltre dans l'appareil risque de provoquer
une défaillance, un incendie ou un choc électrique.
Nettoyez l'appareil à l'aide d'un chiffon doux imbibé d'eau.
Français
35
Page 74

Autre information
Licence
TruSurround HD, SRS and symbol are trademarks of SRS Labs, Inc.
TruSurround HD technology is incorporated under license from SRS Labs, Inc.
Manufactured under license from Dolby Laboratories. Dolby and the double-D symbol are trademarks of Dolby
Laboratories.
Avis de licence relative à l'exploitation libre
Dans les cas où un logiciel de source libre est utilisé, les licences relatives à la source libre sont disponibles dans le menu des produits.
L'avis de licence concernant l'exploitation libre n'est rédigé qu'en anglais.
Spécifications techniques
Facteurs environnementaux
Température de fonctionnement
Niveau d'humidité en fonctionnement
Température d'entreposage
Niveau d’humidité en entreposage
Support pivotant (gauche / droite)
Nom de modèle
Taille de l'écran
(diagonale)
Son
(sortie)
Dimensions (L x P x H)
Boîtier
Avec support
Poids
Sans support
Avec support
Résolution
PN42C450 PN50C450
42 pouces
(42.3 pouces en diagonale)
10 W x 2 10 W x 2
40.6 x 2.8 x 24.8 pouces
(1031 x 70.9 x 631.0 mm)
40.6 x 11.2 x 27.4 pouces
(1031 x 284.5 x 695.5 mm)
38.6 Ib (17.5 kg)
43.0 Ib (19.5 kg)
1024 X 768 1360 X 768
50 à 104 °F (10 à 40 °C)
10 à 80%, sans condensation
-4 à 113 °F (- 20 à 45 °C)
5 à 95 %, sans condensation
0˚
50 pouces
(49.9 pouces en diagonale)
47.3 x 2.7 x 28.4 pouces
(1202.6 x 69.5 x 720.5 mm)
47.3 x 11.2 x 31.0 pouces
(1202.6 x 284.3 x 786.3 mm)
50.7 Ib (23 kg)
55.1 Ib (25 kg)
✎
Le design et les spécifications peuvent faire l'objet de modifications sans préavis.
✎
Cet appareil est un appareil numérique de catégorie B.
✎
Pour les caractéristiques d’alimentation et de consommation électrique, voir l’étiquette fixée au produit.
Français
36
Page 75

■ Vue avant / Vue latérale`
Dimensions
05 Autre information
7
8
Nom de modèle
1
2
3
4
5
6
1 2 3 4 5 6 7 8
PN42C450 40.6 37.0 21.1 23.3 24.8 27.4 2.8 11.2
PN50C450 47.3 43.7 24.6 23.3 28.4 31.0 2.7 11.2
■ Panneau des prises / vue arrière
5
6
1
2
(Unité : pouces)
4
3
(Unité : pouces)
Nom de modèle
1 2 3 4 5 6
PN42C450 15.2 3.4 3.2 29.2 15.7 15.7
PN50C450 19.4 3.7 2.5 35.7 15.7 15.7
REMARQUE: Les dessins ne sont pas nécessairement à l’échelle. Certaines dimensions pourraient être modifiées sans préavis. Vérifiez les dimensions
avant d’installer votre téléviseur. Nous ne sommes pas responsables des erreurs de typographie ou d’impression.
© 2010 Samsung Electronics America, Inc
Français
37
Page 76

Autre information
Index
A
Antenne 13
Anynet+ 26
AUDIO OUT 10
Autodiagnostic 22
B
Balance G/D 18
Branchement à un appareil audio 10
Branchement d’un PC 11
C
Capteur Eco 21
Changer NIP 20
Chaud 16
Choisir tout 14
Cinéma maison 11, 26
Clé USB 22, 23
Composantes 9
Contraste dynam. 15
D
Dépannage 33
Diaporama 24
DIGITAL AUDIO OUT 10, 26
D-Sub 11
Dynamique 15
E
Économiseur énergie 21
Égaliseur 18
Enregistrement 28
Entrer le nom 12
Équilibrage des blancs 15
F
Format de l’image 16
Fréquence 11
H
Haut-parleur du téléviseur 18
Haut-parleur externe 18
HDMI 9, 26
Horloge 18
I
Indicateur d’alimentation 6
Installation de Space 31
L
Langue 21
Licence 36
Liste source 12
Luminosité 15
M
Media Play 23
Mélodie 22
Menu des canaux 13
Minuterie 19
Mise à niveau du logiciel 22
Mode Film 16
Mode veille 6
Modification des canaux 14
Mono 18
Musique 25
Musique de fond 26
N
Navigation 12
Netteté 15
Nuance coul. 16
O
Outils 3
P
Photo 24
Piles 7
Prêt-à-l’emploi 8
R
Récepteur 28
Réglage Automatique 17
Réglage automatique du volume 18
Reprise de la musique 25
Résolution optimale 11
S
Sélectioner le haut-parleur 18
Spécifications techniques 36
Support d’obturation 30
Support mural 30
Symboles 3
Syntonisation précise 15
T
Télécommande 7
Ton chair 15
Tonalité noire 15
Touche FAV. CH 7, 13
V
Veille 19
Volume 6
38
Français
 Loading...