

SERVICE
WASHING MACHINE
CONTENTS
WASHING MACHINE
Caution for safety during servicing
1. SPECIFICATIONS
2. OVERVIEW OF THE WASHING MACHINE
3. OVERVIEW OF THE CONTROL PANEL
4. GENERAL ERROR FUNCTION
5. TROUBLE DIAGNOSIS
6. TEST MODE
7. DESIGNATION OF MAIN COMPONENTS
8. PCB SCHEMATIC DIAGRAM
PCB CIRCUIT DIAGRAM
9. ASSEMBLE AND DISASSEMBLE
10
.TOOLS FOR DISASSEMBLY AND ASSEMBLY
11.EXPLODED VIEW AND PARTS LIST
Manual
P8091GW1/YLP
P1091GW1/YLP
P1291GW1/YLP

1
Caution for safety during servicing
1. Do not allow the customer to repair the product.
The person may be injured or the product life may be shortened..
2. Execute A/S after unplugging the power supply unit.
Be careful of electric shocks.
3. Do not plug several plugs in the same outlet.
It may cause the fire due to overheat.
4. Check for damage, pressing or burning of the power plug or outlet.
Replace it promptly if it has a problem.(It may cause electric shocks or fire)
5. Do not clean the main body with water.
It may cause electric shocks and fire and shorten the product life.
6. The wiring of the harness shall be free from moisture and tightened during serving.
It shall not be deviated by certain impact.
7. Remove any dust or filth on the housing section,wiring section,connection section during servicing.
Protect from the possible cause of fire such as tracking,shortage etc.
8. Check for any mark of moisture on the electrical parts, harness section etc.
Replace the parts or remove the moisture..
9. Check the assembly status of the parts after servicing.
Maintain the status before servicing..
10. Pull out the power cord by holding the plug.
Be careful of electric shocks and fire when the cord is damaged.
11. Unplug the power plug from the outlet when the washing machine is not used.
Be careful of electric shocks and fire due to the strike of lightning.
12. Do not use or store sprays or flammable materials(including gasoline,alcohol etc.) around the
washing machine.
Be careful of explosion or fire due to electric sparks.
13. Do not put a bowl of water or wet laundry on the washing machine.
If the water has penetrated into the washing machine, this may cause electric shocks or fire.
14. Do not install the washing machine where it is exposed to bad weather.
It may cause electric shocks and fire and shorten the product life.
15. Do not push the control buttons with the aw l, pin, or sharp materials.
It may cause electric shocks and damage.
16. Check that the washing machine is leveled horizontally and installed properly on the floor.
The vibration may shorten the product life..
17. Joint the wire by the connector correctly.
When the wire is jointed by tape, this may cause fire due to tracking.
18. When the washing machine is to be laid for service, put the pad on the floor and la y the product on
its side slowly.
If the washing machine is laid on its front, the relay may be damaged by the tub.
19. When the wash-heater is replaced, check it is inserted in the bracket-heater and screw the nut.
If the wash is not inserted in the bracket-heater properly, this may cause the noise and
leakage since it is contacted to the drum.
2
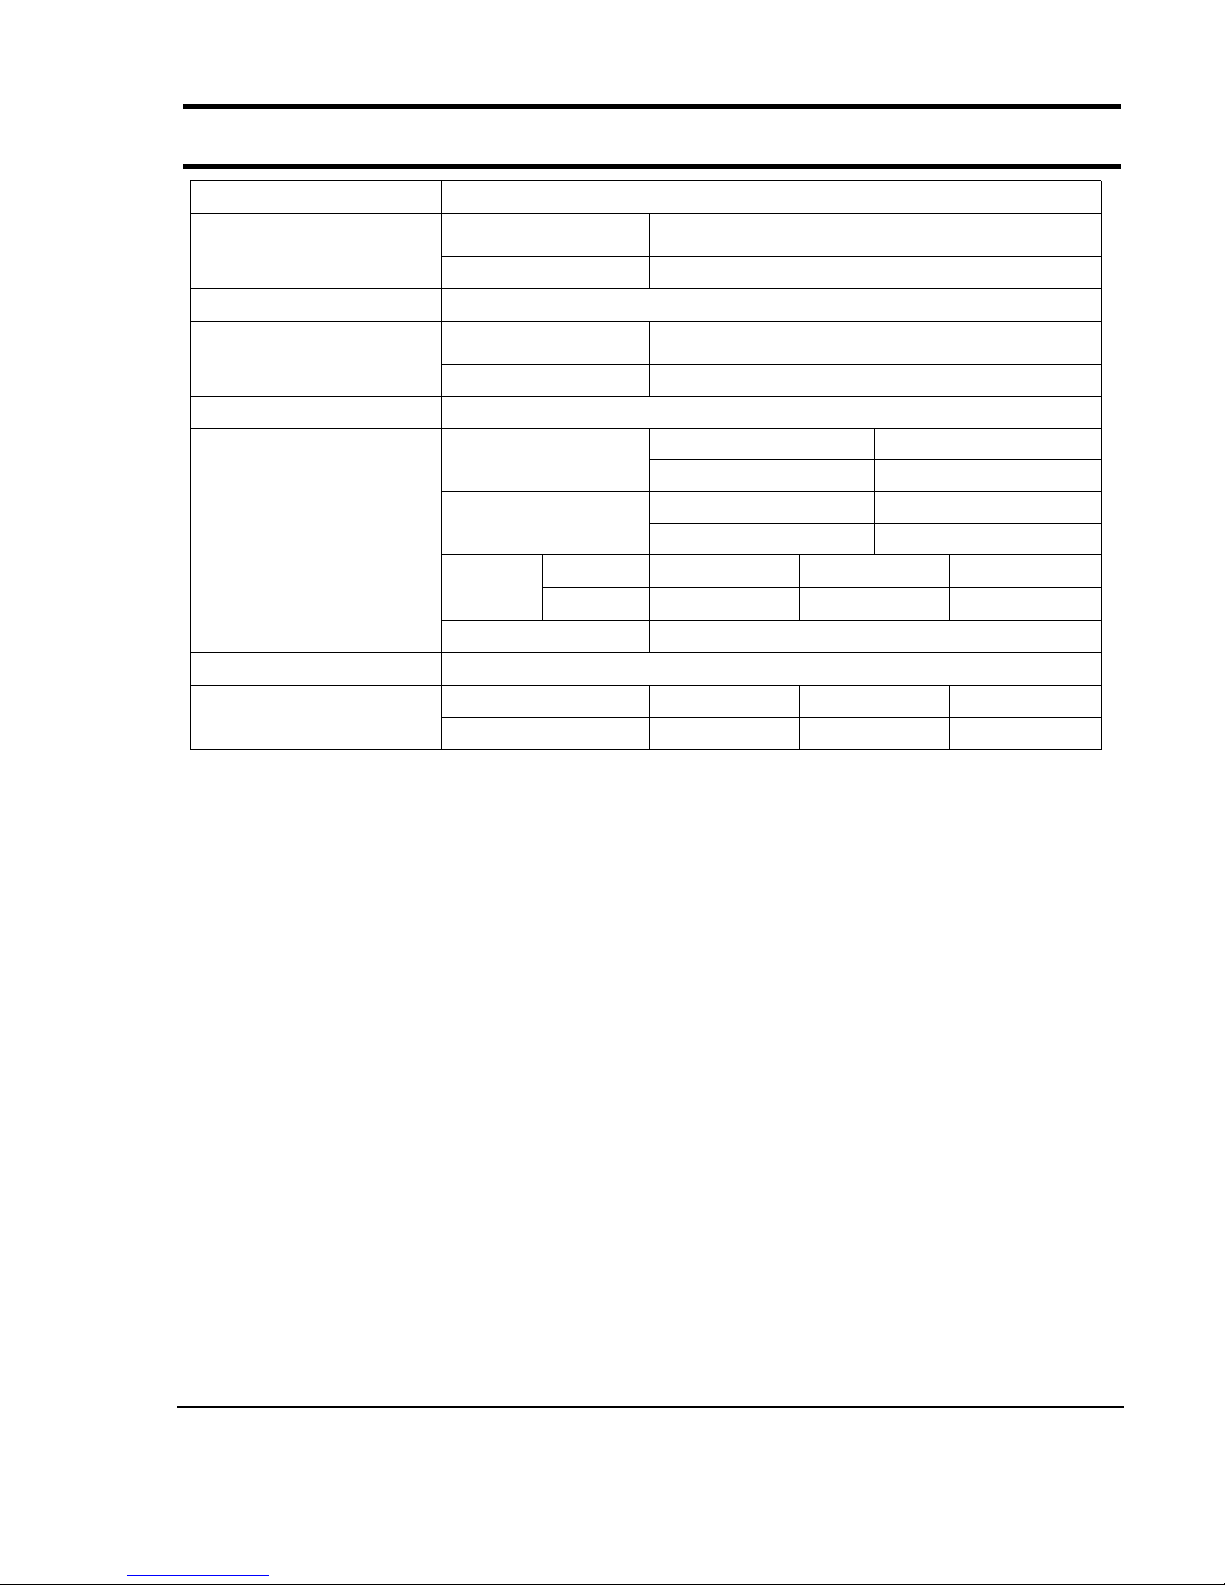
1. Specifications
WASH TYPE
FRONT LOADING TYPE
DIMENSIONS
GROSS W 669 mm X D 656 mm X H 910 mm
NET W 598 mm X D 550 mm X H 844 mm
WATER PRESSURE
50 kPa ~ 800 kPa
WEIGHT
GROSS 80 kg
NET 75 kg
WASH and SPIN CA PACITY
5.0 kg (DRY LAUNDRY)
POWER CONSUMPTION
WASHING
220 V 180 W
240 V 180 W
WASHING and
HEATING
220 V 2000 W
240 V 2400 W
SPIN
MODEL P8091 P1091 P1291
220-240V
430W 500W 550W
PUMPING 34 W
WATER CONSUMPTION
49 l (STANDARD COURSE)
SPIN REVOLUTION
MODEL P8091 P1091 P1291
rpm 800 1000 1200
3
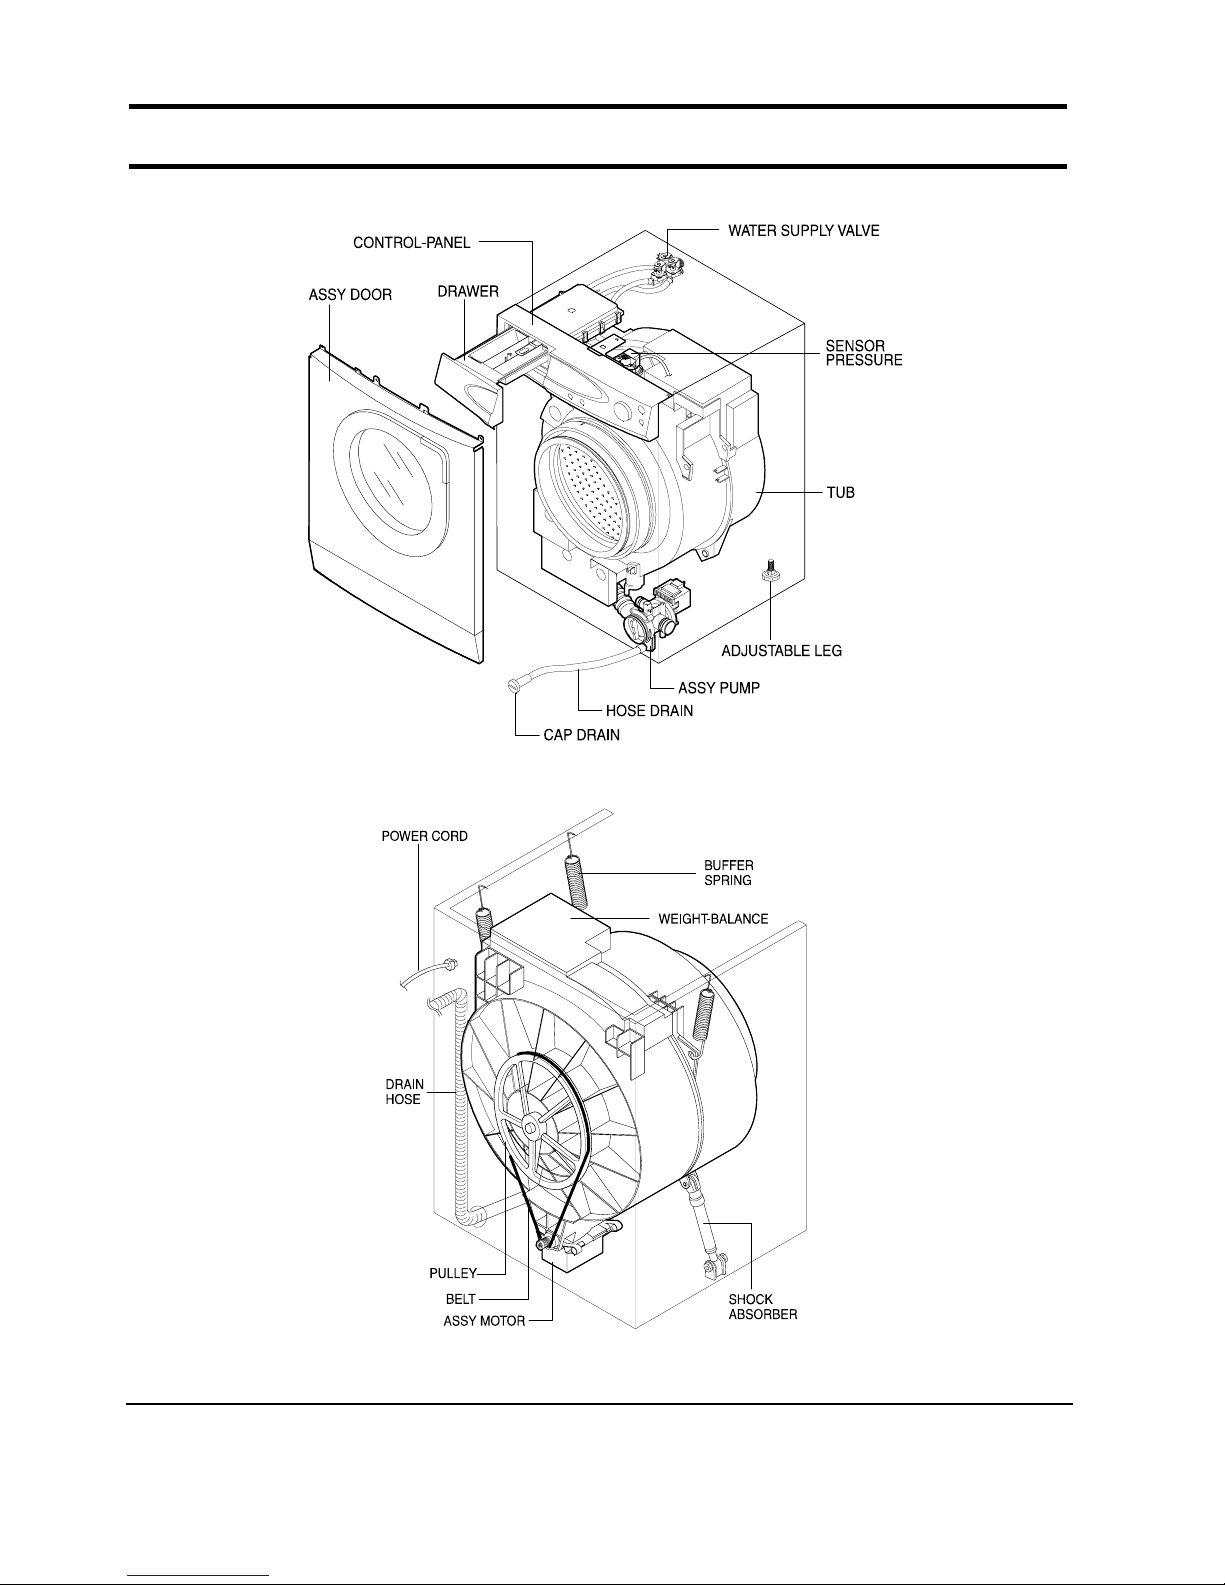
2. Overview of the Washing Machine

4
3. Overview of the control panel
P1091/P1291 P8091
1. Detergent dispenser
2. Display panel
Displays the remaining wash cycle time,errormessages
and cancel -.
3. Temperature selection button
Press the button repeatedlytocycle through the available
water temperature options.
(cold water, 30°C, 40°C, 60°C and 95°C).
4. Spin selection button
Press the button repeatedly to cycle through the available spin speed options.
5. D elay Start button(P1091/P1291)
Press the button repeatedly to cycle through the available delayed start options
(from 1 hour to 24 hours in one hour increments).
6. C ourse button
Press the button repeatedly to select available wash programs
7. Manual button
Press the button repeatedly to cycle through the available partial wash options
[Wash+Rinse+Spin→Prewash+Wash+Spin→Spin→Rinse(1 time)+Spin
→
Rinse(2 times)+Spin→Rinse(3 times)+Spin]
Note
: Prewash is only available when washing cotton, synthetic or delicate.
8. Start/Pause button
Press to pause and restart programs.
9. Door Open button
Press to open the washing machine door.
10.
(On/Off) button
Press once to turn the washing machine on, press again to turn the washing machine off. If the washing
machine power is left on for longer than 10minutes without any buttons being touched, the power
automatically turns off.
11. No Spin button
Presstonospinprogram.
12. Rinse Hold button
Press to rinse hold program.
P1291 No spin, Rinse hold, 400, 600, 800, 1000 and 1200 rpms
P1091 No spin, Rinse hold, 400, 600, 800, and 1000 rpms
P8091 No spin, Rinse hold, 400, 600, and 800 rpms
5
4. General Error Function
•
When an error occurs, this function starts to keep generating error melody sounds and displays error indicators
as shown in the followings per corresponding error by blinking in 0.5sec intervals until the error status is completely
cleared out. In this case, all the driving devices are turned off until the error is cleared out.
1. WATER SUPPLY ERROR
- Water Supply Error occurs when water level frequency does not show changes more than 50Hz or water is not supplied up
to the water level presetting for 20 min or more at the time of initial water supply, the error status can be cleared by turning
POWER S/W OFF and resuming the POWER ON initial status.
- Display shows 'E1'.
2. WATER DRAIN ERROR
- Display shows ëE2í.
- In case the water level frequency is 25.5KHz or less in the initial phase of UNB-detecting cycle.
- Water Drain error can be cleared by turning POWER S/W OFF and resuming the POWER ON initial status.
3. OVER-FLOW ERROR
- Display shows ëE3í.
- Over-Flow error occurs when the water level is in abnormal operation. It can be cleared by turning POWER S/W OFF.
Water is drained prior to POWER S/W OFF and it is forced to be drained for 2 min if a frequency of more than 25.24
KHzisdetected.
4. DOOR OPEN ERROR
- Display shows ëdEí
- Door Open error can be cleared by closing the door.
5. UNBALANCE ERROR
- Display shows ëE4í.
- Unbalance error is cleared by POWER S/W OFF and by resuming the POWER ON initial status.
6.WATERHEATERERROR
- Display shows ëE5,E6í.
- In case the water temperature rises by 40°C or more in 5 min. or by 2°C l ess in 10 min after heating is started.
- It can be cleared by turning POWER S/W OFF.
7. ASSí Y PRESSURE S/W ERROR
* Generated Frequency Signal of WATER LEVEL(W/L) S/W (KHz)
- If the same signal as the above table is detected for more than 5 seconds, it is a PRESSURE S/W Error.
- When the error occurs, water drain pump will operate for 3 min. and then turn off the water drain pump.
Then the display shows ëE7í indicating a pressure s/w error indicator.
8. ABNORMAL WATER TEMPERATURE ERROR
- In case the water temperature is 60°C or more in the synthetic course, 50°Cormoreinthedelicate
- At the time of initial water supply, if the water temperature is not appropriate, water starts to be drained
and it is forced to be drained for 2 min when the abnormal frequency of 25.24KHz is detected.
- Display shows ëE8í.
- This error can be cleared by POWER S/W OFF.
Course Water Temp
Synthetic
60°Cormore
Delicate
45°Cormore
Wool
45°Cormore
Level Low Level High Level
Abnormal W/L Frequency 30.00 KHz 15.00 KHz

6
5. Trouble Diagnosis
♦
As the micom washing machine is configured of a complicated structure, there might be a need for a service
call. The information below is prepared for exact trouble diagnosis and suitable repair guide.
Caution for the Repair and Replacement
1) As some electronic components are damaged by the charged static electricity from the resin part of wash
machine or the human body, prepare the human body earth or remove the potential difference of the human
body and wash machine by contacting the power supply plug when the work contacting to PCB is executed.
2) Since AC220~240V is applied to the triac T1 and T2 on P.C.B, the electric shock may occur by touching
and be careful that the strong and weak electricity are not mixed.
3) If the P.C.B assembly is out of order, do not replace the component on P.C.B except TACT switch since the
component is coated by the urethane.
4) As the P.C.B assembly is designed for easy handling, do not replace the P.C.B assembly by the wrong
diagnosis and follow the procedure of trouble diagnosis when the micom is not operated normally.
5) As the parts on P.C.B are coated by the urethane, they can not be tested by the test bar of the meter.
Check the trouble by the test mode method according to the procedure.
Please follow instructions below for trouble diagnosis and parts replacement.
POWER SUPPLY PLUG

7
5-1. Trouble Diagnosis
No Item Cause and treatment
1 The power is not supplied -Is the PCB connector connected well?
- Is the voltage normal?
- Is the power supply plug connected well?
- Is the noise filter connected well?
- Is the secondary output of the power supply transformation normal?
- Is the fuse disconnected? (option)
ï If above points are not found, the PCB assembly is out of order.
Replace it.
2 The water is not supplied. - Is the knob open?
- Did you push START/PAUSE button after selecting the course?
- Is the water supply valve connected well?
- Is the winding of the water supply valve continuous?
- Is the connection and operation of the pressure switch normal?
ï If above points are not found, the PCB assembly is out of order.
Replace it.
3 The wash does not start though
the water supply is stopped.
- Is the connection and operation of the pressure switch normal?
- Is the pressure switch hose damaged so that the air is leaked?
- Is the pressure switch hose bent?
- Check the operation of the water level switch.
ï If above points are not found, the PCB assembly is out of order.
Replace it.
4 The drum does not rotate during
washing.
- Is the belt connected well?
- Is the winding of the motor continuous?
(Rotor winding, stator winding, generator)
- Is the motor protector normal?
ï If above points are not found, the PCB assembly is out of order.
Replace it.
5 Thewashisexecutedwhilethewater
is supplied.
- The PCB assembly is out of order. Replace it.
6 The drum rotates in one direction
during washing. (The drum rotates
in one direction for SPIN.)
- The PCB assembly is out of order. Replace it.
(Inversion relay open trouble)
7 Drainage problem. - Is the drainage hose bent?
- Is the winding of the drainage pump continuous?
- Is the drain filter clogged by waste?
- If above points are not found, the PCB assembly is out of order.
Replace it.
8 Dehydration problem.
- Unbalance is detected.
- Put in the laundry uniformly and start again.
9 Abnormal noise during SPIN. - Is the pulley nut loose?
- Is the transport safety device removed?
- Is the product installed on a level and stable surface?
(Little noise may be generated during the high-speed SPIN.)
10 Leak breaker or current/leak
breaker is down during washing.
<When the leak breaker and current breaker is installed separately>
- When the leak breaker is down, check and sure it is grounded.
- When the current is down, the current is leaked.
<Is the breaker down when the leak/current breaker is combined?>
- Check the rated capacity of the current and leak breaker.
The current breaker may be down due to the lack of the current when the
washing machine and other apparatus are used.
In this case, execute the cold water wash to check whether the current capacity
is lacking.
11 The heating is not executed.
- Is the wash heater terminal unplugged?
- Is the wash heater normal?
- If above points are not found, the PCB assembly is out of order.
Replace it.

8
6. Test Mode
1. Driving Compartment Test Mode
A. Hold down "2" and "1" keys simultaneously and then press (POWER S/W) on. (Display shows 'tE')
Hold down "1" and "2" keys simultanesously (each processing for 0.3sec) and then press (POWER
S/W) on.
B. The driving compartment can be tested when you press ì 3î key right after entering
into the initial stage of the TEST MODE.
ï Driving Compartment Test
Pre-wash VALVE ON(0.3sec)→OFF(0.3sec)→Main wash(0.3sec)→OFF(0.3sec)
→
Rinse VALVE ON(0.3sec)→OFF(0.3sec)→Pump MOTOR ON(0.3sec)→OFF(0.3sec)
→
MOTOR RELAY1 ON(0.3sec)→OFF(0.3sec)→MOTOR RELAY2(0.3sec)→OFF(0.3sec)
→
MOTOR RELAY2 ON(0.3sec)→OFF(0.3sec)→HEATER RELAY ON(0.3sec)→OFF(0.3sec)
→
DOOR OPEN (Function continues when door is closed)
31 2

9
7. Designation of Main Components
7-1 Normal / Reverse Revolution of Motor and R. P. M. Control
7-2 Door safety Device
7-3 Heater
1) Capacity : AC 230V/2000W
2) Location : Bottom of TUB
3) Function : Raise the water temperature
supplied at the wash process.
4) Resistance value : 23~29
Ω
5) Thermal Fuse : 128°C
+
-
89
510
Rotor
Stator coil
CW
+
-
89
5
5
10
Rotor
Stator coil
CCW
<Figure1> <Figure2>
12345678910
STATOR
WASHING MOTOR
T
A
C
H
O
H
I
G
H
-
S
P
E
E
D
S
T
A
T
O
R
P
R
O
T
E
C
T
O
R
M
I
D
D
L
E
-
S
P
E
E
D
R
O
T
O
R
(
1
5
0
C
)
H
Thermistor
STATOR(5.1) STATOR(5.1) ROTOR(8.9) TACHO(3.4)
PROTECTOR
(6.7)
"H"
(mm)
Code-No. Remarks
Resistancev
alue
−
1.592
Ω
2.094
Ω
38.8
Ω
0
39 DC31-00002E P8091
2.07
Ω
0.90
Ω
2.36
Ω
42.7
Ω
45 DC31-00002C
P1091
P1291
Rated value
220~240V/50Hz
DC47-00001A
DC64-00120E

10
7-4 ASSY-TUB BACK
7-5 ASSY- DRUM
TYPE (A) (B) (C) CODE-NO. REMARKS
I 30 25 44.7 DC97-01463A Lifter type P1091/P1291
II 20 17 25 DC97-01463B Lifter type P8091
TYPE INNER-BEARING(A) OUT-BEARING(B) OIL-SEAL(C) Assy-Housing Bearing(D) REMARKS
I 30 25 43.9 DC97-00214B P1091/P1291
II 20 17 24.3 DC97-00214K P8091
A
C
OIL-SEAL
INNER-BEARING
OUT-BEARING
B
(unit : mm)
(unit : mm)
A
C
B

11
8. PCB Schematic Diagram

8. PCB CIRCUIT DIAGRAM

13
8. PCB List
LOCATION NO. CODE NO. DESCRIPTION SPECIFICATION Q'TY REMARK
WDD01 1401-001007 THYRISTOR-TRIAC 10A,800V,20uA,300V/uS,TO-220AB 1 TRIAC1
WDD01 1401-001024 THYRISTOR-TRIAC 2A,800V,20UA,300V/US,TO-220F 5 TRIAC2,3,4,5,6
WDD02 0402-001023 DIODE-BRIDGE RBV1506,600V,15A,SIP-4 1 B/D
WDD03 3501-001163 RELAY-MINIATURE 12VDC,200MW,5000MA,1FORMA,10MS,5MS 1 RELAY6
WDD04 3501-001156 RELAY-POWER 12VDC,0.53W,16000MA,1FORMA,20MS,10MS 1 RELAY1
WDD05 0402-000137 DIODE-RECTIFIER 1N4007,1000V,1A,DO-41,TP 1 D13,D16~D19,D23
WDD06 0504-001045 TR-DIGITAL KRC119M,NPN,400MW,4.7K/10K,TO-92M,TP 1 TR06
WDD06 0504-001045 TR-DIGITAL KRC119M,NPN,400MW,4.7K/10K,TO-92M,TP 1 TR07
WDD06 0504-001045 TR-DIGITAL KRC119M,NPN,400MW,4.7K/10K,TO-92M,TP 1 TR08
WDD06 0504-001045 TR-DIGITAL KRC119M,NPN,400MW,4.7K/10K,TO-92M,TP 1 TR09
WDD06 0504-001045 TR-DIGITAL KRC119M,NPN,400MW,4.7K/10K,TO-92M,TP 1 TR10
WDD08 0501-000303 TR-SMALL SIGNAL KSA733,PNP,250mW,TO-92,TP,120- 1 TR01
WDD08 0501-000303 TR-SMALL SIGNAL KSA733,PNP,250mW,TO-92,TP,120- 1 TR02
WDD08 0501-000303 TR-SMALL SIGNAL KSA733,PNP,250mW,TO-92,TP,120- 1 TR03
WDD08 0501-000303 TR-SMALL SIGNAL KSA733,PNP,250mW,TO-92,TP,120- 1 TR04
WDD08 0501-000303 TR-SMALL SIGNAL KSA733,PNP,250mW,TO-92,TP,120- 1 TR05
WDD08 0501-000389 TR-SMALL SIGNAL KSC815,NPN,400mW,TO-92,TP,120- 1 TR11
WDD08 0501-000389 TR-SMALL SIGNAL KSC815,NPN,400mW,TO-92,TP,120- 1 TR12
WDD10 2802-001058 RESONATOR-CERAMIC 8MHz,0.2%,TP,10x5x8mm 1 RESO
WDD11 DE13-20017A IC-DRIVE KID65003AP,DIP,16P,STICK,TR-AR 1 IC1
WDD11 DE13-20017A IC-DRIVE KID65003AP,DIP,16P,STICK,TR-AR 1 IC2
WDD11 DE13-20017A IC-DRIVE KID65003AP,DIP,16P,STICK,TR-AR 1 IC4
WDD12 1103-001160 IC-EEPROM 24C010,128X8BIT,DIP,8P,300MIL,-,5V,10%,PLASTIC,-40TO+85 1 IC5
WDD13 DE30-20016A BUZZER CBE2220BA,STICK,-,-,-,-,-,-,- 1 BZ
WDD14 3404-001022 SWITCH-TACT 15V,20mA,130±40gf,6x6x5mm,SPS 1 SW1
WDD14 3404-001022 SWITCH-TACT 15V,20mA,130±40gf,6x6x5mm,SPS 1 SW2
WDD14 3404-001022 SWITCH-TACT 15V,20mA,130±40gf,6x6x5mm,SPS 1 SW3
WDD14 3404-001022 SWITCH-TACT 15V,20mA,130±40gf,6x6x5mm,SPS 1 SW4
WDD14 3404-001022 SWITCH-TACT 15V,20mA,130±40gf,6x6x5mm,SPS 1 SW5
WDD14 3404-001022 SWITCH-TACT 15V,20mA,130±40gf,6x6x5mm,SPS 1 SW6
WDD14 3404-001022 SWITCH-TACT 15V,20mA,130±40gf,6x6x5mm,SPS 1 SW7
WDD14 3404-001022 SWITCH-TACT 15V,20mA,130±40gf,6x6x5mm,SPS 1 SW8
WDD15 DE07-20040A LED LAMP SLH-34VC70F,RED,T,PI5,-,-,-,- 1 L01
WDD15 DE07-20040A LED LAMP SLH-34VC70F,RED,T,PI5,-,-,-,- 1 L02
WDD15 DE07-20040A LED LAMP SLH-34VC70F,RED,T,PI5,-,-,-,- 1 L03
WDD15 DE07-20040A LED LAMP SLH-34VC70F,RED,T,PI5,-,-,-,- 1 L06
WDD15 DE07-20040A LED LAMP SLH-34VC70F,RED,T,PI5,-,-,-,- 1 L07
WDD15 DE07-20040A LED LAMP SLH-34VC70F,RED,T,PI5,-,-,-,- 1 L08
WDD15 DE07-20040A LED LAMP SLH-34VC70F,RED,T,PI5,-,-,-,- 1 L09
WDD15 DE07-20040A LED LAMP SLH-34VC70F,RED,T,PI5,-,-,-,- 1 L10
WDD15 DE07-20040A LED LAMP SLH-34VC70F,RED,T,PI5,-,-,-,- 1 L11
WDD15 DE07-20040A LED LAMP SLH-34VC70F,RED,T,PI5,-,-,-,- 1 L12
WDD15 DE07-20040A LED LAMP SLH-34VC70F,RED,T,PI5,-,-,-,- 1 L13
WDD15 DE07-20040A LED LAMP SLH-34VC70F,RED,T,PI5,-,-,-,- 1 L14
WDD15 DE07-20040A LED LAMP SLH-34VC70F,RED,T,PI5,-,-,-,- 1 L15
WDD15 DE07-20040A LED LAMP SLH-34VC70F,RED,T,PI5,-,-,-,- 1 L16
WDD15 DE07-20040A LED LAMP SLH-34VC70F,RED,T,PI5,-,-,-,- 1 L17
WDD15 DE07-20040A LED LAMP SLH-34VC70F,RED,T,PI5,-,-,-,- 1 L18
WDD15 DE07-20040A LED LAMP SLH-34VC70F,RED,T,PI5,-,-,-,- 1 L19
WDD16 0703-001084 LED DISPLAY GRN,2DIGIT,16SEG,23.7X18.7X28.6MM 10 DISP

14
9. Assemble and Disassemble
1. ASSí Y-COVER TOP
1) Remove two screws fixing the top-cover to back side.
2) Push the top-cover back about 15mm and pull it up.
3) It's possible to exchange and service the trans
former, the pressure-senser, the noise-filter and
the water valve.
2. FRAME FRONT
1) Remove the top-cover and the assí y drawer.
2) Remove two screws fixing the control-panel to
front side and the screw on right side.
3) Remove the cover-front(L) by using the (-)driver.
4) Pull the lever and open the assí y-door.
5) Part the diaphragm and the wire diaphragm
away from the frame-front.
6) Remove the eight screws fixing the frame-front.
7) Ití s possible to exchange and service the heater,
the pump, the shock-absorber and the door lock
s/w.
1
5
m
m
SCREW
LEVER

15
9. Assemble and Disassemble
3. BELT
1) Remove the top-cover.
2) Disassemble and assemble the belt.
3) Check that the belt is located at center of the motor-pulley.
<When assembling the belt>
Hook the belt onto the motor pulley 1) and place it
around the pulley 2).
4. MOTOR
1) Lay down the washer on left side.
2) Remove the wire housing from the motor.
3) Remove the bolt fixing the motor with the box
drive on back side.
4) Remove the motor.
5. How to Assemble the RELAY Housing.
<CAUTION>
Insert the Relay Housing to the Relays on the
opposite direction from each other.
* Relay Housing Color *
1
2
BELT
MOTOR
PULLEY
Motor Assemble Hole
Relay
Relay Housing (A)
Relay Housing (B)
A B
WHITE BLUE

16
10. Tools for Disassembly and Assembly
NO. TOOL
①
Box driver
10mm
13mm
17mm
19mm
Heater (1)
Motor (1), Balance (5)
2 holes on each left and right of the shock absorber
1 Pulley hole
②
Double-ended
spanner
10, 13
17,19mm
Replaceable for the box driver.
Since the bolt runs idle when the box driver is used, use the box
driver 17mm.
③
Vice pliers Tool to protect the idle and abrasion of the bolt for the box driver.
④
Other(Driver, Nipper, Long nose) General tools for the after service.
⑤
JIG for the Tub 1(DisassembleandAssemble)
1
9
m
m
1
7
m
m
1
3
m
m
1
0
m
m
1
7
1
9
1
2
1
3
8
1
0
②
①
⑤
②
④
③
 Loading...