

Samsung OTR17M3 Users Manual
Spacemaker Microwave Oven
Owner’s Manual
JVM1750
EVM1750
HVM1750
LVM1750
2
36
Helpful Information
Microwave Terms 36
Care and Cleaning 37
42
If Something Goes Wrong
Before You Call For Service 42
GE Service Numbers 46
Warranty Back Cover
ge.com
10
Important Safety Information
Precautions to Avoid Possible Exposure
to Excessive Microwave Energy 2
Special Notes About Microwaving 5
Operating Instructions
Features of Your Microwave 10
The Controls on Your Microwave 11
Time Cooking 14
Custom Cooking 20
Automatic Cooking 21
Other Features 29
Oven Shelf 34
Models:
DE68-03328A
49-40534
10-06 JR
Write the model and serial numbers here:
Model# ______________________________
Serial# ______________________________
Find these numbers on a label inside the oven.
49-40534 v08 10/25/06 1:26 PM Page 1

2
IMPORTANT SAFETY INFORMATION
READ ALL SAFETY
INFORMATION BEFORE USING
FOR YOUR
SAFETY
PRECAUTIONS
TO AVOID
POSSIBLE
EXPOSURE
TO EXCESSIVE
MICROWAVE
ENERGY
For your safety, the information in this manual
must be followed to minimize the risk of fire
or explosion or to prevent property damage,
personal injury or loss of life.
Do Not Attempt
to operate this oven
with the door open
since open-door
operation can result
in harmful exposure
to microwave energy.
It is important not to
defeat or tamper with
the safety interlocks.
Do Not Place any object
between the oven front
face and the door or
allow soil or cleaner
residue to accumulate
on sealing surfaces.
Do Not Operate the oven
if it is damaged. It is
particularly important
that the oven door
close properly and
that there is no
damage to the:
1 door (bent),
2 hinges and latches
(broken or loosened),
3 door seals and sealing
surfaces.
The Oven Should Not
be adjusted or repaired
by anyone except
properly qualified
service personnel.
WARNING!
For your safety, the information in this manual must be followed to minimize the risk of fire or
explosion, electric shock, or to prevent property damage, personal injury or loss of life.
49-40534 v04 9/7/06 9:25 AM Page 2

3
When using electrical appliances, basic safety precautions should be followed, including
the following:
WARNING
• Read and follow the
specific “Precautions to
Avoid Possible Exposure
to Excessive Microwave
Energy” on page 2.
• This appliance must be
grounded. Connect only
to properly grounded
outlet. See Grounding
Instructions section on
page 9.
• Do not mount this
appliance over a sink.
• Install or locate this
appliance only in
accordance with the
provided Installation
Instructions.
• This over-the-range oven
was designed for use over
ranges no wider than 36.″
It may be installed over
both gas and electric
cooking equipment.
• Do not operate this
appliance if it has a
damaged power cord or
plug, if it is not working
properly or if it has been
damaged or dropped.
• Do not cover or block
any openings on the
appliance.
• Use this appliance only
for its intended use as
described in this manual.
Do not use corrosive
chemicals or vapors in
this appliance. This
microwave oven is
specifically designed to
heat, dry or cook food,
and is not intended
for laboratory or
industrial use.
This microwave oven is
intended for household
use and is UL listed for
installation over electric
and gas ranges.
This microwave oven is
not approved or tested
for marine use.
SAFETY
PRECAUTIONS
49-40534 v04 9/7/06 9:25 AM Page 3

• Do not store this appliance
outdoors. Do not use this
product near water—for
example, in a wet basement,
near a swimming pool, near
a sink or in similar locations.
• Keep power cord away from
heated surfaces.
• Do not immerse power cord
or plug in water.
• To reduce the risk of fire in
the oven cavity:
— Do not overcook food.
Carefully attend appliance
when paper, plastic or
other combustible
materials are placed inside
the oven while cooking.
— Remove wire twist-ties and
metal handles from paper
or plastic containers before
placing them in the oven.
— Do not use the oven
for storage purposes. Do
not leave paper products,
cooking utensils or food in
the oven when not in use.
— If materials inside the oven
ignite, keep the oven door
closed, turn the oven off
and disconnect the power
cord, or shut off power at
the fuse or circuit breaker
panel. If the door is
opened, the fire may
spread.
— Do not use the Sensor
Features twice in
succession on the same
food portion. If food is
undercooked after the first
countdown, use Time Cook
for additional cooking
time.
• See door surface cleaning
instructions in the Care and
Cleaning section(s) of this
manual.
• This appliance must only be
serviced by qualified service
personnel. Contact nearest
authorized service facility
for examination, repair
or adjustment.
• As with any appliance, close
supervision is necessary
when used by children.
• Do not store anything
directly on top of the
microwave oven surface
when the microwave oven
is in operation.
SAVE THESE INSTRUCTIONS
4
IMPORTANT SAFETY INFORMATION
READ ALL SAFETY
INFORMATION BEFORE USING
49-40534 v04 9/7/06 9:25 AM Page 4

5
SPECIAL NOTES ABOUT MICROWAVING
Arcing is the microwave
term for sparks in the
oven. Arcing is caused by:
• The metal shelf (if
included) not installed
correctly so it touches the
microwave wall.
• The temperature probe
(if included) in the
microwave but not
inserted in the food.
• Metal or foil touching
the side of the oven.
• Foil not molded to food
(upturned edges act like
antennas).
• Metal, such as twist-ties,
poultry pins or goldrimmed dishes, in the
microwave.
• Recycled paper towels
containing small metal
pieces being used in
the microwave.
If you see arcing, press
the CLEAR/OFF pad and
correct the problem.
ARCING
• Do not pop popcorn in
your microwave oven
unless in a special
microwave popcorn
accessory or unless you
use popcorn labeled for
use in microwave ovens.
• Some products such as
whole eggs and sealed
containers—for example,
closed jars—are able to
explode and should not
be heated in this
microwave oven. Such use
of the microwave oven
could result in injury.
• Do not boil eggs in a
microwave oven. Pressure
will build up inside egg
yolk and will cause it to
burst, possibly resulting
in injury.
• Operating the microwave
with no food inside for
more than a minute or
two may cause damage
to the oven and could
start a fire. It increases
the heat around the
magnetron and can
shorten the life of
the oven.
• Foods with unbroken
outer “skin” such as
potatoes, hot dogs,
sausages, tomatoes,
apples, chicken livers
and other giblets, and
egg yolks should be
pierced to allow steam
to escape during
cooking.
FOODS
49-40534 v04 9/7/06 9:25 AM Page 5

SAFETY FACT
SUPERHEATED WATER
Liquids, such as water,
coffee or tea, are able to
be overheated beyond the
boiling point without
appearing to be boiling.
Visible bubbling or boiling
when the container is
removed from the microwave
oven is not always present.
THIS COULD RESULT
IN VERY HOT LIQUIDS
SUDDENLY BOILING OVER
WHEN THE CONTAINER IS
DISTURBED OR A SPOON
OR OTHER UTENSIL IS
INSERTED INTO THE LIQUID.
To reduce the risk of injury
to persons:
— Do not overheat the
liquid.
— Stir the liquid both
before and halfway
through heating it.
— Do not use straight-
sided containers with
narrow necks.
— After heating, allow the
container to stand in
the microwave oven
for a short time before
removing the container.
— Use extreme care when
inserting a spoon or
other utensil into the
container.
• Avoid heating baby food
in glass jars, even with
the lid off. Make sure all
infant food is thoroughly
cooked. Stir food to
distribute the heat evenly.
Be careful to prevent
scalding when warming
formula or breast milk.
The container may feel
cooler than the milk
really is. Always test the
milk before feeding
the baby.
• Don’t defrost frozen
beverages in narrownecked bottles (especially
carbonated beverages).
Even if the container is
opened, pressure can
build up. This can cause
the container to burst,
possibly resulting in
injury.
• Hot foods and steam
can cause burns. Be
careful when opening
any containers of hot
food, including popcorn
bags, cooking pouches
and boxes. To prevent
possible injury, direct
steam away from hands
and face.
• Do not overcook
potatoes. They could
dehydrate and catch
fire, causing damage
to your oven.
• Cook meat and poultry
thoroughly—meat to
at least an INTERNAL
temperature of 160°F
and poultry to at least an
INTERNAL temperature
of 180°F. Cooking to
these temperatures
usually protects against
foodborne illness.
IMPORTANT SAFETY INFORMATION
SPECIAL NOTES ABOUT MICROWAVING
6
49-40534 v04 9/7/06 9:25 AM Page 6
7
Make sure all cookware used
in your microwave oven is
suitable for microwaving.
Most glass casseroles,
cooking dishes, measuring
cups, custard cups, pottery
or china dinnerware which
does not have metallic trim
or glaze with a metallic
sheen can be used. Some
cookware is labeled “suitable
for microwaving.”
• If you are not sure if
a dish is microwave-safe,
use this test: Place in the
oven both the dish you
are testing and a glass
measuring cup filled with
1 cup of water—set the
measuring cup either
in or next to the dish.
Microwave 1 minute at
high. If the dish heats,
it should not be used
for microwaving.
If the dish remains cool
and only the water in the
cup heats, then the dish
is microwave-safe.
• If you use a meat
thermometer while
cooking, make sure
it is safe for use in
microwave ovens.
• Do not use recycled paper
products. Recycled paper
towels, napkins and waxed
paper can contain metal
flecks which may cause
arcing or ignite. Paper
products containing nylon
or nylon filaments should
be avoided, as they may
also ignite.
• Some styrofoam trays
(like those that meat is
packaged on) have a thin
strip of metal embedded
in the bottom. When
microwaved, the metal
can burn the floor of
the oven or ignite a
paper towel.
• Do not use the microwave
to dry newspapers.
• Not all plastic wrap
is suitable for use in
microwave ovens.
Check the package
for proper use.
• Paper towels, waxed paper
and plastic wrap can be
used to cover dishes in
order to retain moisture
and prevent spattering. Be
sure to vent plastic wrap so
steam can escape.
• Cookware may become hot
because of heat transferred
from the heated food. Pot
holders may be needed to
handle the cookware.
• “Boilable” cooking
pouches and tightly closed
plastic bags should be slit,
pierced or vented as
directed by package.
If they are not, plastic
could burst during or
immediately after cooking,
possibly resulting in injury.
Also, plastic storage
containers should be at
least partially uncovered
because they form a tight
seal. When cooking with
containers tightly covered
with plastic wrap, remove
covering carefully and
direct steam away from
hands and face.
MICROWAVESAFE
COOKWARE
How to test for a microwavesafe dish.
49-40534 v04 9/7/06 9:25 AM Page 7

• Use foil only as
directed in this manual.
When using foil in the
microwave oven, keep the
foil at least 1″ away from
the sides of the oven.
• Plastic cookware—Plastic
cookware designed for
microwave cooking is
very useful, but should
be used carefully. Even
microwave-safe plastic
may not be as tolerant of
overcooking conditions
as are glass or ceramic
materials and may soften
or char if subjected to
short periods of
overcooking. In longer
exposures to overcooking, the food and
cookware could ignite.
Follow these guidelines:
1 Use microwave-safe
plastics only and use
them in strict compliance
with the cookware
manufacturer’s
recommendations.
2 Do not microwave empty
containers.
3 Do not permit children
to use plastic cookware
without complete
supervision.
The fan will operate
automatically under
certain conditions (see
Automatic Fan feature).
Take care to prevent the
starting and spreading of
accidental cooking fires
while the vent fan is in use.
• Clean the underside of
the microwave often.
Do not allow grease
to build up on the
microwave or the
fan filter.
• In the event of a grease
fire on the surface units
below the microwave
oven, smother a flaming
pan on the surface unit
by covering the pan
completely with a lid, a
cookie sheet or a flat tray.
• Use care when cleaning
the vent fan filter.
Corrosive cleaning
agents, such as lye-based
oven cleaners, may
damage the filter.
• When preparing
flaming foods under
the microwave, turn
the fan on.
• Never leave surface units
beneath your microwave
oven unattended at high
heat settings. Boilovers
cause smoking and
greasy spillovers that may
ignite and spread if the
microwave vent fan is
operating. To minimize
automatic fan operation,
use adequate sized
cookware and use high
heat on surface units
only when necessary.
THE VENT
FAN
IMPORTANT SAFETY INFORMATION
SPECIAL NOTES ABOUT MICROWAVING
8
49-40534 v04 9/7/06 9:25 AM Page 8

GROUNDING INSTRUCTIONS/OPTIONAL KITS
WARNING
Improper use of the
grounding plug can result
in a risk of electric shock.
This appliance must be
grounded. In the event of
an electrical short circuit,
grounding reduces the
risk of electric shock by
providing an escape wire
for the electric current.
This appliance is equipped
with a power cord having
a grounding wire with a
grounding plug. The plug
must be plugged into an
outlet that is properly
installed and grounded.
Consult a qualified
electrician or service
technician if the
grounding instructions
are not completely
understood, or if doubt
exists as to whether the
appliance is properly
grounded.
If the outlet is a standard
2-prong wall outlet, it is
your personal responsibility
and obligation to have it
replaced with a properly
grounded 3-prong wall
outlet.
Do not under any
circumstances cut or
remove the third (ground)
prong from the power
cord.
Do not use an adapter
plug with this appliance.
Do not use an extension
cord with this appliance.
If the power cord is too
short, have a qualified
electrician or service
technician install an outlet
near the appliance.
For best operation, plug
this appliance into its own
electrical outlet to prevent
flickering of lights, blowing
of fuse or tripping of
circuit breaker.
GROUNDING
INSTRUCTIONS
Filler Panel Kits
JX48WH—White
JX48BL—Black
When replacing a 36″
range hood, filler panel
kits fill in the additional
width to provide a custom
built-in appearance.
For installation between
cabinets only; not for
end-of-cabinet installation.
Each kit contains two
3″ wide filler panels.
Two kits are needed for
a 36″ opening.
JX81A—Recirculating
Charcoal Filter Kit
Filter kits are used when
the microwave oven cannot
be vented to the outside.
Available at extra cost from
your GE supplier, or see the
GE Service numbers.
Optional Kits
Ensure proper ground
exists before use.
JX81A
JX48
9
49-40534 v04 9/7/06 9:25 AM Page 9
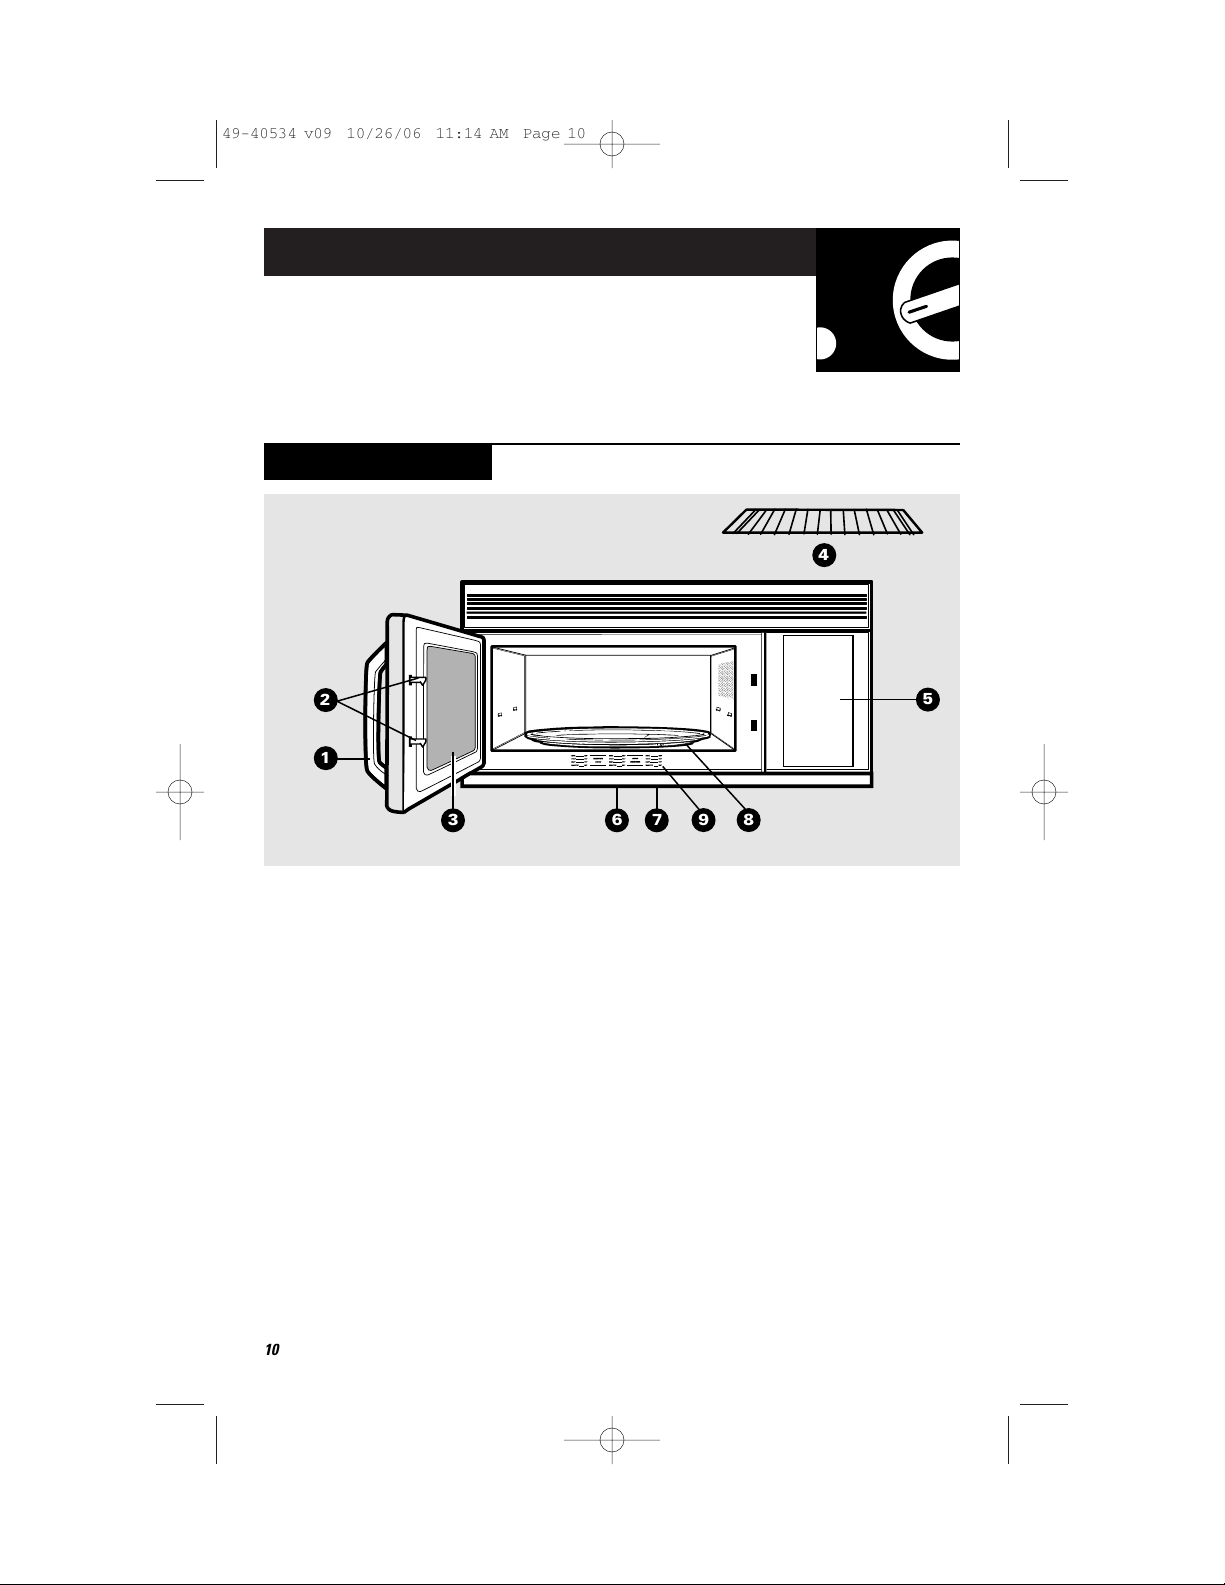
Operating Instructions
Features of Your Microwave
(Throughout this manual, features and appearance
may vary from your model.)
1 Door Handle. Pull to
open the door. The
door must be securely
latched for the
microwave to operate.
2 Door Latches.
3 Window with Metal
Shield. Screen
allows cooking to be
viewed while keeping
microwaves confined
in the oven.
4 Shelf. Lets you
microwave several
foods at once. Food
microwaves best when
placed directly on the
oven floor or turntable.
5 Touch Control Panel
You must set the clock
and calendar before
using the microwave.
6 Cooktop Light.
7 Grease Filter.
8 Removable Turntable.
Turntable and support
must be in place
when using the oven.
The turntable may be
removed for cleaning.
9 Convenience Guide.
NOTE: Rating plate, oven
vent(s) and oven light are
located on the inside walls
of the microwave oven.
Features
;
;
;
;
;
;
;
;
;
;
;
;
;
;
;
;
;
;
;
;
;
;
;
;
;
;
;
;
;
;
;
;
;
;
;
;
;
;
;
;
;
;
;
;
;
;
;
;
;
;
;
;
;
;
;
;
;
;
;
;
;;;
;
4
1
2
5
10
63
9
8
7
49-40534 v09 10/26/06 11:14 AM Page 10

11
Time Features
Time Cooking
Press Enter
TIME COOK I & II (Press once or twice) Amount of cooking time.
DEFROST AUTO/TIME (Press twice) Amount of defrosting time.
EXPRESS COOK Starts immediately!
POWER LEVEL Power level 1–10.
ADD 30 SEC Starts immediately!
Quick Start
The Controls on Your Microwave Oven
(Throughout this manual, features and appearance may vary from your model.)
1
You can microwave by time, temperature, preset time and power level or with the
convenience features.
Defrosting by Weight
Press Enter
DEFROST AUTO/TIME (Press once) Food weight
1
2
Custom Cooking (On some models)
Cooking by Preset Cooking Time and Power Level
Press Enter
CUSTOM (Press and hold for 2 seconds) Amount of cooking time and power level.
2
49-40534 v04 9/7/06 9:26 AM Page 11
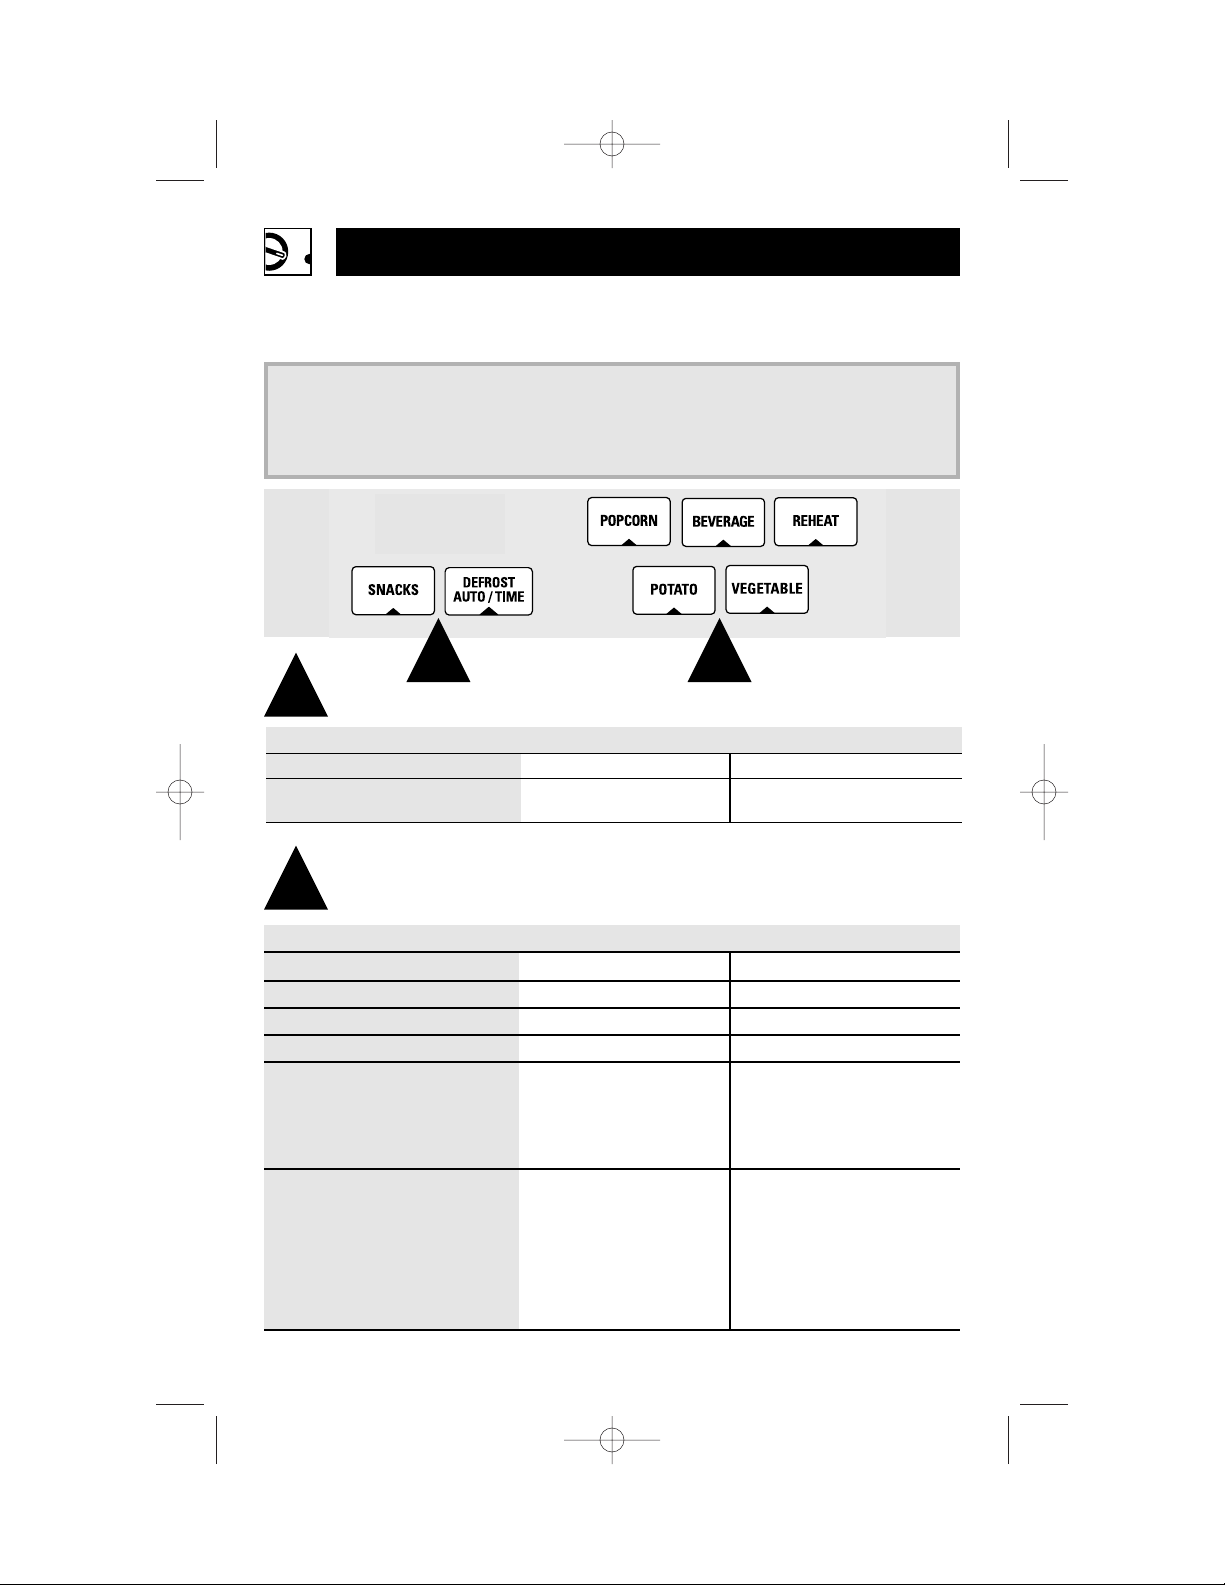
Convenience Features (On some models)
Press Enter Option
SNACKS (See Snacks Guide) Snack type 1–6 number/weight
DEFROST AUTO/TIME Food weight
(Press once)
3
3 4
Sensor Features
Press Enter Option
POPCORN Starts immediately! more/less time
BEVERAGE Starts immediately!
REHEAT Starts immediately! more/less time
POTATO Starts immediately! more/less time
VEGETABLE (on some models) Starts immediately! more/less time
Press once (fresh vegetables)
more/less time
Press twice (frozen vegetables)
more/less time
Press three times (canned vegetables)
more/less time
(on some models)
COOK (on some models) Food type 1–6
Press 1 for Chicken Starts immediately!
Press 2 for Fish
Press 3 for Ground Meats
Press 4 for Fresh Vegetables
Press 5 for Frozen Vegetables
Press 6 for Canned Vegetables
4
HELP
Press this pad and any
feature pad for usage
instructions and tips.
GUIDE ON MICROWAVE
Before you begin, check
the guide located on the
inside front of the oven
when you open the door.
GUIDES IN BOOK
• Cooking
• Time Defrost
• Reheat
• Snacks
Quick Start
The Controls on Your Microwave Oven
(Throughout this manual, features and appearance may vary from your model.)
12
49-40534 v04 9/7/06 9:34 AM Page 12

13
Operating Instructions
Variable power levels add
flexibility to microwave
cooking. The power levels
on the microwave oven can
be compared to the
surface units on a range.
High (power level 10) or
full power is the fastest way
to cook and gives you
100% power. Each power
level gives you microwave
energy a certain percent of
the time. Power level 7 is
microwave energy 70% of
the time. Power level 3 is
energy 30% of the time.
A high setting (10) will
cook faster but food may
need more frequent
stirring, rotating or turning
over. Most cooking will be
done on High (power level
10). A lower setting will
cook more evenly and need
less stirring or rotating of
the food.
Some foods may have
better flavor, texture or
appearance if one of the
lower settings is used. Use
a lower power level when
cooking foods that have a
tendency to boil over, such
as scalloped potatoes.
Rest periods (when the
microwave energy cycles
off) give time for the food
to “equalize” or transfer
heat to the inside of the
food. An example of this
is shown with power level
3—the defrost cycle. If
microwave energy did not
cycle off, the outside of the
food would cook before
the inside was defrosted.
Here are some examples
of uses for various power
levels:
Power Level Best Uses
High 10 Fish, bacon,
vegetables,
boiling liquids.
Med-High 7 Gentle cooking of
meat and poultry;
baking casseroles
and reheating.
Medium 5 Slow cooking
and tenderizing
such as stews and
less tender cuts of
meat.
Low 2 or 3 Defrosting
without cooking;
simmering;
delicate sauces.
Warm 1 Keeping food
warm without
overcooking;
softening
butter.
How to Change the
Power Level
The power level may be
entered or changed
immediately after
entering the feature
time for TIME COOK,
TIME DEFROST or
EXPRESS COOK. The
power level may also be
changed during time
countdown.
1 Press TIME COOK or
select Time Defrost.
2 Enter cooking or
defrosting time.
3 Press POWER LEVEL.
4 Select desired power
level 1–10.
5 Press START.
Changing Power
Levels
49-40534 v04 9/7/06 9:26 AM Page 13

Time Cook I
Allows you to microwave
for any time up to 99
minutes and 99 seconds.
Power level 10 (High) is
automatically set, but you
may change it for more
flexibility.
You may open the door
during Time Cook to
check the food. Close the
door and press START
to resume cooking.
Time Cook II
Lets you change power
levels automatically during
cooking. Here’s how to
do it:
1 Press TIME COOK.
2 Enter the first cook time.
3 Change the power level
if you don’t want full
power. (Press POWER
LEVEL. Select a desired
power level 1–10.)
4 Press TIME COOK
again.
5 Enter the second cook
time.
6 Change the power level
if you don’t want full
power. (Press POWER
LEVEL. Select a power
level 1–10.)
7 Press START.
At the end of Time Cook I,
Time Cook II counts down.
1 Press TIME COOK.
2 Enter cooking time.
3 Change power level
if you don’t want full
power. (Press POWER
LEVEL. Select a
desired power level
1–10.)
4 Press START.
Time Cook
Operating Instructions
Time Features
14
49-40534 v04 9/7/06 9:26 AM Page 14

15
Cooking Guide for Time Cook I & II
NOTE: Use power level High (10) unless otherwise noted.
Vegetable Amount Time Comments
Asparagus
(fresh spears) 1 lb. 6 to 9 min., In 1
1
⁄2-qt. oblong glass baking dish,
Med-High (7) place 1/4 cup water.
(frozen spears) 10-oz. package 5 to 7 min. In 1-qt. casserole.
Beans
(fresh green) 1 lb. cut in half 9 to 11 min. In 1
1
⁄2-qt. casserole, place 1/2 cup water.
(frozen green) 10-oz. package 6 to 8 min. In 1-qt. casserole, place 2 tablespoons
water.
(frozen lima) 10-oz. package 6 to 8 min. In 1-qt. casserole, place 1/4 cup water.
Beets
(fresh, whole) 1 bunch 17 to 21 min. In 2-qt. casserole, place 1/2 cup water.
Broccoli
(fresh cut) 1 bunch 7 to 10 min. In 2-qt. casserole, place 1/2 cup water.
(11⁄4to 11⁄2lbs.)
(fresh spears) 1 bunch 9 to 13 min. In 2-qt. oblong glass baking dish, place
(1
1
⁄4to 11⁄2lbs.) 1/4 cup water.
(frozen, 10-oz. package 5 to 7 min. In 1-qt. casserole.
chopped)
(frozen spears) 10-oz. package 5 to 7 min. In 1-qt. casserole, place 3 tablespoons
water.
Cabbage
(fresh) 1 medium head 8 to 11 min. In 1
1
⁄2- or 2-qt. casserole, place 1/4 cup
(about 2 lbs.) water.
(wedges) 7 to 10 min. In 2- or 3-qt. casserole, place 1/4 cup
water.
Carrots
(fresh, sliced) 1 lb. 7 to 9 min. In 1
1
⁄
2
-qt. casserole, place 1/4 cup water.
(frozen) 10-oz. package 5 to 7 min. In 1-qt. casserole, place 2 tablespoons
water.
Cauliflower
(flowerets) 1 medium head 9 to 14 min. In 2-qt. casserole, place 1/2 cup water.
(fresh, whole) 1 medium head 10 to 17 min. In 2-qt. casserole, place 1/2 cup water.
(frozen) 10-oz. package 5 to 7 min. In 1-qt. casserole, place 2 tablespoons
water.
49-40534 v04 9/7/06 9:26 AM Page 15
 Loading...