

Page 1

Page 2
Page 3
Page 4
Page 5
Page 6
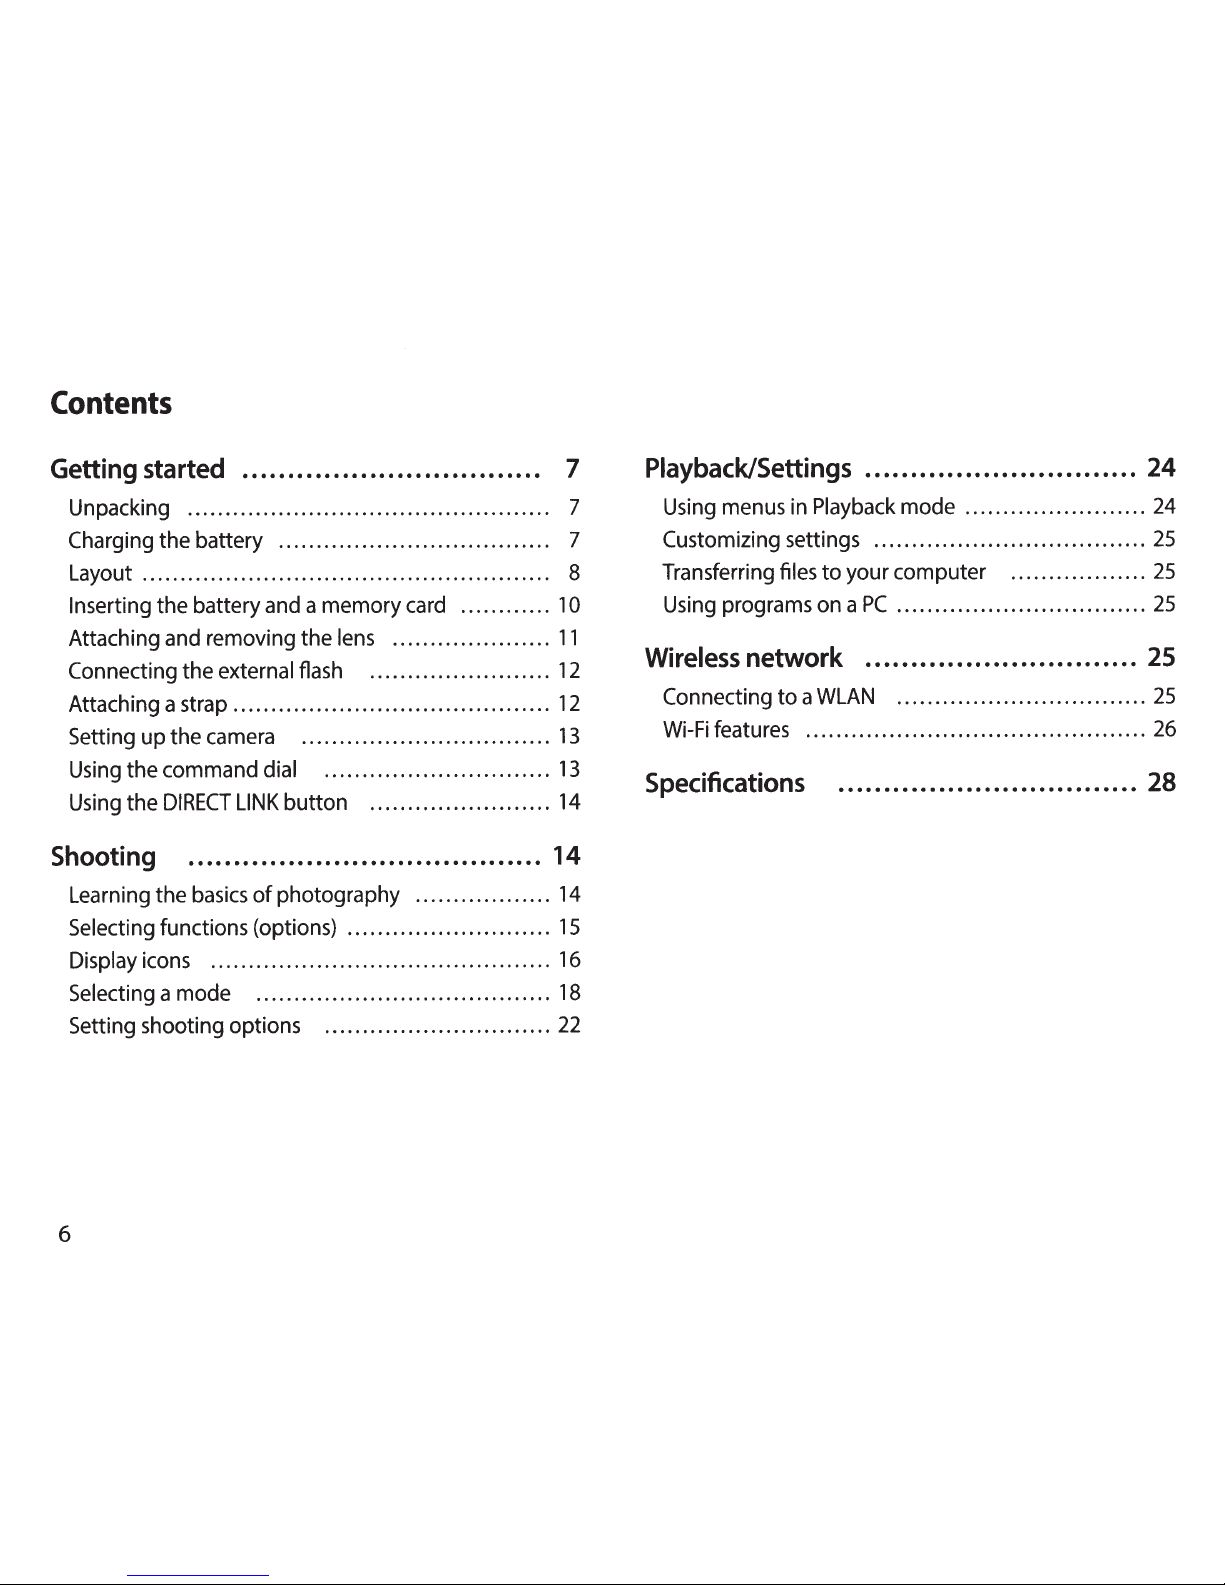
Page 7
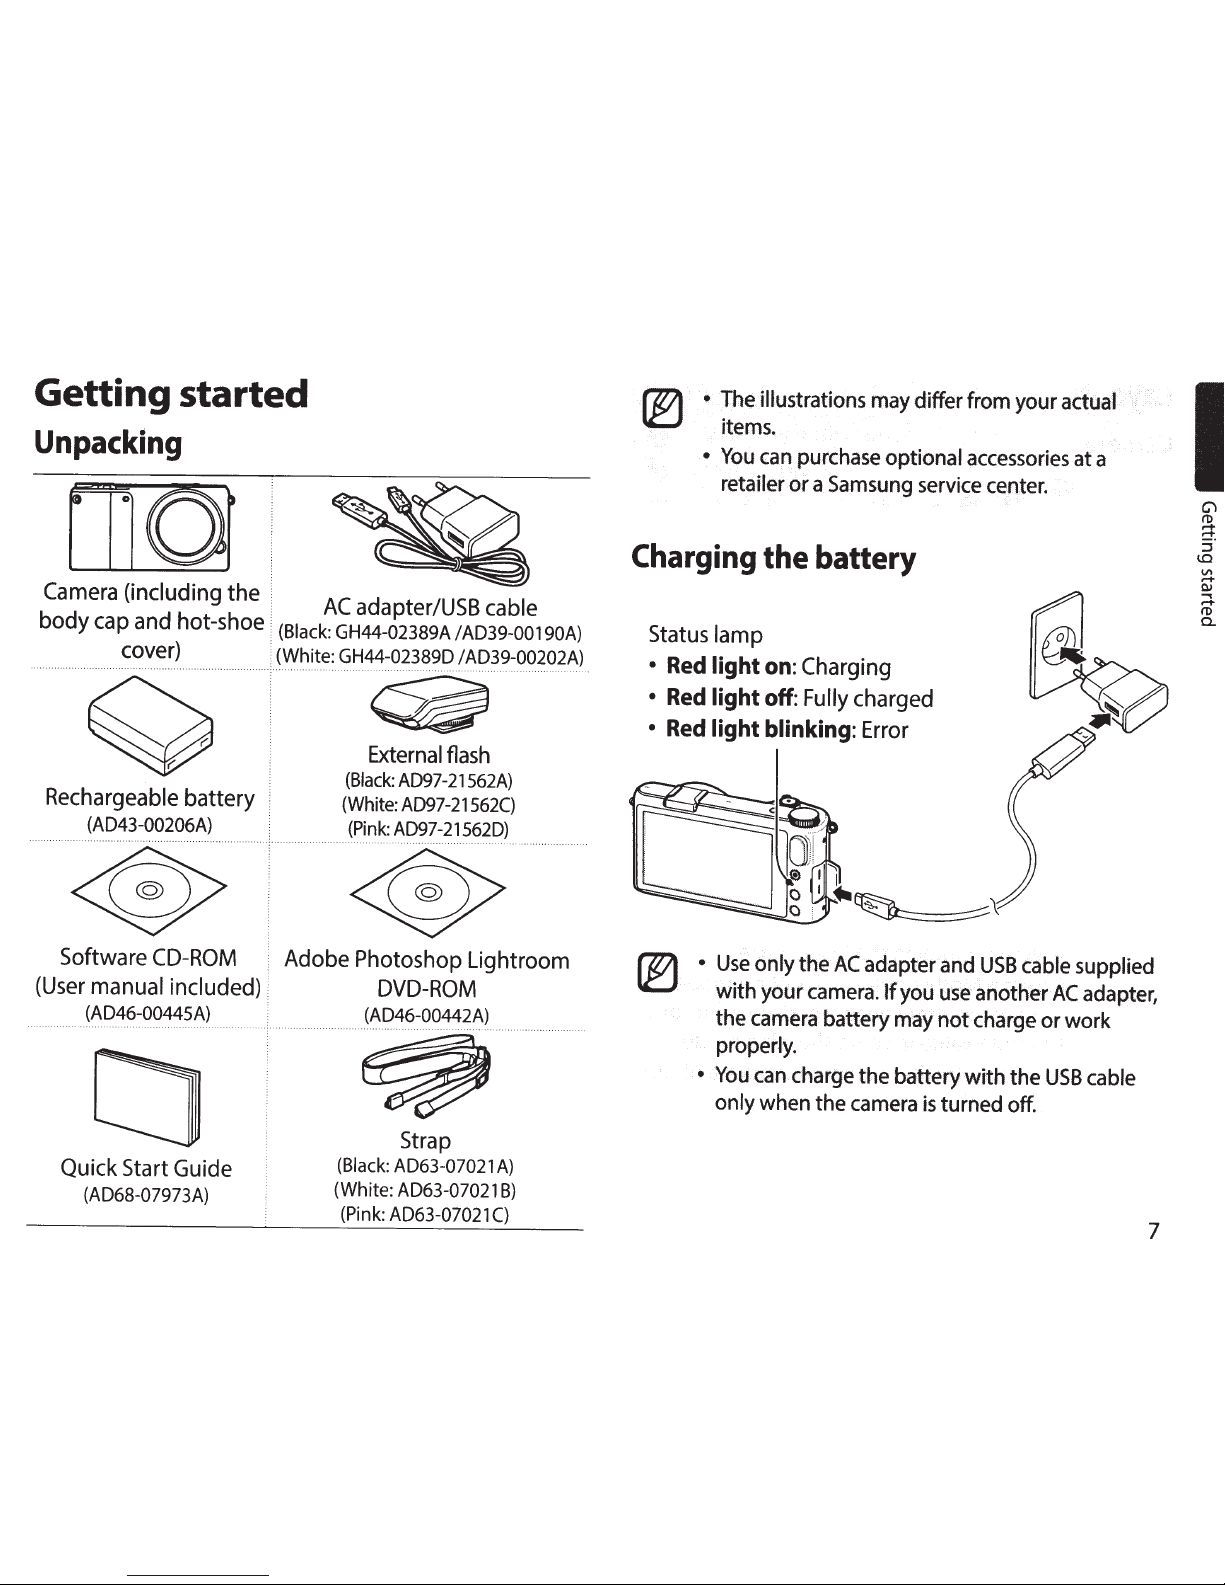
Page 8
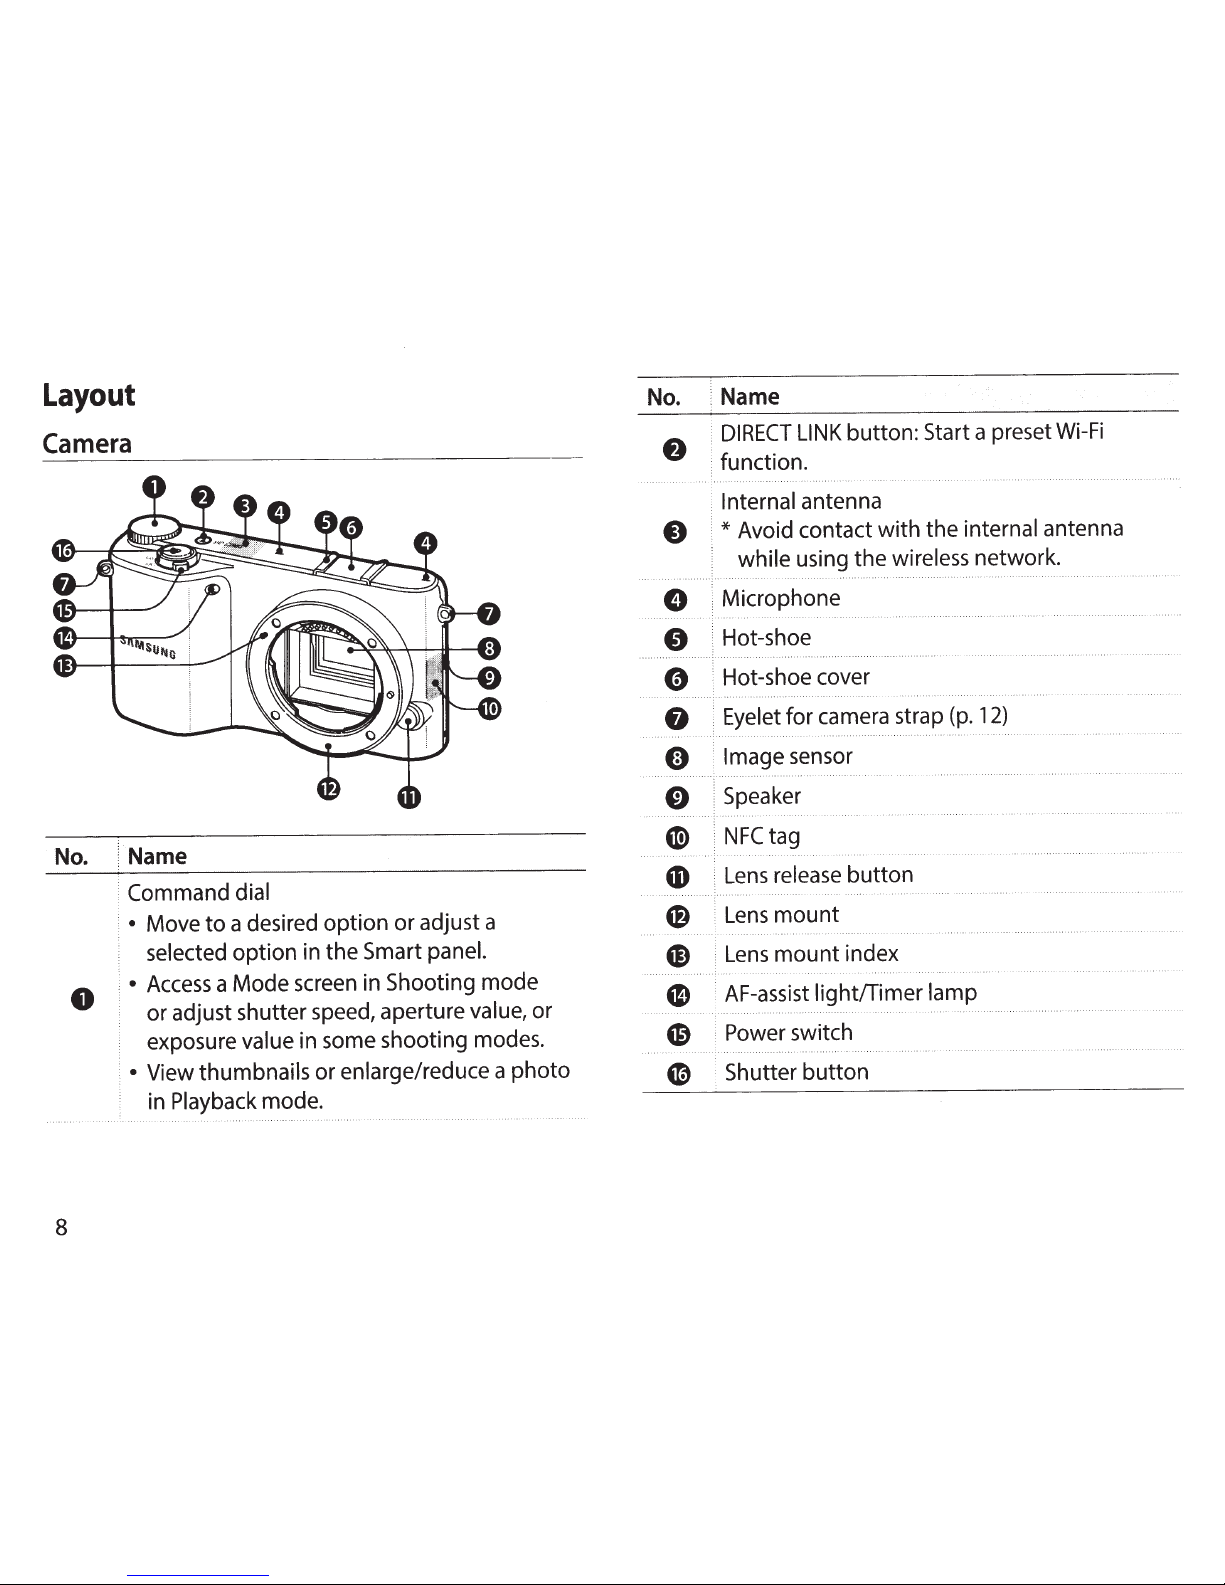
Page 9
Page 10
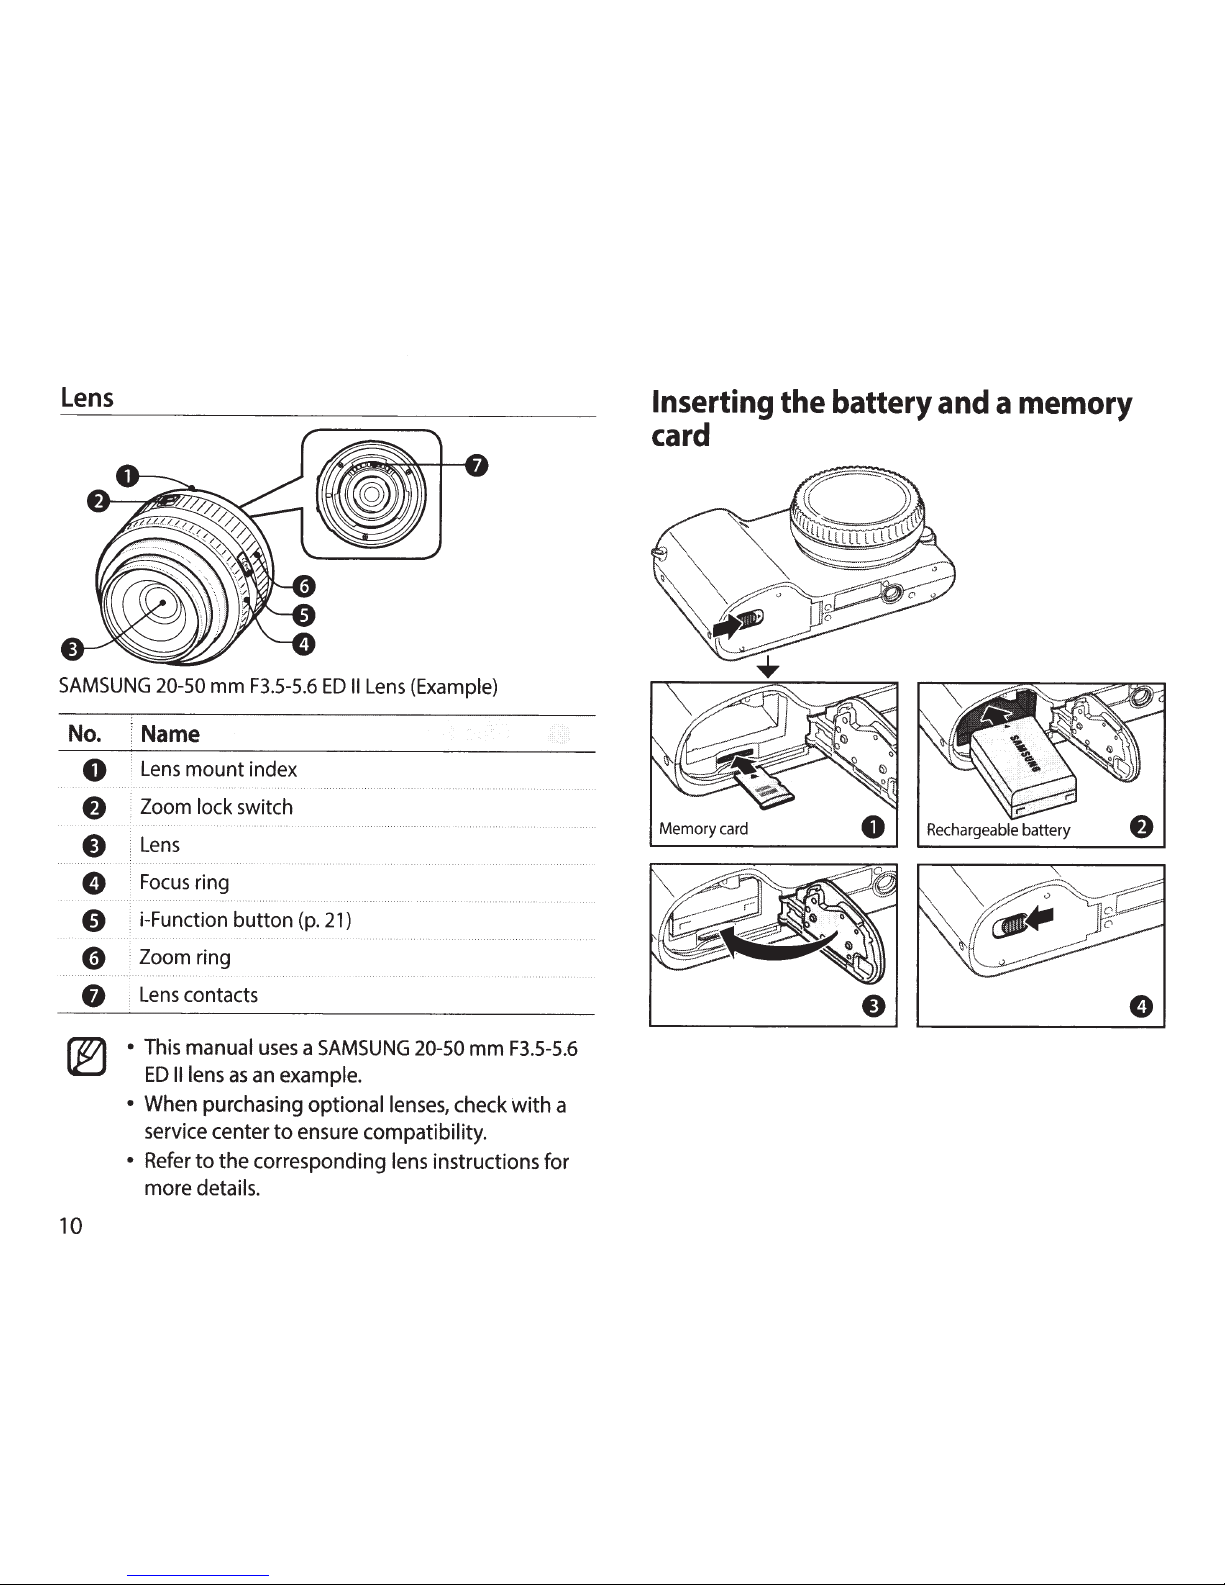
Page 11
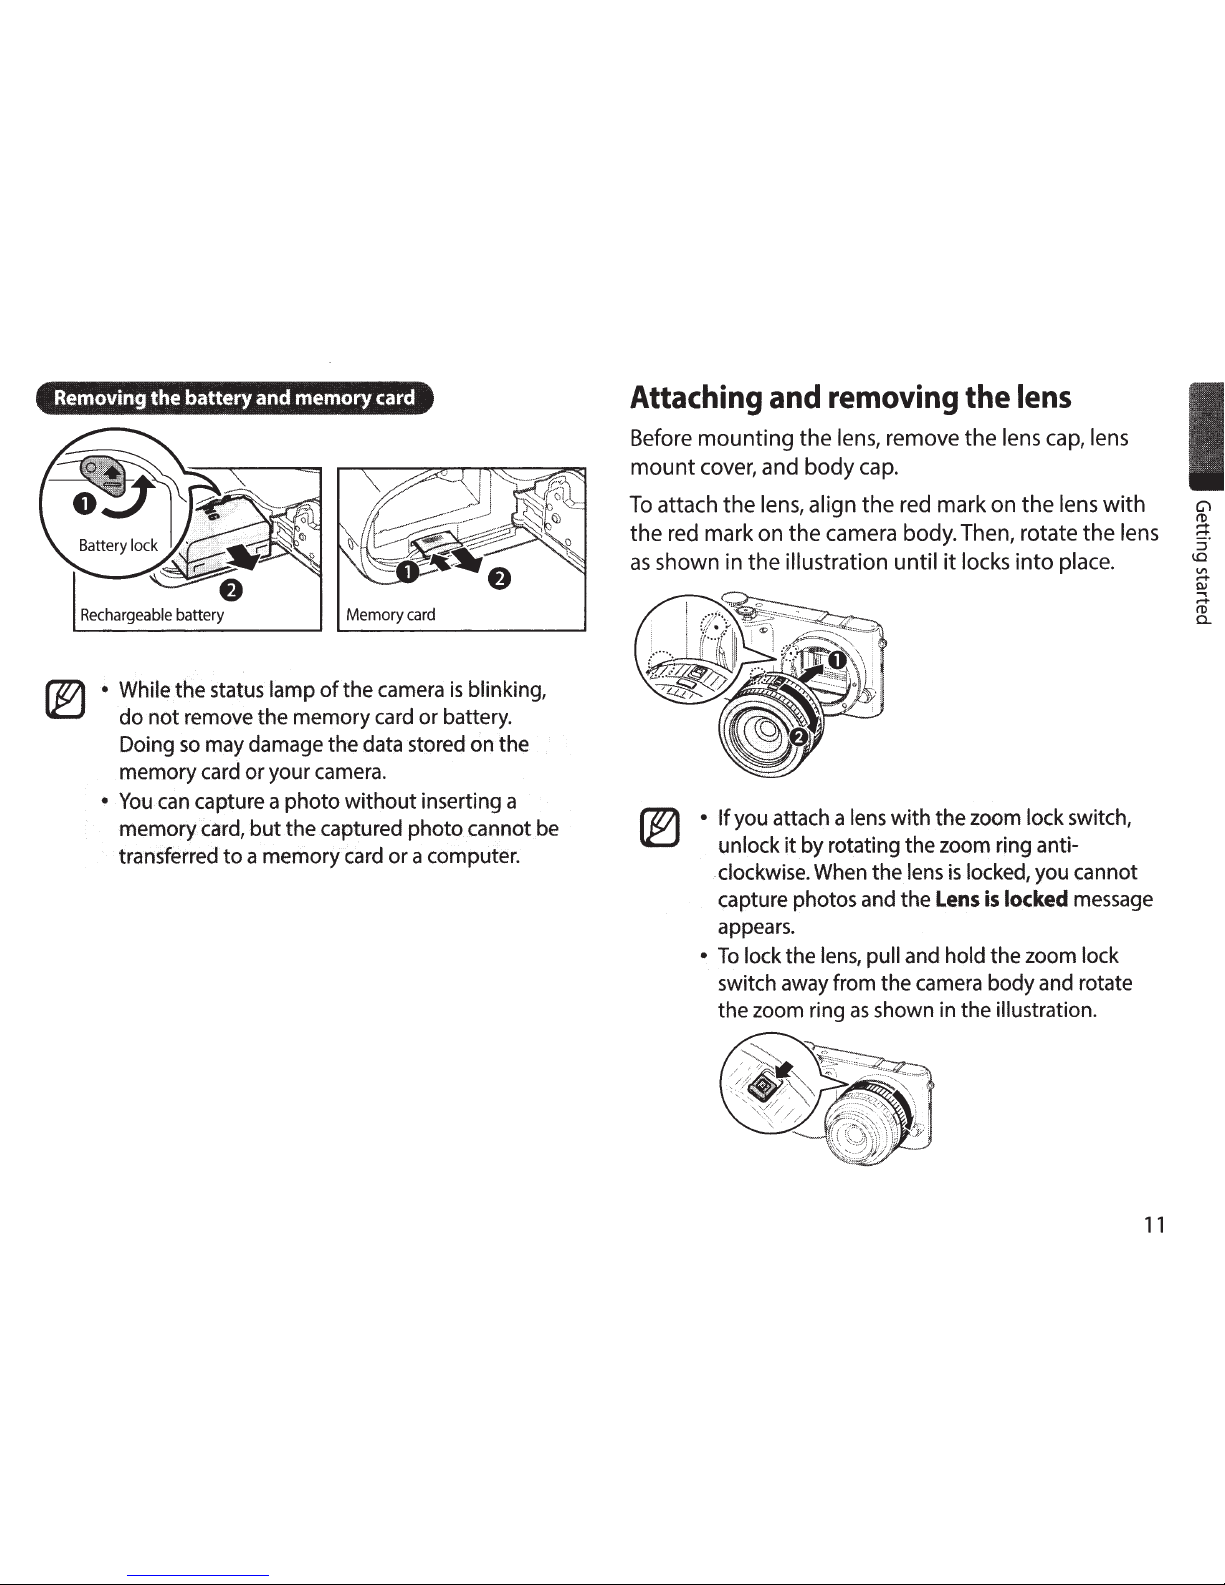
Page 12
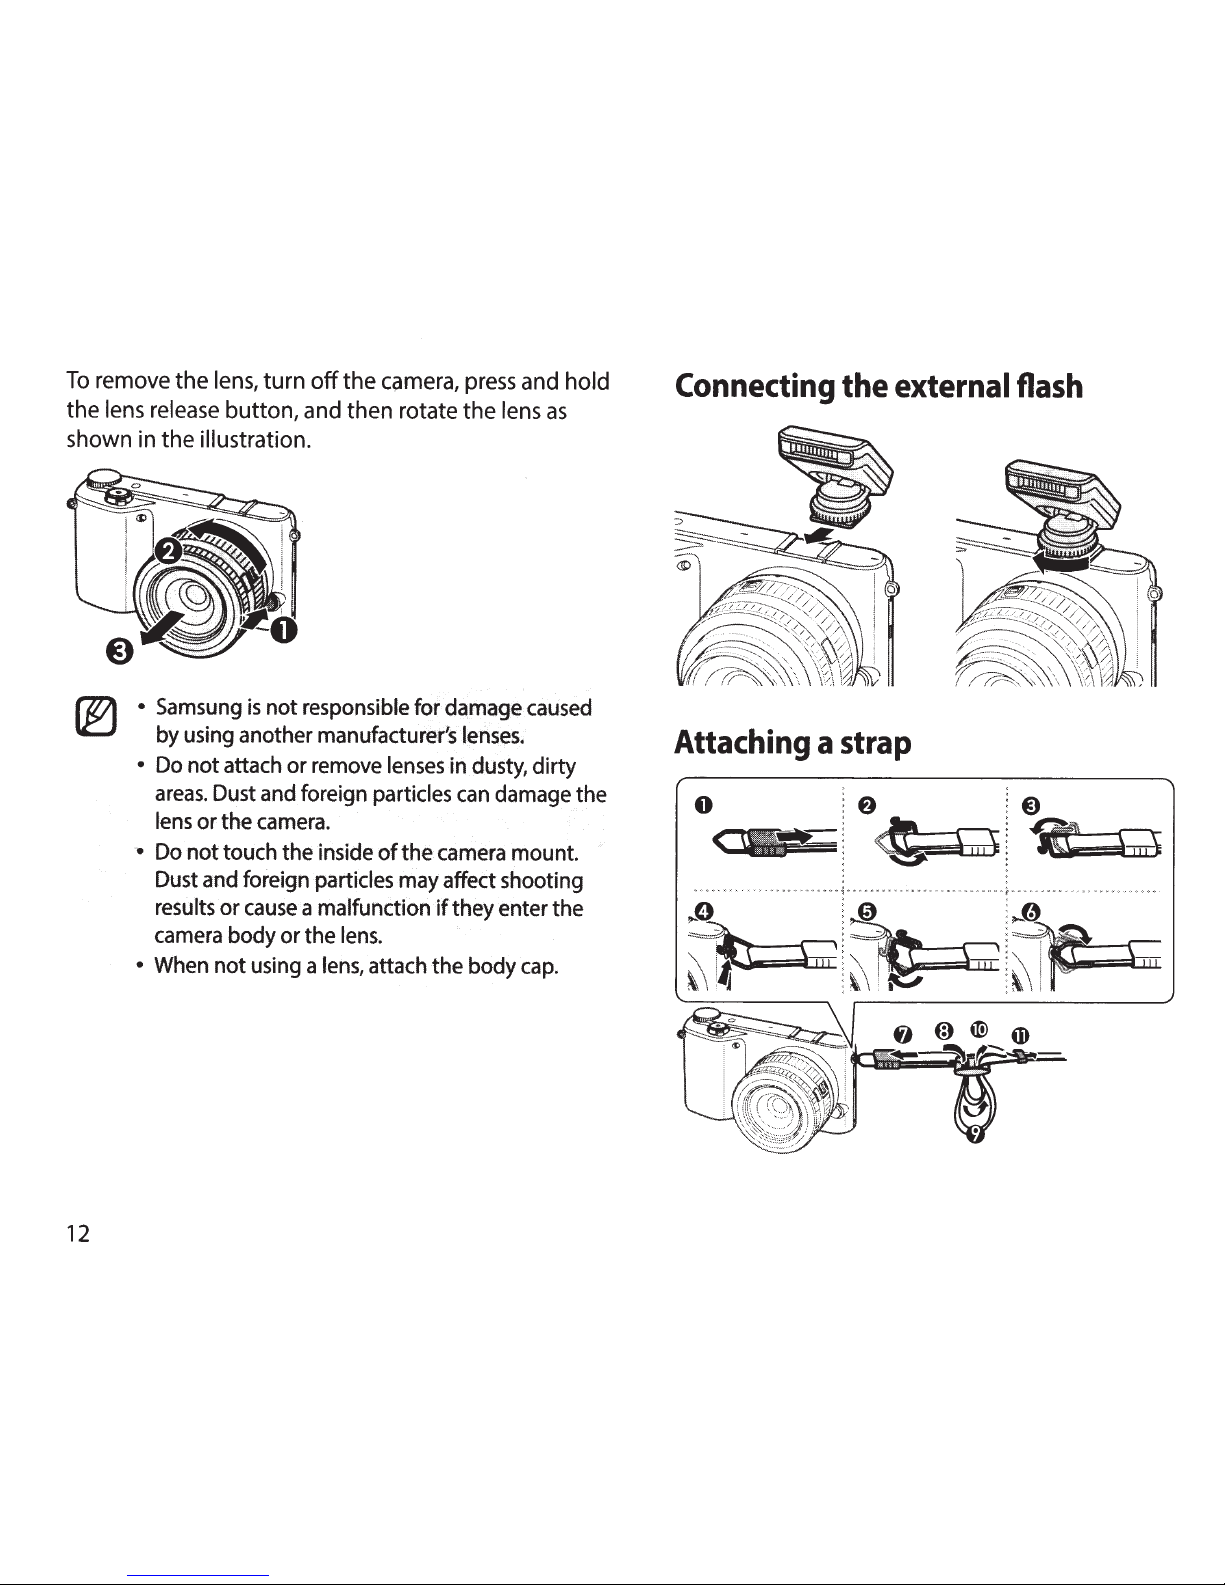
Page 13
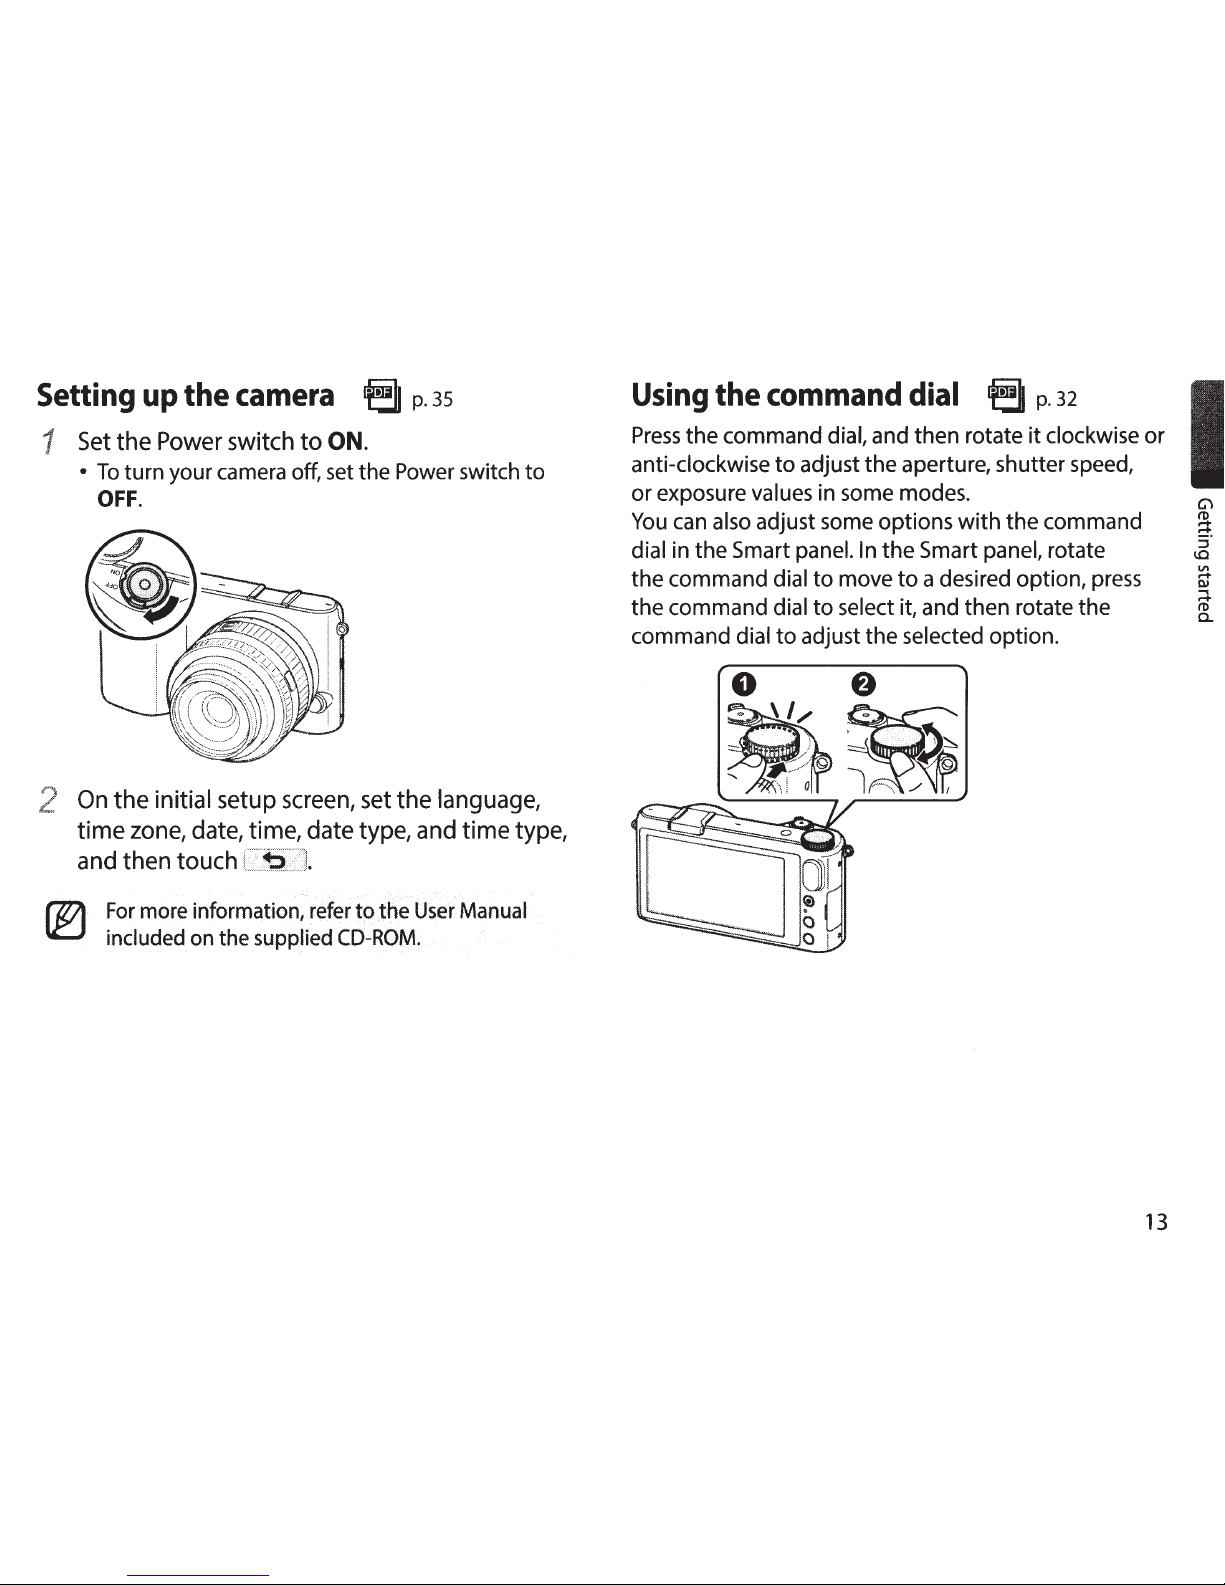
Page 14
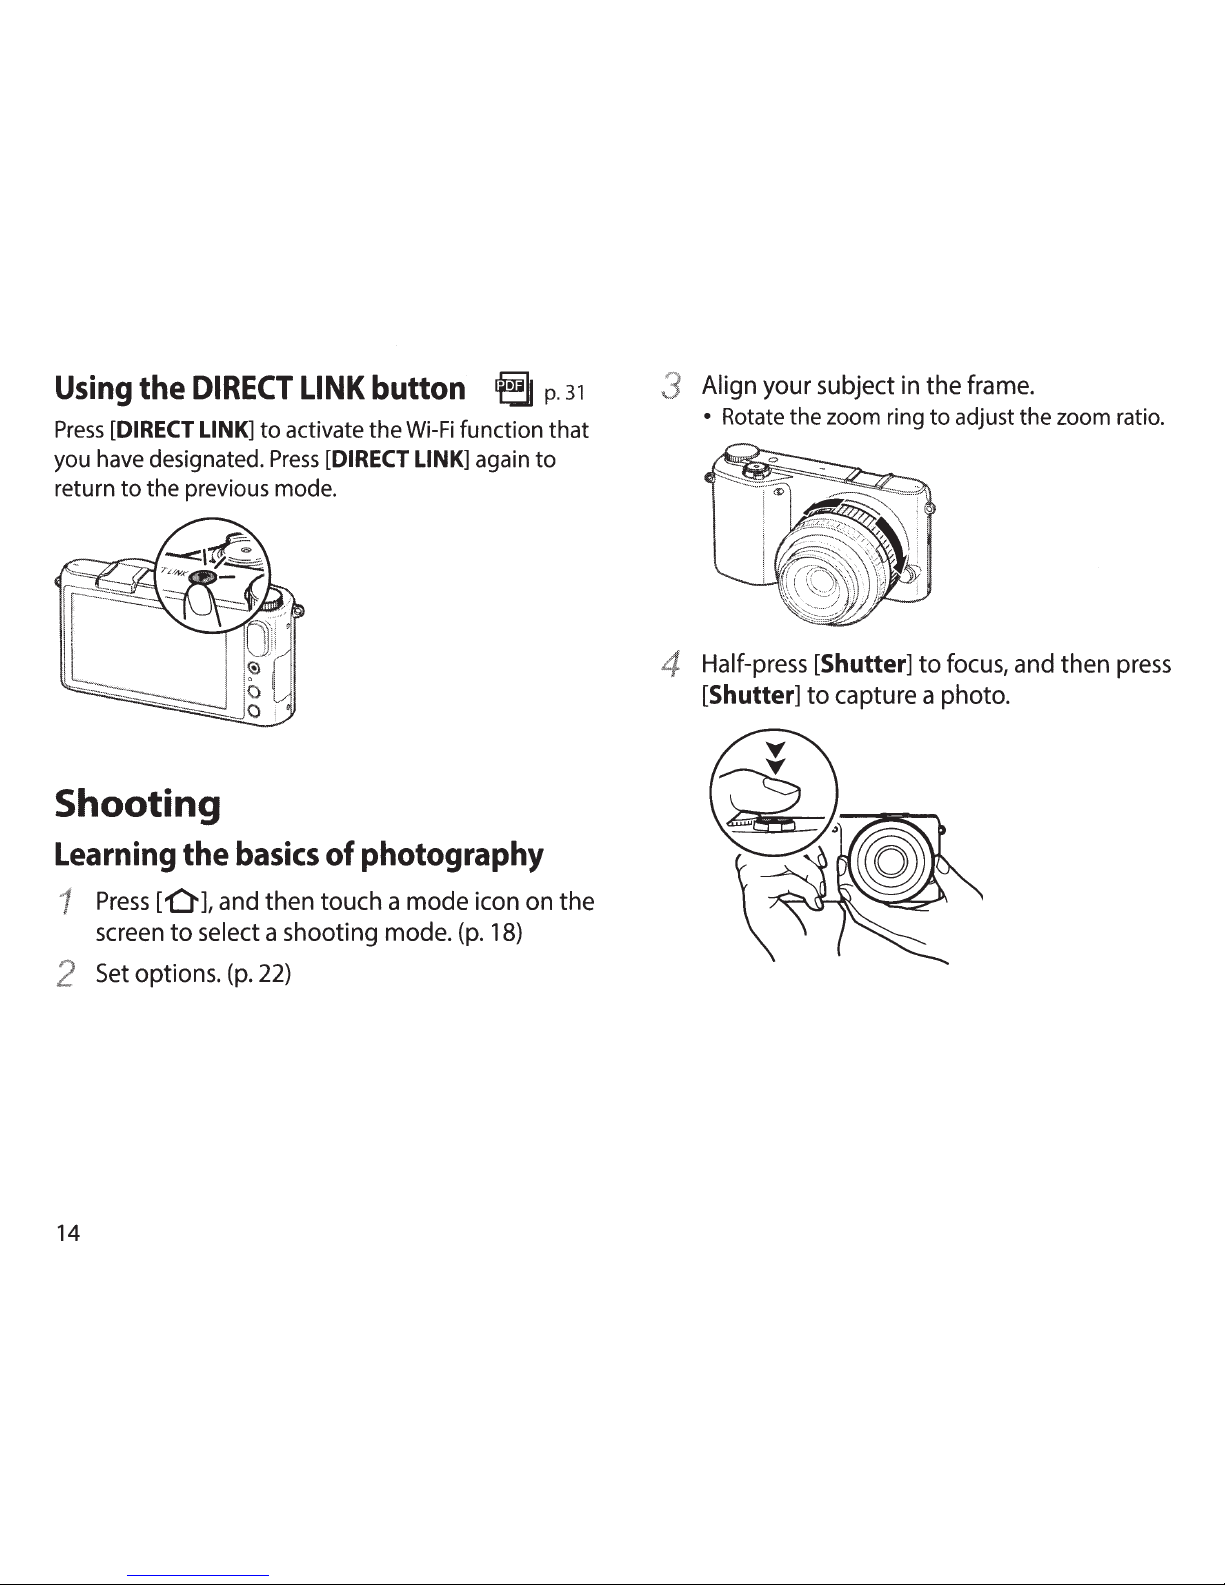
Page 15
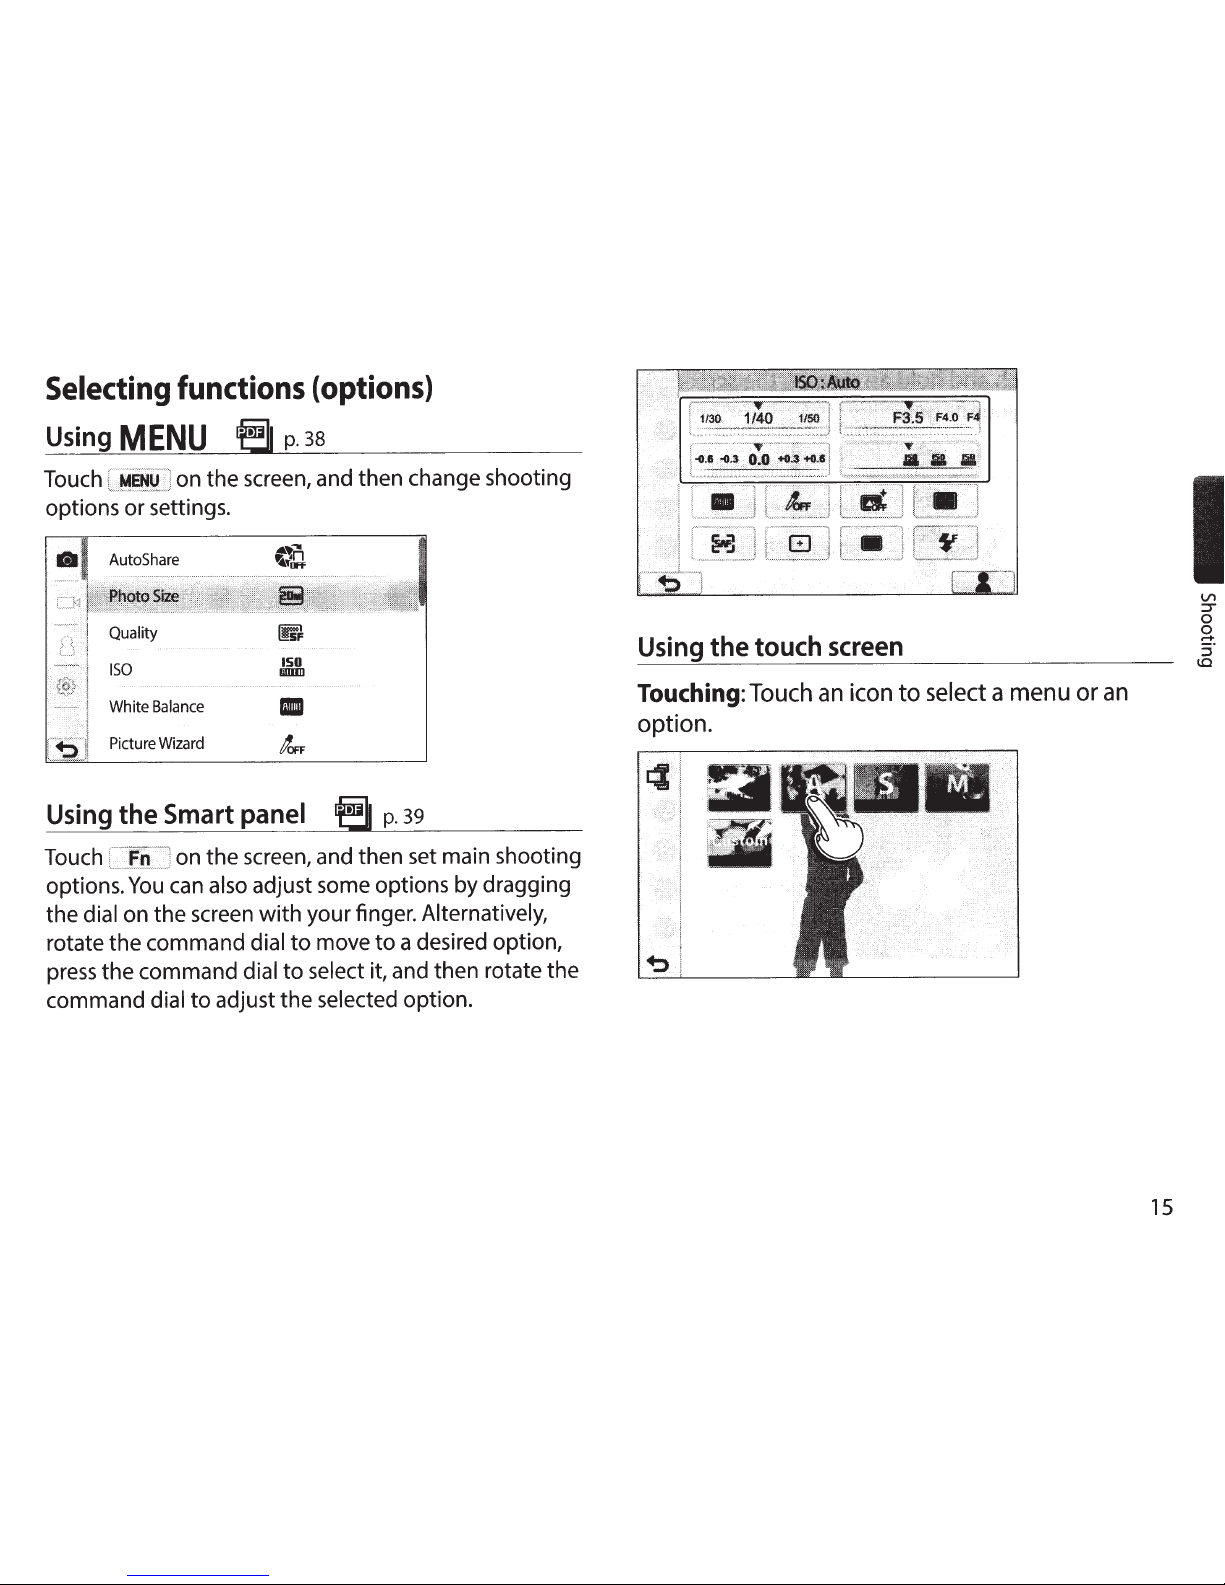
Page 16
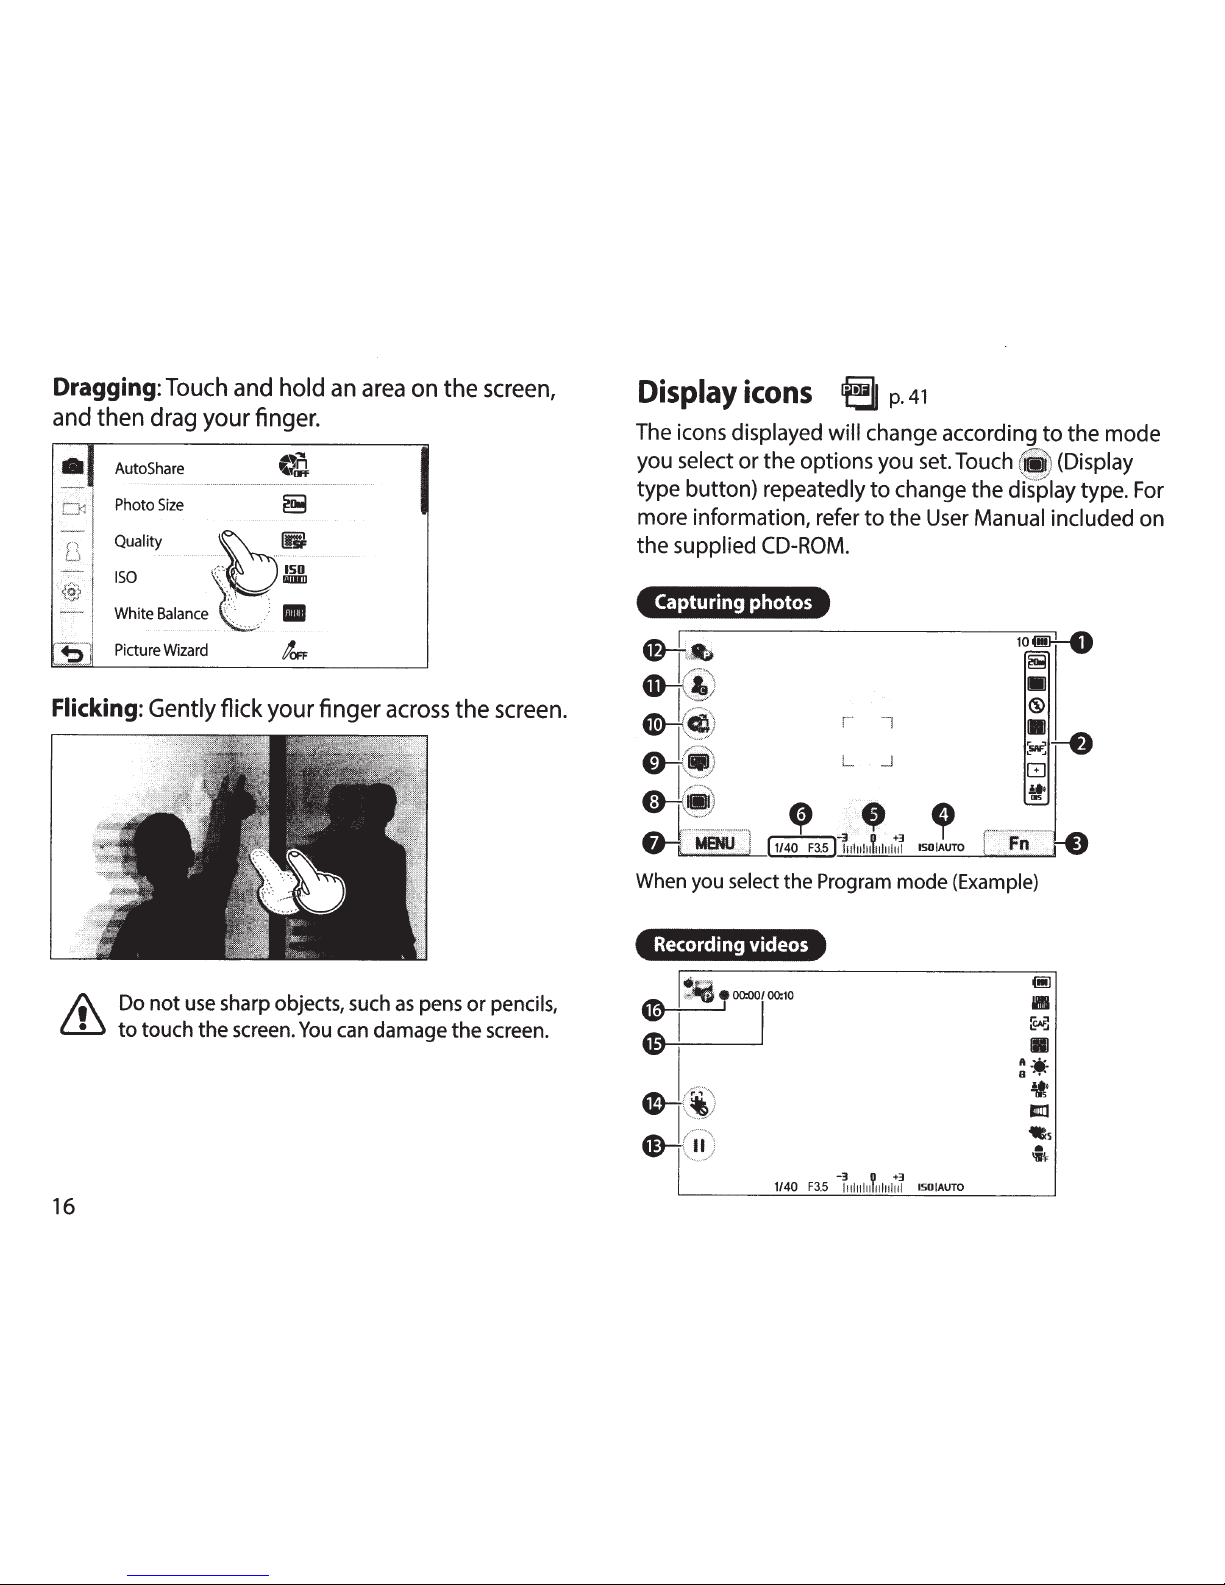
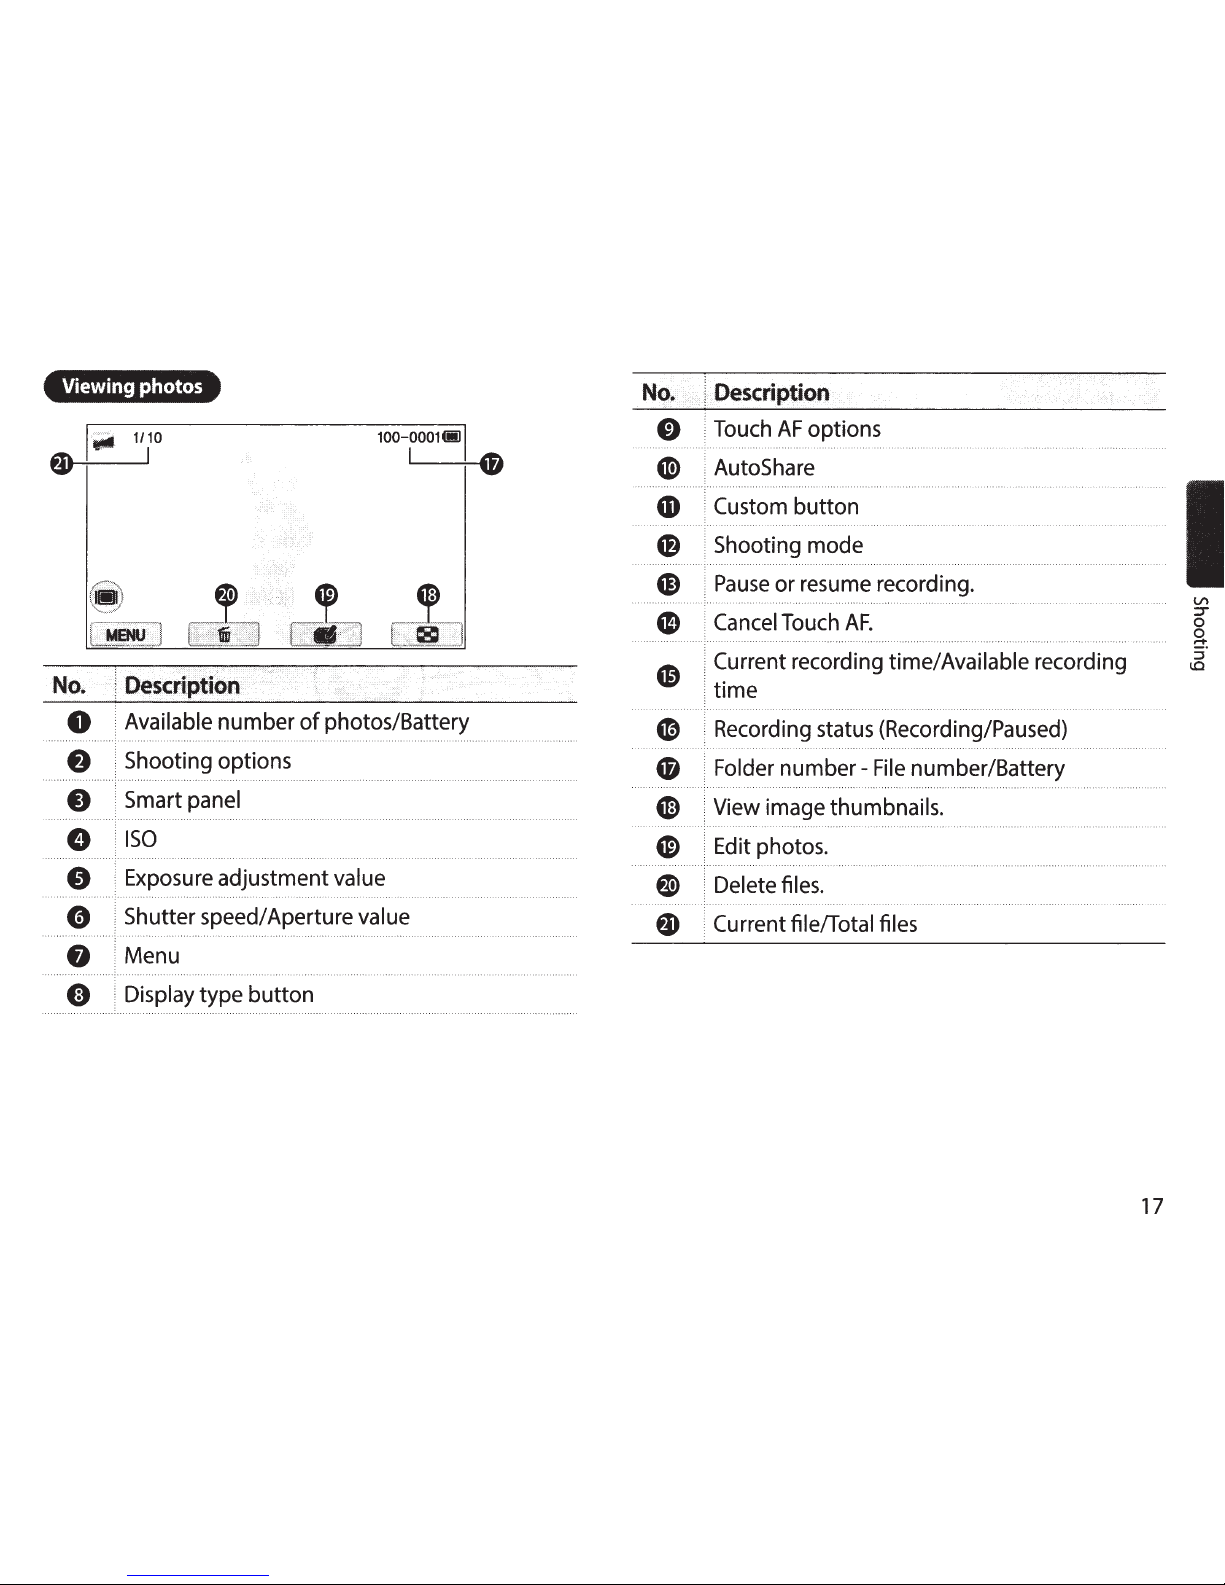
Page 17
Page 18
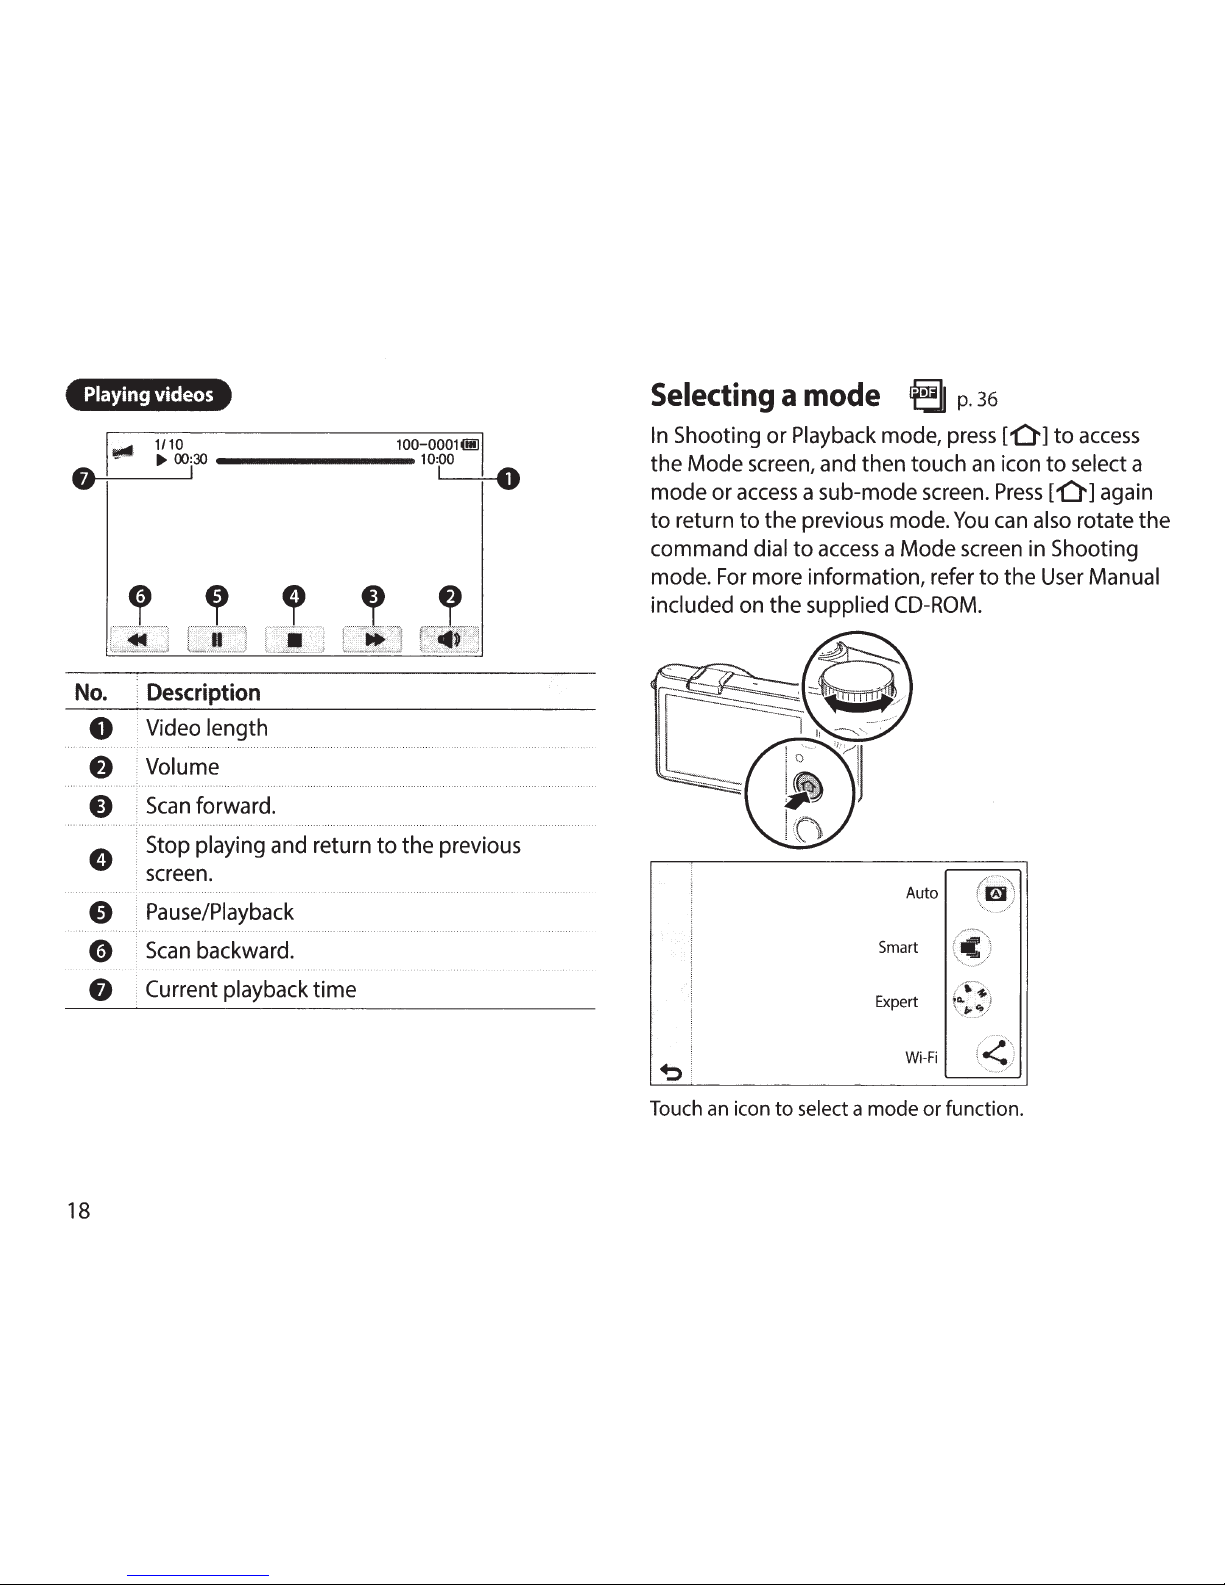
Page 19
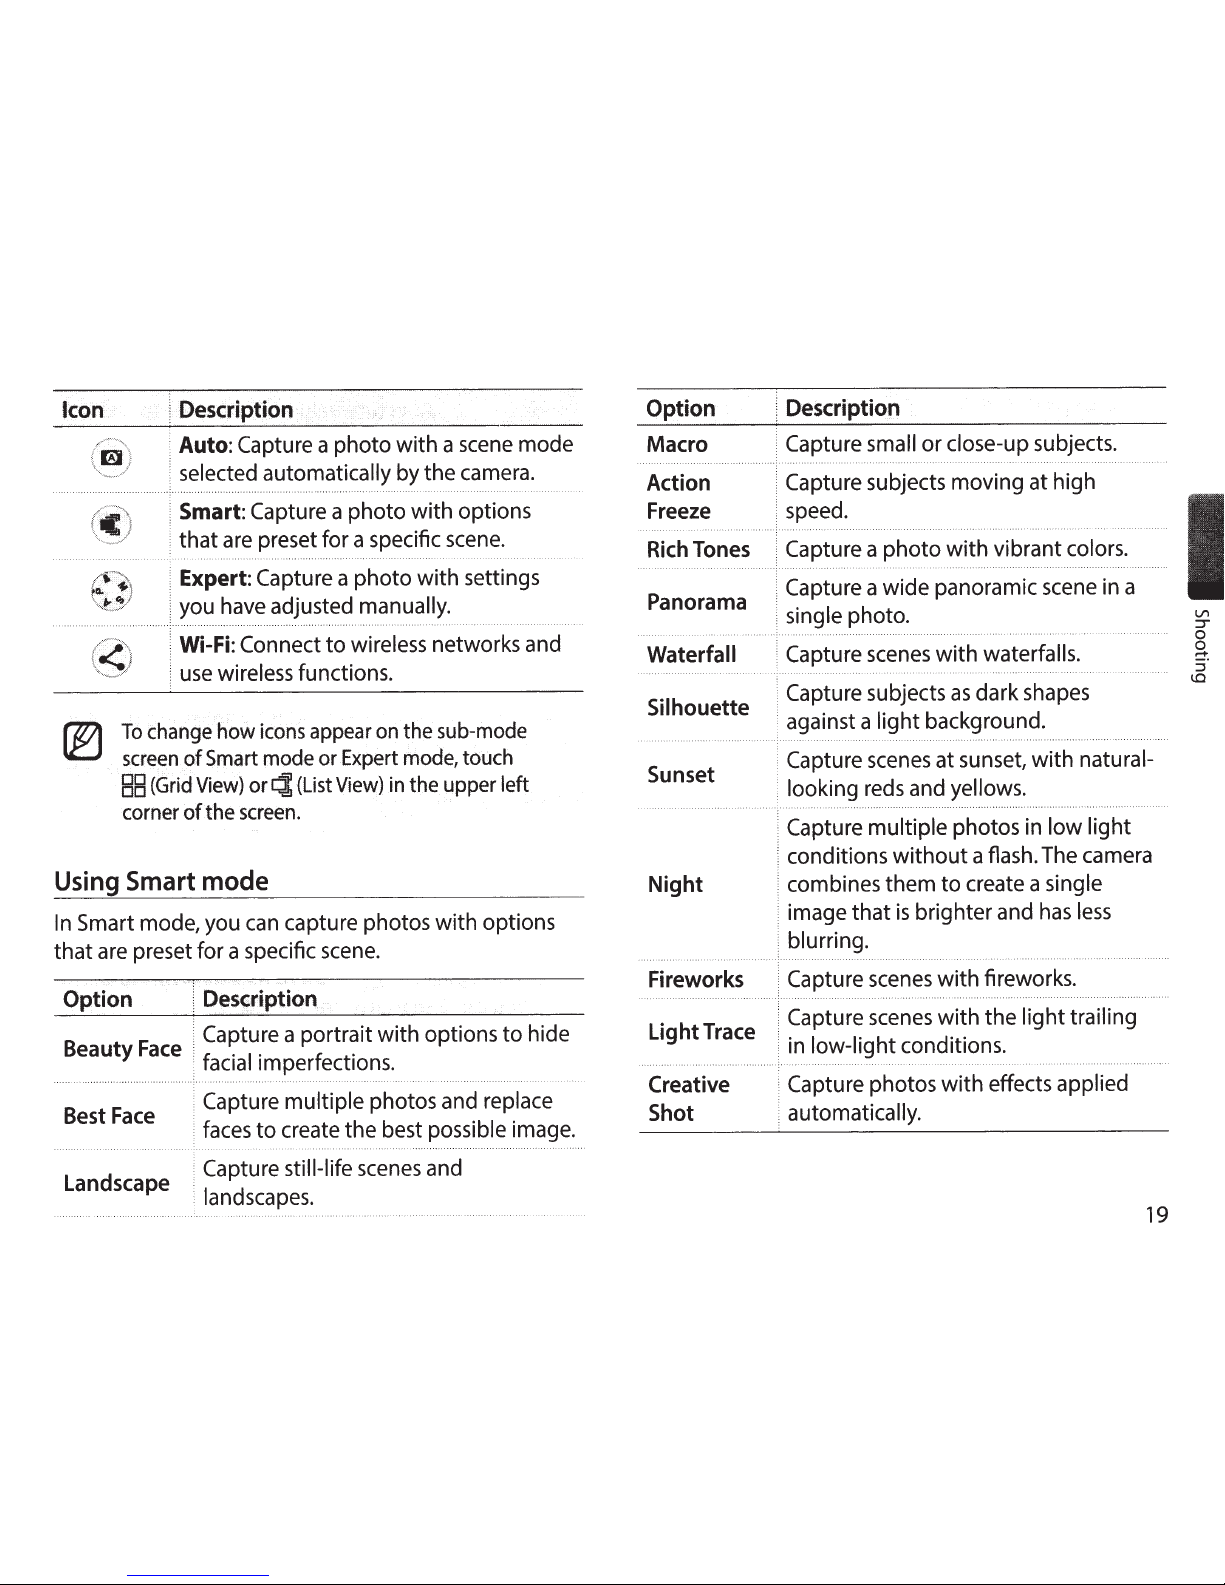
Page 20
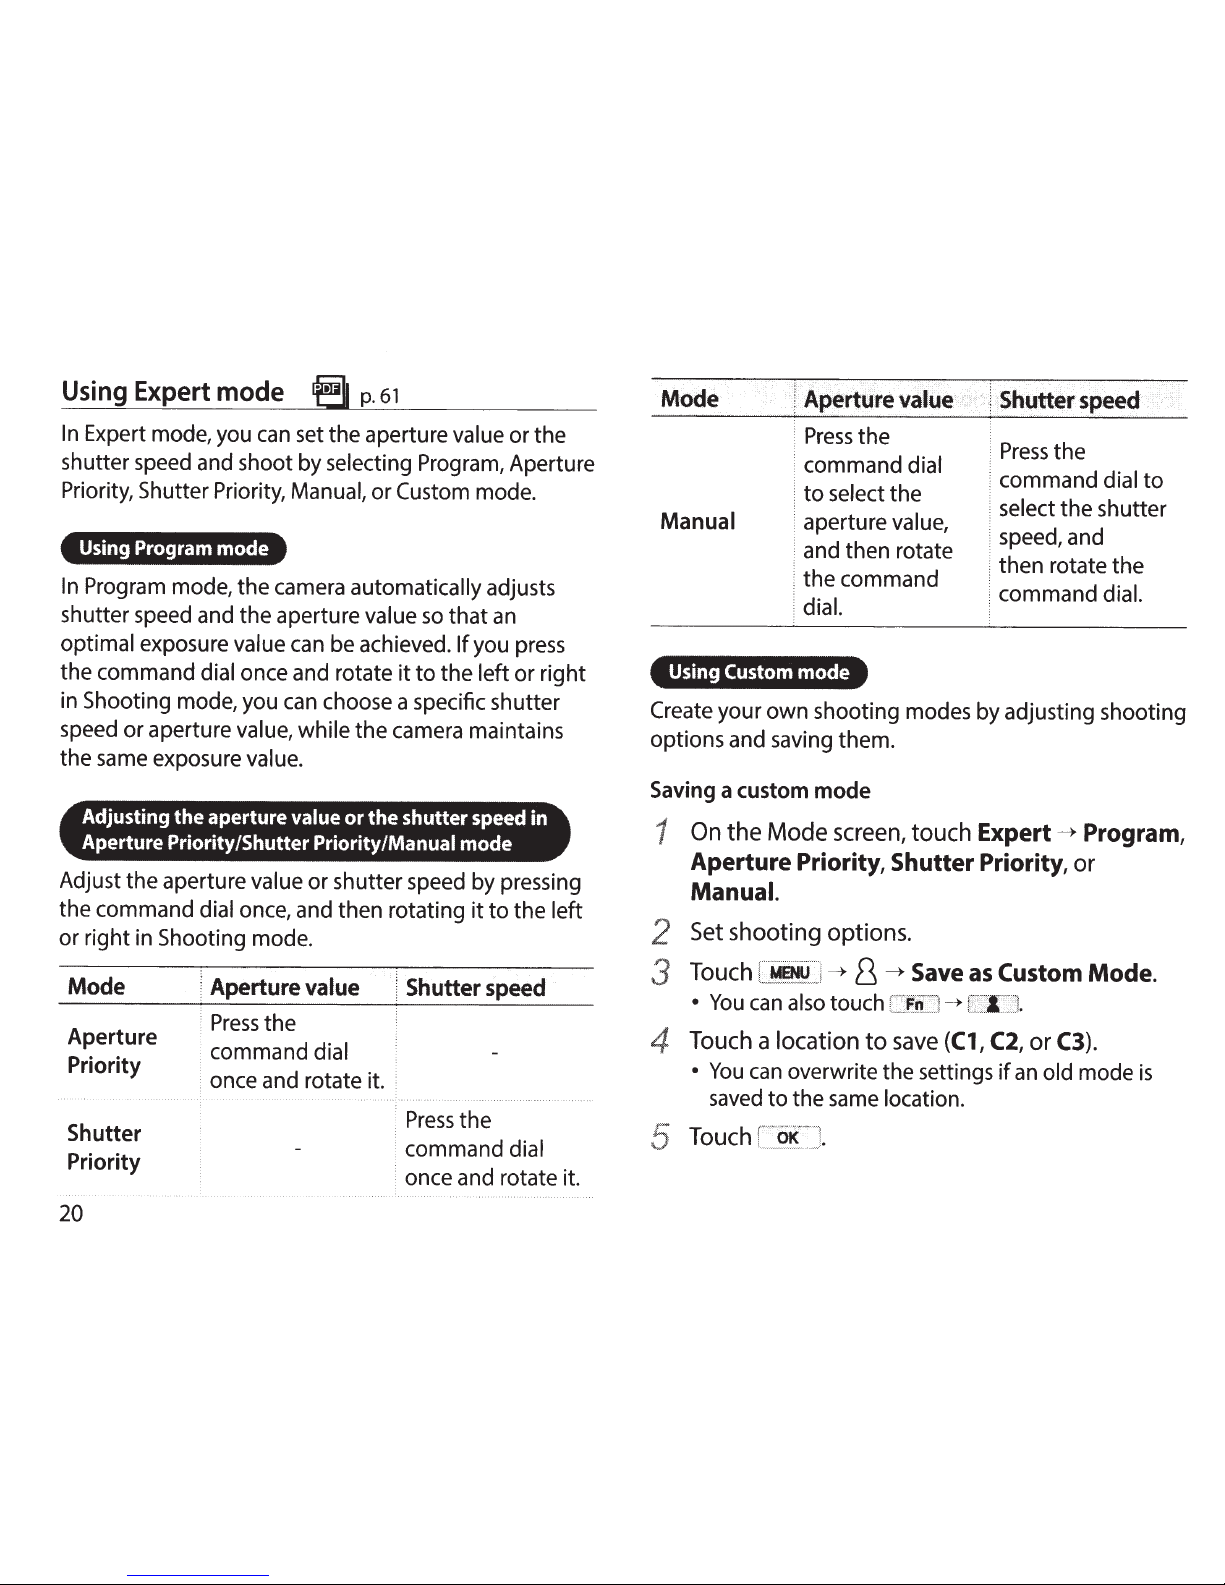
Page 21
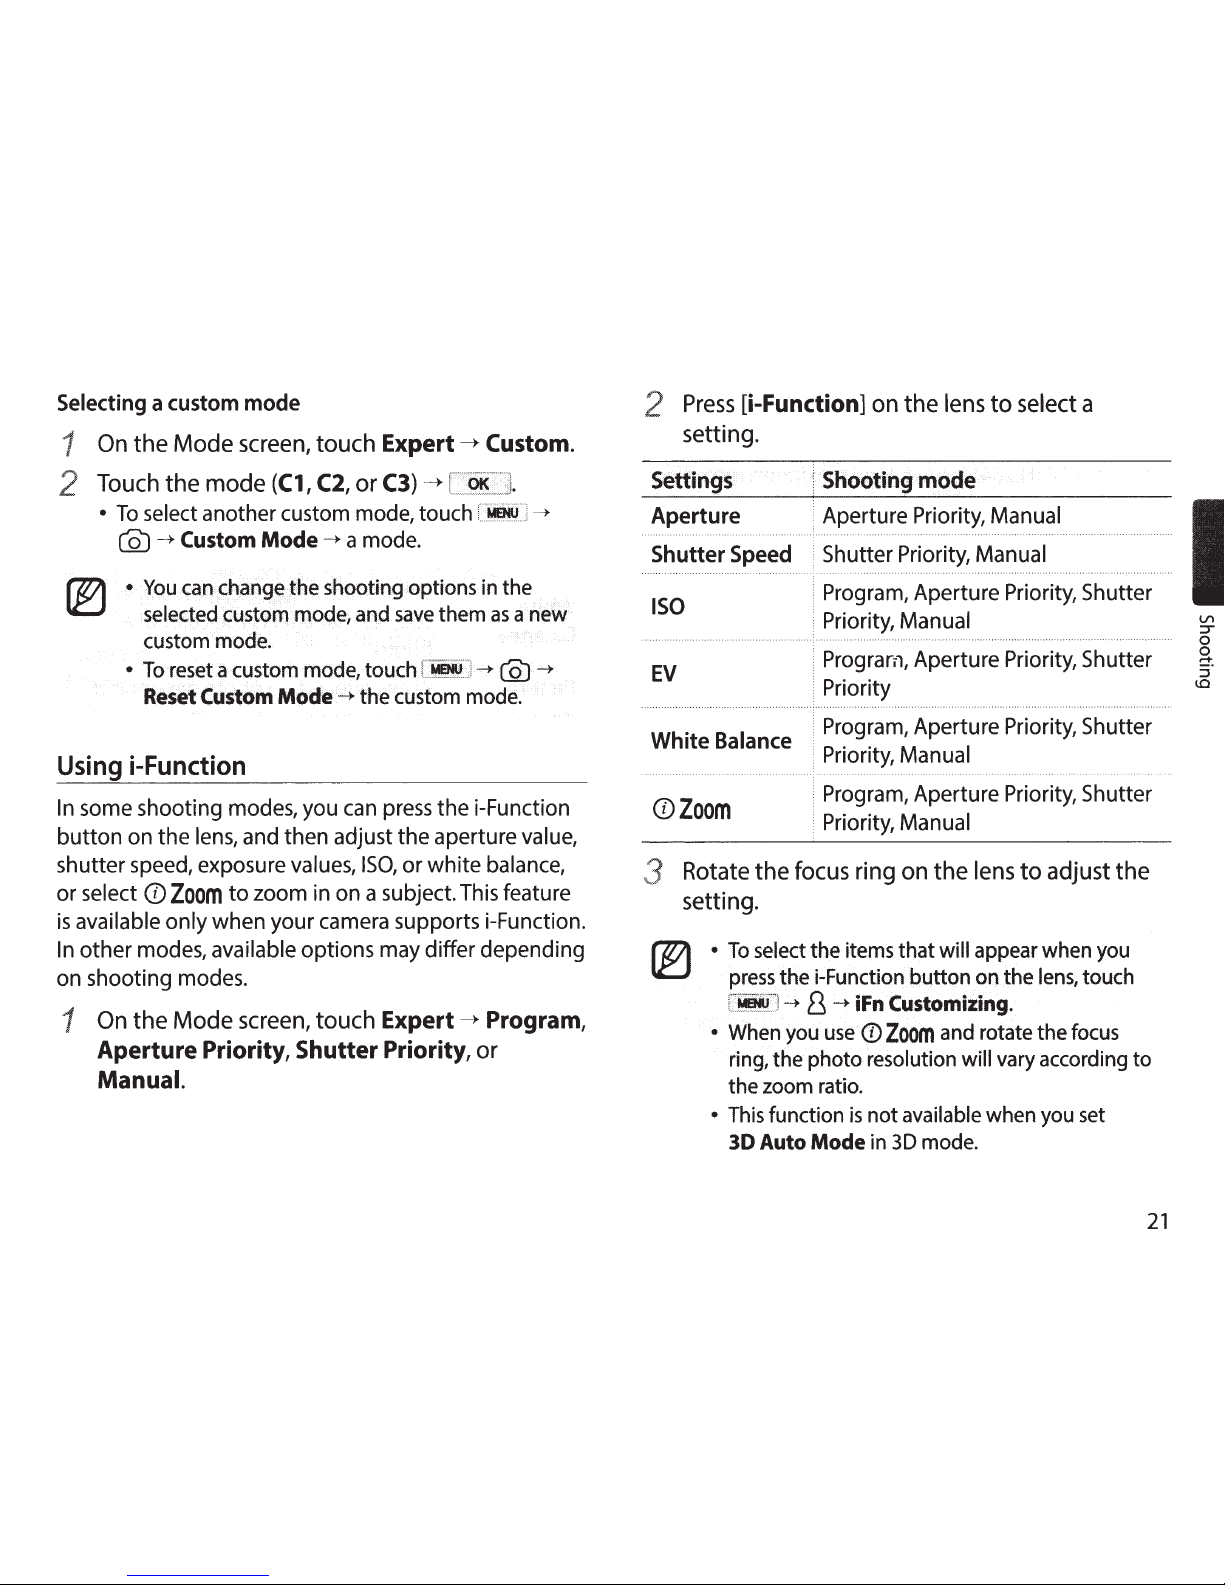
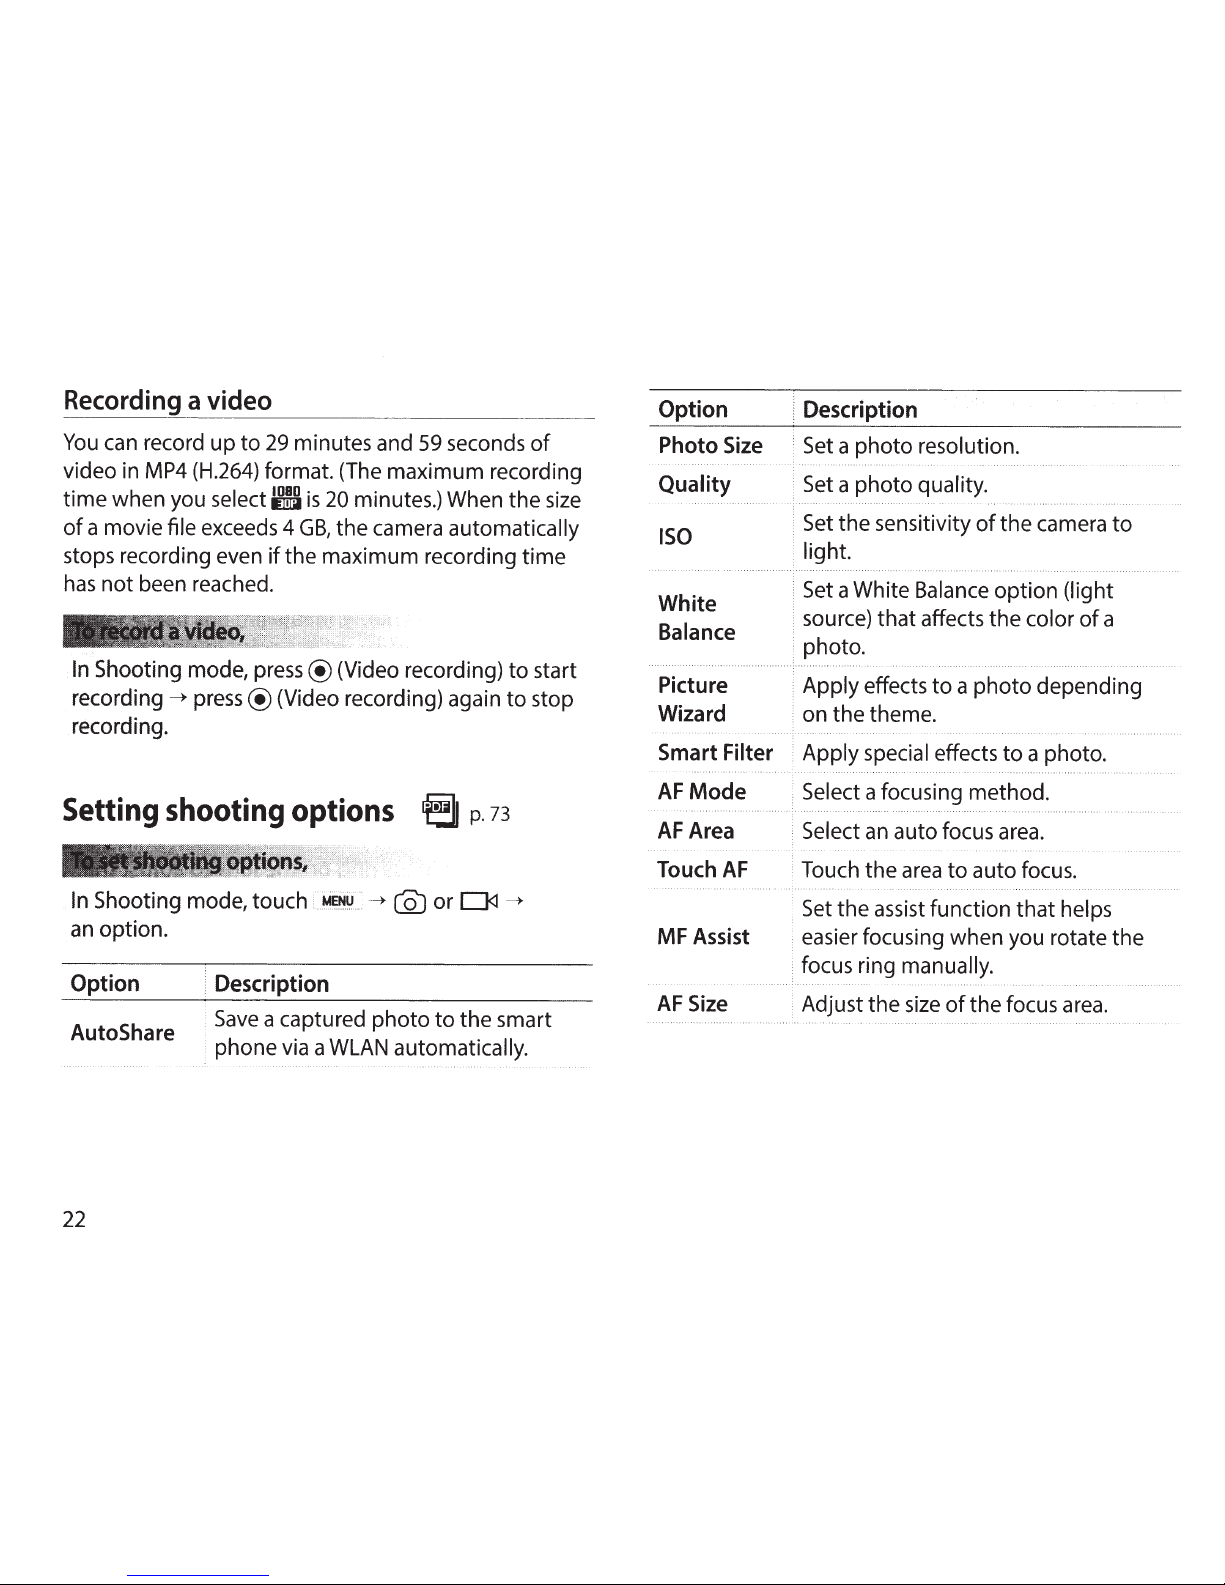
Page 22
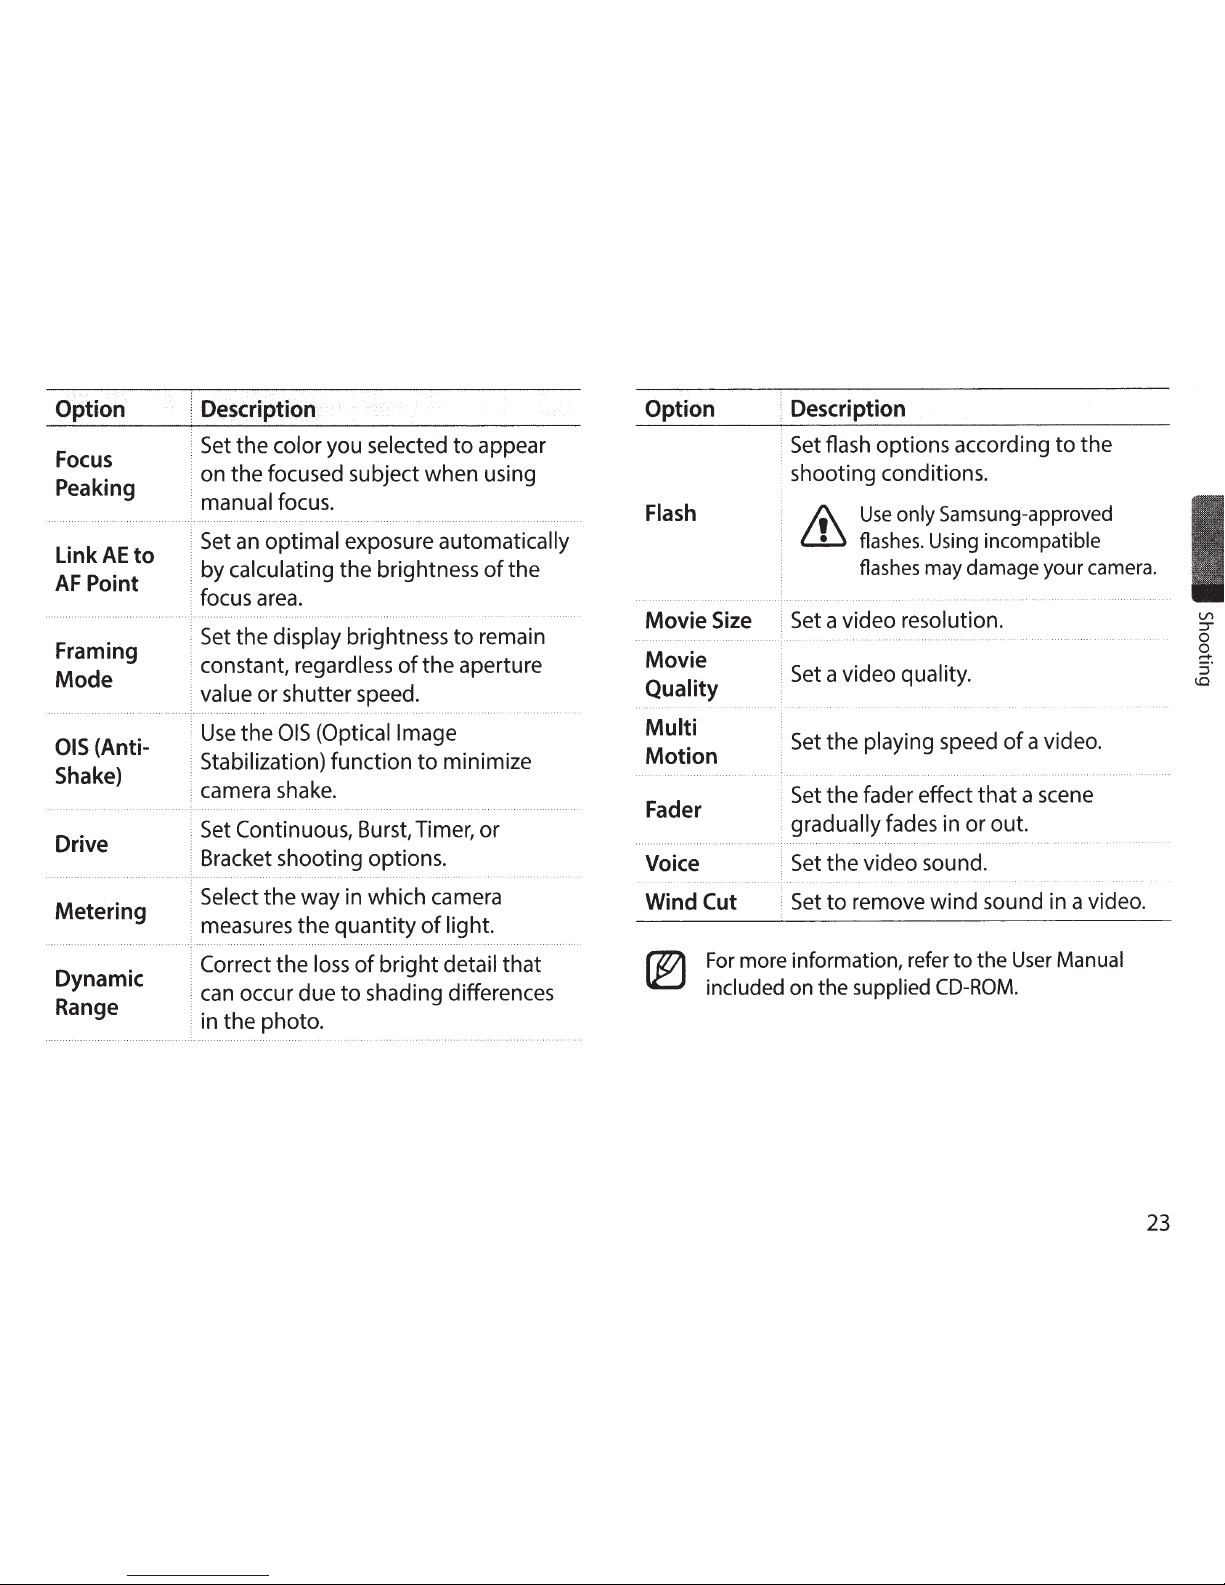
Page 23
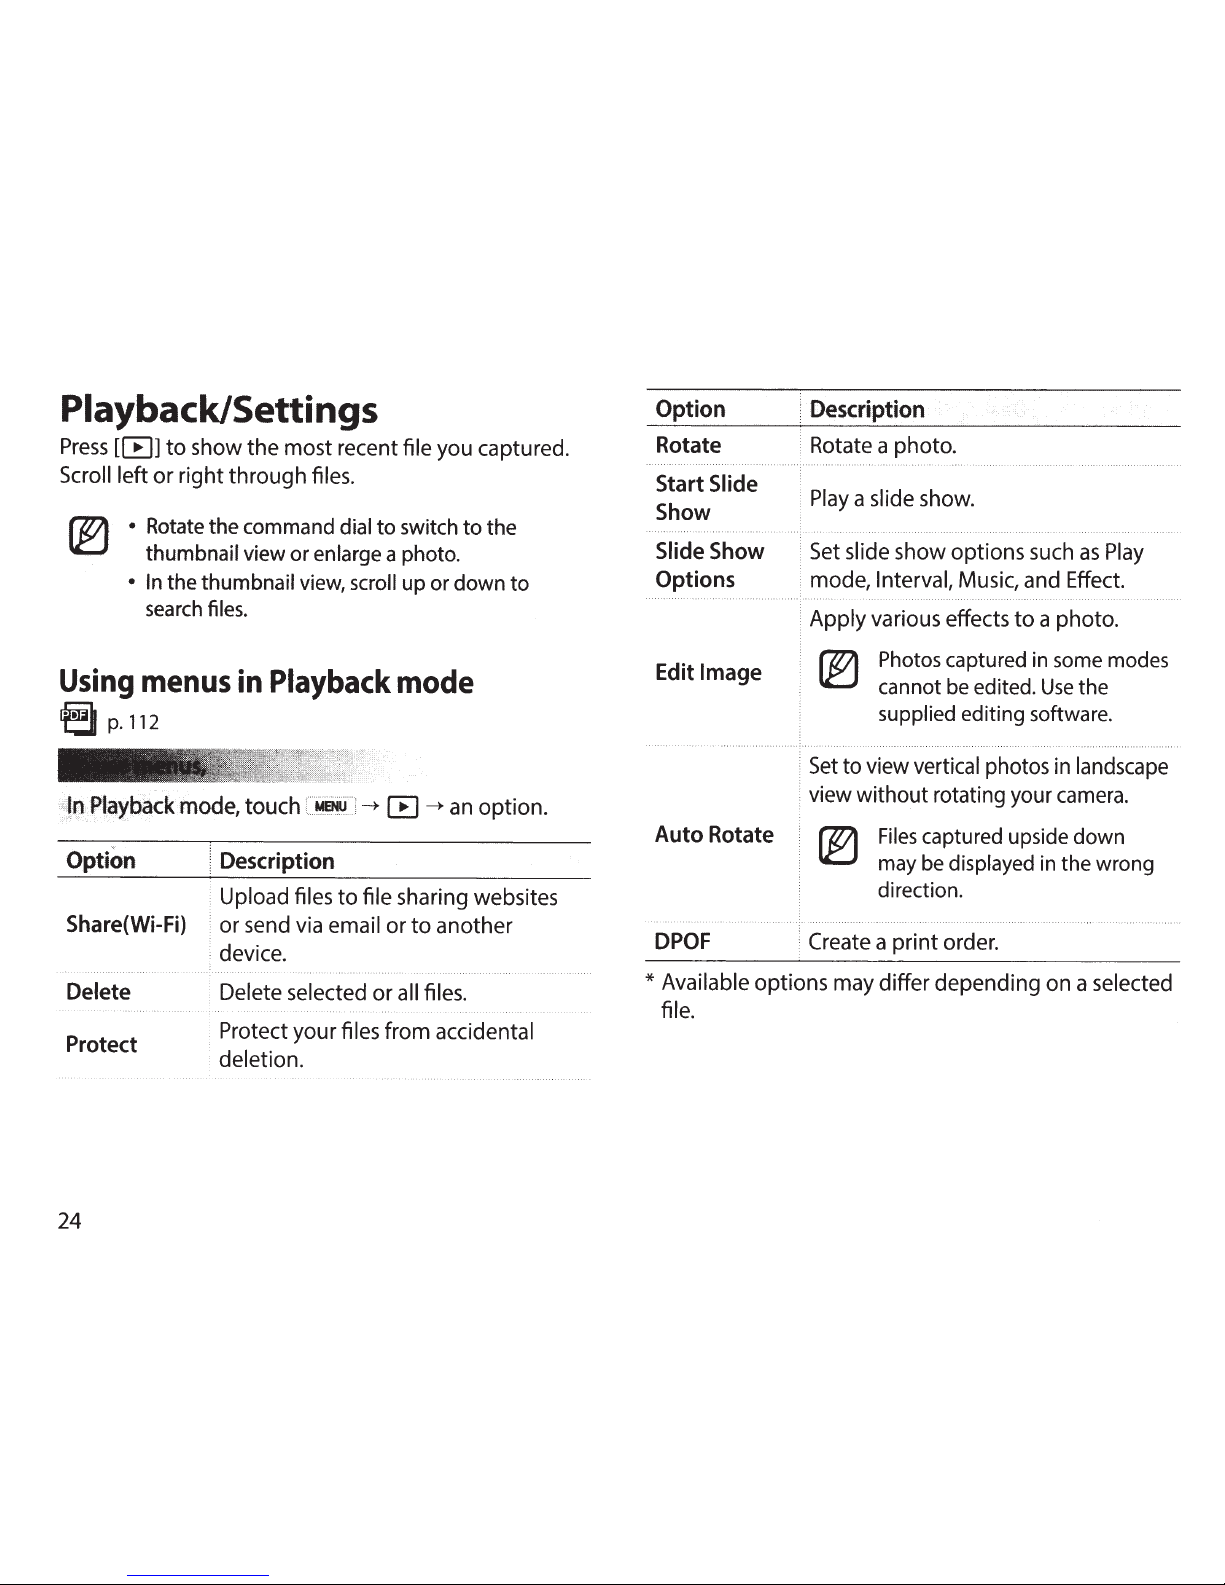
Page 24
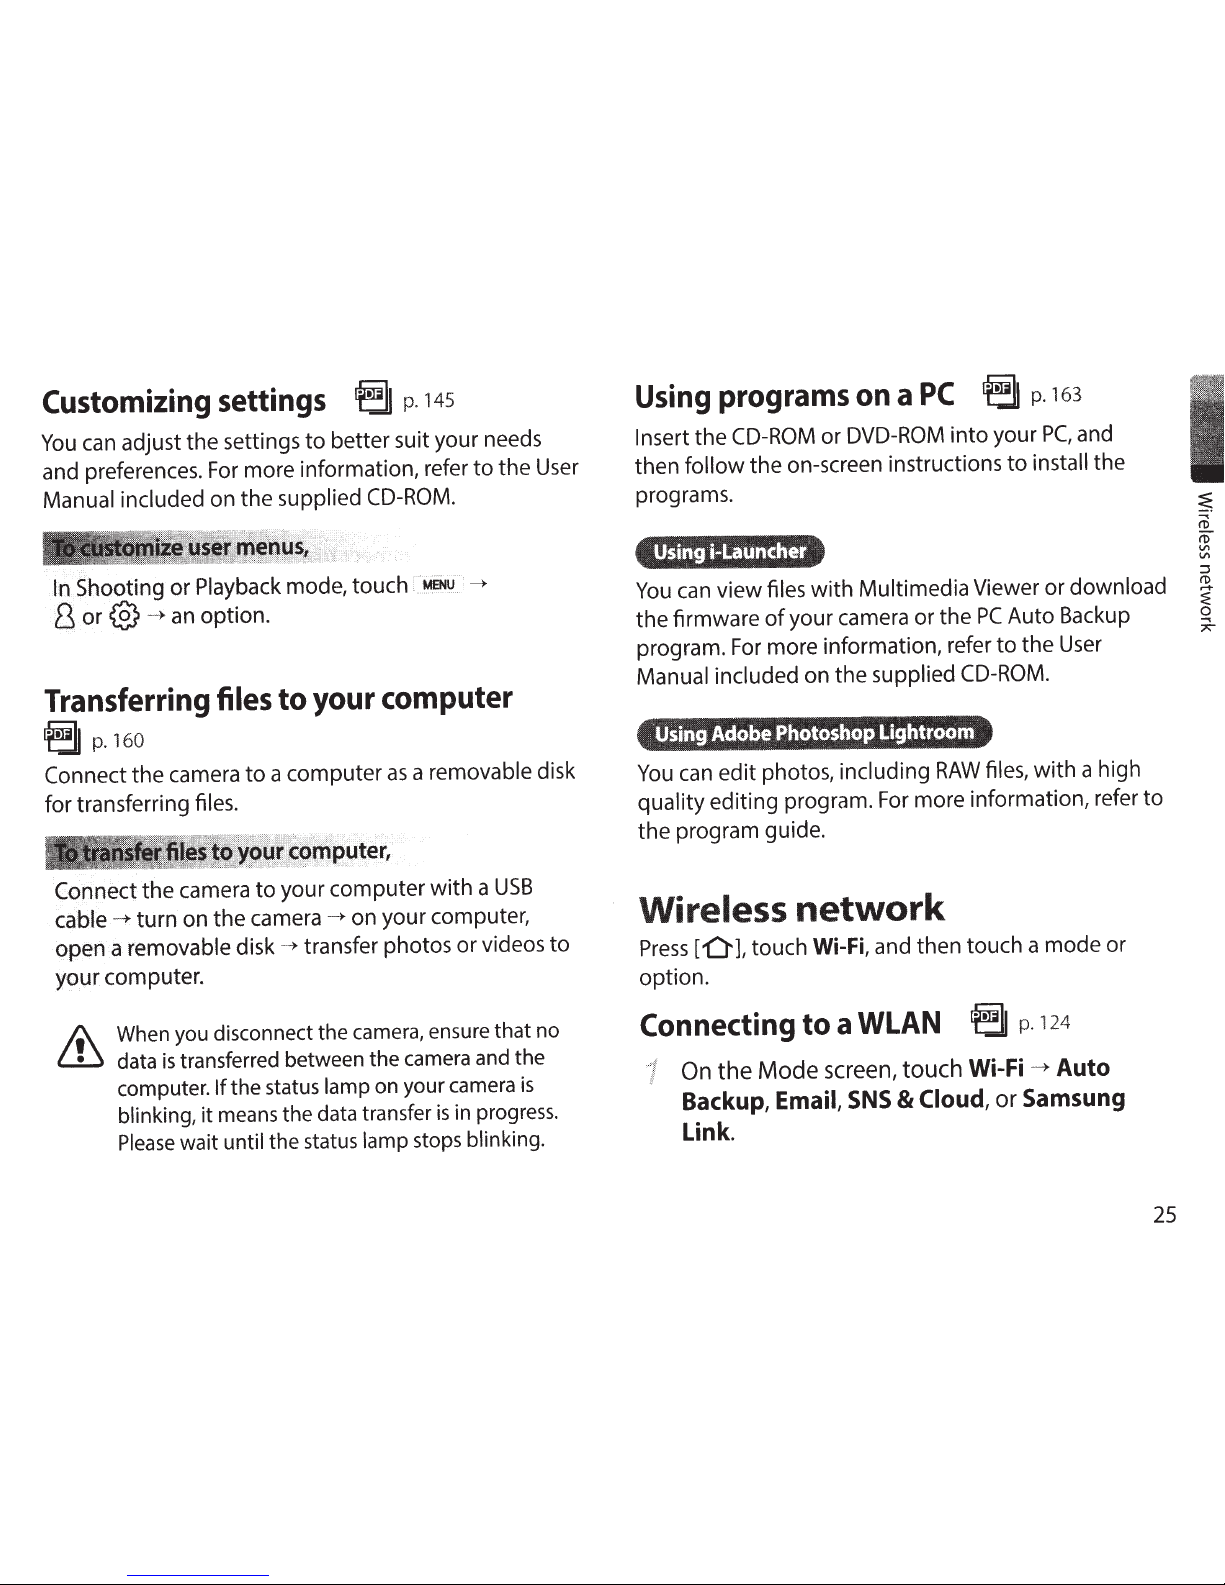
Page 25
Page 26
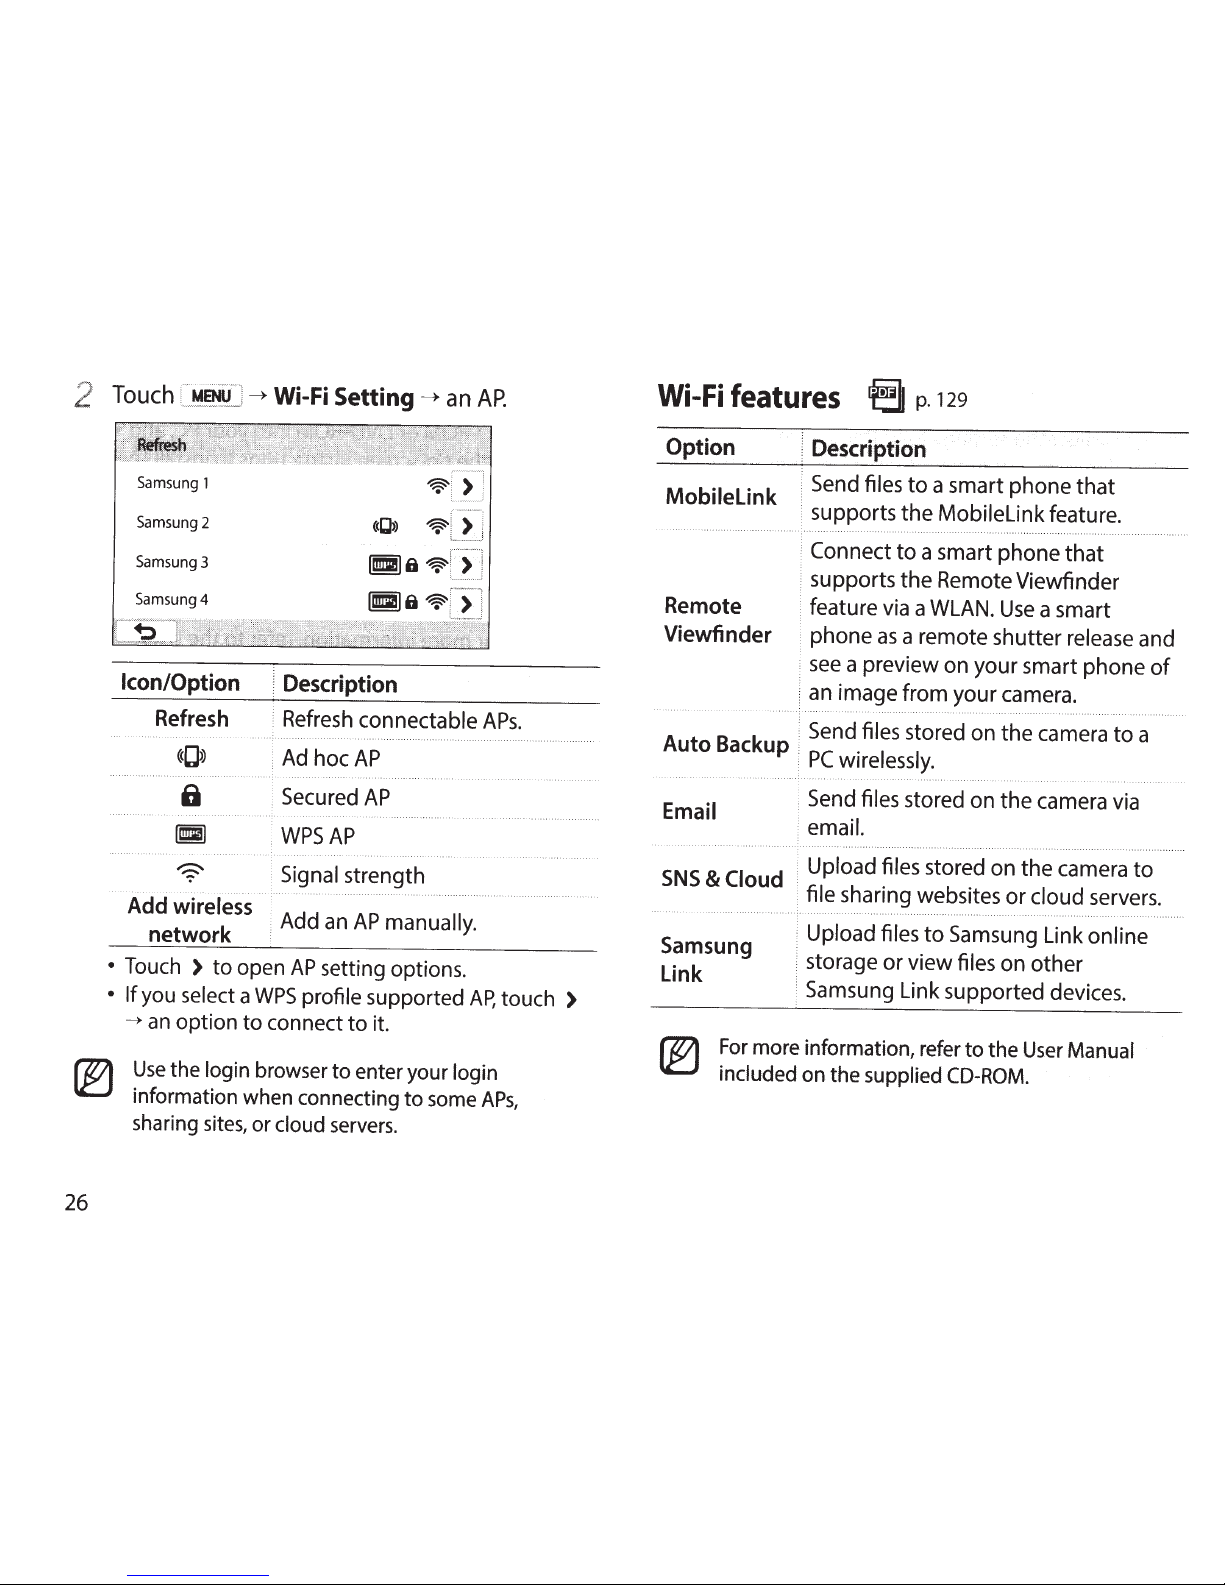
Page 27
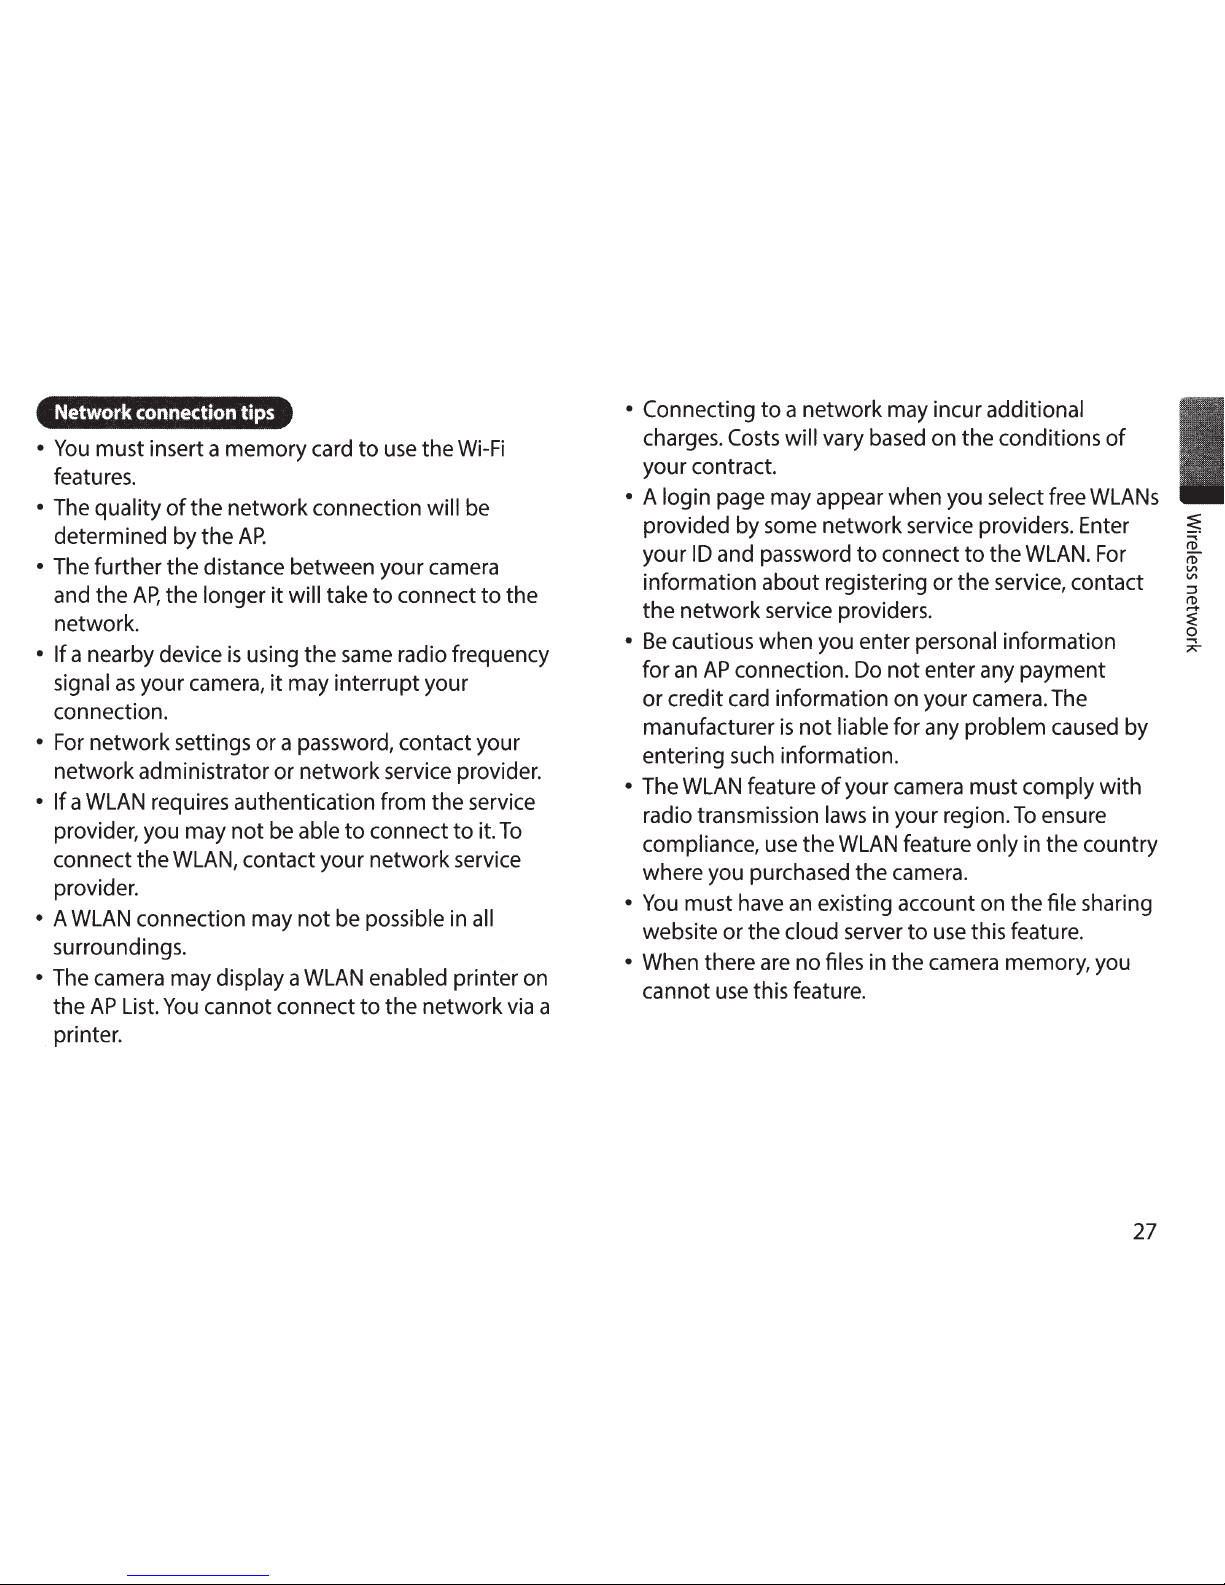
Page 28
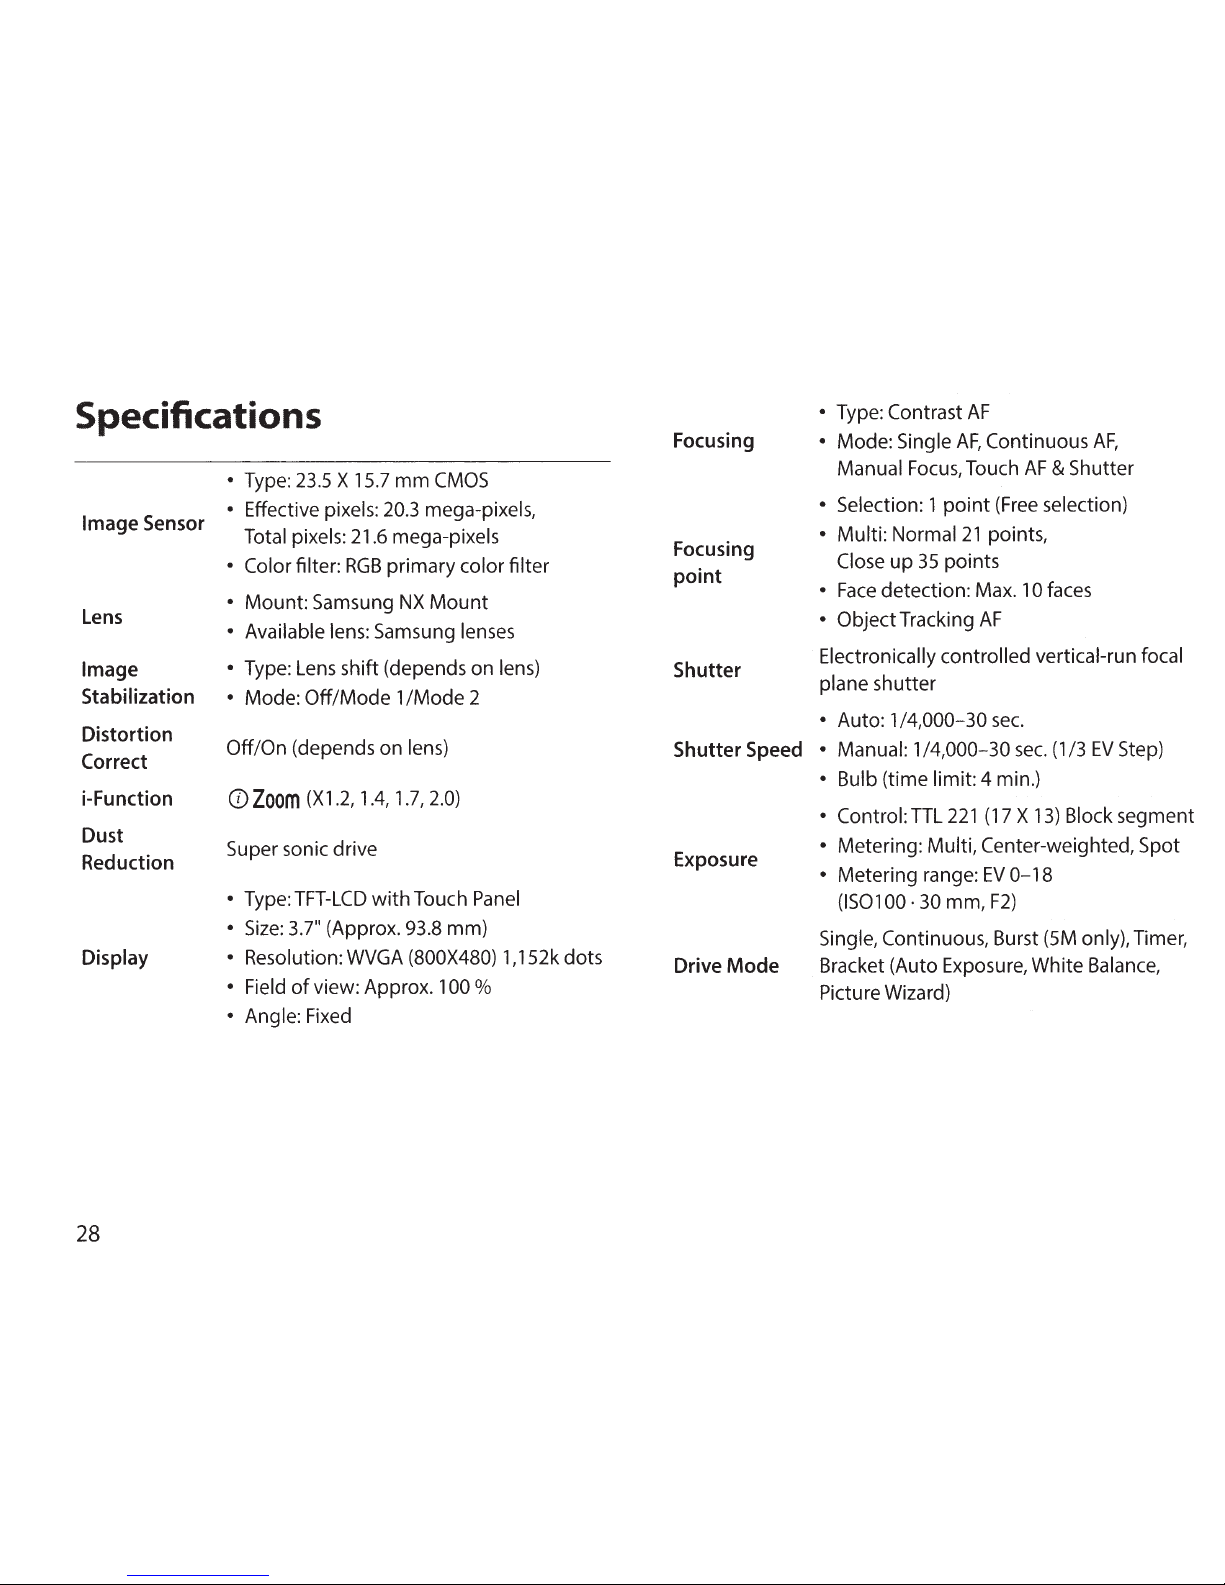
Page 29
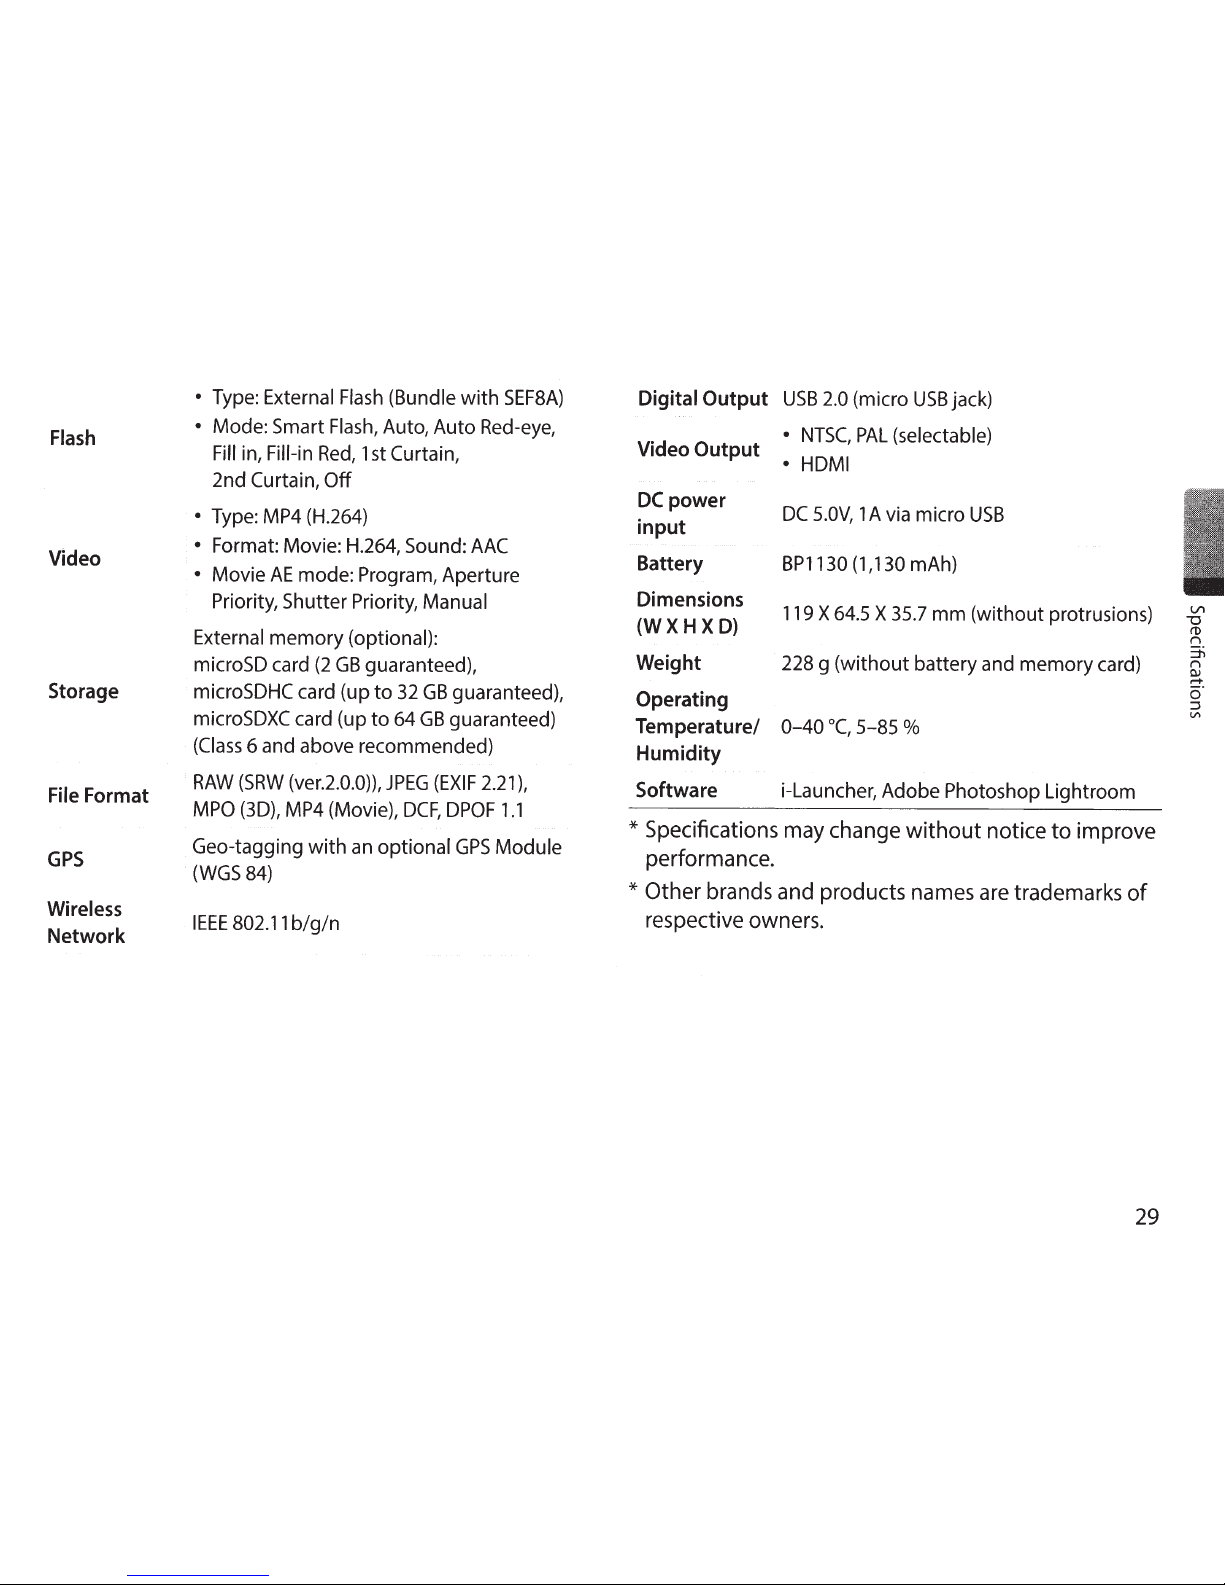
Page 30
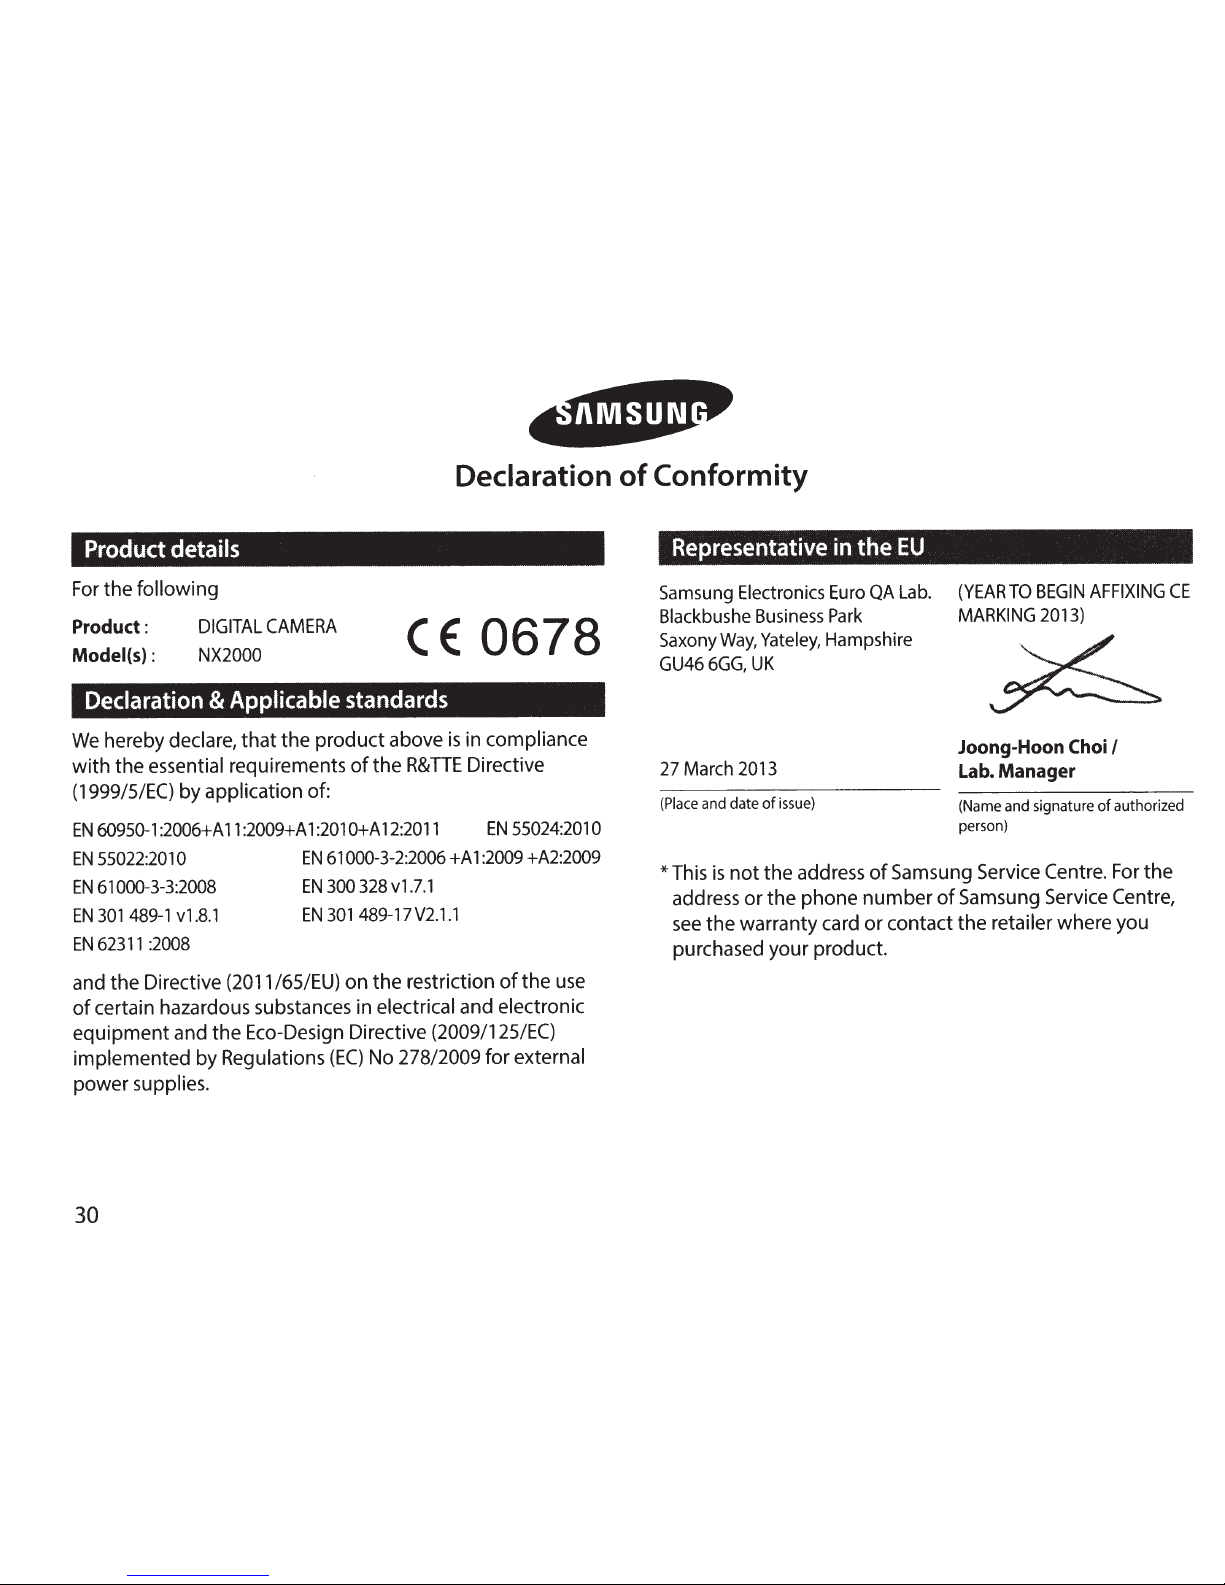
Page 31
Page 32
Page 33

ENG This user manual includes detailed usage instructions
for your camera. Please read this manual thoroughly.
USER
MANUAL
Page 34
1
Copyright information
•
Camera specications or contents of this manual may be changed
without prior notice due to upgrade of camera functions.
•
You are not allowed to reuse or distribute any part of this manual
without prior permission.
•
We recommend using your camera within the country where you
purchase it.
•
Use this camera responsibly and adhere to all laws and regulations
concerning its use.
PlanetFirst represents Samsung Electronics' commitment to
sustainable development and social responsibility through
eco-driven business and management activities.
•
Microsoft Windows and the Windows logo are registered trademarks of
the Microsoft Corporation.
•
Mac and Apple App Store are registered trademarks of the Apple
Corporation.
•
Google Play Store is a registered trademark of Google, Inc.
•
Adobe, the Adobe logo, Photoshop and Lightroom are either registered
trademarks or trademarks of Adobe Systems Incorporated in the United
States and/or other countries.
•
microSD™, microSDHC™, and microSDXC™ are registered trademarks of
the SD Association.
•
HDMI, the HDMI logo, and the term “High
Denition Multimedia Interface” are
trademarks or registered trademarks of HDMI
Licensing LLC.
•
Wi-Fi®, the Wi-Fi CERTIFIED logo, and the Wi-Fi logo are registered
trademarks of the Wi-Fi Alliance.
•
Trademarks and trade names used in this manual are the property of
their respective owners.
Page 35
2
Health and safety information
Prevent damage to subjects’ eyesight.
Do not use the ash in close proximity (closer than 1 m/3 ft) to people or
animals. If you use the ash too close to your subject’s eyes, this can cause
temporary or permanent eyesight damage.
Keep your camera away from small children and pets.
Keep your camera and all accessories out of the reach of small children
and animals. Small parts may cause choking or serious injury if swallowed.
Moving parts and accessories may present physical dangers as well.
Do not expose the camera to direct sunlight or high
temperatures for an extended period of time.
Prolonged exposure to sunlight or extreme temperatures can cause
permanent damage to your camera’s internal components.
Avoid covering the camera with blankets or clothes.
The camera may overheat, which may distort the camera or cause a re.
Do not handle the power supply cable or go near the charger
during a thunderstorm.
This may result in electric shock.
Always comply with the following precautions and usage tips to avoid
dangerous situations and ensure peak performance of your camera.
Warning—situations that could cause injury to yourself
or others
Do not disassemble or attempt to repair your camera.
This may result in electric shock or damage to the camera.
Do not use your camera near ammable or explosive gases
and liquids.
This may cause a re or explosion.
Do not insert ammable materials into the camera or store
these materials near the camera.
This may cause a re or electric shock.
Do not handle your camera with wet hands.
This may result in electric shock.
Page 36

3
Health and safety information
If liquid or foreign objects enter your camera, immediately
disconnect all power sources, such as the battery or AC adapter,
and then contact a Samsung service center.
Comply with any regulations that restrict the use of a camera in
a certain area.
•
Avoid interference with other electronic devices.
•
Turn o the camera when in an aircraft. Your camera can cause
interference with aircraft equipment. Follow all airline regulations and
turn o your camera when directed by airline personnel.
•
Turn o the camera near medical equipment. Your camera can interfere
with medical equipment in hospitals or health care facilities. Follow all
regulations, posted warnings, and directions from medical personnel.
Avoid interference with pacemakers.
Maintain the distance between this camera and all pacemakers to avoid
potential interference, as recommended by the manufacturer and research
groups. If you have any reason to suspect that your camera is interfering
with a pacemaker or other medical device, turn o the camera immediately
and contact the manufacturer of the pacemaker or medical device for
guidance.
Caution—situations that could cause damage to your
camera or other equipment
Remove the batteries from your camera when storing it for an
extended period of time.
Installed batteries may leak or corrode over time and cause serious
damage to your camera.
Use only authentic, manufacturer-recommended,
Lithium-ion replacement batteries. Do not damage or heat the
battery.
Inauthentic, damaged, or heated batteries may cause a re or personal
injury.
Use only Samsung-approved batteries, chargers, cables and
accessories.
•
Using unauthorized batteries, chargers, cables or accessories can cause
batteries to explode, damage your camera, or cause injury.
•
Samsung is not responsible for damage or injuries caused by
unapproved batteries, chargers, cables or accessories.
Use the battery only for its intended purpose.
Misusing the battery may cause a re or electric shock.
Page 37

4
Health and safety information
Do not touch the ash while it res.
The ash is very hot when red and may burn your skin.
When you use the AC adapter, turn o the camera before you
disconnect the power to the AC adapter.
Failing to do so may result in re or electric shock.
Disconnect the AC adapter from the wall socket when not in
use.
Failing to do so may result in re or electric shock.
Do not use a damaged power supply cable, AC adapter, or
loose outlet when you charge batteries.
This may cause a re or electric shock.
Do not allow the AC adapter to come in contact with the +/terminals on the battery.
This may cause a re or electric shock.
Do not drop or subject the camera to strong impacts.
Doing so may damage the screen or external or internal components.
Exercise caution when you connect cables and install batteries
and memory cards.
If you force the connectors, improperly connect cables, or improperly
install batteries and memory cards, you can damage ports, connectors,
and accessories.
Keep cards with magnetic strips away from the camera case.
Information stored on the card may be damaged or erased.
Never use a damaged battery, or memory card.
This may result in electric shock or camera malfunction or cause a re.
Do not place the camera in or near magnetic elds.
Doing so may cause the camera to malfunction.
Do not use the camera if the screen is damaged.
If the glass or acrylic parts are broken, visit a Samsung service center to
have the camera repaired.
Page 38

5
Health and safety information
Check that the camera is operating properly before use.
The manufacturer takes no responsibility for any loss of les or damage
that may result from camera malfunction or improper use.
You must plug the small end of the USB cable into your
camera.
If the cable is reversed, it may damage your les. The manufacturer is not
responsible for any loss of data.
Do not expose the lens to direct sunlight.
This may discolor the image sensor or cause it to malfunction.
If the camera overheats, remove the battery and allow it to
cool down.
•
Prolonged usage of the camera may overheat the battery and raise
the internal temperature of the camera. If the camera stops operating,
remove the battery and allow it to cool down.
•
High internal temperatures may result in noise in your photos. This is
normal and does not aect your camera’s overall performance.
Avoid interference with other electronic devices.
Your camera emits radio frequency (RF) signals that may interfere
with unshielded or improperly shielded electronic equipment, such as
pacemakers, hearing aids, medical devices, and other electronic devices in
homes or vehicles. Consult the manufacturers of your electronic devices
to solve any interference problems you experience. To prevent unwanted
interference, use only Samsung-approved devices or accessories.
Use your camera in the normal position.
Avoid contact with your camera’s internal antenna.
Data transference and your responsibilities
•
Data transferred via WLAN could be leaked, so avoid transferring
sensitive data in public areas or on open networks.
•
The camera manufacturer is not liable for any data transfers that infringe
on copyrights, trademarks, intellectual property laws, or public decency
ordinances.
Page 39
6
Icons used in this manual
Icon Function
Additional information
Safety warnings and precautions
[ ]
Camera buttons. For example, [Shutter] represents the shutter
button.
( )
Page number of related information
→
The order of options or menus you must select to perform a step;
for example: Touch 1
→ Quality (represents touch 1, and
then touch Quality).
*
Annotation
Page 40

7
Contents
Chapter 1
My Camera
Getting started ............................................................................................ 28
Unpacking.................................................................................................................... 28
Camera layout .............................................................................................. 29
Using the DIRECT LINK button ................................................................................ 31
Using the command dial ........................................................................................... 32
Inserting the battery and memory card ................................................. 33
Removing the battery and memory card ........................................................... 33
Charging the battery and turning on your camera .............................. 34
Charging the battery................................................................................................ 34
Turning on your camera ......................................................................................... 34
Performing the initial setup ...................................................................... 35
Selecting a mode ......................................................................................... 36
Accessing a Mode screen ....................................................................................... 36
Mode description ...................................................................................................... 36
Rearranging icons ..................................................................................................... 37
Selecting functions (options) ................................................................... 38
Using m .............................................................................................................. 38
Using the Smart panel ............................................................................................. 39
Using the touch screen .............................................................................................. 40
Tips
Concepts in Photography
Shooting postures....................................................................................... 13
Holding the camera ..................................................................................................... 13
Standing photography ............................................................................................... 14
Crouching photography ............................................................................................14
Aperture ........................................................................................................ 15
Aperture value and the depth of eld .................................................................. 16
Shutter speed ............................................................................................... 17
ISO sensitivity .............................................................................................. 18
How the aperture setting, shutter speed, and ISO sensitivity
control exposure ......................................................................................... 19
Correlation between focal length, angle, and perspective ................ 20
Depth of eld ............................................................................................... 21
What controls out-of-focus eects? ....................................................................... 21
Optical preview .............................................................................................................23
Composition ................................................................................................. 23
Rule of Thirds .................................................................................................................. 23
Photos with two subjects ..........................................................................................24
Flash ............................................................................................................... 25
Flash guide number ..................................................................................................... 25
Bounce Photography ..................................................................................................26
Page 41

8
Contents
Display icons ................................................................................................ 41
In Shooting mode ..................................................................................................... 41
Capturing photos ........................................................................................................ 41
Recording videos ......................................................................................................... 42
About the level gauge ............................................................................................... 42
In Playback mode ...................................................................................................... 43
Viewing photos ............................................................................................................ 43
Playing videos ............................................................................................................... 43
Changing the information displayed ................................................................. 44
Lenses ............................................................................................................ 45
Lens layout ................................................................................................................... 45
Locking or unlocking the lens ................................................................................. 46
Lens markings ............................................................................................................ 49
Accessories ................................................................................................... 50
External ash layout ................................................................................................. 50
Connecting the external ash ................................................................................. 51
GPS module layout (optional) .............................................................................. 53
Attaching the GPS module .................................................................................... 53
Shooting modes .......................................................................................... 55
Auto mode ................................................................................................................... 55
Smart mode................................................................................................................. 57
Using the Best Face mode ........................................................................................ 58
Capturing panoramic photos .................................................................................. 59
Program mode ........................................................................................................... 61
Program Shift ................................................................................................................ 61
Aperture Priority mode ........................................................................................... 62
Shutter Priority mode .............................................................................................. 63
Manual mode.............................................................................................................. 64
Using the Bulb function ............................................................................................ 64
Custom mode ............................................................................................................. 65
Saving a custom mode .............................................................................................. 65
Selecting a custom mode ......................................................................................... 65
Recording a video ..................................................................................................... 66
Using i-Function ........................................................................................................ 67
Using Z ............................................................................................................... 69
3D mode ....................................................................................................................... 70
Available functions by shooting mode ............................................................. 71
Page 42

9
Contents
Chapter 2
Shooting Functions
Size and Resolution .................................................................................... 74
Photo size ..................................................................................................................... 74
Quality ........................................................................................................................... 75
ISO sensitivity .............................................................................................. 76
White Balance .............................................................................................. 77
Customizing preset White Balance options ....................................................... 78
Picture Wizard (photo styles) .................................................................... 80
Smart Filter ................................................................................................... 81
AF mode ........................................................................................................ 82
Single AF ....................................................................................................................... 83
Continuous AF ............................................................................................................ 83
Manual focus ............................................................................................................... 84
AF area ........................................................................................................... 85
Selection AF ................................................................................................................ 85
Multi AF ......................................................................................................................... 86
Face detection AF ...................................................................................................... 86
Self-Portrait AF ........................................................................................................... 87
Touch AF ........................................................................................................ 88
Touch AF ....................................................................................................................... 88
Tracking AF .................................................................................................................. 88
One touch shot .......................................................................................................... 89
Focus assist ................................................................................................... 90
MF Assist ....................................................................................................................... 90
Focus Peaking ............................................................................................................. 90
Measuring the exposure value of the focus area ........................................ 91
Framing mode ............................................................................................. 92
Optical Image Stabilization (OIS) ............................................................. 93
Drive (shooting method) ........................................................................... 94
Single ............................................................................................................................. 94
Continuous .................................................................................................................. 94
Burst ............................................................................................................................... 95
Timer .............................................................................................................................. 95
Auto Exposure Bracketing (AE Bracket) ............................................................. 96
White Balance Bracketing (WB Bracket) ............................................................ 96
Picture Wizard Bracketing (P Wiz Bracket) ........................................................ 97
Metering ........................................................................................................ 98
Multi ............................................................................................................................... 98
Spot ................................................................................................................................ 99
Center-weighted ....................................................................................................... 99
Dynamic Range ......................................................................................... 100
Flash ............................................................................................................. 101
Reducing the red-eye eect ............................................................................... 102
Adjusting the ash intensity .............................................................................. 102
Exposure compensation .......................................................................... 104
Exposure lock ............................................................................................. 105
Video functions ......................................................................................... 106
Movie size.................................................................................................................. 106
Movie quality ........................................................................................................... 106
Multi Motion ............................................................................................................ 107
Fader ........................................................................................................................... 107
Voice ............................................................................................................................ 108
Wind cut .................................................................................................................... 108
Page 43

10
Contents
Chapter 3
Playback/Editing
Searching and managing les ................................................................ 110
Viewing photos ....................................................................................................... 110
Viewing image thumbnails ................................................................................. 110
Viewing les by category .................................................................................... 111
Viewing les as a folder ........................................................................................ 111
Protecting les ........................................................................................................ 112
Lock/Unlock all les .................................................................................................. 112
Deleting les ............................................................................................................ 113
Deleting a single le ................................................................................................. 113
Deleting multiple les .............................................................................................. 113
Deleting all les .......................................................................................................... 113
Viewing photos .......................................................................................... 114
Enlarging a photo .................................................................................................. 114
Viewing a slide show ............................................................................................. 114
Auto rotating ........................................................................................................... 115
Creating a print order (DPOF) ............................................................................ 115
Playing videos ............................................................................................ 116
Trimming a video during playback .................................................................. 116
Capturing an image during playback ............................................................. 117
Editing photos ........................................................................................... 118
Cropping a photo ................................................................................................... 118
Rotating a photo .................................................................................................... 119
Resizing photos....................................................................................................... 119
Adjusting your photos .......................................................................................... 120
Retouching faces .................................................................................................... 121
Reducing red-eye ................................................................................................... 121
Applying Smart Filter eects .............................................................................. 122
Chapter 4
Wireless network
Connecting to a WLAN and conguring network settings ............... 124
Connecting to a WLAN ......................................................................................... 124
Setting network options ......................................................................................... 125
Manually setting the IP address ........................................................................... 125
Using the login browser....................................................................................... 125
Network connection tips ..................................................................................... 126
Entering text ............................................................................................................ 127
Saving les to a smart phone automatically ....................................... 128
Sending photos or videos to a smart phone ....................................... 129
Using a smart phone as a remote shutter release .............................. 131
Using Auto Backup to send photos or videos ..................................... 133
Installing the program for Auto Backup on your PC.................................. 133
Sending photos or videos to a PC .................................................................... 133
Sending photos or videos via email ...................................................... 135
Changing email settings ...................................................................................... 135
Storing your information ........................................................................................ 135
Setting an email password ..................................................................................... 136
Changing the email password .............................................................................. 137
Sending photos or videos via email ................................................................ 137
Using photo or video sharing websites ................................................ 139
Accessing a website .............................................................................................. 139
Uploading photos or videos............................................................................... 140
Using Samsung Link to send les .......................................................... 141
Uploading photos to online storage ............................................................... 141
Viewing photos or videos on devices that support Samsung Link ...... 142
Sending photos using Wi-Fi Direct ........................................................ 144
Page 44

11
Contents
Chapter 6
Connecting to external devices
Viewing les on an HDTV or 3D TV ........................................................ 158
Viewing les on an HDTV .................................................................................... 158
Viewing les on a 3D TV ....................................................................................... 159
Transferring les to your computer ....................................................... 160
Transferring les to your Windows OS computer ....................................... 160
Connecting the camera as a removable disk ................................................... 160
Disconnecting the camera (for Windows XP) .................................................. 161
Transferring les to your Mac OS ...................................................................... 161
Using programs on a computer ............................................................. 163
Installing programs from the provided CD ................................................... 163
Available programs when using i-Launcher .................................................... 163
Using i-Launcher .................................................................................................... 163
Requirements for Windows OS ............................................................................. 163
Requirements for Mac OS ....................................................................................... 164
Opening i-Launcher .................................................................................................. 164
Using Multimedia Viewer ........................................................................................ 165
Downloading the rmware .................................................................................... 166
Downloading the PC Auto Backup program ................................................... 166
Installing Adobe Photoshop Lightroom ........................................................ 167
Using Adobe Photoshop Lightroom ............................................................... 167
Chapter 5
Camera settings menu
User settings ............................................................................................... 146
ISO Customizing ..................................................................................................... 146
ISO Step ......................................................................................................................... 146
Auto ISO Range .......................................................................................................... 146
Noise Reduction ..................................................................................................... 146
Bracket Set ................................................................................................................ 147
DMF (Direct Manual Focus) ................................................................................ 147
Color space ............................................................................................................... 148
Distortion Correct .................................................................................................. 149
Save as Custom Mode .......................................................................................... 149
iFn Customizing ...................................................................................................... 149
User Display .............................................................................................................. 149
Key Mapping ............................................................................................................ 150
Grid Line .................................................................................................................... 151
AF Lamp ..................................................................................................................... 151
Setting ......................................................................................................... 152
Page 45

12
Contents
Before contacting a service center ........................................................ 181
Camera specications .............................................................................. 184
Glossary ....................................................................................................... 189
Optional accessories ................................................................................. 195
Index ............................................................................................................ 197
FCC notice ................................................................................................... 200
Chapter 7
Appendix
Error messages .......................................................................................... 169
Maintaining the camera........................................................................... 170
Cleaning the camera ............................................................................................. 170
Camera lens and display ......................................................................................... 170
Image sensor ............................................................................................................... 170
Camera body ............................................................................................................... 170
Using or storing the camera ............................................................................... 171
Inappropriate places to use or store the camera ........................................... 171
Using on beaches or shores ................................................................................... 171
Storing for extended period of time ................................................................... 171
Using the camera with caution in humid environments ............................ 172
Other cautions ............................................................................................................ 172
About memory card .............................................................................................. 173
Supported memory card ........................................................................................ 173
Memory card capacity ............................................................................................. 174
Cautions when using memory cards .................................................................. 176
About the battery .................................................................................................. 177
Battery specications ............................................................................................... 177
Battery life .................................................................................................................... 178
Low battery message ............................................................................................... 178
Notes about using the battery .............................................................................. 178
Cautions about using the battery ........................................................................ 179
Notes about charging the battery ....................................................................... 179
Notes about charging with a computer connected...................................... 180
Handle and dispose of batteries and chargers with care ............................ 180
Page 46
13
Concepts in Photography
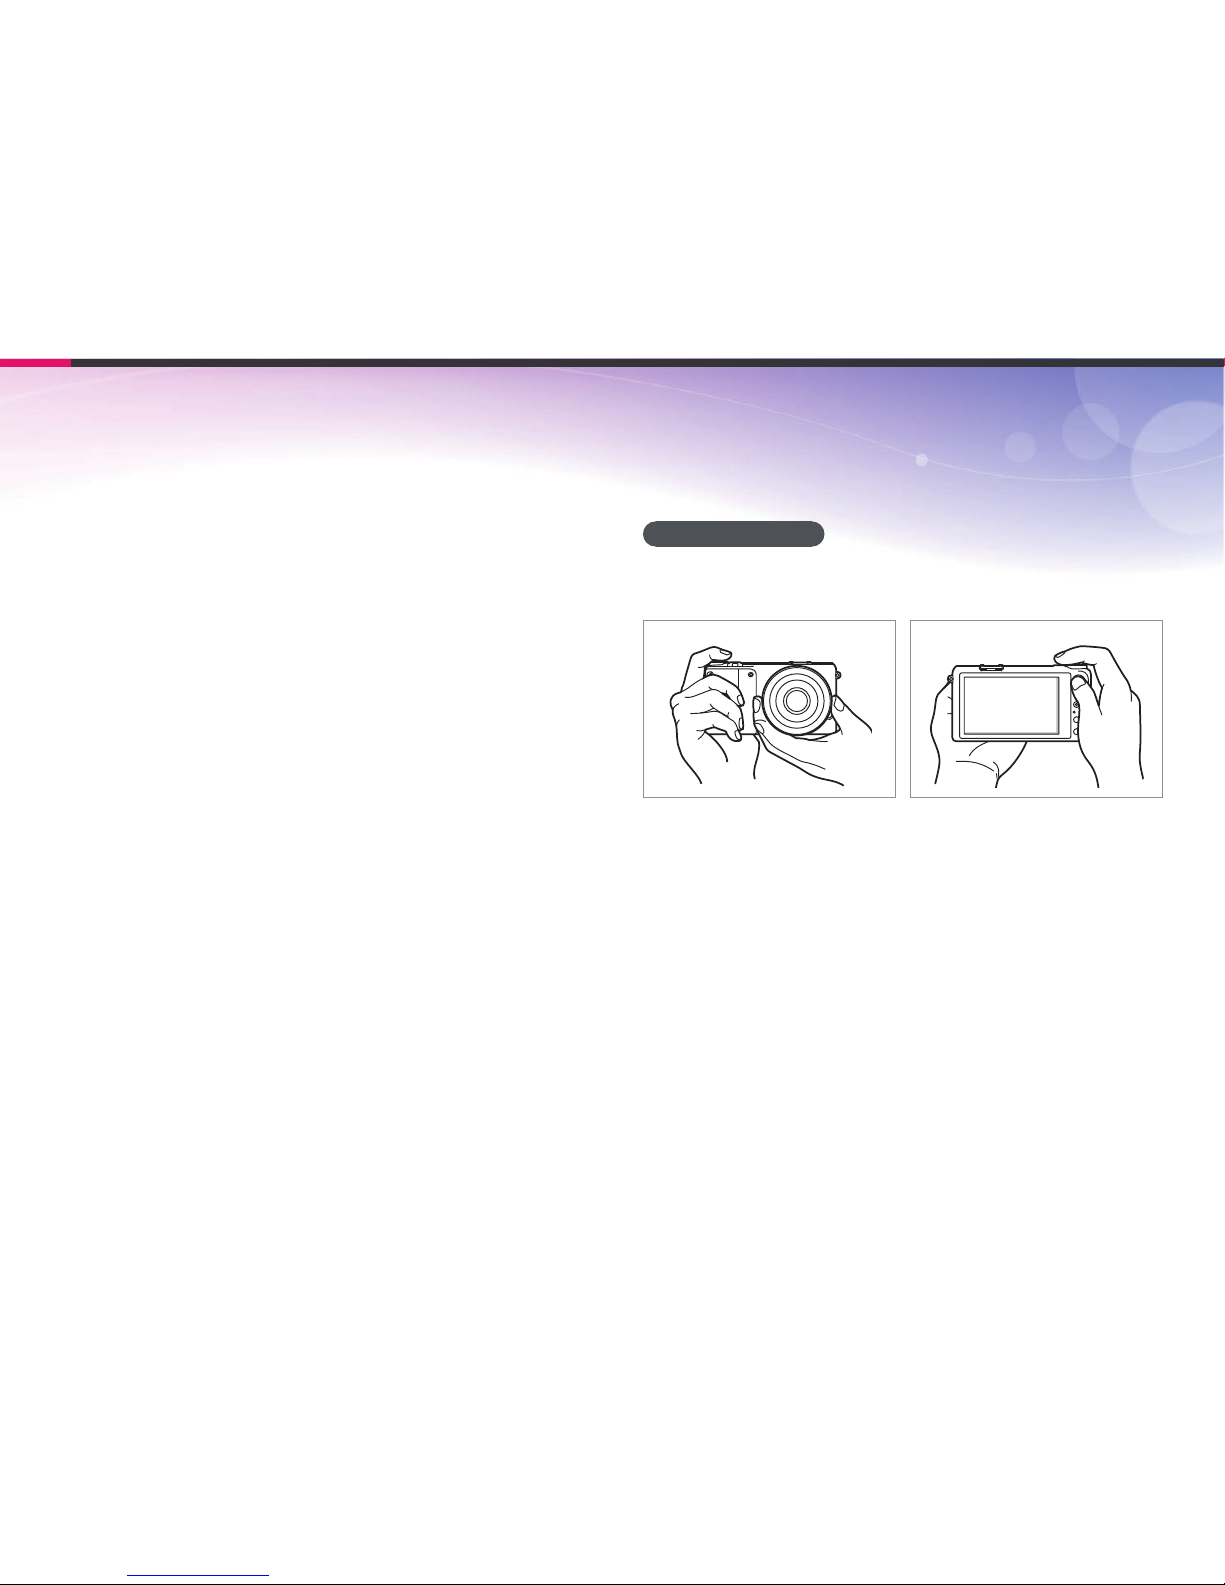
Holding the camera
Hold the camera with your right hand and place you right index nger on
the shutter button. Place your left hand under the lens for support.
Shooting postures
A correct posture for stabilizing the camera is necessary for taking a good
photo. Even if you hold a camera correctly, the wrong posture can cause
the camera to shake. Stand up straight and remain still to maintain a
steady base for your camera. When shooting with a slow shutter speed,
hold your breath to minimize body movement.
Page 47
14
Concepts in Photography
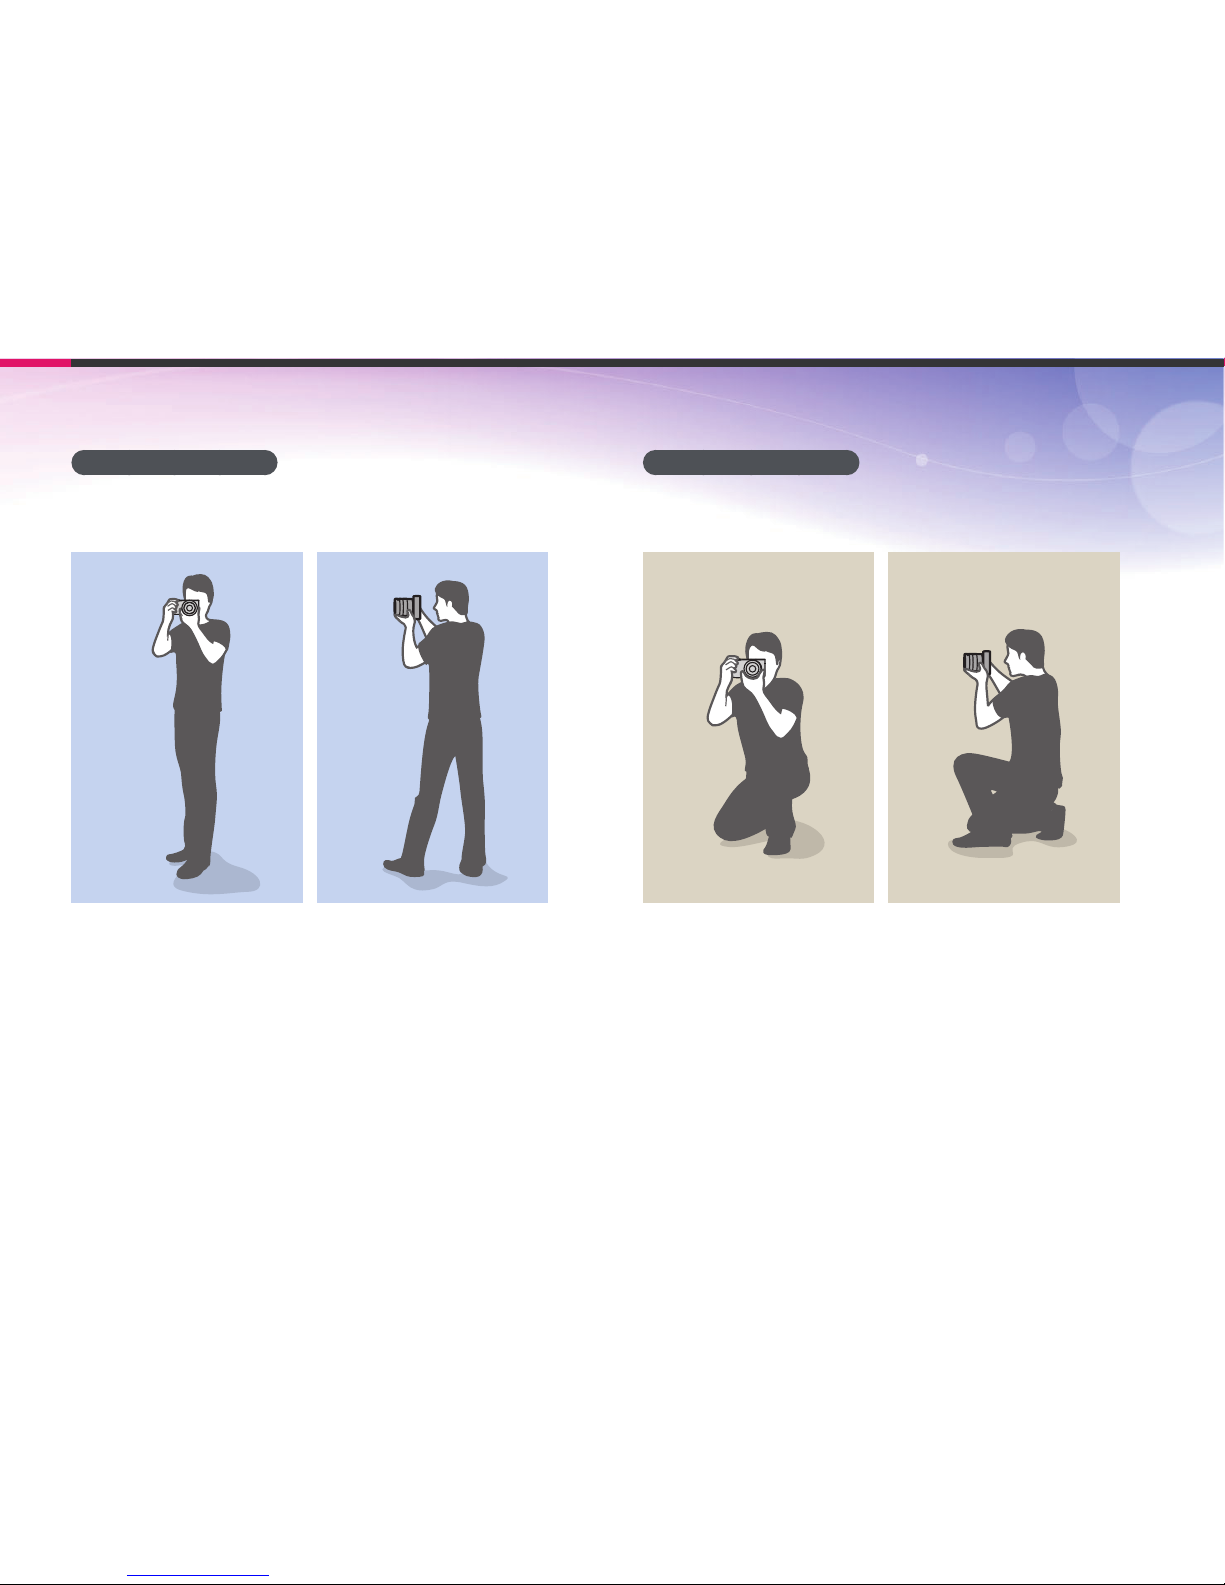
Standing photography
Compose your shot; stand up straight with your feet shoulder-length
apart, and keep your elbows pointed down.
Crouching photography
Compose your shot, crouch with one knee touching the ground, and keep
a straight posture.
Page 48
15
Concepts in Photography
Aperture
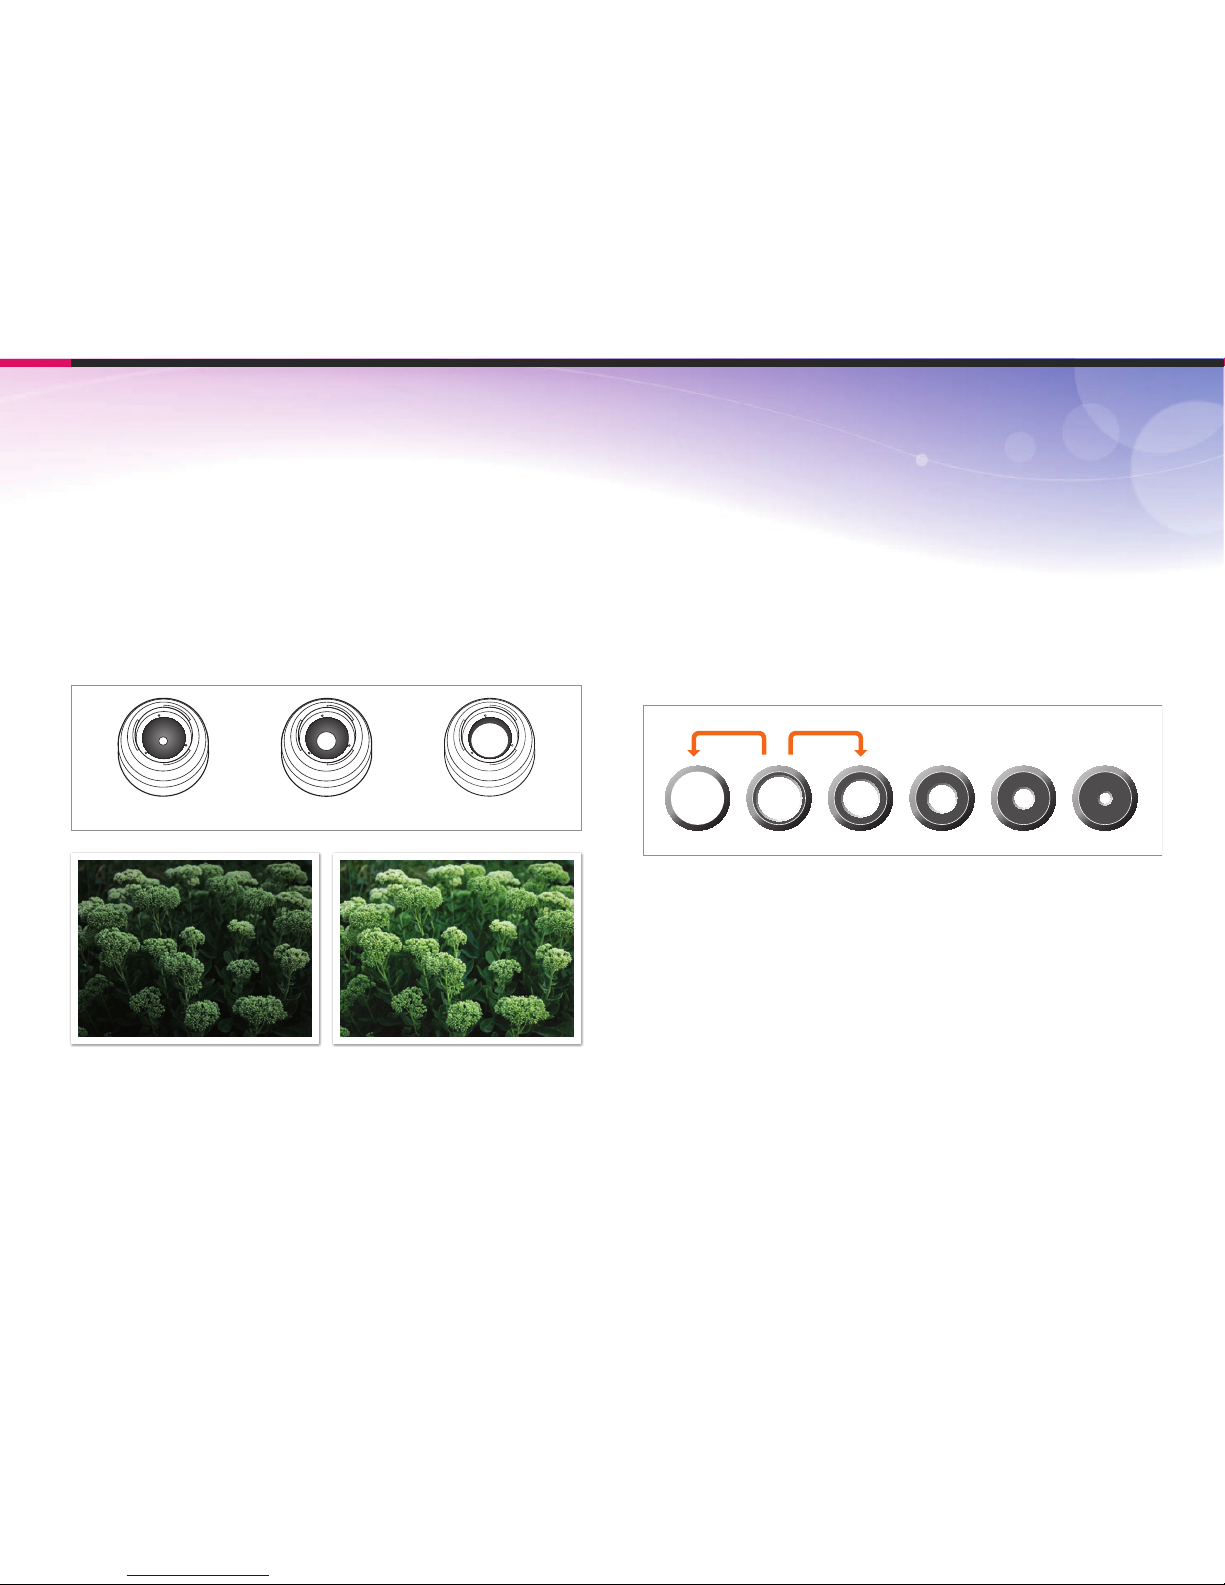
The aperture, a hole that controls the amount of light that enters the
camera, is one of the three factors that determine the exposure. The
aperture housing contains thin, metal plates that open and close to let
light through the aperture and into the camera. The size of the aperture
is closely related to the brightness of a photo: the larger the aperture, the
brighter the photo; the smaller the aperture, the darker the photo.
Aperture sizes
Minimum aperture Medium aperture Maximum aperture
Darker photo
(aperture opened slightly)
Brighter photo
(aperture opened wide)
The size of the aperture is represented by a value known as an “F-number.”
The f-number represents the focal length divided by the diameter of the
lens. For example, if a lens with a 50 mm focal length has an f-number of
F2, the diameter of the aperture is 25 mm. (50 mm/25 mm=F2) The smaller
the f-number, the greater the size of the aperture.
The opening in the aperture is described as the Exposure Value (EV).
Increasing the Exposure Value (+1 EV) means the amount of light doubles.
Decreasing the Exposure Value (-1 EV ) means the amount of light halves.
You can also use the exposure compensation feature to ne-tune the
amount of light by subdividing exposure values into 1/2, 1/3 EV, and so on.
+1 EV
F1.4 F2 F2.8 F4 F5.6 F8
-1 EV
Exposure Value Steps
Page 49
16
Concepts in Photography
Aperture value and the depth of eld
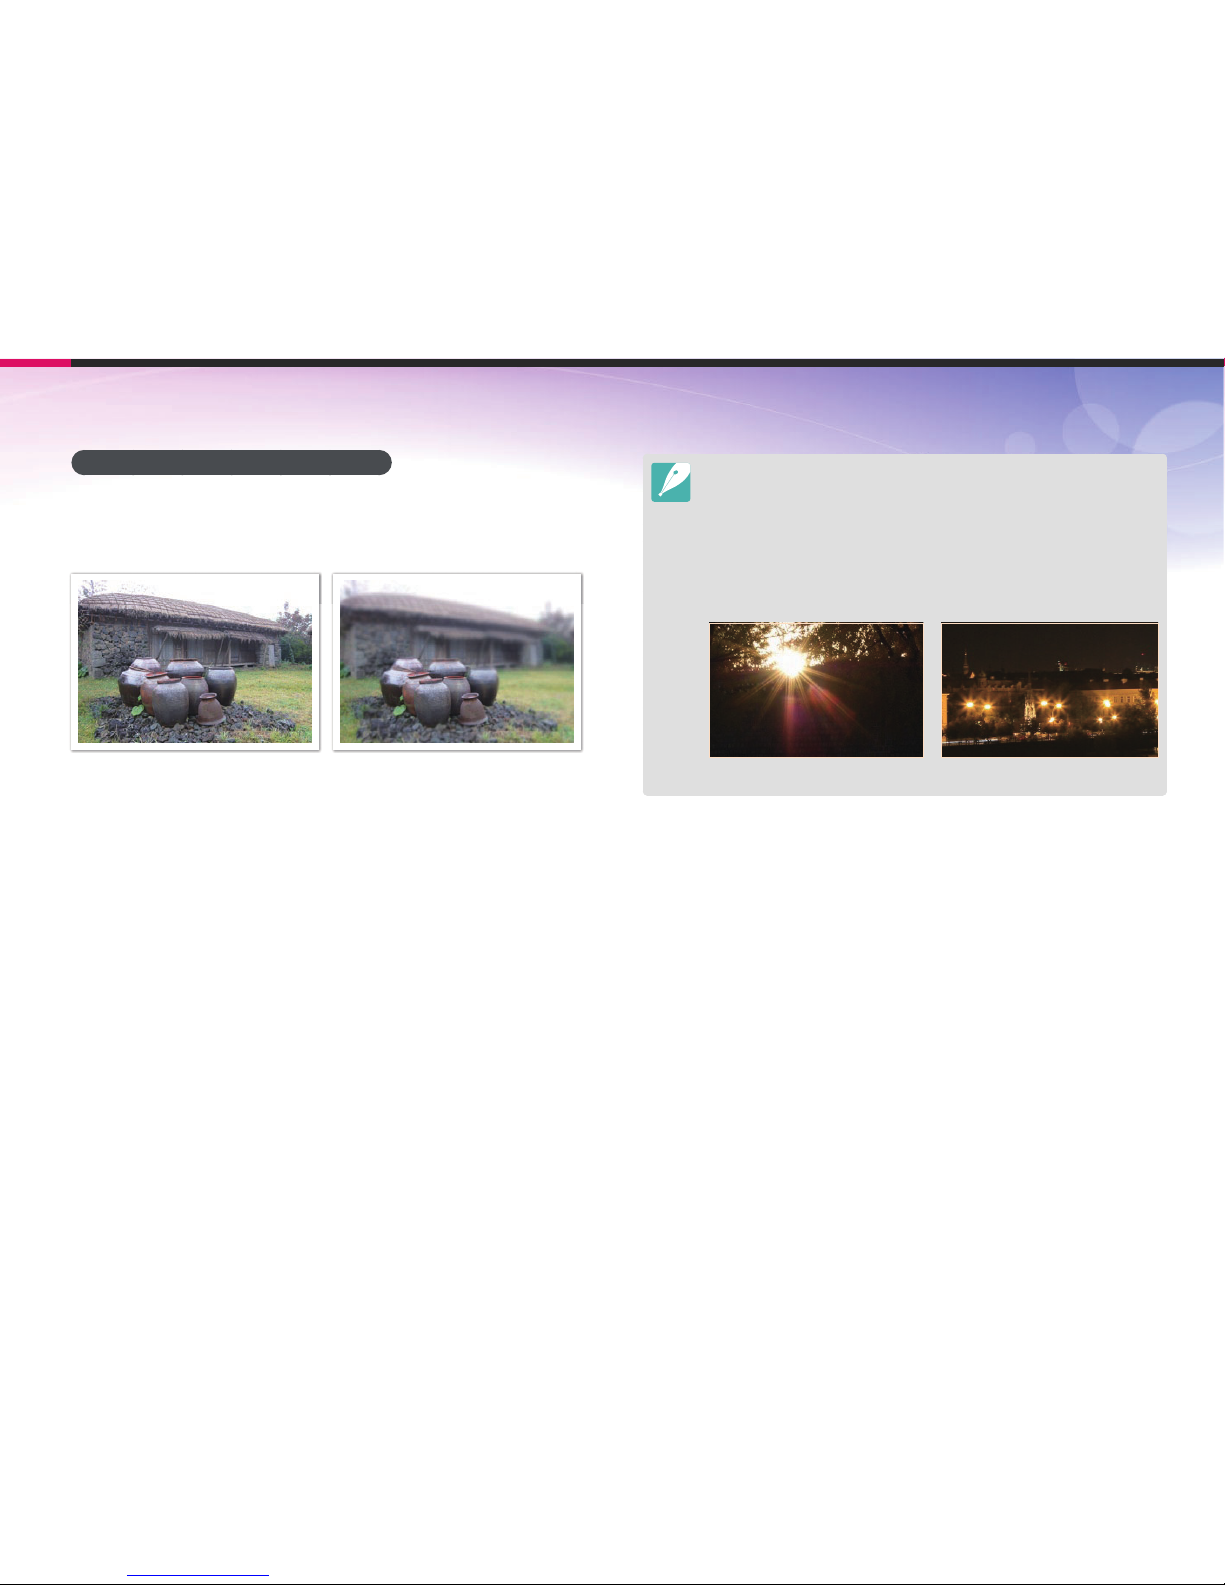
You can blur or sharpen the background of a photo by controlling the
aperture. It is closely related to the depth of eld (DOF), which can be
expressed as small or large.
A photo with a large DOF A photo with a small DOF
The aperture housing contains several blades. These blades move together and
control the amount of light passing through the center of the aperture. The
number of blades also aects the shape of light when shooting night scenes. If
an aperture has an even number of blades, light divides into an equal number
of sections. If the number of blades is odd, the number of sections is double the
number of blades.
For example, an aperture with 8 blades divides light into 8 sections and an
aperture with 7 blades into 14 sections.
7 blades 8 blades
Page 50
17
Concepts in Photography
Shutter speed
Shutter speed refers to the amount of time it takes to open and close the
shutter, and it is an important factor in the brightness of a photo, as it
controls the amount of light which passes through the aperture before it
reaches the image sensor.
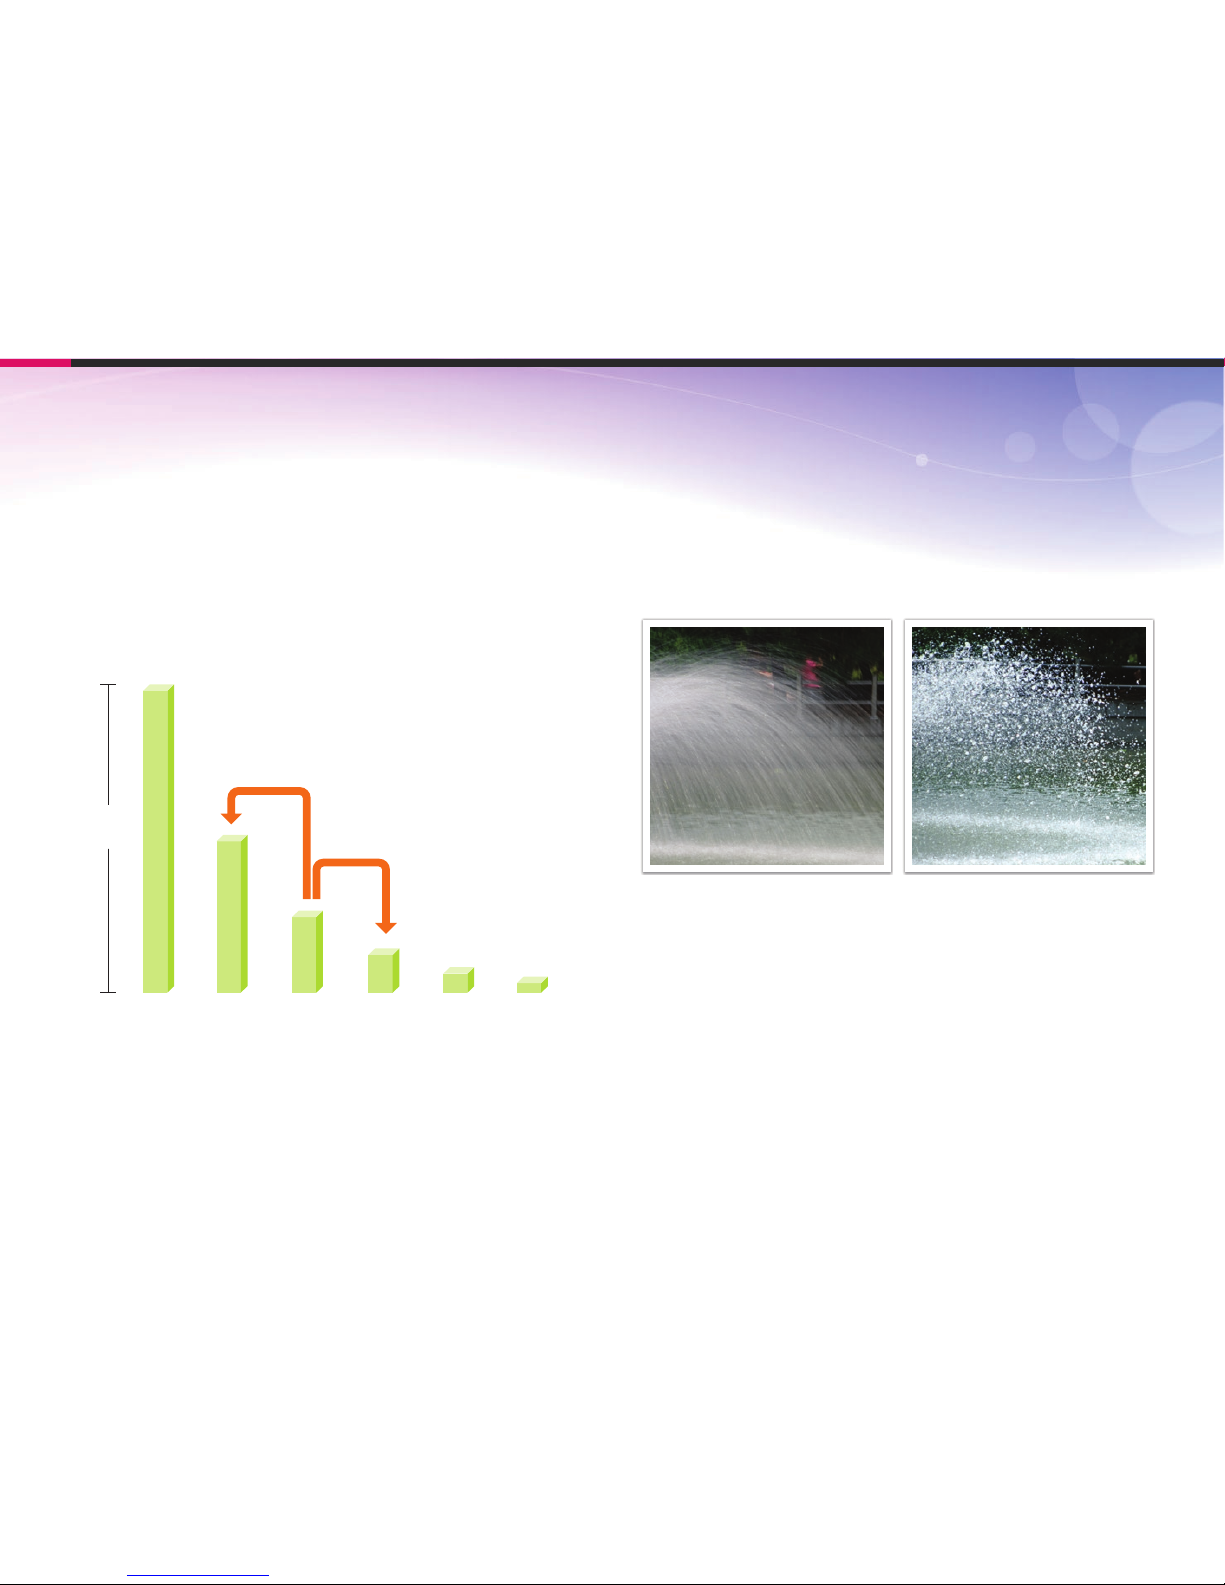
Usually, the shutter speed is manually adjustable. The measurement of the
shutter speed is known as the “Exposure Value” (EV), which is marked in
intervals of 1 s, 1/2 s, 1/4 s, 1/8 s, 1/15 s, 1/1000 s, 1/2000 s, and so on.
Exposure
+1 EV
-1 EV
1s 1/2 s 1/4 s 1/8 s 1/15 s 1/30 s
Shutter Speed
Therefore, the faster the shutter speed, the less light will be let in. Likewise,
the slower the shutter speed, the more light will be let in.
As the photos below illustrate, a slow shutter speed allows more time
to let light in, so the photo becomes brighter. On the other hand, a fast
shutter speed allows less time to let light in and the photo becomes
darker and more easily freezes subjects in motion.
0.8 s 0.004 s
Page 51
18
Concepts in Photography
ISO sensitivity
The exposure of an image is determined by the sensitivity of the camera.
This sensitivity is based on international lm standards, known as ISO
standards. On digital cameras, this sensitivity rating is used to represent
the sensitivity of the digital mechanism that captures the image.
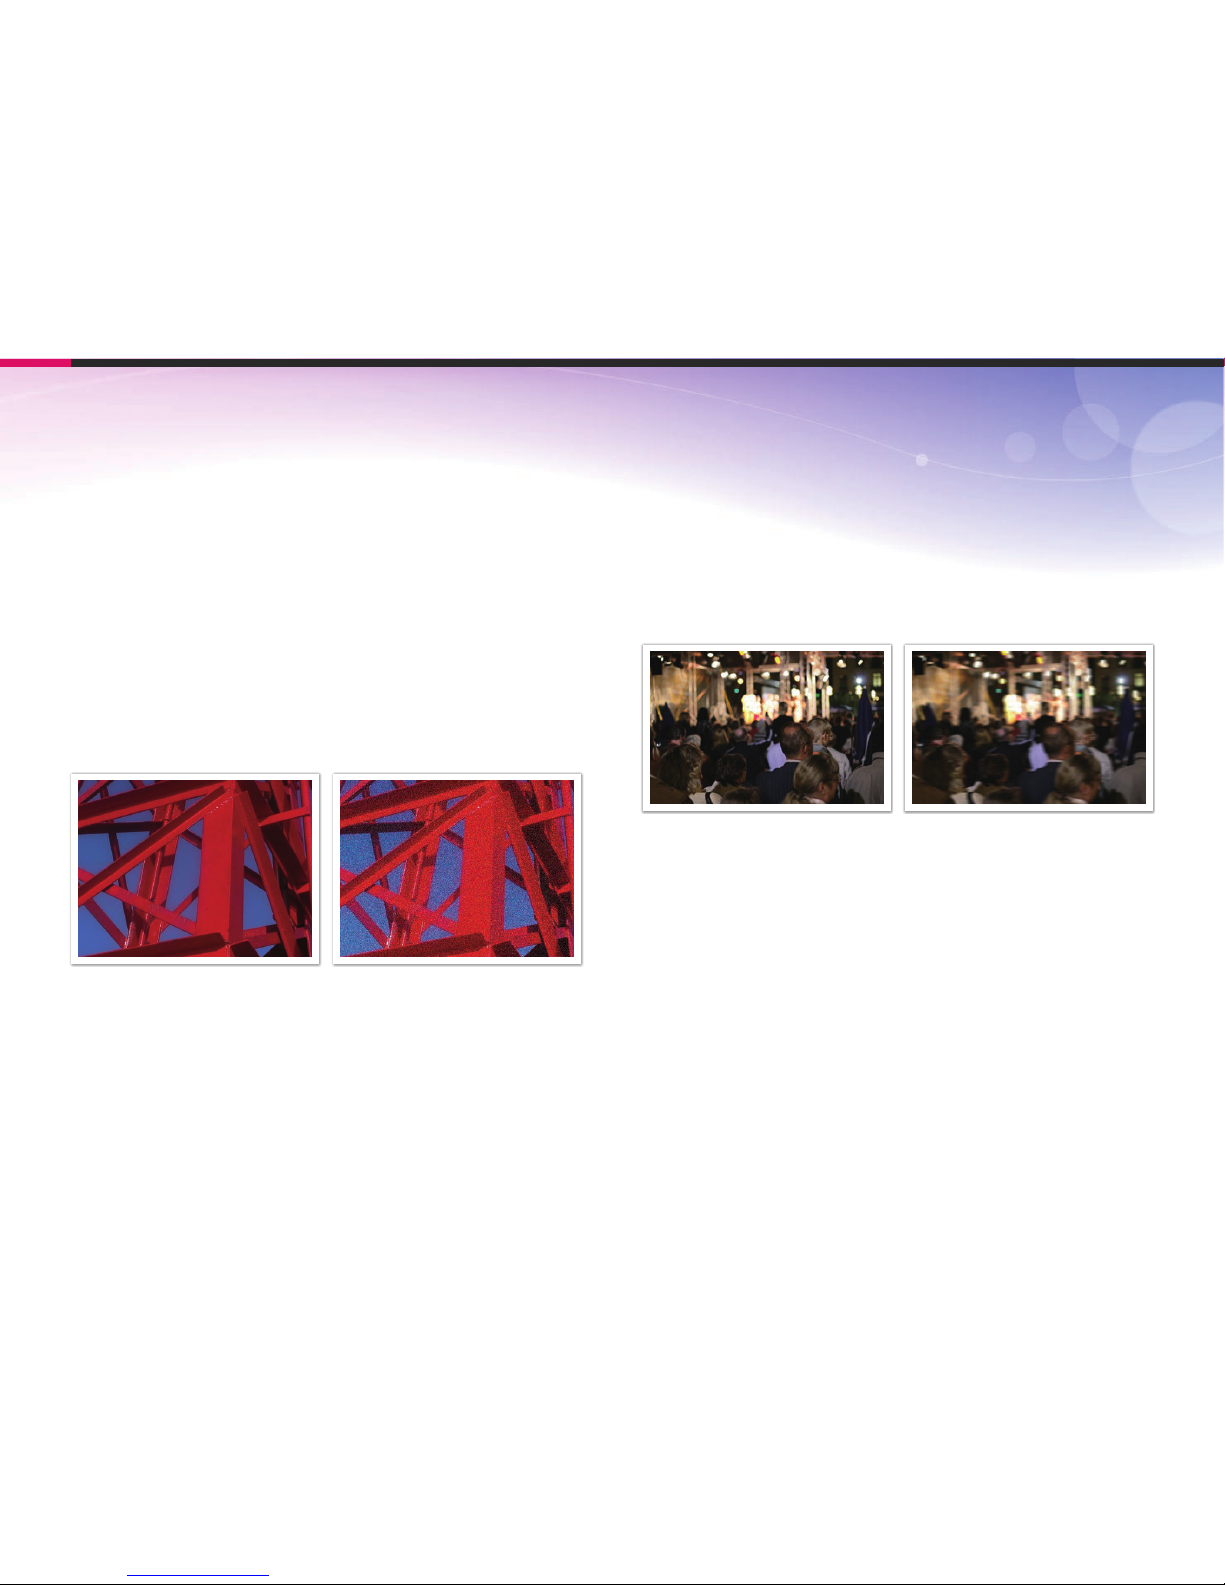
ISO sensitivity doubles as the number doubles. For example, an
ISO 200 setting is capable of capturing images at twice the speed of an
ISO 100 setting. However, higher ISO settings can result in “noise”—small
specks, spots, and other phenomena in a photo that give the shot a noisy
or dirty appearance. As a general rule, it is best to use a low ISO setting
to prevent noise in your photos, unless you are shooting in darkened
environments or at night.
Changes in the quality and brightness according to ISO sensitivity
Because a low ISO sensitivity means the camera will be less sensitive to
light, you need more light to have an optimal exposure. When using a low
ISO sensitivity, open the aperture more or reduce the shutter speed to
allow more light to enter the camera. For example, on a sunny day when
light is abundant, a low ISO sensitivity does not require a slow shutter
speed. However, in a dark place or at night, a low ISO sensitivity will
result in a blurry photo. Therefore, it is recommended to increase the ISO
sensitivity by a moderate amount.
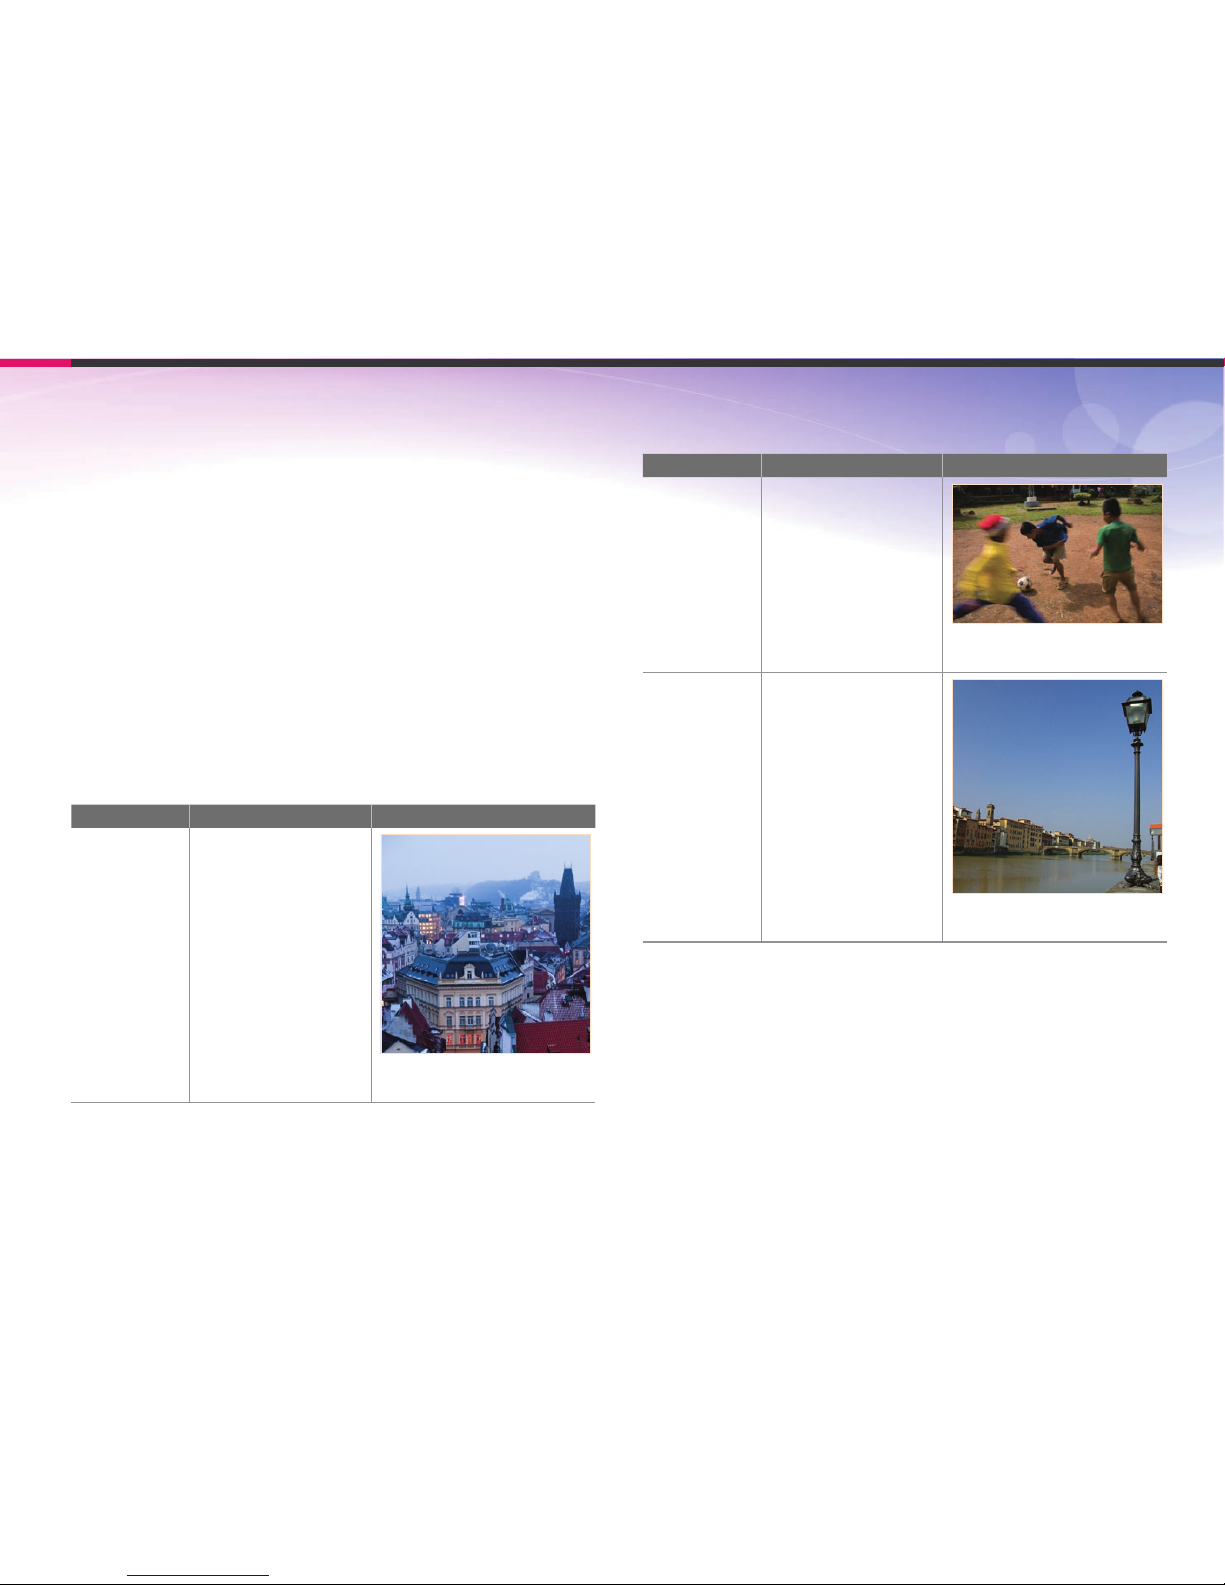
A photo captured with a tripod and
high ISO sensitivity
A blurred photo with a low ISO sensitivity
Page 52
19
Concepts in Photography
How the aperture setting, shutter speed,
and ISO sensitivity control exposure
The aperture setting, shutter speed, and ISO sensitivity are closely
interconnected in photography. The aperture setting controls the opening
that regulates the light that enters the camera, while the shutter speed
determines the length of time that light is allowed to enter. ISO sensitivity
determines the speed at which the lm reacts to light. Together, these
three aspects are described as the triangle of exposure.
A change in shutter speed, aperture value, or ISO sensitivity can be oset
by adjustments to the others to maintain the amount of light. The results,
however, change according to the settings. For example, shutter speed is
useful in expressing movement, aperture can control the depth of eld,
and ISO sensitivity can control the graininess of a photo.
Settings Results
Aperture
value
Wide aperture
= more light
Narrow aperture
= less light
Wide = small depth of eld
Narrow = large depth of eld
Settings Results
Shutter speed
Fast speed
= less light
Slow speed
= more light
Fast = still
Slow = blurry
ISO sensitivity
High sensitivity
= more sensitive to light
Low sensitivity
= less sensitive to light
High = more grainy
Low = less grainy
Page 53
20
Concepts in Photography
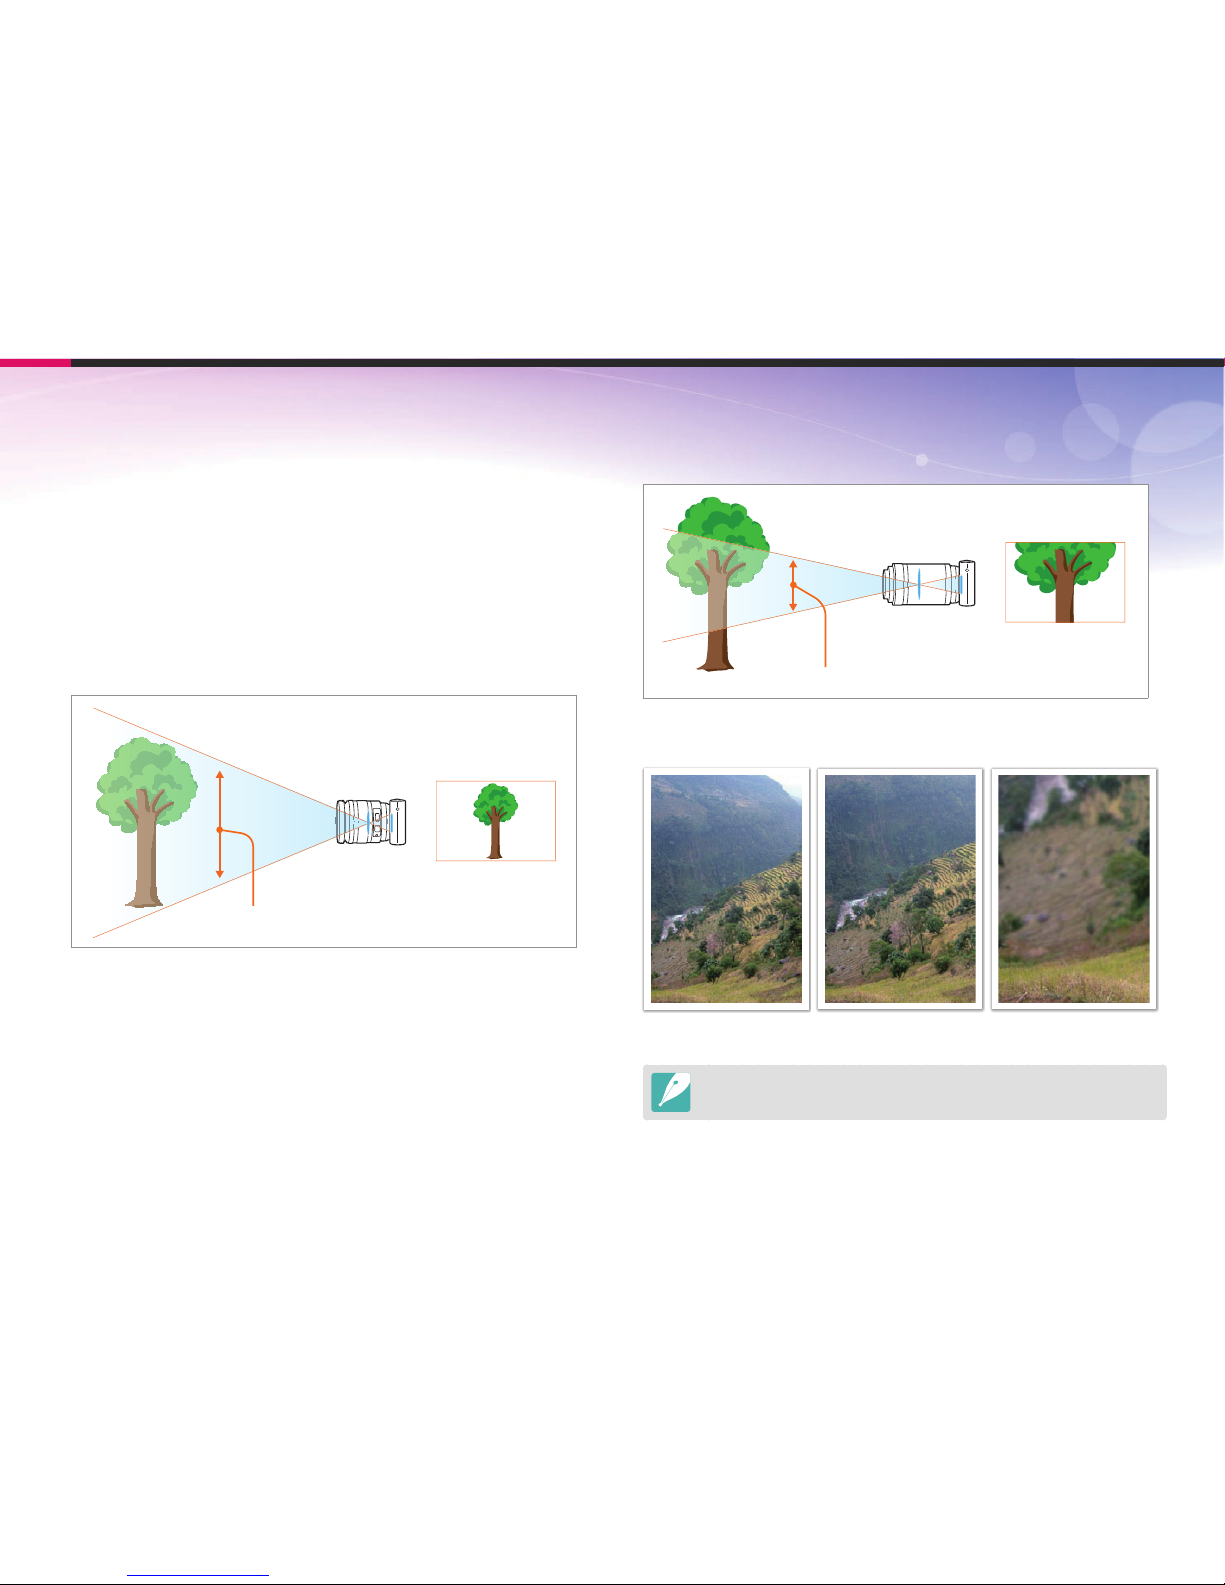
Correlation between focal length, angle,
and perspective
Focal length, which is measured in millimeters, is the distance between
the middle of the lens to its focal point. It aects the angle and perspective
of captured images. A short focal length translates into a wide angle,
which allows you to capture a wide shot. A long focal length translates
into a narrow angle, which allows you to capture telephoto shots.
Short focal length
wide shot
wide angle
wide-angle lens
Long focal length
telephoto shot
narrow angle
telephoto lens
Look at these photos below and compare the changes.
20 mm angle 50 mm angle 200 mm angle
Normally, a lens with a wide angle is suitable for shooting landscapes and a lens
with a narrow angle is recommended for shooting sports events or portraits.
Page 54
21
Concepts in Photography
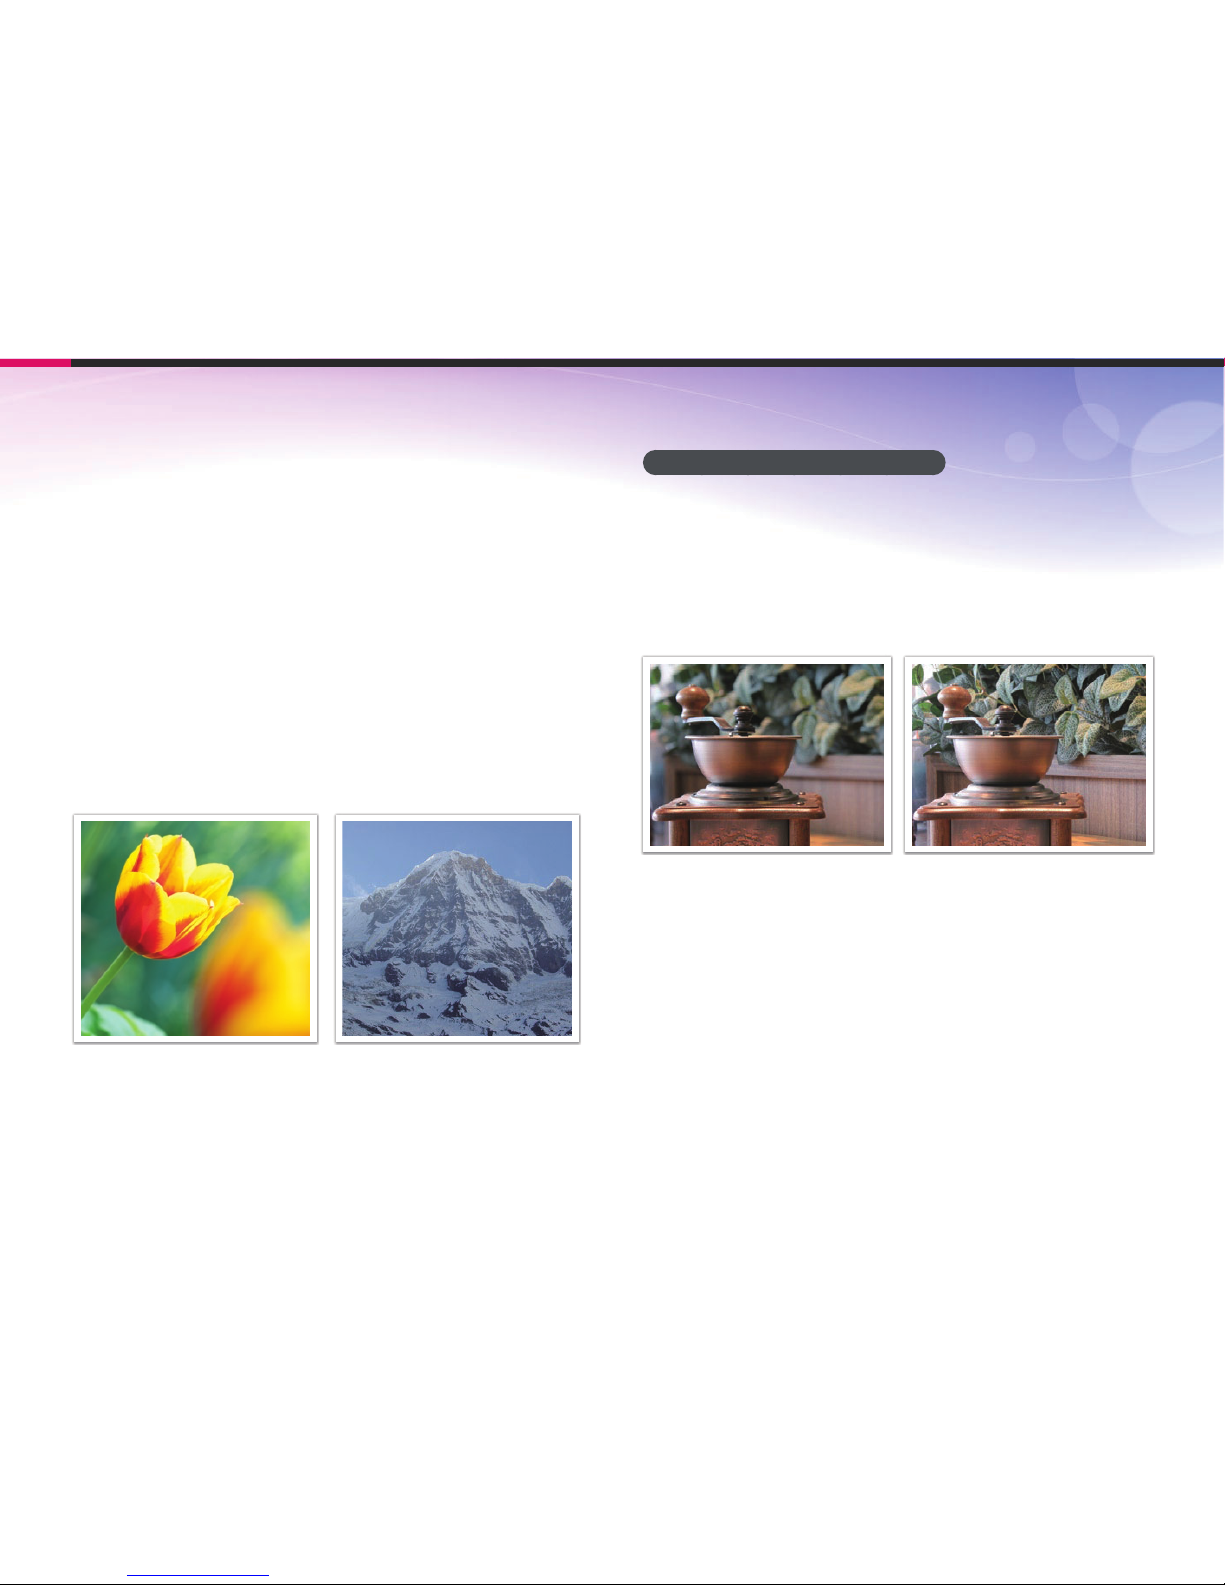
Depth of eld
Portraits or still-life photos mostly acclaimed by people are the ones on
which the background is out of focus so the subject looks pronounced.
Depending on the focused areas, a photo can be blurred or sharpened.
This is called ‘a low DOF’ or ‘a high DOF’.
The depth of eld is the focused area around the subject. Therefore, a
small DOF signies that the focused area is narrow and a large DOF means
the focused area is wide.
A photo with a small DOF, which stresses the subject and makes the rest
of it blurred, can be obtained by using a telescope lens or selecting a low
aperture value. Conversely, a photo with a large DOF which shows all the
elements on the photo sharply focused can be achieved by using a wide
angle lens or selecting a high aperture value.
Small Depth of Field Large Depth of Field
What controls out-of-focus eects?
DOF depends on aperture value
The wider the aperture is (namely the lower the aperture value), the lower
the DOF becomes. Under the condition where the other values including
shutter speed and ISO sensitivity are equal, a low aperture value leads to a
photo with a low DOF.
50 mm F5.7 50 mm F22
Page 55
22
Concepts in Photography
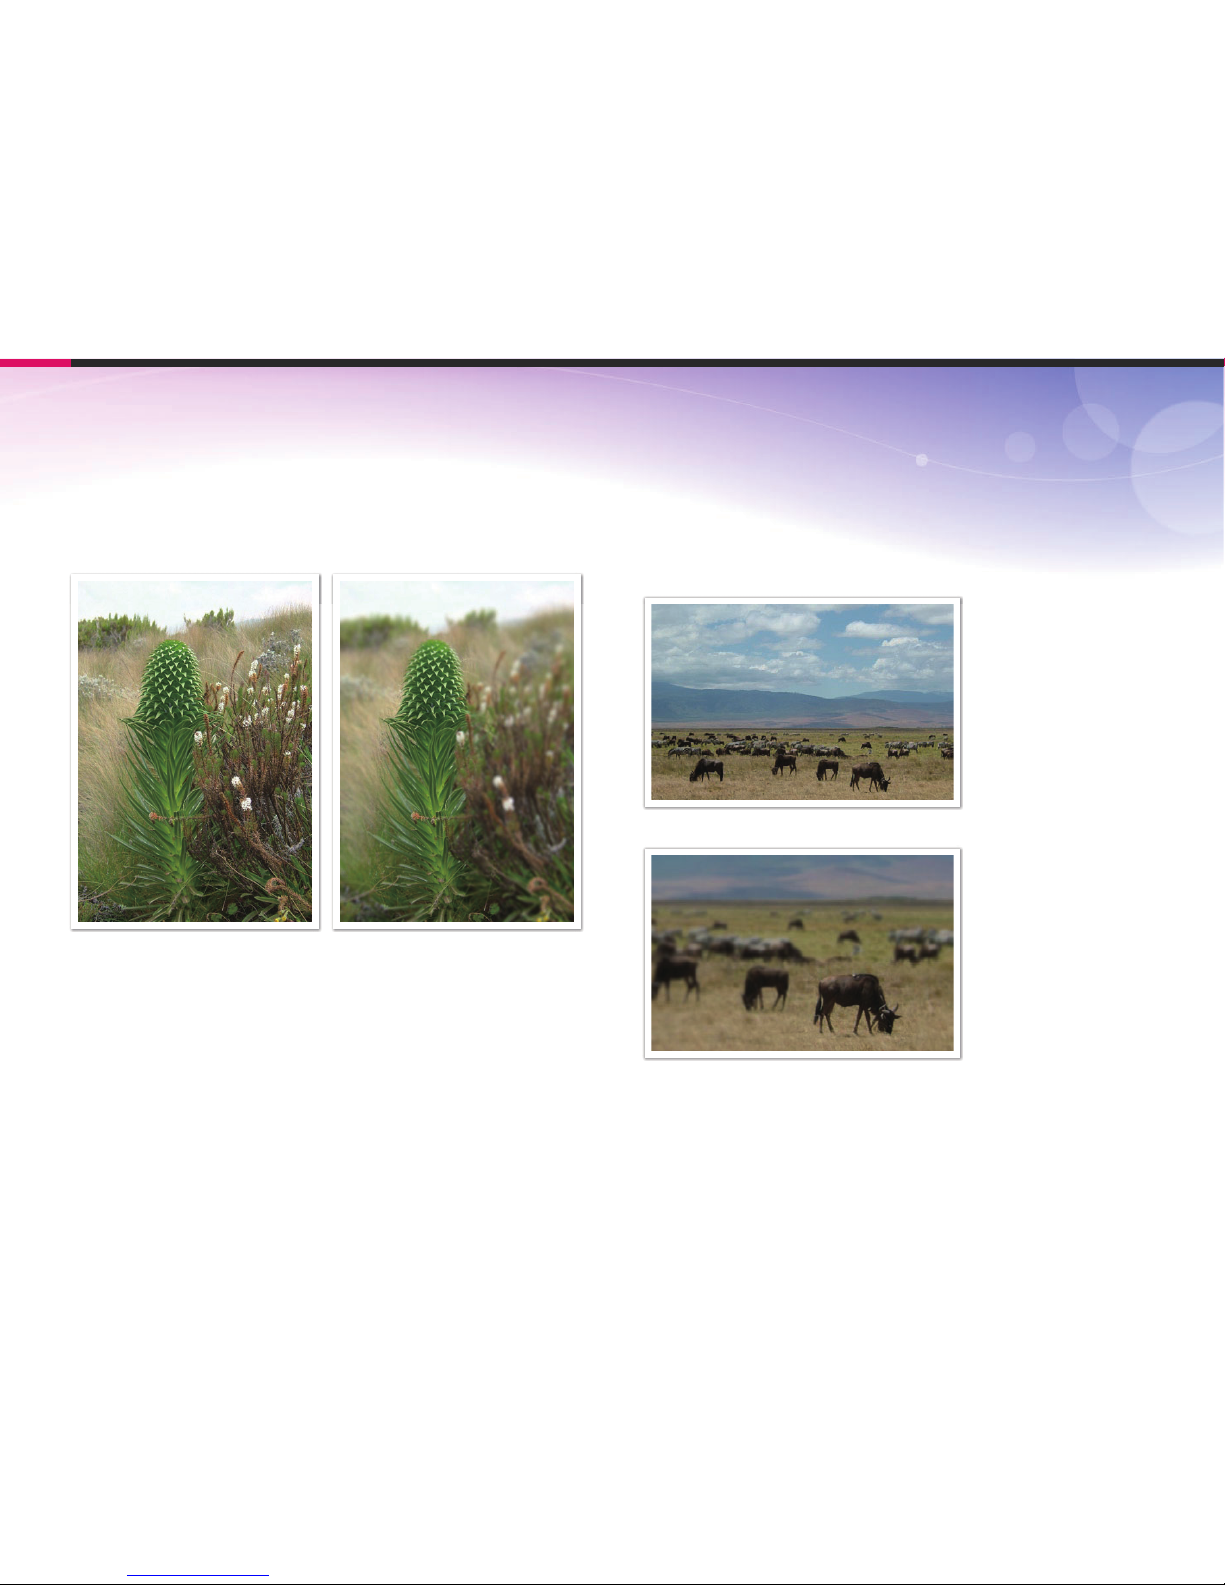
DOF depends on focal length
The longer the focal length is, the lower the DOF gets. A telescope lens
with a longer focal length than a telescope lens with a short focal length is
better to capture a photo of a low DOF.
A photo captured with a 20 mm
telescope lens
A photo captured with a 100 mm telescope
lens
DOF depends on the distance between the subject and the
camera
The shorter the distance between the subject and the camera is, the lower
the DOF gets. Therefore, taking a photo close to a subject can result in a
photo of low DOF.
A photo captured with a 100 mm telescope lens
A photo captured close to the subject
Page 56
23
Concepts in Photography
Optical preview
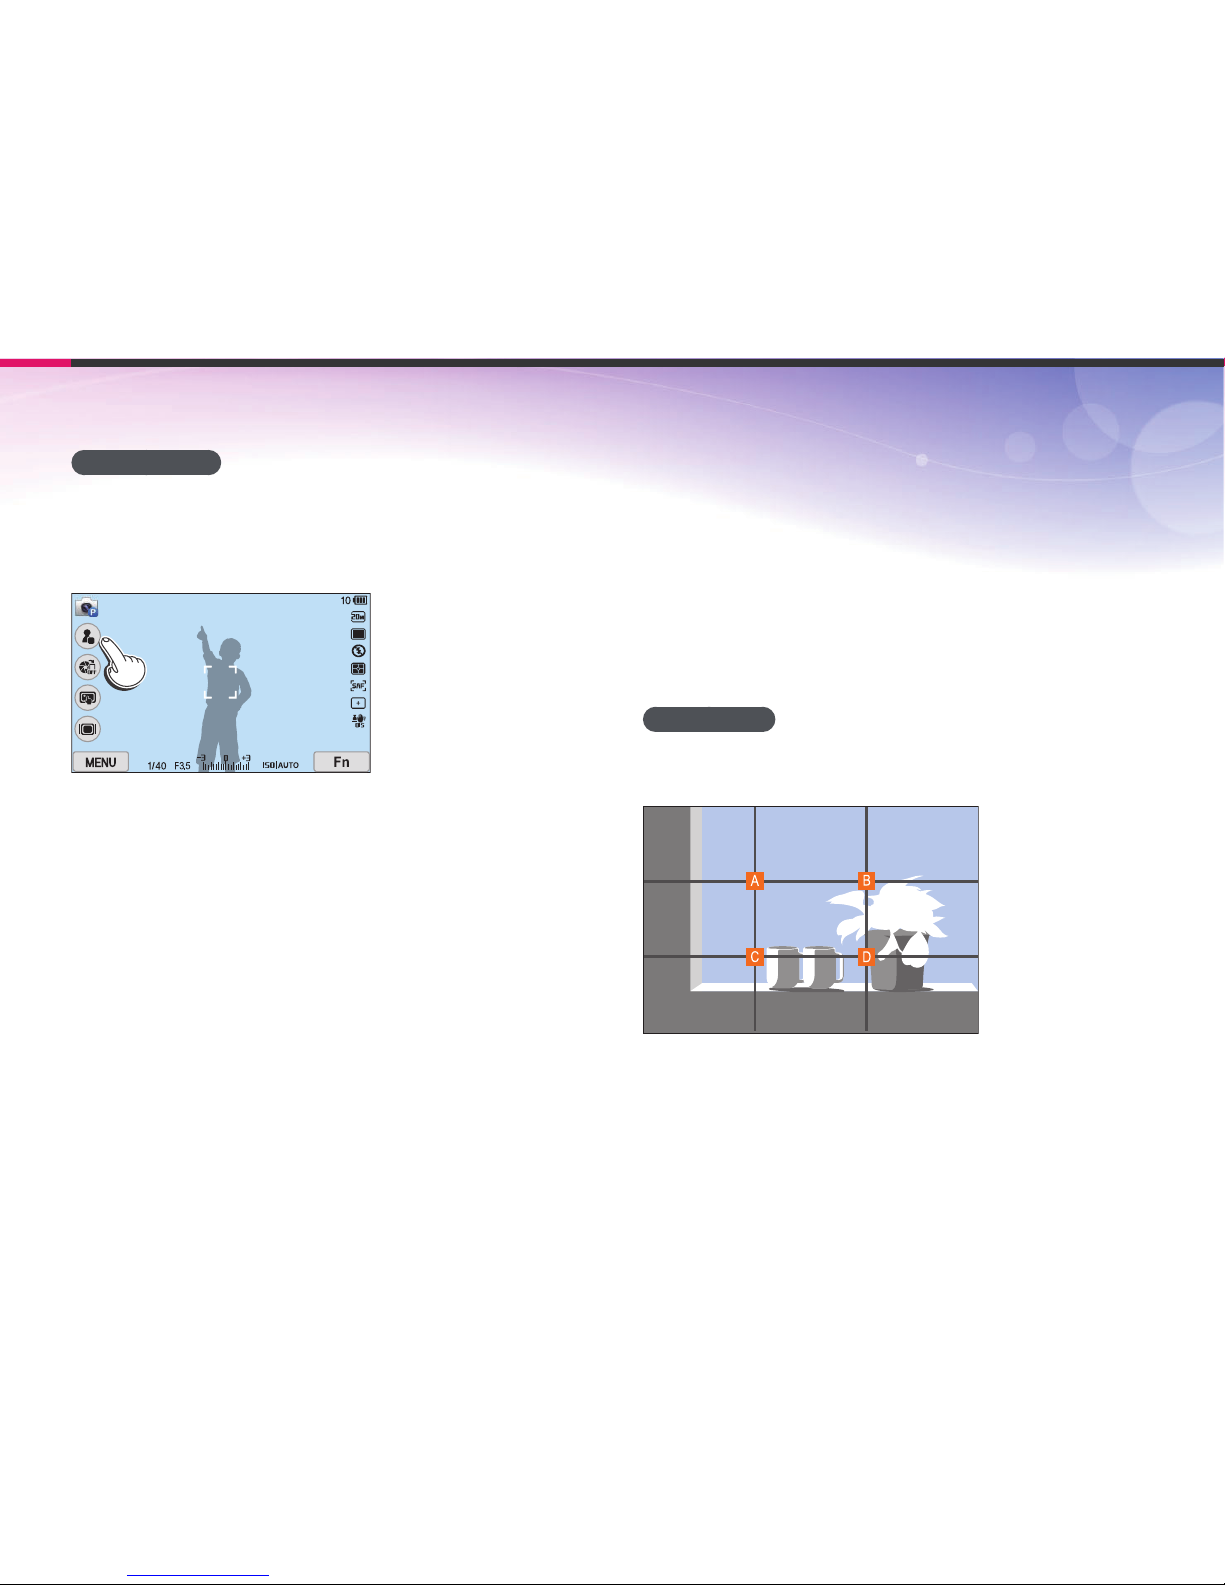
You can touch the Custom button on the screen to view the optical
preview before capturing a photo. The camera adjusts the aperture to the
predened settings and shows the results on the screen. Set the Custom
button to Optical Preview. (p. 150)
F
Composition
It is fun to capture a photo of the beauty of world with a camera. No
matter how the world is beautiful, however, a poor composition cannot
capture the beauty of it.
When it comes to composition, it is very important to prioritize subjects.
Composition in photography means arranging objects in a photo. Usually,
abiding by the rule of thirds leads to a good composition.
Rule of Thirds
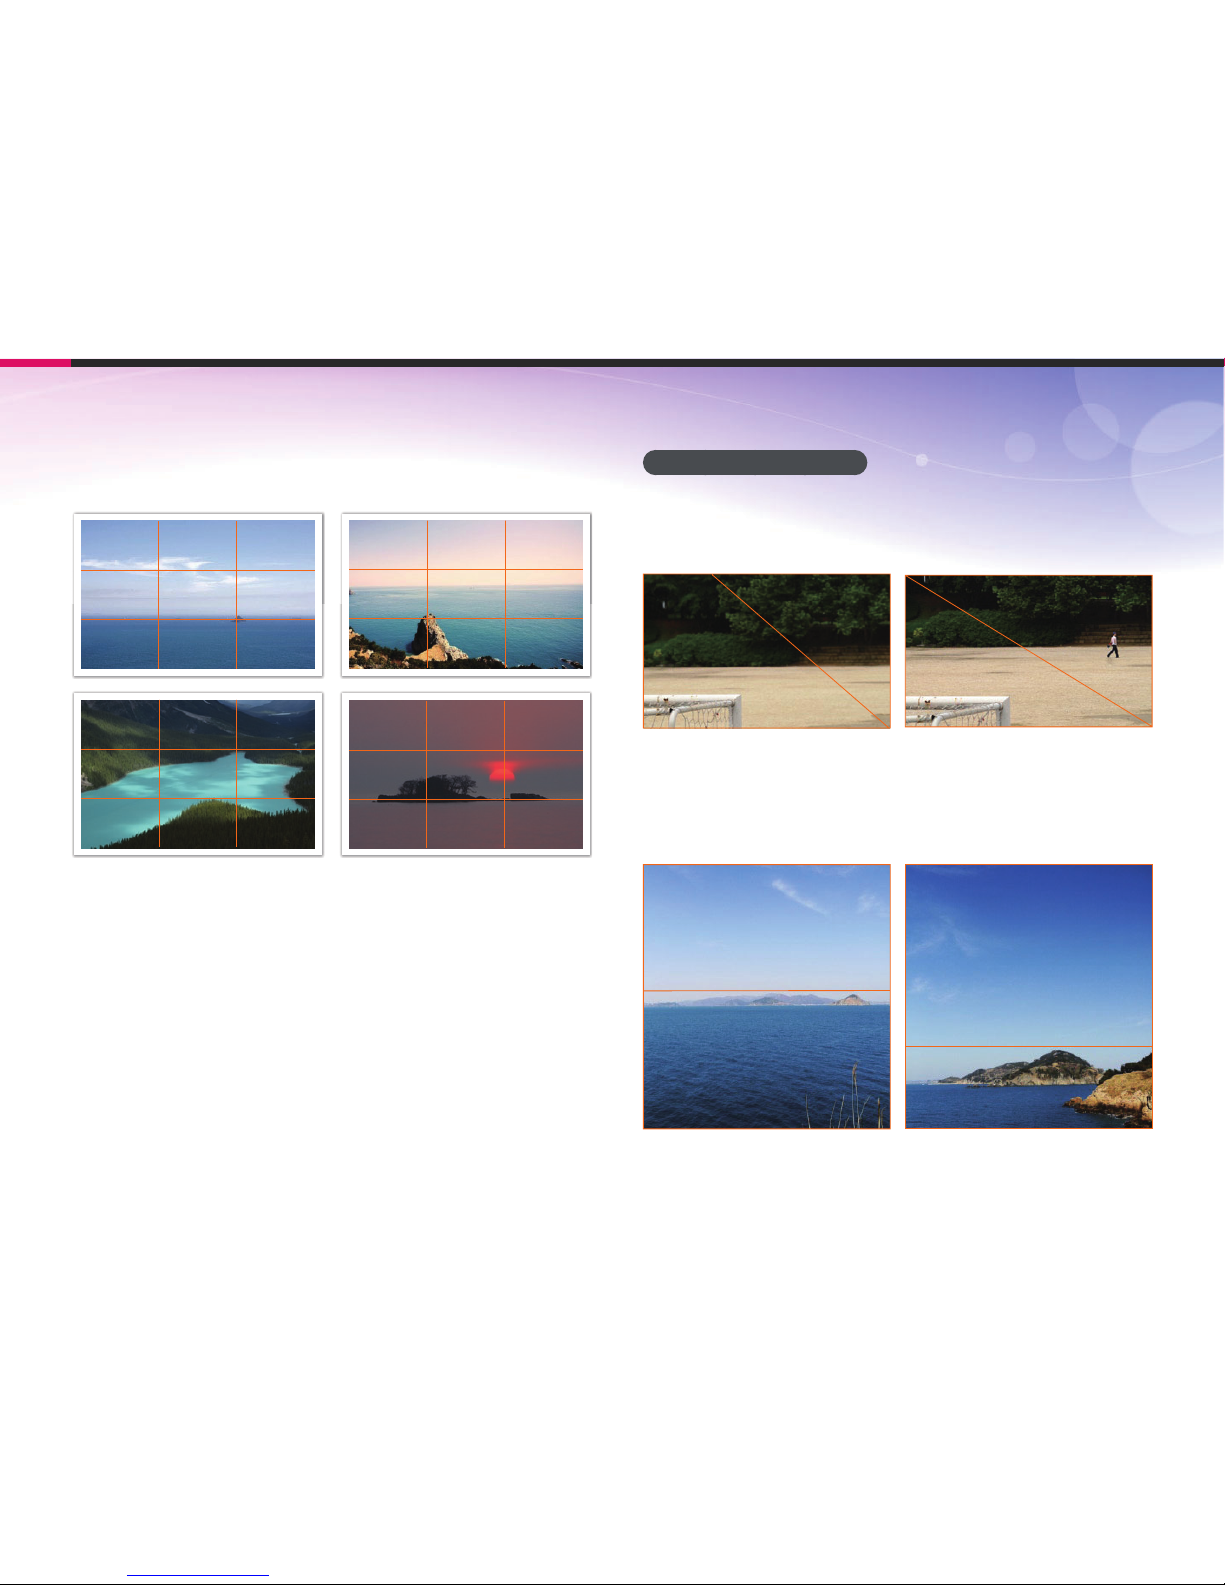
To use the rule of thirds, divide the image into a 3x3 pattern of equal
rectangles.
To compose photos that best emphasize the subject, make sure the
subject is located at one of the corners of the center rectangle.
Page 57
24
Concepts in Photography
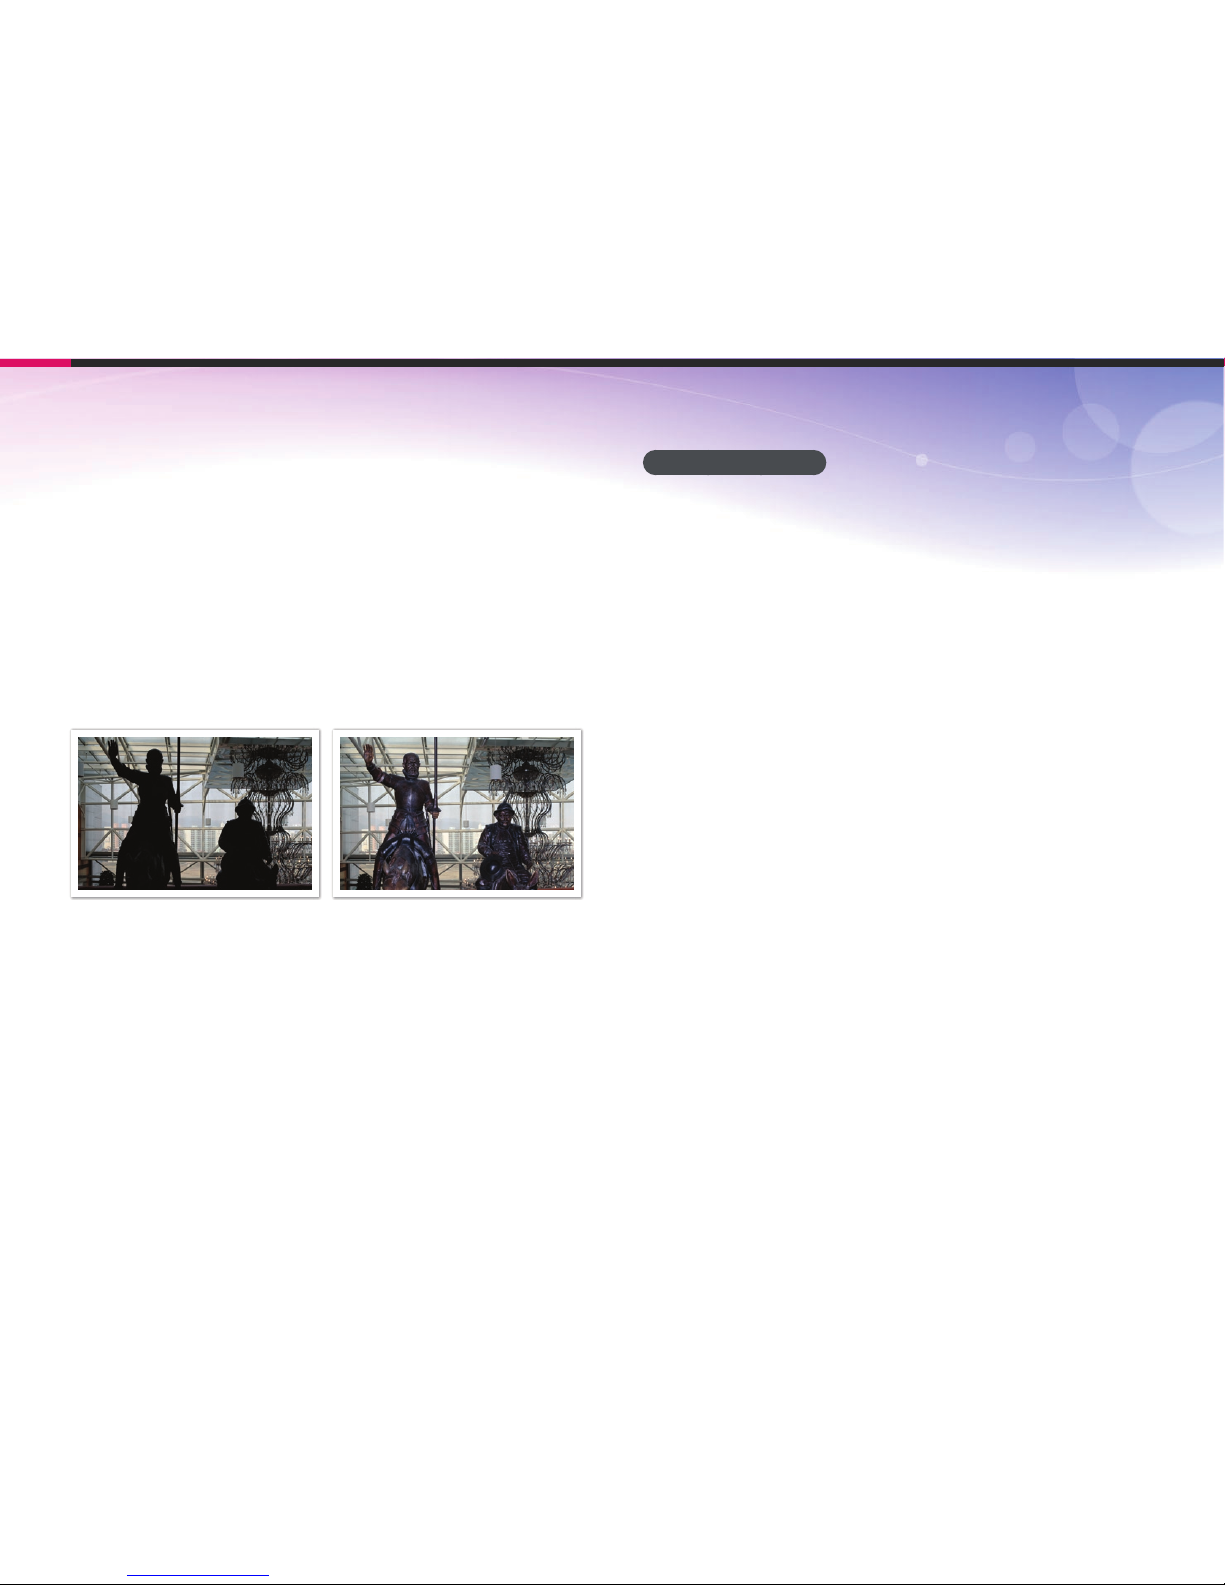
Using the rule of thirds will create photos with stable and compelling
compositions. Below are a few examples.
Photos with two subjects
If your subject is in one corner of the photo, it creates an unbalanced
composition. You can stabilize the photo by capturing a second subject in
the opposite corner to balance the weight of the photo.
Subject 1
Subject 2
Subject 1
Subject 2
Unstable Stable
When taking landscape photos, centering the horizon will create an
unbalanced eect. Give more weight to the photo by moving the horizon
up or down.
Subject 1
Subject 2
Subject 1
Subject 2
Unstable Stable
Page 58
25
Concepts in Photography
Flash
Light is one of the most important components in photography. It’s not
easy, however, to have an enough amount of light anytime and anywhere.
Making use of a ash allows you to optimize light settings and create a
variety of eects.
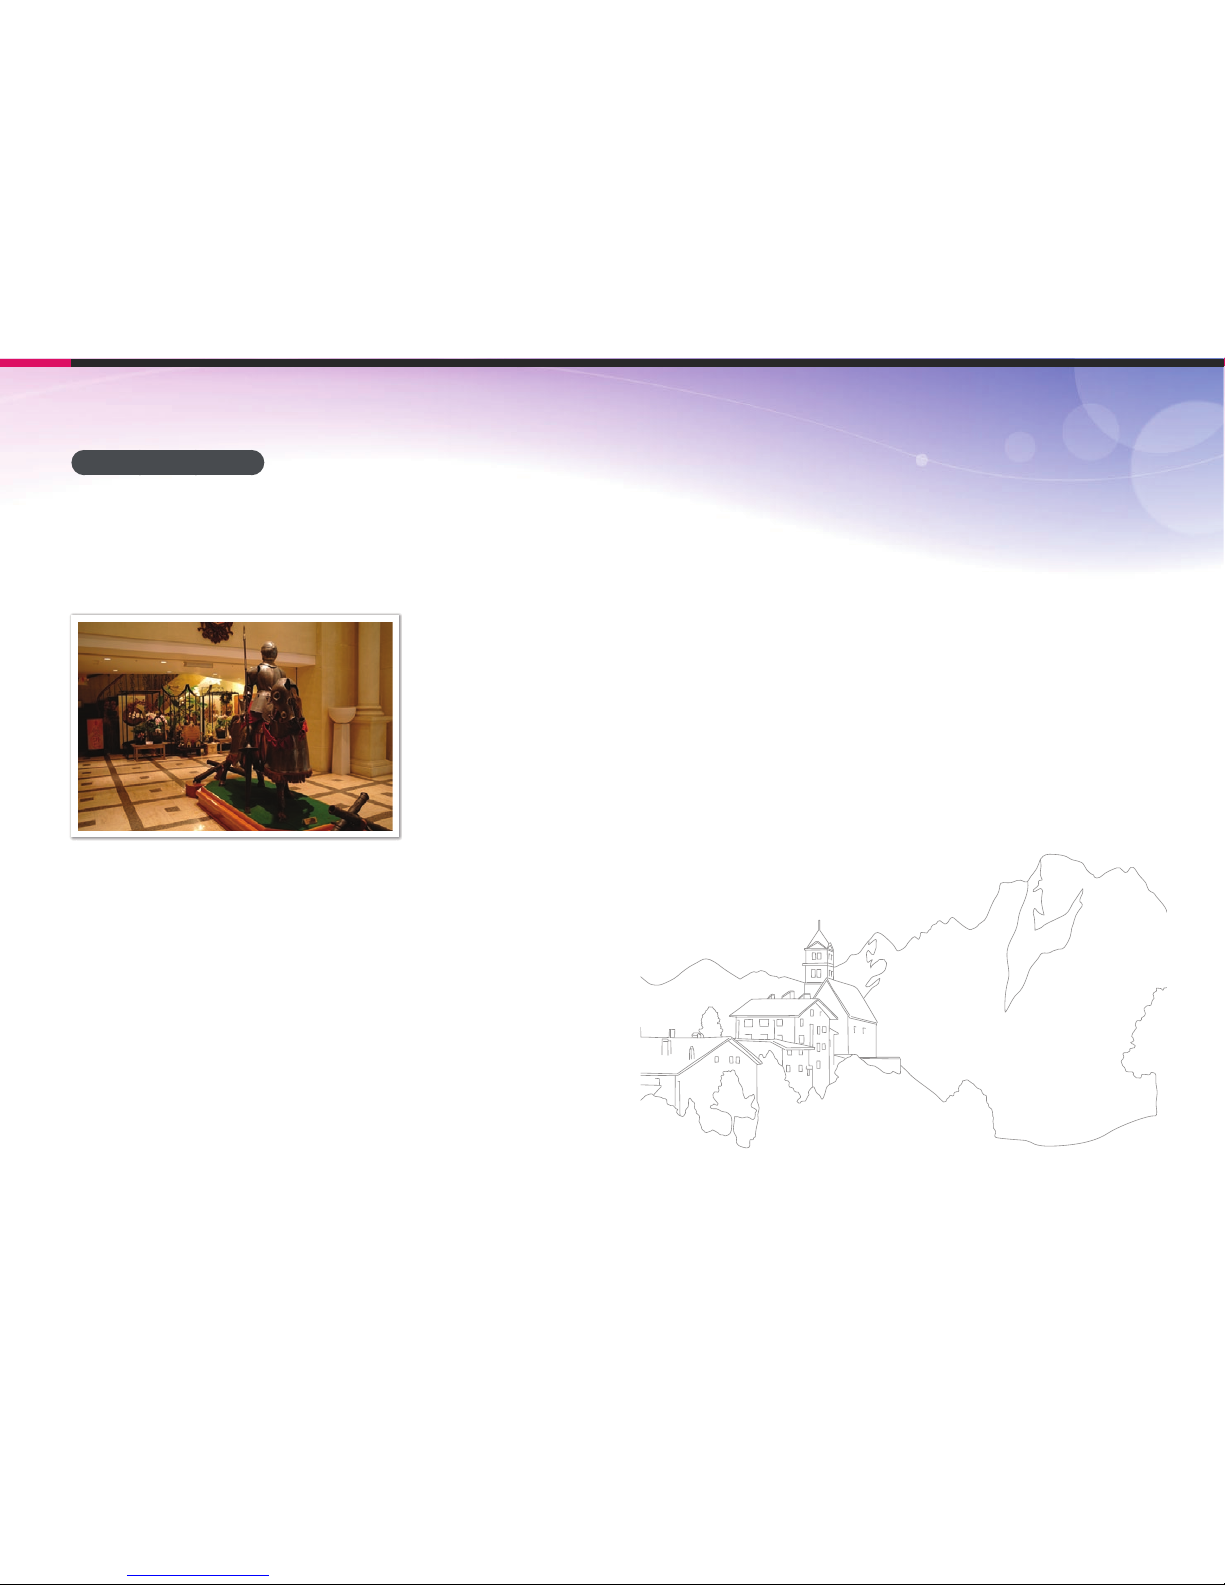
Flash, also known as strobe or speed light, helps to create adequate
exposure in low-light conditions. It is also useful in light-abundant
situations. For example, ash can be used in compensating the exposure
of a subject’s shadow or capturing clearly both the subject and the
background in backlit conditions.
Before correction After correction
Flash guide number
The model number of a ash refers to the ash’s power, and the maximum
amount of light created is represented by a value known as a “guide
number.” The bigger the guide number, the more light is emitted from the
ash. The guide number is achieved by multiplying the distance from the
ash to the subject and the aperture value when the ISO sensitivity is set
to 100.
Guide number = Flash to Subject Distance X Aperture value
Aperture value = Guide number / Flash to Subject Distance
Flash to Subject Distance = Guide number / Aperture value
Therefore, if you know the guide number of a ash, you can estimate an
optimum ash to subject distance when setting the ash manually. For
example, if a ash has a guide number of GN 20 and is 4 meters away from
the subject, the optimal aperture value is F5.0.
Page 59
26
Concepts in Photography
Bounce Photography
Bounce photography refers to the method of bouncing light o of the
ceiling or walls so that the light spreads evenly over the subject. Normally,
photos captured with ash may appear unnatural and cast shadows.
Subjects in photos captured with bounce photography cast no shadows
and look smooth due to evenly spread light.
Page 60

Chapter 1
My Camera
Learn about your camera’s layout, display icons, lens, optional accessories,
and basic functions.
Page 61
My Camera
28
Getting started
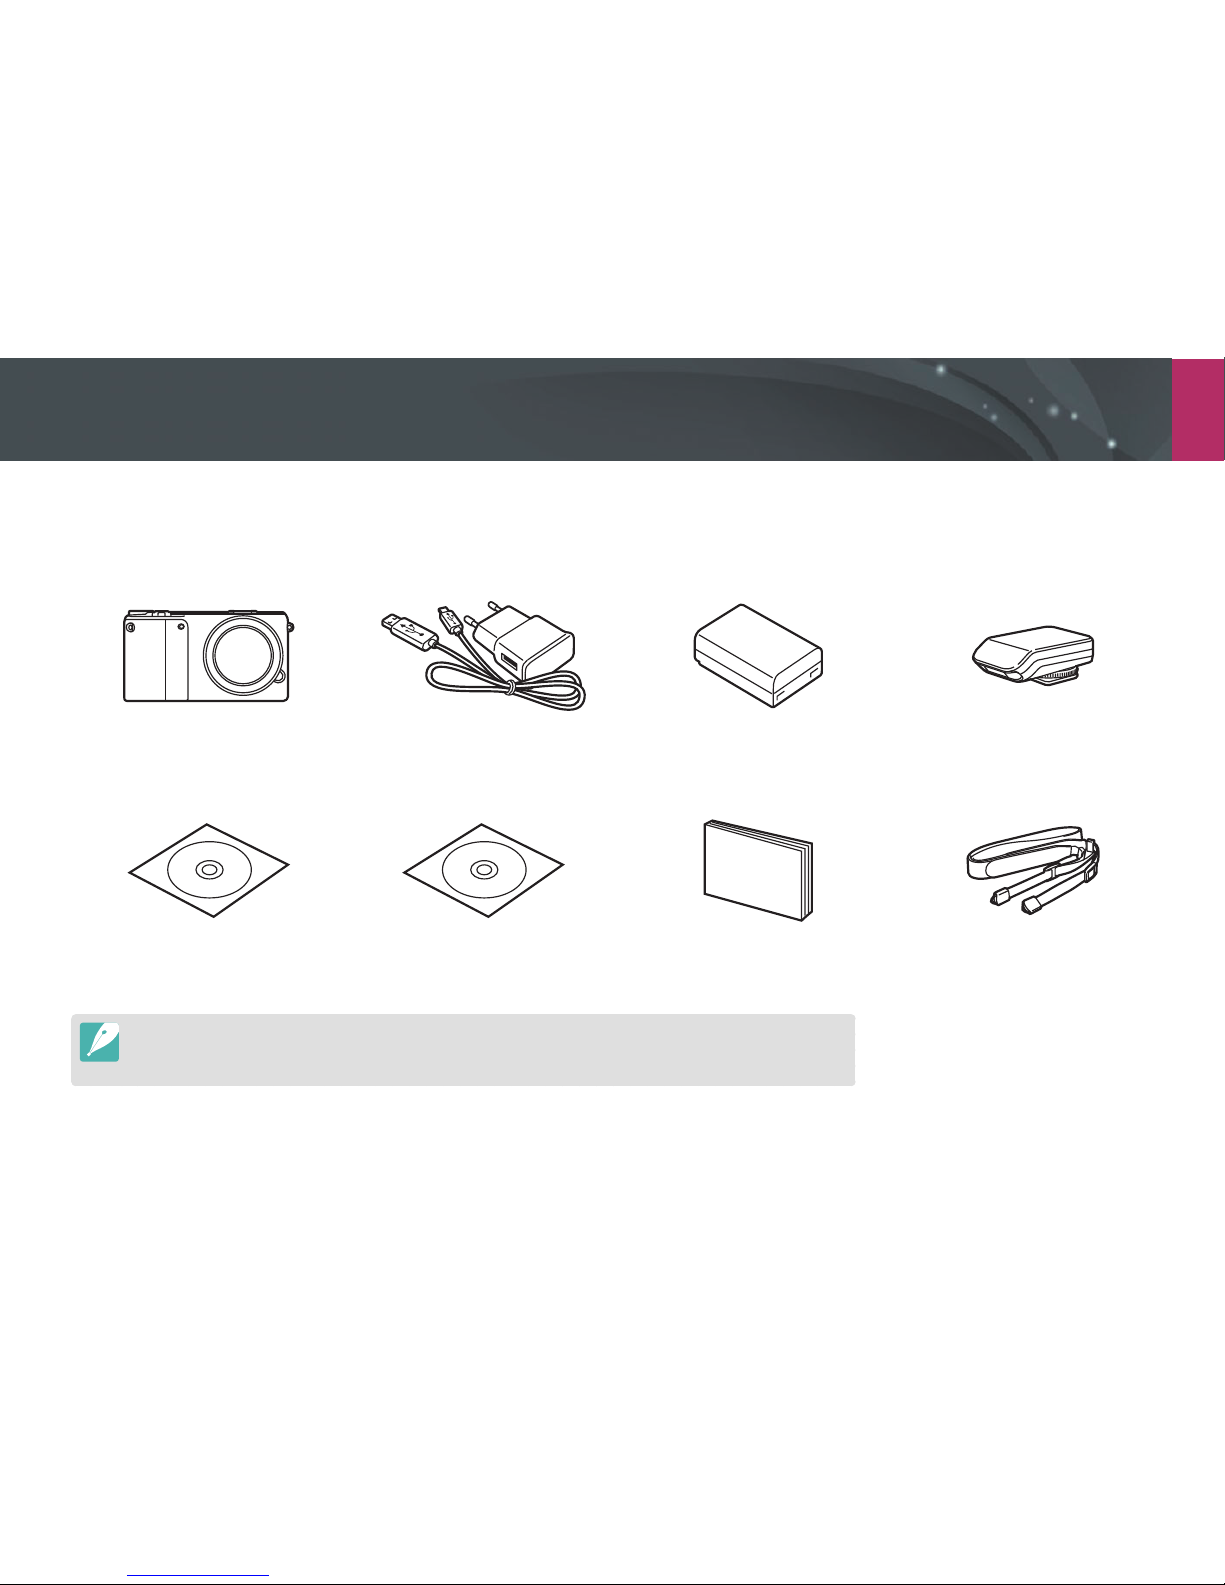
Unpacking
Check your product box for the following items.
Camera
(including the body cap and hot-shoe
cover)
AC adapter/USB cable Rechargeable battery External ash
Software CD-ROM
(User manual included)
Adobe Photoshop Lightroom DVD-ROM Quick Start Guide Strap
•
The illustrations may dier from your actual items.
•
You can purchase optional accessories at a retailer or a Samsung service center. Samsung is not responsible for any
problems caused by using unauthorized accessories. For information about accessories, refer to page 195.
Page 62
My Camera
29
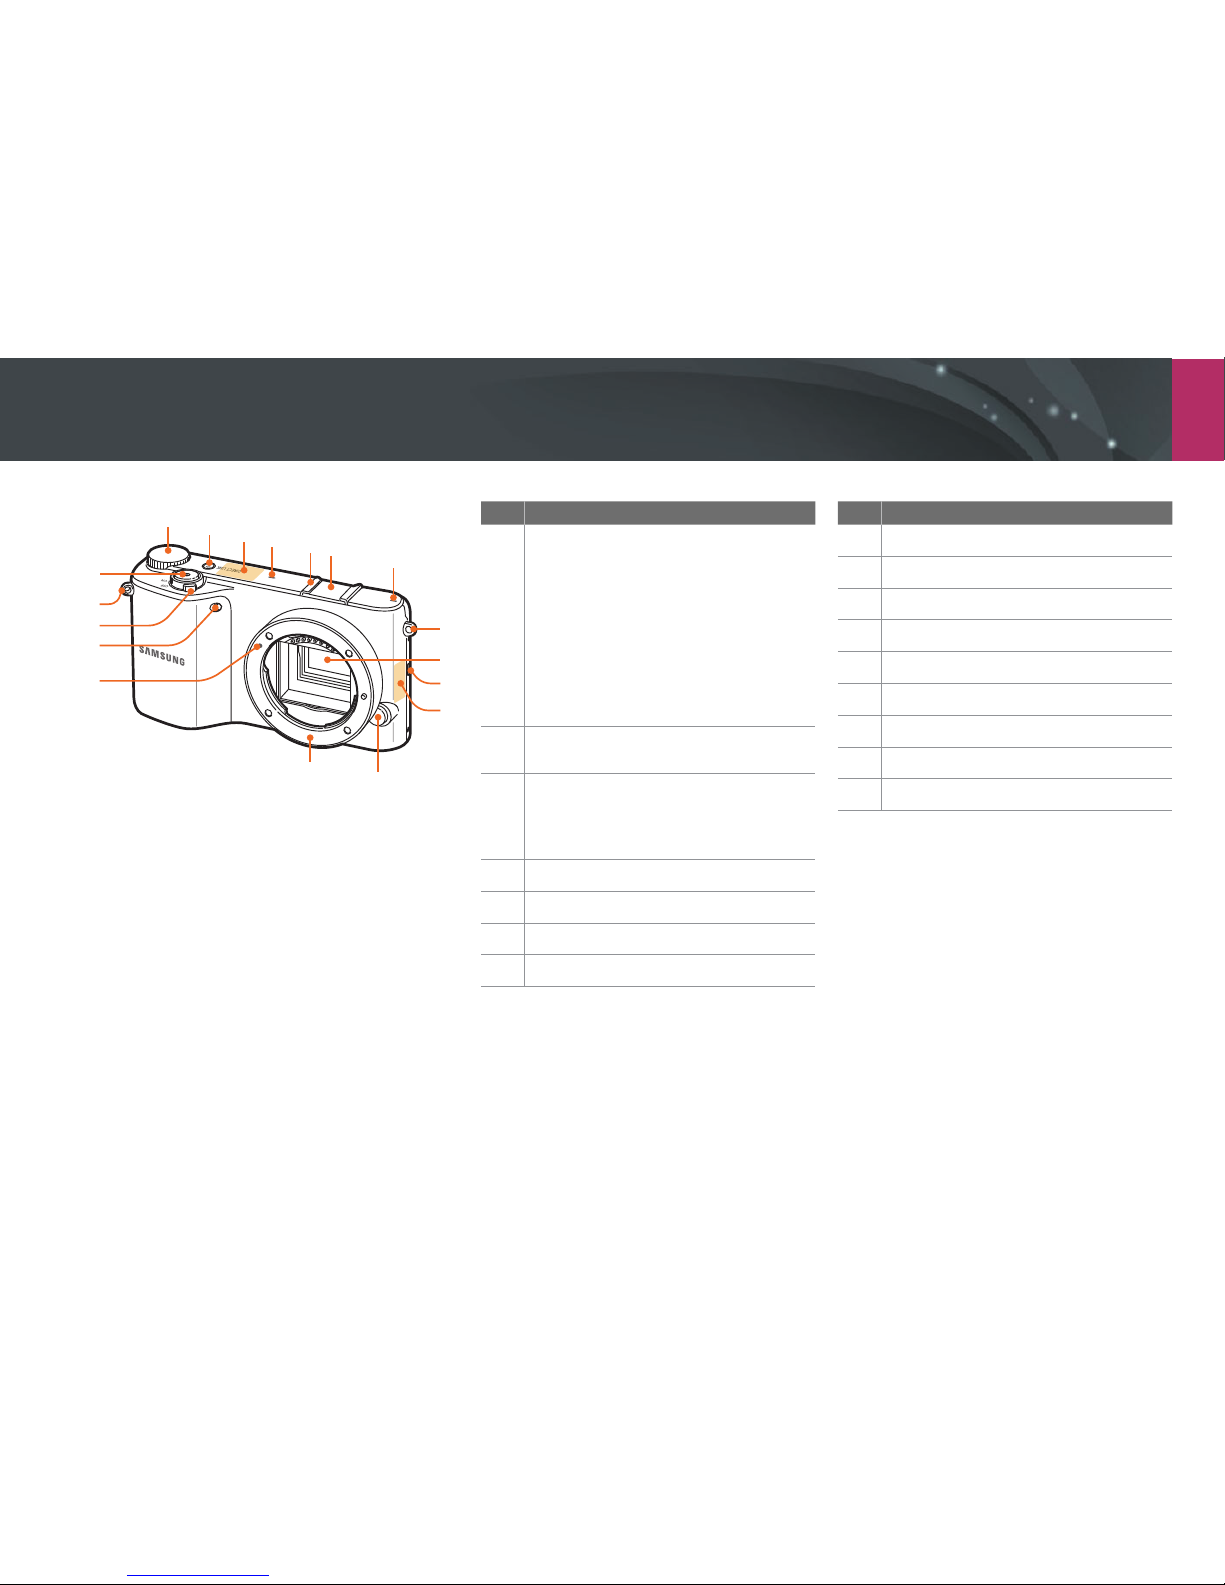
Camera layout
No. Name
1
Command dial
• In the Smart panel: Move to a desired
option or adjust a selected option.
• In Shooting mode: Access a Mode
screen in Shooting mode or adjust
shutter speed, aperture value, or
exposure value in some shooting
modes.
• In Playback mode: View thumbnails
or enlarge/reduce a photo.
2
DIRECT LINK button: Start a preset Wi-Fi
function. (p. 31)
3
Internal antenna
* Avoid contact with the internal
antenna while using the wireless
network.
4
Microphone
5
Hot-shoe
6
Hot-shoe cover
7
Eyelet for camera strap
No. Name
8
Image sensor
9
Speaker
10
NFC tag
11
Lens release button
12
Lens mount
13
Lens mount index
14
AF-assist light/Timer lamp
15
Power switch
16
Shutter button
1
2
3
5
7
9
10
11
12
13
14
6
4
8
7
16
15
4
Page 63
My Camera > Camera layout
30
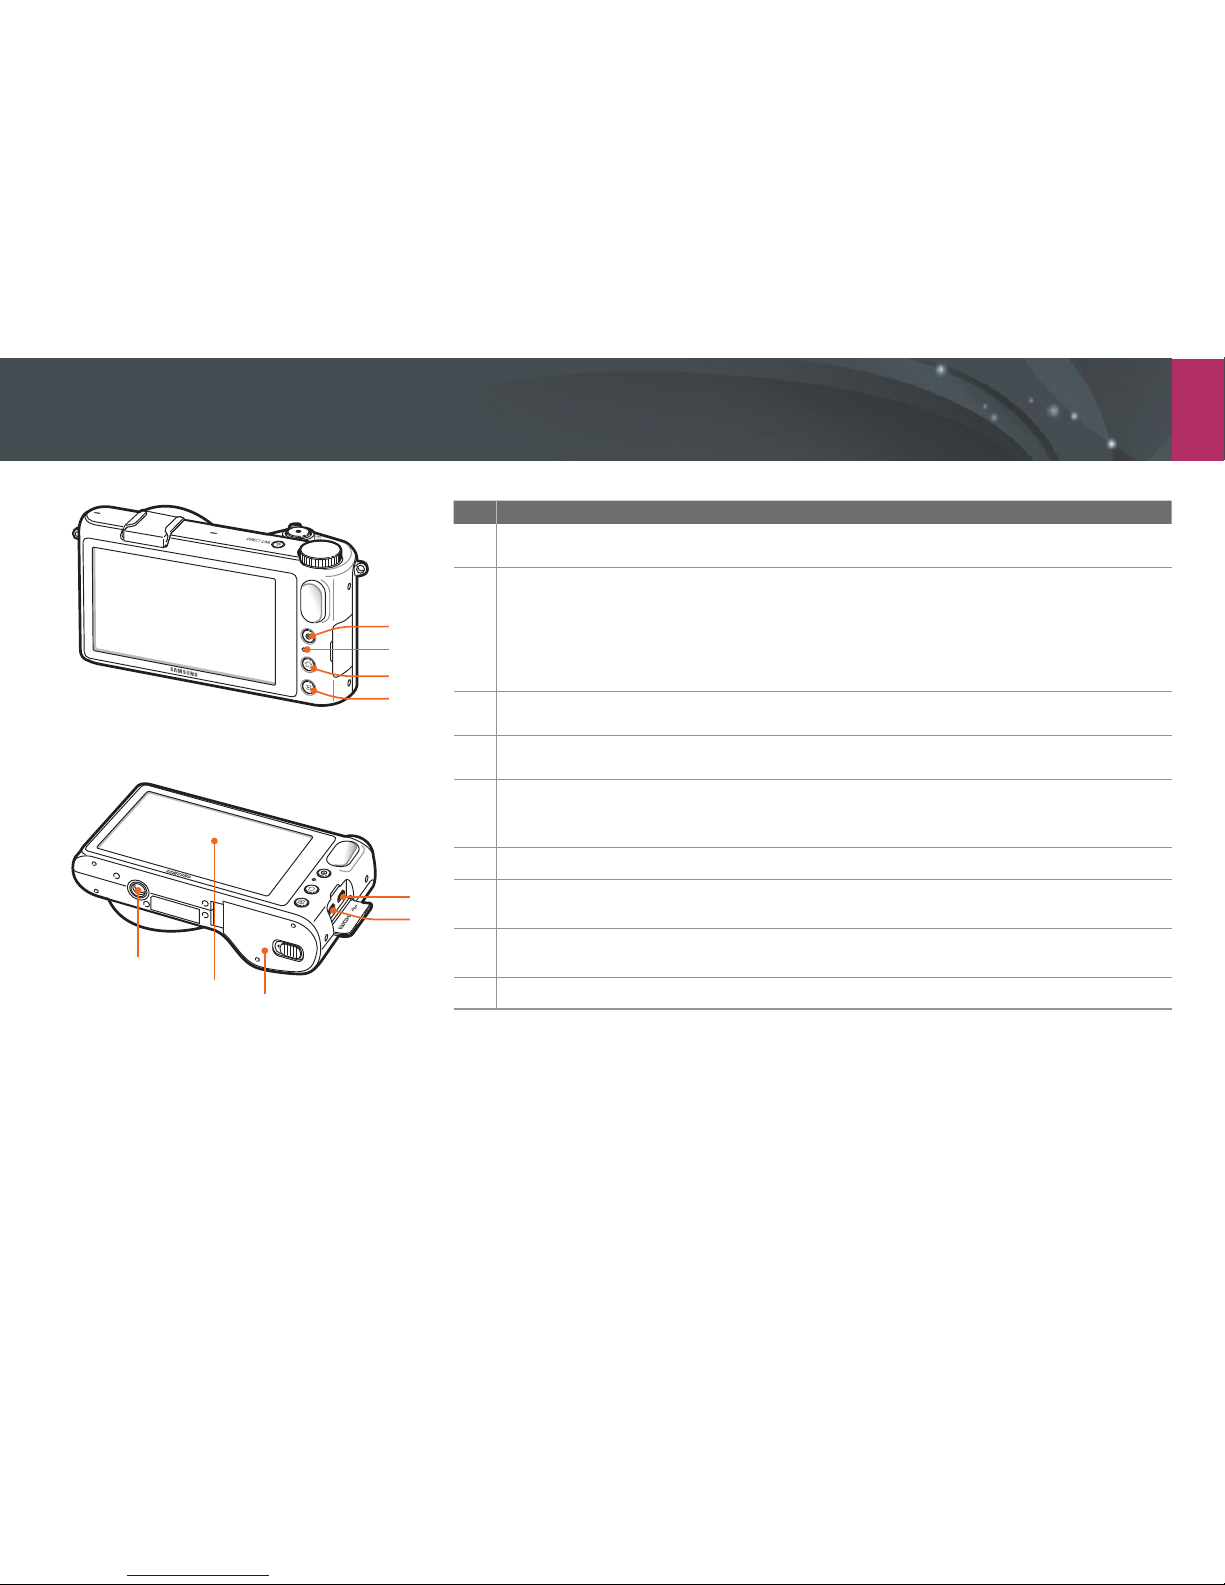
No. Name
1
Video recording button
Start recording a video.
2
Status lamp
Indicate the status of the camera.
• Blinking: When saving a photo, shooting a video, sending data to a computer, connecting to
WLAN, or sending a photo.
• Steady: When there is no data transfer between the camera and a computer, or the battery is
charging.
3
Mode button
Access the Mode screen. (p. 36)
4
Playback button
Enter Playback mode.
5
USB and shutter release port
Connect the camera to a computer or shutter release. Use a shutter release cable with a tripod to
minimize camera movement.
6
HDMI port
7
Battery chamber/Memory card cover
Insert a memory card and battery.
8
Display
Touch the screen to select a menu or an option. (p. 38)
9
Tripod mount
1
2
3
4
8
9
5
6
7
Page 64
My Camera > Camera layout
31
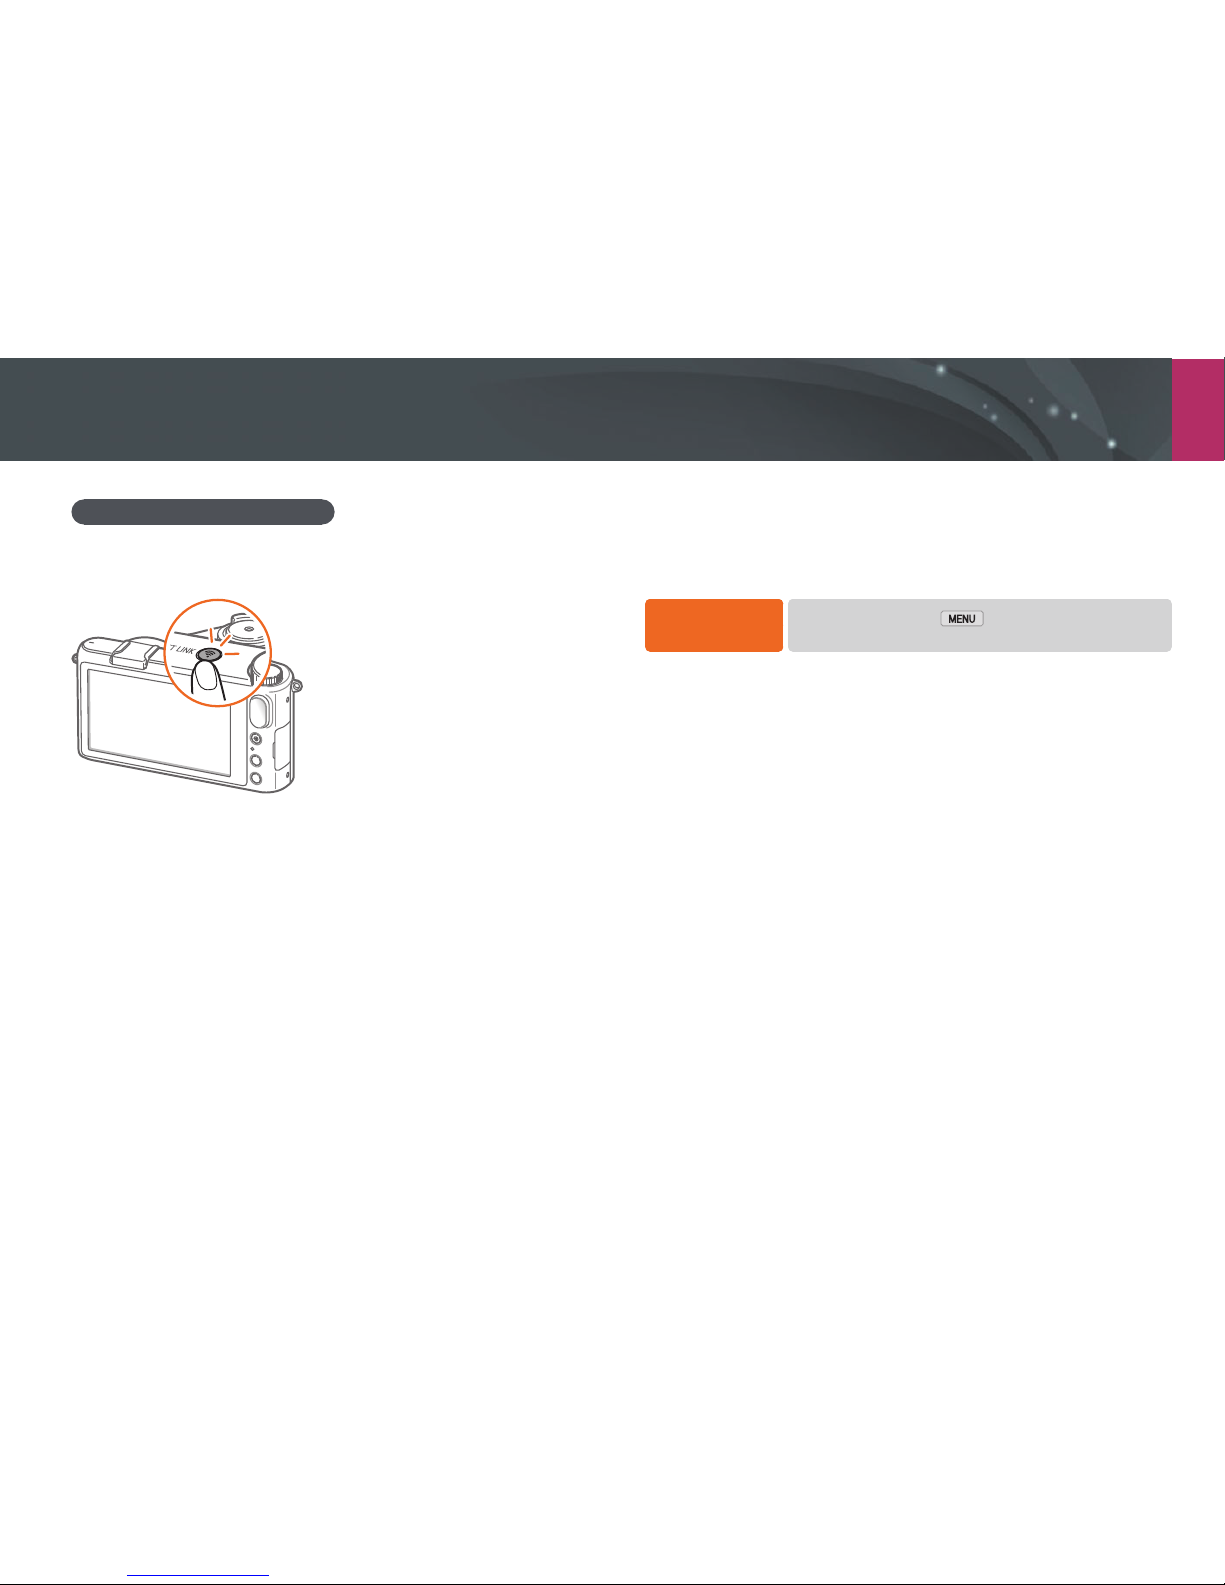
Setting the DIRECT LINK button
You can select a Wi-Fi function to launch when you press [DIRECT LINK].
(p. 150)
To set a DIRECT
LINK option,
In Shooting mode, touch → 5 → Key Mapping
→
DIRECT LINK → an option.
Using the DIRECT LINK button
You can turn on the Wi-Fi feature conveniently by pressing [DIRECT LINK].
Press [DIRECT LINK] again to return to the previous mode.
Page 65
My Camera > Camera layout
32
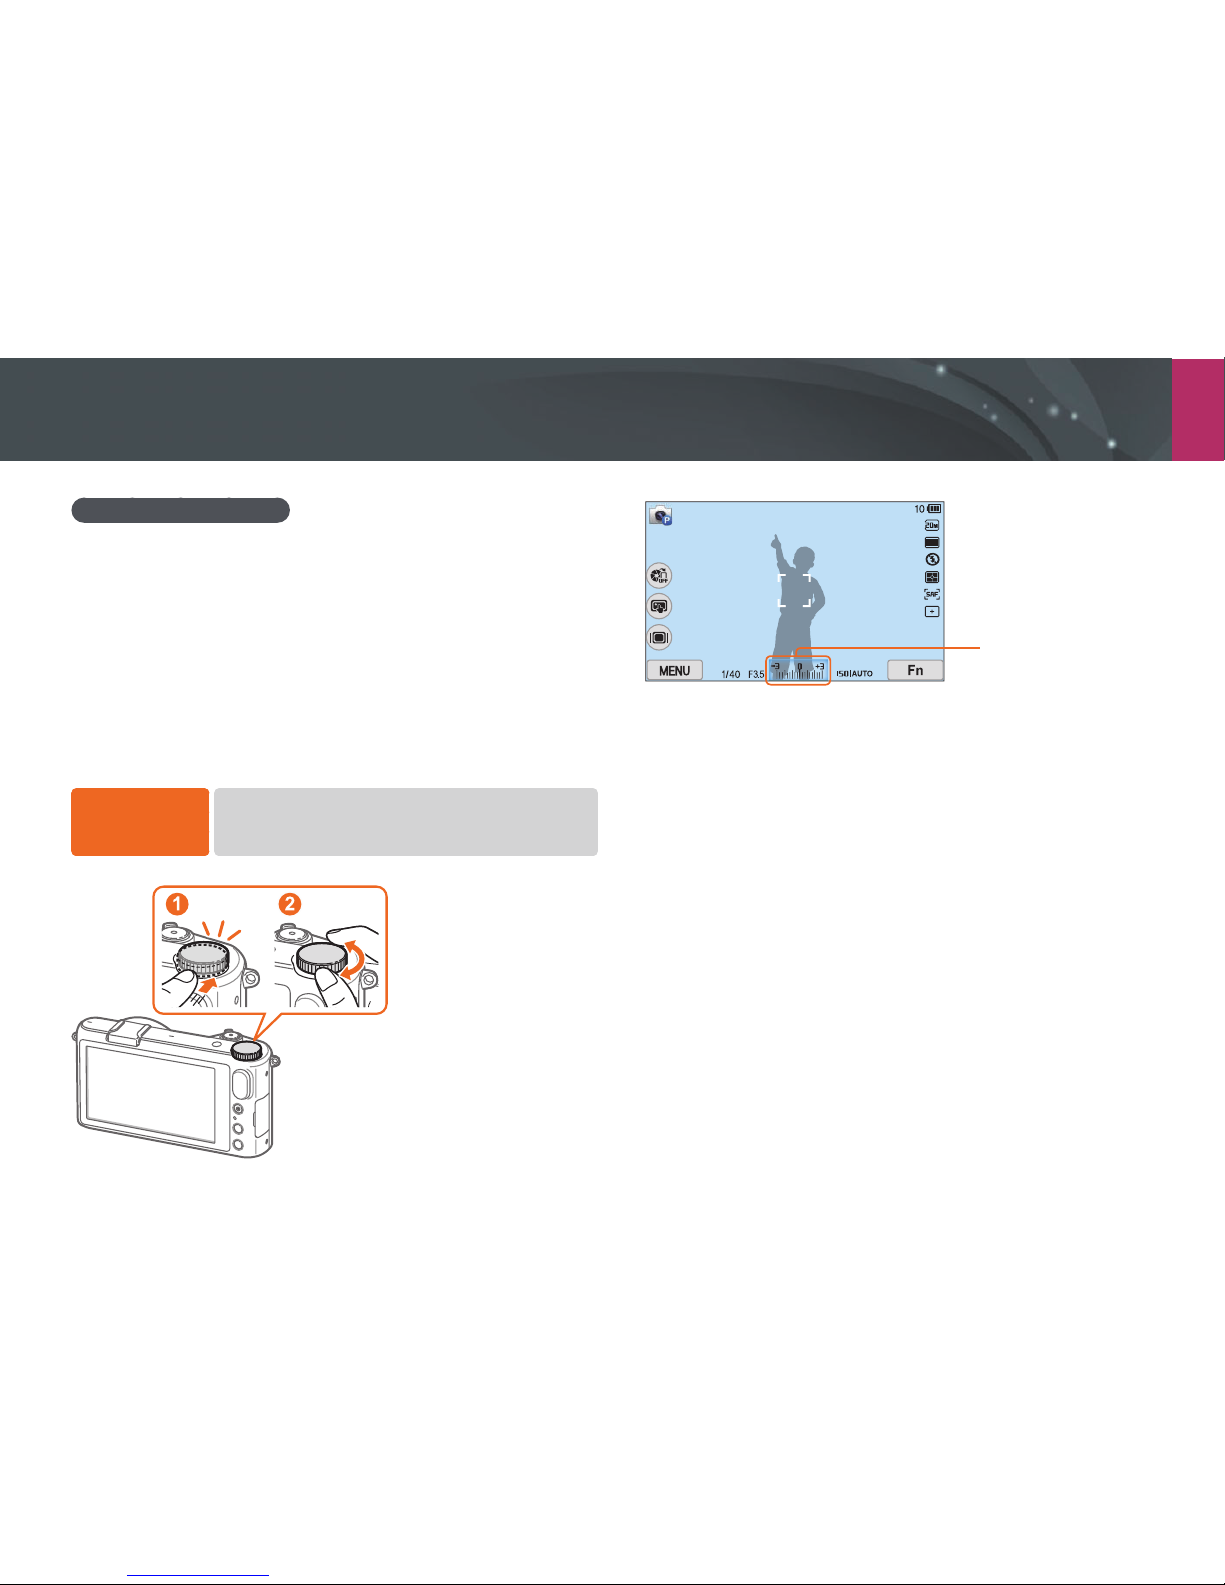
Exposure value
Using the command dial
You can adjust options such as aperture value, shutter speed, or exposure
value with the command dial in some shooting modes. Press the
command dial, and then rotate it clockwise or anti-clockwise.
You can also adjust some options with the command dial in the Smart
panel. In the Smart panel, rotate the command dial to move to a desired
option, press the command dial to select it, and then rotate the command
dial to adjust the selected option.
E.g. Adjusting the exposure value in Program mode
To adjust the
exposure value,
On the Mode screen, touch Expert → Program → press the
command dial twice to select the exposure value
→
rotate the
command dial to adjust.
Page 66
My Camera
33
Inserting the battery and memory card
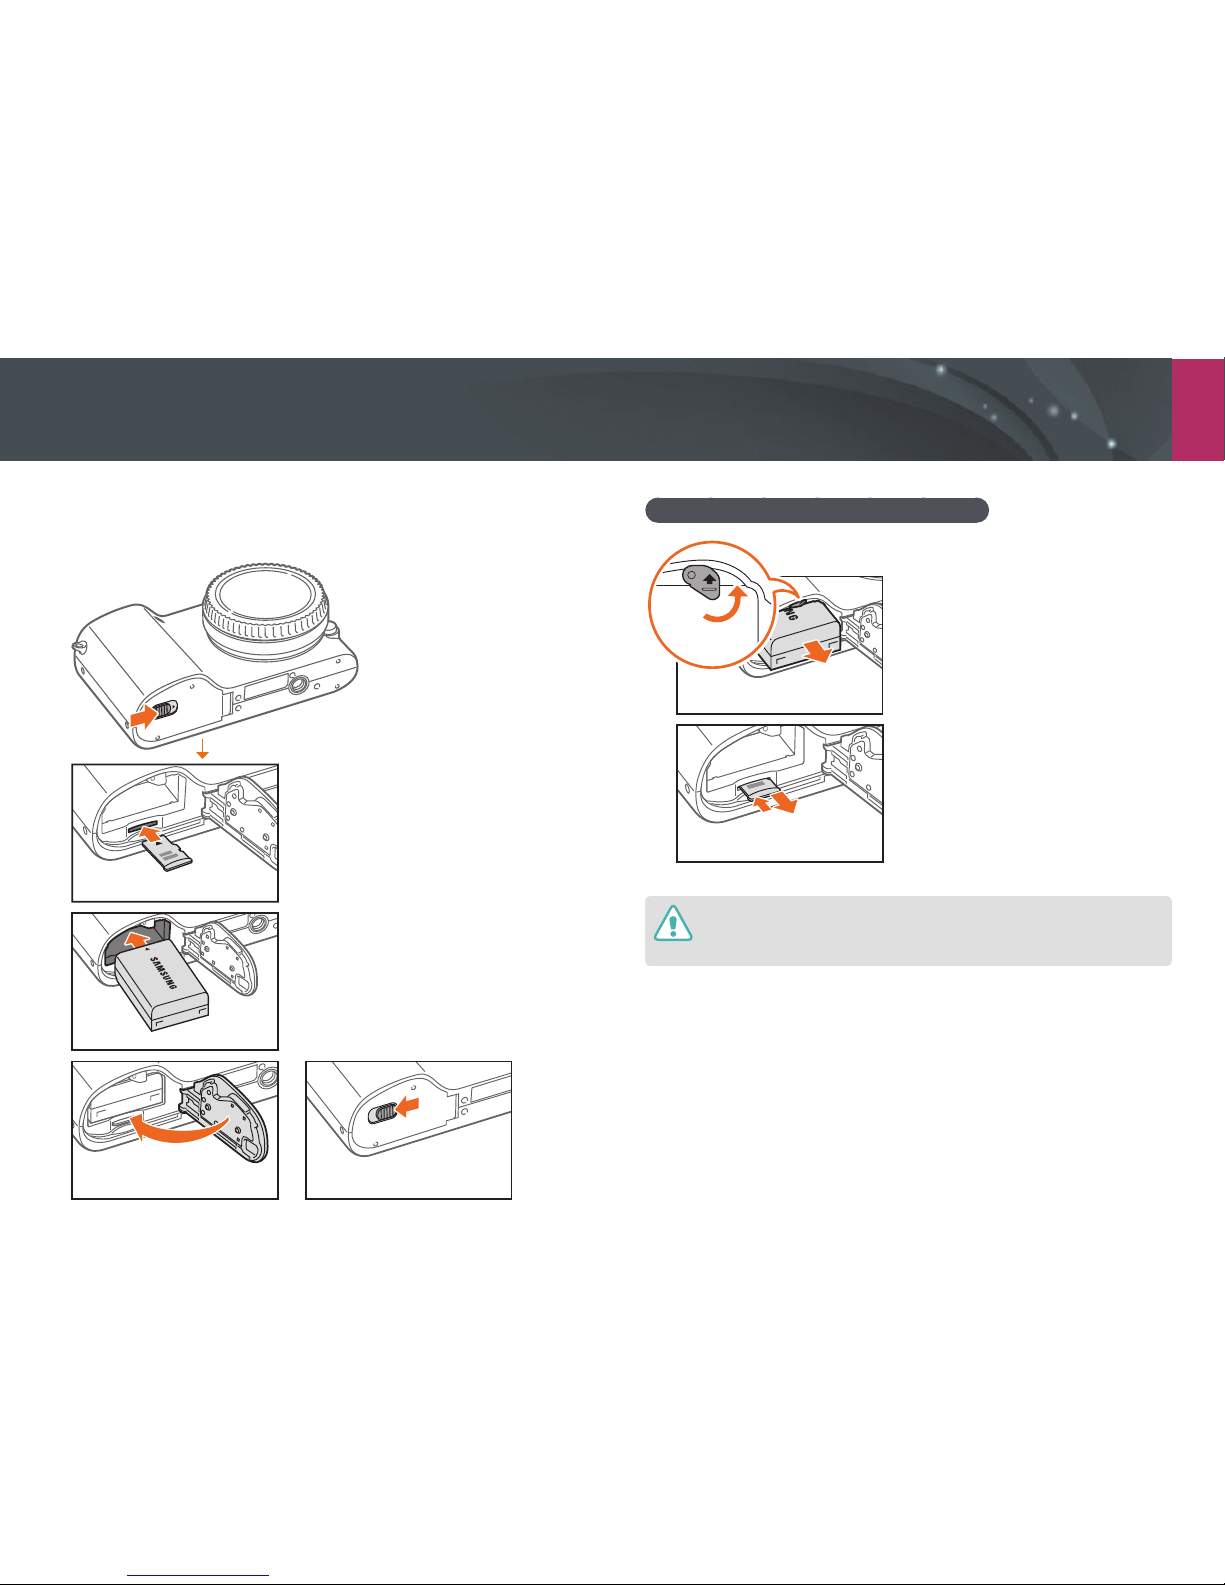
Learn how to insert the battery and an optional memory card into the
camera.
Memory card
Insert a memory card with the goldcolored contacts facing down.
Rechargeable battery
Insert the battery with the Samsung logo
facing up.
Removing the battery and memory card
Rechargeable battery
Battery lock
Slide the lock up to release the
battery.
Memory card
Push the card gently until it
disengages from the camera, and
then pull it out of the slot.
While the status lamp of the camera is blinking, do not remove the memory card
or battery. Doing so may damage the data stored on the memory card or your
camera.
Page 67
My Camera
34
Charging the battery and turning on your camera
Charging the battery
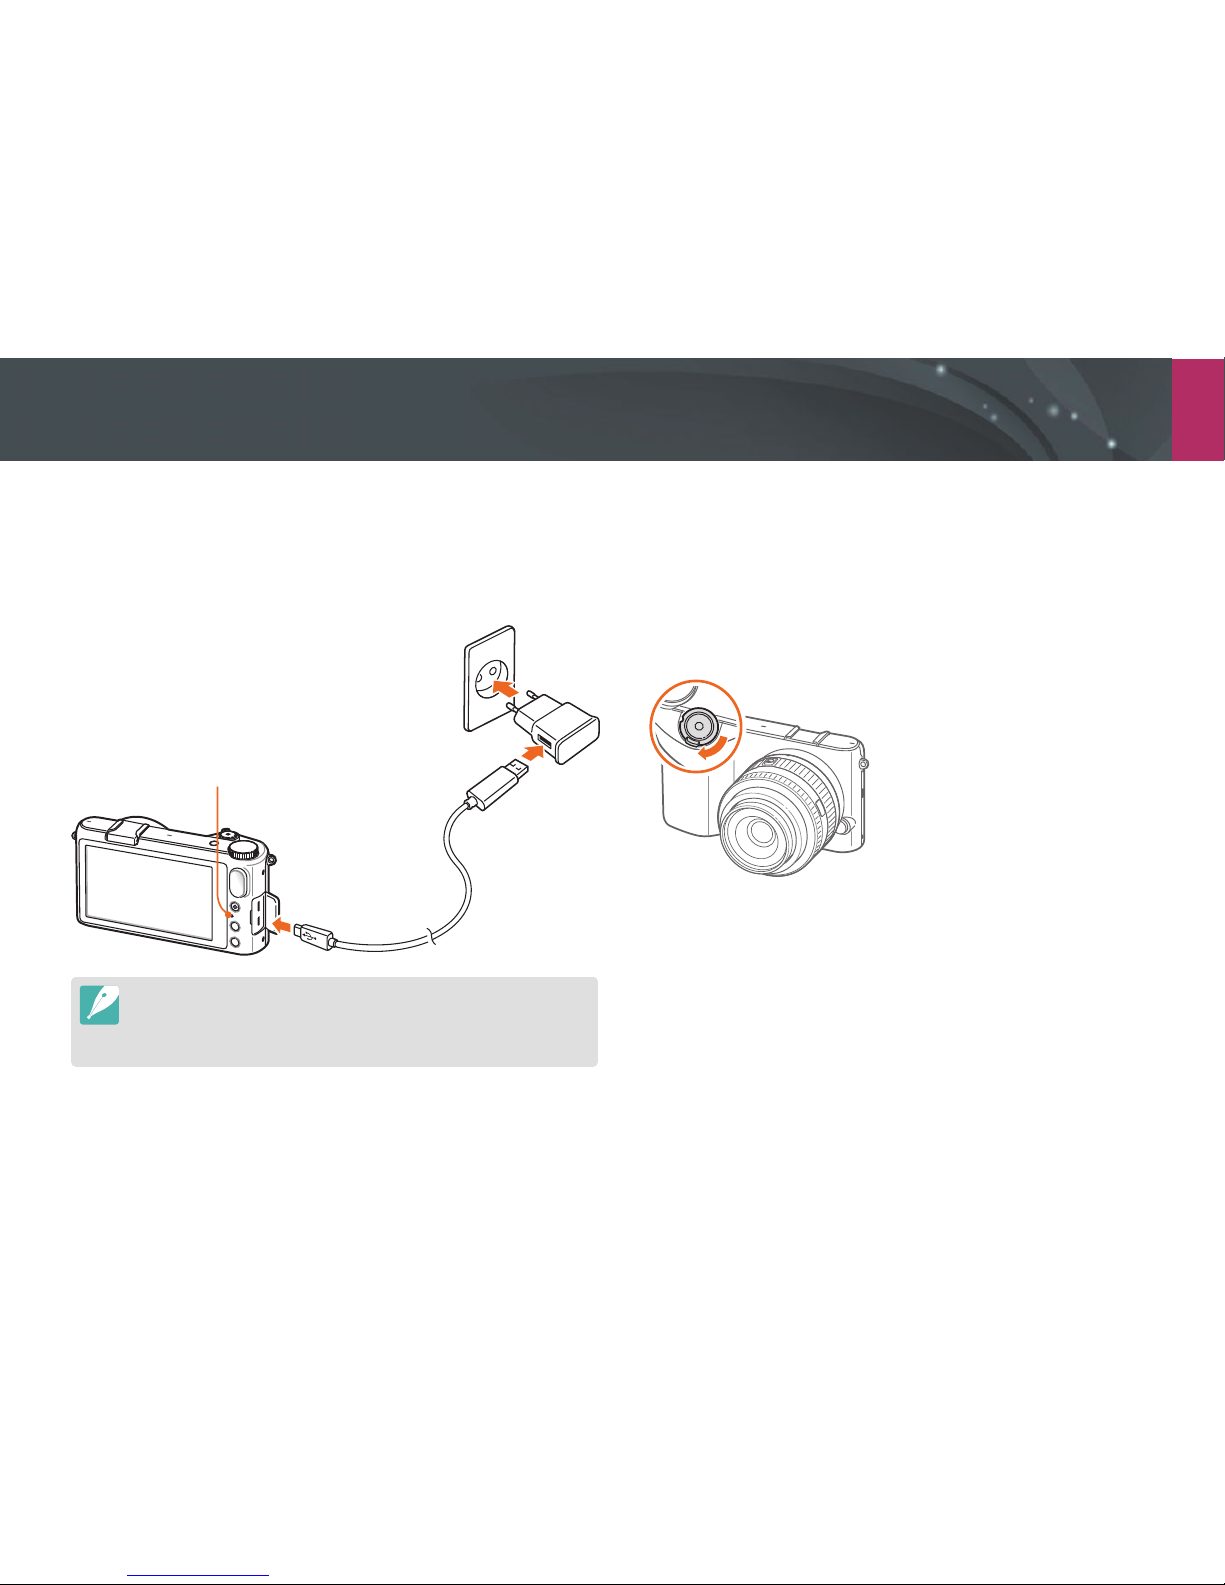
Before you use the camera for the rst time, you must charge the battery.
Plug the small end of the USB cable into your camera, and then plug the
other end of the USB cable into the AC adapter.
Status lamp
• Red light on: Charging
• Red light o: Fully charged
• Red light blinking: Error
•
Use only the AC adapter and USB cable supplied with your camera. If you use
another AC adapter, the camera battery may not charge or work properly.
•
You can charge the battery with the USB cable only when the camera is turned
o.
Turning on your camera
Set the Power switch to ON.
•
To turn your camera o, set the Power switch to OFF.
•
The initial setup screen appears when you turn on the camera for the
rst time. (p. 35)
ON
OFF
Page 68
My Camera
35
Performing the initial setup
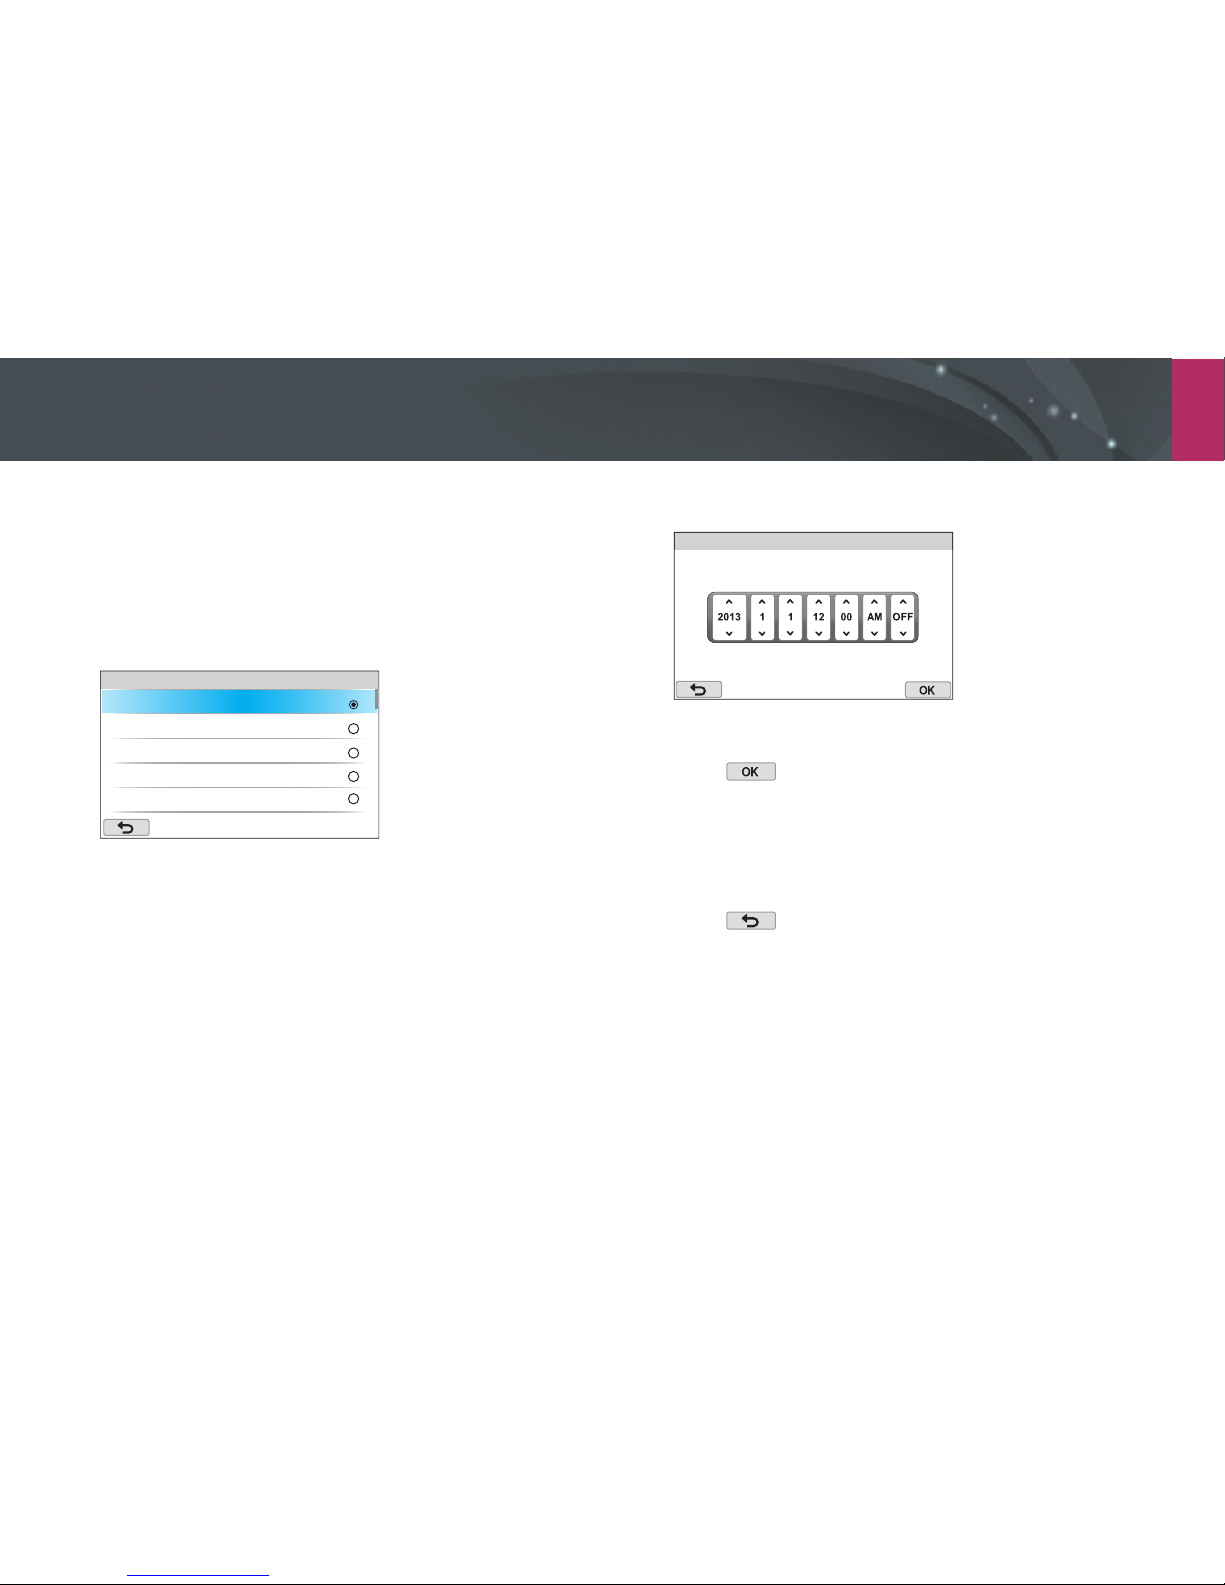
When you turn on your camera for the rst time, the initial setup screen
appears. The language is preset for the country or region where the
camera is sold. You can change the language as desired.
1
Touch Time Zone.
2
Drag the option list up or down, and then touch a time zone.
Time Zone
[GMT +00:00] London
[GMT -01:00] Cape Verde
[GMT -02:00] Mid-Atlantic
[GMT -03:00] Buenos Aires, Sao Paulo
[GMT -03:30] Newfoundland
3
Touch Date & Time.
4
Touch the up or down arrows to set an option.
Date & Time
Year Month Day Hr Min DST
•
The screen may dier depending on the language selected.
5
Touch .
6
Touch Date Type → a date type.
7
Touch Time Type → a time type.
8
Touch to nish the initial setup.
Page 69
My Camera
36
Selecting a mode
Select various modes and functions on the Mode screen.
Accessing a Mode screen
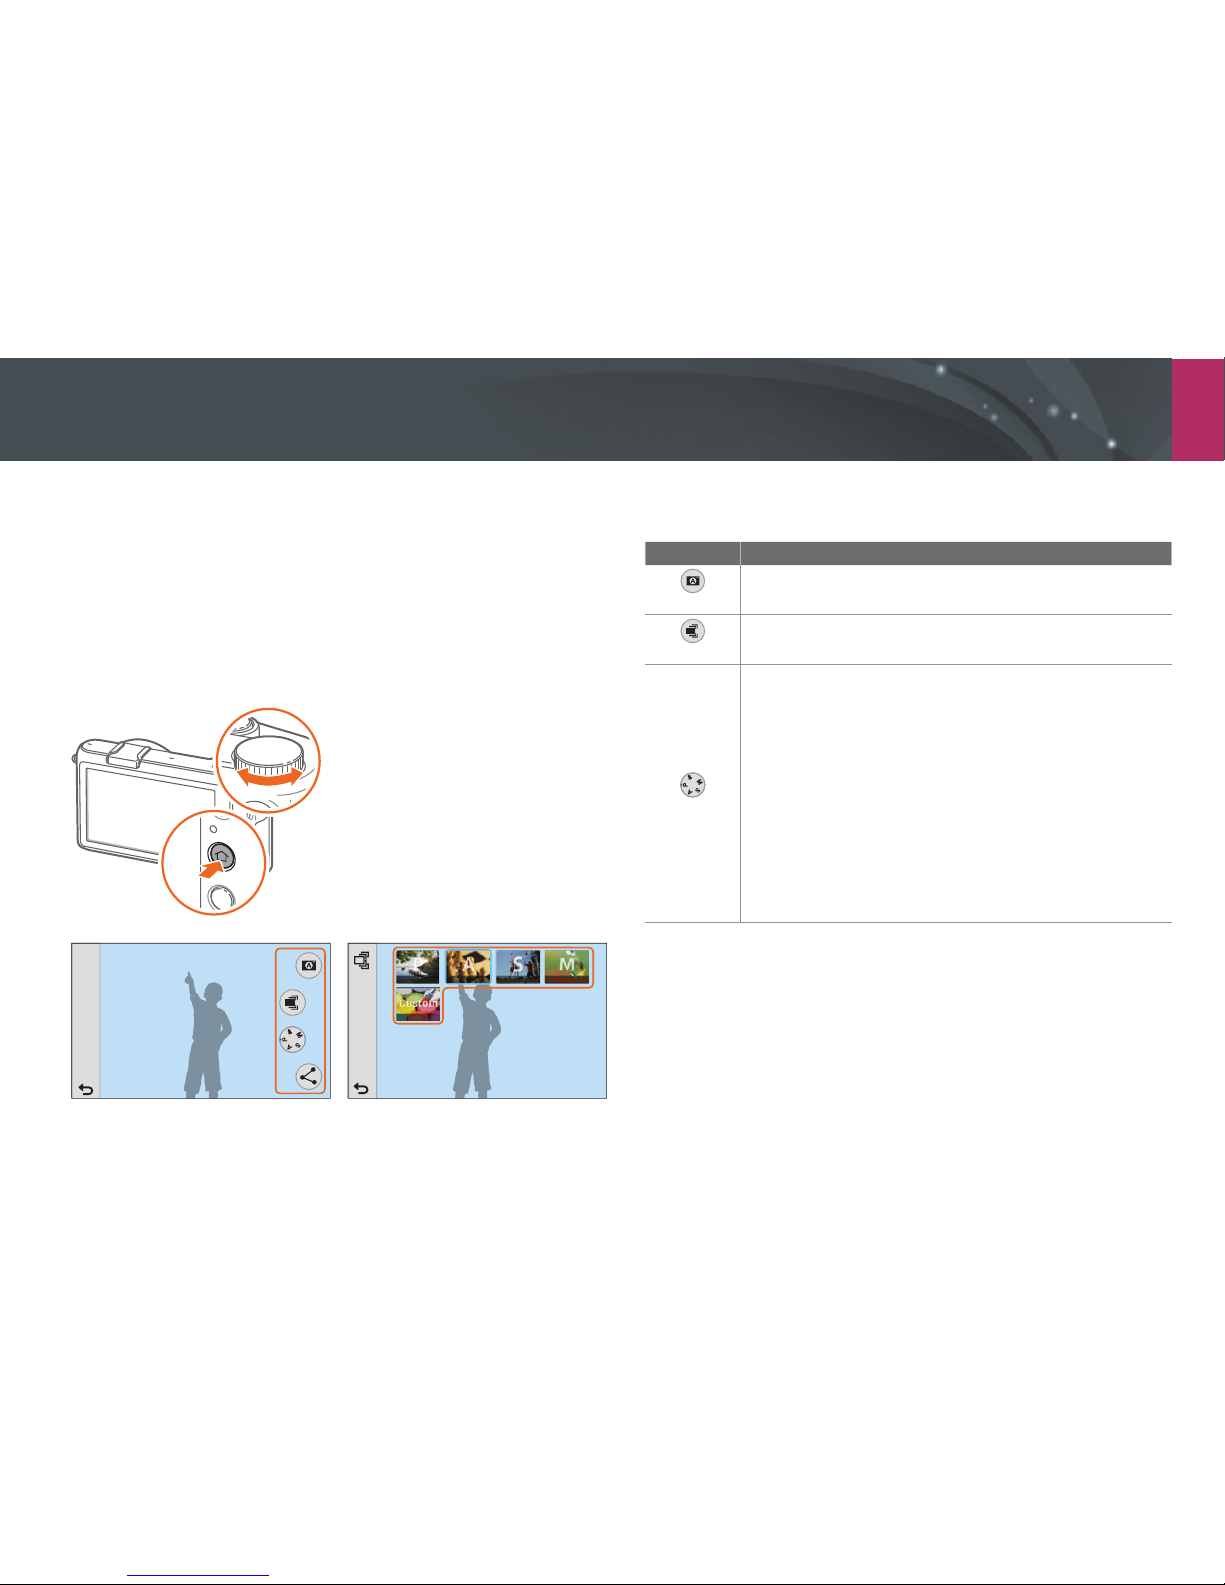
In Shooting or Playback mode, press [h]. Press [h] again to return to
the previous mode. You can also rotate the command dial to access a
Mode screen in Shooting mode.
Auto
Smart
Expert
Wi-Fi
Touch an icon to select a mode or function.
Mode description
Mode Description
Auto
Capture a photo with a scene mode selected automatically by
the camera. (p. 55)
Smart
Capture a photo with options that are preset for a specic
scene. (p. 57)
Expert
• Program: Capture a photo with settings you have adjusted
manually except the shutter speed and aperture value.
(p. 61)
• Aperture Priority: Set the aperture value manually while
the camera automatically selects an appropriate shutter
speed. (p. 62)
• Shutter Priority: Set the shutter speed manually while the
camera automatically selects an appropriate aperture value.
(p. 63)
• Manual: Adjust both the aperture value and the shutter
speed manually. (p. 64)
• Custom: Create your own shooting modes by adjusting
options and saving them. (p. 65)
Page 70
My Camera > Selecting a mode
37
Rearranging icons
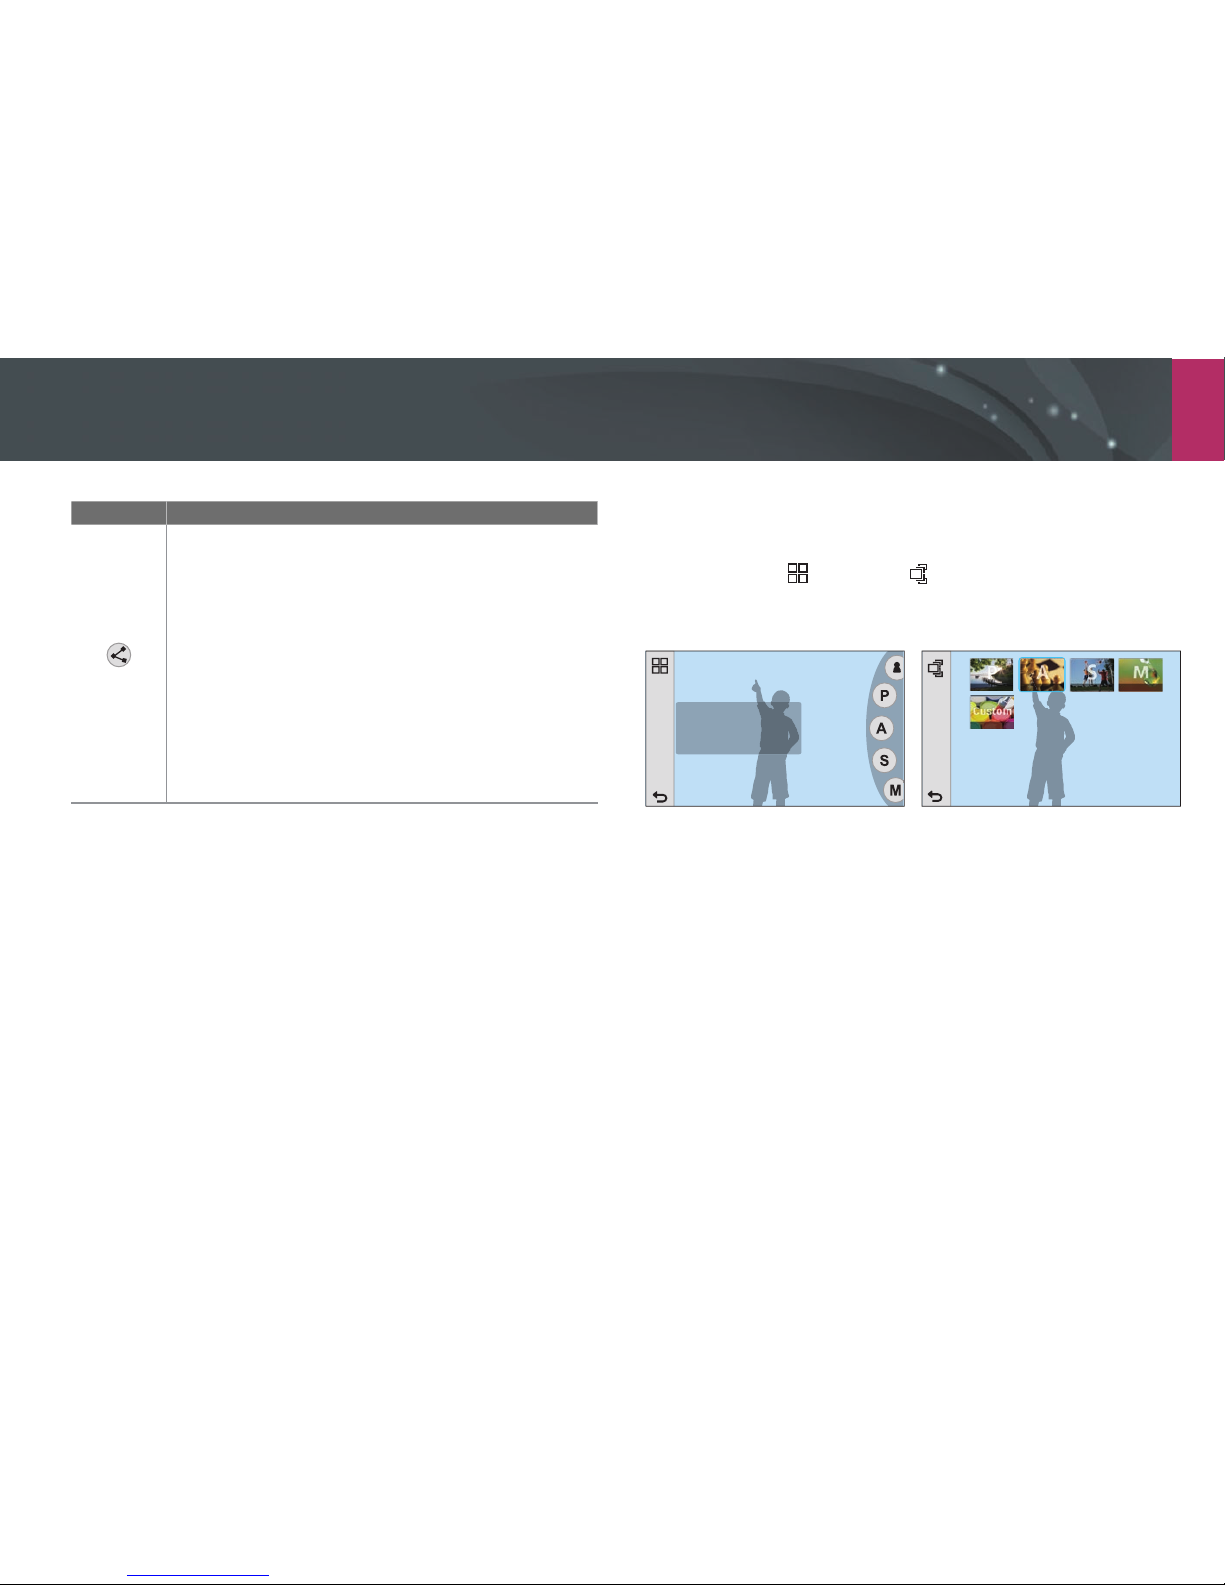
To change how icons appear on the sub-mode screen of Smart mode or
Expert mode, touch
(Grid View) or (List View) in the upper left corner
of the screen. If you selected List View, drag the option list up or down, or
rotate the mode dial on the screen, and then touch an icon.
<List View> <Grid View>
Mode Description
Wi-Fi
• MobileLink: Send photos or videos to a smart phone.
(p. 129)
• Remote Viewnder: Use a smart phone as a remote shutter
release and see a preview on your smart phone of an image
from your camera. (p. 131)
• Auto Backup: Send photos or videos that you captured
with the camera to a PC wirelessly. (p. 133)
• Email: Send photos or videos stored on the camera via
email. (p. 135)
• SNS & Cloud: Upload photos or videos to le sharing
websites. (p. 139)
• Samsung Link: Upload photos to Samsung Link online
storage or view les on other Samsung Link supported
devices. (p. 142)
Page 71
My Camera
38
Selecting functions (options)
Select menus or options by gently touching an item on the screen with
your ngertip.
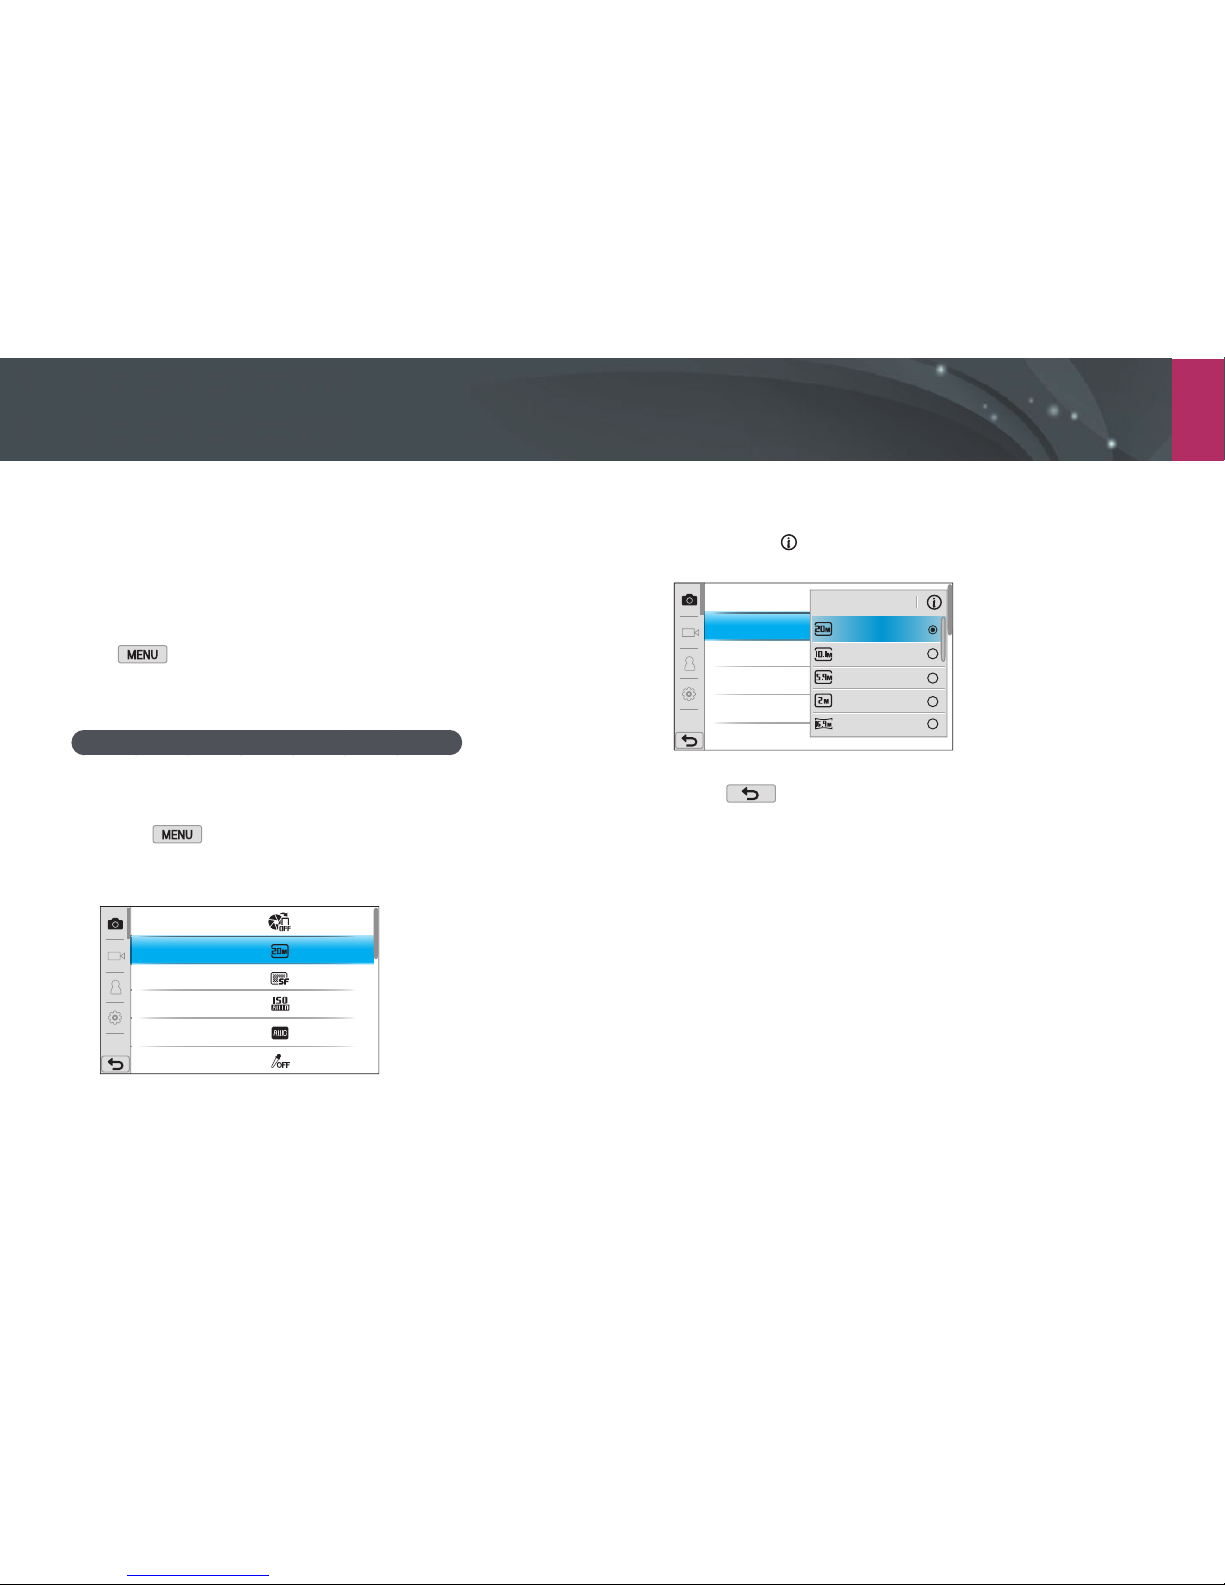
Using m
Touch on the screen, and then change shooting options or
settings.
E.g. Selecting the photo size in Program mode
1
On the Mode screen, touch Expert → Program.
2
Touch .
3
Touch 1 → Photo Size.
AutoShare
Photo Size
Quality
ISO
White Balance
Picture Wizard
4
Drag the option list up or down, and then touch an option.
•
If you touch , a pop-up window with information on features and
settings will be displayed.
AutoShare
Photo Size
Quality
ISO
White Balance
Picture Wizard
5472x3648 (3:2)
3888x2592 (3:2)
2976x1984 (3:2)
1728x1152 (3:2)
5472x3080 (16:9)
Photo Size
5
Touch to switch to Shooting mode.
Page 72
My Camera > Selecting functions (options)
39
Using the Smart panel
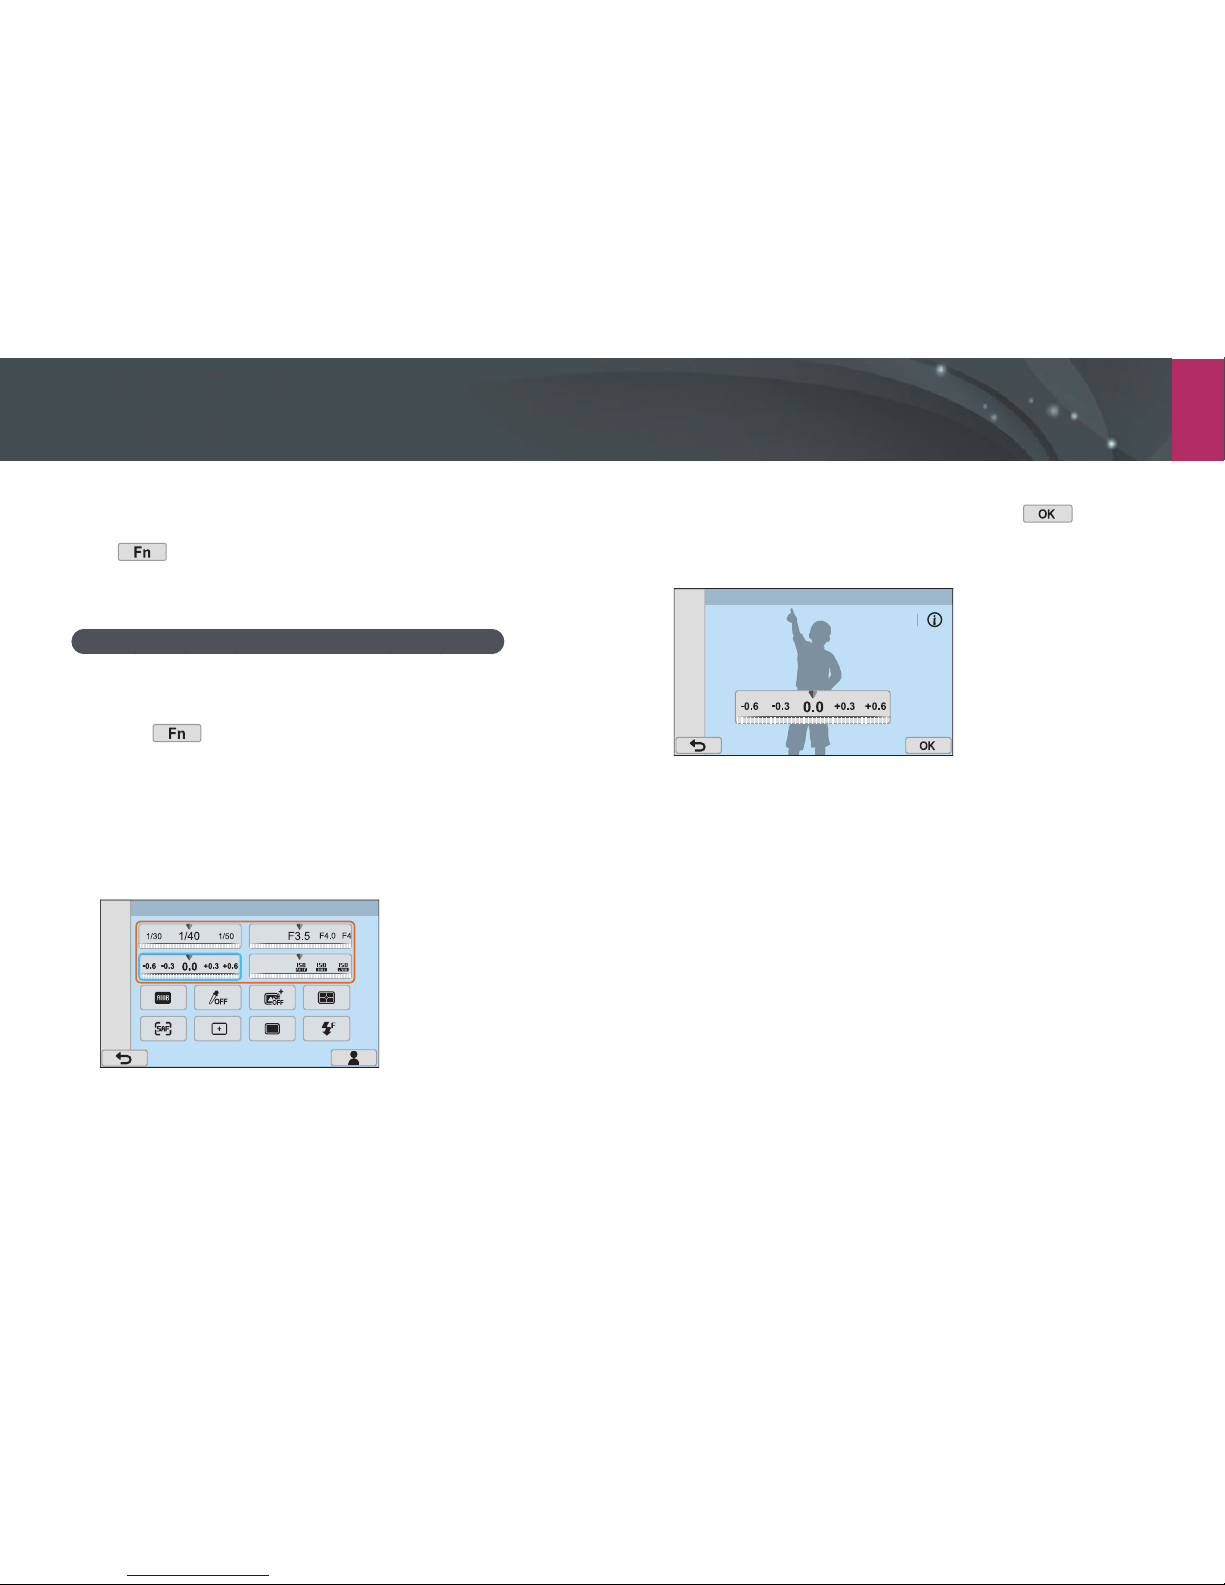
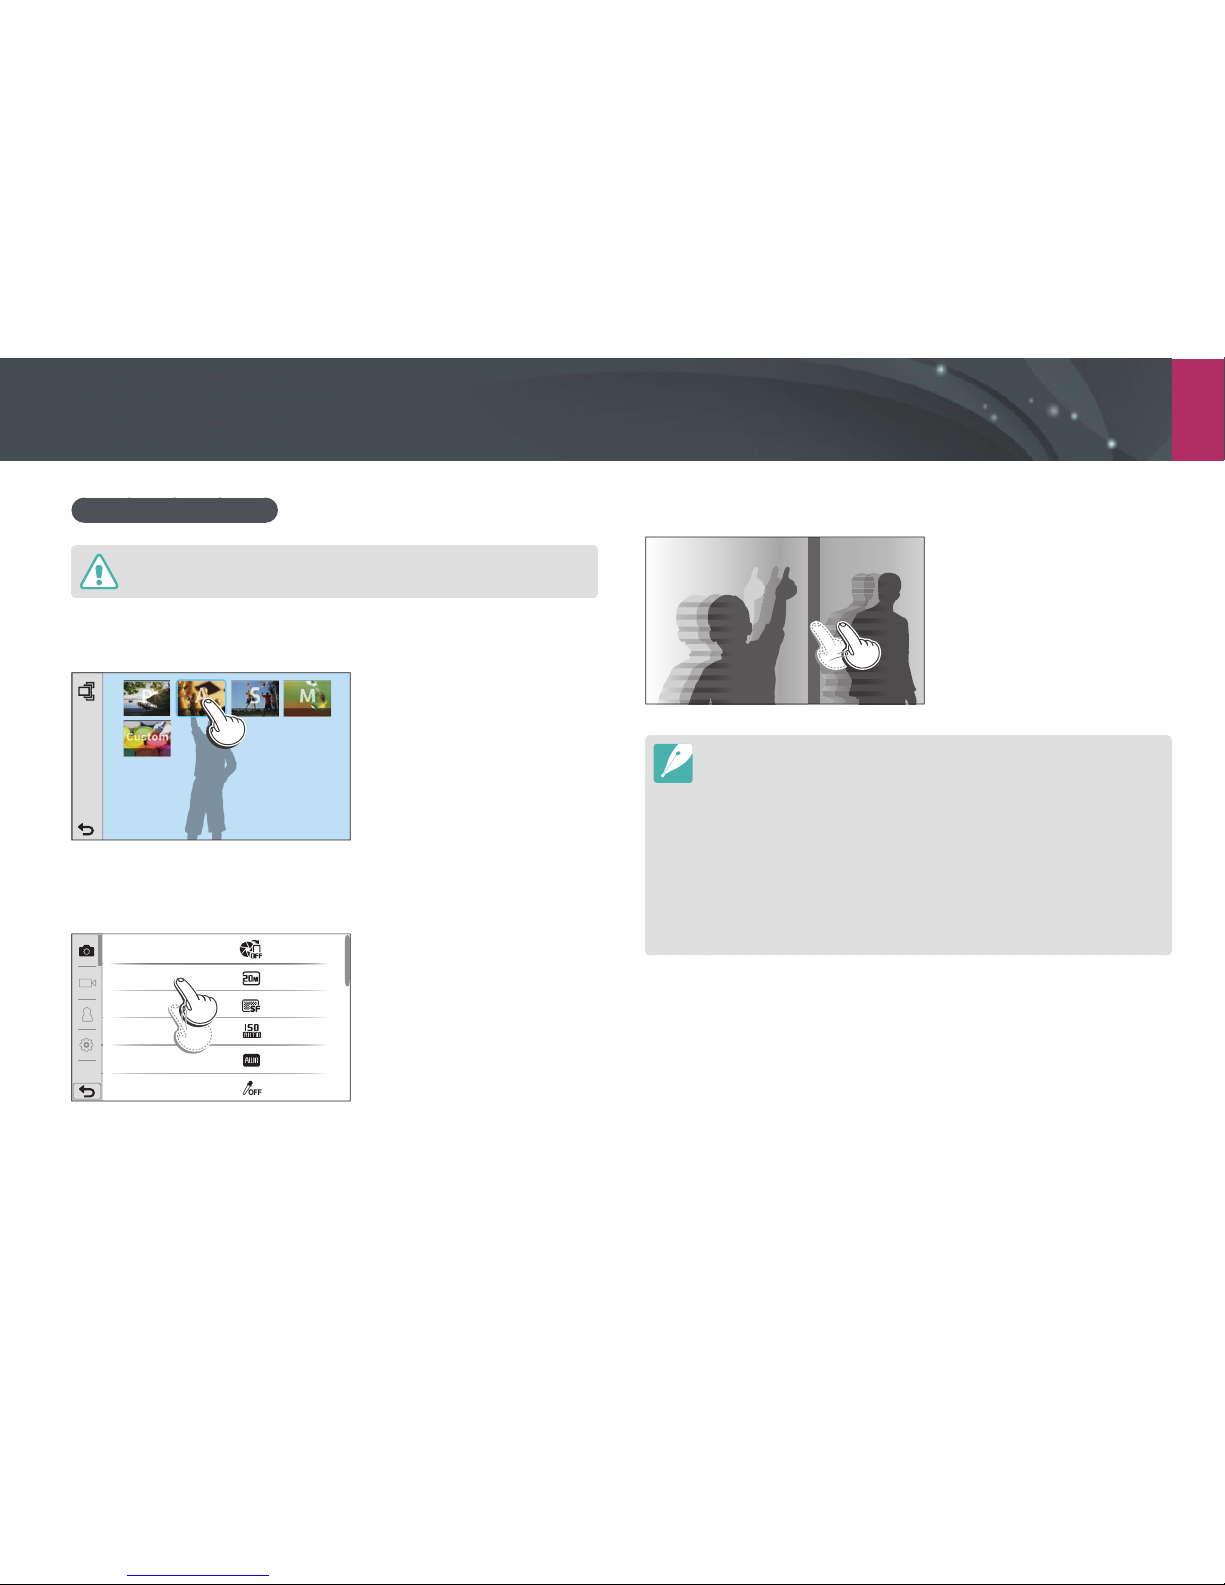
Touch on the screen to access some functions such as Exposure,
ISO, and White Balance.
E.g. Adjusting the exposure value in Program mode
1
On the Mode screen, touch Expert → Program.
2
Touch .
3
Touch EV.
•
You can also adjust some options by dragging the dial on the
screen with your nger. Alternatively, rotate the command dial to
move to a desired option, press the command dial to select it, and
then rotate the command dial to adjust the selected option.
EV : 0.0
4
Drag the dial on the screen, and then touch to adjust
the option.
•
You can also rotate the command dial to adjust the option. (p. 32)
EV : 0.0
Page 73
My Camera > Selecting functions (options)
40
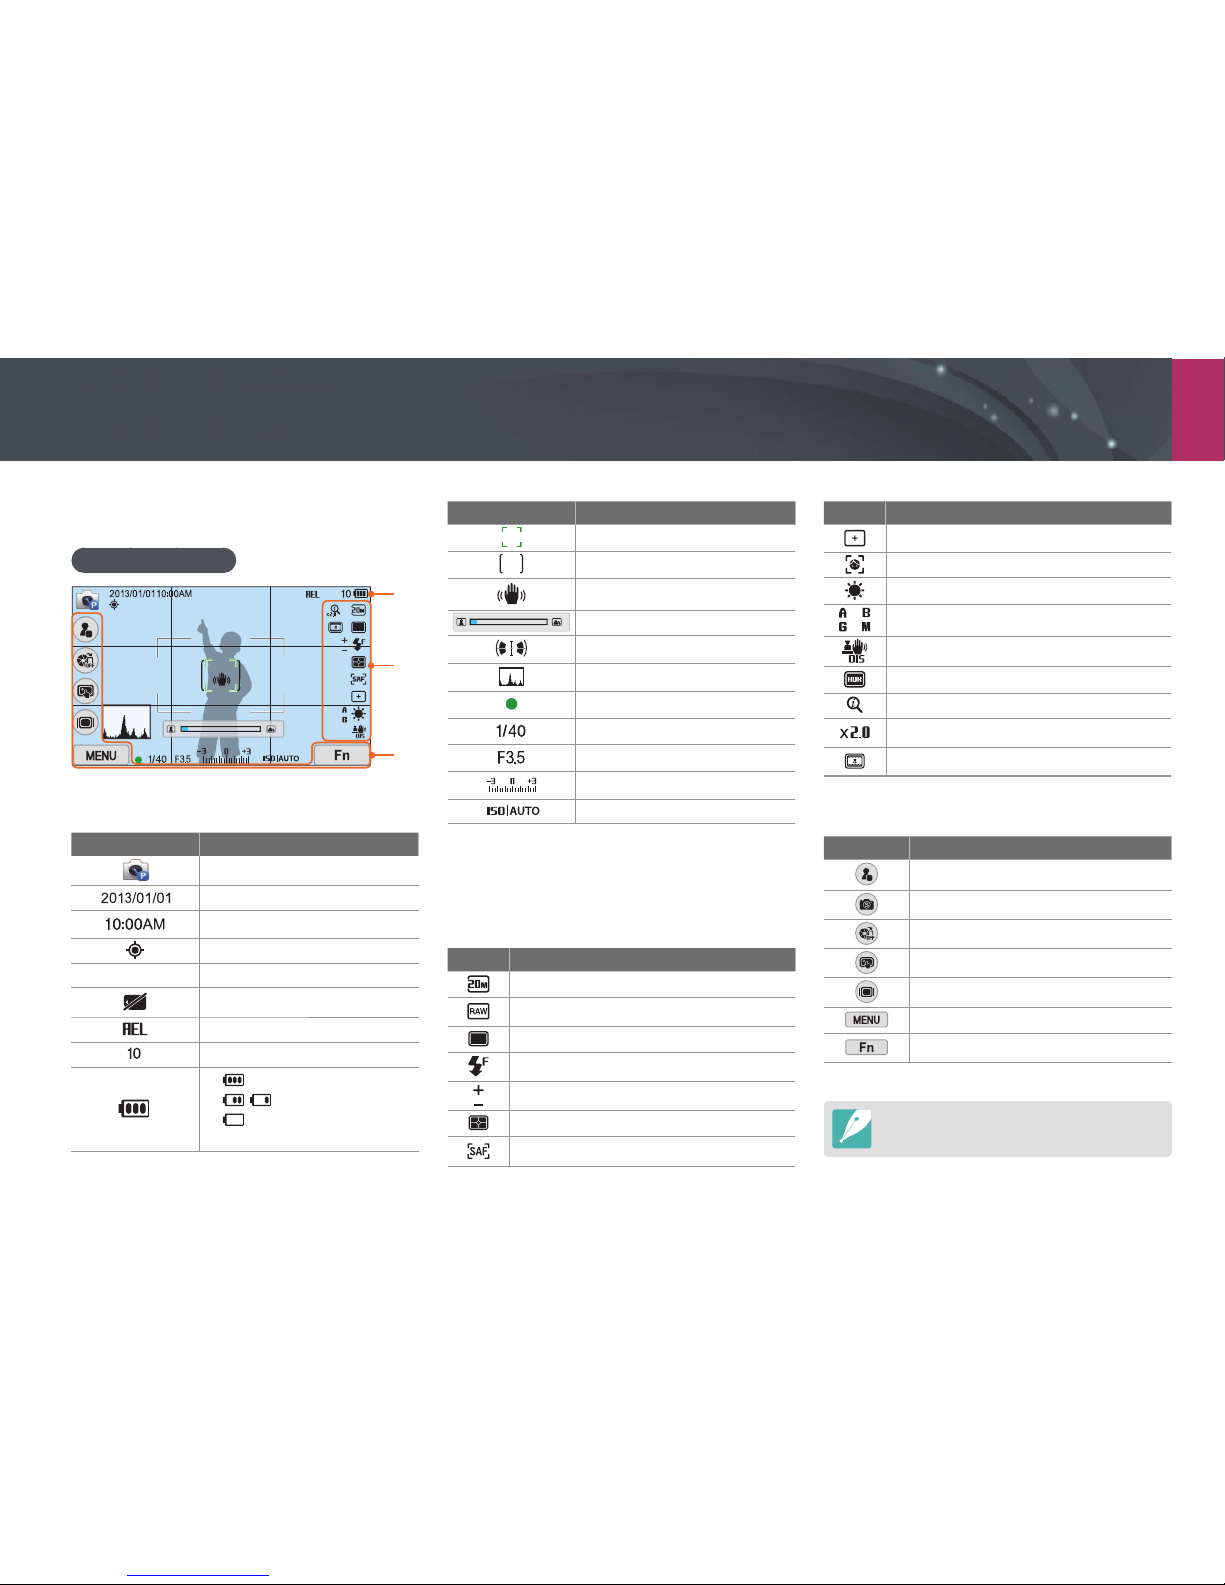
Using the touch screen
Do not use sharp objects, such as pens or pencils, to touch the screen. You can
damage the screen.
Touching: Touch an icon to select a menu or an option.
Dragging: Touch and hold an area on the screen, and then drag
your nger.
AutoShare
Photo Size
Quality
ISO
White Balance
Picture Wizard
Flicking: Gently ick your nger across the screen.
•
The touch screen may not recognize your inputs if you touch multiple items
at the same time.
•
When you touch or drag the screen, discolorations may occur. This is not a
malfunction, but a characteristic of the touch screen. Touch or drag lightly to
minimize the discolorations.
•
The touch screen may not work properly if you use the camera in extremely
humid environments.
•
The touch screen may not work properly if you apply screen protection lm
or other accessories to the screen.
•
Depending on the viewing angle, the screen may appear dim. Adjust the
brightness or viewing angle to improve the resolution.
Page 74
My Camera
41
Display icons
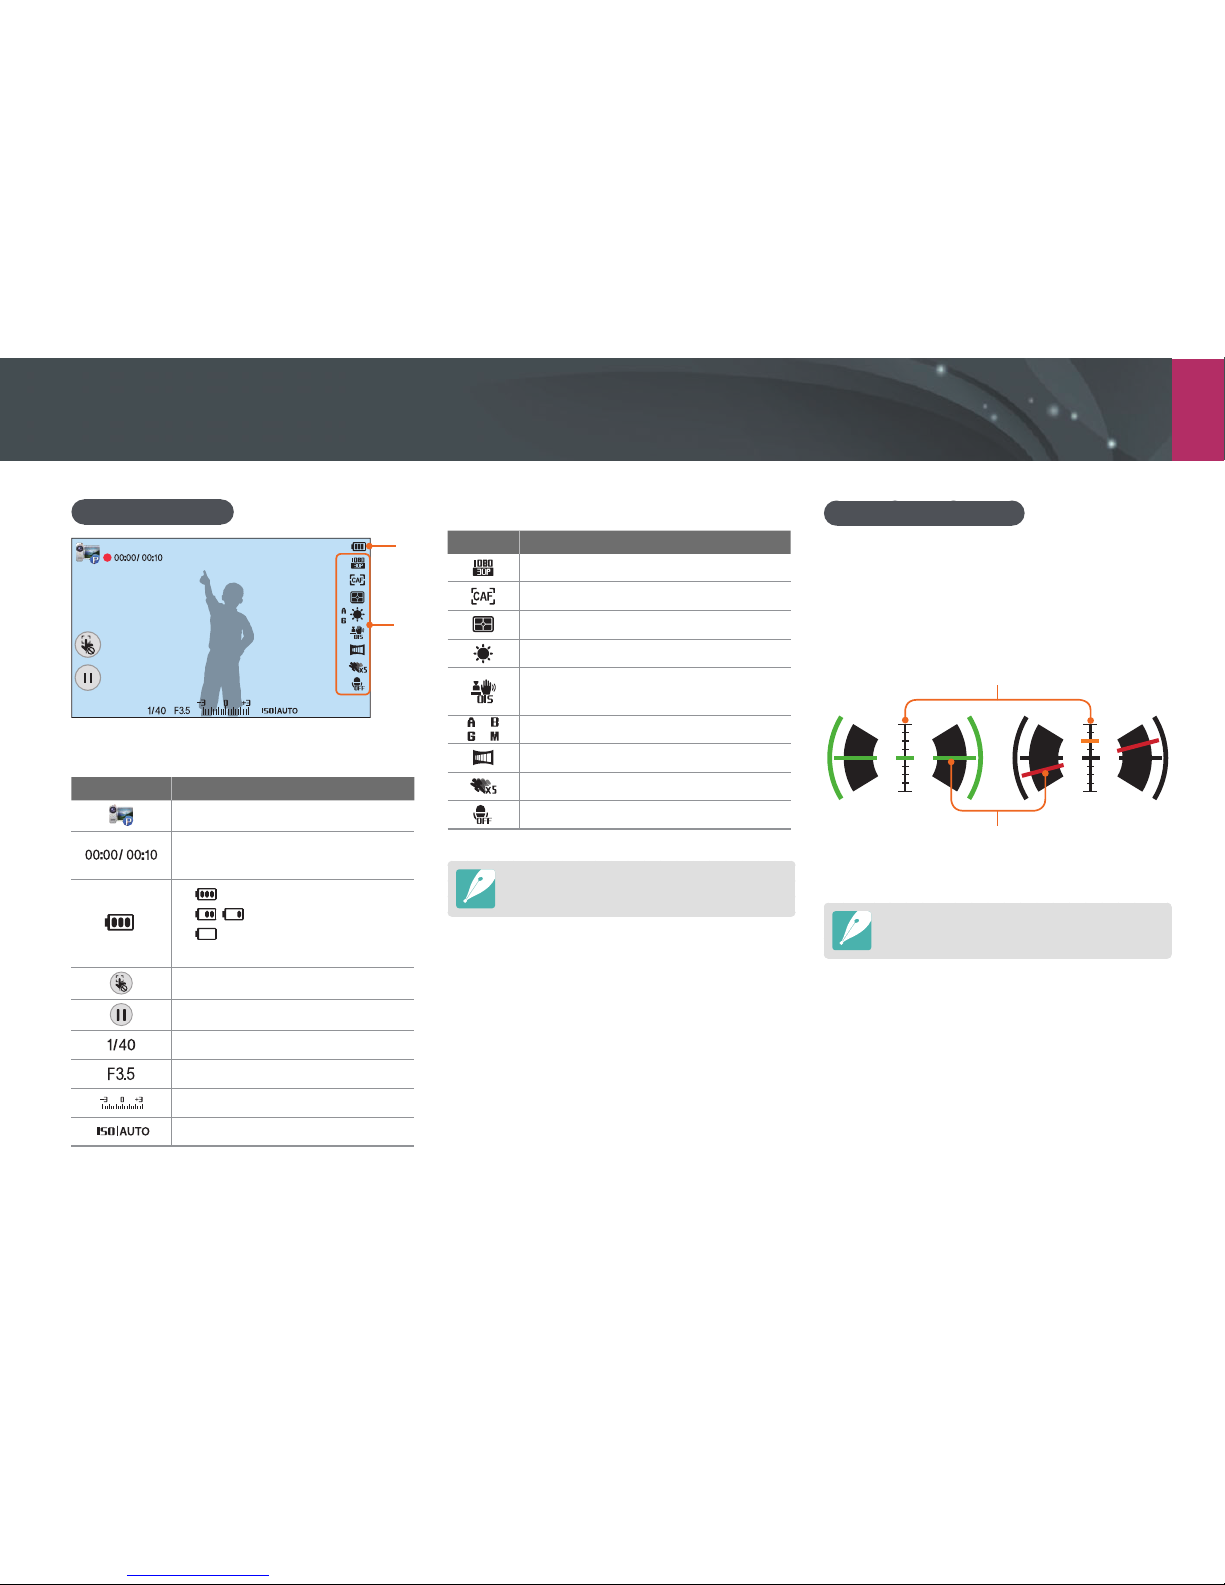
Capturing photos
F
1
2
3
London
1. Shooting information
Icon Description
Shooting mode
Current date
Current time
GPS activated*
London
Location information*
Memory card not inserted**
Auto exposure lock (p. 105)
Available number of photos
• : Fully charged
• : Partially charged
• (Red): Empty (recharge
the battery)
Icon Description
Auto focus frame
Spot metering area
Camera shake
Manual focus scale
Level gauge (p. 42)
Histogram (p. 150)
Focus
Shutter speed
Aperture value
Exposure adjustment value
ISO sensitivity (p. 76)
* These icons appear when you attach an optional GPS
module.
** Photos that were captured without inserting a memory
card cannot be transferred to a memory card or a computer.
2. Shooting options
Icon Description
Photo size
RAW le
Drive mode
Flash (p. 101)
Flash intensity adjustment
Metering (p. 98)
AF mode (p. 82)
Icon Description
Focus area
Face detection
White Balance (p. 77)
White Balance micro adjustment
Optical Image Stabilization (OIS) (p. 93)
Dynamic Range (p. 100)
Z on
Z ratio
Smart Filter
3. Shooting options (Touch)
Icon Description
F
Custom button (p. 150)
Change Smart mode***
AutoShare
Touch AF options
Display type button
Shooting options
Smart panel
*** This icon appears only when you select Smart mode.
The icons displayed will change according to the
mode you select or the options you set.
In Shooting mode
Page 75
My Camera > Display icons
42
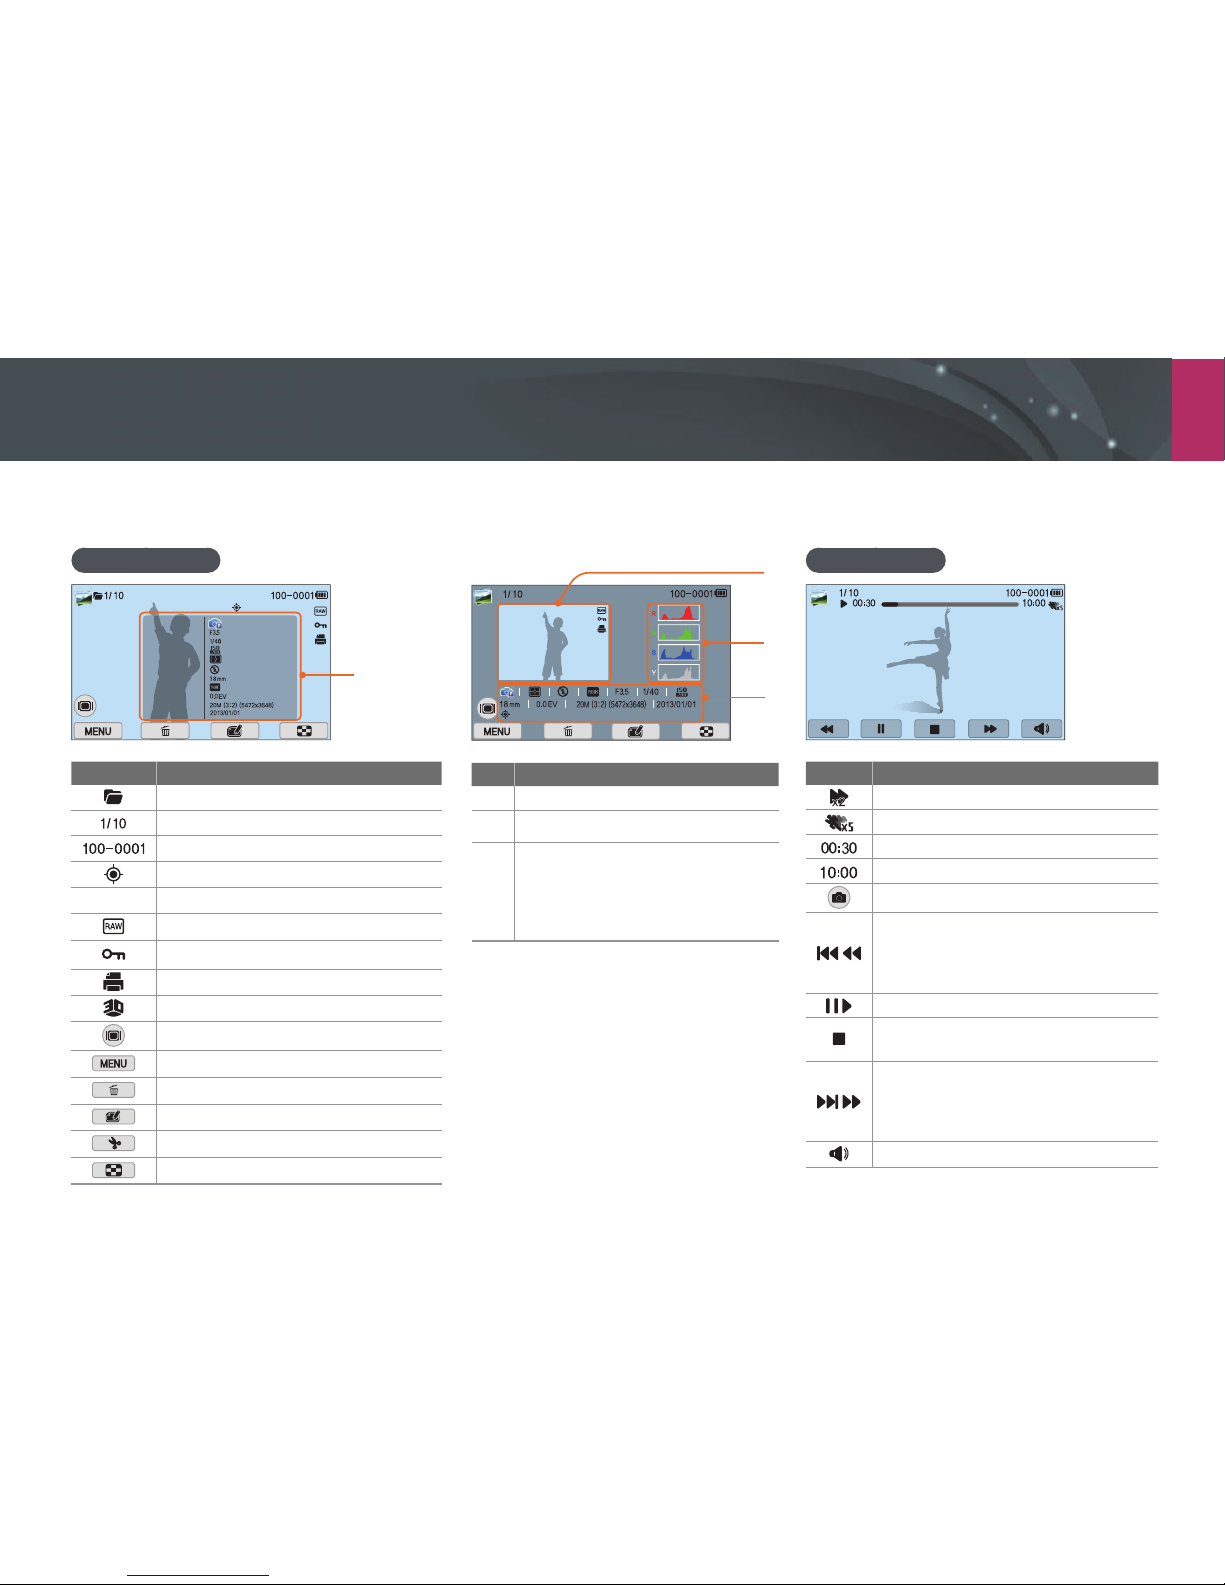
2. Shooting options
Icon Description
Video size
AF mode (p. 82)
Metering (p. 98)
White Balance (p. 77)
Optical Image Stabilization (OIS)
(p. 93)
White Balance micro adjustment
Fader (p. 107)
Multi Motion (p. 107)
Voice recording o (p. 108)
The icons displayed will change according to the
mode you select or the options you set.
About the level gauge
The level gauge helps you align the camera with
the horizontal and vertical lines on the display.
If the level gauge is not level, calibrate the level
gauge using the Horizontal Calibration function.
(p. 152)
Vertical
Horizontal
▲ Level ▲ Unlevel
You cannot use the level gauge when you shoot
in portrait orientation.
Recording videos
1
2
1. Shooting information
Icon Description
Shooting mode
Current recording time/Available
recording time
• : Fully charged
• : Partially charged
• (Red): Empty (recharge the
battery)
Cancel Touch AF
Pause or resume recording
Shutter speed
Aperture value
Exposure value
ISO sensitivity (p. 76)
Page 76
My Camera > Display icons
43
In Playback mode
Viewing photos
London
Information
Mode
F No
Shutter
ISO
Metering
Flash
Focal Length
White Balance
EV
Photo Size
Date
Icon Description
Continuously captured le
Current le/The total number of les
Folder number - File number
File with location information
London
Location information
RAW le
Protected le
Print information added to le (p. 115)
3D le
Display type button
Playback/Editing menu
Delete les
Edit photos
Trim a video
View image thumbnails
1
2
3
London
No. Description
1
Captured photo
2
RGB histogram (p. 150)
3
Shooting mode, Metering, Flash,
White Balance, Aperture value,
Shutter speed, ISO, Focal length,
Exposure value, Photo size, Date,
Location information
Playing videos
Icon Description
Playback speed
Multi Motion
Current playback time
Video length
Capture an image
/
View previous le/Scan backward. (Each
time you touch the scan backward icon,
you change the scan speed in this order:
2X, 4X, 8X.)
/
Pause or resume playback.
Stop playback and return to the
previous screen.
/
View next le/Scan forward. (Each time
you touch the scan forward icon, you
change the scan speed in this order:
2X, 4X, 8X.)
Adjust the volume or mute the sound.
Page 77
My Camera > Display icons
44
Changing the information displayed
Touch on the screen repeatedly to change the display type.
Mode Display type
Shooting
• Display shooting options at the right of the display,
Custom button, AutoShare button, Touch AF button,
Display type button and basic shooting information
(Shooting mode, Shutter speed, Aperture value, Exposure
value, ISO sensitivity, AEL).
• Display all information about shooting including
histogram, date, and time. (p. 150)
• Hide information about shooting except basic shooting
information, Custom button, and Display type button.
• Basic shooting information, Custom button, AutoShare
button, Touch AF button, Display type button, and the
level gauge.
Playback
• Basic information
• Display all information about the current le.
• Display all information about the current le including
RGB histogram.
Page 78
My Camera
45
Lenses
You can purchase optional lenses made exclusively for your NX series
camera.
Learn about the functions of each lens and select one that suits your needs
and preferences.
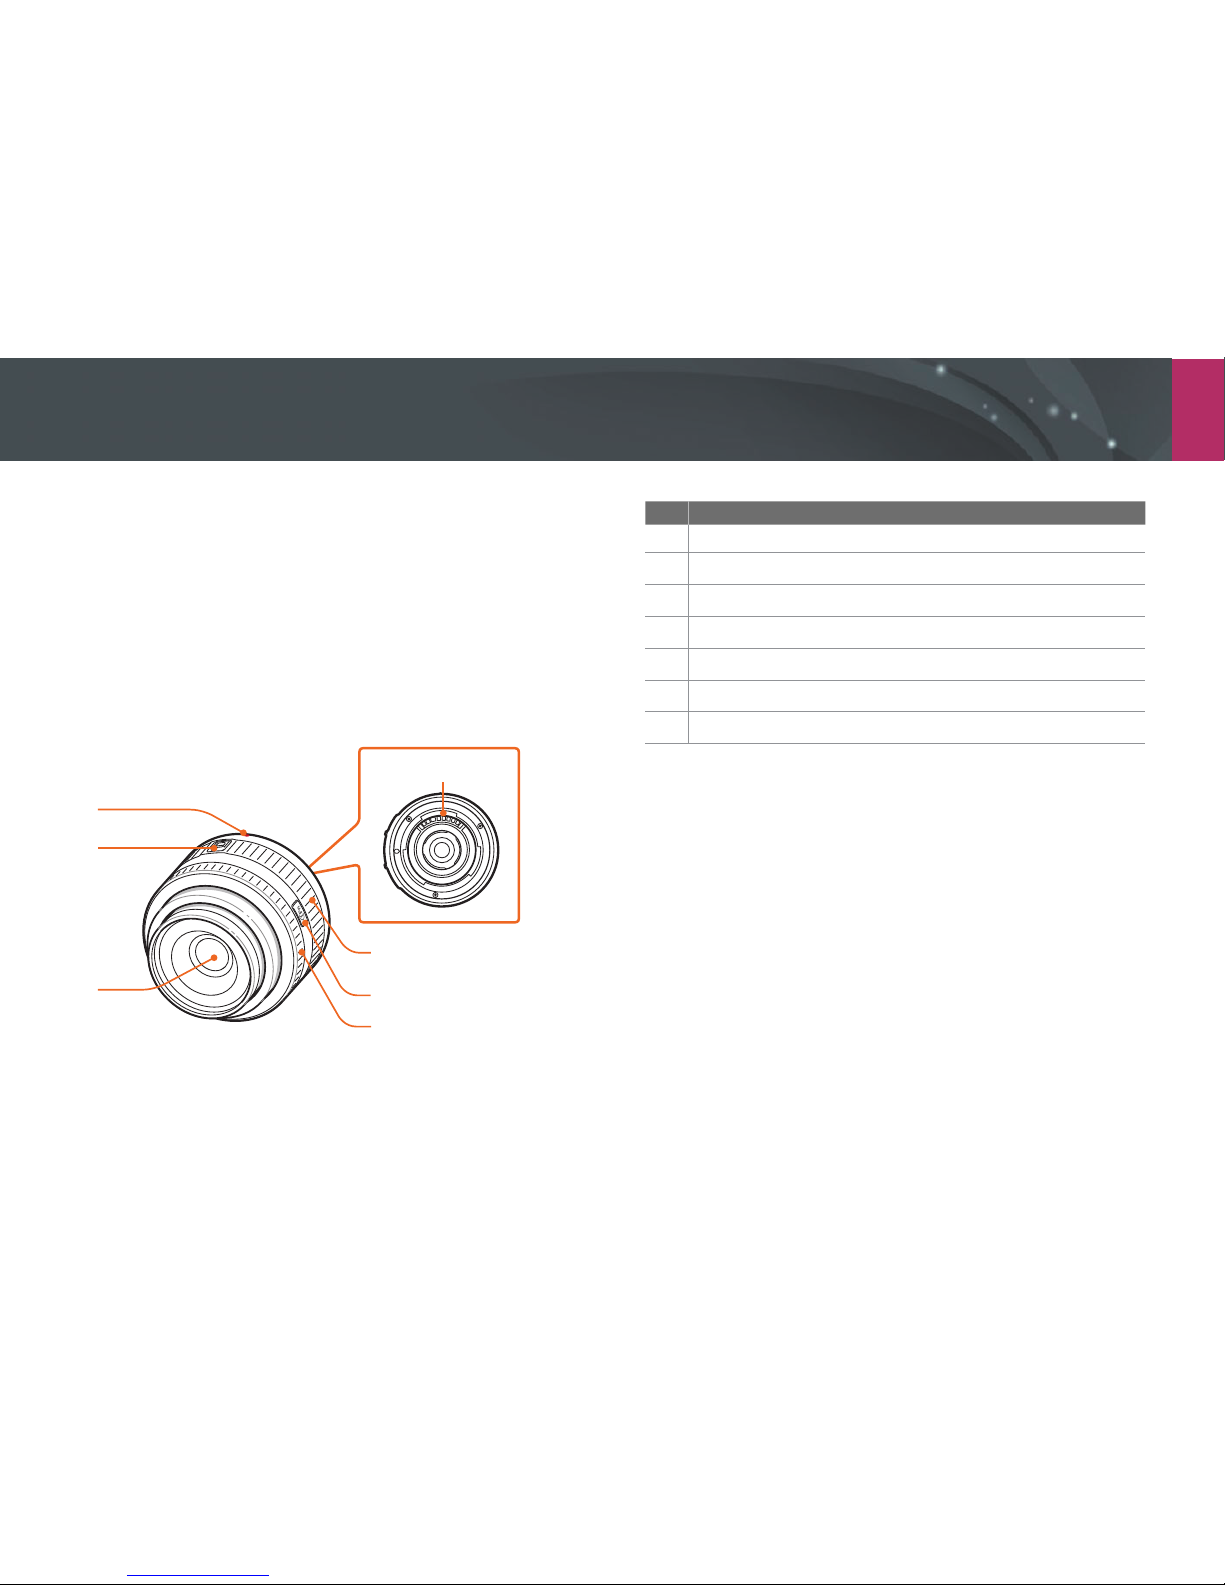
Lens layout
SAMSUNG 20-50 mm F3.5-5.6 ED II lens (example)
7
1
2
3
5
6
4
No. Description
1
Lens mount index
2
Zoom lock switch
3
Lens
4
Focus ring (p. 90)
5
i-Function button (p. 67)
6
Zoom ring
7
Lens contacts
Page 79
My Camera > Lenses
46
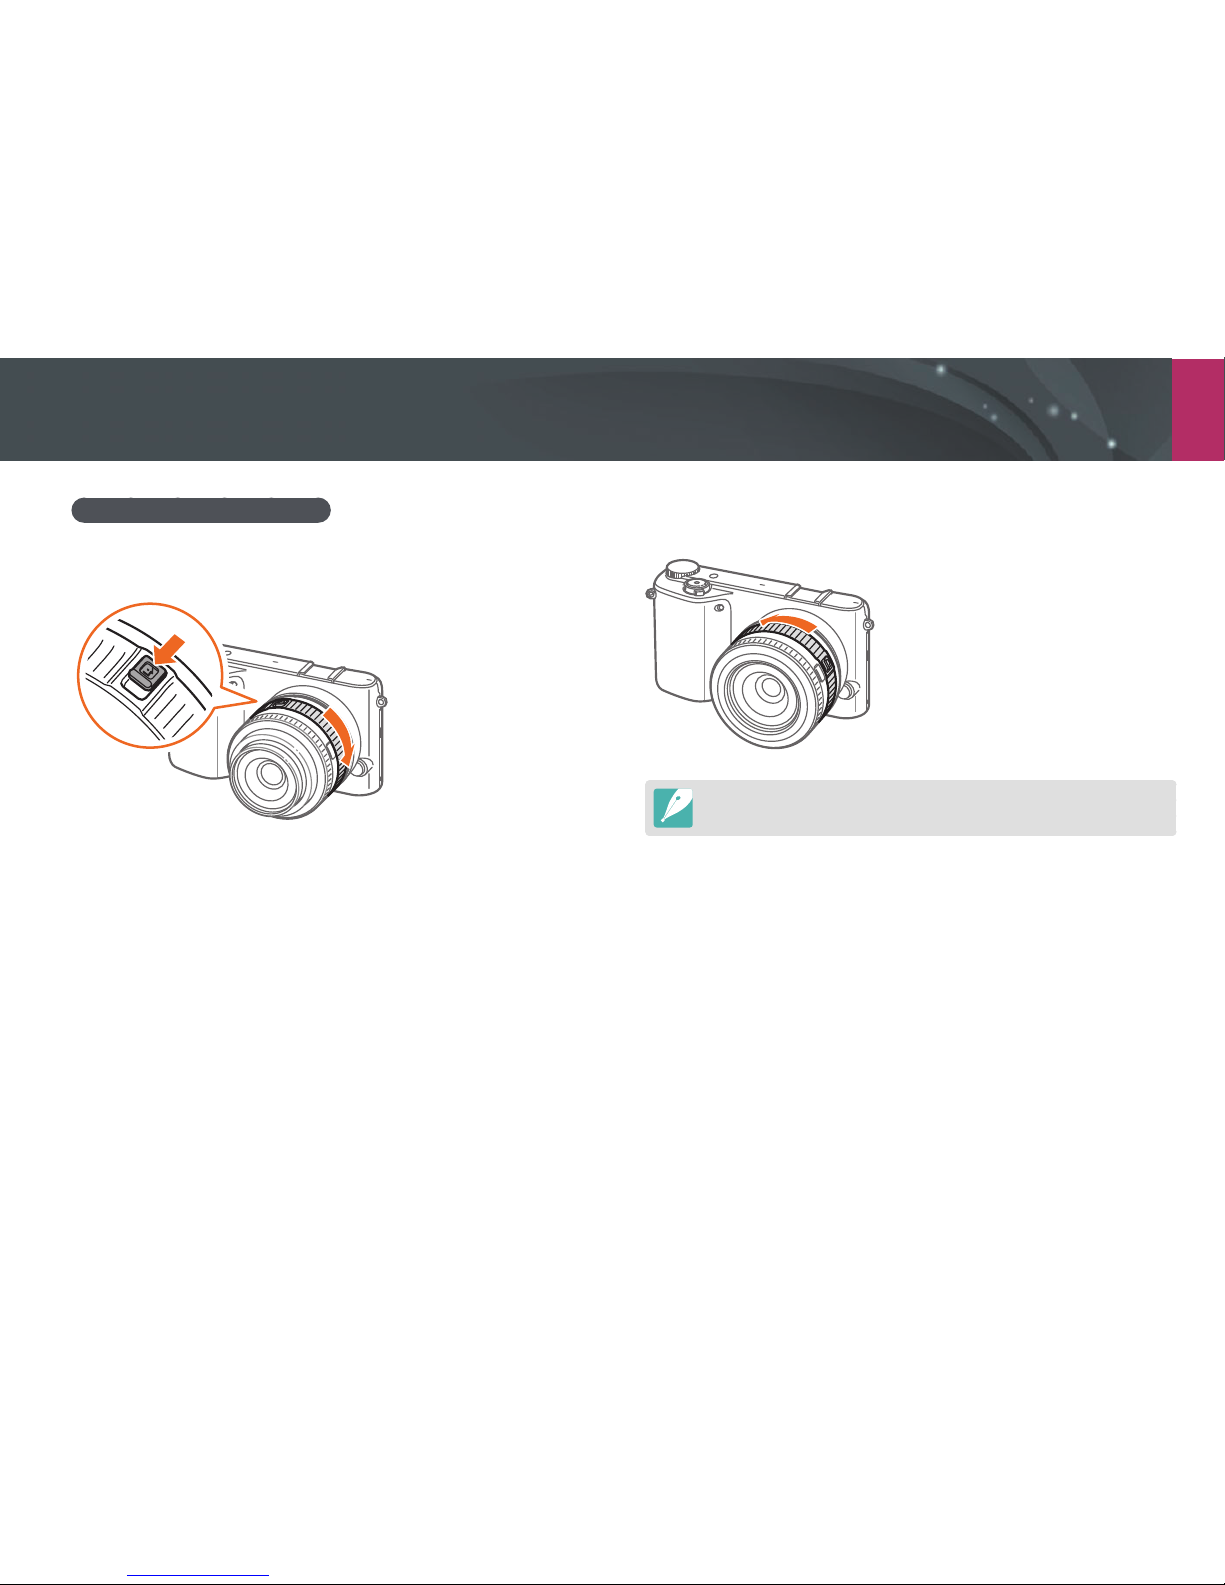
Locking or unlocking the lens
To lock the lens, pull and hold the zoom lock switch away from the camera
body and rotate the zoom ring as shown in the illustration.
To unlock the lens, rotate the zoom ring as shown in the illustation until
you hear the click.
You cannot capture a photo when the lens is locked.
Page 80
My Camera > Lenses
47
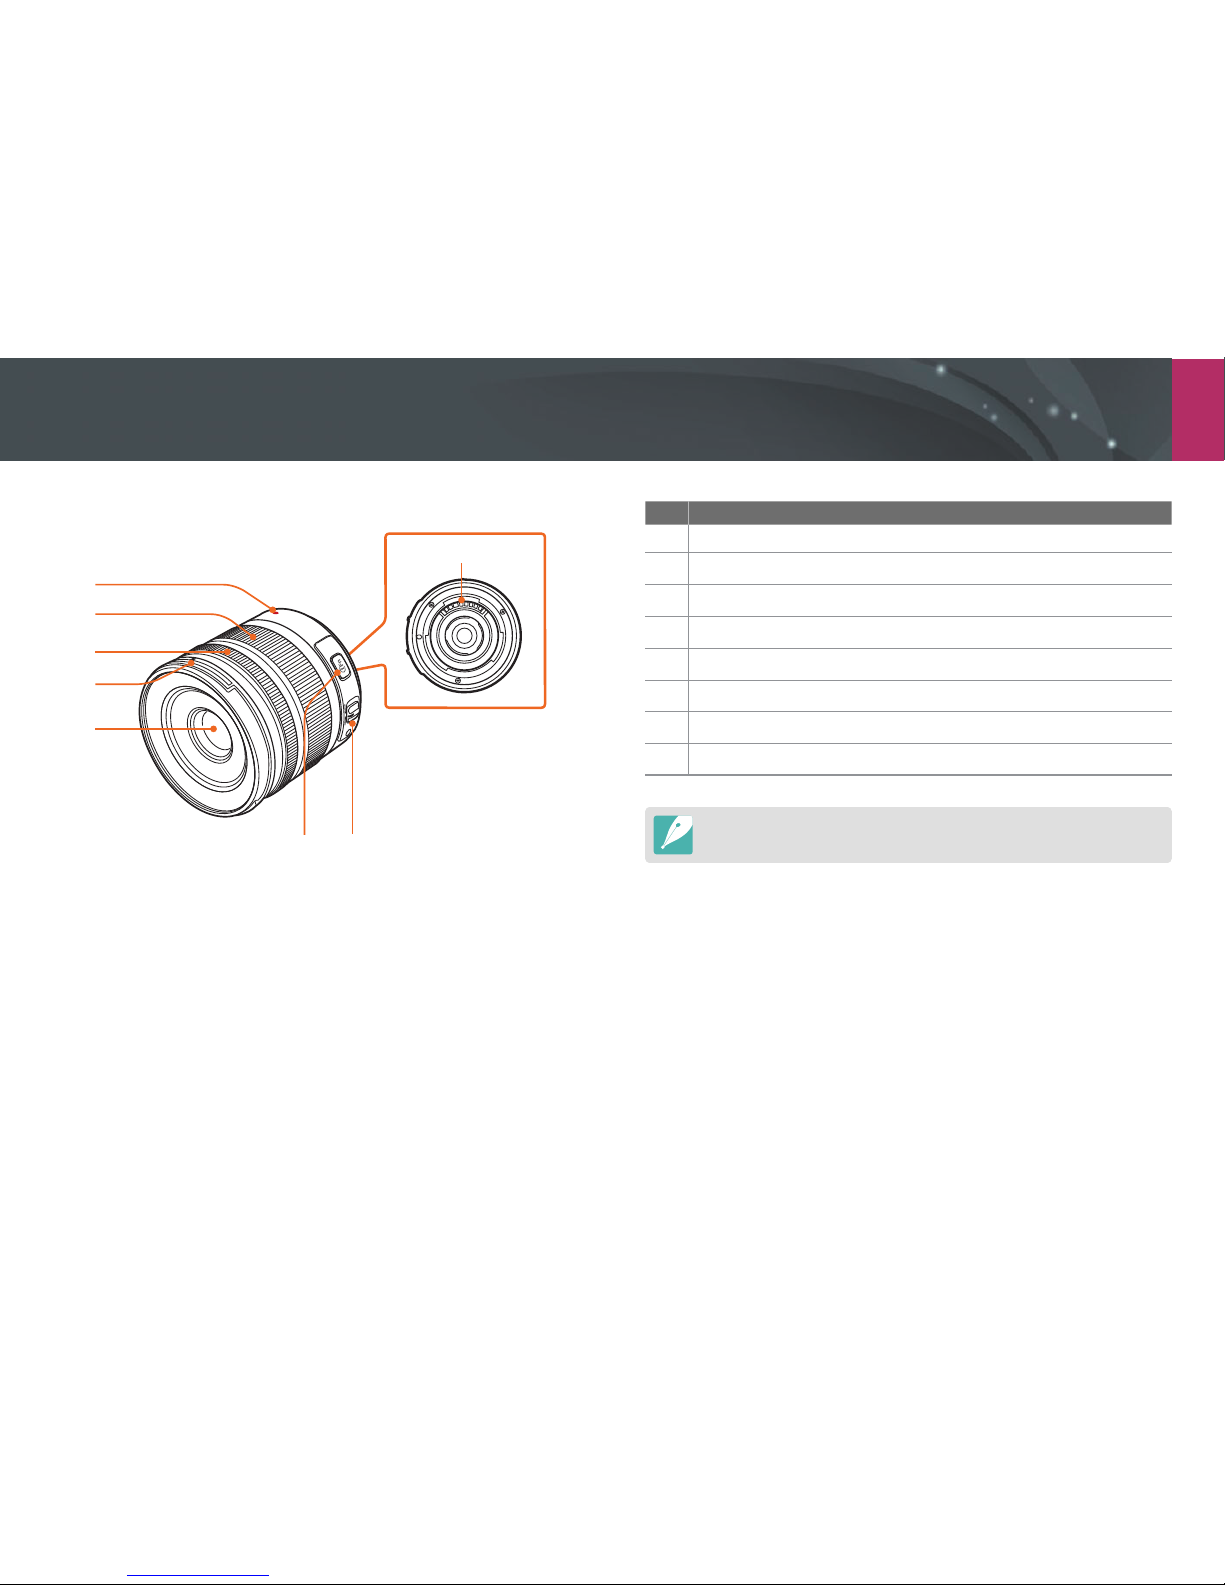
SAMSUNG 18-55 mm F3.5-5.6 OIS III lens (example)
1
2
3
5
4
67
8
No. Description
1
Lens mount index
2
Zoom ring
3
Focus ring (p. 90)
4
Lens hood mount index
5
Lens
6
i-Function button (p. 67)
7
AF/MF switch (p. 82)
8
Lens contacts
When not using the lens, attach the lens cap and lens mount cover to protect
the lens from dust and scratches.
Page 81
My Camera > Lenses
48
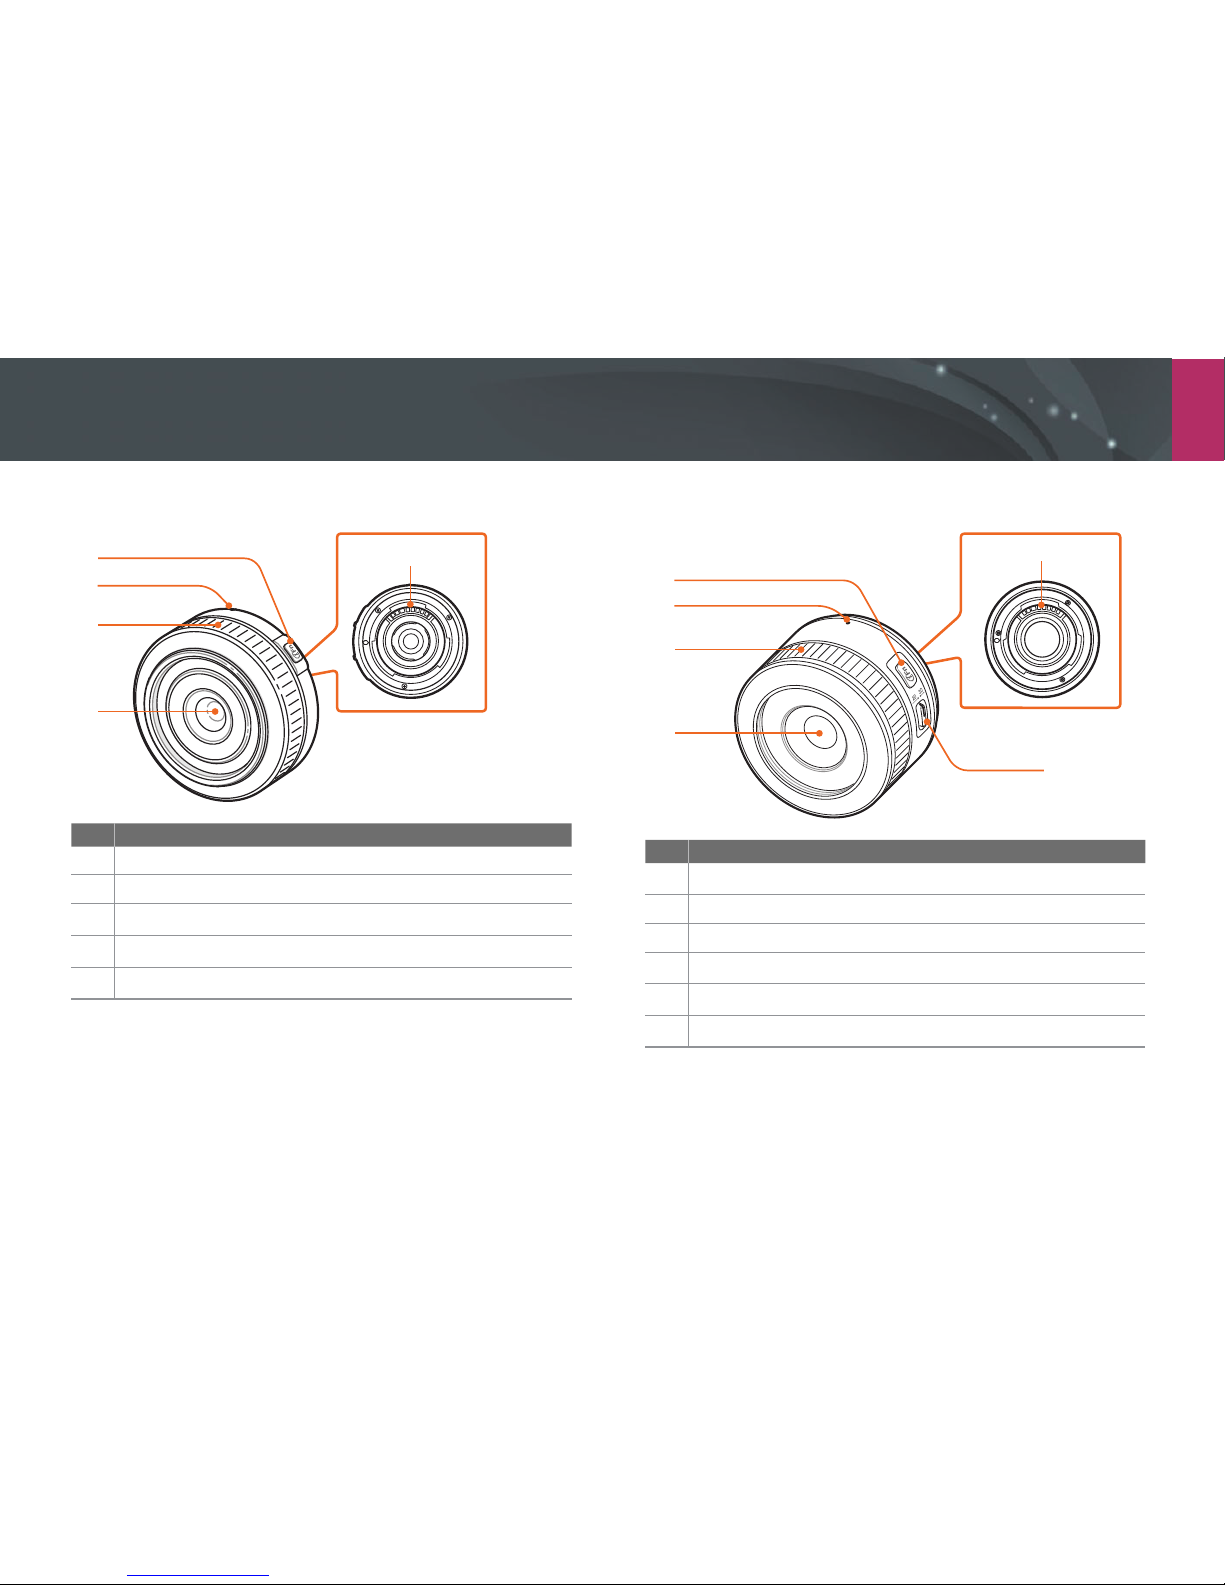
SAMSUNG 16 mm F2.4 lens (example)
5
2
1
4
3
No. Description
1
i-Function button (p. 67)
2
Lens mount index
3
Focus ring (p. 90)
4
Lens
5
Lens contacts
SAMSUNG 45 mm F1.8 [T6] 2D/3D (example)
6
2
1
3
4
5
No. Description
1
i-Function button (p. 67)
2
Lens mount index
3
Focus ring (p. 90)
4
Lens
5
2D/3D switch (p. 70)
6
Lens contacts
Page 82
My Camera > Lenses
49
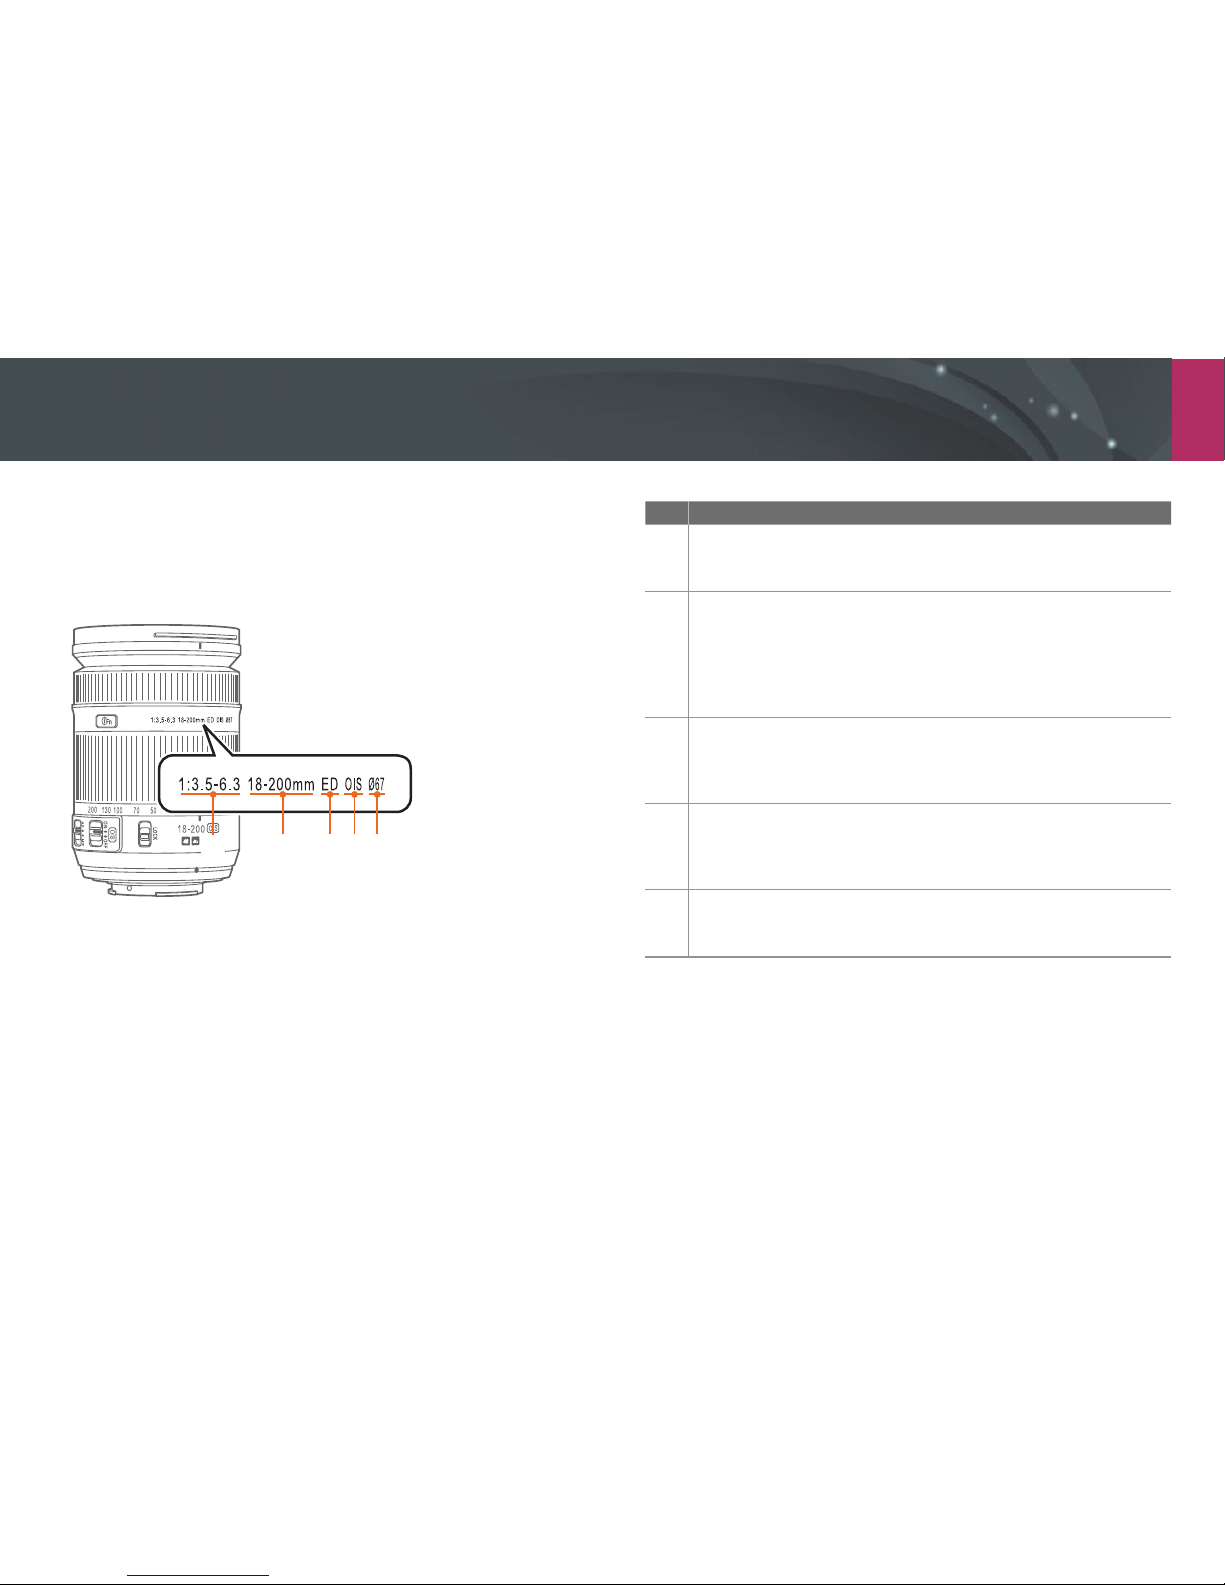
No. Description
1
Aperture value
A range of supported aperture values. For example, 1:3.5–6.3 means
the maximum aperture value range from 3.5 to 6.3.
2
Focal length
The distance from the middle of the lens to its focal point (in
millimeters). This gure is expressed in a range: minimum focal length
to maximum focal length of the lens.
Longer focal lengths result in narrower angles of view and the subject
is magnied. Shorter focal lengths result in wider angles of view.
3
ED
ED stands for Extra-low Dispersion. Extra-low dispersion glass is
eective in minimizing chromatic aberration (a distortion that occurs
when a lens fails to focus all colors to the same convergence point).
4
OIS (p. 93)
Optical Image Stabilization. Lenses with this feature can detect
camera shake and eectively cancel out the movement inside the
camera.
5
Ø
The lens diameter. When you attach a lter to the lens, make sure that
the diameters of the lens and the lter are the same.
Lens markings
Find out what the numbers on the lens signify.
SAMSUNG 18-200 mm F3.5-6.3 ED OIS lens (example)
1
2345
Page 83
My Camera
50
Accessories
You can use accessories including external ash and GPS module that can
help you capture better and more convenient photos.
For more information about optional accessories, refer to the manual for
each accessory.
•
The illustrations may dier from the actual items.
•
You can purchase Samsung-approved accessories at a retailer or a Samsung
service center. Samsung is not responsible for damage caused by using
another manufacturer's accessories.
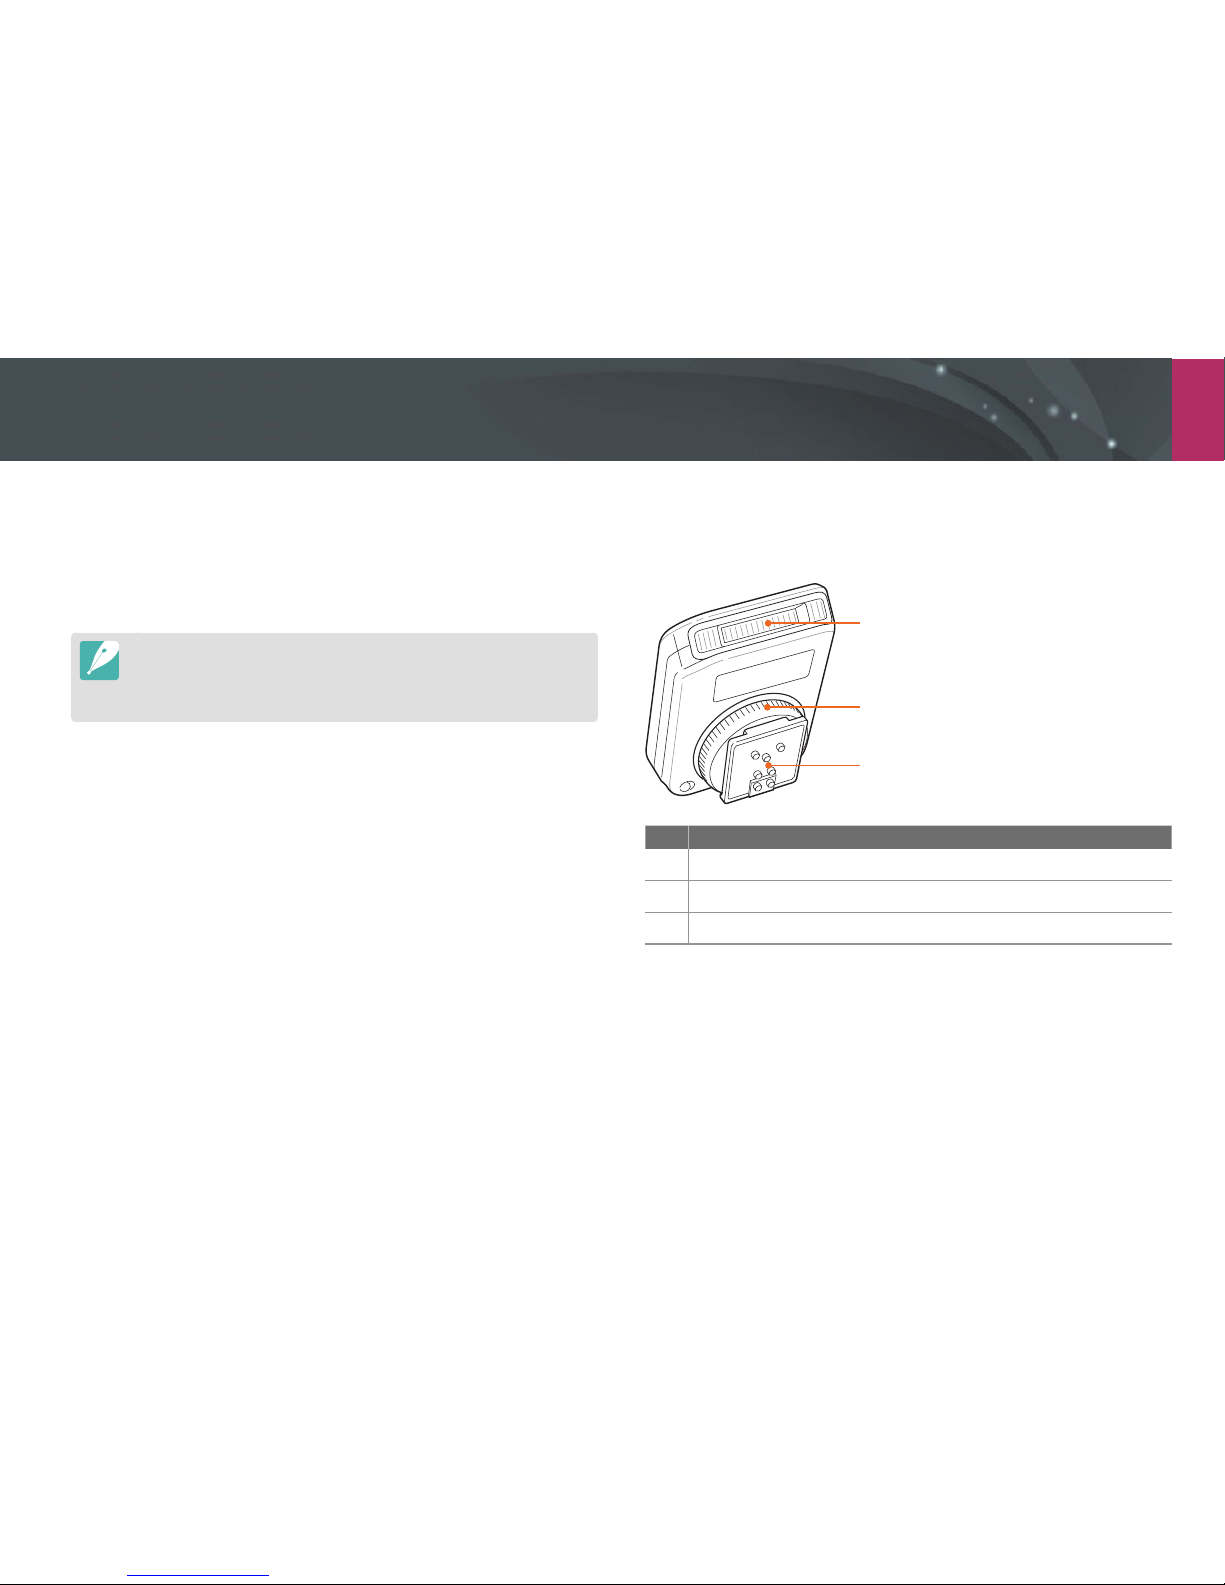
External ash layout
SEF8A (example)
1
2
3
No. Description
1
Bulb
2
Hot-shoe fastening dial
3
Hot-shoe connection
Page 84
My Camera > Accessories
51
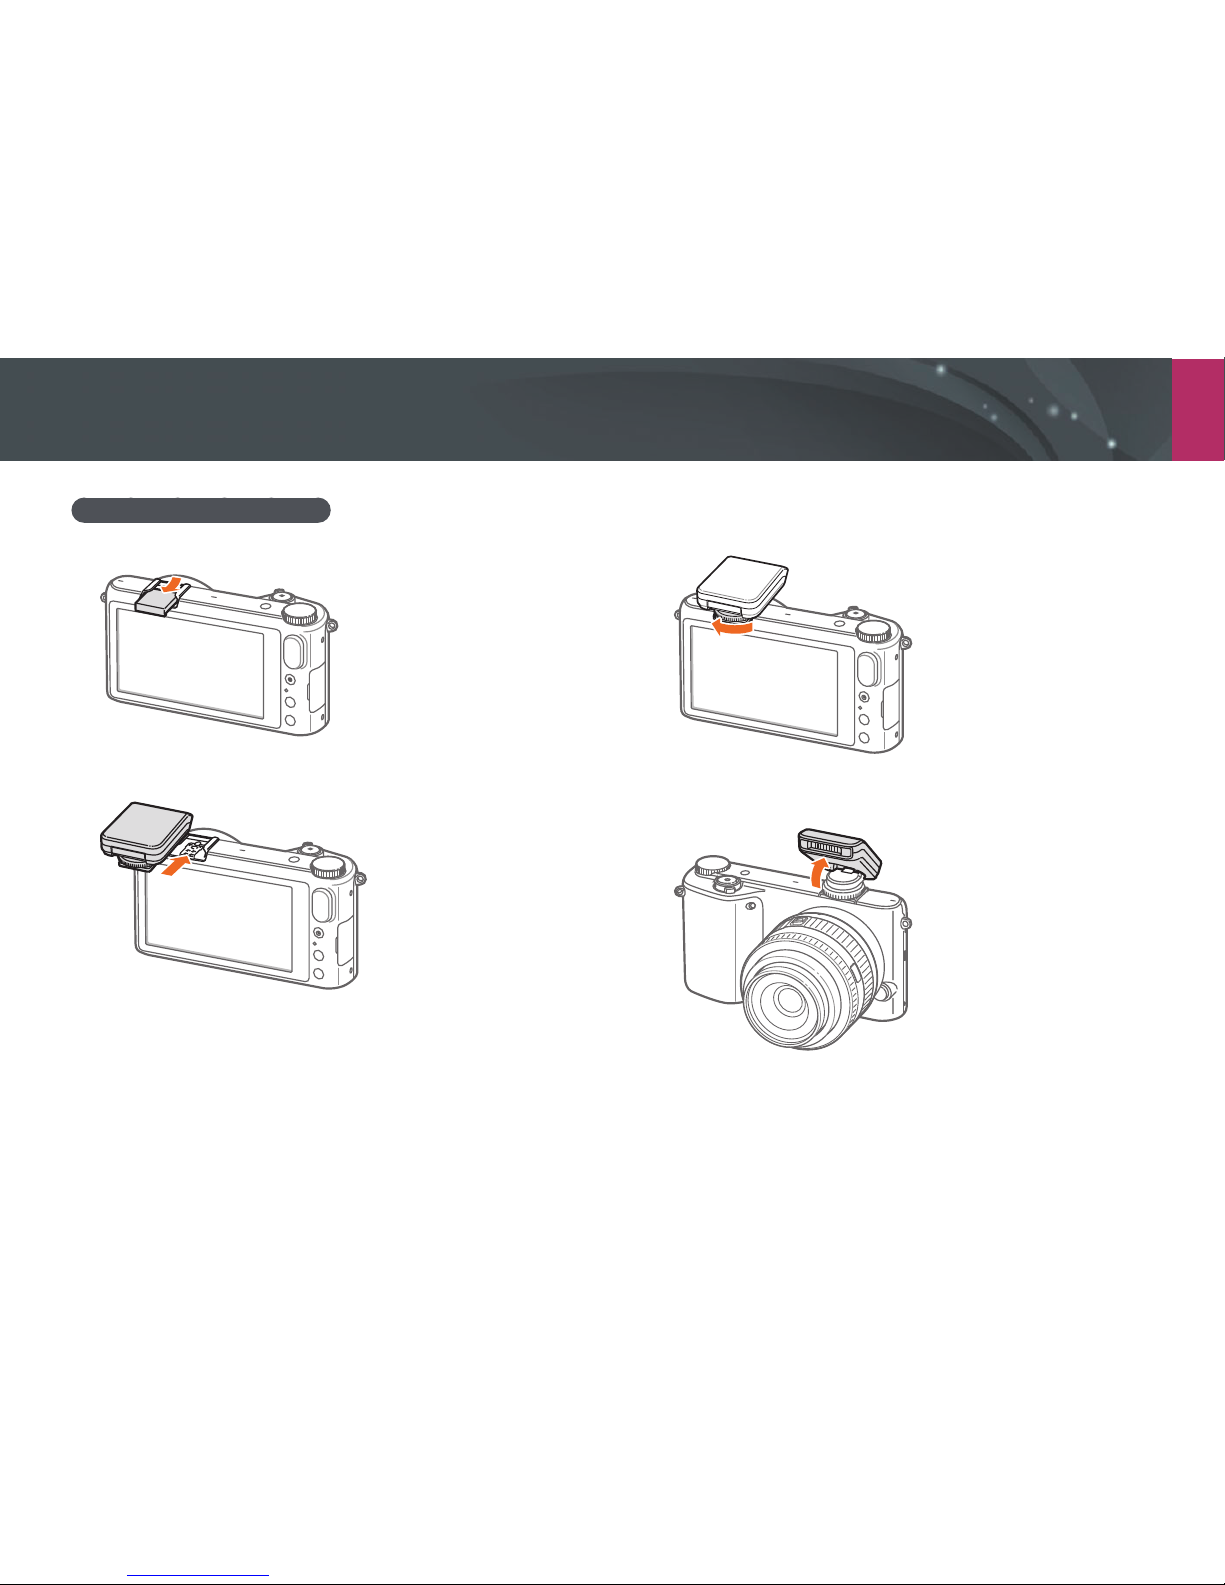
Connecting the external ash
1
Remove the hot-shoe cover from the camera.
2
Mount the ash by sliding it into the hot-shoe.
3
Lock the ash into place by turning the hot-shoe fastening dial
clockwise.
4
Lift up the ash for use.
Page 85
My Camera > Accessories
52
•
You can capture a photo with a ash that is not fully charged, but it is
recommended to use a fully charged ash.
•
Refer to the optional accessories page for available external ashes. (p. 195)
•
The available options may dier depending on the shooting mode.
•
There is an interval between two bursts of the ash. Do not move until the
ash res a second time.
•
SEF8A may not be compatible with other NX series cameras.
•
For more details about optional ashes, refer to the user manual for the ash.
Use only Samsung-approved ashes. Using incompatible ashes may damage
your camera.
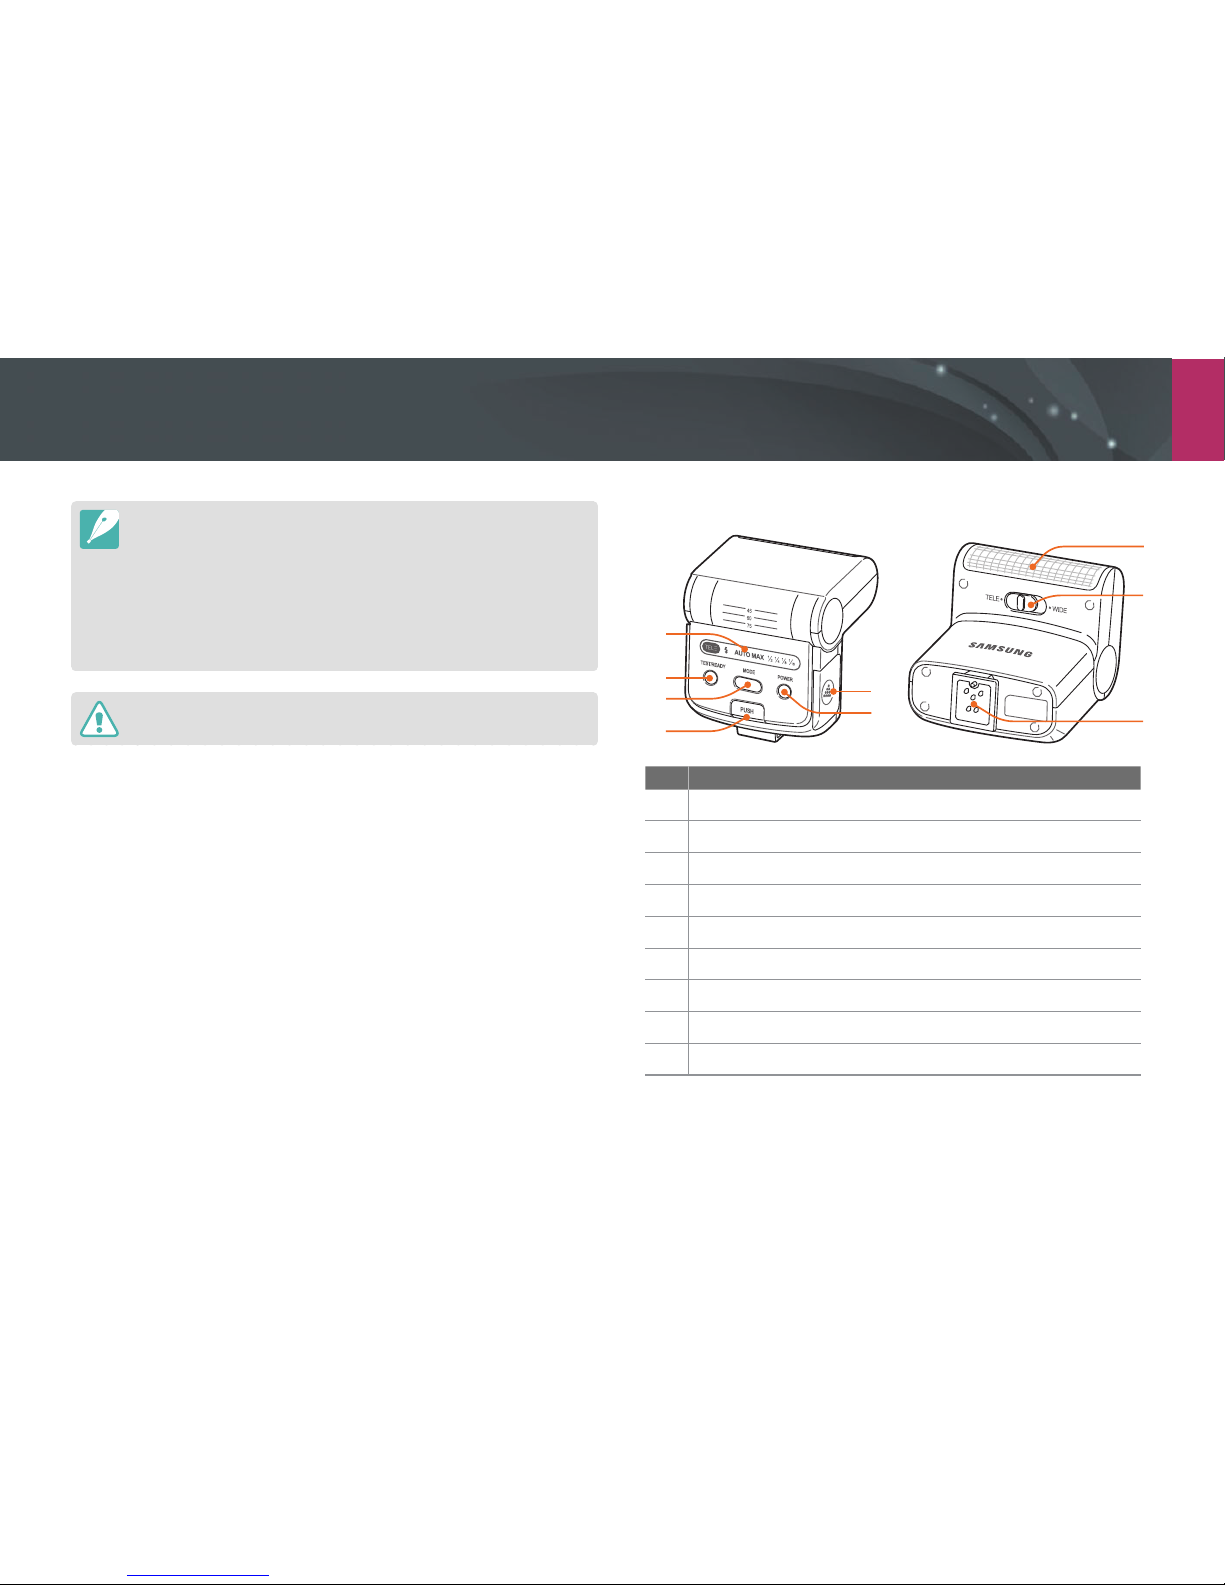
SEF220A (example) (optional)
2
1
3
4
5
6
7
8
9
No. Description
1
Display icons
2
READY lamp/Test button
3
MODE button
4
Flash release button
5
Power button
6
Battery cover
7
Bulb
8
TELE/WIDE mode switch
9
Hot-shoe connection
Page 86
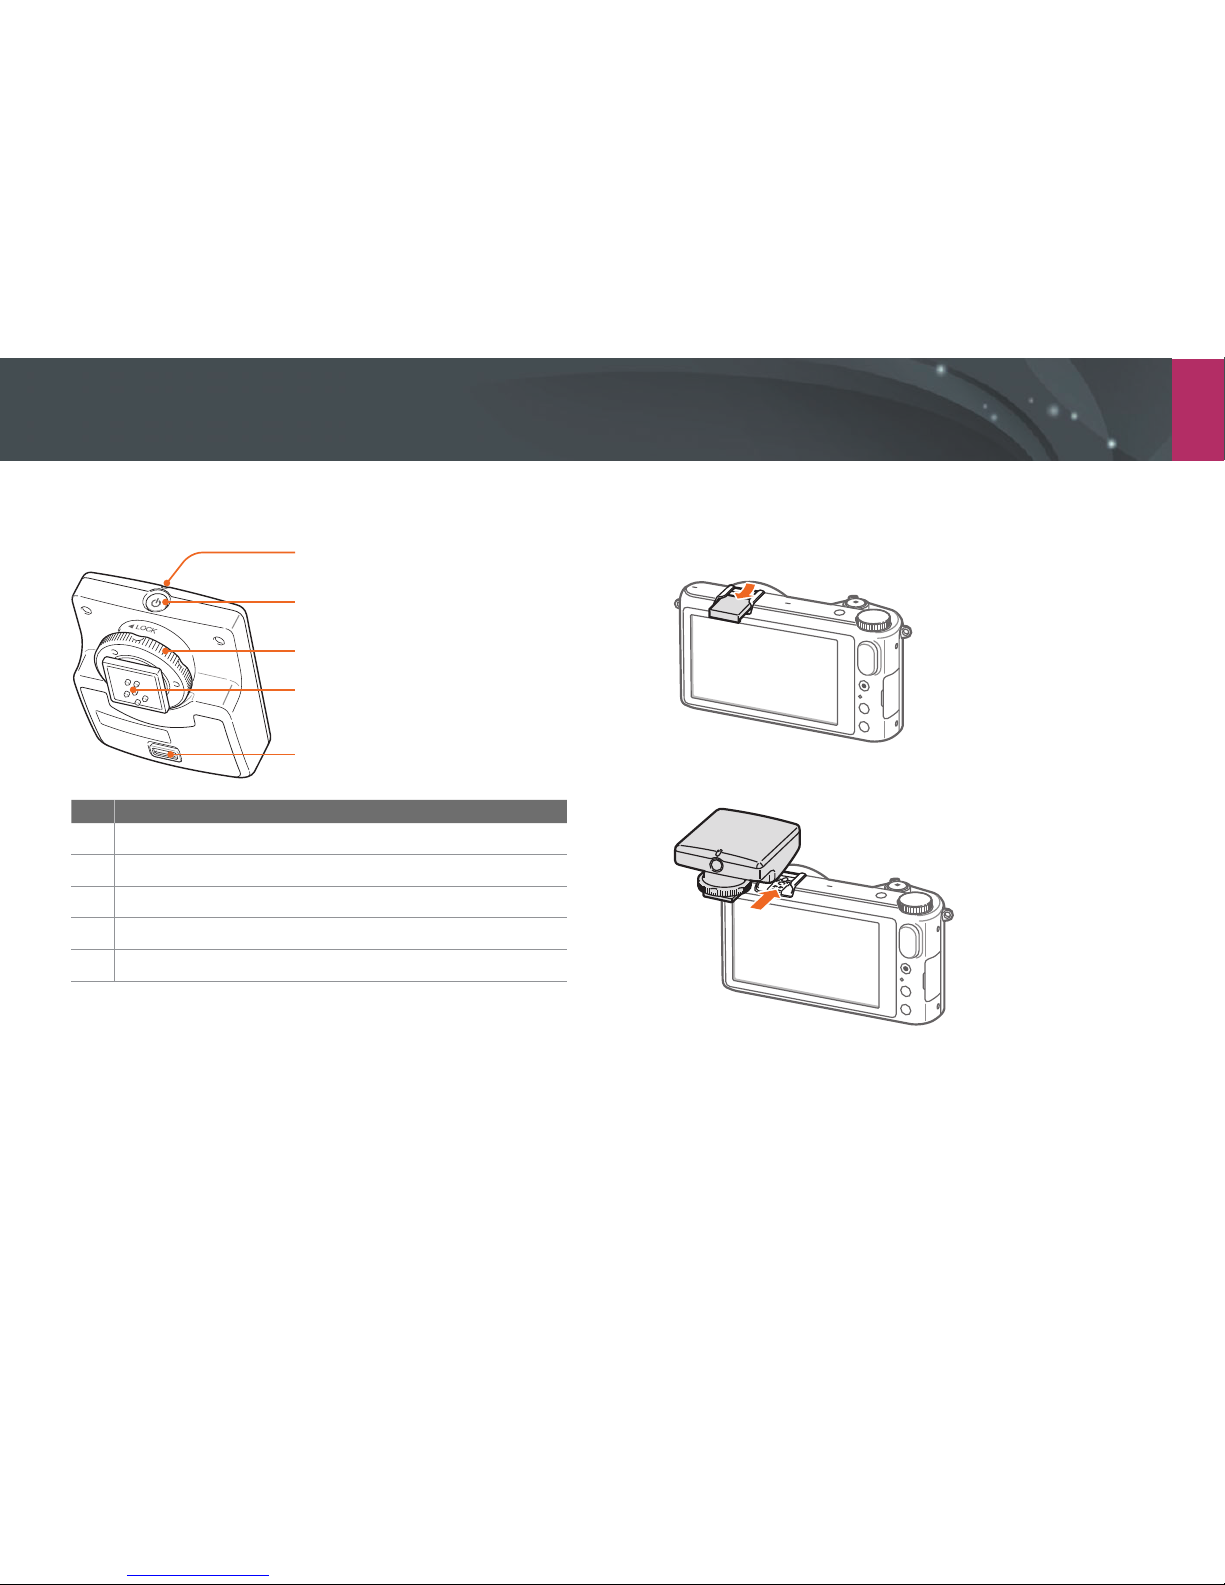
My Camera > Accessories
53
GPS module layout (optional)
1
2
3
4
5
No. Description
1
Status lamp
2
Power button
3
Hot-shoe fastening dial
4
Hot-shoe connection
5
Battery cover
Attaching the GPS module
1
Remove the hot-shoe cover from the camera.
2
Mount the GPS module by sliding it into the hot-shoe.
Page 87
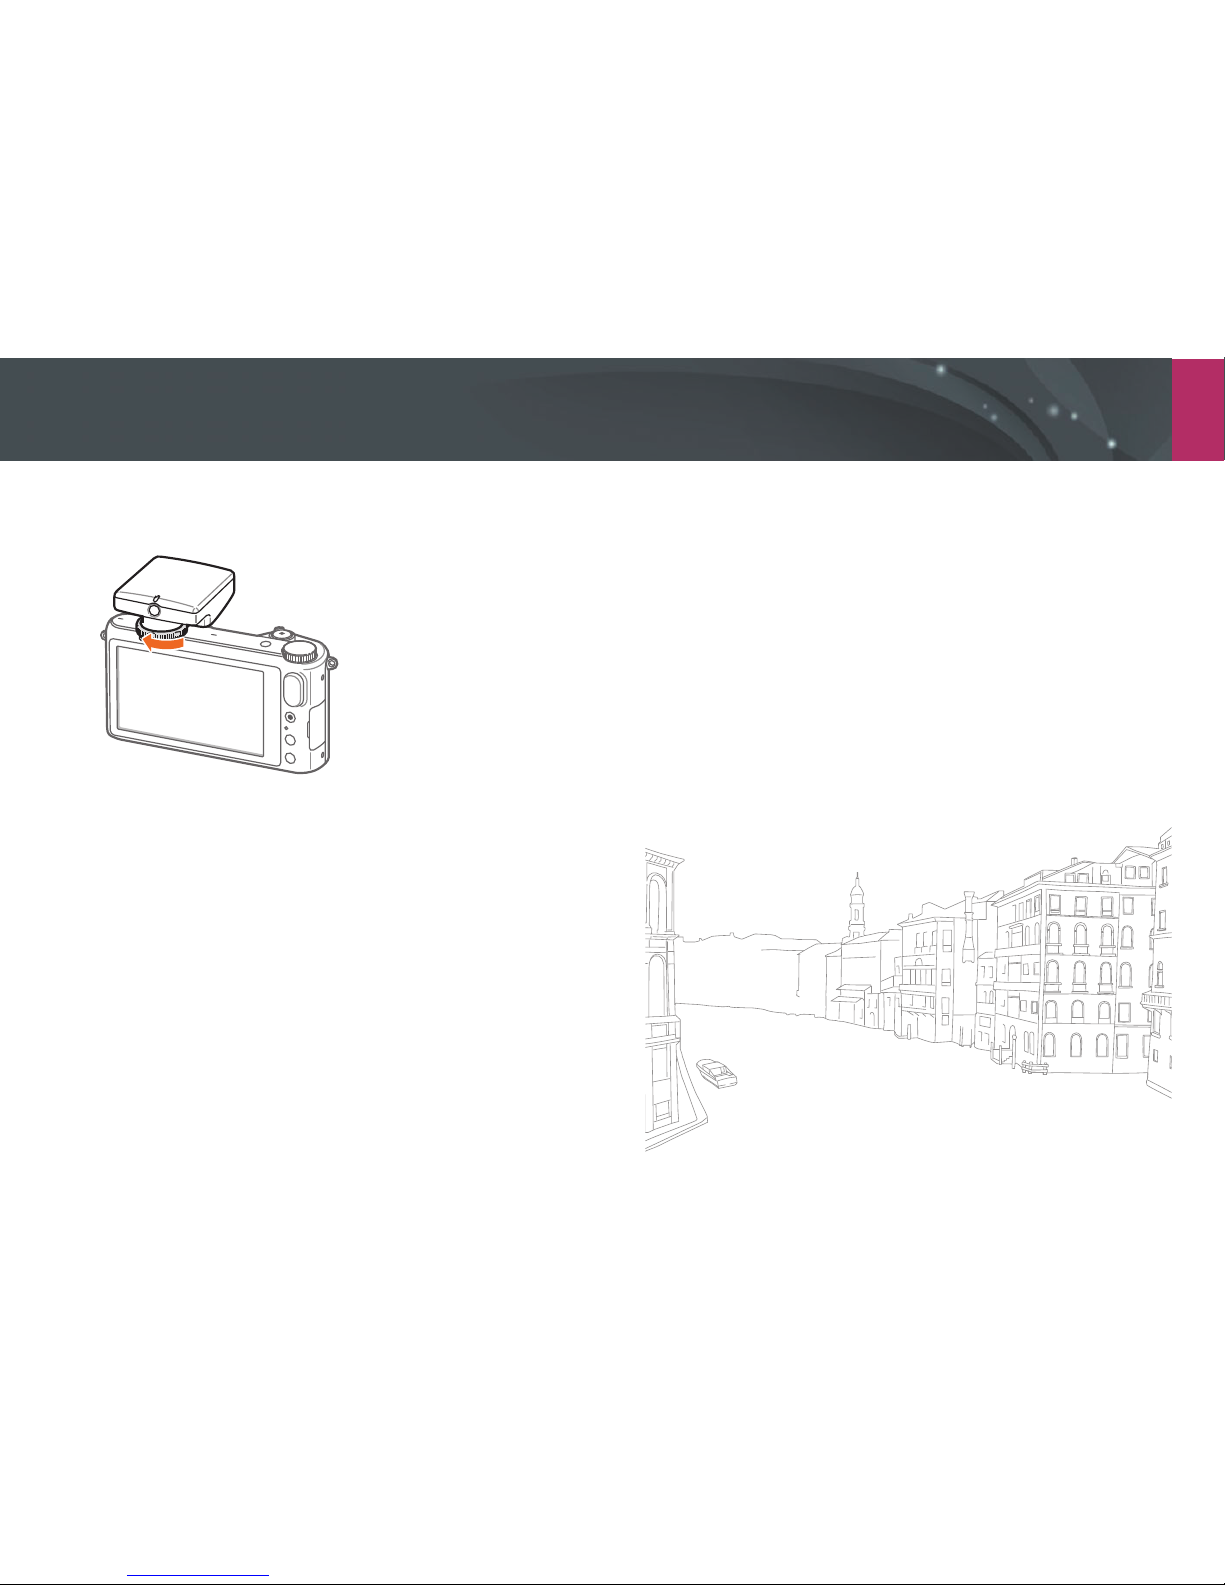
My Camera > Accessories
54
3
Lock the GPS module into place by turning the hot-shoe
fastening dial towards LOCK.
4
Press the power button of the GPS module.
Page 88
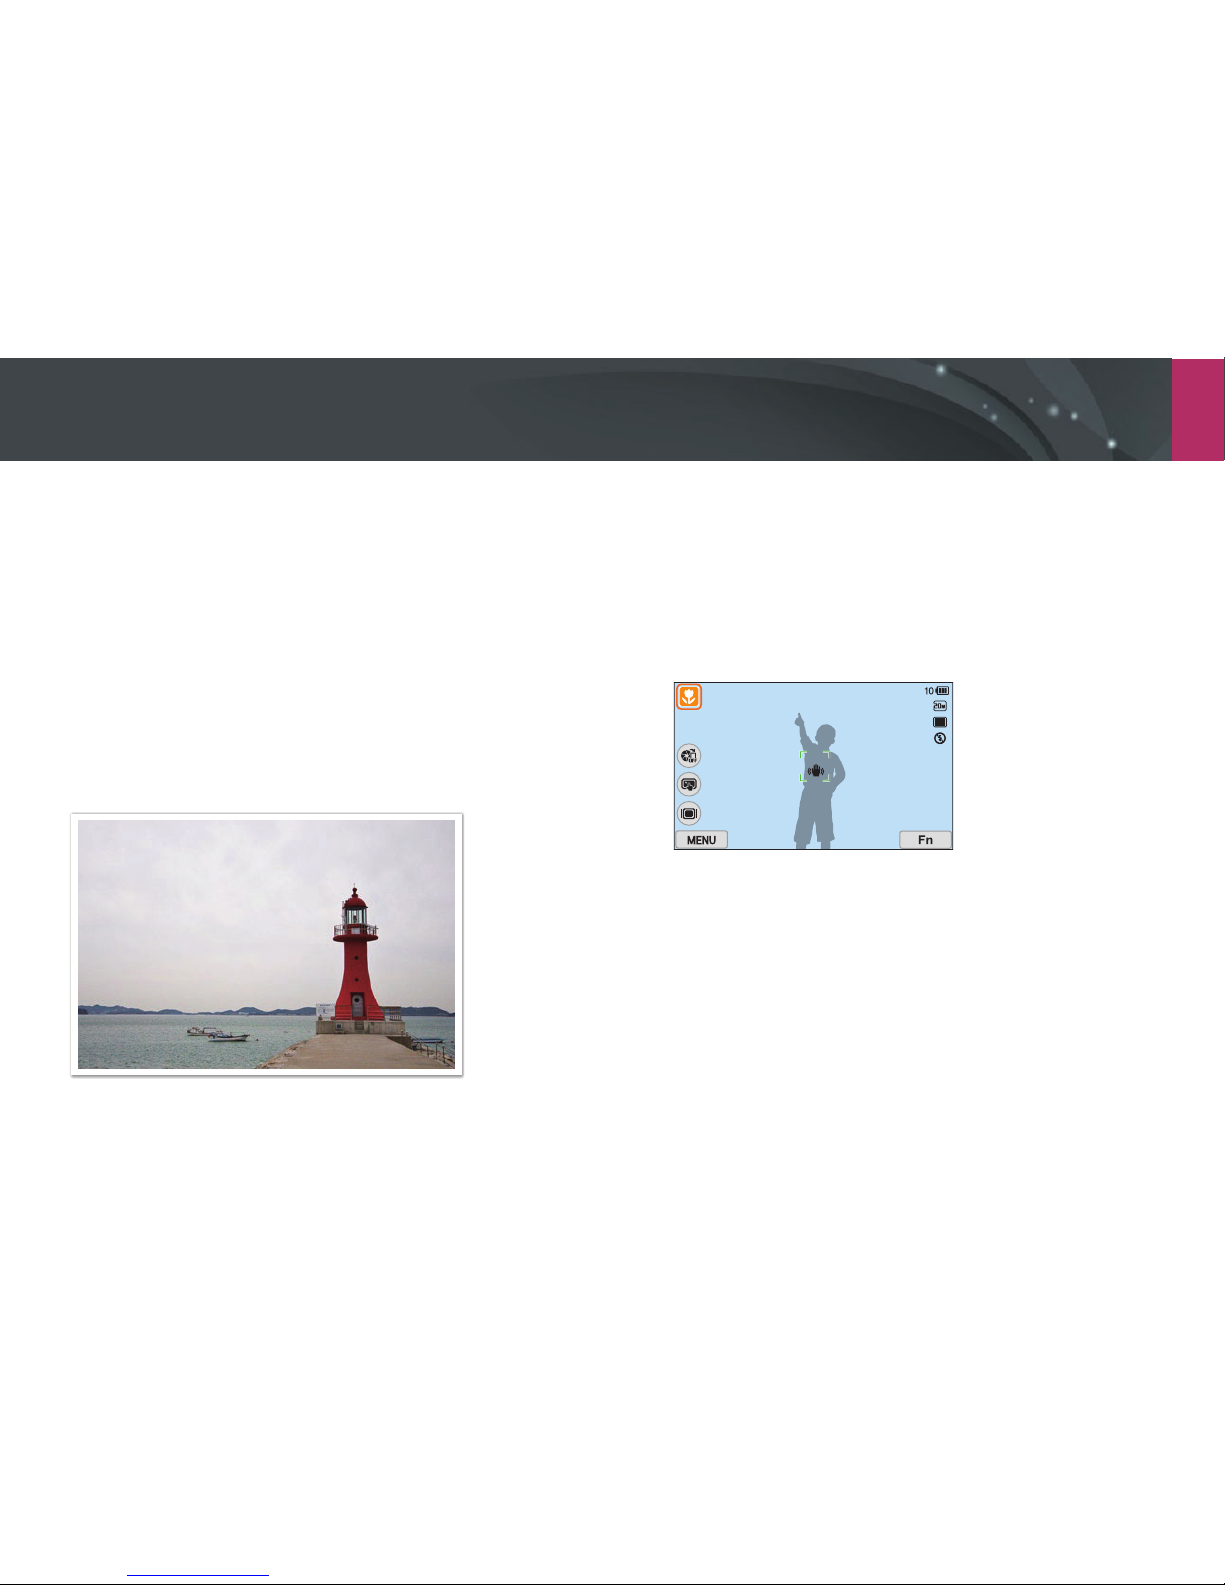
My Camera
55
Shooting modes
Two simple shooting modes—Auto and Smart mode—help you capture
photos with numerous automatic settings. Additional modes allow for
greater customization of settings.
Auto mode
In Auto mode, the camera recognizes surrounding conditions and
automatically adjusts factors that contribute to exposure, including
shutter speed, aperture value, metering, White Balance, and exposure
compensation. As the camera controls most of the functions, some
shooting functions are limited. This mode is useful for capturing quick
snapshots with the least amount of adjustment.
1
On the Mode screen, touch Auto.
2
Align your subject in the frame.
3
Half-press [Shutter] to focus.
•
The camera selects a scene. An appropriate scene icon appears at
the screen.
Page 89
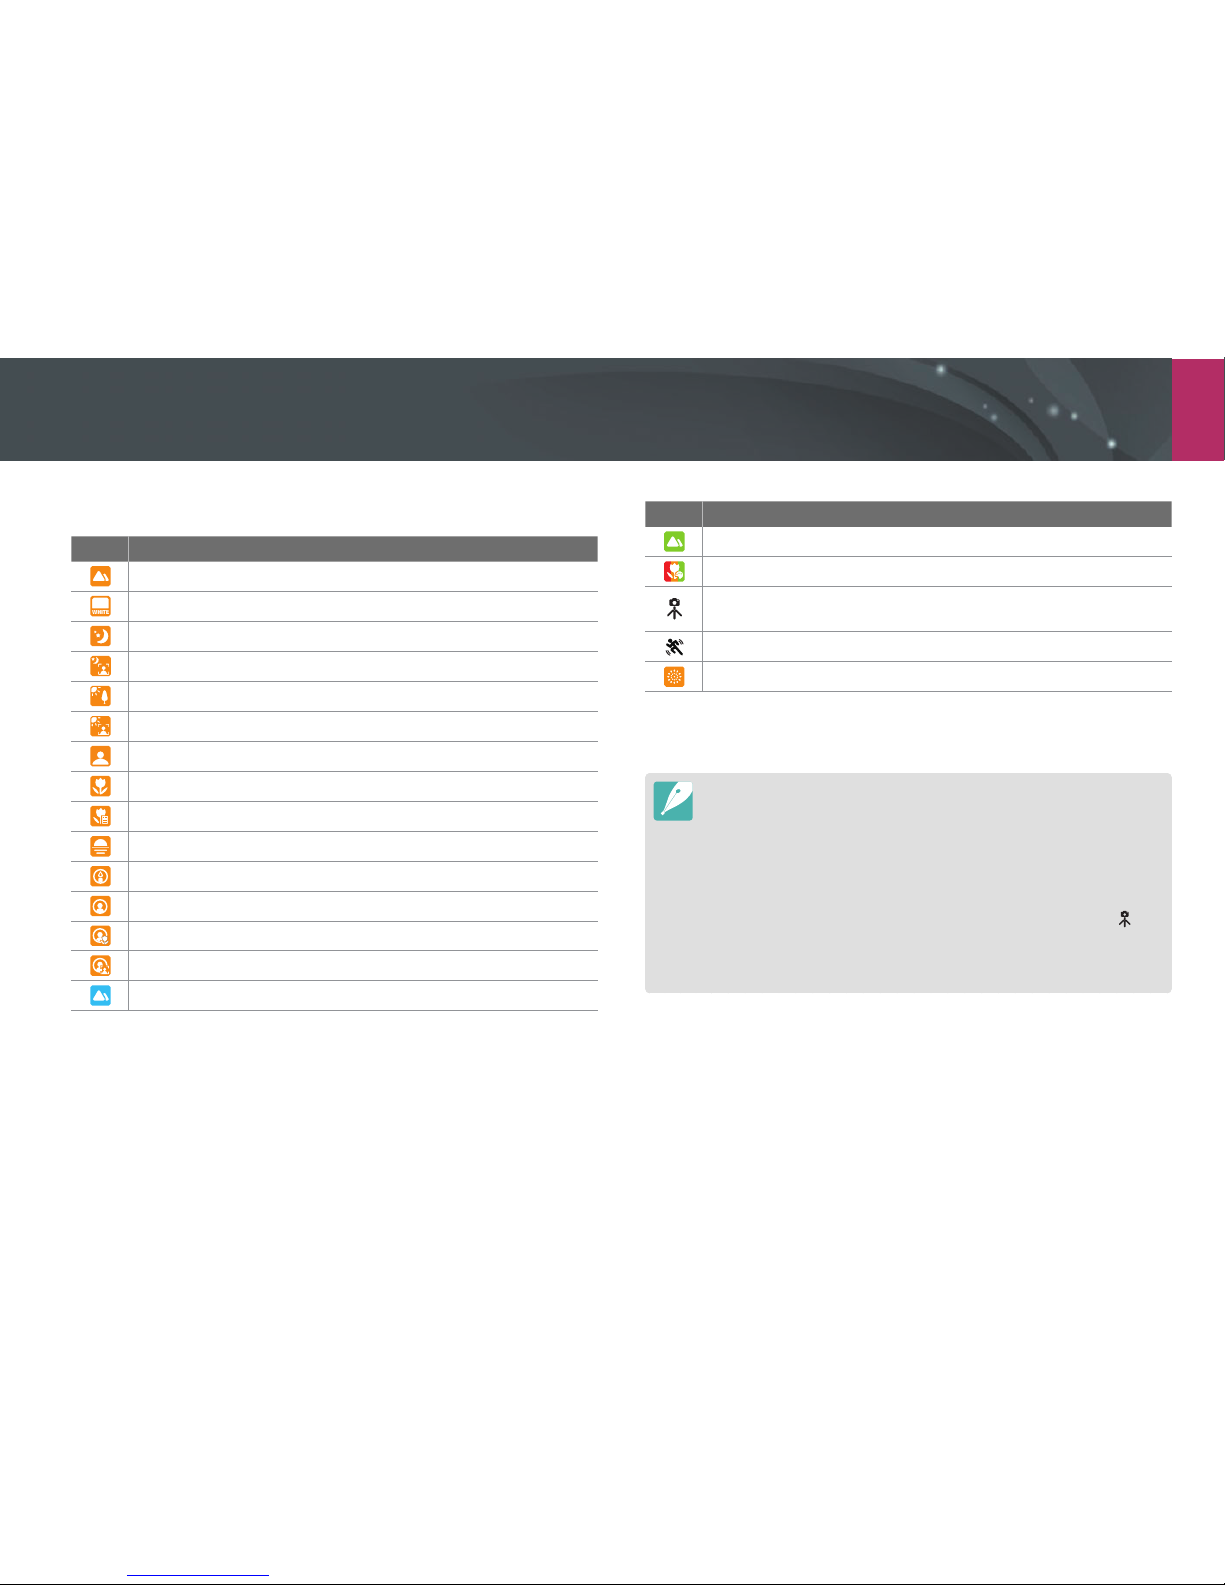
My Camera > Shooting modes
56
Recognizable scenes
Icon Description
Landscapes
Scenes with bright white backgrounds
Landscapes at night
Portraits at night
Landscapes with backlighting
Portraits with backlighting
Portraits
Close-up photos of objects
Close-up photos of text
Sunsets
Indoors, dark
Partially lit
Close-up with spot lighting
Portraits with spot lighting
Blue skies
Icon Description
Forested areas typically consist of green-colored subjects
Close-up photos of colorful subjects
Camera is stabilized on a tripod and the subject is not moving for a
certain period of time. (when shooting in the dark)
Actively moving subjects
Fireworks (when using a tripod)
4
Press [Shutter] to capture the photo.
•
The camera may detect dierent scenes, even the same subjects, depending
on external factors such as camera shake, lighting, and distance to the
subject.
•
If the camera does not recognize an appropriate scene mode, it uses the
default settings for the Auto mode.
•
Even if it detects a face, the camera may not select a portrait mode
depending on the subject's position or lighting.
•
Even if you use a tripod, the camera may not detect the tripod mode ( ) if
the subject is moving.
•
The camera consumes more battery power, because it changes settings often
to select appropriate scenes.
Page 90
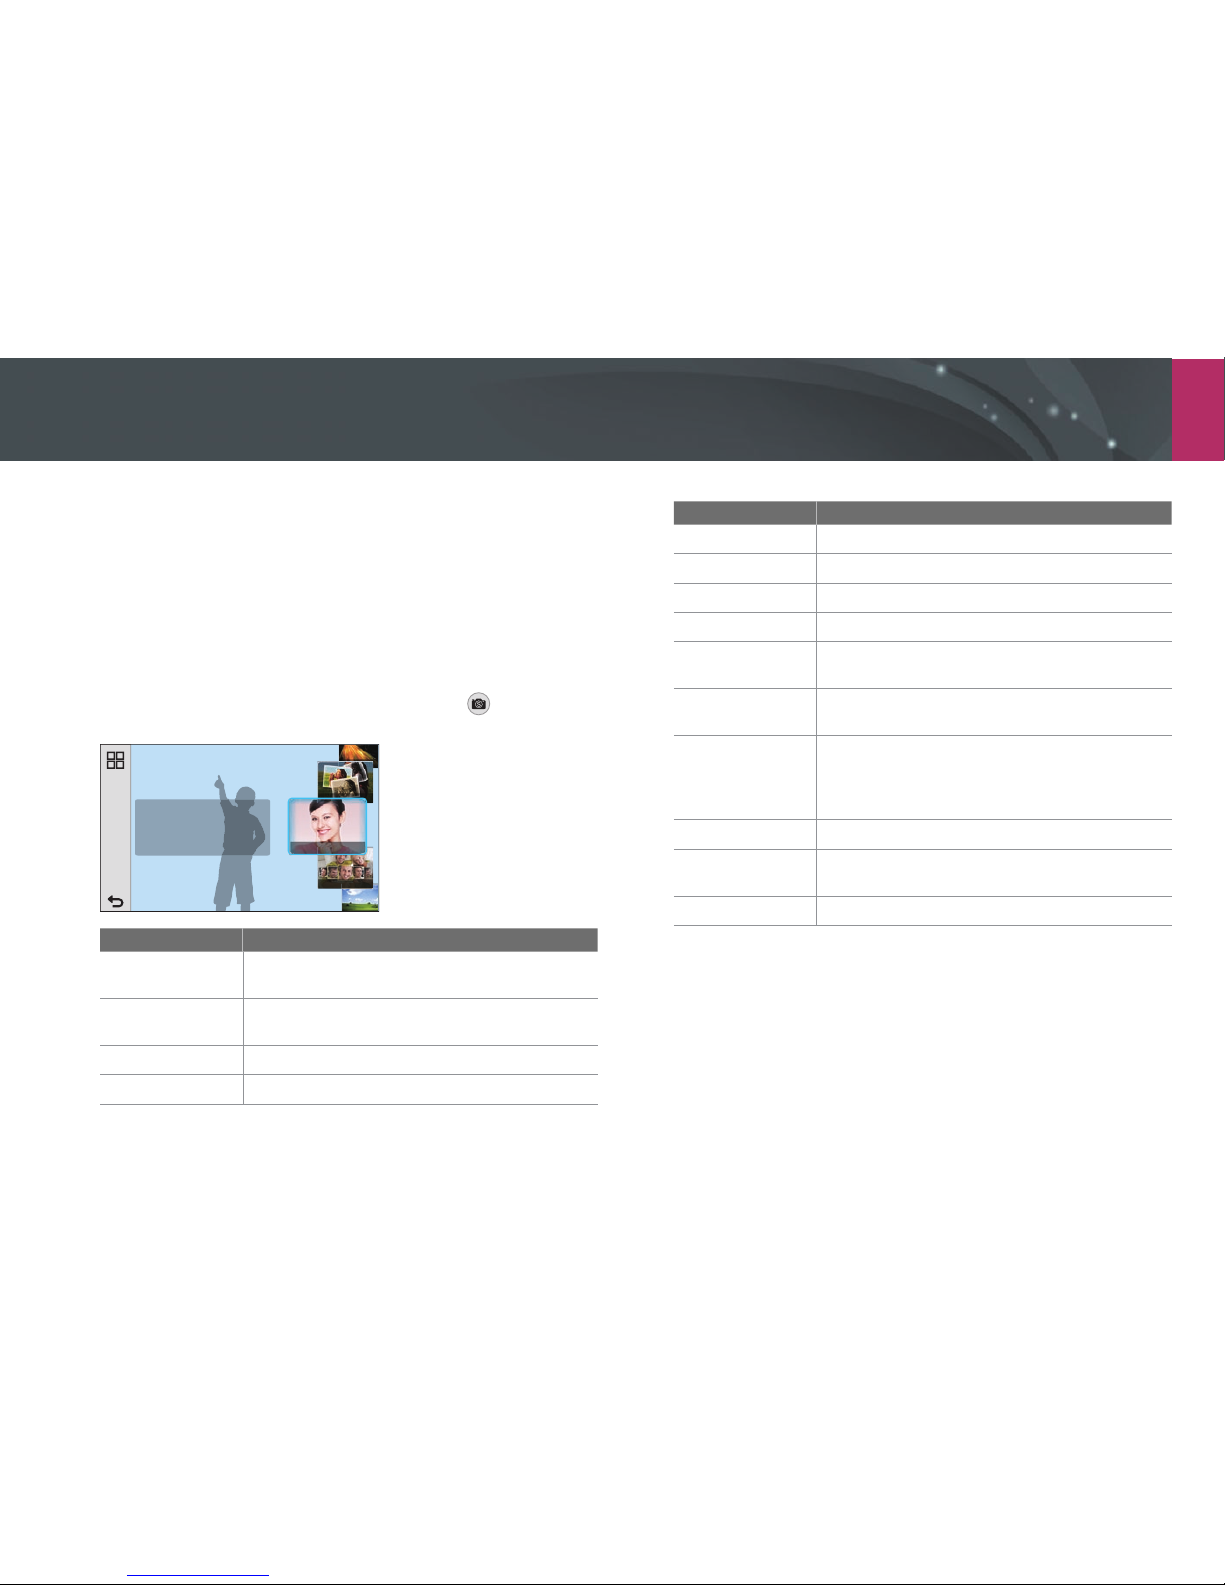
My Camera > Shooting modes
57
Smart mode
In Smart mode, you can capture photos with options that are preset for a
specic scene.
1
On the Mode screen, touch Smart.
2
Touch a scene.
•
To select another scene in Shooting mode, touch on the screen,
and then touch a mode from the list.
Option Description
Beauty Face
Capture a portrait with options to hide facial
imperfections.
Best Face
Capture multiple photos and replace faces to
create the best possible image.
Landscape
Capture still-life scenes and landscapes.
Macro
Capture small or close-up subjects.
Option Description
Action Freeze
Capture subjects moving at high speed.
Rich Tones
Capture a photo with vibrant colors.
Panorama
Capture a wide panoramic scene in a single photo.
Waterfall
Capture scenes with waterfalls.
Silhouette
Capture subjects as dark shapes against a light
background.
Sunset
Capture scenes at sunset, with natural-looking
reds and yellows.
Night
Capture multiple photos in low light conditions
without a ash. The camera combines them to
create a single image that is brighter and has less
blurring.
Fireworks
Capture scenes with reworks.
Light Trace
Capture scenes with the light trailing in low-light
conditions.
Creative Shot
Capture photos with eects applied automatically.
3
Half-press [Shutter] to focus, and then press [Shutter] to
capture.
Page 91
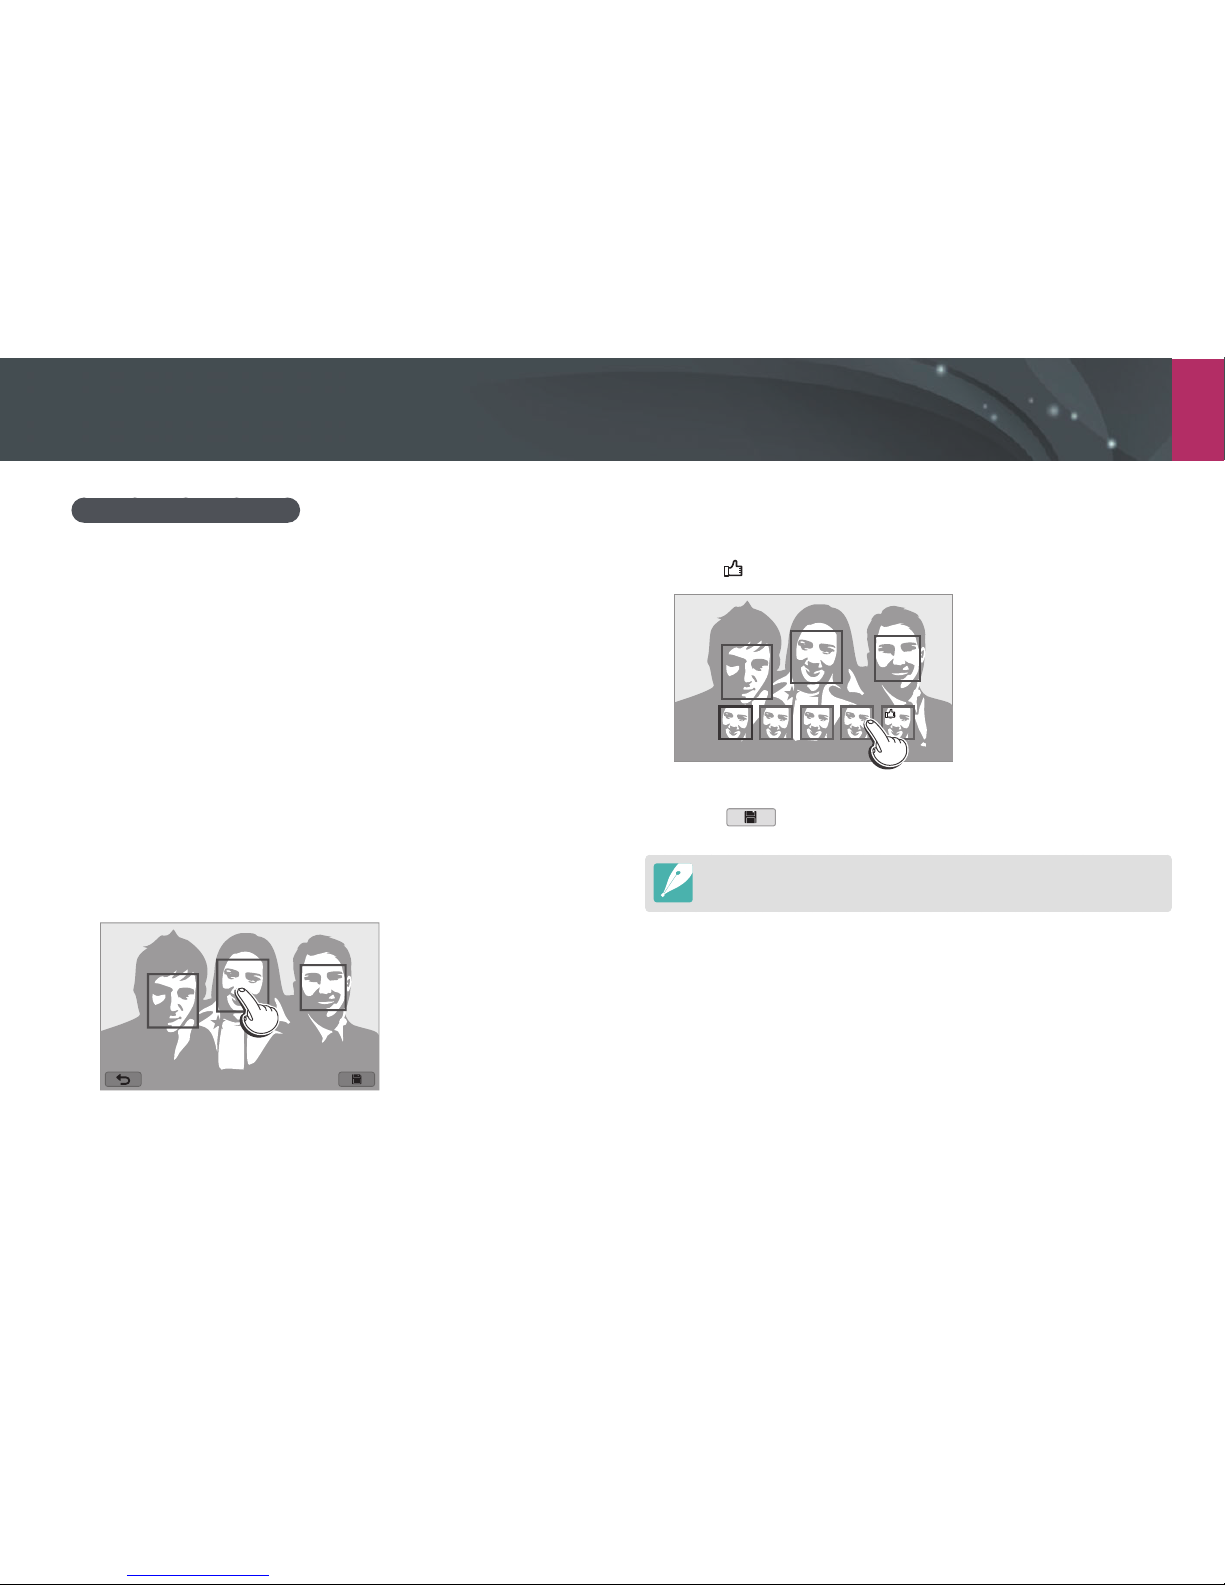
My Camera > Shooting modes
58
Using the Best Face mode
In Best Face mode, you can capture multiple photos and replace faces to
create the best possible image. Use this mode to select the best image for
each individual when capturing group photos.
1
On the Mode screen, touch Smart → Best Face.
2
Align your subject in the frame, and then half-press [Shutter]
to focus.
3
Press [Shutter] to capture the photo.
•
The camera captures 5 photos consecutively.
•
The rst photo is set as the background image.
•
The camera automatically detects faces after shooting.
4
Touch a face to replace.
5
Touch the best image from the 5 faces that were captured.
•
Repeat steps 4 and 5 to replace the rest faces of the photo.
•
The icon will appear on the image that the camera recommends.
6
Touch to save the photo.
•
Use a tripod to prevent your camera from shaking.
•
The resolution is set to 5.9M or smaller.
Page 92
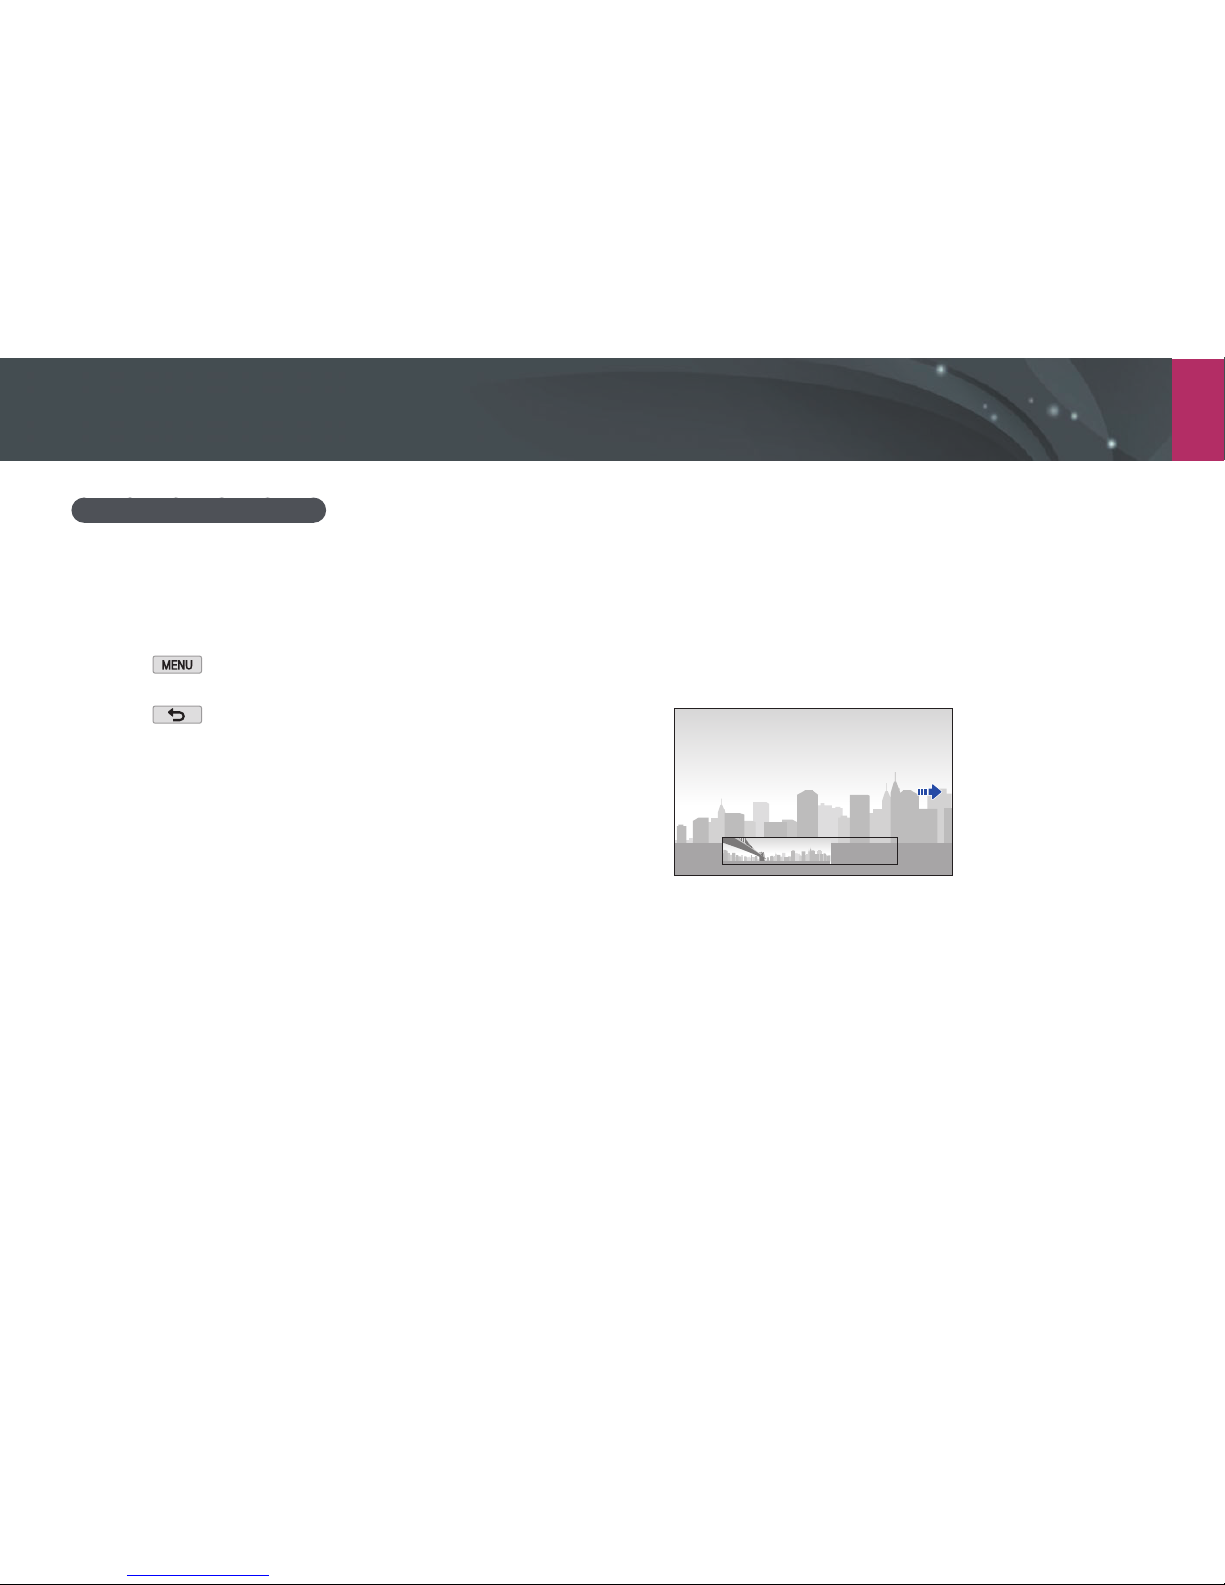
My Camera > Shooting modes
59
Capturing panoramic photos
Capture a 2D or 3D panoramic photo. Captured 3D panoramic photos can
be viewed only on a 3D TV or 3D monitor.
1
On the Mode screen, touch Smart → Panorama.
2
Touch → 1 → Panorama → Live Panorama or 3D.
3
Touch to return to Shooting mode.
4
Press and hold [Shutter] to start shooting.
5
With [Shutter] pressed, slowly move the camera in the
direction you selected.
•
In 3D Panorama mode, you can capture a scene only in horizontal
directions.
•
An arrow toward the direction of motion is displayed, and the entire
shooting image is displayed in the preview box.
•
When the scenes are aligned, the camera captures the next photo
automatically.
6
When you are nished, release [Shutter].
•
The camera will automatically save the shots into one photo.
•
If you release [Shutter] while shooting, the panoramic shooting
stops and photos that have been captured are saved.
Page 93
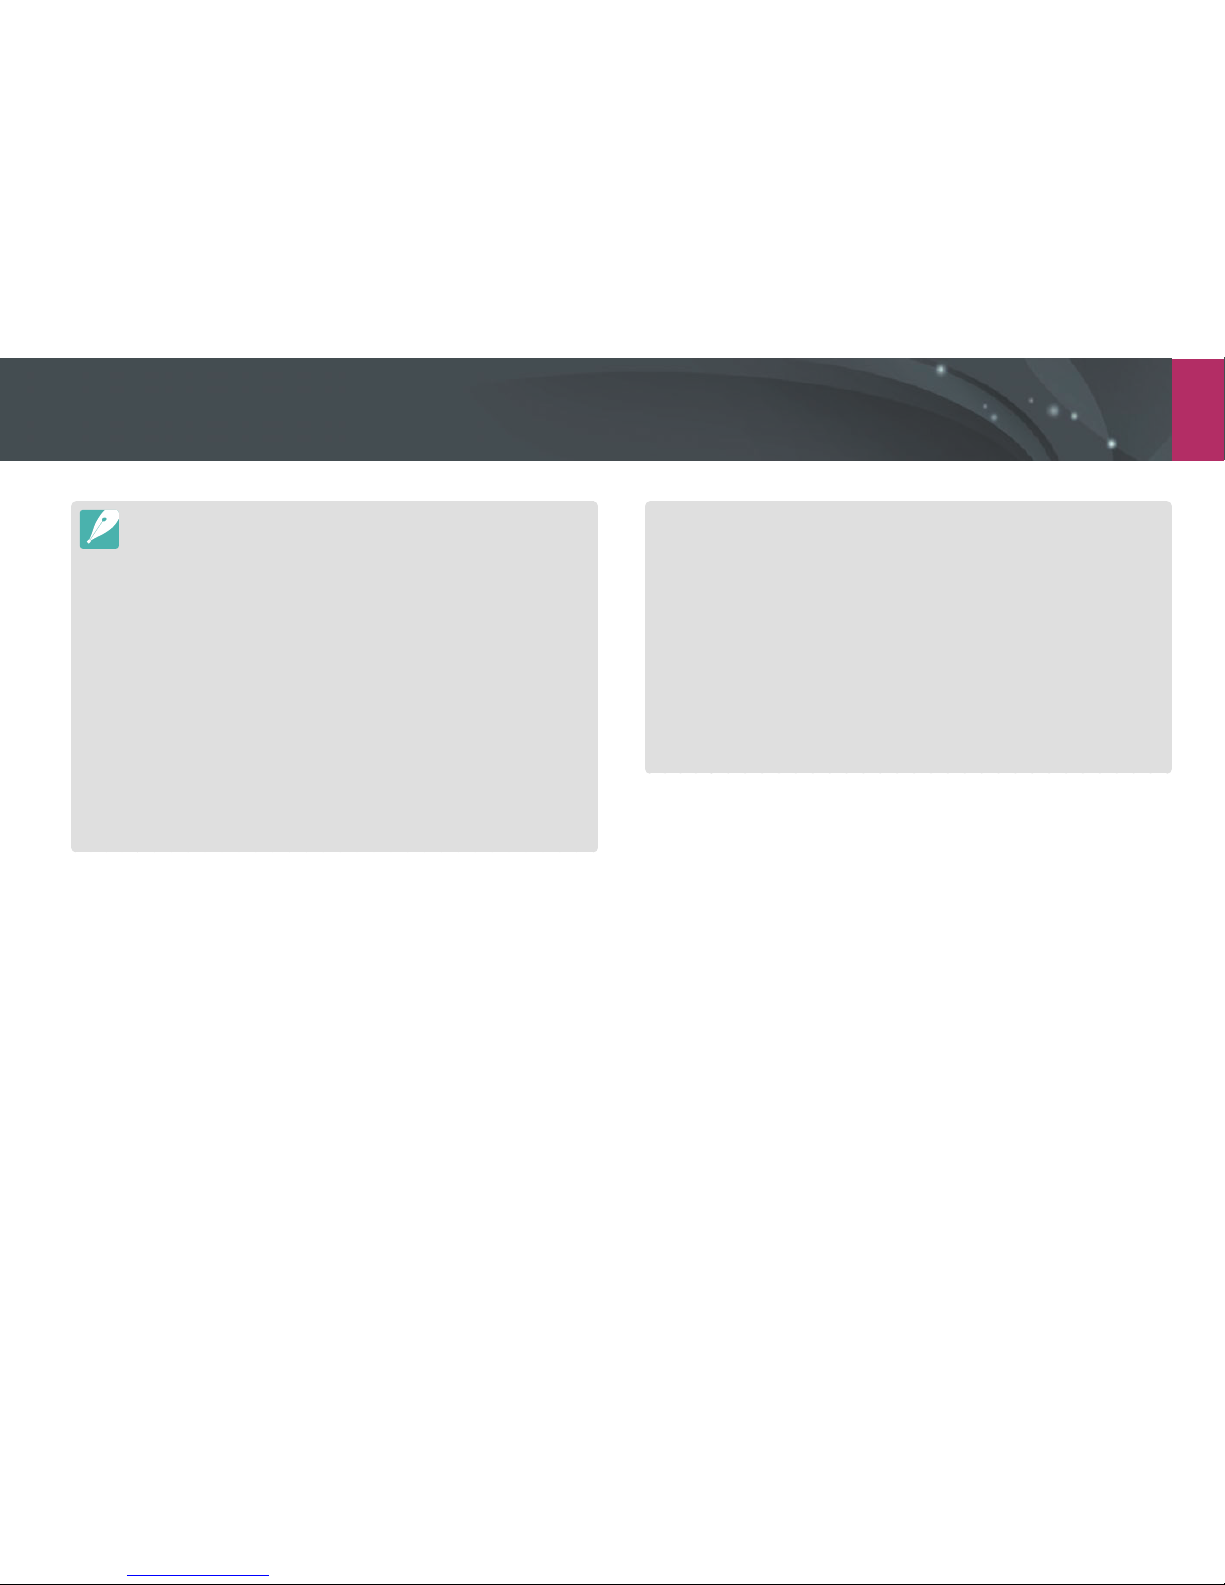
My Camera > Shooting modes
60
•
The resolution varies depending on the panoramic photo you captured.
•
In Panorama mode, some shooting options are not available.
•
The camera may stop shooting due to the shooting composition or the
subject's movement.
•
In Panorama mode, your camera may not capture the entire last scene if you
stop moving the camera to improve the photo quality. To capture the entire
scene, move your camera slightly beyond the point where you want the
scene to end.
•
In 3D Panorama mode, your camera may not capture the very beginning or
end of a scene due to the nature of the 3D eect. To capture the entire scene,
move slightly beyond the beginning and end points you want to capture.
•
Photos captured with the 3D function are saved in JPEG (2D) and MPO (3D)
formats. On your camera's display, you can view only JPEG les.
•
To view 3D les, connect your camera to a 3D TV or 3D monitor with an
optional HDMI cable. While viewing, wear proper 3D glasses.
•
Capturing photos in 3D Panorama mode may result in a less pronounced 3D
eect than those captured with a 3D lens. To increase the 3D eect, attach
the optional 3D lens and use 3D mode. (p. 70)
•
For best results when capturing panoramic photos, avoid the following:
-
moving the camera too quickly or too slowly
-
moving the camera too little to capture the next image
-
moving the camera at irregular speeds
-
shaking the camera
-
shooting in dark places
-
capturing moving subjects nearby
-
shooting conditions where the brightness or color of light is changing
•
Photos taken are automatically saved, and shooting is stopped under the
following conditions:
-
if you change the shooting direction while shooting
-
if you move the camera too rapidly
-
if you don't move the camera
Page 94
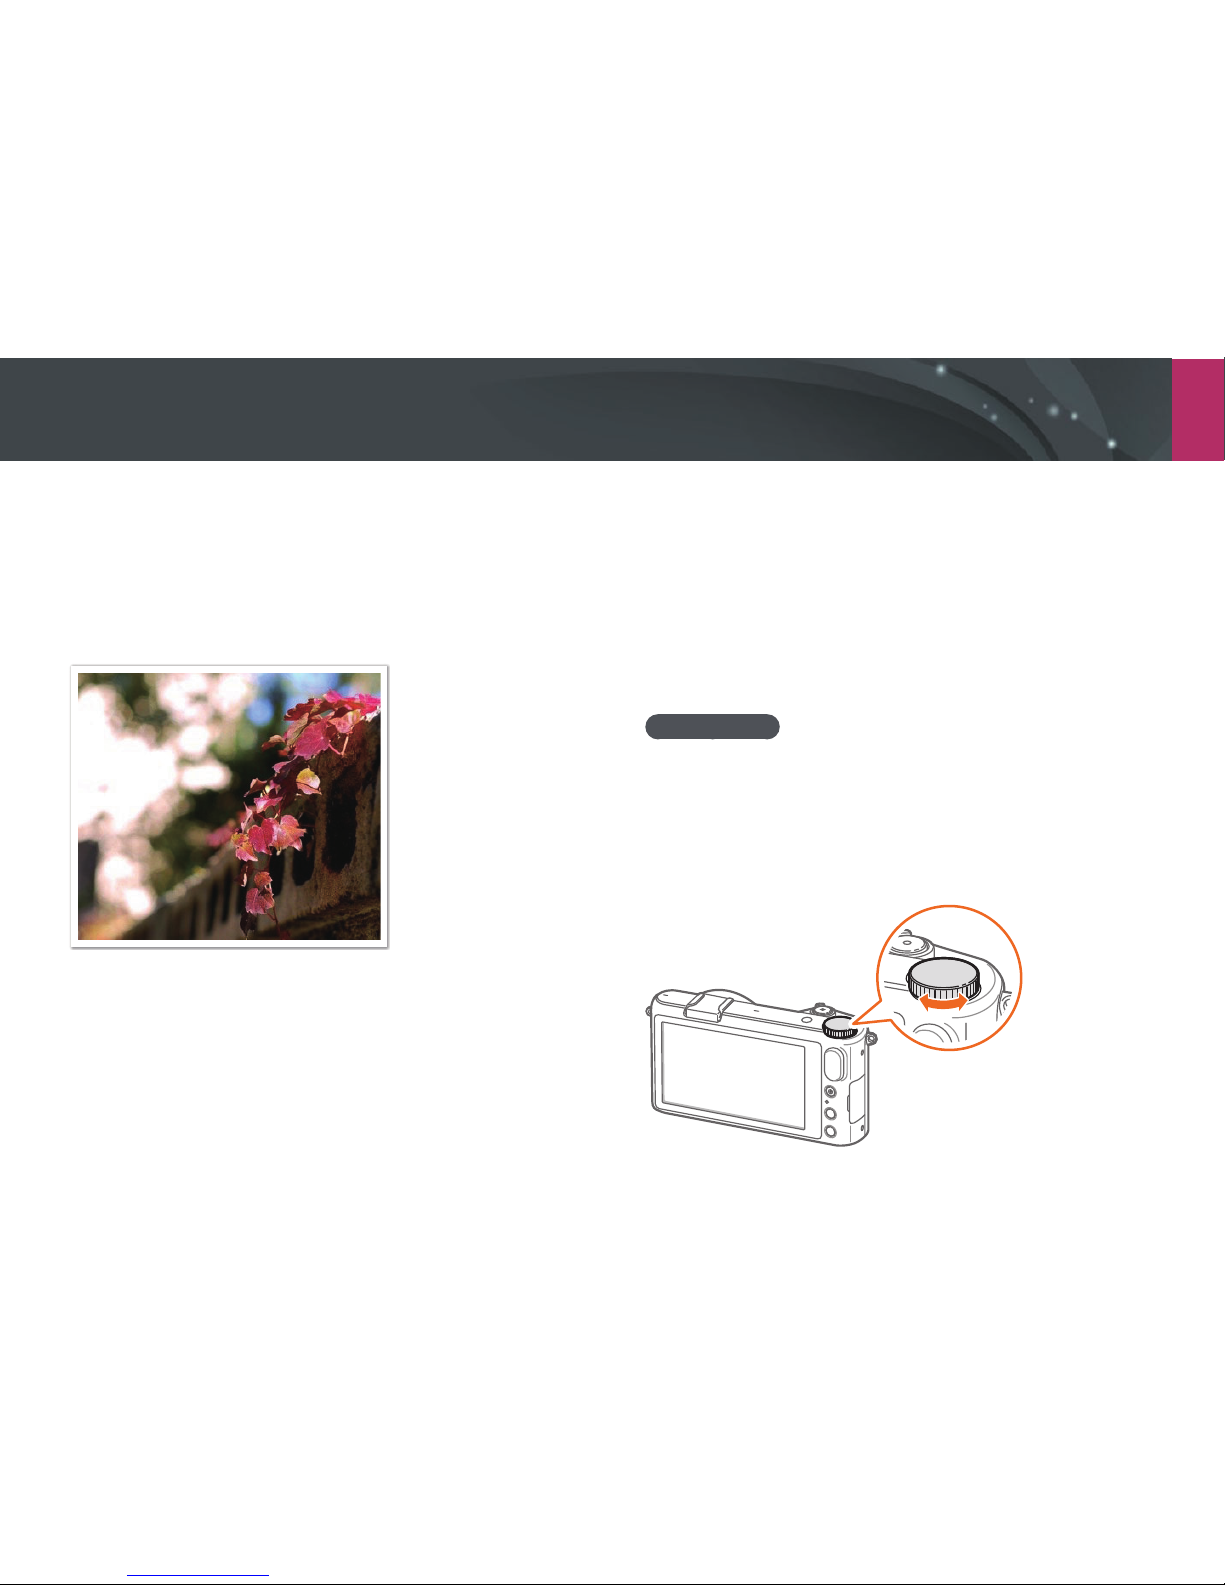
My Camera > Shooting modes
61
Program mode
The camera automatically adjusts shutter speed and aperture value so that
an optimal exposure value can be achieved.
This mode is useful when you want to capture shots of constant exposure
while being able to adjust other settings.
1
On the Mode screen, touch Expert → Program.
2
Set the desired options.
•
For a list of options, refer to "Shooting Functions". (p. 73)
3
Half-press [Shutter] to focus, and then press [Shutter] to
capture the photo.
Program Shift
Program Shift function lets you adjust the shutter speed and aperture
value while the camera maintains the same exposure. In Shooting mode,
press the command dial once, and then rotate it anti-clockwise to decrease
the shutter speed and increase the aperture value. Conversely, press the
command dial once, and then rotate it clockwise to increase the shutter
speed and decrease the aperture value.
Page 95
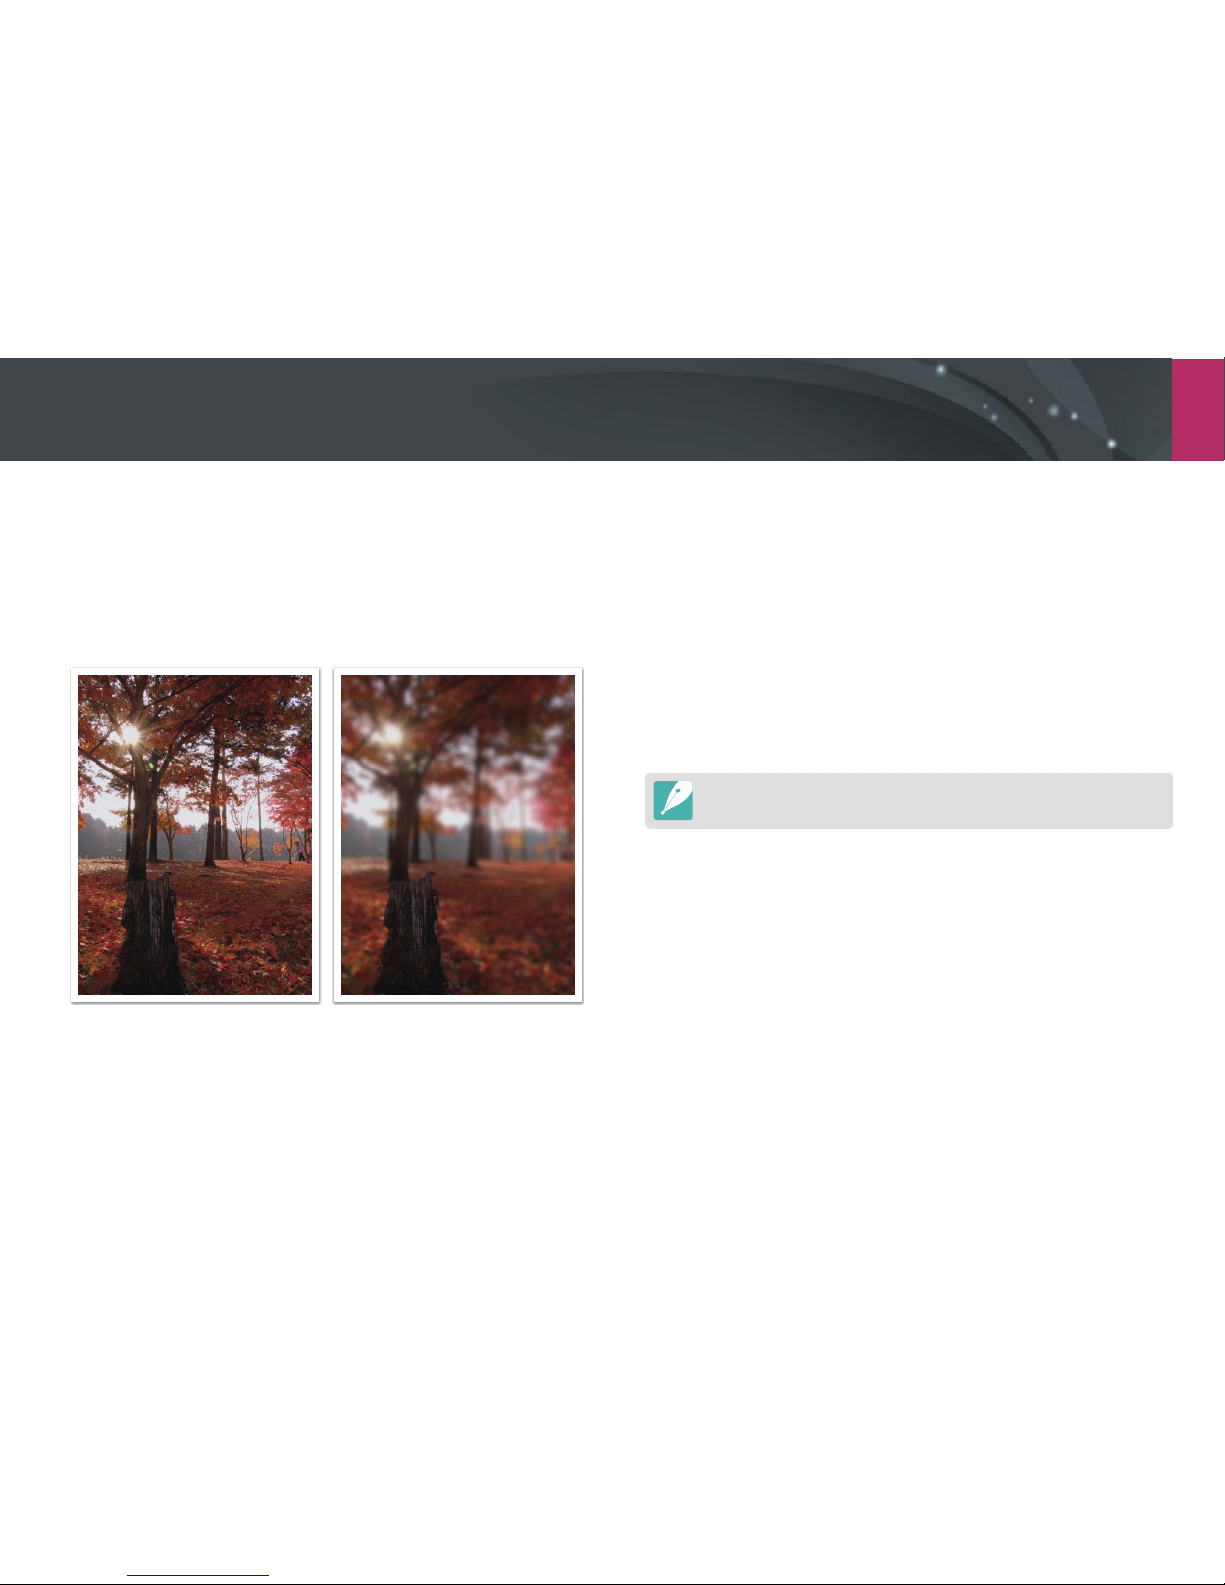
My Camera > Shooting modes
62
Aperture Priority mode
In Aperture Priority mode, the camera automatically calculates shutter
speed according to the aperture value you choose.
You can adjust the depth of eld (DOF) by changing the aperture value.
This mode is useful for taking portraits, owers, or landscape shots.
Large Depth of Field Small Depth of Field
1
On the Mode screen, touch Expert → Aperture Priority.
2
Press the command dial once, and then rotate it to the left or
right to adjust the aperture value.
3
Set the desired options.
•
For a list of options, refer to "Shooting Functions". (p. 73)
4
Half-press [Shutter] to focus, and then press [Shutter] to
capture the photo.
In low-light settings, you may need to increase the ISO sensitivity to prevent
blurred photos.
Page 96
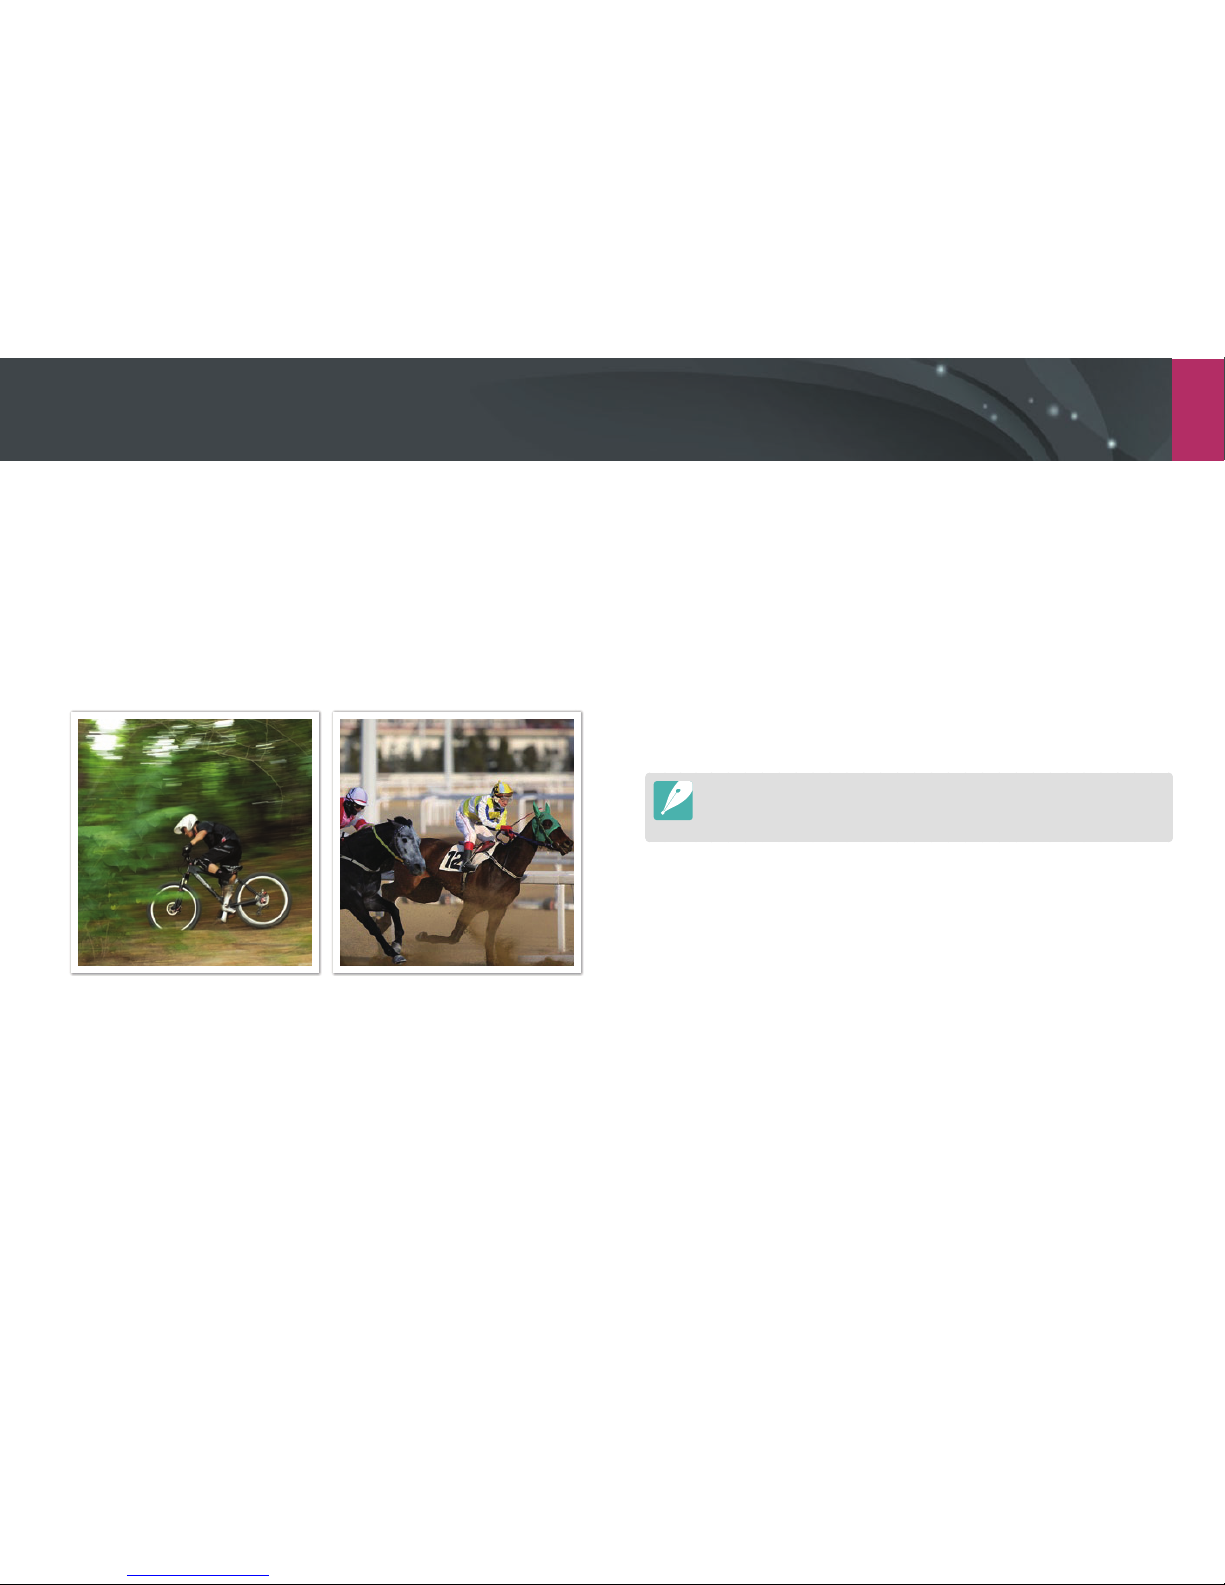
My Camera > Shooting modes
63
Shutter Priority mode
In Shutter Priority mode, the camera automatically adjusts the aperture
value according to the shutter speed you choose. This mode is useful for
capturing photos of fast-moving subjects or for creating tracer eects in a
photo.
For example, set the shutter speed to over 1/500 s to freeze the subject.
To make the subject appear blurred set the shutter speed to below 1/30 s.
Slow shutter speed Fast shutter speed
1
On the Mode screen, touch Expert → Shutter Priority.
2
Press the command dial once, and then rotate it to the left or
right to adjust the shutter speed.
3
Set the desired options.
•
For a list of options, refer to "Shooting Functions". (p. 73)
4
Half-press [Shutter] to focus, and then press [Shutter] to
capture the photo.
In order to compensate for the reduced amount of light allowed by fast shutter
speeds, open the aperture and let in more light. If your photos are still too dark,
increase the ISO value.
Page 97
My Camera > Shooting modes
64
Manual mode
Manual mode lets you adjust the shutter speed and aperture value
manually. In this mode, you can fully control the exposure of your photos.
This mode is useful in controlled shooting environments, such as a studio,
or when it is necessary to ne-tune camera settings. The Manual mode is
also recommended for shooting night scenes or reworks.
1
On the Mode screen, touch Expert → Manual.
2
Press the command dial to select the shutter speed or the
aperture value.
3
Rotate the command dial to adjust the shutter speed or the
aperture value.
4
Set the desired options.
•
For a list of options, refer to "Shooting Functions". (p. 73)
5
Half-press [Shutter] to focus, and then press [Shutter] to
capture the photo.
Using the Bulb function
Use the Bulb function to shoot night scenes or the night sky. While you are
pressing [Shutter], the shutter is left open so you can create moving light
eects.
To use a Bulb,
Completely rotate the command dial clockwise to Bulb →
press and hold [Shutter] for the desired time.
•
If you set a high ISO value or open the shutter for a long time, image noise
may increase.
•
Drive options, ash, and One touch shot cannot be used with the Bulb
function.
•
The Bulb function is available only in Manual mode.
•
Use a tripod and shutter release to prevent your camera from shaking.
•
The longer you open the shutter, the longer it takes to save a photo. Do not
turn the camera o while the camera saves a photo.
•
If you use this function for a long time, use a fully charged battery.
Page 98
My Camera > Shooting modes
65
Custom mode
Custom mode lets you create your own shooting modes by adjusting
options and saving them.
Saving a custom mode
1
On the Mode screen, touch Expert → Program, Aperture
Priority, Shutter Priority, or Manual.
2
Set shooting options.
•
For a list of options, refer to "Shooting Functions". (p. 73)
3
Touch → 5 → Save as Custom Mode.
•
You can also touch → .
4
Touch a location to save (C1, C2, or C3).
•
You can overwrite the settings if an old mode is saved to the same
location.
5
Touch .
Selecting a custom mode
1
On the Mode screen, touch Expert → Custom.
2
Touch a mode → .
•
To select another custom mode, touch → 1 →
Custom Mode
→
a mode.
•
You can change the shooting options in the selected custom mode, and save
them as a new custom mode.
•
To reset a custom mode, touch → 1 → Reset Custom Mode →
the custom mode.
Page 99
My Camera > Shooting modes
66
Recording a video
In Shooting mode, you can record Full HD videos (1920X1080) by pressing
(Video recording). The camera lets you record a video up to 29 minutes
and 59 seconds in length at 30, 24, or 15 fps, and saves the les in
MP4 (H.264) format. The maximum recording time when you select
is
20 minutes. 24 fps is available only with 1920X810.
15 fps is available only with some Smart Filter options. The sound is
recorded via the camera's microphone.
You can set the exposure by adjusting the aperture value and shutter
speed for the mode you selected. The camera automatically focuses on
the subject that you touch on the screen when shooting a movie. When
you touch the Touch AF cancel button (
), the camera will switch to
continuous autofocus. When the AF/MF switch on the lens is set to MF, you
cannot use the Touch AF feature.
Touch Fader to fade in or out a scene. You can also select Voice, Wind Cut,
or other options to set recording options. (p. 108)
1
On the Mode screen, touch Auto, Smart, or Expert →
Program, Aperture Priority, Shutter Priority, Manual, or
Custom.
•
This feature may not work in some modes.
2
Set the desired options.
3
Press (Video recording) to start recording.
4
Press (Video recording) again to stop.
•
H.264 (MPEG-4 part10/AVC) is the latest video coding format established
in 2003 collaboratively by ISO-IEC and ITU-T. Since this format uses a high
compression rate, more data can be saved in less memory space.
•
If you have the image stabilizer option on when shooting a movie, the
camera may record the image stabilizer sound.
•
The zoom sound or other lens sounds may be recorded if you adjust the lens
while recording a video.
•
When using an optional video lens, the autofocus noise is not recorded.
•
If you remove the camera lens while recording a movie, the recording will be
interrupted. Do not change the lens while recording.
•
If you attach an external microphone while recording a movie, sound will not
be recorded through the external microphone. (The previous settings are
maintained.) If you remove the external microphone while recording a movie,
sound will not be recorded. Turn o the camera before attaching or removing
the external microphone.
Page 100
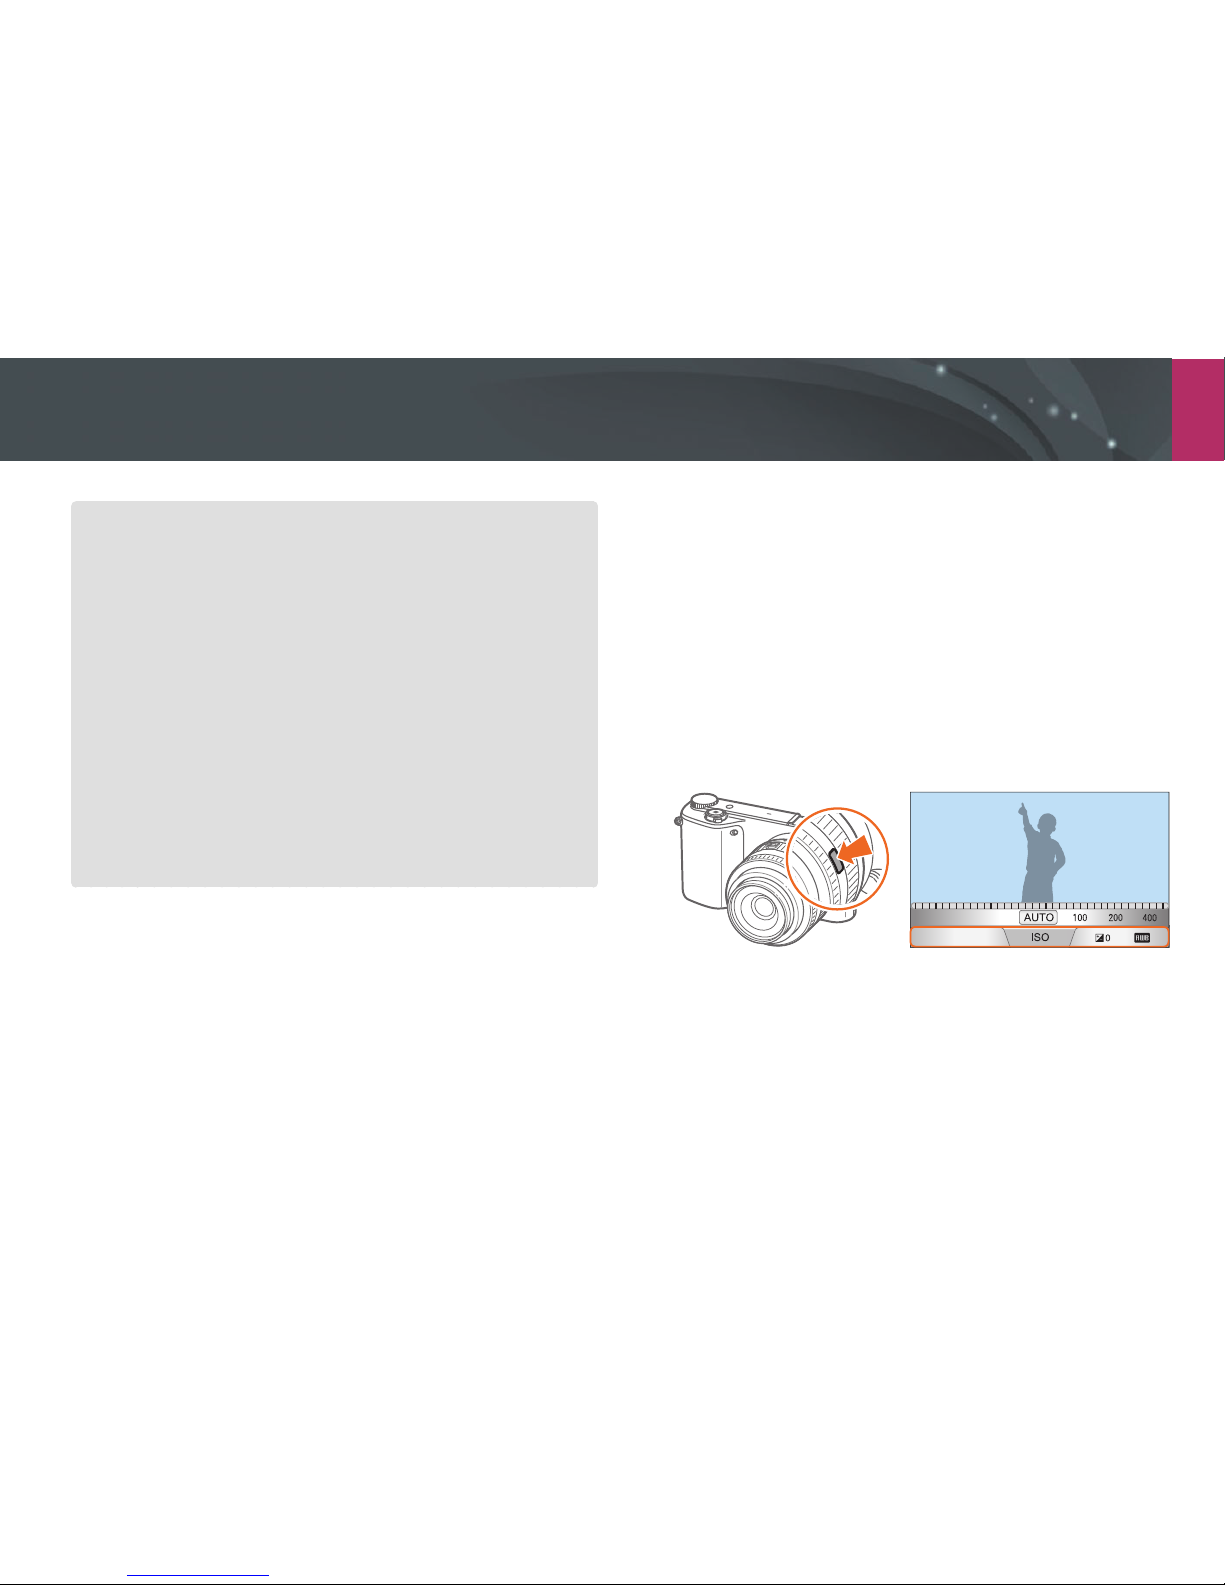
My Camera > Shooting modes
67
•
If you change the shooting angle of the camera suddenly while shooting a
movie, the camera may not be able to record images accurately. Use a tripod
to minimize camera shake.
•
The camera supports only the Multi AF function when recording a video. You
cannot use any other focus area setting functions, such as Face Detection AF.
•
When the size of a movie le exceeds 4 GB, the camera automatically stops
recording even if the maximum recording time (29 minutes and 59 seconds)
has not been reached.
•
If you use a slow writing memory card, the recording of your movie can
be interrupted because the card cannot process data at the rate the video
is being shot. If this occurs, replace the card with a faster memory card or
reduce the video size (for example, from 1280X720 to 640X480).
•
When formatting a memory card, always format using the camera. If you
format on another camera or a PC, you can lose les on the card or cause a
change in the capacity of the card.
•
When you press the video recording button, Z turns o.
•
While recording a video in the same ISO sensitivity, the screen may be darker
than taking a photo. Adjust the ISO sensitivity.
•
When you record a video in Program, Aperture Priority, or Shutter Priority,
ISO is automatically set to Auto.
Using i-Function
When you use the i-Function button on an i-Function lens, you can
manually select and adjust shutter speed, aperture value, exposure value,
ISO sensitivity, and White Balance on the lens.
1
On the Mode screen, touch Expert → Program, Aperture
Priority, Shutter Priority, or Manual.
2
Press [i-Function] on the lens to select a setting.
•
You can also press [i-Function], and then drag the screen to select
a setting.
 Loading...