

Samsung NX11 Owner Manual
User Manual
This user manual includes detailed usage instructions for your camera.
Please read this manual thoroughly.
ENG

Copyright information
•
Microsoft Windows and the Windows logo are registered trademarks
of the Microsoft Corporation.
•
Mac is a registered trademark of the Apple Corporation.
•
HDMI, the HDMI logo, and the term “High Definition Multimedia
Interface” are trademarks or registered trademarks of HDMI Licensing
LLC.
•
Trademarks and trade names used in this manual are the property of
their respective owners.
•
Camera specifications or contents of this manual may be changed
without prior notice due to upgrade of camera functions.
•
You are not allowed to reuse or distribute any part of this manual
without prior permission.
•
For Open Source License information, refer to the
“OpenSourceInfo.pdf” in the provided CD-ROM.
PlanetFirst represents Samsung Electronics' commitment
to the sustainable development and social responsibility
through eco-driven business and management activities.
1

Health and safety information
Always comply with the following precautions and usage tips to avoid
dangerous situations and ensure peak performance of your camera.
Safety warnings
Do not disassemble or attempt to repair your camera
This may result in electric shock or damage to the camera.
Do not use your camera near flammable or explosive
gases and liquids
Do not use your camera near fuels, combustibles, or flammable
chemicals. Do not store or carry flammable liquids, gases, or explosive
materials in the same compartment as the camera or its accessories.
Keep your camera away from small children and pets
Keep your camera and all accessories out of the reach of small
children and animals. Small parts may cause choking or serious injury
if swallowed. Moving parts and accessories may present physical
dangers as well.
Prevent damage to subjects’ eyesight
Do not use the flash in close proximity (closer than 1 m/3 ft) to people
or animals. Using the flash too close to your subject’s eyes can cause
temporary or permanent damage.
Handle and dispose of batteries and chargers with care
•
Use only Samsung-approved batteries and chargers. Incompatible
batteries and chargers can cause serious injuries or damage to your
camera.
•
Never dispose of batteries in a fire. Follow all local regulations when
disposing of used batteries.
•
Never place batteries or cameras on or in heating devices, such as
microwave ovens, stoves, or radiators. Batteries may explode when
overheated.
•
Do not use a damaged power supply cord, plug, or loose outlet when
charging batteries. This may cause fire or electric shock.
Safety precautions
Handle and store your camera carefully and sensibly
•
Do not allow your camera to get wet—liquids can cause serious
damage. Do not handle your camera with wet hands. Water damage
to your camera can void your manufacturer’s warranty.
•
Do not expose the camera to direct sunlight or high temperatures
for an extended period of time. Prolonged exposure to sunlight
or extreme temperatures can cause permanent damage to your
camera’s internal components.
2

Health and safety information
•
Avoid using or storing your camera in dusty, dirty, humid, or poorlyventilated areas to prevent damage to moving parts and internal
components.
•
Remove the batteries from your camera when storing it for an
extended period of time. Installed batteries may leak or corrode over
time and cause serious damage to your camera.
•
Prolonged usage of the camera may overheat the battery and raise
the internal temperature of the camera. If the camera stops operating,
remove the battery and allow it to cool down.
•
Protect your camera from sand and dirt when using it on beaches or
in other similar areas.
•
Protect your camera from impact, rough handling, and excessive
vibration to avoid serious damage.
•
Exercise caution when connecting cables or adapters and installing
batteries and memory cards. Forcing the connectors, improperly
connecting cables, or improperly installing batteries and memory
cards can damage ports, connectors, and accessories.
•
Do not insert foreign objects into any of your camera’s compartments,
slots, or access points. Damage due to improper use may not be
covered by your warranty.
•
Do not swing your camera by the strap. This may cause injury to
yourself or others.
•
Do not paint your camera, as paint can clog moving parts and prevent
proper operation.
•
Paint or metal on the outside of the camera may cause allergic
reactions, itchy skin, eczema, or swelling for people with sensitive
skin. If you experience any of these symptoms, stop using the camera
immediately and consult a doctor.
•
Do not use batteries for unintended purposes. This may cause a fire
or electric shock.
•
Do not touch the flash while it fires. The flash is very hot when fired
and may burn your skin.
•
Keep cards with magnetic strips away from the camera case.
Information stored on the card may be damaged or erased.
Protect batteries, chargers, and memory cards from
damage
•
Avoid exposing batteries or memory cards to very cold or very hot
temperatures (below 0 ºC/32 ºF or above 40 ºC/104 ºF). Extreme
temperatures can reduce the charging capacity of your batteries and
can cause memory cards to malfunction.
•
Prevent batteries from making contact with metal objects, as this can
create a connection between the + and – terminals of your battery
and lead to temporary or permanent battery damage. Also, this may
cause fire or electric shock.
•
Prevent memory cards from making contact with liquids, dirt, or
foreign substances. If dirty, wipe the memory card clean with a soft
cloth before inserting in your camera.
3

Health and safety information
•
Do not allow liquids, dirt, or foreign substances to come in contact
with the memory card slot. Doing so may cause the camera to
malfunction.
•
Insert the memory card in the correct direction. Inserting a memory
card in the wrong direction may damage your camera and memory
card.
•
Turn off the camera when inserting or removing the memory card.
•
Do not bend, drop, or subject memory cards to heavy impact or
pressure.
•
Do not use memory cards that have been formatted by other cameras
or by a computer. Format the memory card with your camera.
•
Never use a damaged charger, battery, or memory card.
Use only Samsung-approved accessories
Using incompatible accessories may damage your camera, cause injury,
or void your warranty.
Protect your camera’s lens
•
Do not expose the lens to direct sunlight, as this may discolor the
image sensor or cause it to malfunction.
•
Protect your lens from fingerprints and scratches. Clean your lens with
a soft, clean, debris-free lens cloth.
Important usage information
Allow only qualified personnel to service your camera
Do not allow unqualified personnel to service the camera or attempt to
service the camera yourself. Any damage that results from unqualified
service is not covered by your warranty.
Ensure maximum battery and charger life
•
Overcharging batteries may shorten battery life. After charging is
finished, disconnect the cable from your camera.
•
Over time, unused batteries will discharge and must be recharged
before use.
•
Disconnect chargers from power sources when not in use.
•
Use batteries only for their intended purpose.
Exercise caution when using the camera in humid
environments
When transferring the camera from a cold environment to a warm and
humid one, condensation may form on the delicate electronic circuitry
and memory card. In this situation, wait for at least 1 hour until all
moisture has evaporated before using the camera.
Check that the camera is operating properly before use
The manufacturer takes no responsibility for any loss of files or damage
that may result from camera malfunction or improper use.
4

Indications used in this manual
Icons used in this manual
Icon Function
Additional information
Safety warnings and precautions
Camera buttons. For example, [Shutter] represents the
[ ]
shutter button.
Page number of related information
( )
The order of options or menus you must select to
perform a step; for example: Select 1
►
(represents select 1, and then Quality).
Annotation
*
Shooting mode indications
Shooting mode Indication
Smart Auto
Program
Aperture Priority
Shutter Priority
Manual
Lens Priority
t
P
A
S
M
i
► Quality
Shooting mode Indication
Sound picture
Panorama
Scene
Movie
N
p
s
v
Abbreviations used in this manual
Abbreviation Definition
AE
AF
BKT
DPOF
EV
FA
MF
OIS
ISO
WB
Auto Exposure
Auto Focus
Bracketing
Digital Print Order Format
Exposure Value
Focus Aid
Manual Focus
Optical Image Stabilization
International Organization for
Standardization's measure for light
sensitivity
White Balance
5

Contents
Tips
Concepts in Photography
Shooting postures ....................................................................... 11
Holding the camera ......................................................................... 11
Standing photography ..................................................................... 11
Crouching photography .................................................................. 12
Aperture ....................................................................................... 12
Aperture value and the depth of field ............................................... 13
Shutter speed .............................................................................. 14
ISO sensitivity .............................................................................. 15
How the aperture setting, shutter speed, and ISO sensitivity
control exposure ......................................................................... 16
Correlation between focal length, angle, and perspective ....... 17
Depth of field ............................................................................... 18
What controls out-of-focus effects? ................................................ 18
DOF preview ................................................................................... 20
Composition ................................................................................ 20
Rule of Thirds .................................................................................. 20
Photos with two subjects ................................................................ 21
Flash............................................................................................. 22
Flash guide number......................................................................... 22
Bounce Photography ...................................................................... 23
Chapter 1
My Camera
Getting started ............................................................................ 25
Unpacking ..................................................................................... 25
Camera layout ............................................................................. 26
Display icons ............................................................................... 29
In Shooting mode .......................................................................... 29
Capturing photos ............................................................................ 29
Recording videos ............................................................................ 30
In Playback mode .......................................................................... 31
Viewing photos ............................................................................... 31
Playing videos ................................................................................. 31
Lenses .......................................................................................... 32
Lens layout .................................................................................... 32
Locking or unlocking the lens .......................................................... 33
Lens markings ............................................................................... 35
Optional accessories .................................................................. 36
External flash layout ....................................................................... 36
Connecting the flash ...................................................................... 36
GPS module layout ........................................................................ 37
Attaching the GPS module ............................................................ 38
6

Contents
Shooting modes .......................................................................... 39
t Smart Auto mode ................................................................ 39
P Program mode .......................................................................... 40
Program Shift .................................................................................. 40
A Aperture Priority mode .............................................................. 41
S Shutter Priority mode ................................................................. 41
M Manual mode ........................................................................... 42
Framing mode ................................................................................. 42
Using bulb ....................................................................................... 42
i Lens Priority mode ................................................................... 42
Using the i-Scene mode .................................................................. 42
Using i-Function in PASM modes ................................................. 43
Available options ............................................................................ 44
N Sound Picture mode ............................................................. 45
p Panorama mode .................................................................... 45
s Scene mode ....................................................................... 46
v Movie mode ............................................................................ 48
Available functions by shooting mode ............................................ 49
Chapter 2
Shooting Functions
Size .............................................................................................. 51
Photo size options ......................................................................... 51
Video size options ......................................................................... 51
Quality .......................................................................................... 52
Photo quality options ..................................................................... 52
Video quality options ..................................................................... 52
ISO sensitivity .............................................................................. 53
White Balance (light source) ....................................................... 54
White Balance options ................................................................... 54
Customizing preset options ............................................................. 55
Picture Wizard (photo styles) ...................................................... 57
Color space ................................................................................. 58
AF mode ...................................................................................... 59
Single AF ....................................................................................... 59
Continuous AF ............................................................................... 60
Manual focus ................................................................................. 60
AF area ......................................................................................... 61
Selection AF .................................................................................. 61
Multi AF ......................................................................................... 62
Face detection AF ......................................................................... 62
Self-portrait AF .............................................................................. 63
AF priority .................................................................................... 64
MF assist ..................................................................................... 65
Drive (shooting method) ............................................................. 66
Single ............................................................................................ 66
Continuous .................................................................................... 66
Burst ............................................................................................. 67
Timer ............................................................................................. 67
Auto Exposure Bracketing (AE BKT) .............................................. 68
White Balance Bracketing (WB BKT) ............................................. 68
Picture Wizard Bracketing (P Wiz BKT) .......................................... 69
Bracketing setting .......................................................................... 69
7

Contents
Flash............................................................................................. 70
Flash options ................................................................................. 70
Correcting the red-eye effect ......................................................... 71
Using the built-in flash ................................................................... 71
Adjusting the flash intensity ............................................................ 72
Metering ....................................................................................... 73
Spot .............................................................................................. 73
Measuring the exposure value of the focua area ............................ 73
Center-weighted ............................................................................ 74
Multi .............................................................................................. 74
Smart Range ................................................................................ 75
Optical Image Stabilization (OIS) ................................................ 76
OIS options ................................................................................... 76
Exposure compensation ............................................................. 77
EV step ......................................................................................... 77
Exposure/Focus lock .................................................................. 78
Video functions............................................................................ 79
Movie AE mode ............................................................................. 79
Fader ............................................................................................. 79
Wind cut ........................................................................................ 80
Auto focus ..................................................................................... 80
Voice ............................................................................................. 80
Chapter 3
Playback/Editing
Searching and managing files .................................................... 82
Viewing photos .............................................................................. 82
Viewing image thumbnails ............................................................. 82
Viewing files by category in Smart Album ....................................... 83
Protecting files ............................................................................... 83
Deleting files .................................................................................. 83
Deleting a single file ......................................................................... 83
Deleting multiple files ....................................................................... 84
Deleting all files................................................................................ 84
Viewing photos ............................................................................ 85
Enlarging a photo .......................................................................... 85
Viewing a slide show ..................................................................... 85
Highlight ........................................................................................ 86
Auto rotating .................................................................................. 86
Playing videos ............................................................................. 87
Video viewing controls ..................................................................... 87
Trimming a video during playback .................................................. 87
Capturing an image during playback ............................................. 88
Editing photos ............................................................................. 89
Options ......................................................................................... 89
8

Contents
Chapter 4
Camera settings menu
User settings .............................................................................. 92
EV step ......................................................................................... 92
ISO custimizing .............................................................................. 92
ISO step .......................................................................................... 92
Auto ISO range ............................................................................... 92
Noise reduction ............................................................................. 92
AF assist light ................................................................................ 93
User display ................................................................................... 93
Key mapping ................................................................................. 94
Setting 1 ....................................................................................... 95
Setting 2 ....................................................................................... 97
Setting 3 ....................................................................................... 98
Setting 4 ..................................................................................... 100
Setting 5 ..................................................................................... 101
Chapter 5
Connecting to external devices
Viewing files on a TV or HDTV .................................................. 103
Viewing files on a TV .................................................................... 103
Viewing files on an HDTV ............................................................. 104
Printing photos .......................................................................... 105
Printing photos with a PictBridge photo printer ............................ 105
Configuring print settings .............................................................. 106
Creating a print order (DPOF) ....................................................... 106
DPOF options ............................................................................... 107
Transferring files to your computer .......................................... 108
Transferring files to your Windows computer ............................... 108
Connecting the camera as a removable disk ................................. 108
Disconnecting the camera (for Windows XP) ................................. 109
Transferring files to your Mac computer ....................................... 109
Editing photos on a PC ............................................................. 110
Installing software ........................................................................ 110
Programs contained on the CD ..................................................... 110
Using Intelli-studio ....................................................................... 110
Requirements ................................................................................ 111
Using the Intelli-studio Interface ..................................................... 112
Transferring files using Intelli-studio ................................................ 113
Using Samsung RAW Converter .................................................. 114
Requirements for Windows ........................................................... 114
Requirements for Mac ................................................................... 114
Using the Samsung RAW Converter Interface ............................... 115
Editing RAW format files ................................................................ 115
9

Contents
Chapter 6
Appendix
Error messages ......................................................................... 119
Maintaining the camera ............................................................ 120
Cleaning the camera .................................................................... 120
Camera lens and display ............................................................... 120
About the image sensor ................................................................ 120
Camera body ................................................................................ 120
Using or storing the camera ......................................................... 121
About memory card ..................................................................... 122
Supported memory card ............................................................... 122
Memory card capacity ................................................................... 122
Cautions when using memory cards ............................................. 124
About the battery ...................................................................... 125
Battery specifications .................................................................. 125
Battery life ................................................................................... 125
Notes about charging the battery .................................................. 126
Before contacting a service center .......................................... 128
Camera specifications .............................................................. 131
Lens specifications ................................................................... 135
Glossary ..................................................................................... 137
Optional accessories ................................................................ 142
Index .......................................................................................... 143
FCC notice ................................................................................. 146
10
Concepts in Photography
Shooting postures
A correct posture for stabilizing the camera is necessary for taking a
good photo. Even if you hold a camera correctly, the wrong posture
can cause the camera to shake. Stand up straight and remain still to
maintain a steady base for your camera. When shooting with a low
shutter speed, hold your breath to minimize body movement.
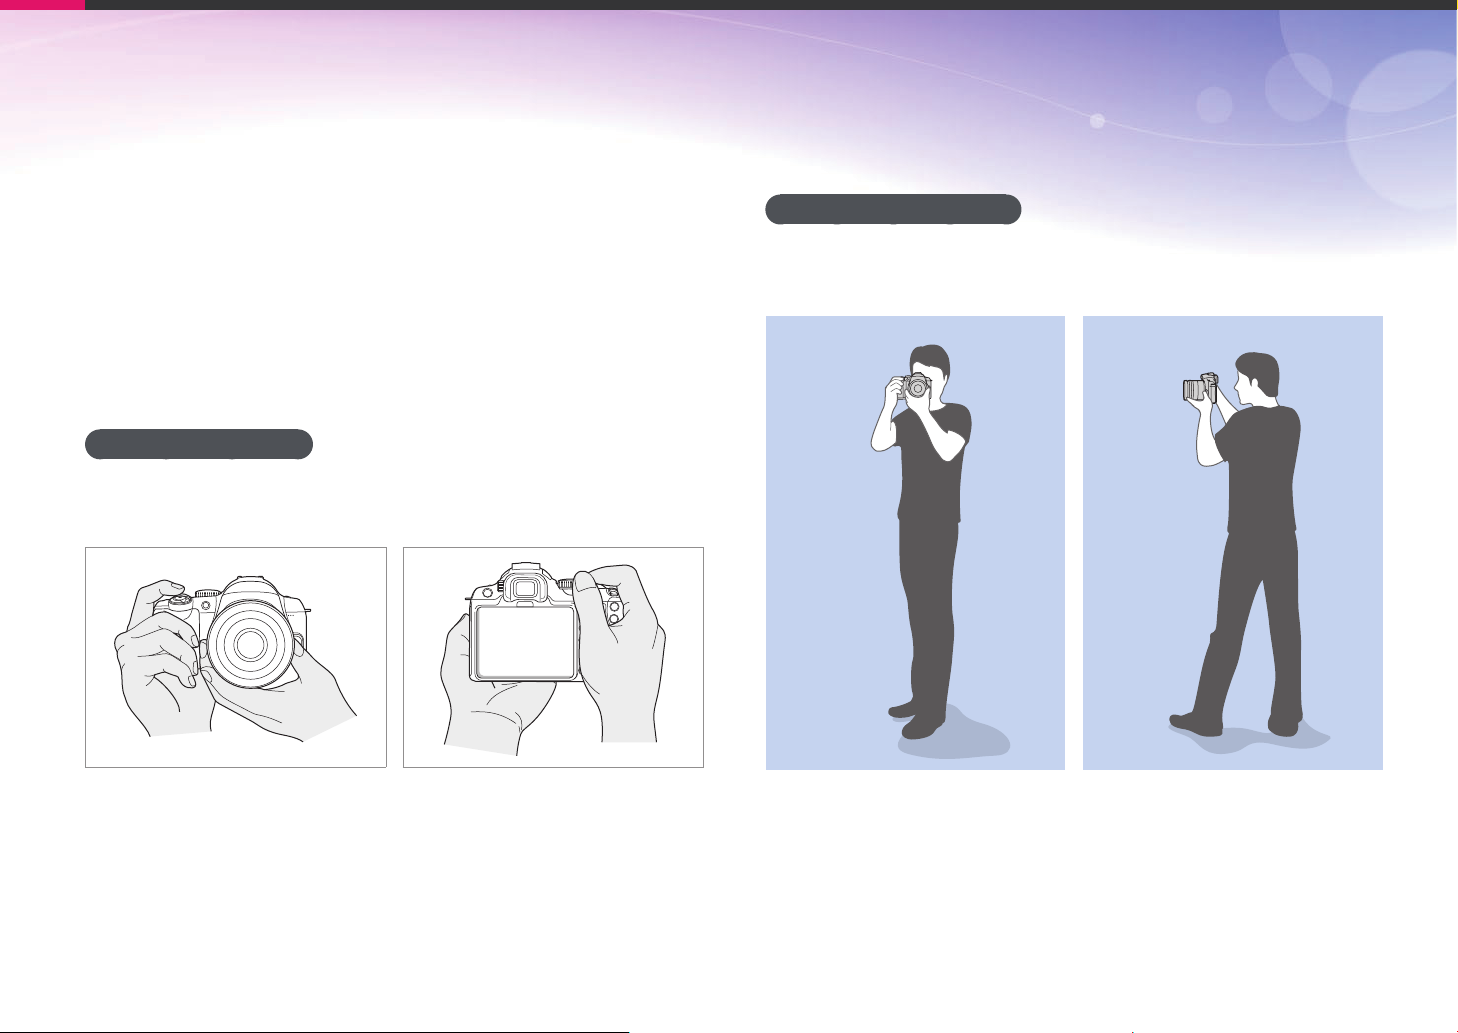
Holding the camera
Hold the camera with your right hand and place you right index finger
on the shutter button. Place your left hand under the lens for support.
Standing photography
Compose your shot; stand up straight with your feet shoulder-length
apart, and keep your elbows pointed down.
11
Concepts in Photography
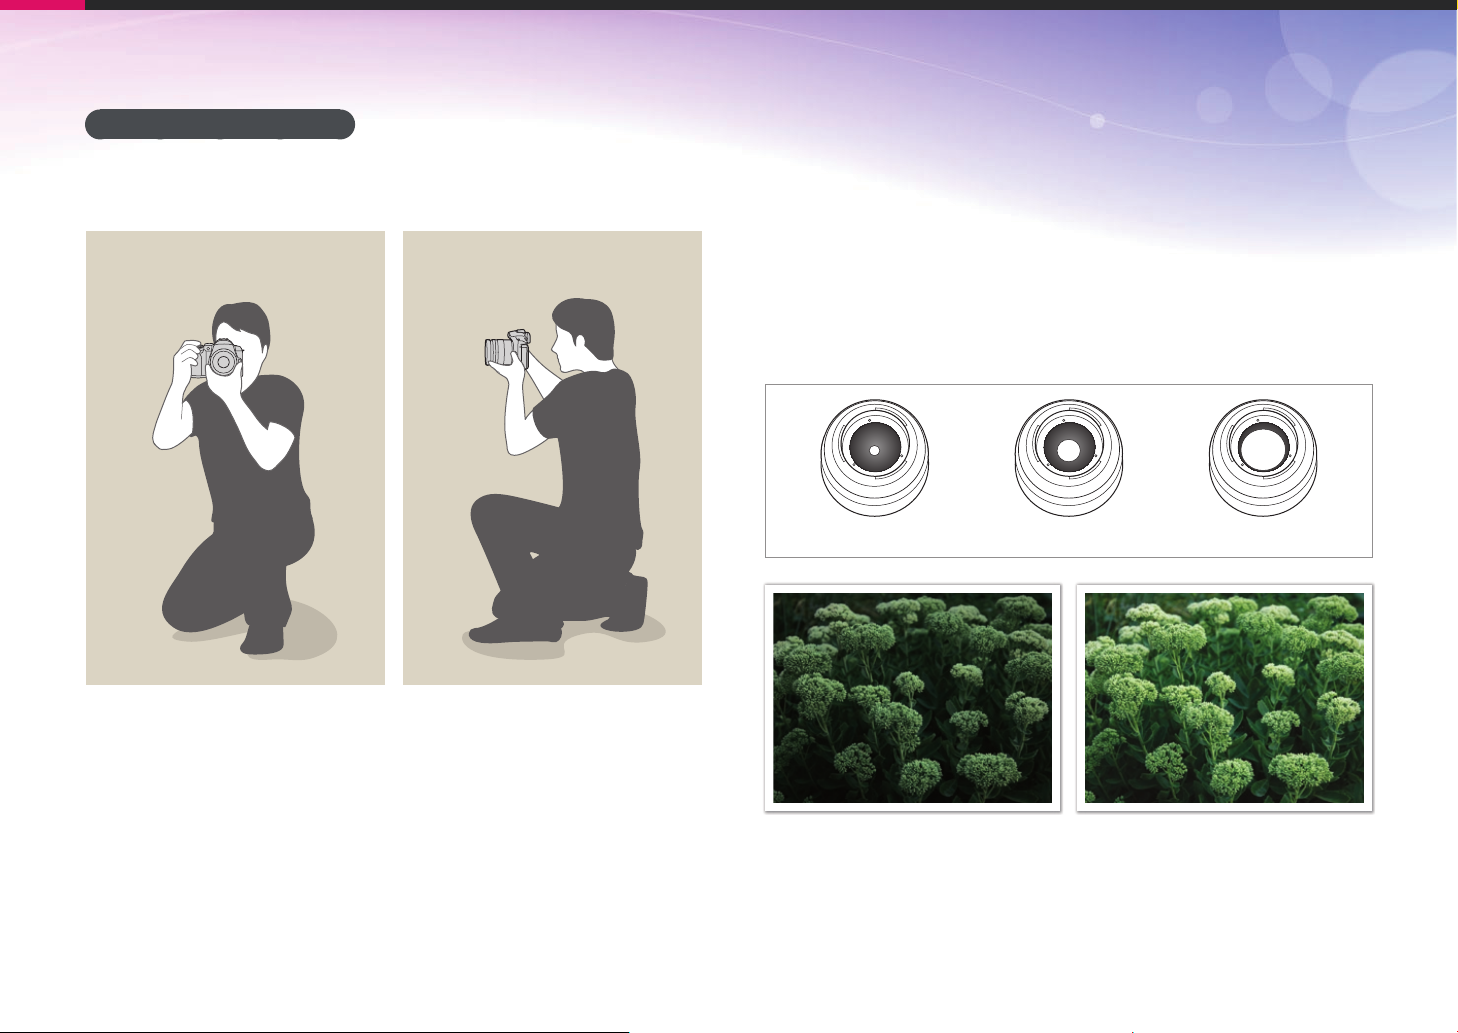
Crouching photography
Compose your shot, crouch with one knee touching the ground, and
keep a straight posture.
Aperture
The aperture, a hole that controls the amount of light that enters the
camera, is one of the three factors that determine the exposure. The
aperture housing contains thin, metal plates that open and close to let
light through the aperture and into the camera. The size of the aperture
is closely related to the brightness of a photo: the larger the aperture,
the brighter the photo; the smaller the aperture, the darker the photo.
Aperture sizes
Minimum aperture Medium aperture Maximum aperture
Darker photo
(aperture opened slightly)
Brighter photo
(aperture opened wide)
12

Concepts in Photography
The size of the aperture is represented by a value known as an
“F-number.” The f-number represents the focal length divided by the
diameter of the lens. For example, if a lens with a 50 mm focal length
has an f-number of F2, the diameter of the aperture is 25 mm. (50
mm/25 mm=F2) The smaller the f-number, the greater the size of the
aperture.
The opening in the aperture is described as the Exposure Value (EV).
Increasing the Exposure Value (+1 EV) means the amount of light
doubles. Decreasing the Exposure Value (-1 EV) means the amount of
light halves. You can also use the exposure compensation feature to
fine-tune the amount of light by subdividing exposure values into 1/2,
1/3 EV, and so on.
+1 EV
F1.4 F2 F2.8 F4 F5.6 F8
-1 EV
Exposure Value Steps
Aperture value and the depth of field
You can blur or sharpen the background of a photo by controlling the
aperture. It is closely related to the depth of field (DOF), which can be
expressed as small or large.
A photo with a large DOF A photo with a small DOF
The aperture housing contains several blades. These blades move together
and control the amount of light passing through the center of the aperture.
The number of blades also affects the shape of light when shooting night
scenes. If an aperture has an even number of blades, light divides into an
equal number of sections. If the number of blades is odd, the number of
sections is double the number of blades.
For example, an aperture with 8 blades divides light into 8 sections and an
aperture with 7 blades into 14 sections.
7 blades 8 blades
13
Concepts in Photography
Shutter speed
Shutter speed refers to the amount of time it takes to open and close
the shutter, and it is an important factor in the brightness of a photo, as it
controls the amount of light which passes through the aperture before it
reaches the image sensor.
Usually, the shutter speed is manually adjustable. The measurement
of the shutter speed is known as the “Exposure Value” (EV), which is
marked in intervals of 1 s, 1/2 s, 1/4 s, 1/8 s, 1/15 s, 1/1000 s, 1/2000 s,
and so on.
+1 EV
Exposure
-1 EV
The numbers indicated on the camera are the denominators of
exposure values, which means that the higher the number, the less light
will be let in. Likewise, the smaller the EV number, the more light will be
let in.
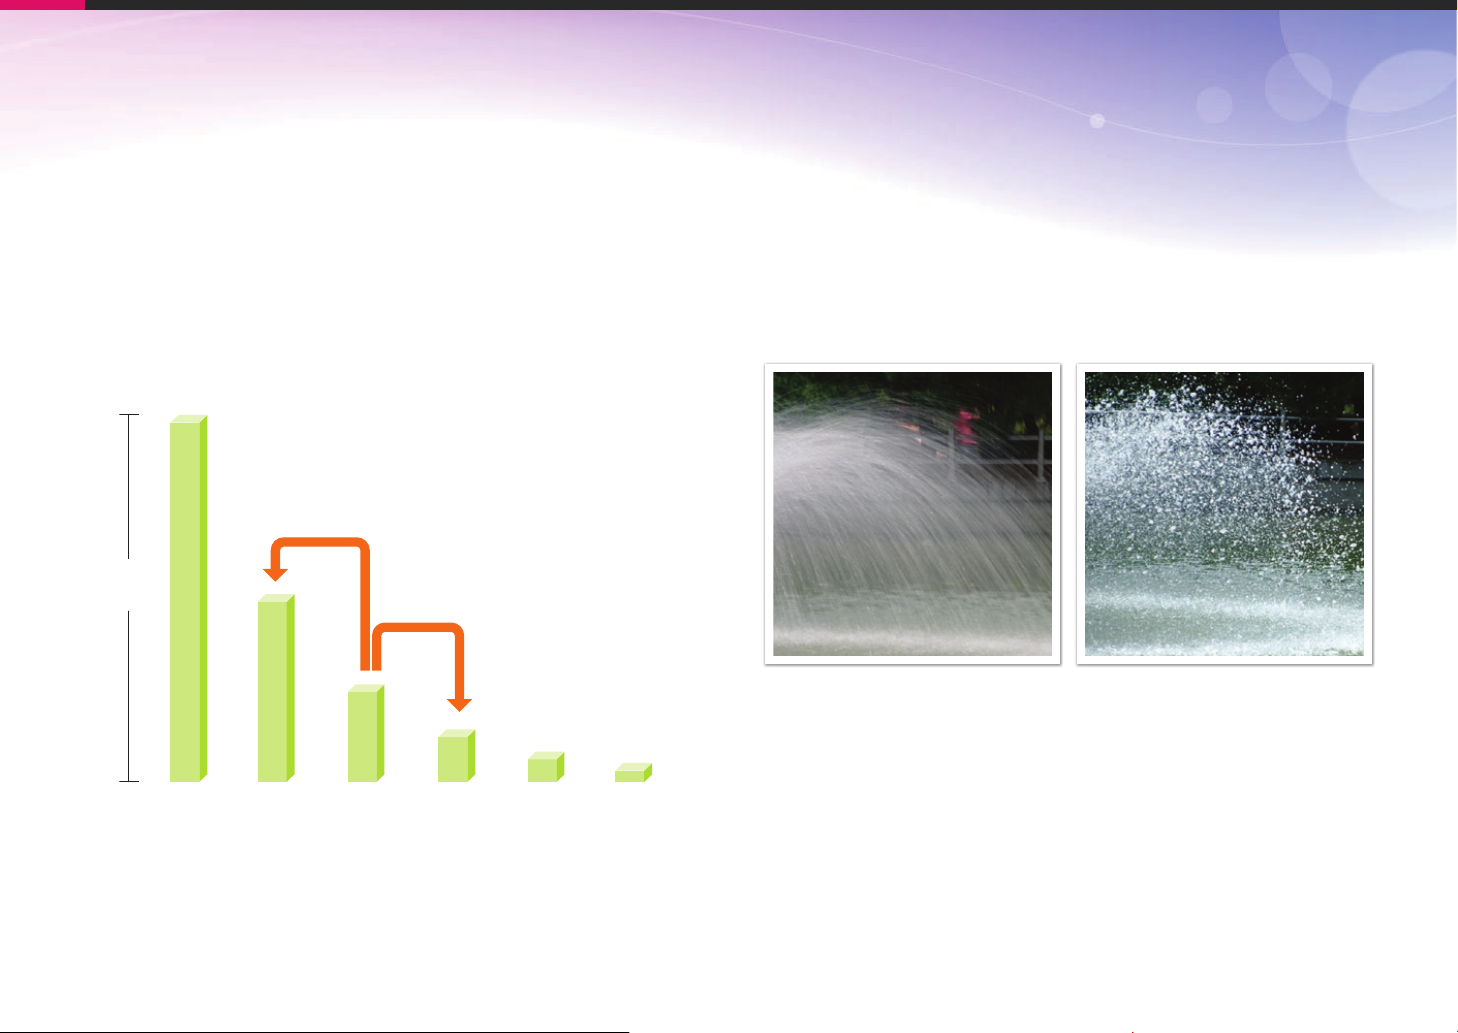
As the photos below illustrate, a slow shutter speed allows more time
to let light in, so the photo becomes brighter. On the other hand, a fast
shutter speed allows less time to let light in and the photo becomes
darker and more easily freezes subjects in motion.
0.8 s 0.004 s
1 s 1/2 s 1/4 s 1/8 s 1/15 s 1/30 s
Shutter Speed
14
Concepts in Photography
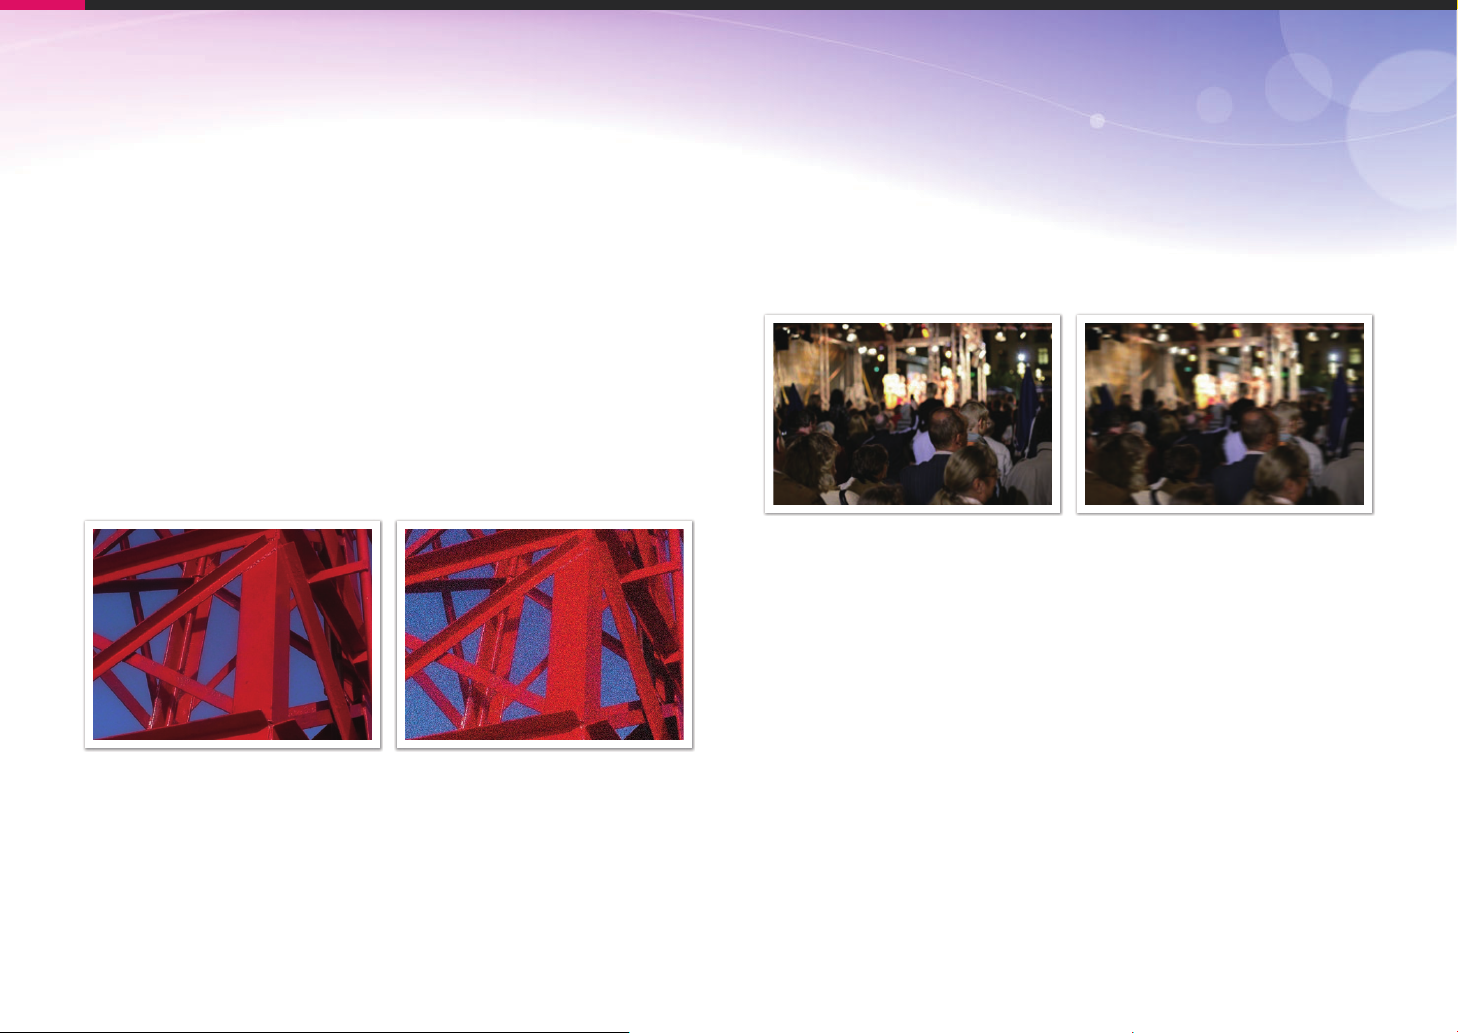
ISO sensitivity
The exposure of an image is determined by the sensitivity of the
camera. This sensitivity is based on international film standards, known
as ISO standards. On digital cameras, this sensitivity rating is used
to represent the sensitivity of the digital mechanism that captures the
image.
ISO sensitivity doubles as the number doubles. For example, an ISO
200 setting is capable of capturing images at twice the speed of an ISO
100 setting. However, higher ISO settings can result in “noise”—small
specks, spots, and other phenomena in a photo that give the shot
a noisy or dirty appearance. As a general rule, it is best to use a low
ISO setting to prevent noise in your photos, unless you are shooting in
darkened environments or at night.
Because a low ISO sensitivity means the camera will be less sensitive
to light, you need more light to have an optimal exposure. When using
a low ISO sensitivity, open the aperture more or reduce the shutter
speed to allow more light to enter the camera. For example, on a sunny
day when light is abundant, a low ISO sensitivity does not require a low
shutter speed. However, in a dark place or at night, a low ISO sensitivity
and a fast shutter speed will result in a blurry photo.
A photo captured with a tripod and
high sensitivity
A blurred photo with a low ISO sensitivity
Changes in the quality and brightness according to ISO sensitivity
15

Concepts in Photography
How the aperture setting, shutter speed, and ISO sensitivity control exposure
The aperture setting, shutter speed, and ISO sensitivity are closely
interconnected in photography. The aperture setting controls the
opening that regulates the light that enters the camera, while the shutter
speed determines the length of time that light is allowed to enter.
ISO sensitivity determines the speed at which the film reacts to light.
Together, these three aspects are described as the triangle of exposure.
A change in shutter speed, aperture value, or ISO sensitivity can be
offset by adjustments to the others to maintain the amount of light.
The results, however, change according to the settings. For example,
shutter speed is useful in expressing movement, aperture can control
the depth of field, and ISO sensitivity can control the graininess of a
photo.
Settings Results
Shutter speed
ISO sensitivity
Settings Results
Fast speed
= less light
Slow speed
= more light
Fast = still
Slow = blurry
High sensitivity
= more sensitive to light
Low sensitivity
= less sensitive to light
High = more grainy
Low = less grainy
Aperture
Wide aperture
= more light
Narrow aperture
= less light
Wide = small depth of field
Narrow = large depth of field
16

Concepts in Photography
Correlation between focal length, angle, and perspective
Focal length, which is measured in millimeters, is the distance between
the middle of the lens to its focal point. It affects the angle and
perspective of captured images. A short focal length translates into a
wide angle, which allows you to capture a wide shot. A long focal length
translates into a narrow angle, which allows you to capture telephoto
shots.
Short focal length
wide-angle lens
wide shot
wide angle
Long focal length
telephoto lens
telephoto shot
narrow angle
Look at these photos below and compare the changes.
18 mm angle 55 mm angle 200 mm angle
Normally, a lens with a wide angle is suitable for shooting landscapes and
a lens with a narrow angle is recommended for shooting sports events or
portraits.
17

Concepts in Photography
Depth of field
Portraits or still-life photos mostly acclaimed by people are the ones on
which the background is out of focus so the subject looks pronounced.
Depending on the focused areas, a photo can be blurred or sharpened.
This is called ‘a low DOF’ or ‘a high DOF’.
The depth of field is the focused area around the subject. Therefore,
a small DOF signifies that the focused area is narrow and a large DOF
means the focused area is wide.
A photo with a small DOF, which stresses the subject and makes the
rest of it blurred, can be obtained by using a telescope lens or selecting
a low aperture value. Conversely, a photo with a large DOF which
shows all the elements on the photo sharply focused can be achieved
by using a wide angle lens or selecting a high aperture value.
What controls out-of-focus effects?
DOF depends on aperture value
The wider the aperture is (namely the lower the aperture value), the
lower the DOF becomes. Under the condition where the other values
including shutter speed and ISO sensitivity are equal, a low aperture
value leads to a photo with a low DOF.
55 mm F5.7 55 mm F22
Small Depth of Field Large Depth of Field
18

Concepts in Photography
DOF depends on focal length
The longer the focal length is, the lower the DOF gets. A telescope lens
with a longer focal length than a telescope lens with a short focal length
is better to capture a photo of a low DOF.
A photo captured with a 18 mm telescope
lens
A photo captured with a 100 mm
telescope lens
DOF depends on the distance between the subject and
the camera
The shorter the distance between the subject and the camera is, the
lower the DOF gets. Therefore, taking a photo close to a subject can
result in a photo of low DOF.
A photo captured with a 100 mm telescope lens
A photo captured close to the subject
19
Concepts in Photography
DOF preview
You can use the Depth preview button to get an idea of what your shot
will look like before shooting. When you press the button, the camera
adjusts the aperture to the predefined settings and shows the results on
the screen.
Composition
It is fun to capture a photo of the beauty of world with a camera. No
matter how the world is beautiful, however, a poor composition cannot
capture the beauty of it.
When it comes to composition, it is very important to prioritize subjects.
Composition in photography means arranging objects in a photo.
Usually, abiding by the rule of thirds leads to a good composition.
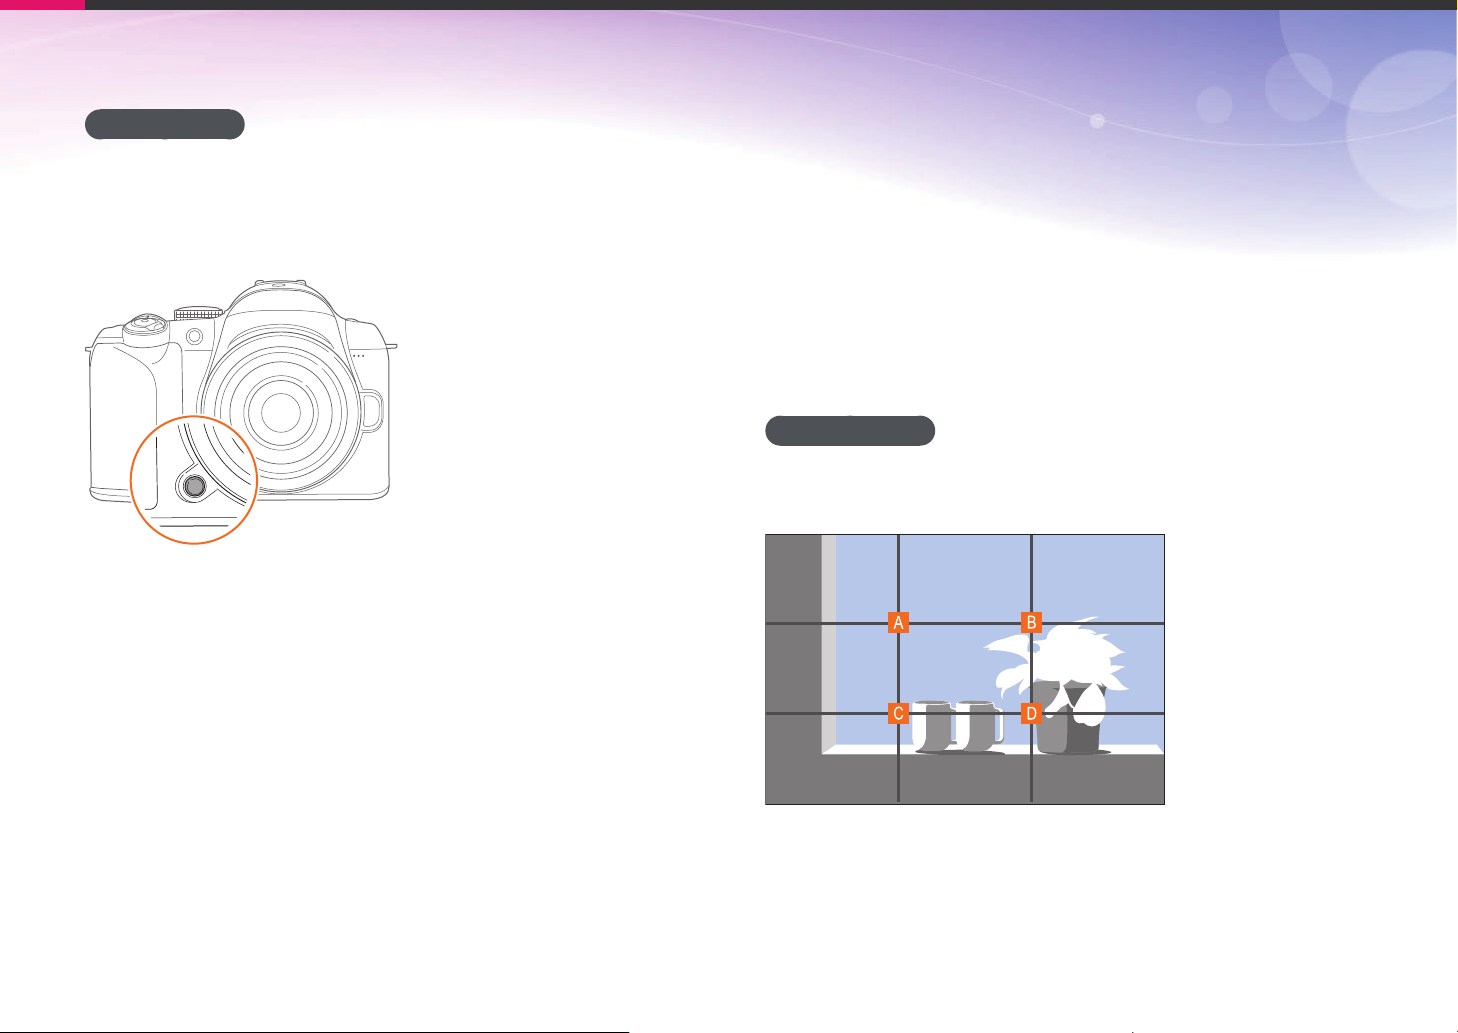
Rule of Thirds
To use the rule of thirds, divide the image into a 3x3 pattern of equal
rectangles.
To compose photos that best emphasize the subject, make sure the
subject is located at one of the corners of the center rectangle.
20

Concepts in Photography
Using the rule of thirds will create photos with stable and compelling
compositions. Below are a few examples.
Photos with two subjects
If your subject is in one corner of the photo, it creates an unbalanced
composition. You can stabilize the photo by capturing a second subject
in the opposite corner to balance the weight of the photo.
Subject 2
Subject 1
Unstable Stable
Subject 1
When taking landscape photos, centering the horizon will create an
unbalanced effect. Give more weight to the photo by moving the
horizon up or down.
Subject 1
Subject 2
Subject 1
Subject 2
Subject 2
Unstable Stable
21

Concepts in Photography
Flash
Light is one of the most important components in photography. It’s
not easy, however, to have an enough amount of light anytime and
anywhere. Making use of a flash allows you to optimize light settings
and create a variety of effects.
Flash, also known as strobe or speed light, helps to create adequate
exposure in low-light conditions. It is also useful in light-abundant
situations. For example, flash can be used in compensating the
exposure of a subject’s shadow or capturing clearly both the subject
and the background in backlit conditions.
Before correction After correction
Flash guide number
The model number of a flash refers to the flash’s power, and the
maximum amount of light created is represented by a value known
as a “guide number.” The bigger the guide number, the more light is
emitted from the flash. The guide number is achieved by multiplying the
distance from the flash to the subject and the aperture value when the
ISO sensitivity is set to 100.
Guide number = Flash to Subject Distance X Aperture value
Aperture value = Guide number / Flash to Subject Distance
Flash to Subject Distance = Guide number / Aperture value
Therefore, if you know the guide number of a flash, you can estimate an
optimum flash to subject distance when setting the flash manually. For
example, if a flash has a guide number of GN 20 and is 4 meters away
from the subject, the optimal aperture value is F 5.0.
22

Concepts in Photography
Bounce Photography
Bounce photography refers to the method of photography which
redirects the light from the subject to the ceiling or walls so that the
light spreads evenly. Normally, photos captured with flash may appear
unnatural and cast shadows. Subjects in photos captured with bounce
photography cast no shadows and look smooth due to evenly spread
light.
23

Chapter 1
My Camera
Learn about your camera’s layout, display icons, basic functions, supplied lens,
and optional accessories.

My Camera
Getting started
Unpacking
Check your product box for the following items.
Camera
(including the body cap, eye-cup,
and hot-shoe cover)
Software CD-ROM
(User manual included)
•
The illustrations may differ from your actual items.
•
You can purchase optional accessories at a retailer or a Samsung service center. For information
about accessories, refer to page 142.
USB cable Recharable battery Battery cradle/AC power cable
User manual Basic Operation Strap
25
My Camera
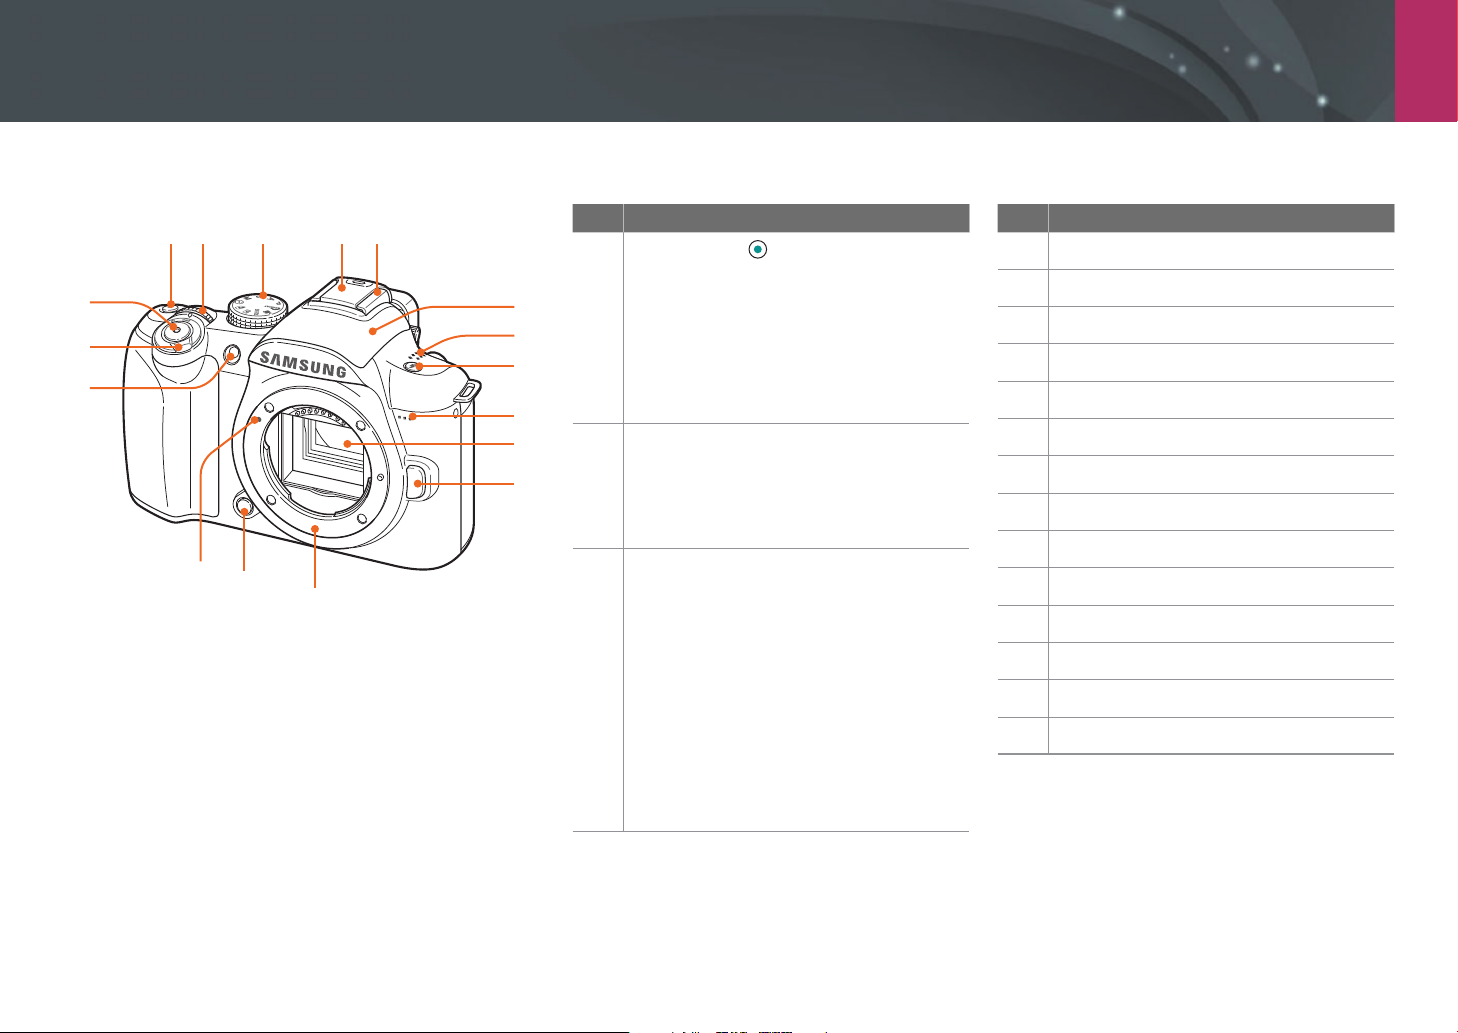
Camera layout
17
16
15
12 3 4 5
14
13
12
6
7
8
9
10
11
No. Name
Green button
Reset the value of Program Shift,
Picture Wizard, White Balance, Color
Temperature, Display Color, Timer,
1
Flash EV, Selection AF (a repositioned
focus area is moved back to the
center), or exposure compensation in
individual function menus.
Jog dial
Move to a desired direction in the menu
screen, adjust aperture value or shutter
2
speed in some shooting modes, and
change the size of a focus area.
Mode dial
• t: Smart Auto mode (p. 39)
• P: Program mode (p. 40)
• A: Aperture Priority mode (p. 41)
• S: Shutter Priority mode (p. 41)
• M: Manual mode (p. 42)
3
• i: Lens Priority mode (p. 42)
• N: Sound Picture mode (p. 45)
• p: Panorama mode (p. 45)
• s: Scene mode (p. 46)
• v: Movie mode (p. 48)
No. Name
Hot-shoe cover
4
Hot-shoe
5
Built-in flash (p. 71)
6
Speaker
7
Flash pop-up button (p. 71)
8
Microphone
9
Image sensor
10
Lens release button
11
Lens mount
12
Depth preview button (p. 20)
13
Lens mount index
14
AF-assist light/Timer lamp
15
Power switch
16
Shutter button
17
26

My Camera > Camera layout
15
14
13
12
11
10
9
8
7
6
No. Name
1
Drive mode button
EV adjust button W (p. 77)
Press and hold [W], and then scroll the
2
jog dial to adjust the exposure value.
1
2
3
4
5
No. Name
AEL button E (p. 94)
• In Shooting mode: Lock the
3
4
5
6
7
adjusted exposure value or focus.
• In Playback mode: Protect the
displayed file.
Memory card cover
Navigation button
• In Shooting mode
- F: Select an AF Mode
- I: Select an ISO value
- C: Select a metering mode
- w: Select a White Balance
• In other situations
Move up, down, left, right,
respectively.
Delete/Picture Wizard button /
• In Shooting mode: Access Picture
Wizard.
• In Playback mode: Delete files.
OK button o
• Confirm the highlighted option or
menu.
• Allow you to select a focus area
manually.
No. Name
Playback button n
8
Enter Playback mode.
Status lamp
• Blinking: When saving a photo,
shooting a video, sending data to a
9
10
11
12
13
14
15
computer or printer.
• Steady: When there is no data
transfer or when data transfer to a
computer or printer is complete.
Fn button f
Access major functions and fine-tune
some settings.
DISP button D
• In Shooting mode: View camera
settings and change options.
• In Playback mode: View photo
information.
Viewfinder
Eye-cup
Eyelet for camera strap
MENU button m
Acces menus.
27

My Camera > Camera layout
No. Name
Battery chamber cover
1
9
8
7
6
5
4
Insert a memory card and battery.
Tripod mount
2
Display
3
USB and A/V port
Connect the camera to other devices
4
via a USB A/V cable.
1
2
3
No. Name
Shutter release port
Use a shutter release cable with a
5
tripod to minimize camera movement.
HDMI port
6
Power adapter port
7
Proximity sensor (p. 98)
8
Diopter adjustment dial
If the image is not shown clearly
through the viewfinder, scroll the
9
diopter adjustment dial to improve the
view.
28

My Camera
Display icons
In Shooting mode
Capturing photos
1. Shooting options (left)
Icon Description
Photo size
Photo quality
Focus area option
Face detection
Flash option
Flash intensity
Color space
Smart range (p. 75)
Optical Image Stabilization (OIS) (p. 76)
2. Shooting options (right)
1
2
3
Icon Description
Drive mode
AF mode (p. 59)
White Balance (p. 54)
White Balance micro adjustment
ISO sensitivity (p. 53)
Metering (p. 73)
Picture Wizard (p. 57)
Face tone
Face retouch
3. Shooting information
Icon Description
GPS activated*
Time
Date
Location information*
Focus aid bar (p. 65)
Auto focus frame
Spot metering area
Camera shake
Icon Description
Histogram (p. 93)
Shooting mode
Focus
Flash indicator
Shutter speed
Aperture value
Exposure value
Auto exposure lock (p. 94)
Auto focus lock (p. 94)
Memory card not inserted
Available number of photos
: Fully charged
: Partially charged
(Red): Empty (recharge the
battery)
* These icons appear when you attach an optional GPS
module.
The icons displayed will change according to
the mode you select or the options you set.
29
 Loading...