

Samsung NP300E5AI, NP300E5C, NP300E4C-A02US, NP305E7A-A03US, NP300E5A-A03US User Manual
...Page 1
User Guide
Page 2
1
Chapter 1
Getting Started
Contents
Chapter 1. Getting Started
3 Before You Start
6 Safety Precautions
21 Proper Posture During Computer Use
24 Overview
29 Turning the Computer On and O
Chapter 2. Using Windows 8
32 What is Microsoft Windows 8?
33 Screen At a Glance
35 Using the Charms
37 Using Apps
40 Windows Hot Key Function
Chapter 3. Using the computer
42 Keyboard
45 To uc hp ad
49 CD Drive (ODD, Optional)
50 Multi Card Slot (Optional)
53 Connecting an External Display Device
58 Adjusting the Volume
60 LCD Brightness Control
61 Wired Network
64 Wireless Network (Optional)
66 Using the Multimedia App (Optional)
70 Samsung Software Update
71 Diagnosing the Computer Status and
Troubleshooting
72 Using the Security Slot (Optional)
Chapter 4. Settings and Upgrade
74 BIOS Setup
76 Setting a Boot Password
79 Changing the Boot Priority
80 Upgrading Memory
82 Battery
Chapter 5. Troubleshooting
88 Recovering/Backing up the Computer (Optional)
95 Reinstalling Windows (Optional)
98 Q&A
Chapter 6. Appendix
104 Important Safety Information
106 Replacement Parts and Accessories
108 Regulatory Compliance Statements
124 WEEE Symbol Information
125 Samsung Packaging Take-Back Program
126 Product Specications
128 Glossary
132 Index
Page 3
Before You Start 3
Safety Precautions 6
Proper Posture During Computer Use 21
Overview 24
Turning the Computer On and O 29
Chapter 1.
Getting Started
Page 4

3
Chapter 1
Getting Started
Before You Start
Before reading the User Guide, rst check the following
information.
Optional items, some devices and software referred to in •
the User Guide may not be provided and/or changed by
upgrade.
Note that the computer environment referred in the User
Guide may not be the same as your own environment.
The pictures used for the cover and the main body in the •
User Manual are those of the representative model of each
series and may dier from the actual appearance of the
product.
This guide decribes procedures for using both the mouse •
and the touchpad.
This manual has been written for the Windows 8 operating •
system. The descriptions and gures may dier depending
on the installed operating system.
The User guide supplied with this computer may vary •
depending on your model.
Using the software
From the • Start Screen, right-click any area and select All
Apps
in the bottom right corner. Then, click a desired
program. Or you can simply launch Quick Starter to do
the same.
You can install • Quick Starter from SW Update.
Page 5
4
Chapter 1
Getting Started
Before You Start
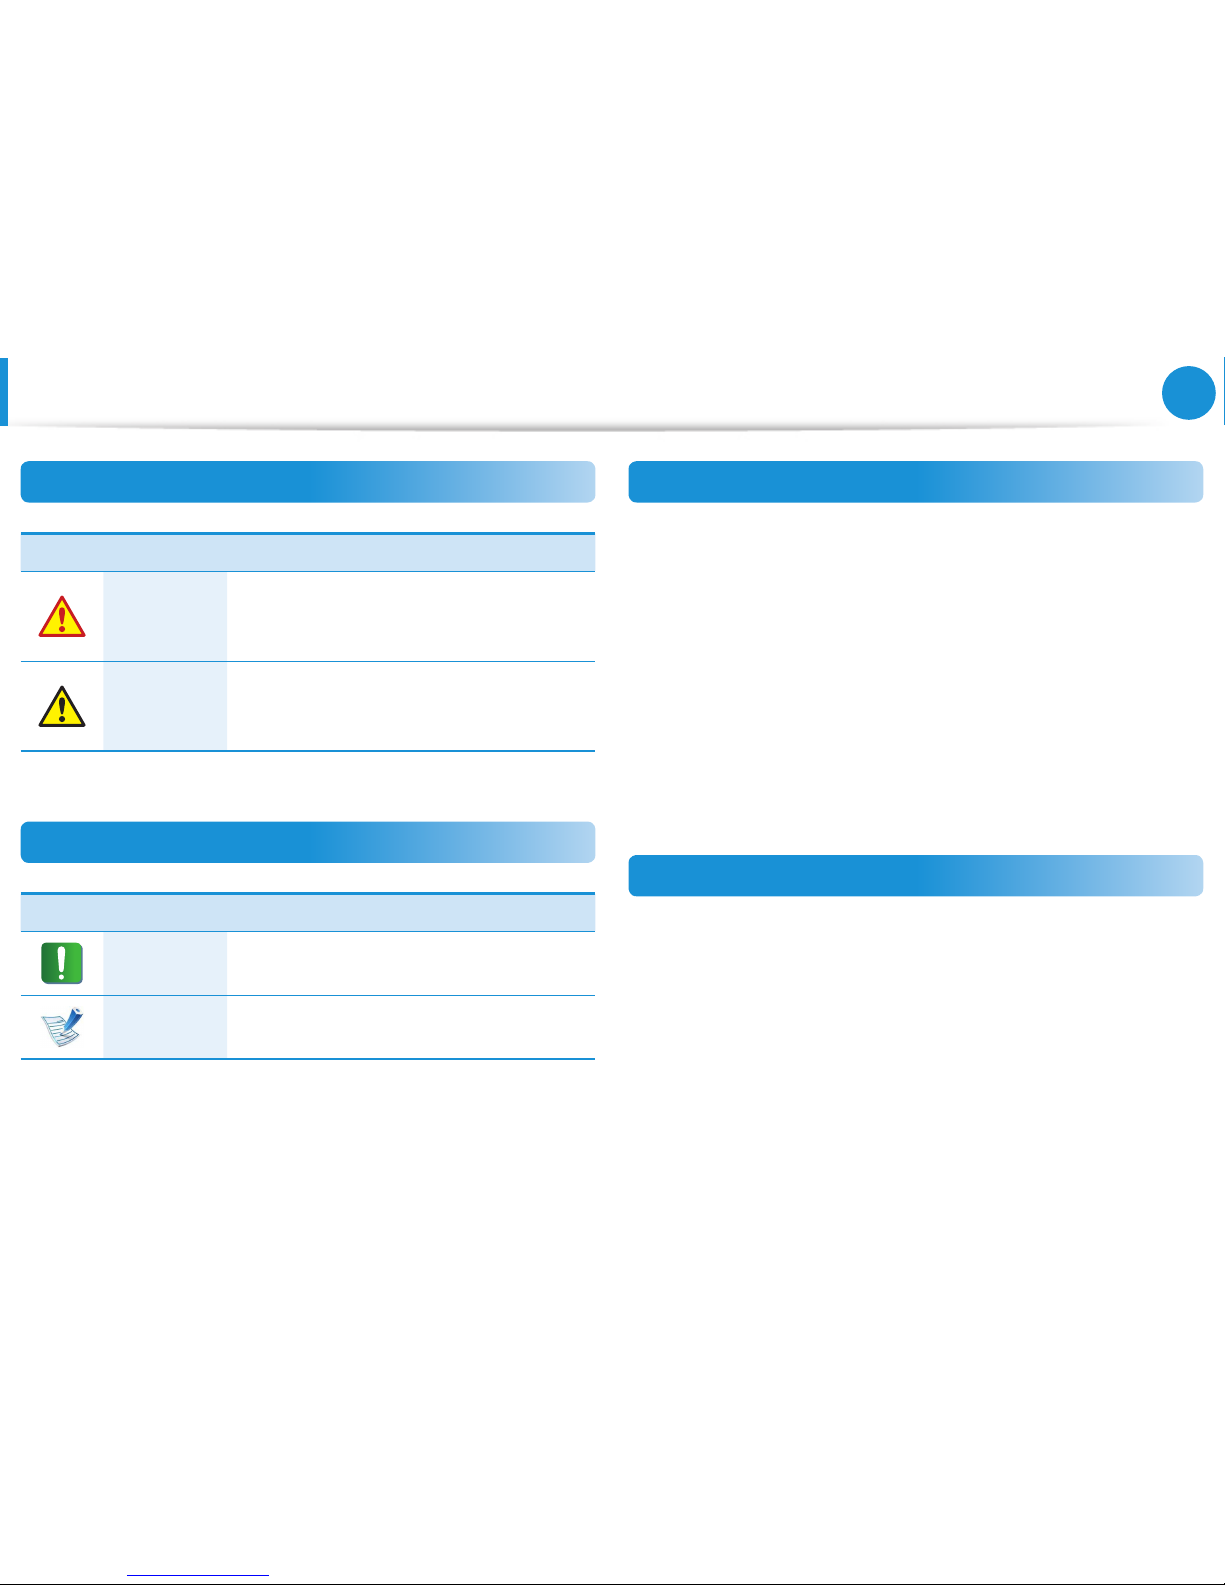
Safety Precaution Notations
Icon Notation Description
Warning
Failure to follow instructions marked with
this symbol, may cause personal injury
and or fatality.
Caution
Failure to follow instructions marked with
this symbol, may cause slight injury to
yourself or damage your property.
Text Notations
Icon Notation Description
Caution
Content included in this section includes
information required about the function.
Note
Content included in this section includes
helpful information to use the function.
Copyright
© 2012 Samsung Electronics Co., Ltd.
Samsung Electronics Co., Ltd. owns the copyright of this manual.
No part of this manual may be reproduced or transmitted in any
form or by any means, electronic or mechanical, without the
consent of Samsung Electronics Co., Ltd.
The information in this document is subject to change without
notice due to improving the performance of the product.
Samsung Electronics shall not be liable for any data loss. Please
take care to avoid losing any important data and backup your data
to prevent any such data loss.
OS and Software Support
If you change the product’s factory OS (Operating System) to
another OS or if you install software which is not supported by the
product’s original factory OS, you will not receive any technical
support, product exchange or refund. And a fee will be charged
when requesting a service.
Please use your computer with the original factory OS. If you
install an OS other than the factory OS, data may be deleted or the
computer may not start.
Page 6

5
Chapter 1
Getting Started
About the Product Capacity Representation
Standard
About the capacity representation of the storage
The capacity of the storage device (HDD, SSD) of the manufacturer
is calculated assuming that 1KB=1,000 Bytes.
However, the operating system (Windows) calculates the storage
device capacity assuming that 1KB=1,024 Bytes, and therefore the
capacity representation of the HDD in Windows is smaller than the
actual capacity due to the dierence in capacity calculation.
(E.g. For a 80GB HDD, Windows represents the capacity as 74.5GB,
80 x1,0 00 x1,0 00x1, 000 by te /(1,024x1,024 x1,024)by te = 74. 505 GB)
In addition, the capacity representation in Windows may be even
smaller because some programs such as Recovery may reside in a
hidden area of the HDD.
About Memory Capacity Representation
The memory capacity reported in Windows is less than the actual
capacity of memory.
This is because BIOS or a video adapter uses a portion of memory
or claims it for further use.
(E.g. For 1GB(=1,024MB) memory installed, Windows may report
the capacity as 1,022MB or less)
Before You Start
Page 7

6
Chapter 1
Getting Started
Installation Related
Do not install the product in places exposed
to humidity such as a bathrooms.
There is a danger of electric shock. Use the
product within the operating conditions
specied in the Manufacturers User Guide.
Keep the plastic bags out of the reach of
children.
There is a danger of suocation.
Keep a distance of 15cm or more between
the computer and the wall and do not place
any objects between them.
This may increase the internal temperature of
the computer and may cause an injury.
Safety Precautions
Do not install the computer on a slant or a
place prone to vibrations, or avoid using the
computer in that location for a long time.
This increases the risk that a malfunction or
damage to the product will occur.
Be careful that people are not exposed to
the computer’s ventilator, adapter, etc., as
they generate heat over a long period of
time when your PC is powered on.
Exposing a part of your body close to the heat
from the vent or AC adapter for long periods of
time may cause a burn.
Avoid blocking the vent at the bottom or
side of the computer when using it on a bed
or cushion.
If the vent is blocked, there is a danger of
damaging the computer or overheating the
inside of the computer.
For your security and to prevent damage, please read the
following safety instructions carefully.
Since this is commonly applied to Samsung Computers,
some pictures may dier from actual products.
Warning
Failure to follow instructions marked with this symbol may
cause personal injury and even fatality.
Ver 3.2
Page 8
7
Chapter 1
Getting Started
G
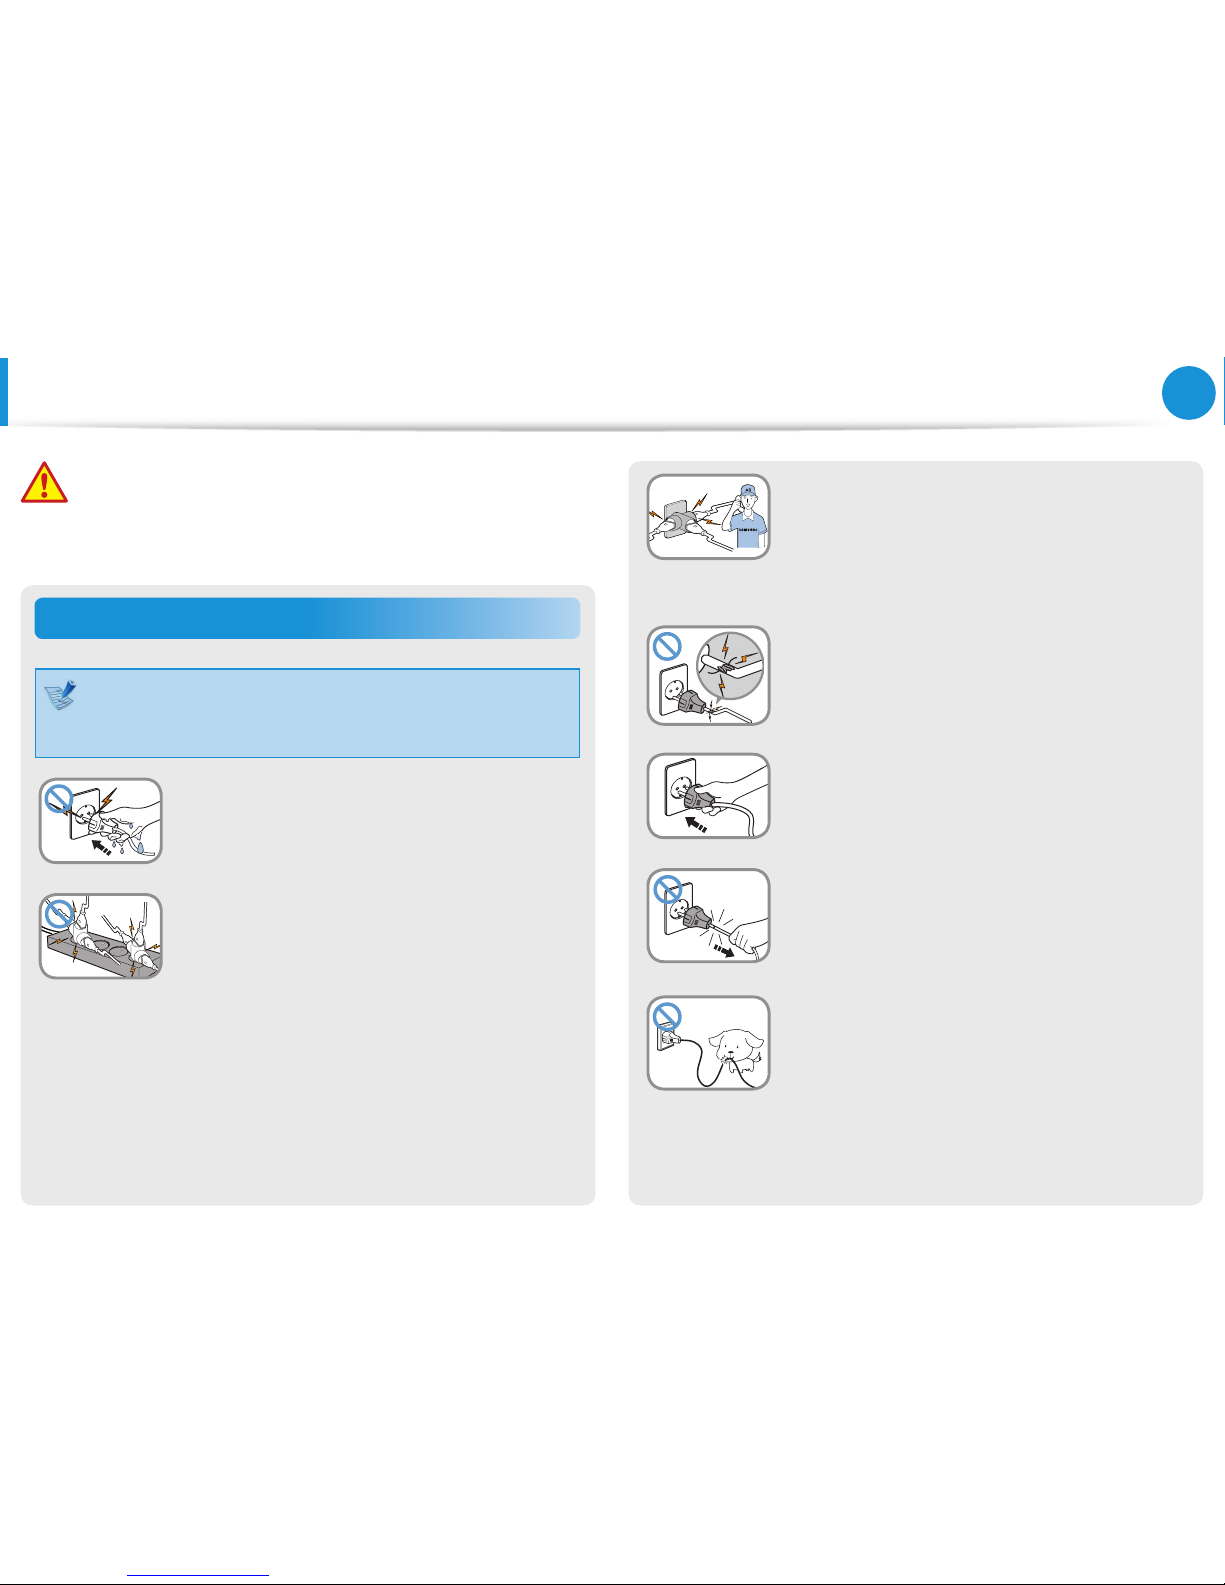
If the power cord or power outlet makes a
noise, disconnect the power cord from the
wall outlet and contact a service center.
There is a danger of electric shock or re
hazard.
Do not use a damaged or loose main plug or
power cord or power outlet.
There is a danger of electric shock or re
hazard.
Plug the power cord rmly into the power
outlet and AC adapter.
Failure to do so may cause re hazard.
Do not unplug the power cord by pulling
the cable only.
If the cord is damaged, it may cause electric
shock.
Do not bend the power cord excessively or
do not place a heavy object over the power
cord. It is especially important to keep the
power cord out of reach of infants and pets.
If the cord is damaged, it may cause electric
shock or re.
Power Related
The power plug and wall outlet gures may dier
depending on the country specications and the product
model.
Do not touch the main plug or power cord
with wet hands.
There is a danger of electric shock.
Do not exceed the standard capacity
(voltage/current) of a multiplug or power
outlet extension when using it for the
product.
There is a danger of electric shock or re
hazard.
Safety Precautions
Warning
Failure to follow instructions marked with this symbol may
cause personal injury and even fatality.
Page 9
8
Chapter 1
Getting Started
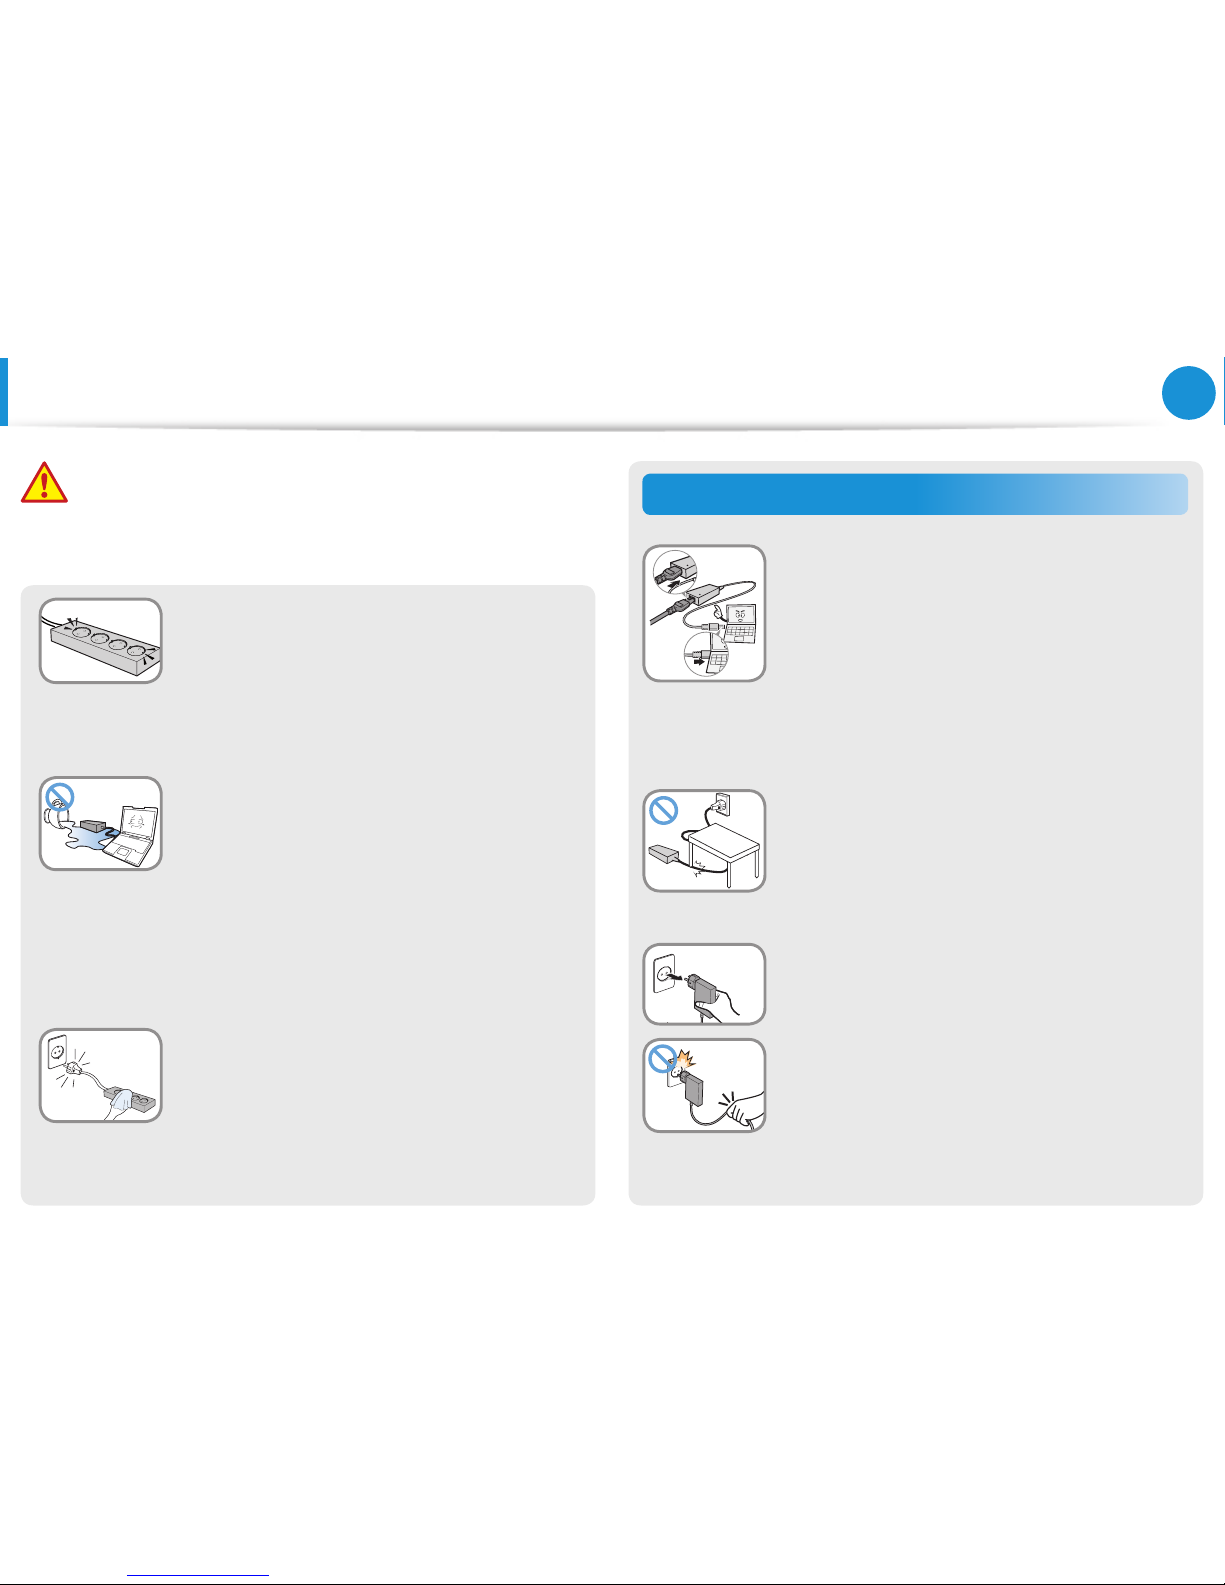
Connect the power cord to an outlet or
multiple power plug (extended cable) with
a ground terminal.
Failure to do so may result in electric shock.
When the power supply is ungrounded, the
current may leak resulting in electric shock.
If water or another substance enters
the power input jack, AC adapter or the
computer, disconnect the power cord and
contact the service center.
If the notebook computer has an external
type (removable) battery, separate the
battery also.
Damage to the device within the computer
may cause electric shock or re hazard.
Keep the power cord or outlet clean so that
they are not covered with dust.
Failure to do so may result in re.
AC Adapter Usage Precautions
Connect the power cord to the AC adapter
rmly.
Otherwise, there is a danger of re due to an
incomplete contact.
Use only the AC adapter supplied with the
product.
Using another adapter may cause the screen to
ick er.
Do not place heavy objects or step onto
the power cord or AC adapter to avoid
damaging the power cord or AC adapter.
If the cord is damaged, there is a danger of
electric shock or re.
Unplug the wall-mount AC adapter (adapter
and plug intergrated type) from the wall
outlet while holding the body and pulling it
in the direction of the arrow.
If you unplug the adapter by holding and
pulling the cable, the adapter may be damaged
and an electric shock, explosive sound or spark
may occur as a result.
Warning
Failure to follow instructions marked with this symbol may
cause personal injury and even fatality.
Safety Precautions
Page 10
9
Chapter 1
Getting Started
Battery Usage Related
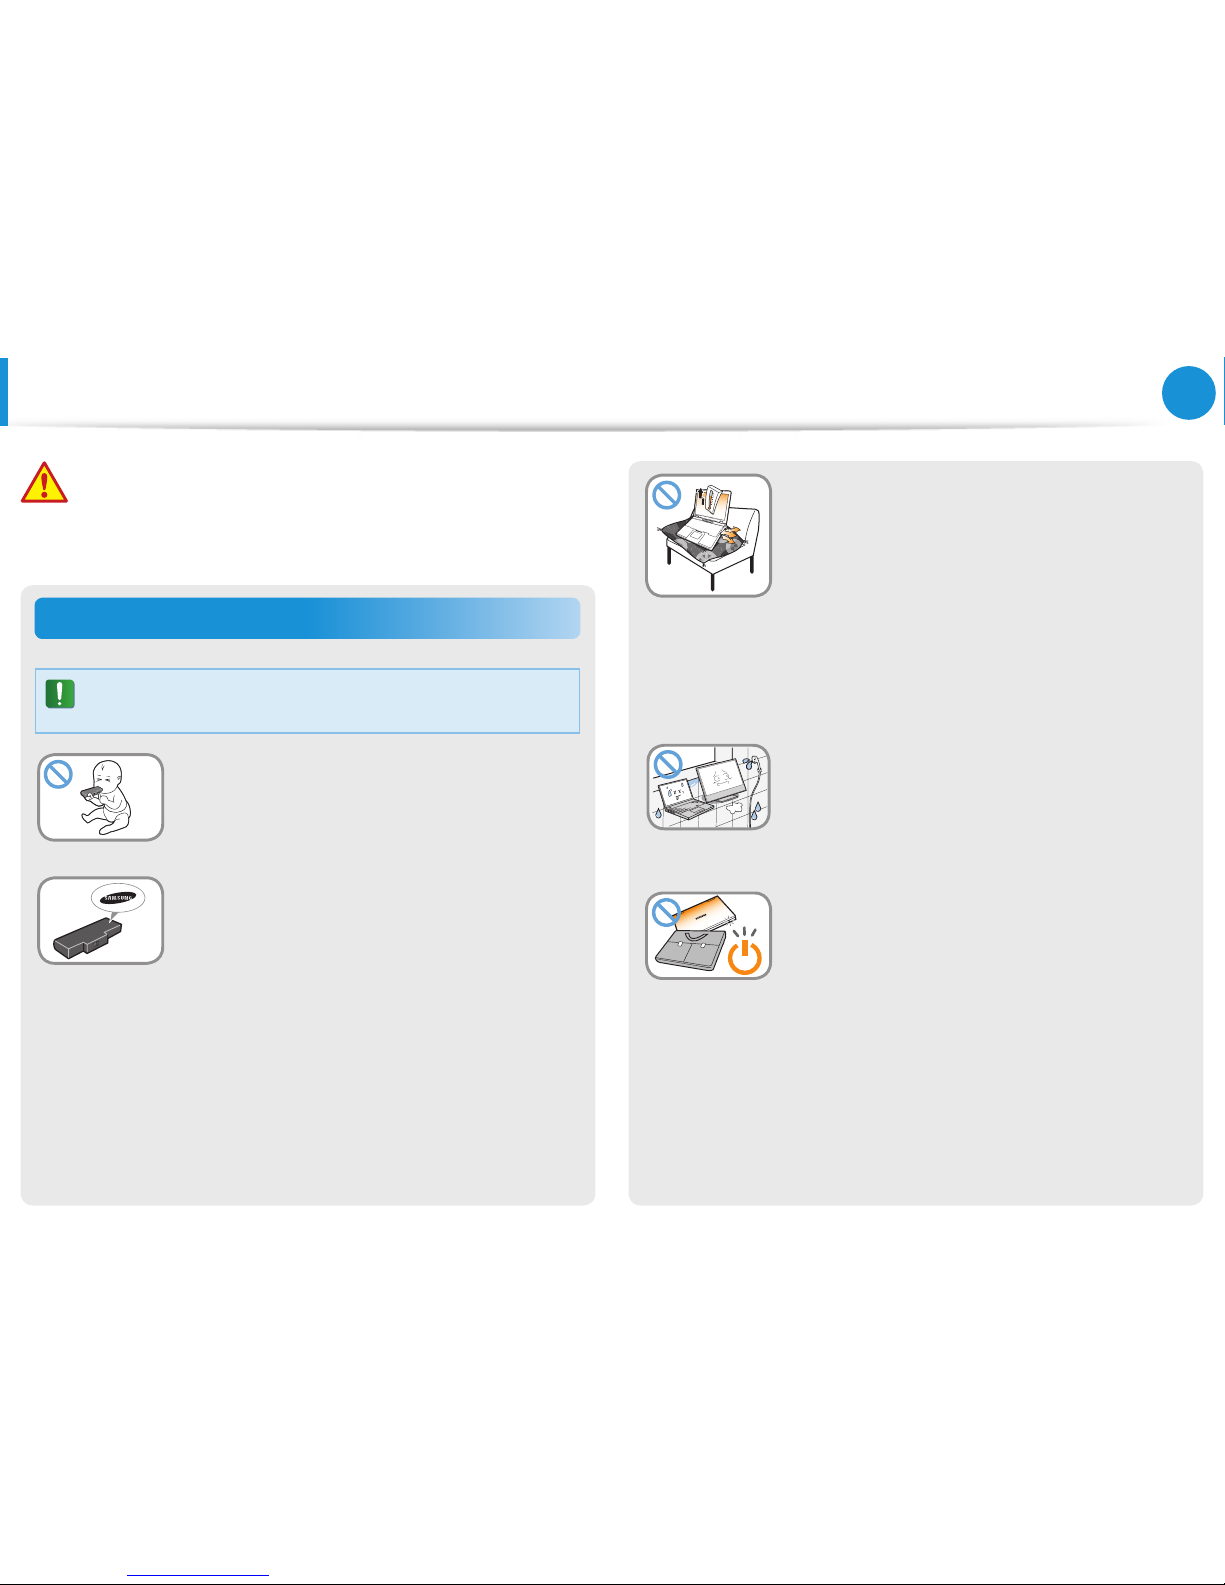
Please charge the battery fully before using the
computer for the rst time.
Keep the battery out of the reach of infants
and pets, as they could put the battery into
their mouths.
There is a danger of electric shock or choking.
Use an authorized battery and AC adapter
only.
Please use an authorized battery and adapter
approved by Samsung Electronics.
Unauthorized batteries and adapters may not
meet the proper safety requirements and may
cause problems or malfunctions and result in
an explosion or re.
Warning
Failure to follow instructions marked with this symbol may
cause personal injury and even fatality.
Safety Precautions
Do not use the computer in a badly
ventilated location such as on bedding, on a
pillow or cushion, etc, and do not use it in a
location such as room with oor heating as
it may cause the computer to overheat.
Take care that the computer vents (on the side
or the bottom) are not blocked especially in
these environments. If the vents are blocked,
the computer may overheat and it may cause a
computer problem, or even an explosion.
Do not use the computer in a humid
location such as a bathroom or sauna.
Please use the computer within the
recommended temperature and humidity
range (10~32ºC, 20~80% RH).
Do not close the LCD panel and put the
computer into your bag to move it when it is
still turned on.
If you put the computer into your bag without
turning it o, the computer may overheat and
there is a danger of re. Shut the computer
down properly before moving it.
Page 11
10
Chapter 1
Getting Started
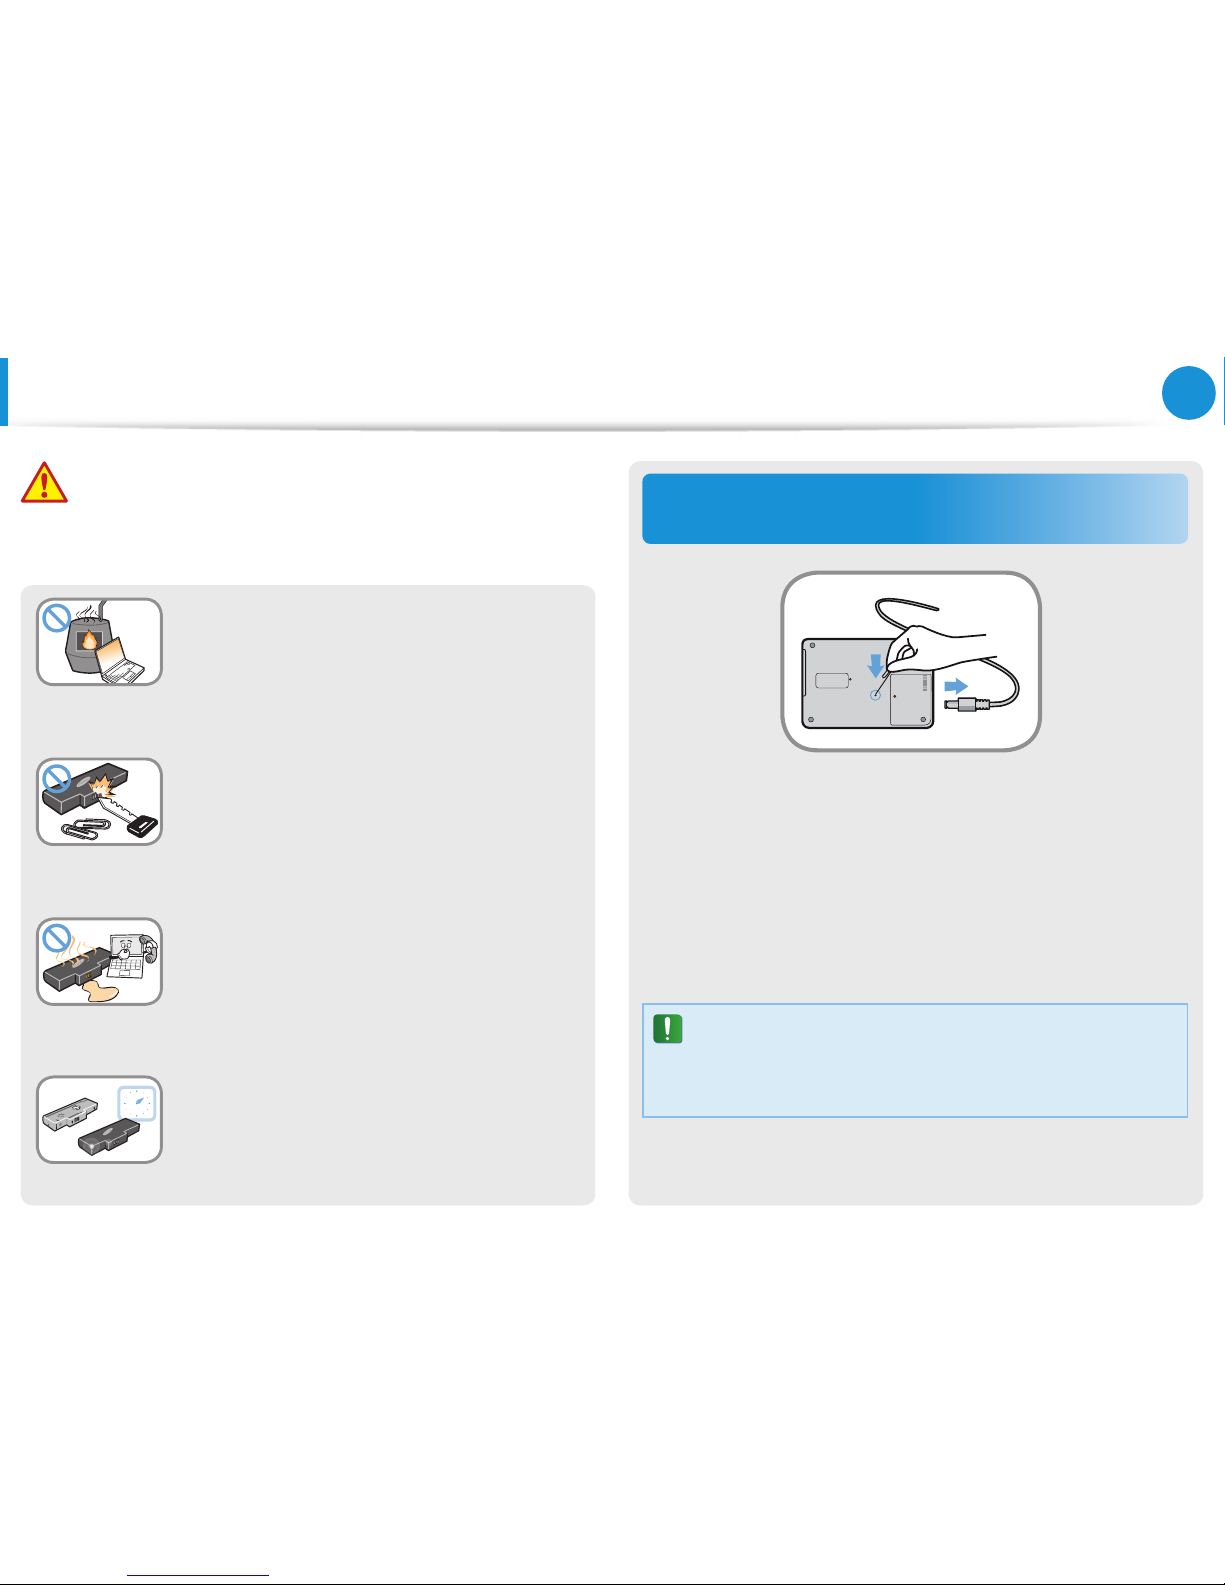
Cutting the power to the internal battery
(for corresponding models only.)
For products with built-in batteries, customers cannot remove •
the battery.
In the case of ooding, lightning or explosions, you can cut •
the battery power by inserting an object such as a paper clip
into the [Emergency Hole] at the bottom of the computer.
Disconnect the AC adapter and insert an object such as a •
paper clip into the hole at the bottom of the computer to cut
the battery power.
In the case of ooding, lightning or explosions, cut
the battery power, do not reconnect the AC adapter,
and immediately contact Samsung Electronics so that
the appropriate countermeasures can be taken.
Never heat the product(or battery) or put
the product(or battery) into a re. Do not
put or use the product(or battery) in a hot
location such as a sauna, inside a vehicle
exposed to the heat, and so on.
There is a danger of an explosion or re.
Take care not to allow metal objects such as
a key or clip to touch the battery terminal
(metal parts).
If a metal object touches the battery terminals,
it may cause excessive current ow and it may
damage the battery, or result in a re.
If liquid leaks out of the product(or battery)
or there is a funny smell coming from
the product(or battery), remove the the
product(or battery) the computer and
contact a service center.
There is a danger of an explosion or re.
To use the computer safely, replace a dead
battery with a new, authorized battery.
Safety Precautions
Warning
Failure to follow instructions marked with this symbol may
cause personal injury and even fatality.
Page 12
11
Chapter 1
Getting Started
Safety Precautions
Warning
Failure to follow instructions marked with this symbol may
cause personal injury and even fatality.
Thereafter, if you connect the AC adapter, the battery power •
will be supplied again.
Do not cut the battery power under normal •
conditions.
This may result in data loss or a product •
malfunction.
The location of the Emergency Hole may dier depending
on the model.
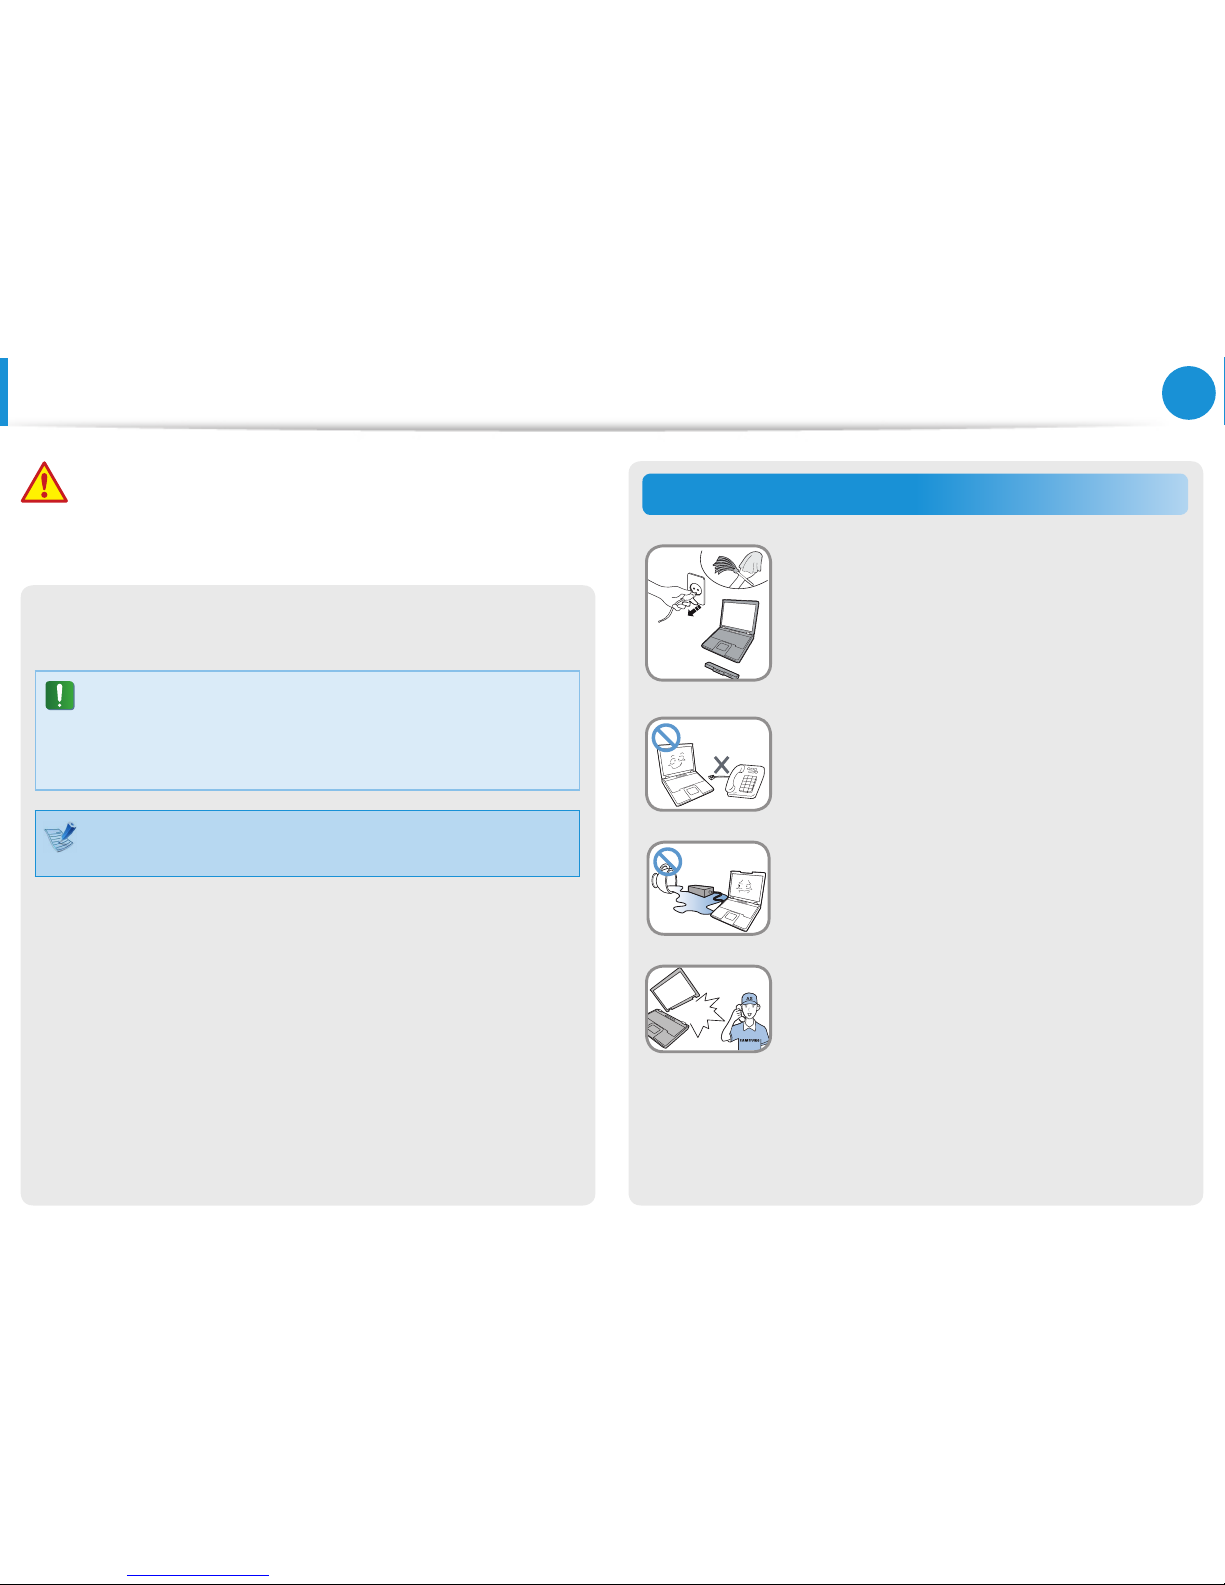
Usage Related
Disconnect all cables connected to the
computer before cleaning it. If your
notebook is external & removable battery
type, remove the external battery.
There is a danger of electric shock or damage
to the product.
Do not connect a phone line connected to a
digital phone to the modem.
There is a danger of a electric shock, re or
damage to the product.
Do not place any container lled with water or
chemicals over or near the computer.
If water or chemicals enter the computer, this
may cause re or electric shock.
If the computer is broken or dropped,
disconnect the power cord and contact a
service center for a safety check.
If the notebook computer has an external
type (removable) battery, separate the
battery also.
Using a broken computer may cause electric
shock or re hazard.
Page 13
12
Chapter 1
Getting Started
Upgrade Related
Never disassemble the power supply or AC
adapter.
There is a danger of electric shock.
When removing the RTC (Real Time Clock)
battery, keep it out of the reach of children
as they could touch and/or swallow it.
There is a danger of choking. If a child has
swallowed it, contact a doctor immediately.
Use only authorized parts (multiplug, battery and memory) and never
disassemble parts.
There is a danger of damaging the product,
electric shock or re hazard.
Shut down the computer and disconnect
all cables before disassembling the
computer. If there is a modem, disconnect
the phone line. If your notebook is external
& removable battery type, remove the
external battery.
Failure to do so, may cause electric shock.
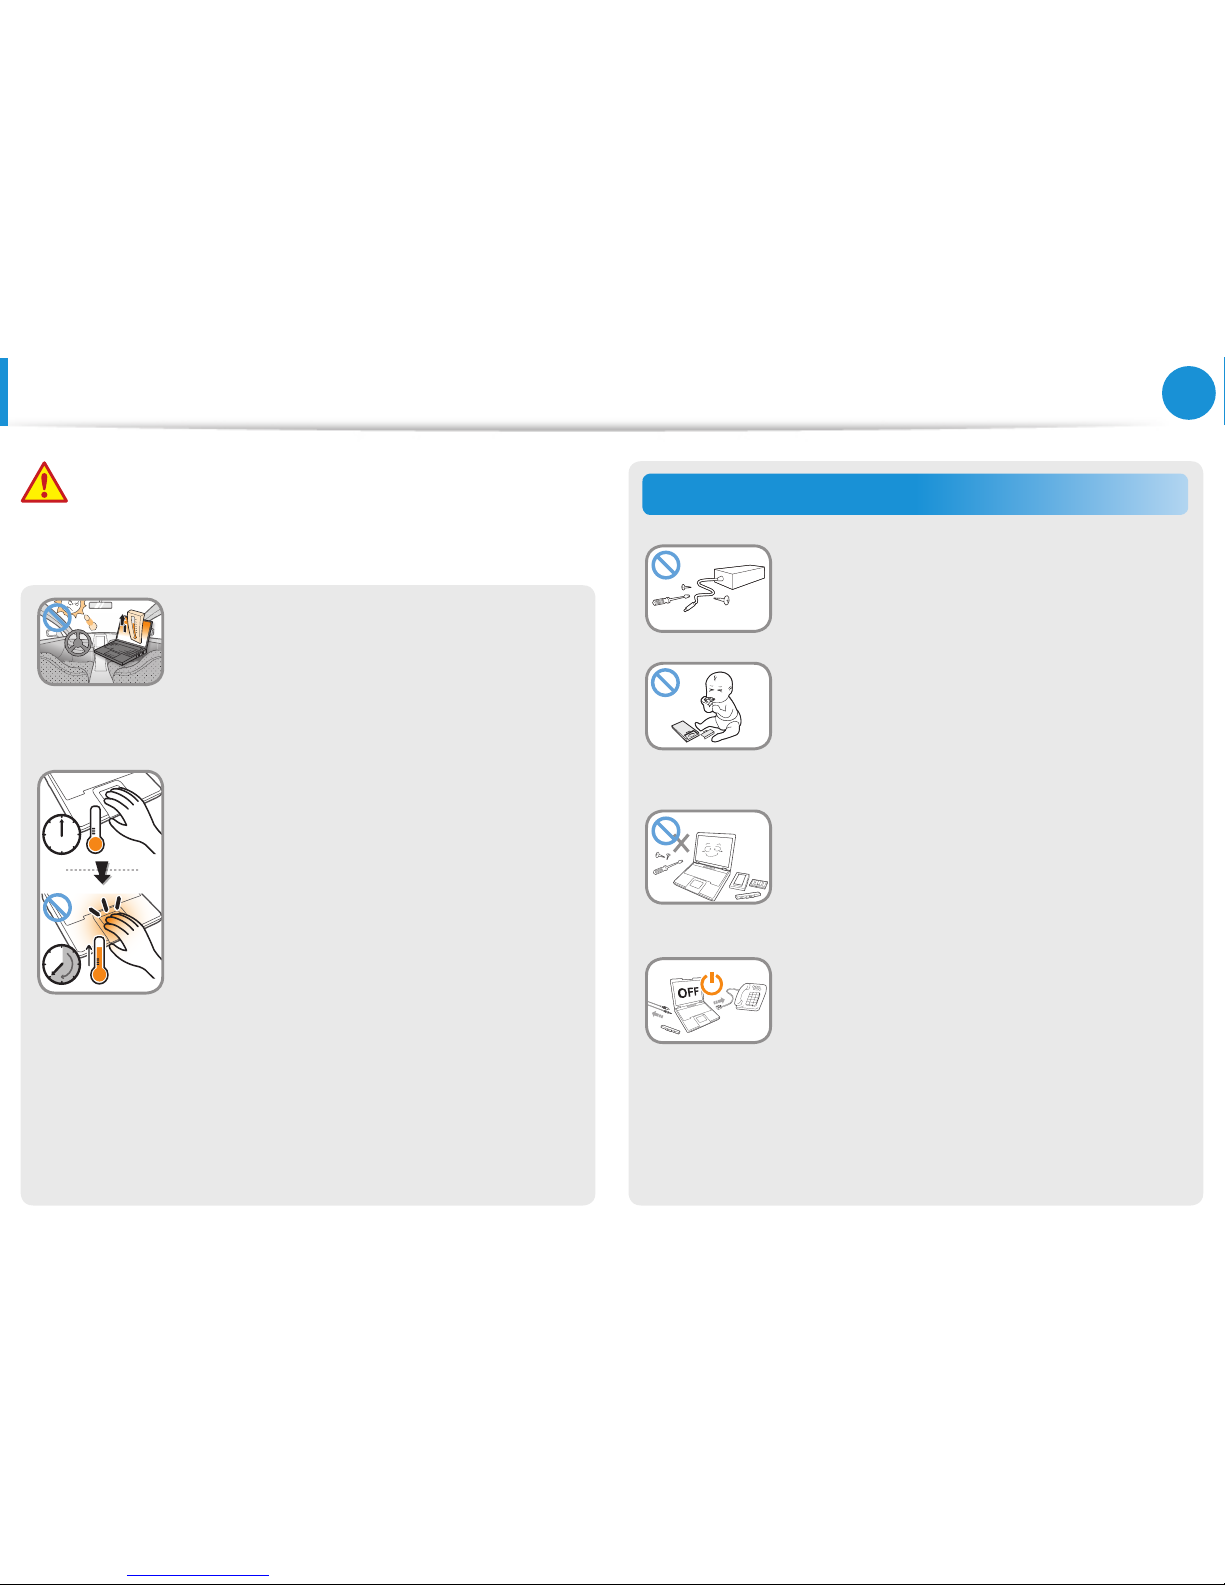
Avoid direct sunlight when the computer
is in an air-tight location such as inside a
vehicle.
There is a danger of a re hazard. The computer
may overheat and also present opportunity to
thieves.
Do not use your computer for long
periods of time while any part of your
body is making direct contact with it. The
temperature of the product may increase
during normal operation.
This may result in harming or burning your skin.
Safety Precautions
Warning
Failure to follow instructions marked with this symbol may
cause personal injury and even fatality.
Page 14
13
Chapter 1
Getting Started
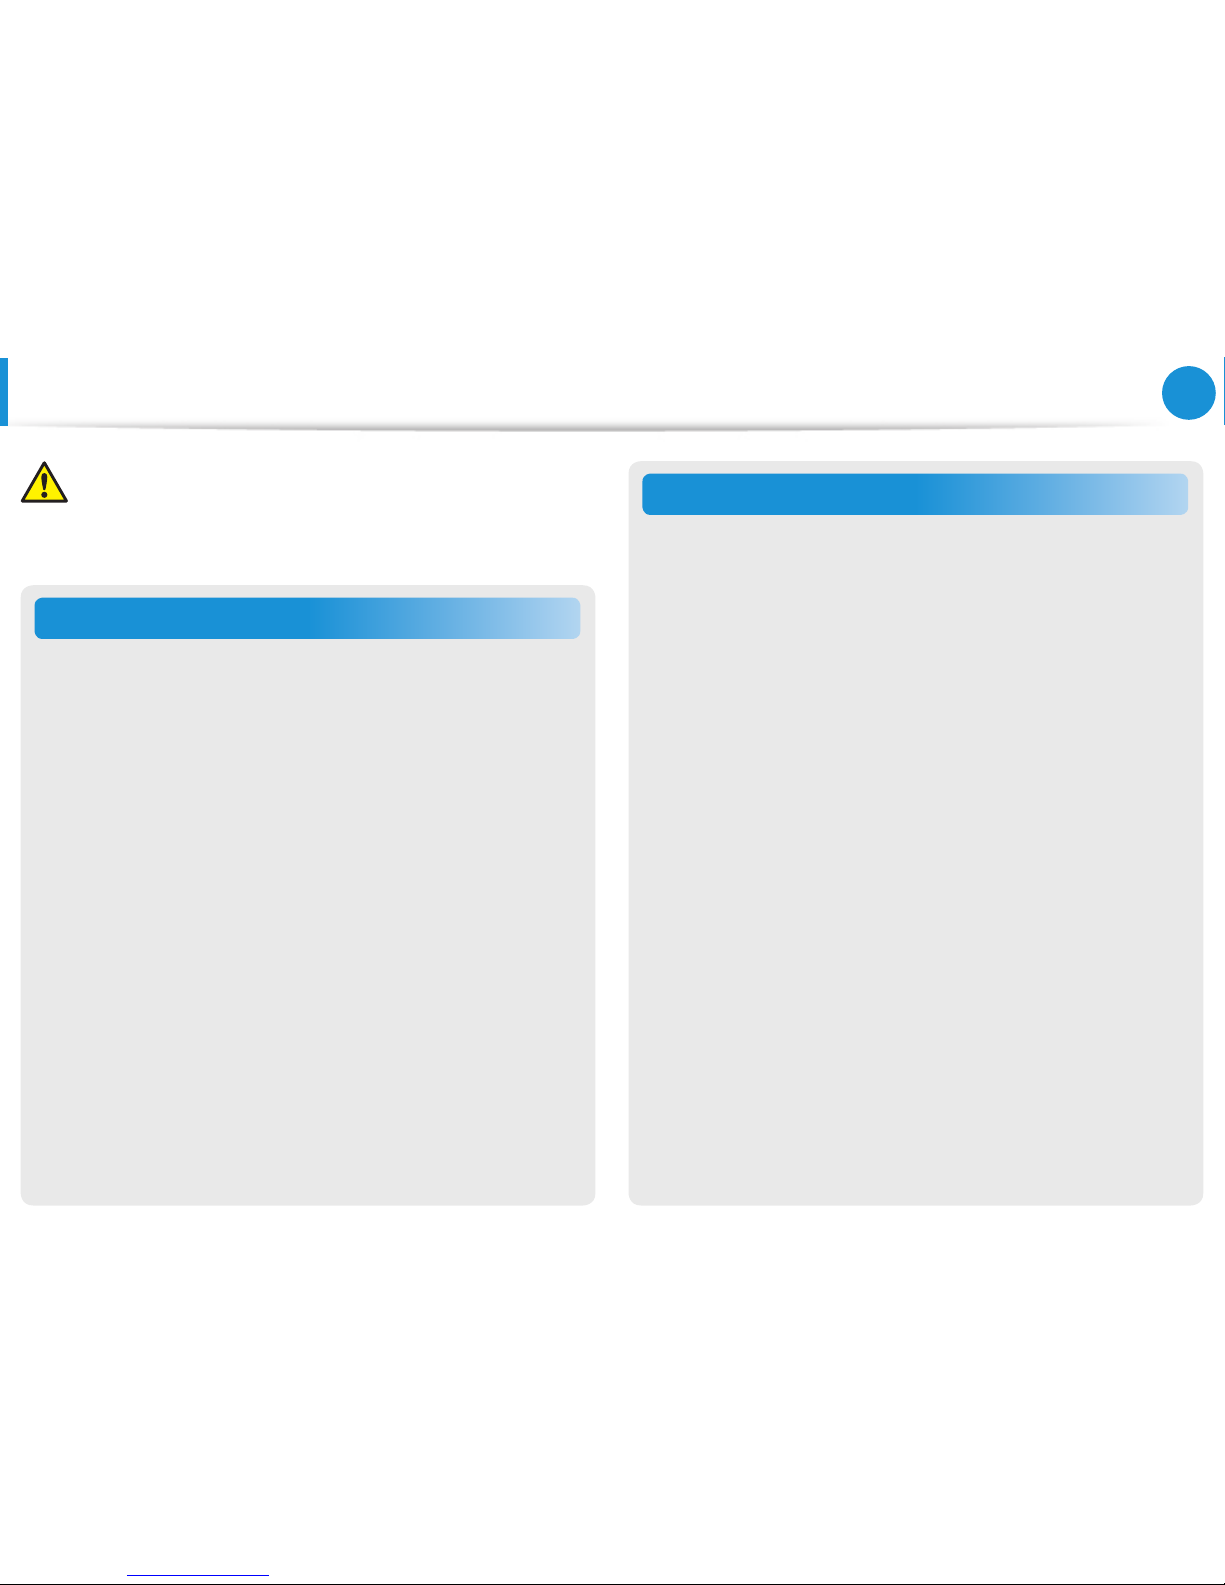
When carrying the notebook computer
with other items, such as the adapter,
mouse, books etc, take care not to press
anything against the notebook computer.
If a heavy object is pressed against the
notebook computer, a white spot or stain may
appear on the LCD. Therefore, take care not to
apply any pressure to the notebook.
In this case, place the notebook computer in
a separate compartment away from the other
objects.
Security and Movement Related
Follow the instructions for the relevant
location (e.g. airplane, hospital, etc.) when
using a wireless communication device
(wireless LAN, Bluetooth, etc.).
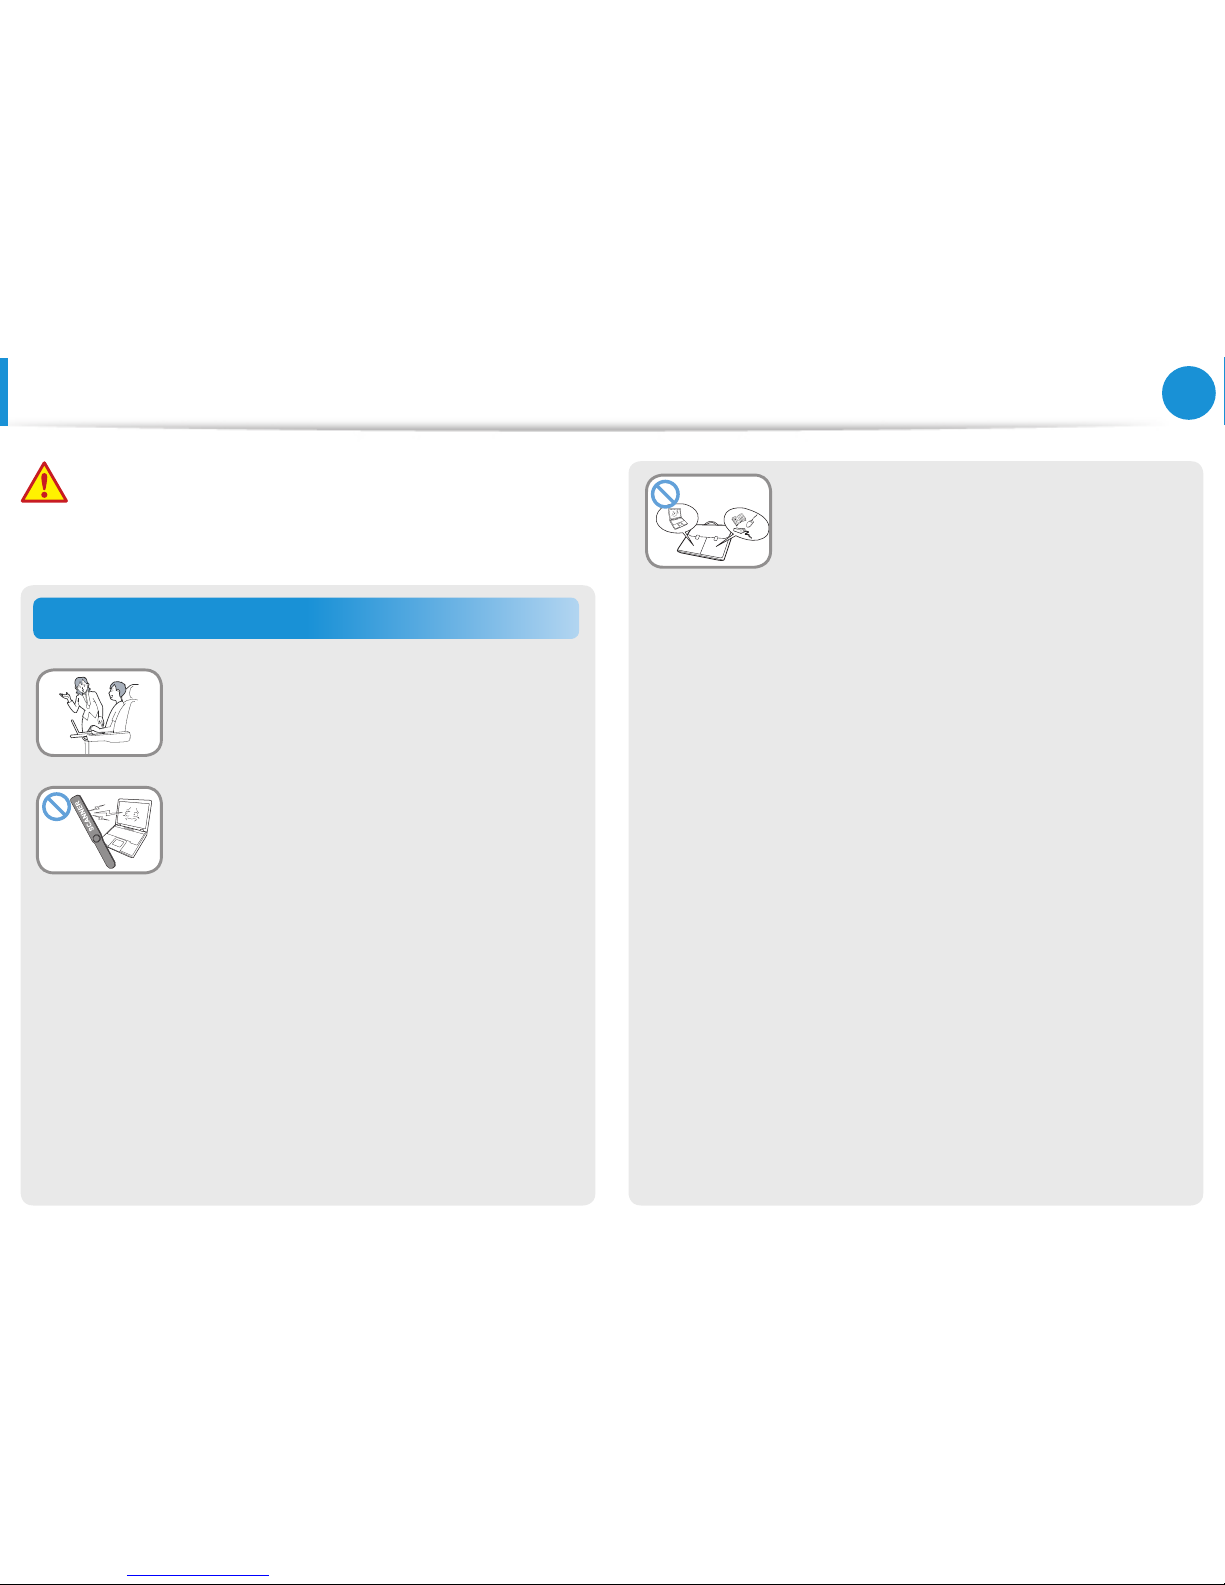
Avoid exposing a drive to magnetic elds.
Security devices with magnetic elds include airport walk-through devices and security wands.
The airport security devices that check carry-on luggage, such as conveyor belts, use
x-rays instead of magnetism and will not
damage a drive.
Safety Precautions
Warning
Failure to follow instructions marked with this symbol may
cause personal injury and even fatality.
Page 15
14
Chapter 1
Getting Started
Safety Precautions
Installation Related
Do not block the ports (holes), vents, etc. of the product and
do not insert objects.
Damage to a component within the computer may cause electric
shock or re.
When using the computer with it lying on its side, place it so
that the vents face upwards.
Failure to do so, may cause the internal temperature of the
computer to rise and the computer to malfunction or halt.
Do not place a heavy object over the product.
This may cause a problem with the computer. In addition, the
object may fall and cause injury, or damage the computer.
Battery Usage Related
Dispose of worn-out batteries properly.
There is a danger of re or explosion.•
The battery disposal method may dier depending on •
your country and region. Dispose of the used battery in an
appropriate way.
Do not throw or disassemble the battery and do not put it
into water.
This may cause an injury, re or explosion.
Use only a battery authorized by Samsung Electronics.
Failure to do so may cause an explosion.
Avoid contact with metal objects such as car keys or clips
when keeping or carrying a battery.
Contact with a metal may cause excessive current and a high
temperature and may damage the battery or cause a re.
Charge the battery according to the instructions in the manual.
Failure to do so, may cause an explosion or re from damage to
the product.
Do not heat the product(or battery) or expose it to heat (e.g.
inside a vehicle during the summer).
There is a danger of explosion or re.
Caution
Failure to follow instructions marked with this symbol may
cause slight injury or damage to the product.
Page 16
15
Chapter 1
Getting Started
Usage Related
Do not place a candle, light cigar, etc. over or on the product.
There is a danger of re.
Use a wall outlet or multi-plug with a grounding part.
Failure to do so may cause electric shock hazard.
Make sure to have the product tested by a safety service
engineer after repairing the product.
Authorized Samsung Repair Centers will carry out safety checks
after a repair. Using a repaired product without testing it for
safety may cause an electric shock or re.
In case of lightning, immediately turn the system o,
disconnect the power cord from the wall outlet and phone
line from modem. Do not use a modem or phone.
There is a danger of electric shock or re.
Do not use your computer and AC-Adapter on your lap or
soft surfaces.
If the computer temperature increases, there is a danger of
burning yourself.
Connect only permitted devices to the connectors or ports
of the computer.
Failure to do so, may cause electric shock and re.
Close the LCD panel only after checking if the notebook
computer is turned o.
The temperature may rise and it may cause overheating and
deformation of the product.
Do not press the Eject Button while the CD-ROM drive is in
operation.
You might lose data and the disk might be suddenly ejected and
could cause an injury.
Take care not to drop the product while using it.
This may cause personal injury or loss of data.
Do not touch the antenna with electricity facility such as the
power outlet.
There is a danger of electric shock.
When handling computer parts, follow the instructions on
the manual supplied with the parts.
Failure to do so, may cause damage to the product.
Safety Precautions
Caution
Failure to follow instructions marked with this symbol may
cause slight injury or damage to the product.
Page 17
16
Chapter 1
Getting Started
If the computer emits smoke, or there is a burning smell,
disconnect the power plug from the wall outlet and contact
a service center immediately. If your notebook is external &
removable battery type, remove the external battery.
There is a danger of re.
Do not use a damaged or modied CD.
There is a danger of damaging the product or personal injury.
Do not insert your ngers into the PC Card Slot.
There is a danger of injury or electric shock.
Use recommended computer cleansing solution when
cleaning the product and only use the computer when it is
completely dried.
Failure to do so may cause electric shock or re.
Emergency disk eject method using paperclip should not
be used while the disk is in motion. Make sure to use the
emergency disk eject method only when the Optical Disk
Drive has stopped.
There is a danger of injury.
Do not place your face close to the Optical Disk Drive tray
when it is operating.
There is a danger of injury due to an abrupt ejection.
Check CDs for cracks and damage prior to use.
It may damage the disc and cause disorder of device and injury of
user.
Safety Precautions
Caution
Failure to follow instructions marked with this symbol may
cause slight injury or damage to the product.
Page 18
17
Chapter 1
Getting Started
Upgrade Related
Take care when touching the product or parts.
The device may be damaged or you may be injured.
Take care not to throw or drop a computer part or device.
This may cause injury or damage to the product.
Make sure to close the computer cover before connecting
the power after a reassembly.
There is a danger of electric shock if your body touches an
internal part.
Use parts authorized by Samsung Electronics only.
Failure to do so, may cause re or damage the product.
Never disassemble or repair the product by yourself.
There is a danger of electric shock or re.
To connect a device that is not manufactured or authorized
by Samsung Electronics, enquire at your service center
before connecting the device.
There is a danger of damaging the product.
Security and Movement Related
When moving the product, turn the power o and separate
all connected cables rst.
The product might be damaged or users may trip over the cables.
For long periods of not using the notebook computer,
discharge the battery and preserve as it is detached.
(For external & removable battery type)
The battery will be preserved at its best condition.
Do not operate or watch the computer while driving a
vehicle.
There is a danger of a trac accident. Please concentrate on
driving.
Safety Precautions
Caution
Failure to follow instructions marked with this symbol may
cause slight injury or damage to the product.
Page 19
18
Chapter 1
Getting Started
Cautions on Preventing Data Loss
(Hard Disk Management)
Take care not to damage the data on a hard disk drive.
A hard disk drive is so sensitive to external impact that an •
external impact may cause loss of data on the surface of the
disk.
Take extra care, because moving the computer or an impact •
on the computer when it is turned on may damage the data of
the hard disk drive.
The company is not liable for any loss of data on the hard disk •
drive.
Causes that may damage the data of a hard disk drive and
the hard disk drive itself.
The data may be lost when an external impact is applied to the •
disk while disassembling or assembling the computer.
The data may be lost when the computer is turned o or reset •
by a power failure while the hard disk drive is operating.
The data may be lost and irrecoverable due to a computer virus •
infection.
The data may be lost if the power is turned o while running a •
program.
Sudden impact or movement to the computer while the hard •
disk drive is operating, may cause les to be corrupted or bad
sectors on the hard disk.
To prevent data loss due to damage to the hard disk drive,
please backup your data frequently.
Safety Precautions
Caution
Failure to follow instructions marked with this symbol may
cause slight injury or damage to the product.
Page 20
19
Chapter 1
Getting Started
Safety Precautions
Using the power supply in an airplane
Since the power outlet type diers depending on the type of
airplane, connect the power appropriately.
Since the representative gures of the power plug and
the auto adapter are used, they may dier from the actual
parts.
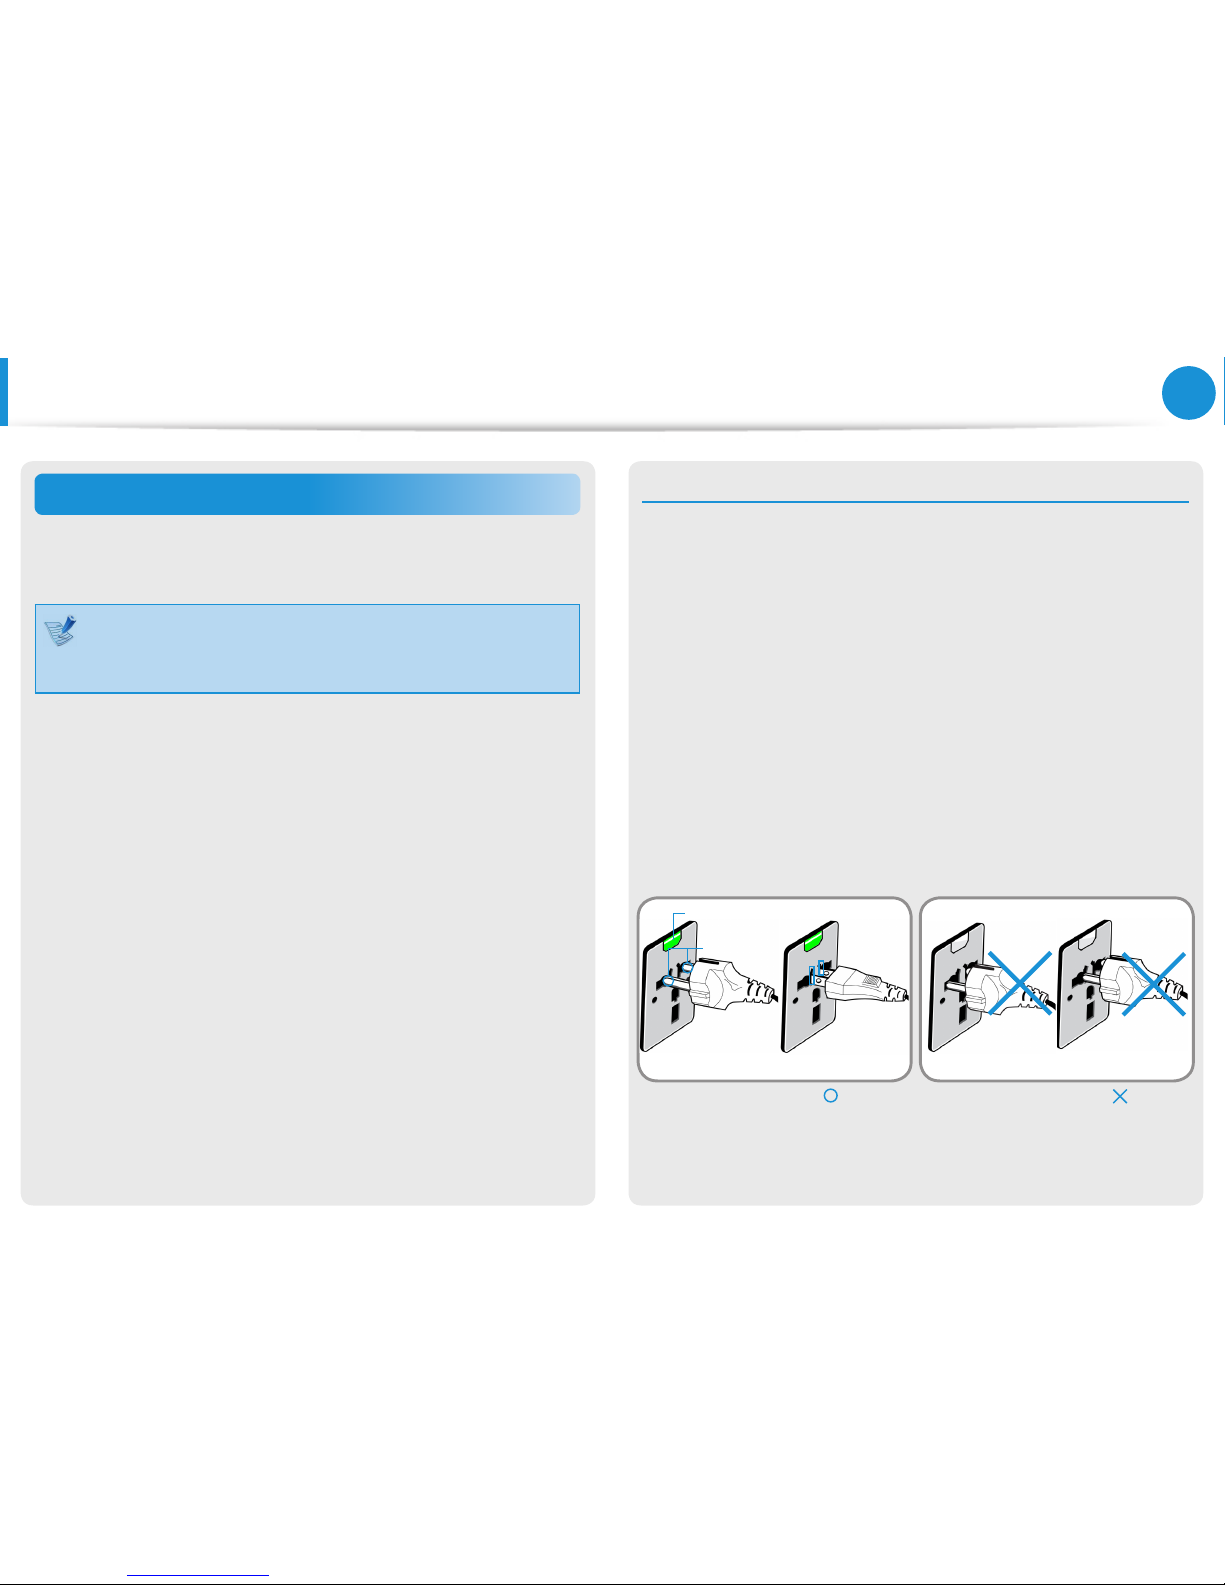
When using the AC power plug
Connect the power plug pins perpendicular into the center of the
power outlet.
If the plug pins are not inserted into the center of the holes, the •
plug pins are only inserted up to half their length. In this case,
reconnect the power plug.
You have to insert the power plug into the outlet when the •
power indicator (LED) of the power outlet is lit green. If the
power is connected properly, the power indicator (LED)
remains green.
Otherwise, the power indicator (LED) is turned o. In this case,
unplug the power, check if the power indicator (LED) is green,
and then reconnect the power plug.
Wrong Example
Good Example
220V Power Plug 110V Power Plug
Center
Holes
Power Indicator (LED)
Page 21
20
Chapter 1
Getting Started
Safety Precautions
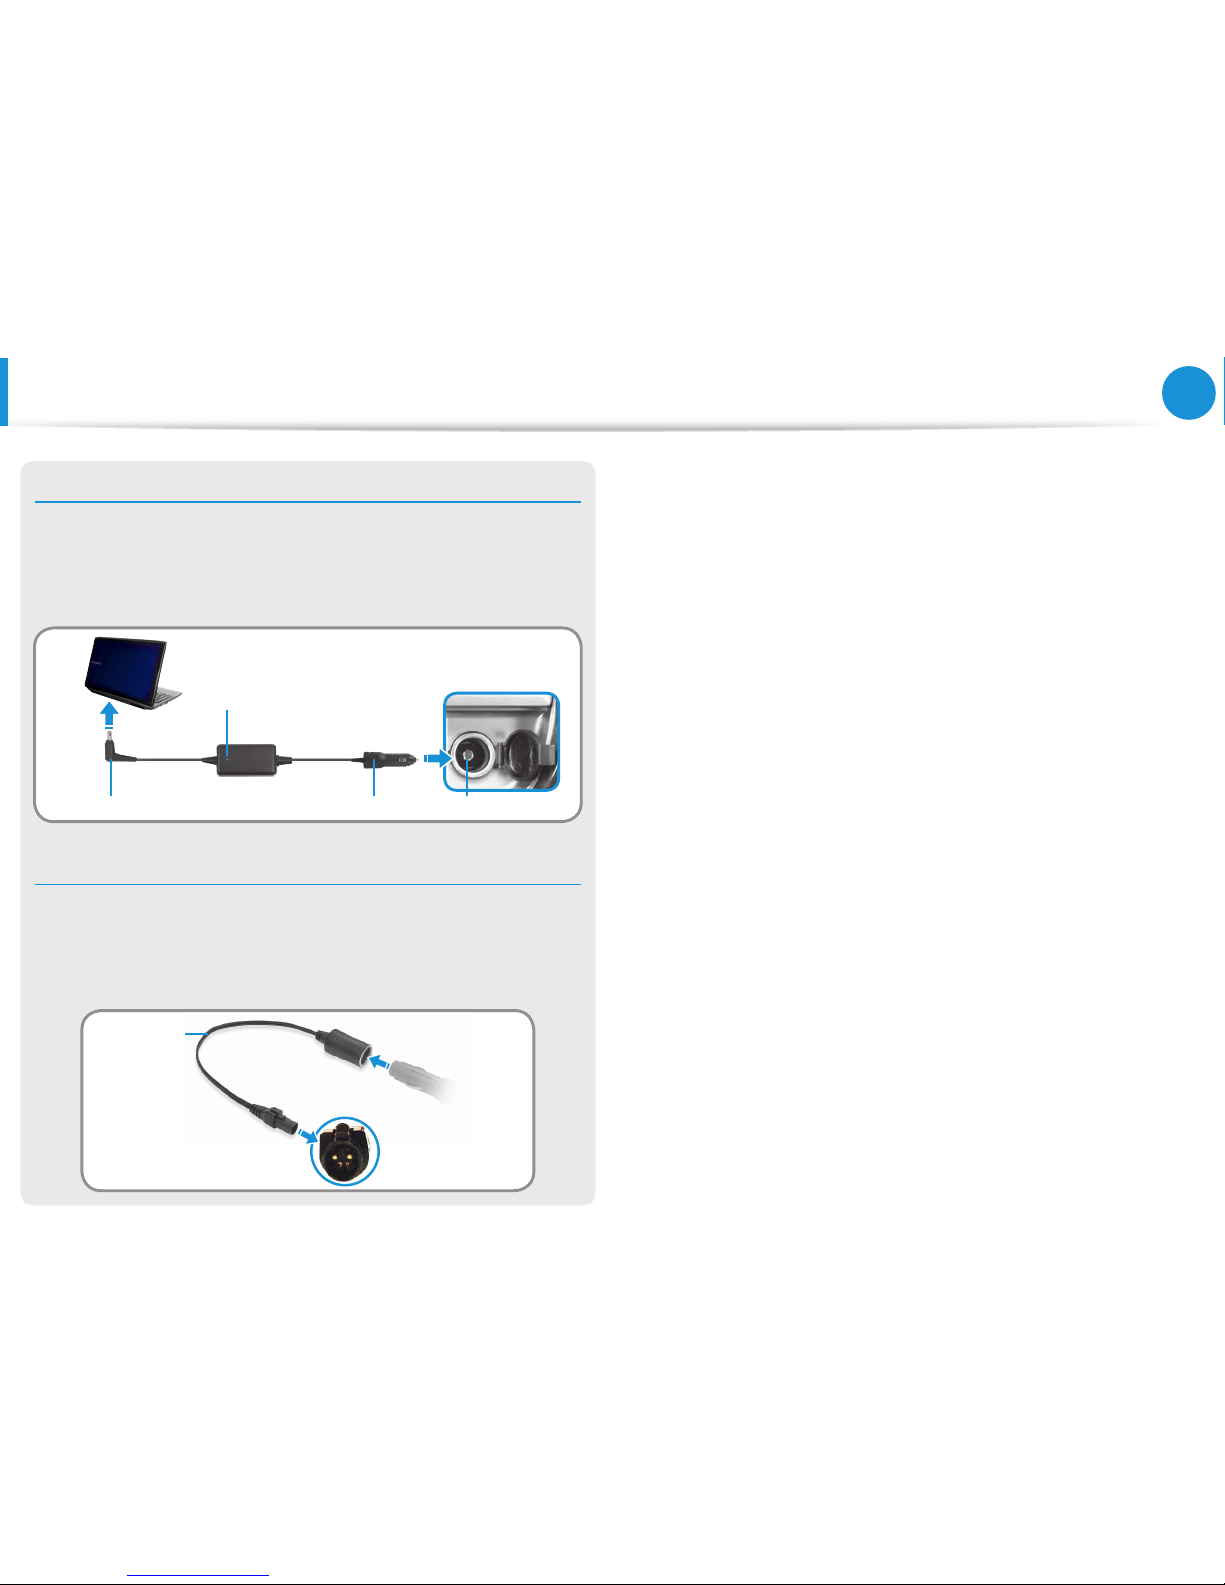
When using the auto adapter
When the cigar socket is provided, you have to use the auto
adapter (optional). Insert the cigar plug of the auto adapter into
the cigar socket and connect the DC plug of the auto adapter to
the power input port of the computer.
Auto Adapter
In-ight Cigar SocketCigar PlugDC Plug
When using the Airplane Charging Converter
Depending on the airplane, you have to use the auto adapter
and charging converter. Connect the airplane charging converter
(optional) to the auto adapter (optional) and then insert the
airplane power input jack into the power outlet.
Charging
Converter
1
Connect this end to
the auto adapter.
Connect the airplane power
input jack to the power
outlet of the airplane.
2
Page 22
21
Chapter 1
Getting Started
Proper Posture During Computer Use
Maintaining a proper posture during computer use is very
important to prevent physical harm.
The following instructions are about maintaining a proper posture
during computer use developed through human engineering.
Please read and follow them carefully when using the computer.
Otherwise, the probability of (RSI: Repetitive Strain Injury) from
repeated operations may increase and serious physical harm may
be caused.
The instructions in this manual have been prepared so that •
they can be applied within the coverage of general users.
If the user is not included in the coverage, the •
recommendation is to be applied according to the user’s
needs.
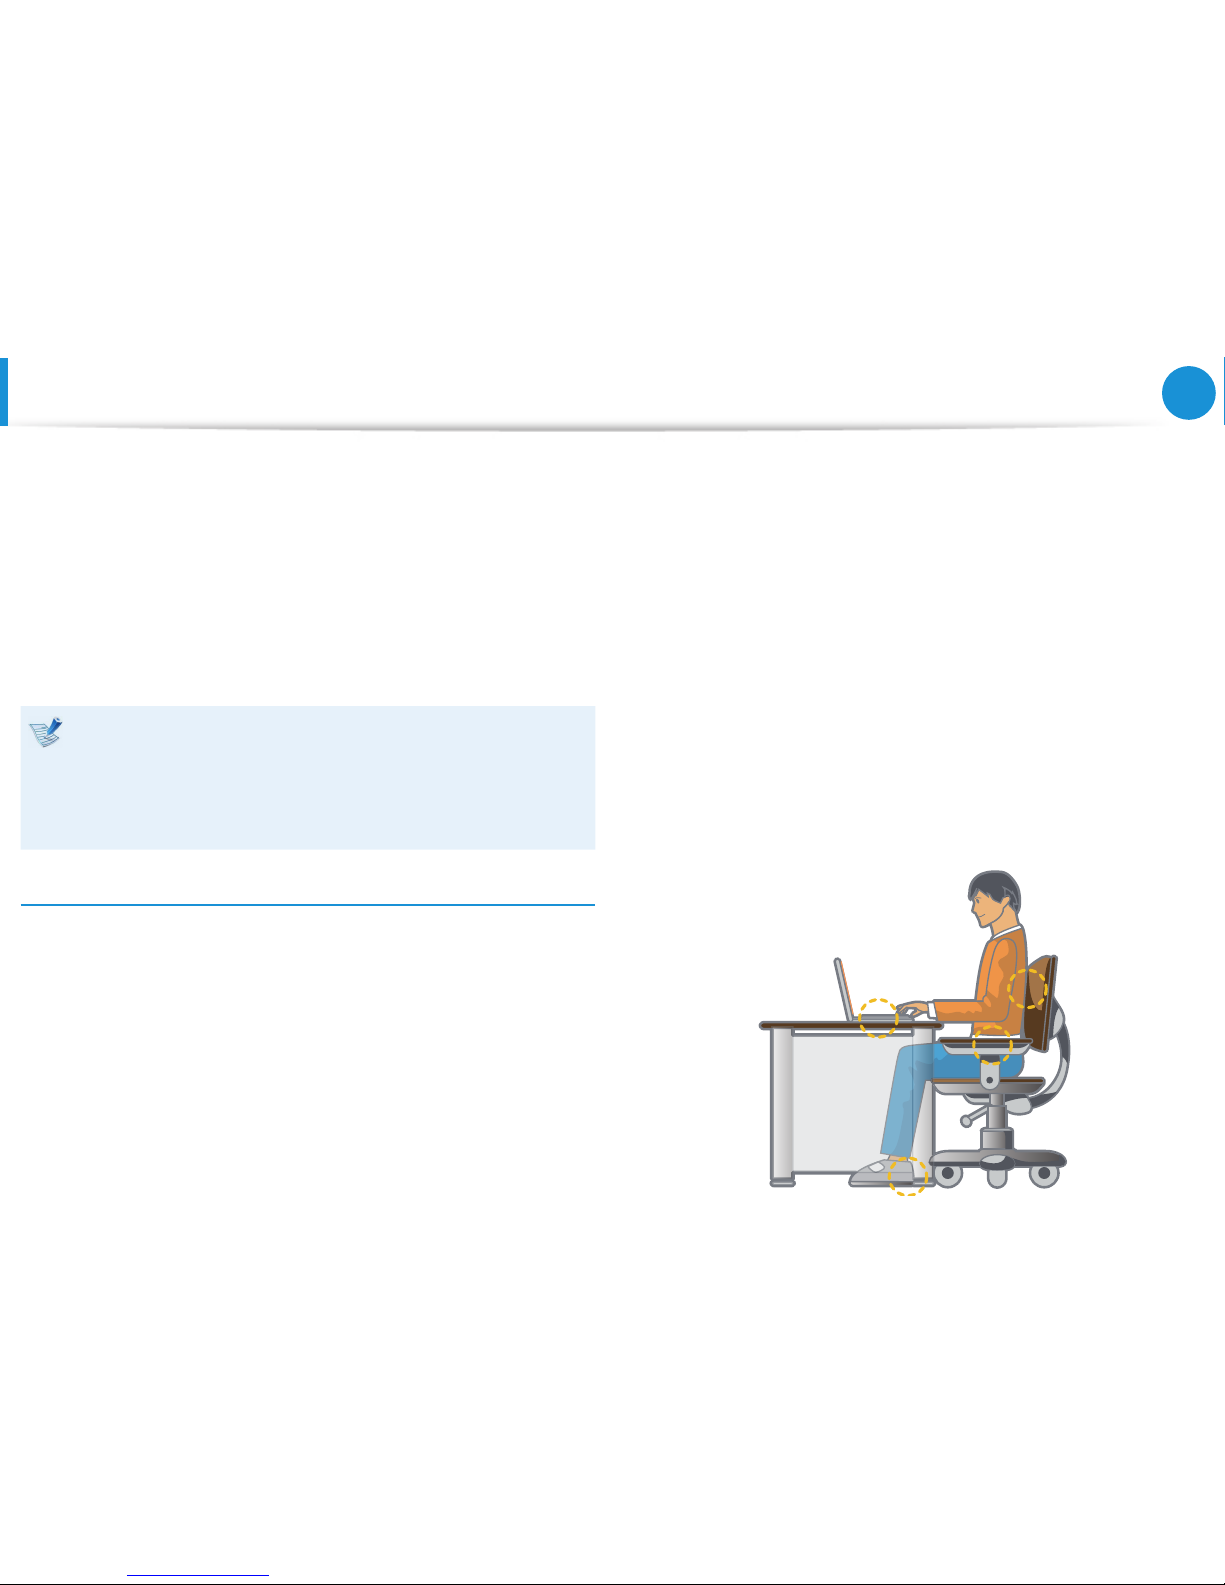
Proper Posture
Adjust the heights of desks and chairs appropriate to your
height.
The heights are to be adjusted so that your arm forms a right
angle when you place your hand over the keyboard while sitting
down on a chair.
Adjust the height of chair so that your heel is comfortably placed
on the oor.
Do not use the computer while you are lying down, but only •
while you are sitting down.
Do not use the computer on your lap. If the computer •
temperature increases, there is a danger of burning yourself.
Work while keeping your waist straight.•
Use a chair with a comfortable back.•
Keep the center of your leg weight not on the chair but on •
your feet when you are sitting on a chair.
To use the computer while talking over the telephone, use a •
headset. Using the computer with the phone on your shoulder
is bad for posture.
Keep frequently used items within a comfortable work range •
(where you can reach them with your hands).
Page 23
22
Chapter 1
Getting Started
Proper Posture During Computer Use
Eye Position
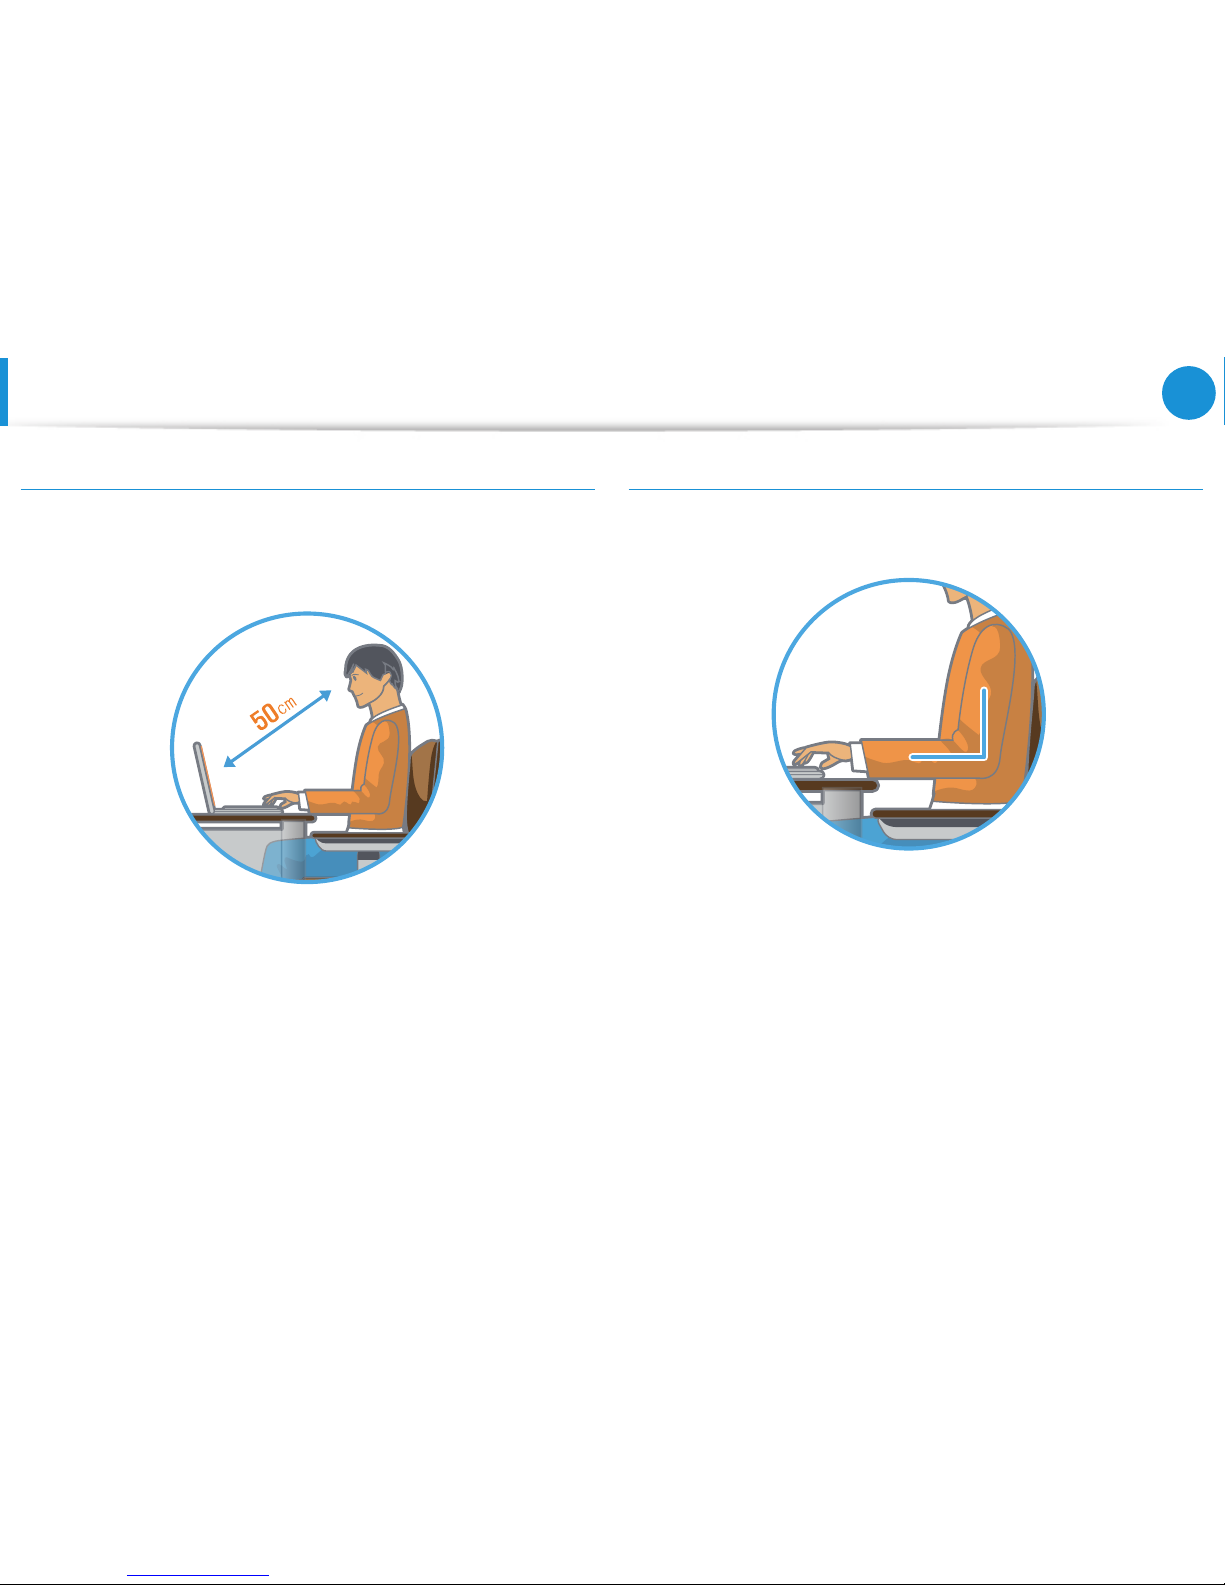
Keep the monitor or LCD away from your eyes by at least
50cm.
Adjust the height of the monitor and the LCD screen so that its •
top height is equal to or lower than your eyes.
Avoid setting the monitor and LCD excessively bright.•
Keep the monitor and LCD screen clean.•
If you wear glasses, clean them before using the computer.•
When entering contents printed on a paper into the computer, •
use a static paper holder so that the height of the paper is
almost equal to that of the monitor.
Hand Position
Keep your arm at a right angle as shown by the gure.
Keep the line from your elbow to your hand straight.•
Do not place your palm over the keyboard while typing.•
Do not hold the mouse with excessive force.•
Do not press the keyboard, touchpad or mouse with excessive •
force.
It is recommended connecting an external keyboard and •
mouse when using the computer for long periods of time.
Page 24
23
Chapter 1
Getting Started
Proper Posture During Computer Use
Volume Control (Headphones and Speakers)
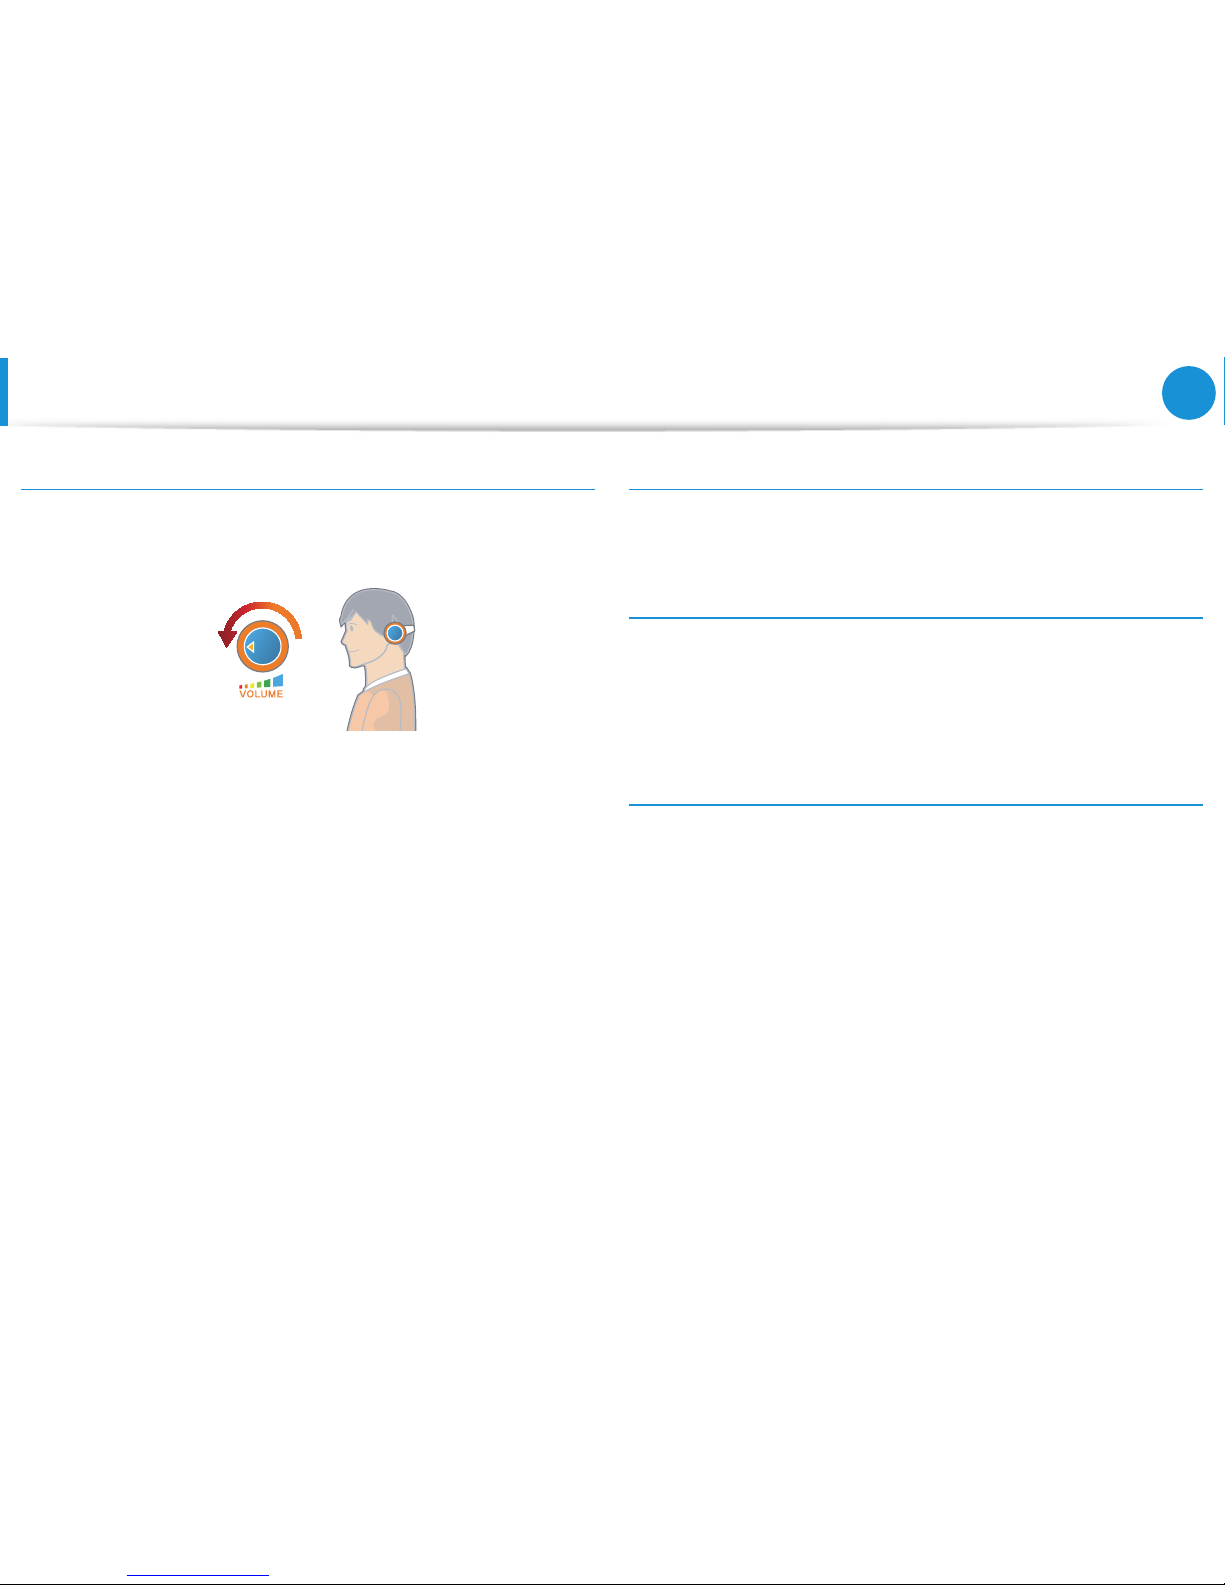
Check your volume rst to listen to music.
Check your
volume!
Check if the volume is too loud before using headphones.•
It is not recommended using headphones for long periods of •
time.
Any deviation from the equalizer default setting could cause •
hearing impairment.
The default setting can be changed through software and •
driver updates without your intervention. Please check the
equalizer default setting before rst usage.
Use Time (Break Time)
Take a break for 10 minutes or more after a 50-minute period •
when working for more than one hour.
Illumination
Do not use the computer in dark locations. The illumination •
level for computer use must be as bright so for reading a book.
Indirect illumination is recommended. Use a curtain to prevent •
reection on the LCD screen.
Operation Condition
Do not use the computer in hot and humid locations.•
Use the computer within the allowed temperature and •
humidity range specied in the User Guide.
Page 25

24
Chapter 1
Getting Started
Overview
Front View
The pictures used for the cover and the main body in the •
User Manual are those of the representative model of each
series. Therefore the colors and appearance of the pictures
may dier from the actual appearance of the product
depending on the model.
The items marked as optional may not be provided or may •
be provided in dierent locations.
1
2
3
3
4
5
6
7
8
9
1 Camera (Optional)
Using this camera, you can take still
pictures and record video.
You can take a picture or make a movie
using the Charms > Start > Camera.
2
LCD
The screen images are displayed here.
3 Speaker A device used to generate sound.
4
Power Button
Turns the computer on and o.
5 Keyboard
A device to enter data by pressing the
keys.
6
To uc hp ad /
Touchpad Buttons
The touchpad and touchpad buttons
provide functions similar to the mouse
ball and buttons.
7 Status Indicators
Shows the operating status of the
computer. The corresponding operating
LED is lit when the corresponding
function operates.
8
Multi Card Slot
(Optional)
A card slot supports multi cards.
9 Microphone
You can use the built-in microphone.
Page 26
25
Chapter 1
Getting Started
Overview
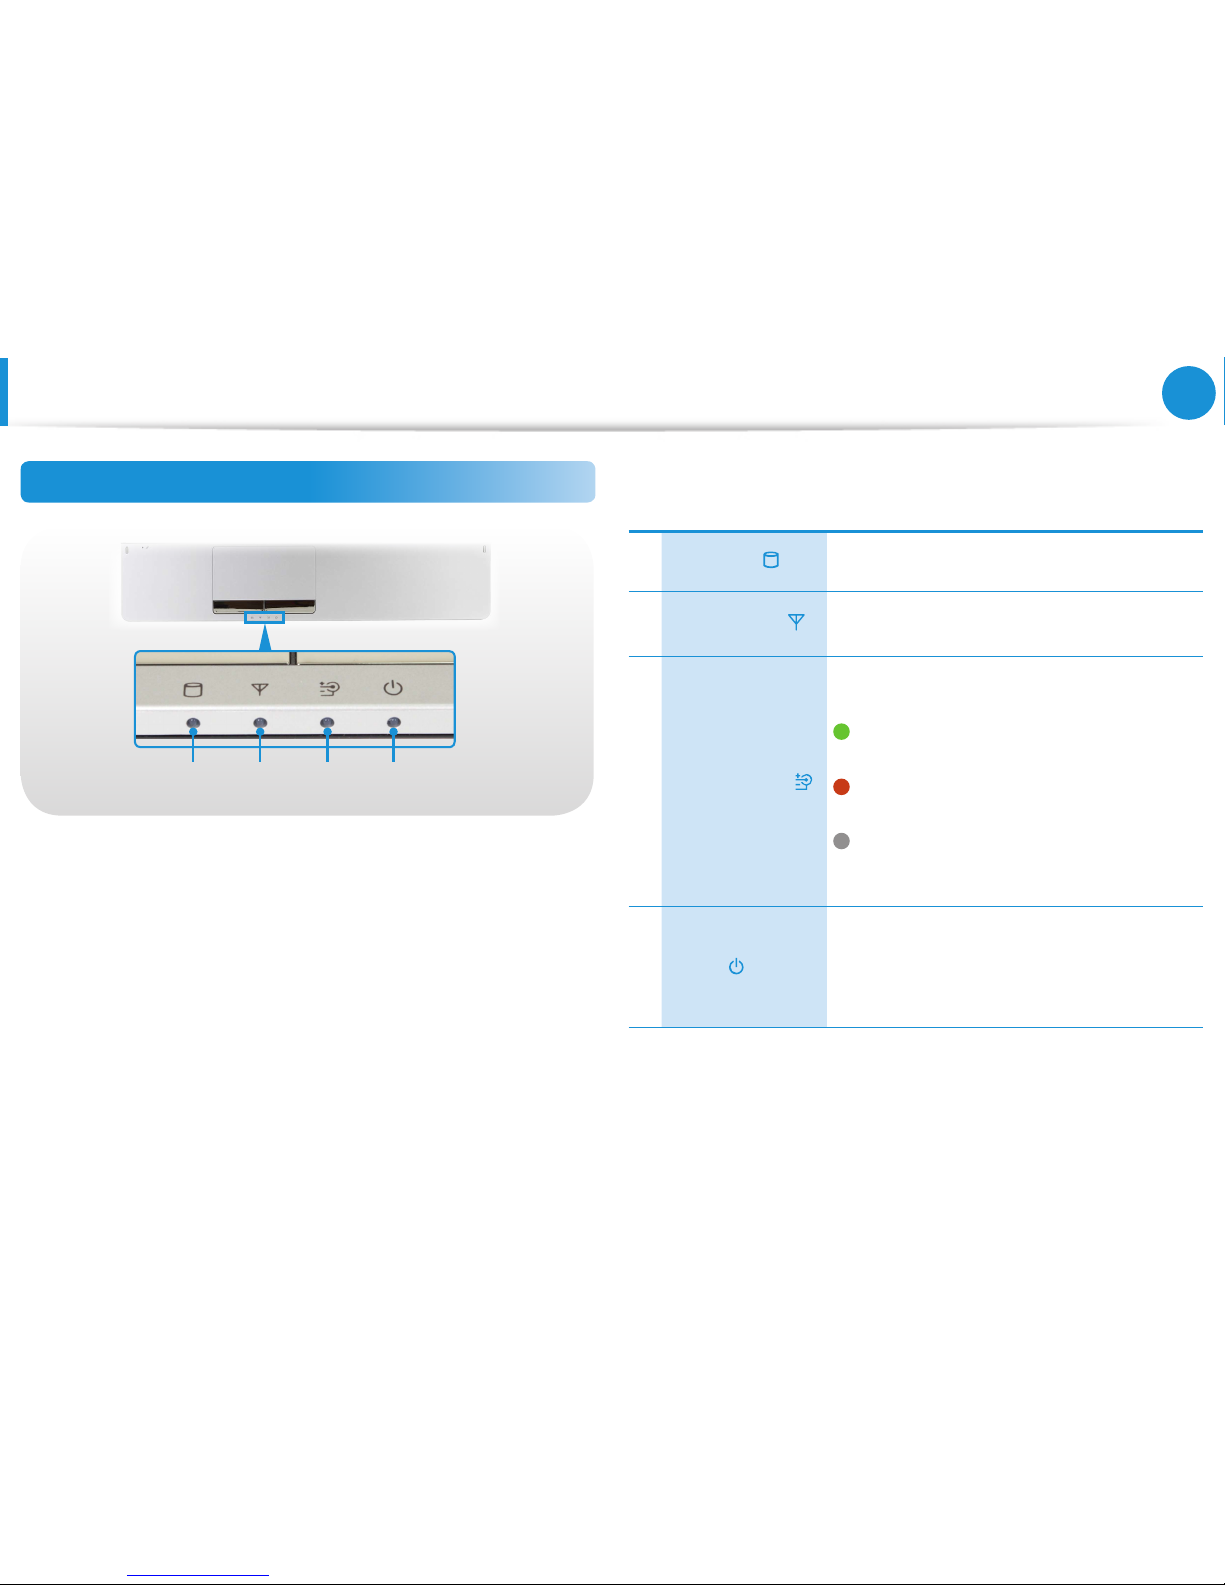
Status Indicators
1 2 3 4
1
HDD/ODD
This turns when either the HDD or ODD is
being accessed.
2
Wireless LAN
This turns on when the wireless LAN is
operating.
3 Charge Status
This shows the power source and the
battery charge status.
Green: When the battery is fully charged
or the battery is not installed.
Orange: When the battery is being
charged.
O: When the computer is running on
battery power without being connected
to AC adapter.
4 Power
This shows the computer operating status.
On: When the computer is operating.
Blinks: When the computer is in Sleep
mode.
Page 27
26
Chapter 1
Getting Started
Overview
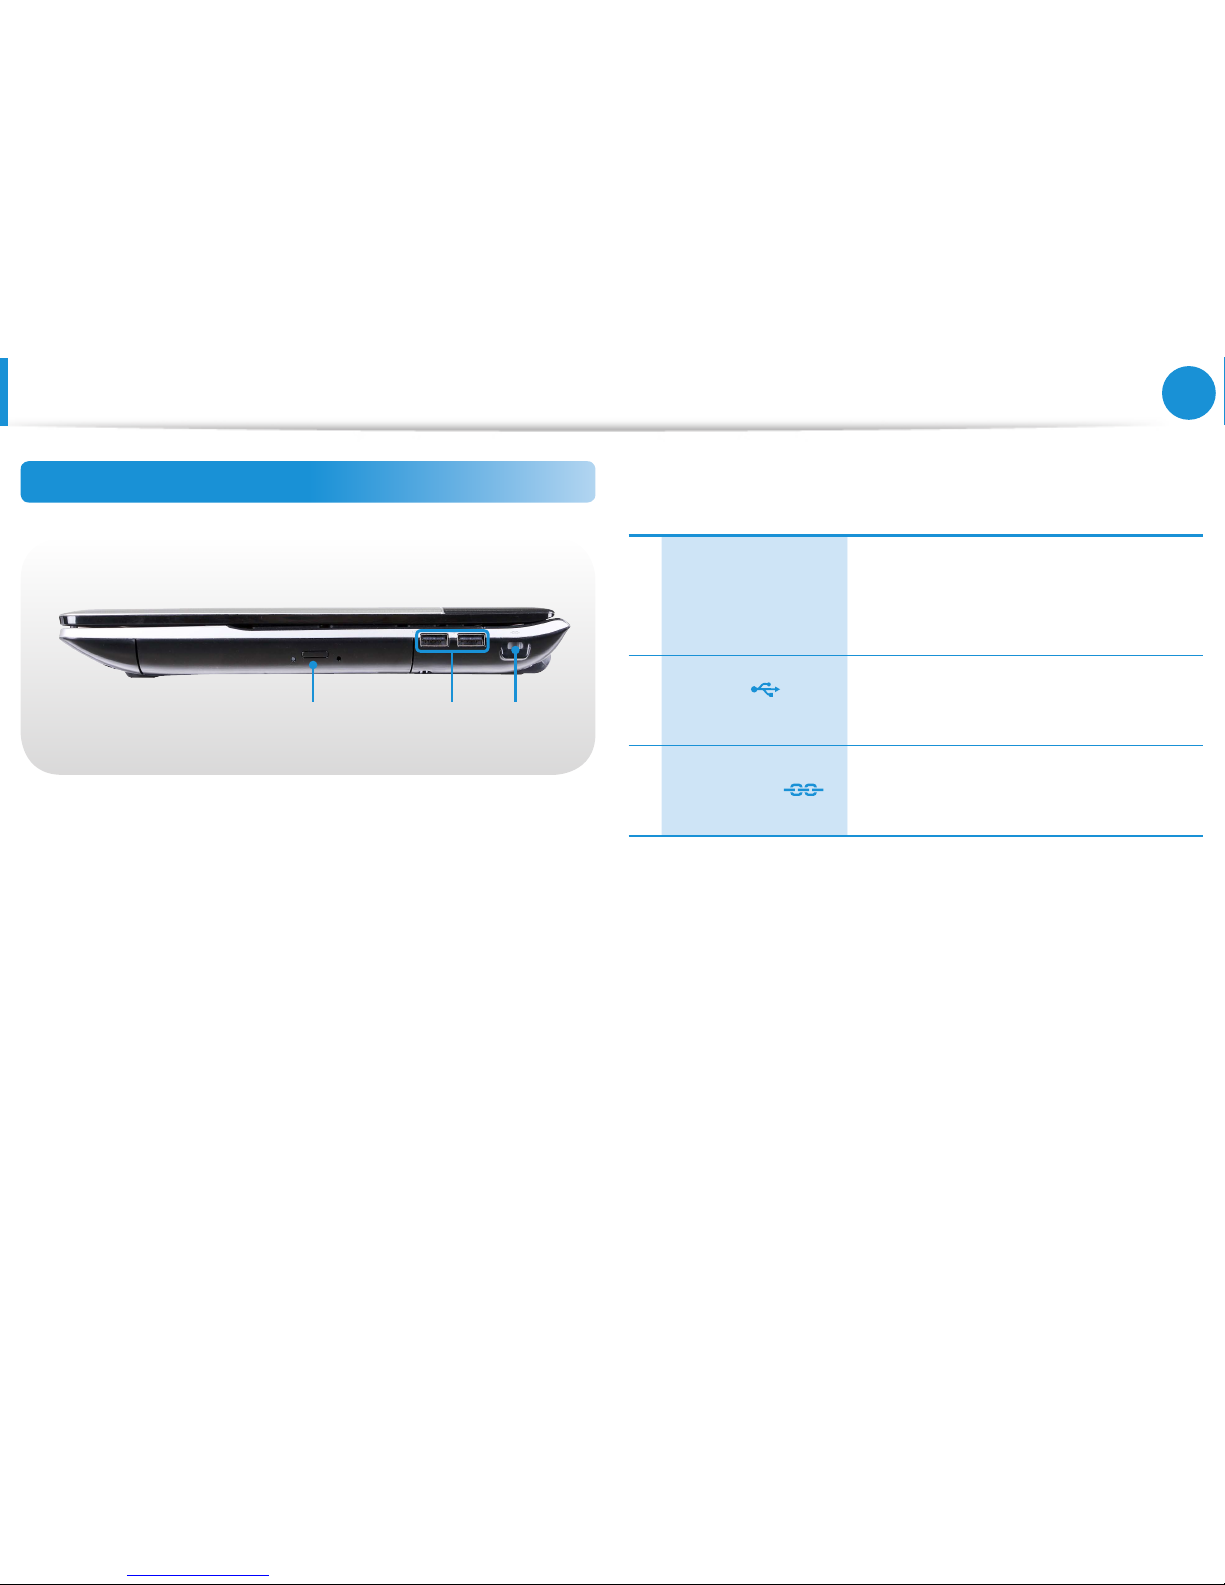
Right View
1 2 3
1
CD Drive (ODD)
(Optional)
Plays CD or DVD titles.
A CD Drive is optional. The installed drive
may dier depending on the model
specications.
2
USB Port
(Optional)
You can connect USB devices to the USB
port such as a keyboard/mouse, digital
camera, etc.
3 Security Slot
You can secure the computer by
connecting a lock and cable to the
Security Slot.
Page 28
27
Chapter 1
Getting Started
Overview
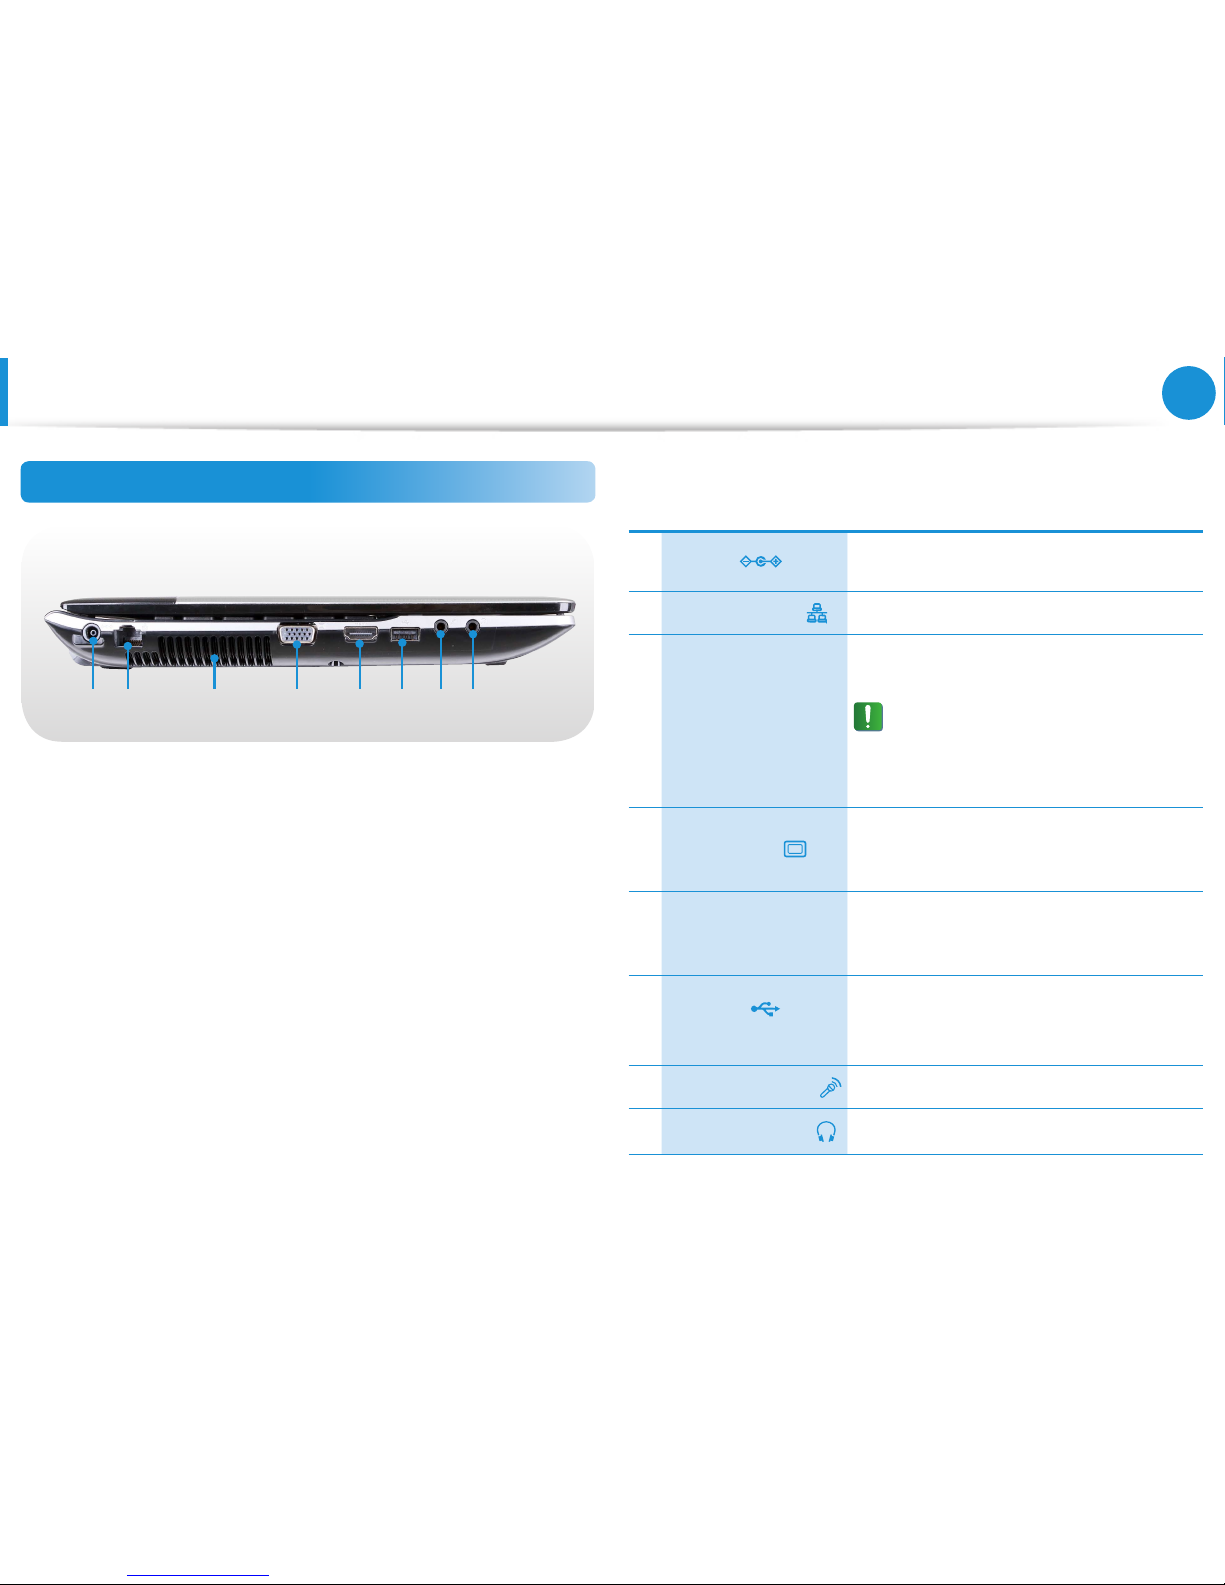
Left View
21 4 53 6 7 8
1 DC Jack
A jack to connect the AC adapter that
supplies power to the computer.
2
Wired LAN Port
Connect the Ethernet cable to this port.
3 Fan Vents
The internal heat of the computer is
emitted through these holes.
If the vents are blocked the
computer may overheat.
Avoid blocking the vents as this may
be dangerous.
4 Monitor Port
A port used to connect a monitor, TV
or projector supporting a 15pin D-SUB
interface.
5
Digital Video/
Audio Port (HDMI)
(Optional)
You can connect an HDMI cable to this
port. Using this port, you can enjoy
digital video and audio on the TV.
6
USB Port
(Optional)
You can connect USB devices to the USB
port such as a keyboard/mouse, digital
camera, etc.
7
Microphone Jack
A jack used to connect the microphone.
8
Headphone Jack
A jack used to connect the headphones.
Page 29
28
Chapter 1
Getting Started
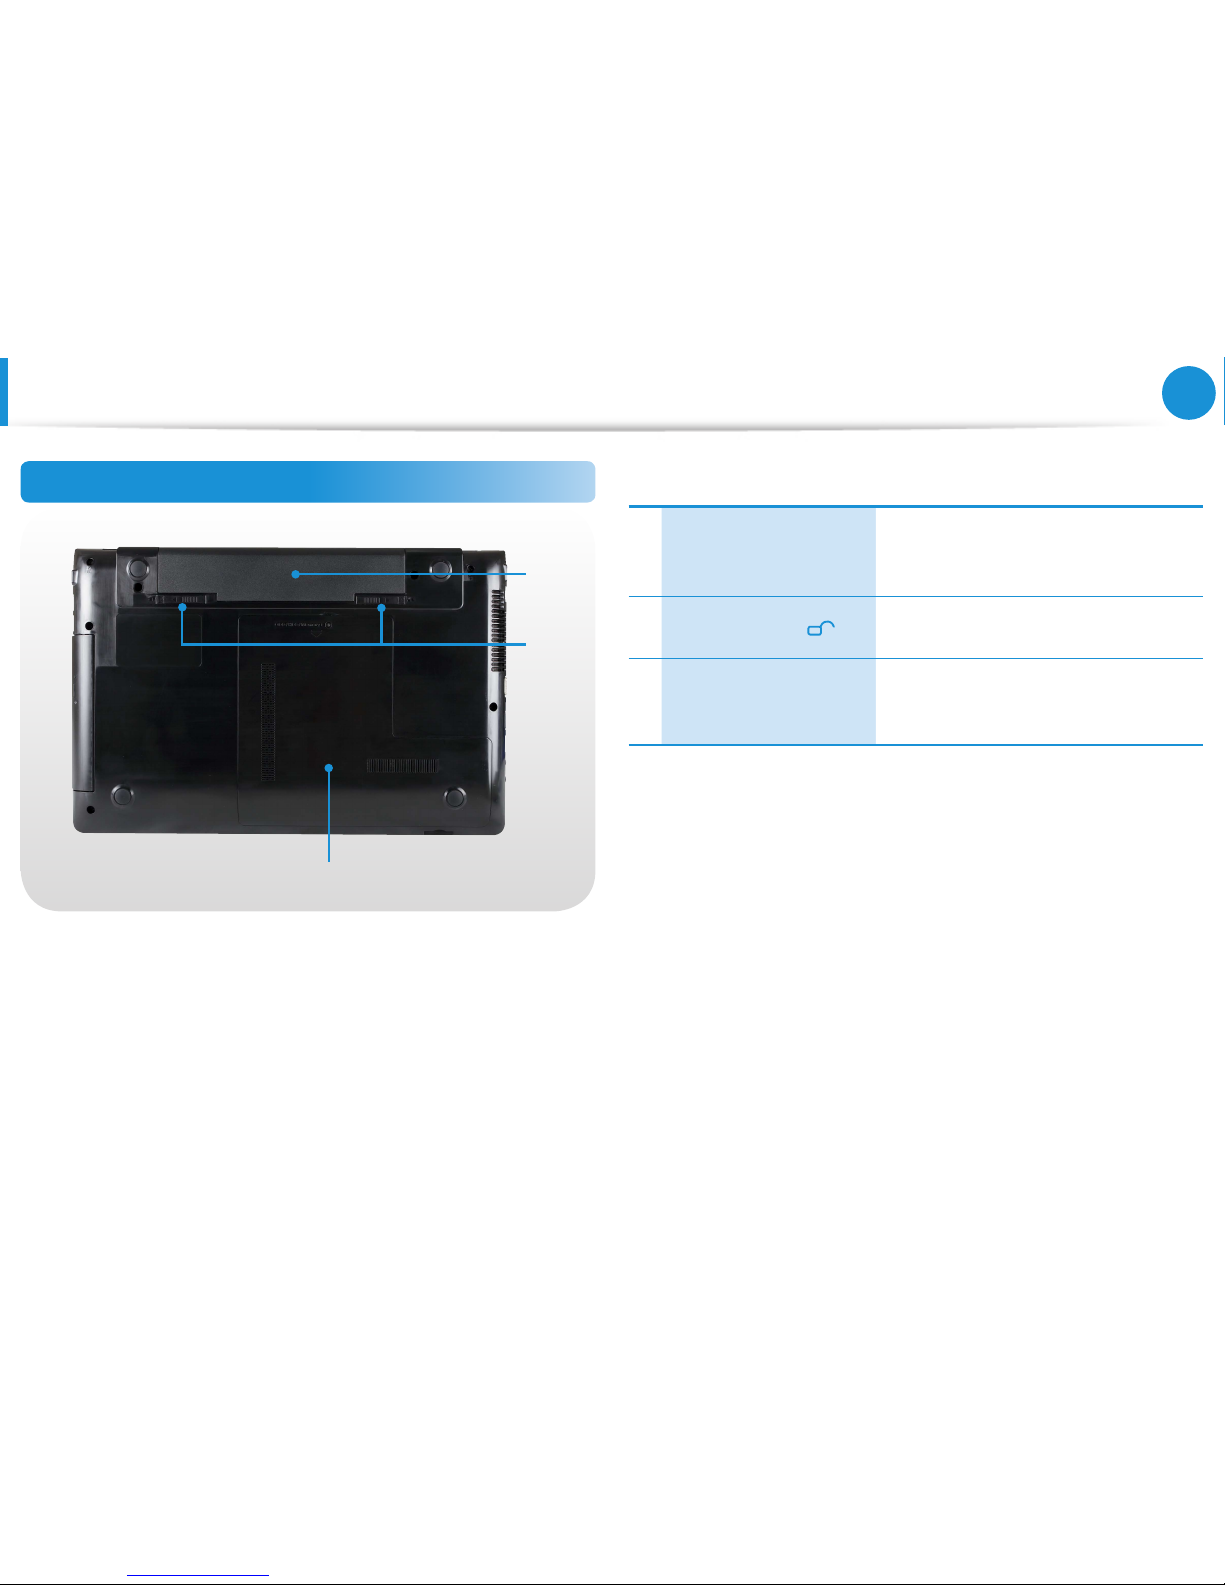
Bottom View
2
1
3
1 Battery
This is a Lithium-Ion rechargeable
battery that supplies power to the
computer.
2 Battery Latches
The latch used to remove or install
the battery.
3
Memory Compartment
Cover/Hard Disk Drive
Compartment Cover
The main memory and hard disk drive
is installed inside the cover.
Overview
Page 30
29
Chapter 1
Getting Started
Turning the Computer On and O
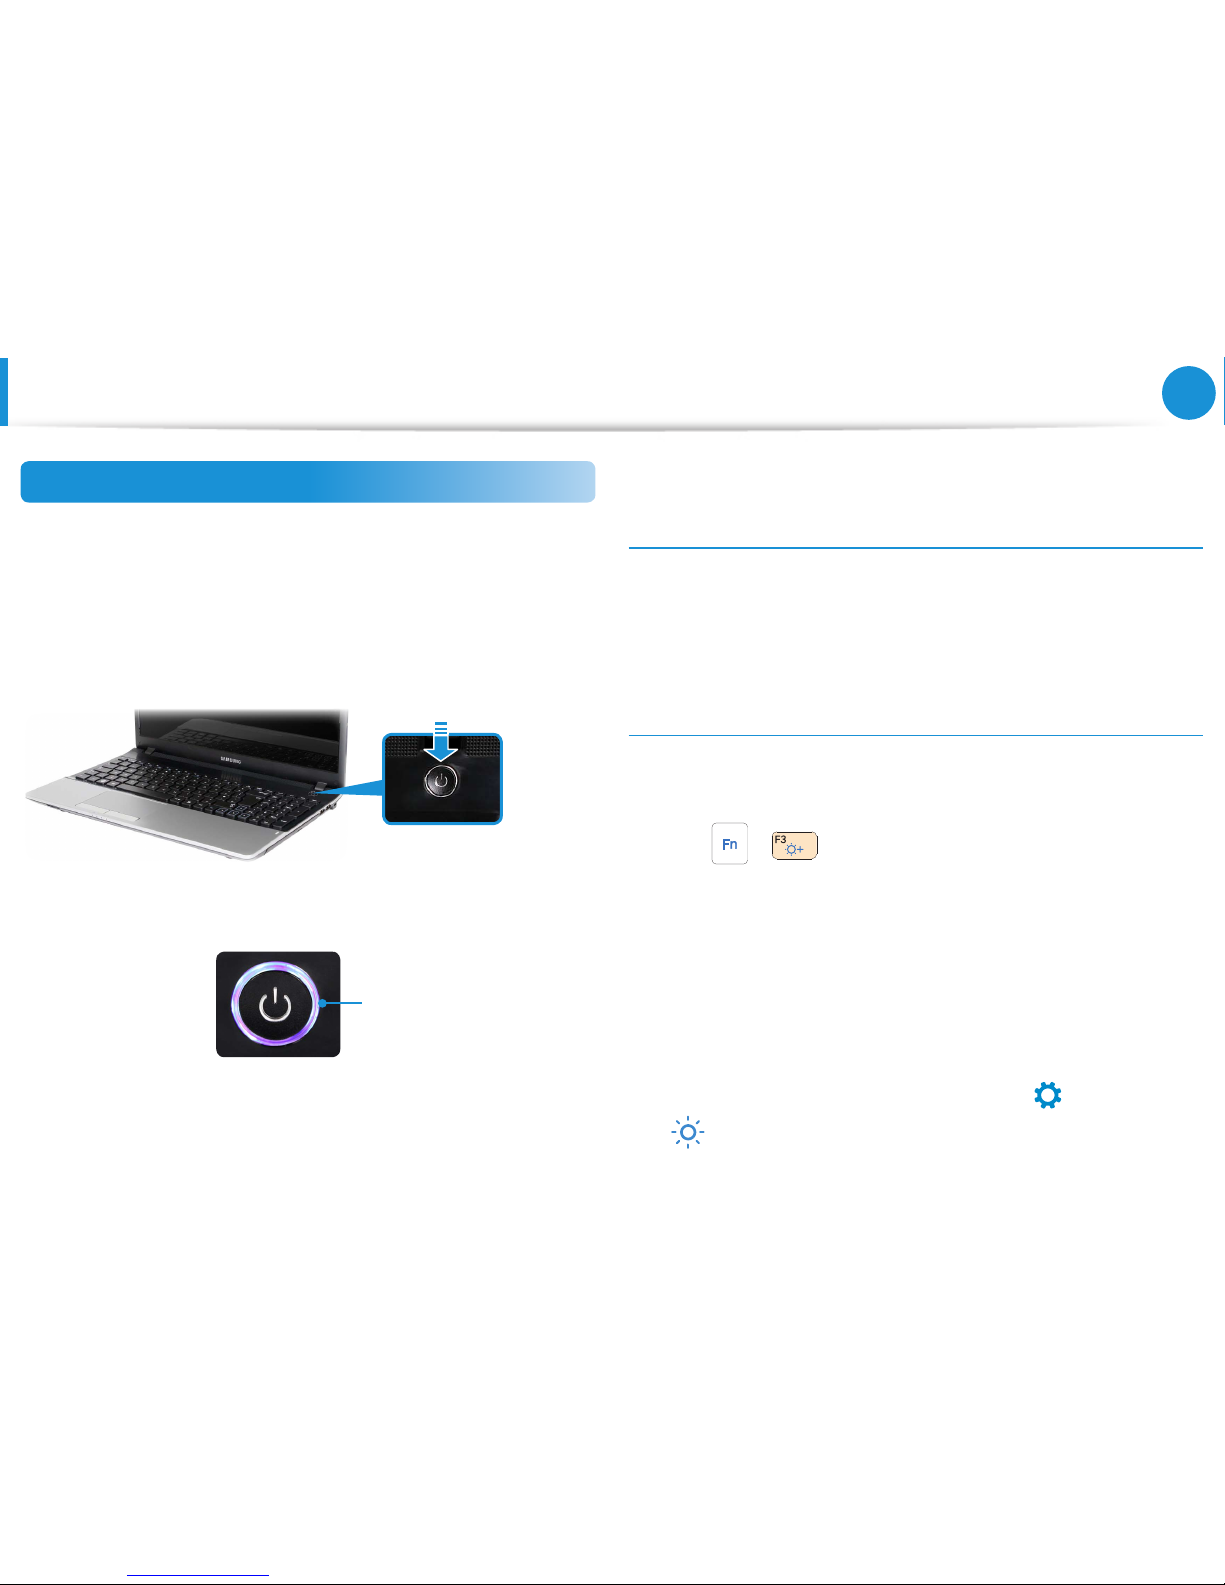
Turning the computer on
1
Connect the AC adapter.
2
Lift the LCD panel up.
3
Press the Power button to turn the computer on.
4
Power button LED is lit while the computer is turned on.
LED
About Windows Activation
When you turn the computer on for the rst time, the Windows
activation screen appears.
Follow the activation procedures according to the instructions on
the screen to use the computer.
Adjusting the screen brightness
When the computer runs on battery power, the LCD brightness is
automatically set to low.
Press the
+ key combination to increase the screen
brightness.
1
The Charms menu appears when you place your mouse
pointer at the edge of the top or bottom right of the screen.
Alternatively, if you place your nger on the right edge of the
touchpad and drag your nger toward the center, the Charms
menu appears.
2
Increase the bar by pressing the Settings
áᔪ
Ŗᮁ
᯲
ᰆ⊹
> Brightness
.
Page 31
30
Chapter 1
Getting Started
Turning the computer o
Since the procedures to turn the computer o may dier •
depending on the installed operating system, please turn
the computer o according to the procedures for the
purchased operating system.
Save all your data before clicking on • Shut down.
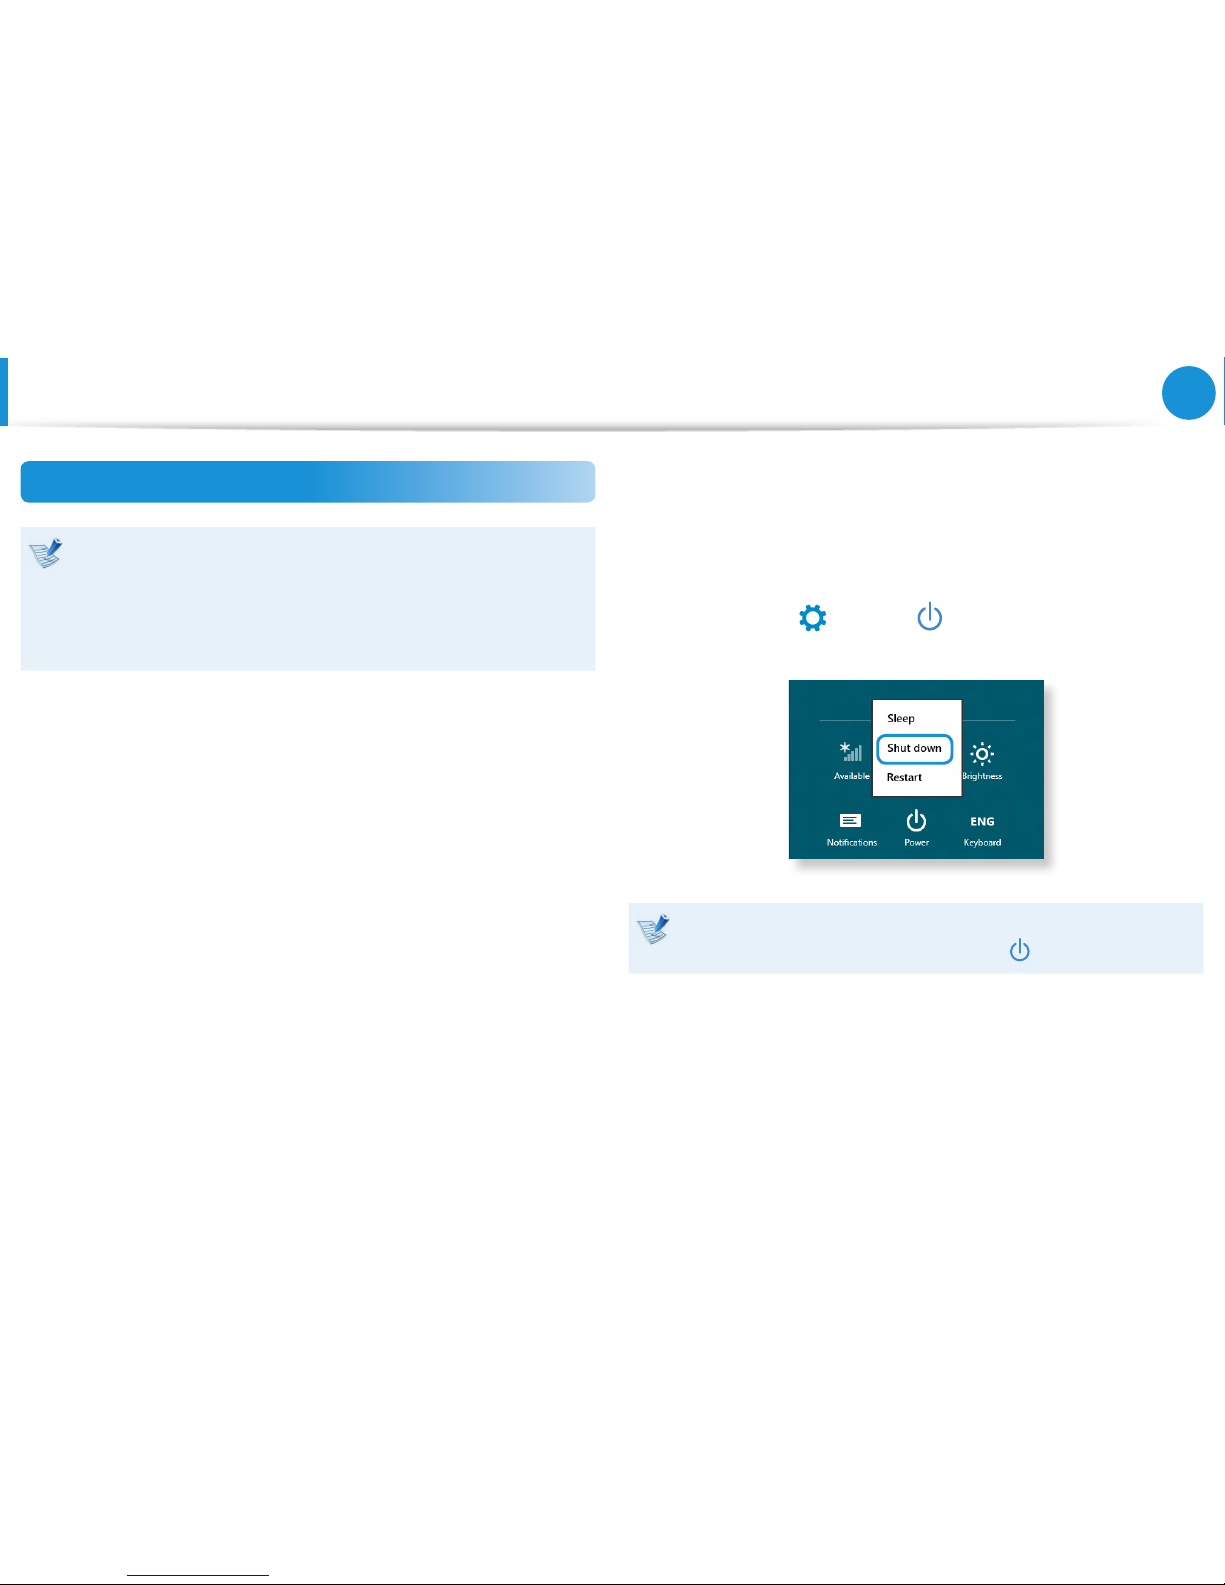
1
The Charms menu appears when you place your mouse
pointer at the edge of the top or bottom right of the screen.
2
Click Settings
áᔪ
Ŗᮁ
᯲
ᰆ⊹
> Power
> Shut down.
If you want to power o your computer when you are logged
out, unlock the screen and click Power
> Shut down.
Turning the Computer On and O
Page 32

Chapter 2.
Using Windows 8
What is Microsoft Windows 8? 32
Screen At a Glance 33
Using the Charms 35
Using Apps 37
Windows Hot Key Function 40
Page 33
32
Chapter 2
Using Windows 8
What is Microsoft Windows 8?
Microsoft Windows 8 (hereafter referred to as Windows) is an
operating system that is required for operating a computer.
To use your computer optimally, you need to know how to use it
properly. Therefore, It is better to learn how to use Windows by
utilizing Windows Help and Support.
The screen may appear somewhat dierent depending on •
the model and the operating system.
Since this guide has been prepared based on Windows •
8, some of the instructions may dier depending on the
version. It may also be modied without prior notice.
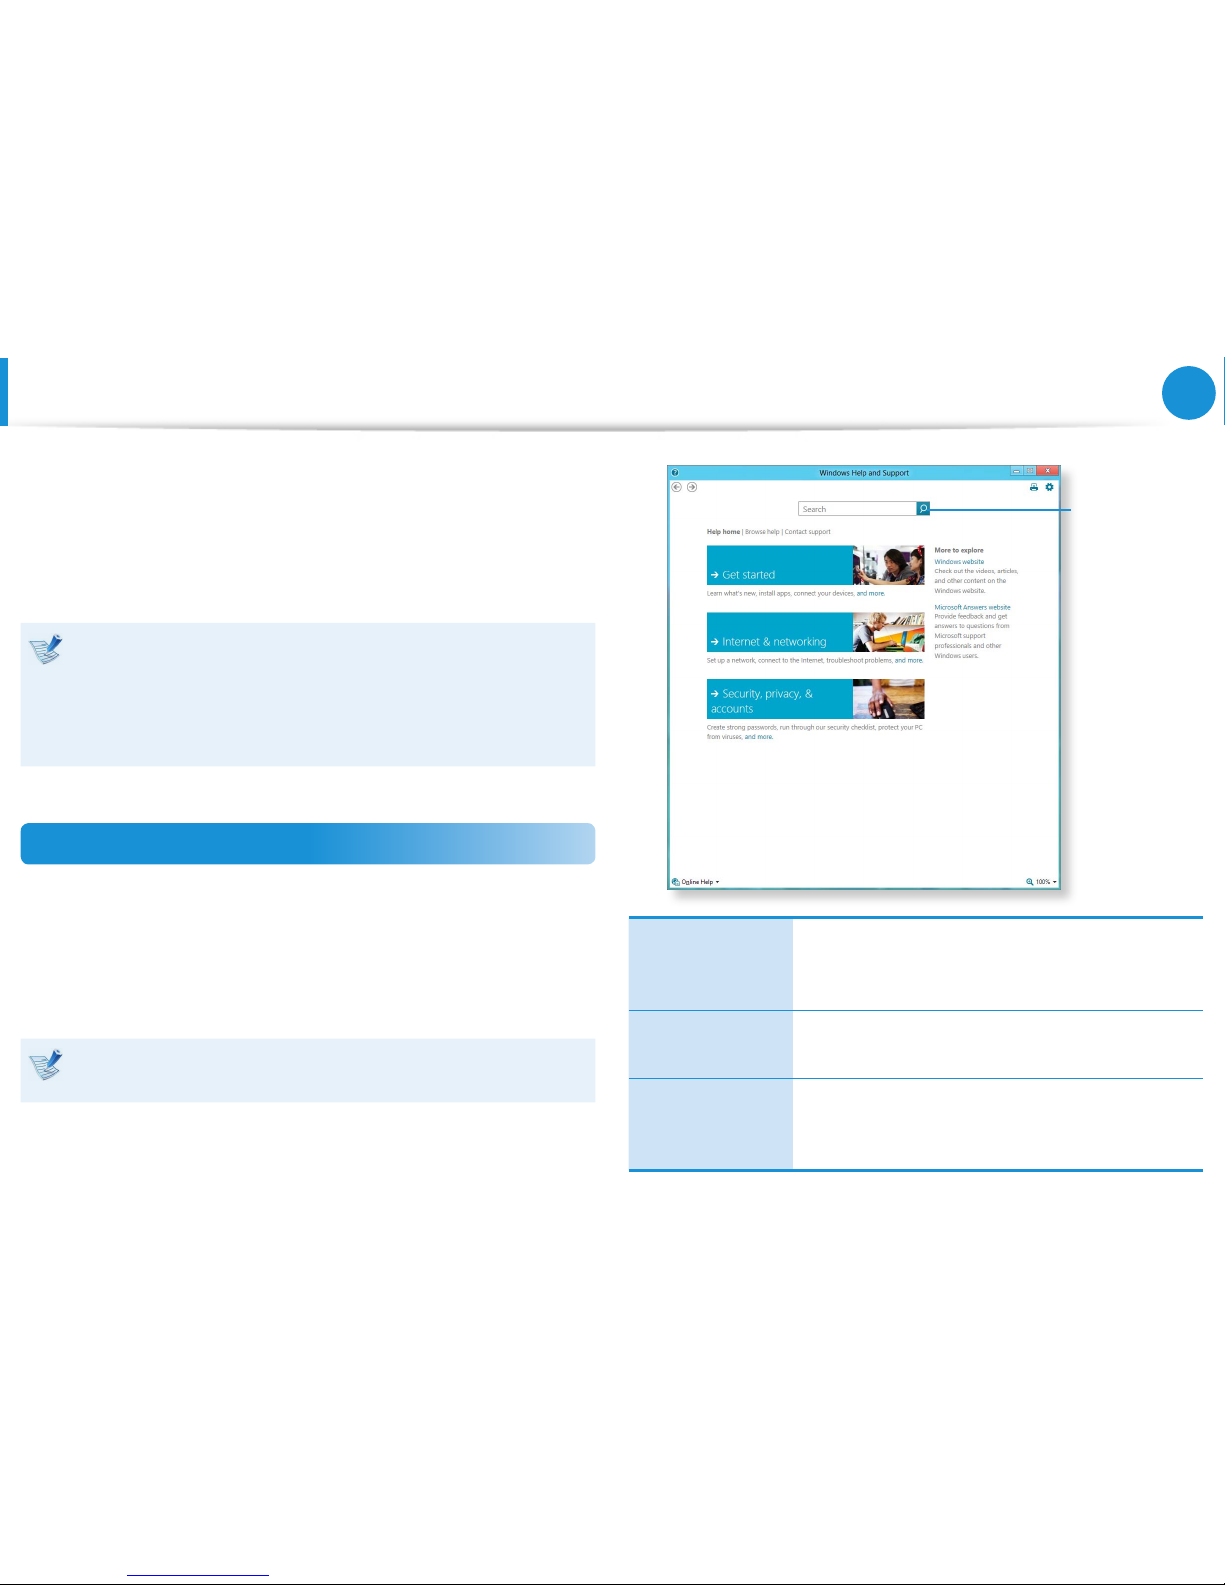
Displaying Help
Press the F1 Key on the keyboard to display the Help.
Alternatively, place your mouse cursor over the end of the top or
bottom right area on the screen to display the Charms menu.
Click Charms menu > Settings > Help.
If you are connected to the internet, you can access the most
recent online Help.
Searching
for Help
Getting Started
You can view basic instructions on how to use
your computer including new function(s) for the
Windows OS.
Internet &
networking
After connecting to the network, you can check
the Help section required to use the internet.
Security, Privacy,
& accounts
You can check the Help information required
to protect your computer and personal
information.
Page 34
33
Chapter 2
Using Windows 8
Screen At a Glance
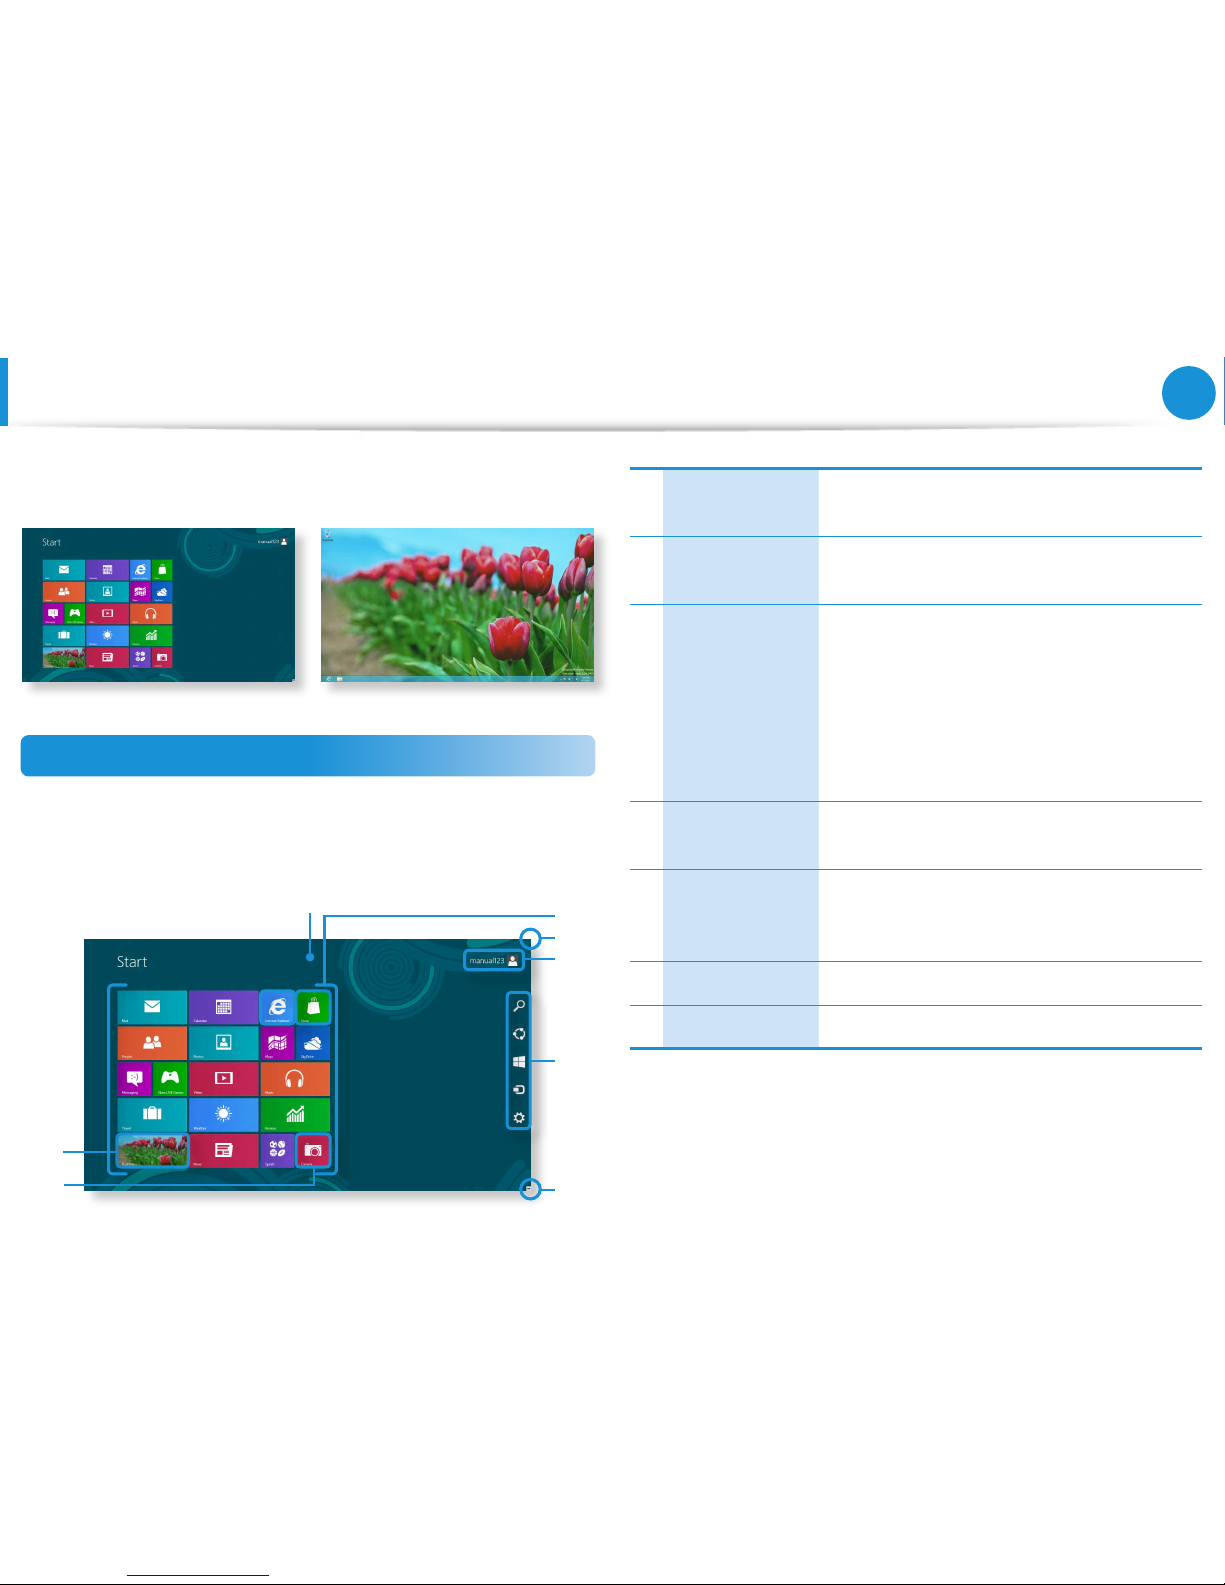
Windows 8 provides both the new Start screen mode and the
Desktop mode of the existing OS.
Start Screen Desktop
Start Screen
When you turn on the computer, the Start screen is displayed,
which allows you to use the applications (Application, App,
hereafter referred to as an App) at the same location.
5
6
7
4
3
3
2
1
1 Start Screen
Refers to the default Start screen of
Windows 8.
2 App
Refers to the apps that are currently
installed.
3
Displaying the
Charms
The Charms is hidden at the right of the
screen. Place your mouse pointer at the
edge of the top or bottom right of the
screen to display the Charms.
Or you place your nger on the right edge of
the touch pad and drag your nger toward
the center, the Charms menu appears.
4 User Account
This refers to the currently used user
account.
5 Charms
This refers to the menu that allows you to
use functions such as Search, Share, Start,
Device and Settings.
6 Desktop Switches to Desktop mode.
7 Camera Allows you to take pictures or make a movie.
Page 35
34
Chapter 2
Using Windows 8
Screen At a Glance
Desktop
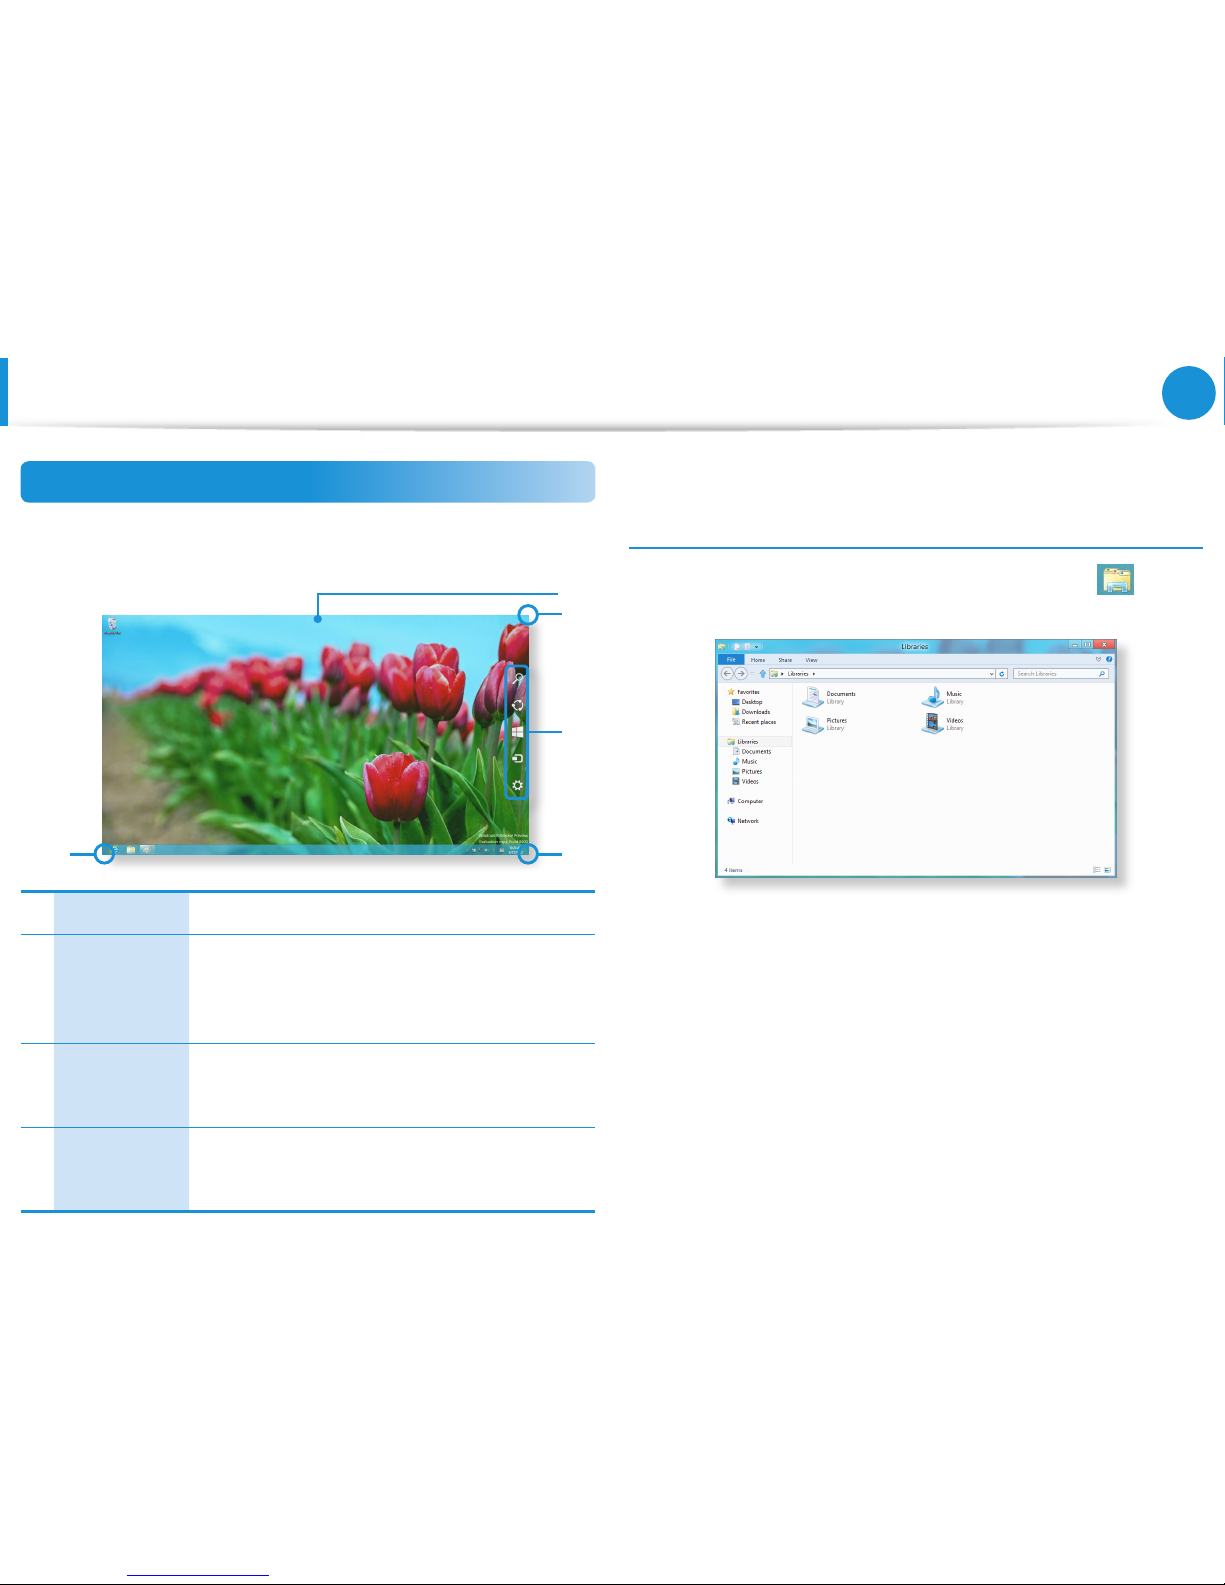
This provides similar functions to those provided by the Desktop
in prior Windows versions.
3
4
2
2
1
1 Desktop Refers to the Desktop.
2
Displaying the
Charms
The Charms is hidden at the right of the screen.
Place your mouse pointer at the edge of the
top or bottom right of the screen to display the
Charms.
3 Charms
This refers to the menu that allows you to use
functions such as Search, Share, Start, Device
and Settings.
4
Switching
to the Start
Screen
Click the corner of the bottom left of the screen
to switch to the Start screen.
Displaying Documents and Files
Click Windows Explorer in the taskbar on the Desktop to
search for documents and les.
Page 36
35
Chapter 2
Using Windows 8
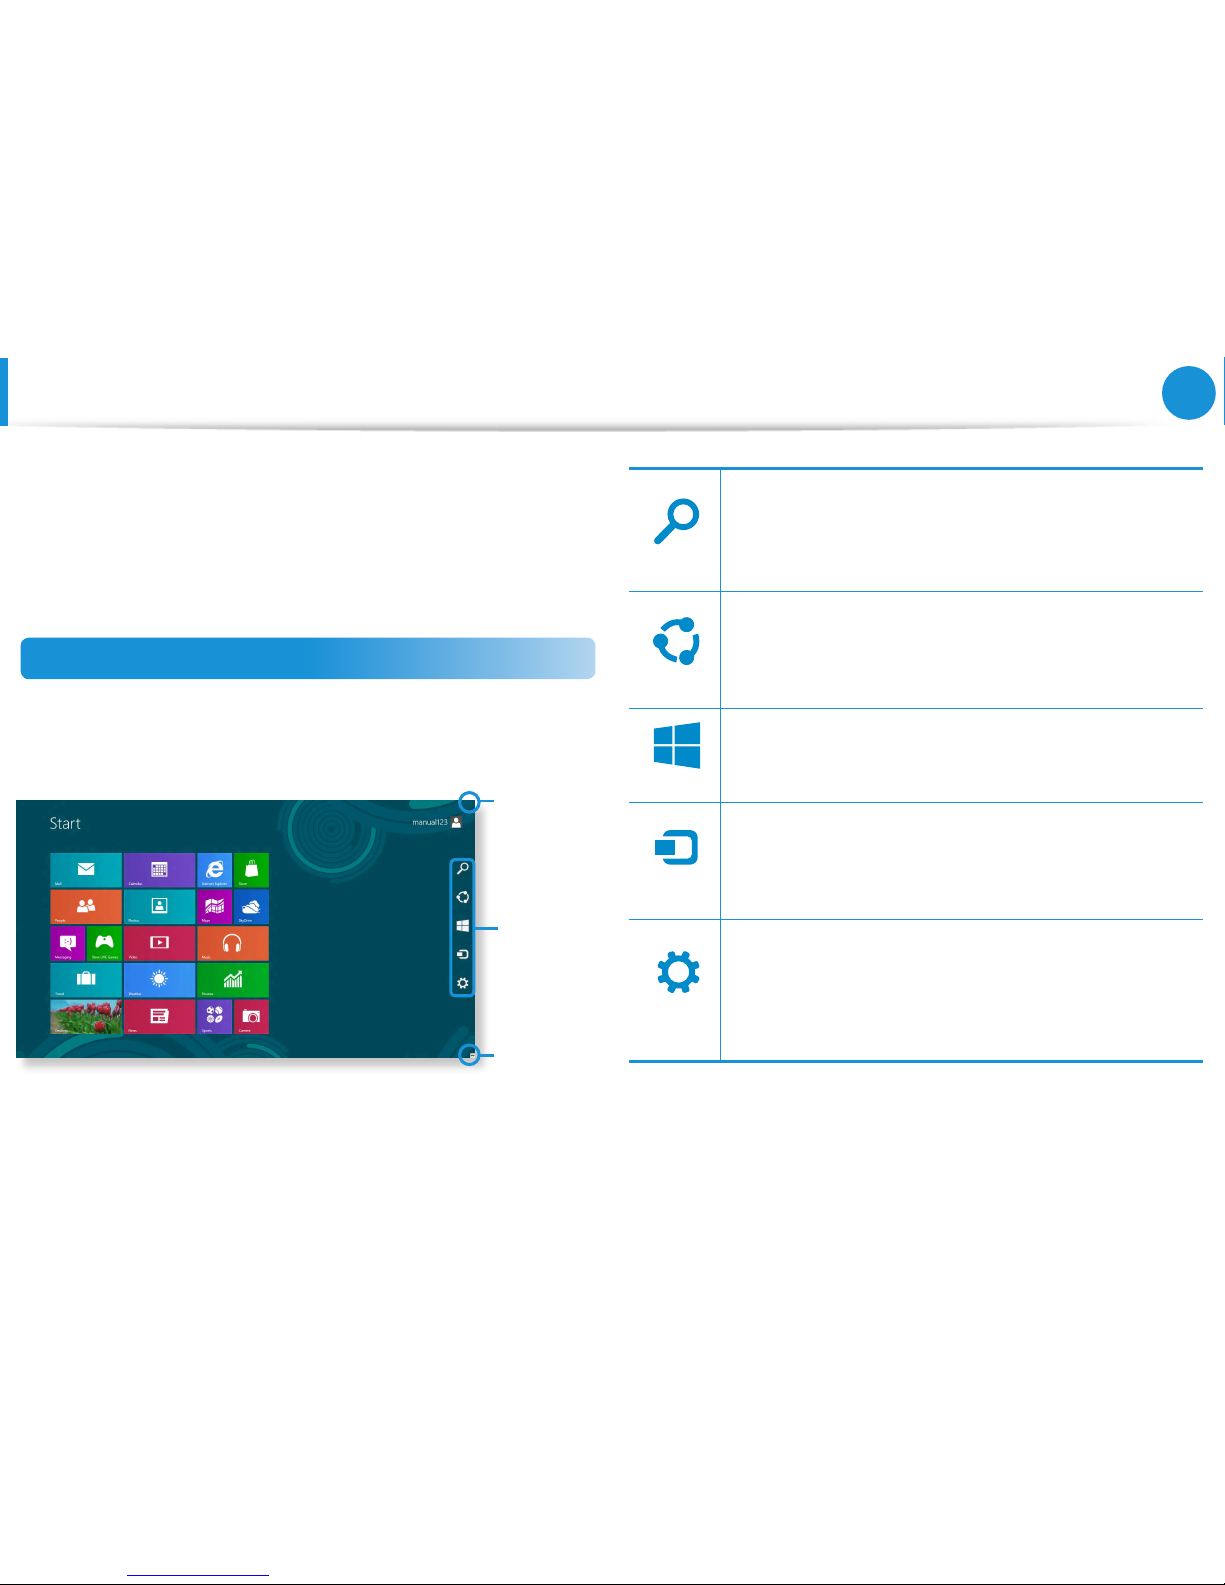
The Charms is a new type of menu that combines the Start menu
with the Control Panel of existing Windows.
The Charms allows you to quickly congure the device(s)
connected to your computer, search for App(s)/le(s), and use the
sharing function, etc.
Activating the Charms
If you move your mouse pointer to the top or bottom right corner
of the screen, the Charms appears.
Charms
Displaying
the Charms
Menu
Displaying
the Charms
Menu
Search
If you want to search for a program or le in the App(s)/
Settings/File(s), simply enter a keyword in the Search
charm and start Search.
You can also search within an App or on the Web.
Search
Share
You can use this menu to transfer a picture or le to
another user. You can easily share pictures or les with
other users simply by associating multiple Apps with the
Share charm.
Search
Share
Start
You can move to the Start screen.
Search
Share
Start
Device
As this allows you to move directly to a desired device,
you can handle tasks such as importing pictures from
a digital camera, streaming a video to your TV or
transferring les to a device on the current screen.
Search
Share
Start
Device
Settings
The Settings charm allows you to perform basic tasks
such as adjusting the volume, turning o the PC, etc.
If you select the Settings charm while a specic App is
running, the settings for the currently running App are
displayed.
Using the Charms
Page 37
36
Chapter 2
Using Windows 8
Using the Charms
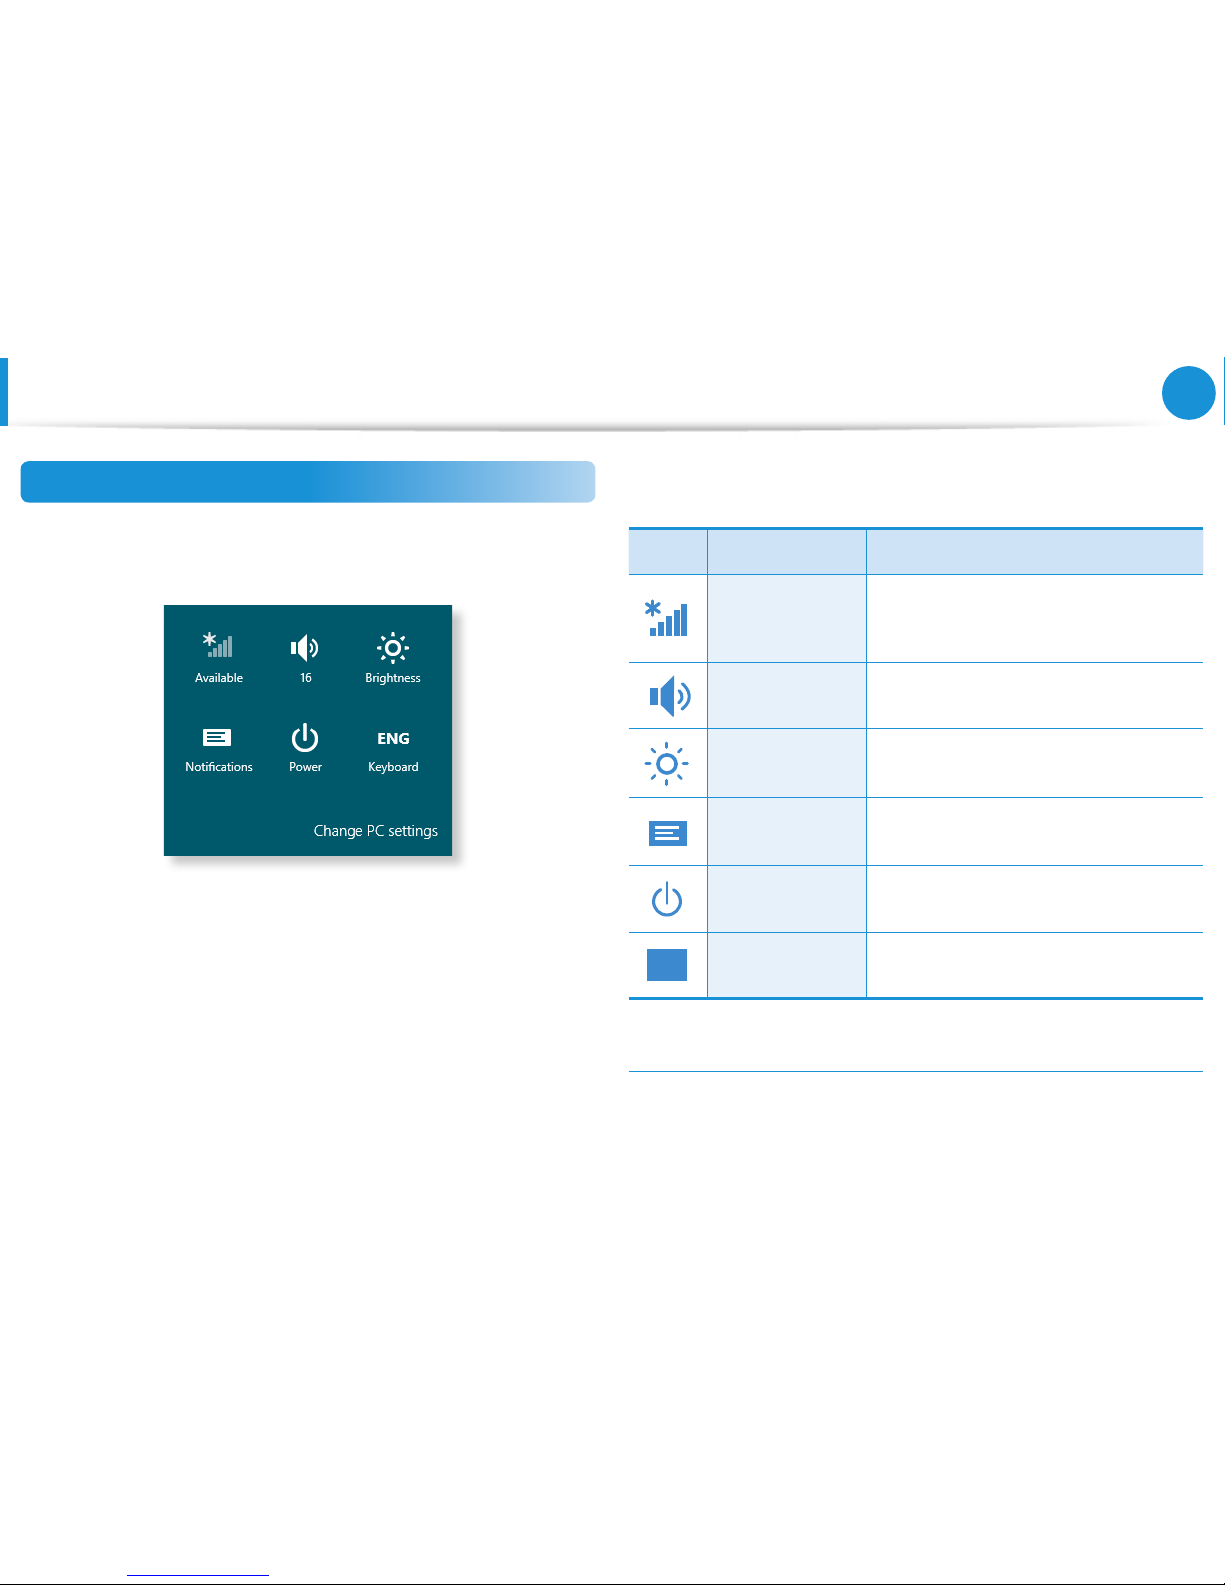
Changing the Settings
Frequently used Windows menus are collected.
Click the Charms > Settings.
Icon Name Function Description
Wireless
Network
You can connect to a wireless network.
Select a wireless network to connect
to.
Adjusting the
Volume
You can adjust the volume or mute the
sound.
Screen
Brightness
You can adjust the screen brightness.
Notice
You can set the interval at which an
App sends notices.
Power
You can turn o your computer or
select the Power Options.
ENG
Language You can set the Language.
Change PC settings
You can change more settings.
Page 38
37
Chapter 2
Using Windows 8
Using Apps
An App refers to an application program (hereafter referred to as
an App). In a larger sense, it refers to all the software programs
installed on the operating system.
Windows 8 provides basic Apps for frequently performed tasks.
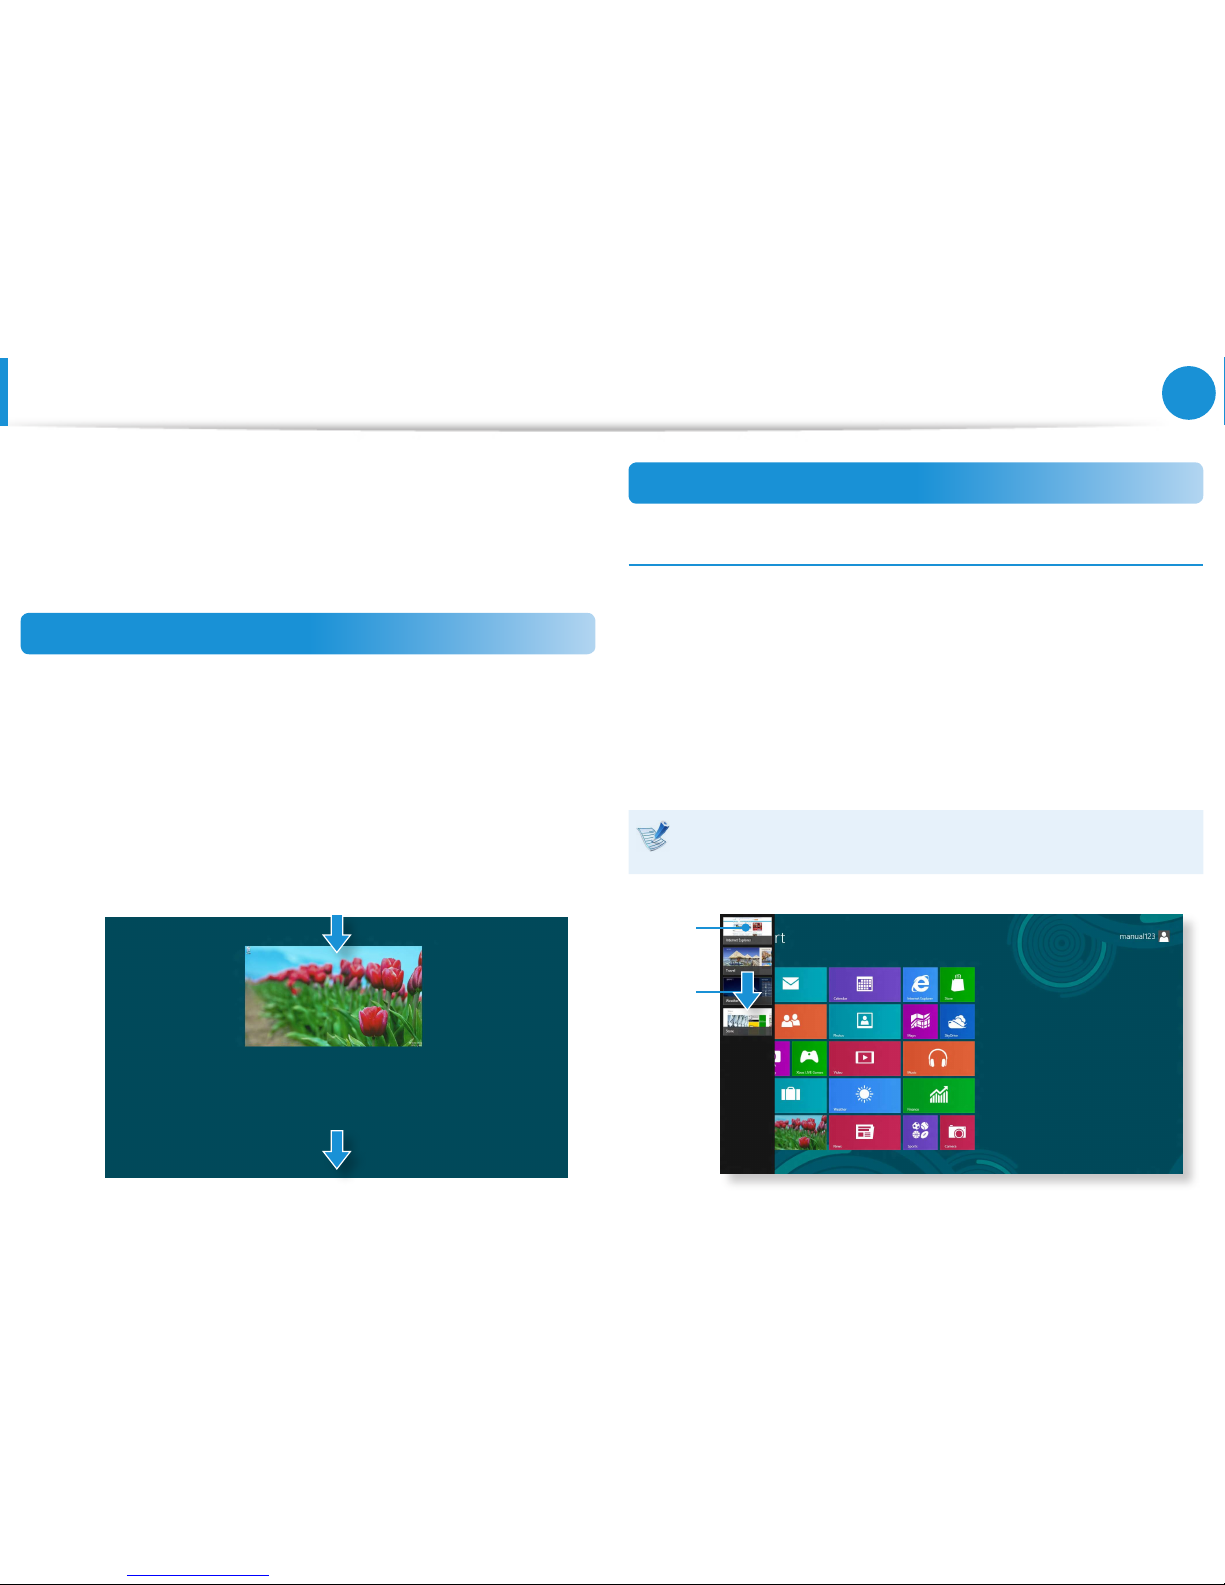
Starting/Exiting an App
Click on an App in the Start screen to activate it.
To exit the App
1
Move your mouse pointer to the top of the screen.
Your mouse pointer changes to a hand shape.
2
Click and hold your mouse button and then drag it to the
bottom of the screen. The App moves downward and
disappears and exits.
1
2
Using Apps
Displaying Currently Running App(s)
1
Move your mouse pointer to the top left corner of the screen
to display the last run App.
2
Then, move your mouse pointer down to display a list of the
currently running Apps in order.
3
Click on an App in that list or drag it to the center of the
screen. Now, you can check the selected App which is
currently running.
Right-click over the App in the list and click Close to exit the
App.
1
2
Page 39
38
Chapter 2
Using Windows 8
Using Apps
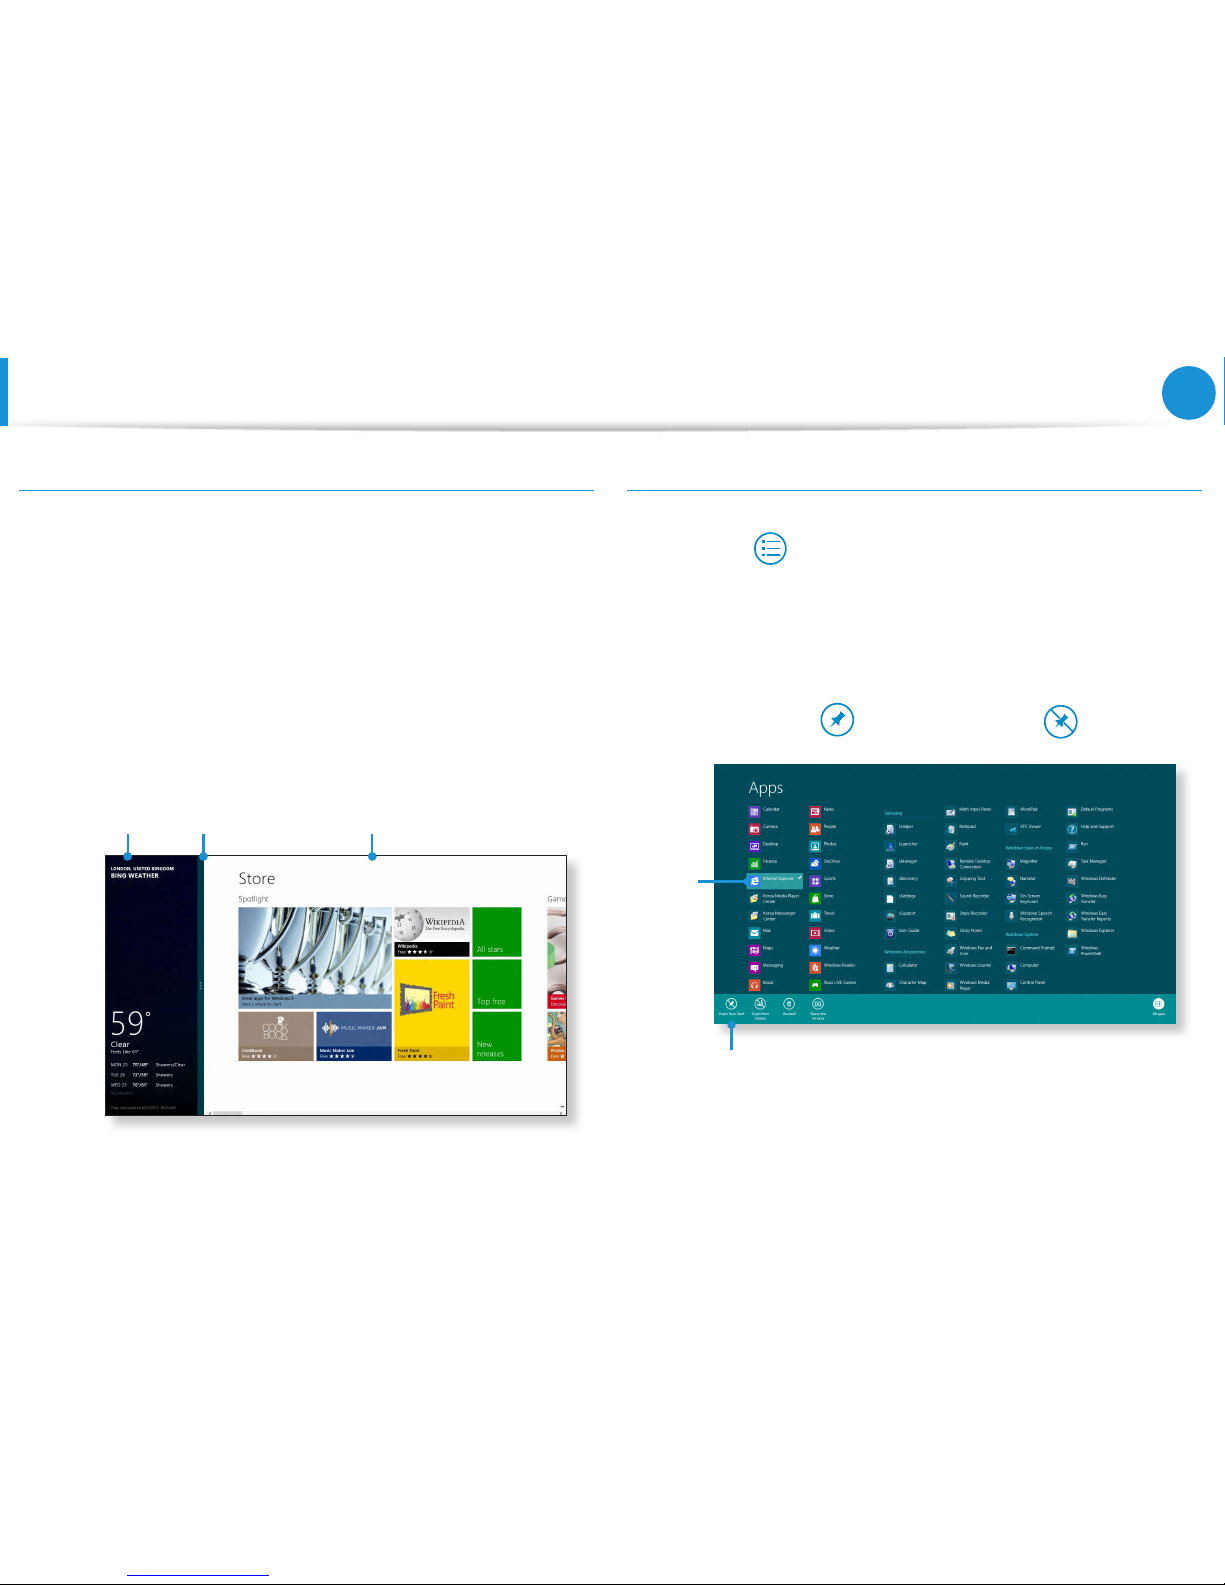
Running Two Apps at the Same Time
1
Select the Apps in the Start screen.
2
Move your mouse pointer to the top of the screen. Your
mouse pointer changes to a hand shape.
3
If you click and hold your mouse button and move left or
right, you can split the screen to display multiple Apps.
4
Move the Screen Split Bar to change the screen split ratio.
Supported screen split ratios are 3:7 or 7:3.
Ex) If you run the Weather App and Store App at the
same time
Screen
Split Bar
Weather
App
Store App
Adding/Removing an App to/from the Start Screen
Click Start screen > right-click your mouse button.
Click All Apps
at the bottom of the screen to display all the
Apps that are currently installed.
1
If you right-click over the App to be added, the relevant menu
is activated at the bottom of your screen.
2
Click Pin to start or Unpin from Start .
Ex) When removing an App in the Start screen
1
2
Page 40
39
Chapter 2
Using Windows 8
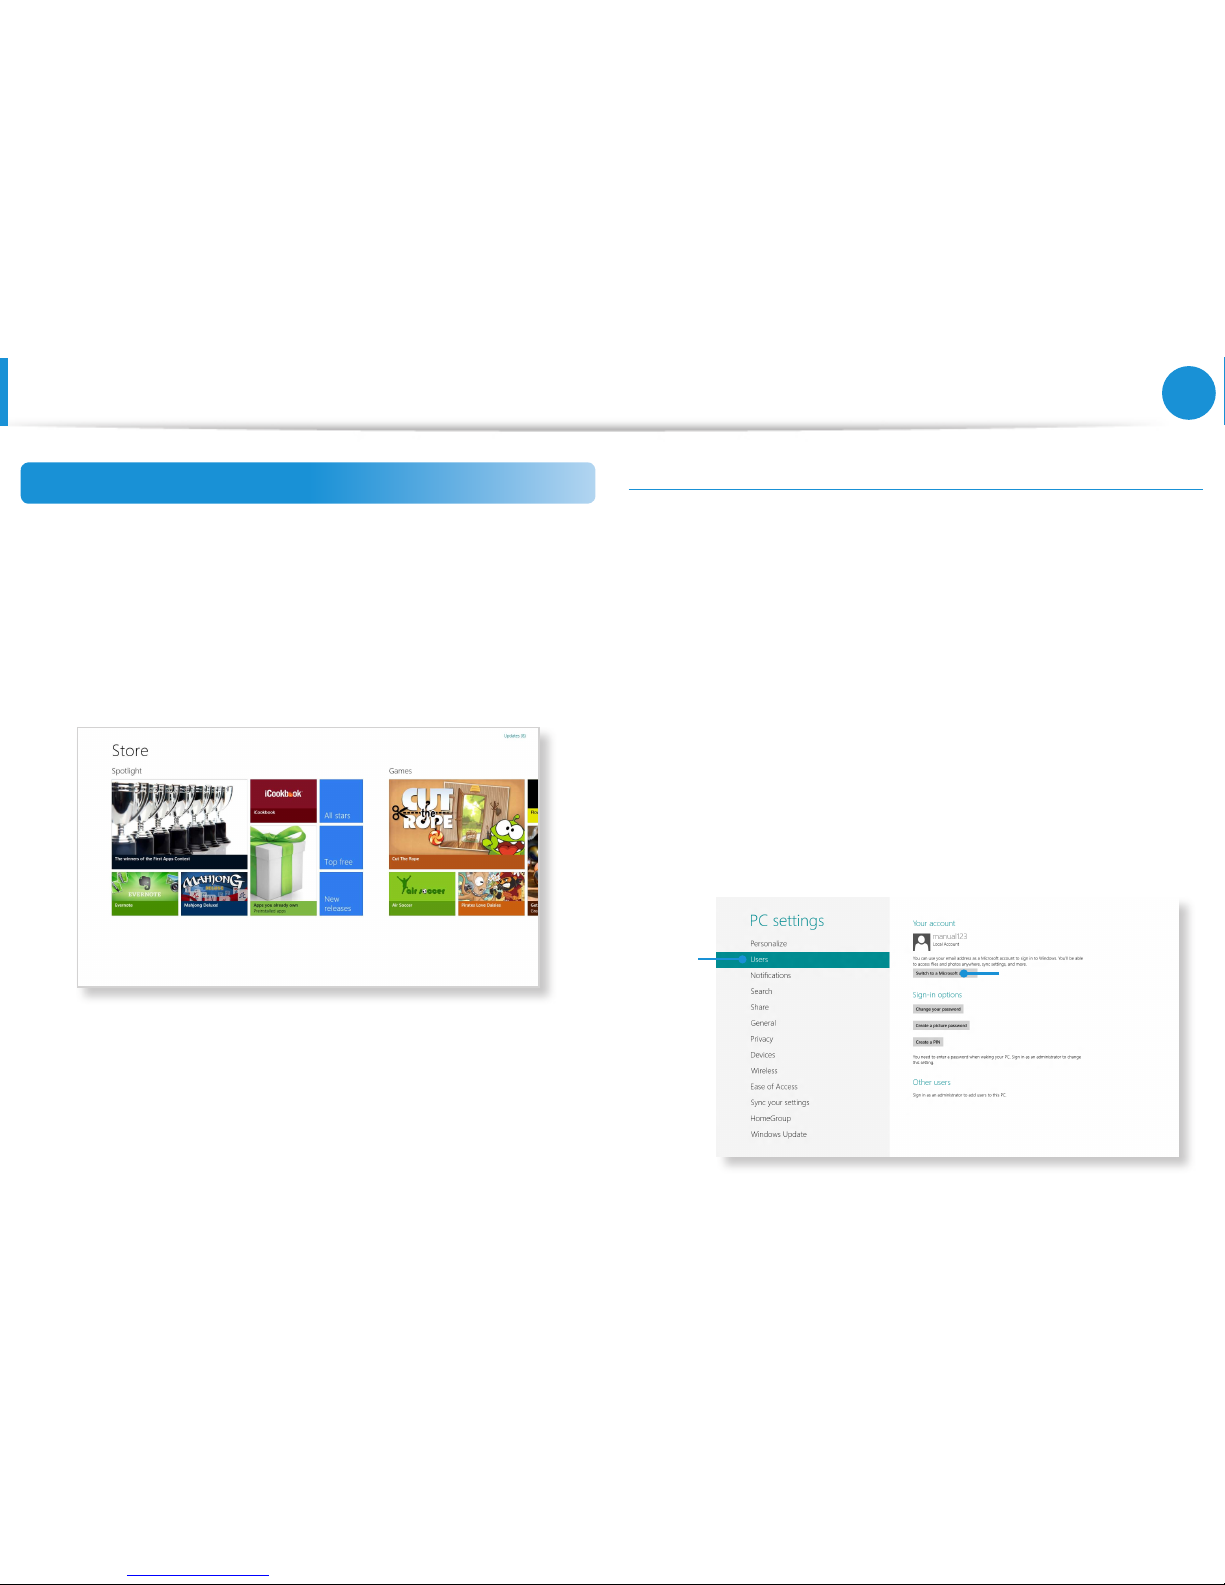
Using the Windows Store
If you run the App Store in the Start screen, the Apps in the
Windows Store are displayed.
However, a Microsoft account is required to purchase App(s) in the
Windows Store.
Continue after registering your Microsoft Account in the
Charms.
Conguring your Microsoft Account
A Microsoft Account allows you to synchronize your settings with
other device(s) running Windows 8 online allowing you to share
le(s) or settings.
You should register a Microsoft Account to download or purchase
App(s) from the Store.
1
Run the Charms and click Settings > Change PC Settings.
2
Click Users > Your Account > Switch to a Microsoft account.
3
Register your account through the following relevant
procedures.
1
2
Using Apps
Page 41
40
Chapter 2
Using Windows 8
Windows Hot Key Function
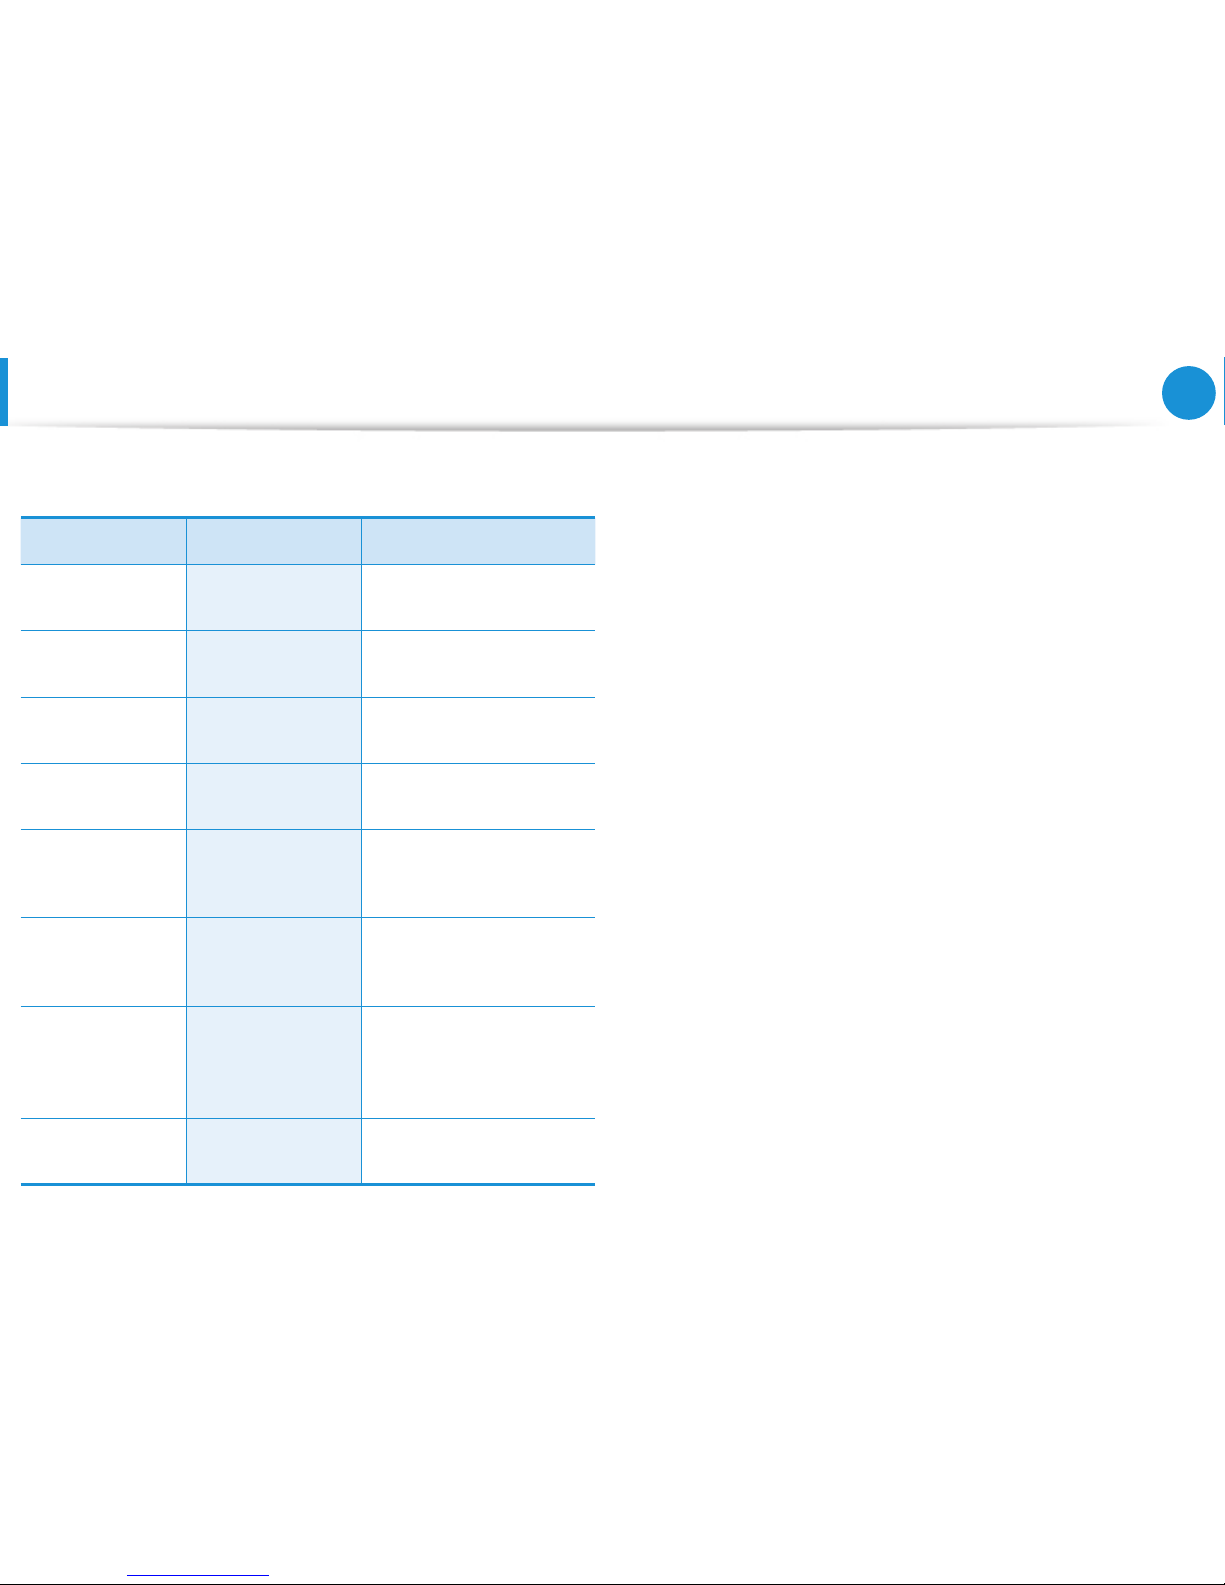
You can use the following convenient hot keys in Windows 8.
Function Hot Keys Function Description
Displaying the
Start Screen
Windows Key Switches to Start mode.
Displaying the
Desktop
Windows Key + D
Switches to Desktop
mode.
Running the
Charms
Windows Key + C Activates the Charms.
Locking the
Screen
Windows Key + L Locks the screen.
Opening the
Ease of Access
Center
Windows Key + U
Opens the Ease of Access
Center conguration.
Opening the
Second Screen
Settings
Windows Key + P
Opens the External
Monitor Settings menu.
Opening the
Advanced
Management
To ol
Windows Key + X
Opens the Advanced
Management Tool.
Exit App Alt + F4
Exits the currently
running App.
Page 42

Keyboard 42
Touchpad 45
CD Drive (ODD, Optional) 49
Multi Card Slot (Optional) 50
Connecting an External Display Device 53
Adjusting the Volume 58
LCD Brightness Control 60
Wired Network 61
Wireless Network (Optional) 64
Using the Multimedia App (Optional) 66
Samsung Software Update 70
Diagnosing the Computer Status and
Troubleshooting 71
Using the Security Slot (Optional) 72
Chapter 3.
Using the computer
Page 43
42
Chapter 3.
Using the computer
Keyboard
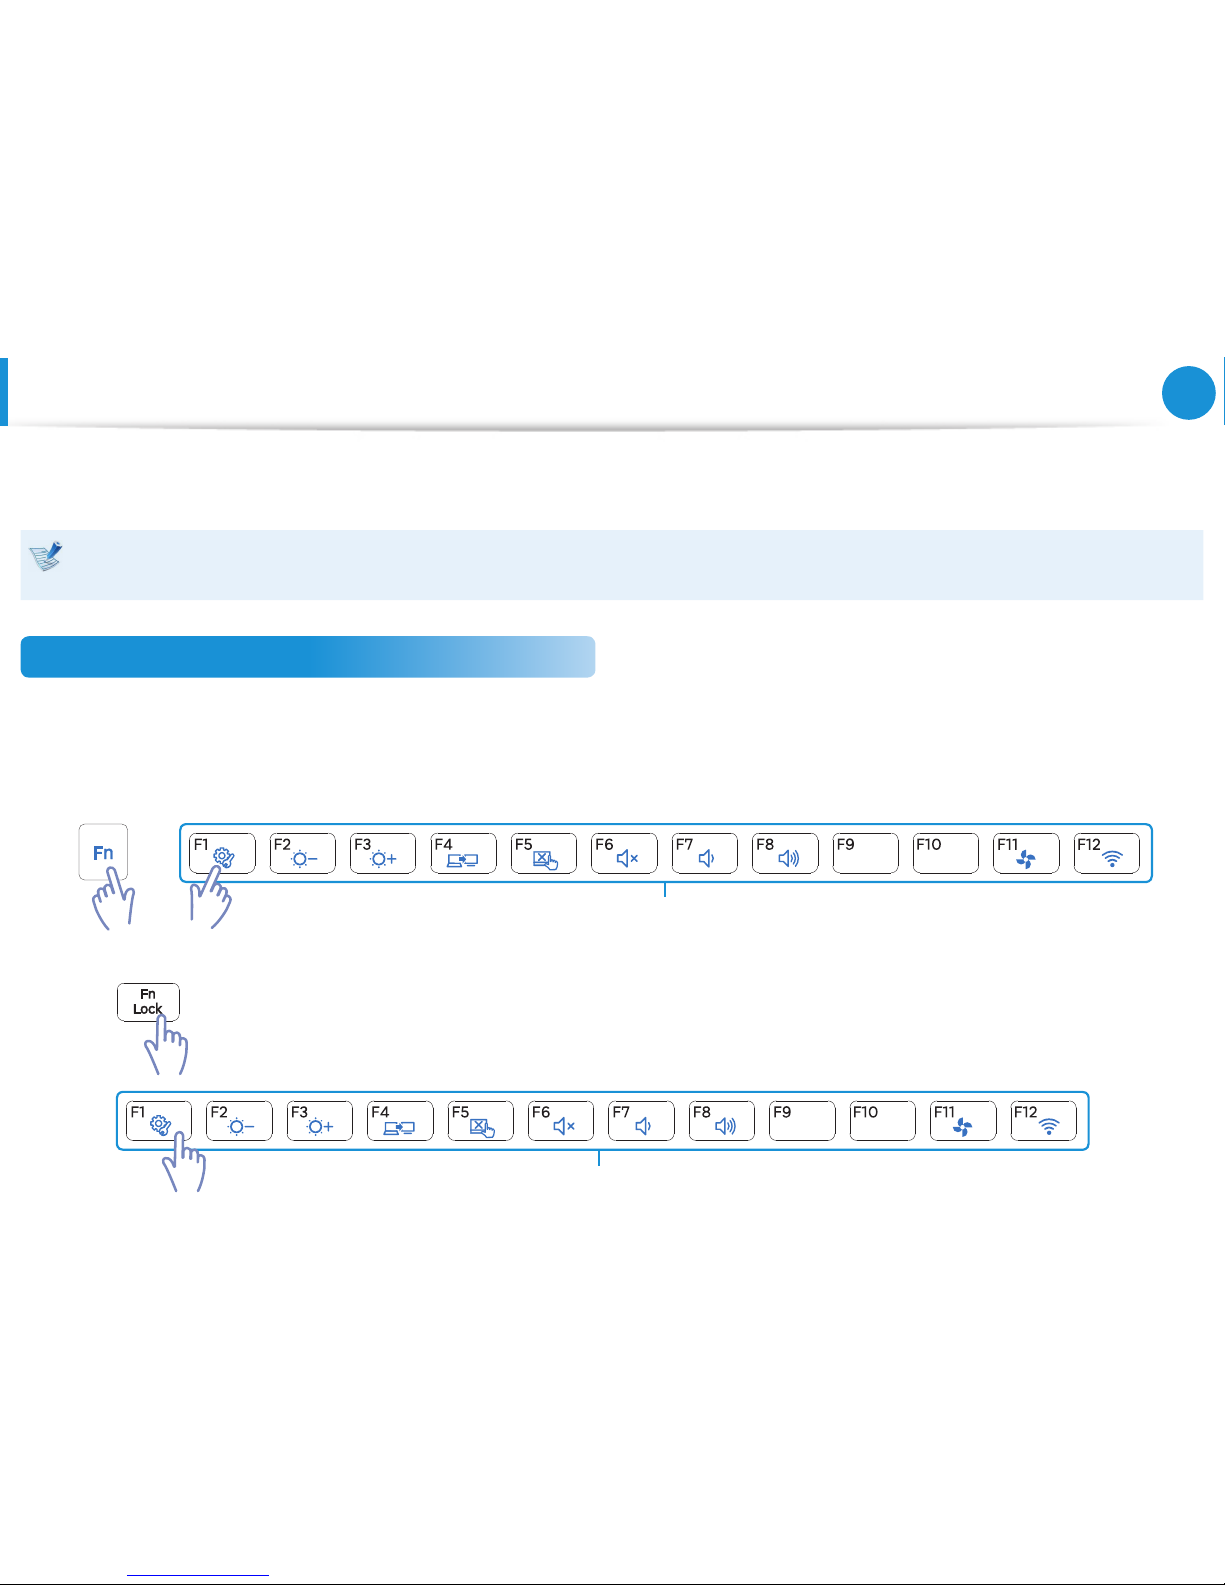
Shortcut key functions and procedures are discussed in the following sections.
The keyboard image may dier from the actual keyboard.•
The keyboard may dier depending on your country. The following mainly describes the shortcut keys.•
Shortcut Keys
Press both the Fn key and hot key at the same time.
Alternatively, press the Fn Lock key as well as a hot key to use the hot key functions more easily.
►
Method 1
+
Shortcut Keys
►
Method 2
1
2
Shortcut Keys
Page 44
43
Chapter 3.
Using the computer
Keyboard
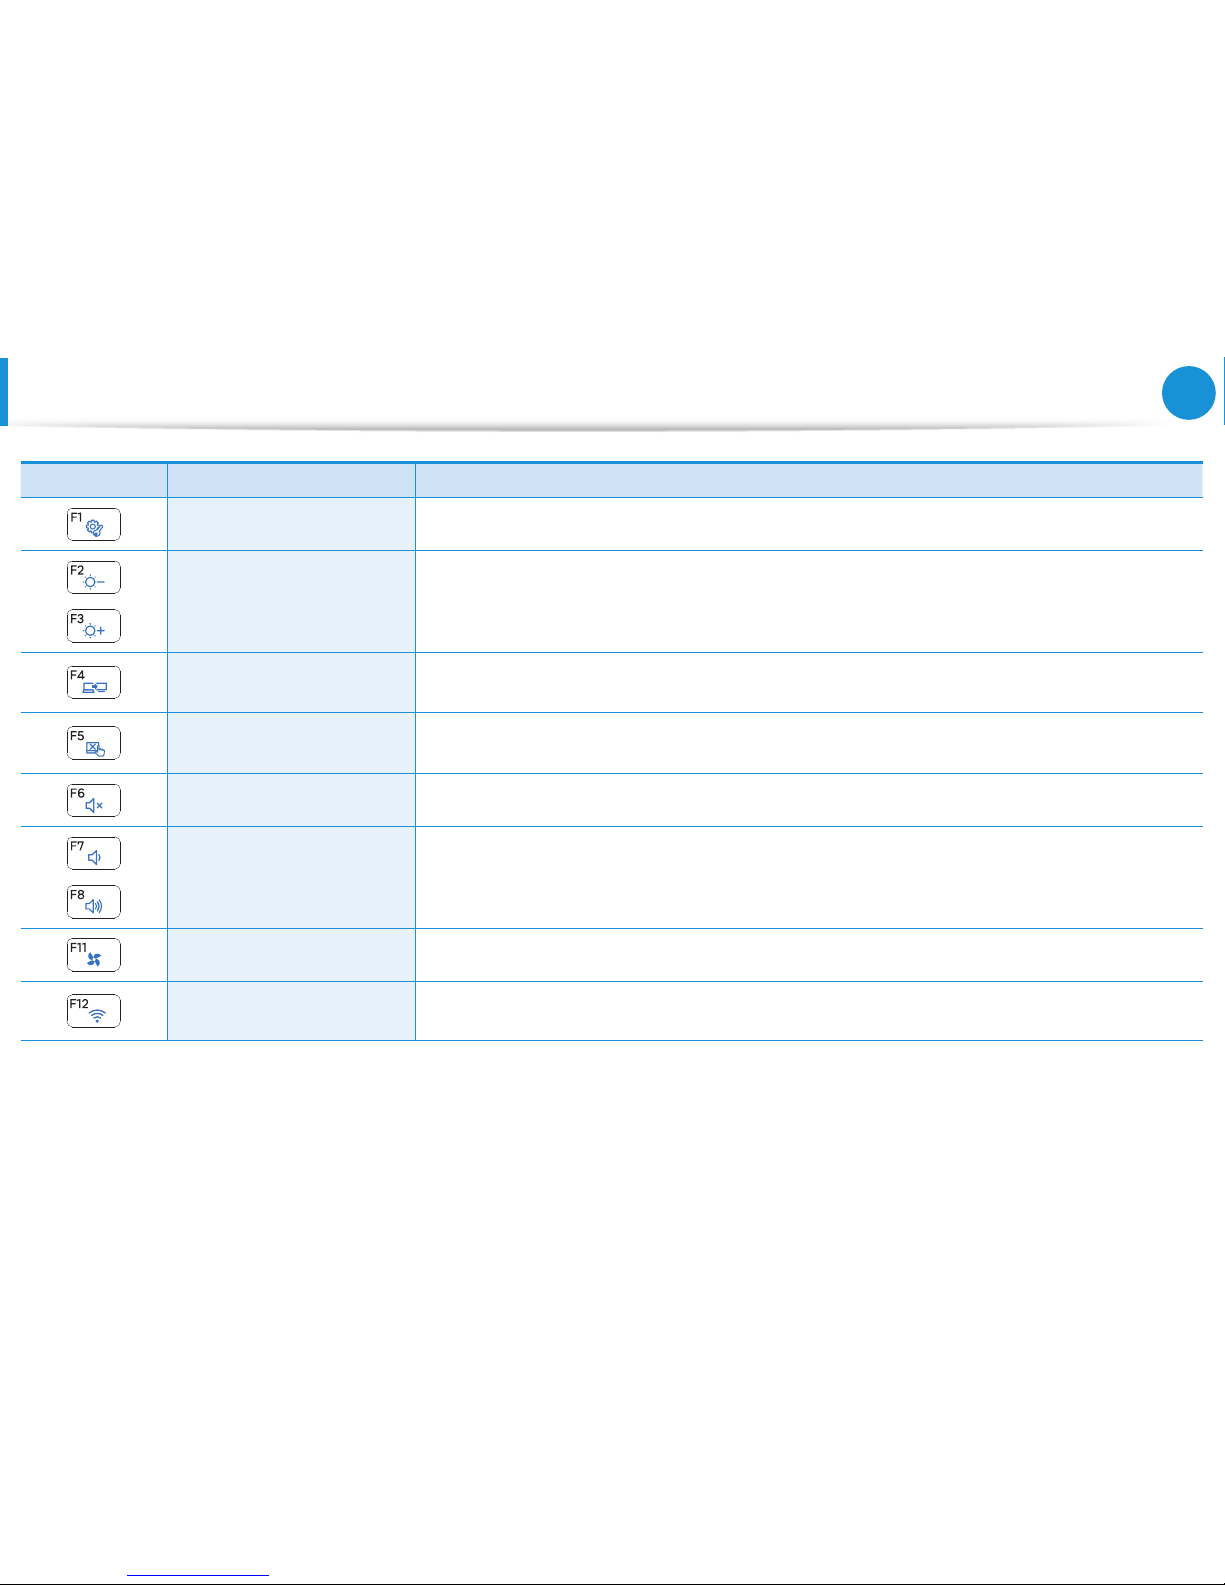
Shortcut Keys Name Function
Settings The Samsung software control program, the Settings, is launched.
Screen Brightness Control Controls the screen brightness.
CRT/LCD
Switches the screen output to the LCD or external monitor when an external monitor (or TV)
is connected to the computer.
To uc hp ad
Turns the Touchpad function on or o.
When using an external mouse only, you can turn the Touchpad o.
Mute Press this button to turn the audio on or o.
Volume Control Controls the volume.
Silent Mode Reduces the Fan noise so that users can use the computer without hearing noise.
Airplane Mode
Turns all wireless network devices on or o.
(Only for models with a wireless network device.)
Page 45
44
Chapter 3.
Using the computer
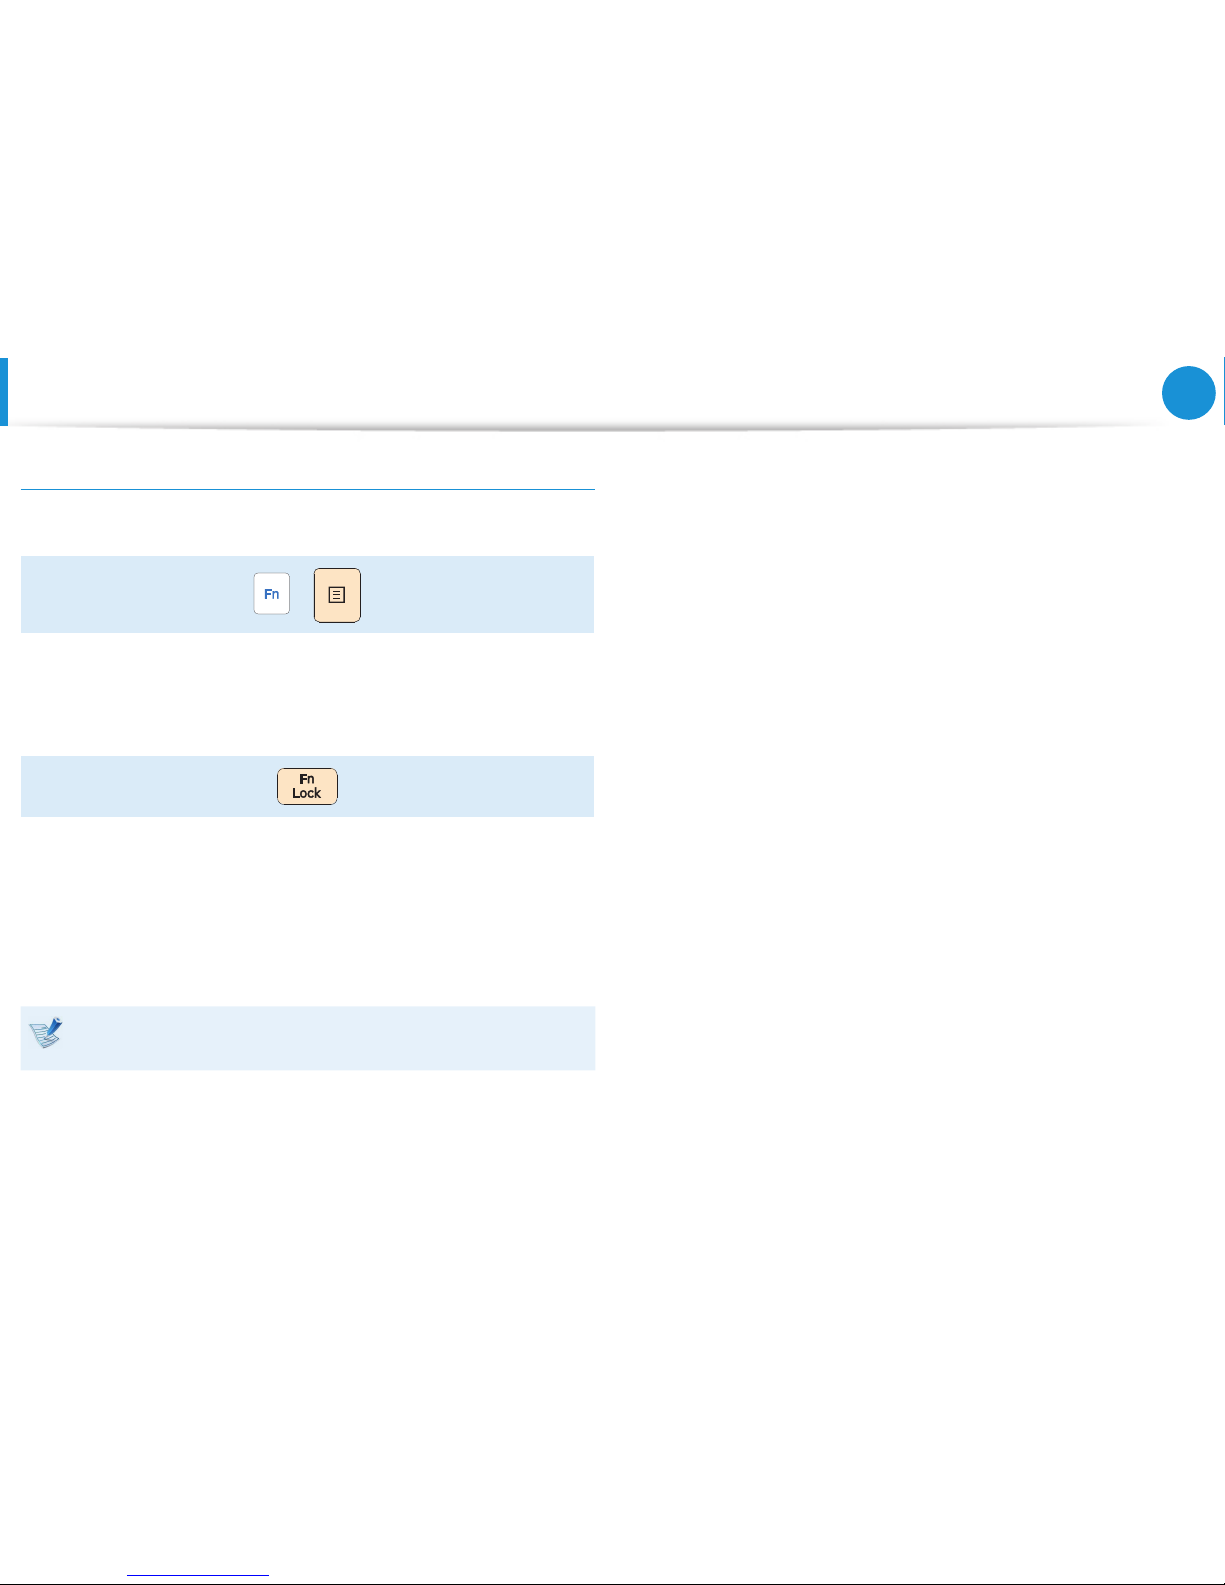
Other Function Keys (Optional)
Performs the right-click mouse function (touchpad).
+
If you press the • Fn Lock key, you can use the hot key functions
without pressing the Fn key.
If the Fn Lock function is On• : You can use the hot key
functions without pressing the Fn key.
If the Fn Lock function is O• : You can use a hot key
function by pressing the Fn key + the hot key at the same
time.
If the hot keys do not work properly, you have to install the
Settings.
Keyboard
Page 46
45
Chapter 3.
Using the computer
Tou chpad
The touchpad provides the same function as a mouse and the left
and right buttons of the touchpad plays the role of the left and
right buttons of a mouse.
Touch the touchpad with your ngers only. •
Anything other than your ngers, such as a ball-point pen,
will not be recognized by the touchpad.
If you touch the Touchpad or press the Touchpad buttons •
while booting up, the Windows boot time may be
extended.
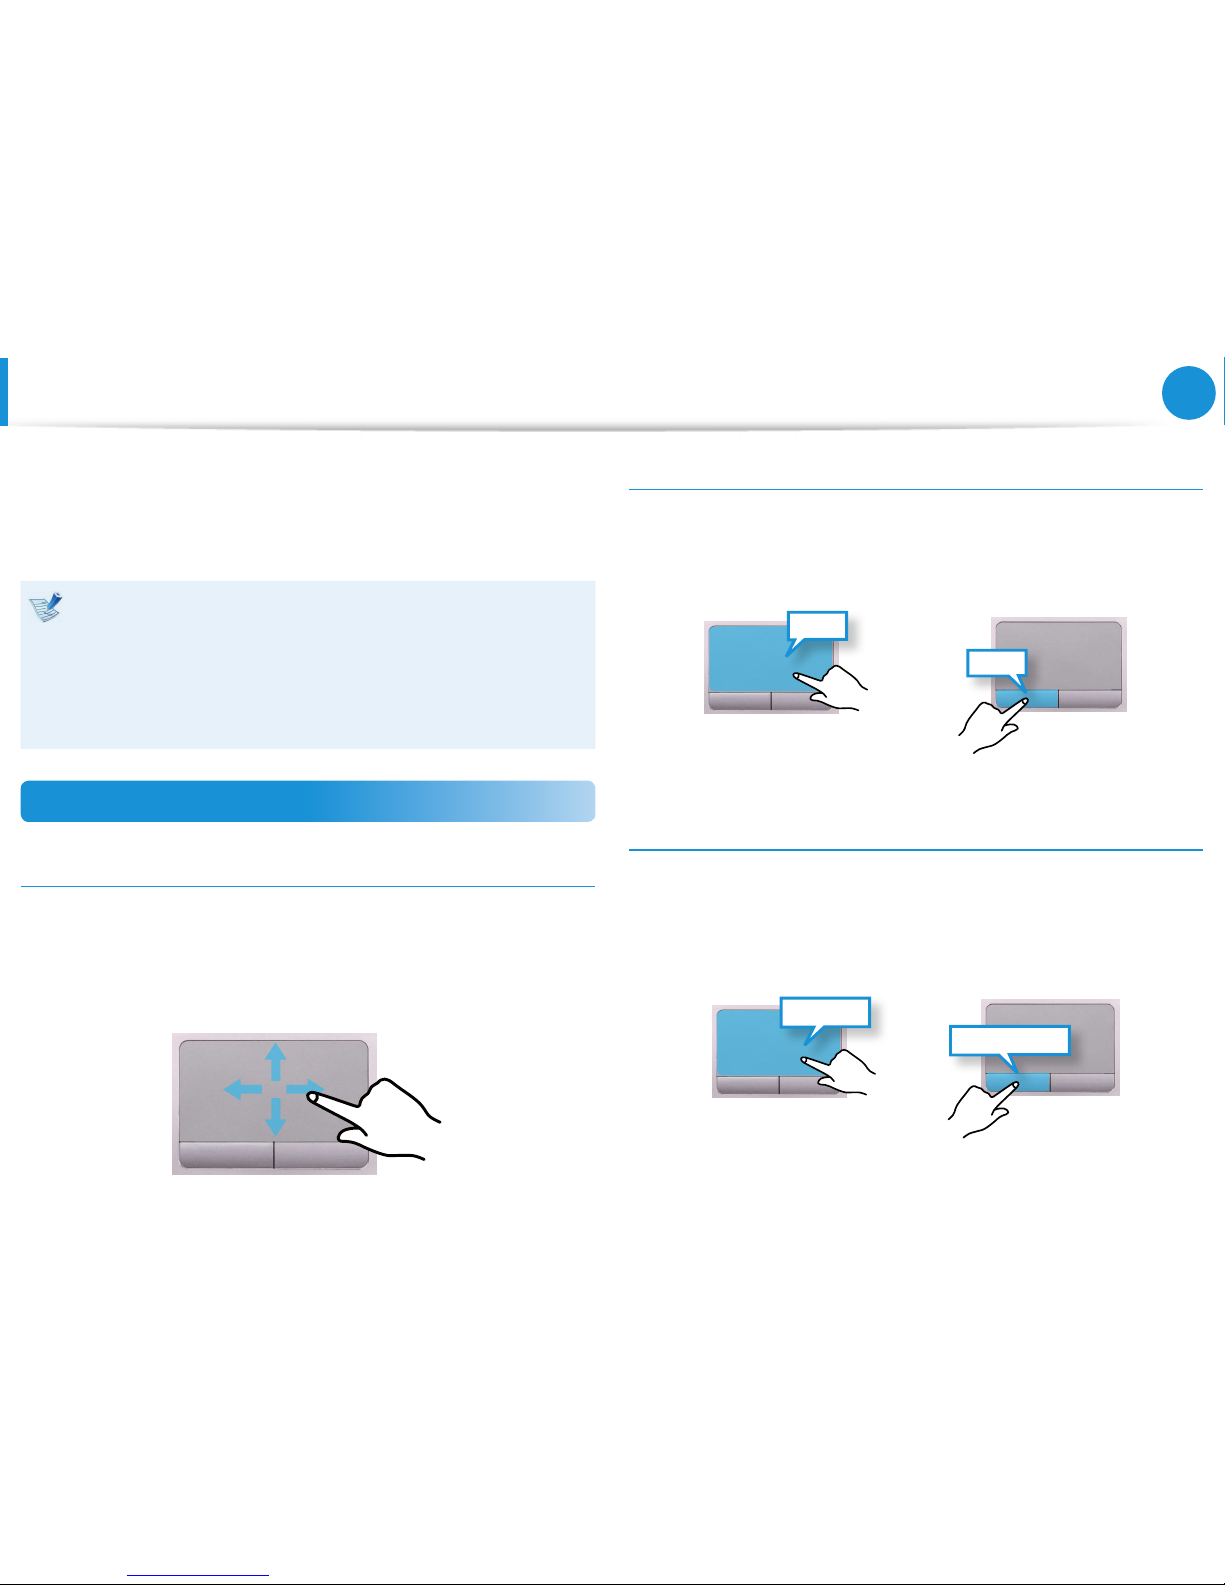
Basic Touchpad Functions
Moving the cursor on the screen
Place your nger on the touchpad slightly and move your nger.
The mouse cursor will move accordingly. Move your nger in the
direction you wish to move the cursor.
Click Function
Place a nger on the touchpad and click on an item once.
Alternatively, press the left button once quickly and release it.
Tap
Click
or
Double-Click Function
Put your nger on the touchpad and quickly tap twice with your
nger on an item you want.
Alternatively, press the left touchpad button twice quickly.
ClickClick
Tap Tap
or
Page 47
46
Chapter 3.
Using the computer
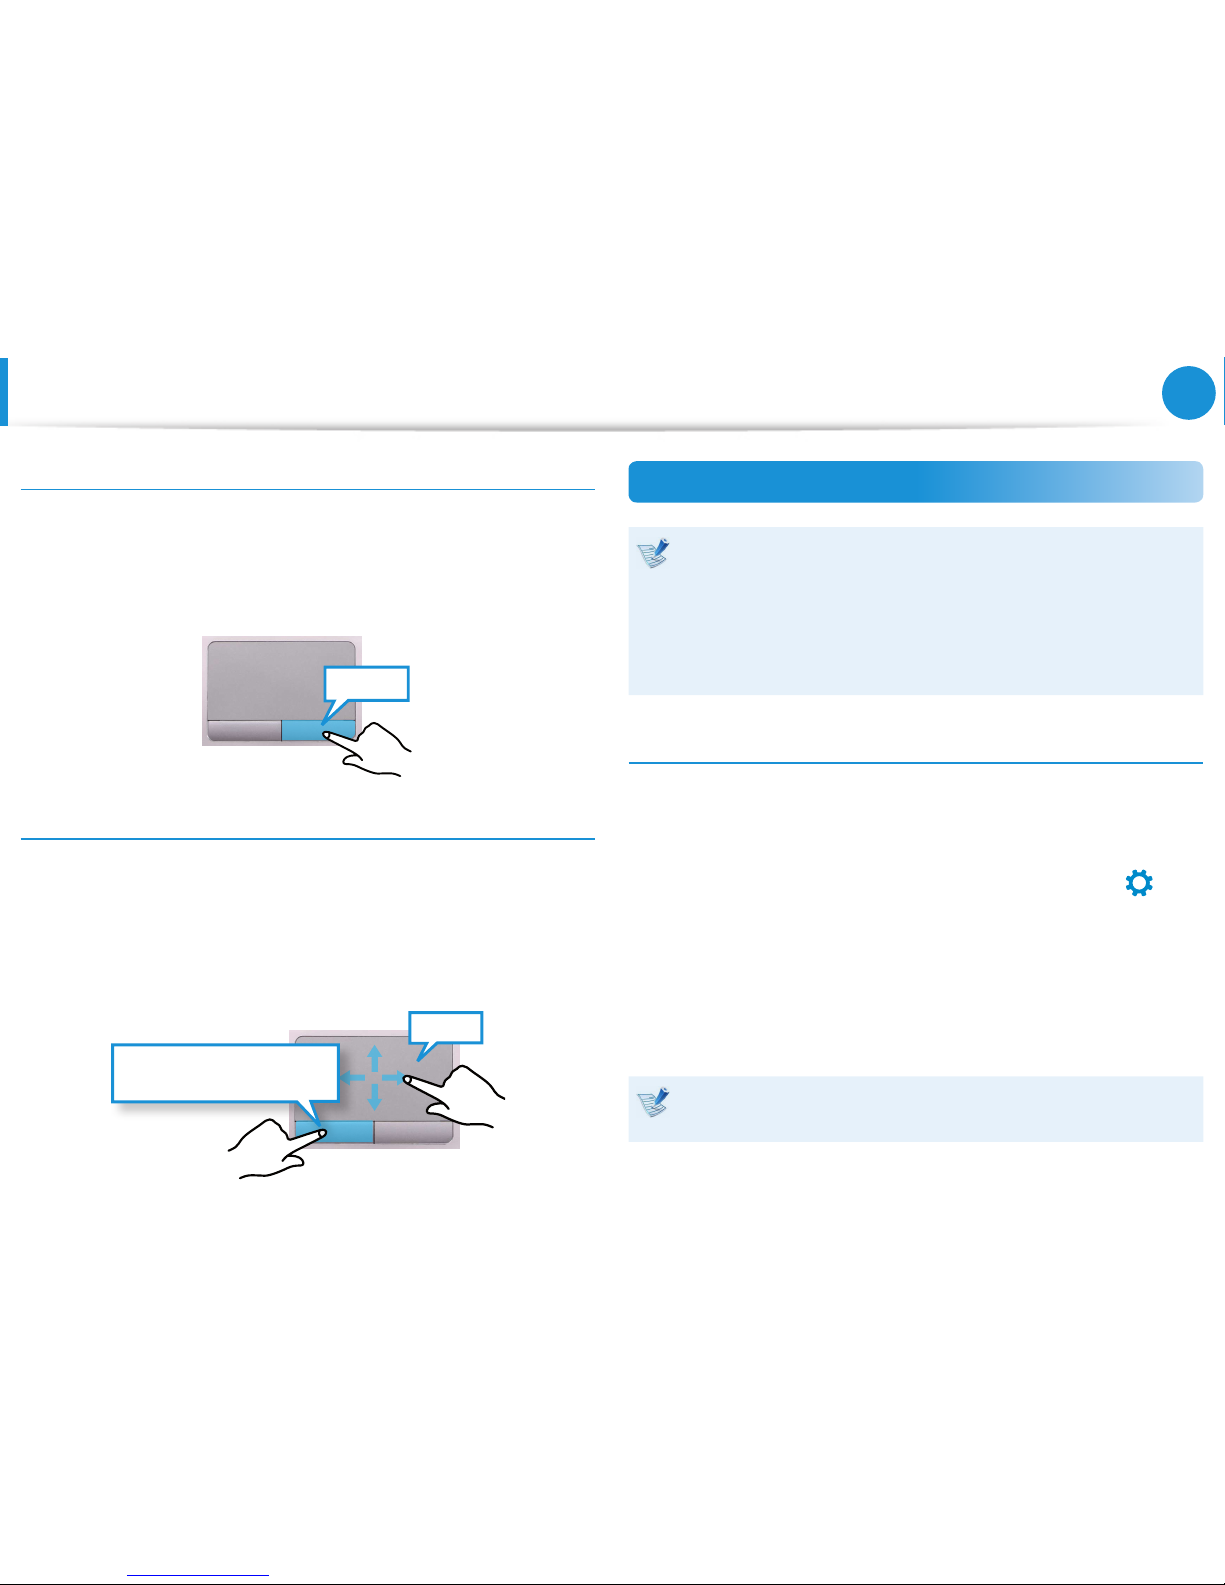
Right Button Function
This corresponds to clicking the right mouse button.
Press the right touchpad button once. The corresponding pop-up
menu appears.
Click
Drag Function
Dragging refers to moving an item to another place after selecting
it.
Press and hold down the left touchpad button over an item you
want to drag and move the item to the new location.
Holding down the left
touchpad button
Move
The Gesture Function of the Touchpad (Optional)
The Touchpad Gesture function may not be provided and •
the version of the function may dier depending on the
model. Some usage procedures may dier depending on
the version.
For detailed usage procedures, refer to the description in •
the Touchpad Settings window.
Conguring the Gesture Function
Some gesture functions may not be congured.
In this case, you can congure them using the following path.
1
On the Desktop, click the Charms menu > Settings
áᔪ
Ŗᮁ
᯲
ᰆ⊹
>
Control Panel > Hardward > Touchpad.
2
When the Touchpad Settings window appears, click the
corresponding item in the Select an Item to Congure
setting to select the checkbox for the corresponding item.
To cancel the Gesture function, deselect the checkbox for the
corresponding item in the Touchpad Settings window.
Tou chpad
Page 48
47
Chapter 3.
Using the computer
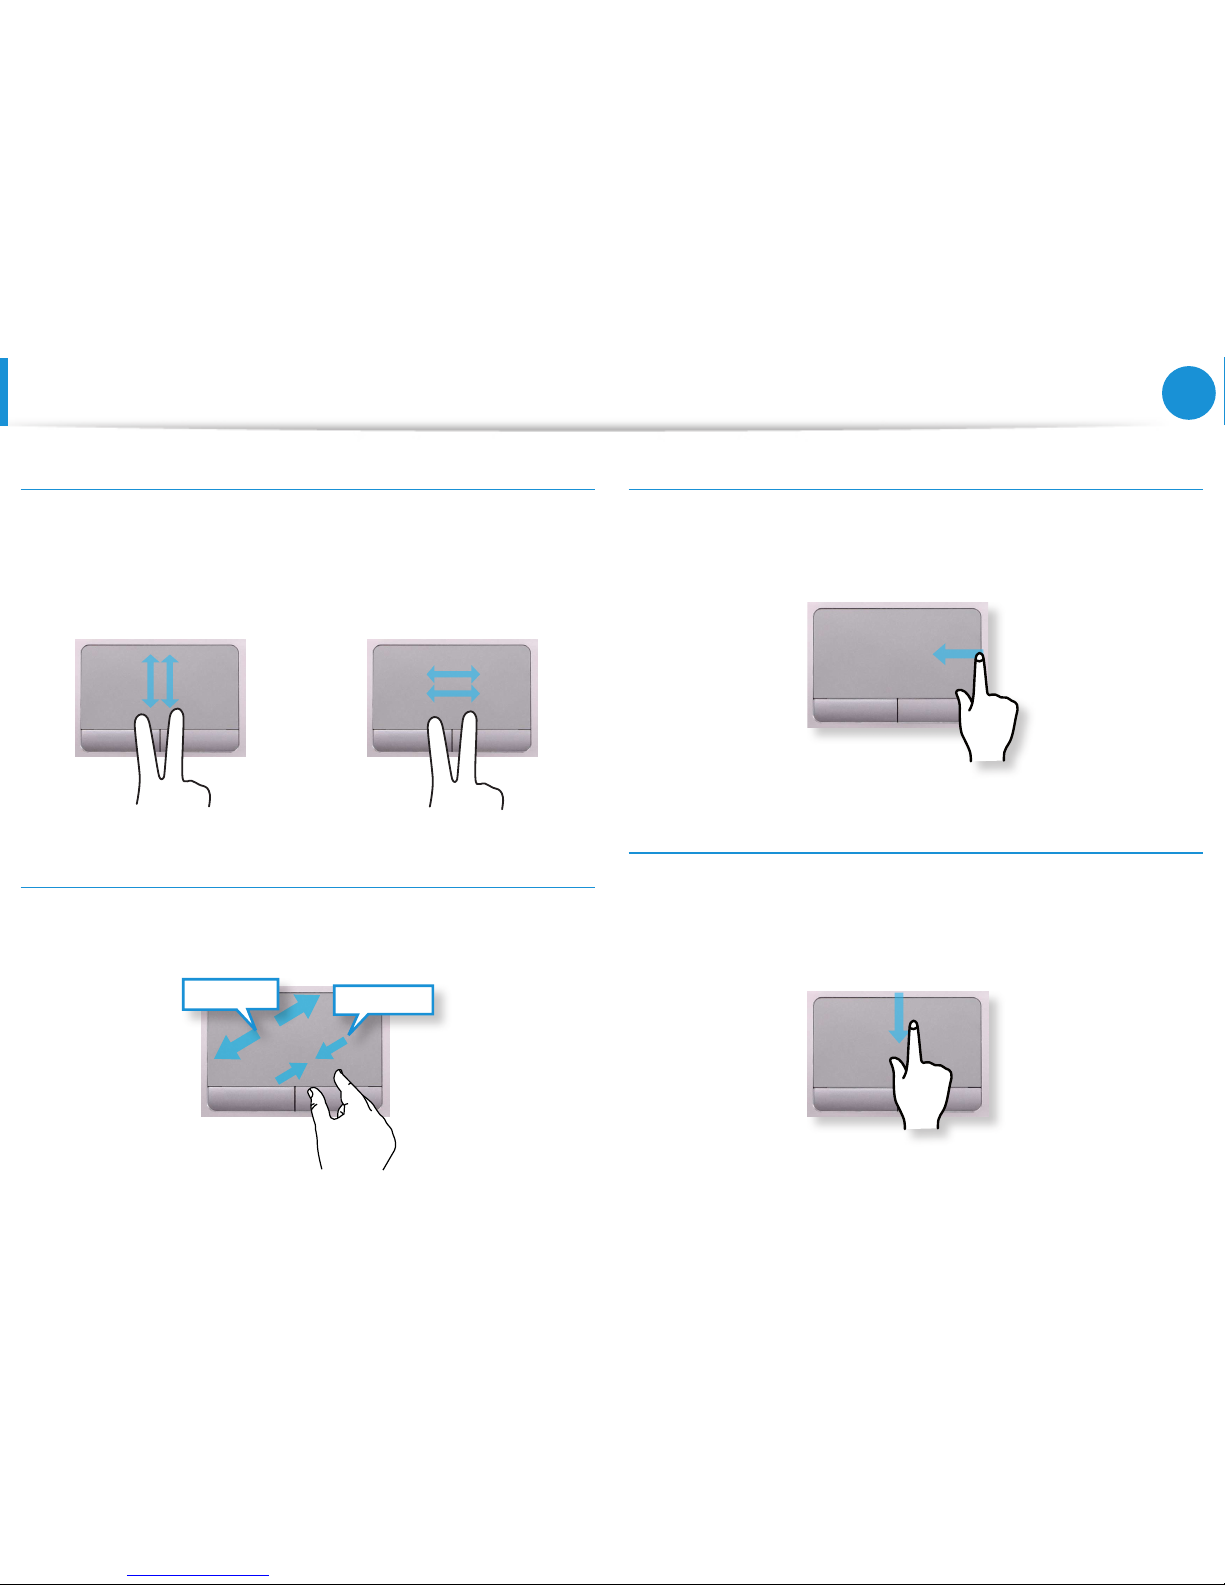
The Scroll Function
This function is the same as the scroll area of the Touchpad.
If you place two ngers over the Touchpad and move them up,
down, left or right, the screen is scrolled up, down, left or right
accordingly.
or
Zoom Functions
If you place two ngers over the Touchpad together or apart, the
current image or text is zoomed in or out.
Zoom-out
Zoom-in
or
Charms Menu Activating Function
If you place your nger on the right edge of the touch pad and
drag your nger toward the center, the Charms menu appears.
Displaying Additional Menu(s) of a Currently Running
App
Place your nger at the edge of the top area on the touch pad and
drag your nger toward the center, and the menu of the currently
running App appears.
Tou chpad
Page 49
48
Chapter 3.
Using the computer
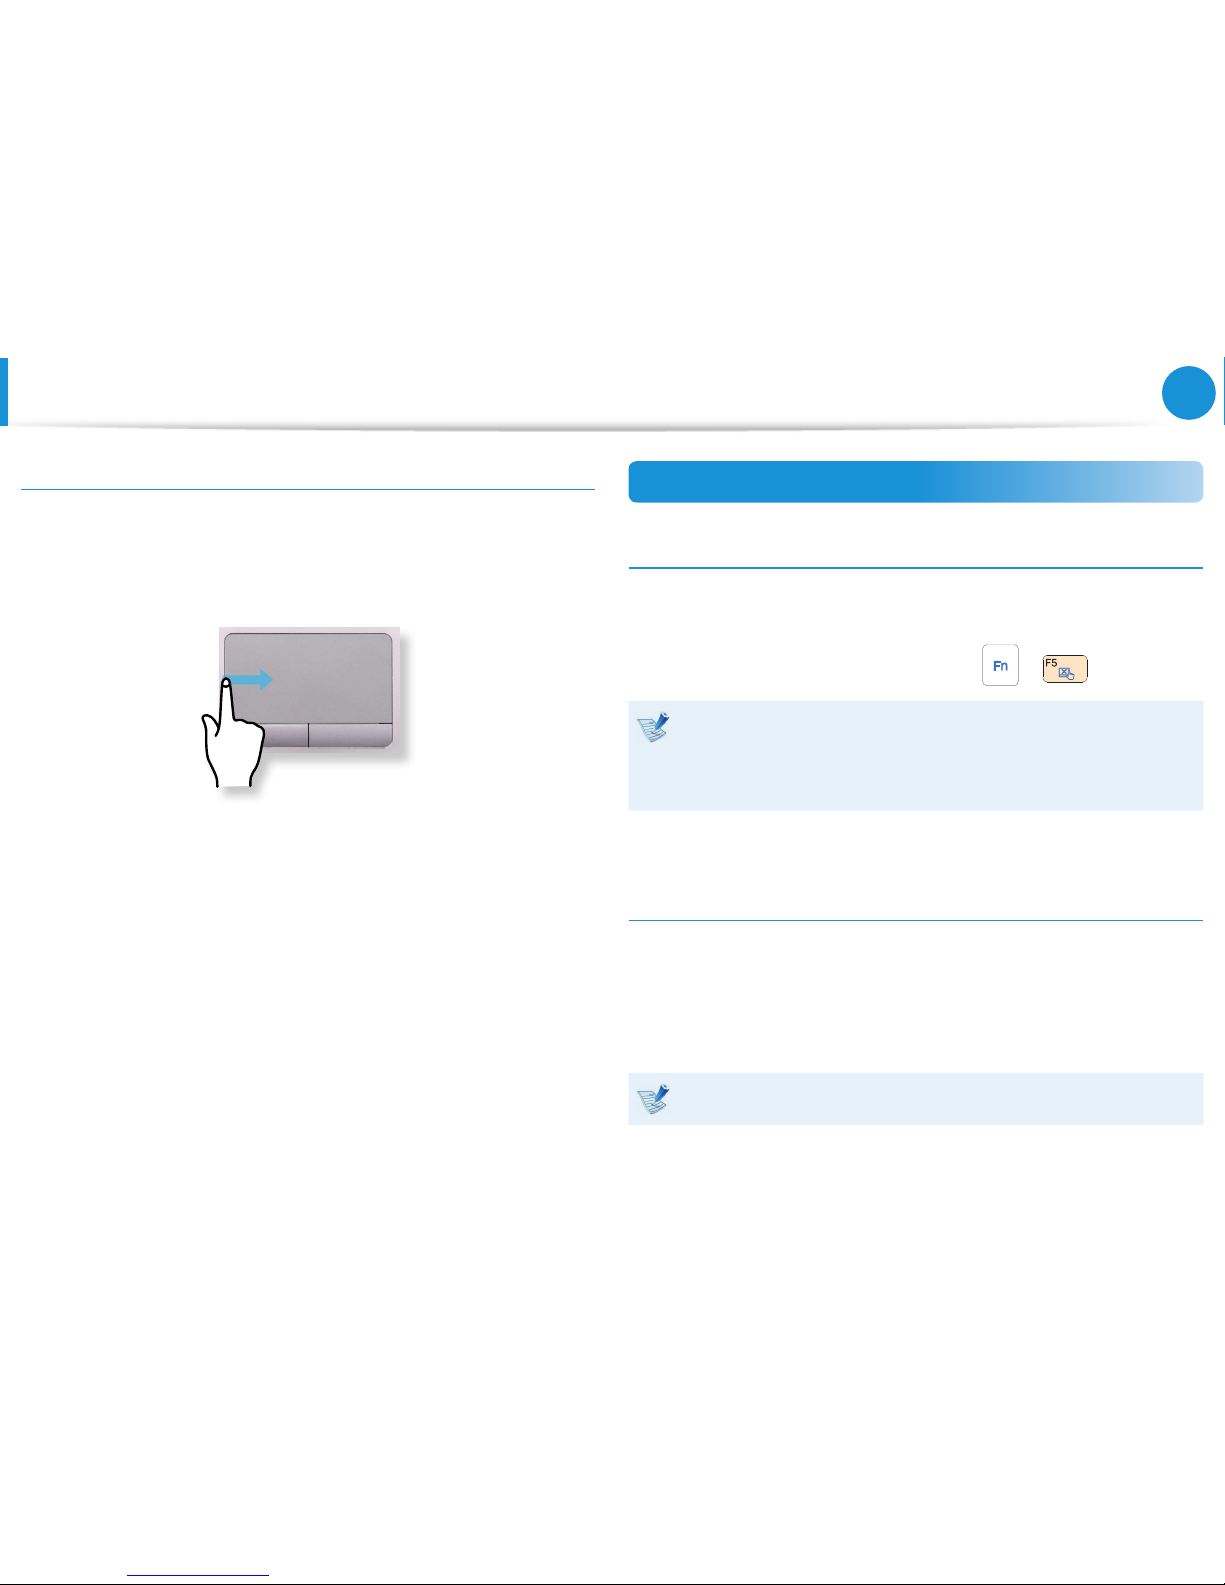
Last Run Window Opening Function
Place your nger on the left edge of the touch pad and drag
your nger towards the center to activate a previously operating
program from among the currently running programs.
Touchpad On/O Function
Locking with shortcut keys
If you want to use the mouse only without using the touchpad,
you can turn the touchpad o.
To lock the touchpad function, press the
+ keys.
You can set the touchpad and touchpad button settings in
the tabs that appear when clicking Charms menu on the
Desktop > Settings > Control Panel > Hardware and
Sound > Touchpad.
Auto-locking when connecting USB mouse
If an external USB pointing device is connected in the Charms
menu in Desktop > Settings > Control Panel > Hardware and
Sound > Touchpad, check Disabled to disable the touchpad
feature when connecting to the USB mouse.
This auto-locking function is not provided for some models.
Tou chpad
Page 50
49
Chapter 3.
Using the computer
CD Drive
(ODD, Optional)
If your computer does not have a CD drive, you can purchase an
external CD drive.
Do not insert a cracked or scratched CD. •
Otherwise, the CD may break and damage the optical disk
drive when the CD rotates at a high speed.
When you clean a CD or DVD title, wipe with a soft cloth •
from inside to outside.
Insert a Mini CD into the center of the CD drive.•
The gures used for the description are of a representative •
model. Therefore the gures may dier from the real ones.
Using a CD that is not in the shape of a circle is not •
recommended.
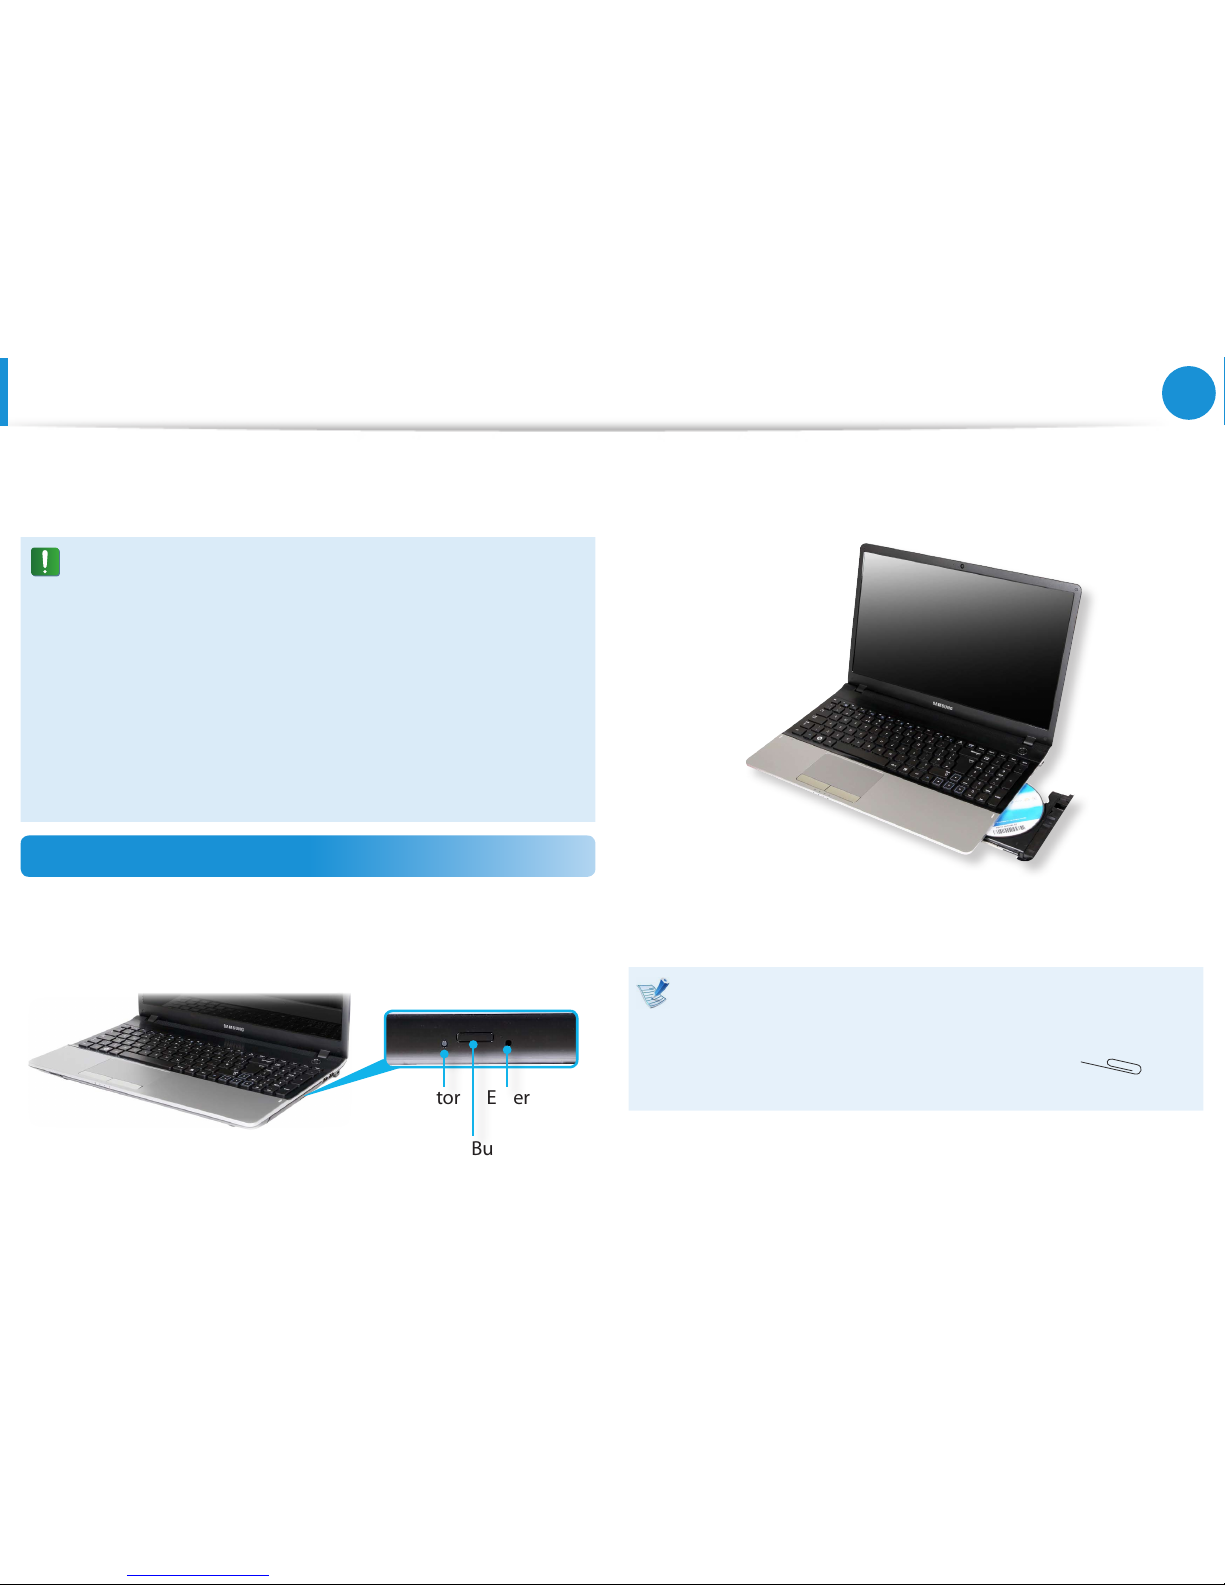
Using CD Drive
1
Press the Eject button of the optical disk drive at the side of
the computer.
Emergency
Hole
Eject Button
Status Indicator
2
When the CD tray opens, insert a CD or DVD and push the
tray in until it clicks.
3
Push the CD tray inward until it clicks.
The CD drive status indicator is turned on.
A CD drive’s reading and writing speed may dier •
depending on the condition and type of the media.
To eject a CD when the CD drive does not work or the •
computer is o, place the end of a paper clip (
) into
the Emergency Hole until the CD tray is ejected.
Page 51
50
Chapter 3.
Using the computer
Multi Card Slot
(Optional)
Using the multi card slot, you can read and write data to cards.
You can use a card as a removable disk and conveniently
exchange data with digital devices such as a digital camera, digital
camcorder, MP3, etc..
Supported Cards : SD Card, SDHC Card, SDXC Card•
You have to additionally purchase a multi card with the •
necessary capacity depending on your requirements.
You can use a multi card just like any data storage device. •
A copyright protection function is not supported.
Since you can lose a card when moving the computer, •
keep the card separately.
The gures used for the description are of a representative •
model. Therefore the gures may dier from the real ones.
If a slot protection dummy card is inserted into your •
computer, remove the dummy card before using the
computer.
These descriptions are written based on Windows 8, the •
latest operating system. Therefore, some descriptions and
gures may dier from your operating system. But as the
usage is similar to other Windows operating systems, you
can use these descriptions for reference.
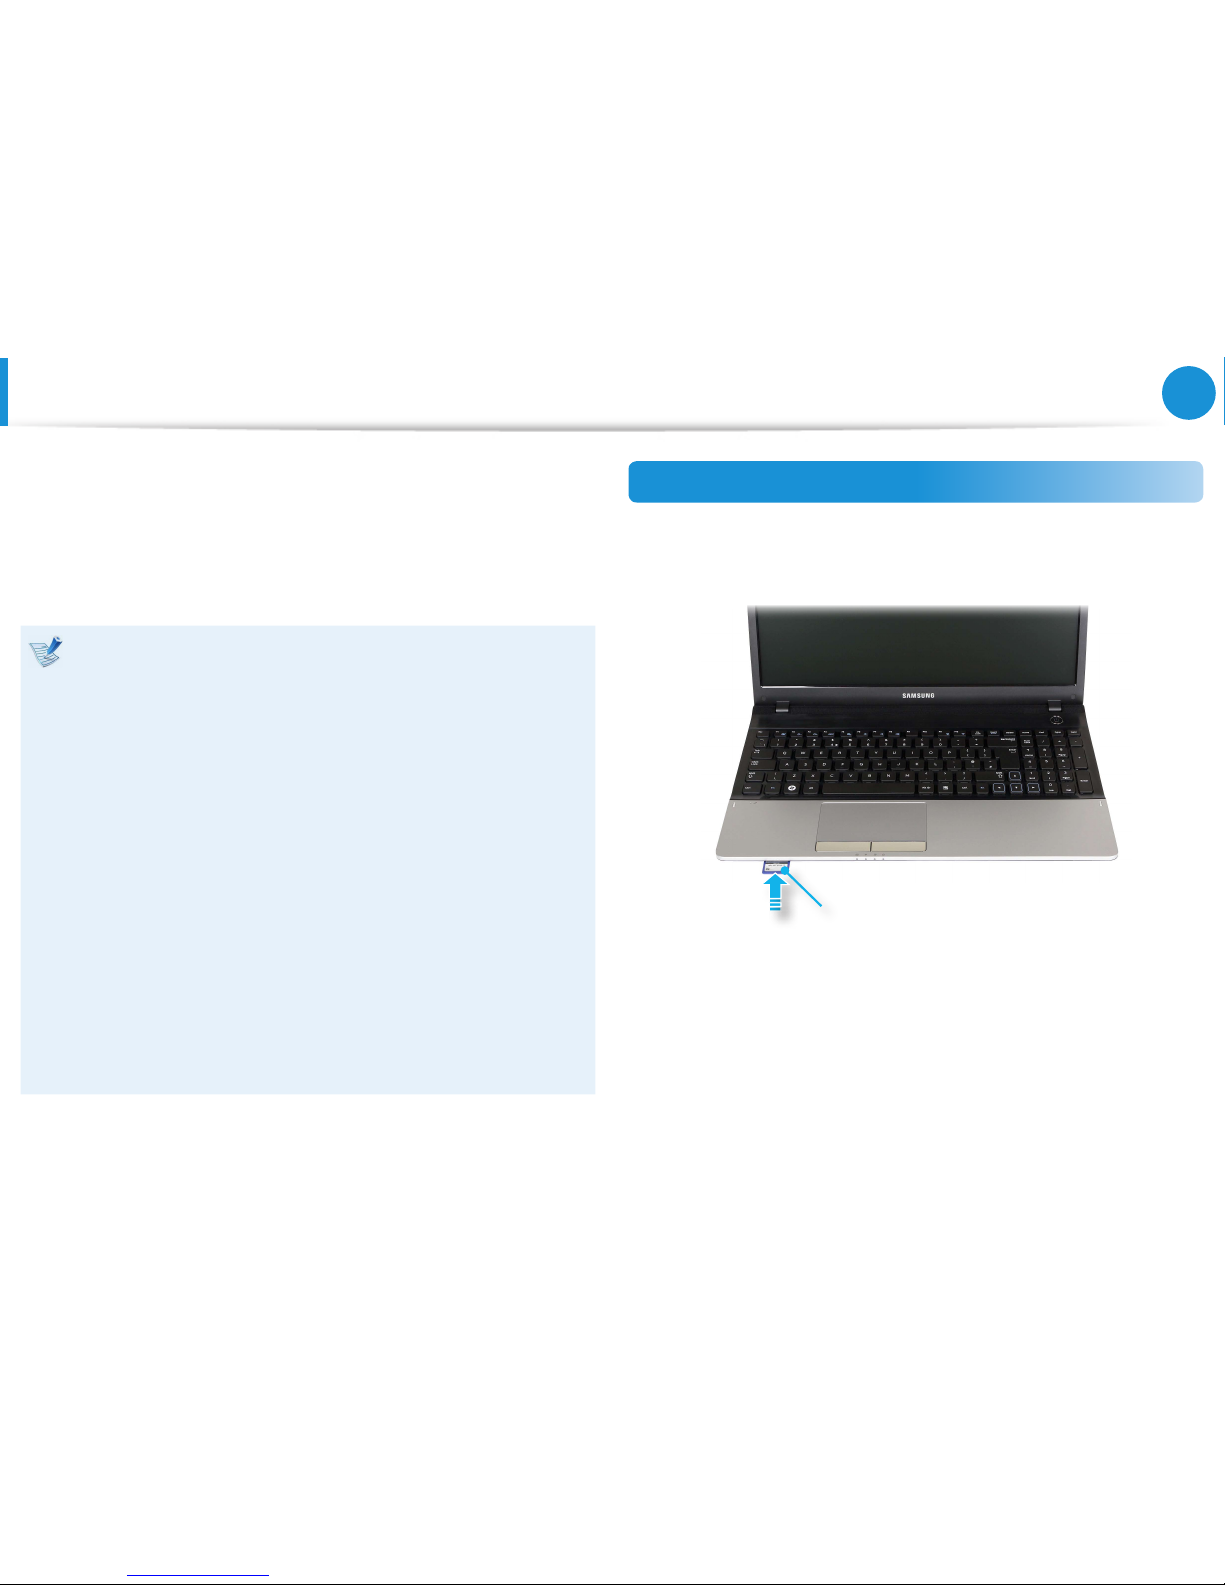
Using the card
1
Insert the card into the multi card slot in the indicated
direction.
Example) SD Card
Page 52
51
Chapter 3.
Using the computer
Multi Card Slot
(Optional)
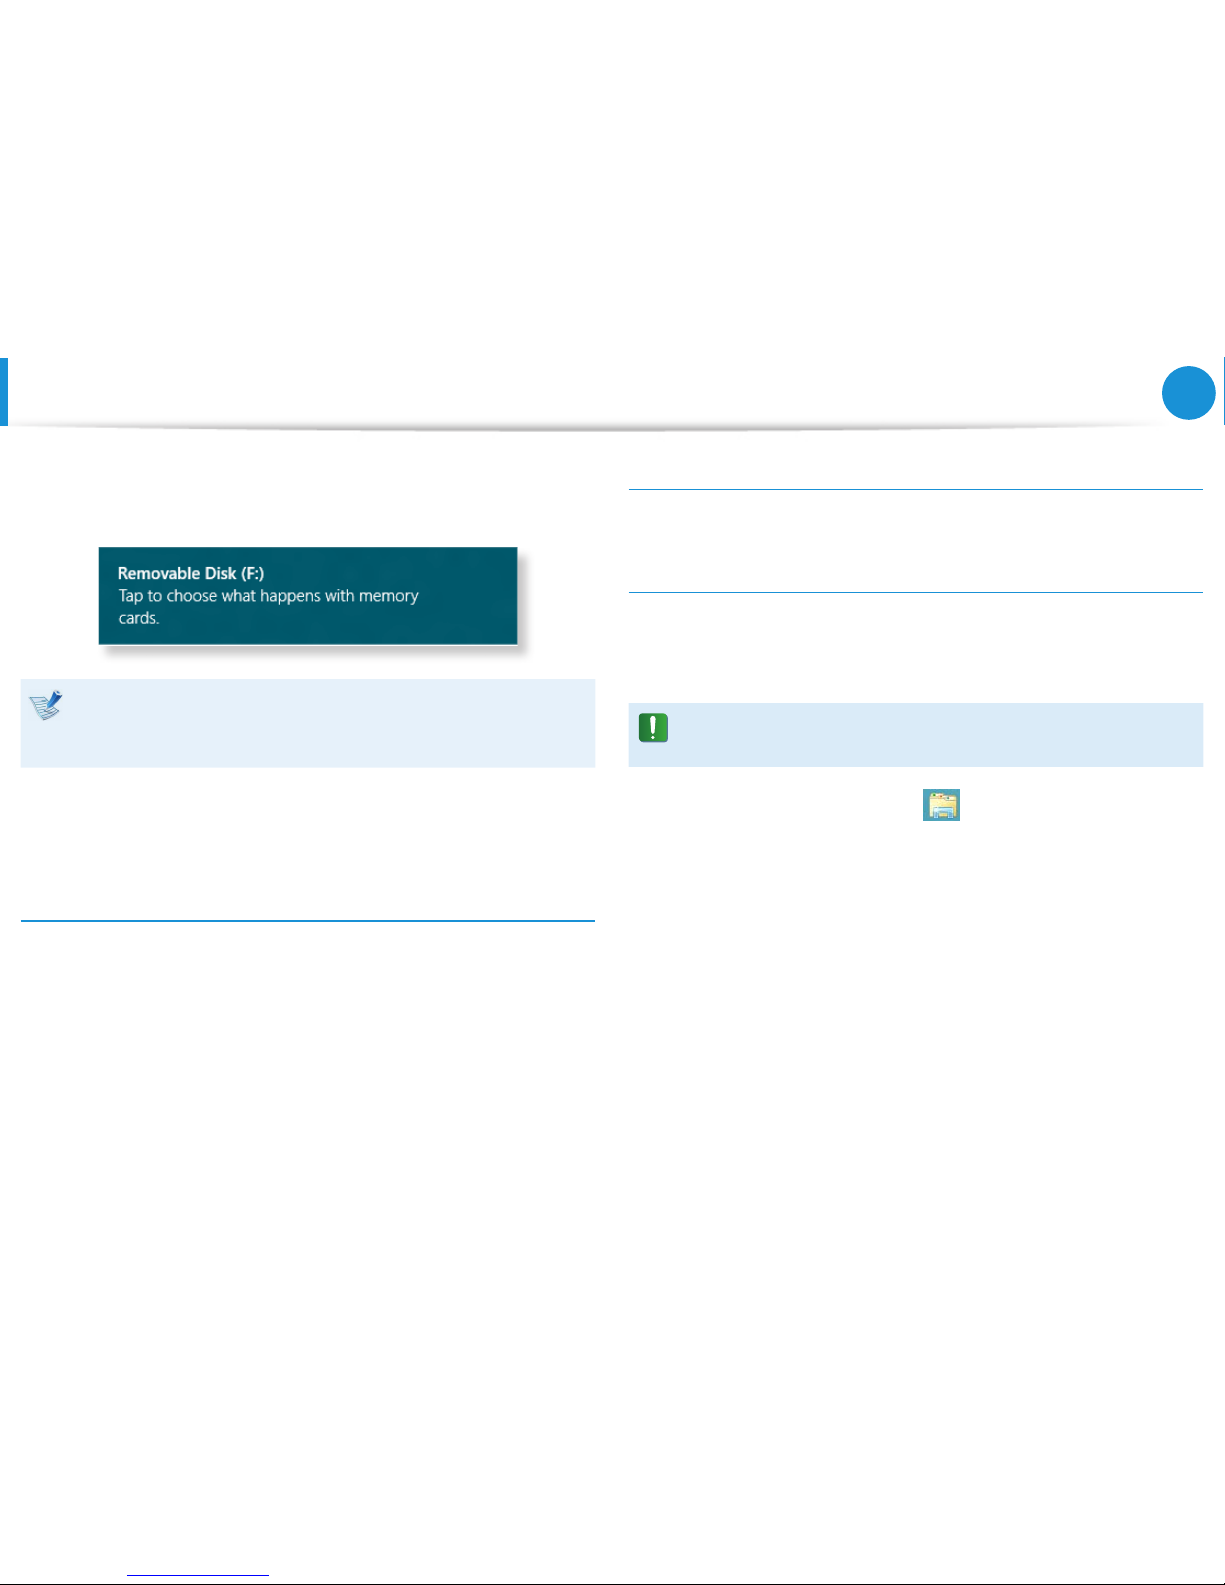
2
The following message appears on the top right. Click to
open the folder and click View Files.
If a message appears to notify you of any problem, click the
corresponding window > Continue without Scanning. You
can perform the following process described in No. 3.
3
Windows Explorer runs on the Desktop. You can save, move
and delete data on the corresponding drive.
Using a Mini SD
Since the above cards are too small, you cannot insert the cards
into the slot directly.
Insert the card into the dedicated adapter (available from most
electronic retailers) and then insert the adapter into the multi card
slot.
To remove a memory card
Take hold of the end of the card and remove the card.
To format a memory card
When using the memory card for the rst time, you must format
the card before using it.
Formatting a card deletes all data saved on the card. If the
card includes data, backup the data before formatting it.
1
Click the Windows Explorer icon in the taskbar on the
Desktop.
2
Right-click over a card drive with the touchpad and select
Format.
3
Click Start to the formatting.
Page 53

52
Chapter 3.
Using the computer
To use a card to exchange data with a digital device such •
as a digital camera, formatting the data using the digital
device is recommended.
When you try to use a card, which is formatted in the •
computer, in another digital device, you may have to
format the card again in the device.
You cannot format, write or delete data from a SD, or SDHC •
card with a write protection tab when it is in the Lock
position.
Inserting and removing a memory card repeatedly may •
damage the memory card.
Multi Card Slot
(Optional)
Page 54
53
Chapter 3.
Using the computer
Connecting an External Display Device
If you connect an external display device such as a monitor, TV,
projector, etc., you can view the picture on the wider screen of the
external device when you give a presentation or watch a video or
movie.
The computer provides an analog monitor port (D-SUB) and a
digital video/audio port (HDMI).
The visual quality is sharper when a display device is connected
through the HDMI port rather than the analog monitor port
(D-SUB) port. Therefore, when multiple ports are supported,
connect a display device to a port that provides the better visual
quality.
Before you start, check the port and cable of the external
display device and then connect the display device to the
computer.
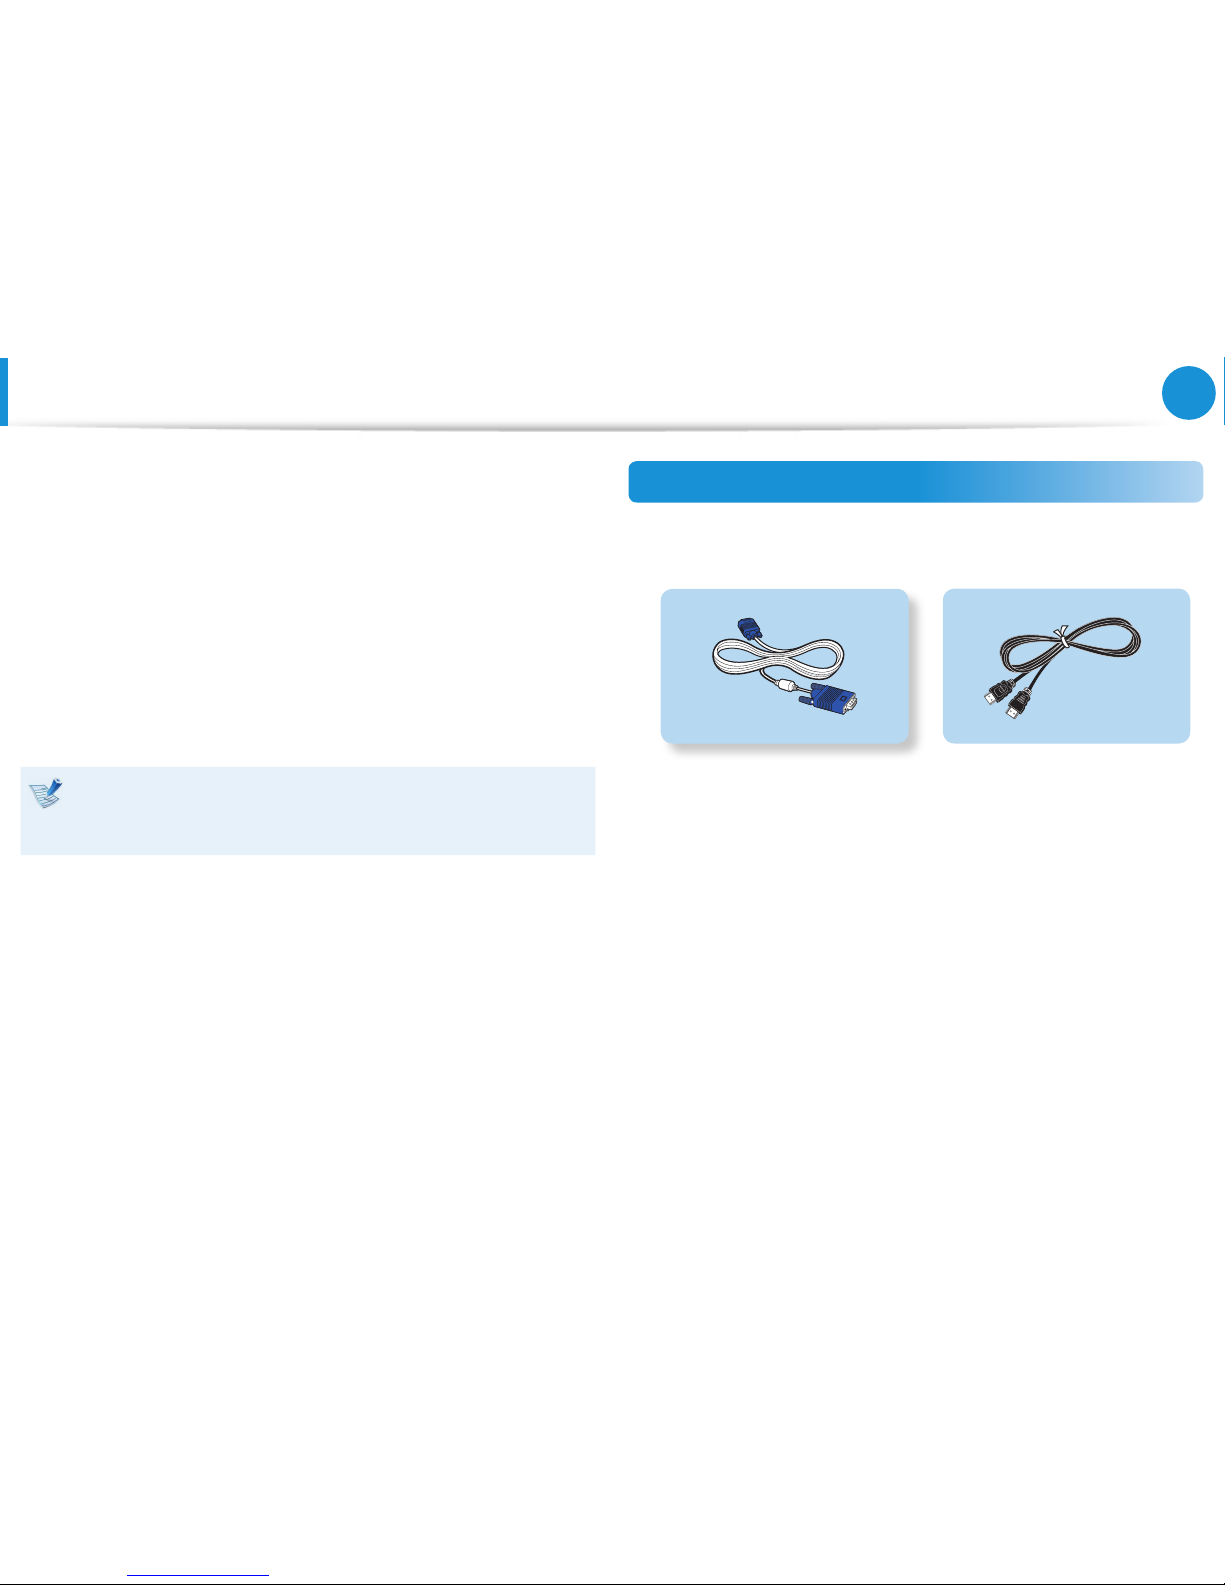
About the connection cable
Users should additionally purchase the necessary connection
cables.
D-SUB Cable
HDMI Cable
Page 55
54
Chapter 3.
Using the computer
Connecting to the monitor port (Optional)
You can experience a wider screen by connecting the computer to
a monitor, TV or projector with a monitor port.
You can give better presentations by connecting the computer to
a projector.
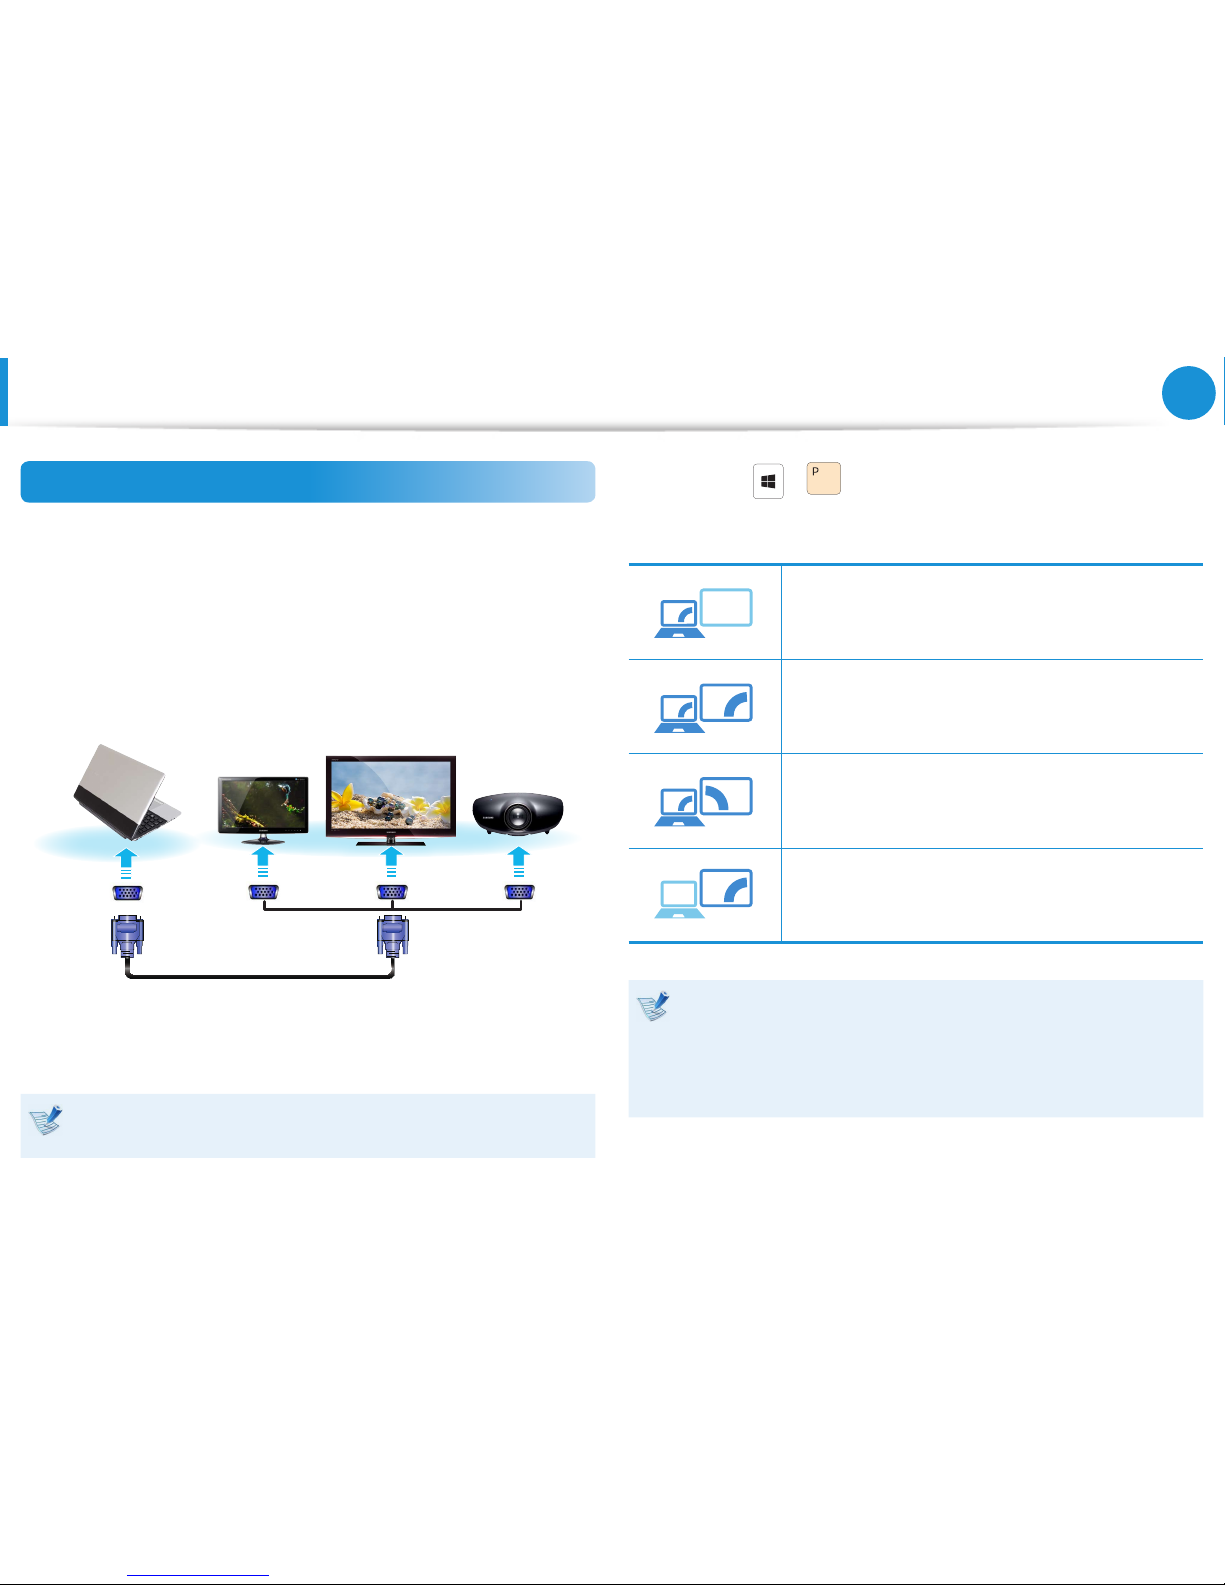
1
Connect the D-SUB port of the computer and the port of the
monitor or TV with the monitor cable (15 pin).
External
Monitor
TV
Projector
2
Connect the power cord of the connected monitor, TV or
projector and turn the power on.
Change your TV to external device mode when connecting to
the TV.
3
Press the + key once to display a window to select
the monitor mode. Select a mode.
3&ִփ
PC Screen only
The contents are only displayed on the PC
monitor (current device).
3&ִփ
ـࢿ
Duplicate
The contents of the current device are displayed
on the external device as well.
3&ִփ
ـࢿ
ࢠ
Extend
The screen of the current device is expanded to
the external device.
3&ִփ
ـࢿ
ࢠ
ѿءִփ
Second screen Only
The contents are displayed only on the screen of
the external device.
Alternatively, to set up dual view:
Open the Display Settings window in the Control Panel,
select Monitor 2 and select the Expand to t to this
monitor checkbox to set dual view. For more detailed
information, refer to the Windows online help.
Connecting an External Display Device
Page 56
55
Chapter 3.
Using the computer
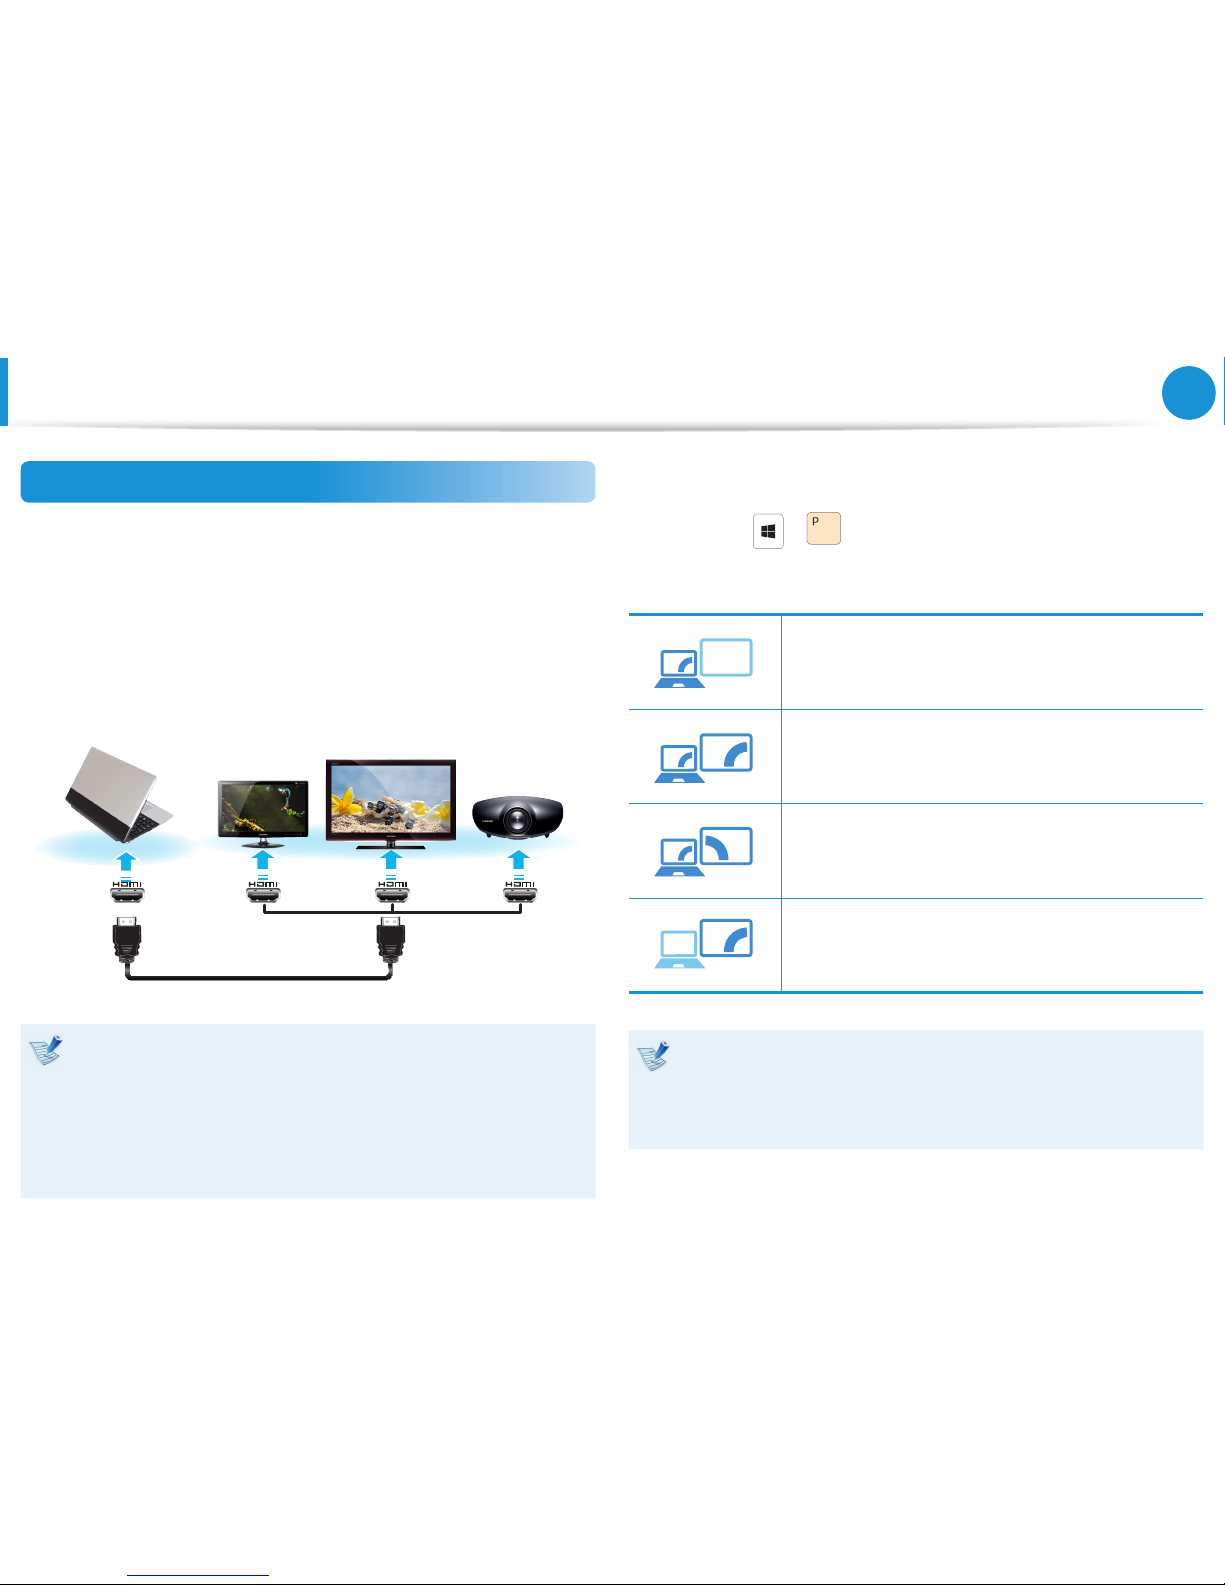
Connecting through the HDMI port (Optional)
By connecting the computer to a TV with a HDMI port, you can
enjoy both a high visual quality and a high sound quality.
After connecting a TV through HDMI, you have to congure the
screen and sound.
1
Connect the HDMI cable to the HDMI port of the TV.
External
Monitor
TV
Projector
This is only supported for models that support a TV output •
port (HDMI).
When a TV provides more than one HDMI port, connect •
the computer to the DVI IN port.
When connecting the computer to a TV, switch the •
external input mode of the TV to HDMI.
2
Press the + key once to display a window to select
the monitor mode. Select a mode.
3&ִփ
PC Screen only
The contents are only displayed on the PC
monitor (current device).
3&ִփ
ـࢿ
Duplicate
The contents of the current device are displayed
on the external device as well.
3&ִփ
ـࢿ
ࢠ
Extend
The screen of the current device is expanded to
the external device.
3&ִփ
ـࢿ
ࢠ
ѿءִփ
Second screen Only
The contents are displayed only on the screen of
the external device.
External Monitor / TV is not supported in the DOS •
Command Prompt window.
Simultaneous output to all 3 (LCD + CRT + HDMI) is not •
supported.
Connecting an External Display Device
Page 57
56
Chapter 3.
Using the computer
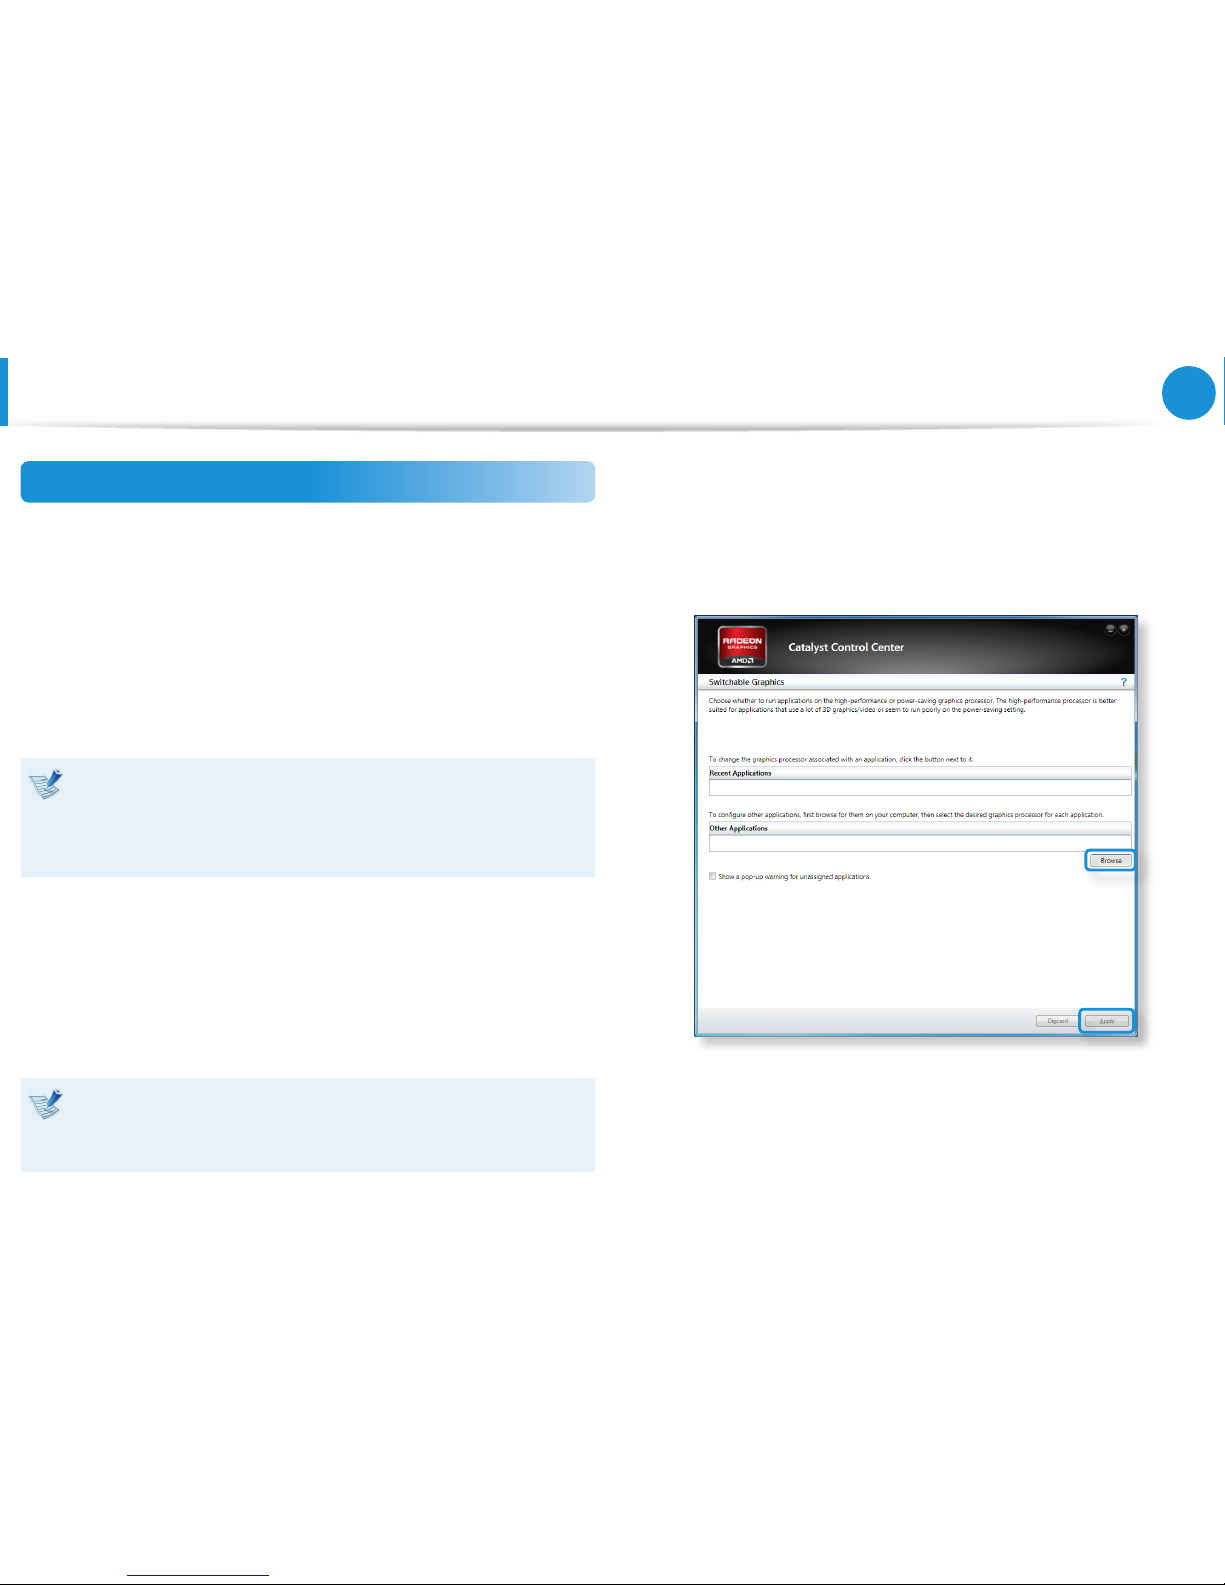
Using AMD Graphics Eectively (optional)
PowerXpress is Switchable Graphics technology that selectively
enables either the internal or external graphics chipset depending
on the program to extend the battery life time while maintaining
the graphics performance.
This technology uses the internal graphics by default to reduce
battery consumption and switches to the external graphics when
the user uses some program functions that require a high graphics
performance such as games and playing videos.
This description is only for Windows 8 and models with •
AMD PowerXpress technology.
If Windows XP is installed, you can only use Internal •
Graphics.
►
Adding programs for PowerXpress graphics technology
You have to register the program to run some functions of a
program using the external graphics chipset.
Some programs are pre-registered. To register more programs,
complete the following steps.
Unregistered programs will run using the internal graphics •
chipset.
You can register executable les (EXE) only.•
1
Right-click on the Desktop and select Congure Switchable
Graphics from the popup menu.
2
Click the Browse button and register the software and click
the Apply button.
z
x
3
From now on some of the functions of the registered
program that require a high graphics performance will
run with the external graphics chipset without additional
conguration.
Connecting an External Display Device
Page 58
57
Chapter 3.
Using the computer
Using NVIDIA graphics more eciently
(optional)
NVIDIA Optimus is a function that enables automatic selection
and usage of the internal or external graphics chipsets depending
on the currently running software.
For example, the internal graphics chipset can be used for
Internet surng or word processing to minimize battery power
consumption and the high-performance external graphics graphic
chipset can be used for gaming or video processing to deliver a
more realistic experience.
The NVIDIA Optimus model supports Windows 8 only.•
This function is only available in models that support the •
NVIDIA Optimus technology.
Registering programs to be executed by the external
graphics chipset
To run a program using the external graphics graphic chipset, you
have to register the program in the NVIDIA Panel.
Some programs are pre-registered. To register more programs (e.g.
3D games, etc.), complete the following steps.
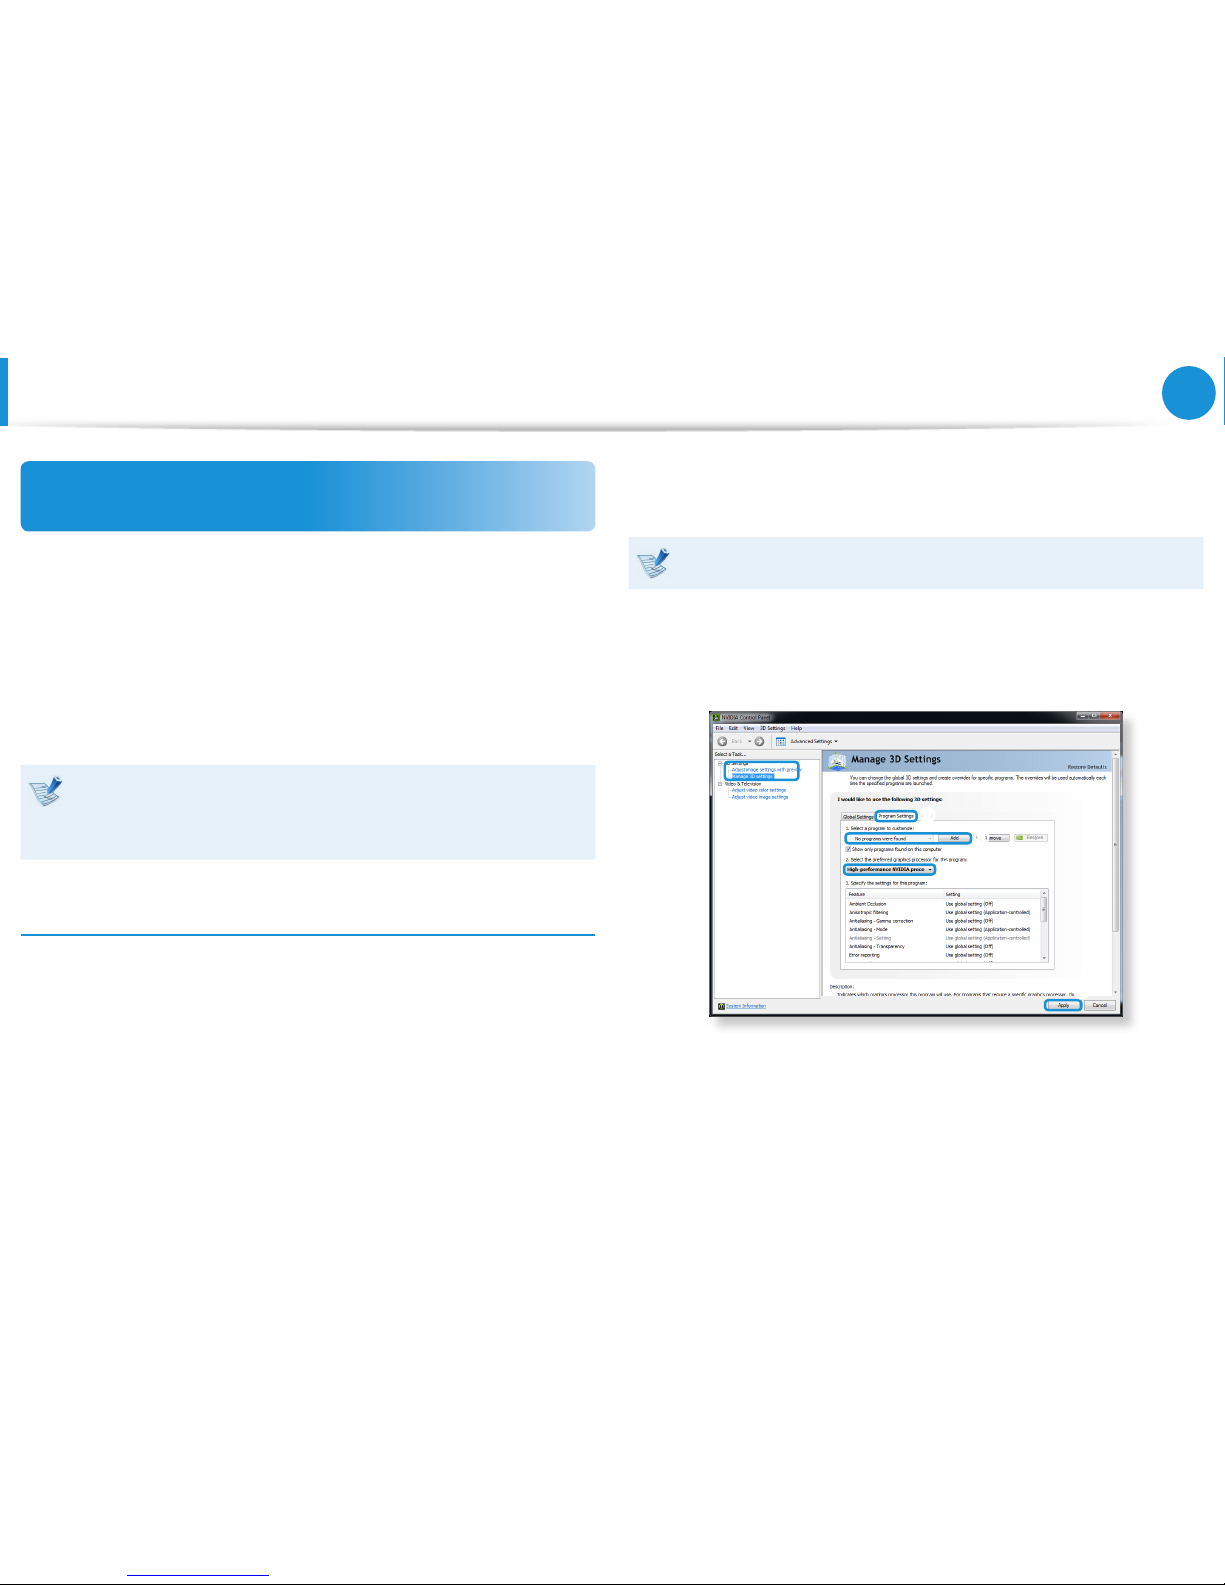
1
Right-click over the Desktop and select NVIDIA Panel.
2
Select 3D Settings > Manage 3D settings in the left pane
and select the Program Settings tab.
3
In the Select a program to customize(S) eld, click the Add
button to register the software.
You can register executable les (EXE) only.
4
In the Select the preferred graphics processor for this
program (O) eld, select High-performance NVIDIA
processor and click the Apply button.
x
x
c
v
v
5
The program has been registered.
When you run the registered program, the program is
executed using the external graphics chipset without
requiring additional conguration.
Connecting an External Display Device
Page 59
58
Chapter 3.
Using the computer
Adjusting the Volume
You can adjust the volume using the keyboard and the volume
control program.
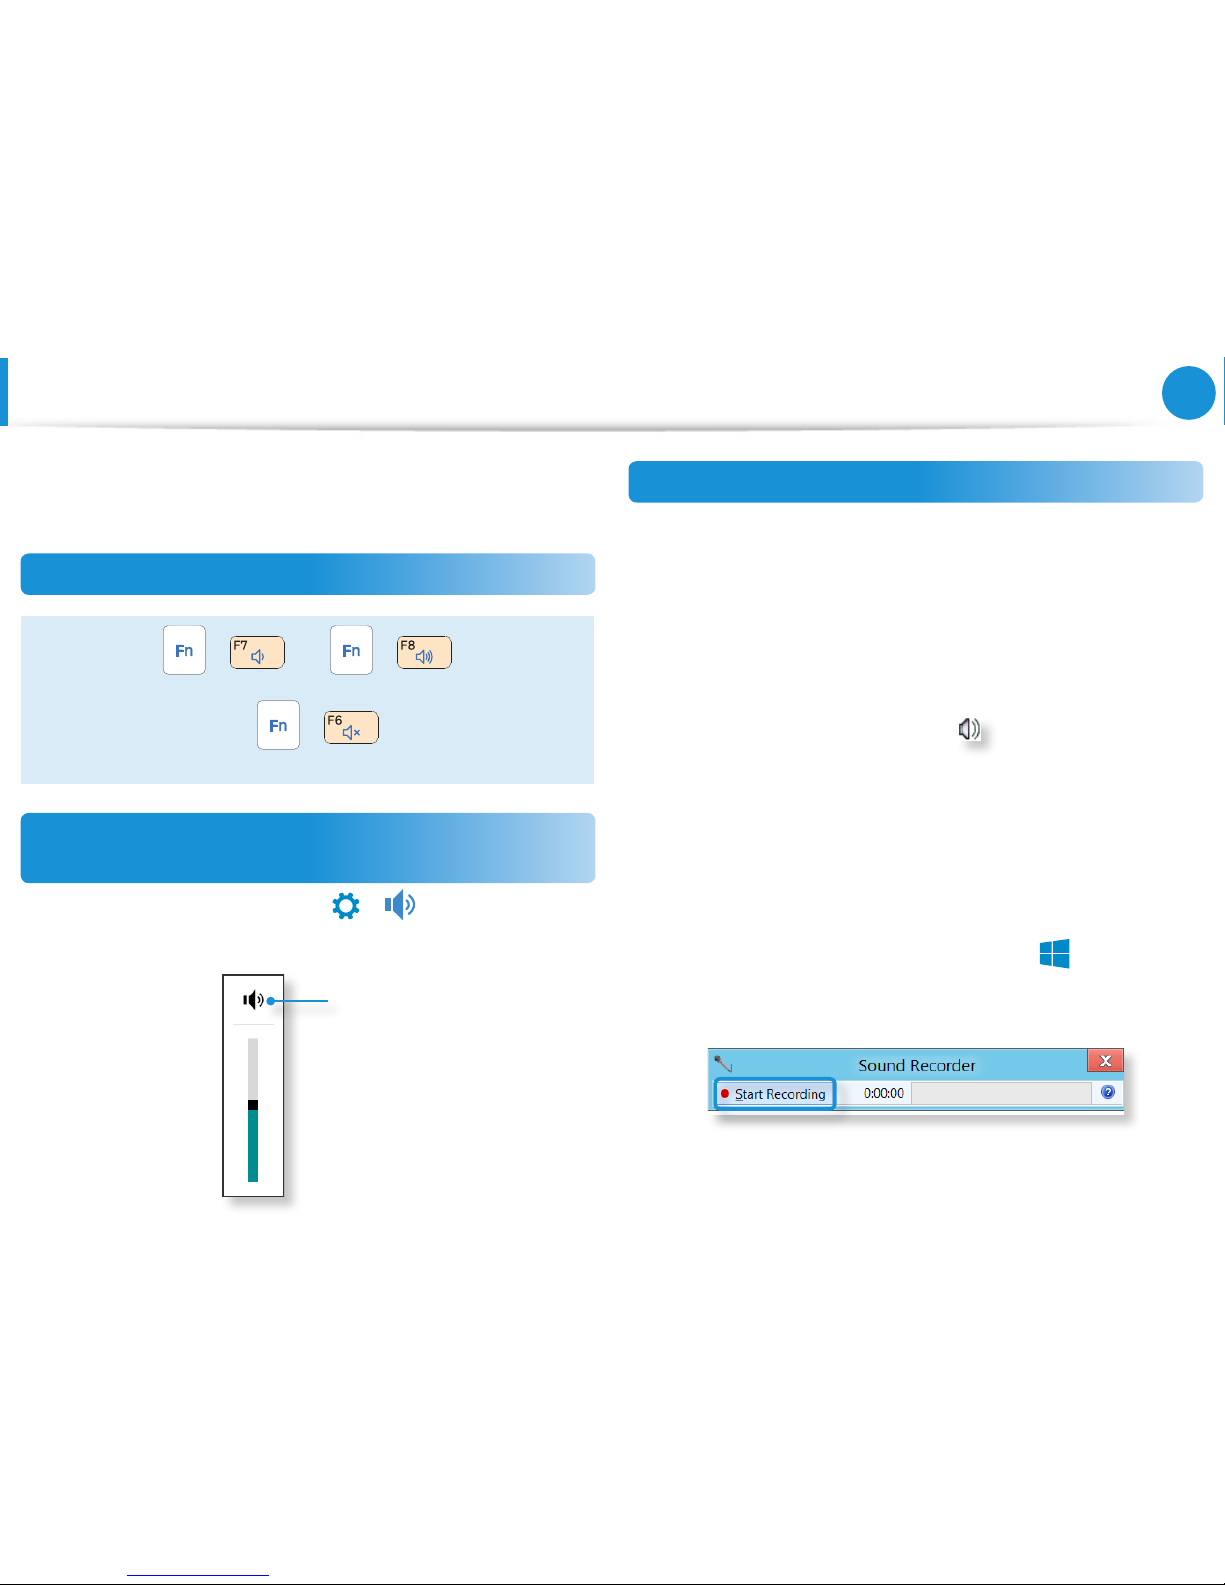
Adjusting the Volume using the Keyboard
+ o
r
+
Alternatively, press the + key combination to
turn the volume on or o.
Adjusting the Volume using the Volume
Adjustment Program
Click the Charms menu > Settings
áᔪ
Ŗᮁ
᯲
ᰆ⊹
>
to adjust the control
bar.
Mute
Using the Sound Recorder
The procedures to record sound using the Windows Recorder are
described below.
1
Connect a microphone to the microphone jack.
You can also use the internal MIC.
2
Right-click over the Volume icon on the taskbar and select
Recording Device.
3
Check if the microphone is set as the default recording
device.
If this is the case, it is already set as the default device. If not,
right-click over the microphone and select Set default.
4
Right-click over the Charms menu > Start
áᔪ
Ŗᮁ
to click All
Apps > Sound Recorder. Then press Start Recording to
record.
Page 60

59
Chapter 3.
Using the computer
Using SoundAlive (Optional)
The SoundAlive function enables you to experience more
stereophonic sound using stereo speakers.
SoundAlive is only supported in Windows 8.•
The software programs provider may vary, depending on •
your computer model.
In addition, some pictures may dier from actual product •
depending on the computer model and software version.
1
Right-click over the Volume in the taskbar on the Desktop
and click Play Device.
(Alternatively, click the Charms menu on the Desktop >
Settings
áᔪ
Ŗᮁ
᯲
ᰆ⊹
> Control Panel > Hardware and Sound >
Sound.)
2
Right-click over the Speakers and select Properties.
3
Select the SoundAlive tab and select one of the modes.
Adjusting the Volume
Page 61
60
Chapter 3.
Using the computer
LCD Brightness Control
The screen brightness is automatically set to the brightest
level when AC power is connected and the brightness is
automatically set dimmer when the computer runs on battery
power to extend the battery use time.
Controlling the Brightness Using the Keyboard
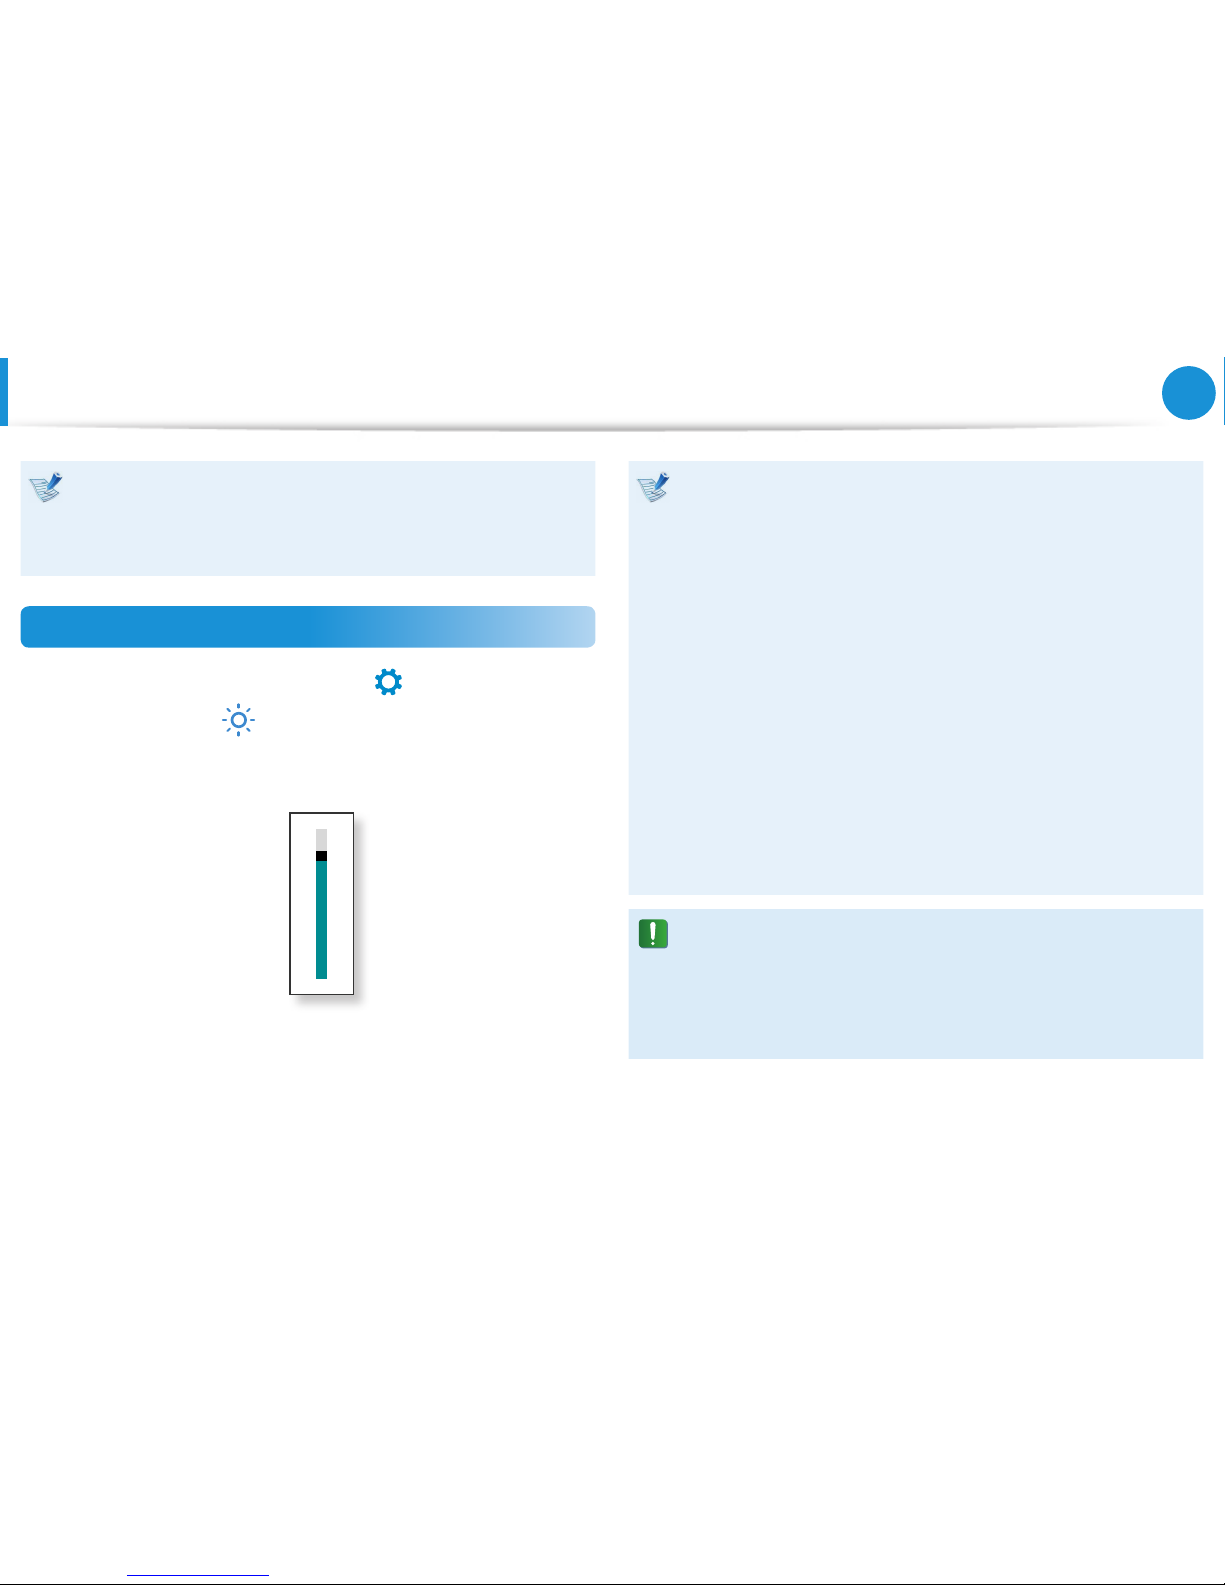
1
Click the Charms menu > Settings
áᔪ
Ŗᮁ
᯲
ᰆ⊹
> Screen
Adjustment icon
.
2
Adjust the brightness with the screen brightness control bar.
Saving battery power consumption•
Decreases the LCD brightness when the computer
is running on battery power to save battery power
consumption.
LCD bad pixels principle of computer•
Samsung observes the specications regarding strict
quality and reliability of LCD. But in spite of that, it is
inevitable that there might be a small number of bad
pixels. A large number of bad pixels can cause problems in
appearance, but a small number of pixels doesn’t aect the
computer performance.
Therefore Samsung observes and manages the following
dot principles:
- Bright dot : 2 or less
- Black dot : 4 or less
- Combination of Bright and Dark : 4 or less
Instructions for Cleaning the LCD
Clean the LCD panel with a soft cloth lightly moistened with
computer cleansing detergent moving in one direction.
Cleaning the LCD panel with excessive force can damage the
LCD.
Page 62
61
Chapter 3.
Using the computer
Wired Network
A wired network is a network environment used for a company
network or broadband internet connection at home.
Since these descriptions are written on the basis of the •
latest operating system, Windows 8, some of the content
and the gures of the descriptions may dier depending
on the operating system. Since the procedures for other
Windows operating systems are similar, use the computer
referring to these descriptions.
The gures used for the description are of a representative •
model. Therefore the gures may dier from the real ones.
Connecting to the Wired LAN
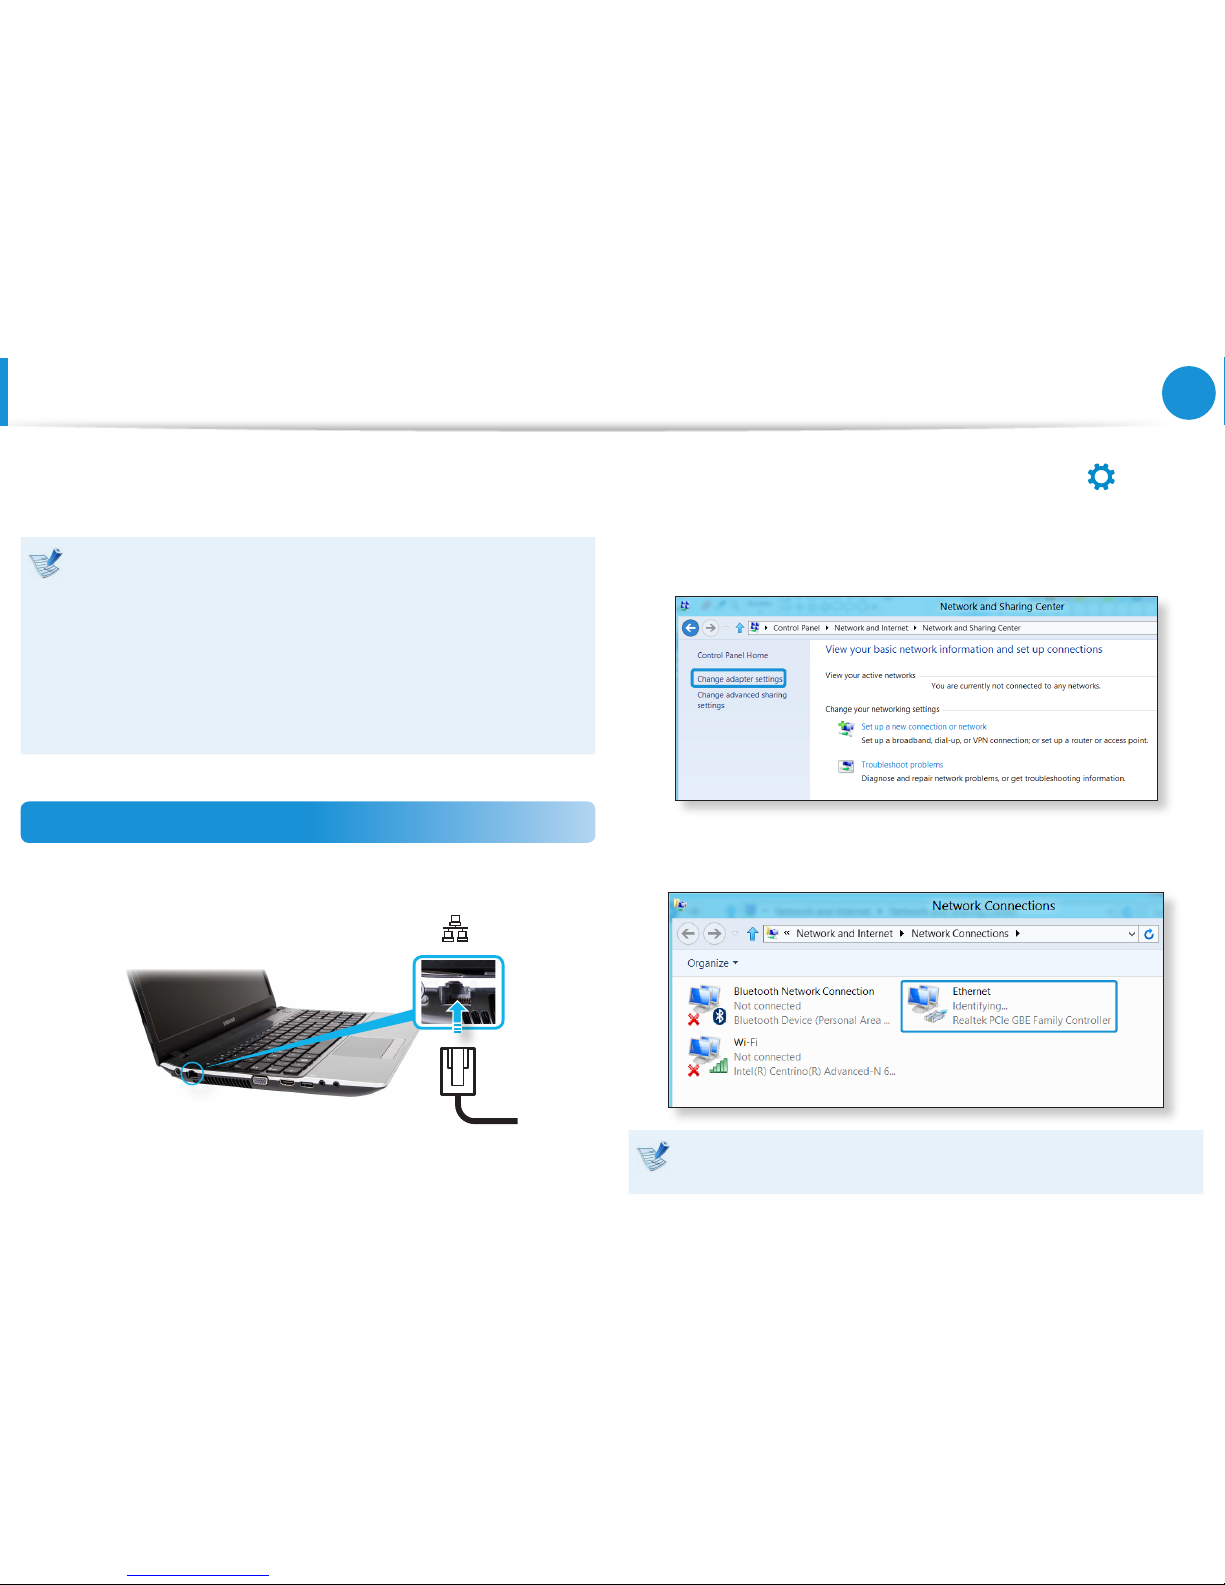
1
Connect the LAN cable to the wired LAN port.
2
Click Charms menu on the Desktop > Settings
áᔪ
Ŗᮁ
᯲
ᰆ⊹
>
Control Panel > Network and Internet > Network and
Sharing Center and click on Change adapter settings in
the left menu pane.
3
Select Ethenet and click the right button of the touch pad
and select Properties.
The LAN Device name may dier depending on your
computer’s Network Device.
Page 63
62
Chapter 3.
Using the computer
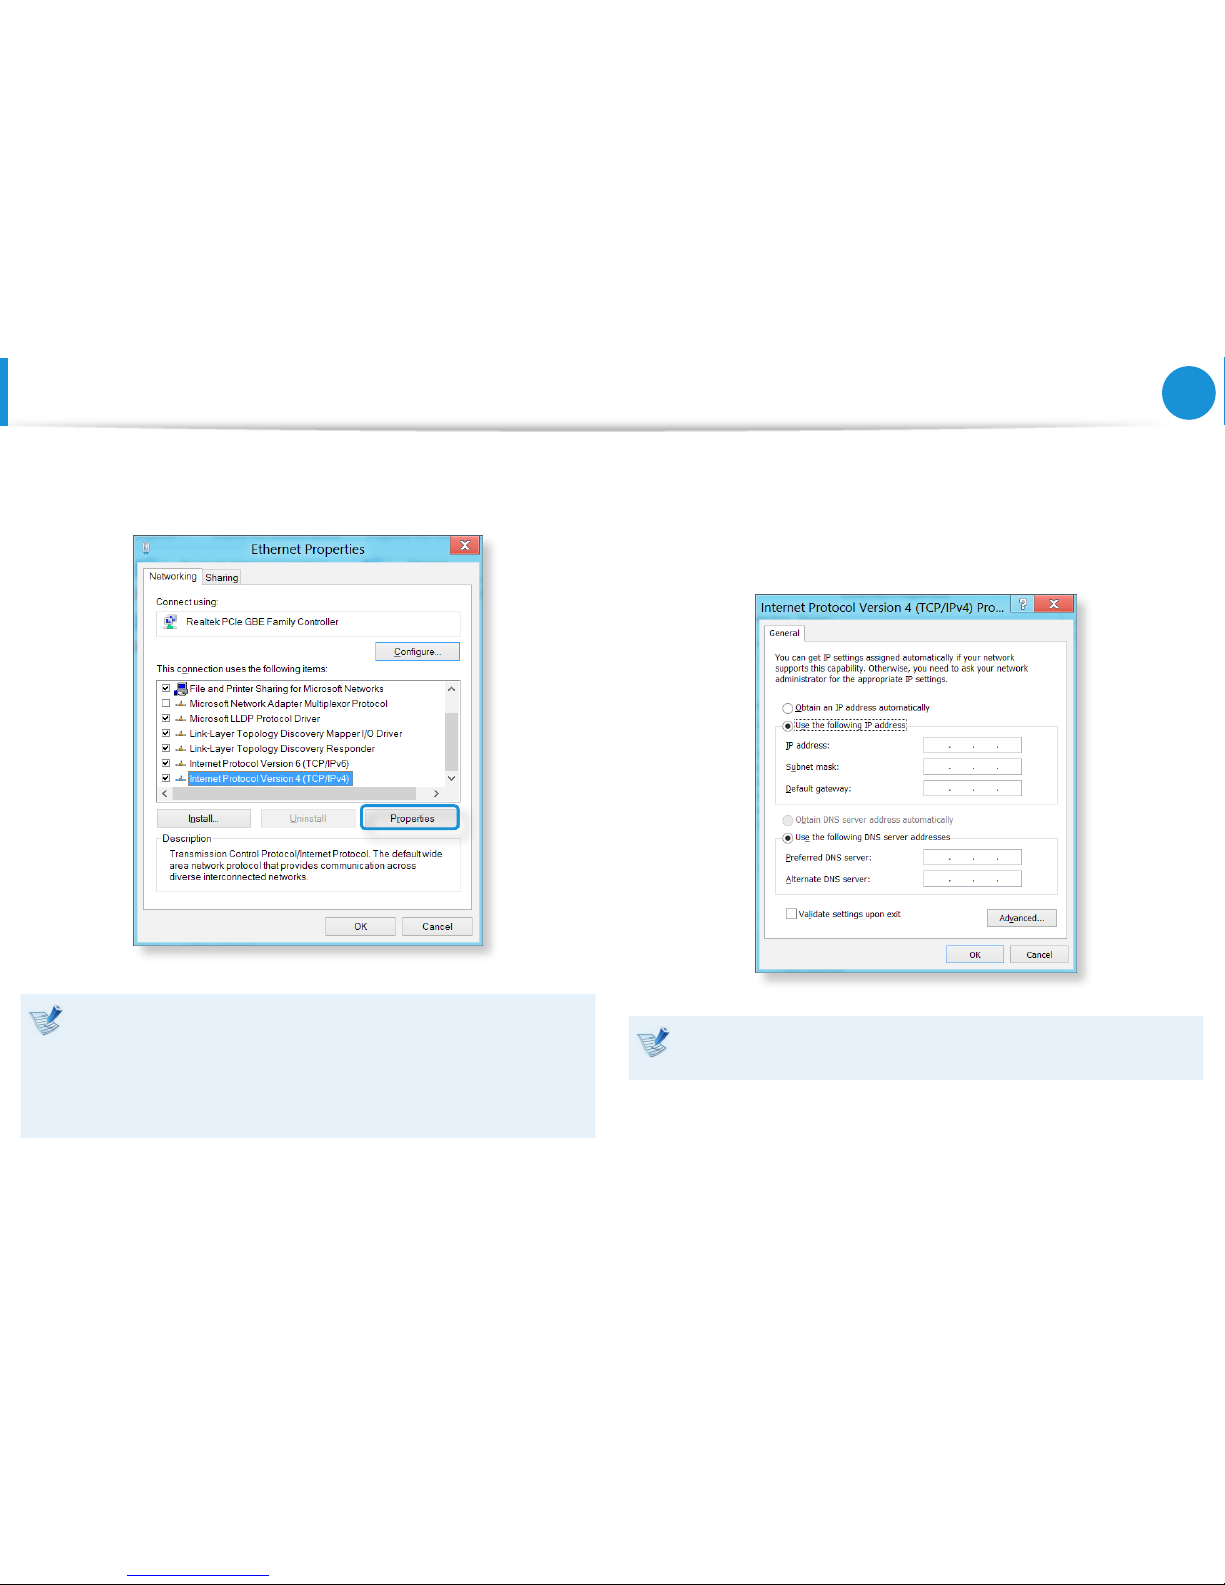
4
Select Internet Protocol Version 4(TCP/IPv4) from the list
of Network Components and click Properties.
The Network Component name may dier depending on •
the Operating System Installed.
To add a network component, click Install in the screen •
shown in the gure above. You can add clients, services,
and protocols.
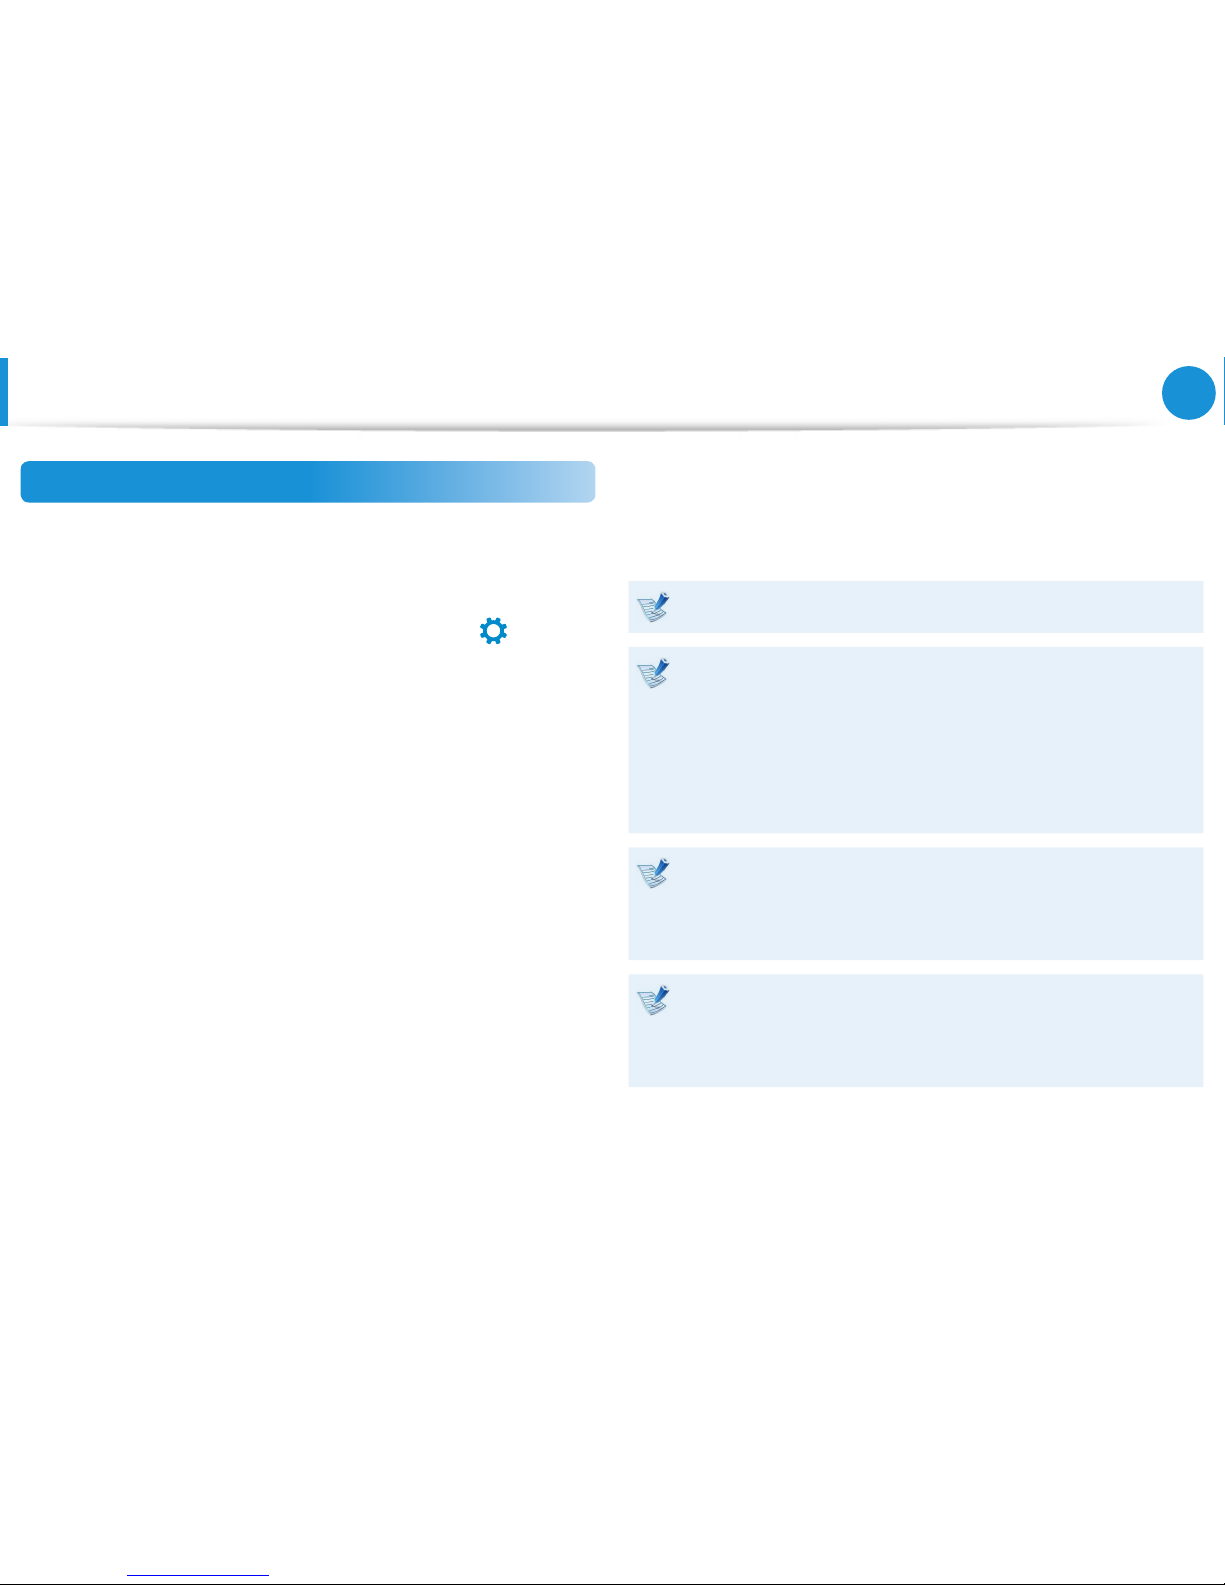
5
Congure the IP settings.
When using DHCP, select Obtain an IP address
automatically. To use a static IP address, select Use the
following IP address, and set the IP address manually.
When not using DHCP, ask your network administrator for the
IP address.
6
When you have completed the settings, click the OK button.
The network settings have been completed.
Wired Network
Page 64
63
Chapter 3.
Using the computer
Wired Network
Using the WOL (Wake On LAN) function
<Wake On LAN> is a function that activates the system from Sleep
mode when a signal (such as a ping or magic packet command)
arrives over the network (wired LAN).
1
Click Charms menu on the Desktop > Settings
áᔪ
Ŗᮁ
᯲
ᰆ⊹
>
Control Panel > Network and Internet > Network and
Sharing Center and click on Change adapter settings in
the left menu pane.
2
Right-click on the Wired Ethernet Connection and select
Properties.
3
Click Congure > Power Management tab. Select Allow
this device to wake the computer, then click OK. Restart
the system.
- If the system wakes up from Sleep mode even though there
is no received signal, use the system after disabling the
<Wake On LAN> function.
- The LAN LED may not be turned o if System is shoutdown
without disabling the WOL (Wake on LAN) option.
-
Connecting a wired LAN while using a wireless LAN may not
activate the
<Wake On LAN> function. Set the Wireless LAN
to Disable to use the <Wake On LAN> function.
- <Wake On LAN> feature may not work while using Hybrid
power saving feature. Hybrid sleep mode can be disabled
from Power Options under Control Panel.
For Windows 8, Wake On LAN is not supported by Ping.
When connected to a 100Mbps/1Gbps wired LAN and the
computer exits Sleep/hibernation mode, a message appears
informing you of a connection to a 10Mbps/100Mbps
wired LAN. This happens because when the computer exits
standby/hibernate mode, restoring the network takes about
3 seconds. When the network is restored, it operates at
100Mbps/1Gbps.
When system is running on battery, some time it may take
a few second extra after inserting LAN cable to be able to
connect to internet. This symptom happen as a result of
power saving feature to reduce battery consumption.
When system is running on battery, the Wired LAN speed
is decreased automatically to reduce battery consumption.
In such case, a 1Gbps /100Mbps LAN would function at
100Mbps/10Mbps speed.
Page 65
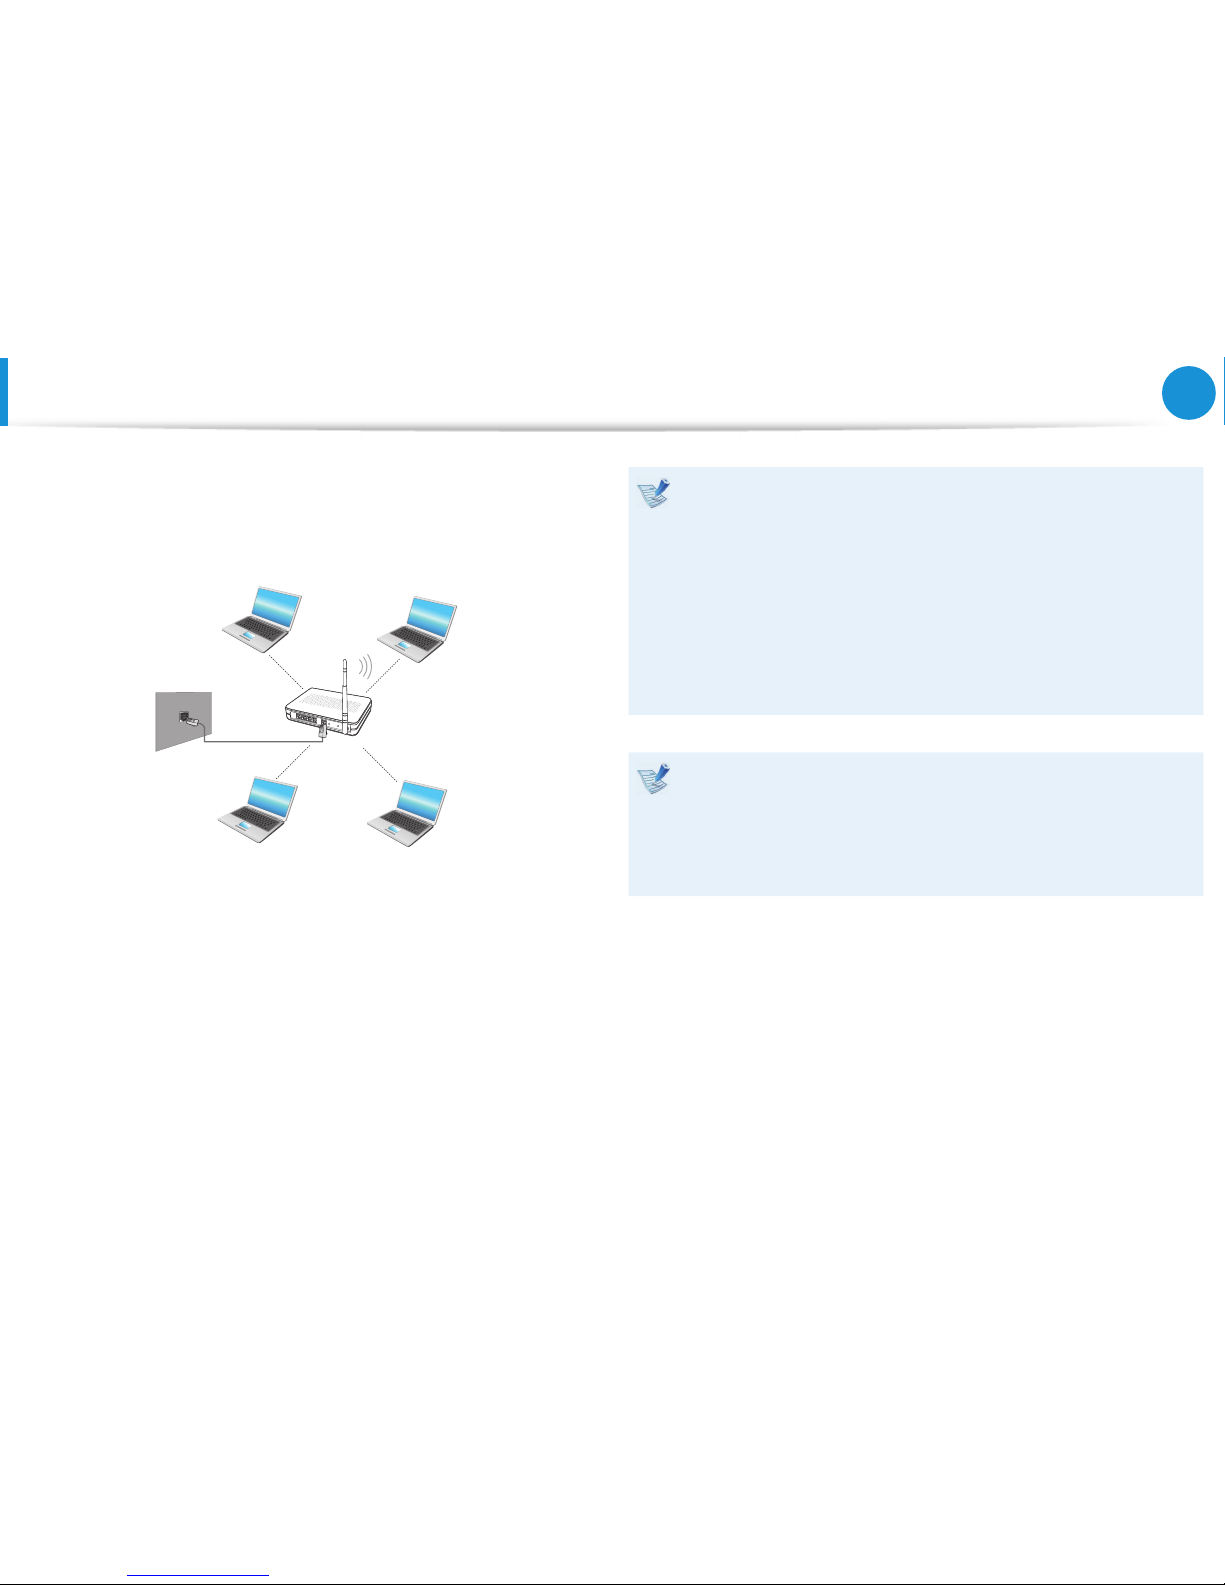
64
Chapter 3.
Using the computer
A wireless network (Wireless LAN) environment is a network
environment that enables communicating between multiple
computers at home or a small-size o ce through wireless LAN
devices.
The screen gures and terms may di er depending on the •
model.
Depending on the program version, some functions may •
not be provided or di erent functions may be provided.
The descriptions below are for computer models with •
a Wireless LAN card or device. A Wireless LAN device is
optional.
The pictures in this manual may di er from the actual
product depending on your wireless LAN device model.
What is an Access Point ( AP)?
An AP is a network device that bridges wired and wireless
LANs, and corresponds to a wireless hub in a wired network.
You can connect multiple wireless LAN installed computers
to an AP.
Wireless Network
(Optional)
Page 66
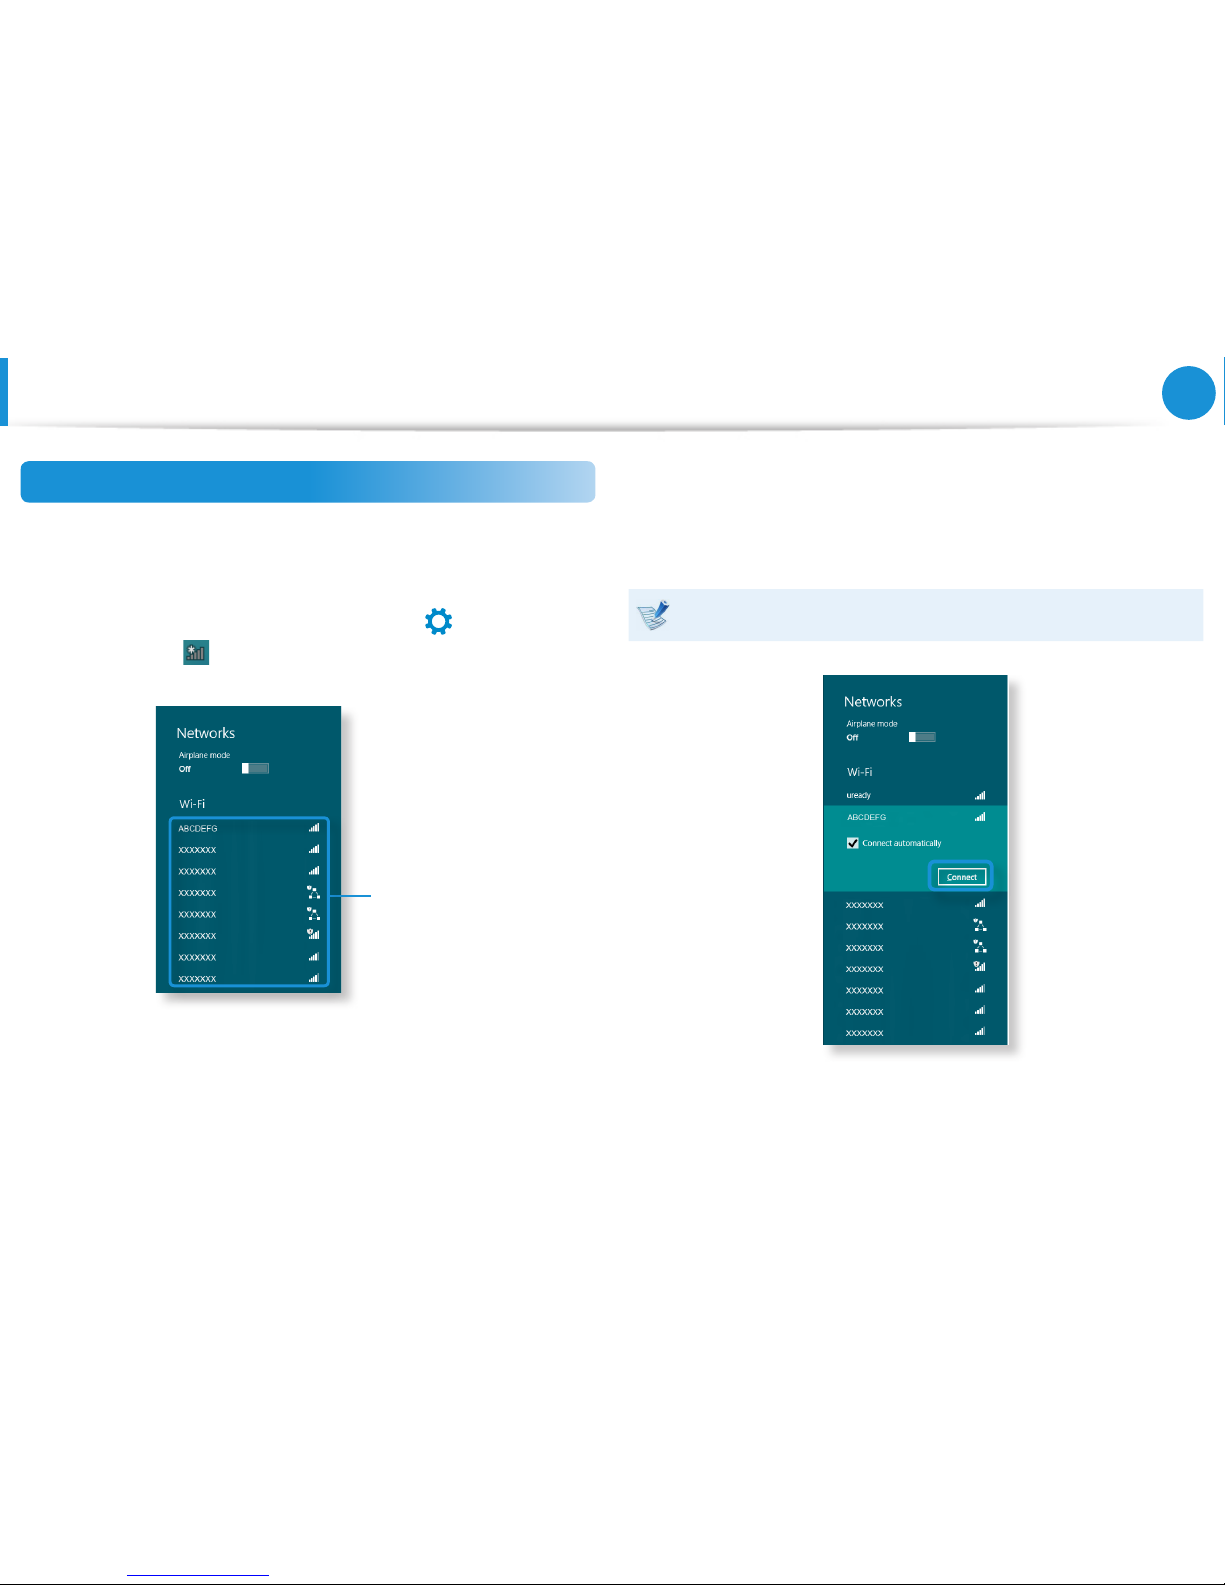
65
Chapter 3.
Using the computer
Wireless Network
(Optional)
Connecting to a Wireless LAN
If there is an AP, you can connect to the Internet via the AP using
the Wireless LAN connection method provided by Windows.
1
If you click the Charms menu > Settings
áᔪ
Ŗᮁ
᯲
ᰆ⊹
> Network
Connections
icon, a list of available APs appears. If you
select an AP to connect to, the Connect button appears.
AP List
2
Click Connect.
If a network key is set for the AP, enter the network key and
then click OK.
For the network key, please ask your network administrator.
3
When the AP connection is completed, Connected is
displayed next to the corresponding AP. You can now you can
use the wireless network.
Page 67
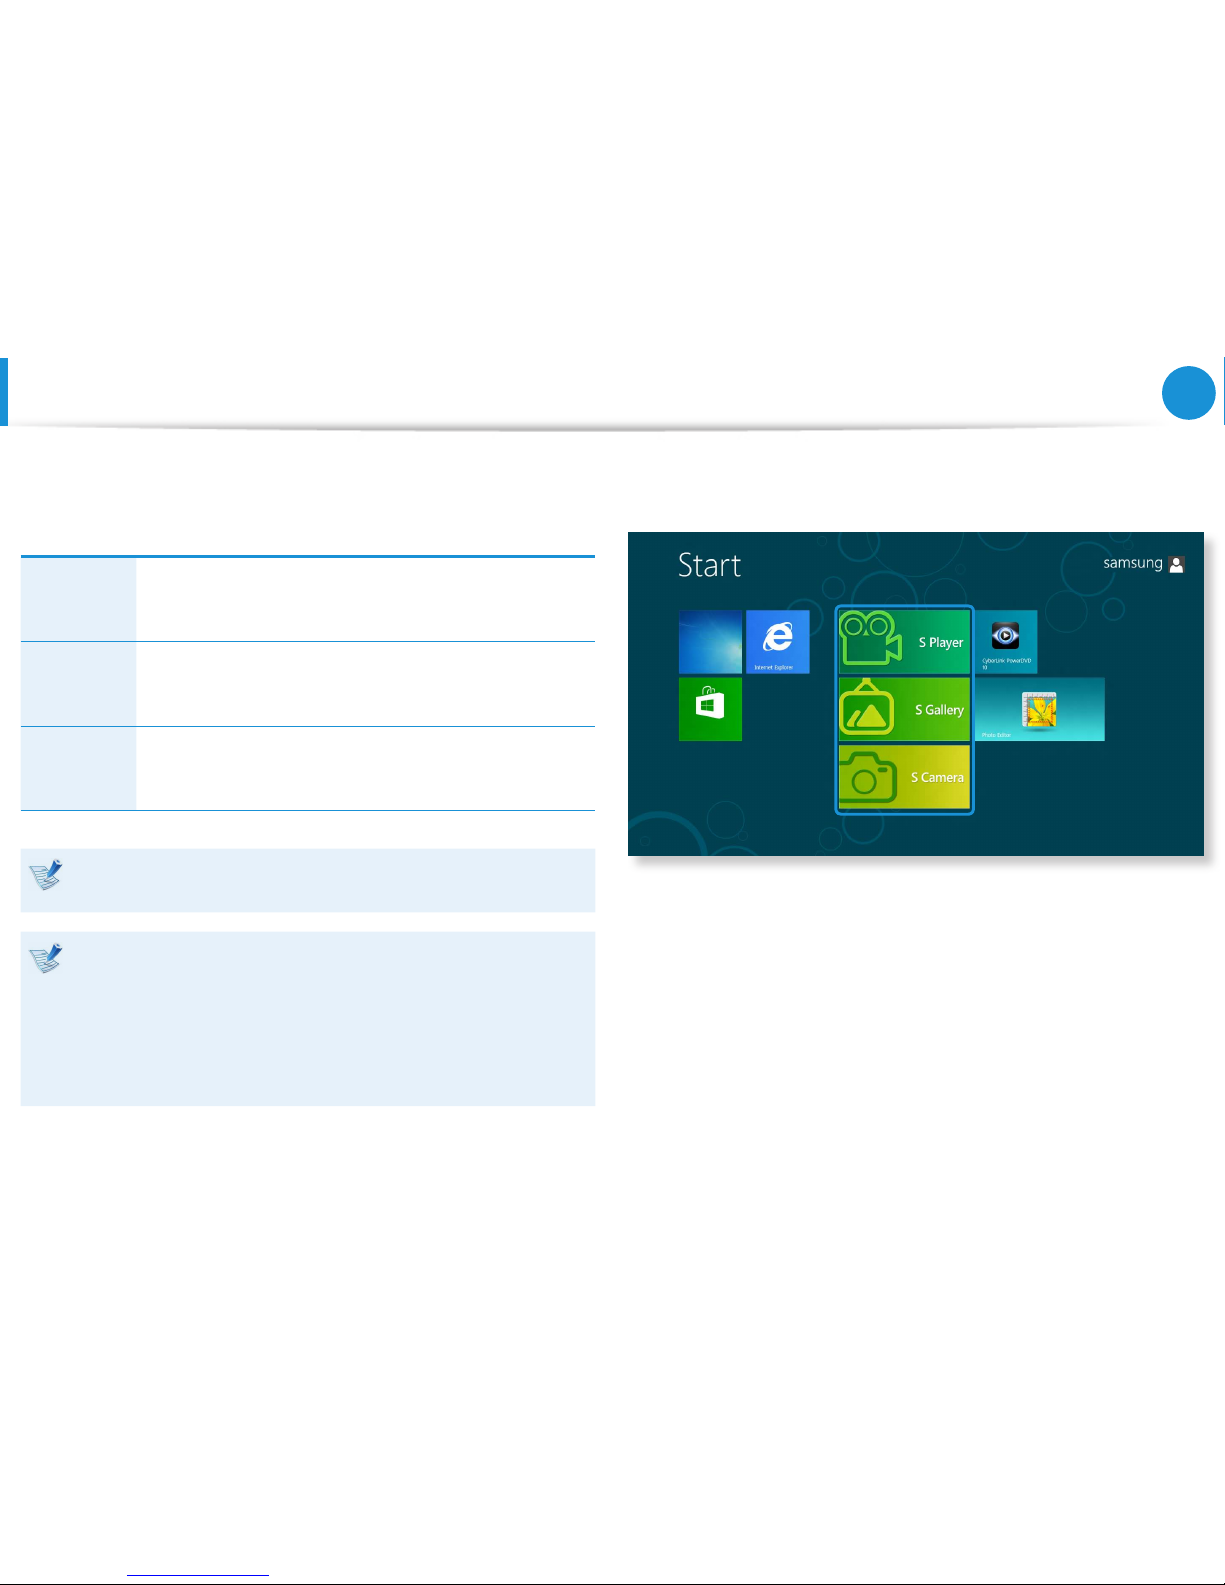
66
Chapter 3.
Using the computer
Using the Multimedia App
(Optional)
You can enjoy photo, video and music les with the S Camera, S
Gallery and S Player apps.
S Camera
You can take photos and record videos with the S
Camera app, and view them directly in this app.
S Gallery
Only photos or videos recorded with the S Camera
app can be viewed with the S Camera app.
S Player
You can view the photo, video and music les saved
on the computer.
Depending on the version of the program, some functions
may not be provided or dierent functions may be provided.
Third-party software related services
For descriptions about and service requests for third-party •
software, please contact the relevant manufacturer.
Some troubleshooting actions in response to service •
requests may not work depending on the software
manufacturer.
You can launch an app in the Start screen.
Page 68
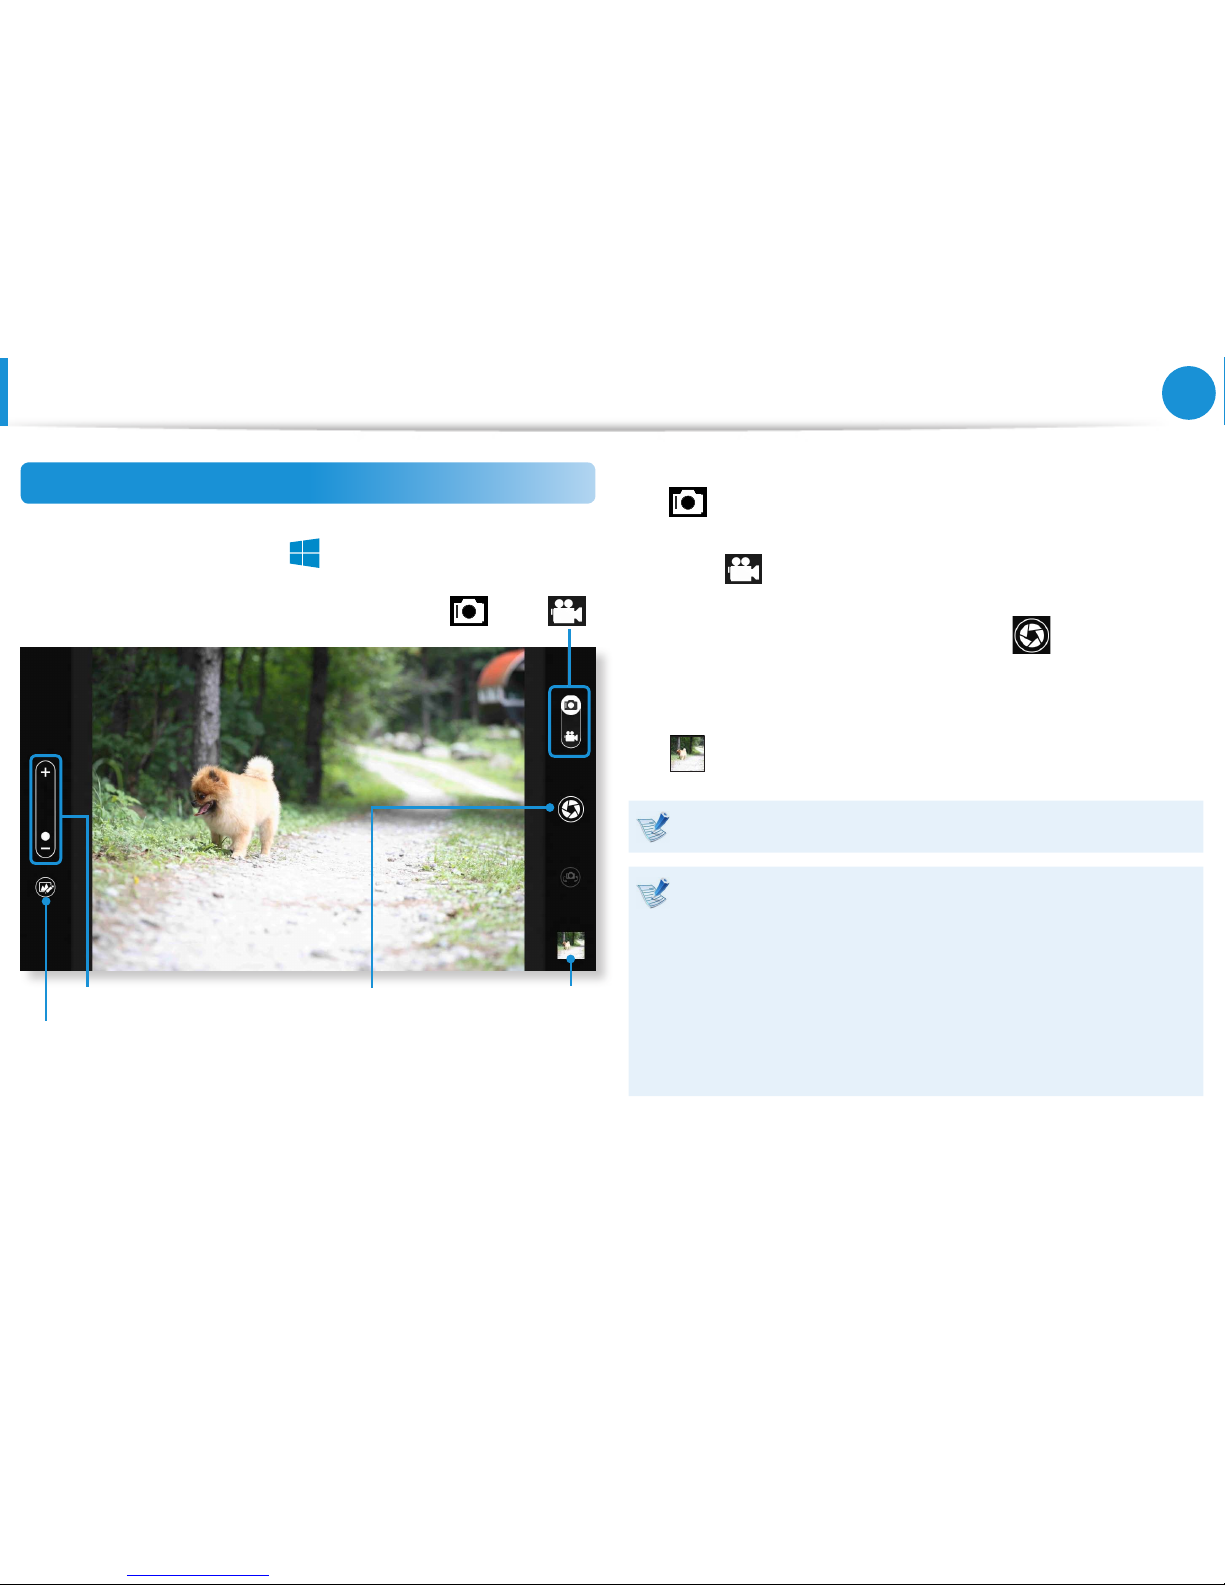
67
Chapter 3.
Using the computer
Using the S Camera app
1
Tap Charm menu > Start
áᔪ
Ŗᮁ
> S Camera.
Zoom in/out
Camera mode (Photo
, Video )
Picture
preview
Take a picture/
Record a video
Photo settings
2
To take a picture, slide the camera mode bar into the Photo
position.
To make a video recording, slide the camera mode bar to the
Video
position.
3
Tap on Take a picture/Record a video to take a picture
or record a video.
4
You can view the picture or video using the Picture preview
or S Gallery app.
The S Camera app is not available in Desktop mode.
Precautions while taking a picture or video
Do not take a picture or video of others without their •
consent.
Do not take a picture or video in locations where this is not •
allowed.
Do not take picture or videos in locations where you may •
infringe on others’ privacy or condential information may
be exposed.
Using the Multimedia App
(Optional)
Page 69
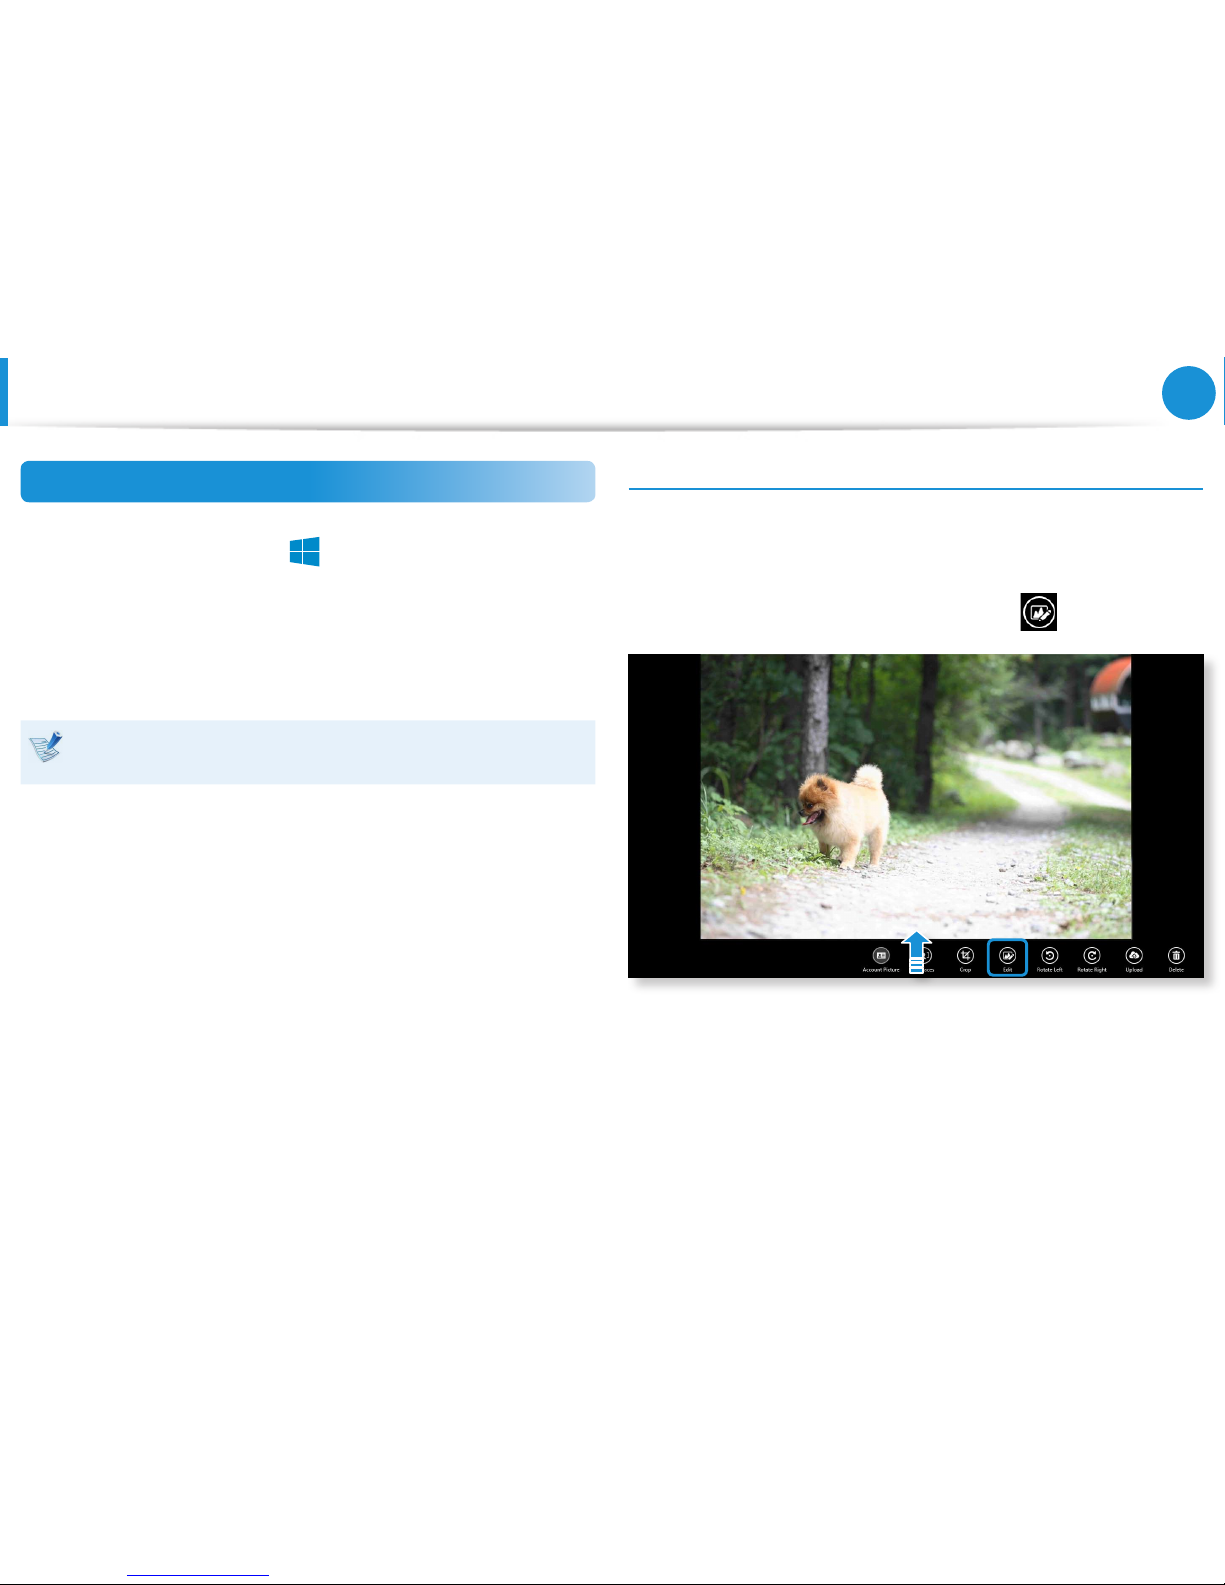
68
Chapter 3.
Using the computer
Using the S Gallery app
1
Tap Charm menu > Start
áᔪ
Ŗᮁ
> S Gallery.
2
You can view the pictures and videos taken by the S Camera.
In addition, you can apply special eects to the pictures using
the photo editing function.
You can take a picture in the S Gallery app by tapping the
Camera icon.
Editing a photo
1
Select Picture preview.
Drag it upward slightly from the bottom center.
If the options menu appears, select Edit
.
Using the Multimedia App
(Optional)
Page 70
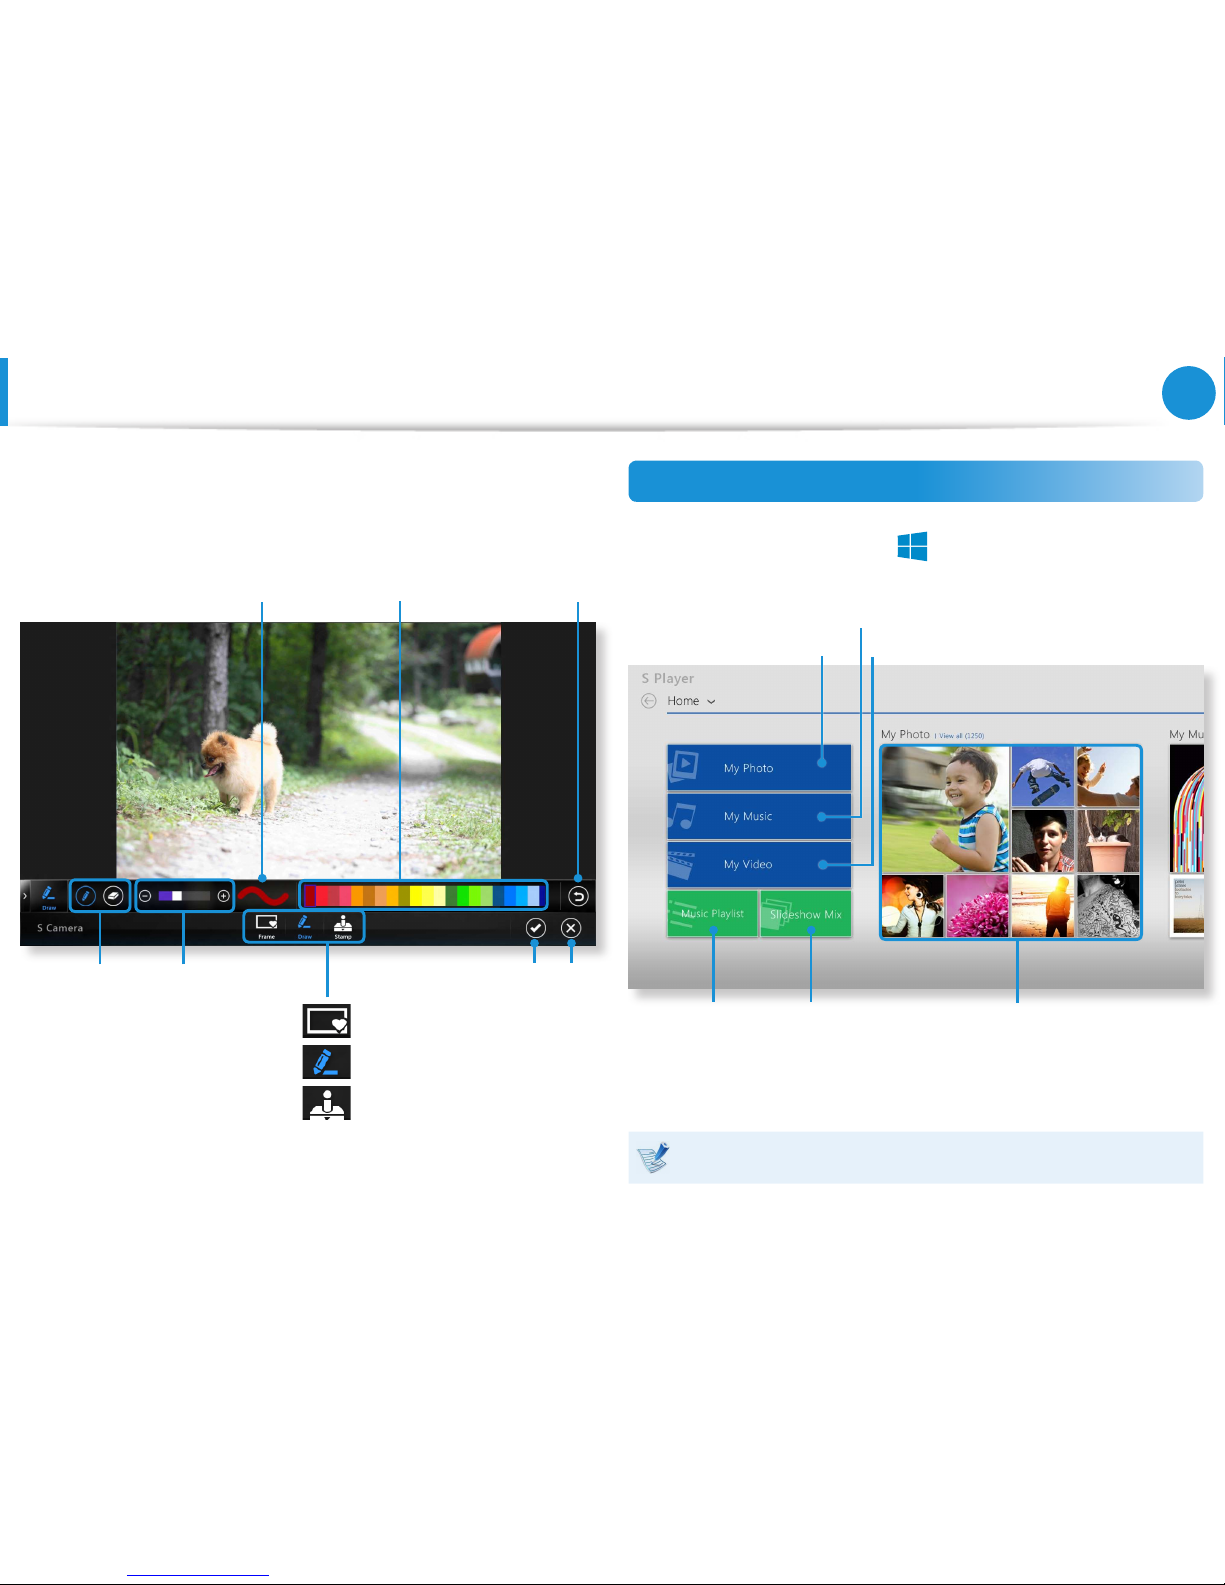
69
Chapter 3.
Using the computer
2
Select an eect to be applied to the photo.
E.g. If you select Draw
Close
UndoLine preview
Line thickness Save
Color
Erase/Draw
Frame
Draw
Stamp
Using the S Player app
1
Tap Charm menu > Start
áᔪ
Ŗᮁ
> S Player.
My Photos
My Music
My Videos
My photo list
Music playlist Slideshow
2
Select a menu to enjoy photo, video and music les.
Some les may not be played depending on their format.
Using the Multimedia App
(Optional)
Page 71
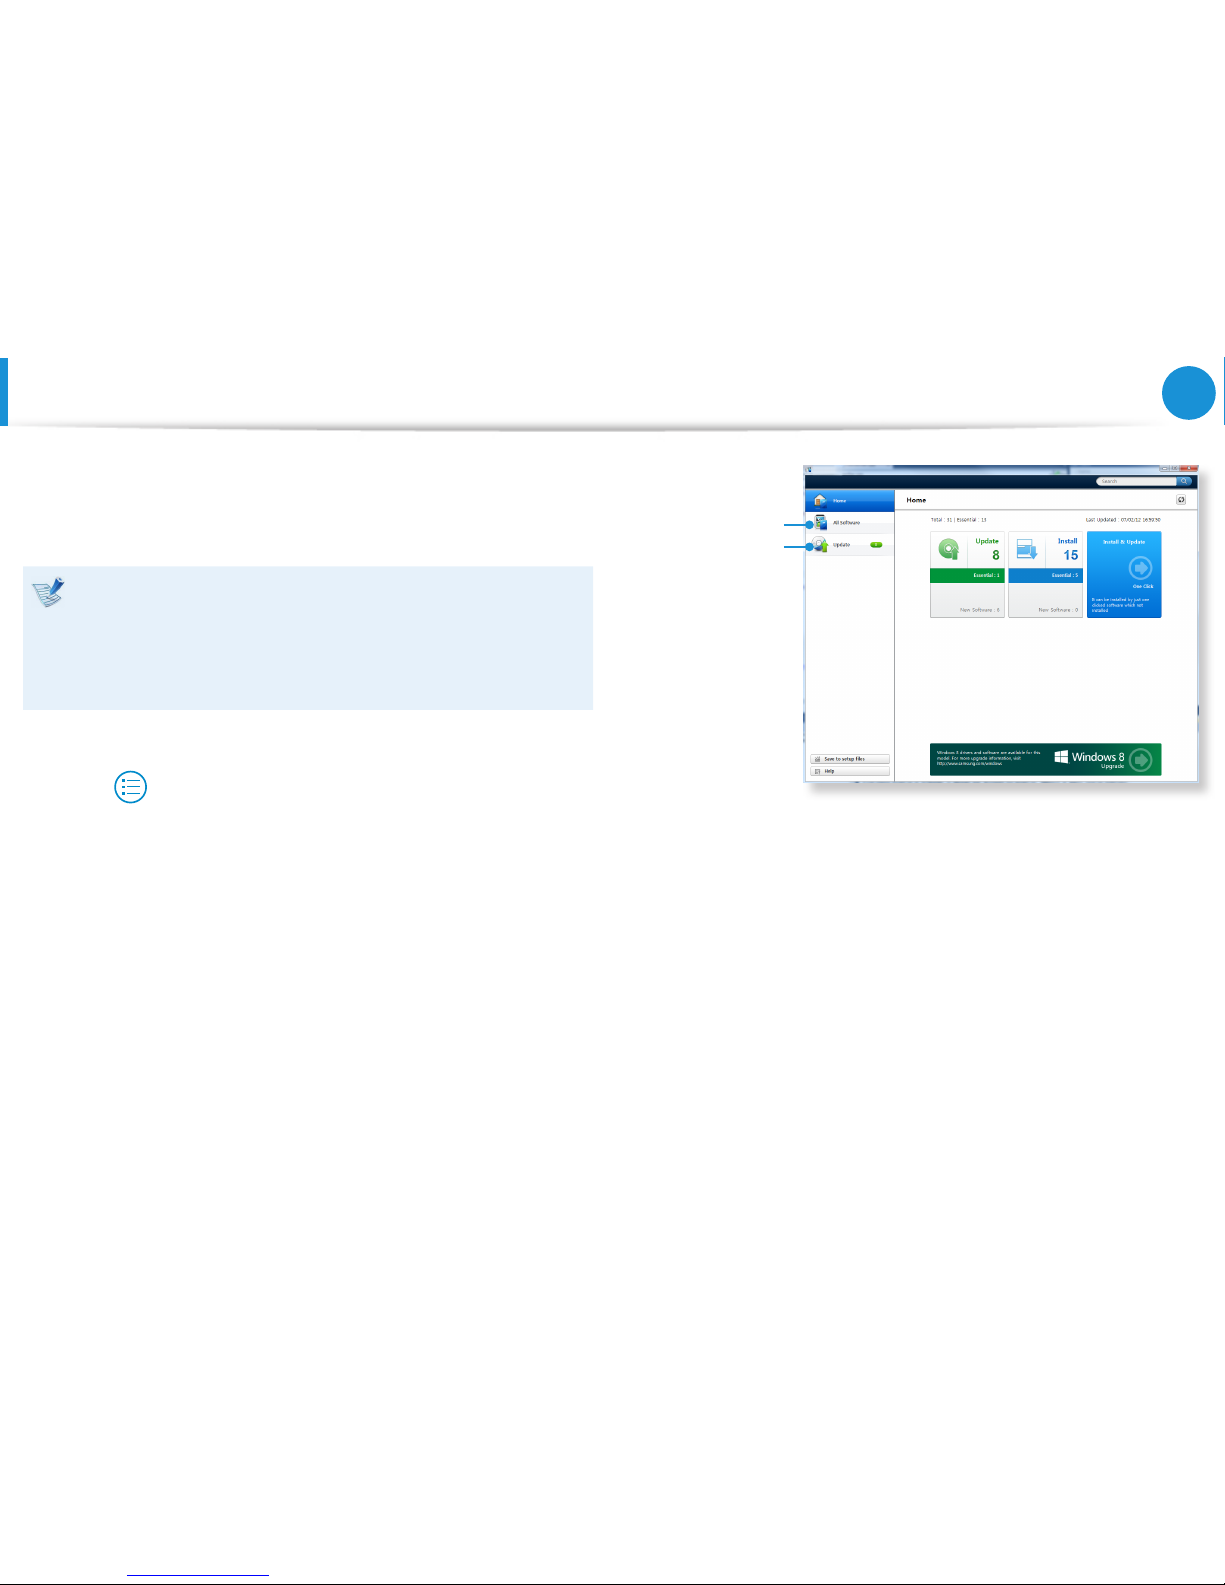
70
Chapter 3.
Using the computer
Samsung Software Update
SW Update is a software program that searches for Samsung
software programs and drivers installed when you purchased the
computer and helps you update any drivers or programs.
You can check updatable les before performing the •
update only when you are connected to the internet.
SW Update does not provide any updates for device •
drivers or software programs installed separately by the
user.
1
From the Start Screen, right-click any area and select All
Apps
in the bottom right corner. Then, click SW Update.
2
If the program is running for the rst time, the User
Agreement for personal information use appears.
Click Agree.
3
The SW Update program runs.
Select the items that you want to update before proceeding
with the update process.
Software
Update
Software List
Page 72
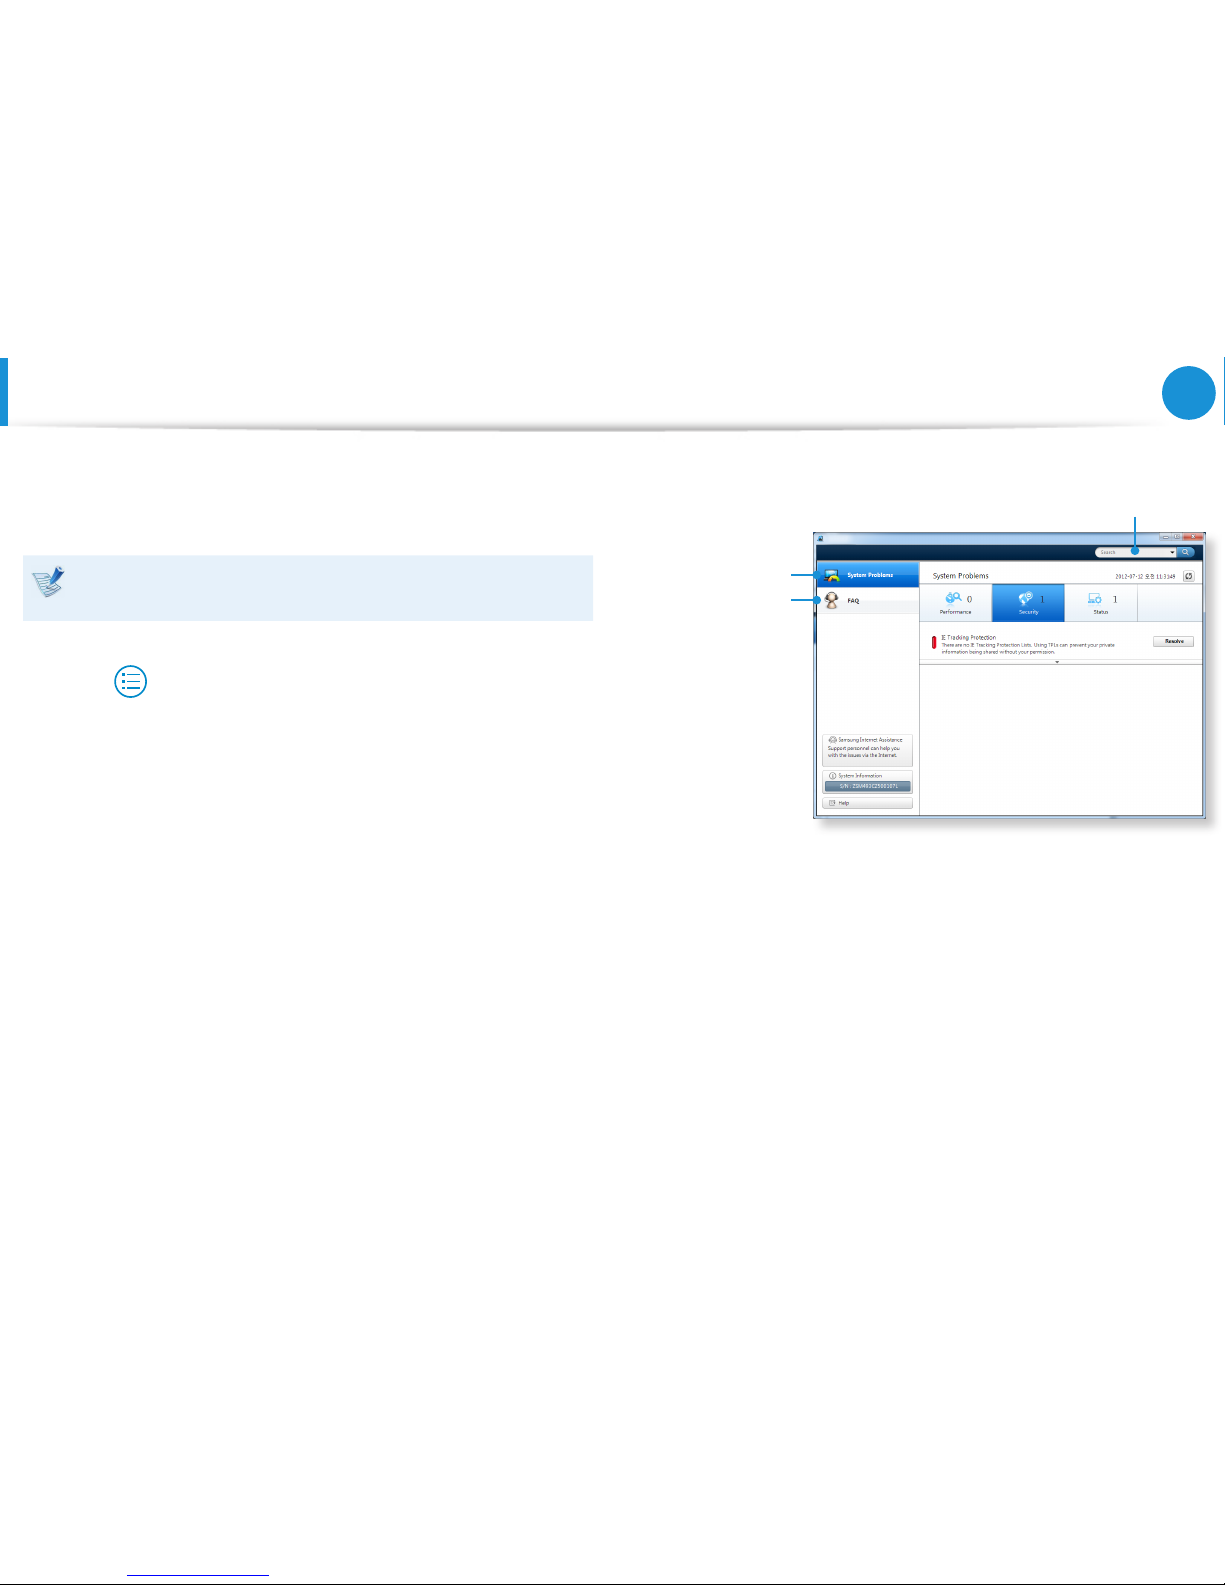
71
Chapter 3.
Using the computer
Diagnosing the Computer Status and Troubleshooting
The Support Center program, which is Samsung’s computer’s
troubleshooting guide, supports diagnosing the system and has a
FAQ for frequently occurring problem(s).
Support Center may not be provided or may be a dierent
version depending on the model.
1
From the Start Screen, right-click any area and select All
Apps
in the bottom right corner. Then, click Support
Center.
2
eSupport is activated and starts diagnosing your computer.
After the diagnosing process is nished, the System Status
menu displays a list of the current problems to be solved as
shown.
FAQ for
computer’s
major problems
Diagnosing
Computer and
Troubleshooting
Searching for
computer’s problems
3
You can solve a problem by clicking the Troubleshoot button
for the problem.
Page 73
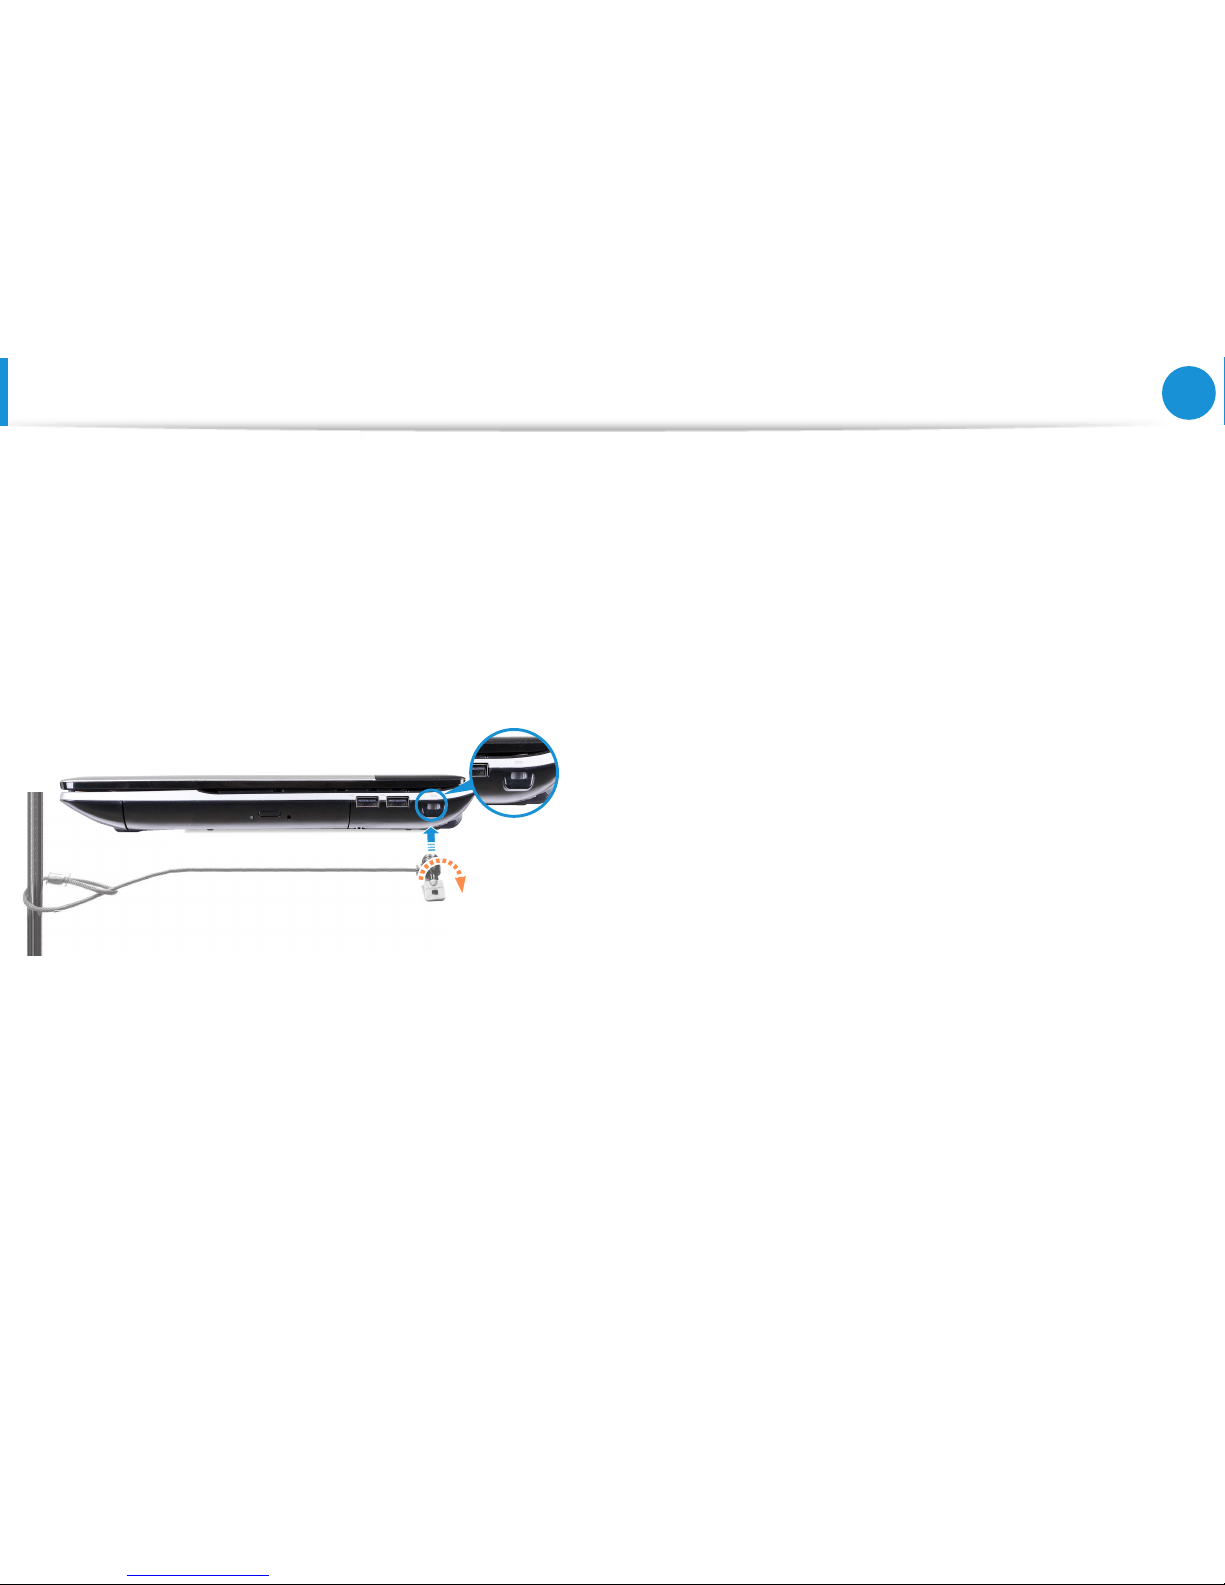
72
Chapter 3.
Using the computer
Using the Security Slot
(Optional)
You can secure the computer by connecting a lock and cable to
the Security Slot.
To use this feature, you have to purchase the lock and cable
additionally. To use the lock and cable, refer to the product
manual.
Tie the lock and cable to a xed object and install the other end of
the cable to the security slot.
Page 74

BIOS Setup 74
Setting a Boot Password 76
Changing the Boot Priority 79
Upgrading Memory 80
Battery 82
Chapter 4.
Settings and Upgrade
Page 75

74
Chapter 4.
Settings and Upgrade
BIOS Setup
The BIOS Setup enables you to congure your computer hardware
according to your needs.
Use the BIOS setup to dene a boot password, change the •
booting priority, or add a new device.
Since incorrect settings may cause your system to •
malfunction or crash, take care when conguring the BIOS.
The functions of the BIOS setup are subject to change for •
product function enhancement purposes.
The BIOS Setup menus and items may dier depending on •
your computer model.
Entering the BIOS Setup
1
Turn the computer on.
Immediately press the F2 key several times.
2
After a moment, the BIOS setup screen appears.
The items in the BIOS setup may dier depending on the
product.
Page 76
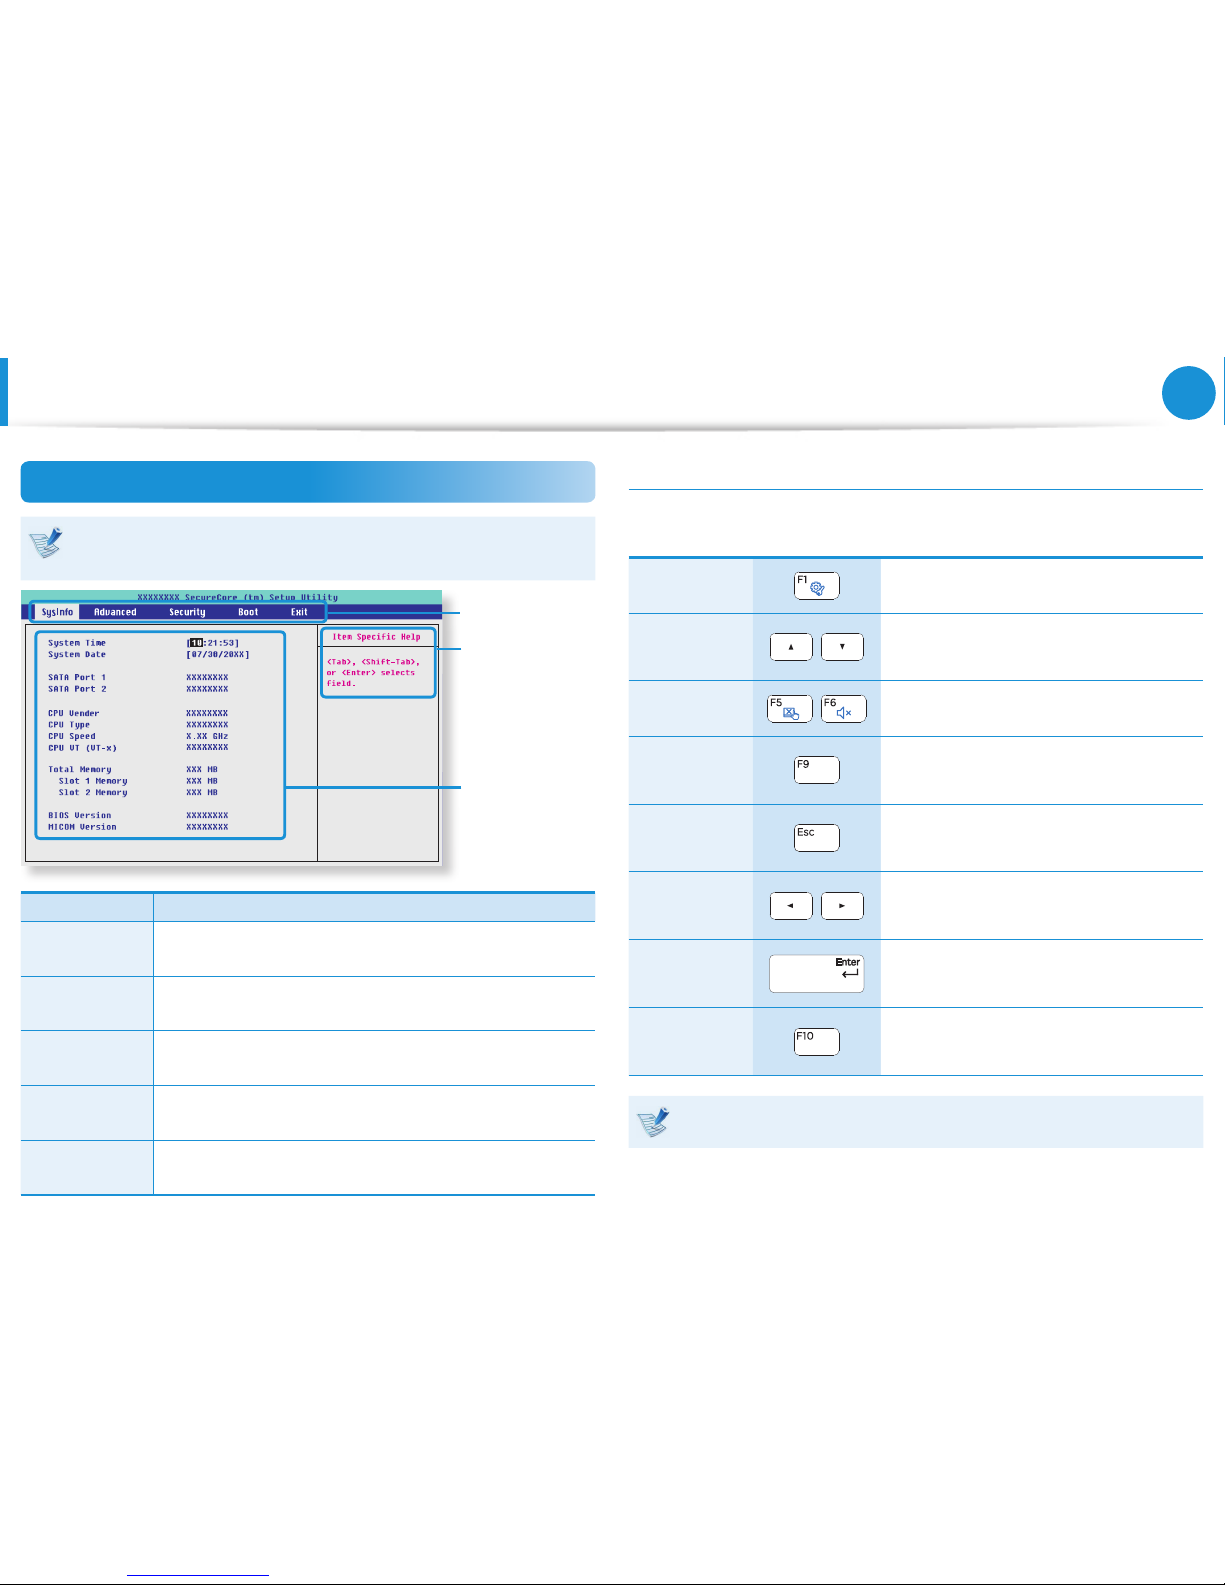
75
Chapter 4.
Settings and Upgrade
The BIOS Setup Screen
The BIOS Setup menus and items may dier depending on
your computer model.
Setup Menu
Setup Items
Help
Help for the
selected
item appears
automatically.
Setup Menu Description
SysInfo
This is a description about the basic specications
of the computer.
Advanced
Using this menu, you can congure the major
chipsets and additional functions.
Security
Used to congure security functions, including
passwords.
Boot
This menu enables you to congure peripherals and
booting related settings such as the boot priority.
Exit
Used to exit the Setup either saving the changes or
not.
System Setup Keys
In the Setup, you have to use the keyboard.
F1 Press to view the Setup Help.
Up & Down
Keys
Press to move up and down.
F5/F6
Press to change the item value.
F9
Press to load the default Setup
settings.
ESC
Press to return to a higher level
menu or to move to the Exit menu.
Left & Right
Keys
Press to move to another menu.
Enter
Press to select an item or to enter a
sub menu.
F10
Press to save the changes and exit
Setup.
The keyboard image may dier from the actual keyboard.
BIOS Setup
Page 77
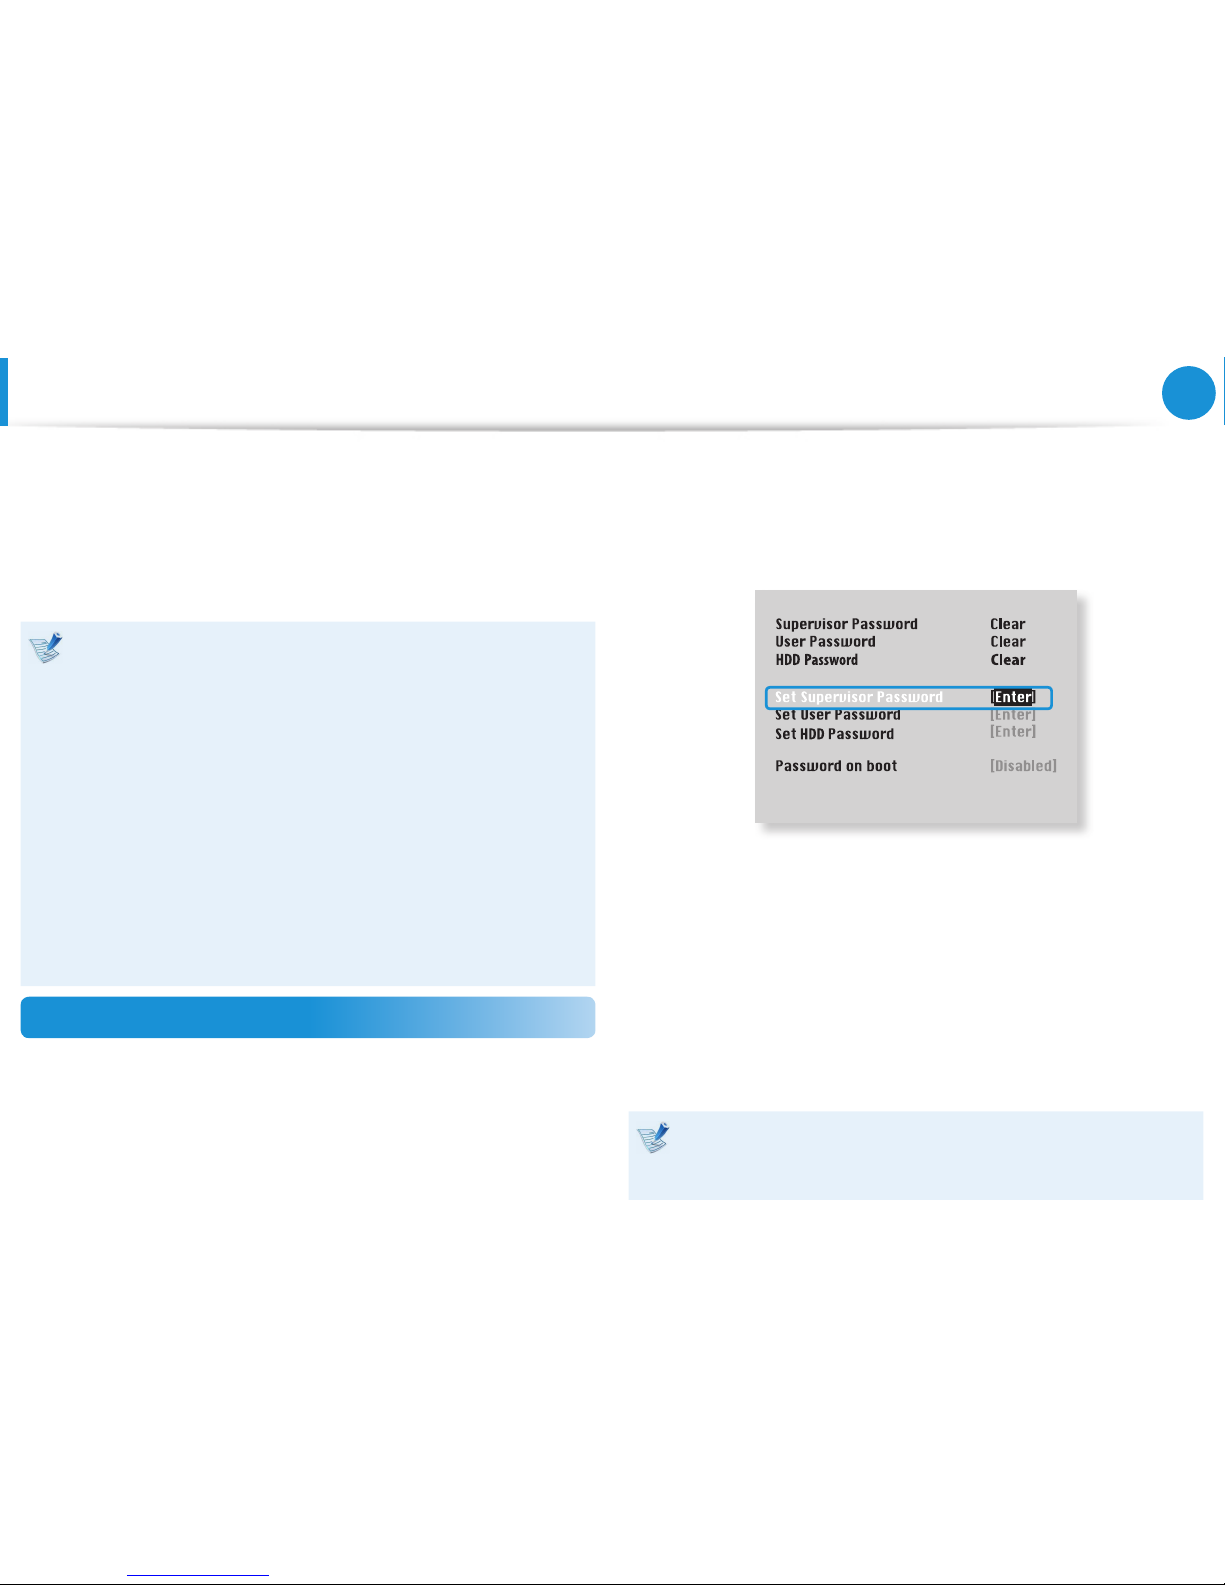
76
Chapter 4.
Settings and Upgrade
Setting a Boot Password
If you set a password, you have to enter the password when you
turn the computer on or enter the BIOS Setup.
By conguring a password, you can restrict system access to
authorized users only and protect data and les saved on the
computer.
The password setting provides the following 3 sub menus.•
(Supervisor Password, User Password and HDD Password)
Do not lose or forget your password. •
Do not let others know your password.•
If you forget the Supervisor Password or HDD Password, •
you will need to request assistance from the service center.
In this case, a service fee will be charged.
When you forget the User Password, you can disable •
the Supervisor Password, and the User Password is also
automatically disabled.
The screen images and terms may dier from actual •
product depending on the computer model and driver
version.
Setting a Supervisor Password
If you set a Supervisor Password, you need to enter the password
when you turn the computer on or enter the BIOS Setup.
Setting only the Supervisor Password and User Password is not
very secure. You can use an HDD Password as well to increase the
security level.
1
Select the Security menu in the BIOS Setup.
2
In the Set Supervisor Password item, press <Enter>.
XXXXXXXX
3
Enter a password, press <Enter>, re-enter the password for
conrmation, and press <Enter> again.
The password can be up to 8 alphanumeric characters.
Special characters are not allowed.
4
The supervisor password has been set.
The supervisor password is required to turn the computer on
or to enter the BIOS Setup.
For some models, if the password entered message appears
in the Setup Notice window, the settings are not complete
until the <Enter> key is pressed.
Page 78

77
Chapter 4.
Settings and Upgrade
Setting a Boot Password
Setting a User Password
Using the User Password, you can turn the computer on but you
cannot change the major settings of the BIOS Setup because you
cannot enter the BIOS Setup.
This helps prevent unauthorized access to the major settings in
the BIOS Setup menu.
Before conguring a user password, a supervisor password must
have been congured. Deactivating the supervisor password also
deactivates the user password.
In the Set User Password item, press <Enter> and complete the
procedures from Step 3 of Setting a Supervisor Password.
Setting Up a Boot Password
To setup a boot password, the administrator password (Set
Supervisor Password) should be set in advance.
Set the Password on boot item to Enabled.
Once a boot password is set, you have to enter a password to boot
up the computer.
Be sure to remember the password for later use.
Setting up a Hard Disk Drive Password
(Optional)
If you set a password for a hard disk drive, it cannot be accessed
from another computer.
Press <Enter> in the Set HDD Password item and dene a
password as described in Step 3 of the Setting up the Supervisor
Password.
The hard disk drive password setting function is not •
provided for some models.
Changing the hard disk drive password•
For security purposes, you can only change a hard disk
drive password after restarting the computer by pressing
the computer Power button.
If you cannot change the hard disk drive password or the
HDD Password Frozen message appears when entering
the BIOS Setup and then selecting Security > HDD
Password, press the Power button to turn the computer
on again.
Page 79

78
Chapter 4.
Settings and Upgrade
Setting a Boot Password
Deactivating the Password
1
Press <Enter> on the password to be deactivated. For
example, to deactivate a supervisor password in the Set
Supervisor Password item, press <Enter>.
2
In the Enter Current Password item, enter the currently
congured password and press <Enter>.
3
Leave the Enter New Password item eld empty, and press
<Enter>.
4
Leave the Conrm New Password eld empty, and press
<Enter>.
The password is deactivated.
For some models the password is only canceled if the
<Enter> key is pressed in the Setup Notice window.
Page 80
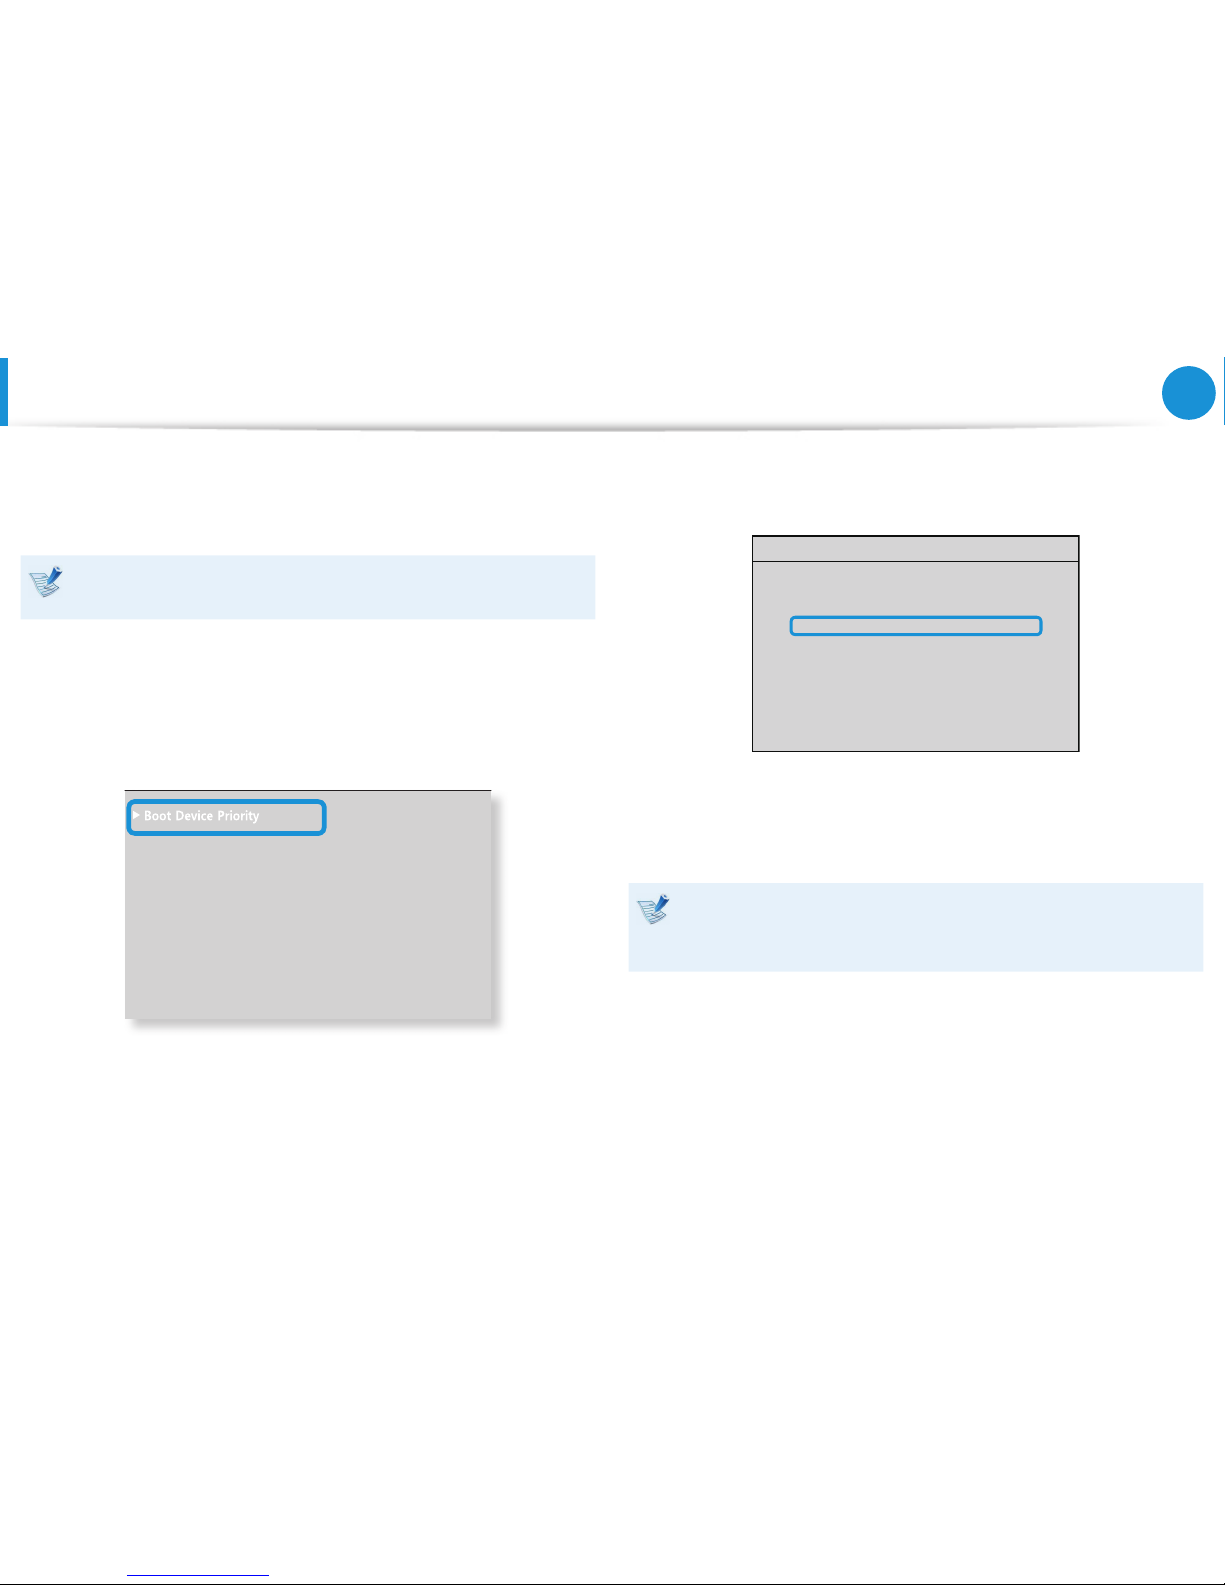
79
Chapter 4.
Settings and Upgrade
Changing the Boot Priority
As an example, the procedures to change the highest boot priority
device to the hard disk drive are described below.
The screen images and terms may dier from actual product
depending on the computer model and driver version.
1
Select the Boot menu in the BIOS Setup.
2
Press <Enter> on the Boot Device Priority item.
XXXXXXXX
0WO.QEM =1HH?
'PCDNG-G[RCF =$[0WO.QEM?
6QWEJ2CF/QWUG ='PCDNGF?
+PVGTPCN.#0 ='PCDNGF?
2:'1241/ =&KUCDNGF?
5OCTV$CVVGT[%CNKDTCVKQP
3
Press the down key (↓) to move to the SATA HDD item and
press the F6 key to move up to the top item.
Boot Menu
[Boot Priority Order]
1. SATA CD : XXXXXXXXXXXX
2. SATA HDD : XXXXXXXXXXXX
3. USB CD : N/A
4. USB FDD : N/A
5. USB HDD : N/A
6. NETWORK : N/A
4
Press the F10 key to save the settings and exit Setup.
The highest boot priority device is now set to the Hard Drive.
If you need to boot to DOS using a USB device, enter the
BIOS Setup, select the Advanced menu and set the Fast
BIOS Mode item to Disabled.
Page 81
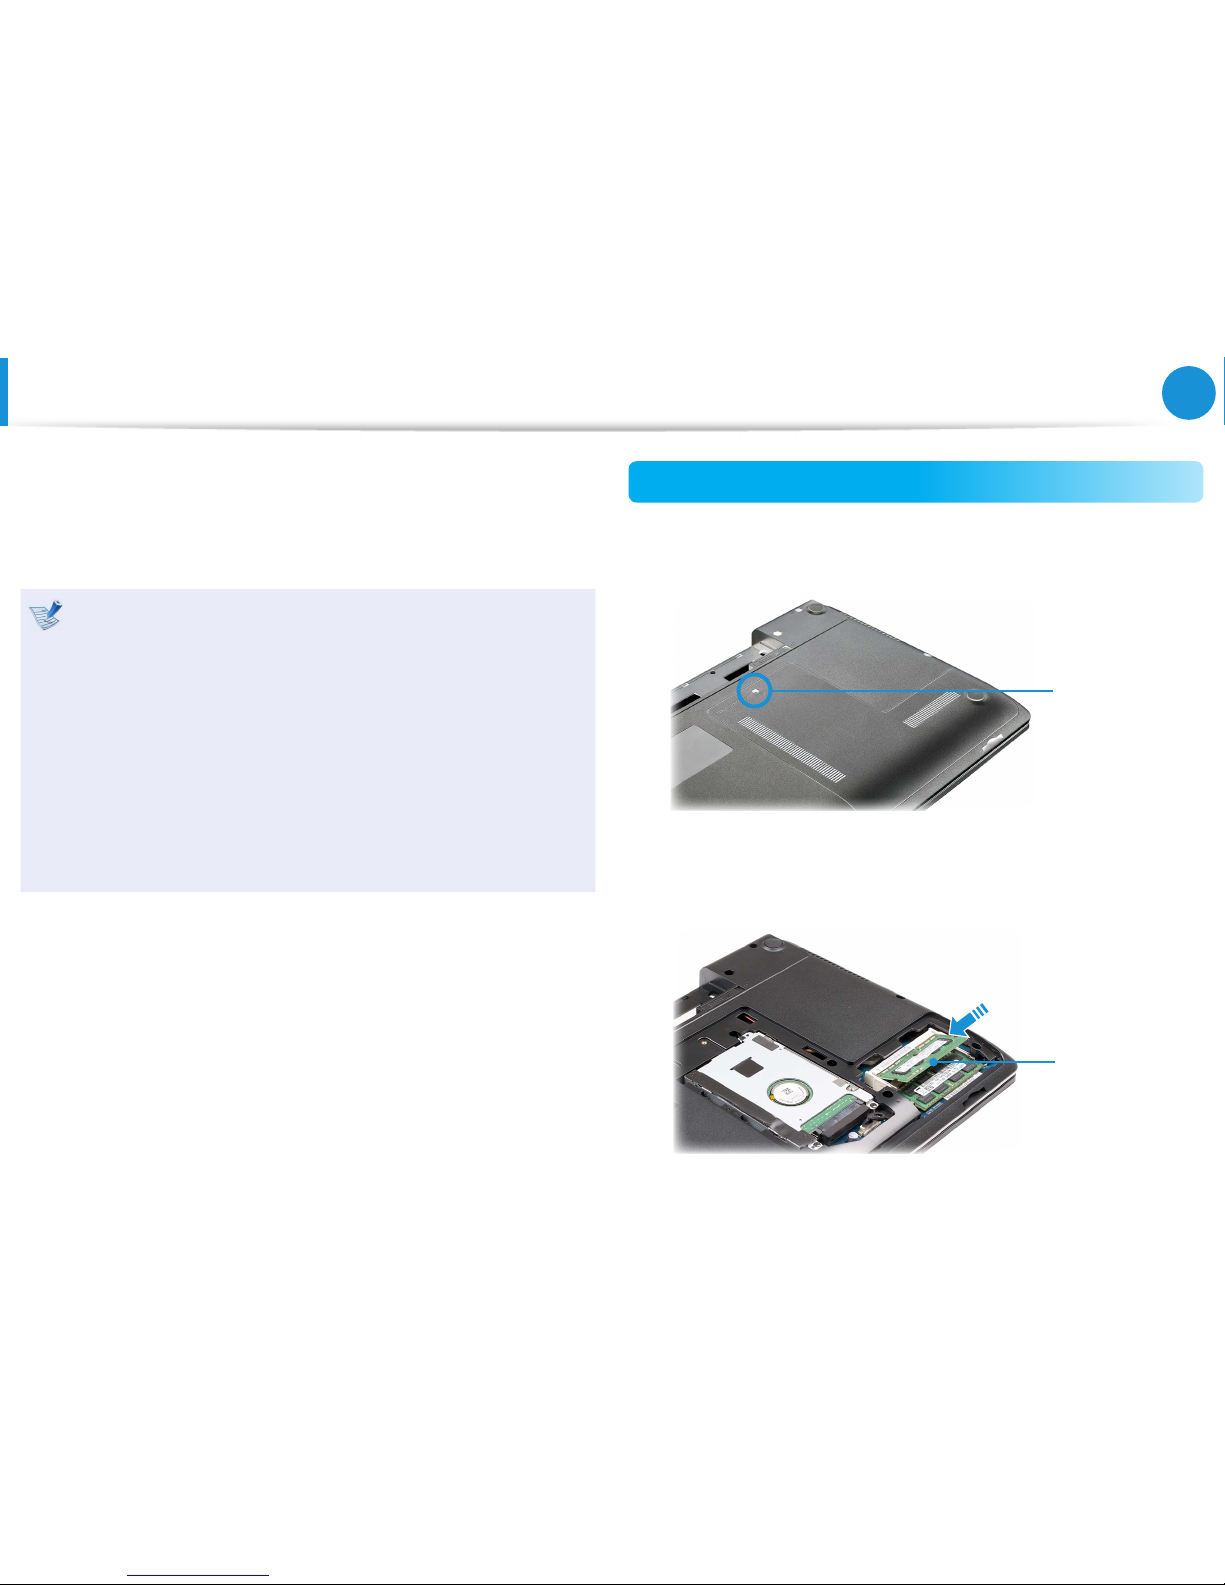
80
Chapter 4.
Settings and Upgrade
Upgrading Memory
One or more memory modules are installed on the computer.
There are 2 memory slots and users can replace the installed
memory or add new memory.
Replace or install new memory only after shutting the •
computer down completely. Do not replace or install
memory when the computer is in Sleep mode.
Disconnect main power plug and remove the battery
before continuing.
It is recommended that you add a memory module with •
the same specication (the same manufacturer and the
same capacity).
The images used for the illustration are of a representative •
model, therefore the images may dier from the the actual
product.
Adding or Replacing Memory Modules
1
Remove the screw on the memory compartment cover at the
bottom of the computer using a screw driver.
Fixing Screw
2
Insert a new memory module into the memory slot at an
angle of approximately 30 degrees aligning it to the angle of
the memory slot.
Memory Slot
Page 82
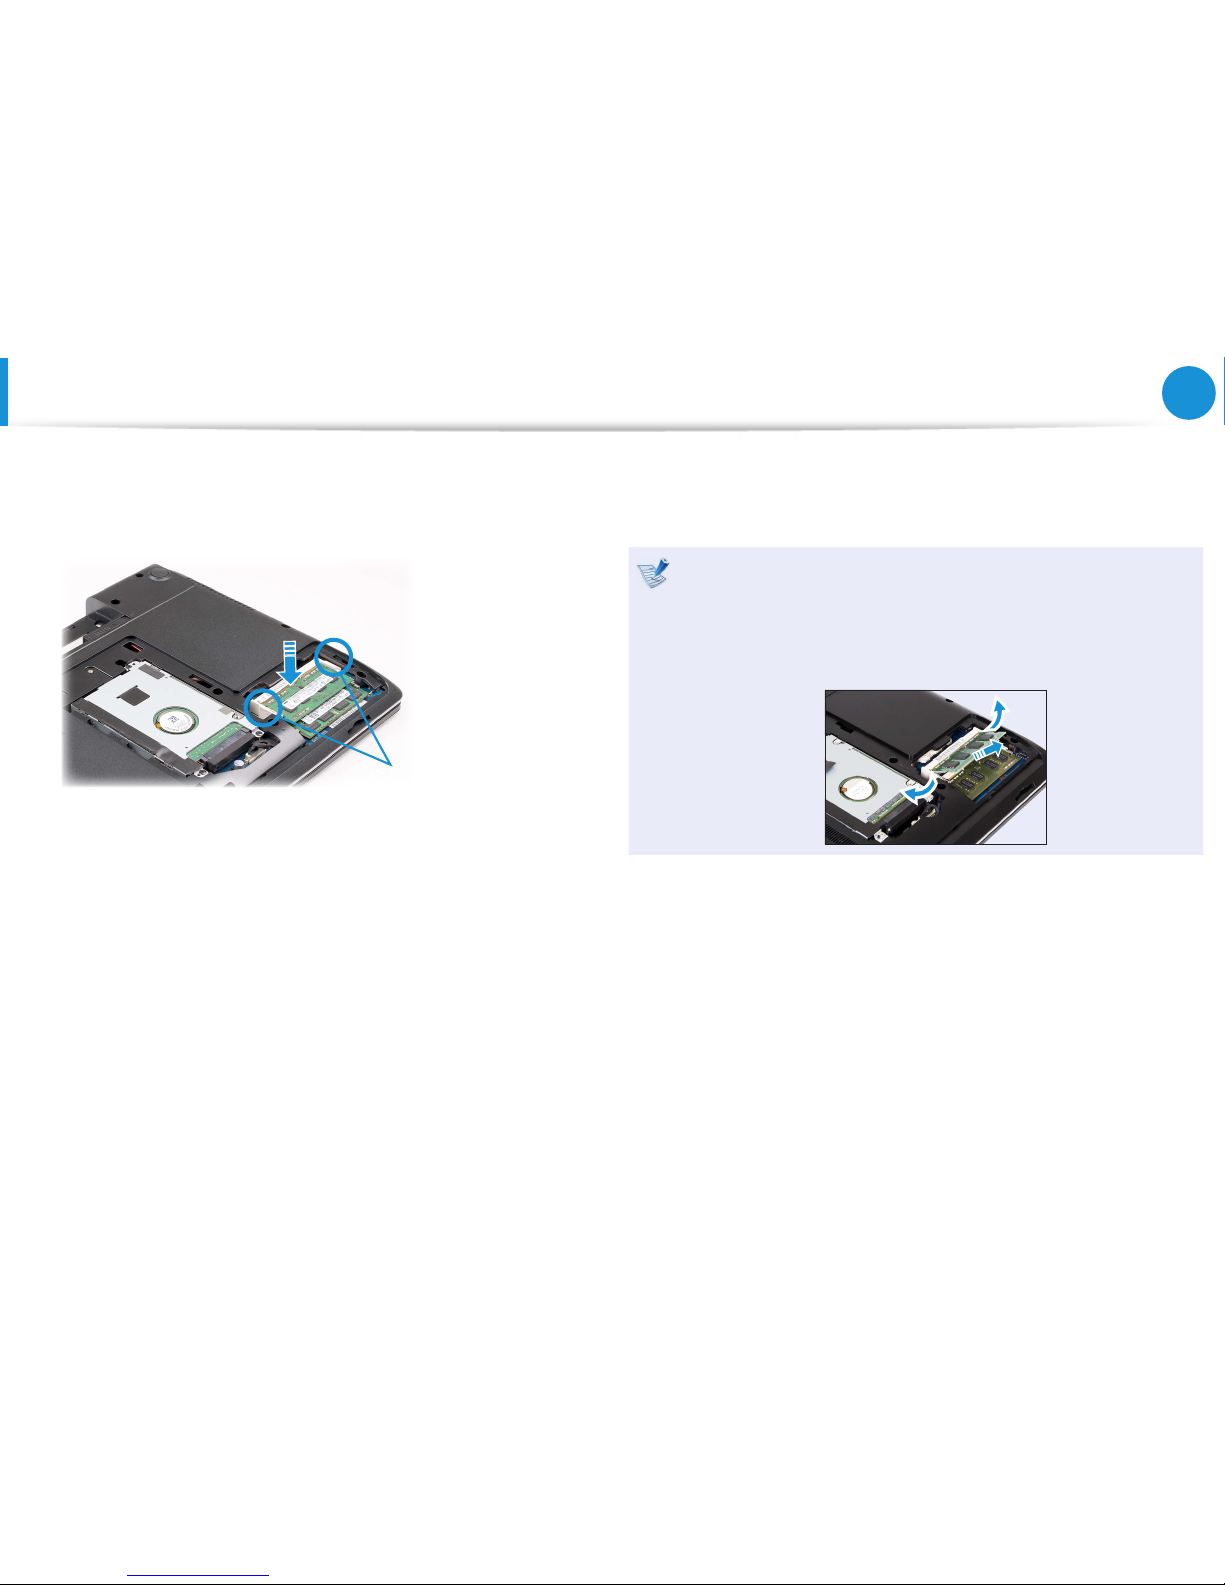
81
Chapter 4.
Settings and Upgrade
Upgrading Memory
3
Push the memory module down so that it is completely xed.
If the memory does not t easily, push the memory module
down while pulling the memory module latches outward.
Memory module latches
4
Close the memory compartment cover and fasten the screw.
Removing a memory module
Pull the memory module latches outward.
The memory module will pop up.
Remove the memory module out at an angle of 30 degrees.
Page 83
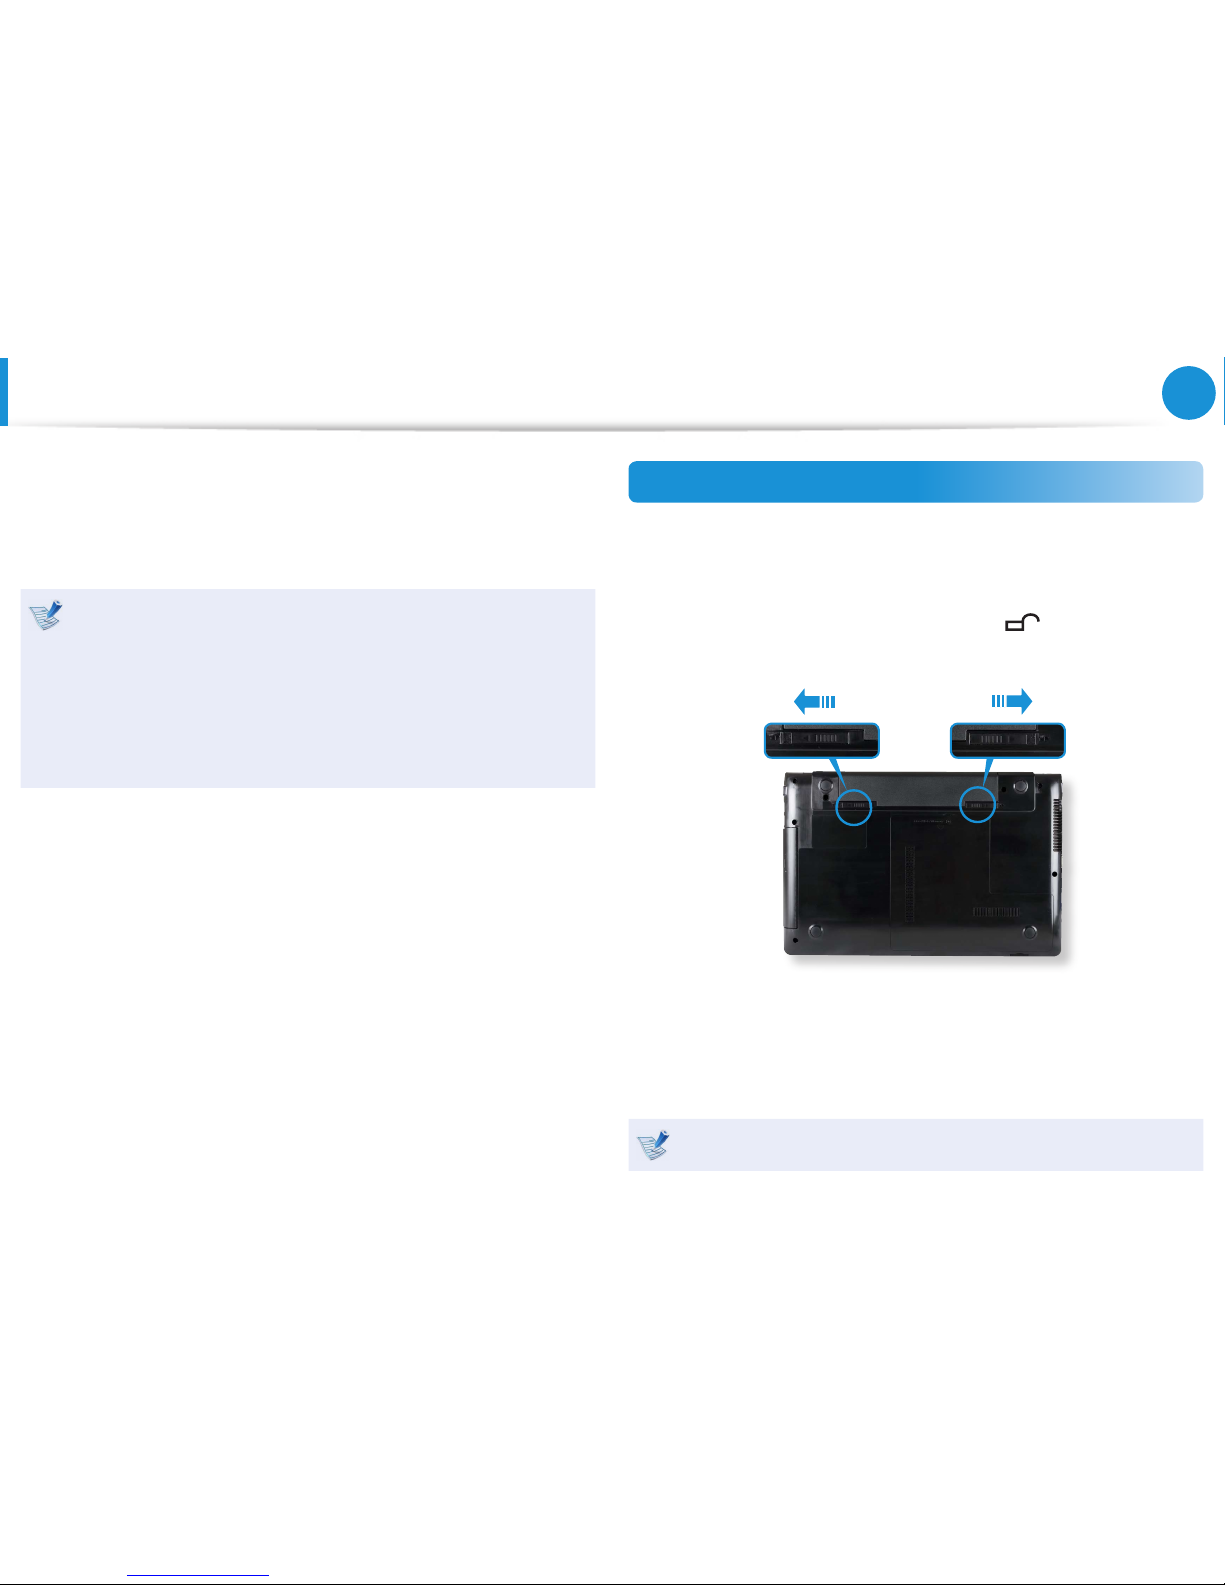
82
Chapter 4.
Settings and Upgrade
Battery
Please refer to the following instructions when running the
computer on battery power without connecting the AC power.
A Lithium-Ion smart battery is supplied with this computer.
Carefully read and follow the precautions printed on the •
battery before using the battery.
Before using your computer for the rst time after •
purchasing it, charge the battery completely.
The images used for the illustration are of a representative •
model, therefore the images may dier from the the actual
product.
Installing/Removing the Battery
1
Shutdown the system, close the LCD panel and place the
computer upside down on a at surface.
2
Pull the two battery latches outwards , then remove the
batte ry.
3
To install the battery again, slide the battery into the system.
The battery latches move inwards and x the battery
automatically.
Check if the battery latch has been moved inwards.
Page 84
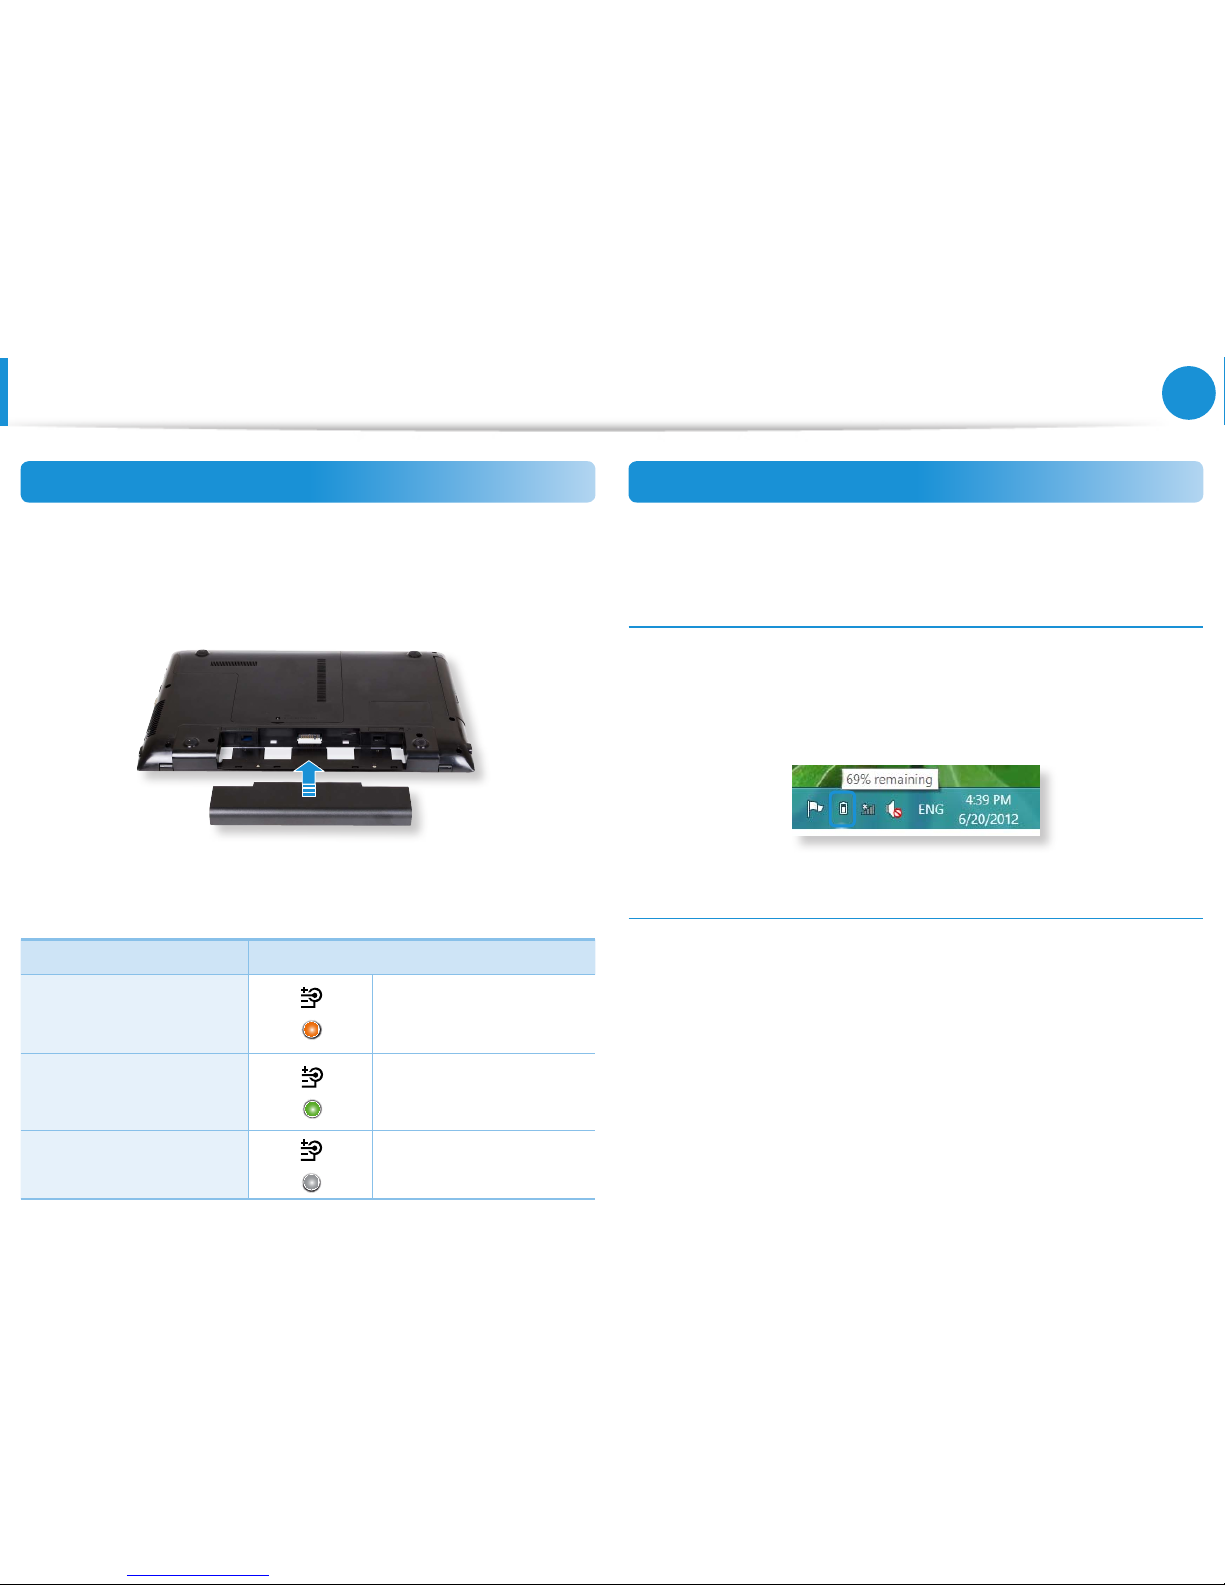
83
Chapter 4.
Settings and Upgrade
Battery
Charging the Battery
1
Attach the battery and connect the AC adapter to the DC-in
jack of the computer.
The battery will then start charging.
2
When charging is complete, the Charge LED turns green.
Status Charge LED
Charging
Orange
Charging complete
Green
AC adapter not
connected
O
Measuring the Remaining Battery Charge
You can view the battery charge status by completing the
following procedures.
Conrming the battery charge in the Taskbar
Disconnect the AC adapter and move the mouse cursor over
the battery icon in the system tray of the Taskbar to conrm the
remaining battery charge.
Battery Usage Time Information
A battery is an expendable supply, so when using it over a long
time, the capacity/battery life is shortened. If the battery life is
reduced to under half of its initial time, we recommend purchasing
a new battery.
When not using the battery for a long time, store the battery after
charging it to 30-40% of its capacity. This extends the battery life
time.
Page 85
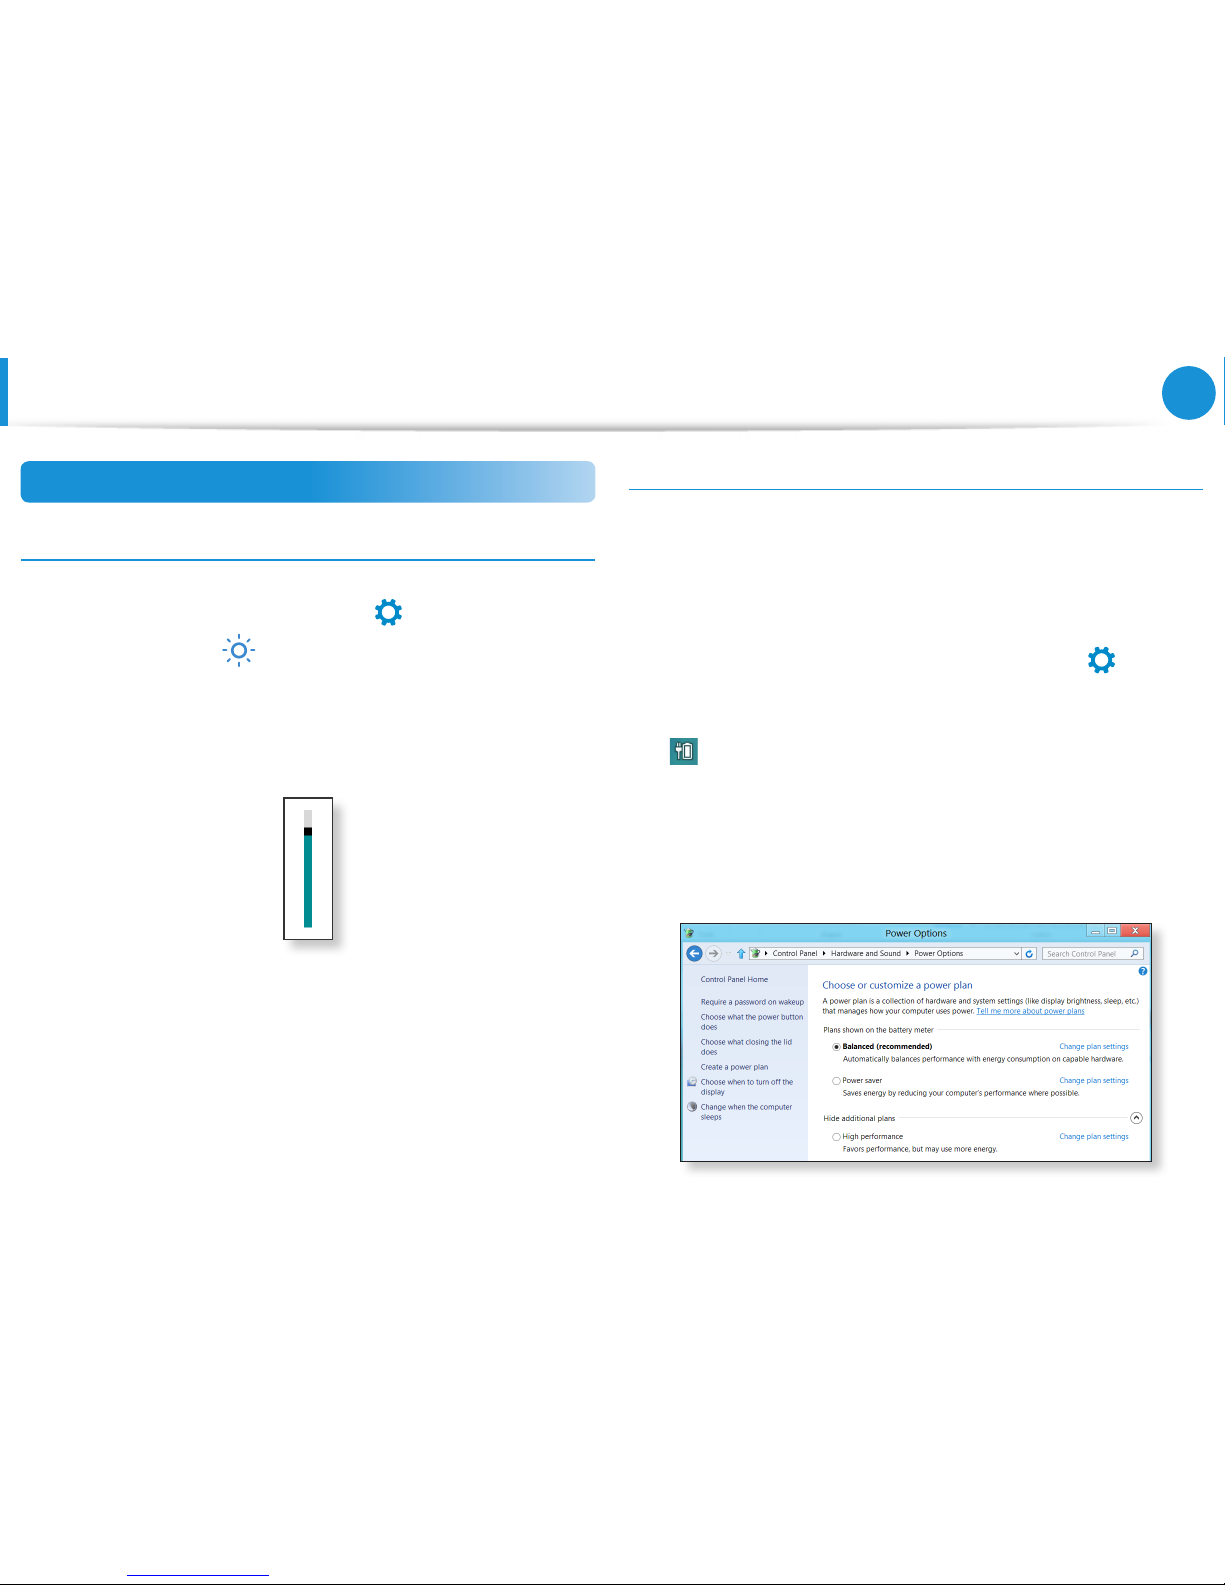
84
Chapter 4.
Settings and Upgrade
Battery
Extending the Battery Usage Time
Decreasing the LCD Brightness
1
Click the Charms menu > Settings
áᔪ
Ŗᮁ
᯲
ᰆ⊹
> Screen
Adjustment icon
.
2
Adjust the brightness with the screen brightness control bar.
The battery life will be extended.
Using the power management program
This program helps you use the battery more eciently
and supports the power mode optimized for the operating
environment.
1
Click Charms menu on the Desktop > Settings
áᔪ
Ŗᮁ
᯲
ᰆ⊹
>
Control Panel > Hardware and Sound > Power Options.
Alternatively, right-click the power measuring device icon
in the notication area of the taskbar and select Power
Options.
2
If the following screen appears, select one of the modes.
Page 86
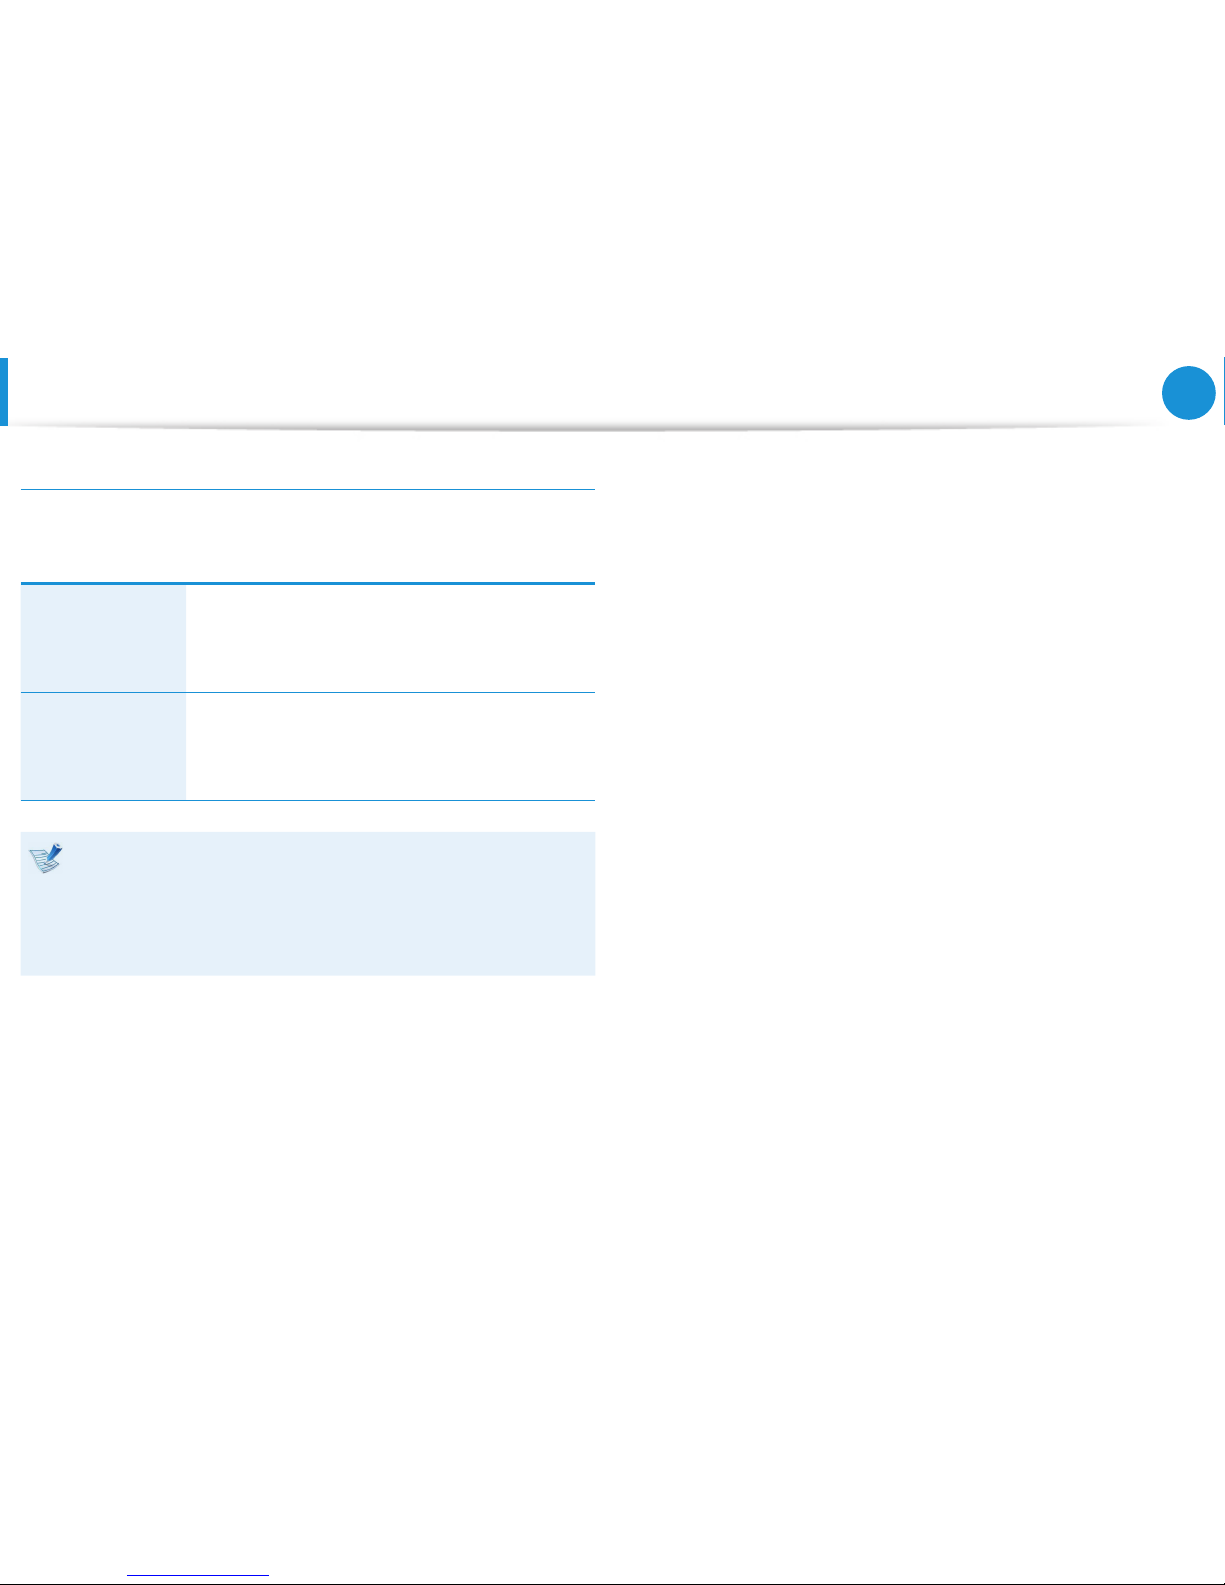
85
Chapter 4.
Settings and Upgrade
Battery
Extending the Battery Life (Optional)
In the Settings program, click Power Management and set the
Battery Life Extender to ON or OFF.
OFF
This mode maintains 100% of the battery
charge when using the computer on AC power.
In this case, although the battery use time
increases, the battery life is reduced.
ON
This mode maintains 80% of the battery charge
when using the computer on AC power. In this
case, although the battery use time decreases,
the battery life is extended.
Alternatively, to extend the battery life
Press the F2 key when the Samsung logo appears in the
booting sequence to enter the BIOS Setup, select Advanced
> Battery Life Cycle Extension, and set it to Enable.
Then you can use the battery life cycle extension mode.
Page 87
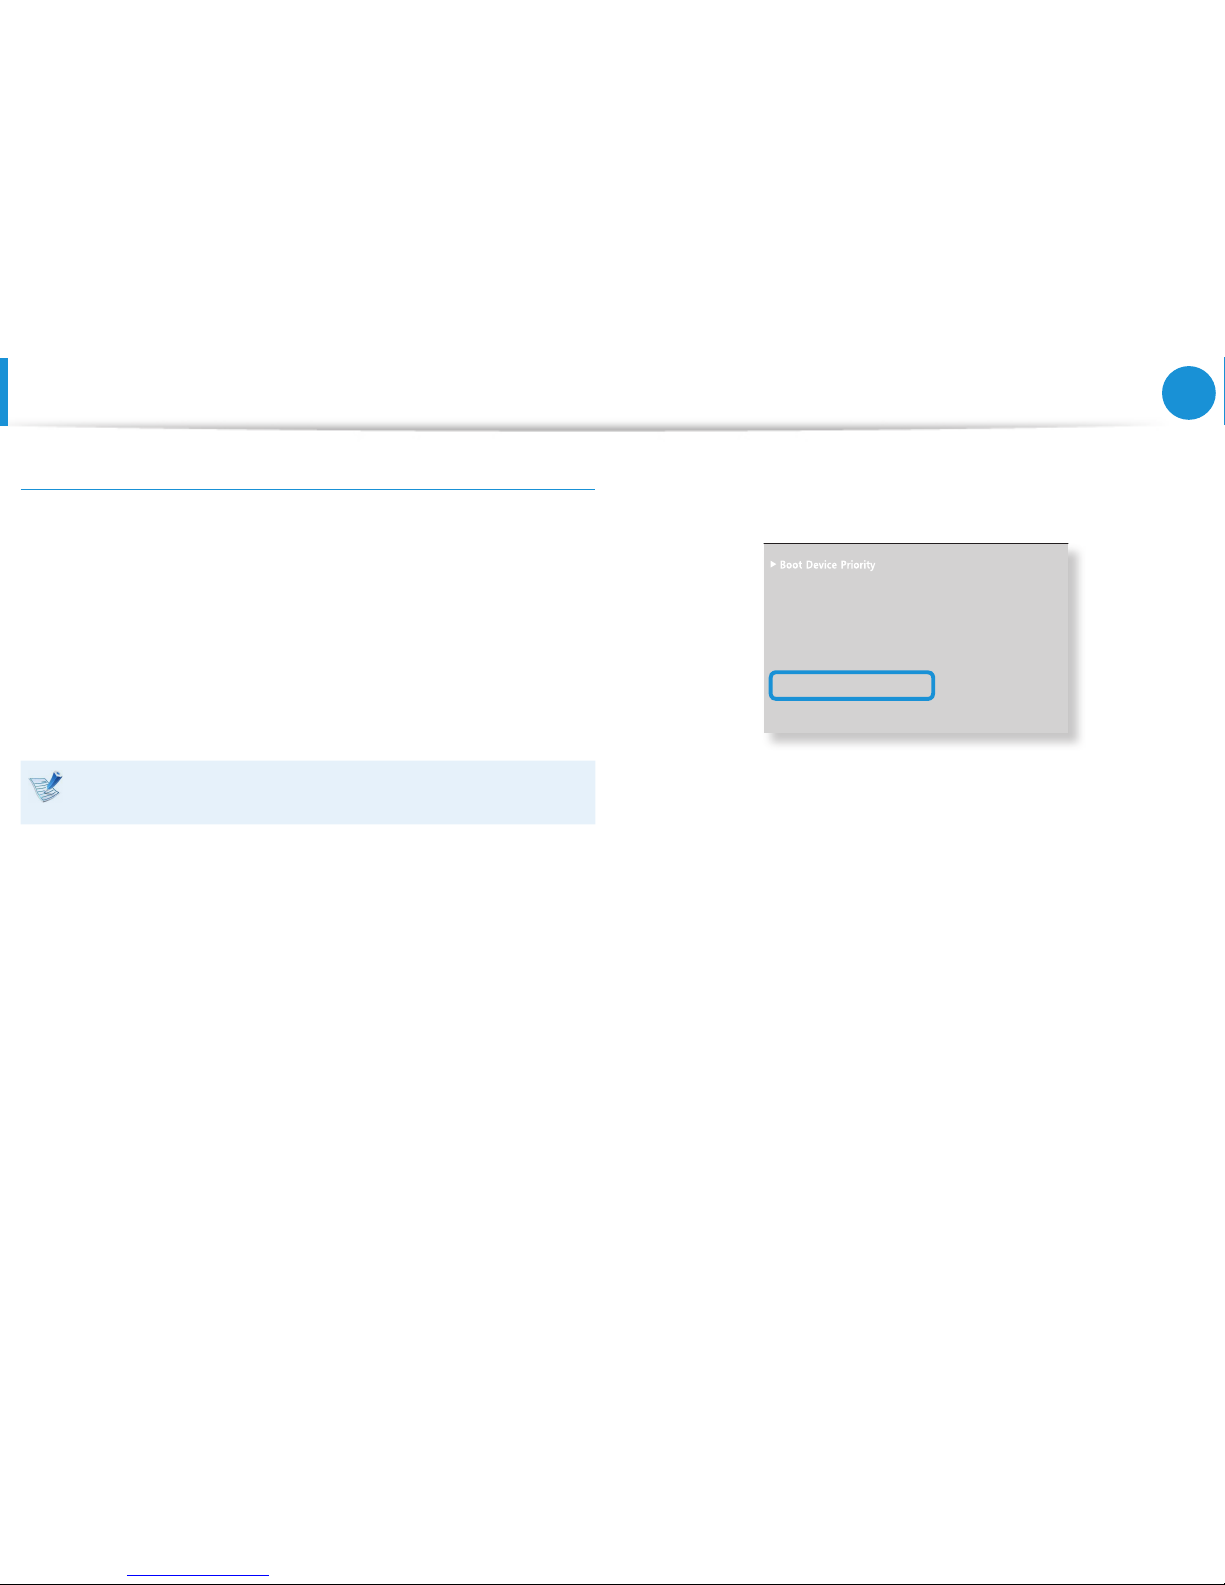
86
Chapter 4.
Settings and Upgrade
Battery
Using the Battery Calibration Function
When charging/discharging the battery repeatedly for a short time
only, the battery usage time may be reduced by the dierence
between the actual battery charge and the remaining charge
disp lay.
In this case, the actual battery charge and the remaining charge
display will be the same by discharging the battery completely
using the Battery Calibration function, and then recharging it
again.
The screen images and terms may dier from actual product
depending on the computer model and driver version.
1
Disconnect the AC power adapter after turning o the
computer.
2
Turn the computer back on, and press the F2 key to enter the
Setup screen.
3
Move to the Boot > Smart Battery Calibration item using
the direction keys and press <Enter>.
XXXXXXXX
0WO.QEM =1HH?
'PCDNG-G[RCF =$[0WO.QEM?
6QWEJ2CF/QWUG ='PCDNGF?
+PVGTPCN.#0 ='PCDNGF?
2:'1241/ =&KUCDNGF?
5OCTV$CVVGT[%CNKDTCVKQP
4
Highlight Ye s in the Battery Calibration Conrmation
window and press <Enter>.
The Battery Calibration function is activated and the battery
is forcefully discharged. To stop the operation, press the
<Esc> button.
This operation requires 3~5 hours depending on the battery
capacity and the remaining battery charge.
Page 88

Chapter 5.
Troubleshooting
Recovering/Backing up the Computer (Optional) 88
Reinstalling Windows (Optional) 95
Q&A 98
Page 89
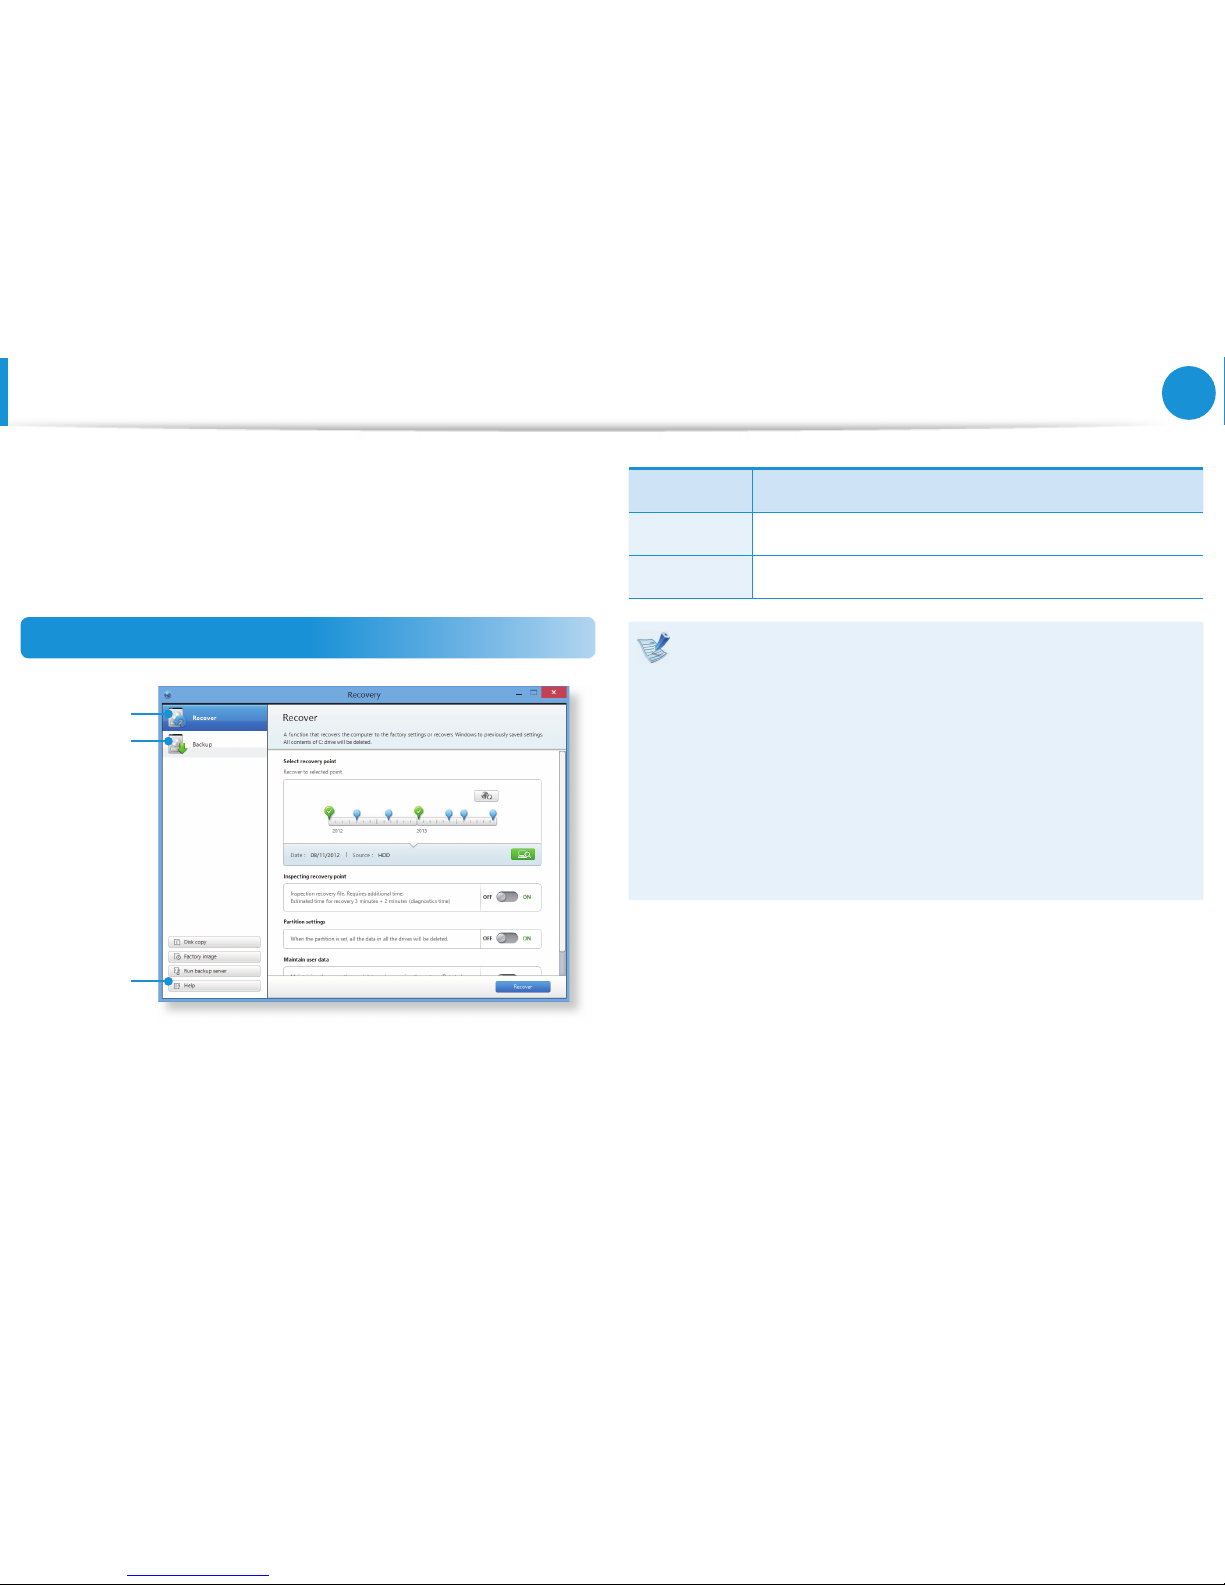
88
Chapter 5.
Troubleshooting
Recovering/Backing up the Computer
(Optional)
If a problem occurs with your computer, Recovery (recovery
program) allows you to easily restore your computer to the default
(factory) settings. Alternatively, you can back up your computer so
that you can restore it to your preferred state at any time.
Recovery Introduction
Help
Back Up
Recover
Function Description
Recover Restores the entire Windows drive.
Back Up You can back up your entire Windows drive.
Recovery may not be provided or may be a di erent •
version depending on the model.
For models whose hard disk or SSD capacity is less than 64 •
GB, the Recovery program is not provided.
The instructions are provided based on Recovery 6.0 •
version. Some functions may di er slightly or be excluded
depending on the version. Refer to the program's Help
section for more information.
An ODD (CD/DVD drive, etc.) is not supported by the •
Recovery program.
Page 90
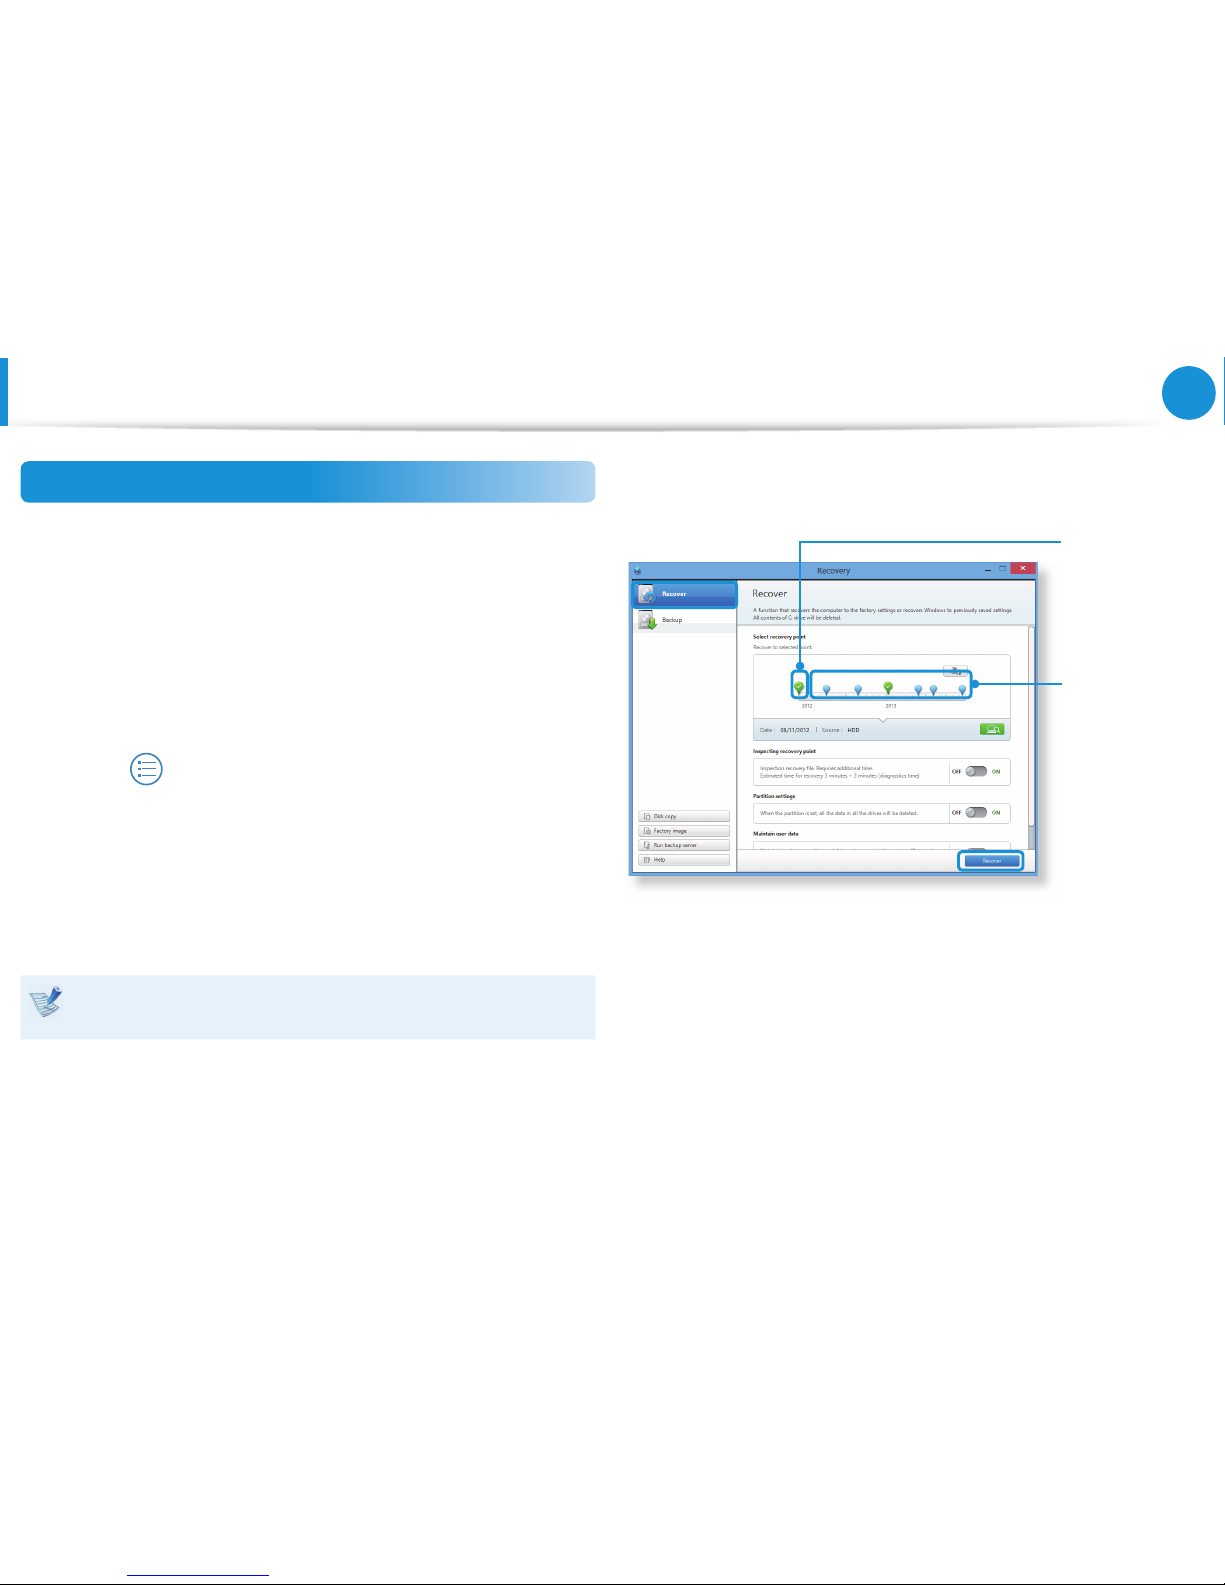
89
Chapter 5.
Troubleshooting
Recovering
You can recover your computer to the default (factory) status
when your computer does not boot up.
1
- If Windows does not start
Turn your computer on and press the F4 key.
Run recovery mode.
- If Windows is run
From the Start Screen, right-click any area and select All
Apps
in the bottom right corner. Then, click Recovery.
2
If the program is running for the rst time, you need to agree
to the User Agreement.
3
If the initial menu screen appears, click Recover.
Select a recovery point and click Recover.
If you set the User Data Maintenance to ON, the computer is
restored while maintaining the current user data.
Factory Default
Point
Restores your
computer to the
factory default
status.
User's Backup
Point
Restores your
computer to a
previously backed
up status.
4
Recover is performed based on the screen instructions.
If the recover is completed, you can use your computer
normally.
Recovering/Backing up the Computer
(Optional)
Page 91
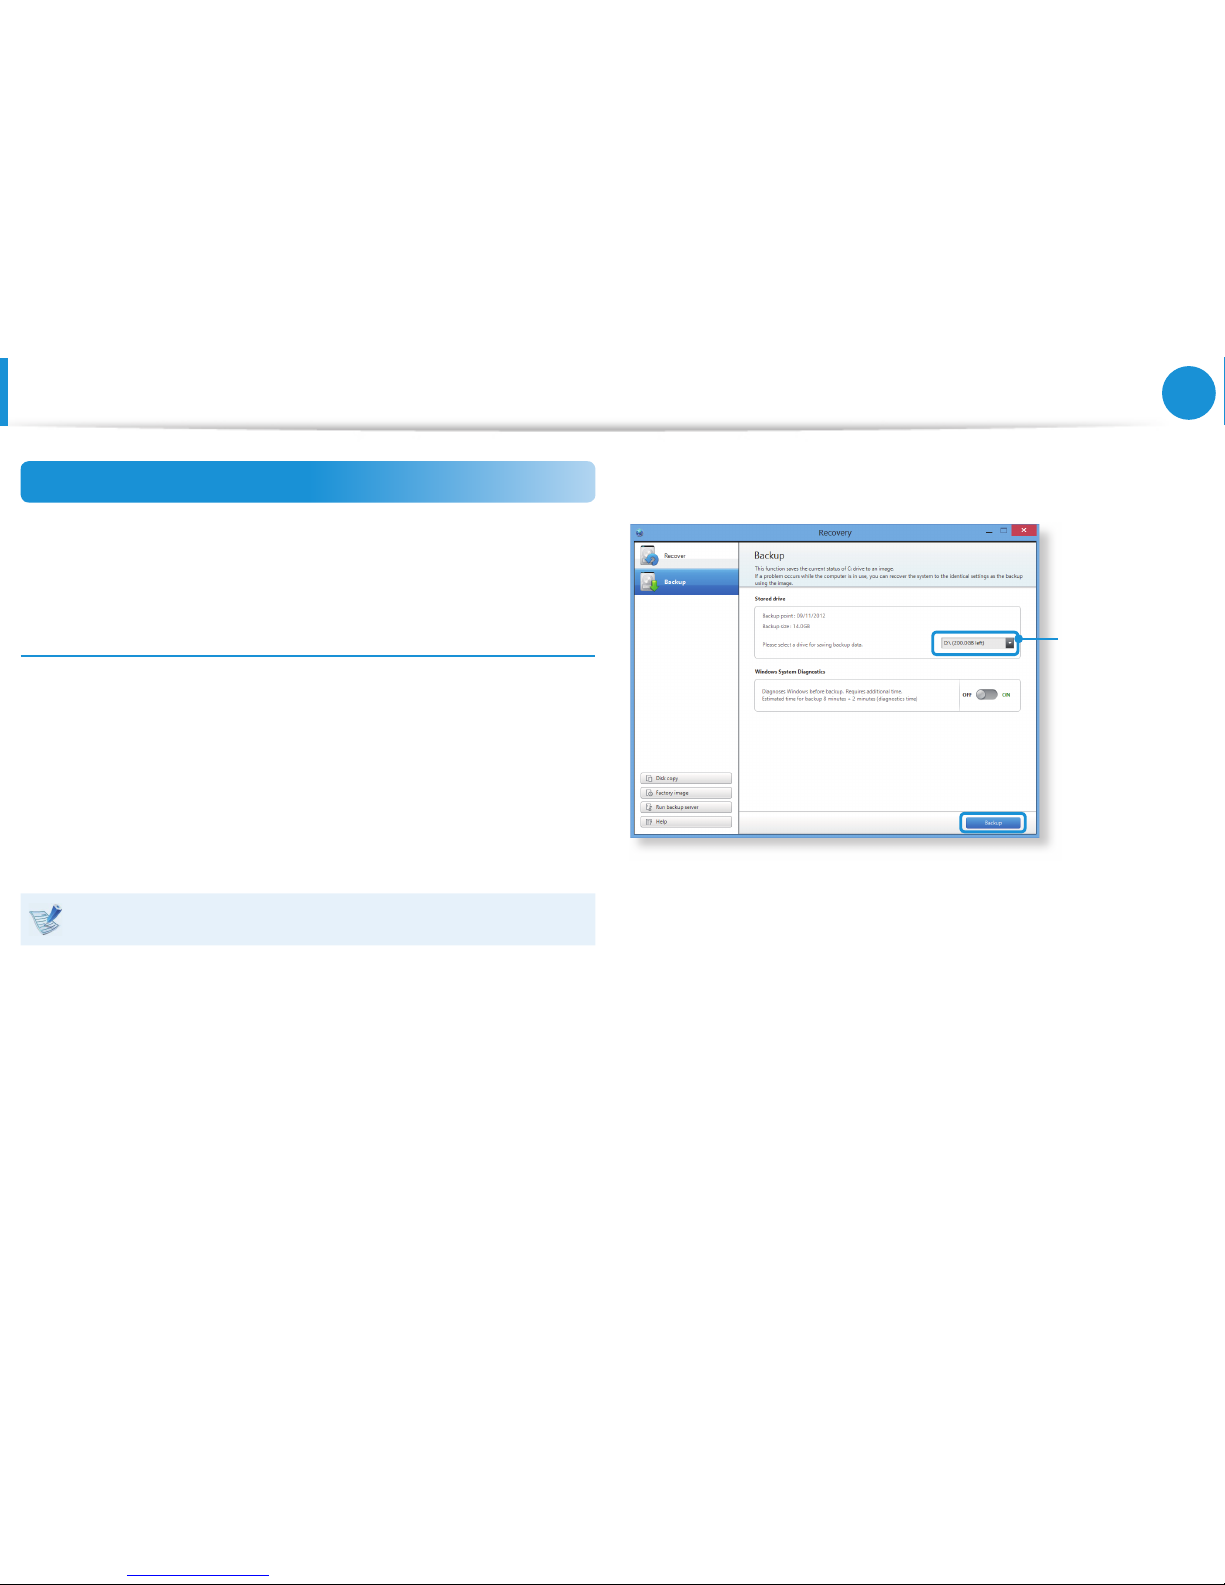
90
Chapter 5.
Troubleshooting
Recovering after a Backup
You can recover your computer after you have backed up your
computer to a separate drive or external storage device.
Backing up
1
To back up your computer to an external storage device,
connect the external storage device and select the relevant
drive.
2
Click Backup in the Recovery Home screen.
Select the drive to save and click Backup.
You cannot select a DVD drive.
Select the drive
to save to.
3
The backup process is performed based on the instructions.
Recovering/Backing up the Computer
(Optional)
Page 92
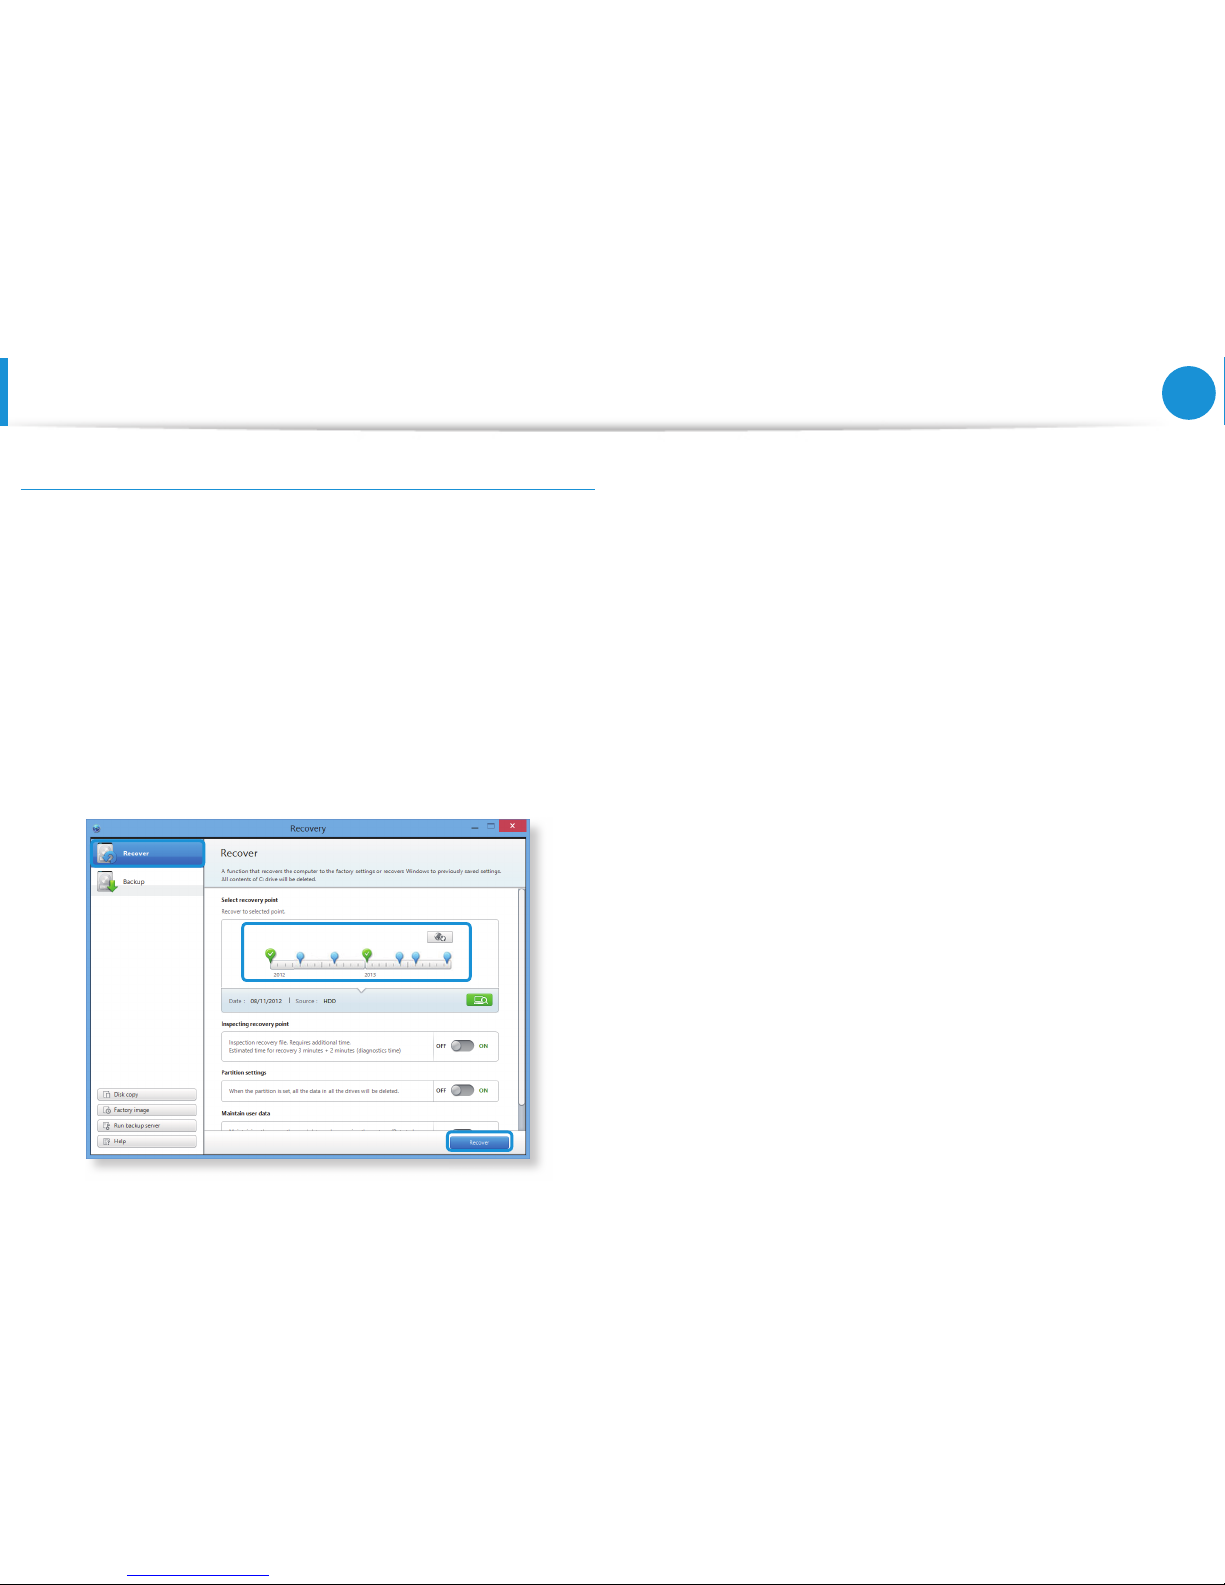
91
Chapter 5.
Troubleshooting
Recovering
You can recover your computer using the backup from the above
process.
1
If the backup image is saved to an external storage device,
connect the device.
2
Start Recovery and click Recover.
3
Select a Recover Option and click Recover.
Select a point to recover.
4
The recover is performed based on the screen instructions.
You can use your computer after the recover is completed.
Recovering/Backing up the Computer
(Optional)
Page 93
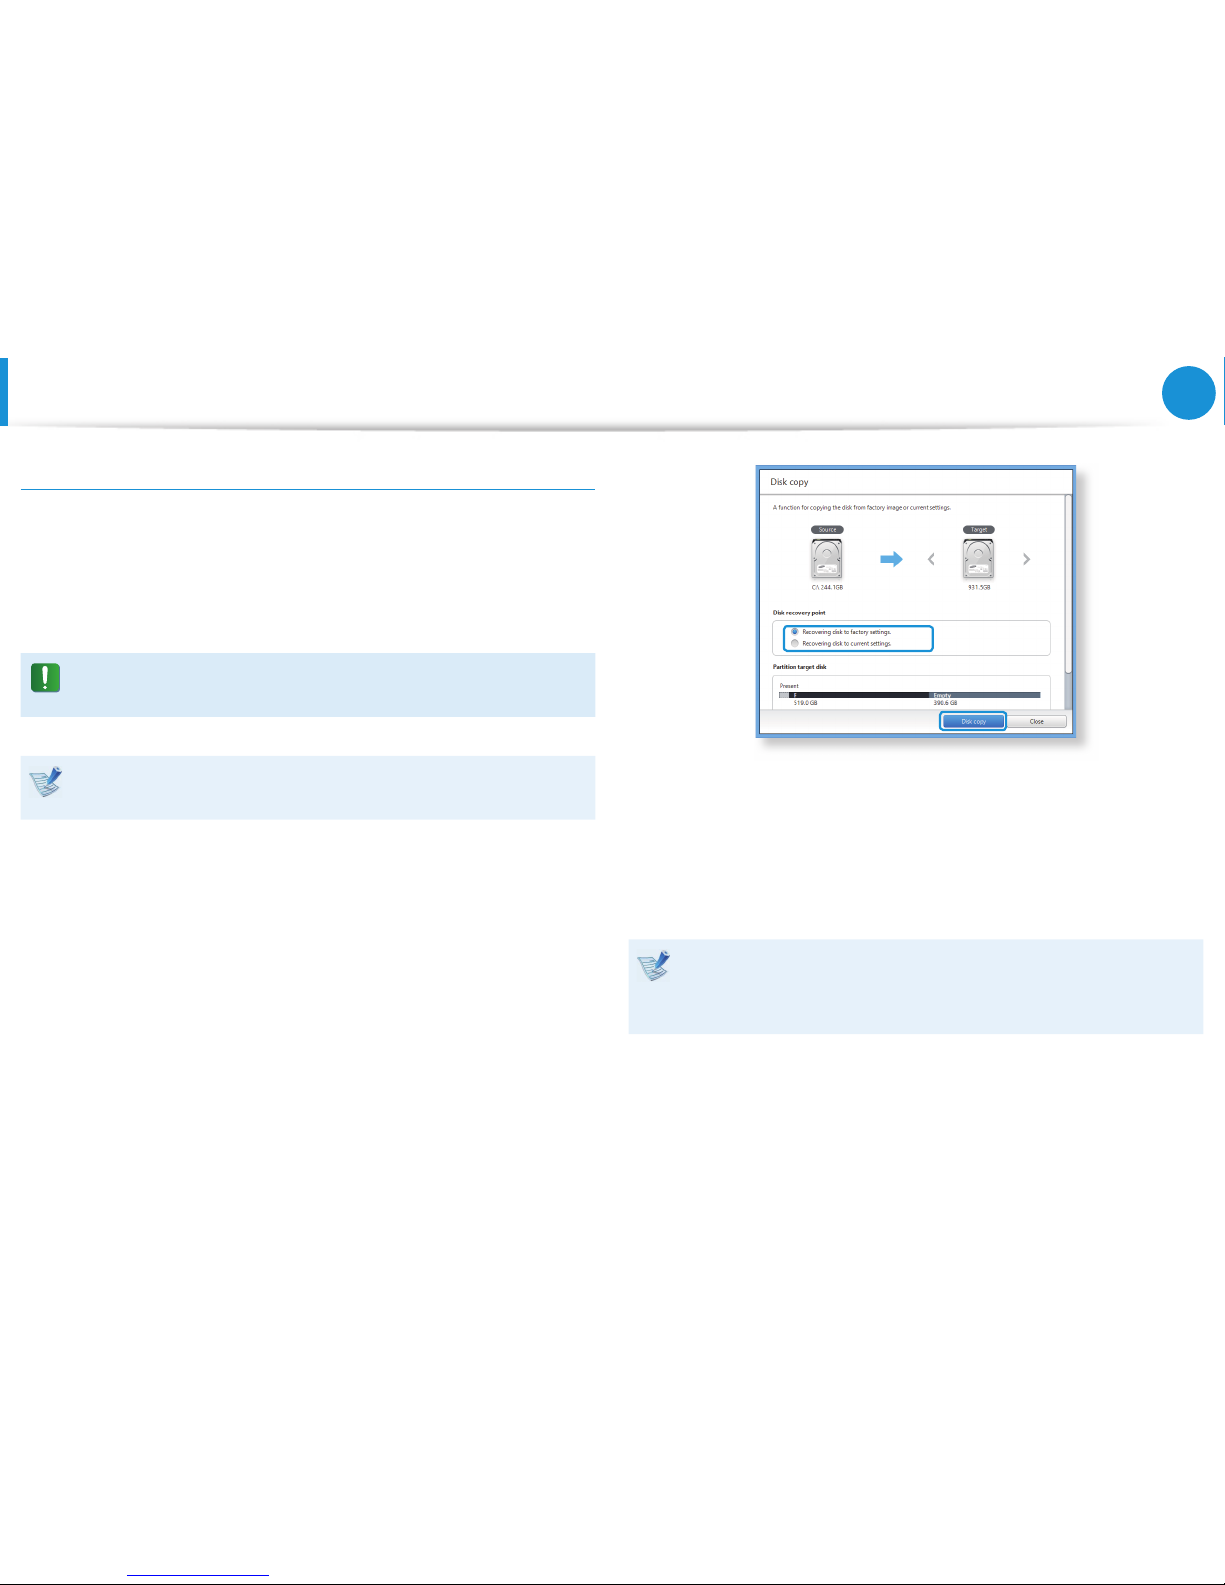
92
Chapter 5.
Troubleshooting
To copy the external storage disk
When you replace a storage device such as the HDD, SSD, etc.
(hereafter referred to as a hard disk) built into your computer, you
can move your existing data to the new storage device easily and
safel y.
The new storage device must have su cient capacity to save
your existing data.
You need to purchase an external hard USB connector
separately to connect the hard disk and your computer.
1
You need to purchase an external hard USB connector
separately to connect the hard disk and your computer.
2
Start Recovery and click Disk copy.
3
Select an option in Disk recovery Point and click Disk copy.
4
The data on the current hard disk is saved to the new hard
disk.
5
If the data is completely saved, open the hard disk cover at
the bottom of your computer and replace the existing hard
disk with the new one.
If you cannot open the cover at the bottom of the computer,
contact the Samsung Service Center to request assistance.
In this case, you may be charged for the relevant service.
6
Your computer is now equipped with a new hard disk.
You can use your computer with a larger hard disk capacity
with the same con guration as the old one.
Recovering/Backing up the Computer
(Optional)
Page 94

93
Chapter 5.
Troubleshooting
Export Disk Image Function
If you frequently recover your computer to the default (factory)
settings, you can conveniently recover your computer after
exporting the default (factory) status disk image to an external
storage device.
1
Connect the external storage device, and then select a drive
to save to.
2
Click Run.
3
Perform the process by following the instructions to
completely save the default (factory) status disk image to the
external storage device.
Now disconnect the saved external storage device and store
it separately.
4
If your computer needs to be restored to the default (factory)
settings, connect the external storage device with the saved
image.
5
Start Recovery and click Recover. Select Factory Default
Point and click Recover. The Recover process is started.
When the recover process is nished, you can use your
computer with the default (factory) settings.
Recovering/Backing up the Computer
(Optional)
Page 95
94
Chapter 5.
Troubleshooting
Recovering/Backing up the Computer
(Optional)
Computer Recovery Function in Windows 8
If you need to install Windows 8 again due to an unexpected error,
use the following function.
For models of which the storage device capacity is less than
SSD 64 GB, use the system recovery feature provided by
Windows instead of the Recovery program.
1
Click the Charms menu > Settings > Change PC Settings >
General.
2
Click the Start button for PC Recovery or Remove All Items
and Reinstall Windows.
PC Recovery
If your PC does not work properly, you
can restore your PC while keeping your
media les such as your photo, video and
music les, etc. as well as your personal
documents.
Remove All Items
and Reinstall
Windows
If you want to return your PC to the default
settings, or start from scratch, you can
reset your PC to the factory default.
You should back up the les in the following folders
before using the PC Recovery function since these les
are not kept.
\Windows, \Program les, \Program les(x86), \ProgramData,
OEM Folder (ex) c:\samsung), \User\<user name>\AppData
3
Follow the onscreen instructions to proceed with the
recovery process.
If the recovery is complete, you can use your computer
normally.
Page 96
95
Chapter 5.
Troubleshooting
Reinstalling Windows
(Optional)
You can reinstall Windows using the SYSTEM RECOVERY MEDIA
for Windows when Windows is no longer working properly.
(For models supplied with a SYSTEM RECOVERY MEDIA.)
For models supplied with the Samsung Recovery Solution, you
can reinstall Windows using the Samsung Recovery
Solution.
These descriptions are for Windows 7/8 and Windows Vista and for
supported models only.
A • SYSTEM RECOVERY MEDIA may not be supplied
depending on your computer model.
If you cannot start Windows, or if you want to delete •
all existing data and reinstall Windows, install Windows
according to the descriptions in [Reinstalling when
Windows does not start].
Some pictures may dier from actual product.•
These descriptions may dier depending on the operating •
system.
Reinstalling Windows may delete data (les and programs) •
saved on the hard disk drive.
Make sure to backup all important data. Samsung •
Electronics shall not be held liable for any loss of data.
Reinstalling in Windows
1
Insert the SYSTEM RECOVERY MEDIA into the DVD drive.
2
If the Select Windows Installation window appears, click
Install Now. When the Select Update window appears, click
on the relevant item.
If you select • Go online to get the latest updates for
installation in the Select Update window, the latest
updates are installed and Step 4 follows. At this time, the
computer must be connected to the Internet.
For Windows 7/8, the screen asking for the operating •
system to be installed may appear depending on the
version. If you click the Next button, the screen of Step
3appears.
3
If the User Agreement screen appears, select I accept the
license terms and then click Next.
For Windows 7/8, this screen may not appear depending on
the version.
Page 97
96
Chapter 5.
Troubleshooting
Reinstalling Windows
(Optional)
4
The following window appears, select an installation option.
If you click Custom, the procedures from Step 5 continue
sequentially.
If you click Upgrade, the procedures from Step 6 continue
sequentially.
For Windows 7/8, this screen may not appear depending •
on the version.
Custom•
Select this option to Reinstall Windows. You have to
reinstall all necessary device drivers and programs after
the Custom installation. In addition, unnecessary folders
and les may remain on the hard disk drives after the
installation (e.g. C:\ Windows.old, etc.).
Upgrade•
Select this option to Upgrade Windows while maintaining
current les, congurations and programs. Although you
therefore do not need to reinstall the device drivers and
programs, some programs may not work properly after the
upgrade.
5
When a window appears asking for the location to install the
operating system to, select a disk drive partition and click the
Next button.
Drive D includes an area to save the backup image used by
Samsung Recovery Solution. Installing Windows to drive C is
recommended.
When previous Windows installation les are in the selected
partition, a message appears informing you that the les and
folders will be moved to the Windows. old folder. Click the
OK button.
6
The Windows installation continues.
The computer will restart 3 times during the installation.
If the Press any key to boot from CD or DVD... message
appears after a restart, do not press any button.
7
Register a user according to the instructions on the Windows
screen.
8
When the registration is complete, the Windows Desktop
screen appears.
For a smooth computer operation, installing the necessary
software installation is recommended.
Page 98
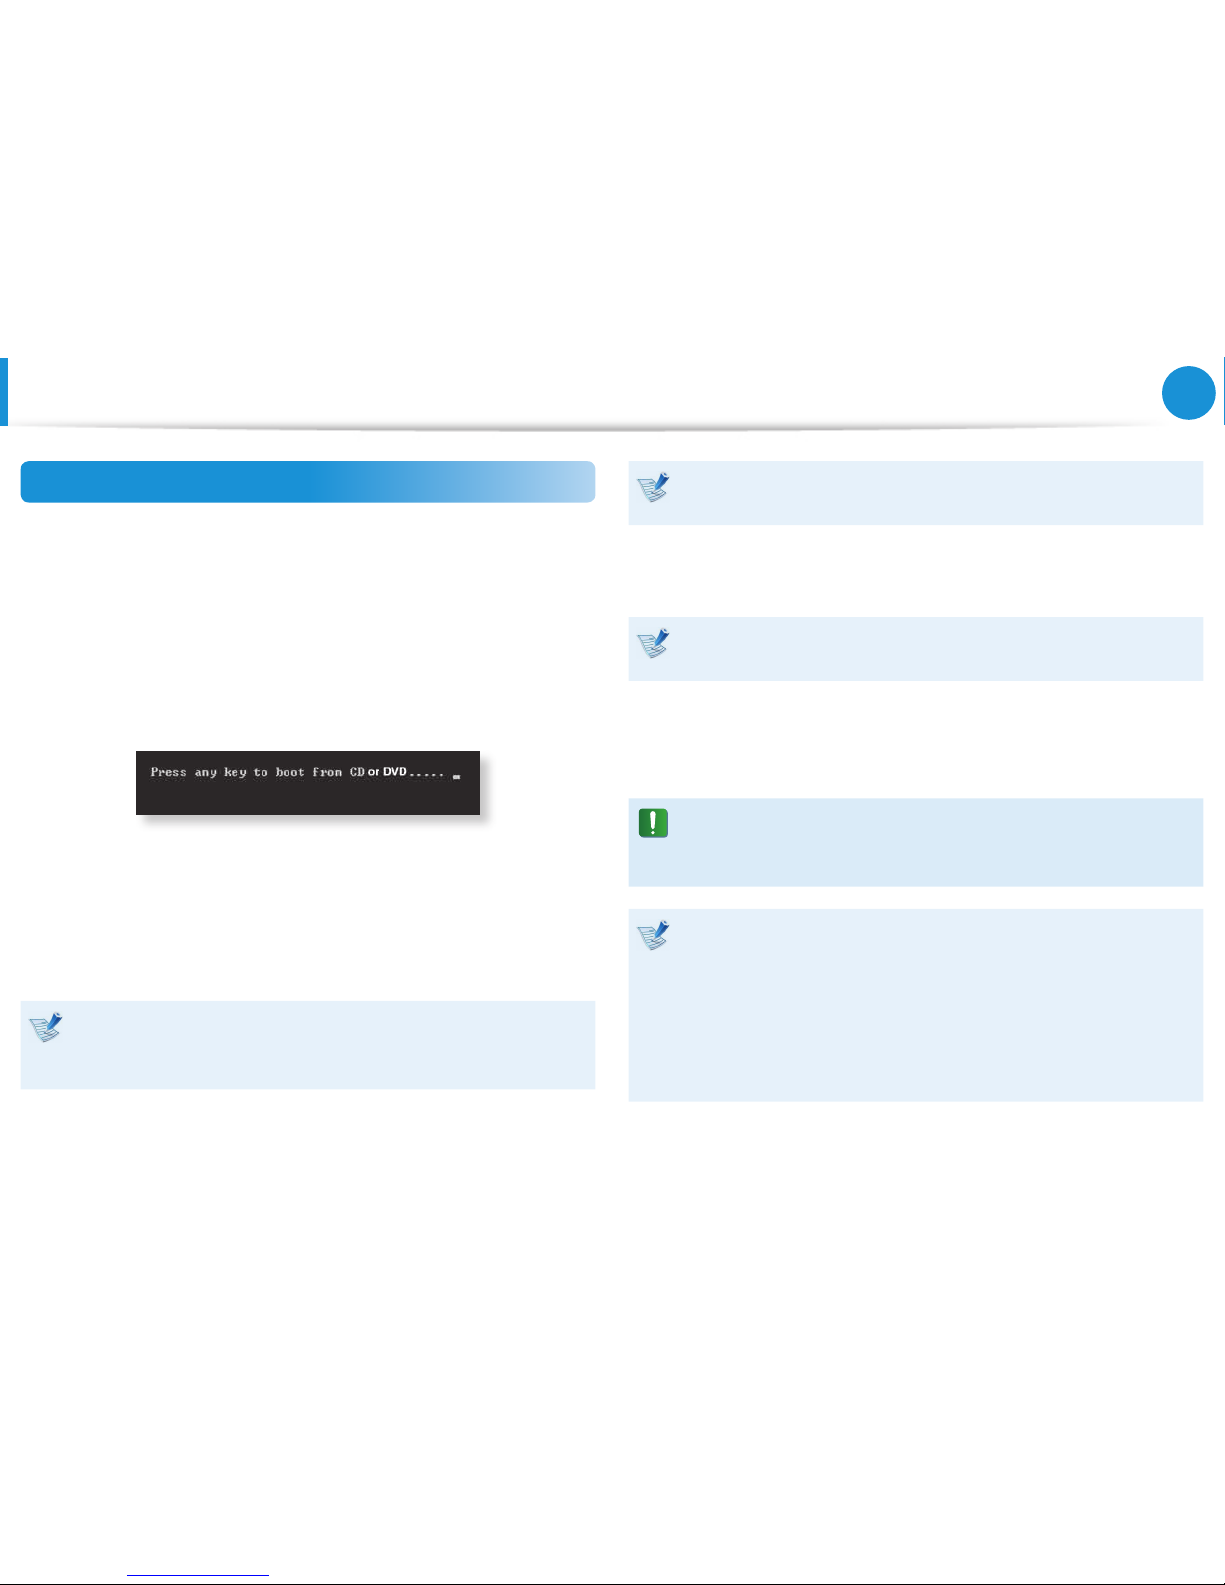
97
Chapter 5.
Troubleshooting
Reinstalling Windows
(Optional)
Reinstalling when Windows does not start
When Windows does not start, boot up with the SYSTEM
RECOVERY MEDIA and from there you can reinstall Windows.
1
Insert the SYSTEM RECOVERY MEDIA into the DVD drive
and restart the computer.
2
If the Press any key to boot from CD or DVD... message
appears while booting, press any key on the keyboard.
3
After a while, the Options windows such as Language, Time,
Keyboard, etc. appear. Conrm the settings and click the
Next button.
4
If the Select Windows Installation window appears, click
Install Now.
For Windows 7/8, the screen asking for the operating system
to be installed may appear depending on the version. If you
click the Next button, the screen of Step 5 appears.
5
If the User Agreement screen appears, select I accept the
license terms and then click Next.
For Windows 7/8, this screen may not appear depending on
the version.
6
When the window asking for the installation type appears,
click Custom.
For Windows 7/8, this screen may not appear depending on
the version.
7
When a window appears asking for the location to install the
operating system to, select the partition of the disk drive and
then click the Next button.
Drive D includes an area to save the backup image used by
Samsung Recovery Solution. Installing Windows to drive C is
recommended.
A If you click • Drive Options (Advanced), you can delete,
format, create or expand a partition. Click on a function
and proceed according to the instructions on the screen.
When previous Windows installation les are in the •
selected partition, a message appears informing you that
the les and folders will be moved to the Windows.old
folder. Click the OK button.
8
The subsequent steps are the same as those from Step 7 of
Installing in Windows.
Page 99

98
Chapter 5.
Troubleshooting
You can look for potential problems that may occur with the
system and view the relevant solutions. Also, you may look up any
reference(s) required while operating the computer.
Recovery Related
Q1
What is a Recovery Area?
A
Samsung computers have an additional partition to recover
computers or save backup les. (Only for models with the
Recovery.)
This partition is called a Recovery Area and it includes a
recovery image that comprises of the OS and application
programs.
Q2
The capacity representation of the hard disk
drive(HDD) in Windows is dierent from the product
specications.
A
The capacity of the storage device (HDD) of the
manufacturer is calculated assuming that 1KB=1,000 Bytes.
However, the operating system (Windows) calculates the
storage device capacity assuming that 1KB=1,024 Bytes,
and therefore the capacity representation of the HDD in
Windows is smaller than the actual capacity.
The capacity representation in Windows may be smaller
than the actual capacity because some programs occupy a
certain area of the HDD outside of Windows.
For models with Recovery, the HDD capacity representation
in Windows may be smaller than the actual capacity because
Recovery uses a hidden area of about 5~20GB of the HDD
to save the recovery image, and that hidden area is not
counted towards the total size available to Windows.
The size of Recovery varies by models because of the
dierent size of applied programs.
Q&A
Page 100

99
Chapter 5.
Troubleshooting
Q3
What is a recovery image?
A
This refers to the computer status (including operating
system, specic driver(s), software(s), etc.) which is converted
to a data image. It is required to recover your computer and
is embedded in the computer's hard disk. However, this is
not provided for storage devices where the capacity is less
than 64 GB due to the small capacity.
Q4
How can I restore a computer that does not have the
Recovery program?
A
You can restore the computer using the system recovery
function provided by Windows.
Refer to the Restore Functionality item in the Help section
for more details.
Windows 8 Related
Q1
I cannot nd the Start button on the Desktop.
A
There's no Start button in Windows 8.
You can use the Control Panel, PC-running menu(s), etc. by
activating the Charms menu.
Q2
I cannot nd the computer's Shutdown button.
A
Click the Charms menu > Settings > Power to display the
Power Options menu.
Click System Shutdown.
Q3
The App disappeared in the Start screen.
A
Click the Charms menu > Search to display all installed
Apps. Right-click over the corresponding App to select in a
Tile in the Start Screen.
Q&A
 Loading...