

Page 1
www.samsung.com
User Manual
Page 2

2
About this manual
•
This user manual is specially designed to detail the computer’s
functions and features.
•
The user manual supplied with the computer may vary
depending on the model.
•
Please read this manual before using the computer to ensure
safe and proper use.
•
Optional items, some devices and software referred to in the
user manual may not be provided or subject to upgrades.
Note that the computer environment referred in the user
manual may not be the same as your environment.
•
Descriptions are based on the computer’s default settings
and Windows 8.1 operating system. Available features and
additional services may vary by computer or operating
system.
•
This user manual describes procedures for using the
touchpad, mouse, and touch screen. Instructions for using the
touch screen are for models with the touch screen feature.
•
Images and screenshots are those of the representative model
of the series and may differ in appearance from the actual
product.
•
Content may differ from the final product and is subject to
change without prior notice. For the latest version of the
manual, refer to the Samsung website,
www.samsung.com
.
Page 3

About this manual
3
Copyright
© 2013 Samsung Electronics Co., Ltd.
This manual is protected under international copyright laws.
No part of this manual may be reproduced, distributed, translated,
or transmitted in any form or by any means, electronic or
mechanical, including photocopying, recording, or storing in any
information storage and retrieval system, without the prior written
permission of Samsung Electronics.
Computer specifications or the contents of this manual may
be changed without prior notice due to an upgrade of the
computer’s functions.
Instructional icons and
expressions
Warning: situations that could cause injury to yourself or
others
Caution: situations that could cause damage to the
computer or other equipment
Note: notes, usage tips, or additional information
The order of options or menus you must select to perform
a step. For example, select the
Settings
charm →
Power
(represents select the
Settings
charm and then
Power
).
Select Click or touch. For example, when using a mouse or
touchpad, select
Settings
means click
Settings
. When
using a touch screen, it means touch
Settings
.
Page 4
About this manual
4
HDMI, the HDMI logo, and the
term High Definition Multimedia
Interface are trademarks or
registered trademarks of HDMI
Licensing LLC.
As an ENERGY STAR® Partner,
Samsung has determined that this
product meets the ENERGY STAR
®
guidelines for energy efficiency.
Trademarks
•
Samsung and the Samsung logo are trademarks or registered
trademarks of Samsung Electronics.
•
Intel and Core are trademarks or registered trademarks of the
Intel Corporation.
•
Microsoft, MS-DOS, and Windows are trademarks or registered
trademarks of the Microsoft Corporation.
•
Bluetooth® is a registered trademark of Bluetooth SIG, Inc.
worldwide.
•
Wi-Fi®, Wi-Fi Protected Setup™, Wi-Fi Direct™, Wi-Fi
CERTIFIED
™
, and the Wi-Fi logo are registered trademarks of
the Wi-Fi Alliance.
•
All other trademarks and copyrights are the property of their
respective owners.
Page 5

About this manual
5
Product capacity representation
Storage capacity representation
The capacity of the storage device (HDD, SSD) of the manufacturer
is calculated assuming that 1KB=1,000 Bytes.
However, the operating system (Windows) calculates the storage
device capacity assuming that 1KB=1,024 Bytes, and therefore the
capacity representation of the HDD in Windows is smaller than
the actual capacity due to the difference in capacity calculation.
For example, for a 80GB HDD, Windows represents the capacity
as 74.5GB, 80x1,000x1,000x1,000 byte/(1,024x1,024x1,024)byte =
74.505GB.
In addition, the capacity representation in Windows may be even
smaller because some programs such as Recovery may reside in a
hidden area of the HDD.
Memory capacity representation
The memory capacity reported in Windows is less than the actual
capacity of memory. This is because BIOS or a video adapter uses
a portion of memory or claims it for further use. For example,
for 1GB(=1,024MB) memory installed, Windows may report the
capacity as 1,022MB or less.
Caution for the data
Samsung Electronics shall not be liable for any data loss. Please
take care to avoid losing any important data and back up your
data to prevent any such data loss.
Operating system and software
support
If you change the product’s factory OS (Operating System) to
another OS or if you install software which is not supported by the
product’s original factory OS, you will not receive any technical
support, product exchange or refund, and a fee will be charged
when requesting a service.
Please use your computer with the original factory OS. If you
install an OS other than the factory OS, data may be deleted or the
computer may not start.
Recommended screen resolutions
The recommended screen resolution for Windows is “FHD”
(1,920x1,080) and for Windows 8.1 is “QHD+” (3,200x1,800).
If you set the resolution higher than the recommended value, it
may result in problems with some applications, due to limitations
of the operating system.
Page 6

6
Table of contents
Getting started
7 Layout
14 Charging the battery
17 Turning the computer on
and off
19 Unlocking the screen
Windows
20 About Windows
23 Start screen
25 Desktop
27 The Charms
30 Applications
36 Microsoft account
36 Store
Basics
37 Touch screen
46 Keyboard
49 Touchpad
53 LCD brightness
55 Volume
56 Setup utility (BIOS)
Network & Internet
62 Wired LAN
65 Wireless LAN
67 Mobile broadband
(Wireless WAN, optional)
Applications
69 Using applications
70 Settings
71 Software Update
72 Support Center
73 S Player+
73 Samsung Kies
74 HomeSync Lite
74 SideSync
75 TPM security solution
(optional)
External devices
85 External CD/DVD drive
87 Memory card
90 External display
92 Slim security slot
Troubleshooting
93 Recover/Backup
100 Windows recovery
function
100 Q&A
Appendix
105 Product specifications
106 Ergonomic tips
110 Battery
112 Safety precautions
125 Important safety
information
128 Replacement parts and
accessories
130 Regulatory compliance
statements
147 WEEE symbol information
149 Samsung package Take-
Back program
150 TCO certified (for
corresponding models
only)
Page 7
7
Getting started
Layout
•
Features or options may differ depending on the model.
•
Optional parts referred to in the manual may not be
provided or changed by the manufacturer.
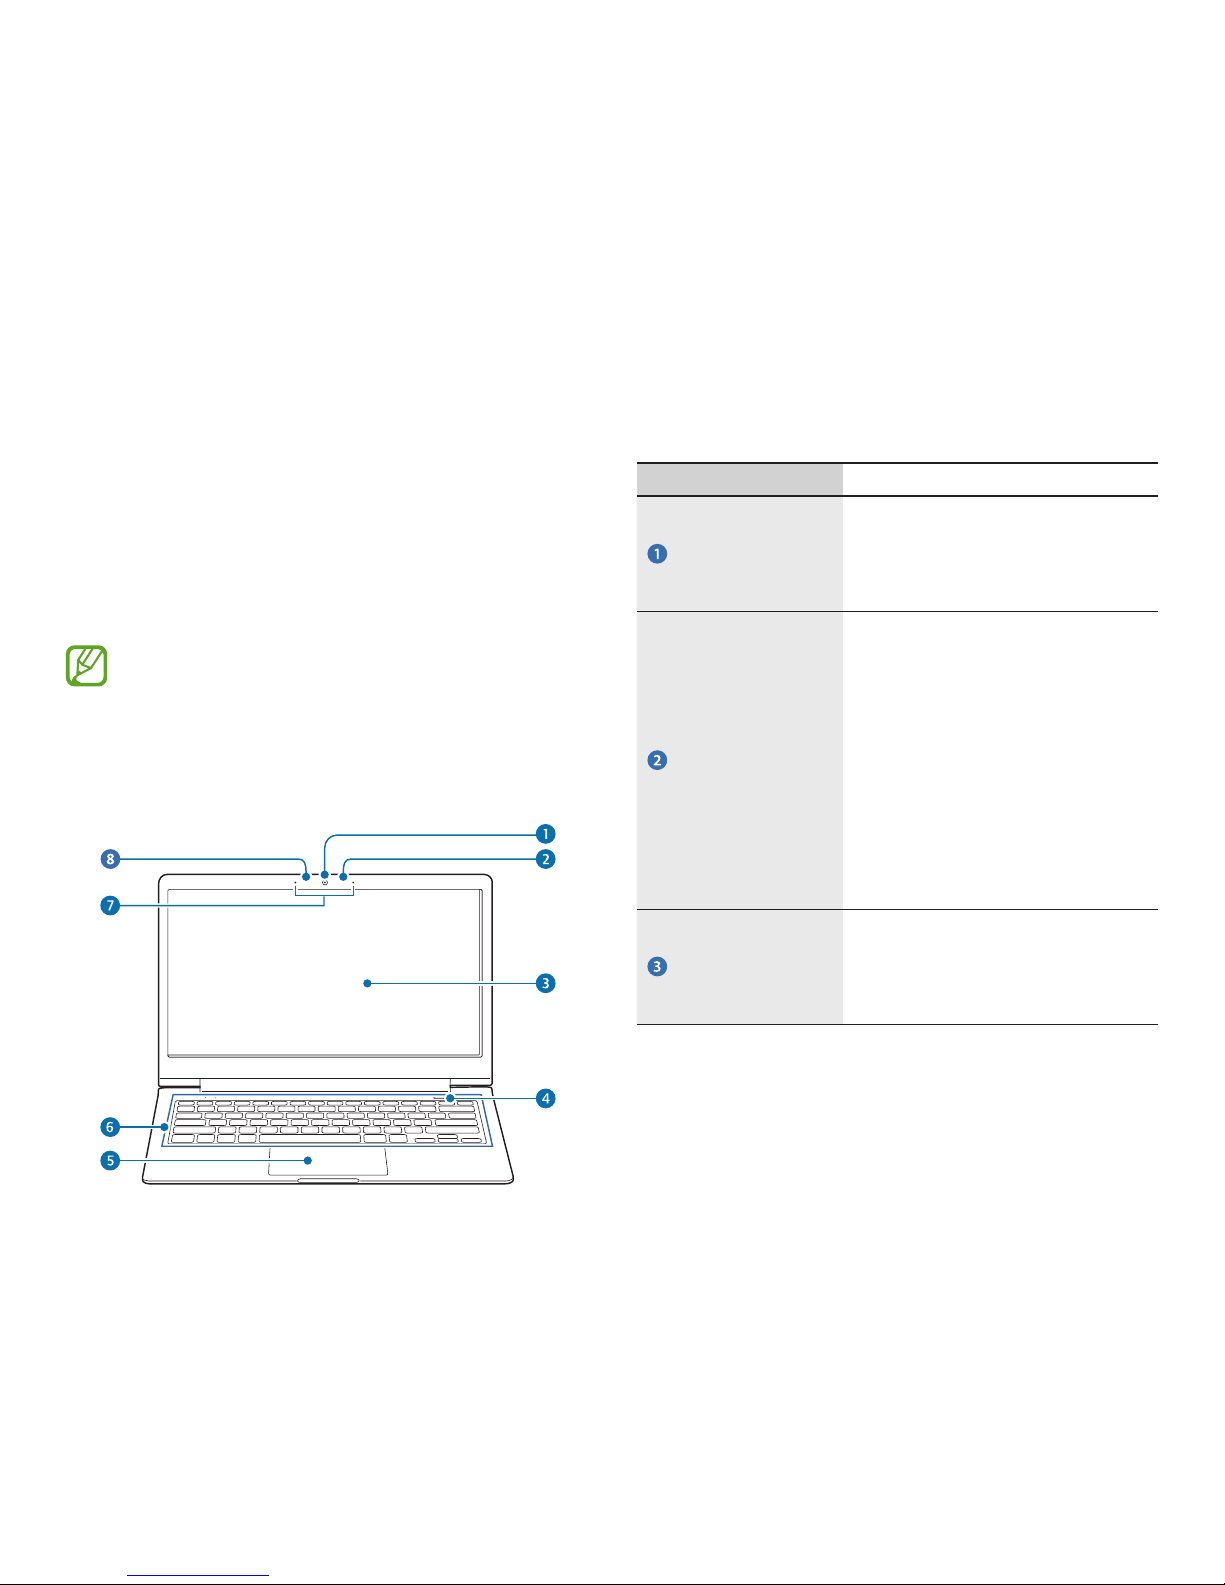
Front view
Number/Name Description
Camera
•
Takes photos or videos.
•
Use the camera application on
the
Start
screen to take photos or
videos.
Light sensor
•
This sensor detects the ambient
illumination of the computer.
If the ambient illumination
becomes dark, the LCD becomes
dimmer and the keyboard
backlight is lit. On the contrary,
if the ambient illumination
becomes brighter, the LCD
becomes brighter and the
keyboard backlight is turned off.
•
Do not cover the sensor.
LCD/Touch screen
•
Displays the user interface.
•
Recognizes touches on the screen.
(Only for models with the touch
screen.)
Page 8
Getting started
8
Number/Name Description
Power button
•
Press to turn the computer on.
Touchpad
•
Move the cursor and click options.
•
Works actions as those of a
mouse.
Keyboard
•
Press keys to enter data.
Microphone
•
Use the built-in microphone.
Camera indicator
light
•
Indicates the camera status.
Page 9
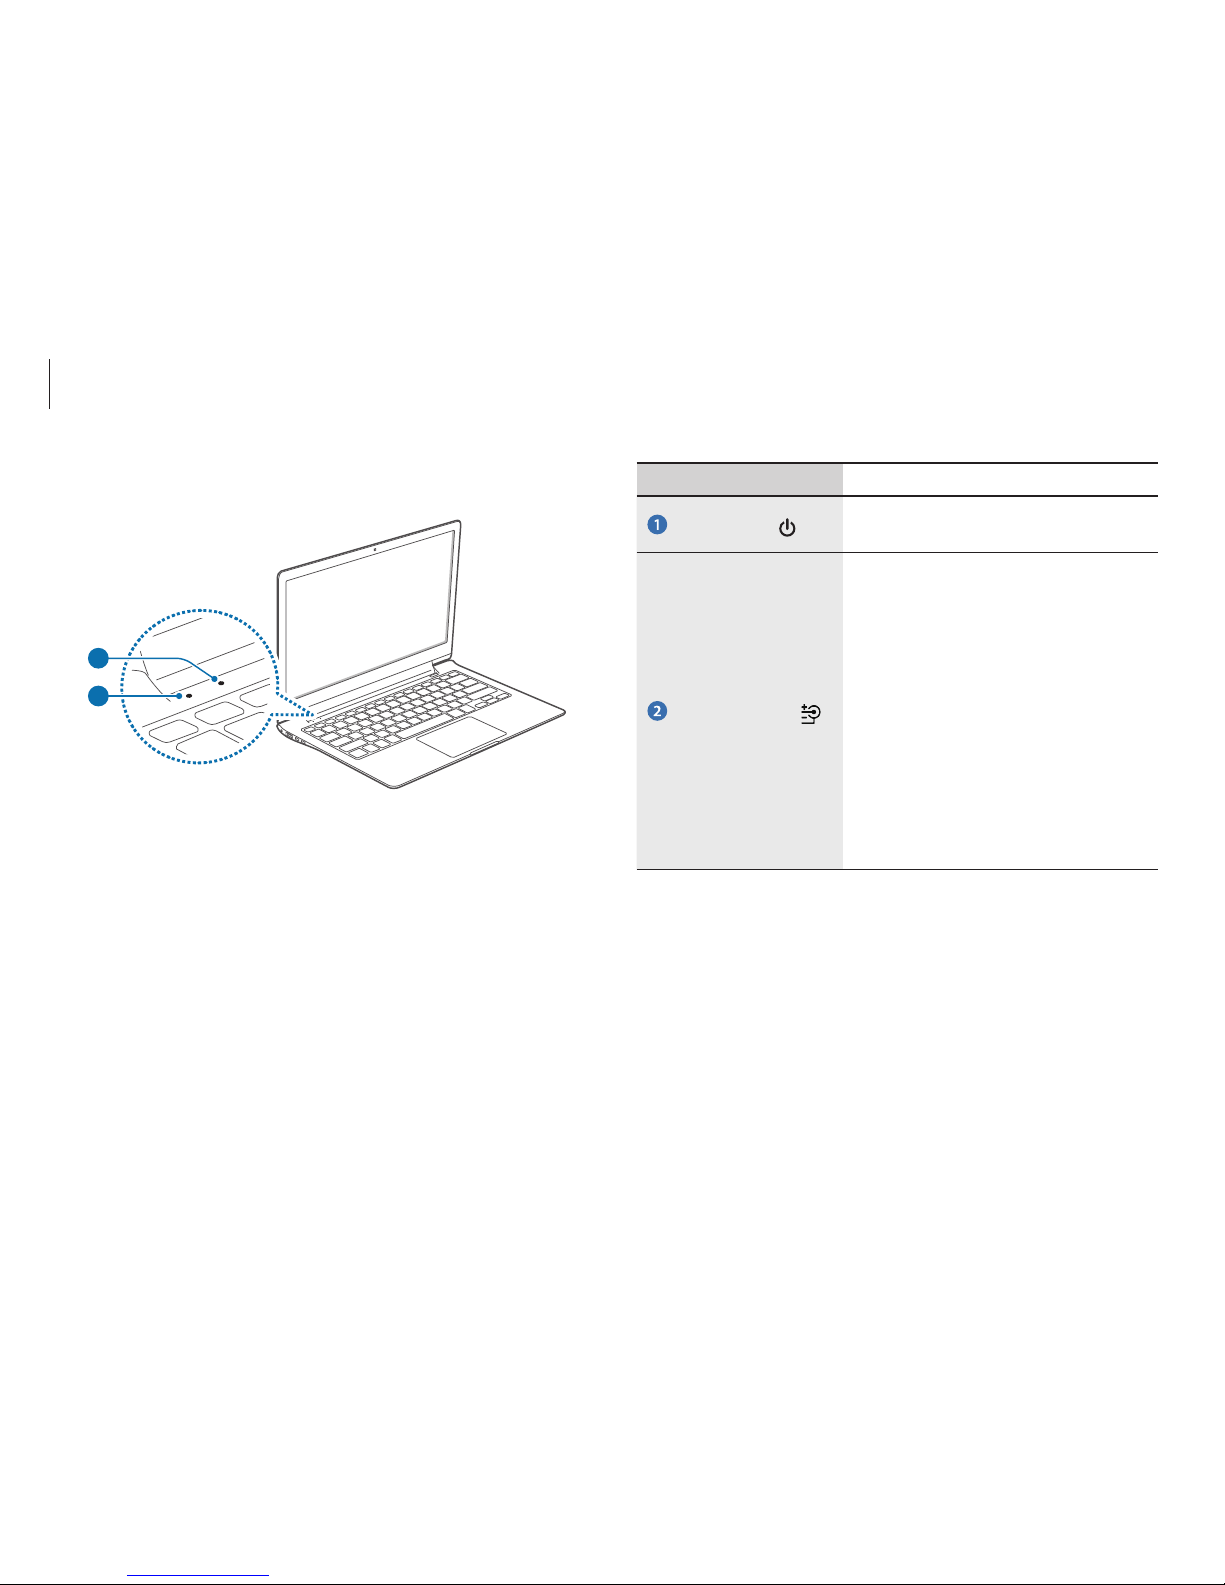
Getting started
9
Number/Name Description
Power LED
•
Turns on when the computer is
turned on.
Charge status
•
Shows the battery’s charging
status.
–
Red
or
Orange
: While
charging is in progress
–
Green
: When charging is
complete or the battery is
not installed
–
Off
: When the AC adapter
is disconnected and the
computer is running on the
battery
Operating indicator light
2
1
Page 10
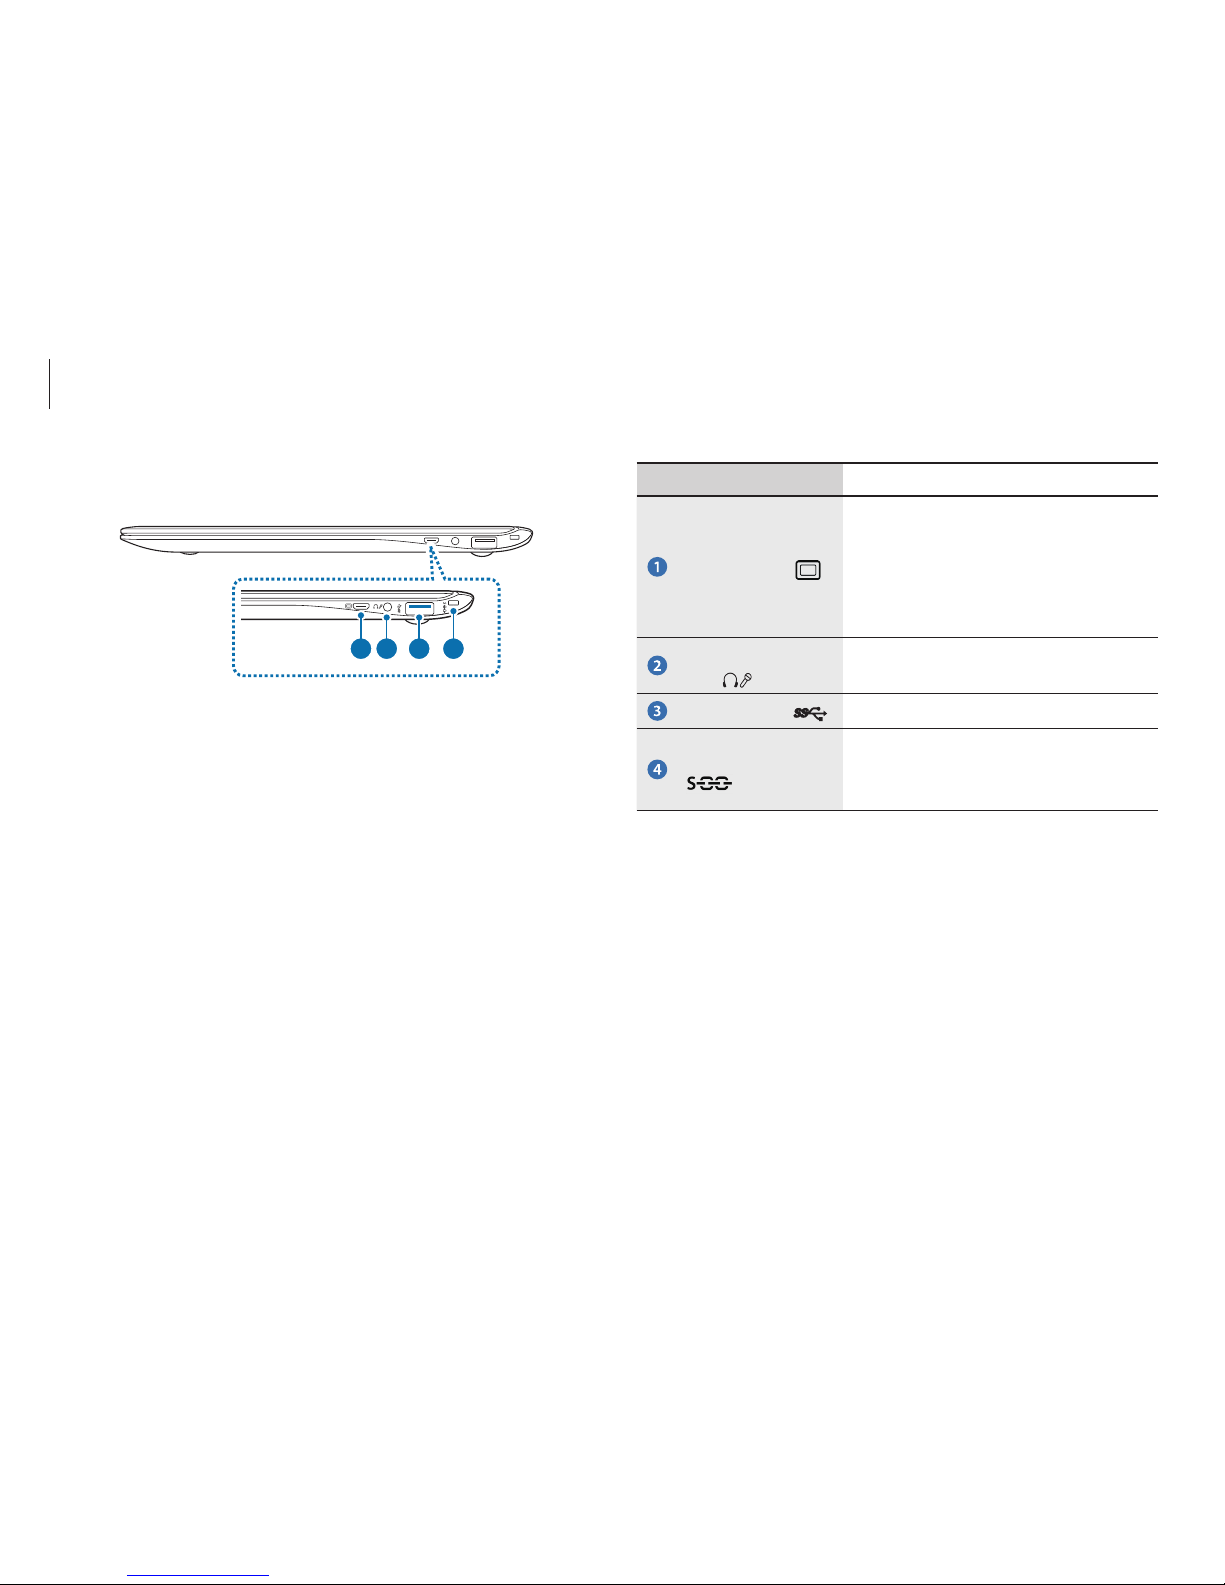
Getting started
10
Number/Name Description
Monitor port
•
Connect external display devices
that support a 15-pin analog
connector.
•
You can connect a VGA adapter
(optional).
Ear-set/Headset
jack
•
Connect a headset or ear-set.
USB 3.0 port
•
Connect a USB device.
Slim security slot
•
Secure the computer by
connecting an optional lock and
cable to it.
Right view
1 2 3
4
Page 11
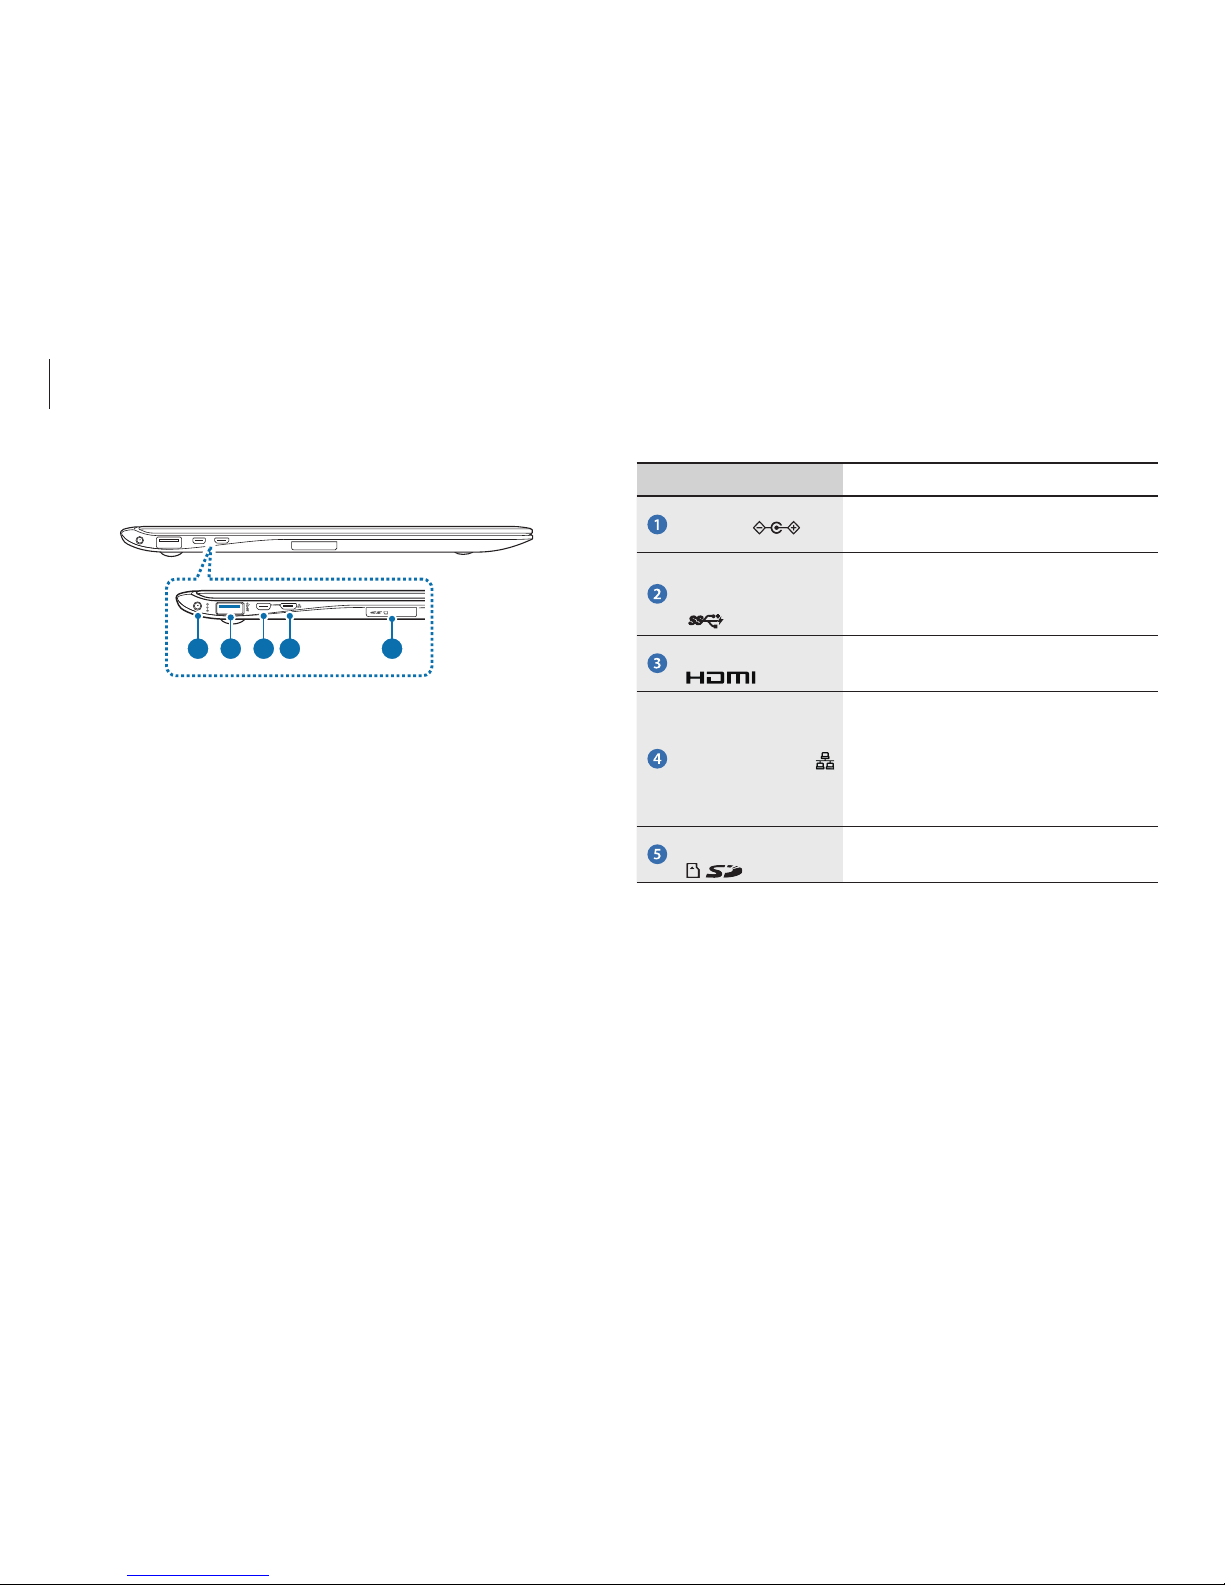
Getting started
11
Number/Name Description
DC jack
•
Connect the AC adapter to supply
the power to the computer.
Chargeable USB
3.0 port (optional)
•
Connect and charge a USB device.
Micro HDMI port
•
Connect external display devices
that support HDMI.
Wired LAN port
•
Connect an Ethernet cable to
this port when connecting to the
Internet via a wired LAN. Use a
LAN adapter (optional) to connect
to a wired LAN.
Memory card slot
•
Insert a memory card into the slot.
Left view
1 2 3 4 5
Page 12

Getting started
12
About the chargeable USB port
•
It may take longer to charge the battery when charging a USB
device.
•
The battery power level may be reduced when charging a USB
device while the computer is powered by the battery.
•
The charging status of the USB device is not displayed on the
computer.
•
To turn on the chargeable function while the computer is
turned off:
Open the
Settings
application and select Power
Management
→
USB Charging → ON.
•
This feature may not be available with some USB devices.
Page 13
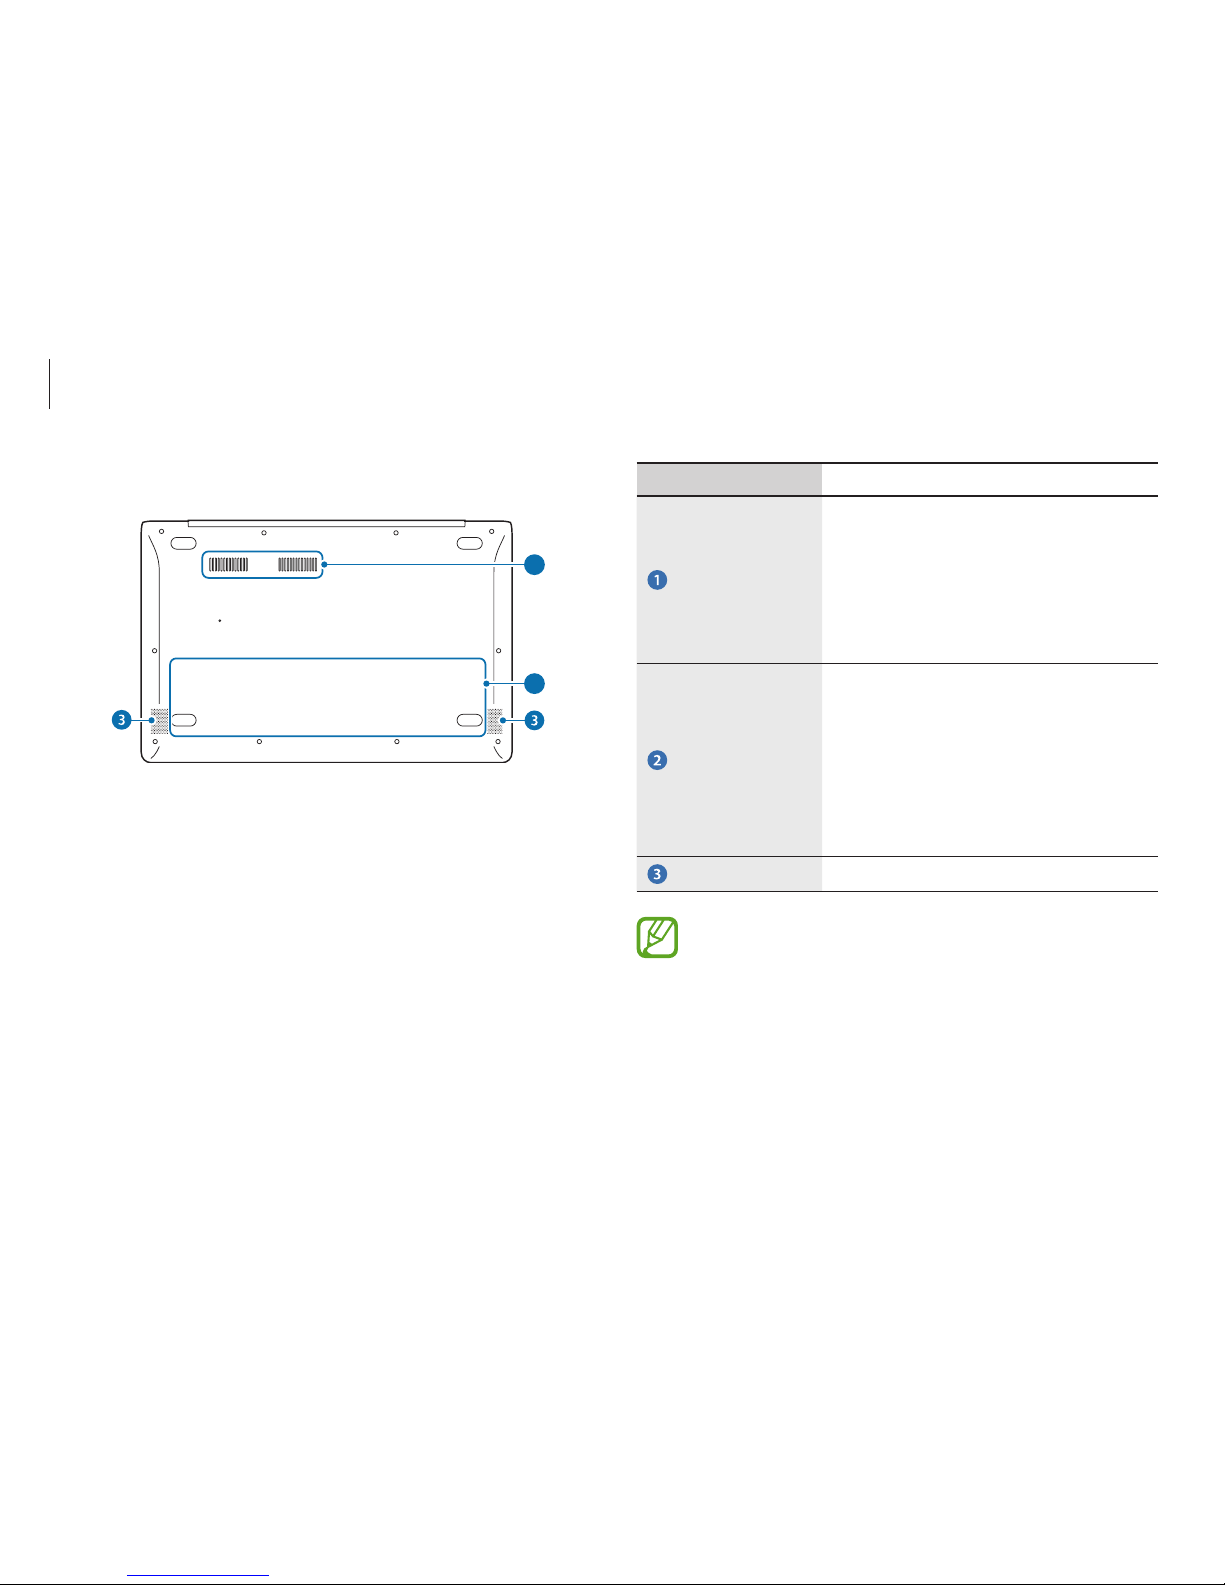
Getting started
13
Number/Name Description
Fan vents
•
The internal heat of the computer is
emitted through these holes.
•
If the vents are blocked the
computer may overheat. Avoid
blocking the vents as this may be
dangerous.
Internal battery
•
Provides power to the computer
when not connected to an AC
adapter.
•
To remove or replace the internal
battery, take it to the Samsung
Service Center. You will be charged
for this service.
Speaker
•
Emits sound from the computer.
After replacing the bottom of the computer, the model
name, serial number and some logos on will no longer
be present. For more information, contact the Samsung
Service Center to request assistance.
Bottom view
1
2
Page 14

Getting started
14
3
Plug the power cable into an electric socket.
1
2
3
Charging the battery
Charge the battery before using it for the first time. Use the AC
adapter to charge the battery.
•
Use only Samsung-approved AC adapters, batteries,
and cables. Unapproved adapters or cables can cause
the battery to explode or damage the computer.
•
Incorrectly connecting the charger may cause serious
damage to the computer.
To restore the battery power after cutting it, connect the
AC adapter.
1
Connect the power cable to the AC adapter.
2
Connect the AC adapter to the DC jack of the computer.
Page 15
Getting started
15
4
After charging, disconnect the AC adapter from the computer.
5
Unplug it from the electric socket.
•
This computer is equipped with an internal battery.
The battery is not user-serviceable or user-replaceable.
•
To have battery removed or replaced safely, take the
device to a Samsung Service Center. You will be charged
for this service.
•
You can use the computer while it is charging, but
the battery charging time may increase. If the battery
temperature rises too much, the charging may stop as a
safety measure.
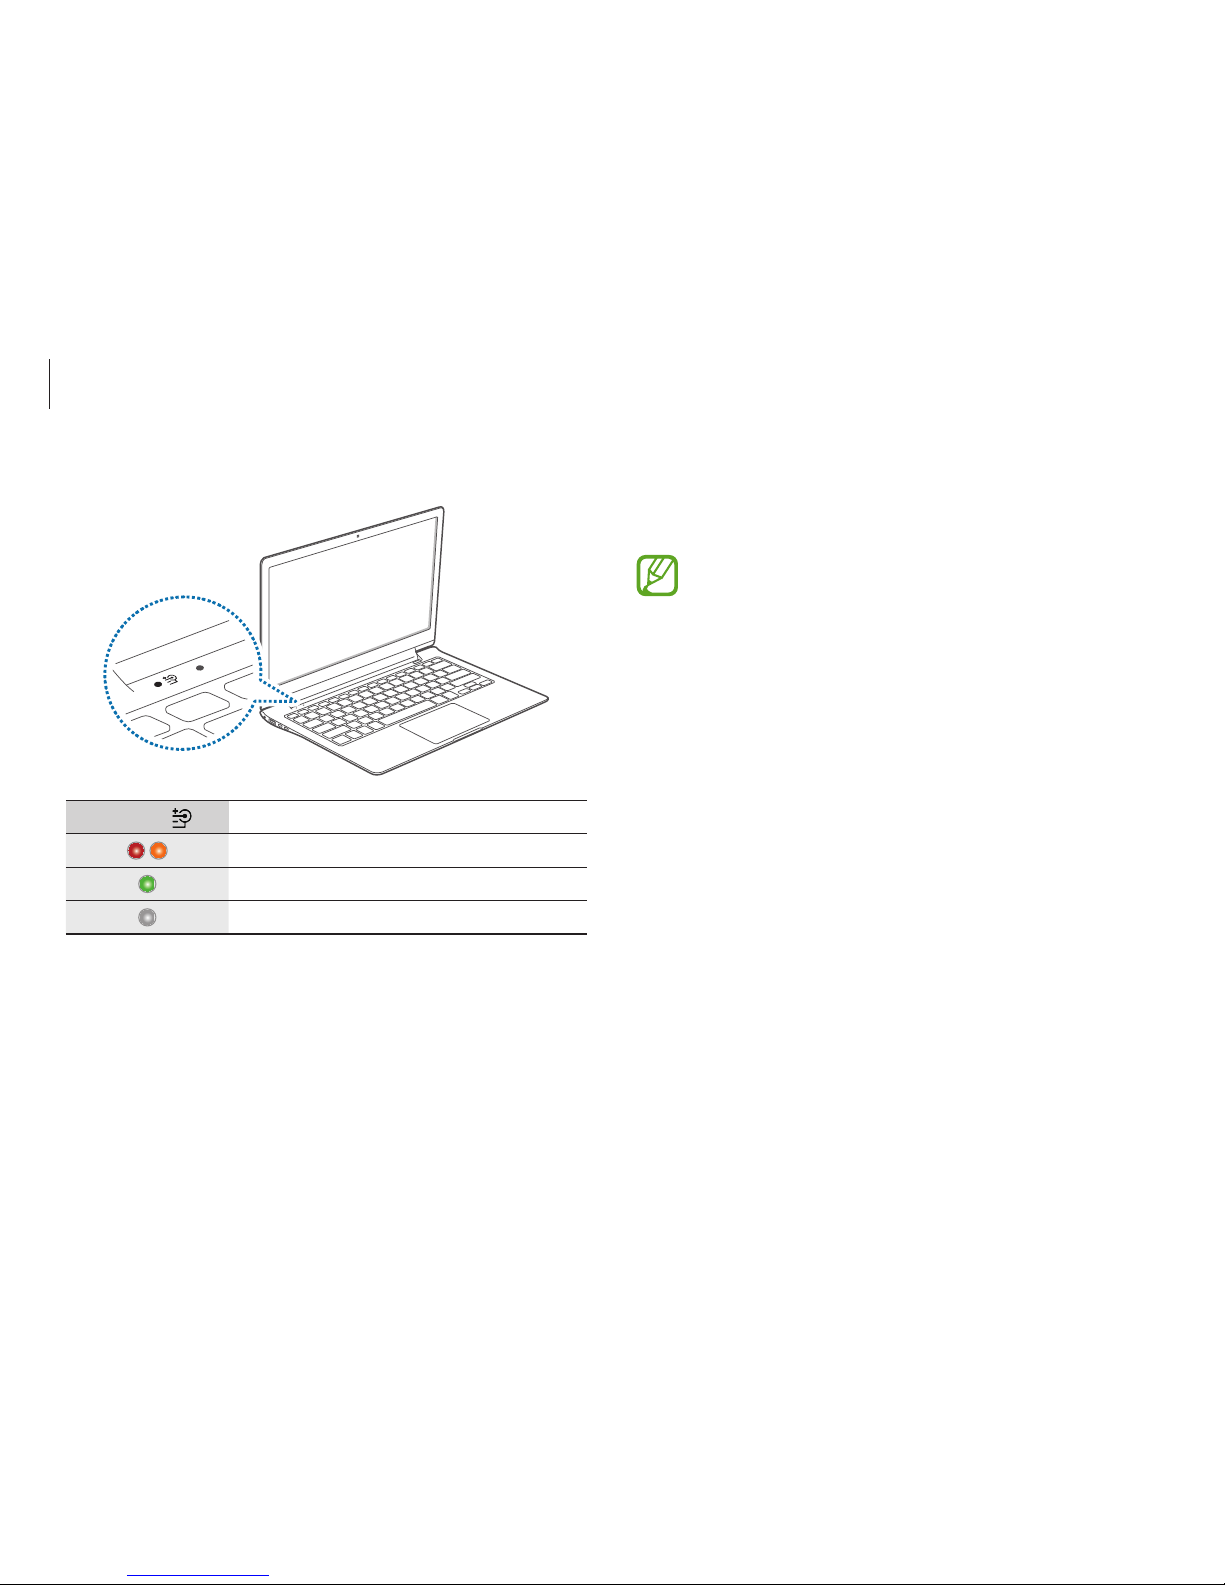
When charging is complete, the charge status turns green.
Charge LED
Status
•
Red or Orange: Charging
•
Green: Fully charged
•
No color: AC adapter not connected
Page 16

Getting started
16
Battery usage time
Batteries are replacement items and over time the battery’s
capacity to hold a charge and its power level is reduced. If a
battery can only hold its charge for half of the time that it could
when new, it is recommended to purchase a new, replacement
battery.
When not using the battery for extended periods, charge the
battery to 30-40% of full charge before storing it. This extends
battery life.
Battery status
Move the cursor over the battery icon on the taskbar to view the
current battery charge when disconnecting the AC adapter from
the computer.
10:00 AM
1/1/2014
5 hr 21 min (64%) remaining
ENG
Viewing the current battery charge when the
computer is turned off
Connect or disconnect the AC adapter from the computer to view
the current battery charge when the computer is turned off.
10:00
2013/7/1
Page 17
Getting started
17
3
Press the Power button.
The Power LED turns on.
4
Activate Windows by following the on-screen instructions.
The Windows activation screen appears only when turning on
the computer for the first time.
•
To adjust the brightness of the screen, see LCD
brightness.
•
To adjust the sound, see Volume.
Turning the computer on and off
Turning on
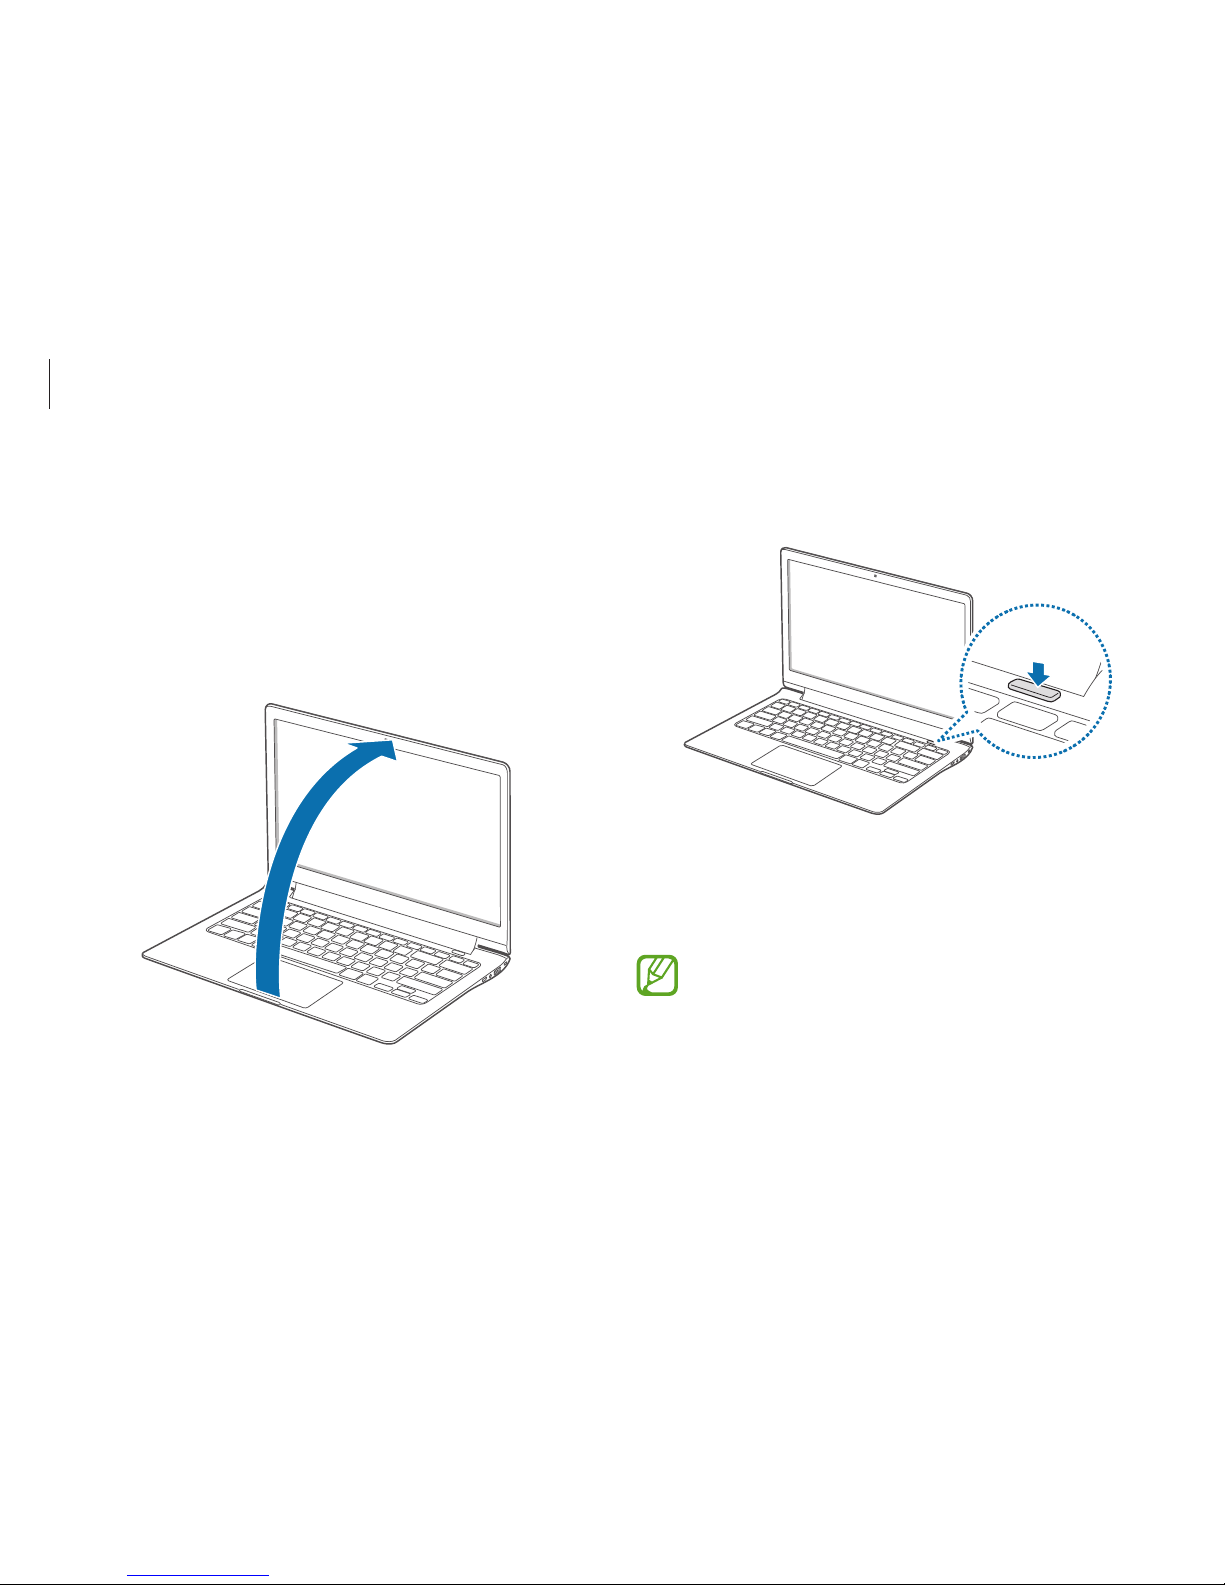
1
Before turning on the computer, charge the battery.
2
Open the LCD panel.
Page 18
Getting started
18
•
Save all the data before turning off the computer.
•
Since the procedures to turn the computer off may
differ depending on the installed operating system,
please turn the computer off according to the
procedures for the purchased operating system.
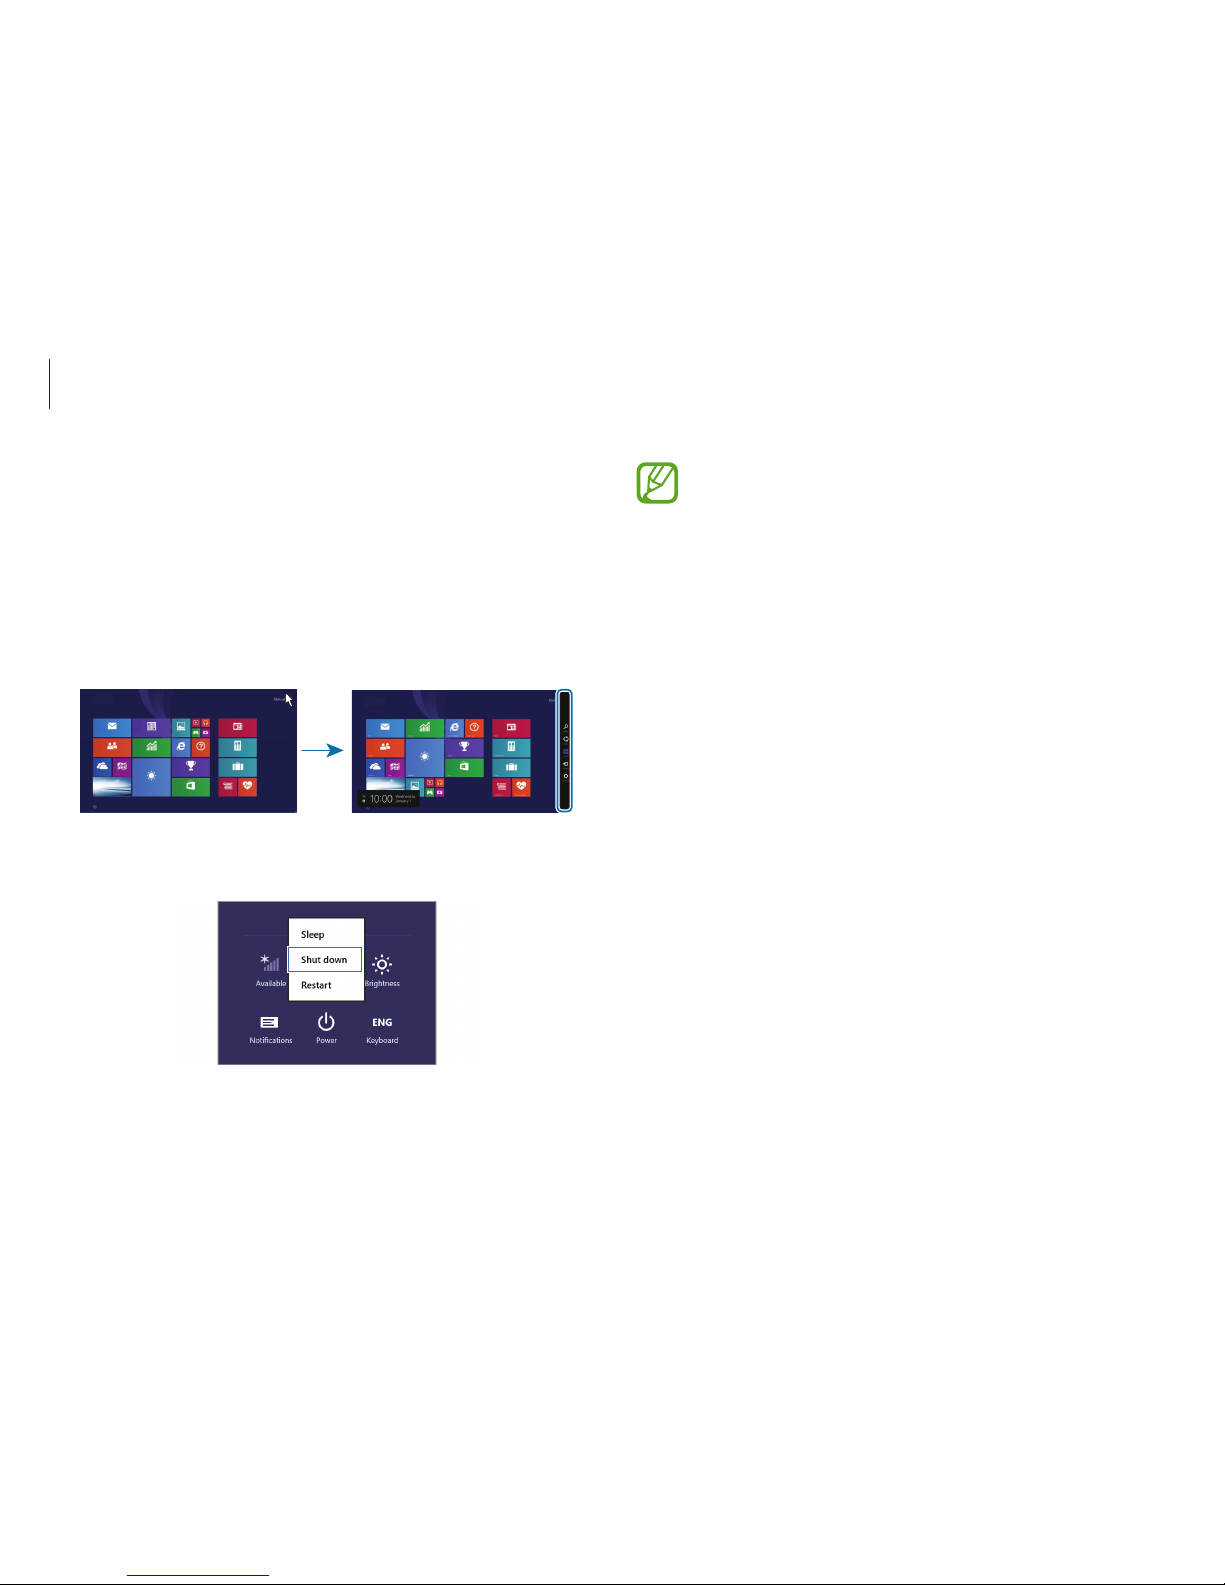
Turning off
1
To open the Charms, do one of the following:
•
Touch screen
: Swipe inward from the right edge of the
touch screen.
•
Touchpad/Mouse
: Move the cursor to the upper- or lower-
right edge of the screen.
Start Start
2
Select the
Settings
charm →
Power
→
Shut down
.
Page 19
Getting started
19
Unlocking the screen
To unlock the lock screen, do one of the following:
•
Touch screen
: Swipe the lock screen from bottom to top.
•
Mouse
: Click the lock screen.
•
Keyboard
: Press any key.
•
Touchpad
: Tap the touchpad.
10:00
Wednesday, January 1
If the account has a password, enter the password to log in after
unlocking the screen.
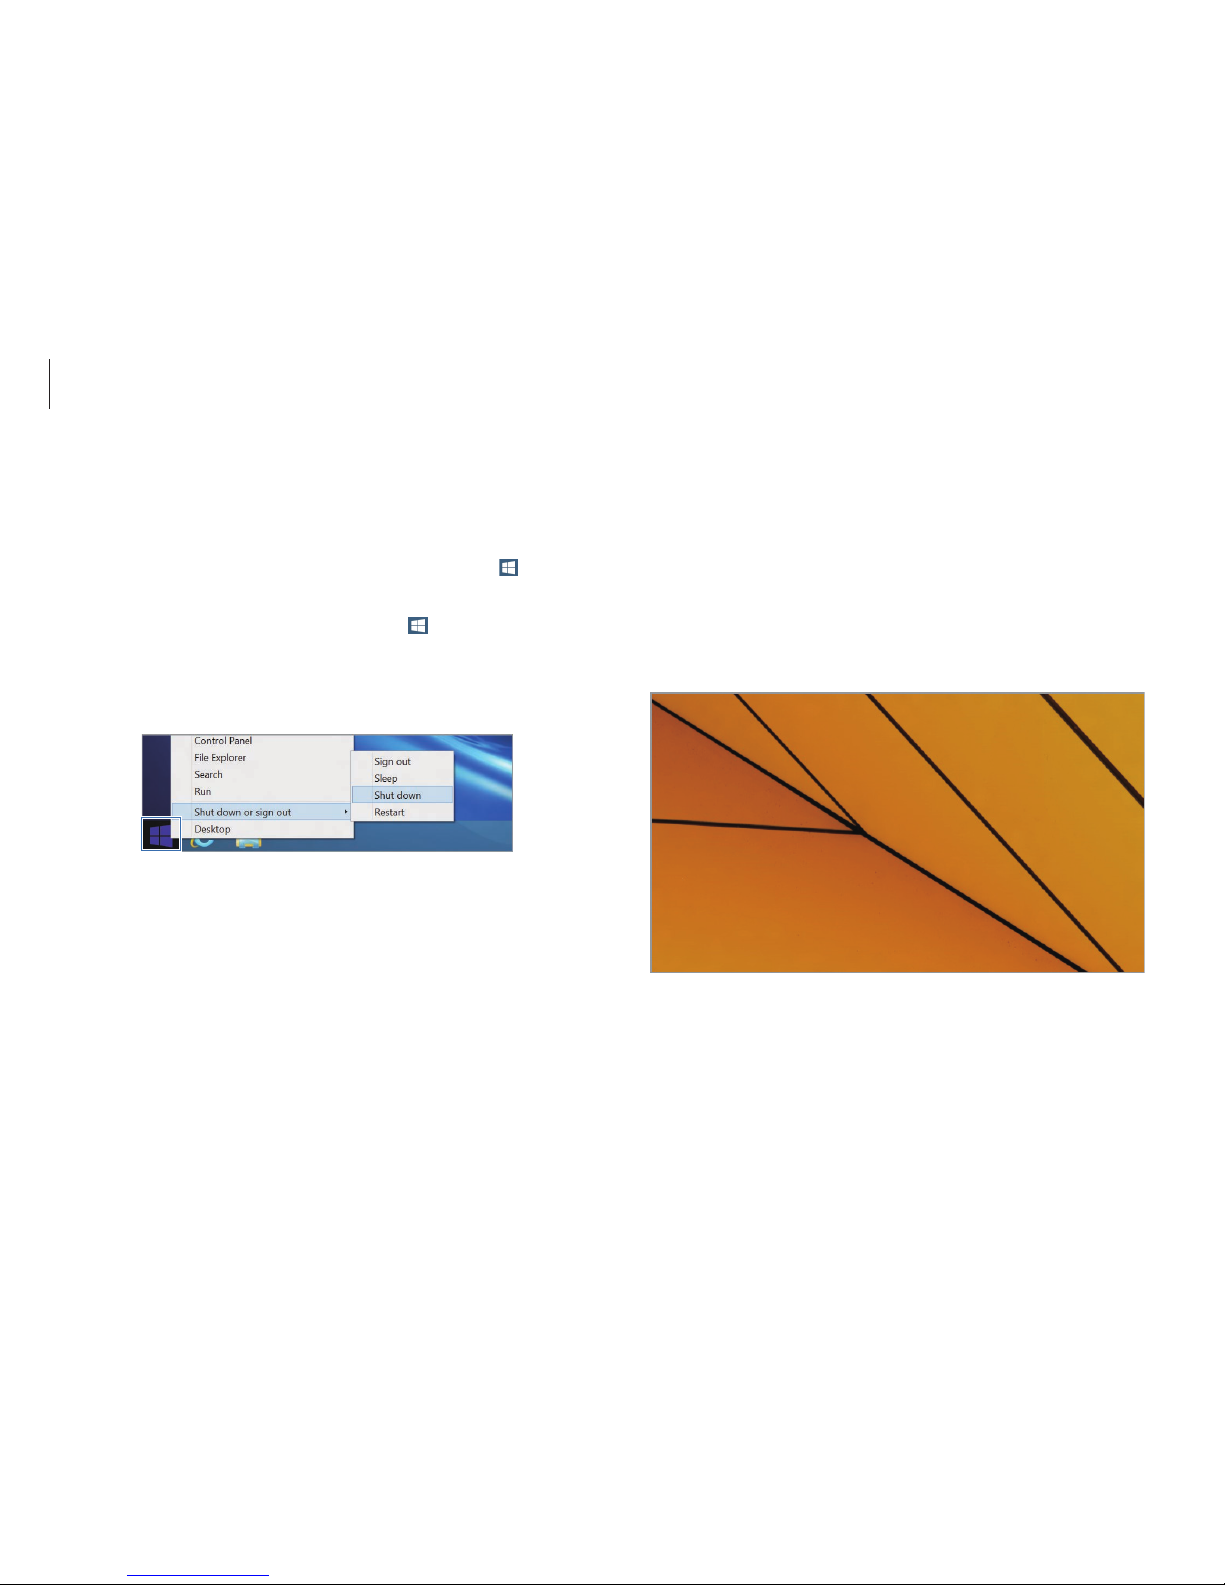
Turning off on the desktop
1
To select the Start button, do one of the following:
•
Touch screen
: Touch and hold the Start button ( ) at the
lower-left edge of the desktop.
•
Mouse
: Right-click the Start button ( ) at the lower-left
edge of the desktop.
2
Select
Shut down or sign out→ Shut down
.
Page 20

20
Windows
About Windows
Microsoft Windows is an operating system that is used to control
a computer. For optimal use of the computer, learn how to use the
operating system properly. It is best to learn how to use Windows
by using
Windows Help and Support
, and
Help+Tips
.
•
Images and available features may differ depending on
the model and operating system.
•
This manual is designed for Windows 8.1 and content
may differ depending on the OS version.
•
The image displayed on the desktop screen may differ
between models and OS versions.
Help
To access the help, do one of the following:
•
Keyboard
: Press the F1 key.
•
Touch screen
: Swipe inward from the right edge of the touch
screen to open the Charms and select the
Settings
charm →
Help
.
•
Mouse
: Move the cursor to the upper- or lower-right edge of
the screen to open the Charms and select the
Settings
charm
→
Help
.
Page 21
Windows
21
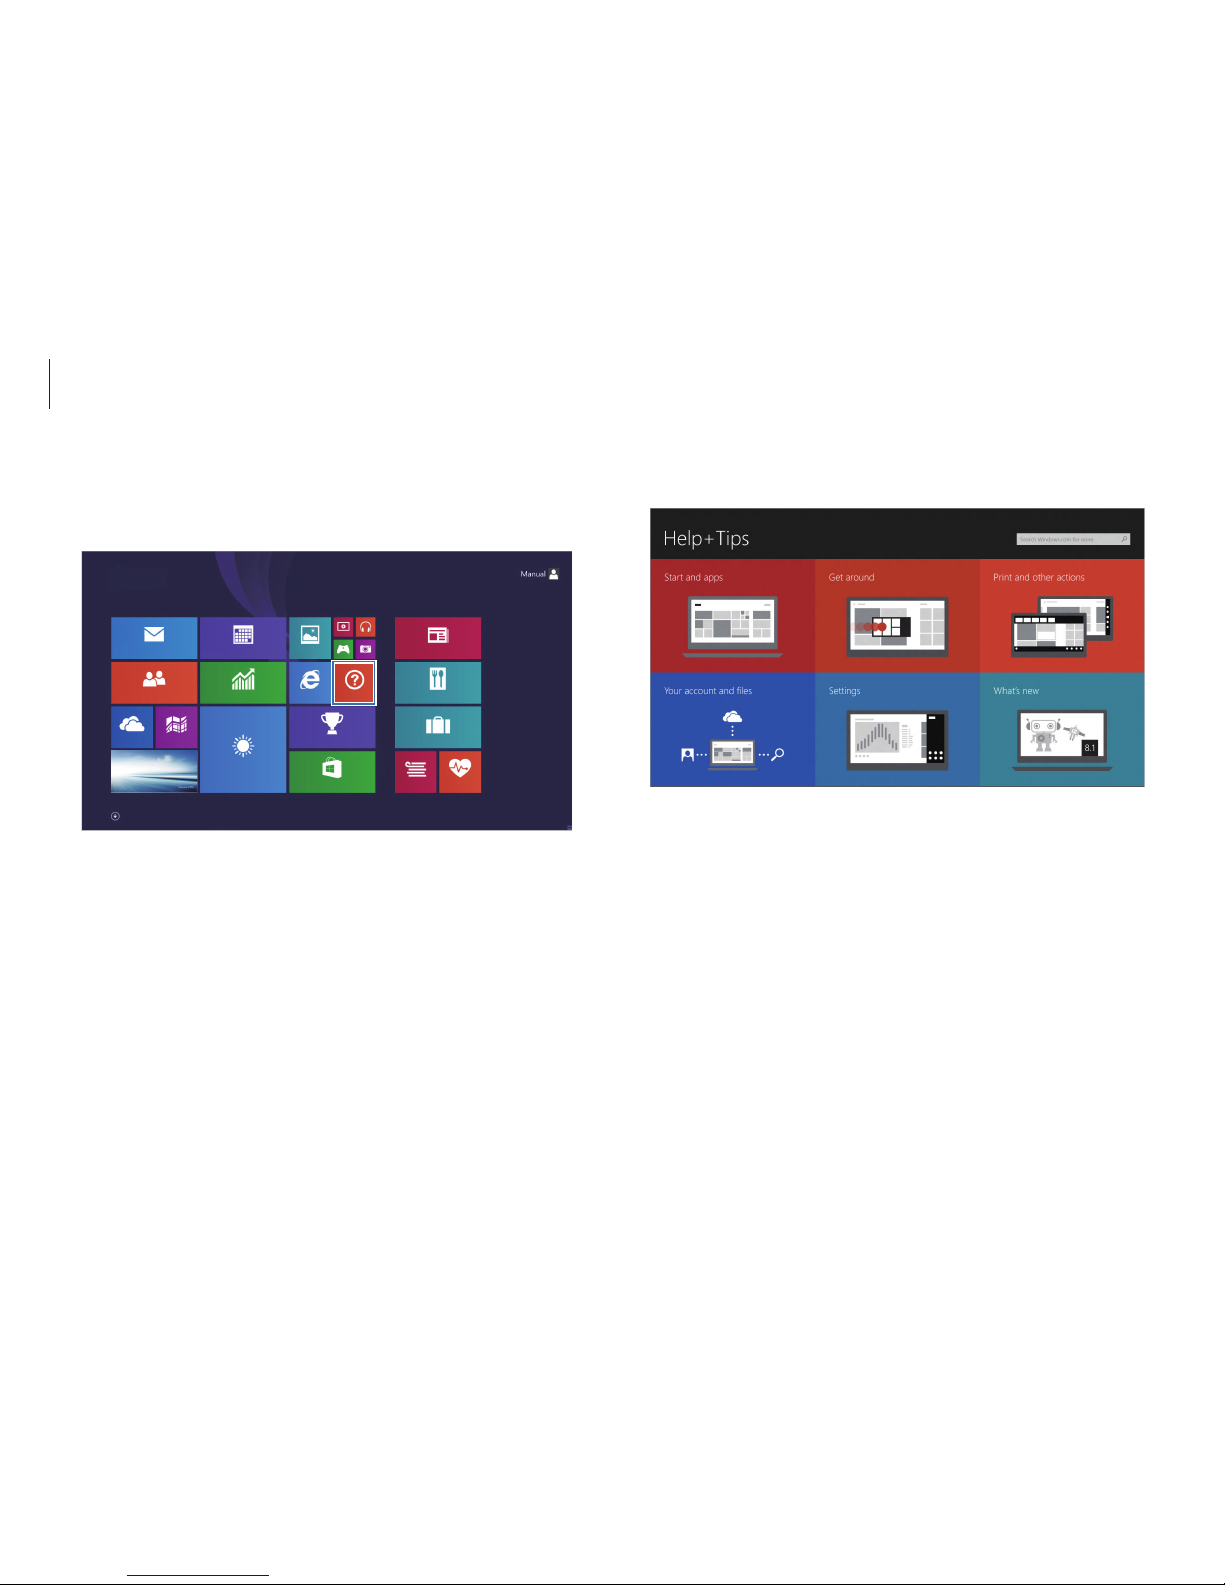
Help+Tips
On the
Start
screen, select
Help+Tips
.
Start
You can control Windows menus with the mouse or with gestures.
Page 22
Windows
22
10:00 AM
1/1/2014
Desktop
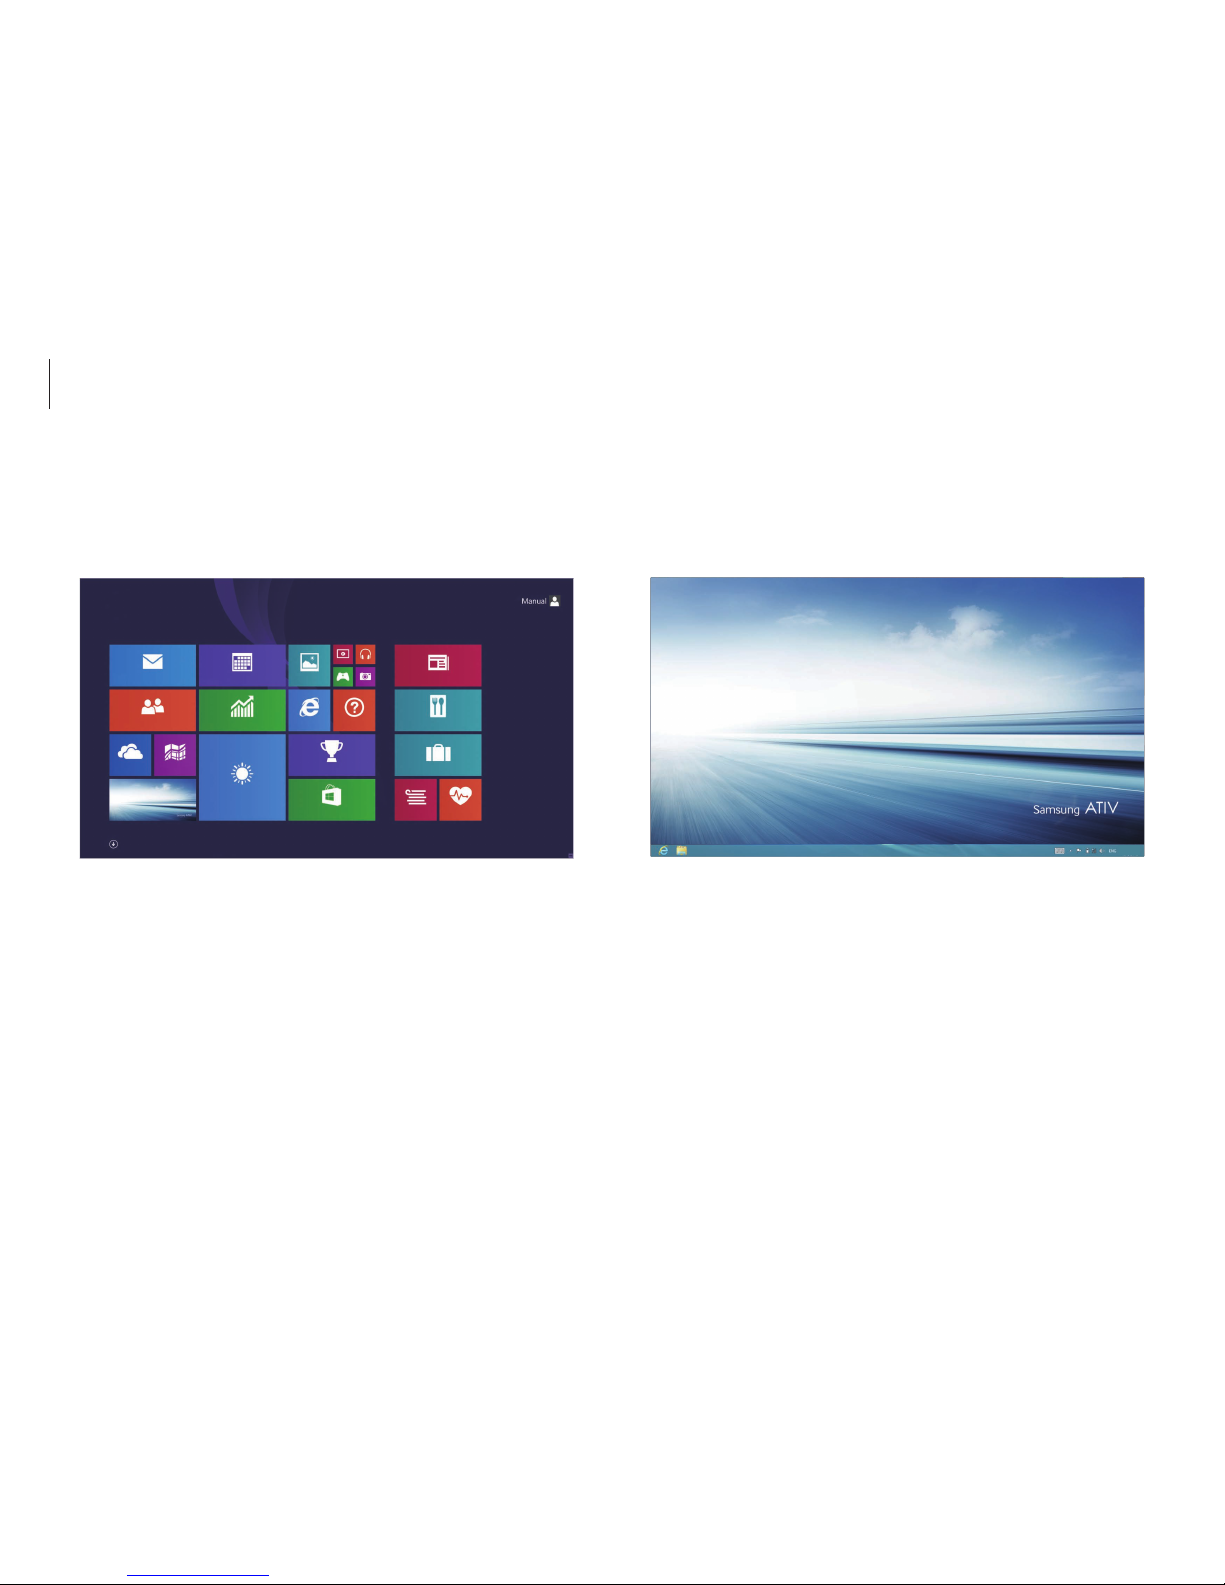
Screens in Windows 8.1
The following two screens are provided: the
Start
screen and the
desktop.
Start
Start screen
Page 23
Windows
23
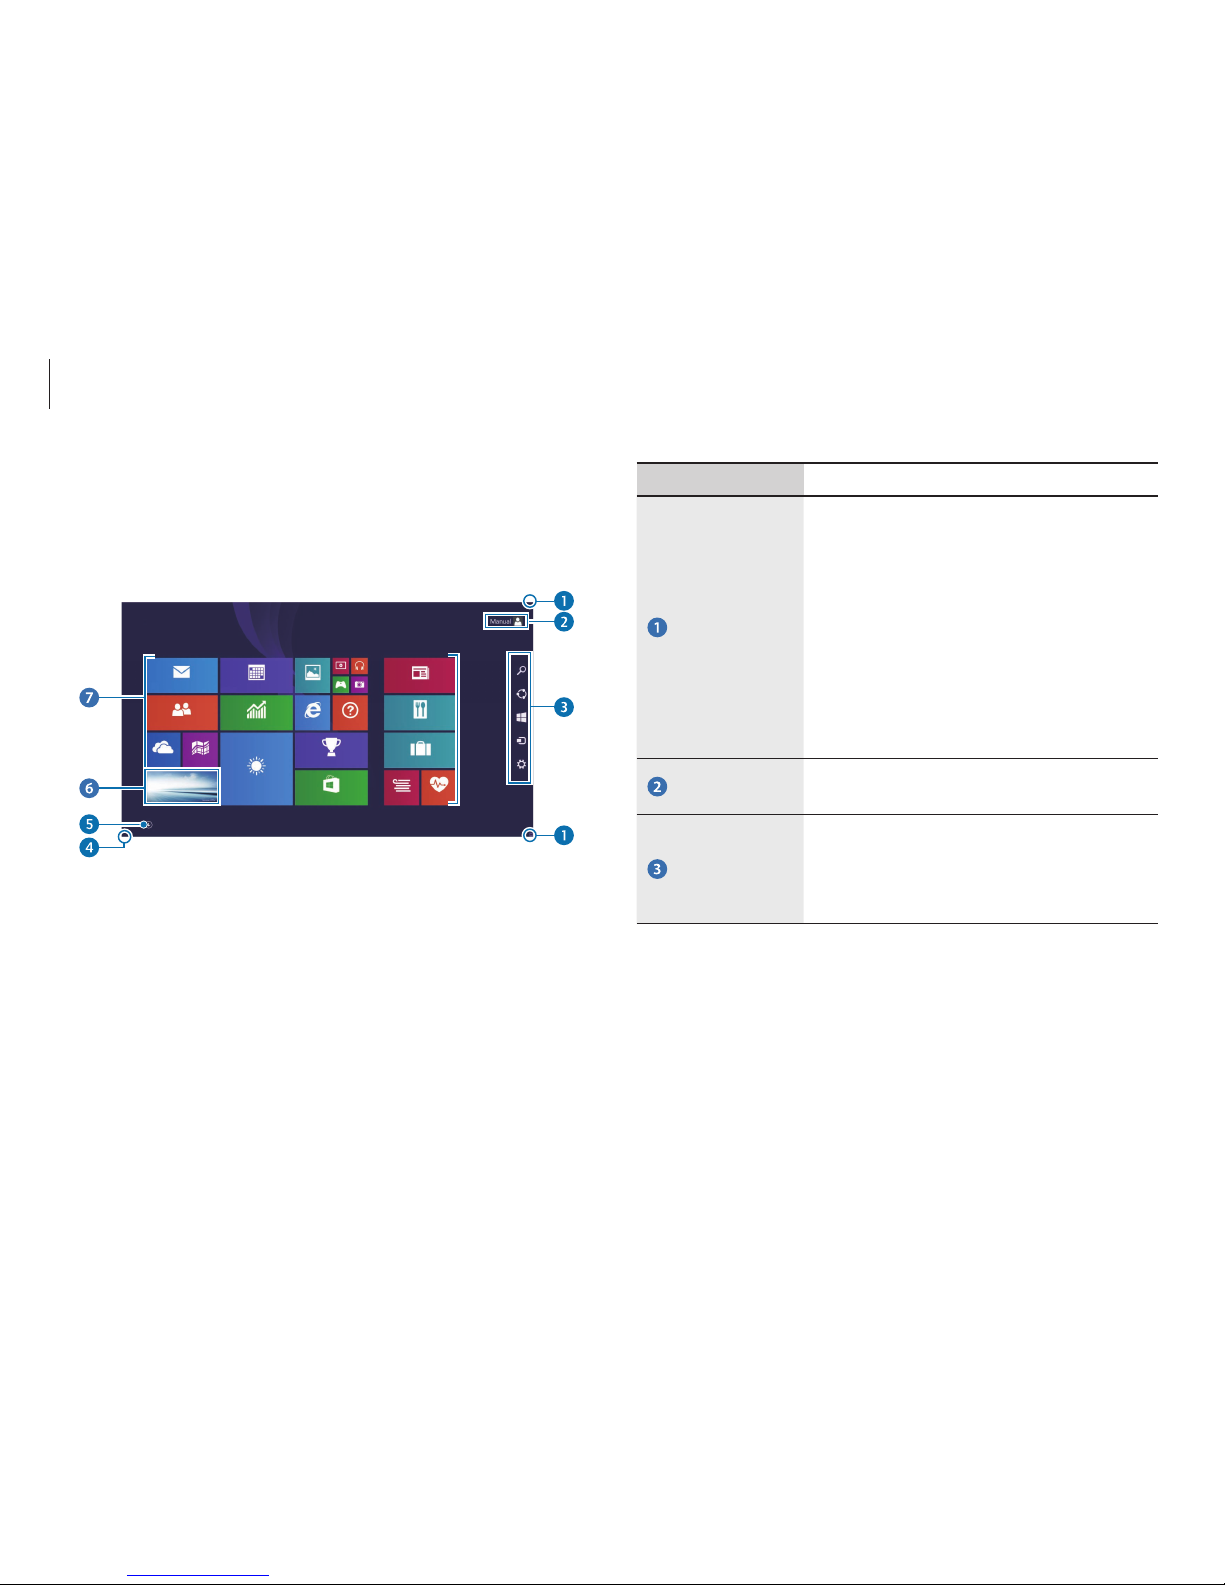
Number/Name Description
Open the
Charms
•
Opens the Charms that are hidden at
the right of the screen.
•
To open the Charms, do one of the
following:
–
Touch screen
: Swipe inward from
the right edge of the touch screen.
–
Touchpad/Mouse
: Move the
cursor to the upper- or lower-right
edge of the screen.
User account
•
Refers to the currently-used user
account.
The Charms
•
Refers to the menu that allows you
to search, share, connect to devices,
configure settings or switch to the
Start
screen.
Start screen
Launch applications on the
Start
screen. When the computer is
turned on, the
Start
screen is displayed first.
Start
Page 24

Windows
24
Number/Name Description
Start button
•
The Start button can be accessed only
with the mouse. Move the cursor to
the lower-left edge of the screen to
view the Start button (
). Click the
button to switch to the most recent
application screen or the desktop.
Right-click this button to access other
Windows features, such as shutting
down the system or opening the
Control Panel.
•
The application screen appears where
the list of applications installed on the
computer is displayed. The application
screen can be accessed only with the
touchpad or mouse.
Desktop
•
Switches to the desktop.
App tiles
•
Refers to the tiles of installed
applications.
Page 25
Windows
25
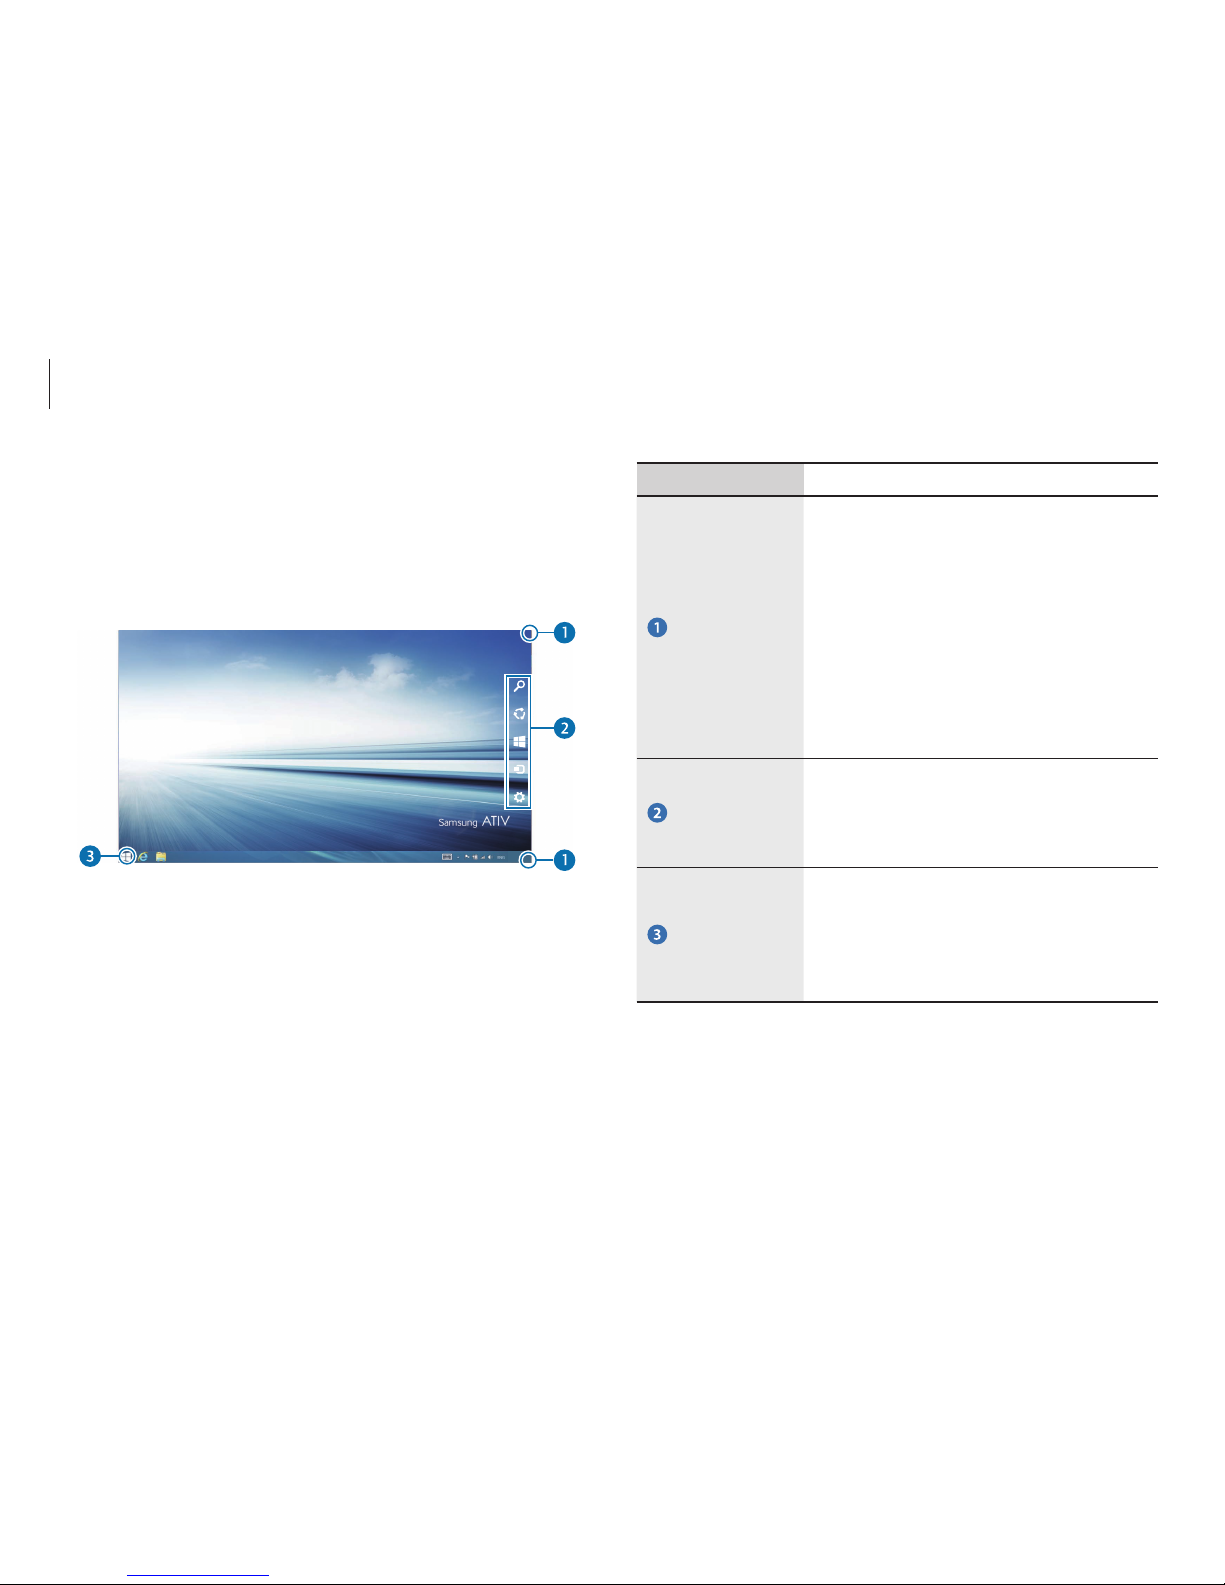
Number/Name Description
Open the
Charms
•
Opens the Charms that are hidden at
the right of the screen.
•
To open the Charms, do one of the
following:
–
Touch screen
: Swipe inward from
the right edge of the touch screen.
–
Touchpad/Mouse
: Move the
cursor to the upper- or lower-right
edge of the screen.
The Charms
•
Refers to the menu that allows you
to search, share, connect to devices,
configure settings or switch to the
Start
screen.
Start button
•
Move to the
Start
screen. Right-click or
touch and hold this button to access
Windows features, such as shutting
down the system or opening the
Control Panel.
Desktop
The desktop provides a layout that is similar to earlier versions of
Windows.
On the
Start
screen, select
Desktop
from the tiles.
10:00 AM
1/1/2014
Page 26
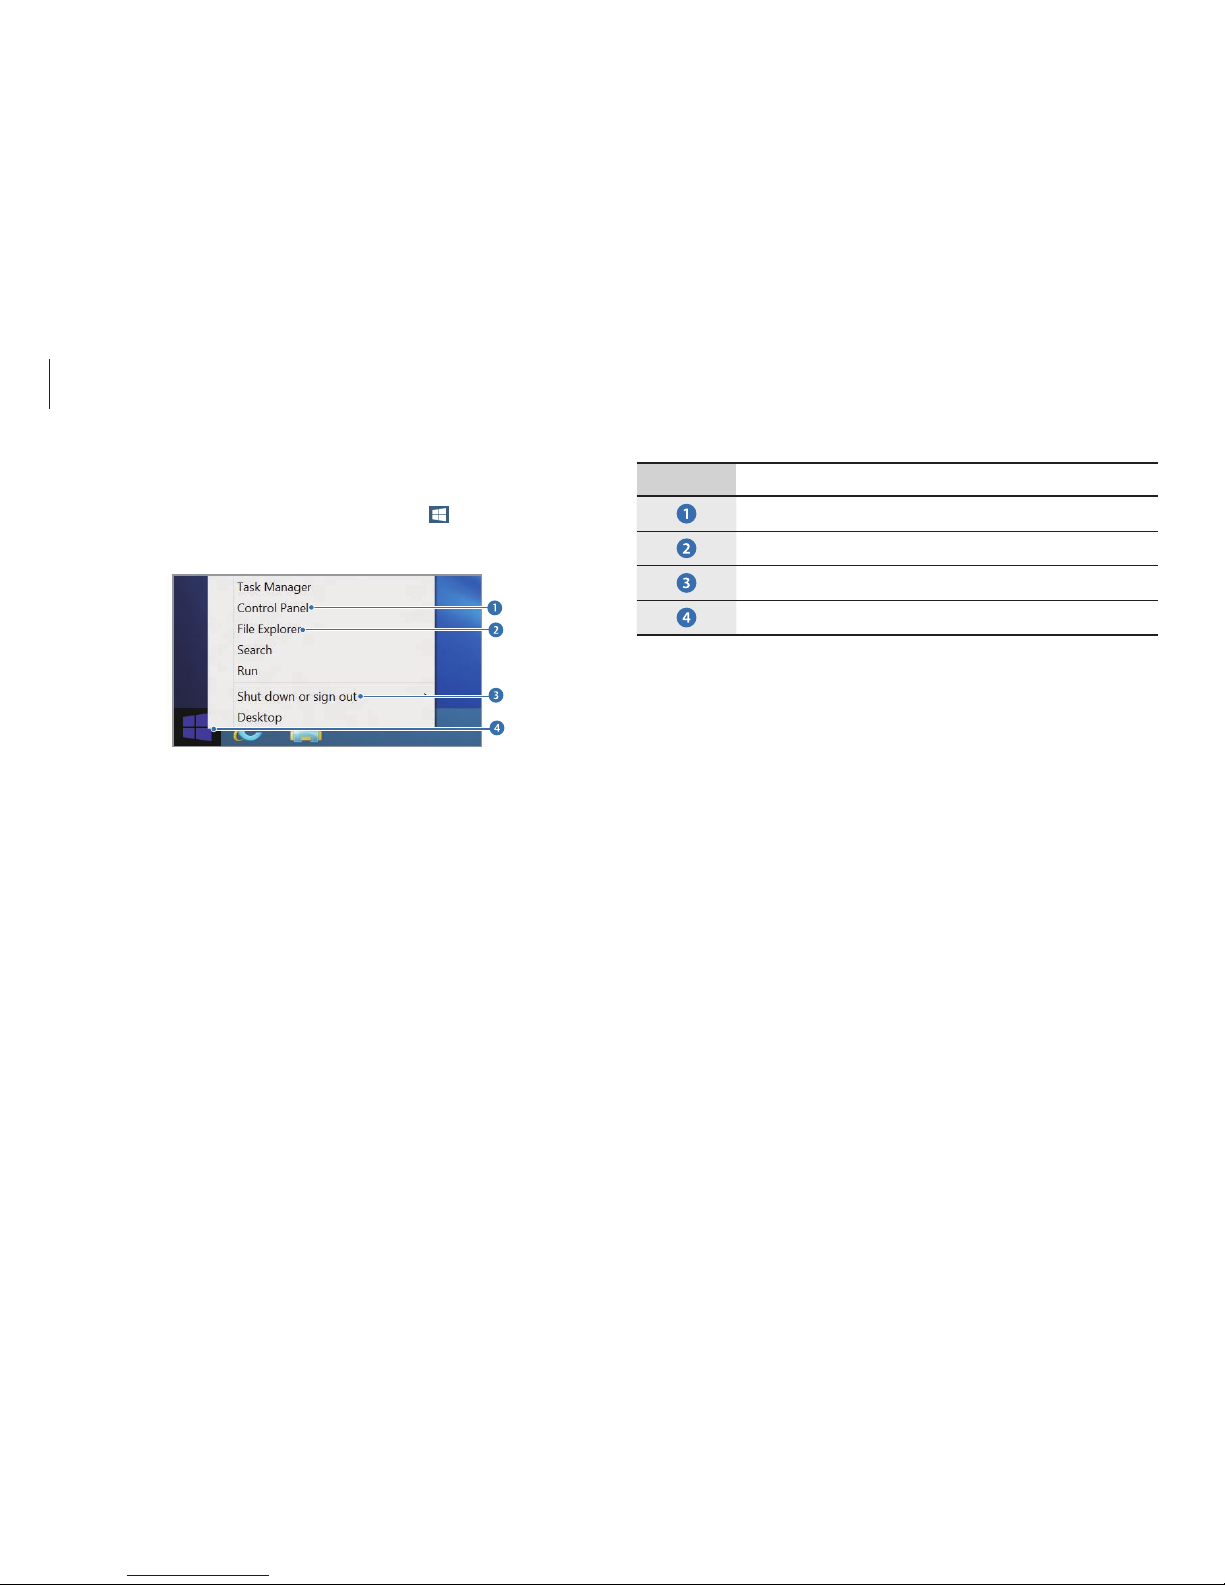
Windows
26
Number Name
•
Control Panel
•
File Explorer
•
Power menu
•
Start button
Using the Start button
Touch and hold or right-click the Start button ( ) to quickly and
conveniently access various features of Windows.
Page 27
Windows
27
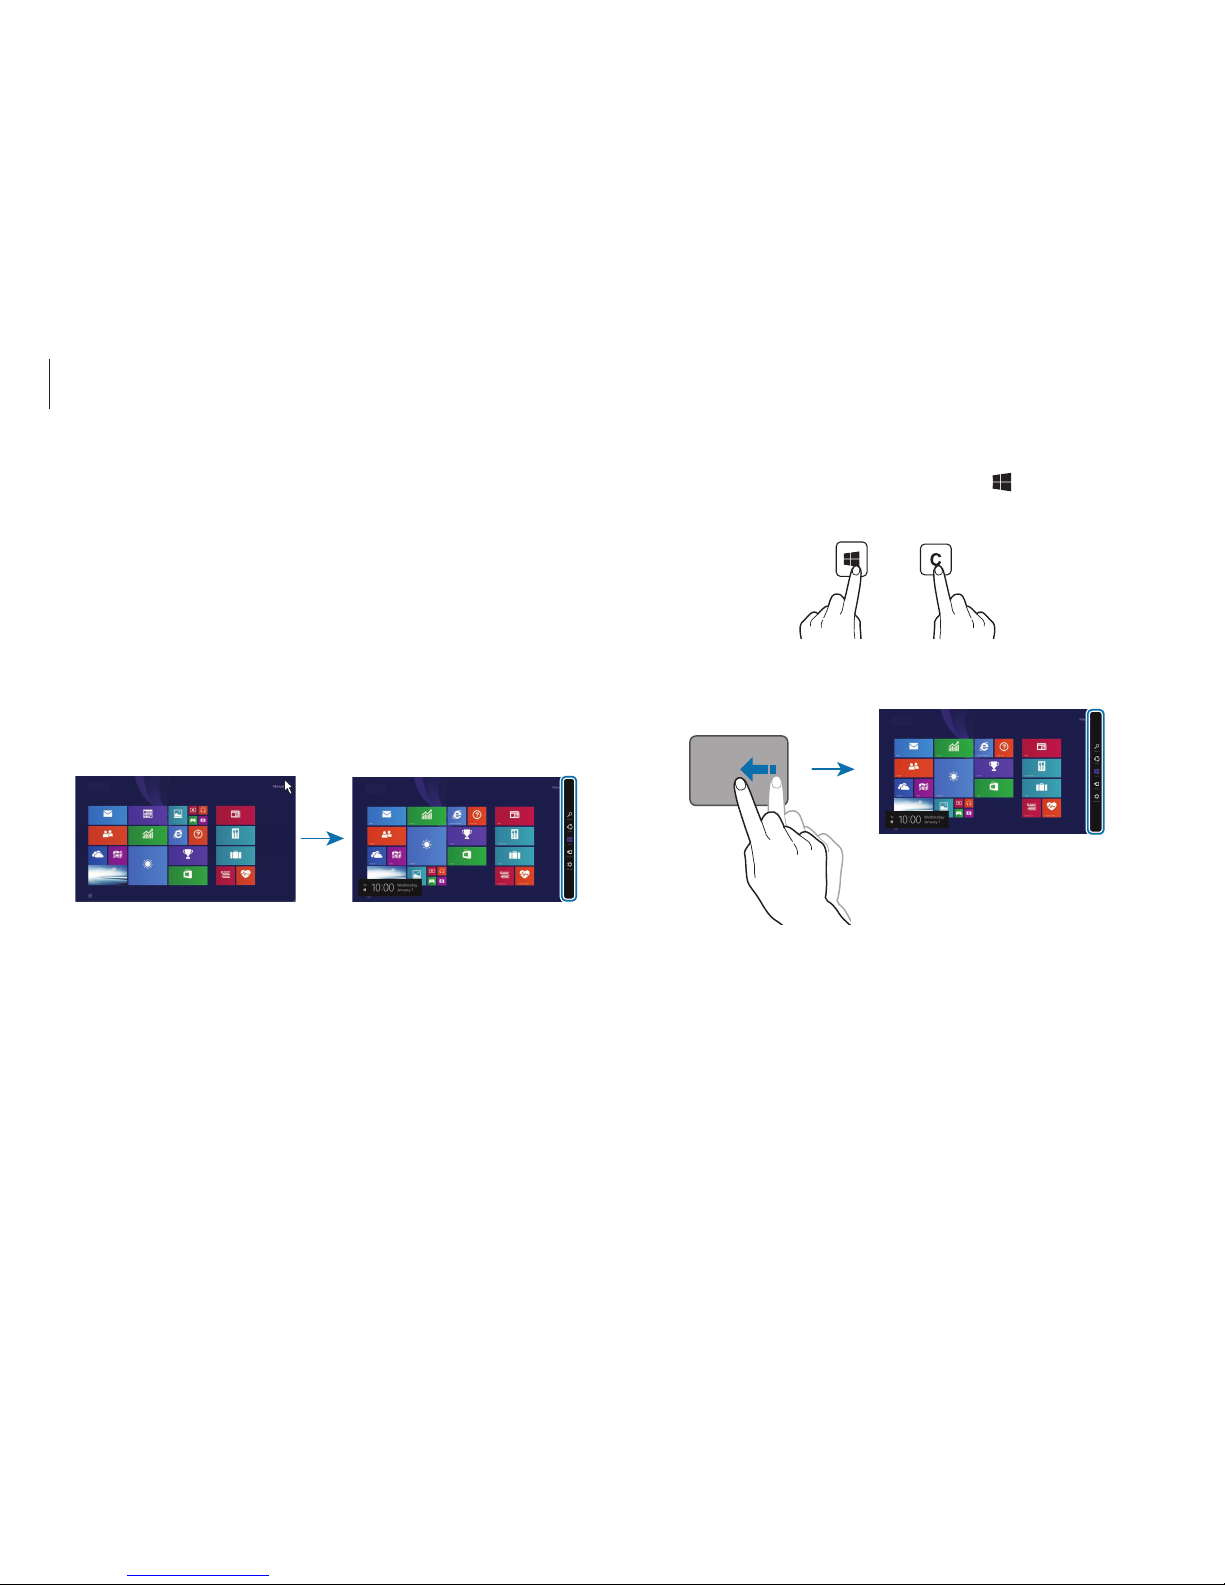
•
Keyboard
: Hold down the Windows key ( ) and press the C
key.
+
•
Touchpad
: Swipe inward from the right edge of the touchpad.
Start
The Charms
The Charms let you search, share links and photos, connect
devices, and change settings. The Charms functions available may
differ between the
Start
screen and the desktop or applications.
Opening the Charms
To open the Charms, do one of the following:
•
Mouse
: Move the cursor to the upper- or lower-right edge of
the screen.
Start
Start
Page 28
Windows
28
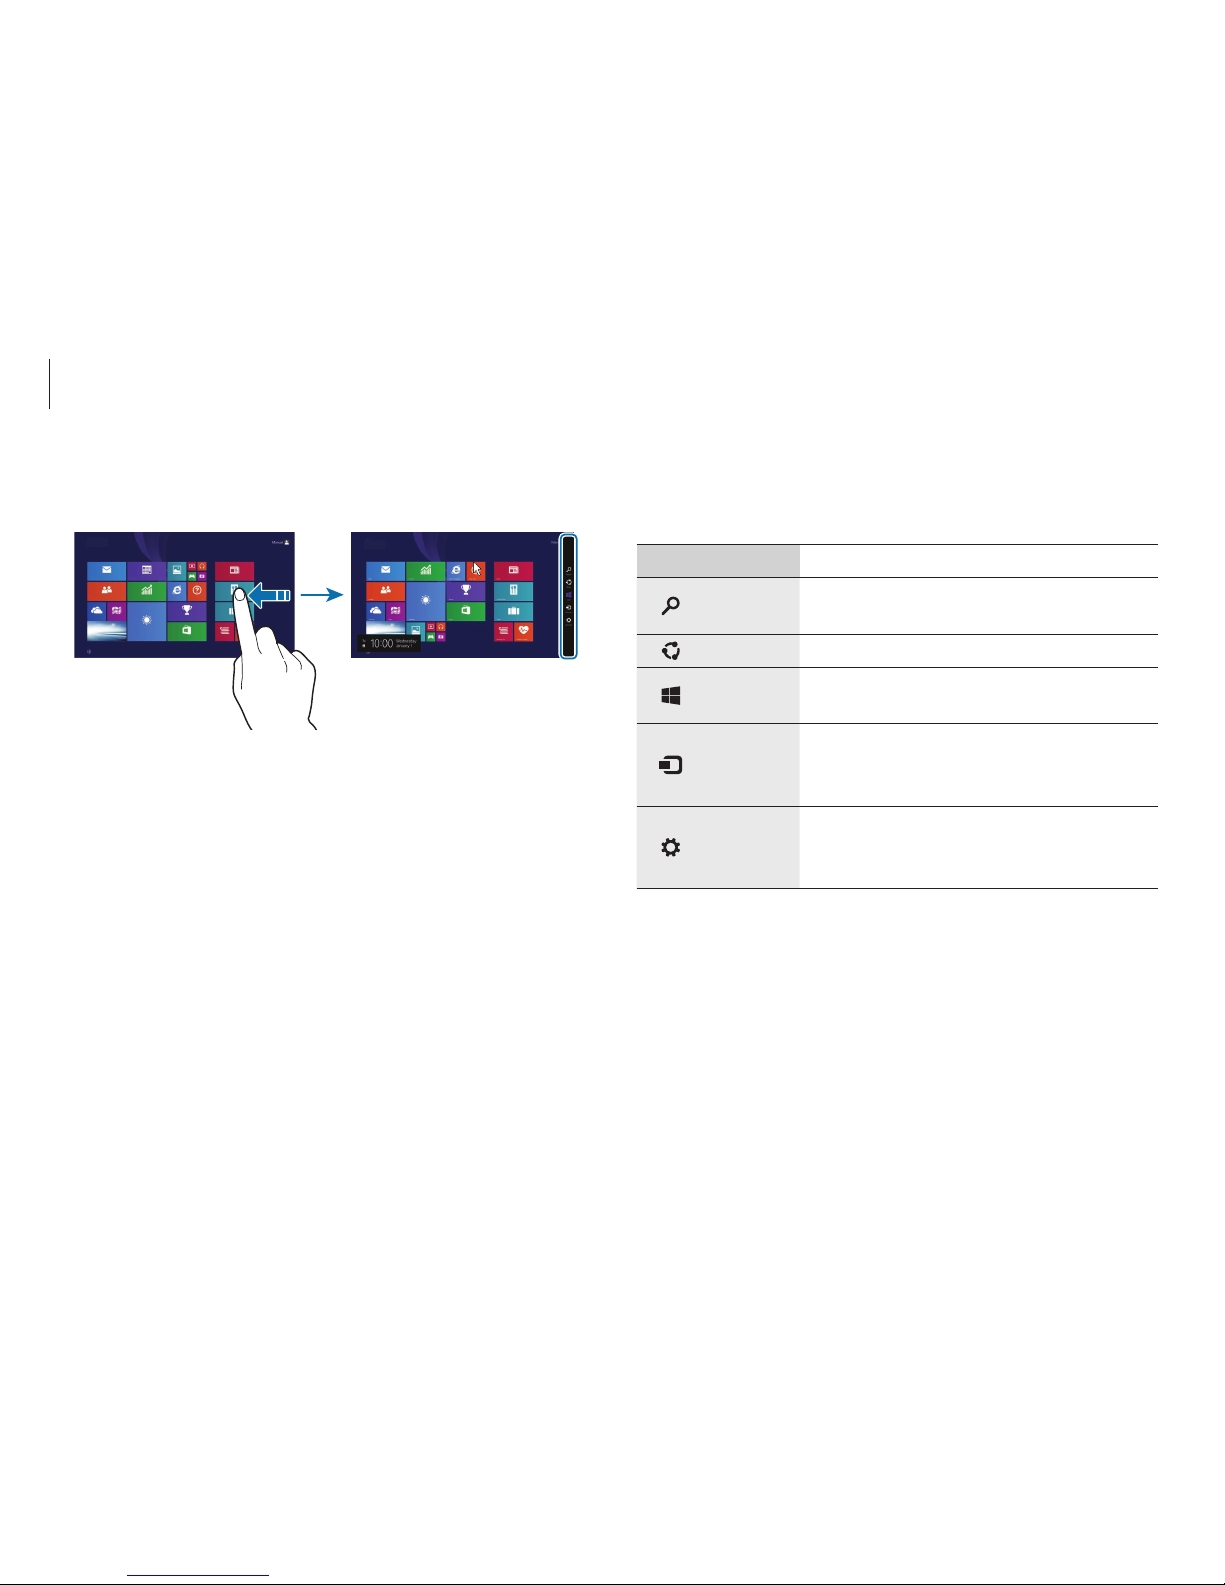
Learning about the Charms
Use the following Charms to control the computer:
Charm Description
Search
•
Search for applications, files, or
websites by entering keywords.
Share
•
Share various files with others.
Start
•
Return to the
Start
screen or open the
most recent application.
Devices
•
Connect devices, such as printers or
displays or sync files with a mobile
device.
Settings
•
Configure the computer, set application
options, or add accounts. See Settings
charm.
•
Touch screen
: Swipe inward from the right edge of the touch
screen.
Start Start
Page 29
Windows
29
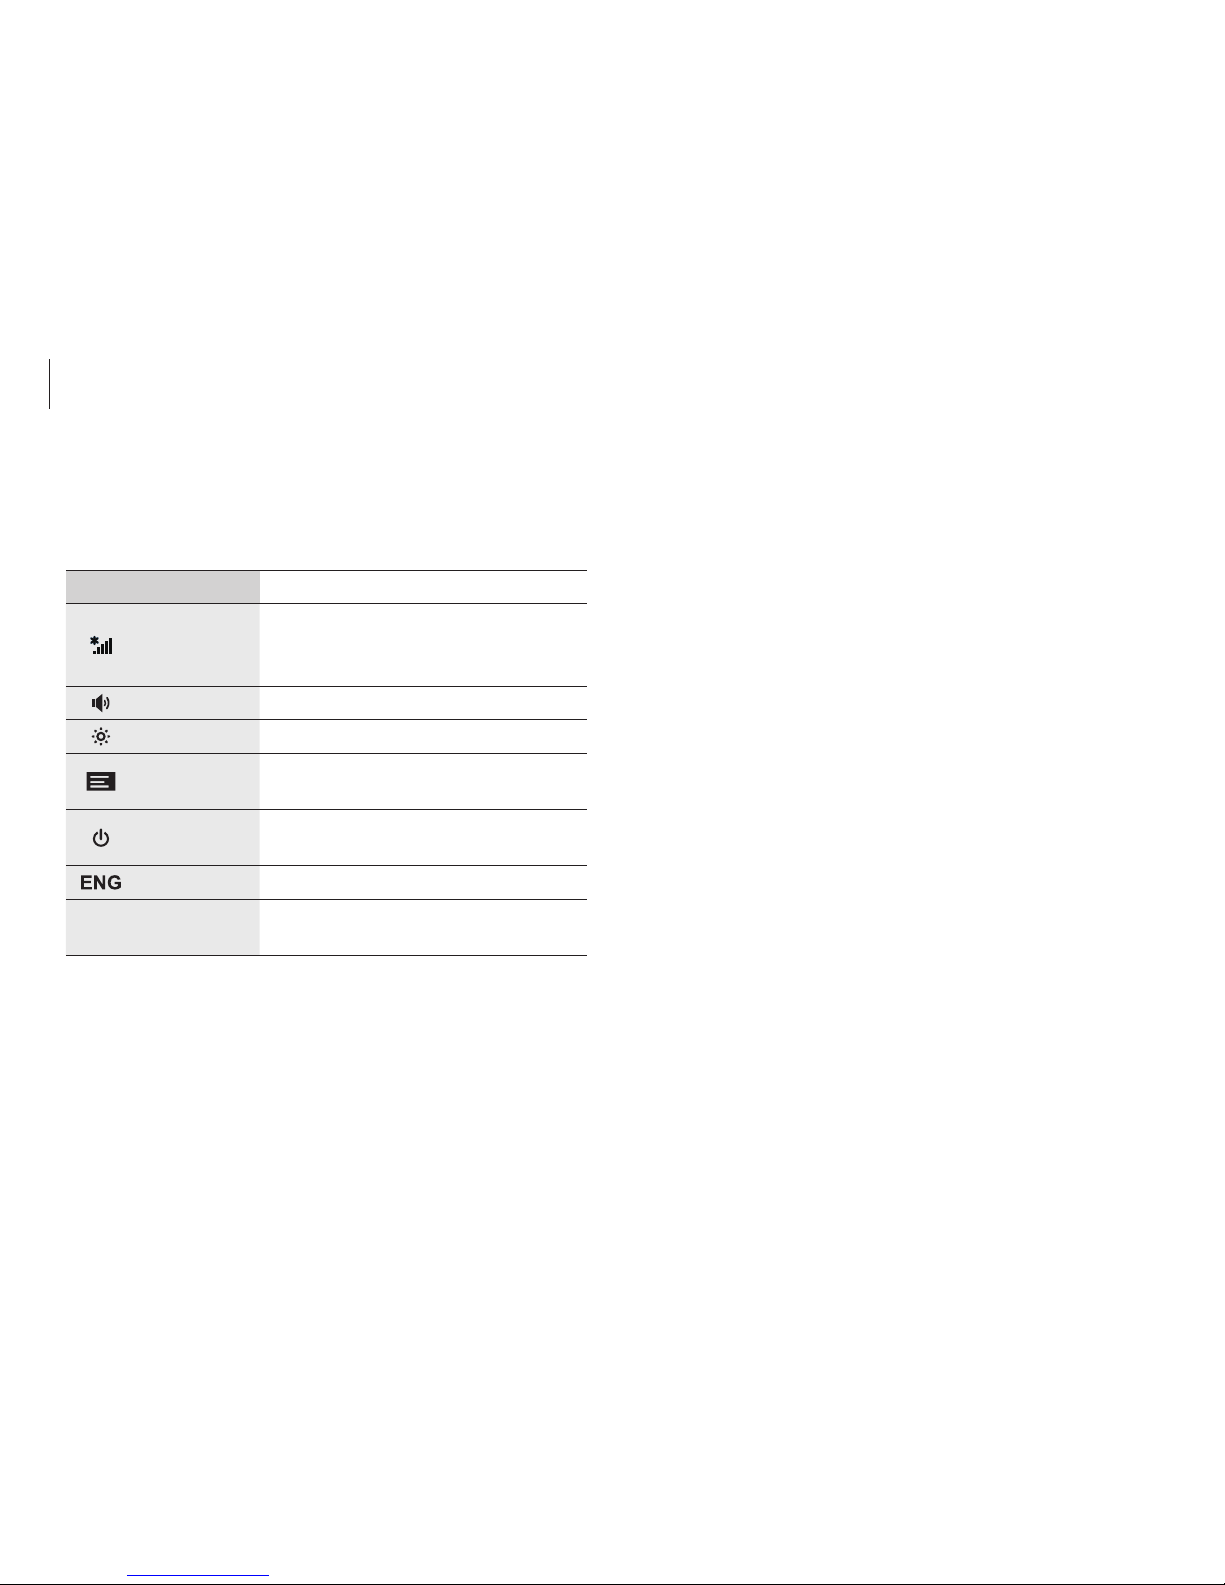
Settings charm
To configure the computer, open the Charms and then select the
Settings
charm → an option.
Option Description
Network
•
Connect the computer to a
network to use the Internet or
share files with other devices.
Volume
•
Adjust the volume level.
Brightness
•
Set the brightness of the screen.
Notifications
•
Set the interval at which an
application sends notices.
Power
•
Turn off the computer or select
power options.
Keyboard
•
Set a language to enter text.
Change PC
settings
•
Change more settings and
personalize the computer.
Page 30

Windows
30
Closing an application
Running multiple applications at the same time can slow down
the performance of some applications or consume the battery
power fast. Close applications not in use to save battery power
and maintain performance.
1
Move the cursor to the top of the application screen until the
cursor changes to a hand shape.
2
Click and hold the hand shape and drag it to the bottom of
the screen.
Applications
Opening or closing applications
On the
Start
screen, select an application icon to open it.
•
Touchpad/Mouse
: Select at the lower-left edge of the
desktop to view all applications.
•
Touch screen
: Swipe upwards on the touch screen.
Page 31
Windows
31
App tiles
Tile position
To change the position of an app tile on the
Start
screen, select
and hold the tile and then drag it to a new position.
Start
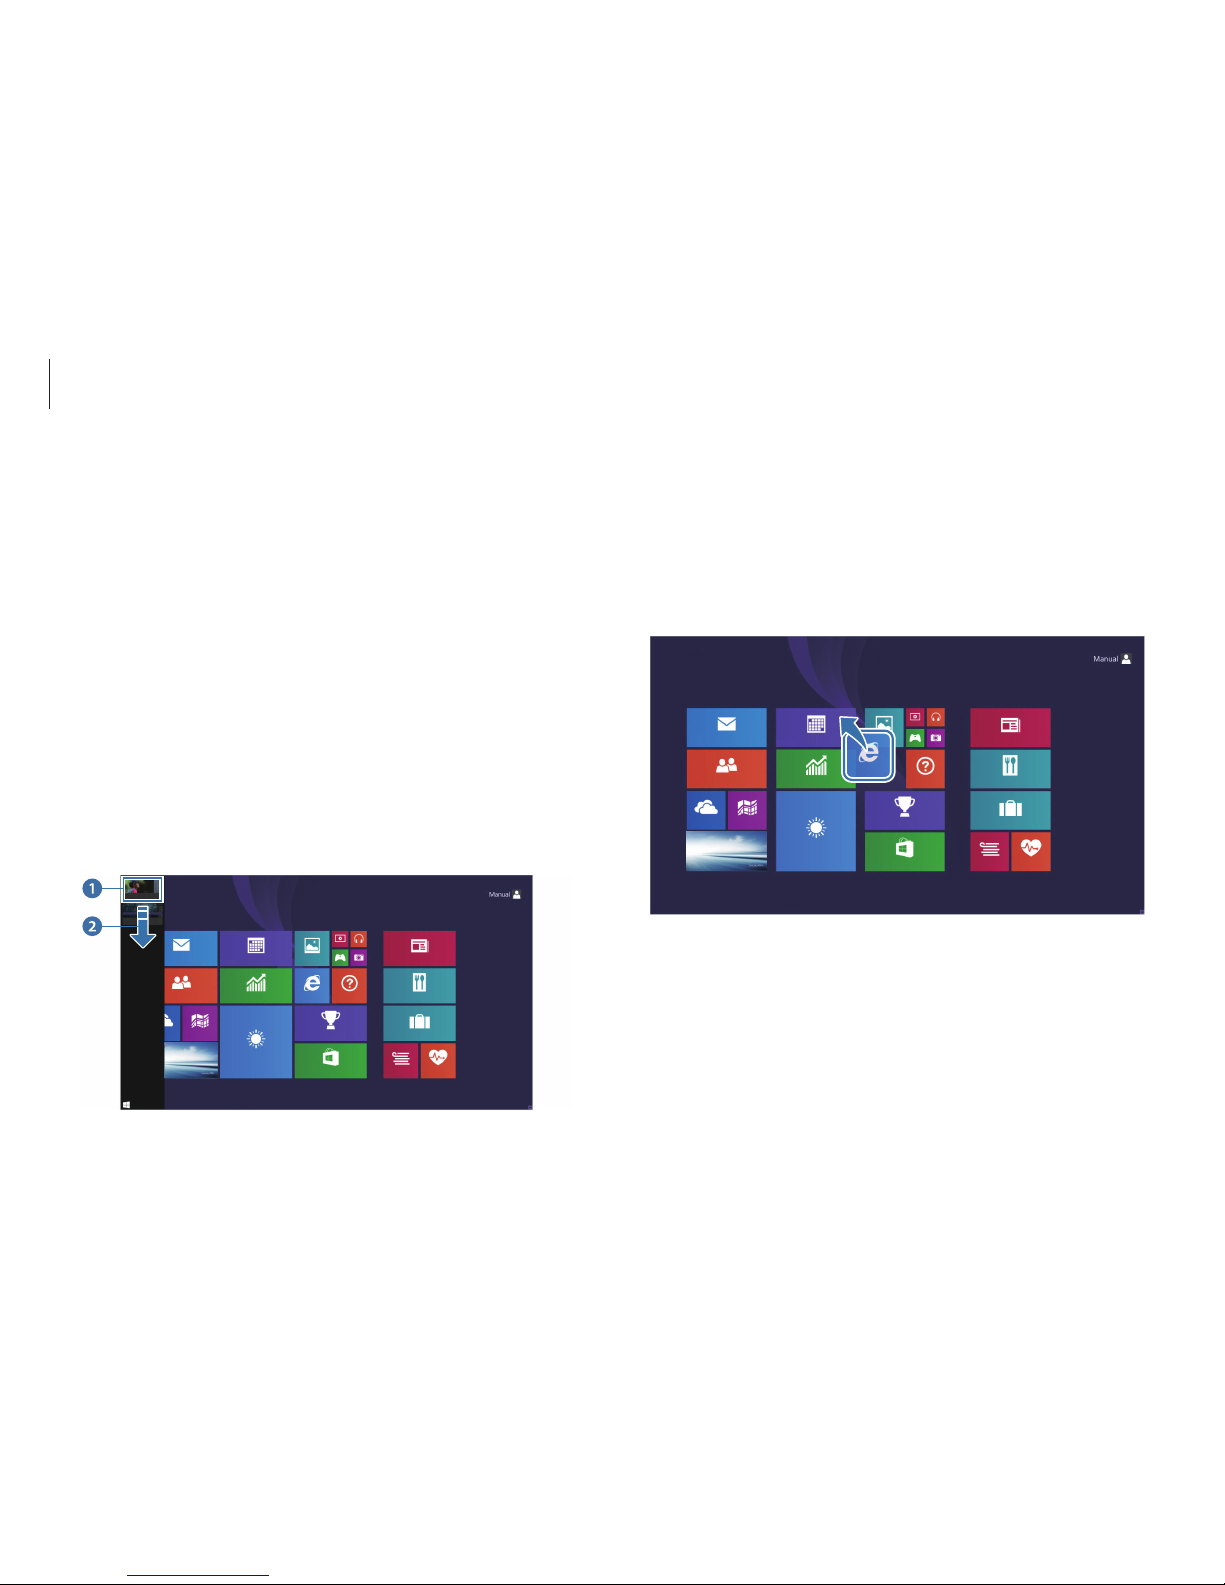
Opening recent applications
1
On the
Start
screen, place the cursor in the upper-left corner
of the screen until a small application image appears.
Swipe from the left edge of the touchpad or screen towards
the middle of the touchpad or screen to open the most recent
application.
2
Move the cursor down to display a list of recently used
applications.
3
Select an application to open it.
Right-click over an application in the list and click
Close
to exit
the application.
Page 32
Windows
32
Naming a group
1
To open menu items, do one of the following:
•
Touch screen
: On the
Start
screen, swipe upwards from
the bottom edge of the touch screen.
•
Touchpad/Mouse
: On the
Start
screen, right-click any
area.
2
Select
Customize
.
3
Select
Name group
on each group.
4
Enter a name with the keyboard or the on-screen keyboard,
and then press the
Enter
key.
Editing tiles
1
To select a tile and then an option, do one of the following:
•
Touch screen
: Press and hold the tile to edit.
•
Touchpad/Mouse
: Right-click on the tile to edit.
2
Select an option.
•
Unpin from Start
: Delete the tile from the
Start
screen.
•
Resize
: Change the size of the tile.
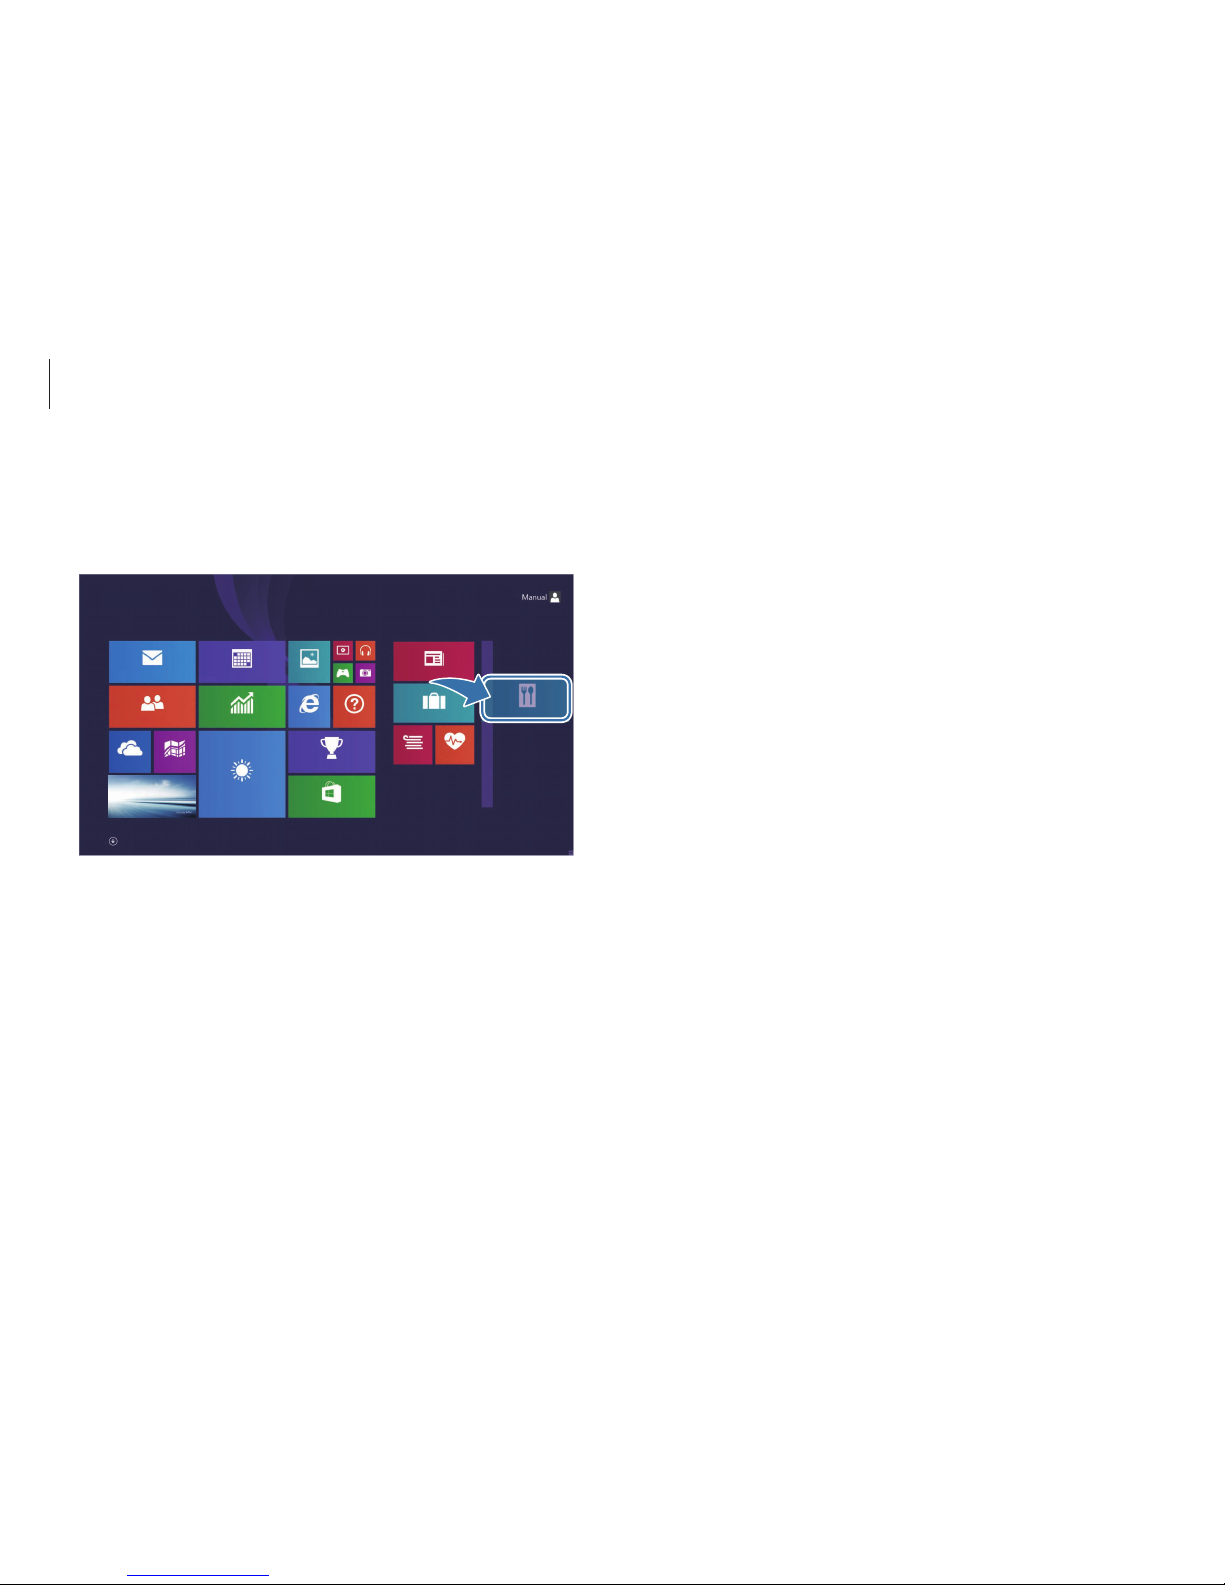
Grouping tiles
To group tiles, select and hold a tile and drag it to an open space.
Then, drag other tiles to the new group.
Start
Page 33
Windows
33
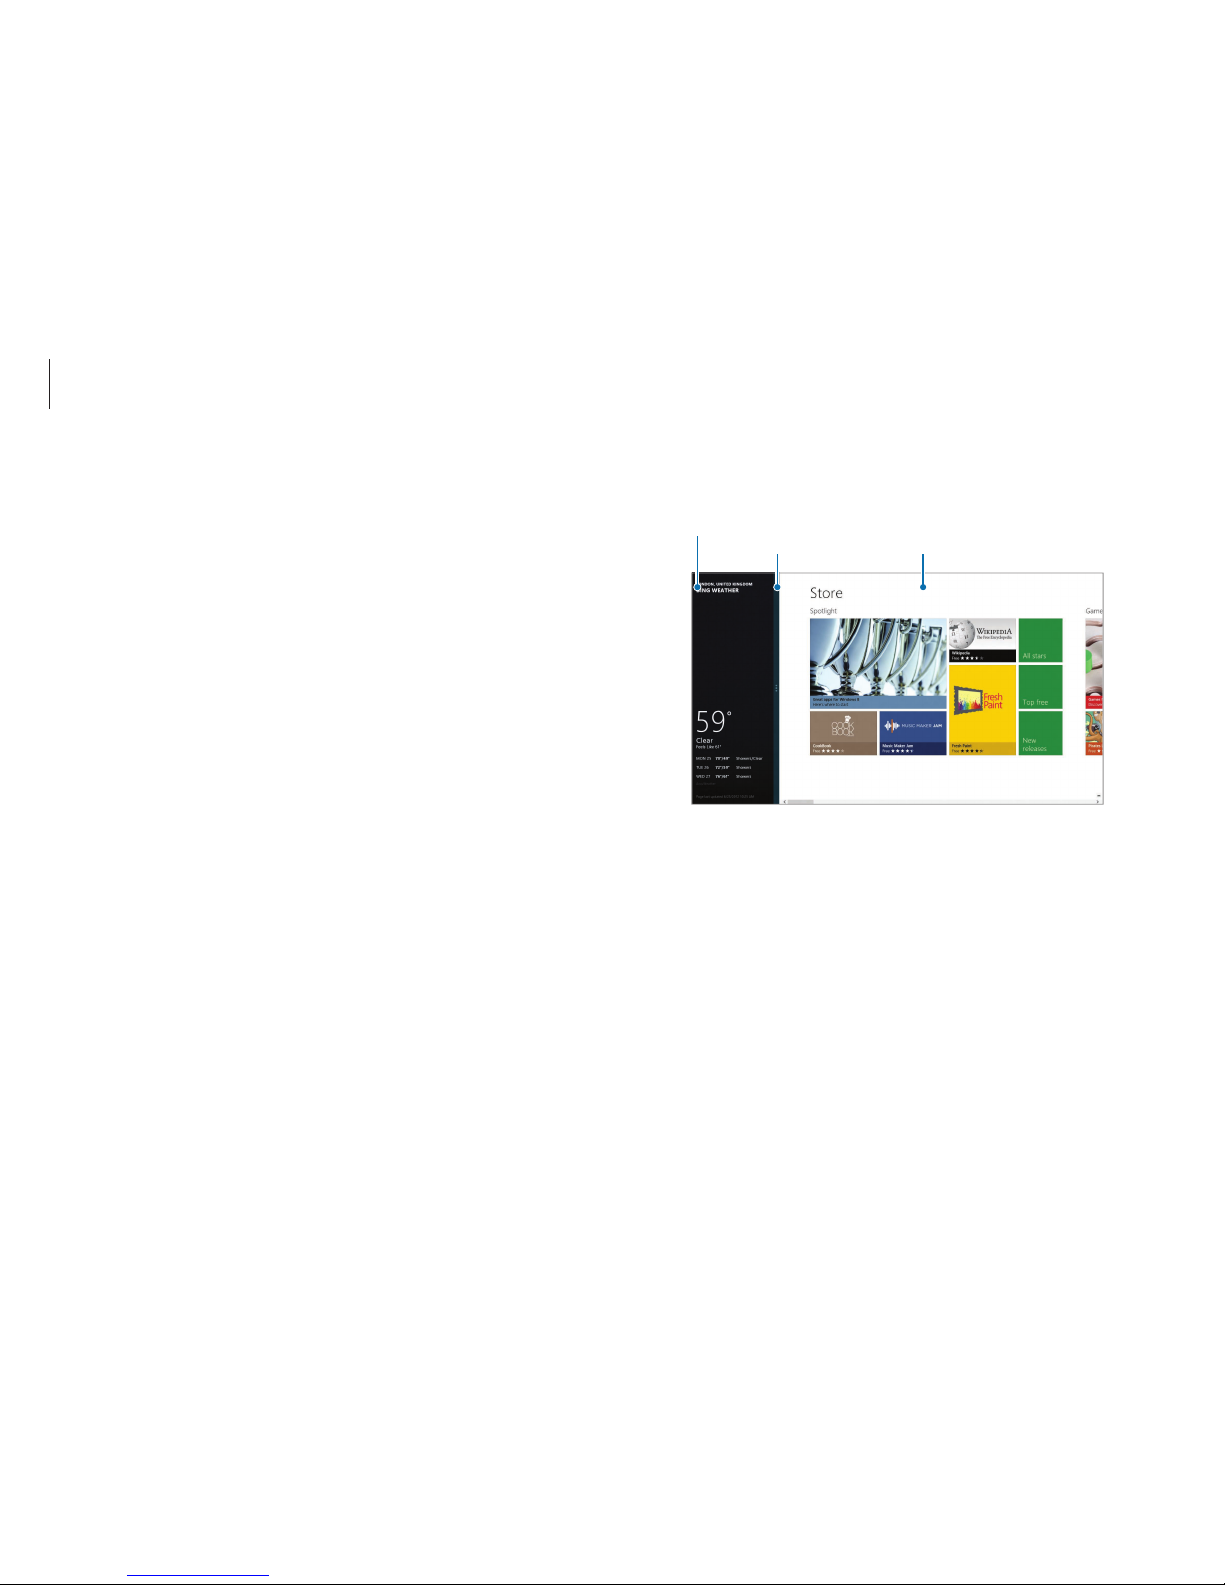
4
Drag the
Screen Split Bar
to change the screen split ratio.
Weather app
Screen Split Bar Store app
Example: If the Weather application and the Store application are
running at the same time
Using split screens
1
On the
Start
screen, select an application.
2
To enter the split mode, do one of the following:
•
Touch screen
: Put your finger on the top edge of the
screen, and swipe to the left or right.
•
Touchpad/Mouse
: Place the cursor at the top corner of the
screen. The cursor will change to a hand shape. Drag the
cursor to the left or right.
3
Arrange the position of each split screen as desired.
Page 34
Windows
34
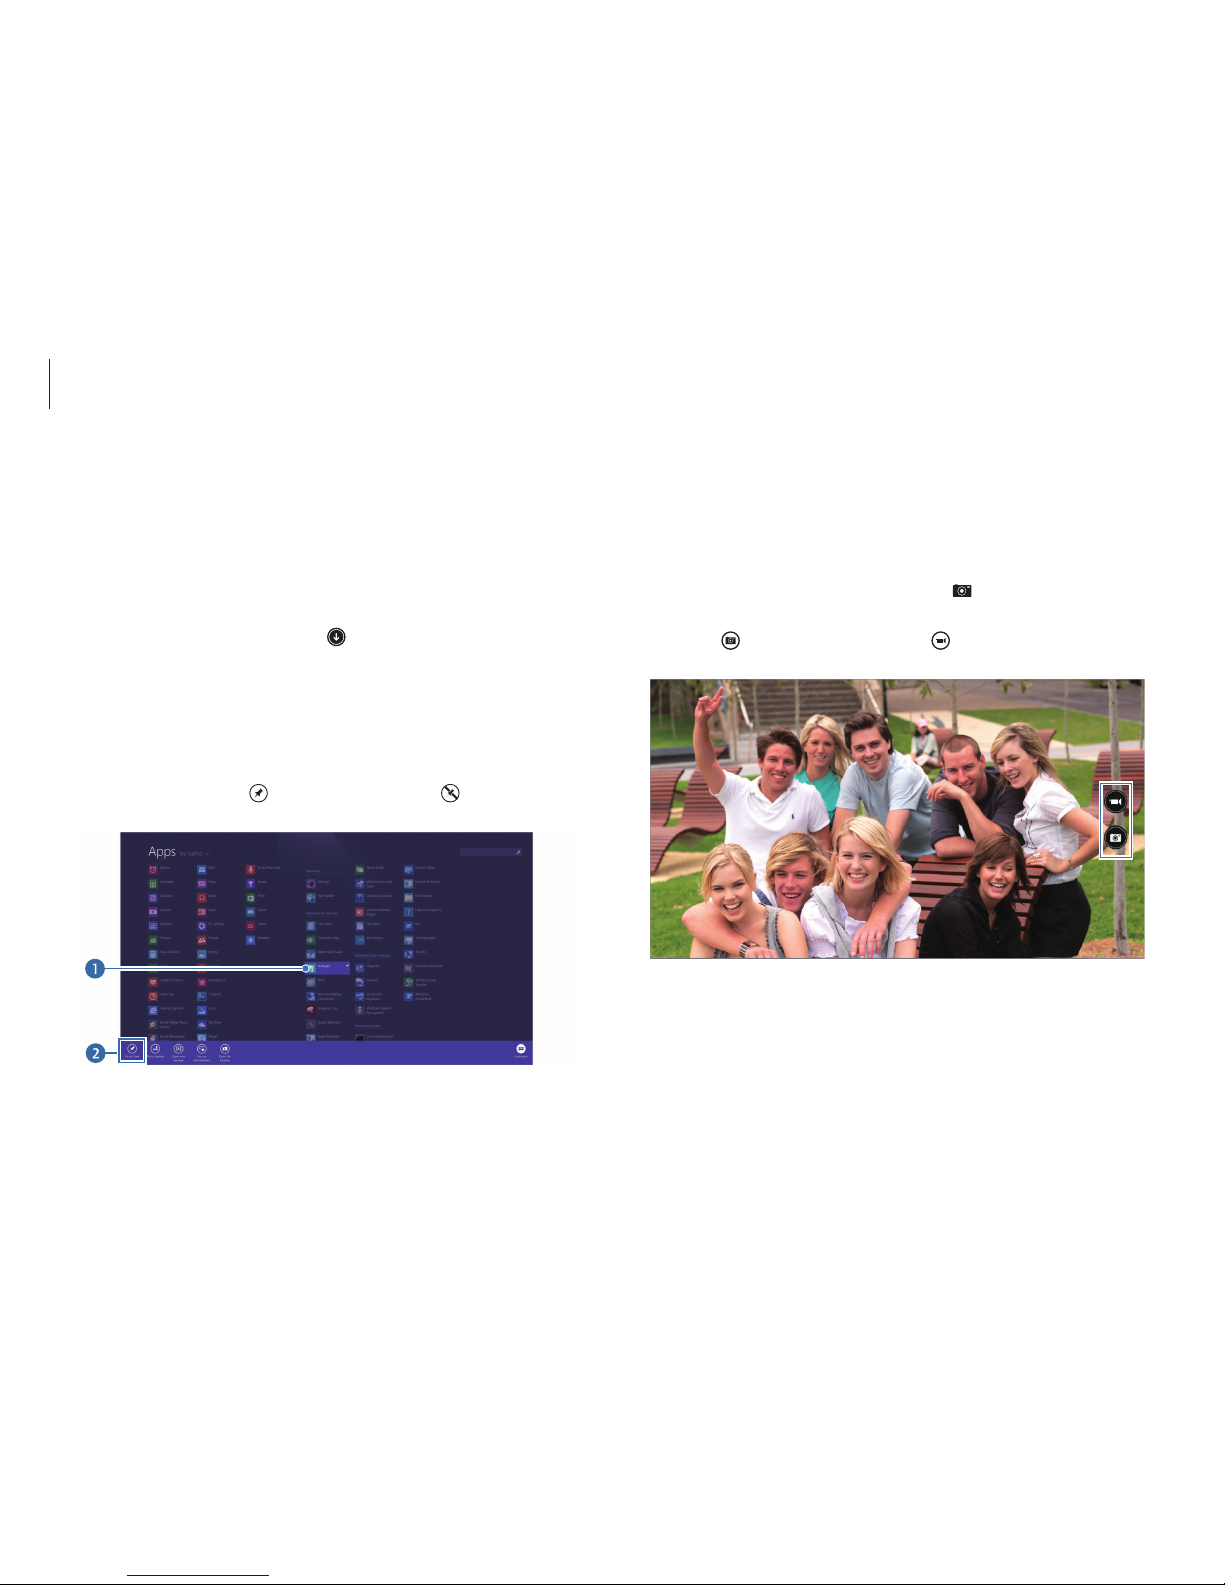
Using the camera application
Use the camera application provided by Windows to take photos
or videos or edit photos.
1
On the
Start
screen, select
Camera
( ).
2
Select to take photos or select to take videos.
Adding or removing an application on the
Start screen
1
To move to the applications screen, do one of the following:
•
Touch screen
: Swipe upwards on the
Start
screen.
•
Touchpad/Mouse
: Select
at the lower-left edge of the
Start
screen.
2
Touch and hold or right-click an application.
Menu items will appear at the bottom of the screen.
3
Select
Pin to start
( ) or
Unpin from Start
( ).
Example: When removing an application on the
Start
screen
Page 35

Windows
35
Editing photos
1
Select a photo.
2
Swipe downward or upward from the edges of the screen.
Alternatively, right-click the photo.
3
Select
Edit
and edit the photo.
Camera etiquette
•
Do not take photos or videos of other people without
their permission.
•
Do not take photos or videos where prohibited.
•
Do not take photos or videos in places where doing so
may violate other people’s privacy.
Viewing photos or videos
To view photos or videos, do one of the following:
•
Touch screen
: Swipe from the left edge of the screen to the
right.
•
Mouse
: Click the arrow symbol on the left of the screen.
Or, on the
Start
screen, select
Photos
( ) → Camera Roll
.
Page 36

Windows
36
Store
Purchase and download applications for the computer. Create a
Microsoft account to use this feature. See Microsoft account.
On the
Start
screen, select
Store
.
•
This feature may not be available depending on the
operating system.
•
Samsung cannot resolve problems with applications
installed from the Store. Contact customer support for
the application.
Microsoft account
Some Microsoft services, such as the
Store
, require a Microsoft
account. Create a Microsoft account to get the most from the
computer.
Before creating an account, the internet must be
connected.
1
Open the Charms and select the
Settings
charm →
Change
PC settings
.
2
Select
Accounts → Connect to a Microsoft account
, and
then follow the on-screen instructions to complete the
account setup.
•
If you already have an account, sign in with the Microsoft
account.
•
The registered Microsoft account on the computer cannot
be removed.
•
Select Switch to a Local account to sign in the computer
with a Windows account.
Page 37
37
Basics
Touch screen
Only use fingers to use the touch screen.
Touch screen gestures
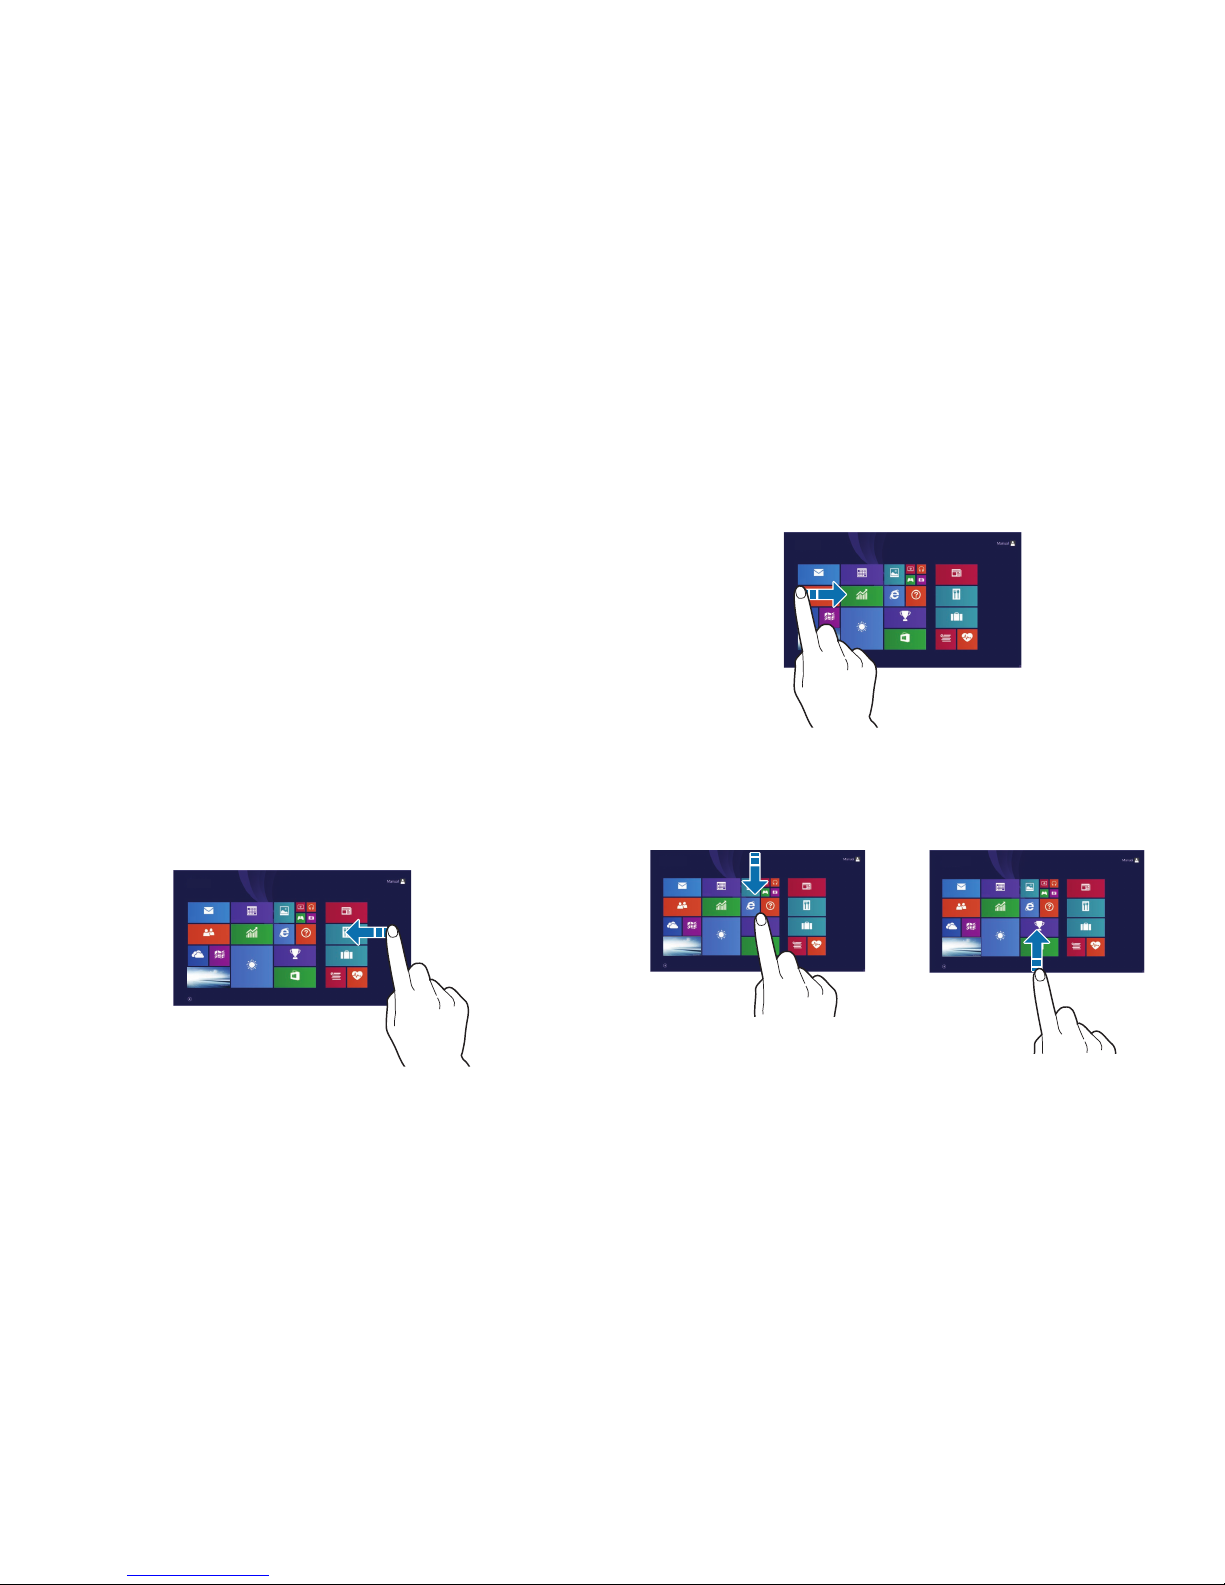
Swiping
•
To open the Charms, swipe from the right edge of the touch
screen to the middle.
•
To open the most-recently used application, swipe from the
left edge of the touch screen to the middle.
•
To bring up the app commands, swipe downwards from the
top edge of the touch screen or swipe upwards from the
bottom edge of the touch screen.
Start
Start
Start
Start
or
Page 38
Basics
38
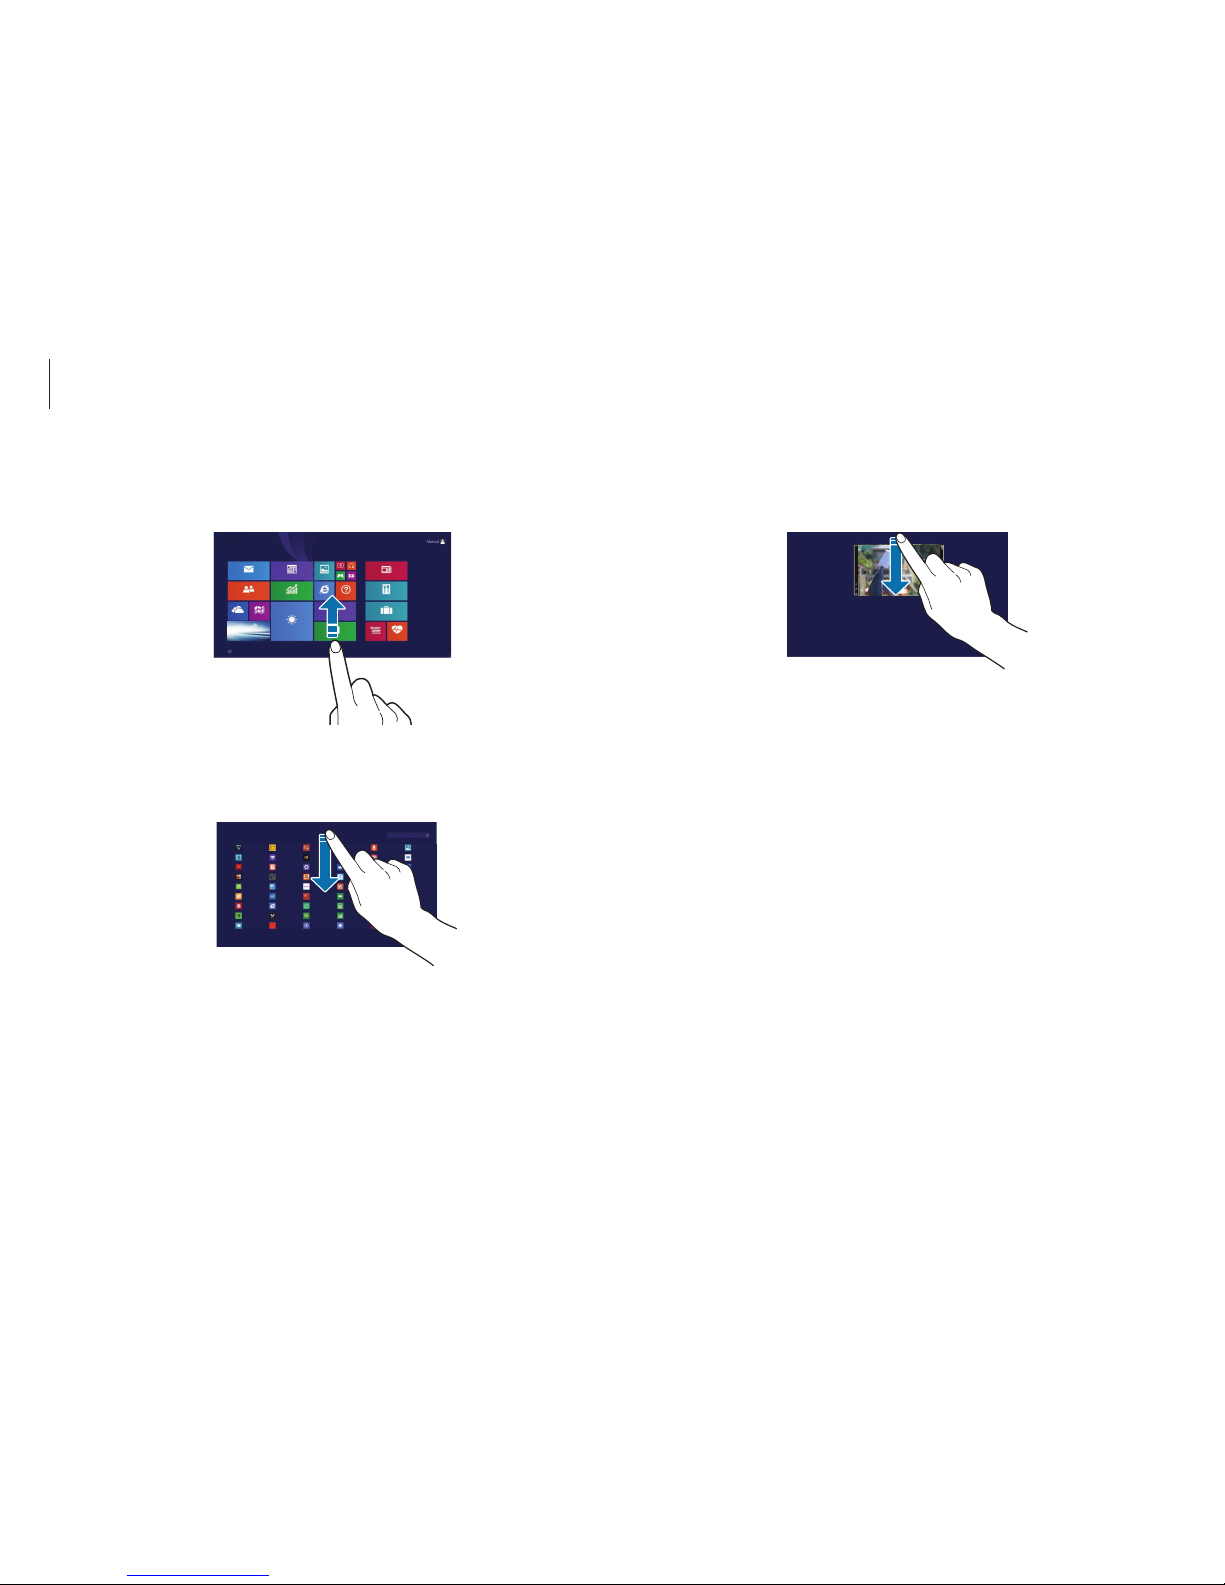
•
To close an application, swipe downward from the top edge
to the bottom edge of the touch screen.
•
To view all installed applications, swipe upwards on the
Start
screen.
•
To switch from the applications screen to the
Start
screen,
swipe downward on the applications screen.
Start
Page 39
Basics
39
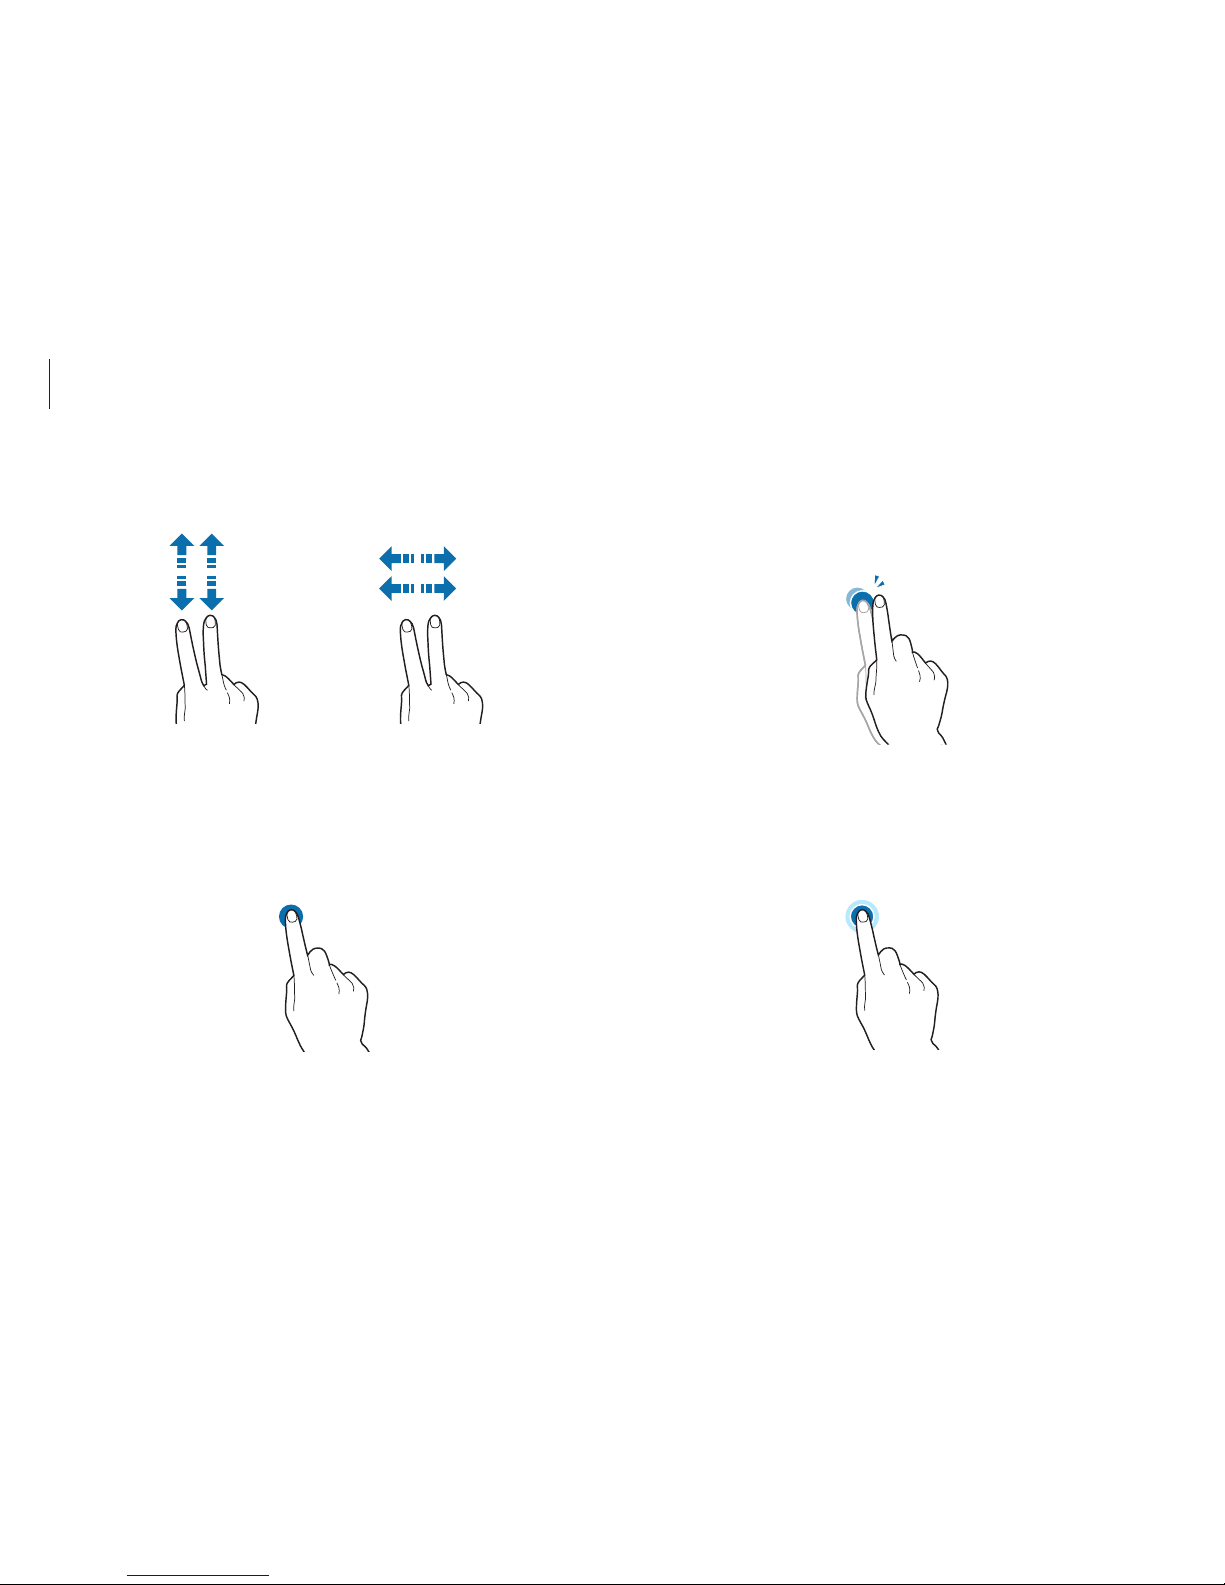
Double-tapping
To zoom in a part or double-click an item, double-tap on the
touch screen.
Tapping and holding
To perform the right-clicking function, tap and hold an item on
the touch screen.
•
To scroll up, down, left or right, swipe with two fingers on the
touch screen.
or
Tapping
To open an application, select a menu item, press an on-screen
button, or enter a character using the on-screen keyboard, tap it
with a finger on the touch screen.
Page 40
Basics
40
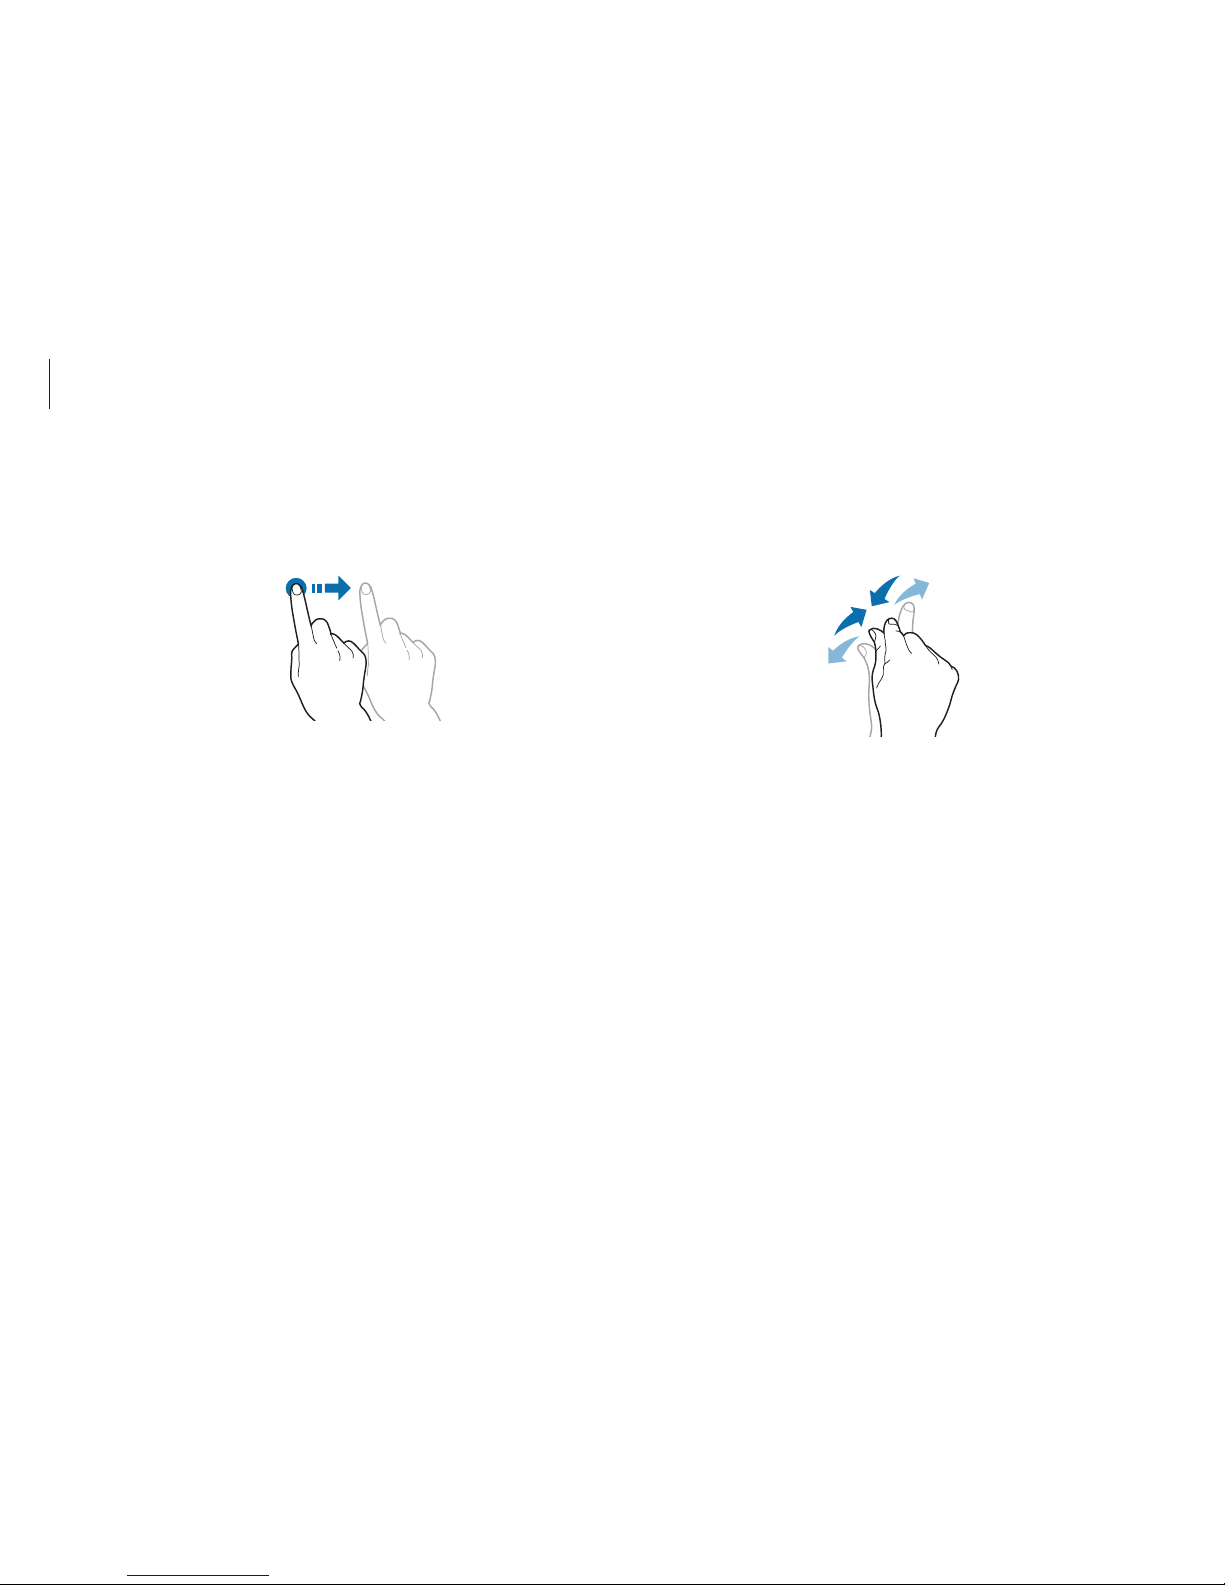
Pinching
To zoom in, spread two fingers apart on a website, map, or image.
Pinch to zoom out.
Dragging
To move an icon, app tile, or preview to a new location, touch and
hold it, and then drag it to the target position on the touch screen.
Page 41

Basics
41
•
Leaving the touch screen idle for extended periods
may result in afterimages (screen burn-in) or ghosting.
Turn off the touch screen when you do not use the
computer.
•
Touch the touch screen with clean and dry hands.
Remove the moisture from your hands and the touch
screen surface before use.
•
Avoid contacting the computer with a foreign
substance. Doing so may cause the touch screen to
malfunction.
•
Very light touches on the touch screen may not be
recognized.
•
On the touch screen, press over an item precisely.
•
The touch screen sensors are located at the edges of
the touch screen. Therefore, do not cover the edges of
the touch screen with protective covers or accessories.
•
Touch screen gestures are available for touch screen
models running Windows and work only with some
applications.
•
Do not apply a severe impact to the touch screen or
press it with a sharp object. Doing so may damage the
touch screen.
•
Do not allow the touch screen to come into contact
with other electrical devices. Electrostatic discharges
can cause the touch screen to malfunction.
•
Do not allow the touch screen to contact water. The
touch screen may malfunction in humid conditions or
when exposed to water.
•
Do not spray liquid cleansing solutions directly onto the
touch screen. The solution may enter the touch screen
or cause undesired operation. To clean the screen,
dampen a cloth with the solution and wipe the screen
gently. Do not use solutions or cloths that contain
abrasive materials, as they may damage the touch
screen.
•
Do not damage the edges of the touch screen. Doing so
may damage the touch screen.
Page 42
Basics
42
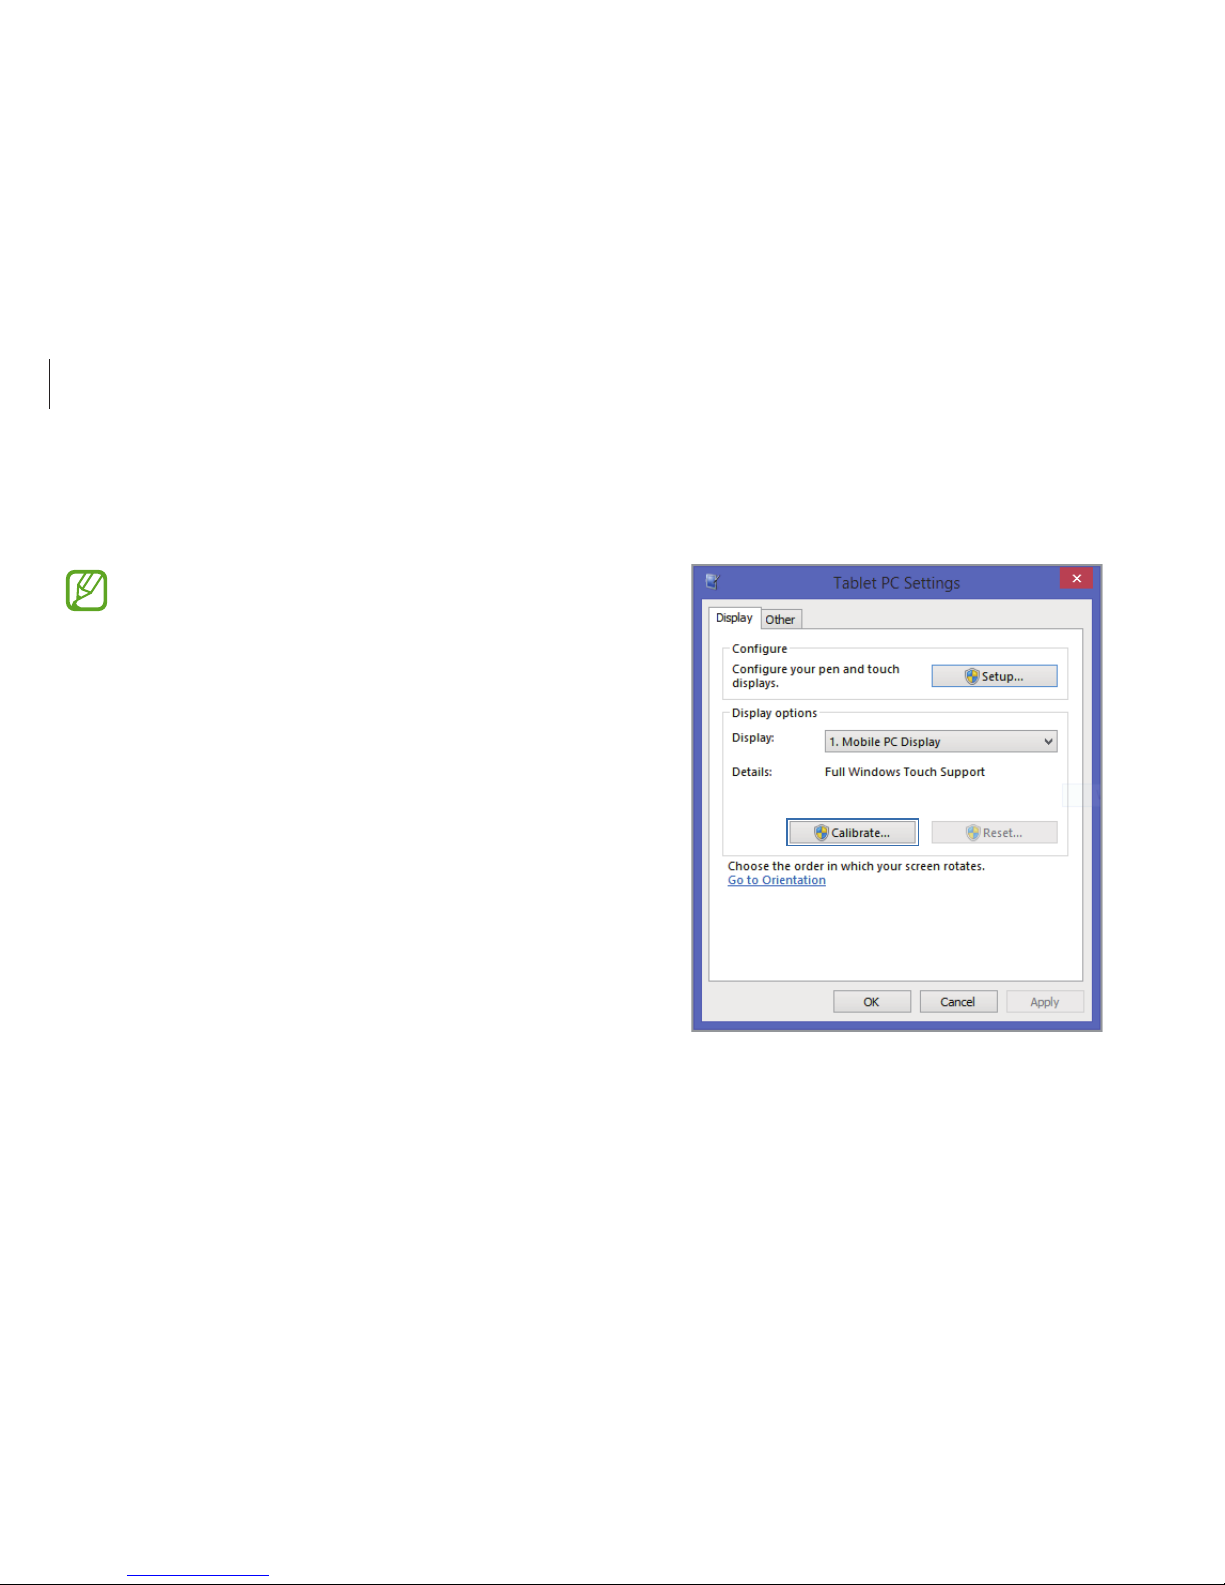
1
On the desktop, open the Charms and then select the
Settings
charm →
Control Panel
→
Hardware and Sound
→
Tablet PC Settings
→
Calibrate...
.
Calibrating the screen
Calibrate the touch settings to make the screen sense accurately
when using a finger.
This feature may differ or may not be available depending
on the operating system.
Page 43
Basics
43
Entering text
Use the virtual keyboard to enter text.
•
Text entry is not supported in some languages. To
enter text, change the input language to one of the
supported languages.
•
Enter text with the keyboard when using the computer
for a long time.
2
Select
Yes
when a pop-up appears.
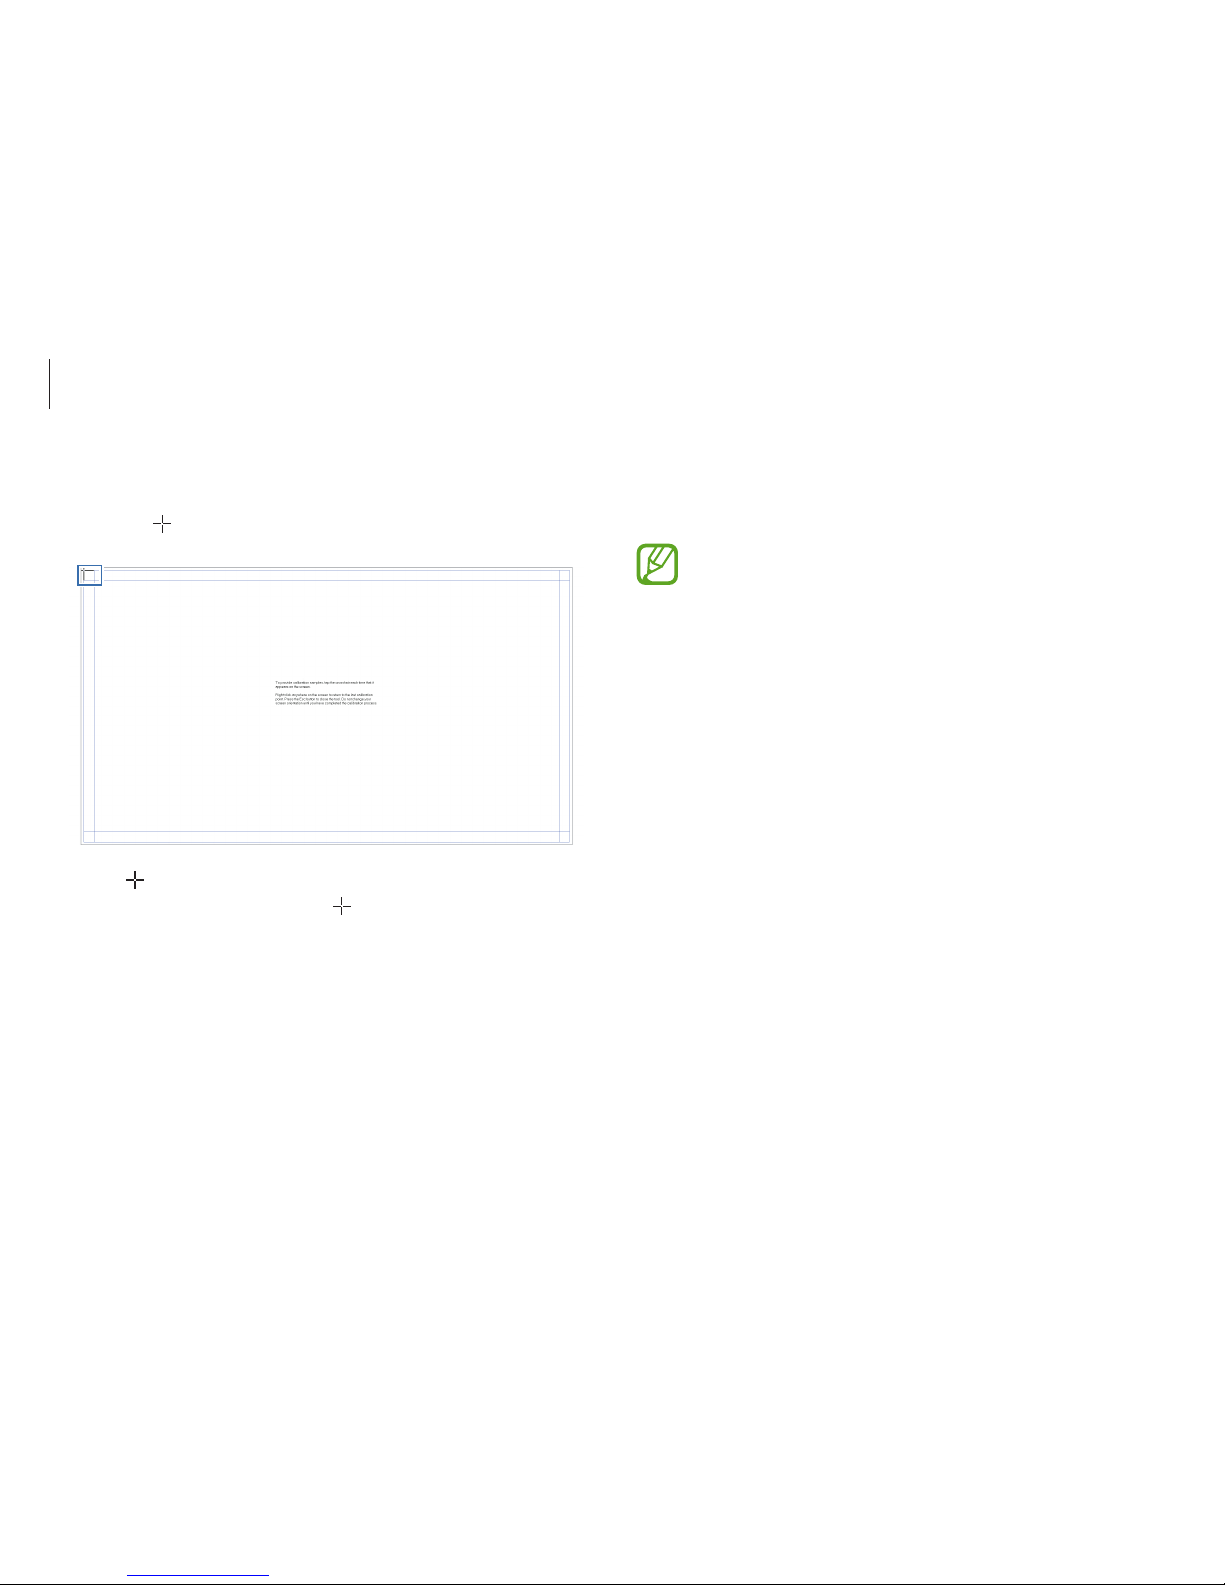
3
Touch on the calibration screen.
•
appears sequentially from the upper-left to the lower-
right on the screen. Touch
each time it appears.
•
To return to the last calibration point, right-click or touch
and hold anywhere.
•
To close the calibration screen, press the
Esc
key.
4
When finishing calibrating and a pop-up appears, select
Yes
.
Page 44
Basics
44
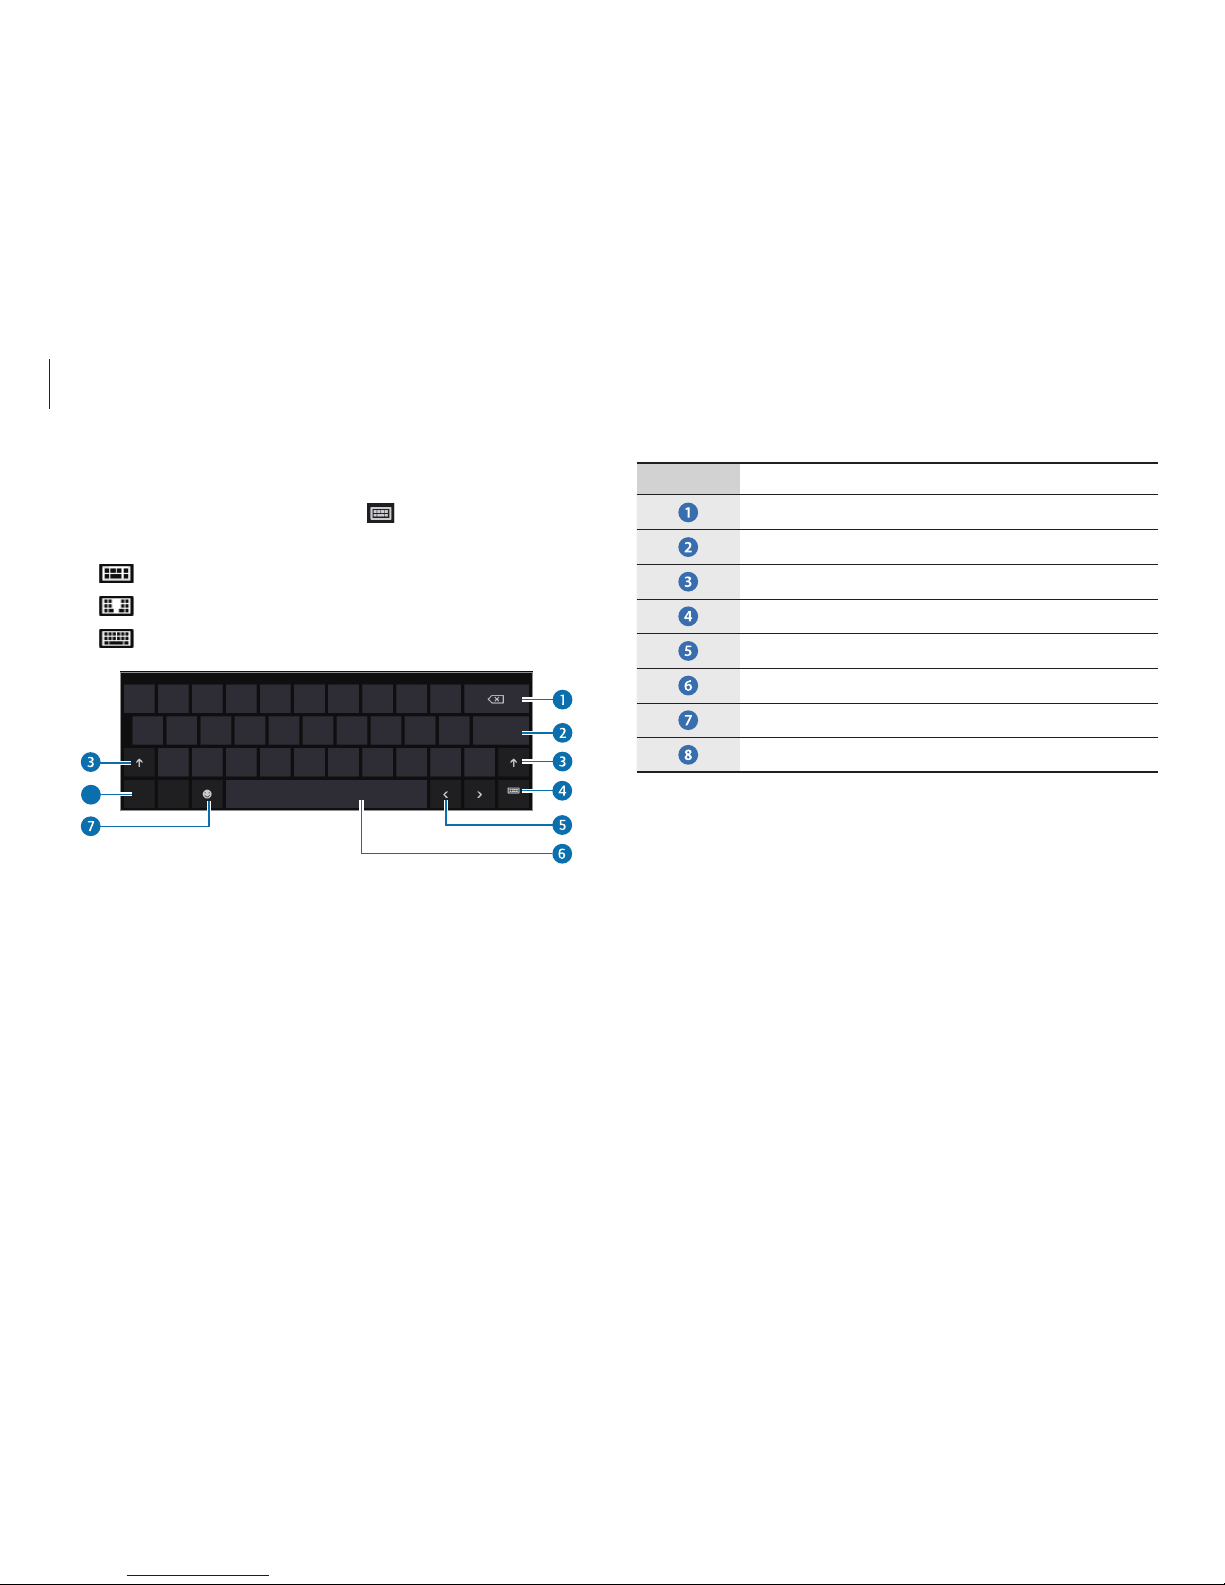
Number Description
•
Delete a preceding character.
•
Break to the next line.
•
Enter uppercase. For all caps, press and hold it.
•
Change the keyboard layout.
•
Move the cursor.
•
Enter a space.
•
Enter emoticons.
•
Enter numerals and punctuation marks.
Changing the keyboard layout
To change the keyboard layout, touch and select one of the
following:
•
: Simplified Qwerty keyboard.
•
: Split Qwerty keyboard for entering text with two hands.
•
: Standard Qwerty keyboard.
8
Page 45

Basics
45
Copying and pasting
1
Touch and drag your finger across the text to select it.
2
Touch and hold the text to open the options pop-up.
3
Touch
Copy
or
Cut
.
4
Touch and hold a text input field and then touch
Paste
.
Entering uppercase
Touch before entering a character. For all caps, touch it twice.
Changing language keyboards
Add keyboards to enter text in other languages. Open the Charms
and select the
Settings
charm →
Change PC settings
→ Time
and language
→
Region and languages
→
Add a language
→
a language
→
Add
.
Handwriting
Touch → , write a word with a finger, and then touch
Insert
.
To view the handwriting help, touch
.
Handwriting is not supported in some languages.
Page 46
Basics
46
•
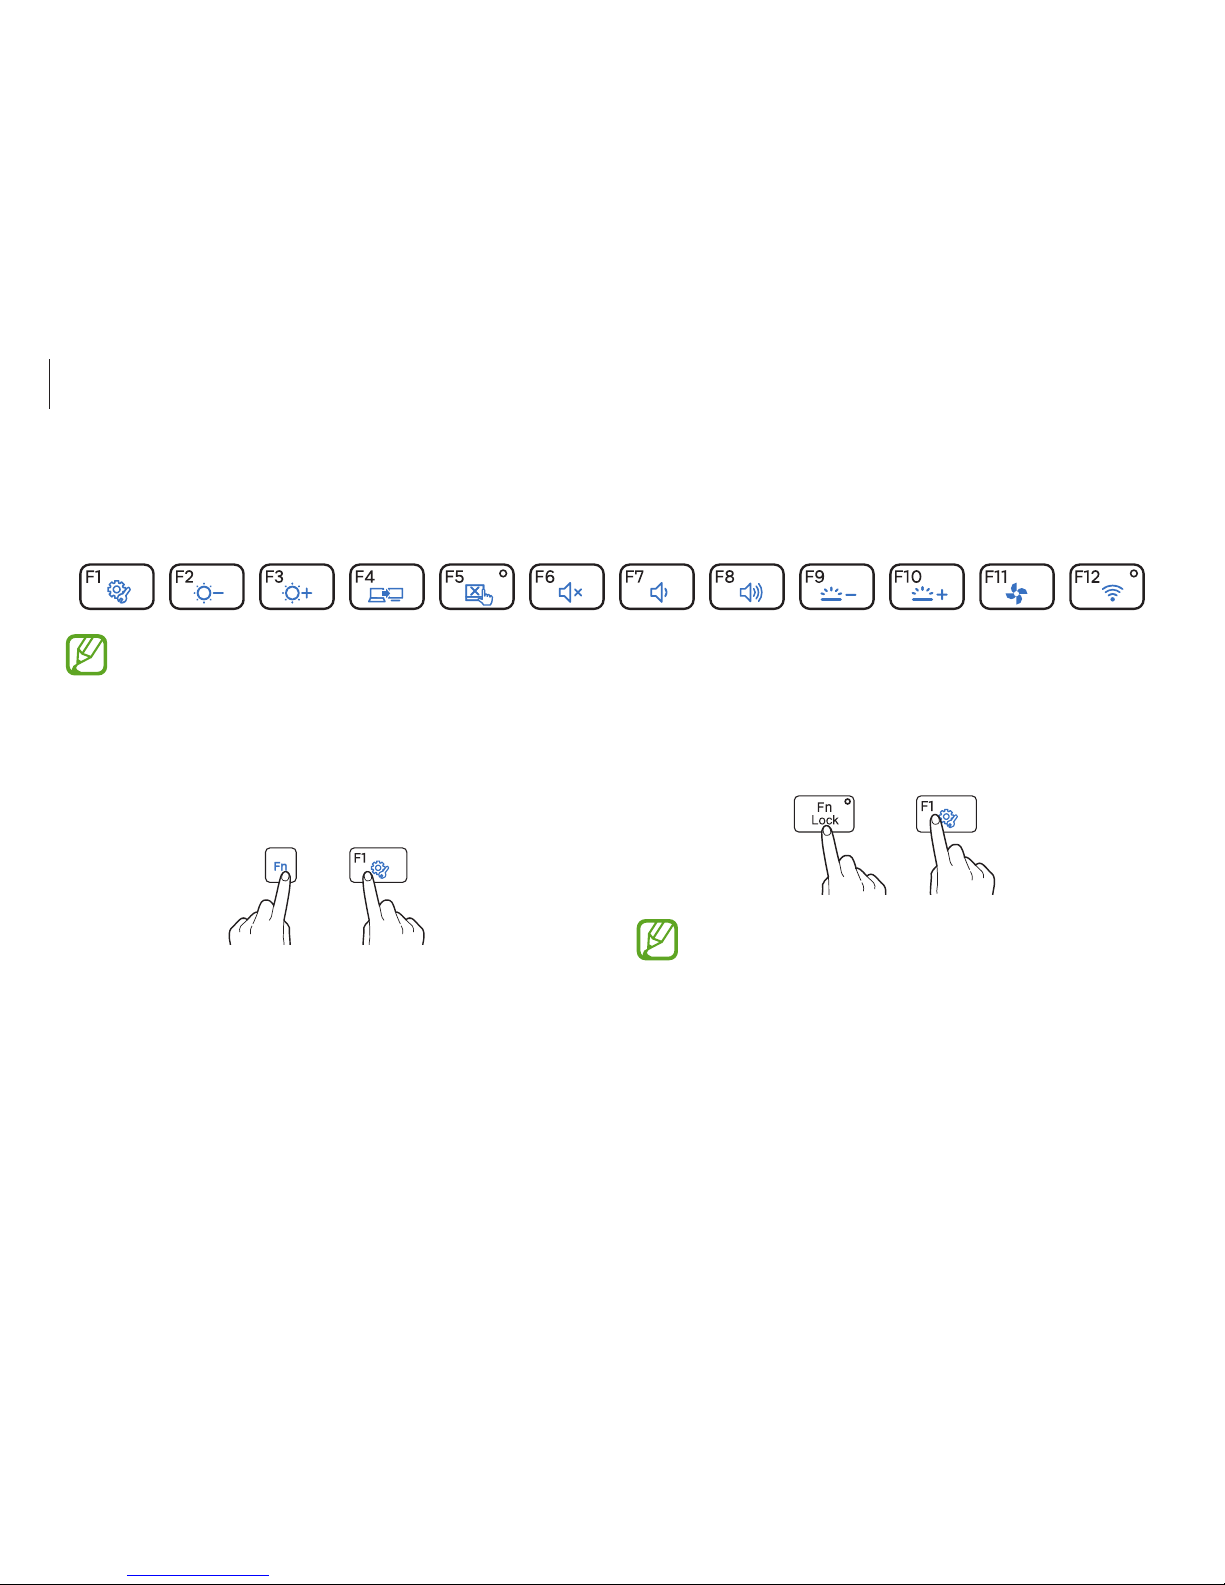
Press the Fn Lock key. When the Fn Lock key LED turns on,
press a hot key.
→
When the
Fn Lock
key is on, hot keys are activated without
pressing the
Fn
key.
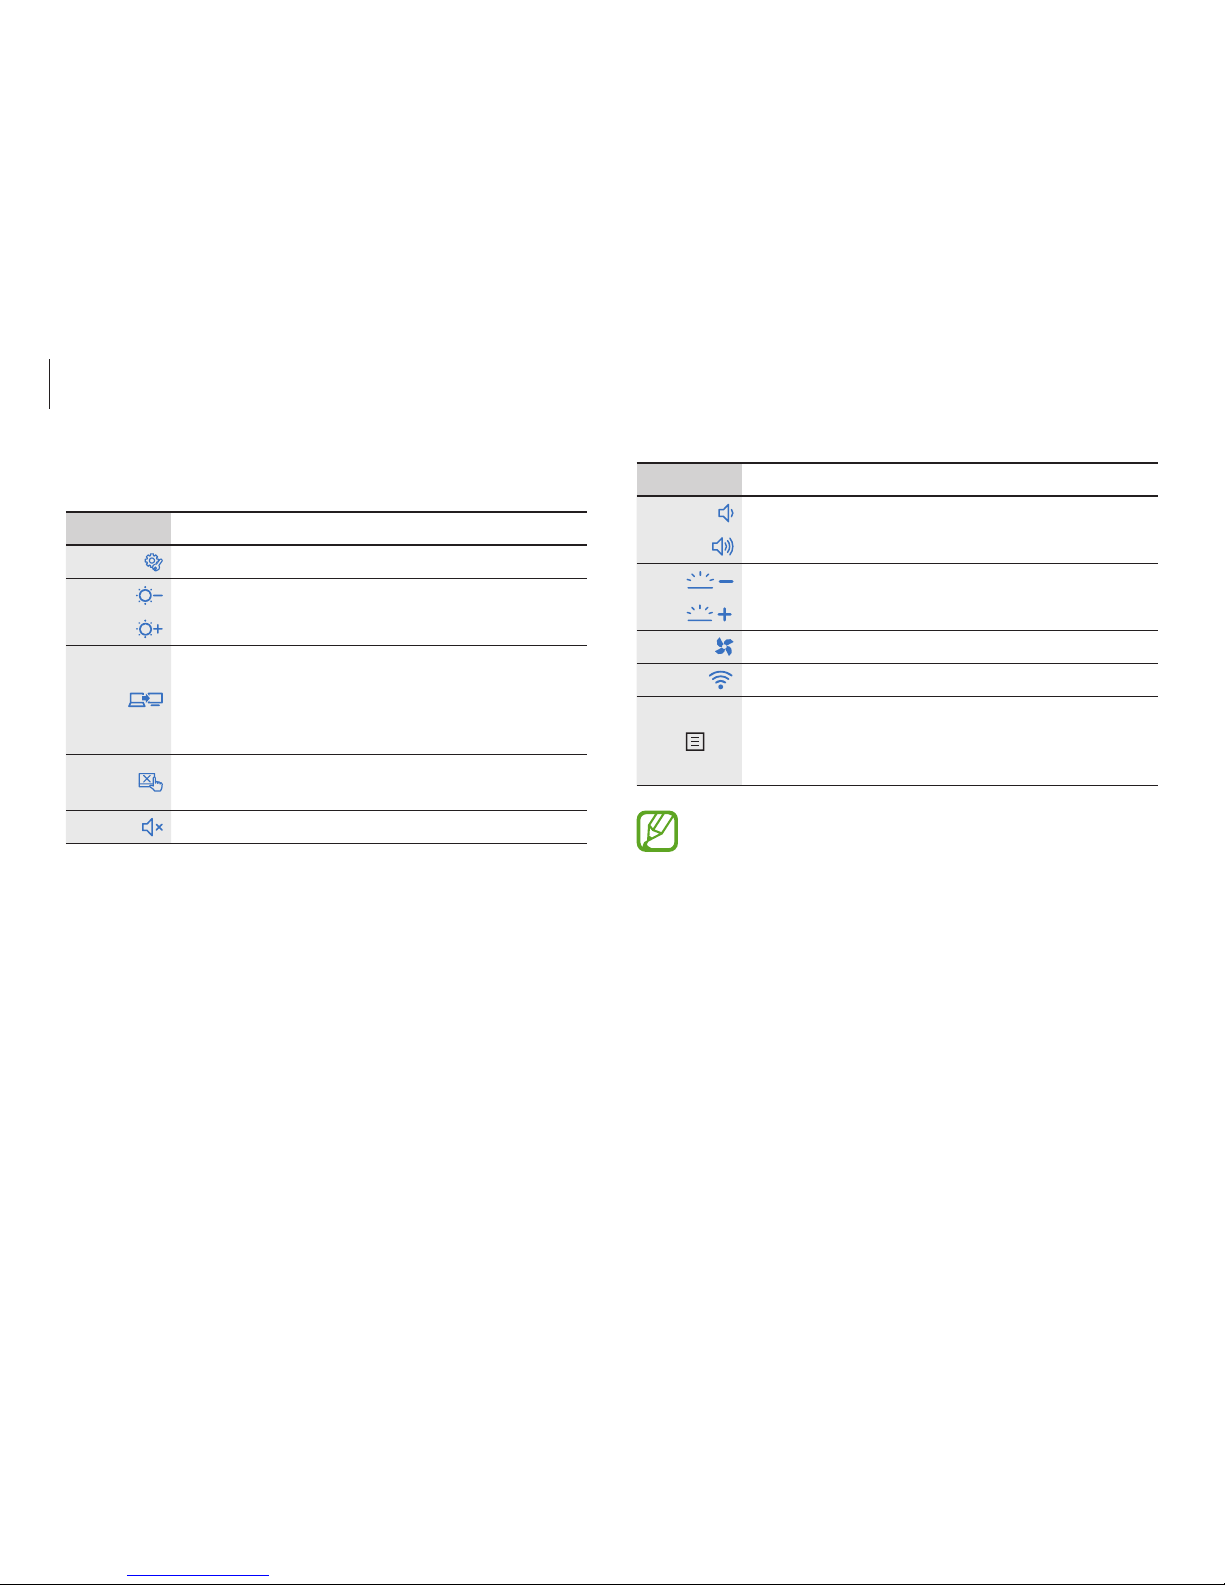
Using hot keys
To use keyboard hot keys, do one of the following:
•
Hold down the Fn key and press a hot key.
+
Keyboard
Enter text or access computer functions with the keyboard.
•
Images and available features may differ depending on the model and operating system.
•
The keyboard layout may differ depending on the country.
Page 47
Basics
47
Key/Icon Description
F7
•
Volume Control: Adjust the volume level.
F8
F9
•
Keyboard backlight control: Adjust the
keyboard backlight brightness.
F10
F11
•
Silent mode: Reduce the fan noise.
F12
•
Airplane mode
: Turn a Wi-Fi network on or off.
Fn +
•
Right-click: Perform the right-click function.
•
Open the app commands of the selected
application on the
Start
screen.
If the hot keys do not work properly, install the
Settings
application.
Hot key functions
Key/Icon Description
F1
•
Settings
: Launch the
Settings
application.
F2
•
Screen brightness control: Adjust the
brightness level.
F3
F4
•
LCD/External monitor
: Switch between the
LCD and an external display device when an
external display device is connected to the
computer.
F5
•
Touchpad: Turn on or off the touchpad
function.
F6
•
Mute: Mute or unmute the audio.
Page 48
Basics
48
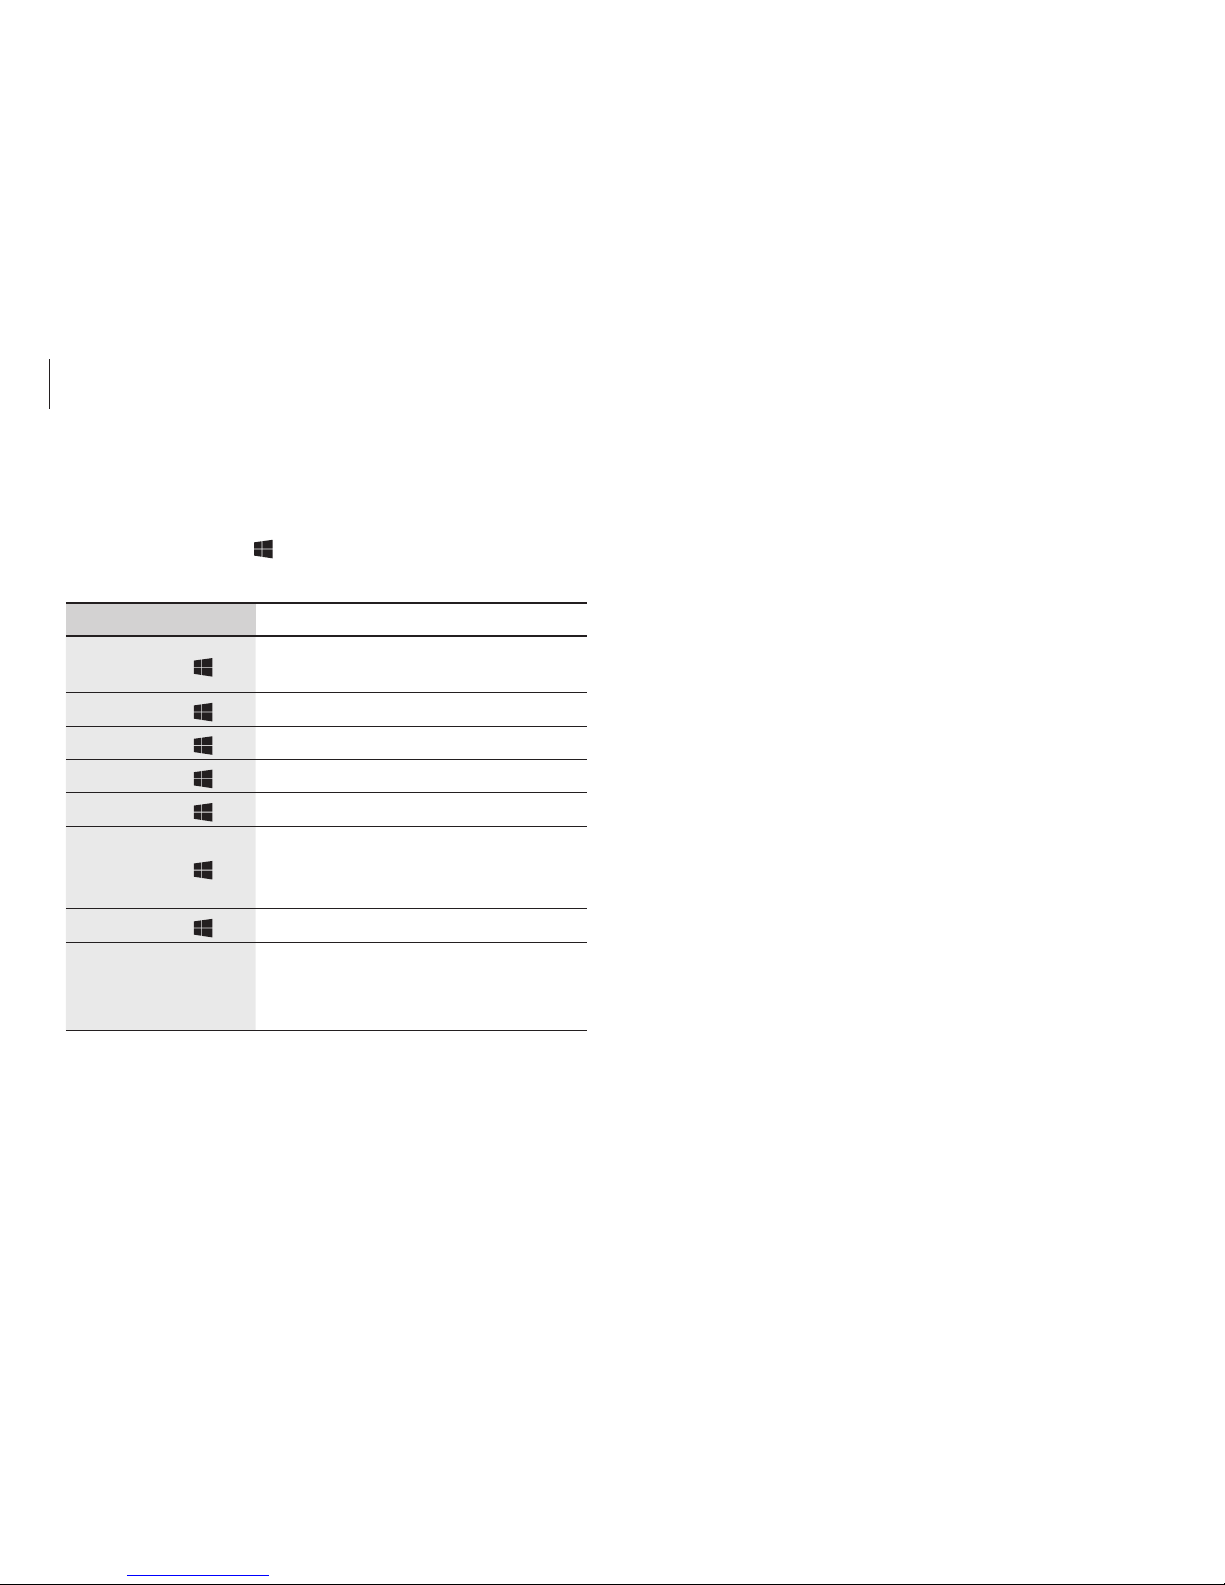
Windows hot keys
Use hot keys to access functions conveniently in Windows.
Press the Windows key (
) or the Alt key, and a hot key
simultaneously.
Key Description
Windows key ( )
•
Switch to the
Start
screen or the
most recent application.
Windows key ( )+D
•
Switch to the desktop.
Windows key ( )+C
•
Open the Charms.
Windows key ( )+L
•
Lock the screen.
Windows key ( )+U
•
Open
Ease of Access Center
.
Windows key ( )+P
•
Opens the project menu (external
display connection) in the
Devices
charm.
Windows key ( )+X
•
Open advanced management tools.
Alt+F4
•
Close a running application.
•
To use this function, the
Fn Lock
key
must be turned off.
Page 49
Basics
49
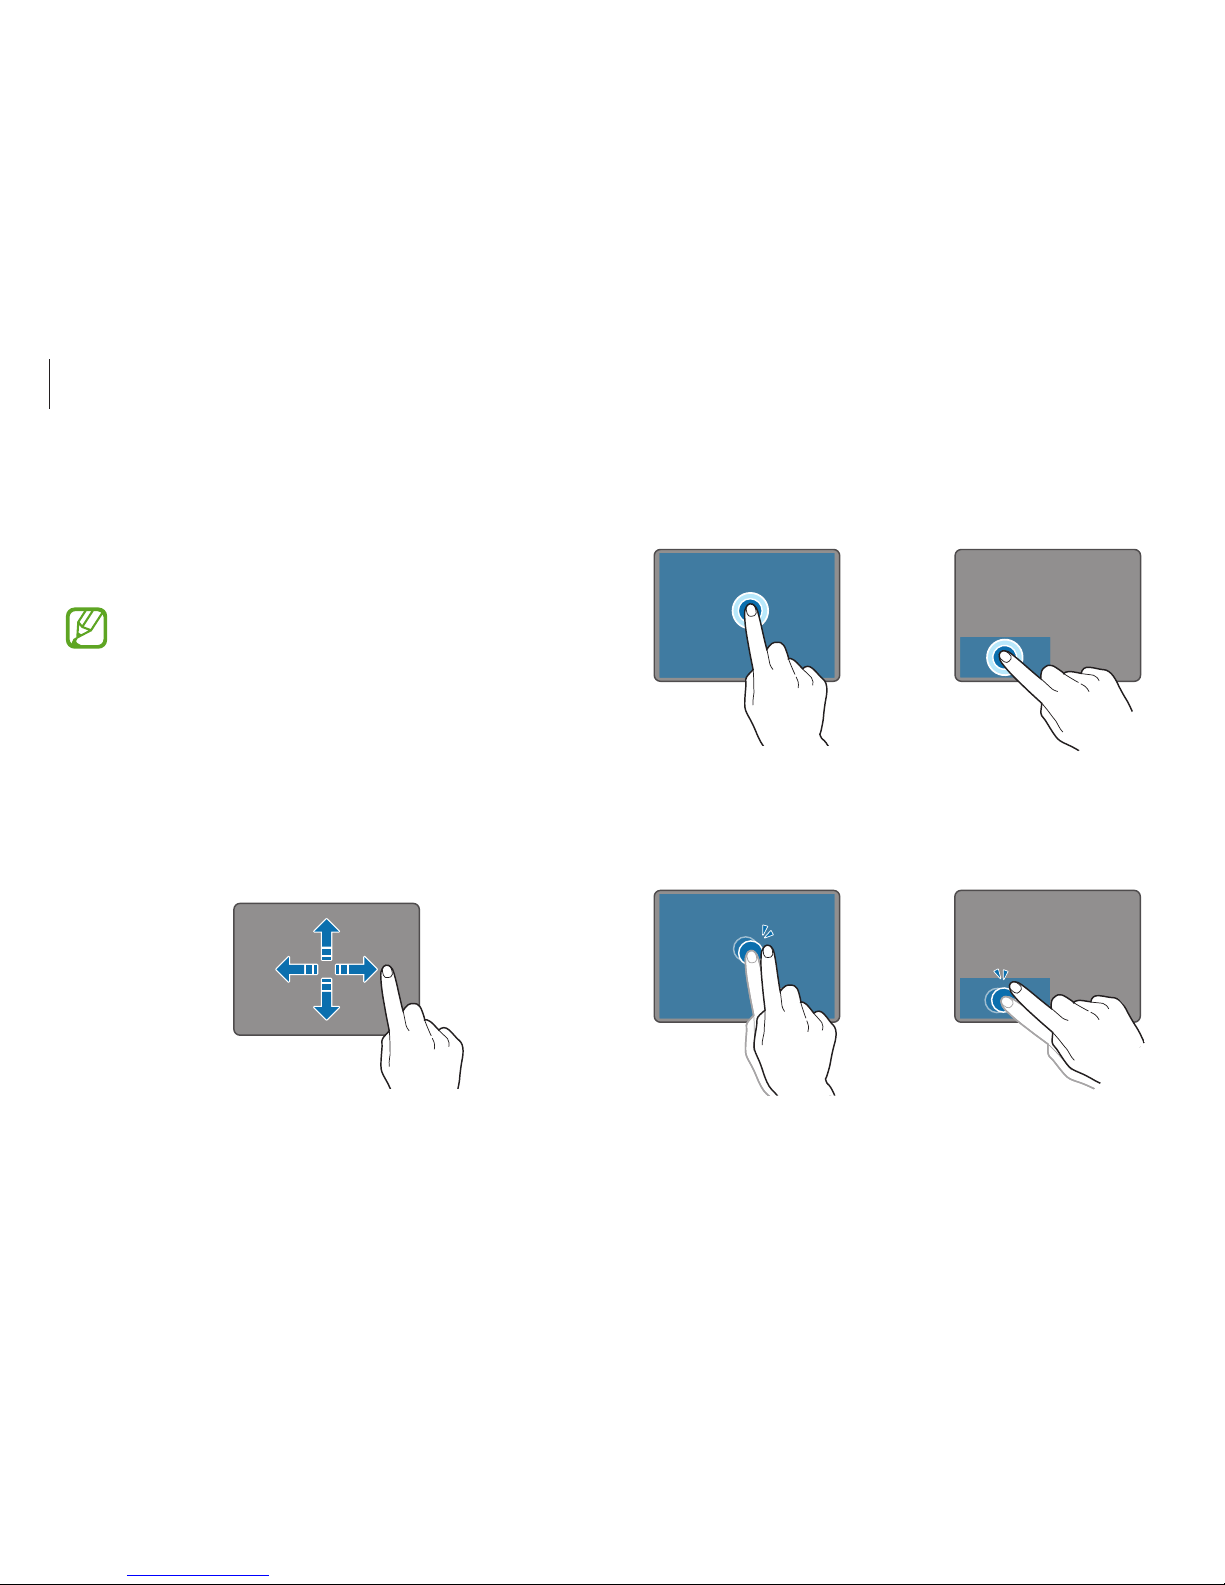
Clicking function
Tap the touchpad or press the left touchpad button.
or
Tap
Click
Double-clicking function
Double-tap the touchpad or press the left touchpad button twice.
or
Tap-tap
Click-click
Touchpad
Use the touchpad to move the cursor or select an item. The left
and right buttons of the touchpad act the same as the left and
right buttons of a mouse.
•
Use the touchpad only with fingers. The touchpad will
not recognize actions of other objects.
•
Images and the touchpad layout may differ depending
on the model.
Basic touchpad functions
Moving
To move the cursor, move a finger on the touchpad.
Page 50
Basics
50
Gesture functions
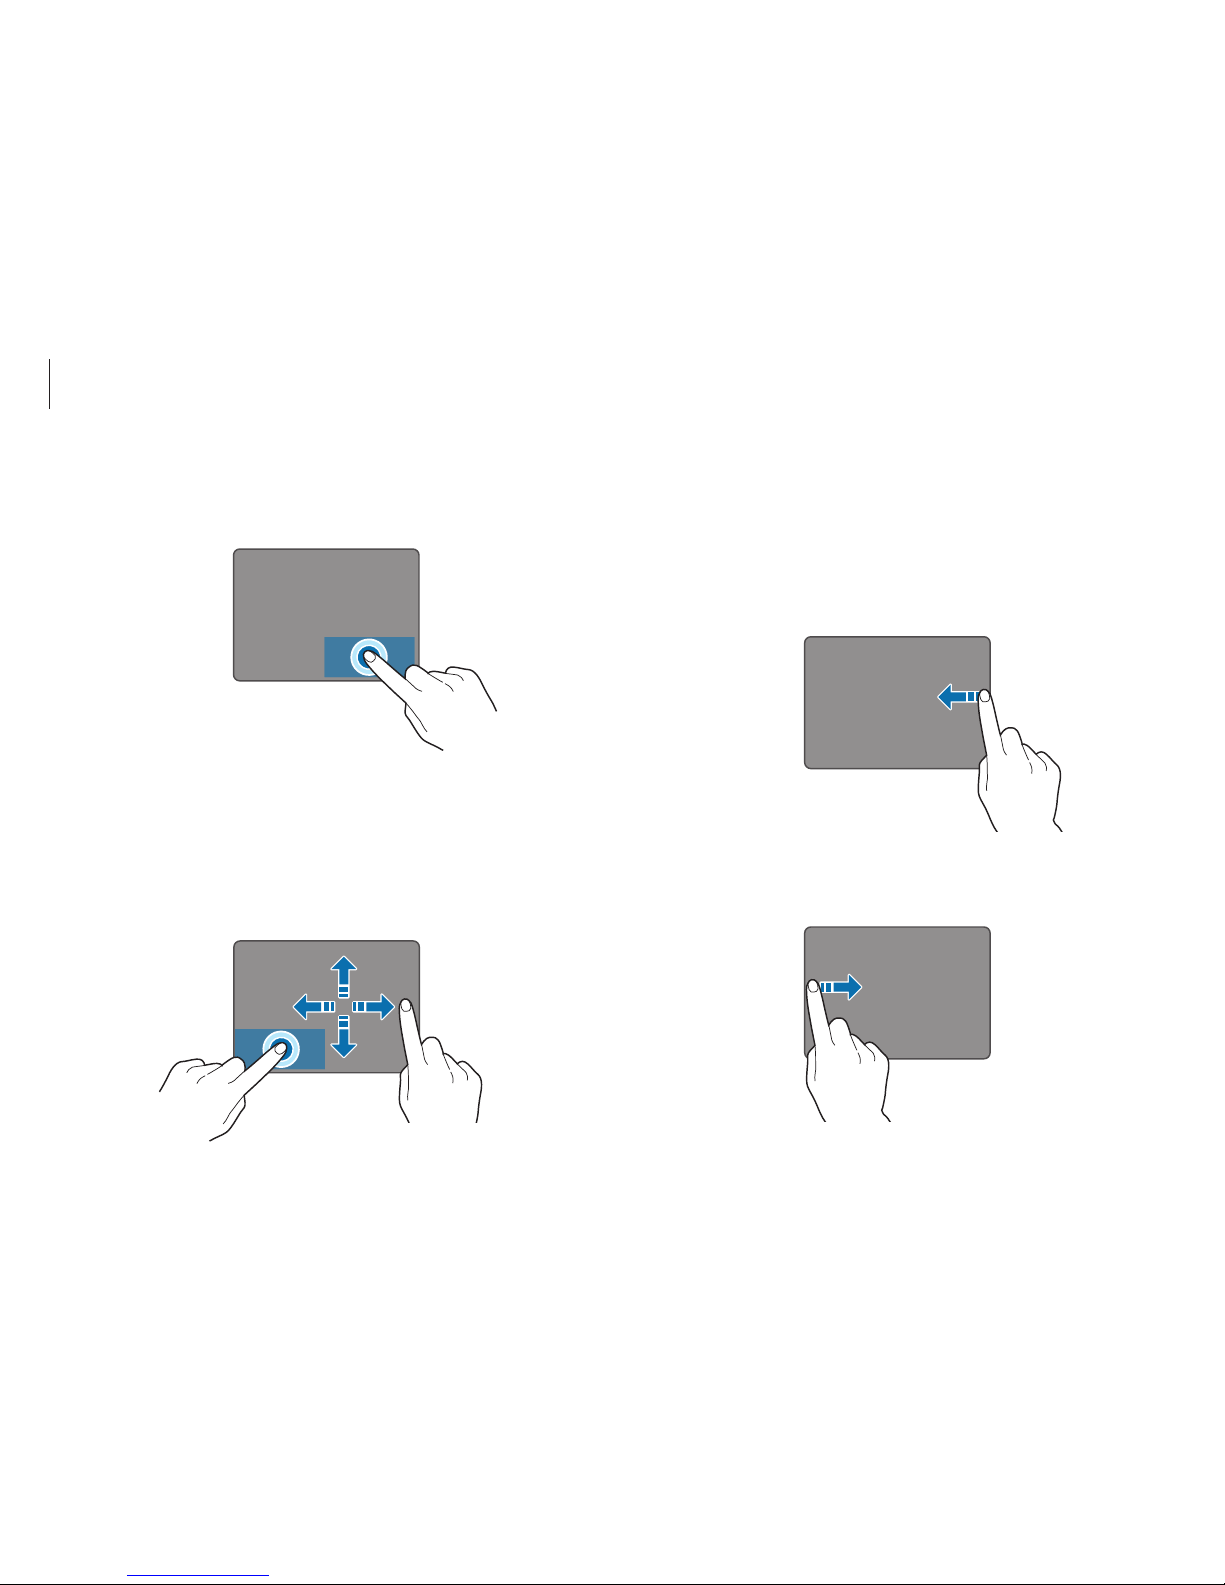
Swiping
•
To open the Charms, swipe from the right edge of the
touchpad to the middle.
•
To open the most-recently used application, swipe from the
left edge of the touchpad to the middle.
Right-clicking function
To right-click an item, press the right touchpad button.
Click
Dragging function
To move an icon or an app tile to a desired location, press and hold
it and then drag it to the target position with the left touchpad
button pressed.
Page 51
Basics
51
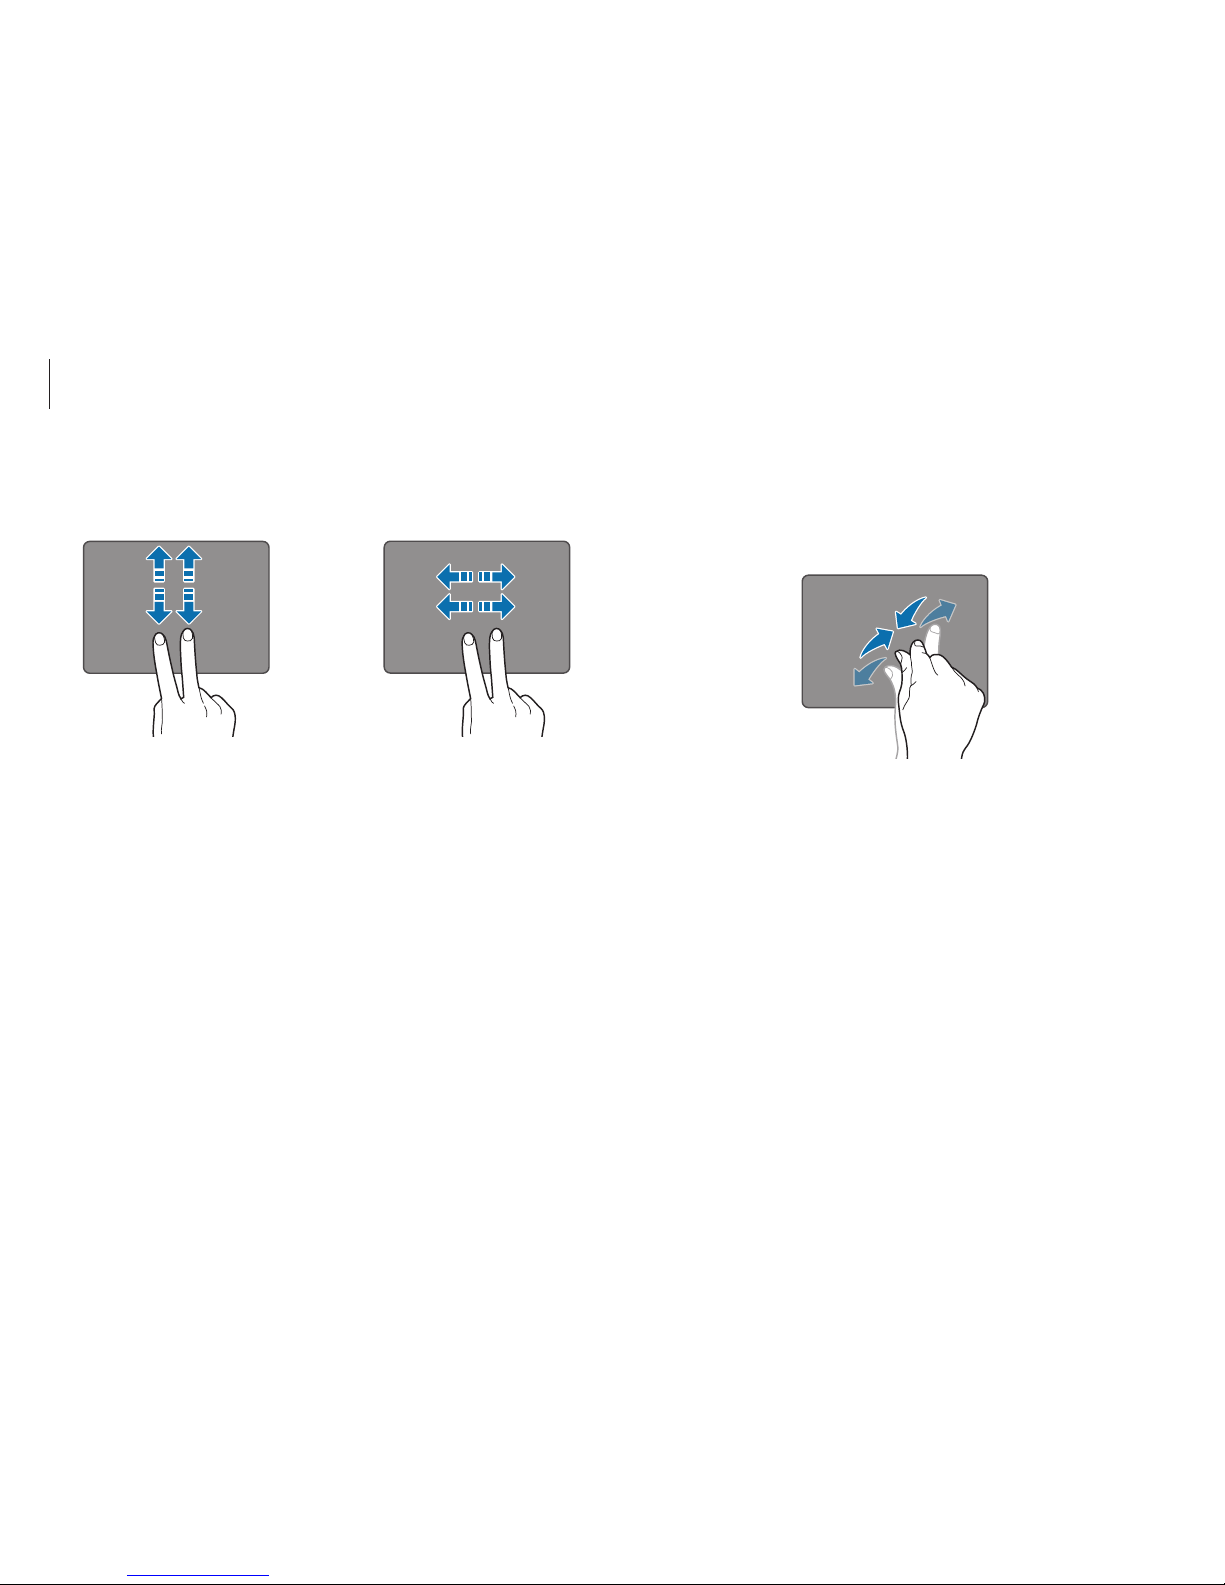
Pinching
To zoom in, spread two fingers apart on a website, map, or image.
Pinch to zoom out.
•
To scroll up, down, left or right, swipe with two fingers on the
touchpad.
or
Page 52

Basics
52
Touchpad lock
Hold down the Fn key and press the F5 key. You can lock the
touchpad.
+
Turning the touchpad off automatically
When a USB mouse is connected to the computer, the computer
can turn the touchpad off automatically.
1
On the desktop, open the Charms and then select the
Settings
charm →
Control Panel
→
Hardware and Sound
→
Touchpad
.
2
Check the
Disable when external USB pointing device plug
in
box.
Configuring touchpad gestures
Configure touchpad gestures to use the touchpad more efficiently.
On the desktop, open the Charms and then select the
Settings
charm
→
Control Panel
→
Hardware and Sound
→
Touchpad
→
desired options.
To cancel touchpad gestures, deselect check boxes for the
corresponding options in the
Touchpad
window.
Some options in the touchpad settings may not be
available depending on the model.
Page 53
Basics
53
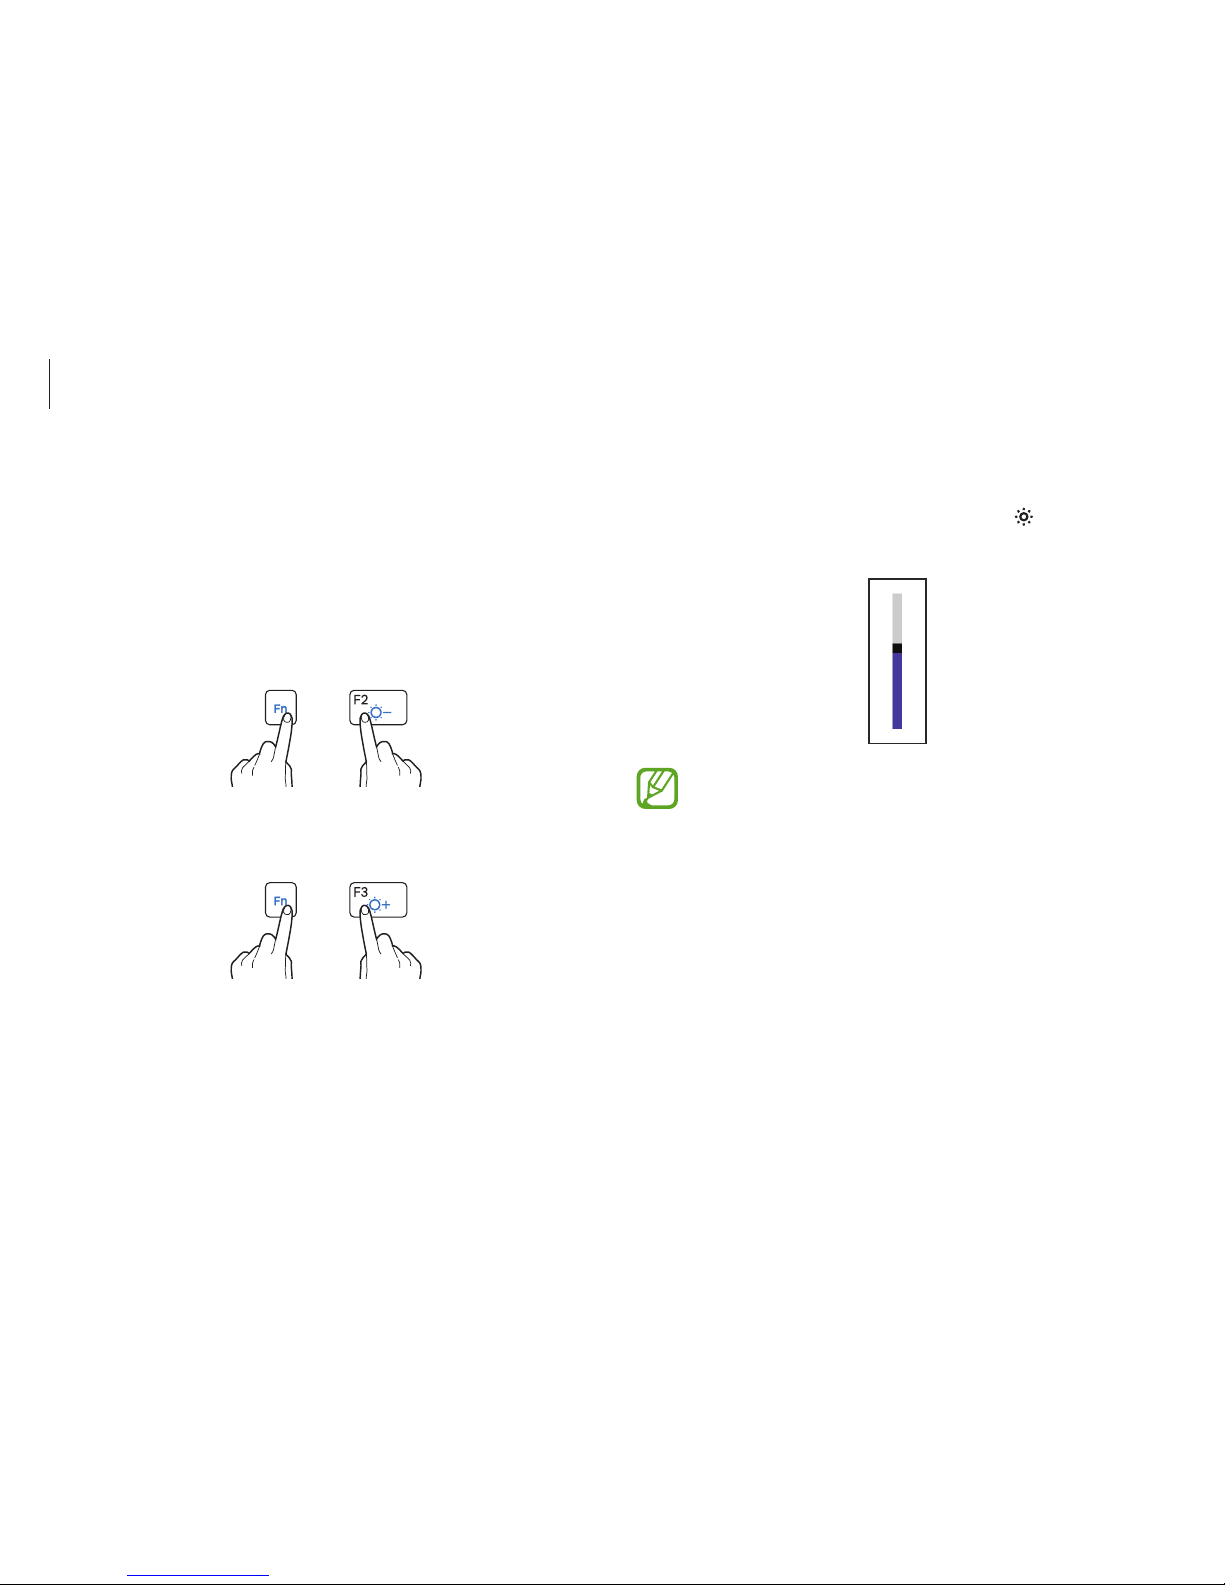
Controlling with Charms
Open the Charms, select the
Settings
charm → , and drag the
slider.
•
The LCD screen is set to the brightest level
automatically when the AC adapter is connected. The
LCD screen gets dimmer automatically when the AC
adapter is disconnected to preserve battery power.
•
The computer has an automatic screen brightness
adjustment to extend the battery usage time. When
necessary, the screen brightness is gradually adjusted.
To turn off this function, right-click any area on the
desktop and set at Graphics Properties.
LCD brightness
Adjust the LCD brightness to reduce eye strain and save power.
Controlling with keyboard
•
To dim the LCD screen, hold down the Fn key and press the
F2 key.
+
•
To brighten the LCD screen, hold down the Fn key and press
the
F3
key.
+
Page 54

Basics
54
Changing display mode
Set the optimal conditions for the screen, based on the activity.
1
On the
Start
screen, select .
2
Select
Settings
.
3
Select
Display
→
Display Color
→ an option.
•
Standard
: Appropriate for normal environments and
convenient for most situations.
•
Movie
: Appropriate for dark surroundings or when
watching a movie.
•
Movie (Bright)
: Adjusts colors and brightness for better
viewing, particularly for dark scenes in movies.
•
Dynamic
: Makes scenes more vivid and clear.
•
Reading mode
: Appropriate for reading documents.
•
No Effect
: Uses the display defaults.
Page 55
Basics
55
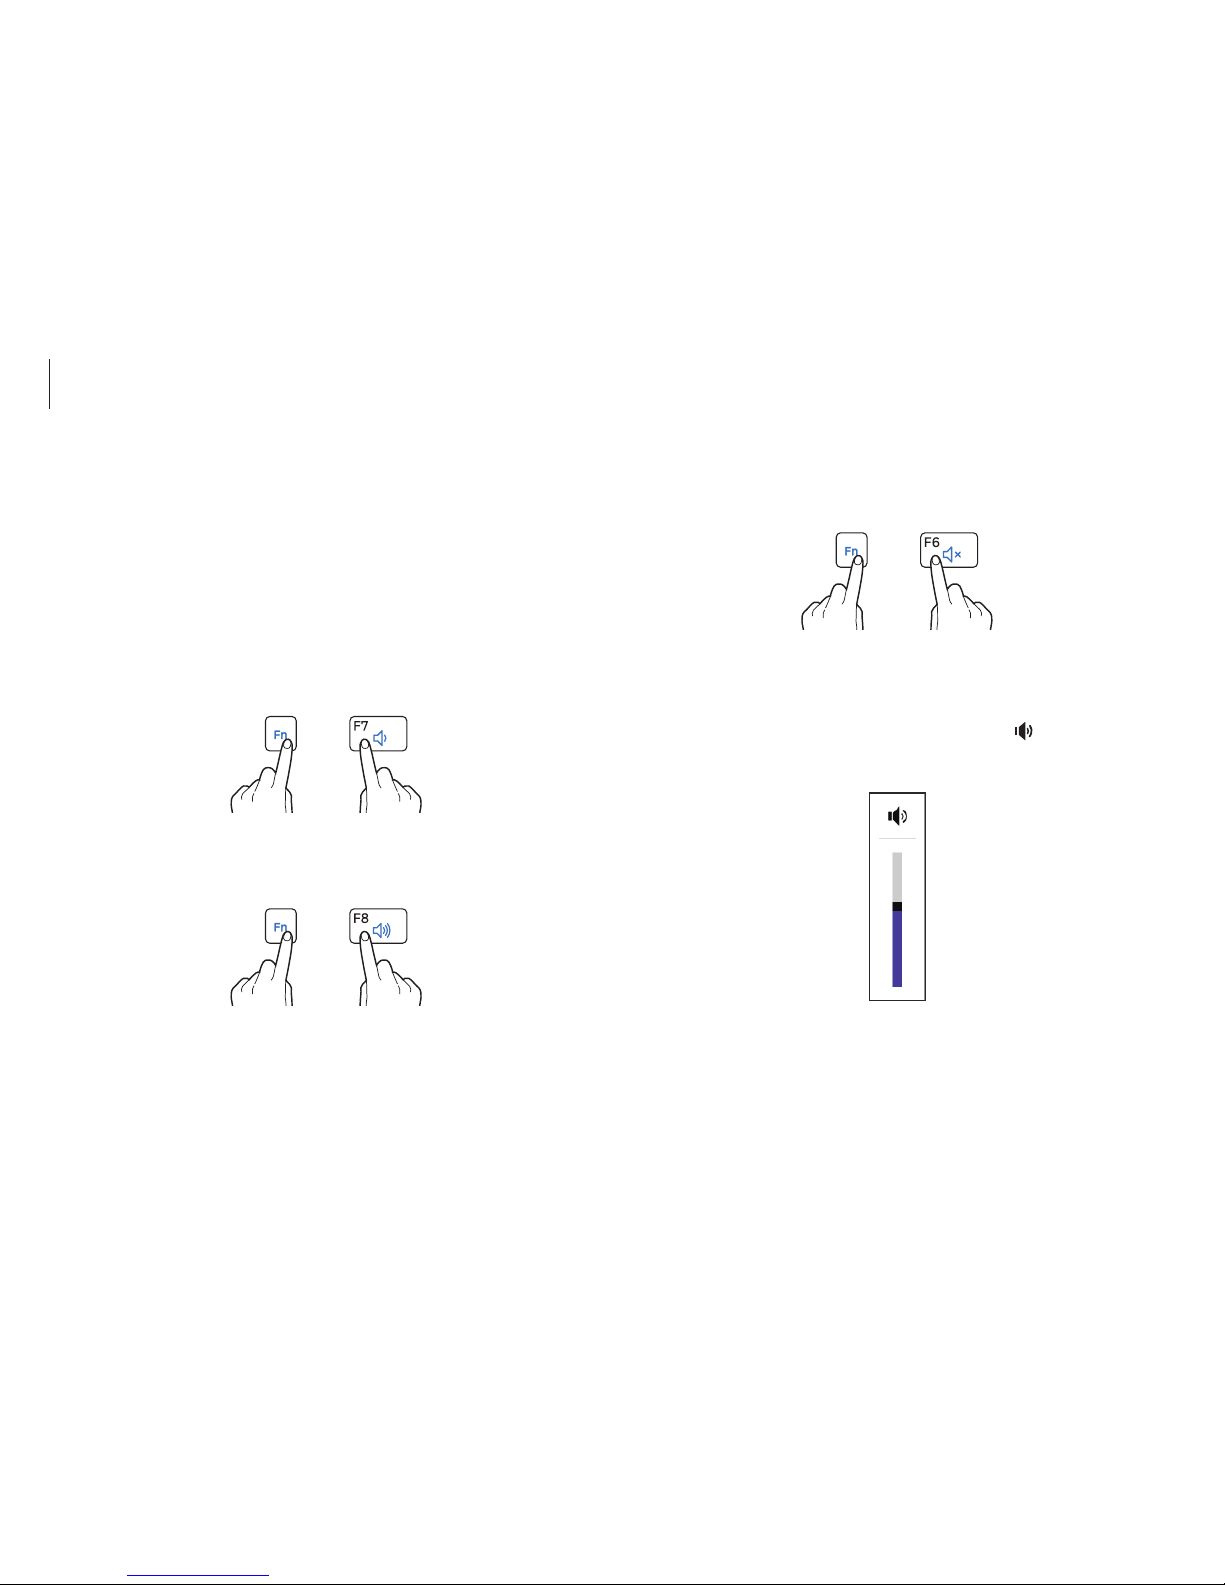
•
To mute or unmute the volume, hold down the Fn key and
press the
F6
key.
+
Controlling with Charms
Open the Charms, select the
Settings
charm → , and drag the
slider.
Volume
Adjust the system volume or sound volume when playing music
or video.
Controlling with keyboard
•
To turn down the volume, hold down the Fn key and press the
F7
key.
+
•
To turn up the volume, hold down the Fn key and press the
F8
key.
+
Page 56

Basics
56
Setup utility (BIOS)
Define a boot password, change the boot priority, or configure the
installed chipsets.
•
Incorrect settings may cause the system to malfunction
or crash.
•
The BIOS setup screens, menus, and items may appear
differently depending on the model and BIOS version.
•
BIOS setup functions are subject to upgrades.
Entering the BIOS screen
1
Turn on the computer.
2
Before the Samsung logo appears, press the F2 key several
times.
•
If the computer is password-protected, press the F2 key
several times before the password screen appears.
•
If the password screen or the Windows start screen
appears, restart the computer and try again.
SoundAlive
Use
SoundAlive
to optimize your audio experience. This feature
enhances sound elements by analyzing and adjusting sound
levels automatically.
This feature may not be available depending on the model
and operating system.
1
On the desktop, right-click on the taskbar and select
Playback devices
.
Alternatively, on the desktop, open the Charms and select the
Settings
charm →
Control Panel
→
Hardware and Sound
→
Sound
.
2
Right-click
Speakers
and select
Properties
→
SoundAlive
.
3
Select
Enable SoundAlive
→ an option → OK → OK.
Page 57
Basics
57
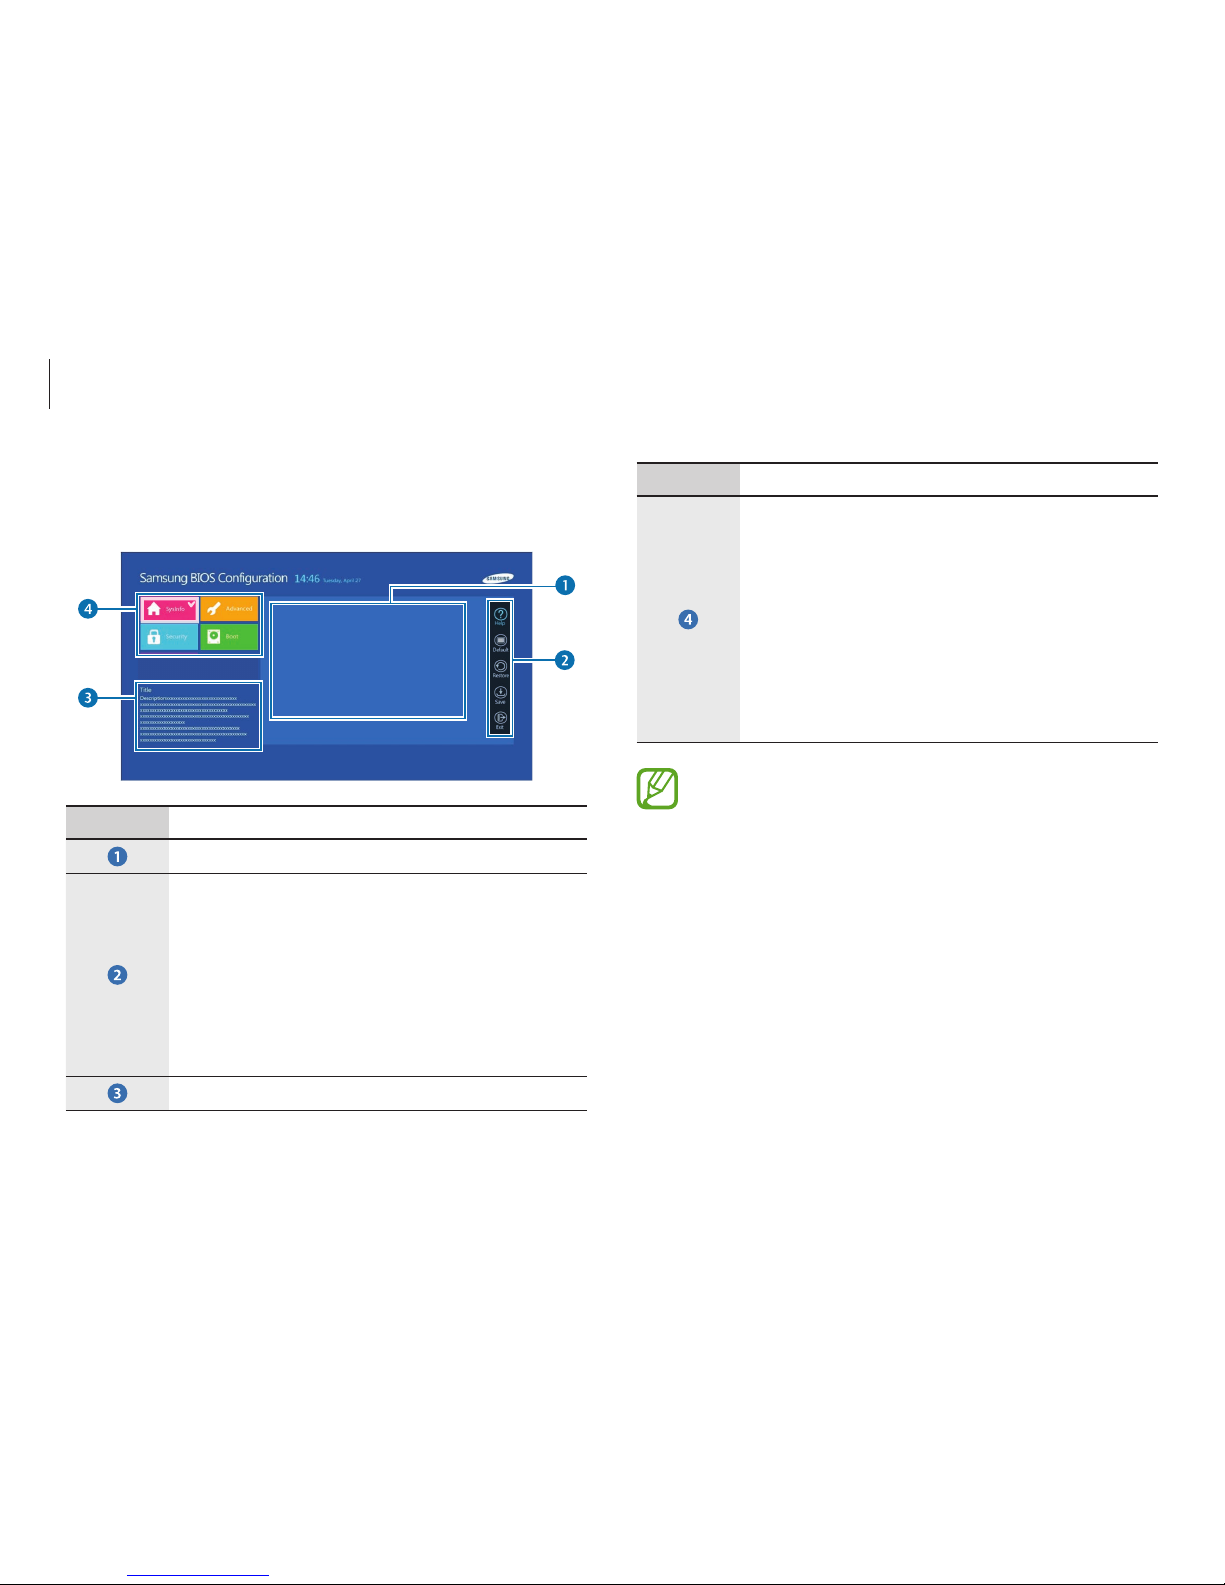
Number Name
•
Setup menu
–
SysInfo
: View the basic specifications of
the computer.
–
Advanced
: Configure the chipsets and
additional functions.
–
Security
: Configure security functions.
–
Boot
: Configure peripherals and
boot-related settings.
•
The BIOS setup screen appears only in English.
•
When using a keyboard, only certain keys will control
the BIOS setup screen.
Learning the BIOS screen
The BIOS setup screen appears as shown below.
Aptio Setup Utility - Copy (C) 2012 American Megatrends, Inc.
System Date >
System Time >
SATA Port 1 SanDisk SSD U100 126GB
CPU Vender Intel(R)
CPU Type Core Core(TM) i5-3317U CPU
CPU Speed 1.70 GHz
CPU VT (VT-x) Supported
Total Memory 4096 MB
BIOS Version E00AAT.017.120804.dg
MICOM Version E00AAT.017
Number Name
•
Setup items
•
Setup tools
–
Help
: View the help for BIOS set up.
–
Default
: Return to default settings.
–
Restore
: Cancel changes.
–
Save
: Save settings.
–
Exit
: Exit BIOS setup.
•
Help
Page 58
Basics
58
Boot password
Setting a password with the BIOS enhances protection against
viruses and hacking attacks.
•
Do not forget your password or expose it to others.
•
If you forget the
Supervisor Password
or
HDD
Password
, request assistance from the service center. In
this case, a service fee will be charged.
•
When you forget the
User Password
, disable the
Supervisor Password
, and the
User Password
is also
automatically disabled.
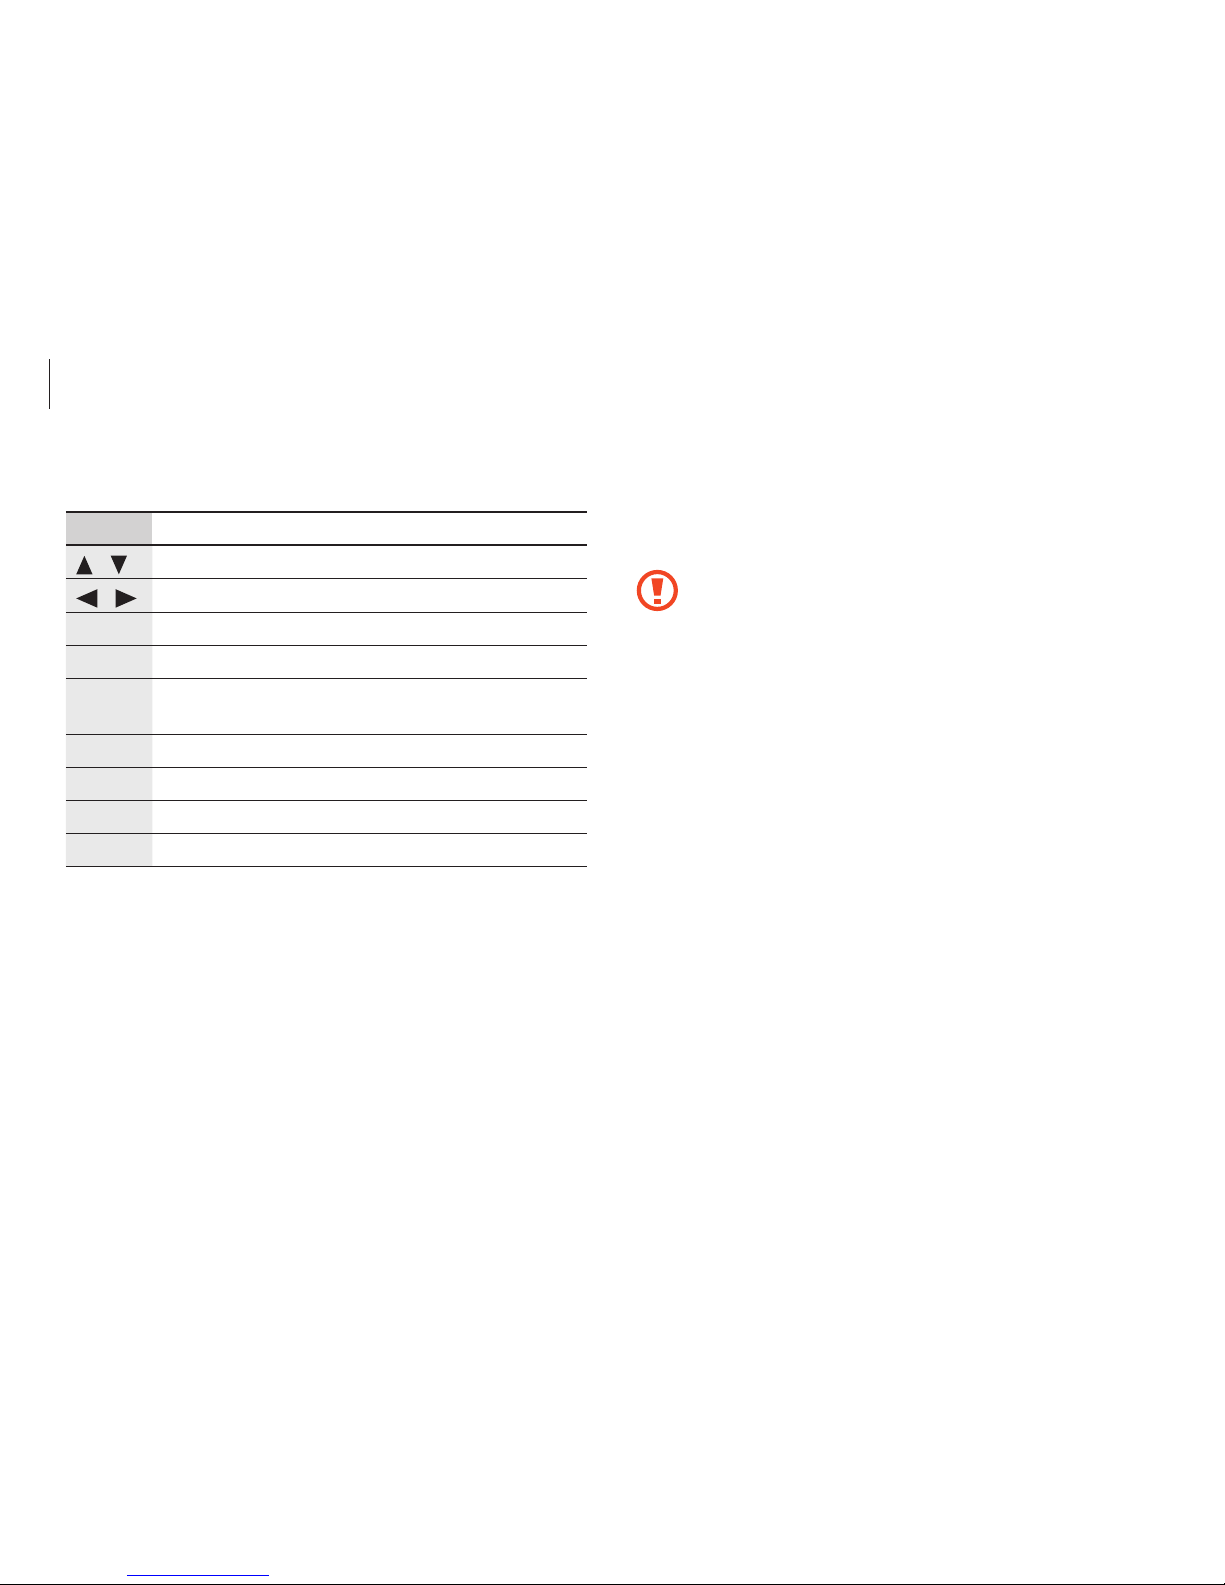
BIOS setup keys
Key Description
/
•
Change values.
/
•
Move to another menu.
Enter
•
Select an item or enter a sub-menu.
Space
•
Change the slide button.
Esc
•
Return to a higher level menu or to the
Exit
menu.
F1
•
View the setup help.
F3
•
Load the previous settings.
F9
•
Load the default settings.
F10
•
Save changes and exit the BIOS setup.
Page 59

Basics
59
Setting a boot password
1
Turn on the computer.
2
Before the Samsung logo appears, press the F2 key several
times.
3
Access the
Security
menu.
4
Select a password type (
Supervisor Password, User
Password
, or
HDD Password
).
If you cannot select an item or the
HDD Password Frozen
message appears, restart the computer. Then, press the
F2
key
several times before the Samsung logo appears to enter the
BIOS setup screen.
5
Enter a password and select Ok.
The password can be up to 20 characters.
Setting passwords
There are three password settings available; Supervisor Password,
User Password, and HDD Password.
•
Supervisor Password
(low security level): This password is
required when turning on the computer or attempt to enter
the BIOS setup.
•
User Password
(low security level): This password is required
to enter the BIOS setup. This password will be deactivated
automatically if the Supervisor Password is disabled.
•
HDD Password
(high security level): This password is required
to access the hard disk drive (HDD) from another computer.
This password may not be supported, depending on the
model.
Page 60

Basics
60
Removing a password
1
Turn on the computer.
2
Before the Samsung logo appears, press the F2 key several
times.
3
Access the
Security
menu.
4
Select a password type (
Supervisor Password, User
Password
, or
HDD Password
).
5
Enter the current password and select Ok.
6
Without entering any characters, select Ok → Ok.
For some models, to cancel the password, select
Cancel
in
the Setup Notice window.
6
Enter the password again to confirm it and select Ok.
7
Select
Save
→
Yes
to save and restart.
•
To enable the
Password on boot
option, set a
Supervisor Password
and enter the password when
starting up the computer.
•
To change the
HDD Password
after setting it, restart
the computer.
•
For some models, when the password entered message
appears in the Setup Notice window, select
Ok
to
complete the setup.
Page 61

Basics
61
Boot priority
Change the boot priority from the BIOS setup.
1
Turn on the computer.
2
Before the Samsung logo appears, press the F2 key several
times.
3
Access the
Boot
menu.
4
Select
Boot Device Priority
.
5
Click an option menu to open the list.
6
Select an option.
7
Select
Save
→ Yes to save and restart.
Select
Exit
→ Yes to restart without saving the changes.
To boot to DOS when using a USB device, enter the BIOS
setup, select the
Boot
menu, and set the
Fast BIOS Mode
item to
Off
.
Page 62
62
Network & Internet
Wired LAN
To access the Internet at home, set up an account with an Internet
service provider (ISP). To purchase Internet service and a modem,
contact a local ISP.
•
Some features or procedures may differ depending on
the model.
•
These descriptions are written for Windows 8.1, so some
figures and descriptions may differ from your operating
system. Since the procedures for other Windows
operating systems are similar, use the computer
referring to these descriptions.
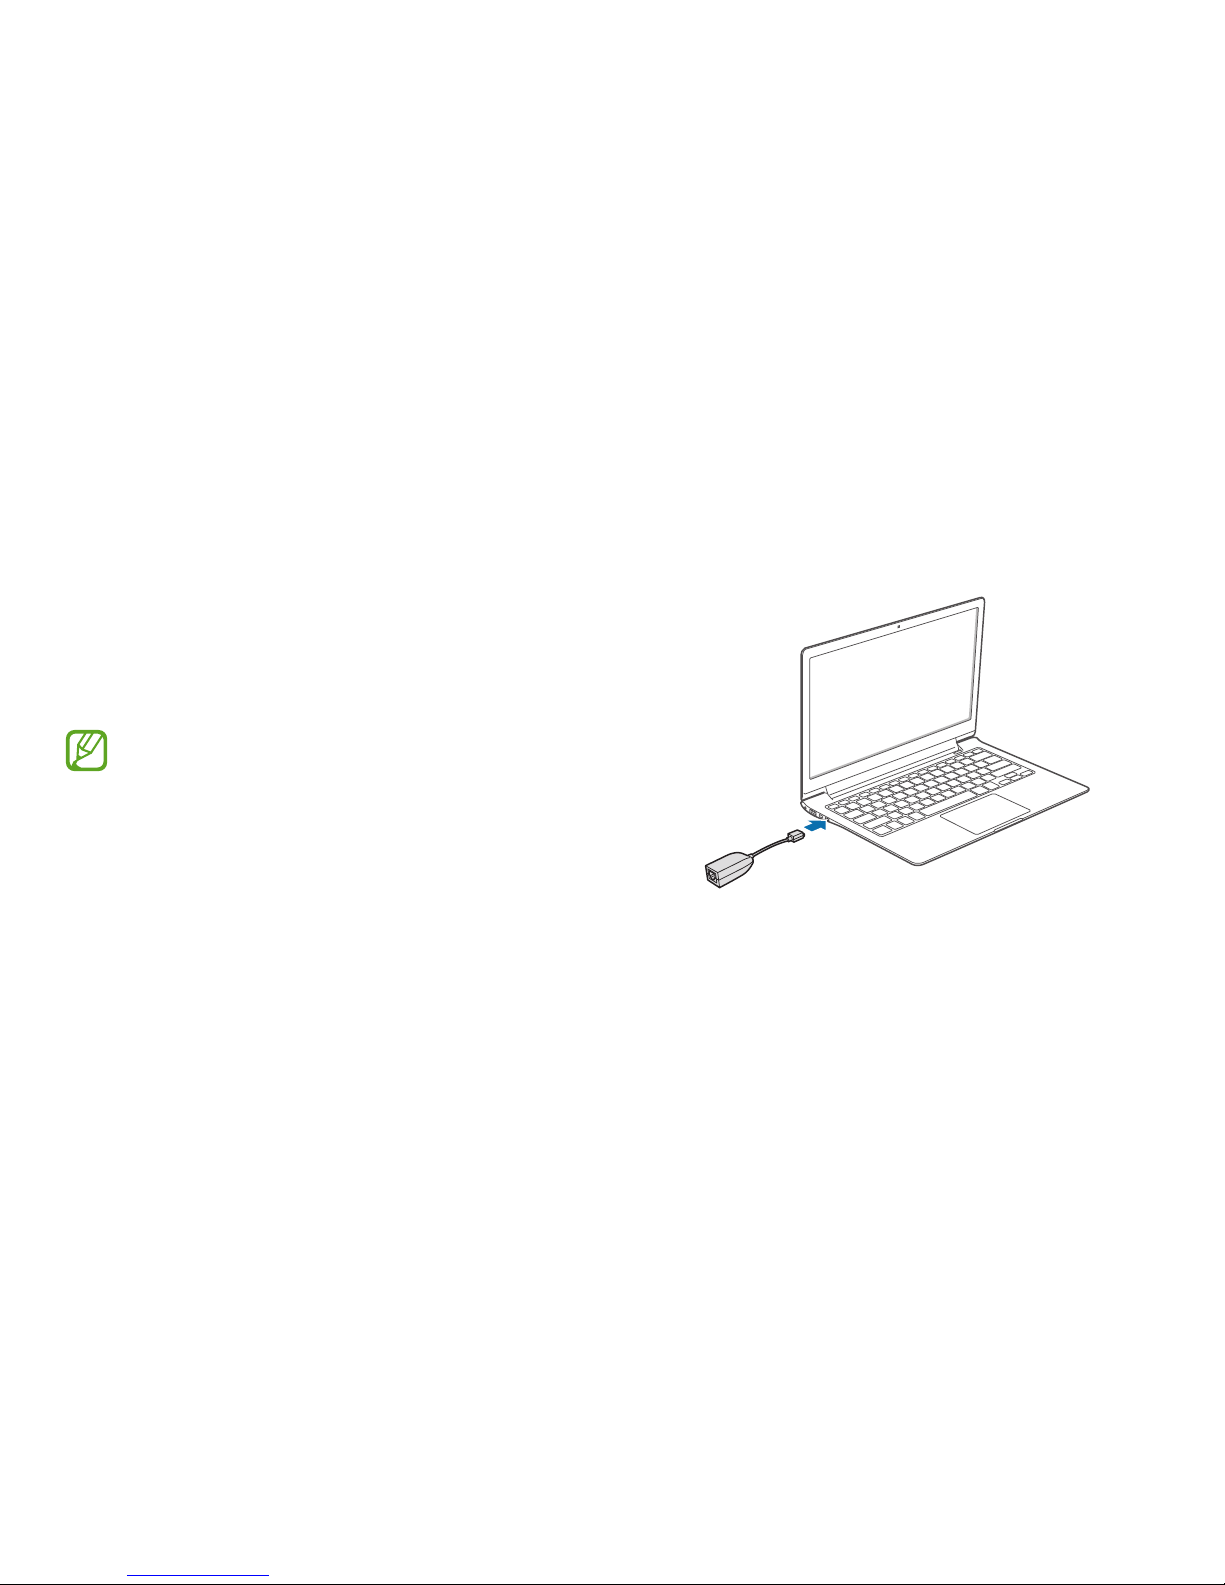
Wired LAN
1
Connect a LAN adapter to the wired LAN port of the
computer.
2
Connect the LAN cable to the LAN adapter.
Page 63
Network & Internet
63
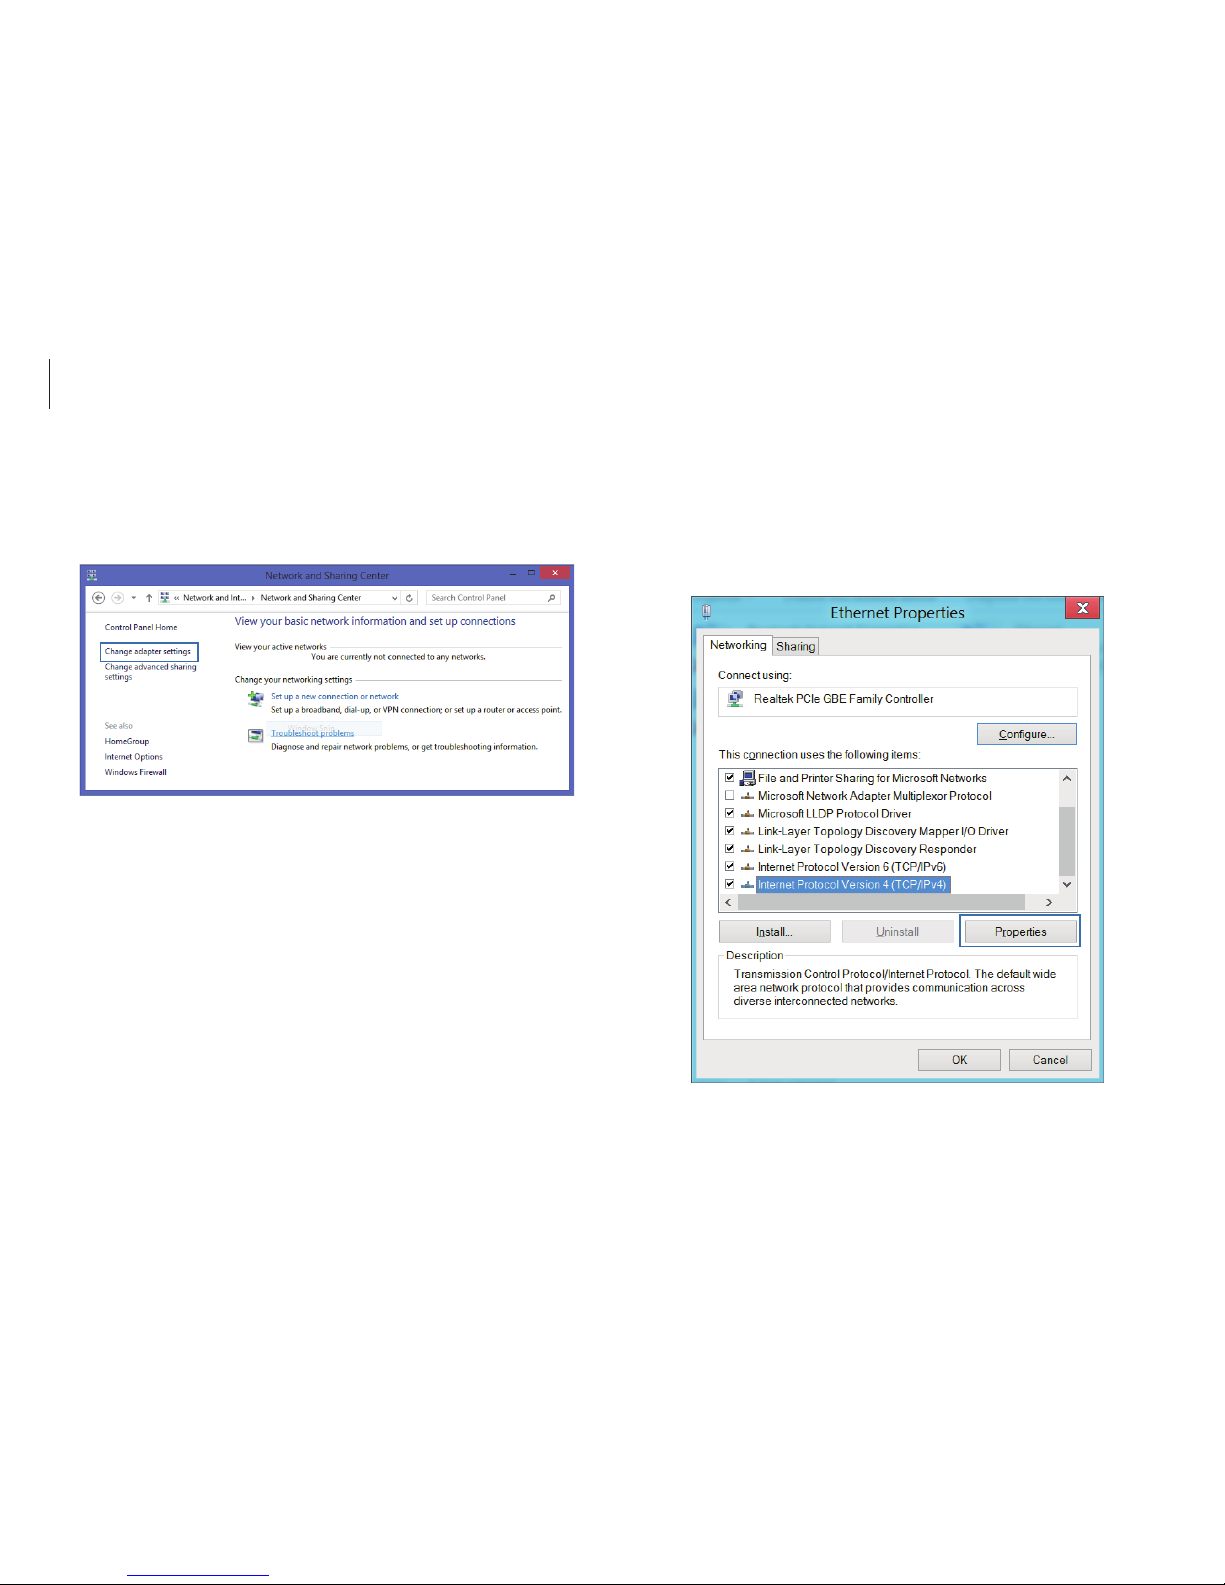
5
Select
Internet Protocol Version 4 (TCP/IPv4)
from the list of
network settings
→
Properties
.
•
The Network Component name may differ depending on
the operating system Installed.
•
To add a network item such as a client, service, or protocol,
select
Install
under the list of network items.
3
On the desktop, open the Charms and select the
Settings
charm
→
Control Panel
→
Network and Internet
→
Network and Sharing Center
→
Change adapter settings
.
4
Right-click
Ethernet
and select
Properties
.
The LAN device name may differ depending on the
computer’s network device.
Page 64

Network & Internet
64
Wake on LAN (WOL) feature
Activate the system remotely from sleep mode when a signal,
such as a ping or magic packet command, is received via a wired
LAN.
1
On the desktop, open the Charms and select the
Settings
charm
→
Control Panel
→
Network and Internet
→
Network and Sharing Center
→
Change adapter settings
.
2
Right-click
Ethernet
and select
Properties
.
3
Select
Configure…
→
Power Management
→
Allow this
device to wake the computer
→ OK.
4
Restart the computer.
•
If the computer wakes up from sleep mode inadvertently,
disable the Wake on LAN feature.
•
This feature may not work while using other power saving
features. To disable other sleep functions, select the
Settings
charm →
Control Panel
→
Hardware and Sound
and then set
Power Options
.
6
Configure the IP settings.
•
When using DHCP, select
Obtain an IP address
automatically
.
•
When not using DHCP, contact the network administrator
for the IP address. To use a static IP address, select
Use the
following IP address
and set the IP address manually.
7
Select OK to save the settings.
Page 65

Network & Internet
65
Wireless LAN
Connect the computer to a wireless network to use the Internet.
The descriptions below are for computer models with
a Wireless LAN card or device. A Wireless LAN device is
optional. The pictures in this manual may differ from the
actual product depending on the wireless LAN device
model.
About Access Point (AP)
An Access Point (AP) is a network device that bridges wired
and wireless LANs and corresponds to a wireless hub in a wired
network. Multiple devices can be connected to an AP.
•
When connected to a 100Mbps/1Gbps wired LAN , a
message appears informing the user of connection to
a 10Mbps/100Mbps wired LAN when the computer
wakes from sleep mode. This happens because
restoring the network takes about 3 seconds. When the
network is restored, the computer will be connected to
the 100Mbps/1Gbps LAN.
•
When the system is running on battery power, it may
take a few seconds for the connection to be established
when connecting a LAN cable. This is the result of
power saving features designed to reduce battery
consumption.
•
When the system is running on battery power, the
speed of a wired LAN is decreased automatically
to reduce battery consumption. In this case, a
1Gbps/100Mbps LAN would function at the speed of a
100Mbps/10Mbps connection.
Page 66
Network & Internet
66
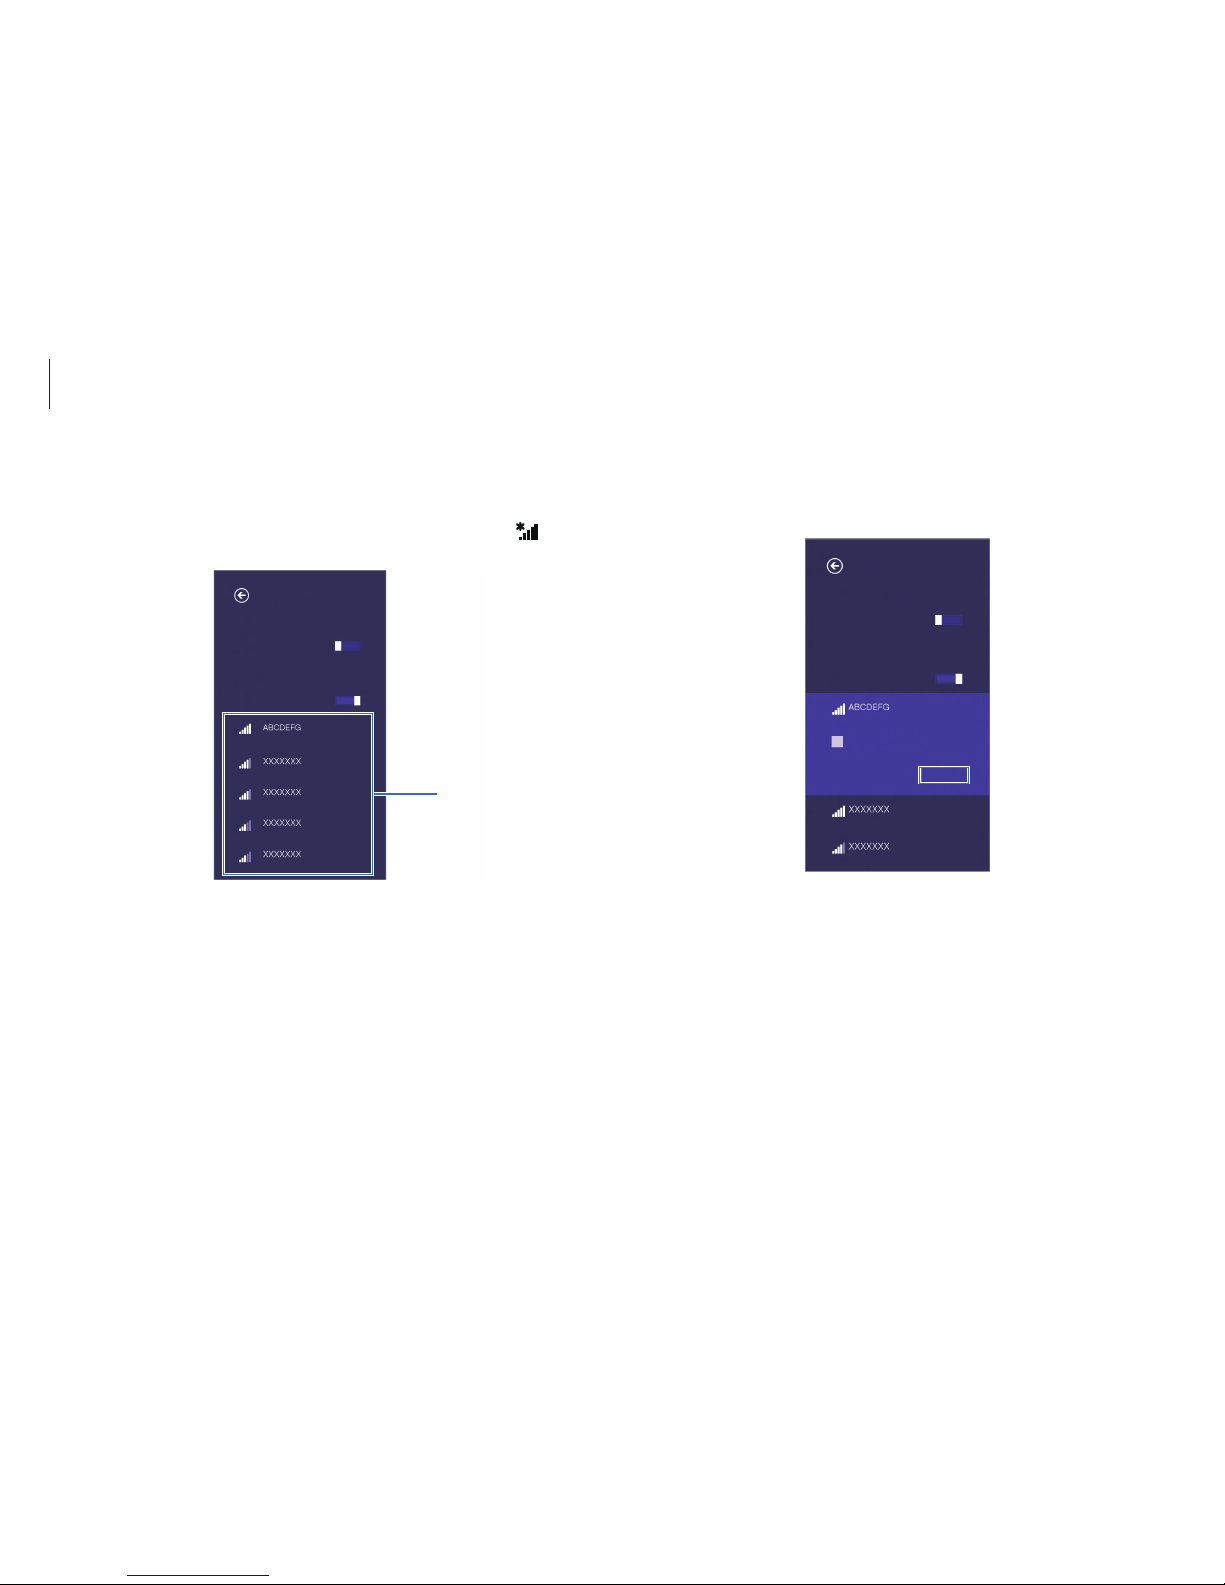
2
Select a network from the list of detected wireless networks
→
Connect automatically
→
Connect
.
Networks
Connect automatically
Connect
Airplane mode
Off
3
Enter a password, if necessary, and select
Next
.
Once the computer has been connected to a wireless
network, it will attempt to connect to it automatically when
it is available. For the network key, please ask the network
administrator.
Wi-Fi networks
1
Open the Charms and then select
Settings
charm → .
Networks
Wi-Fi
On
AP List
Airplane mode
Off
Wi-Fi
On
Page 67

Network & Internet
67
Mobile broadband
(Wireless WAN, optional)
A wireless wide area network (WWAN) is a mobile broadband
network that is available in mobile phone service areas.
•
The descriptions below are for computer models with
mobile broadband devices. A mobile broadband device
is optional.
•
Contact the Samsung Service Center to receive service
for computer models with mobile broadband devices.
•
Depending on the version of the operating system,
some functions may not be provided or different
functions may be provided.
•
The pictures in this manual may differ from the actual
product depending on your WWAN device model.
•
Contact your service provider for inquiries about mobile
broadband services.
Airplane mode
Airplane mode disables all wireless functions on the computer.
Only non-network services are available in Airplane mode.
To turn on Airplane mode, hold down the Fn key and press the
F12 key.
•
This computer uses a non-harmonized frequency and
is intended for use in all European countries. The WLAN
can be operated in the EU without restriction indoors,
but cannot be operated outdoors.
•
Turn off the WLAN feature when not in use to save
battery power.
Page 68
Network & Internet
68
1
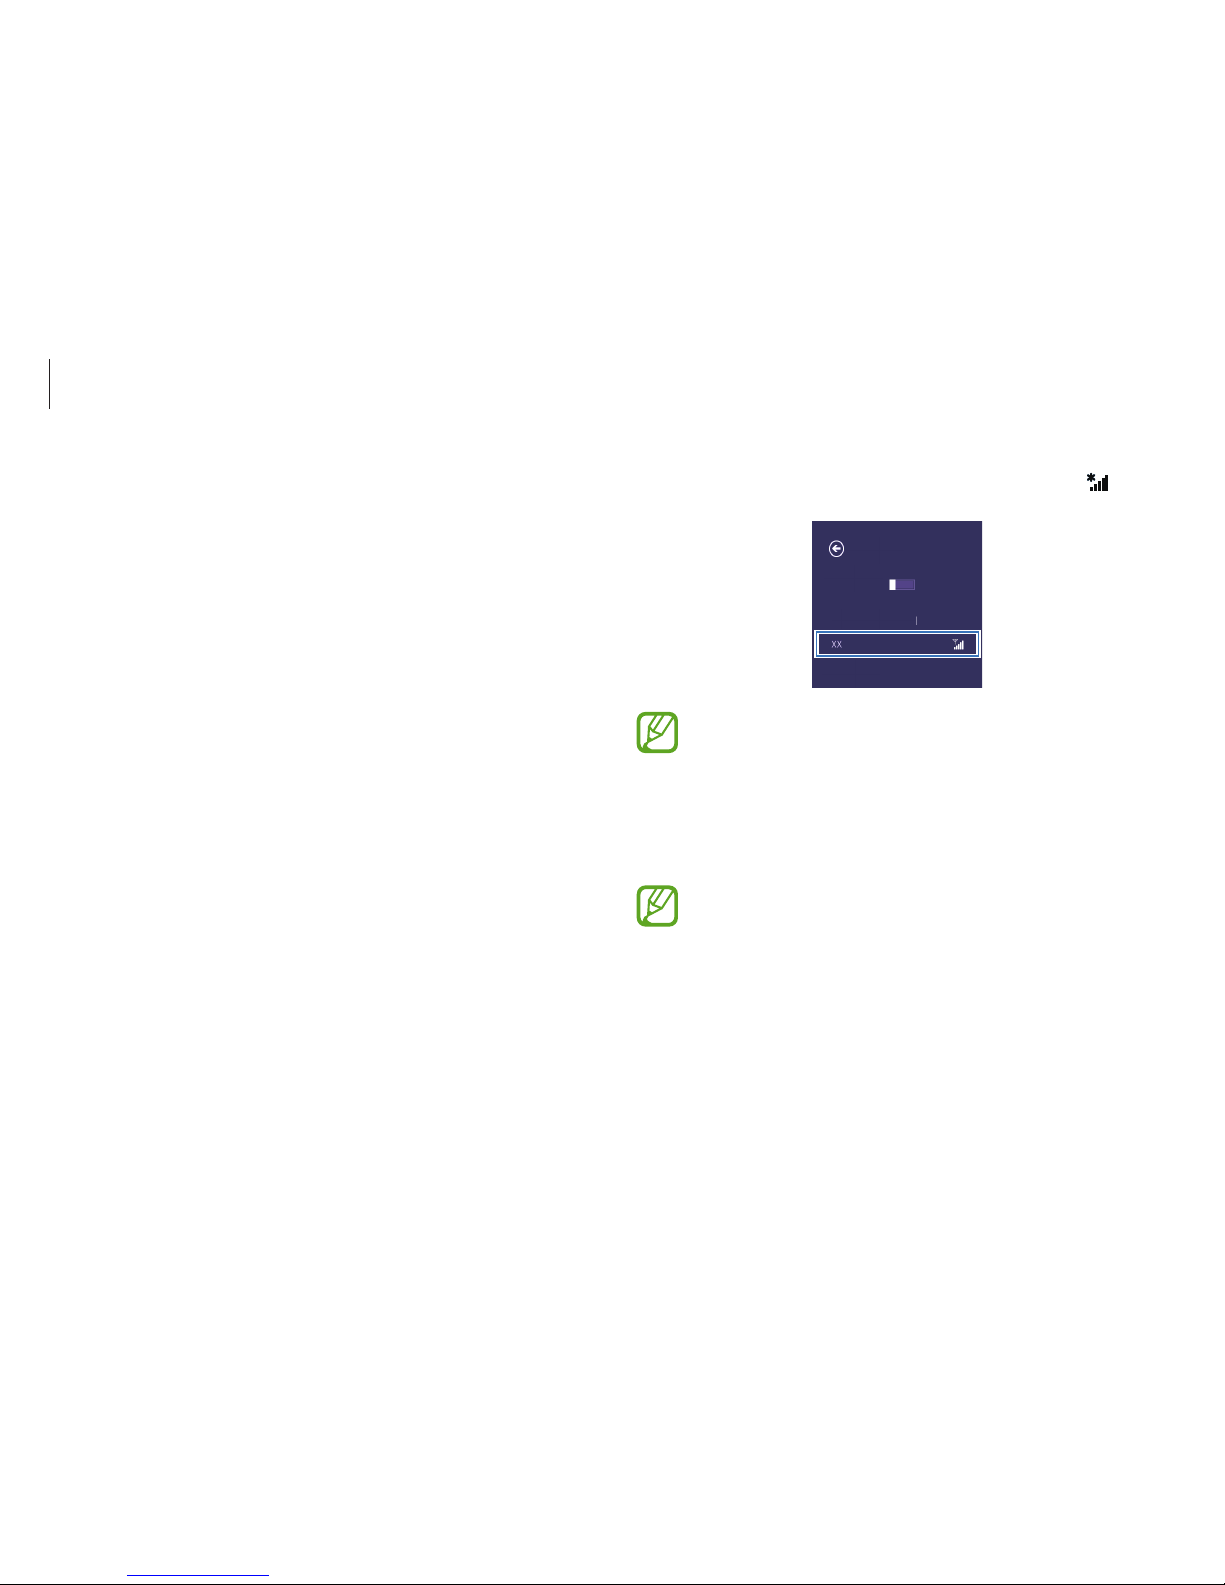
Open the Charms and then select
Settings
charm → .
Networks
Mobile broadband
Wi-Fi
Airplane mode
Off
If there are no available network service providers
listed under
Mobile broadband
, turn off the computer,
and insert the SIM card correctly, and then turn on the
computer.
2
Select a carrier name →
Connect
.
Selecting
Connect
overseas will automatically start
roaming. In this case, a service fee will be charged.
3
If the
Profile
settings screen appears, follow the on-screen
instructions to enter the required information.
When the connection is made,
Connected
appears beside the
network name and Internet access is available.
•
You must subscribe first to use mobile broadband
services. To learn more, open the Charms and select
the
Settings
charm →
Change PC settings
→
View
mobile broadband hardware information
under
Wireless
. You can view the IMEI, phone number, and
SIM ICC ID information. The carrier serial number can be
found on the bottom of the computer (corresponding
models only).
•
Set a SIM card password for security. Open the Charms
and select the
Settings
charm →
Network
, and then
touch and hold
Mobile broadband provider
. Select
View connection properties
→
Security
to set the
password.
Page 69

69
Applications
Using applications
Applications include the software that make up the
operating system. Windows provides basic applications for
frequently-performed tasks.
•
Some applications are available only in Windows 8.1
desktop mode.
•
Images and features may differ depending on the
model and the application version.
•
Third-party software related services
For descriptions about and service requests for
third-party applications, please contact the relevant
manufacturer. Some troubleshooting actions in
response to service requests may not work depending
on the application manufacturer.
•
Applications that are provided by Samsung can be
installed from
SW Update
.
•
Some applications may not be supported depending
on the model.
Page 70
Applications
70
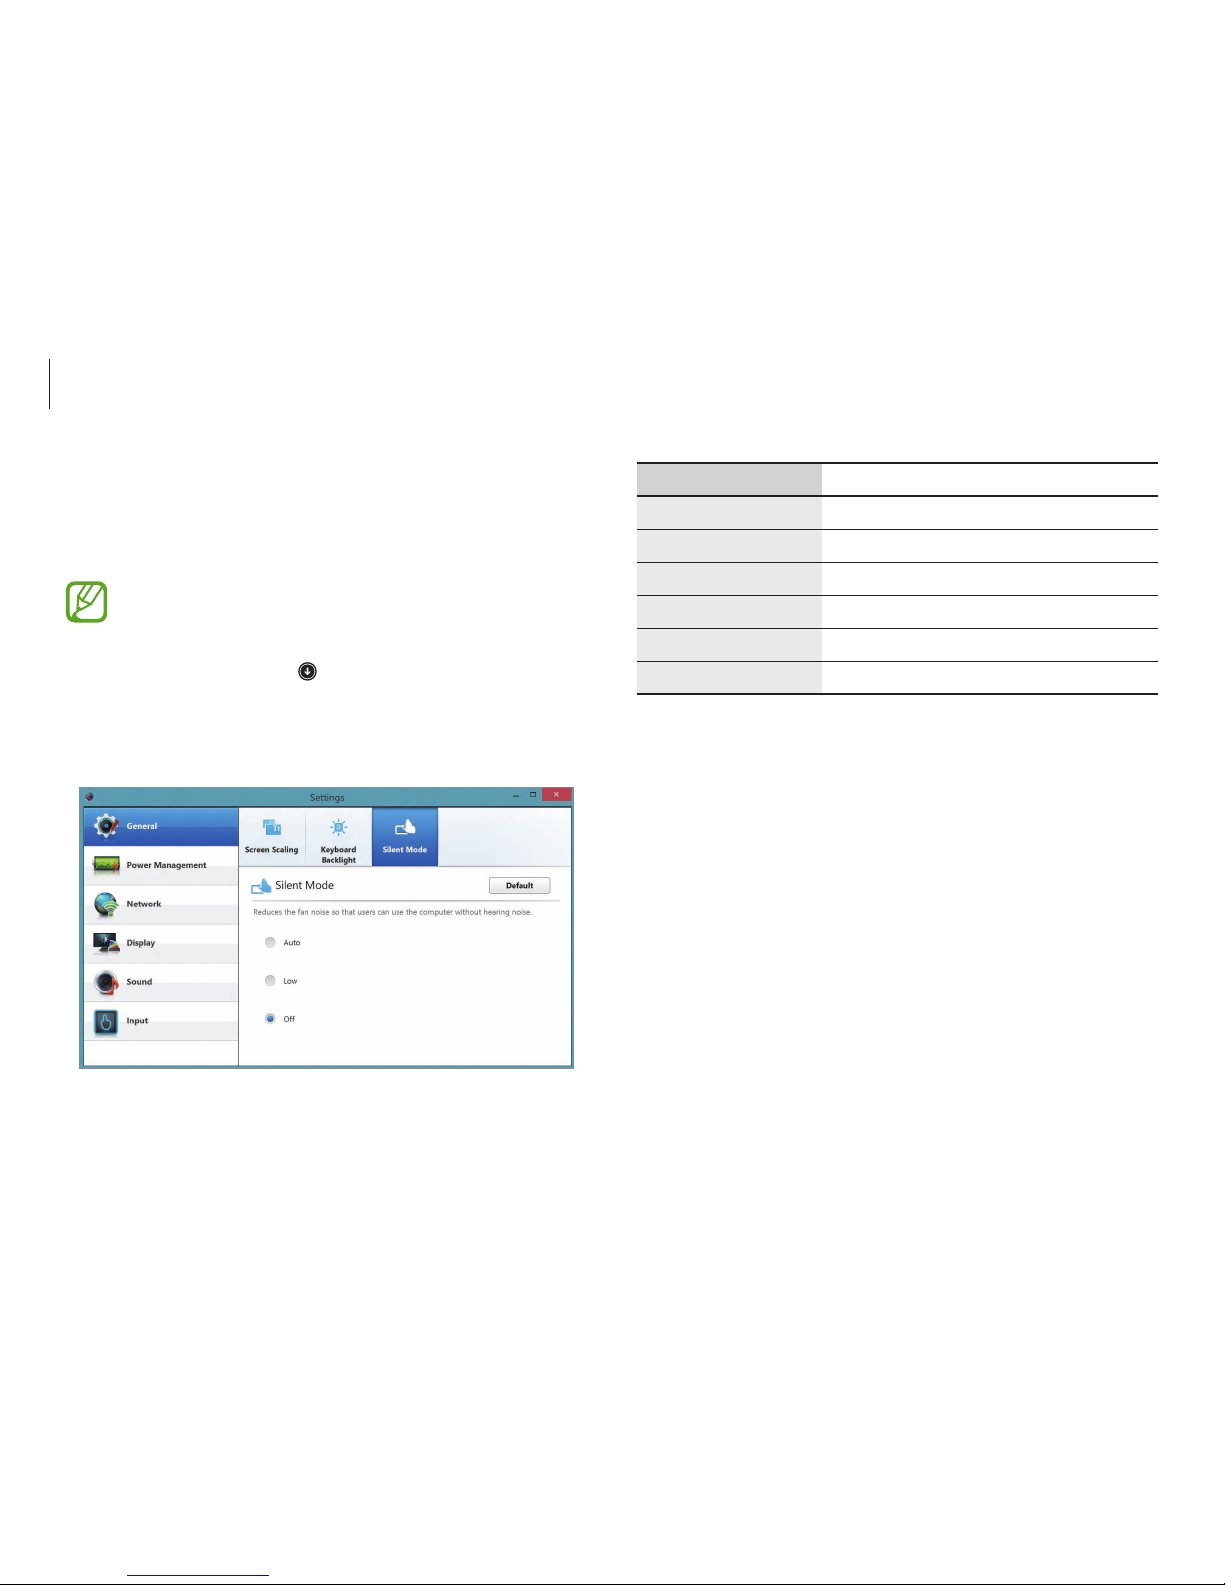
Menu Description
General
•
Set general settings.
Power Management
•
Set power related settings.
Network
•
Set network functions and settings.
Display
•
Set the screen brightness and color.
Sound
•
Set sound functions and settings.
Input
•
Set input functions and settings.
Settings
Settings
, a Samsung integrated settings application, offers various
settings functions.
Images and features may differ depending on the model
and the application version.
1
On the
Start
screen, click at the lower-left edge, and select
Settings
.
2
Select an option to configure the corresponding function.
Page 71
Applications
71
2
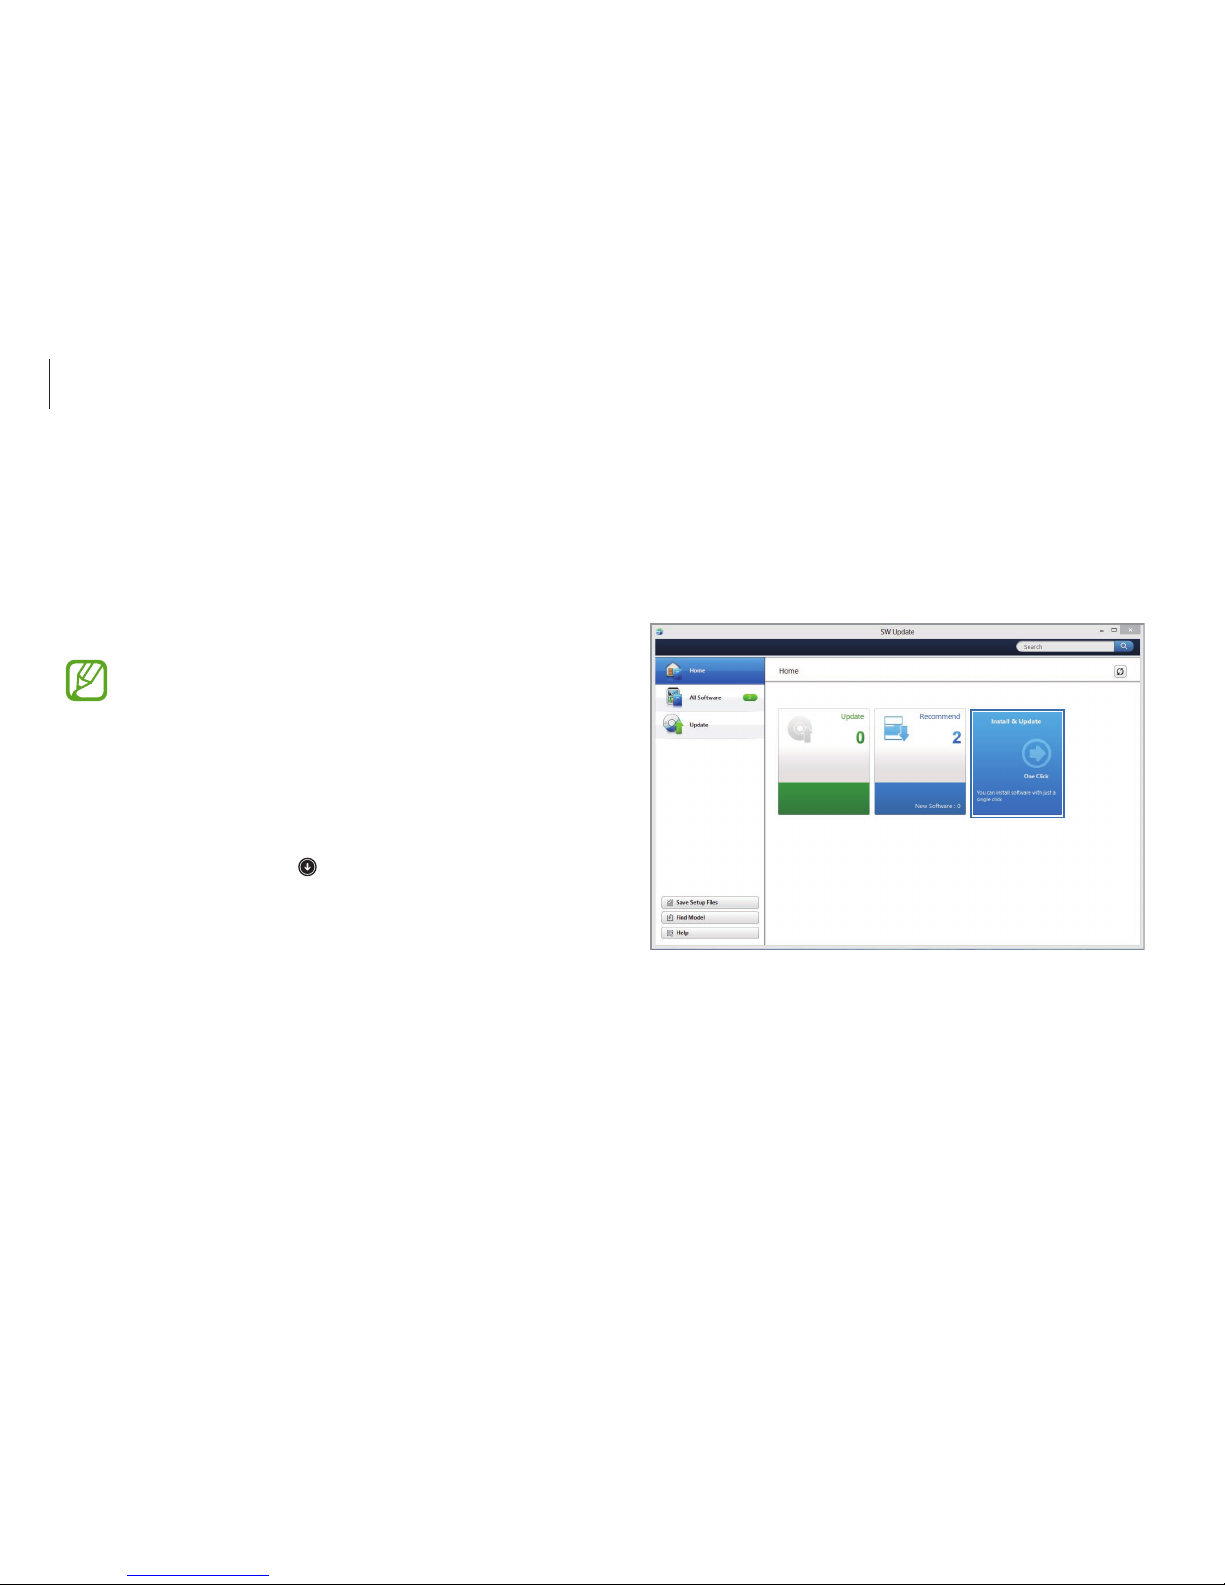
Read and agree to the User Agreement.
This step appears only when the application runs for the first
time.
3
Select
Install & Update
.
4
Select items to update → OK.
Software Update
Install and update Samsung applications and drivers on the
computer easily and conveniently. This application enables the
user to search for or download the BIOS, drivers, and applications
over the Internet. Keep the computer performing better and more
stably with
SW Update
.
•
To check for available updates, the computer must be
connected to the Internet.
•
Only applications that have been installed with this
application can be updated.
•
Images and features may differ depending on the
model and the application version.
1
On the
Start
screen, click at the lower-left edge, and select
SW Update
.
Page 72
Applications
72
1
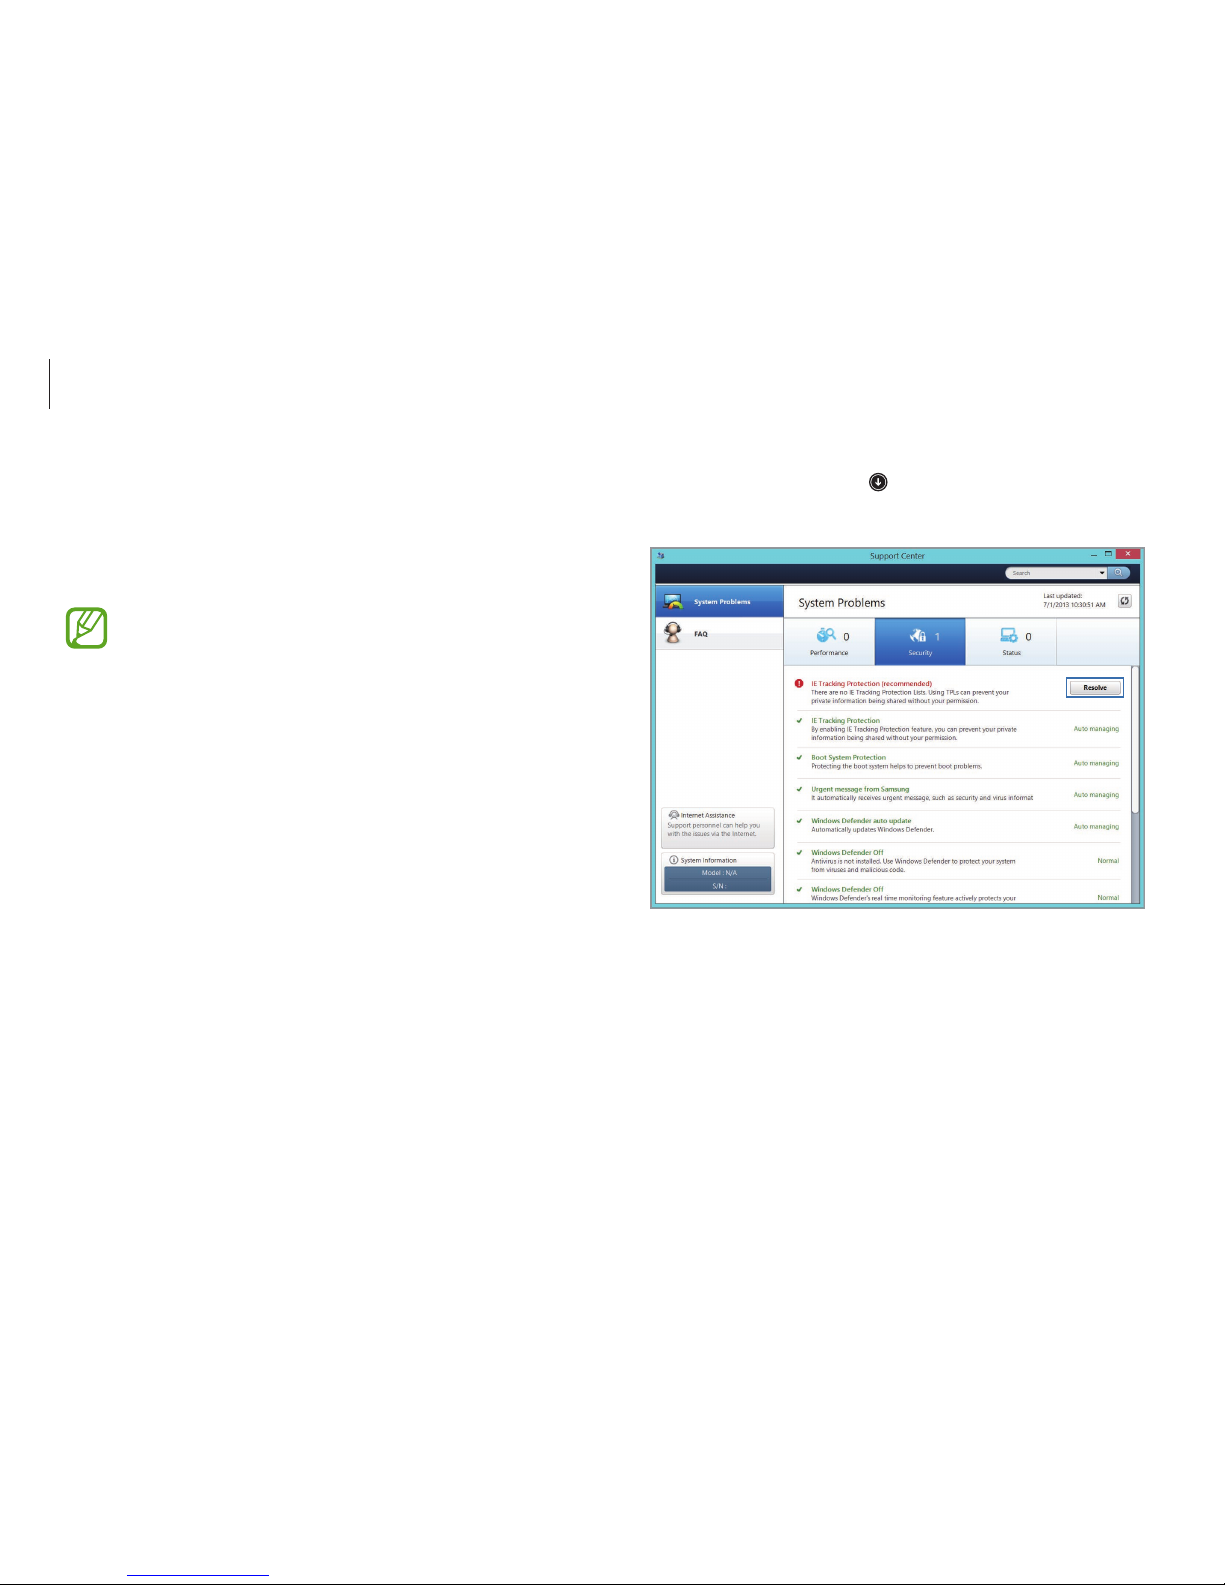
On the
Start
screen, click at the lower-left edge, and select
Support Center
.
2
Select
Resolve
to correct the problems.
Support Center
Diagnose the performance, security, and status of the computer
and fix any problems it may have. Additionally, access the FAQ and
search features to find solutions for the problems.
•
The
Support Center
application may not be provided
or may be a different version depending on the model.
•
Images and features may differ depending on the
model and the application version.
Page 73

Applications
73
Samsung Kies
Samsung Kies
is an application to transfer music, contacts, and
photos, or sync files between a Samsung mobile device and a
Samsung computer. This application also enables the user to
update the firmware of the connected mobile device to keep it
up-to-date.
On the
Start
screen, click at the lower-left edge, and select
Samsung Kies
.
•
Images and features may differ depending on the
model and the application version.
•
Refer to the application help for more information.
S Player+
Play videos and music in various file formats. Search for and view
videos online.
On the
Start
screen, select
S Player+
.
•
Images and features may differ depending on the
model and the application version.
•
Third-party software related services
For descriptions about and service requests for
third-party applications, please contact the relevant
manufacturer. Some troubleshooting actions in
response to service requests may not work depending
on the application manufacturer.
•
Some file formats may not be supported.
•
Some files may not play properly, depending on how
they are encoded.
Page 74

Applications
74
SideSync
SideSync
allows the user to control a Samsung mobile device
from a Samsung computer or share files between them.
Use a computer’s keyboard or mouse from a mobile device.
On the
Start
screen, click at the lower-left edge, and select
SideSync
.
Refer to the application help for more information.
HomeSync Lite
HomeSync Lite
enables the user to use the computer as cloud
storage and access it via a Samsung mobile device. Set folders
to share, and view and manage the shared folders anywhere
anytime.
On the
Start
screen, select
HomeSync Lite
.
Refer to the application help for more information.
Page 75

Applications
75
Configuring the security solution
To use the TPM security solution, initialize the TPM chip in the BIOS
Setup, initialize the TPM solution, and then register a user. To use
the TPM function, complete the following steps.
Step 1: Initializing the TPM chip
When using the TPM solution for the first time or registering a user
again, initialize the TPM chip.
•
Initializing the TPM chip deletes all authentication data
on the chip.
•
If the TPM chip is initialized after the security solution is
configured, decrypting any existing folders or files that
have been encrypted by the security solution may not
be possible. Failure to do so may lead to inaccessibility
to the folder and files after initialization.
1
Turn on the computer.
2
Before the Samsung logo appears, press the F2 key several
times.
3
Access the
Security
menu.
TPM security solution (optional)
Protect the user’s personal information by saving user
authentication data on a Trusted Platform Module (TPM) chip
installed in the computer. The Trusted Platform Module checks
the system integrity and authenticates third-party users who
would like to access the security features, while remaining under
complete control of its primary user.
•
Images and features may differ depending on the
model and the application version.
•
Refer to the security solution help for more information.
•
This function is only supported for models with TPM
(security chip).
Page 76
Applications
76
9
Before the Samsung logo appears, press the F2 key several
times.
10
On the BIOS setup screen, access the
Security
menu.
11
Select
TPM Configuration
.
12
Set
TPM State
to
Enable and Activate
.
13
Select
Save
.
The computer restarts.
14
When the system reboots, press the corresponding keys by
following the on-screen instructions.
15
Select
Save
.
The computer restarts.
4
Select
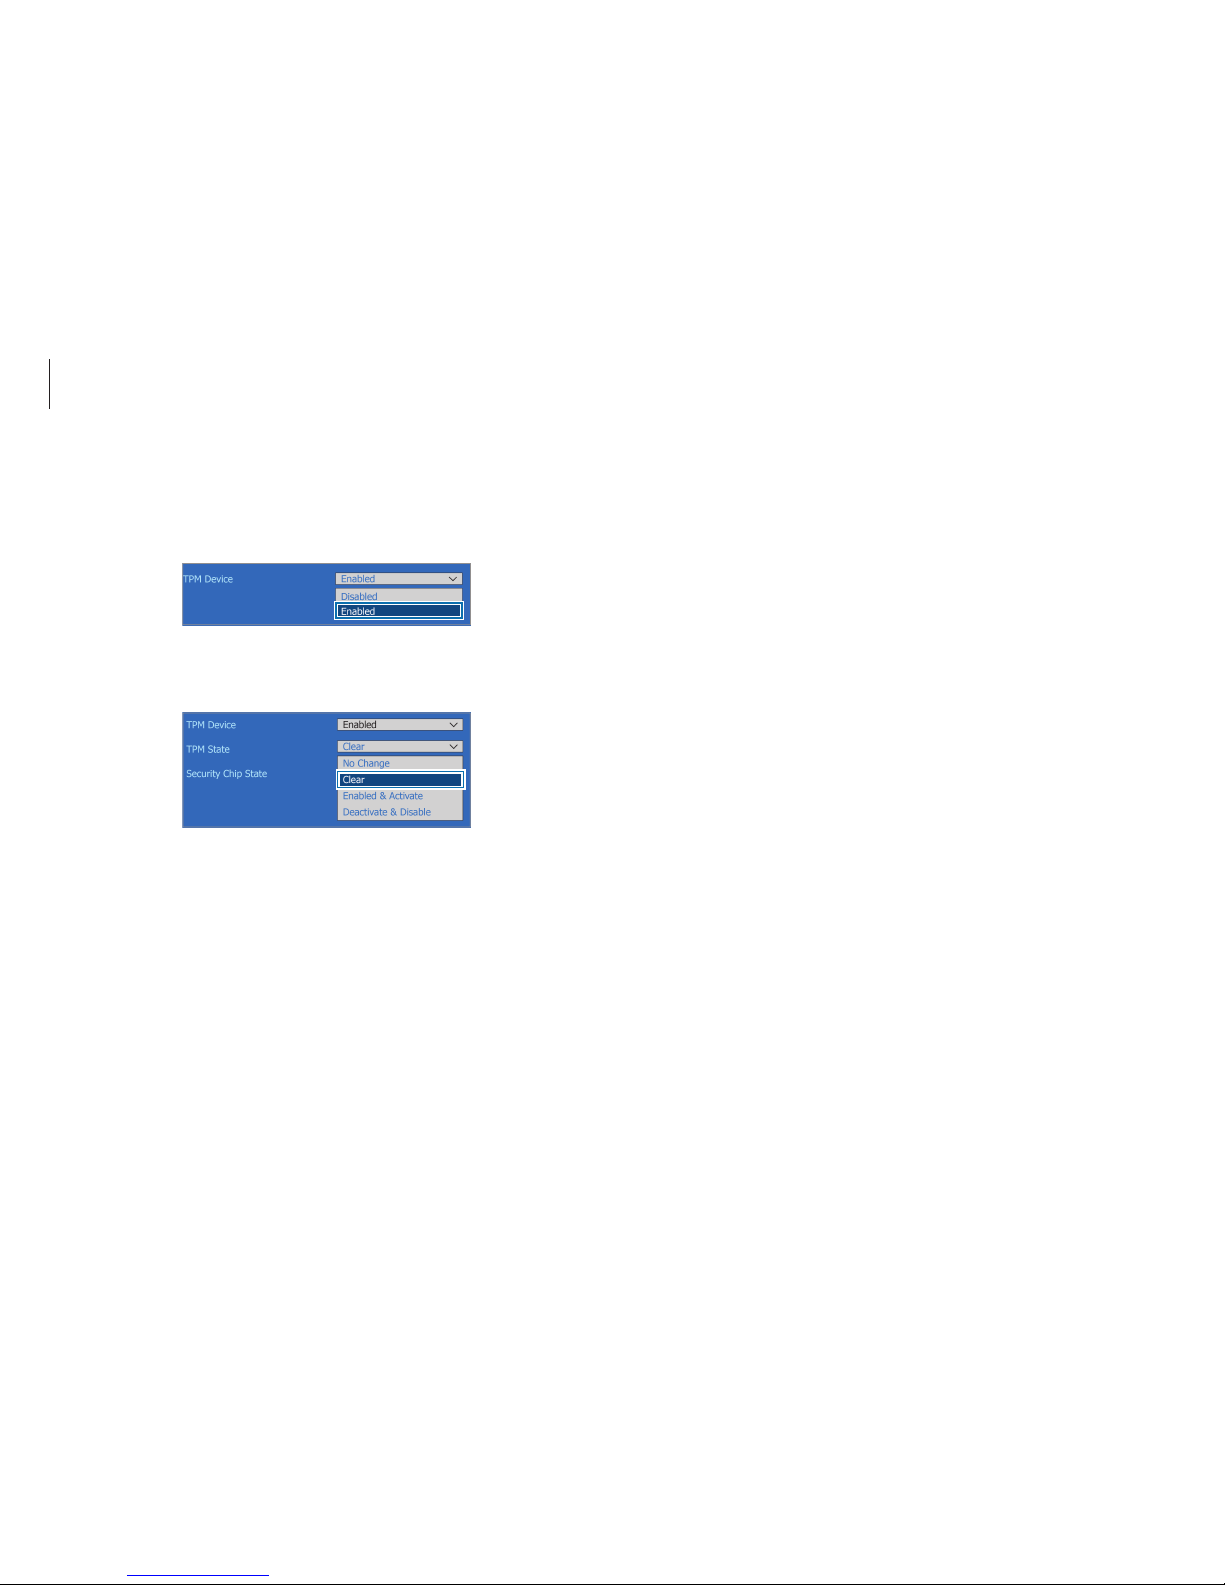
TPM Configuration
.
5
Set
TPM Device
to
Enabled
.
6
Set
TPM State
to
Clear
.
7
Select
Save
.
The computer restarts.
8
When the system reboots, press the corresponding keys by
following the on-screen instructions.
Page 77

Applications
77
Step 3: Registering a user
Register a user according to the procedures below.
1
On the
Start
screen, click at the lower-left edge.
2
Select
Manage Security Platform
→
User Settings
.
3
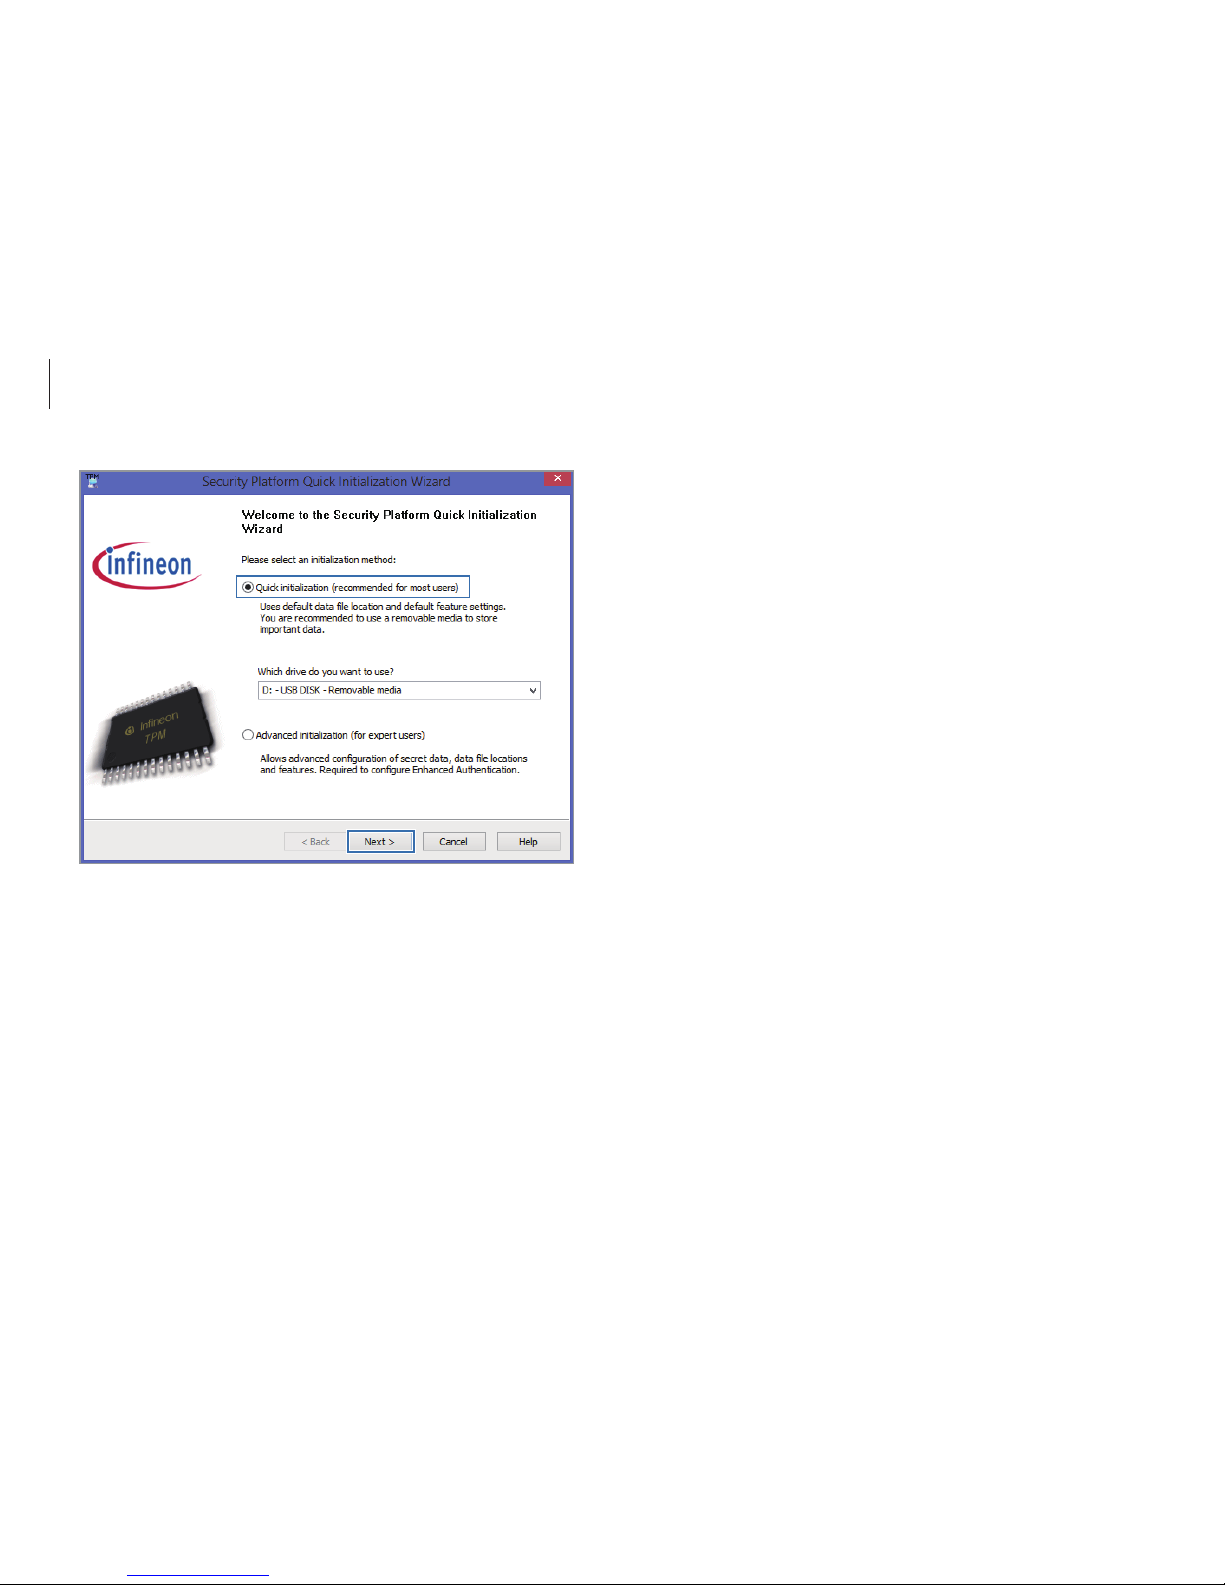
When the initialization wizard appears, select an initialization
method
→
a drive →
Next
.
•
Back up the emergency recovery file to an external
storage device according to the instructions of the
initialization wizard to use the TPM security device more
safely.
•
If
Not initialized
pop-up message appears, select
Yes
.
Step 2: Installing the TPM solution
Install the TPM solution according to the procedures below.
This solution is provided only for models with Recovery
and the TPM solution.
1
Run
Recovery
and select
System Software
.
2
Select
System Software Installation
.
3
Select
TPM Host SW
→
Install Now
.
The
SW Update
application will be launched.
If the system software media is supplied with the product,
install the application by using the system software media
(only when supplied.)
4
After the installation, select OK.
The computer restarts.
Page 78
Applications
78
4
When the security platform screen appears, select
Next
.
5
Select a security platform feature and set a user password.
6
Follow the on-screen instructions to complete the registration.
To use the virtual drive feature, select
Security Platform
Features
and then select
Personal Secure Drive (PSD)
.
Page 79
Applications
79
2
Select a security type → OK.
Encrypting folders and files
Encrypt folders and files with the Encrypt Files System (EFS). EFS is
available for the following operating systems:
•
Windows 7 Professional / Windows 7 Enterprise /
Windows 7 Ultimate
•
Windows 8 Pro / Windows 8 Enterprise
•
Windows 8.1
1
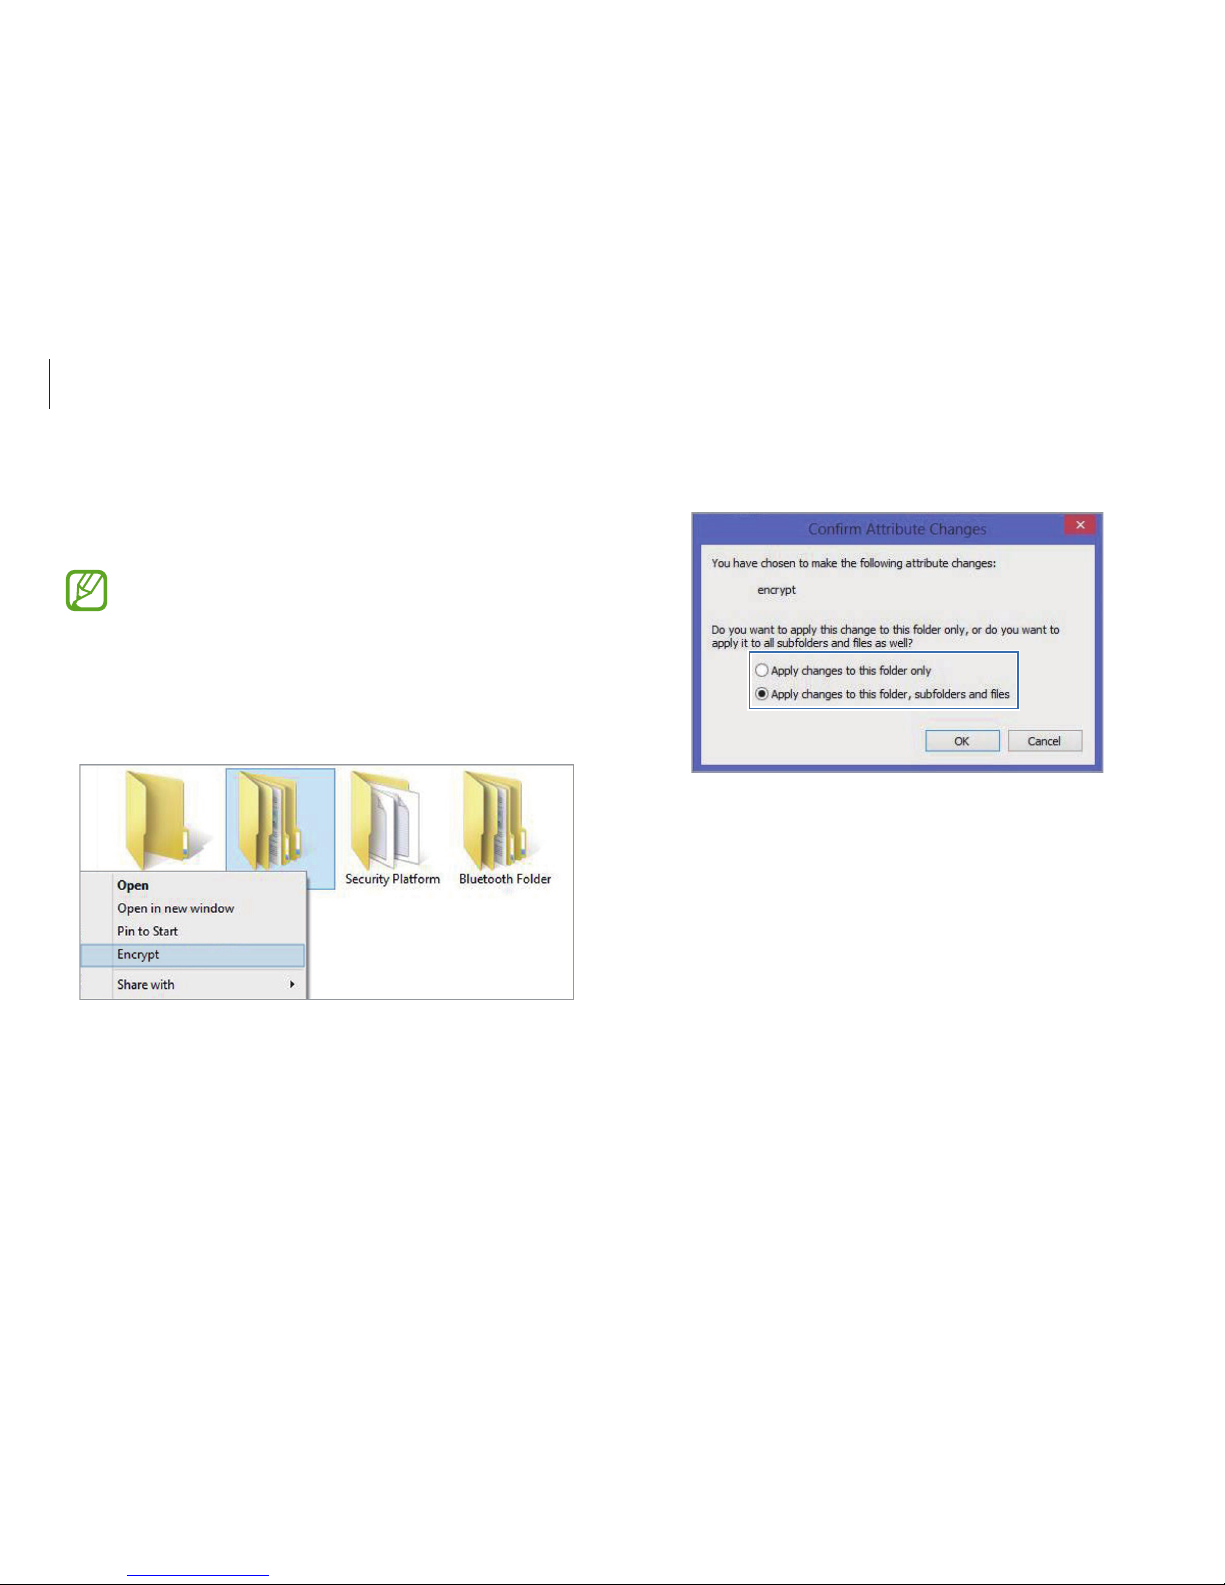
Right-click a folder or file and then select
Encrypt
.
Page 80
Applications
80
Opening encrypted folders and files
1
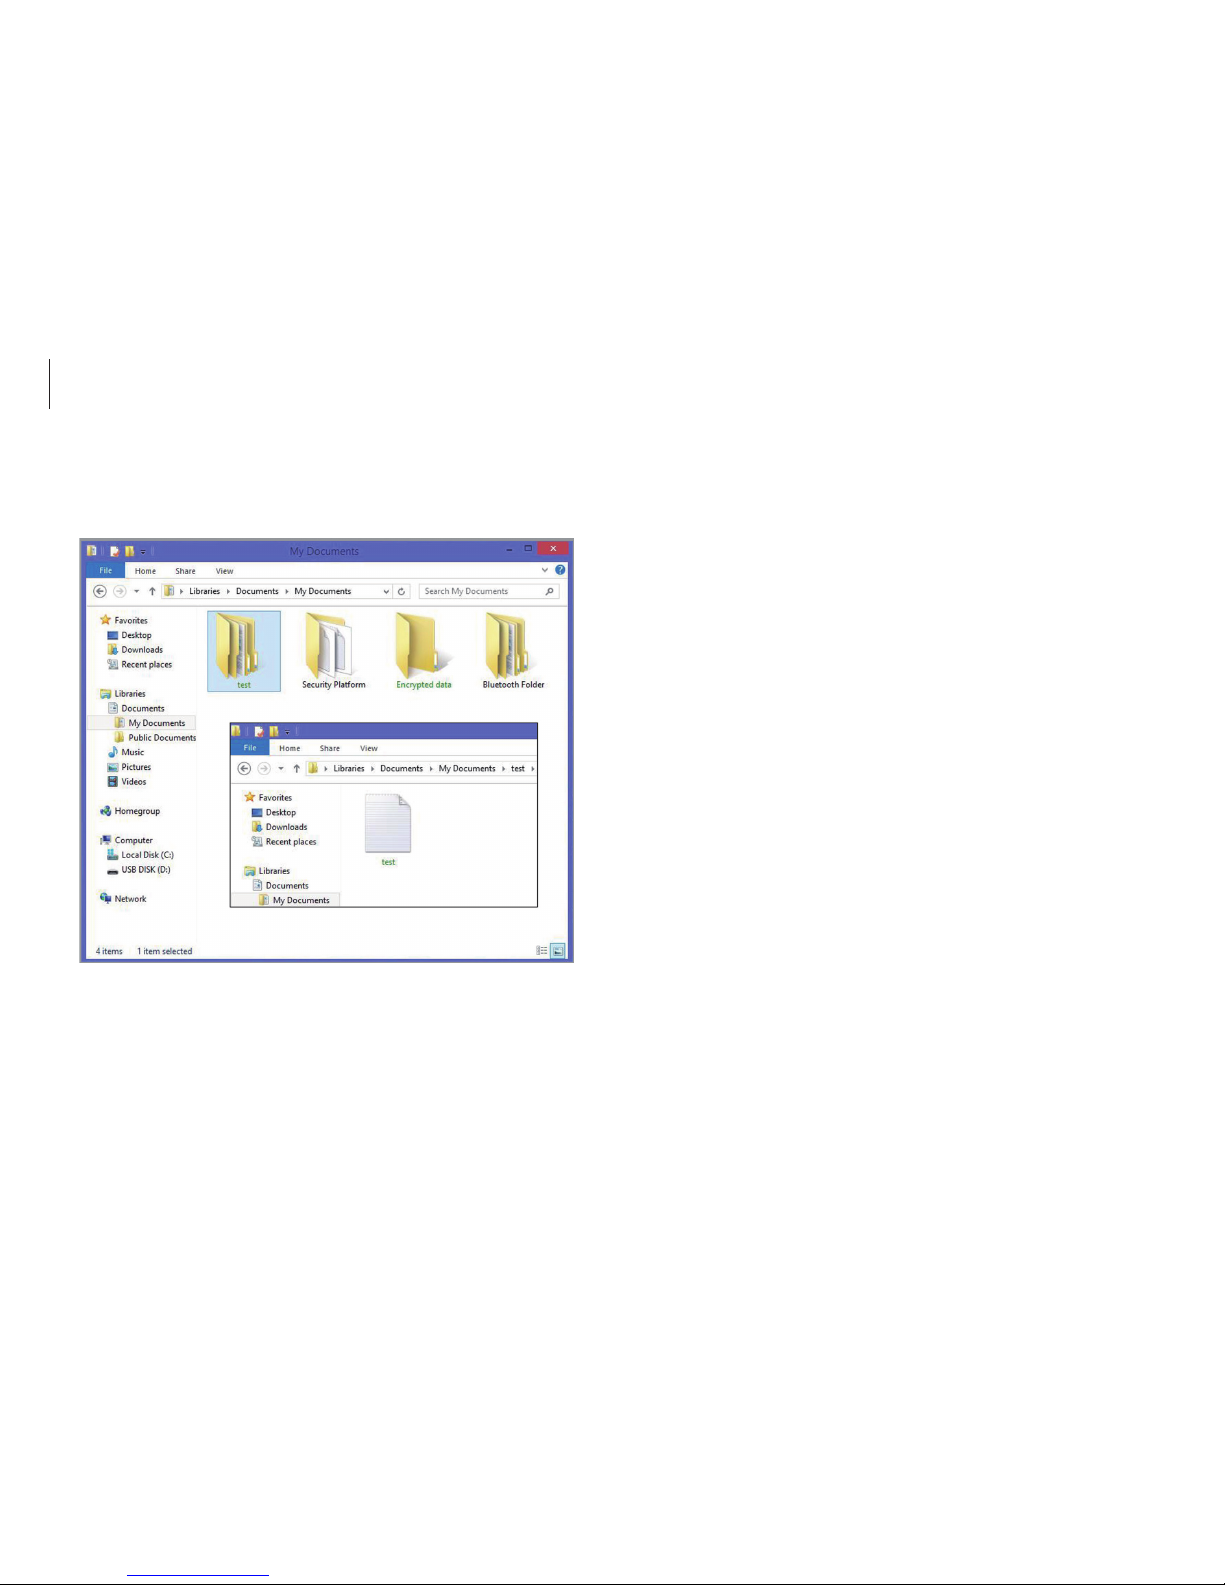
Double-click an encrypted folder or a file.
2
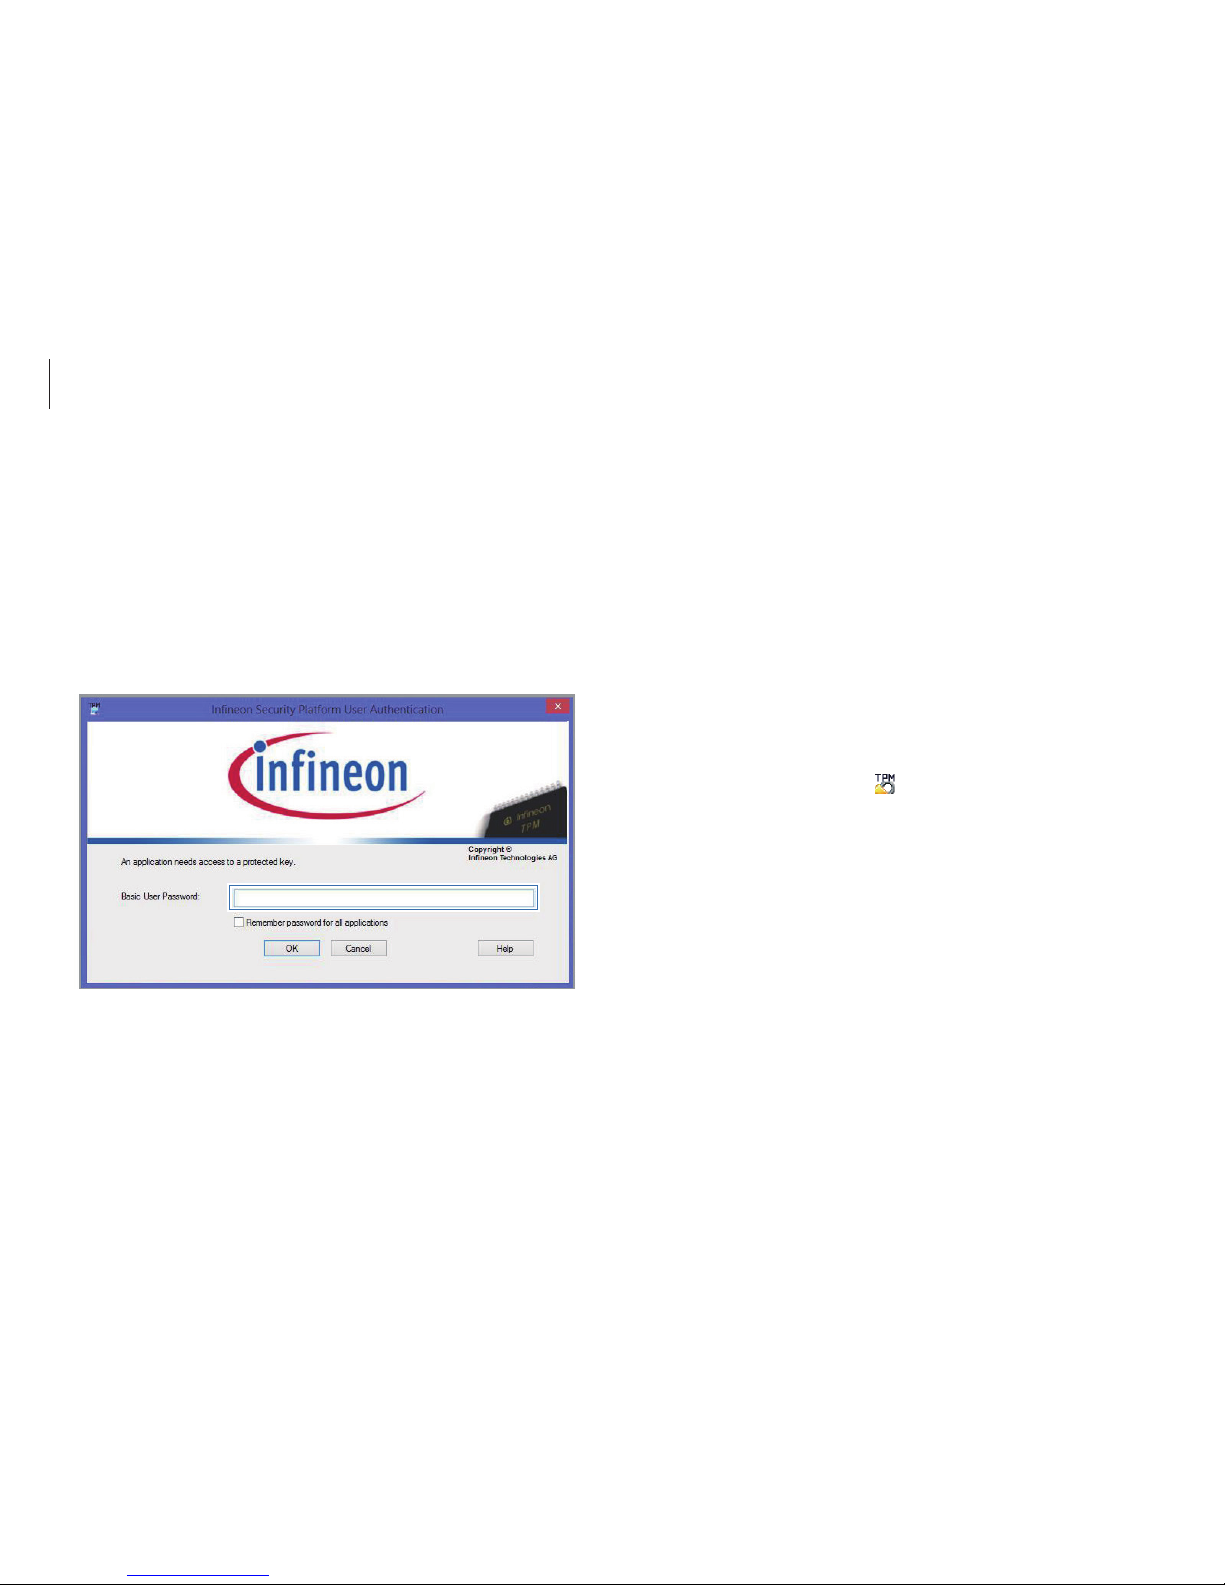
Enter the basic user password on the user account control
window and select
OK
.
3
The color of the encrypted folder or name of the encrypted
file changes to green.
Page 81
Applications
81
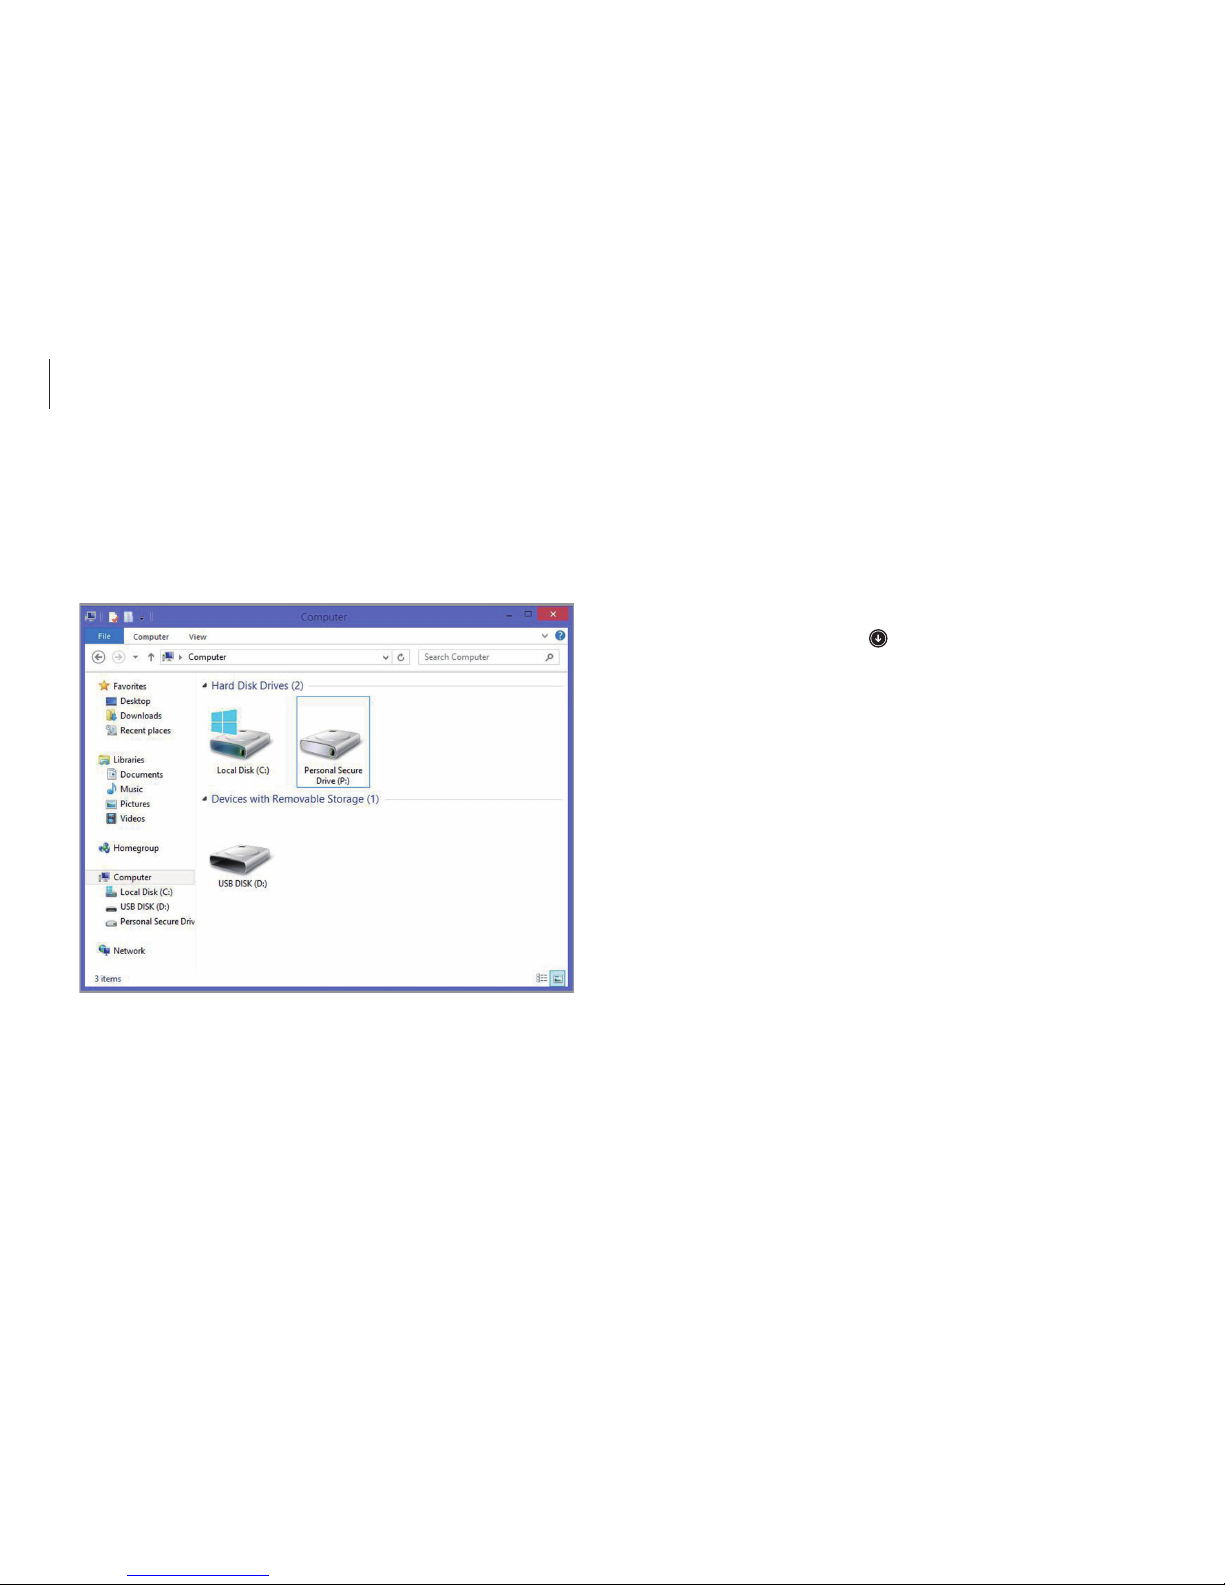
Using the virtual drive (Personal Secure
Drive)
The virtual drive is a space to save and manage confidential data.
In the created virtual drive (PSD), it is possible to create files and
folders as with a normal drive and to use confidential data saved
on another drive by copying the data to the virtual drive (PSD).
To use the virtual drive, select
Personal Secure Drive (PSD)
when
registering the security solution, and then load the virtual drive.
To load a virtual drive,
1
On the taskbar, right-click and select
Personal Secure
Drive
→
Load…
.
Decrypting folders and files
1
Right-click an encrypted folder or file and then select
Decrypt
.
2
When the User Account Control window appears, select
Continue
.
3
Enter a password and select OK.
Page 82
Applications
82
When the virtual drive (PSD) does not appear
The virtual drive (PSD) is available only when the Personal Secure
Drive (PSD) option is selected during the program registration.
Complete the following steps to select the Personal Secure Device
option from the user settings.
1
On the
Start
screen, click at the lower-left edge.
2
Select
Manage Security Platform
→
User Settings
.
3
Select
Configure…
under
Security Platform Features
.
4
When the initialization wizard appears, select
Personal Secure
Drive (PSD)
→
Next
.
5
Enter the user password.
6
Follow the on-screen instructions to complete the
configuration.
2
Enter a password and click OK.
•
The virtual drive (Personal Secure Drive) is created.
•
Note that when copying confidential data to the Personal
Security Drive, the original data files are not encrypted.
Page 83

Applications
83
Step 1: Deleting a virtual drive
If a virtual drive has been created, delete the virtual drive before
deleting the existing authentication information saved on the TPM
chip.
1
On the taskbar, right-click and select
Personal Secure
Drive
→
Create/Manage...
.
2
Select
Next
.
3
Enter the current password and select
Next
.
4
Select
Delete selected PSD
→
Next
.
5
Select a deletion type and select
Next
.
6
Select
Next
→
Finish
.
The virtual drive is deleted.
Registering a new user to the security
solution
To register an existing user, delete the existing authentication
information saved on the TPM chip, and then clear the TPM chip.
Register the user in the following order.
Page 84

Applications
84
7
Select
View
→
Options
→
View
→
Hidden files and folders
.
8
Select the
Show hidden files, folders, and drives
option and
select
OK
.
9
Open the
Computer
window and select
Local disk (C:)
→
ProgramData
.
10
Delete the
Infineon
folder.
The security solution is deleted.
Step 3: Configuring the security solution (TPM)
To use the TPM security solution, see Configuring the security
solution.
Step 2: Deleting authentication information
To delete the existing authentication information, uninstall the
TPM security solution and delete the solution data.
1
On the desktop, open the Charms and select the
Settings
charm.
2
Select
Control Panel
→
Programs
→
Uninstall a program
.
3
Right-click
Infineon TPM Professional Package
→
Uninstall
.
4
If the message window appears, select
Yes
.
5
If the
Infineon Security Platform
message appears, select No.
6
On the taskbar, select File Explorer ( ).
Page 85
85
External devices
External CD/DVD drive
This computer supports external CD/DVD drives with USB
interfaces (optional). Check if the interface type of the external
CD-ROM drive is a USB type.
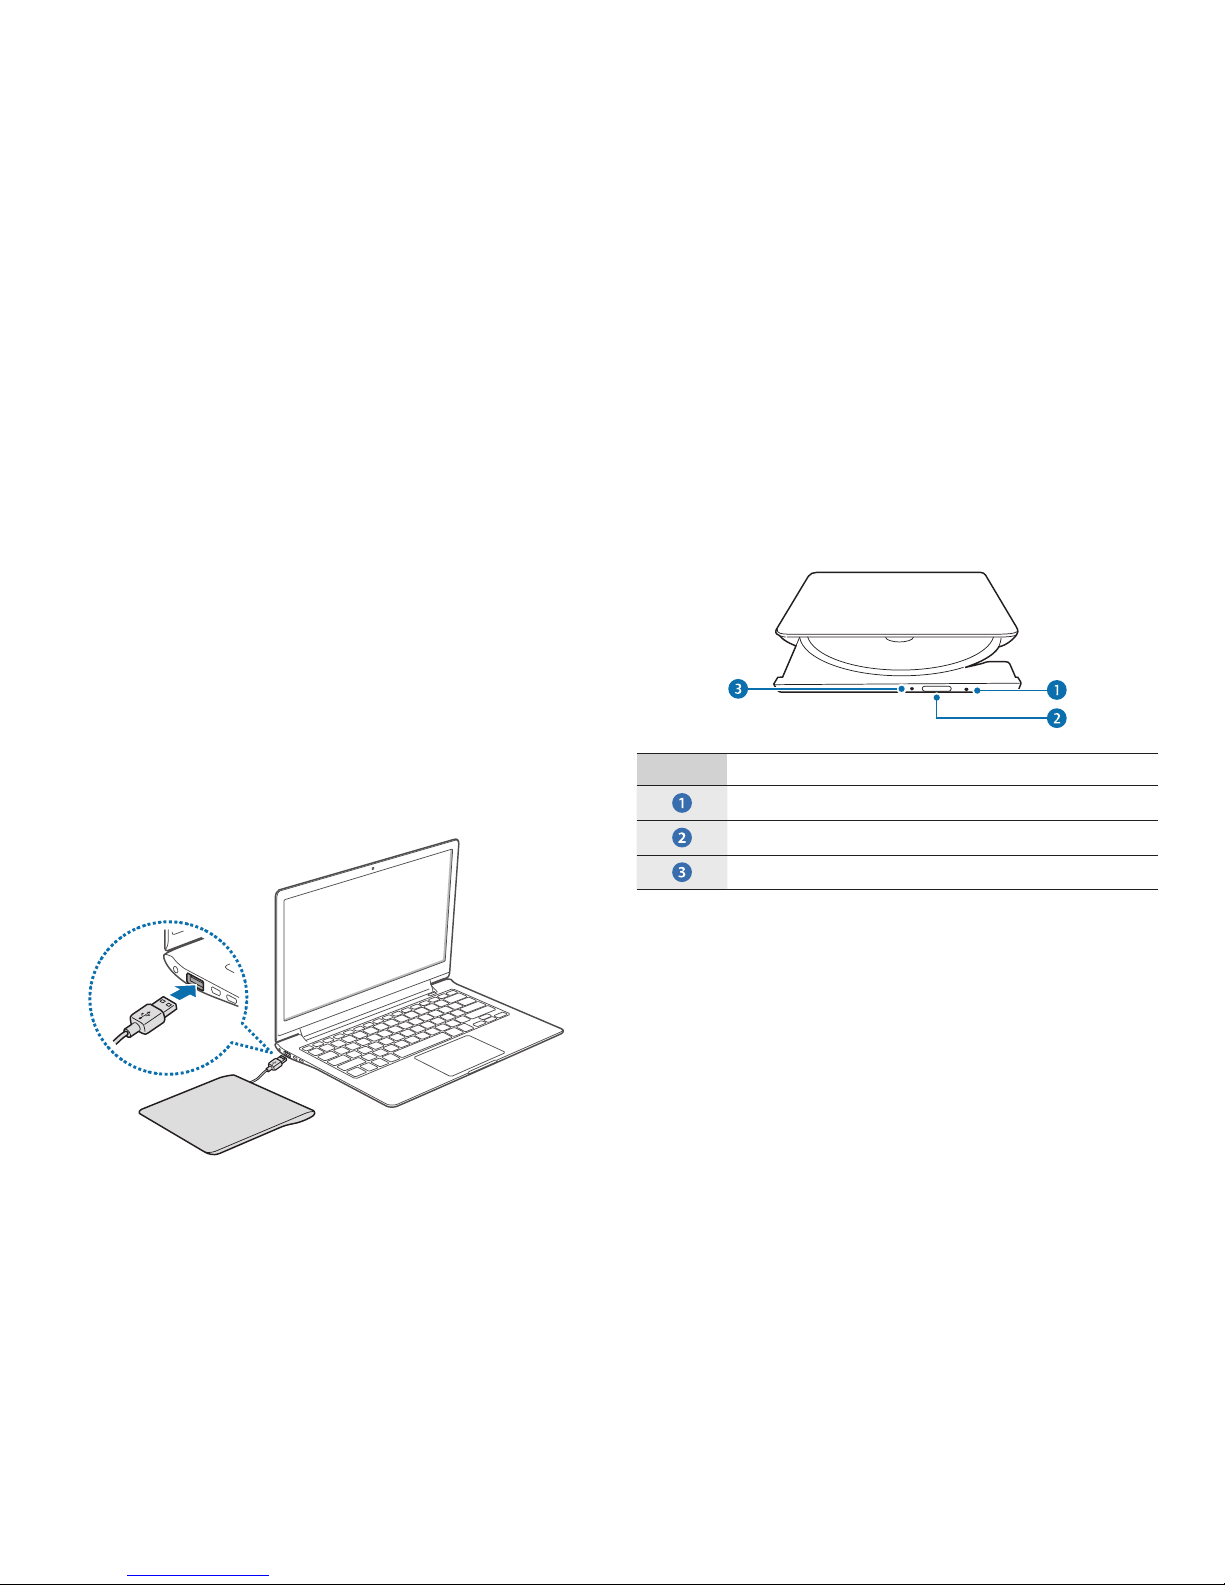
Connecting the drive
Connect the drive to the USB port of the computer.
Inserting and ejecting a CD or DVD
1
Press the Eject button to open the tray.
Number Description
•
Emergency aperture
•
Eject button
•
Status indicator light
2
Insert a CD or DVD.
3
Push the tray inward until it clicks.
The status indicator turns on.
Page 86

External devices
86
•
Do not insert warped, cracked, or heavily scratched
disks. Doing so can damage the drive.
•
Do not eject disks while the status indicator light is on.
•
Your external drive may differ from the images used in
this manual.
•
If the drive will not open when the power is off, insert
the end of a paper clip (
) into the emergency
aperture to open the tray manually.
•
When cleaning a CD or DVD, wipe it with a soft cloth
from the inside edge towards the outside edge.
•
Reading and writing speeds may differ depending on
the condition and type of media.
•
A CD or DVD that is not in the shape of a circle is not
recommended.
Page 87

External devices
87
•
Some memory cards may not be fully compatible with
the computer. Using an incompatible card may damage
the computer or the memory card, or corrupt the data
stored in it.
•
Use caution to insert the memory card in the indicated
direction.
•
Store the card separately to prevent losing the card
when moving the computer.
•
Memory card speeds vary.
Memory card
Use a memory card to transfer data to other devices, such as
digital cameras or MP3 players. Memory cards are sold separately.
Purchase a memory card with the necessary capacity for the
requirement.
This computer supports the following types of memory cards.
Abbreviation Description
SD
•
Secure Digital
mini SD
•
mini Secure Digital
micro SD
•
micro Secure Digital
SDHC
•
Secure Digital High Capacity
mini SDHC
•
mini Secure Digital High Capacity
micro SDHC
•
micro Secure Digital High Capacity
SDXC
•
Secure Digital eXtended Capacity
micro SDXC
•
micro Secure Digital eXtended Capacity
To use a mini or micro card, insert the card into an adapter before
inserting it into the memory card slot.
Page 88
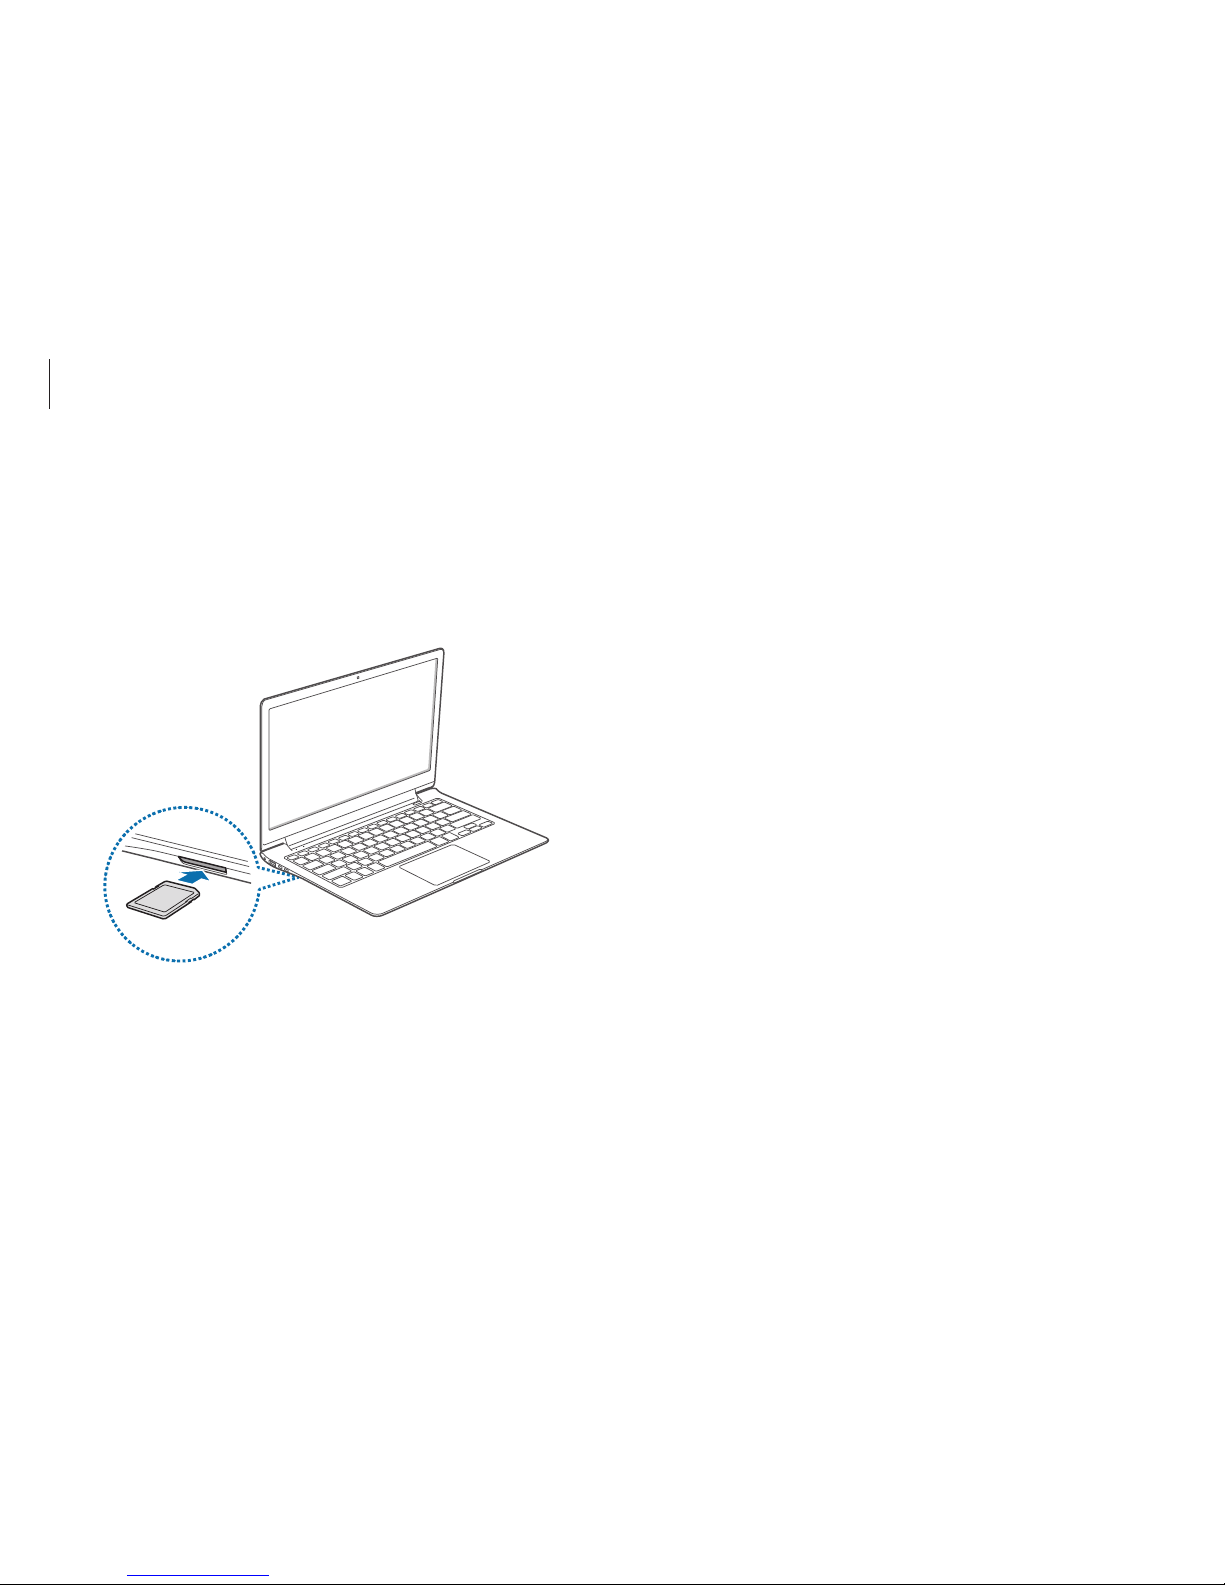
External devices
88
3
Select the pop-up message to open the memory card folder.
If a pop-up message appears, click the corresponding window
→
Continue without scanning
.
4
Select
Open folder to view files
.
5
Save, move, or delete data on the memory card.
The memory card folder opens only on the desktop.
Removing a memory card
Grasp the end of the card and pull it out of the slot.
Inserting a memory card
1
If a dummy card is inserted in the memory card slot, remove it.
2
Insert a memory card into the memory card slot in the
indicated direction.
Page 89

External devices
89
•
To use a memory card to exchange data with a digital
device, such as a digital camera, formatting the data
with the digital device is recommended.
•
When trying to use a formatted memory card in
another digital device, format the memory card again in
the device.
•
Inserting and removing a memory card repeatedly may
damage the memory card.
•
Secure Digital Input Output (SDIO) is not supported.
•
If the write-protect tab is in the locked position, you
cannot format, write, or delete data on the card.
Formatting a memory card
Format the memory card to remove all data or before using it for
the first time.
Formatting a memory card deletes all data saved on
the card. If necessary, back up important data before
formatting the card.
1
On the taskbar, select File Explorer ( ).
2
Right-click the memory card drive, and then select
Format
.
3
Select
Start
.
Page 90

External devices
90
Connecting to a display
1
Connect the VGA cable or micro HDMI cable to the
corresponding port of the computer.
When using a VGA cable, connect the VGA adapter to the
computer first.
A VGA adaptor is an optional item and may not be
provided for some models.
External display
Connecting the computer to an external display device can be
useful for presentations or when watching a movie. The cables
required to connect an external display are sold separately. The
computer supports either VGA or micro HDMI cables.
VGA cable Micro HDMI cable
•
Check the available ports on the display device to
ensure that it is compatible with the computer.
•
If both types of ports are available, the micro HDMI port
is recommended for better audio and video quality.
•
An external display is not supported when using DOS or
the Command Prompt window.
•
Simultaneous output to all three (LCD + CRT + HDMI) is
not supported depending on the model.
Page 91
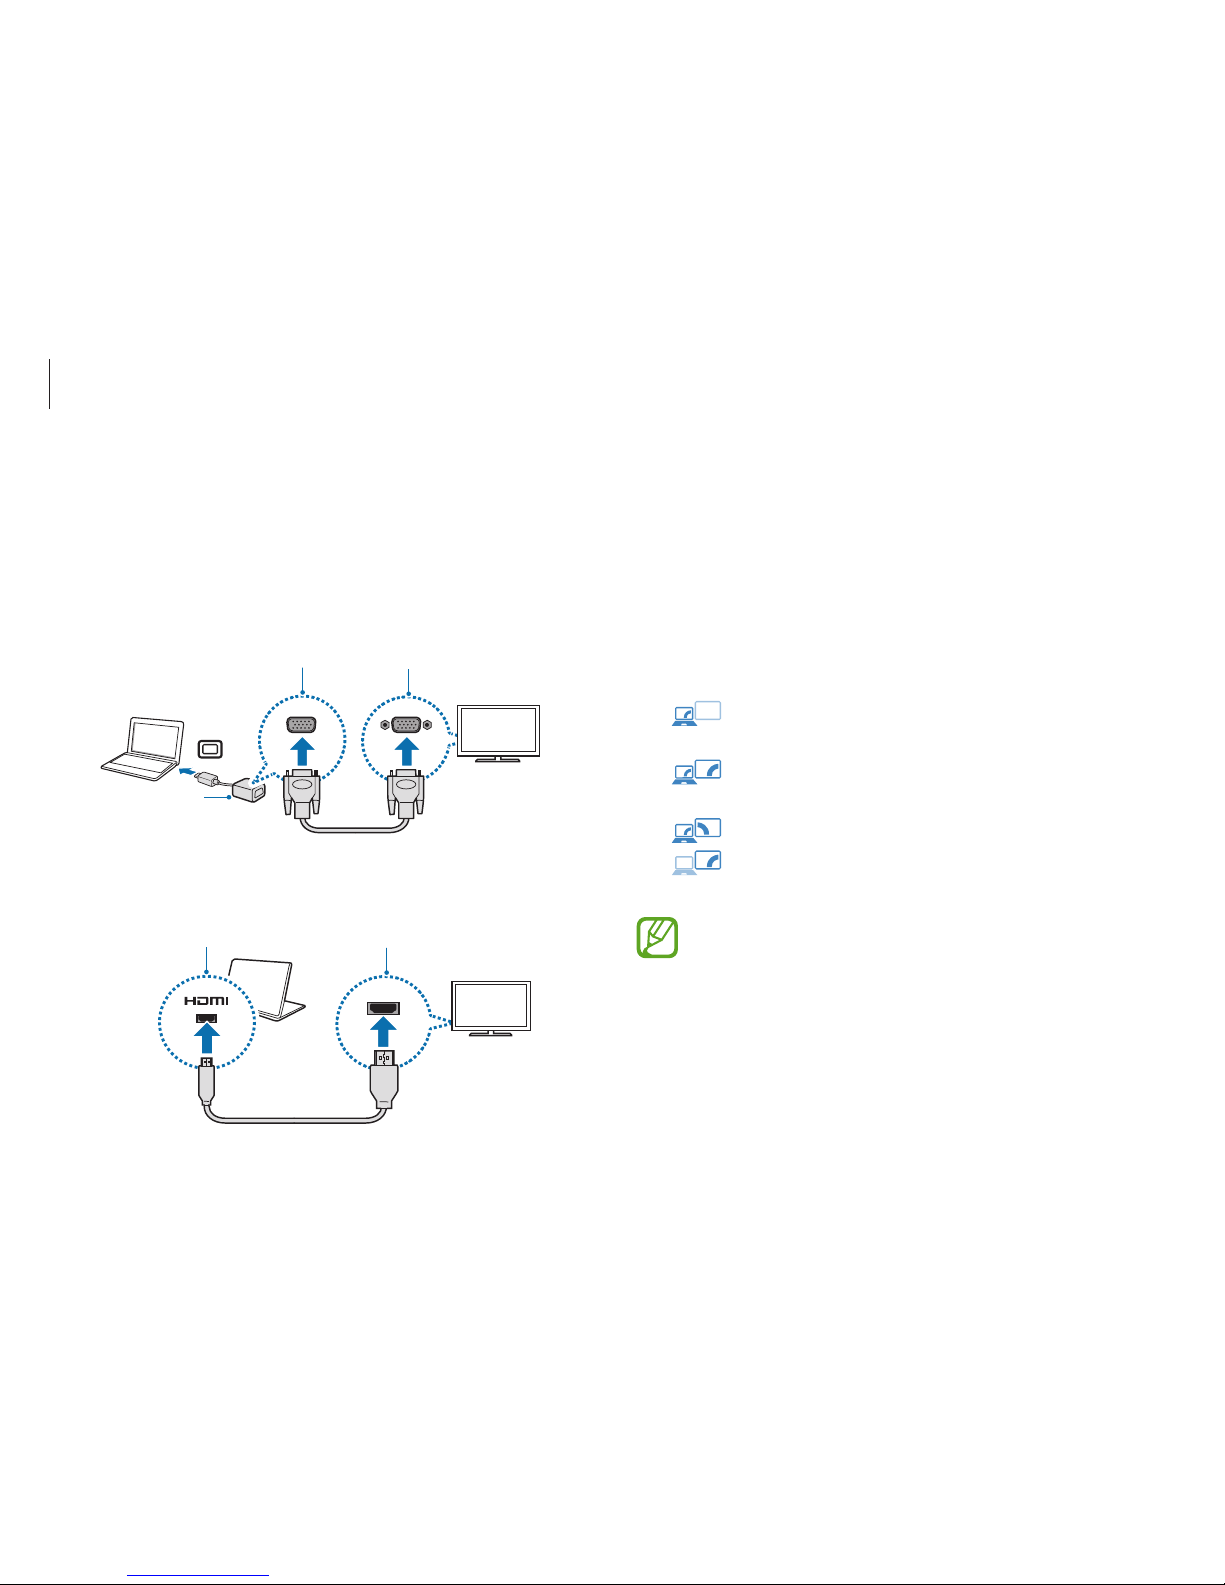
External devices
91
3
Connect the power cord to the external display.
4
Turn on the display and change its display mode to one that
supports an external input.
5
On the computer, open the Charms and select the
Devices
charm
→
Project → Second screen
.
6
Select a mode.
•
PC screen only
: Show the interface on the computer
monitor only.
•
Duplicate
: Show the interface on both the computer
and the external display.
•
Extend
: Extend the screen to the external display.
•
Second screen only
: Show the interface only on the
external display.
Alternatively, on the desktop, open the Charms and select
the
Settings
charm →
Control Panel
→
Appearance and
Personalization
→
Display
→
Change display settings
→
Display
→ an option. For more information, refer to OS
help.
2
Connect the other end of the cable to the D-SUB port or HDMI
port of the external display.
If the display has several HDMI ports, connect the cable to the
DVI IN port.
<When using a VGA cable>
Monitor port
VGA adapter
D-SUB port
<When using a Micro HDMI cable>
Micro HDMI port
HDMI port
Page 92
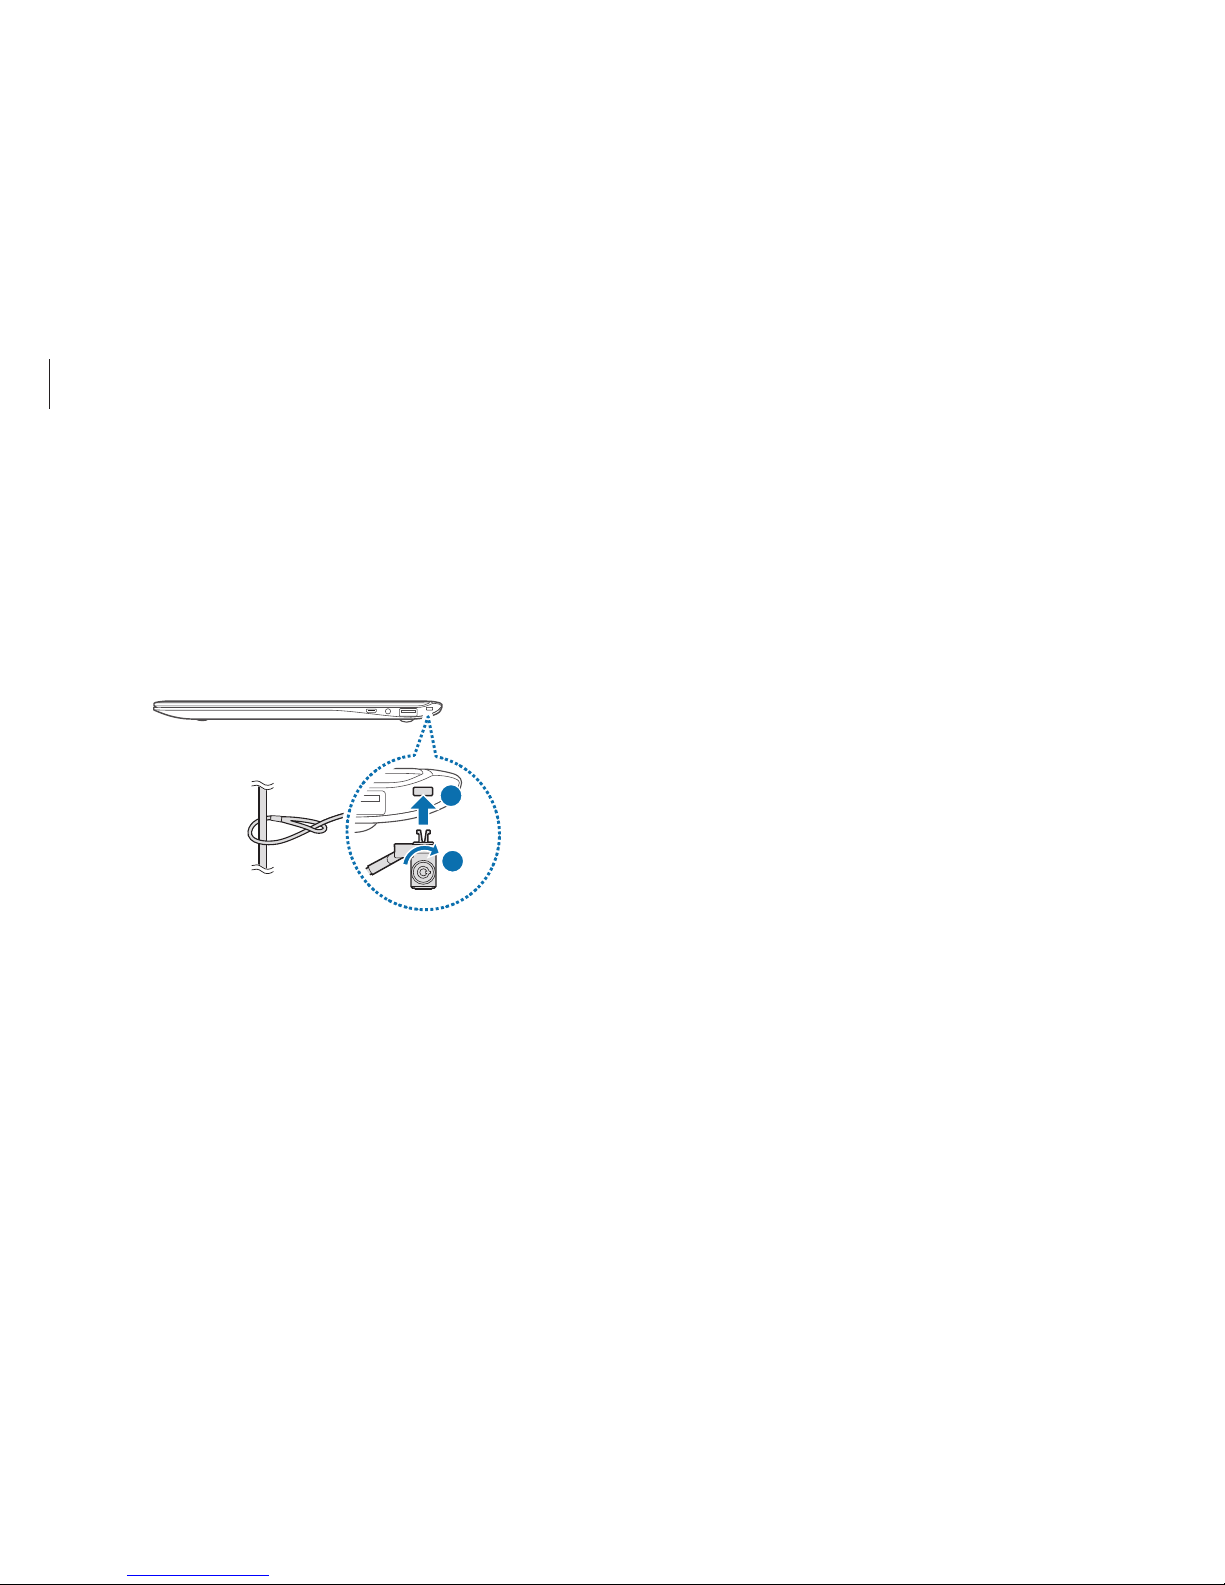
External devices
92
Slim security slot
Secure the computer to an object by connecting the security
lock (optional) to the security slot. The security slot is designed
for Samsung Security Locks only, which are sold separately. Other
security locks will not fit in the slot.
Loop the Samsung Security Lock around a secure object and
connect it to the security slot on the computer.
1
2
Page 93

93
Troubleshooting
Recover/Backup
When a problem occurs with the computer, it is possible to easily
recover the computer back to the factory default settings by using
the
Recovery
application (Recover/Backup). It is also possible
to recover the computer to a previously backed up point. Back
up important data regularly before a problem occurs with the
computer.
•
The
Recovery
application may not be provided in
models with less than 64 GB of memory. For models
with less than 64 GB of memory, recover the computer
to the factory default settings by reinstalling Windows.
•
Some functions may differ or may be unavailable,
depending on the version. Refer to the application’s
help for more information.
•
Run the
Recovery
application with administrator
privileges.
•
CD/DVD drives are not supported by the
Recovery
application.
•
Recovering the computer erases the data or
applications saved after a backup point. Therefore, back
up important data regularly before a problem occurs
with the computer.
Page 94
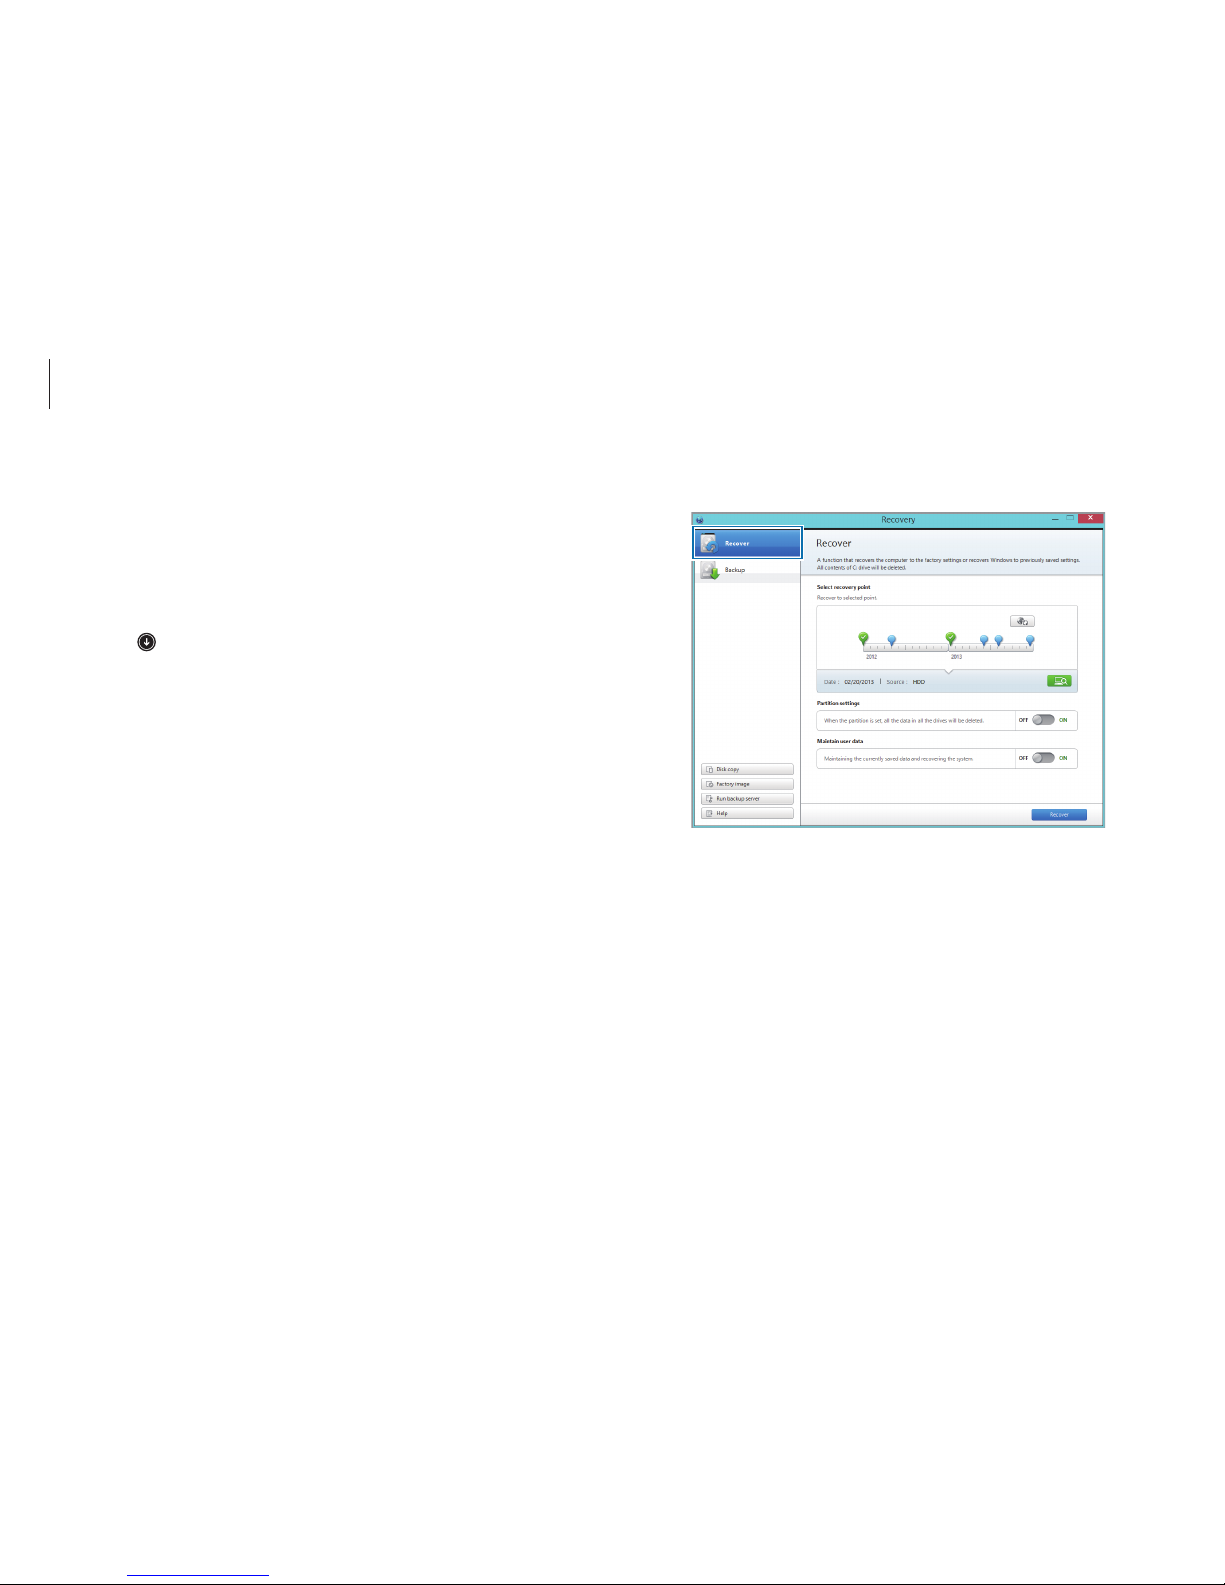
Troubleshooting
94
2
Select
Recover
.
Recovering to factory default
Recover the computer to factory default settings. If necessary,
back up important data to an external storage device before
restoring the system. See Backing up the current system.
1
When the computer starts Windows
: On the
Start
screen,
click
at the lower-left edge, and select
Recovery
.
When the computer does not start Windows
: Turn on the
computer and press the
F4
key several times before the
Samsung logo appears.
Page 95
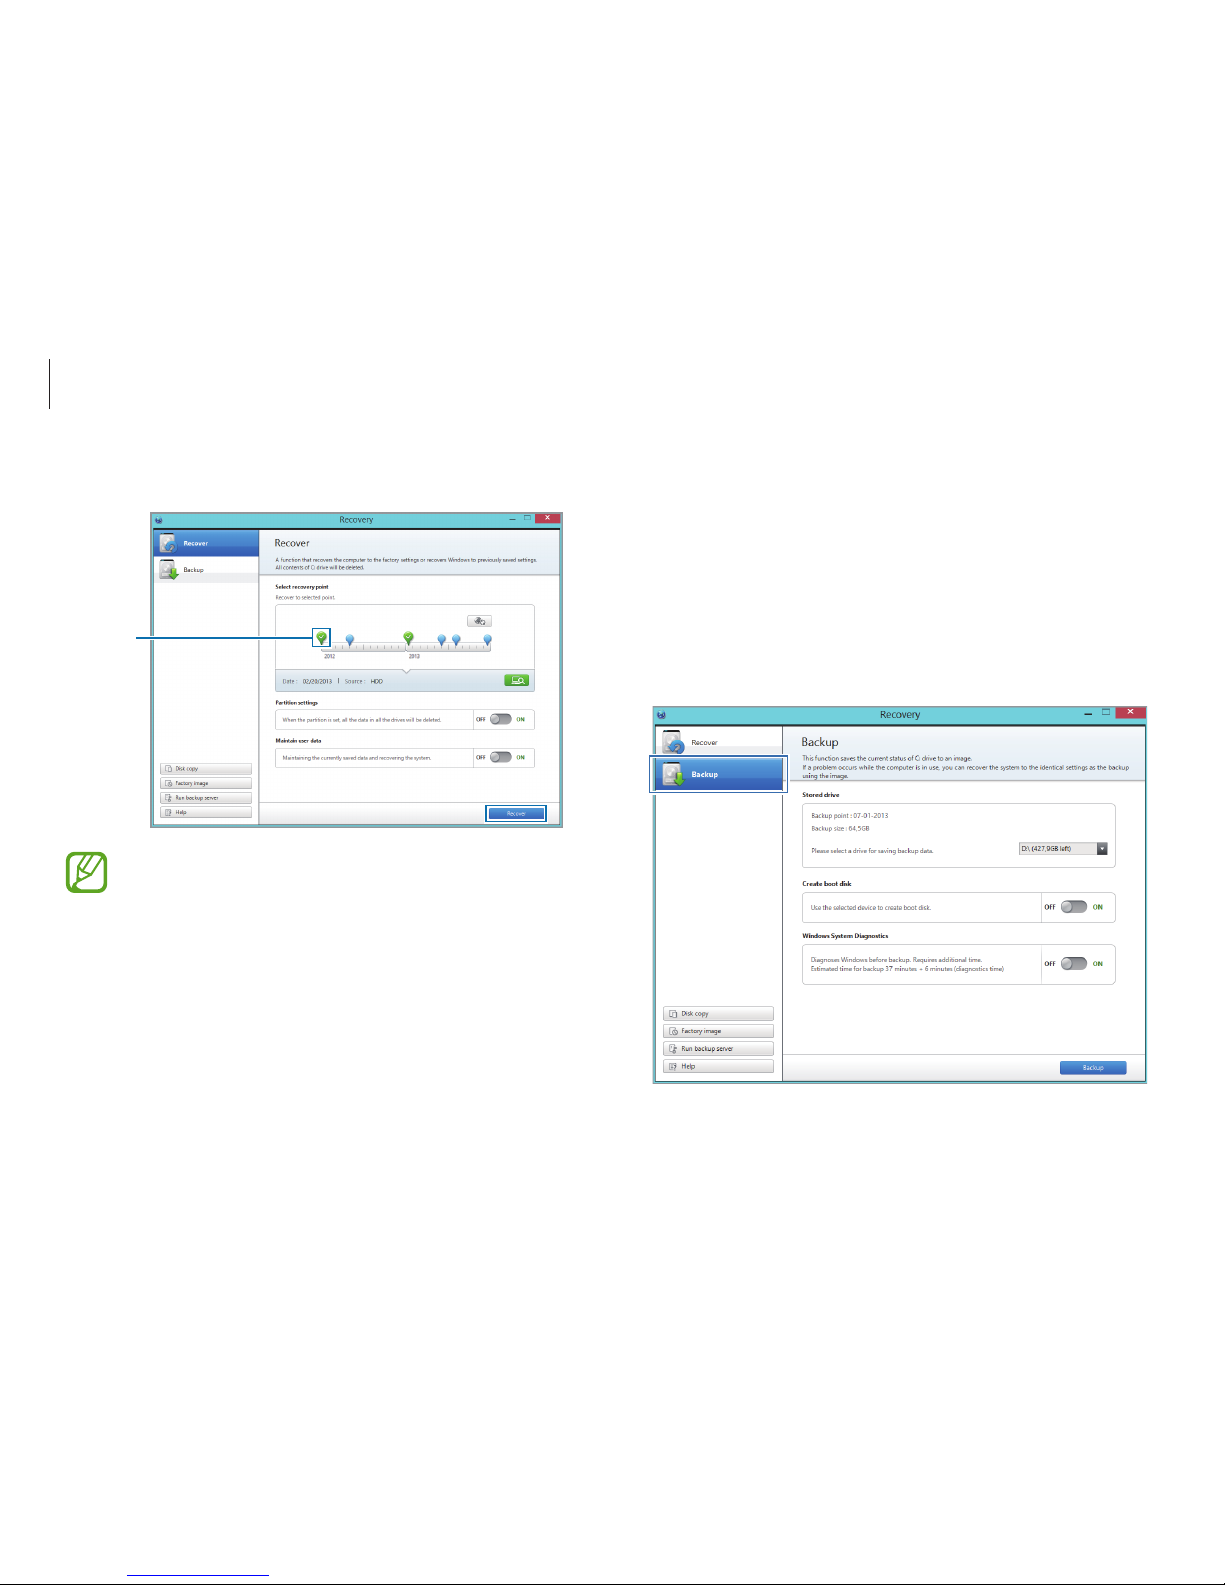
Troubleshooting
95
Backing up the current system
Back up important data to an alternate internal drive or an
external storage device regularly to prevent data loss.
1
When backing up to an external storage device, connect the
device to the computer.
2
On the initial Recovery screen, select
Backup
.
3
Select the first point →
Recover
.
Factory
default
point
Set
Maintain user data
to ON to recover the computer
while maintaining the current user data.
4
Follow the on-screen instructions to complete the recovery.
Page 96
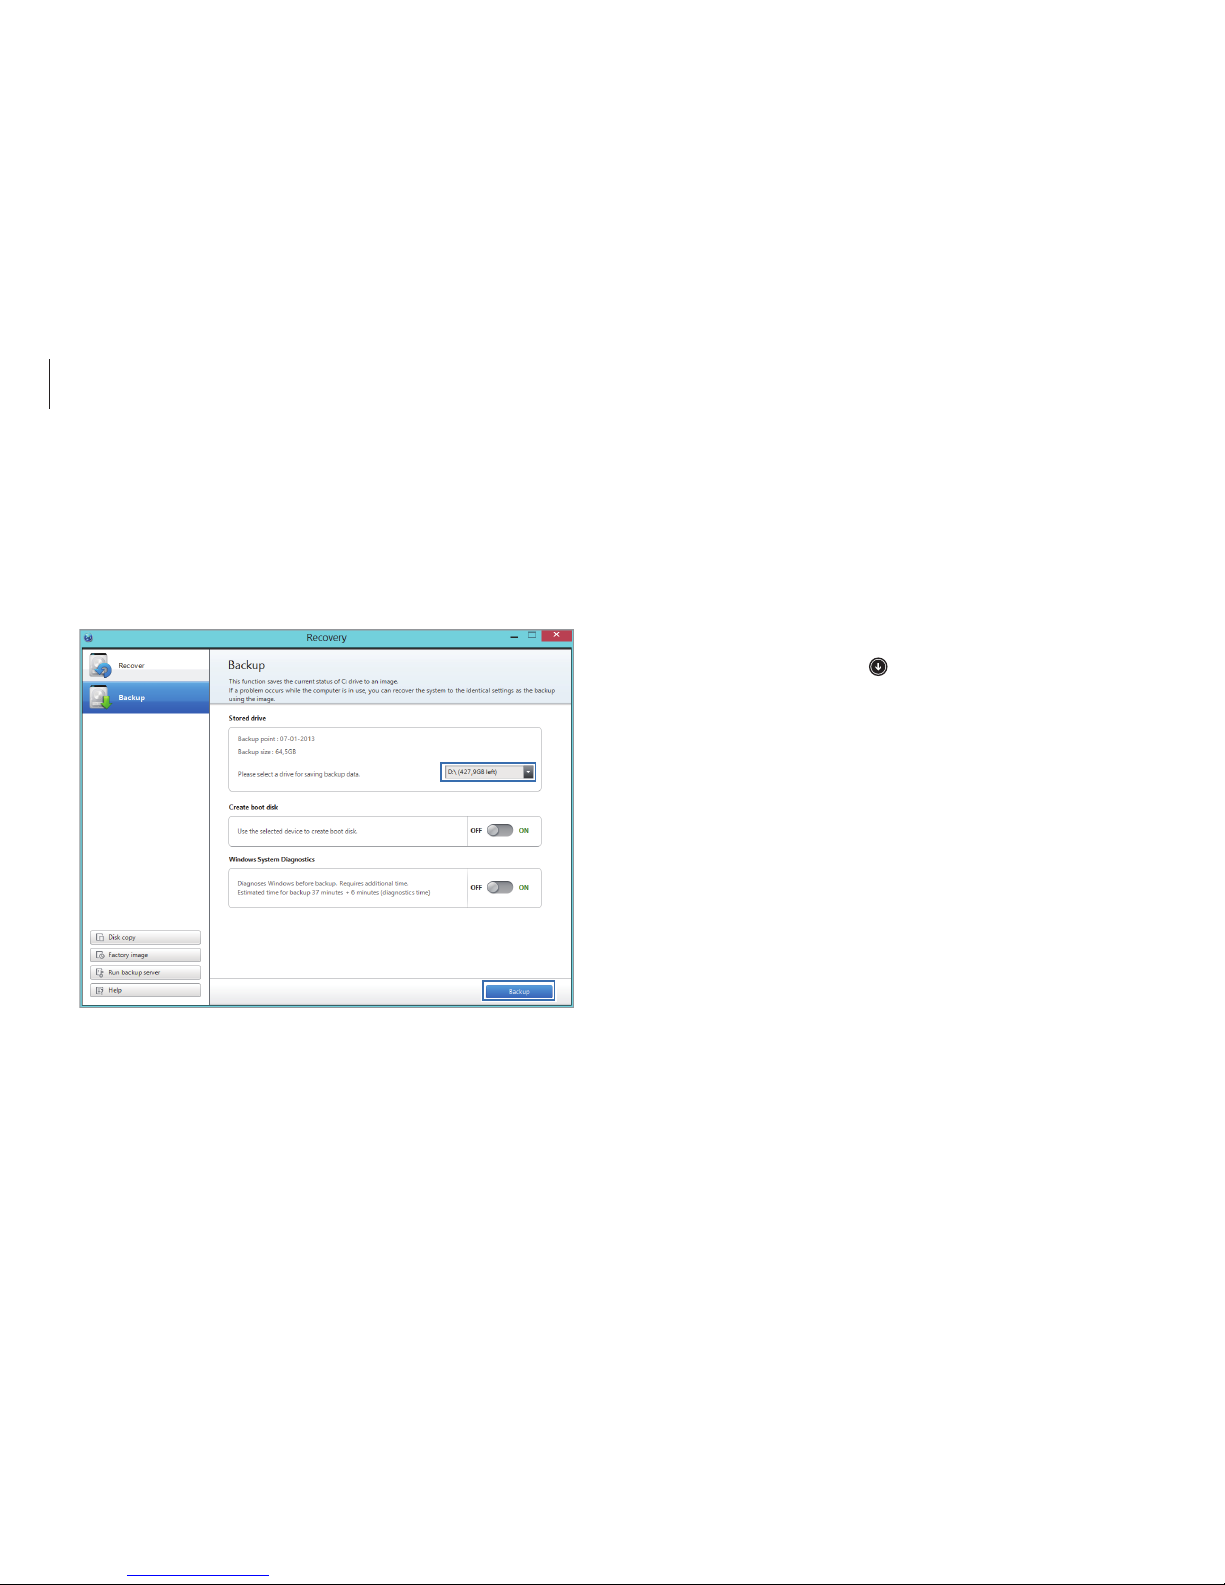
Troubleshooting
96
Recovering after a backup
Select a backup point saved on an alternate internal drive or an
external storage device to recover the computer to the point.
1
When backing up to an external storage device, connect the
device to the computer.
2
On the
Start
screen, click at the lower-left edge, and select
Recovery
.
3
Select
Recover
.
3
Select a drive under
Stored drive
→
Backup
.
•
When backing up to an external storage device, connect
the device to the computer and then select the external
drive.
•
CD/DVD drive cannot be selected.
4
Follow the on-screen instructions to complete the backup.
Page 97
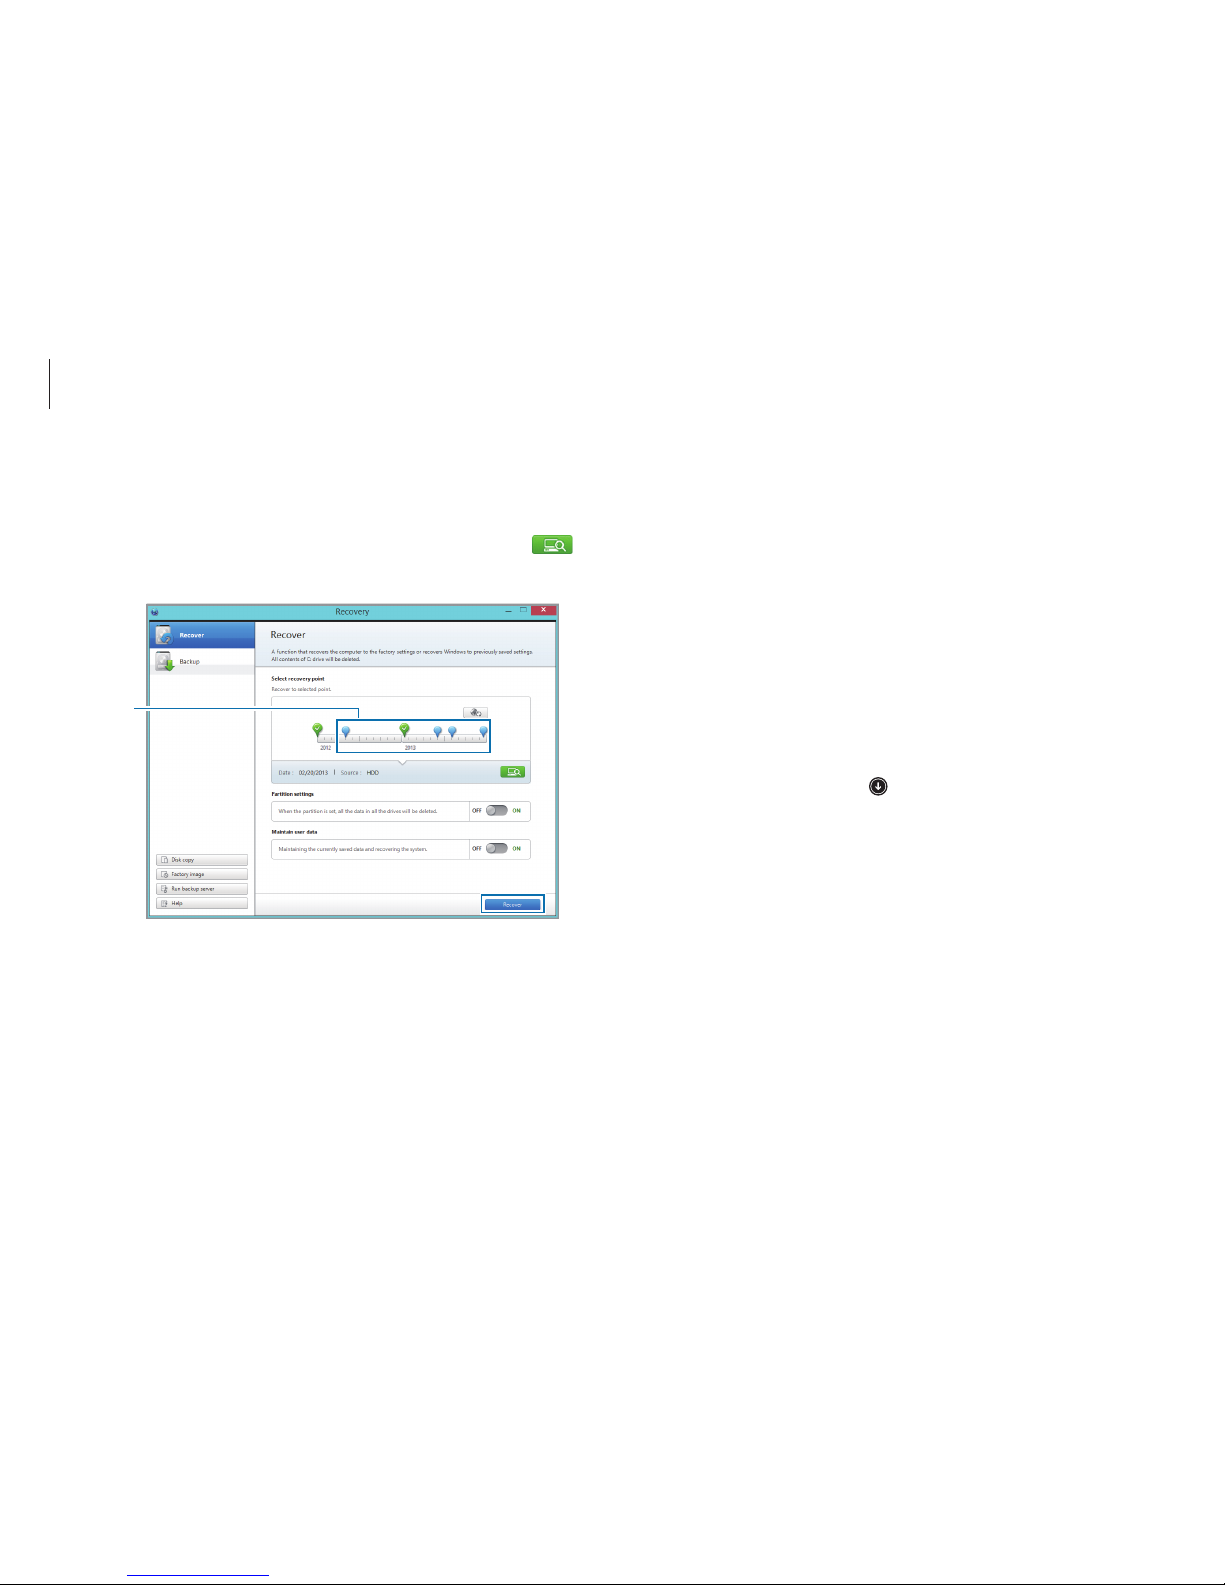
Troubleshooting
97
Copying the hard drive
(making a disk image)
To replace the hard drive, move the data to the new drive by
making a disk image. The new drive must be large enough to hold
the data from the current drive.
Purchase an external hard drive connector separately to connect
the new drive to the computer.
1
Connect the new drive to the computer with an external hard
drive connector.
2
On the
Start
screen, click at the lower-left edge, and select
Recovery
.
3
Select
Disk copy
.
4
Select a point to recover →
Recover
.
•
Select one of your backup points.
•
If a backup data is stored on an internal drive, select
→
the drive.
Backup
point
5
Follow the on-screen instructions to complete the restoration.
Page 98
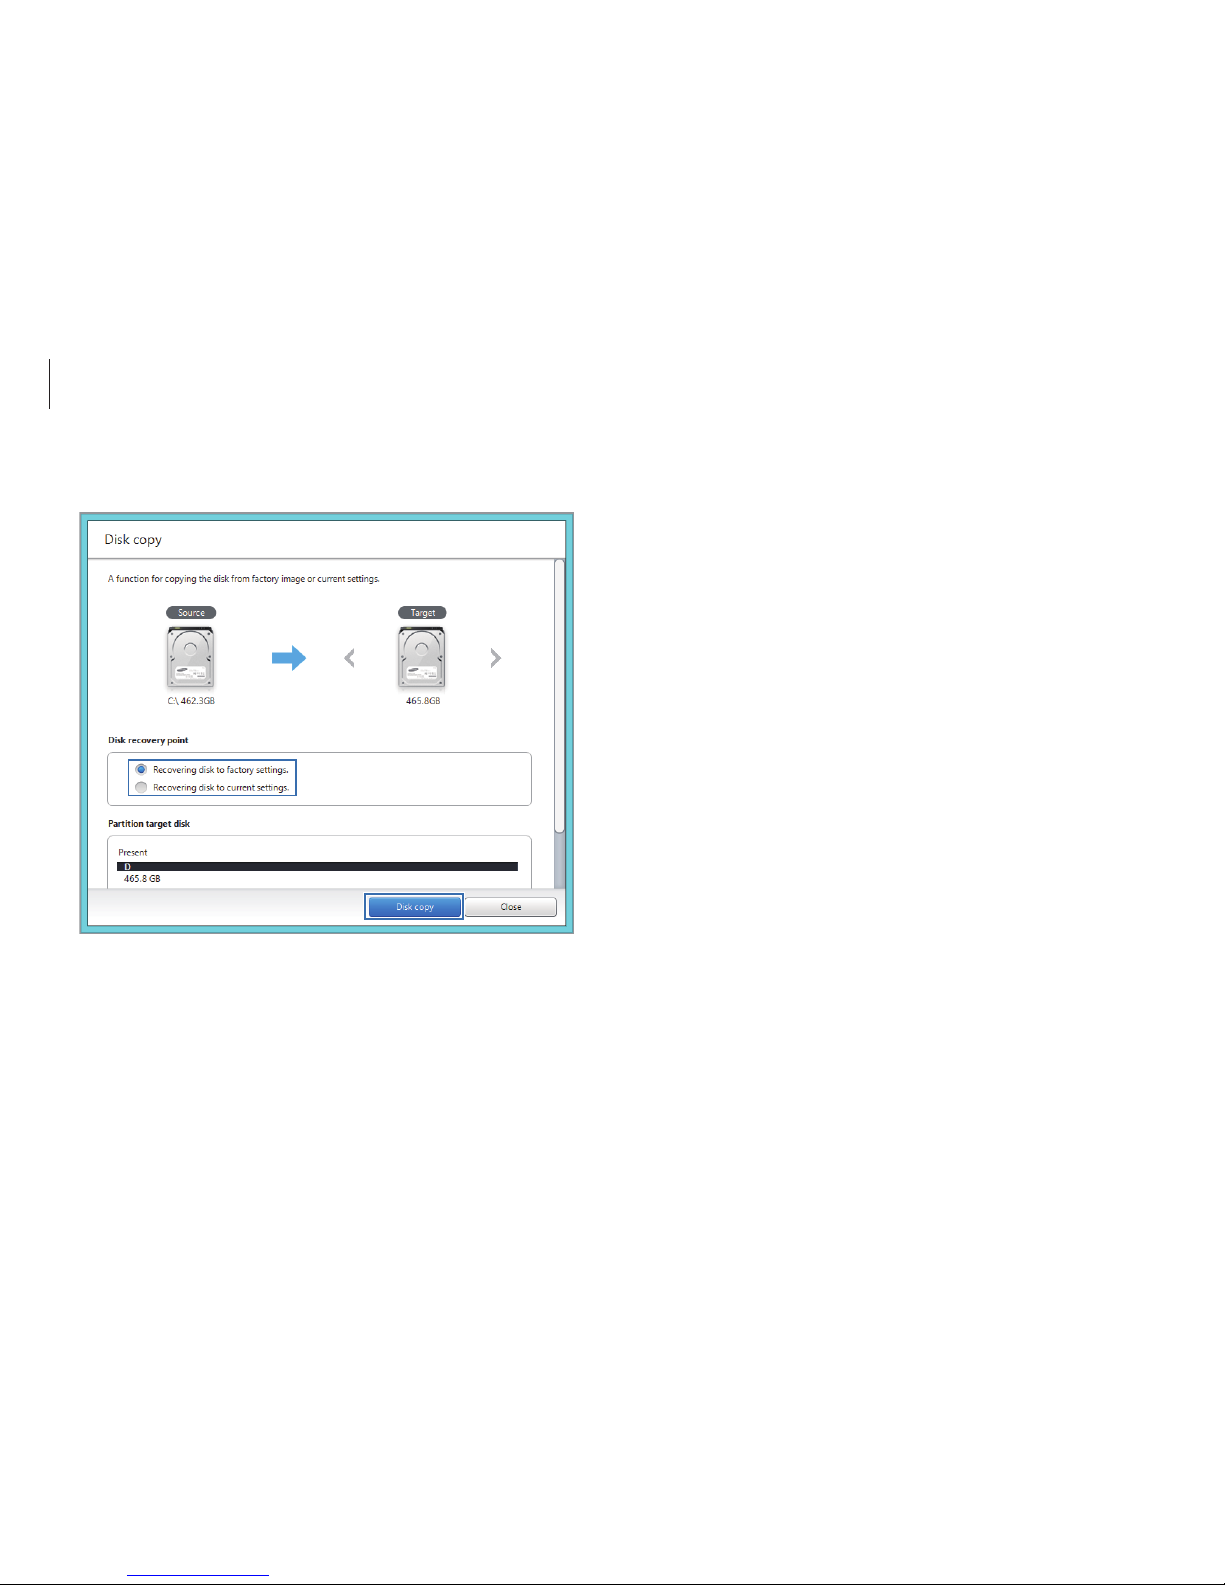
Troubleshooting
98
5
After the data is saved to another drive, open the cover at the
bottom of the computer and replace the existing drive with
the new one.
If the cover is difficult to open, contact the Samsung Service
Center to request assistance. You will be charged for this
service.
4
Select an option under
Disk recovery point
→
Disk copy.
The data on the current hard disk is copied to the new hard
disk.
Page 99

Troubleshooting
99
5
Follow the on-screen instructions to complete creating the
disk image.
6
Disconnect the external storage device and store it in a safe
place.
To recover the computer to the factory default settings with
the factory image, connect the external storage device. Start
the
Recovery
application and select the upper-left
Recover
→
factory default point → the lower-right
Recover
.
Making a disk image of factory default
settings
Create a factory disk image to simplify the restoring process.
1
Connect an external storage device.
2
On the
Start
screen, click at the lower-left edge, and select
Recovery
.
3
Select
Factory image
.
4
Select an external drive →
Run
.
Page 100

Troubleshooting
100
Q&A
When experiencing problems with the computer, try these
solutions.
Windows
Where is the Shut down button?
Touch screen:
•
Open the Charms and select the
Settings
charm →
Power
→
Shut down
.
•
Touch and hold the Start button, and then select
Shut down
or sign out
→
Shut down
.
Mouse:
•
Open the Charms and select the
Settings
charm →
Power
→
Shut down
.
•
Right-click the Start button, and then click
Shut down or sign
out
→
Shut down
.
Windows recovery function
If the
Recovery
application is not supported by the computer,
recover system to factory default settings using the recovery
function of Windows.
Reinstalling Windows will erase all data saved on the
computer. Back up application and personal data to an
external storage device before reinstalling Windows.
1
Open the Charms and select the
Settings
charm →
Change
PC settings
→
Update and recovery → Recovery
.
2
Select
Get Started
under
Remove everything and reinstall
Windows.
Select
Get Started under Refresh your PC without affecting
your files
to recover the computer while keeping photos,
videos, music files, and documents.
3
Follow the on-screen instructions to proceed with the
reinstallation.
After a recovery, on the
Start
screen, click at the lower-
left edge, and select
SW Update
to install the necessary
Samsung applications.
 Loading...