

Page 1

TABLE OF CONTENTS
TABLE OF CONTENTS
YOUR DEVICE 3
Front View Features 3
Side Features 4
S Pen Features 5
Battery Cover 6
SIM Card 8
Memory Card 12
Battery 14
Turning Your Device On or Off 19
Locking and Unlocking Your Device 20
Home Screen 21
Using Gestures 25
S Pen 26
1
Page 2

TABLE OF CONTENTS
DEVICE FUNCTIONS 32
Creating a New Google Account 32
Signing into Your Google Account 33
Calling Features 34
Voicemail 39
Contacts 40
Messaging 42
Setting Up Email 44
Bluetooth 48
Web Browsing 50
Wi-Fi 52
Smartphone Mobile HotSpot 54
USB Tethering 57
Near Field Communication 59
S Beam 60
NOTES 65
2
Page 3
YOUR DEVICE
YOUR DEVICE
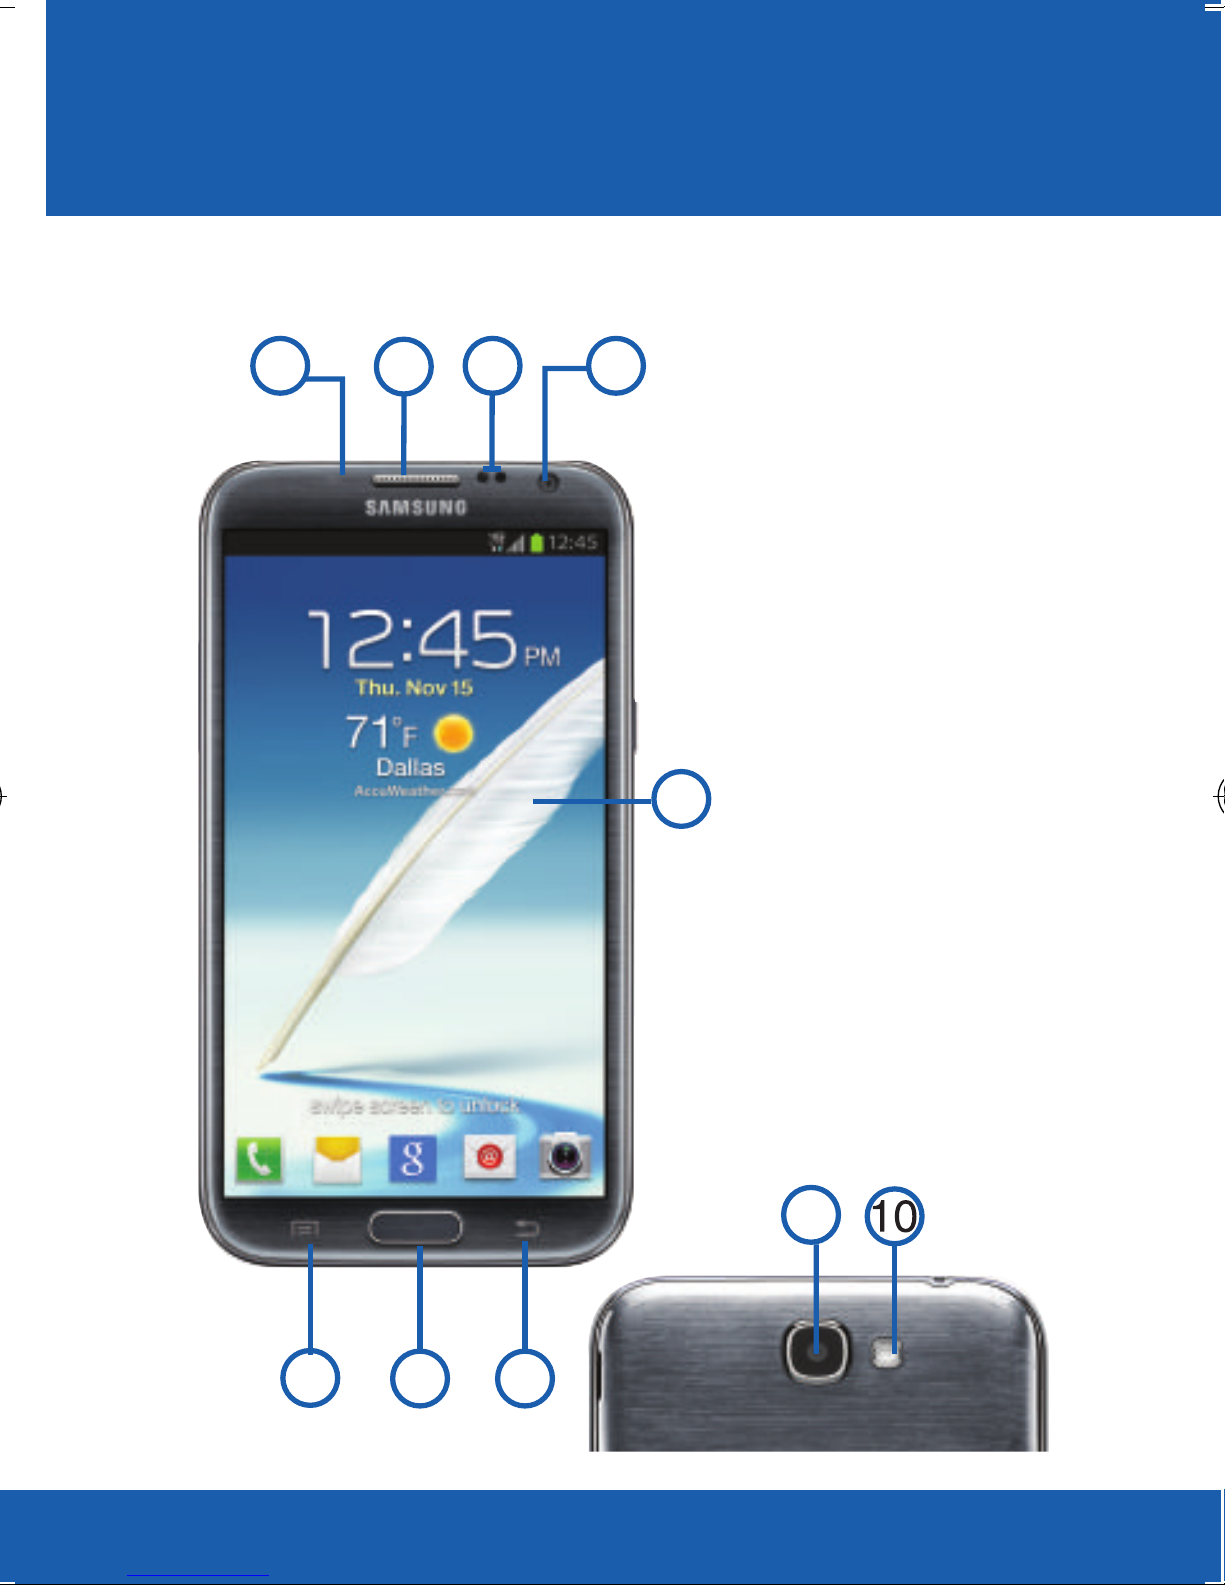
FRONT VIEW FEATURES
8
7
61
1. INDICATOR LIGHT
2. MENU KEY
3. HOME KEY
4. BACK KEY
5. DISPLAY
6. FRONT-FACING
5
CAMERA
7. PROXIMITY AND
LIGHT SENSORS
8. RECEIVER
9. CAMERA LENS
10. FLASH
9
432
3
Page 4
YOUR DEVICE
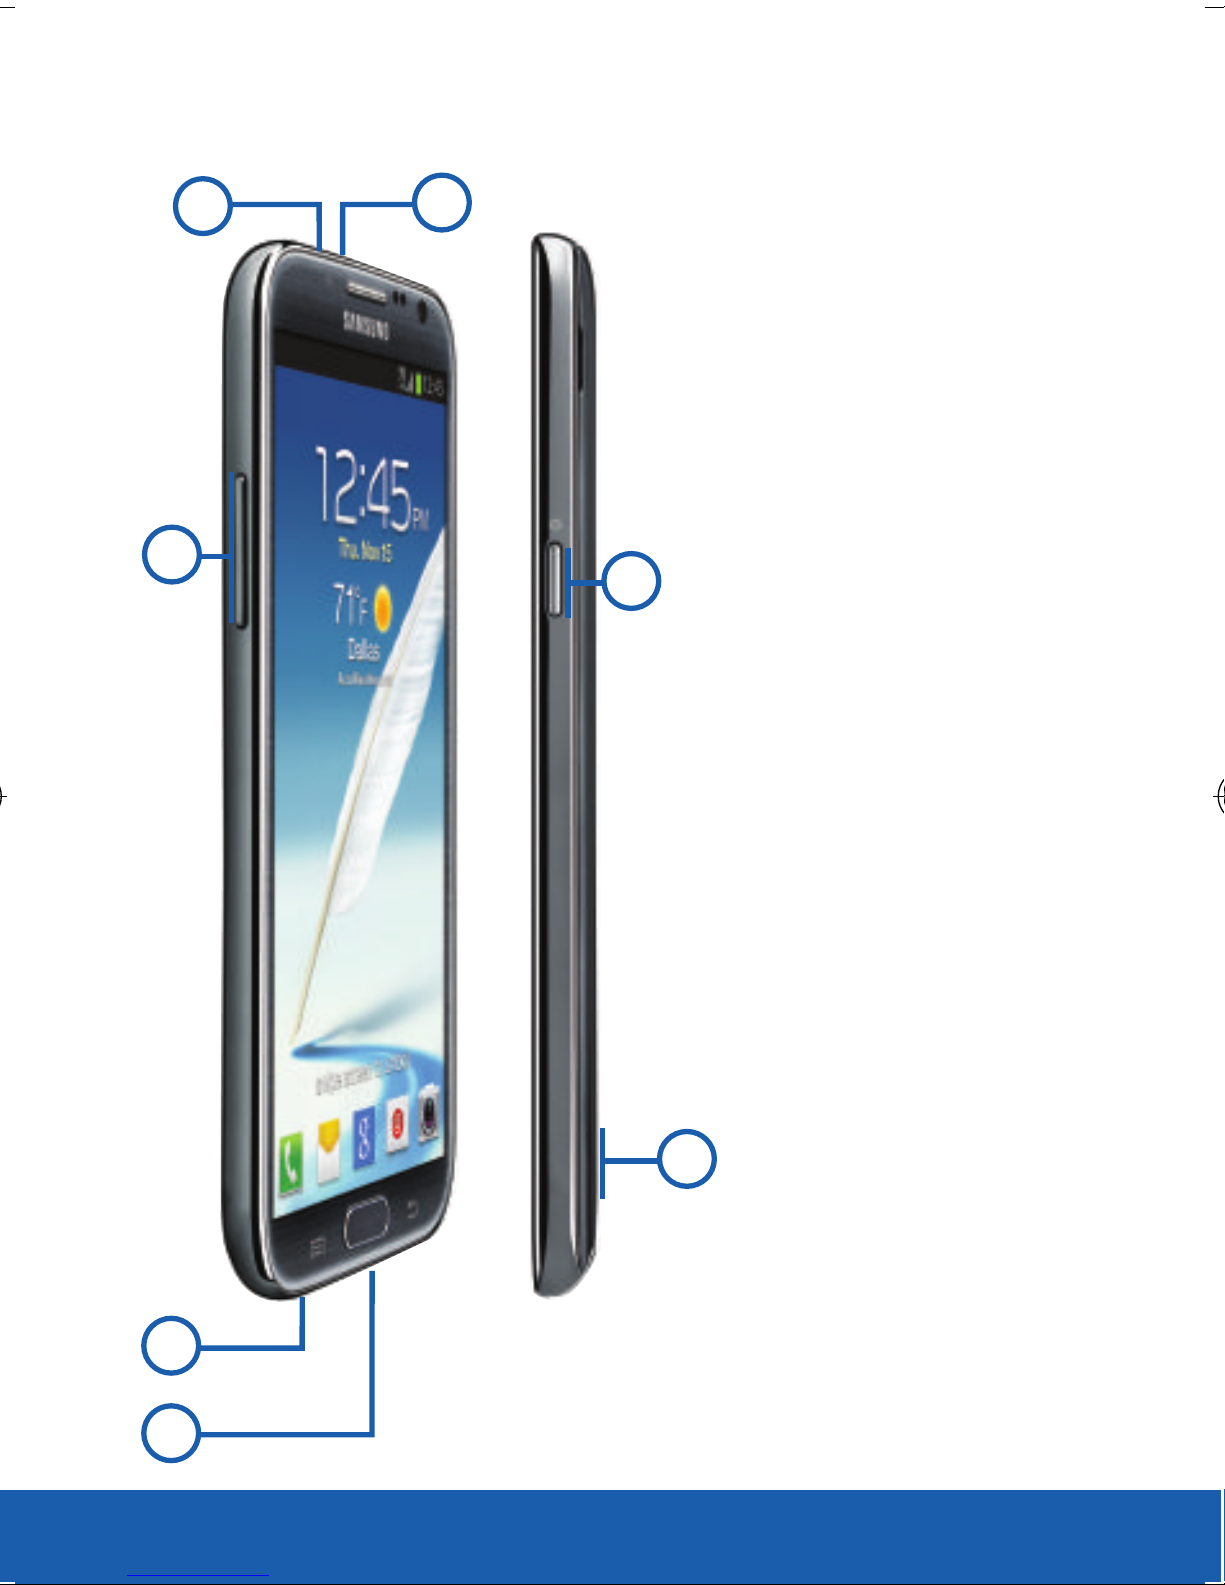
SIDE FEATURES
3
2
1
1. MICROPHONE
2. HEADSET
CONNECTOR
3. VOLUME KEY
4. CHARGING PORT
5. EXTERNAL SPEAKER
6
6. POWER/LOCK KEY
1
4
4
5
Page 5
YOUR DEVICE
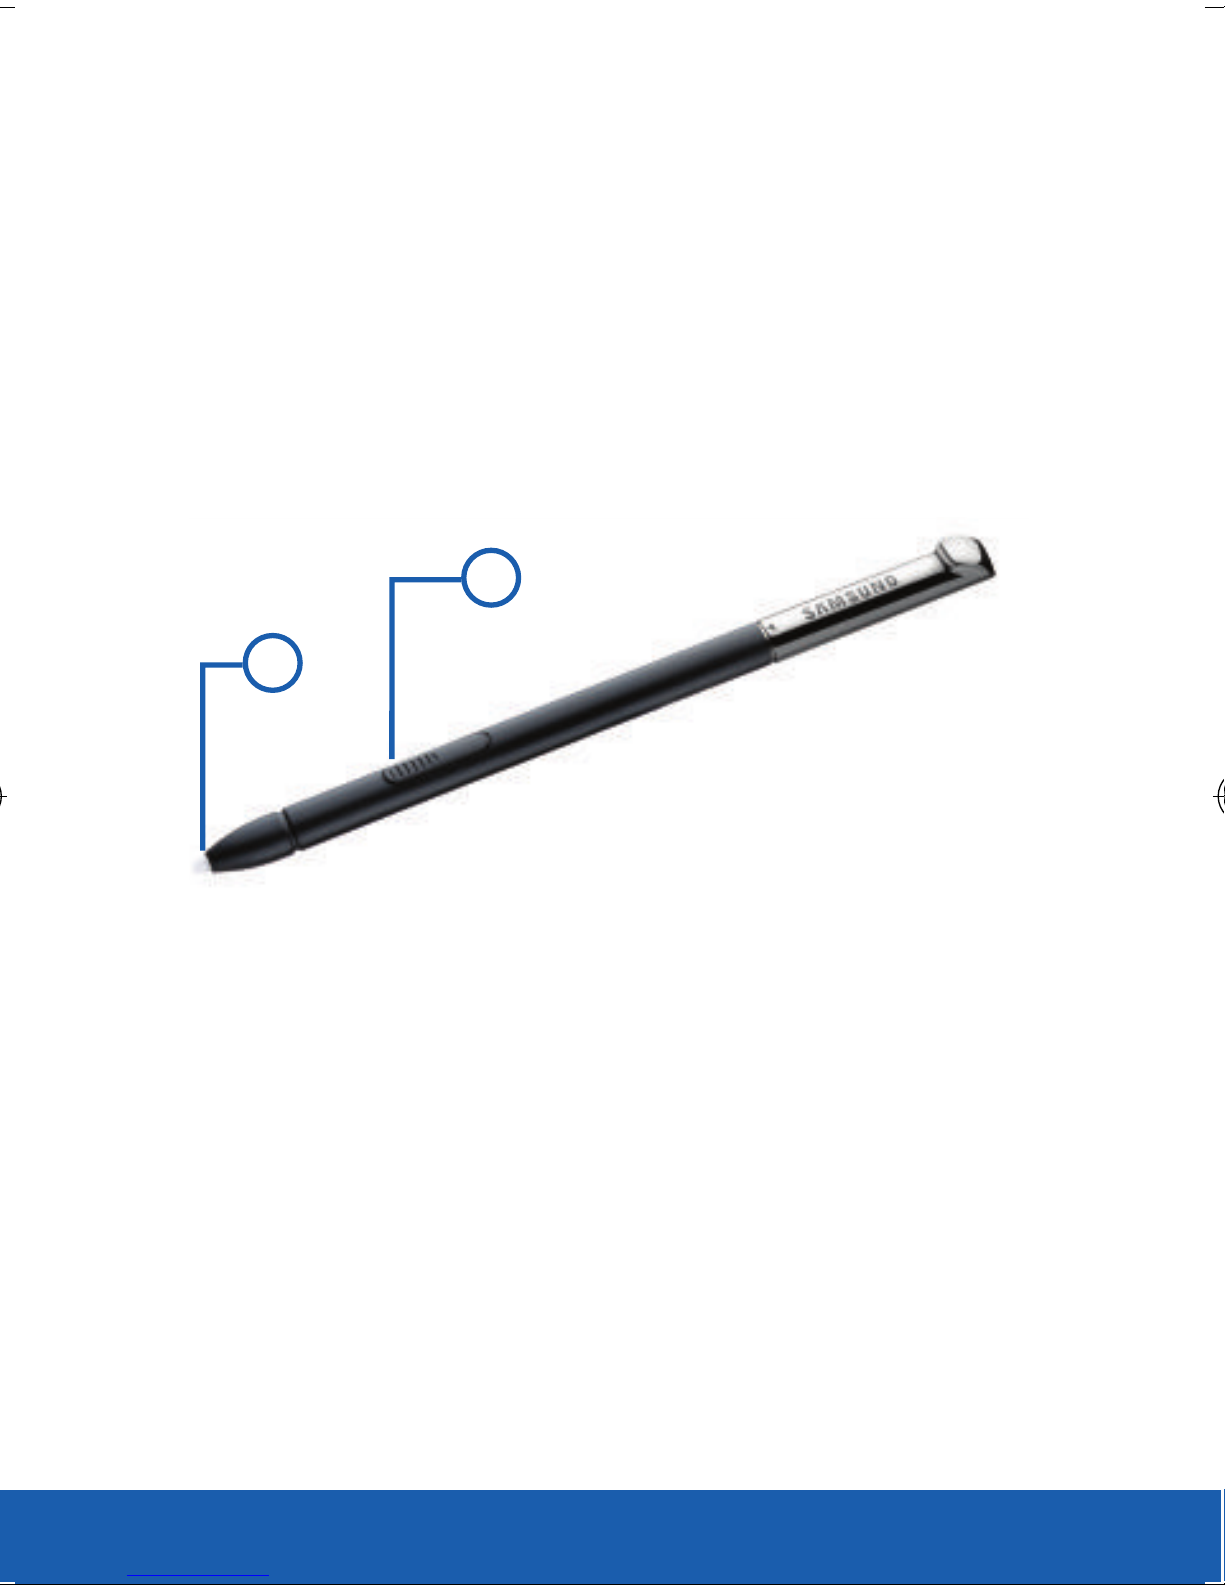
S PEN FEATURES
The S Pen™ is a stylus that assists you in
performing different functions. By using the Pen
button, you can minimize having to switch between
touch and pen input.
1
2
1. S PEN BUTTON
2. S PEN TIP
5
Page 6
BATTERY COVER
YOUR DEVICE
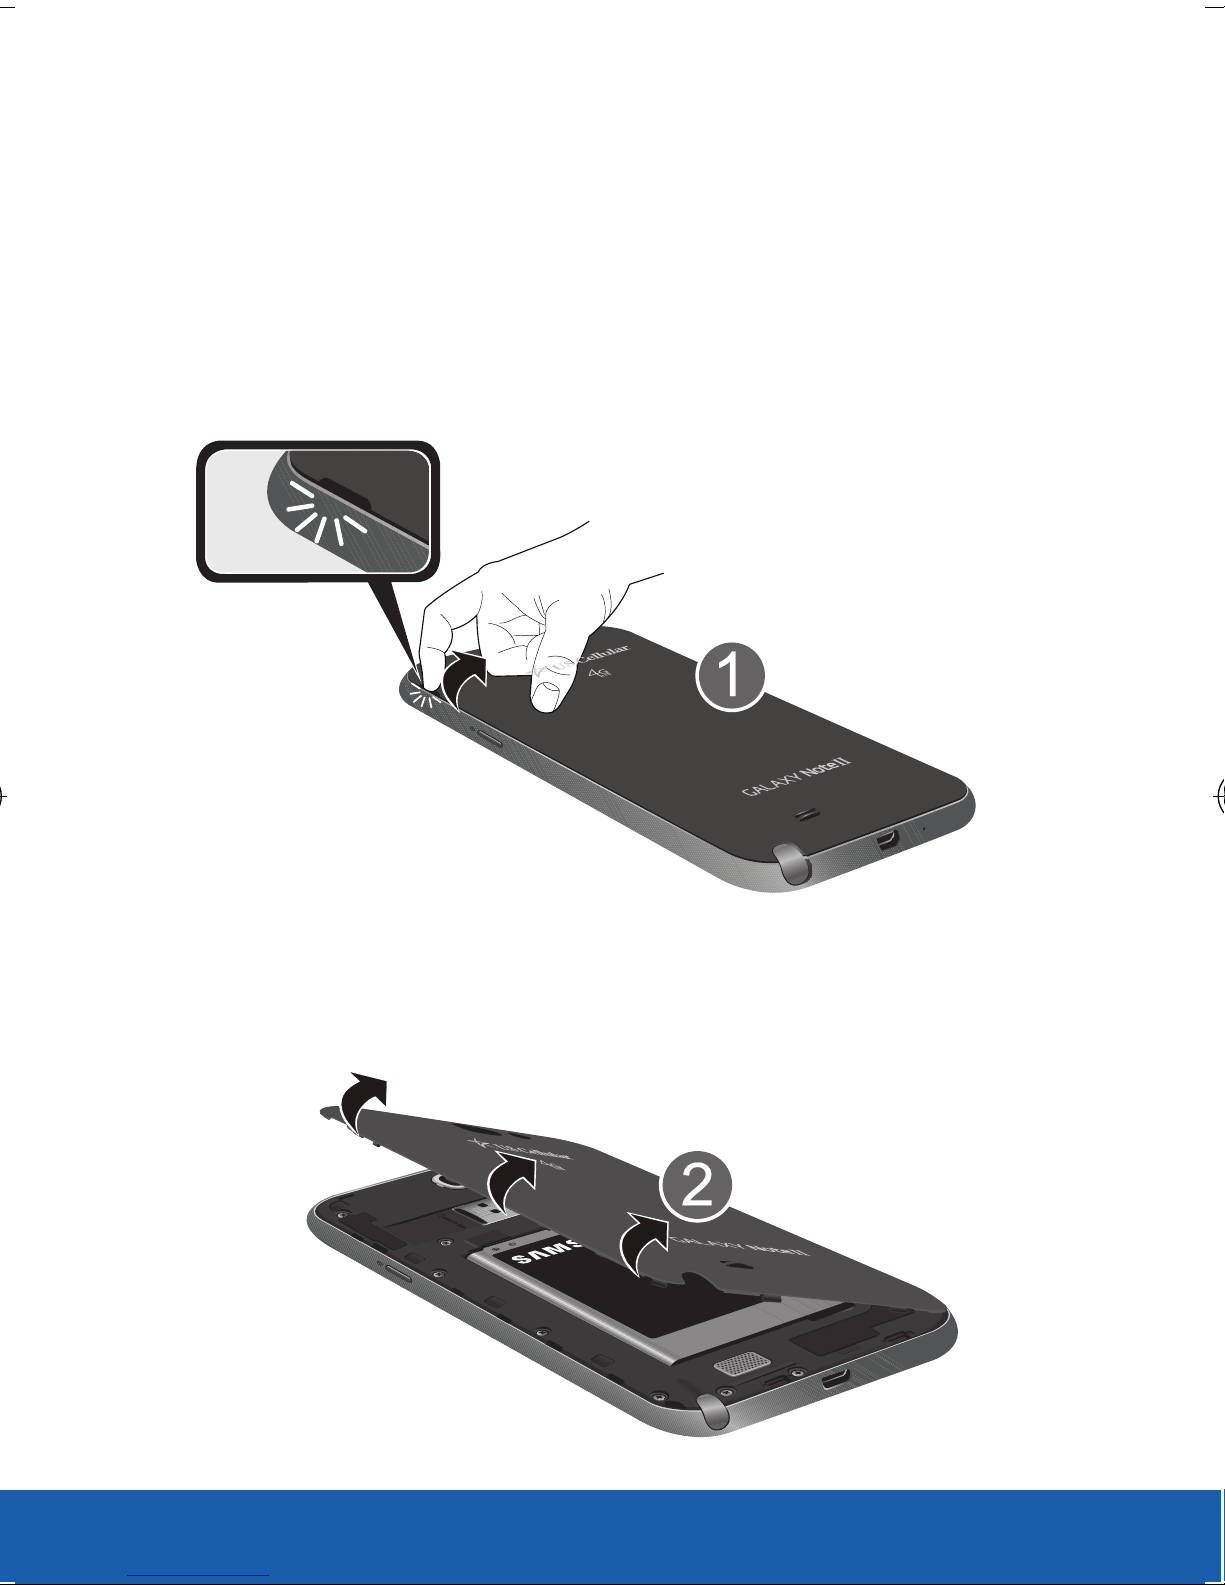
Removing the Battery Cover
1. Hold the device firmly and locate the cover
release latch (1).
2. Place your fingernail in the opening (2) and
firmly “pop” the cover off the device.
6
Page 7
YOUR DEVICE
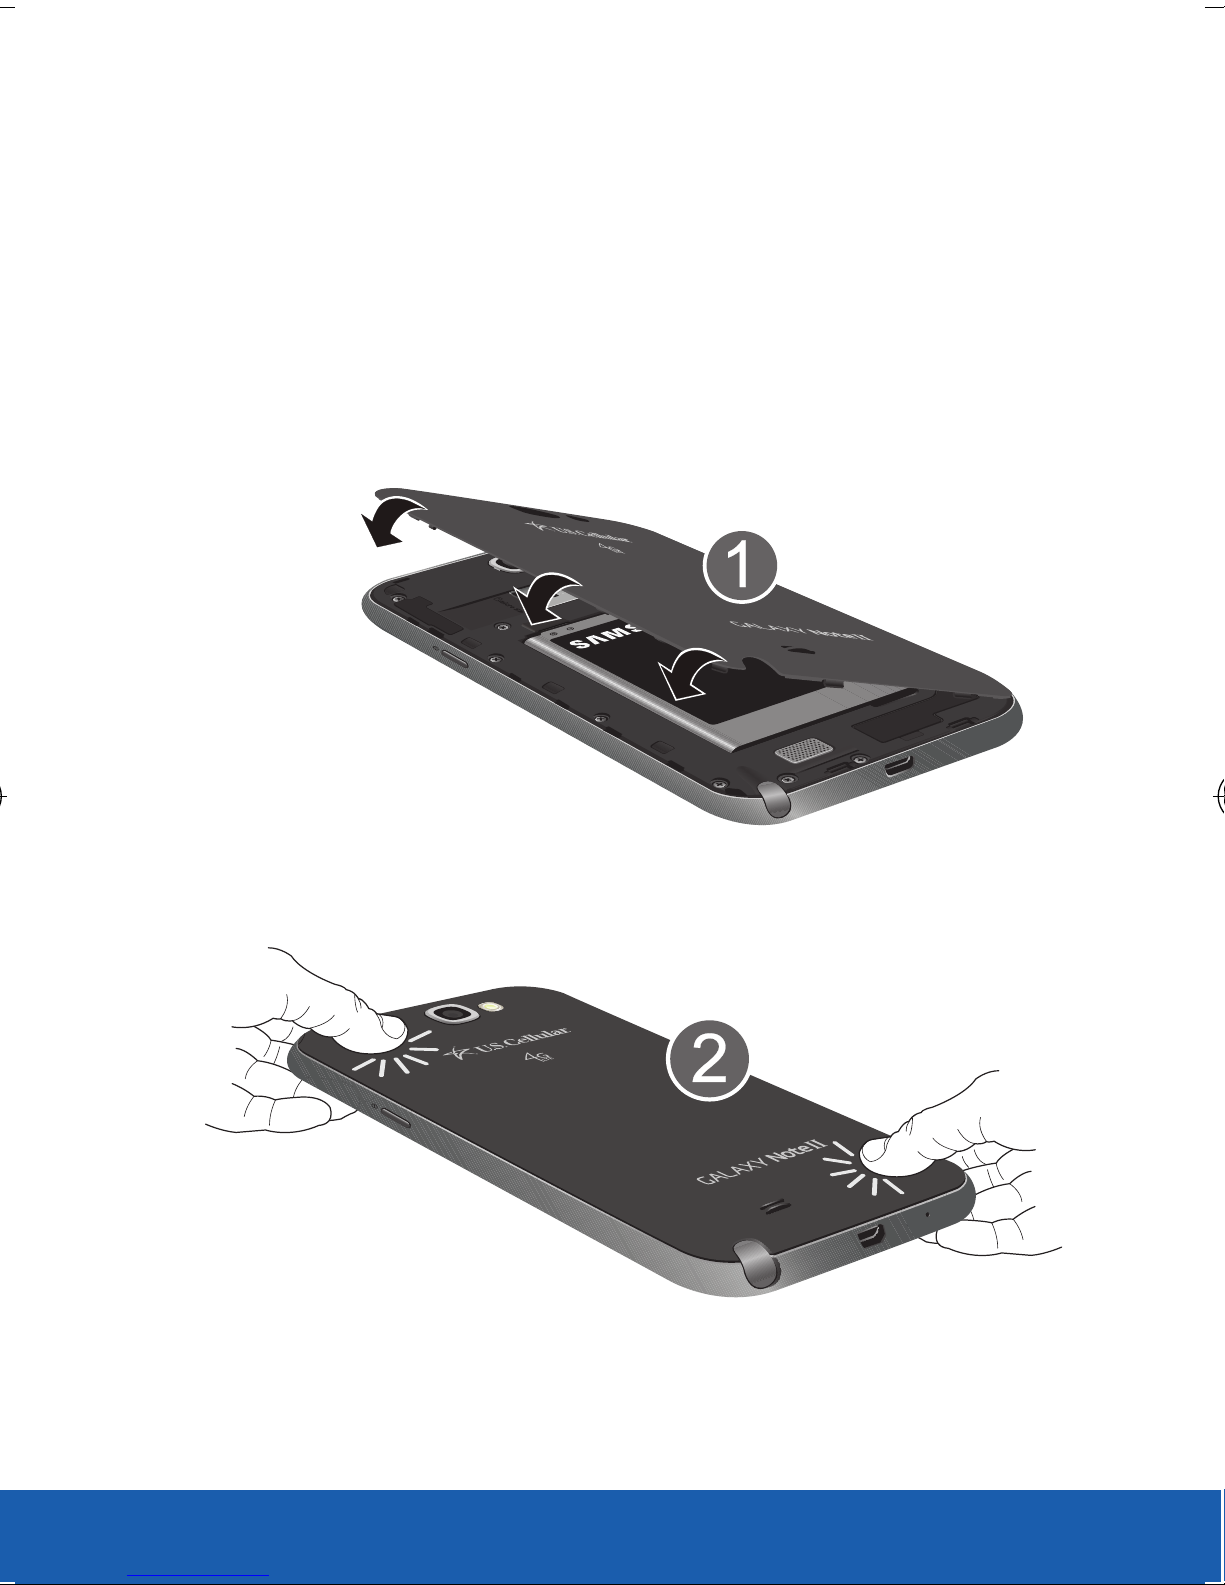
Replacing the Battery Cover:
X Position the battery cover over the battery
compartment and press down around the rim
of the device until you hear clicks and the
cover is secure.
7
Page 8

YOUR DEVICE
SIM CARD
Installing and Removing the SIM Card
This device uses a micro SIM. The micro SIM
(Subscriber Identity Module) card identifies your
phone to the wireless network. You cannot make
or receive calls or browse the Internet without a
properly installed micro SIM card. Other larger SIM
cards will not function or fit within this slot.
IMPORTANT: Before removing or replacing the SIM card, make
sure the device is switched off. To turn the device off,
hold down until the Device options screen
displays, then tap Power off.
To install the micro SIM card:
1. Detach the SIM card from its package.
8
Page 9
YOUR DEVICE
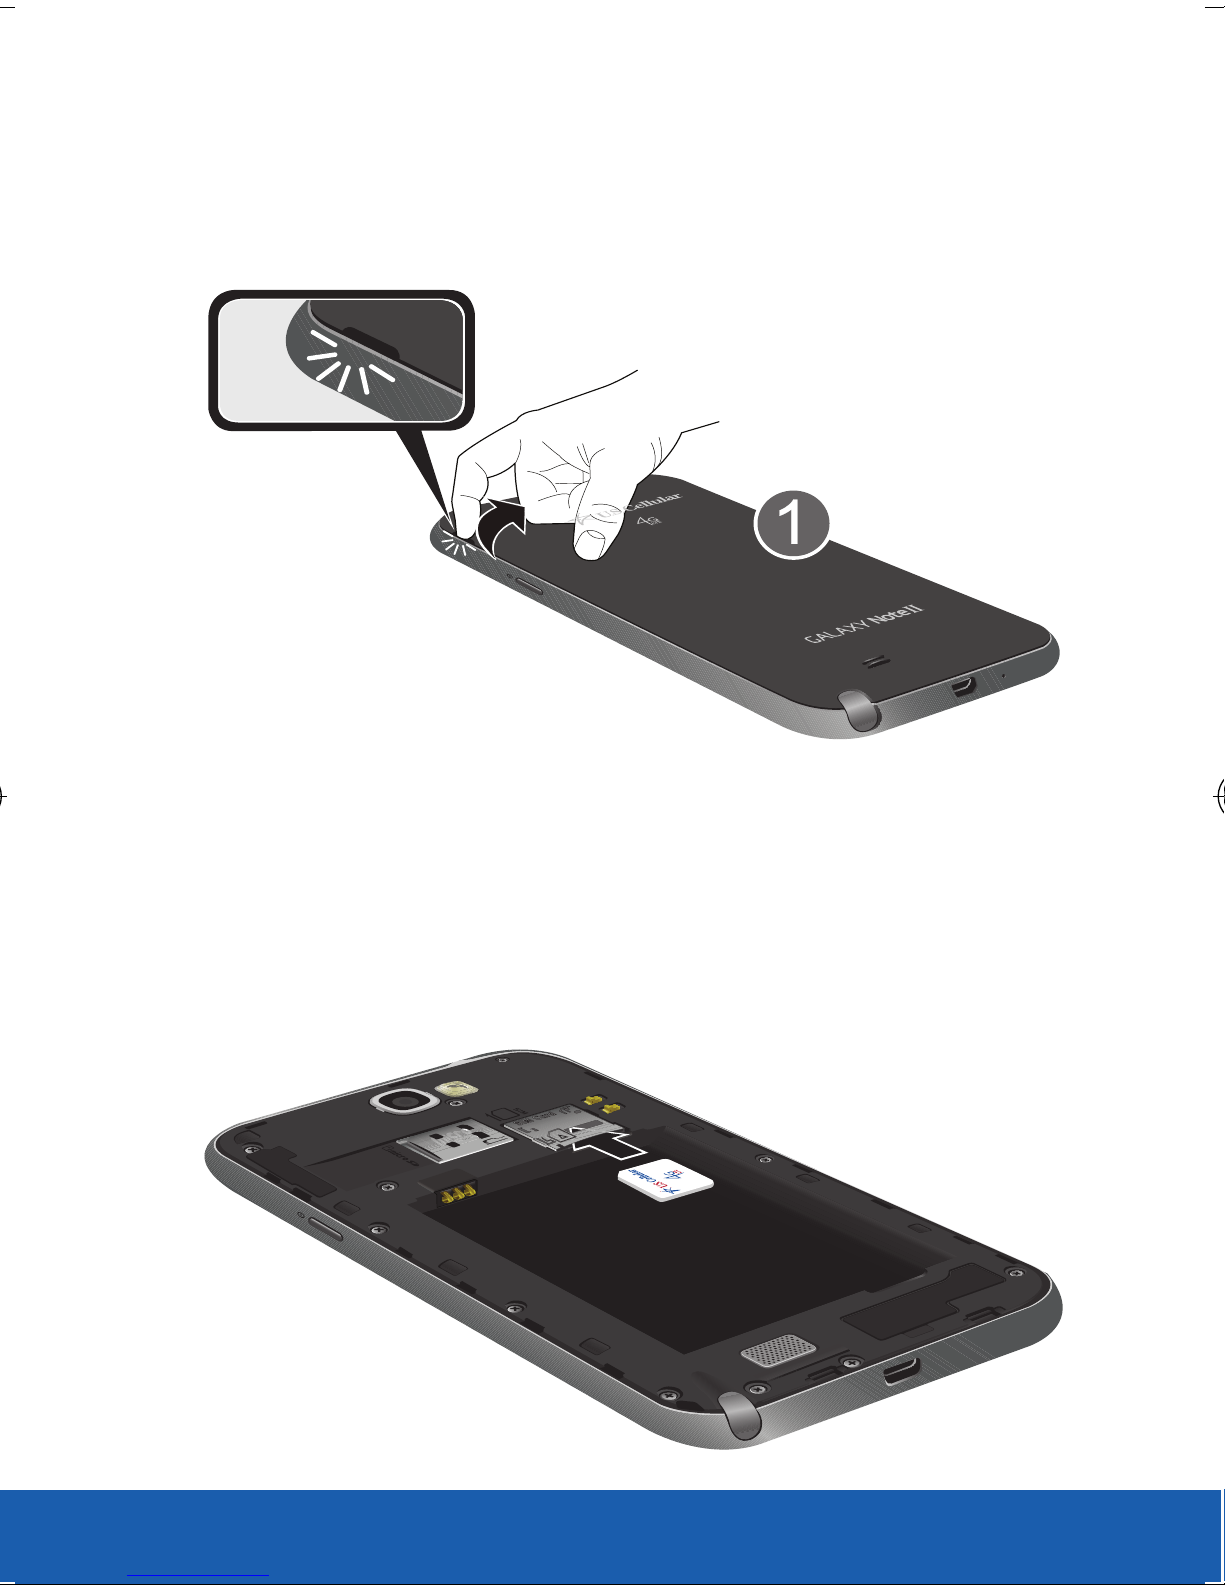
2. Hold the device firmly and locate the cover
release latch.
3. Carefully slide the micro SIM card into the
socket until the card clicks into place.
9
Page 10

YOUR DEVICE
IMPORTANT: Make sure that the card’s gold contacts face into the
device and that the upper-left angled corner of the card
is positioned as shown.
NOTE: This device requires a SIM card. Please insert the SIM card
included in the package prior to turning on the device. This SIM
card will only work with this device. Once the SIM card has
been inserted, do not remove!
If your SIM card is ever separated from the device or damaged,
your device will not function. If you experience any issues with
your device, contact Customer Service at
888-944-9400 (or dialing 611 on Your U.S. Cellular® handset)
or visit your nearest U.S. Cellular retail location.
SIM Card Limited Warranty
Subject to the exclusions contained below, United States
Cellular Corporation (“U.S. Cellular®”) warrants to the original
purchaser (“You” or “Your”) of the handset with which the SIM
card was provided that the SIM card will be free from defects
in material and workmanship for a period of one (1) year from
the date you purchased the handset (the “Warranty Period”).
This warranty is not transferable. Should a defect appear
during the Warranty Period, U.S. Cellular will send a
replacement SIM card to Your address within the United States
without charge provided that you request the replacement SIM
card during or within thirty (30) days following the Warranty
Period by calling U.S. Cellular Customer Service at 888-9449400 (or dialing 611 on your U.S. Cellular handset) or by
visiting a U.S. Cellular retail store.
10
Page 11

YOUR DEVICE
REPLACEMENT OF THE SIM CARD AS PROVIDED HEREIN
IS YOUR EXCLUSIVE REMEDY UNDER THIS LIMITED
WARRANTY, AND IS IN LIEU OF ALL OTHER WARRANTIES,
EXPRESS OR IMPLIED INCLUDING, WITHOUT LIMITATION,
ANY WARRANTIES OF TITLE, FITNESS FOR A PARTICULAR
PURPOSE, MERCHANTABILITY, NON-INFRINGEMENT OR
ARISING FROM COURSE OF DEALING OR USAGE OF TRADE.
NEITHER U.S. CELLULAR NOR ANY OF ITS AFFILIATES OR
RETAILERS SHALL BE LIABLE TO YOU FOR ANY DIRECT,
INDIRECT, INCIDENTAL, SPECIAL, ECONOMIC, EXEMPLARY,
PUNITIVE OR CONSEQUENTIAL DAMAGES (INCLUDING,
WITHOUT LIMITATION, LOSS OF DATA, LOSS OF REVENUE
OR PROFITS, DAMAGE TO PROPERTY OR LOSS OF USE).
IN NO EVENT SHALL U.S. CELLULAR’S, ITS AFFILIATES’
OR RETAILERS’ LIABILITY TO YOU OR ANY THIRD PARTY
WITH RESPECT TO THE SIM CARD EXCEED THE COST OF
REPLACING THE SIM CARD.
THIS LIMITED WARRANTY SHALL BE CONSTRUED UNDER
THE LAWS OF THE STATE OF ILLINOIS, EXCLUDING ITS
CONFLICTS OF LAW PROVISIONS. SOME STATES AND
JURISDICTIONS DO NOT ALLOW LIMITATIONS ON HOW
LONG AN IMPLIED WARRANTY LASTS, OR THE DISCLAIMER
OR LIMITATION OF INCIDENTAL OR CONSEQUENTIAL
DAMAGES, SO THE ABOVE LIMITATIONS AND DISCLAIMERS
MAY NOT APPLY TO YOU.
No agent, employee, dealer, retailer, representative or reseller
is authorized to modify or extend the terms of this Limited
Warranty.
11
Page 12

YOUR DEVICE
MEMORY CARD
Your device supports an optional (external)
microSD™ or microSDHC™ memory card for
storage of media such as music, pictures, video and
other files.
NOTE: microSD memory cards include capacities of up to 2GB.
microSDHC™ memory card types can range from 4GB to up
to 32GB.
NOTE: This device supports up to a 64GB microSDHC memory card.
WARNING: Applications, personal settings and other stored data may
be lost or may not function properly if the memory card
is removed.
12
Page 13
YOUR DEVICE
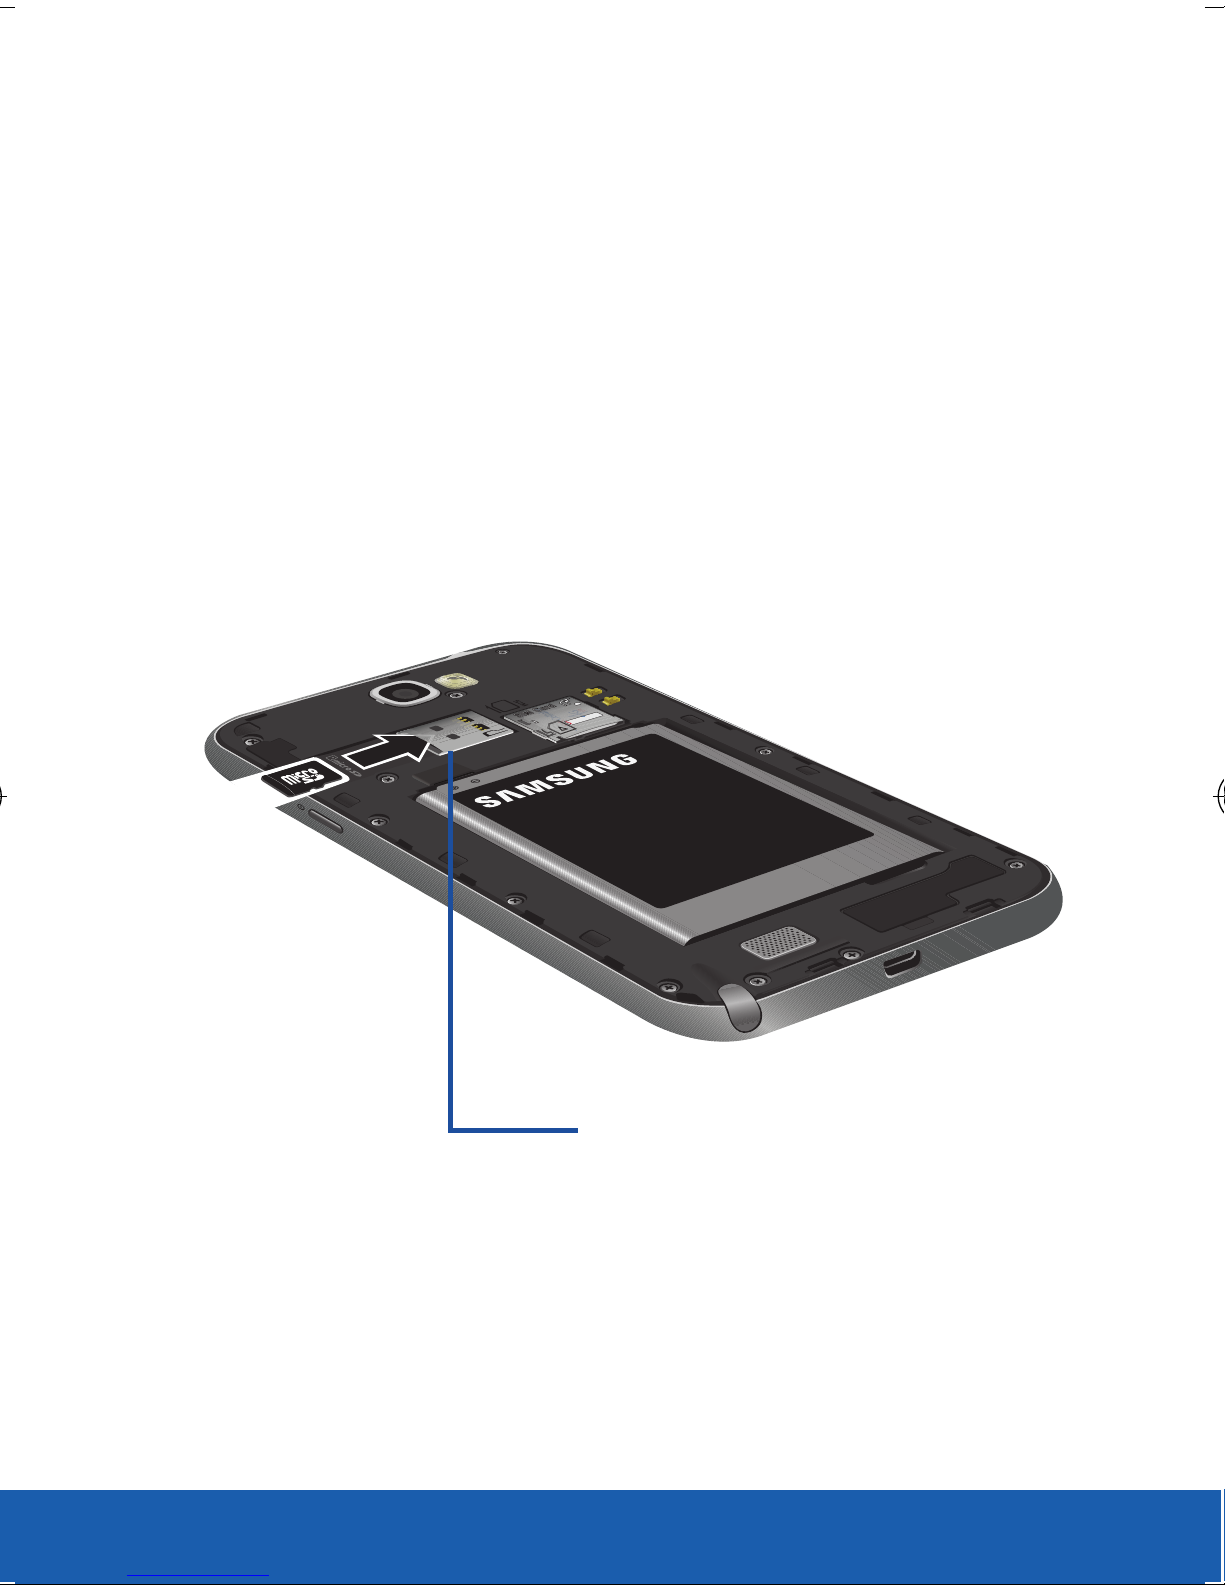
Installing the microSD Memory Card
1. Remove the battery cover.
2. Locate the microSD card slot on the inside of
the device.
3. Orient the card with the gold strips facing
down.
4. Carefully slide the microSD card into the card
socket until it clicks into place.
microSD card slot
13
Page 14

YOUR DEVICE
BATTERY
Your device is powered by a rechargeable, standard
Li-Ion battery. The battery, SIM card and SD card are
installed under the battery cover.
NOTE: Although the battery comes partially charged, you must fully
charge this battery before using your device for the first time.
WARNING: Use only Samsung-approved charging devices and
batteries. Samsung accessories are designed to maximize
battery life. Using other accessories may invalidate your
warranty and may cause damage.
IMPORTANT: Before removing or replacing the battery, make sure the
device is switched off. To turn the device off, hold down
until the Device options screen displays,
then tap Power off.
Caution!: Do not bend or twist the back cover excessively during
installation or removal. Doing so may damage the cover.
14
Page 15
YOUR DEVICE
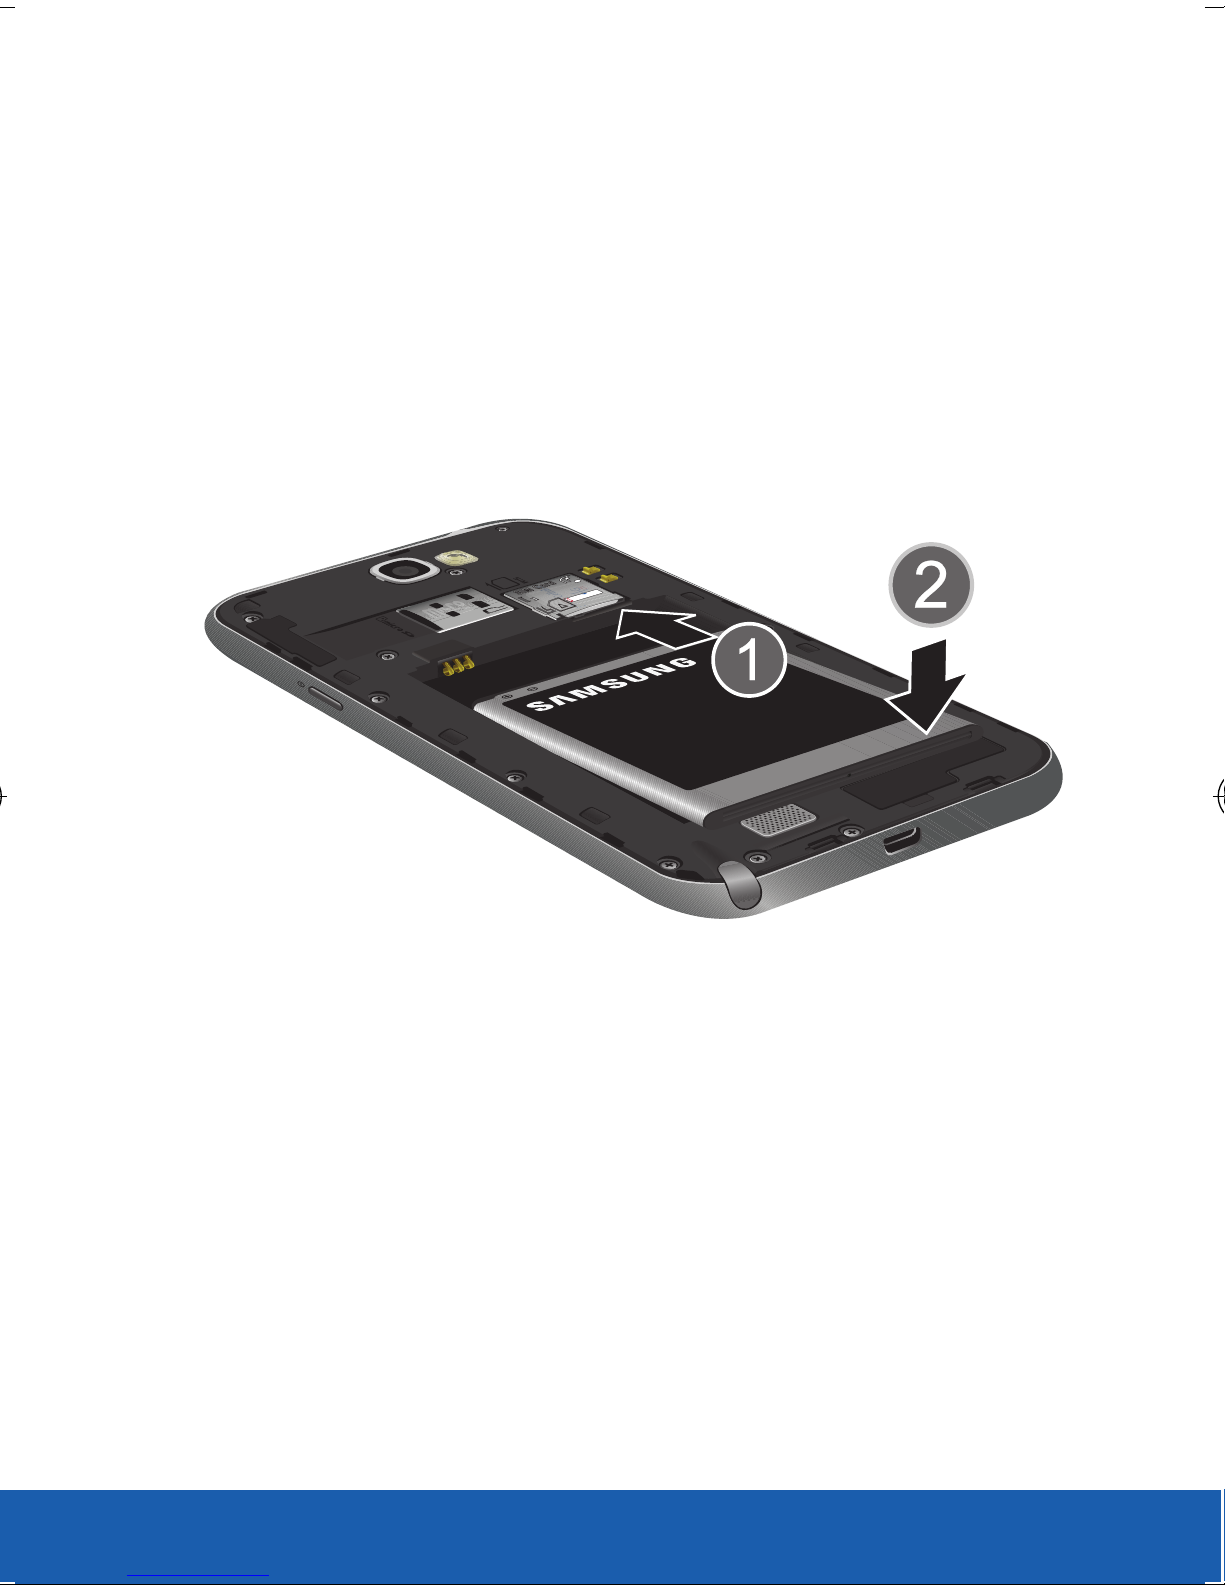
Installing the Battery
1. Slide the battery into the compartment (1) so
that the tabs on the end align with the slots
at the bottom of the phone, making sure the
connectors align.
2. Gently press down to secure the battery (2).
15
Page 16
YOUR DEVICE
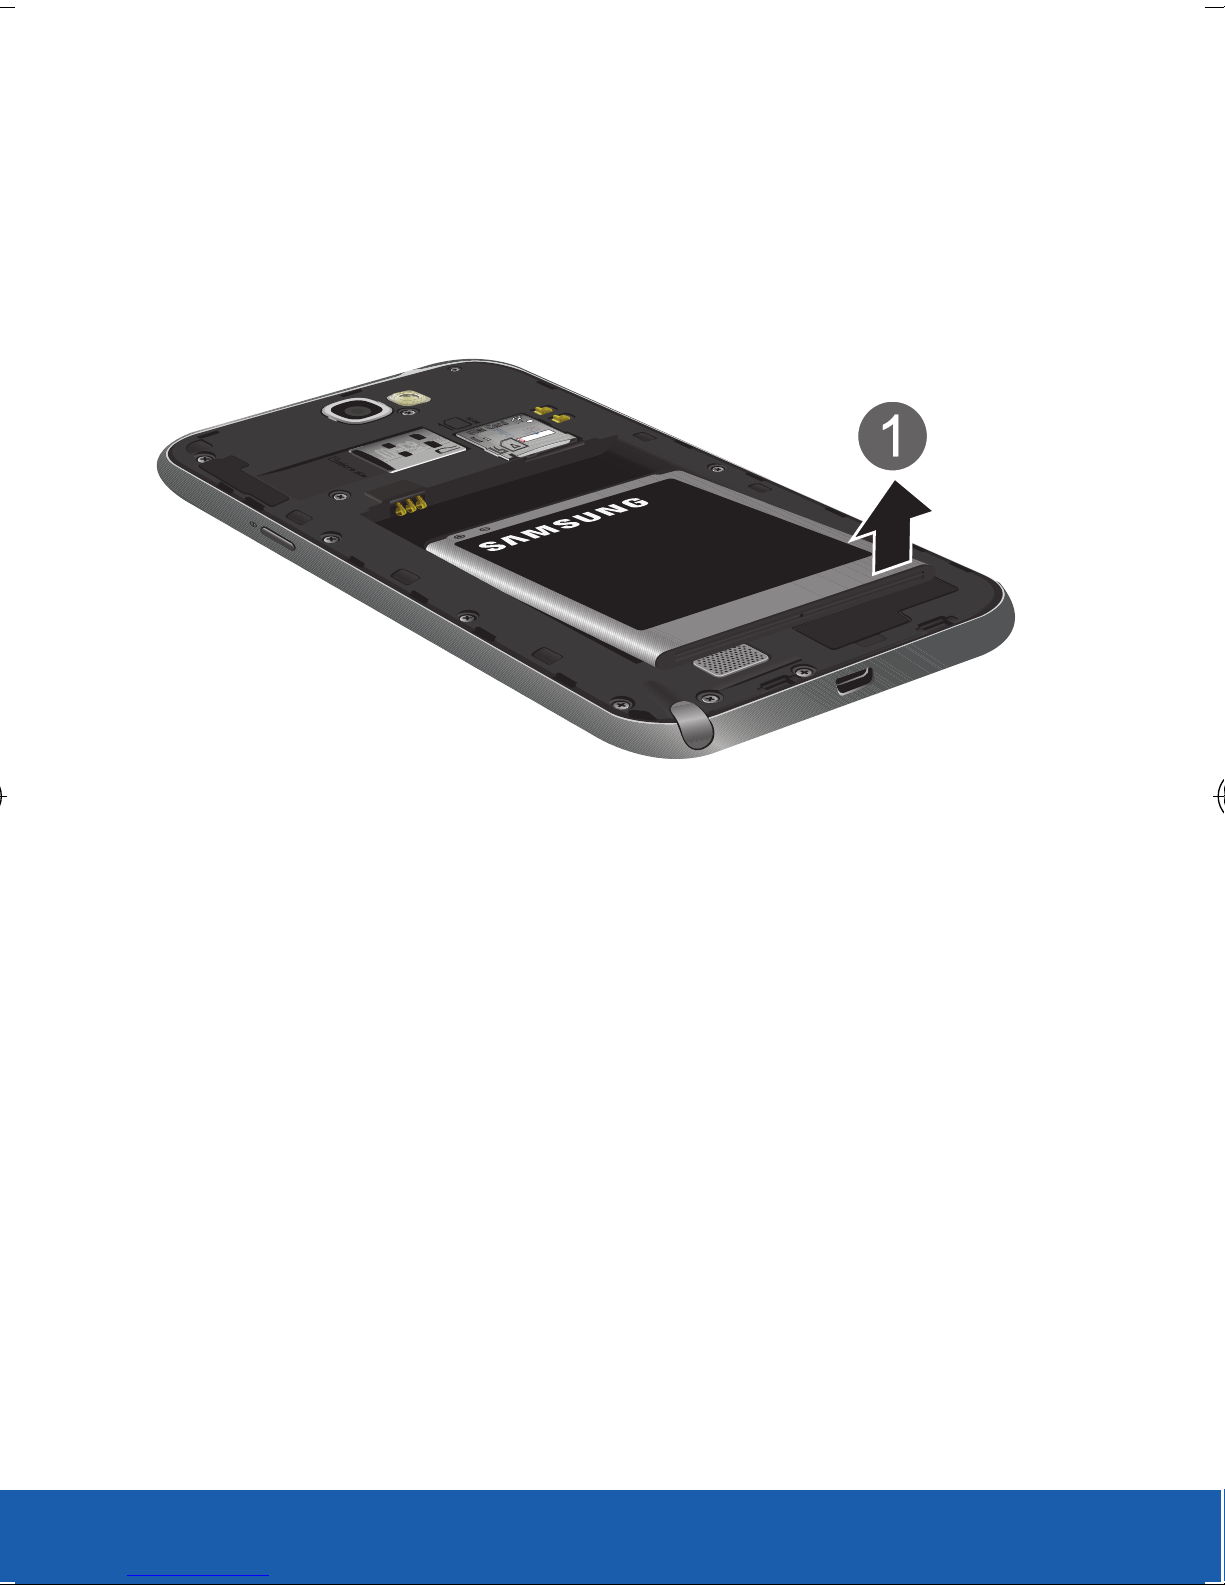
Removing the Battery
X Grip the battery at the top end (1) and lift it up
and out of the battery compartment.
16
Page 17
YOUR DEVICE
Charging the Battery
Your device is powered by a rechargeable Li-ion
battery. A wall charger, which is used for charging
the battery, is included with your device. Use only
approved batteries and chargers. Ask your local
Samsung dealer for further details.
IMPORTANT: Verify that the battery is installed prior to connecting the
wall charger. If both the wall charger is connected and
the battery is not installed, the handset will power cycle
continuously and prevent proper operation. Failure to
unplug the wall charger before you remove the battery,
can cause the device to become damaged.
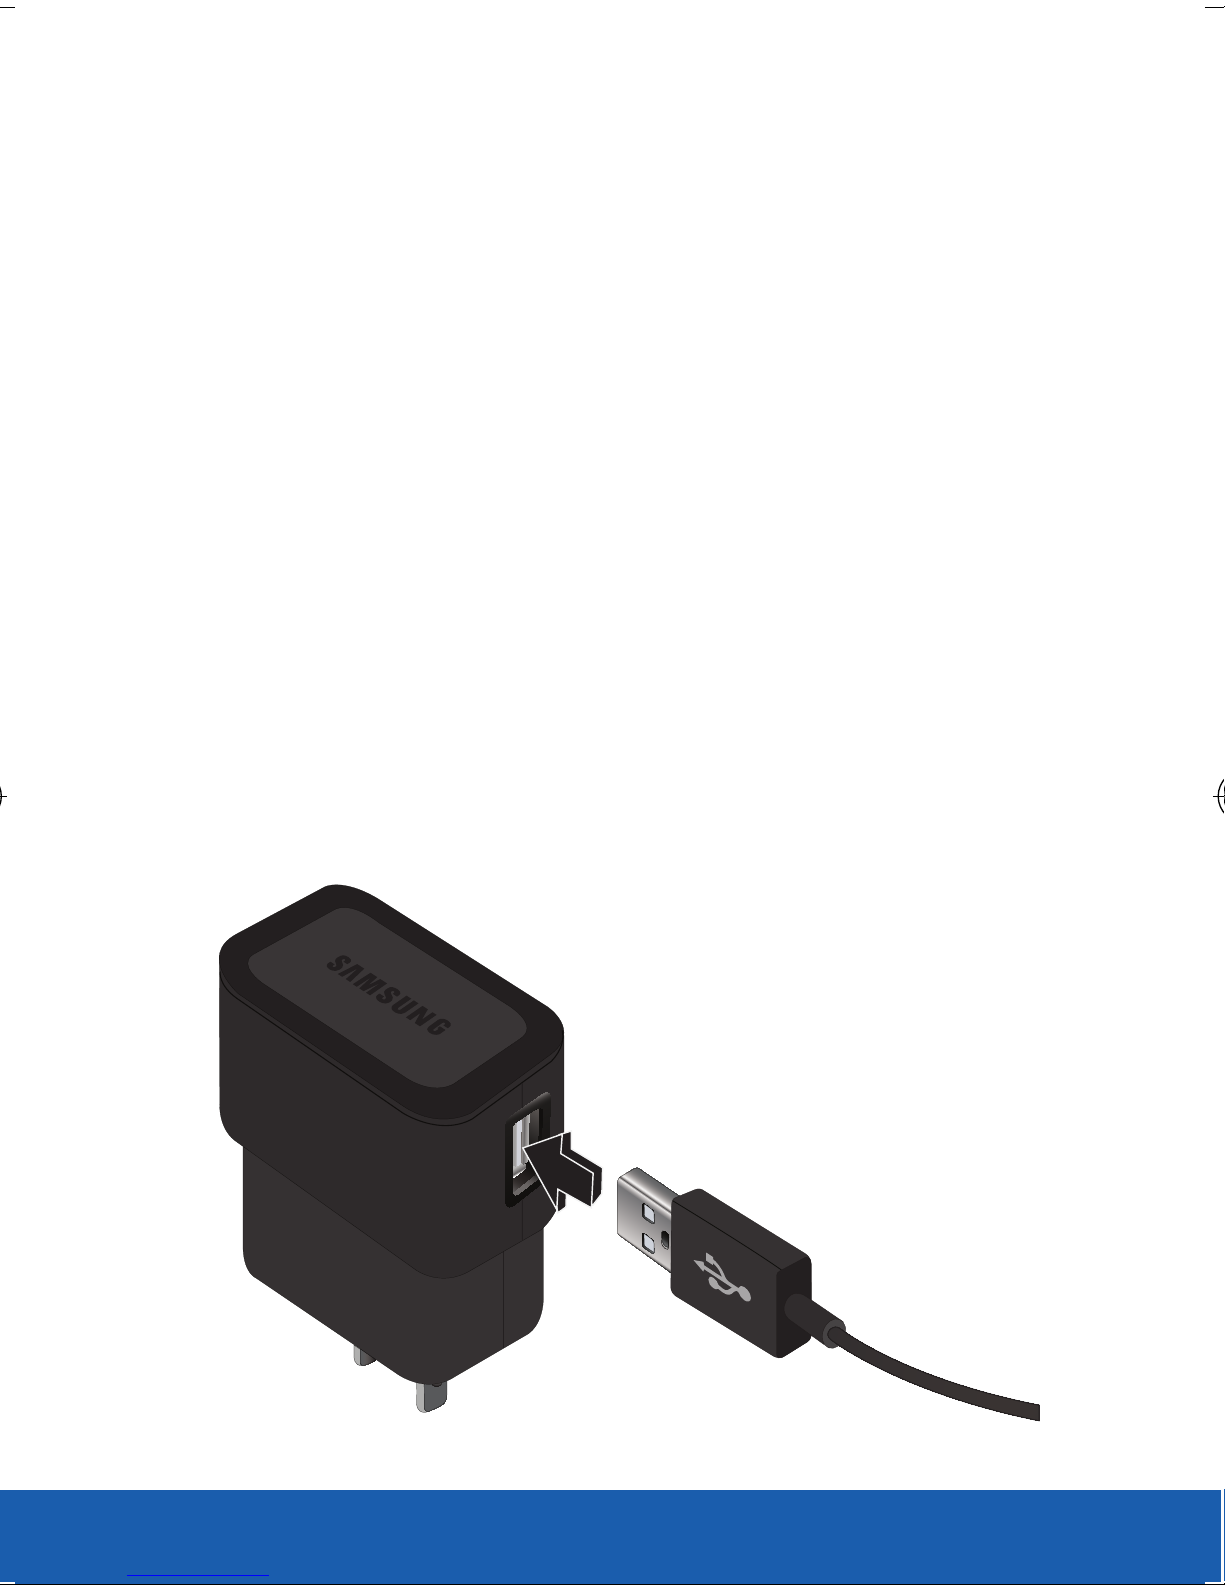
1. Connect the USB cable to the charging head.
2. Locate the Charger/Accessory jack.
CHARGING HEAD
USB CABLE
17
Page 18
YOUR DEVICE
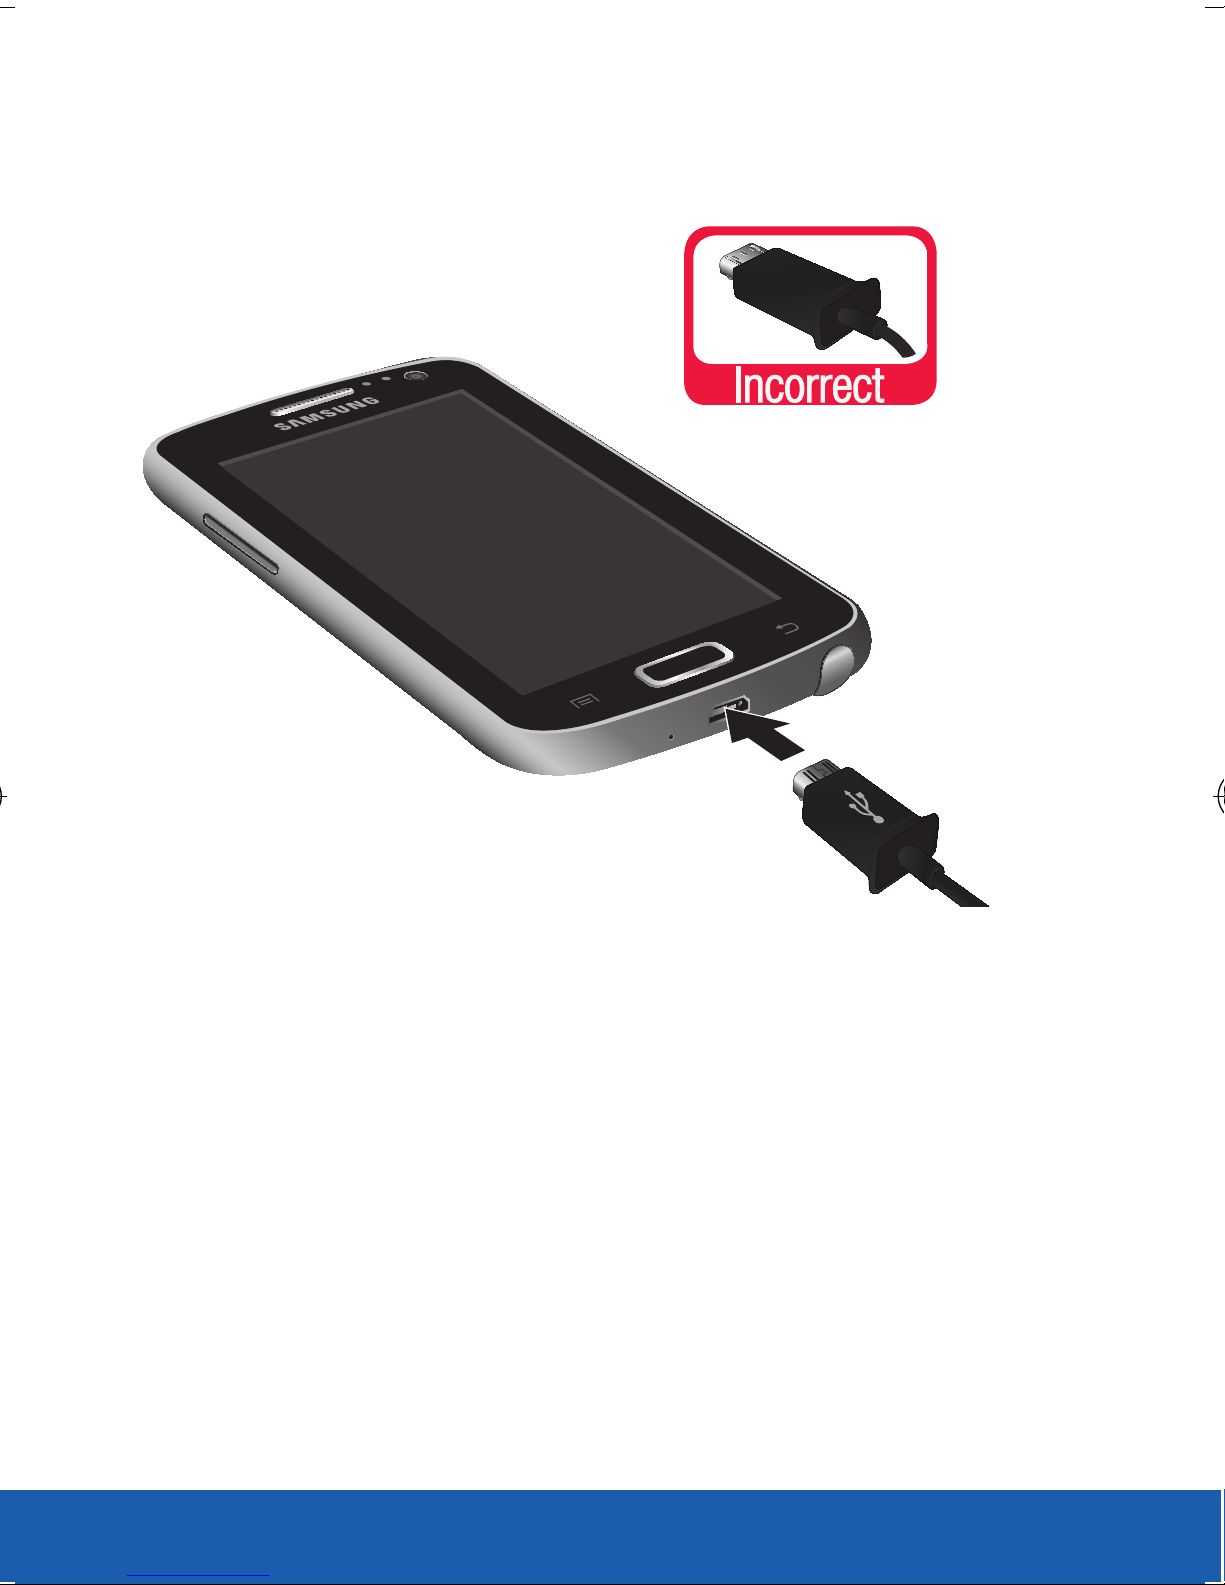
3. Insert the USB cable into the device’s Charger/
Accessory jack.
4. Plug the charging head into a standard AC
power outlet. The device turns on with the
screen locked and indicates both its charge
state and percent of charge.
5. When charging is finished, first unplug the
charger’s power plug from the AC wall outlet,
then disconnect the charger’s connector from
the device.
NOTE: For the most efficient charging, consumers should use the
charger included in the box.
18
Page 19

YOUR DEVICE
TURNING YOUR DEVICE ON OR OFF
Powering On Your Device
X Press and hold (Power/Lock) until the
device turns on. It searches for your network
and after finding it, you can make or receive
calls.
Powering Off Your Device
1. Press and hold the (Power/Lock) until
the Device options screen appears.
2. Tap (Power off).
Restarting Your Device
1. Press and hold the (Power/Lock) until
the Device options screen appears.
2. Tap (Restart).
19
Page 20

YOUR DEVICE
LOCKING AND UNLOCKING YOUR DEVICE
By default, the device screen locks when the
backlight turns off.
To unlock your device from the lock screen:
X With your device turned on, press
(Power/Lock) to wake the display and sliding
your finger across the screen in any direction.
To lock your device screen:
X Press (Power/Lock). The screen goes
black.
20
Page 21
YOUR DEVICE
HOME SCREEN
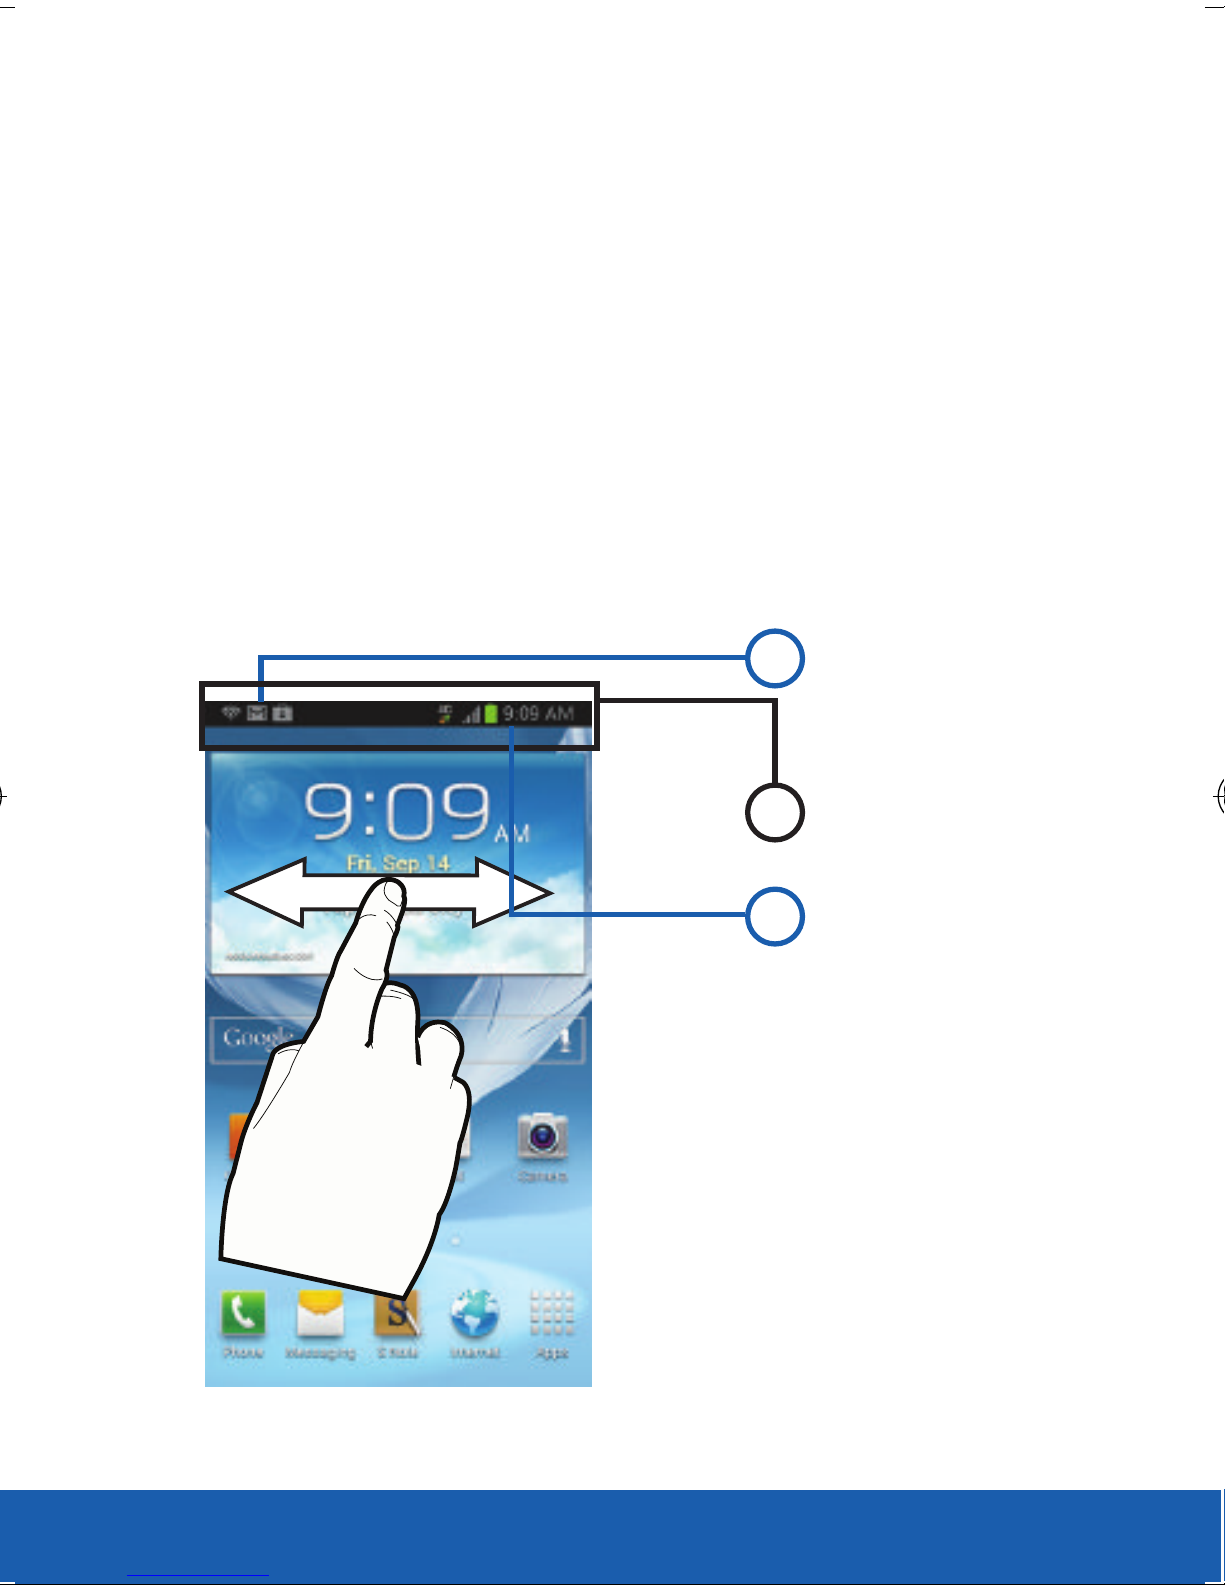
Swipe your fingers left or right to view the entire
Home screen. You can customize the screen with
widgets and shortcuts to your favorite applications.
Status Bar
The Status bar appears at the top of your Home
screen. Icons indicating your device’s status and new
notification alerts appear on the Status bar.
1
2
3
1. NOTIFICATIONS
AREA
2. STATUS BAR
3. STATUS AREA
21
Page 22

YOUR DEVICE
Notification Screen
The Notification area indicates new message events
(data sync status, new messages, calendar events,
call status, etc). You can expand this area to reveal
the Notification screen that provides more detailed
information about the current on-screen notification
icons.
22
Page 23
YOUR DEVICE
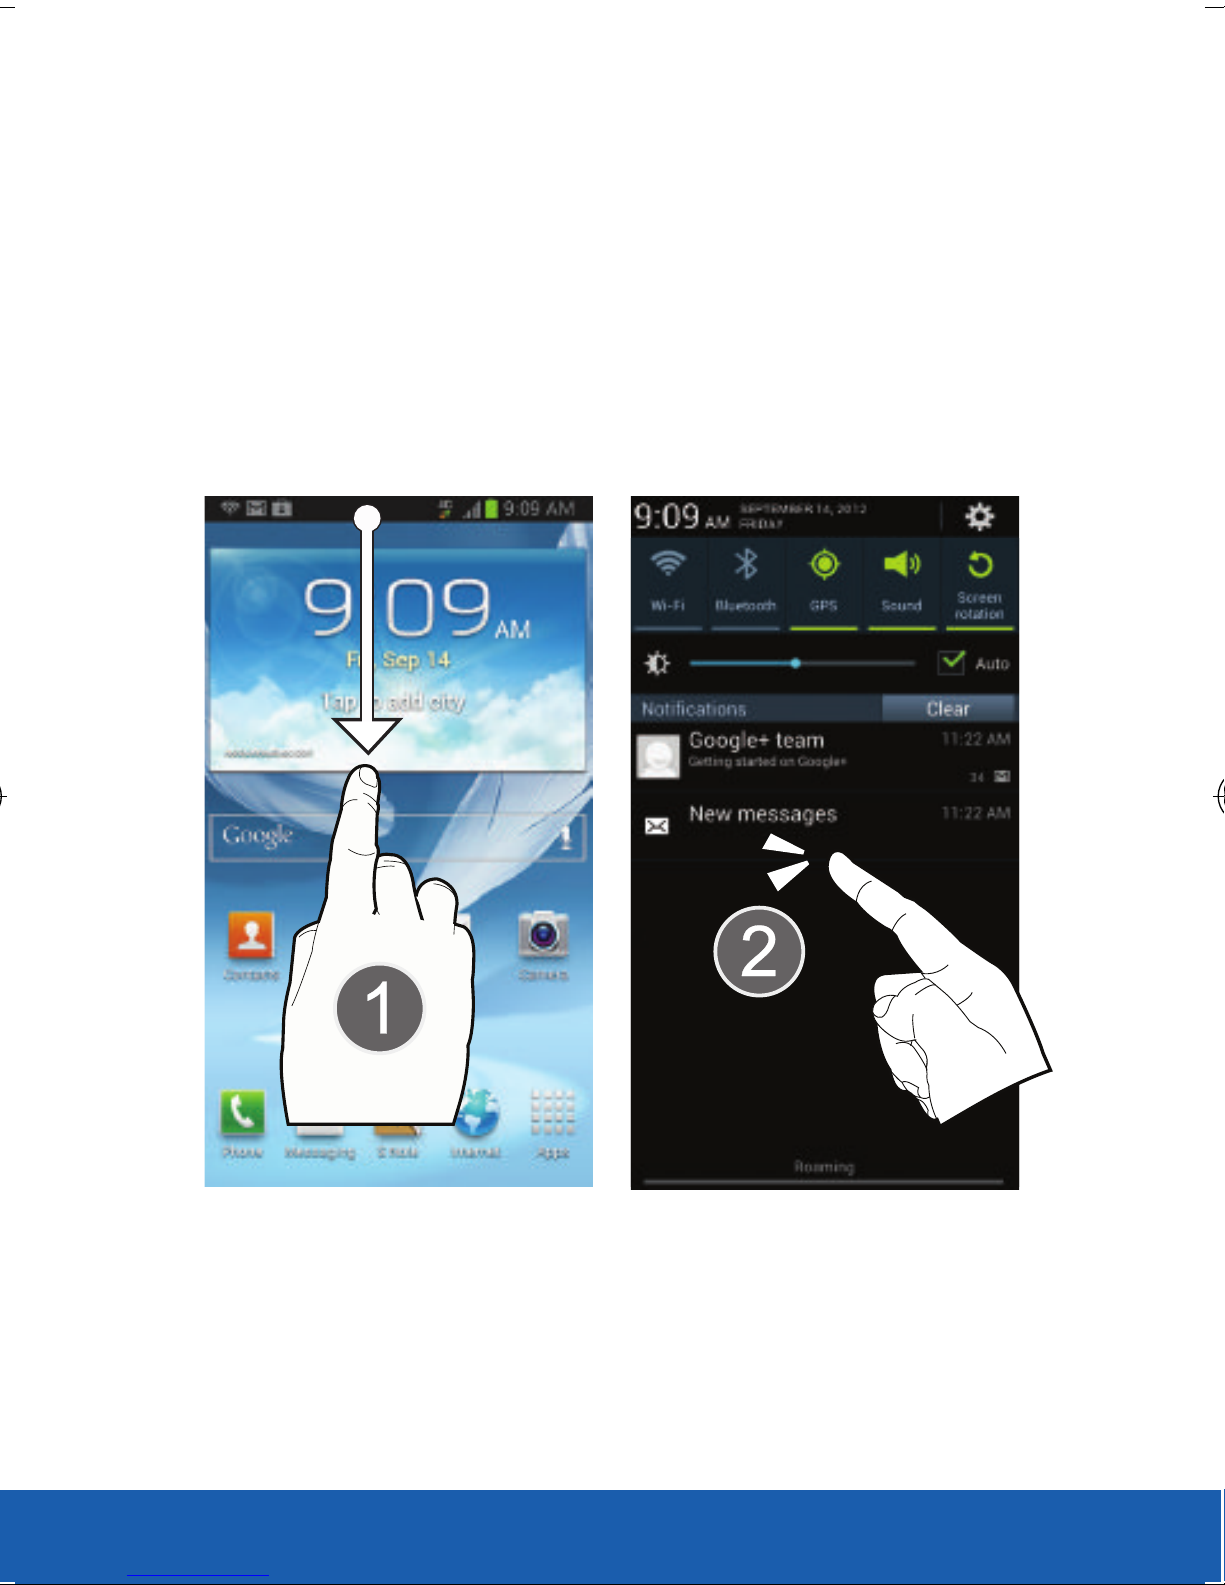
Opening the Notification Screen
1. In a single motion, touch and drag the Status
bar down to the bottom of the screen to open
the Notification screen (1).
2. Tap a notification entry to open the associated
application (2).
23
Page 24
YOUR DEVICE
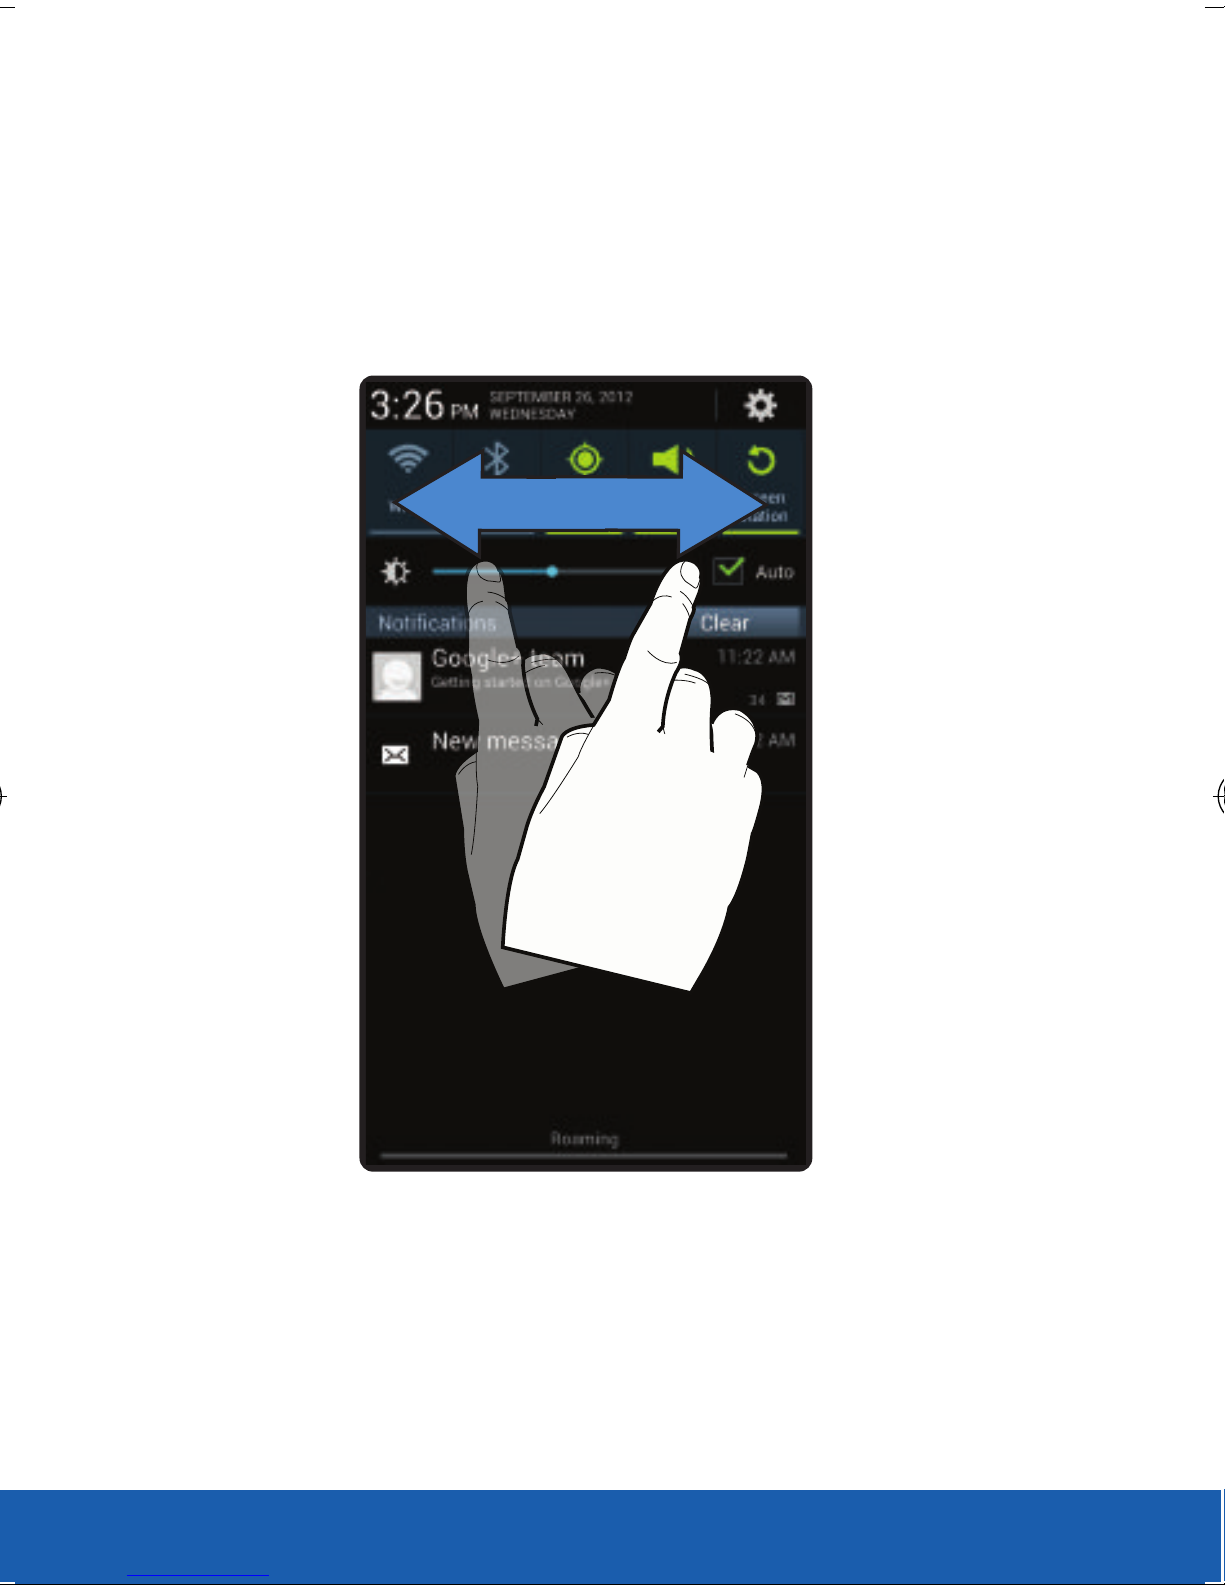
Accessing Additional Functions
In addition to notifications, this screen also provides
quick and ready access to device functions. These
can be quickly activated or deactivated.
The following functions can either be activated
(green) or deactivated (white): Wi-Fi, Bluetooth,
GPS, Sound/Vibrate/Mute, Screen rotation,
Airplane mode, Power saving, Driving mode,
AllShare Cast or Sync.
24
Page 25
YOUR DEVICE
USING GESTURES
ON
By activating the various gesture features within
the Motion menu, you can access a variety of time
saving functions.
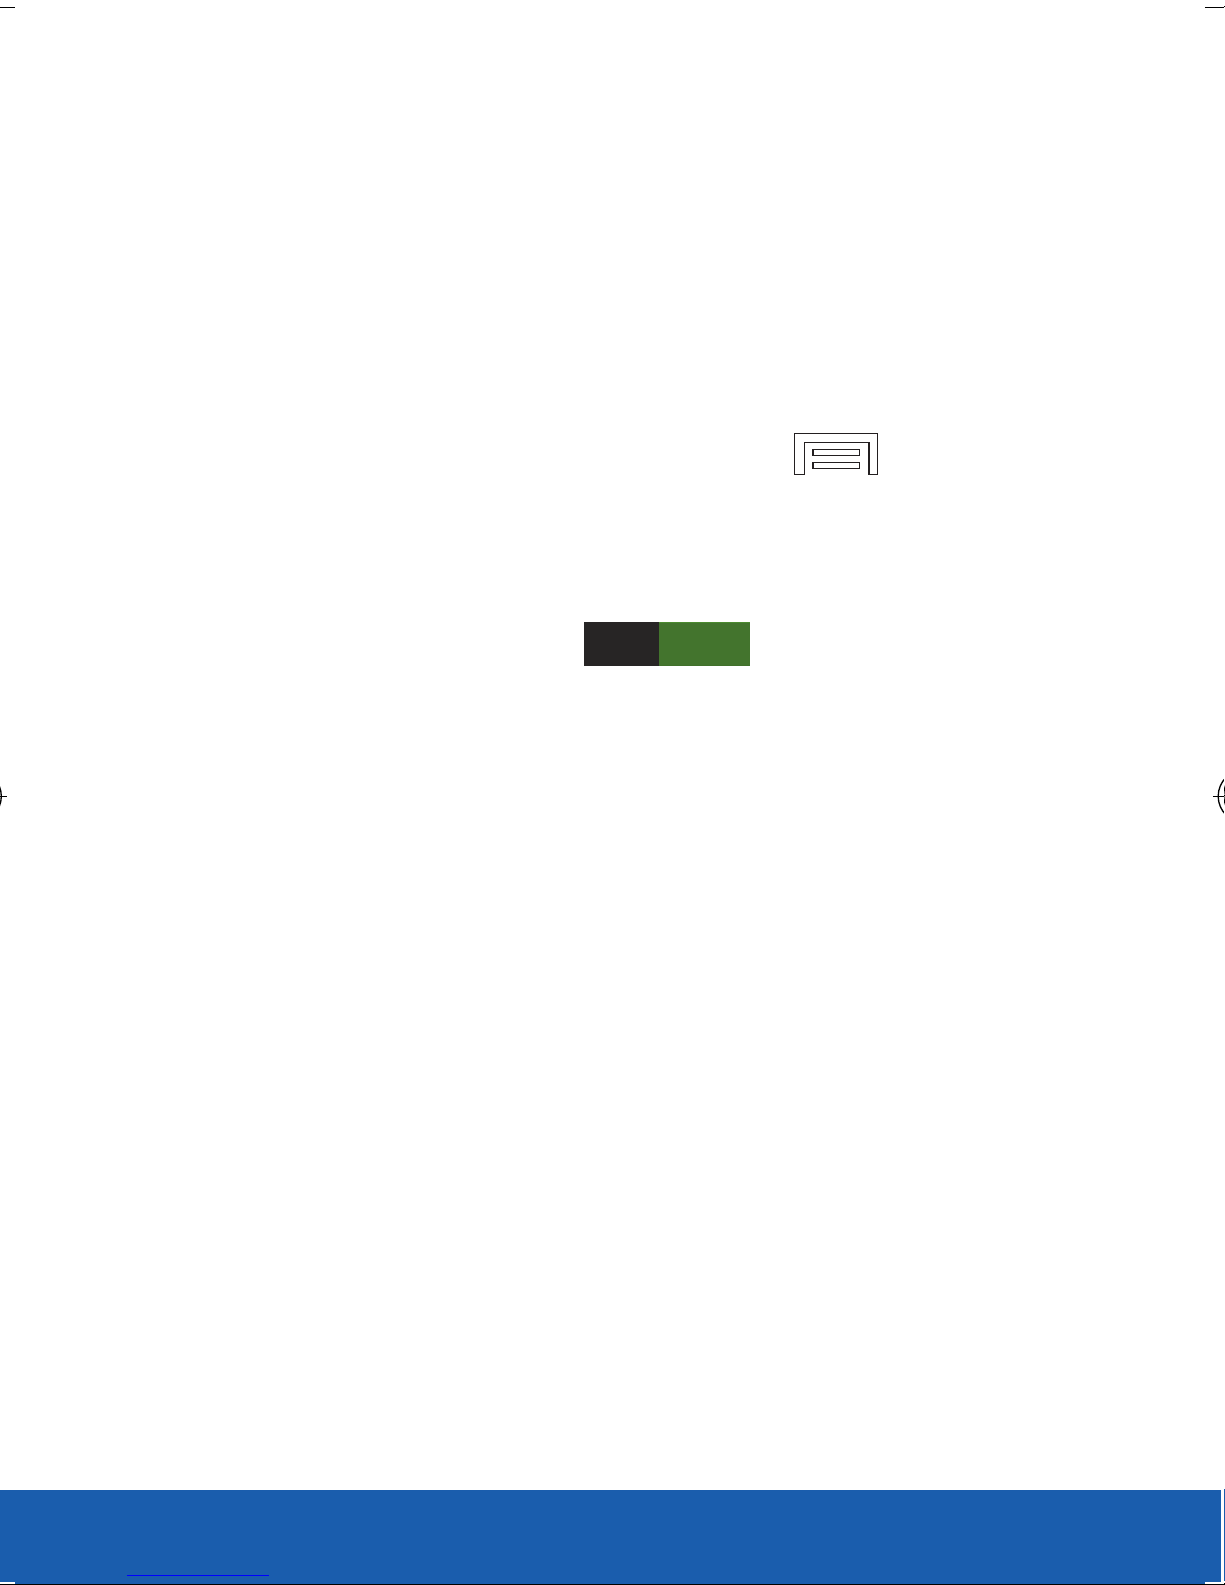
To activate motion:
1. From the Home screen, press (Menu)
and then tap Settings g Motion.
2. In a single motion touch and slide the Motion
slider to the right
to turn it on.
3. Tap the desired on-screen motion option.
The feature is active when a green checkmark
appears in the adjacent field.
For more information, refer to the Gestures section of
the online User Manual.
25
Page 26
YOUR DEVICE
S PEN
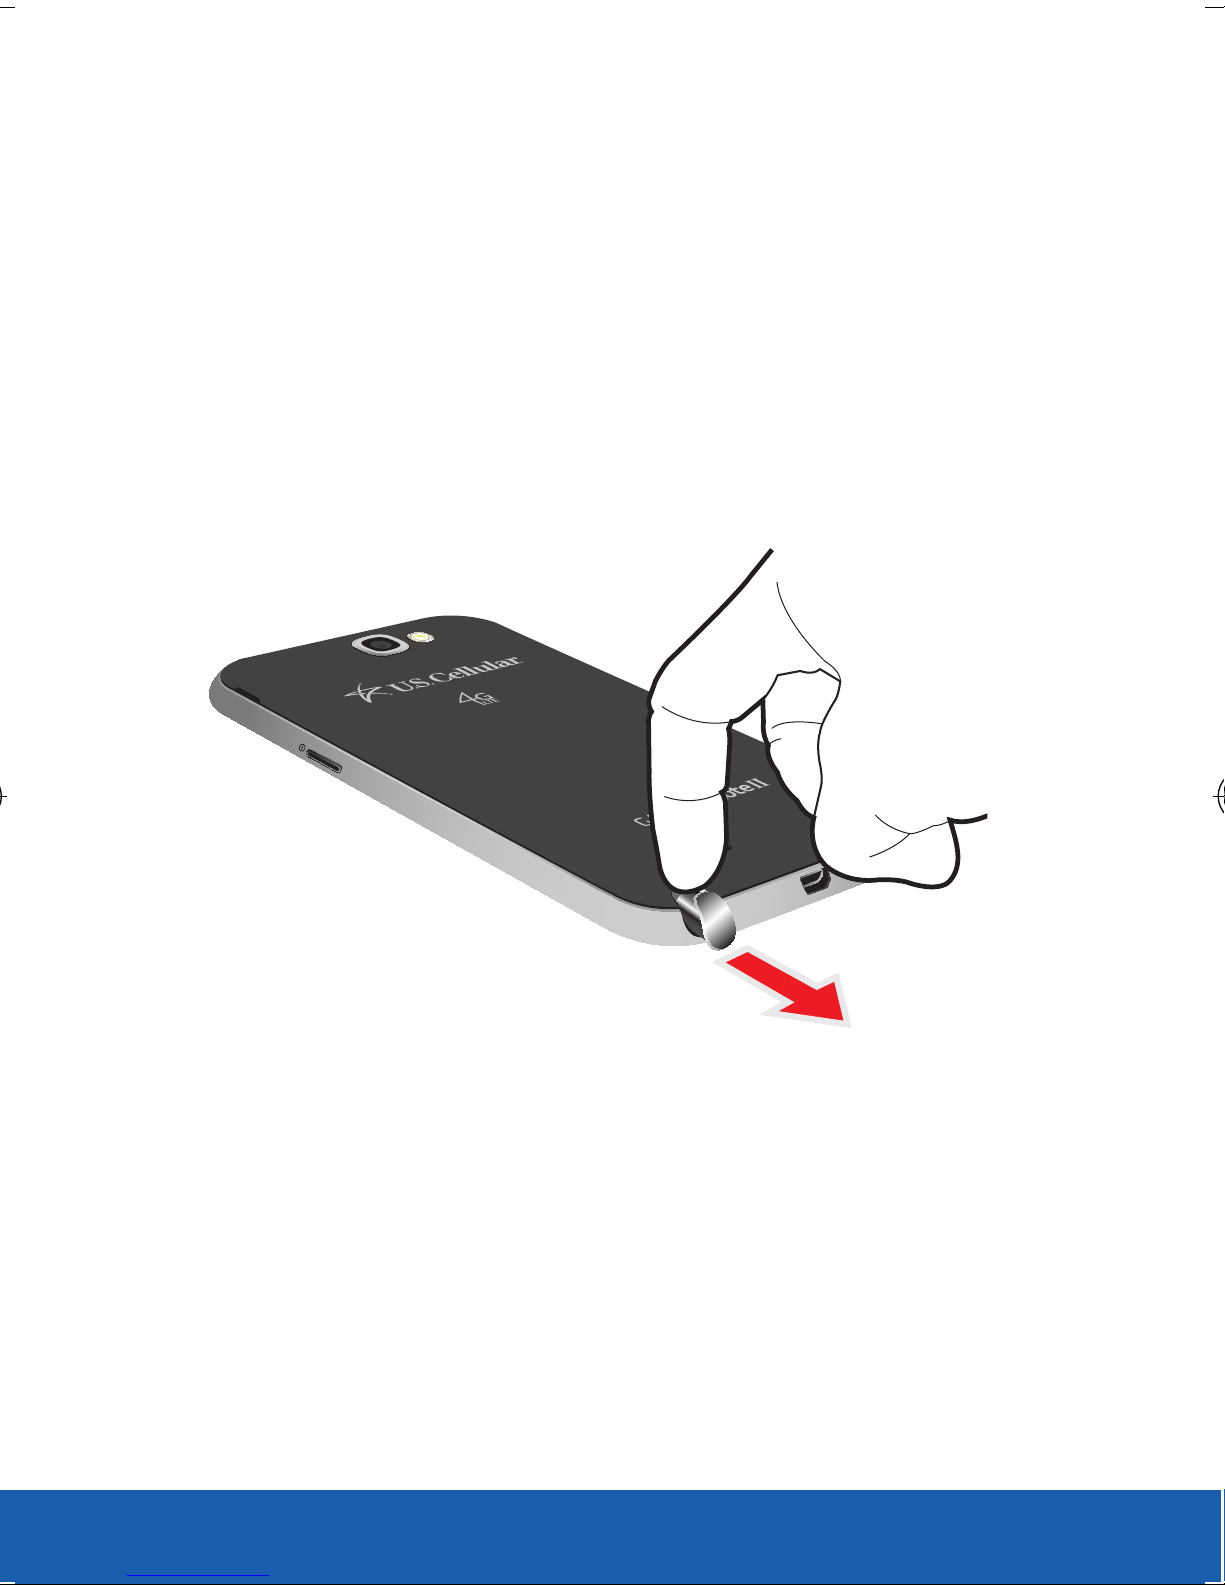
Removing the S Pen
The S Pen is stored within your device to make it
easier to keep track of.
X Use your fingernail or a sharp object to pull the
end of the S Pen from the S Pen slot.
26
Page 27
YOUR DEVICE
Using the S Pen
There are several different functions you can perform
by using the S Pen.
Effectively express yourself
Write/Draw directly into an email, or the calendar,
annotate Word, Excel, PowerPoint, and PDF
documents, capture your ideas in S Note, write a
note on the back of the picture.
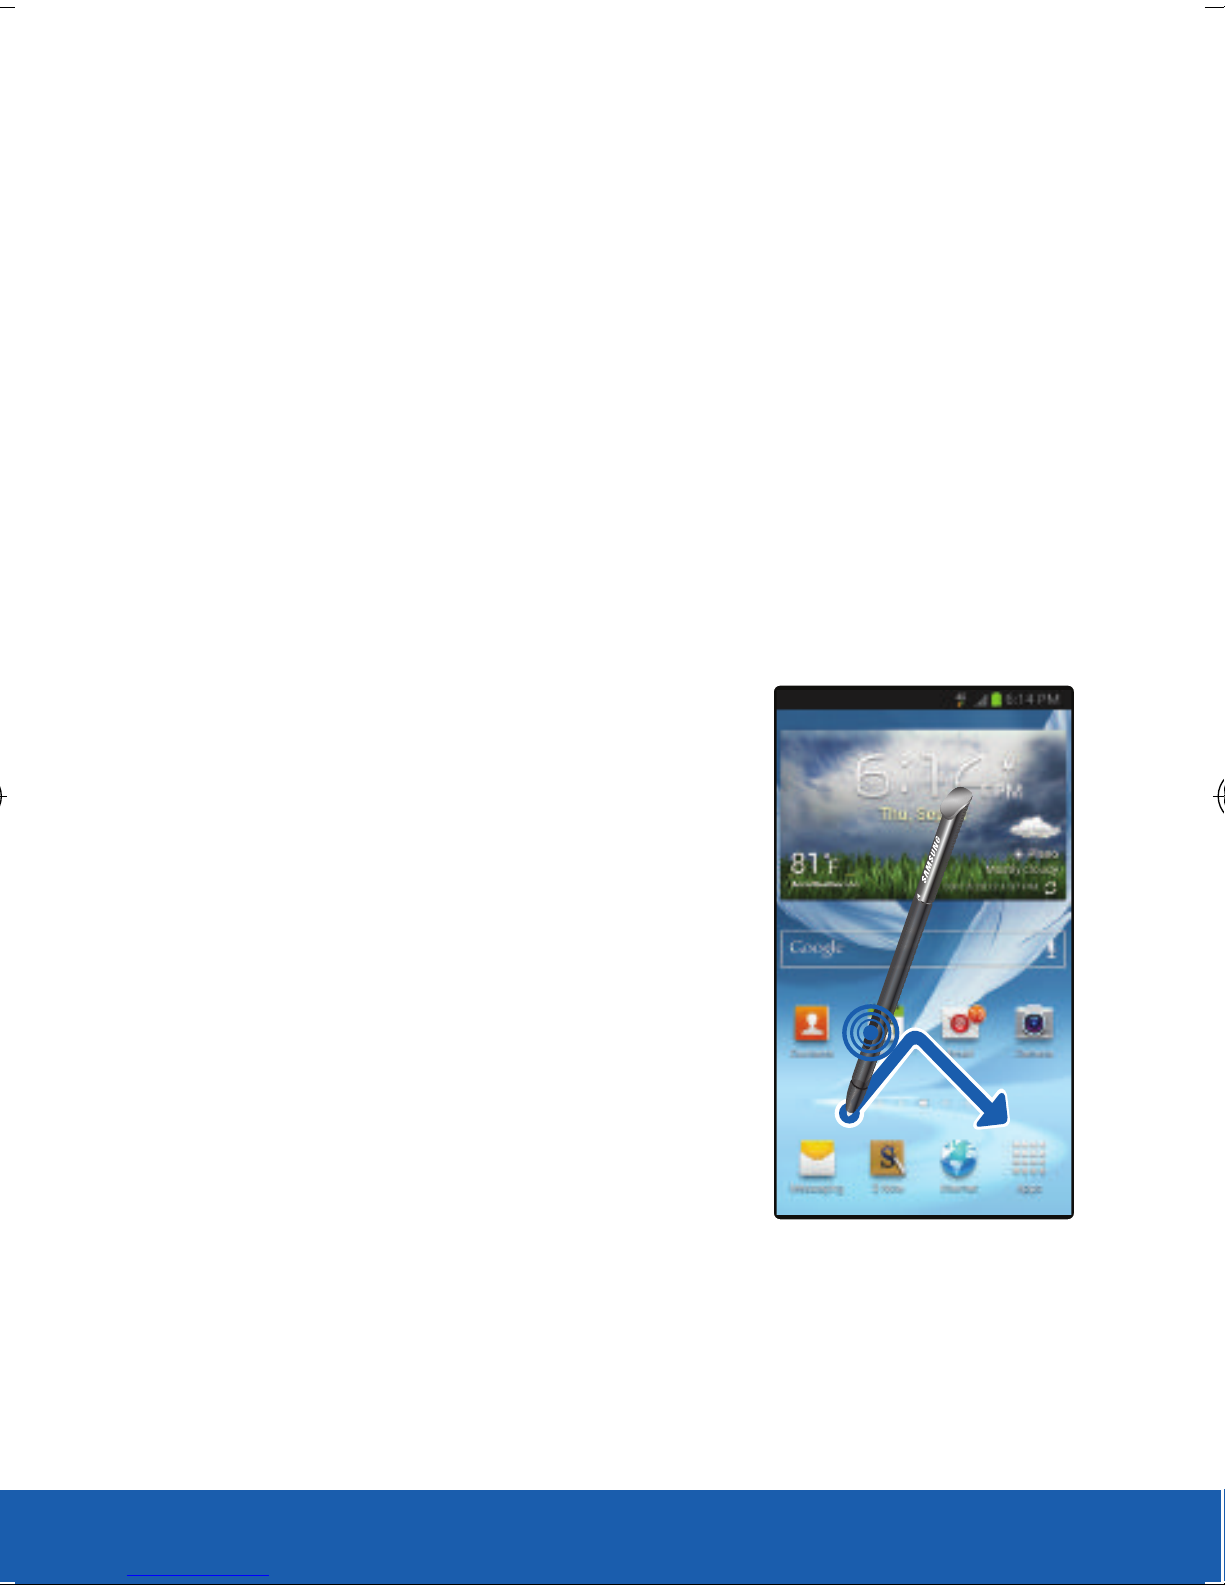
Opening a Menu
X Press the S Pen button
and then drag the screen
as shown. The previous
screen is displayed
27
Page 28
YOUR DEVICE
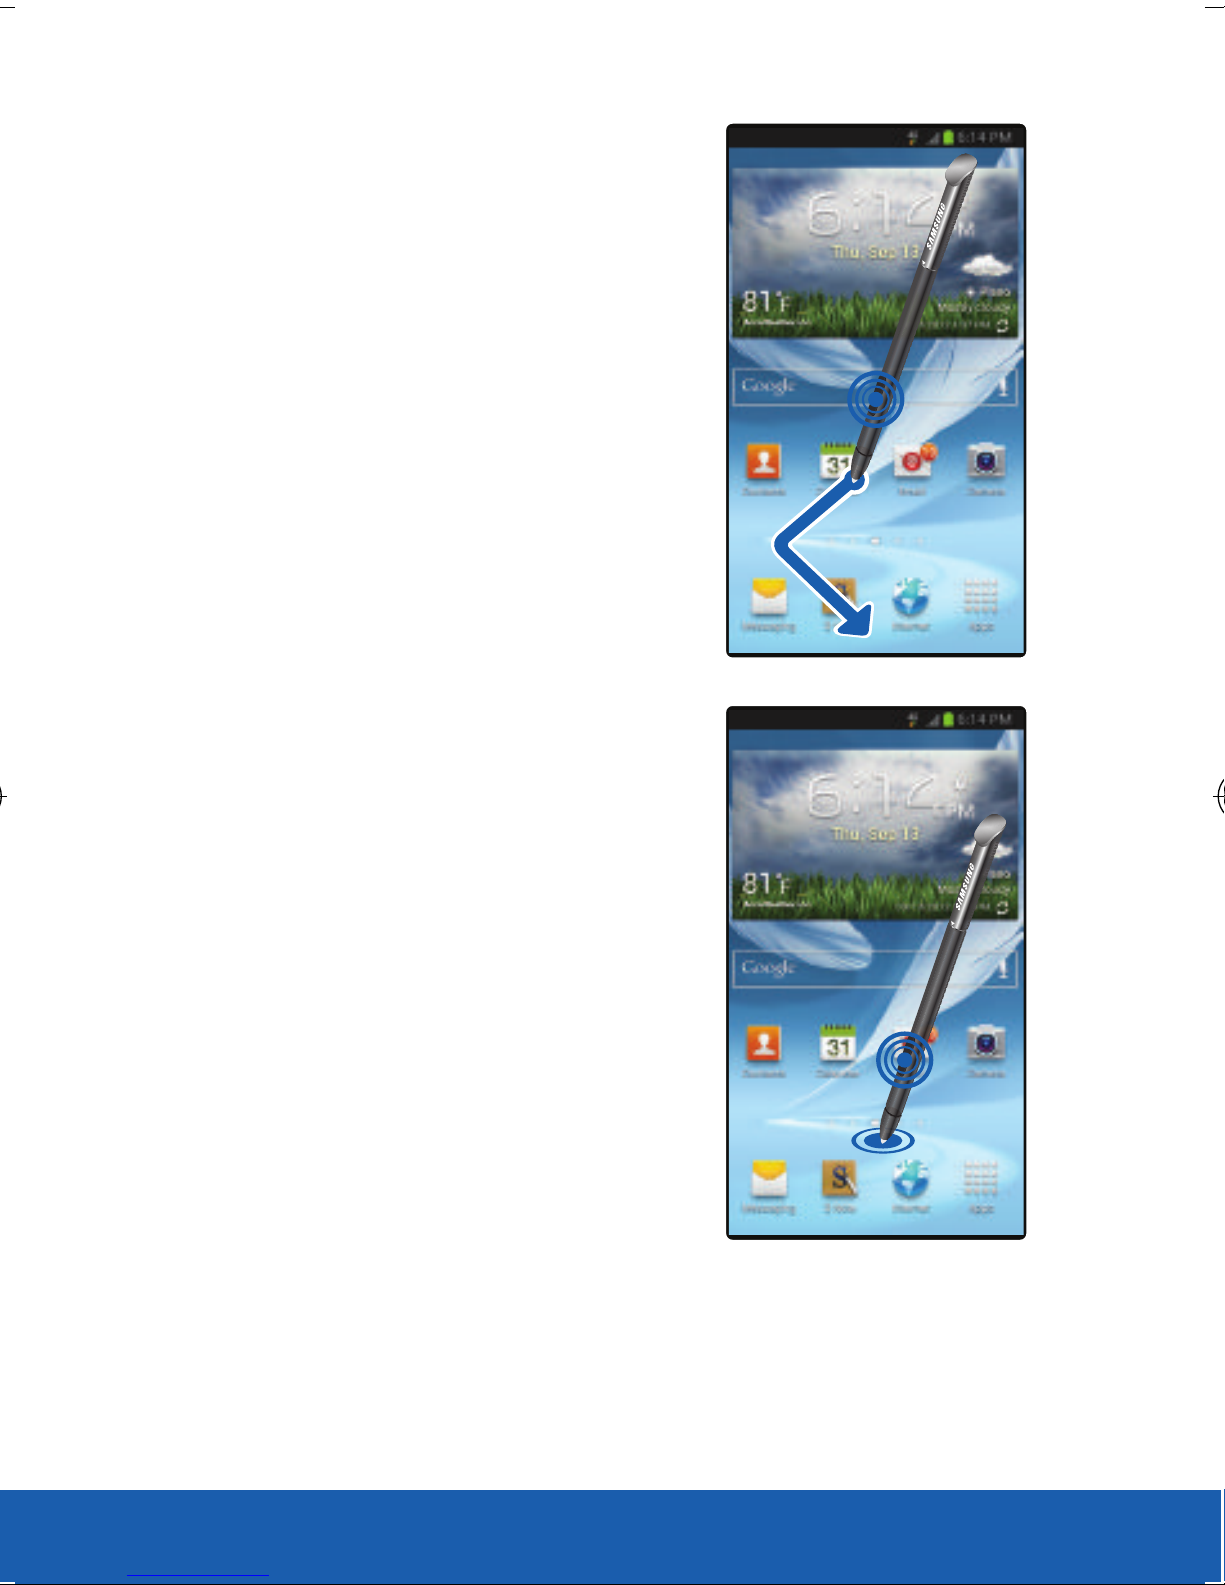
Undoing the last
action
X Press the S Pen button and
then drag the screen as
shown. The previous screen
is displayed.
Capturing Screenshots
X Press the S Pen button then
touch and hold the screen
for 2 seconds to take a
screen shot.
28
Page 29
YOUR DEVICE
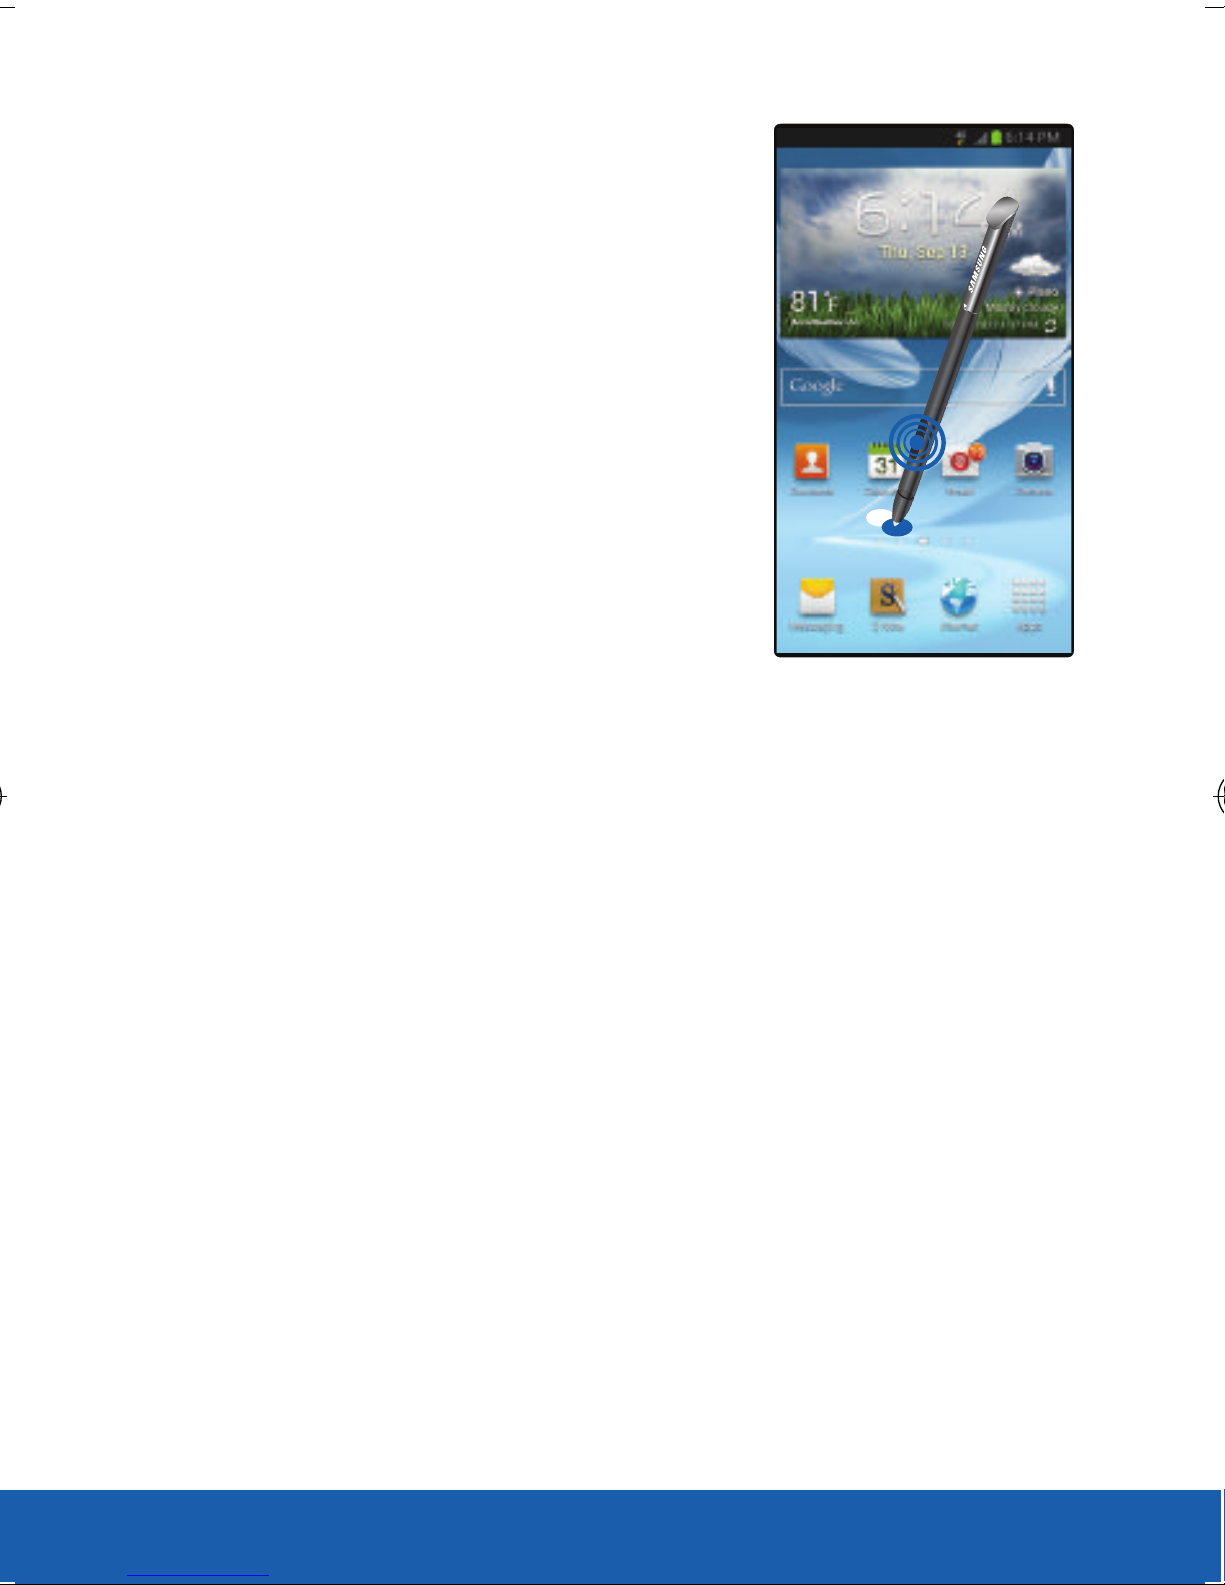
Launching S Note
X Press the S Pen button then
double-tap the
screen to launch S Note.
Selecting Text
With the S Pen button pressed, drag left or right on
the text to select. If you drag between lines, you may
select unwanted text. To select only the text you
intend, drag across the middle of the text or drag the
text selection icons.
29
Page 30
YOUR DEVICE
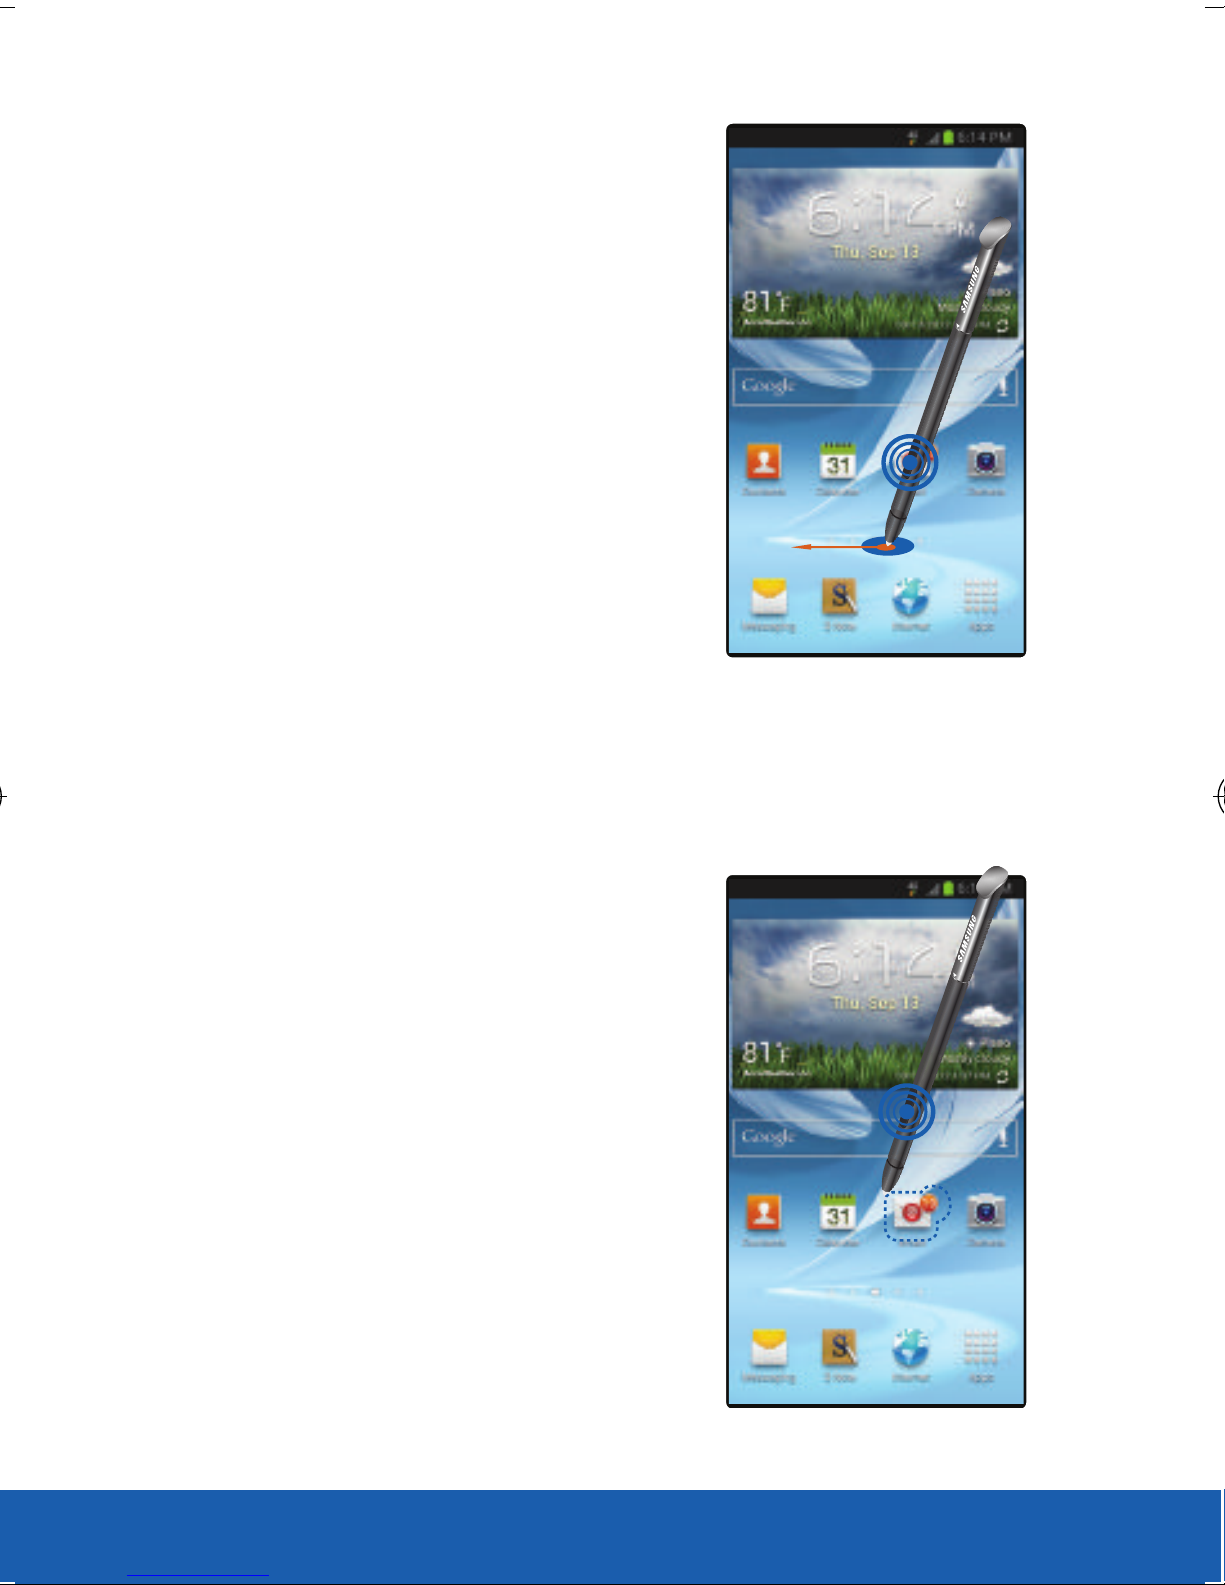
Lauching Quick
Commands
With the S Pen button pressed,
drag the S Pen up the screen
to launch Quick Command.
On the Quick Command
screen, draw a gesture
command to launch the assigned
application or
feature. To view assigned gesture
commands, press the
S Pen button while hovering
over the Quick Command screen.
Selecting and Capturing
an Image
With the S Pen button pressed,
draw a line around an area to
select it. Select an application
to use with the selected area
from the icons that appear at the
bottom of the screen.
30
Page 31

YOUR DEVICE
S Pen Air View
When you hold the S Pen near the screen, a pointer
appears on the screen. Move the pointer to files,
subjects, or options to preview the contents or
view information in pop-up windows. You can scroll
through panels or lists by moving the pointer to an
edge (top/bottom/left/right) of the screen.
31
Page 32
DEVICE FUNCTIONS
DEVICE FUNCTIONS
CREATING A NEW GOOGLE ACCOUNT
You should create a Google™ account when you
first use your device in order to fully utilize available
functionality. This account provides access to several
device features such as Gmail™, Google Maps™,
and Google Play Store™ applications. Before you
can access Google applications, you must enter
your account information. These applications sync
between your device and your online Google account.
To create a new Google account from your
device:
1. From the Home screen, tap (Apps) g
(Play Store).
2. Read the introduction and tap New to begin.
3. Follow the on-screen instructions to create a
Google Account.
– or–
If this is not the first time you are starting the
32
phone, tap (Apps) g (Gmail).
Page 33

DEVICE FUNCTIONS
To create a new Google account from the Web:
1. From a computer, launch a Web browser and
navigate to www.google.com/account.
2. Click Create an account for free.
3. Follow the on-screen prompts to create your
free account.
4. Look for an email from Google in the email
box you provided, and respond to the email to
confirm and activate your new account.
SIGNING INTO YOUR GOOGLE ACCOUNT
1. Launch an application that requires a Google
account (such as Play Store or Gmail).
2. Tap Existing.
3. Tap the Email and Password fields and enter
your information.
4. Tap Sign in. Your device communicates with
the Google servers to confirm your information.
5. If prompted, create a new Gmail username by
entering a prefix for your @gmail.com email
address.
33
Page 34
DEVICE FUNCTIONS
CALLING FEATURES
Making a Call
1. From the Home screen, tap (Phone).
2. Enter the number you wish to call (using the
keypad) and tap (Send) to place a call.
If you make a mistake while dialing, tap to
clear the last digit. Touch and hold to clear the
entire sequence.
NOTE: When you activate the Auto redial option in the Call settings
menu, the device automatically redials up to 10 times when
the person does not answer the call or is already on the device,
provided your call is not sent to voicemail.
Ending a Call
X From within an active call, tap
(End Call).
Answering a Call
X Touch and slide (Answer) anywhere to
answer an incoming call.
34
Page 35

DEVICE FUNCTIONS
Reject a Call
X Touch and slide (Reject) anywhere.
This action routes the incoming call to your
voicemail system.
Reject a Call with a Message
1. At the incoming call screen, touch and drag the
Reject call with message tab upward.
2. Tap a predefined rejection message or tap
Create new message to create a new custom
outgoing response.
Using the Speakerphone
X During an active call, tap
to switch between the earpiece and the
speakerphone.
Speaker
(Speaker)
35
Page 36
DEVICE FUNCTIONS
Call Waiting
Call Waiting notifies you of incoming calls during a
call. You have the option of answering or ignoring a
new incoming call.
1. Make your initial call.
2. Touch and slide (Answer) anywhere to
answer the new incoming call.
3. Tap an option from the on-screen menu:
● Putting xxx on hold to place the initial
caller on hold while you answer the new
incoming call.
● Ending call with xxx to end the initial call
and answer the new call.
NOTE: The new caller appears at the top of the list. The previous caller
is placed on hold and appears at the bottom of the list.
36
Page 37

DEVICE FUNCTIONS
To return to your original call:
Swap
Swap
Swap
Swap
X Tap
(Swap) to switch to the original
call. This places the new caller on hold and
activates the previous call.
To alternate between calls:
X Tap
(Swap) to alternate between the two
calls.
IMPORTANT: The currently active call is displayed as a large
on-screen Contact image.
37
Page 38
DEVICE FUNCTIONS
Making a Three-way Call
Three-way calling is similar to a conference call with
a total of three people (including yourself). Make a
call to two numbers and connect them together on
your device using three-way calling.
1. From the Home screen, tap (Phone).
2. Enter the number you wish to call (using the
dialpad) and tap (Send).
3. Once connected to the first caller tap
Add call
Add call
(Add call) to place the first caller on hold and
begin your second call.
4. Enter the second party’s phone number and tap
(Send).
Merge
5. Once the second party answers, tap
Merge
(Merge) to connect all three parties.
38
Page 39

DEVICE FUNCTIONS
VOICEMAIL
Voicemail allows callers to leave voice messages,
which can be retrieved any time. Your device
automatically transfers all unanswered calls to
voicemail, even if your device is in use or turned off.
IMPORTANT: Always use a password to protect against unauthorized
access.
Setting Up Voicemail
1. From the Home screen, tap (Phone) and
then touch and hold until the device
dials voicemail. You may be prompted to enter
a password.
2. Follow the prompts in the new user tutorial to
setup your mail box.
Listening to Your Voicemail
1. From the Home screen, tap (Phone) and
then touch and hold until the device
dials voicemail. After connection, you will hear
your voice greeting.
2. When connected, follow the voice prompts from
the voicemail center.
39
Page 40

DEVICE FUNCTIONS
Accessing Your Voicemail From
Another Phone
1. Dial your wireless phone number.
2. When you hear your voicemail greeting, press the
asterisk key on the dialpad you are using.
3. Enter your passcode.
CONTACTS
Creating a New Contact
1. From the Home screen, tap (Phone).
2. Enter the number using the on-screen dialpad.
3. Tap Add to Contacts g Create contact.
4. Tap a destination type (Phone, Google,
Microsoft Exchange ActiveSync, or Samsung
Account) (depending on where you want to
save the new contact information).
5. Enter the desired information into the
appropriate fields.
6. Tap Save to store the new entry.
40
Page 41
DEVICE FUNCTIONS
Adding a Number to an Existing
Contact
1. From the Home screen, tap (Apps) g
(Contacts).
2. Tap a contact name from the list and tap
(Edit).
– or–
Touch and hold a Contacts entry then tap Edit.
3. Tap within the Phone number area and
enter a new phone number.
If you make a mistake while entering the
number, tap to clear the last digit.
Touch and hold to clear the entire sequence.
4. Tap Save to complete and store the new entry.
Deleting a Contact
1. From the Home screen, tap (Apps) g
(Contacts).
2. Touch and hold an entry and from the
on-screen context-menu, select Delete g OK.
41
Page 42
DEVICE FUNCTIONS
MESSAGING
Accessing Messages
X From the Home screen, tap (Messaging).
Create and Send a Message
1. From the Home screen, tap (Messaging)
g (New message).
2. Enter either the recipient’s phone number or
e-mail address.
– or–
Tap (Add recipient) to select from among
Groups, Favorites, Contacts, or Logs.
42
Page 43

DEVICE FUNCTIONS
3. If adding a recipient from among Logs,
Contacts, or Group, tap the contact to place
a checkmark alongside the entry and tap Done.
The contact will be placed in the recipient field.
4. Tap the Enter message field and use the
on-screen keypad to enter a message.
5. Tap (Attach) to insert file types to your
message (such as images, videos, or audio).
Select the file and complete the on-screen
instructions to insert it to the current message.
6. Review your message and tap Send.
43
Page 44

DEVICE FUNCTIONS
SETTING UP EMAIL
In addition to Gmail, your device supports the
following account types: POP3, IMAP, and Exchange.
NOTE: This product is SAFE™ (Samsung Approved For Enterprise)
compliant.
Set Up Internet Email
1. From the Home screen, tap (Apps) g
(Email).
2. If you already have email accounts:
● If have an existing email account, press
and then tap Settings g
(Add new account).
– or–
Enter your email address in the Email address
field and enter your password in the Password
field and tap Next.
44
Page 45

DEVICE FUNCTIONS
3. At the Account options screen, select the
frequency which the device should check for
new email on the server and tap Next.
● Tap the Notify me when email arrives field
to receive new email notifications.
4. At the Set up email screen, name the account
and enter a screen name to identify yourself on
this account.
5. Tap Done to store the new account.
45
Page 46
DEVICE FUNCTIONS
Set Up Microsoft Exchange Email
1. From the Home screen, tap (Apps) g
(Email).
● If have an existing email account, press
and then tap Settings g
(Add new account).
2. Enter your Email address and Password
information.
3. Tap Show password to display the password
as you enter it in the associated field.
NOTE: If selected, the Manual setup button changes to read
Microsoft Exchange ActiveSync®. If activated, skip to step 6.
Consult your Network or IT Administrator for further details
and support.
4. Tap Next g Microsoft Exchange ActiveSync.
IMPORTANT: If you receive a message that your “Setup could not
finish”, tap Edit details to manually configure any
remaining exchange account information that could not
be automatically retrieve by the phone.
46
Page 47

DEVICE FUNCTIONS
5. If prompted, tap Edit details and edit the
account information as necessary and tap
Next.
NOTE: If you are experiencing difficulty setting up your corporate email
account, contact your company’s IT department for further
information.
6. Consult your IT Administrator if it is necessary
to enable the Use client certification option
and tap Next.
7. Read the on-screen Activation disclaimer and,
when prompted, tap OK.
8. If prompted, read the Remote security
administration information and tap OK to
accept the service and continue.
9. Adjust the various on-screen configuration
fields and tap Next. It may take a few seconds
for the next screen to load.
10. If prompted, read the Activate device
administrator? screen and tap Activate to
complete the email setup process.
11. Identify your new work email account with a
unique name (Ex: Work), then tap Done.
47
Page 48

DEVICE FUNCTIONS
BLUETOOTH
ON
Bluetooth® is a short-range communications
technology that allows you to connect wirelessly to
a number of Bluetooth devices, such as headsets
and hands-free car kits, and Bluetooth-enabled
handhelds, computers, printers, and wireless devices.
Turn Bluetooth On and Off
To turn Bluetooth on:
1. From the Home screen, press (Menu)
and then tap Settings.
2. In a single motion touch and slide the
Bluetooth slider to the right
it on.
● When active, displays in the Status
area.
● When an available open and visible Bluetooth
device, displays.
to turn
48
Page 49

DEVICE FUNCTIONS
To turn Bluetooth off:
OFF
1. From the Home screen, press (Menu)
and then tap Settings.
2. In a single motion touch and slide the
Bluetooth slider to the left
it off.
Pairing Bluetooth Devices
1. Verify Bluetooth is active.
2. From the Bluetooth settings page, tap the
Visibility field (shown by the device name).
Your device must be visible to successfully pair
with an external device. This is shown by a
green check mark.
3. Tap Scan. Your device displays a list of
to turn
discovered in-range Bluetooth devices.
4. Tap a device from the list to initiate pairing.
5. Enter the passkey or PIN code, if needed, and
tap OK.
6. The external device must accept the connection
and enter your device’s PIN code.
7. Once successfully paired to a headset,
displays in the Status area.
49
Page 50
DEVICE FUNCTIONS
WEB BROWSING
Your device is equipped with a Google browser to
navigate the Web.
To open the Browser screen:
X From the Home screen, tap (Apps) g
(Internet).
Entering a URL
You can access a website quickly by entering the
URL. Websites are optimized for viewing on your
device.
X From the homepage tap the URL field at the top
of the screen, enter the URL and tap .
50
Page 51
DEVICE FUNCTIONS
Adding and Deleting a Window
You can have up to eight Internet windows open at
one time.
To add a new window:
1. From your browser window, tap
(Windows) g (New window). A new
browser window displays.
NOTE: The number of currently open windows is displayed at the
bottom of the Windows screen.
2. Scroll across the screen to view the currently
active windows and tap an entry to launch the
selected Internet window.
To delete an existing window:
1. From your browser window, tap
(Windows).
2. Scroll across the available windows and locate
your target window.
3. Tap next to the listing to delete the
window.
51
Page 52
DEVICE FUNCTIONS
WI-FI
ON
Your device can connect to the Internet using Wi-Fi.
Wi-Fi communication requires access to an existing
and accessible Wireless Access Point (WAP). These
WAPs can either be Open (unsecured) as within most
HotSpots, or Secured (requiring knowledge of the
Router name and password).
Turn on Wi-Fi:
1. In a single motion, touch and drag the Status
bar down to the bottom of the screen.
2. Tap Wi-Fi.
– or–
1. From the Home screen, press (Menu)
and then tap Settings.
2. In a single motion touch and slide the Wi-Fi
slider to the right
● When active and there is an available open
wireless network, displays in the
Status area.
● When active and communicating,
to turn it on.
displays in the Status area.
52
Page 53

DEVICE FUNCTIONS
To turn Wi-Fi off:
OFF
1. From the Home screen, press (Menu)
and then tap Settings.
2. In a single motion touch and slide the Wi-Fi
slider to the left
to turn it off. The
slider color indicates the activation status.
Connect to a Wi-Fi network
1. From the Home screen, press (Menu)
and then tap Settings g Wi-Fi.
2. Tap the desired network.
3. Enter the password, if necessary,
4. Tap Connect.
53
Page 54
DEVICE FUNCTIONS
SMARTPHONE MOBILE HOTSPOT
ON
Turn your device into a portable Wi-Fi HotSpot so you
can share your mobile data connection.
To use your device’s HotSpot capability, you must
have the Smartphone Mobile HotSpot service added
to your rate plan.
You will see (Tethering active) in the Status
bar when the feature is active.
NOTE: The Smartphone Mobile HotSpot service cannot be active at the
same time as Wi-Fi. Please close your Wi-Fi connection prior to
launching this service.
NOTE: Up to 10 devices can share your phone’s Mobile HotSpot
connection.
To activate the Smartphone Mobile HotSpot
service:
1. From the Home screen, press (Menu)
and then tap Settings g More settings g
Tethering and portable hotspot.
2. In a single motion touch and slide the Portable
Wi-Fi hotspot slider to the right
to
turn it on.
54
Page 55

DEVICE FUNCTIONS
3. Read the on-screen introduction regarding
Portable Wi-Fi hotspot and tap Accept.
4. Tap Configure and create a new Network SSID
name and then write it down.
5. Verify the Security field is set to WPA2 PSK.
6. Enter a new password then write it down.
7. Tap Save to store the new settings.
8. Confirm the Mobile HotSpot icon appears at
the top of the screen.
NOTE: By default, the connection is open and not secure. It is
recommended that you access the Smartphone Mobile HotSpot
settings and create a secure connection by using a password
for communication.
NOTE: Using your 4G service and Smartphone Mobile HotSpot drains
your phone’s battery at a much faster rate than when using
any other feature combination. The best way to keep using the
phone as a HotSpot is to have it connected to a power supply.
55
Page 56

DEVICE FUNCTIONS
To change the Portable HotSpot password:
1. From the Home screen, tap (Apps) g
and then tap Settings g More settings
g Tethering and portable hotspot g
Configure.
2. Tap the Security field and select WPA2 PSK.
3. With security enabled, delete the previous
password and enter a new one into the Password
field.
NOTE: The more complex the password, the harder it will be for
intruders to break your security. It is recommended that you not
use names, birthdays, or other personal information.
4. Tap Save to store the new settings.
56
Page 57
DEVICE FUNCTIONS
USB TETHERING
This option allows you to share your device’s mobile
data connection via a direct USB connection between
your device and a single computer. The Mobile
HotSpot connectivity is a wireless version of this
same functionality and allows you to provide Internet
connectivity to multiple devices.
To use your device’s tethering capability, you must
have the Smartphone Mobile HotSpot service added
to your rate plan.
You will see (Tethering active) on the Status
bar when the feature is active.
● For more information on tethering with operating
systems, go to www.android.com/tether.
● You cannot mount your device’s microSD card
to your computer while using the USB Tethering
feature. If additional software or USB drivers are
required, go to www.samsung.com/us/support/
downloads.
57
Page 58

DEVICE FUNCTIONS
● When you connect your phone to a computer with
a USB cable, you can either share your mobile data
connection via tethering OR you can share files—
you cannot do both. Do not turn on tethering if you
want to use your computer to access your phone’s
memory card.
To connect using USB Tethering:
1. From the Home screen, press (Menu)
and then tap Settings g More settings g
Tethering and portable hotspot.
2. Plug in the USB cable between your computer
and your device.
3. Tap USB tethering from the Tethering menu.
This places a green check mark next to the
entry and activates the feature. A Tethering or
HotSpot active notification briefly appears on
the screen.
4. Read the on-screen introduction regarding
Portable Wi-Fi hotspot and tap Accept.
● Look for (Tethering Active) in the Status
bar area of the screen.
58
Page 59

DEVICE FUNCTIONS
NEAR FIELD COMMUNICATION
ON
Near Field Communication (NFC), when enabled,
allows two compatible devices to exchange
data when they touch each other. When used in
conjunction with S Beam, your device can be used to
share images/videos/files content when
NFC-capable devices are touched.
To activate NFC:
1. From the Home screen, press (Menu)
and then tap Settings g More settings.
2. Tap NFC and make sure the feature is turned
on.
3. If not already active, in a single motion touch
and slide the NFC slider to the right
to turn it on.
59
Page 60

DEVICE FUNCTIONS
S BEAM
ON
This feature (when activated via NFC) allows you to
beam large files directly to another compatible device
that is in direct contact. These files can be larger,
such as Videos, HD pictures, and other large files.
You can beam images and videos from your gallery,
music files from your music player, and more.
1. From the Home screen, press (Menu)
and then tap Settings g More settings.
2. Verify the NFC feature is active.
3. Tap S Beam and make sure the feature is
turned on.
4. If not already active, in a single motion touch
and slide the S Beam slider to the right
to turn it on.
5. Complete the transfer process between the
two NFC-enabled devices by placing them back
to back. This feature can come in very handy
to quickly share pictures between users with
compatible S Beam devices.
60
Page 61

DEVICE FUNCTIONS
AllShare Cast Hub
This hardware allows you to enjoy what’s currently
on your device directly on your TV.
NOTE: There is no need to be connected to a Wi-Fi network or to be
logged into your Samsung Account to use this feature. AllShare
Cast Hub establishes a WI-Fi Direct connection between the
device and the hub.
To connect your AllShare Cast Hub hardware:
1. Connect the AllShare Cast hub to a power
source via the USB Travel Adapter.
2. Connect your TV to the AllShare Cast Hub via
an HDMI cable (A-to-A cable) as shown above.
3. Change the source input on your TV to match
the input port used by the incoming HDMI
cable.
NOTE: The television screen should now display an on-screen tutorial
showing you how to configure your device’s AllShare Cast Hub
and device settings.
61
Page 62

DEVICE FUNCTIONS
To activate AllShare Cast on your device:
ON
1. From the Home screen, press (Menu)
and then tap Settings g More settings g
AllShare Cast.
2. In a single motion touch and slide the AllShare
Cast slider to the right
to turn it on.
Pairing to an AllShare Cast Hub
To pair your device and Hub for the 1st time:
1. Locate the AllShare Hub (dongle) name
displayed at the bottom of the TV (showing the
tutorial). Ex: Name: Dongle - XXXXXX.
2. Access your device’s AllShare Cast screen and
locate the same hub/dongle name in the list.
Tap Scan if necessary.
3. Verify your AllShare Cast Hub is on (blinking red
LED) and the on-screen tutorial is displaying on
the connected TV.
62
Page 63

DEVICE FUNCTIONS
4. Verify the previous Wi-Fi Direct icon now
displays (Wi-Fi Direct Communicating).
NOTE: The AllShare Cast Hub communicates with your paired device
via a Wi-Fi Direct connection.
5. For a first time connection:
● Press the RESET button (located at the rear
of the hub) once and only for a second until
the LED turns solid BLUE.
● Quickly tap the hub name entry on your
device’s AllShare Cast screen.
6. Verify (AllShare Cast Hub
Communicating) appears at the top of the
device’s screen.
7. Confirm the connection by making sure both
your TV and device show the same image/
screen.
IMPORTANT: The AllShare Cast Hub is a 1-to-1 connection. If a
previous device was paired to the Hub and is still
connected to the AllShare Cast Hub, you can not pair a
new device until the first connection is stopped.
63
Page 64

DEVICE FUNCTIONS
To disconnect your device from the hub:
1. Access your device’s AllShare Cast screen and
locate the current connection.
2. Tap the entry and select Stop.
To reconnect your device again to an existing
hub:
1. Locate the AllShare Hub (dongle) name
displayed at the bottom of the TV (showing the
tutorial). Ex: Name: Dongle - XXXXXX.
IMPORTANT: Verify the LED is not a solid blue. This indicates there is
another device currently connected.
2. Access your device’s AllShare Cast screen and
tap the same hub/dongle name in the list.
3. Confirm the connection by making sure both
your TV and device show the same image/
screen.
64
Page 65

NOTES
65
 Loading...