

Page 1
MX-HS6000
MX-HS7000
PREMIUM HI-FI Component System
(MP3/WMA/CD-DA Playback with CD/USB)
user's manual
imagine the possibilities
Thank you for purchasing this Samsung product.
To receive more complete service,
please register your product at
www.samsung.com/register
Page 2
Safety Information
Warning
TO REDUCE THE RISK OF ELECTRIC SHOCK, DO NOT REMOVE THE COVER (OR BACK).
NO USER-SERVICEABLE PARTS ARE INSIDE. REFER SERVICING TO QUALIFIED SERVICE
PERSONNEL.
CAUTION
RISK OF ELECTRIC SHOCK DO NOT OPEN
CAUTION: TO PREVENT ELECTRIC SHOCK, MATCH WIDE
BLADE OF PLUG TO WIDE SLOT, FULLY INSERT.
WARNING
• To reduce the risk of fire or electric shock, do
not expose this appliance to rain or moisture.
CLASS 1 LASER PRODUCT
This Compact Disc player is classified as a CLASS
1 LASER product. Use of controls, adjustments
or performance of procedures other than those
specified herein may result in hazardous radiation
exposure.
Complies with 21CFR 1040.10 except for
deviations pursuant to Laser Notice No. 50, dated
June 24, 2007.
DANGER :
• VISIBLE AND INVISIBLE LASER RADIATION
WHEN OPEN. AVOID DIRECT EXPOSURE TO
BEAM. (FDA 21 CFR)
CAUTION :
• CLASS 3B VISIBLE AND INVISIBLE LASER
RADIATION WHEN OPEN. AVOID EXPOSURE
TO THE BEAM. (IEC 60825-1)
This symbol indicates “dangerous
voltage” inside the product that presents
a risk of electric shock or personal injury.
This symbol indicates important
instructions accompanying the product.
• THIS PRODUCT UTILIZES A LASER.
USE OF CONTROLS OR ADJUSTMENTS
OR PERFORMANCE OF PROCEDURES
OTHER THAN THOSE SPECIFIED HEREIN
MAY RESULT IN HAZARDOUS RADIATION
EXPOSURE. DO NOT OPEN THE COVER
AND DO NOT REPAIR YOURSELF. REFER
SERVICING TO QUALIFIED PERSONNEL.
CLASS 1 LASER PRODUCT
KLASSE 1 LASER PRODUKT
LUOKAN 1 LASER LAITE
KLASS 1 LASER APPARAT
PRODUCTO LÁSER CLASE 1
WARNING
TO PREVENT THE SPREAD
OF FIRE, KEEP CANDLES AND
OTHER ITEMS WITH OPEN FLAMES AWAY
FROM THIS PRODUCT AT ALL TIMES.
• An administration fee may be charged if either
an engineer is called out at your request and there is no defect in the product
(i.e. where you have failed to read this user's manual).
you bring the unit to a repair centre and there is no defect in the product
(i.e. where you have failed to read this user's manual).
• The amount of such administration charge will be advised to you before any work or home visit is
carried out.
2 English
Page 3
FCC NOTES (for U.S.A)
This equipment has been tested and found to
comply with the limits for a Class B digital device,
pursuant to Part 15 of the FCC rules. These limits
are designed to provide reasonable protection
against harmful interference in a residential
installation. This equipment generates, uses
and can radiate radio frequency energy and, if
not installed and used in accordance with the
instructions, may cause harmful interference
to radio or television reception, which can be
determined by turning the equipment off and on.
If interference is present, the user is encouraged
to try to correct the interference by one or more of
the following measures:
• Reorient or relocate the receiving antenna.
• Increase the separation between the equipment
and receiver.
• Connect this equipment to an outlet that is
on a circuit that is different than the circuit the
receiver is connected to.
• Consult the dealer or an experienced radio/TV
technician for help.
This class B digital product meets all requirements
of the Canadian Interference - Causing Equipment
Regulations.
Important Safety Instructions
Read these operating instructions carefully before
using the unit. Follow all the safety instructions
listed below. Keep these operating instructions
handy for future reference.
1. Read these instructions.
2. Keep these Instructions.
3. Heed all warnings.
4. Follow all instructions.
5. Do not use this apparatus near water.
6. Clean only with a dry cloth.
7. Do not block any ventilation openings. Install
in accordance with the manufacturer's
instructions.
8. Do not install near any heat sources such
as radiators, heat registers, stoves, or other
apparatus (including amplifiers) that produce
heat.
9. Do not defeat the safety purpose of the
polarized or grounding type plug. A polarized
plug has two blades with one wider than the
other. A grounding type plug has two blades
and a third grounding prong. The wide blade
or the third prong are provided for your safety.
If the provided plug does not fit into your
outlet, consult an electrician for replacement
of the obsolete outlet.
10. Protect the power cord from being walked on
or pinched particularly at plugs, convenience
receptacles, and the point where they exit
from the apparatus.
11. Only use attachment/accessories specified
by the manufacturer.
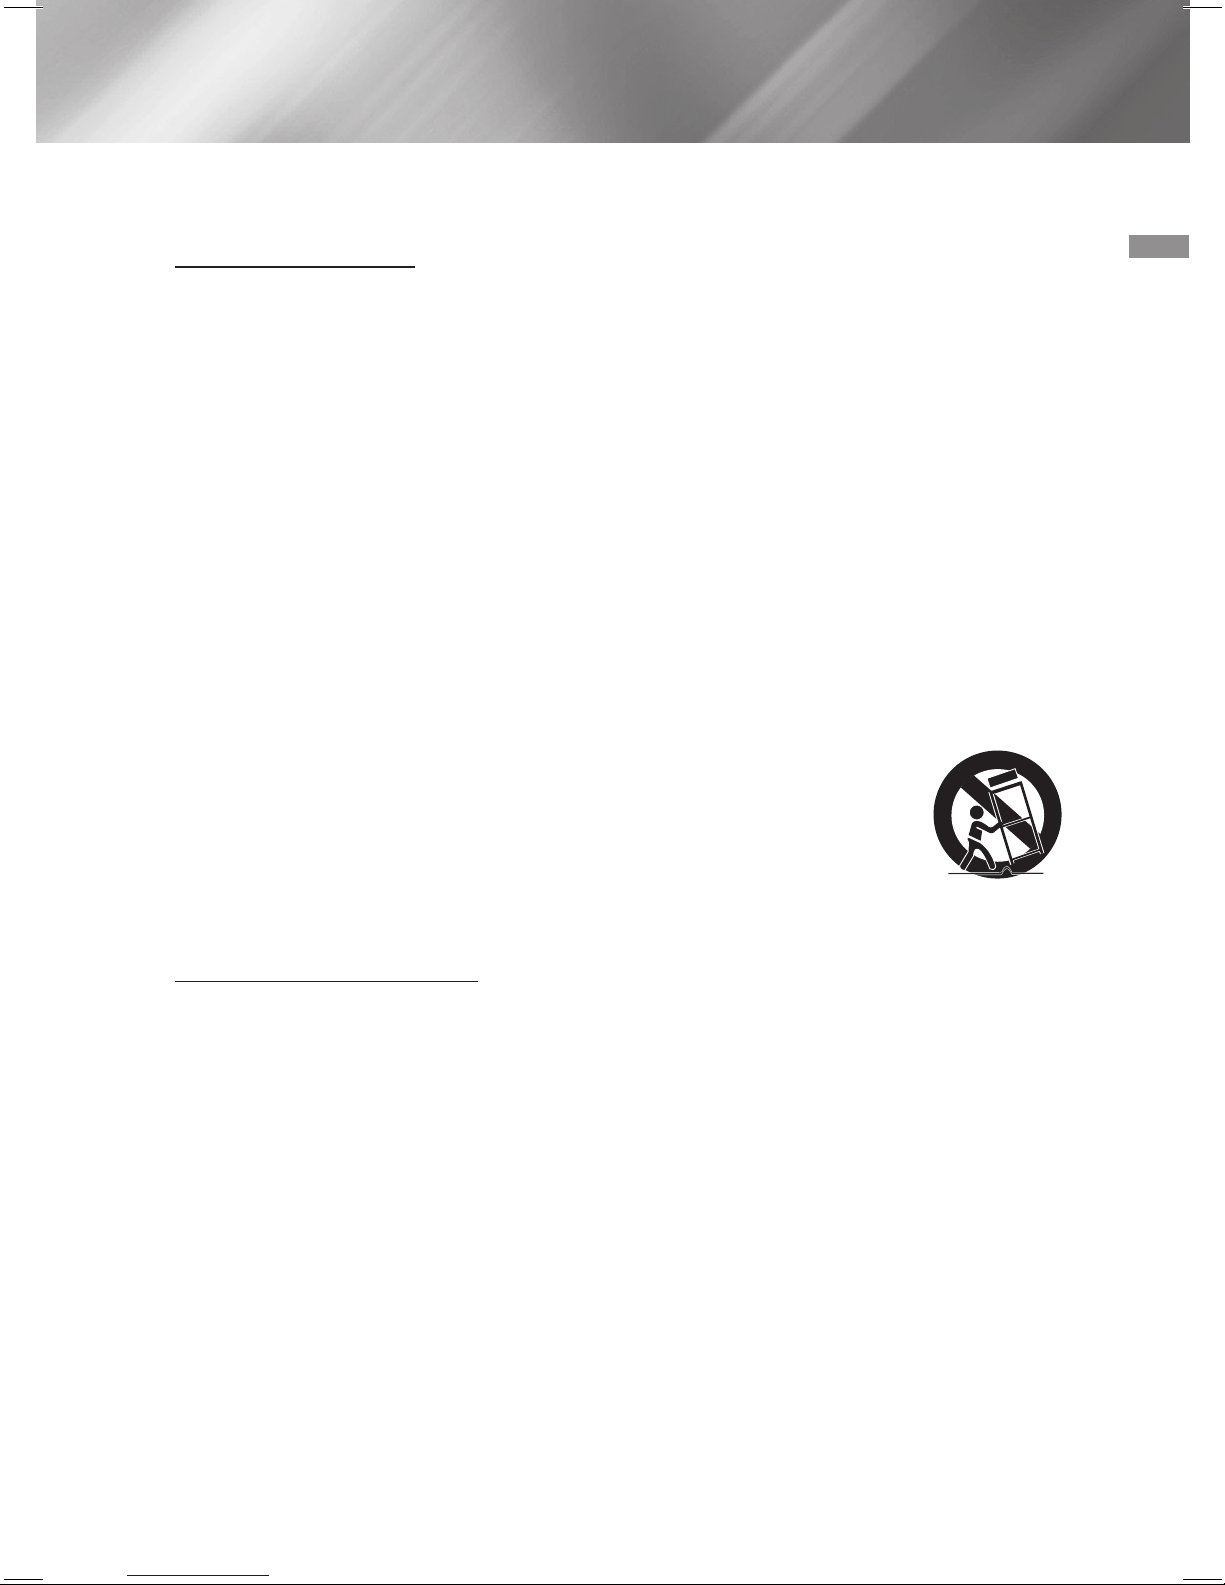
12. Use only with the cart,
stand, tripod, bracket,
or table specified by the
manufacturer, or sold with
the apparatus.
When a cart is used, use
caution when moving the cart/apparatus
combination to avoid injury from tip-over.
13. Unplug this apparatus during lightning storms
or when it will be unused for long periods of
time.
14. Refer all servicing to qualified service
personnel. Servicing is required when the
apparatus has been damaged in any way,
such as when the power-supply cord or plug
is damaged, liquid has been spilled or objects
have fallen into the apparatus, the apparatus
has been exposed to rain or moisture, does
not operate normally, or has been dropped.
01 Safety Information
3 English
Page 4
Safety Information
Precautions
• Ensure that the AC power supply in your house
complies with the identification sticker located
on the back of your product.
• Install your product horizontally, on a suitable
base (furniture), with enough space around it for
ventilation (7.5~10cm).
• Do not place the product on amplifiers or other
equipment which may become hot. Make sure
the ventilation slots are not covered.
• Do not stack anything on top of the product.
• Before moving the product, ensure the Disc
Insert Slot is empty.
• During thunderstorms, disconnect the AC
plug from the wall outlet. Voltage peaks due to
lightning could damage the product.
• Do not expose the product to direct sunlight
or other heat sources. This could cause the
product to overheat and malfunction.
• when the mains plug or appliance coupler shall
remain readily operable.
• Protect the product from moisture, and excess
heat or equipment creating strong magnetic or
electric fields (i.e. speakers.).
• Disconnect the power cable from the AC supply
if the product malfunctions.
• Your product is not intended for industrial use. It
is for personal use only.
• Condensation may occur if your product or
disc has been stored in cold temperatures. If
transporting the product during the winter, wait
approximately 2 hours until the product has
reached room temperature before using.
• The batteries used with this product contain
chemicals that are harmful to the environment.
Do not dispose of batteries in the general
household trash.
• Place the loudspeakers at a reasonable distance
on either side of the system to ensure good
stereo sound.
• Direct the loudspeakers towards the listening
area.
•Do not expose this apparatus to dripping
or splashing. Do not place objects filled
with liquids, such as vases, on the
apparatus.
•To turn this apparatus off completely, you
must disconnect it from the wall outlet.
Consequently, the wall outlet and power
plug must be readily accessible at all
times.
•Use only a properly grounded plug and
receptacle.
- An improper ground may cause electric shock
or equipment damage. (Class l Equipment
only.)
Disc Storage & Management
• Holding Discs
- Fingerprints or scratches on a disc may
reduce sound and picture quality or cause
skipping.
- Avoid touching the surface of a disc where
data has been recorded.
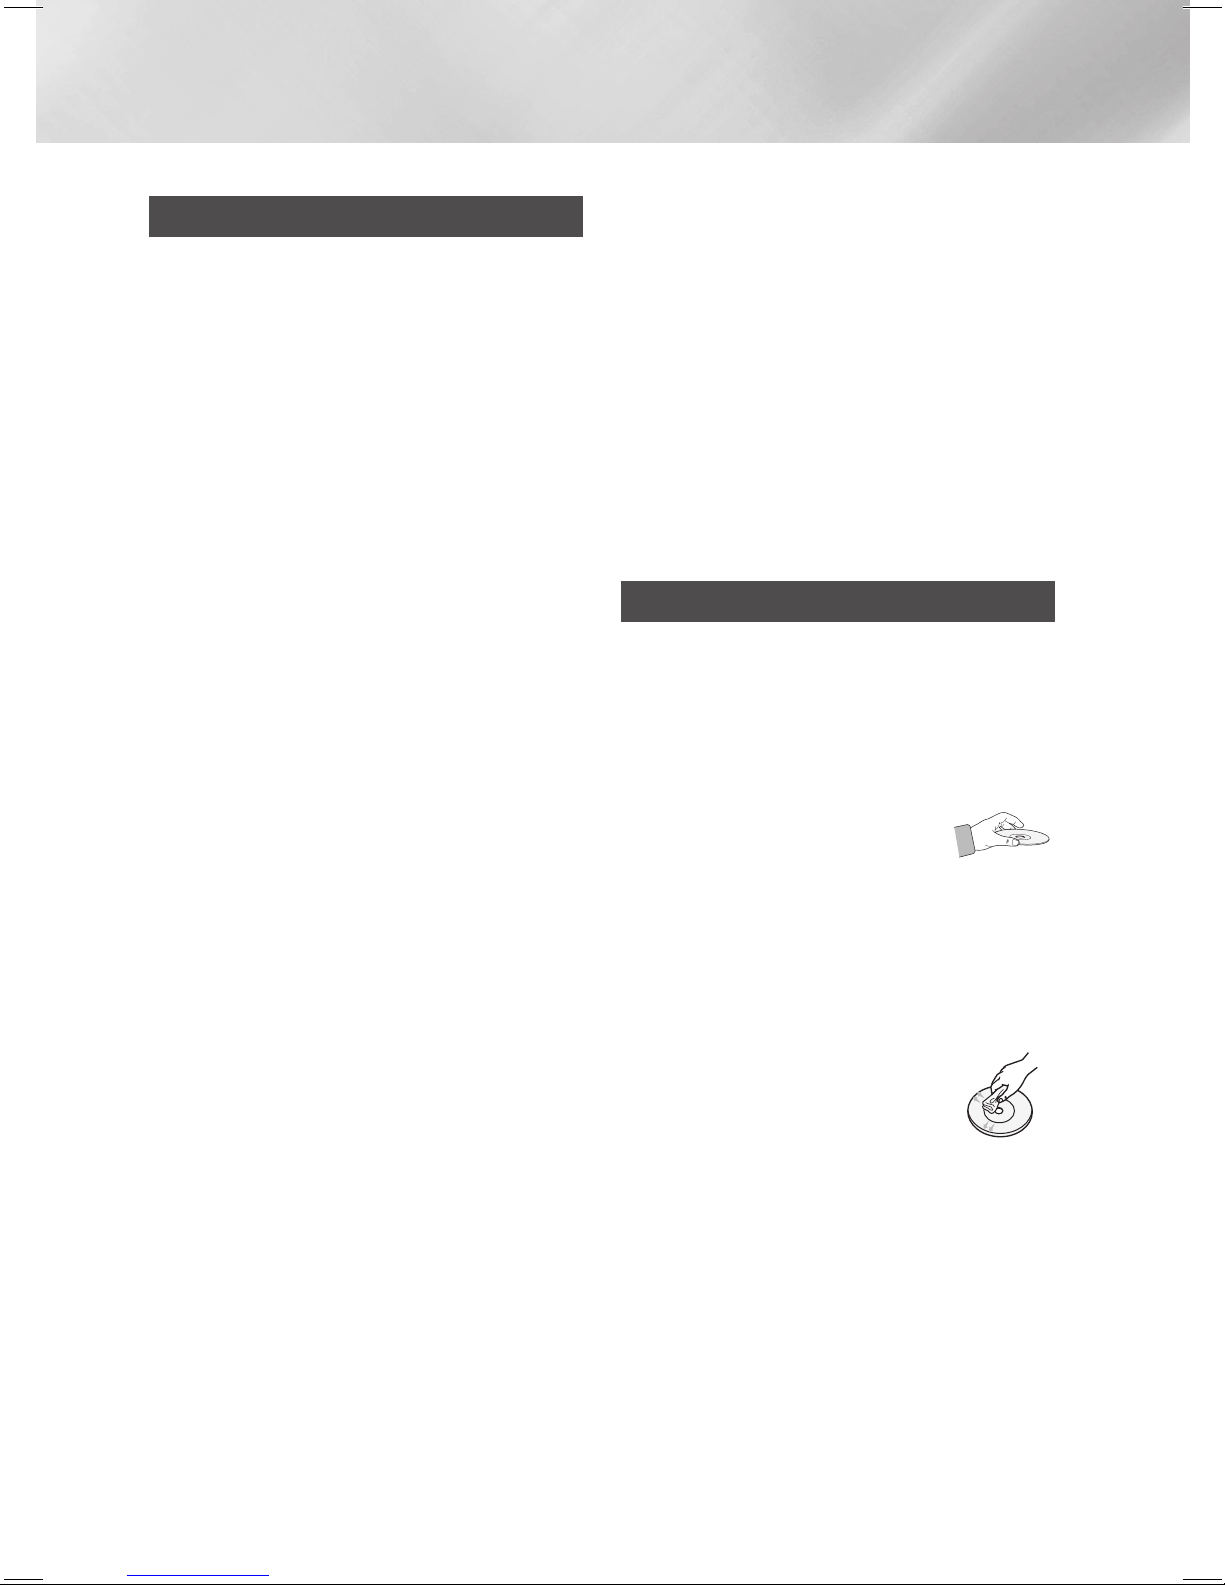
- Hold the disc by the edges so
that fingerprints will not get on
the surface.
- Do not stick paper or tape on the disc.
• Cleaning Discs
- If you get fingerprints or dirt on a disc, clean
it with a mild detergent diluted in water and
wipe with a soft cloth.
- When cleaning, wipe gently from
the inside to the outside of the
disc.
• Disc Storage
`Do not keep in direct sunlight.
`Keep in a cool ventilated area.
`Keep in a clean, protective jacket and store
vertically.
4 English
Page 5
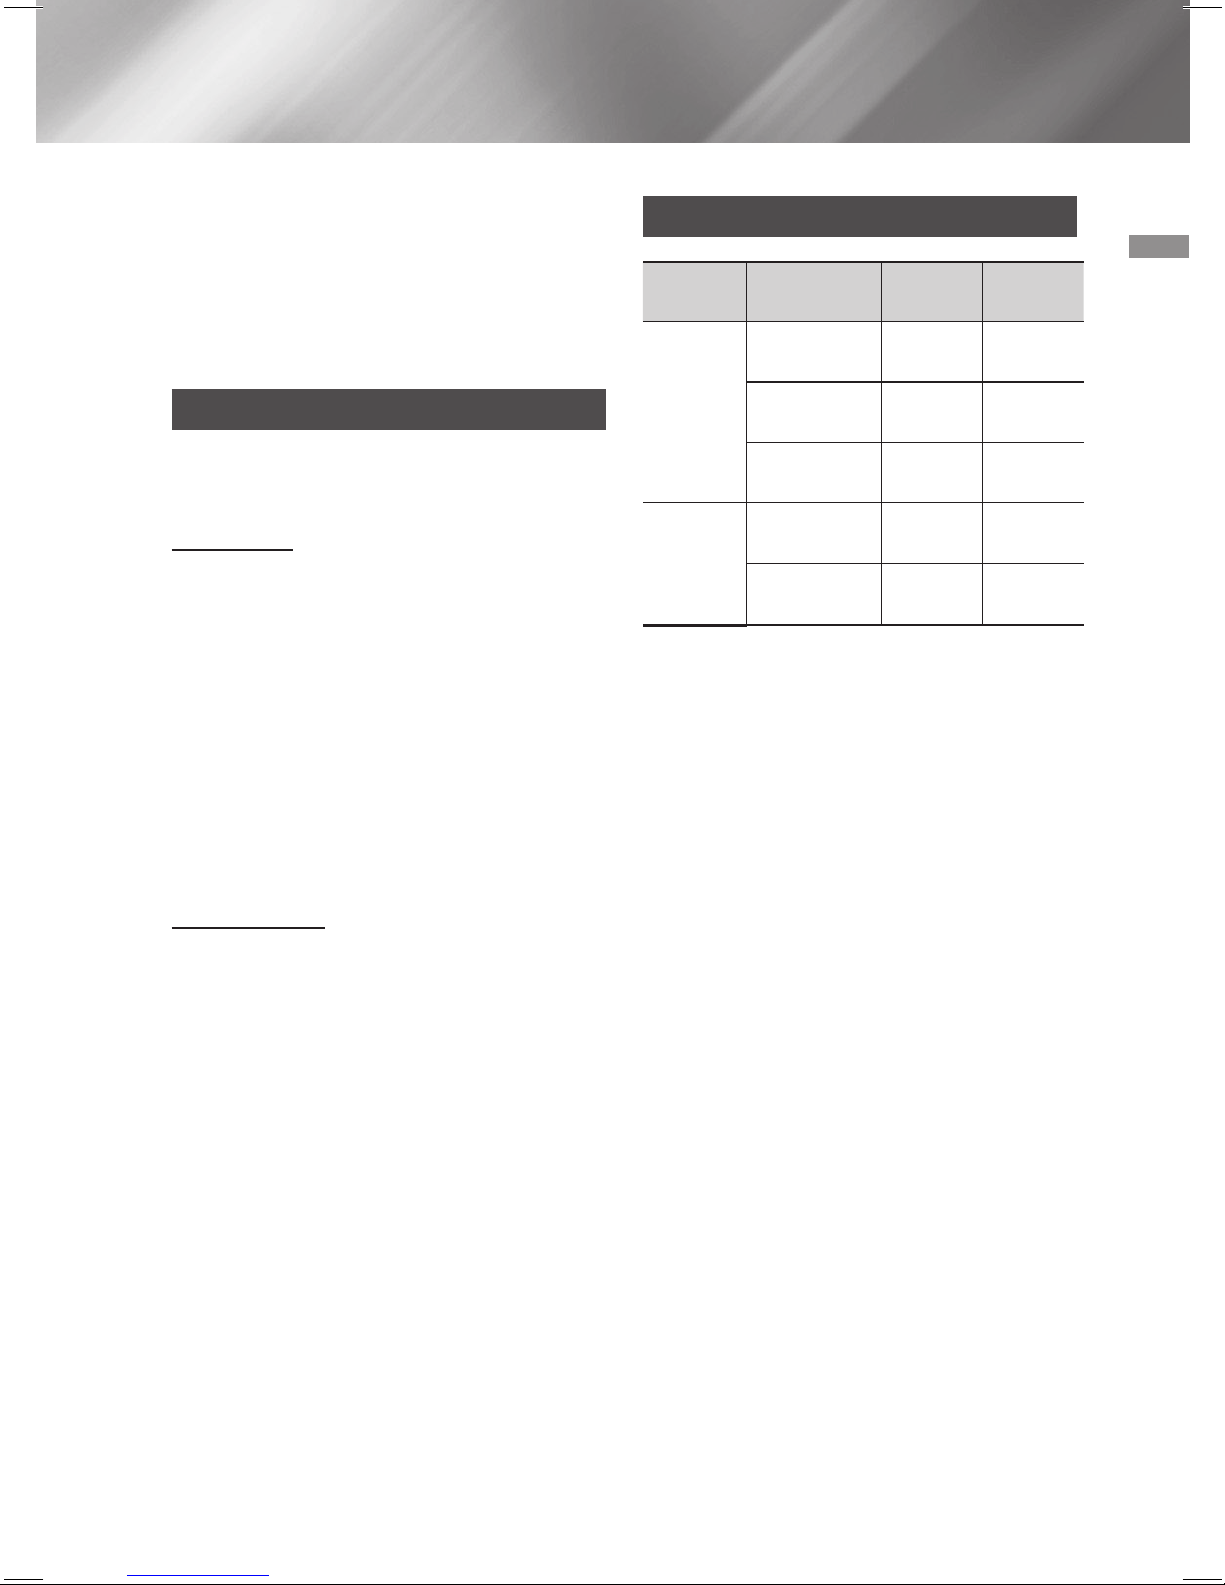
• Condensation may form if warm air comes
into contact with cold parts inside the product.
When condensation forms inside the product, it
may not operate correctly. If this occurs, remove
the disc and let the product stand for 1 or 2
hours with the power on.
Supported Audio Formats
File
Extension
Audio
Codec
MPEG 1 Layer3
Sampling
Rate
16KHz ~
48KHz
01 Safety Information
Bit Rate
80Kbps ~
320Kbps
Disc and Format Compatibility
This product does not support Secure (DRM)
Media files.
CD-R Discs
• Some CD-R discs may not be playable
depending on the disc recording device (CDRecorder or PC) and the condition of the disc.
• Use 650MB/74 minute CD-R discs.
Do not use CD-R discs over 700MB/80 minutes
as they may not be played back.
• Some CD-RW (Rewritable) media may not be
playable.
• Only CD-Rs that are properly "closed" can be
fully played. If the session is closed, but the disc
is left open, you may not be able to fully play the
disc.
MP3-CD Discs
• Only CD-R discs with MP3 files in ISO 9660 or
Joliet format can be played.
• MP3 file names should contain no blank spaces
or special characters (. / = +).
• Use discs recorded with a compression/
decompression data rate greater than 128Kbps.
• Only a consecutively written multisession disc
can be played. If there is a blank segment in the
Multisession disc, the disc can be played only
up to the blank segment.
• If the disc is not closed, it will take longer to
begin playback and not all of the recorded files
may play.
• For files encoded in the Variable Bit Rate (VBR)
format,( i.e. files encoded in both low bit rate
and high bit rate - 32Kbps ~ 320Kbps), the
sound may skip during playback.
• A maximum of 999 files can be played per CD.
*.mp3
*.wma
| NOTES |
✎Does not support WMA Professional codec.
✎The above table shows supported sampling
rates and bit rates. Files of not supported
formats may not be played properly.
MPEG 2 Layer3
MPEG 2.5 Layer3
Wave_Format_
MSAudio1
Wave_Format_
MSAudio2
16KHz ~
48KHz
16KHz ~
48KHz
16KHz ~
48KHz
16KHz ~
48KHz
80Kbps ~
320Kbps
80Kbps ~
320Kbps
56Kbps ~
128Kbps
56Kbps ~
128Kbps
5 English
Page 6

Contents
SAFETY INFORMATION
2 Warning
4 Precautions
4 Disc Storage & Management
5 Disc And Format Compatibilit
GETTING STARTED
7 Front Panel
8 Rear Panel
9 Remote Control
10 Accessories
10 Connecting the Speakers
10 Attaching the speaker foot
11 Attaching the Toroidal Ferrite Core to the
Cord of the Subwoofer
FUNCTIONS
12 The Display function
12 Playing a CD
12 Loading a Compact Disc
12 CD/MP3/CD-R Playback
13 Selecting a Track
13 Searching for a Specific Music Passage on
a CD
13 Repeat One or All Tracks on a CD
14 Playing USB Devices
14 USB Device Playback
14 To Select a File from a USB Device
15 To Use High Speed Search
15 To Delete a File
15 To Move to the Next/Previous Folder
15 To safely remove a USB device
15 Read Before Connecting USB Storage
Devices
16 Searching for a Track Quickly
16 Using the Program Function
16 Viewing or Editing Programmed Tracks
17 Bluetooth
17 What is Bluetooth?
17 To connect the Hi-Fi Component to a
Bluetooth device
18 To disconnect the Bluetooth device from
the Hi-Fi Component
18 To disconnect the Hi-Fi Component from
the Bluetooth device
18 Using the Bluetooth Power On
19 TV SoundConnect
19 To connect the Hi-Fi Component to a
SoundConnect Compatible Samsung TV
19 To disconnect the TV from the Hi-Fi
Component
19 To disconnect the Hi-Fi Component from
the TV
20 Using My Karaoke
20 Auto Change Function
20 Listening to the Radio
20 To Store the Stations You Want
21 Selecting a Stored Station
21 Timer Function
21 Setting the Clock
21 Setting the Timer
23 Cancelling the Timer
23 The Recording Function
23 Basic Recording
24 Recording Speed
25 Special Sound Effect
25 Selecting EQ Mode
25 FOOTBALL MODE function
25 GOAL Function
26 GIGA SOUND Function
26 BEAT WAVING Function
26 DJ BEAT Function
27 +PANNING Function
27 NON-STOP MUSIC RELAY Function
27 DANCE TIME Function
27 TEMPO Function
27 Booting Sound Function
APPENDIX
28 Troubleshooting
28 Specifications
6 English
Page 7
Getting Started
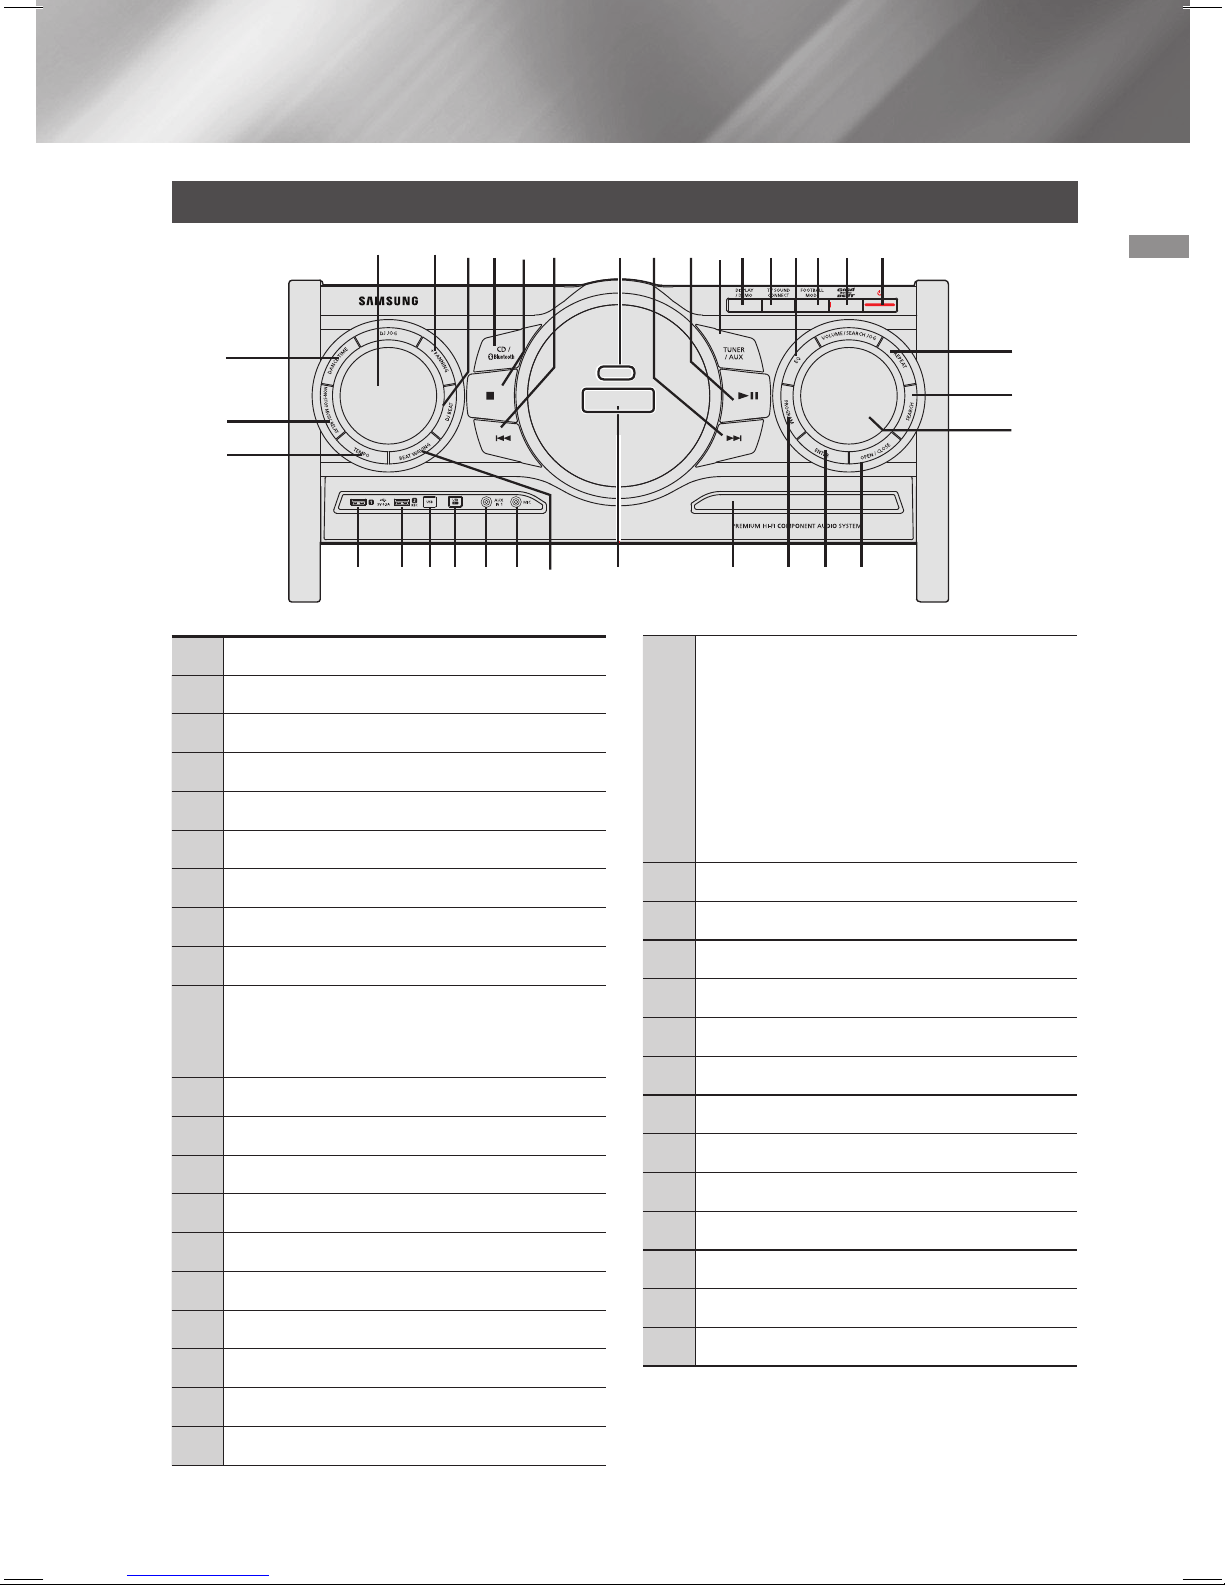
Front Panel
j
k 56c7
i
l
h
g
f
e
REMOTE CONTROL SENSOR
1
FORWARD SEARCH/SKIP button
2
PLAY/PAUSE button
3
TUNER/AUX button
4
DISPLAY / DEMO button
5
TV SOUND CONNECT button
6
EQ button
7
FOOTBALL MODE button
8
GIGA SOUND BEAT button
9
POWER button
0
• Press this button to switch your product
on or off.
REPEAT button
!
SEARCH button
@
VOLUME / SEARCH JOG
#
OPEN/CLOSE button
$
ENTER button
%
PROGRAM button
^
DISC slot
&
Display Panel
*
b
)
1 43
2m n
*d (
a
b
c
d
e
f
g
h
i
j
k
l
m
n
8a9
0
!
@
#
&
AUX IN 1 jack
Connecting an external device such as an
MP3 player.
• Connect AUX IN 1 on the front panel
of the product to the Audio Out of an
external device/MP3 player.
• Press the TUNER/AUX button to select
AUX1.
USB REC button
USB button
USB 2 jack for Playing and USB Recording
USB 1 jack for Playback only.
TEMPO button
NON-STOP MUSIC RELAY button
DANCE TIME button
DJ JOG
+PANNING button
DJ BEAT button
CD/ Bluetooth button
STOP button
BACKWARD SEARCH/SKIP button
%
$^
02 Getting Started
BEAT WAVING button
(
MIC jack
)
7 English
Page 8
Getting Started
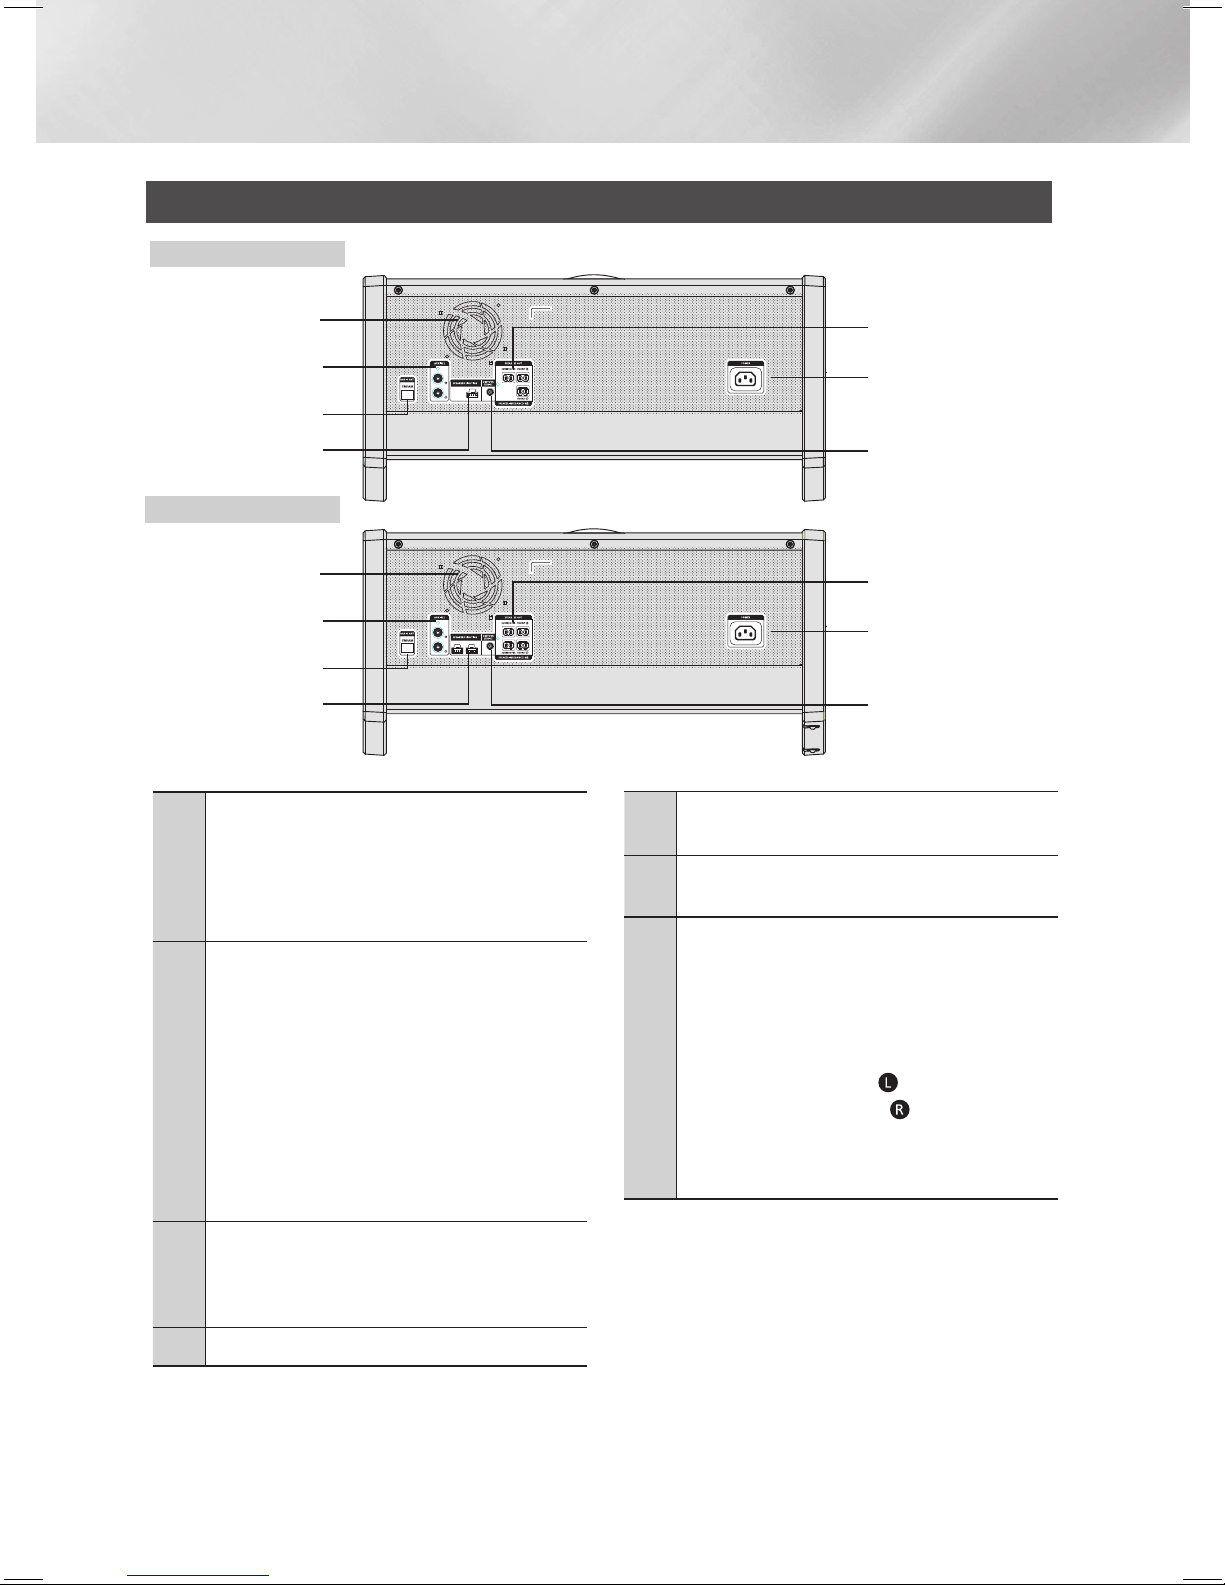
Rear Panel
MX-HS6000
MX-HS7000
Cooling fan
• The fan operates while the unit is powered on.
1
2
If you set the unit to the minimum volume, the
fan won't operate.
Secure a minimum 10 cm of clear space from
all sides of the fan when installing the product.
AUX IN 2 Terminals
Use an Audio Cable (not supplied) to connect
1.
AUX IN 2 on the product to Audio Out on the
external analog output device.
• Be sure to match connector colors.
•
If the external analog output device has only
one Audio Out jack, connect either left or right
terminal.
•
Press the TUNER/AUX button to select the AUX 2.
•
If no button actions for more than 8 hours in AUX
mode, the power will automatically turn off.
1
2
3
4
1
2
3
4
7
6
5
7
6
5
ONLY FOR SERVICE
5
• This jack is just for testing, please don't use it.
POWER
6
• Insert only provided power cable.
2.1 CH Speaker Terminals (MX-HS6000)
2.2 CH Speaker Terminals (MX-HS7000)
To achieve the correct sound quality, when
1.
you connect the speakers, match the color
of the speaker plugs to the color of the
7
speaker jacks. See below.
• LEFT channel (marked ).
• RIGHT channel (marked ).
• Don't force the Purple SUBWOOFER
connector or into the White or Red speaker
jack.
FM/AM Antenna Terminals
• Plug the connector on the FM/AM antenna
3
4
(supplied) into the FM/AM terminal on the rear
of the system.
LED Terminals for Speaker Beat Waving.
8 English
Page 9

Remote Control
NON-STOP MUSIC RELAY
Power
Bluetooth
CD
USB
TUNING MODE
TUNER/AUX
02 Getting Started
MUTE (Turn off the sound temporarily. Press
again to turn the sound back on.)
BEAT WAVING
TV SoundConnect
USB REC
REC SPEED
MO/ST
+PANNING
DJ BEAT
TEMPO
SKIP
PLAY/PAUSE
STOP
FOOTBALL
EQ
VOLUME (–, +)
PROGRAM
TIMER SET
TIMER ON/OFF
DISPLAY
MY KARAOKE
Installing Batteries In The Remote Control
EFFECT LEVEL
SEARCH
REPEAT
GIGA SOUND BEAT
GOAL
DANCE TIME
TUNING/ALBUM ,,
DELETE
SLEEP (Set a sleep time to shut off the
product.)
AUTO CHANGE
MIC VOLUME –, +
.
• Place batteries in the remote control so they
match the of the illustrations in the battery
compartment. : (+) to (+) and (–) to (–).
• Do not dispose of batteries in a fire.
• Do not short circuit, disassemble, or overheat
the batteries.
• Danger of explosion if the battery is replaced
with the wrong battery type. Replace only with
the same or equivalent type.
• The remote control can be used up to
approximately 23 feet (7 meters) in a straight
line from the system.
9 English
Page 10
Getting Started
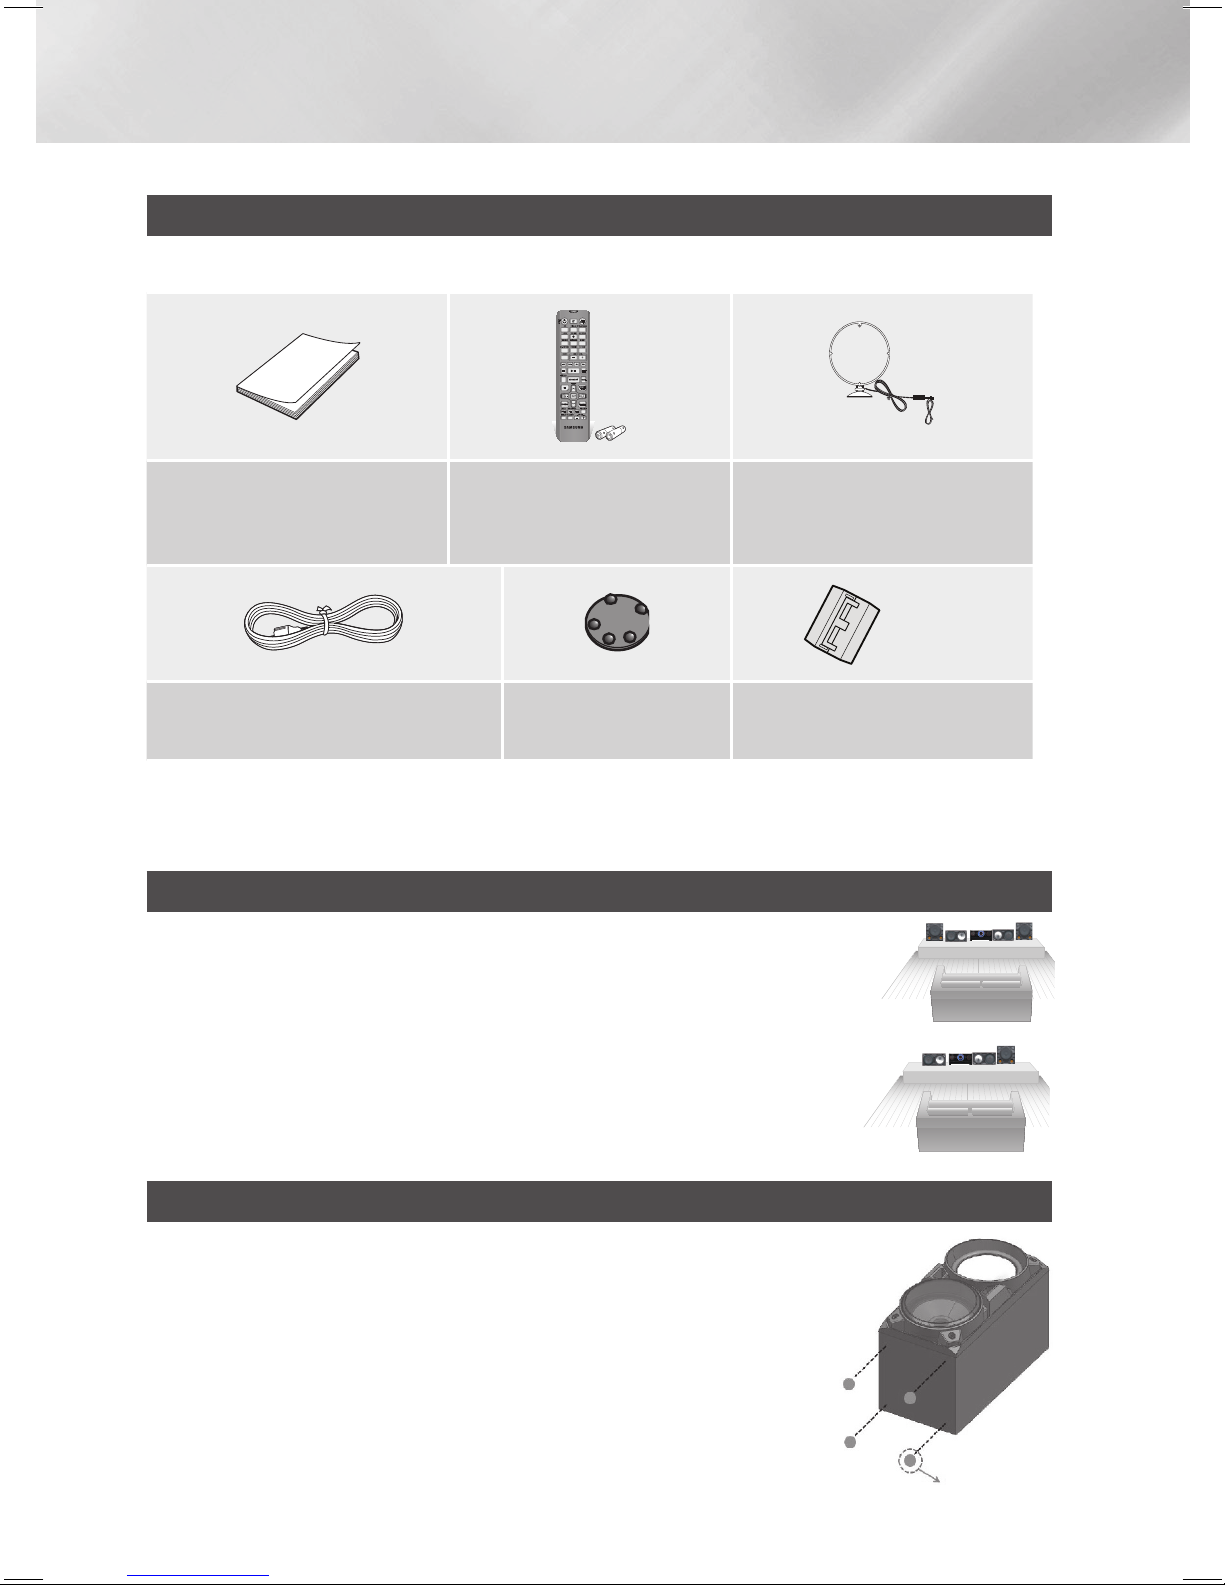
Accessories
Check for the supplied accessories below.
User Manual
(AH68-02680J)
Power Cable
(3903-000467)
• Figures and illustrations in this user's manual are provided for reference only and may differ from actual
product appearance.
Remote Control / Batteries
(AH59-02613A/4301-000116)
Rubber Foot (8ea)
(AH81-05916L)
FM/AM Antenna
(AH42-00036A)
Toroidal ferrite core
(3301-001201)
(For Subwoofer
power cable 1EA)
Connecting the Speakers
Recommended speaker setup.
| IMPORTANT |
✎
The product may not operate properly if it is subject to shaking or external shocks
or if the speakers are not installed as recommended.
✎
Do not stretch the speaker wires or place a heavy object on them.
✎
Please place these subwoofers separately and keep a distance at least 2 inches
/5cm for each other.(only for MX-HS7000)
(MX-HS7000)
Attaching the speaker foot
Attach the supplied speaker feet to the bottom rear corners of each speaker as
shown in the illustration to stabilize the speakers and prevent them from slipping.
(MX-HS6000)
Rubber Foot
10 English
Page 11
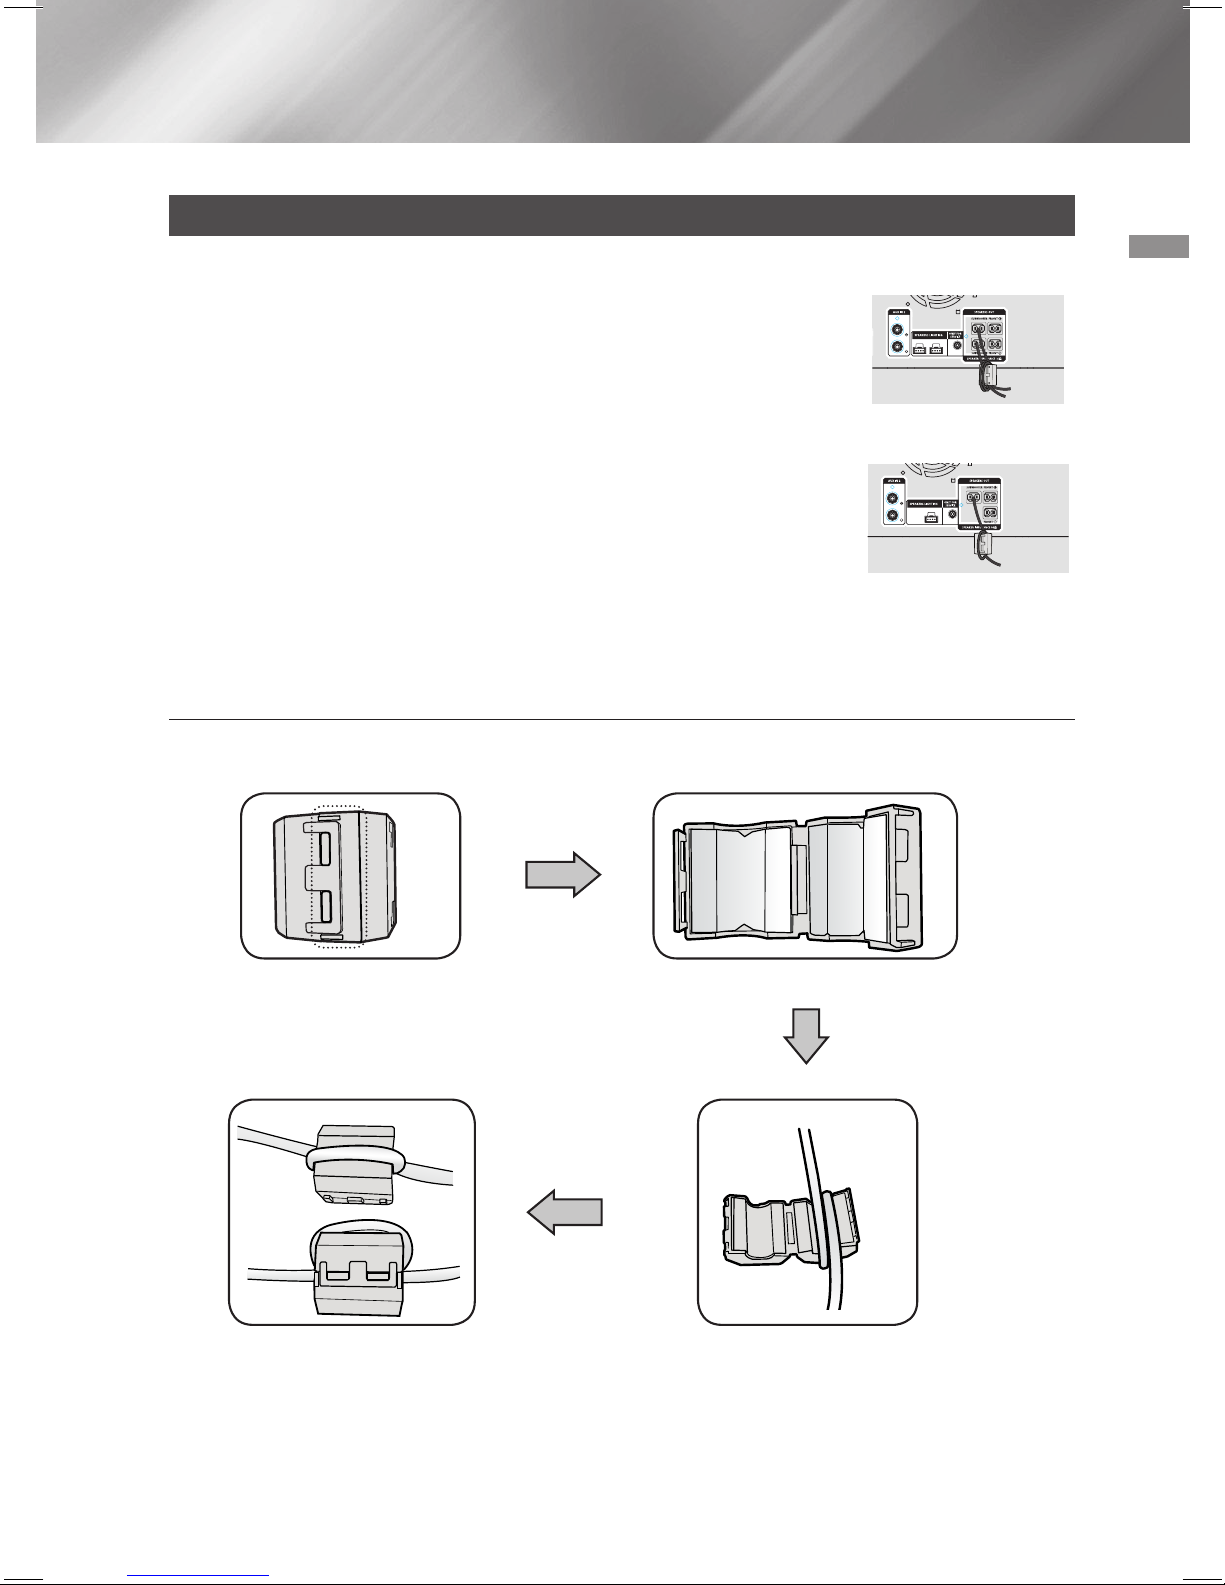
Attaching the Toroidal Ferrite Core to the Cord of the Subwoofer
Attaching the Toroidal ferrite core to the cord of the subwoofer helps prevent RF interference
from radio signals.
1. Pull the fixing tab of the Toroidal ferrite core to open it.
2. Make one loops around the core with the cable of the subwoofer.
3.
Attach the Toroidal ferrite core to the Subwoofer cord as the
(MX-HS7000)
figure shows, and then press it until it clicks.
(MX-HS6000)
LOOPING THE CABLE AROUND THE TOROIDAL CORE
02 Getting Started
Lift up to release the lock and open the core.
Close the lock.
Make one loops around the core with the cable.
(Start winding 2 to 4 inches [5-10 cm]
away from the core).
11 English
Page 12
Functions
The Display function
You can view functions available on the display,
adjust the brightness of the display, and set the
Display/LED either on or off.
Changing Display mode
Press the DISPLAY/DEMO button on the product.
Each time you press this button, the mode will
change as follows:
• The DEMO function
All functions available on the system appear on
the front panel display.
• The Dimmer function
The Dimmer function is selected and the display
darkens.
LED OFF
•
The LED is turned off while the dimmer function
is working.
• Clock ON
The Clock you set is displayed.
• Display/LED ON
All displays and the LED are turned on.
The DEMO MUSIC function
Press the DISPLAY/DEMO button on the product
or the DISPLAY button on the remote control for
5 seconds to turn on the Demo mode.
Each time you press this button, the mode will
change as follows:
DIMMER ; LED Off (unit/speaker) ; --:-- [time
display] ; LED On (unit/speaker);DEMO
✎The DEMO sampler plays for about 3 minutes,
only the message remains displayed on the
front panel after its playback.
Playing a CD
Loading a Compact Disc
You can play standard compact discs that
require no adapter.
1. Insert a disc gently into the disc slot with the
disc's label facing up. The disc will be played
automatically.
• You can load or unload compact discs
when the radio, USB, or auxiliary source
function is selected. When you press the
OPEN/CLOSE button, the unit will exit the
current function and enter CD mode.
• If no buttons are pressed on the product
or remote control for more than 3 minutes
when the product is in Pause mode, it will
change to Stop mode.
• If no buttons are pressed on the product
or remote control for more than 25 minutes
when the product is in Stop mode, the
product will turn off.
CD/MP3/CD-R Playback
| IMPORTANT |
✎This product is designed to play the following
audio disc types: CD, CD-R, CD-RW.
To cancel the Demo Music mode
• Press the DISPLAY/DEMO button on the
product or DISPLAY on the remote control for 5
seconds again.
The current mode is cancelled and the product
is turned off.
• Press the TUNER/AUX, CD/Bluetooth, or USB
button on the product.
The current mode is canceled and the mode is
changed to the mode you selected.
| NOTES |
✎When the Demo mode is on, only the POWER
( ) buttons, VOL, buttons on the product
and the buttons mentioned above work.
1. Insert a disc gently into the disc slot with the
2. The disc will be played automatically.
Track Indicator
12 English
disc's label facing up.
• For MP3/WMA file, it may take several
minutes for the product to finish scanning
the disc tracks.
• If you play a file with an English title, the
song title will be shown in the display. (Titles
in other languages can not be displayed.)
• An English-titled track containing a
special character (@, $, *, etc.) will not be
displayed.
<CD PlaybackDisplay>
1 0:19
Playtime Indicator
Page 13
3. To adjust the volume:
• Turn the VOLUME control on the product.
• Press the VOL+ or VOL- button on the
remote control.
The volume level can be adjust in 31 steps
(VOLUME MIN, VOLUME 01 ~ VOLUME
29, and VOLUME MAX).
4. Pausing playback Main Unit
To pause playback temporarily, press the
button.
Press again to continue playing the disc.
Remote control
To pause playback temporarily, press the
button.
Press the button to continue playing the
disc.
5. To end playing, press the 5 button.
| NOTES |
✎If no CD is in the disc slot, “NO DISC” appears
on the display.
✎The quality of MP3/CD-R playback may vary
depending on the condition of the disc or the
condition of the recorder used to create the
disc.
✎If a disc contains different types of files or
unnecessary folders, you will have problems
with playback.
✎Gently insert a CD into the disc slot. Do not
apply excessive force.
- Do not apply force to the product or place a
heavy object on the product.
- Do not insert an out-of-spec or oddly
shaped CD (heart shaped, octangular, etc.).
You can damage the product.
- Carefully maintain your CDs.
Selecting a Track
You can select a desired track while the disc is
being played.
To play the previous track
Press the 1 button within 3 seconds after the
current track has started playing.
Press the 1 button twice, 3 seconds or more
after the current track starts playing.
To play the next track
Press the 2 button.
To play the current track from the
beginning
Press the 1 button, 3 seconds after the current
track started playing.
To play the track of your choice
Press the 1 or 2 button to move to a desired
track.
Searching for a Specific Music Passage
on a CD
When listening to a CD, you can quickly search for
a specific music passage on a track.
Forward Search ....................
Backward Search .................
You can also press and hold the 1, 2 buttons
on the product to automatically scan for a track.
3
4
Repeat One or All Tracks on a CD
You can play a CD or tracks on a CD repeatedly.
1. Press the REPEAT button.
Each time you press this button, the mode
changes as follows:
MP3 : OFF ; TRACK ; DIR ; ALL ; RANDOM
CD : OFF ; TRACK ; ALL ; RANDOM
03 Functions
13 English
Page 14
Functions
2. When you want to stop the repeat function,
press the REPEAT button until "OFF" is
displayed.
• OFF : Cancels repeat playback.
• TRACK : Repeatedly plays the selected
track.
• DIR (DIRECTORY) : Repeatedly plays all
tracks in the selected folder.
• ALL : Repeatedly plays the entire disc.
• RANDOM : Plays tracks in random order.
Playing USB Devices
Connect an external storage device such as a
USB flash memory or external HDD (Hard Disk
Drive) to the product. You can play files in MP3/
WMA format.
USB Device Playback
1. Connect the external USB storage device to
your product.
2. Select the USB mode by pressing the USB
button on the product or the USB button on
the remote control.
3. The first file of the first directory plays
automatically.
4. To stop playing
Press the 5 button to stop playing.
| NOTES |
✎To remove the USB device
- If you press the 5 button again, you can
remove the USB device safely.
| IMPORTANT |
✎Do not connect a USB recharger to the USB
port of this product. You can damage the
product.
To Select a File from a USB Device
You can select an MP3 file while the product is
playing.
| NOTES |
✎ If you want to move to the previous/next track,
press the 1, 2 buttons briefly.
- The unit moves to the previous/next file
within the directory.
- If you press the 1, 2 buttons more times
than the number of the files in the directory,
the unit moves to the next directory.
To repeat
1. Press the REPEAT button.
Each time you press this button, the mode
changes as follows:
OFF ; TRACK ; DIR ; ALL ; RANDOM
2. When you want to stop the repeat function,
press the REPEAT button until "OFF" is
displayed.
• OFF : Cancels repeat playback.
• TRACK : Repeatedly plays the selected
file.
• DIR (DIRECTORY) : Repeatedly plays all
files in the selected folder.
• ALL : Repeatedly plays all files.
• RANDOM : Plays files in random order.
| NOTES |
✎For Random play: If the file you selected to
play is located in a folder, all the files in that
folder are played in random order. If the file you
selected is located in the root folder, all files in
the root folder will be played in random order.
14 English
Page 15
To Use High Speed Search
You can search a desired section quickly while the
product is playing.
Press the 3, 4 button.
• Each time you press the button, you move
forward/backward quickly through the section.
| IMPORTANT |
✎The product does not output sound during a
high speed search.
To Delete a File
You can delete a file from your USB device.
1. Select a file you want to delete.
2. Press the DELETE button on the remote
control. "DEL N" is displayed.
3. Press the DELETE button on the remote
control and “DEL Y” is displayed.
4. Press the ¬ button. “DELETE END”
appears and deletion is completed.
To Move to the Next/Previous Folder
Press the TUNING/ALBUM . / , button on the
remote control to move to the previous/next folder.
| NOTES |
✎When sound files are stored in the root
directory rather than in a folder, press the
TUNING/ALBUM , / . button to go to the
first TRACK.
To safely remove a USB device
1. Press the 5 button twice while the USB is
playing or press the 5 button once when
play has stopped.
2. When the REMOVE message appears on the
display, remove the USB device.
Read Before Connecting USB Storage
Devices
• Some USB devices may not work properly with
this product.
• This product only supports external HDD`s that
are formatted in the FAT file system.
• USB 2.0 HDDs should be connected to a
separate power source. Otherwise, the USB 2.0
HDDs will not work.
• If multiple USB external storage devices are
connected together, only the MP3 files in the
first HDD will be played.
• Files with DRM are not supported. Digital Right
Management (DRM) restricts unauthorized
access to a DRM file so that the file is protected
from piracy.
• Even if a file has an .mp3 extension, the file
cannot be played if it is formatted in MPEG layer
1 or 2.
• Do not use an unrecognized USB hub.
• Only the first 15 characters of an audio file name
are shown on the product's display.
• Only removable HDDs with less than 160GB are
supported. Depending on the device, a 160GBor more removable HDD may not be supported.
• It can take several minutes for the product to
recognize the files on some USB devices.
• Some USB devices (USB HDDs, in particular)
may cause a delay when moving from track to
track.
• With USB storage devices supporting USB
VER1.1 only, the product may access files
slowly or may not recognize the file properties.
• The maximum electrical current provided by
each USB port to connected USB devices is
0.5A (based on DC 5V).
• If there is no USB connection or STOP mode
lasts for more than 25 minutes, the product will
automatically turn off.
• Some USB devices, digital cameras, USB card
readers, iPods, iPhones, and Smart Phones
may not be supported.
03 Functions
15 English
Page 16
Functions
Searching for a Track Quickly
You can select a track directly without the 1, 2
button.
CDDA/MP3-CD/USB
1. Press the SEARCH button.
After pressing the SEARCH button, turn
the VOLUME/SEARCH JOG control on the
product to the left or right to select a desired
track.
• You can move to the selected track directly.
2. When searching is done, the track will
automatically start playing.
<Search Display>
Selected Track
Indicator
0 12 0 25
Total track Indicator
Using the Program Function
This function is not available during playback of an
MP3-CD/USB.
• You can program the playback order of up to 99
tracks of your choice.
• However, you must stop playing the CD/USB
before selecting tracks.
1. While in CD/USB playback mode, press the
5
button to stop playing the CD/USB.
2. Press the PROGRAM button to display the
message below:
P0 1 --
Or
(01= program number, -- or ---= track number)
3. Use the 1 or 2 button or the VOLUME/
SEARCH JOG to move to a desired track.
• Press 1 to move to the previous track.
• Press 2 to move to the next track.
0 1 ---
above.
6. Press the button to play the programmed
tracks.
7. Press the 5 button to stop playing the
programmed tracks, Press the 5 button
again to cancel playing the programmed
tracks.
• If you eject the disc, CD programming is
cancelled.
If you turn off the product, CD/USB
programming is cancelled.
• If you switch to another mode,CD/USB
programming is maintained.
In Program mode, if you press the USB
•
REC, DELETE, or
buttons, these functions will not work, and
the unit will display "PROG".
TUNING/ALBUM ,, .
Viewing or Editing Programmed Tracks
You can view and edit a list of programmed tracks.
1. If a programmed track is being played, press
the 5 button once.
2. Press the PROGRAM button twice to display
the message below:
C0 1 02
Or
0 1 002
(01= program number, 02 or 002= track number)
3. Repeatedly press the ¬ button until the
desired track is displayed.
4. Press the 1 or 2 button to select a
different track.
5. Press the ¬ button to confirm your
selection.
6. To play the programmed tracks, press the
button.
To repeat
4. Press the ¬ button to confirm your
selection. The selection is stored and
P0 2 --
5. To select another track, follow Steps 3 and 4
or
0 2 ---
is displayed.
1. Press the REPEAT button.
Each time you press this button, the mode
will change as follows:
OFF ; TRACK ; ALL
16 English
Page 17

Bluetooth
You can use a Bluetooth device to enjoy music
with high quality stereo sound, all without wires!
What is Bluetooth?
Bluetooth is a technology that enables Bluetooth
compliant devices to interconnect easily with each
other using a short, wireless connection.
• A Bluetooth device may cause noise or
malfunction, depending on usage, when:
- A part of your body is in contact with the
receiving/transmitting system of the Bluetooth
device or the Hi-Fi Component.
- It is subject to electrical variation from
obstructions caused by a wall, corner, or
office partitioning.
- It is exposed to electrical interference from
same frequency-band devices including
medical equipment, microwave ovens, and
wireless LANs.
• Pair the Hi-Fi Component with the Bluetooth
device while they are close together.
• The greater the distance between the HiFi Component and the Bluetooth device, the
worse the quality. If the distance exceeds the
Bluetooth operational range, the connection is
lost.
• In poor reception areas, the Bluetooth
connection may not work properly.
• The Bluetooth connection only works when
the Bluetooth device and the Hi-Fi Component
are close together. The connection will be
automatically cut off if the Bluetooth device
is out of range. Even within range, the sound
quality may be degraded by obstacles such as
walls or doors.
• This wireless device may cause electric
interference during its operation.
To connect the Hi-Fi Component to a
Bluetooth device
1. Press the CD/Bluetooth button of the Hi-Fi
Component to display the BT message.
• You will see WAIT for a short period of time
and then BT READY on the front display of
the Hi-Fi Component.
2. Select the Bluetooth menu on the Bluetooth
device you want to connect. (Refer to the
Bluetooth device's user manual.)
3. Select the Stereo headset menu on the
Bluetooth device.
• You will see a list of scanned devices.
4. Select "[Samsung] HI-FI XXXXXX" from the
list.
• When the product is connected to the
Bluetooth device, it will display Device
name ; BT on the front display.
• If the Bluetooth device has failed to pair
with the product, delete the previous
“[Samsung] HI-FI XXXXXX” found by the
Bluetooth device and have it search for the
product again.
5. You can listen to the music playing on the
connected Bluetooth device over the Hi-Fi
Component system.
• In Bluetooth mode, some model's Play/
Stop/Next/Back functions are not available.
| NOTES |
The product only supports Middle Quality
SBC data (up to 237kbps@48kHz), and
does not support High Quality SBC data
([email protected]).
✎The AVRCP feature is not supported.
✎ Connect only to a Bluetooth device that
supports the A2DP (AV) function.
✎ You cannot connect to a Bluetooth device that
supports only the HF (Hands Free) function.
03 Functions
Before you begin, confirm that your Bluetooth
device supports the Bluetooth-compliant stereo
headset function.
17 English
Page 18

Functions
✎Only one Bluetooth device can be paired at a
time.
✎Once you have turned off the Hi-Fi Component
and the pairing is disconnected, the pairing will
not be restored automatically. To reconnect,
you must pair the device again.
✎The Hi-Fi Component system may not search
or connect properly in the following cases:
- If there is a strong electrical field around the
Hi-Fi Component.
- If several Bluetooth devices are
simultaneously paired with Hi-Fi Component.
- If the Bluetooth device is turned off, not in
place, or malfunctions.
- Note that such devices as microwave ovens,
wireless LAN adaptors, fluorescent lights,
and gas stoves use the same frequency
range as the Bluetooth device, which can
cause electric interference.
✎ In Bluetooth connection mode, the Bluetooth
connection will be lost if the distance between
the Hi-Fi Component and the Bluetooth device
exceeds 16.25 feet (5 meters).
✎If the Bluetooth device comes back into the
effective range after disconnecting, you can
restart the Hi-Fi Component to restore the
pairing with the Bluetooth device.
✎The Hi-Fi Component automatically turns off
after 25 minutes in the Ready mode.
✎When a Bluetooth device is connected to the
Hi-Fi Component system, the Component
system automatically switches to the Bluetooth
mode if it is in a different mode (except
when it is displaying "REQUEST" in the TV
SoundConnect mode).
Using The Bluetooth Power On
To disconnect the Bluetooth device
from the Hi-Fi Component
You can disconnect the Bluetooth device from
the Hi-Fi Component. For instructions, see the
Bluetooth device's user manual.
• The Hi-Fi Component will be disconnected.
• When the Hi-Fi Component is disconnected
from the Bluetooth device, the Hi-Fi Component
will display BT DISCONNECTED ; BT READY
on the its display.
To disconnect the Hi-Fi Component
from the Bluetooth device
Press the CD/Bluetooth button on the front panel
of the Hi-Fi Component to switch from Bluetooth
mode to another mode or turn off the Hi-Fi
Component. The currently connected device is
disconnected.
| NOTES |
✎The connected Bluetooth device will wait a
certain amount of time for a response from
the Hi-Fi Component before terminating the
connection.(Disconnection time may differ,
depending on the Bluetooth device)
When the product is turned off, you can connect
your smart device to the product via a Bluetooth
connection to turn it on.
1. Turn on the product,press and hold the
Bluetooth button on the remote to set the
Bluetooth Power On function on. Bluetooth
Power On appears on the display.
2. When the product is off, connect your smart
device to the product via Bluetooth. (For
information on Bluetooth connections, refer
to your smart device’s manual.)
• The Bluetooth device paired with your
product before.
3. When the connection is complete, the
product turns itself on automatically in
Bluetooth mode.
• Select the desired music to play from your
smart device.
| NOTES |
✎Press and hold the Bluetooth button on the
remote control to turn the Bluetooth Power On
function on or off.
Each time you press and hold this button,
the Hi-Fi Component displays BLUETOOTH
POWER ON ; BLUETOOTH POWER OFF
on its display.
18 English
Page 19
TV SoundConnect
You can listen to the sound from your
SoundConnect Compatible Samsung TV
through the Hi-Fi Component by using the TV
SoundConnect function.
To connect the Hi-Fi Component to a
SoundConnect Compatible Samsung
TV
Before activating this function, be sure to activate
the Samsung TV's SoundConnect or SoundShare
mode.
1. Press the TV SoundConnect button of
the Hi-Fi Component to display the TV
SOUNDCONNECT message.
WAIT ; SEARCH ; REQUEST
2. Set Add New Device to On in the TV's
SoundConnect Settings menu. (Refer to the
TV's user manual for details.)
3. When the Hi-Fi Component is connected
to the TV, it will display [TV] Name
;
CONNECTED ; TV on the front display.
4. The audio from the connected TV plays over
the Hi-Fi Component system.
| NOTES |
✎In TV SoundConnect mode, some model's
Play/Repeat/Stop/Next/Back functions are not
available.
✎The SoundConnect feature is available on some
Samsung TVs released since 2012. Check
whether your TV supports the SoundShare or
SoundConnect function.
(For further details, refer to the TV's user's
manual.)
✎If you unplug the Hi-Fi Component, the TV
SoundConnect connection is terminated. To
re-establish the connection, plug the Hi-Fi
Component into an outlet, and then set the TV
SoundConnect connection again.
✎Only one Hi-Fi Component at a time can be
connected to a TV via TV SoundConnect.
✎To connect to another TV in TV Soundconnect
mode, press the button for more than 5
seconds, and then connect to the other TV by
following the directions above.
To disconnect the TV from the Hi-Fi
Component
You can disconnect the TV from Hi- Fi
Component.
For instructions, see the TV's user manual.
• When the Hi-Fi Component is disconnected
from the TV, the Hi-Fi Component will display TV
DISCONNECTED ; REQUEST on its display.
To disconnect the Hi-Fi Component
from the TV
Press another mode button on the front panel
of the Hi-Fi Component to switch from TV
SoundConnect mode to another mode or turn off
the Hi-Fi Component. The currently connected
device is disconnected.
| NOTES |
✎The connected TV will wait a certain amount
of time for a response from the Hi-Fi
Component before terminating the connection.
(Disconnection time may differ, depending on
the TV)
✎The connection may be lost or sound may
stutter if the distance between the TV and the
Hi-Fi Component exceeds 6.5 feet (2 m).
✎Instability in the network environment may
cause the connection to be lost or sound to
stutter.
✎The Hi-Fi Component automatically turns off
after 25 minutes if the product is not connected
to a TV.
03 Functions
19 English
Page 20

Functions
Using My Karaoke
You can use the MY Karaoke function to sing
along with your favorite CDs and USB tracks.
1. Connect the microphone to the MIC jack on
the front of the product.
• If your microphone plug is smaller than the
6.3mm MIC jack, you need a ConnectorAdaptor (not supplied) to complete the
connection.
- First, connect the Connector-Adaptor to
the MIC jack on the front of the product,
- Second, connect the microphone (with
larger jack) to the Connector-Adaptor.
2. Press the MIC VOL-, + button on the
remote control to adjust the volume of the
microphone.
3. Press the MY KARAOKE button on the
remote control to suppress the vocal if you
need to. Each time the button is pressed, the
selection is changed as follows:
ON ; OFF
• If you hear strange noises (squealing or
howling) while using the Karaoke feature,
move the microphone away from the
speakers. Turning down the microphone's
volume or the speaker volume is also
effective. Do not aim the MICROPHONE
towards the SPEAKERS.
• The microphone does not operate in the
AUX and TUNER mode.
• If you connect a microphone, GIGA
SOUND automatically turns off. To turn
Giga Sound back on you must remove
the microphone, and then press the GIGA
SOUND BEAT button.
• When My Karaoke is on, GIGA SOUND
DEAT does not work.
• When you turn My Karaoke off, all My
Karaoke settings are lost.
• My Karaoke is only available when a
microphone is connected to the Hi-Fi
Component.
• MY KARAOKE does not operate in the
Bluetooth, TV SoundConnect, FM, AM,
and AUX mode.
Auto Change Function
You can play a disc followed by a USB device
connected to USB1 and/or USB2 continuously.
Press the
and then press
AUTO CHANGE
¬
• If Program Play has not been set in CD/USB
mode, the settings change as follows:
CHANGE OFF ; AUTO CHANGE ALL
button to select setting,
to apply your selection.
AUTO
• If Program Play has been set in CD/USB
mode, the settings change differently:
AUTO CHANGE OFF ; AUTO CHANGE
ALL; AUTO CHANGE PROGRAM
- When the
- The music will be played on
USB2
- When the auto change mode is "PROGRAM",the
programed music will be played on
DISC;USB1;USB2 continuously.
- If you press the
button or the OPEN/CLOSE button, the AUTO
CHANGE function automatically switches to
"OFF" mode.
- When the Auto change mode is "ALL or
PROGRAM", the main unit cannot record.
- When the Auto change mode is "ALL or
PROGRAM", the REPEAT and SLEEP functions
automatically switches to OFF.
- When the Auto change mode is "ALL or
PROGRAM", the REC SPEED, USB REC,
REPEAT, DELETE, and SLEEP functions do not
work, and the unit displays AUTO CHANGE
mode.
-
When the DISC play ends, if there's no device connected
to USB, the unit will continue to play the disc.
-
When the USB play ends, if there's no disc in the unit, the
unit will continue to play music from the USB.
AUTO CHANGE
continuously
POWER
mode is
.
button,function change
"ALL",
DISC;USB1;
Listening to the Radio
To Store the Stations You Want
You can store up to:
15 FM stations,15 AM stations.
1. Select FM or AM by pressing the TUNER/
AUX button.
2. To search for a station, press the TUNING
MODE button on the remote control or the
STOP button on the product one or more
times until MANUAL is displayed.
20 English
Page 21
3. Select a station by:
• Pressing and holding the TUNING/ALBUM
,
or . button on the remote control to
automatically search for active broadcasting
stations.
4. Press the MO/ST button to switch between
stereo and mono.
• In a poor reception area, select MONO for
a clear, interference-free broadcast.
• This applies only when listening to an FM
station.
5. If you do not want to store the radio station
found, go back to Step 3 and search for
another station.
Otherwise:
a. Press the ¬ button.
b. Or, press the TUNING/ALBUM button
on the remote control to select a program
number in the PRESET mode.
c. Press the ¬ button to save the preset.
6. To store any other radio frequencies required,
repeat Steps 3 to 5.
| NOTES |
✎In Tuner mode
- In the Manual mode, you can use the 1 or
2
button or the DJ JOG control.
- In the Preset mode, you can use the 1 or
2
button or the DJ JOG control on the
product to search for a stored radio station.
Selecting a Stored Station
To listen to a stored station, follow these steps:
1. Select FM or AM by pressing the TUNER/
AUX button on the product or remote control.
2. Press the TUNING MODE button on the
remote control until “PRESET” is displayed.
3. Press 1, 2 button on the main unit or
TUNING/ALBUM ,, . on the remote
control to select a preset number.
or
Turn the DJ JOG control left or right on the
main unit to select the stored station.
Timer Function
Setting the Clock
For each step, you have a few seconds to set the
required options. If you exceed this time, you must
start again.
1. Press the TIMER SET button on the remote
control twice. "CLOCK " is displayed.
2. Press the ¬ button on the remote control.
The hour flashes.
•
To increase the hours: TUNING/ALBUM
•
To decrease the hours: TUNING/ALBUM
3. When the correct hour is displayed, press the
button, and then the minutes flash.
¬
•
To increase the minutes: TUNING/ALBUM
•
To decrease the minutes: TUNING/ALBUM
4. When the correct minute is displayed, press
the ¬ button, and then " TIME" appears in
the display.
,
.
,
.
Setting the Timer
The timer enables you to set the product to switch
on or off at specific times automatically.
• Before setting the timer, check that the current
time is correct.
• For each step, you have a few seconds to set
the required options. If you exceed this time,
you must start again.
• If you no longer want the product to be switched
on or off automatically, you must cancel the
timer by pressing the TIMER ON/OFF button.
Example: You want to wake up to
music every morning.
1. Press the TIMER SET button until TIME is
displayed.
2. Press the ¬ button.
Result: ON is displayed for a few seconds.
You can set the timer switch-on time.
03 Functions
21 English
Page 22
Functions
3. Set the timer switch-on time.
a. Press the TUNING/ALBUM , or .
button to set the hours.
b. Press the ¬ button.
Result: The minutes flash.
c. Press the TUNING/ALBUM , or .
button to set the minutes.
d. Press the ¬ button.
Result: OFF is displayed for a few
seconds. You can now set the timer
switch-off time.
4. Set the timer switch-off time.
a. Press the TUNING/ALBUM , or .
button to set the hours.
b. Press the ¬ button.
Result: The minutes flash.
c. Press the TUNING/ALBUM , or .
button to set the minutes.
d. Press the ¬ button.
Result: VOL XX is displayed, where XX
corresponds to the volume already set.
5. Press the TUNING/ALBUM , or . button
to adjust the volume level and press the ¬
button.
Result: The source to be selected is
displayed.
6. Press the TUNING/ALBUM , or . button
to select the source the Hi-Fi Component will
play when it switches on.
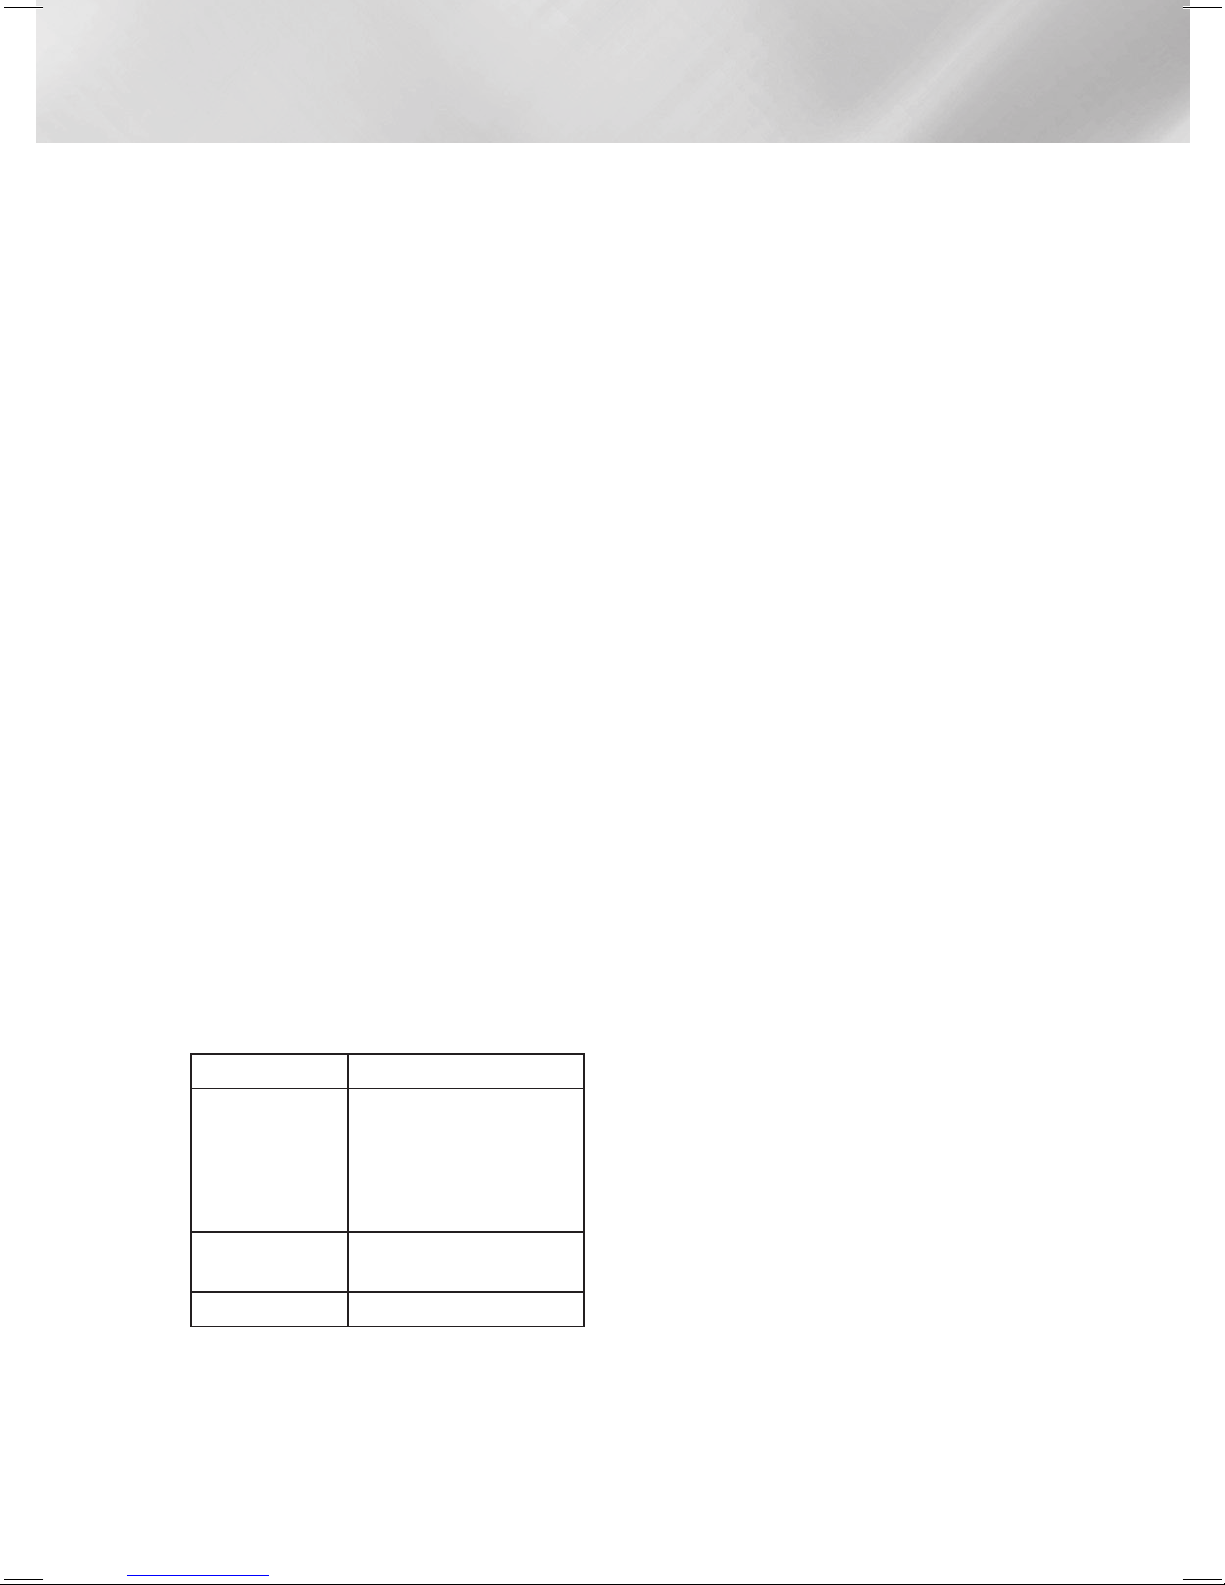
If you select You must also
FM/AM (radio) a. Press the ¬ button.
b. Select a preset station
by pressing the
TUNING/ALBUM ,
or . button.
MP3/CD
(compact disc)
USB Connect a USB device.
7. Press the ¬ button.
Result: CHKREC (Do you want to record?) is
displayed.
Load a compact disc.
8. Press the ¬ button.
Result: REC N is displayed. You can press
the TUNING/ALBUM , or . button to
select REC Y or REC N, and then press ¬
button.
1) If you select REC N, it will cancel tuner
timer recording and any currently set tuner
timer recording. Note that selecting REC
N does not cancel the Timer setting.
2) If you select REC Y, you can set the tuner
timer recording on and off times.
a. Press the ¬ button.
Result: ON is displayed for a few
seconds. You can set the tuner timer
recording switch-on time.
b. Press the ¬ button.
Result: OFF is displayed for a few
seconds. You can set the tuner timer
recording switch-off time.
| NOTES |
✎Tuner timer recording On/Off times can differ
from Timer On/Off times.
✎If the timer switch on and off times are identical,
the word ERROR is displayed.
✎You can use the 1, 2 buttons on the
product instead of the TUNING/ALBUM ,
or . button to make adjustments in Steps 3
through 8.
✎If the switch-on or -off time is the same as the
timer recording time, only the switch-on or -off
time is effective, and the timer recording is not
applied.
✎When you use the auto timer, you may need
an additional step to use a CD or USB device
with it, depending on the disc (or device).
Consequently, it is easier to use the tuner
instead.
✎If you select MP3/CD or USB mode when
there is no disc or no USB in the product, it will
automatically change to TUNER.
22 English
Page 23
Cancelling the Timer
After you have set the timer, it will start
automatically. If you no longer want to use the
timer, you must cancel it.
• To cancel the timer, Press the TIMER ON/OFF
button once.
• To restart the timer, Press the TIMER ON/OFF
button once again.
| NOTES |
✎When you select the TIMER OFF mode, the
TIMER RECORDING and TIMER function are
not available.
The Recording Function
Basic Recording
You can record from a CD, radio broadcast, or an
external source to a USB storage device.
1. Connect an external USB storage device to
the
USB 2 (
2. Play a disc, tune to a station, or connect an
external source to your product.
CD
• Press the CD/ Bluetooth button on the main
unit to select the MP3/CD function.
• Press the OPEN/CLOSE button to open the
disc tray.
• Insert a CD and press the OPEN/CLOSE
button to close the disc tray.
• Use the CD selection buttons ( [ or
select the desired song.
Tuner
• Select TUNER by pressing the TUNER/AUX
button.
• Tune to a station you want to record.
External Source
• Connect an External Component/MP3 player
to your product.
• Press the TUNER/AUX button to select
<AUX> input.
• Play a song from the external device.
USB 1
)
jack on your product.
]
) to
• Connect a USB device to USB 1 jack of your
product.
• Press the USB button to select USB 1.
• Play a song from USB 1.
3.
Press the USB REC button on the remote control
or the USB REC button on the main unit to start
recording.
CD
• “TRACK RECORDING” is displayed and CD
recording starts.
•
Press and hold the USB REC button on the
remote control or press and hold the USB REC
button on the main unit
to start recording all
tracks on the disc. "FULL CD RECORDING" is
displayed.
CD-ROM, USB 1
Press the USB REC button. The currently
•
playing file is copied onto the USB2 device.
Press and hold the USB REC button. All the
•
files in the current folder are copied onto the
USB2 device.
• If you connect a microphone and press the USB
REC button, the currently playing mp3 file and the
sound from the microphone is recorded onto the
USB2 device.
MP3 RECORDING: "MP3 RECORDING""RECORD"
COPY: “CHECK”“START”“COPY XX”“COPY END”
is displayed. When the recording is done,
“STOP” will be displayed.
• If there is a duplicate file name, "FILE EXIST" is
displayed, and the function is canceled.
Tuner /External Source
• RECORD is displayed.
4.
To stop recording, press the STOP (@) button.
The unit automatically creates and saves
recorded files in .MP3 format (SAM-XXXX.MP3).
5. After recording, a directory named
“RECORDING(DISCxxxx)”(FULL CD RECORDING),
“RECORDING”(TRACK RECORDING),
“COPY”(CD-ROM/USB), “MP3 RECORDING”(CDROM/USB), “TUNER RECORDING” or “AUX
RECORDING” is created on your USB device.
03 Functions
23 English
Page 24

Functions
| NOTES |
✎Do not disconnect the USB device or the
AC Cord during recording as this may cause
damage to the file.
✎WMA/MP2 files can be copied but not
recorded.
✎If you disconnected the USB device during a
recording, the main unit powers off and you
will not be able to delete the recorded file from
your USB device. If this occurs, please connect
the USB device to a PC, backup the USB data
to the PC, and then format the USB device.
✎When the USB memory has insufficient free
space, the system will display “NOT ENOUGH
MEMORY”.
✎The USB device or HDD you are recording to
must be formatted in the FAT file system. The
NTFS file system is not supported.
✎When you use the CD high speed search
function, CD recording is not available.
✎The recording time may be longer with some
USB devices.
✎In the program mode, you can't use the CD
recording function.
✎The equalizer is set to "OFF" automatically and
is not available during a CD recording.
✎The GIGA SOUND DEAT function is set to
"OFF" automatically and is not available during
a CD recording.
✎The REPEAT function is set to "OFF"
automatically and is not available during a CD
recording.
✎If you use the MIC function during a CD
recording, the sound from the microphone will
be recorded.
✎You cannot record the radio when searching or
if no stations are available in the Tuner mode.
✎Note that setting the input level too loud when
recording music from an external device
through the AUX or USB channel may cause
noise in the recording. If this occurs, lower the
external device’s volume level.
✎The maximum TUNER/AUX recording time is 5
hours.
Recording Speed
Each time you press the REC SPEED button
on the remote control, the recording speed will
change as follows:
RECORD SPD x 1 ; RECORD SPD x 4
• When you record from the tuner or an external
source, you cannot change the recording
speed.
• If you select RECORD SPD X 4, sound is not
produced during the recording.
• If you connect the microphone, you have one
recording speed mode available: RECORD SPD
X1.
• During recording, if you disconnect the
microphone, the recording will stop. If you
reconnect the microphone, the recording will
not restart.
24 English
Page 25
Special Sound Effects
Selecting EQ Mode
Your Hi-Fi Component system provides predefined
equalizer settings that are optimized for particular
music genre. You can also adjust the bass, middle
and treble levels manually.
1. Press the EQ button.
Each time you press the EQ button or
press the EQ button first and then turn the
VOLUME/SEARCH JOG control on the
product, the mode will change as follows:
OFF ; FLAT ; RANCHERA ;CUMBIA
;
REGGAE ; MERENGUE ; SALSA ;
REGGATON ; FOLKLORE ; PARTY ; POP
;
HIP HOP ; ROCK ; JAZZ ; CLASSIC ;
ELECTRONIC ; MP3 ENHANCER ; VIRTUAL
SOUND ; U B 0
2. To set the BASS, MID (Middle), and TREB
(Treble) levels manually, select U B 0, and
then press the ¬ button.
Result: The BASS level (left numeric) flashes.
Press the 1 or 2 button on the product or
TUNING/ALBUM ,, . button to select a
level: -6,-4,-2,0,+2,+4, or +6.
Then, press the ¬ button.
✎If no buttons are pressed within 8 seconds,
your settings will automatically be cancelled
and the previous settings will be saved.
✎The EQ mode may be different depending on
your region.
✎Use the VOLUME/SEARCH JOG to alter the
EQ mode, and the selected EQ mode will be
applied after about 2 seconds.
✎Use the VOLUME/SEARCH JOG to alter
the EQ mode, and then press ¬. EQ screen
disappears.
FOOTBALL MODE function
The football mode brings greater realism to sports
broadcasts.
1. Press the FOOTBALL MODE button on the
product.
Each time you press this button, the mode
changes as follows:
ANNOUNCER ; STADIUM; OFF
2. To cancel this function, press the FOOTBALL
MODE button until “OFF” is displayed.
| NOTES |
✎The FOOTBALL mode may be different
depending on your region.
03 Functions
Result: The MIDDLE level (middle numeric)
flashes.
Press the 1 or 2 button on the product or
TUNING/ALBUM ,, . button to select a
level: -6,-4,-2,0,+2,+4, or +6.
Then, press the ¬ button.
Result: The TREBLE level (right numeric)
flashes.
Press the 1 or 2 button on the product or
TUNING/ALBUM ,, . button to select a
level: -6,-4,-2,0,+2,+4 ,or +6.
Then, press the ¬ button.
Result: Setting is complete.
| NOTES |
✎When the Hi-Fi Component is recording, the
EQ function is turned off automatically and is
unavailable.
GOAL Function
Press this button to add the sound of cheering
while watching a football game.
1. Press the GOAL button on the remote
control.
Each time you press this button, the mode
changes as follows:
GOAL ON ; GOAL OFF
2. To cancel this function, press the GOAL
button until “GOAL OFF” is displayed.
| NOTES |
✎Press the GOAL button to output the currently
playing sound file mixed with the GOAL sound.
25 English
Page 26
Functions
GIGA SOUND Function
The GIGA SOUND function amplifies the bass
sound and provides twice the bass for powerful,
realistic sound.
1. Press the GIGA SOUND BEAT button on the
main unit or the GIGA button on the remote
control. Each time you press this button, the
mode changes as follows:
GIGA SOUND BEAT ; GIGA SOUND OFF
2. To cancel this function, press the GIGA
SOUND BEAT button until “GIGA SOUND
OFF” is displayed.
| NOTES |
✎The GIGA SOUND mode may be different
depending on your region.
BEAT WAVING Function
The Beat Waving function lets you change the
Speaker LED display mode.
1. Press the BEAT WAVING button on the
product or on the remote control.
Each time you press this button, the mode
changes as follows:
STARDUST ; EMERALD MOON ; STAR ;
PARTY ; FUN ; PURE ; FRESH ; LOVE ;
JOY ; SUNSET ; SUNRISE ; NATURE 1 ;
NATURE 2 ; WAVE 1 ; WAVE 2 ; OFF
| NOTES |
✎If you select Beat Waving OFF, all the speaker
LED displays are turned off.
• FLANGER : Creates an effect similar to the
sound of a jet engine revving up and down.
• CHORUS : Creates an effect similar to a
singing chorus.
• WAHWAH : Creates a 'Wah~ Wah~' effect.
• TREMOLO : Repeatedly and rapidly turns the
volume up and down.
• FUZZ : Distorts the original sound to make it
harder and harsher.
• PHASER : Alters the original sound from clear
to dull.
• SLAPBACK : Creates the effect of a slapback
echo following the original sound.
• DJ BEAT OFF : Turns off this function.
| NOTES |
✎You can control the intensity of the effect with
the DJ Jog.
✎To cancel an effect, press the effect's button
again.
✎You can also control the effect using the
EFFECT LEVEL button on the remote
control.
✎Use the DJ Jog to control the intensity of the
effect that was activated last. For example,
if you activated the WahWah effect and then
the Panning effect, the DJ Jog will control the
Panning effect.
✎To control the intensity of the effect you
applied first, press the button of the effect that
you applied last to turn it off. Then, you can
use the DJ Jog to control the intensity of the
first effect.
DJ BEAT Function
The DJ Beat function lets you turn on the DJ
sound effect functions. The level of each effect is
adjustable.
Press the DJ BEAT button on the remote control
or on the product.
Each time you press this button, the mode
changes as follows:
| IMPORTANT |
✎The set scope is [-15 ~ +15] and the initial set
up value are all 0.
26 English
Page 27

+PANNING Function
Increases the left and right speaker's output in
turn and makes it seem as if the sound is moving
from side to side.
| NOTES |
✎To apply the PANNING effect to another effect,
press the +PANNING button when the other
effect is active or press another effect button
when the PANNING effect is active.
✎You can apply the PANNING effect to the
FLANGER, WAHWAH,CHORUS, TREMOLO,
FUZZ,PHASER, or SLAPBACK effect.
NON-STOP MUSIC RELAY Function
The NON-STOP MUSIC RELAY function plays
music continuously without an interval between
tracks/files. If there were two mp3 files, it skips to
the next file’s 10 seconds from start position when
the previous track reaches its 10 seconds before
end position.
Press the NON-STOP MUSIC RELAY button on
the product or NON-STOP RELAY button on the
remote control.
Each time you press this button, the mode
changes as follows:
NON-STOP MUSIC RELAY ON ; NON-STOP
MUSIC RELAY OFF
DANCE TIME Function
Press the DANCE TIME button on the remote
control when playing music to play the dance
music stored in the product.
Use this function to enjoy exciting music.
1. Press the DANCE TIME button on the
remote control or on the product.
Each time you press this button, the mode
changes as follows:
DANCE TIME ON ; DANCE TIME OFF
2. To cancel this function, press the DANCE
TIME button until "DANCE TIME OFF" is
displayed.
✎When DANCE TIME mode is switched ON,
the BT, TV SoundConnect, TUNER, and AUX
sources enter Mute mode.
✎When playing a DANCE TIME sound file, you
can change the dance music by pressing the
SKIP button.
✎If you set DANCE TIME to OFF during
playback of a CD or USB, playback of the CD
or USB starts again from the beginning of the
current track.
TEMPO Function
Use this to change the TEMPO (-10 ~ +10) while
music is playing.
1. During playback (CDDA/ MP3/ WMA), press
the TEMPO button on the remote control or
on the product.
2. Select the desired TEMPO by using the
EFFECT LEVEL button on the remote control
or DJ JOG button on the product.
• High speed search does not work on TMEPO
mode.
| NOTES |
✎TEMPO Function does not operate in the
Bluetooth, TV SoundConnect, FM ,AM and
AUX mode.
✎When you turn TEMPO off, all TEMPO settings
are lost.
Booting Sound Function
When the Booting Sound Function is on, your Hi-fi
Component demonstrates it's audio prowess as it
boots up.
1. Press the product's GIGA SOUND BEAT
button or the remote control's GIGA button
for about 3 seconds. The BOOTING SOUND
menu appears on the display panel.
2. Press the product's GIGA SOUND BEAT
button or the remote control's GIGA button
for about 3 seconds to turn the BOOTING
SOUND function On or Off.
03 Functions
| NOTES |
✎When the DANCE TIME sound file finishes
playing, the DANCE TIME mode changes to
DANCE TIME OFF.
27 English27 English
Page 28
Appendix
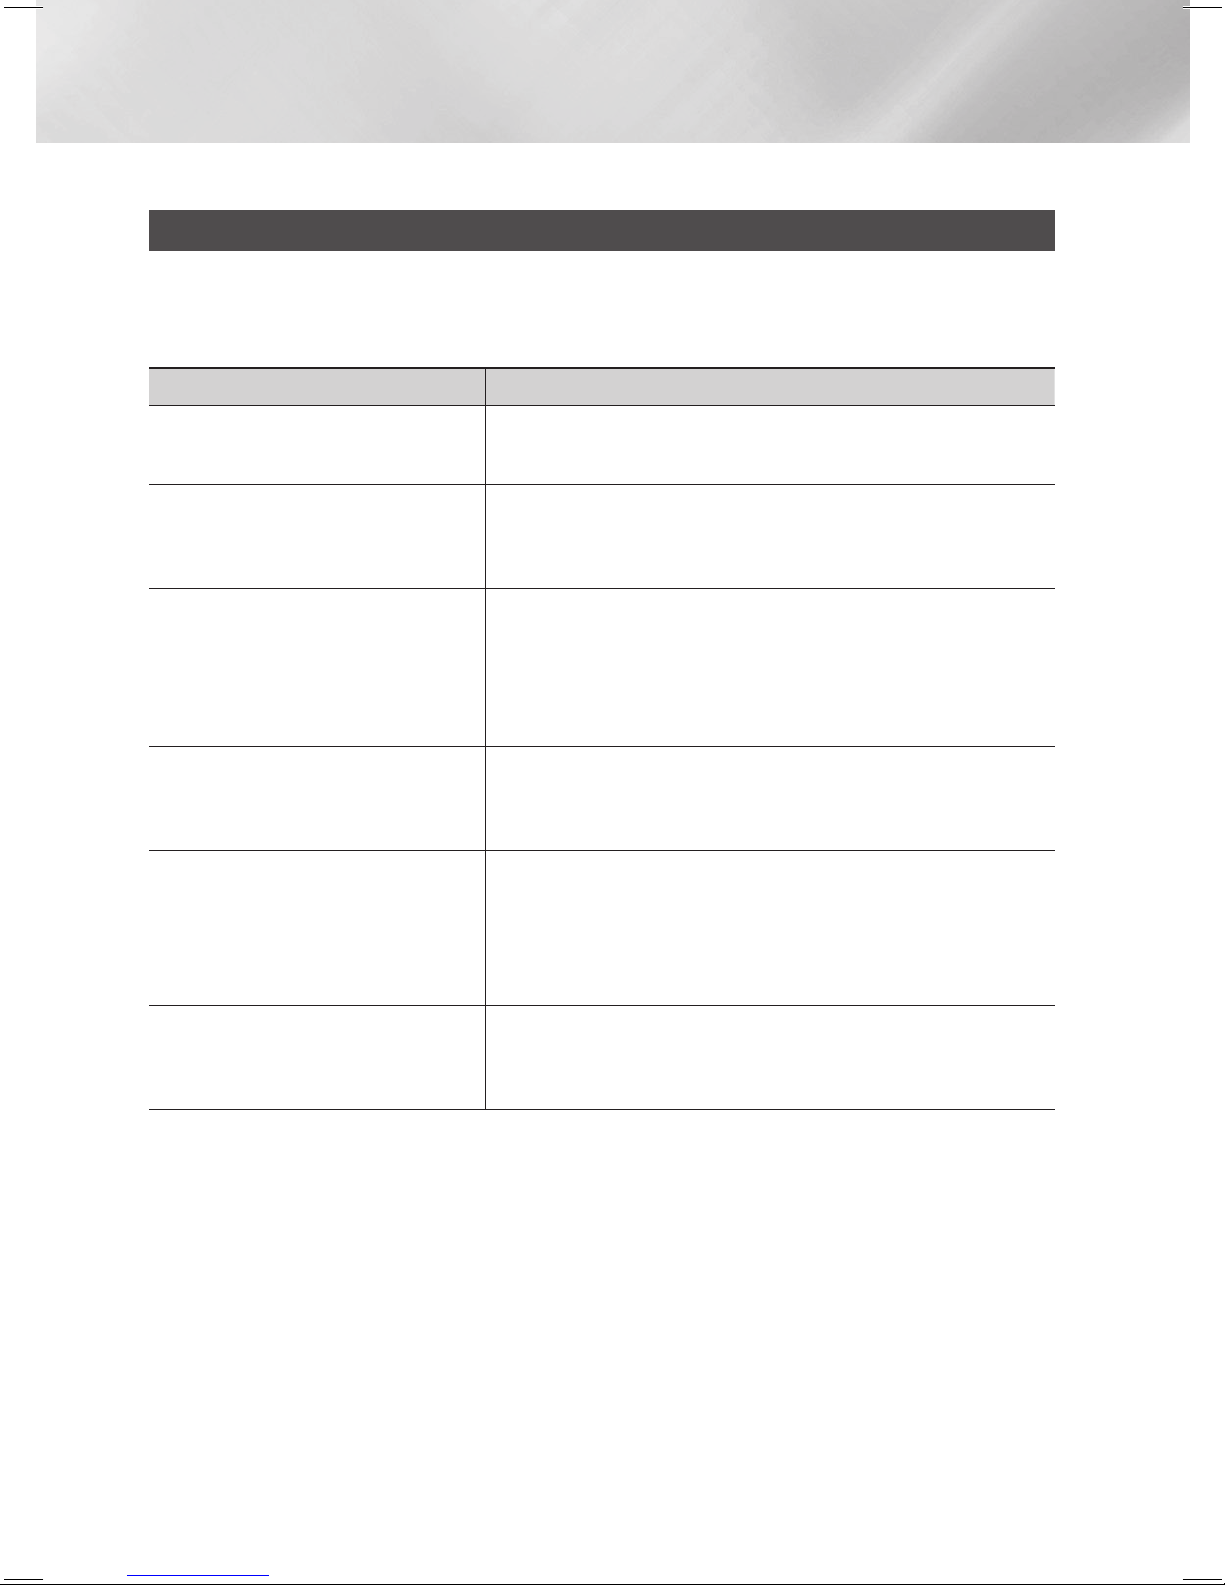
Troubleshooting
Refer to the chart below when this product does not function properly. If the problem you are
experiencing is not listed below or if the instructions below do not help, turn off the product, disconnect
the power cord, and contact the nearest authorized dealer or Samsung Electronics Service Center.
Symptom Check/Remedy
I cannot eject the disc. • Is the power cord plugged securely into the outlet?
• Turn off the power and then turn it back on.
Playback does not start immediately
when the Play/Pause button is
pressed.
Sound is not produced. • No sound is heard during fast playback, slow playback, and
The remote control does not work. • Is the remote control being operated within its operational
The product is not working.
(Example: The power goes out or
the front panel buttons don't work,
or you hear a strange noise.)
The product is not working normally.
Can't receive radio broadcast. • Is the antenna connected properly?
• Are you using a deformed disc or a disc with scratches on
the surface?
• Wipe the disc clean.
step motion playback.
• Are the speakers connected properly? Is the speaker setup
correctly customized?
• Is the disc severely damaged?
angle and distance range?
• Are the batteries drained?
• Press the
with no disc inside. The initialization message appears on the
screen, and the power will turn off automatically. When you
turn your product on again, all the settings will be reset.
Don't use this unless absolutely necessary.
• If the antenna's input signal is weak, install an external FM
antenna in an area with good reception.
@
button (on front panel) for more than 5 seconds
28 English
Page 29
Specifications
04 Appendix
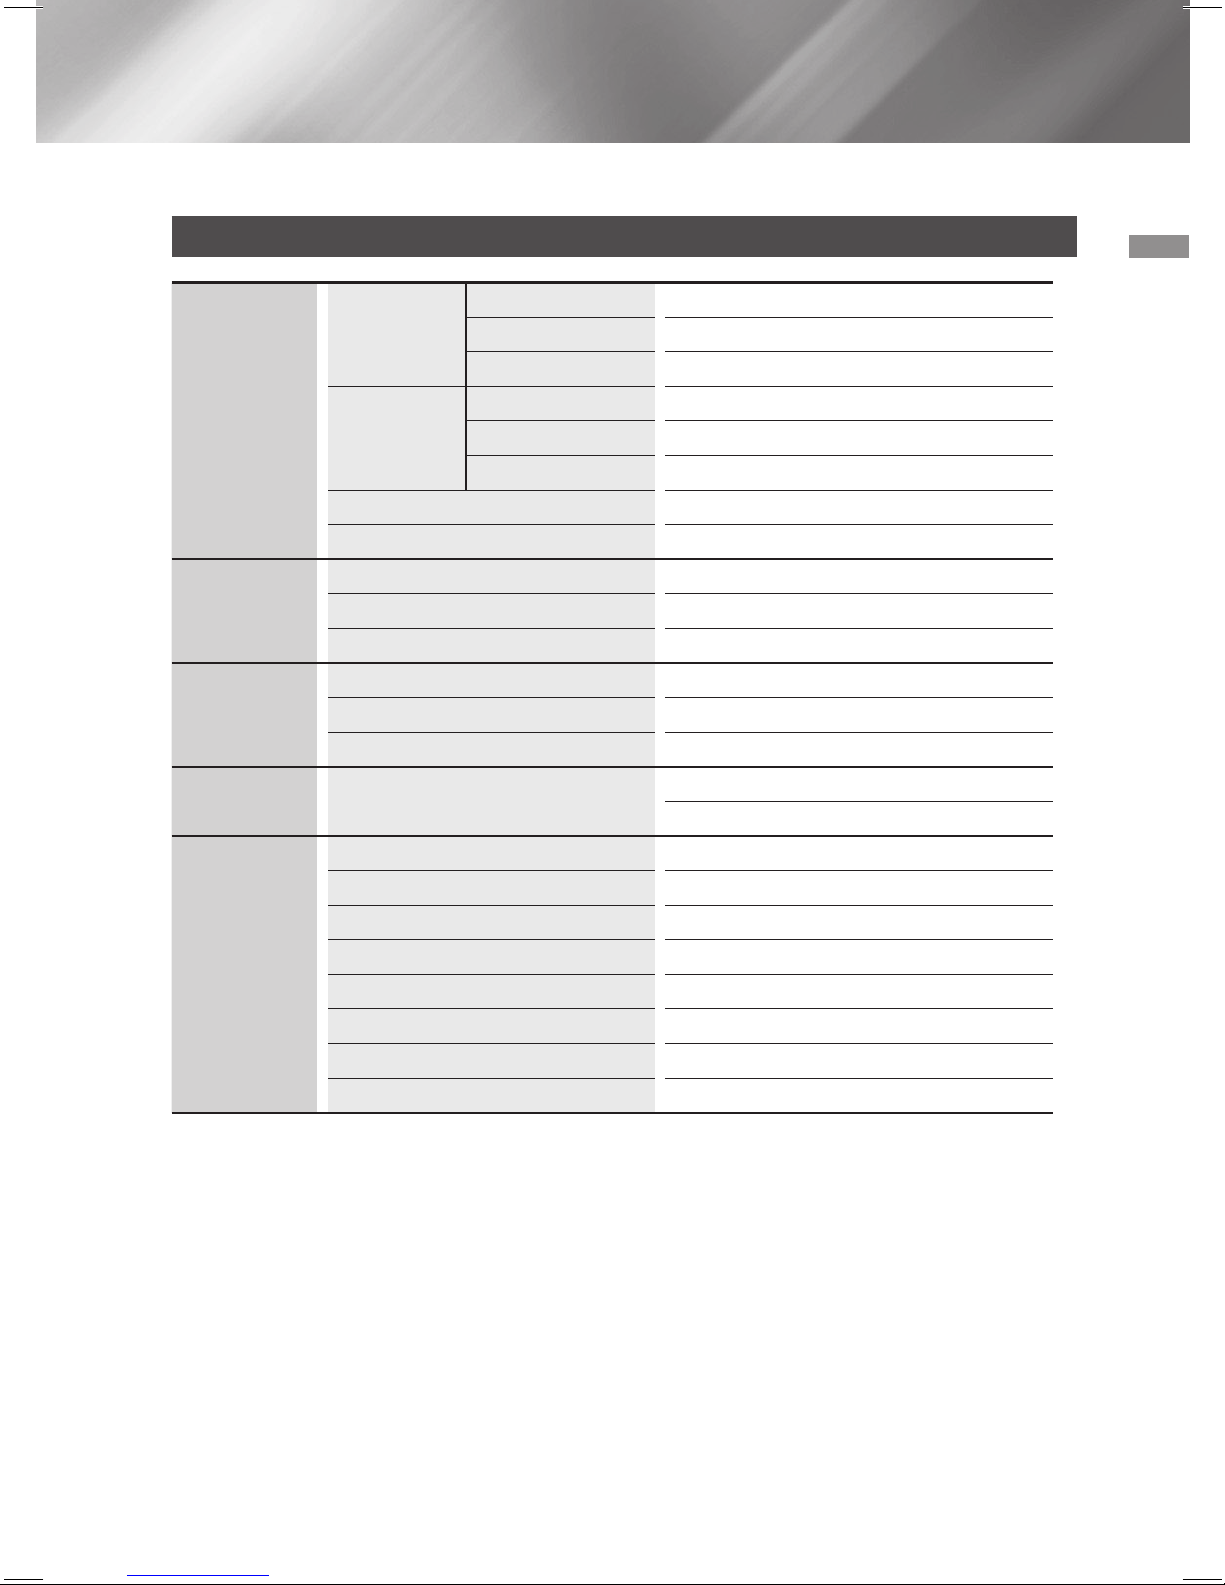
Main unit 4.8 Kg
Weight
General
FM Tuner
AM Tuner
CD Disc CD : 12 cm (COMPACT DISC)
Dimensions
Operating Temperature Range +5°C~+35°C
Operating Humidity Range 10 % to 75 %
Signal/Noise ratio 55 dB
Usable sensitivity 10 dB
Total harmonic distortion 1 %
Signal/Noise ratio 30 dB
Usable sensitivity 70 dB
Total harmonic distortion 4 %
Front speaker output(MX-HS7000) 575W/CH (4Ω)
Front speaker output (MX-HS6000) 567W/CH (4Ω)
Front speaker 6.15 Kg
Subwoofer 11.5 Kg
Main unit 451 (W) x 220 (H) x 304 (D) mm
Front speaker 450 (W) x 225 (H) x 306.7 (D) mm
Subwoofer 450 (W) x 450 (H) x 320 (D) mm
Reading Speed : 4.8 ~ 5.6 m/sec.
Maximum Play Time : 74 min.
Subwoofer output (MX-HS7000) 575W/CH (4Ω)
Amplifier
*: Nominal specification
- Samsung Electronics Co., Ltd reserves the right to change the specifications without notice.
- Weight and dimensions are approximate.
- Design and specifications are subject to change without prior notice.
- For information on the power supply and power consumption, refer to the label attached to the
product.
Subwoofer output (MX-HS6000) 567W/CH (4Ω)
Frequency range 22Hz~20KHz
S/N Ratio 65 dB
Channel separation 50 dB
Input sensitivity AUX IN1 1.2V, AUX IN2 2.0V
Open Source Announcement
To send inquiries and requests regarding open sources, contact Samsung via Email (oss.request@
samsung.com).
29 English
Page 30
Contact SAMSUNG WORLD WIDE
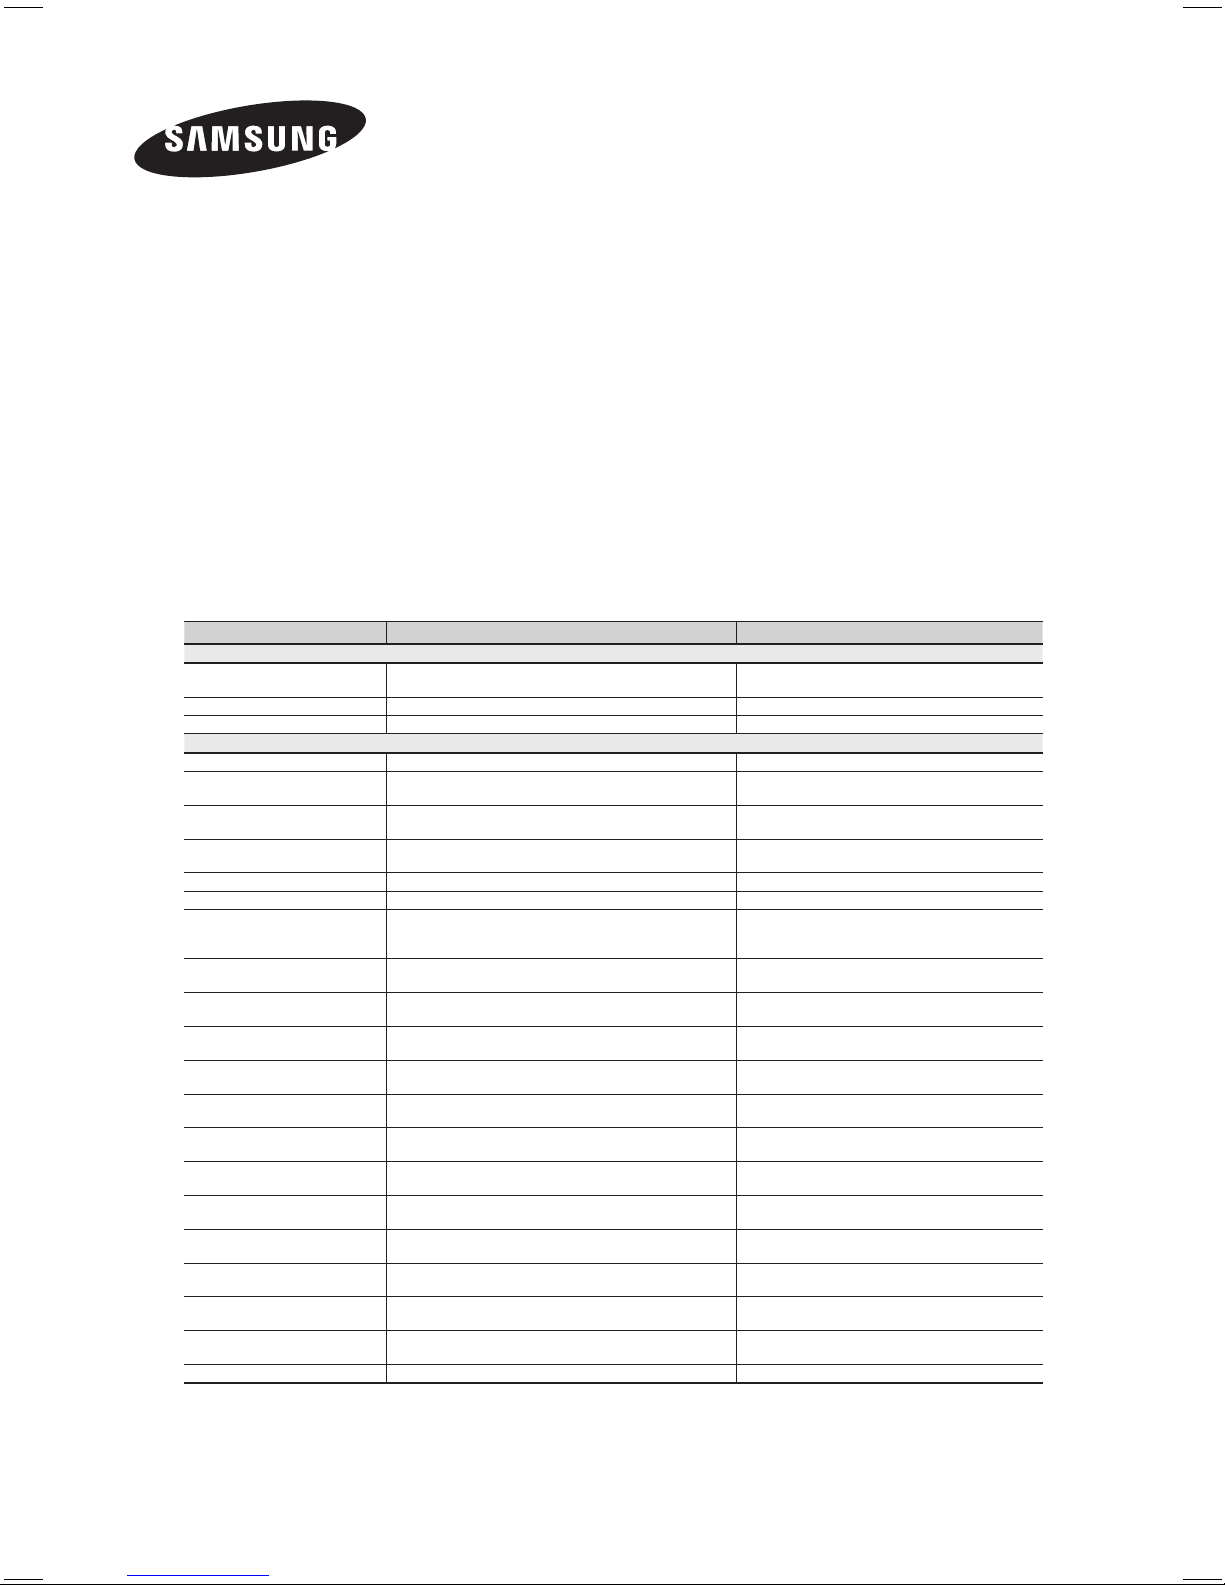
If you have any questions or comments relating to Samsung products, please contact the SAMSUNG customer
care centre.
Area Contact Center
`
North America
CANADA 1-800-SAMSUNG (726-7864)
U.S.A 1-800-SAMSUNG (726-7864) www.samsung.com/us /support
MEXICO 01-800-SAMSUNG (726-7864) www.samsung.com/mx /support
`
Latin America
ARGENTINE 0800-333-3733 www.samsung.com/ar/support
URUGUAY 000 405 437 33
PARAGUAY 009 800 542 0001
BRAZIL
CHILE 800-SAMSUNG(726-7864) www.samsung.com/cl /support
BOLIVIA 800-10-7260 www.samsung.com/cl/support
COLOMBIA
COSTA RICA
DOMINICA 1-800-751-2676
ECUADOR
EL SALVADOR 800-6225
GUATEMALA
HONDURAS
JAMAICA
NICARAGUA 001-800-5077267
PANAMA
PERU
PUERTO RICO 1-800-682-3180
TRINIDAD & TOBAGO 1-800-SAMSUNG(726-7864)
VENEZUELA 0-800-SAMSUNG (726-7864) www.samsung.com/ve
0800-124-421 (Demais cidades e regiões)
4004-0000 (Capitais e grandes centros)
Bogotá 600 12 72
Gratis desde cualquier parte del país 01 8000 112 112 ó
desde su celular #SAM(726)
0-800-507-7267
00-800-1-SAMSUNG (726-7864)
1-800-10-72670
1-800-SAMSUNG (72-6786)
1-800-299-0013
1-800-299-0033
800-27919267
800-2791-9111
1-800-234-7267
1-800-SAMSUNG (726-7864)
800-7267
800-0101
0-800-777-08
Desde celulares por favor llamar al número 336 8686
www.samsung.com/ca /support (English)
www.samsung.com/ca_fr /support (French)
www.samsung.com/latin/support(Spanish)
www.samsung.com/latin_en/support(English)
www.samsung.com/latin/support(Spanish)
www.samsung.com/latin_en/support(English)
www.samsung.com/br/support
www.samsung.com/co/support
www.samsung.com/latin/support(Spanish)
www.samsung.com/latin_en/support (English)
www.samsung.com/latin/support (Spanish)
www.samsung.com/latin_en/support (English)
www.samsung.com/latin/support (Spanish)
www.samsung.com/latin_en/support (English)
www.samsung.com/latin/support (Spanish)
www.samsung.com/latin_en/support (English)
www.samsung.com/latin/support (Spanish)
www.samsung.com/latin_en
www.samsung.com/latin_en
www.samsung.com
www.samsung.com/
www.samsung.com/latin_en
www.samsung.com/latin/support (Spanish)
www.samsung.com/latin_en
www.samsung.com/pe/support
www.samsung.com/latin/support (Spanish)
www.samsung.com/latin_en/support (English)
www.samsung.com/latin
www.samsung.com/latin_en
Web Site
/support
/support
/latin
/support
latin
/support (Spanish)
/support
/support
/support
/support
/support
(English)
(English)
(English)
(English)
(Spanish)
(English)
 Loading...