

Page 1
USER’S MANUAL
Multi Function
Wired Remote Controller
MWR-WE00
ENGLISHESPAÑOLFRANÇAISITALIANOPORTUGUÊSDEUTSCHEΛΛHNIKA
SE F I P GD
System Air Conditioner
Ne Po Hu
DB98-30794A(1)AR
NEDERLANDS
POLSKIMAGYARRUSSIAN
Page 2
E-2
Safety Precautions
• Before using the multi function wired remote controller, read carefully these
instructions.
• After reading the instructions, keep this user's manual in a handy and safe place.
If a user is changed, you must hand over the manuals.
• Never attempt to install the air conditioning system or to move the multi function
wired remote controller by yourself.
WARNING
CAUTION
Do not attempt to install or repair this multi function
wired remote controller by yourself.
This remote controller contains no user-serviceable parts.
Always consult authorized service personnel for repairs.
When moving, consult authorized service personnel for
disconnection and installation of the remote controller.
Ensure that the wall is strong enough to support the
weight of the remote controller.
Must install the remote controller with rated power
supply.
In the event of a malfunction (burning smell, etc.),
immediately stop operation, turn off the electrical
breaker, and consult authorized service personnel.
Do not use inflammable gases near the remote
controller.
Do not spill water into the multi function wired remote
controller.
Do not operate the remote controller with wet hands.
Do not install the remote controller in a location where
it will come into contact with the combustible gases,
machine oil, sulphide gas, etc.
Do not press buttons with a pointed thing.
Do not pull or bend the multi function wired remote
controller cable excessively.
Do not use this multi function wired remote controller
for other purpose.
Do not spray an insecticide or other combustible things
on the multi function wired remote controller.
Do not clean the multi function wired remote controller
with benzene, solvents or other chemicals.
Do not give a shock to the multi function wired remote
controller or disassemble it by yourself.
Page 3

E-3
ENGLISH
Contents
MULTI FUNCTION WIRED REMOTE CONTROLLER
GETTING STARTED
SELECTING THE AUTOMATIC OPERATING MODE
SELECTING THE COOLING MODE
SELECTING THE DEHUMIDIFYING MODE
SELECTING THE FAN MODE
SELECTING THE HEATING MODE
SELECTING THE QUIET MODE
SELECTING THE SLEEP MODE
ADJUSTING THE AIR SWING DIRECTION
CHECKING THE ROOM TEMPERATURE
LOCKING THE MULTI FUNCTION WIRED REMOTE CONTROLLER
OPERATING THE ERV
USING THE E.SAVER FUNCTION
SETTING THE 7-DAY SCHEDULE
DELETING A SCHEDULE
SETTING AND CANCELING A HOLIDAY SCHEDULE
RESETTING THE 7-DAY SCHEDULE
SETTING THE AUTO STOP FUNCTION
SETTING THE TEMPERATURE LIMITS
LOCKING THE PARTS OF THE MULTI FUNCTION
IRED REMOTE CONTROLLER
W
SETTING THE CURRENT TIME AND DAY
...........................................................................
....................................................
.............................................................
....................................................
.........................................................
..........................................................
............................................
......................................................................
.....................................................
......................................................
....................................................................
..................................................
.............................................
................................................
........................................................
........................
..........................
........................................
........................................
.........................
.........................................
.......
4
5
6
7
8
9
10
11
12
13
14
14
15
16
17
20
21
22
23
24
25
26
Page 4
E-4
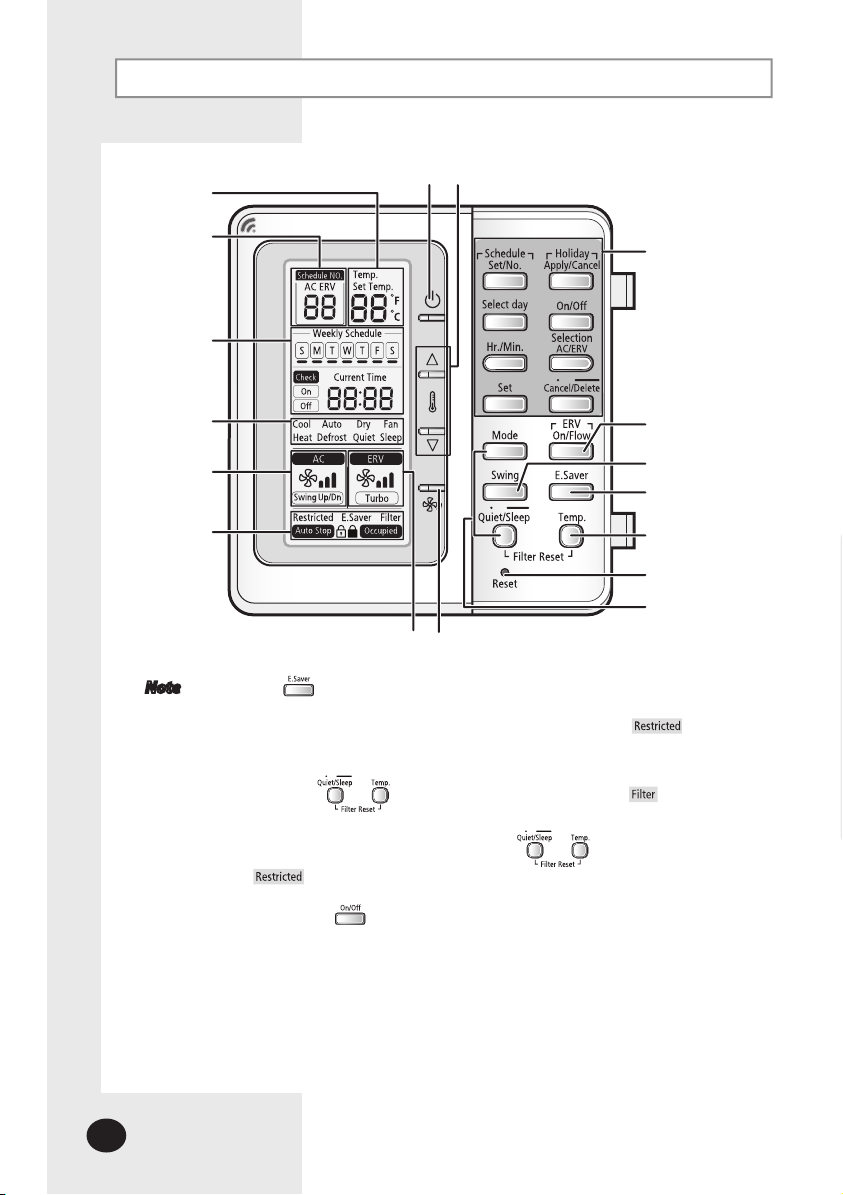
Multi Function Wired Remote Controller
The multi function wired remote controller is installed on the wall.
Temperature setting
Temperature
display
Schedule number/
Schedule applied
unit display
Schedule/
Current time
display
Operation ON/OFF button
button
7-day schedule setup
Operation mode
display
AC fan speed/
air swing display
Special function
display
ERV fan speed
display
Fan speed setting
button
Note The button operates only when 1 indoor unit and 1 ERV unit is
connected to the multi function wired remote controller. If ERV unit is
not connected or more than 2 ERV units are connected,
displayed when you control it.
ERV operates in Heat Exchange mode only.
Press the buttons after cleaning the air filter. sign will be off.
The remote controller will display the filter sign to alert the user to clean the
filter and turn off the display when the
buttons are pressed.
will be displayed if you press the button of the function that the
indoor unit does not support.
If you press button when ERV unit is connected to the multi function
wired remote controller, you can turn on/off both of ERV unit and the air
conditioner at the same time or turn on/off the air conditioner only.
The default setting is turning on/off both of them.
(Refer to the installation manual.)
Even if the ERV and air conditioner are set to turn on/off at the same time,
you can control the air conditioner and ERV individually by other controllers
(Wireless remote controller, Centralized controller, S-NET mini, etc.) except
the multi function wired remote controller.
ERV on/fan speed
control
Swing button
Energy saving
function selection
Room temperature
check button
Schedule reset button
Mode selection
will be
Page 5
E-5
ENGLISH
Getting Started
You have just purchased a multi function wired remote controller and it has
been installed by your installation specialist.
Your User’s Manual contain much valuable information on using
your multi function wired remote controller. Please take the time to read
them as they will help you take full advantage of the unit’s features.
In the manual, you will find a series of step-by-step procedures for each
function available.
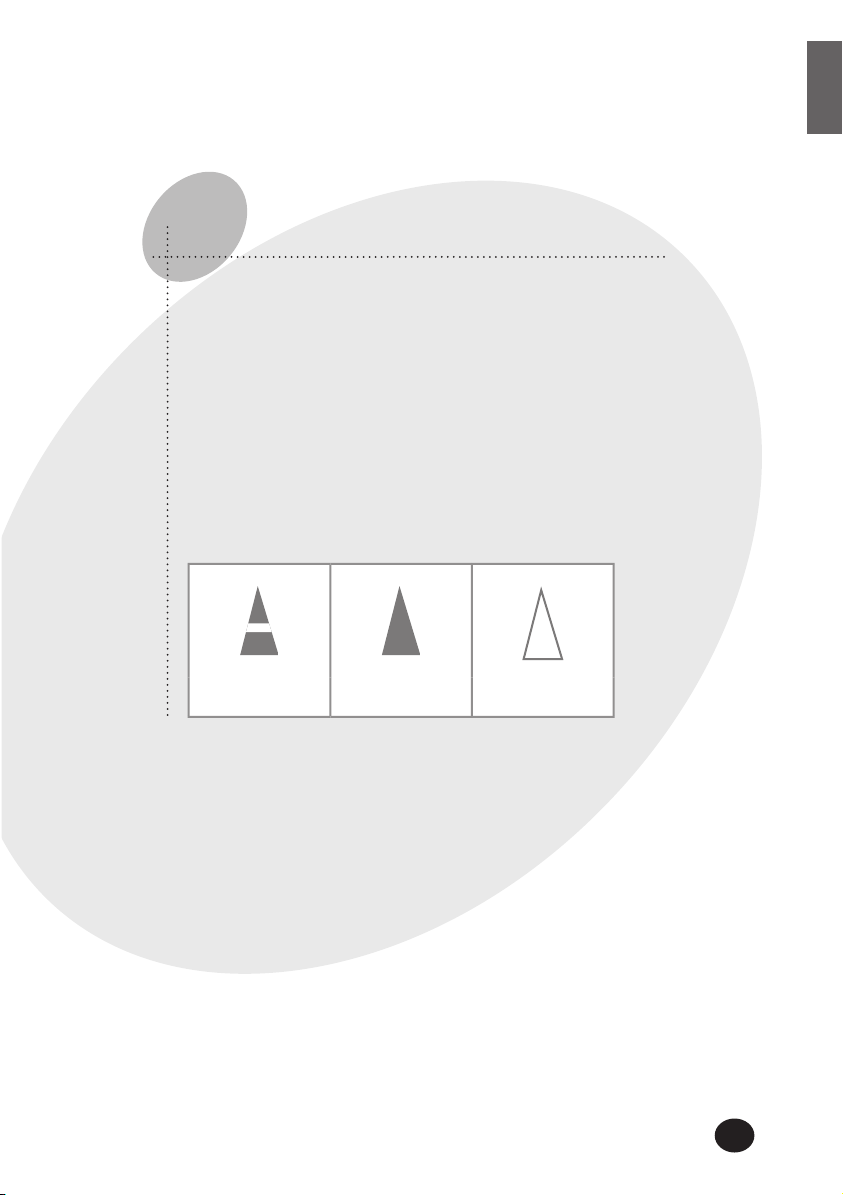
The illustrations in the step-by-step procedures use 3 different symbols:
PRESS PUSH HOLD DOWN
Page 6
E-6
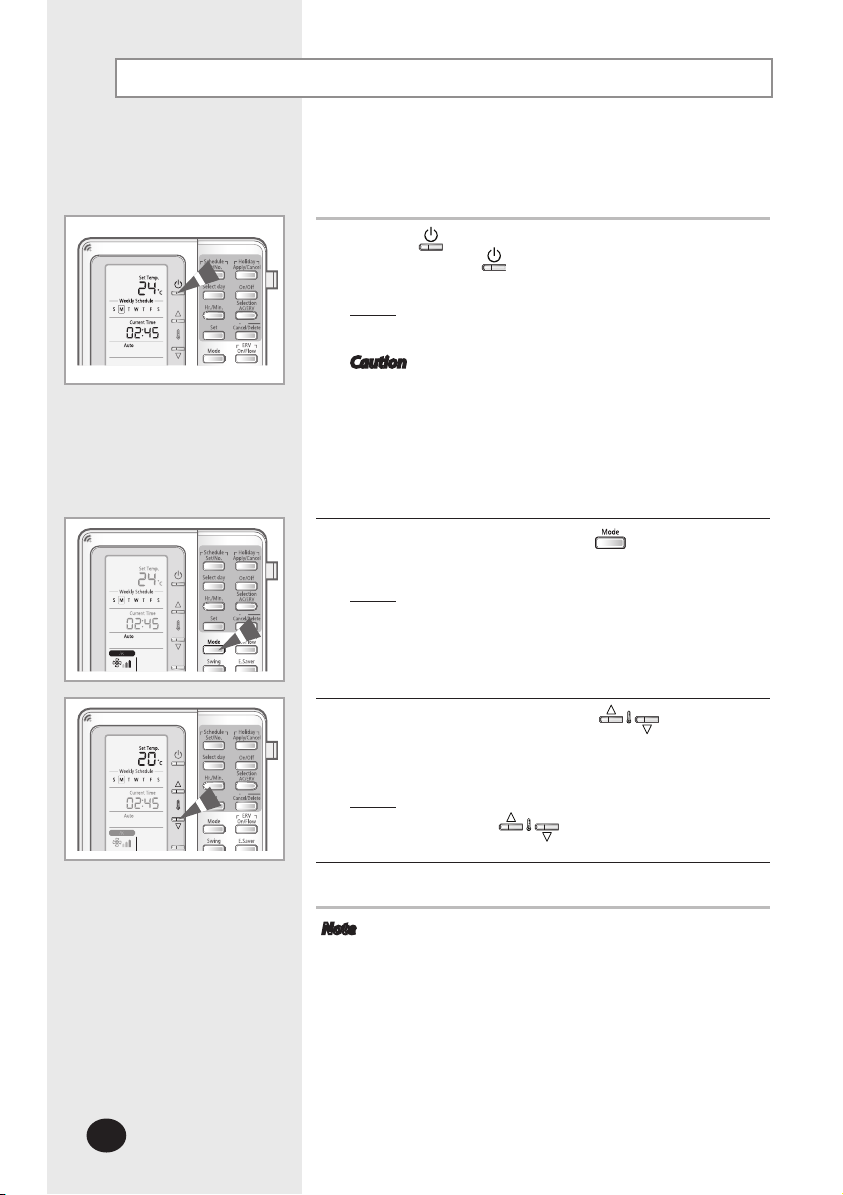
Selecting the Automatic Operating Mode
The room temperature and the fan speed are controlled
automatically in the auto mode.
Press the (ON/OFF) button to turn on the indoor unit.
1
- Do not press the
controller is on.
: The air conditioner will be turned on with the
Result
Caution The air conditioner has a built-in protection
To select the AUTO mode, press the button until Auto is
2
displayed on the remote controller.
Result
The auto fan speed will be selected
most recently used mode.
mechanism to prevent the unit from being
damaged when it is started immediately after
being:
Plugged in
Stopped
The air conditioner will start up after 3 minutes.
: The air conditioner will operate in auto mode.
automatically in auto mode.
You cannot control the fan speed.
(ON/OFF) button if the remote
To adjust the temperature, press the buttons.
3
The temperature can be set between 18°C(65°F) and
30°C(86°F).
Result
: The temperature will be adjusted by 1°C(1°F)
when the buttons are pressed.
4
To adjust the air swing direction, refer to page 13.
Note Fan speed in auto mode
When the room temperature is high, cool and strong
air will come out. After the room is cooled, mild air will
come out.
Page 7
E-7
ENGLISH
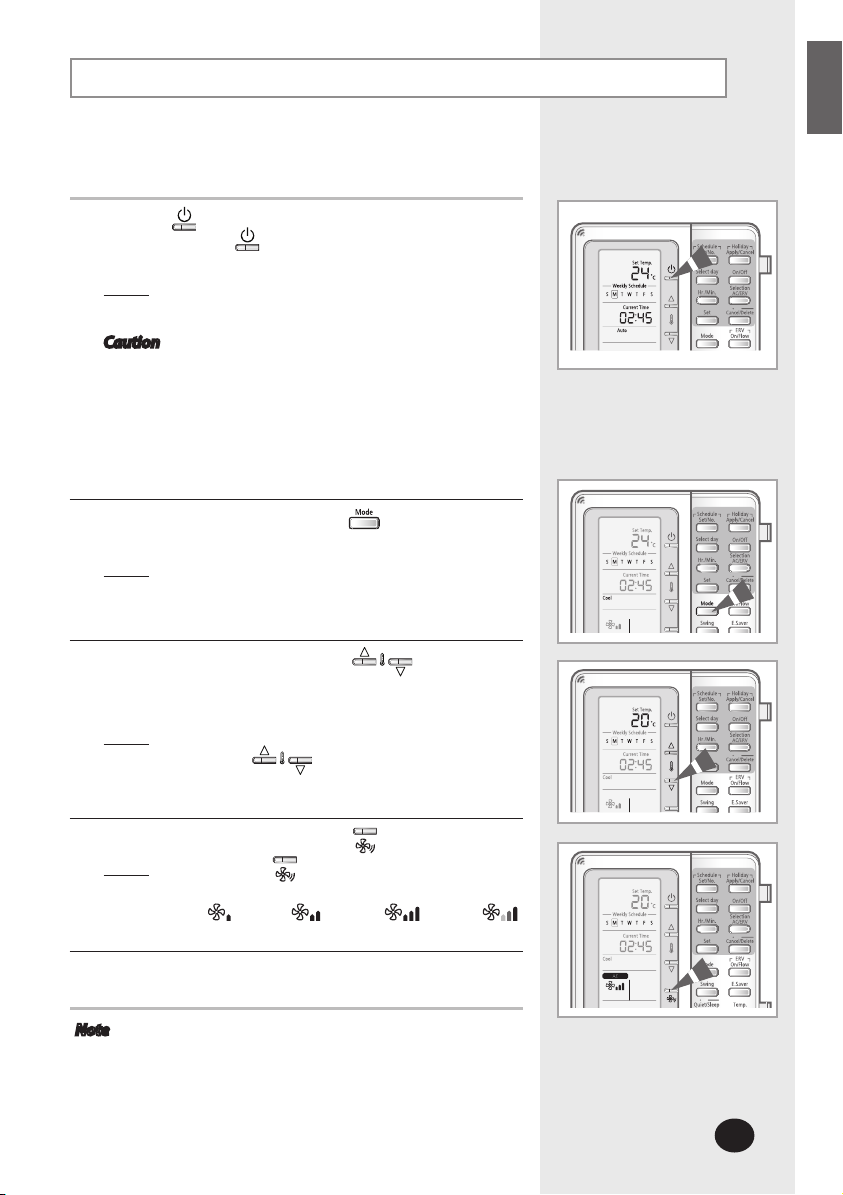
Selecting the Cooling Mode
Select the cooling mode to lower the room temperature.
Press the (ON/OFF) button to turn on the indoor unit.
1
- Do not press the
controller is on.
: The air conditioner will be turned on with the
Result
Caution The air conditioner has a built-in protection
To select the COOL mode, press the button until Cool is
2
displayed on the remote controller.
Result
most recently used mode.
mechanism to prevent the unit from being
damaged when it is started immediately after
being:
Plugged in
Stopped
The air conditioner will start up after 3 minutes.
: The air conditioner will operate in cooling mode.
(ON/OFF) button if the remote
3
To adjust the temperature, press the buttons.
The temperature can be set between 18°C(65°F) and
30°C(86°F).
: The temperature will be adjusted by 1°C(1°F)
Result
4
Select the fan speed by pressing the button.
Result
5
To adjust the air swing direction, refer to page 13.
Note If you select heating mode while the cooling mode is in
when the buttons are pressed.
: Each time the button is pressed, fan speed will
change in the following order:
Low
Med High Auto
operation, cooling mode will be canceled.
Page 8
E-8
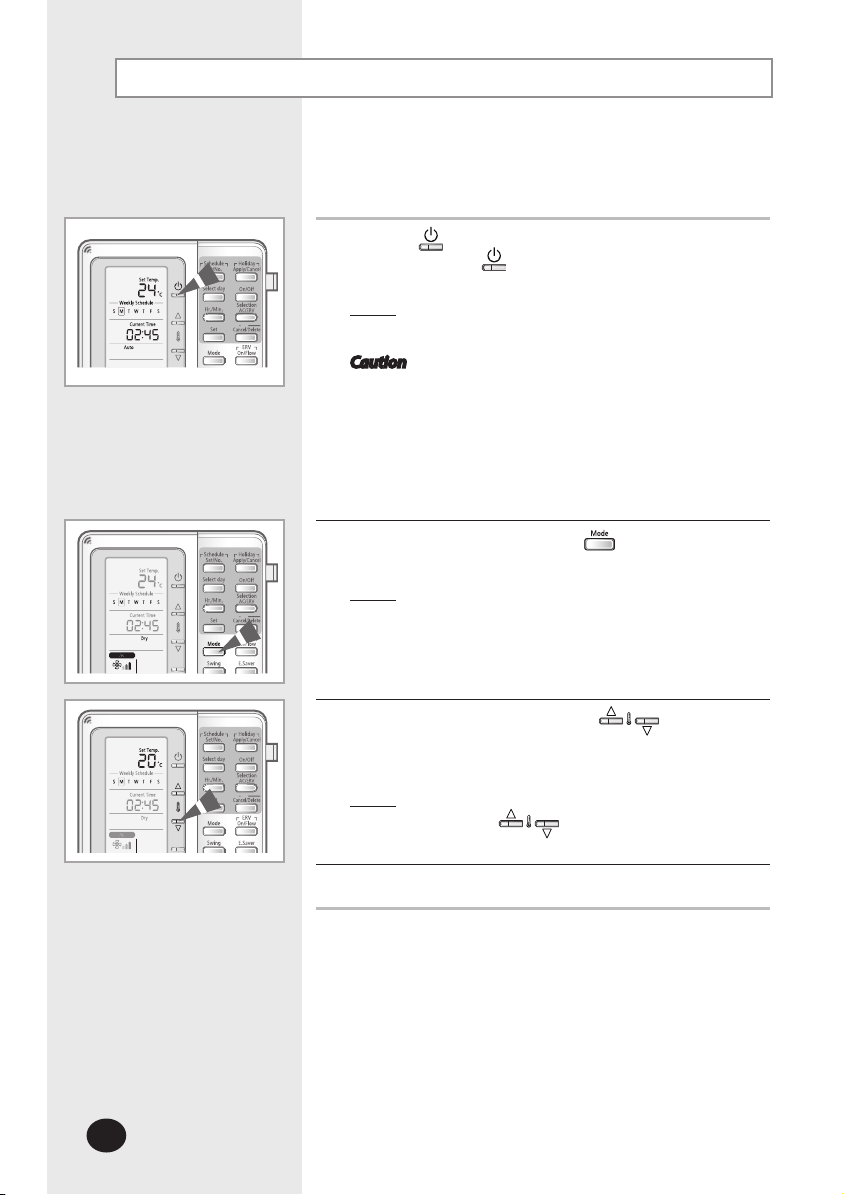
Selecting the Dehumidifying Mode
Select the dehumidifying mode if the room is too humid.
Using this mode will slightly lower the room temperature.
Press the (ON/OFF) button to turn on the indoor unit.
1
- Do not press the
controller is on.
: The air conditioner will be turned on with the
Result
Caution The air conditioner has a built-in protection
To select the DRY mode, press the button until Dry is
2
displayed on the remote controller.
Result
The Auto fan speed will be selected
most recently used mode.
mechanism to prevent the unit from being
damaged when it is started immediately after
being:
Plugged in
Stopped
The air conditioner will start up after 3 minutes.
: The air conditioner will operate in
dehumidifying mode.
automatically in the dry mode.
You cannot control the fan speed.
(ON/OFF) button if the remote
To adjust the temperature, press the buttons.
3
The temperature can be set between 18°C(65°F) and
30°C(86°F).
Result
: The temperature will be adjusted by 1°C(1°F)
when the buttons are pressed.
4
To adjust the air swing direction, refer to page 13.
Page 9
E-9
ENGLISH
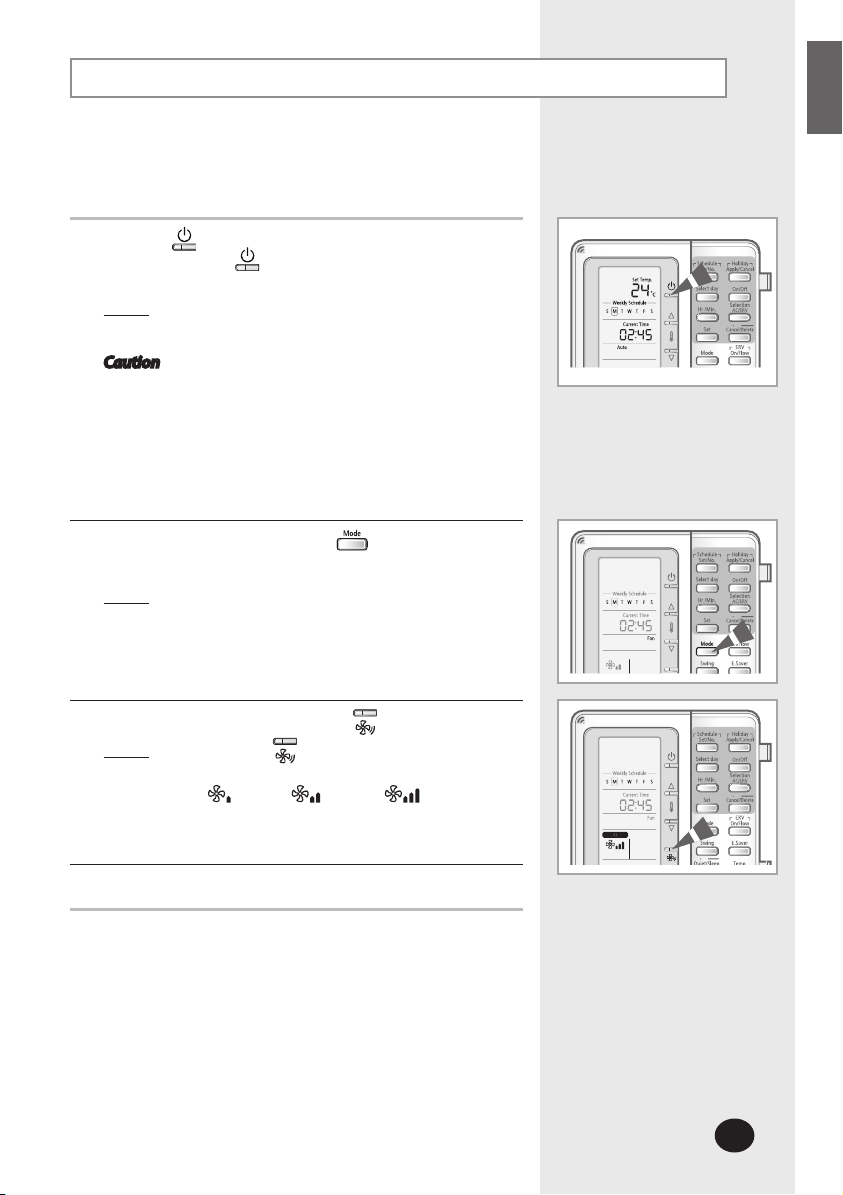
Selecting the Fan Mode
Select the fan mode to circulate air without changing the
temperature.
Press the (ON/OFF) button to turn on the indoor unit.
1
- Do not press the
controller is on.
: The air conditioner will be turned on with the
Result
Caution The air conditioner has a built-in protection
To select the FAN mode, press the button until Fan is
2
displayed on the remote controller.
Result
You cannot adjust the temperature in fan
most recently used mode.
mechanism to prevent the unit from being
damaged when it is started immediately after
being:
Plugged in
Stopped
The air conditioner will start up after 3 minutes.
: The air conditioner will operate in fan mode.
mode.
(ON/OFF) button if the remote
Select the fan speed by pressing the button.
3
Result
: Each time the button is pressed, fan speed will
change in the following order:
Low
Med High
4
To adjust the air swing direction, refer to page 13.
Page 10
E-10
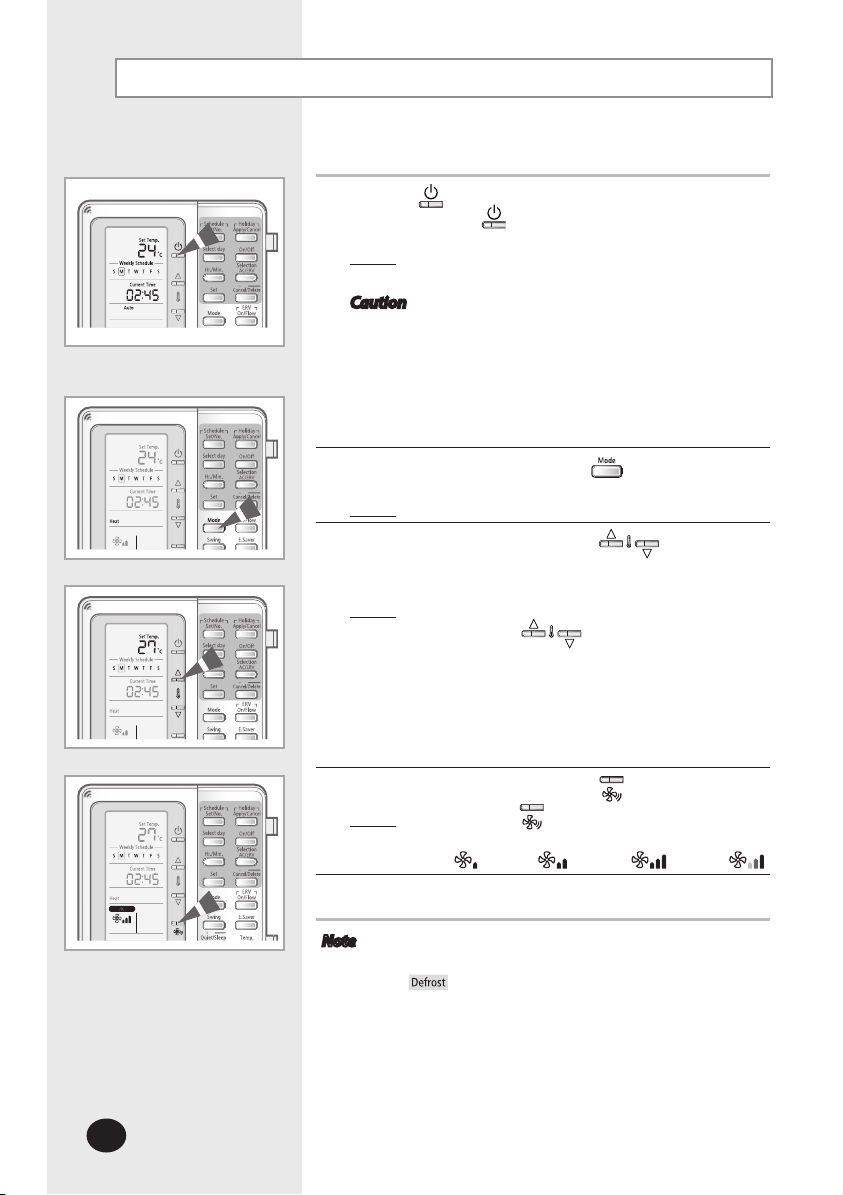
Selecting the Heating Mode
The heating mode can be selected only on the heat pump models.
Select the heat mode to raise the room temperature.
Press the (ON/OFF) button to turn on the indoor unit.
1
- Do not press the
controller is on.
: The air conditioner will be turned on with the
Result
Caution The air conditioner has a built-in protection
To select the HEAT mode, press the button until Heat is
2
displayed on the remote controller.
Result
3
To adjust the temperature, press the buttons.
The temperature can be set between 16°C(61°F) and
30°C(86°F).
Result
The air conditioner will start heating if the
The fan will operate even if the set
4
Select the fan speed by pressing the button.
Result
5
To adjust the air swing direction, refer to page 13.
most recently used mode.
mechanism to prevent the unit from being
damaged when it is started immediately after
being:
Plugged in
Stopped
The air conditioner will start up after 3 minutes.
: The air conditioner will operate in heating mode.
: The temperature will be adjusted by 1°C(1°F)
: Each time the button is pressed, fan speed
will change in the following order:
Low
(ON/OFF) button if the remote
when the buttons are pressed.
set temperature is higher than the room
temperature.
temperature is lower than the room
temperature.
Med High Auto
Note
If you stop running the air conditioner after heating
If you select cooling mode while the heating mode is in
After starting heating operation, the air may not come out
immediately to prevent the cold air from coming out.
(Defrost indicator)
- Defrost indicator will be on while your outdoor unit
defrosts the frost formed during heating operation.
After defrosting is completed, the indicator will be off.
(Air will not come out of the indoor unit while defrosting.)
operation, the air will come out for a while to radiate heat.
operation, heating mode will be canceled.
Page 11
E-11
ENGLISH
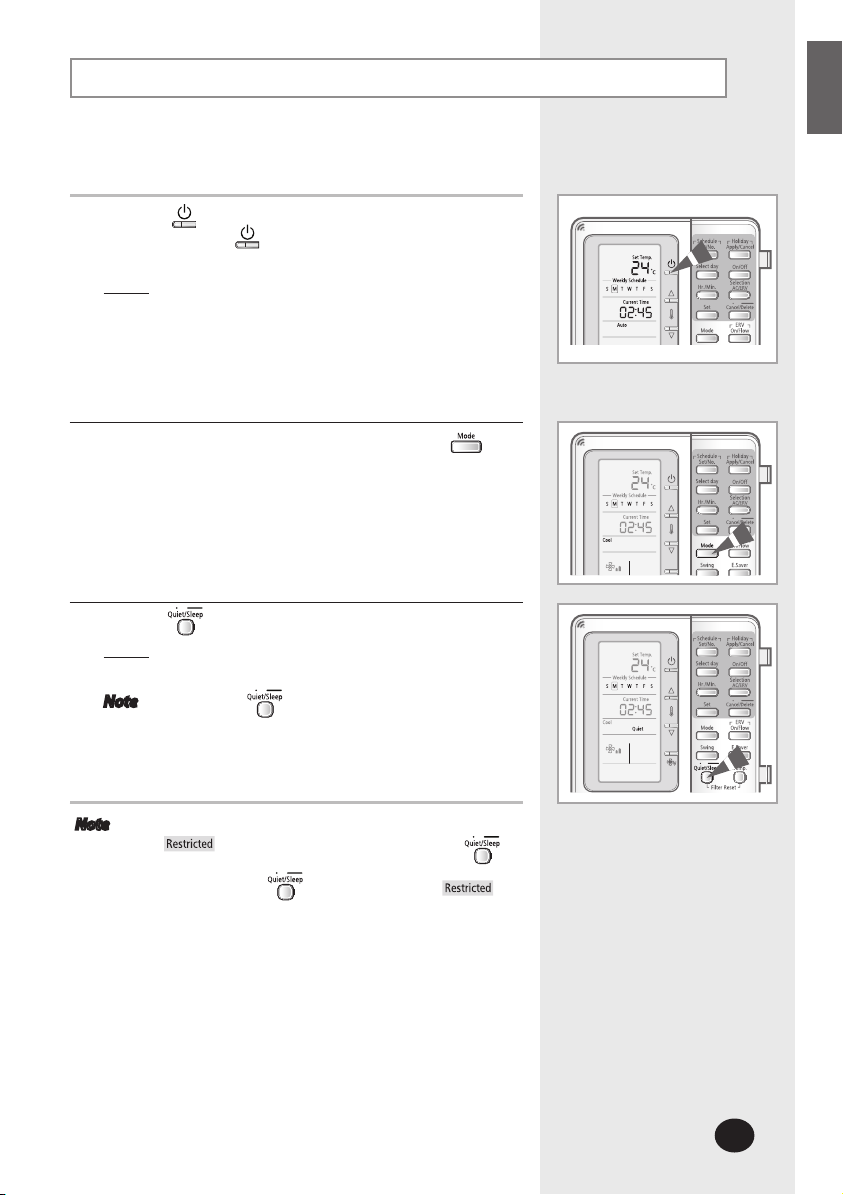
Selecting the Quiet Mode
Select the quiet mode to run the indoor unit as quietly as
possible.
Press the (ON/OFF) button to turn on the indoor unit.
1
- Do not press the
controller is on.
: The air conditioner will be turned on with the
Result
Select the desired operation mode by pressing the
2
button.
Press the button to select the Quiet mode.
3
Result
Operating noise will be reduced.
Note Press the button again to exit the quiet
most recently used mode.
: The air conditioner will operate in quiet mode.
mode.
(ON/OFF) button if the remote
Note If the indoor unit does not support Quiet mode,
will be displayed when you press the
button.
If you press the button in fan mode,
will be displayed.
Page 12
E-12
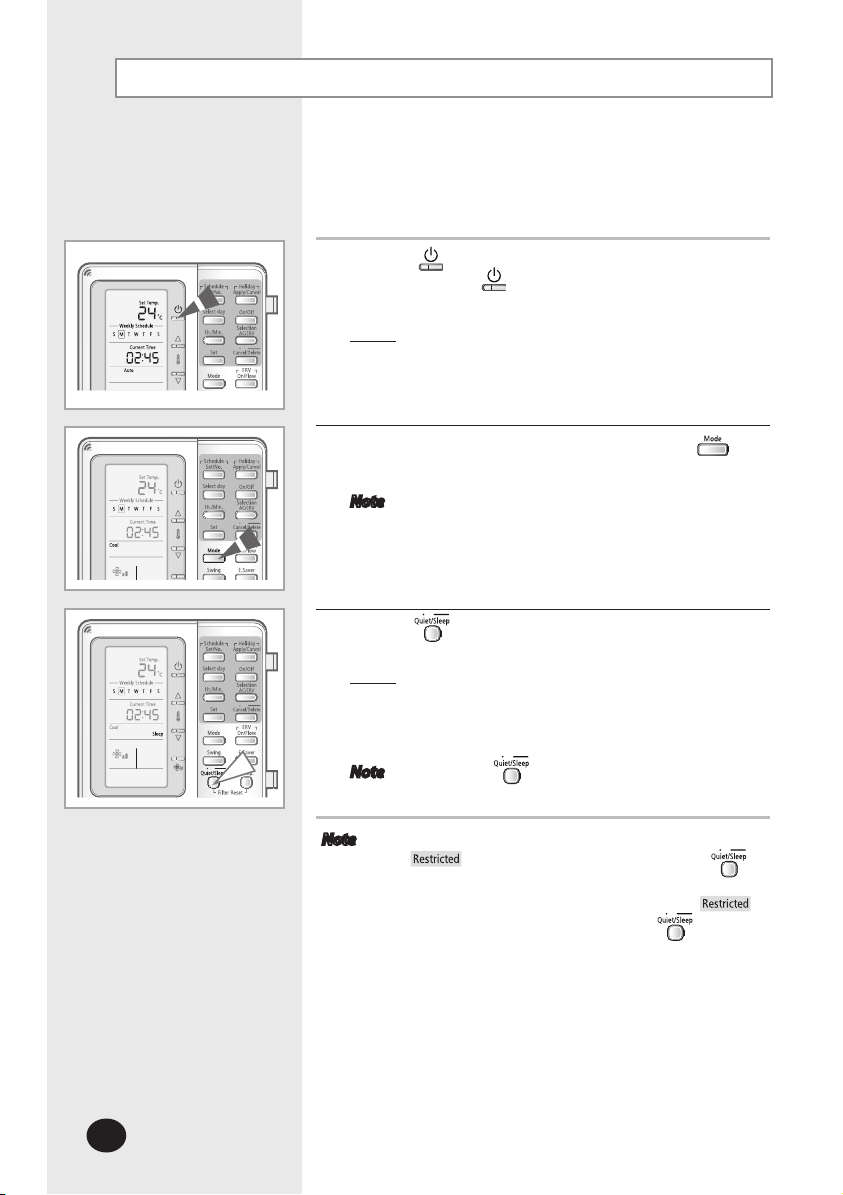
Selecting the Sleep Mode
Select the sleep mode to sleep in comfort without worrying to
urn off the air conditioner in the middle of the night.
The air conditioner will turn off automatically after 6 hours.
Press the (ON/OFF) button to turn on the indoor unit.
1
- Do not press the
controller is on.
Result
Select the desired operation mode by pressing the
2
button.
(ON/OFF) button if the remote
: The air conditioner will be turned on with the
most recently used mode.
Note
3
Press the button for 3 seconds to select the Sleep
mode.
Result: The air conditioner will operate in sleep mode.
The air conditioner will gradually raise or
Note Press the button for 3 seconds again to exit
Note If the indoor unit does not support Sleep mode,
If the indoor unit is not in Cool/Heat mode,
Only cooling and heating mode support the sleep
mode.
lower the set temperature internally and
eventually turn off automatically after 6 hours.
the sleep mode.
will be displayed when you press the
button for 3 seconds.
will be displayed when you press the
3 seconds.
button for
Page 13
E-13
ENGLISH
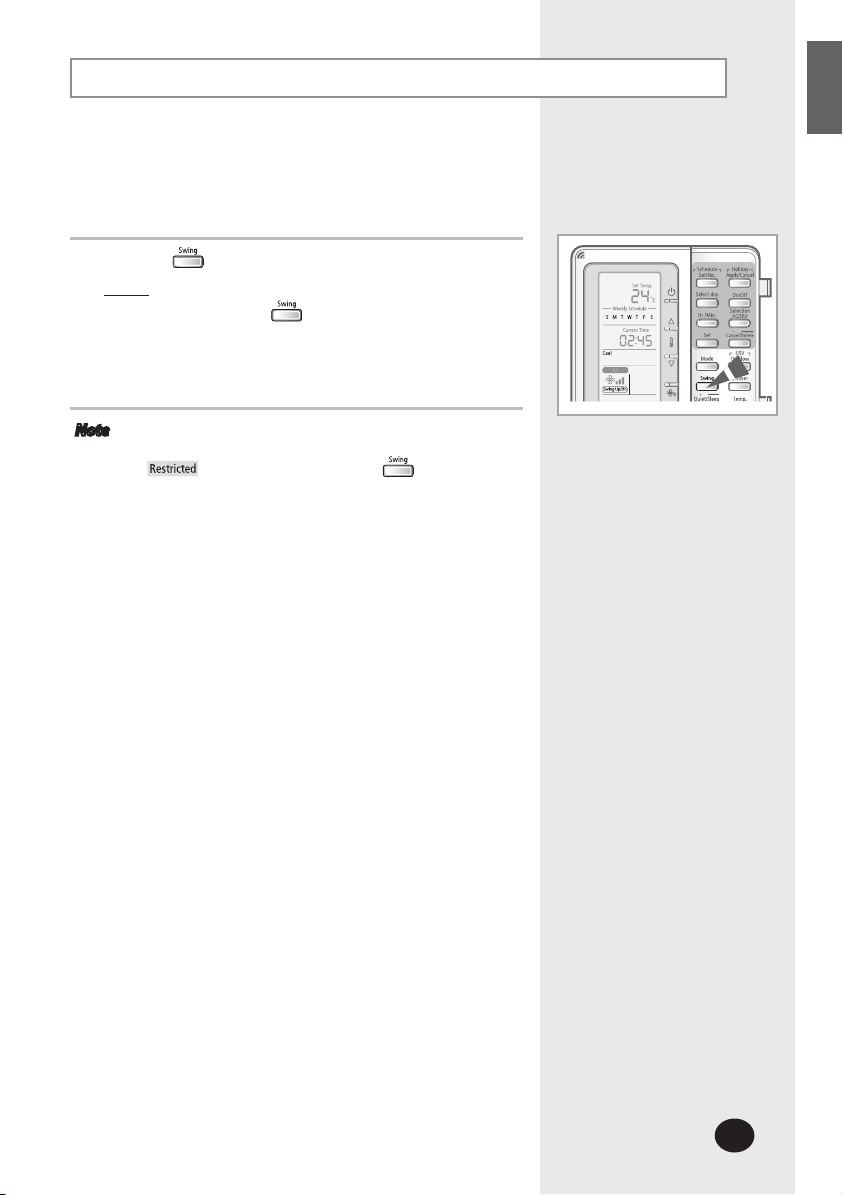
Adjusting the Air Swing Direction
Adjust the air swing direction to circulate the air according
to various needs. By adjusting the air swing direction, the
efficiency of the air conditioner can be increased.
Press the button.
1
Result
: The blade will start swinging up and down.
Press the button again to stop the
blade from swinging and set the blade to the
desired position.
Note The air swing direction cannot be set on duct type
indoor units.
pressed.
will be displayed when the button is
Page 14
E-14
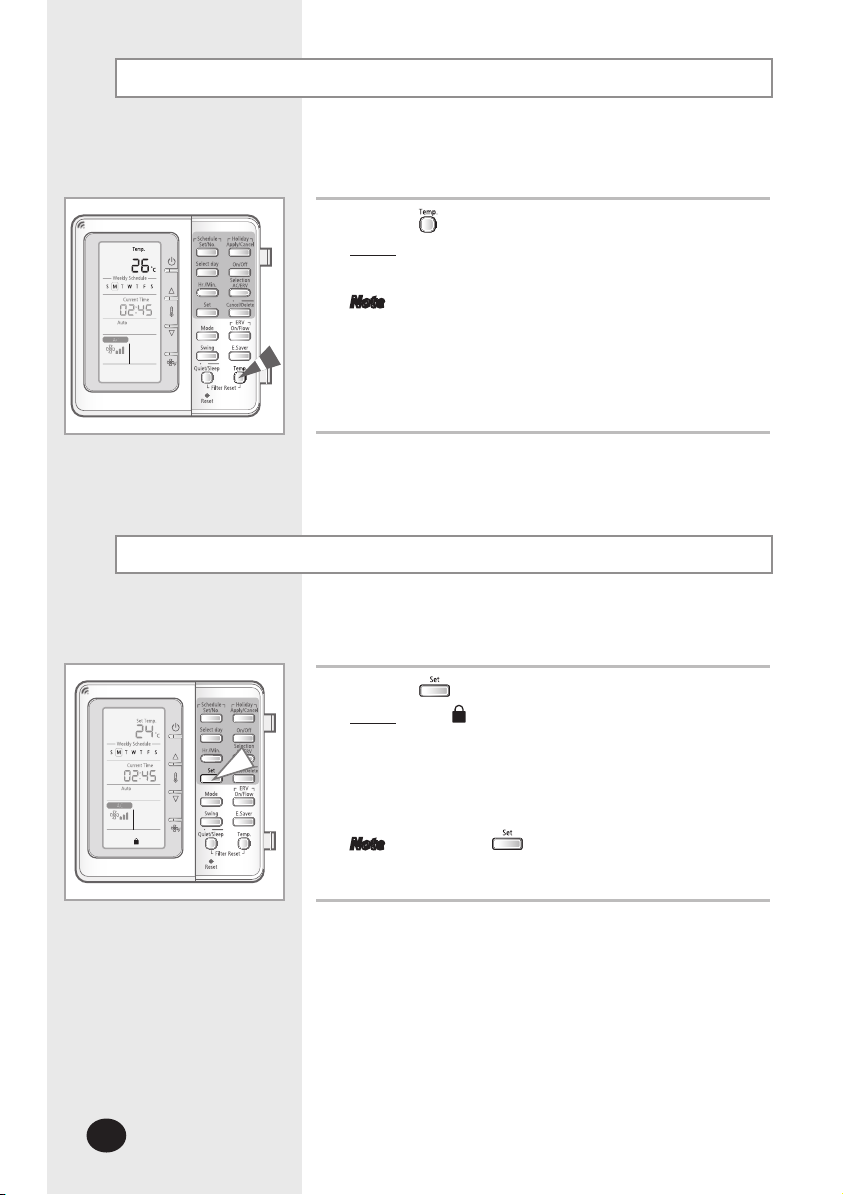
Checking the Room Temperature
You can check the current room temperature.
Press the button to check the room temperature.
1
Result
: The room temperature will be displayed for
3 seconds and return to set temperature display.
Note
The room temperature may be slightly different
depending on the installation location of the
remote controller.
Locking the Multi Function Wired Remote Controller
Lock the multi function wired remote controller to prevent it
from children and changing the settings unwillingly.
Press the button for 3 seconds.
1
Result
: will be displayed and the multi function
When the multi function wired remote
Note
wired remote controller is locked.
controller is locked, you cannot control the
air conditioner by the multi function wired
remote controller.
Press the button for 3 seconds again to cancel
the lock.
Page 15
E-15
ENGLISH
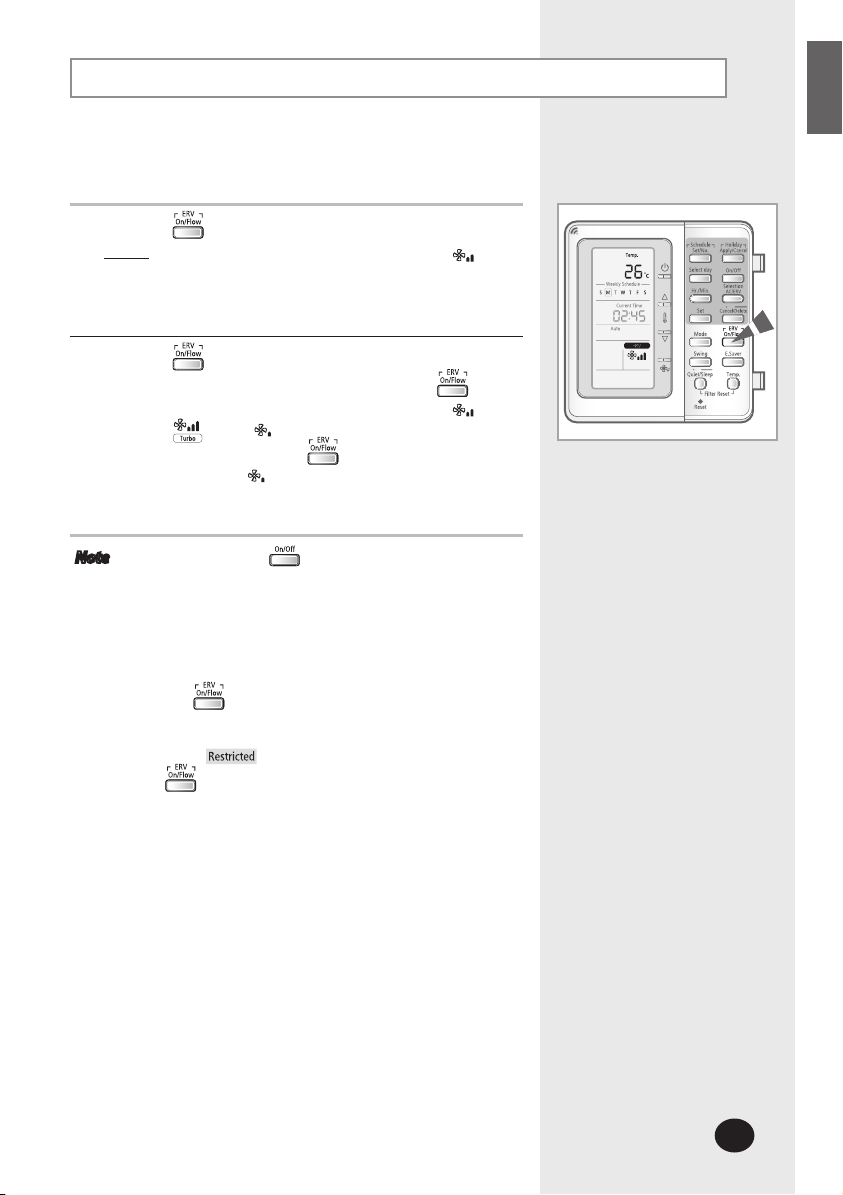
Operating the ERV
Select ERV function to ventilate the room.
Press the button to start ERV ventilating system.
1
Result: The fan speed will be displayed as High
Press the button to select the fan speed.
2
You can adjust the fan speed by pressing the
button. The fan speed changes in order of High
Turbo Med
To stop the ERV, press the button again when the
fan speed is Med
Note If you press the button when ERV unit is
The button operates when more than 1 ERV
ERV operates in heat exchange mode only.
connected to the multi function wired remote
controller, you can turn on/off both of ERV and the
air conditioner at the same time or turn on/off the
air conditioner only. The default setting is turning
on/off both of them.
(Refer to the installation manual.)
unit is connected to the multi function wired remote
controller.
If not,
button.
will be displayed when you press the
Page 16
E-16
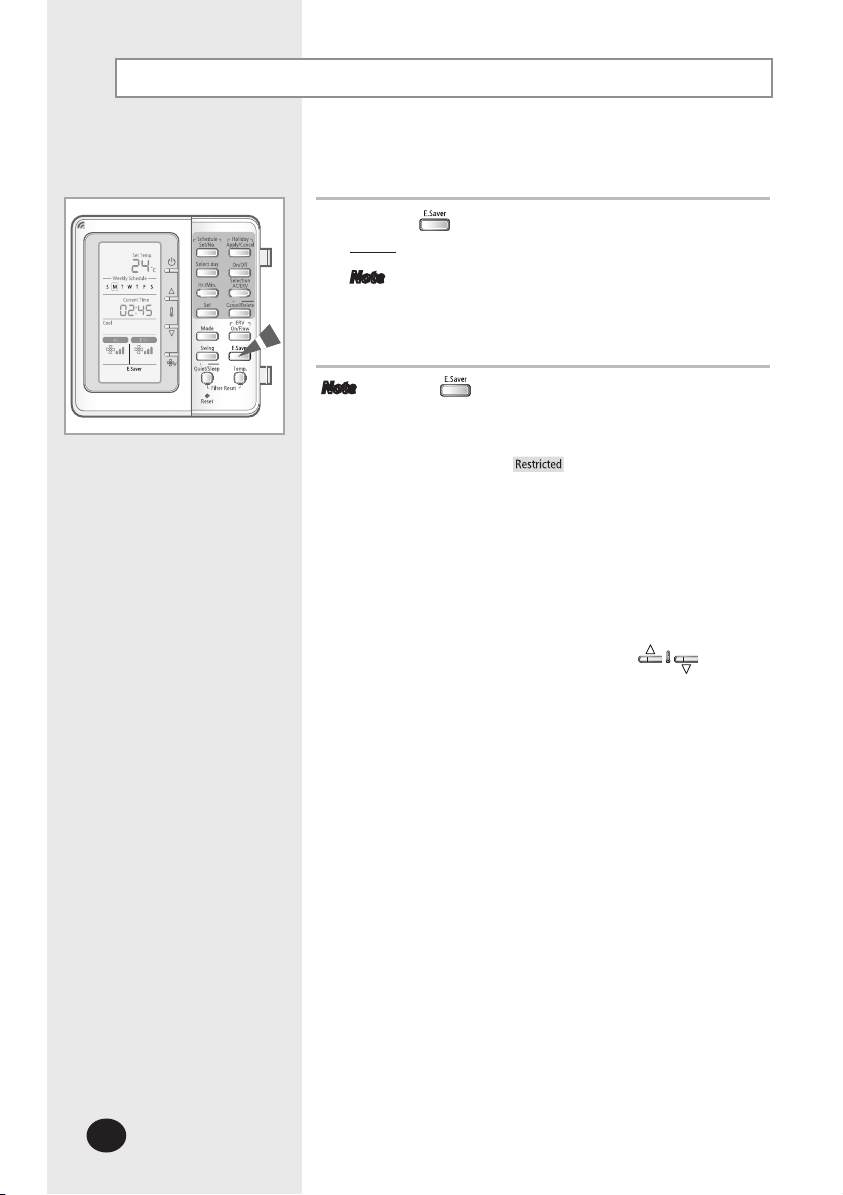
Using the E. Saver Function
Select E.Saver function to save electricity.
Press the button.
1
: The air conditioner will operate in E.Saver mode.
Result
Note
In fan mode, E.Saver is displayed but the E.Saver
function is not operated.
Note The button operates only when 1 indoor unit
When E.Saver function in operation, the indoor unit
If you set the E.Saver function when the air
and 1 ERV unit is connected to the multi function
wired remote controller.
If ERV unit is not connected or more than 2 ERV units
are connected,
control it.
and ERV unit may operate automatically.
conditioner is operating in cool/heat mode, the
set temperature may set automatically [Cooling
operation : 26°C(79°F), Heating operation :
22°C(72°F)].
You can change it by pressing the
will be displayed when you
buttons.
Page 17
E-17
ENGLISH
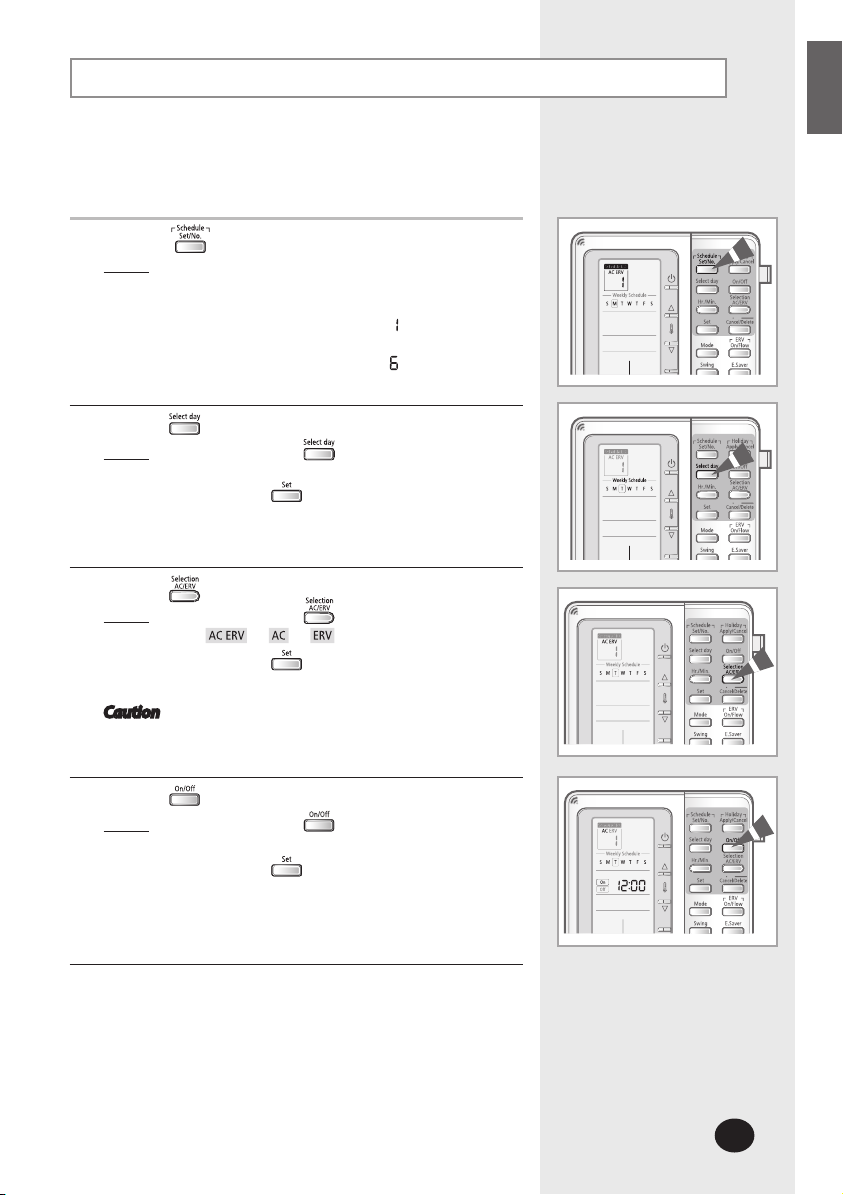
Setting the 7-day Schedule
Set the 7-day schedule to reserve the On/Off timer to be repeated
every week. At most 10 schedules may be set for each day.
Press the button to set a schedule.
1
: The day is set to today and the schedule number
Result
Press the button to select the day to set the schedule.
2
Result: Each time the button is pressed, the
Press the button to end the selection.
Press the button to select the device.
3
Result
Press the button to end the selection.
Caution If ERV is not connected, only the AC can be
displays the next empty schedule number for
that day. If there are no schedules set,
the schedule number displays
If there are 5 schedules set, for example,
the schedule number displays
square box shifts to the right.
You will move to the device selection.
: Each time the button is pressed,
will be selected in order.
You will move to the On/Off selection.
selected.
.
.
Press the button to set the schedule on or off.
4
: Each time the button is pressed,
Result
Press the button after the selection.
On Off will be selected in order.
If you set On schedule, refer to step ‘5. Mode
selection’ and if you set Off schedule, refer to
step ‘10. Hour selection’
.
Page 18
E-18
Setting the 7-day Schedule (Continued)
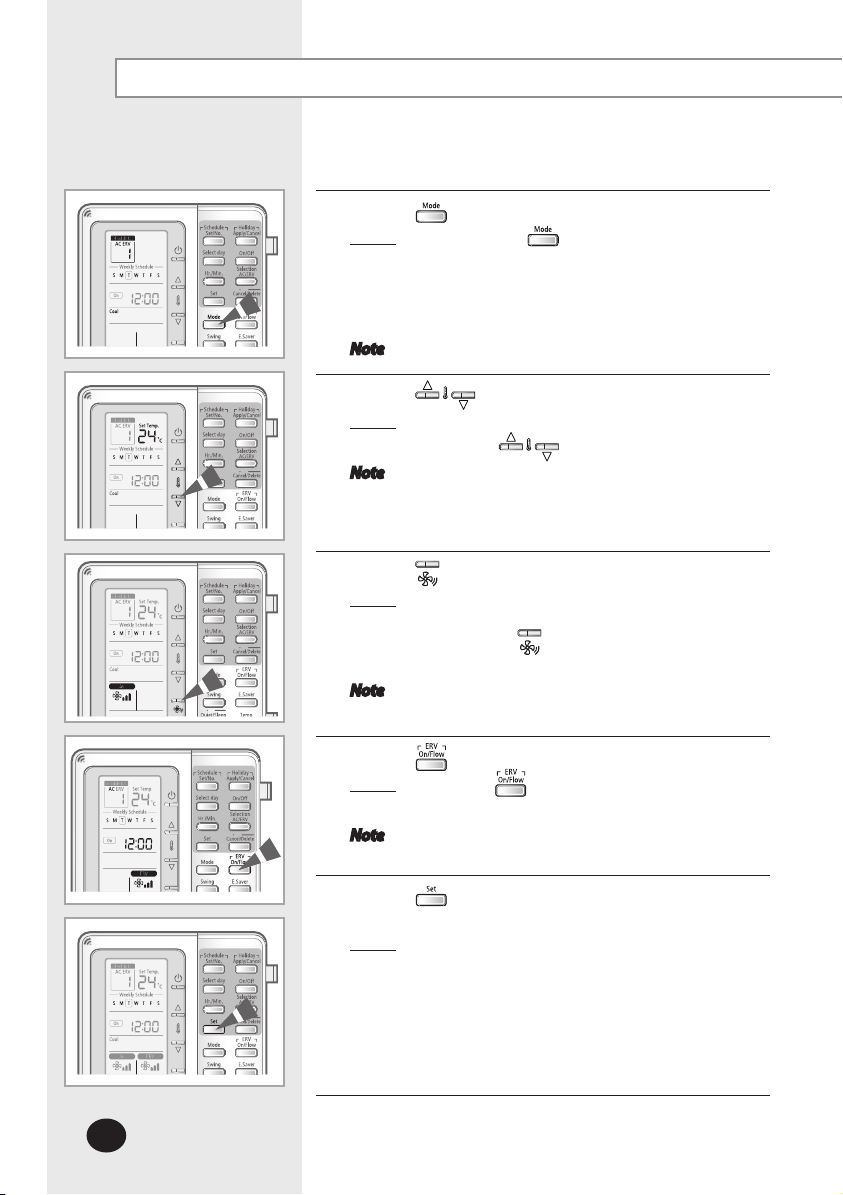
Press the button to select operation mode.
5
Result: Each time the button is pressed, Auto
Note This step is for setting the ‘On schedule’.
Press the buttons to set the temperature.
6
Result
Note This step is for setting the ‘On schedule’.
You cannot control the desired temperature
Press the button to set the fan speed.
7
Result: Fan speed can be adjusted in cool/fan/heat
Press the button until the desired fan
Note This step is for setting the ‘On schedule’.
Cool Dry Fan Heat will be selected in
order. Auto mode and Heat mode may not be
selected depending on the option settings.
(Refer to the installation manual.)
: The temperature will be adjusted by 1°C(1°F)
when the buttons are pressed.
if you selected fan mode.
mode.
speed you want is selected.
Press the button to set the fan speed of ERV.
8
: Press the button until the desired fan speed
Result
Note This step is for setting the ‘On schedule’.
Press the button to set the set temperature, operation
9
mode and fan speed.
Result
Schedule air conditioner only: Set the desired
ERV schedule only: Set the fan speed of ERV
you want is selected.
: Schedule air conditioner and ERV together :
Set the desired temperature, operation mode
and fan speed of air conditioner/ERV.
temperature, operation mode and fan speed
of air conditioner
Page 19
E-19
ENGLISH
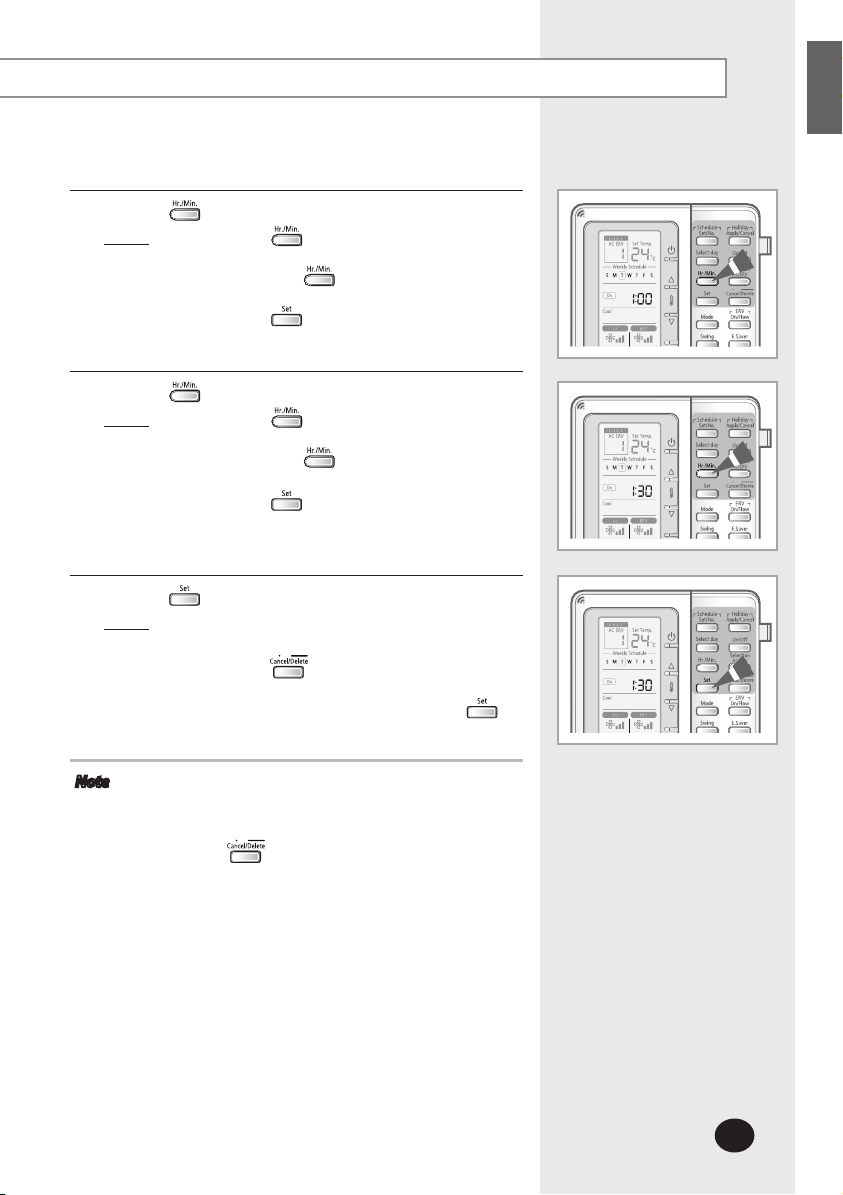
Press the button and select ‘Hour’ to set the hour.
10
Result: Press the button until the desired hour is
selected.
Each time the button is pressed,
the time is increased by 1 hour.
Press the button to end the selection.
Press the button and select ‘Minute’ to set the minute.
11
: Press the button until the desired
Result
minute is selected.
Each time the button is pressed,
the time is increased by 1 minute.
Press the button to select schedule time.
The schedule time setting is completed and
you will move to schedule confirm display.
Press the button to complete 7-day schedule.
12
: The display blinks once and the schedule set
Result
will be saved.
Press the button while setting the
schedule to cancel the setting. You cannot
cancel the schedule after pressing the
button.
Note Once the schedule is saved, the schedules are
automatically sorted and the schedule number is
displayed by increasing time order.
Press the button to cancel the setting.
When the centralized control is set, you can set the
7-day schedule but it will not be executed.
Page 20
E-20
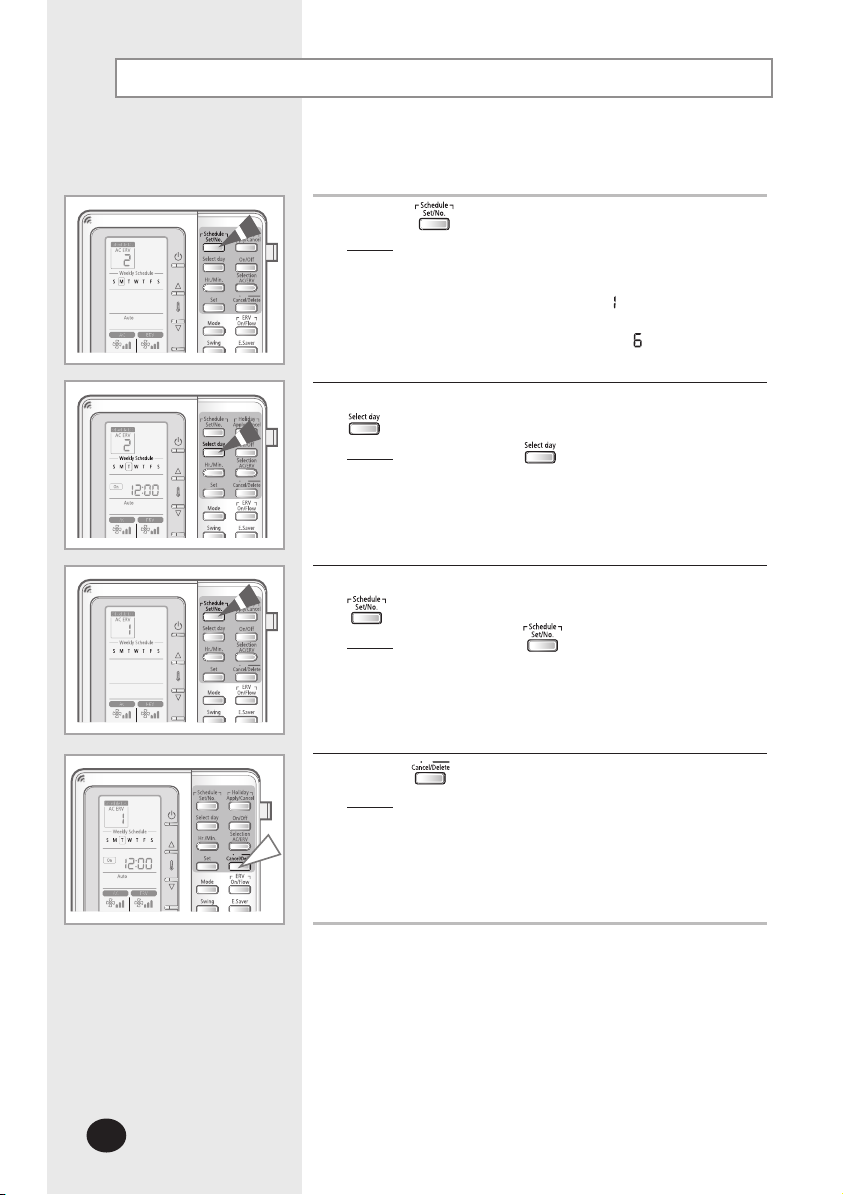
Deleting a Schedule
Schedules may be deleted one at a time.
1
2
3
Press the button to enter the schedule setup mode.
: The day is set to today and the schedule number
Result
Select the day of the schedule to be deleted by pressing the
Result
Select the schedule number to be deleted by pressing the
Result
displays the next empty schedule number
for that day. If there are no schedules set, the
schedule number displays
If there are 5 schedules set, for example,
the schedule number displays
button.
: Each time the button is pressed,
the square box blinks and shifts to the right.
button.
: Each time the button is pressed,
the schedule number will change.
.
.
Press the button for 3 seconds.
4
Result: The schedule is deleted and the remaining
schedules are sorted automatically.
Page 21
E-21
ENGLISH
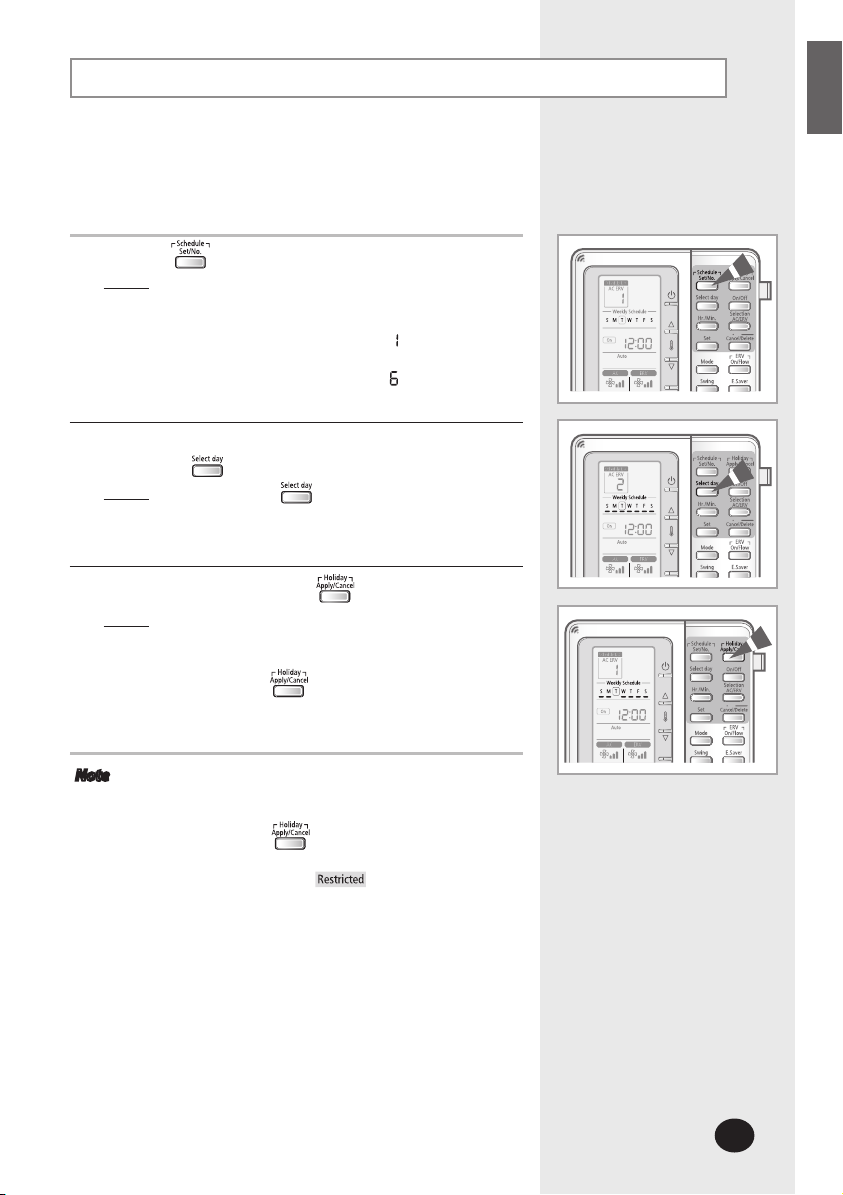
Setting and Canceling the Holiday Schedule
Schedules need not be deleted when there’s a holiday. Instead,
the holiday can be set to stop the schedule from running for the
set holiday while keeping the schedule information.
1
Press the button to enter the schedule setup mode.
Result
: The day is set to today and the schedule number
displays the next empty schedule number for
that day. If there are no schedules set,
the schedule number displays
If there are 5 schedules set, for example,
the schedule number displays
Select the day of the schedule to be set as holiday by
2
pressing the
Result
: Each time the button is pressed,
button.
the square box blinks and shifts to the right.
.
.
Set the holiday by pressing the
3
: The schedules are not deleted but the bar
Result
Press the button to cancel the setting.
Note If there are schedules set for a day and if the bar
You can use the button only when more than
The schedule of the day is not executed when the
below the day becomes invisible to indicate
the schedule will not run.
below that day is invisible, that day is set as a
holiday.
1 schedule is scheduled on the specific day.
If there is no schedule,
holiday setting is applied.
button.
will be displayed.
Page 22
E-22
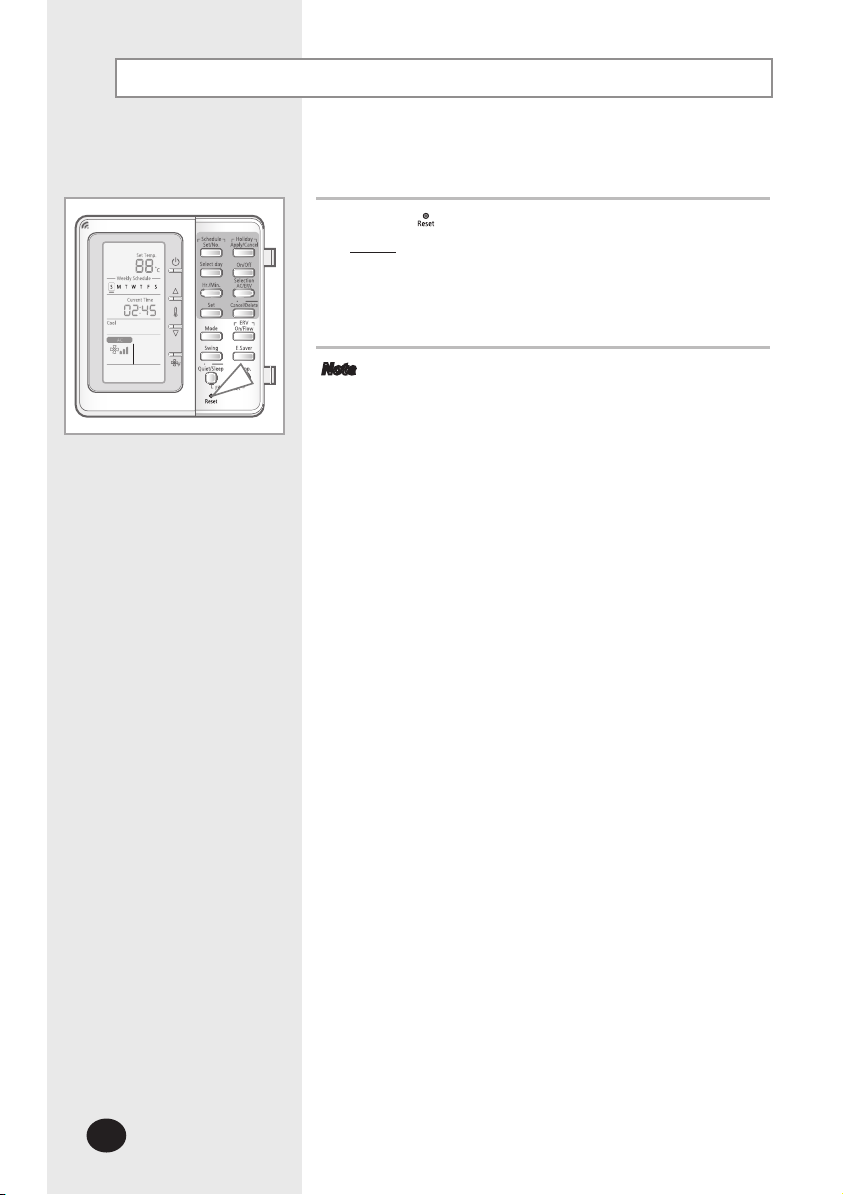
Resetting the 7-day Schedule
To delete all schedules, reset the schedule.
Press the button for 5 seconds.
1
: All the saved schedules will be deleted.
Result
Note Make sure that the deleted schedule cannot be
restored.
Page 23
E-23
ENGLISH
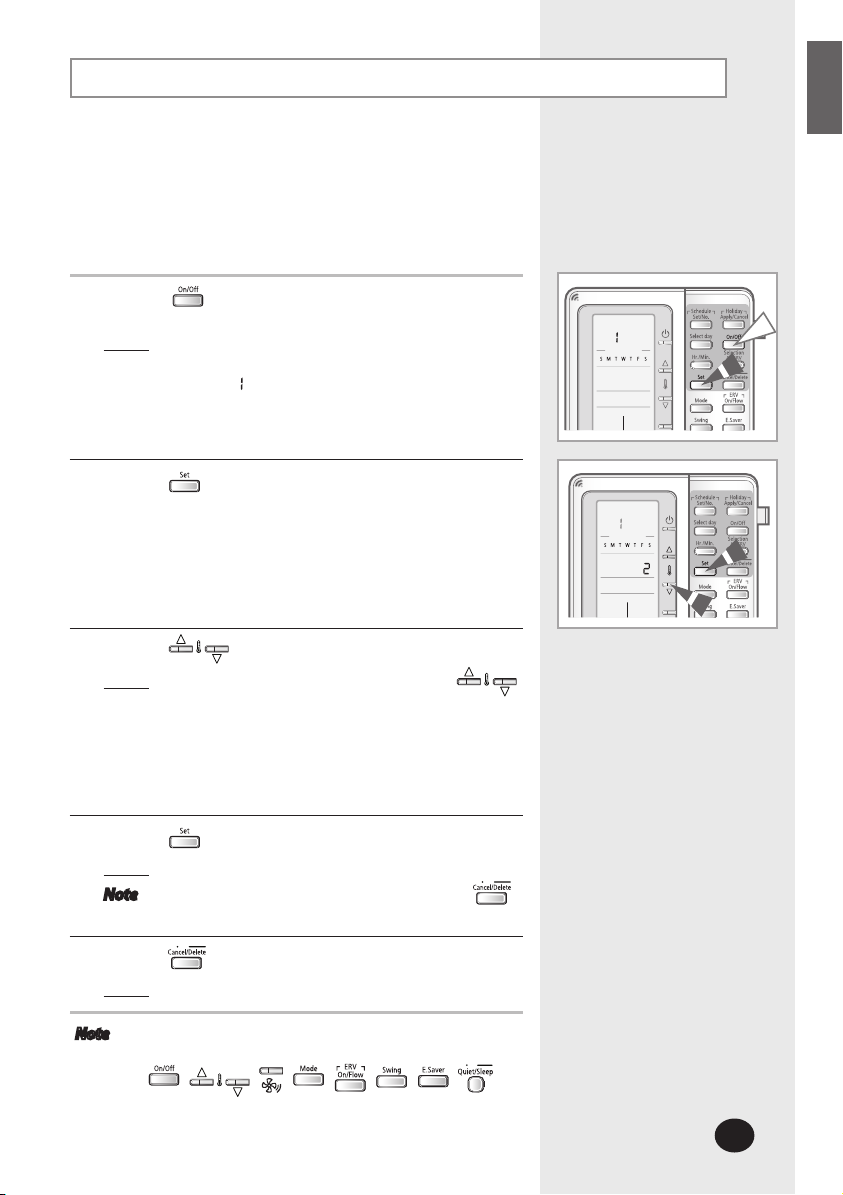
Setting the Auto Stop Function
The multi function wired remote controller can be set to turn
off the indoor unit(s) after a set period of time has passed
since any button on the remote controller was last pressed.
This function is used to turn off the indoor unit in case the user
forgets to turn off the indoor unit.
Press the button for 3 seconds to enter the setup
1
mode.
: The multi function wired remote controller will
Result
Press the button to enter the auto stop time setup
2
mode.
enter the setup mode and the menu will
display
.
Press the
3
: Time is adjusted by 1 hour when the
Result
The default time setting is 0. The auto stop
If you select 0, auto stop function will be
Press the button to complete the auto stop function.
4
: Auto stop function is set.
Result
Note To cancel the auto stop function, press the
Press the button.
5
: Menu selection display will end.
Result
Note The air conditioner stops automatically after
controlling indoor unit or ERV unit by pressing the
buttons.
buttons to set the auto stop time.
buttons are pressed.
time can be set between 0 and 12 hours.
canceled.
button.
, , , , , , ,
Page 24
E-24
Setting the Temperature Limits
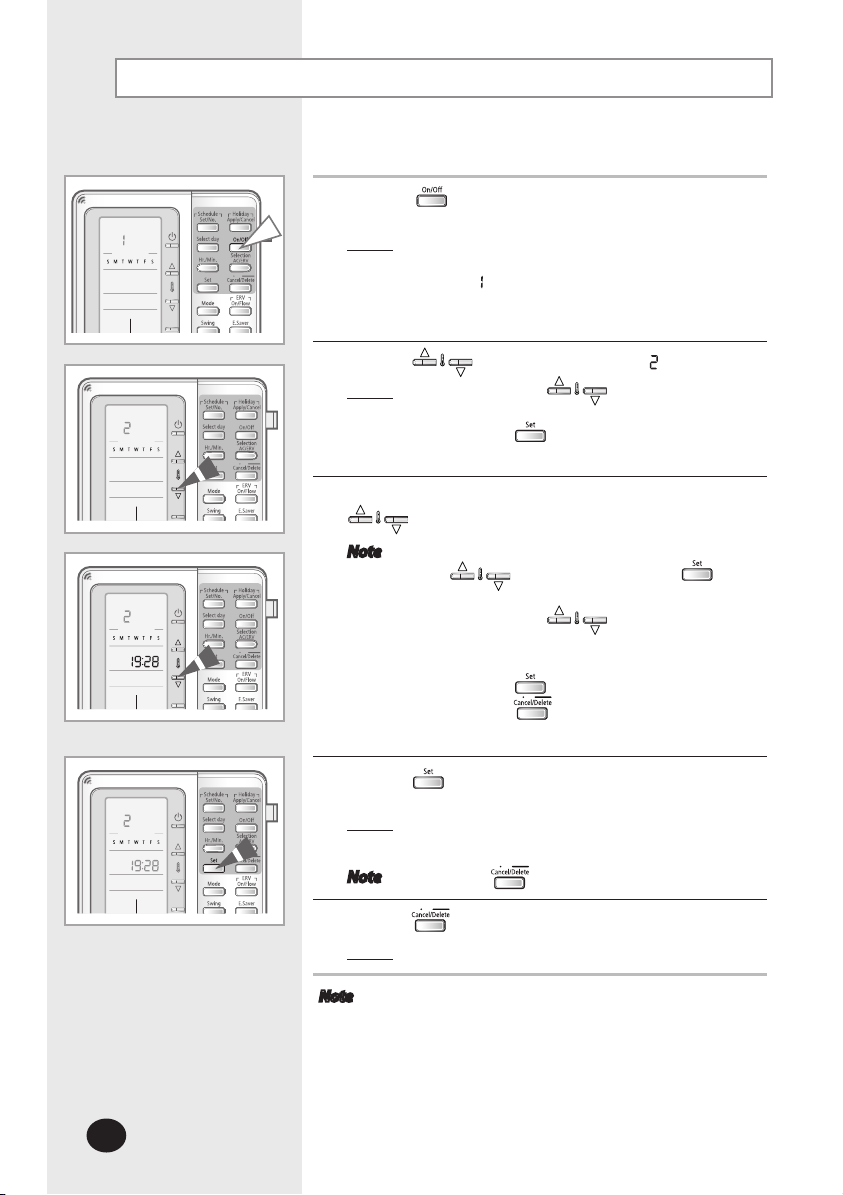
You can set upper limit/lower limit temperature so that the
desired temperature is not set too high or low.
Press the button for 3 seconds to enter the setup
1
mode.
: The multi function wired remote controller will
Result
Press the buttons and select menu .
2
Result
Press the button to enter the
Set the lower and upper temperature limit by pressing the
3
Note Set the lower limit first by pressing the
Each time the
Press the button after setting.
Press the button to cancel the
enter the setup mode and the menu will
display
: Each time the buttons are pressed,
menu number increases by 1.
temperature limit setup mode.
buttons.
button and set the upper limit.
the temperature is increased/decreased
by 1°C(1°F) .
temperature limits setup.
.
buttons followed by the
buttons are pressed,
Press the button to complete the temperature limit
4
settings.
Result: The desired temperature will be restricted
Note Press the button to cancel the setting.
Press the button.
5
Result
Note
Even though you set the lower temperature limit to
Temperature limit is applied to 7-day schedule setting as
by the set lower/upper temperature limit.
: Menu selection display will end.
The lower limit can not be same or higher than upper
limit.
16°C(61°F), lower temperature will be set to 18°C(65°F) in
all the modes except in heating mode. When you set the
lower temperature limit to 18°C(65°F), it will be applied
under all the operation modes.
well.
Page 25
E-25
ENGLISH
Locking the Part of the Multi Function Wired Remote Controller
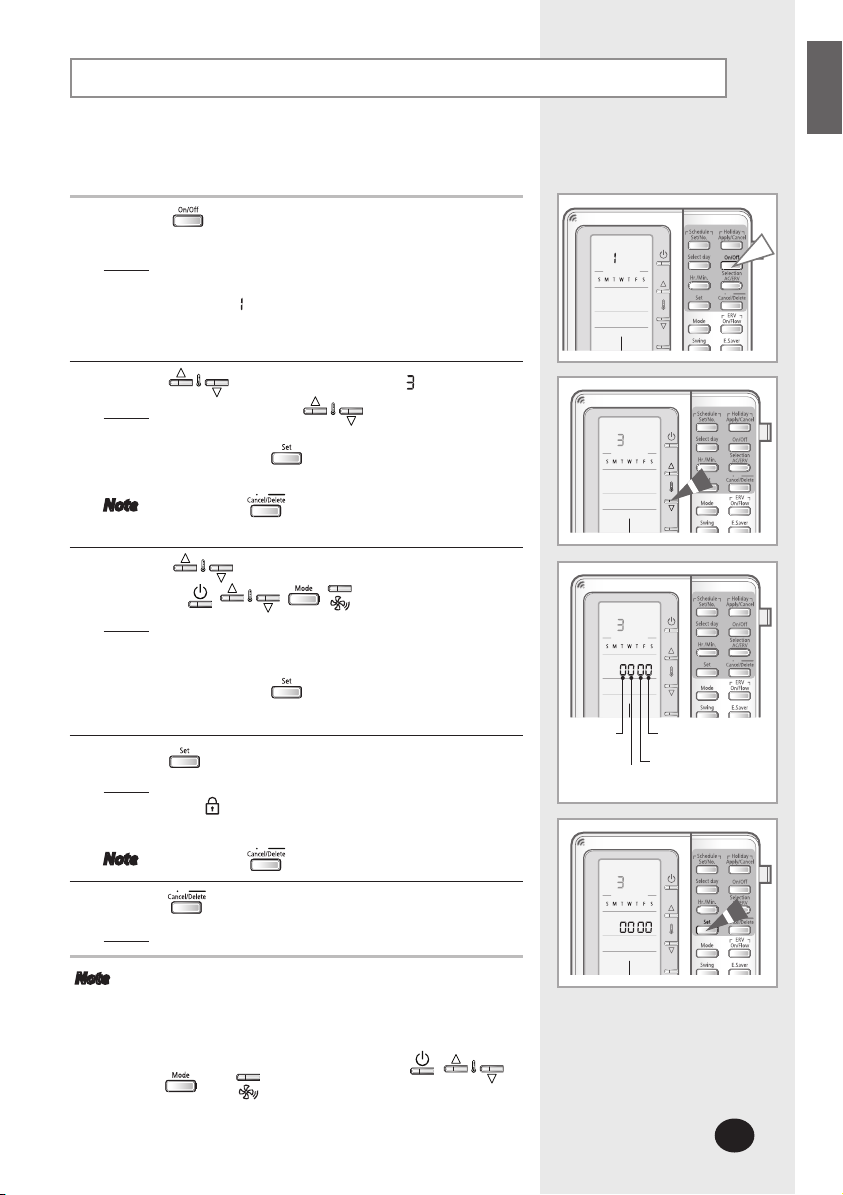
To prevent the multi function wired remote controller from
children and changing settings unwillingly, you can lock some
functions of multi function wired remote controller.
Press the button for 3 seconds to enter the setup
1
mode.
: The multi function wired remote controller will
Result
Press the buttons and select menu .
2
Result
Press the button to enter the lock setup
Note Press the button to cancel the setting.
Using the buttons, you can set the lock setting
3
value of the
Result
Press the button after setting.
enter the setup mode and the menu will
display
.
: Each time the buttons are pressed,
menu number increases by 1.
mode.
, , , buttons.
: Lock setting value
- 0: Cancel lock
- 1: Set lock
Press the button to complete the part lock settings.
4
Result
: Changed settings will be applied.
will be displayed when the lock function is
set.
Note Press the button to cancel the setting.
Press the button.
5
: Menu selection display will end.
Result
Note If the centralize control is set, you cannot use the
part lock function.
You cannot use the part lock function when Lock all
is set.
Part Lock function can be applied to , ,
, and buttons only.
On/off
button
Temperature
setting button
Fan speed button
Mode button
Page 26
E-26
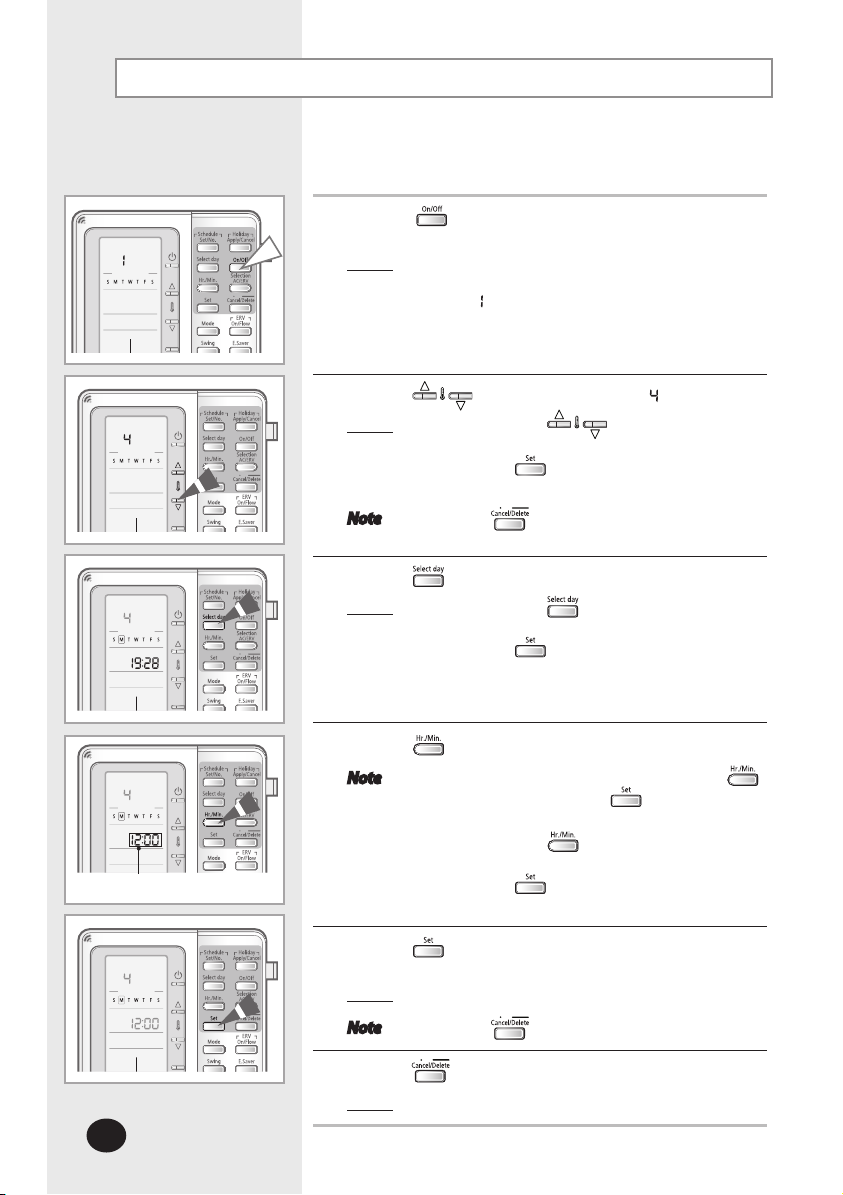
Setting the Current Time and Day
You can set the current time and day.
Press the button for 3 seconds to enter the setup
1
mode.
: The multi function wired remote controller will
Result
Press the buttons and select menu .
2
Result
Press the button to enter the time and
Note Press the button to cancel the setting.
Press the button to select current day.
3
Result: Each time the button is pressed,
Press the button to select the day.
enter the setup mode and the menu will
display
: Each time the buttons are pressed,
menu number increases by 1.
day setting mode.
the selected day will be changed.
.
Set current time
Press the button to set hour and minute.
4
Note Set the current hour first by pressing the
button followed by the
the current minute.
Each time the button is pressed,
the hour/minute is increased by 1.
Press the button after setting.
Press the button to complete the current time and day
5
settings.
: The set time and day will be applied.
Result
Note Press the button to cancel the setting.
Press the button.
6
: Menu selection display will end.
Result
button and set
Page 27
E-27
ENGLISH
Memo
Page 28
 Loading...