

Samsung MW4699S, MW4688BA User Manual
Microwave
Oven
Owner ’s Manual
MW4699S
MW4688BA
Code No. : DE68-01092A-01

S
AFETY
RECAUTIONS TO
P
MPORTANT SAFETY
I
AVOID POSSIBLE
EXPOSURE TO
EXCESSIVE
MICROWAVE
(a) Do not attempt to operate this oven
with the door open since open-door
operation can result in harmful
exposure to microwave energy. It is
important not to defeat or tamper with
the safety interlocks.
(b) Do not place any object between the
front face of the oven and the door or
allow soil or cleaner residue to accumulate on sealing surfaces.
(c) Do not operate the oven if it is dam-
aged. It is particularly important that the
oven door close properly and that there
is no damage to the
1) Door (bent or dented),
2) Hinges and latches (broken or
loosened),
3) Door seals and sealing surfaces.
(d) The oven should not be adjusted or
repaired by anyone except properly
qualified service personnel.
WARNING
Always observe Safety Precautions
when using your oven. Never try to
repair the oven on your own – there is
dangerous voltage inside. If the oven
needs to be repaired, call 1-800-SAMSUNG for the name of an authorized
service center near you.
ENERGY
INSTRUCTIONS
When using any electrical appliance,
basic safety precautions should be
followed, including the following:
:
WARNING
To reduce risk of burns, electric
shock, fire, personal injury or exposure to excessive microwave energy:
• Read all safety instructions before using the
appliance.
• Read and follow the specific “Precautions to
Avoid possible Exposure to Excessive
Microwave Energy” on this page.
• This appliance must be grounded. Connect
only to properly grounded outlets. See
“Important Grounding Instructions” on page 4
of this manual.
• Install or place this appliance only in accordance with the installation instructions
provided.
• Some items, like whole eggs and food in sealed
containers, may explode if heated in this oven.
• Use this appliance only for its intended use as
described in the manual. Do not use corrosive
chemicals or vapors in this appliance. This type
of oven is specifically designed to heat, cook, or
dry food. It is not designed for industrial or laboratory use.
• As with any appliance, close supervision is nec-
essary when used by children.
AVE THESE INSTRUCTIONS
S
S
AFETY
2

S
AFETY
Important Safety Instructions,
continued
• Do not operate this appliance if it has a damaged
cord or plug, if it is not working properly, or if it
has been damaged.
• This appliance should be serviced only by qualified service personnel. Contact the nearest authorized service facility for examination, repair, or
adjustment.
• Do not cover or block any of the openings on this
appliance.
• Do not store this appliance outdoors. Do not use
near water – for example, near a kitchen sink, in a
wet basement, or near a swimming pool, etc.
• Keep the inside of the oven clean. Food particles
or spattered oils stuck to the oven walls or floor
can cause paint damage and reduce the efficiency of the oven.
• Do not immerse cord or plug in water.
• Keep cord away from heated surfaces.
• Do not let cord hang over edge of table or
counter.
• When cleaning door and oven surfaces, use only
mild, nonabrasive soaps or detergents applied
with a sponge or soft cloth.
• To reduce the risk of fire in the oven:
a.Do not overcook food. Watch appliance care-
fully if paper, plastic, or other combustible
materials are inside.
b.Remove wire twist-ties from plastic cooking bags
before placing bags in oven.
c.If materials inside the oven ignite, keep the
oven door closed, turn the oven off, disconnect
the power cord, or shut off the power at the
fuse or circuit breaker panel.
d.Do not use the oven compartment for storage
purposes. Do not leave paper products, cooking
utensils, or food in the oven when not in use.
• Do not try to preheat oven or operate while empty.
• Do not cook without the glass tray in place on the
oven floor. Food will not cook properly without the
tray.
• Do not defrost frozen beverages in narrow-necked
bottles. The containers can break.
• Dishes and containers can become hot. Handle
with care.
• Carefully remove container coverings, directing
steam away from hands and face.
• Remove lids from baby food before reheating.
After heating baby food, stir well and test temperature by tasting before serving.
• A short power-supply cord is provided to reduce
the risk of becoming entangled in or tripping over
a longer cord. Longer cord sets or extension
cords are available and may be used
with caution.
• Do not operate any other heating or cooking appliance beneath this appliance.
• Do not mount unit over or near any portion of a
heating or cooking appliance.
• Do not mount over a sink.
• Do not store anything directly on top of the appliance when it is in operation.
AVE THESE INSTRUCTIONS
S
S
AFETY
3

S
AFETY
Important Grounding
Instructions
This appliance must be grounded. In the event of
an electrical short circuit, grounding reduces the
risk of electric shock by providing an escape wire
for the electrical current. This appliance is
equipped with a cord that includes a grounding
wire and a grounding plug. The plug must be
plugged into an outlet that is properly installed and
grounded. Plug the three-prong power cord into a
properly grounded outlet of standard 115-120 voltage, 60 Hz. Your oven should be the only appliance
on this circuit.
WARNING
Improper use of the grounding plug can result
in a risk of electric shock. Consult a qualified
electrician or servicer if you do not understand
the grounding instructions or if you are not
sure if the appliance is properly grounded.
WARNING
Do not cut or remove the third (ground) prong
from the power cord under any circumstances.
Use of Extension Cords
A short power-supply cord is provided to reduce
the risk of becoming entangled in or tripping over a
longer cord. Longer cord sets or extension cords
are available and may be used if care is exercised
in their use. If a long cord or extension cord is
used:
1. The marked electrical rating of the cord set or
extension cord should be at least as great as
the electrical rating of the appliance.
2. The extension cord must be a grounding-type 3wire cord and it must be plugged into a 3-slot
outlet.
3. The longer cord should be arranged so that it
will not drape over the counter top or tabletop
where it can be pulled on by children or tripped
over accidentally. If you use an extension cord,
the interior light may flicker and the blower
may vary when the microwave oven is on.
Cooking times may be longer, too.
AVE T
S
S
AFETY
4
HESE INSTRUCTIONS

C
ONTENTS
Your New Microwave Oven . . . . . 6
Checking Parts . . . . . . . . . . . . . . . . . . . . . . .6
Setting Up Your Microwave Oven . . . . . . .6
Control Panel Buttons . . . . . . . . . . . . . . . . .7
Operation . . . . . . . . . . . . . . . . . . . . . 8
Setting the Clock . . . . . . . . . . . . . . . . . . . . . 8
Using the Pause/Cancel Button . . . . . . . . . 8
Using the Auto Cook Button . . . . . . . . . . . . 8
Using the 1 Min+ Button . . . . . . . . . . . . . . . 9
Reheating Automatically . . . . . . . . . . . . . . 9
Using Defrosting . . . . . . . . . . . . . . . . . . . . . 10
Setting Cooking Times &
Power Levels . . . . . . . . . . . . . . . . . . . . . . . 10
Cooking Instructions . . . . . . . . . . . .11
Cooking Utensils . . . . . . . . . . . . . . . . . . . . .11
Testing Utensils . . . . . . . . . . . . . . . . . . . . . .11
Cooking Techniques . . . . . . . . . . . . . . . . . .12
General Tips . . . . . . . . . . . . . . . . . . . . . . . . .12
Cooking Guides . . . . . . . . . . . . . . . . . . 13-14
Defrosting Guide . . . . . . . . . . . . . . . . . . . . .15
Recipes . . . . . . . . . . . . . . . . . . . . . . . . . .16-17
Appendix . . . . . . . . . . . . . . . . . . . . . .18
Troubleshooting Guide . . . . . . . . . . . . . . . .18
Care and Cleaning . . . . . . . . . . . . . . . . . . . .18
Warranty Information . . . . . . . . . . . . . . . . .19
Specifications . . . . . . . . . . . . . . . . . . . . . . .20
Guía de Consulta Rápida en
Español . . . . . . . . . . . . . . . . . . . . . . . 21
Manual Block Warranty
. . . . . . . . . . . . . . . . . Inside
Back Cover
Quick Reference . . . . . . . . Back Cover
C
ONTENTS
5
Y
OUR
N
EW
M
ICROWAVE OVEN
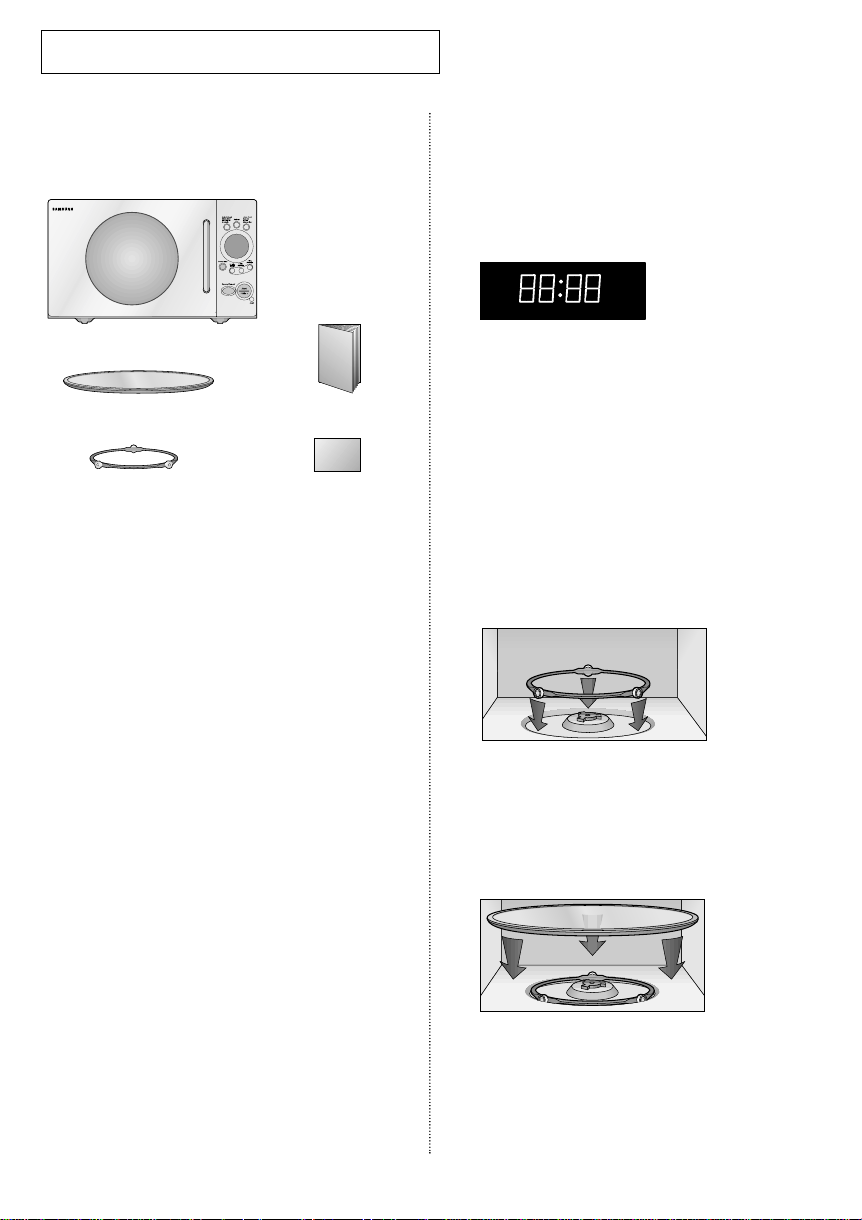
Checking Parts
Unpack your microwave oven and check to make
sure that you have all the parts shown here. If any
part is missing or broken, call your dealer.
microwave oven
glass tray
roller guide ring
instruction manual
registration card
WARRANTY AND SERVICE INFORMATION
To help us better serve you, please complete the
enclosed registration card and promptly return it by
mail. If the registration card is missing, you can
call Samsung Electronics America, Inc., at 1-800SAMSUNG (1-800-726-7864), or register on-line at
WWW.SAMSUNGUSA.COM
When contacting Samsung, please provide the specific model and serial number information which is
usually located on the back or bottom of the product. Please record these numbers below, along
with the other requested information. Keep this
information in a safe place as a permanent record
of your purchase to aid in identification in case of
theft or loss, and a copy of your sales receipt as a
proof of purchase if warranty service is needed.
MODEL NUMBER ______________________
SERIAL NUMBER ______________________
DATE PURCHASED ______________________
PURCHASED FROM______________________
Warranty service can only be performed by a
Samsung Authorized Service Center. If you should
require warranty service, provide the above information with a copy of your sales receipt to the
Samsung Authorized Service Center. For service
assistance and the location of the nearest service
center, please call 1-800-SAMSUNG (1-800-726-
7864), or go on-line to WWW.SAMSUNGSUP-
PORT.COM
Y
OURNEWMICROWAVEOVEN
6
Setting Up Your Microwave Oven
1 Place the oven on a flat, sturdy surface
and plug the cord into a grounded outlet.
Once plugged in, the display on your
oven will show:
Make sure there is adequate ventilation for your
oven by leaving at least four inches of space
behind, above, and to the sides of the oven.
2 Open the oven door.
3 Wipe the inside of the oven with a damp
cloth.
4 Place the pre-assembled ring in the
indentation in the center of the oven.
5 Place the glass tray on top of the ring so
that the three glass tabs in the center of
the tray fit securely into the tabs on the
floor of the oven.
Y
OUR
N
EW
M
ICROWAVE OVEN
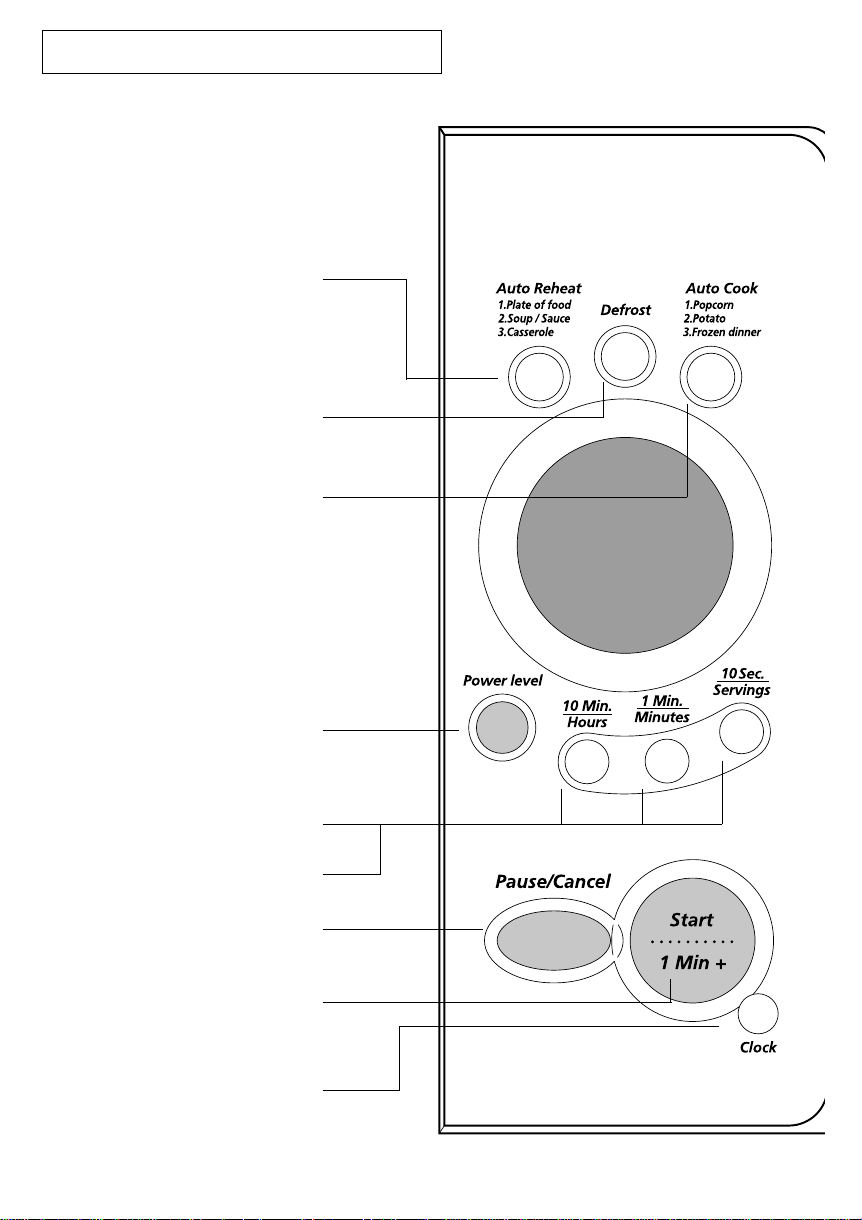
Control Panel Buttons
Auto Reheat p. 9
Press to reheat popular foods.
Defrost p. 10
Press to set the defrosting
time of the food to be defrosted
Auto Cook p. 8
Press to cook popular foods.
Power Level p. 10
Press to set the power to
a level other than HIGH.
Time Setting p. 10
Press to set the cooking time
Servings p. 8-p. 9
Press to select number of servings
Pause/Cancel p. 8
Press to pause oven or correct a mistake.
Start / 1Min + p.9
Press to begin cooking. Press once
for each minute you wish to cook at
HIGH Power.
Clock p.8
Press to set the clock.
Y
OURNEWMICROWAVEOVEN
7
 Loading...