

Page 1
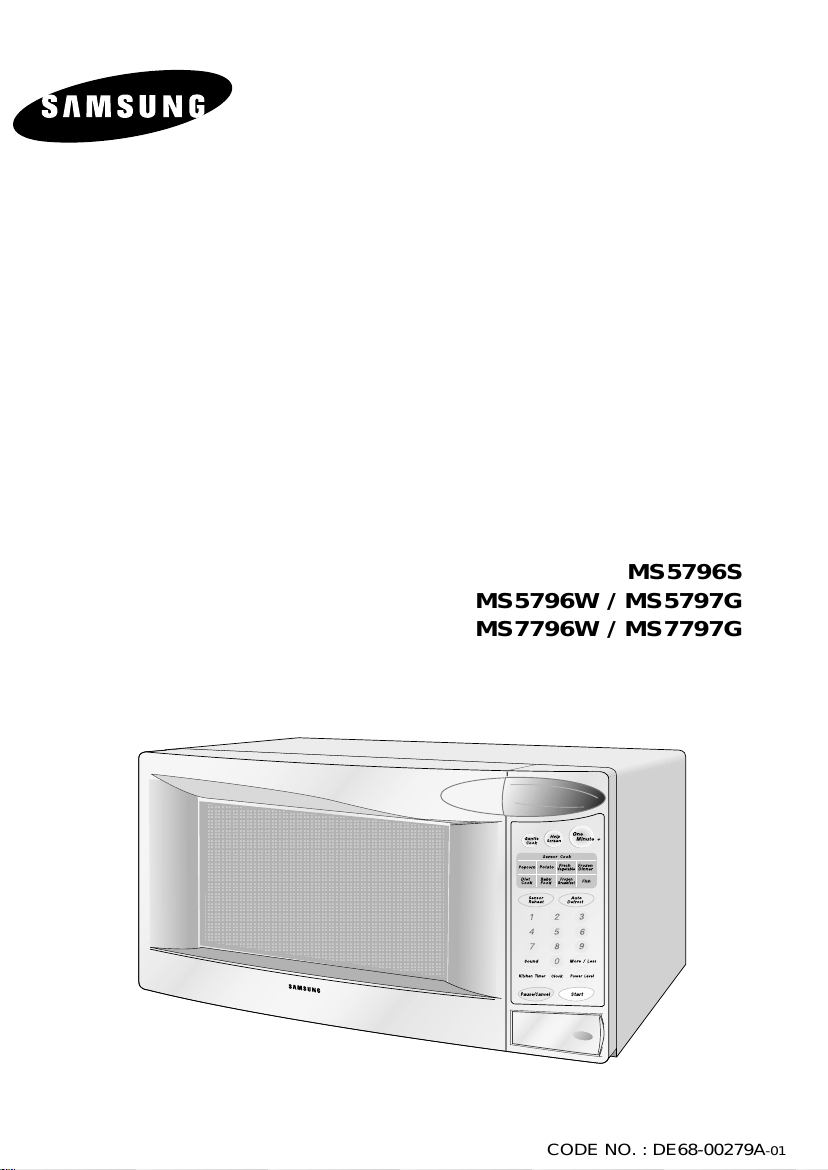
Microwave
Oven
Owner ’s Manual
MS5796S
MS5796W / MS5797G
MS7796W / MS7797G
CODE NO. : DE68-00279A-01
Page 2

S
AFETY
PRECAUTIONS TO
AVOID POSSIBLE
EXPOSURE TO
EXCESSIVE
MICROWAVE ENERGY
(a) Do not attempt to operate this oven
with the door open since open-door
operation can result in harmful
exposure to microwave energy. It is
important not to defeat or tamper with
the safety interlocks.
(b) Do not place any object between the
front face of the oven and the door or
allow soil or cleaner residue to accumulate on sealing surfaces.
(c) Do not operate the oven if it is dam-
aged. It is particularly important that the
oven door close properly and that there
is no damage to the
1) Door (bent or dented),
2) Hinges and latches (broken or
loosened),
3) Door seals and sealing surfaces.
(d) The oven should not be adjusted or
repaired by anyone except properly
qualified service personnel.
WARNING
Always observe Safety Precautions
when using your oven. Never try to
repair the oven on your own – there is
dangerous voltage inside. If the oven
needs to be repaired, call 1-800-SAMSUNG for the name of an authorized
service center near you.
IMPORTANT SAFETY
INSTRUCTIONS
When using any electrical appliance,
basic safety precautions should be
followed, including the following:
:
WARNING
To reduce risk of burns, electric
shock, fire, personal injury or exposure to excessive microwave energy:
• Read all safety instructions before using the
appliance.
• Read and follow the specific “Precautions to
Avoid Exposure to Excessive Microwave
Energy” on this page.
• This appliance must be grounded. Connect
only to properly grounded outlets. See
“Important Grounding Instructions” on page 4
of this manual.
• Install or place this appliance only in accordance with the installation instructions
provided.
• Some items, like whole eggs and food in sealed
containers, may explode if heated in this oven.
• Use this appliance only for its intended use as
described in the manual. Do not use corrosive
chemicals or vapors in this appliance. This type
of oven is specifically designed to heat, cook, or
dry food. It is not designed for industrial or laboratory use.
• As with any appliance, close supervision is nec-
essary when used by children.
SAVE THESE INSTRUCTIONS
AFETY
S
2
Page 3

S
AFETY
Important Safety Instructions,
continued
• Do not operate this appliance if it has a damaged
cord or plug, if it is not working properly, or if it
has been damaged.
• This appliance should be serviced only by qualified service personnel. Contact the nearest authorized service facility for examination, repair, or
adjustment.
• Do not cover or block any of the openings on this
appliance.
• Do not store this appliance outdoors. Do not use
near water – for example, near a kitchen sink, in a
wet basement, or near a swimming pool, etc.
• Keep the inside of the oven clean. Food particles
or spattered oils stuck to the oven walls or floor
can cause paint damage and reduce the efficiency of the oven.
• Do not immerse cord or plug in water.
• Keep cord away from heated surfaces.
• Do not let cord hang over edge of table or
counter.
• When cleaning door and oven surfaces, use only
mild, nonabrasive soaps or detergents applied
with a sponge or soft cloth.
• To reduce the risk of fire in the oven:
a.Do not overcook food. Watch appliance care
fully if paper, plastic, or other combustible
materials are inside.
b.Remove wire twist-ties from plastic cooking bags
before placing bags in oven.
c.If materials inside the oven ignite, keep the
oven door closed, turn the oven off, disconnect
the power cord, or shut off the power at the
fuse or circuit breaker panel.
d.Do not use the oven compartment for storage
purposes. Do not leave paper products, cooking
utensils, or food in the oven when not in use.
• Do not try to preheat oven or operate while empty.
• Do not cook without the glass tray in place on the
oven floor. Food will not cook properly without the
tray.
• Do not defrost frozen beverages in narrow-necked
bottles. The containers can break.
• Dishes and containers can become hot. Handle
with care.
• Carefully remove container coverings, directing
steam away from hands and face.
• Remove lids from baby food before heating. After
heating baby food, stir well and test temperature
by tasting before serving.
• A short power-supply cord is provided to reduce
the risk of becoming entangled in or tripping over
a longer cord. Longer cord sets or extension
cords are available and may be used
with caution.
• Do not operate any other heating or cooking appliance beneath this appliance.
• Do not mount unit over or near any portion of a
heating or cooking appliance.
• Do not mount over a sink.
• Do not store anything directly on top of the appliance when it is in operation.
SAVE THESE INSTRUCTIONS
Page 4

S
AFETY
Important Grounding
Instructions
This appliance must be grounded. In the event of
an electrical short circuit, grounding reduces the
risk of electric shock by providing an escape wire
for the electrical current. This appliance is
equipped with a cord that includes a grounding
wire and a grounding plug. The plug must be
plugged into an outlet that is properly installed and
grounded. Plug the three-prong power cord into a
properly grounded outlet of standard 115-120 voltage, 60 Hz. Your oven should be the only appliance
on this circuit.
WARNING
Improper use of the grounding plug can result
in a risk of electric shock. Consult a qualified
electrician or servicer if you do not understand
the grounding instructions or if you are not
sure if the appliance is properly grounded.
WARNING
Do not cut or remove the third (ground) prong
from the power cord under any circumstances.
Use of Extension Cords
A short power-supply cord is provided to reduce
the risk of becoming entangled in or tripping over
a longer cord. Longer cord sets or extension cords
are available and may be used if care is exercised
in their use. If a long cord or extension cord is
used:
1. The marked electrical rating of the cord set or
extension cord should be at least as great as
the electrical rating of the appliance.
2. The extension cord must be a grounding-type 3wire cord and it must be plugged into a 3-slot
outlet.
3. The longer cord should be arranged so that it
will not drape over the counter top or tabletop
where it can be pulled on by children or tripped
over accidentally. If you use an extension cord,
the interior light may flicker and the blower
may vary when the microwave oven is on.
Cooking times may be longer, too.
SAVE THESE INSTRUCTIONS
AFETY
S
4
Page 5

C
ONTENTS
Your New Microwave Oven 6
Checking Parts 6
Setting Up Your Microwave Oven 6
Control Panel Buttons 7
Operation 8
Turning on the Power and Selecting a
Display Language 8
Setting the Clock 8
Using the Pause/Cancel Button 8
Using the Help System 9
Using the Sensor Cook Buttons 9
Using the One Minute+ Button 10
Using the Gentle Cook Button 10
Sensor Reheat 10
Defrosting Automatically 11
Defrosting Guide 12
Setting Cooking Times &
Power Levels 13
One-stage Cooking 13
Multi-stage Cooking 13
Using the More/Less Button 14
Adjusting the Volume 14
Using the Kitchen Timer 15
Setting the Child Protection Lock 15
Demonstration Mode 15
Cooking Instructions 16
Cooking Utensils 16
Testing Utensils 16
Cooking Techniques 17
General Tips 17
Auto Sensor Cook 18
Utensils & Cover For
Sensor Cooking 18
Important 18
Cooking Guides 19-20
Sensor Cooking Guide 21-22
Sensor Reheat Guide 22
Sensor Recipes 23-24
Appendix 25
Troubleshooting Guide 25
Care and Cleaning 25
Warranty Information 26
Specifications 27
Guía de Consulta Rápida en
Español
28-29
Manual Block Warranty
Inside Back Cover
Quick Guide Back Cover
ONTENTS
C
5
Page 6
Y
OUR
N
EW
M
ICROWAVE OVEN
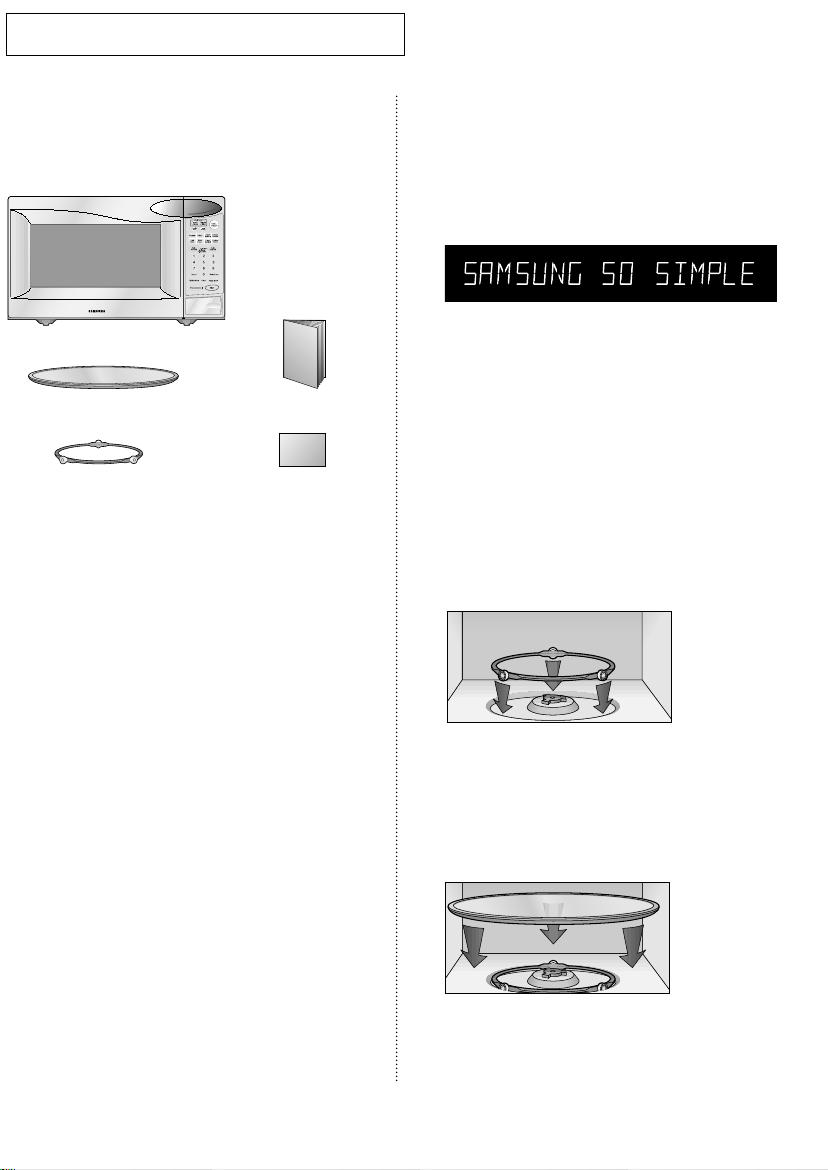
Checking Parts
Unpack your microwave oven and check to make
sure that you have all the parts shown here. If any
part is missing or broken, call your dealer.
microwave oven
glass tray
roller guide ring
instruction manual
registration card
WARRANTY AND SERVICE INFORMATION
To help us better serve you, please complete the
enclosed registration card and promptly return it
by mail. If the registration card is missing, you can
call Samsung Electronics America, Inc., at 1-800SAMSUNG (800-726-7864), or register on-line at
WWW.SAMSUNGUSA.COM
When contacting Samsung, please provide the specific model and serial number information which is
usually located on the back or bottom of the product.
Please record these numbers below, along with the
other requested information. Keep this information
in a safe place as a permanent record of your purchase to aid in identification in case of theft or loss,
and a copy of your sales receipt as a proof of purchase if warranty service is needed.
MODEL NUMBER ______________________
SERIAL NUMBER ______________________
DATE PURCHASED ______________________
PURCHASED FROM______________________
Warranty service can only be performed by a
Samsung Authorized Service Center. If you should
require warranty service, provide the above information with a copy of your sales receipt to the
Samsung Authorized Service Center. For service
assistance and the location of the nearest service
center, please call 1-800-SAMSUNG (800-726-7864),
or go on-line to WWW.SAMSUNGSUPPORT.COM
071100
Setting Up Your Microwave Oven
1 Place the oven on a flat, sturdy surface
and plug the cord into a grounded outlet.
Once plugged in, the display on your
oven will show:
Make sure there is adequate ventilation for your
oven by leaving at least four inches of space
behind, above, and to the side of the oven.
2 Open the oven door by pressing the but-
ton below the control panel.
3 Wipe the inside of the oven with a damp
cloth.
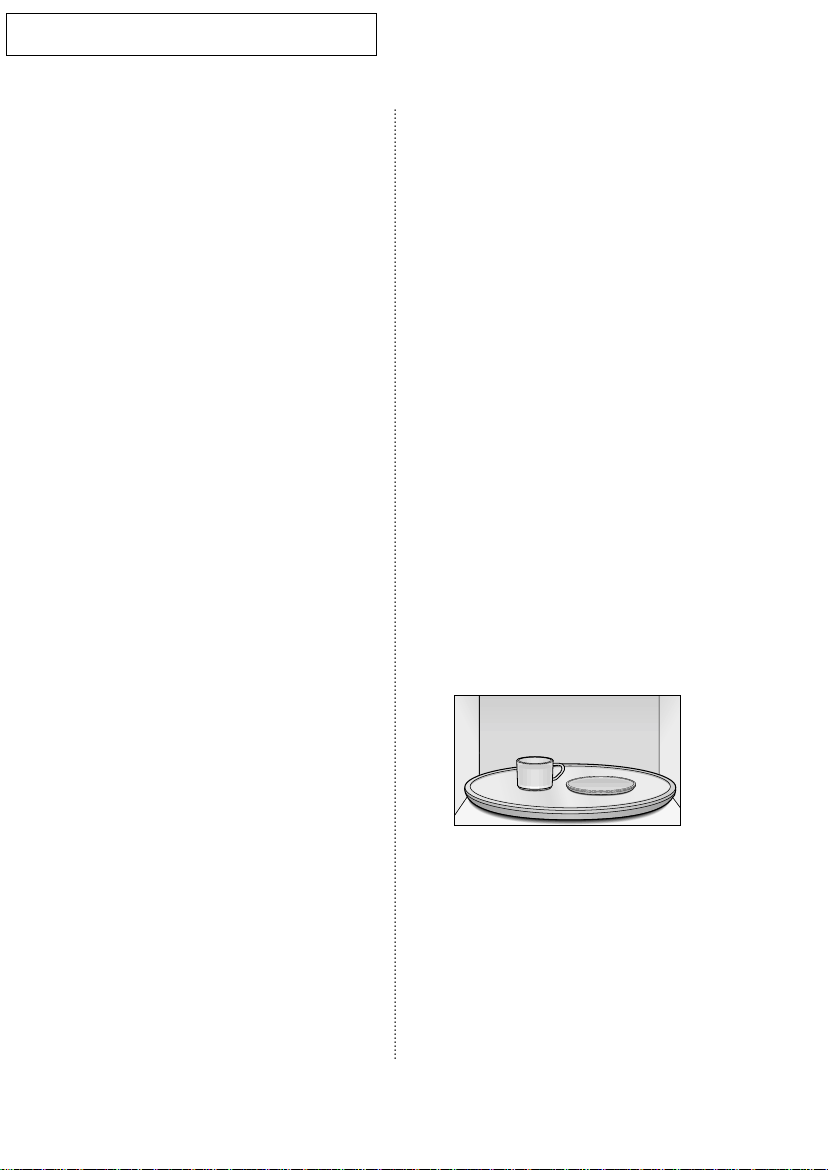
4 Place the pre-assembled ring in the
indentation in the center of the oven.
5 Place the glass tray on top of the ring so
that the three glass tabs in the center of
the tray fit securely into the tabs on the
floor of the oven.
OURNEWMICROWAVEOVEN
Y
6
Page 7
Y
OUR
N
EW
M
ICROWAVE OVEN
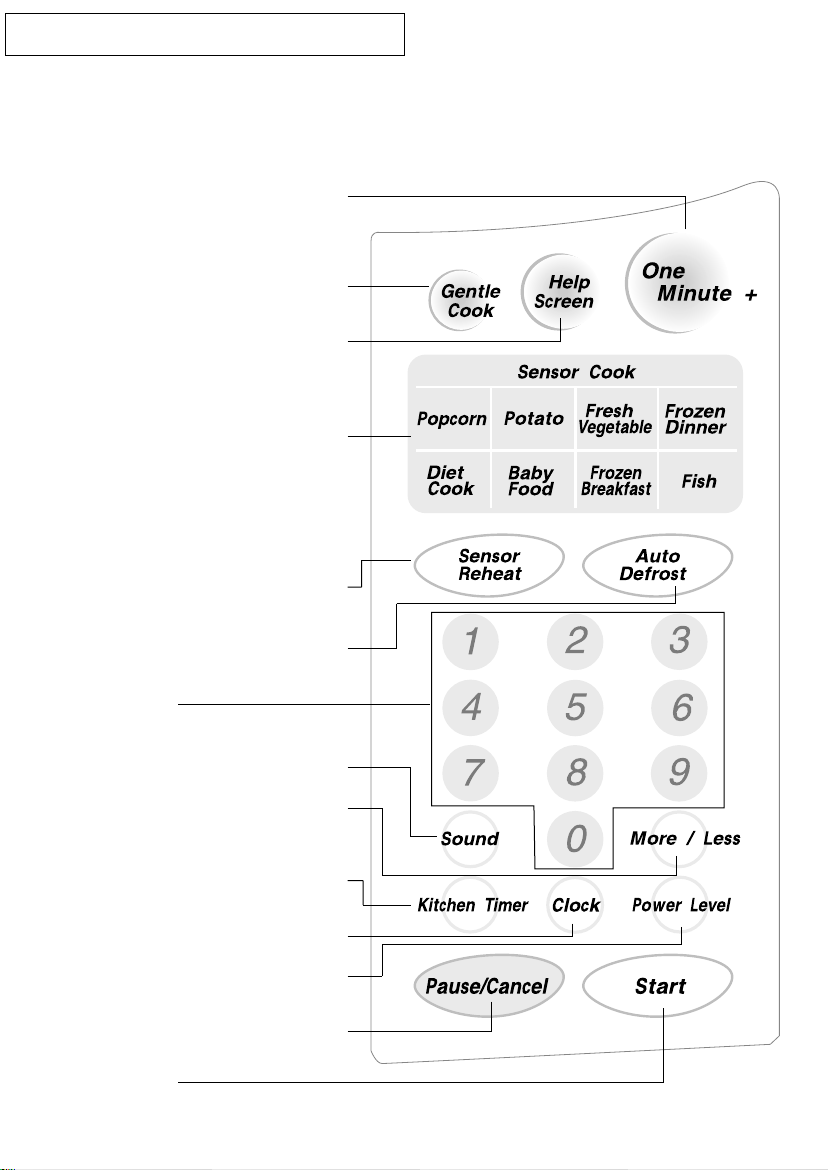
Control Panel Buttons
One Minute+ p. 10
Press once for every minute of cooking at
High power.
Gentle Cook p. 10
Press to set gentler cooking with reduced
power
Help Screen p. 9
Press to see help information about the feature you are using.
Sensor Cook Buttons p. 9
Sensor settings to cook popular foods.
Sensor Reheat p. 10
Auto Defrost p. 11
Sets weight of food to be defrosted.
Number Buttons
Sets cooking times or amounts and power
levels other than high.
Sound Button p. 14
More/Less Button p. 14
Increases or decreases cooking time.
Kitchen Timer p. 15
Clock p. 8
Sets current time.
Power Level p. 13
Sets power to level other than high.
Pause/Cancel p. 8
Press to pause oven or correct a mistake.
Start
Press to start cooking.
OURNEWMICROWAVEOVEN
Y
7
Page 8
O
PERATION
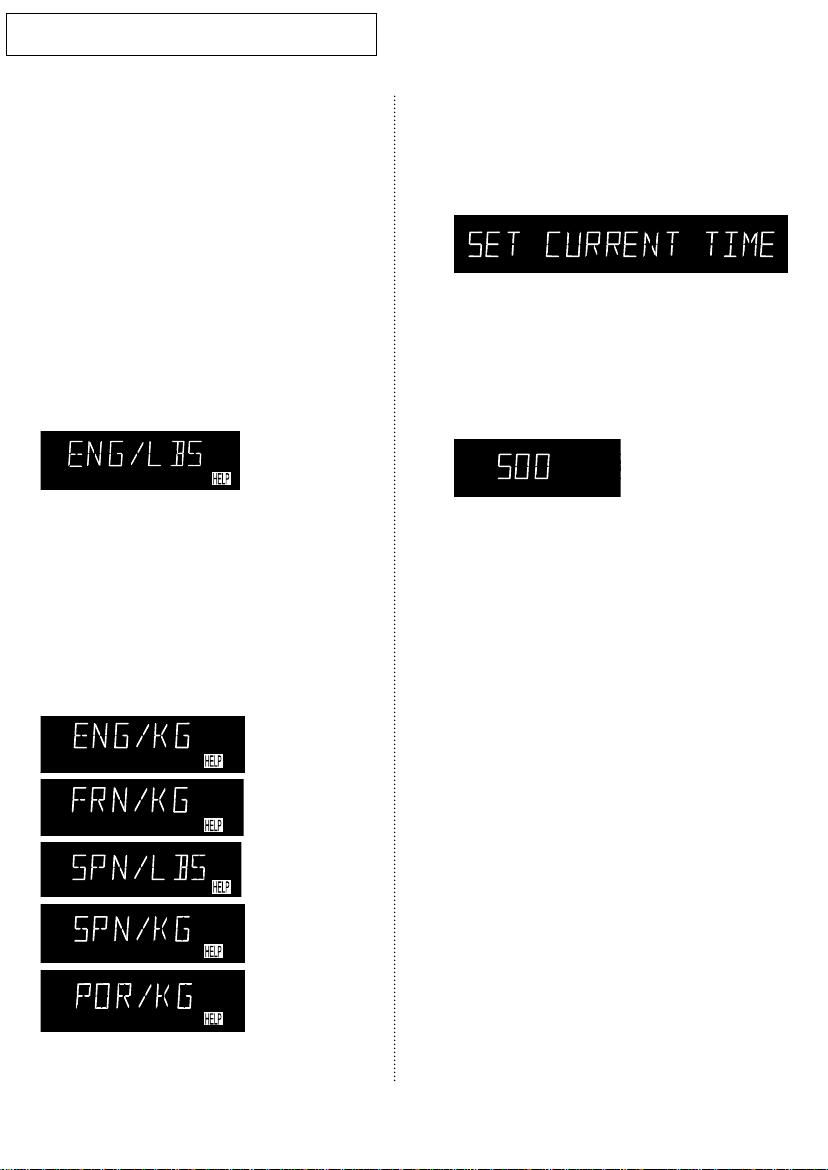
Turning on the Power and Selecting a
Display Language
The first time you plug the power cord into an outlet, or after there has been an interruption in
power, the display shows “SAMSUNG SO
SIMPLE.” At this point, you can select a language
and weight system for the display. You can choose
from English, French, Spanish and Portuguese and
between pounds (LBS) or kilograms (KG). To do so,
1 Press START immediately after plugging in
your Microwave. The display shows “ ENGLISH/LBS”. If the display does not show
“ENGLISH/LBS”, you will need to unplug the
Microwave and then plug it in again to change
the language.
2 Press STARTrepeatedly to select the lan-
guage and weight system you wish to
use:
• ENGLISH/LBS,
• ENGLISH/KG,
• FRENCH/KG,
• SPANISH/LBS, or SPANISH/KG
• PORTUGUESE/KG.
If you continue to press START, the settings will cycle in the order shown here.
Setting the Clock
1 Press the Clock button. The display will
show:
2 Use the number buttons to enter the cur-
rent time. You must press at least three
numbers to set the clock. If the current
time is 5:00 enter, 5,0,0.
3 Press Clock again. A colon will appear,
indicating that the time is set.
If there is a power interruption, you will need to
reset the clock.
You can check the current time while cooking is in
progress by pressing the Clock button.
When you have selected the language and weight system you want to use, press the PAUSE/CANCEL button
to end this procedure, or press CLOCK to set the clock.
PERATION
O
8
Using the Pause/Cancel Button
The Pause/Cancel button allows you to clear
instructions you have entered. It also allows you to
pause the oven’s cooking cycle, so that you can
check the food.
• To pause the oven during cooking: press
Pause/Cancel once. To restart, press Start.
• To stop cooking, erase instructions, and return
the oven display to the time of day: press
Pause/Cancel twice.
• To correct a mistake you have just entered:
press Pause/Cancel once, then re-enter the
instructions.
• To cancel a timer setting: press Pause/Cancel
once.
Page 9

O
PERATION
Using the Help system
Your microwave offers helpful instructions for many
procedures.
1 When you need feature information and
helpful hints, press the Help Screen
button and then press the button that you
want to get information on. Help information is available in 4 languages (English,
French, Spanish and Portuguese). The
“HELP” indicator appears in the display
while you are using this feature.
Using the Sensor Cook Buttons
By actually sensing the steam that escapes as food
heat, this feature automatically adjusts the oven’s
heating time for various types and amounts of precooked food. All food should be precooked and at
refrigerator temperature.
1 Press the Sensor button corresponding
to the food you are cooking (Popcorn, for
example). The display shows
“POPCORN” and your microwave oven
will begin cooking automatically.
Serving sizes available for each button:
POPCORN
3.0 oz -3.5 oz
(If you want to use the 1.75 oz
serving size, you can use the
“LESS” key of the MORE/LESS
button.
FROZEN BREAKFAST
(Sandwich, Waffle, Egg)
2 - 8 oz
FRESH VEGETABLE
1 - 4 CUPS
FISH
0.5-1.5 lbs
When cooking popcorn, wait at least five minutes
between each bag to avoid overheating the glass tray.
If you want to adjust the cooking time,
you can use the MORE/LESS button.
See page14 for more information.
If you want to check the current time while cooking
is in progress, press the CLOCK button.
POTATO
6 oz -8 oz each
DIET COOK
(Low calorie frozen dinners)
7-18 oz
FROZEN DINNER
(Frozen Entree, Frozen Dinner)
7-18 oz
BABY FOOD
2.5-6.0 oz
PERATION
O
9
Page 10

O
PERATION
Using the One Minute+ Button
This button offers a convenient way to heat food in
one-minute increments at the High power level.
1 Press the One Minute+ button once for
each minute you wish to cook the food.
For example, press it twice for two minutes. The time will display, and the oven
starts automatically.
Add minutes to a program in progress by pressing
the One Minute+ button for each minute you
want to add.
Using the Gentle Cook Button
This button is for slower, gentler cooking with
reduced power. It is ideal for heat sensitive foods
such as those containing egg yolks, sour cream
and mayonnaise and for simmering stews, etc.
Sensor Reheat
Heating leftovers and precooked foods is easy with
your new microwave. By actually sensing the
steam that escapes as food heat, this feature automatically adjusts the oven’s heating time for various types and amounts of precooked food. All food
should be precooked and at refrigerator temperature. To use sensor reheating:
1 Press SENSOR REHEAT.
The display will show “REHEAT”
and the oven will start automatically.
If you want to adjust the heating
time, use the MORE/LESS button.
See page14.
If you want to check the current
time while reheating, press the
CLOCK button
1 Use the Number button to set a cooking
time.
For example, to set 10 minutes, enter
1,0,0,0.
2 Press the Gentle Cook button. The time
will display and the oven will start automatically.
PERATION
O
10
Page 11
O
PERATION
Defrosting Automatically
To thaw frozen food, set the weight of the food and
the microwave automatically sets the defrosting
time, power level and standing time.
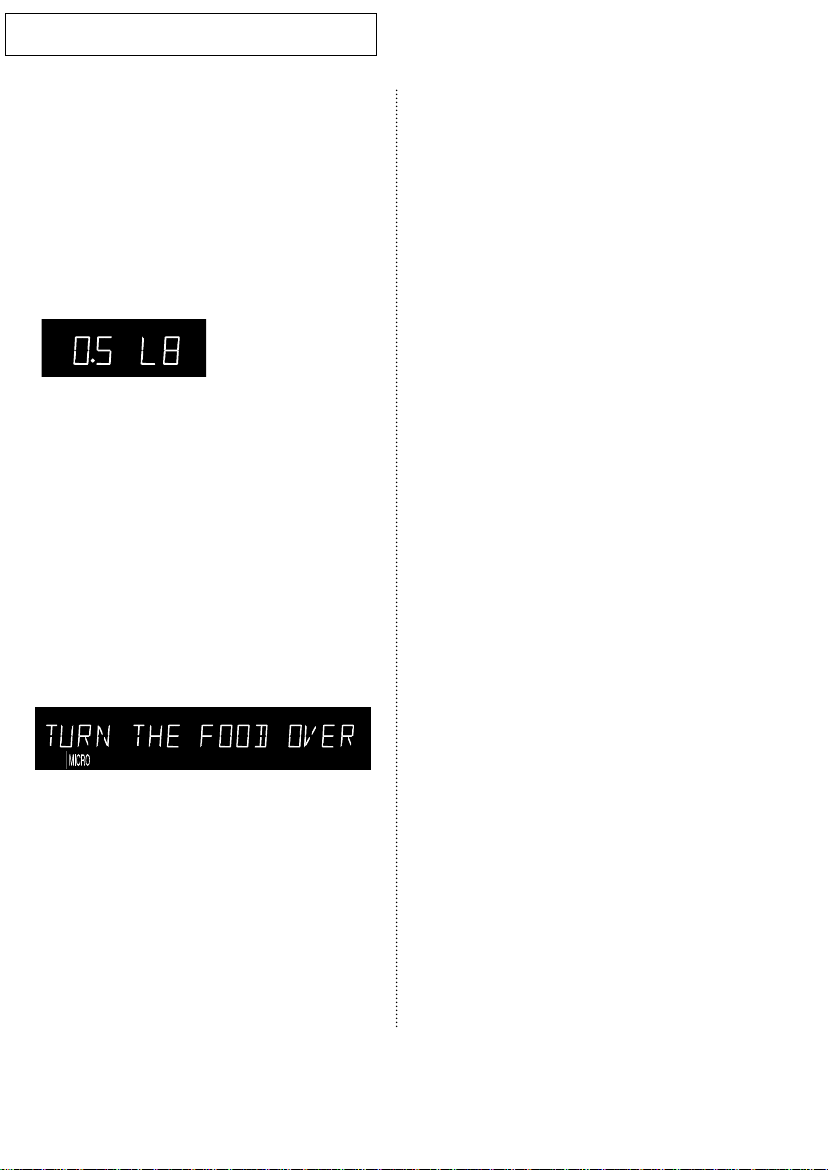
1 Press the Auto Defrost button. The dis-
play shows “0.5 LB.”(0.2Kg if you have
set your oven for metric measure).
2 To set the weight of your food, press the
Auto Defrost button repeatedly. This
increases the weight by 0.5 lb increments, up to 6.0 lbs.
You can also use the number buttons to
enter the weight of the food directly.
The oven calculates the defrosting time
and starts automatically. Twice during
defrosting, the oven will beep and the
display will read “TURN THE FOOD
OVER.”
3 Press the Pause/Cancel button, open the
oven door, and turn the food over.
4 Press the Start button to resume
defrosting.
• See next page for the Auto Defrosting
Guide
PERATION
O
11
Page 12

O
PERATION
Defrosting Guide
Follow the instructions below when defrosting different types of food.
Type of food: Roast beef, pork
Amount: 2.5-6.0 lbs.
Procedure: Start with the food placed fat
side down. After each stage,
turn the food over and shield
any warm portions with narrow
strips of aluminum foil.
Type of food: Steaks, chops, fish
Amount: 0.5-3.0 lbs.
Procedure: After each stage, rearrange the
food. If there are any warm or
thawed portions of food, shield
them with narrow strips of aluminum foil. Remove any pieces
of food that are nearly defrosted. Let stand, covered, for 5-10
minutes.
Type of food: Ground meat
Amount: 0.5-3.0 lbs.
Procedure: After each stage, remove any
pieces of food that are nearly
defrosted. Let stand, covered
with foil, for 5–10 minutes.
Type of food: Chicken, whole
Amount: 2.5-6.0 lbs.
Procedure: Remove giblets before freezing
poultry. Start defrosting with the
breast side down. After the first
stage, turn the chicken over and
shield any warm portions with
narrow strips of aluminum foil.
After the second stage, again
shield any warm portions with
narrow strips of aluminum foil.
When defrost cycle is over, let
stand, covered, for 30–60 minutes
in the refrigerator.
Type of food: Chicken, pieces
Amount: 0.5-3.0 lbs.
Procedure: After each stage, rearrange or
remove any pieces of food that
are nearly defrosted. Let stand
for 10-20 minutes.
Notes
Check foods when the oven signals. After the final
stage, small sections may still be icy; let them stand
to continue thawing. Do not cook until all ice crystals
have thawed.
Shielding roasts and steaks prevents the edges from
cooking before the center of the food has defrosted.
Use narrow, flat, smooth strips of aluminum foil to
cover the edges and thinner sections of the food.
PERATION
O
12
Page 13
O
PERATION
Setting Cooking Times & Power
Levels
Your microwave allows you to set up to three different stages of cooking, each with its own time length
and power level. The power level lets you control
the heating intensity from Warm (1) to High (0).
One-stage Cooking
For simple one-stage cooking, you only need to set a
cooking time. The power level is automatically set at
High. If you want the power set at any other level,
you must set it using the Power Level button.
1 Use the number buttons to set a cooking
time. You can set a time from one second
to 99 minutes, 99 seconds. To set a time
over one minute, enter the seconds too.
For example, to set 20 minutes, enter
2, 0, 0, 0 .
2 If you want to set the power level to
something other than High, press the
Power Level button, then use the number
buttons to enter a power level.
Power Levels:
1 = warm 6 = simmer
2 = low 7 = medium high
3 = defrost 8 = reheat
4 = medium low 9 = sauté
5 = medium 0 = high
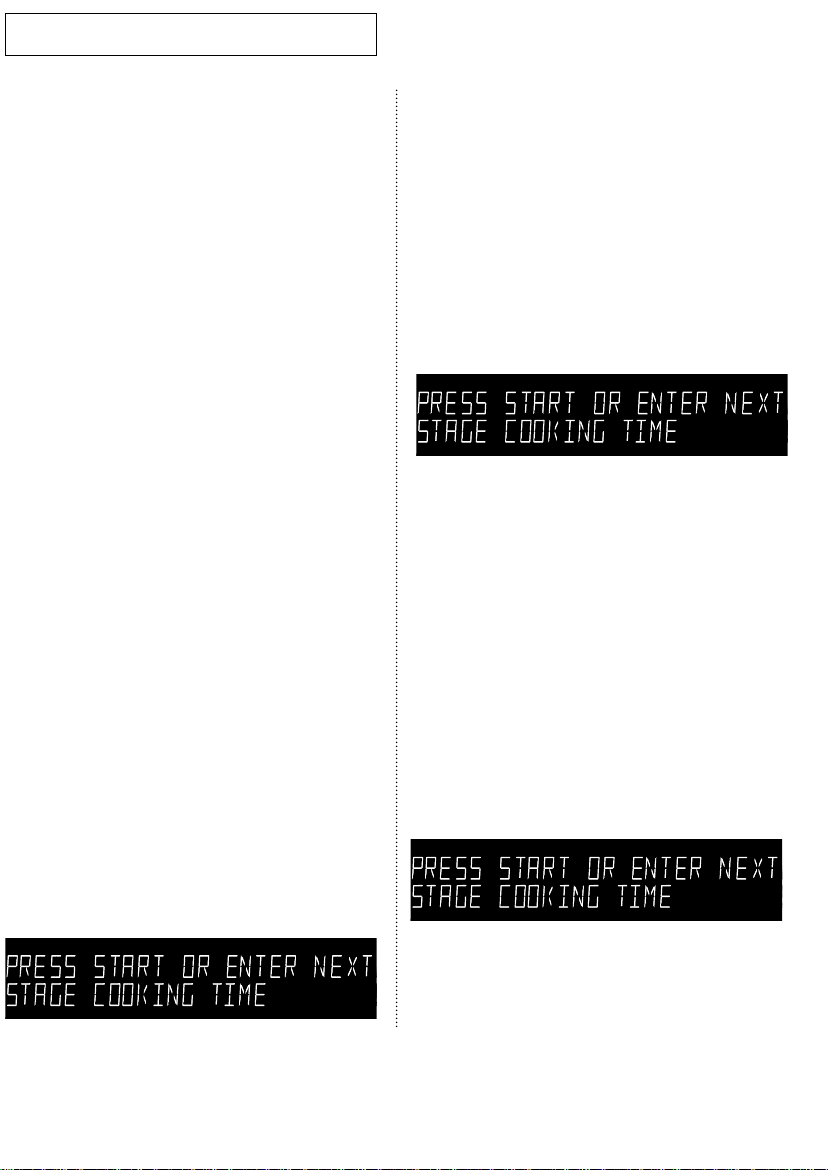
Setting Cooking Times, continued
Some recipes require different stages of cooking at
different temperatures. You can set multiple stages
of cooking with your microwave.
Multi-stage Cooking
1 Follow steps 1 and 2 in the “One-Stage
Cooking” section on this page. The display shows “PRESS START OR ENTER
NEXT STAGE COOKING TIME.”
When entering more than one cooking stage, the
Power Level button must be pressed before the
second cooking stage can be entered.
To set the power level at High for a stage of cooking, press the Power Level button twice.
2 Use the Number buttons to set a second
cooking time.
3 Press the Power Level button, then use
the number buttons to set the power
level of the second stage of cooking.
The display shows the power level you
have set and then “PRESS START OR
ENTER NEXT STAGE COOKING TIME.”
The display shows “PRESS START OR ENTER NEXT
STAGE COOKING TIME”
3 Press the Start button to begin cooking.
If you want to change the power level,
press Pause/Cancel before you press
Start, and reenter all of the instructions.
4 Press Start to begin cooking, or repeat
steps 2 and 3 to set a cooking time and
power level for a third stage of cooking.
When finished, press Start.
PERATION
O
13
Page 14
O
PERATION
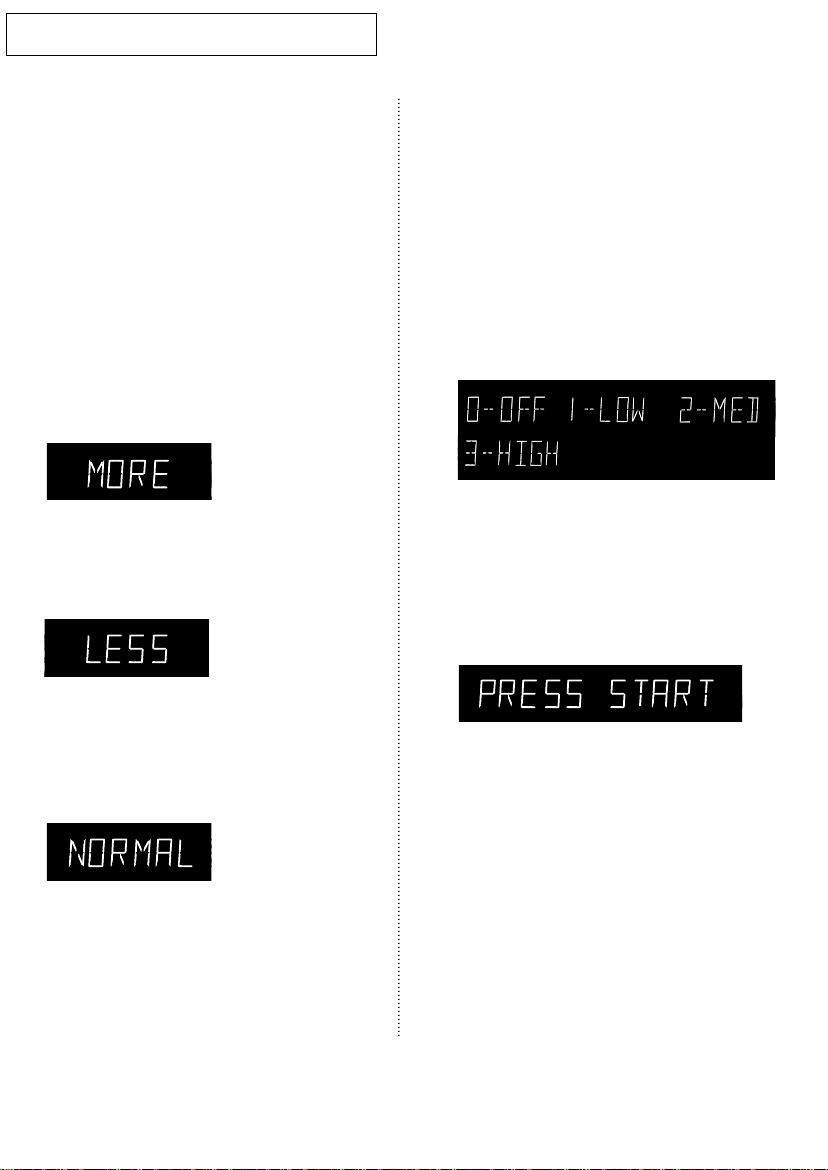
Using the More/Less Button
The More/Less button allows you to adjust pre-set
cooking times. It only works with the Sensor
Reheat , and Sensor-cooking buttons(Popcorn,
Popato, etc.). Use the More/Less button only after
you have already begun cooking with one of these
procedures. The More/Less key cannot be used
with the Baby Food key.
1 To ADD more time to an automatic cook-
ing procedure: Press the More/Less button once. The word “MORE” will appear
in the display.
2 To REDUCE the time of an automatic
cooking procedure: Press the More/Less
button twice. The word “LESS” will
appear in the display.
Adjusting the Volume
The Sound button on the microwave allows you to
adjust the volume of the microwave’s chime
sound. The sound is initially set to its highest setting. To change the volume:
1 Press the Sound button. The display
shows
“0-OFF 1-LOW 2-MED 3-HIGH”
2 Press “0” to turn the volume off, “1” for
low volume, “2” for medium volume, or
“3” for high volume.
The display will show the volume you
have chosen, then shows “PRESS
START”
3 To return to the NORMAL time set for an
automatic cooking procedure: Press the
More/Less button until the word
“NORMAL” appears in the display.
PERATION
O
14
3 Press Start:
The display returns to the time of day.
Page 15
O
PERATION
Using the Kitchen Timer
1 Use the Number buttons to set the length
of time you want the timer to run.
2 Press the Kitchen Timerbutton.
3 The display counts down and beeps
when the time has elapsed.
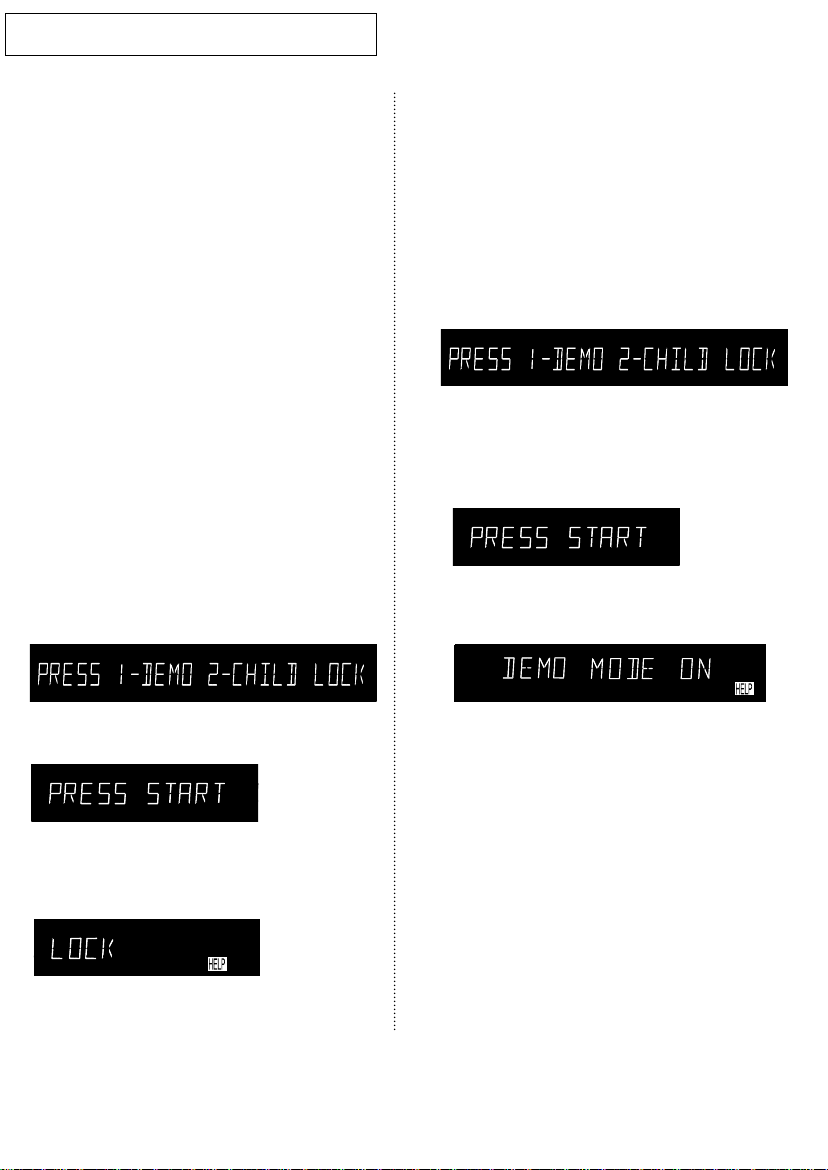
Setting the Child Protection Lock
You can lock your microwave oven so it can’t be
used by unsupervised children.
1 Press the “0” button. The display shows
“PRESS 1-DEMO 2- CHILD LOCK.”
Demonstration Mode
You can use the Demonstration Mode to see how
your microwave oven operates without the oven
heating.
1 Press the “0” button. The display shows
“PRESS 1-DEMO 2- CHILD LOCK.”
2 Press the “1” button. The display shows
“PRESS START”.
3 Press the Start button. The display
shows “DEMO MODE ON”.
2 Press the “2” button. The display shows
“PRESS START.”
3 Press the Start button. The display
shows “LOCK” then returns to the time of
day.
At this point, the microwave oven cannot be used
until it is unlocked. To unlock it, repeat steps 1–3
above.
To turn demo mode off, repeat steps 1–3 above.
NOTE ; You can not use Demonstration Mode for
sensor cooking. If use, “E1” error will be displayed.
PERATION
O
15
Page 16
C
OOKING
I
Cooking Utensils
NSTRUCTIONS
Recommended Use
• Glass and glass-ceramic bowls and dishes —
Use for heating or cooking.
• Microwave browning dish — Use to brown the
exterior of small items such as steaks, chops, or
pancakes. Follow the directions provided with
your browning dish.
• Microwavable plastic wrap — Use to retain
steam. Leave a small opening for some steam to
escape and avoid placing it directly on the food.
• Wax paper — Use as a cover to prevent spatter-
ing.
• Paper towels and napkins — Use for short-term
heating and covering; they absorb excess moisture and prevent spattering. Do not use recycled
paper towels, which may contain metal and can
catch fire.
• Paper plates and cups — Use for short-term
heating at low temperatures. Do not use recycled paper, which may contain metal and can
catch fire.
• Thermometers — Use only those labeled
“Microwave Safe” and follow all directions.
Check the food in several places. Conventional
thermometers may be used once the food has
been removed from the oven.
Not Recommended
• Glass jars and bottles — Regular glass is too
thin to be used in a microwave, and can shatter.
• Paper bags — These are a fire hazard, except
for popcorn bags that are designed for
microwave use.
• Styrofoam plates and cups — These can melt
and leave an unhealthy residue on food.
• Plastic storage and food containers —
Containers such as margarine tubs can melt in
the microwave.
• Metal utensils — These can damage your oven.
Remove all metal before cooking.
Testing Utensils
If you are not sure whether a dish is microwavesafe or not, you can perform this test:
1 Fill a 1 cup glass measuring cup with
water and put it inside your oven, next to
the dish you want to test.
Limited Use
• Aluminum foil — Use narrow strips of foil to pre-
vent overcooking of exposed areas. Using too
much foil can damage your oven, so be careful.
• Ceramic, porcelain, and stoneware — Use these
if they are labeled “Microwave Safe.” If they
are not labeled, test them to make sure they can
be used safely. Never use dishes with metallic
trim.
• Plastic — Use only if labeled “Microwave Safe.”
Other plastics can melt.
• Straw, wicker, and wood — Use only for short-
term heating, as they can be flammable.
OOKINGINSTRUCTIONS
C
16
2 Press the One Minute+ button once to
heat them for one minute at High power.
The water should be warm and the dish you are
testing should be cool. If the dish is warm, then it is
absorbing microwave energy and is not acceptable
for use in the microwave.
Page 17

C
OOKING
I
NSTRUCTIONS
Cooking Techniques
Stirring
Stir foods such as casseroles and vegetables while
cooking to distribute heat evenly. Food at the outside of the dish absorbs more energy and heats
more quickly, so stir from the outside to the center.
The oven will turn off when you open the door to
stir your food.
Arrangement
Arrange unevenly shaped foods, such as chicken
pieces or chops, with the thicker, meatier parts
toward the outside of the turntable where they
receive more microwave energy. To prevent overcooking, place thin or delicate parts toward the
center of the turntable.
Shielding
Shield food with narrow strips of aluminum foil to
prevent overcooking. Areas that need shielding
include poultry wing-tips, the ends of poultry legs,
and corners of square baking dishes. Use only
small amounts of aluminum foil. Larger amounts
can damage your oven.
Turning
Turn foods over midway through cooking to expose
all parts to microwave energy. This is especially
important with large items such as roasts.
Standing
Foods cooked in the microwave build up internal
heat and continue to cook for a few minutes after
the oven stops. Let foods stand to complete cooking, especially foods such as roasts and whole
vegetables. Roasts need this time to complete
cooking in the center without overcooking the
outer areas. All liquids, such as soup or hot chocolate, should be shaken or stirred when cooking is
complete. Let liquids stand a moment before serving. When heating baby food, stir well and test the
temperature before serving.
Adding Moisture
Microwave energy is attracted to water molecules.
Food that is uneven in moisture content should be
covered or allowed to stand so that the heat disperses evenly. Add a small amount of water to dry
food to help it cook.
General Tips
• Dense foods, such as potatoes, take longer to
heat than lighter foods. Foods with a delicate
texture should be heated at a low power level to
avoid becoming tough.
• Altitude and the type of cookware you are using
can affect cooking time. When using a new
recipe, use the minimum cooking time and
check the food occasionally to prevent overcooking.
• Foods with a non-porous skin or shell, such as
potatoes, eggs, or hot dogs, should be pierced
to prevent bursting.
• Frying with heating oil or fat is not recommended. Fat and oil can suddenly boil over and
cause severe burns.
• Some ingredients heat faster than others. For
example, the jelly inside a jelly doughnut will be
hotter than the dough. Keep this in mind to avoid
burns.
• Home canning in the microwave oven is not
recommended because all harmful bacteria may
not be destroyed by the microwave heating
process.
• Although microwaves do not heat the cookware, the heat is often transferred to the cookware. Always use pot holders when removing
food from the microwave and instruct children
to do the same.
OOKINGINSTRUCTIONS
C
17
Page 18

C
OOKING
I
NSTRUCTIONS
Auto Sensor Cook
The Auto Sensor allows you to cook your food
automatically by detecting the amount of gases
generated from the food while cooking.
• When cooking food, many kinds of gases are
generated. The Auto Sensor determines the
proper time and power level by detecting these
gases from the food, eliminating the need to set
the cooking time and power level.
• When you cover a container with its lid or plastic wrap during Sensor Cooking, the Auto
Sensor will detect the gases generated after
the container has been saturated with steam.
• Shortly before cooking ends, the remaining
cooking time will begin its count down. This
will be a good time for you to rotate or stir the
food for even cooking if it is necessary.
• Before auto sensor cooking food may be seasoned with herbs, spices or browning sauces.
A word of caution though, salt or sugar may
cause burn spots on food so these ingredients
should be added after cooking.
• The MORE/LESS function pad is used to
increase or decrease cooking time. You should
use this function to adjust the degree of cooking to suit your personal taste.
Utensils & Cover For Sensor Cooking
• To obtain good cooking results with this function, follow the directions for selecting appropriate containers and covers in the charts in
this book.
• Always use microwave-safe containers and
cover them with their lids or with plastic wrap.
When using plastic wrap, turn back one corner
to allow steam to escape at the proper rate.
• Always cover with the lid intended for the
utensil being used. If the utensil does not have
its own lid, use plastic wrap.
• Fill containers at least half full.
• Foods that require stirring or rotating should be
stirred or turned toward the end of the Sensor
Cook cycle, after the time has started to count
down on the display.
Important
• After installing the oven and plugging into an
electrical outlet, do not unplug the power cord.
The gas sensor needs time to stabilize in order
to cook satisfactorily.
• It its not advisable to use the auto sensor cooking feature on a continuous cooking operation,
i.e. one cooking operation immediately after
another.
• Install the oven in a well ventilated location for
proper cooling and airflow and to ensure the
sensor will operate accurately.
• To avoid poor results, do not use the Auto sensor when the room ambient temperature is too
high or too low.
• Do not use volatile detergent to clean your
oven. Gas resulting from this detergent may
affect the sensor.
• Avoid placing the oven near high moisture or
gas emitting appliances, since this will interfere
with the proper performance of the Auto
Sensor.
• Always keep the inside of the oven clean. Wipe
all spills with a damp cloth.
This oven is designed for household use only.
C
18
OOKINGINSTRUCTIONS
Page 19

C
OOKING
I
NSTRUCTIONS
GUIDE for Cooking Meat in Your Microwave
• Place meat on a microwave-safe roasting rack in a microwave-safe dish.
• Start meat fat-side down. Use narrow strips of aluminum foil to shield any bone tips or thin meat areas.
• Check the temperature in several places before letting the meat stand the recommended time.
• The following temperatures are removal temperatures. The temperature of the food will rise during the
standing time.
Food
Roast Beef
Boneless
Up to 4 lbs.
Pork
Boneless or
bone-in
Up to 4 lbs.
Bacon
2-6 slices
Cook Time /Power Level Directions
Cooking Time:
8-11 min. / lb for 115° F - Rare
9-13 min. / lb for 120° F - Medium
10-15 min. / lb for 145° F - Well Done
Power Level: High(10) for first 5 min., then Medium(5).
Cooking Time:
11-15 min. / lb for 160° F Well Done
Power Level: High(10) for first 5 min., then Medium(5).
Cooking Time:
2 slices: 1- 1
4 slices: 3- 3
6 slices: 3
Power Level: High(10).
3/4 min.
1/2 min.
1/2-41/2 min.
Place roast fat-side down on roasting rack. Cover with wax paper.
Turn over when cooking time is half
up. Let stand 10 min.
Place roast fat-side down on roasting rack. Cover with vented plastic
wrap. Turn over when cooking time
is half up. Let stand 10 min.
Arrange slices on roasting rack or a
dish lined with paper-towel. Cover
with paper towel. Microwave until
crisp.
GUIDE for Cooking Poultry in Your Microwave
• Place poultry on a microwave-safe roasting rack in a microwave-safe dish.
• Cover poultry with wax paper to prevent spattering.
• Use aluminum foil to shield bone tips, thin meat areas, or areas that start to overcook.
• Check the temperature in several places before letting the poultry stand the recommended time.
Food
Cook Time /Power Level Directions
Whole
Chicken
Up to 4 lbs.
Chicken
Pieces
Up to 2 lbs.
Cooking Time:
5-8 min. / lb 170° -180°F
Power Level: Medium High(7).
Cooking Time:
5-8 min. / lb
180°F dark meat
170°F light meat
Power Level: Medium High(7).
Place chicken breast-side down on
roasting rack. Cover with wax paper.
Turn over when the cooking time is half
up. Cook until juices run clear and meat
near the bone is no longer pink. Let
stand 5-10 min.
Place chicken bone-side down on dish,
with the thickest portions towards the
outside of the dish. Cover with wax
paper. Turn over when the cooking time
is half up. Cook until juices run clear and
meat near the bone is no longer pink. Let
stand 5-10 min.
OOKINGINSTRUCTIONS
C
19
Page 20

C
OOKING
I
NSTRUCTIONS
GUIDE for Cooking Seafood in Your Microwave
• Cook fish until it flakes easily with a fork.
• Place fish on a microwave-safe roasting rack in a microwave-safe dish.
• Use a tight cover to steam fish. A lighter cover of wax paper or paper towel provides less steaming.
• Do not overcook fish; check it at minimum cooking time.
Food
Steaks
Cook Time /Power Level Directions
Cooking Time:
6-10 min. / lb
Arrange steaks on roasting rack with
meaty portions towards the outside of
rack. Cover with wax paper. Turn over
and rearrange when cooking time is half
Up to 1.5 lbs.
Fillets
Power Level: Medium High(7).
Cooking Time:
3-7 min. / lb
up. Cook until fish flakes easily with a
fork. Let stand 3-5 min.
Arrange fillets in a baking dish, turning any
thin pieces under. Cover with wax paper. If
over 1/2 inch thick, turn over and rearrange
Up to 1.5 lbs.
Shrimp
Power Level: Medium High(7).
Cooking Time:
1/2
3-5
min. / lb
when cooking time is half up. Cook until fish
flakes easily with a fork. Let stand 2-3 min.
Arrange shrimp in a baking dish without
overlapping or layering. Cover with wax
paper. Cook until firm and opaque, stir-
Up to 1.5 lbs.
Power Level: Medium High(7).
ring 2 or 3 times. Let stand 5 min.
GUIDE for Cooking Eggs in Your Microwave
• Never cook eggs in the shell, and never warm hard-cooked eggs in the shell; they can explode.
• Always pierce whole eggs to keep them from bursting.
• Cook eggs just until set; they become tough if overcooked.
GUIDE for Cooking Vegetables in Your Microwave
• Vegetables should be washed just before cooking.
Often, no extra water is needed. If dense vegetables such as potatoes, carrots and green beans
are being cooked, add about 1/4 cup water.
• Small vegetables (sliced carrots, peas, lima beans,
etc.) will cook faster than larger ones.
• Whole vegetables, such as potatoes, acorn
squash or corn on the cob, should be arranged in
a circle on the turntable before cooking. They will
cook more evenly if turned over after half the
cooking time.
• Always place vegetables like asparagus and broccoli with the stem ends pointing towards the edge
of the dish and the tips toward the center.
OOKINGINSTRUCTIONS
C
20
• When cooking cut vegetables, always cover the
dish with a lid or vented microwavable plastic
wrap.
• Whole, unpeeled vegetables such as potatoes,
squash, eggplant, etc., should have their skin
pricked in several spots before cooking to prevent
them from bursting.
• For more even cooking, stir or rearrange whole
vegetables halfway through the cooking time.
• Generally, the denser the food, the longer the
standing time. (Standing time refers to the time
necessary for dense, large foods and vegetables
to finish cooking after they come out of the oven.)
A baked potato can stand on the counter for five
minutes before cooking is completed, while a dish
of peas can be served immediately.
Page 21

C
OOKING
I
NSTRUCTIONS
SENSOR COOKING GUIDE
• Follow the instructions below when sensor cooking different types of food.
Food
Popcorn
Diet cook
Potatoes
Fresh Vegetables
Frozen Dinner
Amount
1 package
(3.0oz. to
3.5 oz.)
7 to 18 oz.
1 to 6 EA.
1 to 4 cups
7 to 18 oz.
Procedure
Use one microwave-only bag of popcorn. Pop only one bag at a time.
Use caution when removing and opening hot bag from oven.
When popping 1.5 or 1.75 oz. snack-size popcorn bags, use “Less” key
for best results. Let oven cool for at least 5 minutes before using again.
Remove package from outer wrapping and follow package
instructions for covering and standing.
Let oven cool for at least 5 minutes before using again.
Prick each potato several times with fork. Place on turntable
in spoke-like fashion. Let stand 3 -5 min.
Let oven cool for at least 5 minutes before using again.
Arrange fresh vegetables in microwave-safe ceramic, glass or
plastic dish and combine with 2 Tbs. water.
For even cooking, stir or turn vegetables according to
instructions. Let vegetables stand 3 minutes before serving.
Let oven cool for at least 5 minutes before using again.
Remove packing from outer wrapping and follow box
instructions for covering and standing.
Let oven cool for at least 5 minutes before using again.
OOKINGINSTRUCTIONS
C
Page 22

C
OOKING
I
NSTRUCTIONS
Food
Frozen Breakfast
Baby Food
Fish
Amount
2 to 8 oz.
2.5 to 6 oz.
0.5 to 1.5 lbs.
Follow box instructions for covering and standing. Use this pad
for frozen sandwich, breakfast entree, pancakes, waffles. etc.
Let oven cool for at least 5 minutes before using again.
Remove lid from baby food and heat(heating time is very short).
Check temperature and stir well before serving.
The More/Less key cannot be used with the baby food key.
Arrange fish in dish with thickest portions to the outside.
Overlap thin areas in center of dish. Turn thin ends under.
Cover with vented plastic wrap.
Let oven cool for at least 5 minutes before using again.
Procedure
SENSOR REHEAT GUIDE
• Follow the instructions below when sensor reheating different types of food.
Plate of food
1 serving
(1 plate)
Use only pre-cooked, refrigerated foods.
Cover plate with vented plastic wrap or wax paper.
If food is not as hot as you prefer after heating with SENSOR
REHEAT, continue heating using time and power.
.
Contents
- 3 ~ 4 oz. meat, poultry or fish(up to 6 oz.with bone)
- 1/2 cup starch (potatoes, pasta, rice, etc.)
- 1/2 cup vegetables (about 3 ~ 4 oz.)
Casseroles
Soups/Sauces
1 to 4 servings
Use only refrigerated foods. Cover plate with lid or vented
plastic wrap. If food is not as hot as you prefer after heating
with SENSOR REHEAT, continue heating using time and power.
Stir foods once before serving.
Page 23

C
OOKING
I
NSTRUCTIONS
Sensor Recipes
French Onion Soup (4 servings)
3 tablespoons butter or margarine
3 cups ( about 3 medium ) sliced onions
3 cups beef broth
1 cup water
1 teaspoon Worcestershire sauce
Salt, pepper, croutons, grated parmesan
cheese to taste
2 tablespoons brandy (optional)
1 Combine butter and onions in 3-quart casse-
role.
Cover with lid. Microwave at HIGH (10) for 8 to
9 minutes or use Sensor Fresh Vegetable.
2 Stir in broth, water, Worcestershire sauce, salt
and pepper ; cover.
Microwave at HIGH (10) for 5 minutes, and at
MEDIUM (5) for 5 minutes or use Sensor
Reheat. Stir in brandy.
Let stand, covered, for 5 minutes before serving.
Serve with croutons and cheese.
Peas With Lettuce (4 servings)
2 cups fresh shelled green peas
1/3 cup thinly sliced celery
2 tablespoons water
3 cups shredded head lettuce
1 tablespoon butter or magarine
1 tablespoon all-purpose flour
1/2 teaspoon sugar
1/4 teaspoon salt
1/4 cup whipping cream
Dash pepper to taste
1 In 1 1/ 2-quart casserole combine peas, cel-
ery and water ; cover.
Microwave at HIGH (10) for 5 to 7 1/2 minutes or use Sensor Fresh Vegetable. Stir in
lettuce ; re-cover.
2 In small dish combine butter, flour, sugar, salt
and pepper.
Blend in cream. Microwave at HIGH (10) for
1 to 2 minutes or use Sensor Reheat. Stir
until smooth.
3 Drain vegetables. Add sauce to vegetables ;
toss to coat.
Snap Crackle Popcorn Balls
(10 to 15 balls)
30 square caramel candies
1 1/ 2 tablespoons water
1 teaspoon butter or magarine
1 pkg.( 3.5 oz.) microwave popcorn
1 Combine caramel, water and butter in 4 cup
glass bowl.
Microwave at HIGH (10) for 2 to 3 minutes until
melted.
Stir until smooth. Set aside.
2 Place popcorn on turntable. Microwave at
HIGH (10) for 2 to 3 minutes or use Sensor
Popcorn.
3 Place popcorn in bowl. Pour caramel mixture
over popcorn ; toss until completely coated
and cool enough to handle.
Using buttered hands, form into 3-inch balls.
4 Cool on waxed paper. Serve immediately.
Stuffed Potatoes (4 servings)
4 medium potatoes, scrubbed
1/2 cup dairy sour cream
1/3 cup milk
2 tablespoons grated parmesan cheese
1 teaspoon chopped chives or parsley flakes
Salt, pepper, paprika to taste
1 Prick potatoes twice with a fork. Arrange
potatoes at least 1 inch apart on paper towel
placed on turntable. Microwave at HIGH (10)
for 10 to 12 minutes or use Sensor Potato.
Let stand 5 minutes.
2 Slice top from each potato ; scoop out cen-
ter. Mash with sour cream, milk, cheese,
chives, salt and pepper. Spoon into shells.
3 Sprinkle with paprika. Place on plate or on
paper towel in oven. Microwave at HIGH (10)
for 2 to 4 minutes or use Sensor Reheat.
OOKINGINSTRUCTIONS
C
Page 24

C
OOKING
I
NSTRUCTIONS
Vegetable Medley
(4 to 6 servings)
1 1/2 cups broccoli flowerets, 3/4 to 1 inch in
diameter
1 1/2 cups cauliflower flowerets, 3/4 to 1
inch in diameter
1 medium yellow squash, cut into 1/4 inch
diagonal slices
1 medium zucchini, cut into 1/4 inch diagonal
slices
1 medium carrot, cut into 1/8 inch diagonal
slices
1/2 small red pepper, slivered
6-7 pitted ripe olives, sliced
2-3 tablespoons butter or margarine
1/2 teaspoon dried oregano
1 teaspoon fresh lemon juice
parmesan cheese, optional to taste
1 Arrange broccoli and cauliflower alternately
around the edge of a 10 to 12 inch glass dish
with rim. Alternately place yellow squash
and zucchini in circle inside broccoli and
cauliflower, place carrots slices in center
and arrange red pepper slivers over top.
Sprinkle with 2 tablespoons water. Cover
with vented microwave plastic wrap.
2 Microwave at HIGH (10) for 7 to 9 minutes or
use Sensor Fresh Vegetable. Remove wrap
immediately, scatter olive slices attractively
over all.
3 Place butter or magarine in 1 cup glass mea-
sure and Microwave at HIGH (10) for 30 seconds to 1 minute to melt. Add oregano and
lemon juice. Pour over vegetables. Sprinkle
with parmesan cheese and serve.
Franks And Beans Casserole
(4 to 6 servings)
1/2 cup chopped onions
2 tablespoons butter or margarine
1 pkg.(12 - 16 oz.) frankfurters, cut in quar-
ters
1 can (16 oz) baked beans
1 can (15 - 16 oz.) cannellini (white kidney)
beans,drained
1 can (15 - 16 oz.) red kidney beans,drained
1/3 cup brown sugar
1/4 cup catsup
1 teaspoon yellow mustard
Salt, pepper and garlic power to taste
1 Combine onions and butter in 3-quart casse-
role.
Microwave at HIGH(10) for 1 to 2 minutes or
until onions are soft.
2 Stir in all remaining ingredients, pushing
frankfurters to the bottom of dish so they are
covered with the beans.
3 Cover and microwave at HIGH (10) for 11 to
13 minutes or use Sensor Reheat. Stir until
smooth.
Page 25

A
PPENDIX
Troubleshooting Guide
Before you call a repair person for your oven,
check this list of possible problems and solutions.
Neither the oven’s display nor the oven operate.
• Properly insert the plug into a grounded outlet.
• If the outlet is controlled by a wall switch, make
sure the wall switch is turned on.
• Remove the plug from the outlet, wait ten seconds, then plug it in again.
• Reset the circuit breaker or replace any blown
fuse.
• Plug another appliance into the outlet; if the
other appliance doesn’t work, have a qualified
electrician repair the outlet.
• Plug the oven into a different outlet.
The oven’s display works, but the power won’t
come on.
• Make sure the door is closed securely.
• Check to see if packing material or other material is stuck to the door seal.
• Check for door damage.
• Press Cancel twice and re-enter all cooking
instructions.
The power goes off before the set time has
elapsed.
• If there has not been a power outage, remove
the plug from the outlet, wait ten seconds, then
plug it in again. If there was a power outage, the
time indicator will display “SAMSUNG SO SIMPLE” Reset the clock and any cooking instructions.
• Reset the circuit breaker or replace any blown
fuse.
The food is cooking too slowly.
• Make sure the oven is on its own 20 amp circuit
line. Operating another appliance on the same
circuit can cause a voltage drop. If necessary,
move the oven to its own circuit.
You see sparks or arcing.
• Remove any metallic utensils, cookware, or
metal ties. If using foil, use only narrow strips
and allow at least one inch between the foil and
interior oven walls.
The turntable makes noises or sticks.
• Clean the turntable, roller ring and oven floor.
• Make sure the turntable and roller ring are positioned correctly.
Using your microwave causes TV or radio
interference.
• This is similar to the interference caused by
other small appliances, such as hair dryers.
Move your microwave further away from other
appliances, like your TV or radio.
Care and Cleaning
Follow these instructions to clean and care for
your oven.
• Keep the inside of the oven clean. Food particles and spilled liquids can stick to the oven
walls, causing the oven to work less efficiently.
• Wipe up spills immediately. Use a damp cloth
and mild soap. Do not use harsh detergents or
abrasives.
• To help loosen baked on food particles or liquids, heat two cups of water (add the juice of
one lemon if you desire to keep the oven fresh)
in a four-cup measuring glass at High power for
five minutes or until boiling. Let stand in the
oven for one or two minutes.
• Remove the glass tray from the oven when
cleaning the oven or tray. To prevent the tray
from breaking, handle it carefully and do not put
it in water immediately after cooking. Wash the
tray carefully in warm sudsy water or in the dishwasher.
• Clean the outside surface of the oven with soap
and a damp cloth. Dry with a soft cloth. To prevent damage to the operating parts of the oven,
don’t let water seep into the openings.
• Wash the door window with very mild soap and
water. Be sure to use a soft cloth to avoid
scratching.
• If steam accumulates inside or outside the oven
door, wipe with a soft cloth. Steam can accumulate when operating the oven in high humidity
and in no way indicates microwave leakage.
• Never operate the oven without food in it; this
can damage the magnetron tube or glass tray.
You may wish to leave a cup of water in the
oven when it is not in use to prevent damage if
the oven is accidentally turned on.
If you have a problem you cannot solve,
please call our service line:
1-800-SAMSUNG
PPENDIX
A
25
Page 26

A
PPENDIX
SAMSUNG MICROWAVE OVEN
LIMITED WARRANTY TO ORIGINAL PURCHASER
This SAMSUNG brand product, as supplied and distributed by SAMSUNG ELECTRONICS AMERICA, INC. (SAMSUNG)
and delivered new, in the original carton to the original consumer purchaser, is warranted by SAMSUNG against manufacturing defects in materials and workmanship for a limited warranty period of:
One (1) Year Parts and Labor, Eight (8) Years Parts Warranty for Magnetron
This limited warranty begins on the original date of purchase, and is valid only on products purchased and used in the
United States. To receive warranty service, the purchaser must contact SAMSUNG for problem determination and service procedures. Warranty service can only be performed by a SAMSUNG authorized service center. The original
dated bill of sale must be presented upon request as proof of purchase to SAMSUNG or SAMSUNG’s authorized service center. Transportation of the product to and from the service center is the responsibility of the purchaser.
SAMSUNG will repair or replace this product, at our option and at no charge as stipulated herein, with new or reconditioned parts or products if found to be defective during the limited warranty period specified above. All replaced parts
and products become the property of SAMSUNG and must be returned to SAMSUNG. Replacement parts and products assume the remaining original warranty, or ninety (90) days, whichever is longer
This limited warranty covers manufacturing defects in materials and workmanship encountered in normal, noncommercial use of this product and shall not apply to the following, including, but not limited to: damage which occurs in
shipment; delivery and installation; applications and uses for which this product was not intended; altered product or
serial numbers; cosmetic damage or exterior finish; accidents, abuse, neglect, fire, water, lightning or other acts of
nature; use of products, equipment, systems, utilities, services, parts, supplies, accessories, applications, installations,
repairs, external wiring or connectors not supplied or authorized by SAMSUNG which damage this product or result in
service problems; incorrect electrical line voltage, fluctuations and surges; customer adjustments and failure to follow
operating instructions, cleaning, maintenance and environmental instructions that are covered and prescribed in the
instruction book; product removal and reinstallation; problems caused by pest infestations, and overheating or overcooking by user; glass tray or turntable; reduced magnetron power output related to normal aging. SAMSUNG does not
warrant uninterrupted or error-free operation of the product.
THERE ARE NO EXPRESS WARRANTIES OTHER THAN THOSE LISTED AND DESCRIBED ABOVE, AND NO WARRANTIES WHETHER EXPRESS OR IMPLIED, INCLUDING, BUT NOT LIMITED TO, ANY IMPLIED WARRANTIES OF MERCHANTABILITY OR FITNESS FOR A PARTICULAR PURPOSE, SHALL APPLY AFTER THE EXPRESS WARRANTY PERIODS
STATED ABOVE, AND NO OTHER EXPRESS WARRANTY OR GUARANTY GIVEN BY ANY PERSON, FIRM OR CORPORATION WITH RESPECT TO THIS PRODUCT SHALL BE BINDING ON SAMSUNG. SAMSUNG SHALL NOT BE LIABLE FOR
LOSS OF REVENUE OR PROFITS, FAILURE TO REALIZE SAVINGS OR OTHER BENEFITS, OR ANY OTHER SPECIAL, INCIDENTAL OR CONSEQUENTIAL DAMAGES CAUSED BY THE USE, MISUSE OR INABILITY TO USE THIS PRODUCT,
REGARDLESS OF THE LEGAL THEORY ON WHICH THE CLAIM IS BASED, AND EVEN IF SAMSUNG HAS BEEN ADVISED
OF THE POSSIBILITY OF SUCH DAMAGES. NOR SHALL RECOVERY OF ANY KIND AGAINST SAMSUNG BE GREATER IN
AMOUNT THAN THE PURCHASE PRICE OF THE PRODUCT SOLD BY SAMSUNG AND CAUSING THE ALLEGED DAMAGE. WITHOUT LIMITING THE FOREGOING, PURCHASER ASSUMES ALL RISK AND LIABILITY FOR LOSS, DAMAGE OR
INJURY TO PURCHASER AND PURCHASER’S PROPERTY AND TO OTHERS AND THEIR PROPERTY ARISING OUT OF
THE USE, MISUSE OR INABILITY TO USE THIS PRODUCT SOLD BY SAMSUNG NOT CAUSED DIRECTLY BY THE NEGLIGENCE OF SAMSUNG. THIS LIMITED WARRANTY SHALL NOT EXTEND TO ANYONE OTHER THAN THE ORIGINAL
PURCHASER OF THIS PRODUCT, IS NONTRANSFERABLE AND STATES YOUR EXCLUSIVE REMEDY.
Some states do not allow limitations on how long an implied warranty lasts, or the exclusion or limitation of incidental
or consequential damages, so the above limitations or exclusions may not apply to you. This warranty gives you specific legal rights, and you may also have other rights which vary from state to state.
To obtain warranty service, please contact: SAMSUNG ELECTRONICS AMERICA, INC. - WWW.SAMSUNGUSA.COM
SAMSUNG CUSTOMER SERVICE
1 SAMSUNG PLACE, LEDGEWOOD, NJ 07852
Tel: 973-691-6200, Fax: 973-691-6201
1-800-SAMSUNG (1-800-726-7864)
WWW.SAMSUNGSUPPORT.COM
071100
PPENDIX
A
26
Page 27

A
PPENDIX
Specifications
Model Number
Oven Cavity
Controls
Timer
Power Source
Power Output
Outside Dimensions
Oven Cavity Dimensions
Net/Gross Weight
MS5796S / MS5796W / MS5797G MS7796W / MS7797G
1.0 cu.ft 1.3 cu.ft
10 power levels, including defrost 10 power levels, including defrost
99 minutes, 99 seconds 99 minutes, 99 seconds
120 VAC, 60 Hz 120 VAC, 60 Hz
1100 Watts 1100 Watts
20
11/32
7/32
13
”(W) X 11
11/16
3/32
”(W) X 9
”(H) X 13
35.3/38.6 lbs 38.6/43 lbs
”(H) X 14
23/32
29/32
”(D) 21
”(D) 14
7/8
”(W) X 12
3/4
”(W) X 9
5/16
17/32
”(H) X 16
”(H) X 15
21/32
7/16
”(D)
”(D)
PPENDIX
A
27
Page 28

G
UÍA DECONSULTARÁPIDA EN
Usando el Botón PAUSE/CANCEL
• Para pausar mientras está cocinando, oprima una vez al botón PAUSE/CANCEL.
• Para detener el horno y borrar las instrucciones para cocinar, oprima dos veces al
botón PAUSE/CANCEL.
• Para corregir un error de programación,
oprima una vez al botón PAUSE/CANCEL y
vuelva a programr las instrucciones.
• Para cancelar un ajuste del cronómetro,
oprima una vez al botón PAUSE/CANCEL.
Encendiendo el Horno y Seleccionando el
Idioma del desPliegue
• Enchufe el horno de microondas y oprima
el botón START repetidamente hasta que
vea el idioma y sistema de medida que
desea utilizar.
Poniendo el Reloj
• Oprima una vez al botón CLOCK.
• Utilice los botones numéricos 0–9 para
seleccionar la hora correcta.
• Oprima una vez más al botón CLOCK para
fijar la hora.
Ajustando el Tiempo de Concinar y Niveles
de Potencia – Cocinando en Etapas Múltiples
• Utilice los botones numéricos 0–9 para
ajustar el tiempo de cocinar.
• Oprima el botón POWERLEVEL, y los
botones numéricos 0–9 para seleccionar la
potencia de cocinar (si es diferente a 0).
• Utilice los botones numéricos 0–9 para
ajustar el segundo tiempo de cocinar.
• Oprima el botón POWER LEVEL, y los
botones numéricos 0–9 para seleccionar la
potencia de cocinar (si es diferente a 0).
• Utilice los botones numéricos 0–9 para
ajustar el tercer tiempo de cocinar.
• Oprima el botón POWERLEVEL, y los
botones numéricos 0–9 para seleccionar la
potencia de cocinar (si es diferente a 0).
• Oprima el botón START para comenzar a
cocinar.
Ajustando el Tiempo de Concinar y Niveles
de Potencia – Cocinando en una Etapa
• Utilice los botones numéricos 0–9 para
ajustar el tiempo de cocinar.
• Oprima el botón POWER LEVEL, y los
botones numéricos 0–9 para seleccionar la
potencia de cocinar (si es diferente a 0).
• Oprima el botón START para comenzar a
cocinar.
UÍA DECONSULTARÁPIDA ENESPAÑOL
G
28
Page 29

G
UÍA DECONSULTARÁPIDA EN
Descongelado Automático
• Oprima repetidamente al botón AUTO
DEFROST para ajustar el peso correcto de
la comida que va descongelar.
Recalentamiento Sensor
• Oprima repetidamente al botón SENSOR
REHEAT para seleccionar el tipo de comida.
• Utilice los botones numéricos 0-9 para programar las porciones (si son más de una
porción).
• Oprima el botón START para comenzar a
cocinar.
Cocinando Con un Bóton
• Oprima el botón ONEMINUTE una vez para
cada minuto que desea cocinar.
Usando el Teclado de Cocina Sensor cook
• Selecione el botón “Sensor-cook” (POPCORN, FROZEN DINNER, etc.) apropiado
para el tipo de comida que desea cocinar,
oprima este botón repetidamente para programar el tamaño de la porción.
Ajustando el Tiempo de Cocinado
• Si desea ajustar el tiempo de cocinado
mientras el horno está en operación, oprima el botón MORE/LESS repetidamente
hasta llegar al tiempo deseado.
Usando el Cronómetro
• Oprima los botones numéricos 0–9 para
ajustar el tiempo, luego oprima el botón
KITCHEN TIMER.
Utilizando el Seguro Para Evitar que Niños
Utilicen el Horno
• Oprima los botones 0, 2 y START. Repita
para pagar el seguro.
UÍA DECONSULTARÁPIDA ENESPAÑOL
G
29
Page 30

SAMSUNG ELECTRONICS
NORTH AMERICAN LIMITED WARRANT Y ADDENDUM
Subject to the requirements, conditions, exclusions and limitations of
the Original Limited Warranty supplied with Samsung Electronics
(SAMSUNG) products, and the requirements, conditions, exclusions
and limitations contained herein, SAMSUNG will additionally provide
Warranty Repair Service in the United States on SAMSUNG
products purchased in Canada, and in Canada on SAMSUNG
products purchased in the United States, for the warranty period originally specified, and to the Original Purchaser only.
The above described warranty repairs must be performed by a
SAMSUNG Authorized Service Center. Along with this Statement,
the Original Limited Warranty Statement and a dated Bill of Sale as
Proof of Purchase must be presented to the Service Center.
Transportation to and from the Service Center is the responsibility of
the purchaser.
Conditions covered are limited only to manufacturing defects in
material or workmanship, and only those encountered in normal use
of the product.
Excluded, but not limited to, are any original specified provisions for,
in-home or on-site services, minimum or maximum repair times,
exchanges or replacements, accessories, options, upgrades, or
consumables.
For the location of a SAMSUNG Authorized Service Center in the
United States and Canada, please contact SAMSUNG at:
1-800-SAMSUNG (1-80 0-726-7864)
Or on-line at:
WWW.SAMSUNGUSA.COM andWWW.SAMSUNGCANADA.COM
071100
Page 31

Q
UICK
R
EFERENCE
Feature
Set Clock
One Stage Cooking
One Minute+ Cooking
Sensor Cook Buttons
Auto Defrost
Sensor Reheat
Operation
1. Press CLOCK.
2. Use number buttons to enter time.
3. Press CLOCK again.
1. Use number buttons to set cooking time.
2. Set power level or leave at high.
3. Press START.
1. Press the ONE MINUTE + button once for each minute of cooking.
2. The time will display and the oven will start.
1. Press button that corresponds to the food you are cooking
(for example, POPCORN).
2. The display will show the food you have chosen and the
oven will start automatically.
1. Press AUTO DEFROST.
2. Enter weight of food by pressing AUTO DEFROST button
repeatedly or using the number buttons.
3. When prompted by oven display, open oven door and turn
food over. Press START to resume defrosting cycle.
1. Press SENSOR REHEAT.
2. The display will show “REHEAT” and the oven will start
automatically.
Set Cooking Time and
Power Levels
1. Use number buttons to set cooking time.
2. To set power level at other than HIGH, press POWER LEVEL and
use the number buttons to enter the power level.
(Example : number 5 is 50% power.)
3. Press START to begin cooking.
ELECTRONICS
SAMSUNG ELECTRONICS AMERICA, INC.
H
EADQUARTERS
105 CHALLENGER ROAD
RIDGEFIELD PARK, NEW JERSEY 07660-0511
April. 2000
Printed in Korea
Page 32

Four à
micro-ondes
Guide de l’utilisateur
MS5796W / MS7796W
MS5797G / MS7797G
MS5796S / MS7796S
Page 33

S
ÉCURITÉ
PRÉCAUTIONS À
PRENDRE POUR
EVITER UNE EXPOSITION EXCESSIVE
AUX MICRO-ONDES:
(a)N’essayez pas de faire fonctionner le
four lorsque la porte est ouverte, car
cela peut entraîner une exposition
dangereuse aux micro-ondes. Il est
important de ne pas dérégler ou
d’abîmer les dispositifs de verrouillage
de sécurité.
(b) Ne placez pas d’objets entre la surface
avant du four et la porte et ne laissez
pas la saleté ou les résidus de produits
de nettoyage s’accumuler sur les
surfaces de fermeture hermétique.
(c) Ne faites pas fonctionner le four s’il est
endommagé jusqu’à ce qu’il soit réparé
par une personne qualifiée qui a été
formée par le fabricant. Il est aussi très
important que la porte du four se ferme
correctement et qu’il n’y ait pas de
dommages :
(1) à la porte (déformée)
(2) aux charnières et verrous (brisés ou
desserrés)
(3) aux joints de porte et aux surfaces
de fermeture hermétique.
(d) Le four ne doit étre réglé ou réparé que
par un réparateur qualifié.
AVERTISSEMENT
Respectez toujours les consignes de
sécurité lors de l’utilisation de votre
four à micro-ondes. N’essayez jamais
de réparer le four à micro-ondes vous
même car il existe des tensions dangereuses à l’intérieur du four. Si le four
à micro-ondes a besoin d’être réparé,
appelez au 1-800-SAMSUNG pour
obtenir le nom du centre de service
agréé le plus près de chez vous.
CONSIGNES DE
SÉCURITÉ IMPORTANTES
Pour l’utilisation de tout appareil
électrique, vous devez prendre certaines
précautions dont les suivantes :
VERTISSEMENT
A
MISE EN GARDE : Pour réduire le
risque de brûlures, de choc électrique,
d’incendie, de blessures ou d’exposition excessive aux micro-ondes :
• Veuillez lire toutes les instructions avant
d’utiliser l’appareil.
• Veuillez lire et respecter les “PRÉCAUTIONS À
PRENDRE POUR ÉVITER UNE EXPOSITION
EXCESSIVE AUX MICRO-ONDES” à l’intérieur de
la page de couverture de ce manuel.
• Cet appareil doit être mis à la terre. Vous ne
devez le raccorder qu’à une prise bien mise à
la terre. Consultez “DIRECTIVES DE MISE À LA
TERRE” à la page 4.
• Installez cet appareil conformément aux
instructions d’installation fournies.
• Des produits tels que les oeufs entiers et les
contenants scellés peuvent exploser s’ils
sont chauffés dans le four.
Conservez ces directives
S
ÉCURITÉ
2
Page 34

S
ÉCURITÉ
CONSIGNES DE SÉCURITÉ
IMPORTANTES, suite
• N’utilisez cet appareil que pour l’usage
auquel il a été conçu, tel que décrit dans ce
manuel. N’utilisez pas de produits ou vapeurs corrosives dans cet appareil. Ce type de four est spé-
cialement conçu pour chauffer, cuire ou sécher
les aliments. Il n’est pas conçu pour un usage
industriel ou en laboratoire.
• Comme avec tout appareil électrique, il est
important de surveiller de très près lorsque
des enfants utilisent cet appareil.
• N’utilisez pas cet appareil si le cordon ou la
fiche est endommagé(e), s’il ne fonctionne
pas convenablement, s’il a été endommagé ou s’il
est tombé.
• Cet appareil ne doit être réparé que par du
personnel qualifié. Communiquez avec le
Centre de service agréé le plus près de chez
vous pour une inspection, une réparation ou un
réglage.
• Ne pas couvrir ou obstruer les ouvertures de
l’appareil.
• Ne placez pas cet appareil à l’extérieur.
N’utilisez pas l’appareil près de l’eau - par
exemple, près d’un évier, dans un sous-sol
humide, près d’une piscine, etc.
• Gardez l’intérieur du four propre. Les particules
des aliments ou les huiles éclaboussées sur les
surfaces intérieures du four peuvent endommager
le fini et réduire l’efficacité du four.
• N’immergez pas le cordon ou la fiche dans l’eau.
• Gardez le cordon éloigné de toute surface
chaude.
• Ne laissez pas le cordon pendre à partir du
bord d’une table ou d’un comptoir.
• Lorsque vous nettoyez les surfaces de la porte et
du four, n’utilisez que de savons ou de détergents
doux, non abrasifs, à l’aide d’une éponge ou d’un
linge doux.
• Pour réduire le risque d’incendie dans la cavité
du four :
a. Ne cuisez pas trop les aliments. Surveillez l’ap-
pareil si vous avez placé du papier, du plastique
ou d’autres matériaux combustibles à l’intérieur
du four pour faciliter la cuisson.
b. Enlevez les attaches à torsion métalliques des
sacs en plastique avant de les placer dans le
four.
c. Si les matériaux à l’intérieur du four prennent
feu, gardez la porte du four fermée, arrêtez le
four et débranchez le cordon d’alimentation ou
coupez le courant du panneau de fusibles ou
du disjoncteur.
d. N’utilisez pas la cavité aux fins d’entreposage.
Ne laissez pas de produits en papier, d’usten-
siles de cuisson ou de nourriture dans le four
lorsque vous ne l’utilisez pas.
• N’essayez pas de préchauffer le four ou de le
faire fonctionner lorsqu’il est vide.
• Ne cuisez pas sans le plateau en verre bien
installé sur le sol sinon les aliments ne cuiront pas
bien.
• Ne décongelez pas les breuvages congelés
dans des bouteilles à goulot étroit, les
contenants risquent de briser.
• Les assiettes et les contenants peuvent devenir
très chauds. Manipulez avec soin.
• Enlevez les couvercles avec soin en dirigeant la
vapeur loin des mains et du visage.
•Évitez de chauffer la nourriture pour bébés dans
des pots en verre, même sans leurs couvercles,
tout particulièrement les mélanges de viande et
d’oeufs. Après avoir réchauffé la nourriture pour
bébés dans une assiette ou un bol pour four à
micro-ondes, mélangez bien les aliments et
vérifiez la température en goûtant avant de servir
au bébé.
• On vous a fourni un cordon d’alimentation court
pour réduire les risques que pourrait représenter
un cordon plus long sur lequel on pourrait
trébucher ou qui risquerait de s’emmêler. Des
cordons plus longs ou des rallonges peuvent être
utilisés si l’on exerce certaines précautions.
• Ne mettez pas en marche aucun autre appareil de
cuisson au-dessous du four
• Ne montez pas le four au-dessous ou près d’un
appareil de cuisson.
• Ne montez pas le four au-dessous d’un évier.
• N’entreposez pas d’articles sur le four pendant
son fonctionnement.
Conservez ces directives
S
ÉCURITÉ
3
Page 35

S
ÉCURITÉ
DIRECTIVES DE MISE
À LA TERRE
Cet appareil doit être mis à la terre. Dans le cas où
un court-circuit se produirait, la mise à la terre
réduit le risque de choc électrique grâce à un fil
d’échappement pour le courant électrique. Cet
appareil est équipé d’un cordon qui comporte un fil
de mise à la terre avec une fiche de mise à la terre.
Cette fiche doit être branchée sur une prise qui a
été bien installée et mise à la terre.
AVERTISSEMENT:
L’utilisation incorrecte de la fiche de mise à la
terre peut entraîner un risque de choc
électrique. Consultez un électricien ou un
réparateur qualifié si vous ne comprenez pas
bien toutes les instructions de mise à la terre
ou si vous avez des doutes quant à la bonne
mise à la terre de cet appareil.
1. la valeur électrique nominale marquée sur le
cordon ou la rallonge doit être aussi élevée
que celle de l’appareil.
2. la rallonge doit être du type à 3 conducteurs
avec mise à la terre et elle doit être
branchée sur une prise à trois fentes.
3. le cordon plus long doit être disposé de sorte
qu’il ne pend pas du comptoir ou d’une table.
Il pourrait être tiré par un enfant ou on risque
de l’accrocher. Si vous utilisez une rallonge il
se peut que la lumière intérieure dansera et
le bruit du ventilateur variera lorsque le four
est sous tension. En outre, la durée de cuisson peut être plus longue.
AVERTISSEMENT
Vous ne devez en aucun cas couper ou
enlever la troisième fiche (de mise à la terre)
du cordon d’alimentation.
Utilisation d’une rallonge
On vous a fourni un cordon d’alimentation court
pour réduire les risques que pourrait représenter
un cordon plus long sur lequel on pourrait
trébucher ou qui risquerait de s’emmêler. Des cordons plus longs ou des rallonges peuvent être
utilisés si l’on exerce certaines précautions. On
vous a fournì un cordon d’alimentation court pour
réduire les risques que pourrait représenter un
cordon plus long sur lequel on pourrait trébucher
ou qui risquerait de s’emmêler. Des cordons plus
longs ou des rallonges peuvent être utilisés si l’on
exerce certaines précautions. Si vous utilisez un
cordon long ou une rallonge:
Conservez ces directives
S
ÉCURITÉ
4
Page 36

T
ABLE DES MATIÈRES
Votre nouveau four à micro-ondes
Vérification des pièces 6
Installation de votre nouveau four à
micro-ondes 6
Touches du panneau de commande
Fonctionnement 8
Branchement et sélection d’une langue
d’affichage 8
Réglage de l’horloge 8
Utilisation de la touche Pause/Cancel 8
Utilisation du système d’affichage d’aide
Utilisation des touches de cuisson
instantanée avec senseur 9
Utilisation de la touche One Minute+ 10
Utilisation de la touche Gentle Cook 10
Réchauffage avec senseur .10
Décongélation automatique 11
Guide de décongélation 12
Réglage de la durée de cuisson et du
niveau de puissance 13
Cuisson à un stade 13
Cuisson à plusieurs stades 13
Utilisation de la touche More/Less 14
Réglage du niveau sonore 14
Utilisation de la minuterie 15
Activation du verrouillage de sécurité 15
Mode de démonstration 15
6
Directives de cuisson 16
Ustensiles de cuisson 16
Test de résistance aux micro-ondes 16
Techniques de cuisson 17
Conseils généraux et précautions
7
Cuisson automatique avec senseur
Ustensils et couvercles pour la cuisson
avec senseur 18
Conseils importants sur la cuisson avec
senseur 18
Guides de cuisson 19-20
9
Guide de la cuisson instantanée 21-22
Guide du réchauffage avec senseur 22
Recettes 23-24
Annexe 25
Dépannage 25
Entretien et nettoyage 25
Garantie limitée de l’acheteur initial 26
Spécifications 26
Garantie limitée pour l’Amérique du nord
À l’intérieur de la dernière page
Guide à consultation rapide
17
18
Plat verso
T
ABLE DES MATIÈRES
5
Page 37

V
OTRE NOUVEAU FOUR À MICRO-ONDES
Vérification des pièces
Une fois que vous avez déballé votre four, assurez-vous
que vous avez tous les articles montrés ci-dessous. Si
vous constatez qu’il y a une pièce manquante ou
endommagée, contactez votre concessionnaire.
Four à micro-ondes
Plateau en verre
Guide rouleau
Guide de l’utilisateur
Fiche d’inscription
Merci d’avoir choisi un produit
Samsung
Votre nouveau four à micro-ondes fait preuve des
dernières percées technologiques dans le domaine de
la cuisson par micro-ondes. Ce four a été conçu avec
une gamme complète de fonctions faciles à utiliser. Il
répond aux exigences très rigides établies par
Samsung qui sont les plus hautes dans l’industrie.
Nous sommes très fiers de pouvoir vous offrir un produit dont vous profiterez de l’utilisation commode et
fiable pour plusieurs années à venir.
Veuillez inscrire ci-dessous la date d’achat ainsi que le
numéro de modèle qui se trouve sur le panneau de
commande et le numéro de série qui se trouve soit à
l’intérieur ou en arrière. Nous vous conseillons de conserver votre reçu avec ce guide de l’utilisateur au cas
où vous auriez besoin des services de garantie.
Installation de votre four à
micro-ondes
1 Installez le four sur une surface plate et
stable et branchez le cordon à une prise
murale mise à la terre. Une fois branché,
l’afficheur montrera le message:
Il est important de prévoir assez de ventilation pour
le four. Gardez au moins 4 pouces autour du four.
2 Ouvrez la porte du four en appuyant sur
le bouton au-dessous du panneau de
commande.
3 Nettoyez l’intérieur du four à l’aide d’un
linge humecté.
4 Placez le guide rouleau dans le cercle au
centre du four.
5 Montez le plateau sur le guide rouleau en
emboîtant le dispositif à rainure et
languette au centre du plateau dans
celui au centre du sol du four.
Numéro de modèle ______________________
Numéro de série ______________________
Date d’achat ______________________
Concessionnaire ______________________
V
OTRE NOUVEAU FOUR À MICRO-ONDES
6
Page 38

V
OTRE NOUVEAU FOUR À MICRO-ONDES
Touches du panneau de commande
One Minute+ (Une minute +) p. 10
Appuyez sur cette touche pour régler une
durée de cuisson par intervalles d’une minute
au niveau de puissance maximal.
Gentle Cook (Cuisson douce) p. 10
Appuyez sur cette touche pour une cuisson
douce à un niveau de puissance réduit.
Help Screen (Affichage d’aide) p. 9
Appuyez sur cette touche pour afficher des
instructions pour le fonctionnement pas à pas.
Touches de cuisson instantanée p. 9
Touches préprogrammées pour la cuisson
rapide d’aliments populaires.
Sensor reheat (Réchauffage avec senseur)
p. 10
Auto defrost (Décongélation automatique) p. 11
Permet de régler le poids de l’aliment à cuire.
Touches numériques
Permettent de régler une durée de cuisson
ou le nombre de portions.
Sound (Sonnerie) p. 14
More/Less Button (Touche Plus/Moins) p. 14
Permet d’augmenter ou de diminuer la durée
de cuisson.
Kitchen Timer (Minuterie) p. 15
Clock (Horloge) p. 8
Permet de mettre l’horloge à l’heure.
Power Level (Niveau de puissance) p. 13
Permet de choisir un niveau de puissance
outre le niveau de puissance maximal.
Pause/Cancel (Pause/Annulation) p. 8
Appuyez sur cette touche pour arrêter le four
temporairement ou pour corriger une erreur.
Start (Mise en marche)
Appuyez sur cette touche pour mettre le four
en marche.
V
OTRE NOUVEAU FOUR À MICRO-ONDES
7
Page 39

F
ONCTIONNEMENT
Branchement et sélection d’une
langue d’affichage
La première fois que vous branchez le cordon
d’alimentation à la prise murale ou après une
panne de courant, l’afficheur montre le message
“Samsung So Simple”. À ce point, vous pouvez
choisir la langue d’affichage et les unités de
mesure. Vos choix de langue sont: anglais, français
et espagnol. Les deux unités de mesure sont: livres
(lb) et kilogrammes (Kg). Pour faire votre sélection:
1
Appuyez sur la touche Start après avoir
branché le cordon d’alimentation. L’afficheur
montre “English/LBS”. Si l’afficheur
n’affiche pas “Engish/LBS”, débranchez le
cordon et branchez-le de nouveau.
2 Appuyez sur la touche
reprises jusqu’à ce qu’option désirée
apparaisse à l’afficheur:
• ENGLISH/LBS
• ENGLISH/KG
• FRENCH/KG
• SPANISH/LBS ou
• SPANISH/KG
En appuyant sur la touche
vez parcourir les options disponibles dans
l’ordre montré ci-dessus.
Start
à maintes
Start
, vous pou-
Réglage de l’horloge
1 Appuyez sur la touche CLOCK. L’afficheur
montrera:
2 Utilisez les touches numériques pour
définir l’heure actuelle. Il faut appuyer
sur au moins trois touches numériques
pour régler l’horloge. Si l’heure actuelle
est 5h00, alors appuyez sur 5,0,0.
3 Appuyez de nouveau sur la touche Clock.
Les deux points apparaîtront pour indiquer que l’horloge est réglée.
Si une panne de courant survient, il faut régler
l’horloge de nouveau.
Vous pouvez toujours vérifier quelle heure est-il
pendant la cuisson si vous appuyez sur la touche
Clock.
Quand vous avez sélectionné la langue et les unités de
mesure, appuyez sur la touche PAUSE/CANCEL pour quitter ou appuyez sur la touche CLOCK pour régler l’horloge.
F
ONCTIONNEMENT
8
Utilisation de la touche Pause/Cancel
La touche Pause/Cancel vous permet d’annuler les
commandes que vous venez d’exécuter. Cette
touche vous permet aussi d’arrêter la cuisson afin
d’examiner les aliments.
• Pour arrêter la cuisson temporairement,
appuyez une fois sur la touche
Pour redémarrer la cuisson, appuyez sur
• Pour arrêter la cuisson, annuler les commandes
et revenir à l’affichage de l’horloge, appuyez
deux fois sur la touche
• Pour corriger une erreur, appuyez une fois sur la
Pause/Cancel et ensuite exécuter de
touche
nouveau la commande.
Pause/Cancel.
Start.
Pause/Cancel.
Page 40

F
ONCTIONNEMENT
Utilisation du système d’affichage
d’aide
Votre four à micro-ondes vous offre instructions
utiles qui facilitent l’utilisation des fonctions.
1 Lorsque vous avez besoin d’informations
sur une fonction ou des conseils utiles,
appuyez sur la touche Help Screen et
ensuite la touche qui correspond à la
fonction pour laquelle vous souhaitez des
renseignements. Les renseignements
sont disponibles dans quatre langues
(Anglais, Français, Espagnol et
Portuguais). L’indicateur «HELP» s’affiche
à l’afficheur pendant que vous utilisez
cette fonction.
Utilisation des touches de cuisson
avec senseur
En captant la vapeur émise par la nourriture, cette
fonction régle de manière automatique la durée de
cuisson en fonction du type et de la quantité de
nourriture précuite. N'utiliser que de la nourriture
précuite et à la température de réfrigérateur.
1 Appuyez sur la touche de cuisson instan-
tanée qui correspond à l’aliment que
vous souhaitez cuire (par exemple le
maïs à éclater). L’afficheur affiche «maïs
à éclater» et ensuite le four commence à
cuire l’aliment automatiquement.
Portions disponibles pour chaque touche:
MAÏS À ÉCLATER
3,0 oz -3,5 oz
(Si vous désirez l’option
1,750 oz, vous pouvez vous
servir de la touche
MORE/LESS et ensuite
sélectionner l’option moins.)
PETIT DÉJEUNER CONGELÉ
(Sandwich, Waffle, Oeuf)
2 - 8 oz
LÉGUMES FRAIS
1 - 4 tasses
POISSON
0,5-1,5 lbs
Lors de la cuisson du maïs à éclater, attendez au
moins cinq minutes avant de cuire le prochain sac
ce qui per-mettra au plateau en verre de se
refroidir. Lors de la cuisson de pommes de terre,
retournez-les quand l’af-ficheur du four l’indique.
Si vous désirez régler la durée de cuisson, vous
pouvez vous servir de la touche MORE/LESS.
Consultez la page 14 pour des renseignements
supplémentaires. Si vous désirez afficher l’heure
actuelle pendant la cuisson, appuyez sur la touche
CLOCK.
POMME DE TERRE
1,5 oz -3,5 oz
REPAS DIÉTÉTIQUE
(Repas congelé
hypocalorique)
7-18 oz
REPAS CONGELÉ
7-18 oz
ALIMENTS POUR BÉBÉ
2,5-6,0oz
F
ONCTIONNEMENT
9
Page 41

F
ONCTIONNEMENT
Utilisation de la touche One Minute+
Cette touche permet de régler une durée de cuisson par intervalles d’une minute au niveau de puissance maximal.
1 Appuyez sur la touche One Minute+ pour
chaque minute de cuisson désirée. Par
exemple, appuyez deux fois sur cette
touche pour régler une durée de cuisson
de deux minutes. La durée de cuisson
s’affiche à l’afficheur et le four commence la cuisson automatiquement.
Pendant la cuisson, vous pouvez augmenter la
durée de cuisson par étapes d’une minute en
appuyant sur la touche One Minute+.
Utilisation de la touche Gentle Cook
(Cuisson douce)
Utilisez cette touche pour une cuisson plus lente et
douce à une allure réduite.
1 Utilisez les touches numériques pour
régler une durée de cuisson.
Réchauffage avec senseur
Votre nouveau four à micro-ondes rend facile le
réchauffage des restes et des aliments précuits. En
détectant la vapeur dégagée par les aliments, ce
four règle la durée de cuisson selon le type d’aliment précuit et son poids. Tous les aliments
devraient être précuits et à la température du
réfrigérateur.
Pour utiliser la fonction de réchauffage avec
senseur:
1 Appuyez sur la touche SENSOR REHEAT.
L’afficheur montre «Réchauffage» en
ensuite le four se met en marche
automatiquement.
Si vous désirez régler la durée
de cuisson, servez-vous de la
touche MORE/LESS. Consulter
la page 14.
Si vous désirez afficher l’heure
actuelle pendant la cuisson,
appuyez sur la touche CLOCK.
Par exemple, pour régler une durée de
cuisson de dix minutes, appuyez sur la
touche numérique 1,0,0,0.
2 Appuyez sur la touche Gentle Cook. Le
four affiche la durée de cuisson et
ensuite commence la cuisson.
F
ONCTIONNEMENT
10
Page 42

F
ONCTIONNEMENT
Décongélation automatique
Pour la décongélation d’un aliment, spécifiez le
poids et le four règle automatiquement la durée de
décongélation, le niveau de puissance et le temps
de repos.
1 Appuyez sur la touche Auto Defrost.
L’afficheur montre “0,5 lb” (0,2kg si vous
avez sélectionné les unités de mesure
métriques.)
2 Pour spécifier le poids de votre aliment,
appuyez à maintes reprises sur la touche
Auto Defrost. Le poids augmentera par
étapes de 0,5 lb jusqu’à 6 lb. (si vous avez
choisi les unités de mesure métriques, le
four augmente le poids par étapes de 0,2
kg.)
Vous pouvez aussi vous servir des touches numériques pour spécifier le poids de
l’aliment.
Le four détermine la durée de
décongélation et ensuite commence la
décongélation de l’aliment. Deux fois
pendant la décongélation le four émettra
un bip sonore et affichera le message
“Retournez la nourriture”.
3 Appuyez sur la touche Pause/Cancel,
ouvrez la porte et tournez l’aliment
.
4 Appuyez sur la touche Start pour repren-
dre la décongélation.
• Consultez le guide de la décongélation
automatique à la page suivante.
F
ONCTIONNEMENT
11
Page 43

F
ONCTIONNEMENT
Guide de décongélation
Suivez les instructions ci-dessous lors de la décongélation de différents aliments.
Aliment: Boeuf rôti, porc
Quantité: 2,5-6,0 lb
Directives: Commencez la décongélation
avec la partie graisseuse vers
le bas. Après chaque stade,
retournez l’aliment et protégez
les parties chaudes utilisant
des bandes étroites d’aluminium.
Aliment: Biftecks, côtelettes, poisson
Quantité: 0,5-3,0 lb
Directives: Après chaque stade, redisposez
les aliments. S’il y a des parties
chaudes ou décongelées, protégez-les utilisant des bandes
étroites d’aluminium. Enlevez
toute pièce qui est presque
décongelée. Laissez reposer
couvert pendant 5-10 minutes.
Aliment: Boeuf haché
Quanitité: 0,5-3,0 lb
Directives: Après chaque stade, enlevez
toute pièce qui est presque
décongelée. Laissez reposer
couvert avec de l’aluminium
pendant 5 à 10 minutes.
Aliment: Poulet, entier
Quantité: 2,5-6,0 lb
Directives: Retirez les abats avant de con-
geler la volaille. Commencez la
décongélation avec la poitrine
vers le bas. Après le premier
stade, retournez le poulet et protégez toute partie chaude utilisant des bandes étroites d’aluminium. Après le deuxième stade,
protégez de nouveau toute partie
chaude utilisant des ban-des
étroites d’aluminium. Une fois la
décongélation completée, laissez reposer couvert pendant 30 à
60 minutes dans le réfrigérateur.
Aliment: Poulet, pièces
Quantité: 0,5-3,0 lb
Directives: Après chaque stade, rédisposez
ou enlevez toute pièce qui est
presque décongelée. Laissez
reposer pendant 10 à 20 minutes.
Notes
Vérifiez les aliments quand le four vous l’indique.
Après le dernier stade des parties peuvent être toujours congelées; laissez-les reposer. Ne décongelez
pas les pièces jusqu’à ce que toute la glace s’est fondue.
La protection de rôtis et de biftecks empêche les
bords de se cuire avant la décongélation du centre.
Servez-vous de bandes étroites d’aluminium pour
couvrir les bords et les parties plus minces.
12
F
ONCTIONNEMENT
Page 44

F
ONCTIONNEMENT
Réglage de la durée de cuisson et du
niveau de puissance
Votre four à micro-ondes vous permet de régler
jusqu’à trois stades de cuisson différents chacun
avec sa propre durée de cuisson et niveau de puissance. Le niveau de puissance vous permet de
contrôler l’intensité de chauffage en offrant dix
réglages de chaud (1) à maximal (0).
Cuisson à un stade
Pour une simple cuisson à un stade, vous aurez
besoin de régler une durée de cuisson. Le niveau
de puissance maximal est réglé automatiquement.
Si vous désirez régler un niveau de puissance plus
bas, il faut utiliser la touche
Power Level
1 Utilisez les touches numériques pour
régler une durée de cuisson. Vous pouvez spécifier une durée de cuisson d’une
seconde jusqu’à 99 minutes et 99 secondes. Pour régler une durée de cuisson de
plus d’une minute, il faut spécifier les
secondes aussi. Par exemple pour régler
une durée de cuisson de 20 minutes,
appuyez sur 2,0,0,0.
2 Pour spécifier un niveau de puissance
inférieur au niveau maximal, appuyez sur
la touche
vous des touches numériques pour
spécifier un niveau de puissance.
Niveaux de puissance
1=chaud 6=mijotage
2=minimal 7=moyen-fort
3=décongélation 8=réchauffage
4=moyen-faible 9=sauté
5=moyen 0=fort
L’afficheur affiche le message qui vous indique
d’appuyer sur la touche
de cuisson suivant.
Power Level et ensuite servez-
Start ou de régler le stade
Réglage de la durée de cuisson, suite
Quelques aliments doivent être cuits à différentes
températures. Pour réaliser ceci, votre four à
micro-ondes vous permet de régler plusieurs
stades de cuisson.
Cuisson à plusieurs stades
1 Suivez les étapes 1 et 2 dans la section
“Cuisson à un stade” à la page
précédente. L’afficheur indique d’appuyer
sur la touche Start ou d’entrer la durée
de cuisson du stade suivant.
Lors de la programmation de plus d’un stade, il
faut appuyer sur la touche Power Level avant de
spécifier la durée de cuisson du deuxième stade.
Pour régler un niveau de puissance maximal pour
un stade de cuisson, appuyez deux fois sur la
touche Power Level.
2 Servez-vous des touches numériques
pour régler la durée de cuisson du
deuxième stade.
3 Appuyez sur la touche Power Level et
ensuite sur les touches numériques pour
régler le niveau de puissance du
deuxième stade. L’afficheur affiche le
niveau de puissance choisi et ensuite
affiche “Appuyez sur Start ou entrez la
durée de cuisson du stade suivant.”
3
Appuyez sur la touche Start pour commencer la cuisson. Si vous désirez changer le niveau de puissance, appuyez sur la
touche Pause/Cancel avant d’appuyer sur
la touche Start et ensuite programmer de
nouveau toutes les instructions.
4 Appuyez sur la touche Start pour com-
mencer la cuisson ou répétez l’étape 2 et
3 pour régler une durée de cuisson pour
un troisième stade. Une fois que vous
avez terminé, appuyez sur la touche
Start.
F
ONCTIONNEMENT
13
Page 45

F
ONCTIONNEMENT
Utilisation de la touche More/Less
La touche More/Less vous permet de modifier la
durée de cuisson que vous avez déjà programmée.
Cette touche fonctionne uniquement avec les
touches de cuisson instantanée et la touche de
réchauffage automatique. Utilisez la touche
More/Less uniquement pendant la cuisson ou le
réchauffage.
La touche
jointement avec la touche de cuisson instantanée
Baby Food.
More/Less ne peut pas être utilisée con-
1 Pour augmenter la durée de cuisson ou
de réchauffage, appuyez une fois sur la
touche
More/Less. Le mot “Plus” sera
affiché à l’afficheur.
2 Pour réduire la durée de cuisson ou de
réchauffage, appuyez deux fois sur la
touche
More/Less. Le mot “Moins” sera
affiché à l’afficheur.
Réglage du niveau sonore
Le bouton de réglage du niveau sonore du four à
micro-ondes vous permet de régler le volume de
la sonnerie. La sonnerie est réglée en usine au
niveau plus élevé. Si vous désirez abaisser le volume :
1 Appuyez sur la touche Sound. L’afficheur
montre les options : 0-OFF, 1-Bas, 2Moyen et 3-Élevé.
2 Appuyez sur “0” pour assourdir le vol-
ume, “1” pour un volume bas, “2” pour
un volume moyen et “3” pour un volume
élevé. L’afficheur montre le volume
choisi et ensuite affiche le message
“Appuyez sur le bouton de mise en
marche.”
3 Pour revenir à la durée de cuisson ou de
réchauffage d’origine, appuyez sur la
touche
More/Less jusqu’à ce que le mot
“Normal” s’affiche à l’afficheur.
F
ONCTIONNEMENT
14
3 Appuyez sur Start. L’afficheur affiche de
nouveau l’heure actuelle.
Page 46

F
ONCTIONNEMENT
Utilisation de la minuterie
1 Servez-vous des touches numériques
pour spécifier un temps de fonctionnement.
2 Appuyez sur la touche Kitchen Timer.
3 La minuterie fait le compte à rebours et
ensuite émet un bip sonore lorsque la
période de temps réglée s’est écoulée.
Activation du verrouillage de sécurité
Vous pouvez verrouiller le panneau de commande
du four afin d’empêcher les enfants d’utiliser le
four dans votre absence.
1 Appuyez sur la touche “0”. L’afficheur
montre le message “Pressez 1-Demo, 2Verrou.”
2 Appuyez sur la touche numérique “2”.
Ensuite, l’afficheur vous indique d’appuyer
sur la touche de mise en marche.
Mode de démonstration
Vous pouvez apprendre comment faire fonctionner
votre four à micro-ondes sans qu’il chauffe en utilisant le mode de démonstration.
1 Appuyez sur la touche numérique “0”.
L’afficheur montre le message “Pressez
1-Demo, 2-Verrou”.
2 Appuyez sur la touche numérique “1”.
L’afficheur vous indique d’appuyer sur la
touche de mise en marche.
3 Appuyez sur la touche Start. L’afficheur
affiche le message “Mode de démo.
Activé” et ensuite “Démo.”
Pour désactiver le mode de démonstration, répétez
les étapes 1 à 3.
NOTE : Il est impossible de se servir du Mode de
Démonstration pour la cuisson instantanée. Le
message "E1" apparaîtrait sur l'afficheur.
3 Appuyez sur la touche Start. L’afficheur
affiche le message “Verrouillé” et
ensuite l’heure s’affiche à l’afficheur.
Par la suite, vous ne pouvez pas vous
servir du four à moins que vous le
déverrouilliez. Pour déverrouiller le four,
suivez les étapes 1à 3 ci-dessus.
F
ONCTIONNEMENT
15
Page 47

D
IRECTIVES DE CUISSON
Ustensiles de cuisson
Usage recommandé
• Verre et vitrocéramique
Utilisez pour la cuisson ou le réchauffage.
• Plat brunisseur—Utilisez pour obtenir un
extérieur brunâtre d’aliments tels que les
biftecks, les côtelettes ou les crêpes. Suivez les
directives fournies avec le plat.
• Pellicule plastique— Utilisez pour conserver de
la vapeur. Retournez un coin pour que la vapeur
puisse s’échapper. Éviter que la pellicule touche
les aliments.
• Papier ciré — Utilisez comme couvercle pour
éviter les éclaboussures.
• Papier esuie-tout et serviettes de table —Pour
de la cuisson et le recouvrement à court terme
pour absorber l’humidité et les éclaboussures.
N’utilisez pas de produits de papier recyclé, car
ils contiennent du métal et peuvent causer des
étincelles.
• Assiettes et tasses en papier — Pour la cuisson
à court terme et à basse température. N’utiliser
pas de produits de papier recyclé car ils contiennent du métal et peuvent causer des
étincelles.
• Thermomètres — N’utilisez que ceux qui com-
portent l’étiquette “convient aux micro-ondes”
et suivez toutes les directives. Vérifiez les aliments à plusieurs endroits. Vous pouvez utiliser
des thermomètres traditionnels pour prendre la
température des aliments cuits au four à microondes.
Non recommandé
• Pots en verre et bouteilles — Le verre régulier
est trop mince pour supporter le transfert de la
chaleur des aliments et des boissons et peut
éclater.
•
Sacs en papier — Ils peuvent causer un
incendie sauf pour les sacs de maïs à éclater
conçus pour le four à micro-ondes.
•
Assiettes et tasses en mousse de polystyrène —
Elles peuvent fondre et laisser des résidus malsains dans votre nourriture ou boisson.
•
Contentants en plastique — Des récipients
comme des plats de margarine peuvent fondre
dans le four à micro-ondes.
•
Ustensiles en métal — Ces ustensiles peuvent
endommager votre four à micro-ondes. Retirez
de tels articles avant la cuisson.
Test de résistance aux micro-ondes
Si vous n’êtes pas sûr si un récipient est résistant
aux micro-ondes, effectuez ce test:
1 Remplissez une tasse à mesurer en
verre avec de l’eau froide du robinet.
Placez-la dans le four à côté du récipient
que vous voulez tester.
Usage limité
• Papier d’aluminium —Utilisez des bandes de
papier d’aluminium étroites pour éviter de trop
cuire certaines parties. Trop de papier
d’aluminium peut causer des étincelles, alors
surveillez de près.
• Céramique, porcelaine et pots de grès — Vous
pouvez utiliser ces ustensiles s’ils comportent
l’étiquette “convient aux micro-ondes”. S’ils ne
comportent pas l’étiquette “convient aux microondes “, vous devriez leur faire passer le test de
résistance aux micro-ondes avant de les utiliser.
N’utilisez jamais de vaisselle qui comporte une
bordure métallique.
• Contenants de plastique — N’utilisez que s’il
comporte l’étiquette “convient aux microondes”. Les plastiques peuvent fondre.
• Paille, osier, bois— N’utilisez que pour la cuisson à court terme, car les contenants de ces
types de matériaux peuvent être inflammables.
D
IRECTIVES DE CUISSON
16
2 Appuyez une fois sur la touche ONE
MINUTE+
sance maximale pendant une minute.
L’eau devrait être chaude. Si le récipient est chaud,
c’est qu’il a absorbé l’énergie des micro-ondes et il
ne doit donc pas être utilisé dans le four à microondes.
pour les chauffer à la puis-
Page 48

D
IRECTIVES DE CUISSON
Techniques de cuisson
Mélanger
Mélangez les aliments, tels que les cocottes et les
légumes, pendant la cuisson pour distribuer la
chaleur uniformément et cuire plus rapidement.
Les aliments les plus loin du centre de l’assiette
absorbent plus d’énergie; mélangez donc du bord
de l’assiette vers le centre. Le four se mettra hors
tension quand vous ouvrez la porte pour mélanger
vos aliments.
Disposition
Disposez les aliments de formes irrégulières tels
que les morceaux de poulet ou les côtelettes en
plaçant les parties les plus épaisses et comportant
le plus de viande vers le bord du plateau tournant
là où elles recevront une plus grande quantité
d’énergie des micro-ondes. Pour éviter de trop
cuire certains aliments, placez les parties délicates
vers le centre du plateau tournant.
Protéger
Protégez les aliments avec des bandes de papier
d’aluminium de 3 pouces pour éviter de trop cuire.
Les parties qui peuvent avoir besoin d’être
protégées sont les parties des aliments à cuisson
rapide telles que les extrémités des ailes ou des
cuisses de volaille ou les parties qui attirent le plus
d’énergie comme les coins des plats de cuisson
carrés. N’utilisez que de petites quantités de papier
d’aluminium. Des grandes quantités risquent
d’endommager votre four.
Tourner
Tournez les aliments à la moitié du temps de cuisson pour exposer tous les côtés de façon égale à
l’énergie des micro-ondes. C’est important surtout
pour les aliments de grandes dimensions tels que
les rôtis qui doivent être tournés pour obtenir une
cuisson uniforme.
Temps de repos
Les aliments cuits dans un four à micro-ondes
accumulent de la chaleur interne et continuent à
cuire pendant quelques minutes une fois que le
four est arrêté. Laissez les aliments reposer pour
compléter la cuisson et tout particulièrement les
aliments tels que les rôtis et les légumes entiers.
Les rôtis ont besoin de ce temps de repos pour terminer la cuisson au centre sans trop cuire les parties extérieures. Tous les liquides tels que les
soupes, la nourriture pour bébé, le lait, le chocolat
chaud, etc., doivent être remués pour distribuer la
chaleur. Laissez les liquides reposer un moment
avant de servir afin d’éviter qu’une personne se
brûle. Lorsque vous réchauffez de la nourriture
pour bébé, vérifiez la température avant de servir.
Ajout d’humidité
Les aliments humides cuisent uniformément étant
donné que les molécules d’eau attirent l’énergie
des micro-ondes. Les aliments dont la teneur en
humidité n’est pas uniforme doivent être couverts
ou laissez-les reposer pour que la chaleur se disperse uniformément. Ajoutez une petite quantité
d’eau à la nourriture sèche pour l’aider à cuire.
Conseils généraux et précautions
• La densité des aliments a un effet sur les durées
de cuisson. Les aliments denses, tels que les
pommes de terre, prennent plus de temps à
cuire que les aliments poreux et légers. Les aliments dont la texture est délicate cuisent mieux
à une allure moins élevée pendant quelques
secondes pour éviter qu’ils durcissent.
• Des facteurs tels que l’altitude et le type
d’ustensile de cuisson peuvent avoir un effet sur
les durées de cuisson. Lorsque vous réglez une
durée de cuisson pour une nouvelle recette,
utilisez le temps minimal et vérifiez de temps en
temps si les aliments sont cuits. Cela évite de
trop cuire les aliments.
Les aliments qui ont une peau ou une membrane
•
non poreuse, tels que les pommes, les pommes
de terre, les jaunes d’oeuf ou les chiens-chauds
doivent être percés pour éviter qu’ils n’éclatent
lorsqu’ils sont chauffés en entier.
• Nous ne recommandons pas de cuire avec de
l’huile ou de la graisse dans le four à microondes. La graisse chaude pourrait soudainement déborder et causer de sérieuses brûlures.
• Certains ingrédients cuisent plus vite que
d’autres. Par exemple, la confiture à l’intérieur
d’un beigne peut être plus chaude que la pâte
qui l’entoure. Pour éviter de sérieuses brûlures,
tenez compte de ce conseil toutes les fois que
vous utilisez votre four à micro-ondes Samsung
• Nous ne recommandons pas d’utiliser le four à
micro-ondes pour faire des conserves.
Des bactéries dangereuses peuvent ne pas
être détruites.
• Même si les micro-ondes ne réchauffent pas
l’ustensile de cuisson, la chaleur est souvent
transférée par la nourriture au plat ou au récipient, ce qui peut le rendre très chaud. Utilisez
toujours des gants de protection lorsque vous
retirez des ustensiles de cuisson et demandez à
vos enfants de faire la même chose.
D
IRECTIVES DE CUISSON
.
17
Page 49

D
IRECTIVES DE CUISSON
Cuisson automatique avec senseur
La cuisson automatique avec senseur vous permet
de cuire vos aliments facilement en détecant la
quantité de vapeur dégagée par l’aliment pen- dant
la cuisson de l’aliment.
Lors de la cuisson d’un aliment, des vapeurs
•
différentes seront émises par l’aliment. En
détectant ces vapeurs, le four est capable de
régler une durée de cuisson et un niveau de
puissance appropriés pour la cuisson optimale
de l’aliment.
• Quand vous utilisez un couvercle ou une pellicule de plastique pendant la cuisson avec
senseur, le senseur automatique détecte les gaz
émis une fois le contenant rempli de vapeur.
• Peu avant la terminaison de la cuisson, le four
indique à l’afficheur la durée de cuisson qu’il
reste tout en continuant à faire le compte à
rebours. Si vous désirez mélanger ou tourner les
aliments, faites-le en ce moment.
• Si vous le désirez, les aliments peuvent être
assaisonnés avec des herbes, des épices ou
des sauces de brunissage avant la cuisson.
Étant donné que le sel peut laisser des brûlures
sur les aliments, il est mieux de les saler après
qu’ils sont cuits.
• Afin d’optimiser la cuisson selon vos
préférences, servez-vous de la touche
MORE/LESS pour augmenter ou diminuer la
durée de cuisson.
Ustensiles et couvercles convenables
pour la cuisson avec senseur
• Afin d’obtenir les meilleurs résultats culinaires,
suivez les recommandations pour les ustensiles et couvercles appropriées qui se trouvent
dans ce guide.
• Utilisez toujours des contenants qui sont à
l’épreuve des micro-ondes et couvrez-les avec
leur propre couvercle ou une pellicule de plastique. En utilisant une pellicule de plastique
repliez un coin afin de faire échapper la vapeur
à un debit approprié.
• Utilisez toujours le couvercle qui s’accorde
avec le contenant utilisé. Si un contenant ne
possède pas son propre couvercle, employez
une pellicule de plastque.
• Remplissez les contenants au moins à moitié.
• Il est préférable de mélanger ou tourner les ali-
ments qui en ont besoin vers la fin de la durée
de cuisson quand la durée de cuisson est
D
IRECTIVES DE CUISSON
18
Conseils importants sur la cuisson
avec senseur
• Après avoir installé et branché le four sur une
prise murale, ne le débranchez pas. Le senseur
à gaz a besoin de se stabiliser afin de pouvoir
offrir des résultats satisfaisants.
• L’utilisation continuelle de toute fonction avec
senseur est déconseillée.
• Afin d’assurer le bon fonctionnement du
senseur, installez le four dans un endroit bien
ventillé ce qui permettra un refroidissement et
une circulation d’air adéquate.
• Afin éviter des résultats insatisfaisants, n’utilisez pas le senseur automatique dans une
pièce où la température est trop basses ou trop
élevée.
• S’il vous plaît, n’utilisez pas un détergent puis-
sant pour nettoyer le four. Les gaz émis par ce
détergent peuvent affecter le senseur. Si vous
utilisez un tel détergent, assurez-vous qu’
aucune trace du détergent reste dans le four
avant d’utiliser la fonction de cuisson ou de
réchauffage avec senseur.
•Éviter de placer le four près d’appareils élec-
troménagers emettant assez d’humidité ou de
gaz ce qui peut empêcher le bon fonctionnement du senseur.
• Gardez l’intérieur du four toujours propre.
Nettoyez l’intérieur du four à l’aide d’un linge
mouillé.
Le four a été conçu uniquement pour un usage
domestique.
Page 50

D
IRECTIVES DE CUISSON
Guide de cuisson de la viande
• Déposez la viande sur la grille dans un plat à rôtir qui sont les deux à l’épreuve des micro-ondes.
•
Commencez à cuire la viande avec le côté graisseux vers le bas et protégez les extrémités des os, les parties minces ou les parties qui commencent à trop cuire avec des bandes étroites de papier d’aluminium.
• Vérifiez la température à plusieurs endroits avant de laisser reposer la viande pendant la période de
temps recommandée.
• Les températures ci-dessous s’appliquent aux aliments lorsqu’on les sort du four. Leur température
augmentera pendant le temps de repos.
Aliment
Durée de cuisson / Niveau de puissance Directives
Rôti de
boeuf, sans
os
Jusqu’à 4 lb
Porc, sans
ou avec os
Jusqu’à 4 lb
Bacon
2-6 tranches
Durée de cuisson :
8-11 min./lbs à 115˚F - saignant
9-13 min./lbs à 120˚F - médium
10-15 min./lbs à 145˚F - bien cuit
Niveau de puissance : maximale (10) pour les 5
premières minutes et ensuite le niveau moyen.
Durée de cuisson :
11-15 min./lbs à 160˚F - bien cuit
Niveau de puissance : maximale (10) pour les 5
premières minutes et ensuite le niveau moyen.
Durée de cuisson :
2 tranches : 1-1 3/4 min.
4 tranches : 3-3
6 tranches : 4
1/2 min.
1/2-5 1/2 min.
Niveau de puissance : maximal (10)
Déposez le rôti, le côté graisseux sur
la grille de rôtissage. Couvrez avec
du papier ciré. Retournez lorsque la
moitié de la cuisson s’est écoulée.
Faites cuire en retournant à la micuisson. Laissez reposer 10 minutes.
Déposez le rôti, le côté graisseux sur la
grille de rôtissage. Sans serrer, couvrez
d’une pellicule de plastique. Retournez
lorsque la moitié de la cuisson s’est
écoulée. Faites cuire en retournant à la
mi-cuisson. Laissez reposer 10 minutes.
Déposez le bacon sur une grille de
rôtissage ou dans un plat tapissé de
papier essuie-tout. Couvrez utilisant
le papier essuie-tout. Faites cuire
jusqu’à ce qu’il soit croustillant.
Guide de cuisson de la volaille
• Déposez la viande sur la grille dans un plat à rôtir qui sont les deux à l’épreuve des micro-ondes.
• Couvrez la volaille avec du papier ciré pour prévenir les éclaboussures.
• Protégez les bouts d’os, les parties minces ou les portions qui commencent à trop cuire avec des ban-
des de papier d’aluminium.
• Vérifiez la température à plusieurs endroits avant de laisser reposer la volaille pendant la période de
temps recommandée.
Aliment
Poulet, entier
Jusqu’à 4 lb
Poulet,
pièces
Jusqu’à 2 lb
Durée de cuisson / Niveau de puissance Directives
Durée de cuisson :
5-8 min./lbs de 170˚F à 180˚F
Déposez le poulet sur une grille de rôtissage,
la poitrine vers le bas. Couvrez avec du papier ciré. Retournez-le lorsque la moitié de la
cuisson s’est écoulée. Faites cuire jusqu’à
Niveau de puissance : moyen-fort (7)
ce que le jus soit transparent et jusqu’à ce
que la viande entourant les os ne soit plus
rosée. Laissez reposer de 5 à 10 min.
Durée de cuisson :
5-8 min./lbs
180˚F -Viande foncée
170˚F -Viande blanche
Niveau de puissance : moyen-fort (7)
Déposez les morceaux de poulet dans un
plat en orientant les os vers le bas et les
parties les plus épaisses vers le bord du
plat. Couvrez avec du papier ciré. Retournez
le poulet lorsque la moitié de la cuisson
s’est écoulée. Faites cuire jusqu’à ce que le
jus qui coule soit transparent et jusqu’à ce
que la viande entourant les os ne soit plus
rosée. Laissez reposer de 5 à 10 min.
D
IRECTIVES DE CUISSON
19
Page 51

D
IRECTIVES DE CUISSON
Guide de cuisson de fruits de mer
• Le poisson est prêt lorsqu’il s’effrite facilement avec une fourchette.
• Déposez le poisson sur une grille de rôtissage dans un plat à l’épreuve des micro-ondes.
• Utilisez un couvercle bien fermé pour cuire le poisson à la vapeur. On peut aussi le couvrir plus
légèrement avec du papier ciré ou un essuie-tout pour obtenir moins de vapeur.
• Il ne faut pas trop cuire le poisson. Vérifiez le degré de cuisson à la durée minimale.
Aliment
Darnes
Jusqu’à 1,5 lb
Filets
Jusqu’à 1,5 lb
Crevettes
Jusqu’à 1,5 lb
Durée de cuisson / Niveau de puissance Directives
Durée de cuisson :
6-10 min./lbs
Niveau de puissance : moyen-fort (7)
Durée de cuisson :
3-7 min./lbs
Niveau de puissance : moyen-fort (7)
Durée de cuisson :
3-5 1/2 min./lbs
Niveau de puissance: moyen-fort (7)
Déposez les darnes sur la grille de rôtissage
en plaçant les parties les plus épaisses vers
le bord de la grille. Couvrez la grille avec du
papier ciré. Retournez les darnes et redisposez-les lorsque la moitié de la cuisson
s’est écoulée. Faites cuire jusqu’à ce que le
poisson s’effrite facilement avec une
fourchette. Laissez reposer de 3 à 5 minutes.
Déposez les filets dans un plat de cuisson en
couvrant les pièces plus minces avec celles
plus épaisses. Couvrez-les avec du papier
ciré. Tournez et redisposez les filets s’ils sont
plus épais d’un centimètre lorsque la moitié de
la cuisson s’est écoulée. Faites cuire jusqu’à
ce que le poisson s’effrite facilement avec une
fourchette. Laissez reposer de 2 à 3 min.
Étalez les crevettes dans un plat de cuisson. Couvrez le plat avec du papier ciré.
Faites cuire jusqu’à ce qu’elles soient fermes et opaques en remuant 2 ou 3 fois.
Laissez reposer 5 minutes.
Guide de cuisson des oeufs
• Ne faites jamais cuire les oeufs durs dans leur coquille et ne faites pas réchauffer les oeufs cuits durs
avec coquille. Ils risquent d’exploser.
• Percez toujours les jaunes d’oeufs entiers avant de les faire cuire pour éviter qu’ils n’explosent.
• Ne faites cuire les oeufs que jusqu’à ce qu’ils soient fermes. Ils sont fragiles et peuvent devenir
caoutchouteux s’ils sont trop cuits.
Guide de cuisson des légumes
• Il faut laver les légumes avant de les cuire. D’habitude, vous ne devez pas ajouter d’eau. Si vous cuisez
des légumes denses tels que les pommes de terre,
les carottes ou les haricots verts, ajoutez 1/4 tasse
d’eau.
•
Les petits légumes (carottes tranchés, pois, haricots
de lime)cuisent plus vite que les légumes plus grands.
• Les légumes en entier tels que les pommes de terre,
les courges poivrées ou les épis de maïs doivent être
disposés sur le plateau comme des bâtons d’une rue.
Pour obtenir une cuisson uniforme, tournez-les à la
mi-cuisson.
• Disposez les légumes tels que les asperges et les
points de brocoli sur le plateau en orientant les
extrémités vers le bord et les points vers le centre.
• Lors de la cuisson de légumes en pièces, couvrez le
D
IRECTIVES DE CUISSON
20
plat toujours avec un couvercle ou avec une pellicule plastique retournée à un coin.
• Les légumes en entier avec une membrane non
poreuse tels que les pommes de terre, les courges,
les aubergines etc. doivent être percés dans
plusieurs endroits avant la cuisson pour éviter qu’ils
n’éclatent lorsqu’ils sont chauffés en entier.
• Pour une cuisson plus uniforme, mélanger ou redisposez les légumes en entier après la mi-cuisson.
• D’habitude, les aliments plus denses exigent un
temps de repos plus long. Le temps de repos permet
aux légumes et aux grands aliments denses de continuer à cuire après qu’ils sortent du four. Une
pomme de terre a besoin d’un temps de repos de 5
minutes pour compléter la cuisson avant qu’elle soit
servie. Cependant, les pois peuvent être servis
immédiatement.
Page 52

D
IRECTIVES DE CUISSON
Guide de la cuisson instantanée
• Suivez les instructions ci-dessous pour cuisson instantanée de différents types de nourriture.
Aliment
Maïs à éclater
Repas diététique
Pomme de terre
Légumes frais
Repas congelé
Quantité
1 sac
(3,0 à 3,5 oz)
7 à 18 oz
1 à 6
1 à 4 tasses
7 à 18 oz
Directives
Cuisez uniquement un sac de maïs à éclater à la fois. Soyez prudent quand vous sortez et ouvrez le sac. Quand vous cuisez un
sac de maïs à éclater de 1,5 ou 1,75 oz., servez-vous de la touche
Moins pour obtenir des meilleurs résultats. Laissez refroidir le
four pendant 5 minutes avant de l’utiliser de nouveau .
Retirez le repas de son emballage extérieur et suivez les
instructions sur l’emballage pour le temps de repos. Laissez
refroidir le four pendant au moins 5 minutes avant de l’utiliser
de nouveau.
Percez chaque pomme de terre plusieurs fois avec une
fourchette. Déposez sur le plateau en verre comme des bâtons
d’une roue. Laissez reposer de 3 à 5 minutes . Laissez refroidir le
four pendant au moins 5 minutes avant de l’utiliser de nouveau.
Déposez les légumes frais dans un plat céramique, en verre ou
de plastique à l’épreuve des micro-ondes et ajoutez 2 cuillers à
soupe d’eau. Pour une cuisson uniforme, mélangez ou retournez
les légumes selon les instructions. Laissez reposer les légumes
pendant 3 minutes avant de les servir. Laissez refroidir le four
pendant au moins 5 minutes avant de l’utiliser de nouveau.
Retirez le repas de son emballage extérieur et suivez les
instructions sur l’emballage pour le temps de repos. Laissez
refroidir le four pendant au moins 5 minutes avant de l’utiliser
de nouveau.
D
IRECTIVES DE CUISSON
21
Page 53

D
IRECTIVES DE CUISSON
Aliment
Petit déjeuner congelé
Aliments pour bébé
Poisson
Quantité
2 à 8 oz
2,5 à 6 oz
0,5 à 1,5 lb
Suivez les instructions sur la boîte pour le repos. Servez-vous de
cette touche pour les sandwich congelés, les petits déjeuners,
les crêpes, les gaufres etc. Laissez refroidir le four pendant 5
min-utes avant de l’utiliser de nouveau .
Enlevez le couvercle du pot d’aliments pour bébé et réchauffezle (la durée de chauffage est très courte). Vérifiez la température et mélangez bien avant de servir. La fonction Plus/Moins ne
peut pas être utilisée conjointement avec cette touche de cuisson instantanée. Laissez refroidir le four pendant 5 minutes
avant de l’utiliser de nouveau .
Déposez le poisson dans un plat en arrangeant les pièces plus
épais vers les bords du plat. Couvrez les pièces plus minces
avec celles plus épaisses. Couvrez le plat avec une pellicule
plastique et repliez un coin. Laissez refroidir le four pendant 5
minutes avant de l’utiliser de nouveau .
Directives
Guide du Réchauffage avec Senseur
• Suivez les instructions ci-dessous pour le rechauffage avec senseur de différents types de nourriture.
Assiette de nourriture
1 portion
(1 assiette)
Utilisez uniquement des aliments précuits et réfrigérés. Couvrez
le plat avec une pellicule plastique et repliez un coin. Si
l’aliment n’est pas réchauffé à votre goût utilisant la fonction de
réchauffage avec senseur, continuez le réchauffage en réglant
une durée de cuisson et le niveau de puissance.
Aliments
- 3 ~ 4 oz viande, volaille ou poisson (jusqu’à 6 oz avec os)
- 1/2 tasse de féculents (pommes de terre, pâtes, riz, etc.)
- 1/2 tasse de légumes (environ 3 ~ 4 oz)
Cocotte
Soupes/Sauces
D
IRECTIVES DE CUISSON
22
1 à 4 portions
Utilisez uniquement des aliments que vous venez de sortir du
réfrigérateur. Couvrez le plat avec une pellicule de plastique et
repliez un coin. Si l’aliment n’est pas réchauffé à votre goût utilisant la fonction de réchauffage avec senseur, continuez le
réchauffage en réglant une durée de cuisson et le niveau de
puissance. Mélangez les aliments une fois avant de servir.
Page 54

D
IRECTIVES DE CUISSON
Recettes
Soupe à l’oignon (4 portions)
3 cuillers à soupe de beure ou de margarine
3 tasses oignons tranchés (environ 3 oignons
de grosseur moyenne)
3 tasses de bouillon de boeuf
1 tasse d’eau
1 c. à thé de sauce Worcestershire
Sel, poivre, croûtons, fromage parmesan râpé
au goût
2 c. à soupe d’eau-de-vie (au goût)
1Mélangez le beurre et les oignons dans un plat
de 3 litres. Couvrez. Faites cuire à la puissance
élevée (10) pendant 8 à 9 minutes ou servezvous de la touche de cuisson instantanée avec
senseur Fresh Vegetable.
2 Ajoutez le bouillon, l’eau, la sauce
Worcestershire, le sel et le poivre; couvrez.
Faites cuire à la puissance élevée (10) pendant
5 minutes et ensuite à la puissance moyenne
(5) pen-dant 5 minutes ou utilisez la touche de
réchauffage automatique avec senseur.
Laissez reposer, couvert, pendant 5 minutes
avant de servir. Servez avec des croûtons et du
fromage.
Boules de maïs à éclater
(10 à 15 boules)
30 caramels carrés
1 1/2 c. à soupe d’eau
1 c. à thé de beurre ou magarine
1 sac ( 3,5 oz) de maïs à éclater
1Mélangez les caramels, l’eau et le beurre dans
un plat en verre de 4 tasses. Faites cuire à la
puissance élevée (10) pendant 2 à 3 minutes
jusqu’à ce qu’ils soient fondus. Remuez jusqu’à
consistance crémeuse.
Déposez le maïs à éclater sur le plateau tour-
2
nant. Faites cuire à la puissance élevée (10) pendant 2 à 3 minutes ou servez-vous de la touche
de cuisson instantanée avec senseur Popcorn.
3
Placez le maïs à éclater dans un bol. Versez le
mélange de caramel sur le maïs; remuez jusqu’à
ce qu’il soit complètement couvert et refroidir
assez pour pouvoir le manipuler. Avec vos
mains beurrées, formez des boules de 3 pouces.
4 Faites refroidir sur du papier ciré. Servez
immédiate-ment.
Pois et laitue (4 portions)
2 tasses de pois frais écossés
1/3 tasse de céleri en tranches minces
2 c. à soupe d’eau
3 tasses de laitue râpé
1 c. à soupe de beurre ou magarine
1 c. à soupe de farine tout usage
1/2 c. à thé de sucre
1/4 c. à thé de sel
1/4 tasse de crème fouetter
Poivre au goût
1 Dans un plat de 1 1 / 2 litres mélangez les pois,
le laitue, le céleri et l’eau; couvrez. Faites cuire
à la puissance élevée (10) pendant 5 à 7
1 / 2
minutes ou servez-vous de la touche de cuisson instanta-née avec senseur Fresh
Vegetable. Ajoutez du laitue; recouvrez.
2 Dans un petit plat mélangez le beurre, la farine,
le sucre, le sel et le poivre. Ajoutez la crème et
mélangez. Faites cuire à la puissance maximale de (10) pendant 1 à 2 minutes ou utilisez
la touche de réchauffage automatique avec
senseur. Mélangez jusqu’à ce que le mélange
soit onctueux.
3 Égouttez les légumes. Ajoutez la sauce aux
légumes; remuez.
Pommes de terre farcies (4 portions)
4 pommes de terre moyennes, lavées
1/2 tasse de crème sure
1/3 tasse de lait
2 c. à soupe de fromage parmesan râpé
1 c. à thé de ciboulette ou de persil haché
Sel, poivre, paprika au goût
1 Percez les pommes de terre deux fois avec une
fourchette. Disposez les pommes de terre
espacées à une intervalle d’une pouce sur le
plateau en verre tapissé de papier essuie-tout.
Faites cuire à la puissance élevée (10) pendant
10 à 12 minutes ou servez-vous de la touche de
cuis-son instantanée Potato. Laissez reposer
pendant 5 minutes.
Coupez le dessous de chaque pomme de terre;
2
retirez la pulpe. Faites en purée la pulpe retirée
en ajoutant de la crème sure, du lait, du fromage, de la ciboulette, du sel et du poivre.
Remplissez les pommes de terre de ce mélange.
3
Saupoudrez de paprika. Déposez-les dans un
plat ou sur le plateau en verre du four tapissé de
papi-er essuie-tout. Faites cuire à la puissance
élevée (10) pendant 2 à 4 minutes ou servezvous de la touche de réchauffage avec senseur.
D
IRECTIVES DE CUISSON
23
Page 55

D
IRECTIVES DE CUISSON
Macédoine de légumes
(4 à 6 portions)
1 1/2 tasse de fleurettes de brocoli de 3/4 à 1 po
de diamètre
1/2 tasse de fleurettes de chou-fleur de 3/4 à 1
1
po de diamètre
1 courge jaune de grosseur moyenne en
tranches biseautées de
1 courgette de grosseur moyenne en tranches
biseautées de
1/4 po
1 carotte moyenne coupée en tranches diagonales de
1/2 petit poivron rouge coupé en lamelles
1/8 po
6-7 olives noires dénoyautées, tranchées en
lamelles
2 à 3 c. à soupe de beurre ou margarine
1/2 c. à thé d’origan séché
1 c. à thé de jus de citron frais fromage parmesan au goût, optionnel
1 Disposez alternativement le bocoli et le chou-
fleur en rond vers l’extérieur dans un plat à
rebord de 10 à 12 po de diamètre. Déposez
alternativement la courge jaune et la courgette
en l’intérieur du cercle de brocoli et de choufleur. Placez les tranches de carottes au centre
et disposez les lamelles de poivron rouge pardessus. Aspergez de 2 cuillerées à soupe
d’eau. Couvrez d’une pel-licule de plastique en
repliant un coin pour que la vapeur puisse
s’échapper.
2 Faites cuire à la puissance élevée (10) pendant
7 à 9 minutes ou servez-vous de la touche de
cuisson instantanée Fresh Vegetable. Enlevez
la pellicule immédiatement. Disposez les olives
de façon attrayante par-dessus les autres
légumes.
3Déposez le beurre ou la margarine dans une
tasse à mesurer de 1 tasse et faites fondre au
niveau de puissance élevé (10) pendant 30 secondes à 1 minute. Ajoutez l’origan et le jus de
citron. Versez sur les légumes. Saupoudrez de
fromage parme-san et servez.
1/4 po
Casserole de saucisses et de fèves
(4 à 6 portions)
1/2 tasse d’oignons hachés
2 c. à soupe de beurre ou margarine
1 emb.(12 - 16 oz) saucisses, coupées en
quartiers
1 boîte (16 oz) de fèves cuites
1 boîte (15 - 16 oz) de fèves cannellini (blanches), égouttées
1 boîte (15 - 16 oz.) de fèves rouges, égouttées
1/3 tasse de sucre brun
1/4 tasse de ketchup
1 c. à thé de moutarde jaune
Sel, poivre et ail au goût
1Mélangez les oignons et le beurre dans un plat
de 3 litres. Faites cuire au niveau de puissance
élevé de 1 à 2 minutes ou jusqu’à ce que les
oignons soient tendres.
2Mélangez tous les autres ingrédiants en pous-
sant les saucisses au fond du plat de façon à
ce qu’elles soient couvertes de fèves.
3 Couvrez et faites cuire au niveau de puissance
élevé (10) pendant 11 à 13 minutes ou servezvous de la touche de réchauffage avec
senseur. Mélangez jusqu’à ce que le mélange
soit oncueux.
D
IRECTIVES DE CUISSON
24
Page 56

A
NNEXE
Dépannage
Avant d’appeler le réparateur, vérifiez si une des solutions cidessous pourrait résoudre votre probléme.
Rien n’est affiché à l’afficheur et le four ne fonctionne pas.
• Assurez-vous que la fiche à trois broches est fermement insérée dans une prise bien mise à la terre. Si la
prise est contrôlée par un interrupteur mural,
assurez-vous qu’il est sous tension. Retirez la fiche de
la prise, attendez 10 secondes, branchez de nouveau
la fiche. Vérifiez et réglez le disjoncteur de nouveau
et remplacez tout fusible qui aurait explosé. Branchez
un autre appareil dans la prise. Si l’autre appareil ne
fonctionne pas, communiquez avec un technicien
qualifié pour réparer la prise. Branchez le four dans
une prise différente. S’il ne fonctionne pas toujours,
communiquez avec un Centre de service.
L’afficheur fonctionne mais le four ne se met pas
en marche.
• Assurez-vous que la porte est bien fermée. Si un plat
touche la porte, celle-ci peut ne pas fermer. Vérifiez
s’il y a un morceau de papier, d’emballage, ou autre
objet coincé dans le joint de la porte. Assurez-vous
que la porte n’est pas endommagée. Appuyez deux
fois sur la touche CANCEL et entrez de nouveau
toutes les instructions de cuisson.
Le four s’arrête avant que le temps réglé se soit
écoulé.
• S’il n’y a pas eu de panne de courant, retirez la prise,
attendez 10 secondes et branchez-la de nouveau.
Vérifiez et réglez de nouveau le disjoncteur de votre
domicile et remplacez tout fusible qui a pu exploser.
(Dans le cas d’une panne de courant, l’afficheur montrera le message “SAMSUNG SO SIMPLE” et vous
devriez régler l’horloge et toute fonction de nouveau.)
Les aliments cuisent trop lentement.
• Assurez-vous que le four fonctionne sur son propre
circuit de 20 amp. Le fonctionnement d’un autre
appareil sur le même circuit peut causer une baisse
de tension. Au besoin, branchez le four sur une autre
prise pour qu’il ait son propre circuit.
Vous voyez des étincelles.
• Retirez tout ustensile de cuisson métallique, vaisselle
dont le bord est métallique et ligature métallique.
Lorsque vous utilisez du papier d’aluminium, laissez
au moins un pouce entre le papier et les parois de la
cavité. Utilisez uniquement des bandes de papier
d’aluminium étroites.
Le plateau tournant en verre fait du bruit ou ne
tourne pas bien
• Nettoyez le plateau rotatif, le rouleau et le fond du
four. Assurez-vous que le plateau rotatif et le rouleau
sont bien placés.
L’utilisation de votre four à micro-ondes cause des
interférences radio ou de télévision.
• Cela ressemble à l’interférence causée par d’autres
petits appareils tels que des aspirateurs ou des
séchoirs à cheveux. Si le problème est important,
installez le four dans un autre endroit ou bien
changez la radio ou la télévision de place. De cette
façon, ils seront plus éloignés les uns des autres.
Entretien et nettoyage
Voici quelques conseils pour vous aider à entretenir et
garder votre four net :.
• Gardez l’intérieur du four propre. Les particules des
aliments ou des liquides renversés collent aux parois
du four et absorberont les micro-ondes ce qui réduira
l’efficacité du four.
• Essuyez immédiatement. Essuyez tous les renversements avec un linge humide et un détergent doux.
N’utilisez pas de détergents puissants ou abrasifs.
• Pour vous aider à dégager des particules de nourriture ou de liquides renversés collés dans le four, faites
chauffer 2 tasses d’eau dans une tasse à mesurer de
4 tasses à l’allure maximale (10) pendant 5 minutes ou
jusqu’à l’ébullition. Laissez reposer dans le four de 1 à
2 minutes. Pour conserver une odeur fraîche à
l’intérieur du four, ajoutez le jus d’un citron dans l’eau
avant de placer la tasse dans le four à micro-ondes.
• Il est parfois nécessaire de retirer le plateau en verre
pour nettoyer le plateau ou le four. Pour éviter de
briser le plateau, ne le placez pas dans l’eau tout de
suite après la cuisson. Le plateau est lourd et il peut
se briser si on le laisse tomber. Lavez-le avec prudence dans de l’eau tiède et savonneuse ou dans un
lave-vaisselle. Soyez prudent en essuyant le plateau :
il est lourd et peut se casser si on l’échappe.
• Vous devriez, à l’occasion, nettoyer la surface
extérieure du four avec un linge humide et savonneux, le rincer et le sécher avec un linge doux. Pour
éviter d’endommager les pièces de fonctionnement à
l’intérieur du four, ne laissez pas l’eau pénétrer dans
les ouvertures d’aération.
• Lavez la vitre de la porte du four avec un détergent
très doux et de l’eau. Assurez-vous d’utiliser un linge
doux pour éviter d’égratigner la vitre.
• Si de la vapeur s’accumule à l’intérieur ou autour de
l’extérieur de la porte du four, essuyez-la avec un
linge doux. Cela peut se produire si vous utilisez le
four lorsque le temps est extrêmement humide et ne
signifie donc pas une fuite de micro-ondes.
•
Ne faites jamais fonctionner le four sans avoir de l’eau
ou de la nourriture à l’intérieur. Cela pourrait endommager le tube du magnétron ou le plateau en verre.
Une tasse d’eau laissée dans le four lorsqu’il n’est pas
utilisé absorbera cette énergie en toute sécurité si le
four est accidentellement mis en marche.
Si vous continuez d’avoir des problèmes,
veuillez communiquer avec nous au:
1-800-SAMSUNG
A
NNEXE
25
Page 57

A
NNEXE
Garantie limitée de l’acheteur
initial
Ce produit Samsung est garanti par SAMSUNG
ELECTRONICS CANADA INC. (ci-après appelé
SECA) contre tous défauts de matériaux ou de fabrication pendant les périodes précisées ci-dessous :
Main d’oeuvre : deux ana (au comptoir)
Pièces : deux ans
Magnétron : six ans
SECA garantit également que lors du défaut de
fonctionnement correct de ce produit durant la
période de la garantie spécifiée, si ce manque de
fonctionnement est le résultat d’une erreur de fabrication ou d’un défaut matériel, SECA réparera ou
remplacera, à sa discrétion, cet appareil.
Toutes les réparations sous garantie ou remplacements de pièces doivent être effectués dans un
Centre de service agréé SECA. Pour obtenir le nom
et l’adresse du Centre de service agréé le plus
près de chez vous, composez le 1-800-SAMSUNG
ou consultez notre site Internet au www.samsungcanada.com.
Obligation de l’acheteur initial
Le reçu de vente initial doit être conservé en tant
que preuve d’achat. Il doit être présenté au Centre
de service agréé avant qu’un service de garantie
ne soit effectué.
Pour tous les modèles portatifs, le client est
responsable du transport au et à partir du Centre
de service agréé.
Exclusions de la garantie
Cette garantie ne couvre pas les dommages occasionnés par un accident, un incendie, une inondation ou tout cas de force majeure, ni par une mauvaise utilisation, le branchement à une tension
incorrecte, une mauvaise installation, des réparations impropres ou non autorisées, l’usage à des
fins commerciales ou les dommages survenus lors
du transport. Les réglages décrits dans ce manuel
et effectués par le client ne sont pas couverts par
cette garantie. Cette garantie s’annule automatiquement pour tout appareil dont le numéro de
série a été modifié ou est manquant. La présente
garantie ne couvre que les appareils achetés et
utilisés au Canada.
Spécifications
Numéro de modèle
Cavité du four
Commandes
Minuterie
Source d’alimentation
Puissance réstituée
Dimensions extérieures
Dimensions de la cavité du four
Poids Net/Brut
A
26
NNEXE
MS5796W / MS5797G / MS5796S MS7796W / MS7797G / MS776S
1,0 pi3 1,3 pi3
10 niveaux de puissance y compris la décongélation
99 minutes, 99 secondes 99 minutes, 99 secondes
120 VAC, 60 Hz 120 VAC, 60 Hz
1100 Watts 1100 Watts
20
11/32
13
7/32
11/16
po(L) X 11
3/32
po(L) X 9
po(H) X 13
35.3/38.6 lbs 38.6/43 lbs
po(H) X 14
29/32
23/32
po(p)
po(P)
10 niveaux de puissance y compris la décongélation
7/8
21
3/4
14
po(L) X 12
po(L) X 9
5/16
17/32
po(H) X 16
po(H) X 15
21/32
7/16
po(P)
po(P)
Page 58

SAMSUNG ELECTRONICS
GARANTIE LIMITÉE POUR L’AMÉRIQUE DU NORD
Assujettie aux exigences, conditions, exclusions et limitations
de la garantie limitée originale fournie avec les produits de
Samsung Electronics (SAMSUNG) et les exigences,
conditions, exclusions et limitations de la présente garantie,
SAMSUNG offrira en plus un service de réparation sous
garantie aux États-Unis pour les produits achetés au Canada
et un service
de réparation sous garantie au Canada pour les produits
achetés aux États-Unis pendant la période de garantie
précisée à l’origine et pour l’acheteur inital seulement.
Les réparations sous garantie décrites ci-dessus doivent
être effectuées dans un centre de réparation agréé
SAMSUNG. En plus de la présente garantie, la garantie
limitée originale et une facture datée en tant que preuve
d’achat doivent être présentées au centre de réparation. Le
transport de l’appareil au et à partir du centre de réparation
demeure la responsabilité de l’acheteur.
Les conditions couvertes ne sont limitées qu’aux vices de
matériaux et de fabrication dans des conditions d’utilisation
normale.
Exclues, mais non pas limitées à, sont les dispositions
précisées à l’origine pour le service à domicile ou sur place,
durées de réparation minimales et maximales, échanges ou
remplacements, accessoires, options, extensions ou
produits non durables.
Pour obtenir le nom d’un centre de réparation agréé
Samsung, appelez sans frais :
Aux États-Unis : 1-800-SAMSUNG (1-80 0-726-7864)
Au Canada : 1-800-SAMSUNG
Page 59

G
ELECTRONICS
UIDE À CONSULTATION RAPIDE
Fonction
Réglage de l’horloge
Cuisson à un stade
Cuisson à une touche
Touches de cuisson
instantanée
Auto Defrost
Sensor Reheat
Operation
1. Appuyez sur la touche CLOCK.
2. Utilisez les touches numériques pour régler l’heure.
3. Appuyez de nouveau sur la touche CLOCK.
1. Utilisez les touches numériques pour régler la durée de cuisson.
2. Sélectionnez un niveau de puissance ou gardez le niveau de
puissance maximal.
3. Appuyez sur la touche START.
1. Appuyez sur la touche ONE MINUTE+ pour régler une durée de
cuisson par étapes d’une minute.
2. L’afficheur montre la durée de cuisson spécifiée et ensuite le four
se met en marche.
1. Appuyez sur la touche qui correspond à l’aliment que vous
souhaitez cuire. (par exemple le maïs à éclater)
2. Appuyez à maintes reprises sur la touche de cuisson instantanée
pour sélectionner la portion désirée.
1. Appuyez sur la touche AUTO DEFROST.
2. Spécifiez le poids de l’aliment en appuyant plusieurs fois sur la
touche AUTO DEFROST ou en utilisant les touches numériques.
3. A l'invite de l'afficheur, ouvrez le four et retournez les aliments.
Appuyez sur la touche START pour reprendre la décongélation.
1. Appuyez sur la touche SENSOR REHEAT.
2. L'afficheur montre le message "REHEAT" et le four se met en
marche automatiquement.
Réglage de la durée de
cuisson et du niveau de
puissance
1. Utilisez les touches numériques pour régler une durée de cuisson.
2. Pour choisir un niveau de puissance inférieur au niveau maximal,
appuyez sur la touche POWER LEVEL et ensuite appuyez sur les
touches numériques pour spécifier le niveau de puissance.
3. Appuyez sur la touche START pour commencer la cuisson.
May.1999
Imprimé en Corée
 Loading...