

Samsung MM-X5 User Manual
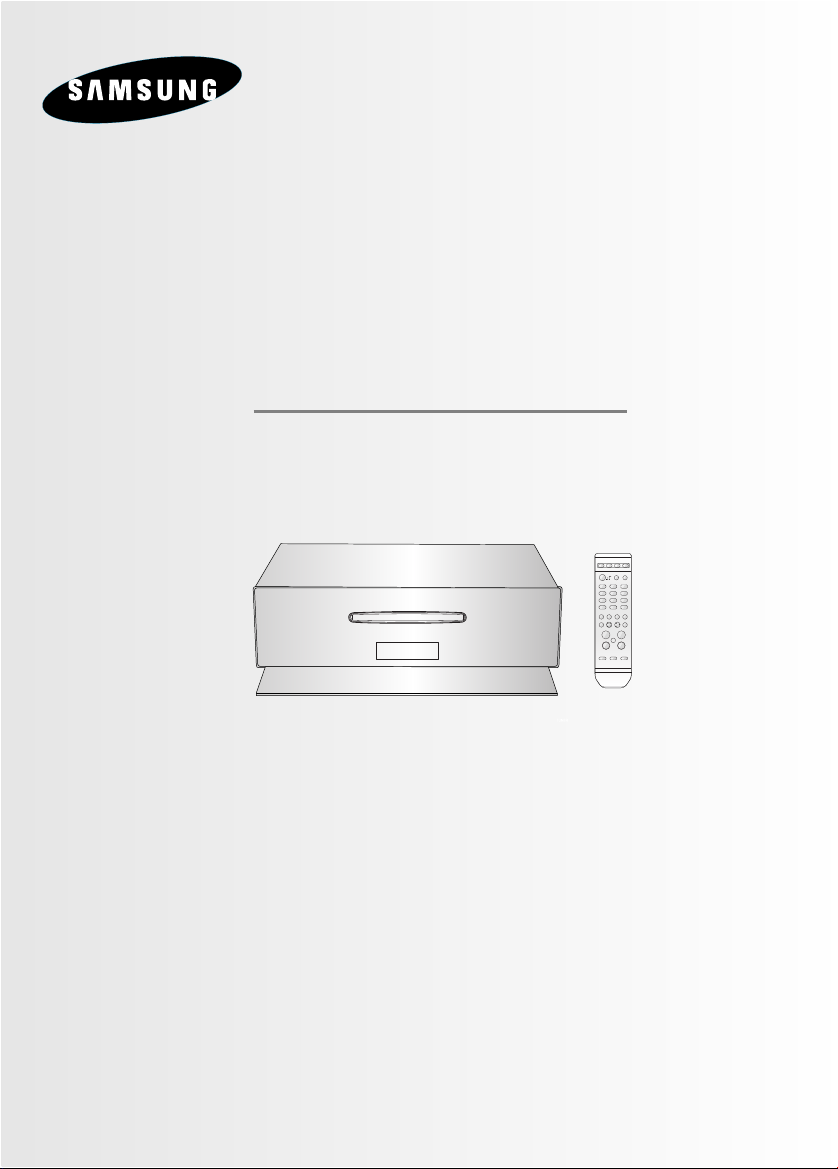
Instruction Manual
MP3 PLAYER DOCKING
MICRO COMPONENT
CD/MP3/WMA-CD/CD-R/RW
PLAYBACK
MM-X5
GB
Press Push Important Note
Symbols
3
GB
2
Safety Warnings Contents
Thank you for buying this
SAMSUNG micro component system.
Please take time to read these instructions.
They will allow you to operate your
system with ease and take full advantage of its features.
SAFETY WARNINGS .......................................................................................................................................................... 2
INSTALLING YOUR MICRO COMPONENT SYSTEM
Top Panel View ..............................................................................................................................................................4
Front Panel View ............................................................................................................................................................4
Remote Control ..............................................................................................................................................................5
Rear Panel View ............................................................................................................................................................5
Where to Install Your Micro Component System............................................................................................................6
Connecting your System to the Power Supply ..............................................................................................................6
Inserting Remote Control Batteries ................................................................................................................................6
Connecting to an External Source ..................................................................................................................................7
iPod Connection..............................................................................................................................................................7
Connecting the FM Antenna ..........................................................................................................................................8
Cooling Fan ....................................................................................................................................................................8
DEMO Function ..............................................................................................................................................................9
DIMMER Function ..........................................................................................................................................................9
Setting the Clock ............................................................................................................................................................9
MP3/WMA-CD/CD-PLAYER
To play the CD/MP3/WMA-CD......................................................................................................................................10
Selecting a Track ..........................................................................................................................................................11
Searching for a Specific Music Passage on a CD/
MP3/WMA-CD
................................................................................11
Repeating One or All Tracks on the CD........................................................................................................................11
Repeating One or All Tracks on the MP3/WMA-CD Disc ............................................................................................11
USING USB
Playing USB ..................................................................................................................................................................12
To use high speed search ............................................................................................................................................13
To repeat ......................................................................................................................................................................13
Selecting a Track from a USB Device ..........................................................................................................................13
TUNER
Searching for and Storing Radio Stations ....................................................................................................................14
Selecting a Stored(preset) Station ................................................................................................................................14
Improving Radio Reception ..........................................................................................................................................14
OTHER FUNCTIONS
Timer Function ..............................................................................................................................................................15
Cancelling the Timer......................................................................................................................................................15
EQ Function ..................................................................................................................................................................16
DNSe Function ............................................................................................................................................................16
ECO Mode Function ....................................................................................................................................................16
MUTE Function..............................................................................................................................................................17
Setting the System to Switch off Automatically ............................................................................................................17
Connecting Headphones ..............................................................................................................................................17
RECOMMENDATIONS FOR USE
Safety Precautions ........................................................................................................................................................18
Cleaning Your Micro Component System ....................................................................................................................18
Precautions When Using Compact Discs......................................................................................................................19
Troubleshooting ............................................................................................................................................................19
Technical Specifications ................................................................................................................................................20
Supported USB Devices
....................................................................................................................................................21
Warranty
........................................................................................................................................................................22
RISK OF ELECTRIC SHOCK.
DO NOT OPEN
CAUTION: TO REDUCE THE RISK OF ELECTRIC SHOCK,
DO NOT REMOVE COVER (OR BACK)
NO USER-SERVICEABLE PARTS INSIDE
REFER SERVICING TO QUALIFIED SERVICE PERSONNEL
CAUTION
Use of controls, adjustments or performance of
procedures other than those specified herein may result in hazardous radiation exposure.
CAUTION : INVISIBLE LASER RADIATION WHEN OPEN AND INTER-
LOCKS DEFEATED, AVOID EXPOSURE TO BEAM.
This Compact Disc player is classified as a CLASS 1 LASER product.
WARNING
•
To reduce the risk of fire or electric shock, do not expose this appliance to rain or moisture.
•
To prevent injury, this apparatus must be securely attached to the floor/wall in accordance
with the installation instructions.
CAUTION
•
Apparatus shall not be exposed to dripping or splashing and no objects filled with liquids,
such as vases, shall be placed on the apparatus.
This product satisfies FCC regulations when shielded cables and
connectors are used to connect the unit to other equipment. To prevent electromagnetic interference with electric appliances, such as
radios and televisions, use shielded cables and connectors for connections.
FCC NOTE (for U.S.A):
This equipment has been tested and found to comply with the limits
for a Class B digital device, pursuant to Part 15 of the FCC Rules.
These limits are designed to provide reasonable protection against
harmful interference in a residential installation.
This equipment generates, uses and can radiate radio frequency
energy and, if not installed and used in accordance with the instructions, may cause harmful interference to radio communications.
However, there is no guarantee that interference will not occur in a
particular installation.
If this equipment does cause harmful interference to radio or television reception, which can be determined by turning the equipment
off and on, the user is encouraged to try to correct the interference
by one or more of the following measures:
• Reorient or relocate the receiving antenna.
• Increase the separation between the equipment and receiver.
• Connect the equipment into an outlet on a circuit different from that
to which the receiver is connected.
• Consult the dealer or an experienced radio/TV technician for help.
Caution: FCC regulations state that any unauthorized changes or
modifications to this equipment may void the user's authority to operate it.
CLASS 1 LASER PRODUCT
KLASSE 1 LASER PRODUKT
LUOKAN 1 LASER LAITE
KLASS 1 LASER APPARAT
PRODUCTO LASER CLASE 1
This symbol indicates that dangerous voltage
consisting a risk of electric shock is present
within this unit.
This symbol indicates that there are important
operating and maintenance instructions in the
literature accompanying this unit.
CLASS 1 LASER PRODUCT
Read these operating instructions carefully before using the
unit. Follow all the safety instructions listed below. Keep
these operating instructions handy for future
reference.
1) Read these instructions.
2) Keep these Instructions.
3) Heed all warnings.
4) Follow all instructions.
5) Do not use this apparatus near water.
6) Clean only with dry cloth.
7) Do not block any ventilation openings. Install in
accordance with the manufacturer’s instructions.
8) Do not install near any heat sources such as
radiators, heat registers, stoves, or other apparatus
(including amplifiers) that produce heat.
9) Do not defeat the safety purpose of the polarized or
grounding-type plug. A polarized plug has two blades
with one wider than the other. A grounding type plug has
two blades and a third grounding prong. The wide blade
or the third prong are provided for your safety. If the provided plug does not fit into your outlet, consult an electrician for replacement of the obsolete outlet.
10) Protect the power cord from being walked on or pinched
particularly at plugs, convenience
receptacles, and the point where they exit from the
apparatus.
11) Only use attachment/accessories specified by the manufacturer.
12) Use only with the cart, stand, tripod,
bracket, or table specified by the manufacturer, or sold with the apparatus.
When a cart is used, use caution when
moving the cart/apparatus combination
to avoid injury from tip-over.
13) Unplug this apparatus during lightning storms or when
unused for long periods of time.
14)
Refer all servicing to qualified service personnel.
Servicing is required when the apparatus has been damaged in any way, such as power-supply cord or plug is
damaged, liquid has been spilled or objects have fallen
into the apparatus, the apparatus has been exposed to
rain or moisture, does not operate
normally, or has been dropped.
Important Safety Instructions
GB
5
GB
4
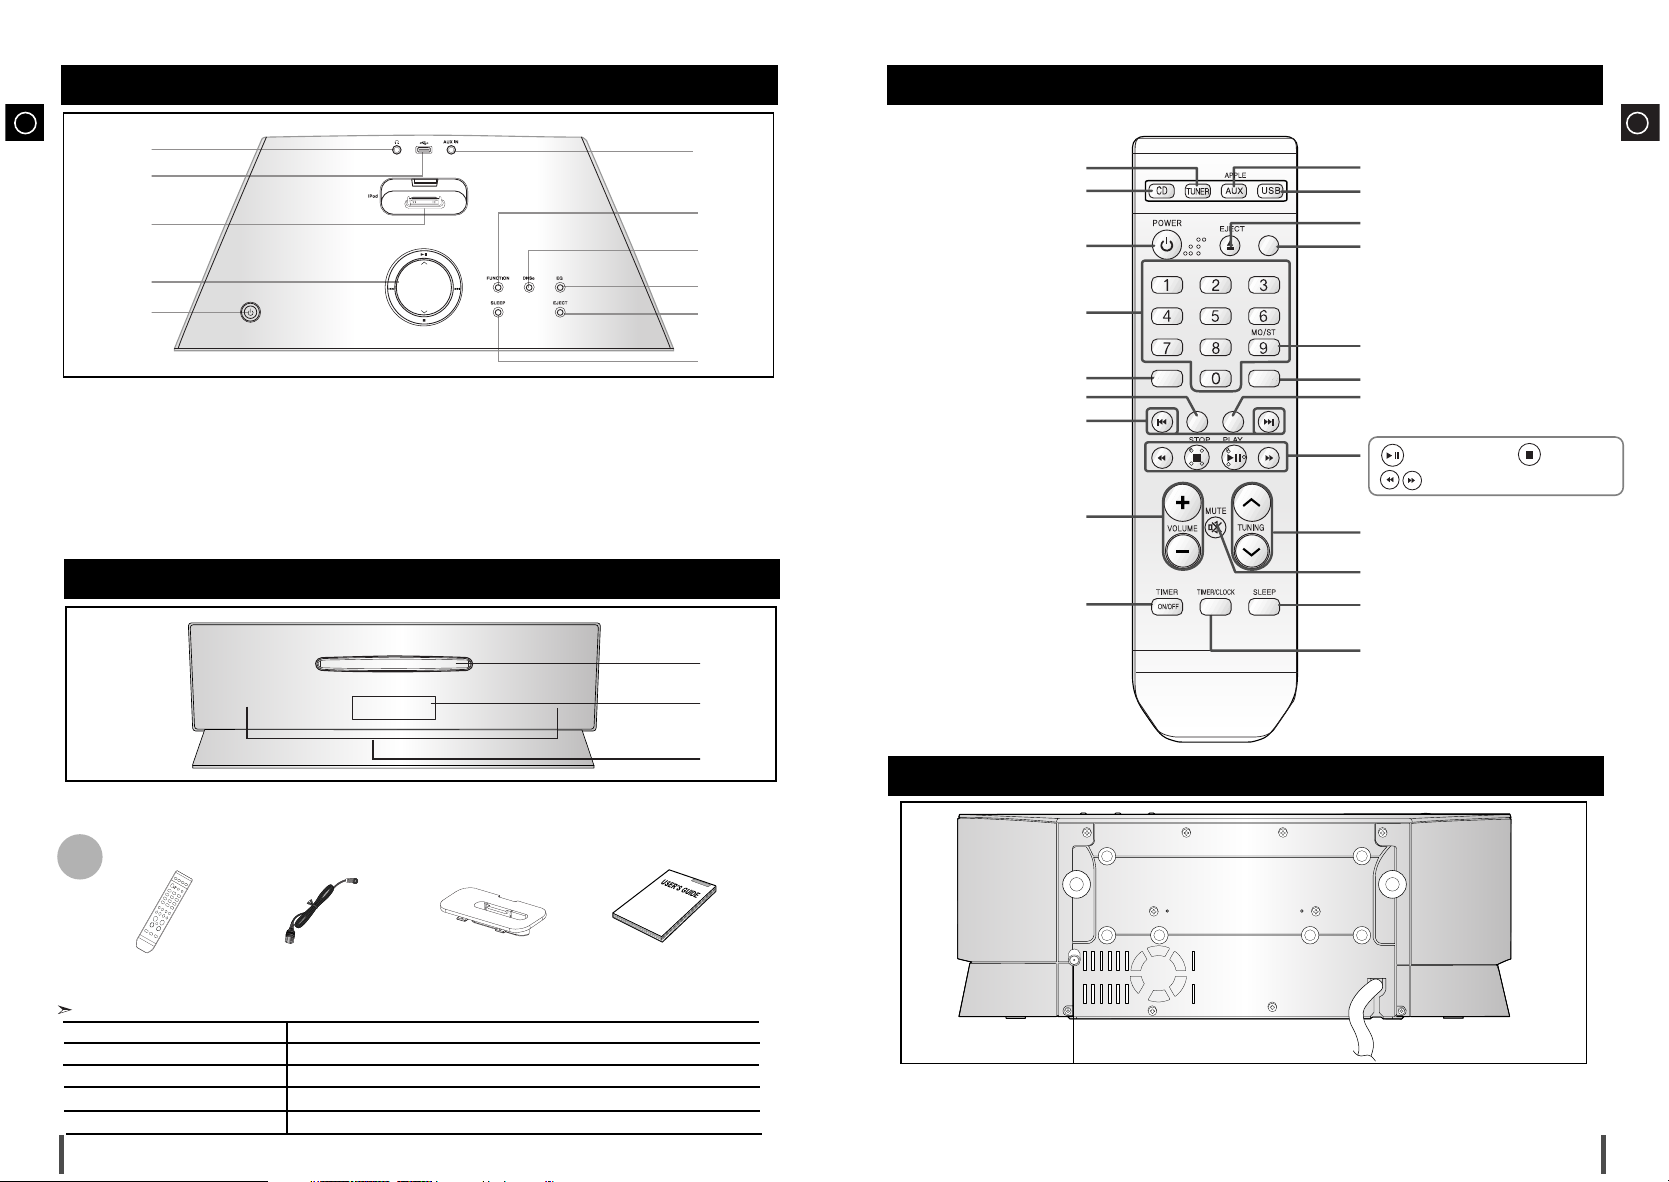
TOP Panel View Remote Control
1.
HEADPHONE JACK CONNECTOR
2. USB
3.
iPod
JACK
4.
SEARCH FUNCTION /
VOLUME CONTROL
BUTTONS
PLAY OR STOP BUTTON
5.
STANDBY/ON/ECO
6. SLEEP
7.
EJECT
8. EQ
9.
DNSe
10.
FUNCTION
11. AUX IN
1
2
3
4
5
7
6
8
9
10
11
DEMO/DIMMER
TUNER MEMORY
DNSe EQ
REPEAT
SET
POWER button
EJECT button
DEMO/DIMMER button
REPEAT button
CD button
USB button
TUNER button
Number(0~9) buttons
VOLUME button
SLEEP button
TUNER MEMORY/SET button
TIMER/CLOCK button
TIMER ON/OFF button
MO/ST button
TUNING button
EQ button
Skip button
SEARCH buttons
Play/Pause button
Stop button
MUTE button
AUX/APPLE button
DNSe button
FRONT Panel View
1.
CD DOOR
2. WINDOW DISPLAY
3. BUILT IN SPEAKERS
1
2
Rear Panel View
FM Antenna Connector Terminal
Remote Control
(AH59-01787J)
Accessories
iPod
cradle
(AH63-01529A,AH63-01530A,AH63-
01531A,AH63-01532A,AH63-01539A)
FM Antenna
(AH42-00017A)
3
User Manual
(AH68-01952M)
iPod cradle’s feature
1-Generation NANO
2-Generation NANO
5-Generation:iPod 30G,60G
5-Generation:iPod 60G,80G
iPhone
AH63-01529A
AH63-01530A
AH63-01531A
AH63-01532A
AH63-01539A
GB
7
The power cord must be plugged into an 120V AC wall
outlet.
Plug the power cord into an AC outlet.
Press the ( ) button to switch your micro component system on.
To take full advantage of your new micro component system,
follow these installation instructions before connecting
the unit.
Install the system on a flat, stable surface.
Never place this unit on carpeting.
Never place this unit in an outdoor area.
For ventilation purposes,maintain an open space of
approximately 6 inches (15 cm) on the sides and rear of
the system.
Make sure that you have enough room to open the compact disc compartment easily.
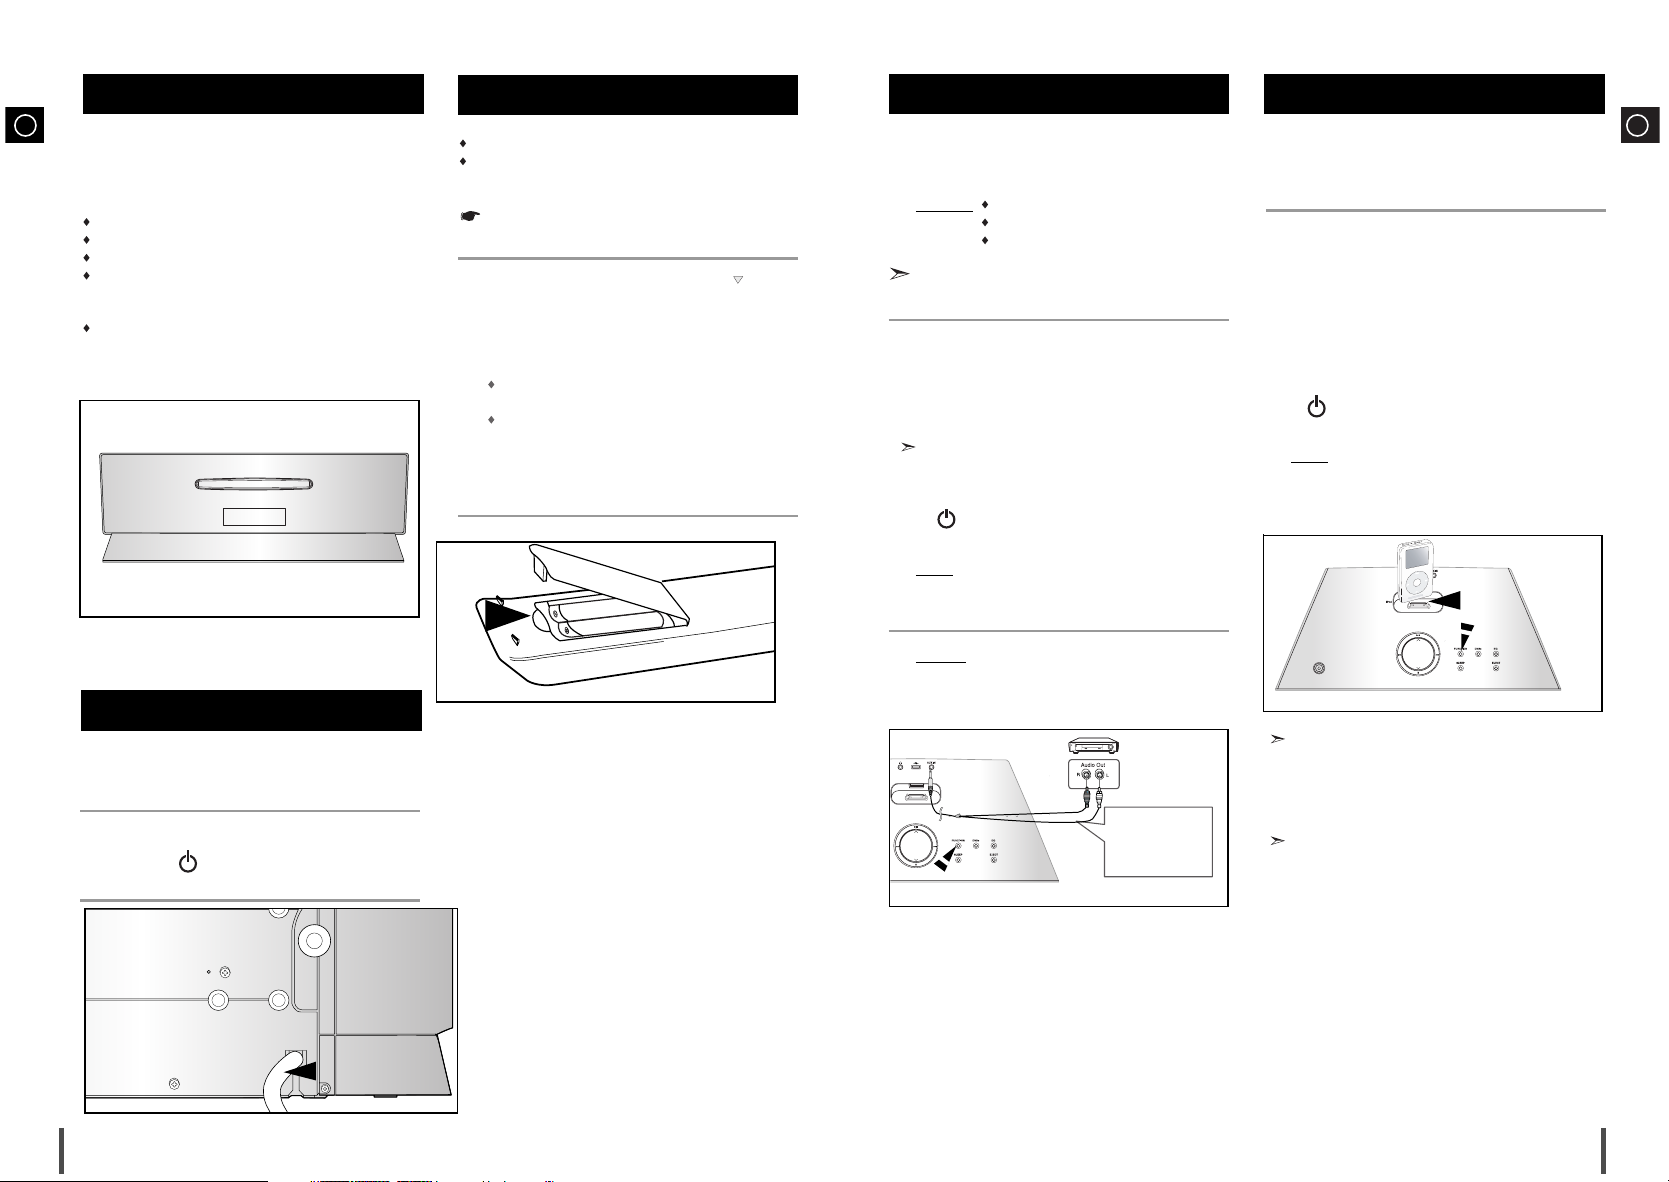
Where to Install Your Micro Component System
Connecting your System to the Power Supply
2
GB
6
Inserting Remote Control Batteries
Insert or replace remote control batteries when you:
Purchase the micro component system
Find that the remote control is no longer operating cor-
rectly
When replacing the batteries, use a new set of batteries and never mix alkaline and manganese batteries.
Place your thumb on the position marked on the
battery compartment cover (rear of the remote control) and pull the cover in the direction of the arrow.
Insert two AAA, LR03 or equivalent batteries, taking
care to respect the polarities:
+ on the battery against + in the battery
compartment
– on the battery against – in the battery
compartment
Replace the cover by sliding it back until it clicks into
position.
1
2
3
1
The auxiliary input can be used to take advantage of
the sound quality of your micro component system
when listening to other sources.
Examples
: A television
A DVD player
A VCR
To connect to the external source, the source must
have an audio output.
Set the system to standby mode and disconnect it
and the external source from the AC outlet.
Connect the audio cable to the rear of the micro component system.
For optimum sound quality, do not invert the right
and left channels.
Plug the system back into the AC outlet and press
( ) to switch it on.
Select the AUX source by pressing FUNCTION.
Result
: AUX is displayed.
Switch the external source on.
Example: You can watch a film on your DVD Player
and take advantage of stereo sound this
unit provides.
Connecting to an External Source
1
2
3
4
5
iPod Connection
You can listen to the audio from an iPod through the
main unit.
Audio Cable
If the external analog
component has only
one Audio Out, connect
either left or right.
iPod is registered trade mark of Apple
Computer,Inc.
When the unit is powered on and you connect an
iPod MP3 player, the unit will charge your iPod's
battery.
Set the system to standby mode and disconnect it
and the external source from the AC outlet.
Choose the appropriate iPod adapter and place into
the micro component system.Place the iPod into the
adapter and connect the iPod player to the top of the
micro component system.
Plug the system back into the AC outlet and press
( ) to switch it on.
Select the iPod source by pressing FUNCTION.
Result
: Apple is displayed.
Switch the iPod on.
1
2
3
4
5
 Loading...