

Page 1
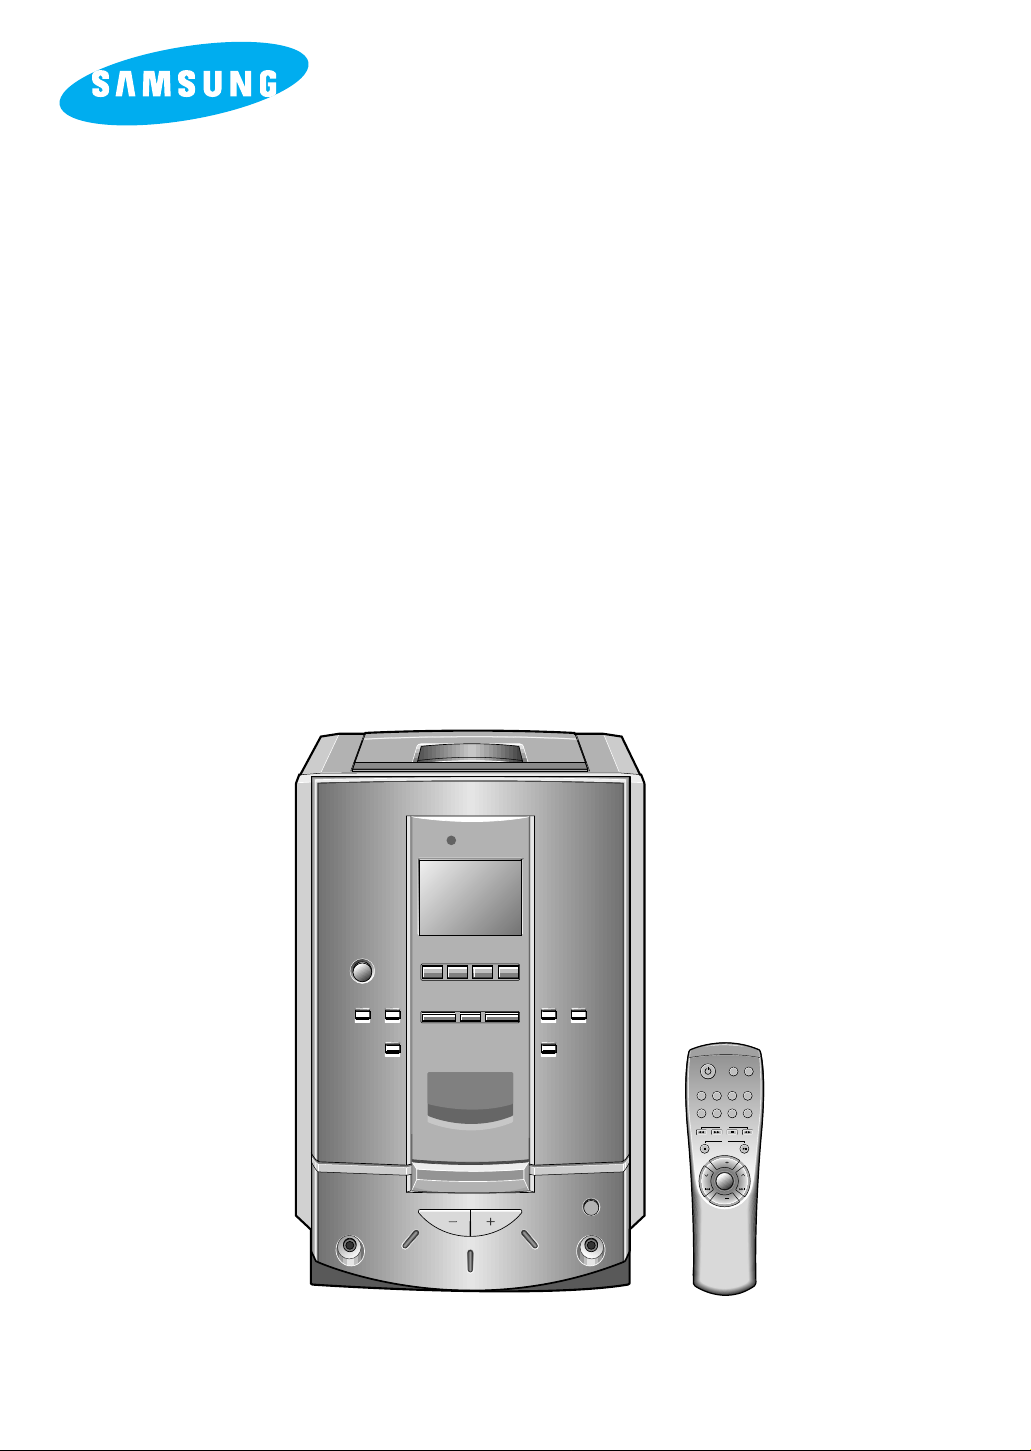
MICRO COMPONENT
SYSTEM WITH
REMOTE CONTROL
MM-N7
On/Standby
Power
Surround
Tuner
/Band
TAPE
Timer
On/Off
CD Repeat
Shuffle
Tape
Counter
Timer
/Clock
Program
/Set
Mono/ST
AI Off/Sleep
CD
CDCD
VOL.
VOL.
Tuning
Mode
Instruction Manual
Page 2
Safety Warnings
GB
2
CLASS 1 LASER PRODUCT
This Compact Disc player is classified as a CLASS 1
LASER product.
Use of controls adjustments or performance of procedures
other than those specified herein may result in hazardous
radiation exposure.
CAUTION-INVISIBLE LASER RADIATION WHEN OPEN
AND INTER LOCKS DEFEATED, AVOID EXPOSURE TO
BEAM.
WARNING: TO REDUCE THE RISK OF FIRE OR
ELECTRIC SHOCK, DO NOT EXPOSE
THIS APPLIANCE TO RAIN OR MOISTURE.
CAUTION: TO PREVENT ELECTRIC SHOCK, MATCH
WIDE BLADE OF PLUG TO WIDE SLOT,
FULLY INSERT.
CAUTION:
TO REDUCE THE RISK OF ELECTRIC SHOCK,
DO NOT REMOVE REAR COVER, NO USER
SERVICEABLE PARTS INSIDE, REFER SERVICING TO QUALIFIED SERVICE
PERSONNEL.
RISK OF ELECTRIC SHOCK.
DO NOT OPEN
CAUTION
CLASS 1 LASER PRODUCT
KLASSE 1 LASER PRODUKT
LUOKAN 1 LASER LAITE
KLASS 1 LASER APPARAT
PRODUCTO LASER CLASE 1
This symbol indicates that dan-gerous voltage constituting of a risk of electric shock is
present within this unit.
This symbol indicates that there are important operating and main-tenance instructions
in the owners manual accompanying this unit.
Page 3
Contents
GB
3
INSTALLING YOUR MICRO COMPONENT SYSTEM
Safety Warnings
...........................................................................................................................
2
Where to Install Your Micro Component System
.........................................................................
4
Inserting Remote Control Batteries
..............................................................................................
4
Connecting the Loudspeakers
......................................................................................................
4
Connecting Your System to the Power Supply
............................................................................
4
Connecting an AM(MW)/LW Aerial
...............................................................................................
5
Connecting an FM Aerial
..............................................................................................................
5
Setting the Clock
..........................................................................................................................
6
CD PLAYER
Listening to a Compact Disc
........................................................................................................
6
Precautions When Using Compact Discs
....................................................................................
7
CD Repeat Function
.....................................................................................................................
7
Programming the Order of Playback
............................................................................................
7
Checking and Changing Programmed Tracks
.............................................................................
8
TUNER
Searching for and Storing the Radio Stations
..........................................................................
8~9
Selecting a Stored Station
............................................................................................................
9
Improving Radio Reception
..........................................................................................................
9
TAPE DECK
Listening to a Cassette
...............................................................................................................
10
Selecting the Cassette Playback Mode
......................................................................................
10
Tape Counter
..............................................................................................................................
10
Maintaining the Sound Quality
...................................................................................................
10
Recording a Radio Programme
..................................................................................................
11
Recording a CD with the CD Synchro Feature
...........................................................................
11
Repeat (A B) Function
...........................................................................................................
11
Recommendations for Recording
...............................................................................................
11
OTHER FEATURES
Timer Function
............................................................................................................................
12
Cancelling the Timer
...................................................................................................................
12
Setting the System to Switch Off Automatically
.........................................................................
13
Shuffle Play Function
..................................................................................................................
13
Equalizer
.....................................................................................................................................
13
Mic Function(Option)
..................................................................................................................
13
Power Surround function
............................................................................................................
14
Connecting Headphones
............................................................................................................
14
Connecting to an External Source
.............................................................................................
14
Safety Precautions
.....................................................................................................................
15
Before Contacting the After-Sales Service
.................................................................................
15
Front Panel View
........................................................................................................................
16
Remote Control
..........................................................................................................................
17
Rear Panel View
.........................................................................................................................
18
Technical Specifications
.............................................................................................................
18
You have just purchased
a SAMSUNG micro component system.
Please take the time to read these instructions,
as they will enable you to set up your
player easily and take full advantage
of its features.
Page 4
GB
4
To take full advantage of your new MICRO component system,
follow these installation instructions before connecting the unit.
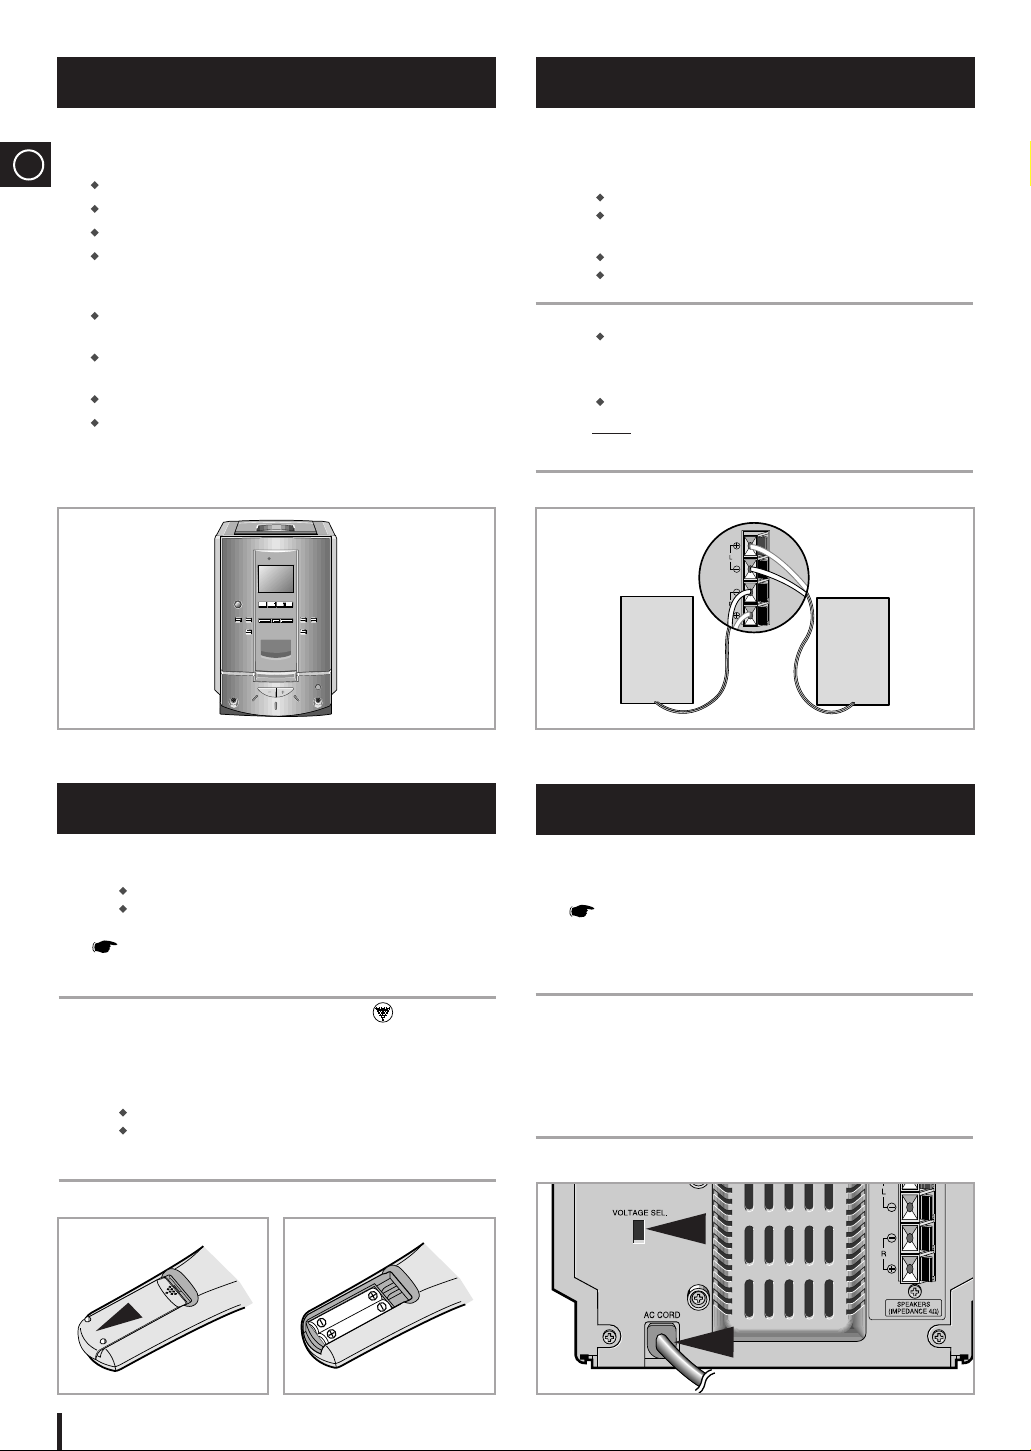
Install the system on a flat, stable surface.
Never place this unit on carpeting.
Never locate this unit in an outdoor area.
Maintain an open space of approximately 4 inches
(10 cm) on the sides and rear of the system, for
ventilation purposes.
Make sure that you have enough room to open the
compact disc compartment easily.
Place the loudspeakers at a reasonable distance on either
side of the system to ensure good stereo sound.
Direct the loudspeakers towards the listening area.
For optimum performance, make sure that both speakers
are placed at an equal distance above the floor.
Insert or replace remote control batteries when you:
Purchase the Micro component system
Find that the remote control is no longer operating
correctly
When replacing the batteries, use a new set of batteries
and never mix alkaline and manganese batteries.
1 Place your thumb on the position marked on the battery
compartment cover (rear of the remote control) and push the
cover in the direction of the arrow.
2 Insert two AAA, LR03 or equivalent batteries, taking care to
respect the polarities:
+ on the battery against + on the remote control
– on the battery against – on the remote control
3 Replace the cover by sliding it back until it clicks into position.
The loudspeaker connector terminals are located on the rear of the
system (red and black tabs).
There are four terminals on the system:
Two for the left speaker (marked L)
Two for the right speaker (marked R)
To achieve the correct sound quality, connect the:
Red wire to the + terminals
Black wire to the -terminals
1 To connect a wire to a terminal, push the tab as far as it will go:
To the right on the system and hold it in position
2 Insert the wire, up to the plastic sheathing, in the hole.
3 Push the tab back:
To the left on the system, release the tab.
Result: The wire is pinched and held firmly in place.
4 Repeat the operation for each wire.
The power cord lead must be plugged into an appropriate socket.
Before plugging your system into an outlet, you must check
the voltage setting (OPTIONAL). If the voltage of the socket
does not correspond to the setting on the rear of the unit,
you may seriously damage your system.
1 Check the position of the voltage selector on the rear of the
system (OPTIONAL).
2 Plug the power cord (marked AC CORD on the rear of the
system) into an appropriate socket.
3 Press the On/Standby button to switch your Micro component
system on.
Where to Install Your Micro-Component System
Inserting Remote Control Batteries
Connecting the Loudspeakers
Connecting Your System to the Power Supply
Option
Page 5

GB
5
The AM(MW)/LW aerial (for long and medium waves) can be:
Placed on a stable surface
Fixed to the wall (you must first remove the base)
The AM aerial connector terminals are located on the rear of the system
and are marked AM ANT.
To avoid noise interference, check that the loudspeaker wires do
not run close to the aerial wires.
Always keep them at least 2 inches (5 cm) away.
There are two types of aerials, follow the instructions below
(depending on option chosen).
How to connect a COAXIAL TYPE areial.
Connect a 75Ω antenna to the FM aerial terminal.
Plug the connector on the FM aerial supplied into the coaxial
socket (75Ω) marked FM on the rear of the system.
Follow the instructions given on Page 8 to tune into a radio
station, and determine the best position for the aerial.
If reception is poor, you may need to install an outdoor aerial.
To do so, connect an outdoor FM aerial to the FM socket on the
rear of the system, using a 75Ω coaxial cable (not supplied).
How to connect a SCREW TYPE wire aerial.
The FM aerial connector terminals are located on the rear of the
system and marked FM(75Ω).
Spread the T.form FM aerial out and attach the ends to a wall,
in the position providing the best reception.
Connecting the AM(MW)/LW Aerial
Connecting the FM Aerial
1
2
FM AERIAL
(supplied)
75Ω COAXIAL CABLE
(not supplied)
FM FM
Page 6
GB
6
Your system is equipped with a clock which allows you to turn
your system on and aff automatically. You should set the clock:
When you purchase the Micro component system
After a power failure
After unplugging the unit
For each step, you have a few seconds to set the required
options. If you exceed this time, you must start again.
1 Switch the system on by pressing On/Standby.
2 Press Timer/Clock twice.
Result: CLOCK is displayed.
3 Press Program/Set.
Result: The hour flashes.
4 To... Press...
Increase the hours
Decrease the hours
5 When the correct hour is displayed, press Program/Set.
Result: The minutes flash.
6 To... Press...
Increase the minutes
Decrease the minutes
7 When the correct time is displayed, press Program/Set.
Result: The clock starts and is displayed, even when the
system is in standby mode.
You can display the time, even when you are using another
function, by pressing Timer/Clock once.
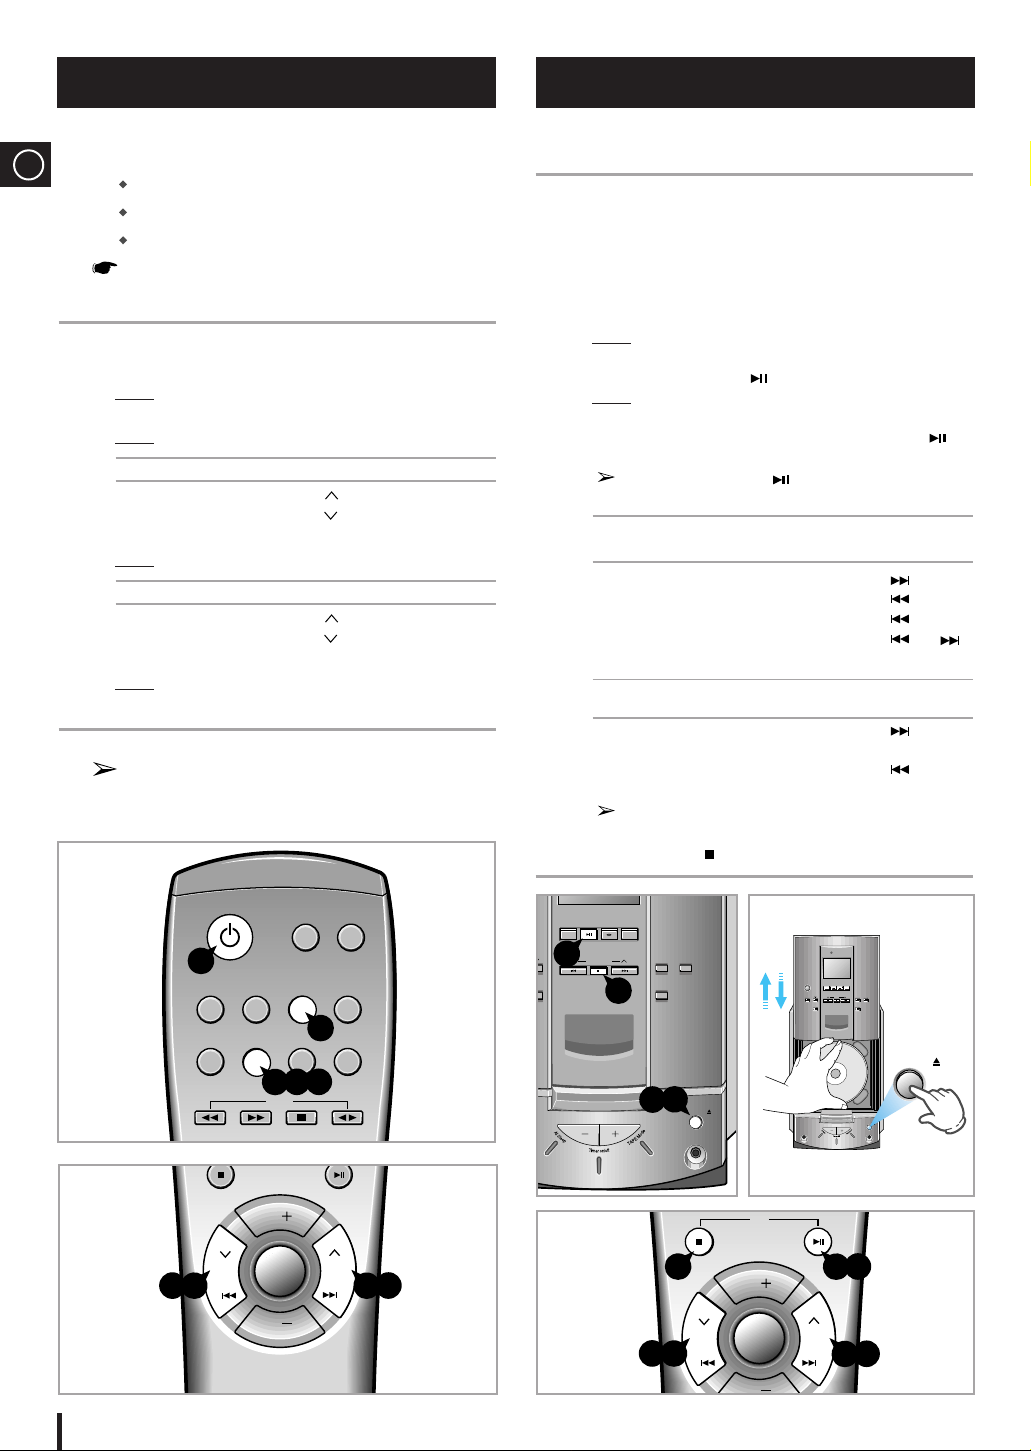
You can play 12 cm or 8 cm compact discs without an adapter.
1 Select the CD function by pressing CD on the front panel.
2 Open the compact disc compartment by pressing down and
releasing the cover.
3 Place your disc in the compartment, with the label on the disc
facing upwards.
4 Close the compartment by pushing down on the cover until it
clicks into place.
Result: The display indicates the number of tracks
on the disc.
5 Press the PLAY/PAUSE ( ) button.
Result: The first track on the disc plays and the track
number is displayed.
6 To stop playback temporarily, press the PLAY/PAUSE ( )
button.
Press PLAY/PAUSE ( ) again to continue playing
the disc.
7 To start playing Press...
at the beginning of...
The next track SKIP/SEARCH once
The current track SKIP/SEARCH once
The previous track SKIP/SEARCH twice
The track of your choice SKIP/SEARCH or
the appropriate number of times
8 To search through Press and hold down...
the tracks...
Forwards SKIP/SEARCH until you
reach the required point
Backwards SKIP/SEARCH until you
reach the required point
You are advised to turn the volume down before using
this function.
9 Press the STOP ( ) button when you have finished.
Setting the Clock
CDCD
VOL.
VOL.
Tuning
Mode
2
1
7
446
6
35
Listening to a Compact Disc
CD
CDCD
VOL.
Tuning
Mode
e
9
1
778
8
9
56
24
On/Standby
AI Off/Sleep
CD Repeat
CD
Timer
On/Off
Program
/Set
Power
Surround
Timer
/Clock
Shuffle
TAPE
CD
Tuner
/Band
Mono/ST
Tape
Counter
TUNER CD
TAPE
Tuning Mode
VOLUME
AUX
CD Synchro REC/Pause
TUNER CD TAPE
AUX
On/
Standby
Band
Power
Surround
Open/Close
Mic
CD CD
Repeat
(A B)
CD Repeat
CD SynchroREC/Pause
Tuning
Preset EQ
VOLUME
Phones Mic
Power
Surround
Open/Close
Open/Close
by
Band
at
B)
Page 7

GB
7
To guarantee hours of enjoyable listening with your compact
discs:
Always hold them by the edges to avoid leaving
fingerprints on the shiny surface
Always replace them in their cases after listening to
them
Do not fix paper or adhesive tape to the discs and do
not write on the label
Clean the player with a special cleaning disc
You can repeat:
A specific track on a compact disc
All tracks on the compact disc
This function is not available when playing a disc in a
random sequence.
1 Press the CD Repeat button.
To repeat the... Press CD Repeat...
Current track indefinitely
Once (REPEAT 1 is displayed)
Disc
Twice (REPEAT ALL is displayed)
2 When you wish to stop the Repeat function, press CD Repeat
a third time.
Result: REPEATis no longer displayed and the function is
cancelled.
You can decide for yourself:
The order in which you listen to the tracks
The tracks to which you do not wish to listen
This feature can be combined with the Repeat function.
1 If necessary, stop the player by pressing STOP ( ).
2 Press Program/Set.
Result: PROGRAM and P-01-- are displayed.
3 Select the required track by pressing the SKIP buttons:
to move backwards through the tracks
to move forwards through the tracks
4 Press Program/Set.
Result: P-02-- is displayed.
5 To select other tracks, repeat Steps 3 and 4.
You can programme up to 15 tracks.
6 When you have finished selecting the tracks, press CD ( )
to start listening to the selection, in the order in which the
tracks were programmed.
7 Press STOP ( ) twice to cancel the selection when the disc is
playing.
Precautions When Using Compact Discs
CD Repeat Function
12
Programming the Order of Playback
TAPE
Timer
On/Off
CD Repeat
Shuffle
Tape
Counter
Timer
/Clock
Program
/Set
Mono/ST
AI Off/Sleep
CD
CDCD
VOL.
VOL.
Tuning
Mode
214
7
3
6
3
AI Off/Sleep
CD Repeat
On/Off
Program
/Clock
Mono/ST
Tape
Shuffle
/Set
TAPE
Counter
CD
CD
CD
Page 8

GB
8
You can check and change your selection of tracks at any time.
You must have selected at least one track.
1 Press STOP ( ) once if you have started listening to the
selection.
2 Press Program/Set.
Each time you press Program/Set, the next selection is
displayed.
3 Press Program/Set one or more times until the track to be
changed is displayed.
4 Press SKIP or to select the new track.
5 Press CD ( ) to start listening to the selection.
Result: The first track selected is played.
You can change one or more tracks in your initial selection.
You can store up to:
15 FM stations
(option)
15 AM stations
15 FM stations
8 MW(AM) stations
(option)
7 LW stations
15 FM stations
5 MW(AM) stations
(option)
5 SW1 stations
5 SW2 stations
1 Switch the system on by pressing On/Standby.
2 Select the TUNER function by pressing TUNER/Band on the
front panel.
3 Select the required frequency band by pressing TUNER/Band
again on the front panel or Tuner/Band on the remote control.
Result: The appropriate indication is displayed:
FM Frequency Modulation
AM(MW) Medium Wave
LW(OPTION) Long Wave
SW1, SW2(OPTION) Short Wave
4 To search for a Press Tuning Mode button
station... on the front panel....
Manually
One or more times until MANUAL is displayed.
Automatically
One or more times until AUTO is displayed
.
5 Select the station to be stored by:
Pressing Tuning Mode or on the front panel
or
Pressing Tuning Mode or on the remote control
To scroll through the frequencies faster when searching
manually, hold down the Tuning Mode or buttons.
The automatic search procedure may stop on a frequency
that does not correspond to a radio station. If this happens,
use the manual search mode.
Checking and Changing Programmed Tracks
On/Standby
Power
Surround
Tuner
/Band
TAPE
Timer
On/Off
CD Repeat
Shuffle
Tape
Counter
Timer
/Clock
Program
/Set
Mono/ST
AI Off/Sleep
CD
CDCD
VOL.
VOL.
Tuning
Mode
Searching for and Storing the Radio Stations
23
5
1
4
4
23
1
5
4
5
CD
TUNER CD TAPE
On/
Band
Standby
Band
Repeat
(A B)
CD Repeat
Preset EQ
Tuning Mode
AUX
CD Synchro REC/Pause
Power
Surround
CD
Page 9

GB
9
6 Adjust the volume by:
Pressing VOLUME + or -on the front panel
or
Pressing the VOL. + or -buttons on the remote control
7 Select the stereo or mono mode by pressing Mono/ST.
Result:
The STEREO indicator is displayed when selected.
8 If you do not want to store the radio station found, revert to Step
4 and search for another station.
Otherwise:
a Press Program/Set.
Result: The program number and PROGRAM are displayed
for a few seconds.
b Press Tuning Mode and to assign a program
number between 1 and 15.
c Press Program/Set to store the radio station.
Result: PROGRAM is no longer displayed and the station is
stored.
9 T o store any other radio frequencies required, repeat Steps 3 to 8.
The PROGRAM function can be used to assign a new
station to an existing program number.
You can listen to a stored radio station as follows:
1 Switch the system on by pressing On/Standby.
2 Select the TUNER function by pressing TUNER/Band button.
3 Select the required frequency band by pressing Tuner/Band
on the remote control or TUNER/Band again on the front
panel.
4 Select the radio station as follows.
To listen to ... Press ...
A stored station a Press the Tuning Mode button
until “PRESET” is displayed.
b TUNING and to select the
required program.
Another station TUNING and until the
required frequency is displayed.
Press Tuning Mode again to exit the stored station
selection function.
You can improve the quality of radio reception by:
Rotating the FM or AM(MW) aerial
Testing the positions of the FM and AM(MW) aerials
before fixing them permanently
If reception from a specific FM radio station is poor,
press Mono/ST to switch from stereo mode to mono.
The quality of the sound will be improved.
Selecting a Stored Station
Improving Radio Reception
On/Standby
Power
Surround
Tuner
/Band
Timer
On/Off
CD Repeat
Shuffle
Tape
Counter
Timer
/Clock
Program
/Set
Mono/ST
AI Off/Sleep
Searching for and Storing the Radio Stations(continued)
On/Standby
Power
Surround
Tuner
/Band
TAPE
Timer
On/Off
CD Repeat
Shuffle
Tape
Counter
Timer
/Clock
Program
/Set
Mono/ST
AI Off/Sleep
8
8
8
6
6
7
8
6
8
1
23
4
4
4
Timer
On/Off
Program
/Set
Timer
/Clock
Shuffle
Mono/ST
Tape
Counter
AI Off/Sleep
CD Repeat
CD
VOL.
Tuning
Tuning
Mode
Mode
CDCD
CD
CD
VOL.
TAPE
CD
VOL.
VOL.
Tuning
Mode
CDCD
CD
VOL.
VOL.
CD
TUNER CD
TAPE
Tuning Mode
VOLUME
AUX
On/
Standby
Band
Repeat
(A B)
CD Repeat
Preset EQ
Phones Mic
CD Synchro REC/Pause
Power
Surround
Open/Close
Page 10

GB
10
1 Switch the system on by pressing On/Standby.
2 Select the TAPE function by pressing TAPE on the front panel.
3 Open the cassette deck by pushing on the corner of the cover
marked Push Open until you hear a click and then releasing it.
4 Insert the pre-recorded cassette with the open edge of the
tape facing downwards.
5 Close the deck by pushing on it until it clicks into place.
6 To listen to... Press...
Side A
Side B
Result: The cassette starts playing.
7 Press any of the following buttons during playback, as required.
To... Press...
Listen to the same track again once
Listen to the next track once
Listen to the previous track twice
Listen to the track of your choice or
the appropriate
number of times
Result: The number of tracks remaining is displayed and
changes as you move forward or backward
through the tracks.
If there are very quiet passages on a track, the
automatic search function may stop before the end of
the track. Also, a very short silence between two tracks
may not be detected.
8 To... Press...
Adjust the volume VOL. + or – (or the
VOLUME + or – buttons
on the front panel)
Stop the playback or search STOP ( )
9 When the cassette is stopped, select one of the following
functions as required.
To... Press...
Rewind the cassette
Fast-forward the cassette
The cassette player stops automatically when the
beginning or end of the cassette is reached.
Your micro audio system has three cassette playback modes which
enable you to listen to both sides of a cassette automatically.
You can select this function during playback or when the
cassette is stopped.
Press TAPE Mode one or more times to display the required symbol.
When the display The system plays back...
indicates...
One side of the cassette and then stops.
One side of the cassette
The other side of the cassette and then stops
Both sides of the cassette indefinitely (both sides
are played one after the other until you stop the
player).
When playing a cassette, a counter is displayed to enable you to take
note of the counter value at the start of each track and thus start
playback at the beginning of the track to which you wish to listen.
The counter is only displayed when a cassette is being played.
Before starting to record a cassette for which you wish to take note of
the counter values at the beginning of each track, reset the counter by
pressing Tape Counter.
To obtain the best possible results from your cassette player,
you must clean it regularly (heads, roller and drive capstan).
Open the deck by pressing the Push Open button.
Use a cotton bud and a special cassette cleaning agent to clean the:
Heads ( )
Roller ( )
Drive capstan ( )
To guarantee hours of enjoyable listening with your cassettes:
Check that the tape in the cassette is always sufficiently taut.
Store your cassettes in a clean place, out of direct sunlight, where
they will not be exposed to high temperatures.
Avoid using 120-minute cassettes as they are extremely fragile.
Listening to a Cassette
TAPE
CD Re eat
Shuffle
Counter/Set
CD
Selecting the Cassette Playback Mode
VOLUME
Phones Mic
Open/Close
Tape Counter
Maintaining the Sound Quality
CD Repeat
Shuffle
Tape
Counter
Program
/Set
1
26
35
79
8
8
8
8
79
TUNER CD TAPE
On/
Standby
Band
Repeat
(A B)
CD Repeat
Preset EQ
TUNER CD TAPE
Band
Repeat
(A B)
Tuning Mode
AUX
CD Synchro REC/Pause
Power
On/
Standby
CD Repeat
Preset EQ
Tuning Mode
VOL.
VOL.
Tuning
Mode
VOL.
VOL.
AUX
CD Synchro REC/Pause
CDCD
Power
Surround
33
12 2
Page 11

GB
11
You can record a radio programme of your choice and listen to it
at a later date.
1 Insert a blank cassette in the cassette deck.
2 Press Tuner/Band to select the radio function.
3 Select the radio station that you wish to records.
4 To start recording, press the REC/Pause button.
Result: Recording starts immediately.
5 To stop recording temporarily, press the REC/Pause button.
6 When you wish to stop recording, press the STOP ( ) button.
You can record a compact disc on a cassette.
1 Insert a blank cassette in the cassette deck.
2 Press the CD button to select the CD mode.
3 Load the compact disc.
4 Press the CD Synchro button.
Result: The first track on the disc is played and the player
starts recording automatically (synchronised
recording).
5 When you have finished recording, press the STOP( ) button.
If the volume is set to “0” nothing will be recorded.
When you select CD(TAPE) Repeat (A B) playback, the music
passages to which you were listening is repeated 3 times.
1 Press CD( )/TAPE( ) button.
Result: The CD(TAPE) player starts playing.
2 Press Repeat (A B) button.
Result: The indications appear: START
The flashes appear: AB
A Time is memorized.
3 Press Repeat (A B) button.
Result: The indications appear: END
B Time is memorized.
Your selected passages are repeated 3 times.
4 When you have finished the Repeat playback,
Press Repeat (A B).
Record on normal bias cassettes only.
To prevent erasing a cassette that you wish to keep,
remove the safety tabs on the upper edge of the
cassette. To re-record a cassette, where the tabs have
been broken, simply cover the openings with
adhesive tape.
It is an infringement of copyright laws to copy
records and pre-recorded cassettes or to re-record
them in any form without the permission of the
owners of the corresponding copyright.
Recording a Radio Programme
Repeat (A B) Function
TUNER CD TAPE
Tuning Mode
Band
CD Synchro REC/Pause
Power
Surround
AUX
Recording a CD with the CD Synchro Feature
Recommendations for Recording
2
45
6
5
2
4
1
1
423
6
CD Repeat
Program
/Set
Shuffle
Tape
Counter
Band
TAPE
CD
VOL.
CD Repeat
Preset EQ
On/
Standby
Repeat
(A B)
TUNER CD TAPE
Band
Tuning Mode
AUX
CD Synchro REC/Pause
Power
Surround
CD Repeat
Preset EQ
On/
Standby
(A B)
Repeat
TUNER CD TAPE
Band
Tuning Mode
AUX
CD Synchro REC/Pause
Power
Surround
Page 12

GB
12
The timer enables you to switch the system on or off at specific times.
Example: You wish to wake up to music every morning.
If you no longer want the system to be switched on or off
automatically, you must cancel the timer.
Before setting the timer, check that the current
time is correct.
For each step, you have a few seconds to set
the required options. If you exceed this time,
you must start again.
1 Switch the system on by pressing On/Standby.
2 Press Timer/Clock until TIMER is displayed.
3 Press Program/Set.
Result: ON TIME is displayed (instead of the equalizer
symbols) for a few seconds, followed by any
switch-on time already set; you can set the timer
switch-on time.
4 Set the timer switch-on time.
a Set the hour by pressing TUNING and .
b Press Program/Set.
Result: The minutes flash.
c Set the minutes by pressing TUNING and .
d Press Program/Set.
Result: OFF TIME is displayed (instead of the equalizer
symbols) for a few seconds, followed by any
switch-off time already set; you can now set the
timer switch-off time.
5 Set the timer switch-off time.
a Set the hour by pressing TUNING and .
b Press Program/Set.
Result: The minutes flash.
c Set the minutes by pressing TUNING and .
d Press Program/Set.
Result:VOL XX is displayed, where XX corresponds to
the volume already set.
6 Press TUNING and to adjust the volume level and
press Program/Set.
Result: The source to be selected is displayed.
7 Press TUNING and to select the source to be played
when the system switches on.
If you select... You must also...
TAPE (cassette) Insert a recorded cassette in one of
the decks before setting the system
to standby.
TUNER (radio) a Select the FM or AM frequency
band by pressing TUNING Mode
and .
b Press Program/Set.
c Select a preset station by pressing
TUNING Mode and .
CD (compact disc) a Load one or more compact discs.
8 Press On/Standby to set the system to standby mode.
Result:
is displayed to the bottom left of the time, indicating
that the timer has been set. The system will switch on
and off automatically at the required times.
If the timer switch on and off times are identical, the word
ERROR is displayed.
After having set the timer, it will start automatically as shown by
the indication on the display. If you no longer wish to use the
timer, you must cancel it.
You can stop the timer at any time (system on or in standby
mode).
To... Press Timer On/Off...
Cancel the timer Once.
Result: is no longer displayed.
Restart the timer Twice.
Result: is displayed again.
Timer Function
On/Standby
Power
Surround
Tuner
/Band
TAPE
Timer
On/Off
CD Repeat
Shuffle
Tape
Counter
Timer
/Clock
Program
/Set
Mono/ST
AI Off/Sleep
Cancelling the Timer
667
7
445
5
67435
2
18
On/Standby
AI Off/Sleep
CD Repeat
CD
Timer
On/Off
Program
/Set
VOL.
Tuning
VOL.
TAPE
CD
Mode
Power
Surround
Timer
/Clock
Shuffle
Tuner
/Band
Mono/ST
Tape
Counter
CDCD
CD
Page 13

GB
13
While listening to a compact disc or a cassette, you can set the
system to switch off automatically.
Example: You wish to go to sleep to music.
1 Press AI Off/Sleep.
Result: Playback starts and the following indications are
displayed:
2 Press AI Off/Sleep one or more times to indicate how long the
system should continue playing before it switches off:
At any time, you can:
Check the remaining time by pressing AI Off/Sleep.
Change the remaining time by repeating steps 1 and 2.
3 Press AI Off/Sleep one or more times until AI SLEEP is
displayed.
Result: The system will automatically switch off at the end of disc
or cassette.
4 To cancel SLEEP or AI OFF function, press AI Off/Sleep one
or more times until OFF is displayed.
You can listen to tracks on a compact disc in a different order
each time, as the various tracks will be selected automatically in a
random sequence.
1 Press the Shuuffle button.
Result: The Shuffle indication appears and all the tracks are
played in a random order. Both the track number and the
playing time are displayed.
2 When playing tracks in a random order, you can;
Move on to the next track (selected at random) by
pressing
/
for less than one second.
Search quickly for a specific point in the current track by
pressing
/
for more than one second.
3 To cancel this funtion, press STOP ( ) button.
Your micro audio system is equipped with a preset equalizer that
enables you to choose the most appropriate balance between treble
and bass frequencies, according to the type of music to which you
are listening.
Press the Preset EQ button one or more times until the required option
is selected.
To obtain a... Select...
Standard balance (linear) PASS
Balance suitable for classical music CLASSIC
Balance suitable for rock music ROCK
Balance suitable for pop music POP
Result
: The corresponding indication is displayed.
Setting the System to Switch Off Automatically
Equalizer
Timer
On/Off
CD Repeat
Shuffle
Tape
Counter
Timer
/Clock
Program
/Set
Mono/ST
AI Off/Sleep
312
Suffle Play Function
TAPE
Timer
On/Off
Shuffle
Tape
Counter
Timer
/Clock
Program
/Set
Mono/ST
CD
1
TUNER CD TAPE
Tuning Mode
Band
CD Synchro REC/P
Power
Surround
AUX
On/
Standby
Repeat
(A B)
eset EQ
2
2
3
Preparation
Plug the microphone with a 3.5mm phono jack connector into
microphone terminal.
Mic Function (Option)
90 MIN(AI Sleep) 60 MIN 45 MIN
OFF 15 MIN 30 MIN
CD Repeat
Preset EQ
On/
Standby
Repeat
(A B)
TUNER CD TAPE
Band
Tuning Mode
AUX
CD Synchro REC/Pause
Power
Surround
Power
Surround
VOLUME
Open/Close
Mic
Page 14

GB
14
This machine is equipped with the function of Power Surround which
amplifies bass treble output to twice as much for powerful real
surround-sound.
1 Press the Power Surround button.
Result: P--SURR is displayed for a few seconds.
A more powerful resonant sound is diffused.
2 To cancel this function, press Power Surround button again.
You can connect a set of headphones to your micro component
system so that you can listen to music or radio programs without
disturbing other people in the room. The headphones must have a
3.5 mm connector or appropriate adapter.
Connect the headphones to the Phones connector on the front panel
(bottom left corner).
Result: The loudspeakers are no longer used for sound output .
Prolonged use of headphones at a high volume may damage
your hearing.
The auxiliary input can be used to take advantage of the sound
quality of your micro audio system when listening to other
sources.
Example
: A television
A video disc player
A DAT or DCC cassette player
A Hi-Fi stereo video cassette recorder
To connect to an external source, the external source must
have an audio output terminal. In addition, you need an RCA
connection cable.
1 Before connecting to an external source, set the system to standby
mode and disconnect it and the external source from the outlet.
2 Connect the audio cable to the rear of the system.
Connect the... To the connector marked...
Red jack R (right)
White jack L (left)
For optimum sound quality, do not invert the right and left
channels.
3 Plug the system back into the wall outlet and press On/Standby
to switch it on.
4 Press AUX.
Result: AUX is displayed.
5 Switch the external source on.
6 Adjust the volume and balance as required:
Volume
Equalizer
Example: You can watch a film and take advantage of stereo
sound as if you were at the cinema (provided that
the original sound track is in stereo).
Power Surround function
Connecting Headphones
Connecting to an External Source
TUNER CD
VOLUME
TAPE
Tuning Mode
Band
CD Synchro REC/Pause
Power
Surround
Phones Mic
AUX
On/
Standby
Repeat
(A B)
CD Repeat
Preset EQ
Open/Close
3
4
CD Repeat
Preset EQ
On/
Standby
(A B)
Repeat
TUNER CD TAPE
Band
Tuning Mode
AUX
CD Synchro REC/Pause
Power
Surround
Open/Close
TUNER CD TAPE
On/
Standby
Band
Repeat
(A B)
CD Repeat
Preset EQ
Tuning Mode
AUX
CD Synchro REC/Pause
Power
Surround
Page 15

GB
15
The following diagrams illustrate the precautions to be taken
when using or moving your Micro component system.
Safety Precautions
H
10%
5°
35°
H
75%
Ambient operating conditions:
Ambient temperature 5°C-35°C
Humidity 10-75%
Do not expose the unit to direct sun
radiation or other heat sources.
This could lead to overheating and
malfunction of the unit.
Do not place potted plants or vases on
top of the unit. Moisture entering the
unit could lead to dangerous electric
shock and cause equipment damage.
In such events immediately disconnect
the power cord from the socket.
During thunderstorms, disconnect
the power cord from the socket.
A voltage surge due to lightning
could damage the unit.
Remove the batteries from the
remote control, if not used for any
extended periods.
Leaking batteries can cause serious
damage to the remote control.
When using headphones, take care
not to listen at excessive volumes.
Extended use of headphones at
high volumes will lead to hearing
damage.
Do not remove any equipment panels.
The inside of the unit contains live
components, which cause electric
shock.
Do not place heavy items on the
power cord. Power cord damage
can lead to damage of the
equipment (fire hazard) or cause
electric shock.
Before Contacting the After-Sales Service
It always takes a little time to become familiar with a new appliance.
If you have any of the problems listed below, try the solutions given.
They may save you the time and inconvenience of an unnecessary
service call.
If the above guidelines do not allow you to solve the problem, take
a note of:
The model and serial numbers, normally printed on
the rear of the system
Your warranty details
A clear description of the problem
Then contact your local dealer or SAMSUNG after-sales service.
Problem
The system does not work
There is no sound
The Timer does not work
Incase it is not worked, even
the action is taken as above.
The compact disc player does not
start playing
The tape does not start playing
The volume falls off
The cassette is not erased correctly
There is excessive wow and flutter
Reception is poor or no radio stations
are received at all
G
E
N
E
R
A
L
C
D
R
A
D
I
O
C
A
S
S
E
T
T
E
S
Checks/Explanation
• T
he power cord is not correctly plugged into a wall
socket or the wall socket is not switched on
.
• The remote control batteries need replacing or
the polarity has not been respected.
• The On/Standby button has not been pressed.
• The volume has been completely turned down.
• The correct function (TUNER, CD, TAPE, AUX)
has not been selected.
• You have connected a set of earphones.
•
The loudspeaker wires have been disconnected.
• The timer has been stopped by pressing Timer
On/Off.
Press the Power Surround button for
5 seconds in power ‘OFF’(standby), then it is
returned the original position (RESET).
• The CD function has not been selected.
• The disc has been inserted face down or is either
dirty or scratched.
• The laser sensor is dirty or dusty.
• The system has not been installed on a flat, horizontal surface.
• Condensation has formed in the player; leave the
system in a warm, airy room for at least one hour.
• The TAPE function has not been selected.
• The cassette has not been inserted correctly.
• The cassette player has not been closed.
• The tape is either slack or broken.
• The audio heads are dirty.
• The rollers or drive capstans are dirty.
• The tape is worn.
• The TUNER function has not been selected.
• The radio frequency has not been correctly
selected.
• The aerial has been disconnected or is not facing
the right way. Turn it until you find the best orientation.
• You are in a building that blocks radio waves; you
must use an outside aerial.
VOLUME
Page 16

GB
16
Front Panel View
TUNER CD
VOLUME
TAPE
Tuning Mode
Band
CD Synchro REC/Pause
Power
Surround
Phones
AUX
On/
Standby
Repeat
(A B)
CD Repeat
Preset EQ
Open/Close
Push
Open
1
10
2
3
4
5
9
6
7
8
12
13
14
11
16
15
Mic
17
18
1. Function selection buttons
2. On/Standby
3. CD Repeat
4. Repeat (A B)
5. Equalizer preset
6. Function control
7. AI Sleep
8. Timer On/Off
9. Headphones jack
10. Push Open
11. AUX
12. REC/Pause
13. CD Synchro
14. Power Surround
15. Volume control
16. Open/Close
17. Mic (Option)
18. TAPE Mode
Page 17

GB
17
Remote Control
On/Standby
Power
Surround
Tuner
/Band
TAPE
Timer
On/Off
CD Repeat
Shuffle
Tape
Counter
Timer
/Clock
Program
/Set
Mono/ST
AI Off/Sleep
CD
CDCD
VOL.
VOL.
Tuning
Mode
1
10
11
12
13
14
15
16
17
18
19
20
21
9
2
3
4
5
6
7
8
1. On/Standby
2. AI Off/Sleep
3. Timer On/Off
4. CD Repeat
5. Program/Set
6. Tape rewind and fast-forward
7. CD stop and cancel
8. CD track or radio station search
9. Infra-red signal transmitter
10. Tuner/Band
11. Power Surround
12. Mono/Stereo
13. Timer/Clock
14. Tape Counter
15. Shuffle
16. Tape auto reverse
17. Tape stop(playback/record)
18. CD play and pause
19. Volume increase
20. Tuning Mode
21. Volume decrease
Page 18

GB
18
Rear Panel View
3
1
4
5
6
2
(option)
Technical Specifications
SAMSUNG strives to improve its products at all times. Both the
design specifications and these user instructions are thus subject
to change without notice.
TUNER
FM
Signal/noise ratio 60 dB
Usable sensitivity 6 dB
Total harmonic distortion 1.5%
AM (MW)
Signal/noise ratio 40 dB
Usable sensitivity 54 dB
Total harmonic distortion 2%
LW (option)
Signal/noise ratio 28 dB
Usable sensitivity 60 dB
Total harmonic distortion 2%
SW1.2 (option)
Usable sensitivity 40 dB
COMPACT DISC PLAYER
Sampling frequency 44.1 KHz
Frequency range 20 Hz - 20 KHz
Signal/noise ratio 90 dB (at 1 KHz) with filter
D/A conversion 16-bit
Wow and flutter
Outside measurable limits
Error correction system Cross Interleave Reed
Solomon Code (CIRC)
Laser type AIGaAS semiconductor
Laser wave length 780 nm
Disc sizes Diameter: 120 or 80 mm.
Thickness: 1.2 mm
Scanning velocity 1.2 - 1.4m/sec.
Rotation speed 200 to 500 rpm
CASSETTE PLAYER
Playing speed Normal speed: 4.75 cm/sec.
Recording system AC Bias
GENERAL
Output power 2x20 Watts (total hamonic
distortion:10%)
Power supply AC mains: See the label
Dimensions 180(W)x265(H)x270(D)mm.
1. FM AERIAL CONNECTOR TERMINALS
2. SW AERIAL CONNECTOR TERMINALS(option)
3.
AM(MW)/LW AERIALCONNECTOR TERMINALS
4. AUXILIARY SOURCE CONNECTORS
5. LOUDSPEAKERS CONNECTOR TERMINALS
6. VOLTAGE SELECTOR (option)
Page 19

ELECTRONICS
THIS APPLIANCE IS MANUFACTURED BY:
AH68-00350B
 Loading...