

Page 1
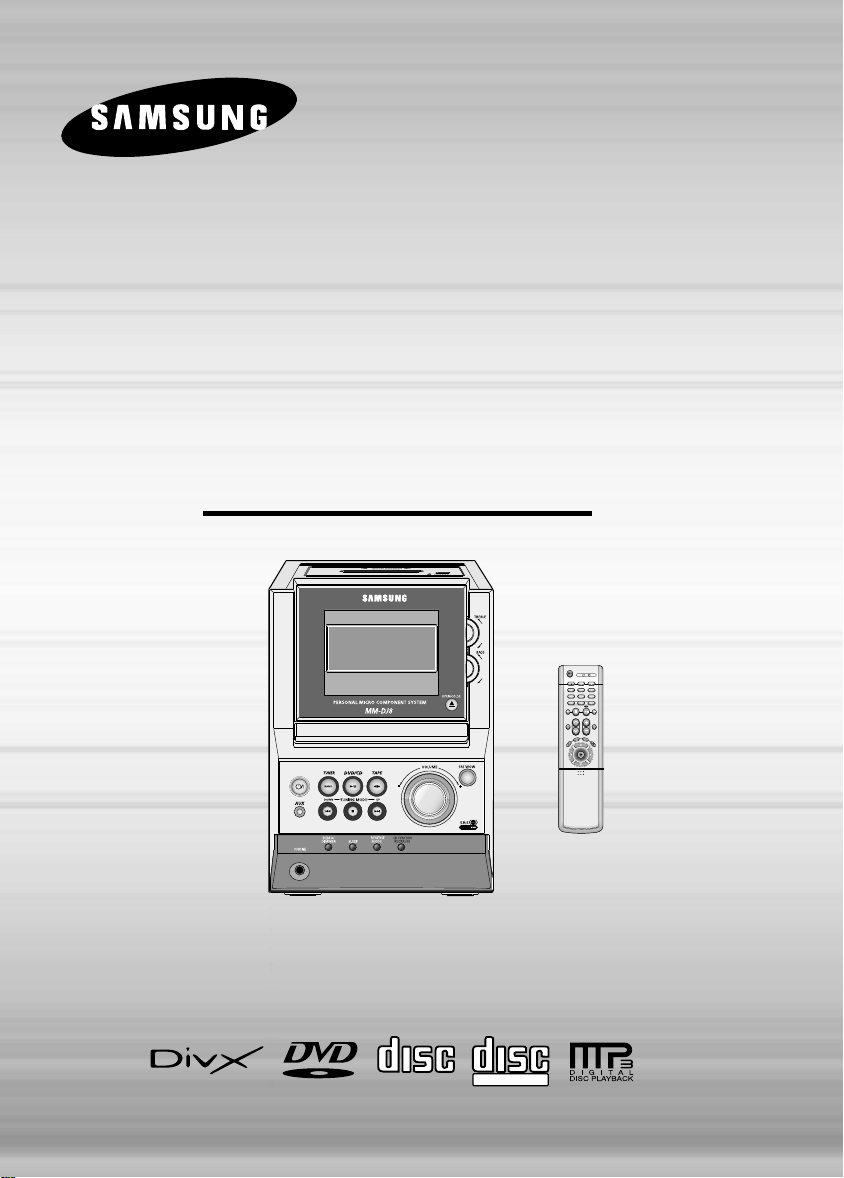
PERSONAL MICRO
V I D E O
COMPACT
DIGITAL AUDIO
COMPACT
DIGITAL VIDEO
COMPONENT SYSTEM
MM-DJ8
MM-DJ8S
Instruction Manual
Page 2
Safety Warnings
CLASS 1 LASER PRODUCT
KLASSE 1 LASER PRODUKT
LUOKAN 1 LASER LAITE
KLASS 1 LASER APPARAT
PRODUCTO LASER CLASE 1
CAUTION
RISK OF ELECTRIC SHOCK.
DO NOT OPEN
CAUTION:
TO REDUCE THE RISK OF ELECTRIC SHOCK, DO NOT
REMOVE REAR COVER. NO USER SERVICEABLE
PARTS INSIDE. REFER SERVICING TO QUALIFIED
SERVICE PERSONNEL.
CLASS 1 LASER PRODUCT
This Compact Disc player is classified
as a CLASS 1 LASER product.
Use of controls, adjustments or performance of procedures other
than those specified herein may result in hazardous radiation
exposure.
CAUTION-INVISIBLE LASER RADIATION WHEN OPEN
AND INTERLOCKS DEFEATED, AVOID
EXPOSURE TO BEAM.
This symbol indicates that dangerous voltage which
can cause electric shock is present inside this unit.
This symbol alerts you to important operating and
maintenance instructions accompanying the unit.
WARNING: To reduce the risk of fire or electric shock, do not
expose this appliance to rain or moisture.
CAUTION: TO PREVENT ELECTRIC SHOCK, MATCH
WIDE BLADE OF PLUG TO WIDE SLOT, FULLY
INSERT.
Wiring the Main Power Supply Plug(UK Only)
IMPORTANT NOTICE
The main lead on this equipment is supplied with a moulded plug incorporating a fuse. The value of the fuse is indicated on the pin
face of the plug and if it requires replacing, a fuse approved to BS1362 of the same rating must be used.
Never use the plug with the fuse cover removed. If the cover is detachable and a replacement is required, it must be of the same
colour as the fuse fitted in the plug. Replacement covers are available from your dealer.
If the fitted plug is not suitable for the power points in your house or the cable is not long enough to reach a power point, you should
obtain a suitable safety approved extension lead or consult your dealer for assistance.
However, if there is no alternative to cutting off the plug, remove the fuse and then safely dispose of the plug. Do not connect the
plug to a main socket as there is a risk of shock hazard from the bared flexible cord.
Never attempt to insert bare wires directly into a main socket. A plug and fuse must be used at all times.
The wires in the main lead are coloured in accordance with the following code:–
BLUE = NEUTRAL BROWN = LIVE
As these colours may not correspond to the coloured markings identifying the terminals in your plug, proceed as
follows:–
The wire coloured BLUE must be connected to the terminal marked with the letter N or coloured BLUE or BLACK.
The wire coloured BROWN must be connected to the terminal marked with the letter L or coloured BROWN or RED.
WARNING: DO NOT CONNECT EITHER WIRE TO THE EARTH TERMINAL WHICH IS MARKED WITH
THE LETTER E OR BY THE EARTH SYMBOL , OR COLOURED GREEN OR GREEN
AND YELLOW.
IMPORTANT
1
Page 3

Precautions
Ensure that the AC power supply in your house complies with the identification sticker located on the back of your player. Install your
player horizontally, on a suitable base (furniture), with enough space around it for ventilation (3~4inches). Make sure the ventilation slots
are not covered. Do not stack anything on top of the player. Do not place the player on amplifiers or other equipment which may become
hot. Before moving the player, ensure the disc tray is empty. This player is designed for continuous use. Switching off the DVD player to
the stand-by mode does not disconnect the electrical supply. In order to disconnect the player completely from the power supply,
remove the main plug from the wall outlet, especially when left unused for a long period of time.
PREPARATION
During thunderstorms, disconnect AC main plug from the
wall outlet.
Voltage peaks due to lightning could damage the unit.
Phones
Protect the player from moisture(i.e. vases) , and excess
heat(e.g.fireplace) or equipment creating strong magnetic or electric
fields (i.e.speakers...). Disconnect the power cable from the AC supply if
the player malfunctions. Your player is not intended for industrial use.
Use of this product is for personal use only.
Condensation may occur if your player or disc have been stored in cold
temperatures.
If transporting the player during the winter, wait approximately 2 hours
until the unit has reached room temperature before using.
Do not expose the unit to direct sunlight or other heat
sources.
This could lead to overheating and malfunction of the unit.
The battery used with this product contain chemicals that
are harmful to the environment.
Do not dispose of batteries in the general household trash.
2
Page 4

Features
V I D E O
1 6
~
Multi-Disc Playback & AM/FM Tuner, TAPE
The MM-DJ8/MM-DJ8S combines the convenience of multi-disc playback
capability, including DVD, VCD,CD,DivX,WMA, MP3-CD, CD-R, CD-RW, and
DVD-RW, with a sophisticated AM/FM tuner, TAPE, all in a single player.
TV Screen Saver Function
The MM-DJ8/MM-DJ8S automatically brightens and darkens the
brightness of the TV screen after 3 minutes in the stop .
The MM-DJ8 automatically switches itself into the power saving mode
after 20 minutes in the screen saver mode.
Power Saving Function
The MM-DJ8/MM-DJ8S automatically shuts itself off after 20 minutes in the stop .
Customized TV Screen Display
The MM-DJ8/MM-DJ8S allows you to select your favorite image during
JPEG, DVD playback and set it as your background wallpaper.
DVD (Digital Versatile Disc) offers fantastic audio and video, thanks to Dolby Digital
surround sound and MPEG-2 video compression technology. Now you can enjoy these
realistic effects in the home, as if you were in a movie theater or concert hall.
DVD players and the discs are coded by region. These regional codes must match in order
for the disc to play. If the codes do not match, the disc will not play.
The Region Number for this player is given on the rear panel of the player.
(Your DVD player will only play DVDs that are labeled with identical region codes.)
Copy Protection
Many DVD discs are encoded with copy protection. Because of this, you should only connect your
•
DVD player directly to your TV, not to a VCR. Connecting to a VCR results in a distorted picture
from copy-protected DVD discs.
This product incorporates copyright protection technology that is protected by methods claims of certain
•
U.S. patents and other intellectual property rights owned by Macrovision Corporation and other rights
owners. Use of this copyright protection technology must be authorized by Macrovision Corporation, and
is intended for home and other limited viewing uses only unless otherwise authorized by Macrovision
Corporation. Reverse engineering or disassembly is prohibited.
3
Page 5

Contents
PREPARATION
Safety Warnings..................................................................................................................................................................1
Precautions.........................................................................................................................................................................2
Features..............................................................................................................................................................................3
Description..........................................................................................................................................................................5
CONNECTIONS
Connecting the Speakers....................................................................................................................................................9
Connecting to a TV.............................................................................................................................................................10
Connecting External Components......................................................................................................................................11
Connecting the FM and AM(MW/LW) Antennas.................................................................................................................12
Setting the Clock.................................................................................................................................................................13
OPERATION
Disc Playback .....................................................................................................................................................................14
DivX Playback.....................................................................................................................................................................15
Displaying Disc Information ................................................................................................................................................17
Fast/Slow Playback.............................................................................................................................................................18
Skipping Scenes/Songs......................................................................................................................................................19
Angle Function....................................................................................................................................................................20
Repeat Playback.................................................................................................................................................................21
A-B Repeat Playback..........................................................................................................................................................23
Zoom Function....................................................................................................................................................................24
Selecting Audio/Subtitle Language.....................................................................................................................................25
Moving Directly to a Scene/Song........................................................................................................................................26
JPEG File Playback............................................................................................................................................................27
Using Disc Menu.................................................................................................................................................................29
Using the Title Menu...........................................................................................................................................................30
SETUP
Setting the Language..........................................................................................................................................................31
Setting TV Screen type.......................................................................................................................................................33
Setting Parental Controls (Rating Level).............................................................................................................................35
Setting the Password..........................................................................................................................................................36
Setting the Wallpaper..........................................................................................................................................................37
Setting the DRC (Dynamic Range Compression)...............................................................................................................39
AV SYNC Setup..................................................................................................................................................................40
RADIO OPERATION
Listening to Radio...............................................................................................................................................................41
Presetting Stations..............................................................................................................................................................42
About RDS broadcasting ....................................................................................................................................................43
TAPE DECK
Listening to a Cassette .......................................................................................................................................................45
REPEAT A↔B Function .....................................................................................................................................................46
Selecting the Cassette Playback Mode ..............................................................................................................................46
Tape Counter......................................................................................................................................................................46
MISCELLANEOUS
Timer Function....................................................................................................................................................................47
Canceling the Timer............................................................................................................................................................48
Recording a Compact Disc.................................................................................................................................................49
Recording a Radio Program ...............................................................................................................................................51
EQ/S.BASS, SRS WOW Function .....................................................................................................................................52
Sleep Timer Function / Mute Function................................................................................................................................53
TREBLE/BASS Function.....................................................................................................................................................54
DEMO Function / DIMMER Function..................................................................................................................................55
Connecting Headphones/Microphone.................................................................................................................................56
Cautions on Handling and Storing Discs ............................................................................................................................57
Before Calling for Service...................................................................................................................................................58
Notes on Discs....................................................................................................................................................................59
Notes on Terminology.........................................................................................................................................................61
Specifications......................................................................................................................................................................62
Memo..................................................................................................................................................................................63
PREPARATION
4
Page 6
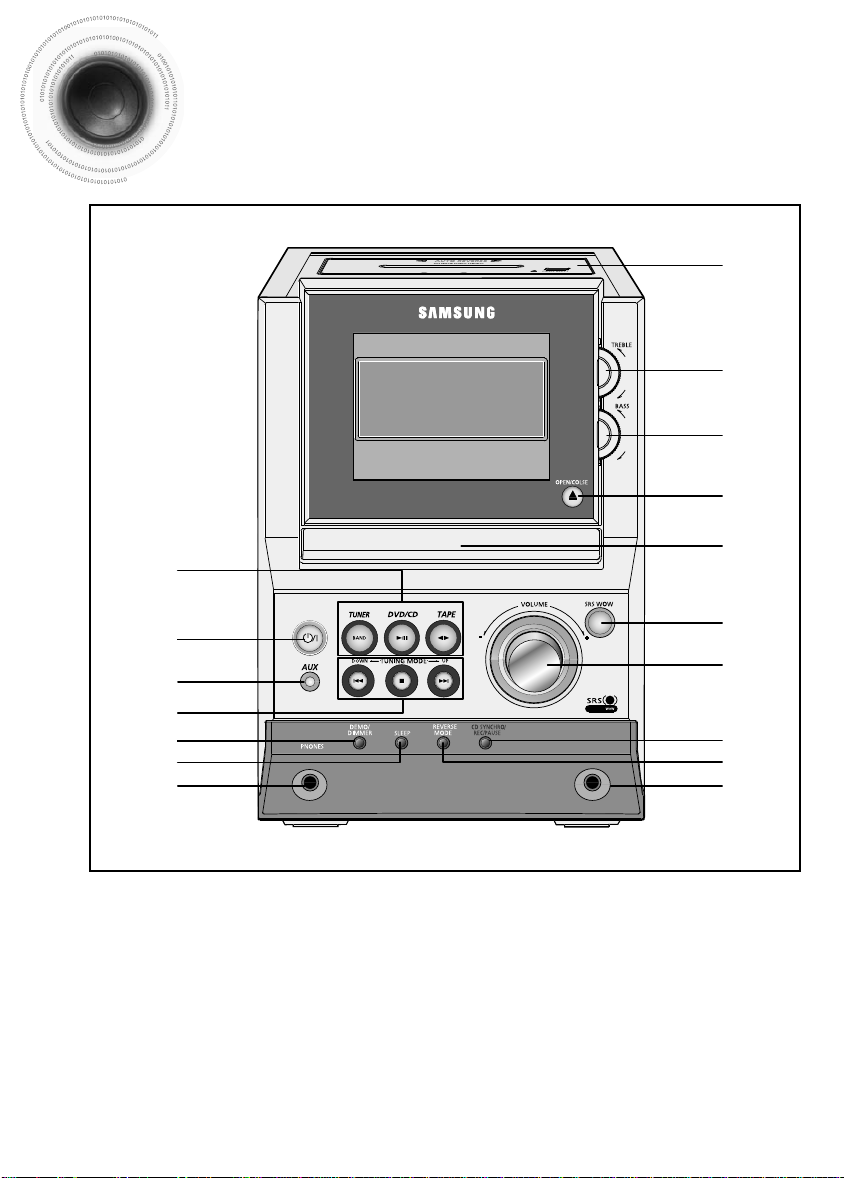
Description
—Front Panel—
1
17
16
15
14
13
2
3
4
5
6
7
1. FUNCTIONS (TUNER/DVD/CD/TAPE)
STANDBY/ON
2.
3. AUX
SEARCH FUNCTION BUTTONS
4.
TUNING MODE OR STOP BUTTON
5.
DEMO/DIMMER
6.
SLEEP
7.
HEADPHONE JACK CONNECTOR
8. MIC
5
9. REVERSE MODE
10. CD SYNCHRO / REC/PAUSE
11. VOLUME CONTROL
12. SRS WOW
13. DISC TRAY
14. CD DOOR OPEN/CLOSE
15. BASS LEVEL
16. TREBLE LEVEL
PUSH EJECT
17.
(CASSETTE DOOR OPEN/CLOSE)
12
11
10
9
8
Page 7
OPEN/CLOSE
DVD TUNER AUX
EZ VIEW
NTSC/PAL
SLOW SUB TITLE
STEP
TUNING
PL II
R
ETU
RN
M
E
N
U
IN
FO
MUTE
MODE
ENTER
SOUND EDIT
TEST TONE
SLEEP
LOGO DIGEST
SLIDE MODE
CANCEL ZOOM
TUNER
MEMORY
PL II
EFFECT
VOLUME
DSP/EQ REPEAT
BAND
MO/ST
REMAIN
DIMMER
PREPARATION
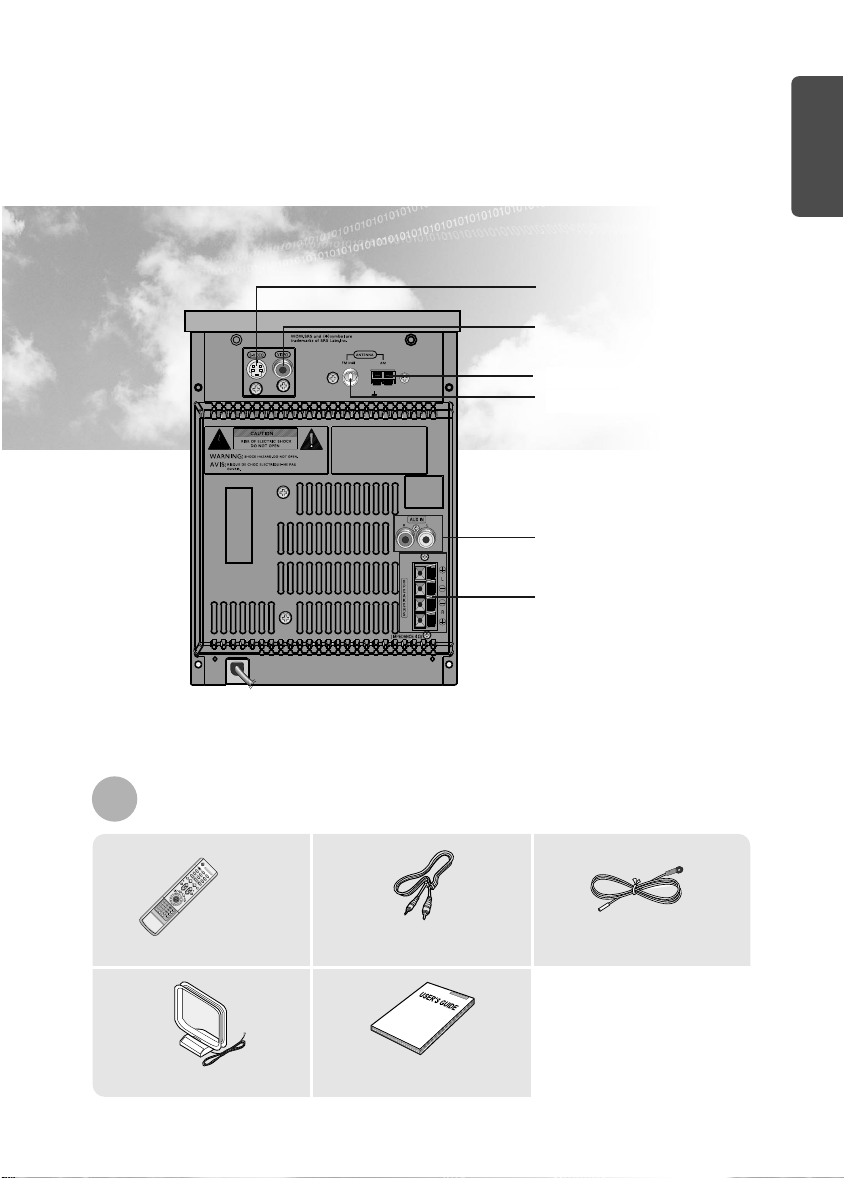
—Rear Panel—
Accessories
S-Video Output Connector
If the TV is equipped with an S-Video
input connector (S-VIDEO IN), connect
it to the player's S-Video output jack.
Video Output Connector
Connect the TV's video input jacks
(VIDEO IN) to the VIDEO OUT connector.
AM Antenna Connector
FM Antenna Connector
AUX-Input
Loudspeaker Connector Terminals
Video Cable FM Antenna Remote Control
AM Antenna
User's Manual
6
Page 8

Description
—Remote Control—
DVD POWER button
SLEEP button
OPEN/CLOSE button
AUX button
COUNTER RESET/STEP button
ZOOM button
REMAIN button
DVD button
TUNER BAND button
SUB TITLE button
SLOW, MO/ST button
REPEAT button
Play/Pause/Tape Play button
CD Skip/Tape Search button
TAPE button
Stop /Tuning Mode button
SRS WOW button
VOLUME button
MENU button
RETURN button
RDS Selection button
Number(0~9) buttons
REPEAT A<–> B button
LOGO button
EZ VIEW, NTSC/PAL button
7
EQ/S.BASS button
TUNING button
INFO button
MUTE button
Direction/Enter button
TREBLE/BASS button
SLIDE MODE button
DIGEST button
TIMER ON/OFF button
TIMER/CLOCK button
CANCEL button
TUNER MEMORY button
Page 9
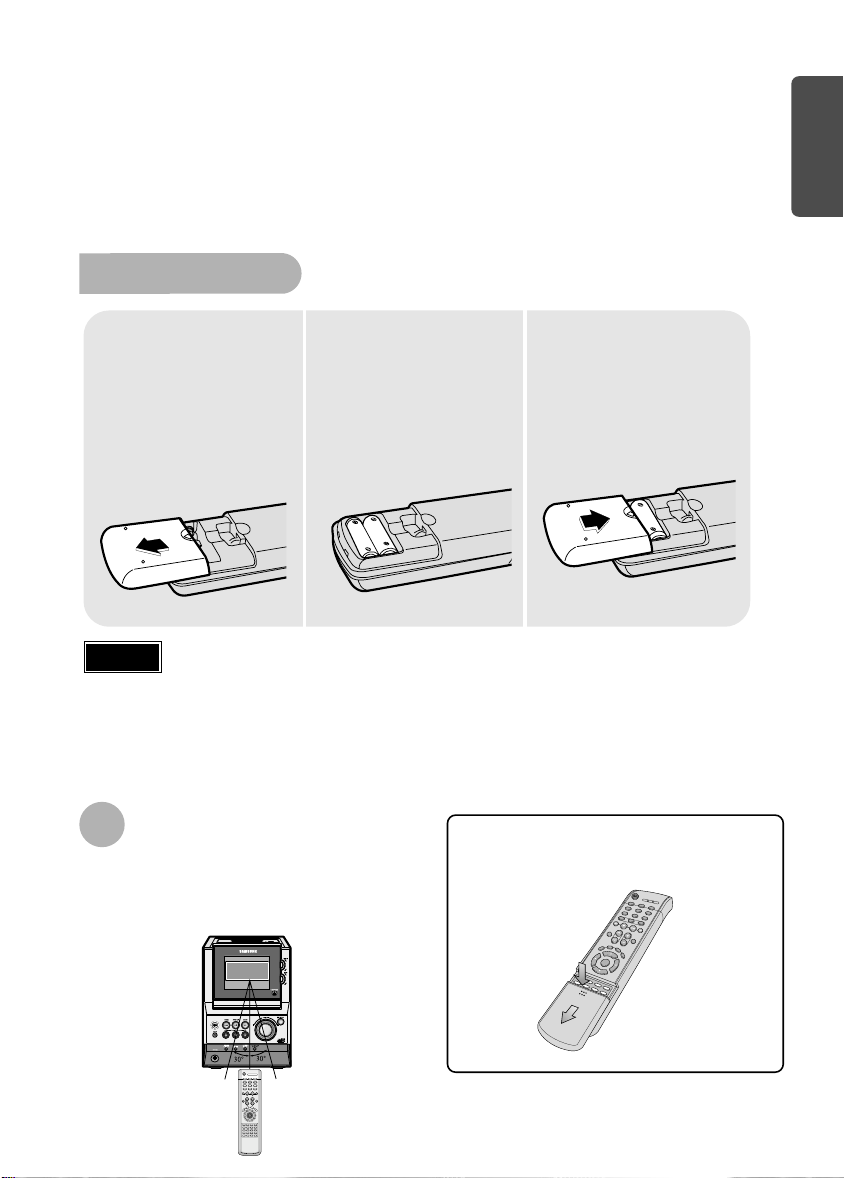
Insert Remote Batteries
PREPARATION
Remove the battery
1
cover on the back of
the remote by
pressing down and
sliding the cover in
the direction of the
arrow.
Caution
Follow these precautions to avoid leaking or cracking cells:
Place batteries in the remote control so they match the polarity:(+) to (+)and (–)to (–).
•
Use the correct type of batteries.Batteries that look similar may differ in voltage.
•
Always replace both batteries at the same time.
•
Do not expose batteries to heat or flame.
•
Range of Operation of the Remote Control
The remote control can be used up to approximately 23
feet/7 meters in a straight line. It can also be operated at
a horizontal angle of up to 30° from the remote control
sensor.
Insert two 1.5V AAA
2
batteries, paying
attention to the correct
polarities (+ and –).
To open the remote control cover, push the
top of the cover, then slide downward.
Replace the battery
3
cover.
8
Page 10
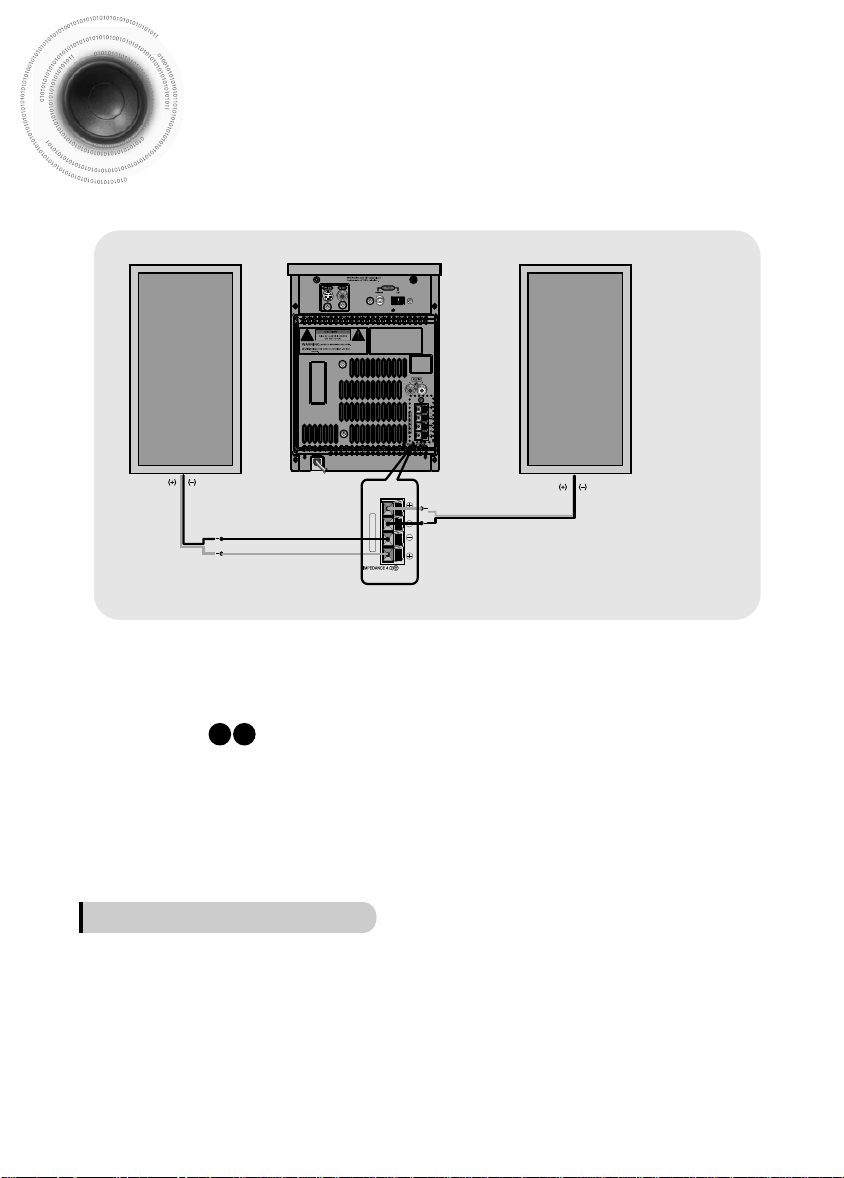
Connecting the Speakers
R
L
Before moving or installing the product, be sure to turn off the power and disconnect the power cord.
Right Speaker
Red
Black
Position of the DVD Player
Place it on a stand or cabinet shelf, or under
•
the TV stand.
Loudspeakers
Place these speakers in front of your listening
•
position, facing inwards (about 45°) toward you.
Place the speakers so that their tweeters will be at
•
the same height as your ear.
Align the front face of the front speakers with the
•
front face of the center speaker or place them
slightly in front of the center speakers.
Left Speaker
L
S
P
E
A
K
E
R
R
S
Red Black
Selecting the Listening Position
The listening position should be located about 2.5 to 3
times the distance of the TV's screen size away from the
TV. Example: For 32" TVs 2~2.4m (6~8feet)
For 55" TVs 3.5~4m (11~13feet)
Directions in Installing Speaker
•Installation in a place near heating apparatus, under direct lay of light or with high humidity may cause
performance degradation of the speaker.
•Do not install on the wall or on a high place of pole or other unstable place to prevent any safety accident
caused by falling of the speaker.
•Do not take the speaker apart from TV or computer monitor.
The speaker near the TV or computer monitor may influence the quality of the screen display.
9
Page 11
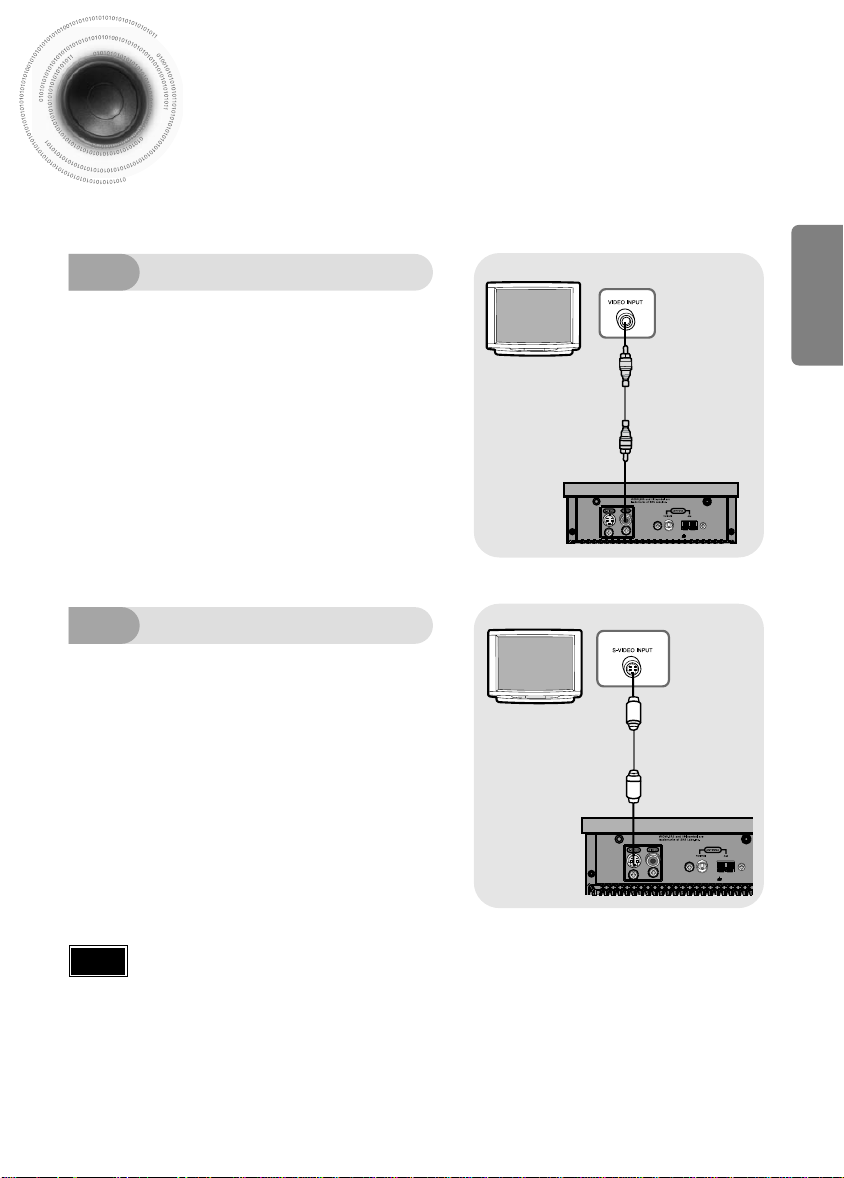
Connecting to a TV
Please be sure to turn off the power and unplug the power cord before moving or installing this unit.
Please choose one of two video connection methods.
CONNECTIONS
Method 1
1
2
Method 2
Use this method if your TV has an S-Video In jack.
1
2
Using Video Out (Cable Included)
Connect Video Out on the player to Video In
on your TV.
Press the TV/VIDEO button on the remote of TV
control to set the TV to "VIDEO".
Using S-Video Out (Cable Not Included)
Connect S-Video Out to S-Video In on your
TV.
Press the TV/VIDEO button on the remote control
of TV to set the TV to "S-VIDEO".
Note
Composite Video: A single video signal that is a composite of the black-and-white
•
information (Y) and the color information (C).
S-Video: A video transmission standard that provides a sharper, brighter picture
•
than ordinary composite video by separating brightness and color signals.
10
Page 12
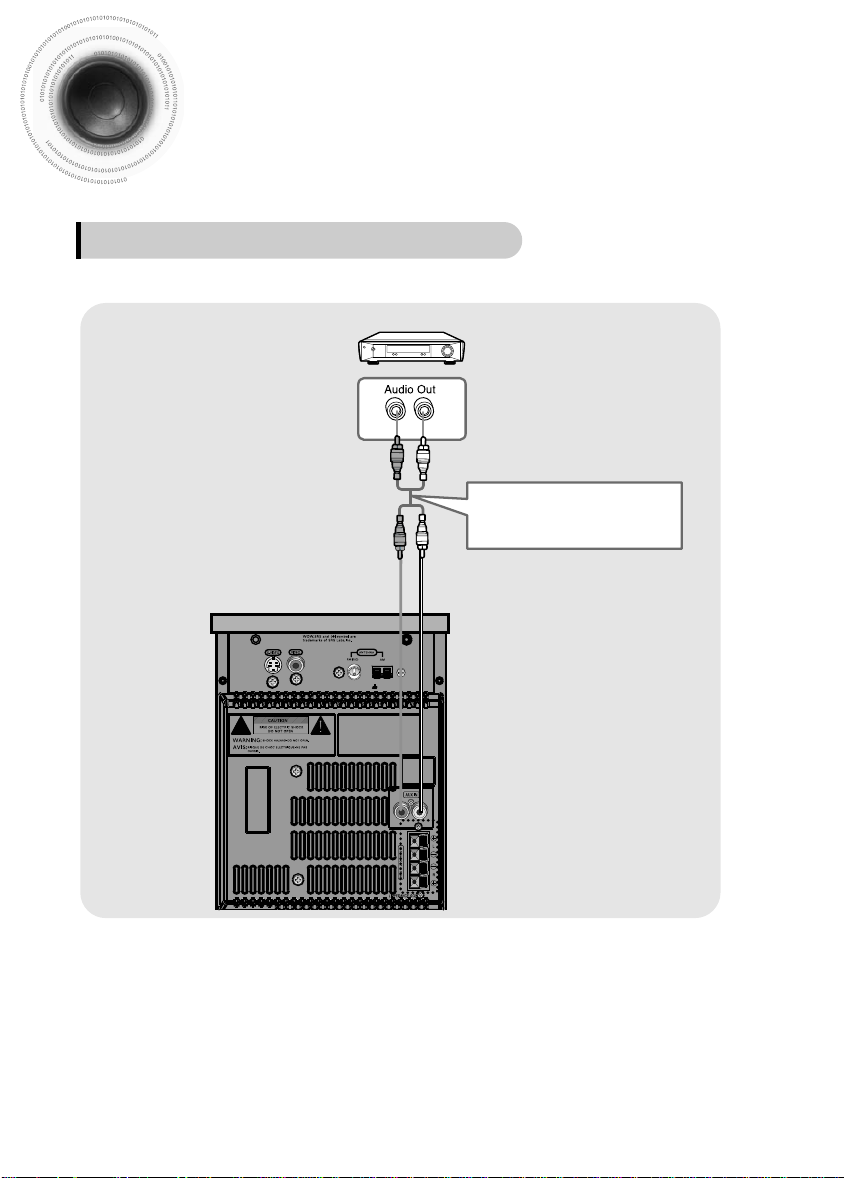
Connecting to External Components
Connecting to an External Analog Component
Example: Analog signal components such as a VCR, Camcorder, and TV.
R
Connect Audio In on the DVD player to Audio Out on the external analog component.
1
Be sure to match connector colors.
•
L
Audio Cable
If the external analog component has
only one Audio Out, connect either left
or right.
Press AUX to select AUX.
2
AUX’ appears in the display.
‘
•
11
Page 13
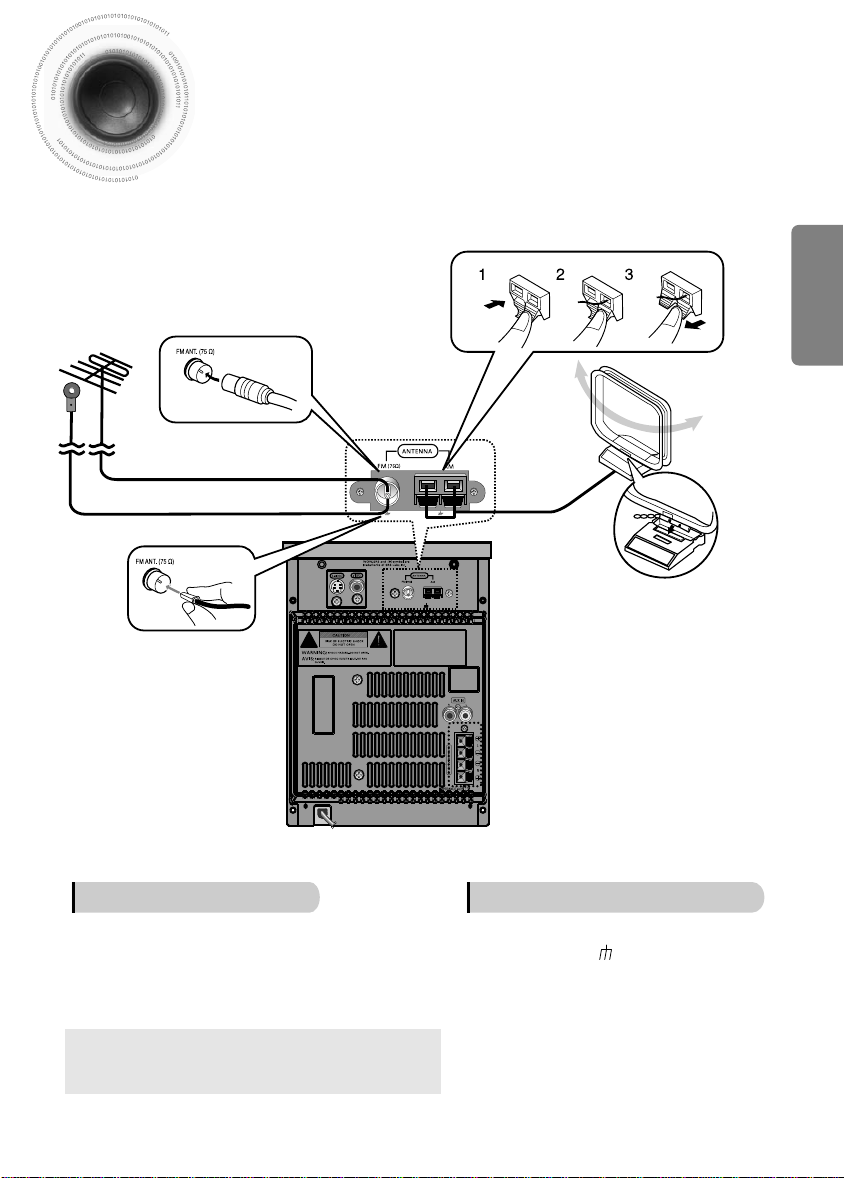
Connecting the FM and AM
(
MW/LW)Antennas
If FM reception is poor,
connect an outdoor FM
antenna (not supplied).
FM Antenna (supplied)
If AM reception is poor, connect an
outdoor AM antenna(not supplied).
AM Loop Antenna
(supplied)
Snap the tabs on the loop into the
slots of the base to assemble the
AM loop antenna.
CONNECTIONS
FM antenna connection AM(MW/LW) antenna connection
1. Connect the FM antenna supplied to the FM 75Ω
COAXIAL terminal as a temporary measure.
2. Slowly move the antenna wire around until you
find a location where reception is good, then
fasten it to a wall or other rigid surface.
•
If reception is poor, connect an outdoor antenna.
Before attaching a 75Ω coaxial cable (with a standard
type connector), disconnect the supplied FM antenna.
1. Connect the AM loop antenna supplied
to the AM and terminals.
2. If reception is poor, connect an outdoor
single vinyl-covered wire to the AM
terminal. (Keep the AM loop antenna
connected).
12
Page 14
Setting the Clock
CHAPTER REMAIN
TITLE REMAIN
CHAPTER ELAPSED
TITLE ELAPSED
TRACK REMAIN
TOTAL ELAPSED
TOTAL REMAIN
TRACK ELAPSED
For each step, you have a few seconds to set the required options.
If you exceed this time, you must start again.
Switch the system
on by pressing
1
POWER button.
When the correct
hour is displayed,
press ENTER.
4
The minutes flash.
Increase the minutes :
•
Decrease the minutes :
•
Selecting the Video Format
Turn off the main unit and then press NTSC/PAL.
By default, the video format is set to "PAL".
•
Each time the button is pressed, the video format switches between "NTSC" and "PAL".
•
Each country has a different video format standard.
•
For normal playback, the video format of the disc must be the same as the video format of your TV.
•
Press TIMER/CLOCK
2
twice.
CLOCK is displayed.
•
When the correct
time is displayed,
5
press ENTER.
"TIMER" appears in the display.
•
The current time is now set.
•
Press ENTER.
3
The hour flashes.
Increase the hours :
•
Decrease the hours :
•
Note
You can display the time, even
•
when you are using another
function, by pressing
TIMER/CLOCK once.
Checking the Remaining Time
Press the REMAIN button.
For checking the total and remaining time of a title or chapter being played.
•
13
DVD
Each time the REMAIN button is pressed
VCD
CD
Page 15
Disc Playback
Something like you
Back for good
Love of my life
More than words
I need you
My love
Uptown girl
DVD RECEIVER SMART NAVI
Press OPEN/CLOSE button to open the
1
disc tray.
Load a disc.
Place a disc gently into the tray with the disc’s label
•
2
facing up.
Press OPEN/CLOSE button to close the disc
3
tray.
DVD VCD CD
Playback starts automatically.
•
MP3
DivX
JPEG
Playback starts automatically.
•
If the TV is on, a list of MP3s on
•
the CD will appear on the TV
screen.
CONNECTIONS
To stop playback,
press STOP during playback.
If pressed once, “PRESS PLAY” is displayed and the
•
stop position will be stored in memory. If PLAY/PAUSE
( ) button or ENTER button is pressed, playback
resumes from the stop position. (This function works
only with DVDs.)
If pressed twice, “STOP” is displayed, and if
•
PLAY/PAUSE ( ) button is pressed, playback
starts from the beginning.
Note
Depending on the content of the disc, the initial screen may appear different.
•
Depending on the recording mode, some MP3-CDs cannot be played.
•
Table of contents of a MP3-CD varies depending on the MP3 track format recorded
•
on the disc.
To temporarily pause playback,
press PLAY/PAUSE during playback.
To resume playback, press PLAY/PAUSE
•
button again.
14
Page 16
DivX Playback
Skip Forward/Back
During playback, press the button.
Go to the next file whenever you press button, if there are over
•
2 files in the disk.
Go to the previous file whenever you press button, if there are over
•
2 files in the disk.
Fast playback
Press and hold button.
Each time the button is held down during playback,
•
the playback speed changes as follows:
Zoom Function
Press ZOOM
1
button.
Each time you press the button,
•
your selection will toggle between
“ZOOM X2” and “ZOOM OFF”.
15
Press Cursor , ,
, buttons to
move to the area
2
you want to enlarge.
DivX files can be played in
•
Note
Zoom X2 mode only.
Page 17
5 Minute Skip function
During playback, press the , button.
Go to the screen about 5 minutes after whenever you press button.
•
Go to the screen about 5 minutes earlier whenever you press button.
•
Subtitle Display
Press the SUBTITLE button.
Each time you press the button, your selection will toggle between “SUBTITLE ON” and “SUBTITLE OFF”.
•
If the disc has only one subtitle file, it will be played automatically.
•
Up to 8 subtitle languages are supported.
•
If the disc has more than one subtitle file
If the disc has more than one subtitle file, the default subtitle may not match the movie and you will have to
select your subtitle language as follows:
In Stop mode, press the , , , button, select the desired subtitle
1
( ) from the TV screen, and then press the ENTER button.
When you select the desired DivX file from the TV screen, the movie
will be played normally.
2
OPERATION
DivX Feature Table
DivX Supported
Avi files are used to contain the audio and video data; these must be stored on CD in the ISO 9660 format.
SPEC
VIDEO Compatibility DivX3.11 Up to the latest VERSION
WMV WMV V1/V2/V3/V7
AUDIO Compatibility MP3 CBR : 80kbps~320kbps
AC3 CBR : 128kbps~448kbps
WMA CBR : 56kbps~160kbps
Note
When playing the DivX disk, you can play the file with extension of AVI only.
•
Among the available DivX audio formats, DTS Audio is not supported.
•
WMV V8 is not supported for WMV files.
•
When burning a subtitle file to a CD-ROM with your PC, be sure to burn it as an SMI file.
•
MPEGs containing DivX can be divided into Video and Audio.
Video compatibility : All versions of DivX later than 3.11 (including
•
the latest 5.1) are supported. In addition, XviD is supported.
For WMV, V1, V2, V3, and V7 formats are possible.
Audio compatibility : MP3s encoded at bitrates from 80kbps to
•
320kbps, AC3s from 128kbps to 448kbps, and WMAs from 56kbps
to 160kbps are supported.
In addition, for subtitles, this unit will support Text format (SMI).
•
16
Page 18
Displaying Disc Information
Something like you
Back for good
Love of my life
More than words
DVD RECEIVER SMART NAVI
You can view playback information on the disc on the TV screen.
Press INFO button.
Each time the button is pressed, the display changes as follows:
•
DVD
Display disappears
Note
Depending on the disc, the disc
•
information display may appear different.
Depending on the disc, you can also
•
select DOLBY DIGITAL, or PRO LOGIC.
Screen Display
VCD CD
Display disappears Display disappears
What is a Title?
•
A movie contained in a DVD disc.
What is a Chapter?
•
Each title on a DVD disc is divided into several smaller sections called "chapters".
appears on the TV screen!
•
If this symbol appears on the TV screen while buttons are being operated, that
operation is not possible with the disc currently being played.
What is a Track (File)?
•
A section of video or a music file recorded on a VCD, CD, or MP3-CD.
MP3
DivX
JPEG
DVD display
VCD display
CD display
17
MP3 CD display
DivX display
CHAPTER display
TRACK (FILE) display
TITLE display
REPEAT PLAYBACK display
AUDIO LANGUAGE display
ELAPSED TIME display
STEREO (L/R) display
DOLBY DIGITAL display
SUBTITLE display
ANGLE display
Page 19
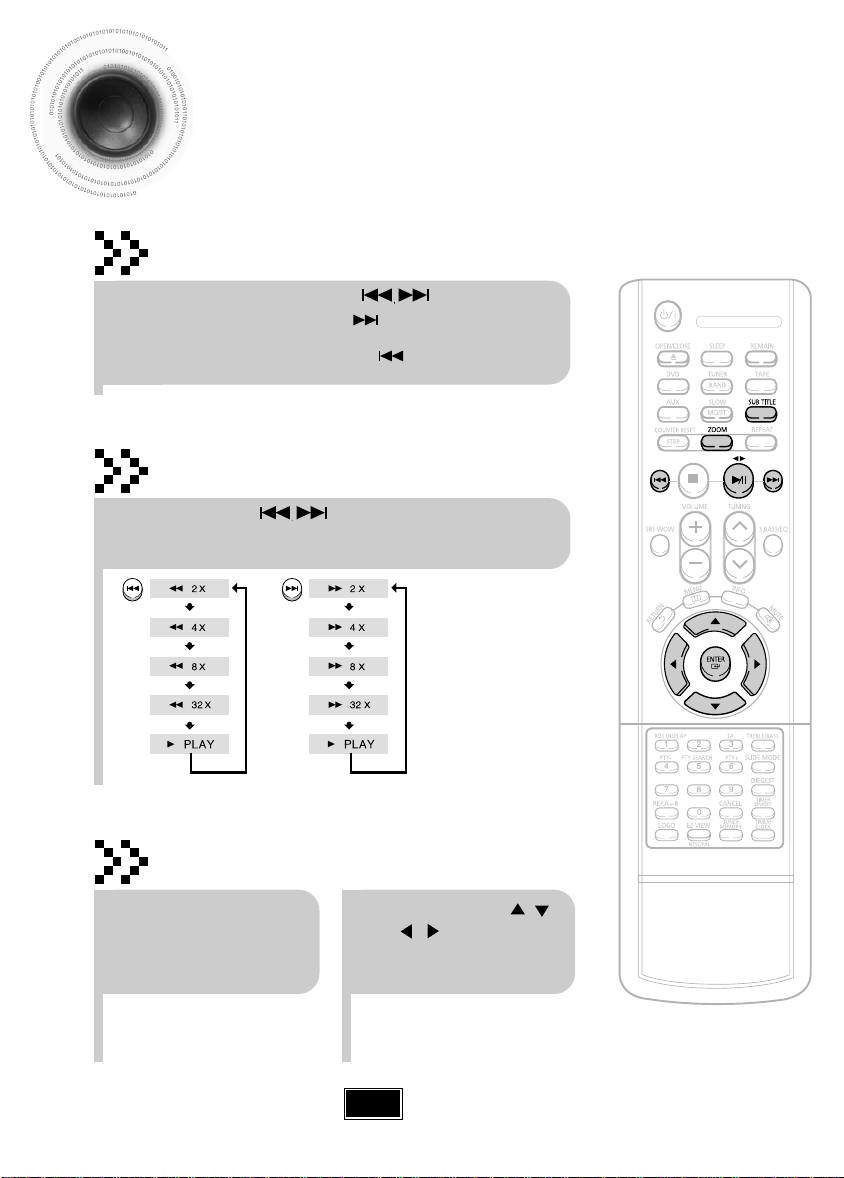
Fast/Slow Playback
Fast Playback
DVD VCD CD MP3
Press and hold .
Each time the button is held down during playback,
•
the playback speed changes as follows:
Slow Playback
Press SLOW button.
Each time the button is pressed during playback,
•
the playback speed changes as follows:
DVD VCD DivX
OPERATION
Note
Reverse slow playback does not
•
work with VCDs and DivX.
18
Page 20
Skipping Scenes/Songs
TITLE 01/05 CHAPTER 002/040
TITLE 01/05 CHAPTER 004/040
DVD VCD MP3
Briefly press .
Each time the button is pressed briefly during playback, the previous or next chapter,
•
track, or directory (file) will be played.
But, you cannot skip chapters consecutively.
•
DVD VCD MP3
DVD RECEIVER SMART NAVI
Something like you
Back for good
Love of my life
More than words
I need you
My love
Uptown girl
DVD RECEIVER SMART NAVI
Something like you
Back for good
Love of my life
More than words
I need you
My love
Uptown girl
DVD RECEIVER SMART NAVI
Something like you
Back for good
Love of my life
More than words
I need you
My love
Uptown girl
When watching a VCD with a track
•
longer than 15 minutes, each time
is pressed, playback
Playing Frame by Frame
will skip back or forward 5 minutes.
DVD
Press STEP button.
The picture moves forward one frame each time the
•
button is pressed during playback.
Note
During fast playback of a CD or MP3-CD, sound is heard only at 2x speed, and not at 4x, 8x, and 32x speeds.
•
No sound is heard during slow playback and step motion playback.
•
19
Page 21

Angle Function
1/3
2/3
3/3
1/3
1/3
This function allows you to view the same scene in different angles.
DVD
Press INFO button.
1
Press Cursor , buttons or numeric buttons
to select the desired angle.
3
Each time the button is pressed, the angle changes as follows:
•
2
Press Cursor
button to move to
ANGLE display.
OPERATION
Note
The Angle function works only with discs on which multiple angles
•
have been recorded.
20
Page 22

Repeat Playback
Repeat playback allows you to repeatedly play a chapter, title, track (song), or directory (MP3 file).
DVD VCD CD MP3 JPEG
Press REPEAT button.
Each time the button is pressed during playback, the repeat playback mode changes as follows:
•
DVD
VCD CD
Note
Repeat playback operation is not possible with version 2.0 VCD discs if PBC is turned on.
•
To use Repeat Playback on a VCD with PBC, you should set the PBC to OFF in the disc menu. (See page 29.)
MP3 JPEG
Repeat Playback Options
CHAPTER
Repeatedly plays the selected chapter.
TITLE
Repeatedly plays the selected title.
RANDOM
Plays tracks in random order.
(A track that has already been played
may be played again.)
TRACK
Repeatedly plays the selected track.
DIR
Repeatedly plays all tracks in the
selected folder.
DISC
Repeatedly plays the entire disc.
OFF
Cancels Repeat Playback.
21
Page 23

DVD VCD CD
To Select a Repeat Playback Mode
in the Disc Information Screen
Press INFO button
twice.
1
For a VCD or CD,Press INFO button
once.
Press Cursor
button to select the
3
desired Repeat
Playback mode.
DVD
VCD CD
Press Cursor button
to move to REPEAT
2
PLAYBACK display.
Press ENTER
button.
4
OPERATION
Note
For MP3 and JPEG discs, you cannot select Repeat Play
•
from the information display screen.
For VCD Version 2.0 discs, you can select Repeat Play in
•
PBC off mode.
22
Page 24

A-B Repeat Playback
DVD VCD CD
Press REP. A↔B
at the beginning of
1
the section you
want to repeat.
REPEAT : A–
To cancel AB Repeat Playback, press REP. A↔B to
select "REPEAT PLAYBACK: OFF".
REPEAT : OFF
Press REP. A↔B
at the end of the
2
section.
REPEAT : A–B
Note
A–B Repeat Playback does not work on MP3 and JPEG discs.
•
To select AB Repeat Playback from the information display screen,
•
press REP. A↔B.
23
Page 25

Zoom Function
This function allows you to enlarge a particular area of the displayed image.
Zoom (Screen Enlarge) Function
Press ZOOM
button.
1
ENTER ZOOM
POSITION
Aspect Ratio
Press EZ VIEW button.
Each time the button is pressed, the zoom function will switch between On
•
and Off.
When a movie is played in Widescreen format, black bars at the top and
•
bottom of the TV screen can be removed by pressing the EZ VIEW button.
Press Cursor , ,
, buttons to
move to the area
2
you want to enlarge.
DVD
DVD VCD
Press ENTER
button.
3
Each time the button is pressed, the
•
zoom level changes as follows:
OPERATION
EZ VIEW OFFEZ VIEW
Note
This function will not work if the DVD is recorded with multi-camera angle format.
•
Black bars may not disappear because some DVD discs have a built-in horizontal to vertical ratio.
•
24
Page 26

Selecting Audio/Subtitle Language
SP 2/3
FR 3/3
Audio Language Selection Function
Press INFO button
twice.
1
Press Cursor ,
buttons or numeric
buttons to select the
2
desired audio language.
Depending on the number of languages on a
•
DVD disc, a different audio language (KOREAN,
ENGLISH, JAPANESE, etc.) is selected each
time the button is pressed.
Subtitle Language Selection Function
Press INFO button
twice.
1
Press Cursor
button to move to
2
SUBTITLE display.
DVD
DVD
Press Cursor
button or numeric
buttons to select
3
the desired subtitle.
EN 1/3 EN 01/ 03
25
SP 02/ 03
FR 03/ 03
OFF / 03
OFF
Note
You can use the SUBTITLE button on the
•
remote control to select a subtitle
language.
Depending on the disc, the Subtitle and
•
Audio Language functions may not work.
Page 27

Moving Directly to a Scene/Song
01/05
001/040 0:00:37 1/1
03/05
001/002 0:00:01 1/1
01/05
001/040 0:00:01 1/1
01/05
025/040 0:00:01 1/1
01/05
028/040 1:30:00 1/1
01/05
025/040 1:17:30 1/1
Something like you
Back for good
Love of my life
More than words
I need you
My love
Uptown girl
DVD RECEIVER SMART NAVI
SELECT 03
Move Select Stop
DVD VCD CD
Press INFO button.
1
Moving to a Chapter
Press Cursor , buttons
or numeric buttons to select
the desired chapter and
4
then press ENTER button.
MP3 JPEG
Moving to a Title/Track
Press Cursor , buttons
or numeric buttons to select
the desired title/track and then
2
press ENTER button.
Moving to a Specific Time
Press Cursor ,
buttons to move to
5
time display.
Moving to a Chapter
Press Cursor ,
buttons to move to
3
Chapter display.
Moving to a Specific Time
Press the numeric
buttons to select the
desired time and then
6
press ENTER button.
OPERATION
Press the numeric
buttons.
The selected file will be played.
•
An MP3 or JPEG disc cannot be moved
•
from the disc information screen.
When playing an MP3 or JPEG disc, you
•
cannot use , to move a folder.
To move a folder, press (Stop) and
then press , .
Note
You can press on the remote
•
control to move directly to the desired
title, chapter, or track.
Depending on the disc, you may not
•
be able to move to the selected title or
time.
26
Page 28

JPEG File Playback
Images captured with a digital camera or camcorder, or JPEG files on a PC can be
stored on a CD and then played back with this DVD player.
JPEG
Slide Mode
1
2
3
Place the JPEG disc on the disc tray.
Press the OPEN/CLOSE button.
Playback starts automatically.
•
Each image is shown for 5 seconds before another image is displayed.
•
Press SLIDE MODE button.
Playback starts automatically.
•
Each time the button is pressed, the image makes the transition as follows:
•
From top to bottom
From bottom to top
Rectangular shape in the center
27
Vertical curtain shape
Each time a new image is displayed, slide modes
(1~11) will be randomly and automatically be applied.
Cancels the slide mode.
Press to skip to the next slide.
Each time the button is pressed, the slide moves backward or forward.
•
Page 29

Digest Function
You can view 9 JPEG images on the TV screen.
Press DIGEST
button during
1
playback.
JPEG files will be shown in
•
9 windows.
To view the previous or next image with 9 windows, press .
Press Cursor , , , buttons
to select the desired image and
2
then press ENTER button.
The selected image is played for 5 seconds before moving to
•
the next image.
Rotate/Flip Function
Press Cursor , , , buttons during playback.
OPERATION
Original Image
button: Rotate 90°
Counterclockwise
button: Flip Vertically
button: Rotate 90° Clockwise
button: Flip Horizontally
28
Page 30

Using Disc Menu
You can use the menus for the audio language, subtitle language, profile, etc.
DVD menu contents differ from disc to disc.
DVD
Press MENU button
in the stop mode.
1
When playing a VCD (version 2.),
•
this toggles between PBC ON and
OFF.
Press Cursor , ,
, buttons to
3
select the desired
item.
Press Cursor ,
buttons to move to
2
‘DISC MENU’ and then
press ENTER button.
When you select the disc menu that is not
•
supported by the disc, the "This menu is not
supported" message appears on the screen.
Press ENTER
button.
4
Note
PBC (Playback Control) Function
When playing a VCD (version 2.0), you can select and view various scenes according to the menu screen.
PBC ON: This VCD disc is version 2.0. The disc is played back according to the menu screen. Some functions may be
disabled. When some functions are disabled, select "PBC OFF" to enable them.
PBC OFF: This VCD disc is version 1.1. The disc is played back in the same way as with a music CD.
29
Page 31

DVD
Using the Title Menu
For DVDs containing multiple titles, you can view the title of each movie.
Depending on the disc, this function may either not work at all or may work differently.
Press MENU button
in the stop mode.
1
Press Cursor ,
button to move to
2
‘Title Menu’.
Press MENU button to exit the setup screen.
Press ENTER
button.
3
The title menu appears.
•
OPERATION
30
Page 32

Setting the Language
OSD language is set to English by default.
Press MENU button
in the stop mode.
Press Cursor
button to move to
21
‘Setup’ and then
press ENTER button.
31
Press RETURN button to return to the previous level.
Press MENU button to exit the setup screen.
Page 33

Press ENTER
button.
3
Press Cursor ,
button to select the
desired item and then
4
press ENTER button.
Press Cursor ,
button to select the
5
desired language and then
press ENTER button.
Once the setup is complete, if the language was
•
set to English, OSD will be displayed in English.
SETUP
Selecting the
OSD Language
Selecting the
Audio Language
(recorded on the disc)
Selecting the
Subtitle Language
(recorded on the disc)
Selecting the Disc Menu
Language (recorded on the disc)
If the language you selected is
*
not recorded on the disc, menu
language will not change even
if you set it to your desired
language.
32
Page 34

Setting TV Screen type
Press Cursor
Press MENU button
in the stop mode.
button to move to
21
‘Setup’ and then
press ENTER button.
33
Press Cursor
button to move to ‘TV
DISPLAY’ and then
press ENTER button.
Press RETURN button to return to the previous level.
Press MENU button to exit the setup screen.
Press Cursor ,
button to select the
43
desired item and then
press ENTER button.
Once the setup is complete, you will
•
be taken to the previous screen.
Page 35

Adjusting the TV Aspect Ratio (Screen Size)
The horizontal to vertical screen size ratio of conventional TVs is 4:3, while that of wide screen and high
definition TVs is 16:9. This ratio is called the aspect ratio. When playing DVDs recorded in different
screen size, you should adjust the aspect ratio to fit your TV or monitor.
✱ For a standard TV, select either "4:3LB" or "4:3PS" option according to
personal preference. Select "16:9" if you have a wide screen TV.
WIDE
4:3LB
(4:3 Letterbox)
4:3PS
(4:3 Pan&Scan)
• If a DVD is in the 4:3 ratio, you cannot view it in wide screen.
Note
• Since DVD discs are recorded in various image formats, they will look different depending on
the software, the type of TV, and the TV aspect ratio setting.
: Select this to view a 16:9 picture in the full-screen
mode on your wide screen TV.
• You can enjoy the wide screen aspect.
: Select this to play a 16:9 picture in the letter box
mode on a conventional TV.
• Black bars will appear at the top and bottom of the screen.
: Select this to play a 16:9 picture in the pan & scan
mode on a conventional TV.
• You can see the central portion of the screen only (with the
sides of the 16:9 picture cut off).
SETUP
34
Page 36

Setting Parental Controls (Rating Level)
Use this to restrict playback of adult or violent DVDs you do not want children to view.
Press MENU button
in the stop mode.
Press Cursor , button
to select the desired rating
level and then press
4
ENTER button.
If you have selected Level 6, you
•
cannot view DVDs with Level 7 or
higher.
The higher the level, the closer the
•
content is to violent or adult material.
Press Cursor
button to move to
21
‘Setup’ and then
press ENTER button.
Enter the password
and then press
5
ENTER button.
The password is set to "7890" by default.
•
Once the setup is complete, you will be
•
taken to the previous screen.
Press Cursor
button to move to
‘PARENTAL’ and then
3
press ENTER button.
35
Note
This function works only if a DVD disc
•
contains the rating level information.
Press RETURN button to return to the previous level.
Press MENU button to exit the setup screen.
Page 37

Setting the Password
You can set the password for the Parental (rating level) setting.
Press MENU button
in the stop mode.
Press ENTER
button.
4
Press Cursor
button to move to
21
‘Setup’ and then
press ENTER button.
Enter the password
and then press
5
ENTER button.
Enter the old password, a new
•
password, and confirm new password.
The setting is complete.
•
Press Cursor button to
move to ‘PASSWORD’
and then press ENTER
3
button.
SETUP
Press RETURN button to return to the previous level.
Press MENU button to exit the setup screen.
36
Page 38

Setting the Wallpaper
While watching a DVD, VCD, or JPEG CD, you can set the image you like as a wallpaper.
DVD VCDJPEG
Setting the Wallpaper
During playback, press
PLAY/PAUSE button
when the image you
like comes up.
PAUSE
The power will turn off
and then back on and
the disc tray will open
automatically.
The selected wallpaper will be
•
displayed.
Press LOGO
button.
21
“LOGO COPY DATA” will be
•
displayed on the TV screen.
LOGO COPY DATA
Press OPEN/
CLOSE to close
43
the disc tray.
You can repeat Steps 1 and 2 to
•
set up to 3 wallpapers.
37
Select this to set the
Samsung Logo image as
your wallpaper.
Select this to set the desired
image as your wallpaper.
Page 39

To Change the Wallpaper
Press MENU button
in the stop mode.
Press to select
the desired ‘USER’,
and then press
ENTER.
Press Cursor
button to move to
‘Setup’ and then
21 3
press ENTER button.
Press MENU
button to exit the
54
setup screen.
Press Cursor
button to move to
‘LOGO’ and then
press ENTER button.
SETUP
Press RETURN button to return to the previous level.
Press MENU button to exit the setup screen.
38
Page 40

Setting the DRC (Dynamic Range Compression)
You can use this function to enjoy Dolby Digital sound when watching movies at
low volume at night.
Press MENU button in the
1
stop mode.
If “DRC” is selected,
3
press ENTER.
Press Cursor button to
move to ‘Audio’ and then
2
press ENTER button.
Press Cursor , to
4
adjust the ‘DRC’.
The Cursor button is pressed, the greater
•
the effect, and the Cursor button is
pressed, the smaller the effect.
39
Press RETURN button to return to the previous level.
Press MENU button to exit the setup screen.
Page 41

AV SYNC Setup
Video may look slower than the audio if it is connected with digital TV.
In this case, adjust the delay time of audio to optimal status to fit the video.
Press Cursor , buttons
Press the MENU button in
the stop mode.
to move to ‘Audio’ and then
21
press ENTER button.
Setup menu appears.
•
Press Cursor , buttons
to move to ‘AV-SYNC’ and
3
then press ENTER button.
AV-SYNC screen appears.
•
'Audio' menu appears.
•
Press Cursor , buttons
to select the Delay Time of
4
AV-SYNC and then press the
ENTER button.
You can set the audio delay time between 0 ms
•
and 300 ms. Set it to the optimal status.
SETUP
Press RETURN button to return to the previous level.
Press MENU button to exit the setup screen.
40
Page 42

Listening to Radio
You can listen to the chosen band (FM, MW, LW broadcast stations) by using
either the automatic or manual tuning operation.
Remote Control Unit
Press TUNER/
BAND button.
1
The selection toggles back
•
and forth between "FM➝ MW
➝
LW" each time the
TUNER(BAND) button is
pressed.
Main Unit
Press the Function
button to select the
desired band (FM,
MW, LW).
Tune in to the
desired station.
2
Automatic Tuning 1
press button to select the preset station.
Automatic Tuning 2
Manual Tuning
Press the STOP ( ) button
to select PRESET and then
Press the STOP
select "AUTO" and then press
button to automatically search the band.
Press the STOP
select "MANUAL",Briefly press
the frequency incrementally.
( )
button to
( )
button to
to increase or decrease
Select a broadcast
station.
21
Automatic Tuning 1
PRESET and then press
button to select the preset station.
Automatic Tuning 2
press button to automatically
search the band.
Manual Tuning
press to tune in to a lower or
higher frequency.
Press the STOP ( )
button to select
Press the STOP
to select "AUTO" and then
Press STOP
MANUAL and then briefly
( )
( )
button
to select
41
Press MO/ST button to listen in Mono/Stereo.
(This applies only when listening to an FM station.)
Each time the button is pressed, the sound switches between "STEREO" and "MONO".
•
In a poor reception area, select MONO for a clear, interference-free broadcast.
•
Page 43

kHz
MHz
kHz
MHz
kHz
MHz
kHz
MHz
kHz
MHz
Presetting Stations
You can store up to:
15 FM stations
8 MW stations
7 LW stations
Example: Presetting FM 89.1 in the memory
Press the
TUNER(BAND)
button and select
Press to
21
select "89.10".
the FM band.
Each time the button is pressed,
•
the band switches between
"FM
➝
MW ➝ LW".
Press to
select preset
Refer to Step 2 on page 39 to
•
automatically or manually tune in
to a station.
Press the TUNER
54
MEMORY button.
number.
You can select between 1 and
•
15.
Press the TUNER MEMORY button before
•
‘
PROG
’ disappears from the display.
‘
PROG
’ disappears from the display and
•
the station is stored in memory.
• FM Frequency Modulation
• AM(MW) Medium Wave
• LW Long Wave
Press the TUNER
3
MEMORY button.
“PROG” flashes in the
•
display.
To preset another
station, repeat
6
steps 2 to 5.
RADIO OPERATION
To tune in to a preset station, press on the
remote control to select a channel.
42
Page 44

About RDS broadcasting
Using the RDS (Radio Data System) to receive FM stations
RDS allows FM stations to send an additional signal along with their regular program signals. For
example,the stations send their station names,as well as information about what type of program they
broadcast, such as sports or music,etc.
When tuned to an FM station which provides the RDS service,the RDS indicator
lights up on the display.
Description on RDS function
•
1. PTY (Program Type) : Displays the type of programme currently being broadcast
2. PS NAME (Program Service Name) :
and is composed of 8 characters.
3. RT (Radio Text) :
of maximum 64 characters.
4. CT (Clock Time) :
• Some stations may not transmit PTY, RT or CT information therefore this may not be
displayed in all cases.
5. TA (Traffic Announcement) :
announcement is in progress.
Note
Decodes the text broadcast by a station (if any) and is composed
Decodes the real time clock from the FM frequency.
RDS is not available for MW/LW broadcasts.
•
RDS may not operate correctly if the station tuned is not transmitting
•
RDS signal properly or if the signal strength is weak.
What information can RDS signals provide?
Indicates the name of broadcasting station
When this symbol flashes it shows that the traffic
You can see the RDS signals the station sends on the display.
TO show the RDS signals
Press RDS DISPLAY while listening to an FM station.
Each time you press the button, the display change to show you the following information:
PS (Program Service) :While searching,"PS"appears and then the station names will be
displayed."NO PS" appears if no signal is sent.
RT(RadioText) : while searching,"RT"appears and then text messages the station sends
will be displayed. "NO RT"appears if no signal is sent.
Frequency : station frequency (non-RDS service)
About characters shown in the display
When the display shows PS,or RT signals,the following characters are used.
The display window cannot differentiate upper case and lower case letters and always
•
uses upper case letters.
The display window cannot show accented letters, “A,” for instance, may stand for
•
accented “A’s” like “À, Â, Ä, Á, Åand Ã.”
Note
If searching finishes at once,“PS”,and “RT” will not appear on the display.
•
43
Page 45

PTY (Program Type) indication and PTY-SEARCH function
One of the advantages of the RDS service is that you can locate a particular kind of program from the
preset channels by specifying the PTY codes.
To search for a program using the PTY codes
Before you start, remember...
The PTY Search is only applicable to preset
•
stations.
To stop searching any time during the process,
•
press PTY SEARCH while searching.
There is a time limit in doing the following steps.
•
If the setting is cancelled before you finish, start
from step 1 again.
When pressing the buttons on the primary remote
•
control, make sure that you have selected the FM
station using the primary remote control.
Press PTY SEARCH while listening to an
1
FM station.
Press the PTY-or PTY+until the PTY code
2
you want appears on the display.
The display gives you the PTY codes described
•
to the right.
Press PTY SEARCH again, while the PTY
3
code selected in the previous step is still on
the display.
The center unit searches 15 preset FM
•
stations,stops when it finds the one you
have selected, and tunes in that station.
AFFAIRS
EDUCATE
CULTURE
SCIENCE
LIGHT M
CLASSIC
OTHER M
WEATHER
FINANCE
CHILDREN
SOCIAL A
RELIGION
PHONE IN
LEISURE
COUNTRY
NATION M
DOCUMENT
Display
NEWS
INFO
SPORT
DRAMA
VARIED
POP M
ROCK M
M.O.R.M
TRAVEL
JAZZ
OLDIES
FOLK M
Program Type
• News including an announced opinion and
report
• Several matters including a current incident,
documentary, discussion and analysis.
• Information including weights and measures,
returns and forecast, matters interesting the
customer, medical information, etc.
• Sports
• Education
• Drama-Radio serial, etc.
• Culture-National or local culture including the
religious problem, social science, language,
theater,etc.
• Natural science and technology
• Others-Speech, amusing program (quiz,
game), interview, comedy and satirical play,
etc.
• Pop music
• Rock music
• Current contemporary music considered to be
“easy listening.”
• Light classical music- Classical music and
instrumental and chorus music
• Heavy classical music-Orchestra music,
symphony, chamber music and opera
• Other music - Jazz, R&B country music
• Weather
• Finance
• Children’s programmes
• Social affairs
• Religion
• Phone in
• Travel
• Leisure
• Jazz Music
• Country Music
• National Music
• Oldies Music
• Folk Music
• Documentary
RADIO OPERATION
44
Page 46

Listening to a Cassette
Always treat your cassettes with care; refer, if necessary, to the section entitled
“Precautions When Using Audio Cassettes” on page 55.
Switch the system
on by pressing
POWER.
Press the
button. The cassette
starts playing.
Side A : Tape ( ) button once.
•
Side B : Tape ( ) button twice.
•
45
Press TAPE on
the player to
21 3
select the Tape
function.
Insert a cassette with the
•
recording/playback side facing
the cassette holder, and then
push the cassette door shut.
Press the ,
button if necessary.
54
Rewind the cassette / DOWN
•
button.
Fast-forward the cassette UP /
•
button.
6
Press the PUSH
EJECT ( ) of the
cassette deck to open
the cassette door and
insert a cassette.
When you have
finished playback,
press STOP button.
Page 47

REPEAT A↔B Function
Press REP. A↔B button.
Use this to listen to a specific section again during playback.
•
Set the start and end points of the section you want to repeat 3 times.
•
This is a useful when learning a foreign language.
•
The TAPE REPEAT function can be used only on sections that are longer
•
than 7 seconds.
Note
You cannot set the end point (B) within 7 seconds after
•
setting the start point (A).
Selecting the Cassette Playback Mode
Your micro component system has three cassette playback modes which enable
you to listen to both sides of a cassette automatically.
Press REV.MODE until the appropriate symbol is
displayed.
: One side of the selected cassette and then stops.
•
: One side of the cassette.
•
•
The other side of the cassette and then stops.
: Both sides of the cassette indefinitely until you press stop.
Tape Counter
When playing a cassette, a counter is displayed to enable you to take note of the counter
value at the start of each track and thus start playback at the beginning of the track to
which you wish to listen.
The counter is only displayed when a cassette is being played.
•
Before starting to record a cassette for which you wish to take note of the
counter values at the beginning of each track, reset the counter by pressing
Counter Reset.
TAPE DECK
46
Page 48

Timer Function
The timer enables you to switch the system on or off at specific times.
•
If you no longer want the system to be switched on or off automatically, you must cancel the timer.
•
Before setting the timer, check that the current time is correct.
•
For each step, you have a few seconds to set the required options.
•
If you exceed this time, you must start again.
Example: You wish to wake up to music every morning.
Switch the system
on by pressing
1
POWER.
Set the timer
switch-on time.
a. Set the hour by pressing or
button.
b. Press ENTER.
The minutes flash.
•
c. Set the minutes by pressing or
button.
d. Press ENTER.
OFF TIME is displayed (instead
•
of the equalizer symbols) for a few
seconds, followed by any switchoff time already set; you can now
set the timer switch-off time.
Press
TIMER/CLOCK
until TIMER is
2
displayed.
Set the timer
54
switch-off time.
a. Set the hour by pressing or
button.
b. Press ENTER.
The minutes flash.
•
c. Set the minutes by pressing or
button.
d. Press ENTER.
VOL 10 is displayed, where 10
•
corresponds to the volume
already set.
Press the ENTER
button.
3
ON TIME is displayed (instead
•
of the equalizer symbols) for a
few seconds, followed by any
switch-on time already set; you
can set the timer switch-on time.
Press or button
to adjust the volume
6
level and press
ENTER.
The source to be selected is
•
displayed.
Press or button
to select the source to
be played when the
system switches on.
TAPE (cassette) : Insert a cassette
•
TUNER (radio) : a Press ENTER.
•
CD (compact disc) : Load a compact
•
tape.
b Select a preset
station by pressing
Tuning or .
disc.
47
Press ENTER to
confirm the timer.
87
Note
If the timer switch on and off times are identical, the word ERROR is displayed.
•
Press POWER to
set the system to
9
standby mode.
is displayed to the top-right
•
of the time, indicating that the
timer has been set.
The system will switch on and off
•
automatically at the required
times.
Page 49

Canceling the Timer
After having set the timer, it will start automatically as shown by the TIMER indication on the display.
If you no longer wish to use the timer, you must cancel it.
To cancel the timer, press TIMER ON/OFF
once.
• is no longer displayed.
To resume the timer, press TIMER ON/OFF
again.
• is displayed again.
Note
You can cancel the timer while the power is on or while the player is in standby.
•
48
MISCELLANEOUS
Page 50

Recording a Compact Disc
You can record a compact disc on a cassette in two different ways:
Synchronised recording
This feature enables you to synchronize the start of the recording with the start of the disc or track of your choice.
Switch the system
on by pressing
1
POWER.
Press the DVD/CD
( ) button.
Use the CD selection ( , )
•
buttons to select the desired song.
49
Insert a blank
cassette in Deck.
2
Press the PUSH/EJECT button ( )
•
to open the cassette door, insert a
cassette, and then close the cassette
door.
Insert the cassette with the safety
•
tabs.
Press and hold CD
SYNCHRO button.
54
When stopped, press the button to
•
start the recording from the first piece
of music.
Press and hold CD SYNCHRO
•
button during the playback of CD to
start the recording from the first part
of the music being played.
Load a compact
disc.
3
Press the OPEN/CLOSE button ( )
•
to open the CD door.
Insert a CD and press the
•
OPEN/CLOSE button ( ) to close
the CD door.
To stop recording,
press button.
6
Page 51

Direct recording
The direct recording mode enables you to start recording with any track on the compact disc.
Switch the system
on by pressing
1
POWER.
Press the DVD/CD
( ) button.
Use the CD selection ( , )
•
buttons to select the desired song.
Insert a blank
cassette in Deck.
2
Press the PUSH/EJECT button ( )
•
to open the cassette door, insert a
cassette, and then close the cassette
door.
Insert the cassette with the safety
•
tabs.
Press REC/ PAUSE
button.
54
Recording will begin.
•
To stop recording, press button.
•
Load a compact
disc.
3
Press the OPEN/CLOSE button ( )
•
to open the CD door.
Insert a CD and press the
•
OPEN/CLOSE button ( ) to close
the CD door.
Note
The cassette tape you want to record
•
on must have the safety tabs intact.
50
MISCELLANEOUS
Page 52

Recording a Radio Program
You can record a radio program of your choice.
You do not need to adjust the volume, as it has no effect on the recording.
Switch the system
on by pressing
1 3
POWER.
Select the radio
station that you wish
to record by pressing
/DOWN or UP/
button .
Insert a blank
cassette in Deck.
2
Press REC/PAUSE
button.
54
REC is displayed in red and
•
recording starts.
6
51
Select the
TUNER function
by pressing
TUNER/BAND.
To stop recording,
press button.
Page 53

EQ/S.BASS, SRS WOW Function
EQ/S.BASS Function
Your micro component system is equipped with a preset equalizer that
allows you to choose the most appropriate balance between treble and
bass frequencies, according to the type of music you are listening to.
The function of Power Sound amplifies bass and improves high key or
bass twice as much for you to appreciate powerful real sound.
Press EQ/S.BASS on the remote control
until the required option is selected.
Press the button repeatedly to select “PASS➝ POP➝
•
ROCK➝CLASSISC ➝ JAZZ➝ S,BASS ➝ P,SOUND”.
S.BASS Function : S.Bass function emphasizes the bass
•
sound to produce the effect of explosion or booms.
P.SOUND Function : You can experience the powerful
•
and realistic sound by amplifying bass and improving
the sound quality of high- and low-pitched sounds by
two-fold.
SRS WOW Function
You can enjoy realistic surround sound by using the SRS and TruBass
sound field functions and the SRS WOW function that enhances sound
clarity.
Press the SRS WOW button.
Each time the button is pressed, the selection changes as
•
follows: TRU BASS ➝ SRS ➝ SRS WOW➝ PASS.
TruBASS Function : Enhances the bass and low frequencies to
•
produce deep and rich bass sounds.
SRS Function : Provides the surround sound that fills the room.
•
SRS WOW Function : Provides the surround sound effects with
•
enhanced sound field depth and bass, through speakers and
headphones.
is a trademark of SRS Labs, Inc.
•
Note
WOW technology is incorporated under license from
•
SRS Labs, Inc.
MISCELLANEOUS
52
Page 54

TREBLE/BASS Function
BASS Function
BASS function stresses low tones providing thudding sound effects.
Turn BASS knob on the front
panel to select from BASS -07
1
to BASS 07 , total 15 steps.
TREBLE Function
Treble function stresses low tones providing thudding sound effects.
Turn TREBLE knob on the
front panel to select from TRE -
1
07 to TRE 07 , total 15 steps.
You can select the level of low
tones you desire.
2
You can select the level of
high tones you desire.
2
53
Page 55

Sleep Timer Function / Mute Function
MHz
Sleep Timer Function
You can set the time that the DVD player will shut itself off.
Press SLEEP button.
Each time the button is pressed, the selection changes as follows:
•
90 MIN ➝ 60 MIN ➝ 45 MIN ➝ 30 MIN ➝ 15 MIN ➝ OFF.
To confirm the sleep timer setting, press SLEEP button.
The remaining time before the DVD player will shut itself off is displayed.
•
Pressing the button again changes the sleep time from what you have set
•
earlier.
To cancel the sleep timer, press SLEEP button until
OFF appears on the display.
Mute Function
This is useful when answering a doorbell or telephone call.
Press MUTE button.
MUTE ’ appears in the display.
•
‘
To turn off mute, press the button again.
•
MISCELLANEOUS
54
Page 56

DEMO Function / DIMMER Function
DEMO Function
You can view the various functions available on
your system.
Press and hold DEMO/DIMMER
button.
The various functions available are listed in turn on the
•
display.
All these functions are described in detail in this booklet.
•
For instructions on how to use them, refer to the
appropriate sections.
To cancel this function, press
DEMO/DIMMER again.
55
DIMMER Function
You can adjust the brightness of the display on the main
unit so it won't interfere with your movie viewing.
Press DEMO/DIMMER button.
Each time the button is press, the brightness changes as
•
follows: DIMMER ON(Dim) ➞ DIMMER OFF(Bright).
Page 57

Connecting Headphones/Microphone
You can connect a set of headphones to your micro component system so that you
can listen to music or radio programmers without disturbing other people in the room.
The earphones must have a 3.5ø jack or an appropriate adapter.
Connect the headphones to the PHONES jack on the front panel.
The loudspeakers are no longer used to output the sound.
•
Note
Prolonged use of headphones at a high volume may damage your hearing.
•
Plug the microphone with a 3.5ø MIC jack into microphone
terminal.
Connect the Microphone.
•
MISCELLANEOUS
56
Page 58

Cautions on Handling and Storing Discs
Small scratches on the disc may reduce sound and picture quality or cause breaks in
playback. Be especially careful not to scratch discs when handling them.
Handling discs
Do not touch the playback side of the disc. Hold
the disc by the edges so that fingerprints will not
get on the surface.
Do not stick paper or tape on the disc.
Handling and Storing Discs
When you get fingerprints or dirt on the disc, clean it
with a mild detergent diluted in water and wipe with a
soft cloth.
When cleaning, wipe gently from the inside to the outside of the disc.
•
Note
Condensation may form if warm air comes into contact with cold parts
•
inside the player. When condensation forms inside the player, the player
may not operate correctly. If this occurs, remove the disc and let the
player stand for 1 or 2 hours with the power on.
Precautions When Using Audio Cassettes
Check that the tape in the cassette is sufficiently taut.
•
To prevent erasing a cassette that you wish to keep, remove the safety tab on the upper edge of the
•
cassette. To record a cassette, where the tab has been broken, simply cover the opening with adhesive
tape.
When you have finished playing a cassette, always put it back in its case.
•
Store your cassettes in a clean place, out of direct sunlight, where they will not be exposed to high
•
temperatures.
Avoid using 120-minute cassettes as they place unnecessary strain on the tape mechanism.
•
57
Page 59

Before Calling for Service
Refer to the chart below when this unit does not function properly. If the problem you are experiencing is not
listed below or if the instruction below does not help, turn off the unit, disconnect the power cord, and contact
the nearest authorized dealer or Samsung Electronics Service Center.
Symptom Check/Remedy
Disc tray does not open.
Playback does not start.
The remote control does
not work.
Playback does not start
immediately when the
Play/Pause button is pressed.
Sound is not produced.
Picture does not appear, sound
is not produced, or the disc
tray opens 2 to 5 seconds later.
Is the power cord plugged securely into the outlet?
•
Turn off the power and then turn it back on.
•
Check the region number of the DVD.
•
DVD discs purchased from abroad may not be playable.
CD-ROMs and DVD-ROMs cannot be played on this DVD
•
player.
Make sure that the rating level is correct.
•
Is the remote control being operated within its operation range of
•
angle and distance?
Are the batteries exhausted?
•
Are you using a deformed disc or a disc with scratches on
•
the surface?
Wipe the disc clean.
•
No sound is heard during fast playback, slow playback, and step
•
motion playback.
Are the speakers connected properly? Is the speaker setup
•
correctly customized?
Is the disc severely damaged?
•
Was the DVD player suddenly moved from a cold place to a warm
•
one? When condensation forms inside the player, remove the disc
and let the player stand for 1 or 2 hours with the power on. (You
can use the player again after condensation disappears.)
• Disc is rotating but no
picture is produced.
• Picture quality is poor and
picture is shaking.
Is the TV power on?
•
Are the video cables connected properly?
•
Is the disc dirty or damaged?
•
A poorly manufactured disc may not be playable.
•
MISCELLANEOUS
58
Page 60

Symptom Check/Remedy
Audio language and
subtitles do not work.
Menu screen does not appear even
when the menu function is selected.
Aspect ratio cannot be
changed.
The tape does not start
playing
The volume falls off
The cassette is not erased correctly
There is excessive wow and flutter
Can't receive radio
broadcast.
•
The main unit is not working.
(Example: The power goes out or
strange noise is heard.)
• The DVD player is not
working normally.
The password for rating
level has been forgotten.
Audio language and subtitles will not work for DVDs not containing
•
them. And depending on the disc, they may work differently.
Are you using a disc that does not contain menus?
•
You can play 16:9 DVDs in 16:9 WIDE mode, 4:3 LETTER BOX
•
mode, or 4:3 PAN SCAN mode, but 4:3 DVDs can be seen in 4:3
ratio only. Refer to the DVD disc jacket and then select the
appropriate function.
The TAPE function has not been selected.
•
The cassette has not been inserted correctly.
•
The cassette player has not been closed.
•
The tape is either slack or broken.
•
The audio heads are dirty.
•
The rollers or drive capstans are dirty.
•
The tape is worn.
•
Is the antenna connected properly?
•
If the antenna's input signal is weak, install an external FM
•
antenna in an area with good reception.
Turn off the power and hold the SRS WOW button on the main unit
•
for longer than 5 seconds.
Using the RESET function will erase all stored settings.
Do not use this unless necessary.
While the player is in the stop mode, hold the main unit's TUNING
•
MODE/ button for longer than 5 seconds. “INITIAL” appears on the
display and all settings will return to the default values.
Press the POWER button.
•
Using the RESET function will erase all stored settings.
Do not use this unless necessary.
59
Page 61

Notes on Discs
Disc Recording Format
CD-R Discs
Depending on the disc recording device (CD-Recorder or PC ) and the condition of the disc, some CD-R discs
•
may not be playable.
Use a 650MB/74 minute CD-R. Avoid CD-R media, as they may not be playable.
•
If possible, do not use CD-RW (Rewritable) media, as they may not be playable.
•
Only the CD-Rs that are properly "closed" can be fully played. If the session is closed but the disc is left open,
•
you may not be able to fully play the disc.
CD-R MP3 Discs
Only CD-R discs with MP3 files in ISO 9660 or Joliet format can be played.
•
MP3 file names should be 8 characters or less in length and contain no blank spaces or special characters (. / = +).
•
If the name of a file is in Korean, the name will be displayed on the TV screen in Korean and * will be shown in the
•
display of the main unit.
Use discs recorded with a compression/decompression data rate greater than 128Kbps.
•
Only files with the ".mp3" and ".MP3" extensions can be played.
•
Only a consecutively written Multisession disc can be played. If there is a blank segment in the Multisession disc, the
•
disc can be played only up to the blank segment.
If the disc is not closed, it will take longer to begin playback and not all of the recorded files may be played.
•
For files encoded in Variable Bit Rate (VBR) format, i.e. files encoded in both low bit rate and high bit rate (e.g.,
•
32Kbps ~ 320Kbps), the sound may skip during playback.
If more than 500 tracks are recorded on a single CD, a maximum of 500 tracks can be played.
•
If more than 300 folders are recorded on a single CD, a maximum of 300 folders can be played.
•
What is MP3?
MP3 is short for MPEG-1 Audio Layer 3 and MPEG is an acronym for Moving Pictures Experts
Group. MP3 is a file format with compression ratio of 1:12 (128 Kbps*) That is, you can use MP3
format to record about 12 times the usual amount of data on a regular CD.
CD-R JPEG Discs
Only files with the ".jpeg" and ".JPEG" extensions can be played.
•
If the disc is not closed, it will take longer to start playing and not all of the recorded files may be played.
•
Only CD-R discs with JPEG files in ISO 9660 or Joliet format can be played.
•
JPEG file names should be 8 characters or less in length and contain no blank spaces or special characters (. / = +).
•
Only a consecutively written multisession disc can be played. If there is a blank segment in the multisession disc, the
•
disc can be played only up to the blank segment.
A maximum of 9,999 images can be stored on a single CD.
•
When playing a Kodak/Fuji Picture CD, only the JPEG files in the picture folder can be played.
•
Picture discs other than Kodak/Fuji Picture CDs may take longer to start playing or may not play at all.
•
MISCELLANEOUS
60
Page 62

Notes on Terminology
Recorded onto some DVD discs are scenes which have been simultaneously shot
ANGLE
CHAPTER
NUMBER
DVD
PCM
from a number of different angles (the same scene is shot from the front, from the
left , from the right , etc.).
With such discs, the Angle button can be used to change the angle of view for
specific scenes.
These numbers are recorded on DVD discs. A Title is subdivided into many
sections, each of which is numbered, and specific parts of the video can be
searched quickly using these numbers.
A high-density optical disc on which high-quality pictures and sound have been
recorded by means of digital signals. Incorporating a new video compression
technology (MPEG-2) and high-density recording technology, a DVD disc
comprises two 0.6 mm thick discs bonded together.
An acronym for Pulse Code Modulation - another name for digital audio.
PBC
(PLAYBACK
CONTROL)
REGION NUMBER
SUBTITLES
TITLE NUMBER
TRACK NUMBER
VIDEO CD
61
This is recorded on a video CD (version 2.0). Selected scenes or information can
be chosen from the menu displayed on the TV monitor.
Both the DVD player and DVD discs are encoded with a region number.
If the region number on the DVD disc does not correspond to the region number
of the DVD player, the player cannot play the disc.
Translated appearing at the bottom of the screen. A DVD disc can contain up to
32 subtitle languages.
These numbers are recorded on DVD discs. When a disc contains two or more
movies, these movies are numbered as Title 1, Title 2, etc.
These numbers are assigned to the tracks which are recorded on video and
audio CDs. They enable specific tracks to be located quickly.
Contains recordings of pictures and sound whose quality is roughly comparable
to that of video tape.
This player also supports video CDs with playback control (version 2.0).
5.1 (or 6) Channel Digital Surround sound reproduced from DVDs and LDs
recorded as a digital signals (with disc marking). With better sound quality,
dynamic range, and directionality than traditional Dolby surround technology, you
can enjoy dynamic, realistic sound.
Page 63

G
E
N
E
R
A
L
T
U
F
N
M
E
R
MW
T
U
/LW
N
/SW
E
R
VIDEO
OUTPUT
A
M
P
L
I
F
I
E
R
S
P
E
A
K
E
R
Specifications
Power Consumption
Weight
Dimensions (W x H x D)
Operating Temperature Range
Operating Humidity Range
Usable Sensitivity
S/N Ratio
Distortion
Usable Sensitivity
S/N Ratio
Distortion
Composite Video
S-VIDEO
Speaker output
Frequency range
S/N Ratio
Channel separation
Input sensitivity
Speaker system
Impedance
Frequency range
Output sound pressure level
Rated input
Maximum input
Dimensions
Weights
(W x H x D)
85W
11.5Kg
194 x 172 x 310 mm
+5°C~+35°C
10%~75%
3dB
60dB
1.0%
56dB/40dB
40dB
2%
1.0Vp-p(75Ω load)
Luminance signal : 1.0Vp-p(75Ω load)
Color Signal : 0.286Vp-p(75Ω load)
2X35W
20Hz~20kHz
75dB
50dB
(AUX)500mV
Loudspeakers
4Ω x 2
20 Hz - 20 KHz (± 1 dB)
84dB/W/M
45W
90W
150(W) x 237 (H) x 249(D) mm
4.7 Kg
speaker system
62
MISCELLANEOUS
Page 64

Memo
Page 65

THIS APPLIANCE IS MANUFACTURED BY:
AH68-01407P
 Loading...